
Leaderboard


Popular Content
Showing content with the highest reputation on 06/26/16 in all areas
-
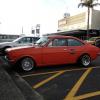
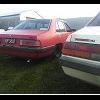
Yeah, I know, ewwww. Another 'this wasn't supposed to be a project' situation. A while ago I bought a cheap Telstar, because after having the odd blast in my brother's one they seemed fun. And they aren't worth much, so meh. The idea was that I could fang about in it, and maybe do the odd hillclimb, 'cos Radisich-tuned spenshuns means it's a racecar (in my head). However the one I bought only has two of it's original Bilstein struts, and the springs were replaced with generic Cobra lowering springs, which were shite. Also, it's 20 year old bushes probably aren't conducive to sporty handling. And it uses oil, 'cos the valve stem seals are poked and the rocker cover gaskets leak. It was fun for a while though. And the paint polished up alright. After doing a little research, it seems Ford did two runs of Radisich Telstars, to commemorate Paul's two WTCC titles (even though those were in a Mondeo, Telstars being the closest we had locally at the time). He did drive one occasionally in the local Production racing series though. By most accounts there were about 150 made in the 1994 run, and only 100 in the 1996 series, with the second lot having a numbered placard on the firewall (wow, special, right?). They tweaked the suspension settings, which apparently involved Paul thrashing one around Pukekohe for a day or two, and ended up with Bilstein inserts and stiffer springs. They all had 16" ROH Astrons, and some earlier cars had baffles deleted from the rear muffler, 'cos more noise means horsepower. Ford also decided (with these being a limited run) to trial fit them with Powerbeat batteries, most of which failed under warranty and had to be replaced. On the inside, they recieved a Momo steering wheel (with PR's signature in the middle) and leather gearknob/shift gaiter. Series I vehicles were specced as a GLEi, whereas Series II cars were based on the Eurosport, so they had front seats with fatter side bolsters (for all the g-forces through the sweeper at Pukekohe, or the local Foodtown). And in case you aren't sick of pointless facts about Telstars yet, here's another: all Series I cars had a steel spare wheel, whereas Series IIs had a matching 16" Astron. Yeah. Anyway, it was all going well, until one day the lifters started clattering. Really loud clattering. Uh oh, me thinks, it's lost oil pressure. . It sounded like all 12 lifters had collapsed, on the rear bank, just to make life difficult. So there was no option really but to pull the heads off to take a look. At this point I remembered why I chose to work on diesels, rather than having to deal with cramped modern engine bays all day... But after a little recreational swearing, this happened: Then this happened And then this happened At least it all looks fairly clean inside, suggesting it's been reasonably well serviced and had coolant in it for most of it's life. Can still see the hone marks in the bores, even after 260000-odd km. At this point it looks like the little oil supply/restrictor/valve seems to be at fault, will whip them out and see if the rear one is blocked. Couldn't poke anything down them, but it would sort of make sense that they are a one-way valve, so oil doesn't bleed back out of the galleries when the engine is stopped. Also, want to do something to the exhaust at some point, it's too quiet. Goals:13 points
-
Not a lot to talk about but I have taken some pretty pictures of neatness caused by previously manky areas being covered in one uniform colour. Painting I believe. I have continued to avoid painting anything outside of the engine bay in order to keep the ‘pulled from a field’ look. However Hannah has painted the floor. This I approve of as it keeps it from getting worse plus when the time comes to tidy up and modify the wiring I have a nice tidy place to do it from. Some photos for proof… The floor surface rust was first neutralised.. The following day with the car wheeled out into the sunshine we both set to work. Hannah painted the floor with an epoxy primer while I covered the engine bay surfaces in a high build spray putty. I was expecting it to be yellow but instead it turned out to be almost exactly the same colour that I had painted my Rx3 in. Oh the memories… When the sun disappeared the car was rolled back inside and I sanded back the spray putty. Its come up pretty smooth. Way nicer than I had ever planned for this car so that will do then. Next dry sunny day it will get a topcoat. Hannah wire brushed a load of other engine bay bits and Ive now readied them for some paint. Then reassembly can start. The only rust work left to do is the hatch/tailgate and I also need to make and fit a battery box under the boot floor. We are both keen on getting this car on the road but its still only getting little bits here and there around paying jobs. Evening work has not really happened as much as planned. The shed is too cold/truck too warm to stay out late. Its just so enticing to go inside and have cups of tea with a fluffy cat in front of the fire. I shall try to improve my efforts….13 points
-
Minor update. I've done a couple of things. Made a tow bar and found a nice piece of chain on the road that now lives on the bulldozer. Made a shifter so I can change between first and second in the auxiliary gearbox. It is much faster now especially in reverse. Fitted a new exhaust. Took it to some motor scooter thing. Then I towed some stuff and posed a bit. Does anyone else here get fizzed up about chainsaws?10 points
-
then the welder ran out of gas.5 points
-
So bought another bike last week, just cos it was local and a mate was egging me on with talk of epic cross country rides. This is a 1973 K4 model in Mars orange, 90cc and a precursor to the ubiquitous red 110cc postie bike. I think lots of parts are interchangeable, so should be plenty of sources for the missing bits... Picked it up yesterday, couple of kicks and she burst into life, I rode it round the house and jemmied it into the overflowing shed... And even better, picked this up this morning, local and $26. Sweet deal, rough as fuck but has a few bits I need... So unsure of plans at this stage, too much on to get into it immediately. Will prob keep patina (rust) and replace bearings, brake shoes, cables etc. Loosely planning some overland trips, also the odd scooter run, should be fun once I get some time to play with it...4 points
-
Yoo, So I sold ol Bluey a fair while ago, but I wasn't really set on selling it. Anyway, one popped up on Trademe a while ago and I finally went and had a look at it yesterday. I was pretty happy with it and brought it! Have a few tidying up jobs but it's pretty sound and clean. Gearbox is making some nasty noises so I'm on the hunt for another, and maybe another engine, current motor burns loads of oil if you get up it. Today I gave the interior a good huck out and it came out really nice. Dash and door cards are all mint, headlining and seats are a wee bit discoloured but no rips. It's missing carpet so I'll sort that out asap. It looks like it's had a gbox change sometime because the shifter if a bit further back than factory. I tidied up that today and made a blank for the old hole. Anyway, jobs; -Gearbox change -Slam -Get some 165 55s for a set of 14x7 Hayashi mesh I have and pop em on. -Roof racks -Carpet After that's done I'm keen to put on some different carbs and some headers. Apparently manifolds off B series MGB fit, but I'm not sure if I want to stick with the J series or not. The head design looks fairly terrible. But we'll see. I'll take some better photos once this poo Auckland weather clears up. I'm using the same threads as I can't be bothered making new ones..4 points
-
So pickapart listed a Hiace of the same series had just arrived in the yard, I need some new front panels as mine are chooched under the front bumper from eating curbs in carparks etc. Turns out the ones on it were worse than mine but I did have these gems on it which I grabbed Super mint and a bargain at $24 for the pair, although one is missing the strap that holds them to the door frame so Im on the lookout for a replacement. Also I have a dancing flower and a waving cat on the dash just coz4 points
-
Lol. Spark plug thread repair kit. Rrp $49.99 Contents: 1x foil square.4 points
-
3 points
-
holy shit that exhaust is like an industrial dream catcher3 points
-
3 points
-
^^^ there we go cert ninja answered while I was thumb typing3 points
-
cert brake check for something with more than 50% increase in power over factory, is 5 stops from 100kph- 0kph, under 4.4 seconds, in a total of 3min max. Fade is the main problem with drums in this test- the heat build up causes them to lose efficiency. A booster wont really help with this- as the booster just decreases the force you have to use on the pedal. I have had a few customers who have managed to get things with 4 wheel drums to pass a cert brake test by fitting hi temp linings to the shoes. If i was you id try the brake test yourself, and see what happens, it might be fine as it is3 points
-
Used to have to wrap hemp twine around the threads in old flatheads3 points
-
http://iforce.co.nz/i/11bhjgyv.xof.jpeg http://iforce.co.nz/i/yi2x0igv.ha5.jpeg http://iforce.co.nz/i/thbdyegw.oug.jpeg http://iforce.co.nz/i/fjyqgw3b.f3g.jpeg http://iforce.co.nz/i/nfqnoysd.jj0.jpeg3 points
-
"ive come to see about trimming your bush and grinding the stump out behind it" I miss my van already3 points
-
OK yeah.. so I have ended up getting a touch carried away with this little wagon and sort of going against my original mission statement of 'keeping it all manky looking and just scrape it through a wof'. The reason for the slight change of heart is because when I started cleaning out the engine bay and really noticed how deep and yucky the surface rust and crusty bits were I soon knew I would have to paint it. Then I pulled the last of the wiring out so I could clean it out and I thought to myself as I was feeding the wires through the bulkhead 'well that's an ugly bit of cable routing..I don’t really want to see that again’. Before I knew it I had Hannah inside watching for fires while I welded discs of steel into all the bulkhead holes from the outside. Rewinding back a couple of weeks, because this project has become glacial in its progress. First thing.. those wheels. I fitted them and rolled the car out the back while I used the hoist for a customers car. It looks great on the Turbos. They certainly do suit this car better than on Viva one. I had also noted that the Viva wagon is exactly the same colour as the water tank... I had been umming and erring about removing the battery tray from the engine bay. I knew if I did that I would have to fabricate a box down the back under the floor due to the wagon needing to be clear floored for max usefulness in earning its keep. I also knew the tray was hiding things. Bad things possibly. I removed it. Not easily either. It seem that the fella who spot welded it in place was either drunk, had too much coffee or was suffering from MS. There was no order to the spots and I couldn’t find them. I couldn’t just chisel it off because doing so would dent and wreak the inner wing. Took ages. Off with it and look at that. Yuck. Glad it was gone because no way would that stuff had rested from its metal eating duty. With it gone I looked over the general mankyness of the whole bay and realised it needed to be done properly. I removed the heart. It was only being held in place by two exhaust nuts and the two mounts. So tiny. With it out I whipped up a simple engine cradle/wheelie tray thingee to put it on so it can be moved about the workshop easily. Hannah is going to get paid in kind words, cups of tea and biscuits to clean the engine for me. I noticed that the frost plug on the back of the head looks very dodgy indeed so lucky it was out anyway. It could have spoiled the party later on… I filled up holes, cut our more rusty patches and generally cleared it all out for a nice clean bay look. I cut off all brackets to do with the ugly factory throttle linkage. I have instead been given a later Viva HC throttle pedal like I have fitted to Viva one. Big thanks to Andre yet again for having one in his stash of bits. Hannah laughs at my idea that if I have the same pedals then when jumping from car to car for daily driving they will feel the same to drive. I don’t think she realises the power of the mighty 1159cc Viva. I also dealt to the rust that was in the drivers side A pillar… Welded up the cut in the hinge bracket that had refused to let go of the pin ages ago at the very beginning. After welding up all the holes in the bulkhead leaving only the clutch cable and speedo cable holes I ground them all smooth. I then removed the now very scratched and sad looking screen. I think it might be the original. With it gone I was pleasantly surprised at the lack of rot in the well. Only one corner had succumbed and it was not bad at all. I cut it out, welded it up and moved around to the back where it was rotten in the pillar. With the screen out one can easily marvel at the beauty of such a mint dash top.. Now fixed and strong again I stepped back into the engine bay and continued grinding, sanding and smoothing the bay. To earn this episodes title of ‘getting carried away’ I even removed the fuse box and welded up the hole. I might have to do this mod to Viva one some day. Finally I applied some Brunox epoxy rust neutraliser. This is now where I am at with the bay… I had popped into Nelson last week for welding gas etc so while there I went to an automotive paint shop and bought some epoxy primer plus three cans of colour matched spray paint. Well they were colour matched at the time. I had forgotten to take in my little bit of steel which had un-faded paint on it. So instead me and the fella behind the till tried to match the colour off a internet photo of a Cactus green Viva off the nerdnet on my phone. Never easy. Once home I sprayed some on the car. Whoops. It’s a bit brighter. But its still nice and looks 60s so it’ll do. Anyway- any engine bay painted in one neat clean colour always looks better. So that is where I am at now. I have heaps of paid work on right now so Hannah having finished her current work in one days time will get some cleaning and painting jobs. This way she shall earn the privilege to hold up traffic in the mighty Viva wagon (hatch..) on the hills around us. I have been having many thoughts about engine swaps or sneaky turbos and simple injection systems don’t you worry. But really I have strayed far enough already. I will however be re-wiring the bay so to allow for really easy engine swap/changes in management etc for the future. Keeping all the lights/horn/starter/alternator etc separate to the engine loom. Ha..the current engine loom. All of 3 wires? Temp, oil, ignition feed. Old cars eh? Giggle3 points
-
WARNING SHARN AHEAD Rather than posting it in spam I might as well start a thread as it's going to be somewhat of a project, just not the normal slammed out OS project lol So I've started a lawn mowing/property maintenance/handy man type shit business And as sticking the weed eater out the rear window of my Altezza doesn't convey the most professional look I decided I needed a van/ute/wagon to haul my gear around. Test drove a couple Previa turds, yuck. Couldn't scrape up enough $$ for the HiAce I was offered, almost brought a Nissan C22 Vanette, but the seller sold it even though I told him I'd take it pending J5 or VG having a look. Probably a good thing though as the mighty A15 probably wouldn't have liked being loaded up with gear and towing a trailer full of greenwaste for long! Also came damn close to picking up a fairly tidy 2002 VX Commodore wagon for $1500 from a dealer, would have been good to put a couple hundred $ into then flicked off for a tidy profit, but I thought about it too long (over night) and it was snapped up by someone else. Anyway a garage around the corner from home often sells cheap vehicles on the side of the road (kinda almost cooked an Estima there trying to sell on one of my test drives) and a couple weeks back this Delica popped up out the front of the garage and it was almost in my budget range of $0-fuck all. Took it for a test drive, straight away I used the fucked clutch and oil leak to my advantage and got a good chunk of $$ off the price and it became my van with a nice new "clean sheet" WOF from the same garage on the screen... Pulled the very rear seat out and lined the floor, I can fit 2 mowers and all my gear in the back and still have a 5 seater wagon. A few minutes after this photo was taken I learned that it has an open diff and that the torsion bars have sagged/been wound down. Went to go straight out the driveway and the front bullbars bottomed out hard on the road and left me stranded with one rear wheel spinning on the grassy gravel drive As said the clutch was well rooted, slipping like anything, but since a full kit is under $150 trade at BNT with a free flywheel grind I wasn't too phased! Blasted the engine/box with 4 big cans of degreaser and went to town on it. Typical early 90's Mitsi, the clear coat is fucked! Easiest clutch change I've ever done, under 45 minutes from driving into my workshop to having the box on the floor, wasn't too much longer to get it back in. Found it's got a new/recon starter, it was the pretty much the only thing that wasn't buried in congealed oil, nice shiny new looking fuel pump too! Was a decent rivet groove in the flywheel too, but didn't think to get a pic of that before dropping it off at BNT. Shiny box haha, my boy spent ages with a scraper then diesel and a dish brush on it. "Regularly serviced" "Clean sheet WOF" That's fail crayon from the main WOF centre in town... Found the dizzy when turned to max advance was timed to TDC, it was also 180° + 1 tooth out! Reinstalled the dizzy correctly and set it to 7.5°, it now revs over 4000rpm haha. "new rocker cover gaskets last week" translates to a touch of orange poo smeared on rock solid stock gasket and half round block, changed to new ones and it doesn't seem to be leaking any more/still a possible front crank seal dribble though. Was backfiring a LOT between gears and has been using an absolute shit load of gas, I'm putting that down to the rather messed with Mikuni Solex "electro jet" carb. I've changed most of the vac lines as several were leaking, set the choke and idle up RPM, changed the thermostat so it actually gets warm enough for the choke to turn off and cleaned out everything I can get to, found a tiny adjuster behind the carb that sets the idle adjustment range too (think it's the fast idle control), when I got it I couldn't get it to idle under 1100rpm, now it holds 750 smoothly. Today I discovered that the accelerator pump was set to the max, 2 pumps of gas was enough to flood the engine and the pump arm was over-travelling so far that it was squirting a little blast of fuel in when I lifted off the gas, could explain the back firing and the super rich smoke clouds when the choke was on?! lol Backed the pump linkage off a lot and in the 15 minutes I've driven it since there's been no backfiring, so fingers crossed it will also stop drinking so much gas, 1/4 tank for 18k is just nuts! Don't think the vac secondary are opening either, but that's a mission for another day. When I've got some more money I'll likely be changing to an Aisan carb from an L300 or something and doing away with all the vacuum and emissions shit!! So yeah I know it seems like a total POS, but at this point I've got less than $2k in it and other than the fuel usage and the torsions needing to wound way back up it drives really well. Engine is smooth, not smoky once warm and makes no bad noises, found a warranty void melt tab on the frost plug behind the flywheel which leads me to think it has had an engine rebuild at some point in it's history too. Can't find ANY rust beyond a hole in one of the sliding window frames, only 210k on the clock and since the speedo is rather optimistic* it may be lower still. *Wondered why I kept getting tail gated so checked the speedo against GPS, 60k on the dash is really 50, 85 is 70, 100 is 80, 135 is 100! Future plans inc properly decking out the back for my gear and I'd like some Valiant steel wheels. TL;DR? I brought a shit van that I'm trying to make less shit and make a living from.2 points
-
what about a ply second floor high enough for the mowers to fit under, other stuff on top, maybe a mesh cargo barrier type thing between the stuff in the back and your passengers. i had something like that in my old work van for my dog, ply sat on top of the wheelwells, and had room for storing stuff underneath2 points
-
Chainsaws are dope. Bulldozer is dope. Dope2 points
-
Get the correct helicoil repair kit and slather the tap in some thick grease for all the shavings to stick to, instead of falling into the cylinder, cleaning it off regularly and reapplying fresh grease. I may have one in my toolbox but I'm all the way down in Wellington sorry. If the motor was mega dollar or in really good condition and didn't want to risk it then pull the head. Otherwise if you get a few bits falling into the cylinder then they'll burn up pretty quickly once its running. Big whoop. http://www.waihyd.co.nz/thread-insert-repair-kits-spark-plug-xidg60967.html2 points
-
Just turned 32 and to give you ideas for what He likes . Choppers, Vans & Tattoo's2 points
-
Pretty miserable weekend so didn't get anything done on this, but did do a very average photoshop job of slam and advans haha. Which made me want to actually try them on, only got so far as the rear because it then started pissing down.2 points
-
Yup, as far as i know they were the Peter Witehira designed never-go-flat batteries, which seemed to always go flat. http://www.nzherald.co.nz/technology/news/article.cfm?c_id=5&objectid=117699 Turbo sounds dangerous haha. Headers are a good idea though, maybe these: http://www.ebay.com/itm/Mazda-MX6-Ford-Probe-2-5L-DOHC-V6-Exhaust-Headers-Downpipe-Steel-Manifolds-/331886834817?fits=Make%3AMazda%7CModel%3AMX-6&hash=item4d45ff3481:g:f08AAMXQ71xRXxiF&vxp=mtr Or maybe just delete a muffler or two... And yeah, the gear knob grub screws work themselves loose occasionally. Apparently these were getting stolen in the '90s for the Momo wheel and knob, although whether that's true or not I don't know.2 points
-
Yes Mr ben! ^ this is exactly what I want from the engine bay. So I will go over the top a little to keep it tidy. That colour is just the spray putty. The final colour that I selected was meant to be the same original green but I forgot to take in a sample. At the paint shop we went off photos on my phone and the colour I ended up purchasing is slightly darker. But still looks nice. You can see the colour here as I used it when painting that mtb frame I had replaced the down tube on.... Pete- yeah I like that turbo idea! As it happens at some point in this cars life the super spec high compression 70 bhp motor had been nicked and its been replaced with an low compression engine. So suitable for boost.... I actually recently bought this Weber manifold. Quite a rare thing and brand new for $50 I just grabbed it. It apparantly also suits some Nikki carbs off Datsuns/Toymotors. But I also still have a brand new SU Hif carb which came factory built to suit boost, as used in the Metro turbos etc. So a few things could be done2 points
-
I love these. What was the story with Powerbeat batteries? Was that something to do with that weird R&D company in Hamilton? Are they still around?2 points
-
Section 7.17 - welding of the housing is allowed, but must meet the critical specs (i.e. tig welded and NDT)2 points
-
After the big milestone of getting the car started i bled up the clutch system and took the car for a test drive up my driveway. Next job was to make start making it look like a car again. Fitted seats, rest of the interior trim, hardtop and doors off the other shell. (Apologies for all the cellphone pics, didn't want to dirty my good camera) The shell came with a green front bumper and bonnet so got the bumper painted black by a friend along with some red guards that I'd picked up, couldnt fit the bonnet in my starlet so ended up rattle canning it. Got some analogue wheel alignment tools and set to making it drive straight and have even camber all round. Swapped to a set of more road friendly wheels then took it to a wof place next to work, it passed with only a couple of lights needing replacing.2 points
-
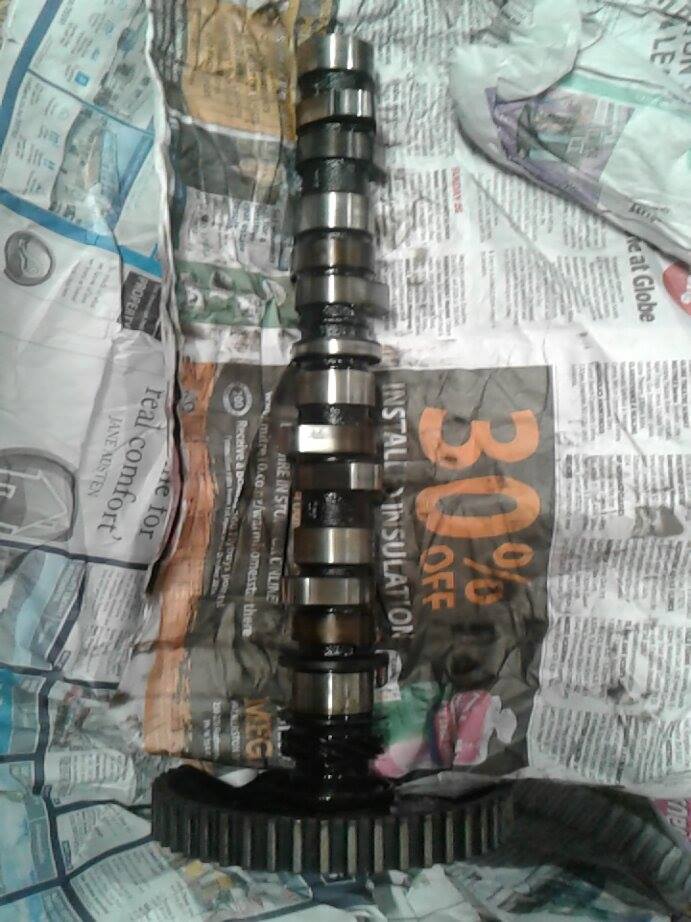
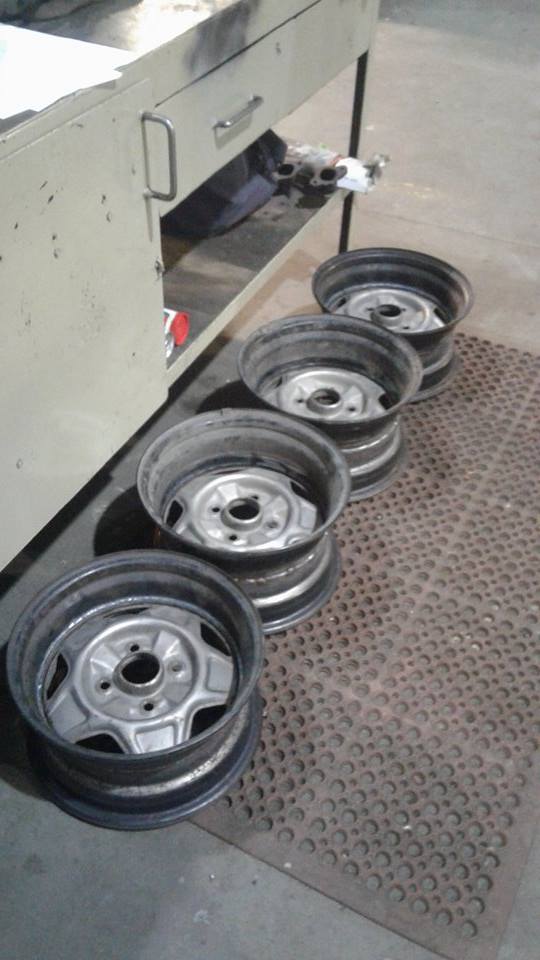
So, today went alright. finished off my steelies, 8 and 9 inch. also my new cam turned up in the mail today. has higher lift and longer duration. will being getting ground once i sack up and get an aftermarket ECU and multipoint intake manifold, but for now it will do. still waiting to sell my rx7 to free up space in my shed as the galant is stored in my old mans back lawn which is not ideal to work on, especially when the jack just sinks into his lawn, ha!
 2 points
 -
Getting my leg over for a bit of head2 points
-
Was just thinking the same thing man... Turning up in a dirty old diesel wagon with assman on the side. Just need some brown stubbies and matching jandels...... And some sweet lip luggage.2 points
-
Please tell me that you'll get some signwriting done and conveniently place the first two letters of "Grassman" on the front passenger's door2 points
-
MX5 engine? I came in here to post this.2 points
-
I must finish the wagon, I must finish the wagon, I must finish the wagon, I must finish the wagon, I must finish the wagon, I must finish the wagon, I must finish the wagon, I must finish the wagon…… Its been put on the back while over the last couple of months while things like family visit, jobs that pay get done, land work gets sorted, swimming in the summer sun happens. Bur I have managed to sneak in a few bits here and there. I did a bit more welding repairs to the rear boot/arch corner and I started on the brakes plus I have sorted out the wheels! Its been a little Vivatastic in our workshop recently too. I had Andre's lovely genuine GT in for repairs and I also have a Firenza that has come down from Auckland for much rust removal and repairs including fitting a wide arch body kit. Its going become a 70's V8 powered road going racecar replica. For us Viva fans the workshop was looking pretty spiffy.. Firstly the welding. Pretty easy to see from photos so here we go. Where I left off on the last post was about here… Then this scabby bit.. So the rear end is pretty much done but for a couple of little bits. Lets just ignore the elephant in the room that is the very frilly tailgate (or hatch as Hannah likes to point out..) Next rust area is around the bulkhead so I can put the brake servo and master back in place. Then I can finish the brakes. So those brakes.. Well they were all knackered. I took all the bits off and evaluated their mankyness.. Luckily the calliper pistons freed up and slide out revealing good chrome and seals. So just a clean for them. The pads are still thick and dry so result. Moving to the back. I cleaned up and honed out the wheel cylinders. Usable but not perfect and for the money of new ones not worth fitting seals into. But then I discovered that new cyclinders in NZ were either non- existent or cost moon beams. So I looked to dear old Blighty. There you could get all new old stock parts for the price of a terrible greasy spoon bacon sarnie. Luckily my older brother lives in the land of greasy bacon sarnies and he was coming home to NZ for a holiday. So I started buying up old Viva bits and getting them posted to his house in Wales. He was so grateful.. and brought them over for me (along with several classic car magazines J ) Here’s some bits… Typically after these bits arrived I had been looking through my boxes of bits and discovered not one but two sets of brand new brake shoes. But they probably don’t have the real deal inside them like these beautys… So the rear end is all fresh and daisy. New cylinders, new shoes and new brake lines. I found a new master cylinder seal kit in my stash of parts and that’ll go in place once the rust is done. Wheels next. The wagon came on a lovely set of classic Cheviot Turbos. Lush! Swoon. Two had slight kerbing damage to the outer rim edge. I could have left it but it looked pretty yuck. So I tigged them up and filed them neat again. Quite satisfying. Then since the wheels were in motion…. and I was on a roll…. I gave them all a good wire brush and removed the horrible build up of oxide. That was a nice job on a sunny afternoon. They look a lot better for it. Then the wheel stud holes needed tidying up/remachining because someone in the past had used the wrong nuts, tapered, and it wasn’t very good really. This was going to be bloody tricky with just files etc. So I whipped up this little fly cutter to reface the washer face. It worked a treat and they pull up great on the hubs now. Now many, many yonks ago some might remember the nice set of Dunlop D1 alloys I had bought for my other Viva. I never ended up using them because I had discovered cracks across the hub faces on two of them. But not before I had spent some time machining up nice new stainless washers to suit the new nuts I had bought for those wheels. I found these stashed away and they are a perfect fit on the Turbos. So that was nice. A few weeks back I spent some time welding up Andres Viva GT where it had failed its WOF and he returned the favour by gifting me a set of 185/65 13 tyres he had left over. I had them fitted yesterday and they look good… Sadly one has a pin hole through the sidewall so hopefully I can get it repaired/patched inside. So next step is finish the rust in front and the tailgate (hatch) , finish the brakes and then fix the leaky Stromberg carb. I’ll swap the screen out for one I have that is not covered in scratches and then it’ll be close to going for a WOF ! Simple………. Oh yeah.. we can all discuss the merits of Cheviot Turbos here... //oldschool.co.nz/index.php?/topic/44200-yoeddynz-and-hannahs-hb-viva-wagon-discussion/2 points
-
I so want one!! God knows what I'd do with it!! But who cares pick up the milk maybe haha1 point
-
What's happened to all the Mk1 Mustangs? The place was deserted today.1 point
-
I have fond memories of replacing Power Beat batteries, fitting new wheels, tyres, steering wheels, and tightening the the gear lever grub screws. There were a few Radisich Mazda Cronos's getting about Henderson in the late 90s.1 point
-
I had the same high voltage problem on my GL145 motor... fucked around for ages trying to fix it, in the end i put one of those big honda type 6 wire regulator/ rectifiers on... sorted the problem instantly. This is also whats on mathers engine and it pumps out a smooth 12.8 volts1 point
-
thought id do a build thread for one off my vdubs. I've had this thing for a few years, but have only just got it home from storage. Plans Install 2l xflow will use the r1 carbs to get it going and the. Eventually switch to some Webers So far I've rebuilt the back end, converted to disc added coilovers etc.... Progress will generally be quite slow.1 point
-
Shit got a birthday, new studs and nuts all round;1 point
-
Had the first drive of this thing on Thursday, trailered it out of town to a garage near work to get the wheel alignment done so took it for a spin to see how it goes. First drive one of the driveshaft loops came loose and dropped onto the driveshaft but once that was sorted it was all go. So it pretty much makes no sense going slow and to be honest I was a little disappointed until I opened it up, then it all came together. Goes good, handles good, sounds awesome, so I am pretty happy. I do have a bunch of things to fix though, the main one being that it is too low at the back, exhaust hits everything and it is a pain to get out of the drive so unfortunately it is going to have to come up. Anyway I will get that sorted this weekend (along with a couple of other minor things) and once that is all done it will be ready for cert.1 point
-
I can only assume/hope you have seen the wagon attack you tube videos.1 point
-
so. after a BUNCH of fucking around and getting dicked for a few items that should have been covered by insurance i finally got a payout to fix my blue car. without wasting everyones time with details the result was that the insurance company would pay for a new gearbox, a secondhand engine and a few sundries. so i bought this, 2016-06-11_09-35-36 by sheepers, on Flickr 2016-06-11_09-35-29 by sheepers, on Flickr 2016-06-11_09-26-57 by sheepers, on Flickr 2J short block, gasket set, new oil pump and a new R154. if i hadn't of just sold the red car i wouldn't be able to afford this and i would have had to buy a second hand 1J. but i have just sold the red car so its splurge on shit time! I've also bough a new manifold which ill post some pics of when it gets here but its pretty special. now its time to put it all back together and make some mods along the way. should be interesting when its back on the dyno…….1 point
-
I'd be pissed off about that wof to be honest. Good luck with the business tho! Must be a good feeling.1 point
-
Cleaned everything up and started again. Tapped out the old 5/16" to M10. I was going to use a fine pitch but only had a taper tap, so used the 1.5 pitch thread. Did a lot of this sort of thing on the old ironhead, retapping fucked imperial to metric. There is usually a good metric size that is in between the imperial steps that doesn't require drilling out too much material... And drilled the housing out to 10mm, lots of meat on this as well... and it works well, although the lower bolthead looks huge... And repeated the intake manifold install, used NZ made Permaseal gaskets this time, they look pretty well made, I just put a very thin smear of RTV around the front and rear water passages, and used a bead of Permatex Ultra Black in place of the cork end gaskets... and a corresponding bead on the intake (all surfaces cleaned with Brakleen first). Around this much seemed perfect, and having studs on the corners makes it really easy to line everything up... And don't know if I actually achieved anything looking at it together, doubtful if I could get this lower bolt out without a lot of swearing, but at least I know the thread isn't boogered, and there is antiseize on all threads that future me will be thankful for... And quite like these, little stainless allen head studs for the rocker covers, all of $15 from Ebay, and arrived in a week... So I reckon I could get the engine in this weekend, can't quite see the opportunity arising however - 'Happy Mother's Day love, would you mind lying under the car and lining things up while I drop this engine in...?'1 point
-
Bit of a saga with the headers, Any coating (incl ceramic) requires curing, and doing it on the vehicle doesn't work in with the running conditions to bed in a new cam. I debated leaving them as-is and doing a proper job later (priced ceramic coating with Elite in Ch'ch) but I can't really be arsed pulling them off again and didn't want to stick rusty old pipes on my shiny engine, so decided just to rattle can VHT on them to see how it goes... So a couple of weeks ago I dropped into the largest sandblasting place in Invers (a place I put a bit of work through incidentally) to ask about blasting them clean. 2 weeks later, despite me going in there twice plus leaving my details, hadn't heard a bloody thing. This disappoints me as I treat every job as a trial for bigger ones, and not being contacted pissed me off more than a little, this will be remembered when larger contracts come about... Anyways, did a google search for sandblasting Invergumboot, and Sievwright blasting/panel/paint popped up. Never knew anything about them but called past on the off chance to see what they could do. The GC there said sure, no probs, they boys had a window and as they were in the car I could get them done right then, and pick them up in an hr. Done... Crap pic but shit this saved some work, I'm over sanding stuff down and would happily pay for this service again. The bloke asked me how I found them as they don't advertise, and laughed when I said I had the arse with the normal outfit (Southern Industrial Coatings) and went looking... And I knocked off early and degreased, warmed and chucked a few coats of VHT black on 'em... These look pretty good now but I'm under no illusions it'll last, so I looked into curing them prior to bolting them up. I need to bake at: 120 degs for 30 mins cool 30 mins 204 degs for 30 mins cool 30 mins 315 degs for 30mins After my last shed cleanup I discovered I had 3 hot air guns (no idea how) so toying with the idea of using these plus an IR thermometer to give it a go. I know I can get the pipes to over 100 degs with one gun, so will be interesting to see what I can do, can always plumb in an lpg torch for bit of extra oomph. Worst case is I'll waste a bit of time trying it out, best case is it works and I have fun trying...1 point
-
So my joy is unbounded at receiving an email stating my parcel has arrived in the country, is being held by nz customs, and that they will send an invoice in a couple of days - once they have added up all the ways they can best squeeze my balls... Yes, this will be the replacement camshaft that NZ Post somehow managed to SNAP IN FUCKING HALF. And yes, this escaped any duty previously (under an exchange rate that should have made it cost more). And yes, it is Easter, so I expect it to be a fortnight before I receive anything... So. More delays, more cost, more frustration. All I ask is consistency (or a better method of getting parts I want without being fiscally raped). Cunts... This on top of a nice letter in the box yesterday advising I had been snapped (and demanding I pay for) doing the insane and life-threatening speed of 56 kmh. On a deserted 4-lane road. At 6:30am. I fucking love bureaucracy...1 point
-
So another update, in a nutshell:. NZ post – pretty useless. Jegs – fucking awesome. The lady from NZ post sent me an email this morning basically telling me it could be ages till they sort out the issue (damage assessment team/reports/sufficient packaging determination etc etc) and I’m prob better off ordering a new one. She also advised me to contact the merchant to advise how it was packaged (when it is in a Jegs branded carton and was opened/inspected at the Youshop warehouse)… So. I placed an order for another cam, with a note saying it was a replacement for a broken one, that I was dealing with the carrier at this end regards redress, and asking if this had happened before. Within minutes I had an email from a Jegs rep saying they had noted my repeat order, they were sorry I had been inconvenienced, they would refund me immediately, and there was no need to send the thing back (all based on a message with no photos)... So after running round town yesterday, repacking carton, arguing over tracking fees and sending it to Aklnd, it seems today I could have saved myself the bother. Being an honest chap, I have advised the lady from NZ post that it is being refunded, that I expect the new one to arrive post-free since I have already paid once, and that since I’ve saved them loadsamoney I would like the thing back for my shed. We’ll see how it pans out…1 point
-
No hoist (thought it may have arrived) but got a bit done. Jacked her up and removed headers (sound but need painted) drained and removed radiator and hoses, starter motor and clips/pipes/wires etc. I cleaned up a few bits, 40-odd years of gunge washed off with petrol and a brush - I'll check bearings/brushes etc and paint these before returning them. I was going to leave the trans in, but there are a few drips underneath, might be just as easy to pull them out as a unit and separate to work on. The guts are pretty much ready to come out, we'll see how things go...1 point
-
I made more progress on this today. No interruptions. Just me, music, coffee, welder, grinder. First off. I spotted this little fella making a go at life in the side window seal. I like it there and will try to nurture it along. Back to rust. This looks a slight iffy.. Yep. Im loving this perfectly shaped wing. I shall keep that as is. Someone has put a lot of effort into creating that. So I cut out the sill and this was inside... I have kept it all and can sell it on to someone who needs an original sill for a future build.. Luckily the front end of the outer sill was solid so that stayed in place so keeping a nice datum point to weld to. Inside the sill it was all really pretty good. Just needed a wirebrush and some paint. Again, much like the other side, it was foolish to attempt to use the very bottom of the inner sill so I chopped it off and welded in fresh steel. I also had to re-make two sections along the top of the sill structure that were just a bit too iffy to use. I then folded up two more sill sections to suit. Painted the inside and then welded them in place. I then chopped out the rear end rot areas. Much better condition at the very end on this side. Good Just two patches but I ended up doing the larger one right back to the bottom edge because it took no longer and means the whole sill bottom along there is new. Pinted and welded up. Its now looking like a proper patch work quilt I finished tonights effort by welding up the last section in the floor. There was an area that was a touch too thin.. I think there will be little hedgehogs sticking out out through the underside.. Then I swept up and moved the car onto the hoist. Next area is the bottom of the a post/sill end which luckily is not too bad. Once that is done I can attack the rotten chassi rail/rails. So far it seems to be that only the drivers side is rotten but I will find out soon. I need to buy more sheet steel though and will get some good thick stuff for the rails while I am at it.1 point


.thumb.jpeg.f619b2b09d6205c0ecd09f9f2fed36f0.jpeg)


This leaderboard is set to Auckland/GMT+12:00