
Leaderboard


Popular Content
Showing content with the highest reputation on 03/24/16 in all areas
-
Time for fuel tank - this job got entrusted to Jon and EUROChris at Strange Workshop. My requirements basically centered around not having any external pumps or additional surge tanks, I wanted to keep everything contained within the original tank confines beneath the car as a means of minimising clutter. Project_KP61_4AGE (163) by Richard Opie, on Flickr Stock tank. What a thoroughly uninspiring piece of crap. Acid dipped as I knew we'd be chopping it up, so why not purge the shit out of it somehow so we didn't blow ourselves up. Project_KP61_4AGE (2338) by Richard Opie, on Flickr This was an investigative foray into a spare tank I had, just to see what we were working with and to map out a location to pop the pump and eventual intank surge-tank arrangement. Project_KP61_4AGE (2352) by Richard Opie, on Flickr Project_KP61_4AGE (2381) by Richard Opie, on Flickr Project_KP61_4AGE (2404) by Richard Opie, on Flickr Project_KP61_4AGE (2436) by Richard Opie, on Flickr The requisite section was measured up and chopped from the shitty fuel tank, and transcribed across to the nice, shiny unmolested tank. This was effectively sized to accomodate the pump with some space around it. Project_KP61_4AGE (2327) by Richard Opie, on Flickr Project_KP61_4AGE (2407) by Richard Opie, on Flickr The inlet/outlet fitting flange was also salvaged from the scrap tank - although in this case it started life as the flange for the fuel filler pipe but was large enough to permit a hole size that suited getting the pump assembly through it. Cut, grind, linish, weld, done. A little bit of panelbeating was needed on the uneven tank surfaces. Project_KP61_4AGE (2414) by Richard Opie, on Flickr Project_KP61_4AGE (2451) by Richard Opie, on Flickr Project_KP61_4AGE (2481) by Richard Opie, on Flickr Chris folded a box up out of fresh steel and got busy welding it all together. Capacity sits at about 3 litres for this. Project_KP61_4AGE (2453) by Richard Opie, on Flickr Project_KP61_4AGE (2467) by Richard Opie, on Flickr Measurements satisfied, it's time to chop up the actual fuel tank. No pressure... Project_KP61_4AGE (2489) by Richard Opie, on Flickr Project_KP61_4AGE (2487) by Richard Opie, on Flickr Pop it in the hole maaaaaate. Levelled up so the surge tank's on the same plane as the fuel tank itself and shit's pretty well sorted. A little bit of trimming of the hole in the tank and it'll be an ideal fit. Project_KP61_4AGE (2562) by Richard Opie, on Flickr Project_KP61_4AGE (2569) by Richard Opie, on Flickr Project_KP61_4AGE (2585) by Richard Opie, on Flickr The fitting to accomodate the AN fittings for the return and feed lines, as well as support the pump via a cradle was fashioned from the spare fuel filler, the filler neck chopped off and a plate tacked across the top. The (dummy mounted to check space in this shot) AN fittings have been welded to pipes which sit below, with a soft line to run to the pump itself on the feed side. Project_KP61_4AGE (2604) by Richard Opie, on Flickr The pump/cradle itself is pretty cool I think. This is just bent up from ~5mm steel rod, welded and braced to the abovementioned plate. Pump's just the Joe average Walbro. Project_KP61_4AGE (2618) by Richard Opie, on Flickr Finally, the surge tank/pump/cradle/bulkhead combo deal perched outside the tank. Holes drilled in the surge tank as this area sits above the original bottom level of the fuel tank and of course we'll need to permit SOME fuel to flow into the unit. Final welding still to take place but afterwards, the tank will get a treatment/seal, the fittings will all be re-passivated and the tank given a coat of black paint to tidy it all up! Thanks for reading Bought not built.10 points
-
I bought a new toy. I've been looking for an RN30/40 for ages but I've been pretty fussy, with one of the harder conditions being that it needs a wellside. There are fuck all. Then this came up, I was like meh, extra cab, but bonus 4x4 tub and guards Plus it's got this!!! Plus it's engineered, and only cost me 3.5K. So fucking cheap. So I went to look, drove it, sounds amazing, bargained the price down a bit, then went home and organised the $ and picked it up last night. It's got a few things to sort, typical hilux rust, high beams are out, shit wiring job on the stereo etc, but it'll make a way better daily than the boring corona I'm retiring. Cheers Matt Discussion Thread9 points
-
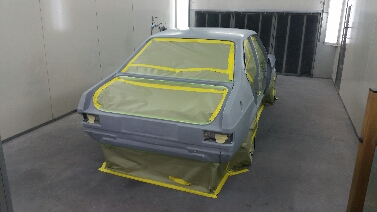
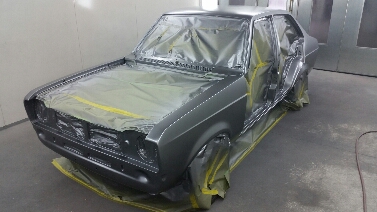
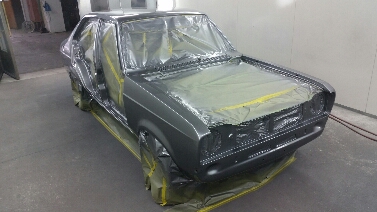
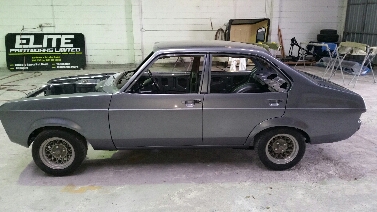
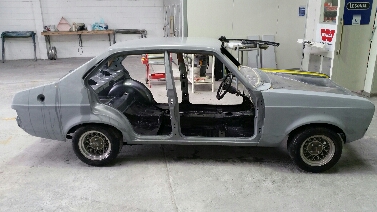
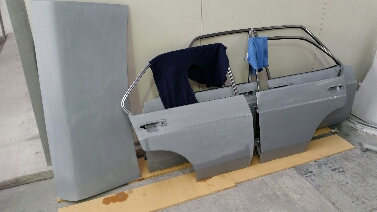
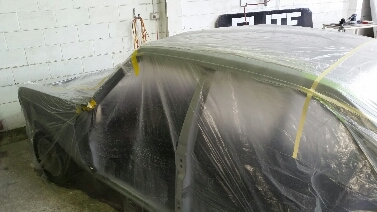
And today after all customers had their cars back for the Easter break and after nearly 18 months since I started,the body was in the booth and masked up After degreasing,checking everything was right,degreasing again and checking again color was on Letting the basecoat flash for 20 mins I hit it with 3 coats of clear And a 40min bake later out it comes Bootlid on And finally doors Real happy with the result and how straight it's come out...not bad for a painter lol Well I've had a guts full of cars for the moment so going to hook up the boat for a couple days fishing and diving. Thats all for now. Chur
 6 points
 -
So my joy is unbounded at receiving an email stating my parcel has arrived in the country, is being held by nz customs, and that they will send an invoice in a couple of days - once they have added up all the ways they can best squeeze my balls... Yes, this will be the replacement camshaft that NZ Post somehow managed to SNAP IN FUCKING HALF. And yes, this escaped any duty previously (under an exchange rate that should have made it cost more). And yes, it is Easter, so I expect it to be a fortnight before I receive anything... So. More delays, more cost, more frustration. All I ask is consistency (or a better method of getting parts I want without being fiscally raped). Cunts... This on top of a nice letter in the box yesterday advising I had been snapped (and demanding I pay for) doing the insane and life-threatening speed of 56 kmh. On a deserted 4-lane road. At 6:30am. I fucking love bureaucracy...6 points
-
Glovebox lid - had an hour spare so knocked this up: It's in 1.6mm aluminium with returns around the entire perimeter. It's also compound curved to match the dash.4 points
-
Work to begin on Otaki Gorge slip Saturday 19 Mar 2016 5:56 a.m. A large amount of earth is about to be moved to restore access to a popular camping and picnic spot north of Wellington. Otaki Gorge Rd was closed late last year after cracks were found in rocks, preventing access to Otaki Forks and the Department of Conservation Otaki Forks Campsite where as many as 300 people stay on summer nights. Kapiti mayor Ross Church says contractors are expected to begin work to clear and stabilise the area at Blue Bluff within the next two weeks. A mass of rock and other debris will need to be removed to allow the hillside to be stabilised. "Clearly it's important for the property owners and the Department of Conservation staff who have been cut off by the slip. It's also good news for the many people who have been missing the tramping, camping and other outdoor activities on offer in the Tararua Forest Park." Mr Church says the work could take two to three months and has an estimated price tag of $500,000, almost half of which will be covered by a contribution from the NZ Transport Agency's emergency works fund.4 points
-
Whilst the body and chassis are waiting for their matrimony I thought I'd have a dabble at the dashboard: It's a stock, steel '38 dash. The car was always going to be LHD (don't ask), so my initial thought was to just fill all of the holes and leave it smooth, ready to add the dials on the 'new' drivers side, but part-way through this process I decided that it would be nice to have a glovebox to put all of the fuse boxes etc into. So here we have it. The slots in the bottom are for the wiring to pass through, there is also a slot at the top just in case there is no room to turn the wires. It's customary in my builds to use some domestic appliance somewhere in the build (my first drag car had steel from a tumble drier, my 105E Anglia had the engine bulkhead made from washing machine sides and my last car the dash was made from steel taken from an old cooker), so the mods on this one are made from a fire surround...... And the (almost) finished dash:4 points
-
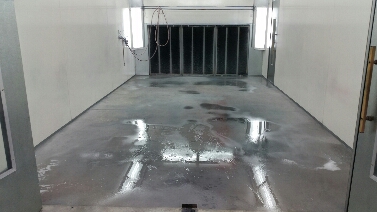
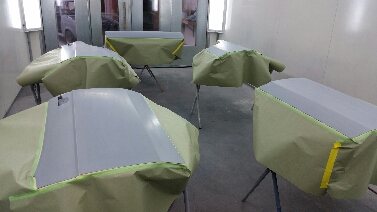
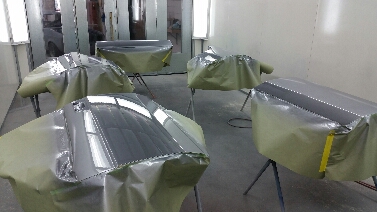
The last week I've been chipping away at getting the final rub down done...firstly blocking with 240 wet to ensure everything's straight then moving on to 400 and finally 800(all wet sanding by the way) Once this was done I fixed a couple areas I wasn't happy with and we were ready Time to give the booth a good hose out and make sure that everything is clean. Doors and bootlid in,masked and degreased. And paint time!
3 points
-
Fixed it all, filled up with gas and went in and failed again Sender gasket had dried out and was pissing out So I drained the tank and passed. Puhuhu3 points
-
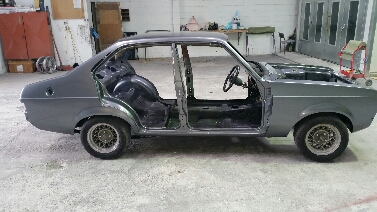
Got a little tipsy tonight.. May need a new boot floor! This and the A pillars are the worst bits, the rest is pretty solid thankfully.3 points
-
Monthly Meet XXVVII Grab a burger, kick some tires and talk some shit. Tell your friends! Burger King Carpark New Plymouth 7PM Wednesday - 30th November 2016 (Pak-n-Save underground car-park if its raining)2 points
-
Could they be spray welded and then machined to bring back a sealing surface like they do on machine shafts ect.2 points
-
This thread on Retro Rides is a must read for a little panel work inspiration and a lot of information. http://retrorides.proboards.com/thread/70135 This guys skill with basic hand tools is very impressive!2 points
-
Test Drive time for the Cert
2 points
-
Richie done good. http://www.speedhunters.com/2016/03/crowning-around-slammed-1960s-toyota/2 points
-
Some people are lobbying to have bike summit in new Plymouth this year btw2 points
-
Chassis out in the sun for the first time. Stage one on it's journey home to meet the body.2 points
-
Just to prove it wasn't a fluke, here are all of the narrowed rear suspension components:2 points
-
//oldschool.co.nz/index.php?/topic/52296-uteruss-kp60-pantay-dropper/#entry1676022 BRAP BRAP BRAP BRAPPED THE SPLINE OFF DASH HOLE HOLE FILLER THEN WE CHEECHED1 point
-
Have to agree with you there mate, the cynic in me wonders if it may be much ado about nothing?1 point
-
Cheap enough to get them done while it's apart. That said IV never actually seen a seat recess apart from some tagged out example ones1 point
-
Mmmmmayte where is it? Il minor over. Someone else can take the commercial but it's no wof and covered in shit like a true East coast car1 point
-
I hardly ever fill my Minor tank up for exactly that reason.1 point
-
It can be any time theres people really.1 point
-
Sweet. I admire your attention to detail. No rushing in and everything is thoroughly thought out before execution.1 point
-
I've been in touch with YT, the alloy Holden 6 heads they make are all 12 ports (Blue or Black mtr) and the valves are different. Big issue is the 5 thou oversize stems, I may have to just bite the bullet and replace all the exhaust guides to bring them back to standard, it would give me a lot more options. I'm still kicking myself for not turning the motor over more frequently!1 point
-
If you have lots of small holes to fix say in a floor pan. I've seen a restorer do this in a 55 chev. Screw a strip of panel steel to a sheet of ply then holesaw out a pile of discs in a drill press so you have no hole in the centre. You can then holesaw out the rust in the car and weld in your discs been round the shrinkage is very uniform a quick linish off of the weld and a gentle tap around and its perfect. Screwing your sheet steel to ply give you something to hold onto while hole sawing and some weight so you wont get sliced up if it grabs. You can get creative to using a bigger disc holesaw out some rust say in a corner of a door bend the disc to shape in a vice and trim it to fit with tinsnips everything will have a round edge again minimum shrinkage.1 point
-
Welp . . . Can't get any parts ever for this thing. Dizzy is tired out and has to be replaced or refurbished. Honda can't / won't, so it'll be up to an auto sparky to give me some kind of solution. Stall issue could also be caused by coolant temp sensor, and that part is no longer available - Honda also say they can't find any aftermarket part there either. So, long story short . . . Honda fixed the clutch cable and nothing else. Dunno how I'm going to solve the rest of these issues.1 point
-
should do the head lights as well and start a trend1 point
-
Damn thats a good looking car Alistair ! Must have been tricky in the wet1 point
-
IMG_4969[1] by Neal OnTheTree, on Flickr1 point
-
Couple of the better ones from tonight, had focus on manual for half of them - doh!1 point
-
No updates as the Mrs bought a bloody spa so having to build a deck for it... Happy wife happy life! That's Easter buggered.1 point
-
so hear we are boys.... this is what it looks from the top, also have a compartment for my battery and any other gear etc i carry... will be fully sealed and is lockable. underneath its abit of a mission iv shortened the xmember by 120mm either side re strengthened it and tig welded it all back up and going to tig the seams. also i shortened the wheel base by and inch so its all the original wheelbase now... so its pretty good and fit-mint is perfect... iv found some adjustable plates for the camber and toe angles so it will be fully adjustable.1 point
-
An actual update! Surprised how easy this was, not perfect ( a few small bubbles) but only took an hour from woah to go (pulled the panel off the car to make life easier) and looks a million times better. cheap too! Its just cheap stuff ($8/m for a 40cm strip) but at that price I dont care if it fades overtime or whatever Excuse the potato photos Discussion //oldschool.co.nz/index.php?/topic/41006-beavers-87-gloria-wagon/page-41 point
-
Next on the agenda is the suspension. The only thing I did notice at slow speed was a kind of "thrumming" for lack of a better description. It only happens every now & then & I'm not sure if its the road or possibly the shocks being worn out. Here are some pics of the current state of the suspension bushes & steering. Looks alright aye??.. Shocks are these Spax things. Is that a good brand? I've heard of them before but can't remember if that's a good thing or not..1 point
-
MY GUARDS ARE FIXED!!!! Suffice to say I'm pretty happy about it. Guards where repaired with just 1 day to spare before a group of us riverside gang members were due to leave for Toyota fest down in Cromwell. So in one day and two late nights i managed to get the car legal enough to get a warrant and then low enough again to be cool. I would have liked to get the front down a bit more but virgin guards and stupid tyre profile would not allow it. Also ran out of time and patience. P.S rear guards arent finished yet either, still need a bit of careful shaping to get perfect and a proper paint as they are currently just in a white primer. After about a 800km round trip the car was still in one piece, despite all the tyre rubbing and chassis encounters with the road surface. Here is a bunch of pictures.1 point
-
shed tour! i can host one, this sunday or monday. All you need to bring is some muscle. I need to move 5 motors, a dead car, and a car worth of parts from one shed to another. Ill supply the bbq and beers and minibike of serious injury1 point
-
Does anyone remember that law, where you werent allowed a bonnet cutout unless you were over 18? I got pulled over and the cop said "Hey bro I'm gonna have to see your IDA"1 point
-
^ So figured out why my results were slightly skewed... Repeated the test but did it in reverse. Set wrench then positioned weight/s along shaft until it just clicked, and measured the distance. Then maths (adding 0.8 kg to account for weight of toolbar) and looks like we're good to go, the numbers line up well from 15 - 90 ft-lbs. With my nerd on I get an average error of 1.0207% over that range. Quite an interesting exercise really...1 point
-
so after spending more hours on a radiator shroud than anyone in history i fixed it. what a fuck around, but the end result looks good and thats the aim of the game i suppose. in other news the "rego on hold" letter came in the post and it expires at the end of this month so i might try and get a warrant on it before the end of the month. that might be a bit optimistic. 2016-03-20_01-08-06 by sheepers, on Flickr 2016-03-20_01-07-57 by sheepers, on Flickr 2016-03-20_01-06-15 by sheepers, on Flickr 2016-03-20_01-06-07 by sheepers, on Flickr 2016-03-20_12-23-53 by sheepers, on Flickr1 point
-
I must finish the wagon, I must finish the wagon, I must finish the wagon, I must finish the wagon, I must finish the wagon, I must finish the wagon, I must finish the wagon, I must finish the wagon…… Its been put on the back while over the last couple of months while things like family visit, jobs that pay get done, land work gets sorted, swimming in the summer sun happens. Bur I have managed to sneak in a few bits here and there. I did a bit more welding repairs to the rear boot/arch corner and I started on the brakes plus I have sorted out the wheels! Its been a little Vivatastic in our workshop recently too. I had Andre's lovely genuine GT in for repairs and I also have a Firenza that has come down from Auckland for much rust removal and repairs including fitting a wide arch body kit. Its going become a 70's V8 powered road going racecar replica. For us Viva fans the workshop was looking pretty spiffy.. Firstly the welding. Pretty easy to see from photos so here we go. Where I left off on the last post was about here… Then this scabby bit.. So the rear end is pretty much done but for a couple of little bits. Lets just ignore the elephant in the room that is the very frilly tailgate (or hatch as Hannah likes to point out..) Next rust area is around the bulkhead so I can put the brake servo and master back in place. Then I can finish the brakes. So those brakes.. Well they were all knackered. I took all the bits off and evaluated their mankyness.. Luckily the calliper pistons freed up and slide out revealing good chrome and seals. So just a clean for them. The pads are still thick and dry so result. Moving to the back. I cleaned up and honed out the wheel cylinders. Usable but not perfect and for the money of new ones not worth fitting seals into. But then I discovered that new cyclinders in NZ were either non- existent or cost moon beams. So I looked to dear old Blighty. There you could get all new old stock parts for the price of a terrible greasy spoon bacon sarnie. Luckily my older brother lives in the land of greasy bacon sarnies and he was coming home to NZ for a holiday. So I started buying up old Viva bits and getting them posted to his house in Wales. He was so grateful.. and brought them over for me (along with several classic car magazines J ) Here’s some bits… Typically after these bits arrived I had been looking through my boxes of bits and discovered not one but two sets of brand new brake shoes. But they probably don’t have the real deal inside them like these beautys… So the rear end is all fresh and daisy. New cylinders, new shoes and new brake lines. I found a new master cylinder seal kit in my stash of parts and that’ll go in place once the rust is done. Wheels next. The wagon came on a lovely set of classic Cheviot Turbos. Lush! Swoon. Two had slight kerbing damage to the outer rim edge. I could have left it but it looked pretty yuck. So I tigged them up and filed them neat again. Quite satisfying. Then since the wheels were in motion…. and I was on a roll…. I gave them all a good wire brush and removed the horrible build up of oxide. That was a nice job on a sunny afternoon. They look a lot better for it. Then the wheel stud holes needed tidying up/remachining because someone in the past had used the wrong nuts, tapered, and it wasn’t very good really. This was going to be bloody tricky with just files etc. So I whipped up this little fly cutter to reface the washer face. It worked a treat and they pull up great on the hubs now. Now many, many yonks ago some might remember the nice set of Dunlop D1 alloys I had bought for my other Viva. I never ended up using them because I had discovered cracks across the hub faces on two of them. But not before I had spent some time machining up nice new stainless washers to suit the new nuts I had bought for those wheels. I found these stashed away and they are a perfect fit on the Turbos. So that was nice. A few weeks back I spent some time welding up Andres Viva GT where it had failed its WOF and he returned the favour by gifting me a set of 185/65 13 tyres he had left over. I had them fitted yesterday and they look good… Sadly one has a pin hole through the sidewall so hopefully I can get it repaired/patched inside. So next step is finish the rust in front and the tailgate (hatch) , finish the brakes and then fix the leaky Stromberg carb. I’ll swap the screen out for one I have that is not covered in scratches and then it’ll be close to going for a WOF ! Simple………. Oh yeah.. we can all discuss the merits of Cheviot Turbos here... //oldschool.co.nz/index.php?/topic/44200-yoeddynz-and-hannahs-hb-viva-wagon-discussion/1 point
-
First up, massive style props absolutely have to go to the Sheeper for his efforts this weekend - basically he's put in a whole lot of hours, and we've managed to get towards the very end of the fabrication work on the car. So this weekend, we tackled the brake/clutch pedalbox and the gearbox crossmember. The idea was to end up with a pedalbox layout similar to KPR's KP60 build, and Kris has been awesome answering my stupid questions and flicking through his build shots so that we were able to easily get a handle on how things needed to happen. IMG_8467 by Richard Opie, on Flickr Proceeded to measure up the Wilwood reverse swing unit, in order to build a basic rectangle frame using pieces of scrap angle iron. IMG_8501 by Richard Opie, on Flickr IMG_8474 by Richard Opie, on Flickr So this was the reeeeal basic start. It gave us the dimension we needed to work with essentially. IMG_8486 by Richard Opie, on Flickr IMG_8490 by Richard Opie, on Flickr Clamp into place, and drill some mounting holes. IMG_8534 by Richard Opie, on Flickr Bolted in place, things kinda start to look like they're all coming together. IMG_8550 by Richard Opie, on Flickr IMG_8552 by Richard Opie, on Flickr The front edge (nearest firewall) bolts onto the firewall using the original location for the booster. This section of the firewall is recessed however, so in order to get around this we used KPR's technique of mashing a couple of threaded bosses onto this edge of the frame, enabling it to be secured with bolts from the firewall side - much tidier in the bay itself. IMG_8603 by Richard Opie, on Flickr IMG_8611 by Richard Opie, on Flickr With those welded on, some faffing about with the old pedalbox pressing (factory) and the steering column height was needed - and from this, it was found that the factory column angle was 20 degrees or thereabouts. Cue one times pie cut in the frame, and some bending to get the angle cock-on, as this unit also doubles as the column mount. Weld solid. IMG_8627 by Richard Opie, on Flickr IMG_8631 by Richard Opie, on Flickr Time to organise some bits for the whole thing to mount to the scuttle area of the firewall. Odd shapes are because the master cylinders need to fit in there! IMG_8639 by Richard Opie, on Flickr A little bit more faffing around with a tape measure, then Sheepers does some cutting and welding. IMG_8653 by Richard Opie, on Flickr And magically, it all bolts in and is super solid to boot. Feels like you could lift the car in the air with this thing. IMG_8671 by Richard Opie, on Flickr IMG_8675 by Richard Opie, on Flickr Then all of sudden! Finished! You'll note the steering column mount section has been changed, we actually needed to shorten the whole thing slightly to fit it in. Reservoirs will need to stay where they are, lurking under the dash. Thanks for reading!1 point
-
So an offer has been extended from the old GC Graeme at my work who has a collection of vintage machinery tractors trucks stationary engines and general cool old stuff to come look round for a few hours if we are keen for a cruise to Tauranga. Highlights include a 70s mack v8 with a 5 inch straight pipe and a commer TS3 2 stroke supercharged engine both on stands which he will fire up for us.1 point
-
Join a gang, sell drugs?1 point
-
Dig a hole, stare at it whilst leaning on spades.1 point
-
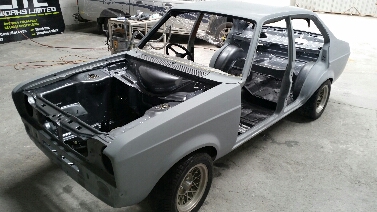
Picked up some boot trim today, its the little things that feel good for fit and finish. Car is nearly ready for paint, hopefully spray some primer this weekend, and have the top coat sitting ready to go. Working all the time on missing parts, and getting some stuff together for intake for engine. Im going to run 4age throttle bodies and a modified nissan ecu, running map sensor/tps. A nissan distributor will be modified to suit as a trigger for ecu, and is internal coil so nice and tidy. My workshop is covered in sanding dust atm, cant wait to get some paint on and begin to bolt stuff to the car again.1 point
-
Brendan Duncker, of Niteparts/Convert Motorsport notoriety kindly agreed to build a set of his super nice headers for me. These are a 4-1 type, 38.1mm diameter primary (I haven't got the lengths yet but will be getting this info) with his own collector and a V-band flange for connection to the exhaust. They are gorgeous things and I am extremely happy with them. 2015-12-20_06-39-01 by Richard Opie, on Flickr Sorry, only a phone shot for now but will elaborate further when I pop together some more photos of all the garbage I have been accumulating for the car for the next update on SH. Thanks for looking!1 point
-
Made a little progress this week on the turbo manifold. Need to trim #1 as it's only 5mm from the strut tower. #5 is a little short and sharp, but there was no other way to do it as I needed space for the dump pipe. I'm trying to make a "proper" twin scroll setup, but I'm a little confused as to whether I should go for a big single gate, or twin gates? (space could be an issue) Thoughts?1 point
-
Bad phone pic of the 2jz-ge I picked up a year or so ago along side a Holset WH1E, as it's the only picture of it I have complete (currently fully stripped) Took the broken 1jz out Pulled it to bits, and stuck it back in for mock up purposes. Sold the gearbox setup to upgrade to R154 later on. Few pics of the destruction, cause everybody likes broken shit. Snap crackle aaaand pop Pretty lame update I know, but I've been buying some bits to make it a little more exciting soon.1 point


.thumb.png.b2aee08688778d18bdc7b3e3c1852d9c.png)
This leaderboard is set to Auckland/GMT+12:00