
Leaderboard


Popular Content
Showing content with the highest reputation on 09/19/14 in all areas
-
17 points
-
5 points
-
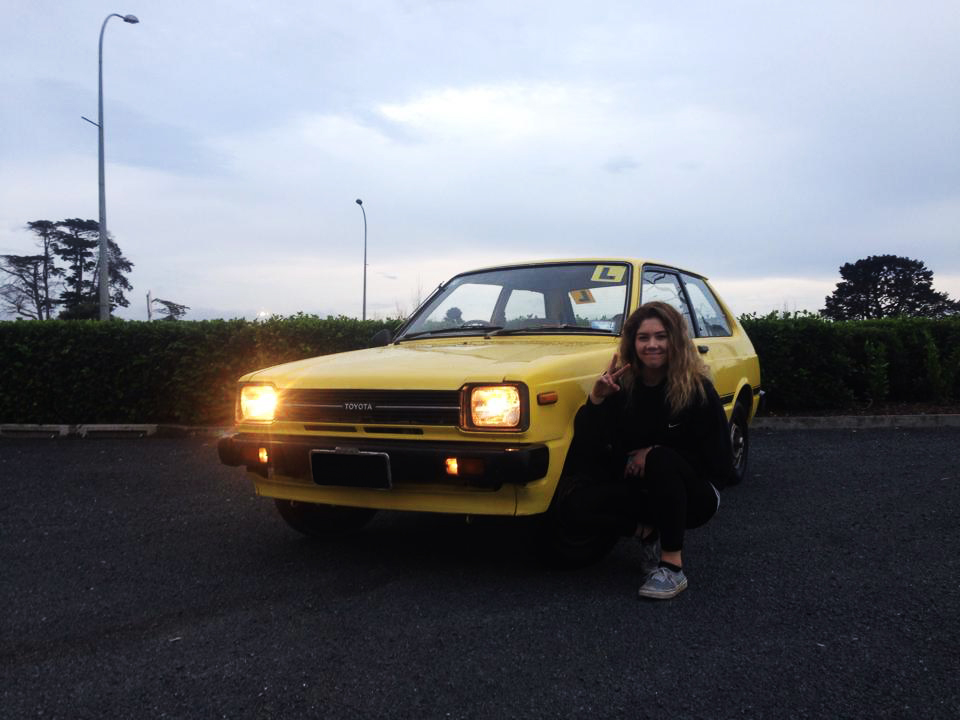
Got that learner spec. Finally took Devon out for my first drive; such a nice car to drive. This makes me want my restricted so bad
 5 points
 -
Tis some bloody good ideas above - cheers all. I will certainly go about asking for steel wire when time comes. Must line up and keep two appropriate trees intact! KK- here is a picture I drew a few months ago for Hannah's nana in the UK. Doesn't show the whole lot but gives you an idea of what we want to do. Shed to be ordered is now going to be 7.7 wide by 15 long and 4.5 high with a mezzanine down one side. I cant wait!4 points
-
4 points
-
For the record, I did finish the pedals... Except the loud pedal, will work this out when the fan shroud is done and I have some idea of where it will run. Not perfect but good enough4 points
-
Got it back last night just in time to drive to the monthly meet. Had to do a mad dash to ripco for a new dizzy cap and roto and the points where wrong as well. I thought it ran like clock work on these parts Many thanks to Azzurro for the great photo Hopefully if it doesn't rain to much over the weekend so I can get the lowering done over the weekend3 points
-
3 points
-
some pux for yooze.3 points
-
So today we fitted a brand new screen and put the moulding back on, had it's very first wash, fitted and wipers, cranked it up ready for wof in the morning.2 points
-
Decided that while it's off the road during the gearbox rebuild I'd make the inside a nicer place to be. When I first got the car I attempted to dye the original gross faded carpets blue again with some dye that you mix up in a salt water solution. Worse idea ever! It worked okay for a while then the carpet just fell apart even more and I noticed that the salt in it had made everything on the floor rust. This is the bottom of my amplifier 2014-09-13 20.52.09 by GuyWithAviators, on Flickr And the seat mounts. Cleaned and painted all these up including the bottom of the seats and the seatbelt components. 2014-09-13 18.14.19 by GuyWithAviators, on Flickr Because the carpet fell apart it meant that my feet were just on the metal floor which I did paint right at the start but it came off and combined with the water from the leaky door seals it started to rust the floor pan again. So I stripped that back and painted it again with several layers of decent paint this time. I bought a bunch of carpet from Bunnings ($25 per m of 2m wide) 2014-09-14 17.37.22 by GuyWithAviators, on Flickr (Can just see the corner of the OG carpet there) Found all the sound deadening and then cut the carpet up to fit nicely! Was a bit difficult sorting the corners out but it looks really good for about $60 of materials compared to $280 for some precut stuff for this car. 2014-09-14 16.33.43 by GuyWithAviators, on Flickr The finished result: IMG_2575 by GuyWithAviators, on Flickr IMG_2577 by GuyWithAviators, on Flickr Let me know what you think!2 points
-
Lol nah its long gone. Only just got round to doing something about it. Tbh, nobody wants their car back after its been nicked/it was time to move on. Has been a couple months daily driving my Terrano, cant take it any more. Gotta buy something with some cornering ability.2 points
-
You are most welcome to come over and dig your own holiday hole on our block. Bring beer and other stuff. Its pretty much all either clay of sandy clay granite stuff. Perfect for digging into. We can have a party...2 points
-
ahhhh i will be here for the next one hopefully! catch up with all you palmy cats.2 points
-
Wasn't happy with the end result with the plumbing, so ended up making a bulkhead to make it tidier and easier to pull the engine out. All oil and fuel lines, and the electrical bulkhead plug run through it. The only potential issue could be if I need to put a scatter shield round the bell housing (thought of this 5 minutes ago). Also been looking at the way all the oil lines are running at the pump and filter, and it looks like I have the wrong remote filter mount, the ins and outs need to be on the opposite side to where they are. And nearly have all the brake and clutch lines sorted barring a few fittings and a metre of brake line. I'm picking it'll be an absolute arse to bleed. For the record -4 Teflon line is an absolute c@*t to make up. Still need to work out go pedal cable attachment etc...2 points
-
Cha Ching week, got the dry sump system plumbed up, pretty much every inlet/ outlet is on the wrong side, so it's done but may change stuff. Pedals, still to be plumbed. Plumbing water and fuel this weekend. Big thanks to The Hose shop in Manukau for wasting 5 hours with me making hoses.2 points
-
This idea has been around since internal combustion engines have been around, it was the only alternative fuel to ever completely replace petrol during WW2, I am having a crack at making a system, I need to find an oldish car to fit it to, something with a 4 or 6 cylinder with a distributor and carb and a manual transition, the older the better. I have mostly finished the generator and cyclone filter, water trap/cooler, I have another big cylinder I am going to make a filter witch uses dry grass/ wood shavings for a partial filter This is how it would look fitted to a car I have to make a lot of air tight hatches for cleaning etc. the fitting on the right is the shaker, I can put a spanner on that and rock the ash grate.1 point
-
Updates in a few days, I'm way too pedantic for quick progress haha. Also, don't you hate when you remember that one essential item you need, right after your order is placed? Yeah..1 point
-
These don't really like running without a thermostat, the water circulates to fast and they will still overheat. They should have a 84 degree thermostat. I would check the compression on numbers 2 and 3 cylinders as they have a habit of blowing the head gasket between these two.1 point
-
Something something, Friday afternoon hotspanner action before paella Friday1 point
-
or a lift company also usually just donate them to whoever as blake said they cant scrap them1 point
-
Jesus Christ! I just gave your thread a read for the first time today. What a saga! If I were in your shoes, I'd be looking for a Honda v-tec engine, or a city turbo motor for this car. There's a guy here in chch (Unsure if he's on here or not?) with a B16A in a mini. Surely there's more room in your engine bay than a mini? You must be getting weary of that english reliability by now?1 point
-
Oh OK, was not so clear to silly me then. I will take this opportunity to advocate for more use of ms paint diagrams1 point
-
I'll have to get Lou to update this with the stereo she built as it came out really nice. Anyway, we are off to Nelson for her brothers wedding in November and this is going to be one of the bridal cars. An ongoing issue we have been having is a strong petrol smell in the boot, has anyone had experience with that? Any ideas? Or good remedies to get rid of the smell? I've replaced the breather tube (it didn't quite reach through the floor) and also replaced the filler tube as it was getting a bit old, hard and cracked. Due to the smell and its effect on our lugguage, I've decided to build a bit of a roof rack for it. I couldn't find any nice old racks when I was looking, so for $20 I bought an old basic roof rack, and then used it to go and buy some steel. Next I got some pipe and angle and made a mandrel, then with the help of Duke-Blackwood, we heated and bent the steel. I was pretty stoked with how it came out for a fairly rough first attempt at this sort of thing. And finally how it is currently Still a bit to do but I'm pretty happy with how it looks so far. I've sized it so it will fit on my anglia as well (if I ever finish it...)1 point
-
1 point
-
As rookie said go hit up a local forestry contractor (hauler not groundbased), try nig bryant or the bloke something fraser from fraser logging. When their working ropes get a bit worn they replace them and the old ropes cant even be scrapped usually as the guillotines wont cut them and compactors cant scrunch them into balls.1 point
-
DAMN SON, YOU DUN GOOD.1 point
-
i think he just forgot where it's parked :[ i miss the BOXER6 dam shame son1 point
-
I spoke a little bullshit above. I do have some more shots, pics from when I was selling it.. pic dumpage have all the originals.. bugger I can't use the plates tho had some guy pestering me to sell him the rear tail light garnish, got up to about 700 this is the only bad bit of rust bar the tire well and bottom corners of the boot rubber lip, its from where they stiched the rx4 panel back on and didn't proof it.. does anybody have a rust free tire well they want to sell me? tire well some cunt put a ding in the roof just before I took it out of storage.. must have been something fairly big to make a ding like that.. mmm brown.. some dash cracks.. take note of my awesome carpets haha.. dole spec there you have it.. have to find an undercover parking spot for the 121 and then its all go..1 point
-
accuired a few goodies next job bare metal the diff and give a fresh lick of paint then assemble after making front adjusties and possible alterations to rears. any suggestions for adjusties? cheers1 point
-
Could cut a rather large hole through each tree that is in the way with a massive holesaw then run flying fox wire through them. Would make for exciting ride (trip..)1 point
-
That's the governed speed. They can rev to around 4000, but don't hold them there too long. (Or else you get a window in the front of the block) Lot's of goodies availble for thoses motors too........1 point
-
Shit this build is going slow! compaired to last time anyway. Ball is still rolling tho, I feel like im real dragging the chain and but Dannys dominating it ...............agian Got some prime-hole on my tank, Tanks to Chris other tank and bits are for chris's hog Put the new foot pegs on, had to modify the hangers, worked out all good, apart from one flaw that i fuct up on - keen motorcycles will spot Think they look oright, not sure if Im just steering at them and not totally all bout them or once its all done, mounts are black, and youll hardly notice them Lowered the rear and front abit more, the rear is at 60mm on the shock and front is 110 in this photo, Im think bang on 100mm will level out the tank and frame nicely and Im happy with that for swing arm levelness haha once i sit on it itll be sweet Head light brackets on, this headlight came with the bike, its not factory, i kinda like it but the bottom of the front surround is totally rusted out, so have to look out for a new one Top view of foot pegs, Dannys hog is looking pretty much finished....looking anyway. He peiced it together the other night and rode it After something like 3 weeks of wiring, cut extend remove and remount, the thing still fires up, with out catching on fire which is nice Ride that hog That is all1 point
-
hello1 point
-
So I did a shitty job of painting the roll bar, I will probably re do it at some point. And my shiz showed up this morning so it looks like racing this weekend is on. This is what the engine bay looks like now. I think I will chuck my locked diff in for the weekend too.1 point
-
Craned on? Why not just back a truck up the drive and hiab it on?1 point
-
The speed and grip between wet and dry in this thing, always seems a bit silly to me.1 point
-
new page time. been driving it and its still fucking awesome to cruse in. thats about it really, acquired a few bits for it that i was missing so ill make them fit and do a few more things i want to do as well. its hard work having 3 cars. I've been working flat out on the blue car which is fucking choice now but I've not done anything on this in a while. good problem to have i suppose. anywho, here are the boys together. Untitled by sheepers-ra28, on Flickr Untitled by sheepers-ra28, on Flickr1 point
-
Here's what we've done recently on the car, mostly rust repairs. Got the inside of the guards cleaned up and under sealed. Chipped out a bit of the sounding stuff on the inside and found a bit of rust. So just to be on the safe side I chipped all of it out. Luckily it was all good, only a little bit of surface rust. The panel beater recommended painting it with Por15 so I did that and it came up sweet. Started doing a bit of sanding as well, got a few bits of rust to fix. These are the worst ones The guards are at the panel beaters, they need quite a bit of work done on them. So slowly getting there and there's not as much rust as I thought so that is a good thing.1 point
-
As some of you know Snoozin parted ways with El Cedrico on the weekend just gone. Full credit goes to him as this car wouldn't be the stunning car it is today without all his hard work and perfect eye for detail. The car Drove flawlessly down to Christchurch, fully loaded up with treasure there was some rear wheel arch vs tyre action as to be expected with a low car Gas stop in Sanson Waiting in line for the ferry (note the rear tyre that has jizzed on the wheel) And lastly I decided I should install the rev counter from the wrecked out hardtop today (excuse the crappy phone pic) Cheers Karl Discussion //oldschool.co.nz/index.php?showtopic=315201 point
-
Got a little sneak peek today as the last of the panel work is being finished off only the new window rubber to go in now. All going to plan It will be at the meet on Wednesday1 point
-
I learnt about this about a year ago, was considering building one for a velobike but too much burn risk. Might still give it a go at some point, I never fornd half as much information on designs than you though, cool to see someone building one.1 point
-
I need to find some kind of blower that is made from steel to use for lighting up the system, it would be used to create the vacuum before the engine is started, don't holden HQS have a steel heater fan?1 point
-
I have gathered alot of info I can't post it all, I was given the Volvo hearth and air nozzle sizing chart and I have a booklet from the NZDSIR from WW2 A friend on face book runs a 350 Chev on wood gas daily. Alot of work has gone into my generator already, I had to form a cone from 12mm plate witch was hard work, I just need to make the flange to bolt the wood hopper onto the firebox. I was hoping someone could give me some enthusiasm to finish this heap of shit1 point
-
The gas is made from burning wood in a controlled environment1 point
-
A old volvo fitted out1 point
-
All the gear is finally here, second set of rears for street rubber (need some 4.5" wide chev pattern 15" rims for the front ), wheelie bars, gearbox and the motor. Been doing a bit of cutting and tucking to fit the gearbox, engine in soon. Its a bit distracting when I have work stuff to fix in the shed... So should have engine in the hole over the next couple of nights. Big plumbing list coming up...1 point
-
Been doing a bit on the car, sorting brake lines, putting in linelok and re routing the staging brake so it works on the rears. Also ripped out the old -6 alloy fuel lines and replaced with -10 feed and -8 return in stainless braided ptfe line. Mocked up radiator mounts ... Still a massive to do list but at least it's moving. Will get some pics. Running gear due on the 23rd of this month...1 point


.thumb.jpeg.384ff72c8d2b0ee0d34a7bdedb55bdcf.jpeg)


This leaderboard is set to Auckland/GMT+12:00