
Leaderboard


Popular Content
Showing content with the highest reputation on 30/10/24 in all areas
-
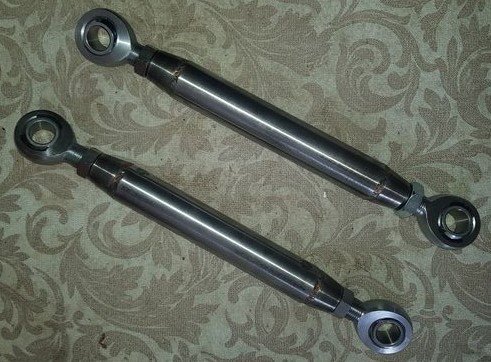
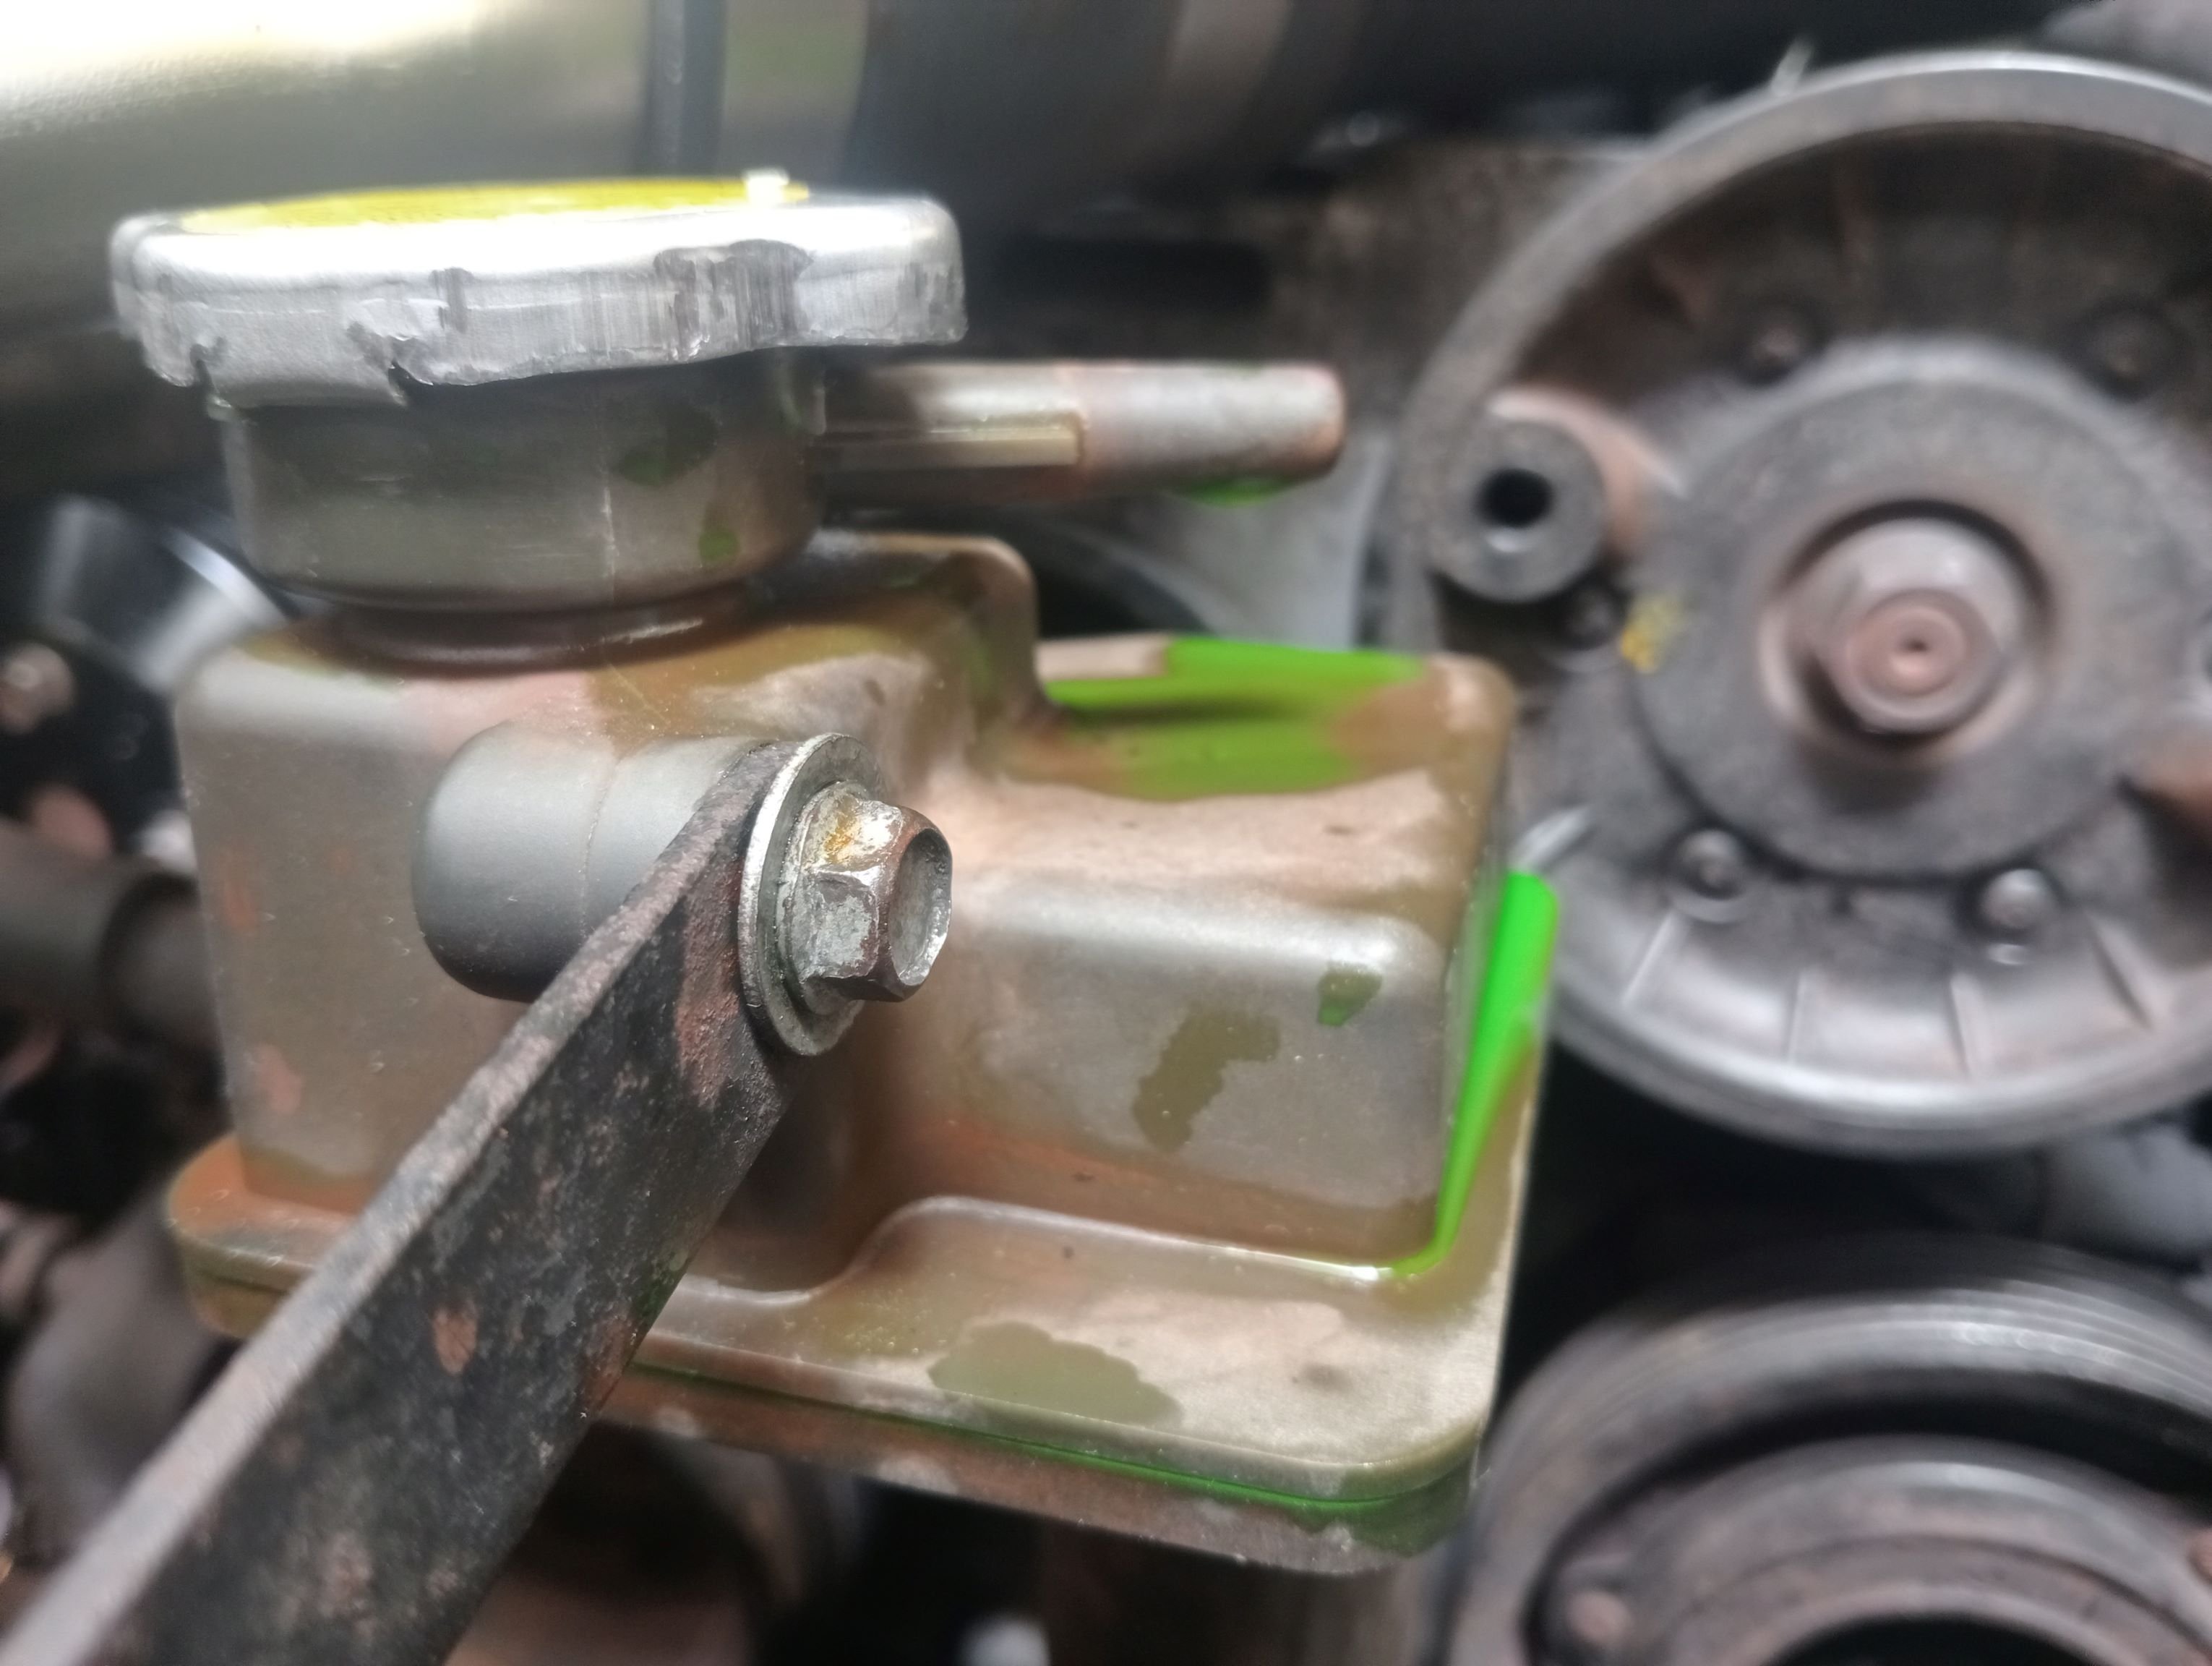
With the Ford 9" axle ready for final assembly, my attention turned to the links for it. Lower links are very straightforward, left and right handed rosejoints and a couple of sturdy tubes: Upper link (yes, just the one) is a bit more complex: The two forward rosejoints are the same size as the lower links, the single axle end one is far larger.
 7 points
 -
Here's my take on why we've seen wildly different sizes on things like exhausts, ports, valve size being "ideal" as tech has changed and we've progressed through the timeline. Carb era In the 60s or 70s when carburetors were common. You've got a situation where the carb is mounted fairly far from the head, and suspending the fuel as it's transported to the combustion chamber is an absolutely critical aspect of the engine performance. So you need small port sizes, small runner sizes in order to keep airspeed up. Even at low rpm. Then your fuel pressure is really low. If there is only 3-4psi of fuel pressure, then having any sort of pressure wave in the intake manifold can hugely affect the fuel delivery. If at some rpm point there is a harmonic wave that adds or removes 2psi of pressure, then you've just lost or gained 50% of your fuel pressure differential. So as a general rule ports were small, valves were small, runners were small, and exhaust manifolds tried to avoid causing any massive peaks or troughs in the intake pressure. Compression ratios were low, in order to avoid issues with knock as there was no computer control over ignition. So very little cam duration, and tuned lengths somewhat avoided. Cast exhaust manifolds quite prominent. 2 valve heads common. Possibly because a 4 or 5 valve head, it was impossible to realize the benefits of the extra valve area when airspeed needed to be high all of the time. Early EFI era In say the 80s, EFI changed the game a bit by having a much higher fuel pressure and injectors mounted right by the head. So now you didnt need super tiny intake runners to suspend the fuel with high airspeed. The fuel is delivered straight down by the valves ready to go. So now runners an get bigger, ports can get bigger, valves can get bigger. You can realize the benefits of a 4 valve head, because you can have larger runners to match the higher valve area. The higher base fuel pressure also means the motor is considerably less sensitive to differential fuel pressure changes from positive or negative tuned waves from intake or exhaust. Having a tuned length exhaust manifold could be beneficial where it helps pull gas out, with comparatively little detriment when it's out of phase. As it's not disrupting the differential fuel pressure like with a carb. So it's not going to cause stand off. So now you could have a bit more cam overlap / duration without any downside. Usually had fixed valve timing, basic ECU & injection, and still a reasonably low compression ratios on NA motors. When you have a motor with a static compression ratio of say... 9:1 or 9.5:1 theres a still room in the head for residual exhaust gas to reside in the cylinder once the exhaust stroke is finished. So these motors were really sensitive to the benefits of having good extractors, and EFI made them insensitive to the downsides. So even really dunga motors like a 4AFE had a really nice 4-2-1 extractor setup. While the carb version of the same motor made in the same year, just has a cast manifold instead. EFI was the change at this point that allowed the removal of a lot of constraints on design for things like tuned exhaust. That had a root cause of fuel delivery issues. The Medium EFI era Then we move to about the 90s. Still usually fixed cam timing. But it seems like manufacturers were trying to maximize the powerband a bit more, and ECUs can deal with knock etc a little better. So we still see the decent 4-2-1 exhaust manifolds on everything, and more effort to try beef the powerband everywhere and improve economy. So there's a range of different variable intake geometry coming out on motors. Things like varaible plenum volume, variable runner designs, and so on all gave decent benefits. Compression ratios generally getting a bit higher into the 10s. Motors were making more power but also getting better fuel consumption without knock issues. Port sizes, tuned lengths etc could now be based around what the variable geometry systems, with fewer downsides than before. So everything could get a bit bigger. Power levels go up, as yet more of the design constraints of low rpm drivability were loosened. VVT Era Late 90s / early 2000s when variable cam phasers came in, it tipped the existing rule book on it's head again. The cam phasers largely made any variable inlet geometry like TVIS obsolete. As it's diminishing gains having more than one variable system in place. Cam phasers became the simplest and cheapest way to broaden a powerband, so the rest of the stuff got the boot. It also seemed to allow engines to have port sizes and valve sizes to suit their peak power requirements, with even less detriment to mid range or low rpm. A motor could now have heaps of overlap when it's beneficial, and not when it's not. Cam duration and lift became more aggressive, ports and valves could get bigger with no downsides. So looking at a beams 3SGE engine which has VVTI, for example. It has absolutely monstrous ports compared to earlier fixed timing heads. Crappy exhaust manifold Era Move to the early/mid 2000s and we're in an era where ECUs control and knock strategies etc are so effective, that compression ratios can go even higher. So ordinary to see 11:1 or more, even on economy engines. When the compression ratio gets higher, and VVT is present. The motor is less sensitive to exhaust design (citation needed, just my observation) So the motors can be made simpler and cheaper by putting a garbage manifold on, without any downside. So we're kinda back to the carb era of exhaust stuff, where we're not relying on a tuned length system anymore. Despite some absolutely disgusting exhausts, motors of this era are making better overall power/torque/economy/etc than earlier designs that were heavily reliant on a tuned 4-2-1 system. Direct Injection Era Then Direct Injection comes along, which was another technology that just tipped everything on it's head like VVT or EFI did. D.I caused a renaissance for the long abandoned variable intake geometry designs. As to get stratified charge working at low rpm, there needs to be lots of swirl in the chamber. Which you cant do with a 4 valve head and the huge valve area. Now the 80s style TVIS block off plates are back in vogue. Total intake port area can be huge, because it gets cut back in half by the TVIS type systems when needed. Based on the above I dont think there's any hard and fast rules around what works, because everythings works or does not work within the constraints of the surrounding tech level of the engine. As a motor can be highly dependent on a tuned exhaust manifold, or, not. (carb era engines, or late high comp EFI engines) Or highly dependent on airspeed, or not (carb era engines, or DI engines, but not anything else in between)7 points
-
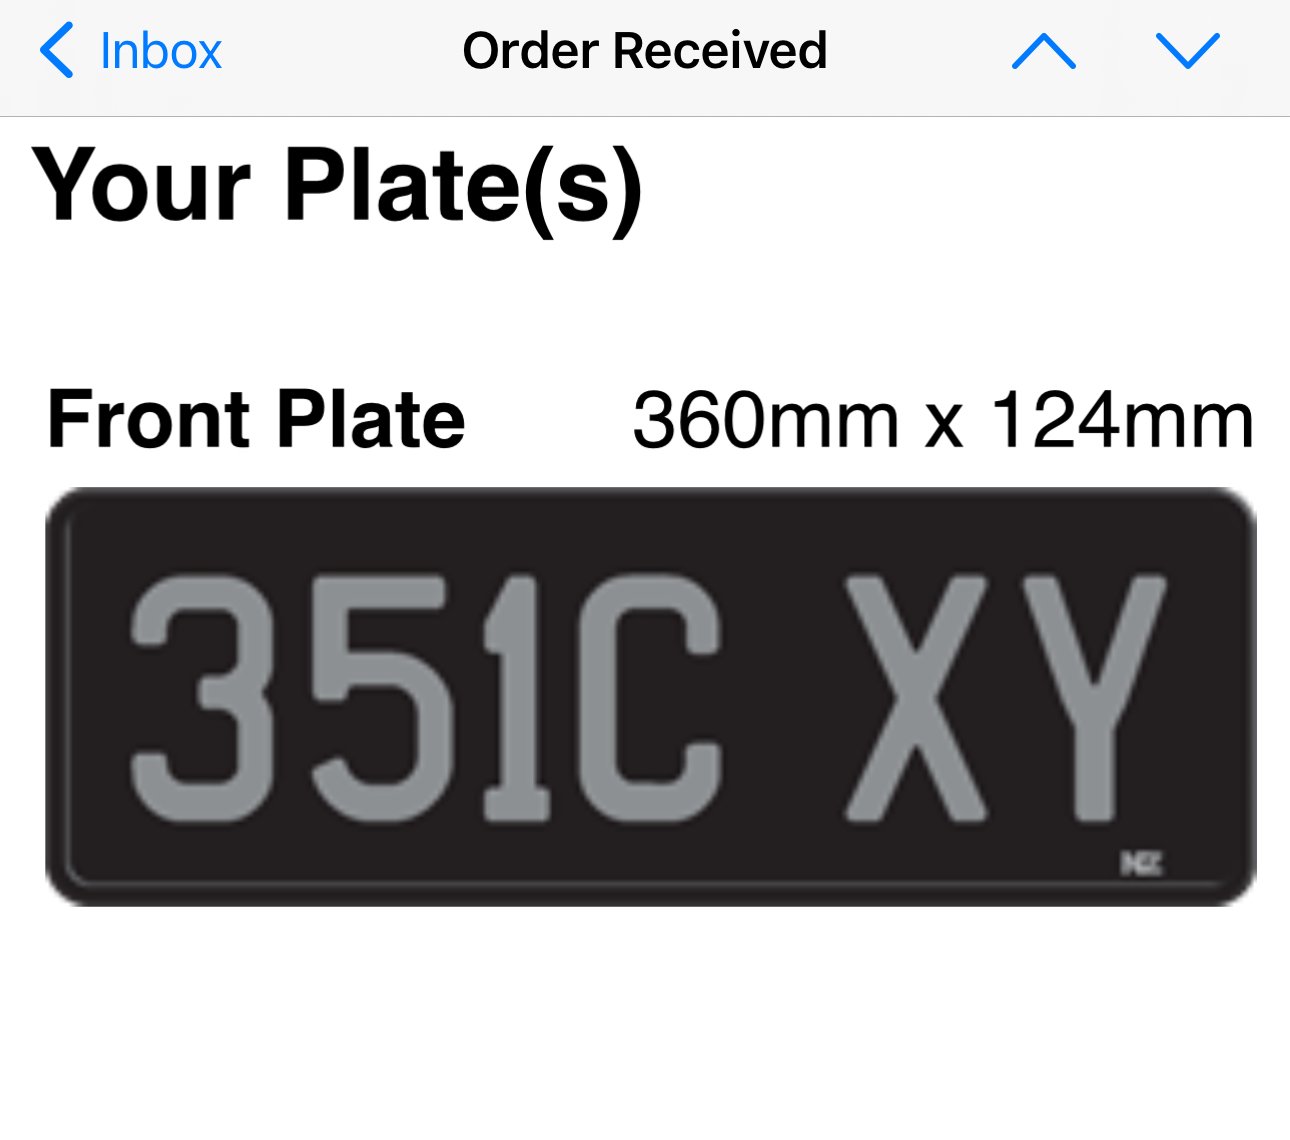
Last day TOMORROW to order personalised plates in black with silver. police and traffic cameras find it hard to detect the details on occasions therefore they care stopping orders as of tomorrow. SOLD. $649 for 3 number 3 letter combination…. I can’t believe it was available 351C XY Fill ya boots - $199 to remake any personalised plate to black silver if some before 31/11/24.
6 points
-
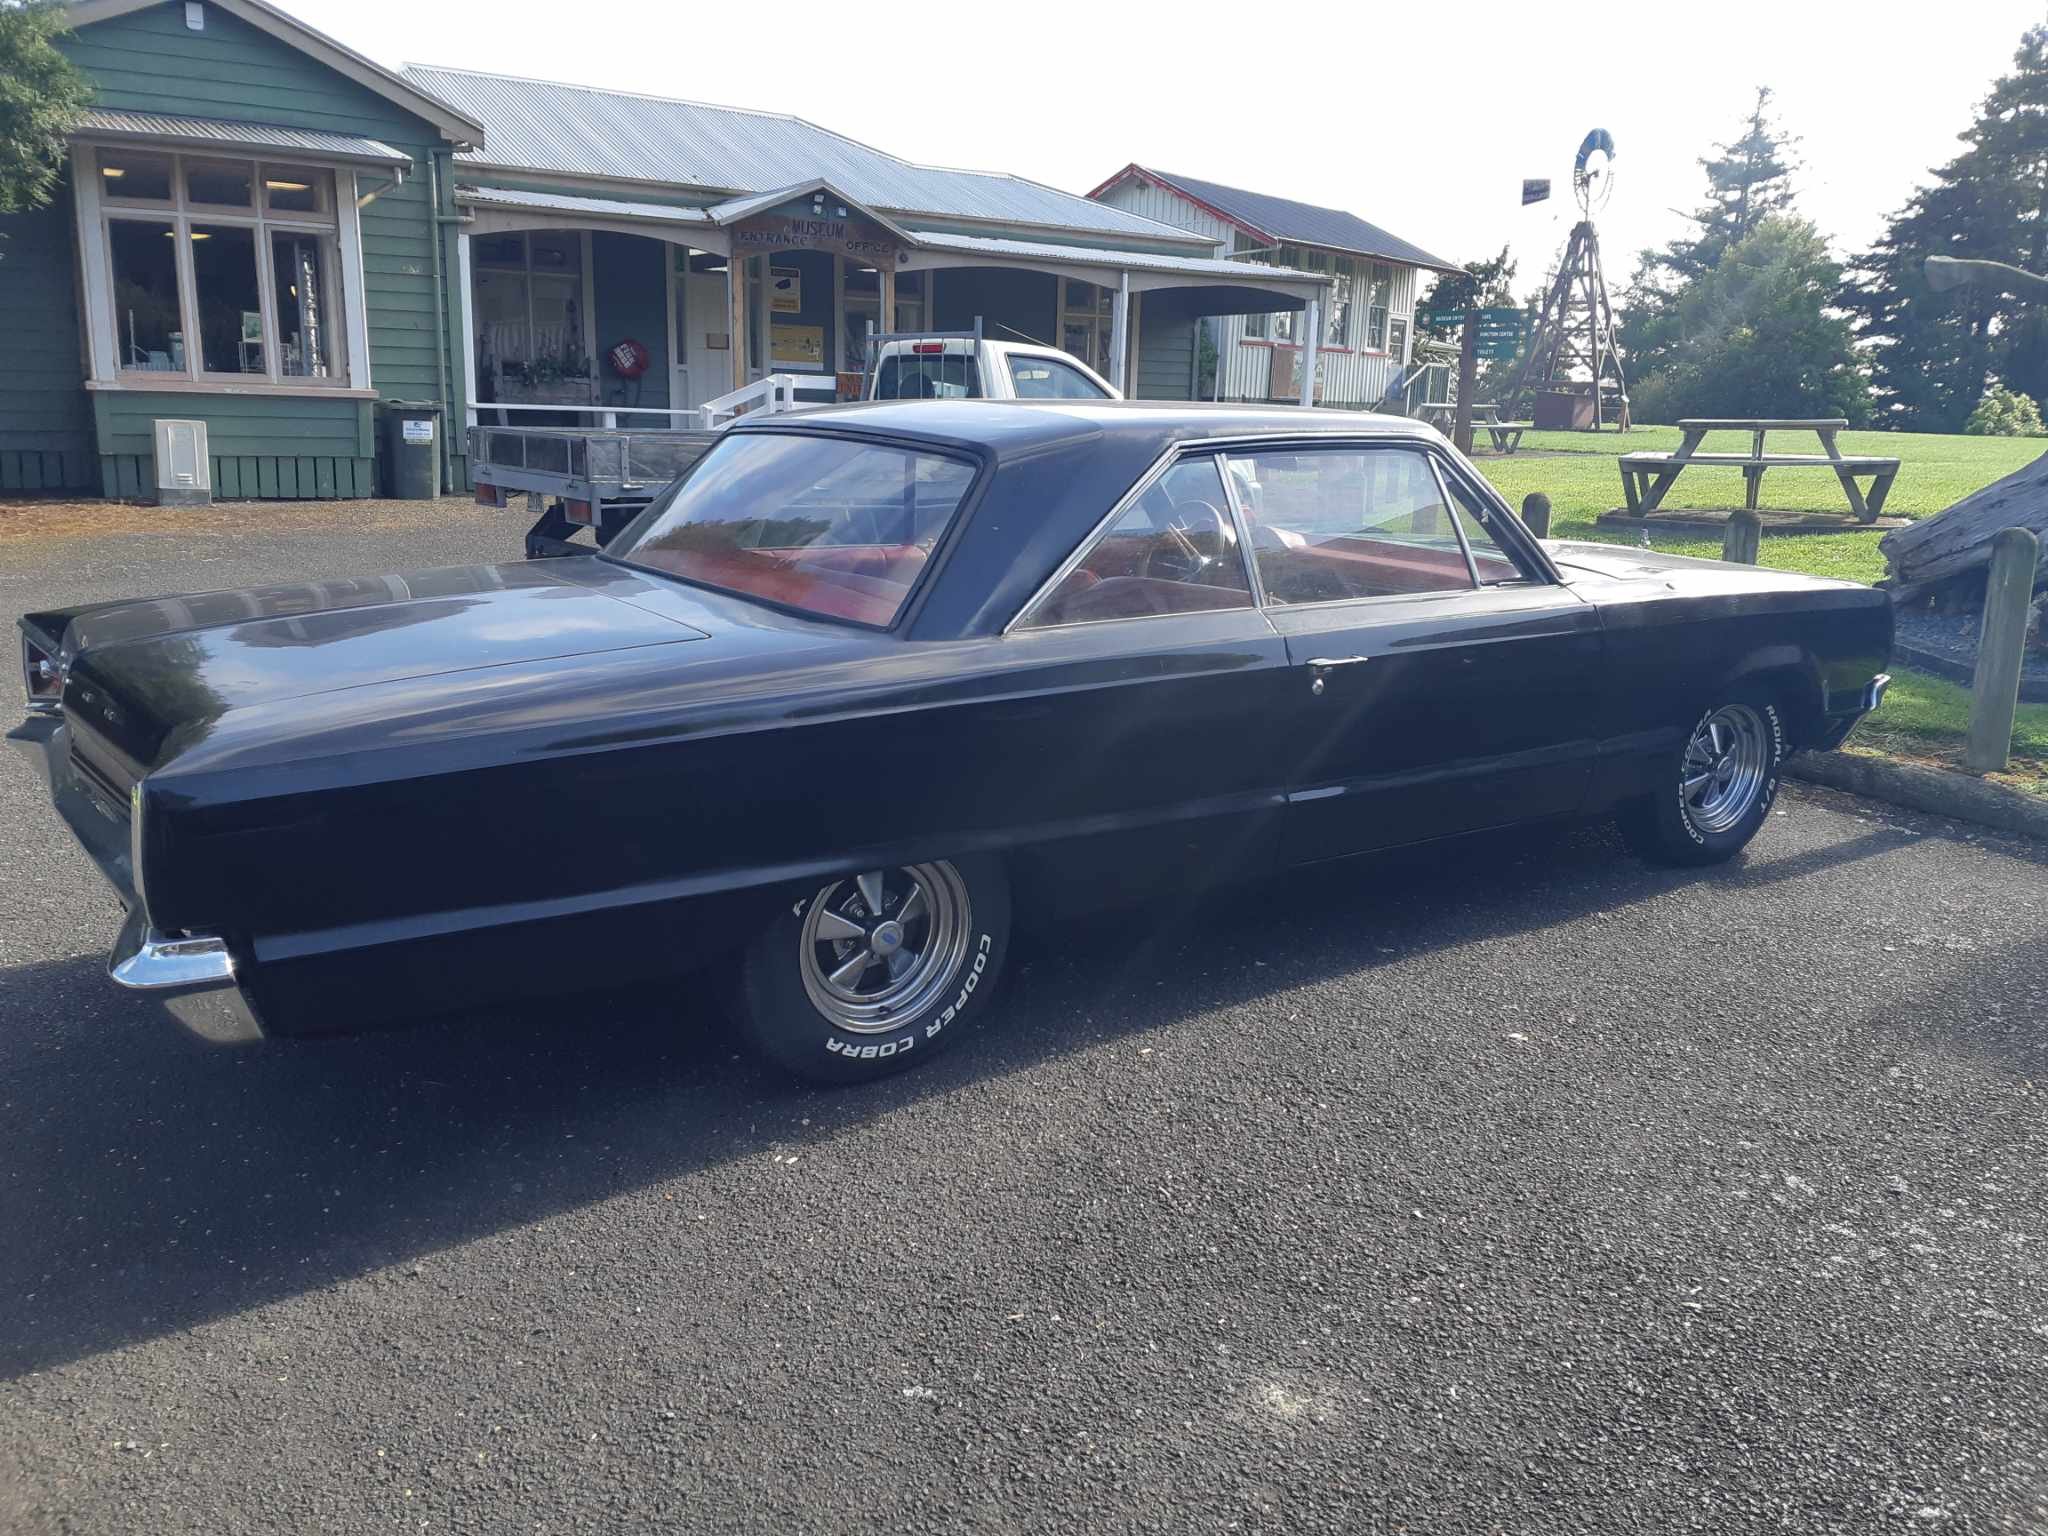
Over the long weekend I took the Firebird to Napier with a bunch of other American car owners. My son took our 1990 Corvette. The Firebird did really well. In the nearly 29 years I have had it this is the longest trip it has ever done, total was about 1200 km over the 4 days we were away. Over the time the stuff settled down, the brakes feel better, more to do with all the crap being burnt off the rear brake shoes than anything else and the gearbox is shifting much better. I have a list of things that need looking at, clutch needs slight adjustment, brake light switch keeps working loose and leaving the brake lights on, the drives seat is bent (always been like that) and gets uncomfortable and the 2 really annoying things, an oil leak on to the headers an both tail pipes hitting the diff and the back springs. I worked out the cars does somewhere between 12 and 13 litres per 100, the corvette looks like it does 9. I'm pretty happy with the economy, even with EFI its still a 60 year old design with pretty low compression. Just as an aside, the Corvette used to do about 10/100 before a set of headers and a full twin exhaust. The increase in torque was very noticeable, I certainly didn't expect the economy to get better as well. There is probably more in it, I know my son was giving it the Welly every chance he could.6 points
-
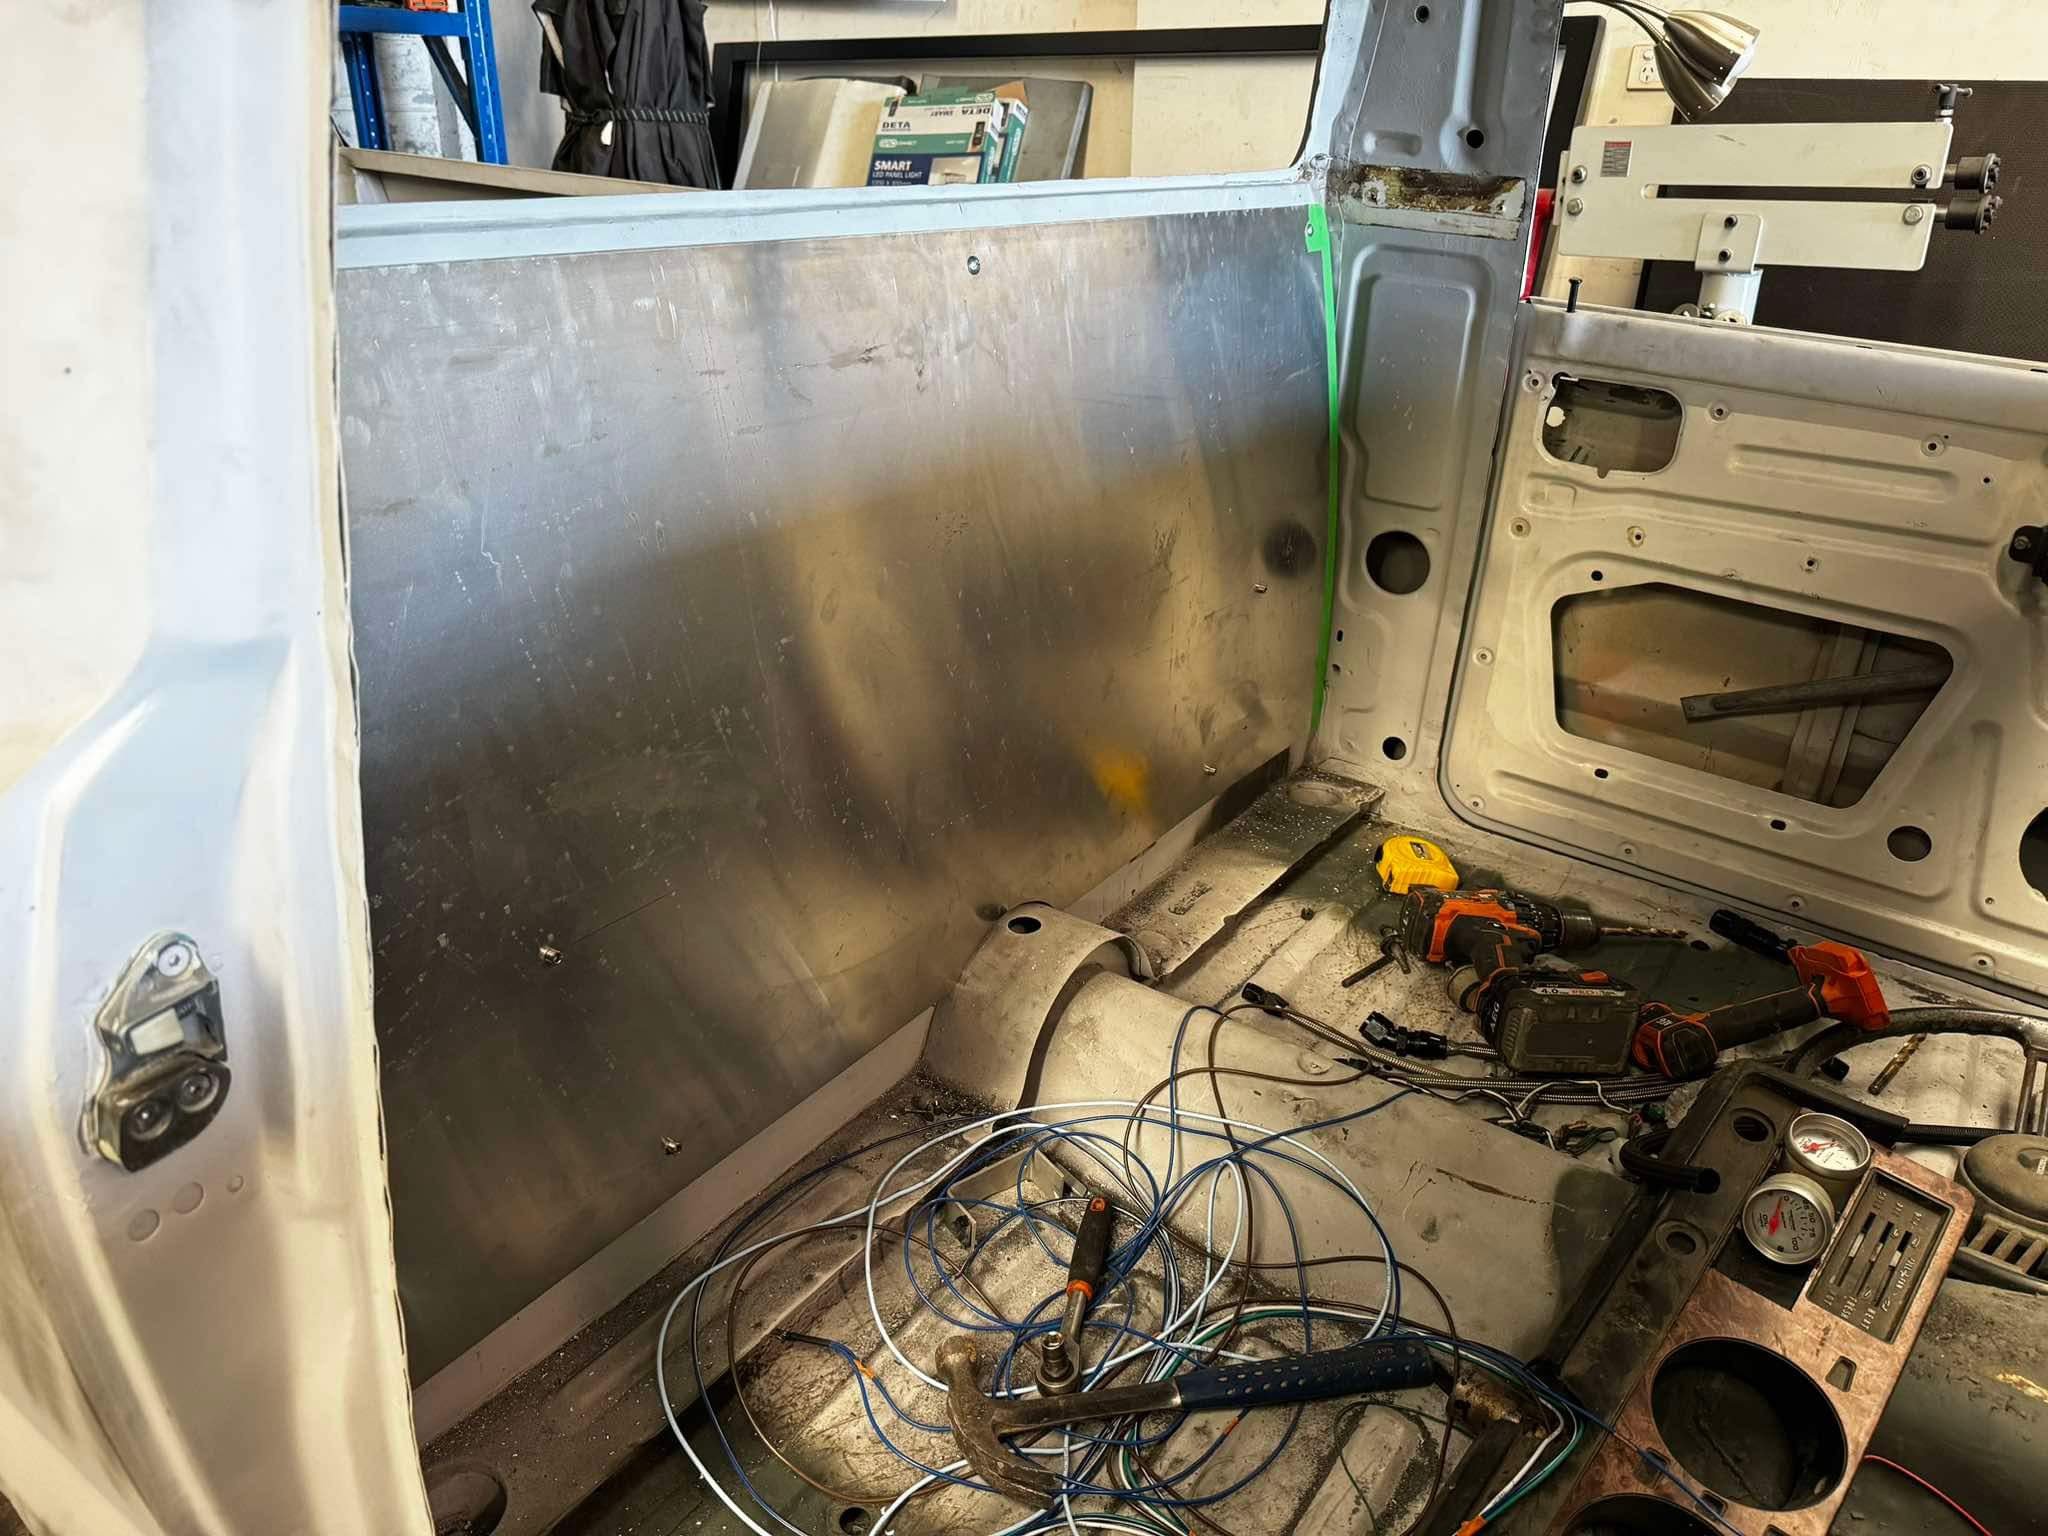
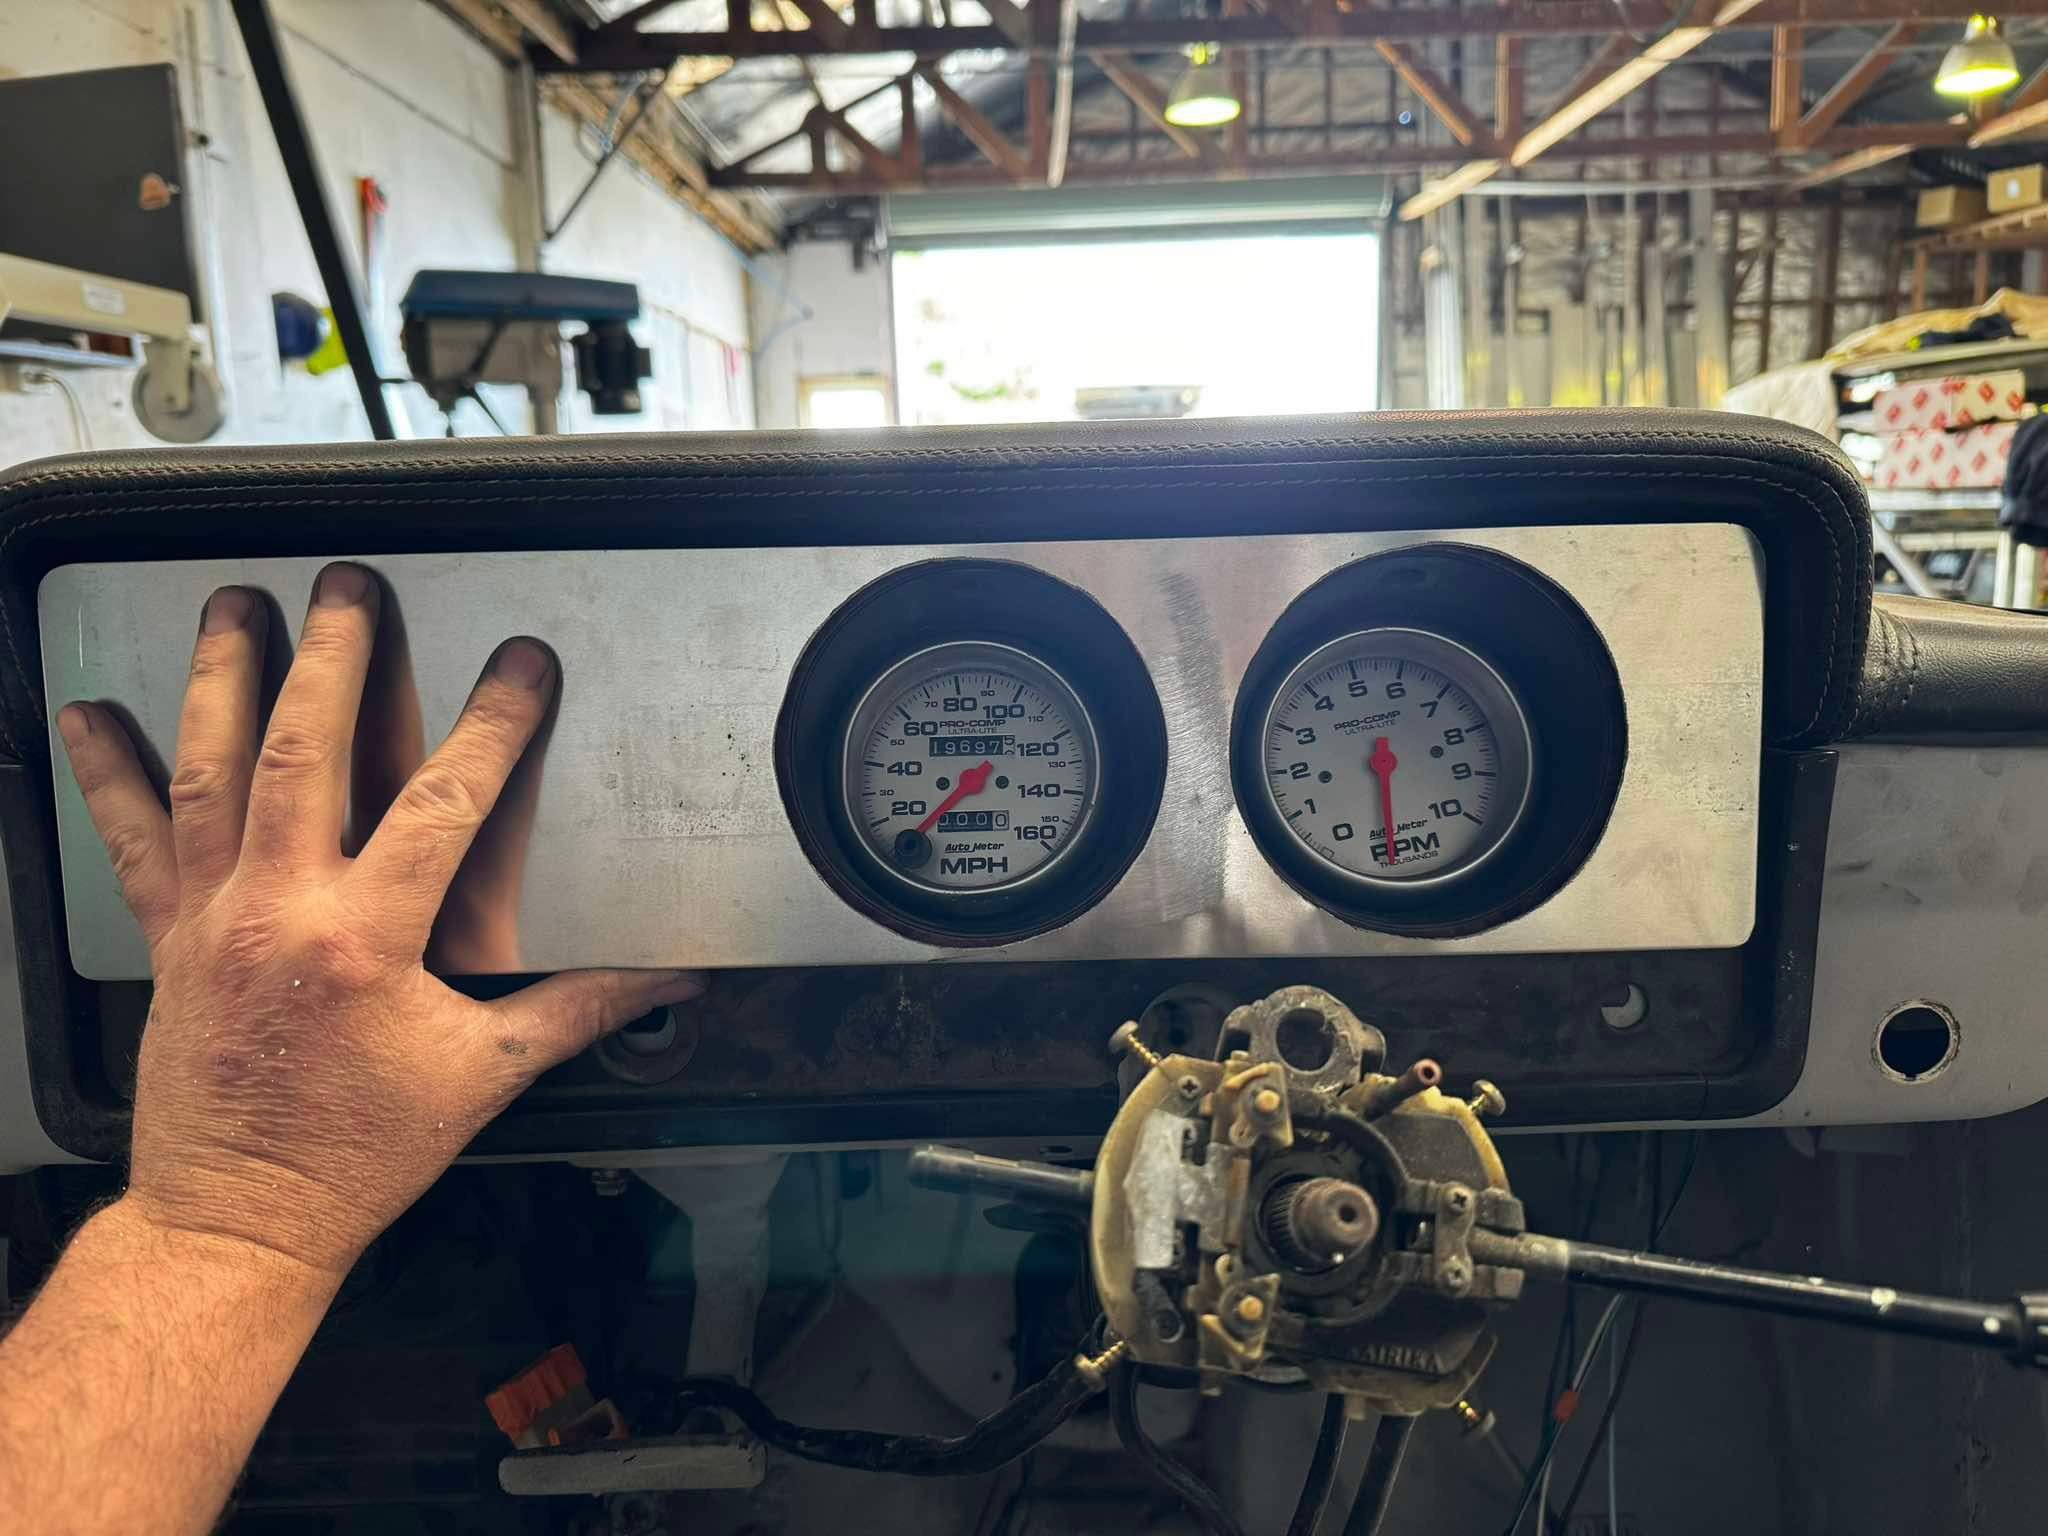
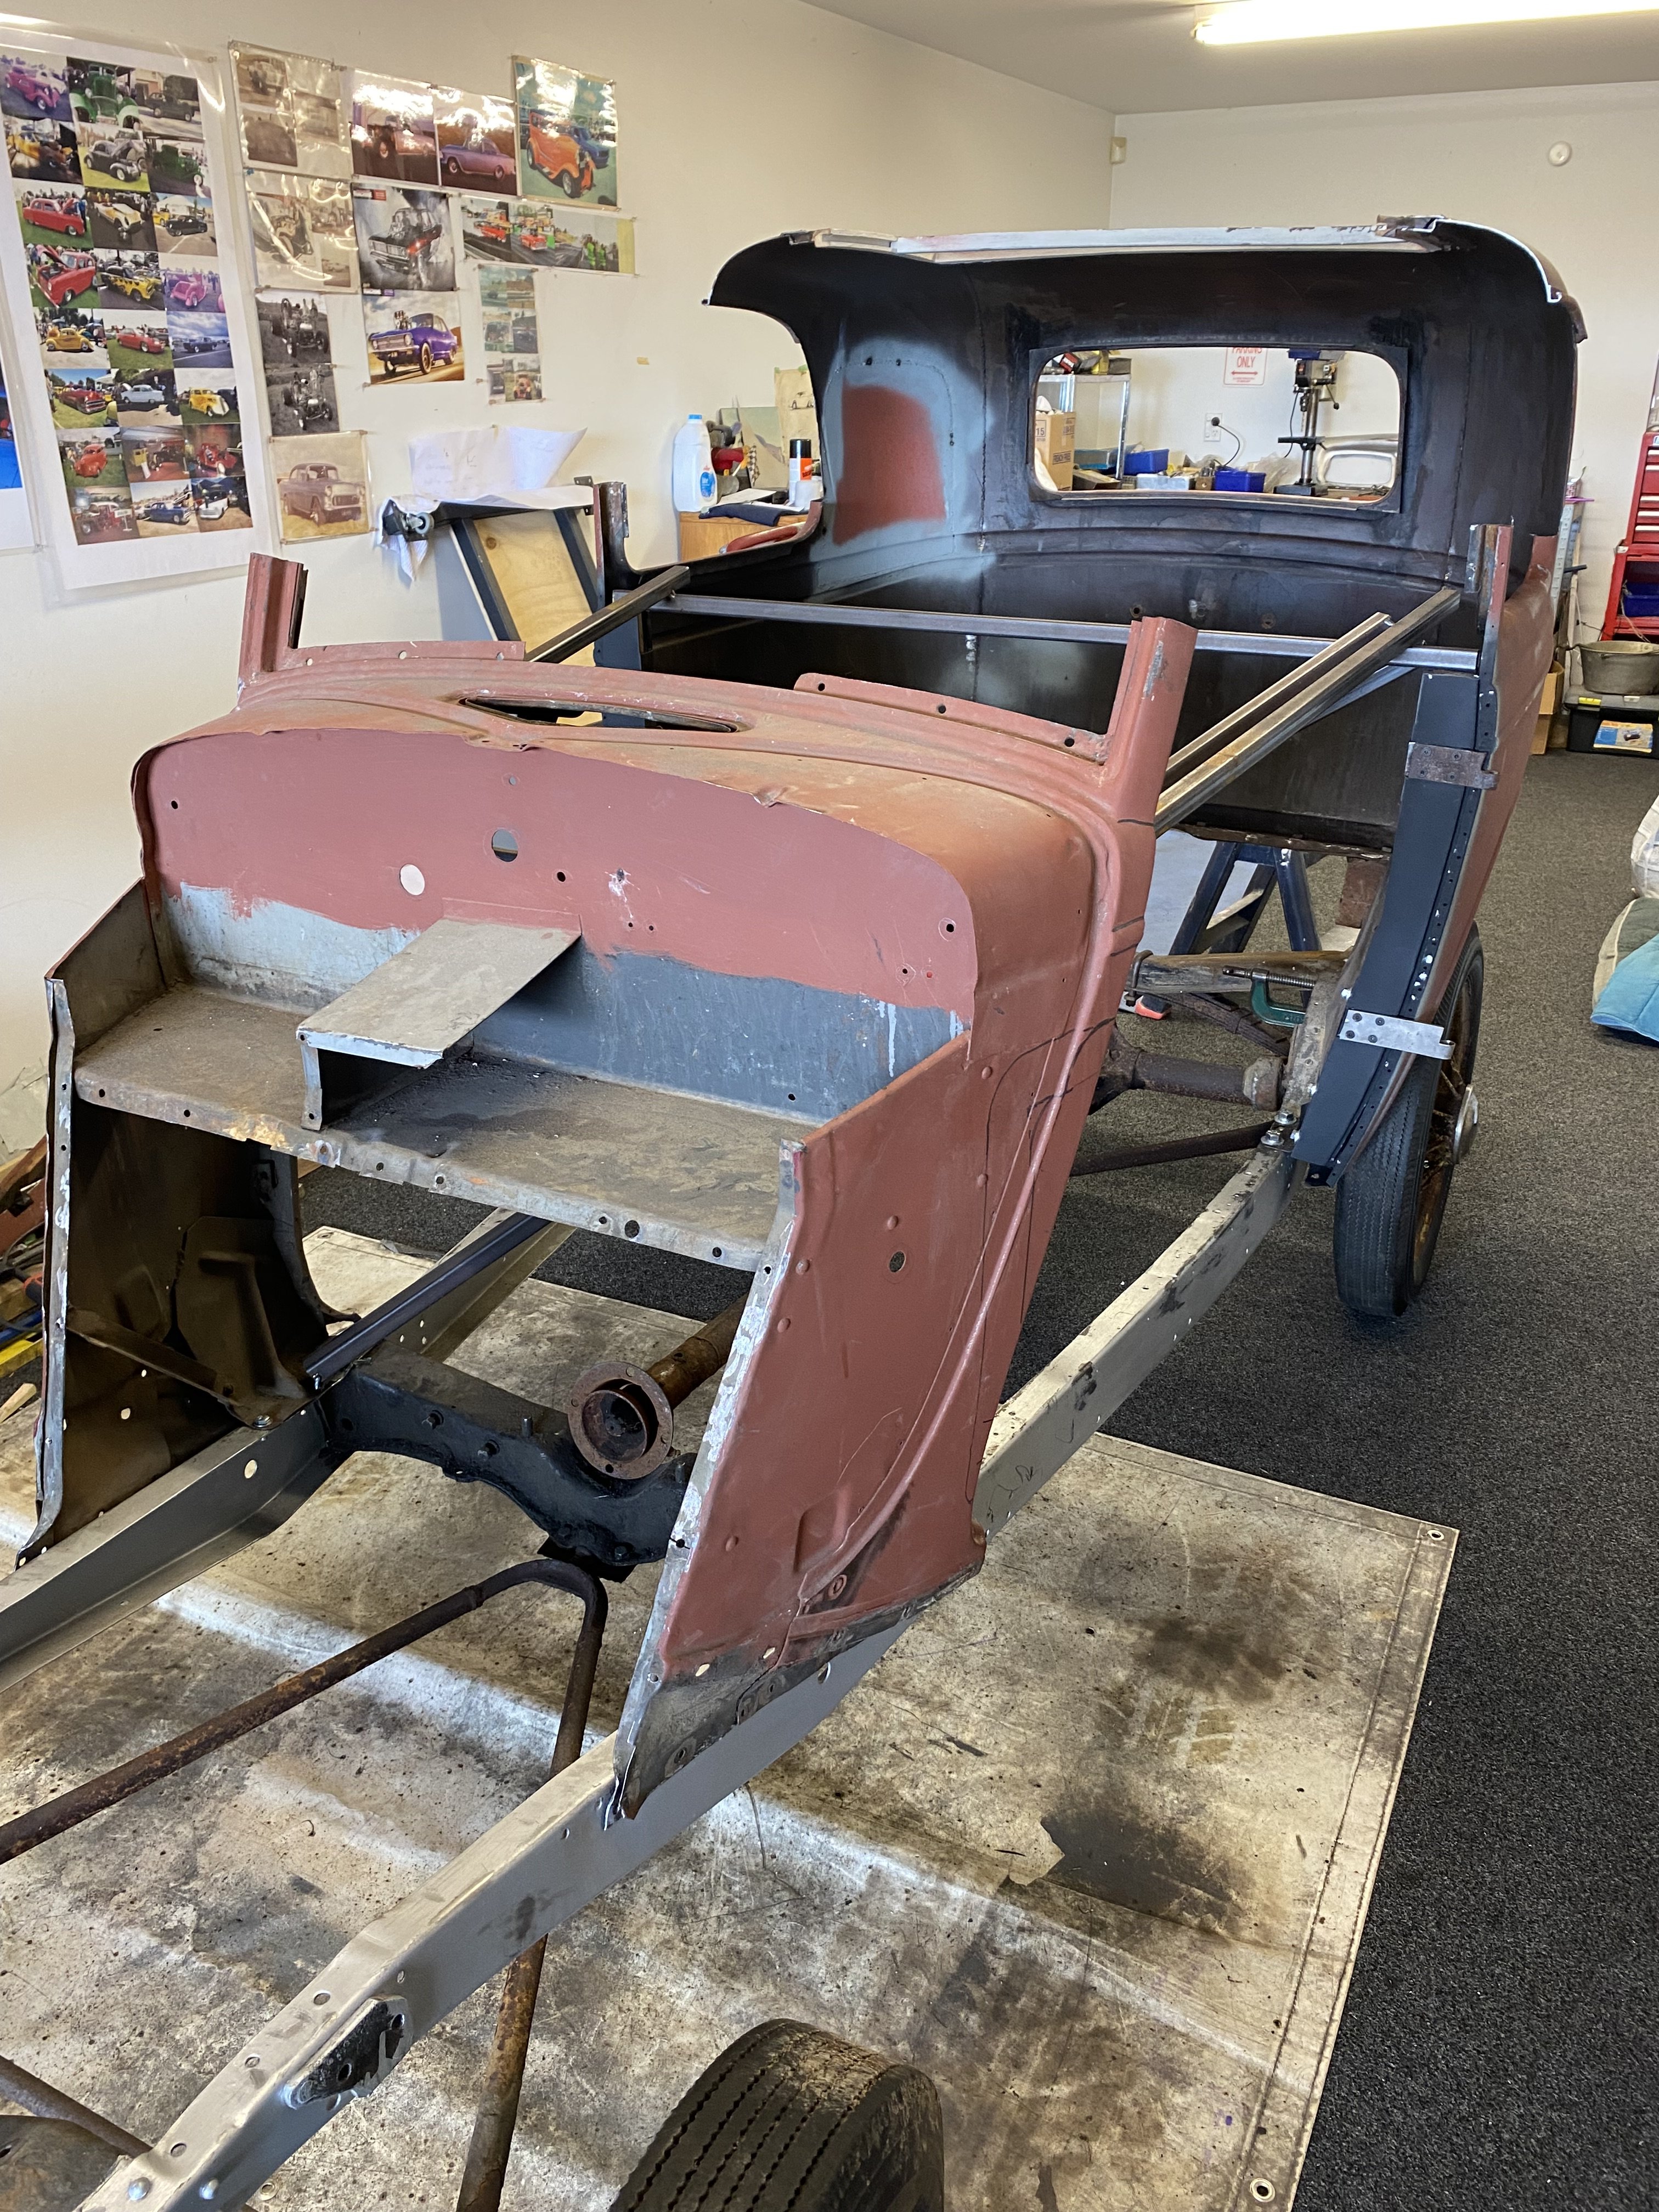
I started playing with the lightning spaghetti, I hate it. I despise electrical work. so I gave up for now. but today I had some alloy sheet laying round so decided to make a rear cab panel so that it’s flat and can be easily upholstered. I will also mount the fuse panel and other electrical bs on this behind the passengers seat. then I made a face plate for the dash cluster to bond to the original. This will allow for the triple 2” gauges to fit better than hot glue and mangled plastic. this will only be a temporary solution as I’ll probably change the dash set up later on once it’s in the road. now I’ve been having all the drama trying to find someone to paint it and some minor finishing (one body line needs a bit of fine tuning and a couple of gaps sorted.).
5 points
-
Ahhh yeah I agree 100% ! The things that need to be taken into consideration at an OEM level are insane. And all of the constraints applied, and then trying to make it a sellable product with a warranty that lasts 100s of thousands of kilometers. We're lucky as DIY tinkerers to have the freedom to do whatever the hell we want. I guess the point I was trying to make, is that "old info" on the internet has a loooooonnnnggggggg lifespan. And that generalizations about port size and so on, are only relevant metrics compared to other similar engines. The graphs that @BiTurbo228 posted are really interesting because they show what a huge variation there is on what some people might consider to be a hard and fast rule. For example, some testing that David Vizard might have done in the 70s or 80s, about optimizing a 2 valve carb motor. Studied port sizes, ratios, runner lengths, and so on. This information is absolutely 100% valid, in that context. So for example, for that motor having good air speed is absolutely critical. Or you're getting fuel puddling in the engine. But then on some EFI engines some dyno testing shows that runner diameter just isnt a critical factor anymore. Going too big has virtually no downsides, and going too small absolutely kills it. (or whatever) Yet some people will spend $$$$$ on an EFI motor and choke the hell out of it with tiny throttles or whatever. Because they've applied irrelevant generalizations to their particular engine. I've seen enough formulas, theories, etc absolutely fall on their face when it comes to emperical testing. That apart from following some very loose rules about how things should be (no super sharp edges on inlet runners) I think it all just comes down to testing testing testing. Some people pick a formula, decide that's the best possible thing, then test it and just accept the results good or bad. Rather than testing more iterations to validate their concepts. So thats why I'm itching to get to that point, this current part sucks and I apologize to everyone who's been reading my drivel this long without seeing any interesting results for better or worse yet. Hopefully though I'm close to the finish start line5 points
-
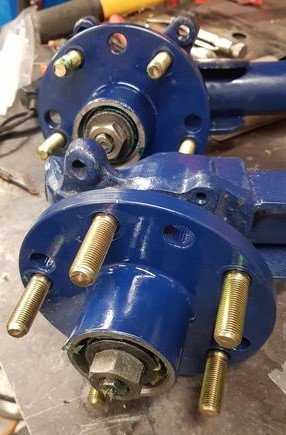
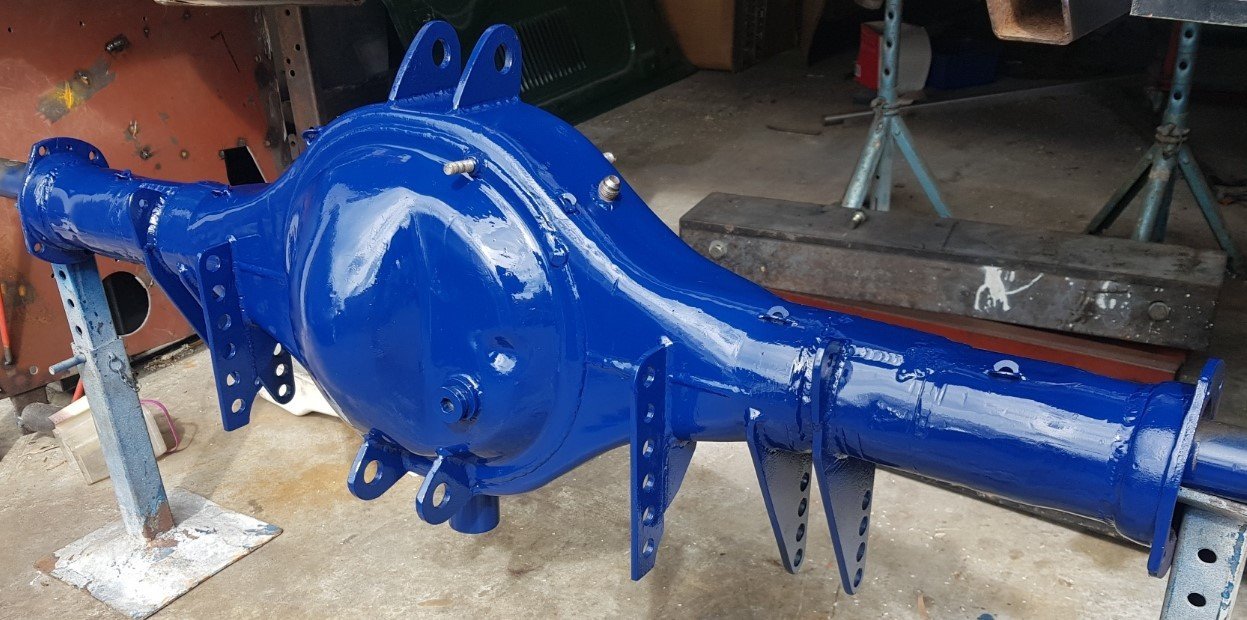
Time for some more paint to be splashed about! Front hubs are now painted and fitted with their larger-than-standard taper-roller bearings: and after adding a couple more tabs just in case I ever fit wheely bars, the back axle casing:
5 points
-
Just pulled the trigger on a xcel arc viper 185 from supercheap's 20% off sale. Will report back with a review once i've pumped out some bird poop.5 points
-
Right, made a start on the resurrection of this crustacean. Moved lots of shit so I could get it out of the shed. Shes a bit dusty/*BARN FIND JOKE* It still thinks it was made in England unfortunately. I decided to remove the race harness as I doubt I'll use it anytime soon, and some inspectors don't like it in there at WOF time, and this is when I discovered another weeee job that needs doing. The right rear seat mount (on the drivers seat) is not happy, and the seat rail is also not impressed. This was starting to happen 11 years ago when I was putting the car back together, so welded up the cracks and added a big washer to disperse the load. After pulling the seat out, I now know its much worse than before. Now before you point fingers and exclaim "what a fat cunt" i'd just like to point out that I'm not just a fat cunt, but also a 6'4" tall fat cunt, so I have to have the seat full back, and when its full back, the rear mounts are near on half way along the seat. So the majority of my fat cuntness is right on top of or behind the mount, less than ideal. Finger indicating location of rear mount. Not much I can do about this, other than make a beefy replacement mount, and reinforce the rail I guess. The other mounts are all fine. Anyways, got the old girl going (started perfectly) but the gas is very off, so will drain that and replenish. Gave it a good wash, which reminded me of all its other haggardness, but meh, just needs a WOF, not trying to win no sho'n'shine. Removed everything needed to start cutting the windscreen out, most of it came out OK, but the top window trim was a COMPLETE BASTARD to get off, due to me gluing it on with a litre of window sealant years ago after it blew off. Got my first peeks at the rust. Started on the cut out procedure, haven't cut a screen out for like 20+ years, but I managed to do it myself without rooting anything. Don't ask where the cutting wire came from. Check out my pro cutting handles though. Screen gone-burgers. Little rusty bitches. Two main spots, and lots of little bits around the place, next I'll get the buff cup out and go to town, trying not to destroy any interior. Regards, V "I regret not selling this at the hight of retarded covid pricing" G.5 points
-
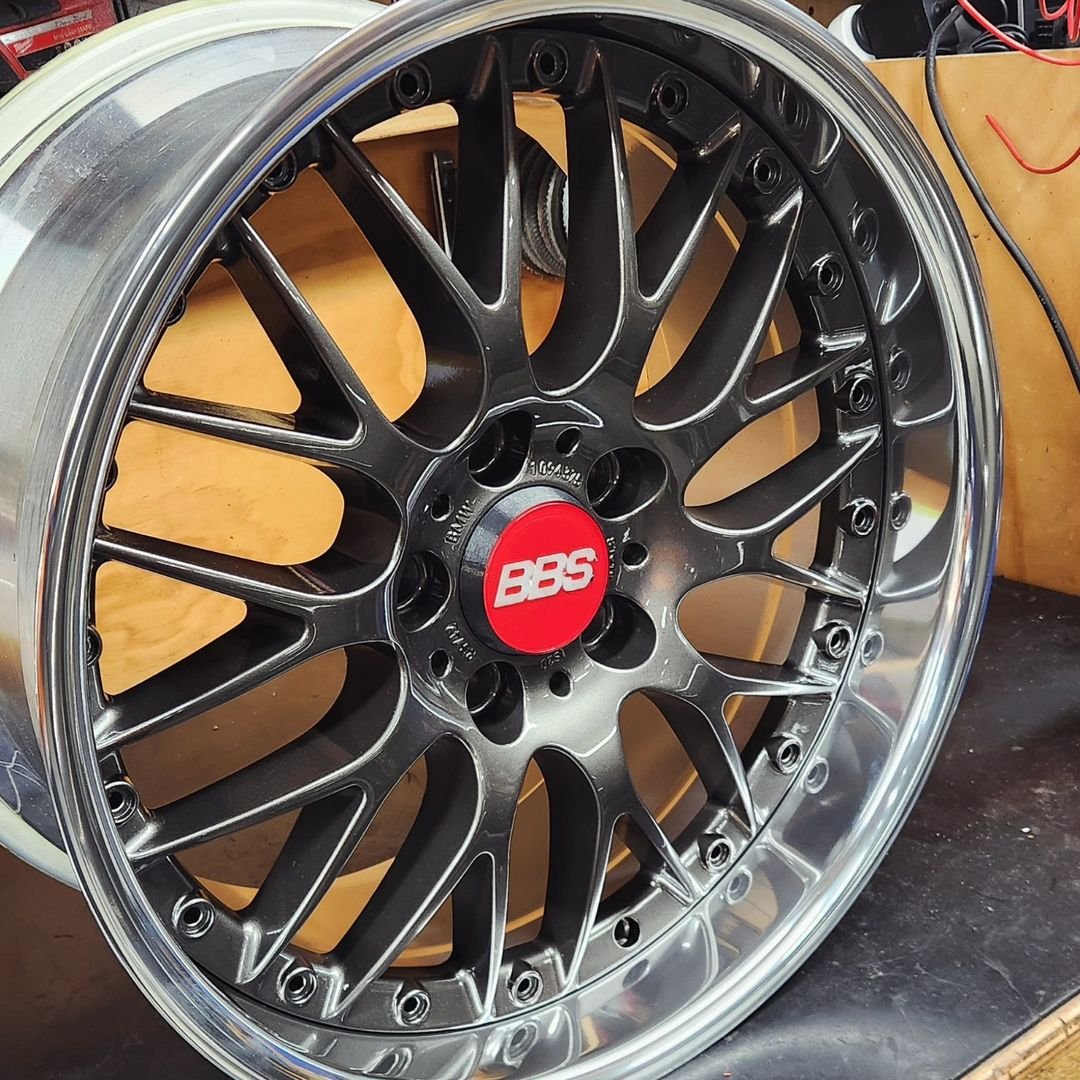
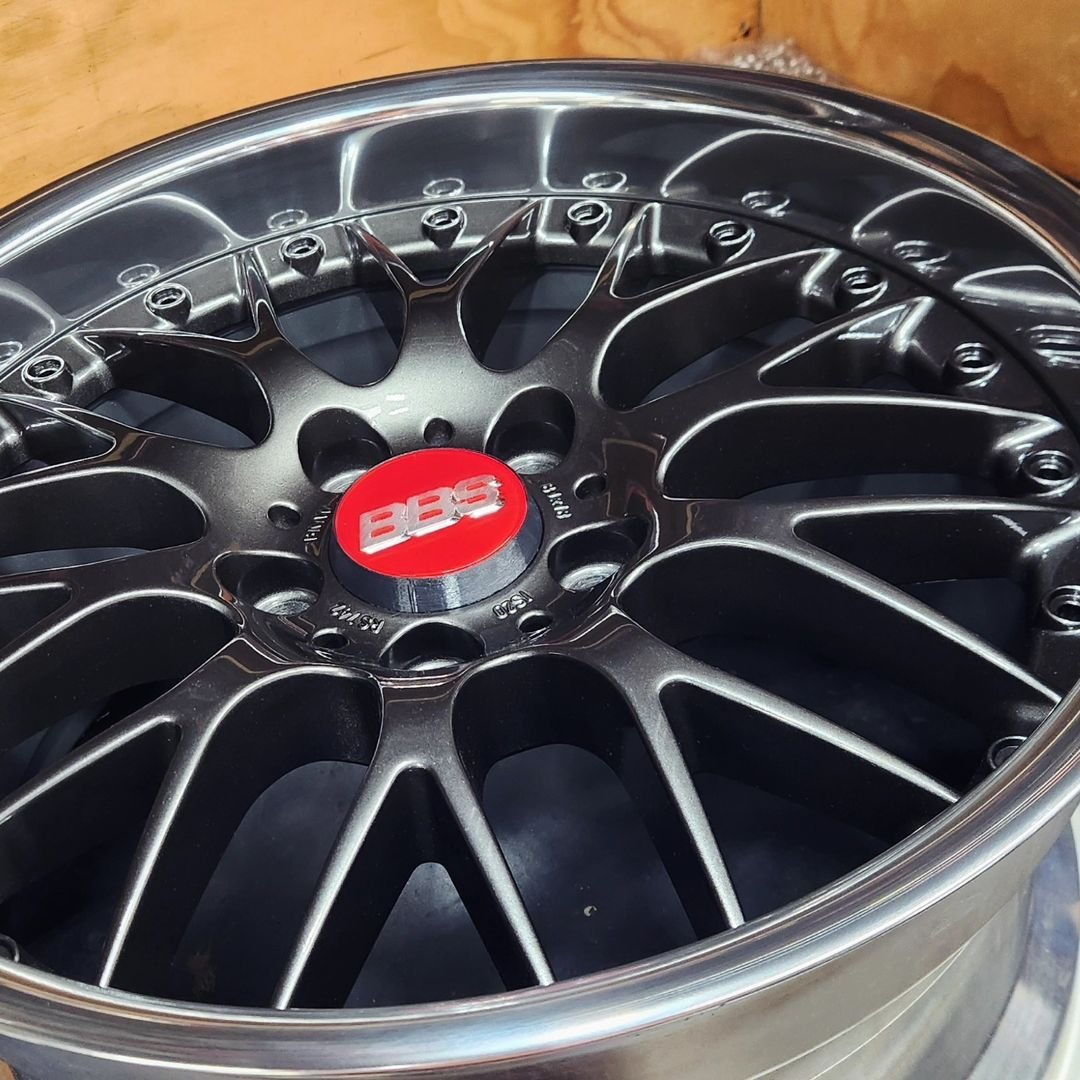
Wheels have been making progress, painters has sorted the centers in a custom mix gunmetal with silver on the inner barrels, & RKM sorted polishing the outer lips looking sharp now, just gotta finish polishing bolts to assemble them
4 points
-
Worth getting for the hoard I reckon.4 points
-
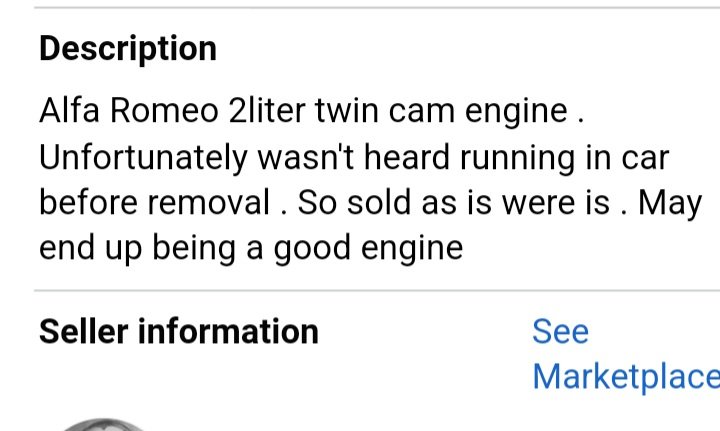
Are there any resident Alfa foamers on here that can offer words of warning or encouragement toward a twin cam? There's one on marketplace which looks cheap at 800, the dellortos would be nearly worth that surely? From a quick google it could be from a 1984 Guiletta? It looks complete from the pics. Main concerns are what are the weak points on these motors, any inherent flaws? Are there any modern gearbox options? Should i just walk away? Plans would be to fit this to an escort sometime 35yrs from now when I get round to that project.
4 points
-
How can a man own the most cherished sports car, without first owning the least cherished sports car? Be the Alpha and the Omega, tomble-san [TAOIST NOISES INTENSIFY]4 points
-
Edited for truth3 points
-
new mods get checked to the rules of now old mods get a quick check to make sure they are safe and were done correctly the first time3 points
-
Dodge goes in for its first wof in my ownership friday, thought i'd get the new outer tie rods on. In the past i'd always done these with a jack and a hammer to separate the joint. This time I was armed with an aliexpress balljoint separator, the wind up sort - amazing, should have got one years ago. I spent a bit of time measuring and remeasuring to try and avoid the need for an alignment and I reckon i've got it pretty bang on, certainly good enough for a car which will be lucky to see 1000km a year. While I was at it I greased and cleaned up all the joints in the front end, couple of zerks were broken or blocked so luckily I had a box of aliexpress imperial zerks handy. I think I am going to start hunting for a 4 barrel manifold now, upgrading from a carb that looks like it should be on a lawnmower ought to really wake the car up.
3 points
-
It'll come as no surprise that I've paid for a lot of alignments in my time, and as on most cars they can only really adjust toe, it began to irk me how little value I got for my money. With that in mind, there is one thing I have wanted to try for a long time but never really been bothered to do, as it seemed like too much work. A DIY string alignment. I will say off the bat, I know it won't be as accurate as frickin lasers on a machine worth tens of thousands of dollars, and adjusting the toe without a hoist is a pain, but for the cost of... almost free, it's good enough. I had done a lot of research and even considered spending the money on a pair of nice toe plates that you use with a pair of tape measures to check if the wheels are toed in or out, but the idea that it couldn't identify if the wheels were "straight" but actually both pointed off to the same direction, didn't sit well with me. And then I found this guy's video online, and it seemed just easy enough that even I could make a string alignment work The basic theory is that you run a pair of string lines down the sides of the car. With certain measurements, you make the string lines parallel and then measure the distance of the front and rear edges of the wheels against the string to check toe. This method will only do toe, but that's all I need to measure. Having just done work on the steering of the Marina, and it being decades since it's probably seen anything resembling an alignment, I wanted to check it before I went too far on the road again. Years ago I marked the steering column before removing the steering wheel, and when I last refitted it I fitted it to the marks, which meant the wheel was off center for whatever reason (maybe wasn't straight in the first place). I fixed this by just moving the wheel a few splines over, and it was close enough. Before checking the alignment now, I foolishly moved the steering wheel back to the marks, thinking it would be a good idea. In an ideal world, you would center the rack, center the steering wheel and then do the alignment, but I don't have a centering hole in the rack as the UK cars do, and I didn't want to have to measure tie rods, so this is close enough. I fired the car up, and using its freshly rebuilt clutch slave, moved it back up and down the driveway a few times to settle the suspension. Before setting up, always roll the car forward, not backwards, as this can impact the alignment settings. Next, I checked and set all the tire pressures to the same 28-29psi Then I set up the string lines on my four axle stands. Almost immediately I noted that the string I was using wasn't right, it was too thick and "fluffy", you really need something like fishing line for this, so it's thin and accurate. Regardless, all I needed was a ballpark figure, so I pushed on. I pulled the string quite tight by rotating the axle stand The first hurdle for me was that I don't have center caps, just a big gaping hole. That makes it a bit harder to measure from the center, so after a few tries of different things, to set the string height I settled on my camber gauge with its top edge sitting at the center of the hub and the bubble flat. The height doesn't have to be 100% accurate, just close enough to the same for both wheels on that side. The string height is set by moving the center of the stand up and down for coarse adjustment, and then sliding the string up and down on the stand for fine adjustment. Next was to measure the distance from the center of the wheel to the string. You need to factor in the track width of the car with this, so that the strings are straight and not slightly tapering off, as the front and rear track are not usually the same. In the Marinas case, the track is 1333.5mm in the front, and slightly narrower 1331mm in the rear. I wanted the string to be 80mm from the rear wheels, so I measured that from just in front of the center bore, at the height of the string. Ignore the .45mm extra, it's really hard to be accurate when also taking a photo. Because the front is slightly wider, I needed to remove the extra width from my measurement, which is 2.5mm across both sides. Halve that, and you get 1.25mm per side. So I needed my string line to be 78.75mm from the wheel on the front. Moving the stands at the front and rear until I got those two measurements, on both sides of the car, and I finally had a pair of parallel strings. Not too hard! Now it was time to measure the toe. I used my calipers on the wheel lip to check the distance to the string line. Protip, make sure your wheel weights aren't in the way... Having checked both sides, I knew the rear was square as the front and rear measurements were the same (good test of my string lines), but being a solid axle I expected that. The fronts, well... The numbers were messing with my head a little, but from that I had 11mm of toe, but not in or out, they were pointing off to one side. They were pretty well parallel, but not straight. This is where the string line has an advantage over the toe plates, it can tell me the wheels are pointing off to the side but only had 1mm toe difference, the plates would tell me there was 1mm toe but not that they are pointing off to one side. This was due to me moving the steering wheel on the splines. Darn. I straightened the steering out so the wheels were more or less straight and then moved the steering wheel over on the splines to straighten that out. To settle the steering I had to push the car back and forth again, which meant the poor thing got its tail out in the rain. With the faint sounds of rust creeping in, I rolled the car forward and set up again. This time all I needed to do was set the string the pre-measured distance from the wheels again Round two was a lot better, this time it looks like I'm slightly pointing off to one side It appears I have about 1mm of toe in on one side, and I'm pointing off to one side still. I need to drive the car and see how centered the steering wheel is, I suspect it might need to go over one more spline, but since it hasn't really stopped raining, I won't be venturing out just yet. Once I have the steering wheel centered, and the car tracks straight, I'll get some fishing line, set up again and see how the actual toe is. The setting in the book is 1.6mm combined or 0.8mm per side toe in (wheels closer together at the front edge than the rear). Over all, the string method seems pretty good. It'll suck to have to actually adjust anything since any time you move the car, move the strings or make any changes you need to set things up again, but you can probably get fairly quick at it with some practice. I'll play with it more, on my other cars too, as a quick basic way to make sure the toe isn't wildly out before having someone check it properly on a machine (if needed). I wouldn't bother with a machine alignment on this Marina, since there are no more adjustments than toe, and this isn't a daily driver, as long as it's in the ballpark and drives straight, I'm happy. My daily, or track car, should really be checked properly for handling and tyre life reasons. I can definitely recommend giving it a go, it's a fun skill to learn and pretty low cost if you have some measurement tools, a set of four jack stands (or similar things to tie the string to on each corner), some fishing line and some time.3 points
-
If you're going to mate it to a conventional clutch and box,you'll need to machine the crank for a pilot bearing. But you'd pull it down anyway.2 points
-
Lot Of Trouble Usually Serious2 points
-
You should be able to unscrew the knurled end on the right, slide off the electromagnets, and pull/push the shuttle by hand. I can't remember if they have detents, it could take a bit of a push2 points
-
They're less awful than the Lotus TwinCam the escorts came with2 points
-
@BiTurbo228 that graph is so cool. Can you add a manual dual VVTi 3SGE Beams to the graph? Happy to get measurements if you need them.2 points
-
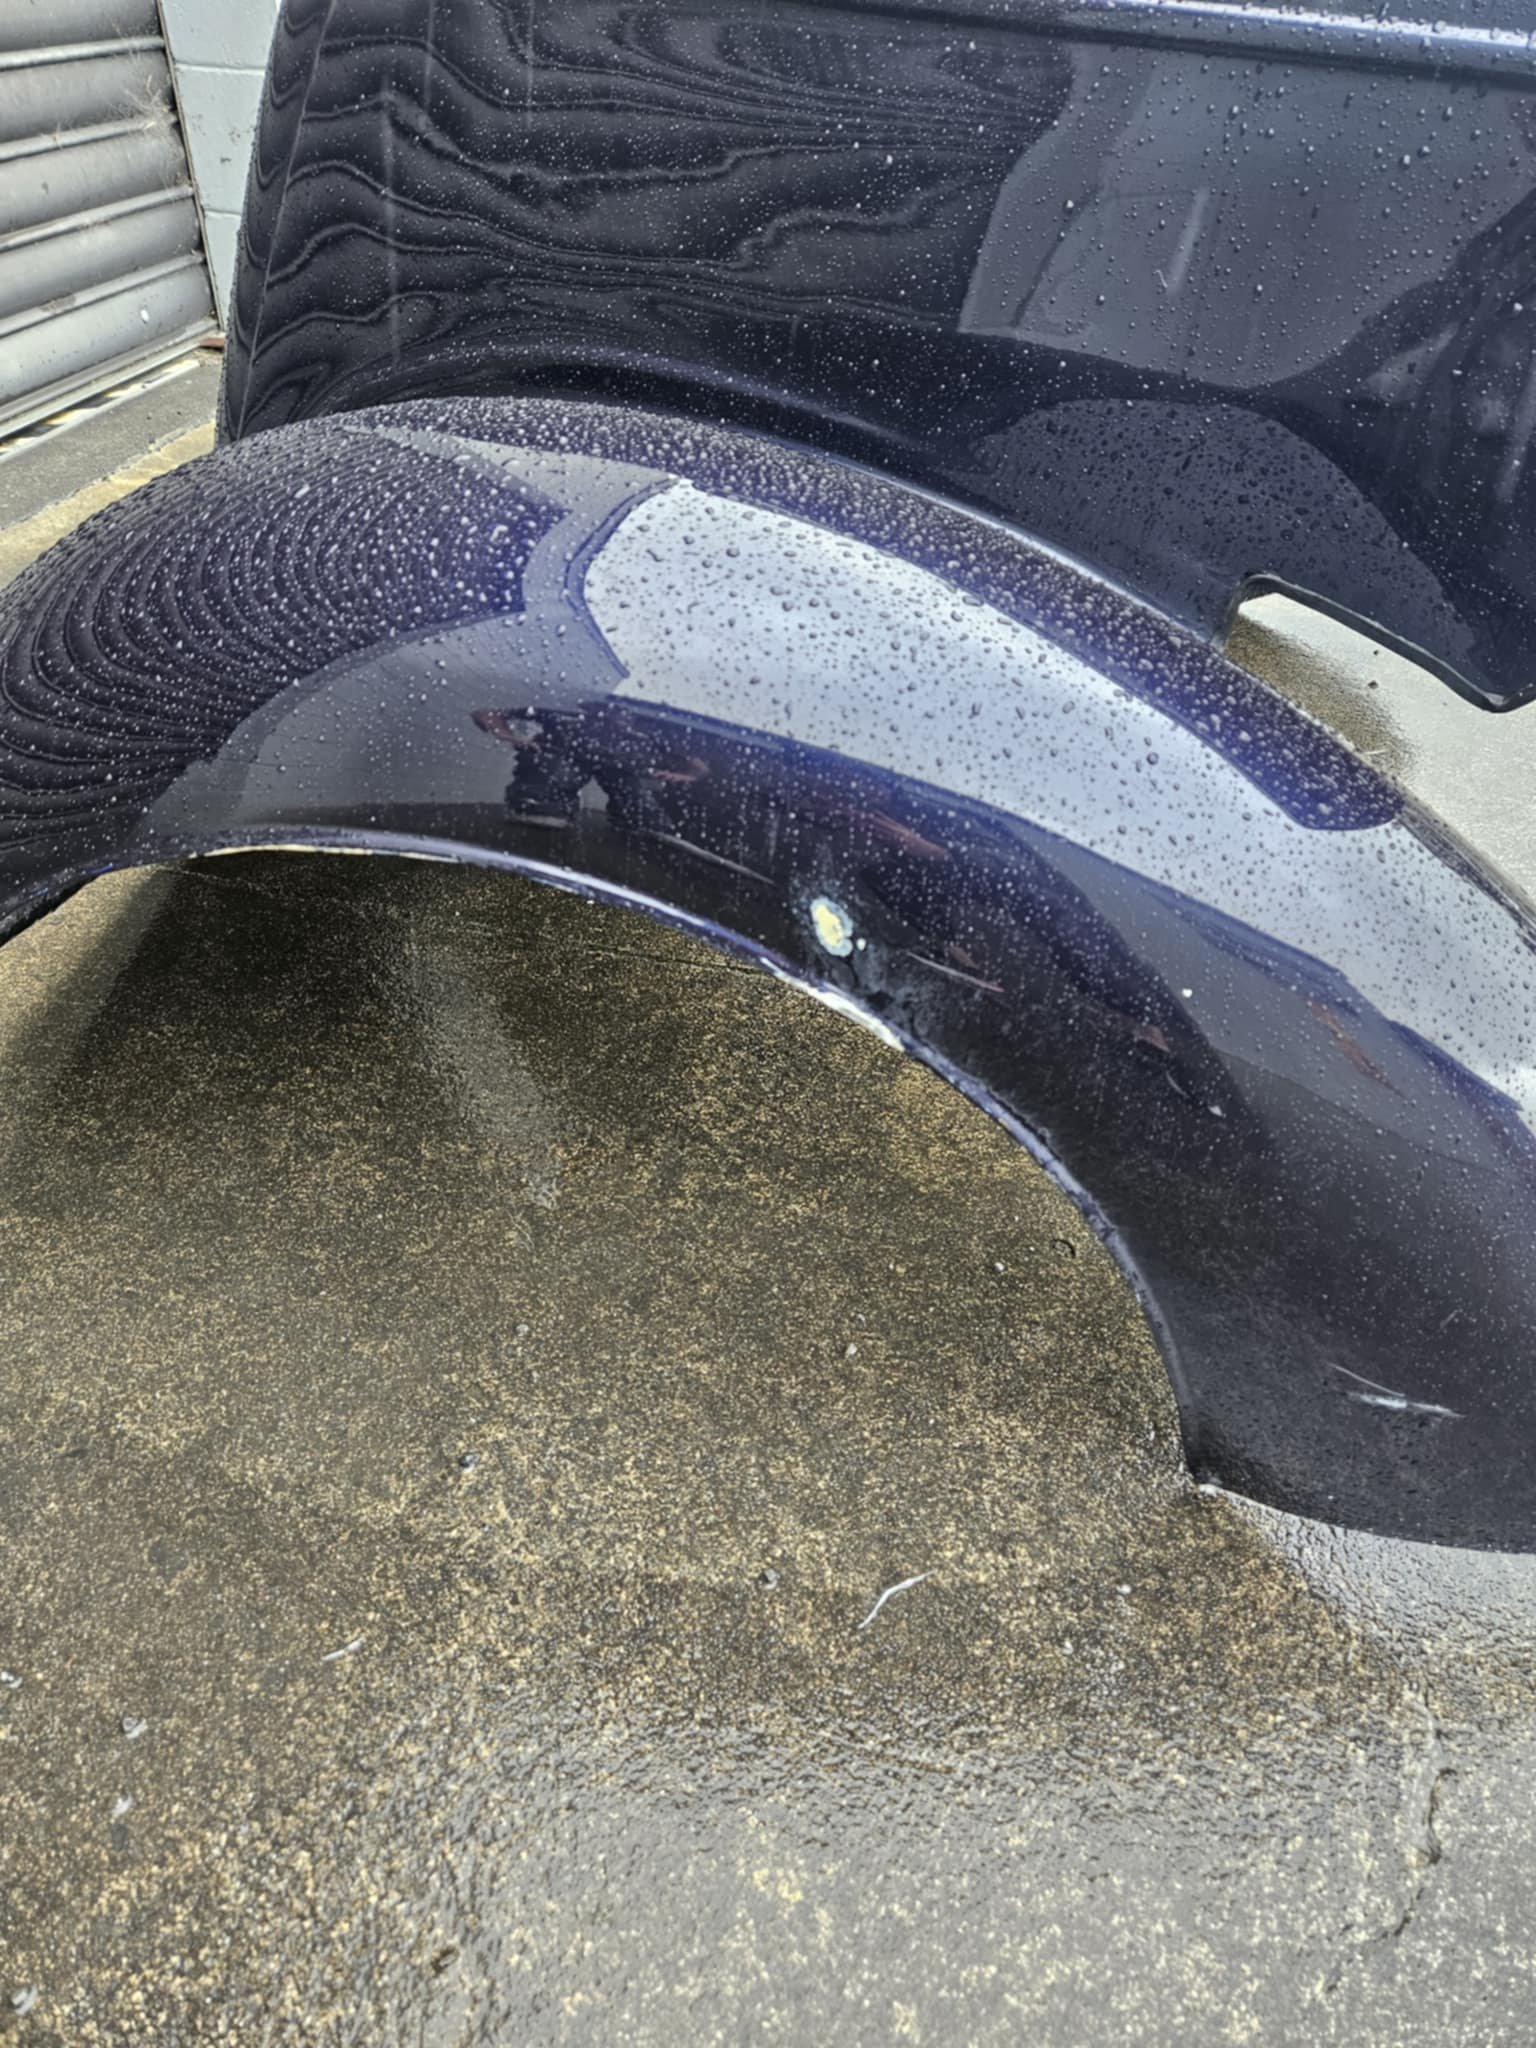
The wife offered to drop the front end of the pop off to the fibreglass workshop while I was at work. One of the straps broke on the trailer and the front end dragged on the ground without her realising. Lost about 3 inches off the back of the left side front guard. Lucky its going to a fibreglass place a lol
2 points
-
The CG13DE shares it's head with the CG10DE so it may have been compromised on that front, compared to the Suzuki G13 the head is much smaller (makes it easier to fit in a mini). The CG wasn't designed for power, it was only ever a shopping cart meant to be easy to drive, so awful inlet and exhaust manifolds, and very heavy flywheel. My cams are 274 duration so trying to have as long as possible to breathe through a small port? A comparison to a later CR10DE, CR12DE, CR14DE may tell a bit of what Nissan found they could do with VVTI, bore, stroke and compression ratio stayed much the same (9.5 vrs 9.8 - 10)2 points
-
Thanks, quite strange old cars - didn't sell very well from new I've been told. Designers told to go as distinctive as they like but maybe went a bit far for the market at the time. Anyway - I'll put a forum up about the Plymouth too in due course! Got the garage open just need to clear a wee bit more room to get some decent photos. Might be a weekend job.2 points
-
Awesome. I reckon they look so cool. Good luck with the restos2 points
-
Actually, have got one handy.
2 points
-
They came with a coupling to connect the crank to the driveshaft, and then on to a clutch/5-speed transaxle unit if from Giulietta/Alfetta/75. I can't see why the usual Fiat/Alfa parts bin shouldn't have everything you need to bung a conventional flywheel+clutch on it.2 points
-
I am keen to have a look and turn it over. Usual story, don't need it, kind of want it for wanker points saying I've got a twin cam escort, then have this in the bay. My main concern at this point is gearbox options. I dunno what they came with, how much they are to buy, how sturdy they are, if there's a more modern option to bolt up its a no Brainer. Old school cool carby twink with a nice smooth 5 speed behind it.2 points
-
I've had a couple of dodge flatheads over the years. Really solid engine and there are still bits for sale that aren't too hard to find. I recall getting a lot of parts out of Turkey when I rebuilt my last one about 15-20 years ago now. Dusting off my memory bank if you want a quick way to ID your engine just measure the length of the head. If it's 23 inches it'll likely be a 218 or 230. If it's 25" then it could be a 228, 237 or a 250 iirc. Most common I found were 230 and 250.2 points
-
Yeah I'd definitely buy that as a development trajectory, with the differing engines in the charts at different stages along it. You can certainly plot that trajectory through Japanese engines from things like the 20R with its teeny tiny ports, through the 5M with more generous ports to the 7M with massive ones. Need to get some good data on European engines of the 'Medium EFI and VVT eras' as I've only really got a handful of them to check against, and none are particularly up at the pointy end of port sizes (aside from the Volvo 20v anomaly and the Alfa 3.0l 24v). American and Ozzy engines tend to be poorly attested in the FIA record though, so there's limits there as well. The exhaust scavenging idea would make a lot of sense as to why I see totally junk manifolds on BMW M inline 6s where a good 6-3-1 on a dodgy old Triumph OHV is utterly transformative. Always seemed like power and torque left on the table to me, but perhaps not. Absolutely agreed that there aren't any hard and fast rules, and trying to apply averaged rules of thumb to engines is a bit of a fools game if you're not experienced enough to know what's what. Hence why I was trying to get a bit of a database going. That way you could look at your head (in my case a Rover 2600 that precisely one person has ever done anything with), look through the database for a couple of other engines with comparable design parameters, and maybe get a bit of a steer about what to do. Less 'become an expert tuner overnight through data crunching', more of 'try to get your first stab in the dark roughly in the right direction with an unknown head'.2 points
-
Thought some graphs I've produced for the Maserati folks might help speed your recovery... I've been looking into benchmarking port and valve sizes for as many engines as I can, just trying to get a steer on what's what. As I don't have a storage container filled with various engine heads, I've been looking at the FIA Historic Database which has homologation docs for tons of cars up to the early 90s (and a few a bit later). That has specs on the valve diameters and port dimensions at the cylinder head face (would have preferred throat diameter, but they don't give that...the prudes). Long story short I've made some graphs plotting valve and port area against cylinder volume for as many engines as I can get my hands on. Makes for some interesting reading for saddoes like me. These are all multi-valve engines. I haven't got the 2GR and 4GR on the graphs, but I have worked out where they'd plot on them. For valve area (orange chart), the 2GR is 3.9mm2/cc which is pretty high up. Just a smidge above the YBB Cosworth. Interestingly, while your 4GR has smaller valves overall, they're similarly proportioned in relation to cylinder volume as its bigger brother (also 3.9, but a little further down so just slotting in above the Audi 20vT Sport Quattro). Probably bodes well for getting decent power and revs out of the 4GR as it's unlikely to be significantly undervalved. Port area (green chart) is a tricky one, and shows one of the limitations of using port area at the cylinderhead face. The super-heavy taper on the 4GR throws things off considerably. If the area is about the same as a 52mm circle as you mentioned, that would put it at 5.1mm2/cc which is off the top of the chart. Way in excess of the excessively large ports of the ST165 (which I note they progressively made smaller with the ST185 and ST205 GT-Fours). If it could comfortably lose about half that area while still being proportional to the throat area (as you guessed), that would put it closer to the mid-pack just next to the 323 GT-R. Tricky to tell what's better in this case as well as there's some high performing NAs with comparatively big ports (4A-GE, B16, B18), some with middling ports (S50, TU5, Mi16), and also a cluster with comparatively small ports (S14, 190E Cosworth, BDA). Edit: Mistyped on the RB20 and only counted one port out of its two. That should now be way at the top of the port graph at 3.9mm2/cc, above the B16A12 points
-
that didn't take long. its been a minute since i done an update, so lets unload whats been going on in classic motorcycle world. got a family photo like my dad did years ago. went for a few rides between and then it was time to do cold kiwi. all packed up headed down with @flyingbrick @MostlySuzukis and a mate called pete. myself and marnix cheated a bit and had our gear and tent taken down to ohakuni the week before hand, but set up camp went for a ride around the local region went up the mountain with a couple of the guys we were camping with had word there was a storm coming with some crazy high winds so we tied the tent to the bikes. probably should have tied my bike to the other side as i woke up to the tent inside out and on me at 230am and woke marnix who was on the other side of the tent. the got winds of 100kph and other bikes fell over during the night. cc in @flyingbrick we packed up and headed home after the miserable night and stopped off on our way home at some spots and made it home to a happy daughter a good clean later spotless and lubed chain we are up and riding again. this time to the Hamilton motorcycle club night not long after that i decided id ride it to work, fouled a plug and got pissed off so changed out all four plugs. while doing that (during work hours) i left a lead off and thought the bike was completely fucked. i was pissed off to say the less during the time that i thought it was fucked. some more riding, this time to kawhia. another month passed now and club night was on again, quick ride out to raglan before hand during these last couple of rides the clutch was slipping at say 140kph and 160kph really bad. so i got some new clutches which i found locally and this was my next task. a few free minutes and a daughter wanting to work on grandad garys motorbike we were all go. oil all drained and wiggles magic wand to help i don't know what i'm doing at this stage, but i'm following my noes quick count up looks about right. clutches now soaking in new oil and time to put it all back together borrowed a torque wrench from a mate and made sure i didn't over torque these clutch bolts back together with a half fearing cause @flyingbrick is a sicko and really likes it like this quick ride to raglan to test the new clutches patted a random dog while i was pondering life but when i got home, i checked the oil and after a couple of rides this bike was still burning oil like no tomorrow. so time has come and the valve stem seals are now to be done on the trailer and off to dads best friends house who has kindly offered to help out and has some really good knowledge of motors and engineering we got into it and stripped the rest down till we came across needing a few different modifed tools. so we stopped, malcolm modified some tools and we caught up today to carry on. but during that time i put on my big boy pants and sat my full license for my motorcycle. took my small honda monkey over to Revs motorcycle center in paeroa went for a bit of a hoon while i was over there and yes i passed my full license but back to today. Malcolm made this handy air compression thing to full the combustion chamber up with air and hold the valves up while we took the springs off to reach the valve stem seals it was originally a spark plug of mine. he also had to modify his tool to press down the springs cams off and into it (well went over timing and a few other things) here we can see his tool that has been modified over the years watch the next video with volume off or down, the air compressor was still getting up to psi. and check out how toast this were. we were on a roll! had a good rhythm going and got them all done. cams back into place and started to put all the bolts back in that held the cam in place. when out of nowhere, one decided to snap under no tension at all. putting a end to the day pretty fast! i can get new bolts which is alright. ill try locally and see if i can get them fast. but for some weird reason we were missing a couple of dowels too. so ill get a couple of them and we should be good to go again. been that dad modified this bike and mucked around with it heaps back in the day, these bolts are a bit rough and i can understand them been fatigued just look at the top of the bolt. anyway, that's us up to date now here is a photo of when malcolms 38 ford was in nz hot rod magazine back in may 1992 with his supercharged 327 small block chev bored to a 331 in it. and a small glimpse into his shed for max barrie points2 points
-
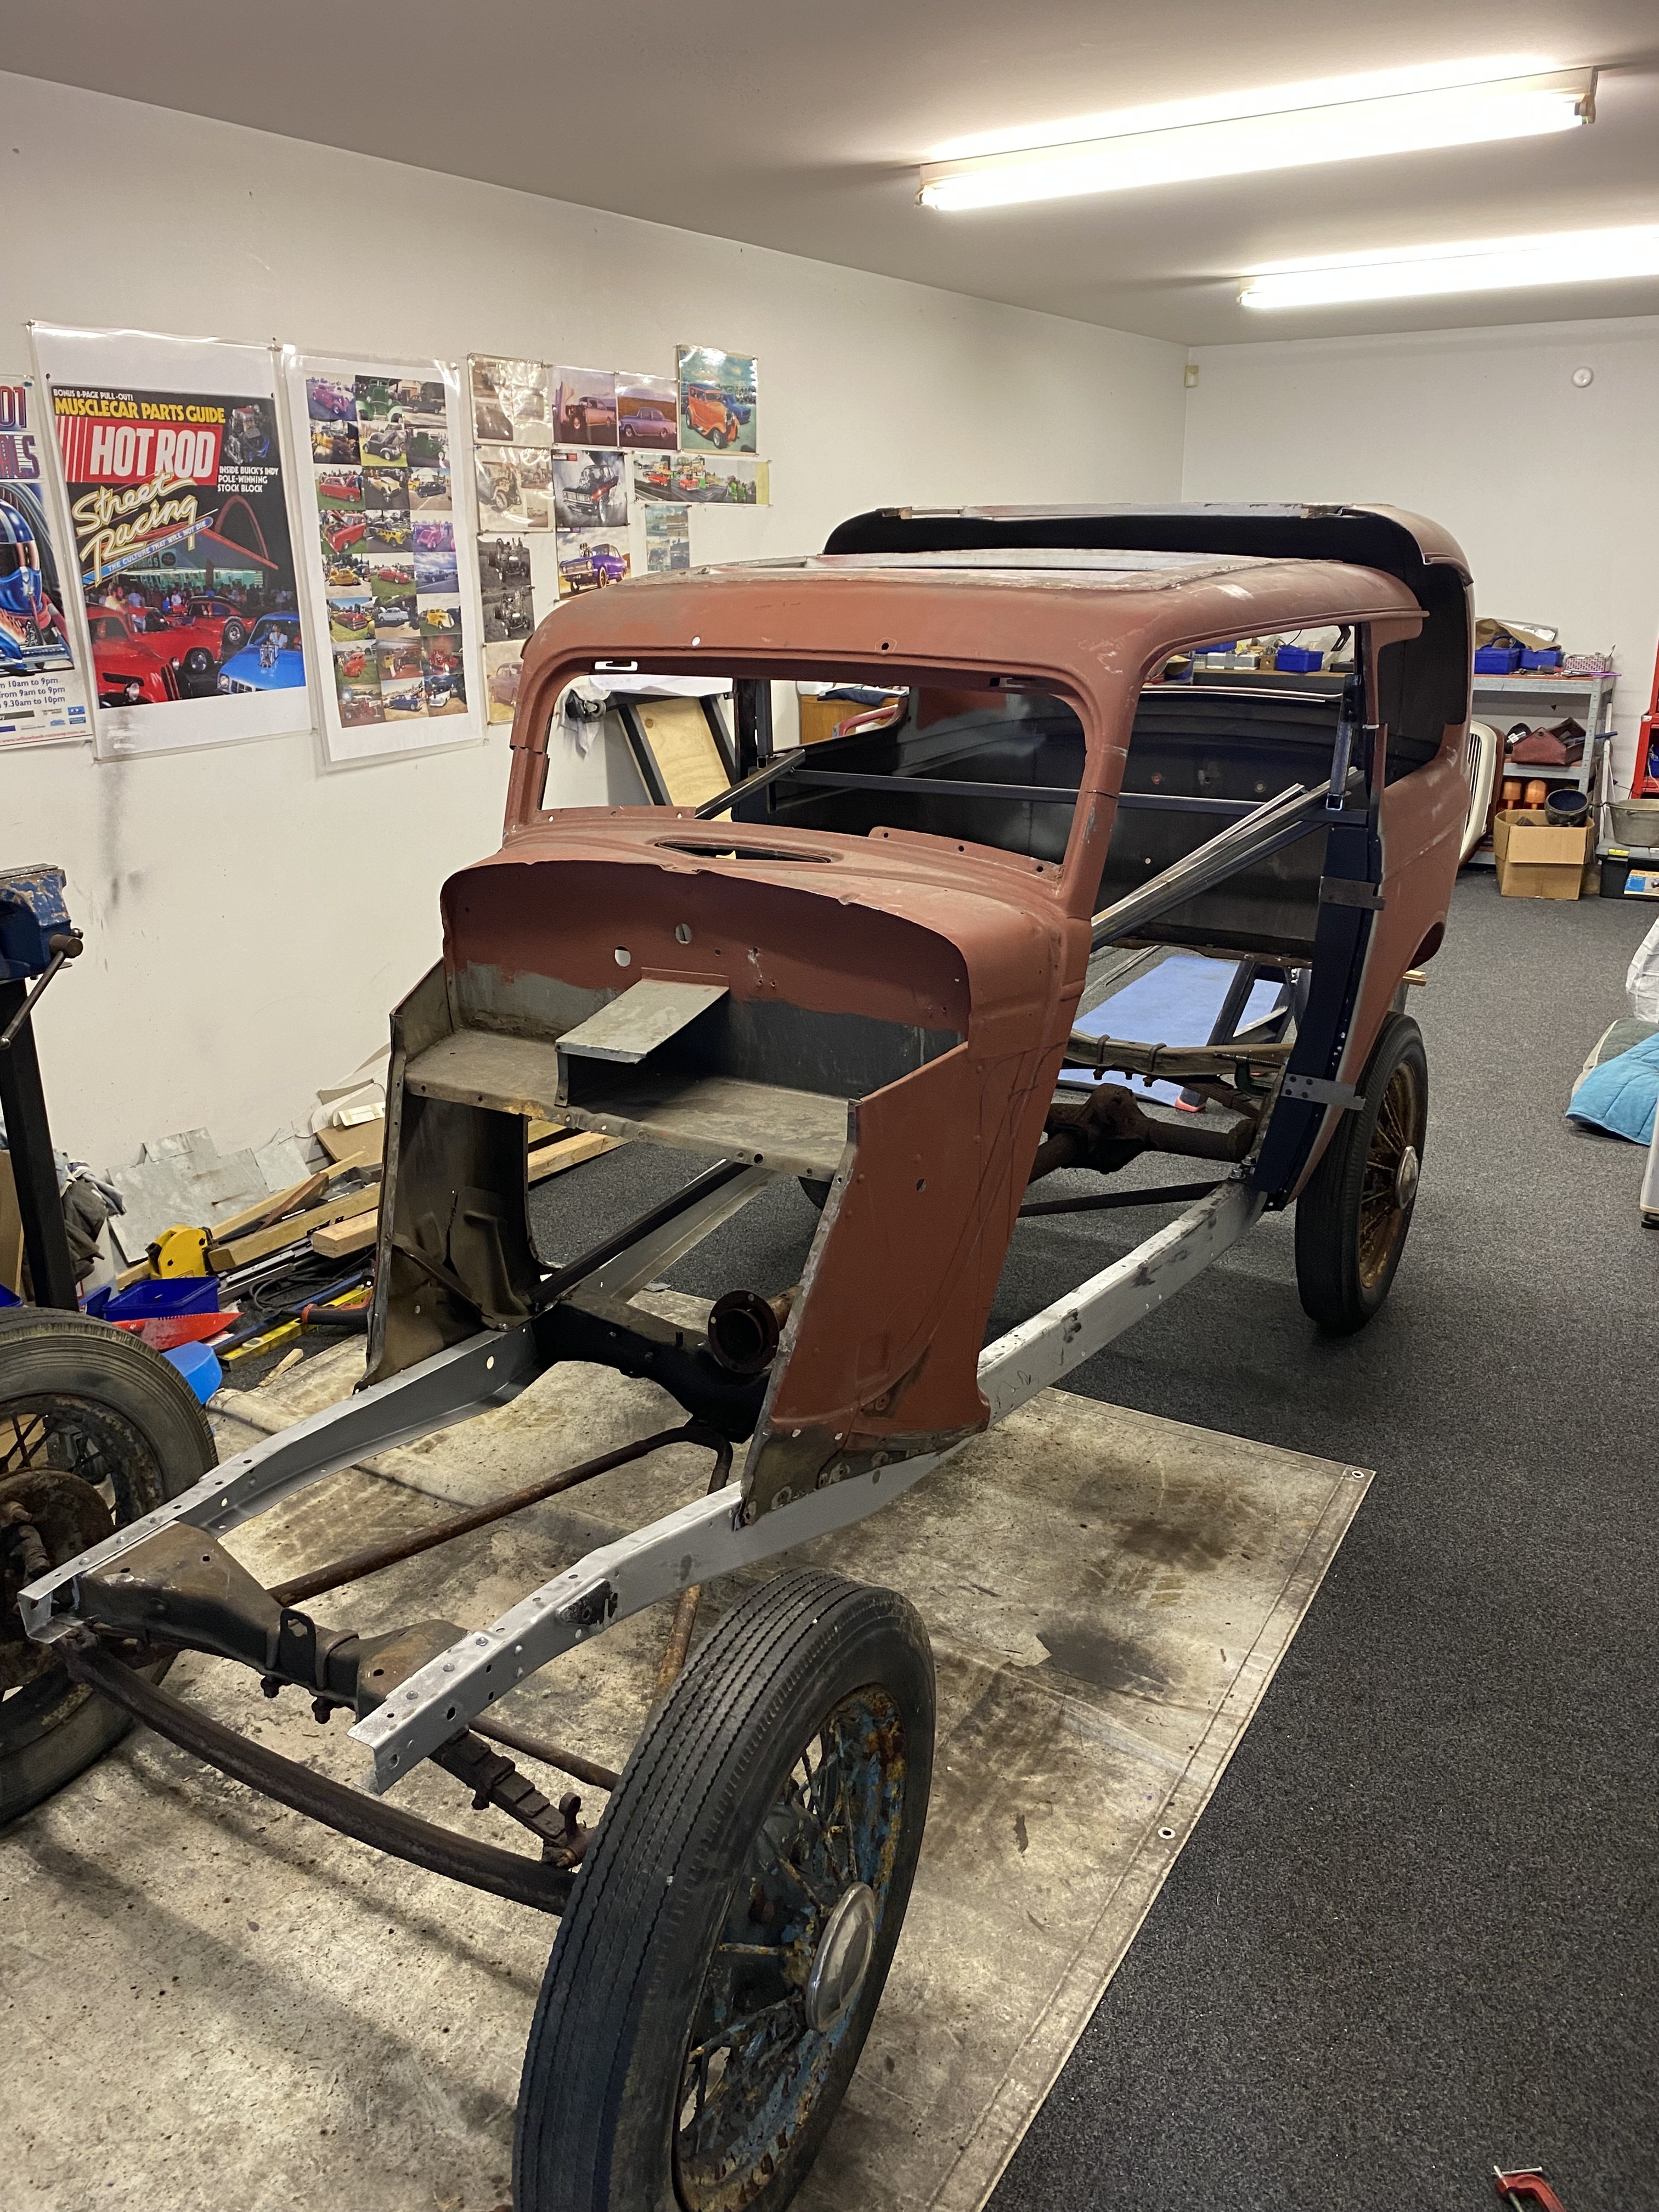
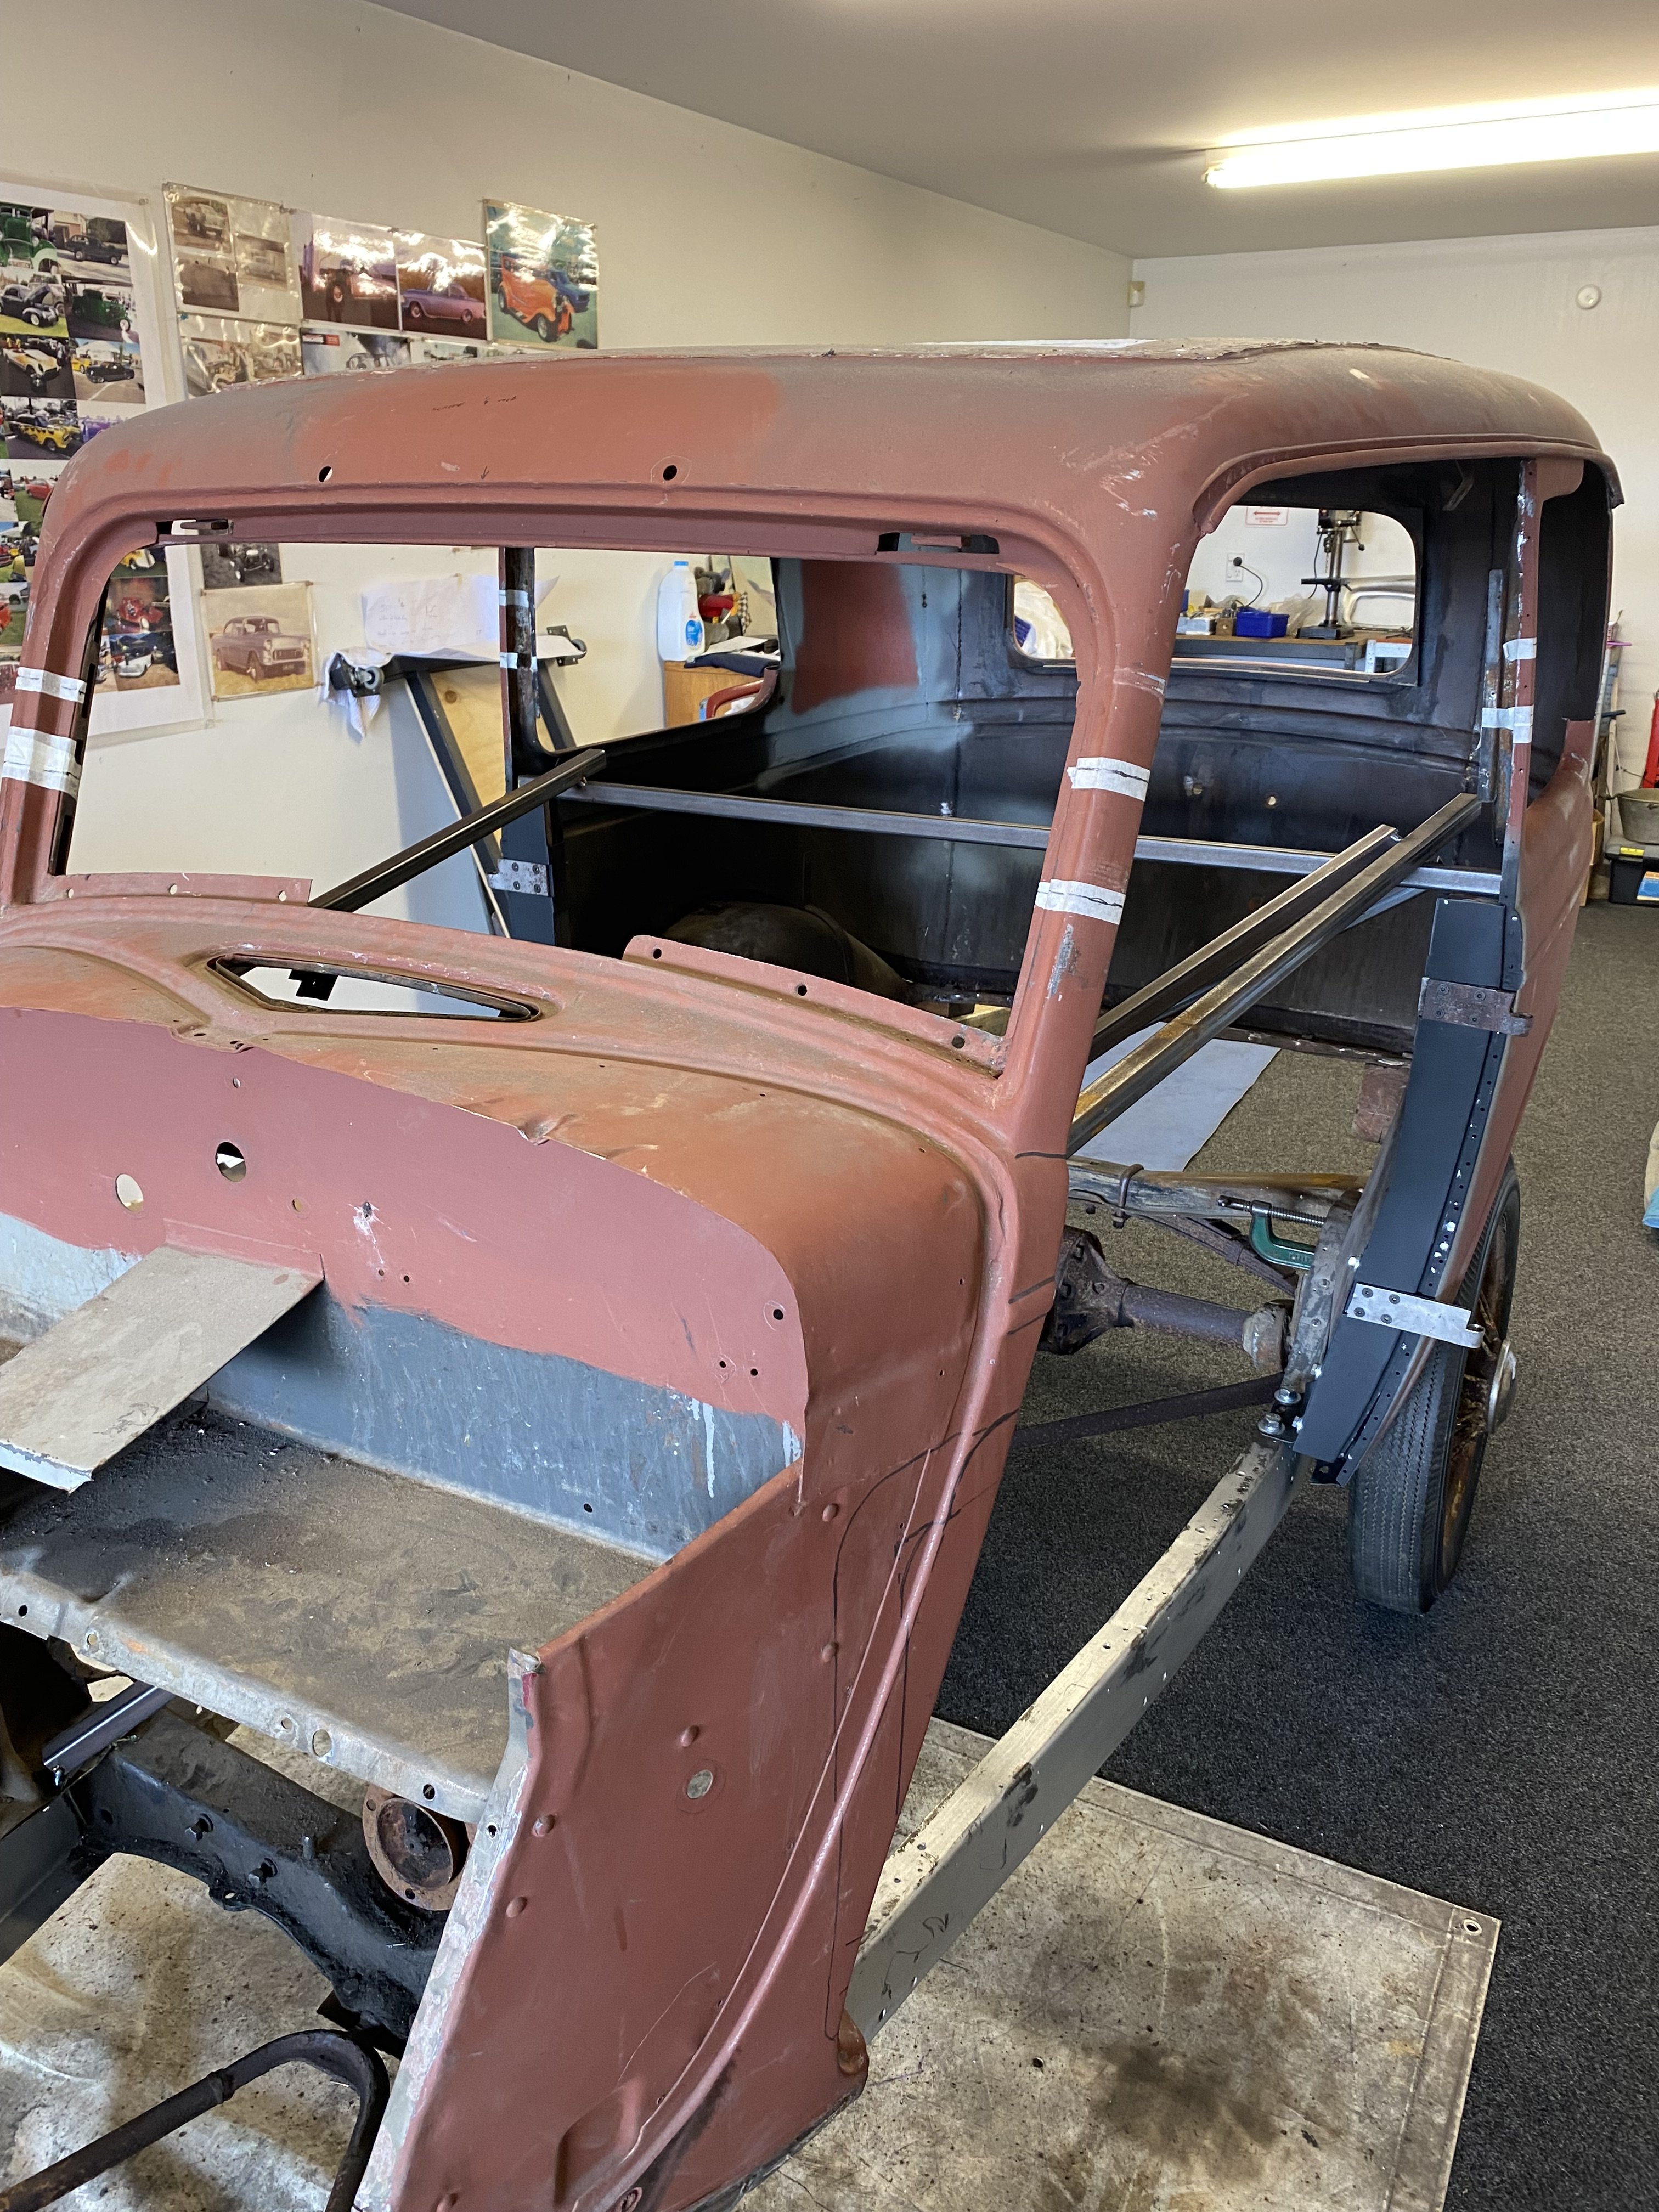
She’s all tacked in place and front screen just needs the top bar narrowed to suit what was cut out of the centre of the roof.
2 points
-
The rusty shit is definitely concentrated around the coolant filler cap, someone's taken it off when the engine was hot for sure, but that could've been anytime really, it was a bitch to clean it off off Finally bought it home and after seeing it the wife has come around, big time. In her words "I just assumed you'd bought another absolute piece of shit"2 points
-
You haven't mentioned what it's like to sleep in? Or is the wife ok2 points
-
Last thing today I took it for a drive around the airport which was interrupted by a BZZZZZZZZZZZZZZZZZZZZZZZZZ which was pretty fucking obviously trying to tell me something was up. the "add coolant" buzzer and light was on and the temp was definitely higher than it should be. I had drained and flushed the coolant a week or so ago and thought I was pretty diligent in bleeding the air out, so I topped it up (and it wanted quite a bit), gave it another run, and... coolant all over the floor, under the overflow bottle. I had admittedly seen a little bit of coolant on the floor after driving it in but to be honest I filed it under "I don't want to see that". So again, another "ohhh that's why it was cheap" moment. bad water seals? is the engine pressurizing the coolant and blowing the water out of the separation chamber? nope, just a bad pressure cap on the chamber. topping up the filler, it was running straight out of here and into the expansion tank. with a bit of heat in it it would've been fair pumping out. a $37 fix, and everything's back to normal Suppose I should talk about how it actually drives? so yes it starts hot and cold (and very hot!) so I think the engine is, actually, pretty good. It's got 78k on the clock which is probably still young enough, certainly for what I paid. If it craps out at 100k that'd probably take me decades to run that figure up. with standard porting and turbos it probably doesn't set the rx7 world on fire, power wise - frankly that suits me. my other cars are a pajero and a triumph, and this is the fastest thing I've driven in quite some time. And it's harsh as well, it's loud and smells like two stroke and the suspension is hard as hell. a million years ago I had two series 1 rx7's, one was bog stock and the other one was more extreme than this. 9 times out of 10 if I was going somewhere I'd jump in the standard one. So I'm super glad that this has a comfortable interior, I guess I just wish it were a little more tame. maybe I'm getting old? Only real plans to come are to hunt down the last bits of interior and get it wof'd ........."shouldnt take much" says the previous owner.........
2 points
-
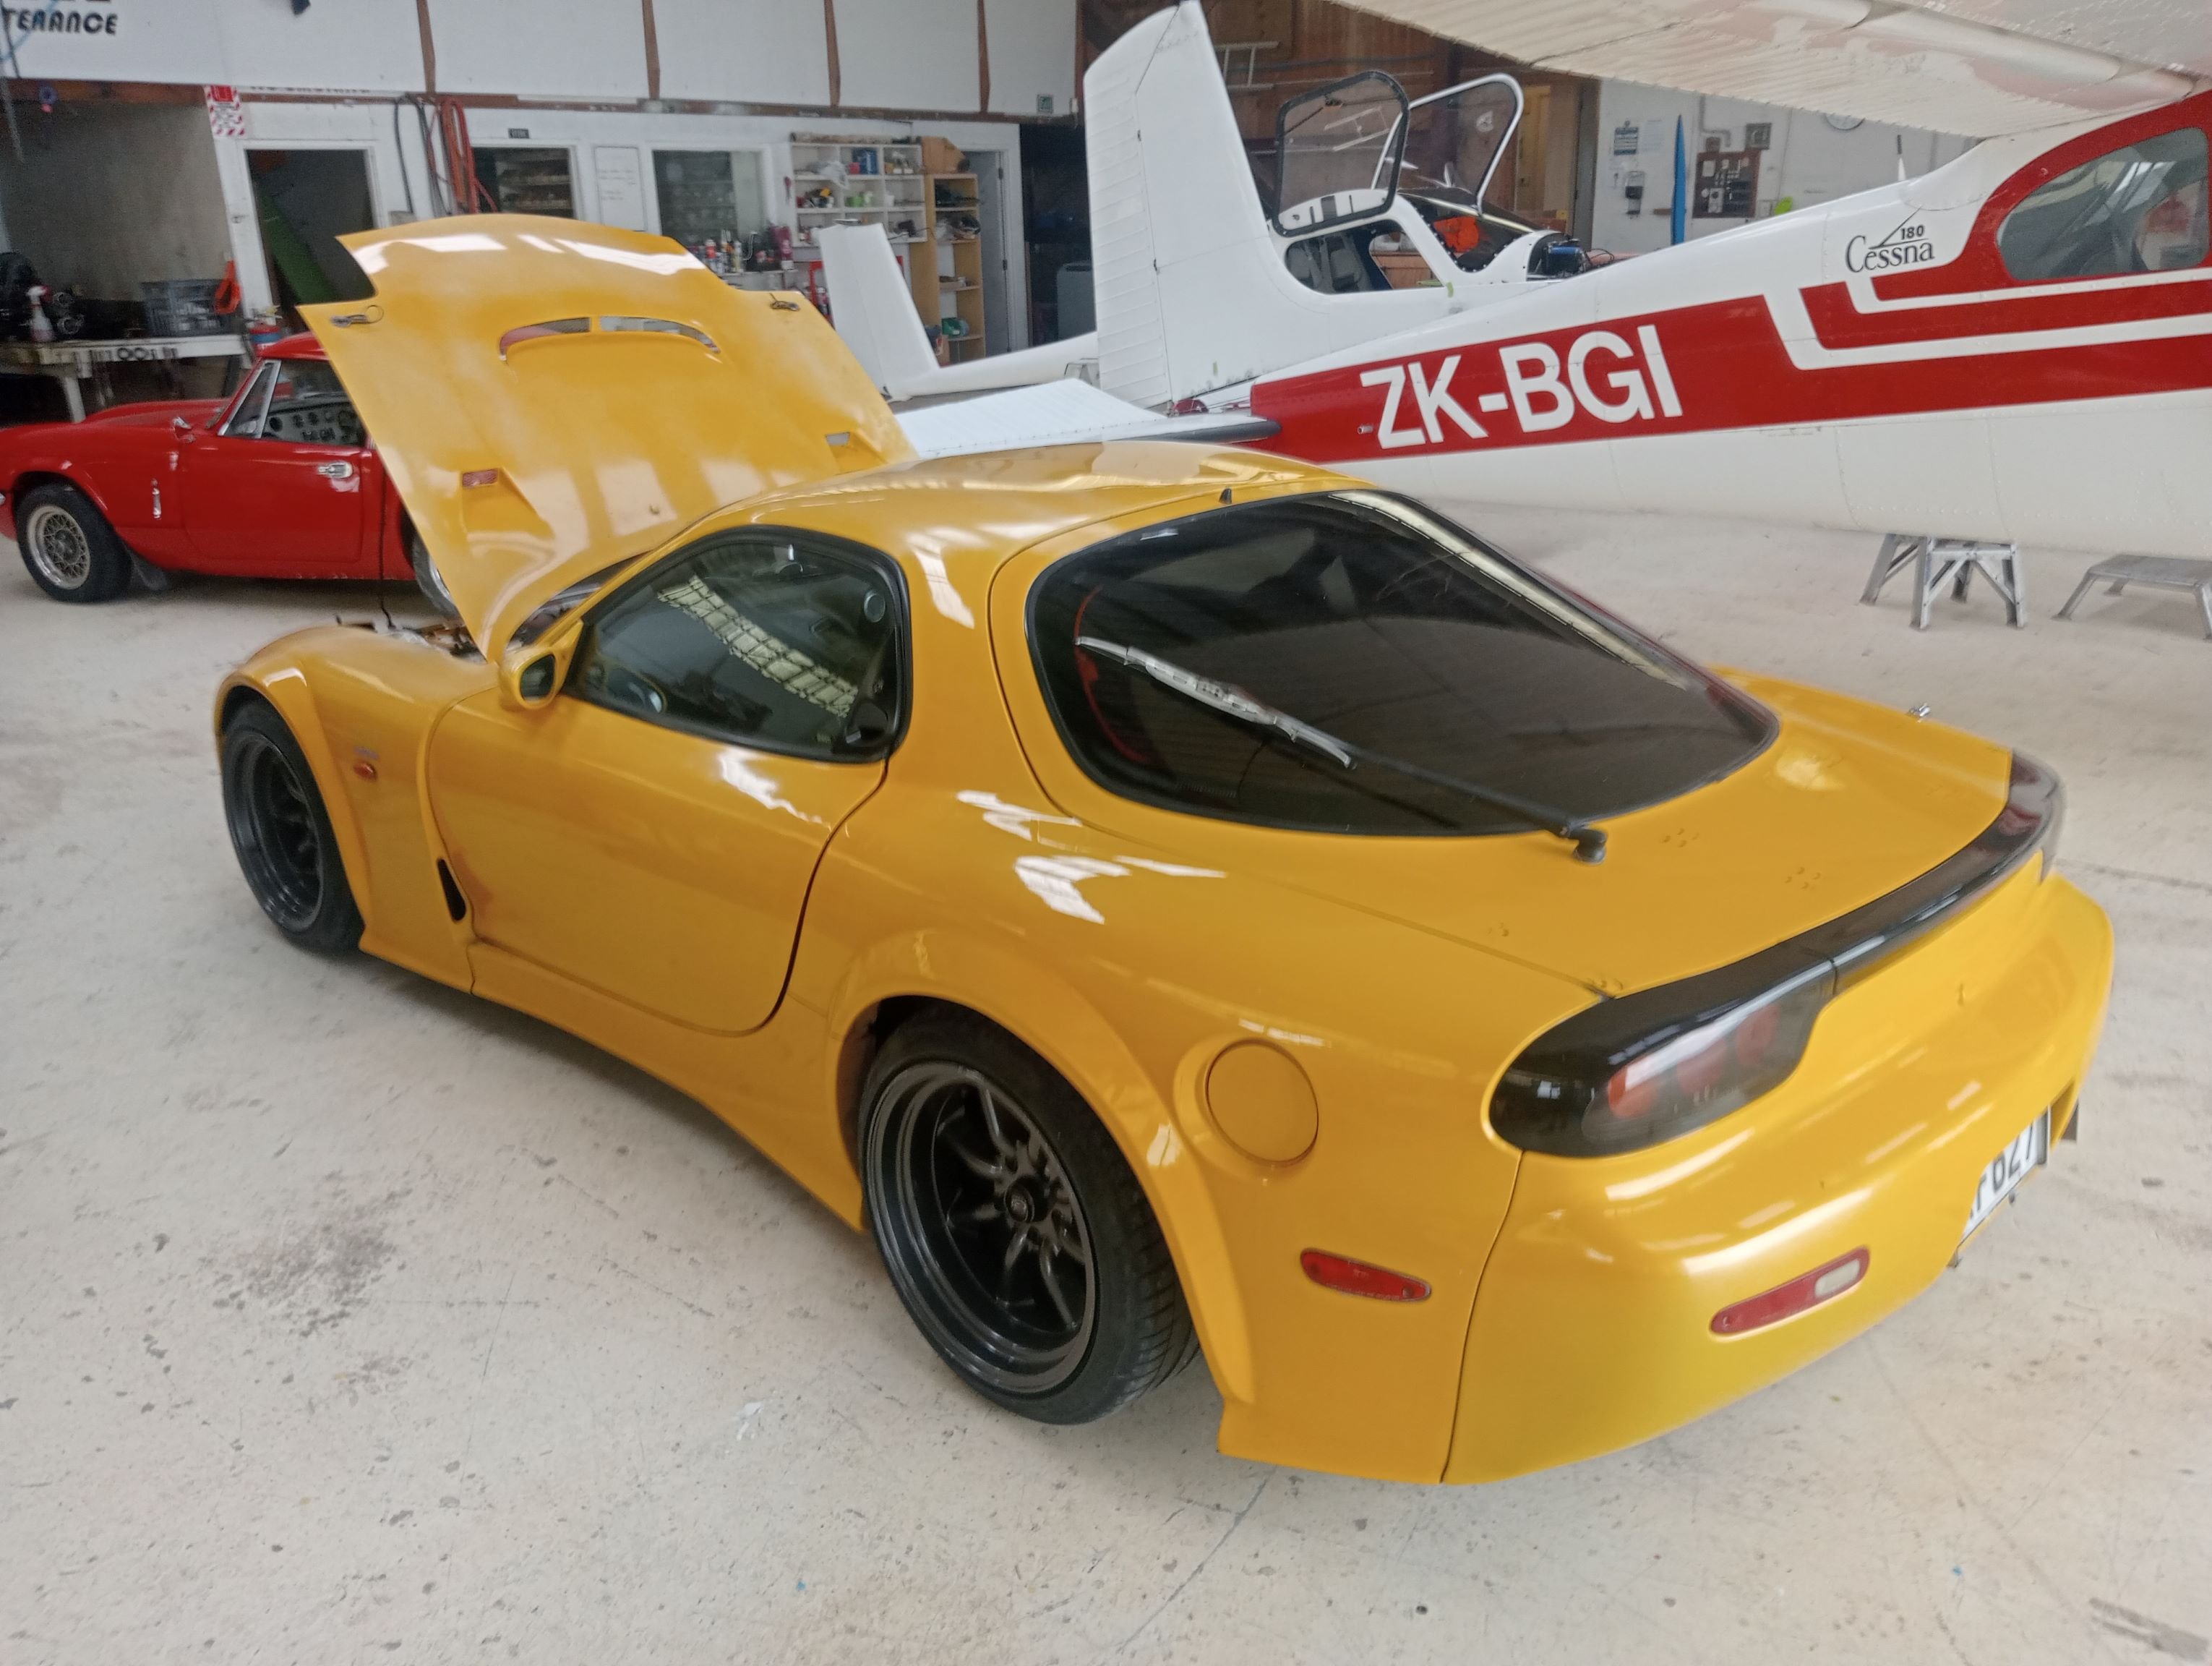
now the bodykit, I can kinda live without. Initially I went looking for a very stock machine but fate would have it (and not for the first time) I ended up with something very much the opposite. It does look like it'll unpick easily enough if the day comes, although that would mean buying stock guards and a stock bumper and most parts aren't cheap. So I'll stick with the kit for now, the downside of this is that I'm limited to exactly bugger all wheels that will fit. As mentioned it came on Enkei 3 piece wheels which sounds nice, but they don't fill the guards, and sit way too far in (even with the 20mm spacers there's extreme wheel rub if you even think about steering. I thought about changing the lips, I thought about changing the barrels, I thought about how that would mean spending 5k just to end up with some beaten to shit centres just to keep the wheel snobs happy. So I cheaped out and got some 9" -20 Rota RKR's because they're pretty much the only thing that would actually fit, straight off the shelf. Realized what I needed on Friday, found some for sale on Saturday in Cambridge, @RXFORD was coming through on Sunday, they were in Auckland Sunday night, and one of my customers was driving a truck straight past on the way to Whangarei the next day, the system works! (compared to the time I tried to bring a starion engine up from CHCH, which wore out it's welcome with about three different OS members, and THREE YEARS LATER, having never actually arrived here, was sold sight unseen) Despite being only an inch smaller they seem absolutely tiny, it's taken some getting used to. But I can turn corners now. Oh but the previous owner had wandered off with the lock nut key. He sent it up to me but it was too late, I'd already created this piece of art what is it? it's a small piece of pipe with five castellations cut into it, hammered into a slightly larger piece of pipe, and welded up with great enthusiasm and little ability. but it did the job! oh and with a socket welded crookedly on the end because I still had half a rod left and by god I was going to use it
2 points
-
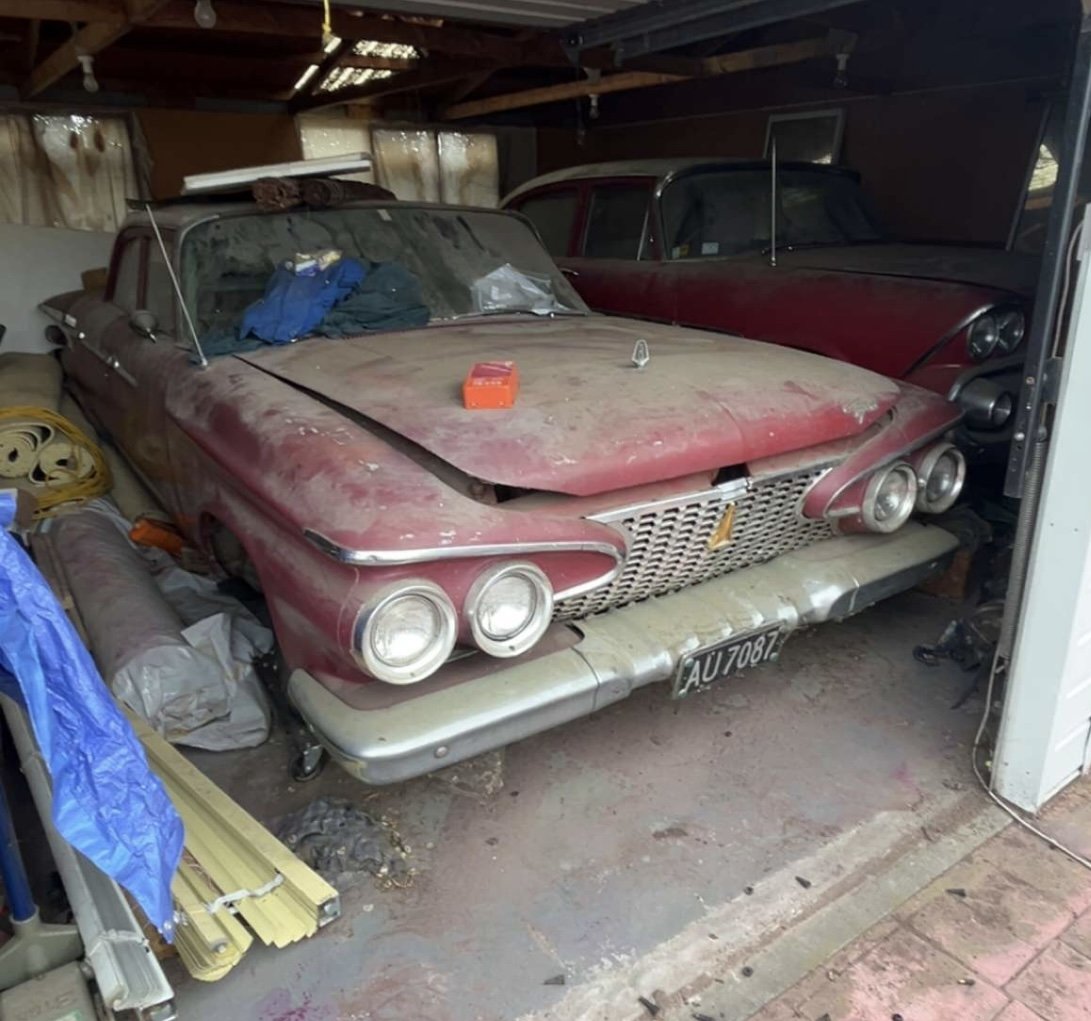
I've recently inherited this 59 Dodge Kingsway from my father who has owned it from 1977. NZ New, 3 speed manual 251ci flat head six and wanting a place to document the restoration. Plan is to keep everything entirely original. Dad used it as a wedding car in 1997, overheated during a wedding and has been parked up ever since. Any resources for parts, general advice or encouragement would be greatly appreciated! Feel free to discuss!
1 point
-
Yeah I still need to go through and caveat everything where I can find out there's odd designs that skew the data. Things like runner taper and funky intake gubbins or VVT could well change the design parameters. I'm on light duties at the moment as I've f'd my back so it's not like I have anything better to do... I need to trawl through for some earlier Japanese 4v engines. I can't quite work out if big ports is just a Japanese design philosophy of the time, or if it's influenced by the Japanese cars being generally later than the European 4v engines (more 90s than 80s), and thus making more use of funky intake trickery. It certainly seems like comparatively small ports and valves is an Italian design philosophy in the late 80s/early 90s (excluding Alfa), so it could well be a cultural thing. If it does effectively fully close off one of the ports then yep, it's 1.8mm2/cc which is about the same as the S14 right at the bottom of the graph. Ah, I did wonder if the ports were more of a manufacturing ease thing. You get the same with the Saab 16v B engines, which all have the same valves and practically all have the same ports, regardless of displacement or aspiration. They'd still be pretty huge for a 3.0l engine as well (4.3mm2/cc), so right up with your 20v Volvo whiteblocks. Could also be that eyeballing a CAD model of a picture of a headgasket isn't the most accurate way to measure the area of a port... I expect the excuses stage will still require a fair dose of speculation Edit: Corrected an error with the RB20 which is now right at the tip top end of the port graph (3.9mm2/cc). Added in a few more older Japanese 4v engines to try and get a bit more representative. SR20DE, FJ20E and FJ20ET are 2.6mm2/cc which is middling, FJ24/RB25 NA/CA16DE have huge ports as well (3.0, 3.6 and 4.0 respectively). The only Japanese 4v engine in the bottom third of the graph (so far) is the little CG13 from a K11 Micra at 2.0mm2/cc, and that seems to be limited by a dinky 71mm bore.1 point
-
So, the engine is too big. But rather than let that defeat me...10 cups of coffee and some head scratching...and an idea popped into my head. Lets turn it around and face it backwards! The gearbox is straight cut, so it won't care which way it rotates. So that's what I'm going to run. This solves a lot of problems, but also creates some new ones. But I have a few ideas on how to overcome these issues.
1 point
-
^Virgil Exner designed some out there boy shapes. Back when style took precedent over ergonomics and aerodynamics.1 point
-
Cool cars. Got any pics of the 61? My mate had a 61 plymouth coupe years ago in welly he daily'd (dereg too!) back when gas prices were 2 digits.. it was Matty B and dropped on its ass with a small block. I loved how weird/cool/ugly it was. Mopars of that era are just so awesome.1 point
-
1 point
-
1 point
-
Got the front of the roof chopped three inches. I need to cut a small piece out of the centre to get it to line up. When you look at the windscreen surround it tapers in towards the bottom a fair bit.
1 point
-
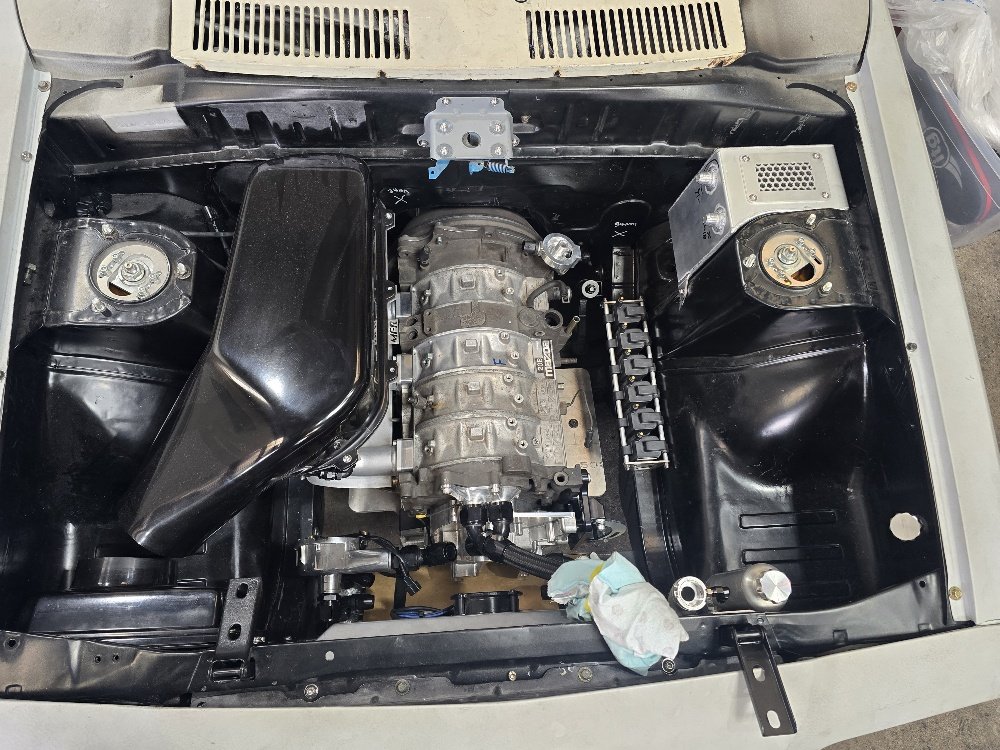
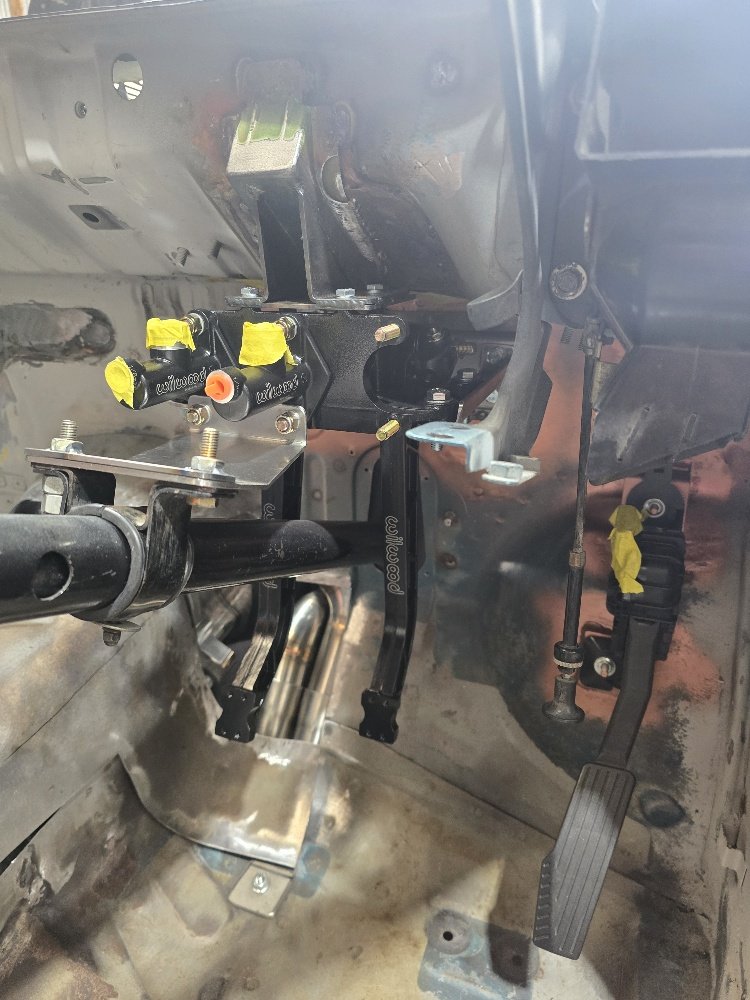
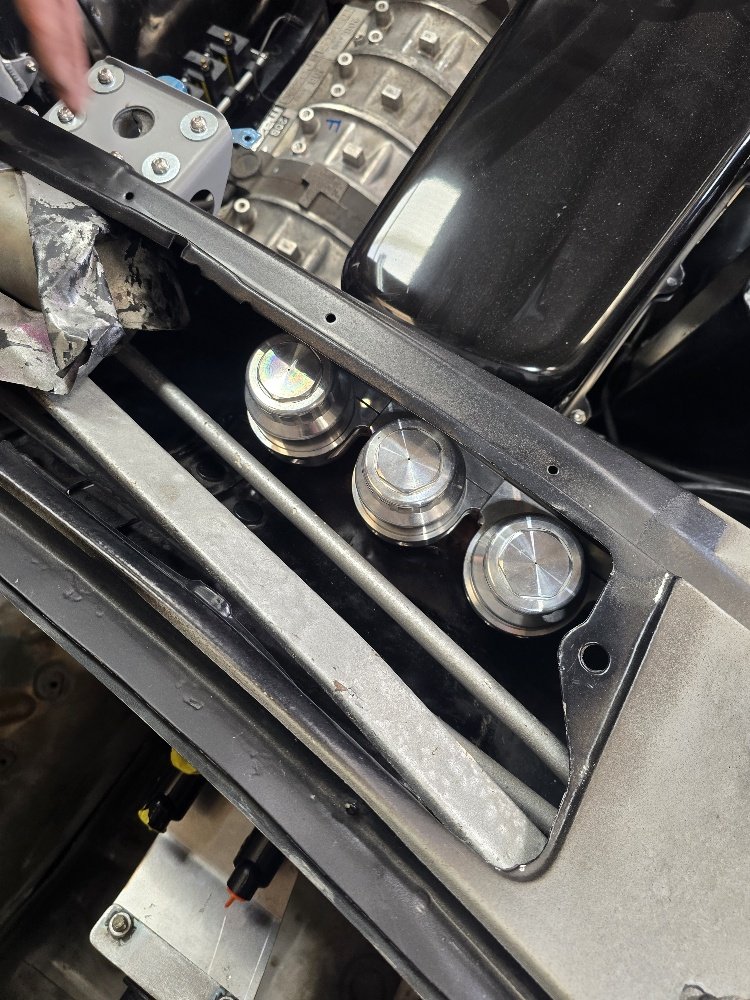
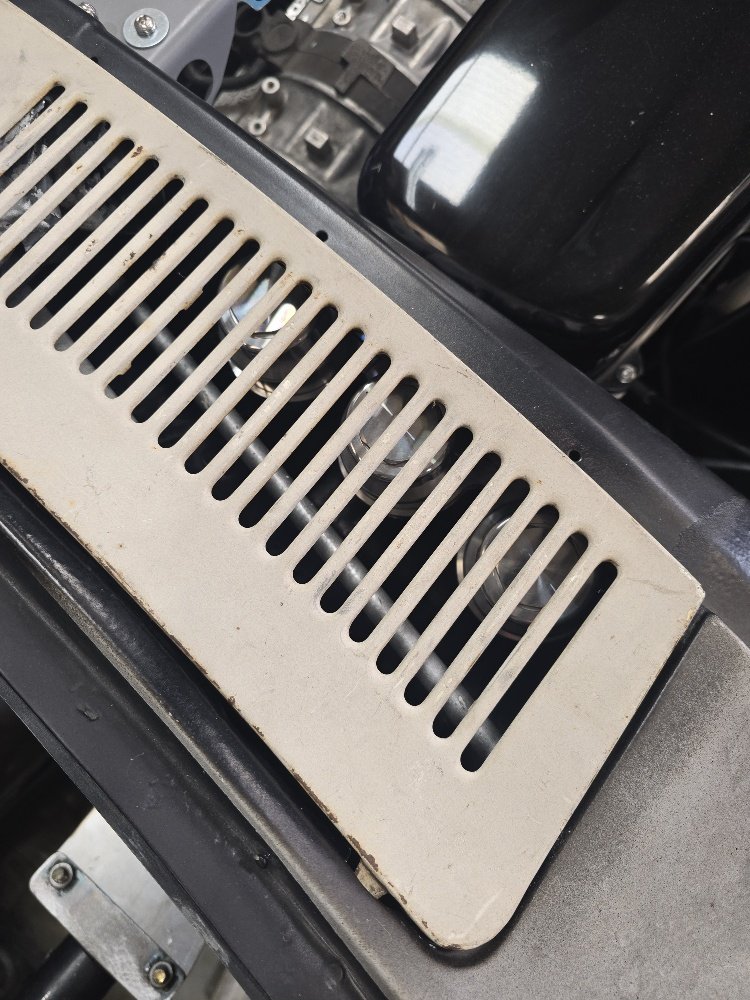
Swung into Rocket this week to check out progressing, Dan and the lads have been hammering it out, bloody stoked on progress. -Have cut the tunnel to allow gearbox to be raised to a better angle (had to come up about 30mm) -Modified gearbox xmember to suit TKX -New driveshaft to suit TKX -Welded up old master cylinder holes in firewall -Fit wideband ports in each header runner -Mounted the pedal box -Mounted wilwood billet reservoirs in the windscreen cowl so nice and hidden away but accessible -Braced EWP as its coming out from the radiator a fair bit -Mounted overflow bottle -Made up the Greens intake manifold kit and welded it up, to get the EFI hardware intake to fit with the MFR airbox overtop and fit under the bonnet -Redid rear diff shock mounts to suit the BC Golds (old shocks had a way narrower eye) -Few other misc holes filled and fab bits done Few things left to do - Clearance floor for diff head an low -Finish sheet metal work for tunnel -Sort brake lines, handbrake cables to suit wilwood rears -Modify MFR intake filter pod to work better with the 20b position /air box angle -Change exhaust to go under diff instead of over (fitted but was really tight and not much clearance) Very happy with how its all coming together and looking!
1 point
-
Apparently the new black/silver plates have been discontinued, last day to order them is 31st Oct. They will all be black/white Post from reddit: " NZ Transport Agency Waka Kotahi (NZTA) have made the decision that black numberplates with silver text will no longer be available, due to a readability issue. The last day to order a black numberplate with silver text will be 31 October 2024. To ensure that you can have your plate(s) made with silver text, you will need to request manufacture with Licensys (the government plate manufacturer) no later than 30 November 2024. What happens if you don't request manufacture by 30 November 2024? If you do not request manufacture before this date, then you will still be able to have your plate(s) manufactured in the same design, however, instead of silver text the plate(s) will come with white text. We wanted to let you know of this important change and provide you with the opportunity to have your plate(s) made as you have ordered. It is important to note that while no new plates with silver text will be issued, NZTA have no plans to recall existing black plates with silver text; any plates that are already registered on a vehicle will still be legal to use in New Zealand. Black plates with white text will continue to be available for customers to purchase through KiwiPlates."1 point
-
Yeah I mainly just need a weather proof space. I can live without power lights etc for now. As I just need to be able to take my motor out to work on the firewall etc without everything being exposed to the elements. (and animals) So hopefully not too long to go. All of the wiring is done, I need to test some things like lights and indicators and so on. But the stuff needed for drags at least is pretty easy. All of the engine wiring is sorted, all of the sensors have been tested and calibrated. Alternator works, and all that. That video you posted is interesting, because to me that KF motor sounds more like a high strung 4cyl. I guess the thing with a V6 is that if you have even firing order separation on each bank. (So 60 deg V6, not 90 deg like DTM motor) Then you have 240 deg of separation between each exhaust event on a bank. Compared to 180 degrees with a 4 cyl. So the exhaust can sound a lot different because if you had a 6-1 (or effectively 6-1) you've got 120 degrees of separation so it will sound higher pitched. But then if you ran totally isolated exhausts on each bank, or the pipes are really uneven. It could also keep its "240deg" sound, and sound like a pair of 3 cyl motors driving in unison instead. And then there's the effect of having an unequal length between each 3 pipes too on each side. I guess a good comparison, is that a Subaru "boxer rumble" comes from only the pipe layout, not uneven firing order or anything. Yet sounds wildly different to most other 4cyl motors. If you put an equal length manifold on it, they sound just like a normal 4 cyl. Compared to a 4 cyl, there are lots of different ways you can affect the pipe interactions on a V6. Can have a 6-1 manifold, long primary, short secondary 6-2-1, Short primary, long secondary 6-2-1, Separate 3-1 with long or short primaries. Then all of the ways that different mufflers can affect the sound... and what cams you have. Then how much noise comes from the intake. So it's probably a good thing that nothing is set in stone in terms of how the motor sounds. As I'm not expecting it to sound particularly pleasant, or even go particularly well on first iteration. But at least when the motor is going, and the car is driving. The fizz level ramps up, and doing the iterative changes and testing is the fun part for me.1 point


This leaderboard is set to Auckland/GMT+12:00