
Leaderboard


Popular Content
Showing content with the highest reputation on 11/04/22 in all areas
-
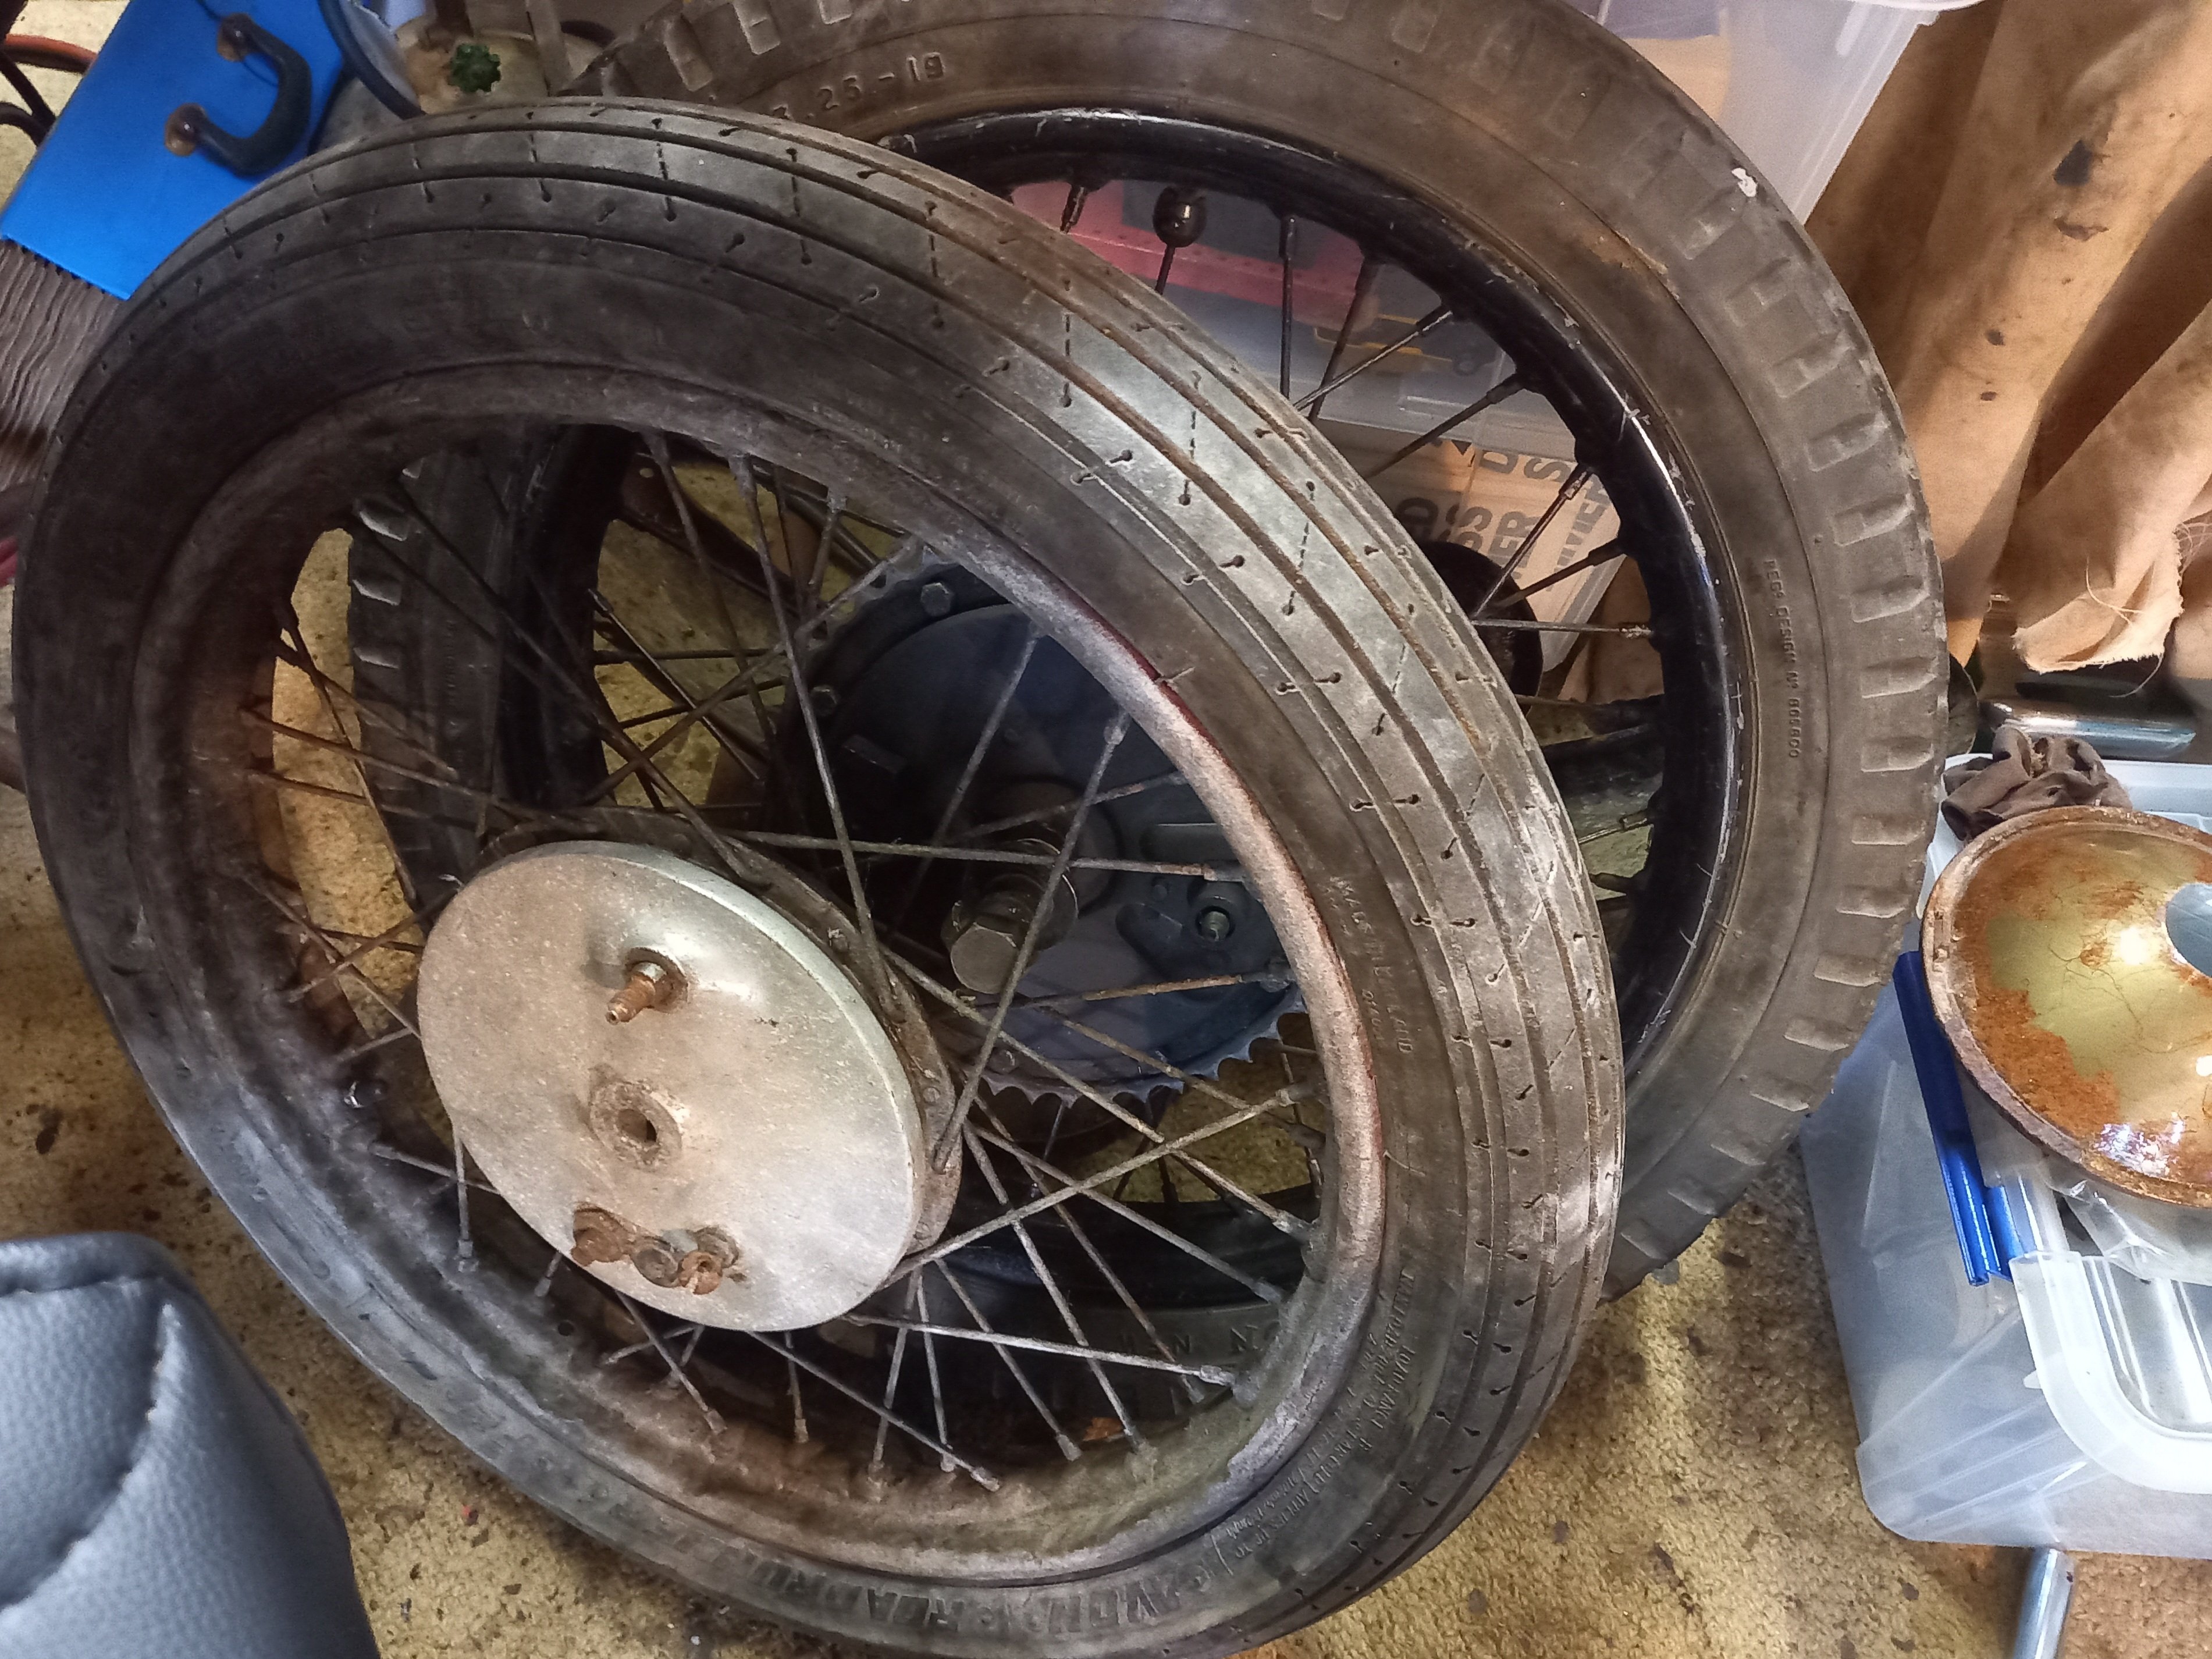
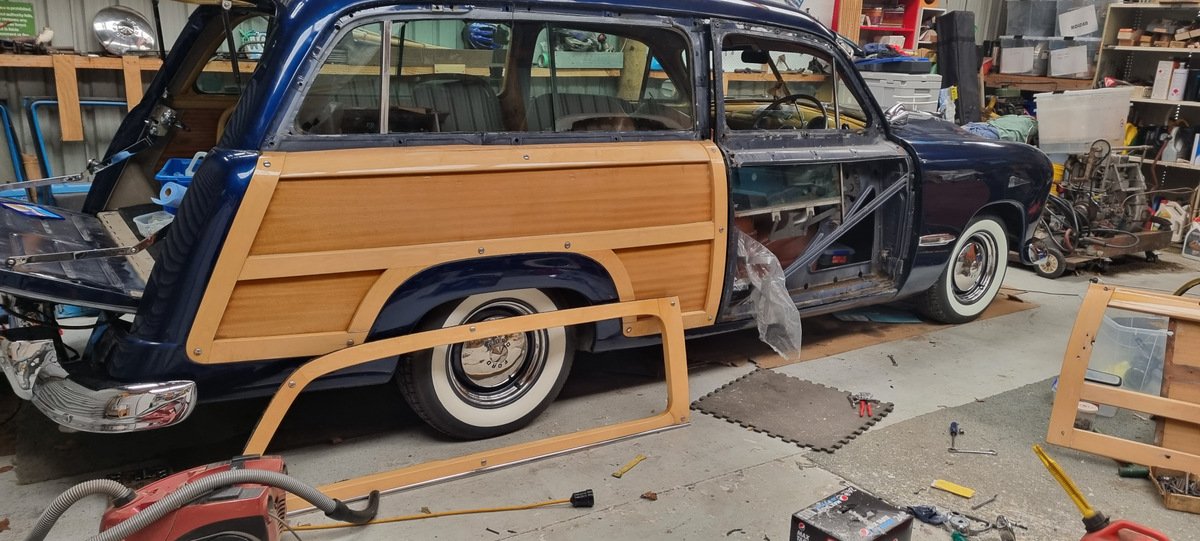
I love that car so much! Mainly because it's simple - Just a near standard 1300 motor, better exhaust, stiff low suspension and just fucking sending it hahaha. Then racing the K11 that is about the same spec. Honestly just looks like incredible fun. I took my car for a VTNZ WOF. With a few amendments that hopefully improved my odds: When you think the jack is still under the car, but it isnt There were a few minor things to fix up. Rear brake imbalance was out, so the drums probably need a dust out. Then replace a windscreen wiper, replace a steering rack boot, fit the front bumper properly, secure a headlight properly. They didnt have any issue with exhaust noise, which is pretty epic considering it's 3" pipe with only a single muffler in it. A real testament to the Adrenalin R muffler design. But it's genuinely not that loud when driving normally. They didnt care about the exhaust valve thingy in it either, probably because it doesnt close currently. Although, I should try connect it up while I've got the plenum on, see if there's enough vacuum to meaningfully pull it closed. Hopefully early next week I'll have time to get these things knocked off, and get have a WOF! I've booked in for the oldschool drags and I cant friggen wait. Best day of the year. (sorry/not sorry for bringing non OS car along) Then also still try get back to the dyno and have a look if any Hampton or Taupo events are coming up. Maybe get back to Pukekohe for another event there too. Also, in some other other news. My second hand 185/60/14 R888R, that I've been driving around on for nearly this entire project. It just blew me away how grippy they were on the track! Ive seen people be super precious about semi slicks, like storing them in black plastic bags, not driving them on the road, etc etc. These tyres have been treated about as poorly as you could in that respect, and were just incredible with some heat in them. I can confirm that I absolutely cannot be fucked trying to wring 3% more grip out of tyres by storing them in bags etc. Anyway! Although my 14x6 Rays Engineering wheels are quite light, and a 185 wide R888R isnt the heaviest thing in the world. Longer term I've wanted to try find a lighter wheel and tyre combo. The plan was to eventually buy a set of 15x7 +35 Advanti Storm S1. These are a cheap-ish wheel that is insanely light because they use some rotational forging or some crap like that. To make the barrel quite thin but really strong. So they are only around 5kg each without tyre which is nuts. However, I've also really liked how the car looks on 13" wheels too, when I've taken it to the drags. This is oldschool forum after all. A problem I've got is that once my drag tyres wear out. I cant get any 13" drag tyres that will fit anymore. Then there's nothing good to do with just a pair of 13" 4x100 wheels... I wonder if anyone else has the same problem? Yes! Another pair turned up for cheap on FB Marketplace, with some balloony looking 185s on. gross. Before committing to purchasing them I figured I'd better test fit on one side with the drag tyres on, and see if I'm going to be able to fit any sort of decent tyre on there with a +25 offset. It's looking surprisingly realistic I think. The rears run a narrower track, so hopefully folding up the inner lip a little bit and it'll not have any issues with tyre rub. The front, not too sure how well it will work yet. I am 100% against any sort of visual modifications to the guards, so hopefully it'll work okay. The 13" Lenso wheel with the drag tyre is only about 11kg combined per corner. Absolutely mental! It'll be heavier with trackday type tyres though, but still crazy light. Initially I was looking to longer term get something like Nankang AR1 which still comes in 13". However I somewhat stumbled into the idea of raiding the used parts bins of the TRS series cars. These cars run a 13" wheel with a Michelen front tyre which is about the equivalent of a 200/52/13 size. I am amid some negotiations to get a set of 4 second hand soft compound slicks that still have some life in them (but beyond the point of usefulness for the series cars) I dont have any tyres yet, maybe this coming week. But I'm fizzing to get some and see how they fit up. Hopefully it works out well. The new tyre size has a smaller rolling diameter than current. It'll have the equivalent effect of changing from the 4.3 final drive ratio, to a 4.6 final. With considerably less effort or $$ needed. The car will also receive some free lowering too. sounds like a win-win to me. Having just been blown away by how much grip the car had with old R888R, I think I'm gonna wee my pants with the grip available from soft compound slicks. In regards to the cooling issues that I've been having. One mystery has always been, where does the TRD turbo car get its wider radiator from??? No other cars seem to have it, but it definitely looks like an OEM part. It's distinctive because it uses a single fan on the radiator, then a second area which just has one way flaps on it. Well the reason I've never seen one, is that they are an OEM part on a Eurotrash NLP10 Yaris diesel model. Which no other region had to suffer through thankfully. As they have all of 70hp or something like that. But this might mean that I can source an NLP10 radiator from somewhere for an okay price, perhaps. Something else interesting specific to the diesel model, and it's extra cooling requirements. Is it's got these shrouding panels in place above the front bumper, that none of the other cars have. So it might be useful to copy this idea, or try buy some of those panels if any exist for a reasonable price. I also found that the TRD turbo car ran an OEM heat exchanger for the oil temp management, from a 3SGTE or similar. So it's cool to know that this fits, I think I've got a few 3SGE ones kicking around. But I'll really need the extra radiator capacity, before adding the burden of oil cooling onto it as well. I really like the idea of having some oil cooling without needing to run any oil lines, only coolant. I cant take credit for the above two discoveries, thanks to Nick from one of the Facebook groups for doing the detective work then showing me. However I'll hopefully be able to put some of this news to good use.
 15 points
 -
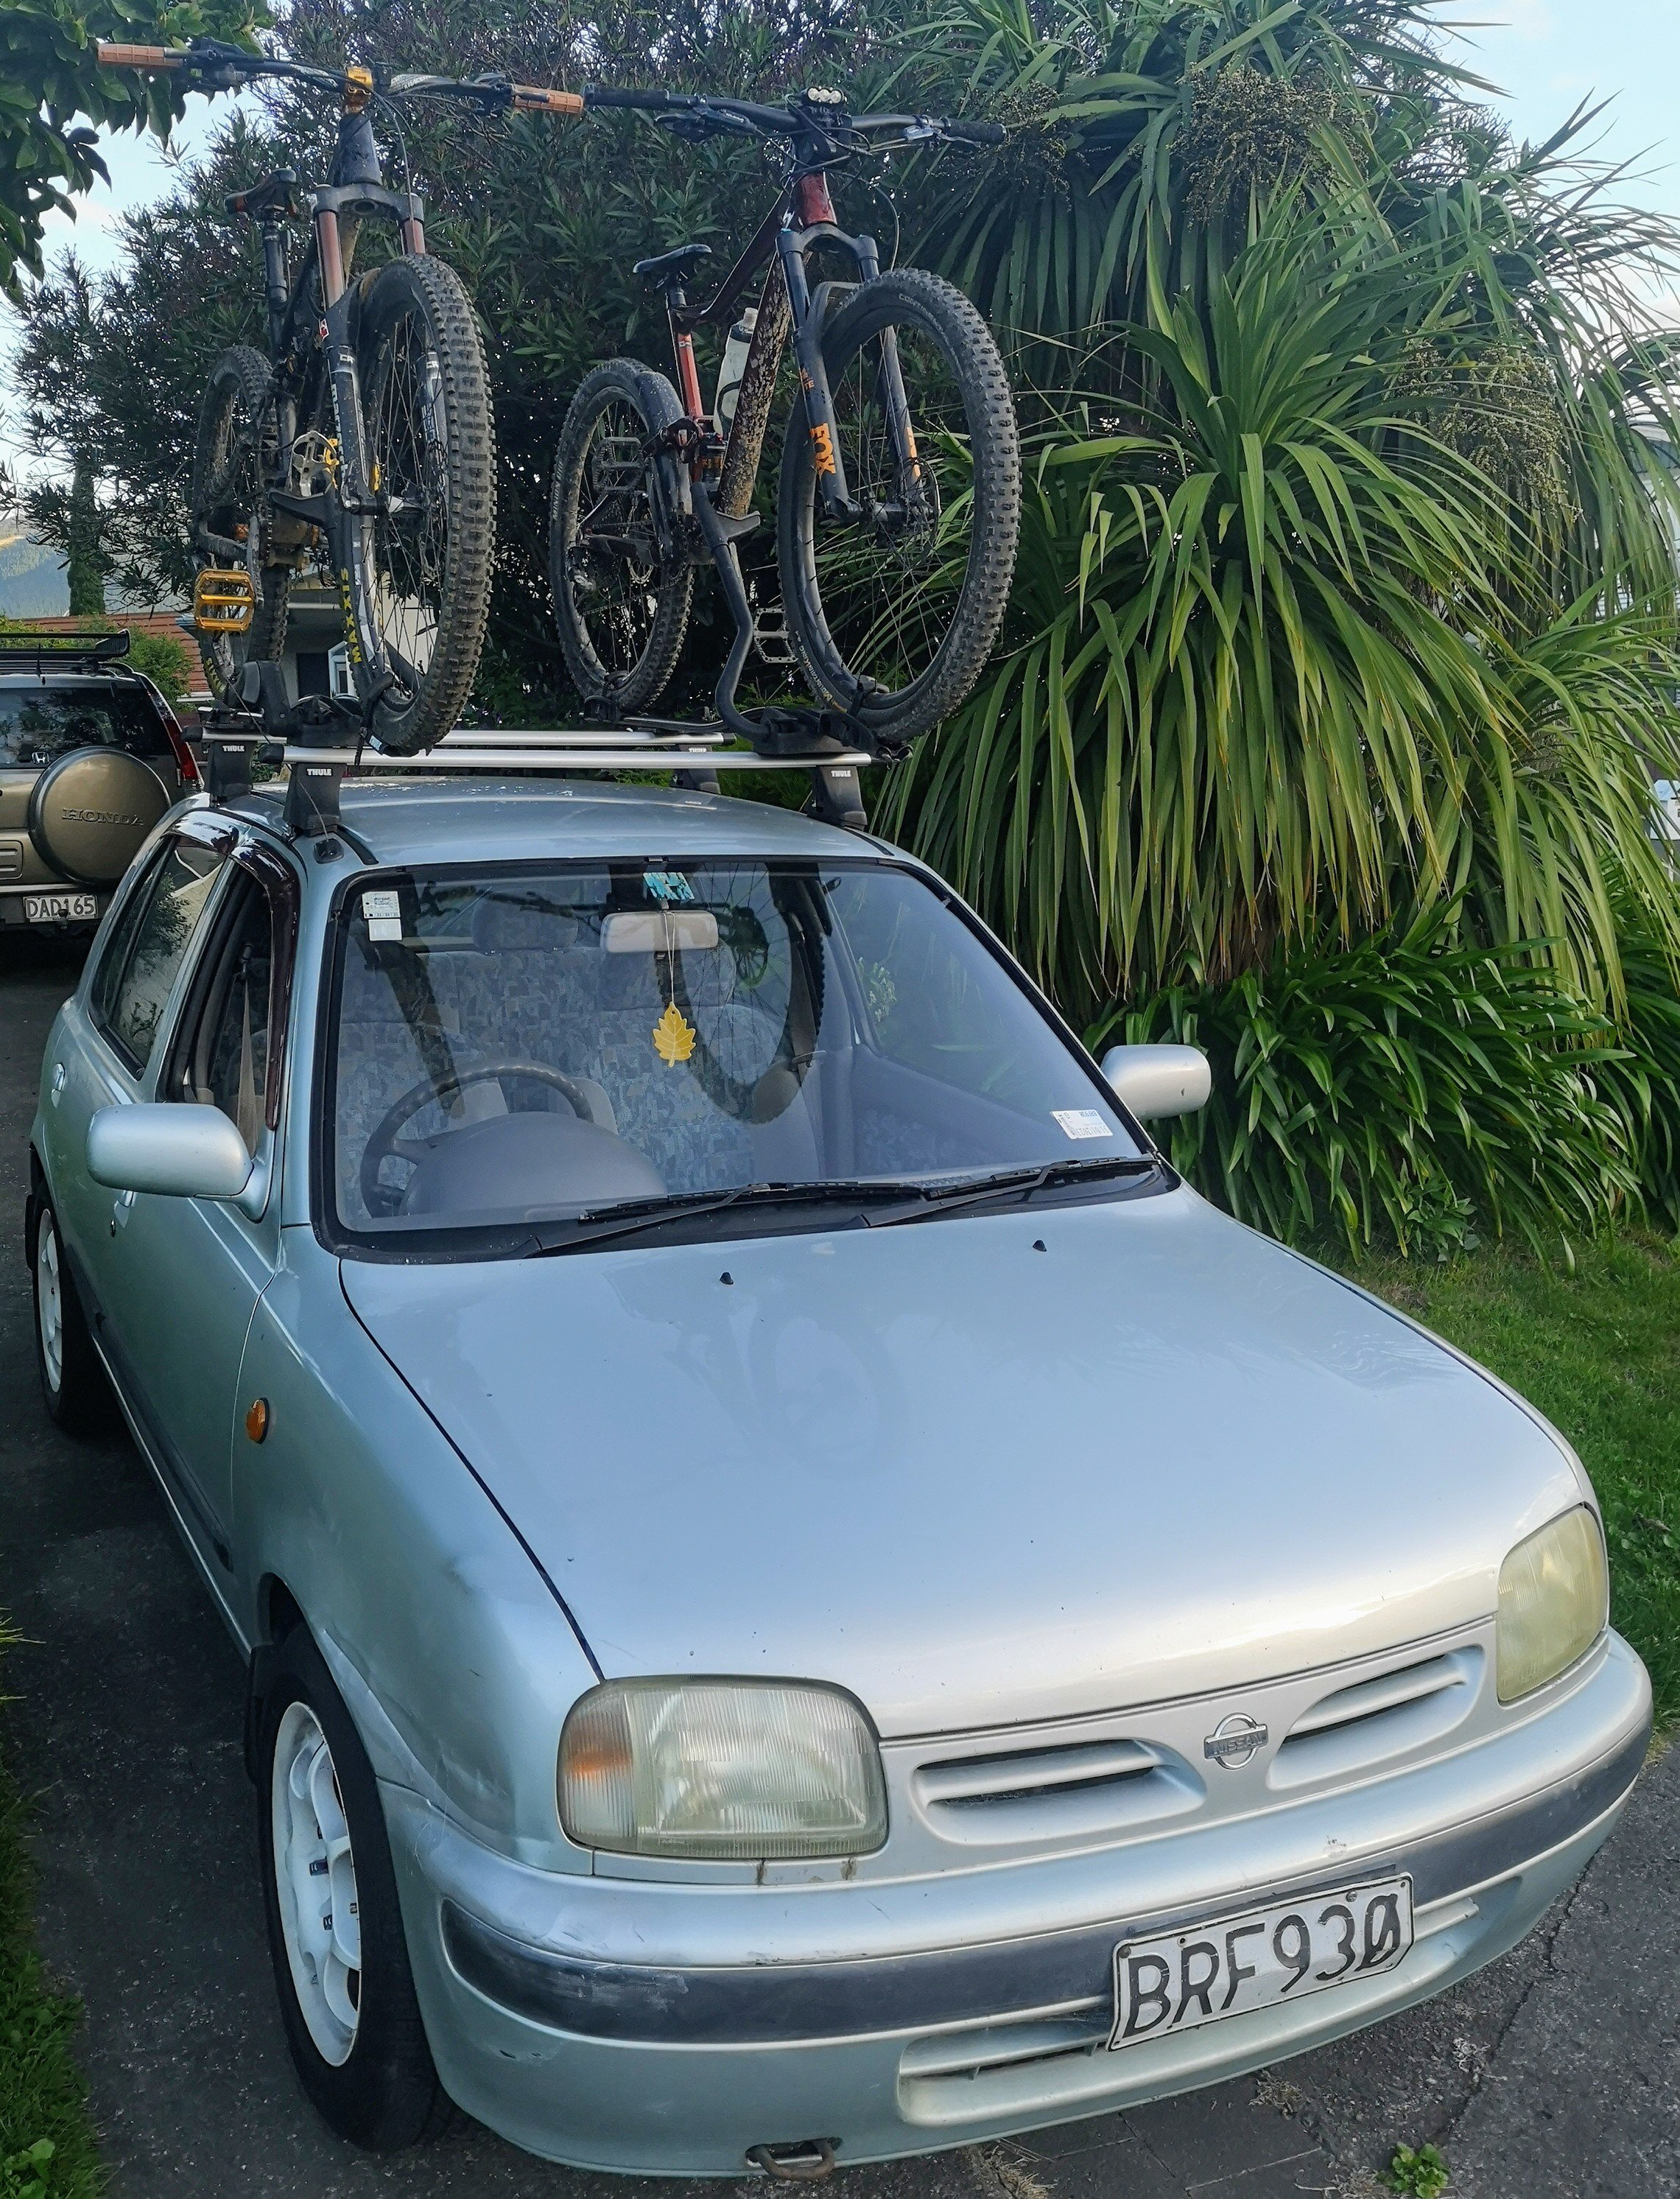
Wof level unlocked Am a bit torn on tyre sizes , I probably need to get used to it but they look a bit balloony Drives mint though plus extra ground clearance means I can attack speed humps with vigor
7 points
-
No pics. but engine and box is back in the hole, new water pipe is spot on. got the headers mated up to the exhaust that was on the 12a. headers are 4-1 and collect into a 2.5” collector, then into a flexi, through 2 resonators and out to the dumpy. I don’t want the raspy tinny 4age twang that these can give with big pipes. also got the starter bolted up and wired in, so now the entire passengers side of the bay is finished off. only have the intake to fit up, modify a couple of wires once I figure out which terminals go where on the alternator. btw the 12a loom is a perfect fit to the 4age for hook ups. even got the oil pressure and temp senders fitted and wired without modding anything from the 12a. even put oil in it and spun it over by hand. still need to fill the gearbox and fit the shifter. progress is progress4 points
-
After checking that my new radiator hoses and the tranny cooler lines all line up, I spent the rest of the morning cutting out the sides of the radiator support panel to expose the full core of the new radiator. The bite sized chunks out of the right-hand panel are the cut outs for the original a/c lines. The new rad is temporarily bolted in position, but I can't finalise the mounts and filler panels until I've sorted out my new a/c condenser location and its mounts. Talking about a/c, just before lunch I swapped a few yarns with my local supplier who has suggested replacing the current 18 inch condenser with a 23 inch unit which will reduce the generated heat. With a bit of luck I can pick up the new unit tomorrow and then button everything up. Thanks for looking.
4 points
-
I’ve just opened it all back up, peened the nut edge, reassembled. Fluids done. Also new clutch cable, chain and sprockets, mounted the extra fuel tank, made a mount for a kick stand. She’s pretty good to go bar the new cdi.
3 points
-
There was no tricking it. There must be a feed-back loop type thing wired in so any attempt at tricking the wiring with simple solutions ends with it shutting itself off when you get to the tricked gear. I've ordered the new CDI, fingers crossed it gets here in time for the east cape ride. https://japan.webike.net/products/25012482.html It left Japan nearly two weeks ago so hopefully its not far away now.3 points
-
3 points
-
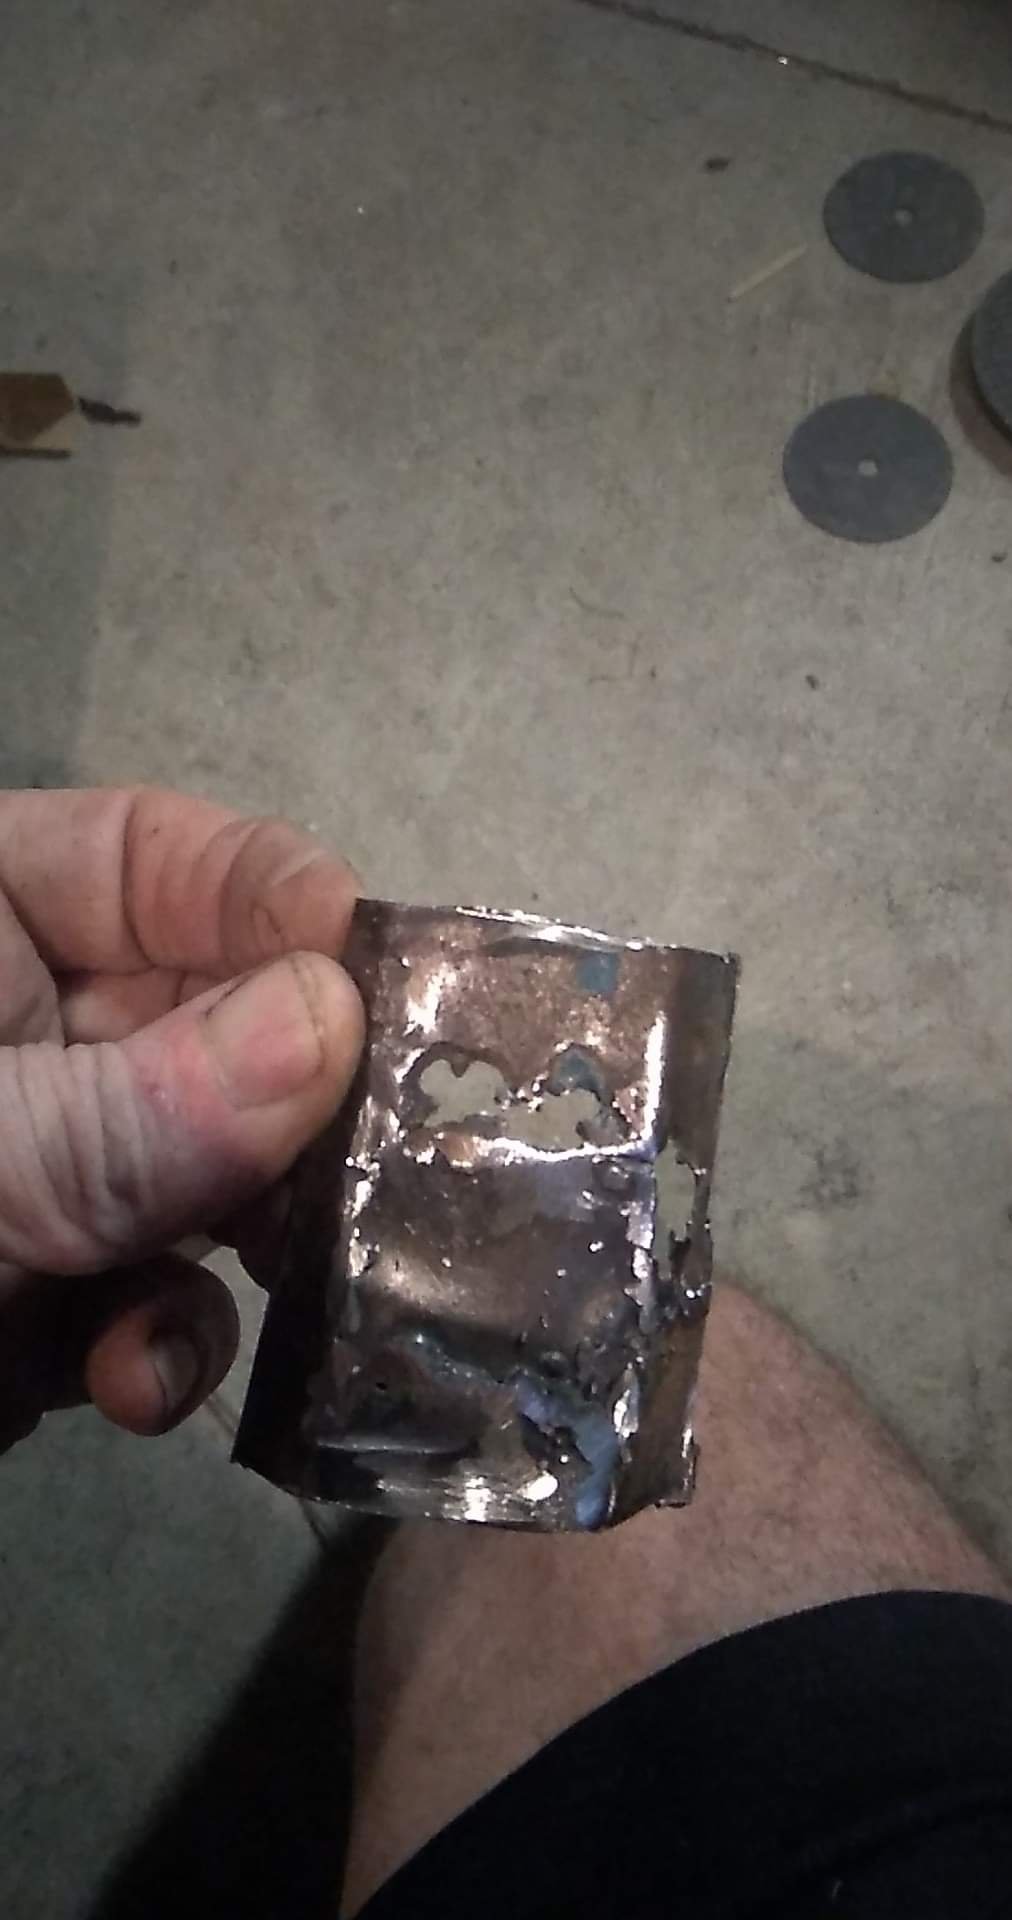
Latest on this little bike. I did get hold of a dent puller kit, the kind that used hot glued pads, and that did manage to remove the worse of the dents. Where the metal is creased though I can't do much unless you can get to both sides of the damage. But it's certainly improved. Unfortunately manipulating the tank made the inevitable rust pitting come to light as the picture shows! It is only that bottom corner so far from where fuel was sitting while the bike wasn't used I imagine. So my plan is to completely strip the paint off the tank. Fix as best as possible the dents and TIG braze the holes. I have the tank soaking in a phosphoric acid bath currently to remove all the rust and will fill it with water before brazing it so I don't explode myself. I will then line the inside with Red Kote sealer which is what I used on the fuel tank I made for my Austin 7 special and that seems to be working very well. Since I had the tank removed I stripped and cleaned the fuel tap which is what normally attached to that threaded bung there. Simon3 points
-
Wow , so it's been a long time yeah ! Sooooo I brought myself a welder to finally start on my escort again ! I've become motivated again and have started working on the pannel van again. Tonight I spent a long time making a patch for the left hand side inner wing pannel. I enjoyed it too be honest and not putting any pressure on myself to get it done... no rush = good job ! Anyways here's some pics !
2 points
-
The 200 in a slick generally translates to about 225 in a road tyre equivalent.. I priced and sized some Hoosier tarmac rally tyres a while ago, so yeah for sure you'd be best to get your hands on some to get a feel for how they might fit.2 points
-
Yeah the guy said hes got some that are 180 wide tread and some 200 wide but they are both the same real world dimensions. Im gonna be in a bit of trouble if theyre much wider than a regular 205 wide tyre. But! Just thinking about it, ive still got basically zero camber in the front. And the rear has room. Adding a few degrees would be win win for making them fit as well as cornering goodness. If they do work out well I will be stoked.2 points
-
There's still a good number of FT40 and FT50 chassis being raced in the north island's Formula Open series, so there's potential to get the right second hand tyres from those teams. They'll have more race KMs on them and might not be as cheap as they were in TRS days, but it'll still be an option for club racers if you talk to the right people.2 points
-
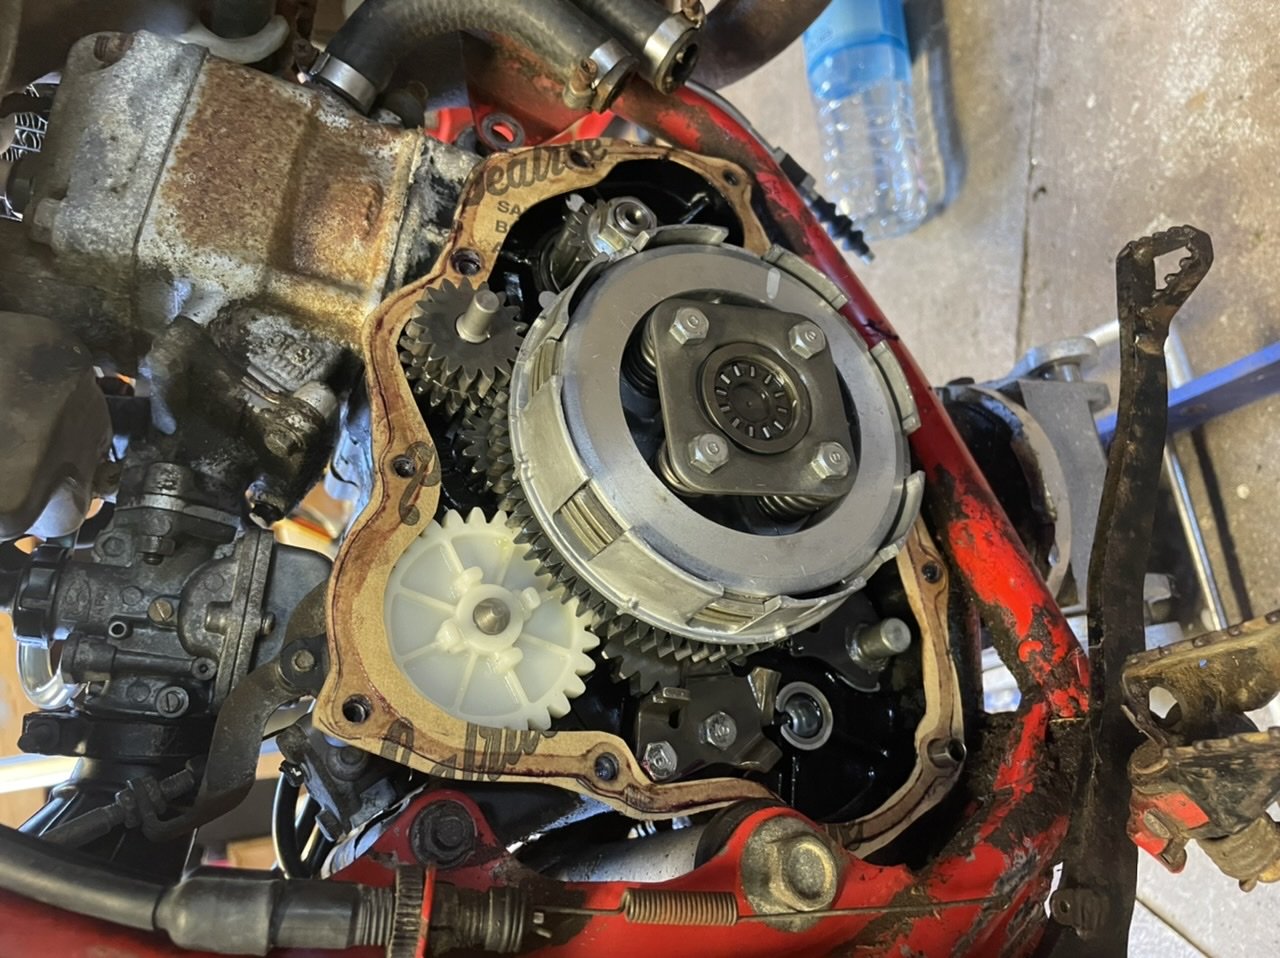
I made a start on replacing the clutch last week. What a ball-ache of a job... First snag was that one of the clutch cover bolts, and hence the clutch cover, are tucked in behind the frame. So I had to pull out two engine mount bolts and an exhaust mount to jack the engine up slightly in the frame. Next I discovered a special tool was required, which pretty much put the brakes on the whole exercise. Trademe came to the party on the tool pretty quickly. So last night, Bucket Barry and I got set on finishing the job. I had overlooked buying a new gasket, so BB spent the best part of 2 hours making one. Buzzed the clutch nut off with the new tool. Whammo its all back together. Completely assembled, just waiting for new fluids. Then Bucket Barry texts me at 11pm last night... He must have woken in a cold sweat... "Did you remember to do the lock tab on the clutch nut?" Fuckety Fucking Fuck2 points
-
So... The Michelin TRS tyres are/were absolutely awesome (They are a F3/F4 tyre), they work from cold, have amazing amounts of grip and were cheap, hence why I run them. So for track days they would be perfect for you. Unfortunately with the latest TRS Chassis they changed rim and tyre sizes and moved the rears to the front and went bigger again on the rear. So the easy access to these tyres is now gone and everyone who was running them are hoarding them (like me) . The new tyres on the TRS are Hankooks which are nowhere near as good. You can still find the old tyres but they will be at least 2 years old (not really an issue they are still amazing) but it's a lot harder to find a decent set as they are usually pretty worn. Compared to semi slicks there is no comparison, they will have more grip and will last a shit load longer. Just to be aware the tyres were designed for a 9" rim, but most guys run them on 8" rims, this means they bulge out to 220mm but tread is still 200mm they have a diameter of 540mm. The new TRS fronts require a 10" rim and 580mm diameter. The rain versions I've been told are amazing in the wet, the grip is like driving in the dry. A lot of guys use them for hill climbs and sprints where you need "treaded" tyres. If you want new slicks you are looking at around 450+gst a tyre, and I can put you in touch with the person who brings them in, seems like a lot but for you they would probably last many years and still be faster then semi slicks. For pressures run them at 21 psi hot and don't let anyone else tell you otherwise, yes it will be slightly rolly, but get used to it and the grip and life of the tyres is that much better, just be careful on initial warm up as you will be starting at 15-17psi so avoid curbs etc.
2 points
-
I am starting to froth now. Bike almost good to go, just gotta sort rear wheel.
2 points
-
Time to crank up the router so i can woodprint some 'Its motherfucking Dynafari time' tees...
2 points
-
Progress has slowed but it’s purely because it’s fiddly boring shit.. putting column back in, tracing wires and cleaning terminals, hooking up fuel tank and breathers, figuring out and making a loom for reverse safety switch which was missing, aligning doors, shifter linkages, making a battery clamp, drilling holes in boot floor for running the plate light and fuel sender wiring, making a rear parcel tray board, etc etc etc..also swapping the spindles from side to side.. turns out you can switch them.. now the brake hoses reach! The underside is done and only the driveshaft to go back in! didn’t achieve over the long weekend as we had visitors, and it was hot as shit in the shed last Sunday so feel a bit lame for not cranking along but it’s happening. The vin plate guy came and checked it out, was all positive really. Said he’s passed worse seatbelts in the past so I’ve cleaned mine up and we’ll see how it goes…he liked that the Chrysler tags were still intact. I mentioned I’d rather no rears and change to lap fronts. Im now to truck on and then get in touch for another pre-check before the real deal incase there’s some bits to re-jig. My car was missing these roof gutter trims when It arrived, I wasn’t overly keen to try ship them from the states and have them arrive tied in a bow.. was checking out Muscle Car Parts (Nelson) website and saw they had a set in stock! A bit spendy, but couldn’t say no, they arrived a day after and are brand new. He was ace to deal with and got tracking emails at all stops. little furry friend inside my filter Underside as I was manoeuvring exhausts back in.. haven’t bothered flashing them up much..I hit them with some shitty old silver paint I needed to use up so they wouldn’t deteriorate too much while outside since removing them.. I plan to run headers when it’s finished and the exhaust might be too loud and need work later anyway.. we’ll find out. i-spy crusty manifolds When pressed, vin man said I would get away with taping up the worst parts of the seats and then running seat covers.. that will buy me some time and several grand! I’ll absolutely reupholster, but it’s was an obstacle in getting it on the road. id approached a well known upholster with a focus on the vinyl roof and headlining so I can get screens installed. Hes not likely to get to it before muscle car madness end of January. Vin man mentioned id need to hide the sharp bits in the roof or I would fail.. so hood lining moved up the list. He and Mia mates use a young guy very local to me so I paid him a visit and he recons we could get it done in time but suggested buying premade kits from USA and he install. Queue frantic pricing and seeing what was actually in stock. Haven’t confirmed anything yet. I did fill the cracks and drop off the dash pad for him to vinyl wrap in the mean time..that will dial in the dash assembly when it comes back.2 points
-
I've finally finished the inlet plenum (although I want to add some paint/tidy some bits) and I'm pretty stoked with it. The end result is a bit of fun. Just mucking about after I had some ideas pop into my head and wouldn't leave. I had to do it. So where I left off last time I had made the base of the plenum which I continued on piecing together, changing some ideas and sussing out construction issues as I went along while keeping the design close to some original drawings that I'd done while visiting my parents. Building the box... made some stainless trims to smooth flow out of the rectangular hole feeding the plenum and also hide interior welds... Tubey bit sticks up facing towards the front of the car... Boxy bits getting tacked together. Welded on the inside too. Enough tacks and welds that it would hold fast and not 'pull' when the outside welds were added Tacked together bits getting welded on the outside... Stumpy elephant trunk... (it could be described worse) Back to milling bits of alloy... Making these bits.. Which were then very, very carefully bent to suit the curved lid of the plenum... Drilled and tapped to suit the plenum body... Lid fits nicely onto the body, sealed with high density foam and held in place with dome headed socket screws. Then the throttle body flange needed welding on. I took my time so nothing warped but luckily it was pretty thick ally anyway. Tacks then welding. Added another layer so I could file it down flat and have a good sealing area. In pics.. Next thing to make was a little curved bit of alloy that would surround a bit of acrylic. I started with some small section alloy capping and milled it down.. It had to be bent in 2 planes. Out with the shrinker stretcher which luckily did almost all of what I needed, the rest being finished in a vice with hammers and pliers. Turned out like this... I got some 5mm acrylic and cut it to the right size. I made a form from two bits of alloy, shaped to the same curvature as the lid. Out with the heat gun... Setting the forms and squeezing together... Checking the curves formed are correct .. Pretty good matches the alloy rim... Drilled some holes in the alloy and through the acrylic (carefully.....! ) which as I predicted was tricky next to the edge and I ended up splitting a couple of the trial domes. So I made this little tool, using a bit of steel I machined to a point and one of the little wooden handles I had made ages ago for wood burners we make. Heated the point up with the oxyset and pushed it through smaller pilot holes drilled... Around the same time as I was playing with bits of plastic some leds with a controller that I'd bought online turned up. I chopped them up and reconfigured bits to suit the underside of the lid. Tiny little solder pads on these. I checked they worked... A hole was cut in the plenum lid to suit the acrylic and alloy rim, which was then bolted in place with little socket head screws, again sealed with foam. Neat. Now I could look inside. Then I stuck those led lights to the underside of the lid. This was all needed because these little treats turned up a while back after I first had the ideas pop into my head. (thanks Ali express)... Lego fun.. The detail... I glued the Mandos so they'd never come apart. They got screwed and glued onto a little section of alloy. I cut a section bit mirror to size and stuck it to the back wall. Then the Mandos were bolted into their new forever spaceship home complete with some signage ... Zooming out from the front of the spaceship/engine... Plenum sits nice and low... I did a little video for fun. I couldn't resist... Fun is over. I now have to crack on with boring water pipes and exhaust manifold building (I must order some stainless bends!!!!) But yeah- I'm pretty happy with what I have just made. A bit of silly fun I know but hey- I'm not a very serious person I'll really enjoy seeing the response the 'Mandalorian spaceship' gets from the more serious type of enthusiasts at car shows in the future. I hope it works out for me and this is a thing that happens.2 points
-
1 point
-
1 point
-
Ahh right. Pooz. Probably wont work then. Cheap enough to give it a try though. Either way im keeping the drag tyres on one pair until at least the oldschool drags. That and getting to the dyno are main priorities after WOF.1 point
-
Same here, though my seizing seemed to sort itself out after the Mt Patriarch hillclimb section!1 point
-
Yeah been talking to someone who still runs the older cars. They may very well be a bit flogged out compared to deals from the past. But thats fine because im still not 100% sure if they will fit okay yet.1 point
-
TRS was good as they had new set each weekend so it forced them to get rid of them early, so sometimes they tyres had only done 1 race. With these guys running the old cars I suspect they will run the tyres into the ground (using in testing etc) since they aren't in the same type of competitive series with the same type of money being thrown at it, but very happy to be proven wrong on that one.1 point
-
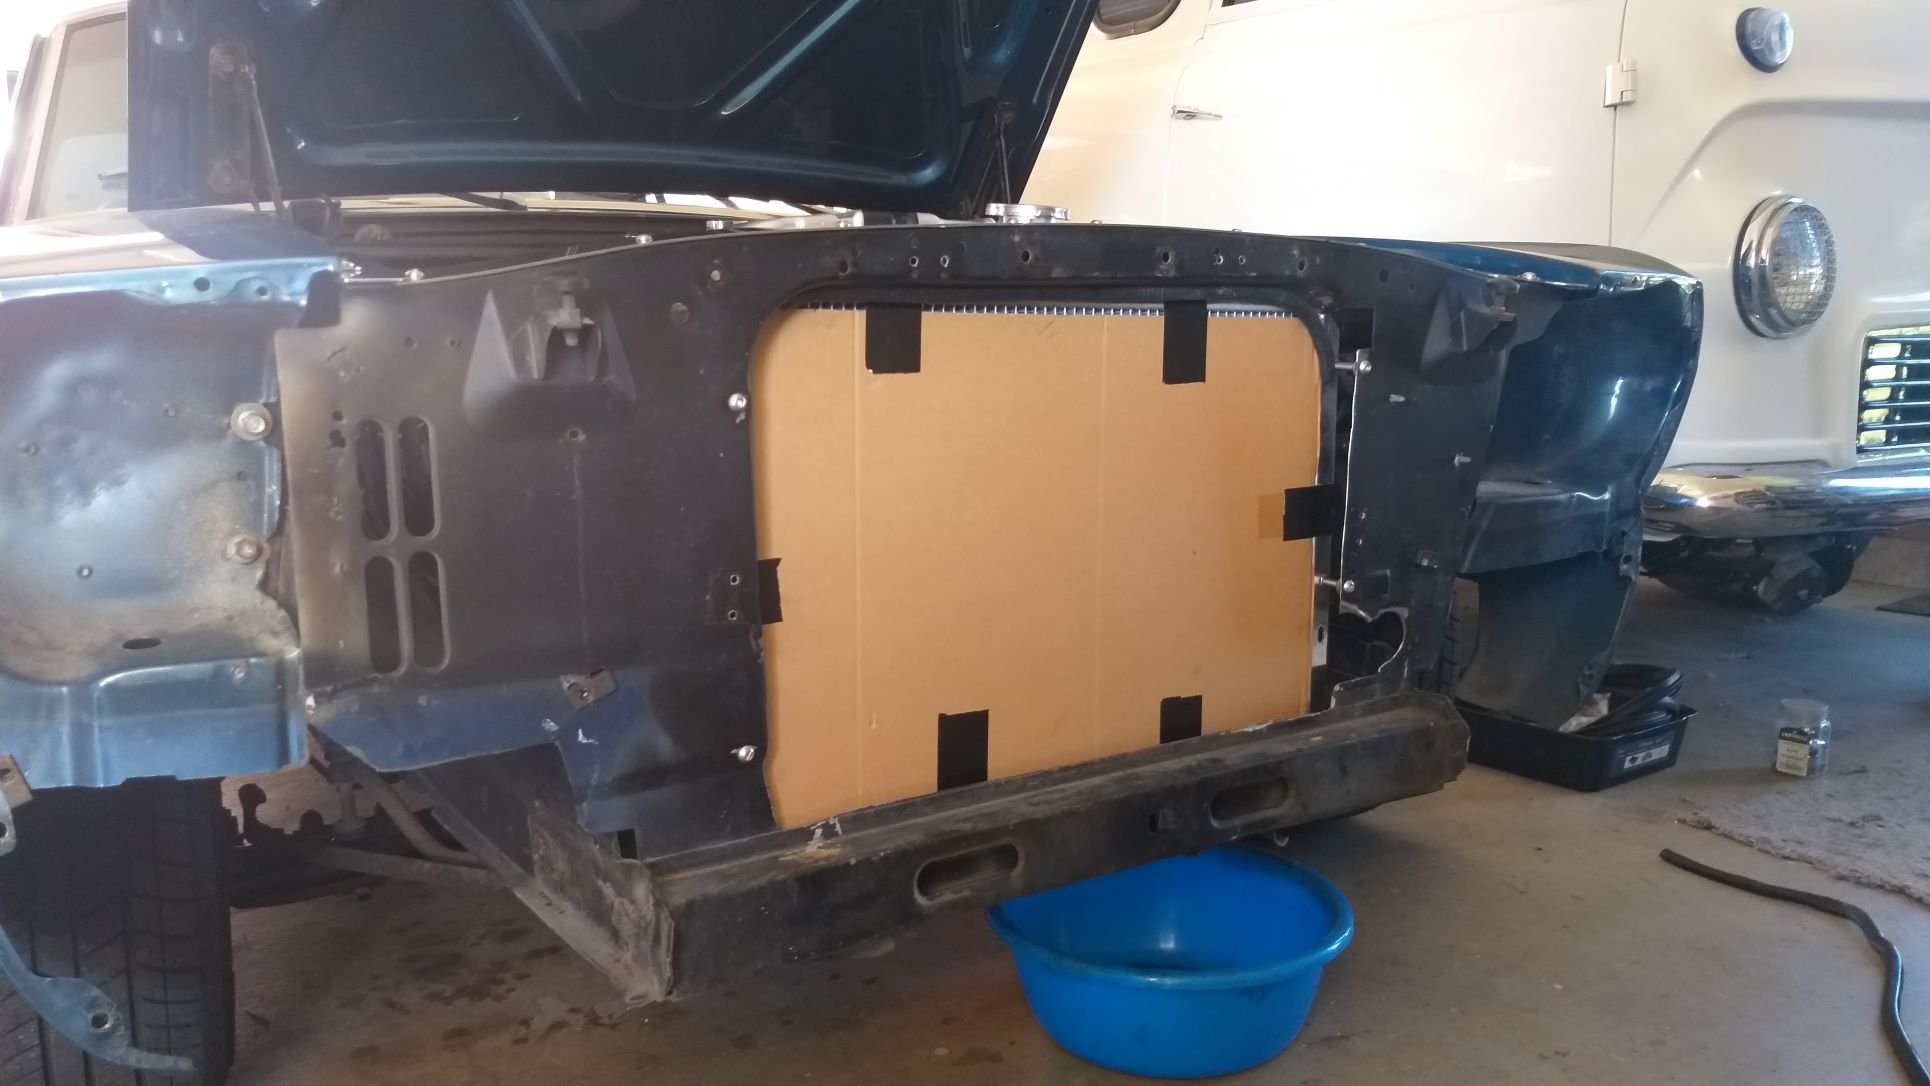
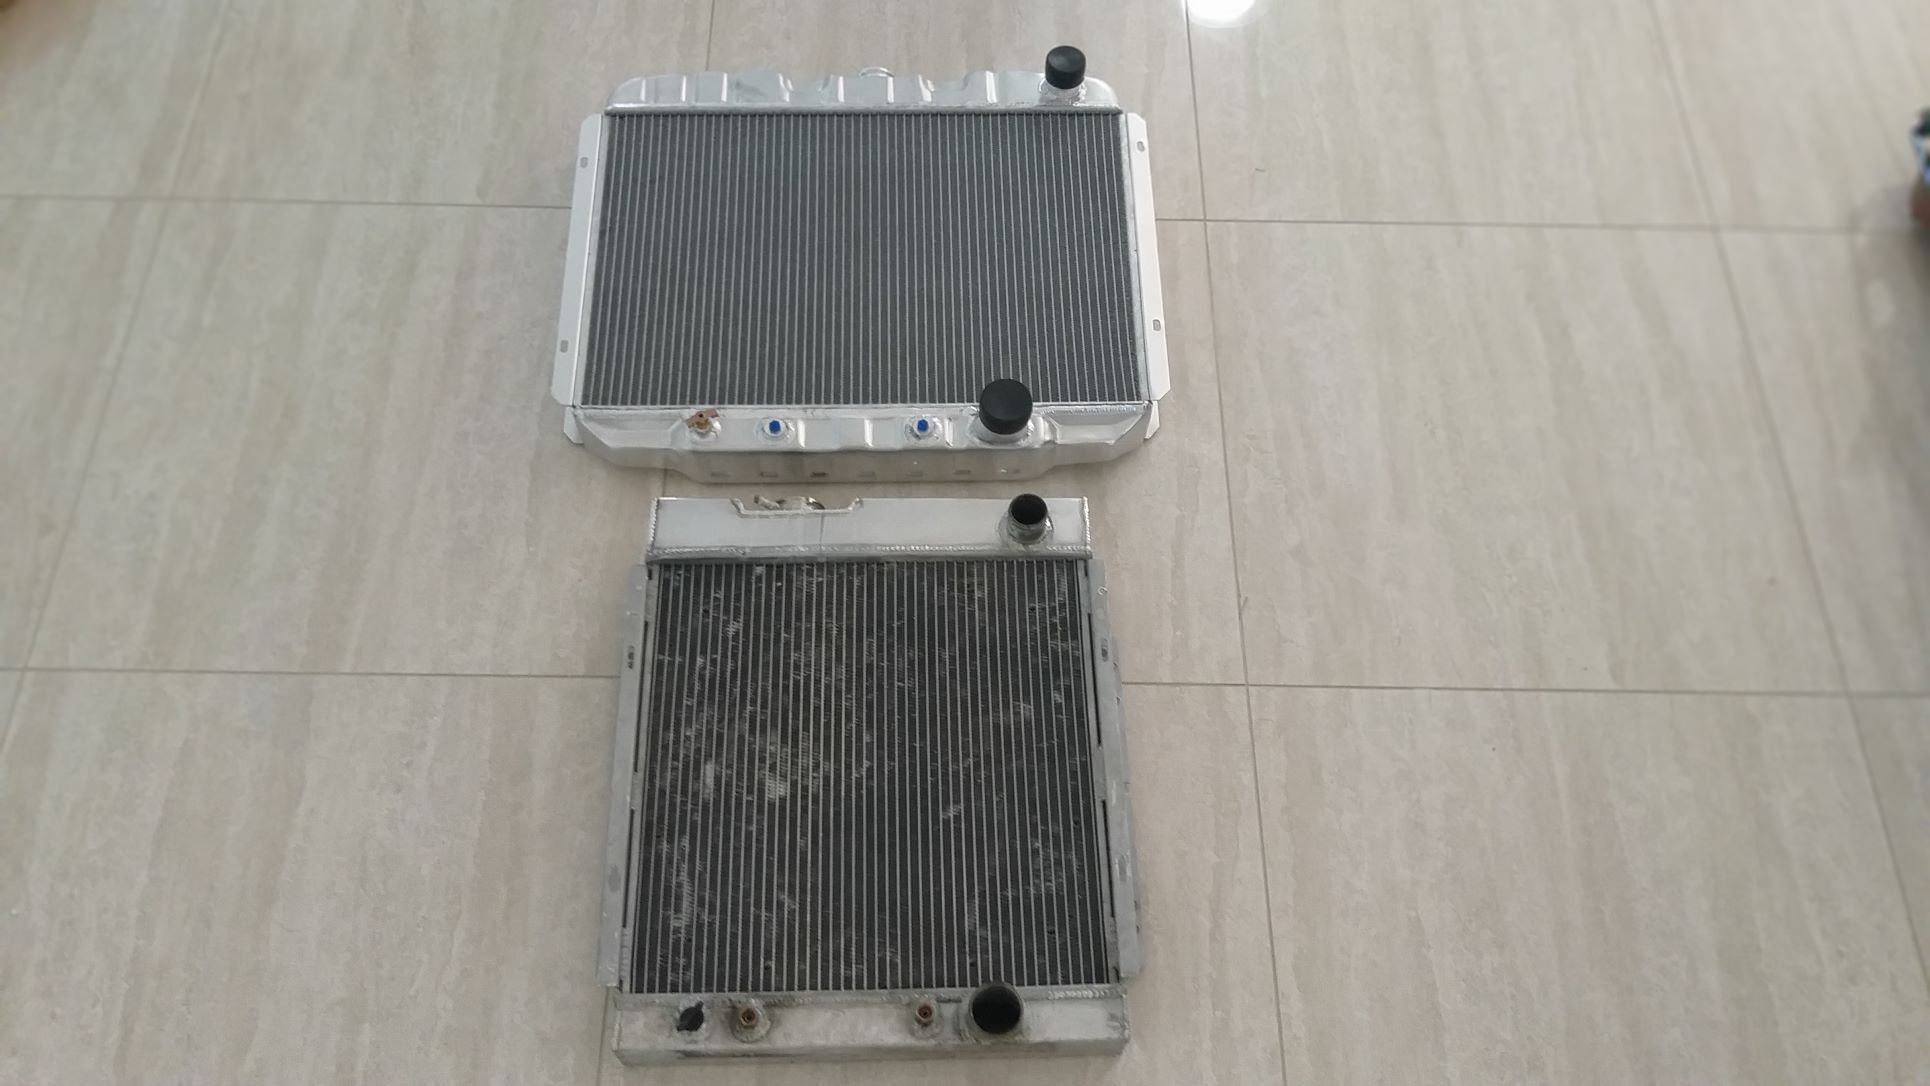
Cooling Issue - Chapter 9 A while back as part of my cooling diagnostic exercise I flushed the system, but I figured it was worth giving things another good flush before installing the new radiator. Managed to do three flushes over the past two days and I reckon I've got things as clear as I am going to get them. So, this morning I cracked into the radiator upgrade. First step was to strip the front of the car which I managed to achieve before morning smoko. With the old radiator out of the car I was able to put the new and old next to each other for a quick comparison. My plan is to test fit the new radiator to make sure that my tranny cooling lines and new radiator hoses all line up and once I'm totally happy with the fitment, I'll then pull the rad out to butcher the bigger opening. More to follow later in the day.
1 point
-
Very jealous Greg! Looks cool1 point
-
Got some old tires from a friend's place, fitted new rim tapes and tubes, this will get it on its wheels to finish the mudgaurd stays, I will get new tires at another stage, front tire is a race tire so will probably be extra dodgy.
1 point
-
Dave made them cool.1 point
-
Most of the people I see with them don't strike me as the type of people that care about things like rules and WOFs1 point
-
This is coming round mighty quick now!1 point
-
Yay, finally received the final piece to the puzzle. heater bypass pipe, and it’s not rotten. now I can fit this up and get the motor back in the hole for the last time. still need to source a T50 clutch slave and pin. haven’t done much on this due to waiting on bits. got some tinkering done on the Ute though, engine mounts tacked in place, gearbox position sorted. Ready for the gearbox crossmember to be done and measure for the driveshaft. I’ll need to go back to a banging bolt for the rear oil cooler fitting due to space. So hopefully I can get a -10 an bango fitting for this. got a radiator and oil cooler to pick up for it, slightly narrower than the one that was in the hunter. that rad will stay in there to cool the 4age. wiring on the Ute is simple as, just a matter of redirecting some wires, fuel system is already done, utes use the same pumps as a s1 rx7, factory facet. picked up some black d window rims for it, 17x8s. Should look alright, bloody heavy though. I’ll need to order new door frame and window rubbers for it. but hopefully the hunter will be up and running fairly soon.
1 point
-
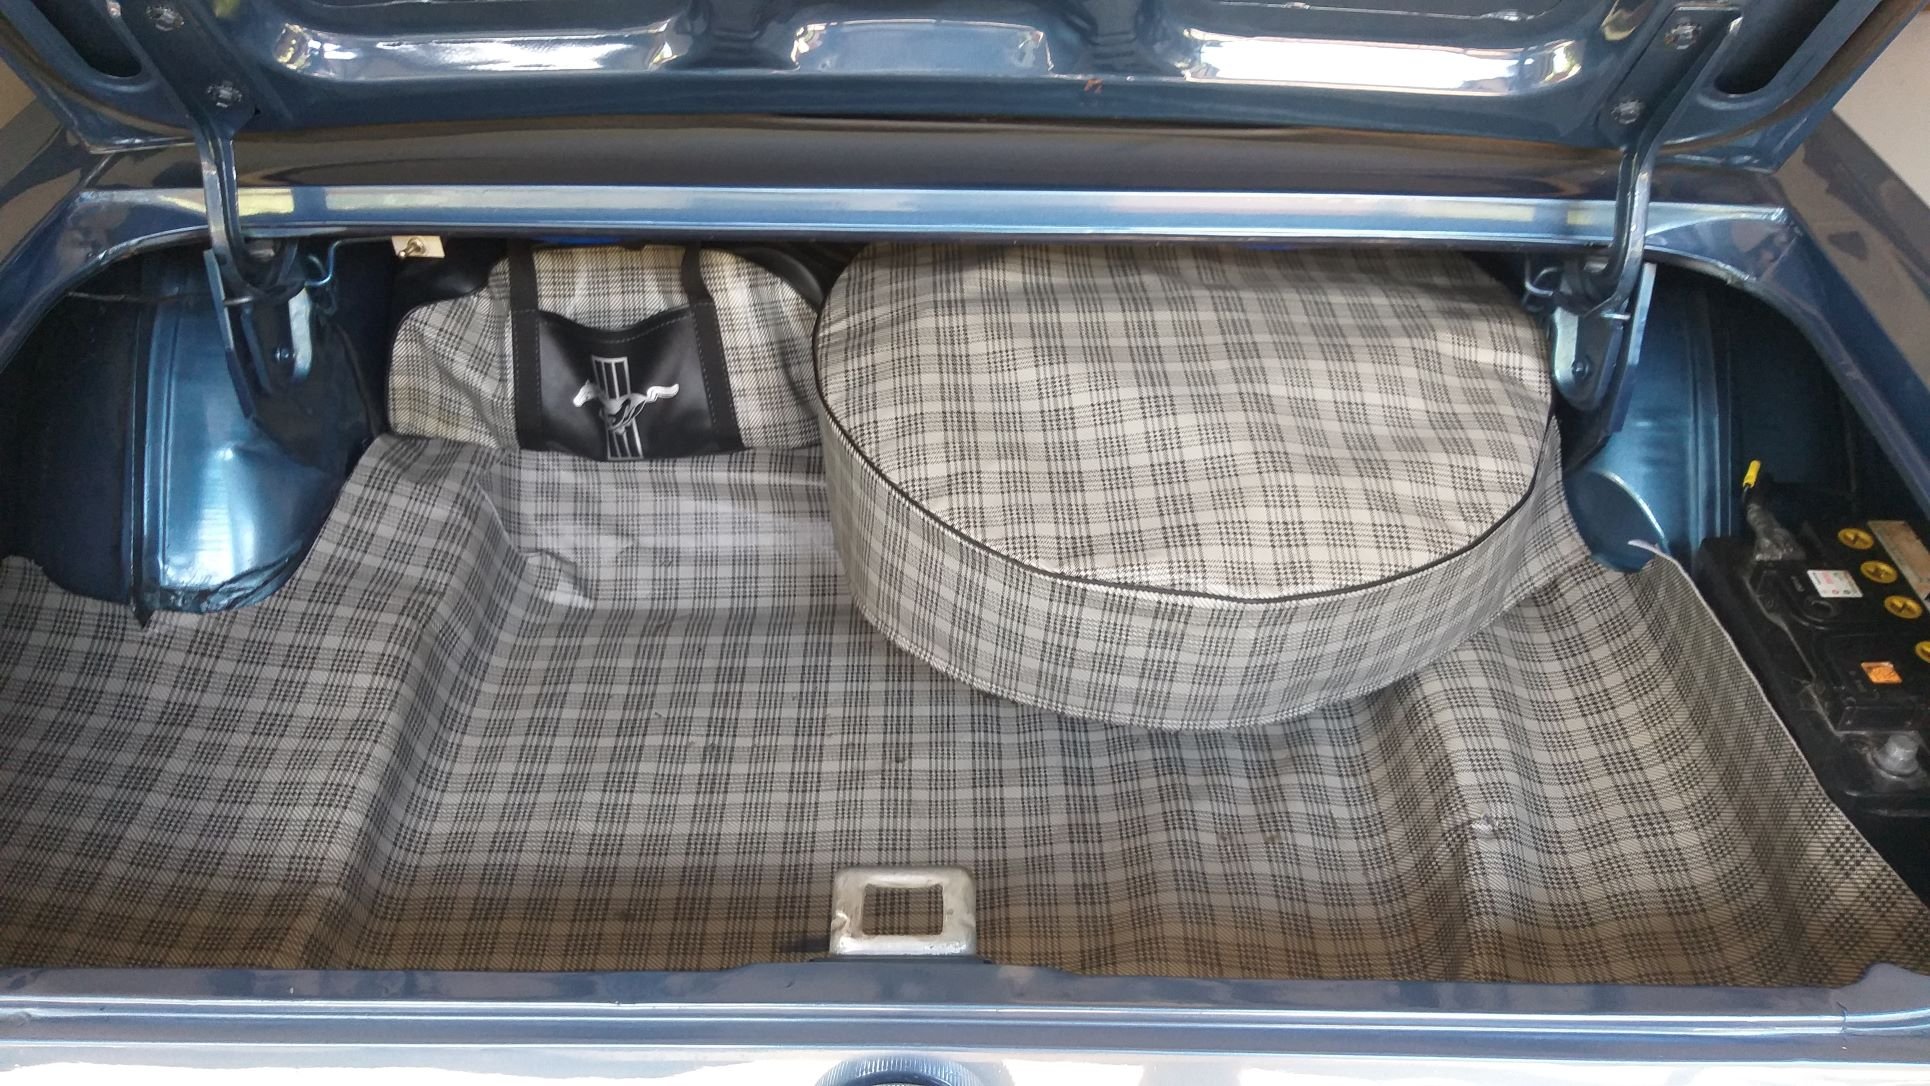
And, that's the boot more or less sorted. The existing boot liner is a bit tatty, but new ones are available so I'll order a fresh one sometime in the future and will then cut up the old one to make a neat little battery cover. That should complete the look nicely. I'm happy with the new spare wheel position as it has freed up some extra useful boot space. Thanks for looking.
1 point
-
What a time to be alive
1 point
-
Current state of play. Might have got more done if hadn't picked up the coof last weekend.
1 point
-
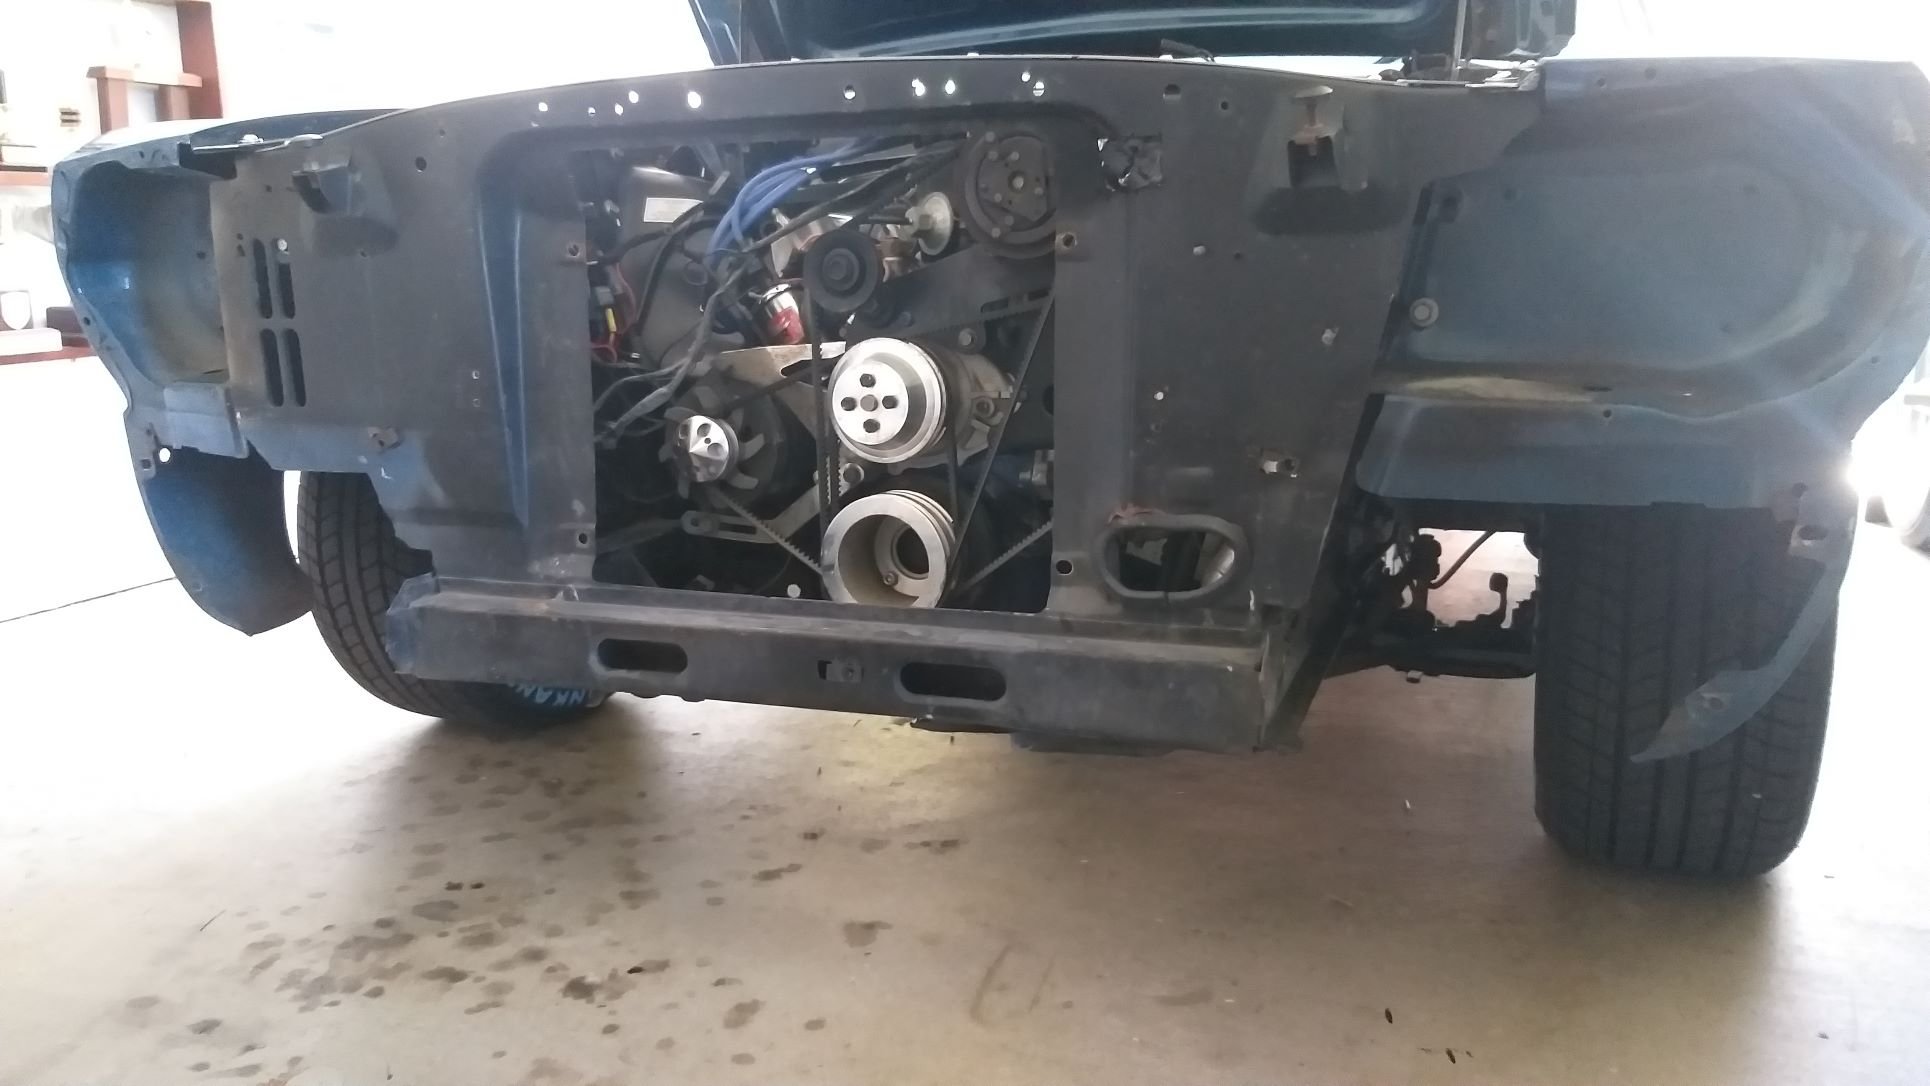
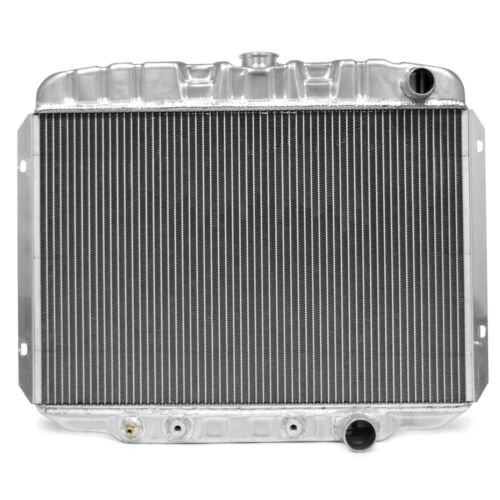
Cooling Issue - Chapter 8 I’ve been running the Muzzy sans a/c condenser unit for just over a month now and the cheap and cheerful 3 core radiator is coping really well with the engine temp barely making it past the thermostat opening threshold. So, to my simple way of thinking all indications seem to point to an air flow issue. I’ve spent a good bit of quality time with my good friend Uncle Google and have come across some interesting info. As previously mentioned in 1965 and 1966 the 260 and 289 equipped Mustangs were fitted from factory with a 17 inch radiator. A/c equipped cars were fitted with a radiator shroud. In 1967 Ford moved to a 20 inch radiator with a 24 inch option for a/c equipped cars. Then in 1968/9 they moved on to the 24 inch radiator across the range. Although by this time they were offering big block power plants as an option they were still fitting the larger radiators to the small block equipped cars as a standard offering. Now you have got to ask yourself why would Ford spend the extra money on a bigger radiator if they didn’t need to. The general consensus from those “in the know” is that the cooling on the first cars was marginal at best and borderline critical on cars fitted with a/c especially in the warmer states. I then spent a good bit of time researching how to upgrade one of the earlier cars to the 24 inch radiator and it’s a pretty straight forward exercise. Apart from having to cut open the radiator support panel to suit the bigger radiator the only other major issue is the battery which is in the way. Many have overcome this by cutting a chunk out of the inner fender panel and welding in a shaped panel. That together with the installation of a ’69 battery tray results in the battery being tucked up against the inner fender rather than the radiator support panel. The other option is to relocate the battery to the boot and this is the way that I intend to go. Not only does it solve the space issue but it also allows me to add an extra level of security as the bonnet on the earlier cars opens from the outside and with a starter solenoid conveniently mounted in plain sight on the inner fender and no steering lock the old Muzzy is a prime target for a spot of thieving. Having the battery tucked away in a locked boot with an isolator switch fitted will hopefully make things more difficult for any teenage joy rider who is ballsy enough to take on a left hooker. So, with this all said I’ve ordered an ACP Maxcore 2-row Performance radiator from Custom Mustang in Victoria. Even although it is only a 2 core the unit is fitted with 1 ¼ inch tubes so the flow is equivalent to a 4 core but with a narrower profile. It still has the inlets and outlets both on the right hand side so from a plumbing point of view all that is needed are the standard upper and lower radiator hoses from a ’69 Muzzy. Anyhoo, here is an image of the sexy looking Maxcore which will hopefully reach me sometime next week.
1 point
-
Wouldn't the smaller valves do less damage to your piston?1 point
-
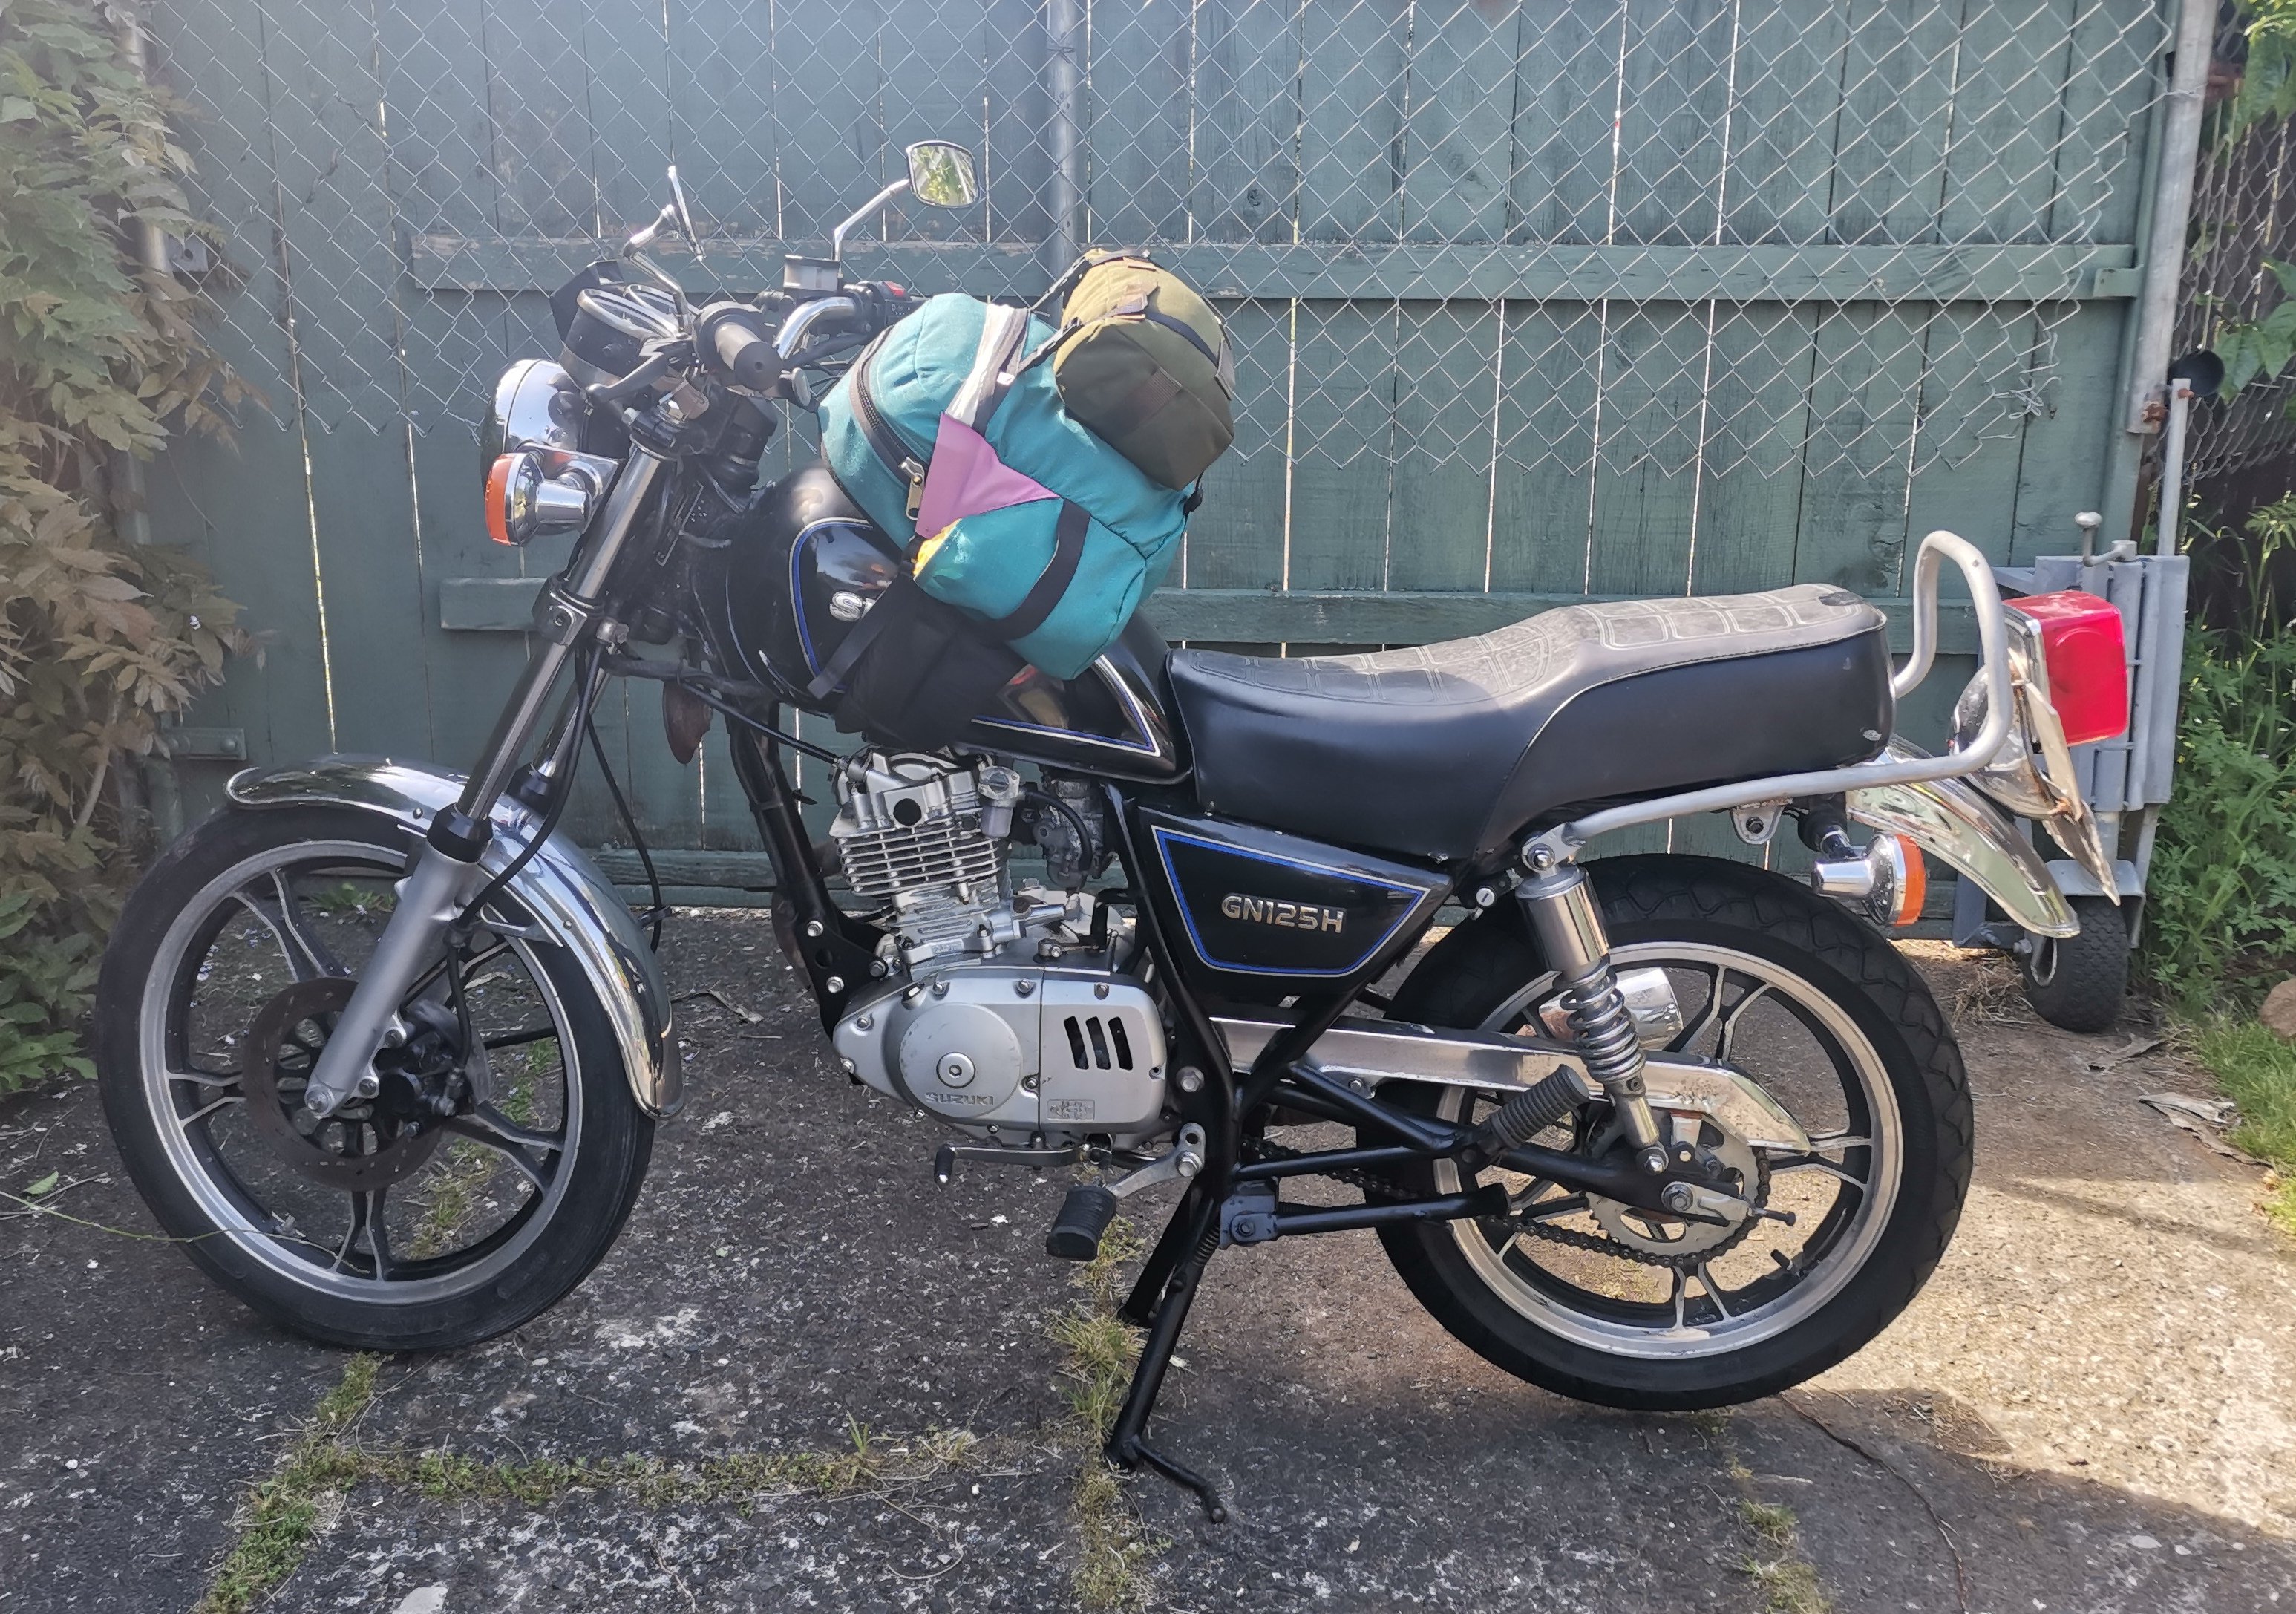
Totally stock GN125 for the hell of it
1 point
-
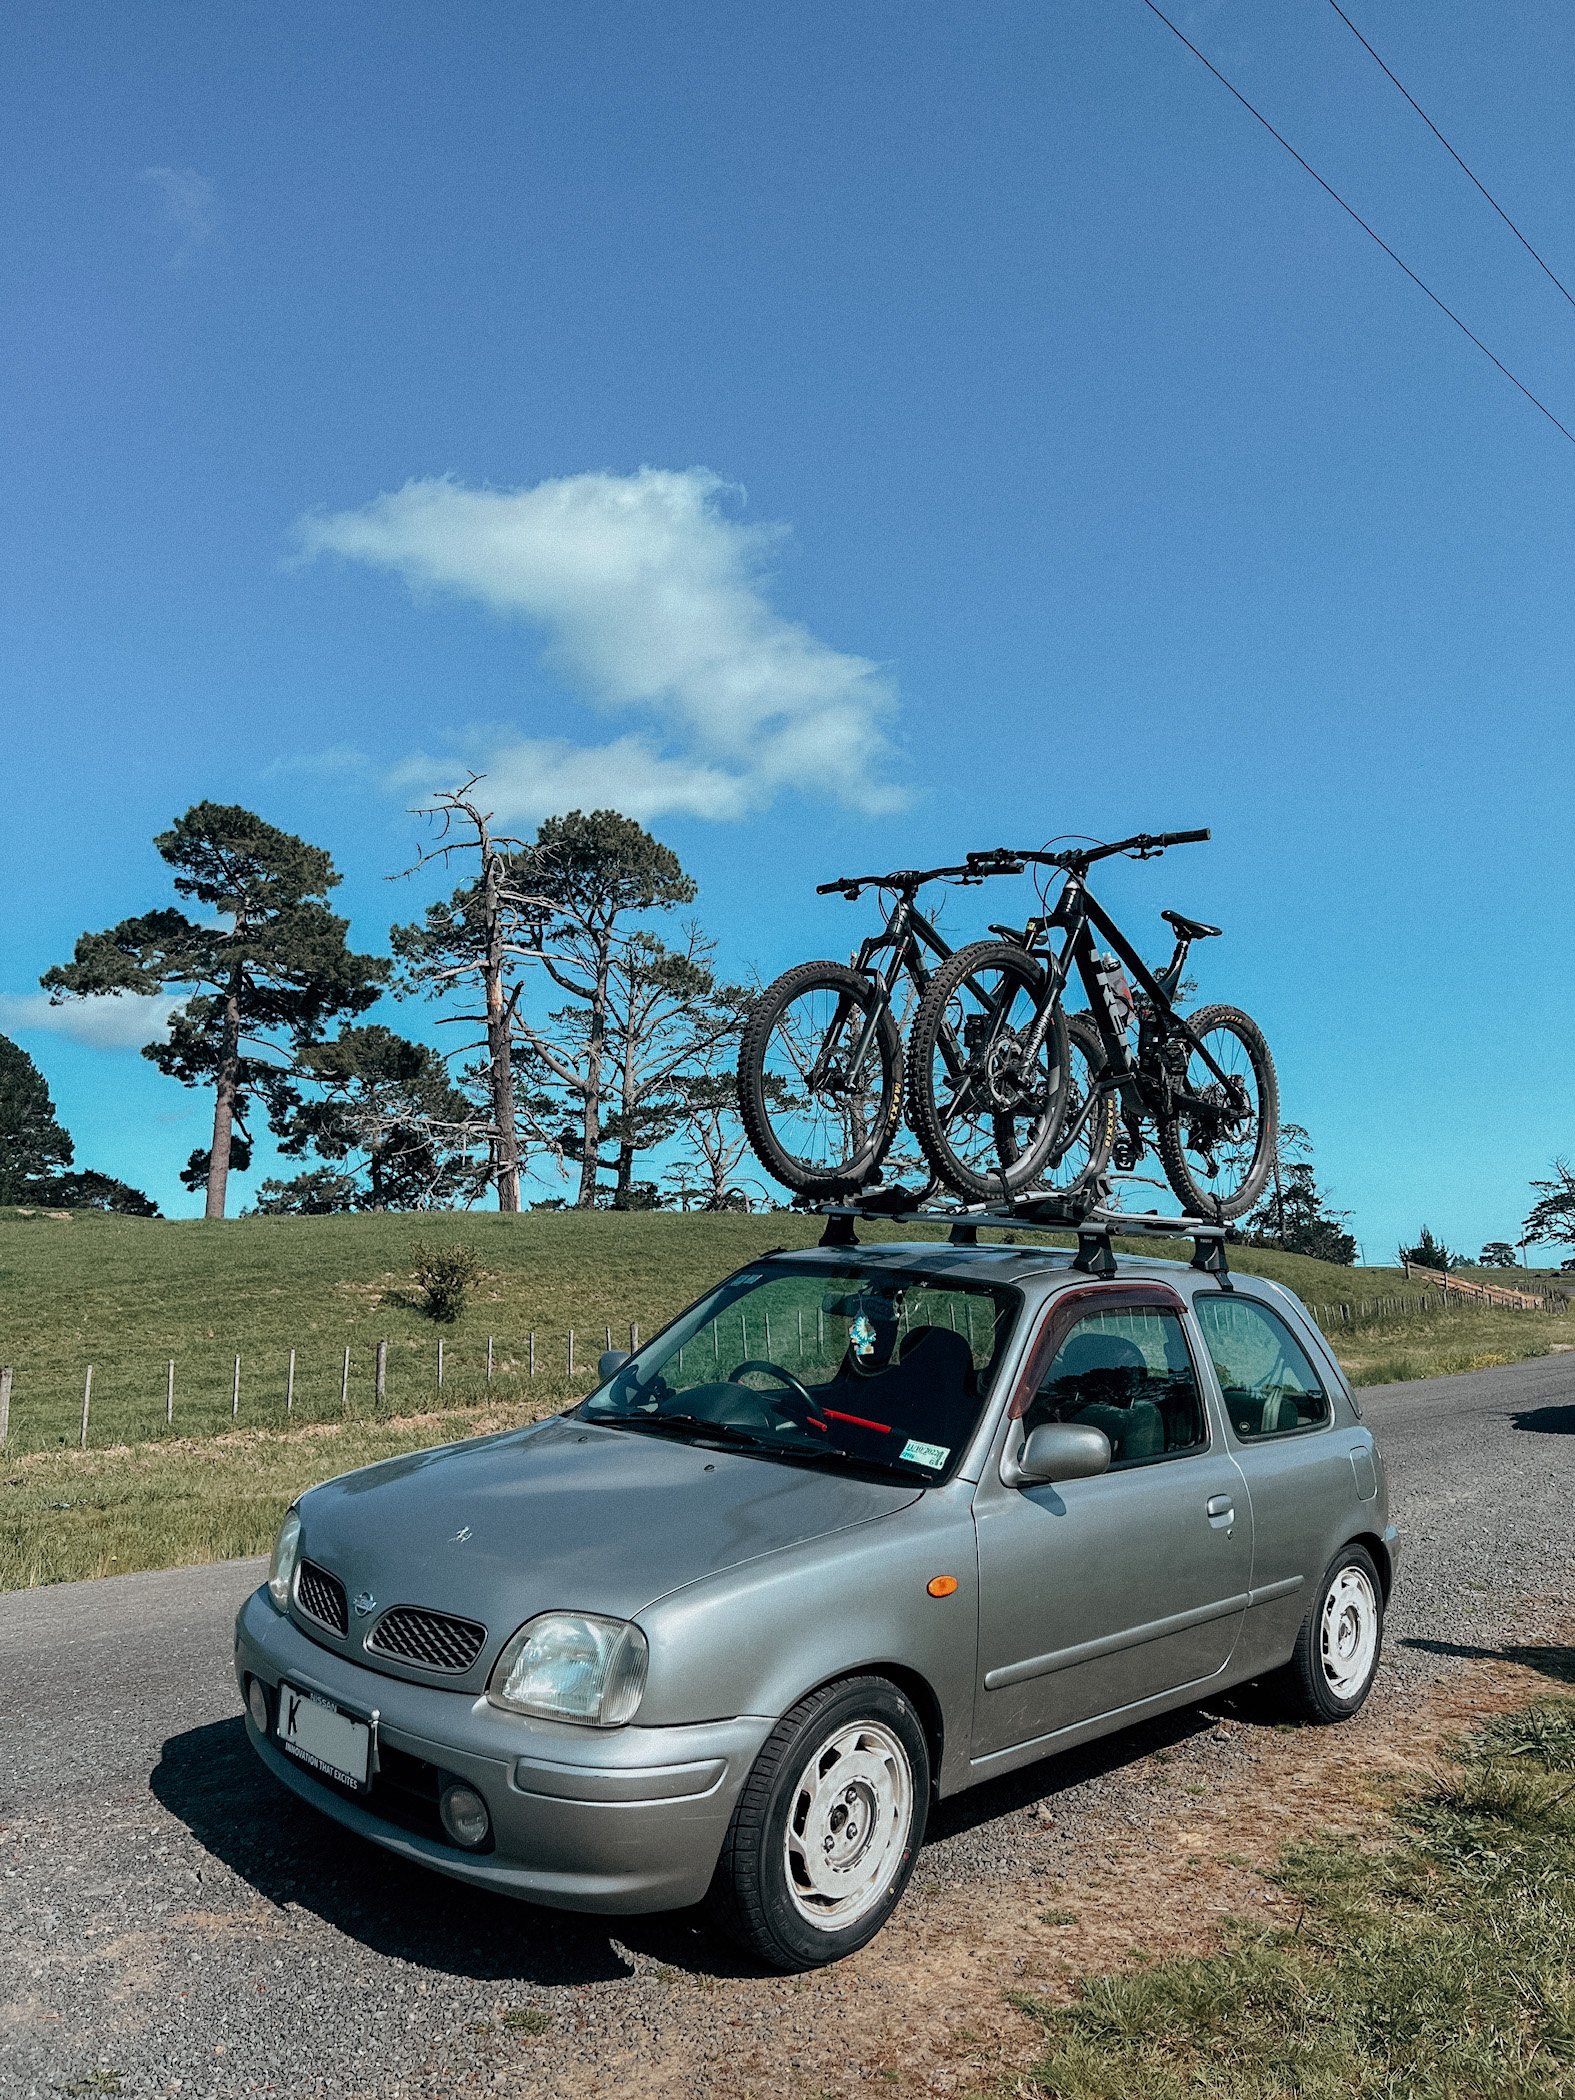
Roof rack testing Very practical.
1 point
-
Beated. I am currently studying to become a wof inspector. I am not enjoying it.1 point
-
Those racks love bikes!
1 point
-
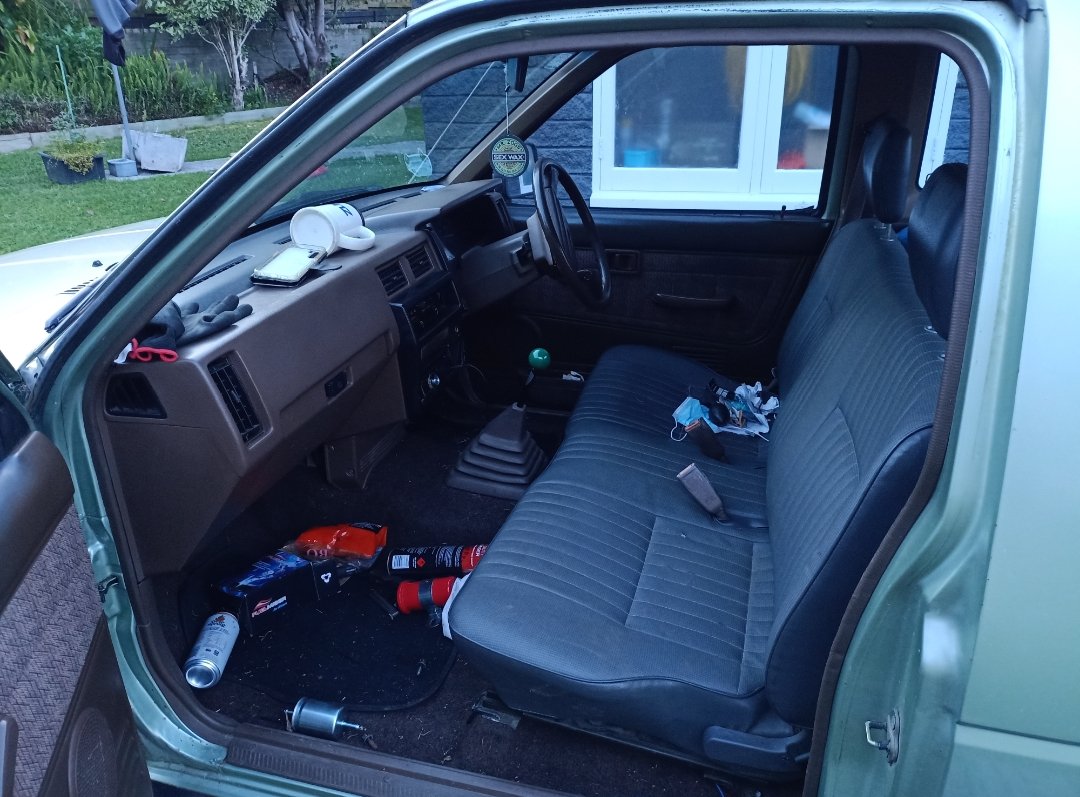
So seats have been a bit of an issue. The factory drivers one was fucked when I got it, so tracked down a pair of terrano seats a long time ago and have been rolling them. They were better but not great. Then a bench seat popped up locally (and we all know bench seats are superior) in reasonable condition and cheap cheap, so nabbed that and figured I'd need to get creative to make room for the shifter. Thankfully I was wrong! And being tall helps as I want the seat as far back as it can go for leg room anyway. It can move forward enough that the misses should still be able to reach the pedals, and back tips forward so can still get people in the back seats. Just needs a seat cover/nice blanket to top it off. Chuffed. Excuse the mess....
1 point
-
I have an Edelbrock Pro Flo 4. It comes with Intake, throttle body, injectors, distributor, computer and wiring loom. They have great reviews and have a simple user interface. Mine came with a 10 table that has the user software loaded. I also bought an EFI fuel tank. I got lucky and paid for it all before the Kiwi dollar tanked and freight went through the roof.1 point
-
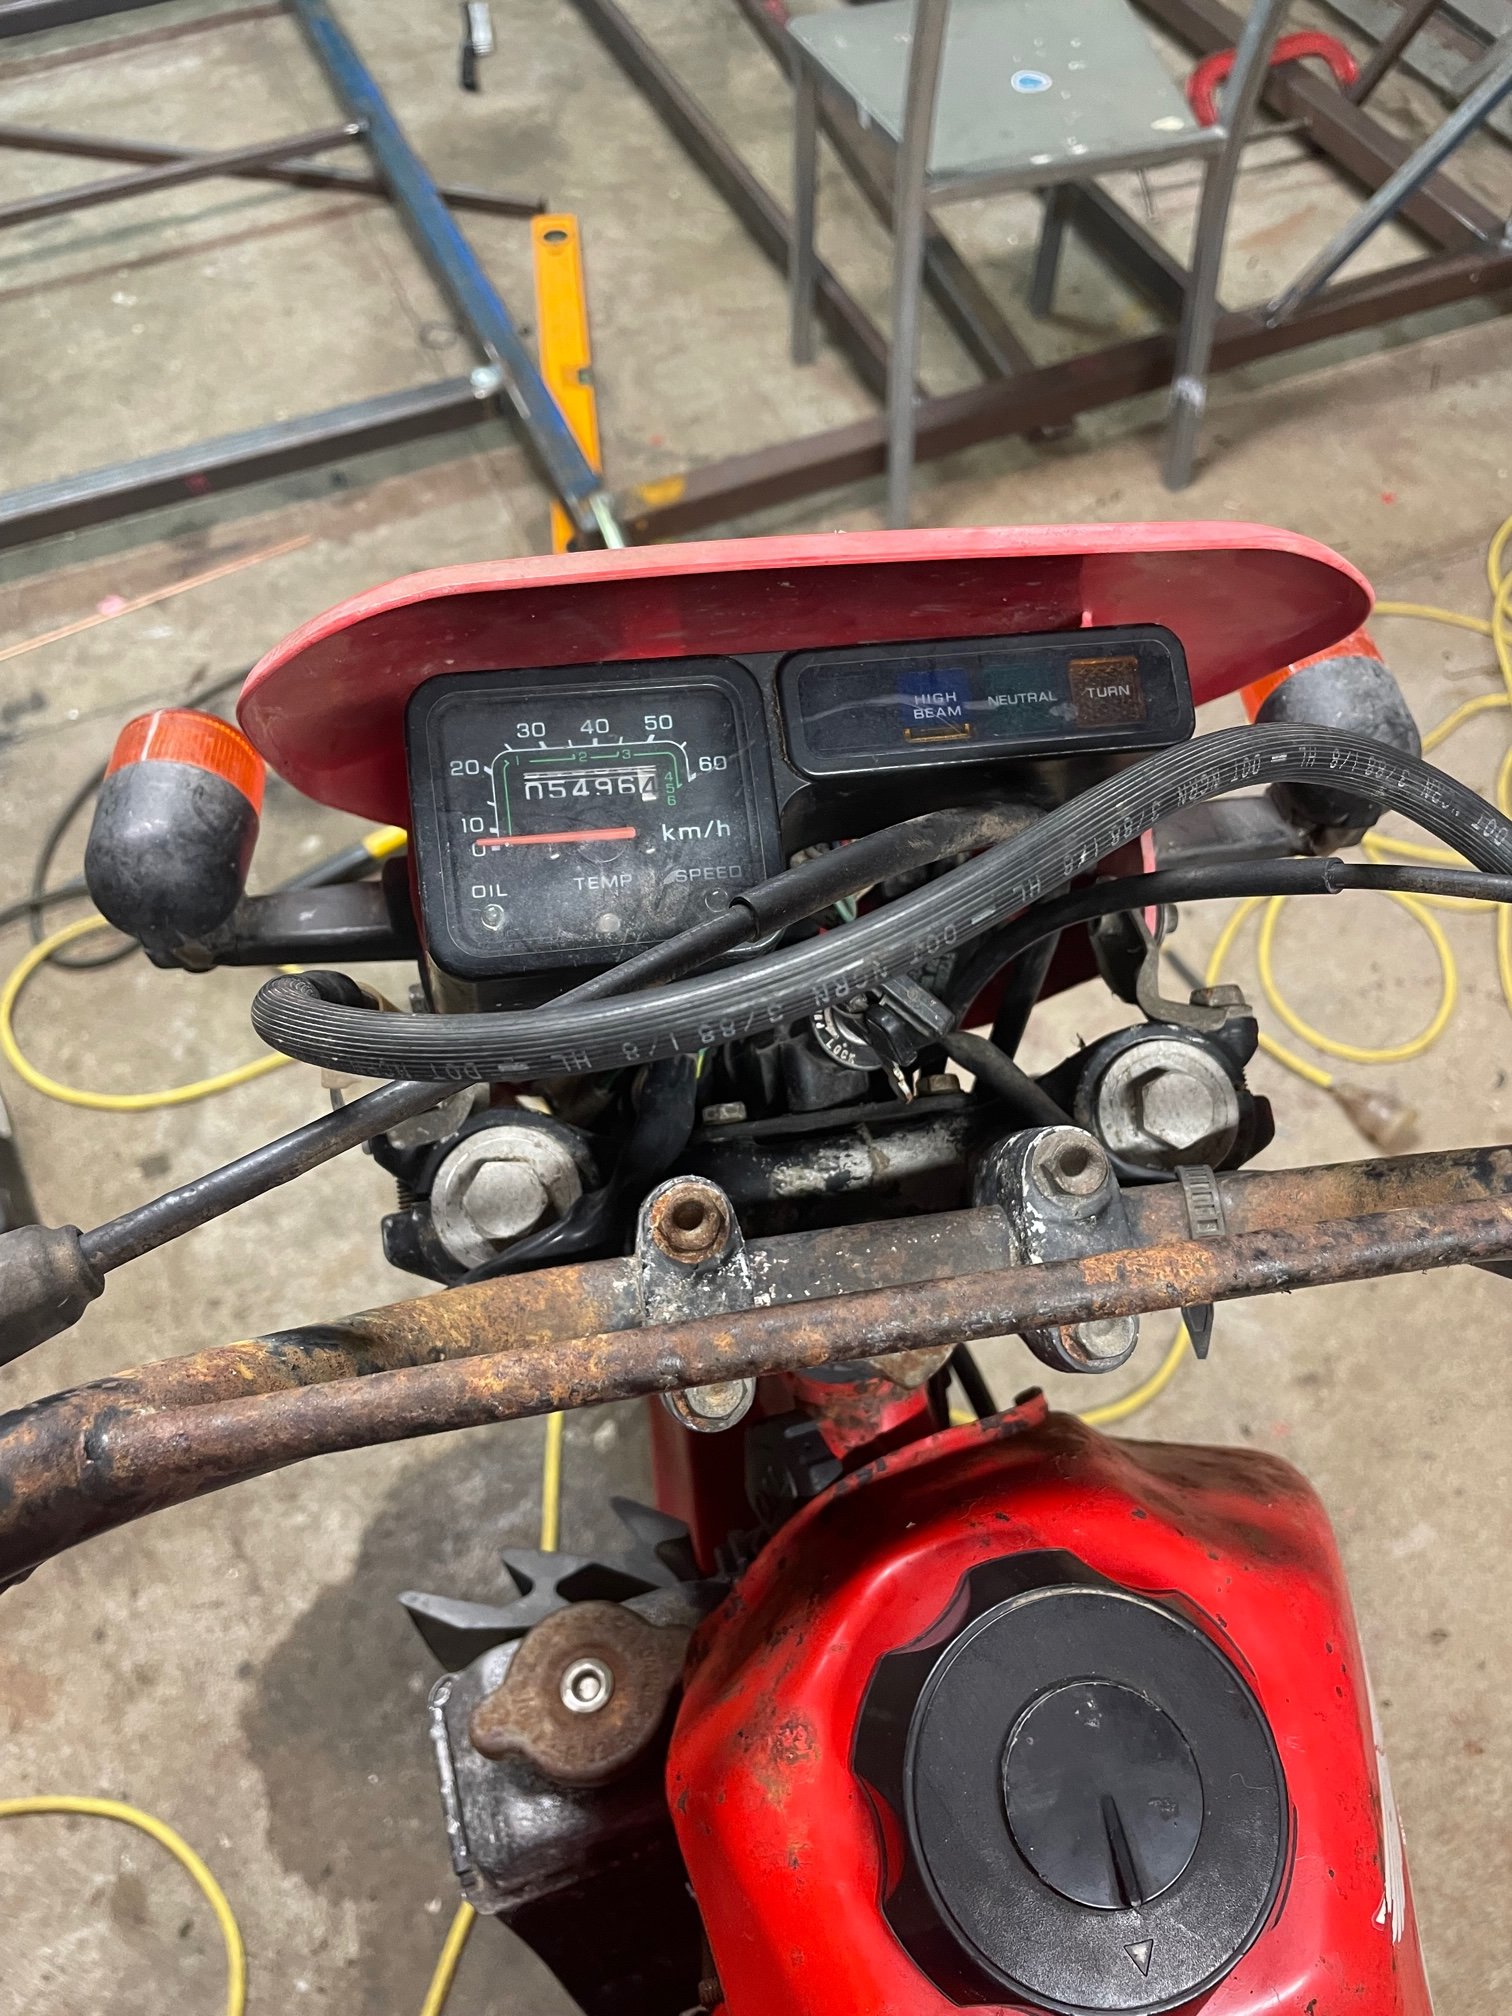
Because it’s got a fucking speed limiter!! I took it for a good 20km ride today, during which my fault finding brain was working hard to diagnose the conditions causing the poor running. The only consistent variable was speed. So I disconnected the Speedo cable hoping it would solve the problem, it didn’t. So I googled it. It turns out they have a rev limit which varies depending what gear it’s in to limit it to 50km/h. A new CDI is the proper solution, but we are gonna try and trick it into thinking it never goes over 3rd gear.1 point
-
Outstanding Goes really hard for what it is. 122 mph……. Looks like a real hoot to drive too. Toyota build a solid bottom end and Roman extracts the max from it! Nick1 point
-
Ok so I'm going split this next update up into a couple of posts spread apart because there's just too much to put up. First off - the project and general life stuff was sort of put on hold for a while because sadly my Dad died about 3 weeks ago. I've been a bit over the place dealing with stuff and family things. I have not said anything about it except to a few friends but I wanted to mention it here now, not because I'm looking for sympathy but just to say what a cool old fella Dad was and in his memory I could pop up a few things I have learned over time more recently about the engineering history that's in my blood. Some of it is pretty neat I reckon and I thought I'd pop it up here. My great grandfather, Alex Davidson and my grandfather, James Davidson, both worked at Argyll works in Scotland. Dad had written a letter to the NZ vintage car magazine, Beaded wheels, a few years ago about this along with some letters from Alex about his time at Argyll. I won't post it all up but here's the letter from my dad. My great uncle Alexander Davidson was also an apprentice at Argyll but left after qualifying in his trade to join the Royal airforce. He went on to become Air vice marshell, served in both wars and eventually became director general of organisation. This was a pretty cool thing to find out. I have done some digging and found out more about him here.. https://www.rafweb.org/Biographies/Davidson_AP.htm So in the last 2 months, going back and forth to see dad, finding out a few more bits of info about his past and dealing with his eventual downturn in health I have to say that other things like work, social outings, this project etc have been last on my mind. But I'm back into it. I had always wished that Dad might have got to go for a drive in the imp with the flat six but that just wasn't to be. Such is life. But at least he knew I was doing the project and he had knew full well that one of his sons was following in the Davidson footsteps of being a total engineer/petrol head Dad was a good dude. I miss him and its a case of the the often heard thing - I wish I had spent more time with him and gained more insight into his past. He was also very athletic. Must be where I got it from.. Its also neat that I have fallen for a wee Scottish car after all those years (although Dads last cars, and those of his Brother Jim who was a motor engineer, have mainly been Datsuns - but hey, there's a connection there too) Here's dad in the last imp outing he had.. Yeah. So that happened. Back into it now, along with catching up on a huge list of (very patient) customers jobs. Now where was I ? Inlet stuff. I had some nice runners set up with some injectors. They looked like this when on the engine.. Now a while ago the very kind Chris @chris r sent me this package of delights. I'd only asked for an old Honda throttle body but look what I got... Wow. The random framed cat picture was really the icing on the cake! As for the super charger pulley, well I'm not sure what he might have been hinting at there. Anyway- now I had a 55mm throttle body that was just a bit more in butterfly surface area than the original twin honda items and was pretty compact. It would possibly sit about here, where I had roughly planned (because I was sort of making this up as I went along, with a few sketches that you might get to see later)... inlet pointing this way? maybe? not sure... Now I had to start building the inlet runners towards the centre and make some flanges to join to a plenum. I welded some bits of 3mm alloy plate cut roughly to size. On the inside too. Awkward getting in there at the right angle. Guess where I touched the tungsten.. Now this plate was some random plate we got from a friend who imports all sorts of engineering stuff and timber, old caravan bases etc from Germany. Much of it comes from scrap a scrap metal dealer there because its amazing what they scrap there that is still of good value here. I have used some of it for a few jobs here and there but shouldn't really have used it on this because its a very very hard alloy and it cracks quite easily. I welded the bits in and even though I had pre-heated the inlets to reduce localised stress one of the weld zones still cracked. Suspect the wrong filler used too. Mostly I weld 5000 series and use appropriate rods but this is probably 7000. Silly me. You'll see that this created a bit of extra work later on for me. Anyway- I sorted the crack out and continued on. Cut the bit down.. Milled it square in the jig I still had left set up on the mill so everything with the inlet runners/plenum build that has to be will be square and parallel.. then I cut some flanges out (6mm thick normal, not poncy, alloy) Drilled them in pairs, spot facing and tapping bits as I went.. I'd bought a load of shiny stainless dome head socket screws and it was playtime assembling things at the bench.. Nice place to be for me at this time. Focus on something and enjoy the ambience. Fire going, music playing and many cups of coffee etc... So now I had some flanges that matched I welded one half of each onto the runners... Great!!! I'm getting somewhere. Bolted the runners up and had a look. Oh curse word!!!! What have I done here? Some things not right. I'd gone and forgotten that the runners are offset to each other by about 15mm or thereabouts. I could try and work around it when I make the plenum but it'll just get messy and not look right. So I had to cut some little bits of alloy up... welded them in place.. ...and accepted the fact that the bolts are not symmetrical at each end any more. But they are still pretty shiny s/s bolts so there. Then I cut some alloy up in the table saw and milled them out like this... The reason why will become known next time I post. So that throttle body. Well it turns out that facing it sideways wasn't the neatest way I do it. I was going to have to use a very tight alloy bend to make it work and the TB would have sat at a really awkward angle in two planes. Also, a big also... the engine would not have been symmetrical ! I sussed out a neater way to place it that will also allow for a nicer path of flexible pipe to feed it from the remote filter. Now I had a plan I could make more things. I cut a out a bit of that aforementioned 3mm plate and made a rectangular hole in it, a bit larger in surface area than the 55mm TB. I then cut some lobster sections from some 60mm tube and pieced together a transitional bit of tubework that would connect the round hole to the rectangle hole from underneath. This is to allow the runners to draw their required air from the centre, evenly like with no favouritism. Well it works like this in my brain so I'm running with it. I put the 4 jaw chuck onto the lathe and I threw a chunky bit of 8mm plate into it. Drilled a big hole and bored it out to suit the TB.. Drilled and tapped some holes and cut it closer to the shape of the TB flange. It will eventually be welded onto the pipe.. Then I had a sleepless night thinking about that 3mm plate. Will it crack down the line?.. as yet, until the engine is run up to temp over a few cycles I won't no how much it might expand and will there be enough heat soak and flexibility with what I am building to allow for expansion. Phew ! Yep - some thinking gets done about this as I try to sleep. It played on my mind. So in order to sleep easier I bought some bog standard softer 3mm plate and this happened.. Cleaned up and re-welded onto the new bit of plate.. And that is about where I am up to with the inlet so far. I'm pretty happy with the progress given some mistakes etc. In other Imp news.. I finally got my new screen in place! Its been 5 months since I last drove the car, which was when a stone had decided to leave someone's tyre and make a bid for my cars interior. 5 months is the longest I've not driven the car since getting it on the road. But hey, it was safely stashed away in a very dry garage over a wet winter and I've had plenty of other things to do. Screen fitted , a quick test drive to the beach. Its so fun to drive. I'd forgotten how nice it was. Time for a warrant of fitness test. But I first had to sort out a number plate light. One that was hidden away and reliable. I made use of a couple of neat little sealed leds, 10mm in diameter, and placed them in some alloy. This was bolted to a stainless mount that I glued to the inside of the fibreglass engine cover. I ran the wires up the edge of the lid to hide them as best I could. Pics.. Finished the wiring yesterday morning in the comfort of the new garage. Very handy.. Took it for a wof and its now legal again Hopefully back soon with more updates. Alex1 point
-
I’ve still got some carb issues to sort. The hoses are very hard and aren’t sealing so it pisses fuel everywhere and I think it’s sucking air into the oil hose. Last night I thought I’d see how much of the road gear was in the box of bits and assembled the front. I was so stoked it was genuinely all there including most of the original screws. None of the wiring has been cut. The Speedo cable wasn’t lost. It even has the original key that matches for the fuel tank! I fired it up quickly and it all came to life
1 point
-
Sorry to say but I think you've done your snorkel incorrectly It's meant to be on the a pillar so it blocks your vision, faces your ear so all the turbo noises go directly into your brain , and you're meant to weld a laser cut logo into the end of the 4" pipe so it blocks off most of the flow1 point
-
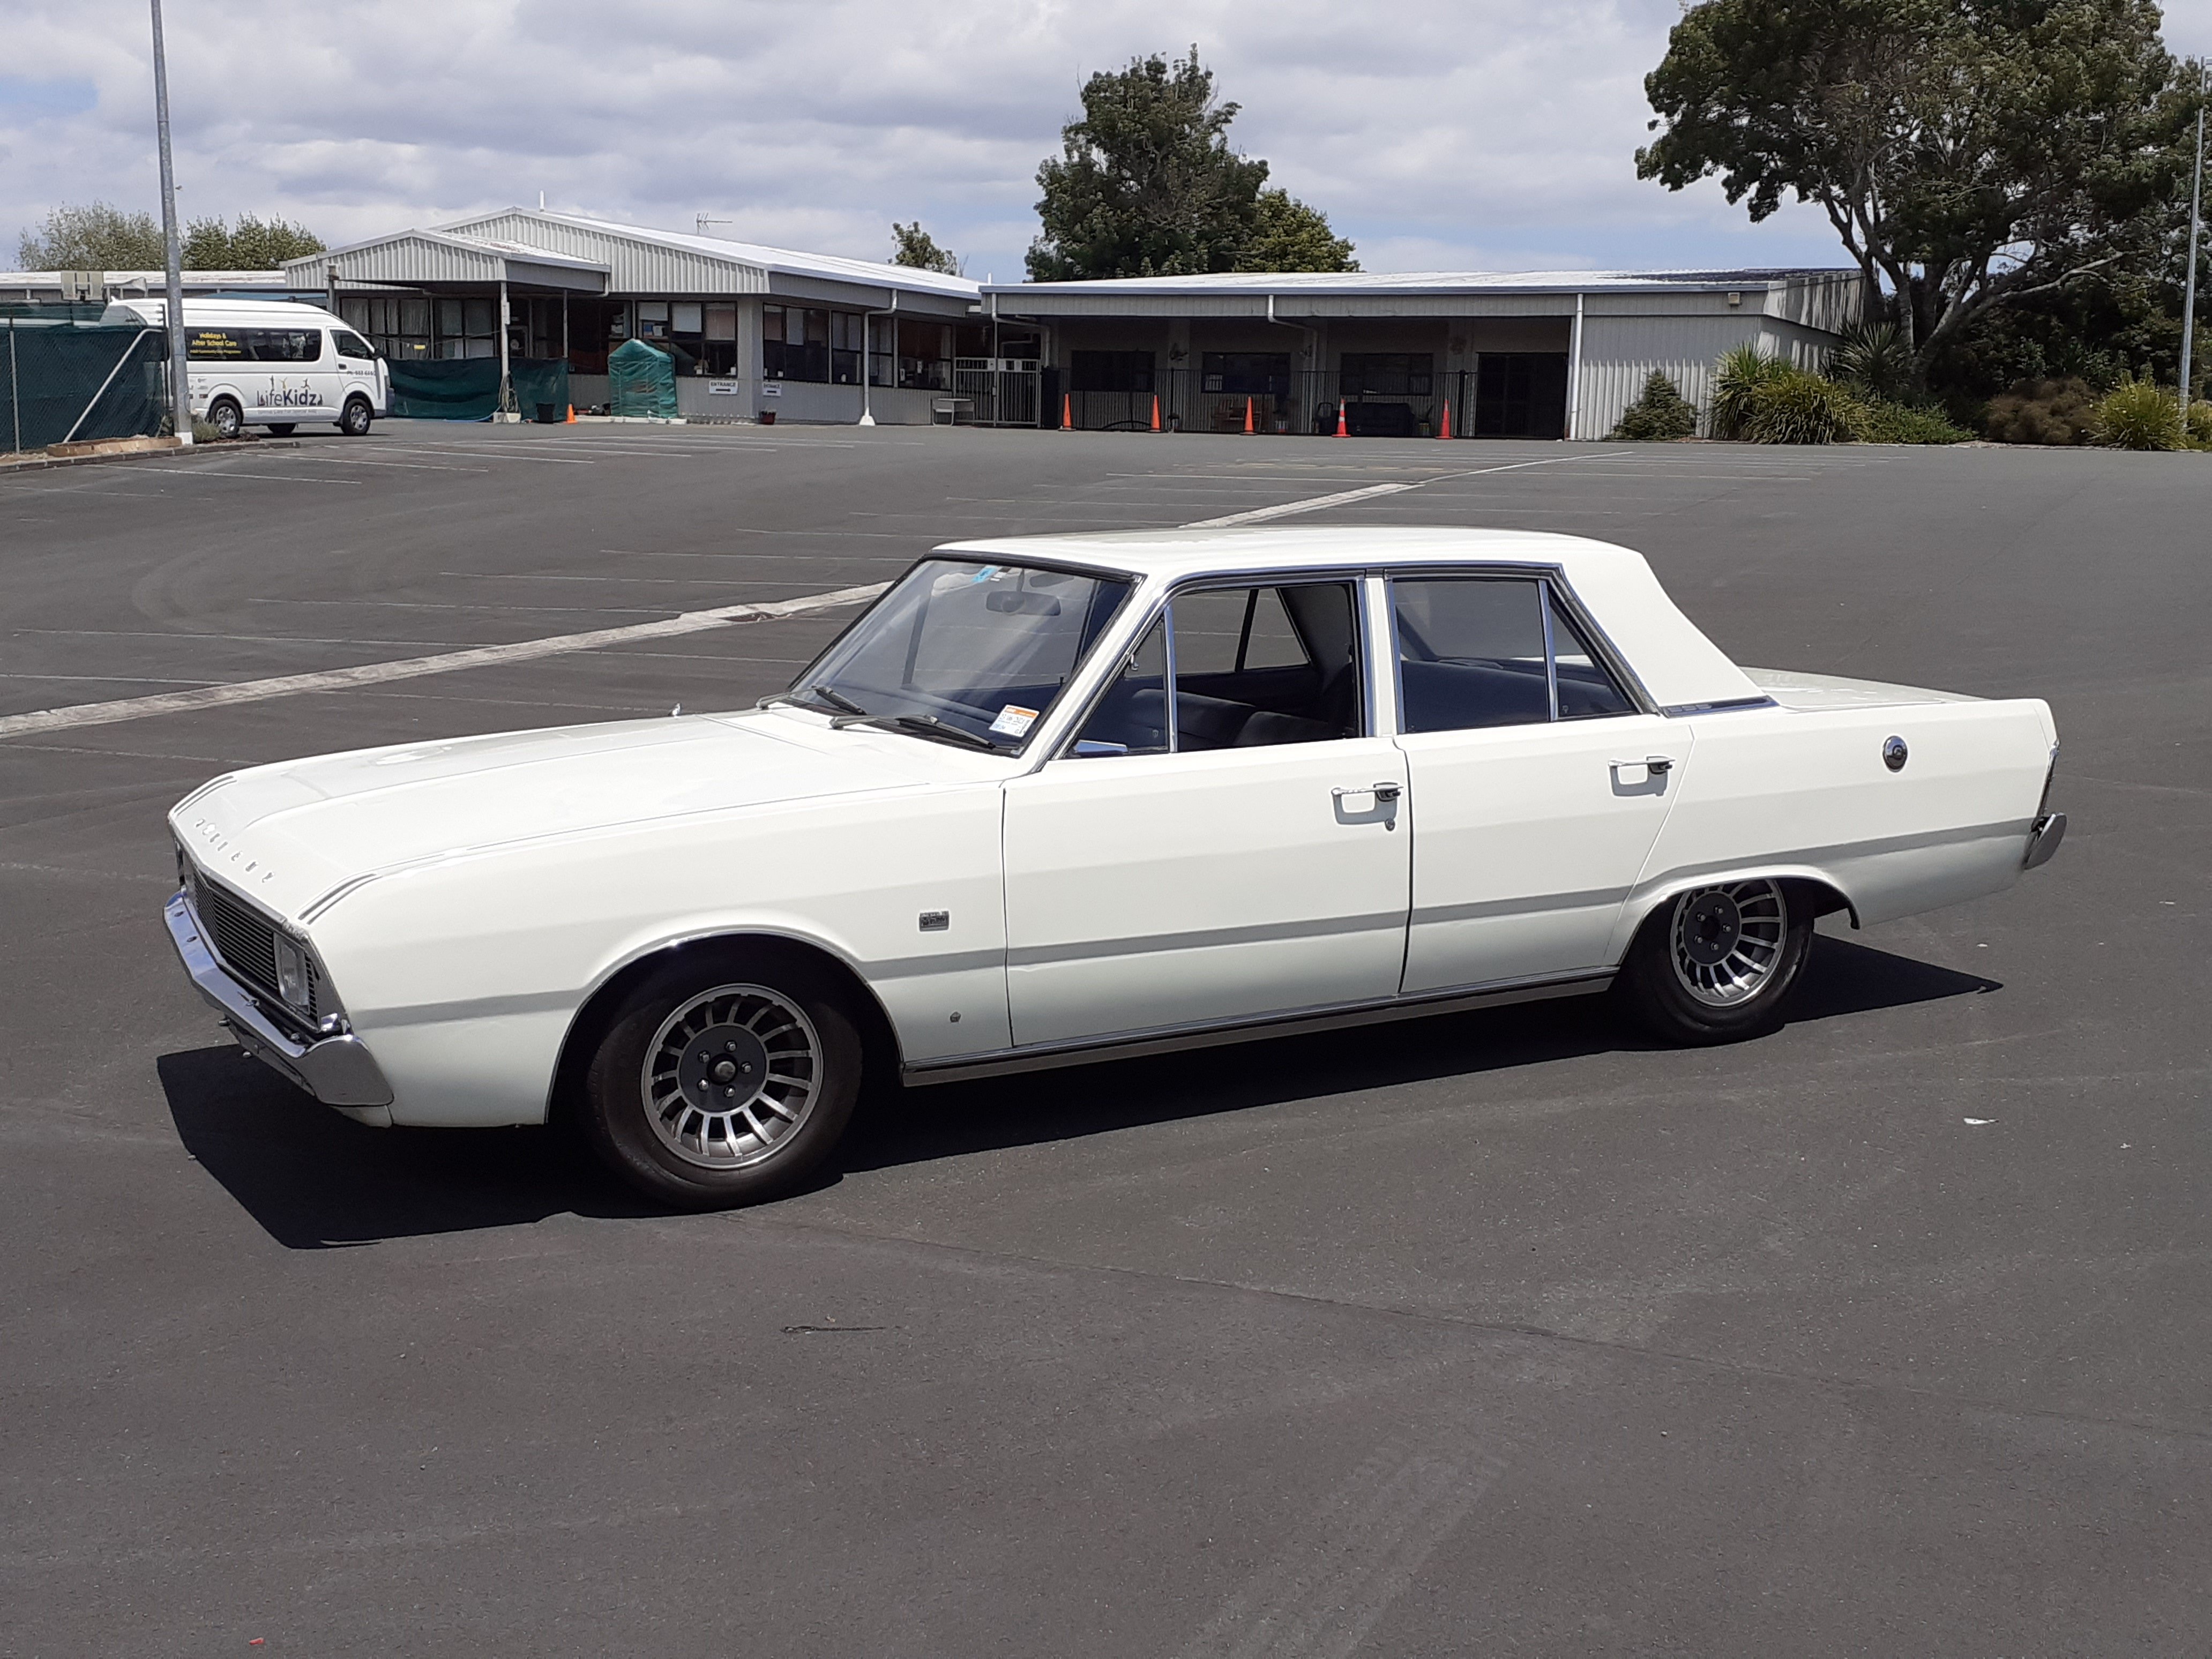
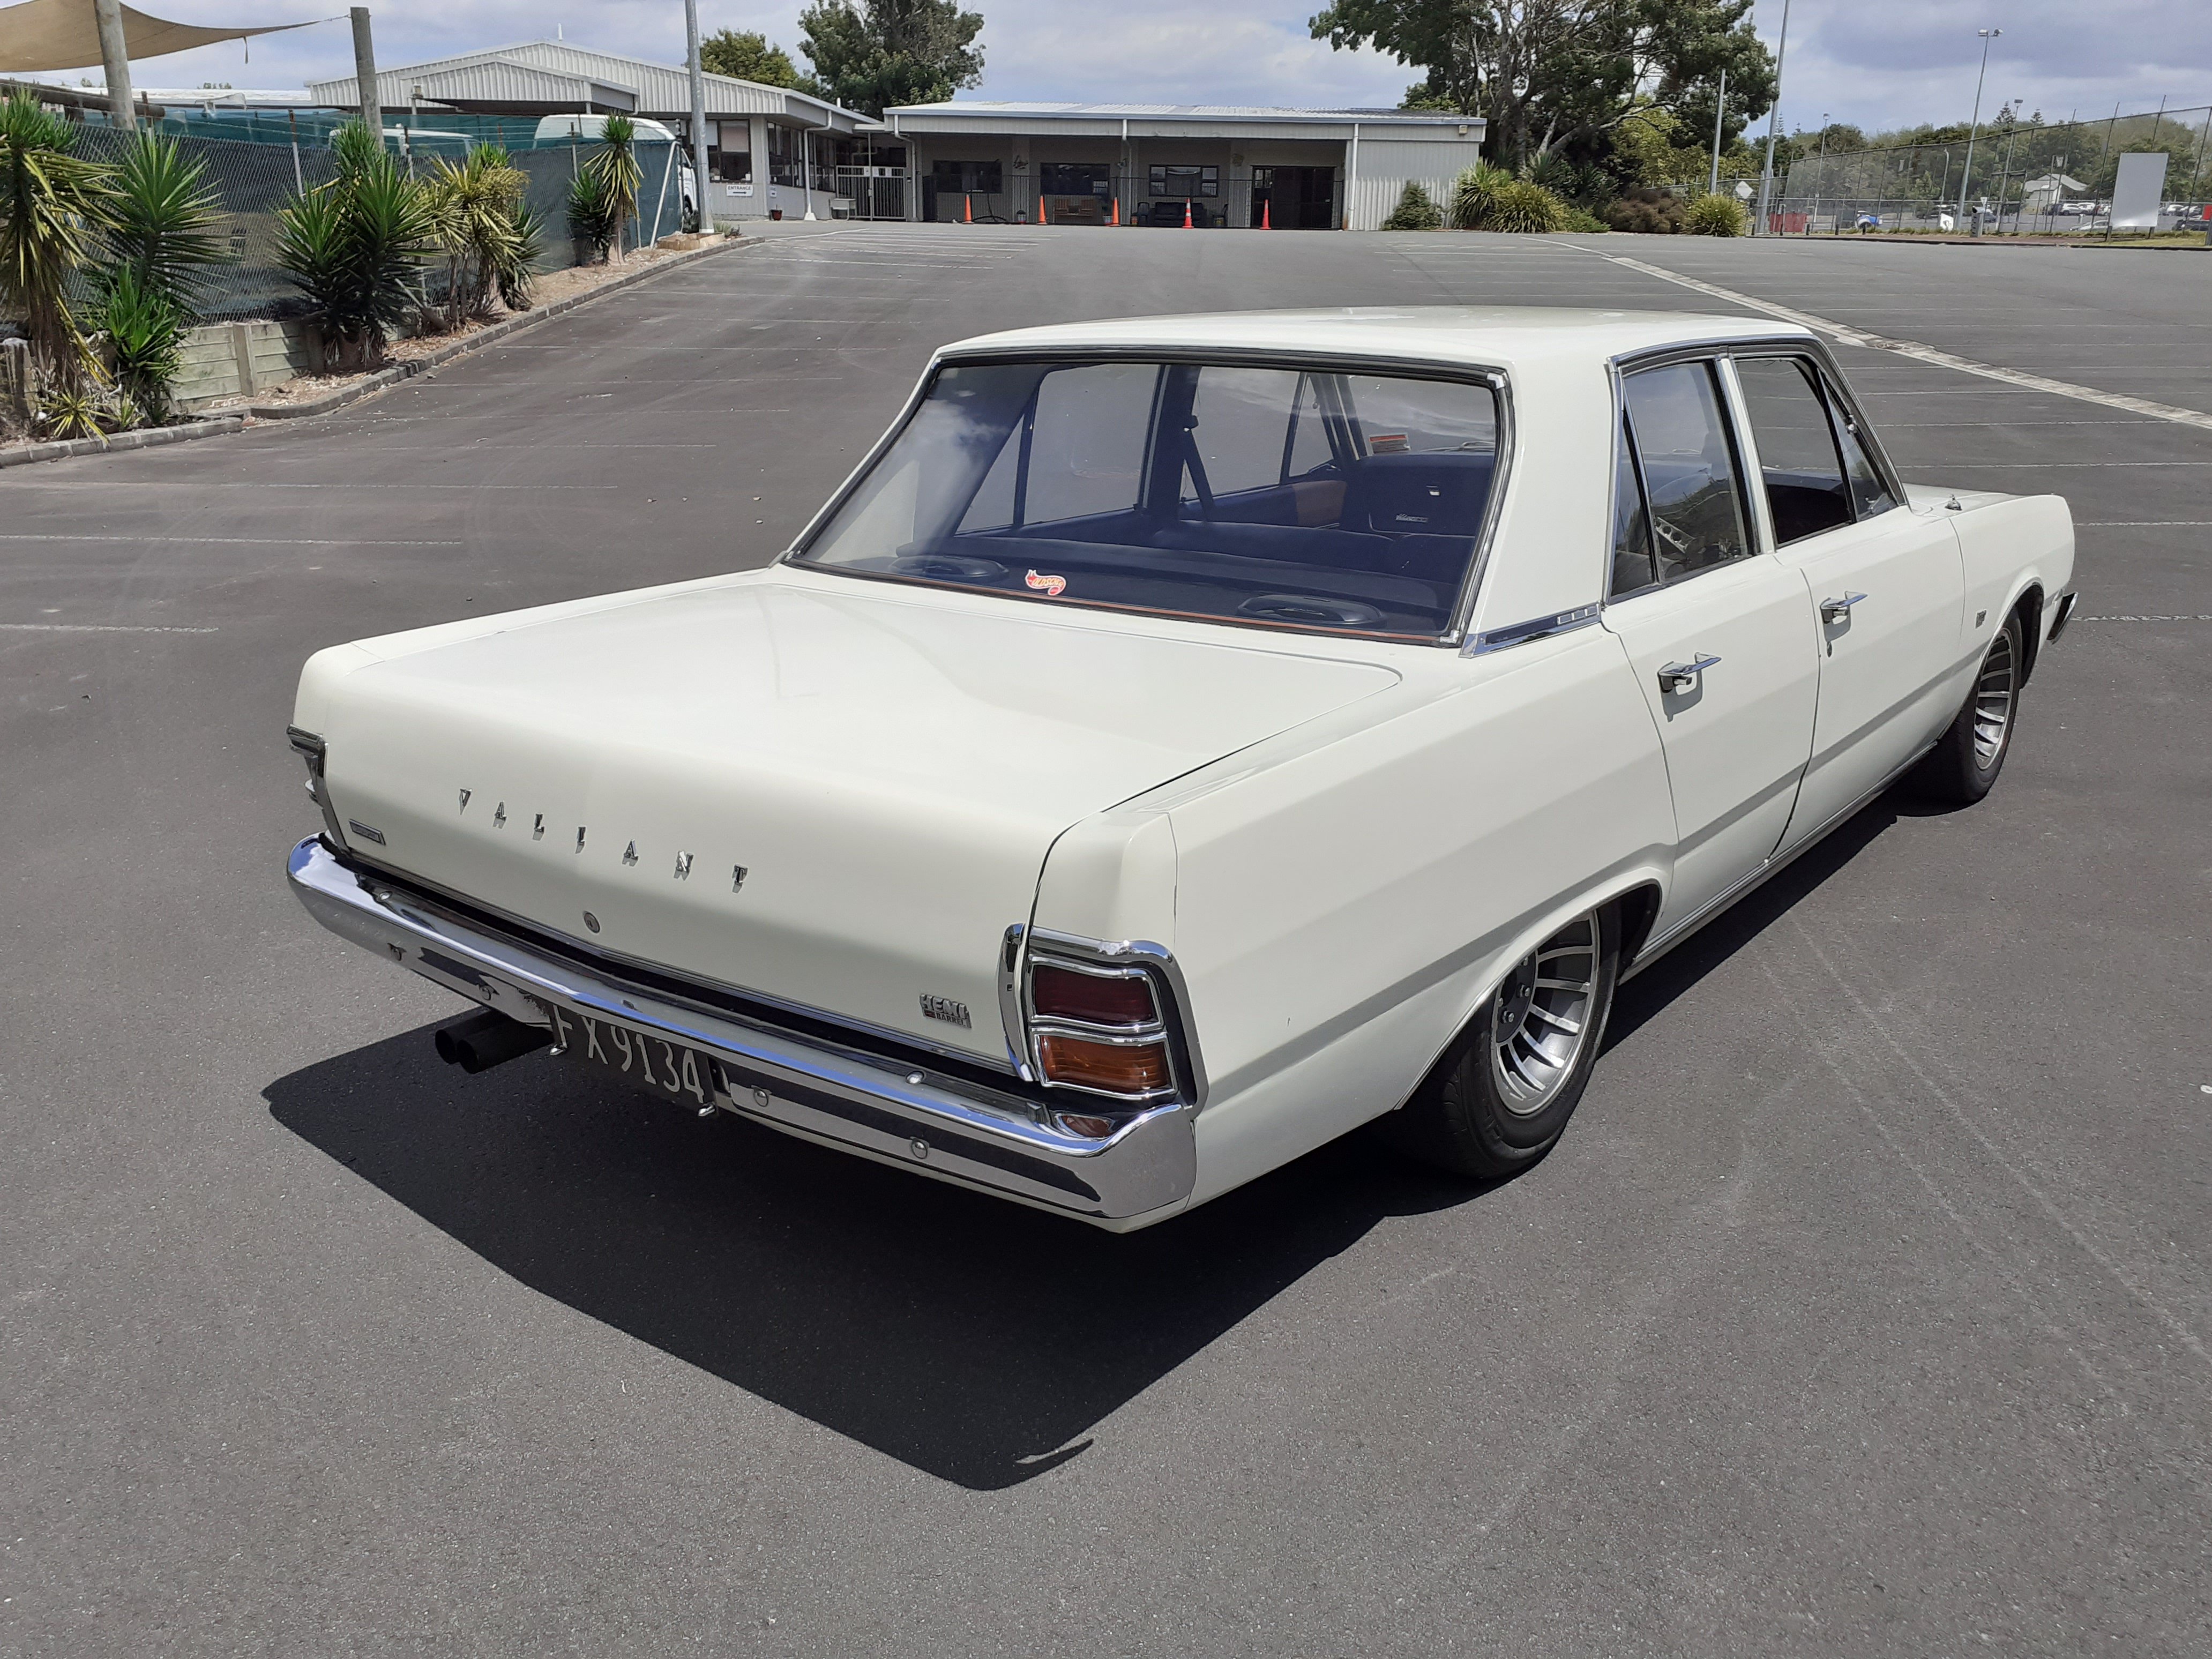
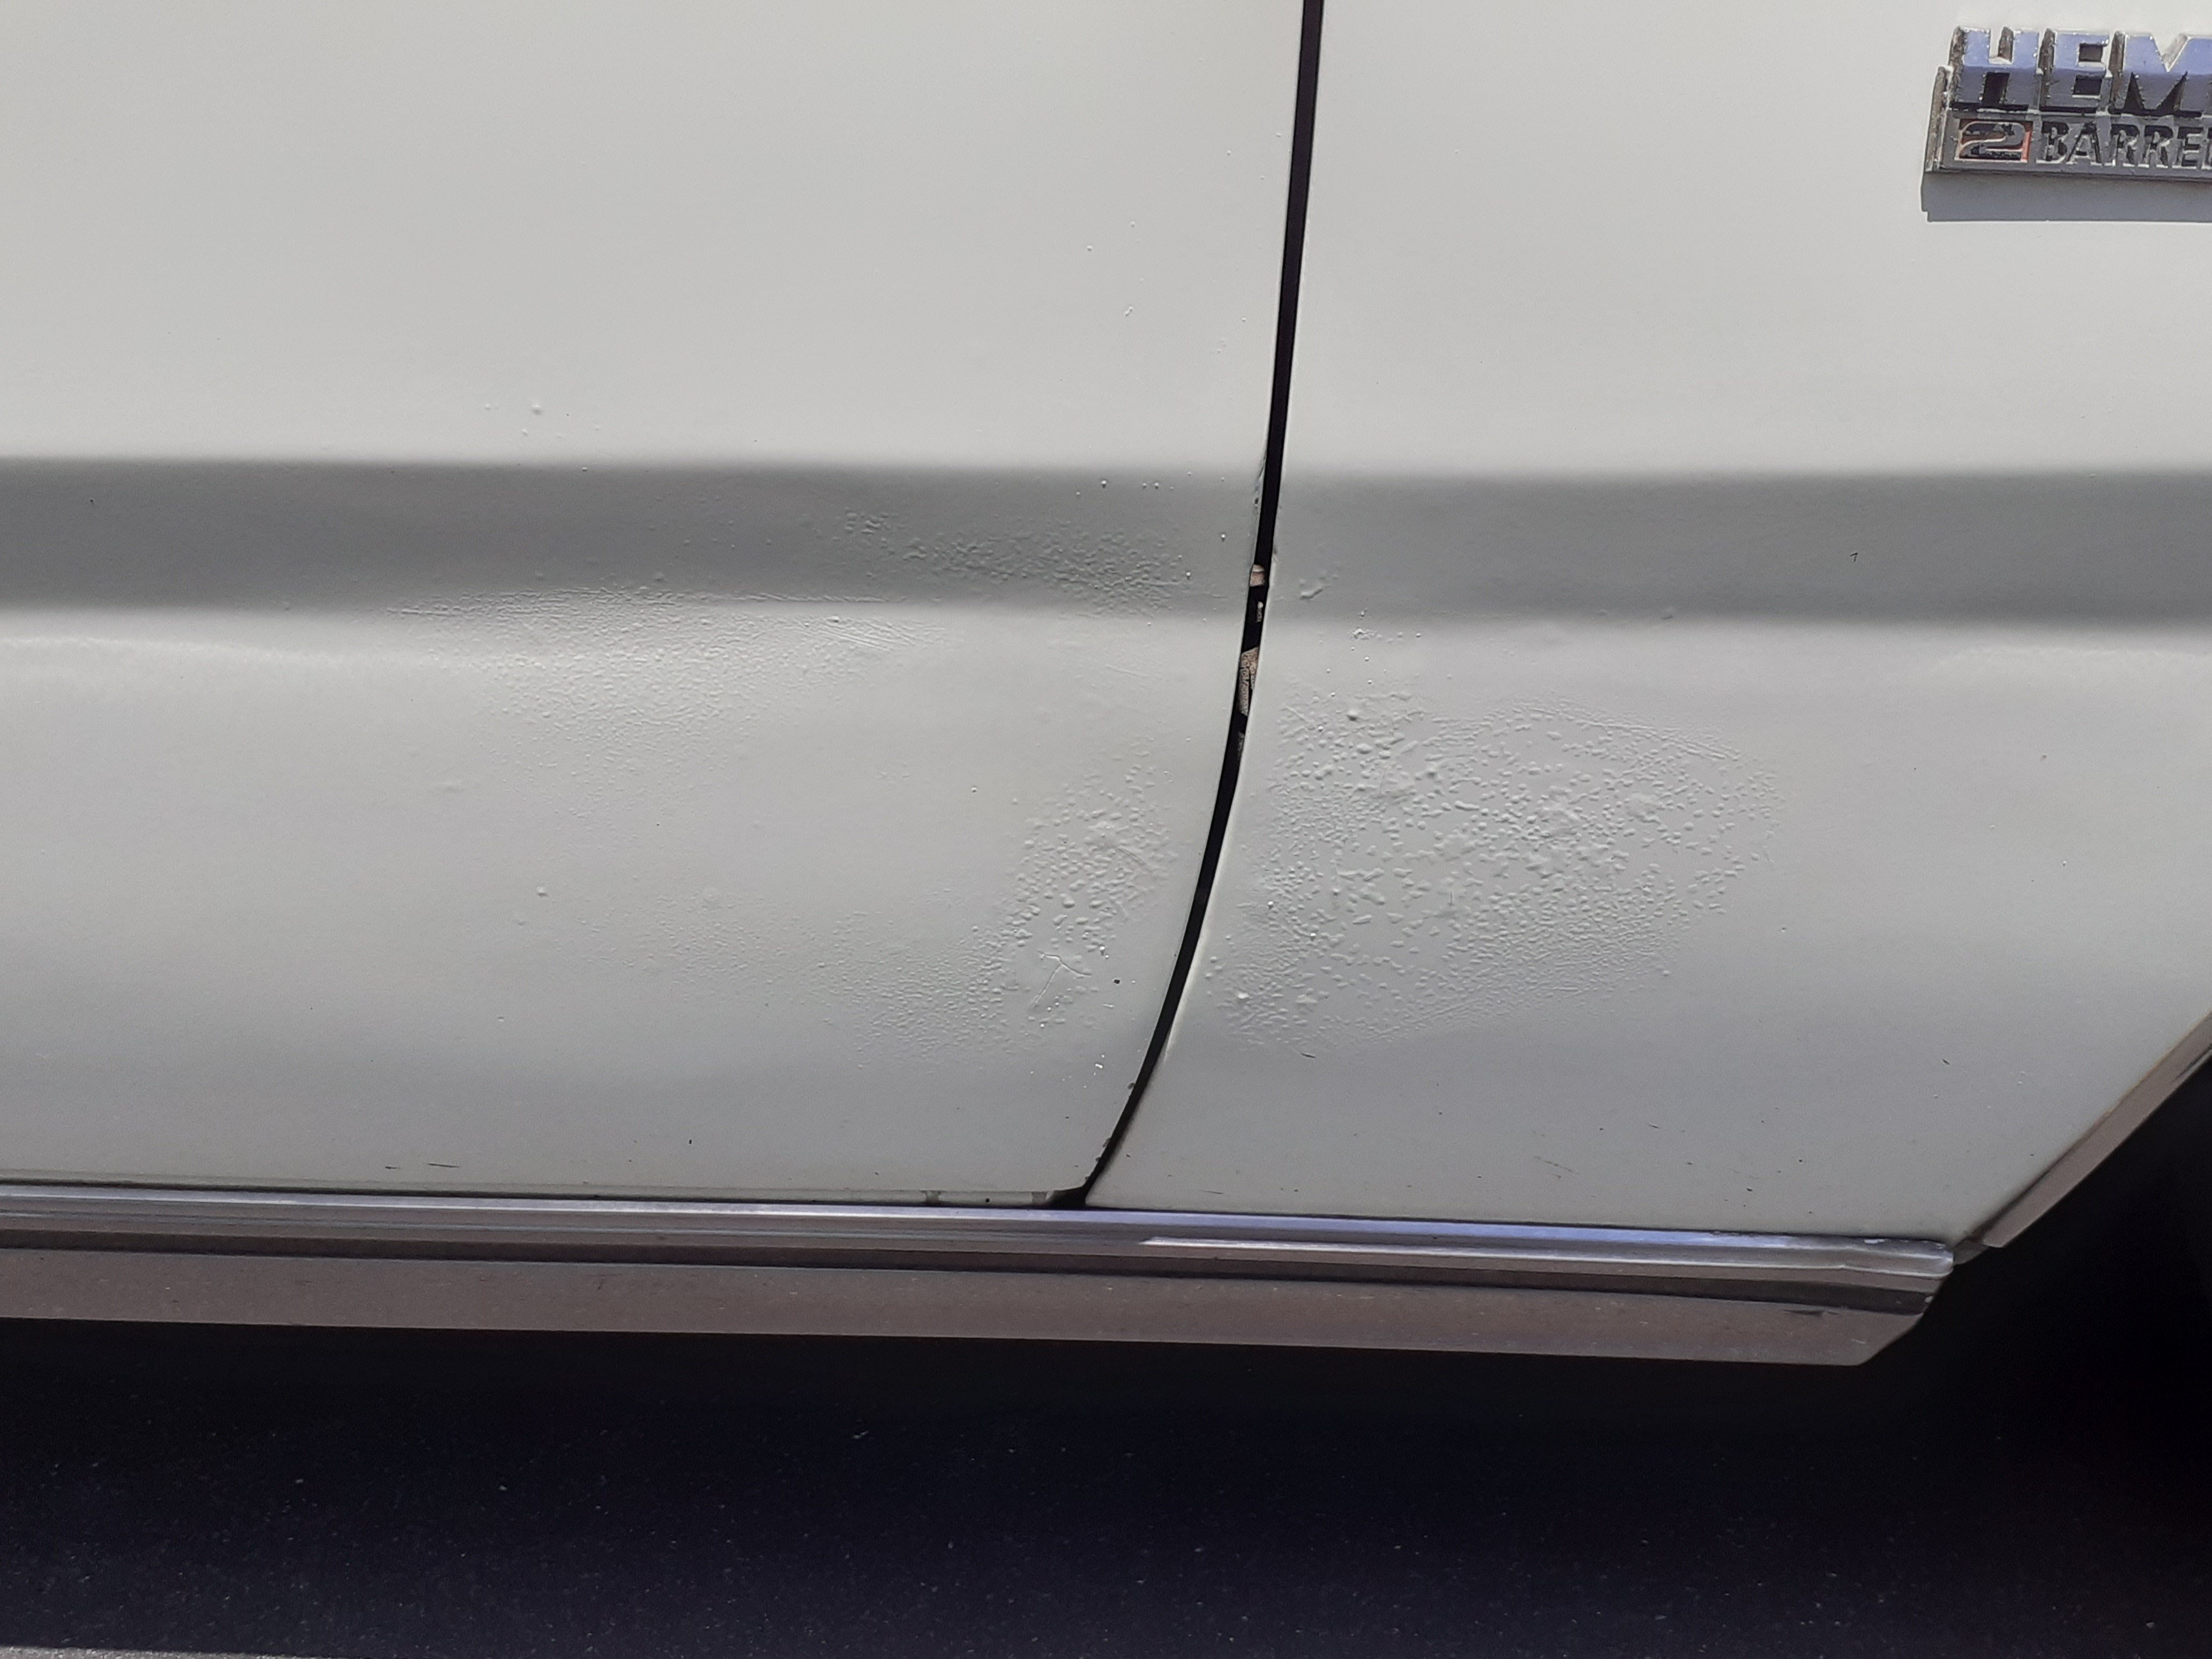
Bloody barn find m8 Hasn't had much use lately, I did a friend's wedding last year in it but I think that's the last time it got driven , hasn't had a wof since June last year Might need a bit of panel work in the next few years, the paint faults have not healed themselves. Also needs a windscreen rubber as that leaks a bit
1 point
-
Righto. Exciting news. However I shall start where I left off. So last time I moved the car under its own steam resulted in quite literally its own steam, all over the floor when the heater matrix decided to give up. I swapped that out with a spare unit I had, replaced that seal in the clutch slave cylinder, fixed another couple of wee things and prepared it for the big drive. I also lowered the platforms on the front dampers and got the car down to a much better height. I may well raise the front by around 5mm later on so to get the camber a little less negative. I'm not a huge fan of excessive negative camber nor does it aid in handling unless corning at 9/10ths all the time. The car looks so much better low all round. I took some photos.. Now lets take it for a drive! This time I made it about 1 metre further then last time. Then I stopped to look for the cause of a terrible rattle coming from the flywheel/clutch area upon engaging the clutch only. I suspected the spigot bearing (which foolishly ...when will I learn... I thought was a bit worn but it would be OK..) Upon Hannah sitting in the car depressing the clutch for me to investigate the sound, the drive to the box stopped. Bug-ger! I thought it might be a broken friction disc hub etc. Same scenario as last time... push the car back in feeling quite a bit pissed off and this time we both went for a decent run. Get away from that car I thought! Proper exercise is my go to thing for instantly feeling happier So that night whilst in the middle of engine and box removal I discovered that the clutch slave had pumped out, again, and was holding the clutch in I released the bleed nipple and the clutch fork returned home So I now suspected two things here: Either the flexi hose had broken down inside and was restricting fluid returning quick enough so instead the master refills from the reservoir. So I had a new hose made to rule that out. Or was it the little one way valve within the master, of which I had made a new spring for to replace the missing item, opening too easily. Possibly it was easier for the master to draw fluid in quicker via that valve then refill from the returning fluid from the slave. Hence the slave was getting pumped out with each push of the pedal. It stayed out in increasing amounts by about 4mm each stroke! So I bought a new 'proper' spring whilst I was at the brake shop too. So there it sat- engine not exactly where it should be. But I do like this shot though... So out with the engine and trans. I made a wooden cradle this time which I lowered the engine into. It made it much easier and meant I was able to have the engine and box sitting on the large mobile steel bench and I could then work on it at a decent height. I removed the transaxle, then the clutch, adaptor plate and finally the flywheel. Gave all those bits a clean. The flywheel has been lightened quite extensively and weighs up at 6kgs. A standard item is about 9kg... Here is a good shot of the alloy adaptor plate that joins the box to the engine. Its quite nicely made... The spigot bearing was indeed pretty worn once I had a good look at it... It was indeed allowing the first motion shaft to just tap inside the release bearing guide tube. I bought some Phosphor bronze and made a new spigot bearing. No photo of resulting new bearing- but rest assured it looks pretty much like the old one but this time without enough room between its bore and the shaft to house several Badgers. I reassembled that lot and had a looksie at the transaxle reverse gear plunger... I was not happy with how much effort there was involved in moving the gearstick into the reverse plane. I knew what was 'grabbing' and had an idea on how to improve it... There is this lockout plate that rotates in an arc as you move the lever across the gate in neutral. There is a spring loaded plunger that has to be pushed in to select reverse. However the edge on the plate is very sharp and rather then sliding over the plunger as it pushes it in it digs in a bit. I could feel it through the lever. You can see it here... You can see scrape marks on the cone of the plunger... So I gave the edge of the plate a gentle tickle with the grinder.. I also took the corners off on the plate here... where they slide through the slots as you move across through neutral here ... Resulting in a much nicer shift. It will be improved further when I get a proper ball for my shifter and I suspect my flexible coupling at the end of the shifter tube onto the transaxle is a bit too flexy. The trans was reunited with the engine and slung back into the Imp. It all went back in nicely. This morning we re-bled the clutch system and YAY !!! It works better with the slave returning instantly. Filled the cooling system back up, having added a bled nipple on the thermostat housing which improved the bleeding of air from the system hugely. I'd also forgotten to mention that a fair while ago a fella on the Imp forum mentioned that my stainless tubes tat run under the floor should not really be touching each other all the way down. The hot one will heat up the cool one. Not good. I didnt think too much of it but it bugged me so quite some time back I ended up ovalising them which gave them clearance all the way down... I also made a throttle stop so not to break the cable... With that it was about time to go for a drive.. Success! This time no rattles from the clutch area, clutch worked fine, battery was good. Ran it up to temp and bled all the air out. Temp went up to about 80 degrees C indicated and sat there. It was a fantastic sunny and pretty hot Autumn day for a drive. All the smoke from oil spills, coolant spills etc burnt off. I checked the timing which was about spot on at factory setting. Gave the carb a tweak so the car idled nicer but it'll need more attention. It has quite a worn primary throttle spindle and I think that combined with that light flywheel makes it hard to get a super smooth idle. Enough is enough though. I finally took the plunge and did this....... I came back beaming. It drives pretty well. Wanted to stall when stopping, because of that lumpy idle. Has a slight flat spot down low but once on the secondaries it fair flies along (well.. for a Datsun powered Imp) It sounds much better then I was expecting. I parked it up and checked all the usual things. No obvious leaks and the fan came on after I adjusted the knob on the thermoswitch. Fan is loud but works really well- very efficient. Happy, relieved, excited. We both sat down on the sofa, had lunch and a cold beer and admired the little blue car in the sun. Yay1 point
-
OK so I was thinking I was not far from painting the shell when I realised my repairs to the rear guard behind the drivers door had a slight bulge, maybe 5mm outwards in relation to the edge of the door shuts. A classic case of working up close and not standing back to look at the complete picture. It showed up worse when I sat the door in place. I thought I had taken a photo but alas no- trust me when I say it would have done my head in noting it each time I looked down the flank. This panel had been badly bashed in at some point we had popped it out. But obviously too far sadly I never realised until now. I tried beating it back in but no luck. It had been previously repaired by someone else and was full of lots of sharp dents. So this happened... Following that I did a super careful replacement of the steel, butt welded in, with very slow careful welding so not to warp anything. In pictures... It turned out great. I still needed a skim of filler to get it spot on but considering what it was like prior I'm happy with it now. It lines up really well with the door... I then gave this and most of the rest of the shell another coat in primer, smoothed it all back with 400. Oh yawn. Helps having beer and loud Reggae playing. Hannah just loved sanding... With the sanding done I then preceded to turn the workshop into something resembling a Smurf murder house. If there was a song to be played afterwards it would have been this... https://www.youtube.com/watch?v=68ugkg9RePc We masked it all up and I painted the door jams, door backs, engine bay, interior, frunk, door bins etc. Next day, re- masked the shell and painted the rest. On the first days painting it was so hot at 34 degrees... The following day time I started as early as I could but it was still about 28. Luckily a very dry heat. Not fun in all the gear... I never really considered how far the blue mist would travel. It covered everything. Great fun. Now we have a blue floor which luckily is slowly going to wear off I think. I hope. After it was finished I shut the doors and let it bake in the oven that was the shed, drank a cold beer and went to the beach for a long swim. Here is a blue Imp. Its very similar to an original Imp colour I like so I went with this. Not sure of the name of the colour. Its very bright and changes from a mint blue to a aqua blue in different light. I'm so relieved to have finished the painting. It'll need a flat back to get rid of the orange peel and shine so it looks more like a original paint job. But I'm going to ignore that job until after the car is road legal. Enough body work and painting!!!! Its time to bring the other Imps inside and play musical chairs with all the various parts. Pick the nicest bits and reassemble one car from them all... It certainly is a fair bit better then when we first looked at this shell a year ago and I'm pretty stoked to be at this point in the restoration1 point


This leaderboard is set to Auckland/GMT+12:00