
Leaderboard


Popular Content
Showing content with the highest reputation on 05/07/21 in Posts
-
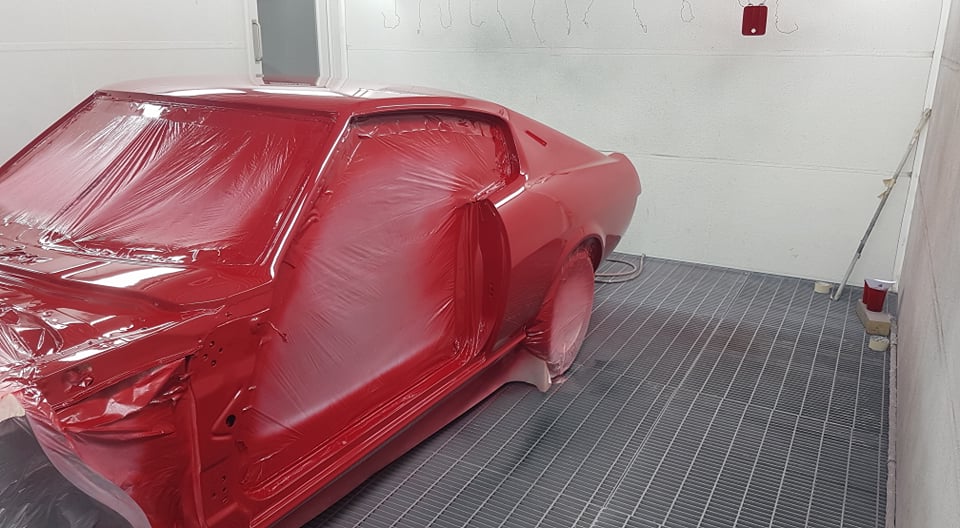
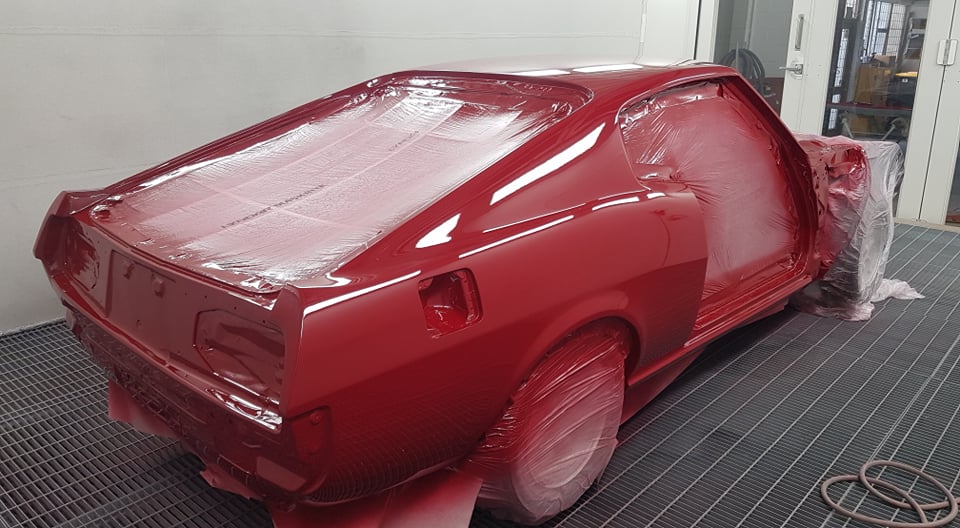
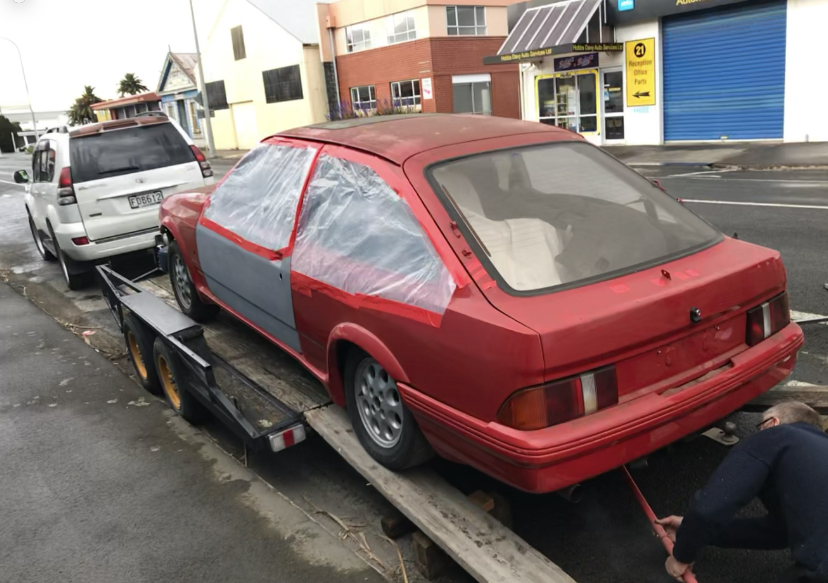
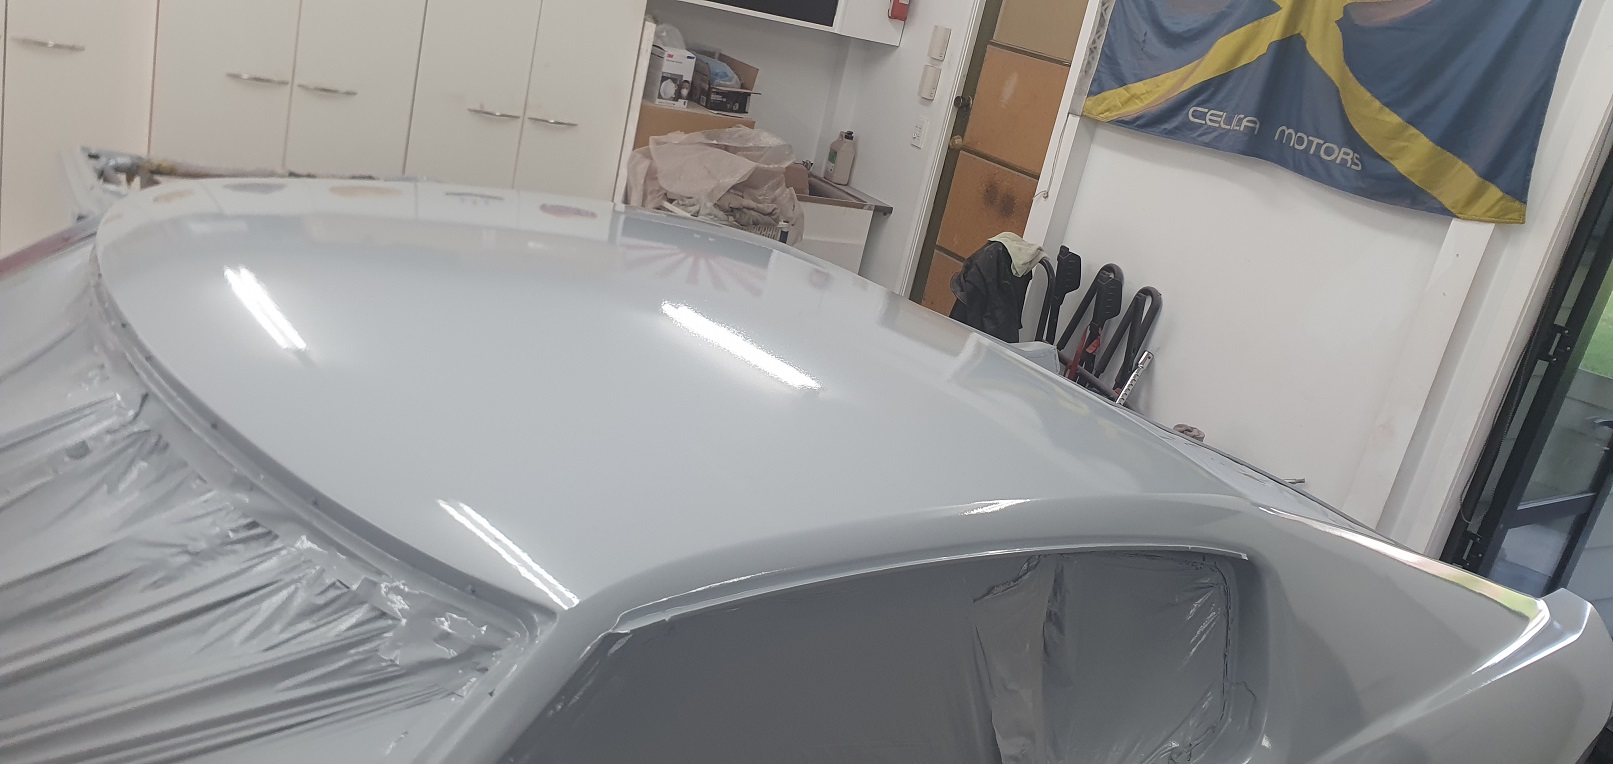
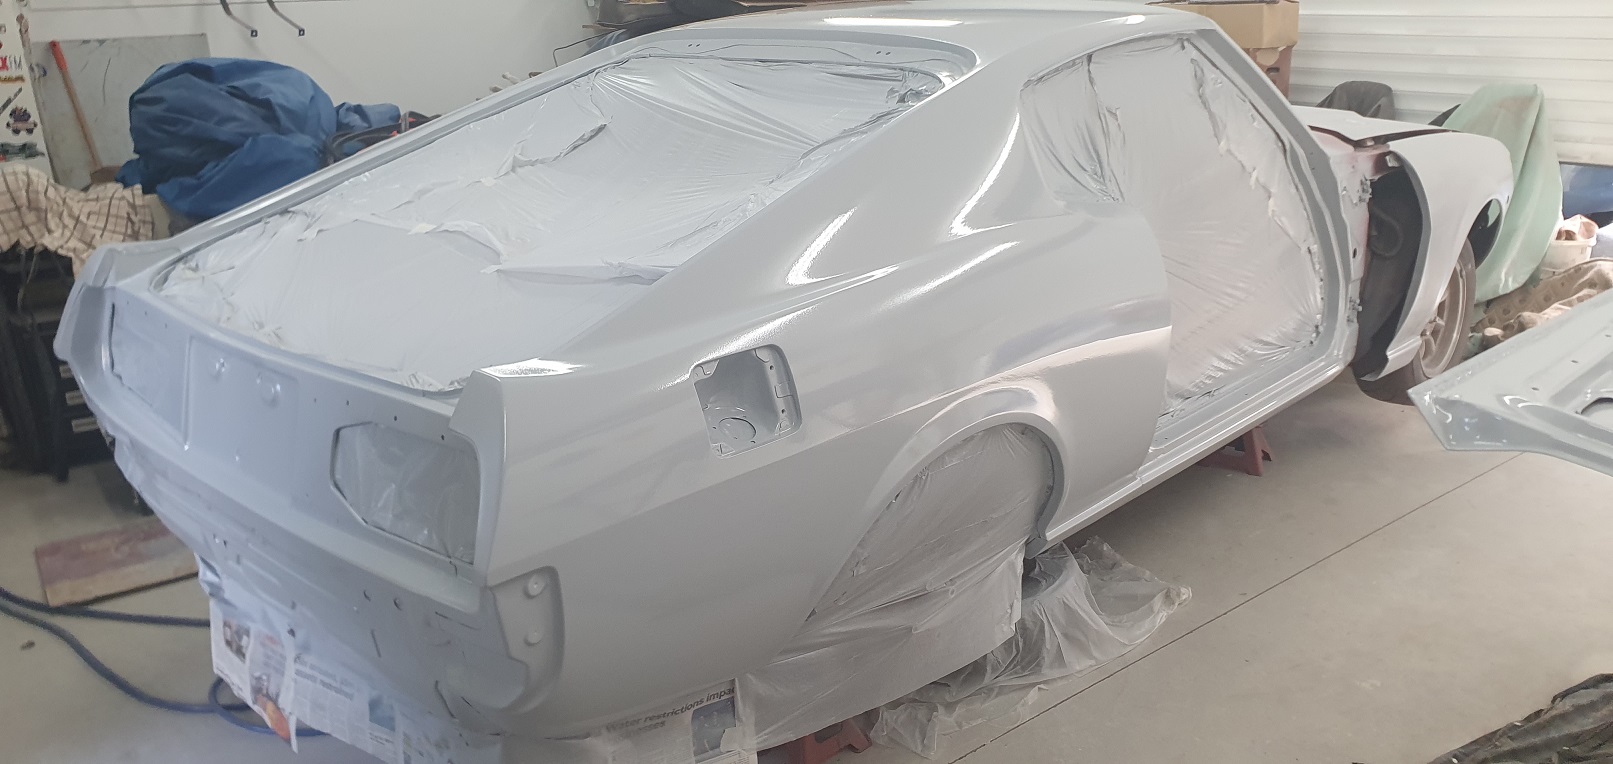
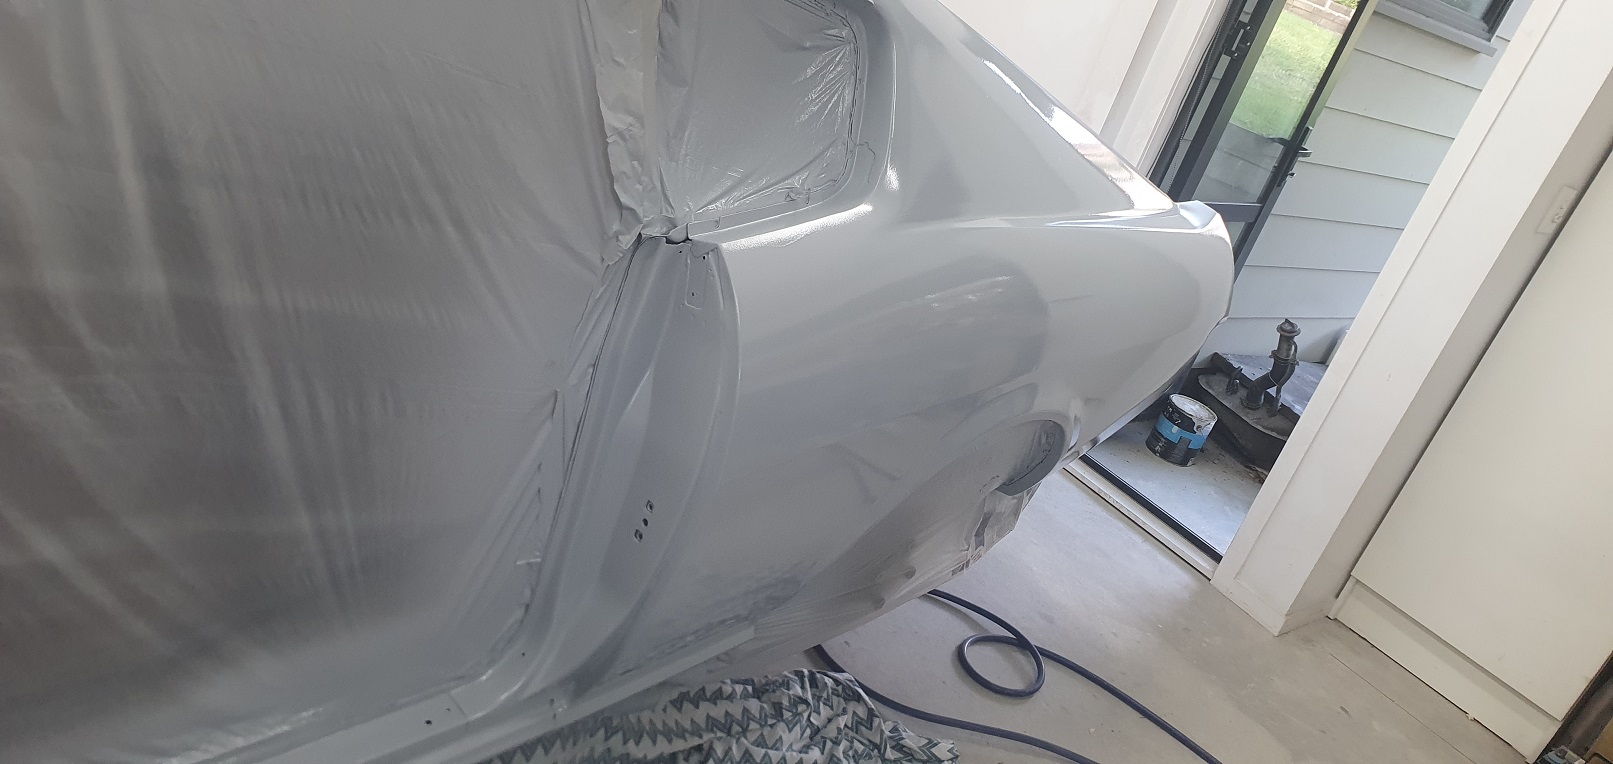
so... the painter told me he had a bit of an incident with my car. . . . . . . . . then he said he spilt a few litres of paint on it. . . . . super duper pleased with the result. .
 10 points
 -
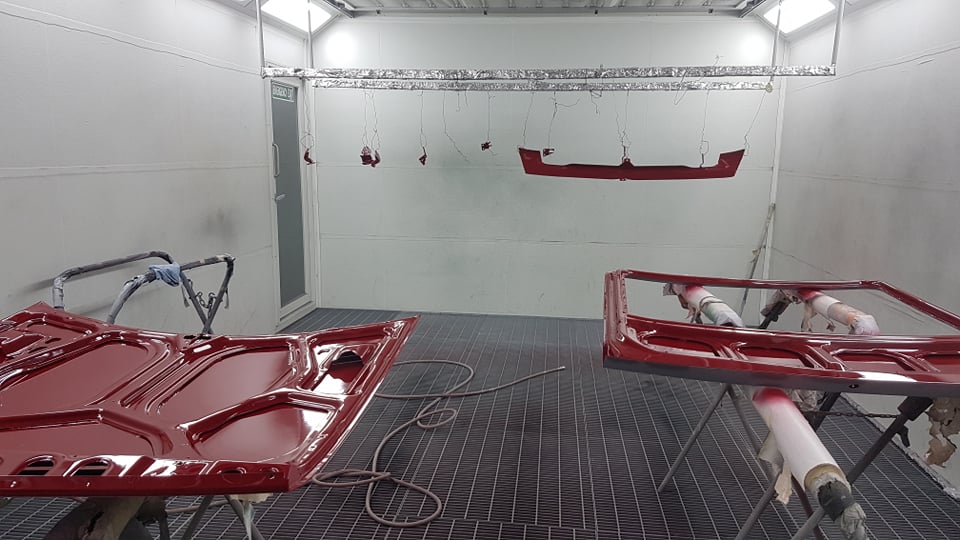
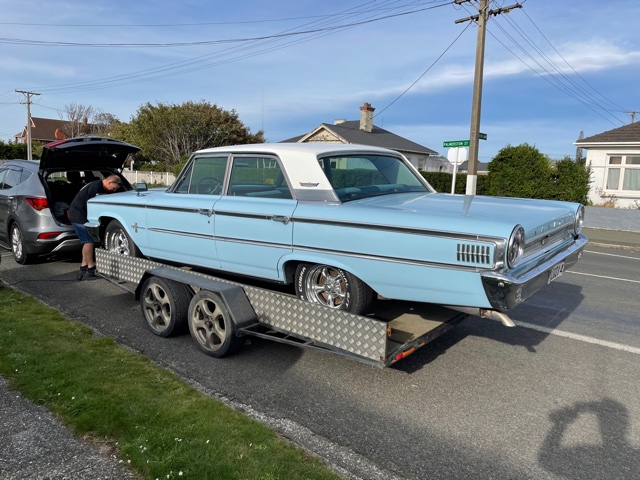
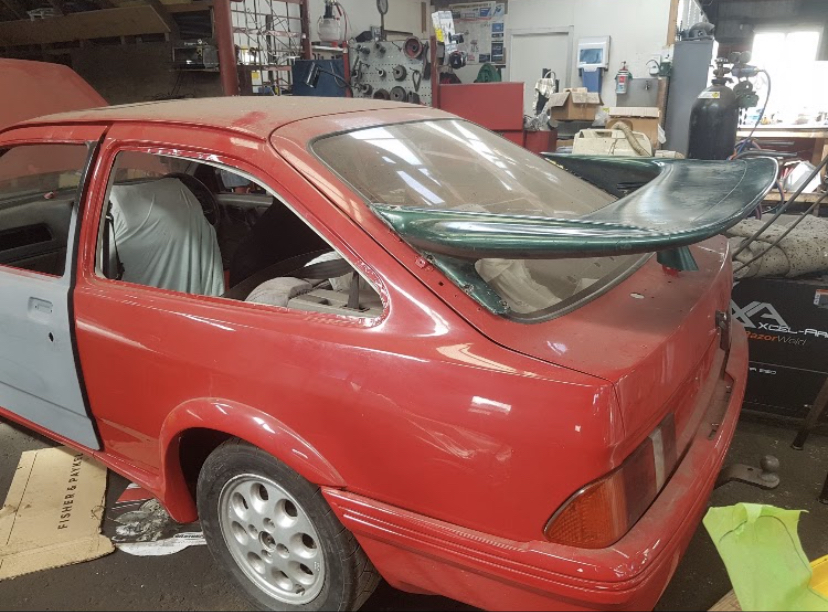
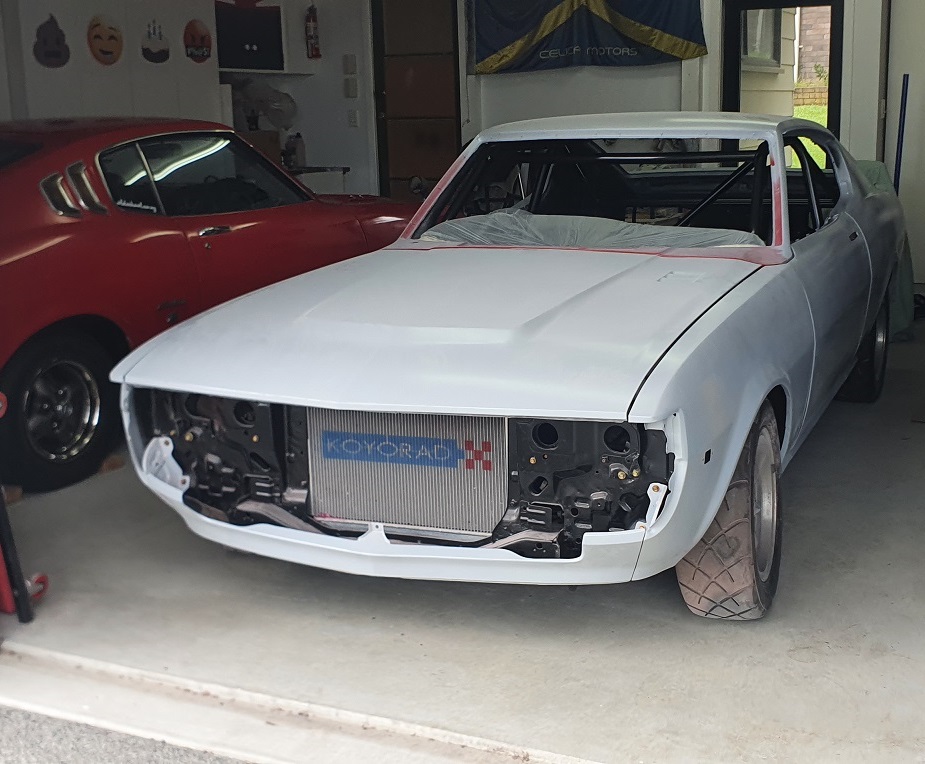
Coming together
9 points
-
Cool. The booster has a ‘silencer’ or ‘filter’ that is foam around input rod. Chances are when the new pads were put in or the brakes bled and the pedal was pushed all the way down the foam has fallen apart. If the brakes are working as they should,then the booster is sad. If you get a hard pedal or poor stopping performance, the booster is dead. Either way, I would recommend replacing the booster.7 points
-
So here’s my big on selecting an agent, and a bit on our strategy for selling this thing. First disclosure, I don’t have a background in RE but my day job is in corporate sales and know a fair bit about the area (various programs, training ppl etc). Also, salespeople are people too mmmmkay. Knowing what I know, I’m able to engineer the following process to the outcome I want. Quick tip, sales is 100% built on information, be transparent with information and sharp with questioning and you can have them eating out of your hand (or visa versa…) I don’t really know any agents personally, so I decided to go to a few open homes ran by local agents who look to be successful. Posing as a buyer I was able to get a bit of an understanding on how they operate from the other side. Honestly a lot acted as professional clip board monitors, because the market is so hot right now, they’re sitting back and waiting for the deals to come to them – we want someone proactive but not pushy. It was a pretty easy shortlist (3) to make, the ones that bothered to call me back and ask some questions….. I asked these ones to come to a visit of our place, and provide an appraisal on potential value and marketing strategy, at this point I’m letting them to try and ‘sell’ to me All agents will give a market appraisal where they show comparable sales in the area and how they see that reflected in your property, they aren’t doing a favour here, they have to do that… Be wary of agents who will look to ‘buy the listing’ by appraising your place super high as an attempt to wow you with greed. At this stage I noticed already differences in offering, Agent #1 was very bubbly and talking a lot about how strong the market was, how well it would sell and how good they were at negotiating. Agent #2 was more casual, walking through the different ways in which we could look to sell and asking questions about what’s important to us. For me, this meeting had nothing to do with getting an appraisal (just say “yes, ok, that’s great” a lot), it was a case of gathering information about who they were, what drivers they looked to use so I could use that again in the next discussion. I left each of these meetings outlining that I would be calling them on when we would speak next, but being clear that I would speak to them before making a decision. (if you are clear on YOUR actions and YOUR timeframe, you wont have them badgering you with calls). Next meeting I’m flipping the script, I’m the one in control and asking all of the questions, the reasoning being that previously the agents are excited about the opportunity and this puts them on edge and more easily persuaded. I’ve defined that the strategy will be to do a quiet listing on the house before it is finished – purpose to capture buyers now and when they might be thinking in a few months, also to do so during winter when new build listings (competition) are low. If we don’t get an offer of something we like then we can pause to finish it complete and try again…. In any RE deal you’ve got 3 levers to pull in the negotiation – price, timing, and conditions. In our situation, the second two are easy for us to be flexible in order to achieve the best possible $$$. So here, I’m very much in control of the convo and the agent is the one saying yes to me, with their ability to manage the buying process being the key feature. It then gets onto commissions…. They both start that the standard rates are 4.5/2.5% but for me selling 2 houses they will get me a ‘deal’…. During this step, it is key to shut up, have long pauses before answering and show zero emotion (Chris Voss styles). Agent #1 did start with “what do you think a fair rate”? after which there was some fumbling to do some quick math that their offer was 2%, but that I should indicate what I thought was appropriate. For all the banter about being trained negotiators it didn’t take long for them to drop their rates with little encouragement. Agent #2 was a bit cooler about the whole thing, straight up a fixed cash price for a sale followed with some questions on if there was anything presented up until that point that we were unhappy with or needed more questions answered. I have picked Agent #2, namely because he listened to understand what was important to us, what we feel the strategy should be and what expectations should be. I have also said to him that I’d like to add to his commission, whereby as well as the fixed rate, if he gets over a certain $X then will receive an additional % - key is to align the incentive schemes of you and your agent…. Agent #1 by accounts is good at what they do, they were top in sales in their office and has lots of listings. I feel that is due to be a hard hustler rather than an active negotiator, so the skills fit really wasn’t there. Lots more I could go into the theories behind this process, but it’ll end up getting into sales101…5 points
-
They make one of those on an episode of Paw patrol for cooking Chilli. I must have seen that episode 3 or 4 times so far. #dadlife /lingpost4 points
-
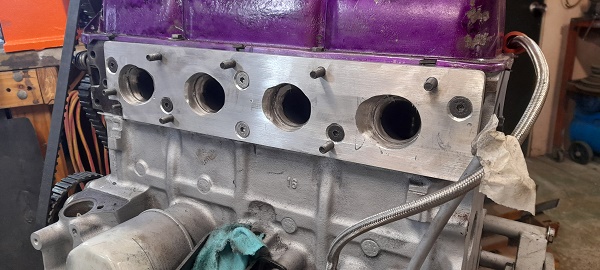
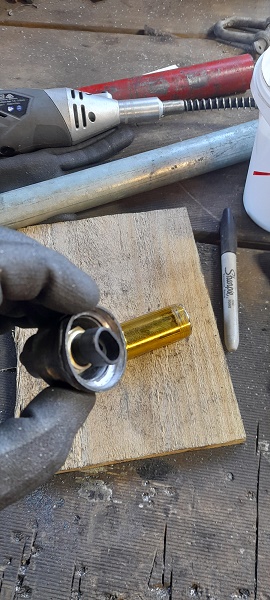
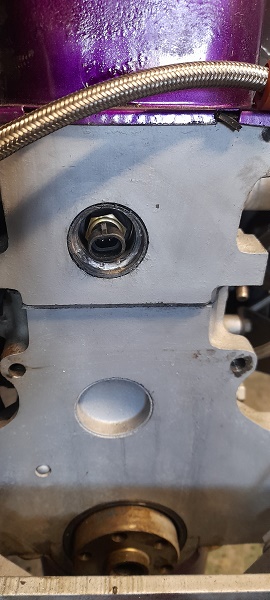
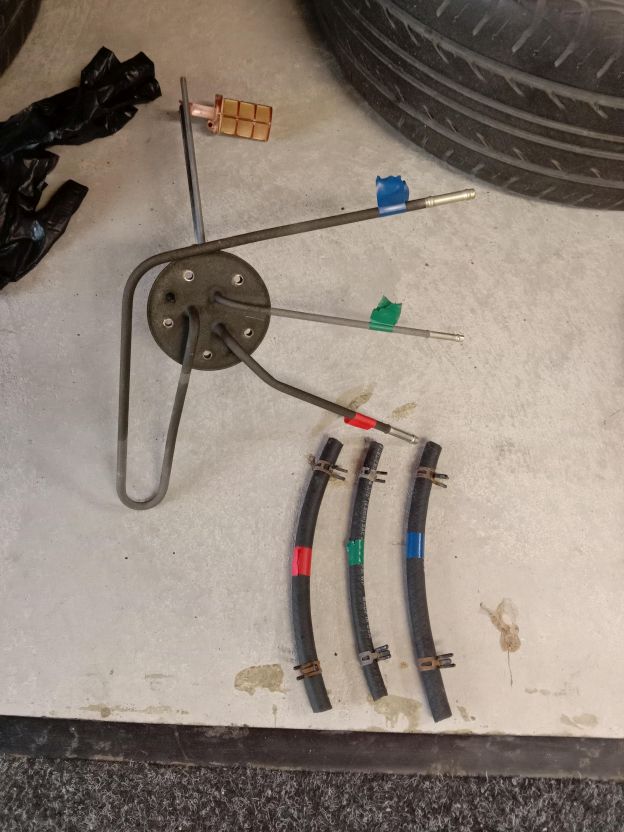
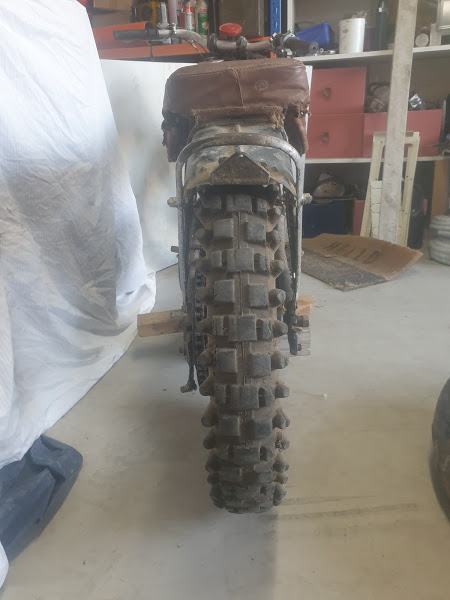
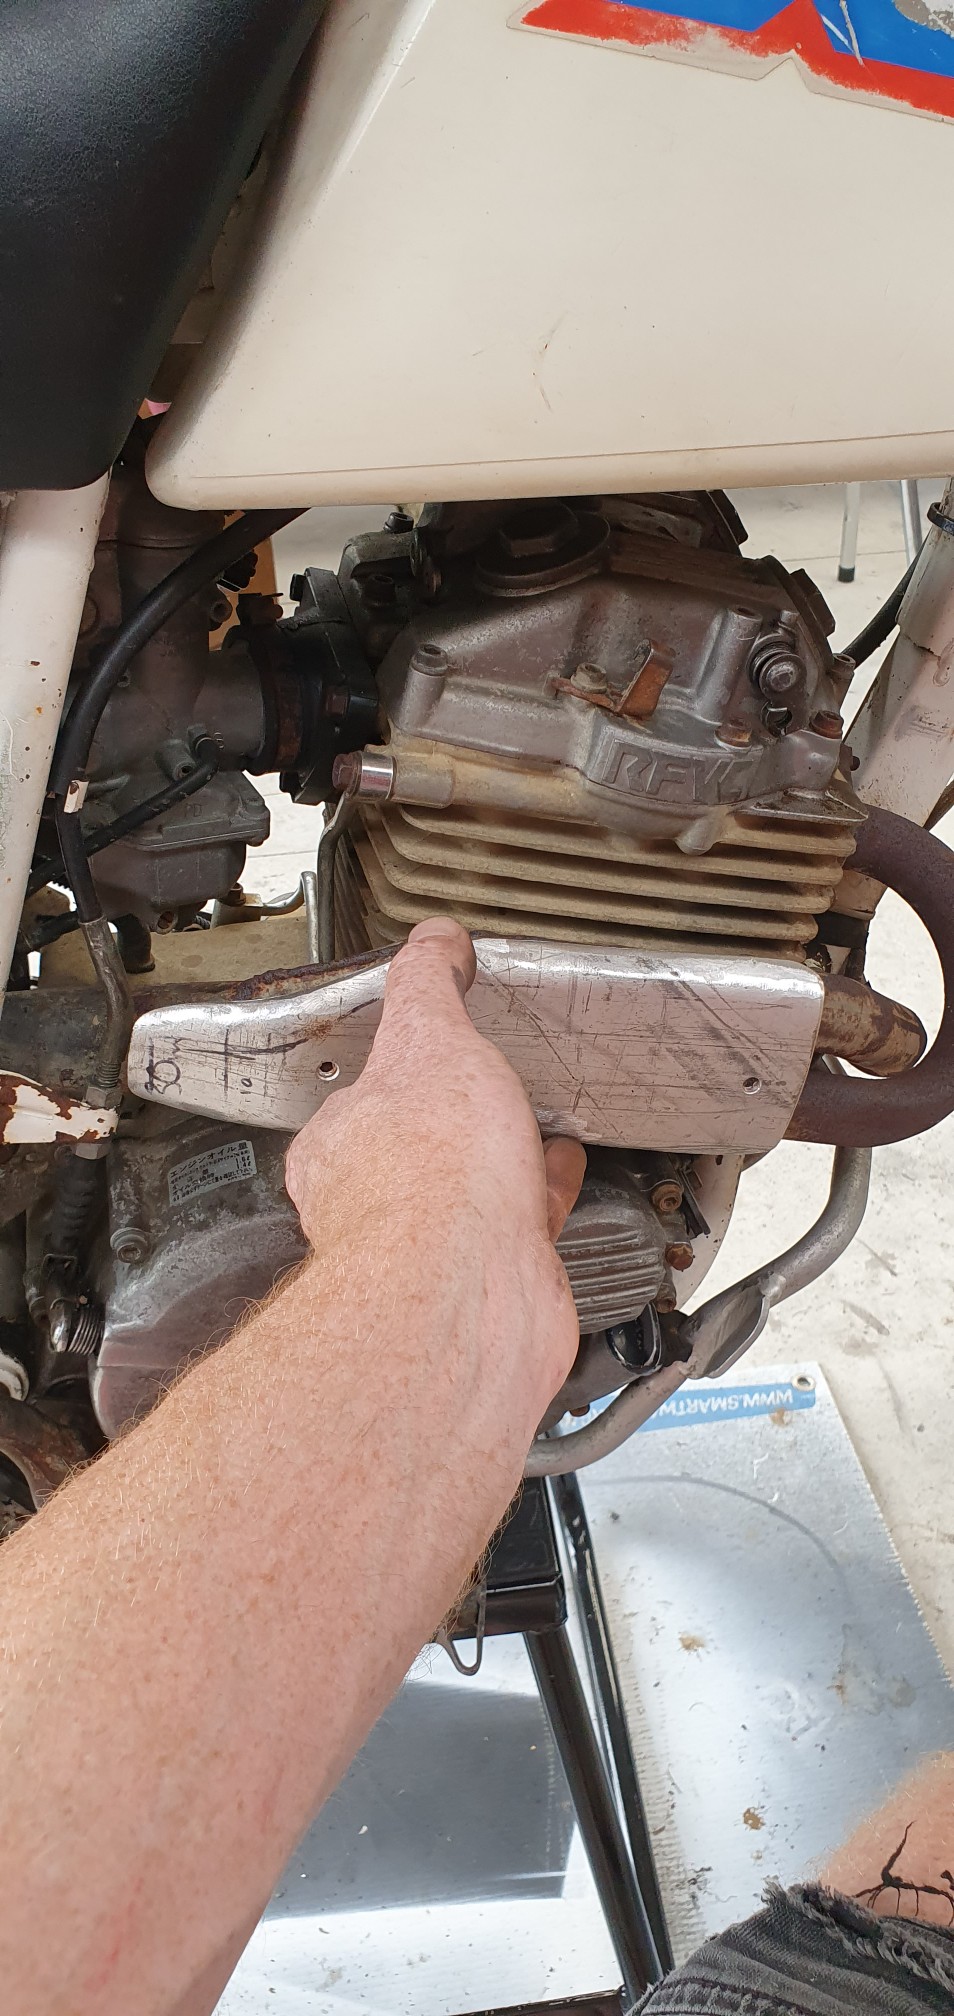
was thinking about temp sensor for the ecu and where to put it.. couldn't put iy in the factory position as the factory sensor was there for dash temp gauge.. thought about the hole in the head between #3 and #4 inlet port but there is no way with the linkages for the inlet manifold... so then i thought about the frost plug at the rea of the head...there is about 30mm from the rear of the head and the fire wall and when i popped the plug out and measured the depth i had ..that was 60mm from head surface to 34 cylinder wall...........and the temp sensor itself is 60mm long. soooo i garbed a new front plug....gutted it and got some thick pipe and cut that to size and then a washer.....welded it all up and fucking back.......sorted.. andits about 10mm of the cylinder wall. and as paranoid as i am with it leaking and being in a spot that the motor will have to come out if it does....i plasty dipped it twice. tapped it into place and it should be fine. also trimmed the adapter plate for factory temp sensor. .port matched it to the inlet manifold.. port matched the head to the adapter plate (will do for now ...this motor is to only get it all running..i don't have hope for it lasting long)..gave to surfaces some belt sander love ..some lock tight on the socket head screw.....a gasket and some extra sealant and bolted it on the last time .....(well till she epode's ) cheers
3 points
-
Not trying to spam this up too much, but in my opinion real estate agents are not working for the seller either. They're working to maximise turnover. In a house worth 600k, 2%= $12k, to get $50k more of a sales price will require a whole lot more hustle for the agent to earn just $1k. A mates way of dealing with this was to offer 10% commission on $ over X, that's a real incentive to maximise what they're getting for you. We sold our house ourselves, was really easy, made a sign, listed on trademe, had an open home, took names and numbers at the open home, rang the people who attended that night and asked if they were interested in making an offer. Sold in a week. The best part was knowing exactly how the process was going.3 points
-
I got bored of reading all that about 12 words in and have concluded that it needs to be tossed into the ocean where it belongs2 points
-
Fancy new grips, stuck on with the old spray paint trick. I had to carefully cut the ends out enough for the bash guards to fit. Looks 1990's cool, which is the period correct look im after.
2 points
-
Managed to find this car closer to home. Took it for a drive to Riverton at Easter, carb float ended up being a sinker and sending fuel all over the intake manofold, fun times.
2 points
-
It's a race car now. Shouldn't be an issue with crumple zones
2 points
-
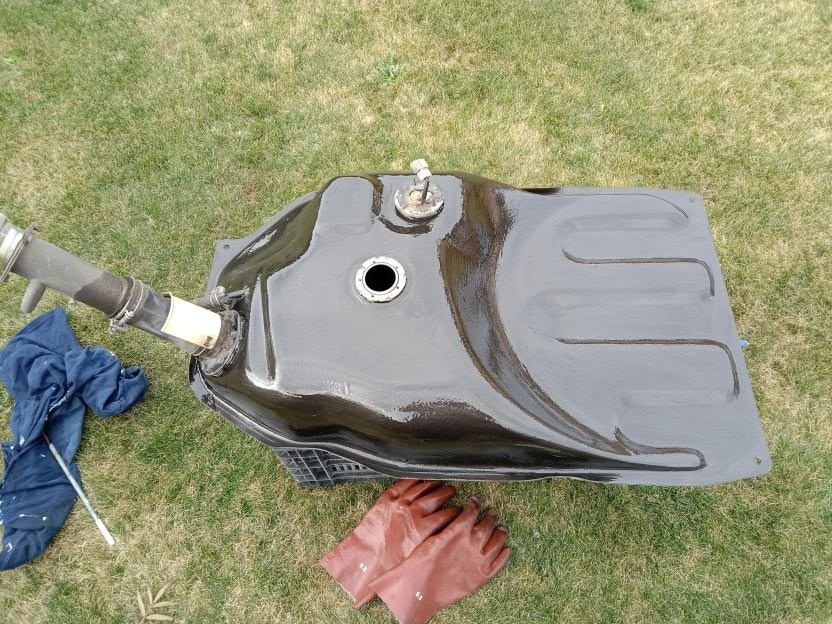
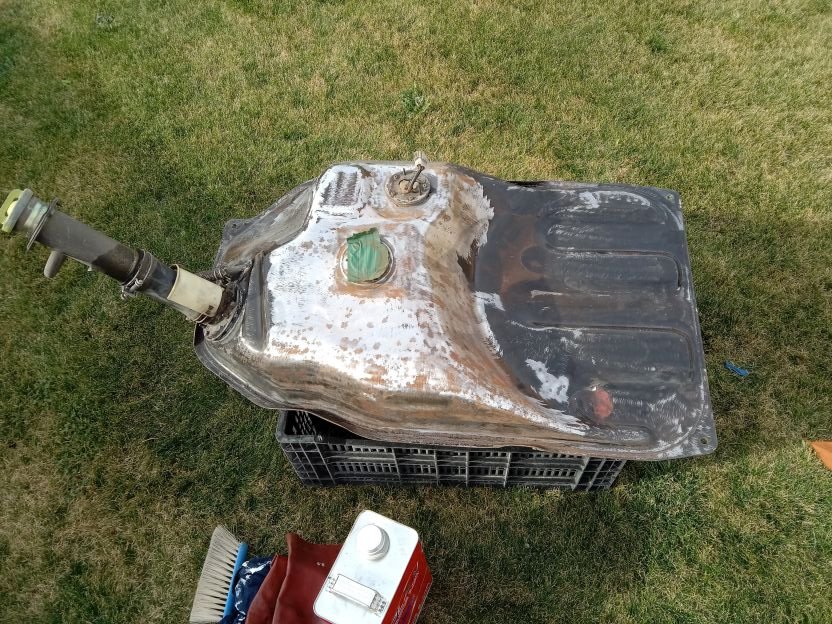
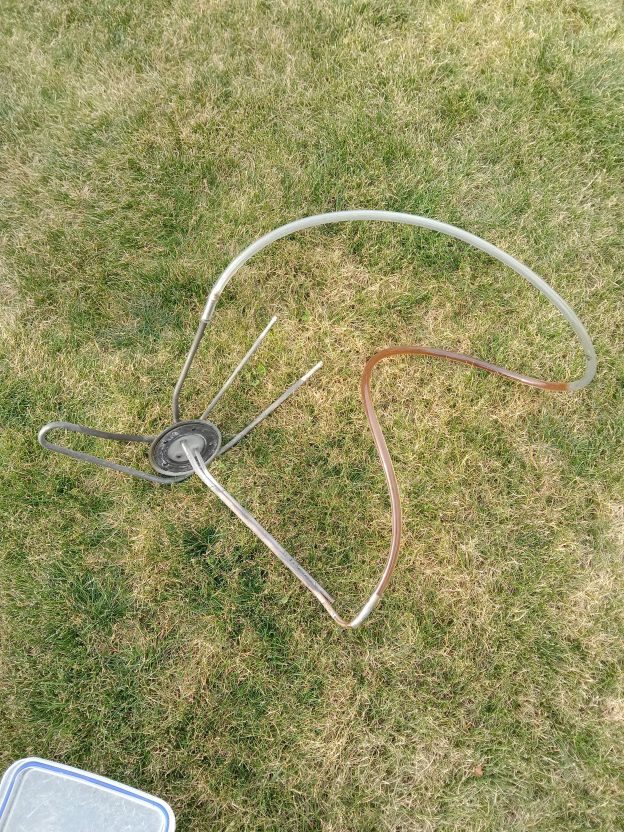
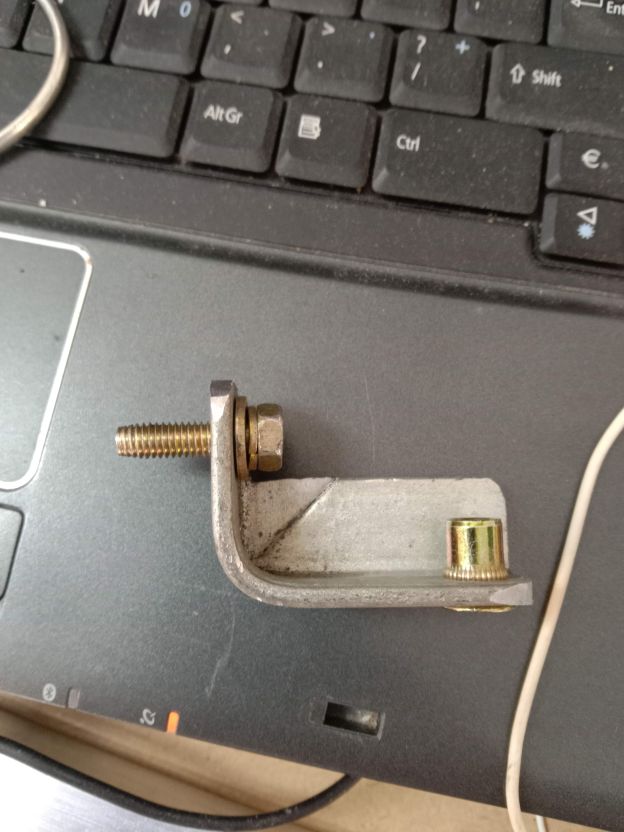
Still chipping away, have had a few jobs that held up other jobs, so progress hasn't been as quick as i'd like. Couldn't put brake master cylinder in till I sorted the clutch and couldn't put fuel tank back in till i'd sorted the brakes... Anyway, a quick run down below. Tried to start it the other week to make sure it still runs, it doesn't. Figured it was probably fuel as it will have been sitting for a while. So I dropped the fuel tank out to find the tube pretty blocked, so that hopefully answers that. Drained the fuel tank, turns out I put quite a bit more fuel in over time than I thought, fill the mower container and any lose containers I had. Took the worst to the dump eco area. Dropped the tank in to Hornby Radiators and they gave it a good clean inside. I grabbed some new hose while that was being done. Got fuel tank back and gave it a quick paint on the top half, only surface rust, but some was a bit pitted so worthwhile doing. Fuel tank. Hoses labelled for future reference, also labelled on car. After getting the insides cleaned. quick tickle up Then a coat of whatever rust paint was lying around. Was blowing a gale, can't beat a brush on product sometimes. Engine fuel supply pipe with some meths in it, sloshed it around a bit and left it overnight. Grabbed some pipe cleaners and it's good as now. Getting a new intank filter thing was too hard basket with my time frame, so I gave it a good clean and chucked it back on. Oh yeah and the new hose: While that was being done I went down to CBC in town and they made me a new clutch cable. The old one had been resting on the exhaust so the cover was pretty toast. No pics because I just wanted it installed. But it was a pretty sweet cable. I had it made 50mm shorter than the one I had, as I couldn't route the one in the car without it hitting exhaust and steering. So with the new cable made I made a bracket to hold it clear of everything. Factory they have a bracket, but it's NLA so I had to just guess it. Asked on a FB group dedicated to these cars but no one could be bothered taking a photo for me of how it's run factory, boo. Anyway, the bracket, which is part of a realtor sign I chopped up. Gave it another tweak with the rivnut tool after this photo and got it compressed a bit more, shes solid as fuck. Bolted to the firewall and installed a P-clip on it to hold the cable. Bolted two clips together to keep the clutch and speedo cable apart and keeps it off the fuel line on firewall from filter. No idea how much of this junk is legit, but none of it's under pressure, it's just done to keep things apart so nothing can rub through. Seems legit enough to me, guess i'll find out soon enough when it gets checked. Just need it together for now and worry about the details later. For those that don't frequent the spam tech thread, I asked about bleeding my new master cylinder and went with this solution. Which when installed worked like this. Didn't leak bugger all when being bled, and I just clamped the pipes with vice grips when done so brake fluid didn't go everywhere. So then I bled the rest of the car, gave up doing it by myself and installed someone in the car to pump for me. It was after I had done this, I realised I had fucked up... I pulled the pads out as I was getting a bit of fluid leaking while trying to bleed the nipples myself (no euphemism). So I thought rather than potentially fuck the pads i'll remove them. I'm sure you can work out the rest... thankfully the pistons are long enough for this rookie mistake to not be an issue. They pushed back in fine with a nipple released. Was going to rebleed the whole system again tomorrow anyway with new fluid. But that is a must now as i'll have air in one side of each caliper. No biggie. Next time I'll have brake pad shaped bits of wood to install. Quake safe on axle stands with enough junk underneath to stop it being able to fall on me. Next up will be work out why the dash sits too high to where the windscreen will struggle to fit on one side. Then book in a windscreen install. Then do my own alignment to the point I can get the brakes bed in a bit. Then book proper alignment. Then not sure... i'll worry about that another day, getting close.
2 points
-
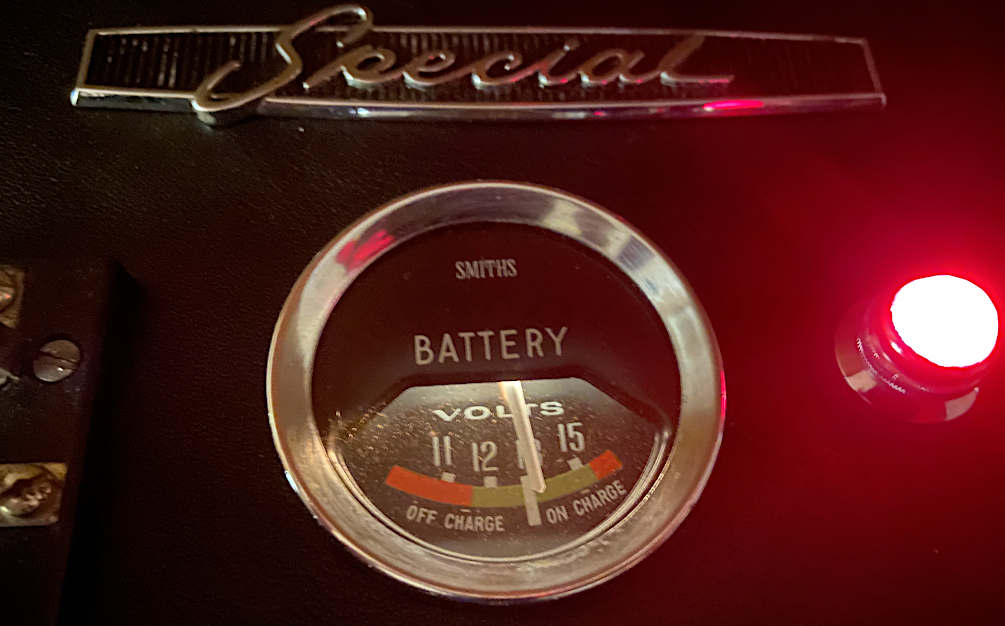
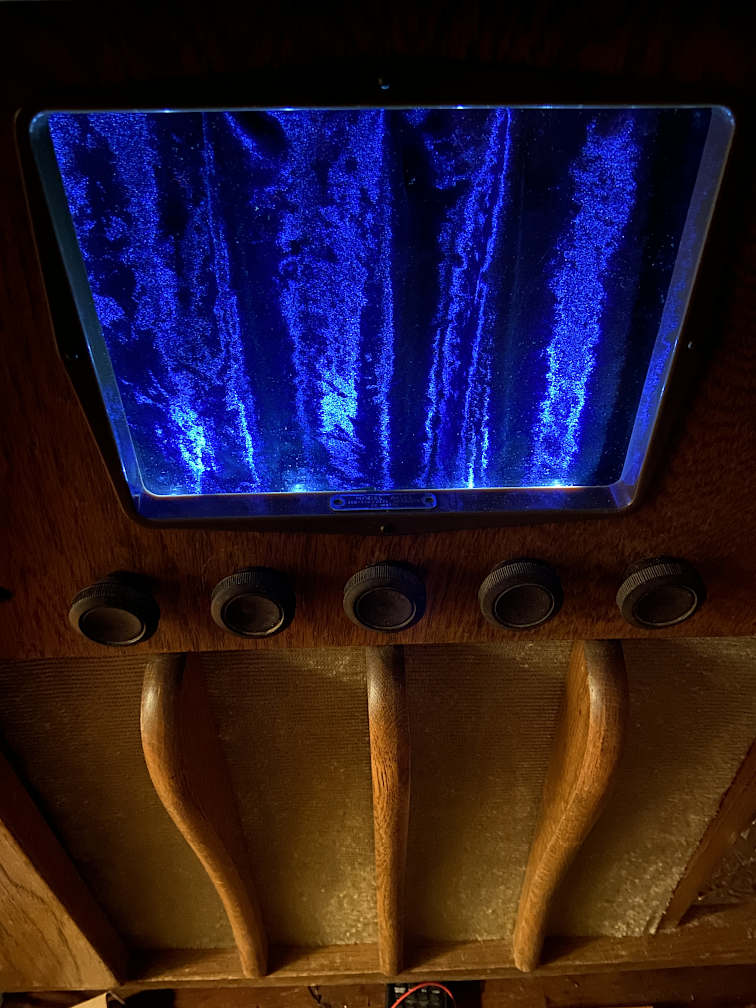
Making slow progress on this whenever I can be bothered. The control panel is covered in leather jacket, and we have volts! I bought a kitset of a motorised chain similar to a tank track, and used it to create a motorised curtain. The curtain grinds its way noisily open and closed, which adds to the cheese factor. It's lit by some Christmas lights: Hopefully the lights in front are sufficient to stop lights behind from being visible through the thin fabric. I discovered that my plasma globe causes my neon bulbs to glow dimly, which is kinda cool. I hope I don't have to ditch the plasma globe because it scrambles electronics in its vicinity. Next up on this project is puzzling out what the rest of the controls should do, and deciding how much effort to put in. I'd quite like a magic eye VU meter.
2 points
-
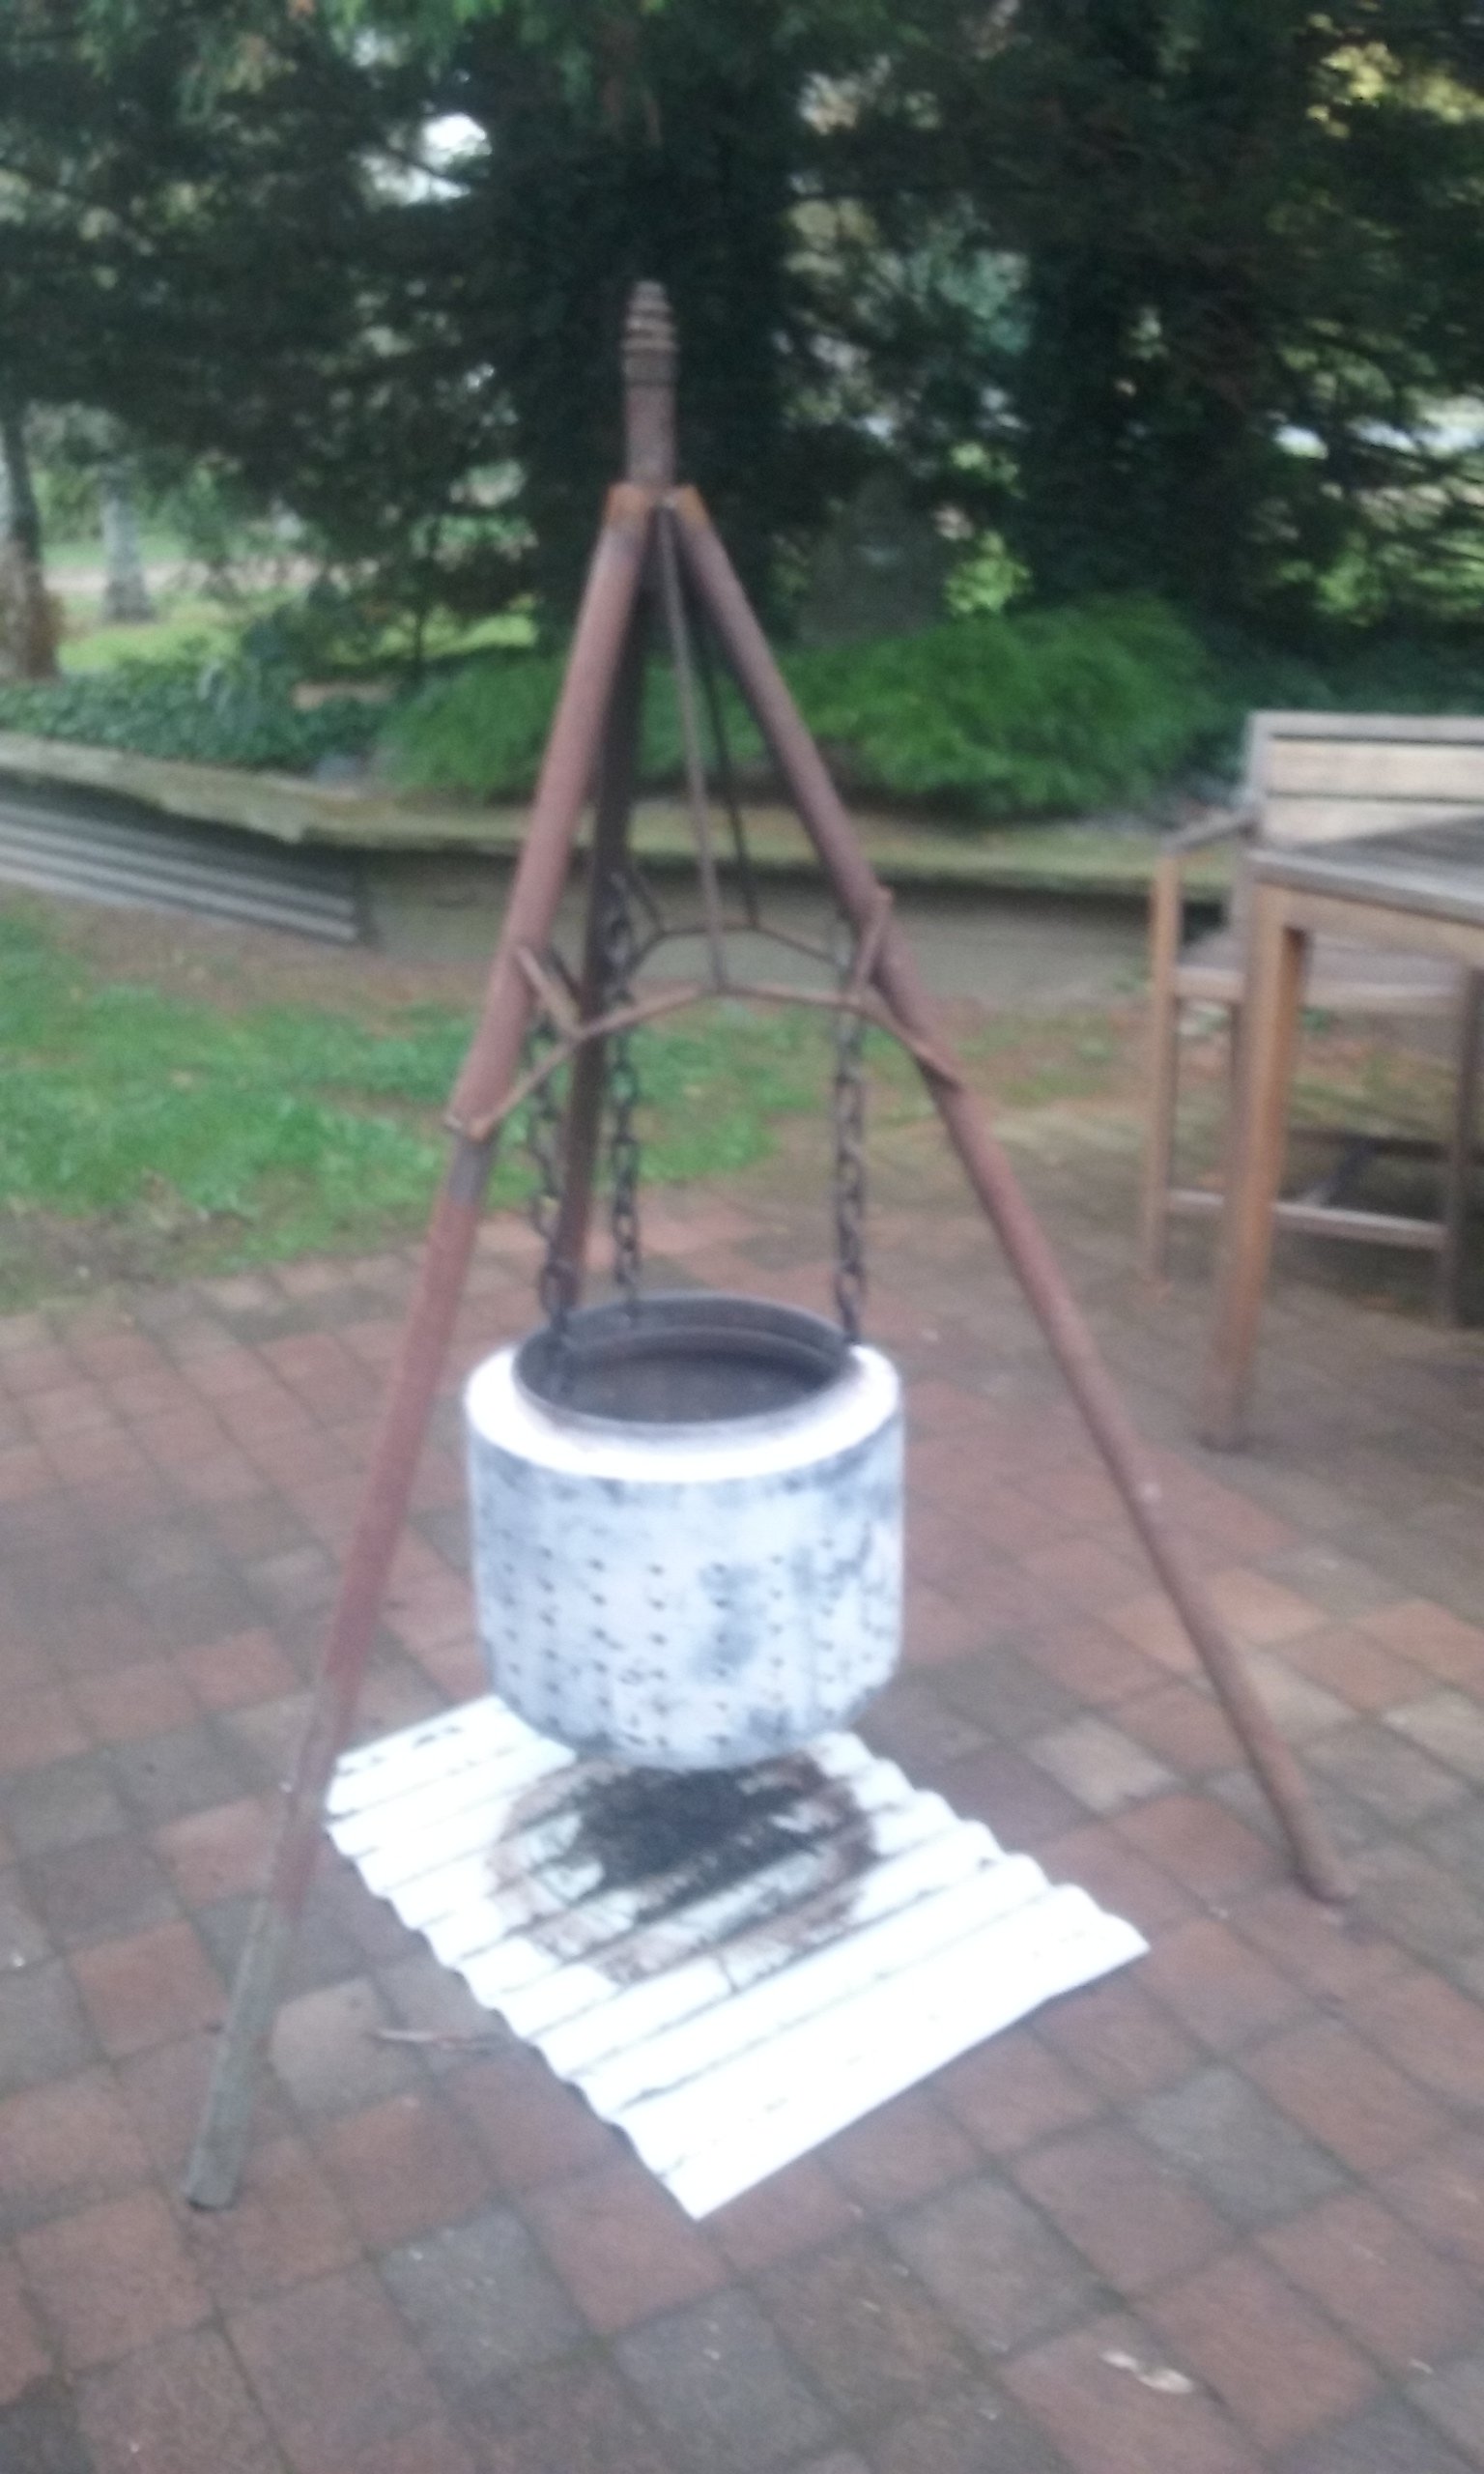
Was a bit hung over on Anzac day appreciation day, So I made a fire thingy out of some junk I had lying around
2 points
-
So this didn't last long! haha I got offered a pretty good price so I sold it for profit2 points
-
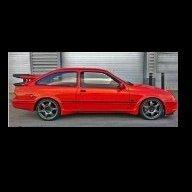
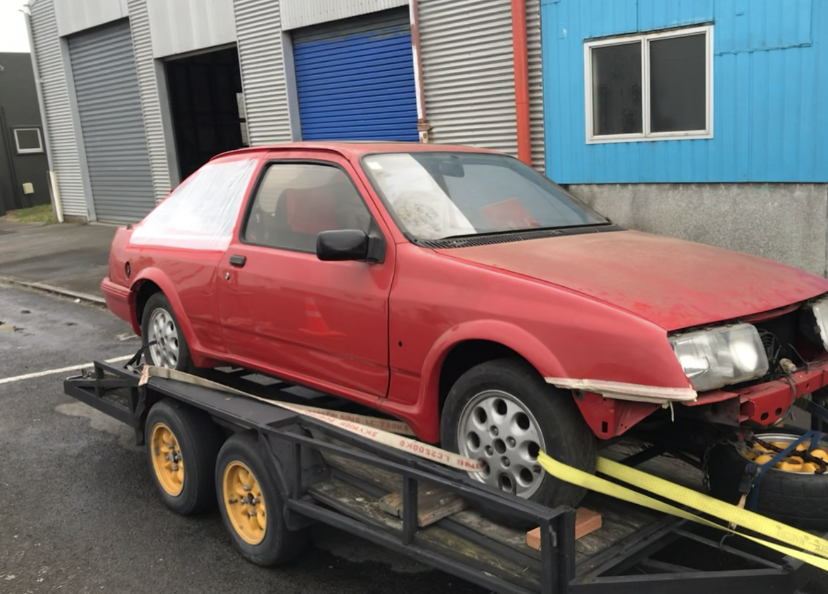
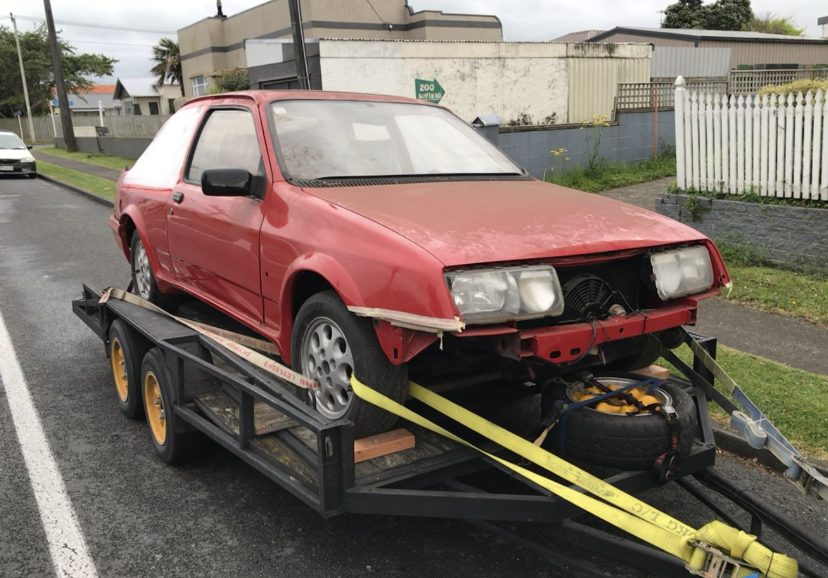
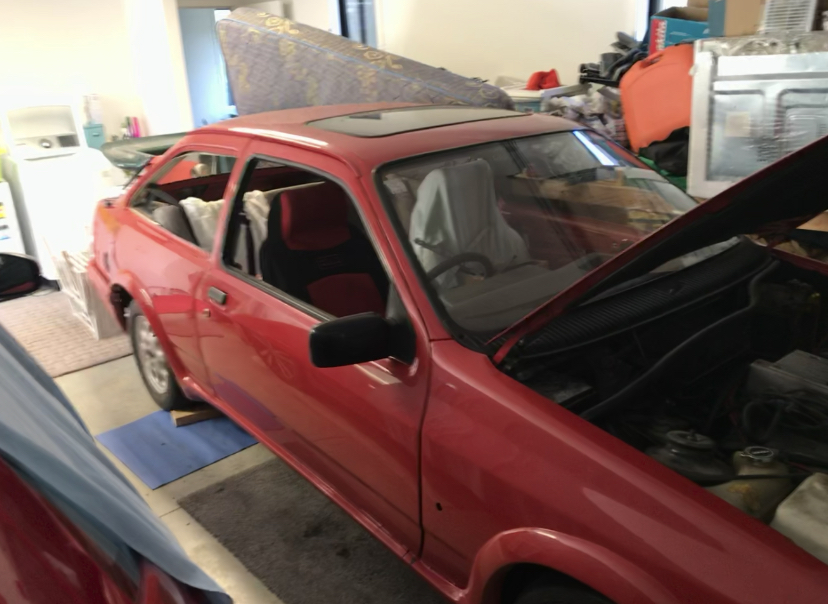
So a year and abit ago I was looking on trade me and someone was trying to sell a ford Sierra project and after looking and wondering I brought it next step was to get to the north island to get it ,so packed up the family and away we went and I got this!!! Its a Ford Sierra xr4i it has a 2.8V6 cologne engine the person I brought it off was going to make it into an RS replica so I’m going to continue with this theme
1 point
-
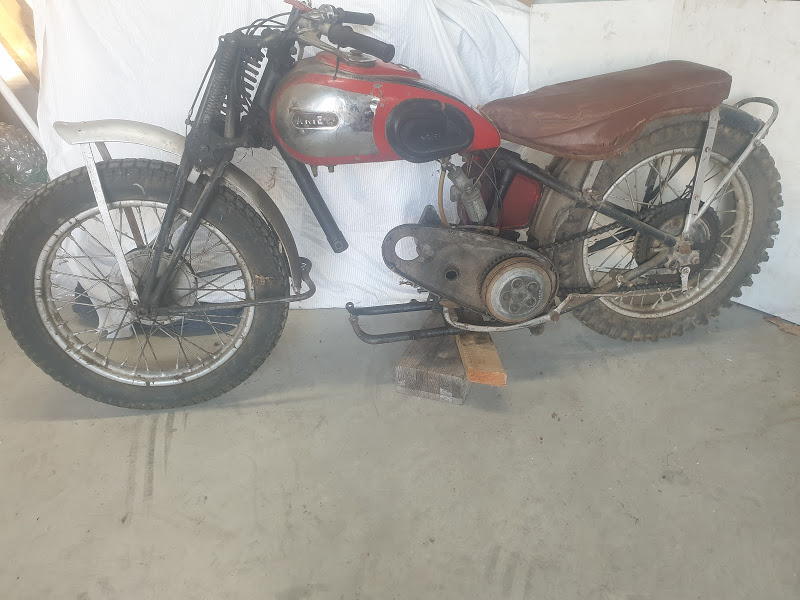
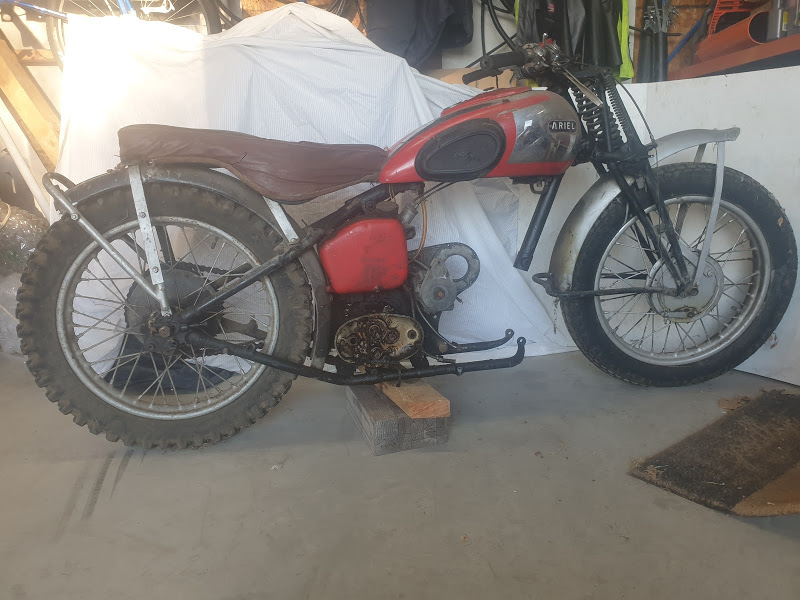
Thought I would put up a build of my Ariel, have been lurking on here for a while and have really enjoyed reading the builds posted, both cars and bikes. I've always been interested in motor bikes and had a few in my earlier years, mostly Yamahas, and had always wanted an older bike. Many moons ago where I worked in Ch-Ch there were quite a few guys in the VCC. A couple of them went to Wellington and bought up a heap of bikes from an estate (Brook or Brock Motorcycles?) One guy got a bunch of AJS/Matchless stuff, and the other guy a bunch of Ariels. I had a look through the Ariels and chose a bit of stuff that would be the grounding of a 1937 Ariel Red Hunter. Engine was 1937 and not too bad, frame is about 1946 from memory. Pretty much enough for a complete bike plus extras, but everything needing work. Back then I got a few bits done, girders straightened, oil pump over hauled and most importantly got the engine done. Had it re-bored to suit a wiseco piston from a 350 Chev and new chev valves to suit. Didn't get much more done due to moving towns, young family, seperating from wife etc. etc. Usual shit. So recently life has settled down a bit and I have come into possession of another Ariel. This is a pretty much complete, bit rough, ex farm/hoons bike that has been hidden in the back of a shed for at least 40 years. It's a 1939 500cc Red Hunter. Frame and engine numbers show it as a 1939. It had been used on a farm for a bit here in Ashburton and thrashed, blown up, piston shattered! Then sold, engine removed and stripped, stashed in the back of a shed until a few weeks ago when I got it. Most parts from 1937 & 1939 are all the same. Will post a couple of pictures of the 1939 bike as I got it, 1937 is in bits and all over the place in my workshop.
1 point
-
LOL; a wonderfully in-depth synopsis / diagnosis, in fact very similar to myself explaining my lathe misbehaving to the "ever lovely" Mrs sr2" as "its a f*****g c**t" etc. The correct term for this type of behavior is 'anthropomorphism'. The definition of anthropomorphism is "attributing human characteristics to nonhumans - i.e. gods, animals, or inanimate objects".1 point
-
1 point
-
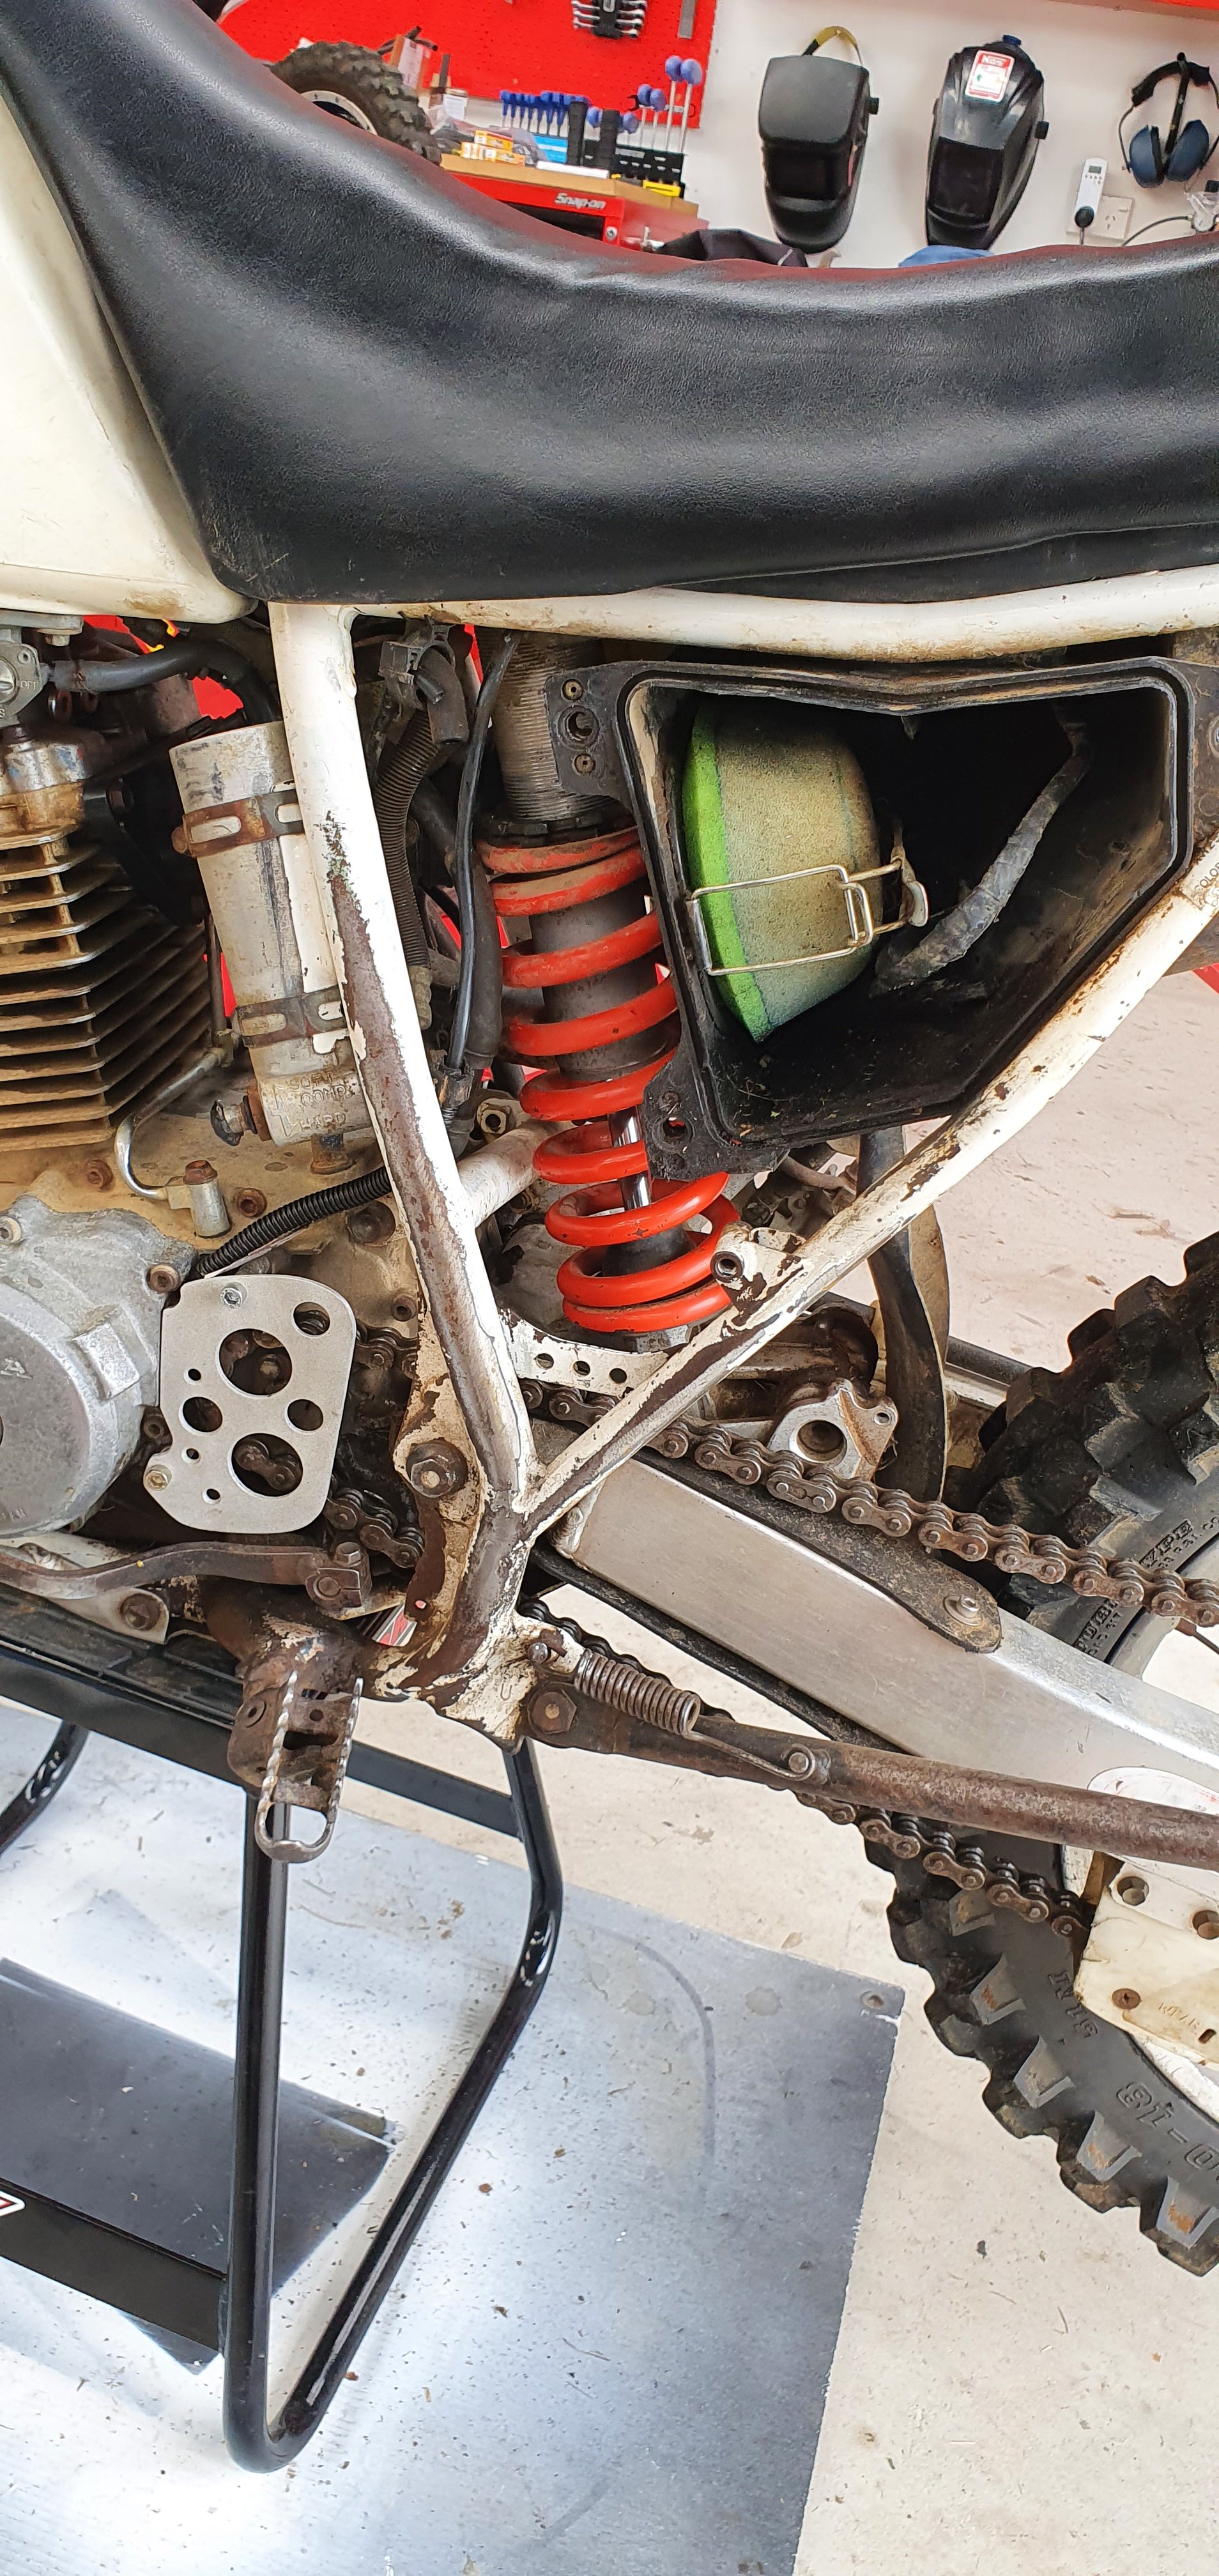
I made a plate for the other side, to prevent the riders foot from going into the front sprocket. Probably not really an issue, as the way its tucked away, plus the near impossible chance something could squeeze into the gap between the upper/lower chains - but hey as I've always said "Saftey 3rd"... I also set the rear suspension up. Google tells me around 25-30mm of bike sag, plus around 100mm of rider sag is about where I want it. I measured: As it was when I brought it to be 32/120 which did feel a little droopy? 1st adjustment I made got 22/100 sag numbers, which made it corner like it was on rails...but felt too hard for me after riding it for the past month on the Cadillac suspension settings. It felt like it would bouncy me off when landing my epic jumps (***my jumps are less than 1m high). 2nd attempt I split the difference and ended up at 30/110. This still feels a bit hard and bouncy in the rear compared to the ride I'd become accustomed to...but I figured I get used to it. The bike corners, handles and lands pretty well, it doesn't feel as droopy as it once did. So I'm leaving it like this for now. I may re-look at this in the future? But keen to just send it for now.
1 point
-
Spam away... You're right, in many cases, the agents work to their incentive scheme rather than maximising the situation for the seller - who said a quick sale is a good sale? potentially leaving $$$ on the table there. With what I do for a living I could look to do this myself, in all honesty its the hassle factor with everything else I have going on in life. With a well trained agent they will do your bidding... I feel the commissions should look like investment funds...... you have a super low base rate, then a large performance fee i.e. achieve x% above the average price/GV for the area... that'll sort the wheat from the chaff.1 point
-
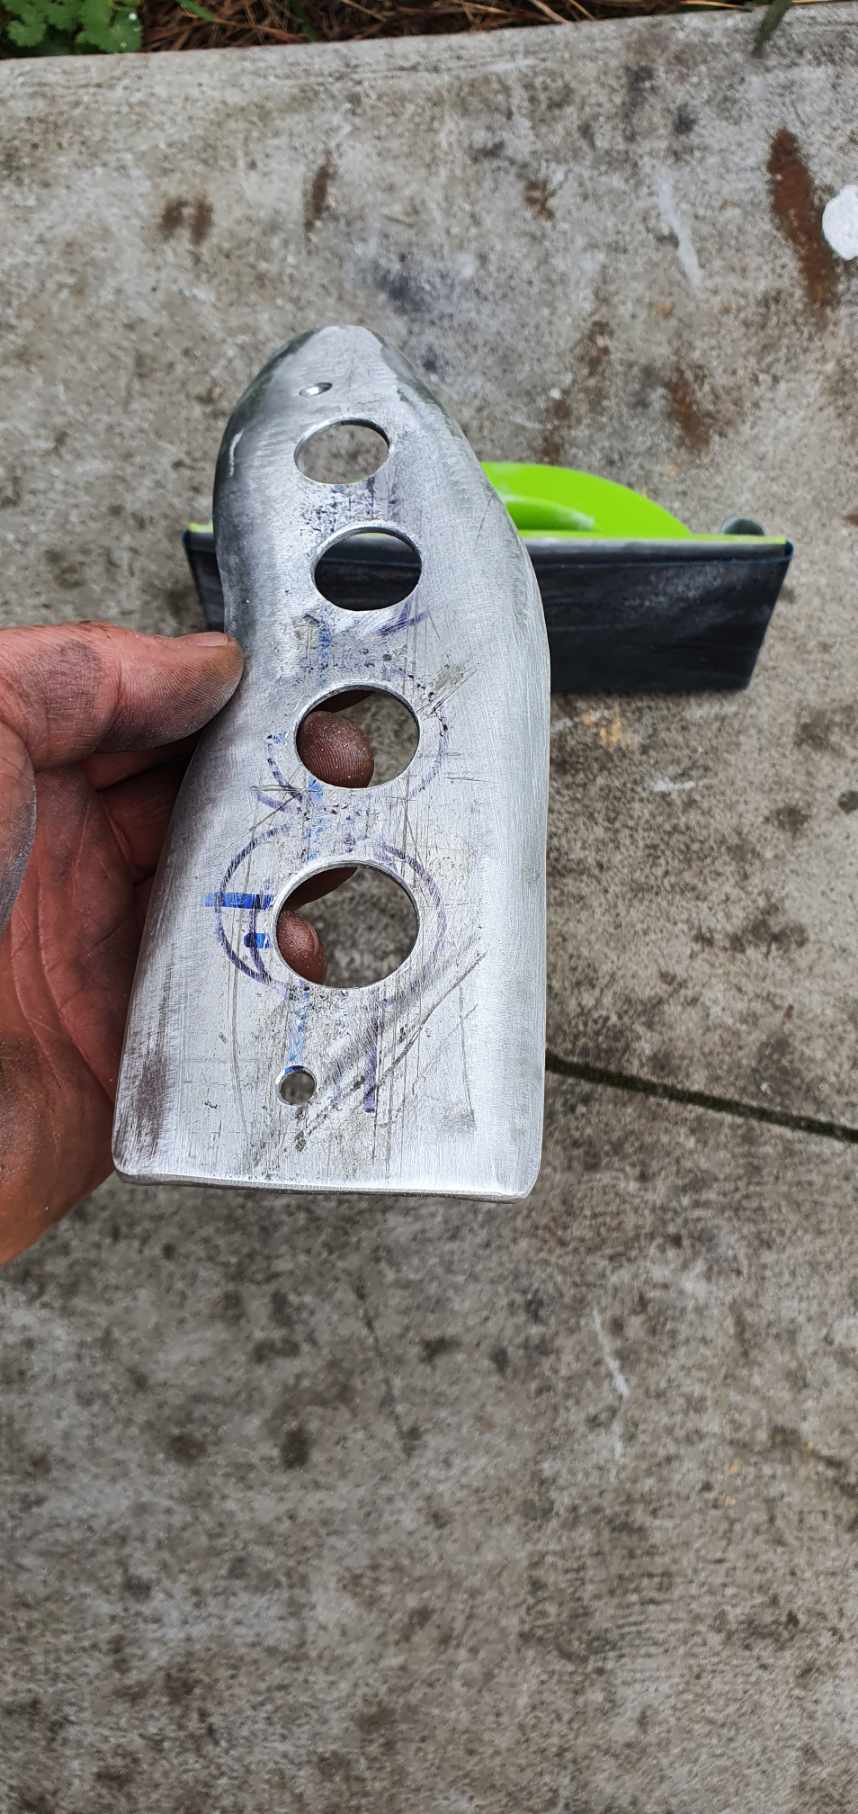
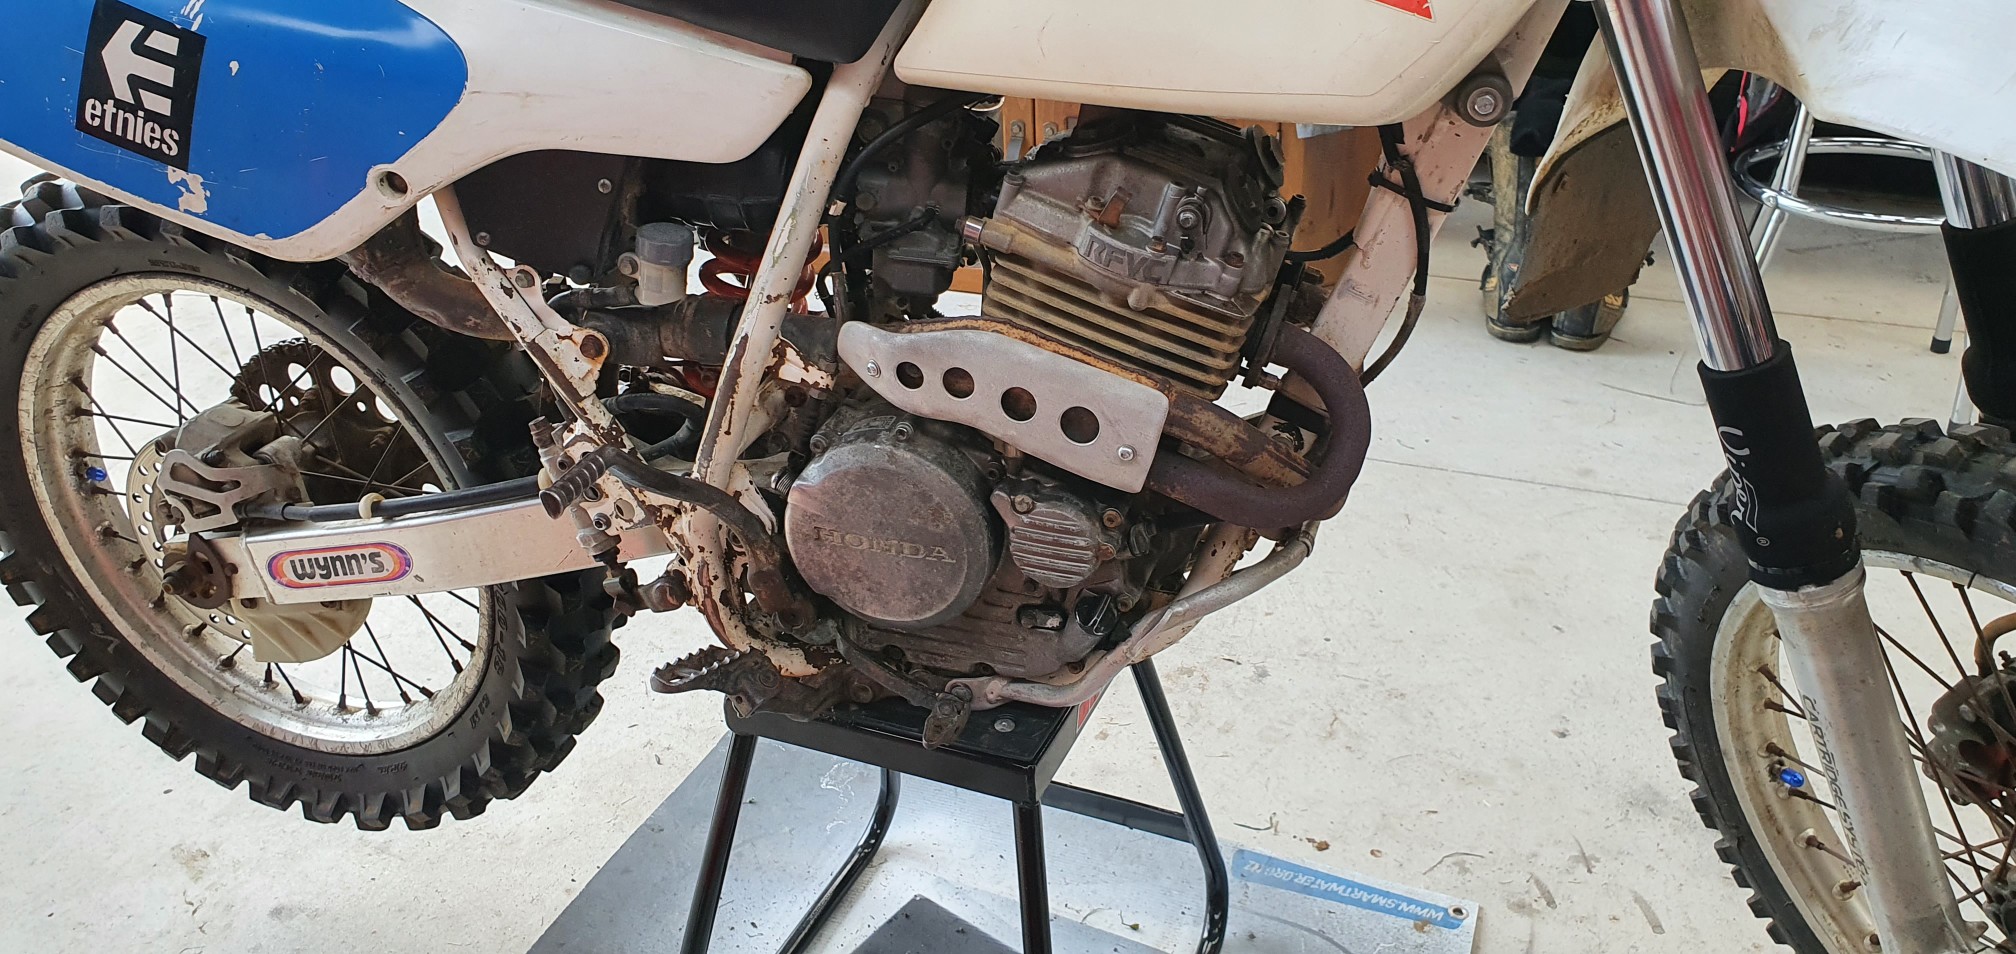
Built a heat shield, after all 3 of my kids got burns from the pipe. Slow learners - but so am I. Beating the flat aluminum into submission. Speed holes and file finishing. Tadah!! Pretty happy with it, should do the trick.
1 point
-
Look forward to hearing every detail of making an agent squirm, dealing with them was the worst part of house buying for us, they all came off as openly dishonest without even trying to hide how much they were ready to rip us off.1 point
-
Windows are now in. Picked an agent, negotiated <2% commission. Post to follow on how to do that. A few articles coming our how commission fees are obscene considering $ and the hot market, I agree but main reason is we sellers accept that without negotiation...1 point
-
take the toyota one out and replace it. although im not so sure a replacement will be better but ill find out i suppose. having said that i have replaced the bush in many W58 type boxes with aftermarket parts and had no issues so we'll see.1 point
-
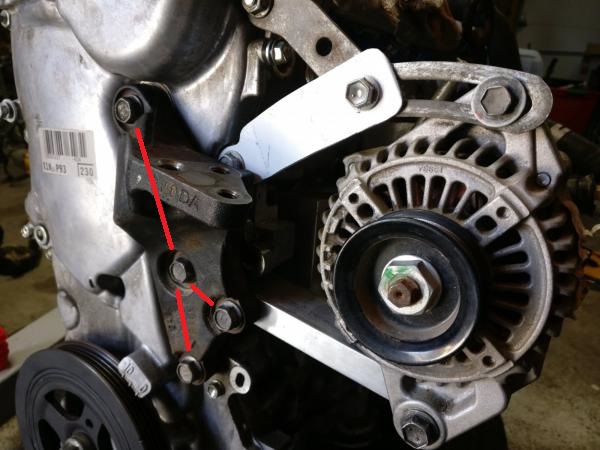
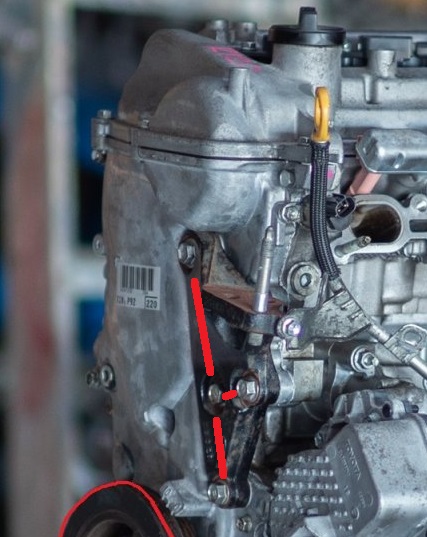
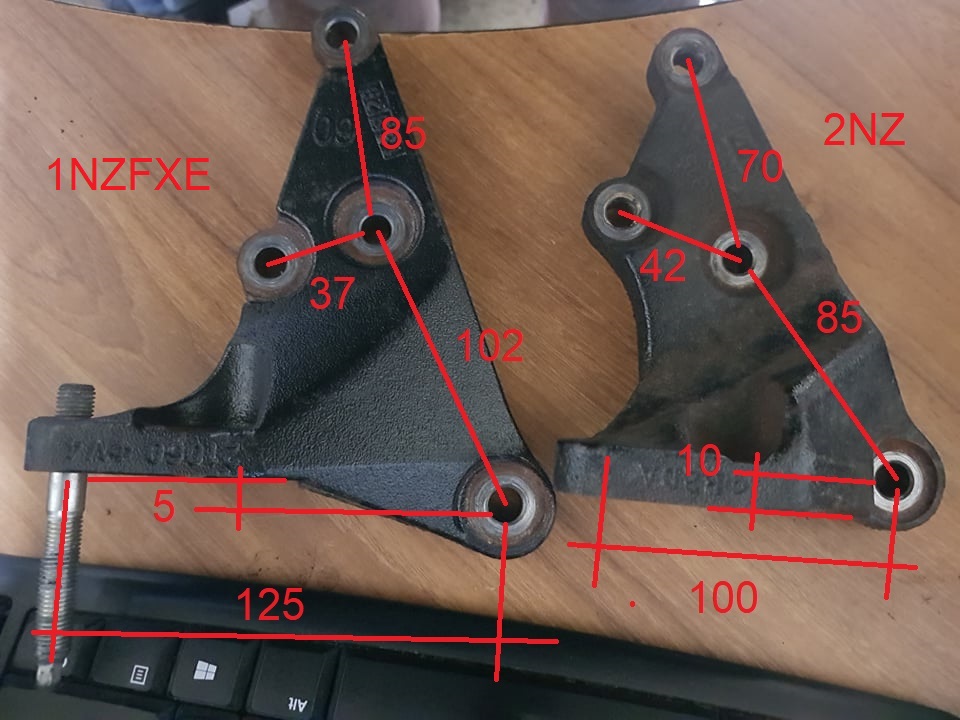
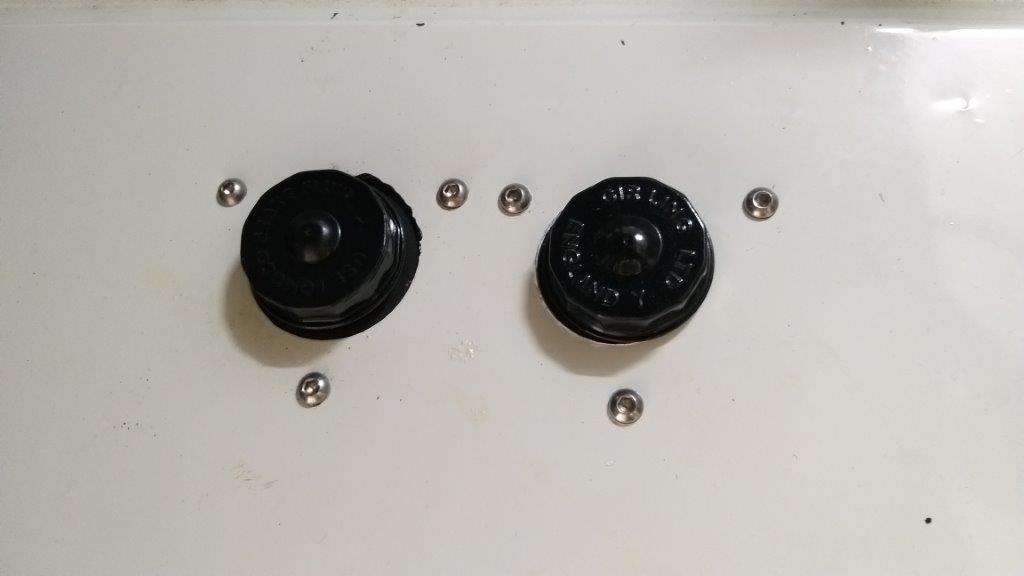
Okay soooo "The other guy" that did this, looks like he's used the earlier engine bracket, but this means one of the bloody bolt holes doesnt line up (again) Notice how on mine the bolt thats out of line faces "up" On this other same motor, faces "down" (So must be standard 1NZ bracket) There are different part numbers between 1NZ and 2NZ brackets for this, so I dont think my existing one will work. EDIT: Yeah definitely no chance of 2NZ one working, need to get a standard 1NZFE Bracket
1 point
-
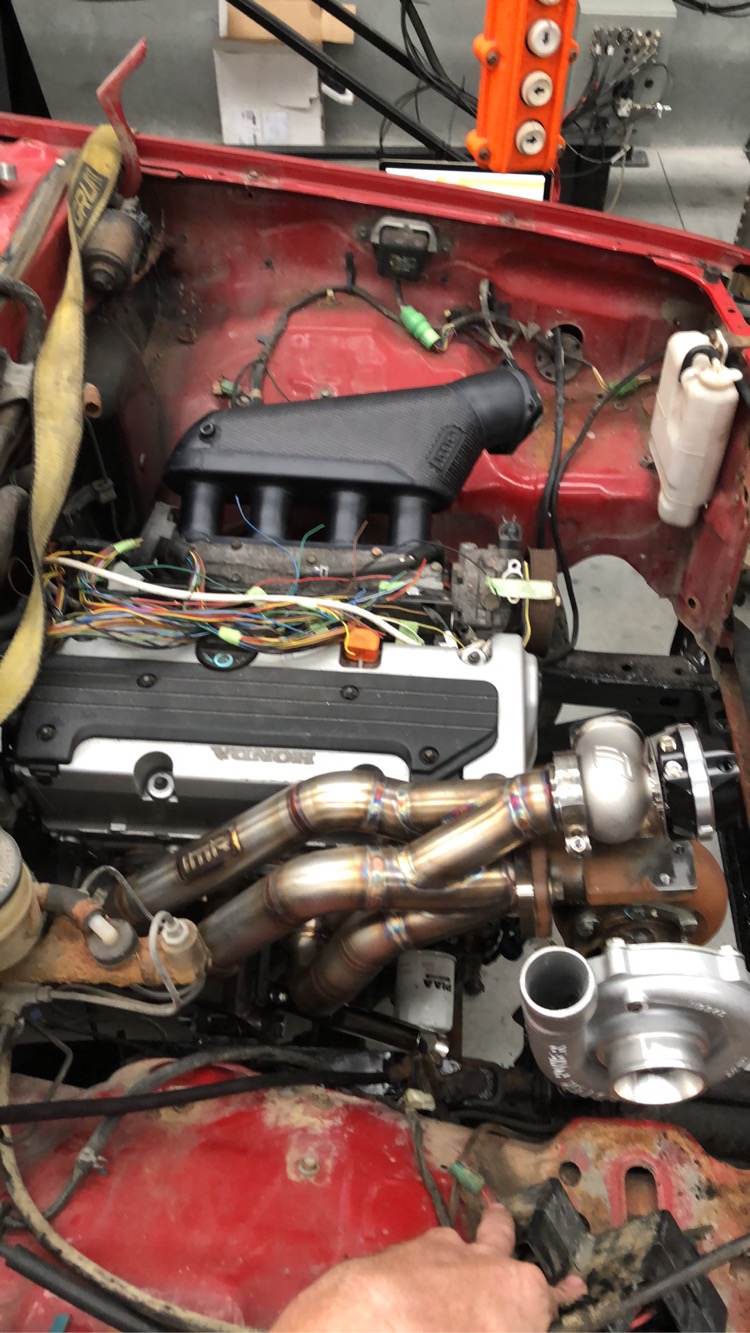
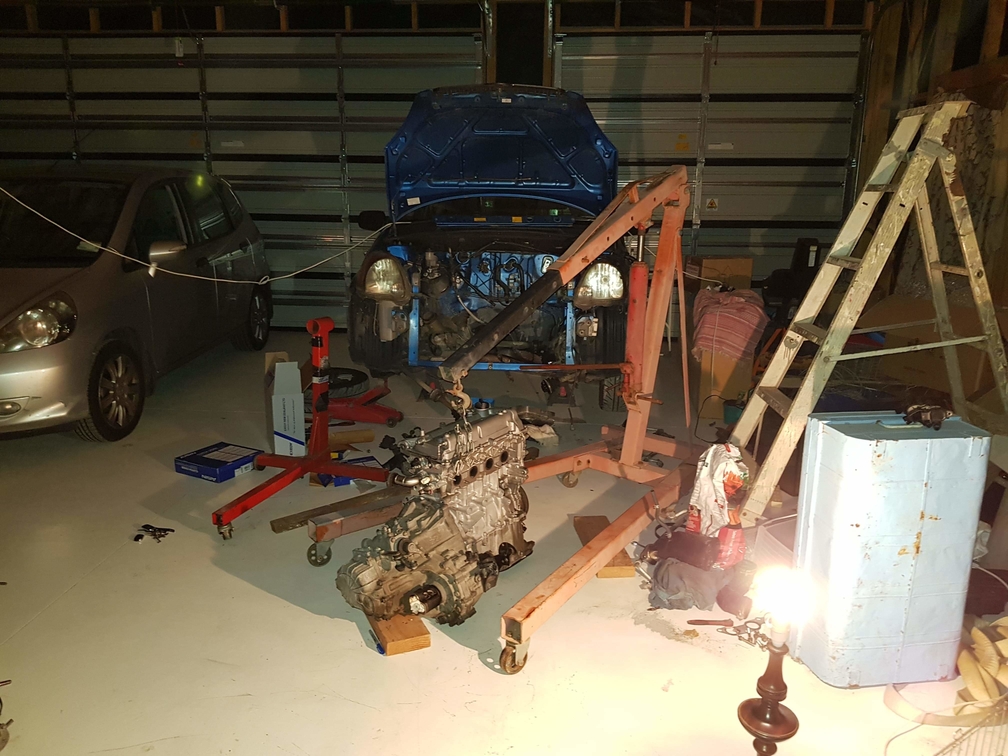
Finally got the throttle body adapter plate port matched and dropped it on the current motor for visual motivation Started a quick spreadsheet and have rapidly worked out I need ~45 individual wires running through the firewall to operate the motor and the usual electrics (lights, wipers etc) most of these are because I wish to move the fusebox and relays into the cabin. A quick estimate and this looks to be about 55m of cable.... For ease, putting a 50pin connector on the bulkhead looks to be the way forward. Rather than threading each wire, I can wire the loom on the workbench, any suggestions for a bulkhead fitting thats not $200 mil-spec?
1 point
-
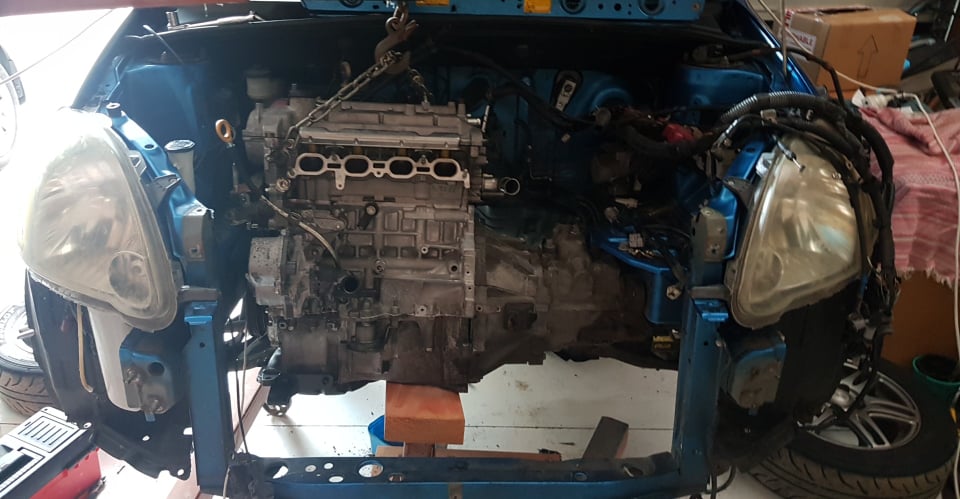
I got all of the bellhousing stuff sorted, got the manual rack in (I have to remember to do up bolts on the steering column...) Ends up losing about 5kg with the non PS rack and no pump. Then I got the engine mostly in but there's some weird shit going on with engine mounts on the engine side. (The other two are on the gearbox) The steel mount part on the Prius block is a different shape to the 2NZ one, so I cant swap them over. I am hoping this is because the Prius block uses a 1NZ specific mount that's different to 2NZ one, meaning I just need the different rubber mount and it'll work. But the mount is wanting to sit too far forward currently, by maybe 20-30mm. So it's not sitting in it's proper spot yet, but happy to have it in the engine bay at least. It's actually been pretty easy to work on, a sideways engine isnt nearly as shit as I remember from MR2 ownership. Also I think I damaged the clutch hose so might need to go find a replacement. More hurdles but still making good progress! I think I'm still hopefully on track for engine start on the weekend. To Do list for first fire up: -Sort engine mounts -2 longer bolts and nuts needed for bellhousing -fit starter motor and battery -fill gearbox oil -fill engine oil -Fit CV rack boots properly -fit radiator/hoses/add coolant -EWP wiring -fit intake and shitty exhaust manifold -Setup new base tune file for 1500cc and 2ZZ injectors.
1 point
-
Thanks fullahs, you're too kind. @a.craw4d Not really a massive technique, I just had a look at what seemed really effective in youtube vids & on various sites, and just tried to copy them. The worn look (or chipping as it's known) is basically to show areas of paint that have been chipped off to the primer or even the metal. The metal will then rust if it's exposed to the elements. If you look at old lathes, presses etc in factories you'll get the idea. Some people seem to do it by actually layering the paint with a "chipping compound" and then physically removing the top layer with various methods. I've just gone for a bit of paint on top aiming for the same effect. Chose a colour that's what you think the primer would be, but that also contrasts with the top coat and the gently go at it with a small brush. Little by little build it up, thinking about what areas would get the most abuse. Edges of panels, damage, foot & hand holds. Fucking great holes from 88 mm shells. If you look at the dozer blade, the top coat is chipped the most, then the primer is exposed but the leading edge is bare metal. Real diggers look like this. The rust is showing under the primer but is worn off in the heavy use areas. The rust and rust streaking is just that, places that would be exposed or vertical surfaces where rusty water would run down. Practice, practice and take it steady... My top tips would be watch a load of youtube. "night shift" is a very skilled and informative bloke. Also get a pack of rust effect acrylics. Vallejo do a set which has many shades and is nice to use. Google "Shigeyuki Mizuno", that man knows rust. His bombed tank factory is amazing. The biggest lol of it all is that there's so much politics about over use of any technique. Armour, and indeed most metal from the 30' & 40's takes ages to rust. It certainly wouldn't be full of rust holes during the war. There's tanks on beaches in France that have got two tides a day since 1944 that aren't that rusty. Chipping looks great but too much just looks like a cartoon. It's all good though, and it should all be done to make the builder happy. There's no reason not to use it on cars though, and it'd probably look more realistic as you could have big rust holes. I'm looking forward to doing a rusty Hako at some point. Anyway, lecture over, thanks for your appreciation.1 point
-
Thread dredge, thanks to @a.craw4d. Ok, so not 1/24, though I did build some & have a couple unmade somewhere. Models is models though 1/35 WW2 stuff was my thing. I had a break from the glue fumes for 30+ years but have got back into it recently. Pics of a few out of the loft... This is chopped down from the longer wheelbase version. Scratchbuilt fuel tank and tyre rack. You can buy the SWB one nowadays. Burned out Opel Anyway, times have moved on and skills displayed on that internet inspired me to get back into it. First bash was this Flak Half-track. Rushed it a bit and didn't really have my eye/hand in but it is what it is. Some bits I'm very pleased with, others not so much. Current build is the last kit I started before I lost interest in about 1990. It's a Bergepanther ARV. I gave up when the rear track idlers kept breaking off so back in the box it went. I'm now using it to practice my weathering & rust, hopefully it will be a bit more subtle than the half-track. I may even end up finishing it. As it was... Repainted it later dark yellow and am now slowly working through ageing it and trying to make it look like metal. So that's enough stupid big post from me, I'll add pics as it goes along. Hopefully I won't be alone on here. Sat on my own, cementing bits of plastic together, waiting for the world to laugh and point, wishing I was a tank commander. Vroom, vroom.1 point
-
Okay so I managed to find a manual rack car at pick a part. All it cost was 50 swear words, catching hepatitis from crawling over busted glass and about 20 bucks. Not bad. (Also got the rubber boot that goes over it) my manual rack turned up in the post some time today as well so im good to go. Its a big dick punch working on anything in the vicinity of the power steer so im happy to be rid of it. Then ive just been burning the midnight oil taking this gearbox off and on about 20 times to confirm bolt hole stuff and make sure it all goes together nicely. I still need to file one of the holes a little more, then it will be about ready to chuck back in. Hopefully fire up on the weekend or earlier. Im glad the steering situation was easily resolved, because it was becoming disheartening to think getting the motor back in would see significant delays.
1 point
-
Little bit more done today. starting to take shape
1 point
-
Hiding it and fixing it are not the same thing Bort, you menace. bartdat1 point
-
id rather just weld it instead of a barry fix1 point
-
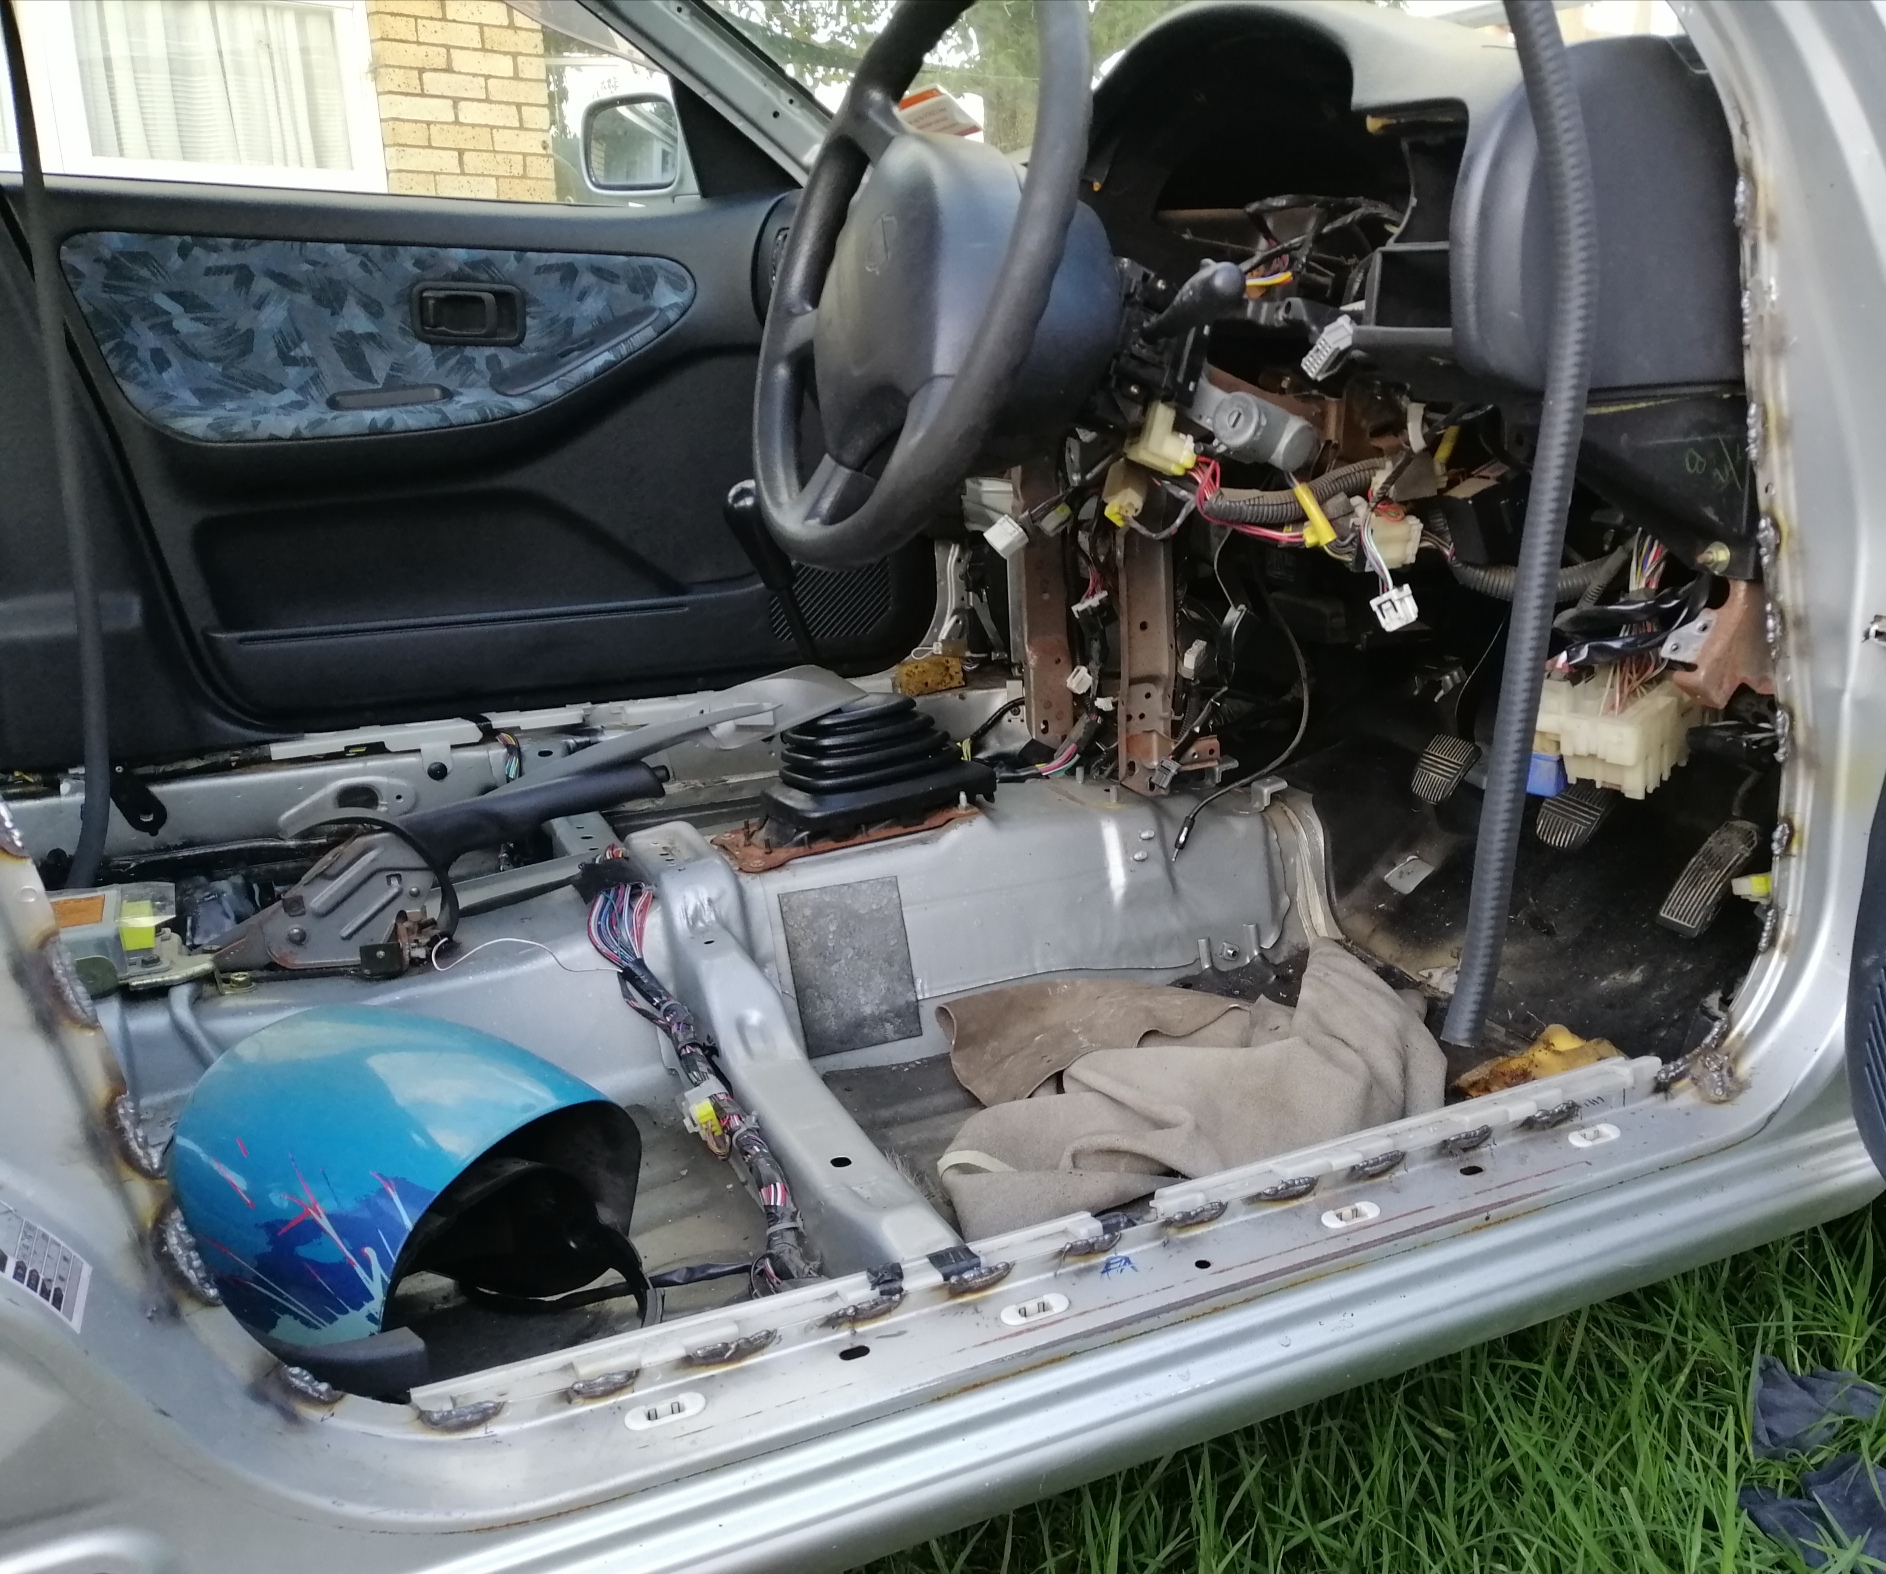
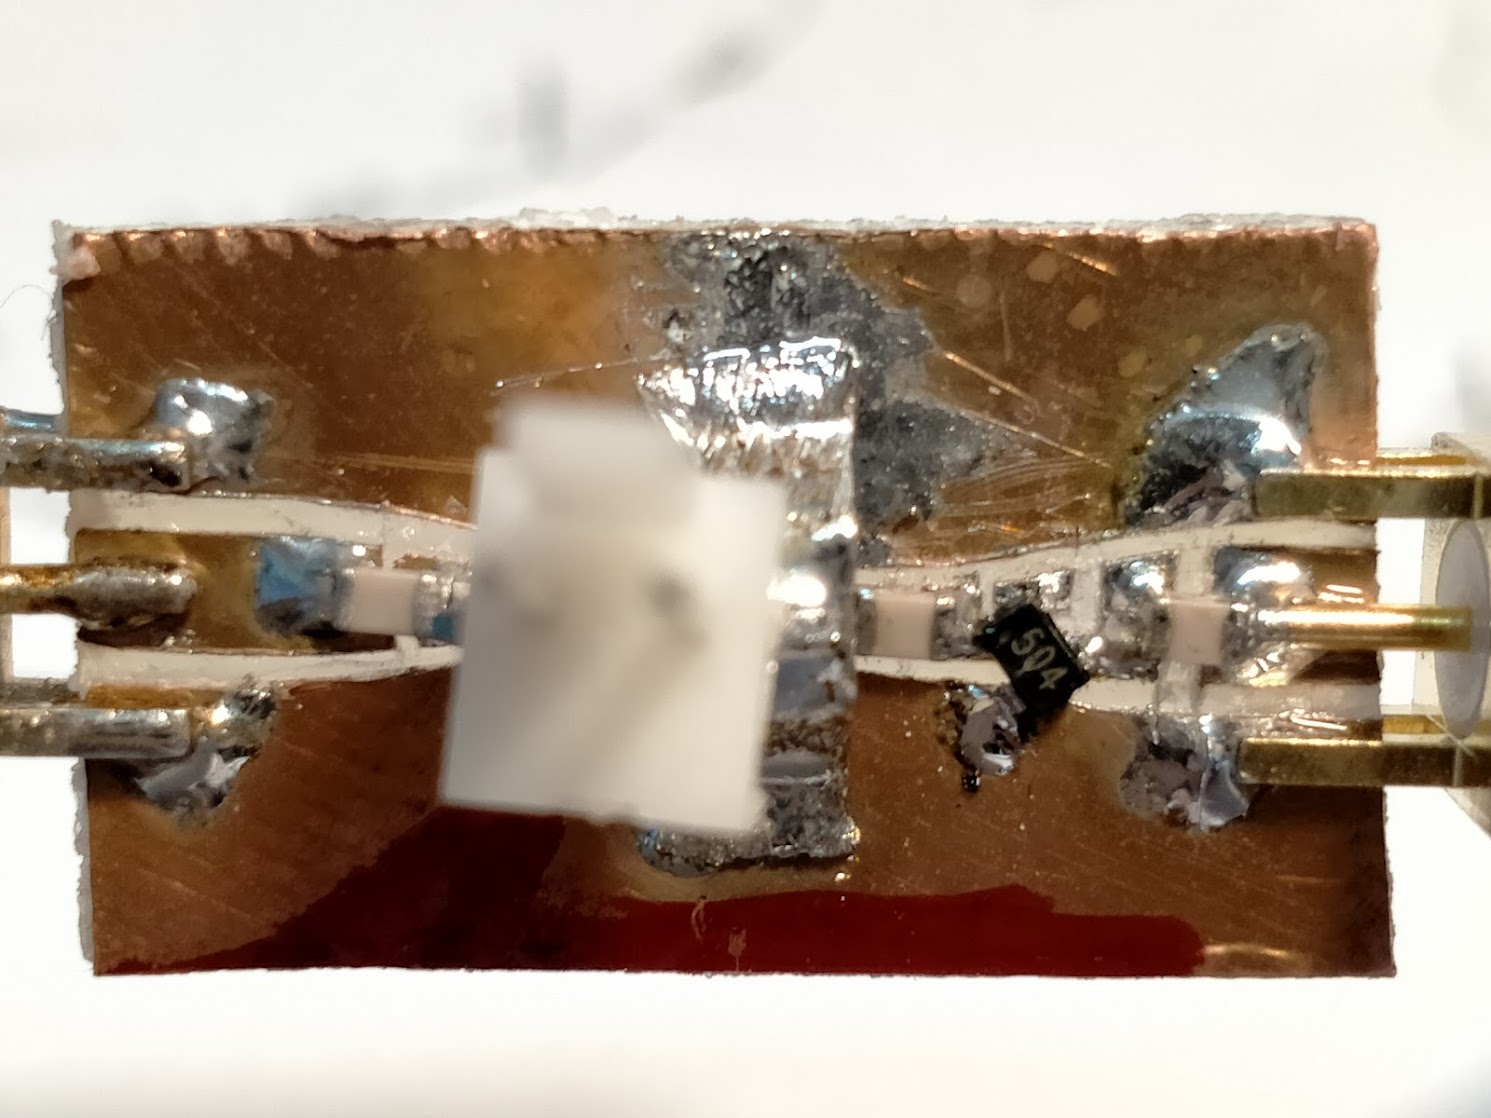
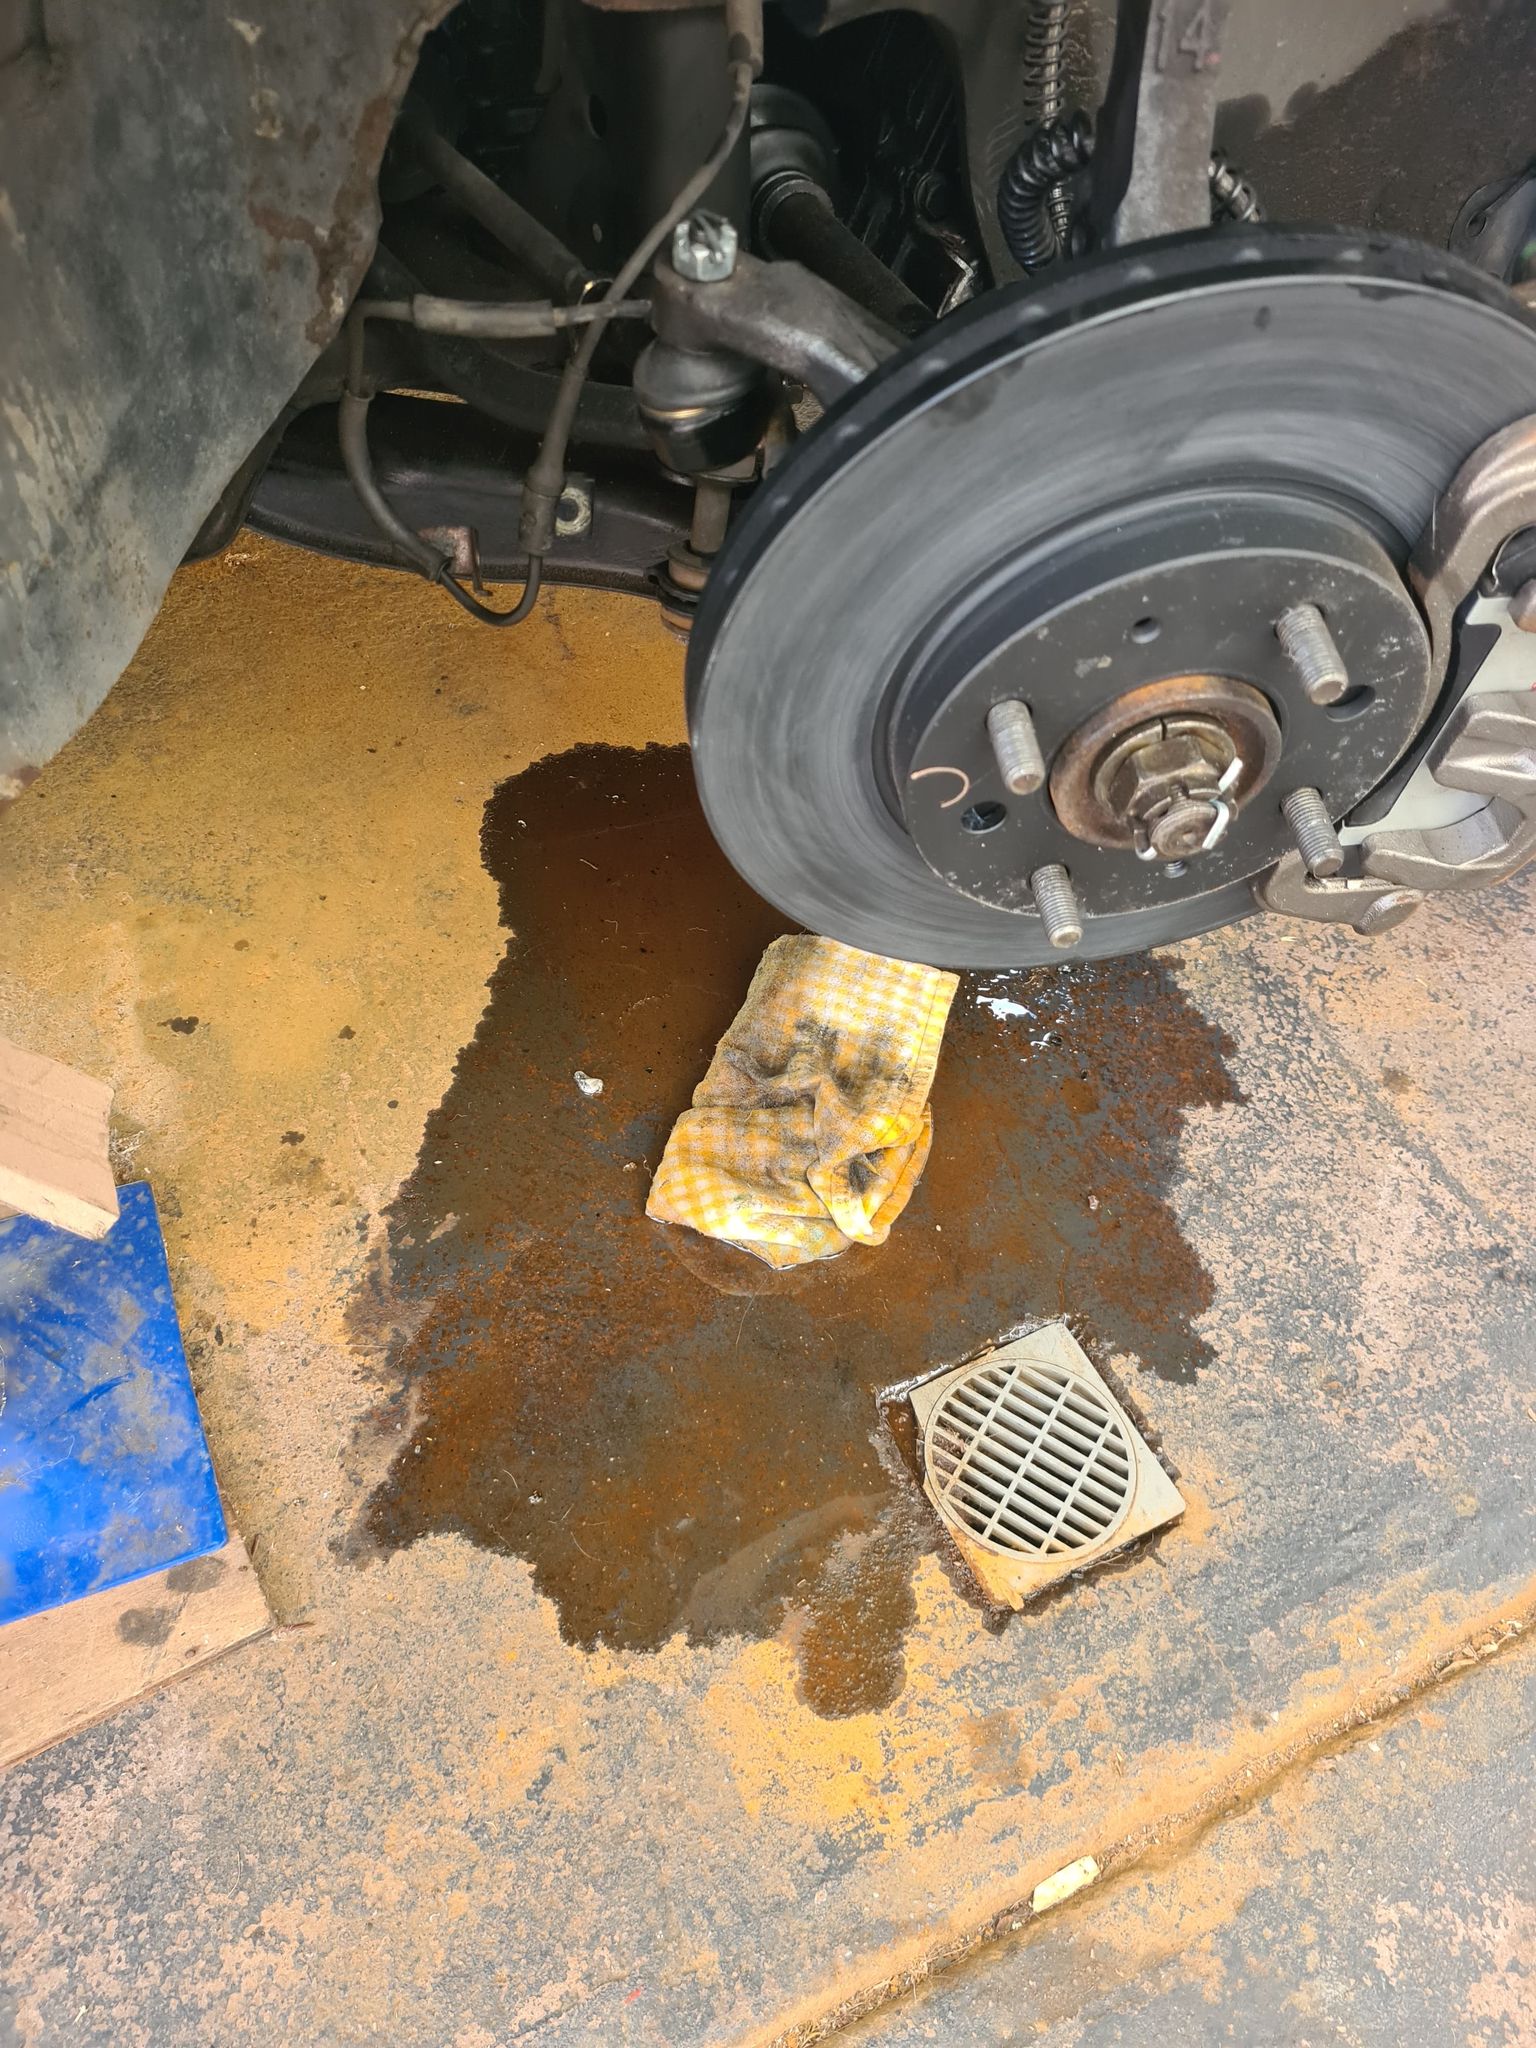
oh, hi!! so yea things have been great with this car. except the output bushing on the gearbox is flopping around and subsequently the output seal is leaking and flinging oil all over the exhaust. this is shit. the gearbox has only done a couple thousand Ks since it was brand new from Toyota. apparently this is fairly common on the new R154s which fucks me off even more. I've fucked around with changing the seal multiple times and all the other usual checks but it just keeps on leaking. cool. so to fix it i have to take the motor and box out because of the whole massive drive train/small car thing so out the motor comes. its fairly depressing taking a motor, that you have worked very hard on to make as new and shiny as you can, out of a car and seeing all the road grime and shit on it, as well as all the crap that goes everywhere when you start taking things apart. well, its what has to be done so away we go. not sure what else ill do while the motor is out. im not 100% happy with the clutch i put in it. its juddery and grabby at take off which sucks so that may change. fuck knows.............. anywho, first step, jack up your car. 2021-05-04_05-59-44 by sheepers, on Flickr1 point
-
1 point
-
1 point
-
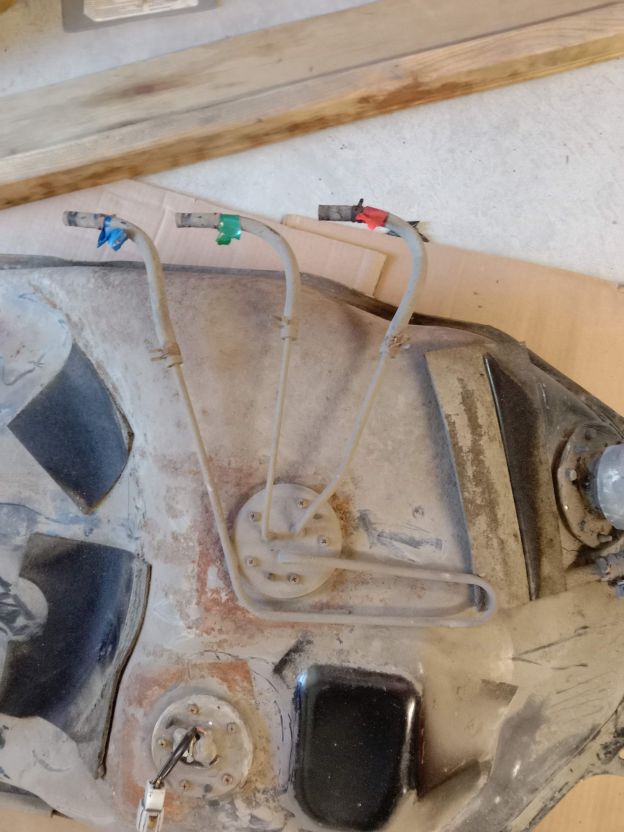
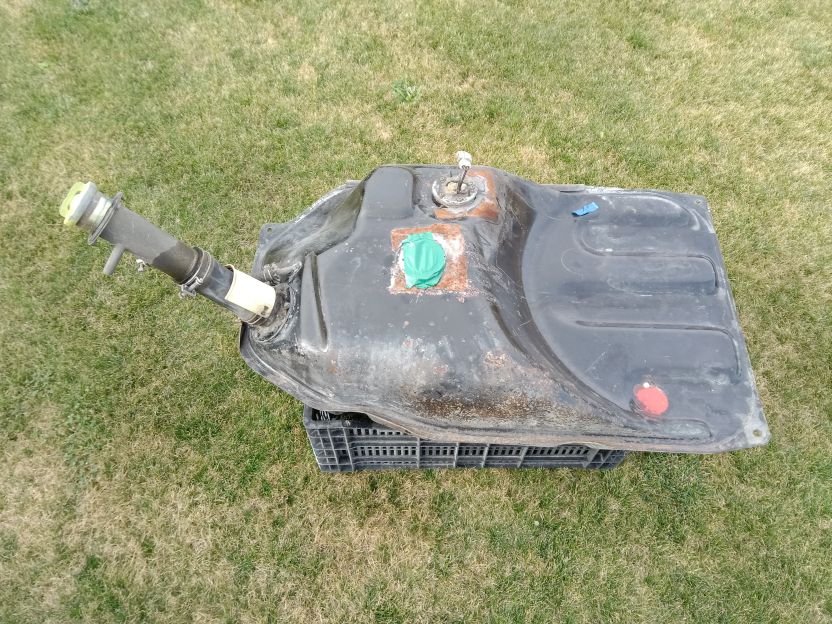
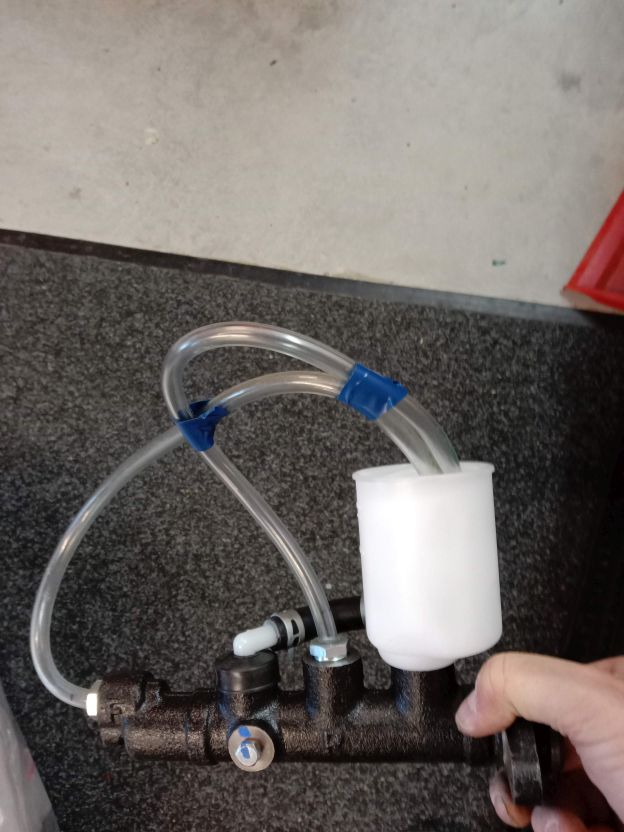
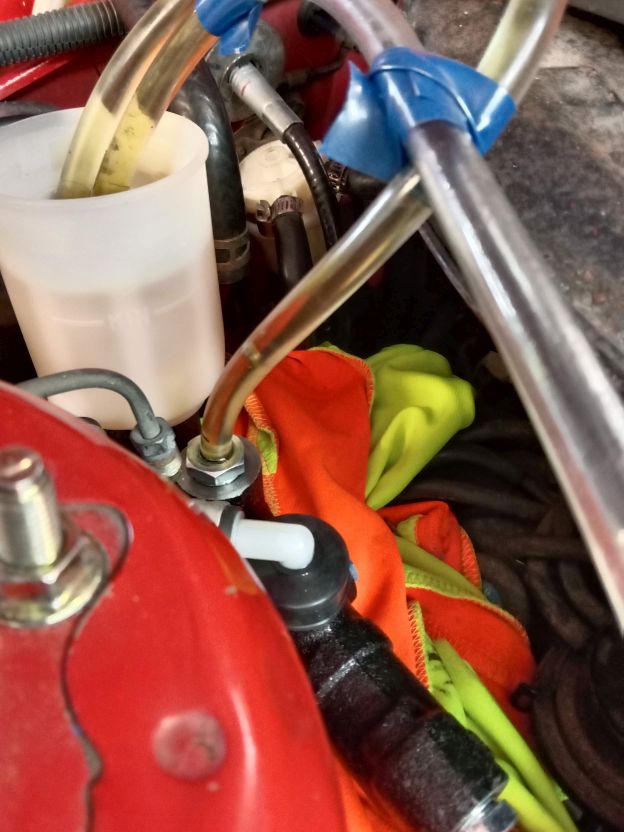
Progress has been slow of late. I've been mocking up the brake hard lines using old lines that I've harvested from my fleet of wrecks. I'm using them just to get the correct shapes and lengths as well as identifying the correct end fittings since I've got a mixture of brake components from both the Thames and some of my donor vans. It's fiddly work, but is worth investing the time to get them right. One of the Thames parts that I will be using is the brake light pressure switch and T piece. It was originally plumbed in to both the front and rear brake lines, but now that I am upgrading to a dual circuit setup I'm going to plumb it into the front circuit only and will blank off the remaining outlets. In other news I've finally installed the second fluid reservoir. I just need to complete the pipes feeding the master cylinder. Once I've got the pipes all mocked up I'll take them along to my local brake and clutch place to have new ones fabricated. Thanks for reading.
1 point
-
I've had a tiny amount of play in my rear wheel bearings so decided to rebuild my whole rear-end New CVs, bearings, aftermarket stub axles & companion flanges to take a 108mm CV. Old vs new stub axles. They have a larger splined diameter and are beefier at the wheel flange. This now shifts the weakest point in the driveline to my r180 diff, but it should be good enough for my engine. I also replaced all diff seals & o-rings so hopefully it stops leaving little puddles on the floor now. I couldn't get a micrometer inside the hubs to confirm, but I've assumed the play was from the bearing spacers getting overtightened and mushrooming slightly. So I cut some 0.05mm shims and torqued the hubs up and things feel right now. The left hub required two shims. Everything seems to measure up correctly and there's no play anymore. Rad! However. At this point I realised I have a problem. Since my new companion flange accepts a 108mm CV directly, I no longer need to run the CV adapter plate I used to use. This means my axles are now 25mm too short. FML. Cars aye!1 point
-
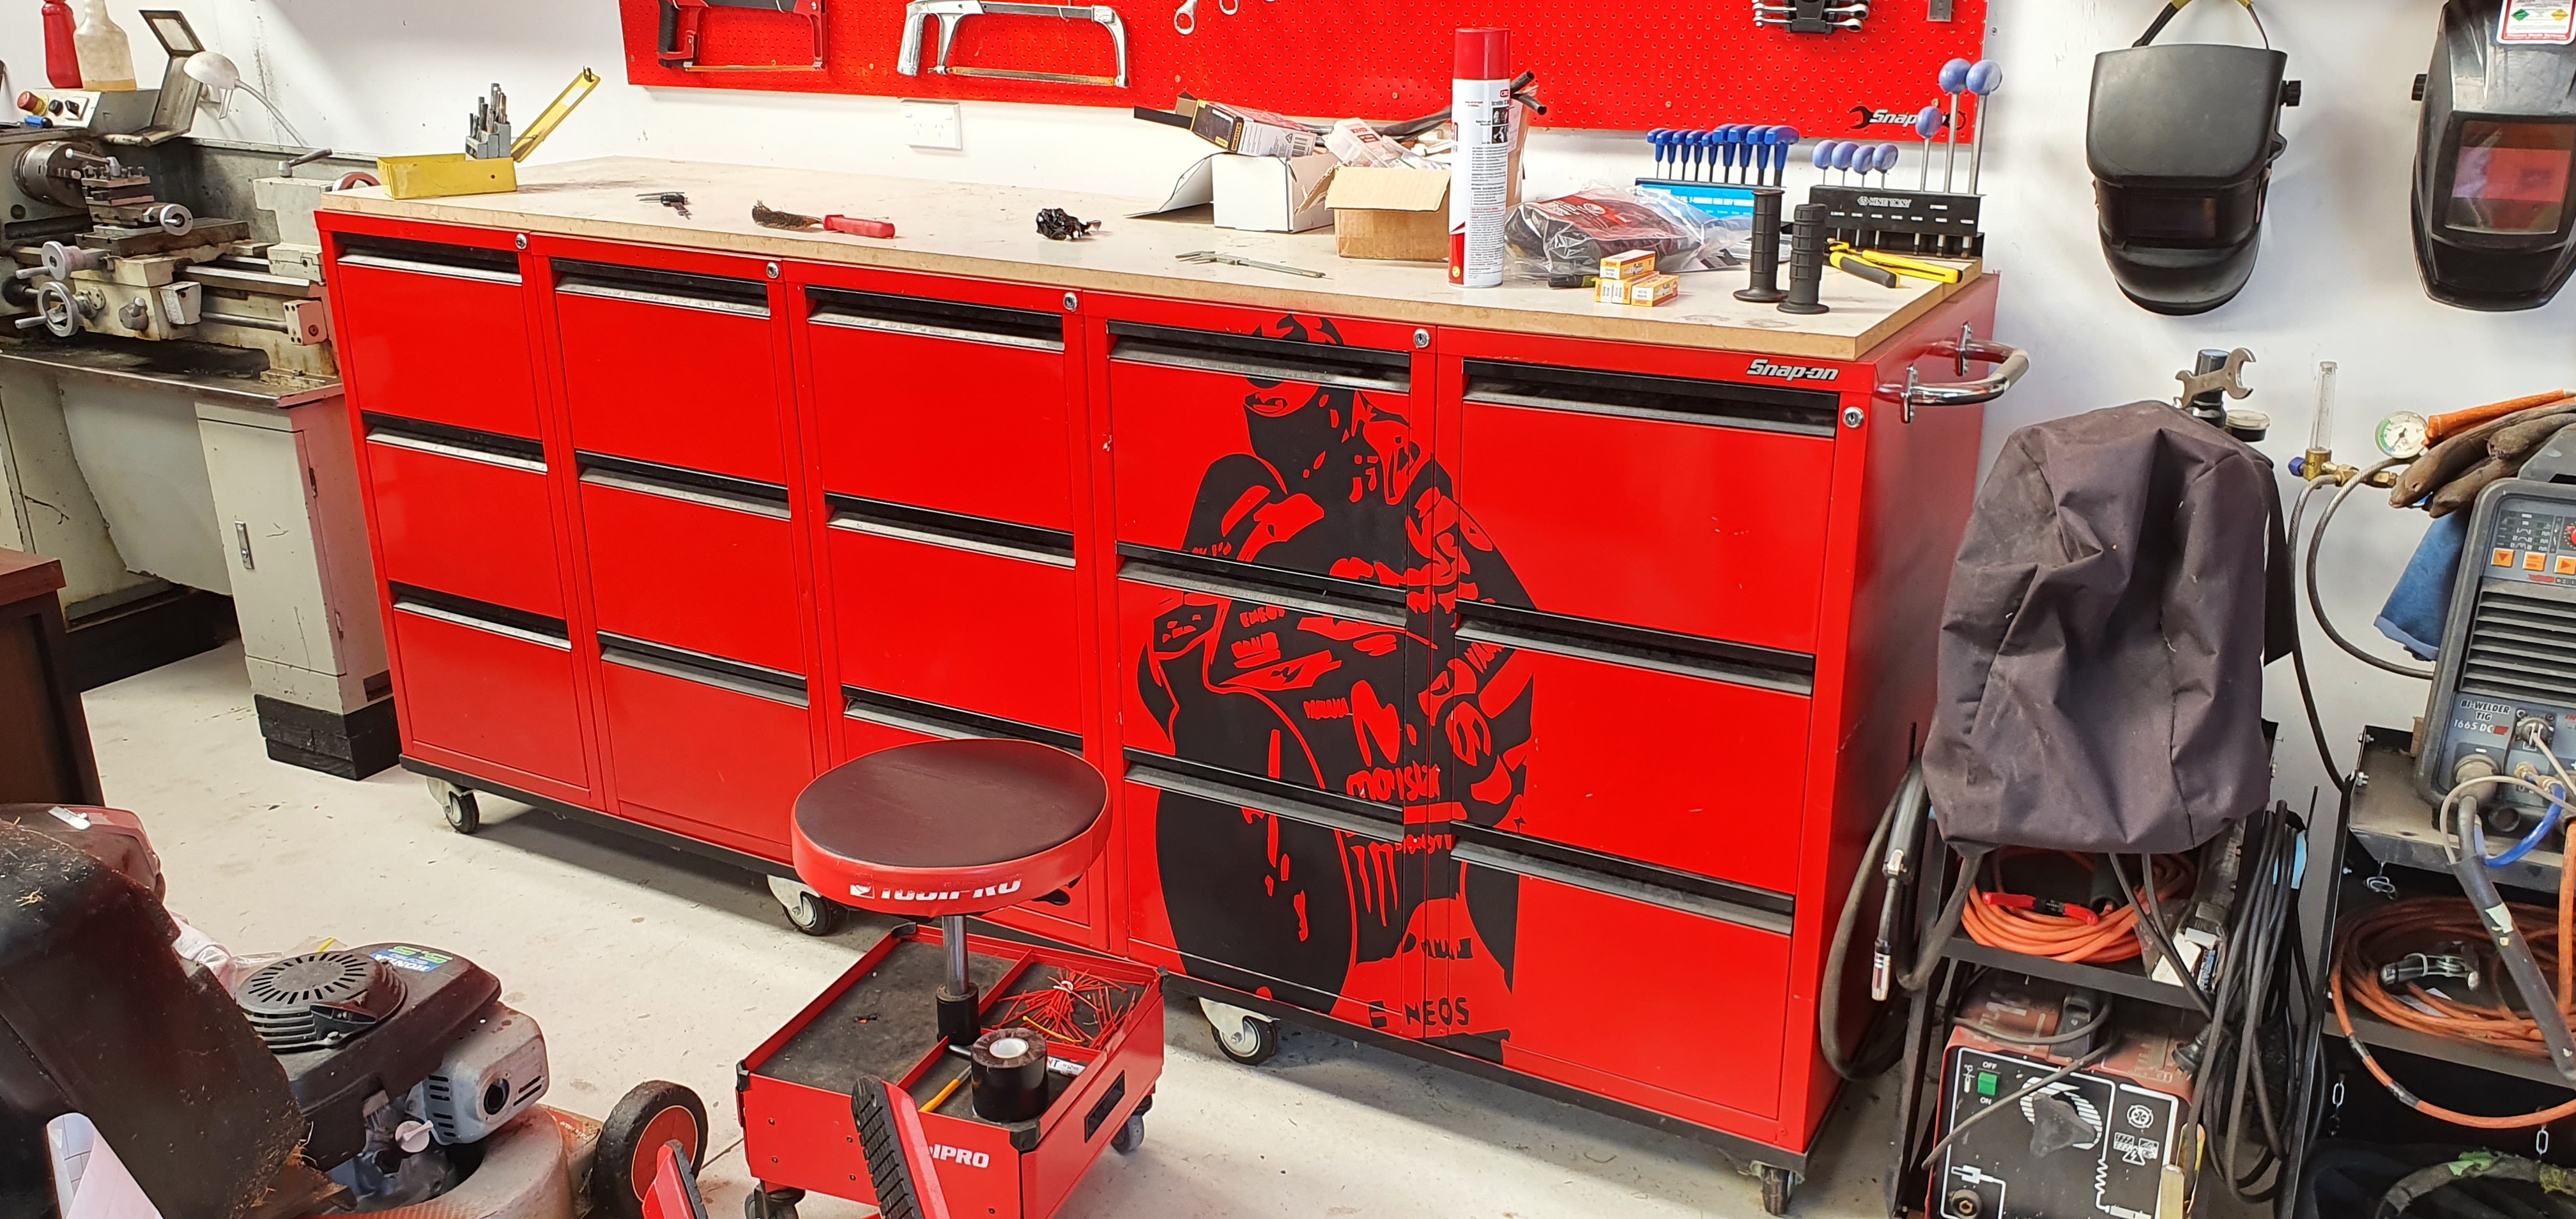
Toolbox art? Well if putting stickers on shit constitutes "art"? Was quite the mission to do and if I did it again I'd probably position it slightly differently...but meh, it works and looks basically like what I had in mind.
1 point
-
Nothing too wrong with the merc engine, but you've got my attention, what stage cam would you recommend for the drillport?1 point
-
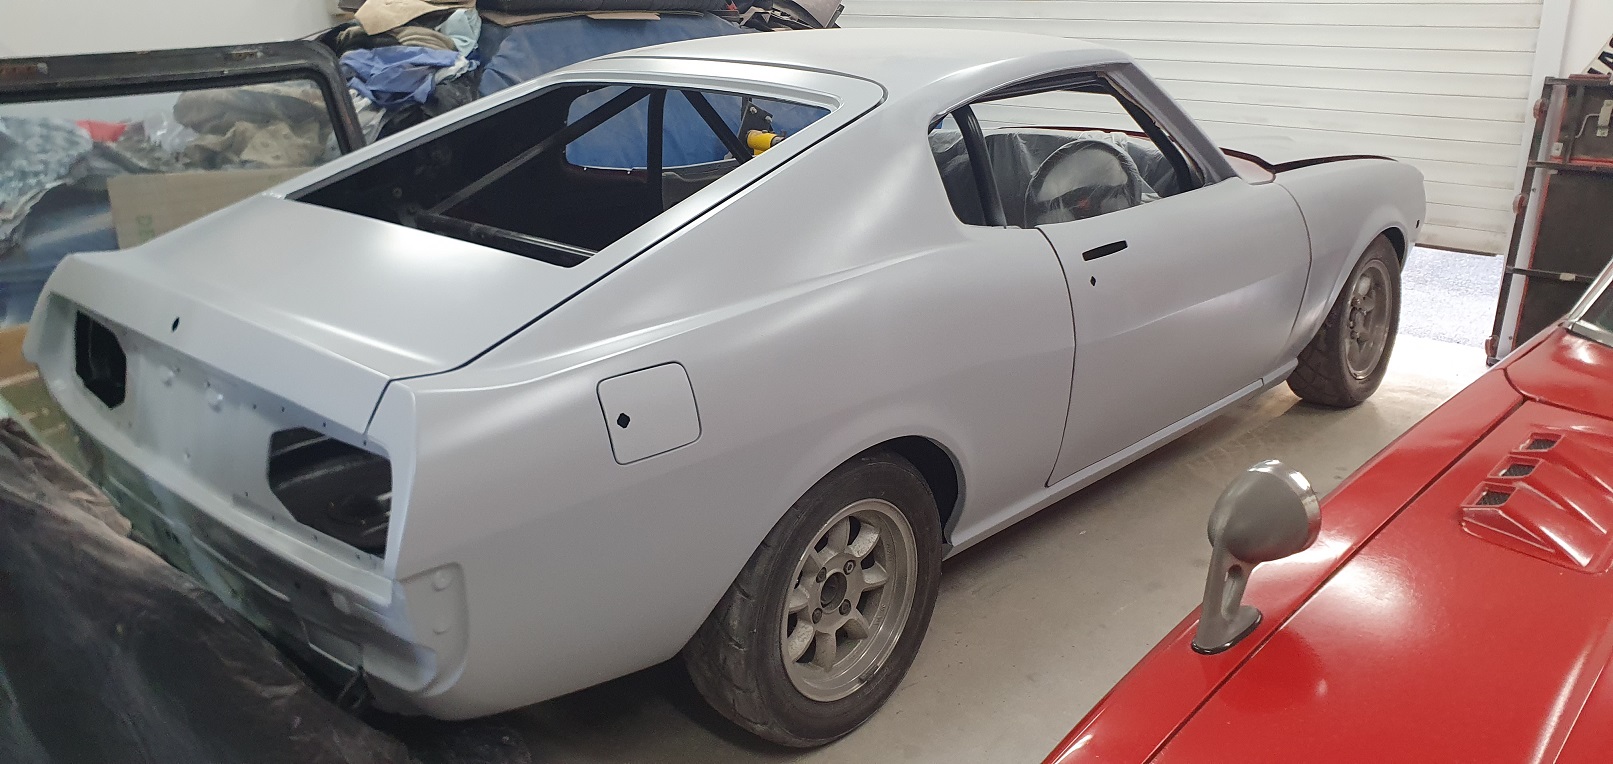
Reassembled and ... off to the paint shop just over 3 years in the shed!!!
1 point
-
Hatch repairs and some fill and final prime
1 point
-
Clean sheet. Might go ride it further than 20m and see how it goes You want it? I'll sell it for the price of a new one cos how often do you see one of these that's road legal (i checked the fleet data just quickly and theres 4 of this model on it, pre 1991 is what i think it is, so a rare bird)
1 point
-
So new carpet I ordered arrived, but discovered its the same as the carpet I have except not hacked up to fit. Will go get some factory carpet from a wreck to use a template to cut it properly/put in the bolt holes. Put the interior all back in, did some more rust hole welding (still need to grind it back) eyeballed the camber settings. Started to ask around about getting an alignment done, so gave it a wash, paints still average but it isn't covered in dust anymore. Fixed the power-steering res to pump low pressure top hose leak Thought I would put a no rego permit on it for a shakedown drive to supercheap to get another exhaust gasket and maybe some oil. Got it out of the driveway and went really well until boost came on, I forgot how quick the factory TD04HL spools on these. So boost came on and popped an inter-cooler pipe off, I think I got to house number 49 and im number 37. Of course it was the most dodgy one I had installed so will remake that in stainless and clamp it in better. Might invest in a 2.5" adapter so I can put the compressor on it to check for leaks Manged to get the pipe re-clamped enough to drive it home, under 40km as it wasn't running well. 2nd gear doesn't seem the best so will have to see if it gets better next time I drive it, might have just been me with the puk clutch. Feels like at least one of the brakes is stuck on as its dragging a little as well, so pretty shit drive overall EDIT: jacked it up and turning all wheels in neutral by hand no brakes feel stuck on, front wheel bearings feel pretty sloppy however so hoping I just didnt torque the driveshafts up enough otherwise ill be pulling the front end apart again :s Realized the drivers seat doesn't have a seat-belt stalk1 point
-
So small fuel leak on the driveway this morning, just had to tighten the fuel tank drain screw so hoping thats sorted it Small drip of engine oil so need to find out where that's from, and a small drip of gearbox oil again not sure where its coming from Need to set the Bliss properly this weekend and then decide what I am doing with the front exhaust off the turbo Edit Ordered another 2.5-3" adaptor, getting a quote on 6m of 3" 304SS pipe delivered (should be about 100aud plus the delivery fee) and im going to attempt to remake the front pipe, hoping to reuse the cat but might need to shorten some sections. This may be interesting as there isn't much space1 point
-
Saw an RVR pop up at the Kilsyth Pick-apart on Thursday, thought I wonder if it will have bits I want as spares. Drove the hour there for when it opened at 9am and discovered its Auto Diesel 4 stud and rear drum Someones already taken the motor, gearbox and diff (funnily the transfer case was on the ground) Rear axles are smaller then the ones I have so no good Front drivers side axle is smaller and non abs to what I have so no good Considered grabbing the front exhaust but cost wasn't worth it when I would have to mod anyway Was like ok this place should still have two cc lancer station wagons so ill grab some bits off them, discovered they had gone Sat in the car and had a look at the other wreckers as I had already paid for tolls and found out the Imlachs in Dandenong had just gotten a station wagon in. So drove the 30mins to get there (still an hour to get home from this wrecker) and I hit gold managed to get the below for $100 (tempted to go back and grab the engine tbh) cluster said 500000km but the interior was immaculate and the engine looked new under the oil cap. Exterior was rough as, was hoping to grab a front bumper and grill for RWC as trying to get it to pass with a fiberglass evo 3 bumper will just not work. But they were too far gone (so ordered a brand new set from Supercheap and another left hand indicator for $150) Managed to get the below from Imlachs Led bulb set for headlights (free) Lots of screws , relays and bolts etc :p (free) Stereo surround in amazing condition (with din pocket etc) Speaker covers (have since discovered my door cards have been hacked so need to get new lower door cards Might go back and grab the manual window ones from the wreck another day) 3 door scuff plates in good condition Right hand side vent as mine was cracked LH indicator (not happy with the lens was going to swap lens via oven baking but brought a new one for $26 instead) Manual gearbox cables as mine were missing the cover on the firewall (mine however have new bushings, ive also got a brand new set from amyama as well) 4 ok quality kenwood speakers as the car has none (Discovered the front doors don't have speaker cables :s) I have a spare dash loom so will have to see if I have them otherwise will need to get some) these where $6 each A custom pod filter adapter/holder (cost me $5) (wont be using it for awhile but couldn't resist with the effort someone had gone into to make it) Another rad overflow bottle as I cant find the one I had :S they charged me for the cap as well :s Will post pics later Waiting on intercooler joiners to redo the hot side of the intercooler piping and still waiting on a replacement shock insert1 point
-
Full new set of window switches arrived, rear passenger window is still having issues going back up so might need to give it a clean out or replace it New front shock canister insert on the way, and have raised the left hand side one without issues, wheel to guard gap is huge atm, will see how it sits once I have the other one back in and it on the ground Also turned the dampener settings down to the lowest setting on all shocks so its not so hard, will adjust up once I have it on the road and see how it drives with a proper wheel alignment Have a few other parts on the way Park-light bulbs Door Handle trims Din slot holder Will have a crack at replacing the turbo (hot) side inter-cooler piping to try get some more ground clearance this weekend, not touching the down-pipe off the turbo at this stage so that will be my lowest point, need to give the car a good clean as well1 point
-
So that's shit Ordered a replacement canister from Justjap for $550 aud, will have to swap my spring etc over to it. Looking at a few weeks lead-time but at least im not having to buy a complete set of coil-overs.
1 point
-
If you do one component you will have to do every component or your OCD won't rest1 point


This leaderboard is set to Auckland/GMT+12:00