
Leaderboard


Popular Content
Showing content with the highest reputation on 29/08/19 in all areas
-
Does this add horsepower?
 7 points
 -
So many "Oh, HoW dOeS iT gEt OvEr SpEeD bUmPs?!?" comments on the Hoonigan Instagram post. As if bags don't exist/it would be that low if it wasn't bagged. Also a few "seen one, seen 'em all" comments, which if they are from 'Murica they may have seen a few, but I highly doubt they are done to the awesome standard this one is. Source: TL:DR: Love this truck. People say dumb stuff on the internet.5 points
-
I've made some moulds up, it's a 2 part resin and use different coloured pigments to get the desired look. Have just invested in the gear to start stabilising wood so can do hybrid wood/resin ones such as the video you posted which I'm excited to try5 points
-
@KKtrips Do this?4 points
-
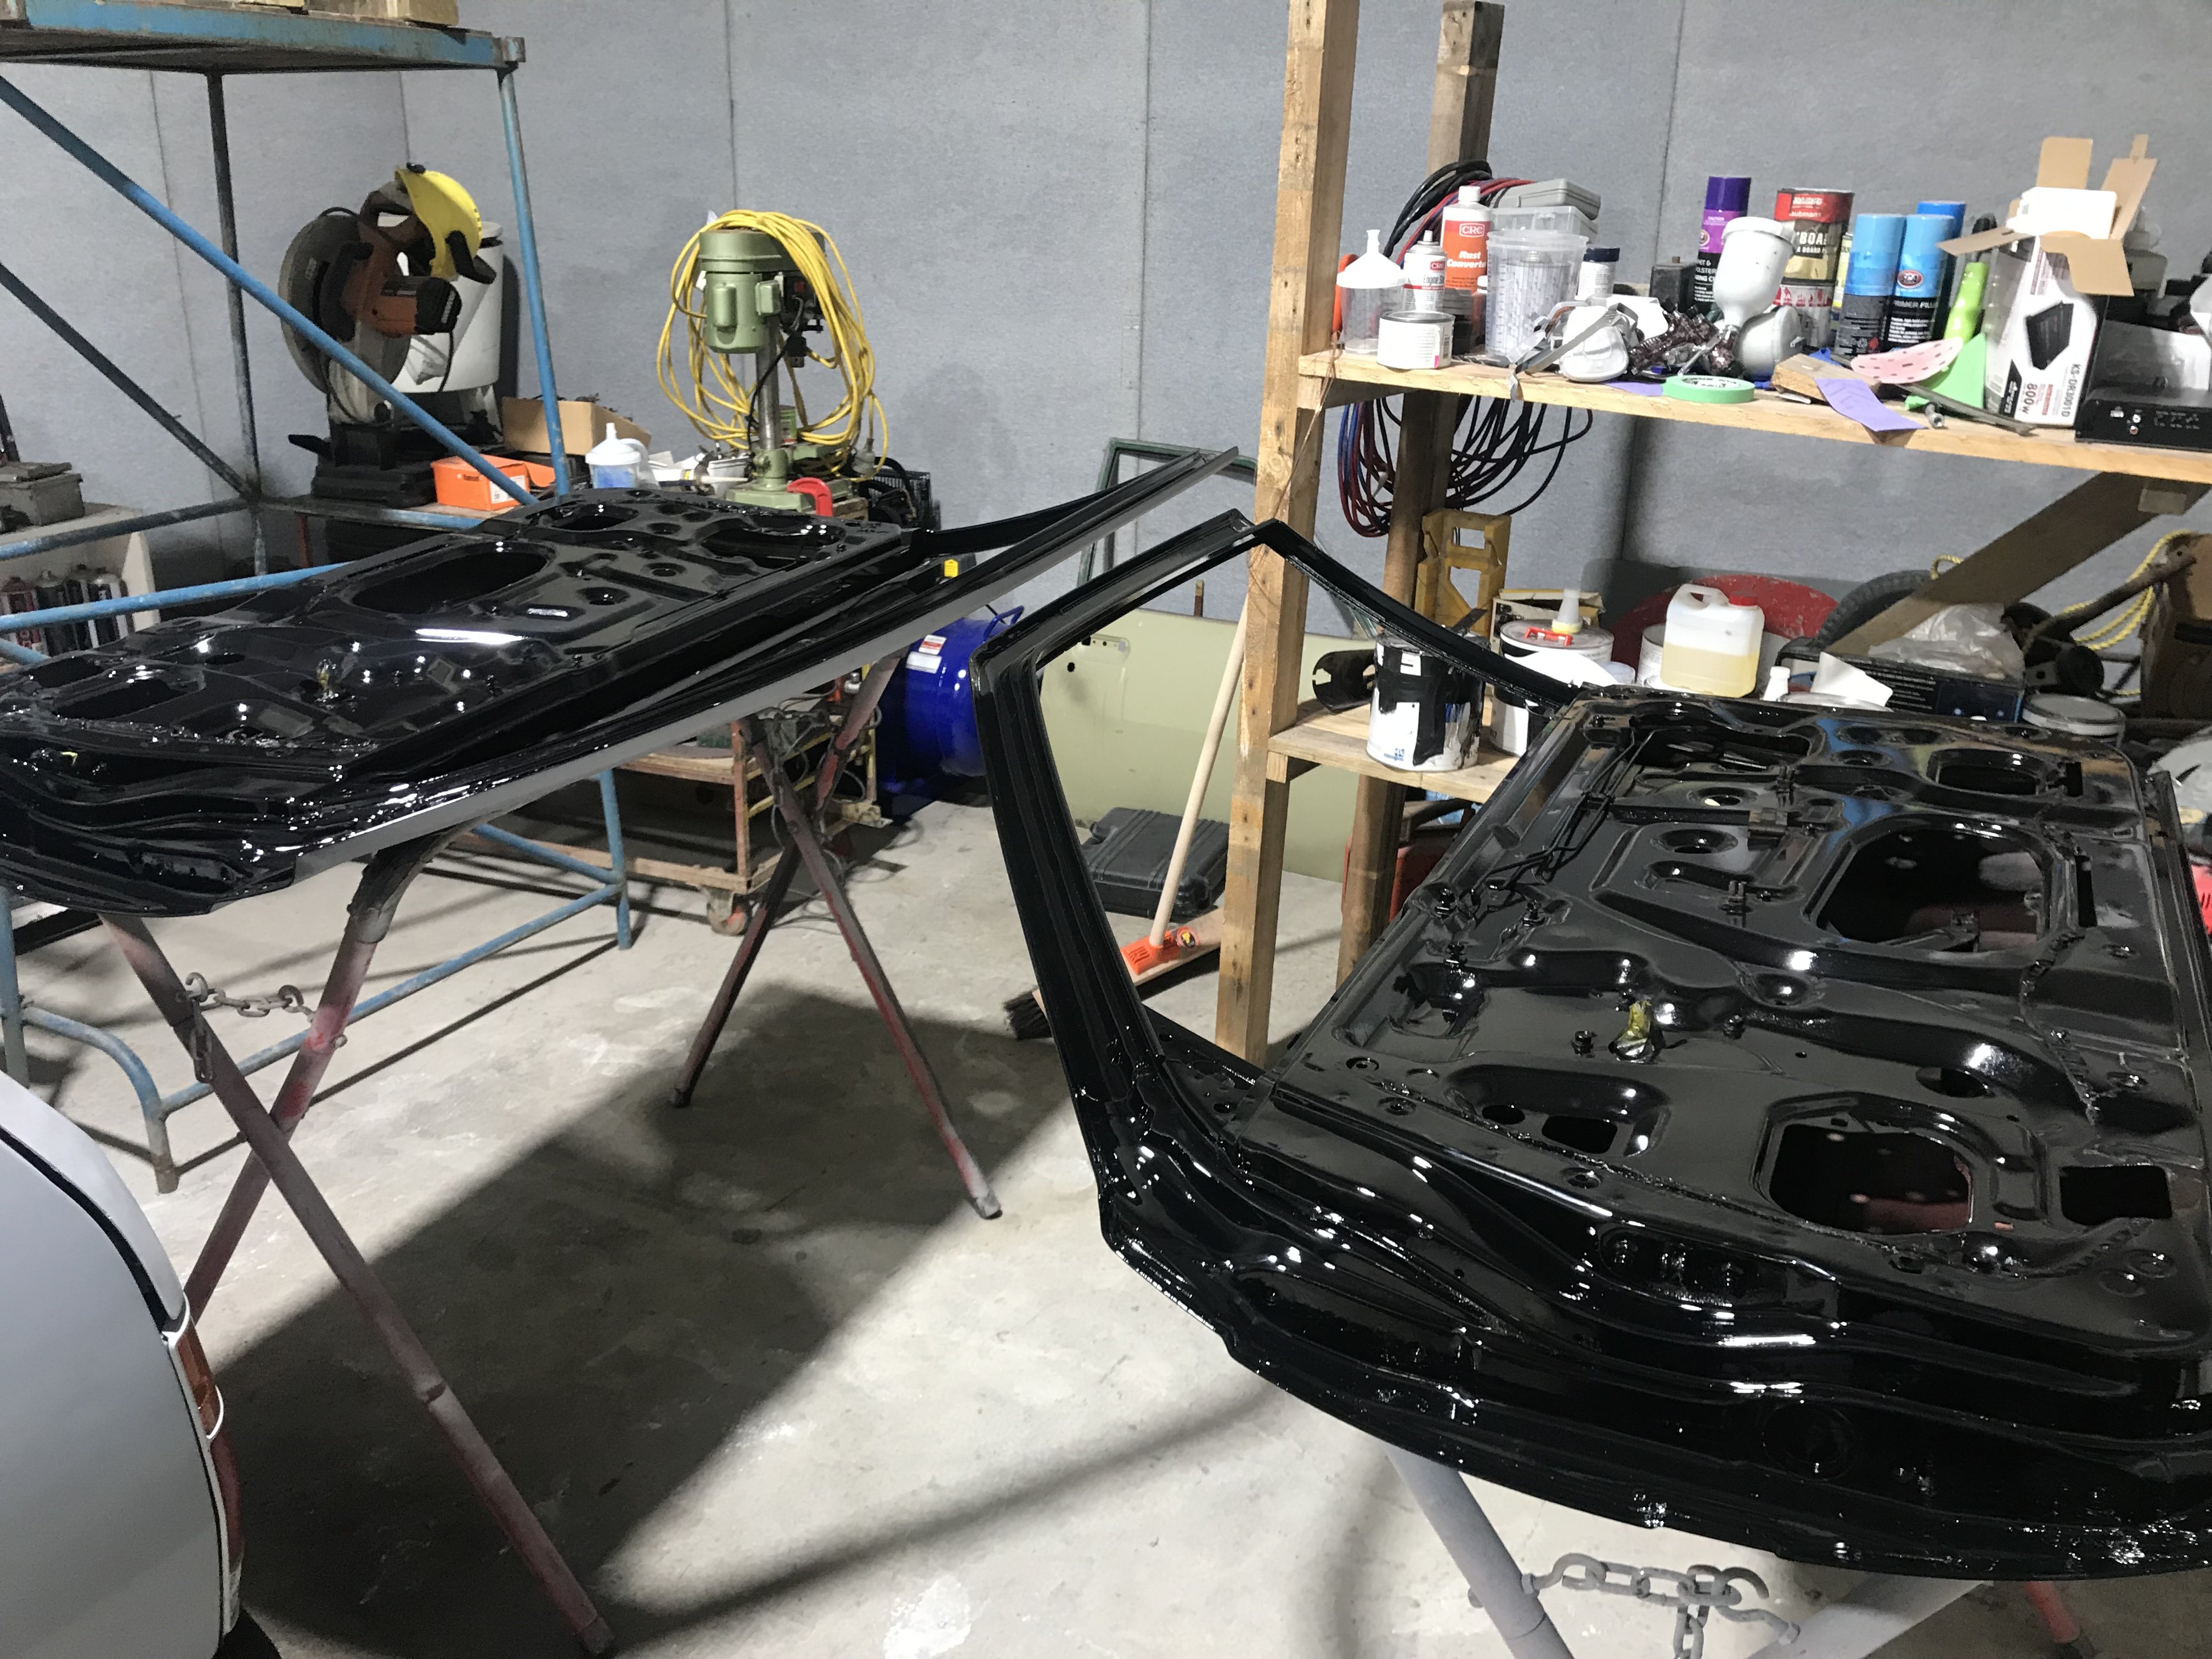
Just a waiting game while the painting guy does stuff. I decided to take the side trim off so the guards needed a bit more work but are all in primer again now. Body is coming along very slowly. Front bumper is off to get fixed as theres a few cracks in it. Painting is boring so just one photo for now. In other news these arrived... finally. I run FA stuff in the EP and its pretty good, so thought Id have a stab at it for the AE too. Spenny, but hopefully worth it. Went with 8kg and 6kg and the shortest possible rear shocks. Will order some new bearings and maybe rotors sometime soon. No rush without the car here.3 points
-
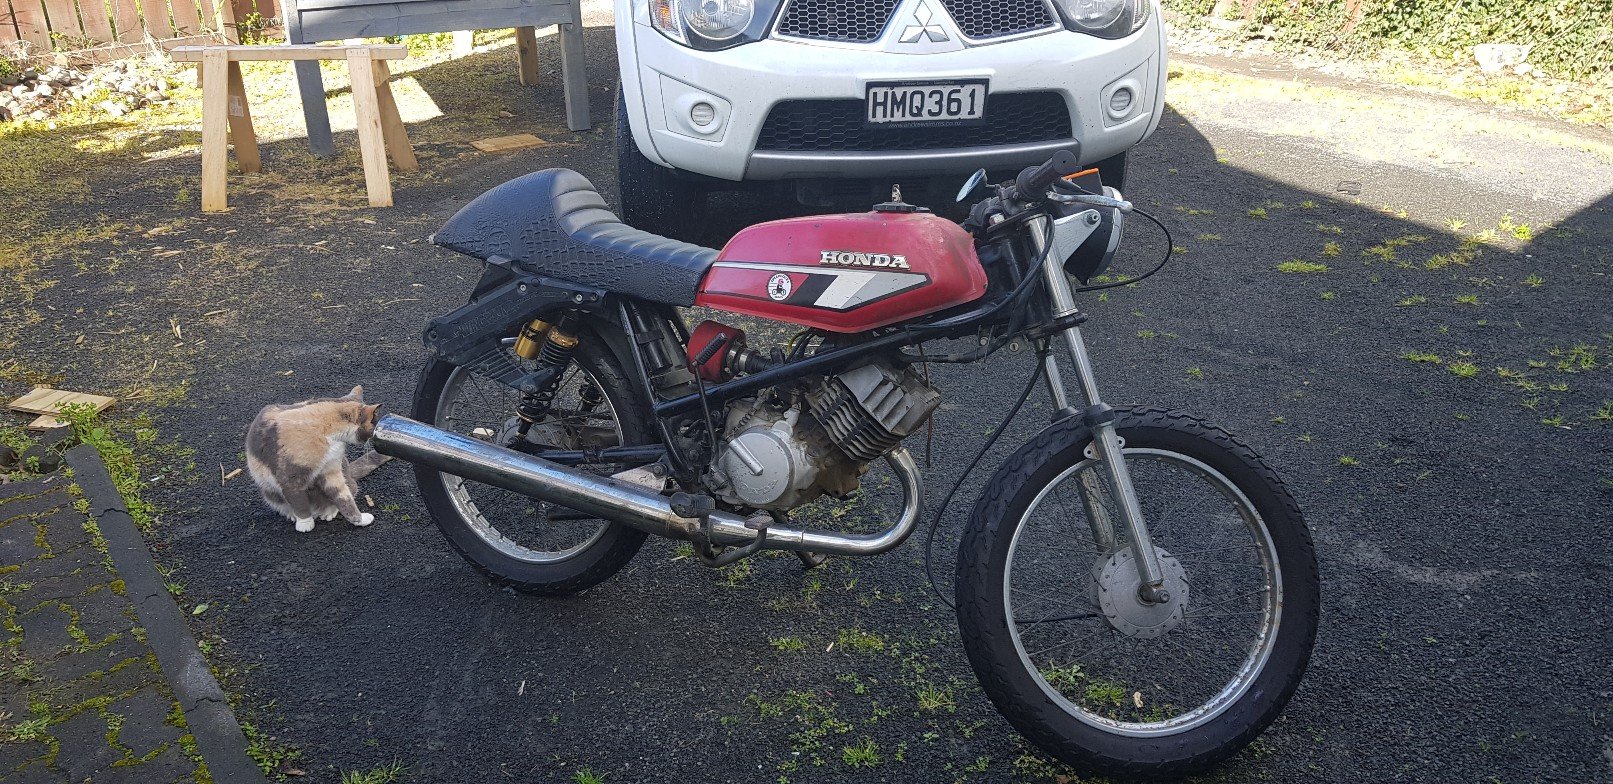
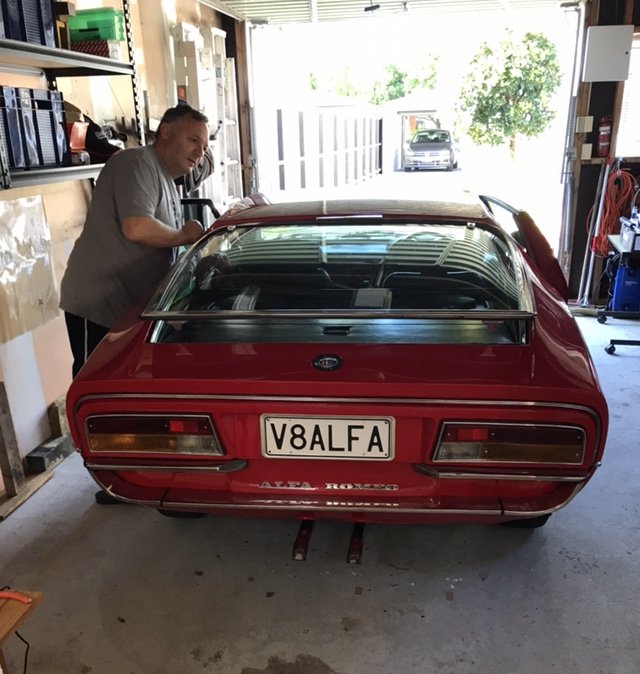
Been dailying it for nearly 4 months now! Awhile ago I took it to Napier and got Simon from Airride NZ to paint on some whitewalls. Looks so much better! A couple weeks a go I drove it up to Auckland. No issues, other than the speedo dying on the way up in Thames. Have been emailing Classic Instruments about the gauge, to see if they can find whats wrong. They have since stopped replying after I did some tests and they figured out it's completely dead. Not the first issue with it either. Have already sent it away to get fixed once, as the odometer wasn't working when I first got it. Not impressed, since they aren't exactly cheap! Brought back an engine and gearbox, a couple storage boxes and a set of wheels from Auckland. The Hoonigans also shared it on their Instagram. Some comments are pretty entertaining haha. Have some bear-claw latches to install one day, as the doors are a pain to get closing properly, keep popping open and rattling. Need to sort some electric solenoids to lock the doors first though.3 points
-
Stripped most exterior stuff off, except for the doors. Have cut off the a-pillar rain gutters after ajg193's suggestion, cleaned up all the rust underneath and plug welded them back on. Found some spots of rust on the hatch after removing the window. Most of it is just surface rust. Got carried away and stripped all the paint off the exterior side. Previously someone has stripped it and gone over all the rust spots and ground them out. Which I wasn't too happy about, but it seemed to have stopped it rusting further. Has a little patch welded in on the lower right as well. This top bit, just below the water squirter had a few small holes. Cut it out and made a patch to weld in, after I cleaned up the rust inside and painting it. All welded and cleaned up. Picked up a new engine! 4AGE 20V Blacktop!!! And a J160 6 speed. It already has the SQ Engineering adapter plate. The clutch/pressure plate and starter is already set up ready to bolt the two together. Pulled out the old 4K. Empty and dirty engine bay. Gave it a steam clean, came up heaps better. Test fit of the J160, definitely going to need to pull out the grinder! Laser cut out a 12mm stainless exhaust flange. Planning on building some high-rise headers at some stage. Ordered some goodies from SQ Engineering. Bought some Cusco AE86 engine mounts. Also have an AE86 water pump set up and some other bits on the way.3 points
-
Been making some gearknobs recently for the intention of selling them eventually. A couple of done so far
3 points
-
16 in the clip and one in the hole, ktrips about to make some bodies turn cold Now they yelling their hybrid hate, but with climate change, ktrips had to conservate3 points
-
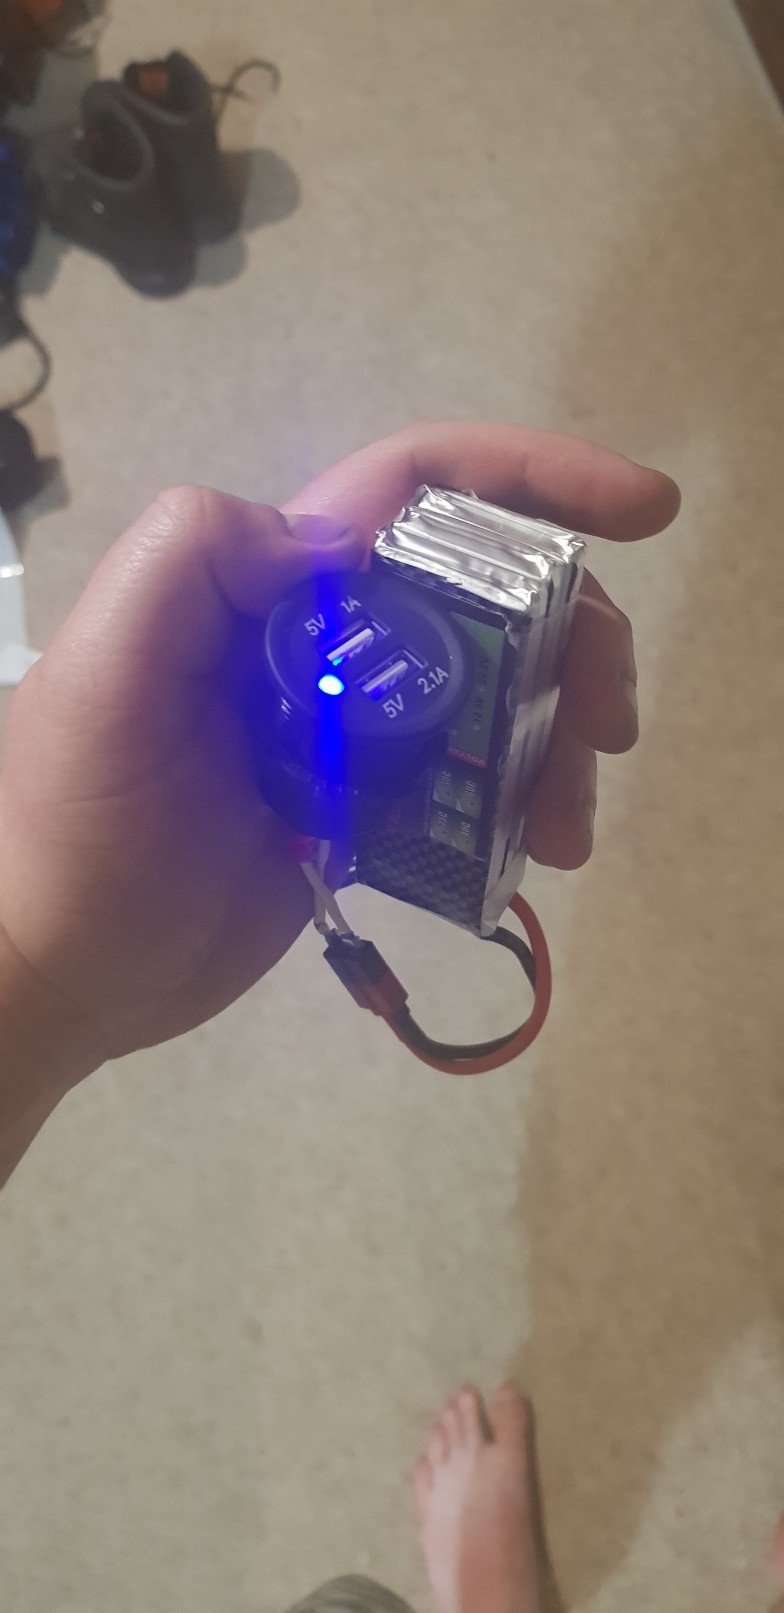
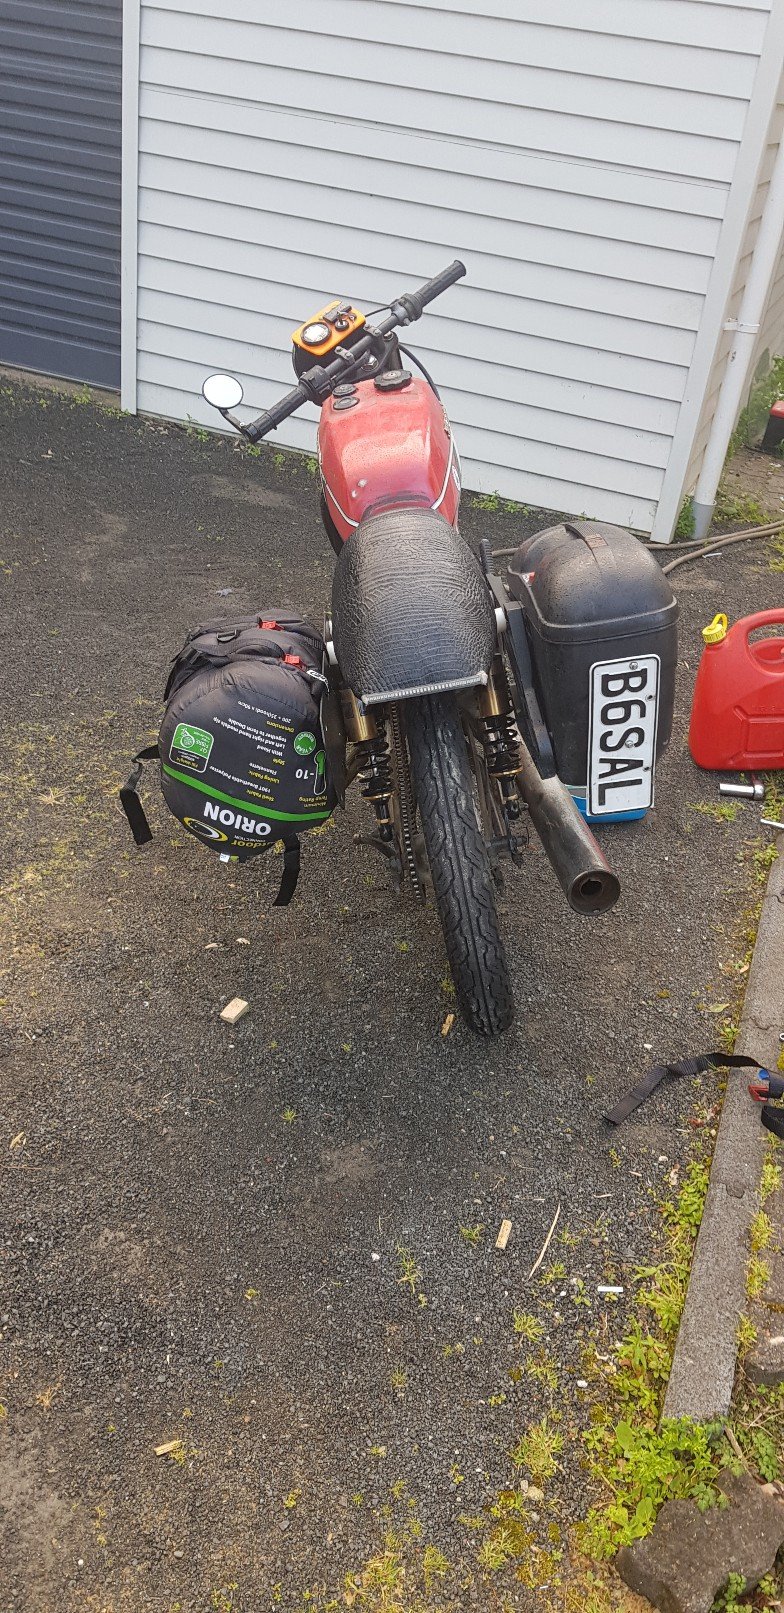
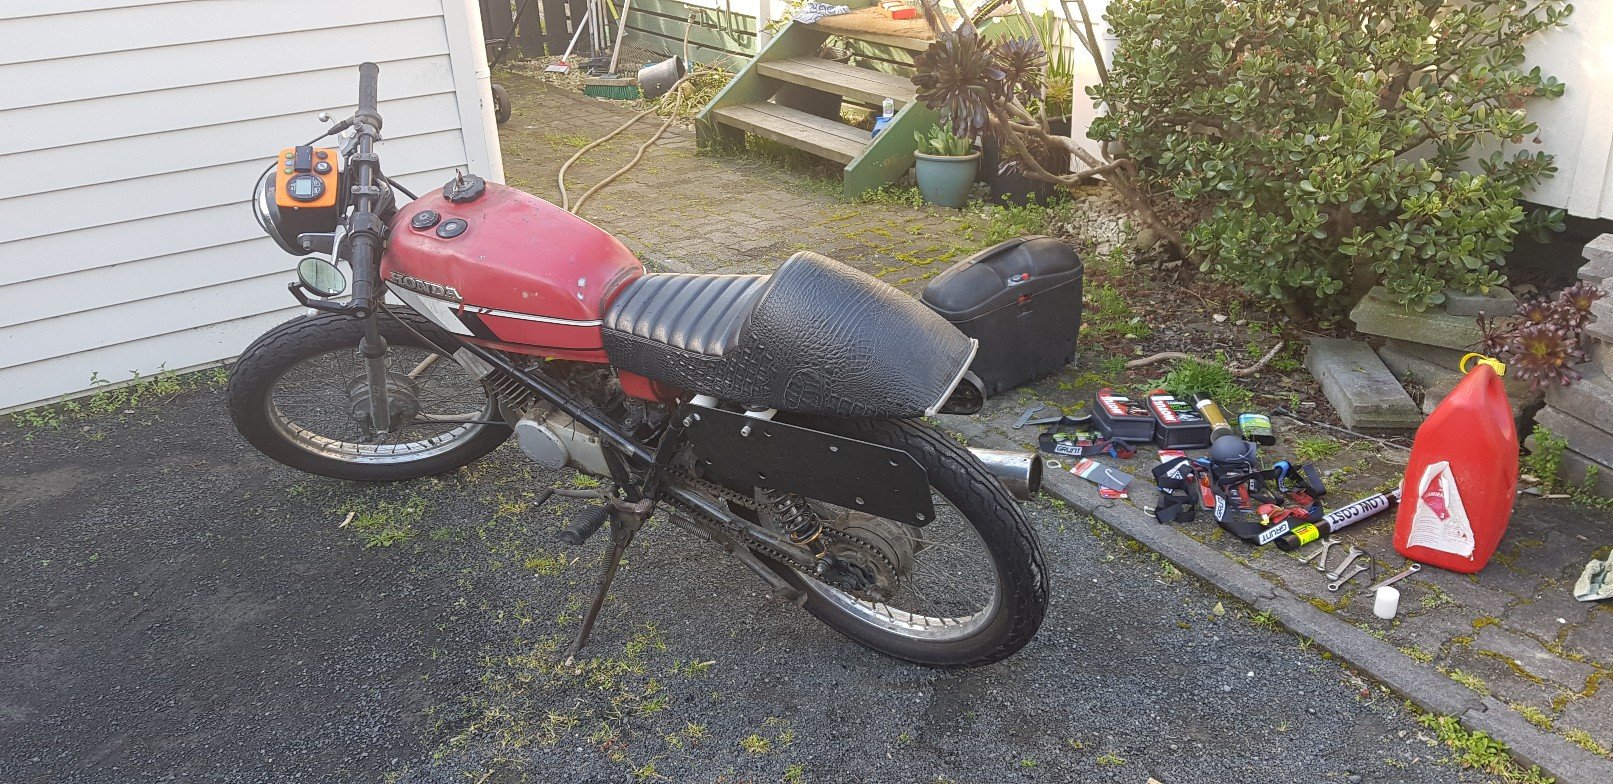
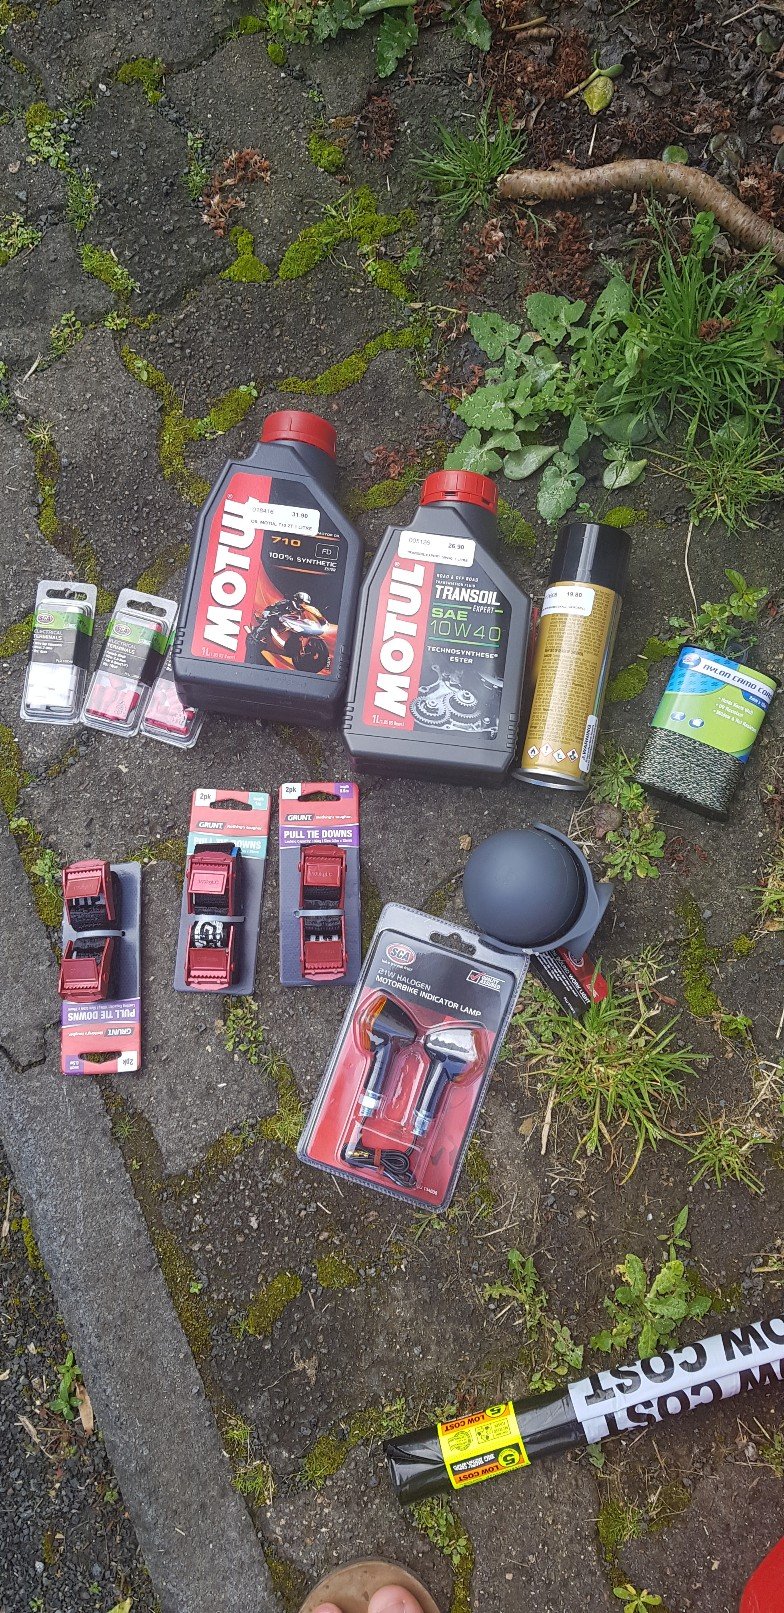
Right so this thing is going to (im going optimistic here) get me from hamilton to waiuru for the cold kiwi. Leaving tomorrow morning. In preparation it got some tlc..most of them things that id never bothered to do (or check) .Some expensive t2 oil (iv had it running on chainsaw oil and outboard boat oil for some time lol), new trans fluid, chain lube, some front indicators, a pannier box thing (got a pair of them for 50$ from a bike wrecker) and the other side got a steel rack to hold my tent, sleeping bag and bed roll. Of course i left this until the last minute so took today off work, slept in, then finished things about an hr ago. Pics fully loaded tomorrow, should be a laugh. Also, got some ear plugs so that i can hear people talking once we arrive. Oh and look at my budget power supply for charging phone. Edit. Yes its ugly as fuck.. but functional. Thats all that matters, right???????!!??!?!
2 points
-
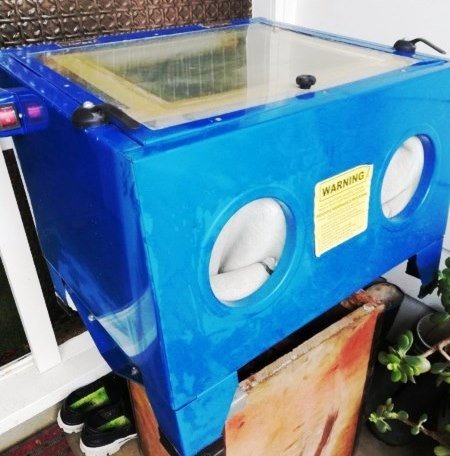
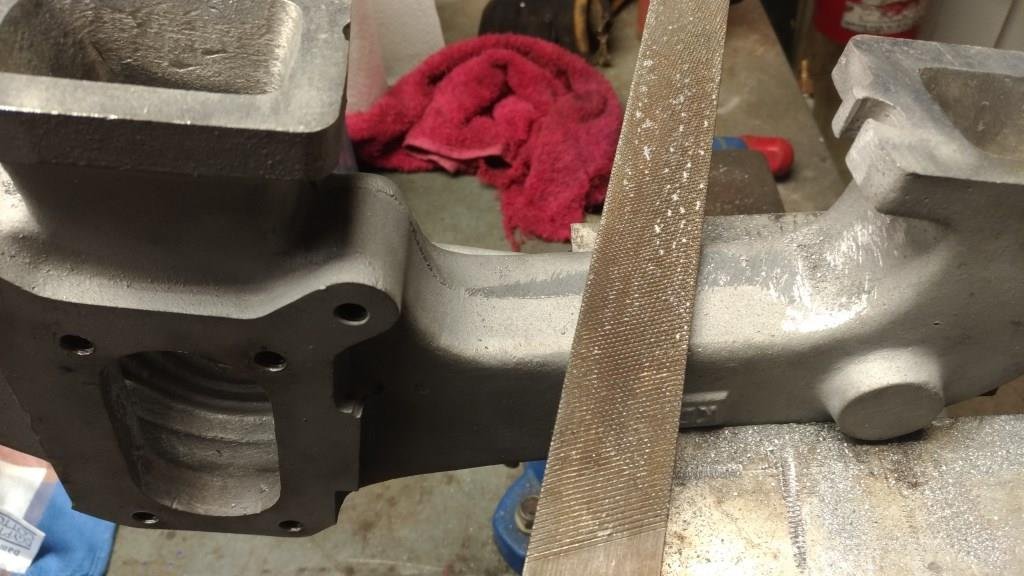
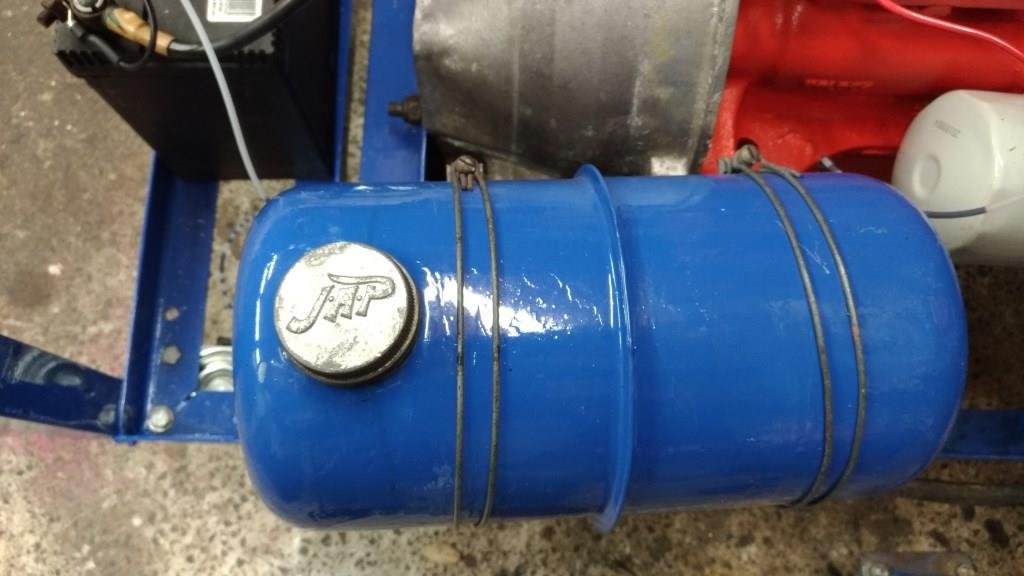
Thought it was time to clean up Rigamortice’s vintage Kel-Co manifold to get the DCD Weber back where it belongs. Couldn’t resist the temptation to cut off unwanted bits, file off casting marks and give it a blast in the new blasting cabinet (only a baby one but all I have is 12 cfm). Have to say I was pleased with the results. I’d been thinking about building an engine start-up cradle for a while, found some old castors, raided the obligatory under bench scrap steel pile and started cutting and welding,……… and cutting and welding,……. Once again happy with the end result, particularly the “Hillbilly headers” fabricated from parts saved from the rubbish bin. I just had to incorporate the “inglorious welding” I found on an old muffler! And how could you not love the 1950’s JAP fuel tank. As an added bonus you can even run motors up on it! (My favourite Torana 2850cc 9 port, stock standard but what little rever – Brock discovered them before anyone else). First 2850 start-up on the new cradle
2 points
-
This happened today, and I bloody missed it happening. Don’t imagine it’s the first time around the block though being a 5 digit odometer. *next update in 99,996k
2 points
-
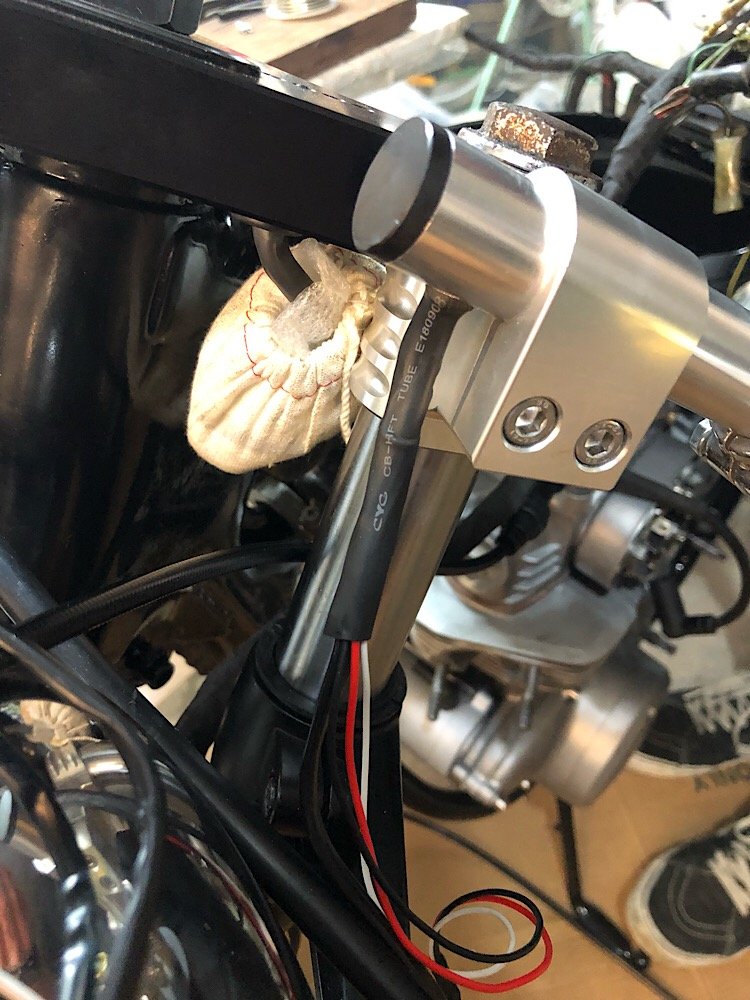
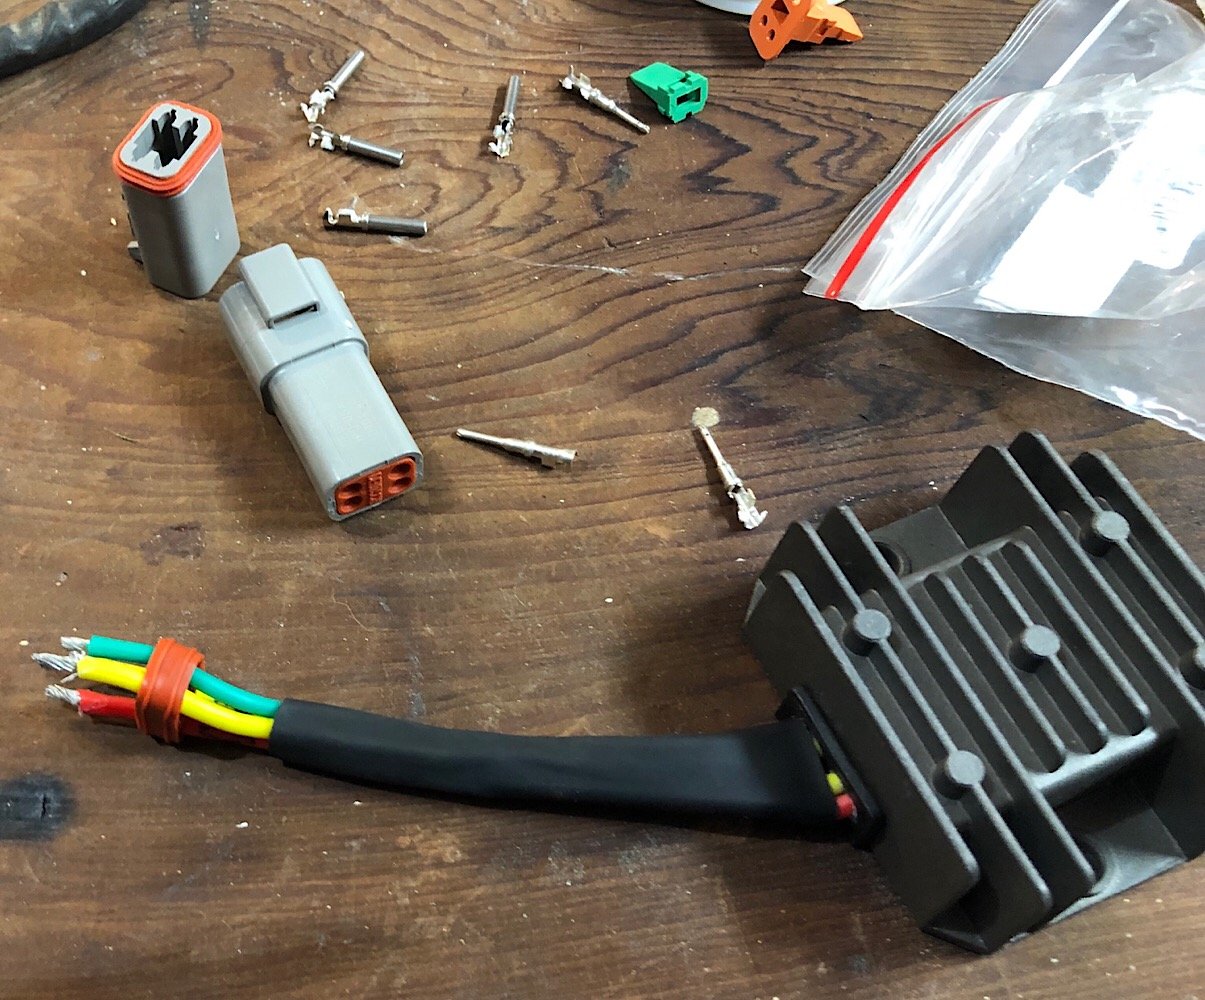
Carried on with the wiring, cleaning up all the old connections and added in modern plugs. Added in a regulator/rectifier to replace the old Honda ones. Drilled holes in the underside of the clip on bars to feed the wires out and down into the headlight. Trying to keep the wiring tidy with some going through the centre of the frame. Had my other Honda round to compare factory spec to cafe spec.
2 points
-
Shit its good driving this thing again. The picture above shows how much lower that middle muffler sits compared to the rails. You can spot it poking underneath. This will need to be priority one if i want to go any lower. Also the 3 speed auto hates hills... more than i remember2 points
-
Some goodies arrived during the week, so it was time to get under the Tasmin and rip out some hose. Since working under cars on stands sucks, I had another go at getting the car up on the Quickjacks. This time I was much more successful. I had to use the jacks sideways (an approved method, and the same as I used on Snicket) The reason I wasn't so keen on this initially was that the exhaust hangs so low I wasn't sure it would clear the frames. It did. Just. With the Tasmin in the air, it was much easier to roll around under it on my creeper. I started to rip the old fuel hose from the tanks out. No photos of this process because it was messy.... First I disconnected the feed to the pump. This is from both of the tanks, so I had a 10L fuel can ready. I managed to spill a fair bit, but got it into the can in the end. I filled up with 10L the other day, and about 9L or so came out. Some of that difference would be on the ground (and my arms), but it confirms that the tanks were bone dry when I got the car. The hose came out easy enough. It was worse than I thought though, every section of hose was seriously perished, with cracking all over it. The hose also smelt like fuel on the outside. There were some nasty splits in the ends of the hoses from each tank too Bend the hose, and it isn't pretty The new hose is Continental J30R7 5/8" fuel hose. This is a low-pressure suction feed, so didn't need to be a high-pressure hose, it just needed to be high quality. The hose walls are thicker than the old Aeroflow 400 series hose. The old Tee piece is made from a bunch of Aeroflow bits. In the interests of simplicity, I replaced it with a 5/8" solid brass Tee Old mate wasn't too hot on cutting ends straight, so a couple of clamps were hanging over the edge. Not best practice. The new Tee section And installed into the car. The two tank outlets are very easy to access And the Tee hangs above the drive shaft (and there is evidence that the old setup had been in contact with the driveshaft at some point!). The zip tie is there to hold it up and clear of the shaft. The hose was routed slightly differently to simplify the route, and then cut to length and connected to the pump. The hose was zip-tied to the chassis in a couple of places to secure it, making sure not to pinch the hose as it had been With the tanks connected I want to replace the fuel filter and inspect the accumulator. The whole lot (pump, filter and accumulator) are mounted on a plate above the chassis, in front of the LH side rear wheel. On the later 280i the filter is mounted in the engine bay. The black one is the accumulator, and the silver one is the filter. The pump is out of shot to the left (with hose removed). This is the other side. Let me illustrate the fuel setup with some coloured arrows. Fuel comes into the pump from the tanks (orange), out of the pump and into the accumulator (blue), out of the accumulator and into the filter (yellow) and finally, once filtered, out of the filter and along hard lines to the fuel distributor in the engine bay (green). These hoses weren't too bad visually, but no point in leaving them there. One quick check for seeing if your accumulator is stuffed or not is to disconnect the vent hose from the back of it, and see if fuel comes out. Mine was full of fuel. This vent hose should be dry, because it's only to help equalise the air inside the accumulator, and shouldn't have any fuel contact. The fuel is (usually) separated from that side of the accumulator by a diaphragm. If the diaphragm splits, it lets fuel through and back into the tank instead of holding pressure. My accumulator is stuffed. Thankfully I had planned to remove it completely and will be using new fuel hose to bypass it and route the pump straight into the filter. The fuel filter has banjo fittings on it. The inlet converts to rubber hose, whilst the outlet is to a hard line. Some of the hose clamps on the fuel hoses had been installed by a scumbag and weren't accessible from the underside. I'm not too sure how they were even done up, unless it was off as a complete assembly and clamped whilst on the bench before fitting. Since I wasn't using the hose again I chopped it off, unbolted the accumulator and pump and removed the lot. The accumulator looks very old and probably original to the car. The filter had been replaced, but it had a date of 2005 on it. The receipts say that the "recently replaced" filter was leaking back in 2011, so either it wasn't that recent, or it was old stock when fitted. I ordered a filter online based on the original filter numbers I had, and even with triple checking, it's wrong. Yeah, that's not gonna fit. It's possibly the correct filter for a later car with the filter in the engine bay. Working off the number on the filter, I need a Ryco Z399 instead. One has been ordered, along with a Z71 oil filter. Unfortunately that leaves me at a standstill now. Hopefully the new filter will be here this week and I can fit it after work one day. In the meantime I had ordered a new air filter, so went about fitting that. I had previously checked the filter and noted it was dirty, and the wrong filter. The old filter had rounded corners, so left an unfiltered gap at each corner. The correct one for the early airbox is a Ryco A1345. No gaps Parts bin special I'll probably lose some +6hp gains from closing up those gaps, but at least I know its right, and won't be sucking in unfiltered air anymore. Sigh. Sometimes I just wish some people wouldn't touch cars. A little knowledge is dangerous.2 points
-
Well, it happened again. Somehow awesome old British cars that need loving find me, and of course who am I to turn them down? This car has a bit of a weird story, but I guess it adds to the history of it all. It all started when I had the M328i listed on Trademe, back in March, and in amongst all the useless time-wasters asking me dumb questions, I got asked if I wanted to swap the black leather vaders for white leather seats from another M3. Of course this was a no, white leather is one of the worst wearing colours in the E36. The fellow wasn't done there though, he wanted my seats. The next question he asked on my listing immediately had my ears perk up, and suddenly I was intrigued. Yes, that's right, a TVR. After a bit of googling I worked out an 80s TVR would be a Wedge. Not the most loved TVR, but I like them, and any TVR is a good TVR in my books. It's 80s, it's British, how bad can it be? Of course I was interested, and let him know. Later that night I get a call and discuss the car. Its been off the road for a few years getting some work done at the "local" TVR specialist, in Auckland. Ok, no problem, except the owner is down in Christchurch (about 1000km and a large body of water away from each other, and I'm somewhere in the middle of that). It turns out that he wanted my car, because he was buying a convertible E36 M3, and wanted to swap my black leather into it. He also had thoughts of "Trevors last drive" by flying up to Auckland, picking up the TVR, driving it down to me, swapping to the M3 and for him to continue on his way down south. As I found out later, this would've been a big ask for the TVR. We discuss the ins and outs, and I'm recommended to contact the specialist and discuss the car. I give the specialist a call and discuss the car. Apparently it's all sorted, and basically ready to "fly through" a WOF and to hit the road. Its had various work done, including most of the hard work like suspension. He noted it does have an issue starting, which is possibly down to a failed fuel accumulator, but does run and could be driven onto a truck. His description of the car was that its a good solid, tidy car, but may need some carpets as they are a bit worn. I was very interested, but needed photos to see what condition it was in. Ok he said, he will try and sort some for me. To cut a long story short, I tried for months to get photos of the car, with every reason under the sun for not getting them from the specialist. On the other side of it, the seller of the TVR decided not to buy that M3, and couldn't find one he wanted, so no longer had a need or want for my car. I let him know I was still interested in outright purchasing the car but would need photos. Both him and myself followed up with the specialist, to no avail. Just before I went on holiday at the end of June, the BMW sold, but I still had no proof of life that the TVR even existed, so just left it hanging whilst I chilled out in the UK (more on that in a later post). When I returned, I already had a list of cars on Trademe I wanted to look at. I had basically given up on the TVR at this point, as during the month I was away, still no photos had been sent. I looked at a couple of cars, including an Evo 4 (which I came very close to buying, but the second viewing showed too many issues, and the unmistakable smell of weed inside) and a C55 AMG (nice car, if a bit dull). I wasn't quite set on them, but noticed that the TVR specialists website had been updated, with new photos, and what happened to be dead center in the photos, but a silver Wedge! Well, there was my proof of life I guess; the car did exist! I contacted the owner and confirmed the car was still for sale, and then did the stupid thing; making an offer for the car as it sits, without so much as a real photo. Offer was accepted, and a call was made to the specialist to make sure no money was owing, that the car could come with the spare parts, and that it would drive onto the truck.... oh wait, what's that, it suddenly doesn't run but you will "try to get it going"... I pushed forward anyway, sending my hard-earned money to the seller, and booking my preferred transport, letting him know that the car doesn't run but the specialist will "try" to get it running. After a long week of waiting, this showed up this morning. Yes, that's the proper good fella Brent from Classic Towing dropping off yet another project to me. Can't recommend him enough, as even when things go a bit pear shaped, he has it all under control, and he loves weird cars almost as much as I do. My first question to him was "did it run?" to which he replied with a no, and tightened the winch ready for laying the bed flat. Such a cool truck, it lowers the bed right off onto the ground. This is half way down Brent pushed the car whilst I jumped in and steered it carefully into the garage. This was harder than you would think, being that it was raining on the outside, and inside of the windscreen, and the wiper didn't work (well, it's not even fitted). We made it safely into the garage though. The brakes work, which is something. So, what is this weird little thing? A 1980 TVR Tasmin 280i It's more or less a Ford Capri in a fibreglass body with tube-frame chassis and some weird and bespoke parts. Powered by a 2.8l V6 Ford Cologne engine topped with Bosch K-Jetronic mechanical fuel injection, backed by the latest (for the 70s) in Ford 4 speed manual gearbox technology, and driven via the rear wheels through a Jaguar XJS diff with spiffy inboard disc brakes. The pinnacle of technology, and a real parts bin special. On the plus side it does get some pretty advanced gear for something that is the same age as my green Mini. Independent rear suspension, four wheel disc brakes, fuel injection, electric windows, bonded windscreen and a targa top convertible. It does have a lot of known quirks though, such as a multitude of wiring issues, a wiring loom that consists of only black wires (seriously), diabolical K-Jet fuel injection, and a dual fuel tank system that is no end of troubles. Anyway, this car is the 106th Tasmin off the line, and appears to be the 4th DHC (Drop Head Convertible) made (1st was a concept made from a chopped up FHC). Before the DHC was in production, the FHC (Fixed Head Coupe) was the TVR to have. The FHC was soon phased out though and only the DHC survived until the end of production, albeit with some big changes. Being a very early car, my one has some specific early only "features". The first, and most obvious, is that its a TVR Tasmin, not a TVR 280i. TVR dropped the Tasmin name later on and left the names to just be the displacement of the engine (280i - 2.8 V6, 350i - 3.5 V8 etc). A couple of other early features are the weird little mirrors hanging off the doors. Later cars changed to pods in front of the side windows, like a normal car. One of my favourite really early features though, has to be the gorgeous Stewart Warner gauges The later cars got boring, but arguably more readable (and probably reliable), VDO gauges. There is just something about the way the SW gauges are clocked, and the vertical odometer. So, now that the car has been delivered, how is it? Did i win the blind buying game, or get screwed? It's not as tidy as described, and it doesn't currently run. The battery was completely dead (to the point my ctek charger won't even detect it), but with a replacement battery the electrics are slowly coming to life again. Unfortunately, it leaks like a sieve and is full of water. I tried to dry as much as I could out, but the dehumidifer will have to do the rest. The roof seals will be the major contributor to this, as they are well buggered. The water ingress is what has ruined the carpet, it's literally rotting away. The boot, once I got it open, wasn't much better, with the lid being full of water and covered in condensation on the inside. The seats are in good condition, with no obvious rips or tears, as is the rest of the general interior. The wood grain has some cracks, but overall for a car I suspect spent a lot of time sitting outside, its in good shape. Apparently blue velour and vinyl stand the test of time. Bodywork is very good, with only some stone chips on the front. The rest of the paint appears to be good and will come up well with a polish. The top is also in good condition, with only some damage to the fabric on the removable section, and the rear window is very cloudy. Hopefully, I can polish that out, but it may need replacement. I don't know how the car is mechanically as it does not run. The previous owner advised (only after I had paid for it) that there is a strong fuel smell from the tanks when sitting, but it drove well otherwise. The fuel in the tanks smells like varnish, but cannot be smelt without opening one of the two fuel caps. I will need to drain this out and throw some new fuel in before trying to start. The starting issues could be a few things, but I will get to that in due course. One cool thing about TVRs is the convertible roof with a removable targa section. You can either have the roof up, down, or the rear section up but without the targa section, which fits into the boot (roof isn't locked in this photo, so looks a bit baggy) So that's the TVR. The plan is to get get it running, get a WOF on it and then take it to the British Car Day show in Feb. In between that, just take it out for some top-down Summer cruising. Oh, and keep fixing it. Can't forget that.1 point
-
Yea that's sort of the idea, can do colours etc to match cars or whatever people want. They come out of the mould as either a cylinder or rectangle depending how I make them then shaped on my wood lathe1 point
-
So it took longer than expected to sort the wiring, which still isn't finished, as I need to make a dash plate and get some new switches n shiz, before I can finish the wiring off. I've been having problems with my trailtech dash giving weird rpm values, and I was darned if I could figure out why. Turns out Dave, being the Barry he is, installed solid copper leads on the motor, so I get an rpm signal even when the wirings not connected to the trailtech, so much zap, lewlz. I might have to put standard leads on it, as I kinda need the rpms to read correctly. Anyways, this evening I halfassedly finished the wiring and put cable ties all over the place, and decided it was a good idea to take it for a quick test drive. In the dark. With no lights. Up my residential street. It was quite exciting. All the controls work well, which is nice, but the motor is not running correctly. I think it's leaning out up in the revs, not that I know how many revs it's doing, so I will have to play with the tune. The gearing seems good, it's definitely not over geared now. After a couple of rips around the neighborhood, I had a quick look over it, and noticed one of the rear sprocket grub screws had stripped out, so I had to pull the rear end to bits so I can drill the 8mm grubs out, and upgrade to 10mm. I'll loctite the piss out of them too. I'll try sort a few issues out, and hopefully take it somewhere this weekend for a second test drive, to see if things are better. But yeh, not too bad, but still lots to do. At least it's now moved under its own power for the first time in nearly two decades, so that's a win. Regards, VG. xoxox1 point
-
That'd be super cool, matching walnut swirl knob for yer walnut trim dash... Do you finish those on a lathe or do they come out of the mould like that?1 point
-
Pretty keen for your knob1 point
-
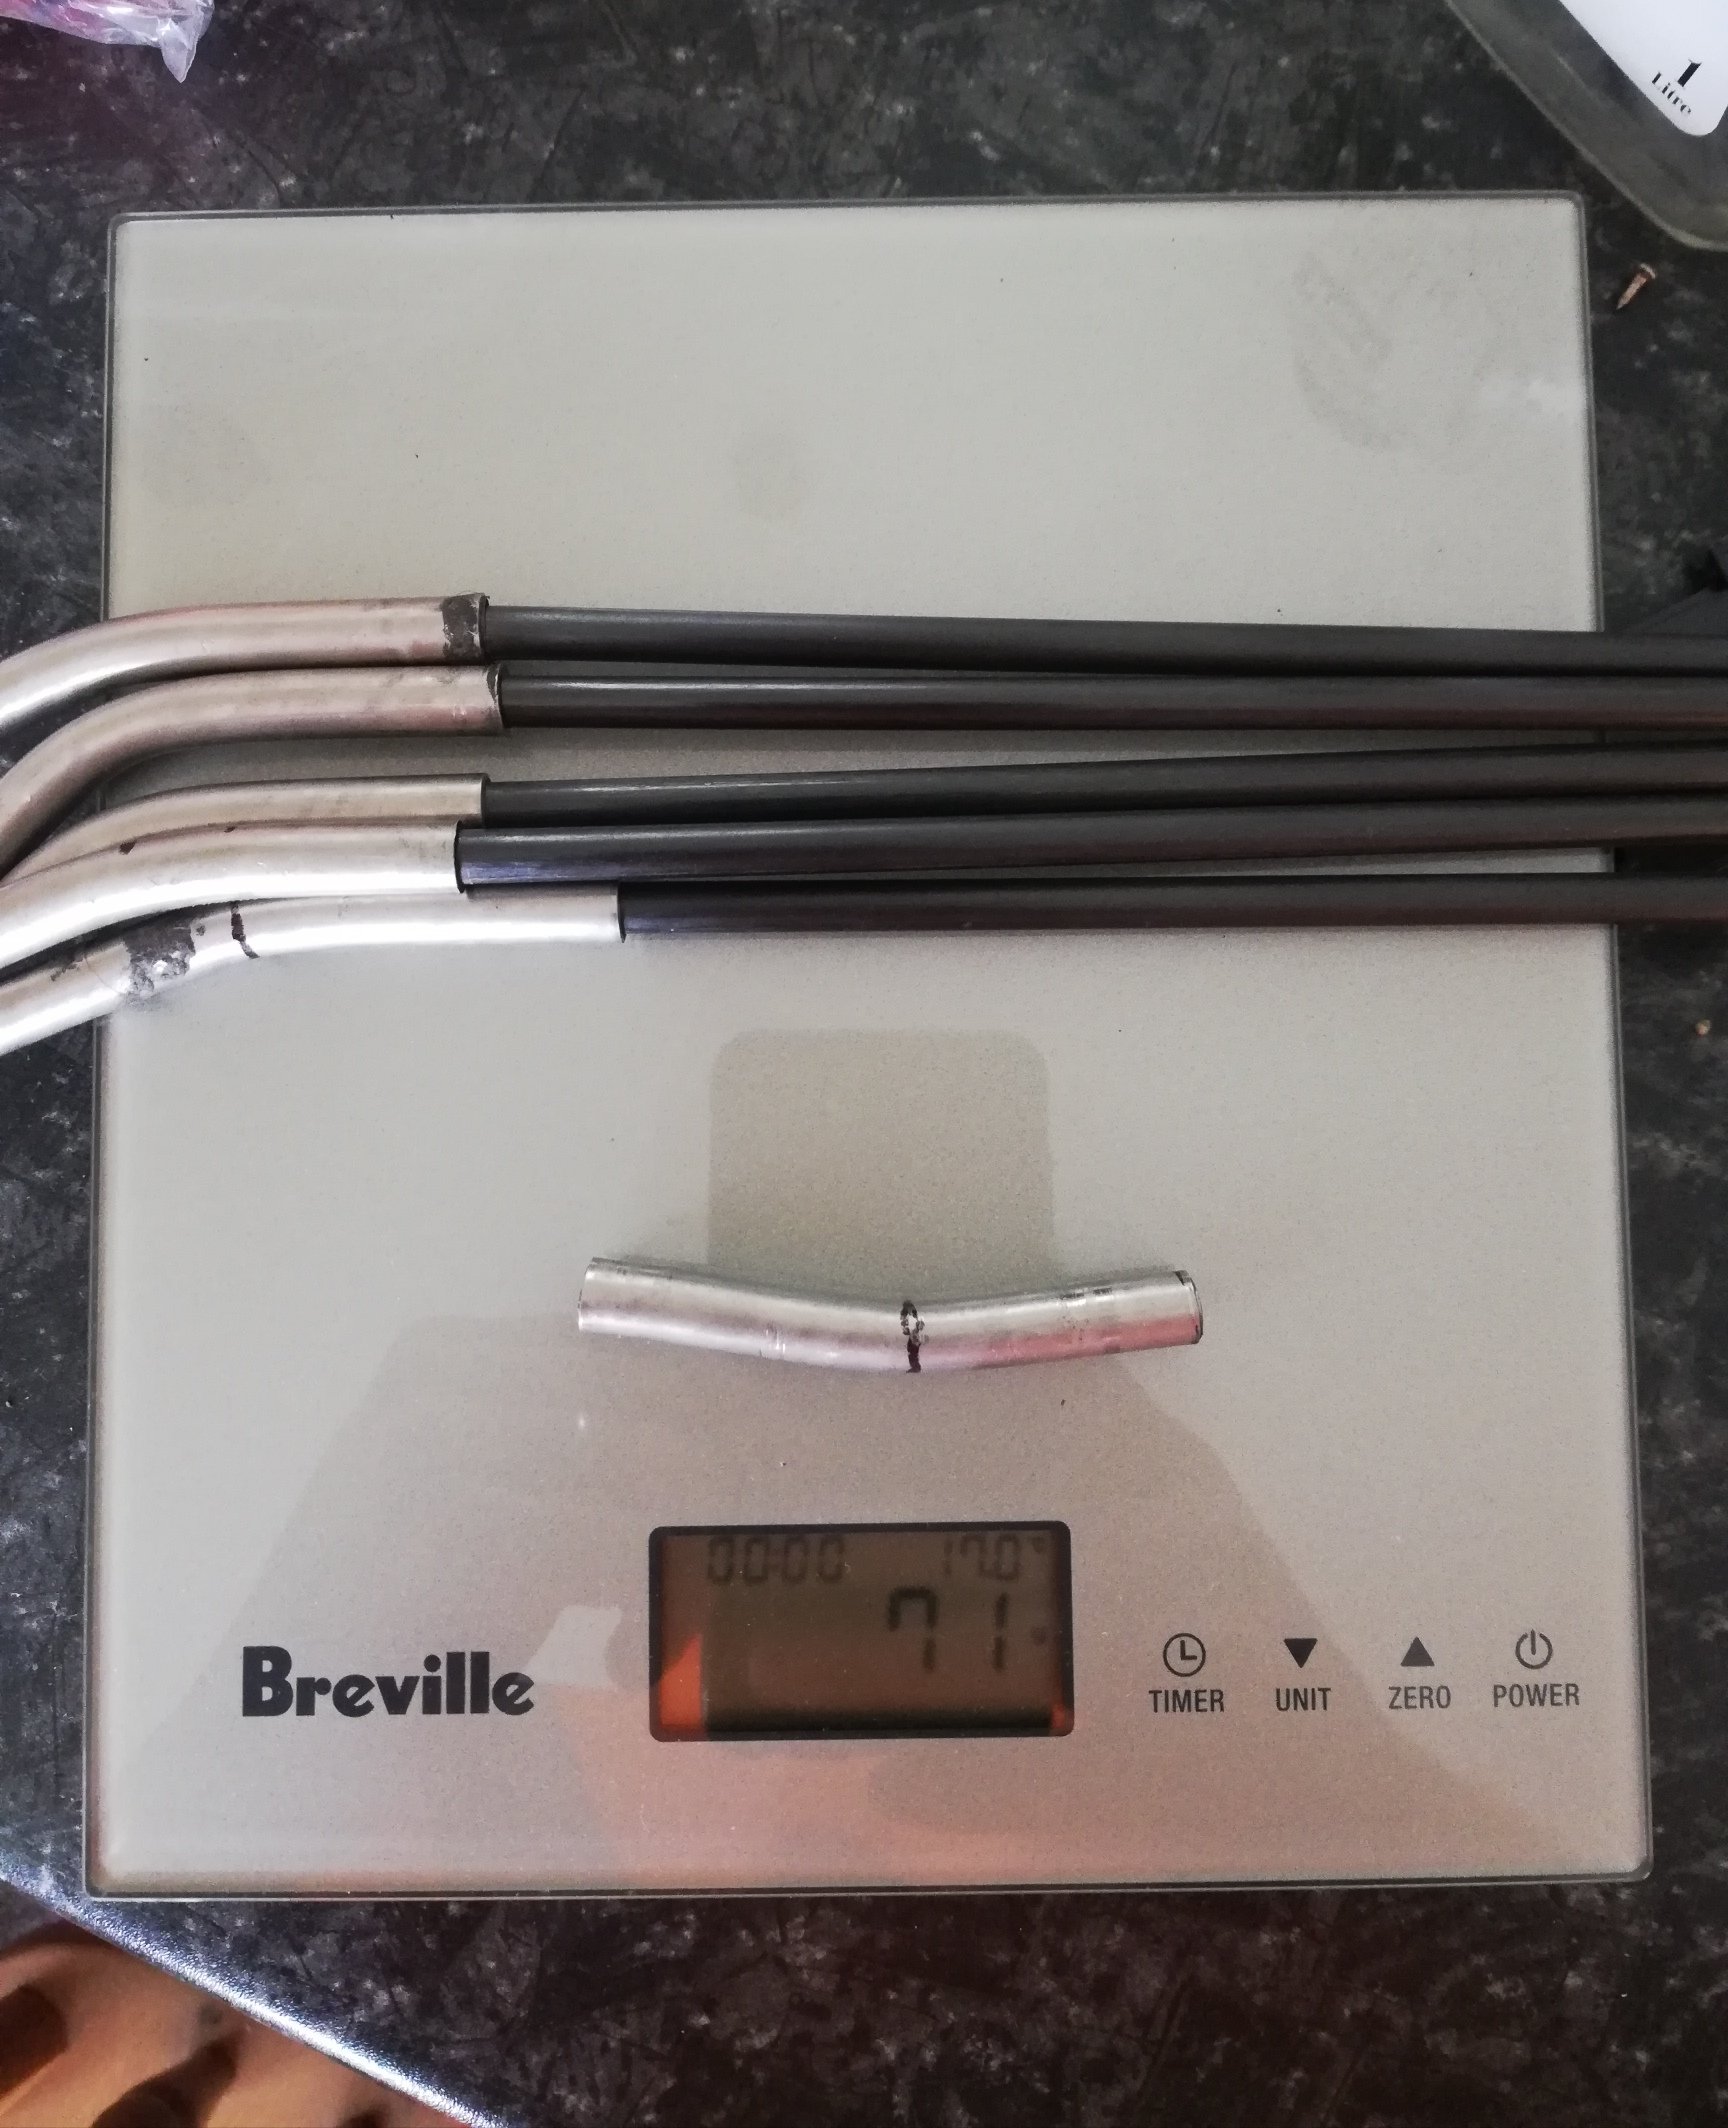
Carbon fibre tube and titanium tube tent pole for my bivy Dunno what the original looked like or weighed. It's roughly 10g less than a comparative length of DAC alloy tent pole. I can probably shorten the titanium a bit and make that 15.... Was cheaper to make them this way then buy the alloy pole anyways
1 point
-
This is the last one I did a couple of years ago (Pic of rally Mini at the bottom of the post). The one before was the SAS Land Rover that was sort of painted pink, aka the Pink Panther: Working on a Revell 1/24 Routemaster Bus, which has stalled for a couple of weeks as I have to make all the seats...
1 point
-
Slowly getting less rustic 2k black for the door jams Plan is 1k black base, 1k colour then a hardened clear over the top
1 point
-
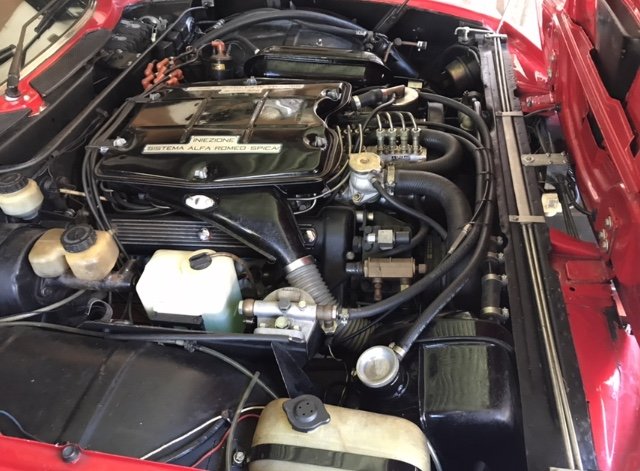
Started a thread on his behalf because he sucks at interwebbing, but also because it’s got a lot of interest so thought people would like to see it and I’ll get him out to some OS things in it. had a fair bit of resto work. from custom milled stainless led high stop to milled stainless rear seat luggage latch mounts. motors 2.6L v8 with mech injection, and factory dry sump setup. motors just had a full rebuild inc the sump setup etc. upgraded 4 pot front brakes and a couple other things using factory bolts ons from other Alfa models rear suspension is pretty shot, and it sits a little high. Got some parts from alfaholics on the way. old boys pretty slack with work updates etc but if anyone has and questions or photos of any part just message me and I’ll get it up
1 point
-
Update on the open chequebook: It has been up North getting work done for compliance, and so far has 15mm to go until the chassis is completely straight, and the front inner guard has been cut off to straighten out any creases caused by the impact. The creases were a fair bit more than thought, up under the strut tower and the engine bay was pretty bent, but it's had a massive weight attached to it and pulled the creases out where possible, and then will be softly hammered with Billy Mavs back into place. But the headlight surround area is too smashed, so a new piece will be made and welded in. Coming along nicely, it's just a shame to not have any control of it as a project at the moment. Most of pics go to Instagram as I forget to update here so much. Feel free to follow along @theamyable.1 point
-
Actually you can see Liv and Seedy are both looking at a pink phone. The same phone? It probably went like this:
1 point
-
As those who are more familiar with us will know both Rigamortice and myself have a great affinity for the environment and take climate change (i.e. the thing we used to “call global warming” before it got cold again!) very seriously. Stricken by remorse and overwhelmed by guilt over the tons of negative carbon credits I’ve released on the global economy through years of motor racing, driving cars for the love of it, and behaving like a typically irresponsible older ‘Oldschool’ member I have acquired an EV! You may scoff at the fact that it’s a clapped out old warehouse sweeper with buggered batteries saved from the scrap heap but to Rigamortice and myself it is a powerful symbol of our indefatigable commitment to a green and politically correct future. With help from my brother providing advice, encouragement and the Wild Turkey may I present the definitive green, negative carbon credit, EV solution to taking the wheelie bins out when you live down a long driveway, (what could possibly go wrong!). Commentary and camera work courtesy of the ever lovely Mrs sr2.1 point
-
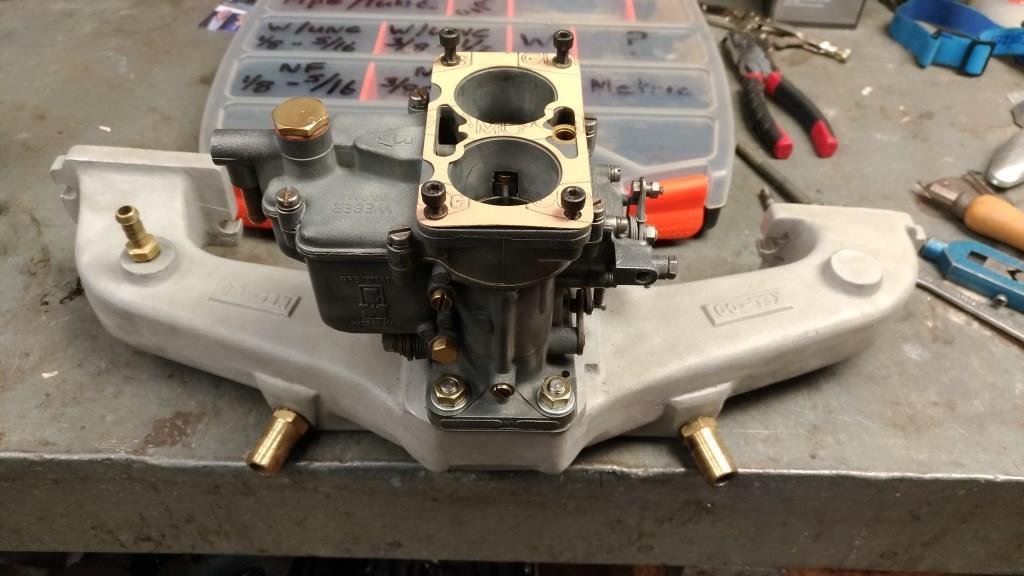
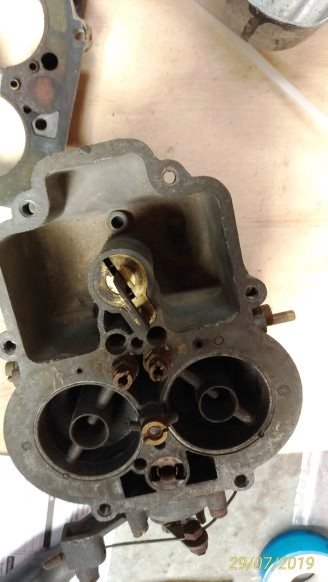
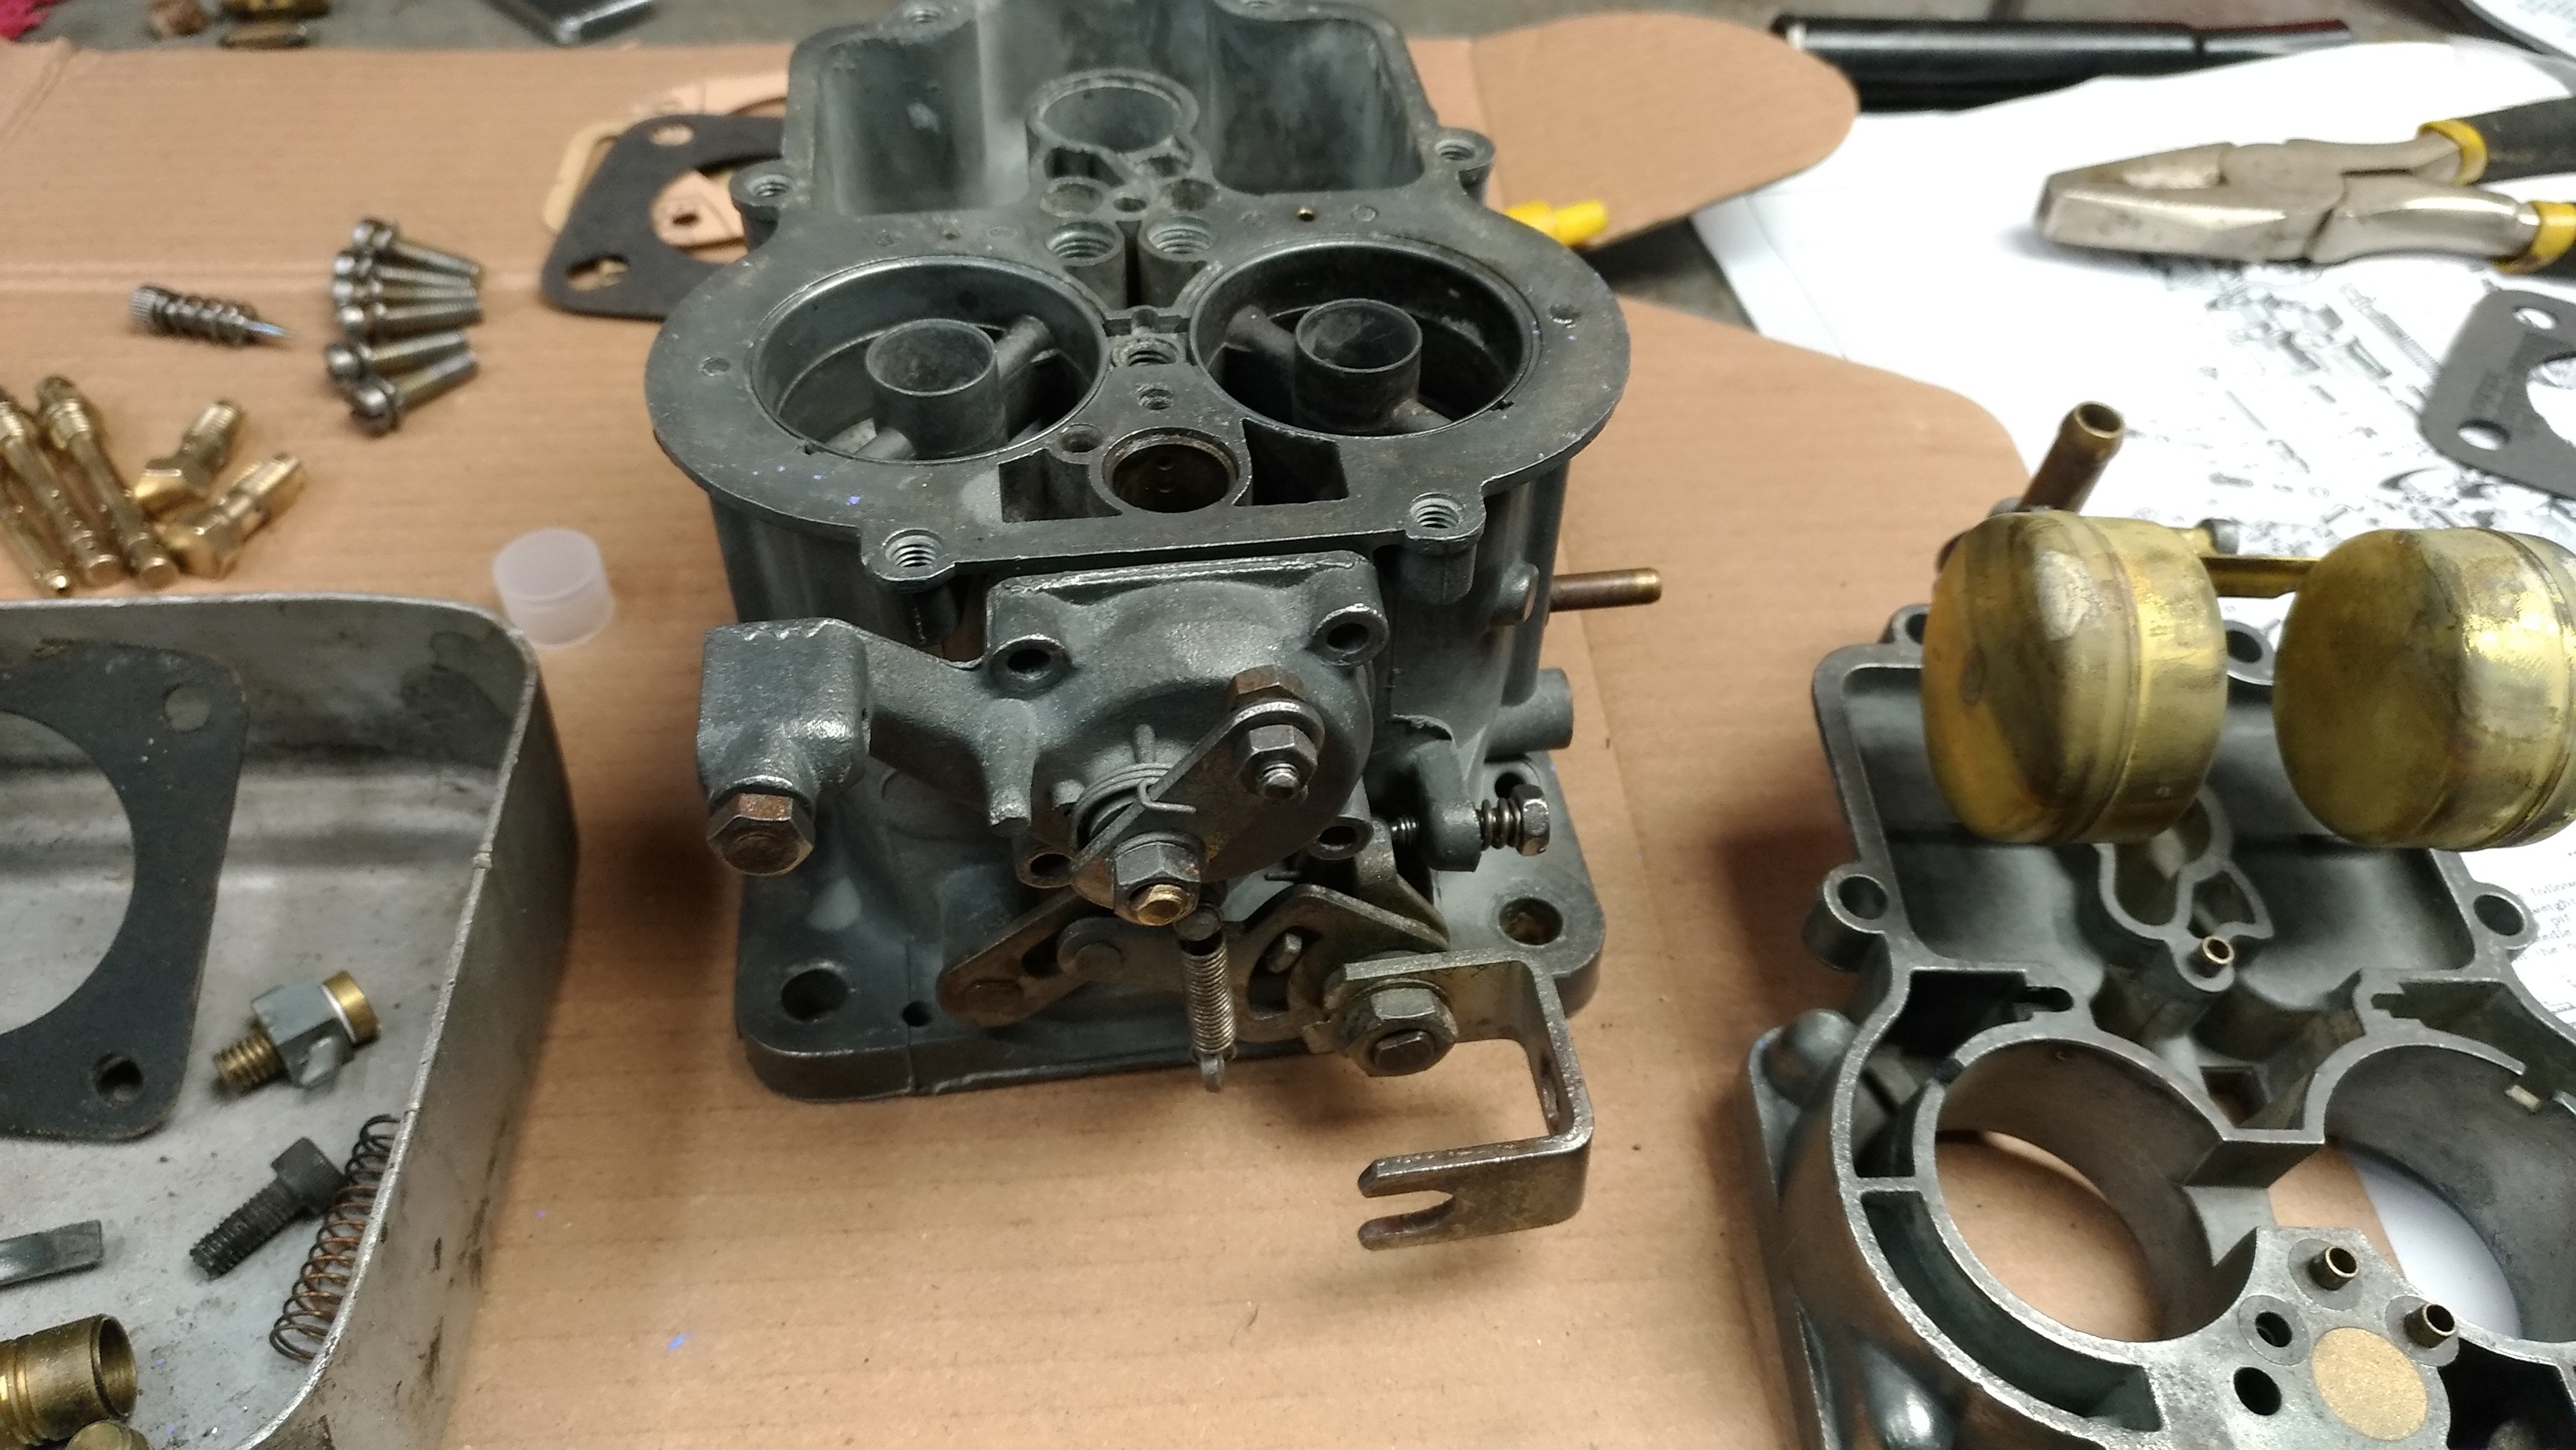
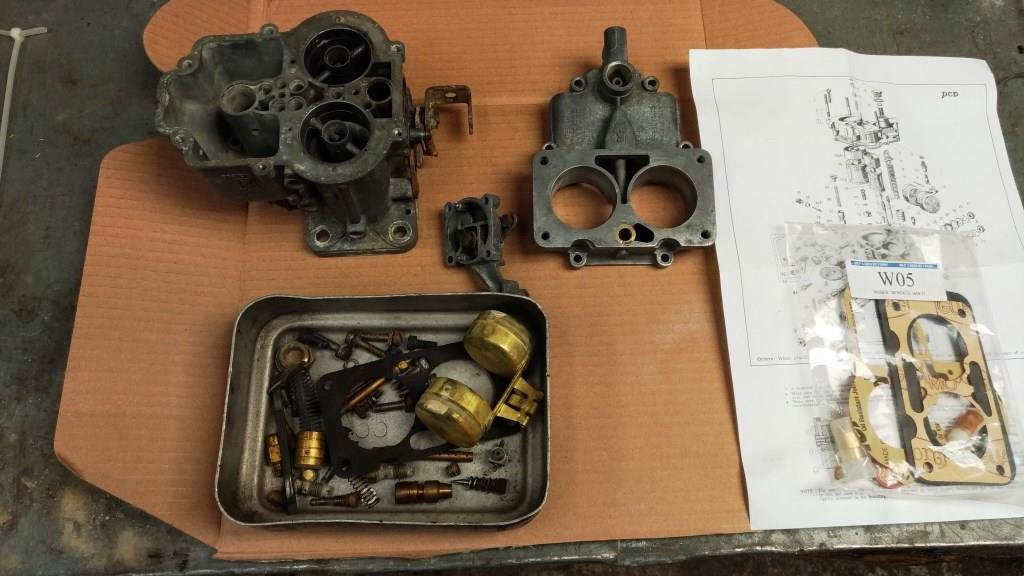
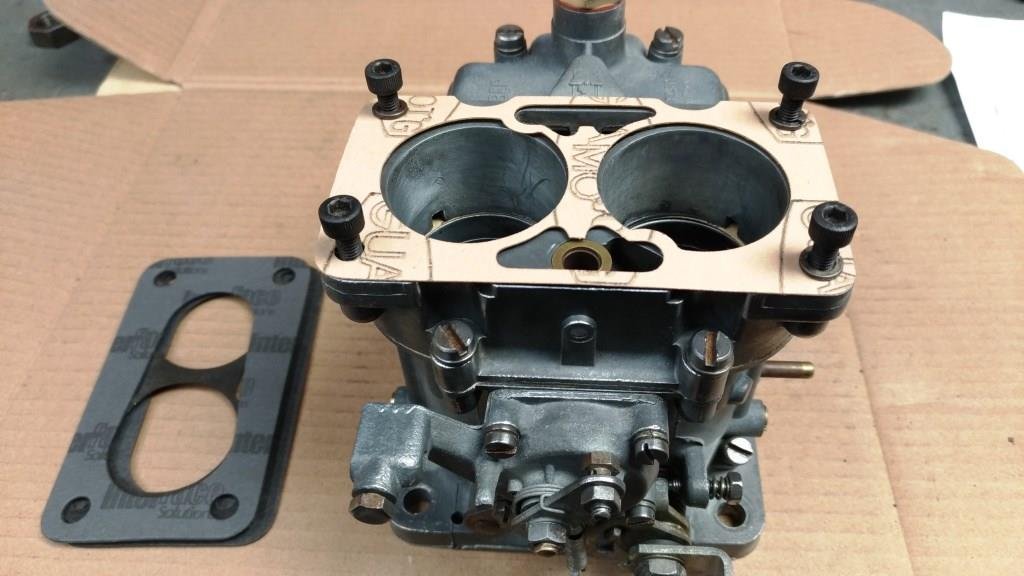
Thought it was about time to have a look at my favorite DCD Weber; we go back a long way, purchased new in 1974 it was looking a little 2nd hand. Stripped it down and on closer inspection the throttle spindles showed little almost no wear and the call was made to give it a good clean and assemble with a new float valve and gaskets. Finally located a rebuild kit from MLP Carbs in Victoria, (don’t you hate it when bloody Aussies turn out to be the good guys……!). After an enjoyable evening in the world famous sr2 man cave rattling the neighbourhood with Pink Floyd playing loud and ½ a bottle of cheap (ish) pinot noir - one more job’s ticked off the list.
1 point
-
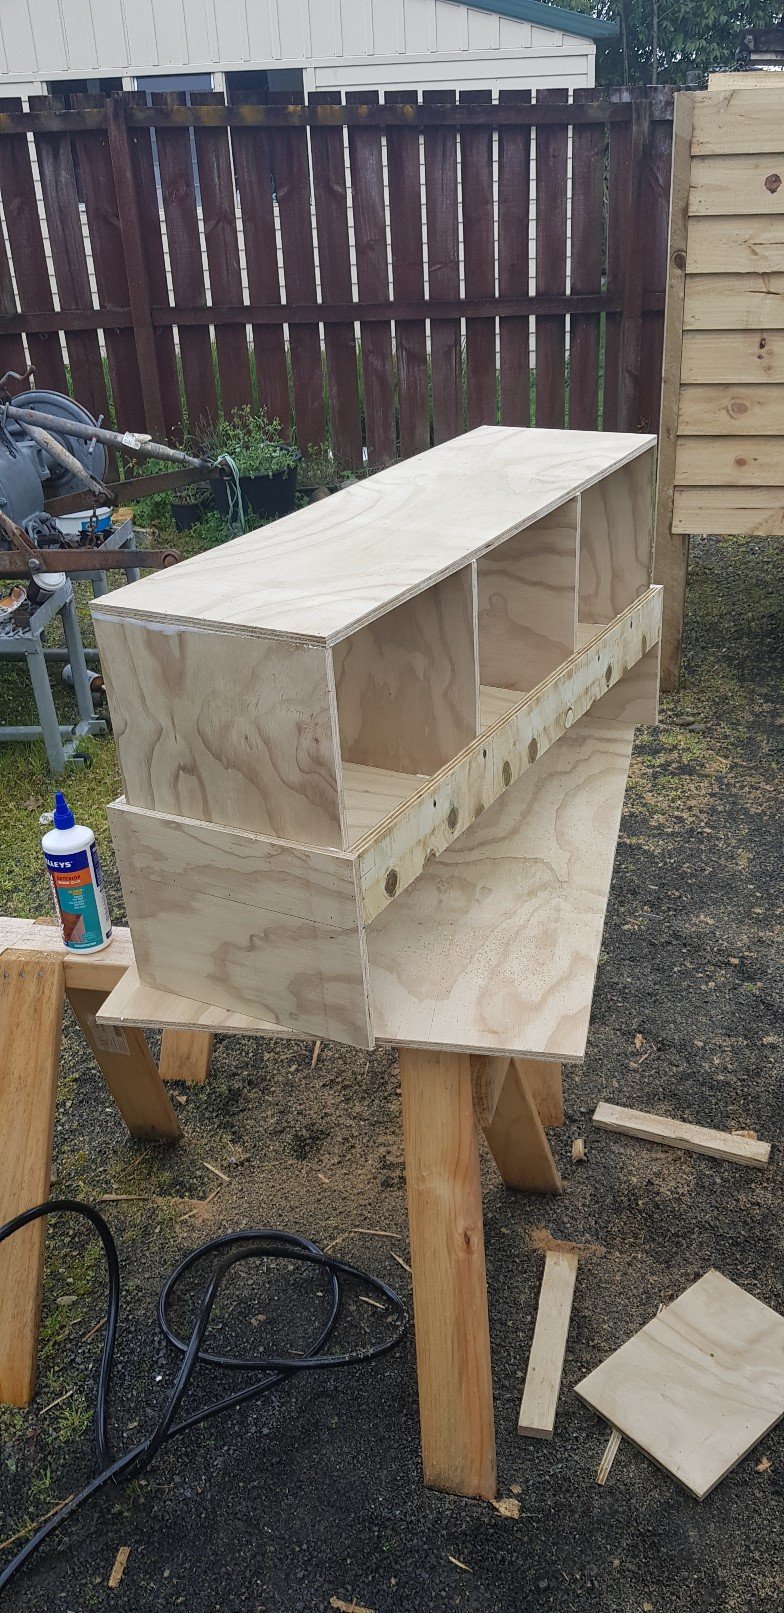
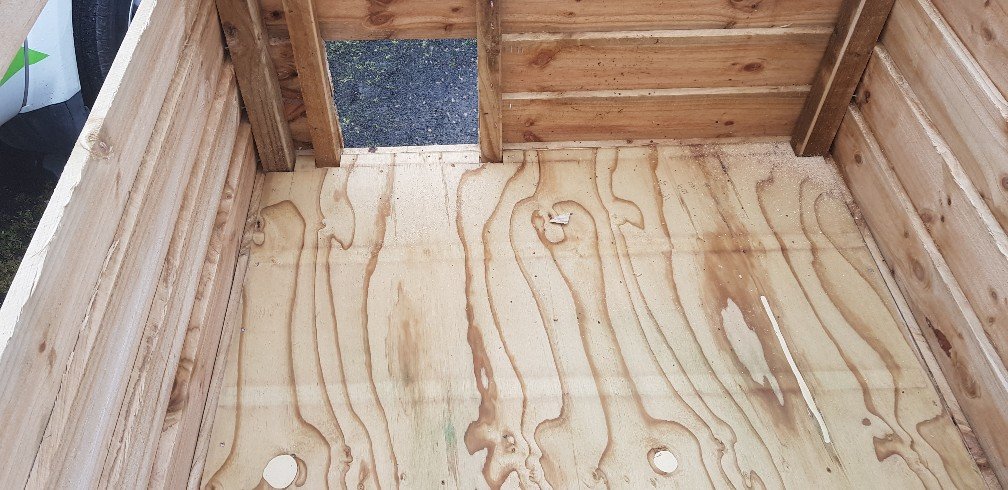
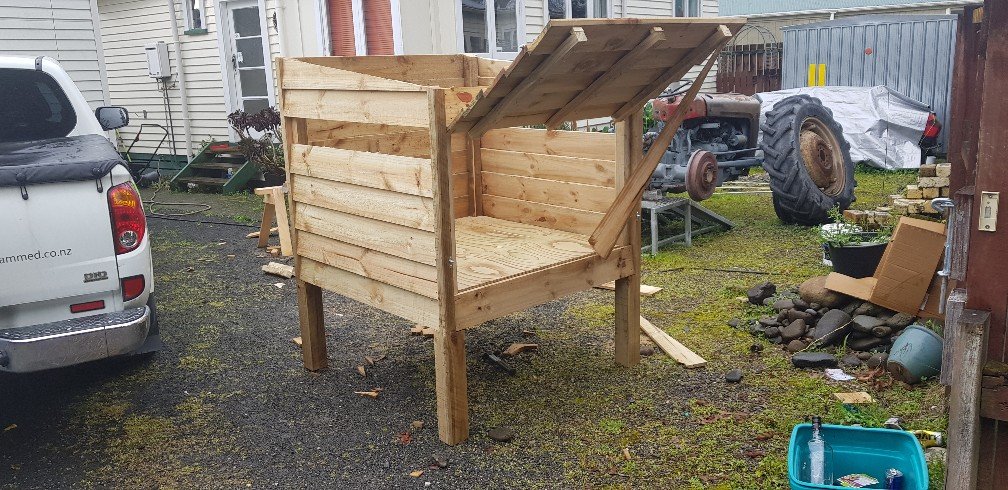
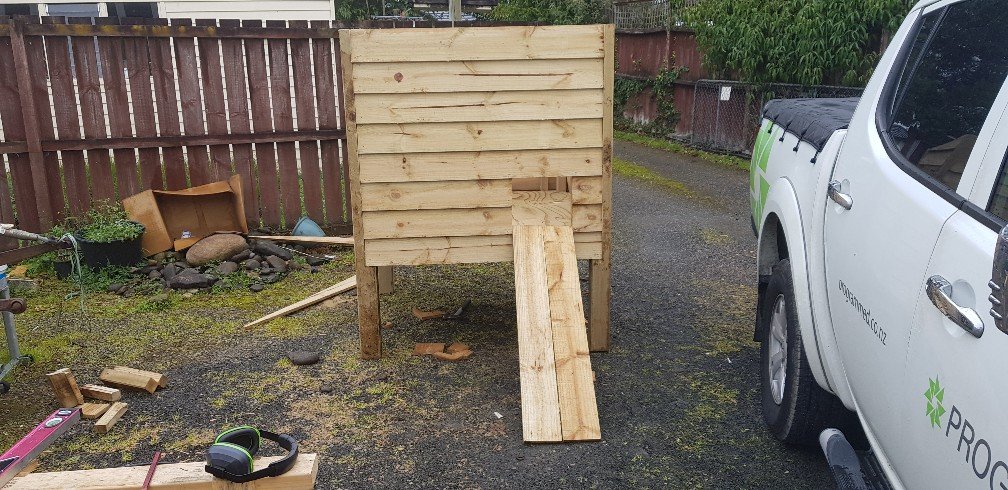
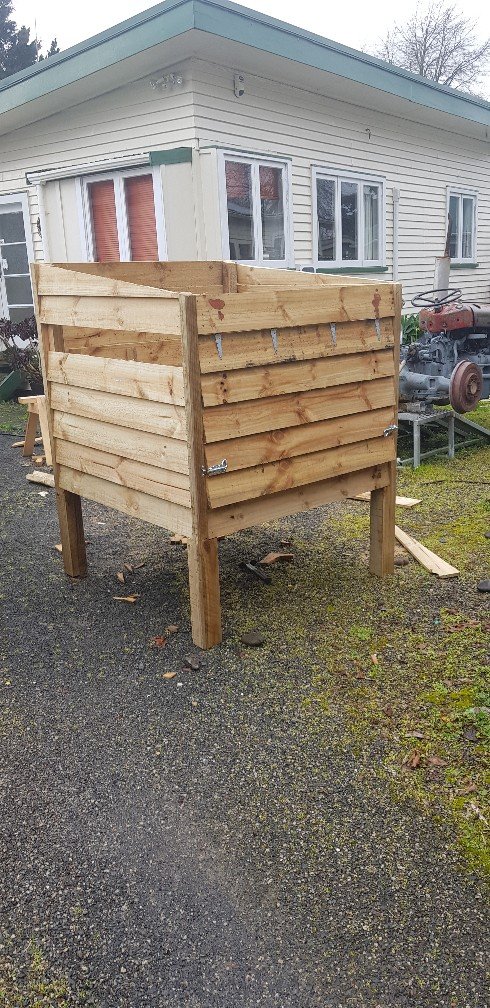
So i thought about this way too much. My floor is fixed but at the right height so that i can open the door, park the wheelbarrow under the opening and scrape the contents straight into the barrow so it can be taken to compost or garden whatever. Made nesting box today. Sits just inside big door(so back of nest boxes are closed in when door is shut) room so we can drag old bedding out under it with a rake type tool, or can lift whole nesting box out and turn upside down into the barrow to clean/ empty it fast. Also.. i gave it a flat top. Videos said to have an angled top so they cant sit up there and make poose. But i dont care! If they like it up there and want to cuddle up high then good on them. Also in photo is my circular saw guide thing/square. Best thing iv made for the saw, omg. Just line up the right hand side edge to the cut line and use the left edge to guide the skillsaw. Cuts perfect square and accurate to the line every time. So good.
1 point
-
So I guess this is where we start then. The first port of call today after having the car delivered was to work out why we had no power. I popped the bonnet, and yes there was a battery. Ok, let's remove the battery and see if I can throw some charge into it. Ctek says NO. With the charger connected to the battery, nothing. No lights on the charger, and if anything, the charger started acting weird. Guess that's no bueno then. Hope my charger is OK. A quick trip to Supercheap sorted out a battery for me. There is very little space for a battery, so a bit of digging in the Century Batteries catalogue yielded the biggest battery that would fit the same footprint, an NS60LSMF Connecting this up showed that we finally had power. The dash warning lights come on with the key, the driver's electric window is working, albeit slowly, and the central locking works. Strangely the headlights did not respond to the switch, but some wiggling of the wires behind the switch sorted that out (yeah, I'll need to look into that). The next obvious step was to see what was up with the fuel tanks. Now that I had power I could see the fuel gauge was reading empty. I decided to take a risk and try dumping some of BPs finest 98 and injector cleaner into the tanks and see what happens. I split the fuel and cleaner between the two tanks as evenly as I could. Since I had been told it was possible the accumulator had failed, there is a trick to work around this and still have the car start and run normally. The accumulator works to hold fuel pressure in the lines when the engine is off, but when it fails the lines no longer have pressure, and the fuel pump only runs when the engine is turning, so it takes ages to build that pressure back up. The trick to work around this is to have the pump run when the key is turned to ON so it primes the lines. The simplest way on early cars like mine is to disconnect one connector from the side of the fuel distribution unit. This causes the pump to run when the key is on. Easy. Its the blue connector in the top photo, and the green plug goes onto it (strangely... why arent they matched colours?) I connected the battery and turned the key. Sure enough, I heard the familiar whine of a pump turning, and then the woosh of fuel heading down the lines into the fuel distributor. Now it was the moment of truth. I turned the key, and the engine turned smoothly over. It spluttered a couple of times, but wouldn't start. What a tease. Eventually, this happened. It was rough, but running, and even idling. I ran it for a while, and everything looked good. No obvious signs of leaks, but blimey does it make a noise! The longer I ran it, the smoother it was getting I checked and it seems to have gears, and a clutch, so that's a big win. It still hesitates a bit, but that's to be expected for an engine that has been sitting around. I'll take the plugs out and give them a clean (or replace), and check the cap and rotor condition. If everything looks OK, it may even be time for a quick run around the block. One must wonder though; if I can get it running with little effort, why couldn't the "specialist" have it running for the truck? Oh well, best not to dwell on it I guess.1 point
-
Is that your video? You spelt extended wrong I been building this. Started last weekend in between rain showers Needs roof and nesting boxes then dry weather for paint ( or stain)
1 point
-
Some wiggling of wires behind the light switch (yeah, ill need to look further into that) and this happened. Thankfully headlight motors work perfectly.1 point
-
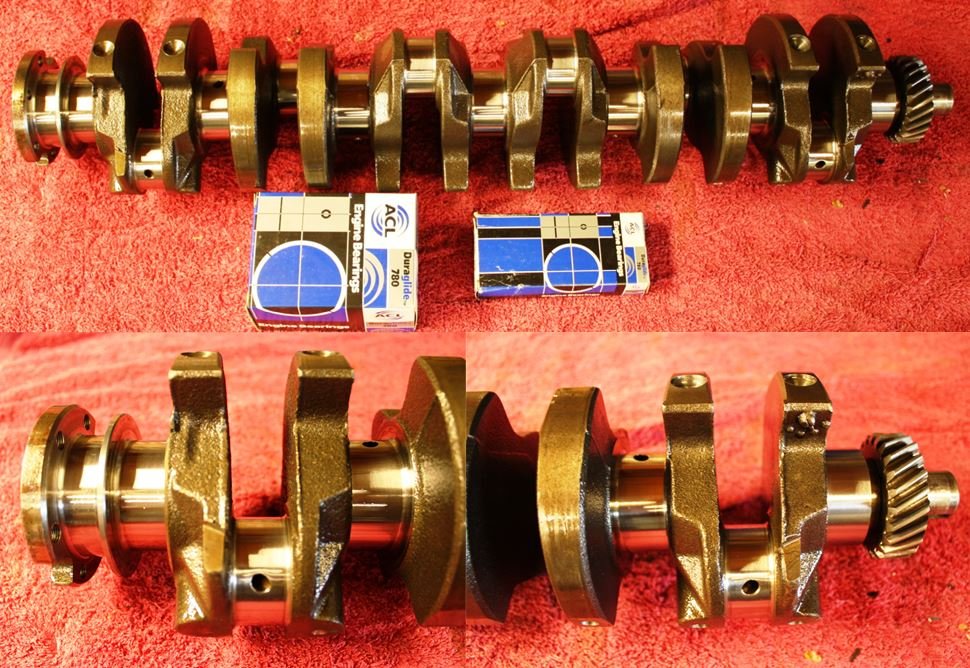
Finally picked up the finished counterbalance crank; big thanks to Engine Specialties for a not cheap but a hard job well done, good value in my books-thanks guys. Crack tested, big ends ground 10 thou, main journals reduced to fit the X2 186 block, rear seal converted from rope to neoprene (once more to fit the block) and a full balance. They insisted on supplying their preferred bearing shells and how can you argue with a bunch of guys taking full ownership of their work? For an old Holden 6 junkie, this is nothing less than pure crankshaft porn!
1 point
-
I assembled a store bought kit, incorrectly.1 point
-
Slowly but surely1 point
-
oh yeah & these, I make these they sometimes come back for repair with Price tags attached over $1100, I've made 18 in the last year alone, & they've been a NWC product since early 2000's... one of our Higher end Products1 point
-
Kids wanted to do better skids on their pedal kart so a quick hunt thru the offcuts and random stuff at work got me a short length of mains water pipe at almost a perfect id to go over the wheels. A bit of pre heating of the sleeves to soften then then worked them on with a hammer. A quick test run tonight proves it has enough traction to get speed up and can drift with enough entry speed I need to fold up some flat bar to lock the diff so to speak then it should slide alot better.1 point
-
Random slightly cool things working together.
1 point
-
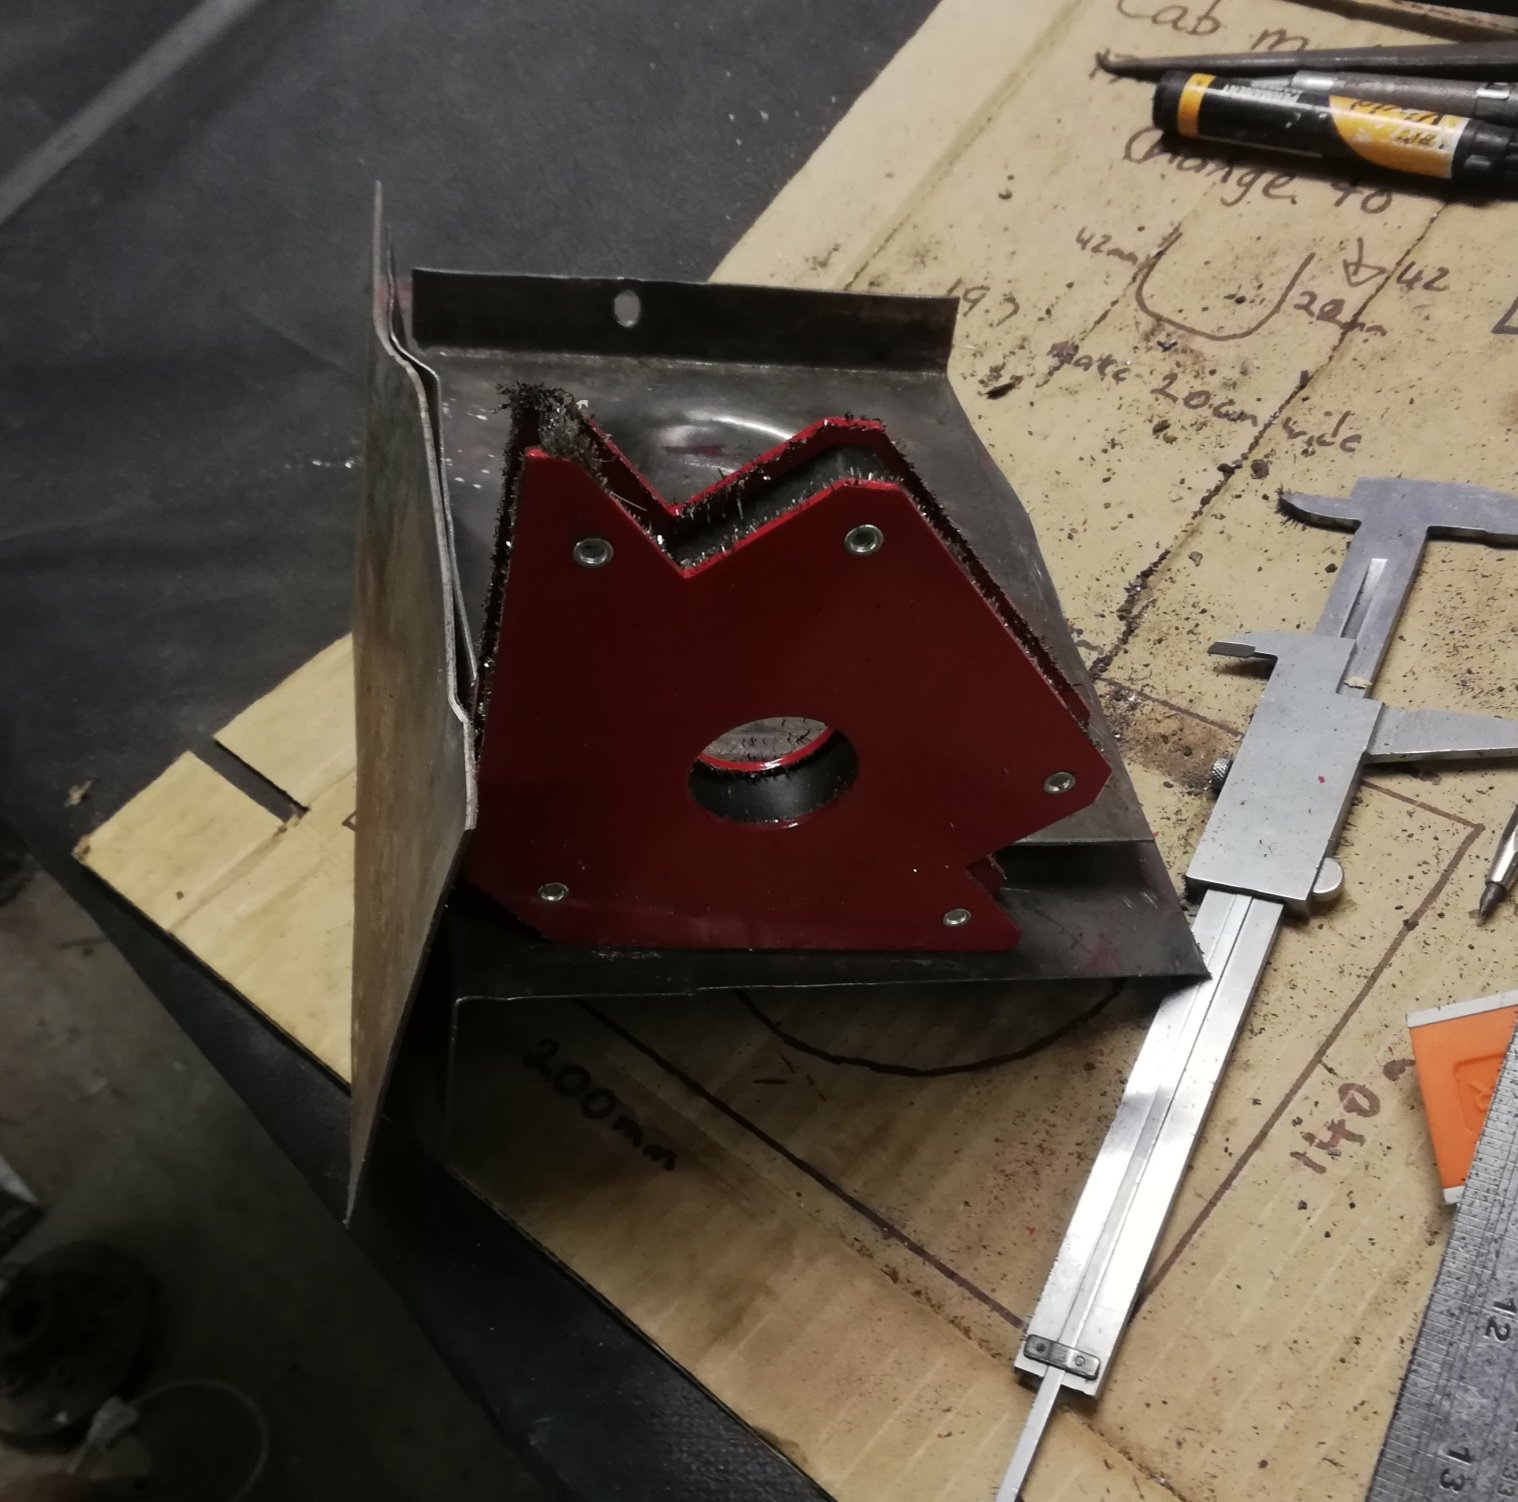
Little bits and pieces starting to come together now on the 86 - painfully slow but any progress is good progress right? I've fitted the new water pump, cleaned up and painted the coolant bypass hard lines, picked up new radiator hoses and have the heater hoses ordered and on way. Front of the engine is coming along with the hall effect sensor on the crank mounted, still have the sensor for the intake cam pulley to do but hoping to knock that off next week. I've found and mounted up an ae85 radiator overflow/washer bottle in the front drivers corner of the engine bay as the ae86 one will melt over by the headers I think. Found a brake reservoir sock thing to cover tidy up the faded gayness. Am in the process of cleaning up and painting the brake lines so I can refit those, have some braided lines to go on. The drive shaft is now in with new bolts and a new gearbox rear seal. Tidied up and painted the strut brace mounting plates. Exhaust is almost done, just have about 200mm of pipe to do from the merge collector to the rest of the system to build. How its looking currently Also picked up this which is now fitted: And this which isn't fitted Pulleys are sitting on the cnc machine so will have them done next week all going well.1 point
-
Gotta make sure those rust traps are in the right spot Now to figure out what to do about the cab back. Normally the floor and cab back extend a little past the back of the cab. The entire corner where the two meet has been replaced, however they chose to weld an L section facing inside the cab (leaving the rusty seam in place and bogging to taste). Tempted to cut it all out and do it as per factory, but don't want to take the tray off etc. So might just go to the next bend in the floor and blend it somehow. Now that I have cut out the front and rear of the sill, I'm thinking I my as well cut the middle out too and replace with a single section. Oh yeah, I checked the passenger side mount. I took my glasses off andd turned out the light. Looks fine
1 point
-
So I looked at the prices of aftermarket pulleys and said to myself "fuck that, I can make those" so have drawn them all up and will be putting them on the cnc lathe soon. Idea is to make myself a set and get them anodised. Will likely sell these eventually too, have got fwd and rwd water pump pulleys drawn up and the alternator pulleys so yell out if anyone is interested. These are underdriven too. Nearly there with the design, just need a few tweaks to give some added strength and make them easier to run up on the lathe.1 point
-
I engraved it on the back of the plate. MOOAHAHAHHAHAHAHAHAHA!!!1 point
-
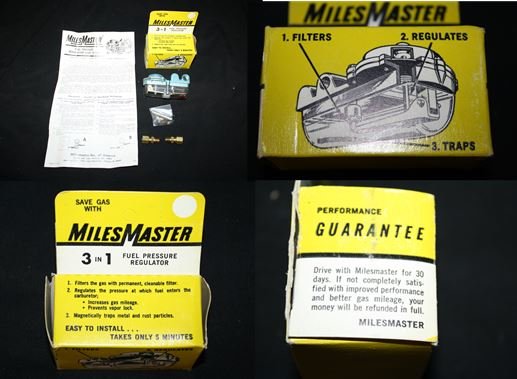
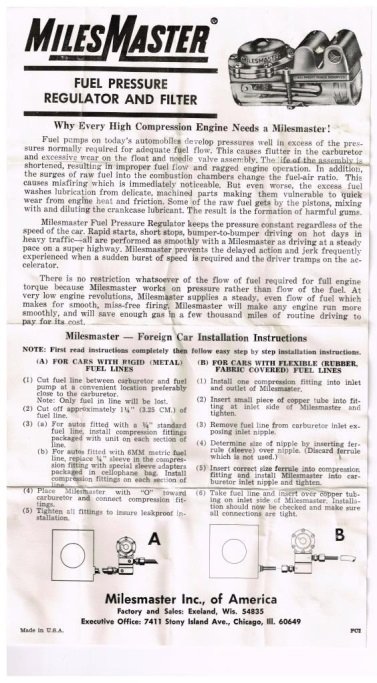
Another new/old Trademe score was a late 50’s “Miles Master” fuel pressure regulator, (SU’s need only a few lbs of fuel pressure). I was going to use a modern conventional 3.5 psi regulator but how could you resist both the packaging not to mention the sales pitch; and how could a mere mortal question the 30 day money back guarantee? Have to point out that both Rigamortice and I were somewhat let-down with the discovery that there was no ‘free set of Ginzu steak knives’ included in the transaction, but we just keep falling in love with this stuff. It’s history.
1 point
-
FUUUUUCCCCCCCCCCCKKKKKKKKKK0 points
-
Nope. That's retarted.0 points
-
I split the cases, gears look ok, everything seems ok but there has been a little moisture in there and the shafts stuck on the bearing and that made the gears and shafts pull out with the wrong side and the shift drum has a detent on the end witch fucking broke the edge, its just the edge to keep a roller on and it might still work but I will try to find another one.0 points
-
Can not make this shit up hahha ffs. Ah choppers.. yes thats a 80% snaped throttle cable might gotta steel one of my van if works for weekedn as away in truck till friday avo ffs
0 points
-
0 points


This leaderboard is set to Auckland/GMT+12:00