
Leaderboard


Popular Content
Showing content with the highest reputation on 08/20/19 in all areas
-
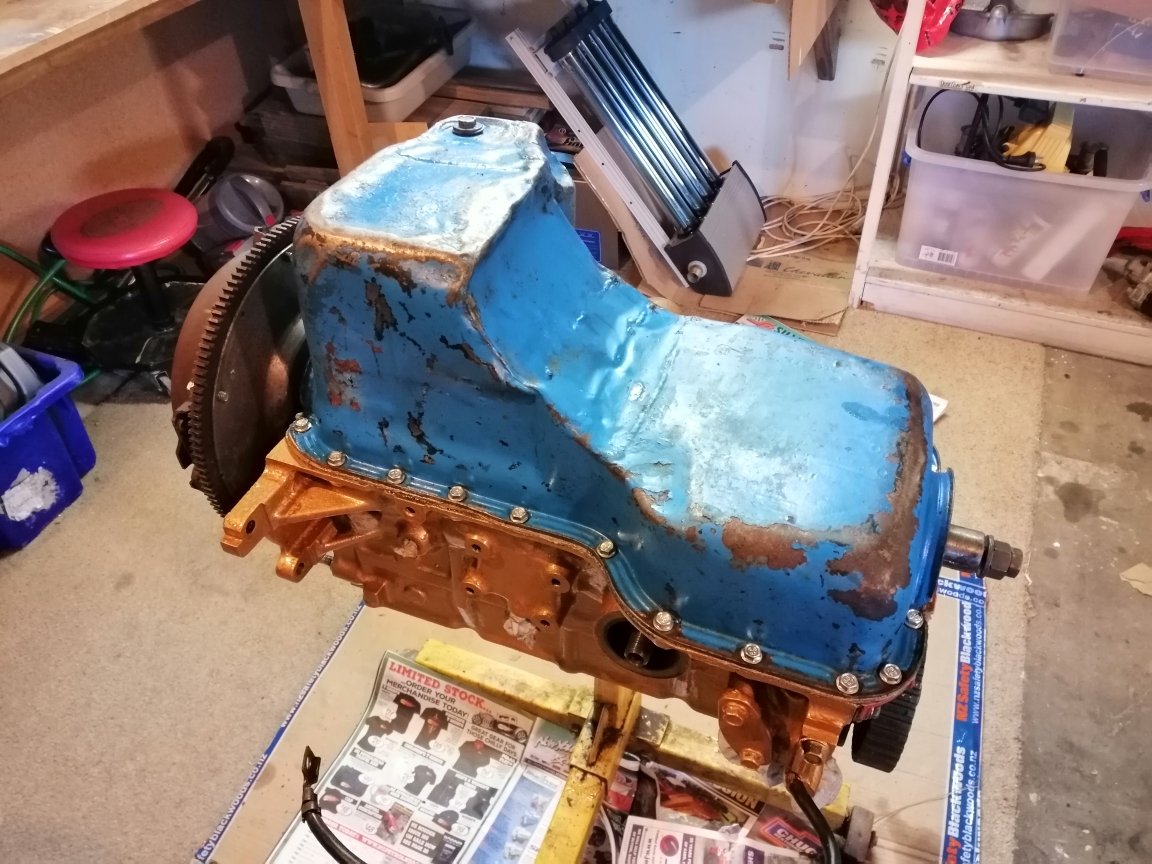
Eventually got tired of the high life and found some cheap Hayashi Street CR mags with good tyres. Found springs at zebra that fit result: I think I'd like to bring the front down some more, the back sits just a little lower. I found some unknown mitsi shocks for the rear, and had bushings machined to suit. Such a huge improvement from the boat-like handling characteristics it previously represented. I just installed standard front shock inserts to get the front stiffened up. New Nolathane went in all round, too. On the lookout for a diff, this one has done nearly 300K and it makes some pretty terrible noises, not to mention both wheel bearings need replacing. The plan here is to sort another replacement diff (E312), new brakes and bearings/seals/clean and then install. To keep me busy until I sort the diff, I went ahead and tracked down a 1G-GE, courtesy of a fellow GX enthusiast. Sold in an unknown cond. I didn't really know what to expect. This should be a big improvement from the asthmatic SOHC 1G, having double the valves, bigger ports, and a cross-flow head. Although it won't be as simple as cleaning it up and putting it in, as it turns out it ran bearing number 2 and churned the metal filings from said bearing around the engine. Thankfully, the leaky SOHC 1G I pulled out earlier has put its hand up to donate the crank and rods. They have the same sized mains, too. (later 1G engines had different sized main bearings). That's all for now. Once the SOHC motor is pulled down and the crank and rods are test fit I'll send the block off for a dip and the head to be machined.9 points
-
I've thrown some money at @Raizerto hopefully make my punishingly small twist n go reliable. Currently on a 2 week cam trip withu bro and just had the first shower after a week so I'm ready5 points
-
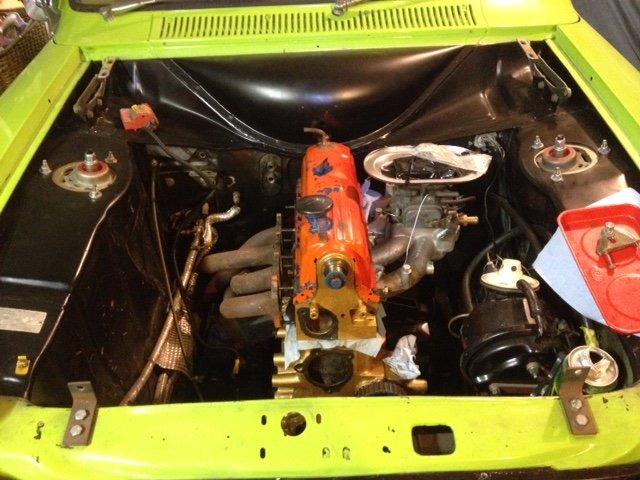
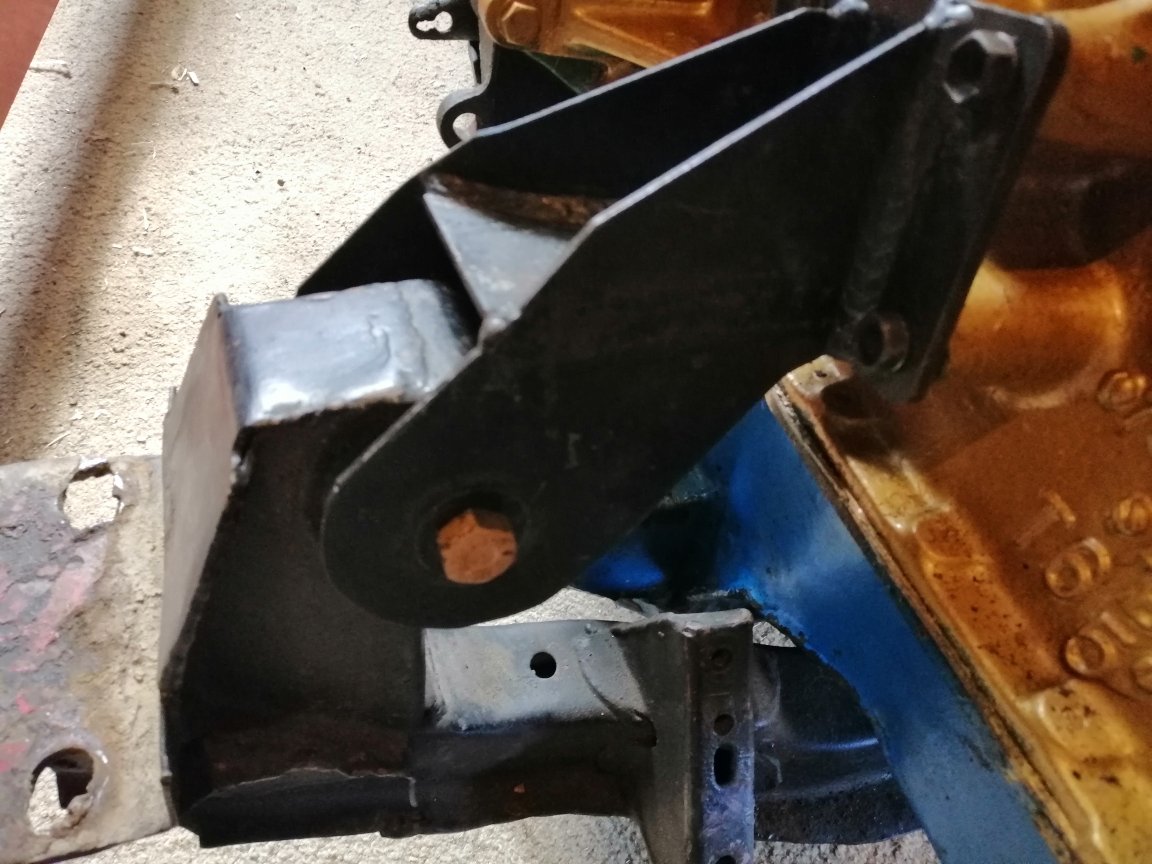
with the exhaust manifolds removed the engine went in the hole effortlessly. it will sit back maybe another inch, but my lifting attachment fouls on the edge of the engine bay so will need to sort that. new custom log manifolds dont look to pose much of a hassle. they will probably need to be installed once the engine is in the bay though, but we'll see how much clearance i can make, haven't used that sledge hammer yet... pretty pleased with how it fits in there. the bonnet wont be shutting any time soon though, but a muscle car style hood should sus it and look pretty stout too. excuse all the truck spec dipsticks and wires all over the show. these will be fastened and trimed to suit. it sure is a big engine! looks pretty snug down in the engine bay properly. now comes the slightly harder job of fitting the engine mount kit and working out a suitable gearbox mount.4 points
-
So yeah it's pretty much finished, except... Bathroom: First idea was to flatten out some copper cylinders we had to line the wall, so after scraping back all the insulation and probably getting a mystery disease in the process, then cutting them to tiles, we decided it didn't look great. So instead used one of the best looking pieces as a feature in the bathroom cupboard storage area. And subsequently lost the cupboard storage area as it looked too cool to cover up. Bought a concrete pot plant thing to use as a vanity, painted the inside black, but didn't like that either. Bought railway sleepers, but cutting them up seemed like you would lose the point of them being sleepers. So we have a sink, pot, and sleepers just hanging out here now. However, we did definitely want exposed pipework, so got the external copper pipe bent around which looks fantastic against the black wall, and my flattened copper. It finishes now where it will eventually be behind a "floating" mirror, and down into the valves and taps. The old stool is the makeshift bathroom shelf, it's helped paint and waterproof the place, oh and I have successfully managed to kill that plant now. Stephen even bent the original pipework from the bathroom into a towel rack which looks sweet And finally used some leftover pipe to create this vision I had of a hanging rack for my favourite rally jackets. Stephen's dad referred to the place now resembling a second-hand shop. Which is perfect by me. I want to end up wrapping the rack around the wall and including shelves for the huge collection of Mazda shit I own, but we are waiting for the concrete dudes to come back and coat the walls prior to making it a better fit. Other than copper pipework and my rally memorabilia, the interior has been gradually added to downstairs, but gets changed around a lot as things move on or come in. The plinth was made for the Sachs rotary bike, but has now ended up as the desk upstairs which is far easier. And that brings me to the rotary storage... it was meant to be for the RX2 Coupe as a priority. But I ended up storing my 808 here for a while, which was bloody cool to wake up to. However, we have managed to break Stephens 808 after a mission to the snow on Friday that ended with a tow truck from Smash Palace to Auckland, arriving at midnight on Saturday. So it's temporarily a piston workshop but it might need an engine upgrade so might sneak a rotary in while it's here as payback for dropping petrol on the concrete and stripping a circle of coating off. (have managed to get rid of most of that stuff on the left now so it's getting tidy) Also birds on tin roofs are hilarious. This little guy smashed his apple core on the clear-light but it bounced back and spooked him so he's left it for the rest of the bird bro community. Hopefully next time we will have a bathroom sink...4 points
-
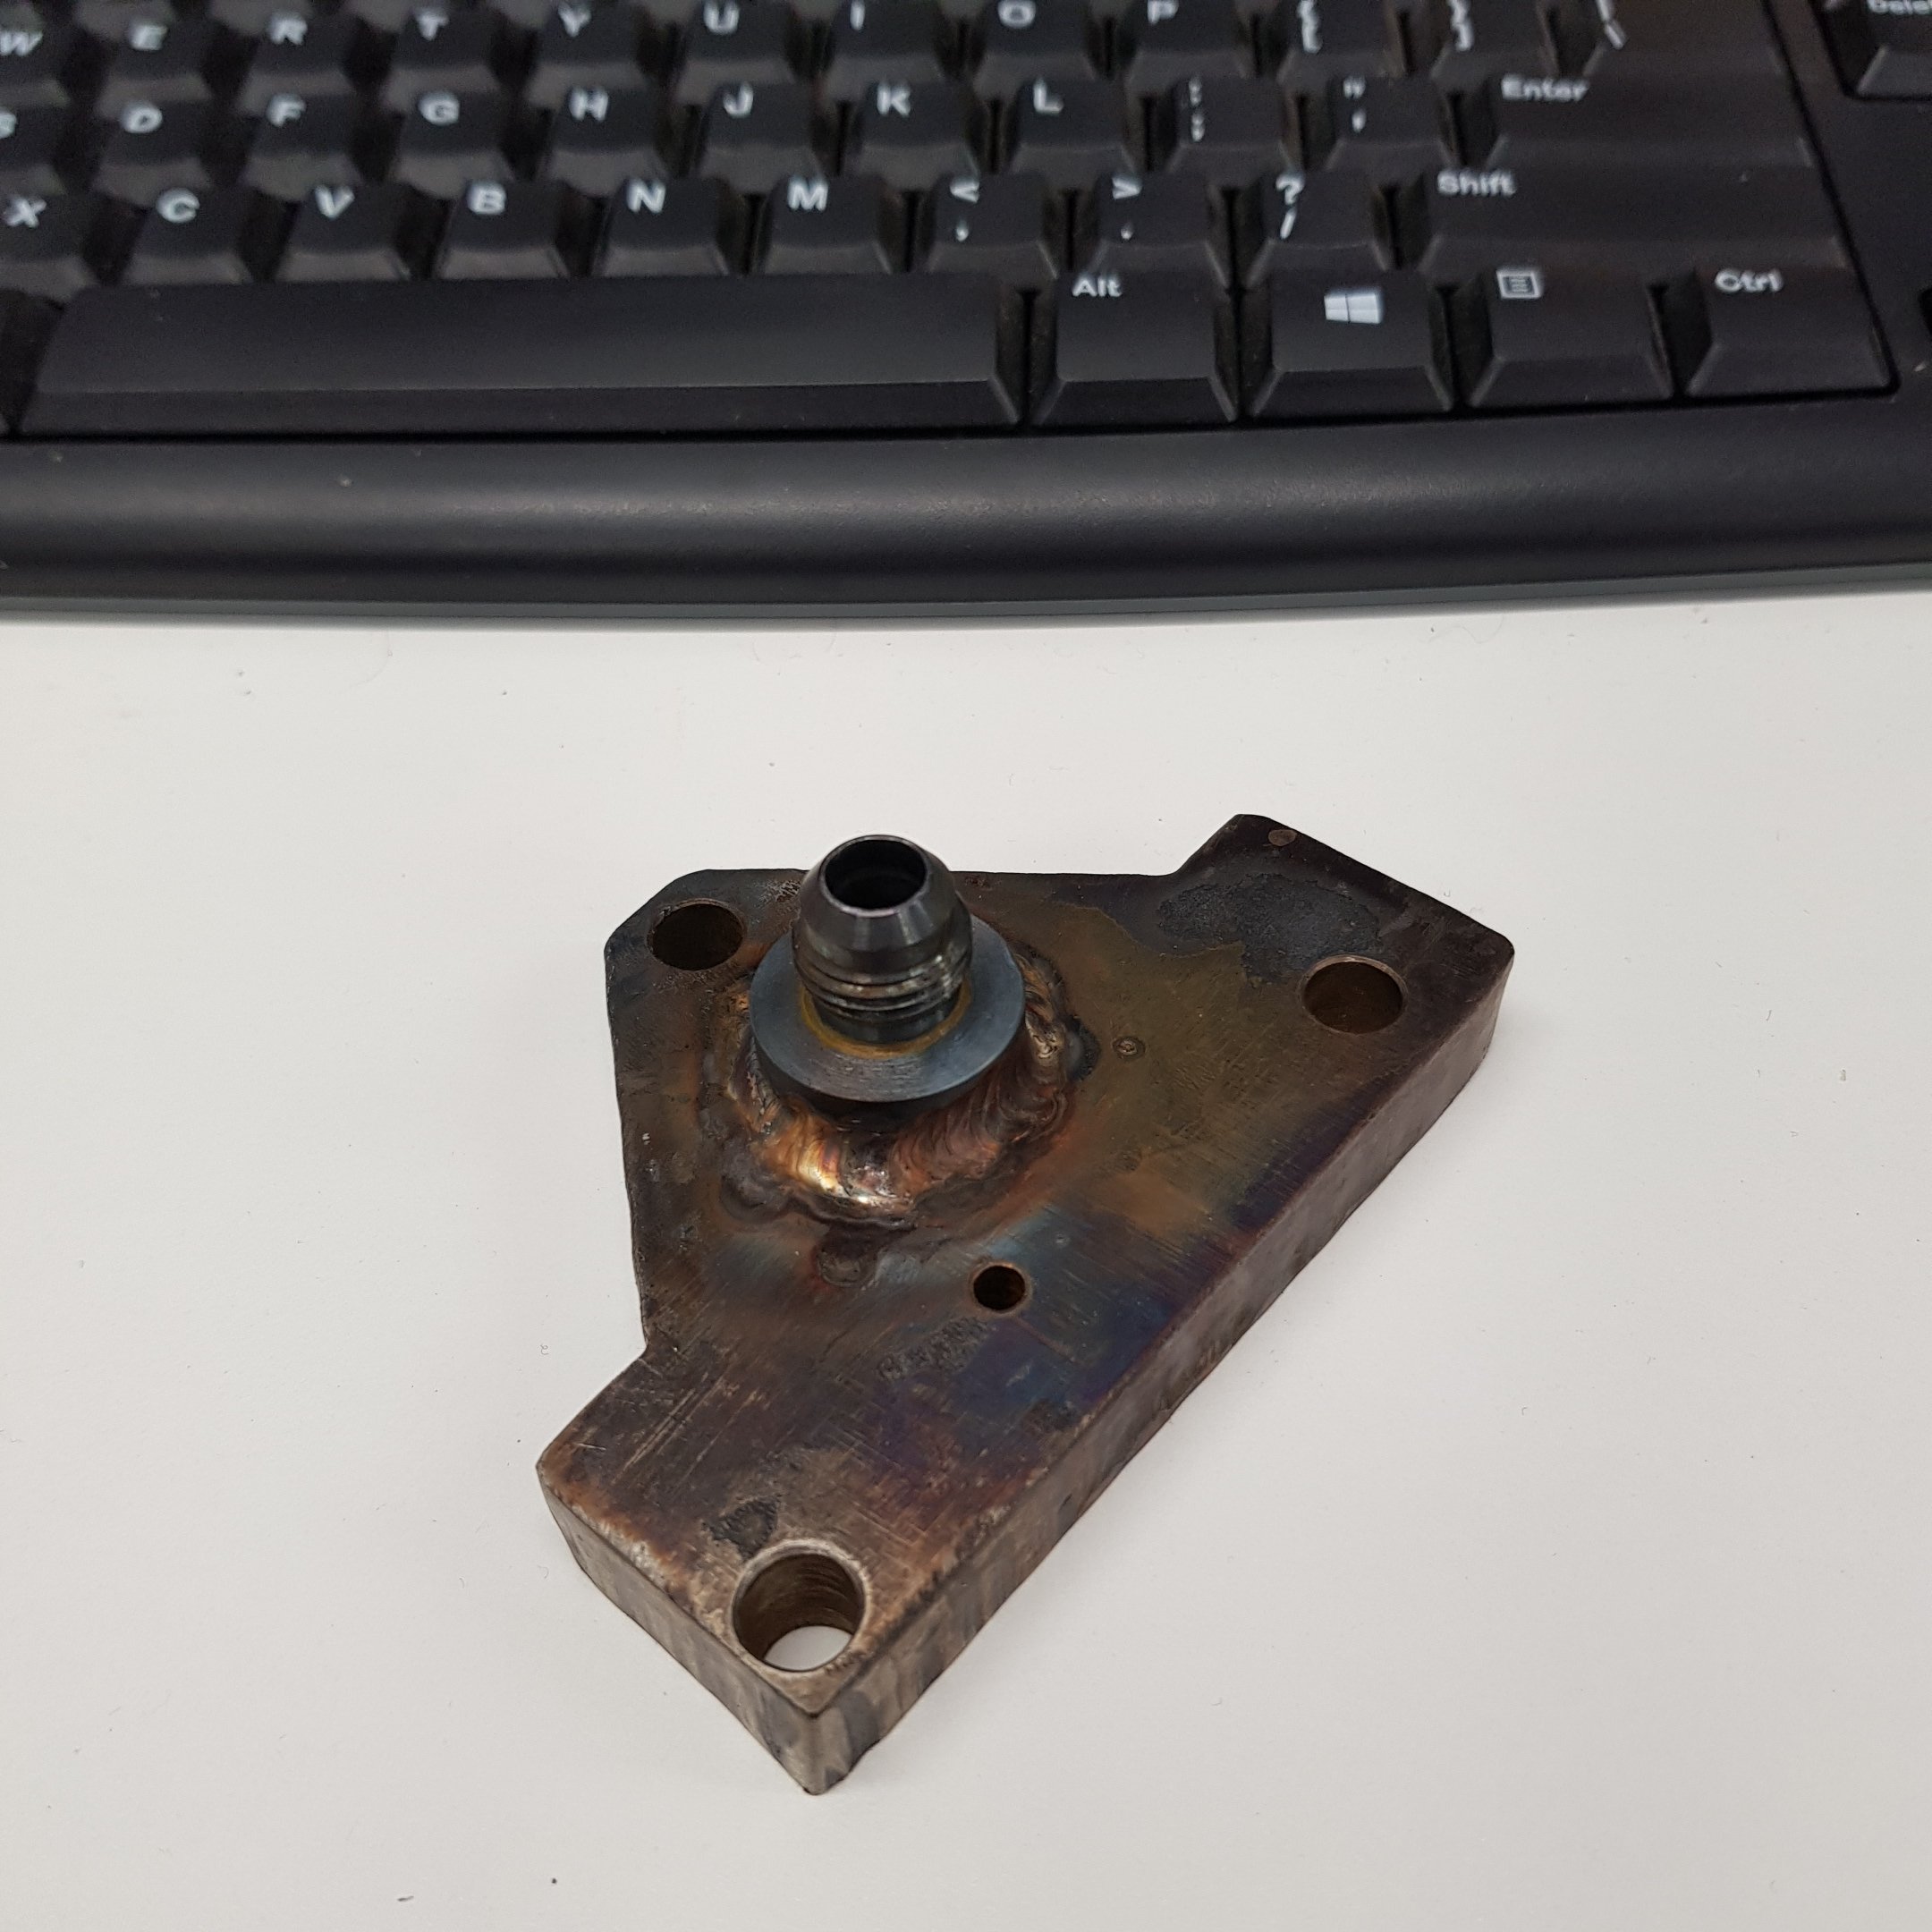
Another thing ticked off. Turbo oil adapter yes 10mm plate is excessive but i threw it in with a job lot of other stuff through work so it was free cant complain. Fuck yes speedflow stuff looks the goods!!
 3 points
 -
yup thats my plan now. unbolted the manis and they cant be flipped, so ill carry on with the install and build manifolds later on to suit once i know where everything goes. not sure where id put the turbos??3 points
-
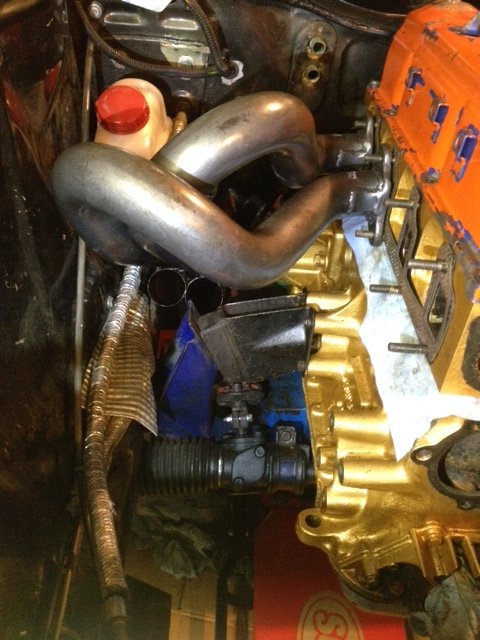
more progress during smoko and lunch today. building a race car at work rules. cut 100mm out of the top of the firewall and made two cuts down each side of the tunnel roof, pushing the tunnel up. once i know the engine fits the holes will be patched up. should make installs a breeze. came across the first real issue too. the exhaust manifold foul on the frame rails. i can notch these out enough to clear i think. however the drivers side manifold dumps right onto the steering shaft. flipping the manifold looks to be an option, and im contemplating the option of bringing the drives side exhaust around or under the engine and merging with the passengers exhaust, or crossing back under the trans. ill clearance the frame rails and see where that leaves me i think. not quite in, but its getting lower in the engine bay! should go down and back about 3" both ways any ideas, shoot them my way! gotta say, i thought id be swinging a sledge hammer pretty early on to make this fit, so im pretty stoked on how its fitting, and can see why LS swaps are so popular in the states.3 points
-
Gave myself a bit of a scare looking at the date of my last update and how young my kids look in the pics. When did this become an annual update...? Amelia has been promised to learn to drive in Felicity and is pretty keen so time to get it done. Wife wants to move house again which may not help progress. Anyway that's enough waffling for context, time for pictures. Spent some time trying to setle the mystery package pinto properly into the engine bay. Removed the brake master cylinder to give more access for trying to get the headers to fit. Be rude not to have a look inside as yes, it's been quite a while. Coby extractors were being difficult and anyway I am pretty keen to get the banananana headers in there. How hard can it be...? Hmmmm, that's not going to work. And the sump is hitting the cross member and steering rack. Even after replacing the square rubbers with taller round donuts it was still not a happening thing. The wish list has included a World Cup cross member for a while so when one came past I grabbed it. And what do you know, it works! We have clearance, Double bonus! Will tickle up the ragged holes which is how I managed to get it in the first place. Here is the beautiful customised sump. I think I'll blow some black paint over it and call it done.
3 points
-
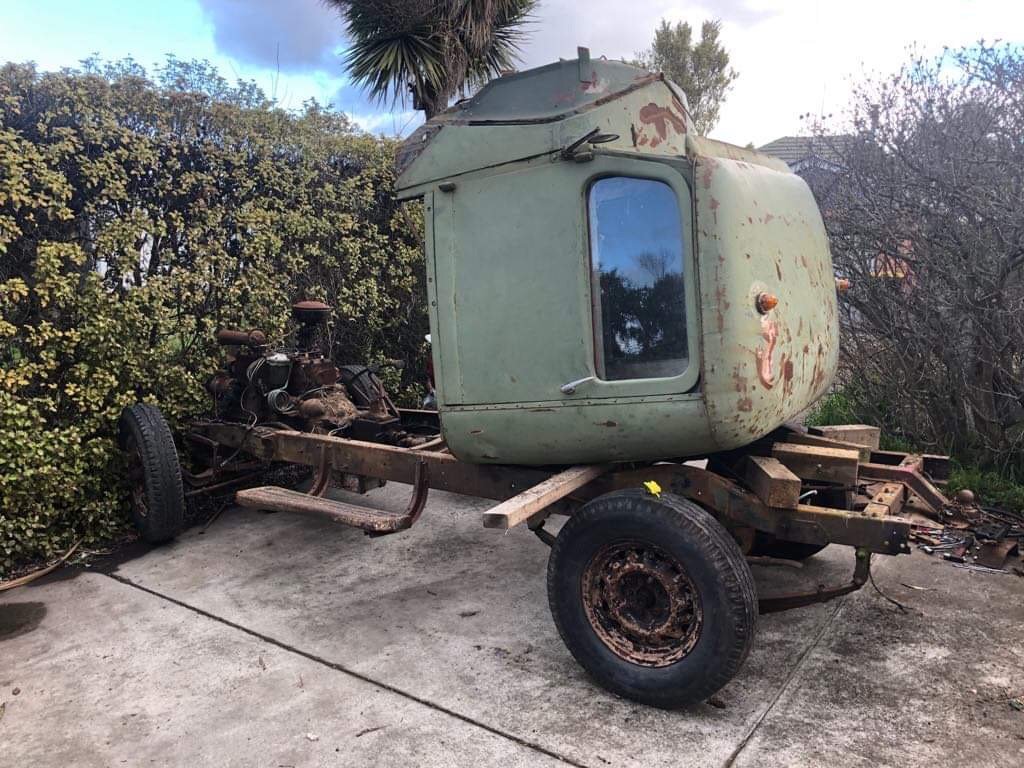
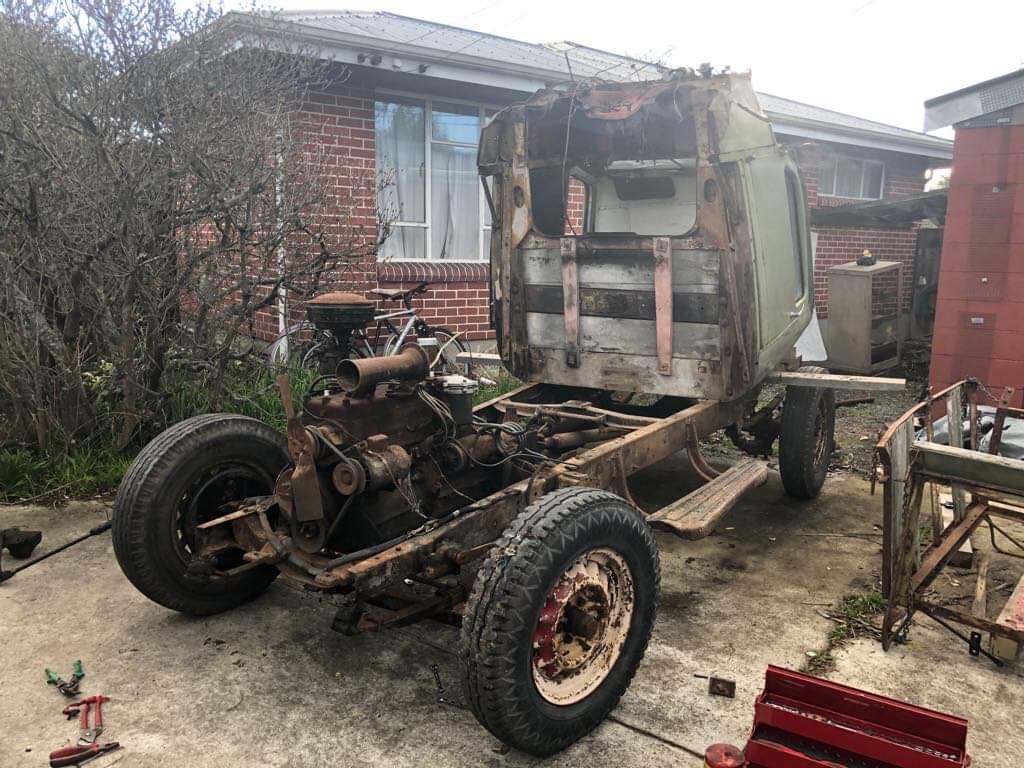
Moving on with our leisurely pace, we removed the rear deck and lifted the cab off. So much wood in the body! It will make rot repairs easy, but I really hope we have no issues re-registering it. From memory if we can prove it was on nz roads long ago enough a wooden body will be fine?
3 points
-
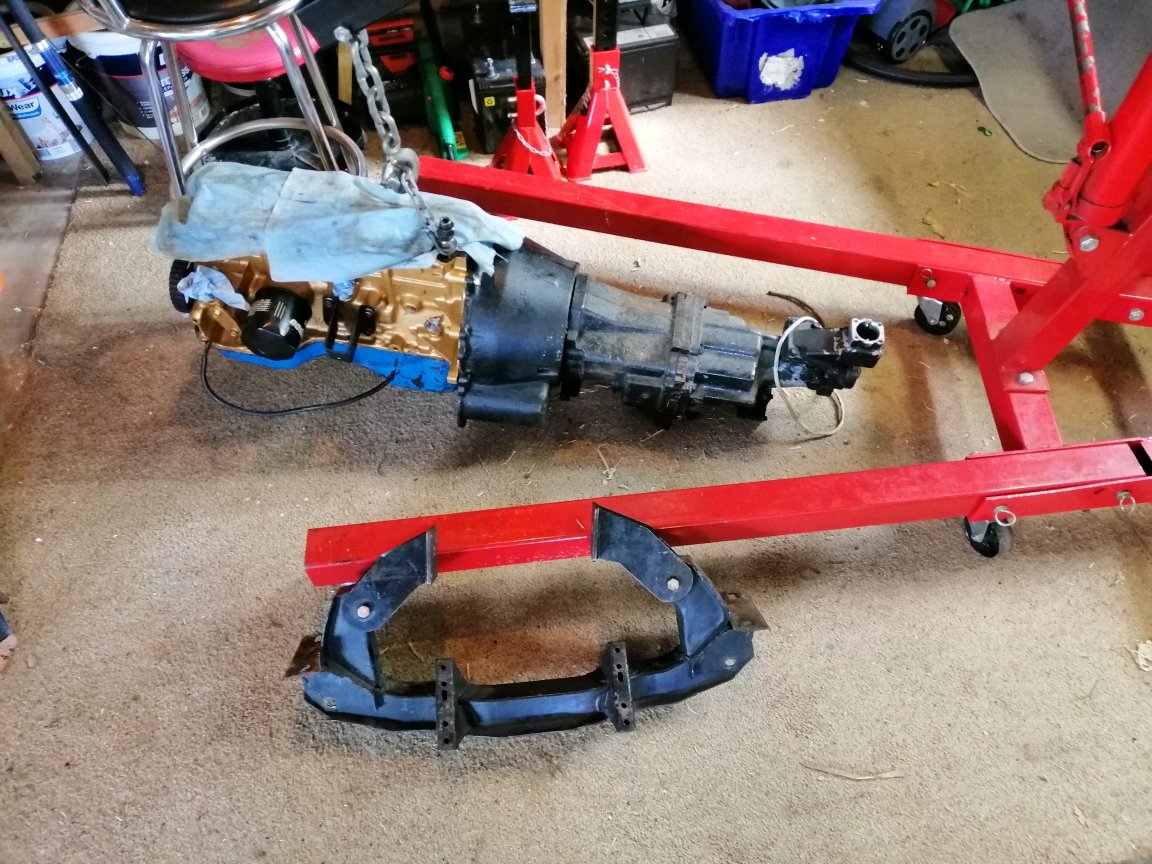
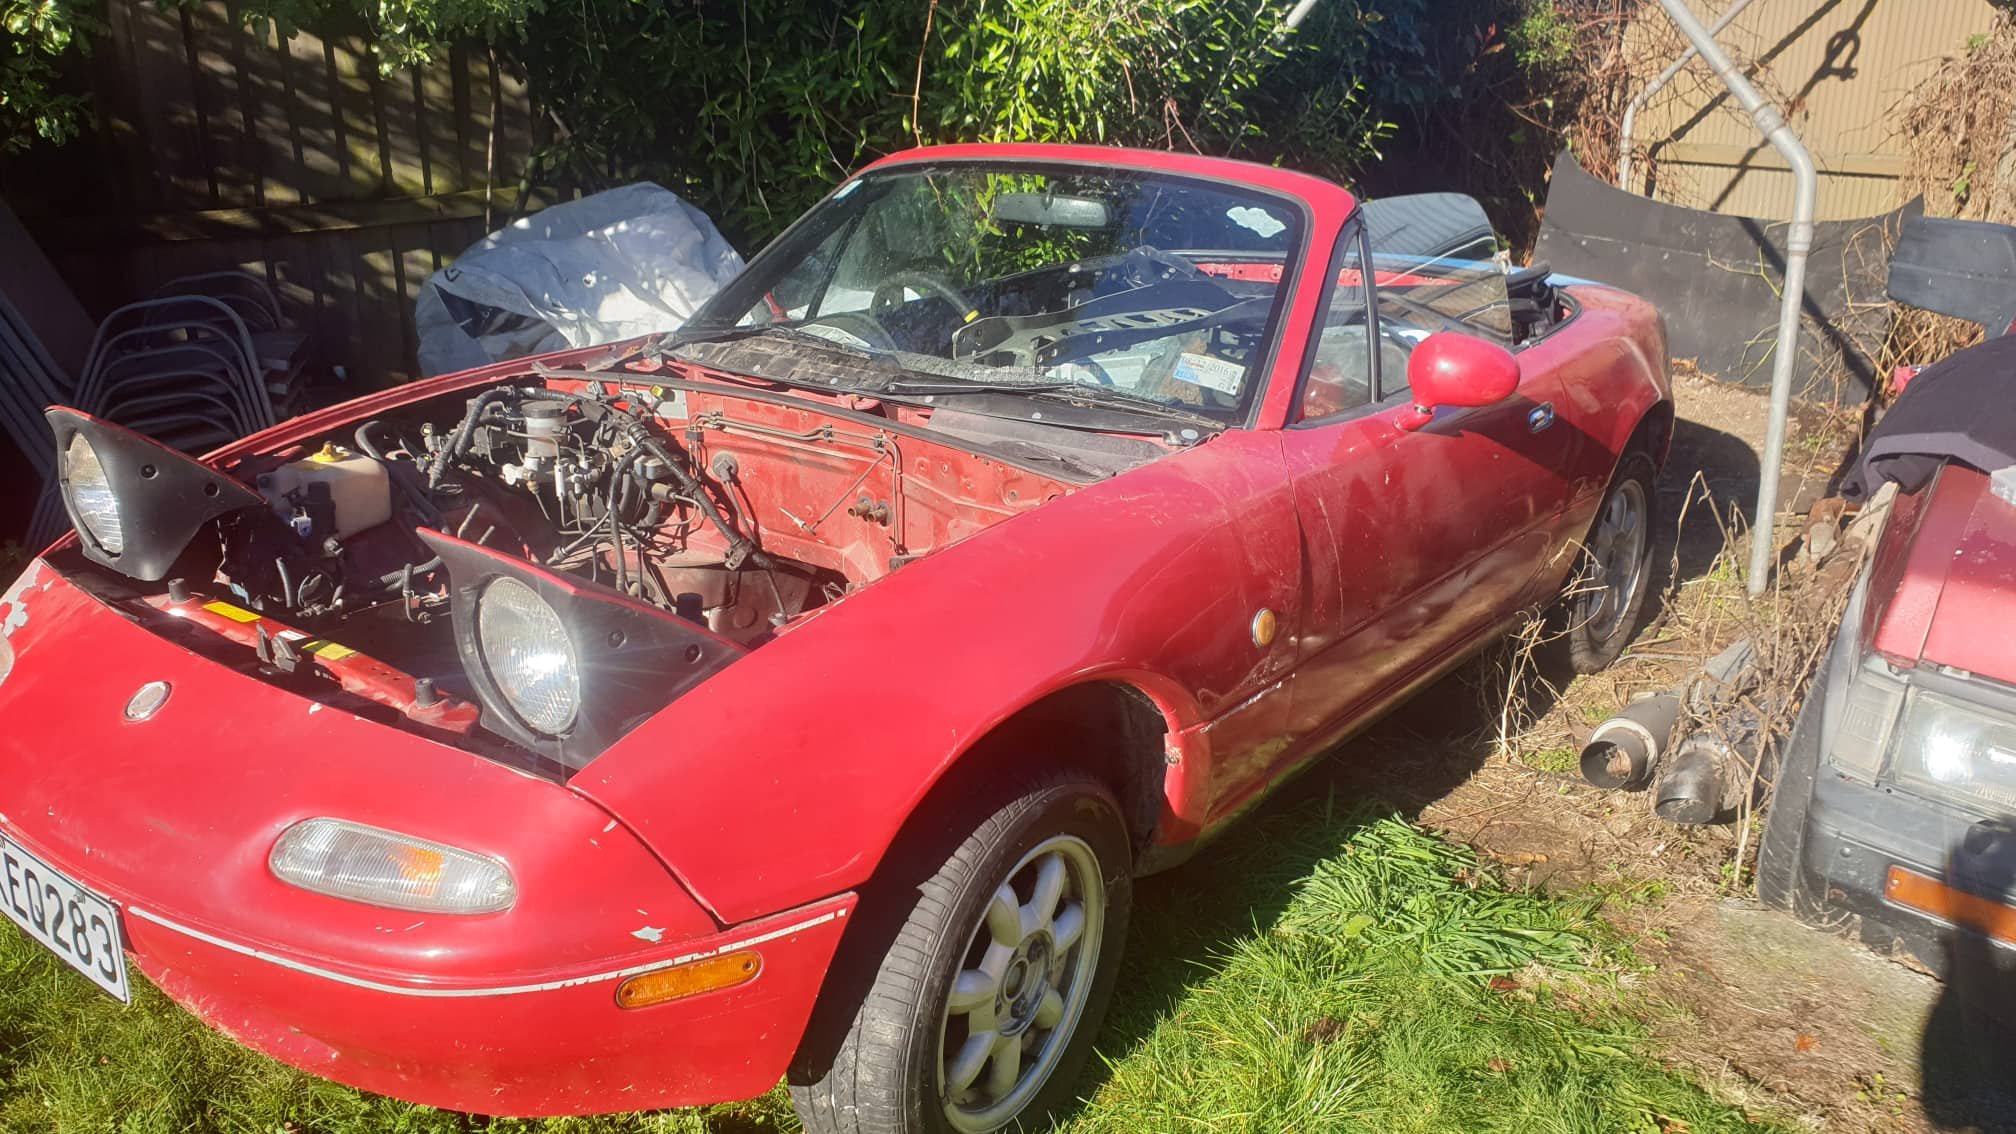
Since selling off my other projects and dedicating most of my available time to this barge I figure it deserves a project log. Nobody wanted this, it was for sale on TM for aaaggeess until I thought to see if the seller wanted a ute. Thankfully, the answer was yes, and a deal was made to swap cars later that night. However, arriving to collect this, the bonnet refused to open, the exhaust was half falling off, the tires were low, and she ran on 5, but I had to have it. The deal was done and it chugged along to the nearest gas station on as many cylinders as it could, where no visible issues were present. Air in the tires, and a quick window clean saw us headed over the harbor bridge back home wondering if we'd even make it. Sure enough we made it back late that night. First thing out was the huge "fart cannon" muffler, and since it's my only functioning vehicle, I used it for the following two days until the warrant expired on Friday, and then went and got a fresh WOF on the Saturday. First Order of business was to clean it, and investigate the misfire. After a week of diagnosis I finally found the issue - the wires inside injector plug 2 didn't reach the injector after that was sorted it was relatively smooth (but far from quiet) sailing. At this point it looked like this : Although that didn't last long. Pulled the window tints due to not enjoying having window tints. Replaced weird wrong 5 stud spare wheel with a 4 stud one. Power steering pump seal quit life and shat oil across the entire engine bay, fan assisted. Replaced pump. Gearbox rear seal and sump pan gasket, rubber trans lines, along with the engine front main seal thought it would be fun to leak lots and drain the entire gearbox overnight. Lifter tick got annoying Removed whole engine and gearbox with pleasure Installed 1G-E and auto from later model cressida = success Problems = solved Problems left to solve = shitloads lots2 points
-
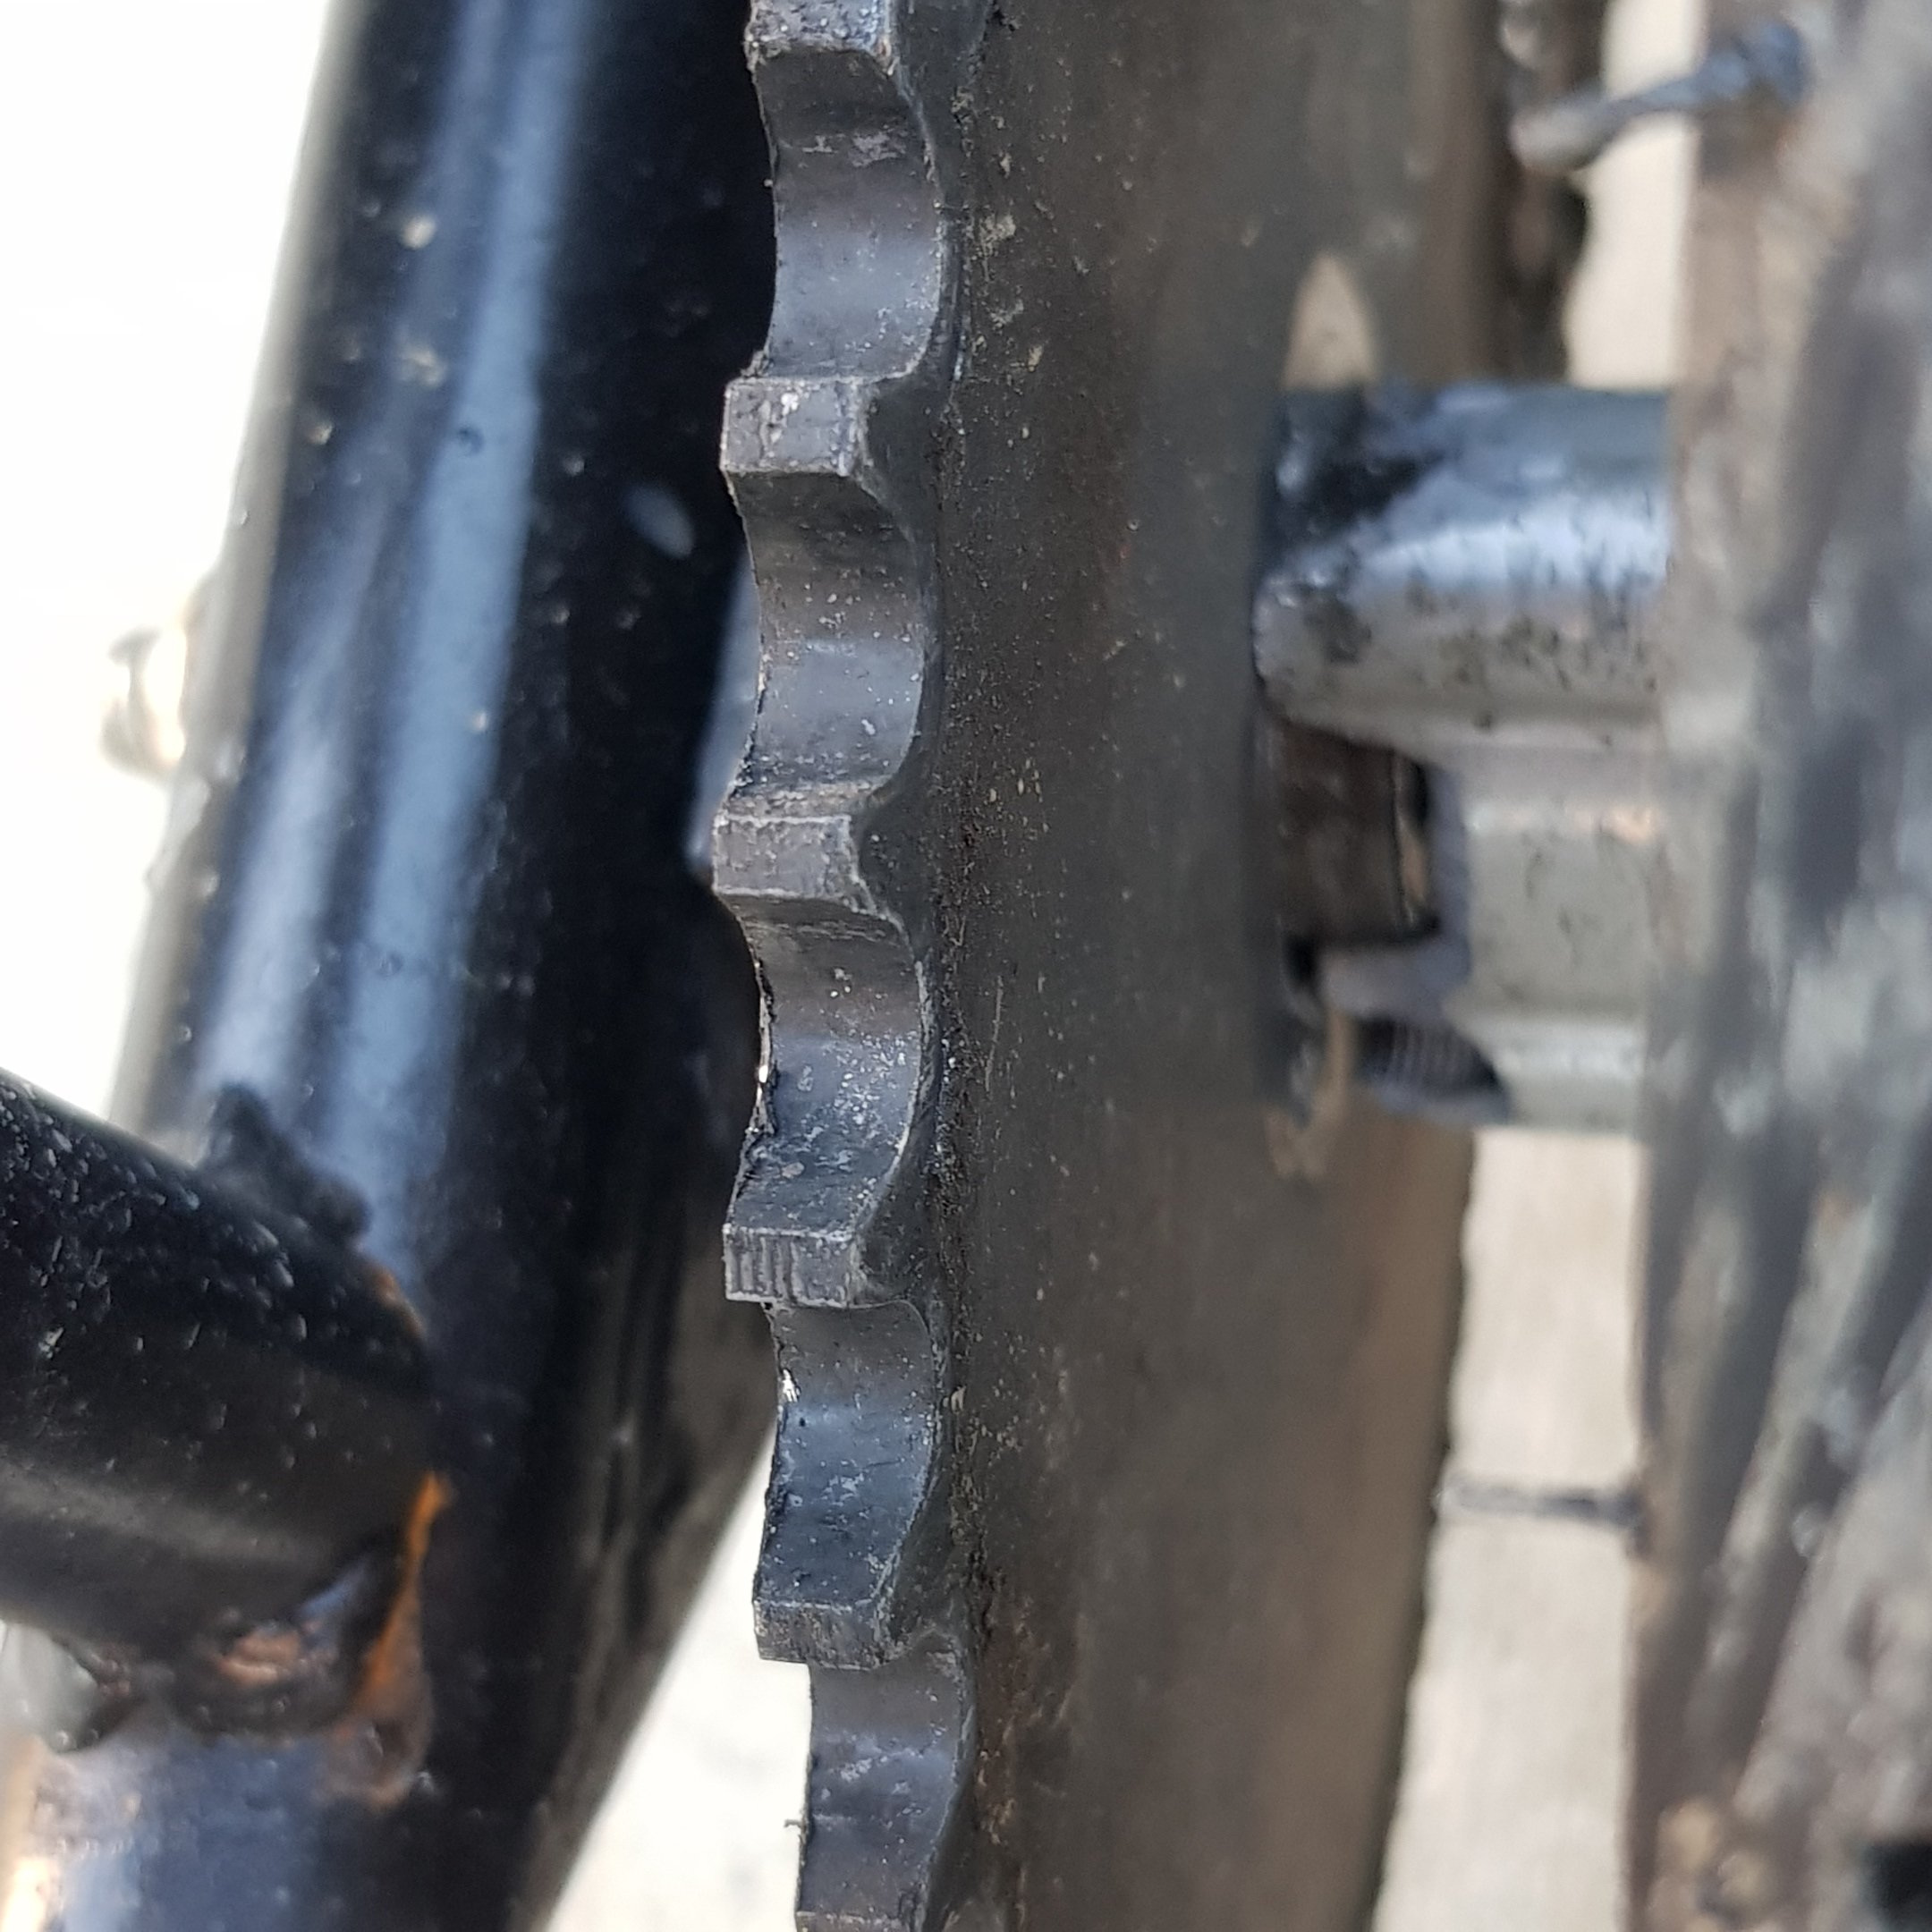
I've re geared the rear end, from 68 to 78 rear sprocket now. Too late at night to annoy my neighbors...so untested. But should be like once trying to start a car off in third gear...to now putting it in first. Hopefully this is the last step in making it awesome!
2 points
-
Finally got the Chaly running with new exhaust/carb/head Had got sidetracked when I only noticed one of the intake manifold threads was stripped after I swapped the head. So then ordered some threaded inserts off aliexpress that were M6 inner thread and M9 outer. Then once i had everything attached it just wouldnt start, no compression..... checked all the headgasket and things Id done and couldnt fault it but when kicking it over it would just chuff air and fuel back out the carb. Did some thinking and decided to check valve clearences (which id set before I put the head on) and dontcha know it, the intake valve was tight as. Loosened it up a bit and first kick it started. So now its running and have ridden it around the driveway, need to order some jets of ali to get it right, idle jet seems a bit big and a unknown size, main jet is a 75 at the moment which shouldnt be far off. Have been using the spacy as my daily for the last 7 weeks or so (probably should register it...) and apart from blocking the carb a couple times it been good. Quite fun to ride and offers a bit more wind protection on the cold mornings than the DJ1 ever did. Hopefully be able to commit some finances to getting the Dax finished by the end of the year2 points
-
Update on the open chequebook: It has been up North getting work done for compliance, and so far has 15mm to go until the chassis is completely straight, and the front inner guard has been cut off to straighten out any creases caused by the impact. The creases were a fair bit more than thought, up under the strut tower and the engine bay was pretty bent, but it's had a massive weight attached to it and pulled the creases out where possible, and then will be softly hammered with Billy Mavs back into place. But the headlight surround area is too smashed, so a new piece will be made and welded in. Coming along nicely, it's just a shame to not have any control of it as a project at the moment. Most of pics go to Instagram as I forget to update here so much. Feel free to follow along @theamyable.2 points
-
Picked up the injectors yesterday arvo. fitted them up just now. Car go VROOOOOOOM! /End thread.2 points
-
An exciting day today! first test fit of the huge engine and trans into a mostly stock body mx5. first i started by cutting the 'ears' off the frame and firewall. forgot to grab a pic but its these parts. theyll need plates welded in to re-add the strength lost. this squares up the bay and allows the engine to sit close to the firewall then in goes the engine! its SO close to fitting in unmodified. infact if i was to unbolt the subframe, id be able to fit the sump bowl past the subframe and the engine could sit down properly. however, i dont really want to have to unbolt the subframe everytime i need to pull the engine. which hopefully wont be often, except for during the build, but even thats enough for me. if i want to slide the whole lot in, ill need to cut maybe 60-100mm out of the top of the tunnel. a pretty easy job for the massive benefit of easy install! trans hits here sump just doesnt quite get over the subframe its possible the unmodified hood may even close over it all! most of the bulk ontop is the wiring loom ect what a monster2 points
-
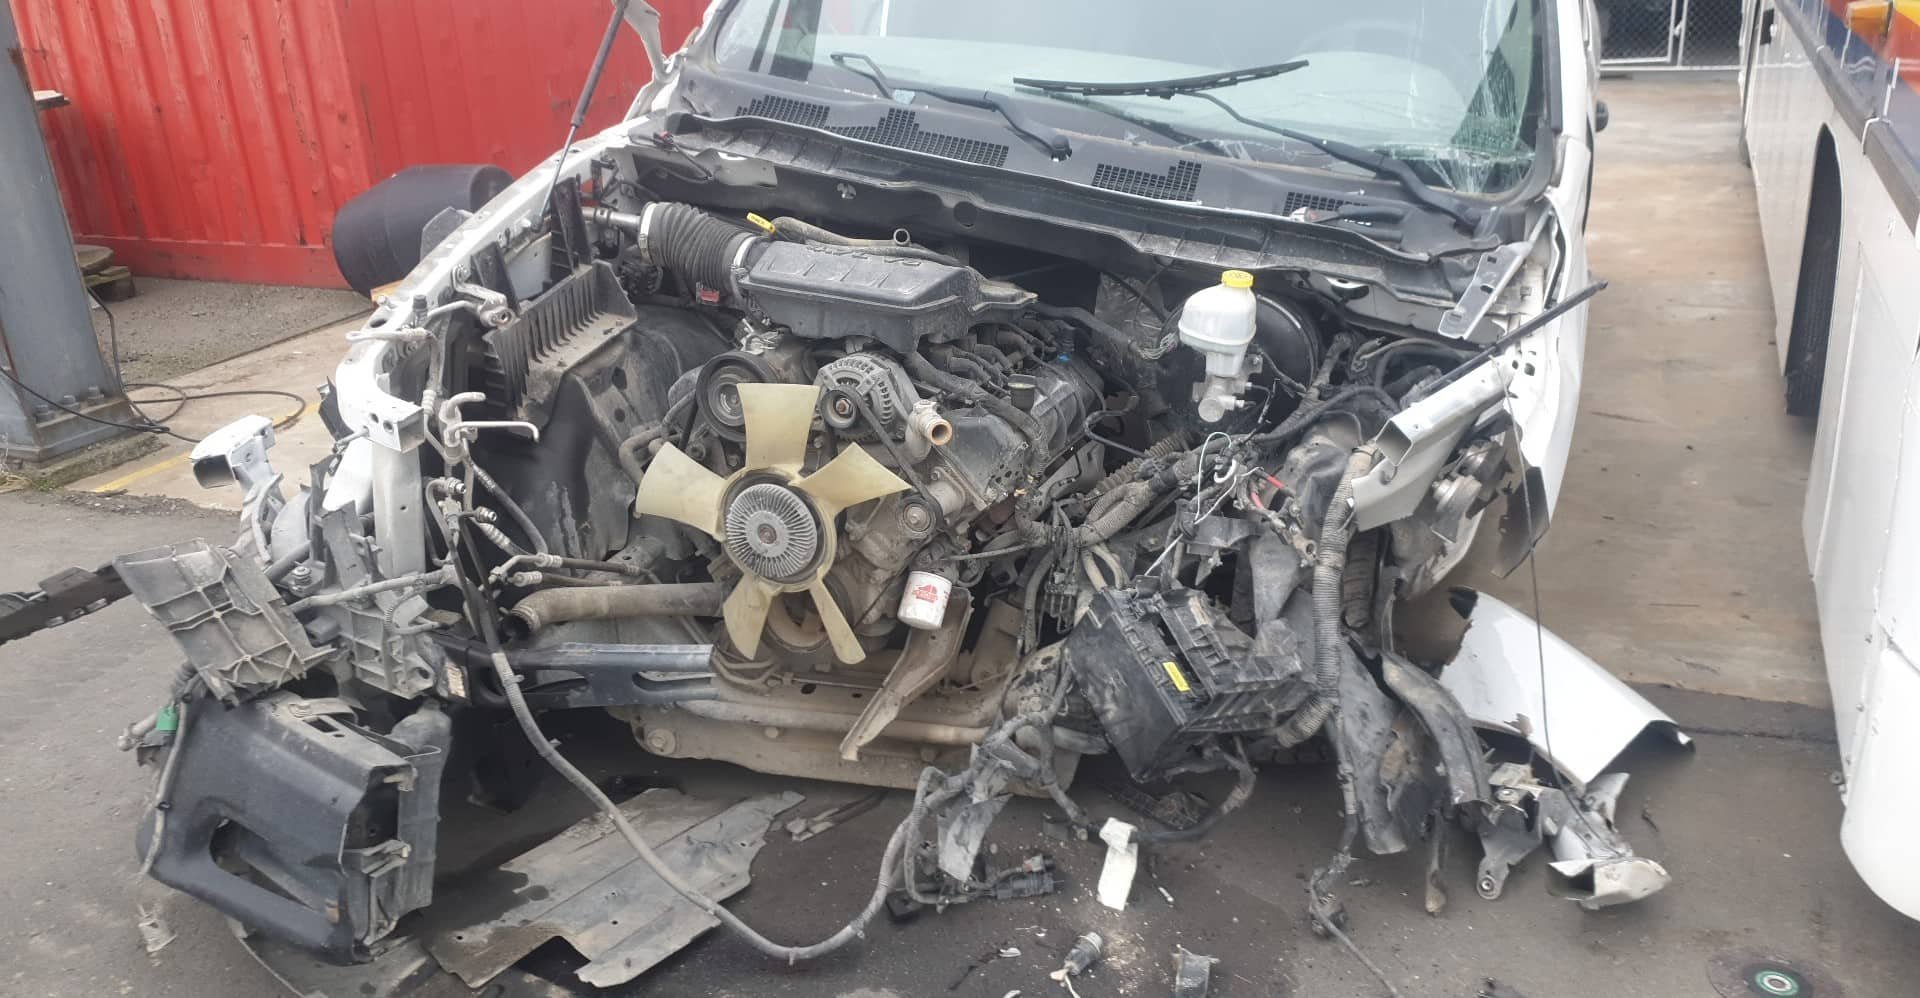
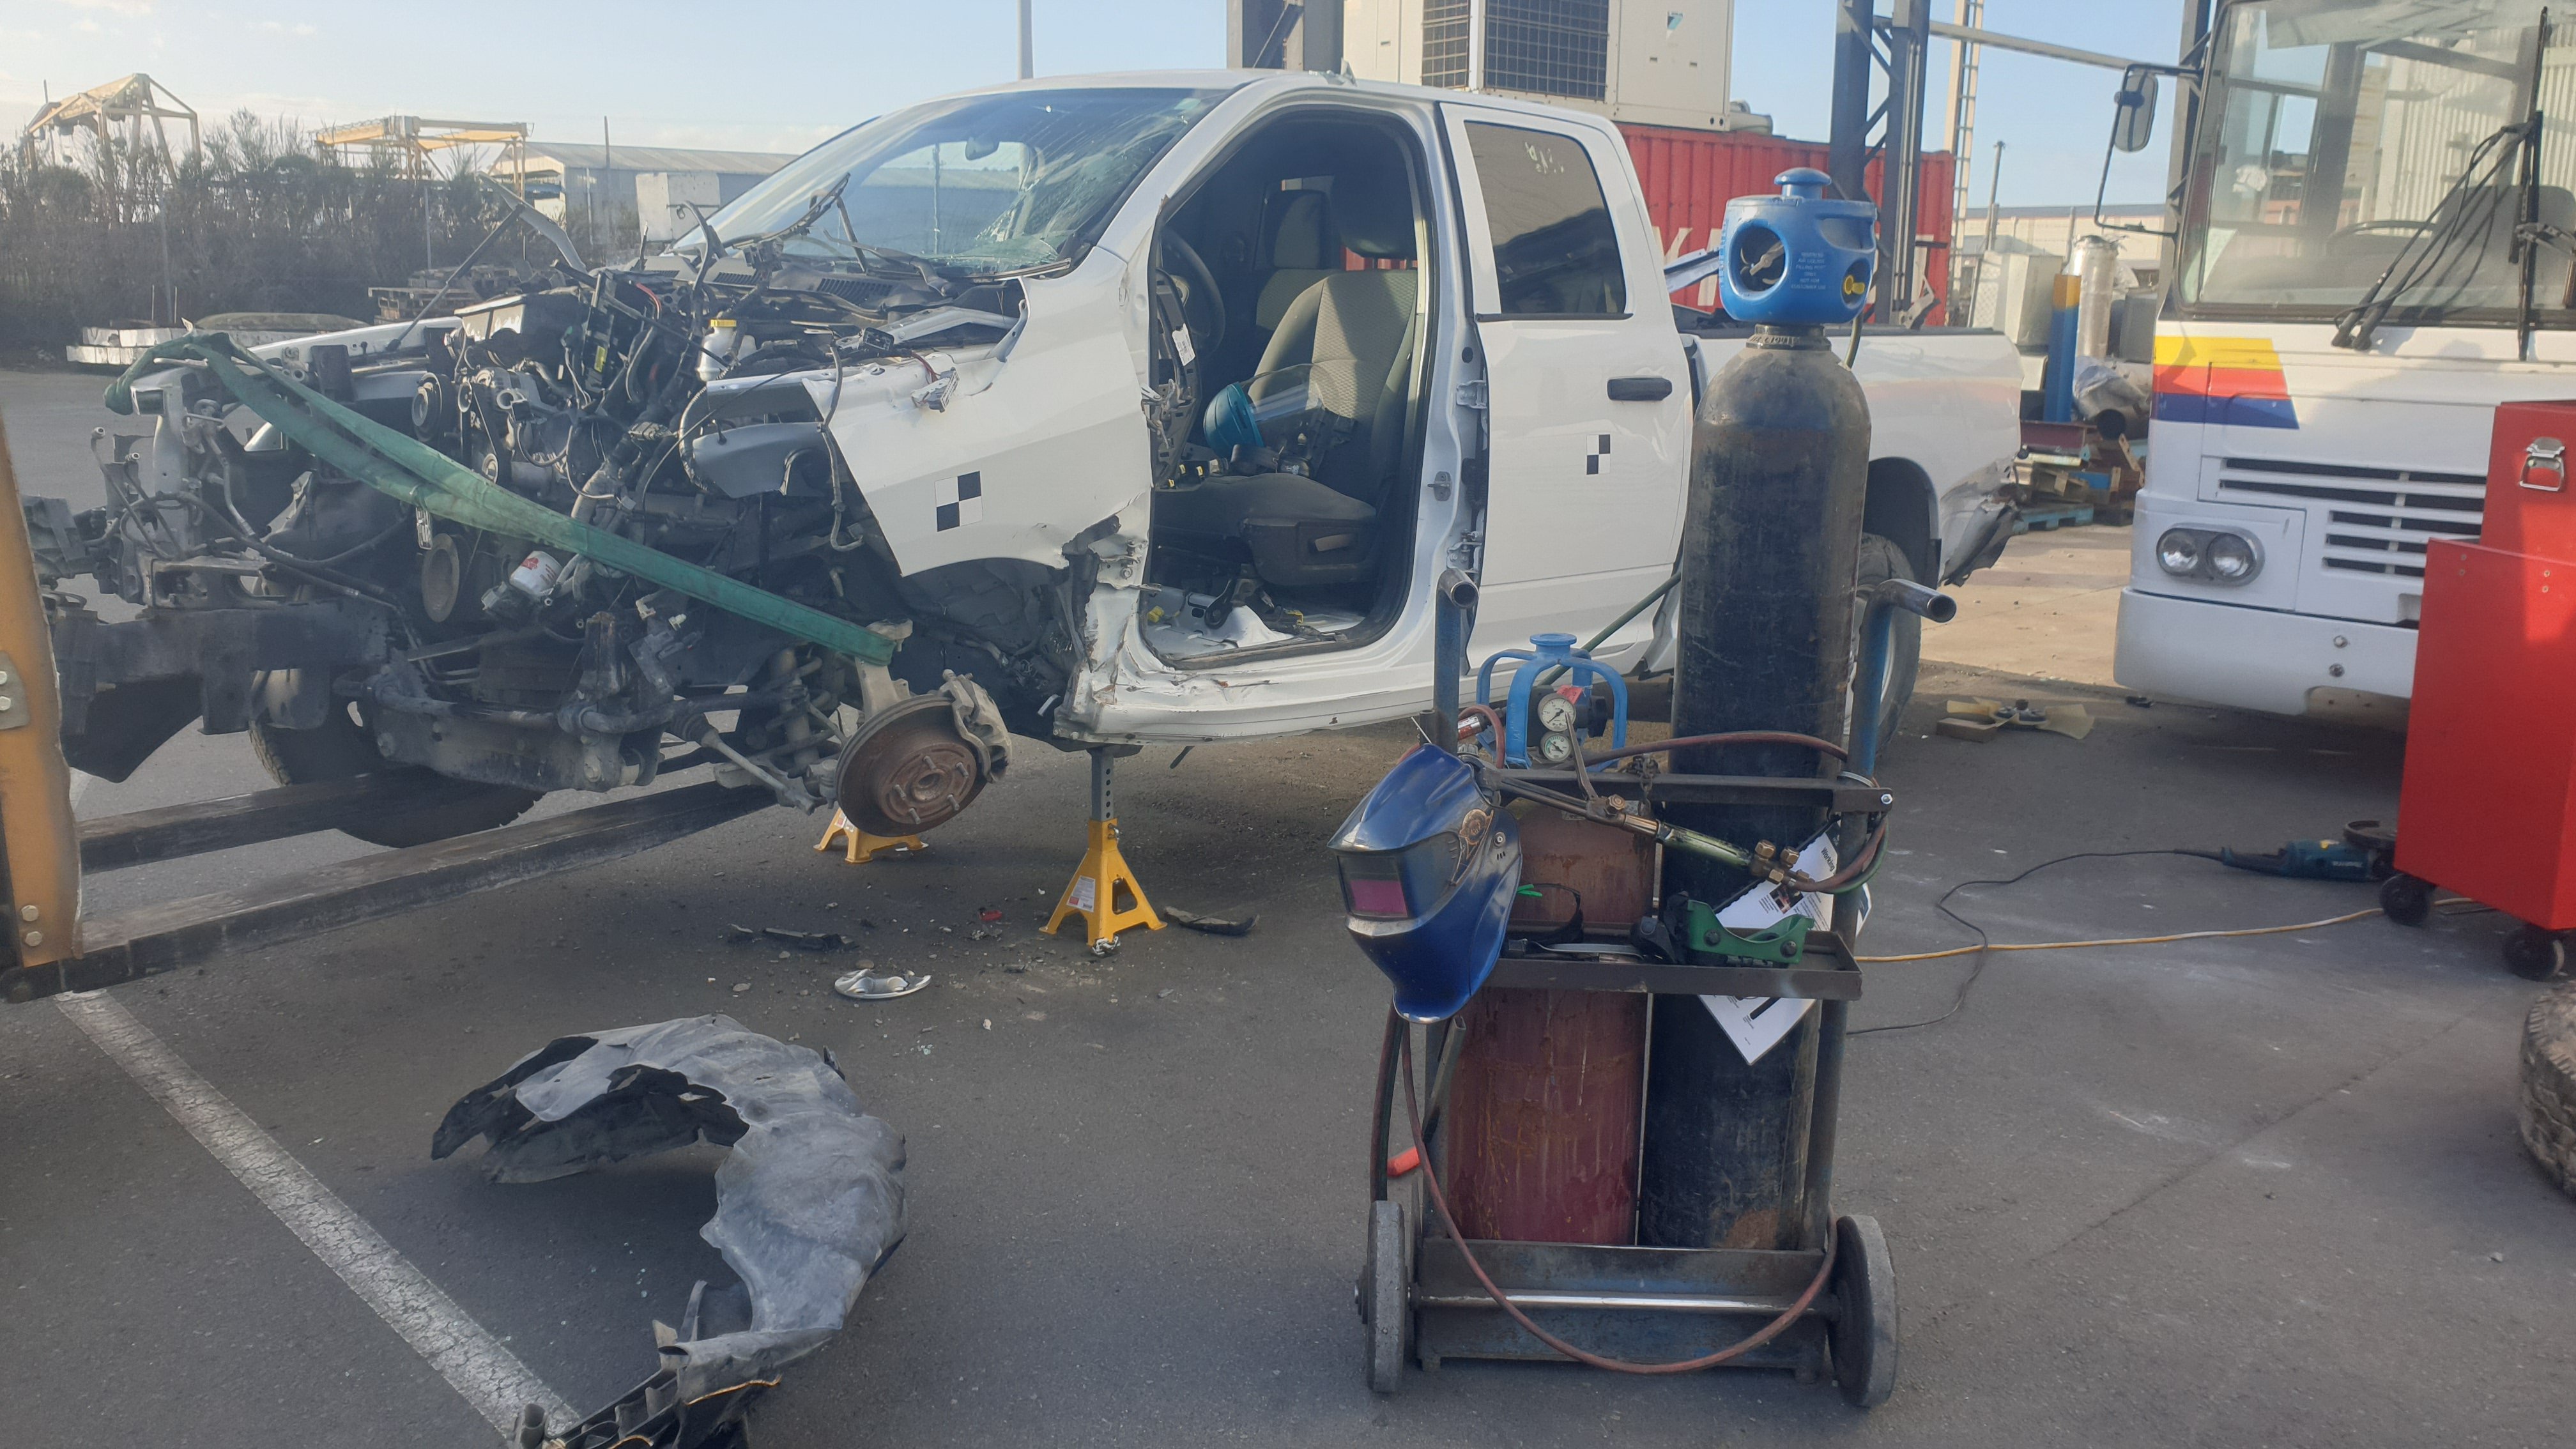
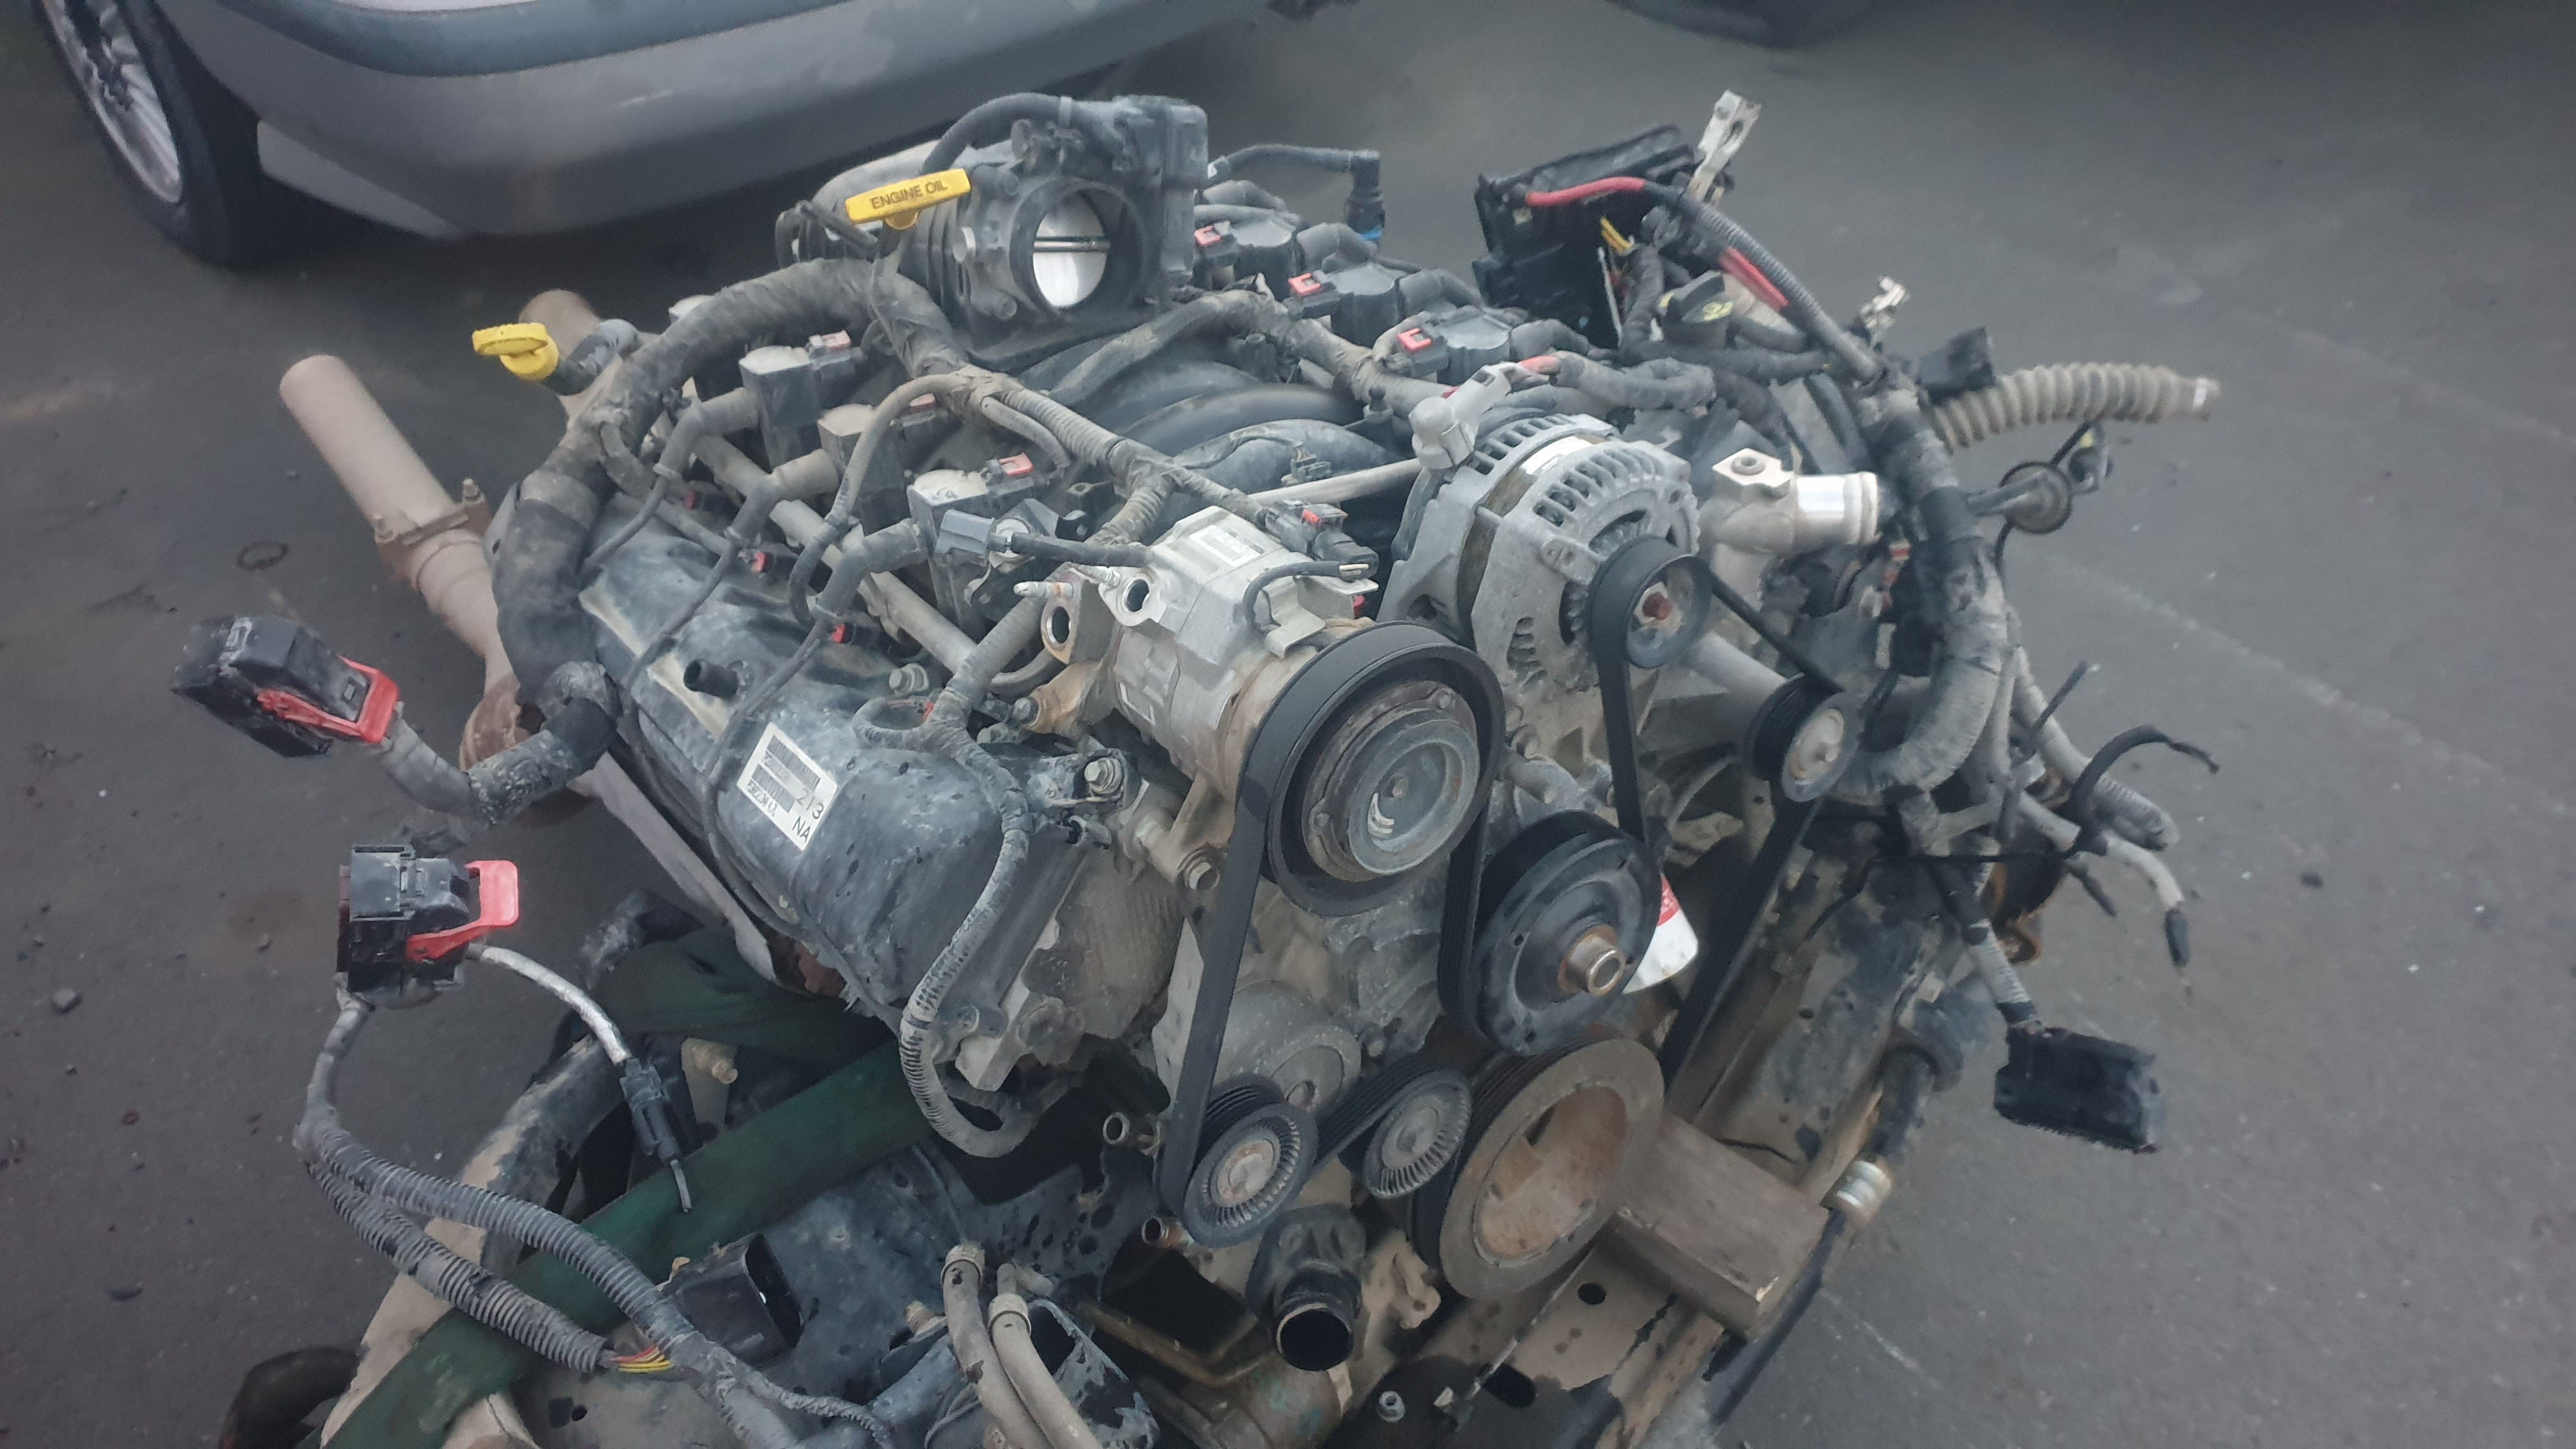
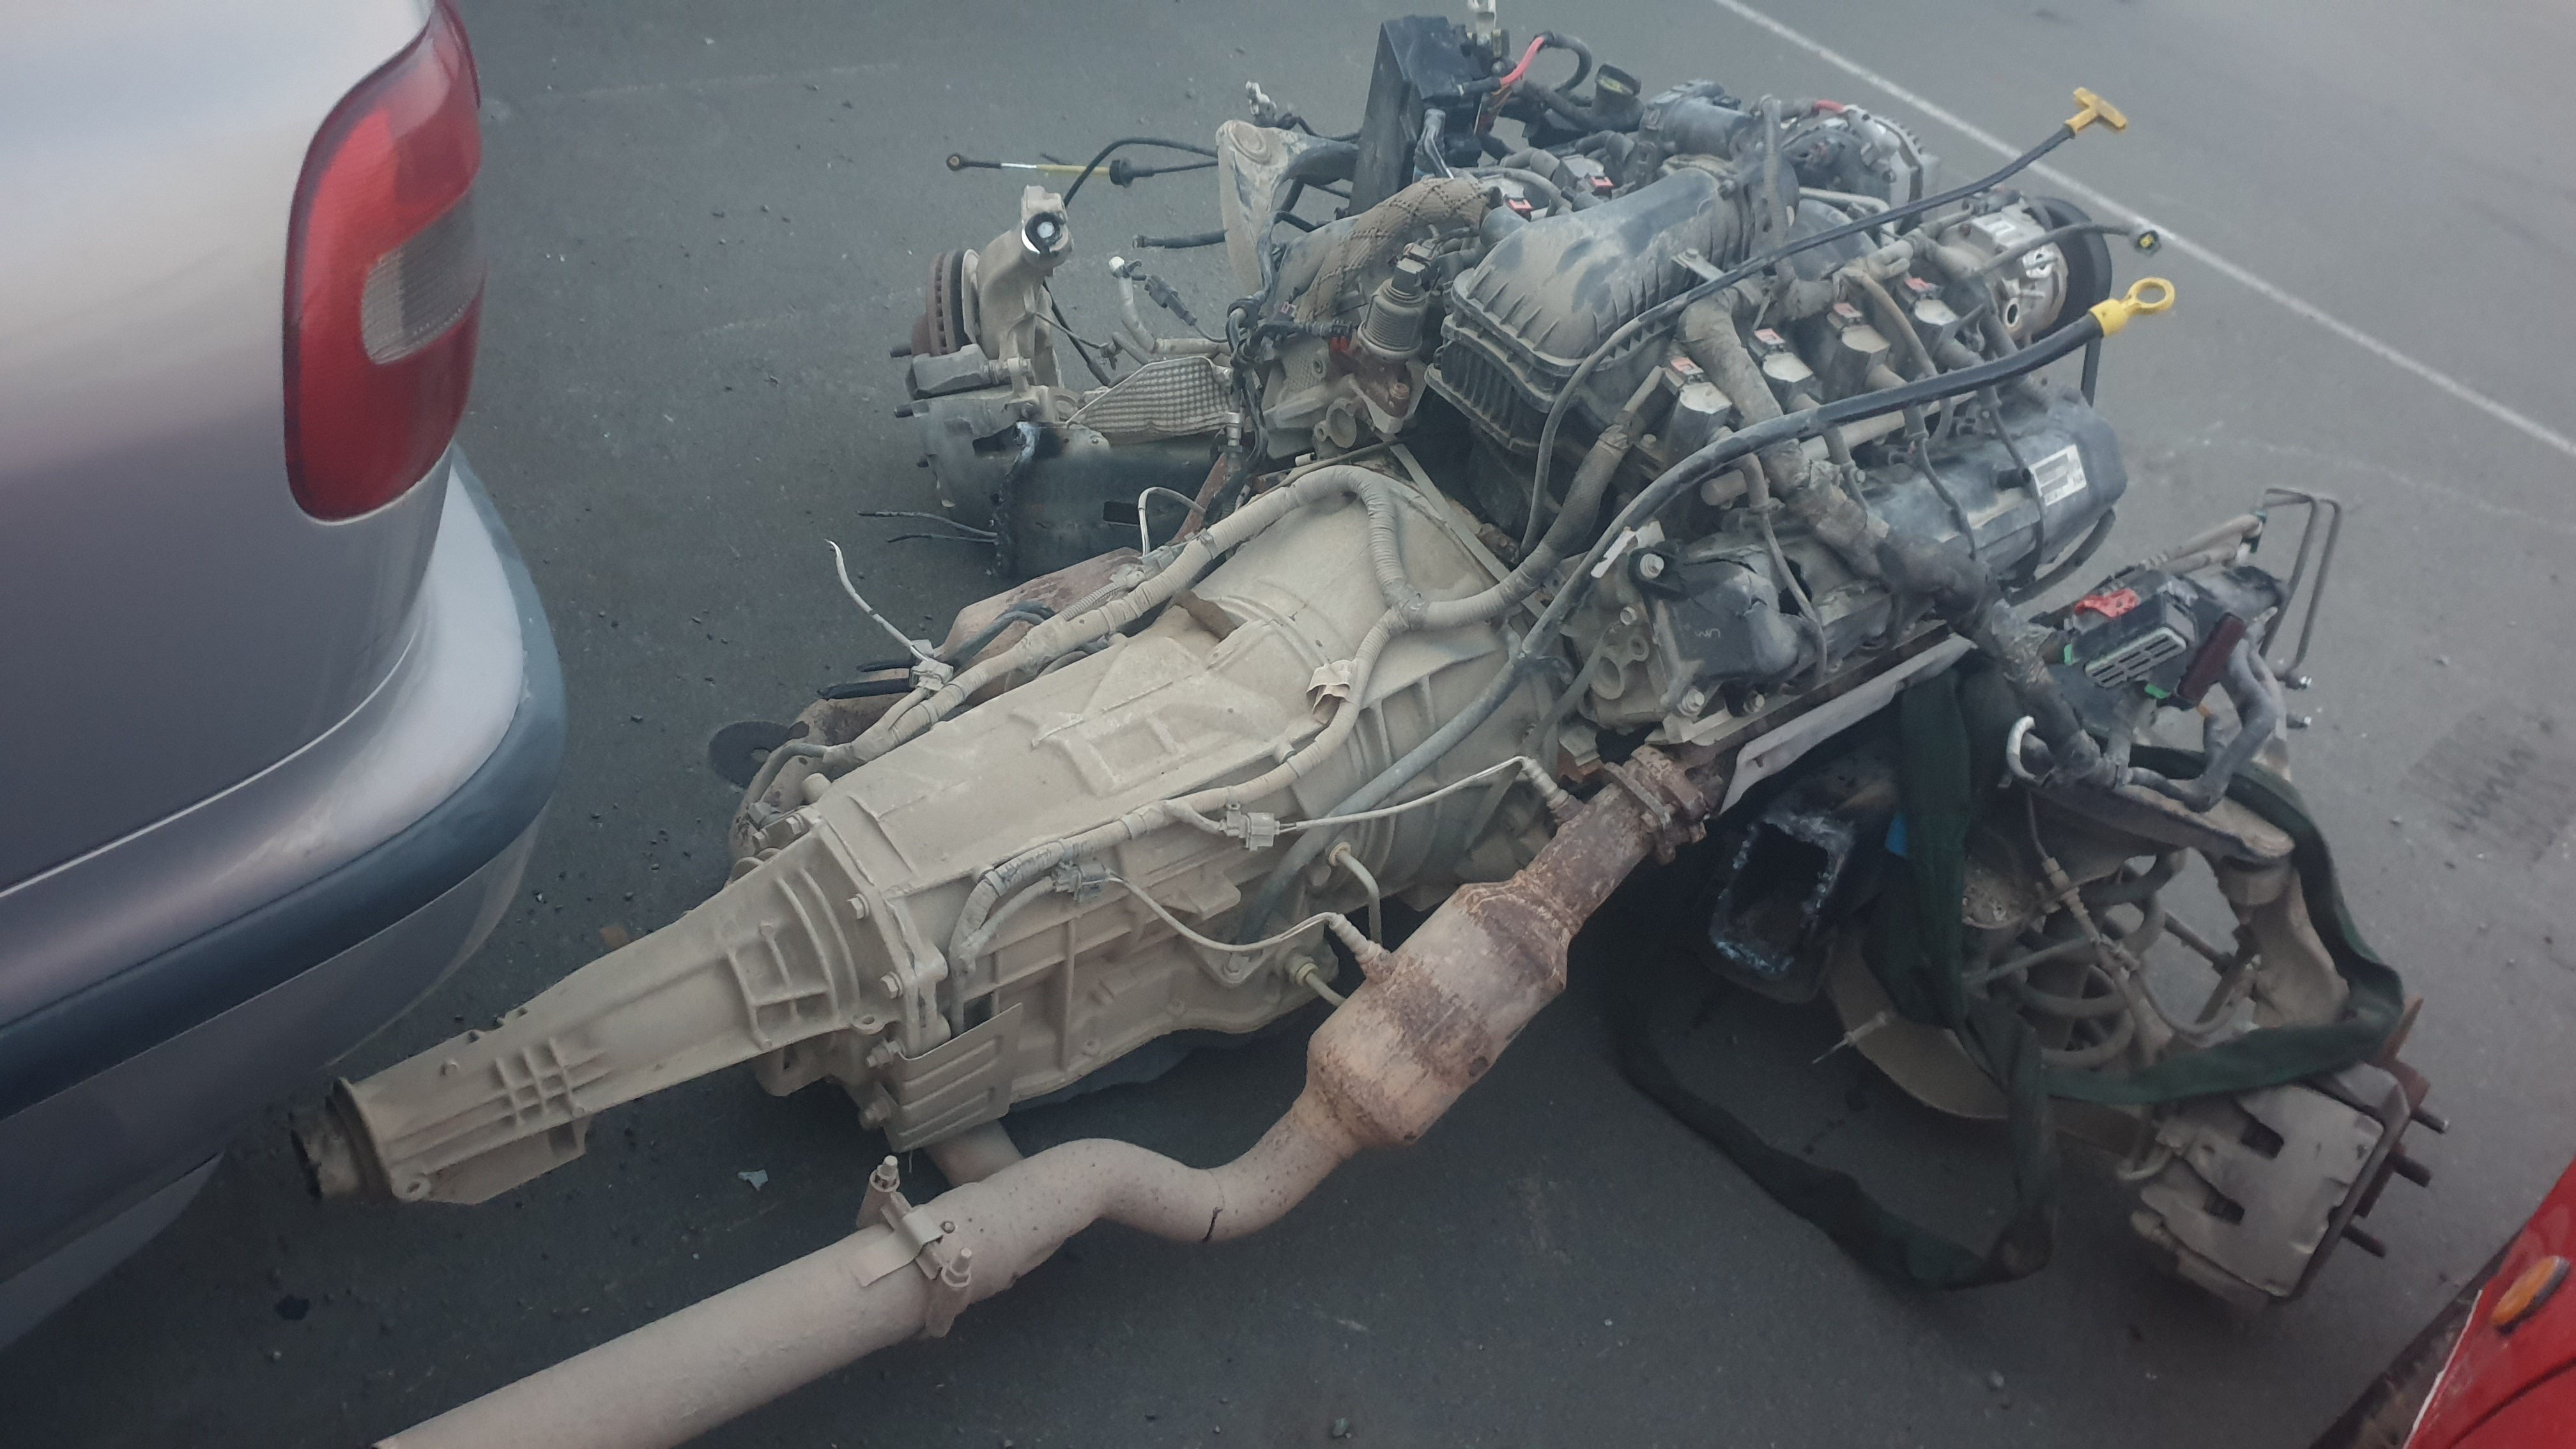
Where do i start. A while ago my brother started building an mx5 for his girlfriend and ended up with a fairly straight, but de registered rolling body, offered it to me for free and i was keen for a future track car project. I also happen to have a job which involved crashing cars, and thanks to a certain american standard roadside barriers must meet, we crash a lot of Dodge Rams. with plenty of v8 engines kicking around i hatched a plan and proceeded to talk about it for at least a year without actually doing anything about it. then the engine blew up on the corona, so while i wait to save up money to build that engine properly, i thought id make a start on this one, which by all accounts should be nearly free, with the only big ticket items needed being a roll cage, a diff swap and a driveshaft. So last weekend i dragged the mx5 into work, where i have all the tools i need to build a race car. and over the week started the efforts to remove the engine. Now that sounds easy, but boy was this truck fucked up. while the engine faired very well with the only damage being an engine mount ripped out (block still fine) and the starter motor wanged in (i have alot of spares). the chassis was bent at near 90 degrees around the engine, i also didn't really want to remove the trans. i started with a 9" angle grinder and removed as much fucked body and frame as possible. i then undid the remaining mounts and then promptly discovered this engine doesn't have lifting points? strapped it around some dubious strong points and tried to lift it out with the forklift. it rapidly became clear that the turbo fucked chassis was going to make it impossible to get out. so packed up, went back to work and had a think over the next few days. that brings us to today, what i had decided to do was cut the chassis in half just behind the trans and lift the truck off. so out came the 9" grinder again and i began by cutting access to the rails around the fucked body, and then trying to cut the rails with the grinder. sketchy at best. so thought fuck it, step it up a notch eh? though this was actually much safer. Gas axed the rails and out she came!
1 point
-
When I was looking for boot rubber for the GTO Basis were very helpful, but at that time (2012) they didn't have anything that fitted correctly. I ended up using the one from Scotts old auto rubber and did does the job pretty well, but it was tight until the rubber settled down.1 point
-
tempting best get it running i think..1 point
-
After testing the Gizzmo IBC boost controller, yes its pretty old but its still newer than the engine haha. It works well and even at 14psi it is still in the 10:1 AFR range, but I really didn't know if it was ok with knock etc so decided I'd better pay for some dyno time even though there isn't much that can be adjusted with the SAFC II. It drives fine and is well mannered. So on the dyno it made 260kw atw on 14psi still running rich, but he didn't try more boost because he detected some knock around 4500rpm, tried adding and removing fuel, but without ignition control he wasn't able to stop it. On low boost 9-10psi (225kw) it's okay but if it got hot at the track it might cause heat knock. On the road it'll be fine on low boost but I built it to take to the track so I am going to have to figure out the best option for an Ecu. He said I could use a Link G4 Monsoon which is cheaper but would lose idle control due to having less outputs. Then it's the slippery slope again... If I am paying for a full tune I should install 1000cc injectors, which will need a bigger fuel pump. That leaves it open to E85, but that needs new fuel lines and a flex fuel sensor. So: Injectors Fuel Pump Clutch upgrade Fuel lines Link ECU Link Looms Wire myself but needs new all the plugs etc (or do I re-use the toyota loom?). Then full tune at about $899 That'll get me around 300kw and an better power curve...lots of money though. If I upgrade the cams it'll be able to make 350kw+ but they are $1000+ then install. Rock and a hard place... OR just install a link and see what it'll do with the 550cc injectors and Walbro 255 pump. BUT then its another retune if I go with bigger injectors later. Any heres the dyno sheet dyno, 260kw is pretty good but I can't use it!
1 point
-
If you knew what the original seal profile looked like, there are heaps of options on ebay1 point
-
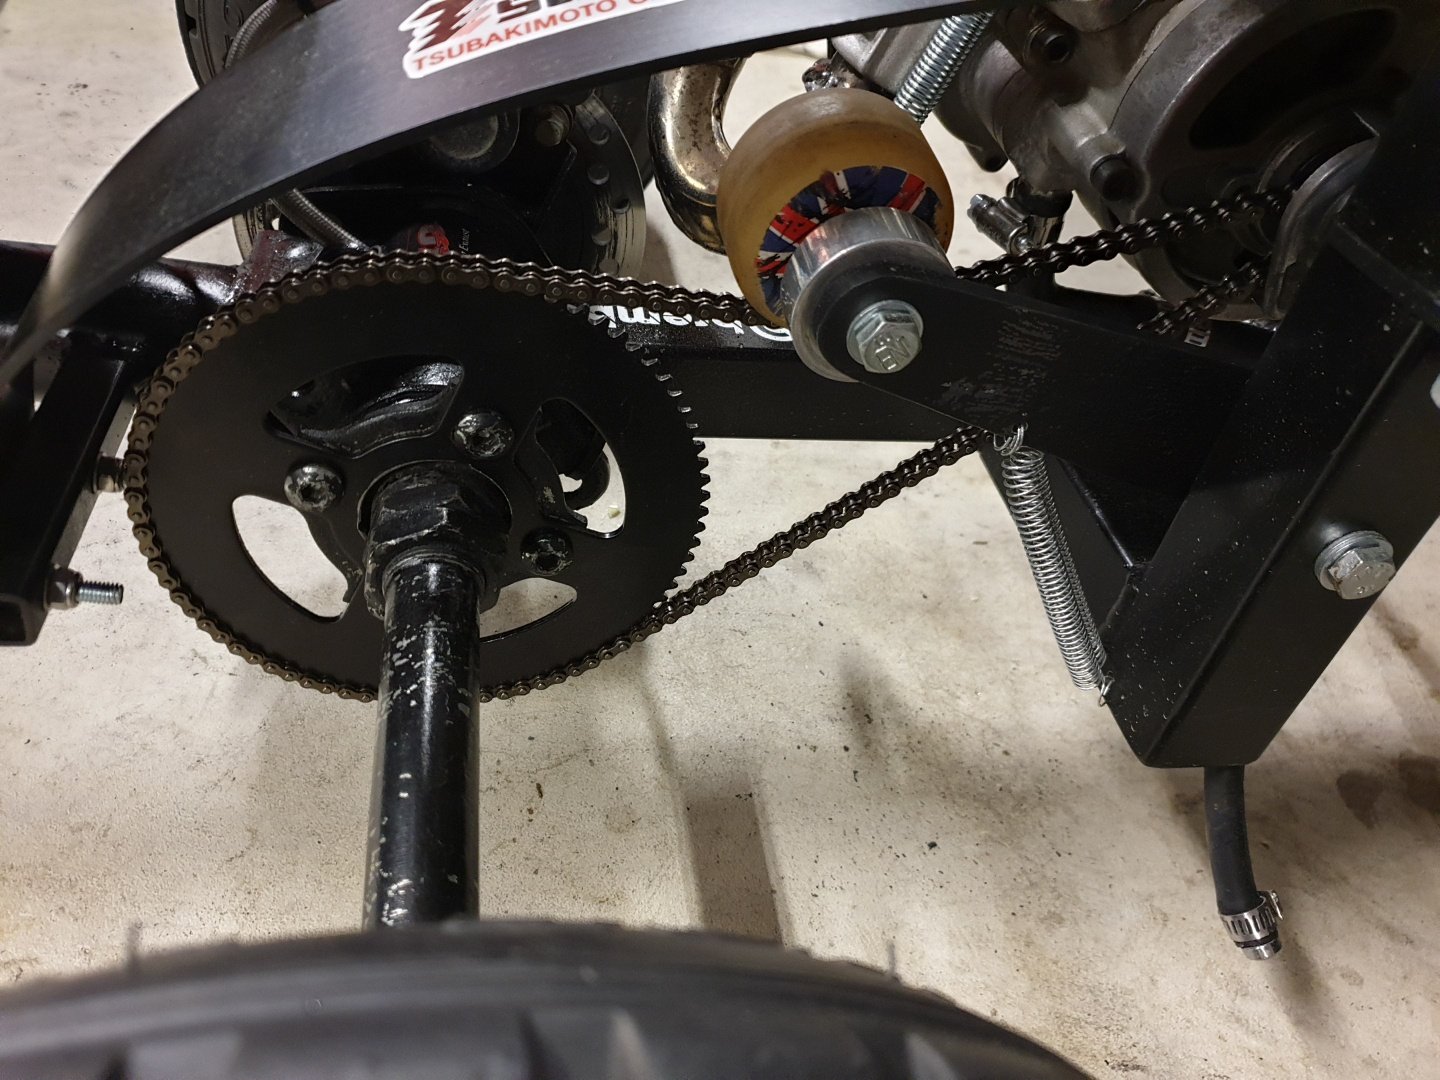
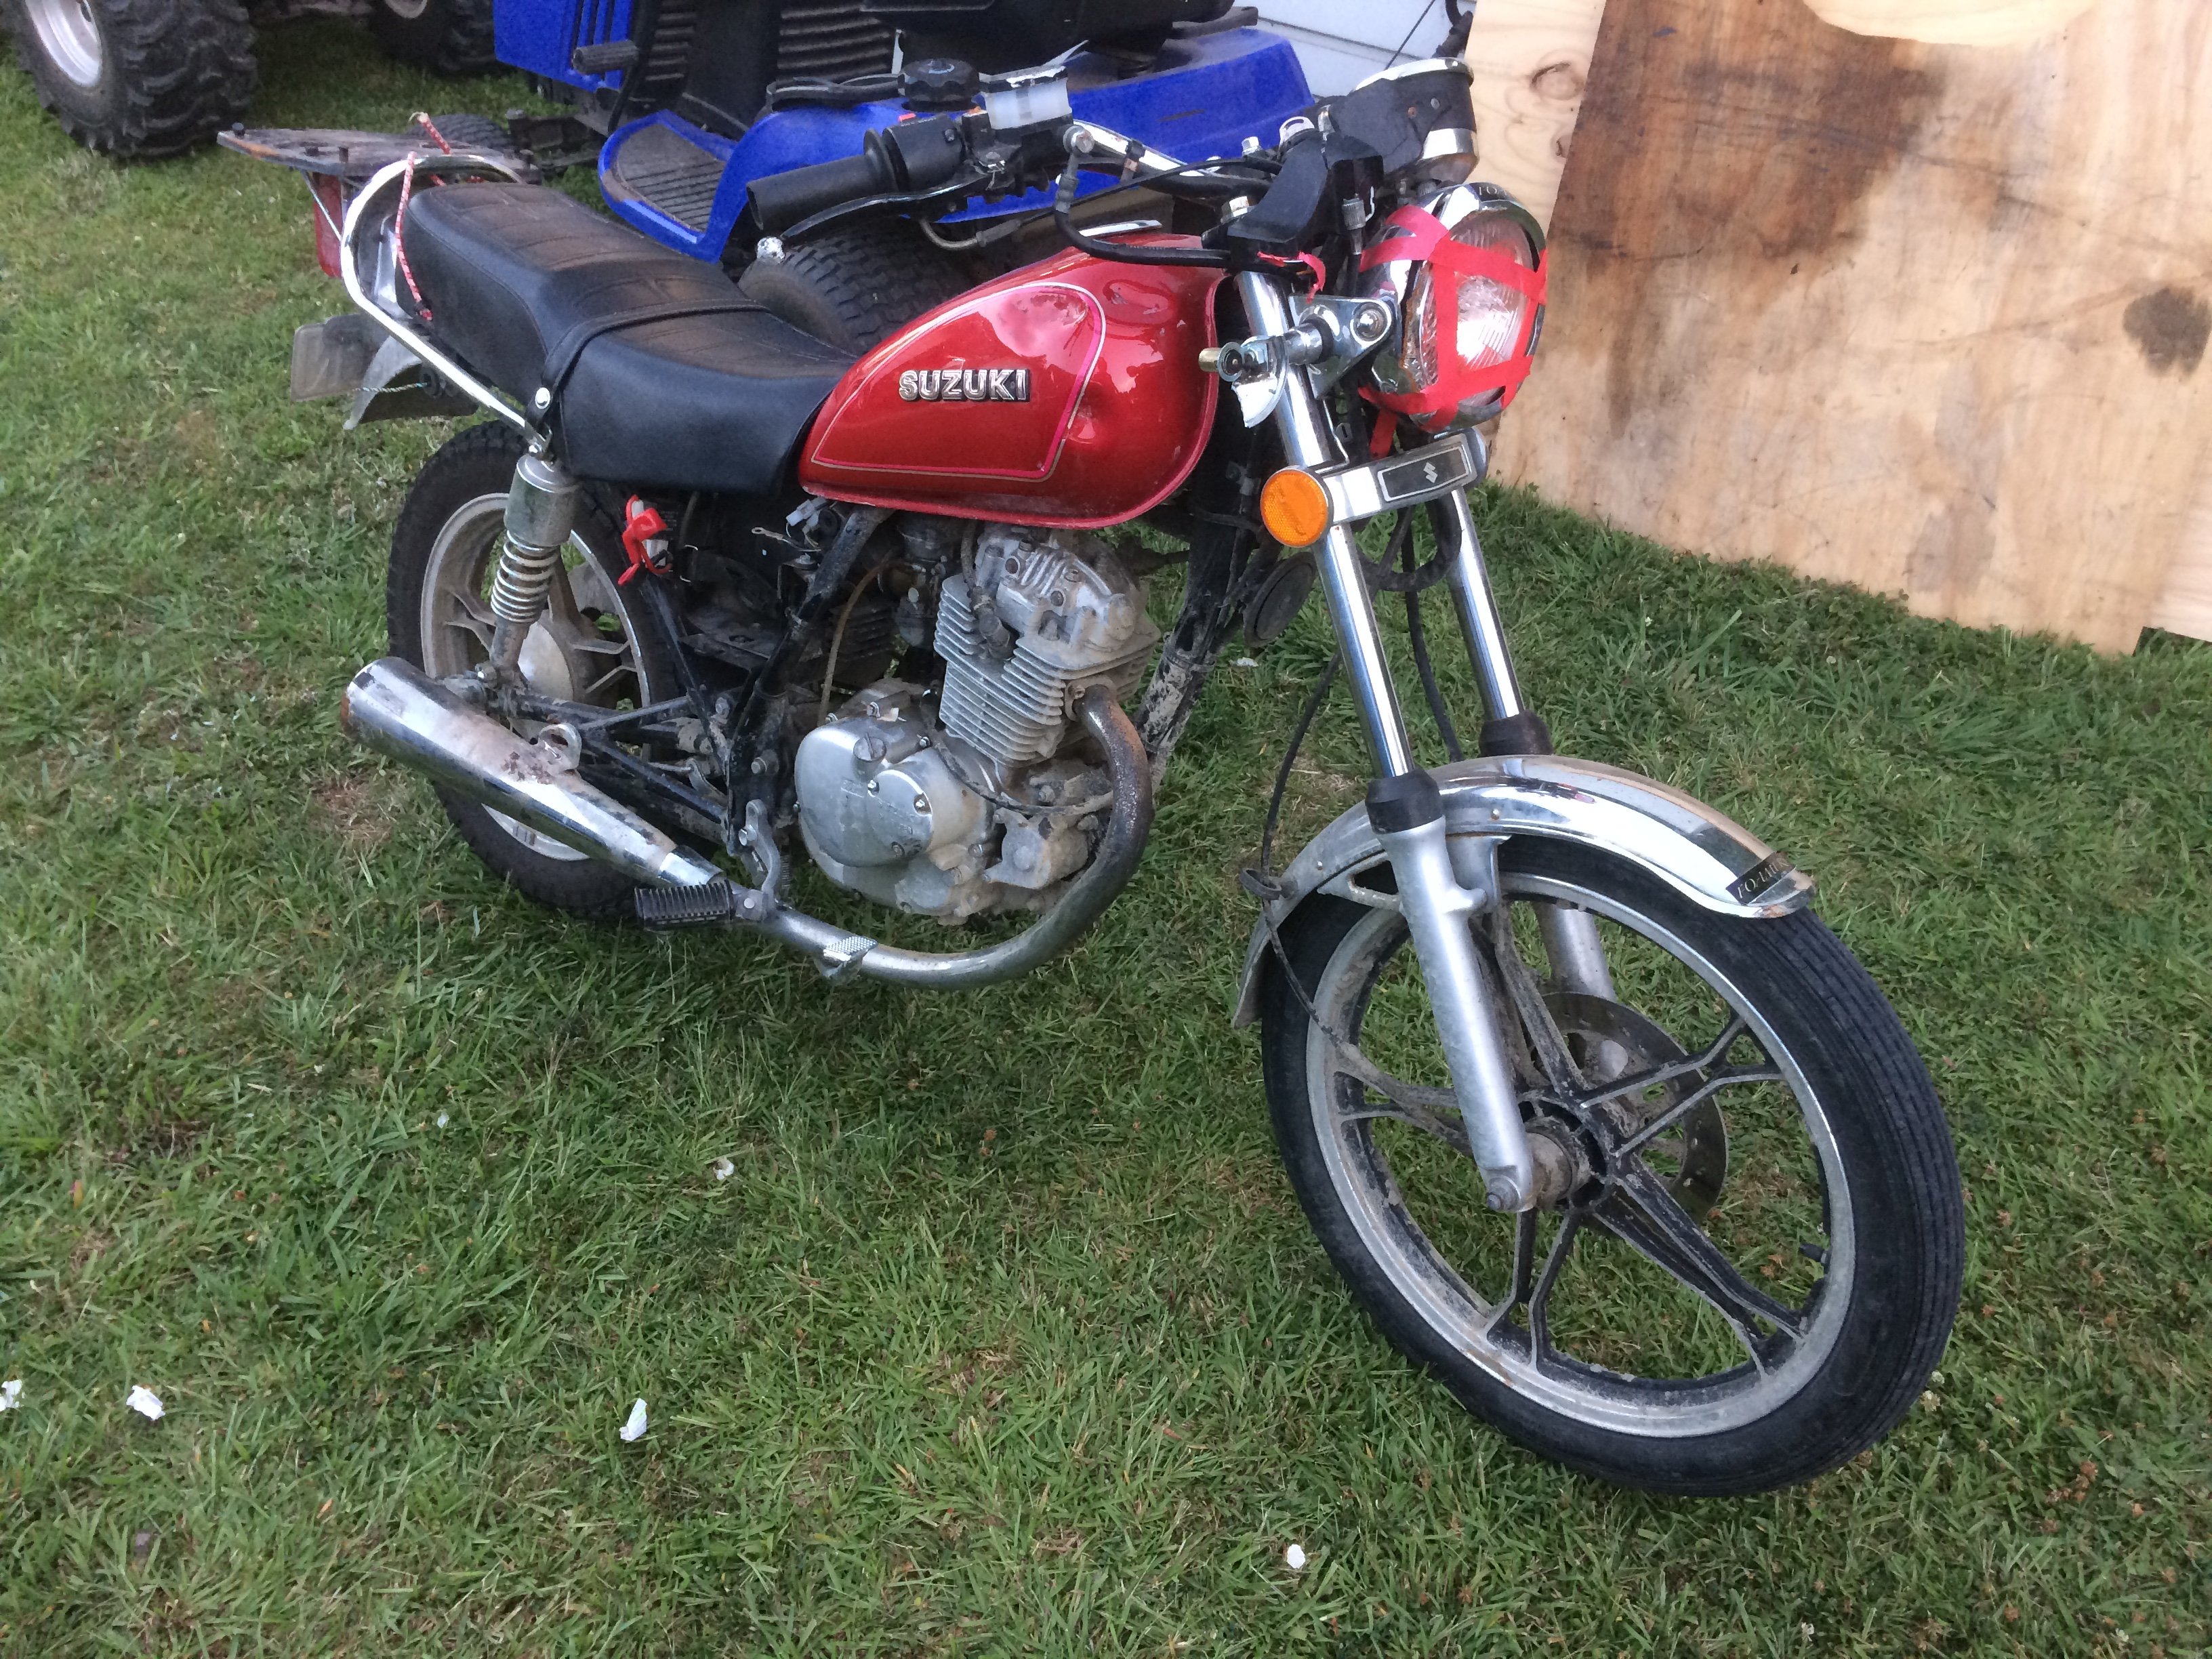
End goal for this is building something road legal. A trike fits that bill for me so i could try avoid the exorbitant registration of a 600+ cc bike.
1 point
-
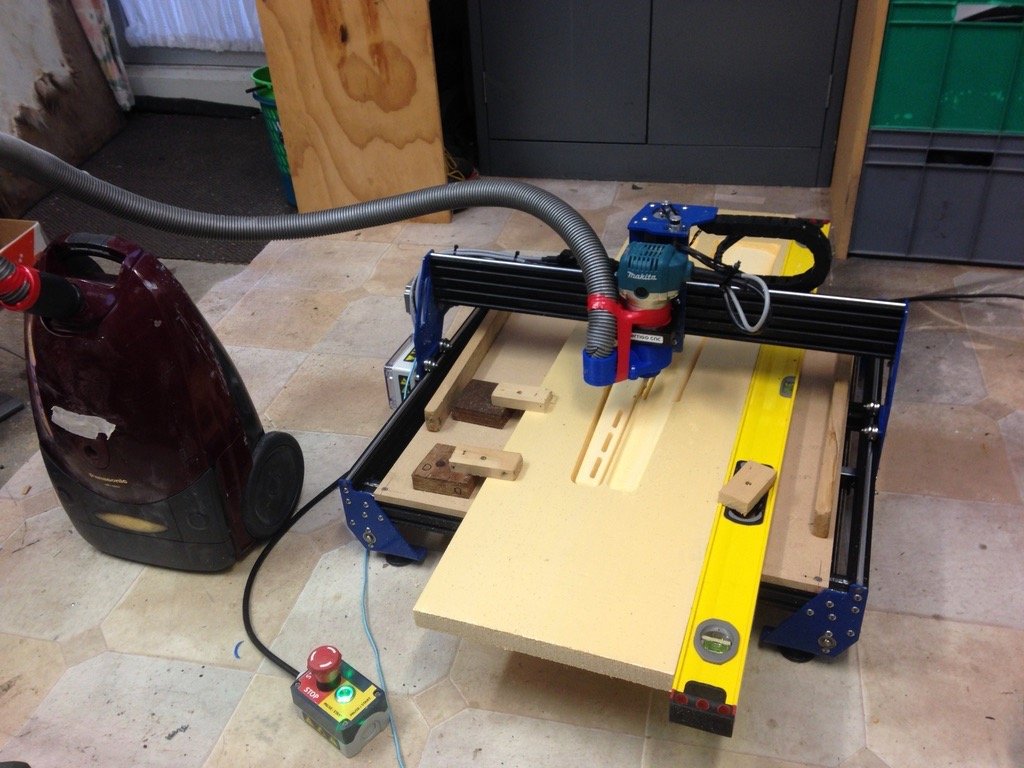
Asked a mate to carve out some foam core for a project, he declined as he didn't want the dust through his shed. He did however have a spare machine knocking about that I was welcome to make a mess in my own shed with! Gotta get me one of these toys, so simple and easy! Cores will be used for a carbon fibre rifle stock, hopefully pics to come.....
1 point
-
Hi everybody. I have just registered for the ride. My accommodation is sorted. I will be bringing Gemima which some of you will recognize.
1 point
-
Temps are surprisingly good, warmer than outside. Concrete seems to hold the heat well, and the clear-light pumps the sun through all day. If it's a good day (weekends) then the roller door goes up and traps the warmth in even more. depends if @Alistair is around or not1 point
-
.1 point
-
Unfortunately 3 of these have had the engines taken apart and left open for many years by the look of it. Im not sure why either I only met the owners son and handed over the money and loaded them up. Picked them up in mamaku which is a fairly questionable area so hopefully they were aquired legitimately.1 point
-
Ive been fucking around with it so long now its been refined if anything its overbraked and cant spin a wheel on anything but gravel because its got so much traction. The 2 guys at work who have ridden it are motocross riders no way I'd let anyone with no handling skills near riding it.... ever What it does well is make heaps of noise and makes going fairly slow a heap of fun standing up your sense of self preservation kicks in pretty early.1 point
-
Anderson is common in industry. https://www.jaycar.co.nz/anderson-35a-sbs-mini-connector-grey/p/PT44841 point
-
Well shit..... did this again blew another rim to bits ive got a permanent fix for this but i might go to a 10 inch rim first same as front. On the the upside ive got the oil feed and drain 80% done for the turbo just got to weld the AN4 next to the AN6 fitting and thats it then it just needs the exhaust made to get hot gases into it.
1 point
-
This weekend I decided to go ask about getting some carpet underlay to whip under neath the carpet in the cabin to make it a bit more homely. Ended up getting a big slab of it for free! Thank god for useless offcuts.. I am no professional fitter by any means. it didn't really come out nice in 3 cut sections but it will all fit in well when the carpet goes back in 20190817_181032 by phillipbaines, on Flickr I also got sick of the awful looking dirt ridden seats that are impossible to find in any sort of 'good' condition so the cheapest fix is to show down to Super Cheap and get some car covers. Which look 10000% better, 20190817_143241 by phillipbaines, on Flickr 20190817_152236 by phillipbaines, on Flickr After installed, got some snaps. List hasn't changed since last weekend but now it's a bit more respectable. 3 by phillipbaines, on Flickr 1 by phillipbaines, on Flickr 11 by phillipbaines, on Flickr 2 by phillipbaines, on Flickr 4 by phillipbaines, on Flickr 5 by phillipbaines, on Flickr 6 by phillipbaines, on Flickr 10 by phillipbaines, on Flickr 8 by phillipbaines, on Flickr 7 by phillipbaines, on Flickr Build Discussion:1 point
-
It seems like I'm stuck in a never-ending loop of dodgy fuel hoses. The TVR is no different. After I paid for the TVR and whilst waiting for the transporter to collect it, I was let in on a little... issue... the car had. This is what I was told, as a little "oh btw" side note "And last but not least – I never cured a petrol smell from the tank and guess he hasn’t either … I couldn’t leave the car in the internal access garage cos it stank the house out." Well, that could be interesting, since my only garaging is internal access, under the bedrooms, and my driveway is too steep to park a classic car on (not to mention uncovered). When the car arrived, there was no obvious smell. I suspect that was to do with the fact the tanks were empty. Once I added fuel, a noticeable smell was present at the rear of the car. It wasn't enough to stink the house out, or even the garage, but with only 10L in the tanks I can only imagine it gets worse the more full they are. I have receipts for one of the tanks being removed and repaired in 2011, along with all the fuel hoses as the "recently replaced" filter was leaking. This dashed my hopes that it might just be a simple case of dodgy old fuel hoses causing the issue, as they had been replaced (we'll see). Today I jacked the car up and had a look. Unfortunately I found that due to differences in early and late chassis, despite seeing this car up on QuickJacks, I cannot line mine up with the chassis tubes to safely lift it. The later cars have body mount plates on the chassis, where mine doesn't. Oh well, the old jack and stands come out to play again You can spot the silver fuel pump in the top left of the above photo, behind the exhaust. The tanks are more or less above the pump, on each side. A quick look around and I suspect I found at least one of the causes of the fuel smell. The main feed hose from the tanks to the pump has horrifically perished The way the hose has been run also causes issues too, with the hose being squished flat in at least two places as it goes over chassis tubes (top and bottom photos are good examples). It's not cheap hose either, being Aeroflow. The Tee piece between the tanks has been replaced with Aeroflow parts. The small hoses from the pump are showing signs of perishing too. All in 8 years, and minimal use. So surprise surprise, despite being done before, it's all dodgy looking and buggered. I have my suspicions about the filler and balance tube couplers, but I'll deal with them if replacing the under car hoses doesn't help. They looked ok from what I could see under the car. I have ordered new 5/8" fuel hose for everything to the pump, a new brass Tee piece (to replace the Aeroflow one), a new fuel filter, and I still have stock of good 8mm hose for the other hoses. Once it all arrives I'll drain the tanks, rip it all out and start again. Hopefully that sorts the fuel smell, and may even help the system run better if the hose isn't being crushed. One last little thing; I gave the other side of the rear window a polish today too. Now you can see through both sides. It's far from perfect, but much better. Interestingly, from the inside, I'm pretty sure the clearer spot on the left was my test patch. I'm going to buy a foam polishing cone and try polishing at a higher speed and see what happens, especially with that pitted yellowing. Just need to take care with the surface heat, not to cause more damage.1 point
-
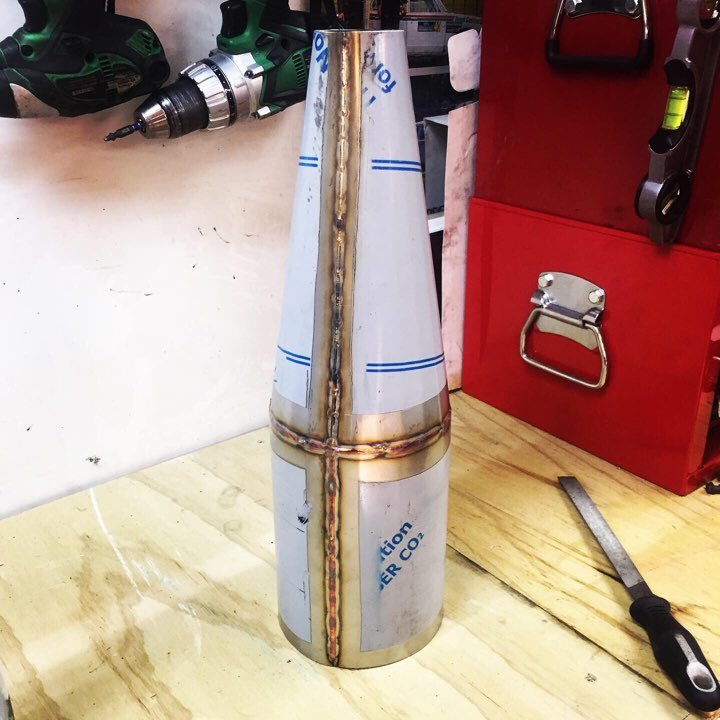
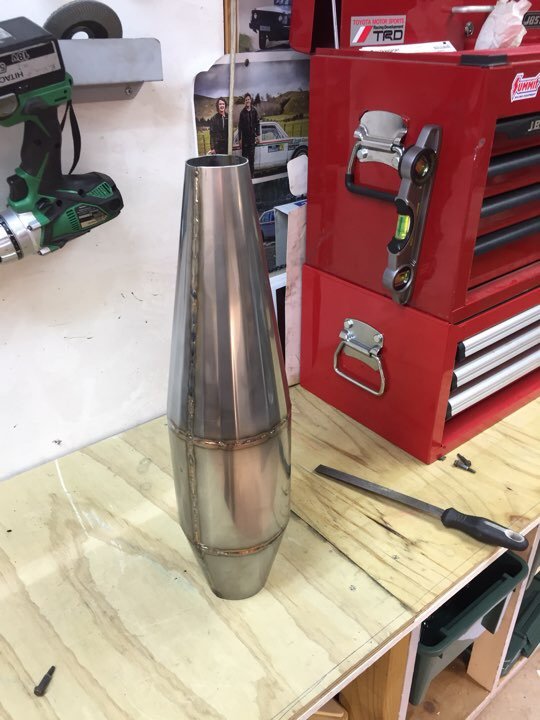
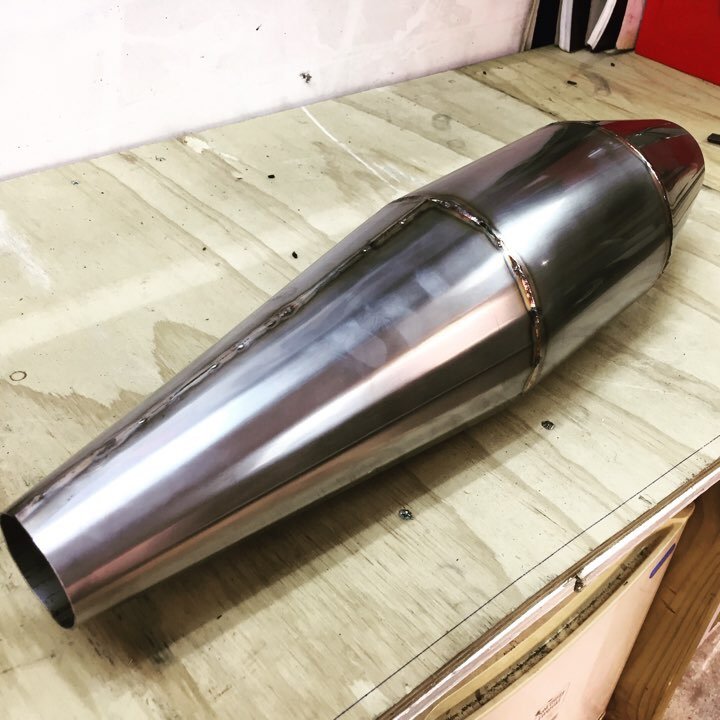
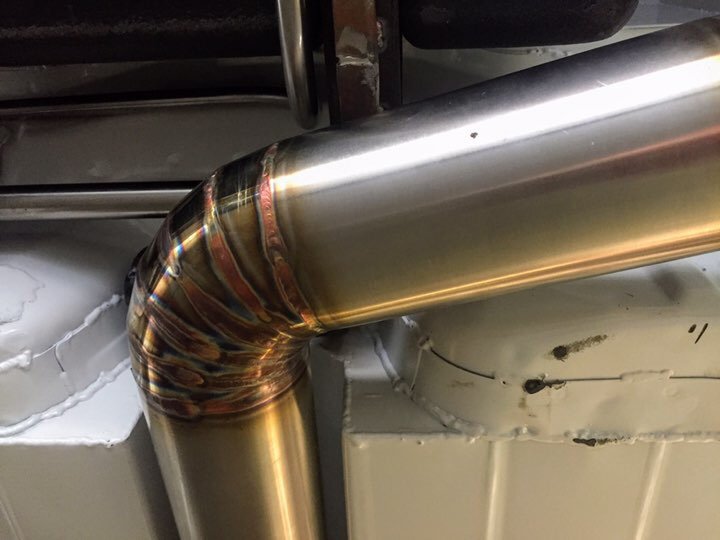
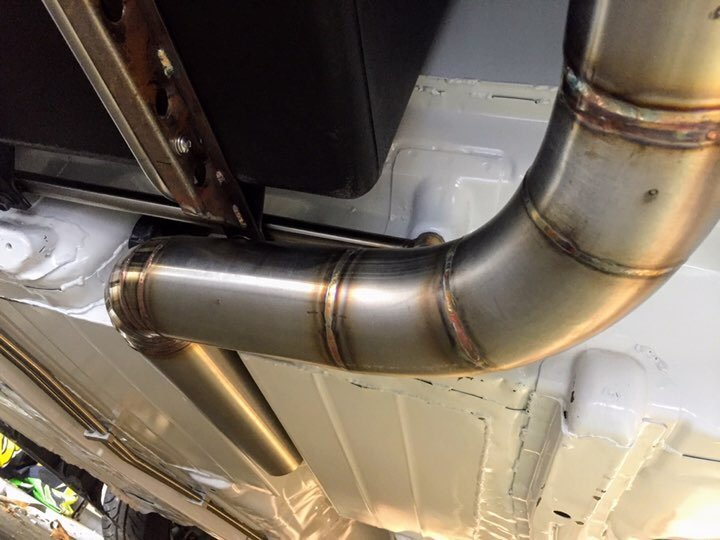
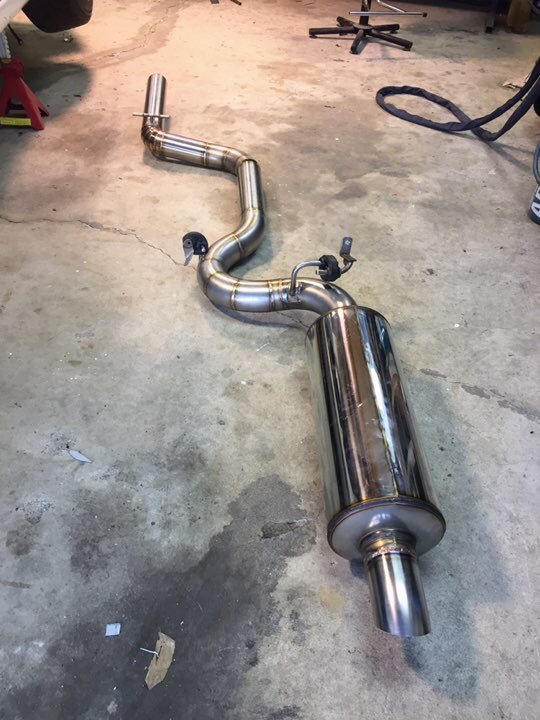
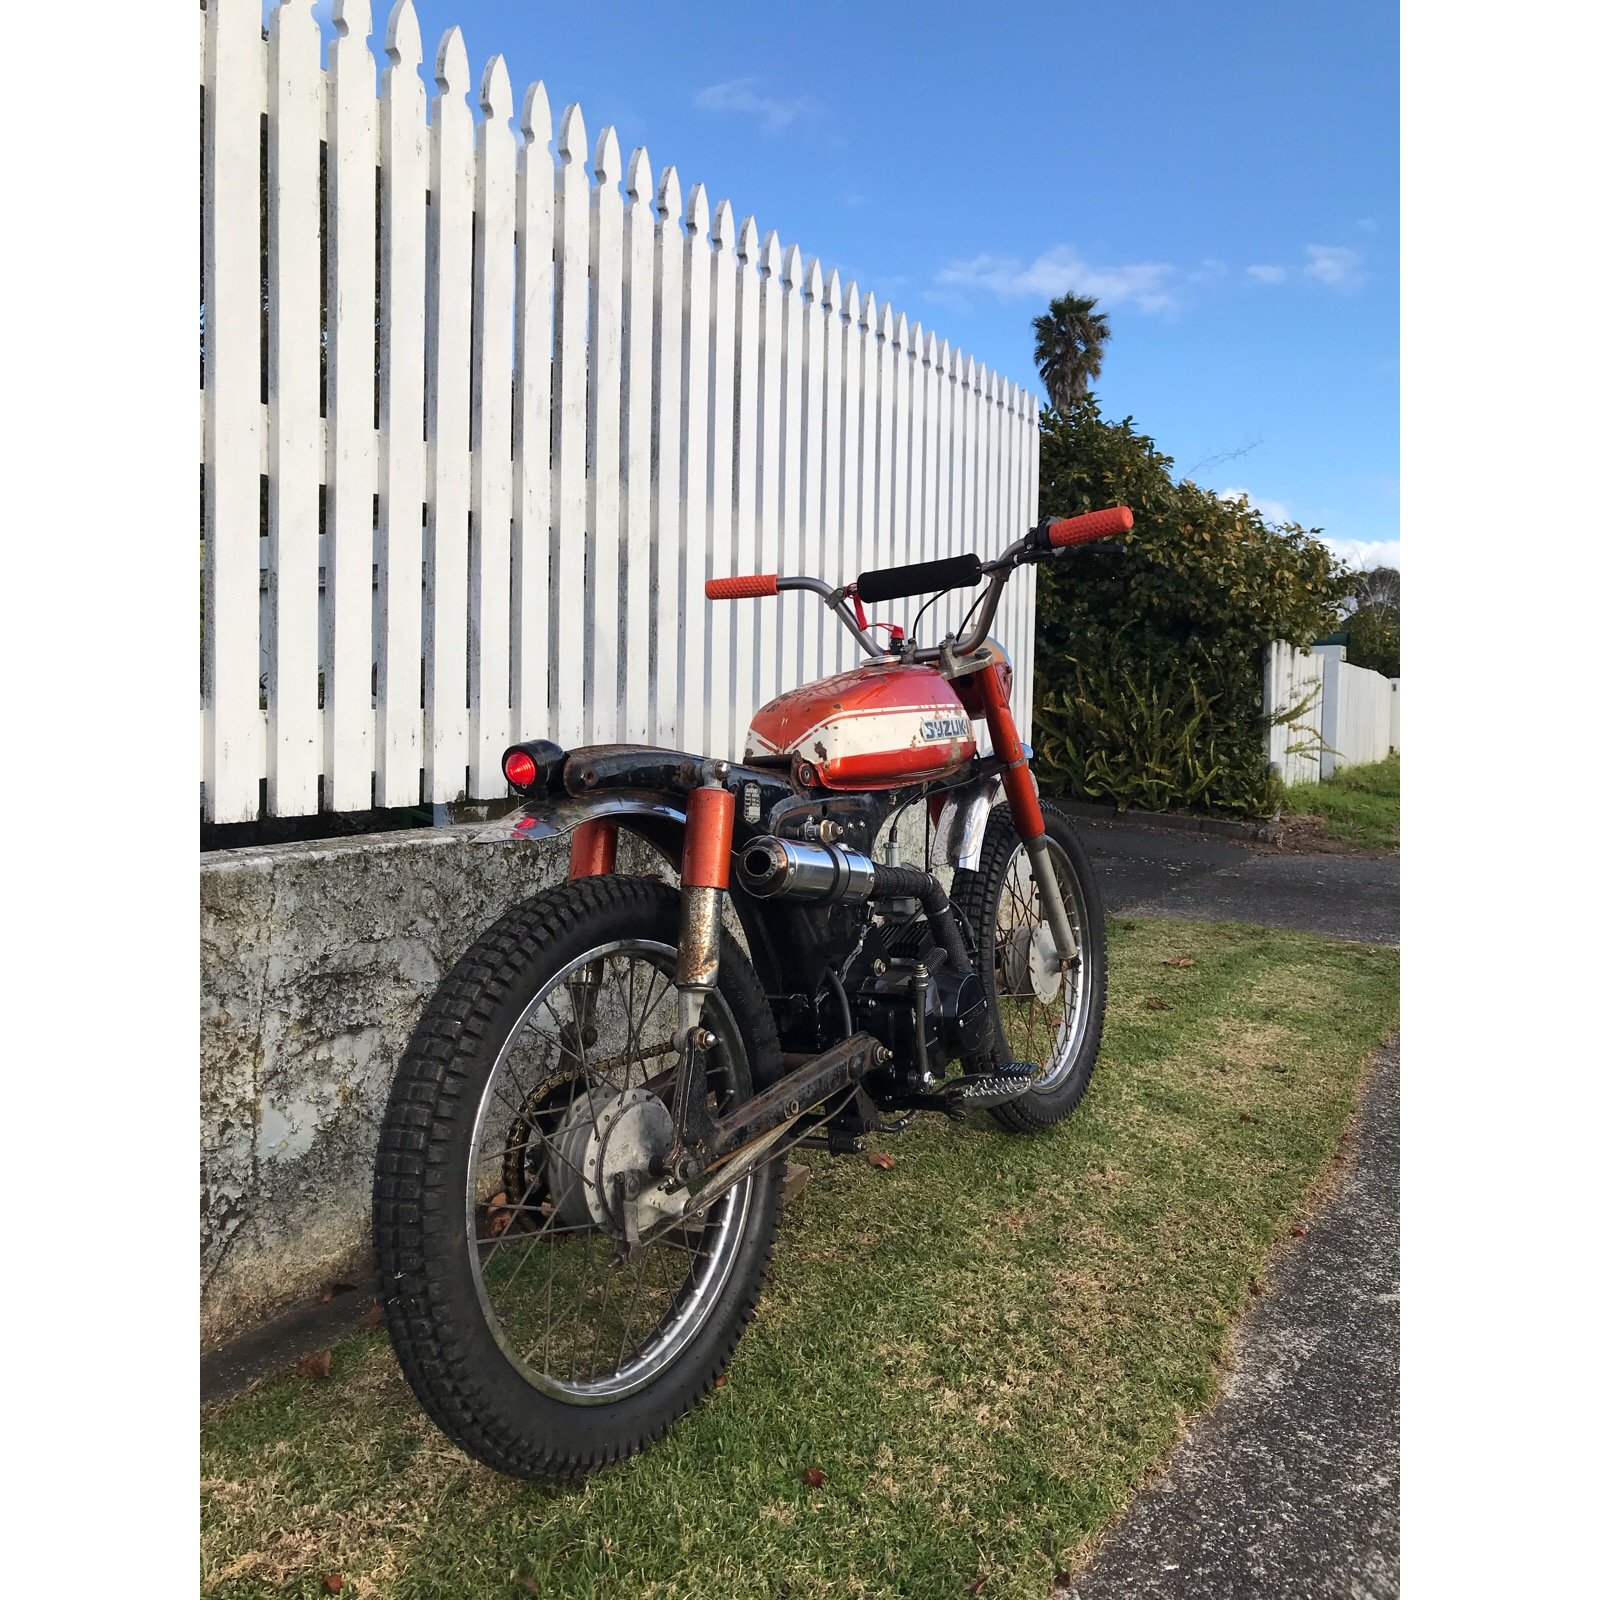
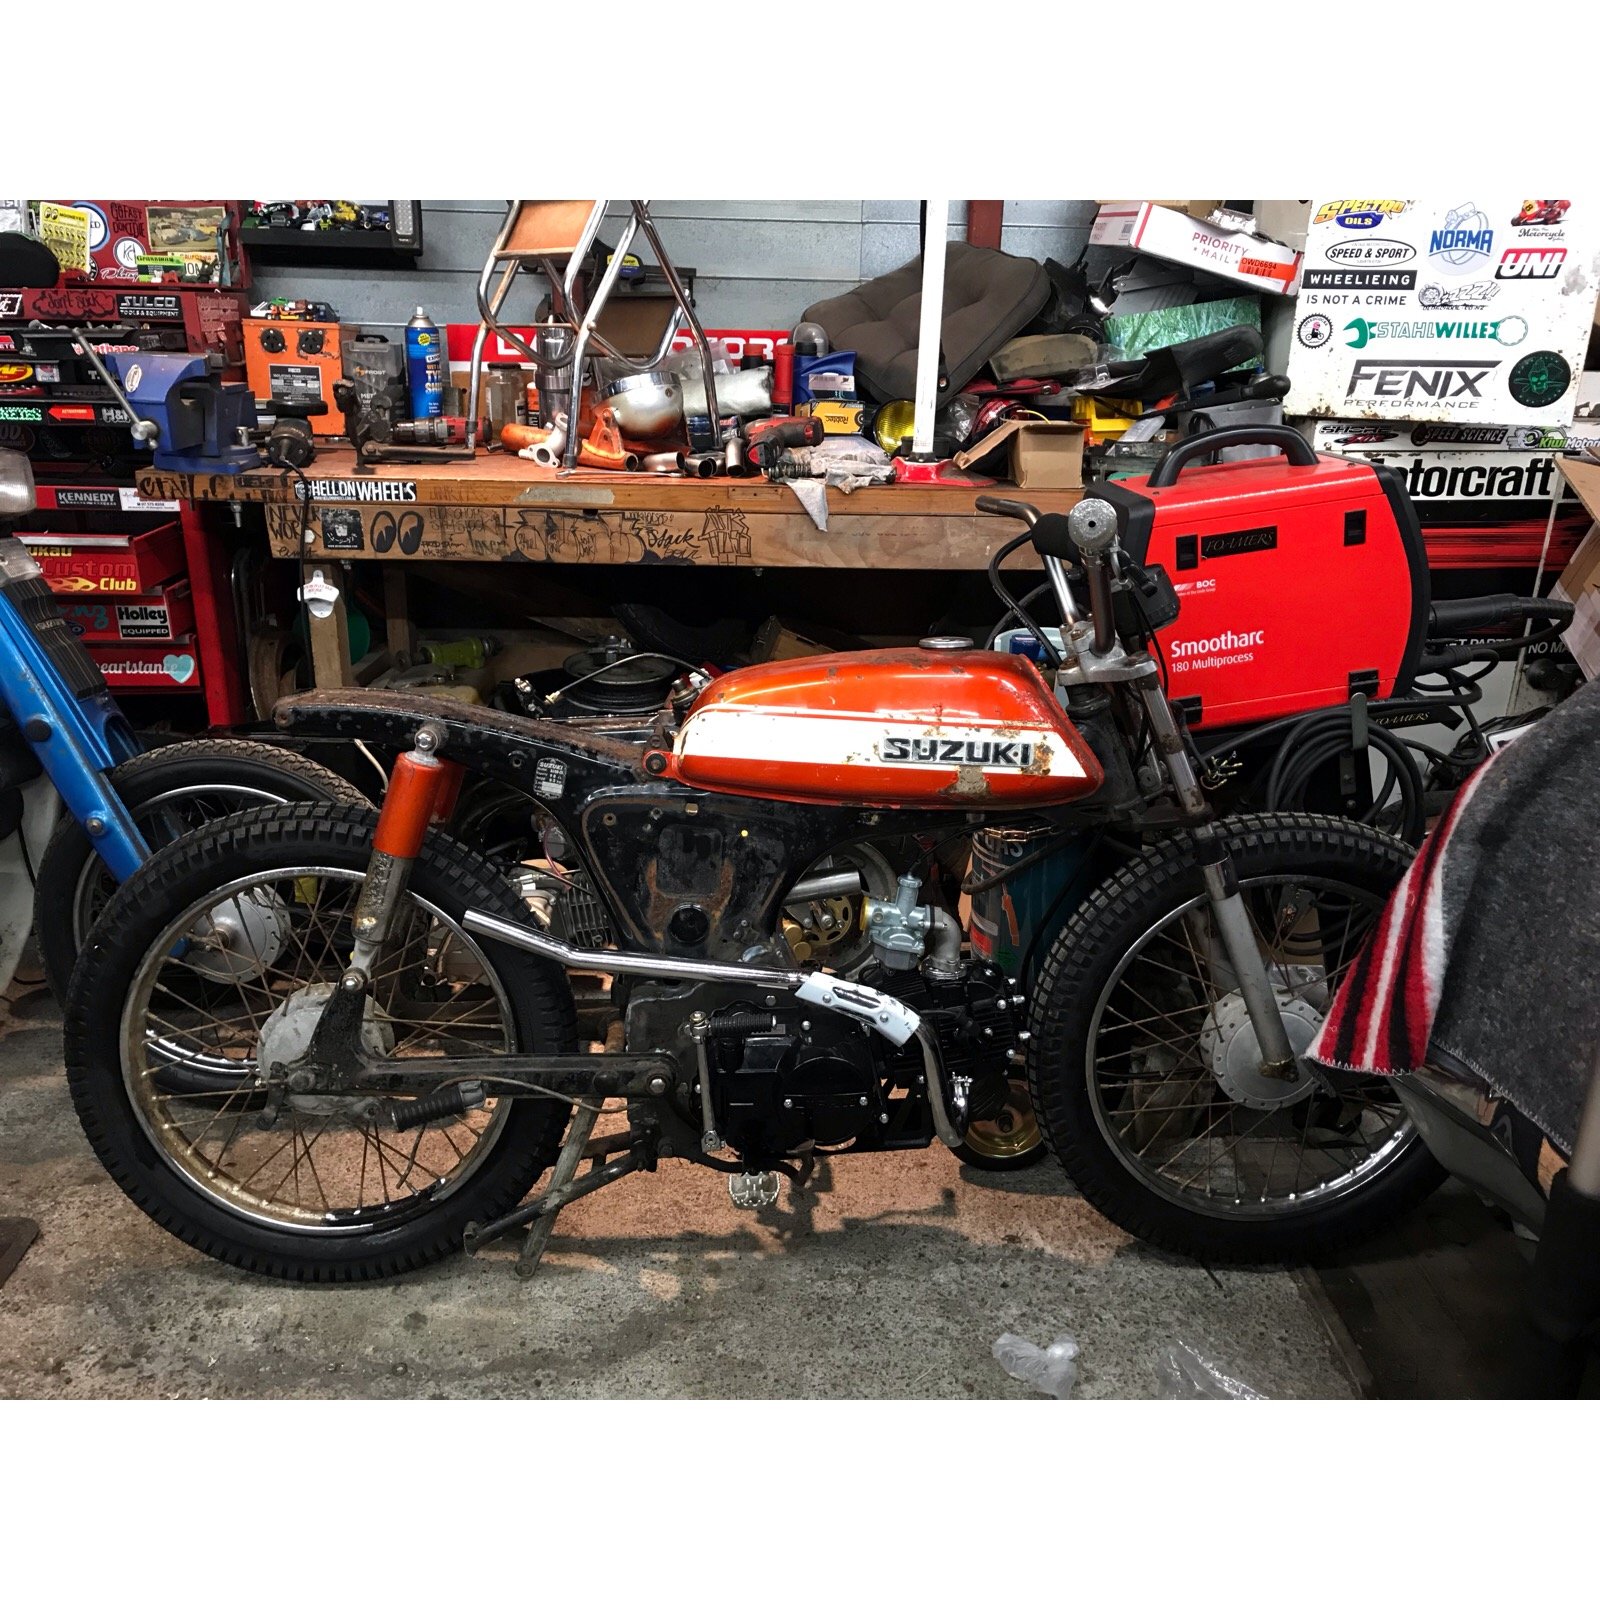
So finally got off my ass and finished this expansion chamber and my exhaust. I ended up rolling the belly section and rear cone of the expansion chamber. Should have done this for the front half too it was tricky but turned out way nicer! and gave it a polish up finished the tunnel end end of my exhaust off too. It’s a pretty tight gap to fit through hence the pie cuts and stupid amount of mounts heres the whole system complete just waiting to build headers and order a Flexi and I’ll be able to install it for good still trying to to find some 41mm od bends for the headers so might need to find something else to sort in the mean time!
1 point
-
So i heard you think recycled plastic is crap? I disagree. I am an enthusiast of it now.
1 point
-
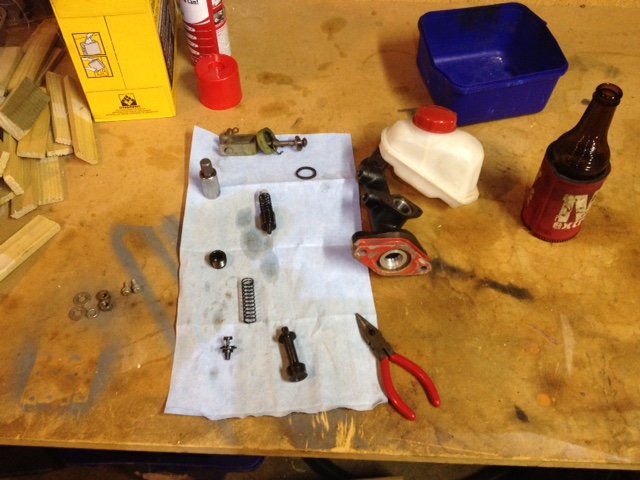
So I guess this is where we start then. The first port of call today after having the car delivered was to work out why we had no power. I popped the bonnet, and yes there was a battery. Ok, let's remove the battery and see if I can throw some charge into it. Ctek says NO. With the charger connected to the battery, nothing. No lights on the charger, and if anything, the charger started acting weird. Guess that's no bueno then. Hope my charger is OK. A quick trip to Supercheap sorted out a battery for me. There is very little space for a battery, so a bit of digging in the Century Batteries catalogue yielded the biggest battery that would fit the same footprint, an NS60LSMF Connecting this up showed that we finally had power. The dash warning lights come on with the key, the driver's electric window is working, albeit slowly, and the central locking works. Strangely the headlights did not respond to the switch, but some wiggling of the wires behind the switch sorted that out (yeah, I'll need to look into that). The next obvious step was to see what was up with the fuel tanks. Now that I had power I could see the fuel gauge was reading empty. I decided to take a risk and try dumping some of BPs finest 98 and injector cleaner into the tanks and see what happens. I split the fuel and cleaner between the two tanks as evenly as I could. Since I had been told it was possible the accumulator had failed, there is a trick to work around this and still have the car start and run normally. The accumulator works to hold fuel pressure in the lines when the engine is off, but when it fails the lines no longer have pressure, and the fuel pump only runs when the engine is turning, so it takes ages to build that pressure back up. The trick to work around this is to have the pump run when the key is turned to ON so it primes the lines. The simplest way on early cars like mine is to disconnect one connector from the side of the fuel distribution unit. This causes the pump to run when the key is on. Easy. Its the blue connector in the top photo, and the green plug goes onto it (strangely... why arent they matched colours?) I connected the battery and turned the key. Sure enough, I heard the familiar whine of a pump turning, and then the woosh of fuel heading down the lines into the fuel distributor. Now it was the moment of truth. I turned the key, and the engine turned smoothly over. It spluttered a couple of times, but wouldn't start. What a tease. Eventually, this happened. It was rough, but running, and even idling. I ran it for a while, and everything looked good. No obvious signs of leaks, but blimey does it make a noise! The longer I ran it, the smoother it was getting I checked and it seems to have gears, and a clutch, so that's a big win. It still hesitates a bit, but that's to be expected for an engine that has been sitting around. I'll take the plugs out and give them a clean (or replace), and check the cap and rotor condition. If everything looks OK, it may even be time for a quick run around the block. One must wonder though; if I can get it running with little effort, why couldn't the "specialist" have it running for the truck? Oh well, best not to dwell on it I guess.1 point
-
The better half and my self have been honing our skills of late. Thats right boss. Hours of hard yards have been put in out in the garage. You all know it and have no doubt also spent many hours doing it. .... Standing there with a beverage staring at an old jalopy, talkn shit and do'in sweet fek all. But seriously what have we been up to other than throwing back jars and chin wagging you say whilst dressed in trendy garage attire. Well ladies and gentlemen wait no longer for here is yet another riveting update to cover the little bit of work we actually did. Radiator all plumbed up. the finned metal hoses bend and hold shape well. like how its kinda central in the engine bay. Replaced the hose clamps that came with it with stronger jobbies as I couldn't be feked with hoses blowing off and coolant going everywhere. Moved on to hooking up the column shift to the trans. Using an IDIDIT GM/700R4 universal shift kit. Thinking being since im using an IDIDIT column it would all just be bolt on. Well that was the theory anyway. Basically it would work fine if I was LHD. the instructions are nice and simple and kit straight forward and well made. Would just bolt in. Being RHD its all opposite though and naturally the American brand dosnt included any instructions and when I contacted support I got no help and basically told me to fek off. LHD shifting would pull the cable out as it moves from park through the gears. RHD we push it in as we move through the gears from Park - 1st. Rejigging at the column is an easy fix. just throw the car in park pull out the cable and hook it up (As pictured). Basically doing opposite as instructed. The bracket that fits to the trans had to be bent so the tab that holds the cable pointed upwards not downwards. Then an extension made up for it. Reason being that the shift arm on the trans is made to point downwards and pull through the gears. Since im pushing through the gears it had to be mounted up top. So the bracket that holds the cable in place had to also point up. Simple enough I know but thought since IDIDIT support and engineers where about as useless as tits on a bull I would flick it up encase any other Kiwis or RHD owners needed a bit of help. Shifts easy though the gears. Clicks from Park to 1st. Ordered a heap of fittings for the fuel system. But before I start hooking all that guff up it was deemed time to finally finish up the gas tank thats mentioned in a previous post. Its made to nestle up nice and happy in this rather large hole that was cut in the boot/trunks floor. Its hard to tell but the hole has been braced up fro the underside so when its all together the floor will be sandwiched and nice and sturdy. Since the lid was still off it seemed a good time to put together the in tank fuel pump. Overkill to be sure since its only driving a few carbs and not fuel injection. But it has good reviews and is supposed to be pretty quiet so I was like mehhh seems easy enough and should be "hook it up and forget about it". Its an Aeromotive Phantom in-tank carb setup. Basically meaning it has a regulator (pictured there front center) that drops the 320psi pump down to 15psi. Also has its return blocked with a removable cap. Comes with pre-filter pictured along with that sponge tube that you cut a tad higher than your tank and acts as a filter and a baffle. Also put together the Dakota Digital universal sender. As with all there stuff its a nice bit of kit with simple instructions. Has the ability to fit in a huge range of depth tanks and works with many gauges. Anyway lid all TIGed up. Thanks lads at Kirk Irrigation for that by the way. Also got them to attach the filler neck and drain. Holes added before assembly to make life easier. Then the sender and pump just all dropped on in to place. Under the car it sits up nice. tucked just above the lowest part of the chassis. Should be no scrub line issues. Also still has a nice amount of clearance from exhaust - its why its an odd T shape. Up top it is about level with the lip of the opening. Will have a floor mounted above it latter down the track. The rest of the other bits of the fuel filler neck still to attach pictured above. Also pictured is the cradle to hold the battery box that we wiped up to hold it all nice and secure on the right side. Just using a standard marine battery box. Fits up nice in the back fender as shown. Can vent it through the floor. Will have a panel to hide it from view down the track. The battery only just fits in whats good i guess - no slipping about. The big bugger should power everything I need and flick over the engine no worries. Looking at either welding cable or 1guage wire to carry the current up the front. earths all over the place of course. So picture the above with panels. sides to hide the battery and tool kit along with fuel neck that will live on the other side. floor to protect the tank then front panel to hide the airtank and amp whilst also adding sound deadening to the shut up those two pumps. Now getting back to my original comments in this post. That being the standing staring at the car. Maybe moving something a fraction taking a drink and repeating the process. Side pipes seemed like a good excuse to practice this. We had to go through the process of draining a few cans to use to hold the pipes in place first of course. Sacrifices we make aye. Note the said cans are crimpled in the middle otherwise they are much to high to suit the air out stance with the pipes. Front grill also seemed like a good excuse. Pondering a 1950 Buick grill. Middle section should fit in well once pushed back but its overall width is wider than the car. Dont really want to cut the chrome as it is so nice so I guess if we use it we may need to flair the guards a bit. Already planned to do this a bit to get better wheel travel for steering when air out but hmm I think this is something a few more brews and staring might require. All this is much down the track of course. Tiki - such a great helper. You got a wire he will attack it. Drop a nut and he will soon have it flying across the garage floor ending up down the side of some thing out of reach or under some other heavy obstacle. Told him I would stuff him is such a pose if he keeps annoying me. Guess he is happy with that idea as the little shit hasn't stopped.1 point
-
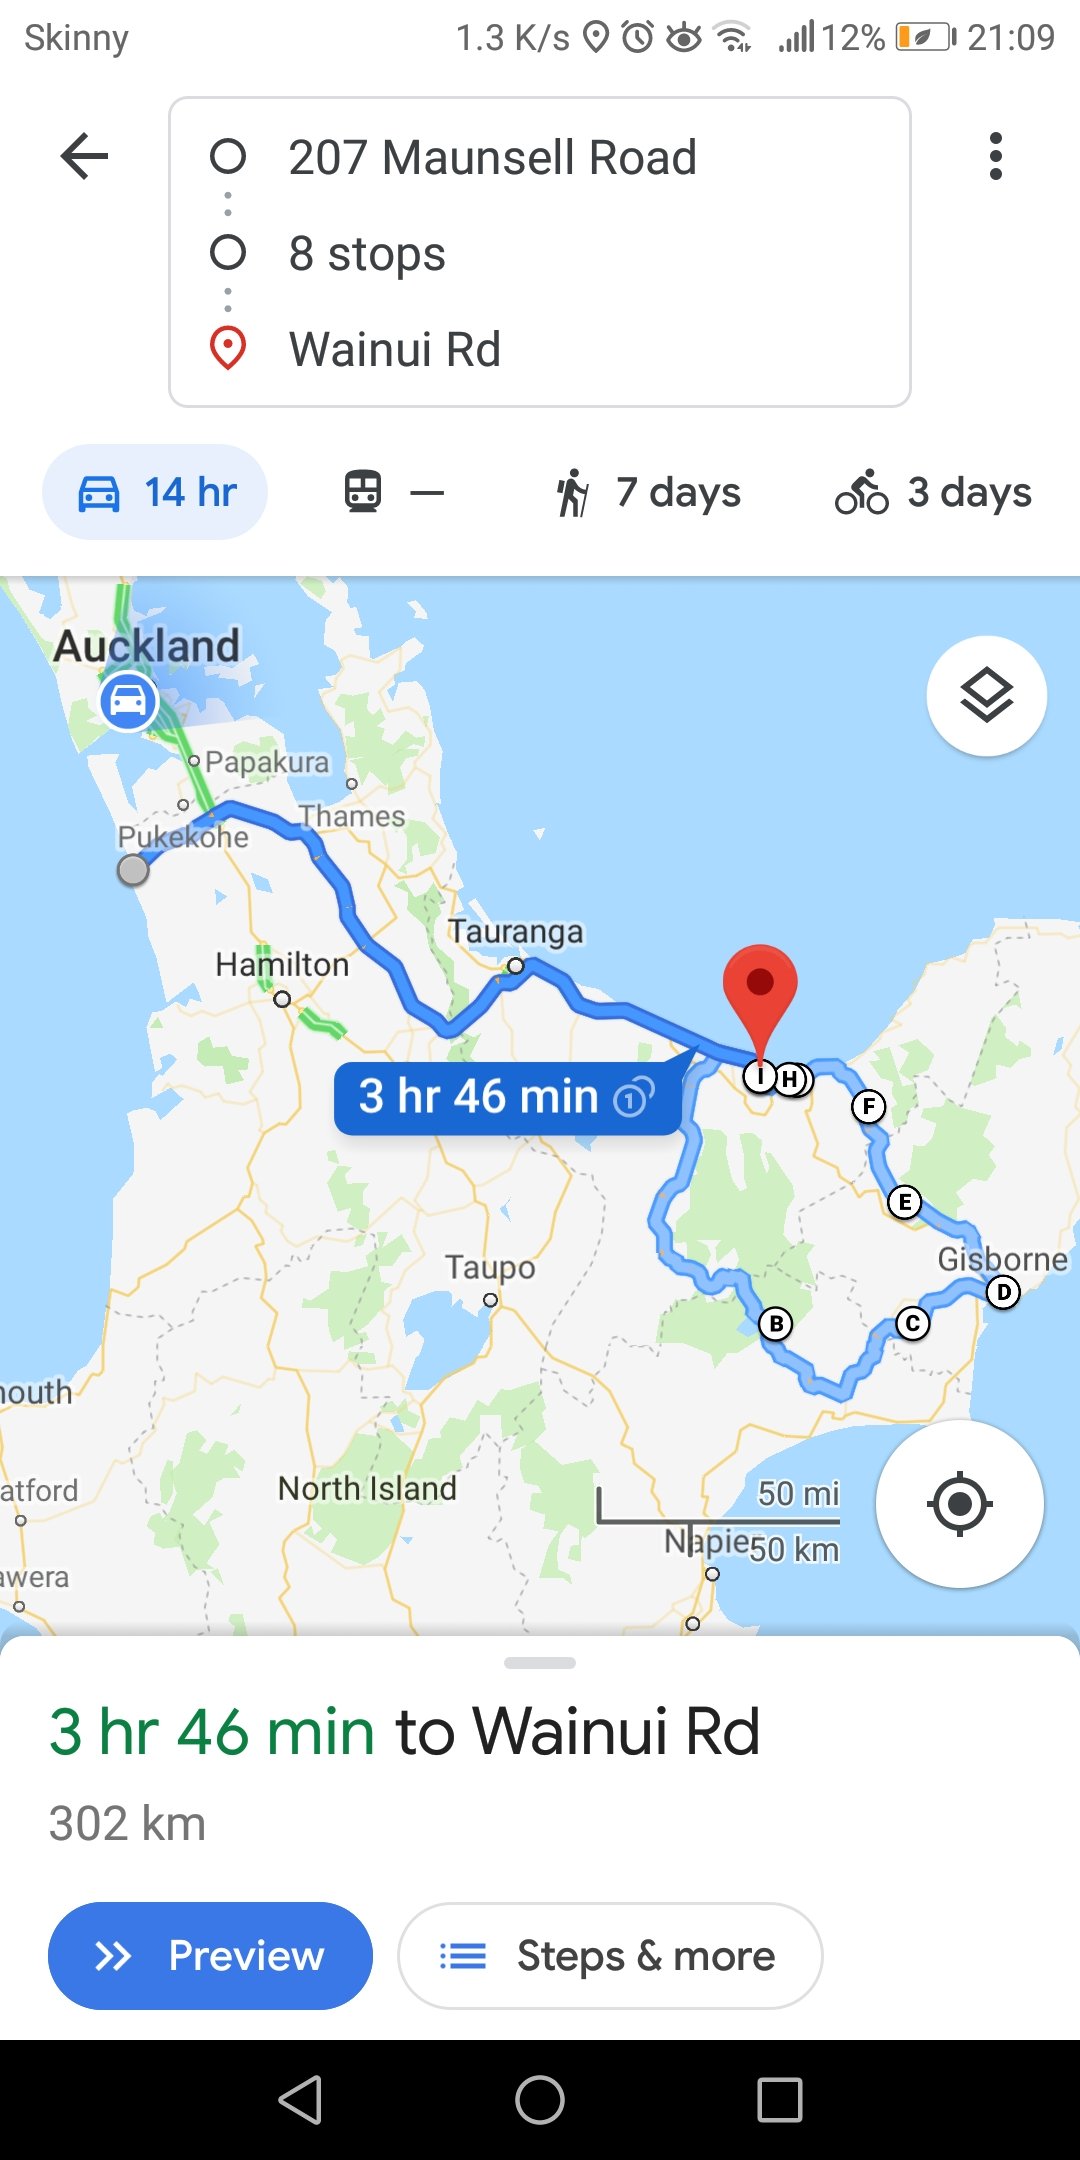
Anyone want to join me on a little coast to coast ride?
1 point
-
Suzuki Adventure50 builds coming along well.
1 point
-
I’ve got this underway. Suzuki A50 feat Lifan 125
1 point
-
Vespa. Have fitted some tyres that will be mildly better in dirt& gravel, already got a cargo rack and bag sorted, and have got a fuel can that fits in the space between my feet.1 point
-
Bone stock CT110, might do an oil change the night before.1 point
-
so a small update. yeah the kombi has had all my attention over recent times but i also got the dream plate that was listed here for sale. for scale this thing is huge. but pre bay windows are also quite small vws also added the bottom of the caravan also added some strength across the roof, so now have three bars from side to side. it had been a while since picking up the welder and i had to put this up against the bench so i could stand on it, on top of a box As of yesterday i got some motivation and done some more work. Cut the side door in and then i added some braces to the caravan. old mate @Geophy came over to drop some steel over and i was like hey hold this. so i welded the base of the up rights for the door, then cut the center. needed the strop in the center so i could get the grinder in. another strop here in this welding action shot. this time holding the peace of steel up. This thing looks like a caravan now. pretty happy to see a door cut out in the side. i now need some right angle for the floor and need to put some triangle braces in some corners and im pretty keen to get some paint on it this month. getting pretty annoying in the shop.1 point
-
i have, that shit crazy fast. there is also a Mercedes M120 v12 going into one, that one fits like a glove too, an XXS glove over an XXL foot. fits none the less. and it will sound like a zonda if hes done it right, funnily enough we also have one of those engines at work, in an sl600 race car we built, its a gigantic engine, truly a monster. sadly the motor is fucked, so its getting similar treatment to my car, except we'll use one of the Hemi 5.7 beasts we sometimes get. i figured i didn't need an additional 25% power over the 4.7 in an mx5, with the added bonus of way more spare parts for the 4.7. cheap cheap1 point
-
Seen the Hellcat Miata in the States? This puppy will fit like a glove* *when you have XL hands and XS gloves .1 point
-
The engine is a nothing flash 4.7l V8. making a reasonably flash for an mx5 310hp and 400 something nm filthy, but not an ugly motor which is nice. i plan to keep the automatic and manualise it. the trans computer should be able to to be programmed to behave like a sequential manual trans and ill make a big gear chopping stick. and the goal for this car is to be as fun as possible for as cheap as possible. it wont be a competitive race car. but it will be a stupid amount of fun
1 point
-
So the first task after the bathroom extension was to have a kitchen area along the back wall. Kitchens are expensive, even for the kitset things. So after a bit of Facebook market searching (never expected to find good stuff on there) I came across a yuck cabinet thing that can only be described as the wooden entrance piece to school camp where 1J5's were stored in the top, and school bags below, and maybe one of those weird clear grey/brown mugs on the top too that a relief teacher sipped from occasionally. Well this thing was also bloody heavy but only $50 so we hoisted it up into the van and to the shop, and I spent 3 days regretting my purchase. Had various ideas for it, tested different woods to see how food-grade polyurethane held up, then eventually stumbled upon a sale of ply at Bunnings and was sold. We sanded up the cupboards and drawers and took the top piece off. Spent another few days testing between paints and stains, with the matte black paint turning out chalky and holding fingerprints, so I settled for an outdoor satin black deck stain. Don't tell the Bunnings paint lady though or she has a meltdown. Ended up sacrificing the left had drawer and cupboard for a Bunnings showroom special oven and hob, and the shelf found it's final place but not by choice, because the chemicals in the floor coating has stuck the feet to that position. So it stays. And the legs are off a commercial cooker that were the cheap price of free. After that we went to work on the dirty/laundry area, but didn't want the machine visible because it's not cool and industrial, and wanted an area to clean car parts etc. Went with the cupboard theme of black with ply top and genuinely impressed with how it all came together, especially with Leonard. And other than those jobs, we had to get some of the bathroom done after months of procrastinating over different ideas. I got Ryan to leave some of the concrete bare, because I wanted to still have some of the tiltslab in the room, so I put what I thought was polyurethane on it, just turns out it was some wood varnish (definitely don't tell Bunnz lady) and it worked a treat, stopped the concrete dust and allows the water to run off. I waterproofed the shower over 2 days, the second day took 3hours straight of coating but old mate Missy and Ice Cube got me through. Then I found a tiler and it all went well until we were one tile short to finish. A few days later it was all tickety boo. Note to self though: if you've never had a dual shower head scenario going on before, do ensure the dump head is turned on first and not the shooty one. Stephen wanted me to have a photo of the shower on and a beer in the soap box, so turned it on full steam with old shooty head pointed at me and the camera. So the camera is thoroughly clean now. Next we are finishing off the final wall, and deciding an idea to make a bathroom vanity. Any ideas are hugely welcome - we got some galv feet off AliExpress which are lush so that's idea one.1 point
-
When my father had the reliant scimitar he had a wee book manually typed out and photocopied by some BL foamer that listed all of the parts in the car and which car they originally came from, I remember the door handles were from an Allegro which loled me. About 10 years ago he had decided to sell the car and offered to give it to me, I stupidly declined0 points


This leaderboard is set to Auckland/GMT+12:00