
Leaderboard


Popular Content
Showing content with the highest reputation on 07/29/19 in all areas
-
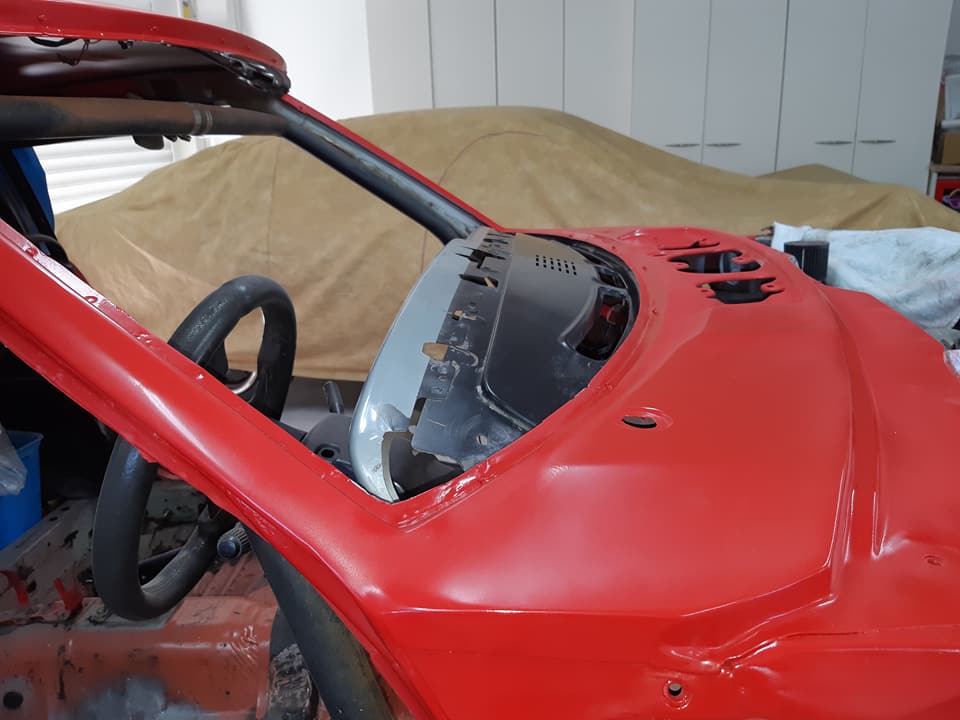
Well today the car passed the compliance recheck and I now have 12 months REG and 6 months WOF. Thanks to those that have helped me during the build. Now it’s time to relax and enjoy the old sled. Beer o’clock for me I will be parked up at chrome this weekend weather permitting. Come say hi.
 21 points
 -
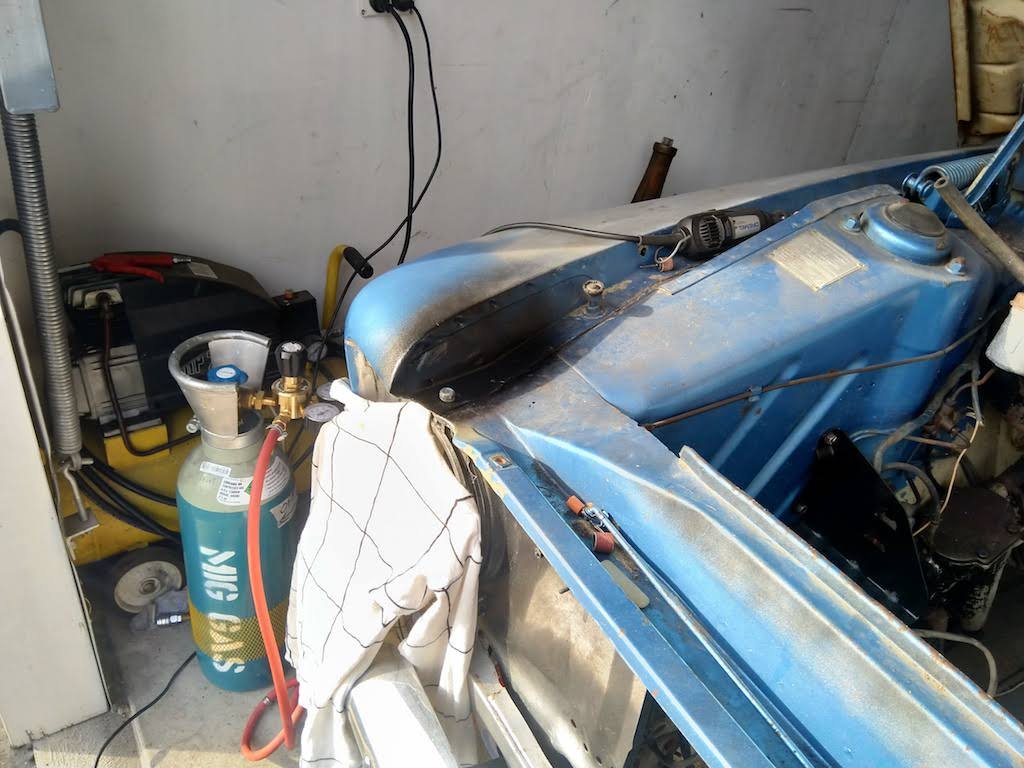
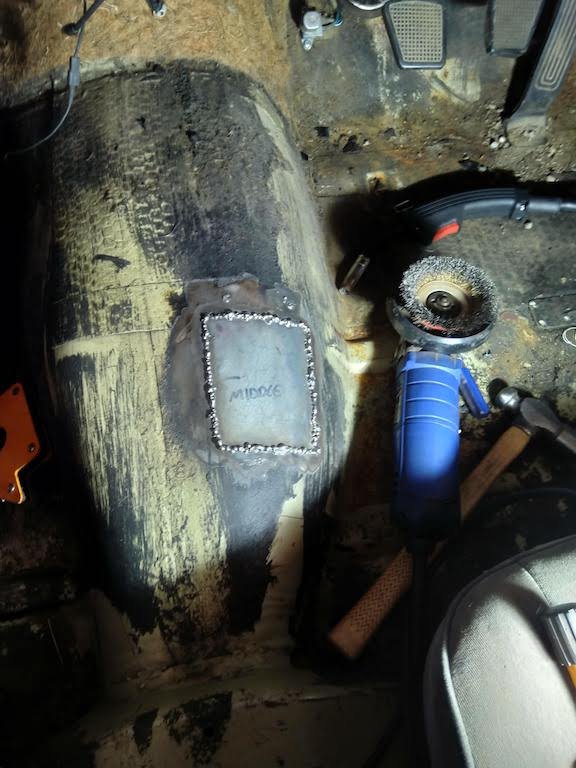
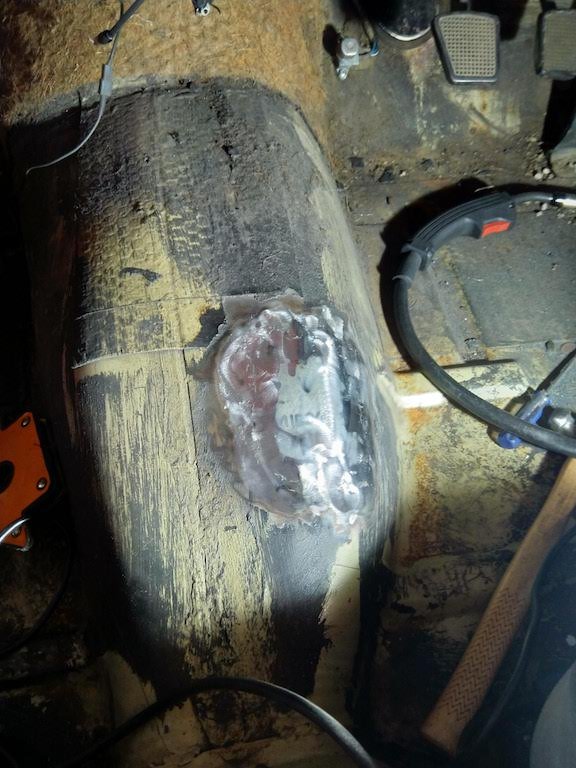
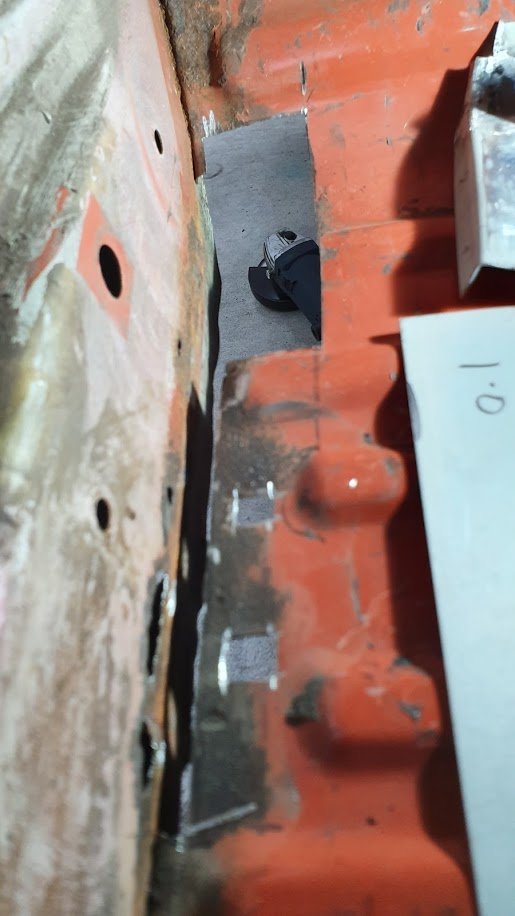
Connected the battery and the spark plug leads that i had removed to test something on the ute with, and it fired right up! Hopefully a good sign. Video below is the second start and first drive out of the shed for two years. Went well, but the rear brakes are binding which suuuuuuuuux as this was the last thing i did. Might just need a drive. No road drive due to the 2 of 4 doors missing or not closing and a loose bonnet Good opportunity to hose out the shed too! Somehow it looks even smaller with nothing in it! Made a new metal board rack for the back wall from the old clothesline bars that came in the back of the van, much stronger and can now easily fit 12 instead of 9ish max All the primer spots are areas that i have picked scabs or chopped out rust. None of them look like they have blown out again, so thats nice. Still a few to sort out, including the front passenger door. Front just needs a paint. Both doors on this side need a lot of work or swapping. Engine bay still looks nice (this is after a wash, blast with the air gun and lashings of WD40) Swapped the new welder over to 0.6mm wire (new roller came in - thanks AliExpress!) from the 0.8 i used on the exhaust and turned it right down to melt in a few patches on the front passenger door Goes pretty good, but its tricky to avoid the blow throughs on this old thin steel - i dont think the amps go quite as low as my old one even tho they both say 30A min, i think my old one was 'optimistic' even tho its actually more useful to be able to go lower on thin stuff. I have also (finally) replaced the liner and torch on the old one so i might fire it up and see - i probably should anyway to make sure its ok before selling it (or keeping it!) Happy this is making some progress again.12 points
-
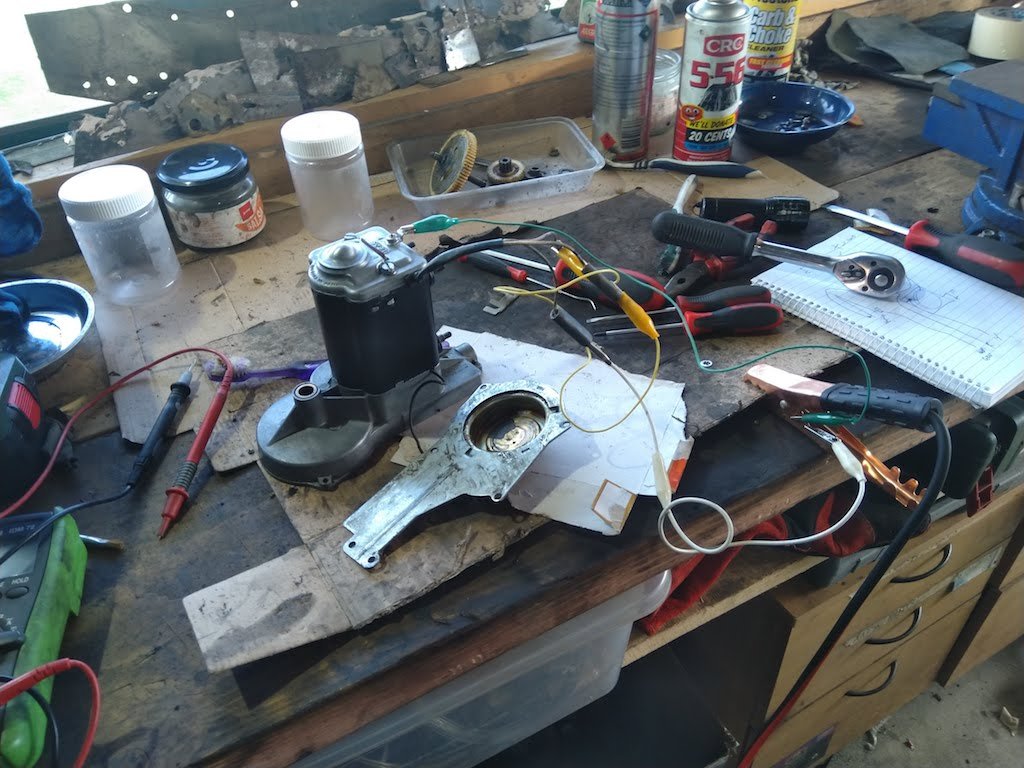
Just been doing little things on this. So far I've rebuild the starter motor, windscreen wiper motor and a carb with the best bits from several. Found a wee bit of rust on the guard, fixed that. Fixed the transmission tunnel, someone had cut it out for a floor shifter with what seemed to be an axe
9 points
-
That's exactly how I planned it, the kids keep asking me to "Adjust the drift Dad"7 points
-
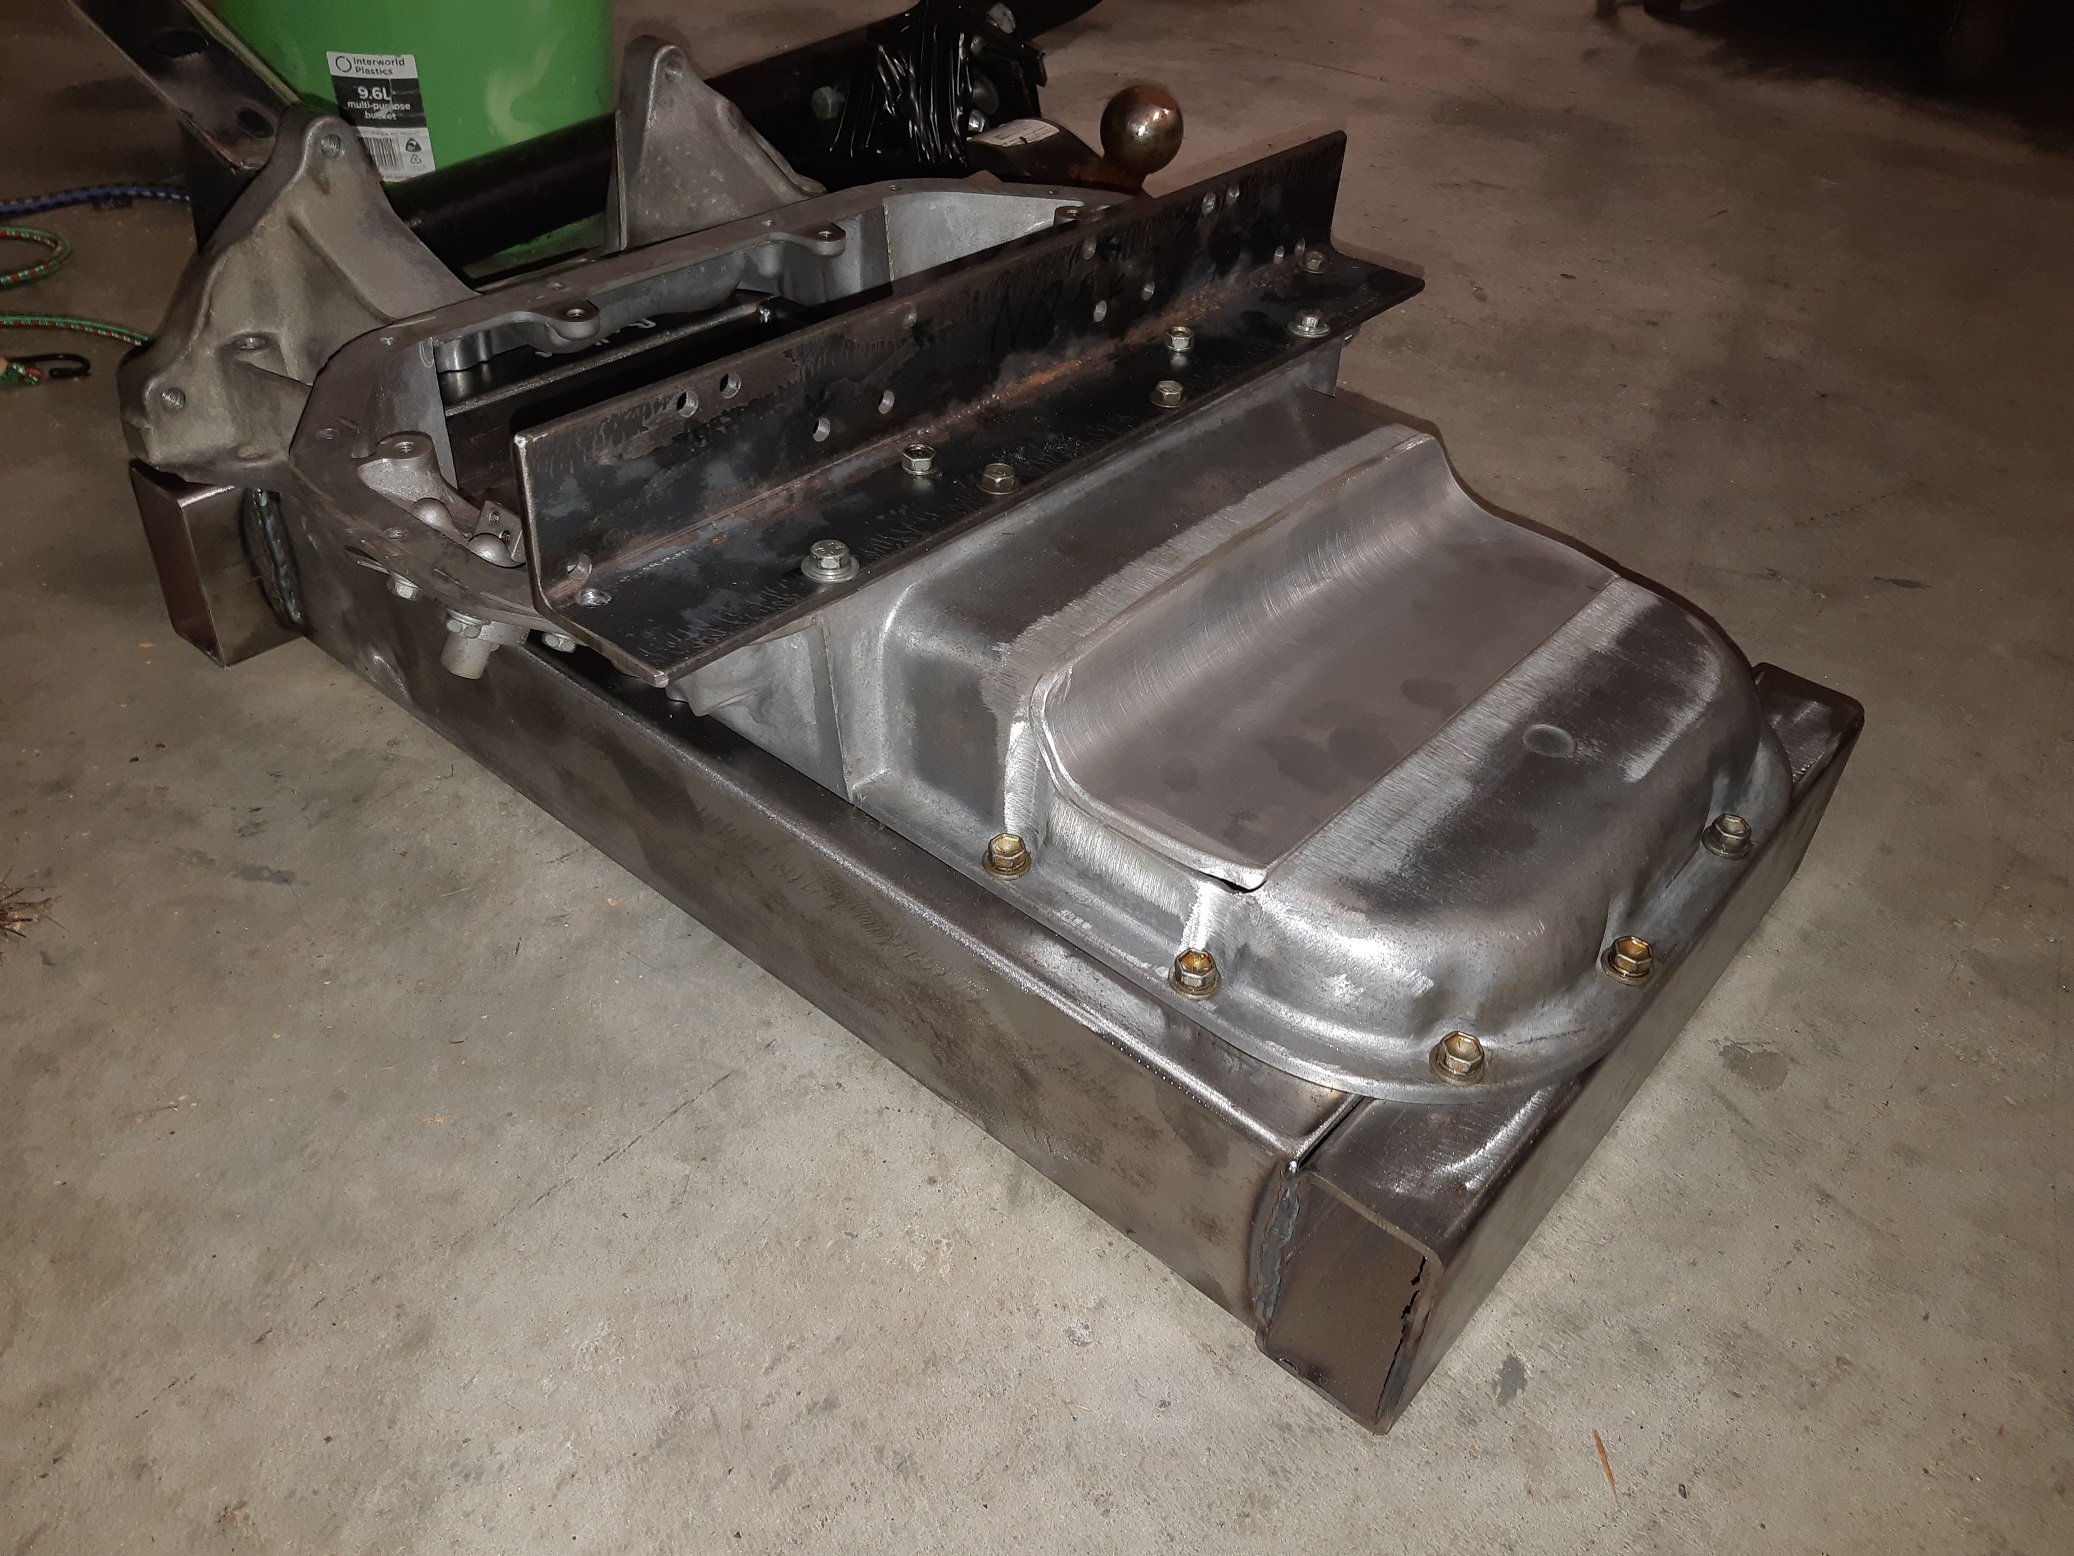
Alrighty bitches, time for the drawers. Real drawer slides are really expensive, the ones I wanted would have set me back $450 ish even at trade prices, so I decided to make some rollers out of bearings and some extrusion from Ullrich. I had already sort of tried to do this with a round rail extrusion and some steel round but this was deeply unsatisfactory. Bearings mounted on a bit of drilled and tapped flat bar, tacked in place for now. Cut out the sides from some checker plate I had lying around, I wasn't too sure about it cos of the generic checker plate wankery that goes on but it looks pretty good. I had stealthily snuck a couple of sheets of 1.2mm electrogalv into the shed on Friday, I made some big patterns for the box and bent them with the finger bender. Then a shit load of weldy weldy, grindy grindy. Then creating the same thing for the other side. During these activities my 5" grinder let out a really considerable amount of smoke and ceased to function. This meant a trip to mitre 10 for a quite expensive replacement. During this I also ran out of gas so dragged out my big tank of co2, I pretty much immediately managed to knock this over onto the concrete and let out quite a lot of gas. This bent my regulator in unfortunate directions. Miraculously it still works so I replaced the snapped outlet and carried on. They are big drawers, 800 wide, 600 in, 350 deep. The extra shelfy bit at the back is for a secondary drawer that will sit on the top and slide away for access to the main box. Should be heaps of room. Here you can also see my modified super sized porta power pump. This now holds enough fluid for my crane to move through its entire possible range. Yay for me. In other news I mounted the fuel filler, this meant moving one of my battery trays, but this worked out ok. This will be covered with a lockable checker plate hatch in the near future. In other other news I made a place for the plate and light. Somehow my deck build calculations failed to take into account the size of the license plate, this meant I had to make a wee mod to the deck. Might buy another of those lights to make it even. Still no word from fucking engine man. @yoeddynz gave me the name of the local safari foamer, he reckoned to open up my engine and have a look to see how fucked it is. If it is at all salvageable I think I will use this. I also got the radiator dude around to check things before getting to carried away with the custom rad, but he was happy so will build it. He will mock it up for me first. This will be super expensive, it will be a 5 row triple pass beast. This is needed as the space is not super wide and I need proper cooling, particularly if I turbo it. Rather pleasingly he said it was the best project he had seen or words to that effect. Yay for me again.7 points
-
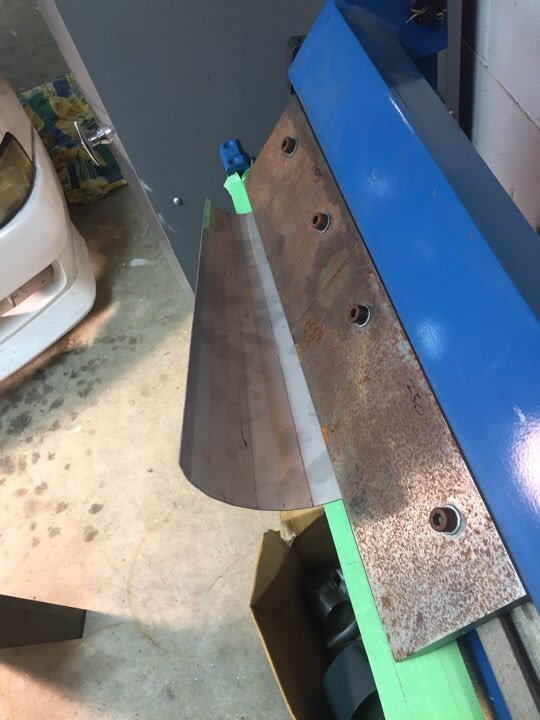
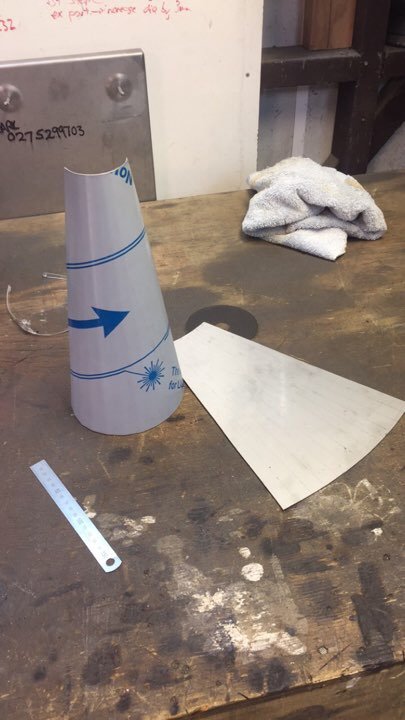
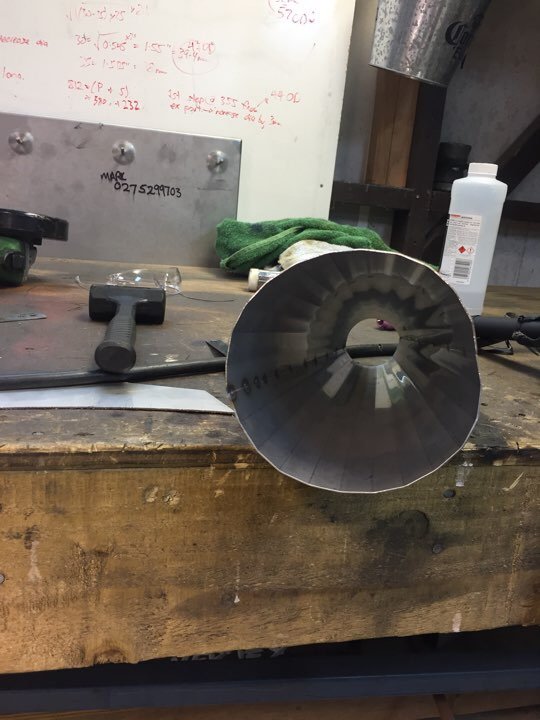
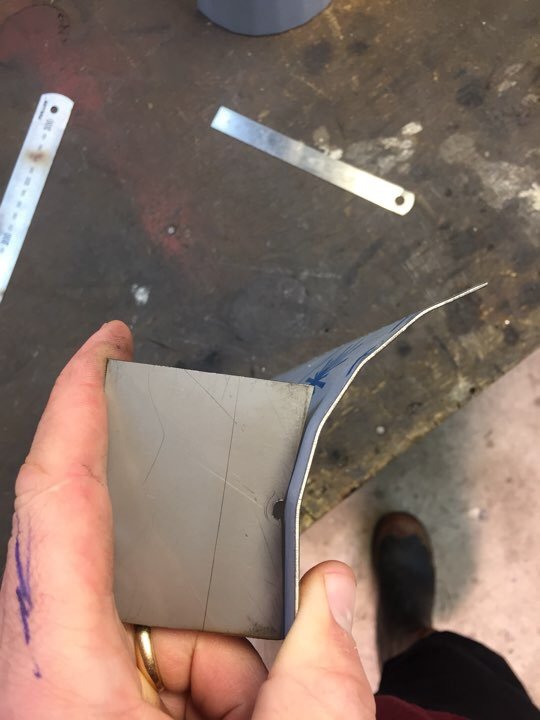
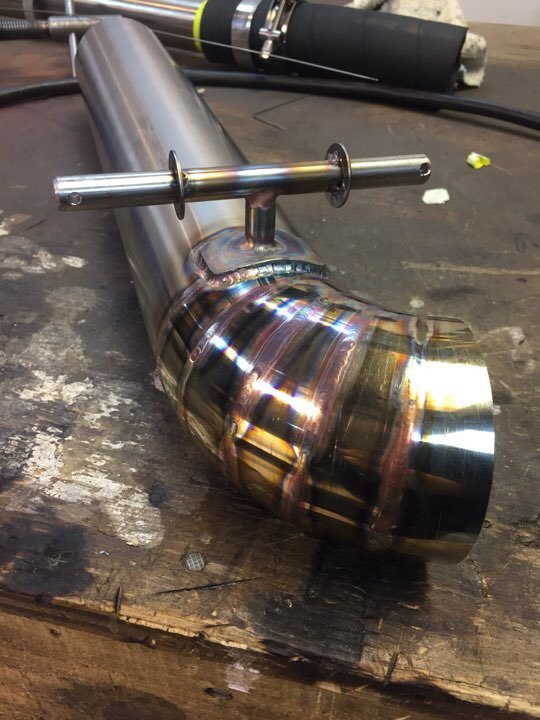
I have a bit of a tight spot at the end of my tunnel/fuel tank that required a tight bend. And I was being cheap so I bought some pie cuts from nzpiecuts on Facebook. showed up the next day A+ service! Turned out awesome no purging and bugger all penetration. Oh yeah and I over engineered the shit outa another exhaust mount.. I’ll post a pic of the finished product a bit later in the week! Full disclaimer I’ve got very limited fabrication skills I am a project manager who sits at a desk all day long. But I’ve been super enjoying making cool stuff so I thought I’d give an expansion chamber a go to test a few theories. Patterned it with the help of youtube I don’t have any rollers so just decided to use my small folder. due to there being 12 folds per half each fold is 180/12 = 15deg which is bloody hard at the best of times so I made a gauge so I could check on my progress as I went.. turned out not too bad got a bit of beating to do to get the seams to line up and make it round but not a bad start!
6 points
-
Slowly slowly getting there6 points
-
Random slightly cool things working together.
5 points
-
Another project finished in the weekend.
4 points
-
Forgive my ignorance but is that not exactly how it should operate? You wouldn't be able to correctly tune the idle circuit if you couldn't close off it's flow completely to then meter it afterwards? Maybe most carbs are worn out from Barry fettling and always let some through. Most manuals I've read indicated it should be screwed right in then back out one and a half turns and adjust from there.4 points
-
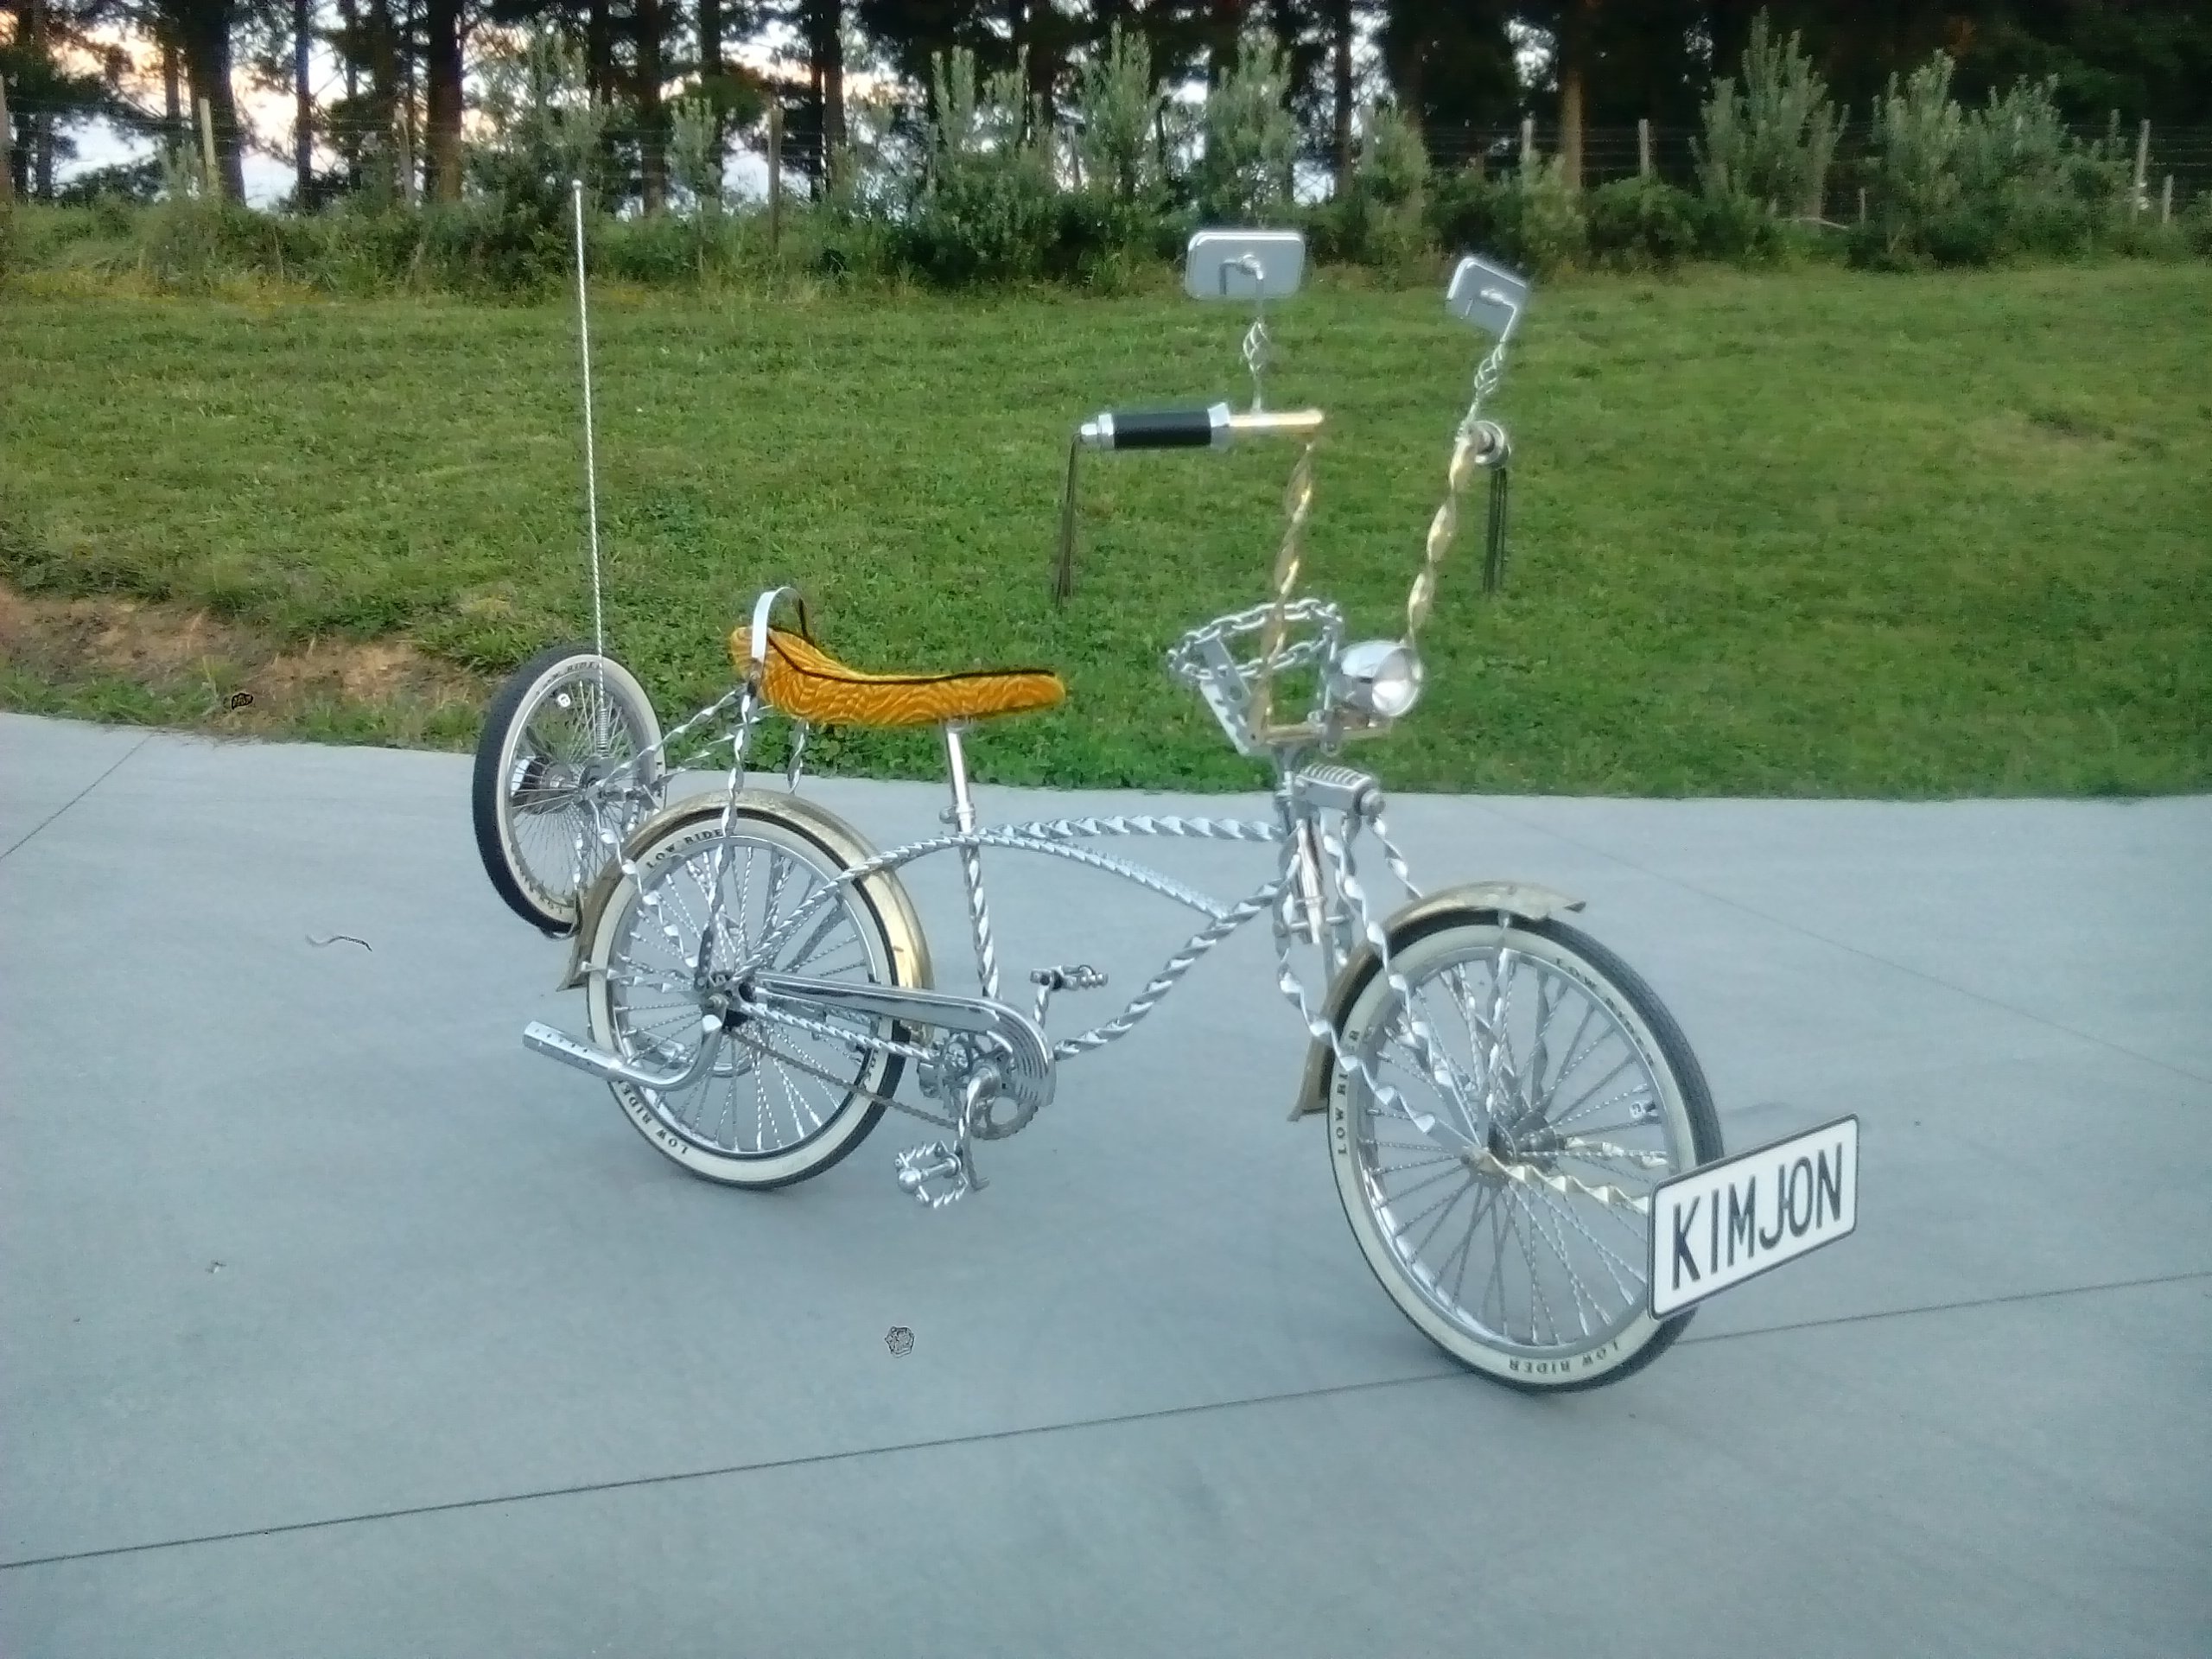
Guy at hobbie store twisted my rubber arm..
4 points
-
today i drove took the car for a decent drive, first drive since power steering install. fuck me, its a different car. the old steering box was fucked which didnt help but man its a different car, both in carparks and on the motorway. so much better! and during the night time i decided i wasnt happy with the sub box i made yesterday so i made another one today. its much better, sub faces forward instead of sideways and the box fits into the car better. the internal volume is closer to what i was trying for as well. every body's a winner! 2019-07-28_04-20-39 by sheepers, on Flickr4 points
-
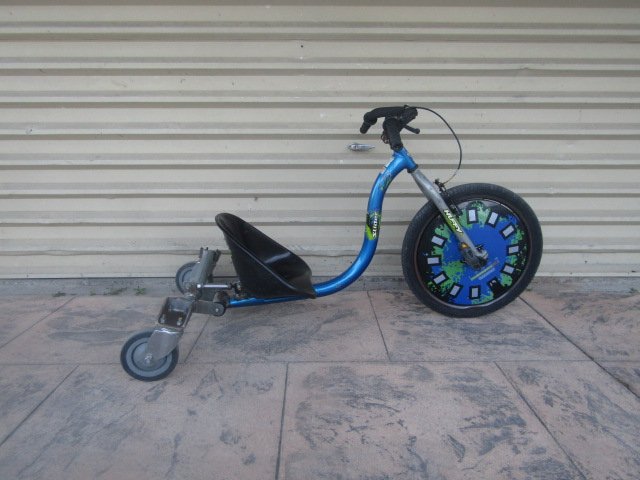
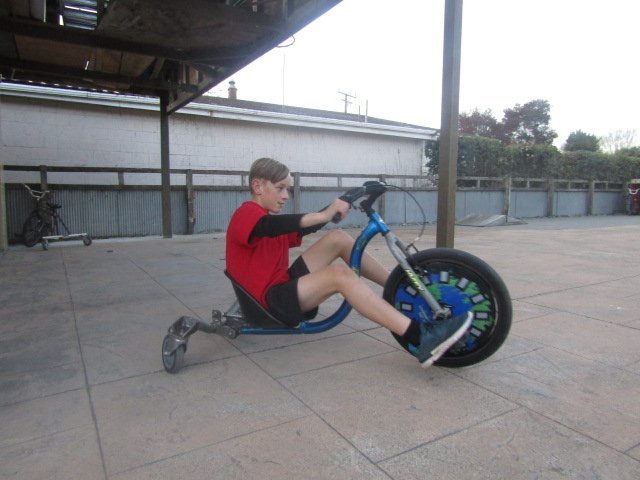
So fast forward nearly 2 months and took it first test this morning. So much fun. Massive props to @Geophy who helped out with pretty much everything. Still need to tidy things up and sort wiring, but yeh, so stoked to have it ridable. Was being a bitch so didn't do a high speed run but goes plenty fast enough for what I want
4 points
-
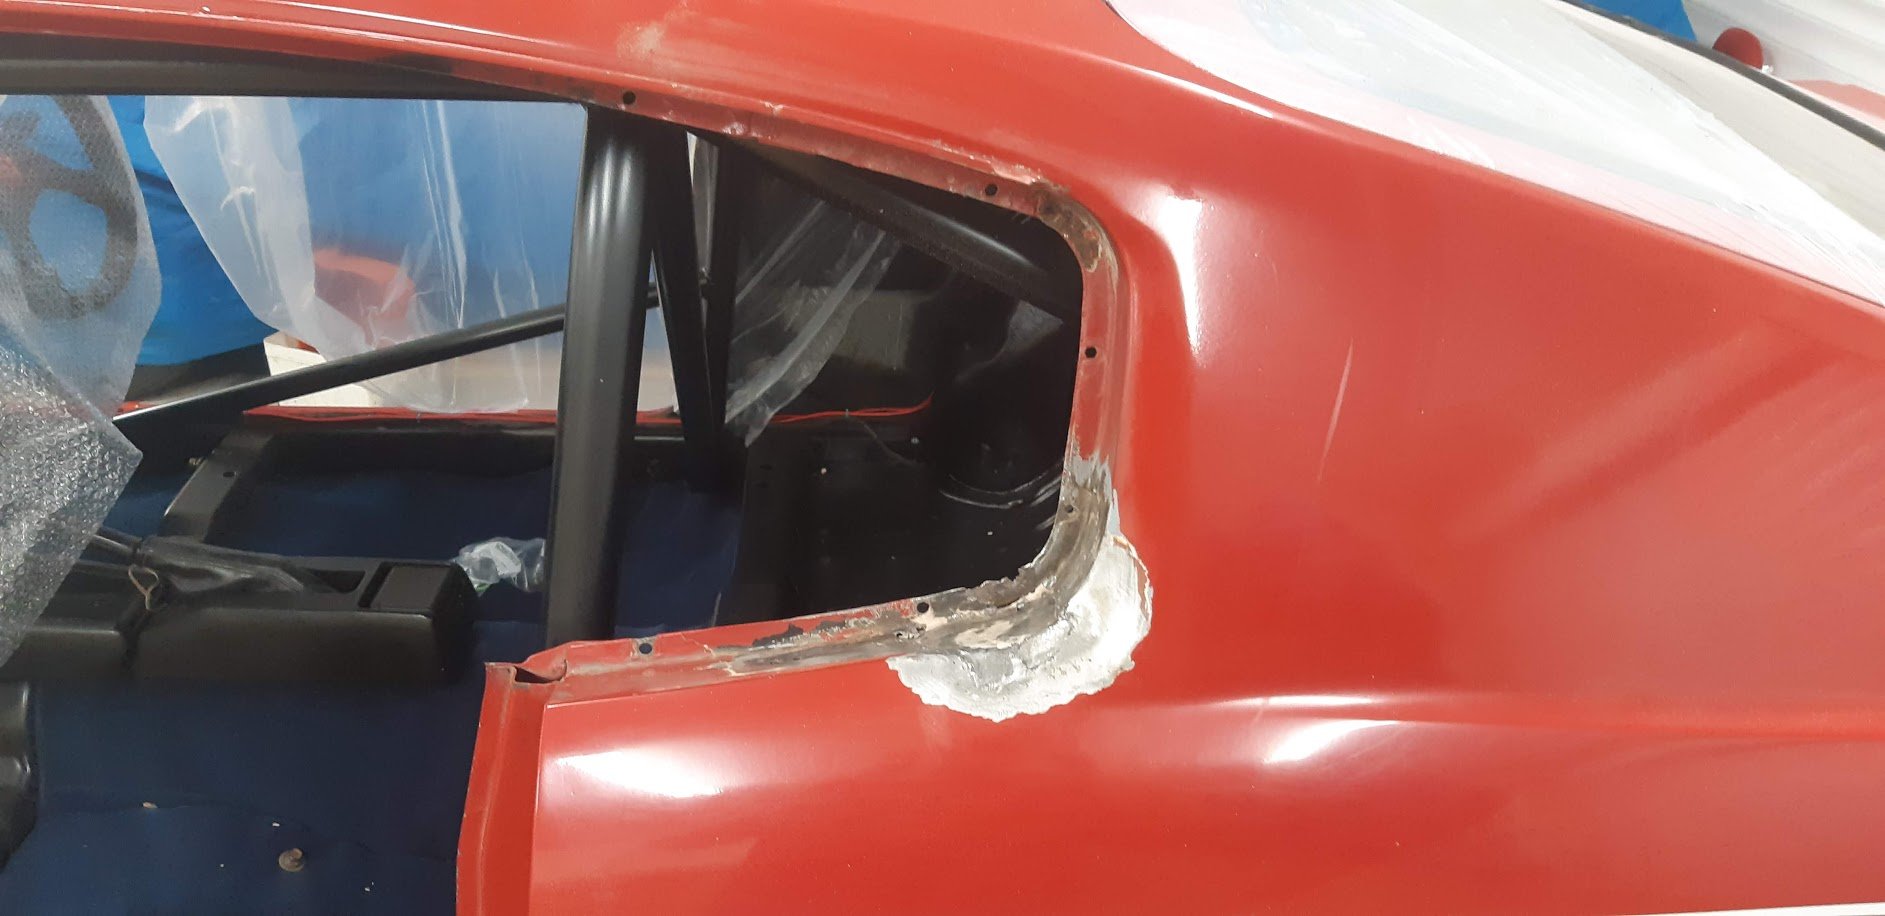
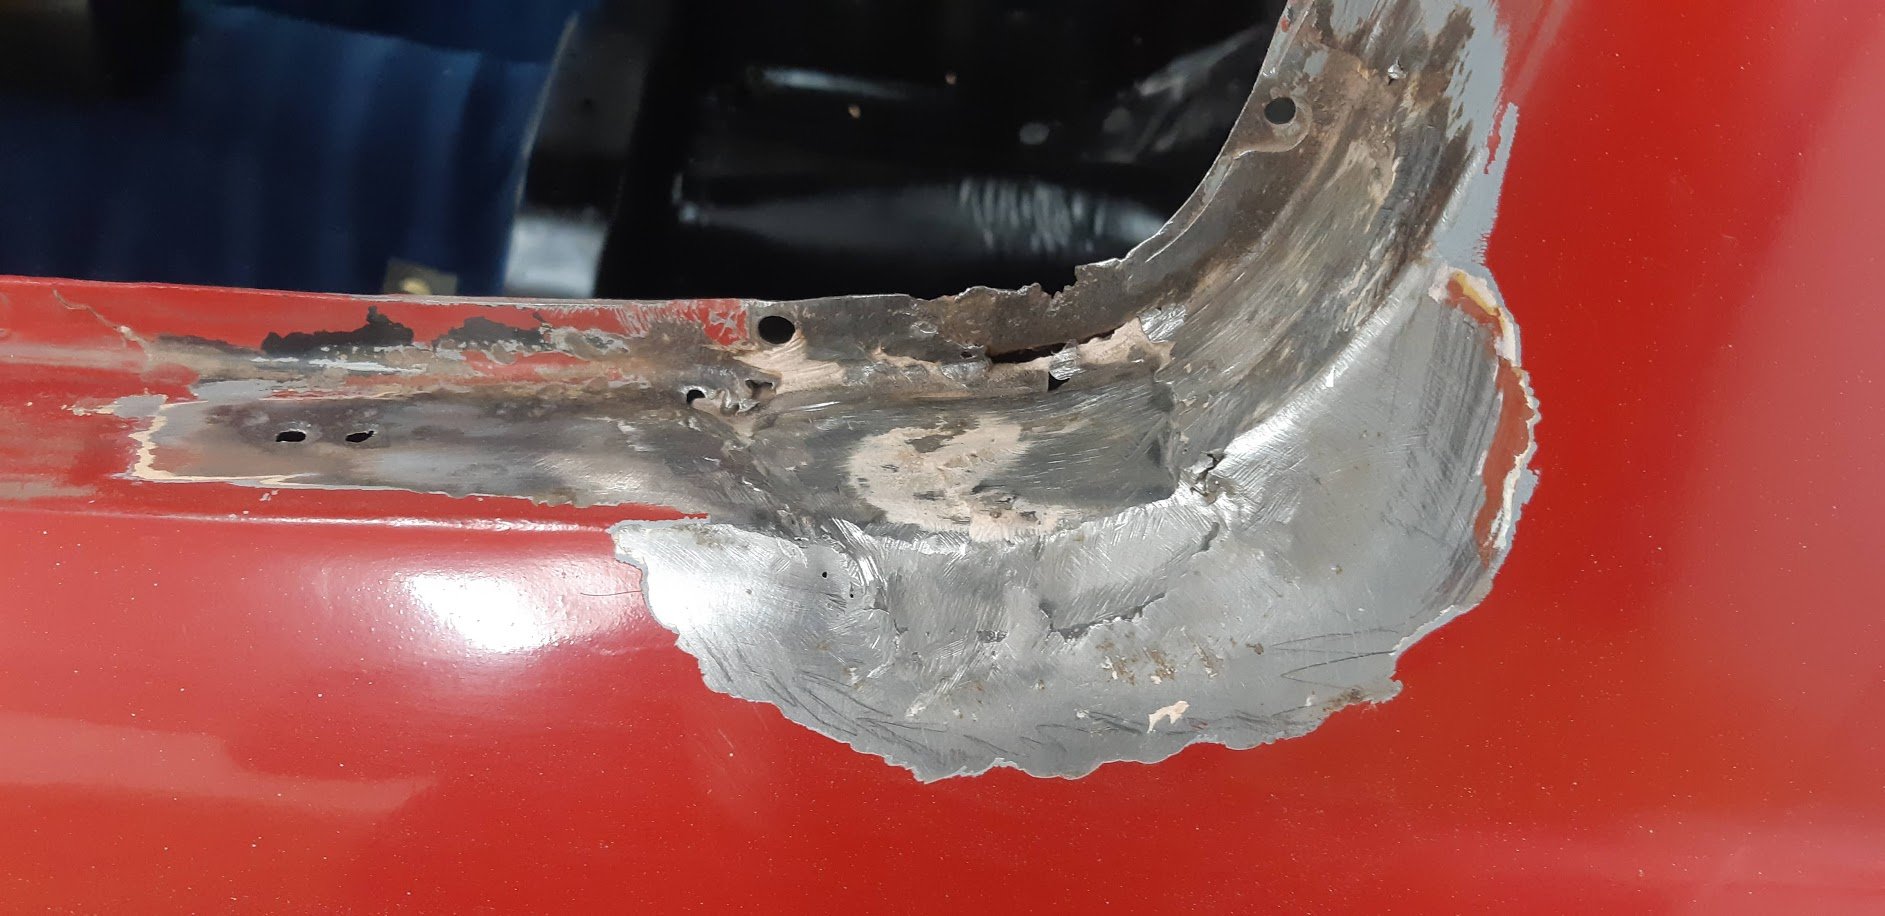
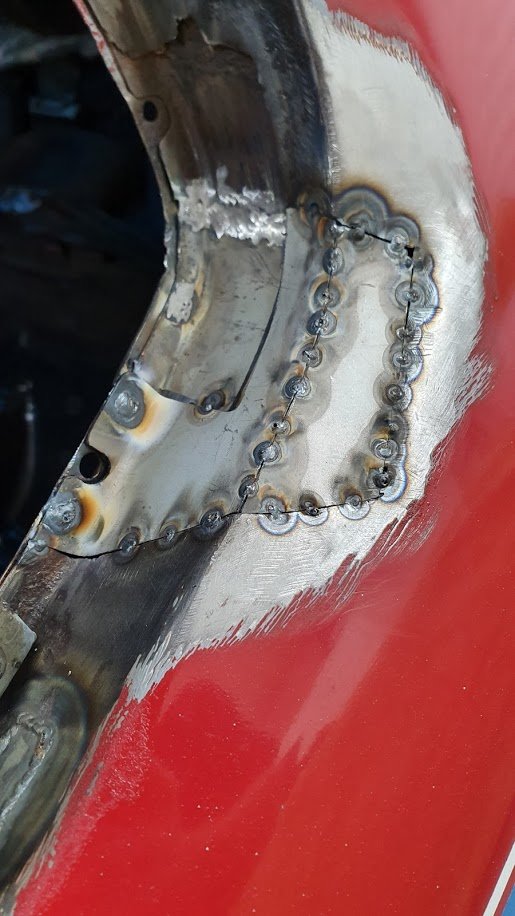
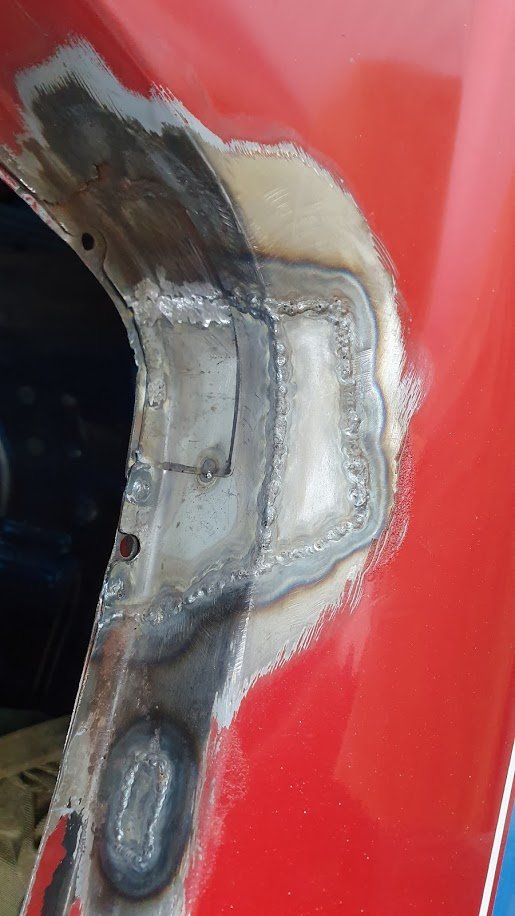
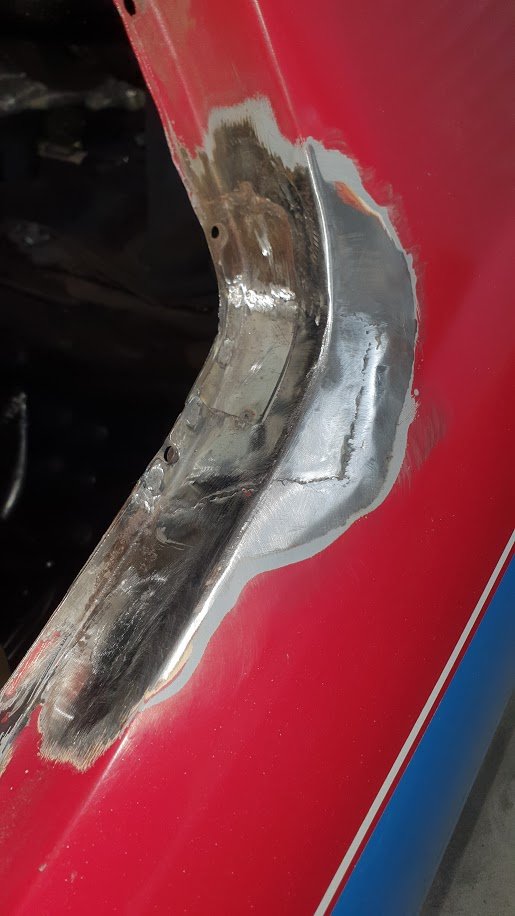
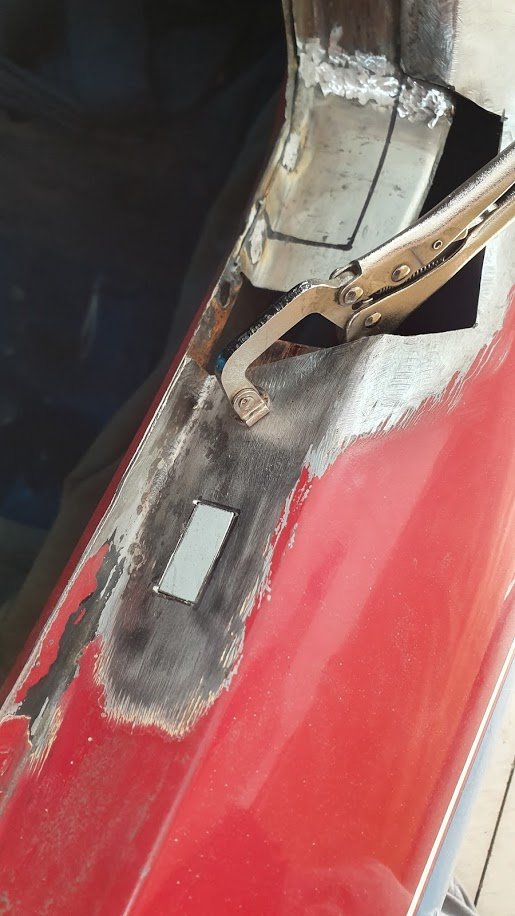
With the welder out for SLEEEK's floor repair, i figured also fixing the other quarter window on the racer was probably long overdue. Some BS repairs from the past that were 90% bog. Repair the inner bit and the reinforcement. Fill other rust holes. Measure and make the outer bits. Glue it up. and 200% betterer...
4 points
-
All sorted as of yesterday!! For some reason, when my idle jet is screwed all the way in, it blocks fuel from passing. But only on the primary side. If I back the idle jet holder out 1/4 of a turn it runs perfectly. Not sure if that's how it's supposed to be, but it's running mint now *shrug*.3 points
-
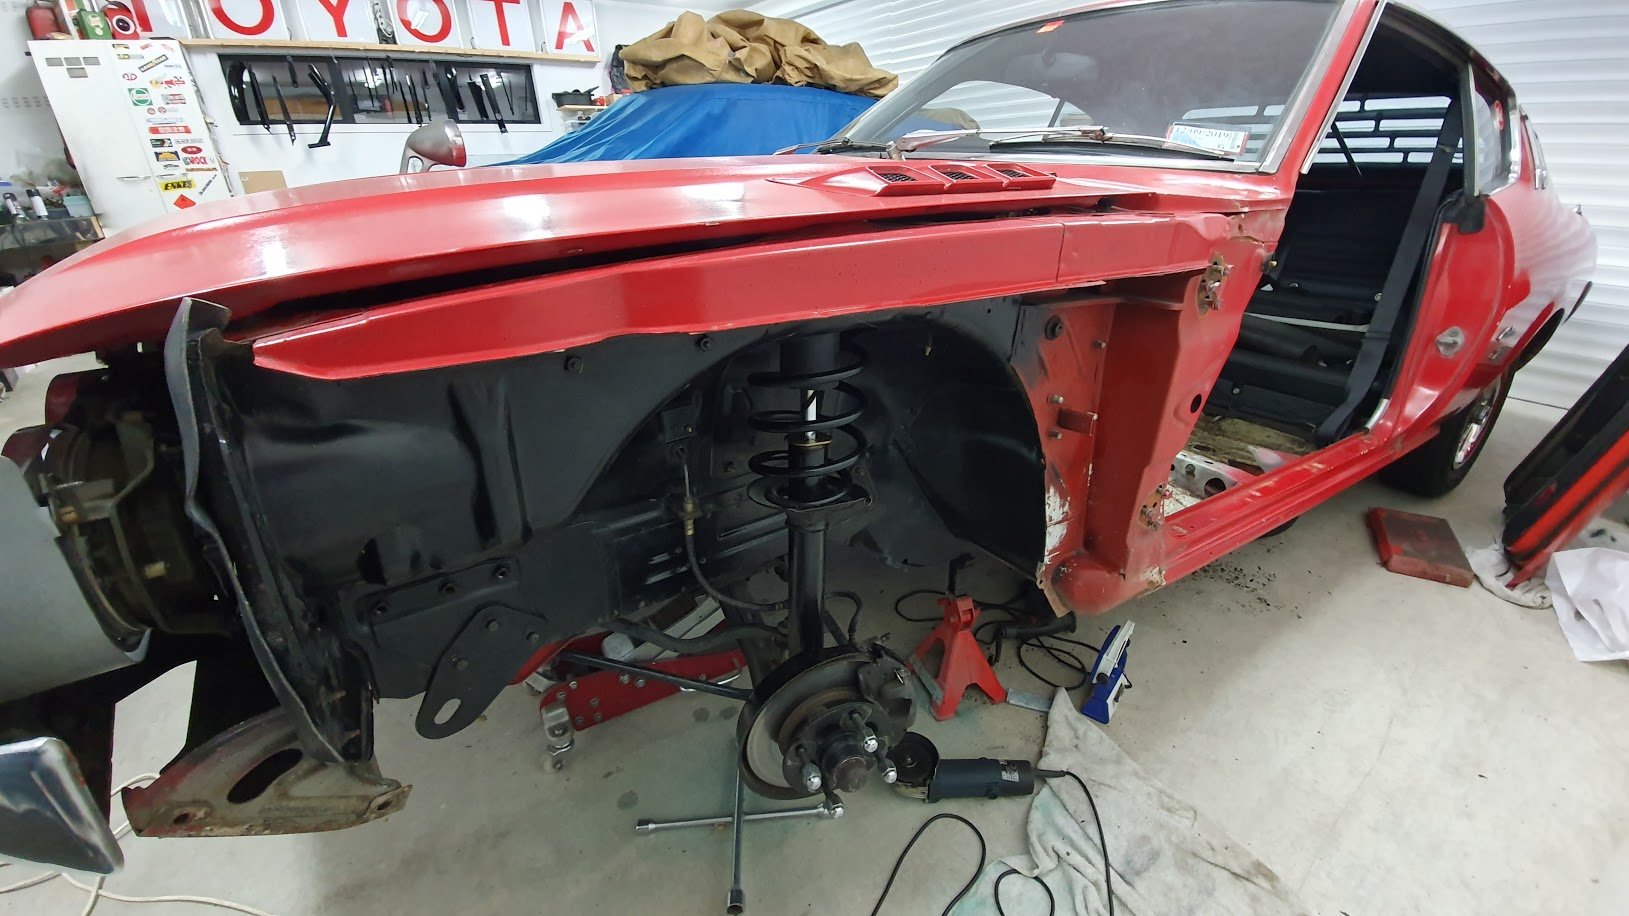
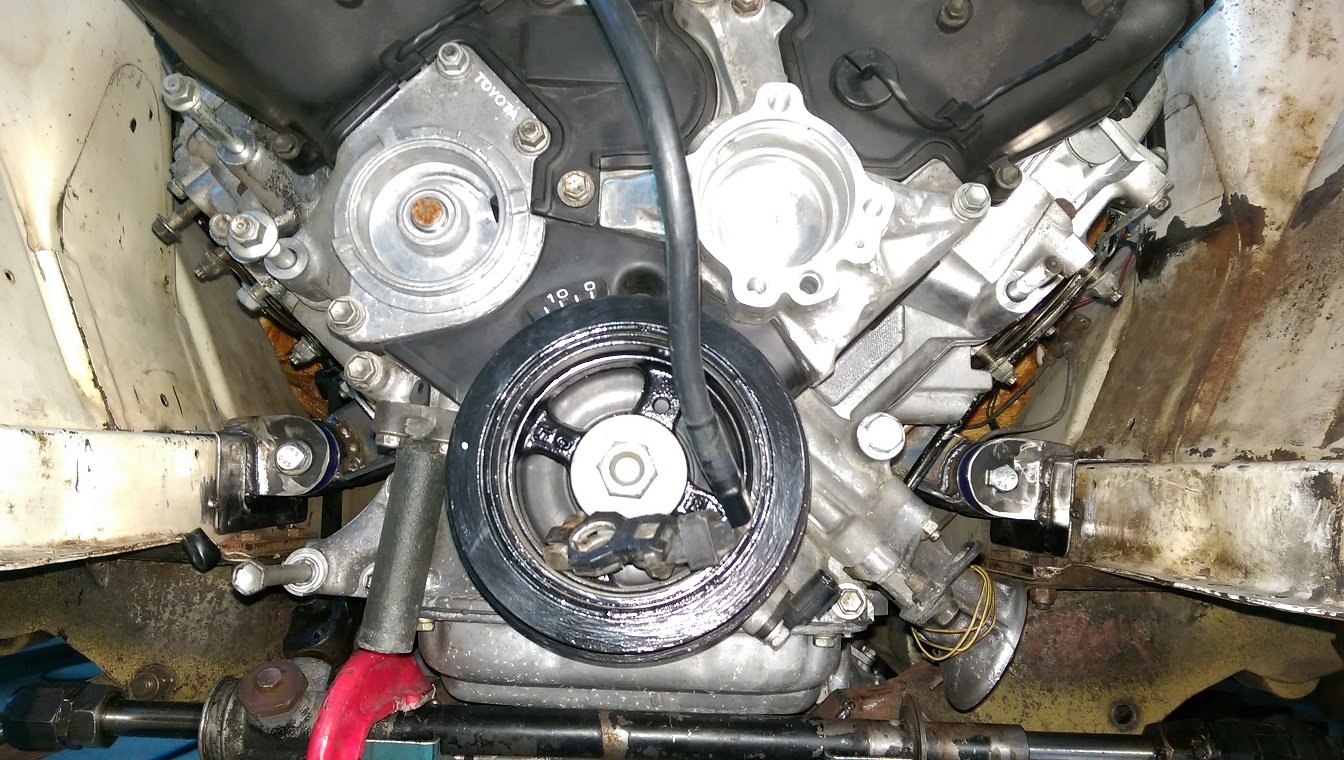
This morning, we fanged across to Caffeine and Classics, then rolled straight back home, where I had intentions of mowing lawns and doing general yard work. Anyway I started cleaning something in the engine bay. Next thing you know it was 6:30pm and I'd just finished cleaning up - after giving the whole engine bay a bit of a tickle with some cleaning products and a range of brushes and micro fibre cloths. Shit I used included - diluted Simple Green (beware, some people have had this stain alloy), Armor All Multi-Purpose cleaner (this shit is amazing on damn near anything) and Interflon Foam Cleaner (beyond incredible cleaner, kind to plastics and electronics, also a weapon on upholstery). Brushes ranged from a toothbrush, up to a soft dish brush. Start - this is in the battery tray corner, the general filth on the firewall is indicative of all the painted surfaces in the engine bay when I kicked off. DC2R Phone (18)-Edit by Richard Opie, on Flickr No real in-progress shots. I did snap a wee comparison of the old cam cover and the NEW HOTNESS just prior to fitting it up with new seals/gaskets etc. DC2R Phone (19)-Edit by Richard Opie, on Flickr It looked good before right? But how much is the difference when you line it up against a brand newie! DC2R Phone (21)-Edit by Richard Opie, on Flickr Basically the end result. I am aware I need to remove a few painted brackets etc and get them recoated. I've also put wheels in motion to buy a whole swag of OEM fasteners to replace anything a bit tarnished/rusty etc. Mainly M6x16 factory ones in the grey zinc finish. DC2R Phone (22)-Edit by Richard Opie, on Flickr This thing positively glows. It's a thing of beauty. DC2R Phone (23)-Edit by Richard Opie, on Flickr Even the letters have a shine and crispness beyond anything I've ever seen on a B-series. Machined OEM finish! DC2R Phone (26)-Edit by Richard Opie, on Flickr Likely the most boring photo I've ever snapped. But it illustrates the finish on the firewall/paint at the end of the proceedings. Turned out pretty good. It's not perfect, no, but it's definitely up there as far as 20-year old engine bays go. DC2R Phone (27)-Edit by Richard Opie, on Flickr And a parting shot. Pretty chuffed with it all, will carry on with a few more jobs to sort in the bay, and also clean the underside of the bonnet which is quite grubby. Toodle-oo.3 points
-
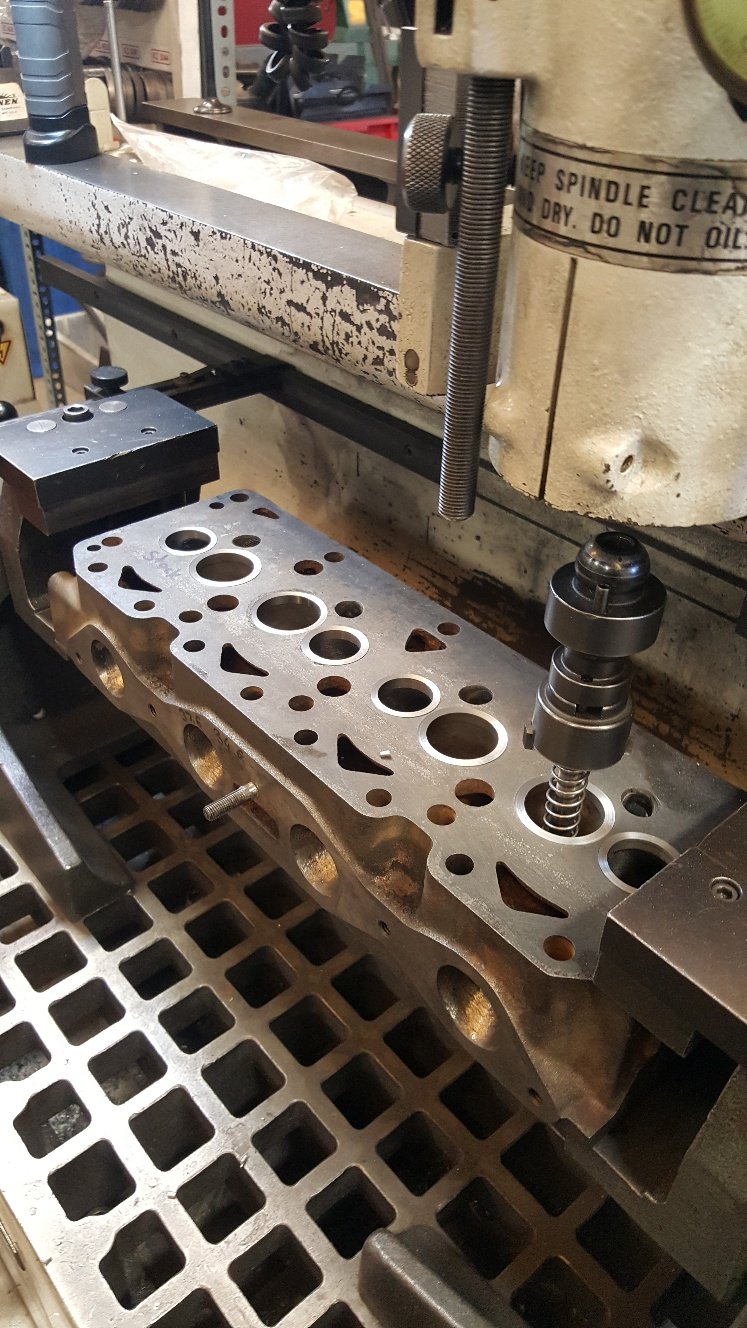
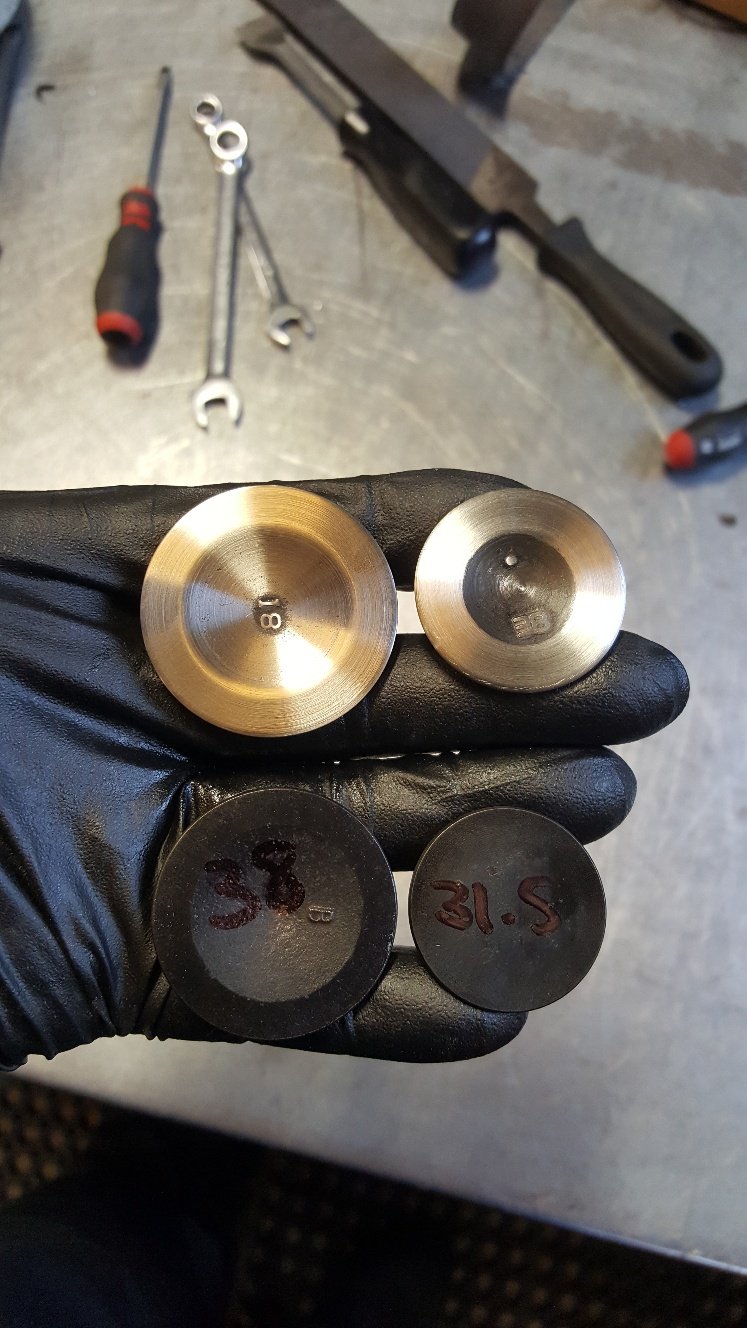
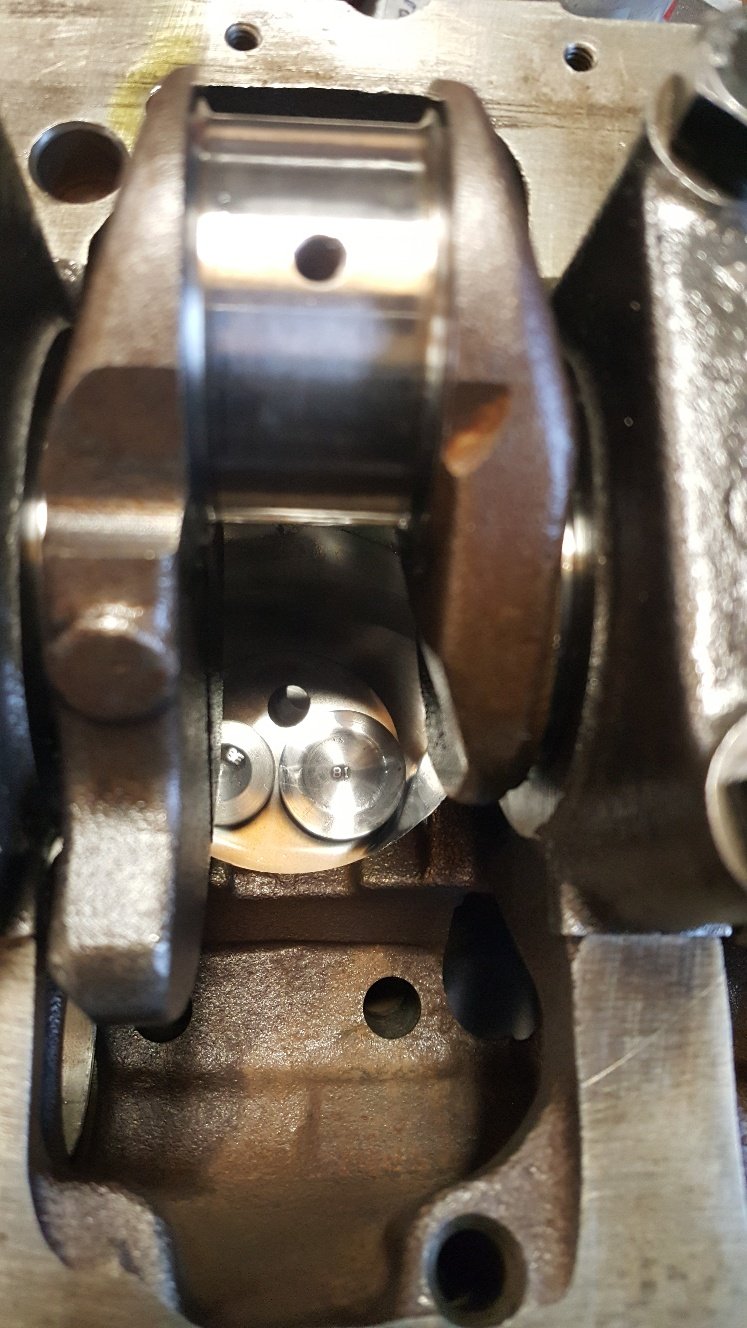
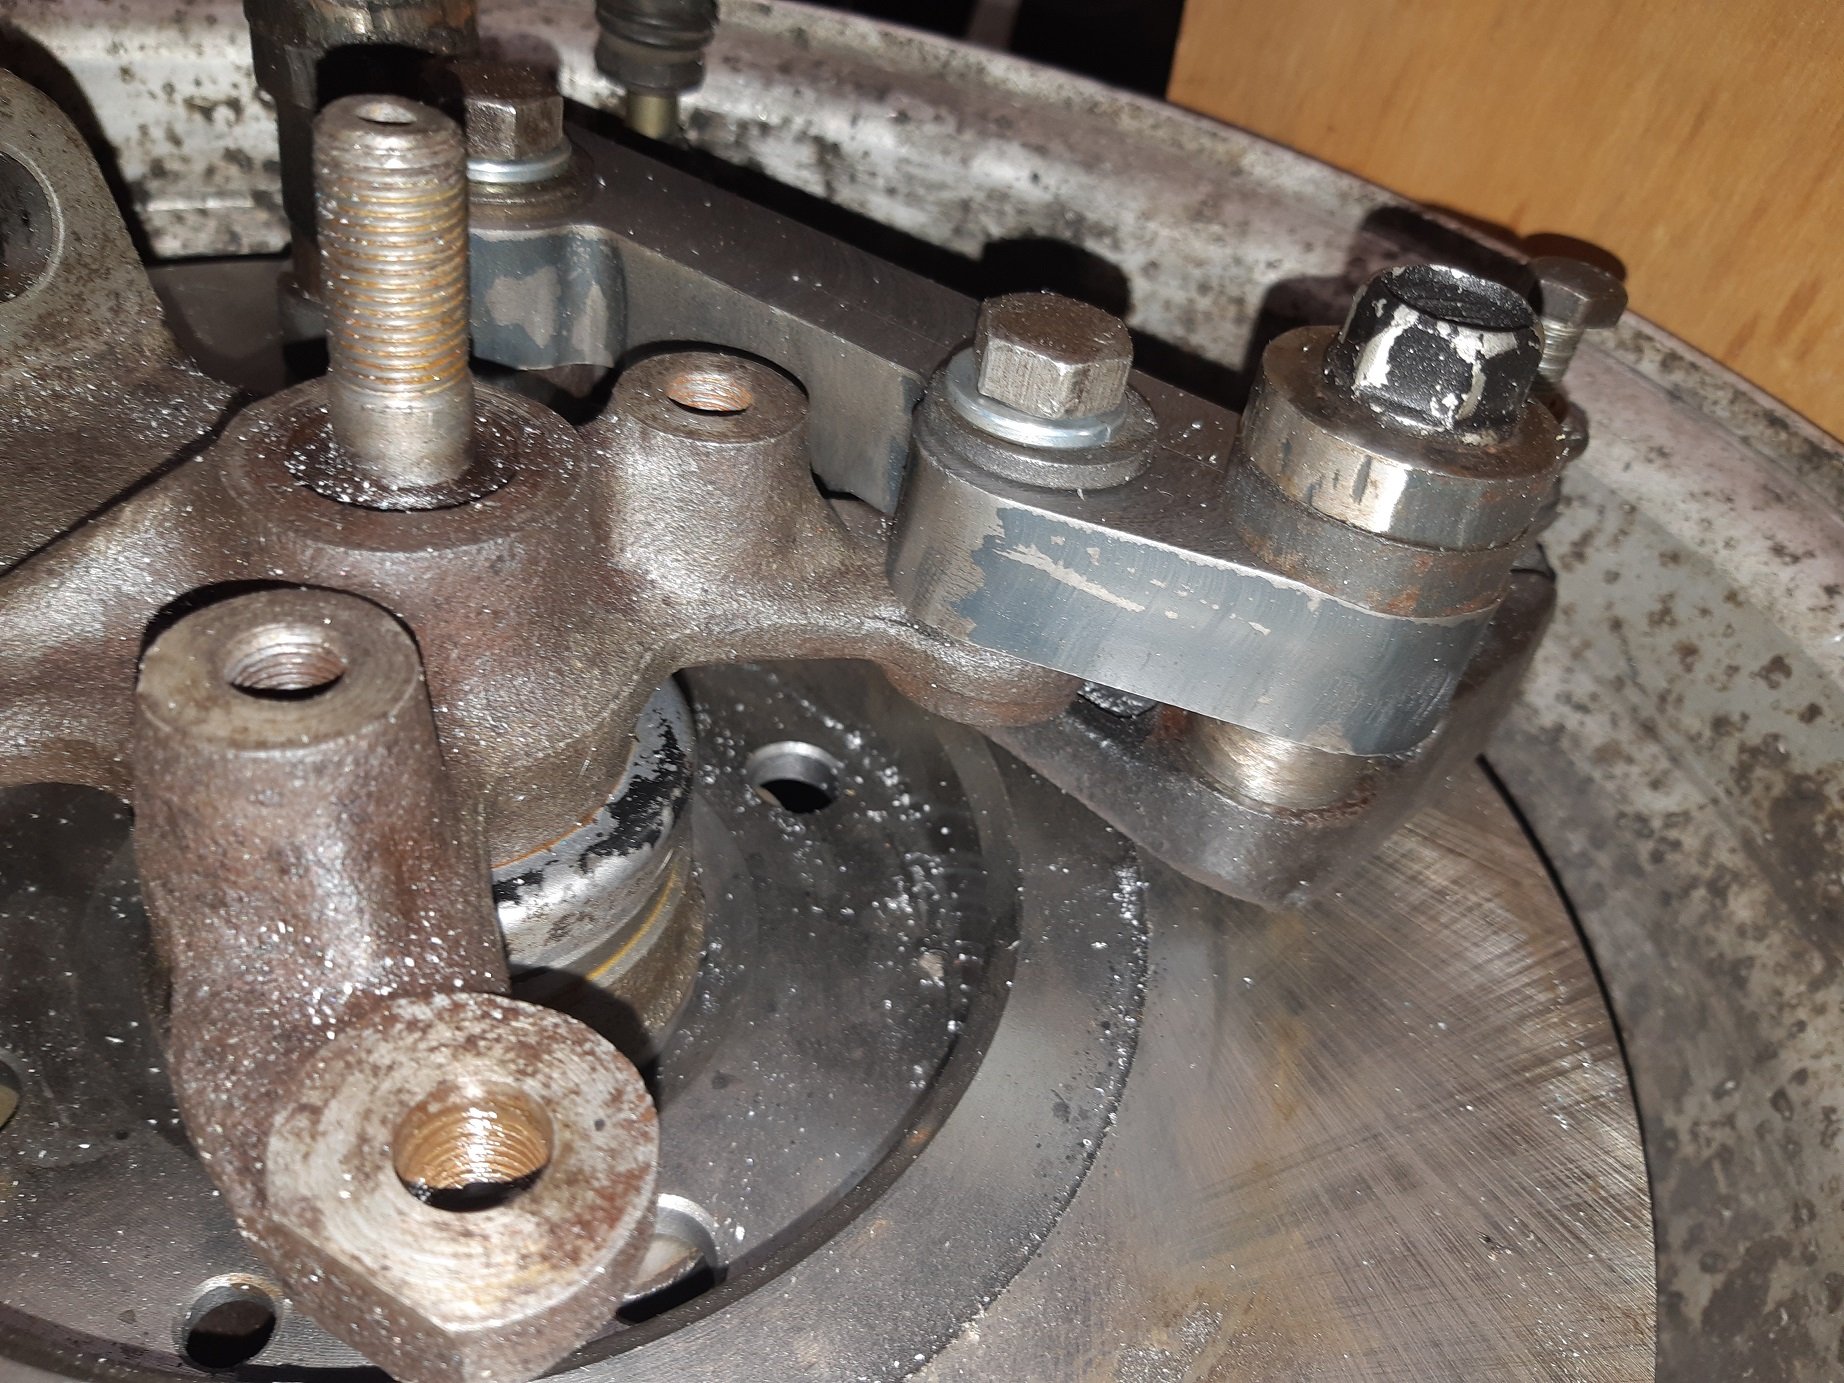
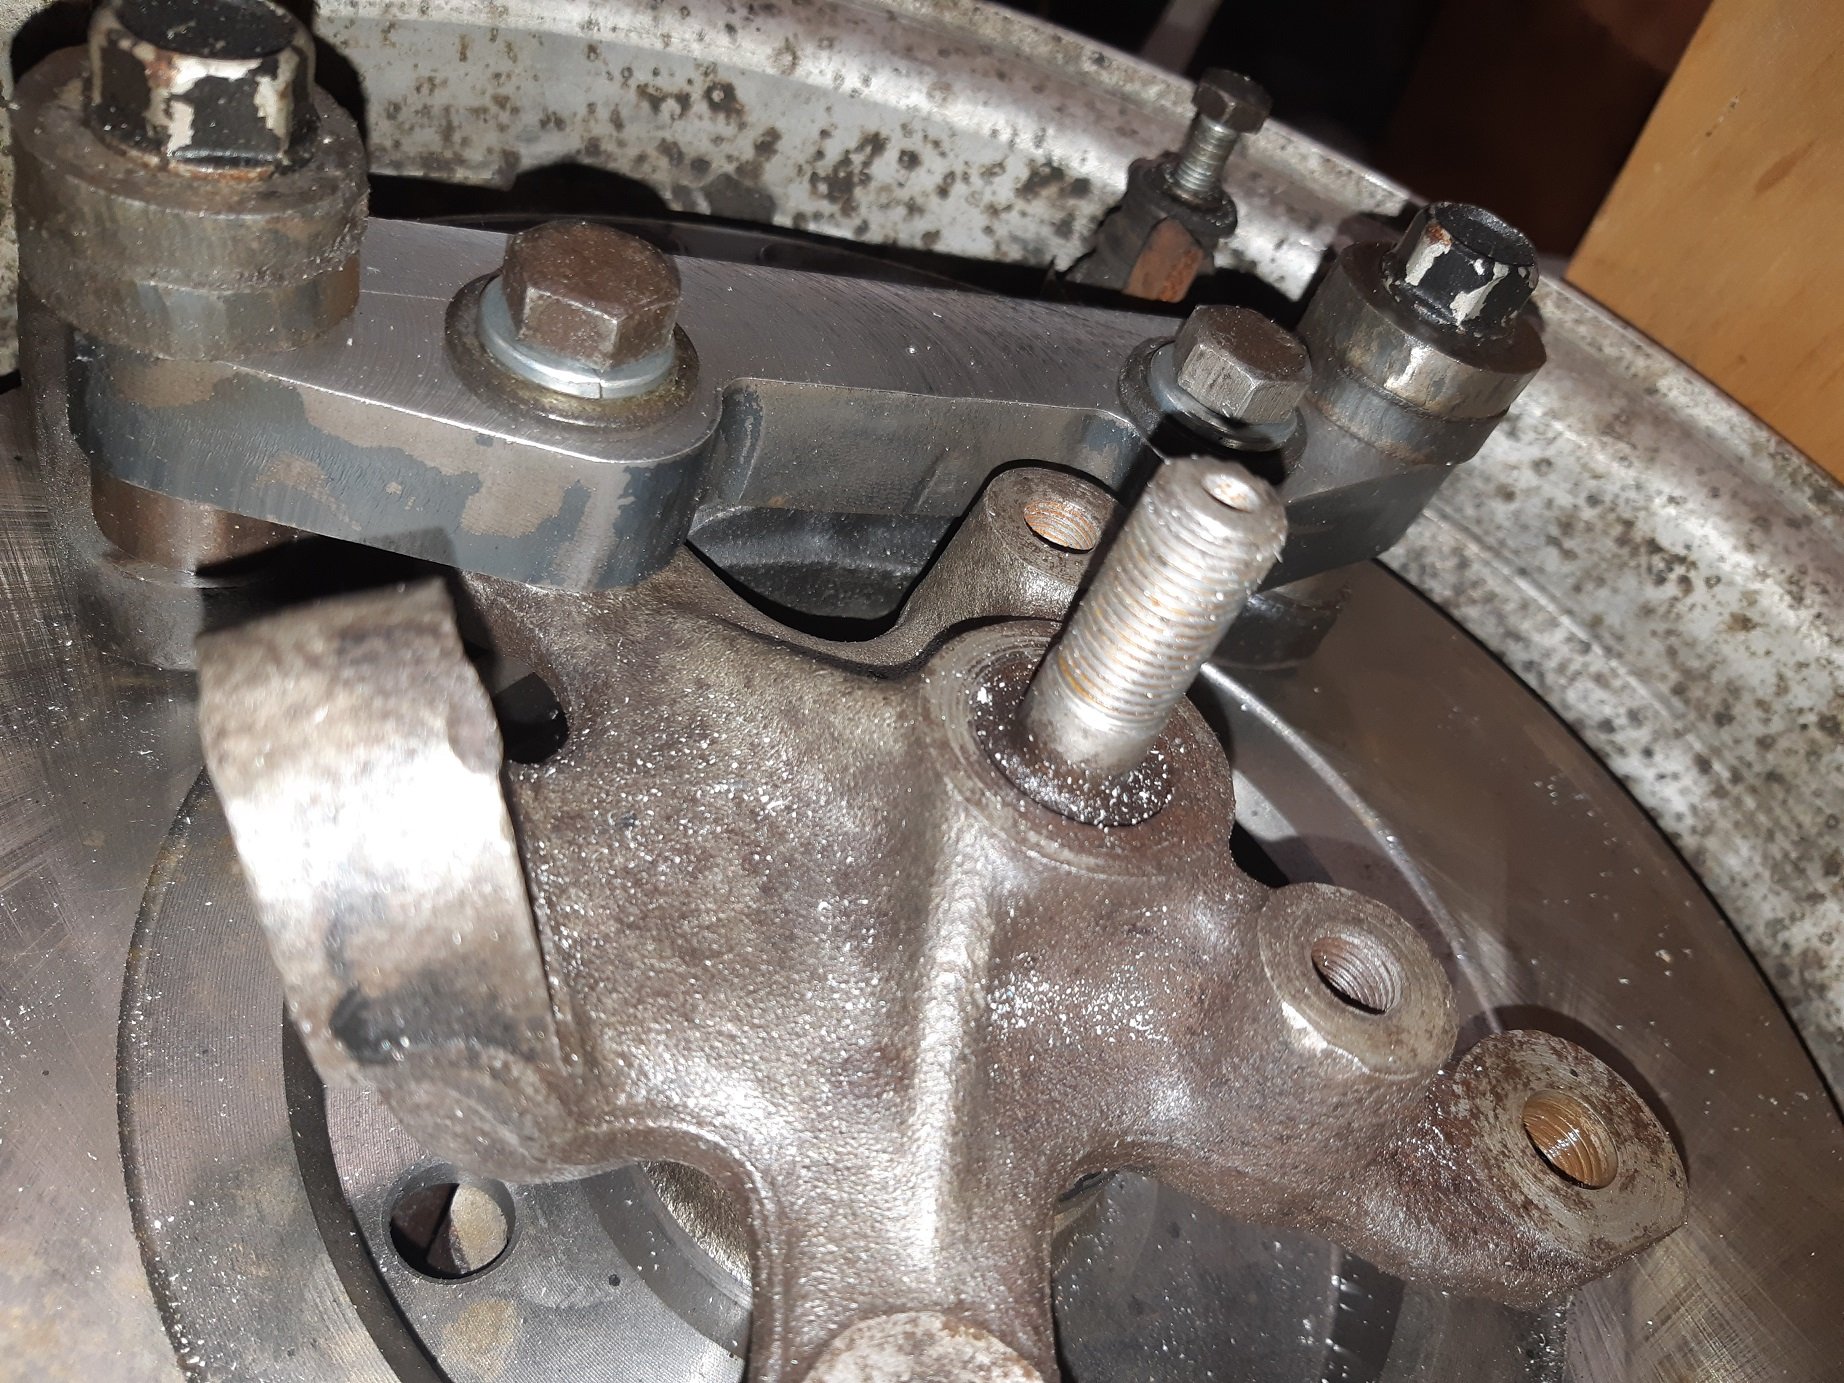
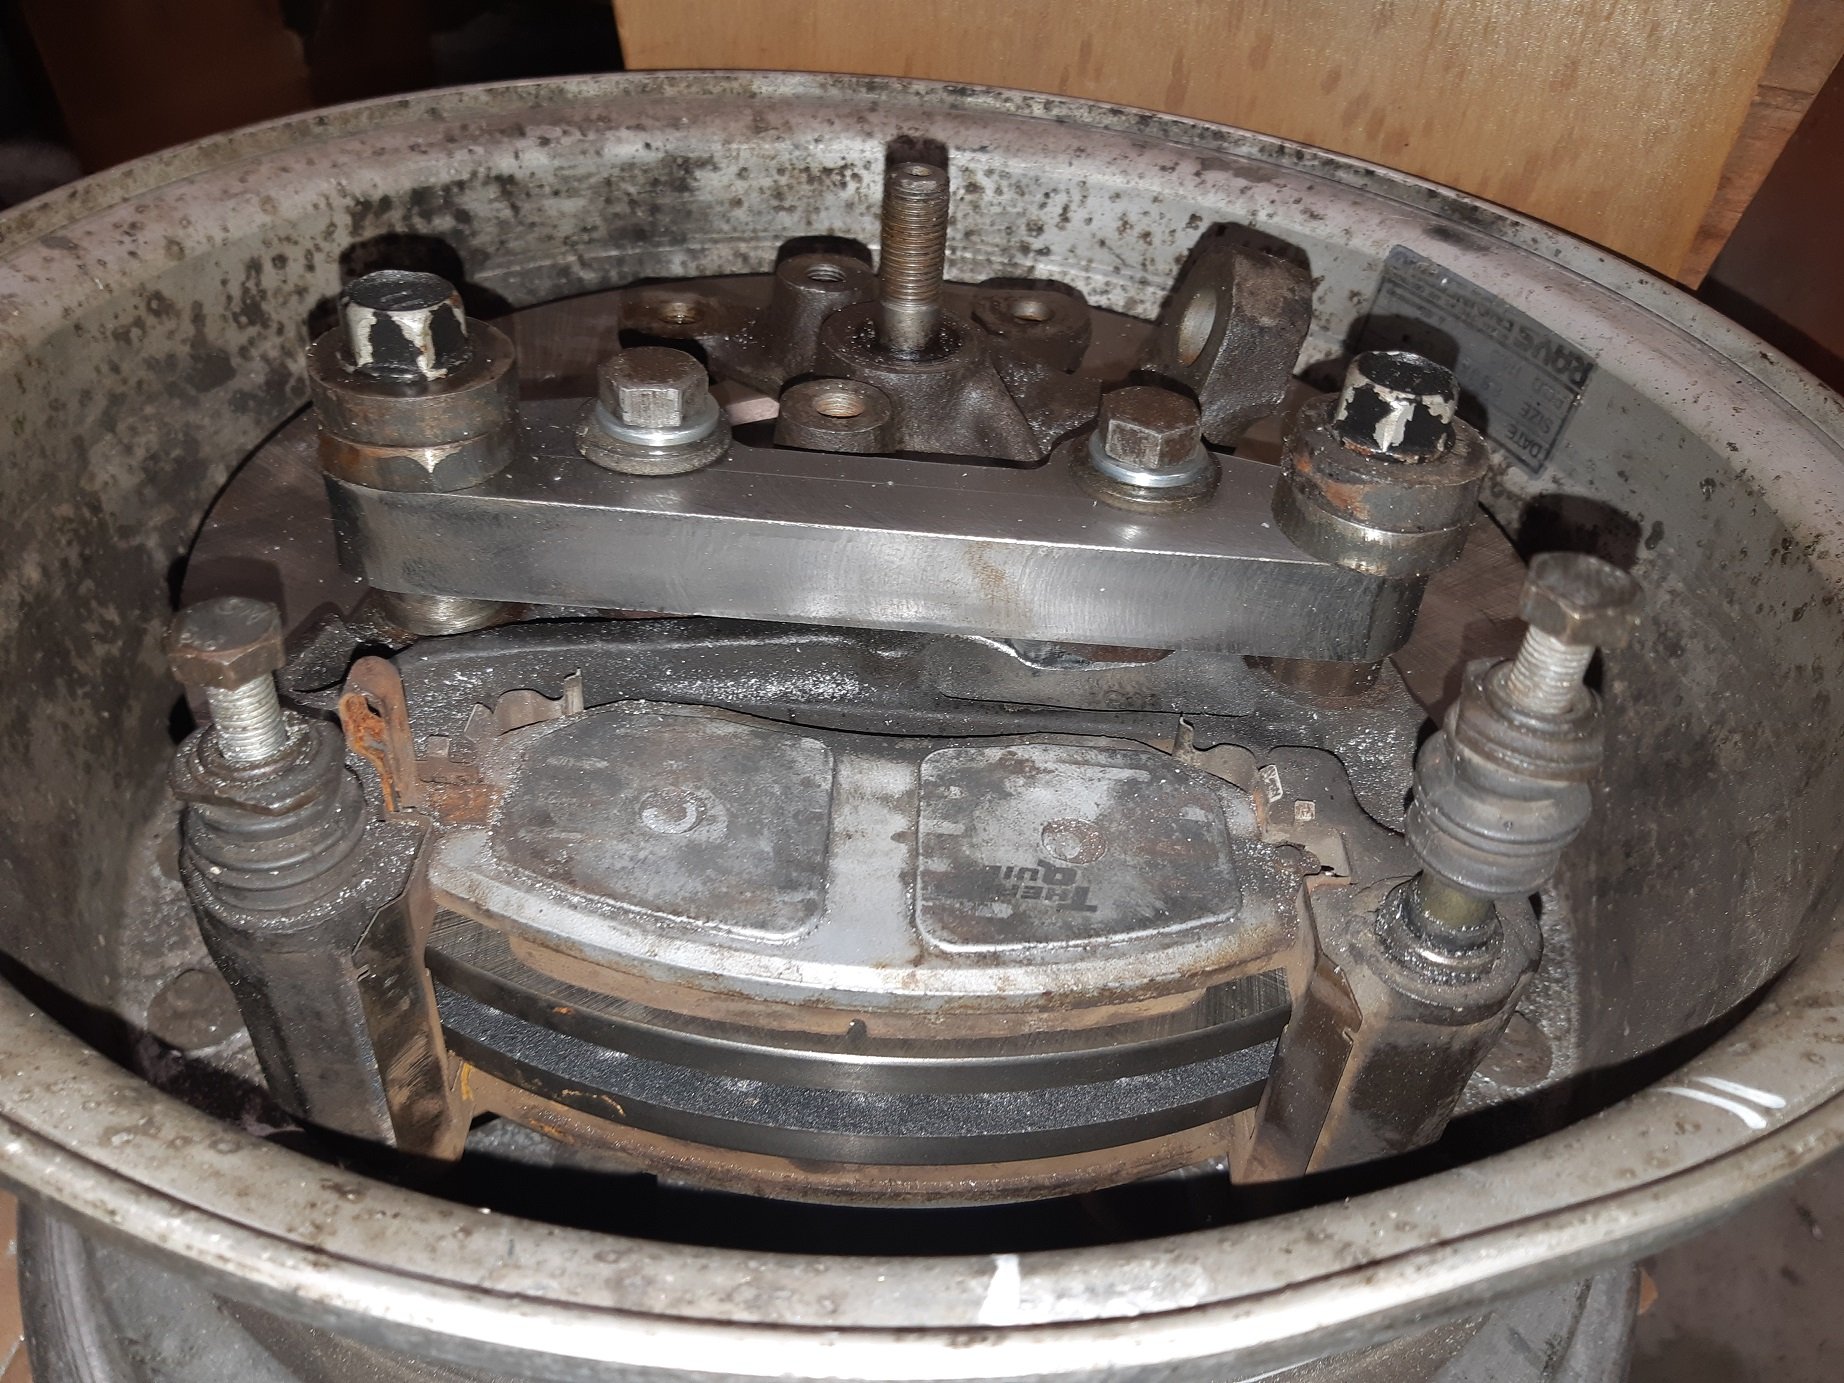
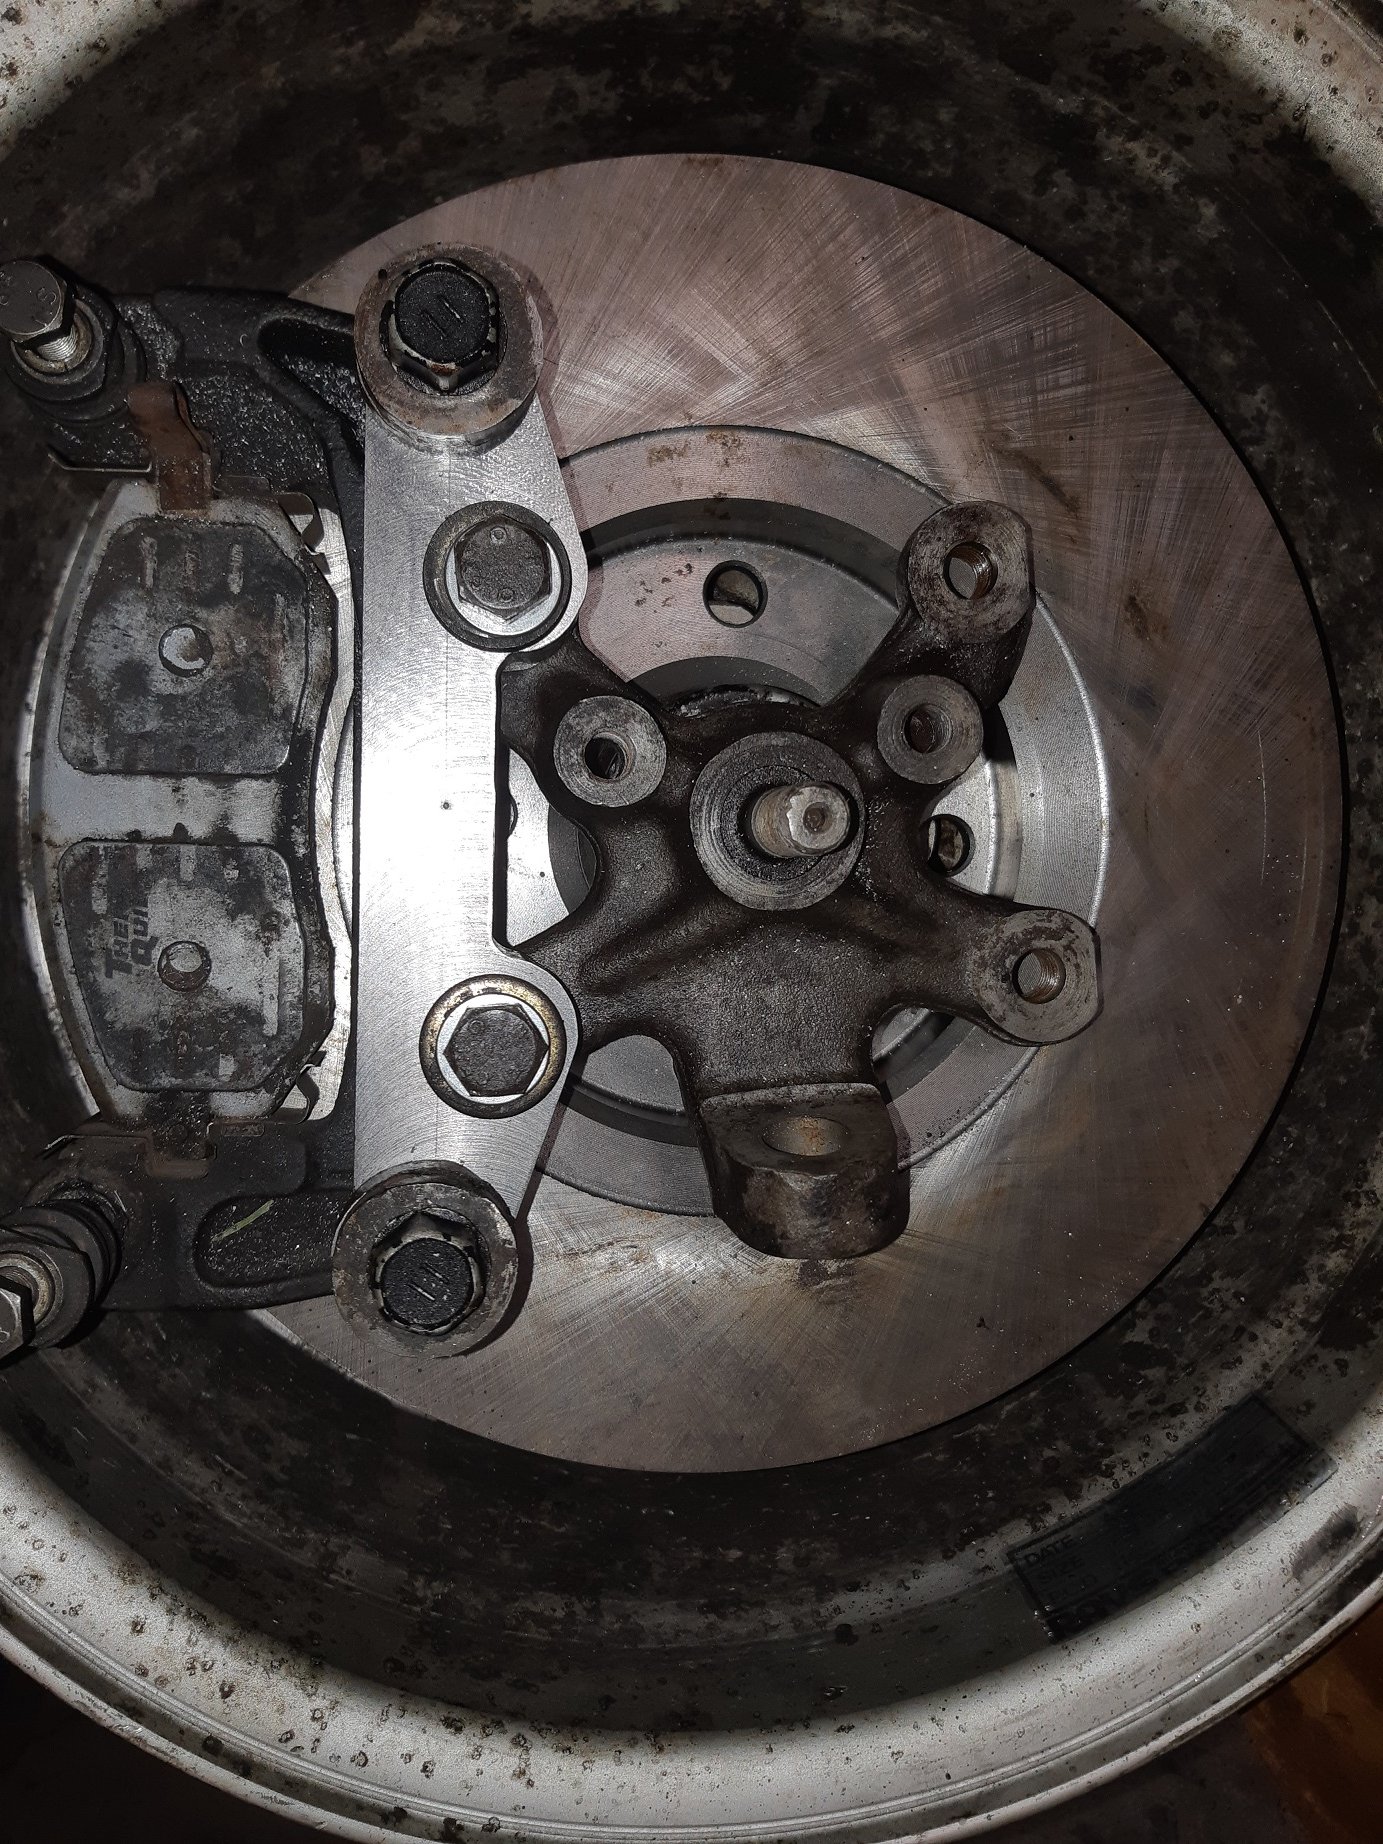
Time to cut some holes for valve seat inserts. We have a Sunnen VGS for all our head work. First picture is setting up the tool cutter to cut the hole. We are looking for between 3-5 tho crush. Once holes are cut just hammer the inserts in. Then turned down a intake valve and a exhaust so had something to check valve spacing and clearance of the side of the bore. I detopped the inserts in the VGS and then surfaced the head. I didn't get a picture of it in the surface grinder as there's pictures of that previously. Here's the valves. And a shot of the head bolted on to the block looking into the bore to see how much clearance the valves have off the side of the bore.
3 points
-
Anyone want to join me on a little coast to coast ride?
2 points
-
thats better. also it works. 2019-07-29_05-40-57 by sheepers, on Flickr 2019-07-29_05-41-07 by sheepers, on Flickr2 points
-
This was my ride for dropping kids off duties. The kids were young enough not to be embarrassed. The pretentious soccer mum's however were another story, as they looked down at me from their Audi 4x4's... I'm sure they felt compelled to report me to chyfs...
2 points
-
Hadn't heard from Stephen so gave him a call just now on the number his wife/partner gave me a few months ago, had a good chat and he said to give him a couple of weeks and he'll see what he can find. Other than that I haven't pulled the distributor off yet, its winter and its outside. Need more garage space haha.2 points
-
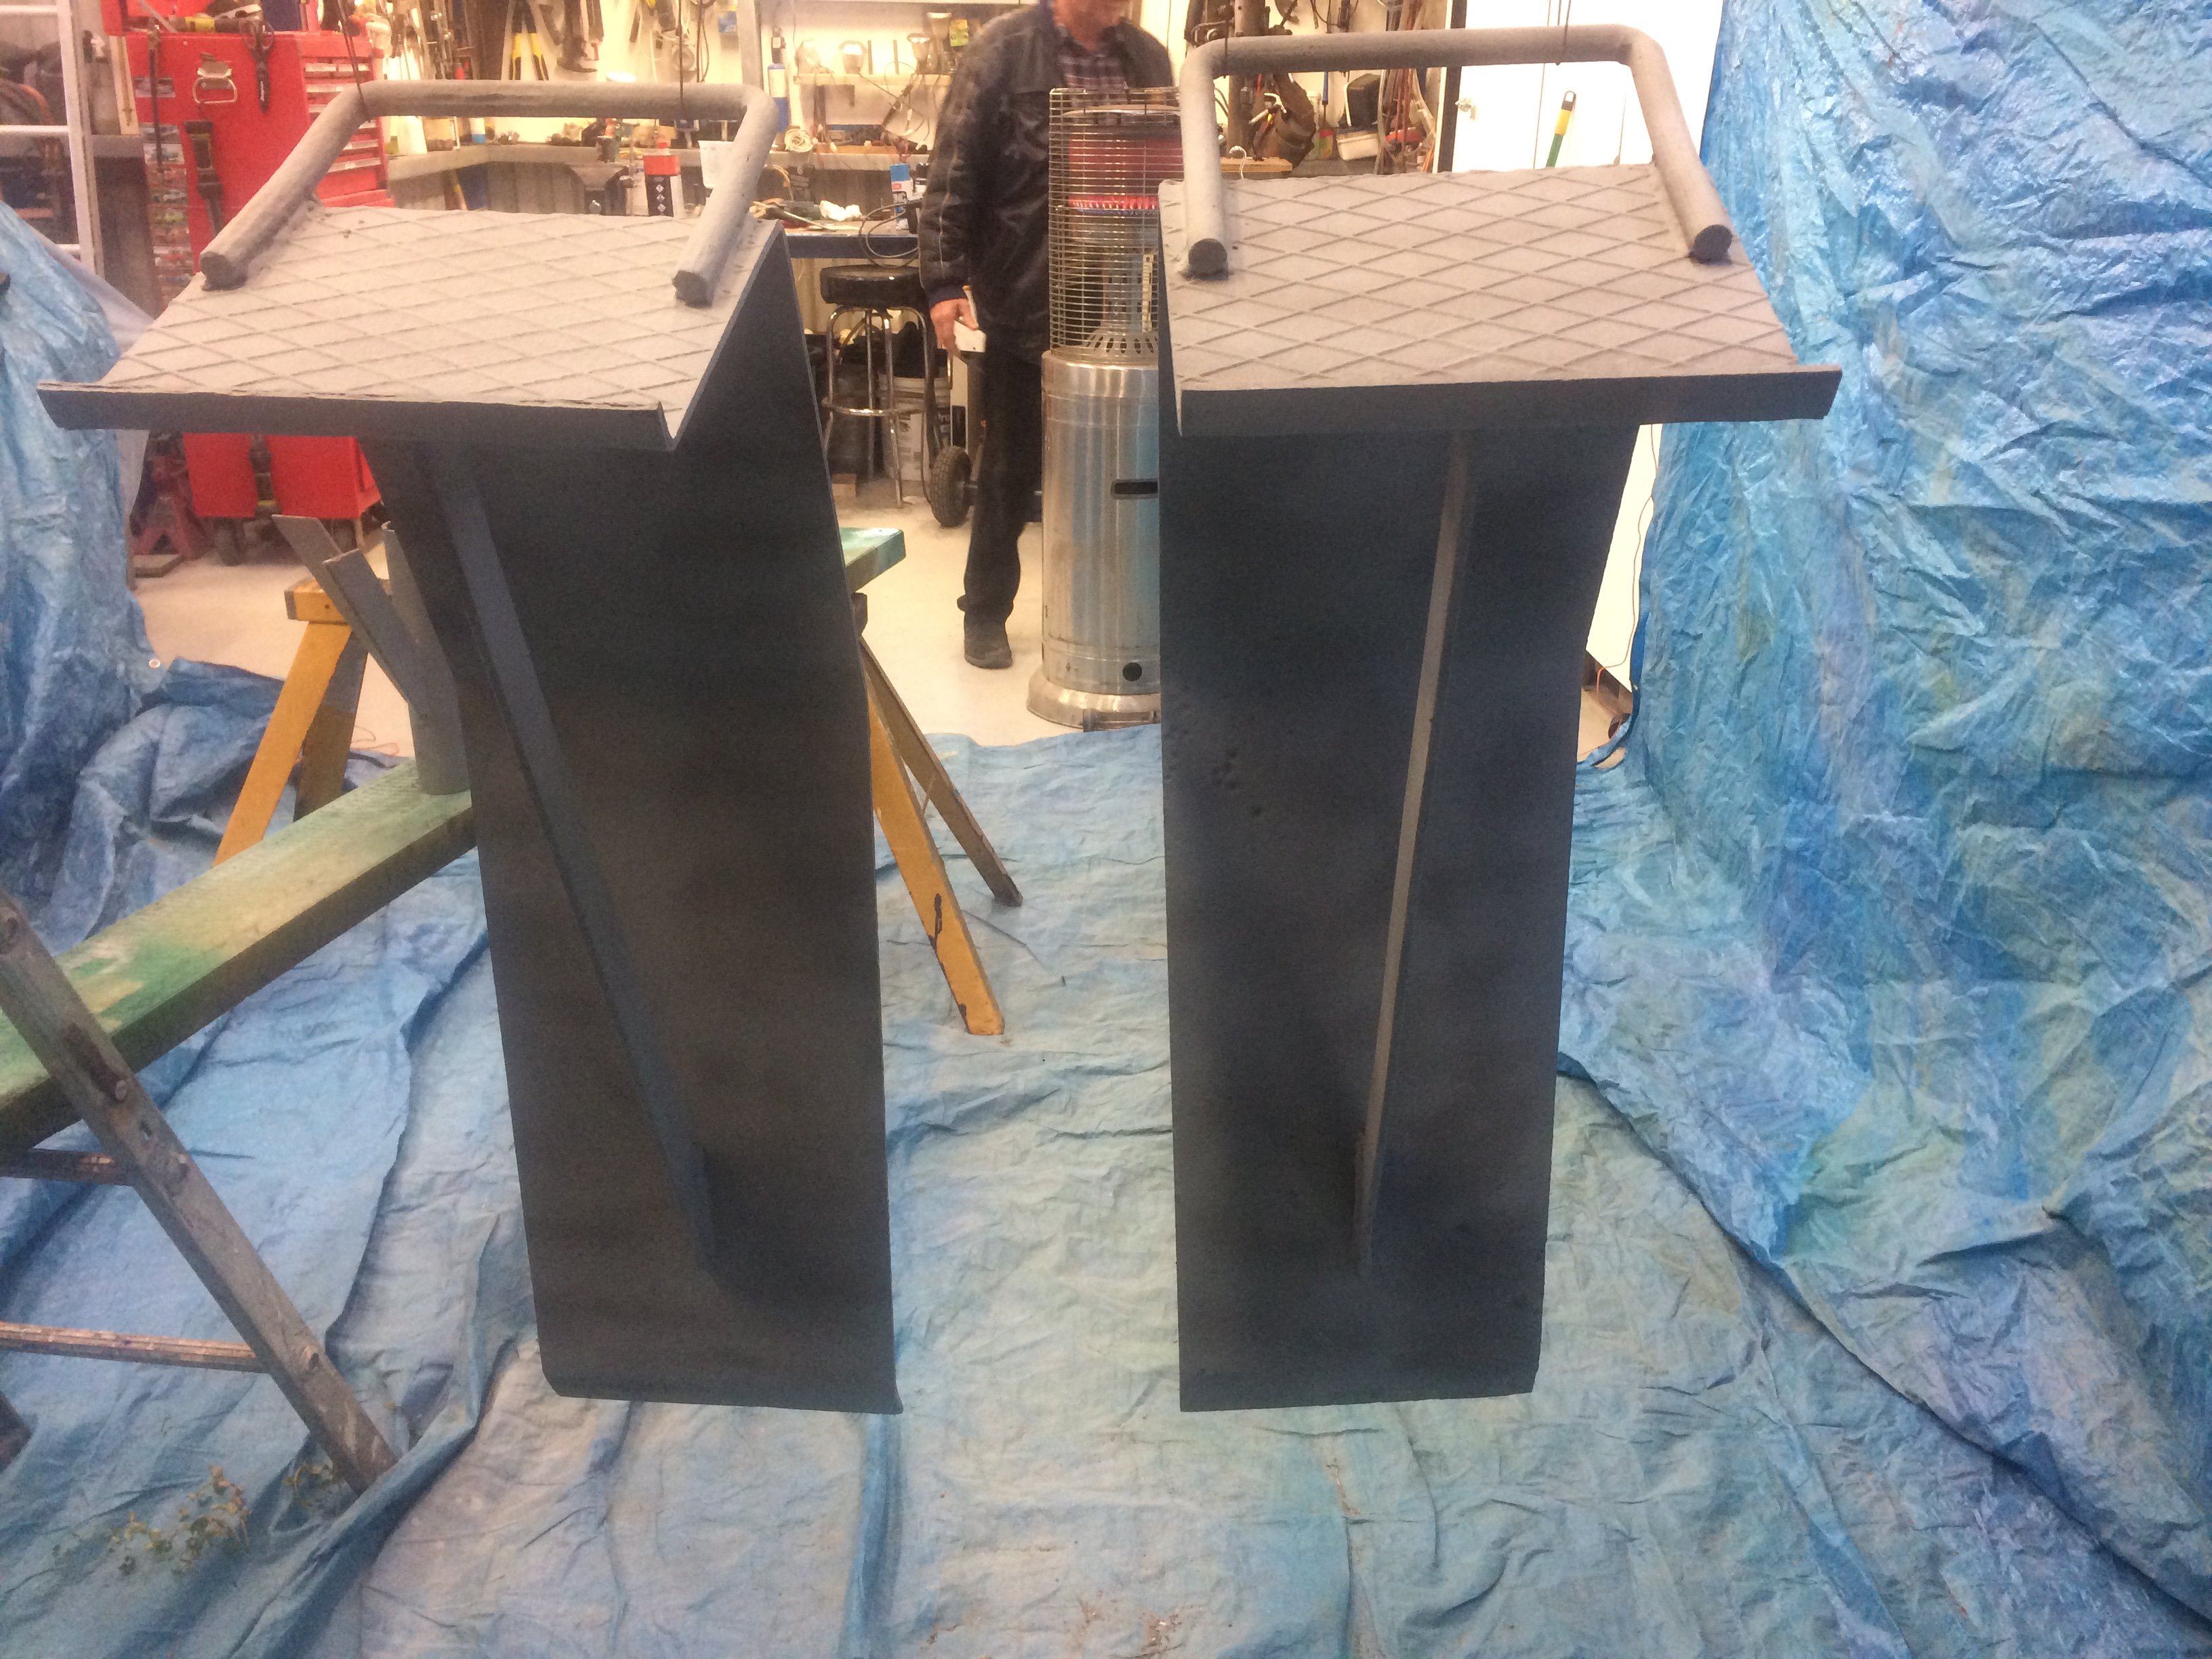
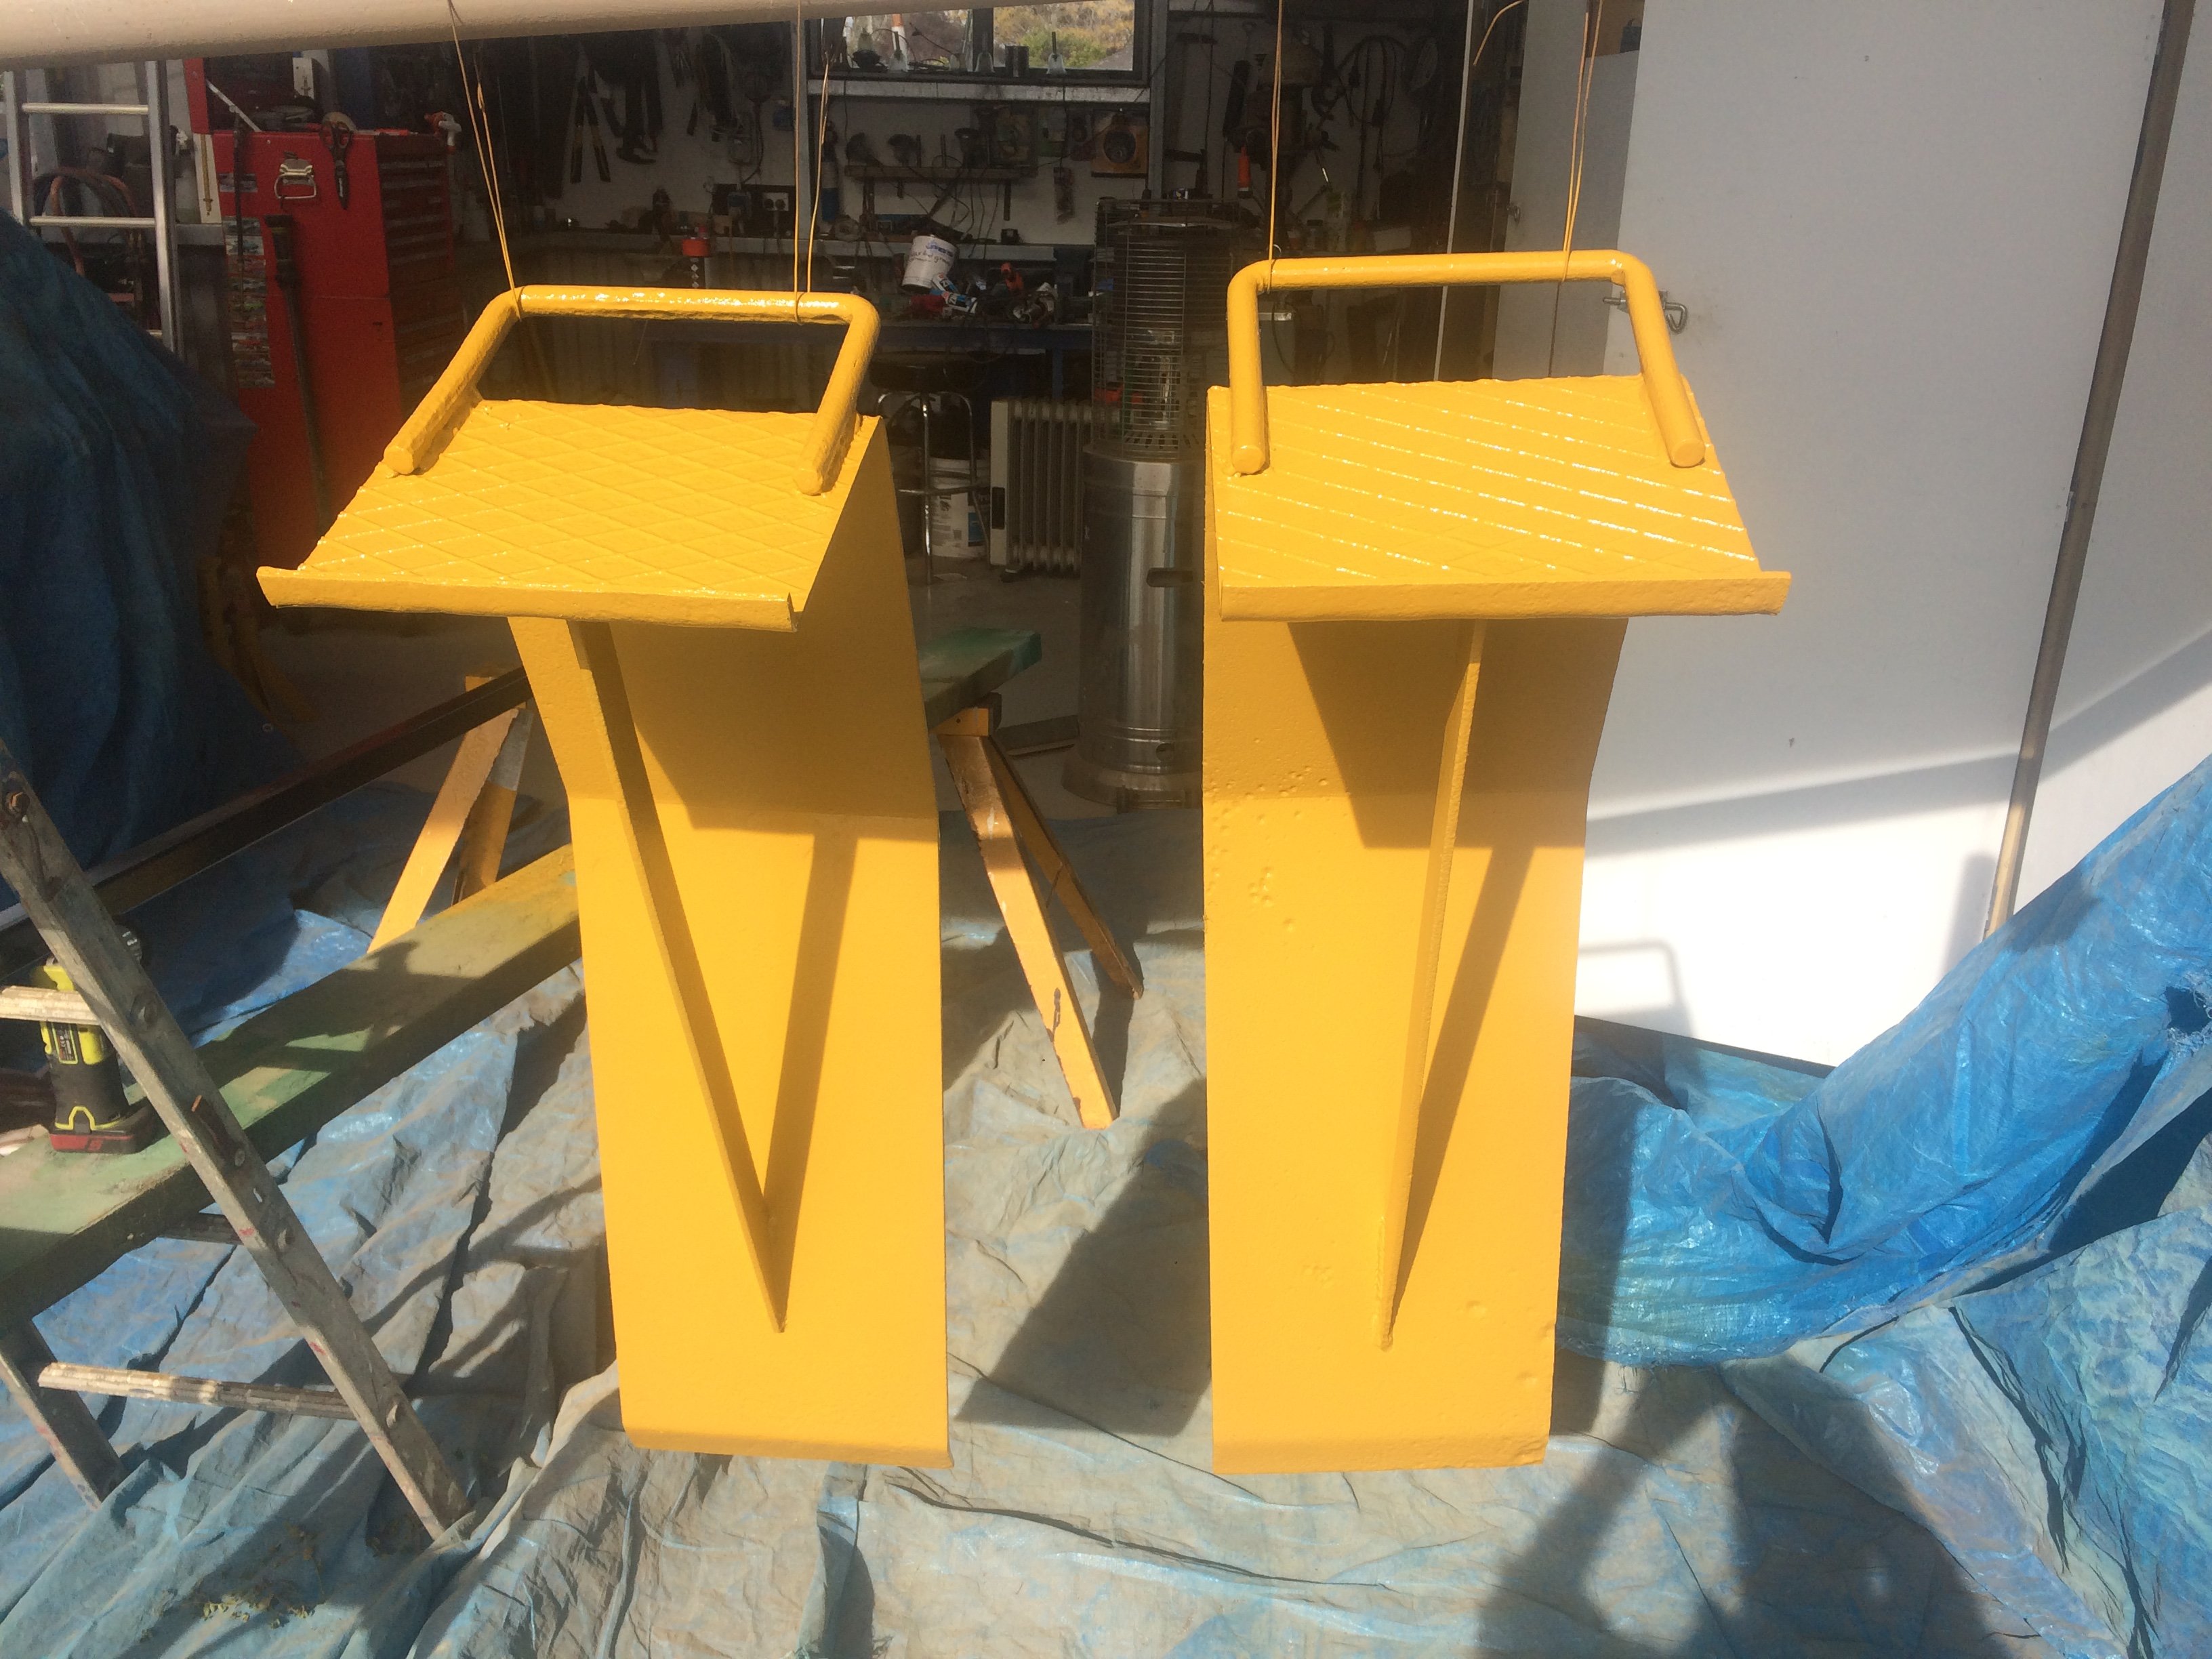
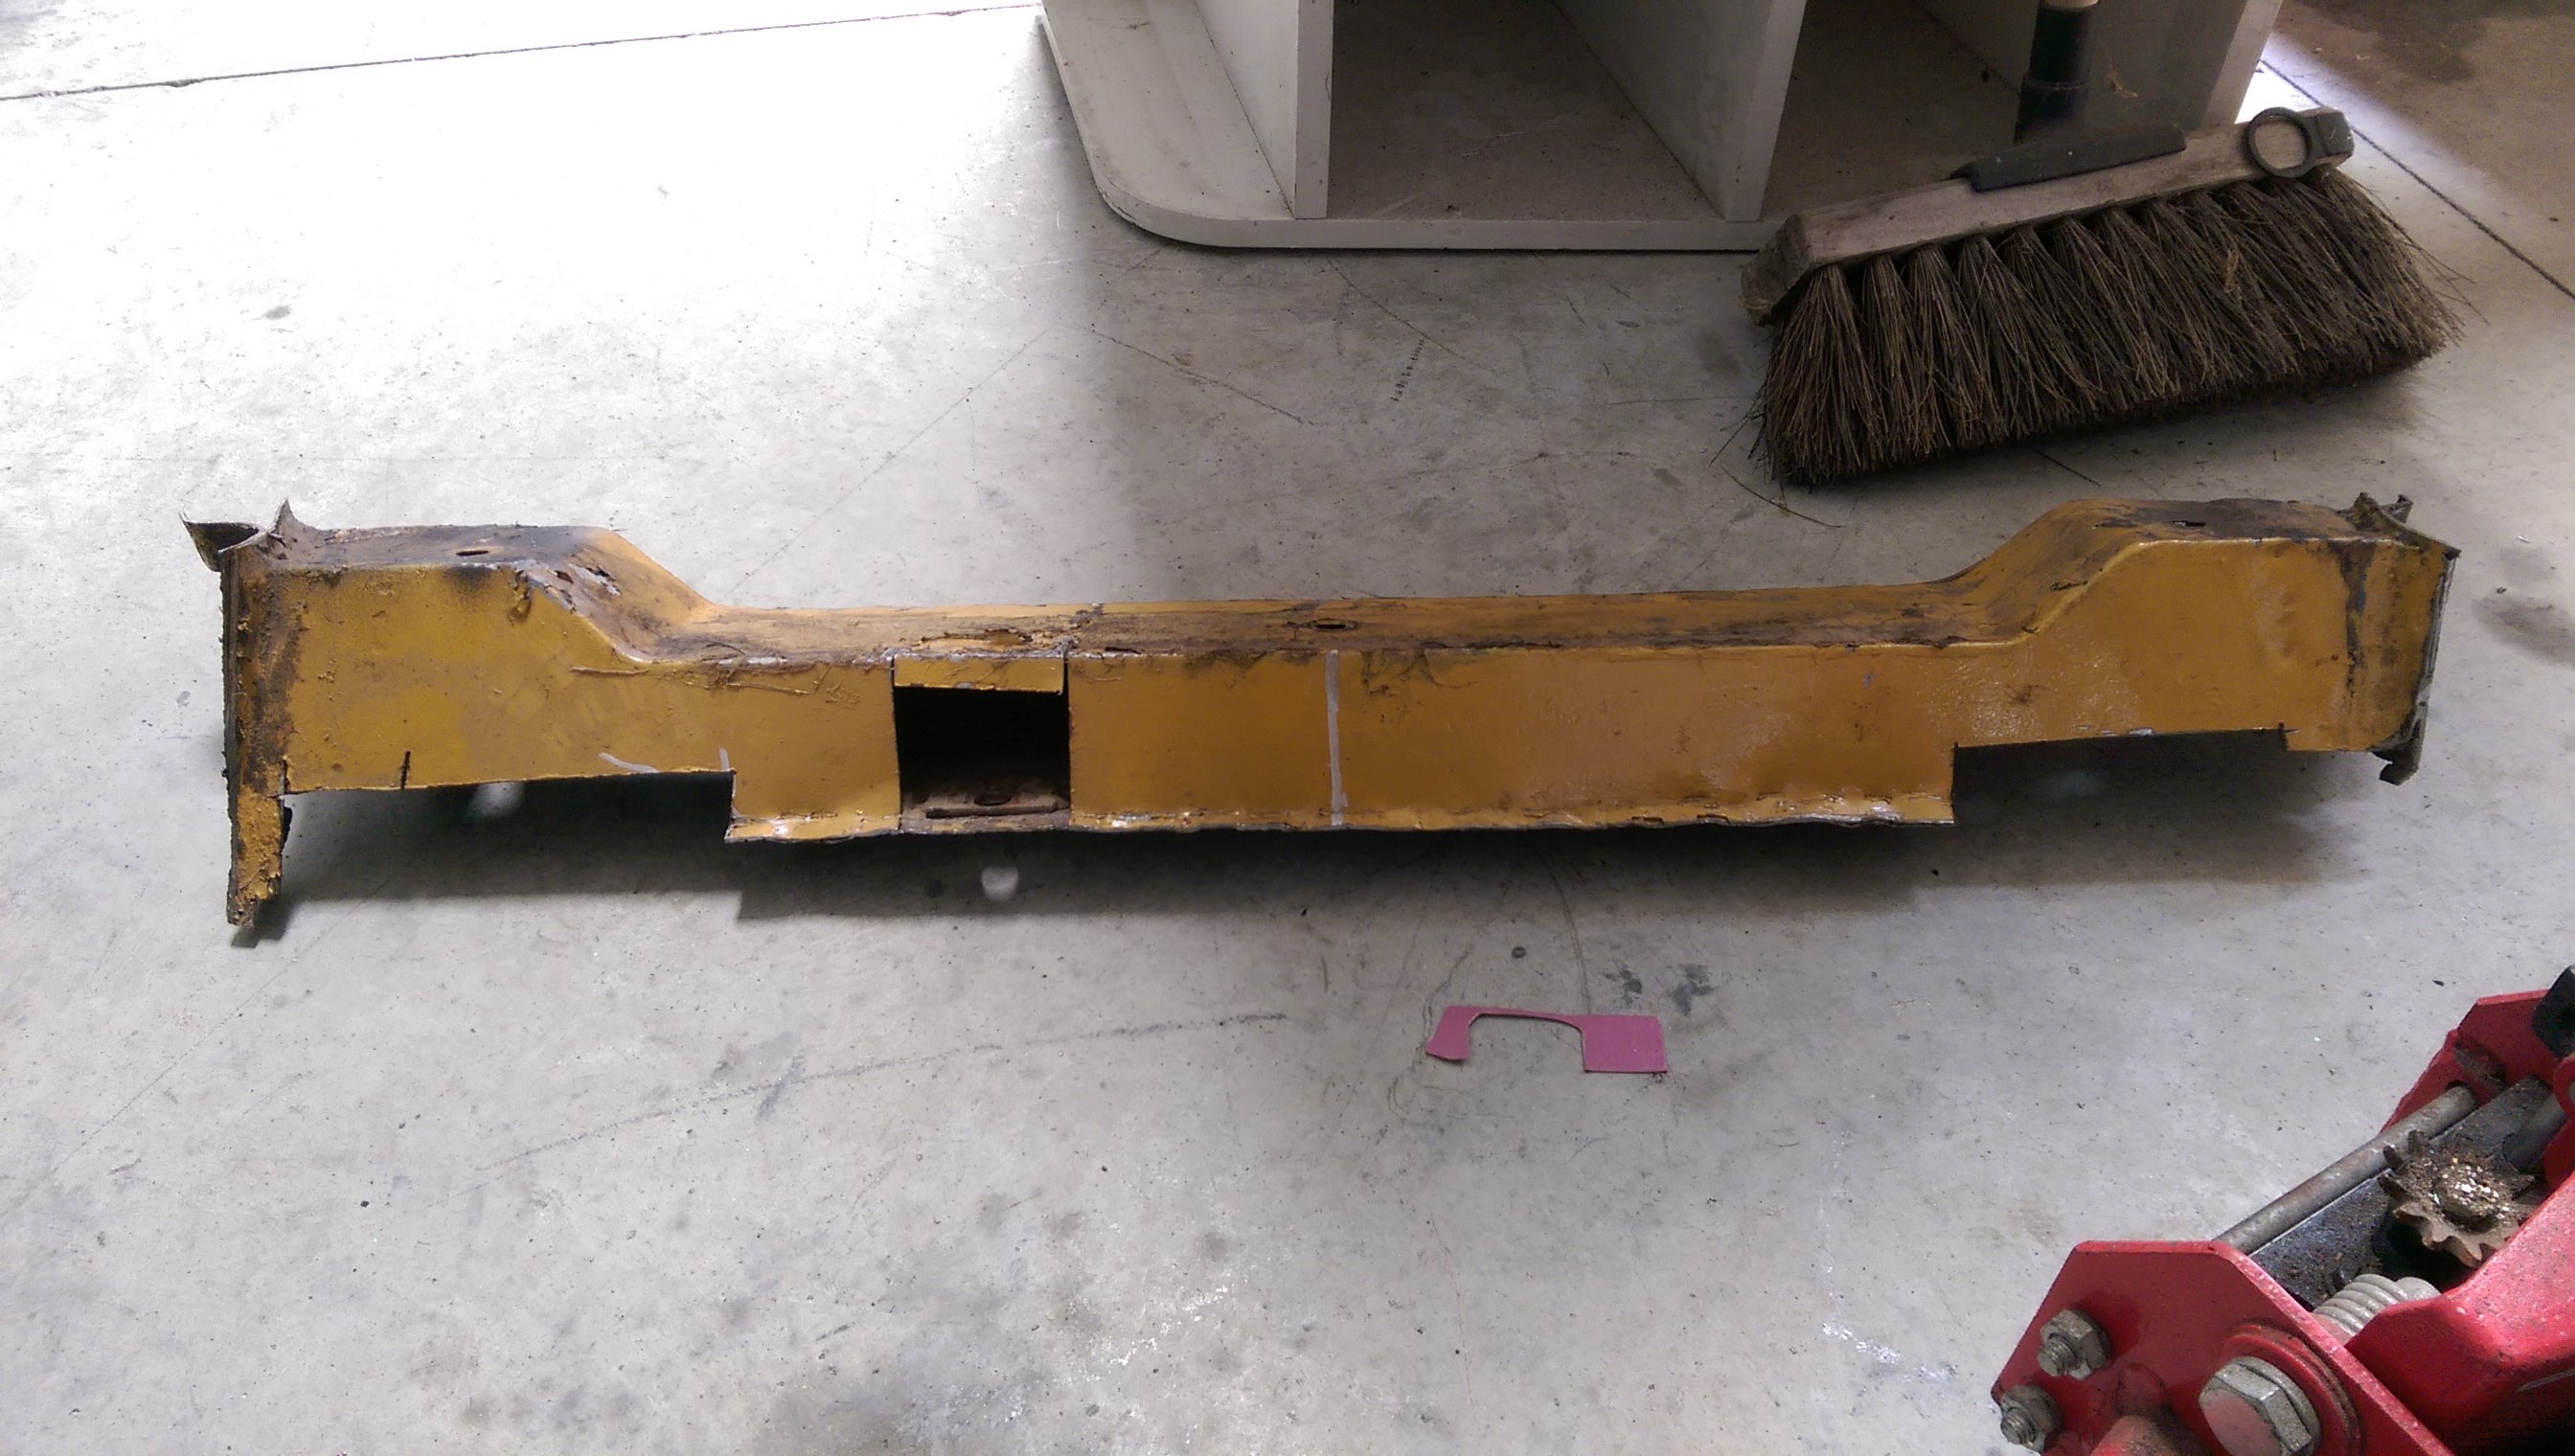
Figured this thread suited this best. Got given these ramps and axle stands by the neighbor. They were all covered in surface rust and figured I should blast and paint them being the weirdo I am Gave them a spray can primer. Then had to decide on a colour I didn't want a normal blue red or black. so caterpillar yellow/mustard they went. also gives me an excuse to get some spray gun experience And unfortunately can't post any photos of the axle stands due to file size
2 points
-
conclusion: bmw throttles make no more power. injectors in bmw throttle instead of head, no change. have revised throttle linkage setup. still not as good as the setup on the 20v throttles, but a whole lot better But have gone with this setup as it heat soaks less. both the throttles and the fuel rail are isolated from the head, with a thermal gasket and 25mm bit of plastic. should be bit more consistent, since hot air and fuel suck Also found that cylinder 1 was running a touch leaner than the rest, after checking afr per cylinder. so have added a fuel trim to add a bit more fuel on cyl 1,2 points
-
Took this on my works mid winter xmas do car rally. got this pretty awesome photo! makes the car look way better than it is, but gets me super excited for painting it!2 points
-
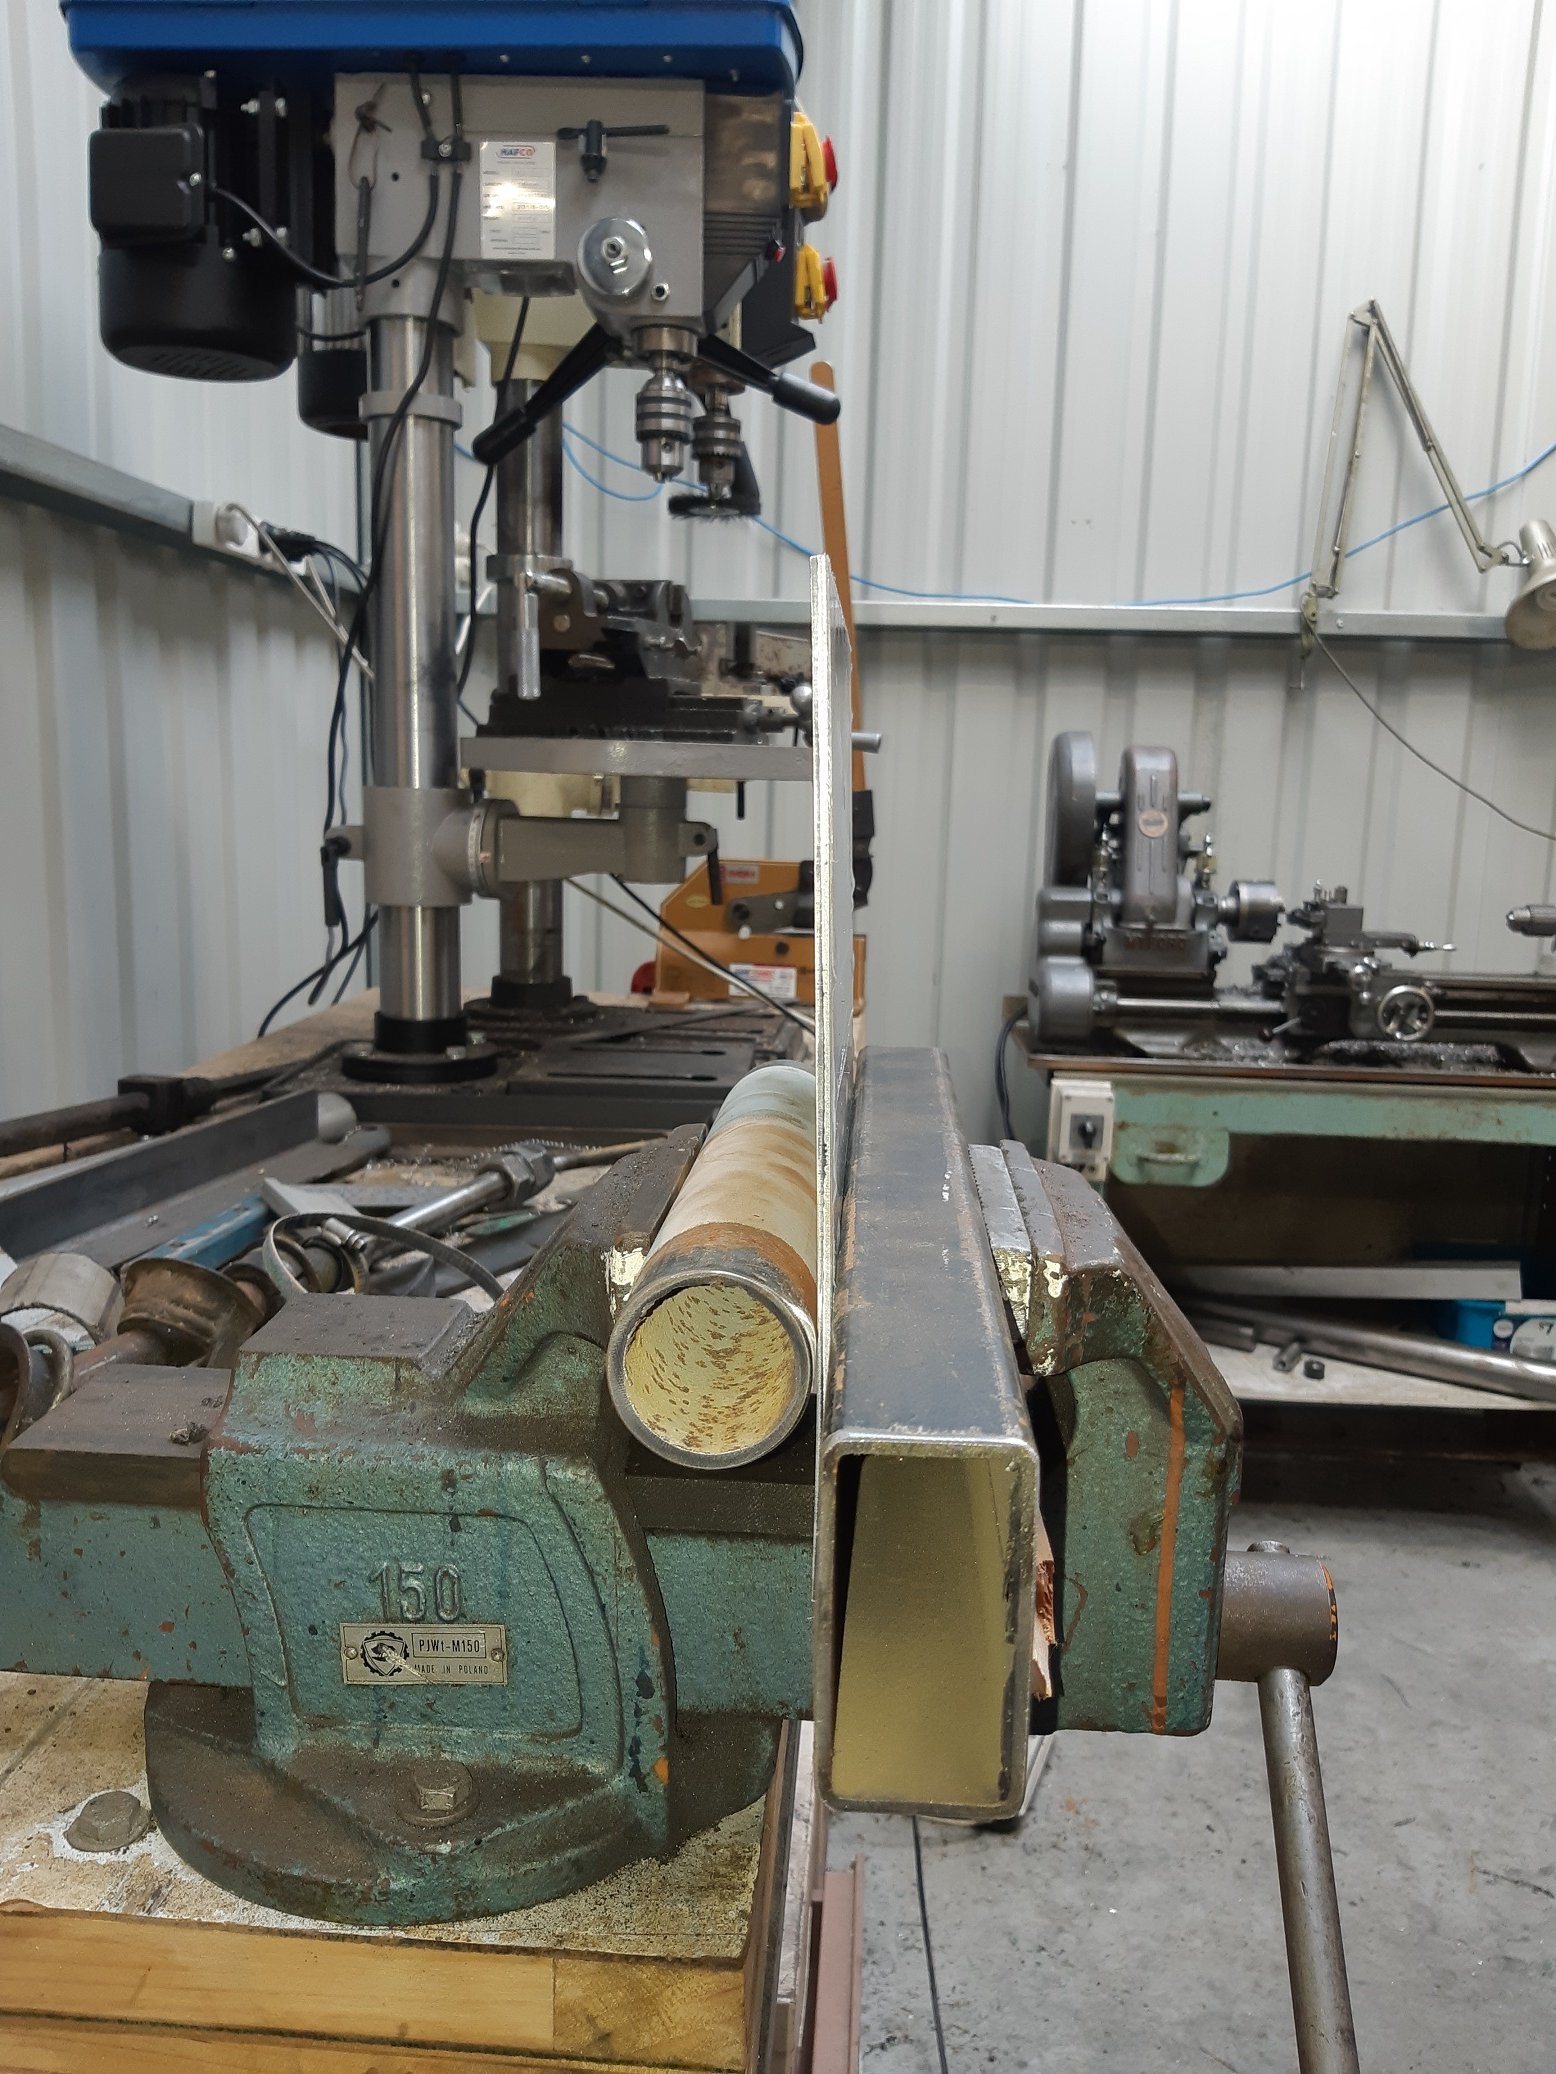
Got some 20mm plate plasma cut. I had a one spare cut in case I fuck it up. I started whittling at it with the mill. Managed to drill 4 holes in EXACTLY the right spots on the first one! I used the dial thingamies on the table adjuster wheels. I still need to machine it down to 15mm, make some 11mm spacers and get some bolts the right length.
2 points
-
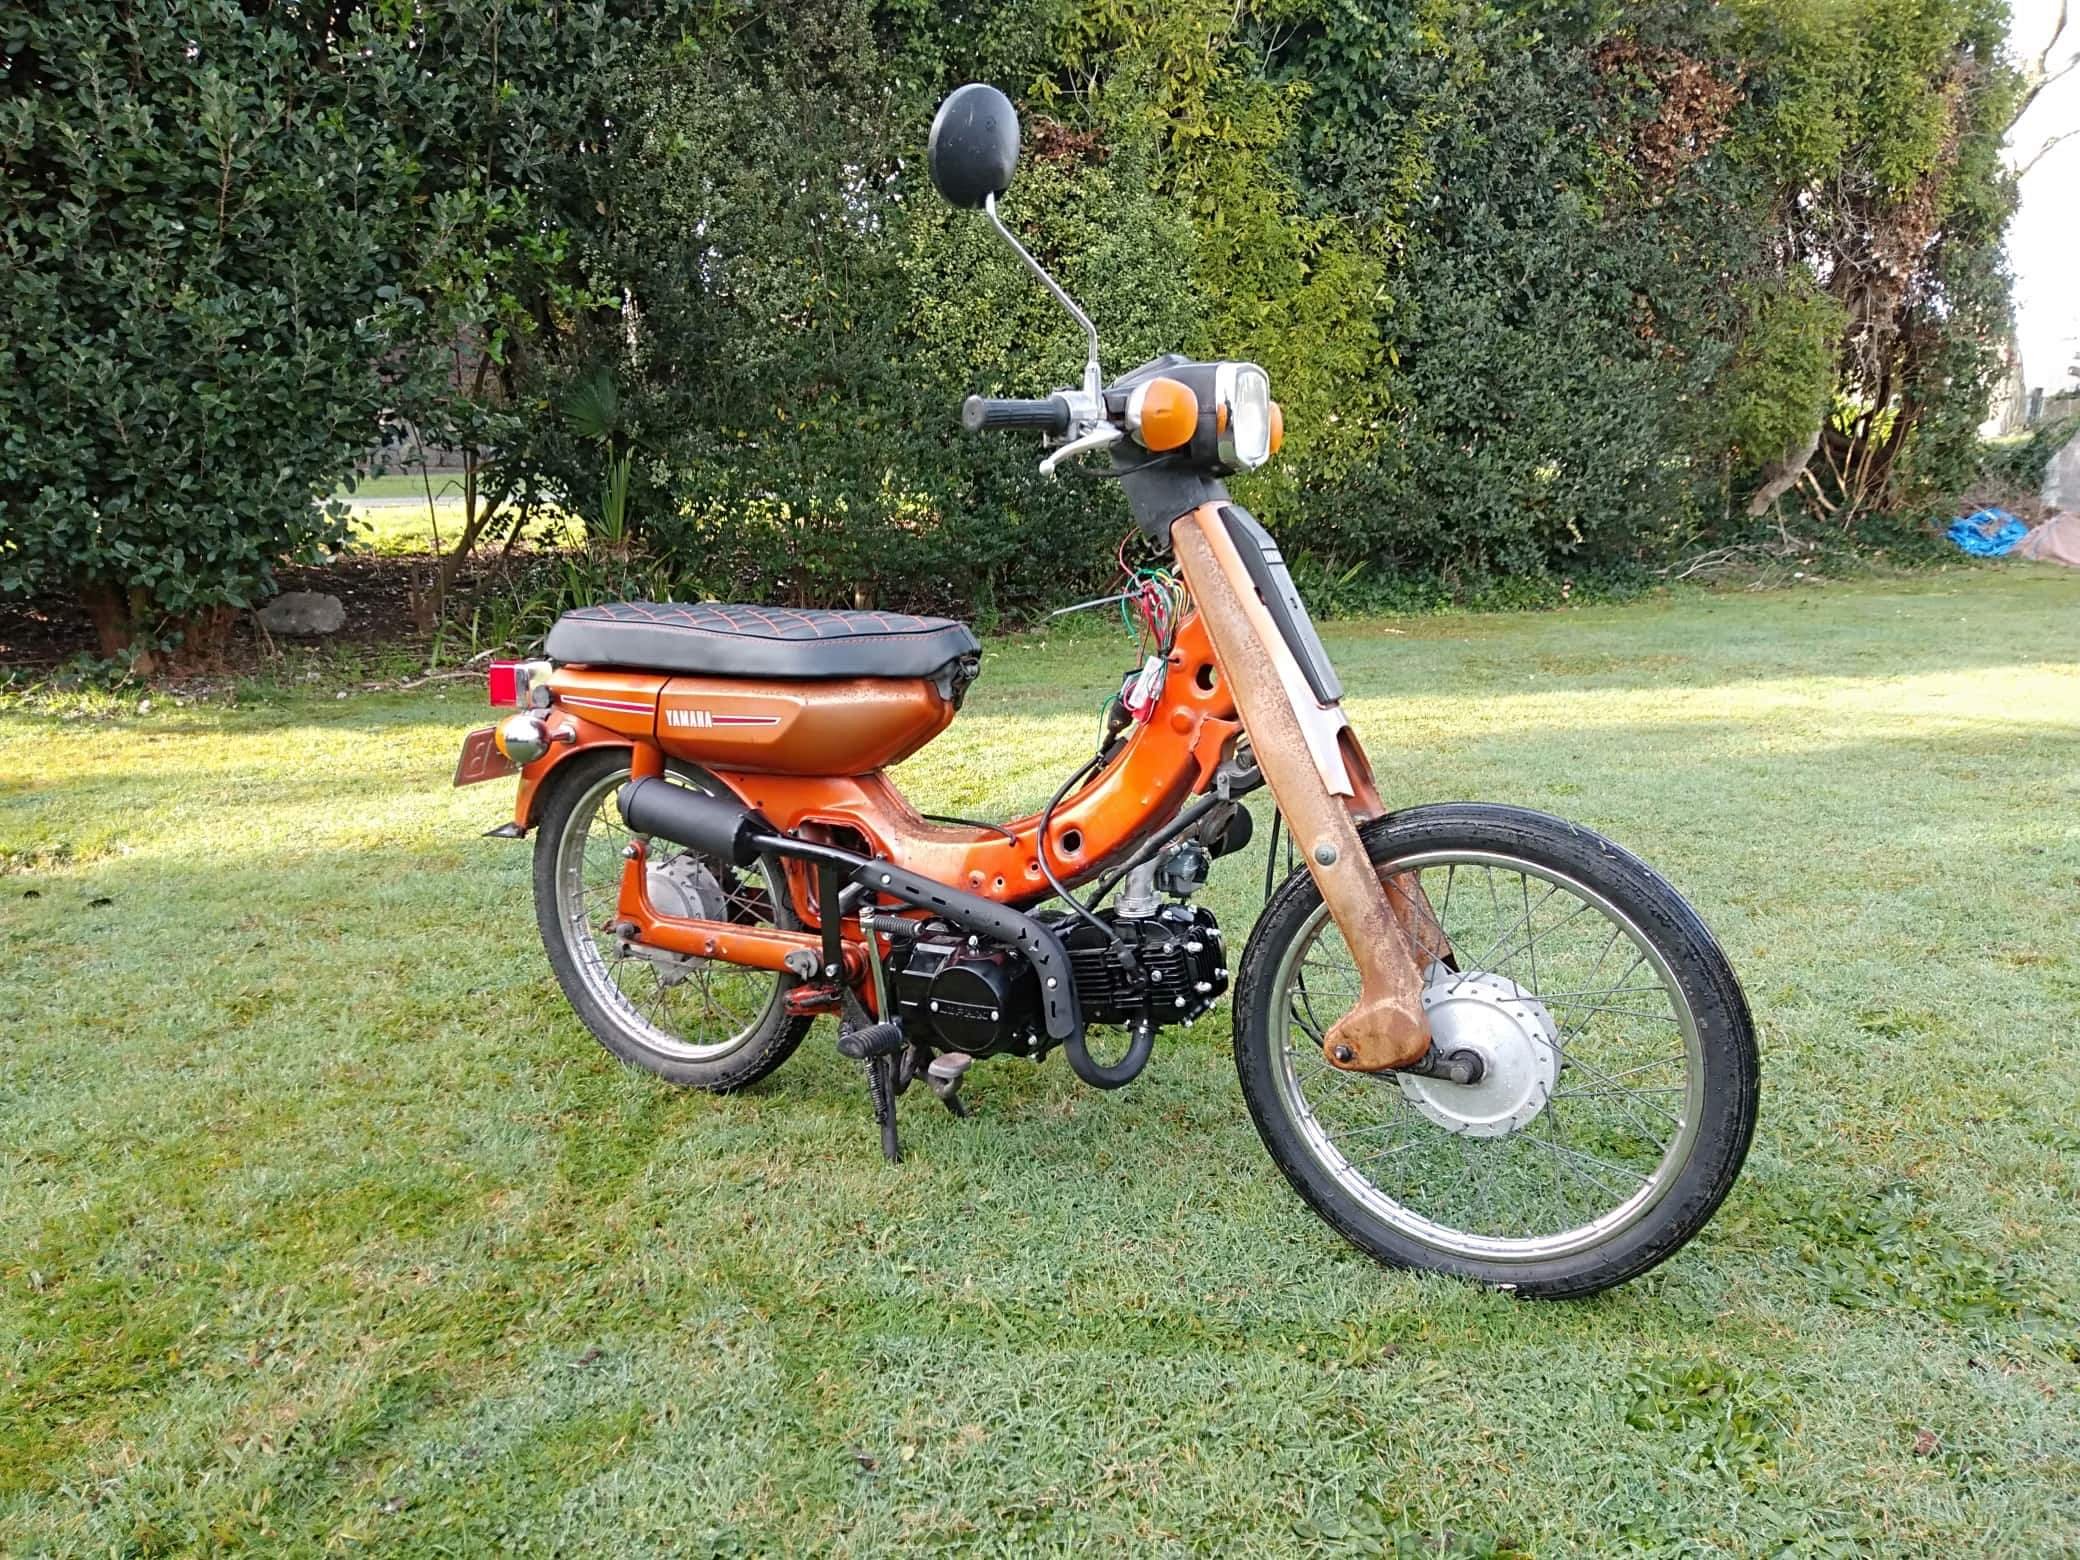
I did a wee bit more tinkering with the Ruby last night. I made a start on an oil change, have drained the old oil out and undone all the bolts on the sump to get at the filter gauze. Annoyingly it looks like I might have to lift the engine off its mounts to get the sump past the front two studs. I might see if I can get the studs out first. Either way, its annoying. The oil that came out, aside from being old and a little sludgy, is in much better nic than I would have expected after being sat for so long. I sprayed a bit of CRC around the front windscreen latch and hinges and veeeery gently pushed it open. Unfortunately the latch mount on the window frame appears to have been made from die-cast cheddar cheese and crumbled away in front of me. So I'll need to manufacture a new one of those... I'm sure (I know) it isn't the only thing like this I also found this funky spanner on the floor under the car. Not sure where its fallen out of, I think maybe its for adjusting the valve clearances.
2 points
-
2 points
-
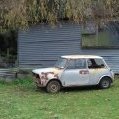
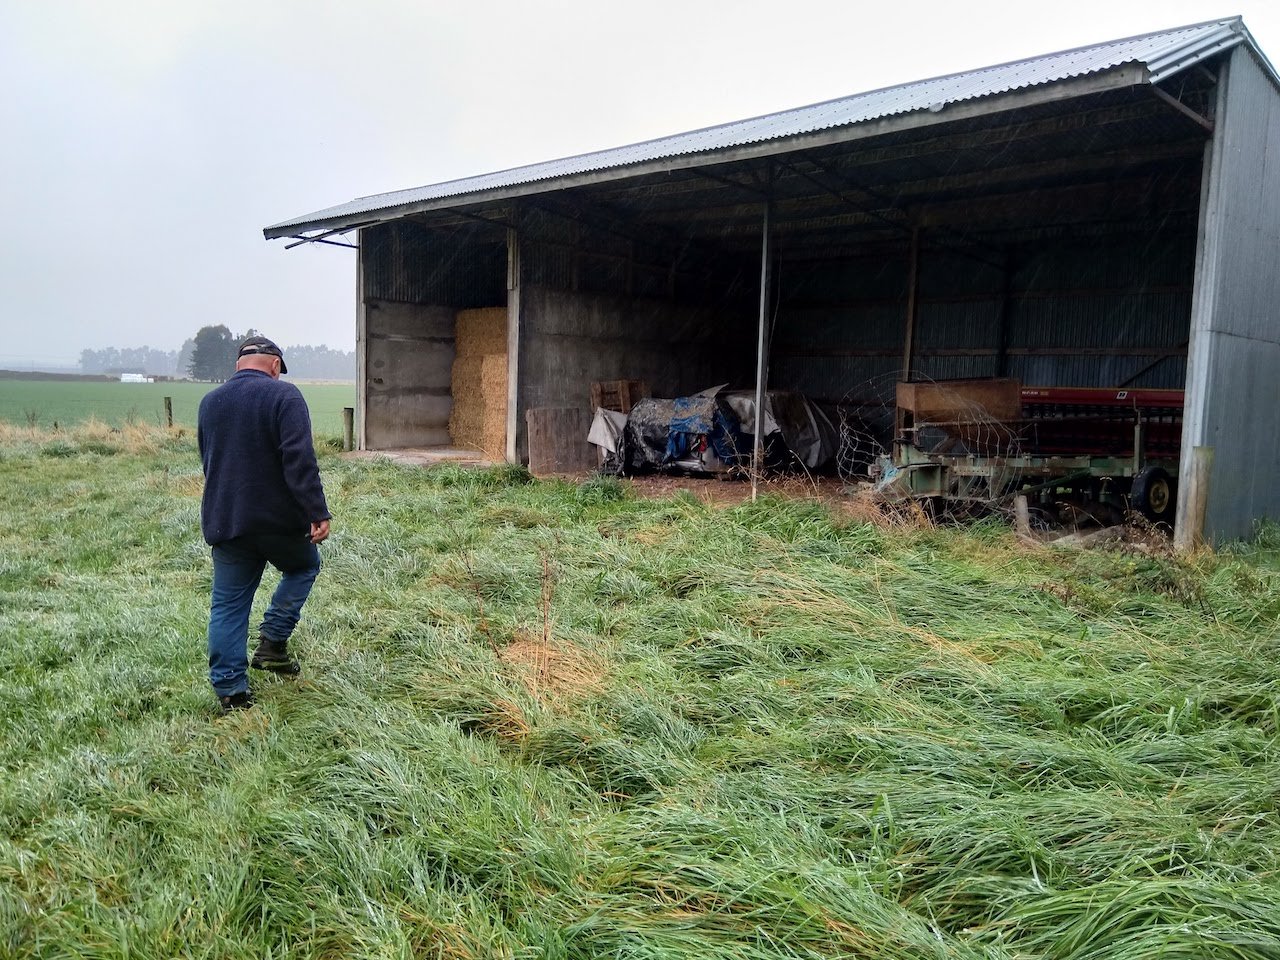
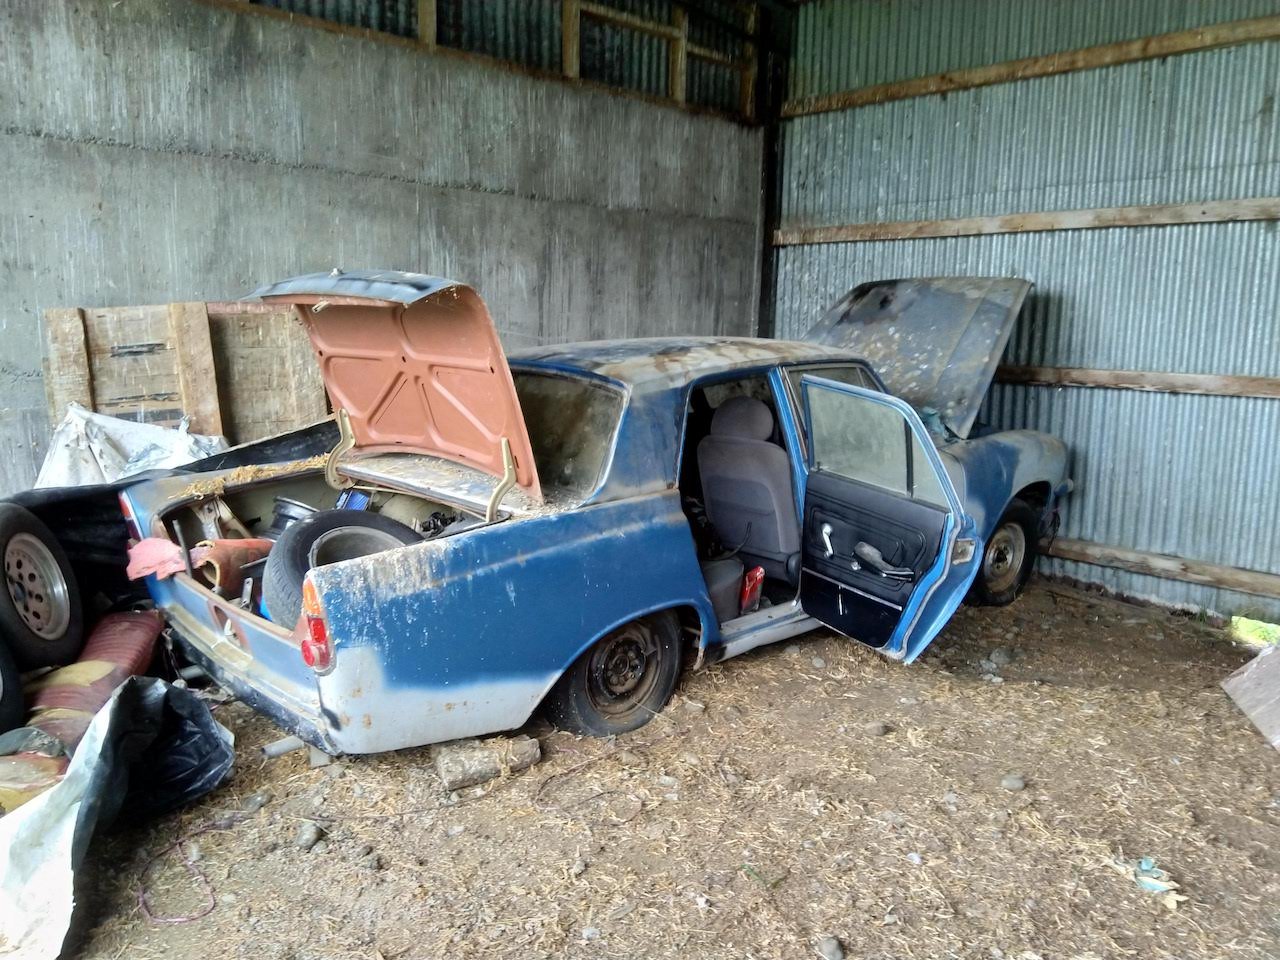
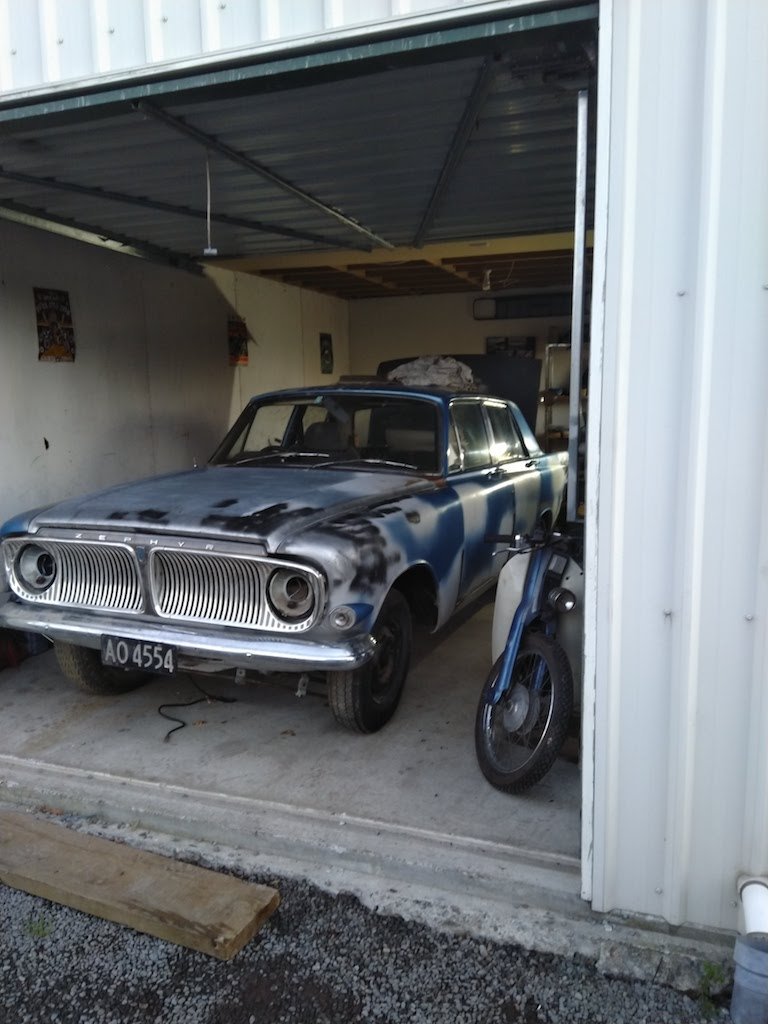
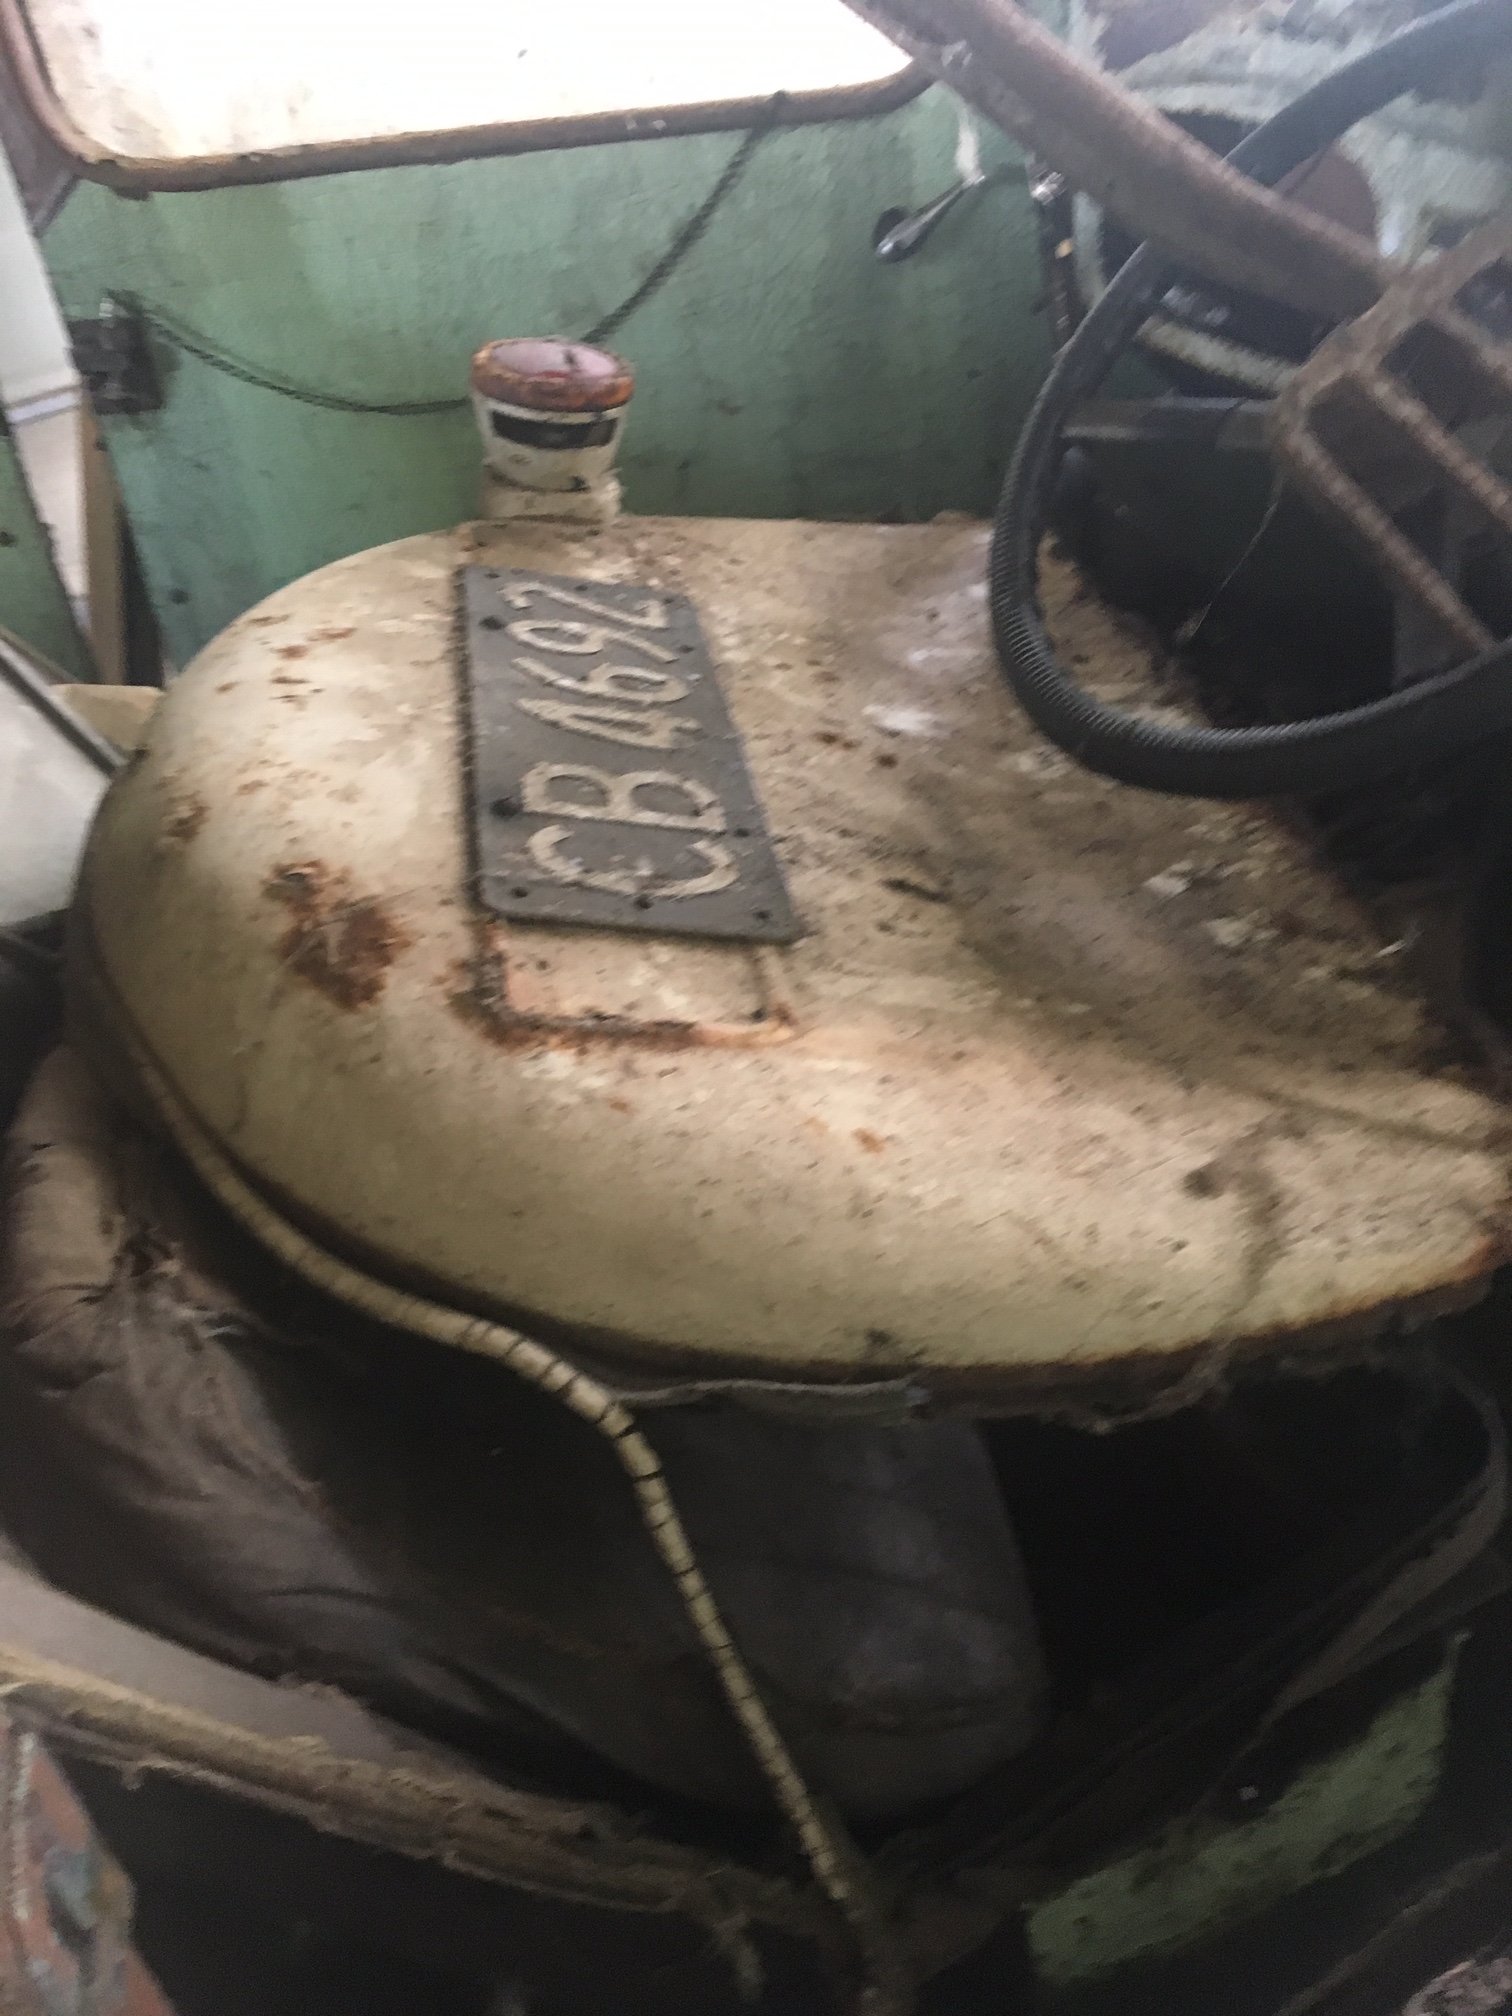
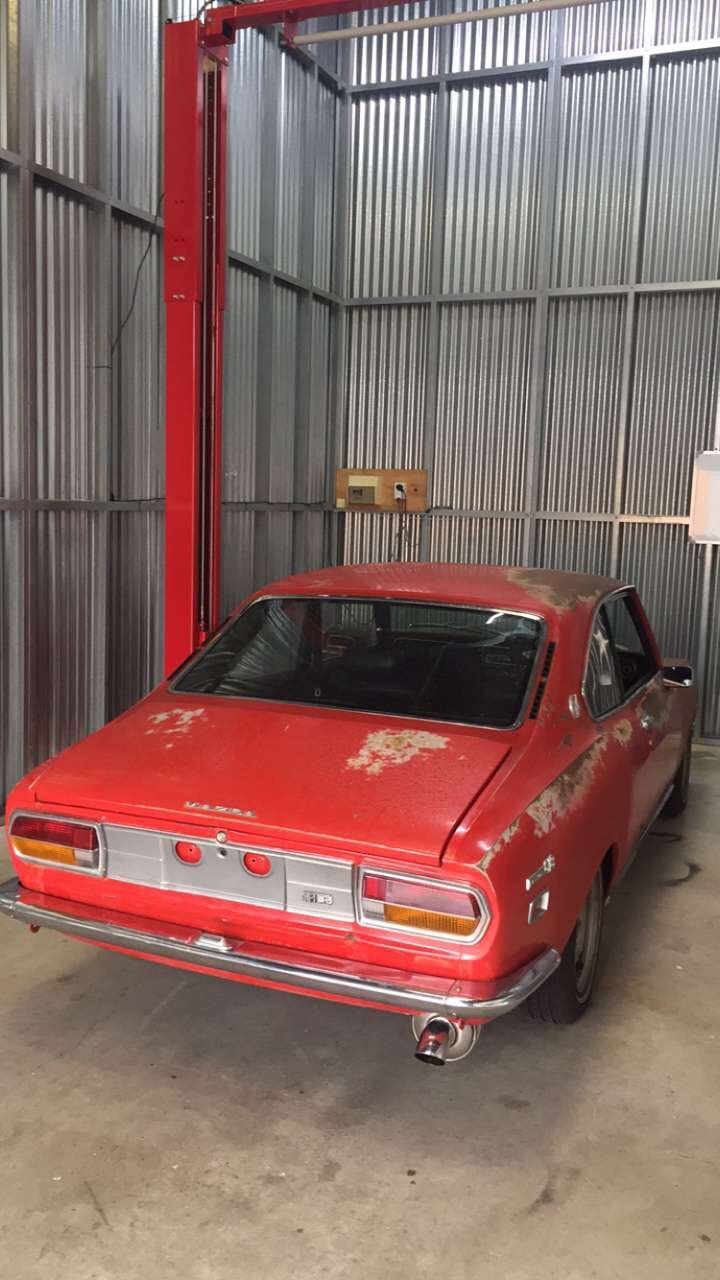
Found myself a new project. Car was last on the road in 1993, then the registration went dead but the rego is still in the system. Previous owner bought the car around '98 with plans of putting a 302 into it. A few years later he took the car to a panelbeater to get some rust fixed and bodywork done. The bill came back a lot more then expected so the car got mothballed to a hay shed. A mk4 zodiac came up a few years later that had already had a certified V8 conversion so he snapped that up and the mk3 stayed in the shed. The car only had minor rust (guards, doors, boot etc) to begin with, there was no damage to the chassis or sills. A bit of minor rust has come back since then, but a sweet barn find. The car was in Methven and had a heap of spares with it. It was pretty heavy towing back. It came with the engine pulled apart and a heap of heads, manifolds and bits. The guy that sold it to me knows someone with a mk2 motor that ran when pulled out, so I will snap that up. Long term plans for it once revinned will be some slam, wide steels and eventually an engine swap to a V8 or a barra. Am I best to get a repair certifier to come and look at it so I can get the rust signed off before I strip it back and paint? I'm thinking that might be easier while everything is pulled apart rather than taking through revin in primer, then pulling everything back apart to paint. Any ideas on how hard this would be and cost? Discuss here:
1 point
-
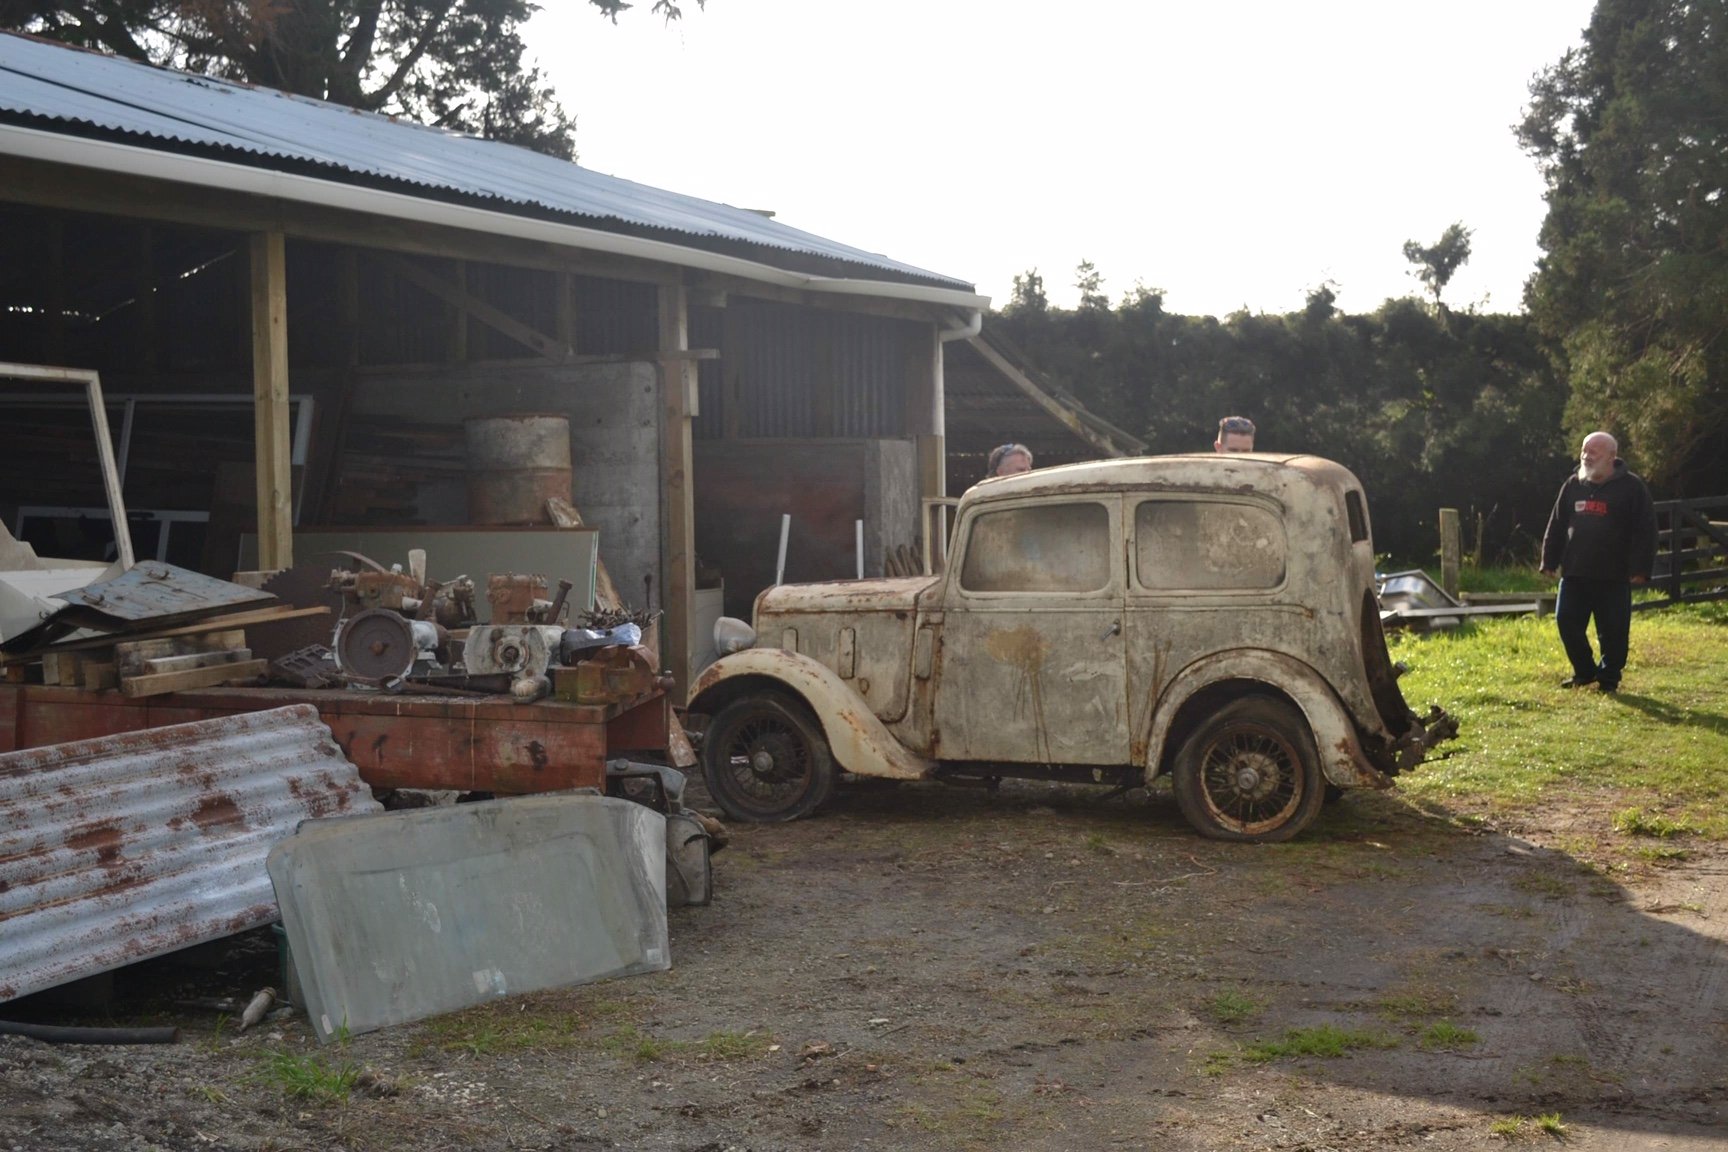
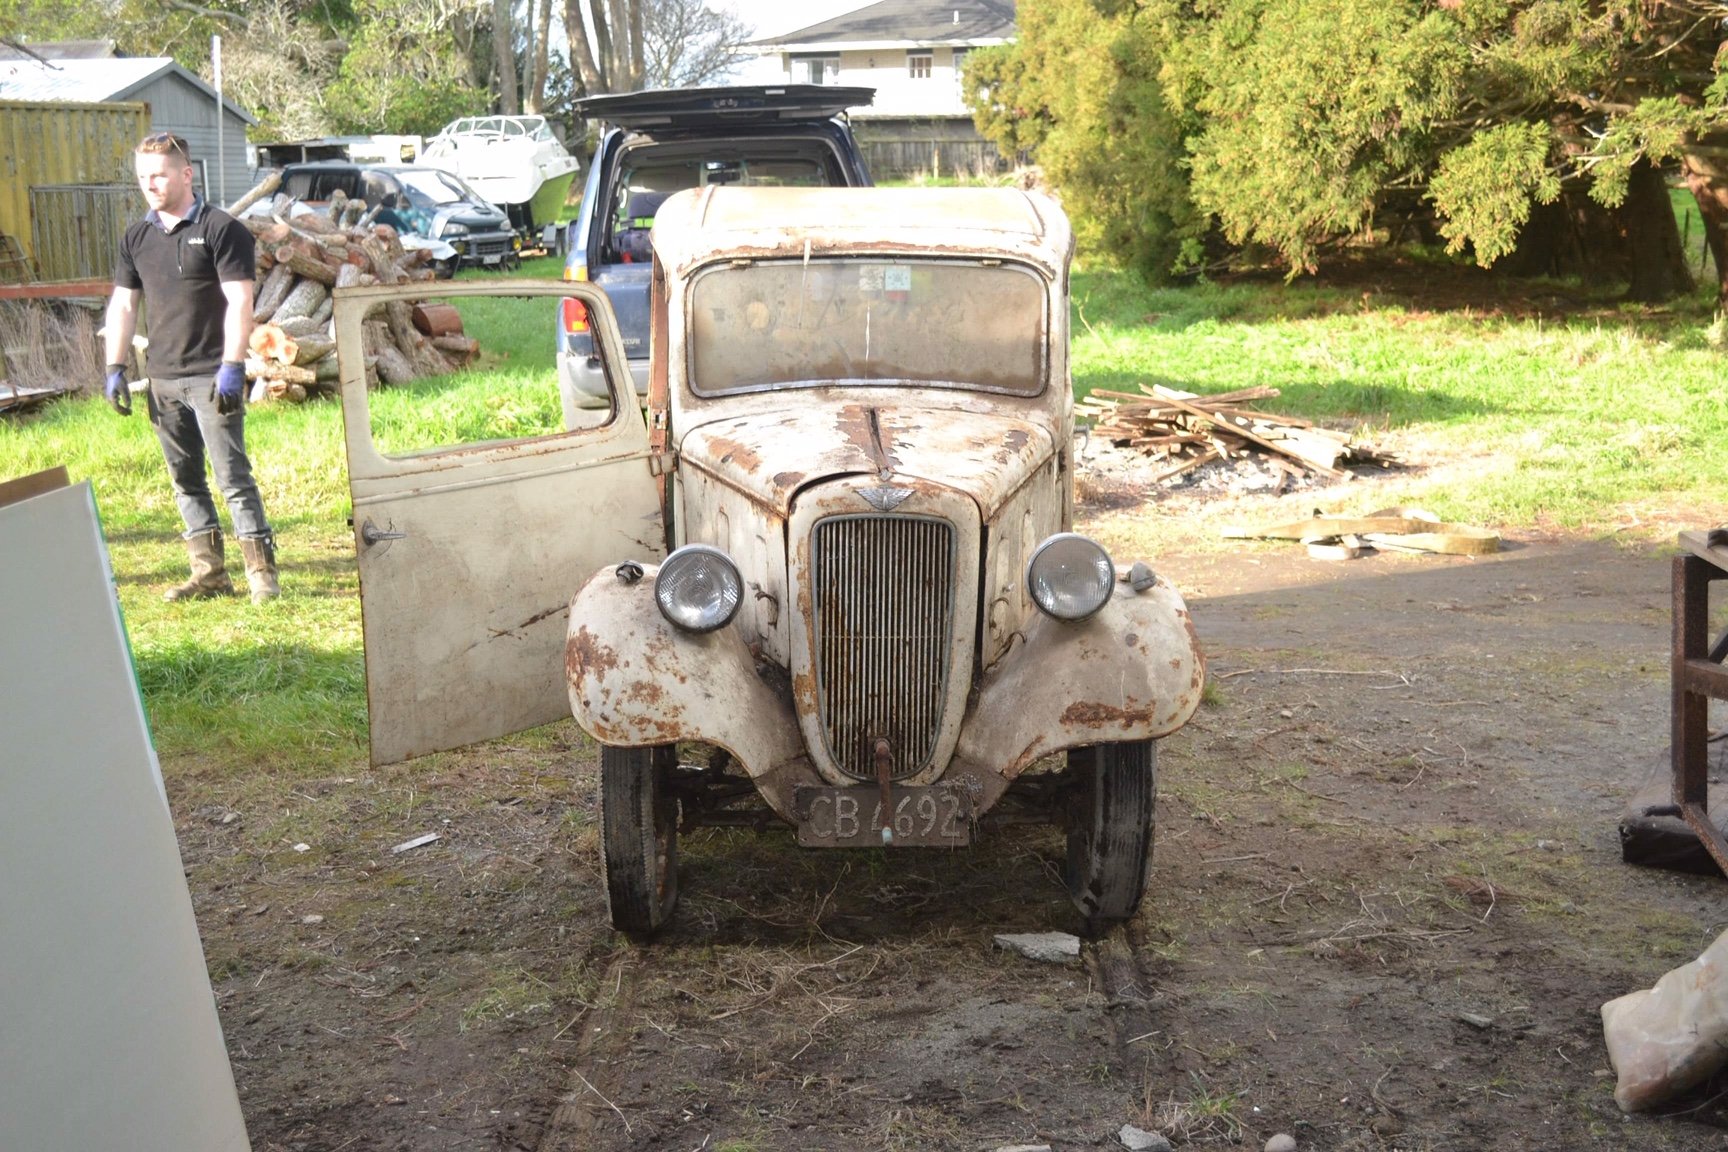
Discussion: Lurking in the back shed at my grandads farm for all of eternity has been an old Austin 7. There was a bunch of old cars there that as kids we used to play in, but the Austin had been there for so long that it was completely buried under hoarded shit and was far too scary to play in, but was always interesting to see if you peered past the old L300, Fergie 19 & piles of old timber. As a 10 year old kid, I was smart enough to know that this one was well beyond rescue... Fast forward 20 years: Grandad has passed on and the sheds have been mostly cleaned out for the next generation of hoarding, revealing this little Austin. Now 30 year old Jeff is not half as smart as his 10 year old self... So now I look at it and think "I reckon I can save that... maybe..."
1 point
-
As far as OS goes, this thread is pretty PC1 point
-
Just make a manifold with 6 branches to siamese at the port?1 point
-
6 FCR 41mm Keihins?1 point
-
There are yeah but I want something with a decent watt rating, I have a panasonic something or other 12v stereo and its "50w" but really struggles and a complete lack of bass. Ideally I need to figure out what kind of 24v amps there are. I haven't looked at this stuff for so long, maybe these tiny amps are the way to go?1 point
-
Awesome thanks, will look into these. Hoping there is an option for more than 2ch.1 point
-
Do carbs on these engines have idle cutoff solenoids?1 point
-
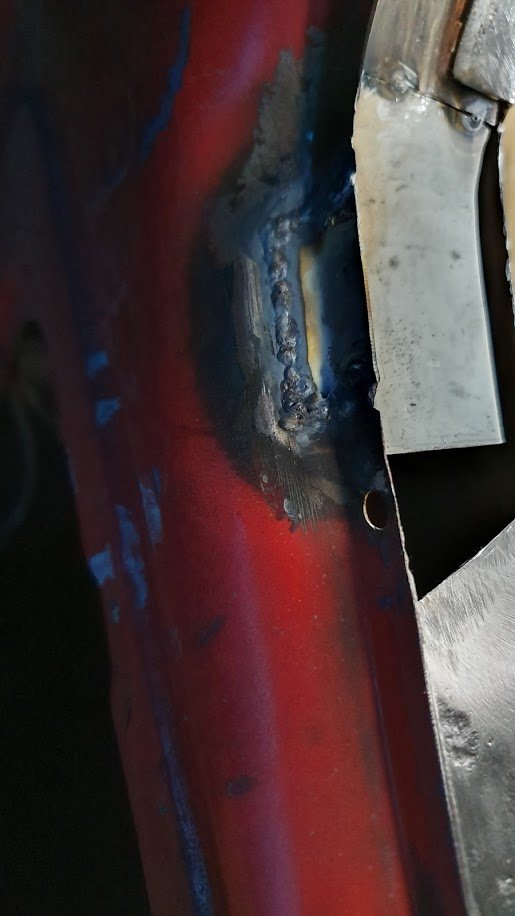
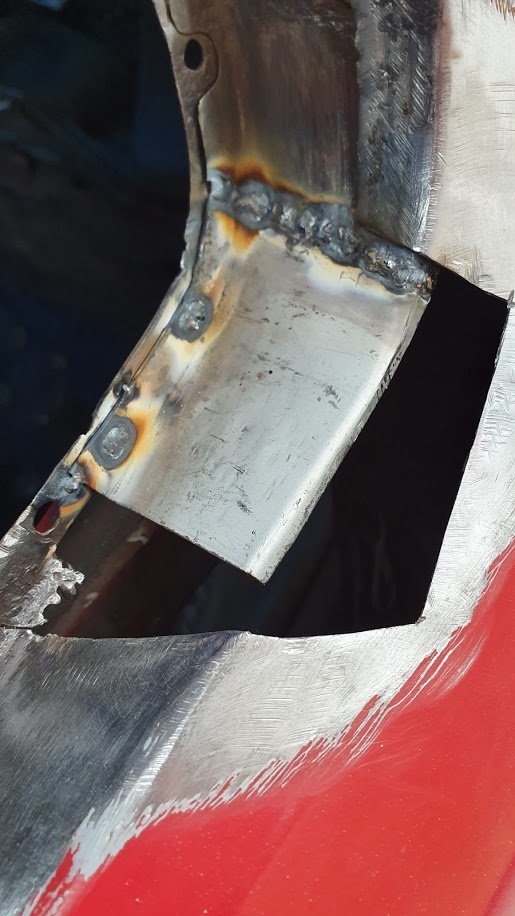
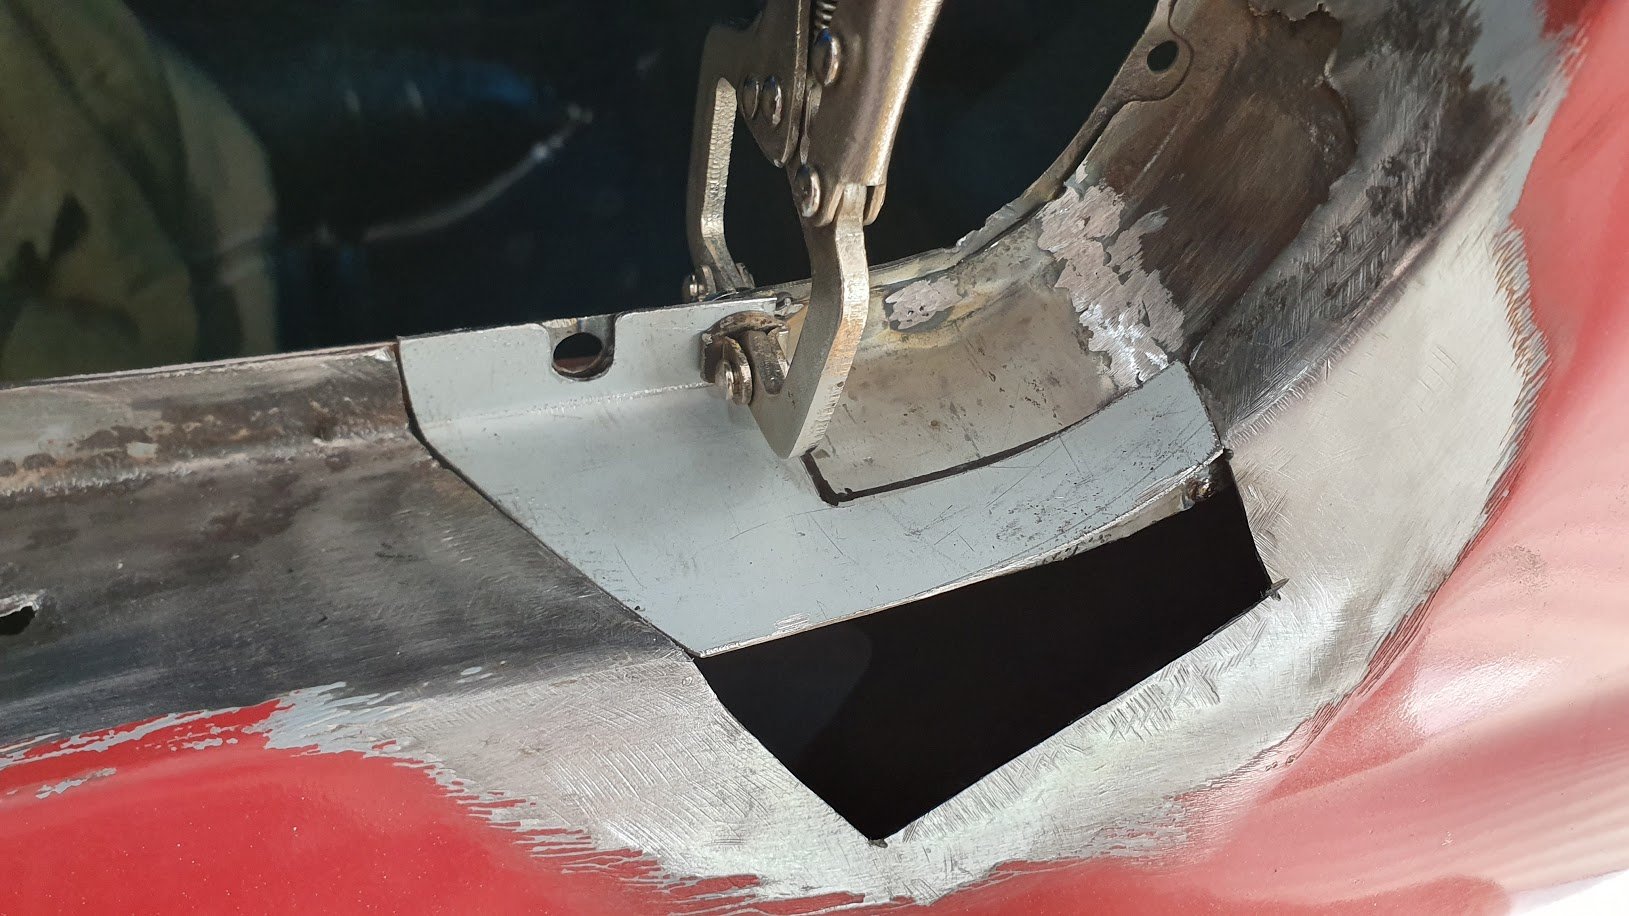
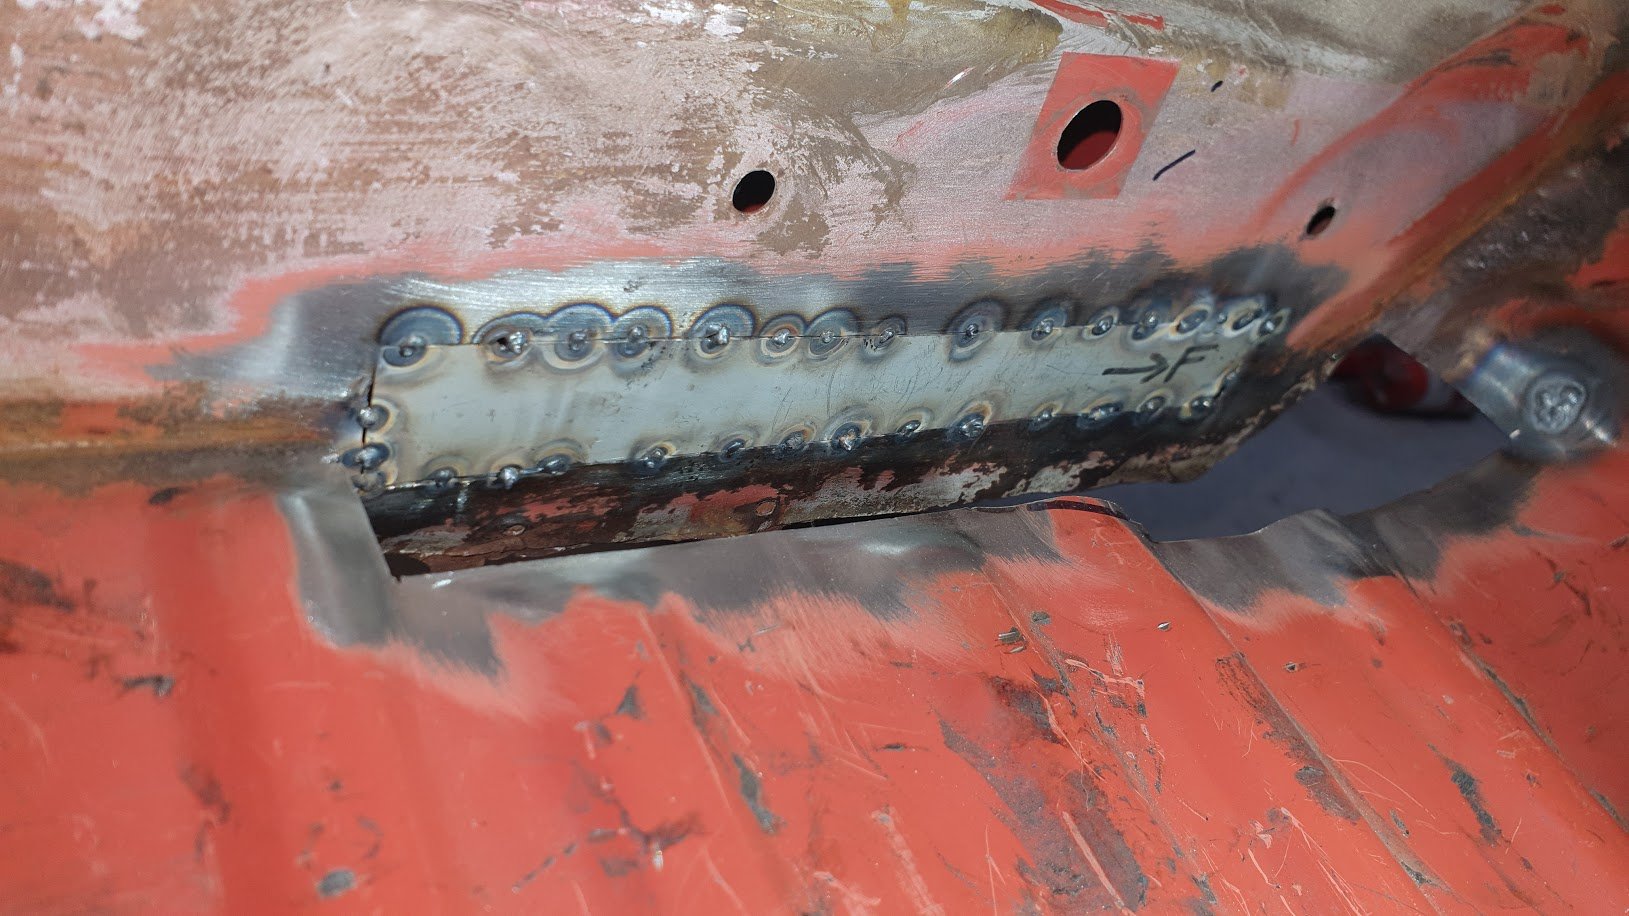
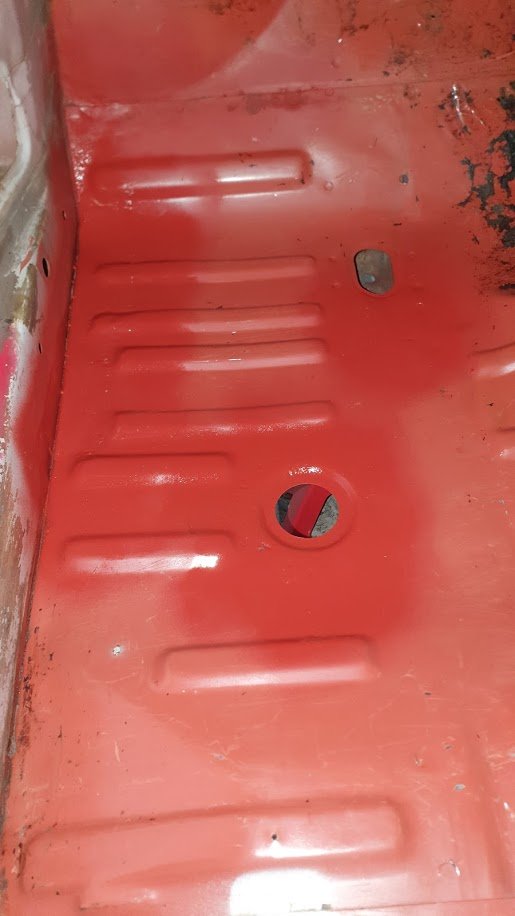
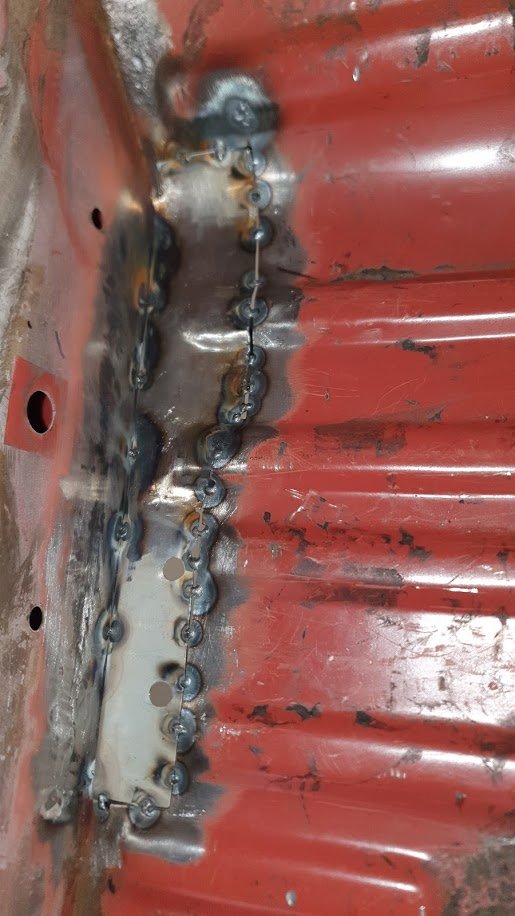
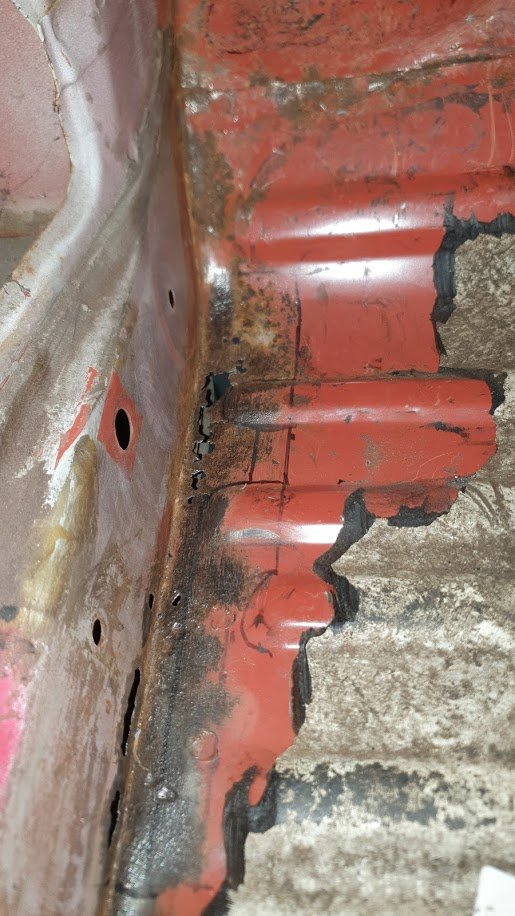
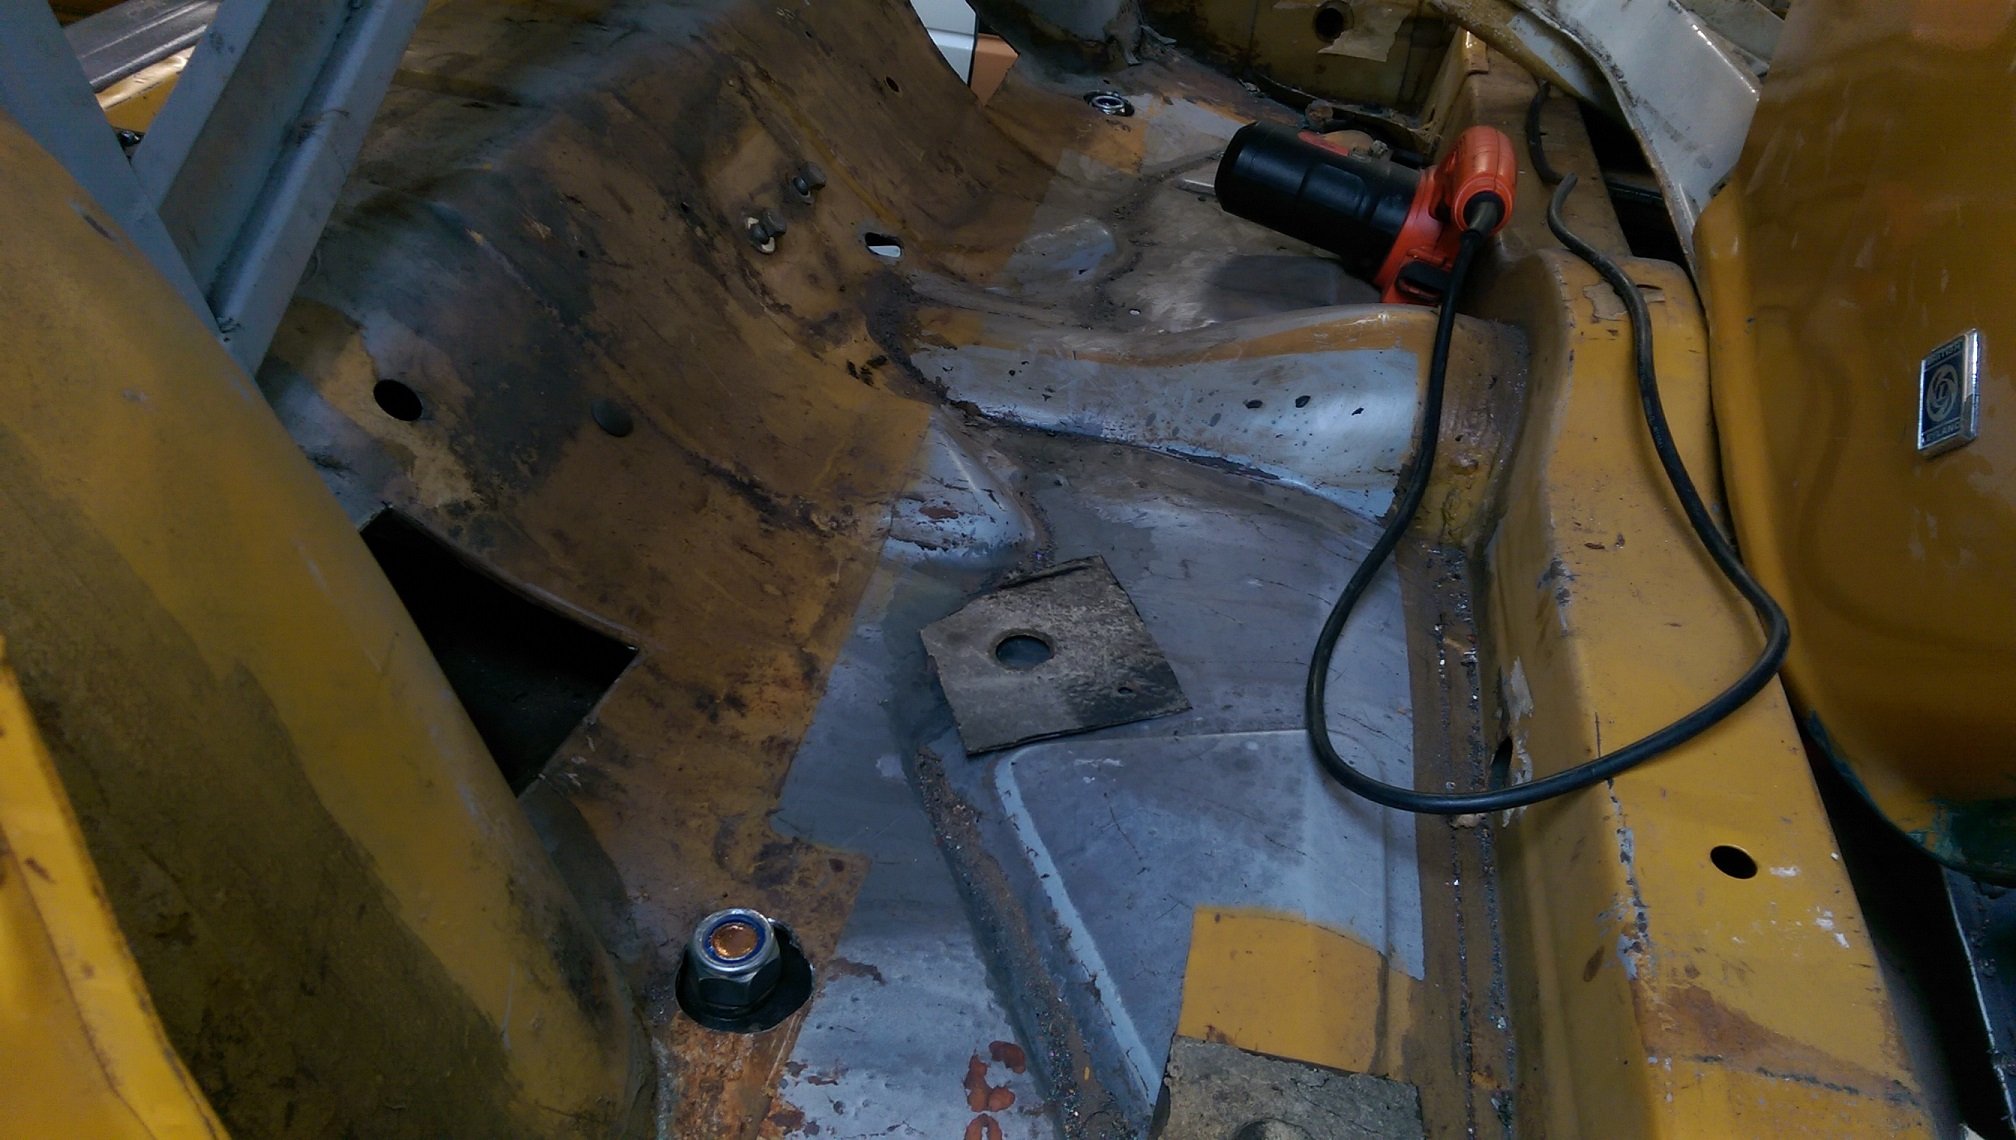
So... a change in the place i took this for a WOF meant it had a bit more of a thorough inspection. It didn't fail but he mentioned that some rust in the passengers floor would need attention soon. So some investigation happened. Turned out that hiding under the sound deadening was a little more serious than anticipated. Likely a leaking windscreen caused this. Out with the cutting disc and I had at it! And then glued it all back together Grind, Sand, and Prime - phone was left in the house so no pics except after And finally a renewal of paint and anti-chip coating. A nice tidy up for it.
1 point
-
Currently ripping out a pair of these. Motorbike for scale. Measure in at 1900mm long, 300mm high. Should only need a block or 2 to get the silv onto them.
1 point
-
Ask your mum, she takes a few.1 point
-
You guys are polluting this threads atmosphere with emissions chat1 point
-
Made an anti-banana jig. You may wonder "why so many holes in top bit?". Well, I was rushing, and you know that episode of Mr Bean where he goes to the dentist?
1 point
-
So given this complete bombshell of how easy this was looking like being, we put a strop around the diff. Put the VX landcruiser in low ratio, and gently towed it out of the shed. To blow my mind even more, I think I jokingly said, "wouldn't it be easy to steer if I could wind the window down" at which point I grabbed the window winder and wound down the bloody window! This little car blowing my mind with how much of it still works is kind of becoming a theme.
1 point
-
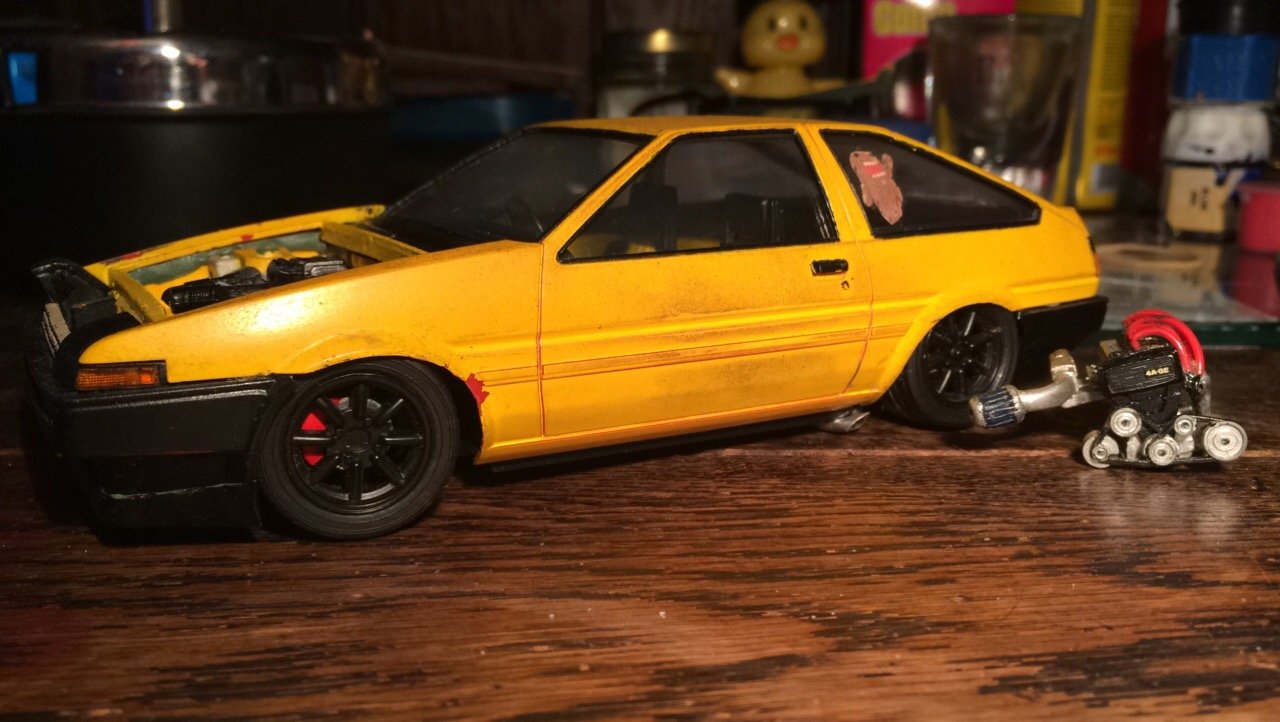
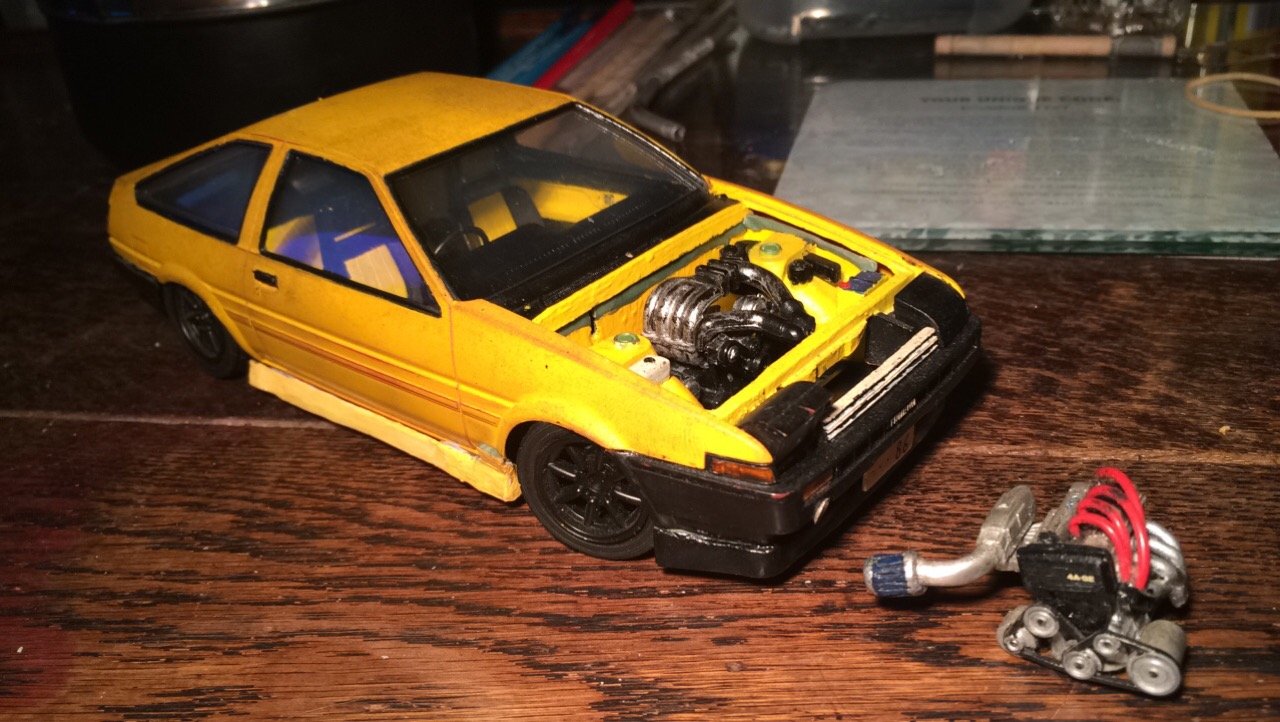
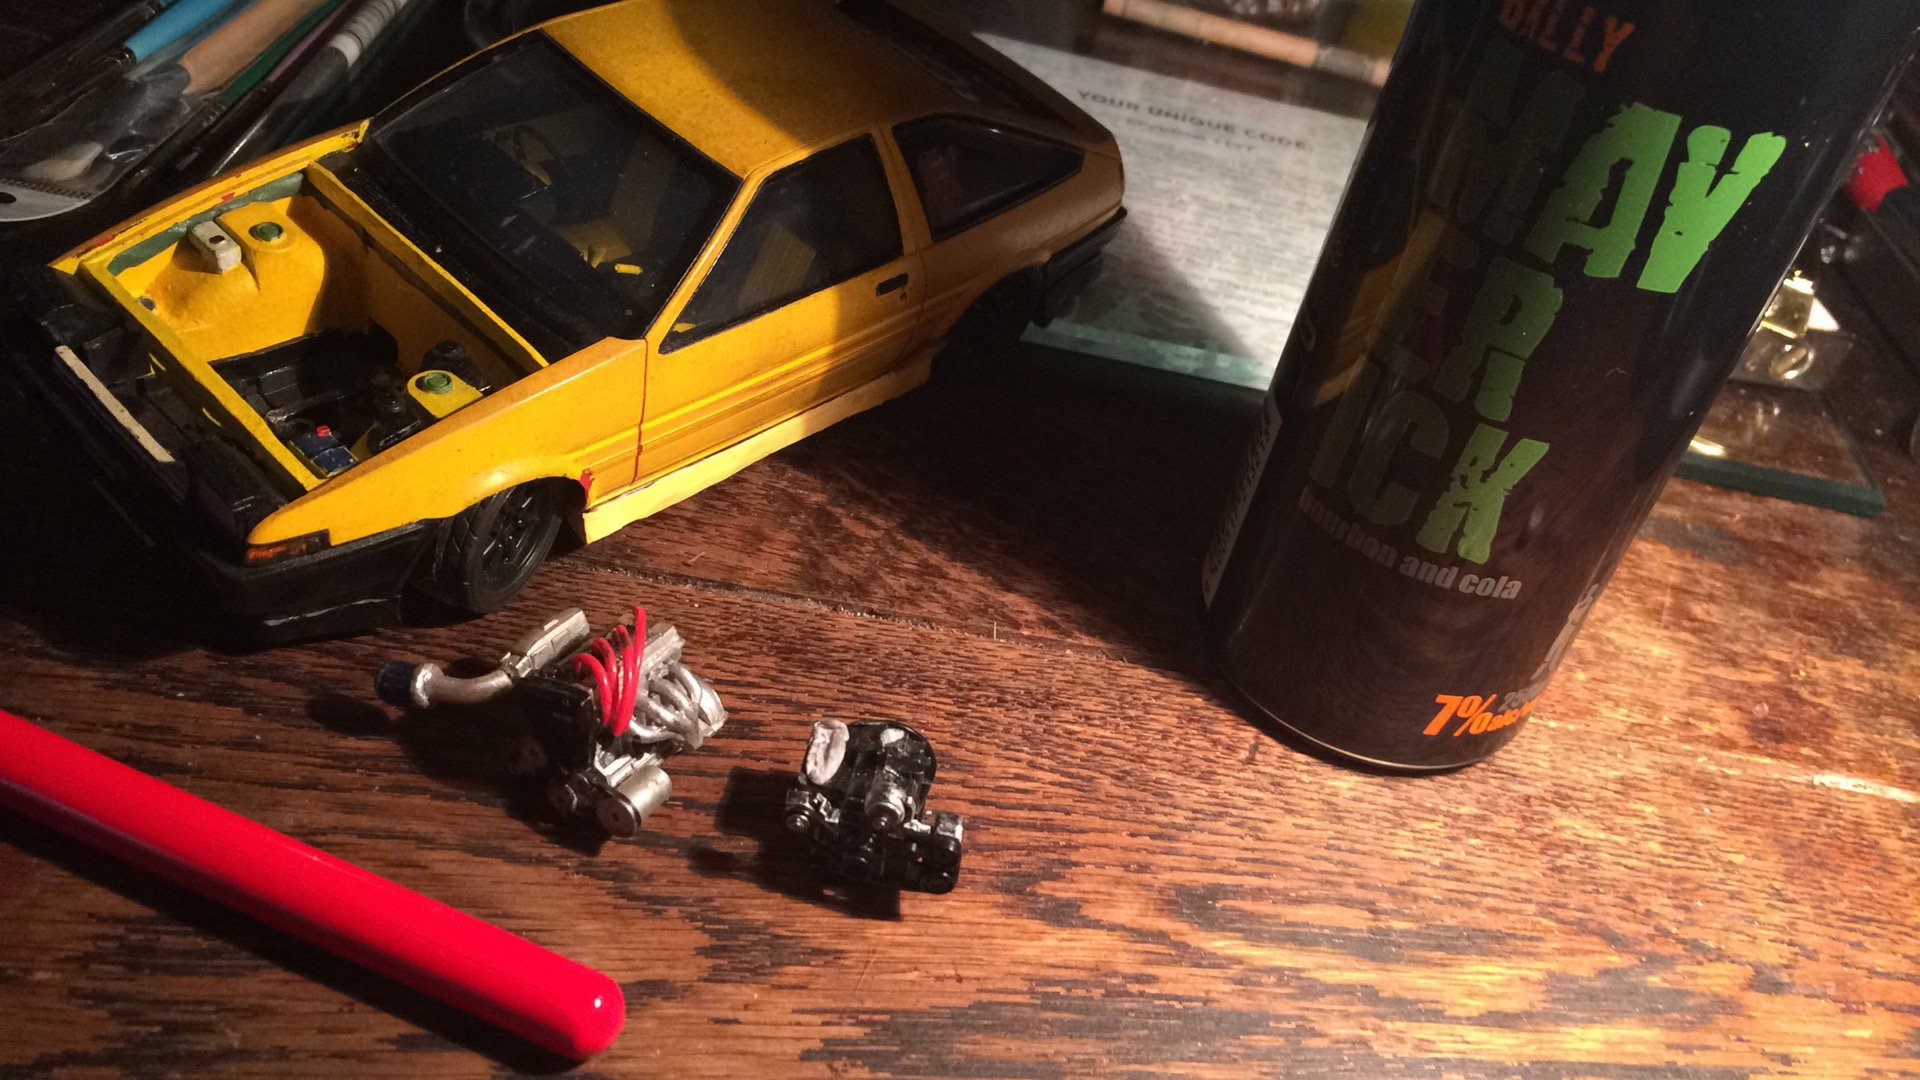
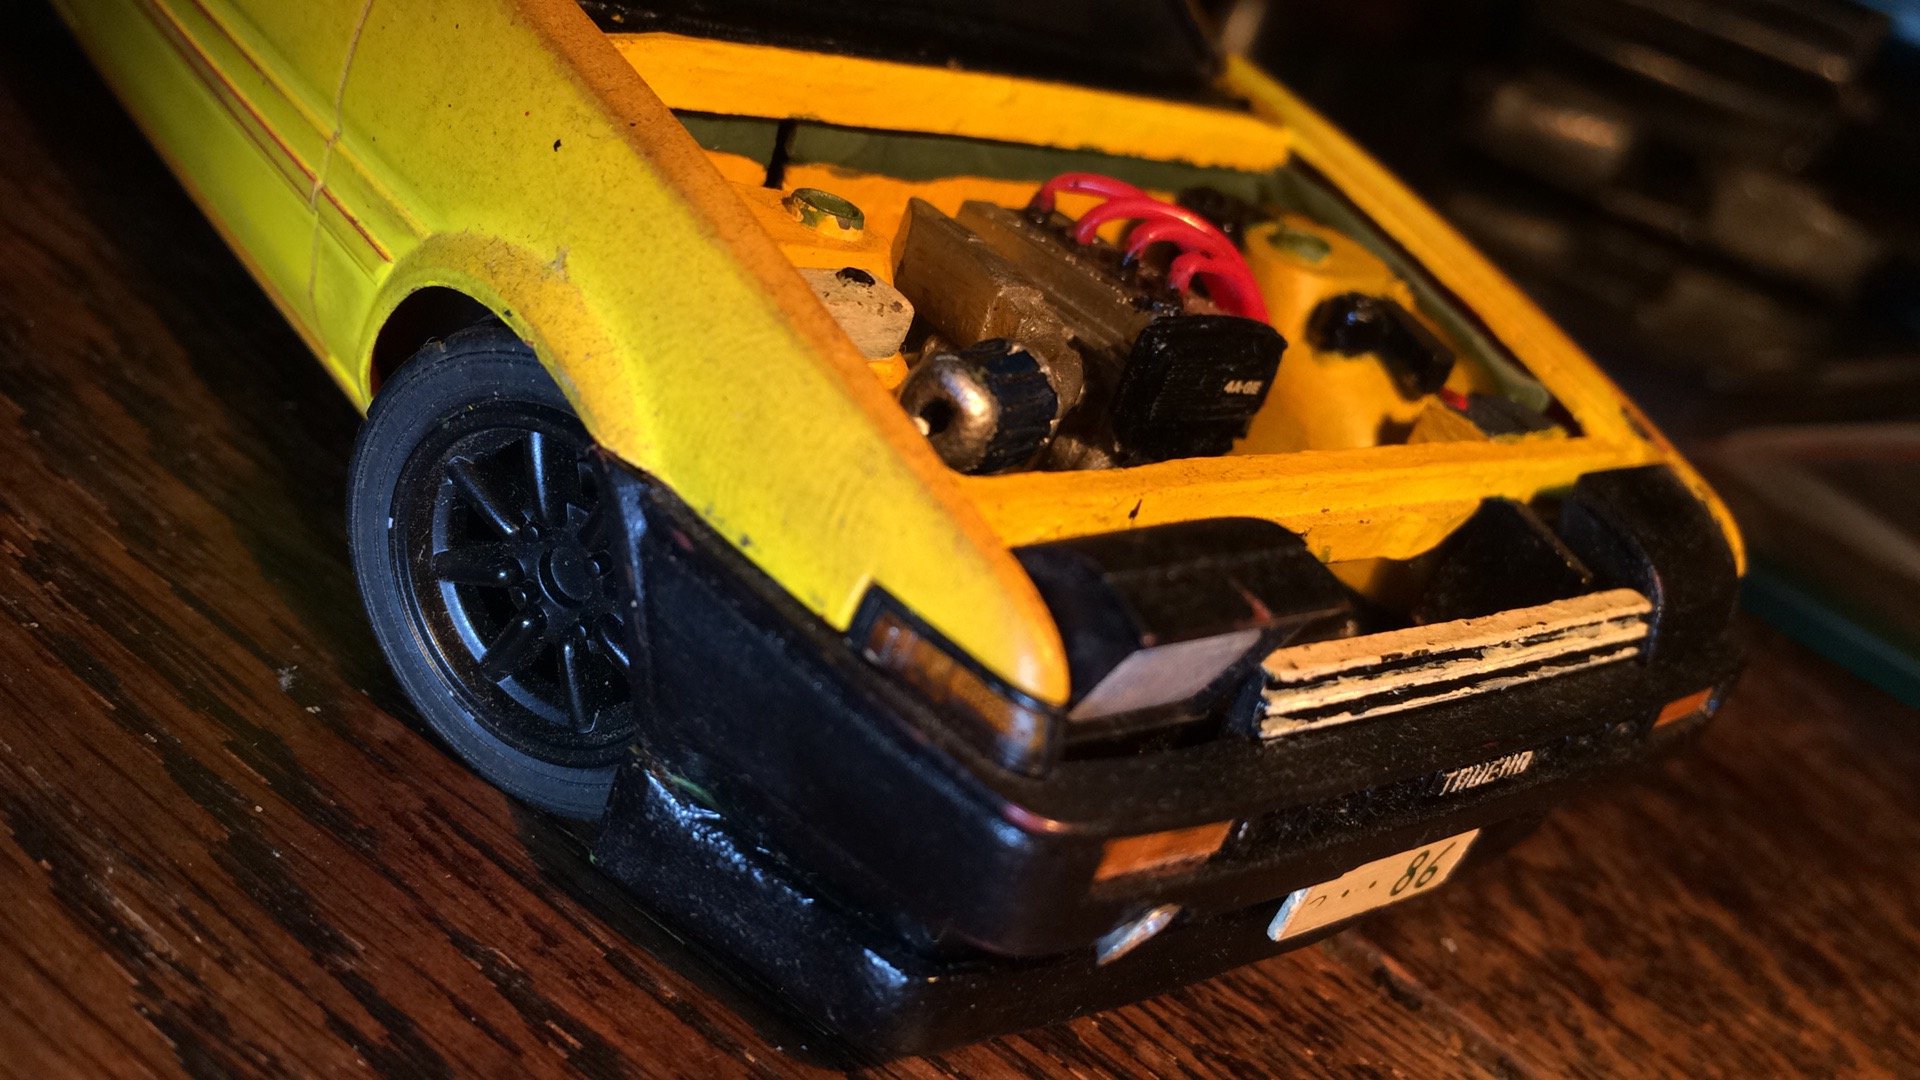
Found a couple more pics on my phone... pretty terrible pics sorry.. but yeah Aoshima 1/24 Trueno it came with engine detail and also had a spring suspension setup (basically just normal plastic struts but with teeny tiny real springs like from inside a pen) took springs out Lowered the body shell itself on to the bottom plate as well as chopped the back out a bit to allow the diff to really slam right down had to cut down the firewall and sides of engine bay to allow body to go down further but massively misjudged and so had to build it back up again with modeling clay custom exhaust with side exit made from alloy tubing had a stab at making front lip and sideskirts from modelling clay cold air induction pipe from front bumper found some tiny rubber tubing somewhere to make into sparkplug leads custom intake pipe and filter made from alloy and clay its been bashed up a bit from moving house and neglect, ill try get some photos of the underside as thats where most of the work was done trying to get it sitting right while still roll freely (thats a thing for me, its gotta still be able to roll even if its not perfectly smooth, not a fan of just gluing wheels in place etc) had an RX7 kit i never really finished that I robbed the 13b out of as well and can exchange that for the 4age if wanted
1 point
-
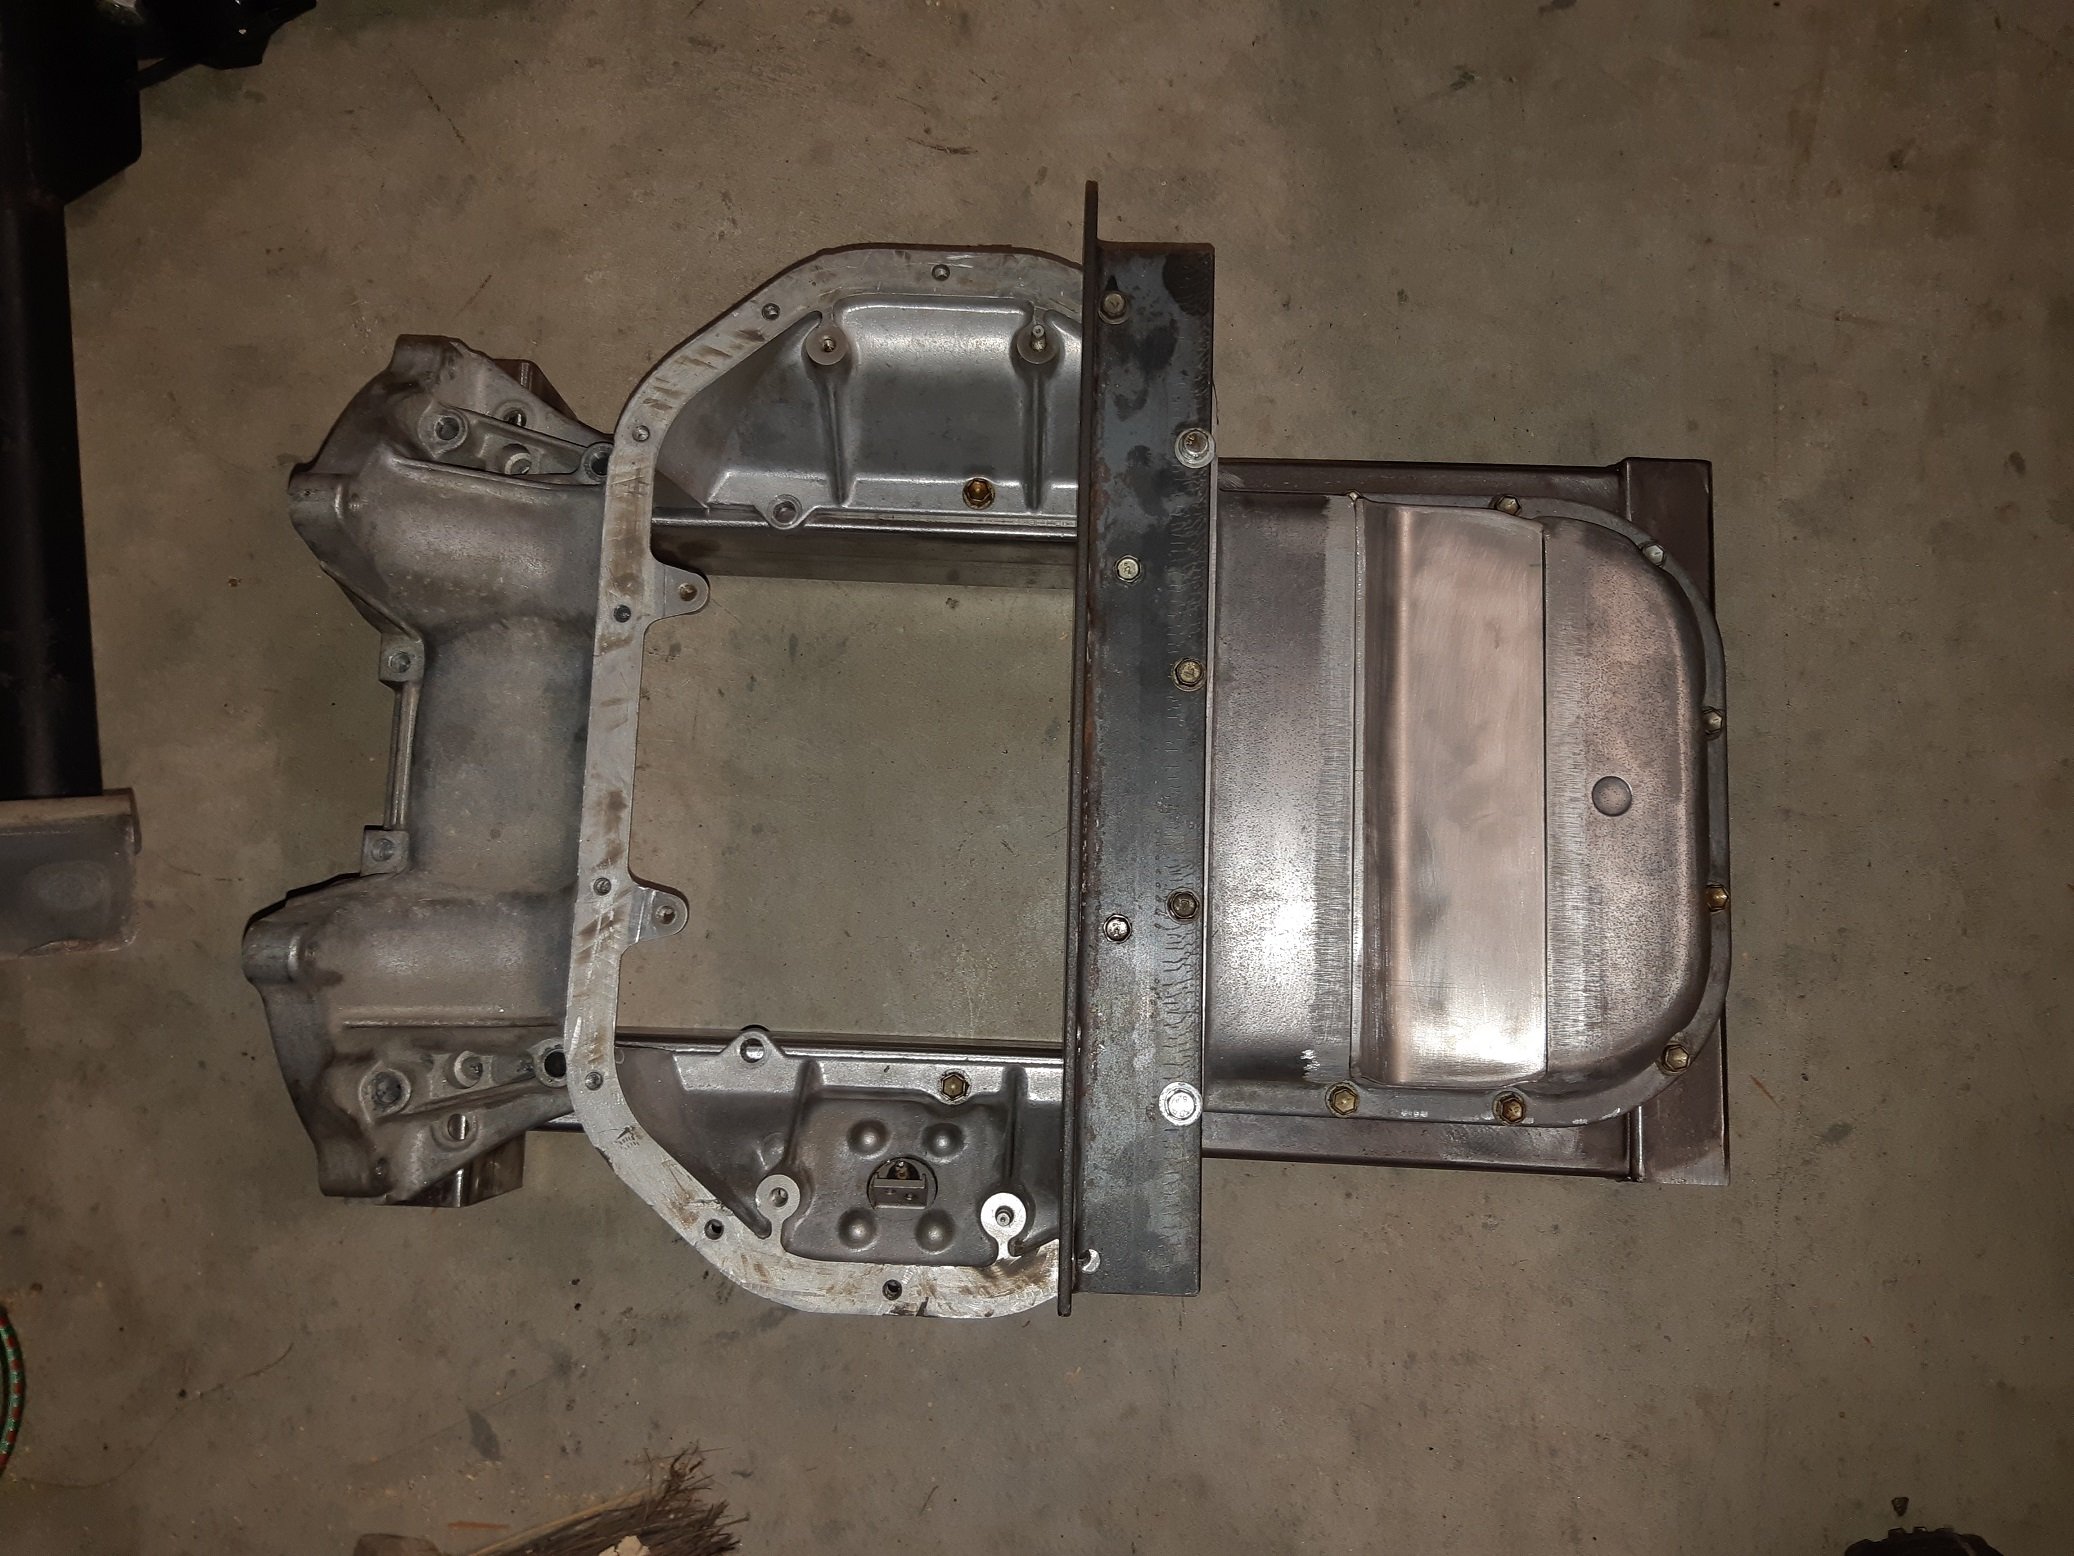
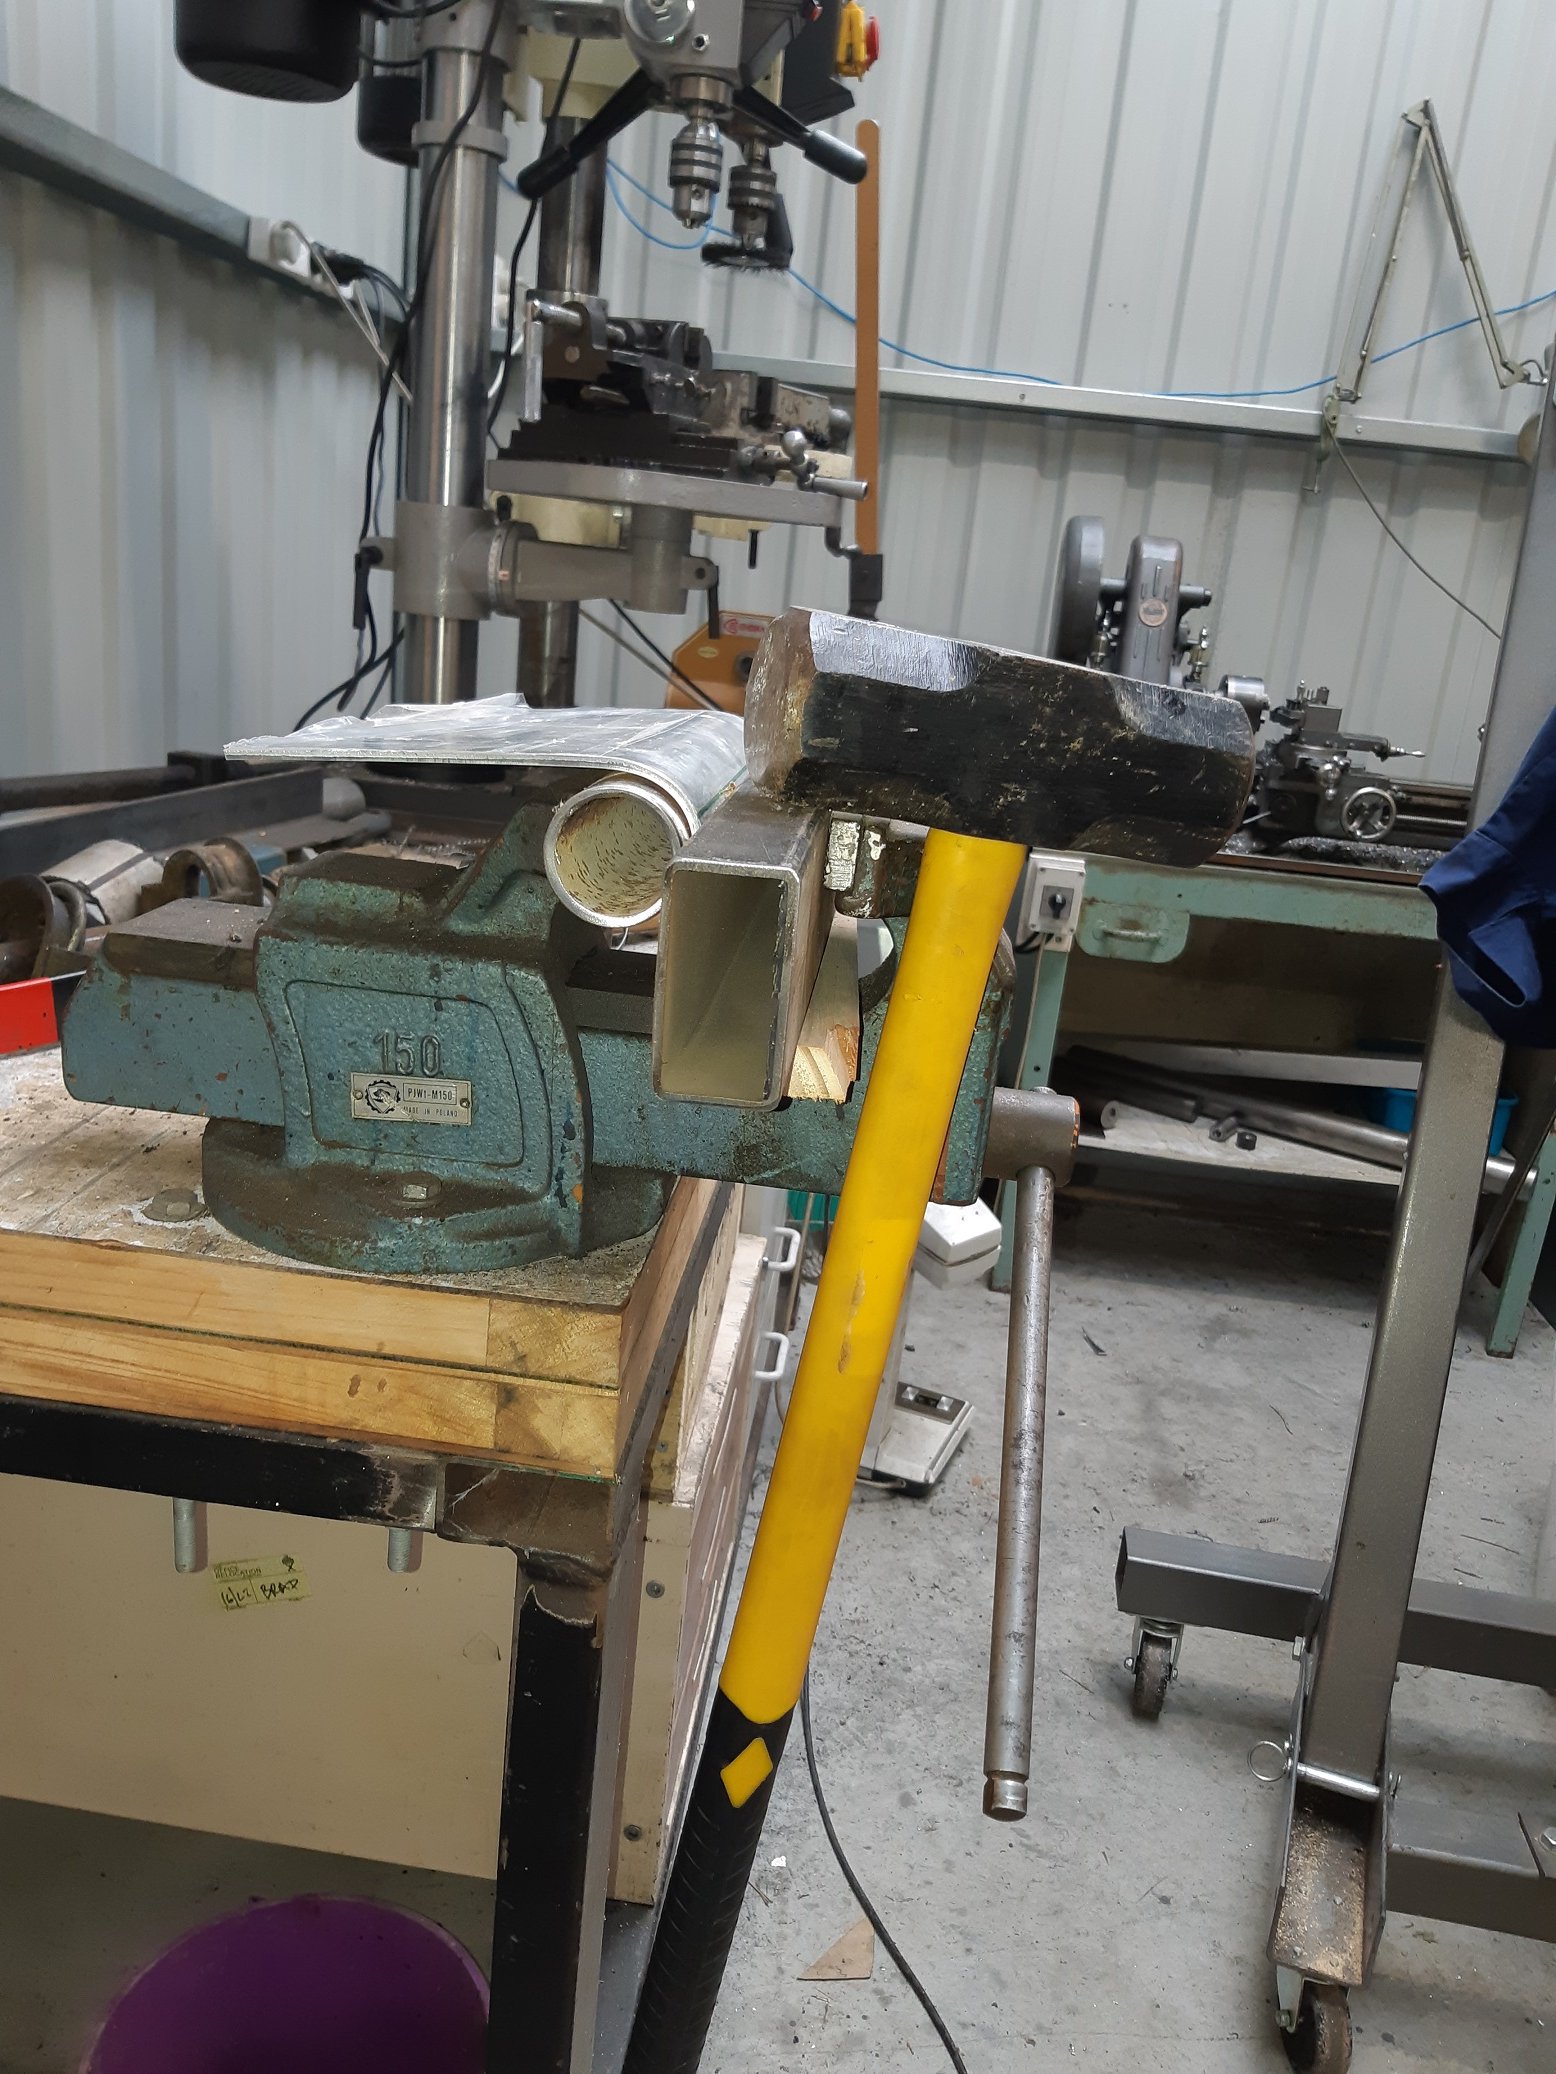
How to put a curve in a 4mm thick aluminium sheet to fill the hole you cut in the sump. Get a random bit of thick wall rusty pipe about the right diameter. Wrap it in card so you don't mash rust into the aluminium. Then, using another bit of square section, clamp it in the vice along the bend line. Put a big bit of wood against it and hit it with a mallet. Pick the wood up off the floor and put it back. Hit it again. Pick the wood up off the floor and put it back. Hit it as hard as you can. Pick the wood up off the floor and put it back. Wail on it like a crazy person. Each time, picking the wood up off the floor and put it back. Observe how much it HASN'T FUCKING MOVED AT ALL. Switch to sledge hammer, hit it literally five times. Done.
1 point
-
noisy version of above1 point
-
Glued the strengthening plates on. Pleased how well the upside down welds went. Didn't push my luck, I'll fully weld it later once I've made a rotisserie.
1 point
-
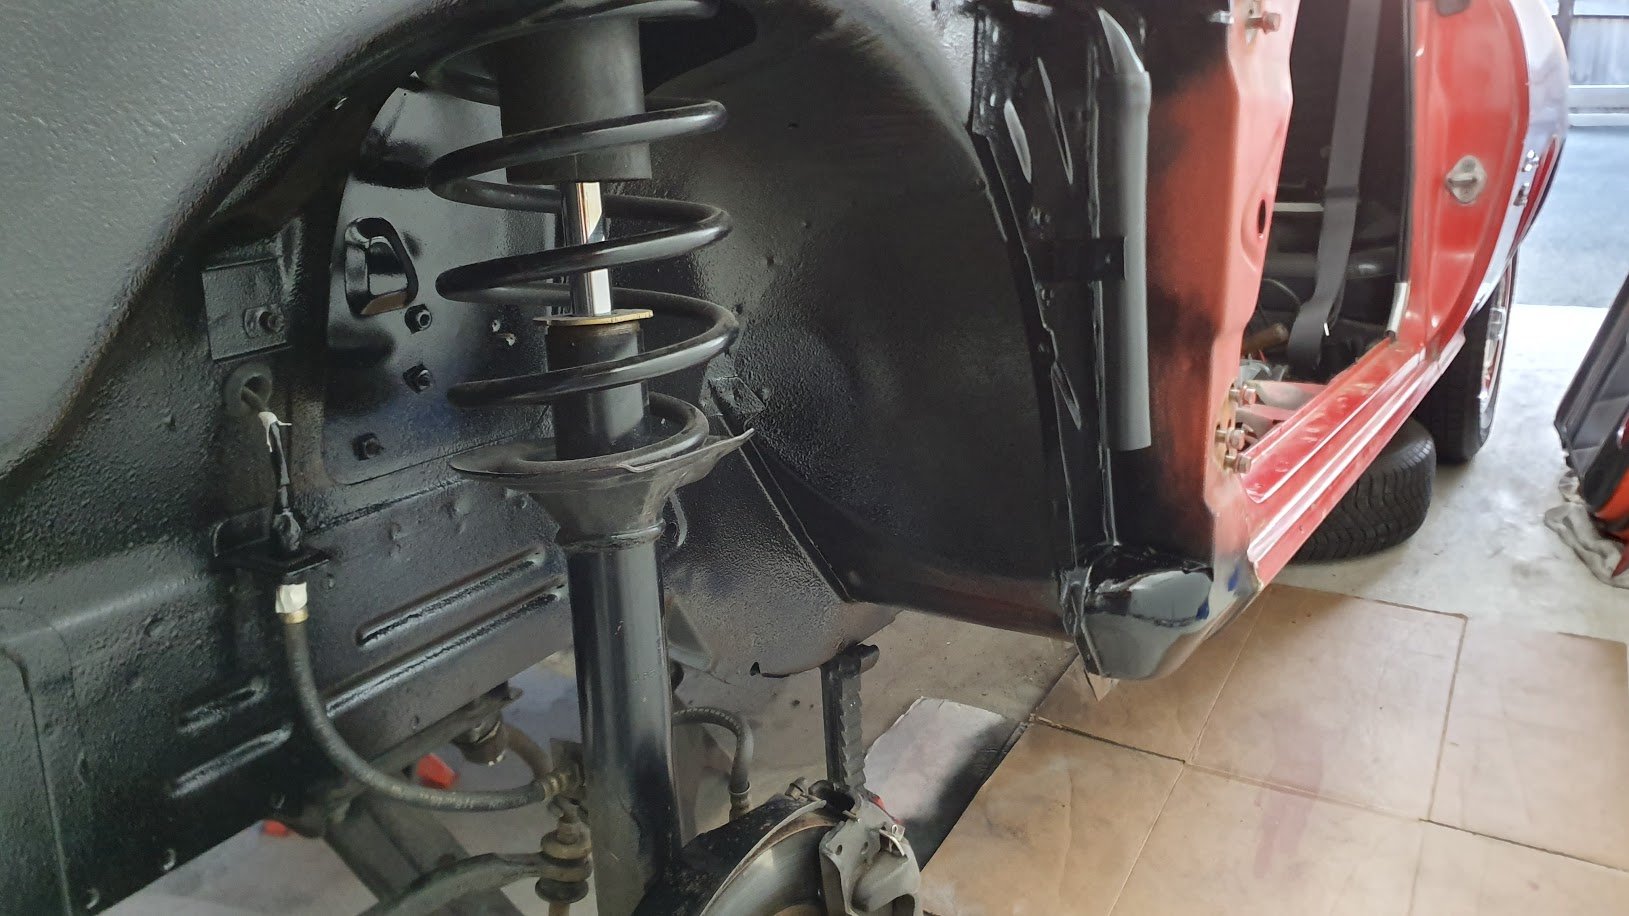
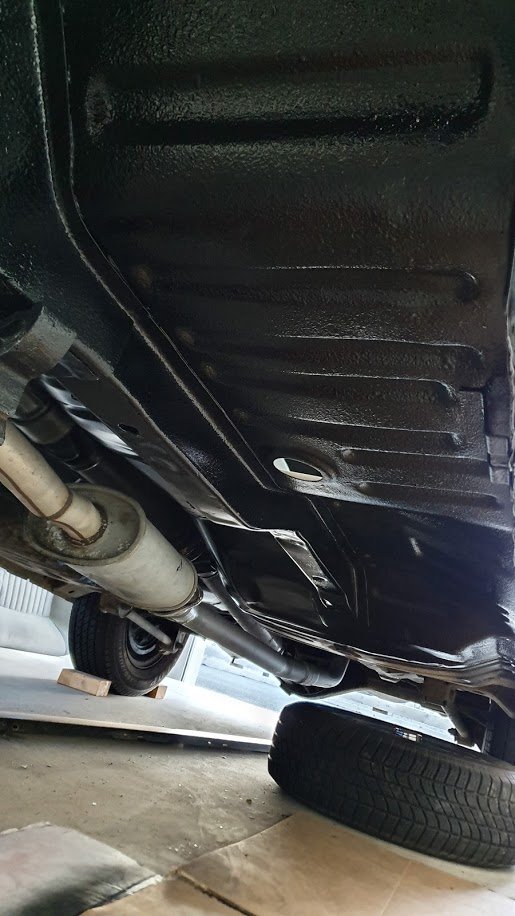
Cert recheck today Passed the drive test and the 5x 100km brake test too. Let me tell you it was loving the fang today and performed spot on. It was the first time going over 50km haha so I had my beady eyes on the temp gauge The only remaining things to do are: 1) supply the alignment print out (repair cert person has this so will need another copy printed) 2) add 2 rear bump stops - ordering tomorrow from a George Stocks 3) tighten hand brake (this needs to be done for the compliance also) 4) the speedo is out 15-20km. I need to apply custom stickers to the speedo corresponding to the correct speed increments eg 120km is actually 100km Legal cruising is so close I can taste it.
1 point
-
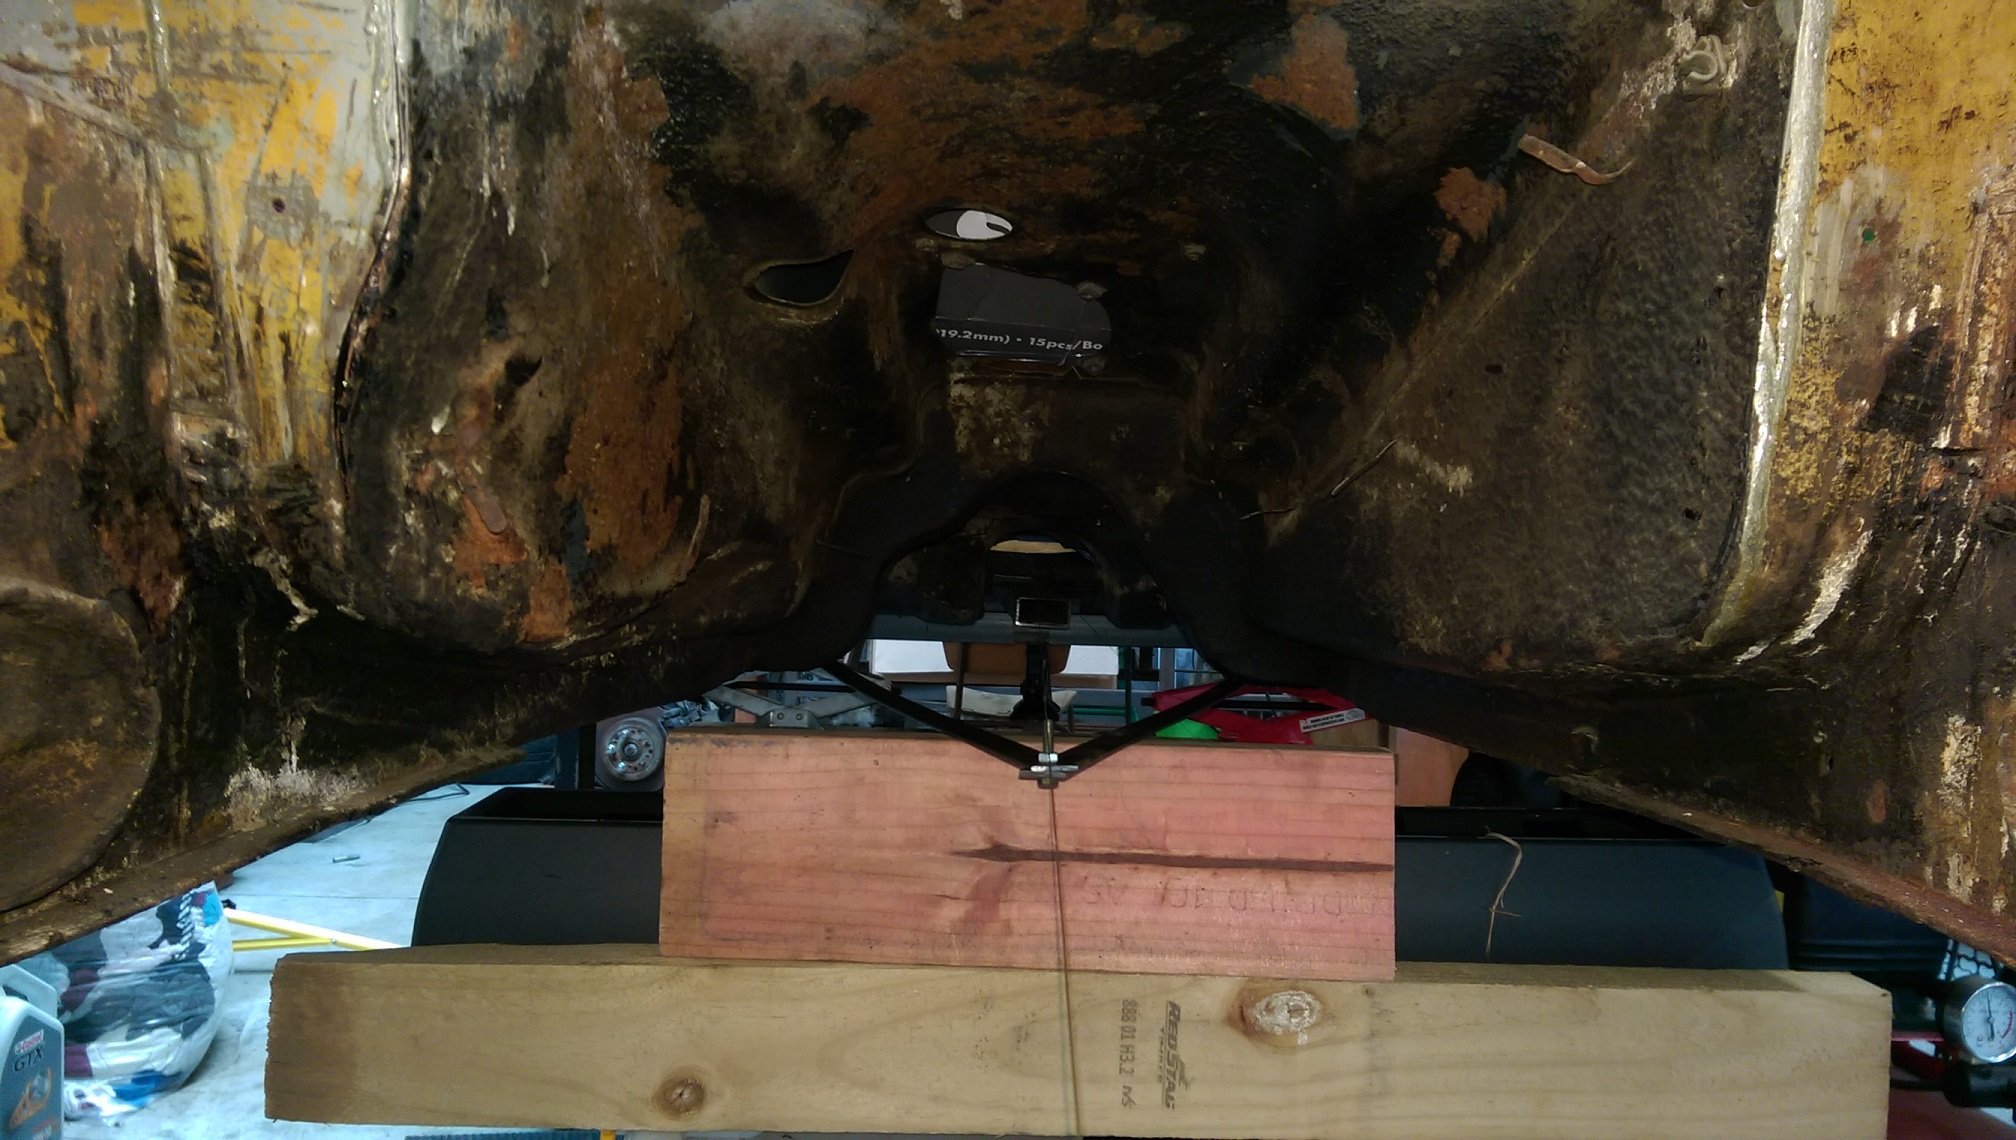
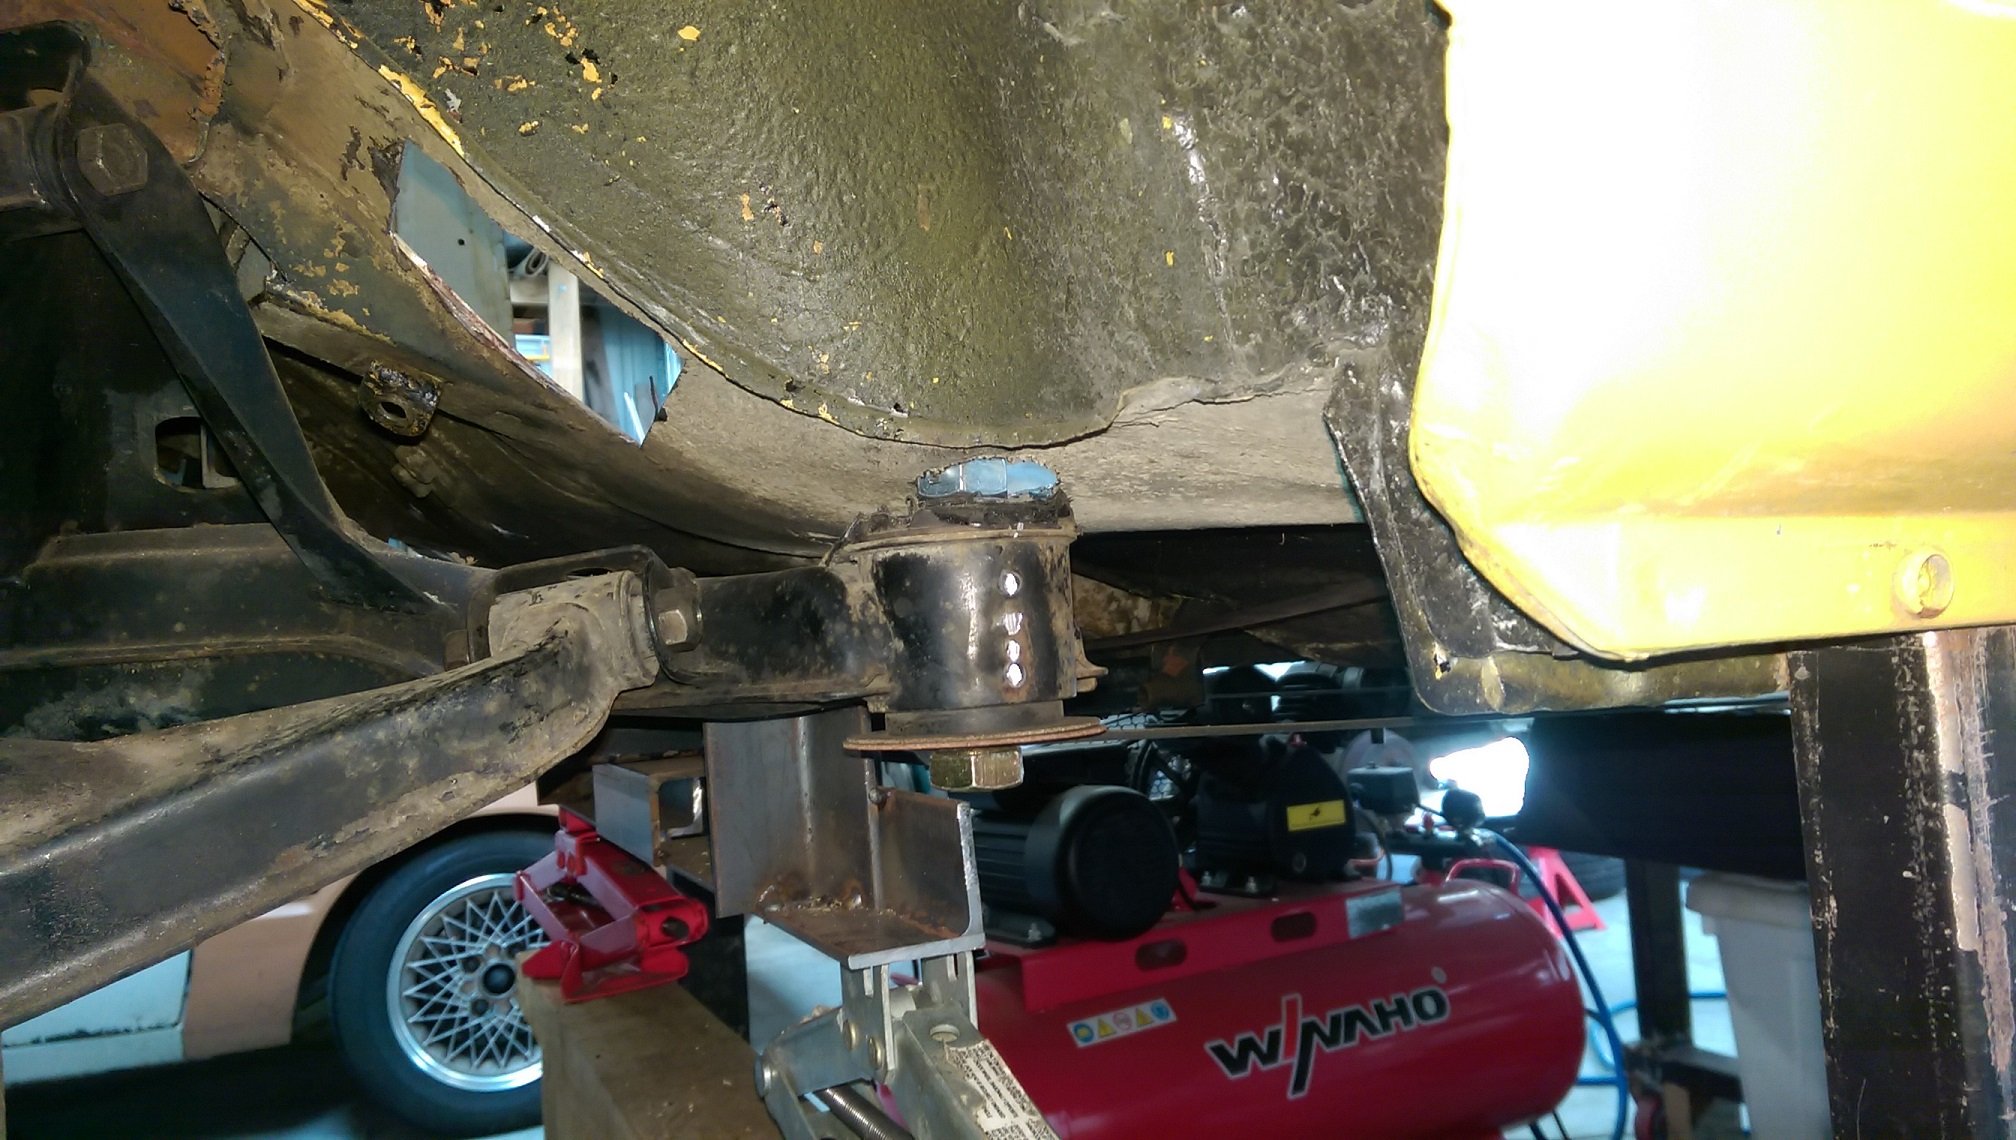
AAAAAARGH!! So with my two triangles connected to the subframe mounts, lined up with the centerline of the car and using the factory body reference points, I thought the subframe must be pretty straight. Now I have reinstalled the suspension and wheels(no tyres). I don't know what measurements to trust. According to my triangles the subframe is straight. But with the wheels on I have measurements that disagree. The factory adjustments are set to max toe out and max neg camber. Both sides are at the same height. If I put a straight edge vertically against the wheel, both sides sit 20mm in from the top of the wheel arch. So You would think "it's in the middle". I used a plumb bob to see where on the wheel arch the wheel center was and marked it on the wheel arch. I was having trouble getting an accurate measure using just the rear guard, so I measured from the mark to the A pillar (2030 both sides) and the B pillar (right side 1128, left side 1122) and the leading edge of the rear guard(right 365, left 364). So both wheels are the same distance front/back, right? I've measured from the centerline of the car to the flat bit on the lower part of the sill, along the whole length, on both side of the car, the measurement is the same within about 5mm. So I thought I could use it to measure the toe angle. So I got some 1800mm lengths of aluminium angle and attached it horizontally to both wheels. Then measured the distance between that and the sill(over a distance of 1300mm). According to that, the right wheel sticks ~10mm further out than the left wheel?! The right wheel toes out by 0.8 degrees and the left wheel 0.2 degrees. Sure I could adjust that out, but I shouldn't need to and AFAIK it's a large percentage of the available adjustment. Or I could rotate the subframe anticlockwise(looking from above), but that would move the right wheel forward and the left wheel back and put my triangles off by heaps. So what's right and whats wrong? A wonky subframe could cause it, but I would be surprised if my narrowed subframe was wonky, the jig I used to narrow it was/is substantial.1 point
-
Using the body measurements in my factory service manual I found the centerline and ran a string down it. I made a much longer isosceles triangle from the front mounts and lined the subframe up with the center line. And raised the subframe up so the front mounts are not the lowest hanging thing under the car. The bolts are only there to hold the triangle, but I cut some holes to raise it up enough. They are higher now than the original triumph mounts. Yes.... I used some worn out cut off discs as washers. Then adjusted the height and measured it and measured it and measured it and measured it and measured it. Then temporarily welded it to my cross member so it doesn't move while I make the actual mounts.
1 point
-
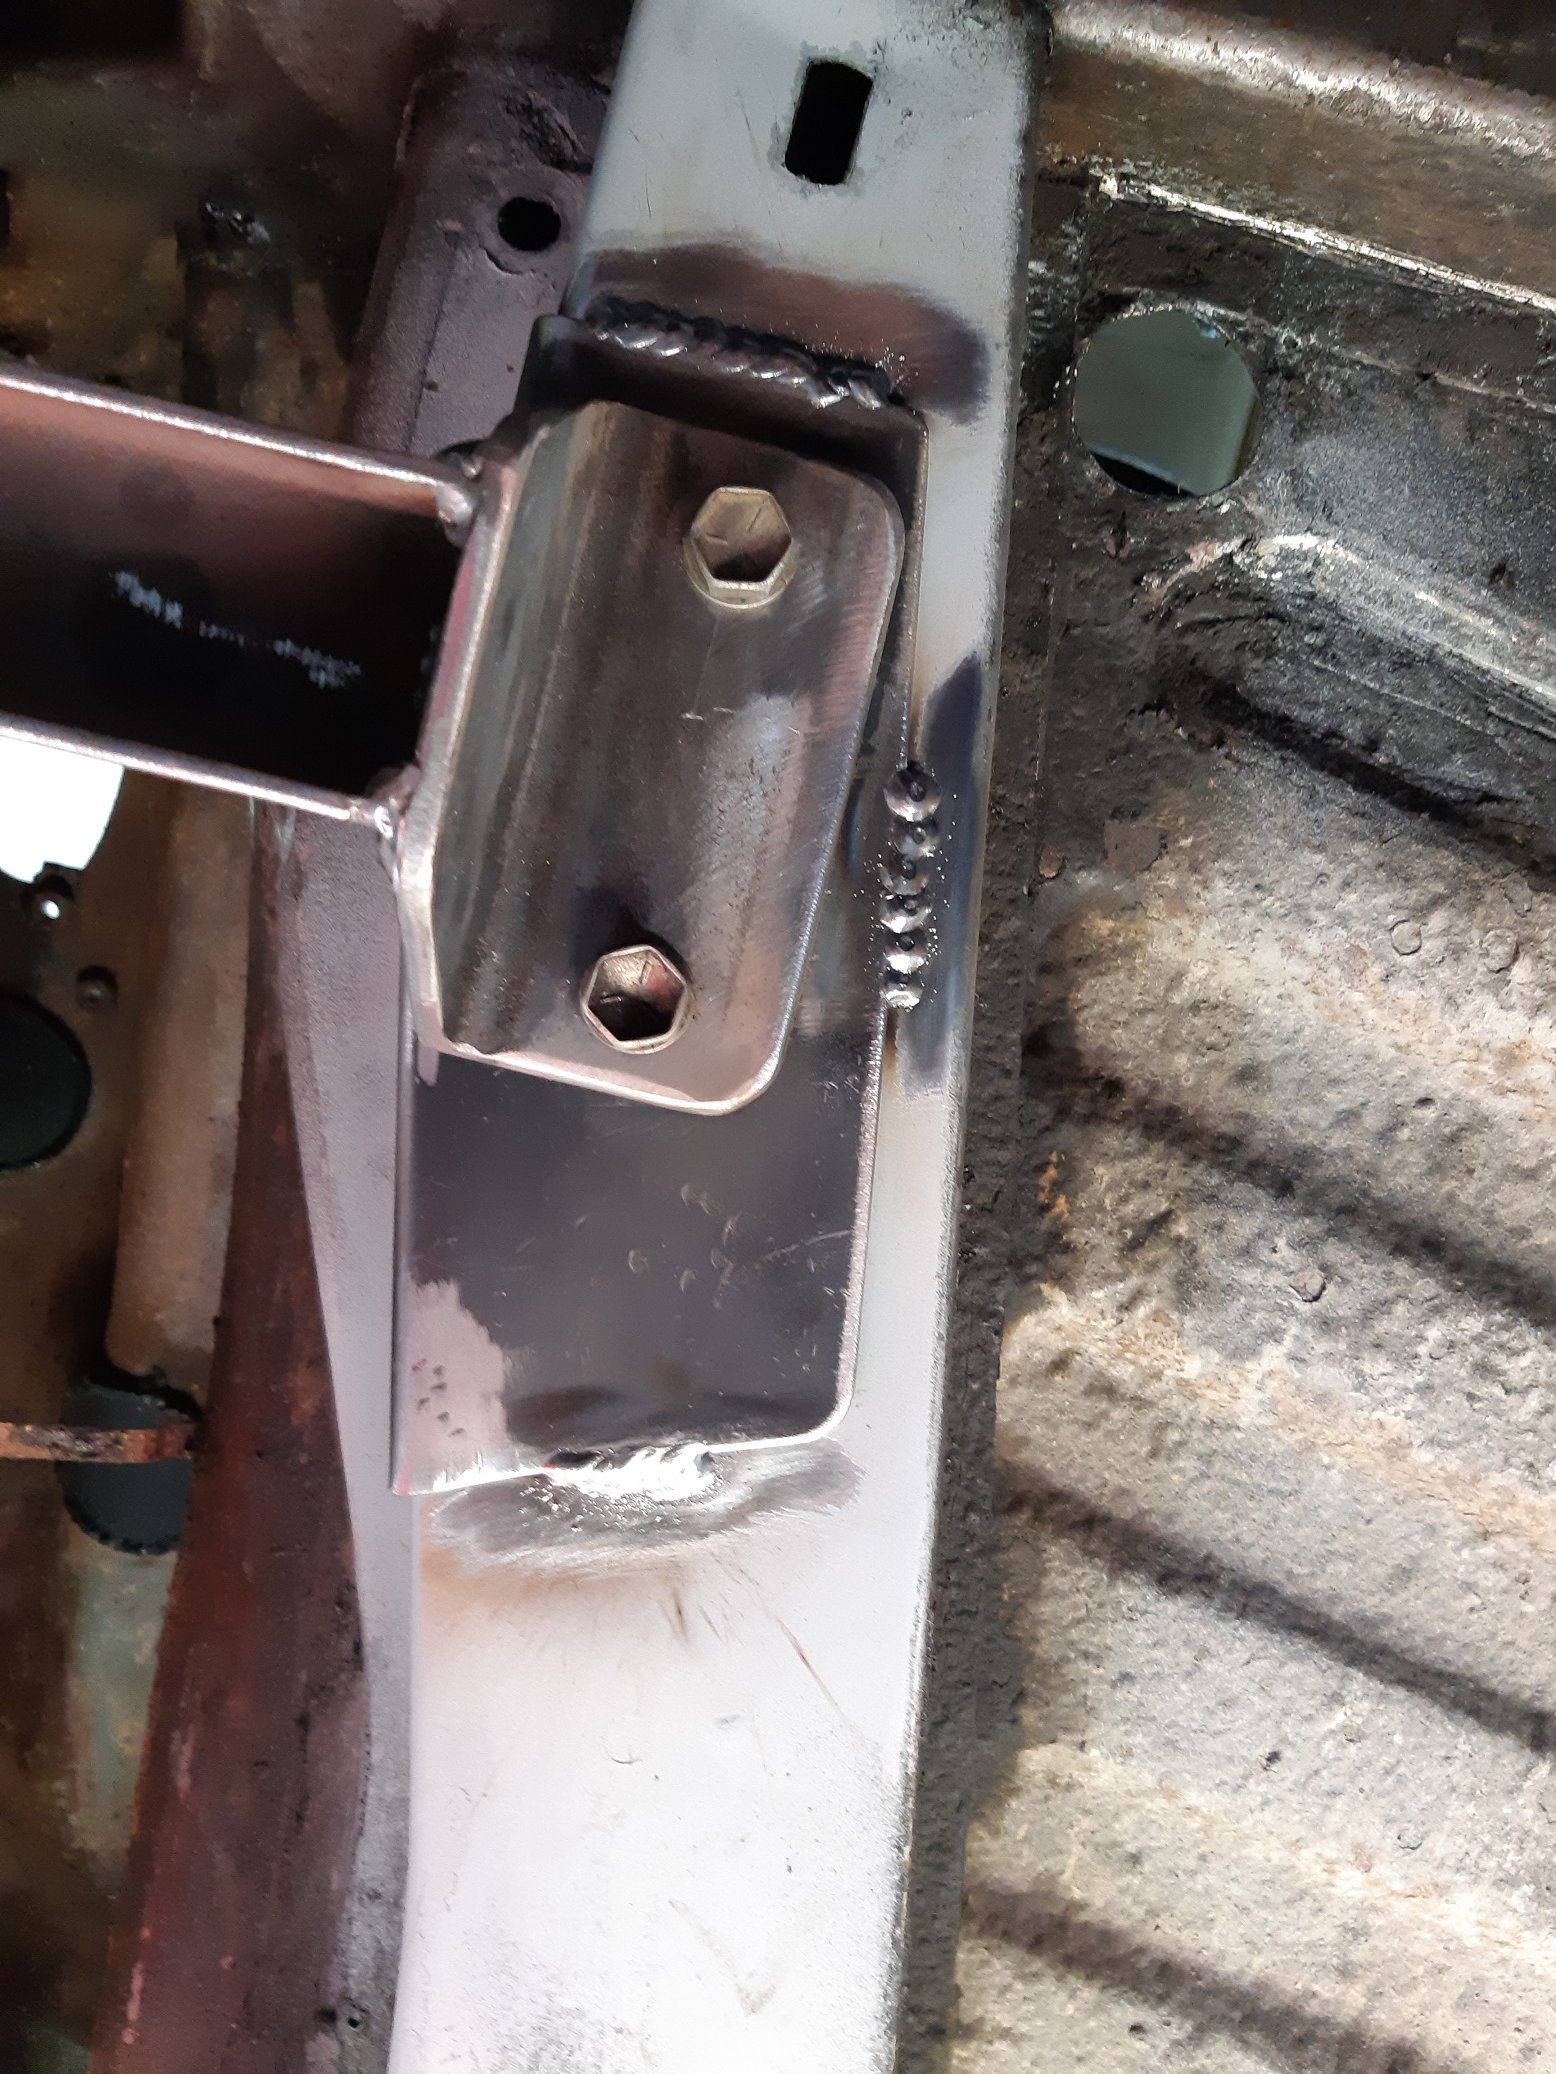
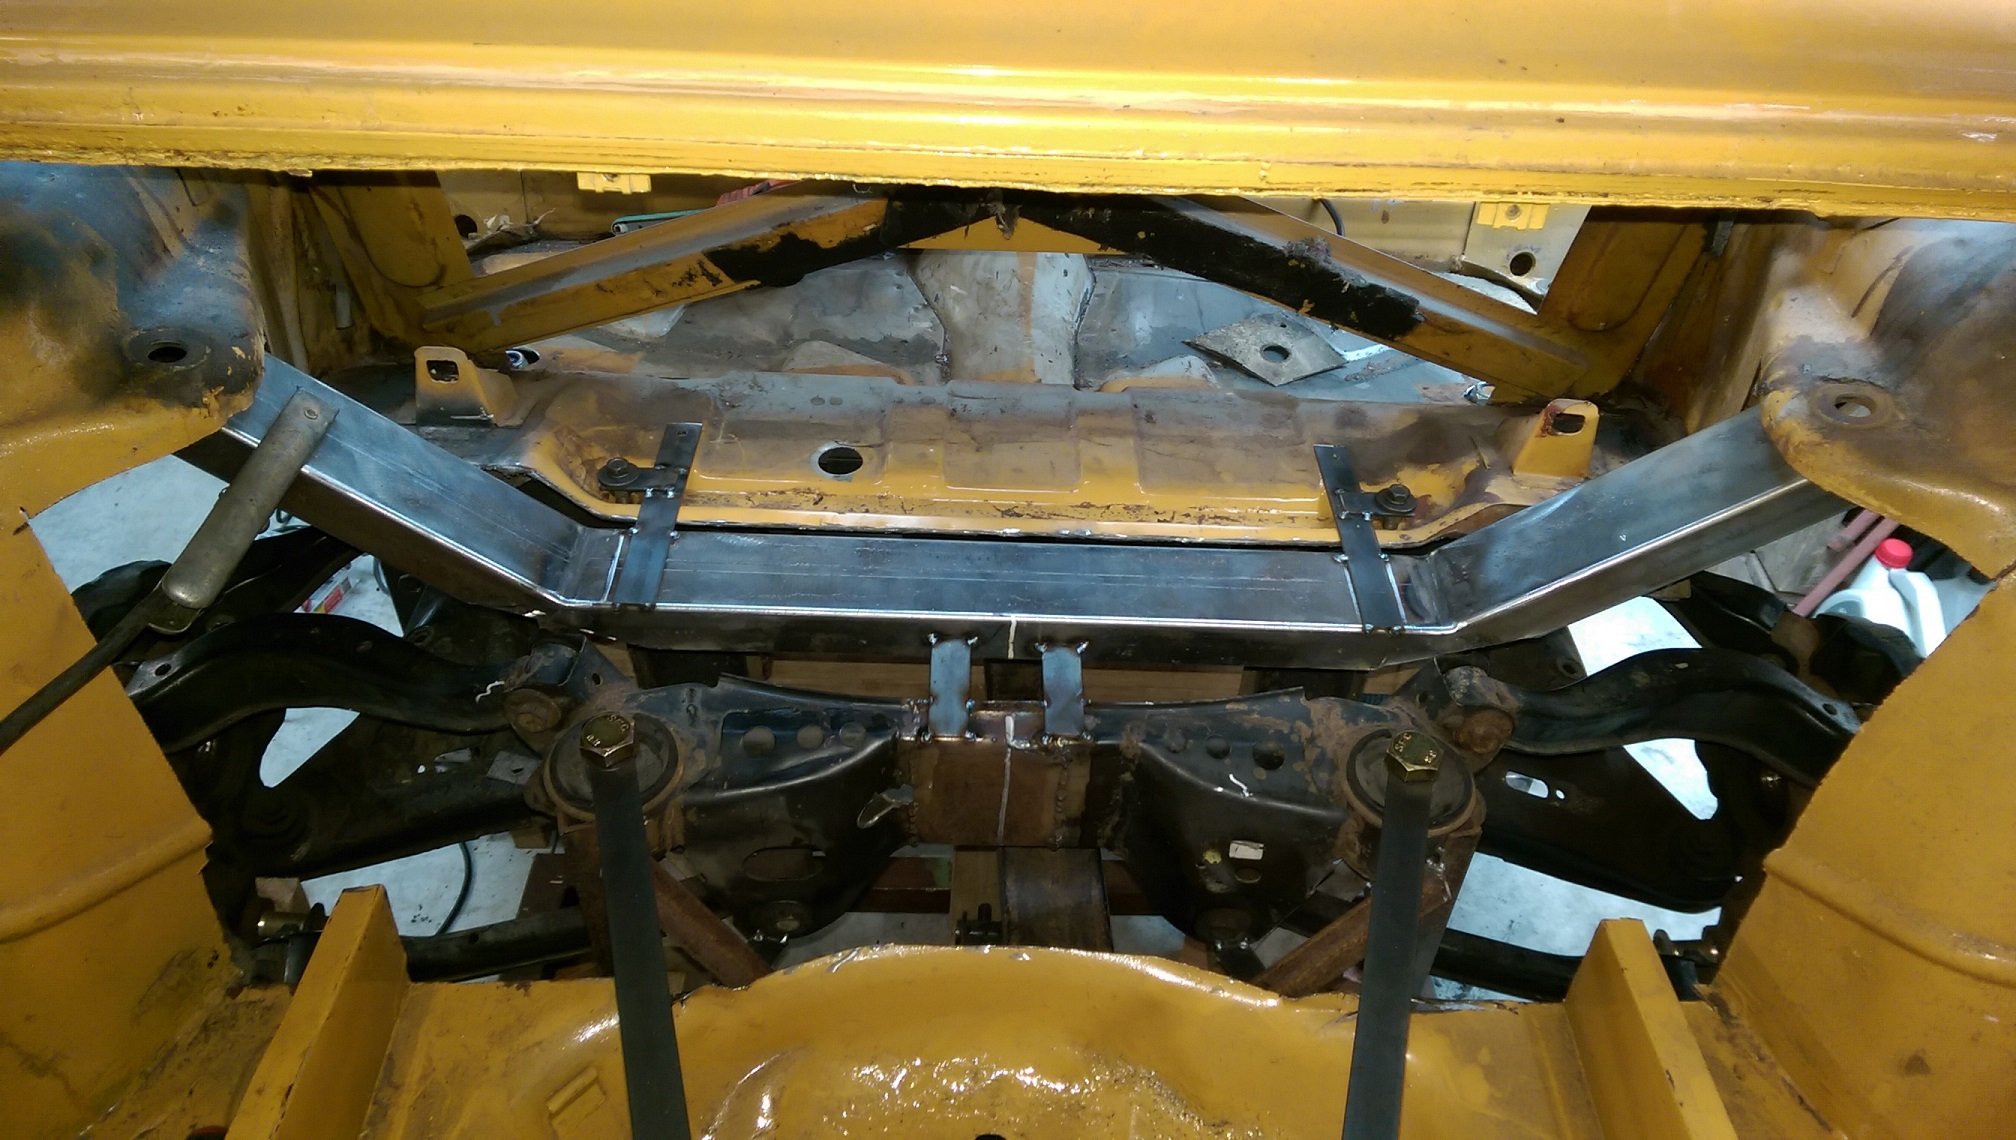
The existing rear cross member needed lots of modifications so I could get the subframe high enough and have room for the top suspension arm. I realised it was going to be WAY less work if I cut the whole thing out and make a new one out of box section. Snip snip. Those straps tacked to the top are my alignment jig, the bolts use existing/factory holes in the body. I don't want to permanently mount this since I will transfer it over to the white car once I've worked out how it will fit. The box is 3mm thick, so should be stronger than the original. I will tie it into the existing chassis rails which start just forward of it. The strut tops will be built off the ends of those angled bits, which I have intentionally made too long so I can trim them to fit. The angled bits follow the sides of the fuel tank, so it will/should still fit.
1 point
-
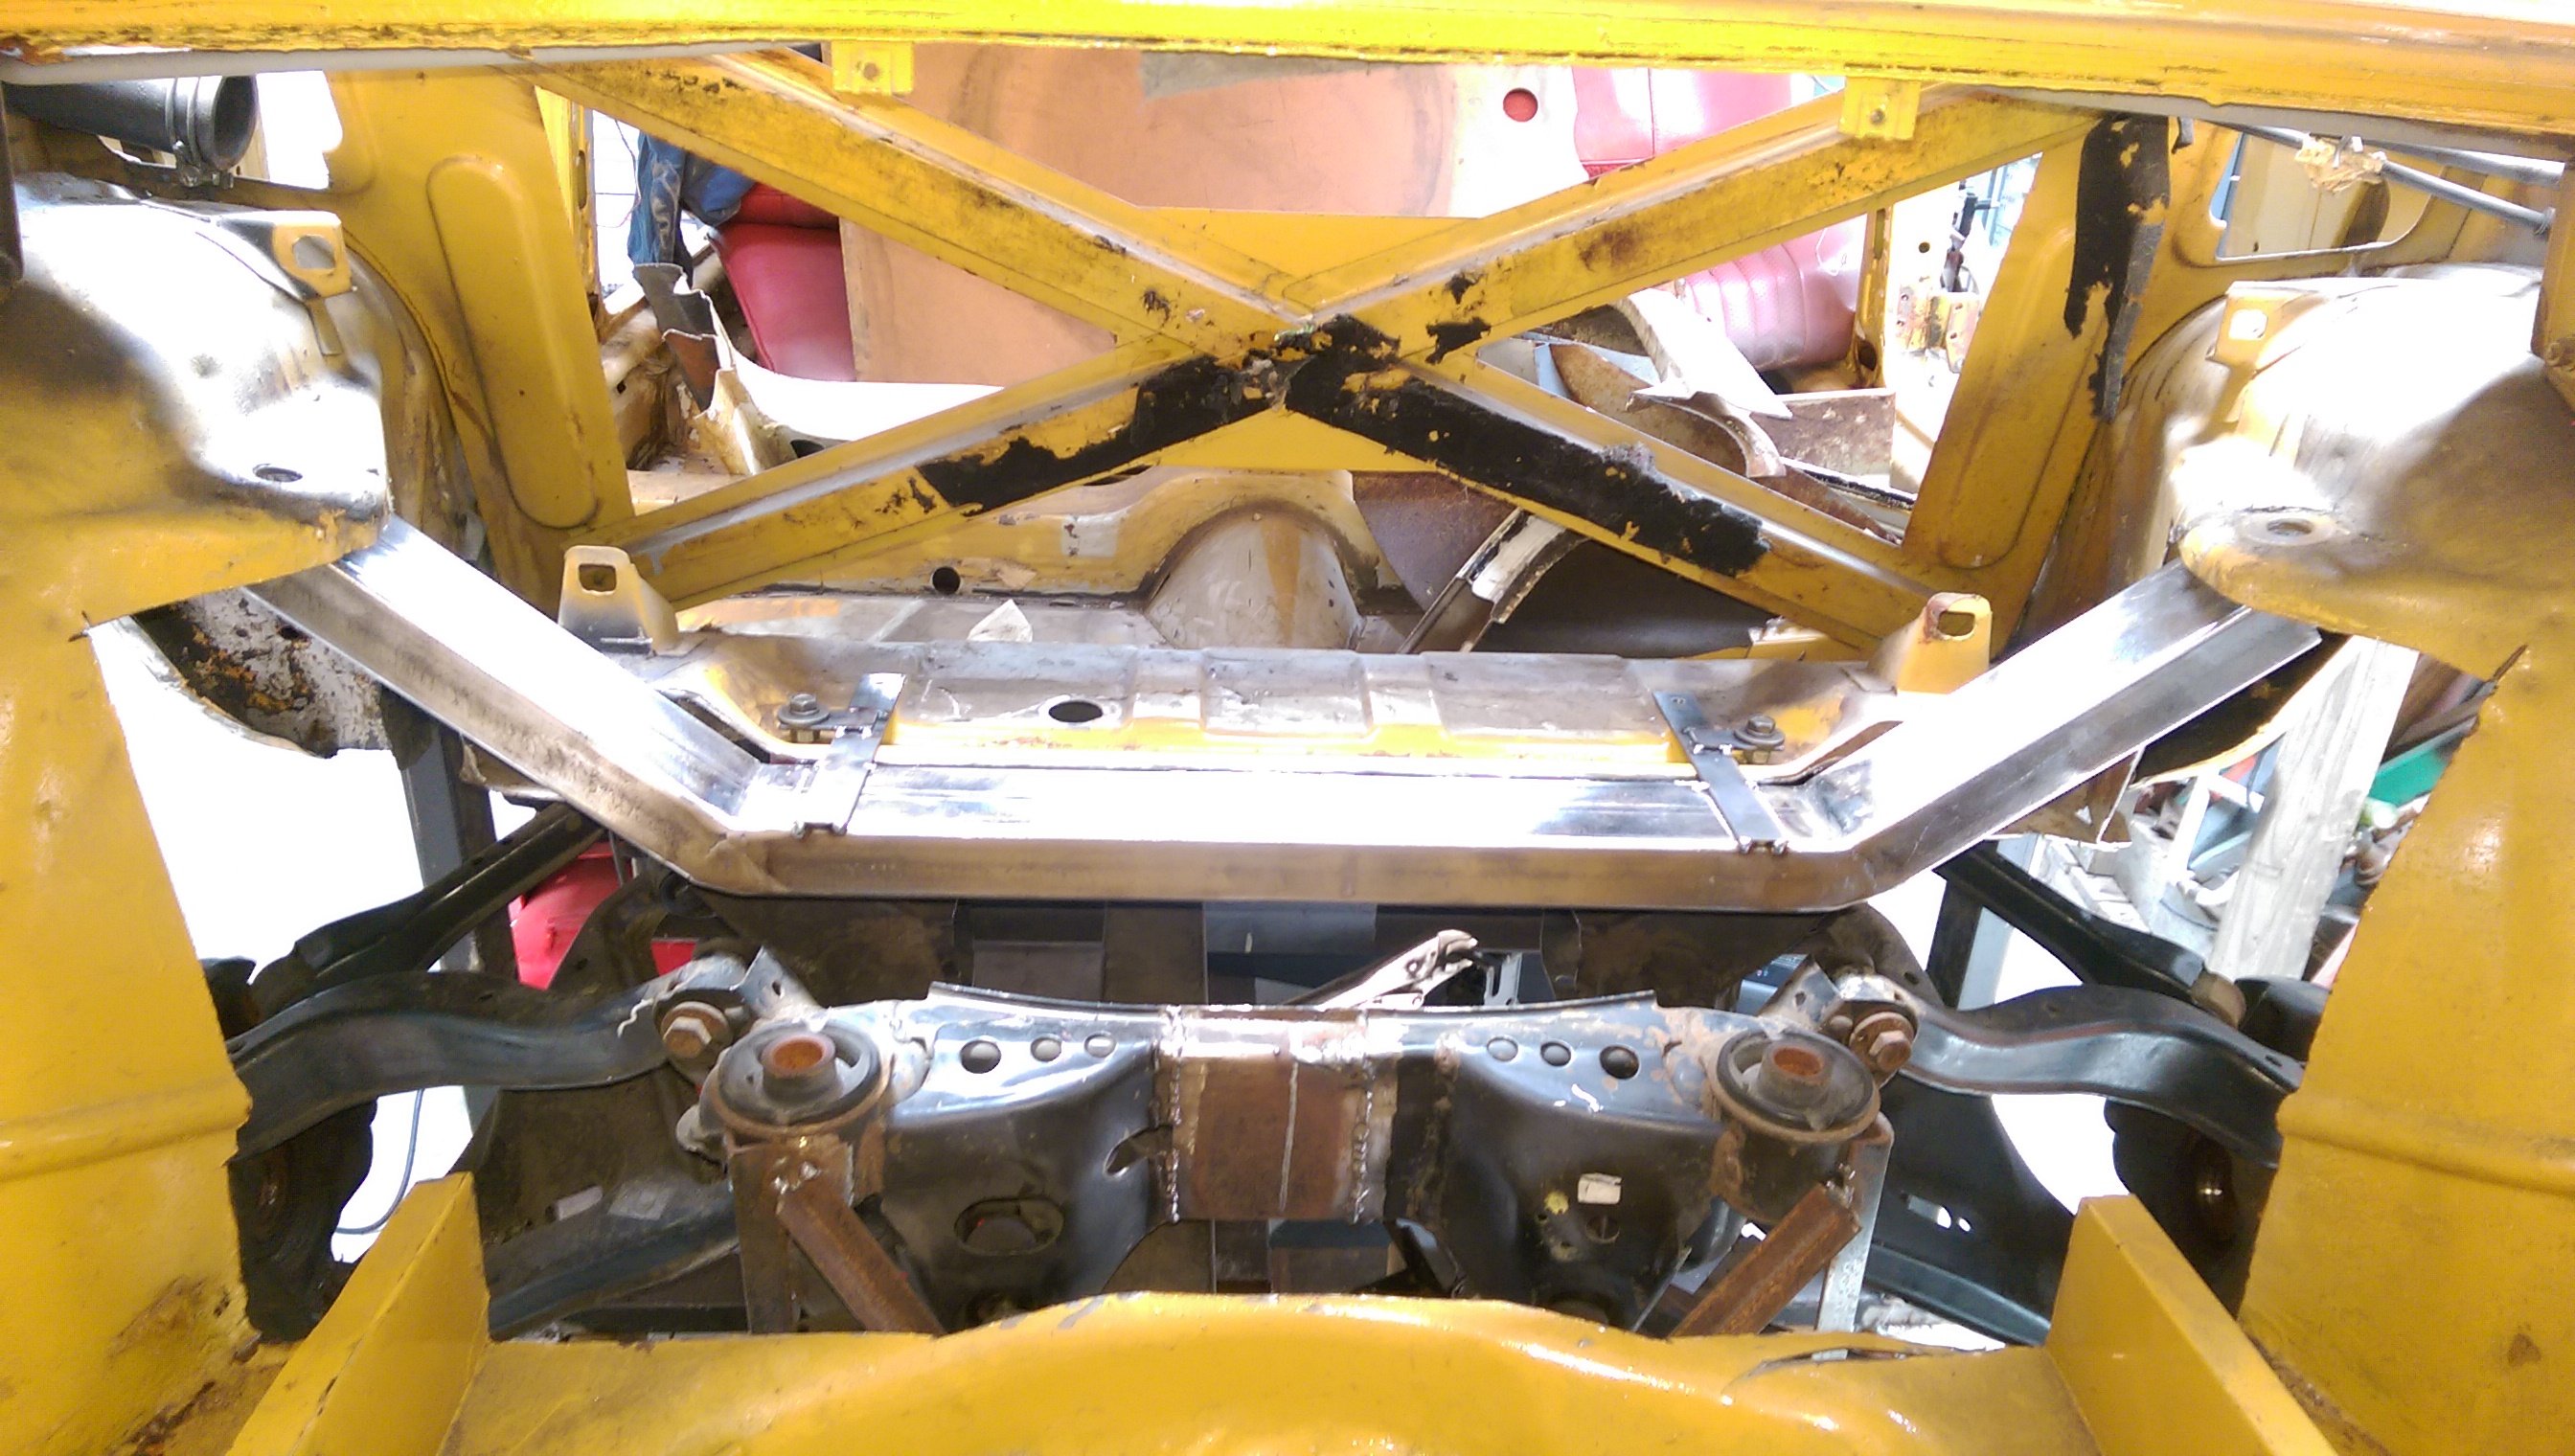
Aaand the engine is now self supporting. It sank a couple mm. I wan't sure if it was resting on the rack, but no, I can slide a thick bit of card between them. I'll be notching the sump, eventually, to get some more clearance off the rack.
1 point


.jpg.419fa298e2d0e54da445eec3b78f9c95.jpg)
.jpg.f29fb048178ff1065a621e7eea5277fd.jpg)
.jpg.fad084fe446608465f7c0af112e953ce.jpg)
.jpg.751d99e600c4bd5ff389dbe2554b0cb5.jpg)


This leaderboard is set to Auckland/GMT+12:00