
Leaderboard


Popular Content
Showing content with the highest reputation on 05/05/19 in Posts
-
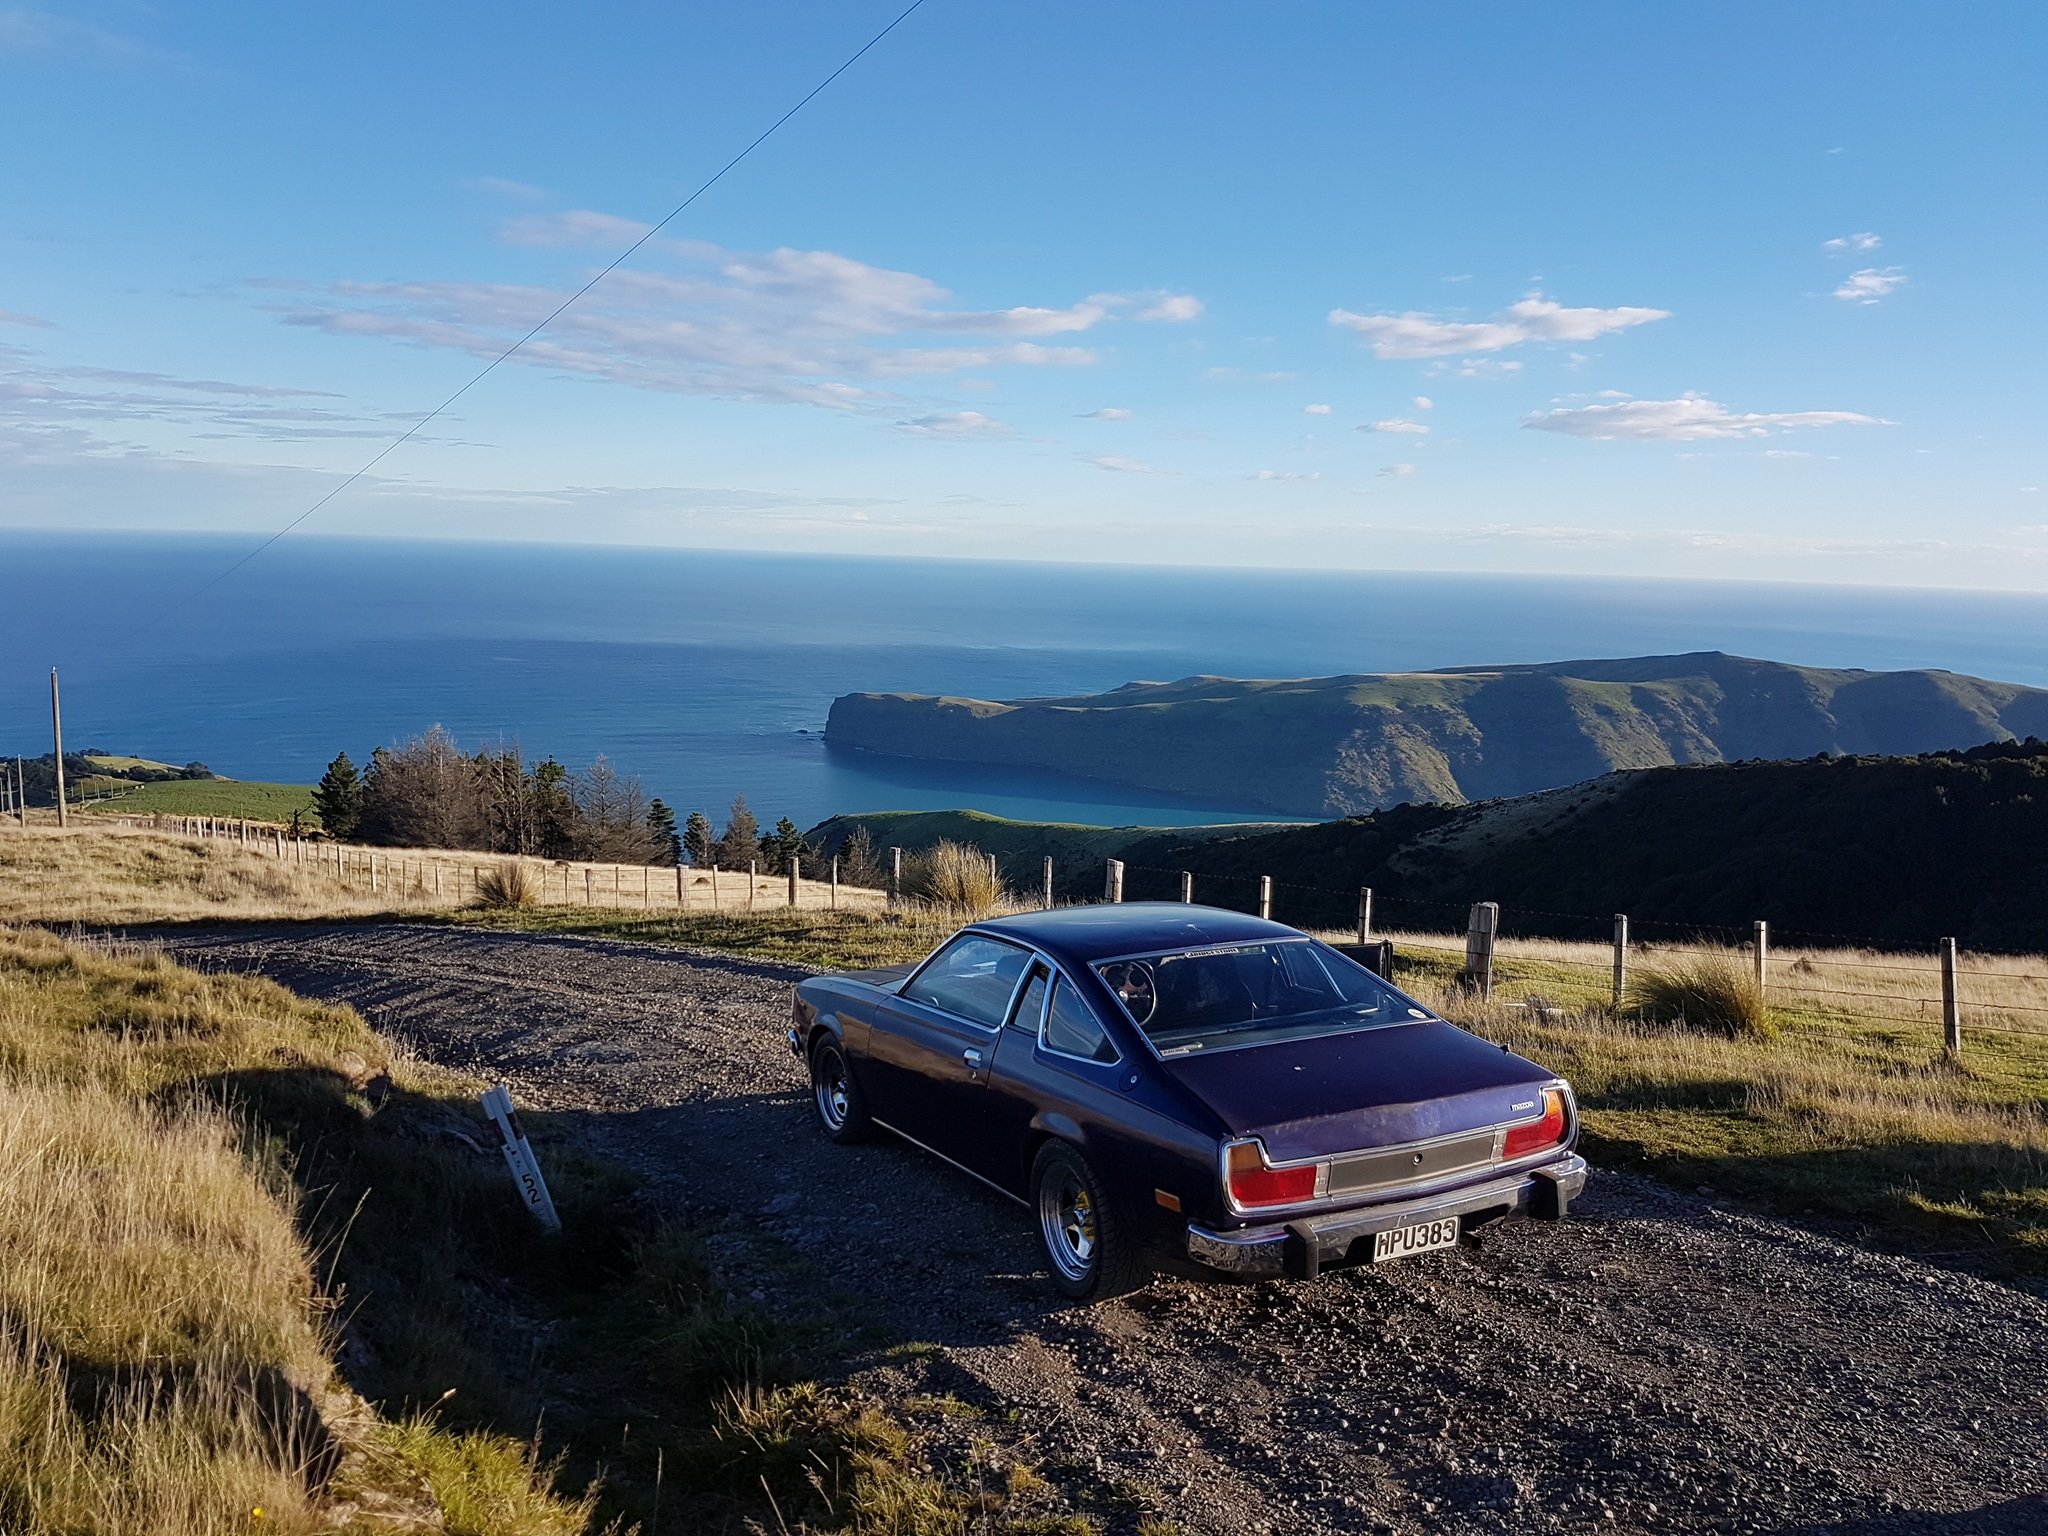
Long time no update.. Not a lot has happened since "16, been to nats banks peninsula, won the grasskhana and didn't miss a beat the whole trip (not that it was a long way) failed a warrant before hand on no horn which took me a while to figure out, turns out there was no earth strap on the rubber coupler to steering box.. Fuck knows how the horn had been going otherwise, And also the hand brake cable on these is mounted via two of these rubber bobbin mounts, they are in fact one of the things I thought would fail the re-vin on but somehow they made it all the way through 6 wofs.. *edit, also failed on the rear muffler which @RUNAMUCK kindly donated.. Multiple hanmeats, the last of which ended up with a fair distance on a potholed gravel road up the back of Hanmer in the snow and rain, the one bonus of the potholes is that my heater fan randomly started working which was terrific as every time it rains the car fogs up like a bitch.. Problem solved. That was 8 months ago..... Decided I should really give her a clean for the next wof.. My little girl was dead keen and came around the corner holding a trade spec scrubbing brush and a wire brush gagging to help, I let her do the wheels, sans wire brush of course.. In the end I did the wheels while she spayed them and me with the hose.. Came up ok, As per the story of my life nothing else on the turbo/injection front has continued because of a lack of working space and the house.. all good tho I guess, she purrs along and is out of the shit brotown weather so I'll just keep driving her as is for now..18 points
-
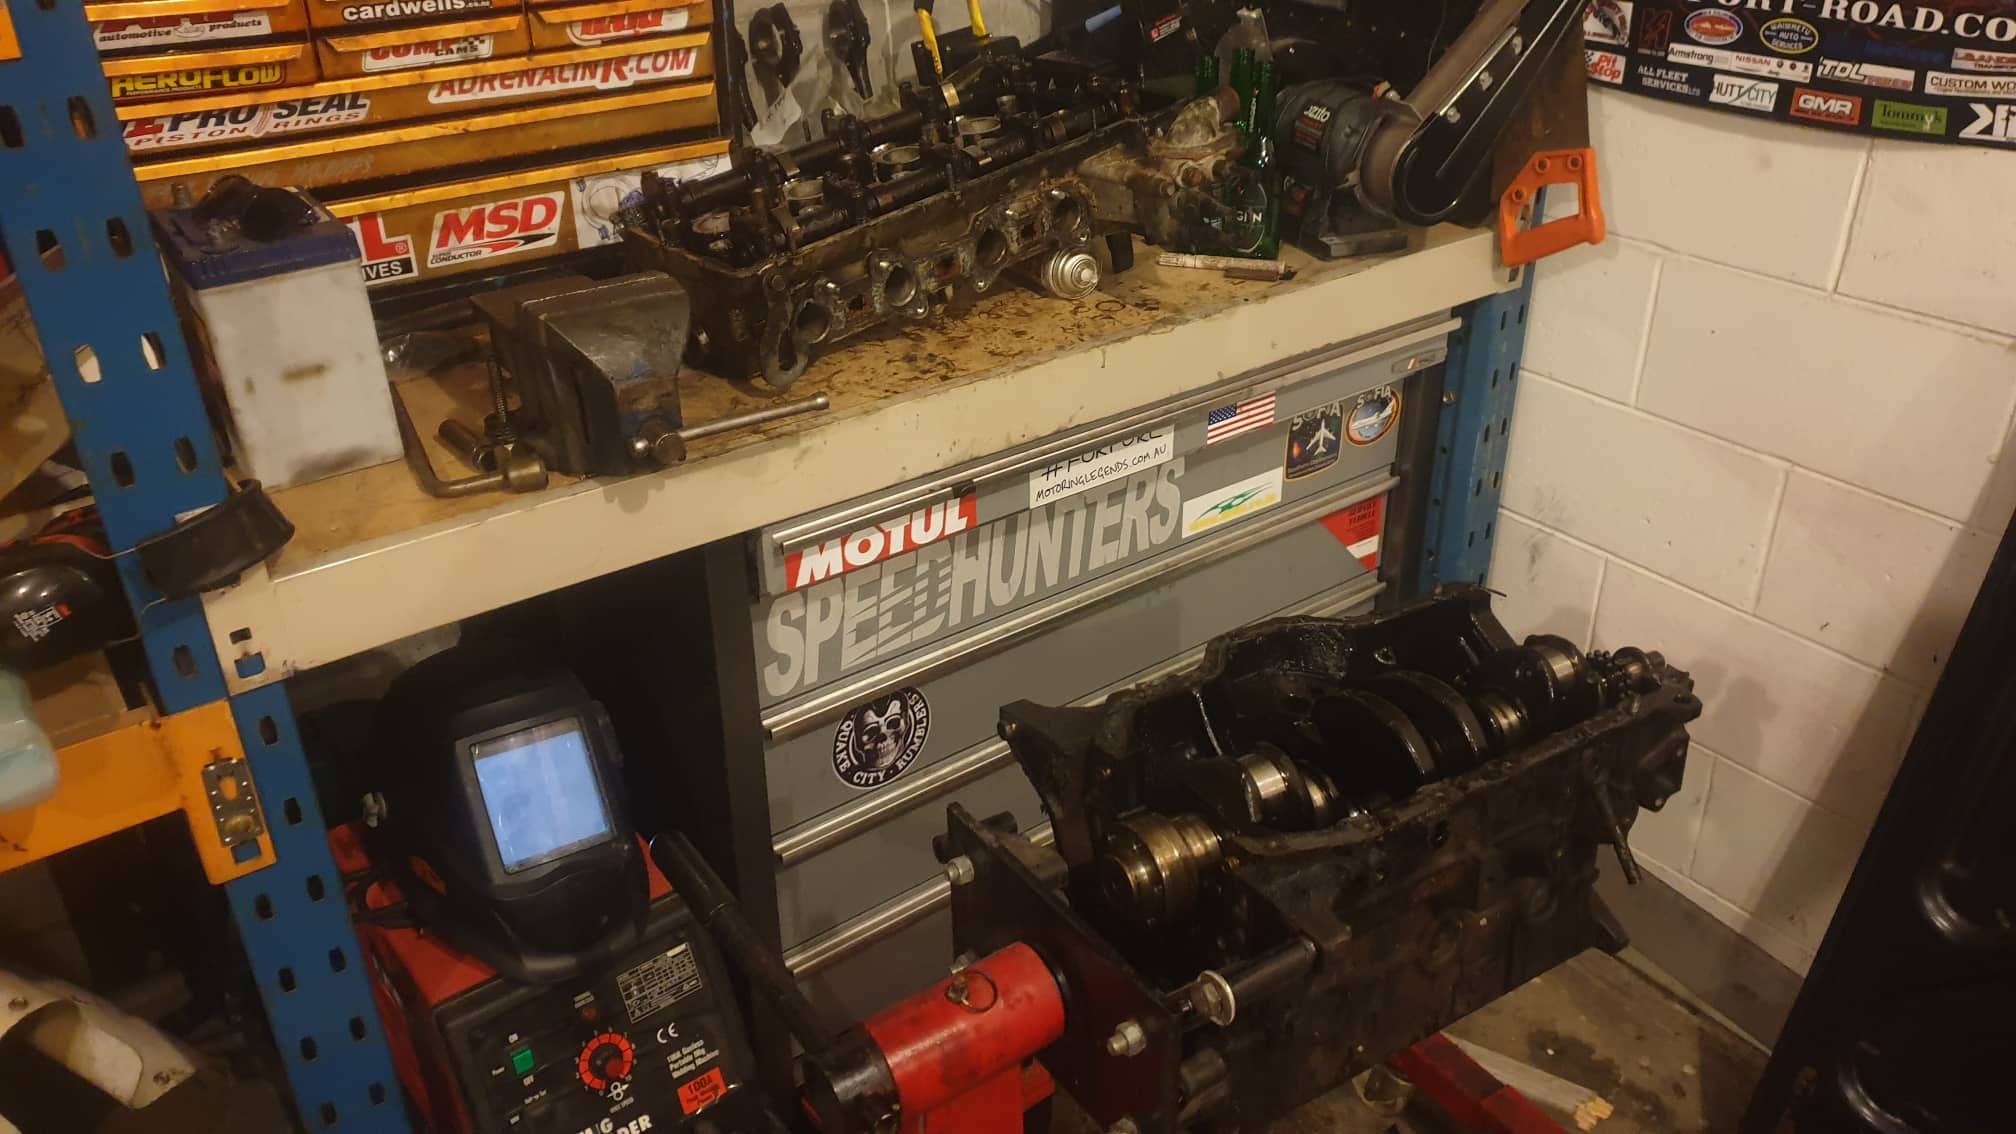
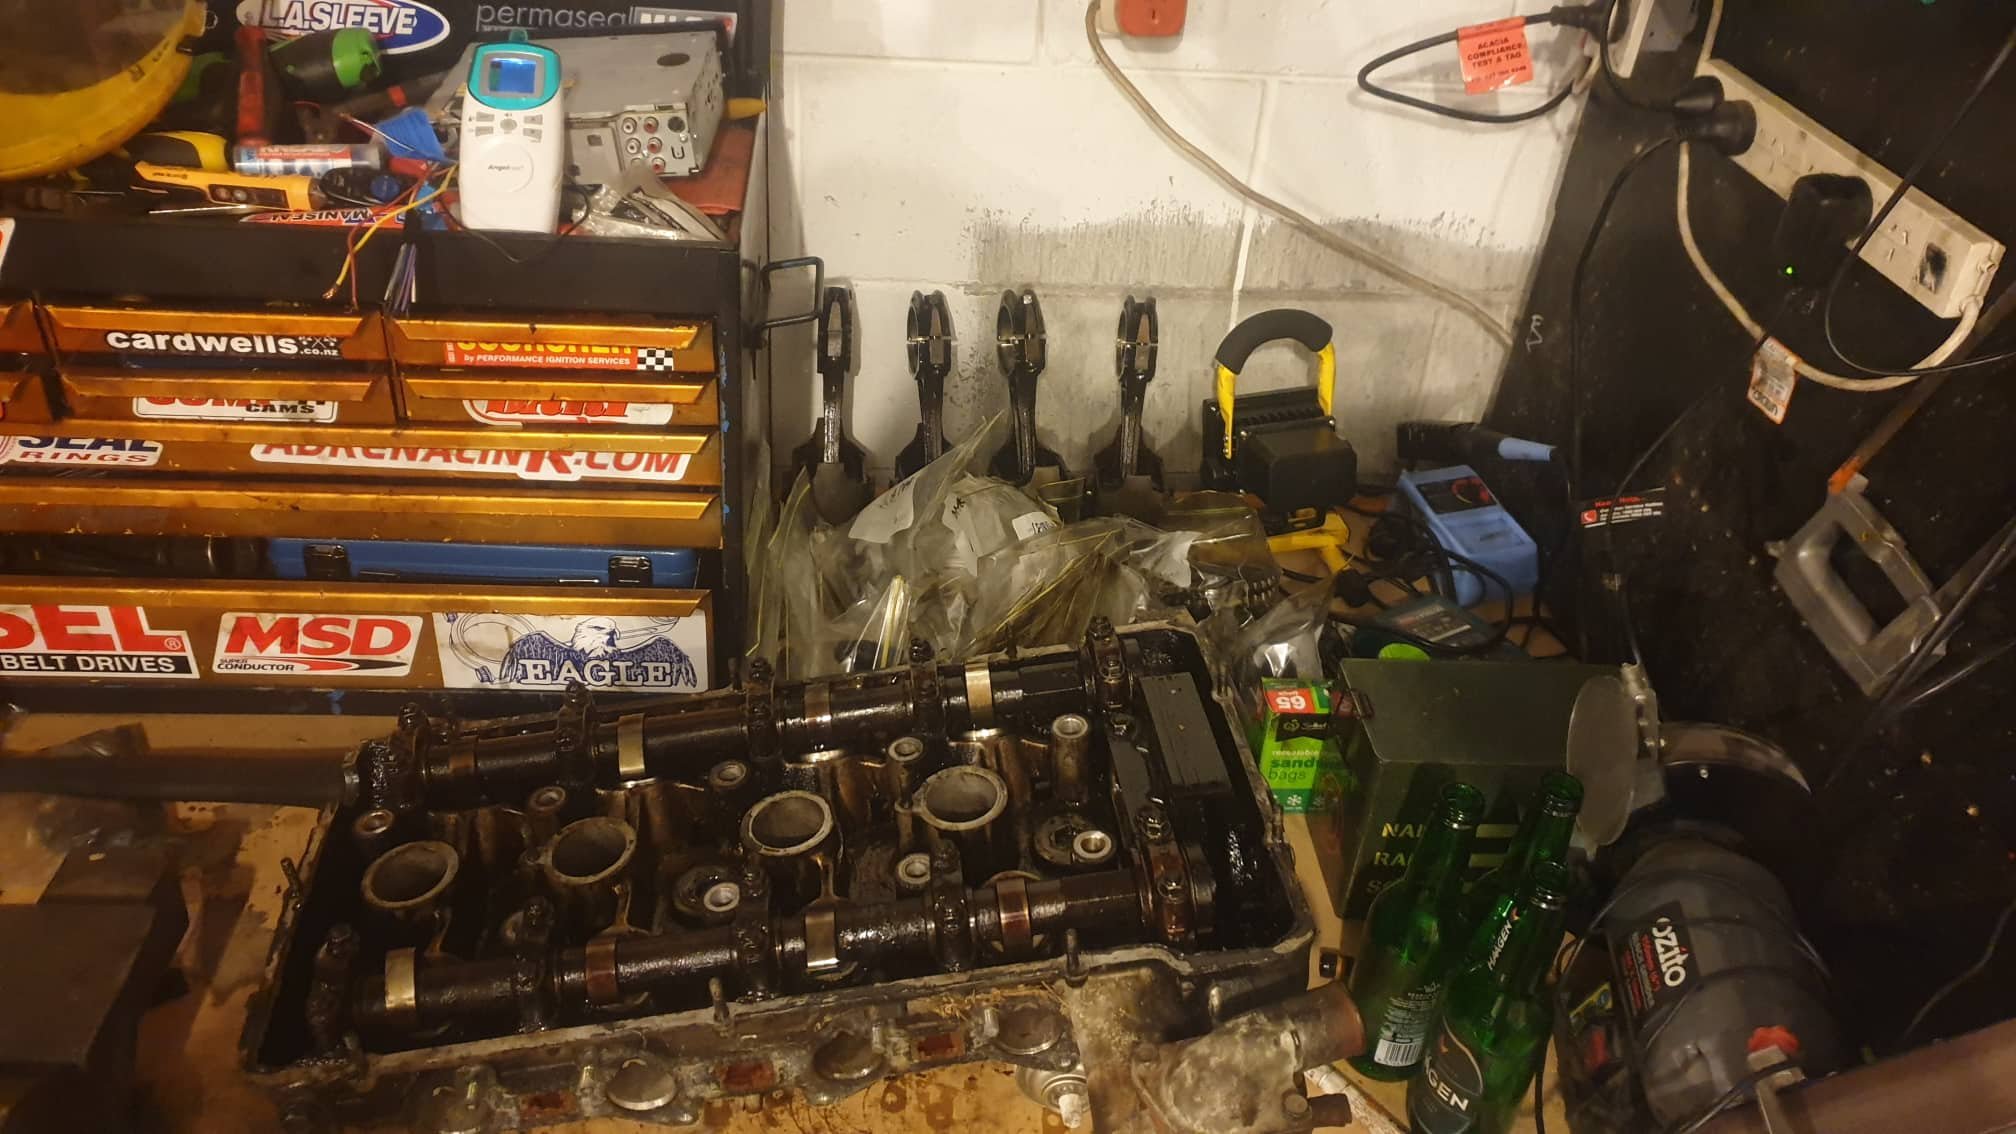
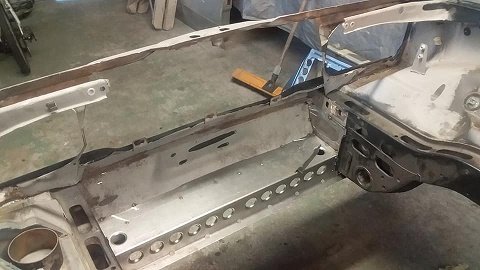
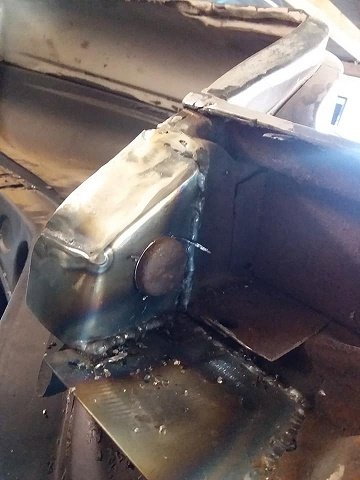
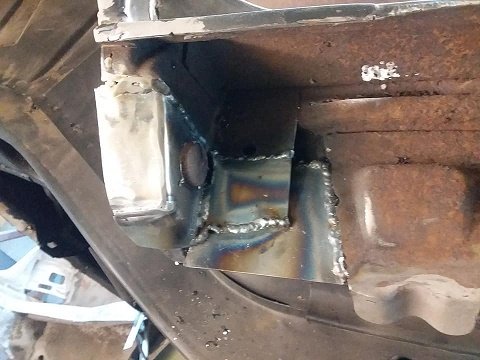
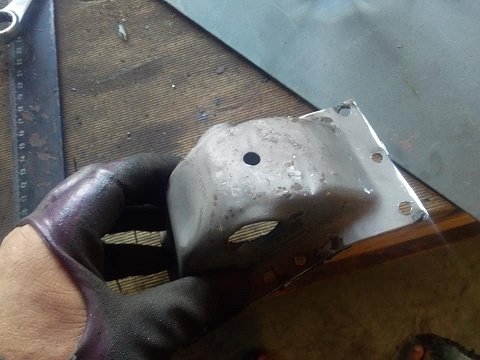
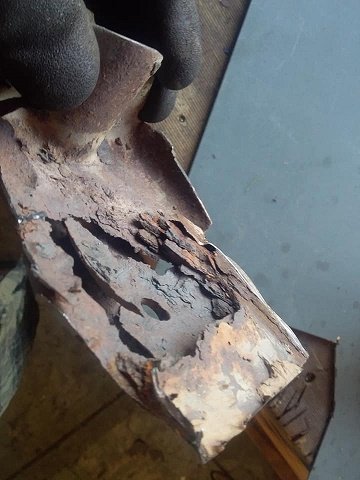
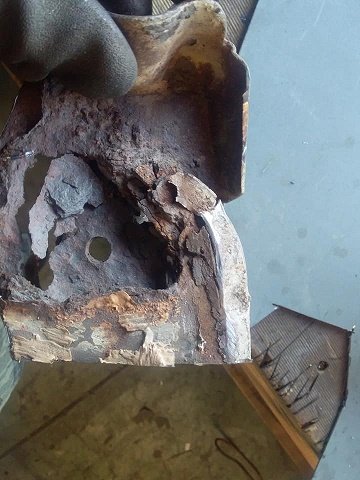
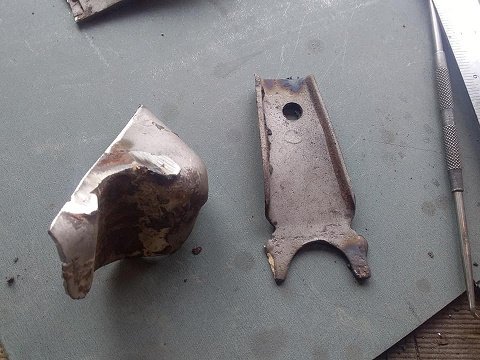
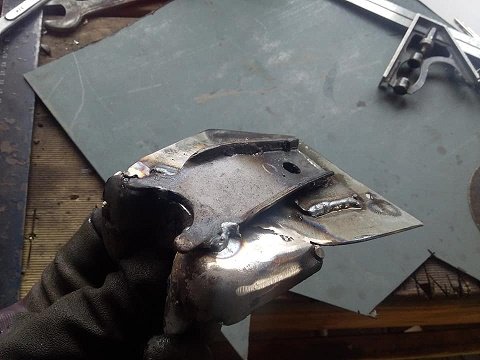
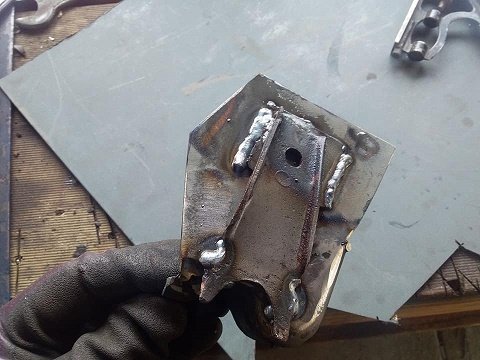
Made a new bit of the blue box section that mounts the steering box. Then after a bit of positioning fuckery I pulled the whole lot off and welded it on the bench for ease of access. Then slapped it back and started welding the easy bits. I will leave the rest of it for when I strip the chassis for painting etc. and can get the positions easier for a nice bead. Then found a spare plug and hooked up my shitty lathe to the power. I discovered after I got it that the low speed gears are broken, so I had to get inventive with the mill drill as well. It worked out ok, but I am now looking for a cheap VSD to run the lathe. I then made some crush tubes for the box mount out of some spare M24 threaded rod I had lying around. After I did all I could on this (but obviously not take anymore pics), I finished up the cross member that goes where the gearbox mount was, and now acts as a sump guard. This is needed as I have the engine sitting about 40mm lower than factory. This will also be part of the mount for the front driveshaft extension sometime in the near future.11 points
-
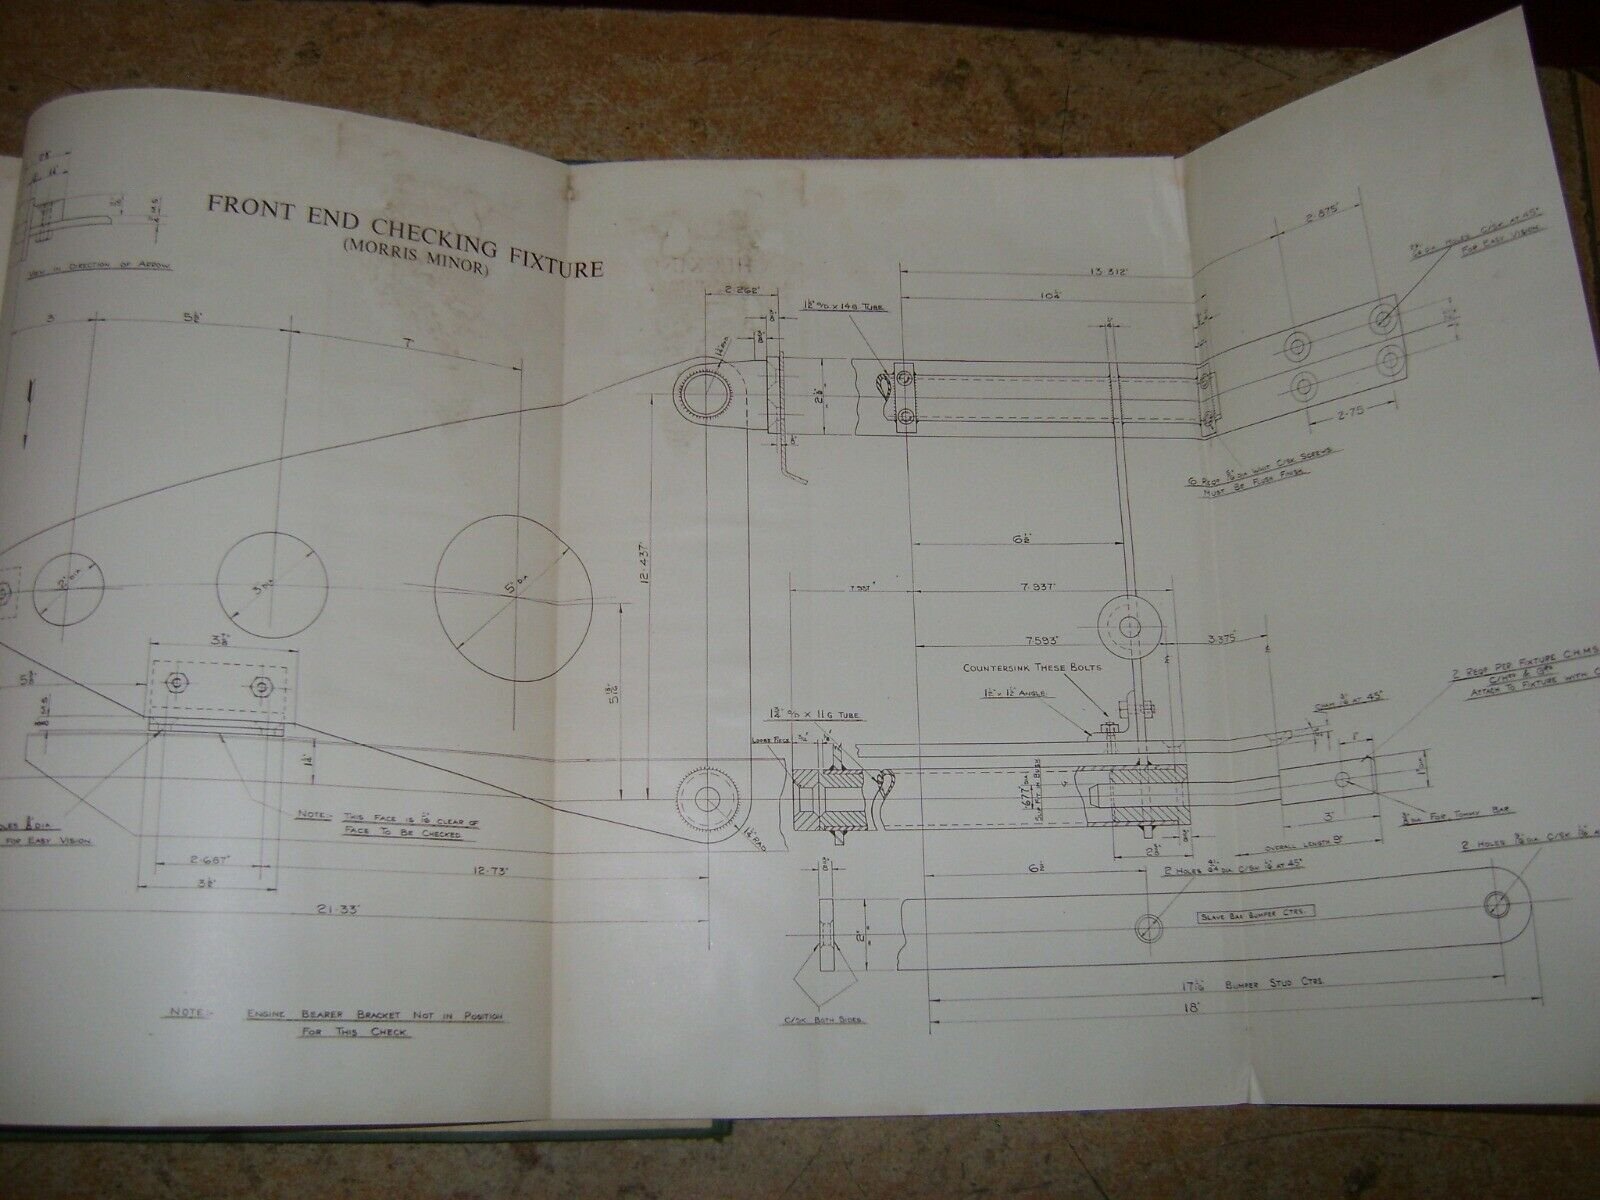
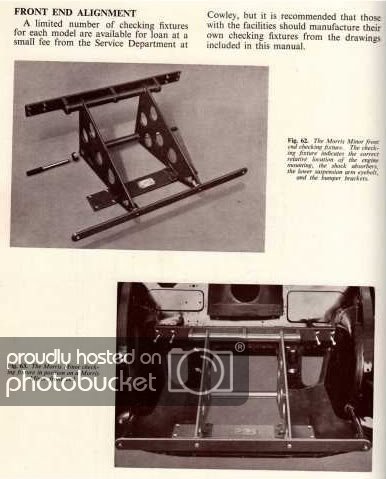
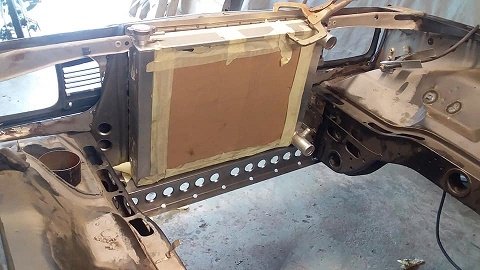
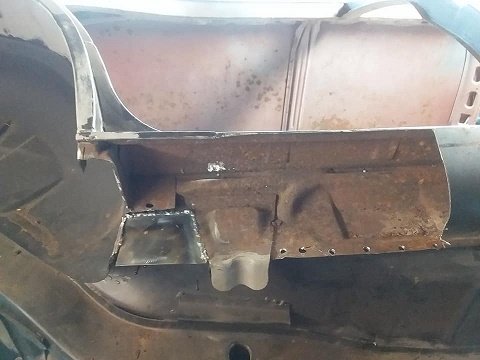
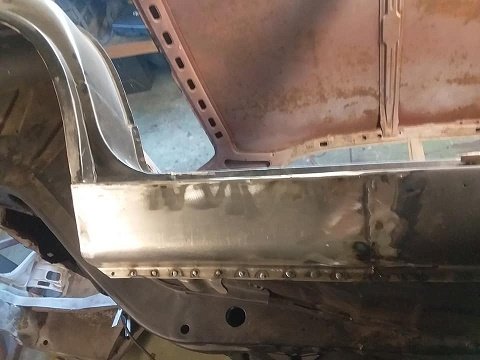
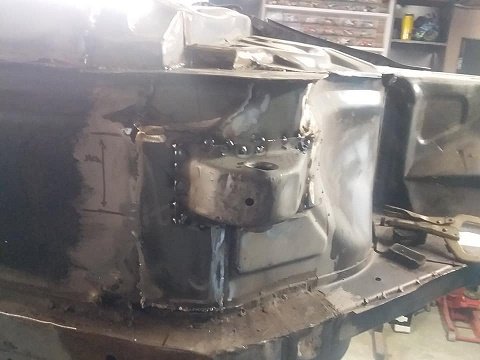
So I made a start on some plates for this jig. Bumper mounts are actually as straight and as centered as factory. Despite the threaded sections being cut off and replaced with welded on bolts. Then I made the engine mount tie plate. All good so far. I think I will need a laser level to extend the centre points of these to confirm the centre of the car, the toe plate cross member (where the suspension mounts), and the centre of the bar to go in-between the lower suspension mounts. The good news is that everything that hasn't been barried is good and straight. The bad news is, most of its been barried. Good news - I can make the jig in my shed and if I'm within a 1/8th of an inch I'm well within factory tolerances. For example. By spacing the lower suspension mounts out by 3mm you get 1 degree negative camber. So with rubber bushings 1mm is neither here nor there. Bad news I don't think it's worth my time aligning the wonky suspension mount. The other side has also had 2 access holes crookedly drilled in to it (despite there being a fresh air access hole on the back side of both....) Good news - there's only about 50 spot welds holding the whole cross member onto the car and because time is money buying a replacement panel is relatively painless. I will need to wait till the new one arrives to confirm some measurements. The battery box and support can be remade while I'm at that as well. The only other area of concern is the repairs around the rear front spring hangers. Its not exactly pretty, but nothing is out of alignment. Will get the hard word from the inspector, these panels are cheap enough just to replace the whole rear floor anyways... Anyway here's the relevant section of the Morris mono construction manual. Everybody else with a copy seems to think it's not to be shared
 11 points
 -
7 points
-
Pics of one of this summers projects... Been wanting to make a sth american asado rack for ages, then one came up on trademe cheap so snapped it up (so no fab to show off there). Needed to make a firepit to use it though, and because asado requires epic low and slow action, came up with this pit and windbreak in one: That worked so well that I rebuilt it, this time properly levelled with more 'patio'. Also built some outdoor furniture out of some macrocarpa sleepers, came out pretty good and should last a while, they are fucken heavy7 points
-
Cher. Got its own woodshed now too. And a pic of the boxing day lamb for yer salivating pleasure. Lamb crackling ftw6 points
-
Sweet little project for the day to make more useable work and storage space in the shed. Had an old kitchen unit just taking up space and holding the toolbox up. Wasn’t very useable had a warped soggy mdf top on it. I had a lot of extra bits and pieces jammed into other corners of the shed that needed a home and weren’t very well stored Picked up some offcuts of ply off a friend and made a new bench top for it. The ply was 12mm so decided to double thickness it with the help of some no more nails.. By the time I pulled the old top off half of it was rotten and junk so rebuilt it with some old wood I had lying around. Quick trip to Bunnings and got some storage bins for like $7ea to fit into the shelves as deep drawers. Pretty happy with the result and didn’t really cost me anything. Feels like a successful Sunday project!
5 points
-
Wow. As the new title suggests. All those little jobs. As all those who have or are undertaking a car project will agree these little jobs certainly do add up. I can skip them or rush them especially as the canvas upon which they attach is so clean and tidy. So is no particular order, due to the fact that some of them I start, then stop when I realise I am missing a vital part which has to wait until the next visit to the big smoke, start on another job in the meantime, go back to last job, forget where I was at with it, then realise I forgot to get the bit even though it was on a list, then start on another bit. While all this happened there was also a fair bit of mini adventures going on because Hannah's brother was over from the UK on holiday. We did some very nice camping, biking, hiking trips with him. Because we all like pretty pictures here's some from a few of the adventures had in a last few weeks... So yeah- working on a car project is tricky when tempted by the outdoors like that Back to the Imp. First big job since the last update was to sort out the wiring. I basically re-wired the whole car. The original layout was not going to work how I wanted it to. There was a fair bit to add for safety, extra features, ease of disassembly, neatness. I bought an extra fuse box as I realised 6 fuses were not enough for what I wanted to do. Photos.. The wiring shop.... I have a fair bit of automotive cable I have collected over the years to use... I mounted the boxes and relays onto a piece of clear lexan. It worked out a very neat way to do it. I also took the instrument cluster apart and cleaned it out 50 years of dust. You can see the amount of connectors that have to be undone to remove the instruments... It just does my head in when I am so used to a couple of plugs, even on the Viva which is the same era. So I added multi pin plugs to the loom. Easy now. Fuses and relays in position... The race car came with an extra gauge pod below the dash. I bought a new electric oil pressure gauge, got given a very neat wee rev counter by my good friend Dean (cheers!!! ) and kept the Smiths temp gauge in place. I didnt like the way the pod was wider then the heater control bracket I was mounting it to. So I made a tapered mount to fit between them.... Gauges and dash etc as it now... Other things added were a neat wee push button switch for an electric washer pump because all the squeezypush type squirty rubber butons had perished. I added extra wires for a stereo, amp, electric water pump, under dash footwell lighting etc. Moving to the back. I re-wired the whole lot. Not much to see because all the wires are now tucked out of the way. I needed an alternator belt tensioning bracket. The datsun item was horrid.. So I made a new one. However I cocked up and soon found out it didnt quite line up. I had to had a bit.... In the end it turned out sweet and I'm very chuffed with it ... Now moving up to the front. The battery. It needed a home so it wouldn't slide about. I made an alloy box from some thin sheet. It bolts in place to some alloys bars attached to the bulkhead so i only need to remove two cap screws and it can be removed if I need to take the tank out etc. In photos... I made a stainless bracket to take a washer bottle, of which I can not remember where I picked up but have had for years waiting to use on a project. Finally a home for it ... Heater tap. I needed one. The Imp one was knackered so I went to the wreckers and got a couple that would work. Picked the best fitting. I think its from a Honda. Really neat item and should last. Would be an idea replacement for a stock Imp setup too. However I am running both hoses, inlet and outlet, from one side now where they tee off from the main lines. Anyway. Photos. I needed to adapt the old brass fitting so I machined it out and soldered in the straight section of the old u angle pipe... Altered the Honda bracket and made it all fit... Played with some hoses... and ended up with this... Clutch time. hannah and I had a hell of a time trying to get it to bleed up. I finally worked out two things. Firstly- the replacement seal that I had been sold by a 'reputable' brake specialist was the wrong one and its heel diameter was slightly too large meaning the piston was struggling to return. It was a friday, no chance get another so I went through all my seal collection and found this... However it was too large and wouldn't fit. I looked again. Next up out of the box was this... Still no good! Bugger. So instead I machined a new piston to suit a seat that was the right OD but had a larger ID... Now the piston returned. But it still would not drag in fresh fluid. I took the master apart for the 14th time and looked at some other diagrams online. I soon realised that there was a teeny tiny spring washer missing behind the rubber inlet washer. Its not visible in the Haynes manual or mentioned that I could see. I made one from a coil of spring and now had a fully working master cylinder. The clutch bleed up pronto and works fine now! Phew. Latest job I did was last night. I removed the exhaust and added a boss I machined from a 18mm nut for an O2 sensor. Then I was mucking about prepping an 18mm bolt to make a plug for the time being and remembered I still had not only a boss but also a stainless plug left over from the Innovate wideband kit I had fitted in the V6 Viva. Sweet. A nice treat. And that is all for now. Its getting very close. Engine has a new oil filter and oil, coolant needs to be added (and I bet some leaks will need fixing....) and then I just need to make an air filter assembly for the carb. Nothing available to fit the space, at a price I like, so I will build my own from one 5th of a Mazda Van filter I also need to machine up some Nylon bar I bought to make a new pivot ball for the gearlever. Big thanks to John875 from Australia who bothered measure one of his balls for me and post a photo online. It looks like this...5 points
-
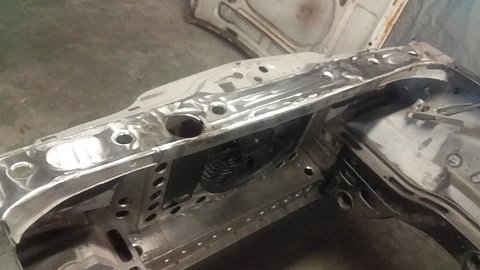
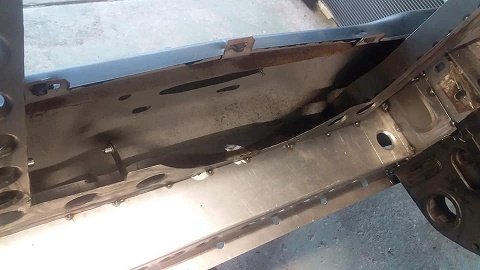
Not much cutting to get this in - just a RHS front crossmember under the radiator.
4 points
-
Just paint them black and dirty them up heaps before going in for a wof3 points
-
Decided to clean up the interior a little The center console was looking tired so I dissembled it and gave it a clean and paint. Found an old photo of when I got it I also cleaned up and painted the bottom section of the dash, both front ash trays and front foot well kick panels and passenger magazine holder thingy but didnt take photos so you'll just have to take my word for it Cheers for looking3 points
-
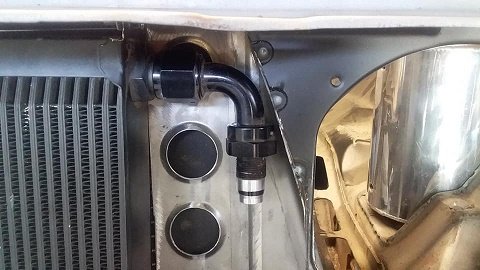
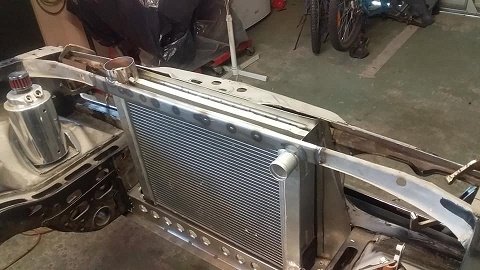
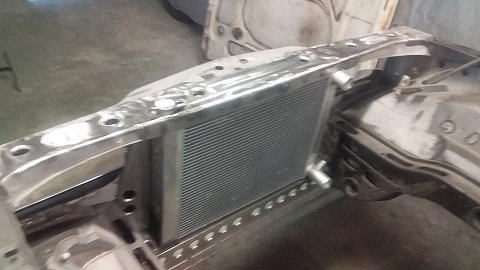
luckily i left enough room for the oil cooler 90. finished up the last of the radiator supports ..(still just silps up under the lip and had 2 brackets on the bottom.) then made the new slam panel...(i had to bolt the bonnet on and drill the pilot hols for the bonnet pins just to see where they would land...before i start)
3 points
-
It probably is good to keep that information secret so there's less people capable of keeping these things on the road. The greater good. Keep calm and minor repairs.3 points
-
Well, the time has come. I'm keeping the BMW for the foreseeable future, so the only logical next step was to drop some dead weight, and pull out the subs. The decision to keep the BMW wasn't one I took lightly, but I'm not sad or disappointed to be stuck with it. I actually quite like the car. There are a few things that didn't suit me about the car though, and having a bunch of useless weight sitting over the rear axle is one of those things. The boot install looked nice, but it really killed my enjoyment of the car. It sounded bad, and had been hastily thrown into the car. The main issue was that the capacitor on the driver's side wasn't actually secured by anything and was just sitting on top of the battery. This meant that every time I cornered hard (like an M3 should), the damn thing would fall over and go for a scoot along the boot floor, until the power wires restrained it. It was sitting on a block of wood So out it all comes. I'll tell you what, getting the sub box out was a mission. First out comes the floor panel and amp from the spare wheel well. Then the side amp, and capacitor come out. This gives enough room to shoehorn the rest of the trim and the box out of the boot opening. Turns out the box wasn't secured at all and was held in with hopes and dreams. It's a big box, that's for sure. I forgot how big a coupe boot actually is! In goes the carpet from Pick A Part, after a quick vacuum Even though this spare wheel doesn't hold air (buckled and leaks at the bead), I still put it in the boot as it helps to hold the carpet up, and also helps with weight balance. I need to find another wheel at some point. The wheel and tire weigh about the same as the amp that was in there, it was a beast. The previous owner butchered all the standard wiring for the speakers, so unless I want to run a whole lot of new wiring, I'm stuck with running the speaker amp. Thankfully I actually like this one as it looks cool, and doesn't take up too much space. Even the wiring going to this is a mess though. Yes, that is the pair of RCA connectors (usually used as one pair for front, and one pair for rear), split out to fill all four channels, front and rear. I'll rejig the RCA cables that went to the sub amp, and use them for the rear speakers so fronts and rears are split properly. The final result isn't perfect. The carpet needs some fettling to tidy it up, and the battery is the wrong size so the plastic cover on it doesn't quite fit properly, but otherwise, it's now a fully functional boot. Driving the car to work yesterday and the lack of weight is noticeable. It's not major, but it doesn't feel like you're dragging the backside around anymore. I would've pulled a good 20-30kg out. The next steps for the car are in motion. I have a set of BC Gold adjustable coilovers to go in, and a nice Purple Tag E46 steering rack to replace the horrible 3.0 M3 rack, which is the dumpster fire of steering racks. I'll also be rebuilding the vanos, since I already have the parts to do it, just need the time.3 points
-
3 points
-
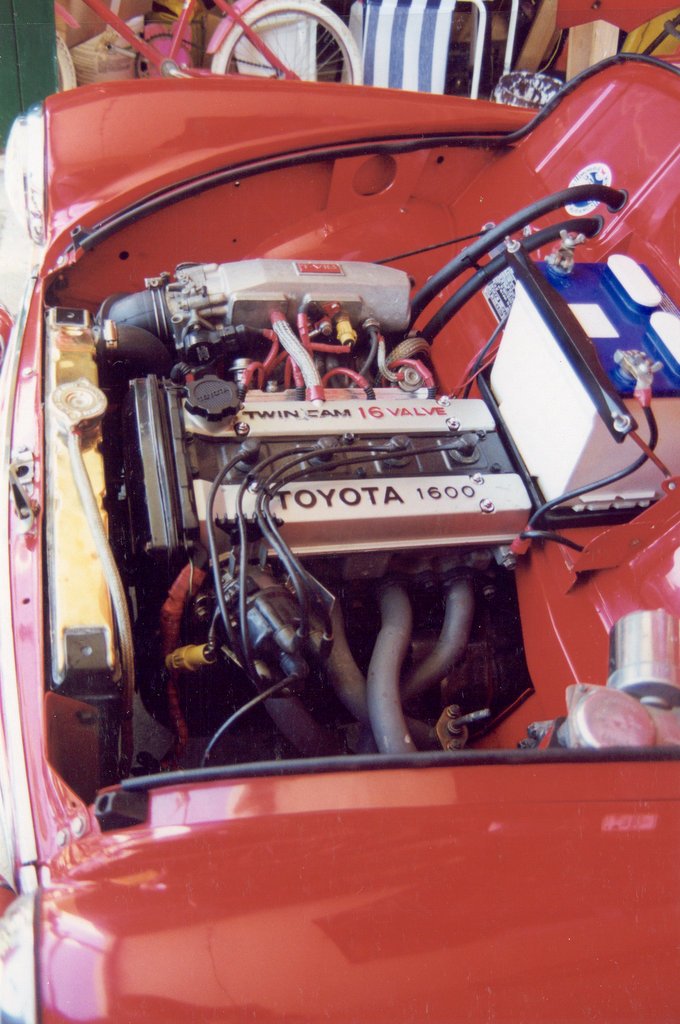
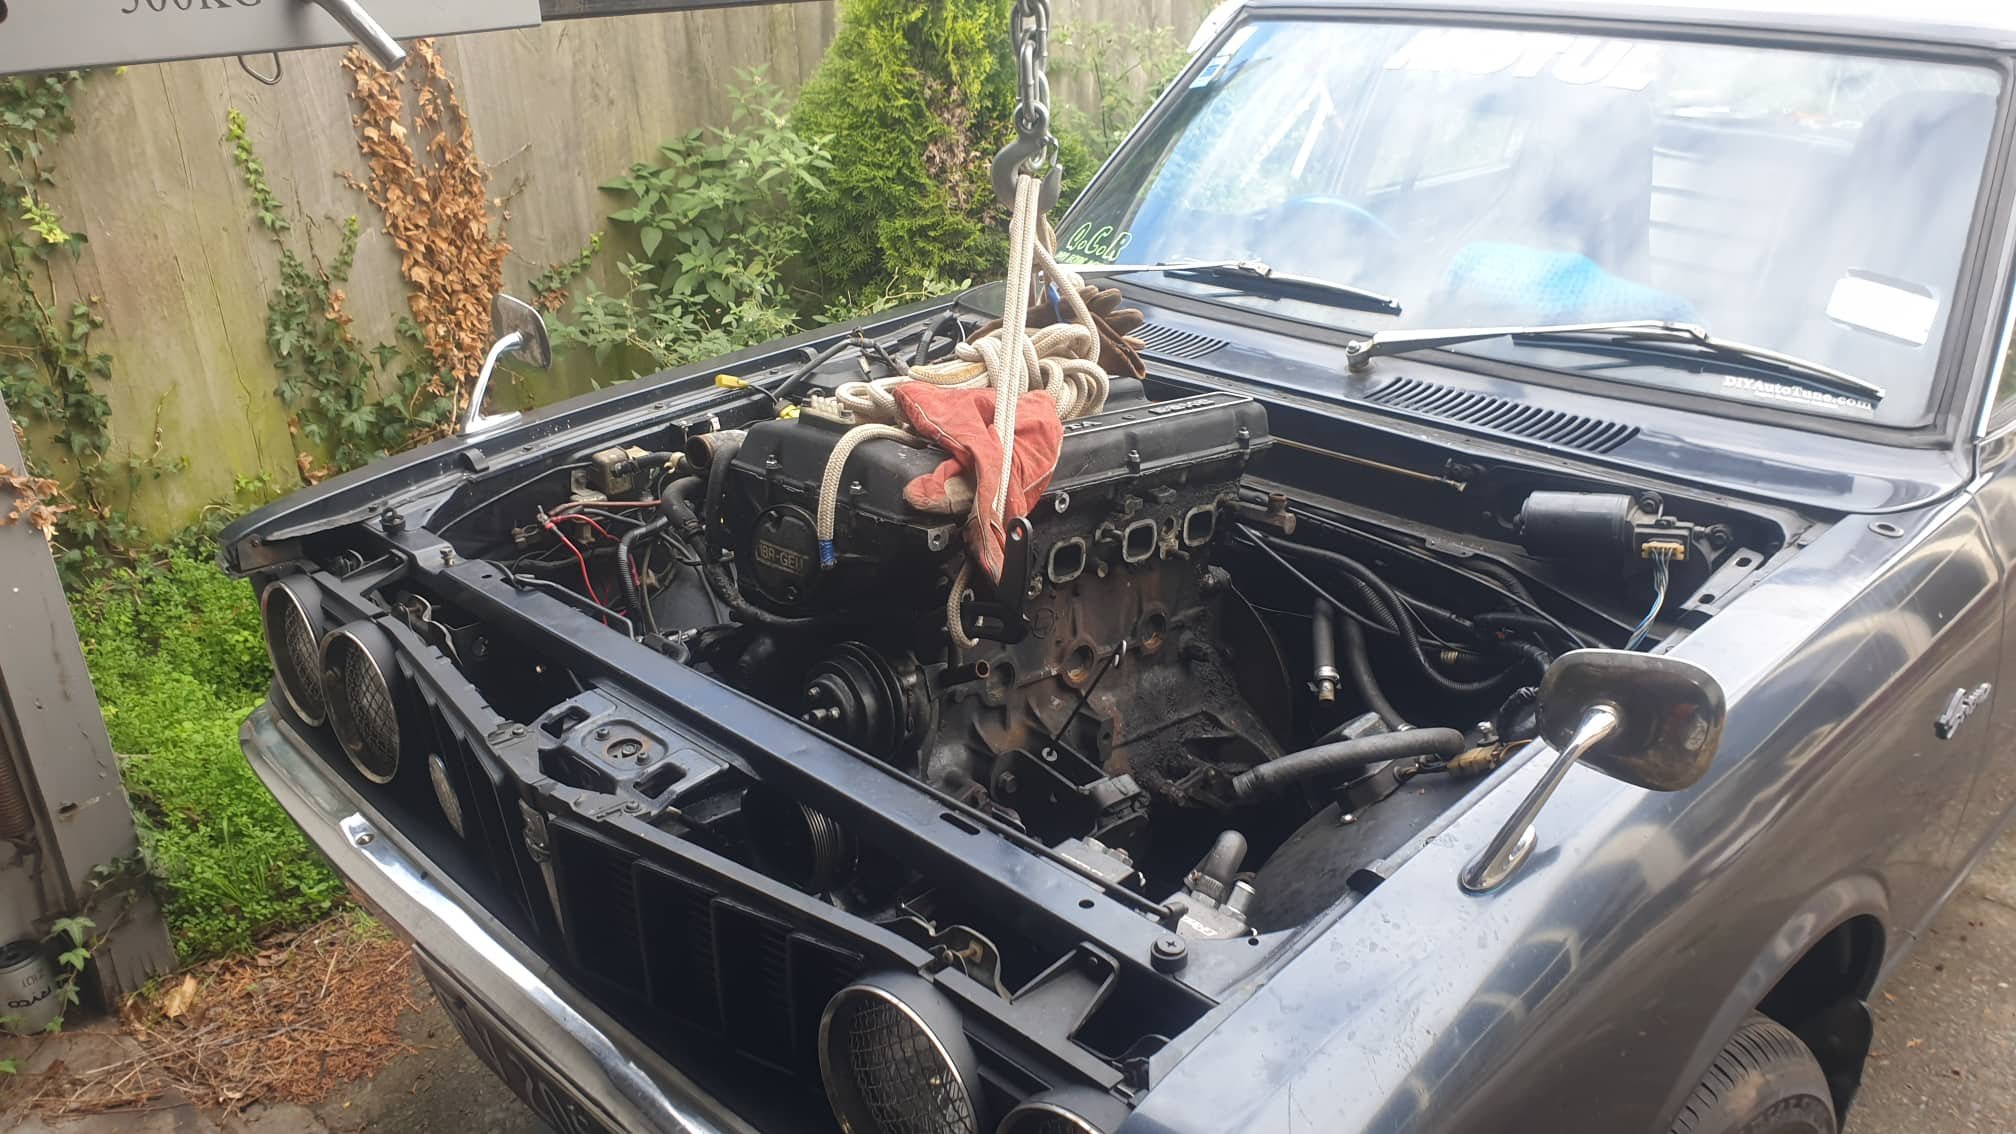
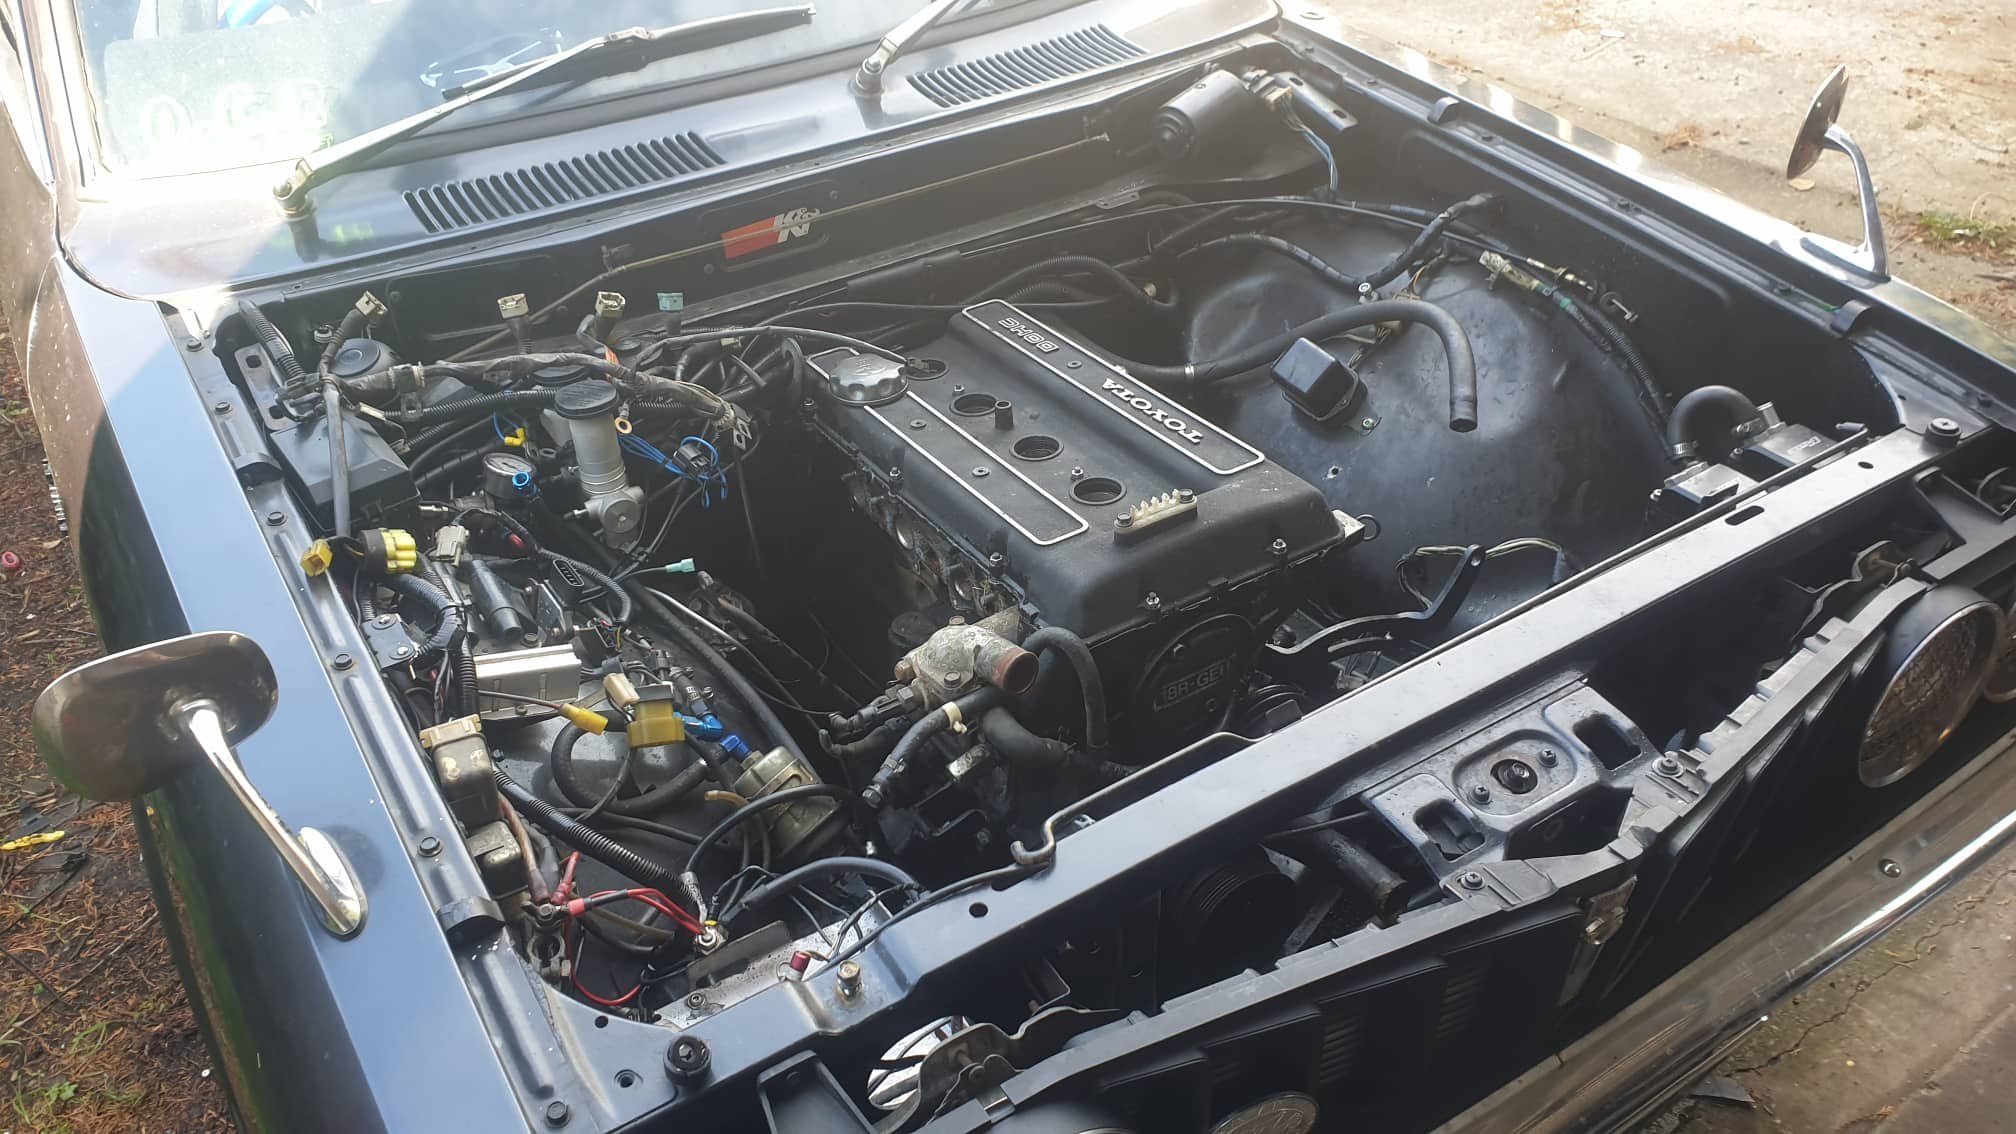
Been plugging away still. My brother came over last weekend and together we tried to bleed the brakes but with still no luck. Spent hours trying too but the bastards still seemed to over extend n leak.. anyway got over that pretty fast so have brought sheepers parts car ms65 wheel cylinders, drums and shoes. Worst case I'll get the cylinders rebuilt. My gasket set from California turned up and it all seems to be well made. The drivers rear window winder mechanism was in a sad state of affairs it had been snapped and re welded.. twice so I quickly fucked that off and got one sent up from harry in chch. Bloody works mint too. Started cleaning rocker cover prepping it for paint. And removing all the parts I had sitting on loosely.. swapped the crankshaft pully to the double for the power steering. Picked up my fully rebuilt power steering box and power steering pump from PG Hydraulics. Heres some steering porn the whole family can enjoy. The power steering box was full of water when they opened it Haha Look at the state of this crap Anyway installed those along with all the parts that needed gaskets and painted up what needed doing. Wrinkle painted the rocker. Mrs was real pleased while I had this baking in the oven for a few hours haha Just need a couple hose clamps for the oil cooler and I can put oil in. Getting closer to firing it up. I'm undecided if I want to sand back the 'Toyota' on the rocker cover and the rectangle. I did it on my Corona and I kinda like it all blacked out.3 points
-
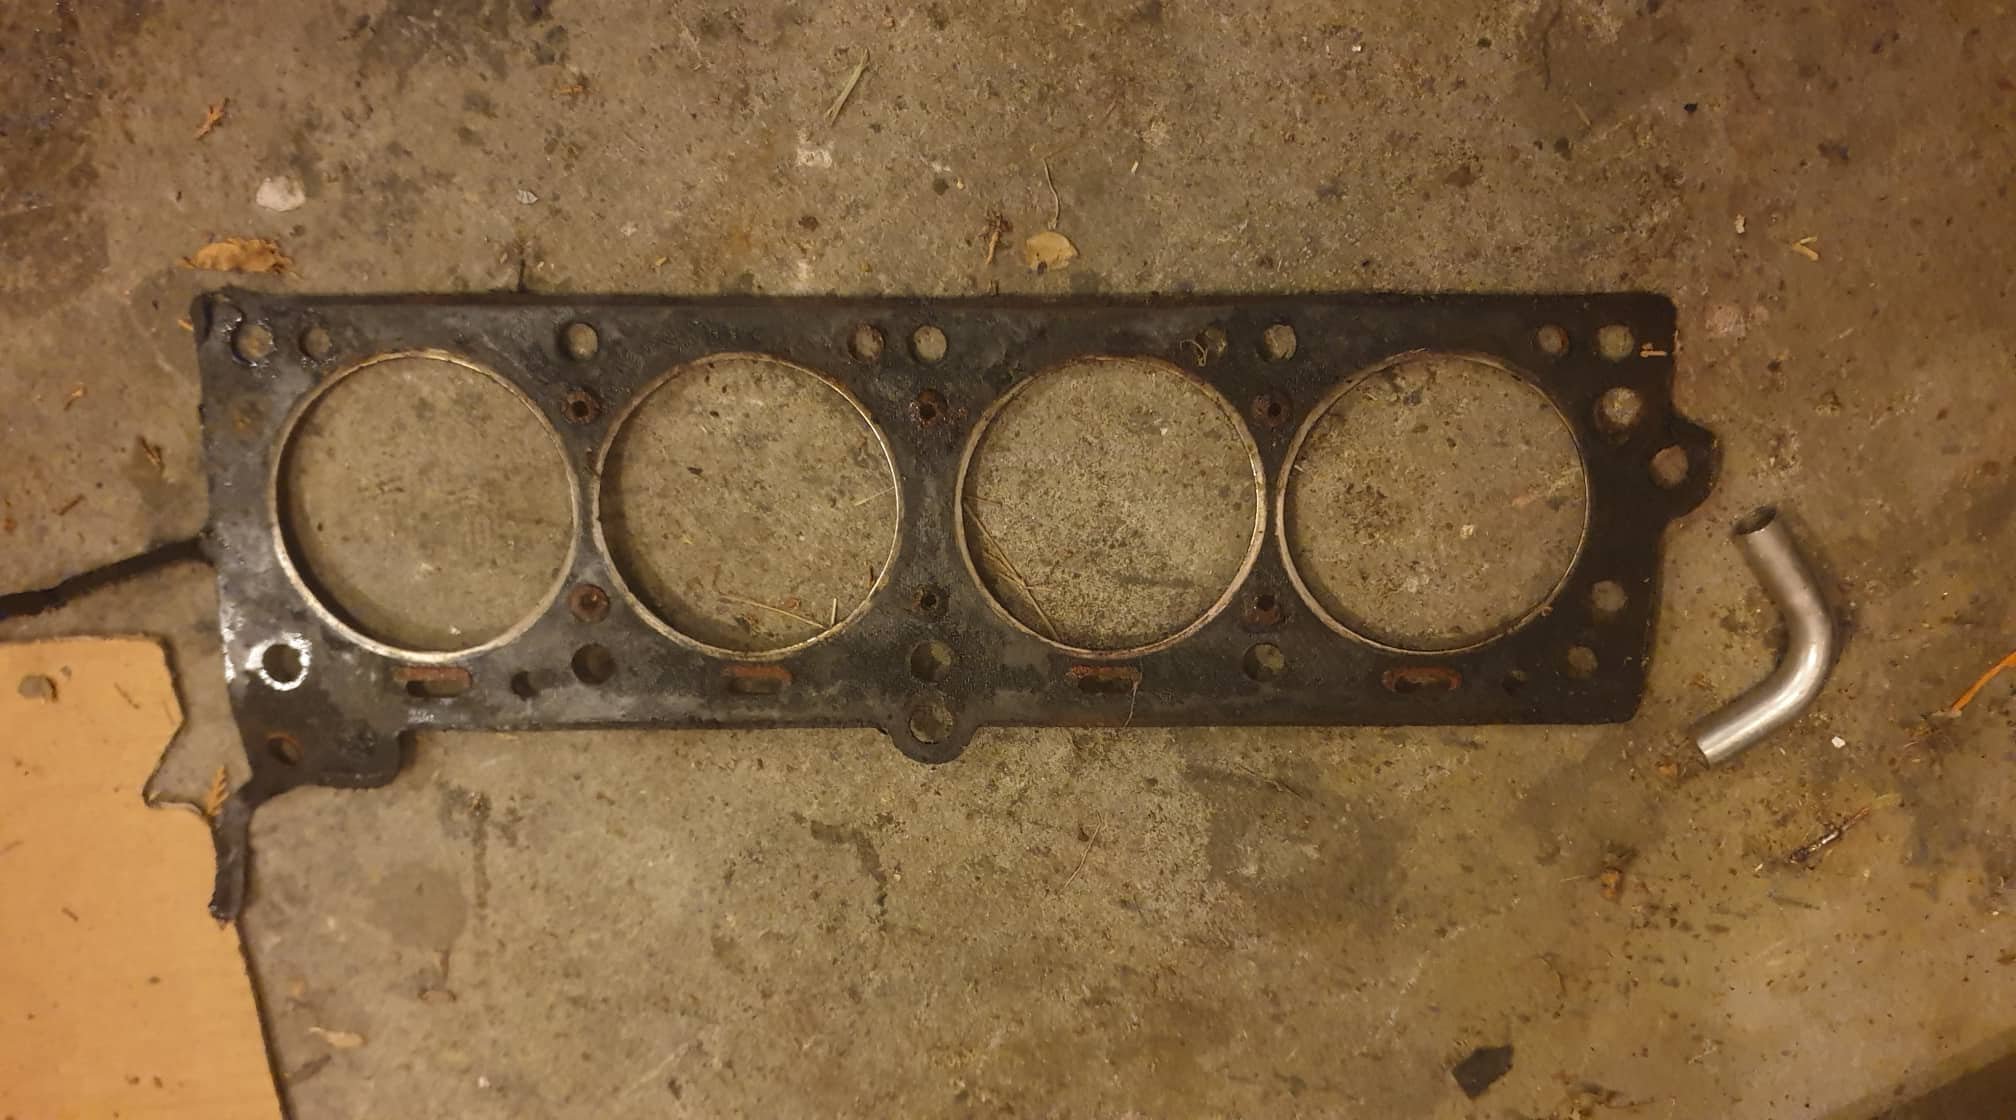
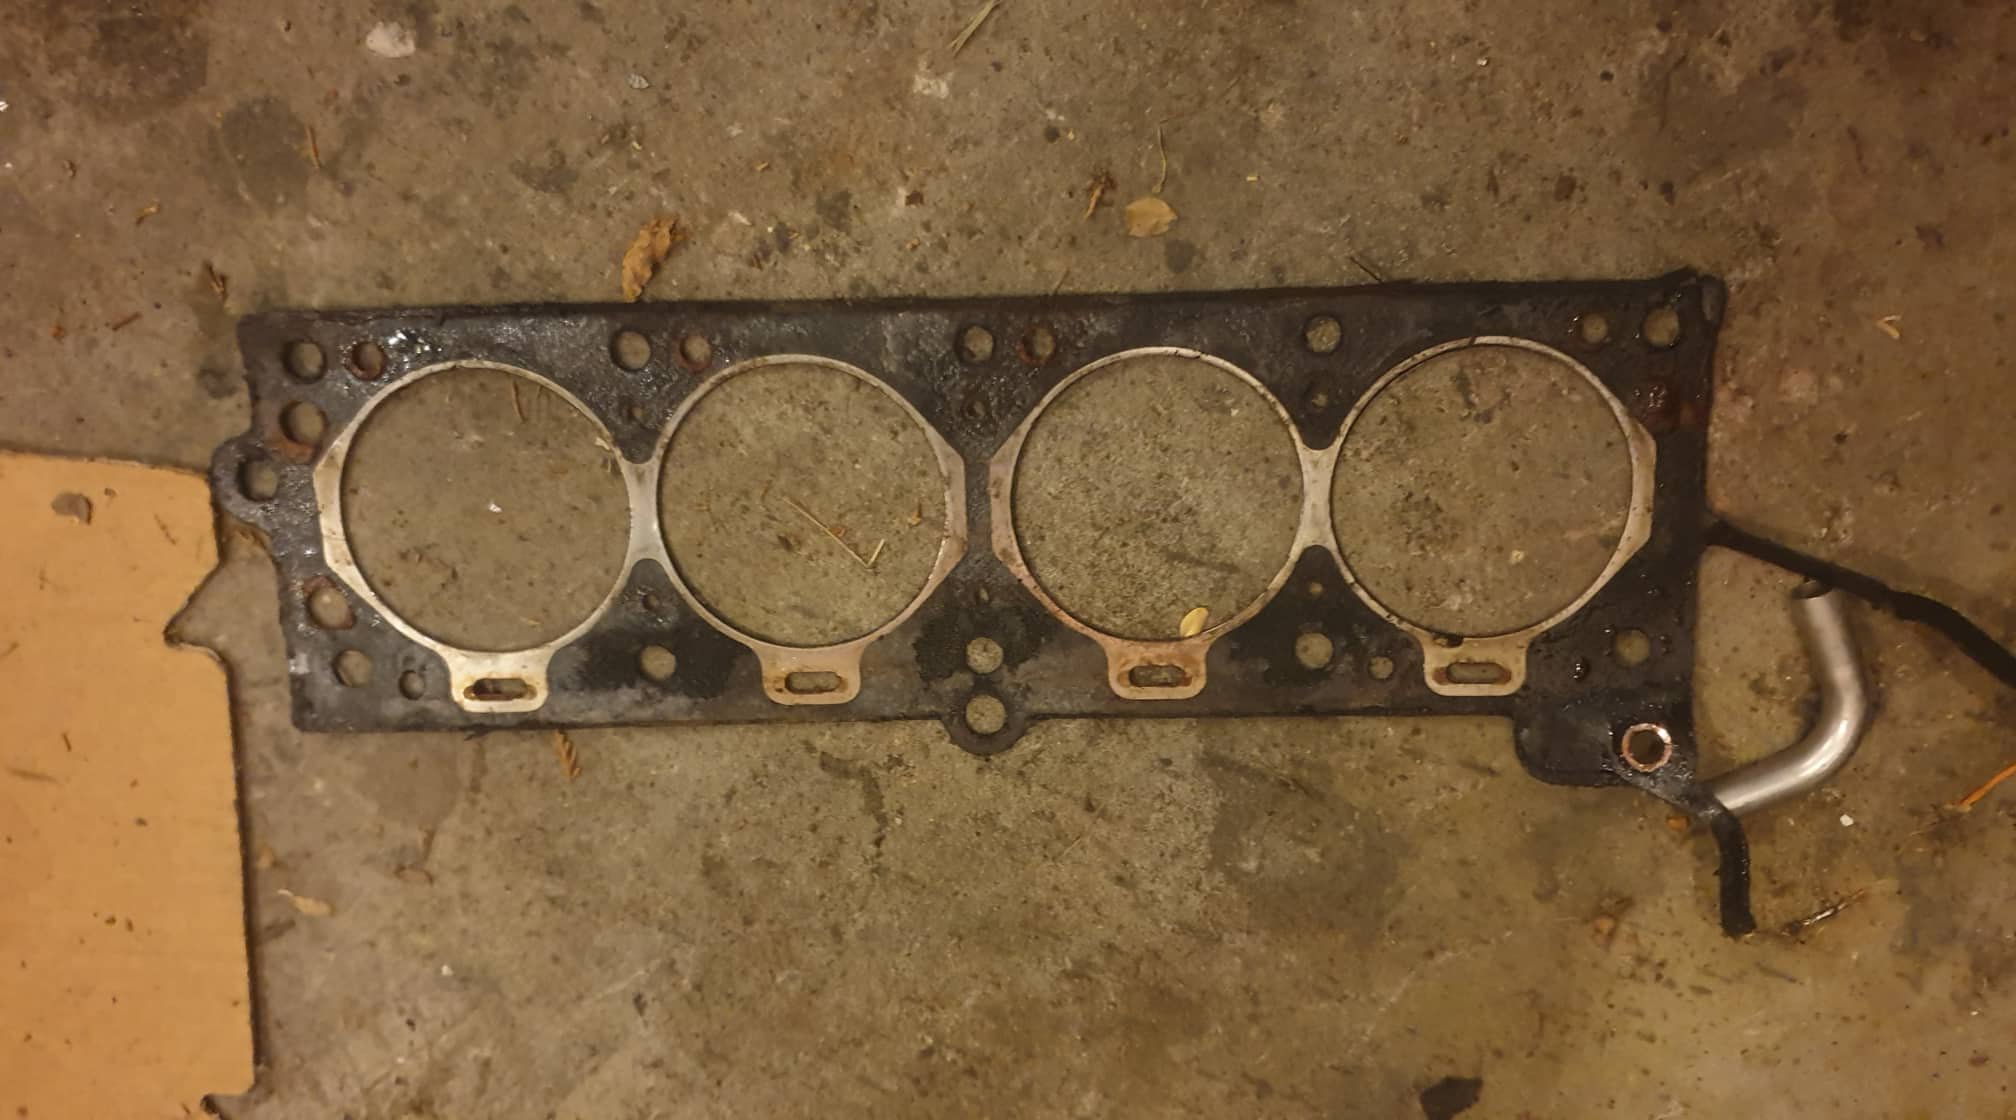
Tonights effort. engine fully disassembled, except the head. everything looks good, its clearly had coolant in the oil. the bearings are fairly worn, but the surfaces look primo. im piking the wear on the bearings has been from the water. Nothing very obvious on the head gasket though other than being quite brittle and shitty. its had a rebuild before so that could be a contributor now onto cleaning and sourcing new parts.
3 points
-
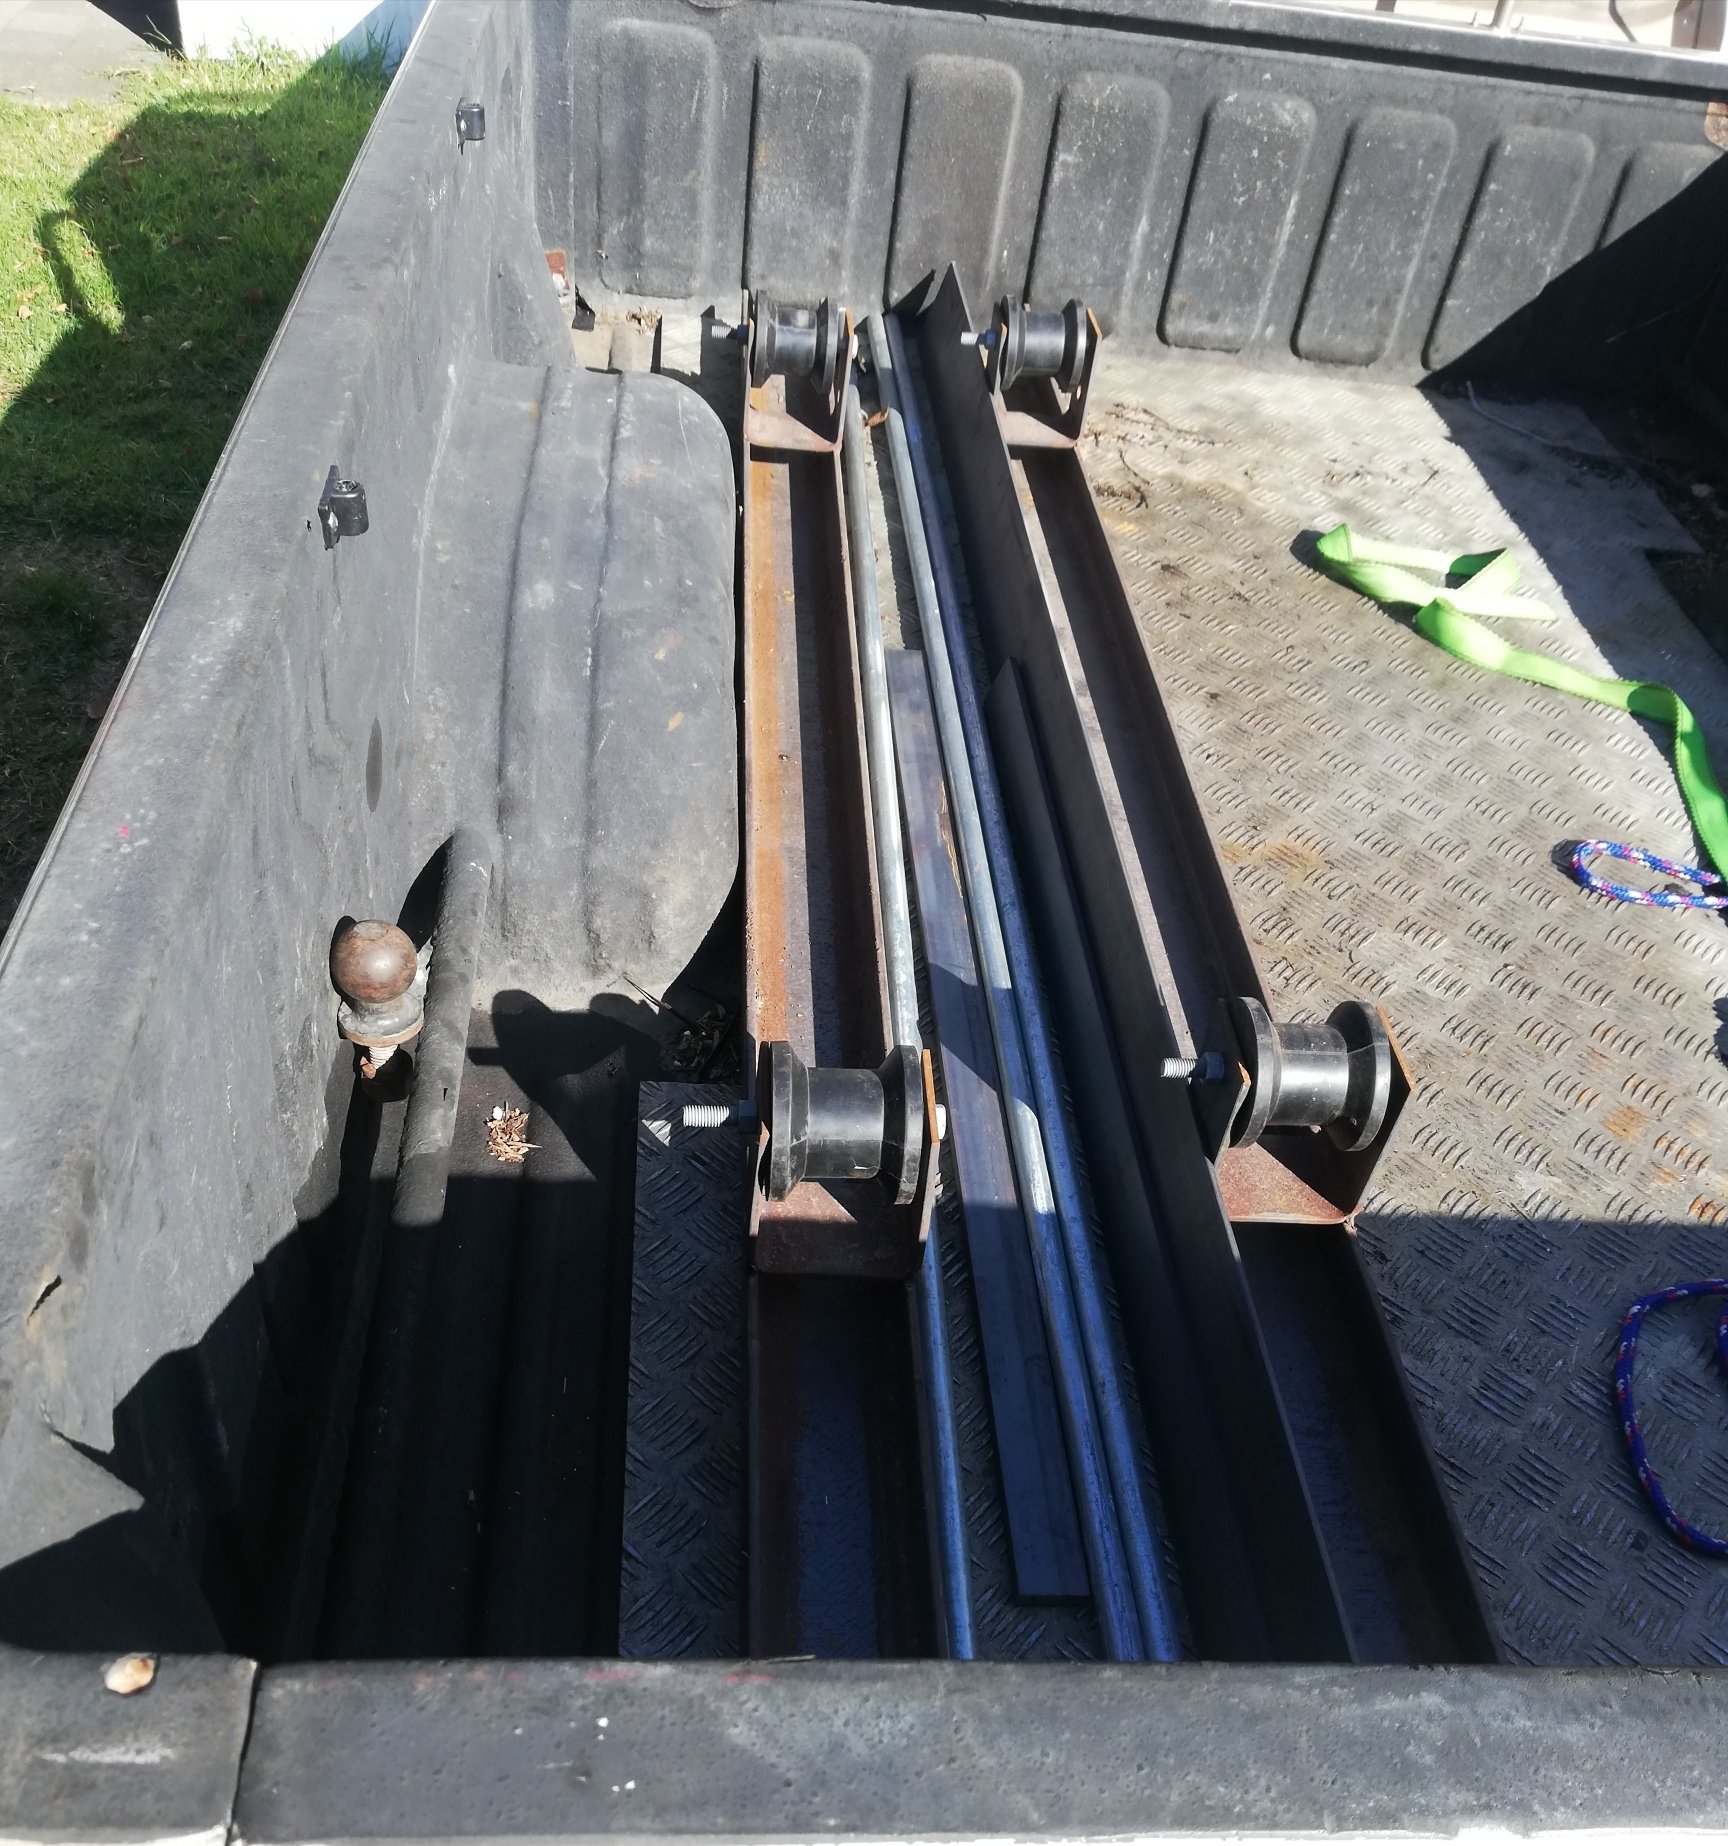
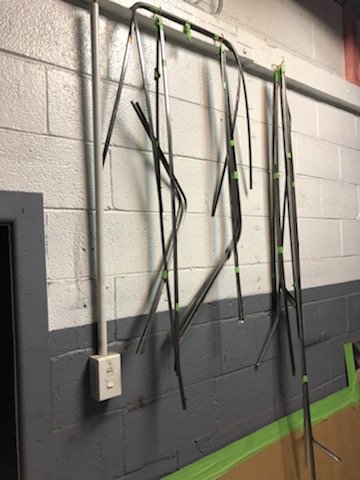
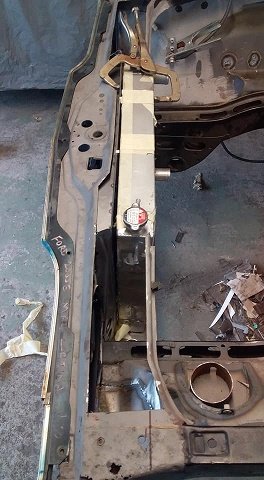
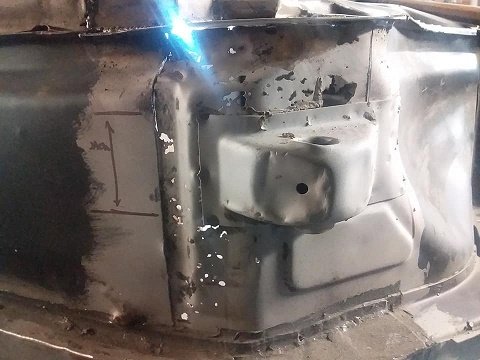
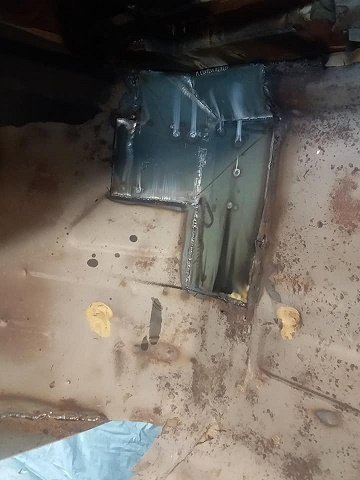
Replacement chassis legs and engine bay tie plate A roller hoop rotisserie And a bunch of steel plate and tube for various chassis jigs. I'll make something like this from the BLMC minor chassis repair manual.
3 points
-
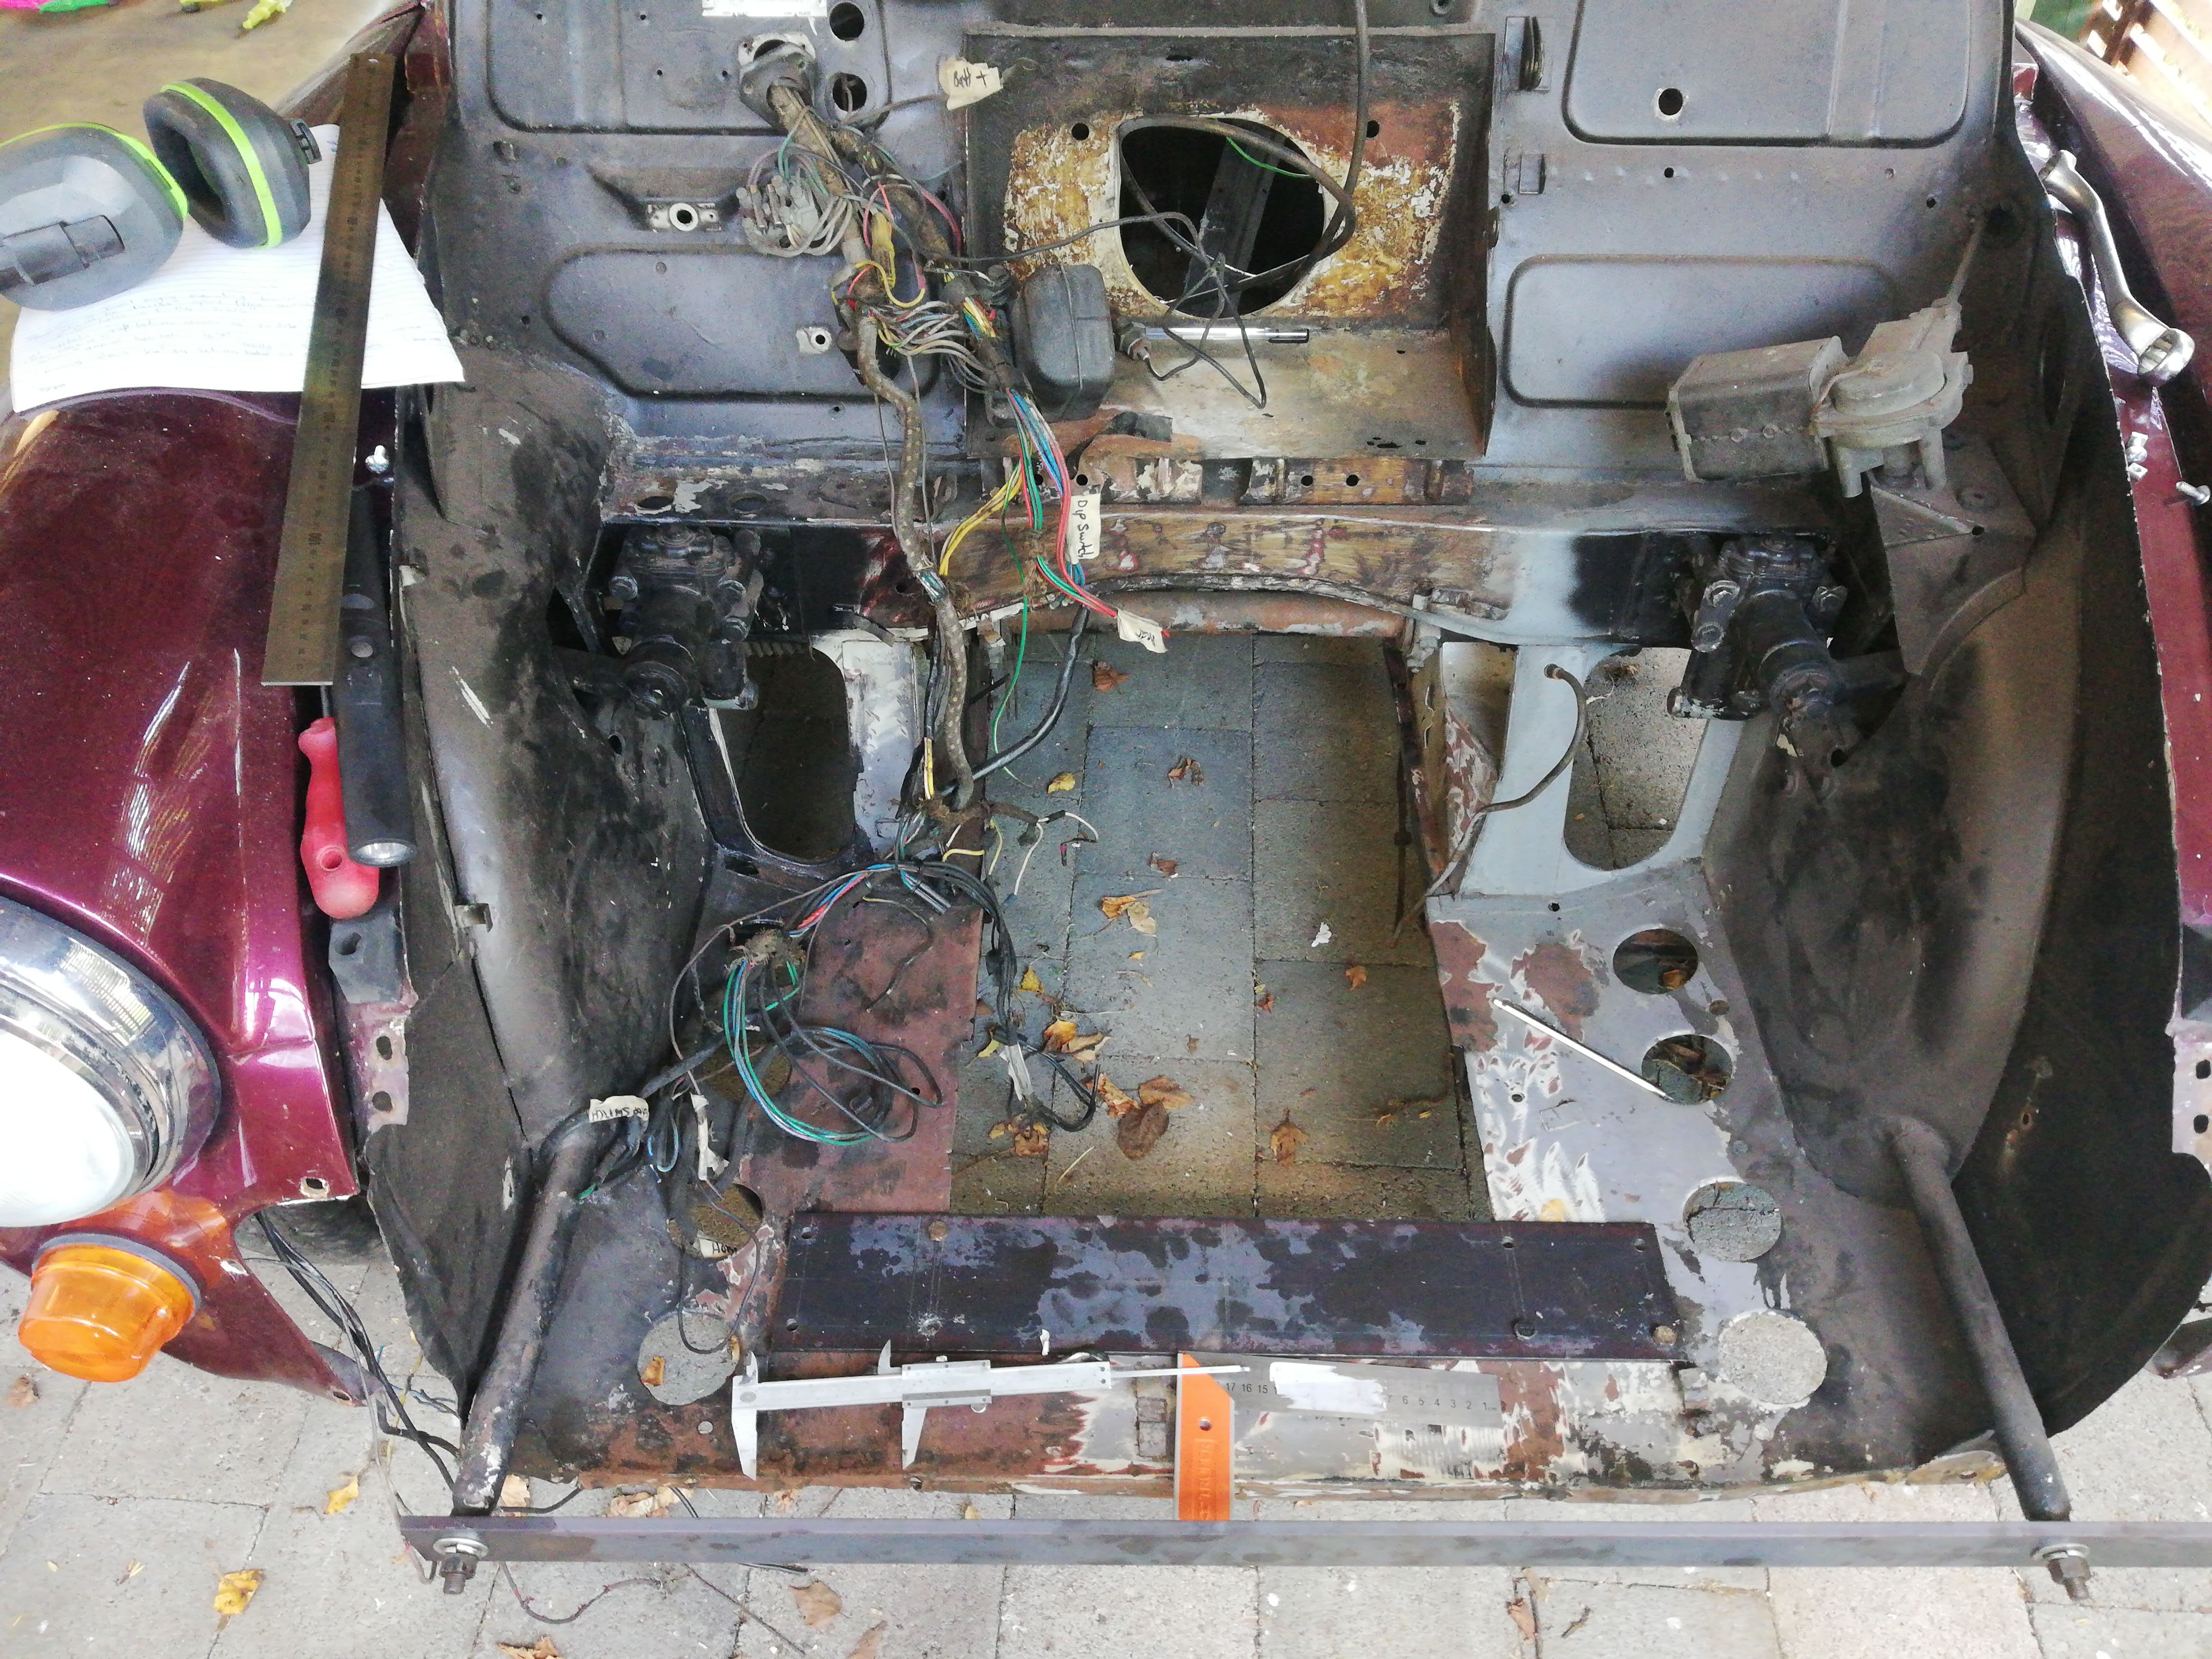
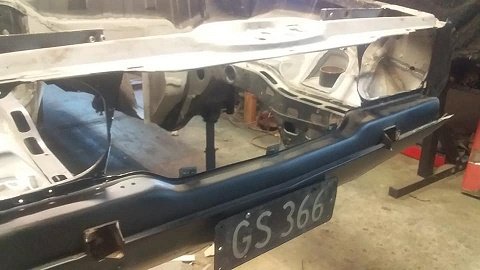
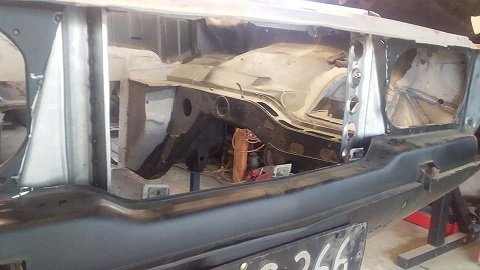
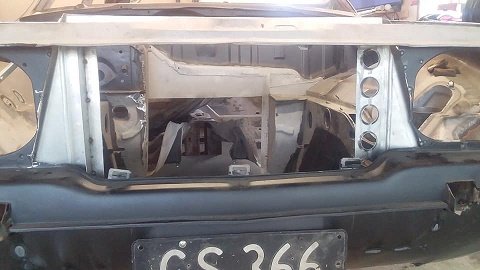
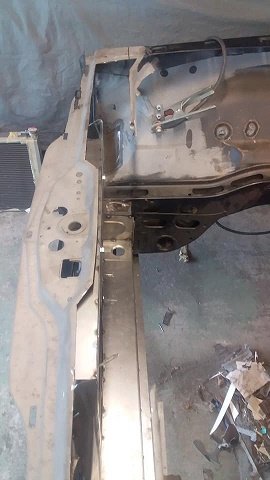
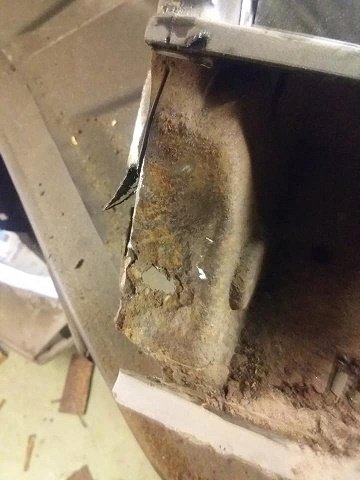
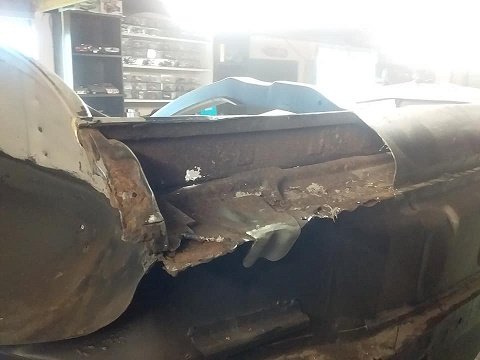
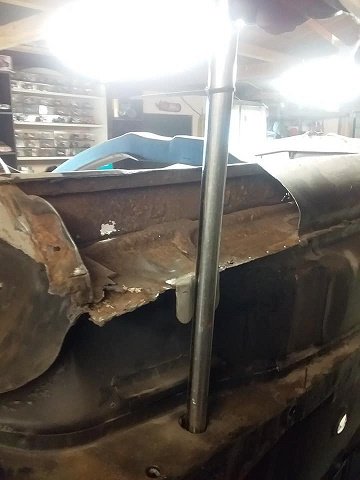
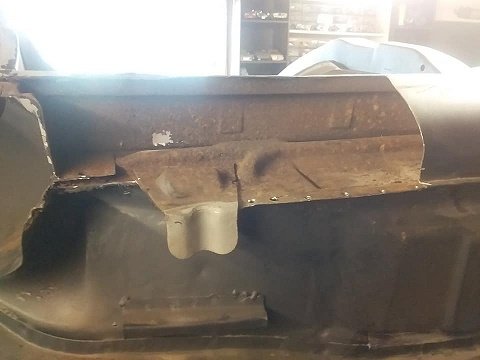
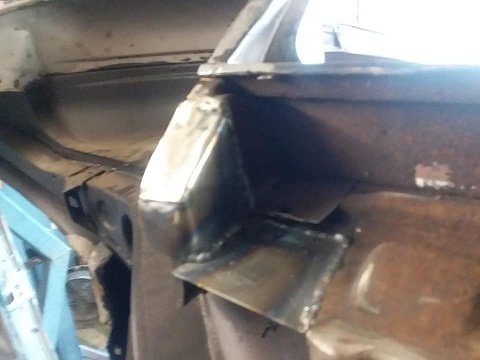
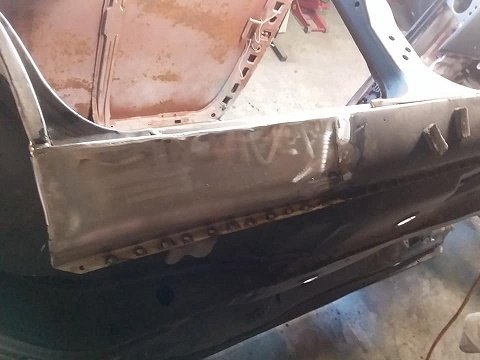
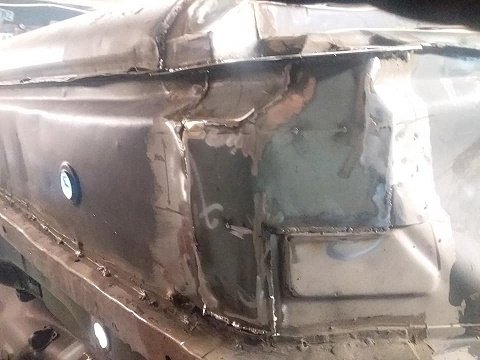
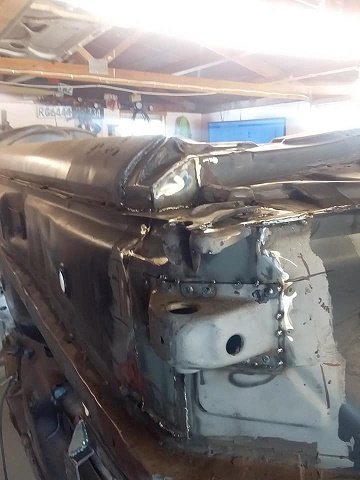
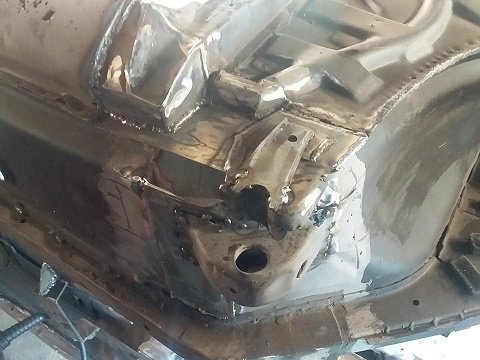
The more I look at this, the less faith I have in the last owner. His chassis repair is just awful. Crusty welds aside, he's double welded over the rusty sections where the suspension mounts to. The idea was obviously to keep these key points in the right spots. However he's not braced anything and the two lower suspension pins are totally on the piss. There has been a front end prang and the engine bay tie plates and rhs inner wing are kinda rippled. Can only assume that the bumper mounts are not in line either. Why is this a concern? Because I'm building a factory style chassis repair jig. It mounts to - the chassis suspension mount tubes, the engine mount bolt holes, and the bumper mounts. That's ok though? Don't you still have the shock mountings to base it off? No. He's also cut the LHS section out and not only welded it back in a few mm further back than it should be, it's also cocked on an angle. At a guess the bolts got stuck or something so it got cut out to free them up? Anyway this all equates to a front end that's totally on the piss and probably not worth my time to fix. So I went ahead and bought everything I need to fix it...
3 points
-
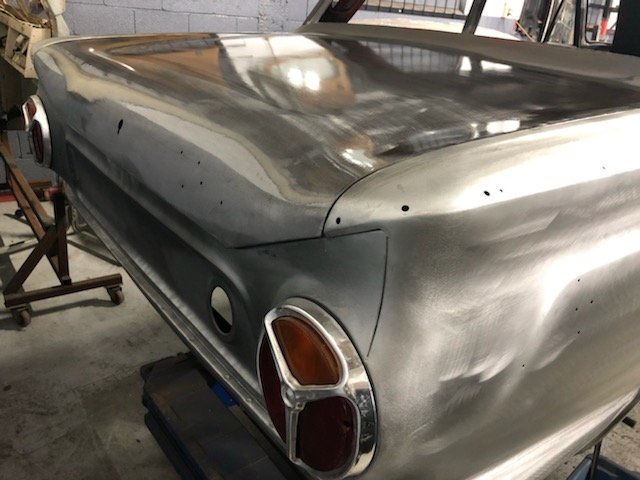
Boot lid finished which pretty well completes the panel. It’s going to be a shame to paint it! Stainless trim already to go to the polishers.
3 points
-
Few pics. LD28 Commy wagon @KKtrips???
2 points
-
troll Limmo is actually a good thing. They hang tuff. If it's working id expect it will stay working for a long long time. They actually work very well. I dear say if you don't need the wheel flex you wont need lockers either but they will never do any harm in a big mud bog. Iv installed a lot of ARB air lockers the most sketch part is deciding where to drill the housing. But things have changed Electric lockers came in and I left the 4x4 industry . There is some very good stuff for patrol out there. If you need it if you look on the ozzy market. A good upgrade for the future could be GU axels they are a tad wider in track than the GQ. Just a thought.2 points
-
We carry a fair few of them on file, but not all of them. (it relied on the person filling out the declaration to send it into the MoT back in the day) Does it still have live rego? If it does then send me the rego number tomorrow and I'll look to see if we have a copy on file.2 points
-
Nope. Go for your life. As long as you meet cert requirements you're good to go.2 points
-
The first one. The second one. Using that now. Today my tests revealed why one of the sensors was becoming increasingly faulty. They've been receiving 18 volt spikes. Not sure where that came from or how to isolate that from the arduino.2 points
-
Got the missus to oil me wood a bit..
2 points
-
Whitworth?2 points
-
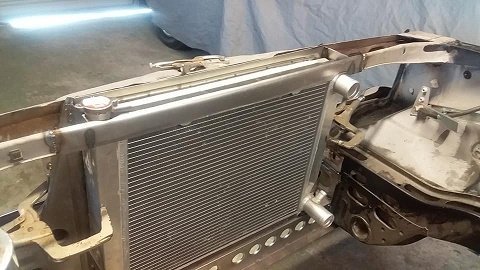
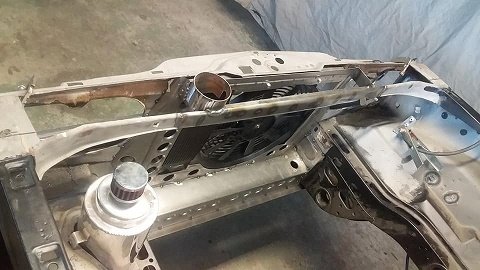
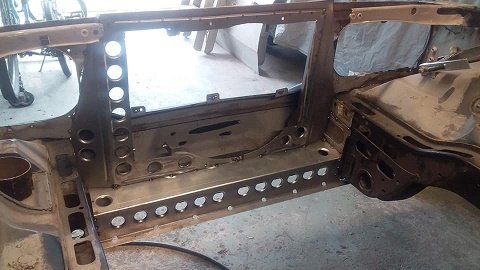
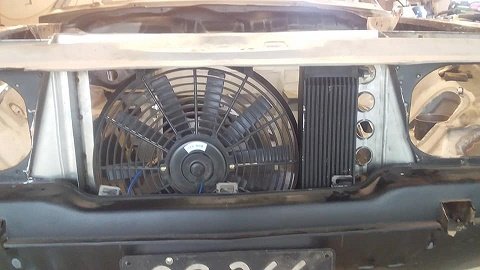
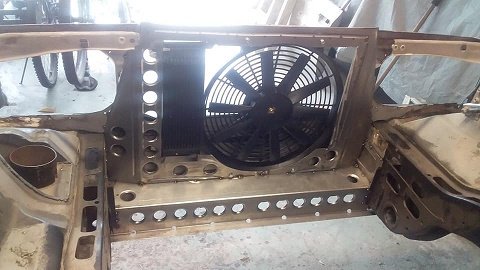
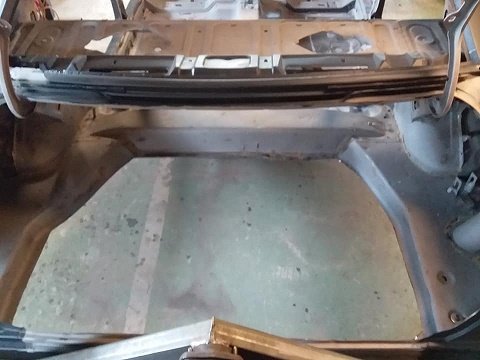
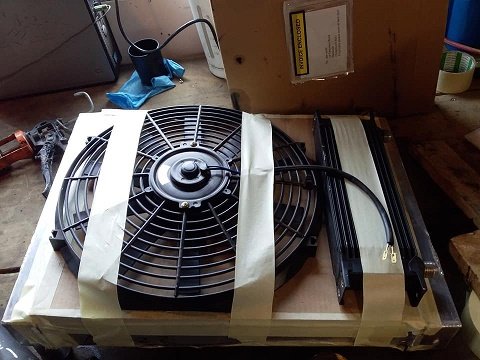
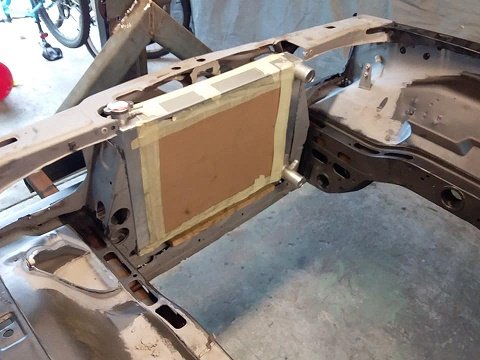
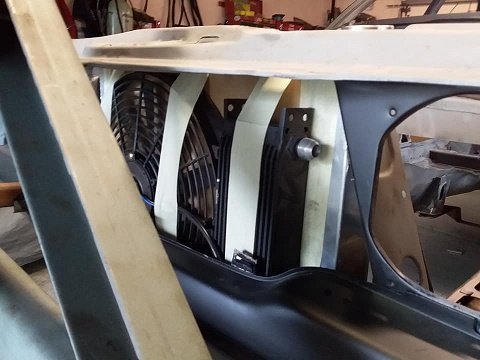
well thats the fan,oil cooler and front suppprt panel done. Had to cut more oit of the front.(fuck all between the lights now) Added some strengthening to the panel Even just tacked in the front feels stronger and still more to go. Its a bit tight behind it but i can still get the gan and oil cooler in and out fine. Can still get ghe grill on and a 70mm rad in and still have all the engine bay left.
2 points
-
What happens if you buy a vehicle that’s on an old declaration type cert, has rego on hold, but they don’t have the old declaration letter thing anymore? recert? Or are there records kept somewhere?1 point
-
One of my favourite photos.
1 point
-
Yeah it does.. Pretty much just looking to keep it all the same colour, and then I'll leave it to do what ever it wants.. Once it's had two to three coats it's soaked into the wood enough to preserve it for ages on the inside while it gets whatever patina brotown throws at it..1 point
-
1 point
-
I turned an adaptor for mine, just had to bore internally using the compound. Stuck it on with loctite 609 and it was sweet.1 point
-
instead of using a roller to bend it try a cylinder cut in half lengthwise to spread the load. Might help avoid the kink?1 point
-
this mornings effort. getting on a major roll. will start engine dissasembly tonight once the kids are in bed and the wife has gone to work.
1 point
-
Was needing to bend 7/8' pipe 180deg with a 250mm outside dia so i knocked this up today .Tho not 100% happy as there is a wee kink at the end of the bend1 point
-
Guy going balls deep in Ferrari engine mods https://grassrootsmotorsports.com/forum/build-projects-and-project-cars/frankenferrari-v12-ferrari-308/148959/page1/1 point
-
The meets are on hold at the moment. So of course no one will turn up...1 point
-
Tentative list of work Replace RH chassis leg Replace LH chassis leg front half Replace RH tie plate Rust RH Sill Rust battery tray Poor patching boot floor rust Crack in engine mount tower New hard brake lines front Replace suspension bushes Fit brake light Install rear indicators Buy driveshaft Assemble front brakes Engine and gearbox Install heater and under bonnet stuff accessories1 point
-
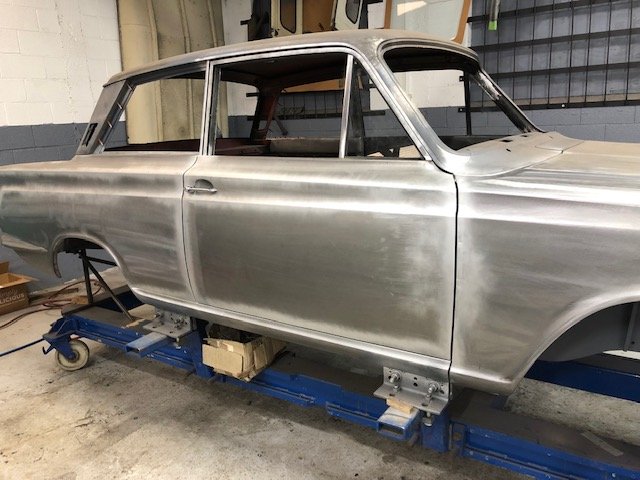
Drivers door complete and only the boot lid to go and body work finished. Still trial fitting parts etc and once done it is off for the final blast and prime then off to paint.
1 point
-
Made this at work.
1 point
-
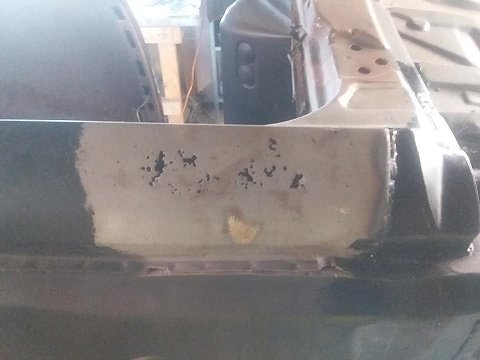
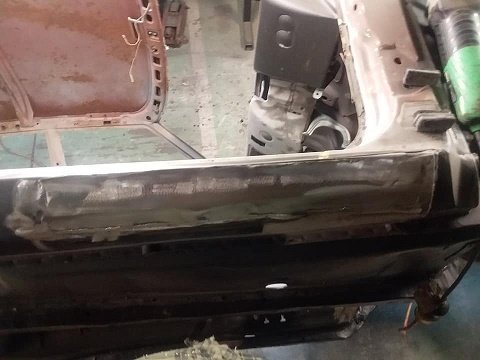
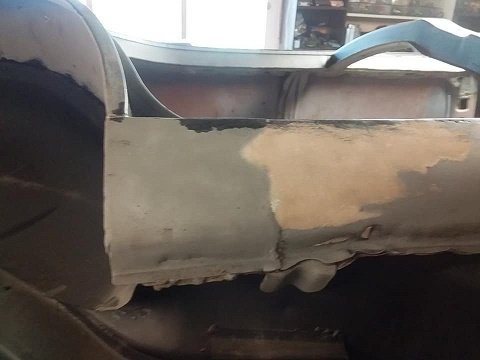
time for the driver side sill....starting with the front end... thought it would have been a small patch but by the time i found clean metal it got bigger. then the rear of the sill (didnt see any rust but it needed straightening and i suspected a patch over rust)
1 point
-
Imp work has taken a back step due to this rusty old 4wd bus thing that has come in for work... However we are both still sneaking in plenty of time on the wee car. Its so exciting to see it come together that we cant help it. Hence I have also been fairly quiet on the forums etc. So when I left off last time it was door cards I think. Or painting the engine. Yeah- that little engine. It looks quite pretty with a little blue bonnet on its head I must say... Now the doors. I cleaned out the threads on the hinge plates, oiled them, cleaned and painted the old screws and then we carefully manoeuvred the doors into place and set the gaps. I knew they would come up good because they were good on the car when we got it. They do look good. They look factory. However I think this car was assembled on a Friday afternoon at the NZ Todd Motor Corp and they had been into the beers already. The wing tops, factory, don't quite match the profile of the door tops, factory, which don't quite match the door or sill bottoms. Factory. Looking at other Imps I think this is fairly par for the course on what was a cheap run around. I'll live with it Then it was the careful task of fitting the 1/4 light windows and the rest of the glass and runners. I rummaged through all my window parts and pieced together the best I could from the stash... I had to lengthen the front glass runners to suit the new bailey channel seals that I'd bought. The new type is soft backed whereas the old ones were steel backed. The runner extension bridges a 40mm gap between the bottom of the 1/4 light and the runner. I folded up a profile the same, butt welded it, cleaned it up and all good.. I fitted the runners, the best glass I had (or so I thought at the time having since now found extra windows hidden behind the lathe which appear to be even less scratched) and then fitted new weather strips on the outside. All very posh for a 53 year old car. Then the door handles. Again it was into the stash of parts. Hannah had already selected, cleaned and polished the best handles of the bunch. I went through all the door locks, hatch lock and ignition barrel managing to get a working set which matches one key. Always a nice thing. I had to make new handle rubbers as the old ones were completely perished. Trying to cut neat holes in thick rubber is never easy but over the years I have made a set of hole punches to suit. I needed a new larger one though... which then made neat holes... Handles fitted and working fine we moved onto the door cards. Actually genuinely excited about this because after the restoration of them came up so well we knew they would look ace against the blue. Even not to bad with the mx5 seats. Nice clean shiny interior handles too along with freshly painted door bins. Very happy with it all... The Mx5 seats dont look too bad in there but we would much prefer to have some red seats.. To match the rear seats which I reckon look great!... I had also fitted the door seals. Not original and a bit too thick to start with but once I cut the bottom out they now now squish perfectly and work well. However- they have either shrunk or were never cut long enough to start with leaving a gap an inch long. I shall have to fill it with some more of the same profile. Now the doors were done it was onto finishing the transaxle rebuild. Ages ago we had scored a later stronger mk3 box from an Imp at the Marshlands graveyard in Christchurch. This car here in fact... I then had a right good collection of boxes... I had stripped down the broken box from the racecar which had some chips in the teeth and was generally in a bad way. These transaxles are so cute (if a gearbox could be cute?..). So dinky. The little diff. Nicely made wee boxes... The later mk3 box has a stronger casing due to extra ribs being cast in around the diff support bearings helping to stop case flex. There is also a breather hole built in a neater way in the back plate, the diff spider gears run the side loads against bronze bearings rather then just the bare cage, the output shafts have pressed on drive lugs rather then just held on by nuts. All the sort of little tweeks one expects as a cars design gets improved through its life. Sadly when we removed the box from the car, which was on its side, I had forgotten to release the gear change coupling from the shaft. The box at one point ended up hanging its weight off this and bent the shaft plus broke the casing. Initially I thought I could just swap the end casing over but they are a different design. There is a breather hole plus the o ring seal that seals the shaft was moved from the shaft itself to the inside of the alloy guide stub (in order to move wearing the alloy down from an O ring attached to a shaft sliding with the hole to fixing the o ring so the hardened shaft now runs within the ring- good idea that man) Photos of broken bits. Note the different casings... I had to fix the casing. I skimmed it flat in the mill.. Milled a step down... Made a small tool with some HSS to machine an inside groove... Machined groove in alloy and a step to on outside for a slight interference fit into plate lug which was then tapped into place with some retaining compound... Cool. Sorted. Then I did some cooking... and pressed a brand new frozen bearing into the case to replace a fairly rough feeling old bearing... I had to weld a block of alloy into the bellhousing to take the pivot ball for the Datsun clutch assembly and then the whole lot was reassembled... Then I had to do a three point turn within the available space, easy with an Imp, so I could par it in a spot with better access to the rear. Next up is to sling engine in place and make a new crossmember to suit because I dont like the one it came with.1 point
-
started on the other half of the drivers side floor/jacking point straitened the jack mount and put back on. then there is this bit of the jacking point....it was stuffed this is all i could keep so made this and this is it all done.....time to move on to another bit
1 point
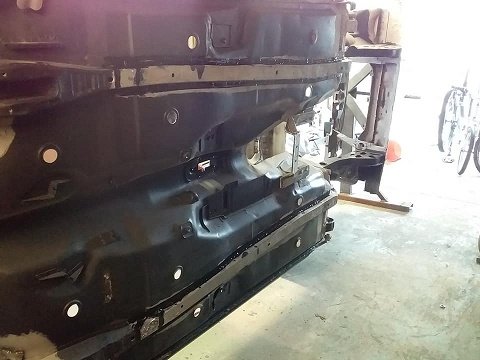
-
i relieved the boot of the wheel well.(was in pretty good condition but i have plans) i also plan to rebuild most of the front end panels (there is some rust ) but i want to repackage the radiator ,fan and oil cooler so its all under the slam panel i removed ...hammered and dolled them and replaced ..even had some seam sealer on the shelf... .
1 point
-
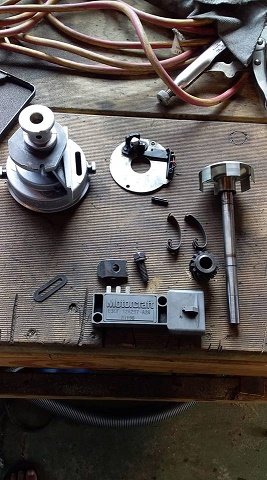
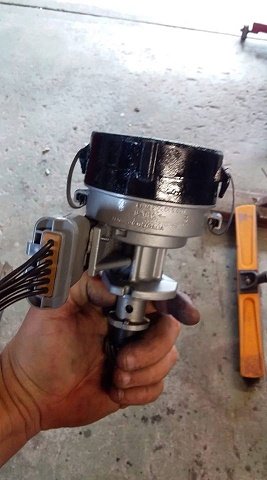
thought i would have a play with falcon TFI dizzy i had that came with all the injection bits i bought. only wanted was the hall effect as a trigger for the ecu and also for the oil pump. so pulled it a part cleaned it up and cut the top off and capped it...rebuilt with a new plug.......good to go
1 point
-
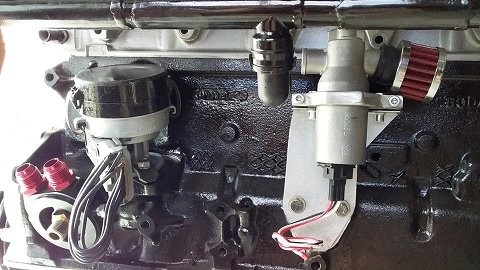
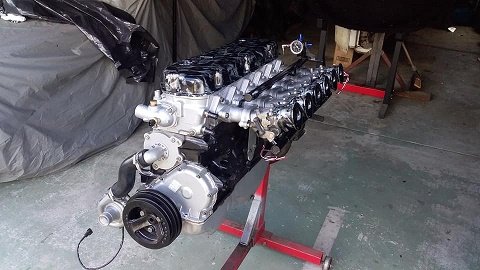
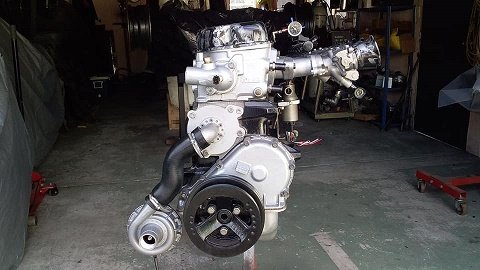
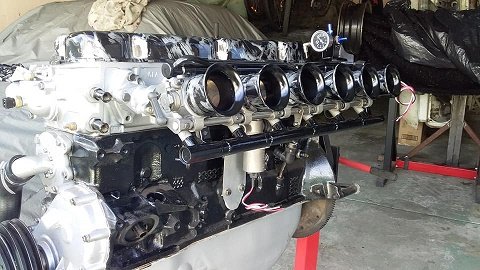
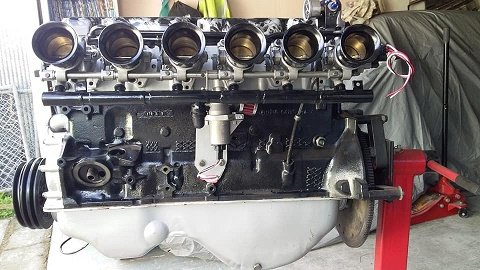
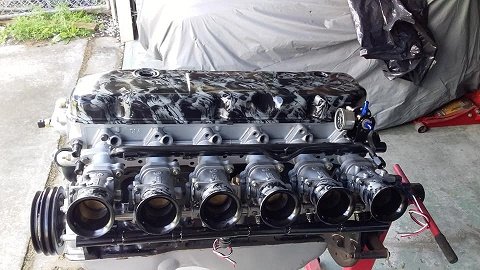
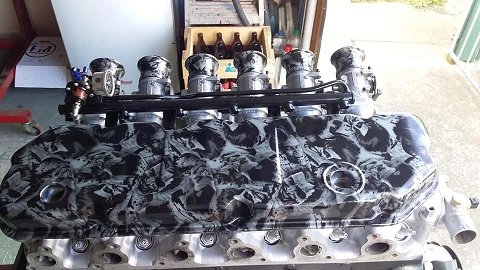
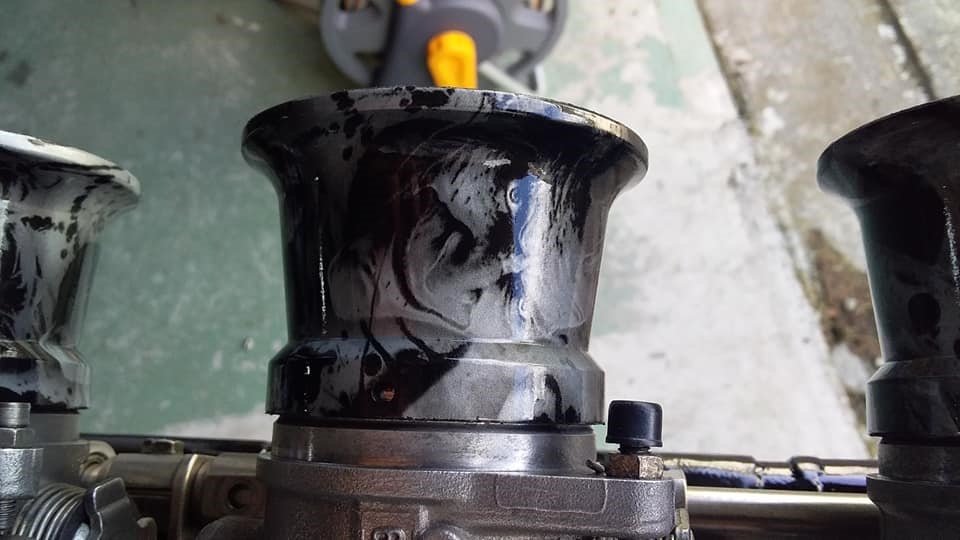
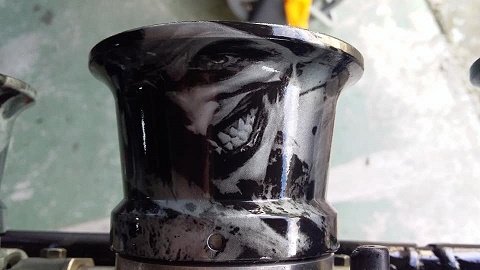
just a quick update motor is almost done ..just need to sort the throttle linkage (pretty much sussed) injectors (might get the factory ones cleaned or go later model) spark (going coil on plug from a later model) and last but not least headers ........going to make from scratch . apart from that Hydroprint Hq here in nz did the rocker cover and trumpets for me and i love it.
1 point
-
Just fill bucket with water then leave it overnight. Chlorine is not a stable thing. It gets used up by dirty things and it also evaporate s when left open.1 point
-
Frame is nearly finished, I just need to make foot rests and fit some bushes to the head stock, I have made the forks and handle bars but havent got any photos1 point


.jpg.32329704d204217b89ac2f1a4d9ac764.jpg)


This leaderboard is set to Auckland/GMT+12:00