
Leaderboard


Popular Content
Showing content with the highest reputation on 04/07/17 in all areas
-
something i forgot to mention, while this is all going on we are living in the garage. i dont have any photos of that but its pretty cramped. i still needed to get a celica into the shed because its my daily and i need it. so i built a wall across at one celica depth in from the big door. the space we're living in is about 5.5 x 6. in one corner is a bathroom that is 2 x 2. so far its been fine. the rain on the roof has been so loud that we couldn't communicate verbally and it isn't winter yet so we'll see how that goes. all my crap, including lathe is in the celica end of the shed. ive built a bench which the nose of the celica fits under so i can still get it into the shed. 2017-04-02_04-55-31 by sheepers, on Flickr11 points
-
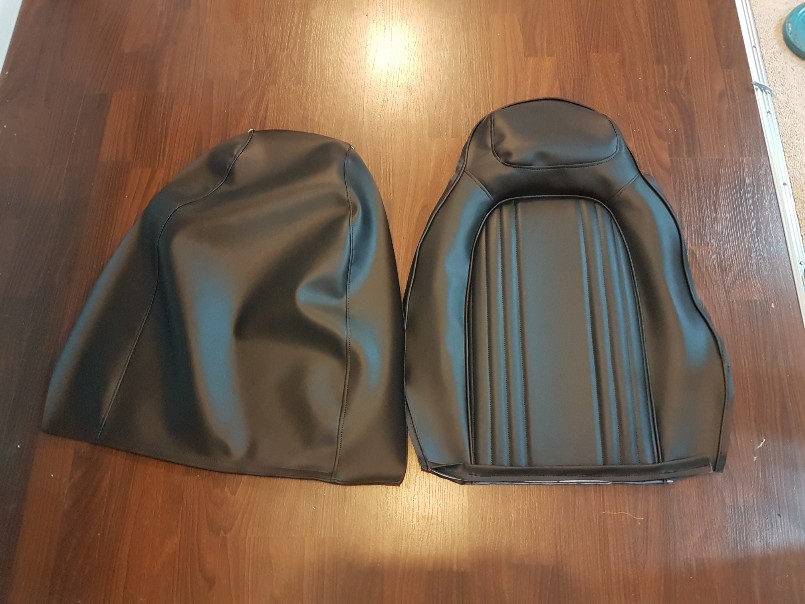
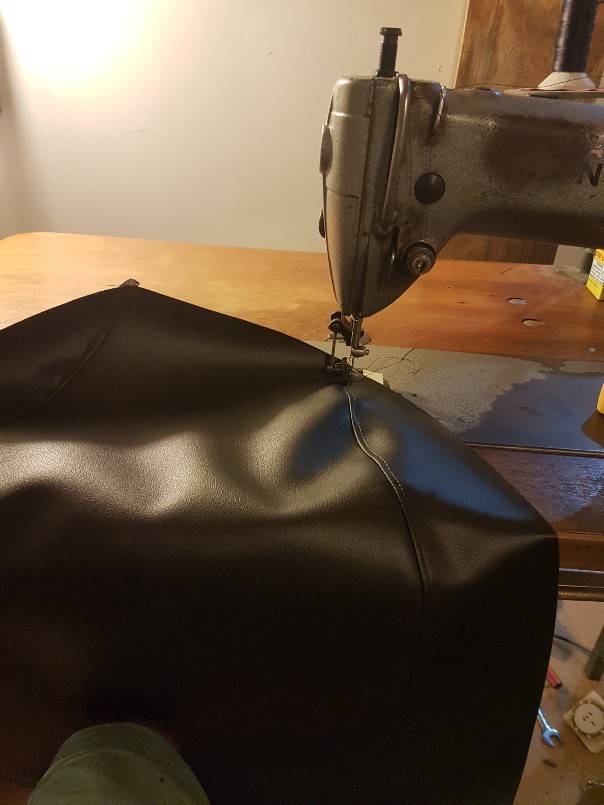
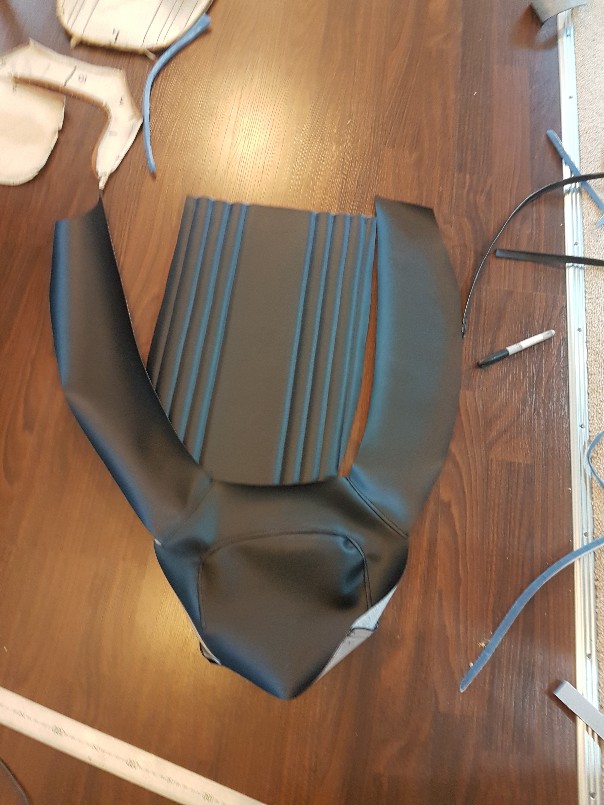
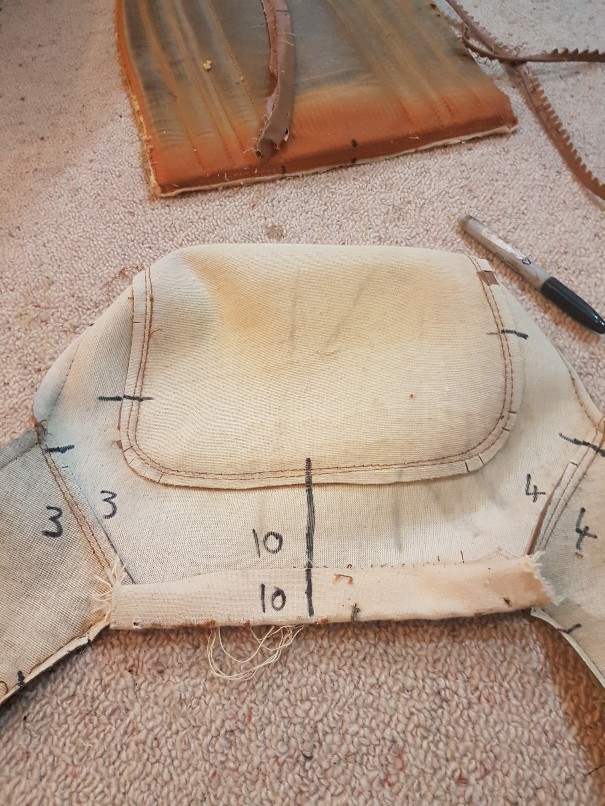
That's the finished product for one of the seats. Defanatly not as easy as I thought. I appreciate the work of pro upholsters. For a first attempt, I think it turned out alright, better then they were before, I think anyway. There's a few loose bits that need to be stretched out, but not sure how to do it without taking the cover back off and glueing it down.
 8 points
 -
So I did something dumb, I bought another Zephyr. I bought a VL churbo wagon that turned out to be a turd so I flicked it after a few weeks and was looking for a tidy 5L VL and then this turned up on the tard. I had a couple of goes at organising to have a look at and got mucked around so I gave up and forgot about it. Came back from a holiday with no reception and discovered that the seller had dropped the asking price significantly. Finally managed to have a look at it and ended up buying it. Its running a 302 Windsor with a C4 and an 8" diff. Modified in 1992 and on declaration form not cert. I've had it for nearly two months now and so far I've had the left hand rear sill section replaced, made and installed a speedo cable, recored the heater, replaced the brake booster, rebuilt the carby and reset the massively retarded timing as well as a bunch of other fiddly little things. Doesn't sound like that much when I write it down but everything's been one step forward and two steps back so far, if I'd had any idea how much I was going to have to do to it I never would have bought it but them's the breaks I guess. I haven't taken many photos so far as it's gotten to the stage where I just want to get the thing going but I think I'm on the home stretch now, have new springs to go in it this weekend and then touchwood I'll be able to take it for a decent drive and take a few photos.7 points
-
Nats Update: Drove Car. Rolled Guards Met GCs Did a skids Did a skids again and runded over a cone Went to the Warehouse Trained. Parked. Good trip. Would trade again. A+6 points
-
Been one of those months that I have seemed to be playing catchup the whole time. Works flatout crazy but seems to be finally settling down as the Easter break approaches. The few breaks from work flashed by. One was a pretty cool car show we took the Buick to “Timaru Caroline Bay Rock n Hop” and the other was a mission to the docks to collect the 50 buick grille and other parts that landed from the states. Flockie has been busy as well but lately has been able to get back into the project. C-Notching the rear so we can get down nice and low. A few pics of the progress so far: Note the forum seems to be resizing the images weird. Making them squished in so if you want a better look click the images to see it in the correct proportions. Initial cuts to the frame and boot floor. Check out the gravel that fell out of the rails that piled up in the inner bottom wheel tub And thats after a bit of a cleanup.. Moser Diff with Wilwood break mockup to check clearances & how much of a notch is needed. Few more cuts made for the top links to fit etc. More cuts are needed to get the diff to sit where we need it air out/lowered. Flockie got his plasma cutter out and made up the plates needed for the C-Notch then tacked in place. As you can tell from this pic to the above a lot was cut out to accommodate the new rails. The angles are bent to keep the original bump stops that we will be reusing. Process of welding it all together started along with the internal braces. First side done! And both sides done. Again the forum is messing with images squishing them. so click em to see the images in correct proportions. Im pretty happy with how its turned out. Next will be the other ridetech triangulated four link bars. Only issue and it isn’t a biggie is the place i had planed to put the airtank & compressors etc was the floor that the c-notch has now invaded. Tank may still fit in the space not sure yet but im thinking it will need to be moved or parcel tray massaged what could be more of a pain than its worth.6 points
-
Well someone bought the old bitch off me, and it left the mainland this week; So yea. What I need now to distract me is a very cheap but live reg 60 series diesel landcruiser. You bitches make that happen for me.5 points
-
open plan living. 2017-04-07_06-12-59 by sheepers, on Flickr 2017-04-07_06-13-08 by sheepers, on Flickr 2017-04-07_06-13-19 by sheepers, on Flickr4 points
-
Mine at a slightly higher speed, driveshaft was a pretzel. Very glad for loop...
4 points
-
do they know the type of cars that we have4 points
-
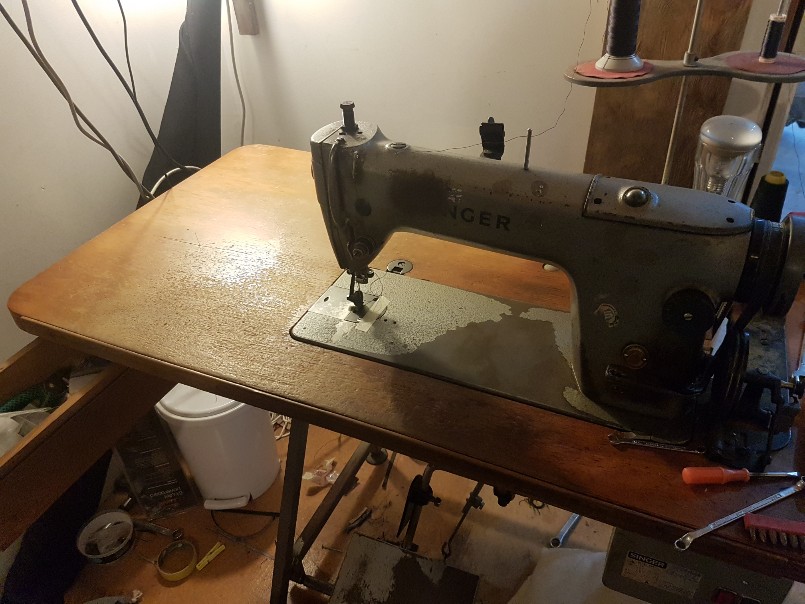
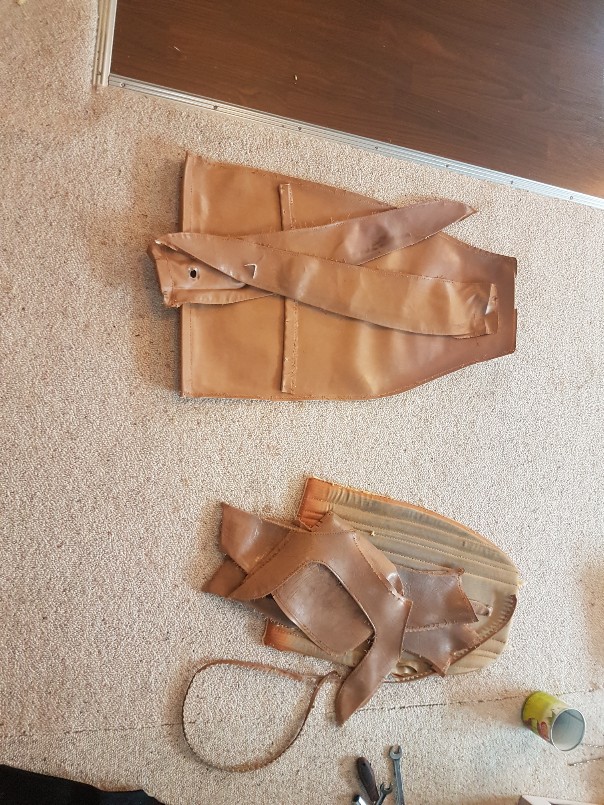
Here's my beast I picked up for $50. It's not a walking foot machine, if been told it's quite hard doing upholstery work without the walking foot, especially sewing vinyl. But I purchased a roller wheel attachment which is meant to help a little.
4 points
-
Its amazing how life gets in the way, last Saturday disappeared in being a taxi service for my eldest son for soccer out in Kelston, about 40 mins each way from home. I stopped into Pick a Part to see about another VX commodore master cylinder. Plenty of VT which were different and looked ugly as sin. I'll take a trip out out to Zebra tomorrow, their web site says they have 2. I did make some progress, new cans of paint and the rear axle is racing shiny black, no more 70's yellow. I forgot to take photos (as usual) while it was all on a couple of saw horses. New brake lines got made and a new HQ type flexible hose turned up from Australia. The mount on the body had the spot welds drilled out and will be moved. Car is back on the ground and suspension wound down (I love the threaded rod instead of springs at this stage). I'm pretty happy if I can get the final ride height here. A piece of 4x2 slides under everything with plenty of clearance. I also got a box from Summit racing today.
3 points
-
Scratch built velocity stack. There are easier ways of doing this...but I only had a scrap chunk of aluminum at hand. Yes I know you can buy these for very little money off trademe...but where's the fun in that?3 points
-
Fred has been made! put it in your diaries chaps //oldschool.co.nz/index.php?/topic/56010-old-school-deep-south-meat-nightcaps-x-tuatapere-x-riverton-6-may-2017/3 points
-
Hey everyone. Had a few drives in the Cortina over the last few months and ran in to some trouble with my clutch gearbox. It was making noise when I put my foot on the clutch when stopped but alright when driving. So for the last 8-9 weeks I have been trying to fix this to no avail. I also noticed that when I would be driving at 90 - 100 kph it would be revving really high and I really missed that 5th gear. So on my 6th time taking out the gearbox I got grumpy and decided that if this was coming out again it isn't going back in without a upgrade. I did a bit of research on what I could replace it with and I ended up buying a t50 Toyota 5 speed to put in. At the moment I am making the adaptor for the bell housing to box so will keep you updated as I plod on with that. So with the car being out of commission I bought some wheels and made a centre console up for around the gear stick. here's some pics.3 points
-
Dude that quad looks farking great! I vote roll (lol) as-is. People would pay damn good money for that bike when it's fixed (could just sell it and buy something else more fitting to a project?)3 points
-
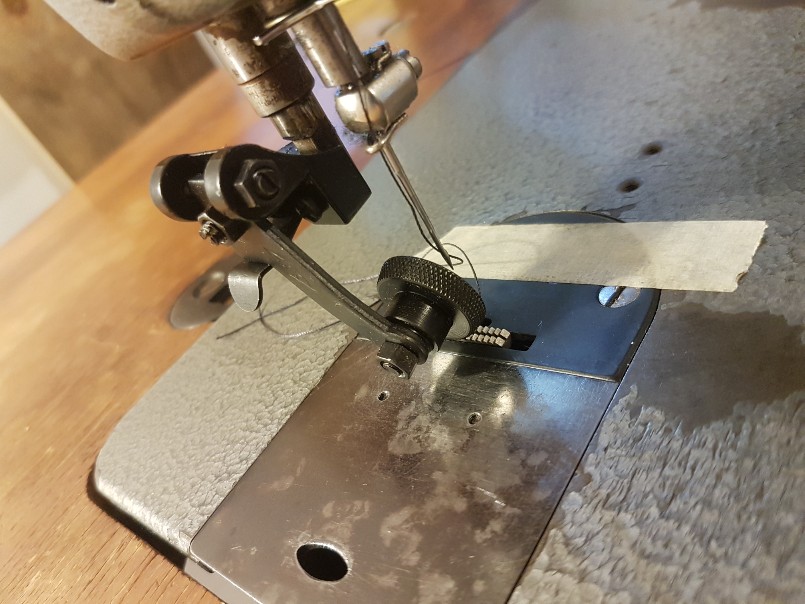
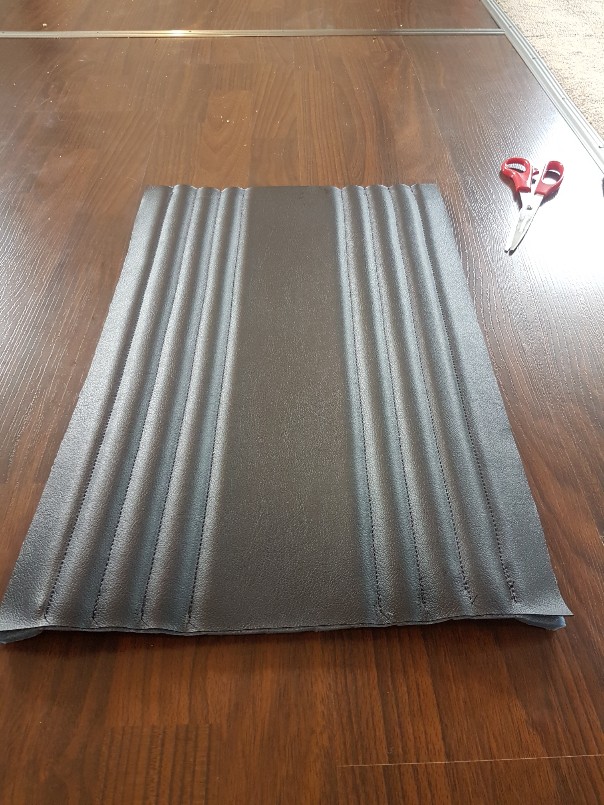
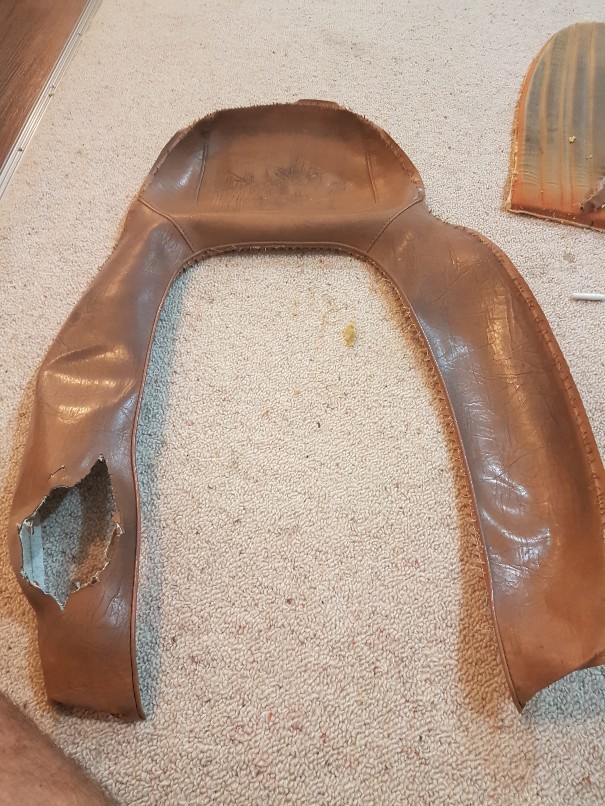
Here's a Bit more pictures of the sewing. It's quite hard as the machine is super quick and i can't slow it done anymore. There's no room for mistakes haha. Un stitched the old covers and traced them onto the new vinyl. Got them sewn up along with some pleats and piping.
3 points
-
Seal your tracks?3 points
-
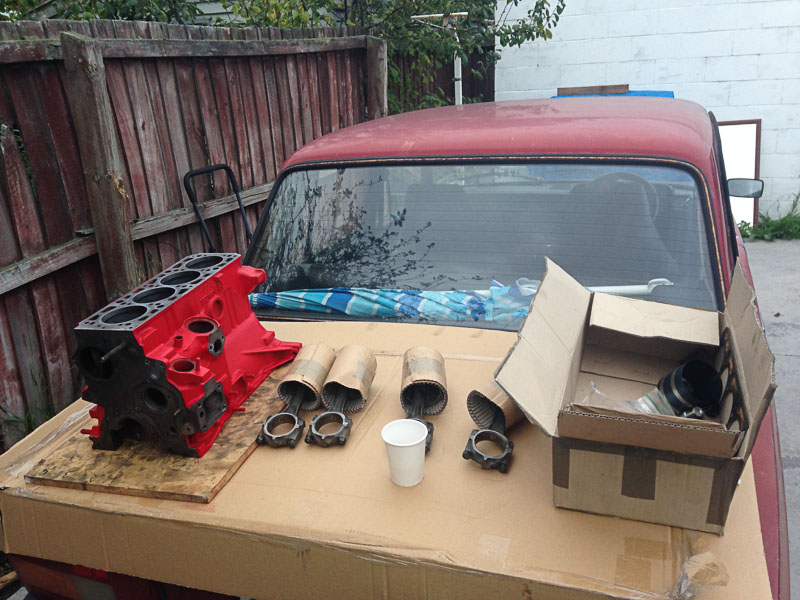
So head is taking a big longer than initially planned as a sensor on the CNC that was being used to port the head died so next week sometime I am expecting to receive the head so can finally piece it all together! Today to make me feel like things were still progressing I bolted up the flywheel... yeah. Exciting... I also made sure I put the sandwich plate on too as I have done it a couple of times where I bolted on the gearbox/flywheel/clutch to find I forgot to do it and have also seen a couple of others do it too Socket makes a great flywheel stopper too. Think the flywheel is 3.8kg's. Probably not ideal for a street car, but this won't be a daily so will still be fun when I get it out on the occasions. After driving the new spiggot bearing into place I thought it would be best to actually see how much contact was made on the input shaft. I just put vivid on the end of the shaft, slipped the box on and gave it a few rotations Looks like I drove the bearing in a bit too much... I whipped everything off and pulled the bearing out a bit. No need to recheck now, a few mm would have done the job I have chosen to go with SSR MK2 feet too. If you know of any, let me know! Thinking of going 8J in the rear and 6.5J in the front Mingling //oldschool.co.nz/index.php?/topic/52401-pbaines-1971-toyota-corolla-ke25/&page=22 points
-
some general crustiness going on in a few spots for some reason the photo didn't save *insert PA10 primer shot and covered with some satin black2 points
-
rogeeee having a looksie at the map, meeting point will be Winton - RSA or something similarly delightful? at say 12pm. then roll down Highway 96 to Nightcaps and stop at the pub. through Ohai, perhaps photo opportunity in front of derelict buildings and the like. then through the dense western Southland bush, onwards to Tuatapere, stop at Cosy Nook or one of the beaches on the coast, and finish in Riverton with a shandy.2 points
-
https://trademe.co.nz/1294563726 https://trademe.co.nz/12904698362 points
-
Ill be keen for the 6th2 points
-
My own private Denniston incline. Hmmmm. I’d still get to wear a boiler suit and engineers hat too. Actually my Mum’s side of the family came from the westcoast and Grandfather worked in the mines as a steam engineer. My great Grandfather died in a big explosion there. But an incline would be lots of work and Ive done enough digging for now.. Anyway..back to the Big Red. I took some photos. It has the optional factory fan fitted which will be handy for slow ascents.. You can see the damaged thread here… It came complete with a gun rack and spot light mount. I don’t have a gun (getting firearms license is on the list of things to do as we have many pigs and deer) , but my cousin visiting has some so I tested it out… Hannah has been cleaning the engine parts but we will get something stronger to get the last bits clean. Its not bad but makes sense while its apart. I found another small broken bolt in the cylinder barrel. I mounted it on the drill mill and and managed, with the help of some localised heat, to remove the remains. My next task is to drill out, tap and helicoil the stripped head bolt thread. We bought a head gasket set from a local trademe seller who does up old bikes. Handy to know. Reassembly will commence when I have finished a large trailer build (that I really should be out doing now..but coffee to drink..)2 points
-
Just had another look at the plans. I like how the garage is bigger than the original house was.2 points
-
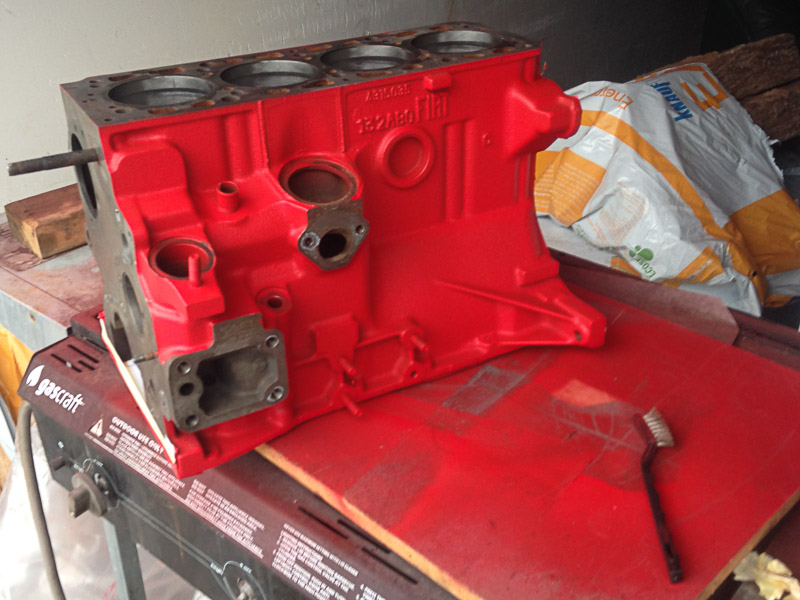
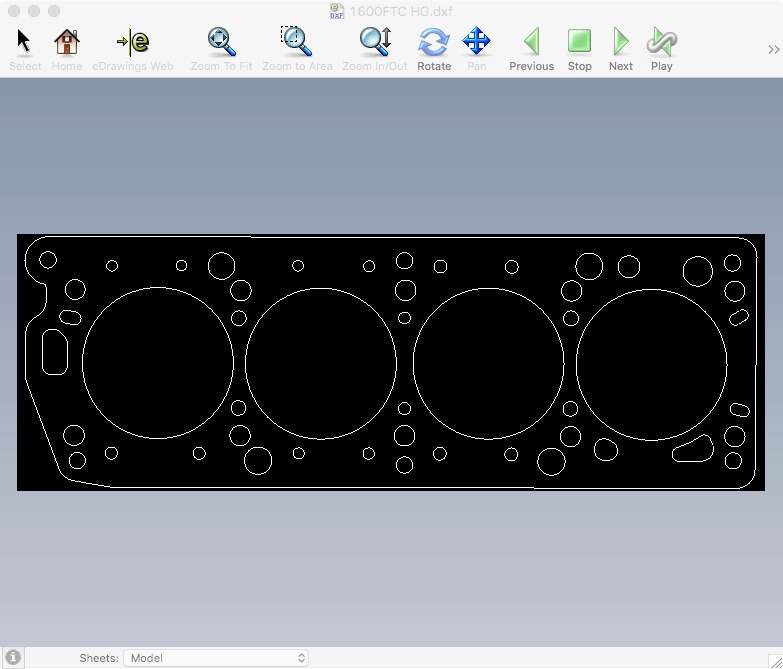
I had plans to get the Niva ready months ago, but work had different plans, I finally dropped the engine off to have all the vitals tickled, while its not going to be a 'performance' build, it will be a darn sight better than previous, i'm hoping to at least have compression back! With Otago rally on this weekend, I was hoping to use the drive there and back to run the engine in, sadly the weather has been absolutely terrible and in my crampt shed with not enough light, achievement has been low. Utilising the parts cleaner obtained off Bart, I've sparkled up the underside bits, ultimately, only the wof man will ever see it... Threw on a lick of speed enhancing red Multifunction 2105 workbench: Forgot how much I enjoy assembling engines, checking, cleaning measuring and torquing, no pics cos its dark, but the block is back together and awaiting a break in the clouds to lift it all into place I've also sealed up a 5 speed box I rebuilt ages ago, 4 just wasn't enough! Sitting out the rain I got onto the computer and drew up a head gasket, my sources have all dried up on standard thicknesses so i'll run a thick one until I get one waterjet cut from copper to give a hoon, hopefully it works......
2 points
-
fuck you roof. 2017-04-06_06-30-20 by sheepers, on Flickr 2017-04-06_06-30-07 by sheepers, on Flickr2 points
-
Well, been a while. Much has happened with no photos taken. Man i'm awesome. -Have Willwoods in the front, man what a difference! -Have an alloy radiator in the front -Have a new windscreen as the one in it decided to shatter to pieces on the way home from Toyotafest at Hampton downs. 6 hour drive with A/C on full blast, myself and my girlfriend wore helmets the whole time with bugs exploding on our helmets. Cheers to the OS boys who stopped on the way back! I've got some photos somewhere that I will add sometime. These photos are courtesy of.. ahh..... 0MEGAH|HAGEM0 ? just did some cropping and visual edits for aesthetics. Toyotafest 2017 @ Hampton downs. Super happy with the car, once the narrow tyres warmed up it was a weapon on the track! Got it sideways a few times with a grin ear to ear. More track days are required. Due to come -Vertex body kit which will have to be painted2 points
-
I got some acid off some hippy in a house truck in golden bay once. /lingpost.2 points
-
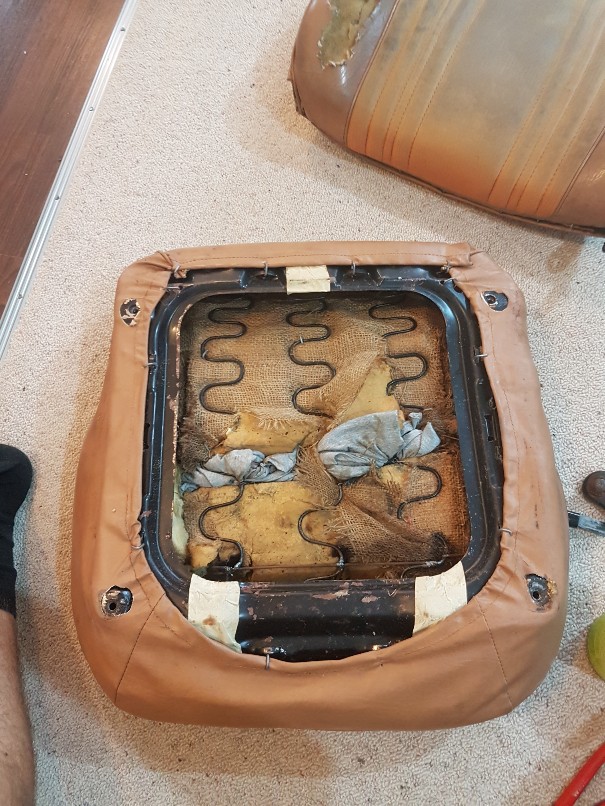
Got the seats all pulled apart. Marked all the peices so I don't get lost and have un stiched all the pieces. Iv ordered some black vinyl material. And some piping cord. Also bought a industrial sewing machine for $50.
2 points
-
Longest exhaust build ever! What a stupid idea it was to design it like this haha. So far has 5 pairs of flanges on each side if you include the ones at the end of the headers. Will have another pair after the diff as well. Got some flexi's and welded them in, as well as the rest of it. Need to put the tray back on now and see where the rest of the exhaust can run out the back. Made some mounts, after making them incorrectly to start with. Had the rubber hanging under tension where-as it should be compressing, otherwise it would most likely tear the rubber in half. Also made some gussets for the 4 link brackets since they didn't quite look strong enough. Might make some to tie in the other side as well. Need to make a start on the fuel tank soon. Any recommendations on an in-tank fuel pump to use? Don't really know much about them, 255LPH should be enough? Tank will be about 220mm deep if that matters.2 points
-
Got asked if i have any pics of the car from when it was in storage. The better half did a quick search pulled these off the interwebs. Since it was off the road since 1969 im guessing it also had other older accommodation at some point. Three owner car so i guess the person who took these was the second owner who had it for a handful of months & we purchased from. And a few old photos we got given of the car & scanned from before it was painted mid 60s. Dated on the back 1962.2 points
-
new house time. our house is small, leaky, cold and old and we've wanted to do something about it for quite a while now. thanks to a long journey which included astronomical increases in building costs, council changing their mind on things multiple times and heaps of other fun things it has taken 3 years to get to this point. but here we are, about to build a new house which was supposed to start last November. the plan? well, we're extending the front a bit and joining onto the garage. to get there we have to remove the current house and start pretty much from scratch. the floor structure of the existing will stay but nothing else. one of my jobs is to remove the current house. in theory the build will take about 8 months. im doing some steel work and a few bits here and there but the bulk of the work will be done by the builders and subcontractors heres the existing floor plan and the finished floor plan. existing floorplan by sheepers, on Flickr new layout by sheepers, on Flickr1 point
-
Hey ya. So recently I picked up a new project now my 52 Buick is complete – a 1949 Hudson Super. Story goes I was browsing auctions with no intention of buying anything just cyber tire kicking so to speak. “Hey a cool old barn find car has surfaced 45 mins away. Want go take a look?” i ask my better half. With a promise that we would go get something tasty for lunch we pile in the old 52. Walking up to it & seeing the fastback shape and roof that looks chopped straight from the factory the better half mutters “I wont say no if you want to buy it” ^^ what more can i say… talked the price down for cash & shook hands with plans to pick it up the following day. Next day swapped the fat wad of bills for the original registration papers, original ownership papers showing two owners (father then son), a few old photos from 1962 and a set of keys to a car that hadn’t been started for 47 years. Now I already have a Straight 8 in the Buick and not really interested in another inline. Fabulous Hudson Hornet NASCAR history or not. Saying this im not into chevy swaps. I do like Buick Nailheads… rare here in New Zealand and always catch my attention when dressed up. I look at the Husdon, scratch the ol chin and go “yus sir that would be mighty fine”. Nailheads have an old school look that would suit that engine bay mighty fine. Images from the Auction & First Look. So what the old timer said was wrong with it: Fuel tank out as he has had it patched n cleaned cus had a few small leaks. trunk floor has a split where fuel tank mounts. guessing due to weight & old NZ roads being not the best etc small patch rust on left rear skirt. patch rust on right front panel. front right door pillar has a split at bottom. apparently he use to chat to people leaning on the open door and thinks this might of been the issue. brake Master cylinder needs put back in as it and all the drums have been redone. Water pump is at a shop getting redone. Rats have nested in seats. All easy stuff really. the splits are clean stress splits with no rust or nasty stuff to be seen. Still trying to figure out my build. Any help or ideas are most welcome. I do know the history of Hudson and NASCAR etc but I already have a hotrod looking restored car and dont want another. im after a more custom look. I haven’t been in a Hudson moving under its own power so im unsure of many things like suspension etc. Plan so far: worked 401 Nailhead. (hard to get here so may need import) Worked 700R4 trans rewire using American Autowire highway 22kit. Wilwood disks all around. Media blast. Shave the handles. French the lights. and do all the normal custom shiz Change up the grill. Lower it. new interior. Thinking 9 inch in the rear to handle the Nailheads torque and power. Not sure what ratio. Not sure for front end. I read how great the near 70 year old front end was. Maybe new hubs for disk brakes and a thicker swaybar. But then i think why not just throw in a jag IFS. comes with disks, power steering etc and is cheap here in New Zealand (cheaper than reworking the old hudsons setup) Driveshaft – unsure. one or 2 piece… So ideas? Suggestions? This will be an expensive project for me. Being at the bottom of the world/New Zealand means expensive shipping. We have a lot of Holdens here and a fair few Euro cars. after a old school look & sound with if possible a more modern handling. Thanks guys Alex1 point
-
Best Zephyr shape. Noice. Zodi's are too busy, this is ideal.1 point
-
Sweet looking car!1 point
-
It's a width thing.. our tracks are narrow and we want to keep the that way. Wide enough for a quad. Makes them much nicer for biking a walking. But yeah.. this quad has turned out to be in very good condition, bar the engine repair needed. We will just use it for now and see what it's like. However if I can sell the trailer for ok coin we might end up with a good quad for less than $500 and I won't feel so bad about modifying it. Plus it's a great starting point. I have been looking for ages and there's always good reason why cheap quads are cheap... I'm amazed at how much new quads cost too! New version of these are 12 k plus !!!1 point
-
The new carpet has made a massive difference. Was the un-tidiest bit of the car. Bit un nerving cutting holes in brand new carpet to put it in1 point
-
@Bombsquad would have had it down in a couple of hours.1 point
-
Already tried that1 point
-
once id thrown all the tiles into the skip it was time to remove the roof framing. battens off then down come the rafters. it started pissing down so i didn't get very far with this 2017-04-05_05-28-23 by sheepers, on Flickr1 point
-
then the ceilings all had to come down. fibrous plaster is heavy and a cunt to deal with but its all gone now. 20170321_185430 by sheepers, on Flickr then its time to take the roof off. one shitty concrete tile at a time. 2017-03-31_06-11-05 by sheepers, on Flickr 2017-04-02_03-48-22 by sheepers, on Flickr 2017-04-02_03-48-50 by sheepers, on Flickr1 point
-
Day 3 - Scavenger Hunt etc Austin Farina Traveller, a brother from another mother. To the beach! Beach! Prize Giving + Fancy Dress Party was later that night, the first Photo i took after prize giving :drunk: , Best Wagon and People Choice1 point
-
Catch Up post: Shake Down Run to Oldschool.co.nz burgers meet in town last night, where it was pretty well received Car went great, feeling pretty confident about the tip to Featherston next week (JINX!) Photo Credit to: Dorian (DCG Photography) https://www.facebook.com/pg/DCGPhotographyNZ/photos/?tab=album&album_id=505248416265912 Guy With Aviators https://www.flickr.com/photos/45457939@N08/sets/72157678363759483/with/334282898021 point
-
gona attempt this, I'm due to go back down1 point
-
I work with structural engineers not mechanical.1 point
-
This will probably be my last interesting post for a while. Will be moving to California in a month to build space stuff. Visa came through today after months of paperwork!So good! So making parts will slow down, but hopefully CAD work will speed up! Anyway, these are spring hangers and a trunion hanger CNCd from 4140. Having a mill in your shed is key to building shiny stuff!1 point
-
I've never loved the factory rear drum brakes; I could never adjust them properly so the handbrake would work, but not drag. So I decided to do something about and do it for basically nothing. I was given some EL Falcon single-piston callipers, rotors and backing plates years ago. The backing plates were drilled out to the 240z bolt pattern, but I still had the rotors to drill. I didn't want to drive all around the place looking for a friendly engineer so I cad'd up a template with the Ford and Datsun stud pattern, taped it to the rotor, centre punched and drilled. Came out radical. Started bolting everything up. The EL Falcon backing plate & rotor work perfectly with the backspacing from the 240z hub face, so the calliper simply bolts to the Falcon backing plate as normal. Then I pinched some longer flexible brake lines from Pick-a-part and made a bracket for the line. Neat! The handbrake bracket required some fiddle to bring it closer to the drum lever. Piece of piss.1 point
-
Real crank in the lounge. 55kg beast!1 point
-
So did the 6 or so hour round trip with the trailer to collect my new found treasures. Sun was shining, my bird was looking top shelf and i do believe i had a grin on my stupid face the whole way. felt likeChristmas from when i was knee high to a grasshopper. Eager dosnt begin to describe the feeling. As the three pallets got loaded up we had the pleasure of checking out a number of old cars that people are bringing in from around the world. One being this sweet 54 Buick convertible. So loaded we head back home. constantly catching my self speeding in my eagerness to arrive home and unload. Have i mentioned the feeling of Christmas day when i was a kid yet? Throw a few brews to the neighbor to get his tractor with forks out to help unload and im golden. Popped of the engines crate – will note here that my cordless drill died recently and i had to undo all the screws by hand. Frustrating to say the least. LET ME IN! <insert xmas day remark> Pictured is most of whats needed to get the car updated and running. Some things like drive shaft, rad, steering column etc i need to wait to get measurements. Other things like ignition system, 2×4 intake etc are still on there way. But new front end by Rods by Reid, New rare from Moser, Ridetech 4-Link along with air system, Wilwood, worked 700R4 Trans and of course the worked 401 nailhead along with other bits are sitting there ready to find there new home in the Crudson. Missing one package from Ridetech. Have images of it packed in the crate from Kiwi Shipping USA. But wasnt included on pickup in Christchurch New Zealand. Need those airbags for the rare and Kiwi Shipping are looking into it as i type. <Insert excited Christmas quote here> So its time to finish ripping the car apart. How it sits currently: Exhaust system, driveshaft, fuel cell, engine & trans etc all out. Time to get those front panels off so we have easy access to the front chassis rails so Flockie can do his measurements and then cut em off and make up a new set. Got a few good vids of the missus hard at work on the car. Think she would kill me (or worse deprive me) if i was to post them. Still funny stuff to look back on. To the garage and general mayhem i go.1 point
-
So I drove this around a bit in the weekend, my man warned me that it will attract old men like flies on shit. Literally the first time I stop in a public venue an old man in his eighties wanders up. They are like fucking zombies attracted to fresh meat... not very fast but extremely intent on the purpose at hand. They love them old Humbers for sure. No issues so far, it runs like a dream. The steering is probably the worst bit, it needs a fair amount of positive input. My mate reckons that it is just how it is, but i imagine some loving to the steering box and checking the geometry might help. It is not that bad really, but it would be nice to improve things. Intent this week is to fix up the rust under the bumper and the gearbox mounts then try for a wof. That is all.1 point


.thumb.jpg.b5491dbec1053270a4d99ed376fc2c36.jpg)


This leaderboard is set to Auckland/GMT+12:00