
Leaderboard


Popular Content
Showing content with the highest reputation on 03/22/17 in all areas
-
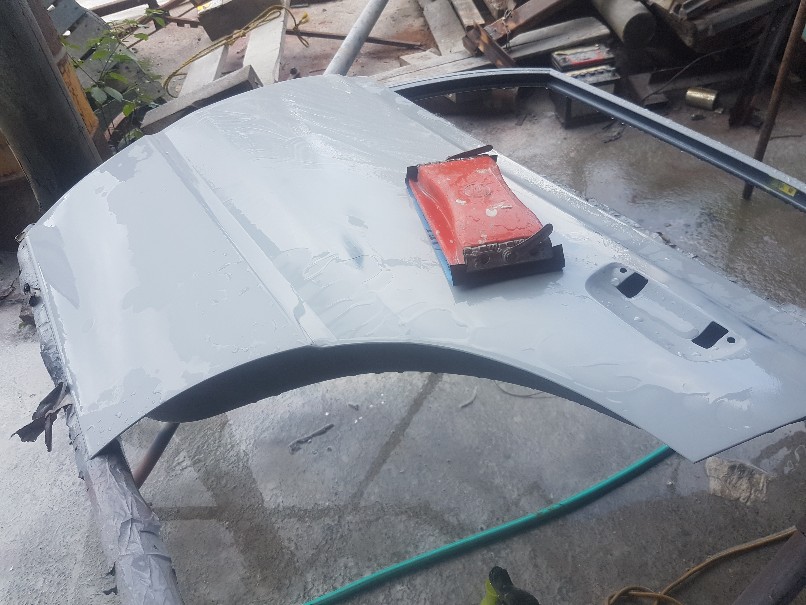
Shes a pretty big job. Been at the machine shop for a week. 1 more week to go! Casting is looking good. Yet to find any lumps of sand or porosity apparently!20 points
-
Man I can't help myself but share this here. So over the moon with how well it's come out. Oh beach hop also starts tomorrow and my car looks like this. So excited to get there. Got a fair bit to go but we can do it. EXCITING!!!
 13 points
 -
Deleted photobucket pictures, as they (photobucket) suck balls.
10 points
-
For those that have glanced over my build thread but not my discussion thread, replacing the oil pump didn't solve my issue. So motor is going to need to be stripped down. So 6th time lucky for now. Although its actually the 4th motor going back in.... so fuck knows what that makes it. But yeah, can't justify having a dead car around, but also am 100 percent over this, so yeah swapping motor till I can be fucked pulling other turd motor apart Nats or bust or some shit.
9 points
-
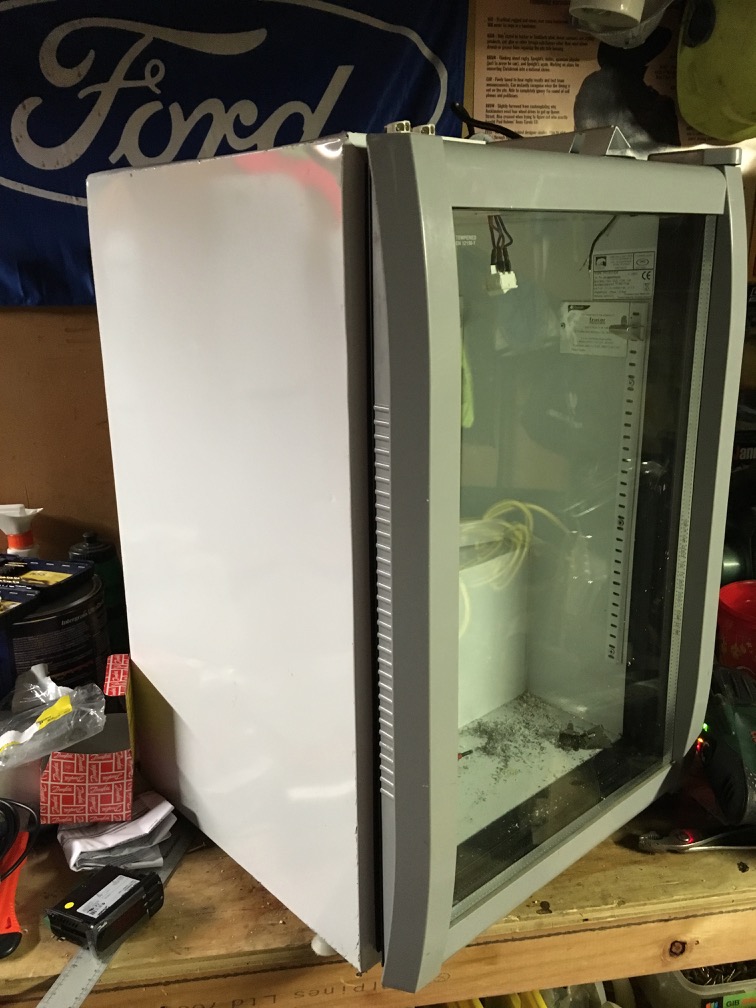
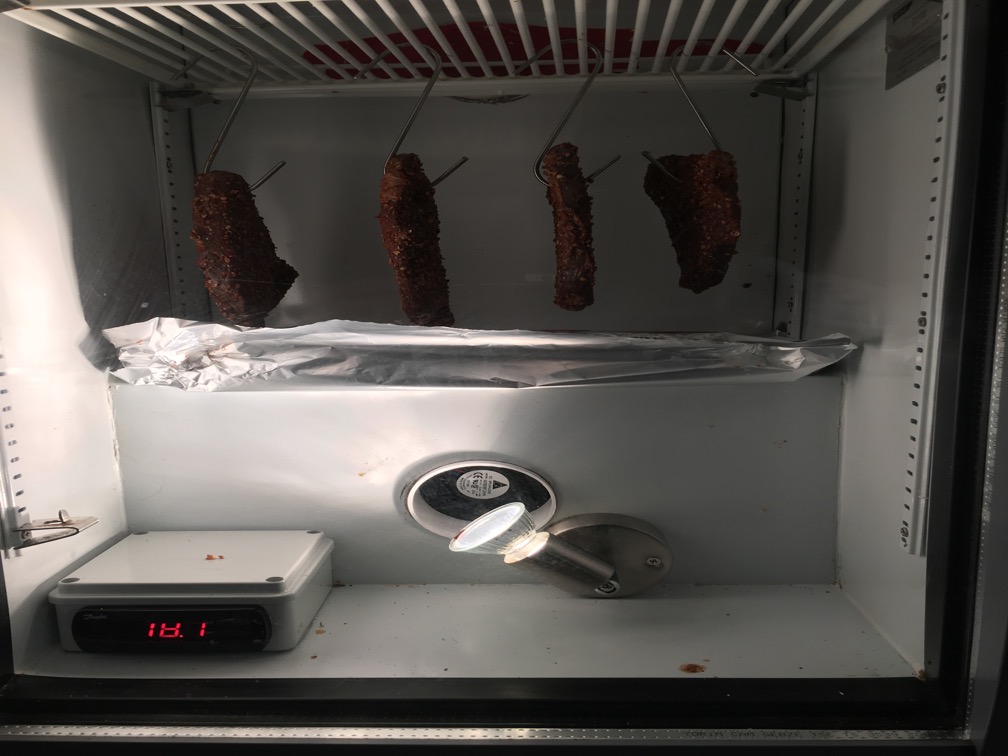
So time for Mk2. Managed to get my hands on a commercial under bench stainless steel fridge with a buggered compressor. Stripped all the shit out I didn’t need, designed a box up to take 2 heat bulbs and a fan to push air past the bulbs into the fridge. Managed to get the shape laser cut and folded by some good buggers at a sheet metal shop, Got a mate to weld it up, as my welds aren’t up for public consumption yet. Testing Wired up the new controller, cut a hole in to take the hot air delivery device and bingo she’s cranking away now. First batch is in now. Beers in a couple of days will be infinitely better.8 points
-
This should last half a run - just hot glued on the wheels to see how far I need to cut the springs. A-Series for the win?7 points
-
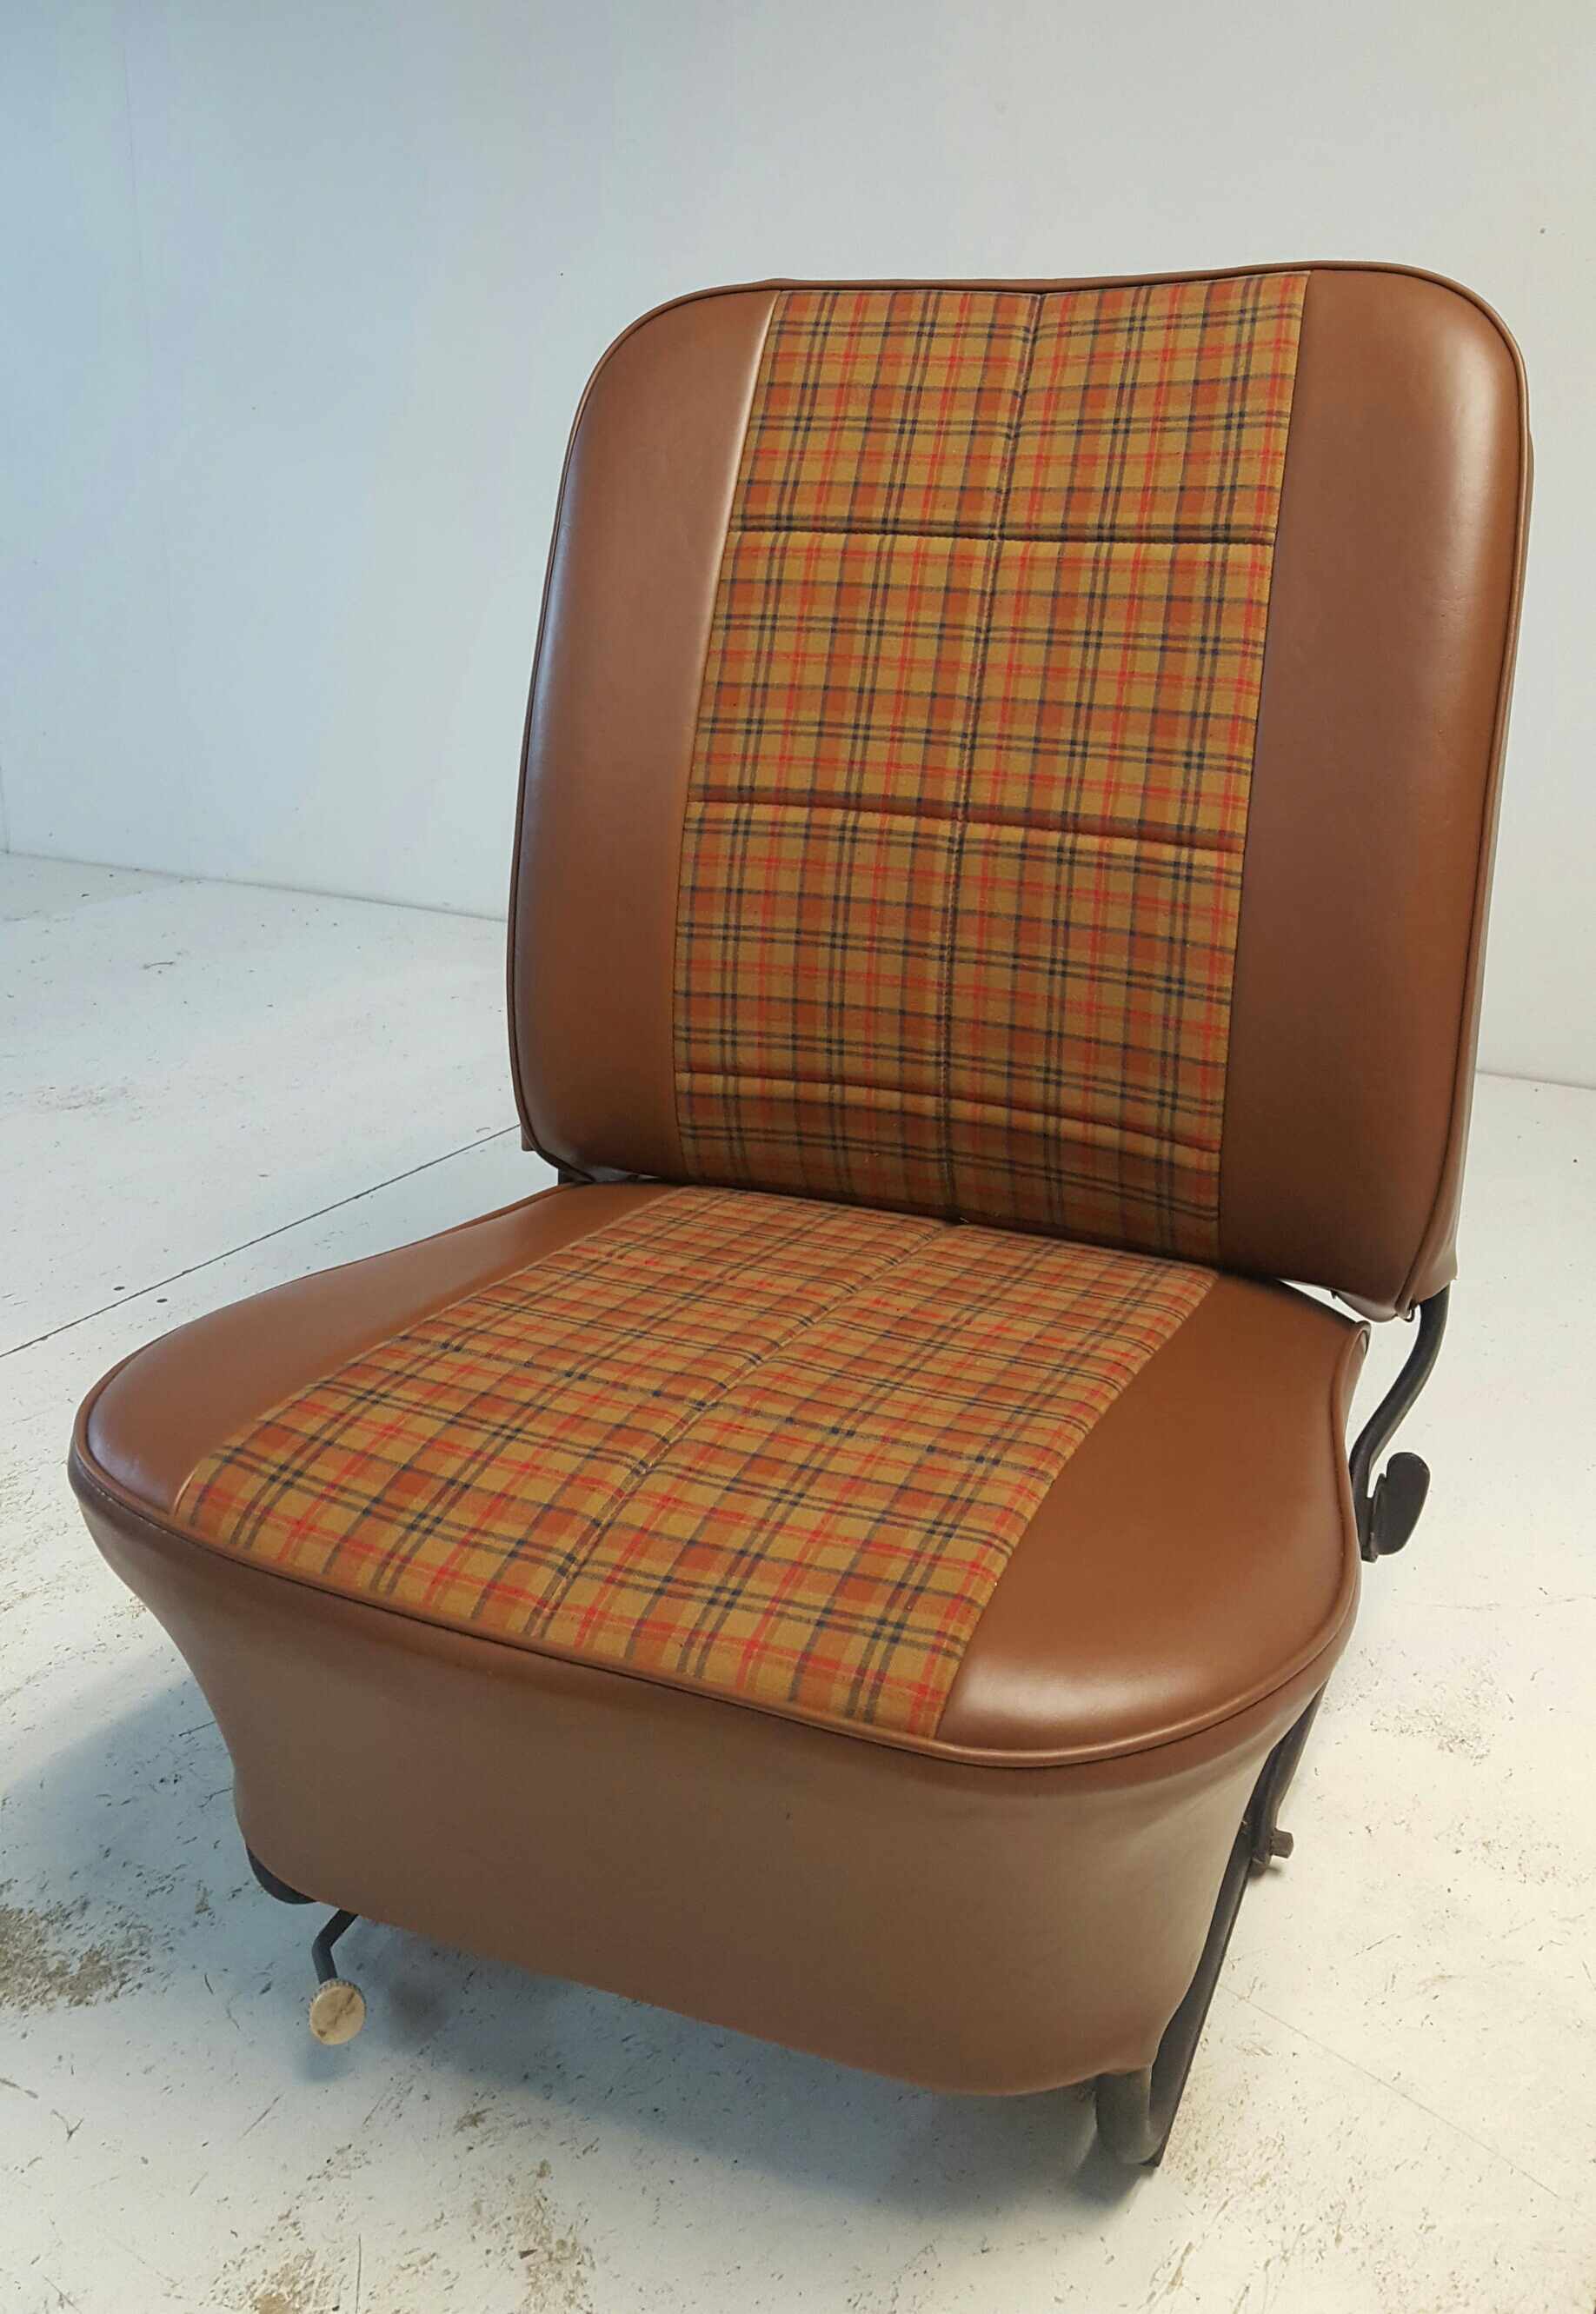
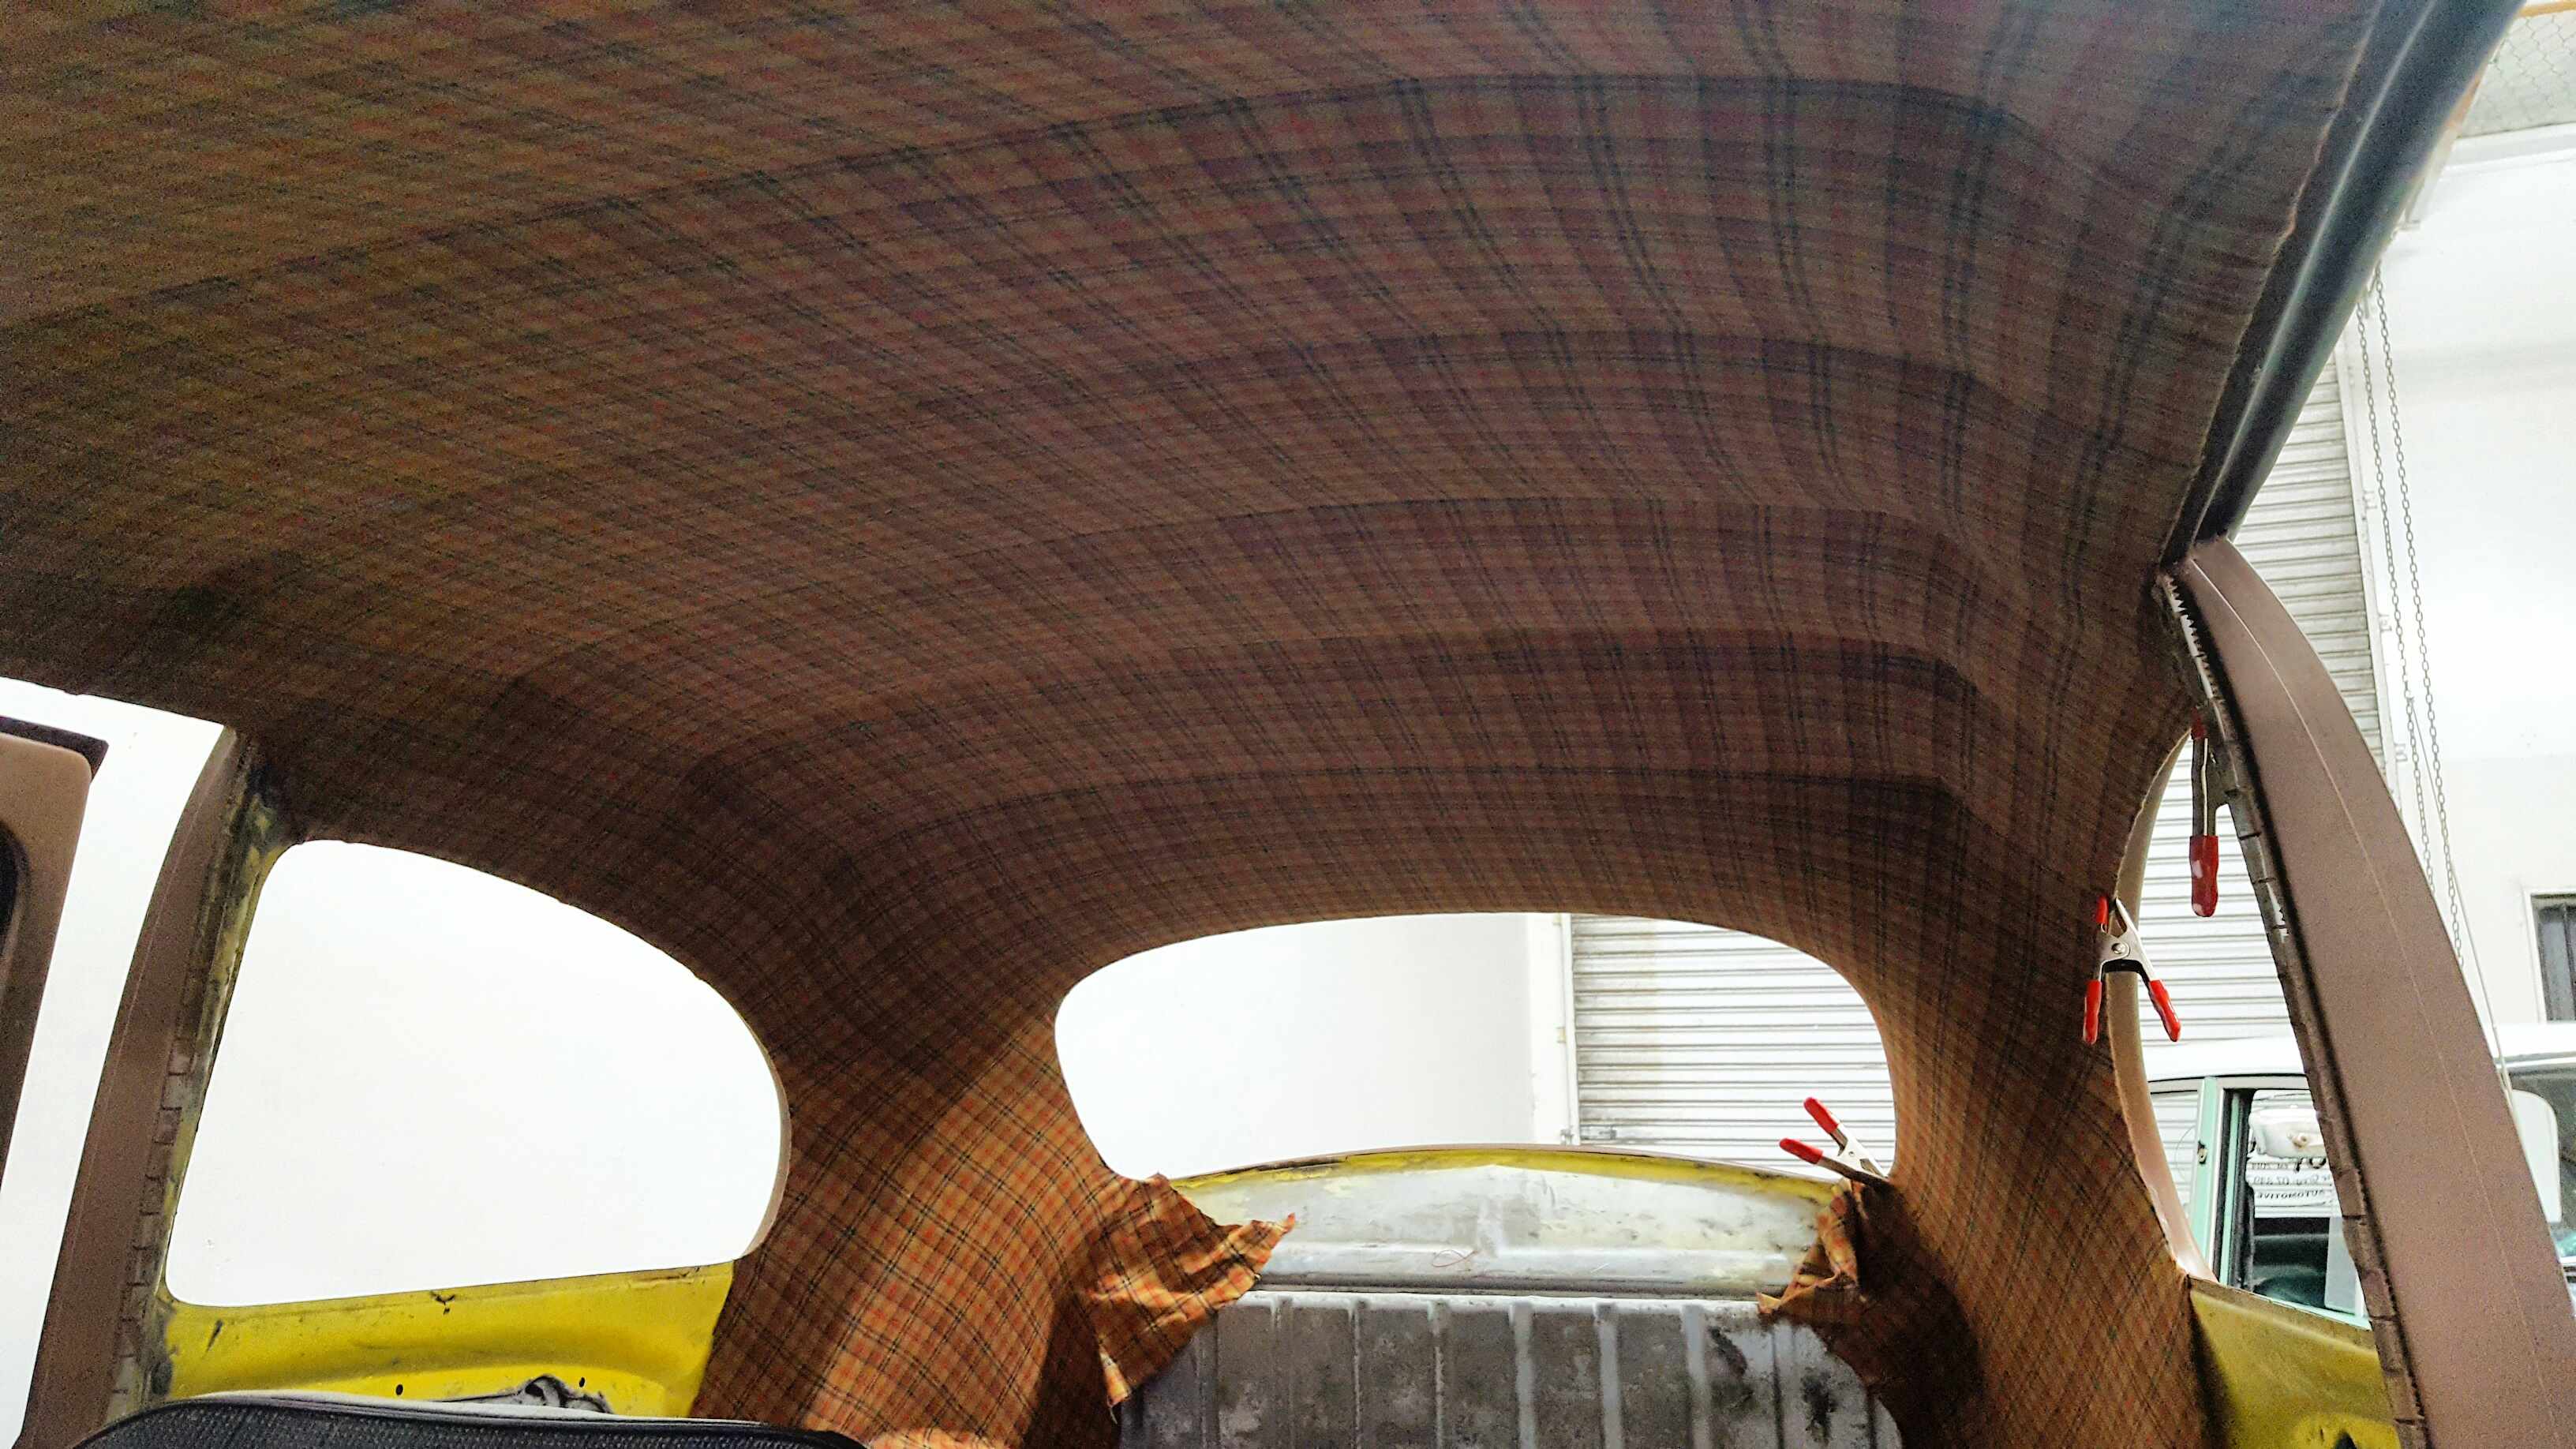
Cheers man. Can't wait to have it all together. Headlining has come out pretty rad also. so happy with the colour combo I've gone with.
6 points
-
As promised... look at that paint dry.... Battery box is all done. Forgot to take photo of wooden lid and a strap to hold it down, made from the nylon belt from some old endura bike shorts. I knew it would come in handy one day.. I couldn't resist..I had to cut open the filter for a look. Wow.. Ok.. so yeah.. that'll be a bit blocked then... I refitted the tank, added a new line so now the fuel rail return runs straight to the main tank and the overflow from the surge tank runs into the other new tank fitting. I ran the system through to clean it before connecting to main rail feed. Started car.. ooohhh. Much quieter and seems a bit smoother. Popped the car outside and plugged the laptop in. Watched it warm up and waited till it was off the warm up enrichment. Idle was tad out so a tweek here and there. Its better but more importantly it should remain consistant. I still have the lean out idle surge in the first half minute after starting the hot engine when its been sat a while. I have suspected for a while that this might be due to heatsoak from the hot bay/radiator area into the inlet pipe where the inlet temp sensor sits. Maybe it sees a much higher temp and alters the mixture? I dont know? The temp sensor is plastic bodied and insulated from the alloy by some foam. Hmmm. I need to work this out as its annoying. Some one suggested ages ago to turn off the 'use inlet temp at startup' feature.. but that would only affect the fist startup and few seconds after? Its starts fine as is, hot or cold, but just starts to stumble up and down for a half minute. Any ideas? You can tell me here... Anyway.. I decided that the car was a bit dirty and was due a wash. The evening was warm so Kevin the cat and I gave it a clean. Kevin actually only played in his bowl of water, chasing sticks. I cleaned the car. I might even apply some wax on it in the morning since its so clean...5 points
-
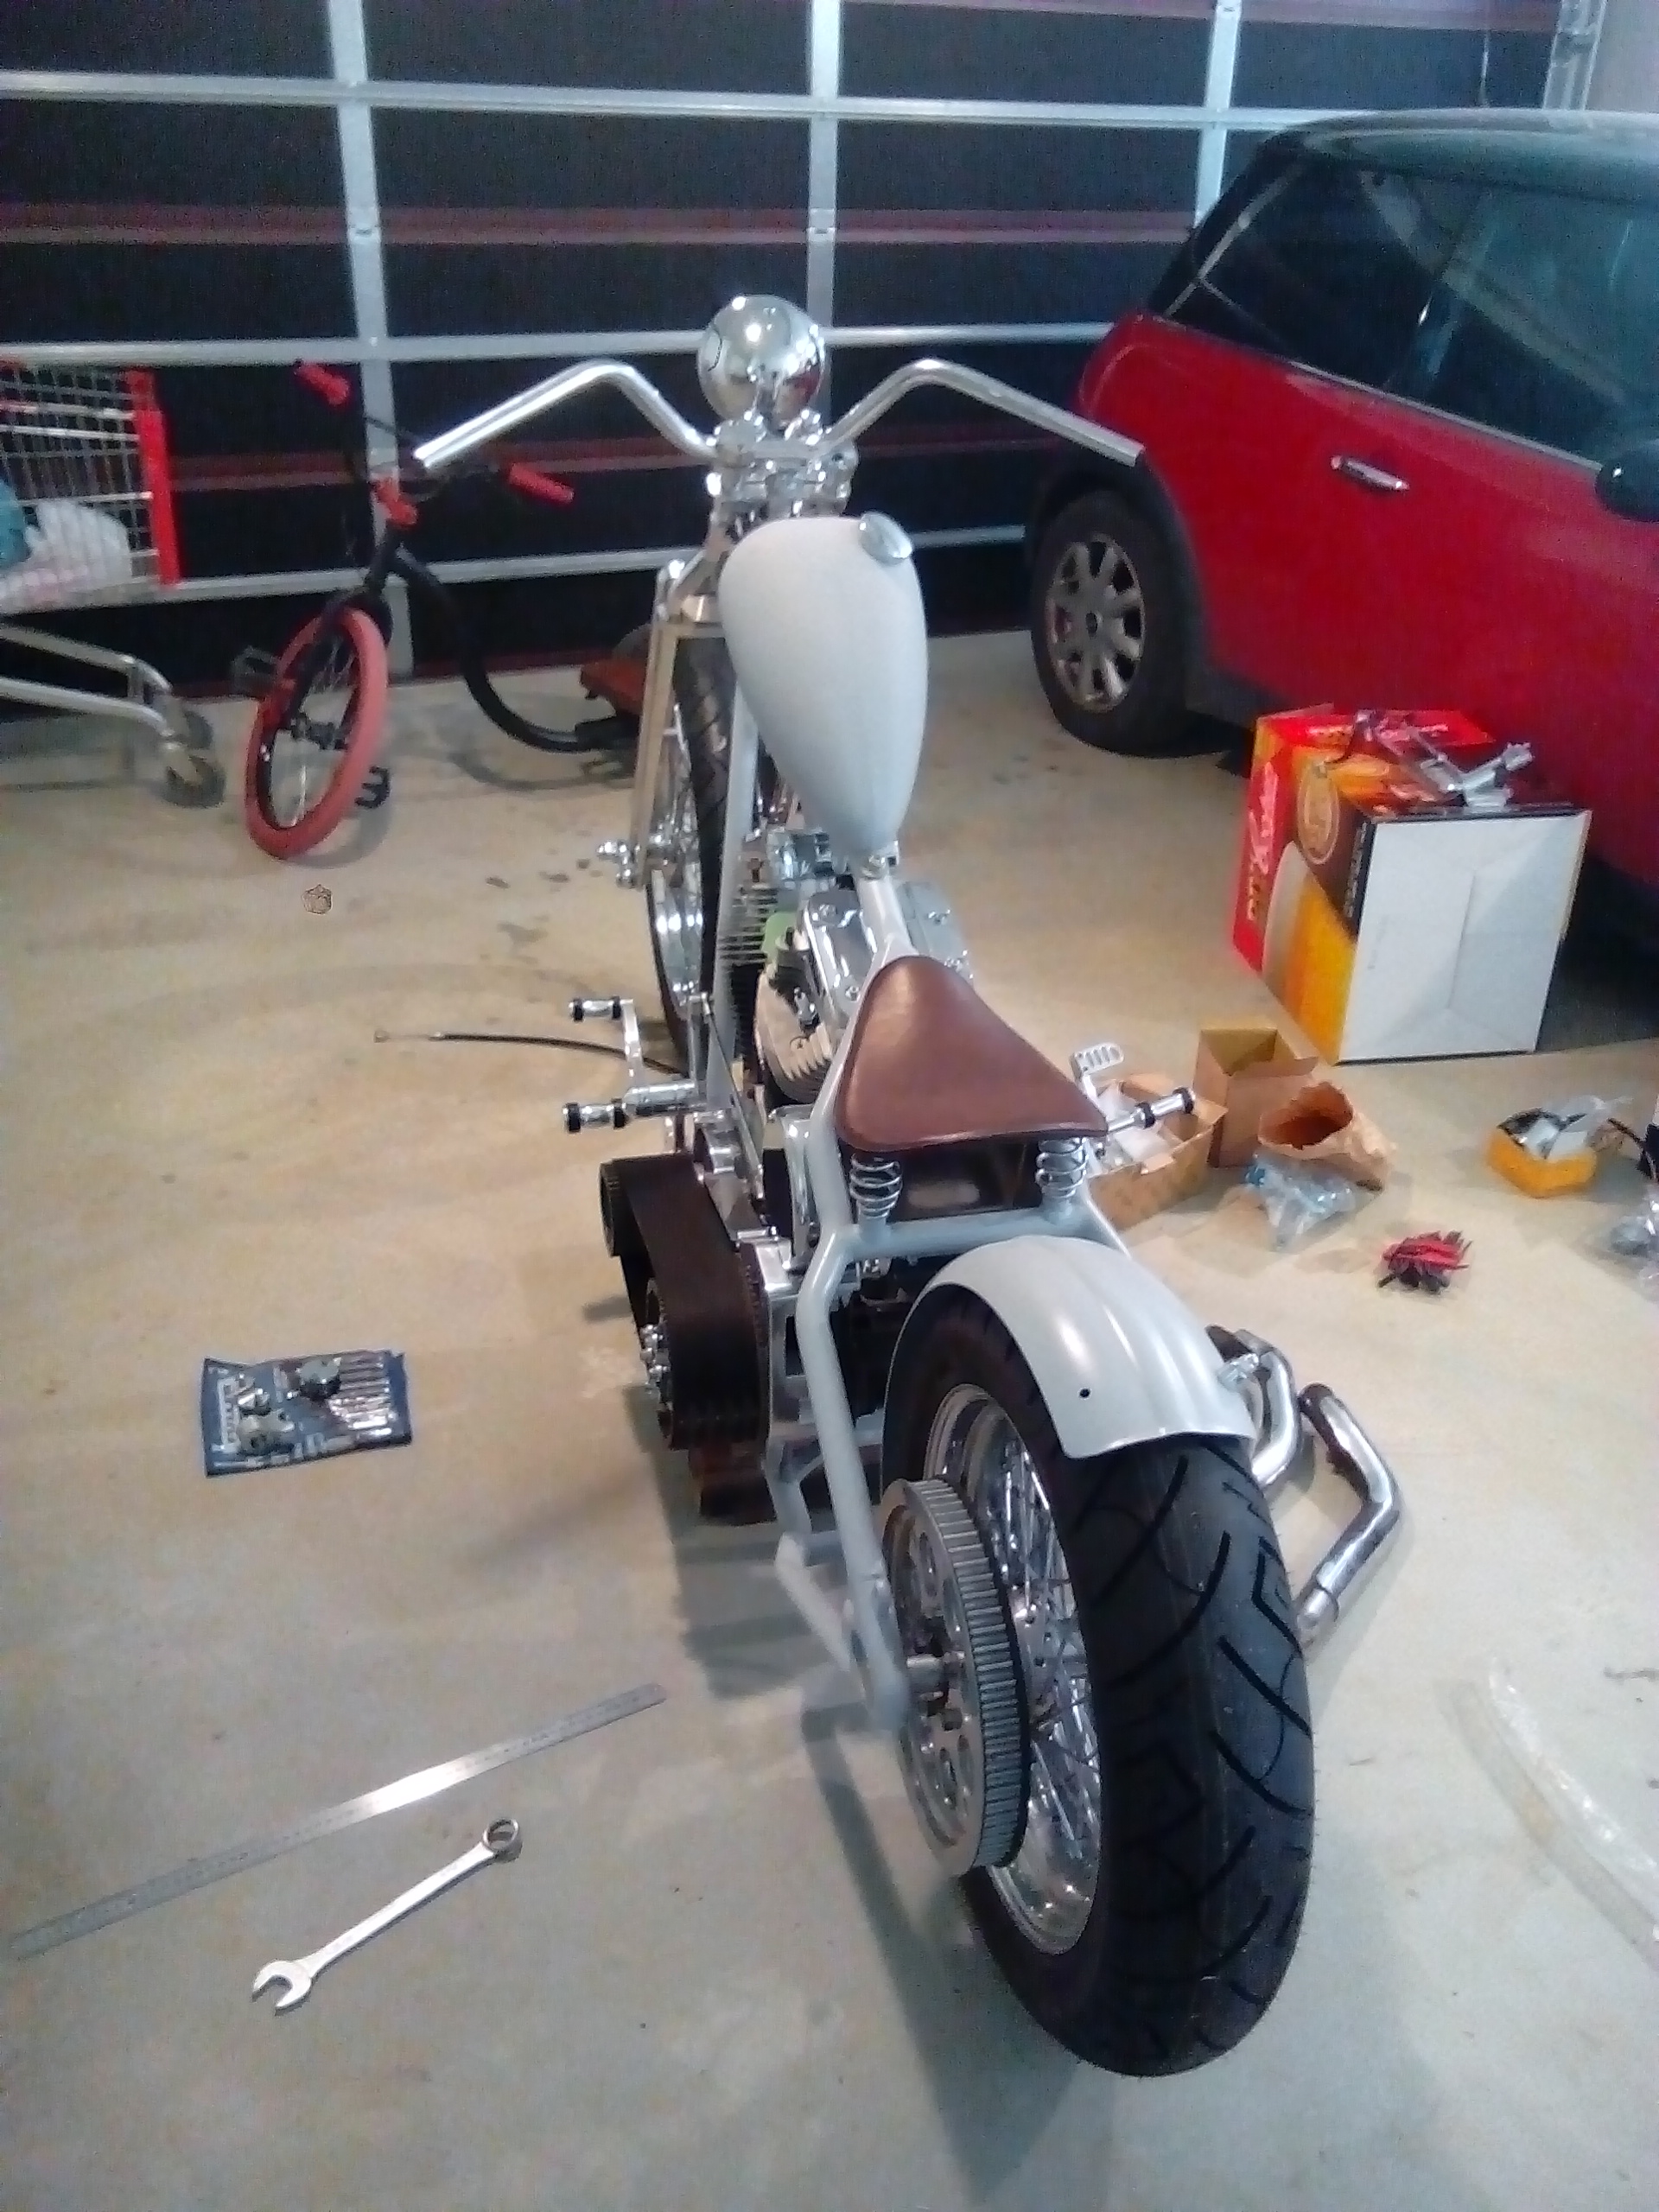
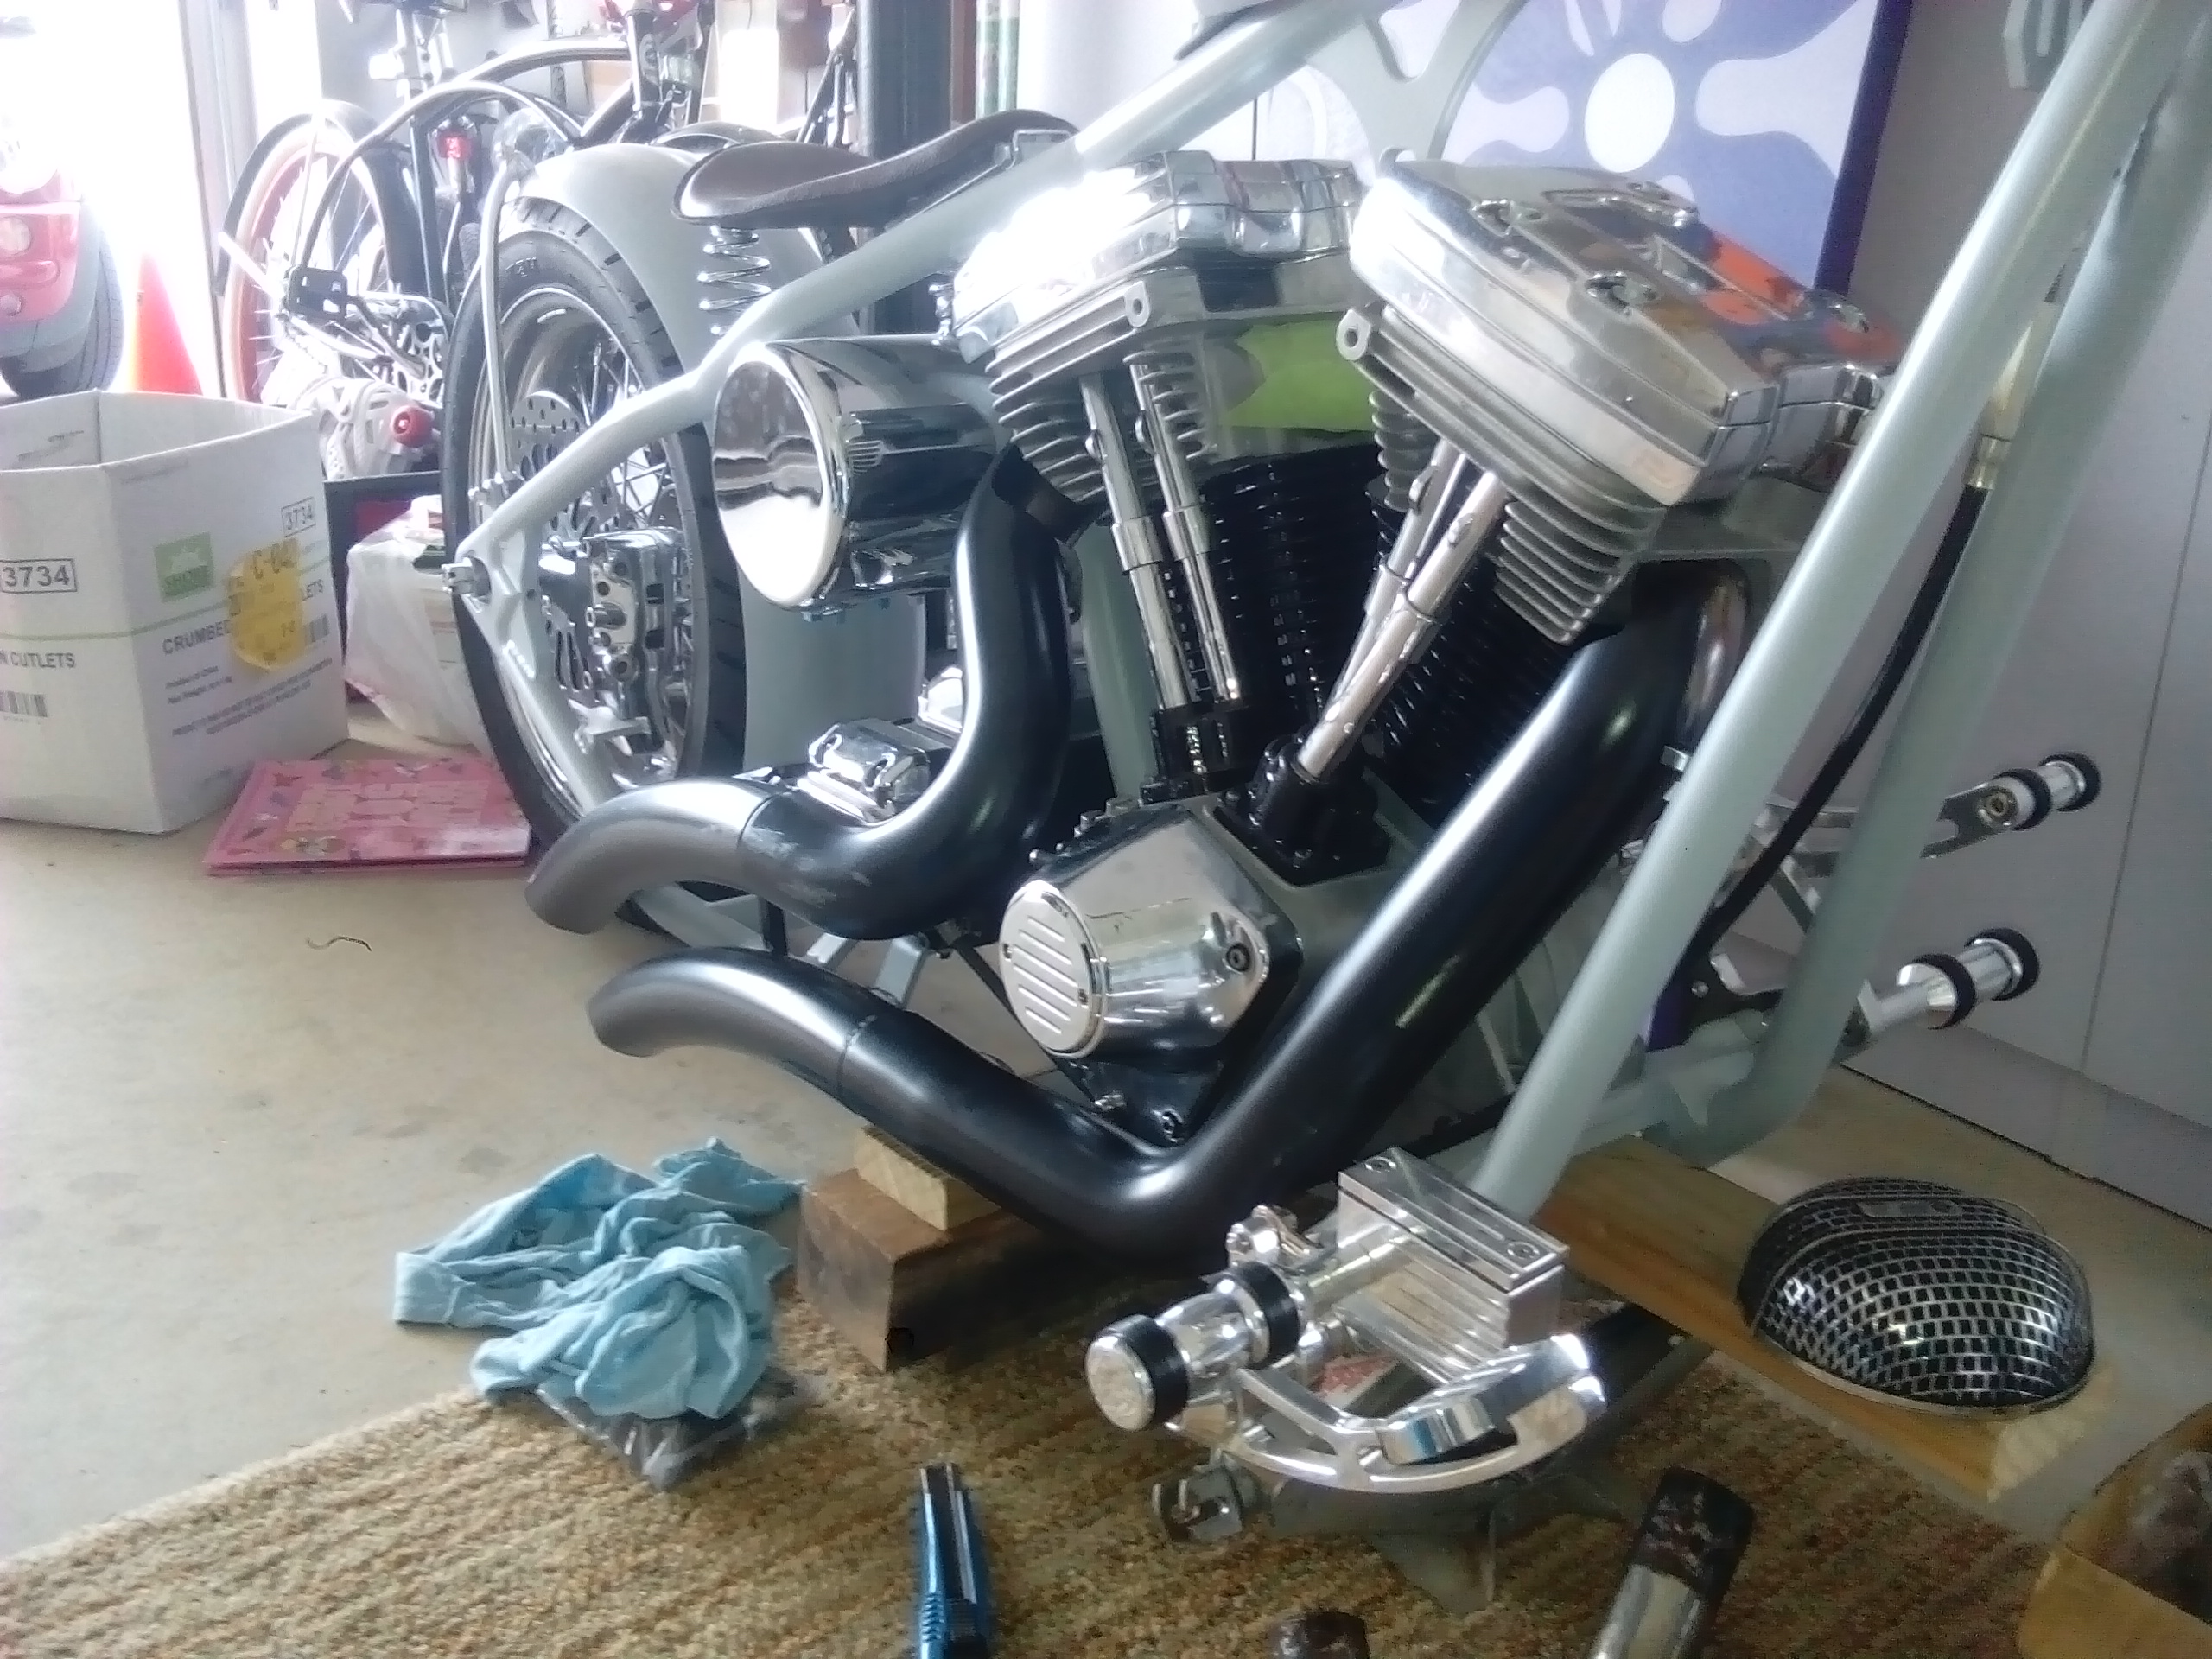
Photobucket sucks balls. Can't be bothered updating the pictures, and without them this thread seams pointless. So revised; long story short I've made a hardtail harley motorcycle. Started with nothing, now looks like this!
5 points
-
A few spills and frills later, we entered the local schools Trolley Derby. Where she got 2nd place in her age bracket. Don't worry, the other girl was fine. There were plenty of crashes...but no one was hurt. Its so cool that a school allows such things to go ahead in this crazy risk averse world. Kj5 points
-
Cool meet. Sharned some sharns. Here's a couple pictures: https://flic.kr/s/aHskRsDnrn Highlights here: Not up to the calibre of MJFox on prev page but still somthing^ Album: https://www.flickr.com/photos/45457939@N08/albums/721576783637594833 points
-
Took some snapppssss2 points
-
That photo is with the bores undersize. They then go in with another tool to size it and do the combustion chamber bowl. Then there is about 4-5mm on the walls. Really prone to cracking so I have thickened things a bit.2 points
-
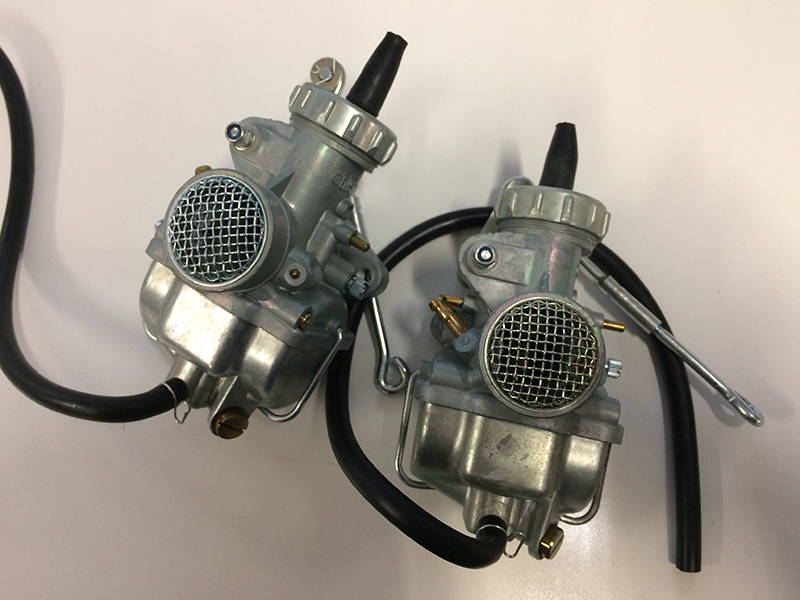
New carb day!
2 points
-
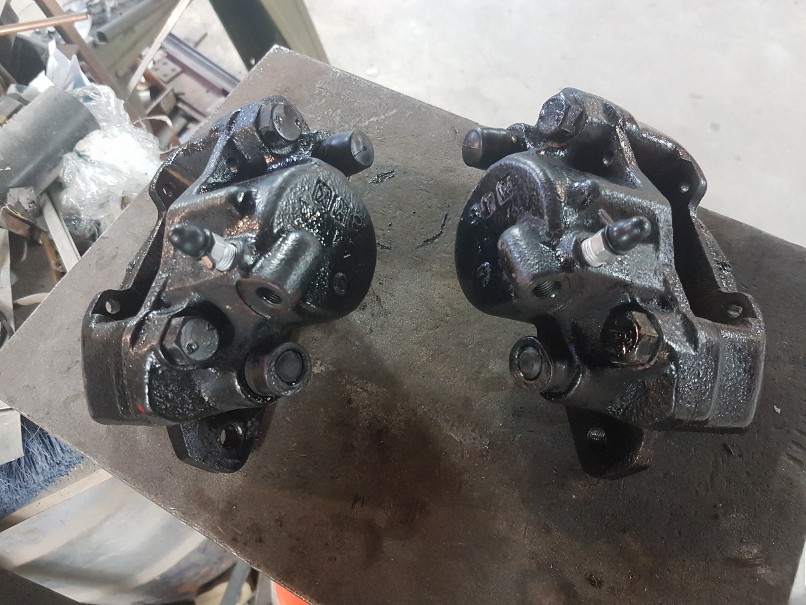
Got the repair kit and also new brake pads. Painted all the caliper bits while it was apart. Much better looking and work like they should. Now just waiting on a pair of new disc rotors.
2 points
-
Been wet sanding all the panels today, they are all basically ready for paint. Still have to panel and do some rust work on the body.
2 points
-
Burgerfuel is reminded this is on tomorrow!2 points
-
Ok.. so after having typed all that the night before and having had some good replies in the tech thread I decided I needed to bench test it and do some chin scratching. I'm glad I did. I found the main problem. out from car and jury rigged up on bench... I discovered that the lift pump was hardly dribbling anything out. Hmmmm. Whats that pre filter like then??... oh.. I removed the filter and wow- proper flow again. I'm amazed the engine was able to run at all!!! So Hannah was heading to town (the big smoke) and would pick me up a new filter. I then decided that while the pumps were out I might as well pull the tank out and add a second return so I have options. First thing was to make things safe before I touch the tank with items of spark or flame. I taped the tank filler onto the trusty old Hiace exhaust and ran it until the tank was purged out of traces of fuel or vapours.. I machined up a little fitting with a nice flat thin section that would provide a good surface area for solder.. I soldered that in place and sat the tank aside. Now since the tank was out I thought it might be a good time to get rid of the horrible large ugly plastic battery box taking up space in the boot and do a similar recessed box like I did on the wagon. I measured the battery and made a box.. Then I cut a big hole out of the boot floor. I did it in that order because my Co2 bottle is about empty. I did not want a large hole that I could not fill. The box is in place now and just needs some paint. I'll continue this very exciting update tomorrow with a photo of some paint drying2 points
-
Almost worked. Got quite a bit of shrinkage in one corner on both parts. So I'll have another go and add some big risers to those areas. Other than that it worked really well!2 points
-
Kneel before my sweet sweet crop sensor. /s1 point
-
God fins are swoon! See if you can get your hands on a 185/50. That profile + blocks will be delish.1 point
-
Yeah so I bought another set of rims, been looking for some Hayashi Street fins for a while and found out that Joe (Goat) had some laying around that he wasn't using. Even sent them up for free, true gc. Anyway, before: And after: Running 195/60 on 6jjx14 with +7 offset. Do you guys think I'll have guard rubbing problems if I run 2" blocks in the rear and lowered springs in the front? Now just need to get all the body the same colour, and maybe some centre caps (if anyone knows of any send me a PM).1 point
-
Yeah I might show up maybe.1 point
-
I'm coming, but not in a Hyundai Stellar like I hoped lol. That will be next month.......................1 point
-
that looks super sweet indeed! does this mean you'll lose the mirror tints, cause I hate them. Also that shit all over the fire is fucking with my OCD something wicked, what you need is a polished stainless louvered firewall, that would make lidless cruzing sparkle like the star you are. hehe.1 point
-
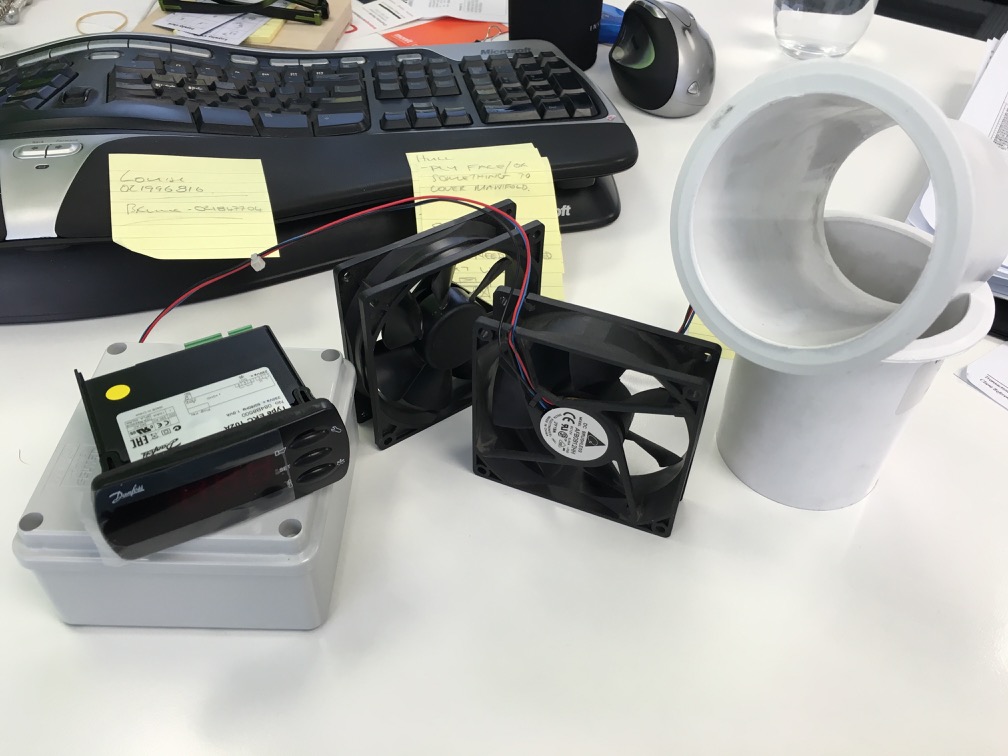
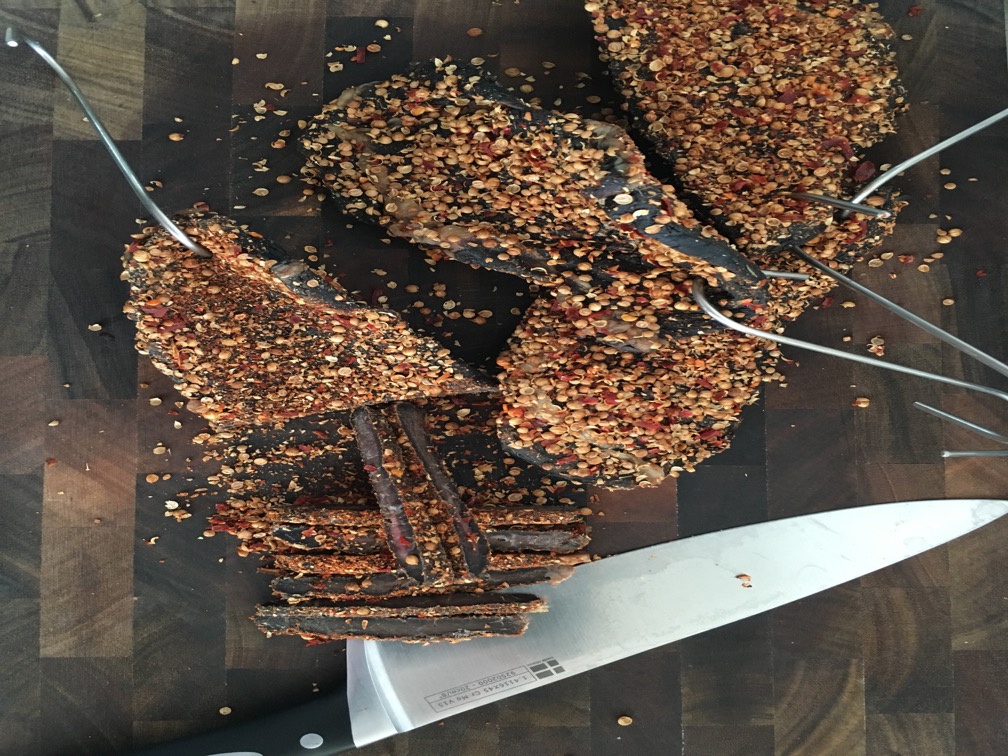
I've been working on Biltong dryers for the past couple of years. I love Biltong, just hate paying for it, $10 for 100grams, and most is pretty average for what you pay. First effort involved a glass door bar fridge, a couple of computer fans, a light and a controller unit. Wired the light to come on until the box got up to temp, for biltong you need air to be pushed past the meat to cure it over time, and a consistent temp between 22-24 degrees is the go, once it reached the 24 degrees it shut the light off. Fans run all the time. This unit was great, although I couldn’t get enough in it to do a batch big enough to cater for my mates and me
1 point
-
will be there, but no rocker cover - tried bolting some wheels to a rotor but its not working!1 point
-
Last night we swapped the good springs back out for the sagging modified missing leaf units that were in it when I got it. It lowered the car 10-15mm when parked although handles like running in jandals due to the missing leaf. Also swapped my original driveshaft back in complete with new UJs at both ends and the vibration is 99% gone. Took it up to 70MPH on the way home and smooth as through the driveline. The only place I still feel a little bit of a wobble is for a split second through the transition of being on the gas to completely off the gas which I would guess is a change in suspension geometry. I feel if it was a driveshaft insertion issue then it should go away completely when I lower it, if it was a diff angle issue I can live with it as long as I can replicate the angles once the good springs and lowering blocks are in Once lowered the plan is to get the driveshaft extended to ensure its smooth if I ever choose to raise it back to standard1 point
-
Nathan right. The lift pump, being able to flow more than the main pressure pump, should fill the surge tank and then over flow back into the fuel tank. There should be no pressure build up within the surge tank.1 point
-
Cheers! I'll have a look at them. Haven't actually got started yet so I'm open to suggestions still. it seems as though their trigger wheels are designed to fit only their alloy crank pulleys, so I'd need to buy their setup im not looking to spend much, think I can get it sorted with an off the shelf trigger wheel, and make a spacer for less then $100 if I get their pulley/spacer/trigger wheel it'all probably run over +$2001 point
-
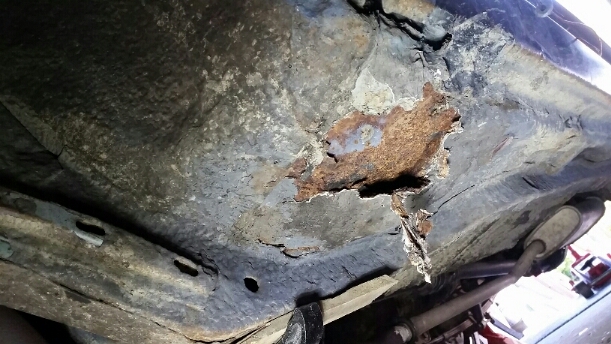
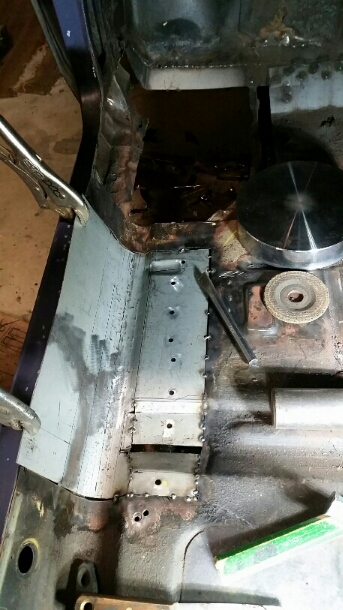
This only lasted a trip down to the bmx track and the monthly meet before I got stuck into it again. The passenger floor has always bugged me so it was time to get into it and repeat what I had done to the drivers floor. The passengers floor was covered on the inside and outside in bog. Underneath were just patches tacked on top of the original floor. Ive cut most of this out. I've replaced the lower section of firewall with new metal, put a new piece in by the gearbox tunnel and now I'm here. After the floor is done, I'll put in the new seat rail and take the sill out. It's rusty from the front to the rear, so I've decided to replace the whole thing.
1 point
-
The exhaust has been pissing me off, muffler hangs low and catches the train track crossing and some driveways. Where it was, was about 3 inch forward of the floor recess under the rear seat, and would hit the body under max gear grabbing. So I cut it out and added a couple of inches from the back, to the front and that set it in the gap where I was happy. Had to move the hanger bracket too. Some slag burnt my moustache so all I can smell is burnt hair, it's average.1 point
-
Are we bringing the Rocker Cover racers for a test run/shit talk session? Team 3.5 over here is bolting some wheels on tonight hopefully.1 point
-
I reckon next time you should drive your brothers car, he will have been giving it death because its not his..... looked like a lot of fun though, that Escort sounded awesome!1 point
-
Got some more thinners and got the front under bonnet/boot painted next.tried to get a good coverage on everything.over the years many stone chips had done a number on the paint under the arches.one more wire wheel dead.had a crack at heat shrinking some of the mess I'd made of the front quarter, worked a wee bit, stopped it popping in and out so easy.bog time!I spent Monday, Tuesday and Wendnesday night last week from about 9pm once the kids were sorted and the next day organized, sanding, sanding and sanding till about 1 or 2 am.And finally on Thursday night.a bit of etch.followed by...just the engine bay and the front valance to prime.but that will have to wait till it's off the spit as I still need to spot weld the bonnet seal strip on both valances as the frame it's bolted to is in the way.still needs heaps of work, found a few dips and bumps after the paint went on, needs lots of sandpaper marks filled in/sanded out, but I should be able to do the seam sealing and smash some red on the bum soon!1 point
-
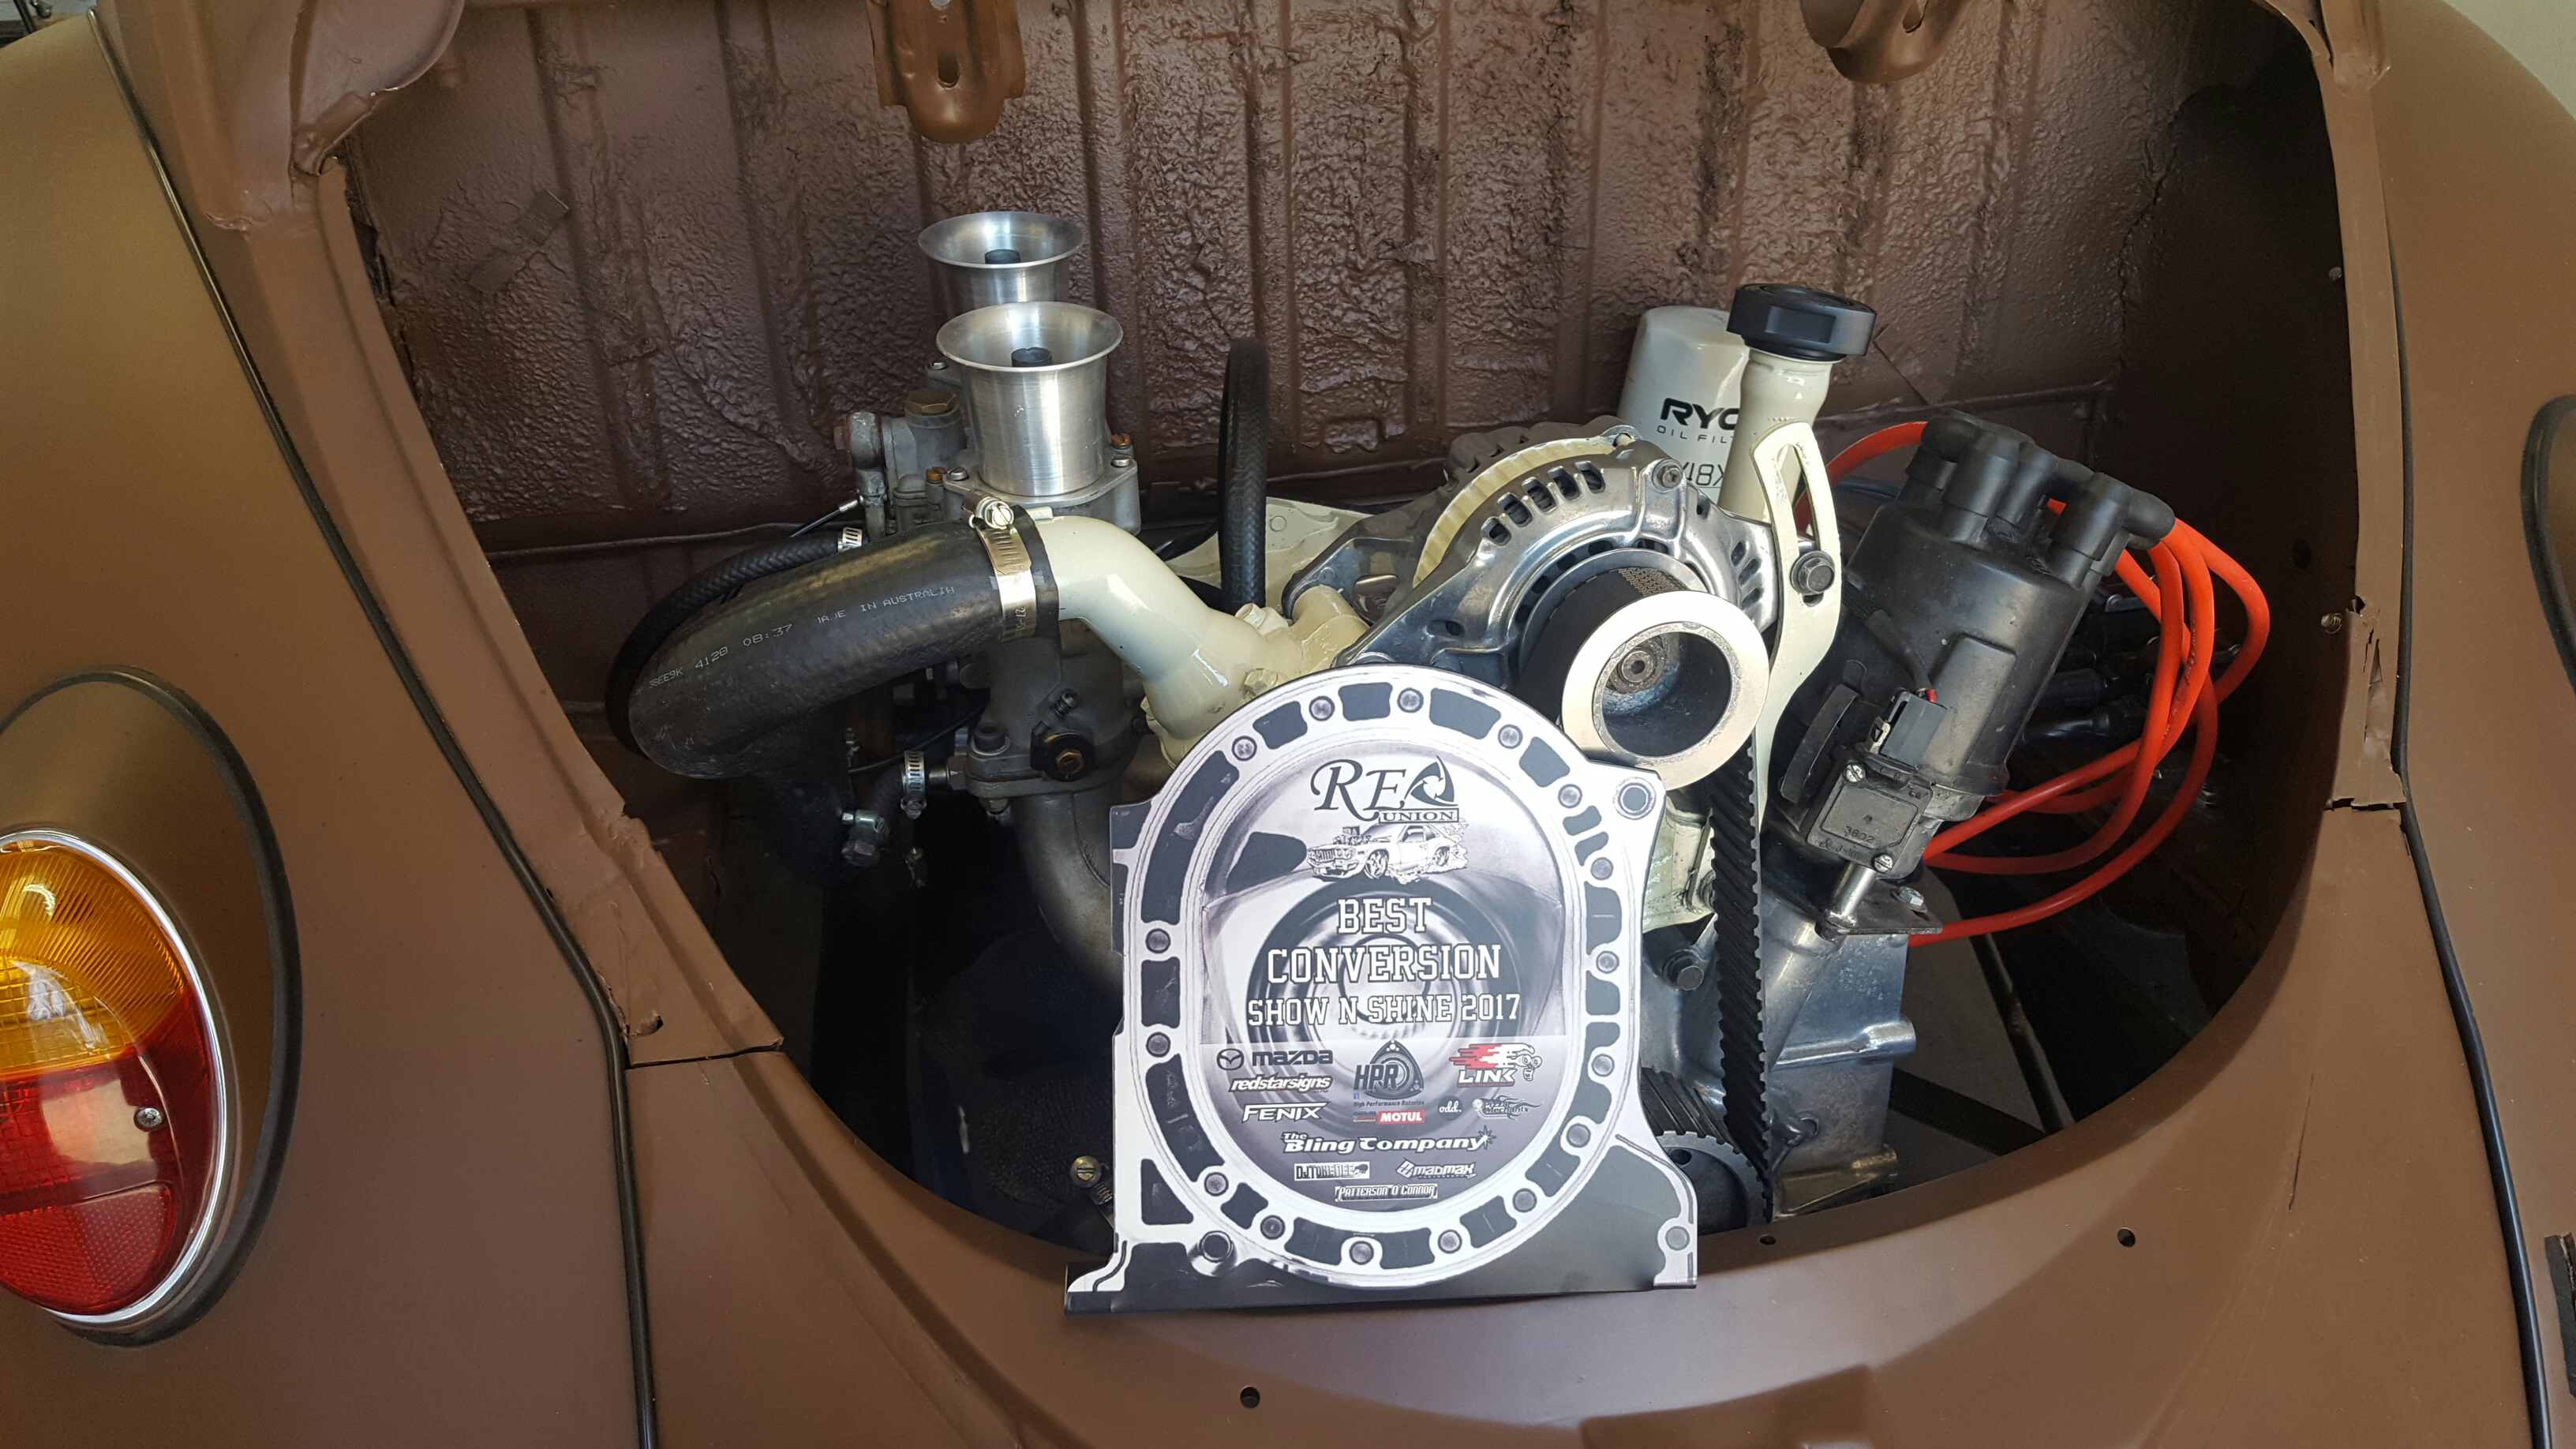
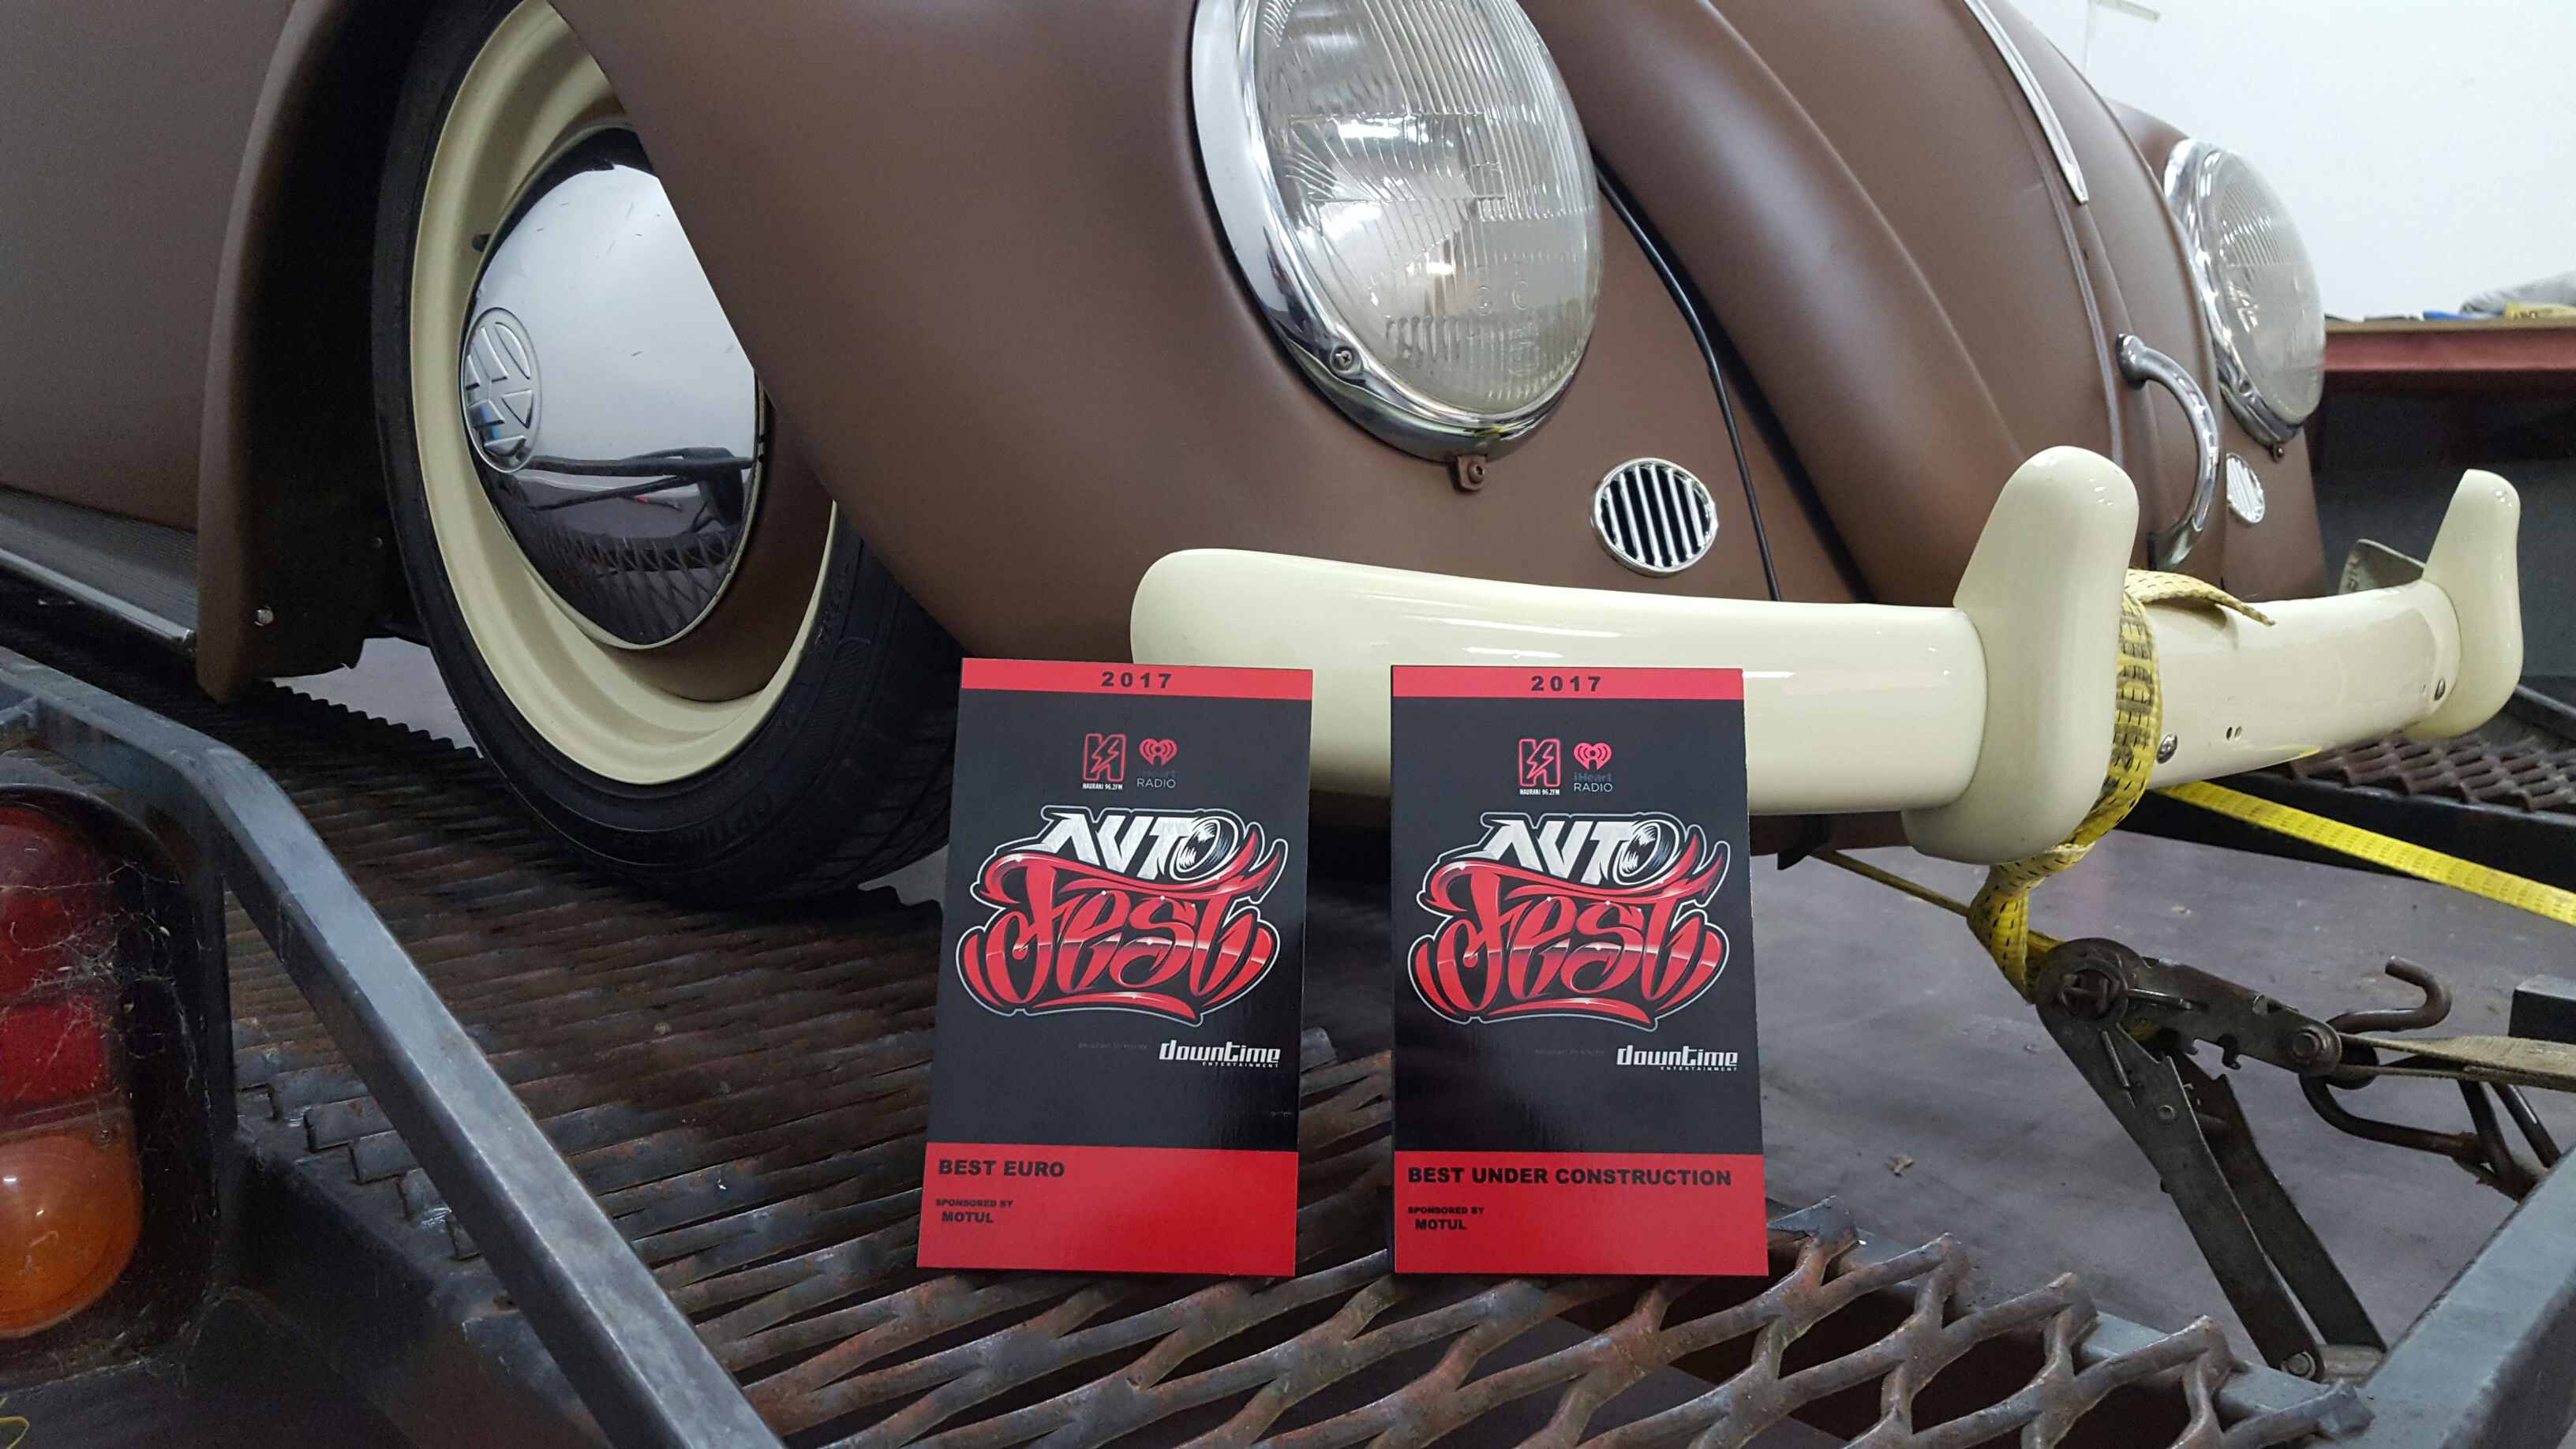
Just a little update. Made it into performance car mag Won best conversion at reunion Got best under construction and best euro at auto fest in the weekend. Time to do the last things ready for beach hop.
1 point
-
I have no idea how this car go a wof its should of not been on the road .1 point
-
What an engine! I wish I could say this was my crankcase! Sadly its on loan (like most of the other bits!).1 point
-
Lol, so oil pump has turned up, bought via rock autos. look at box, oh yeah, some sort of brand. Open box, well well, what have we got here, genuine Aisin oil pump with the Toyota symbol ground off haha. Score in my books. Now I just hope it fits, as its for a cressida and all Anyway, not sure when thats going to make it into the car. busy this weekend, possibly busy the weekend after. and somewhere is nats and then I'm away the weekend after nats also. Such a busy time. Plus I need to get other crown on a hoist to do exhaust, So, kinda stuck in between both, as they both need to get on a hoist really. Not keen for removing sumps on the ground haha. Anyway heres some pictures of the turd. Seedy Al1 point
-
So Summer has officially ended and still no red paint on this thing! But never fear, I'm on it!! I've been spending what feels like every waking moment and many when I should be sleeping working on this thing, I'm beginning to understand why car paint jobs are so flippin expensive!Time, lots and lots of time.So after giving the shed a mighty clean up and tidy, thinning out the heard of pushbikes down to a manageable number and shoving anything unneeded under the house, I began with dressing down the old welds on the sunroof graft.and then the bog.So much sanding.then decided to bare metal the dash and tidy up the rest of the inside.check out the factory spot welds.the reason for this was to remove all the shitty old glue that I had spread about holding the carpets in place, as I wanted to get a nice coat of paint every where.looking much better after some etch.I even managed to get a couple days off work as I was on a roll!moved onto the underside, which apart from the bottom corners on the front firewall, needed no bog at least!also heaps and heaps of tiny small things like bogging up the spot welds under the engine air vents, smoothing out the welds where I grafted said vent panel into the roof and the front scuttle graft aswell, the A pillars, the front wheel wells...... At this point my fingers are numb and my skin feels like 180T sandpaper, are we having fun yet?!But seeing it all coming together in one colour.that is pretty cool.fantastic motivation.You gotta keep on pushin, you gotta keep on pushin!time to crank up the beast!this side was tricky, the hood release tube is right smack in the way.got it stick in place evenchually.and then the one on the scuttle.spot welder was making a bit of a mess out of this one(it may have been the operator) so I had to MIG up a few wee holes here and there.and bog and sand and etch.....another chunk done.need to start seam sealing but it would appear that the tube I used on the chassis has seam sealed its self inside the tube, fuck it, I'd only used a quarter of the fucking thing!I cut the tube open and did the under side bits here.not very pretty, but it will keep out the weather.seams about right, I went to paint the gray primer on the inside of the trunk, got half way and ran out of air, went to finish it tonight and I'd run out of thinners, and now the seam sealer. Ah well, I've been meaning to update you guys so there you are.1 point
-
My life is spiralling out of control... So, ended up with 4 wagons, three sets of tyres and one set of rims so far. I have cleaned one wagon up and sold it for triple what I paid so that will contribute to the steel purchase. Will likely try and sell another wagon and one of the sets of tyres to contribute to another set of rims and hubs. Catching up with a mate who has a kart tyre bead breaker next weekend and chassis building will start the following weekend if all goes to plan. Still aiming to be ready for the Nostalgia Drags here in Perth this April1 point
-
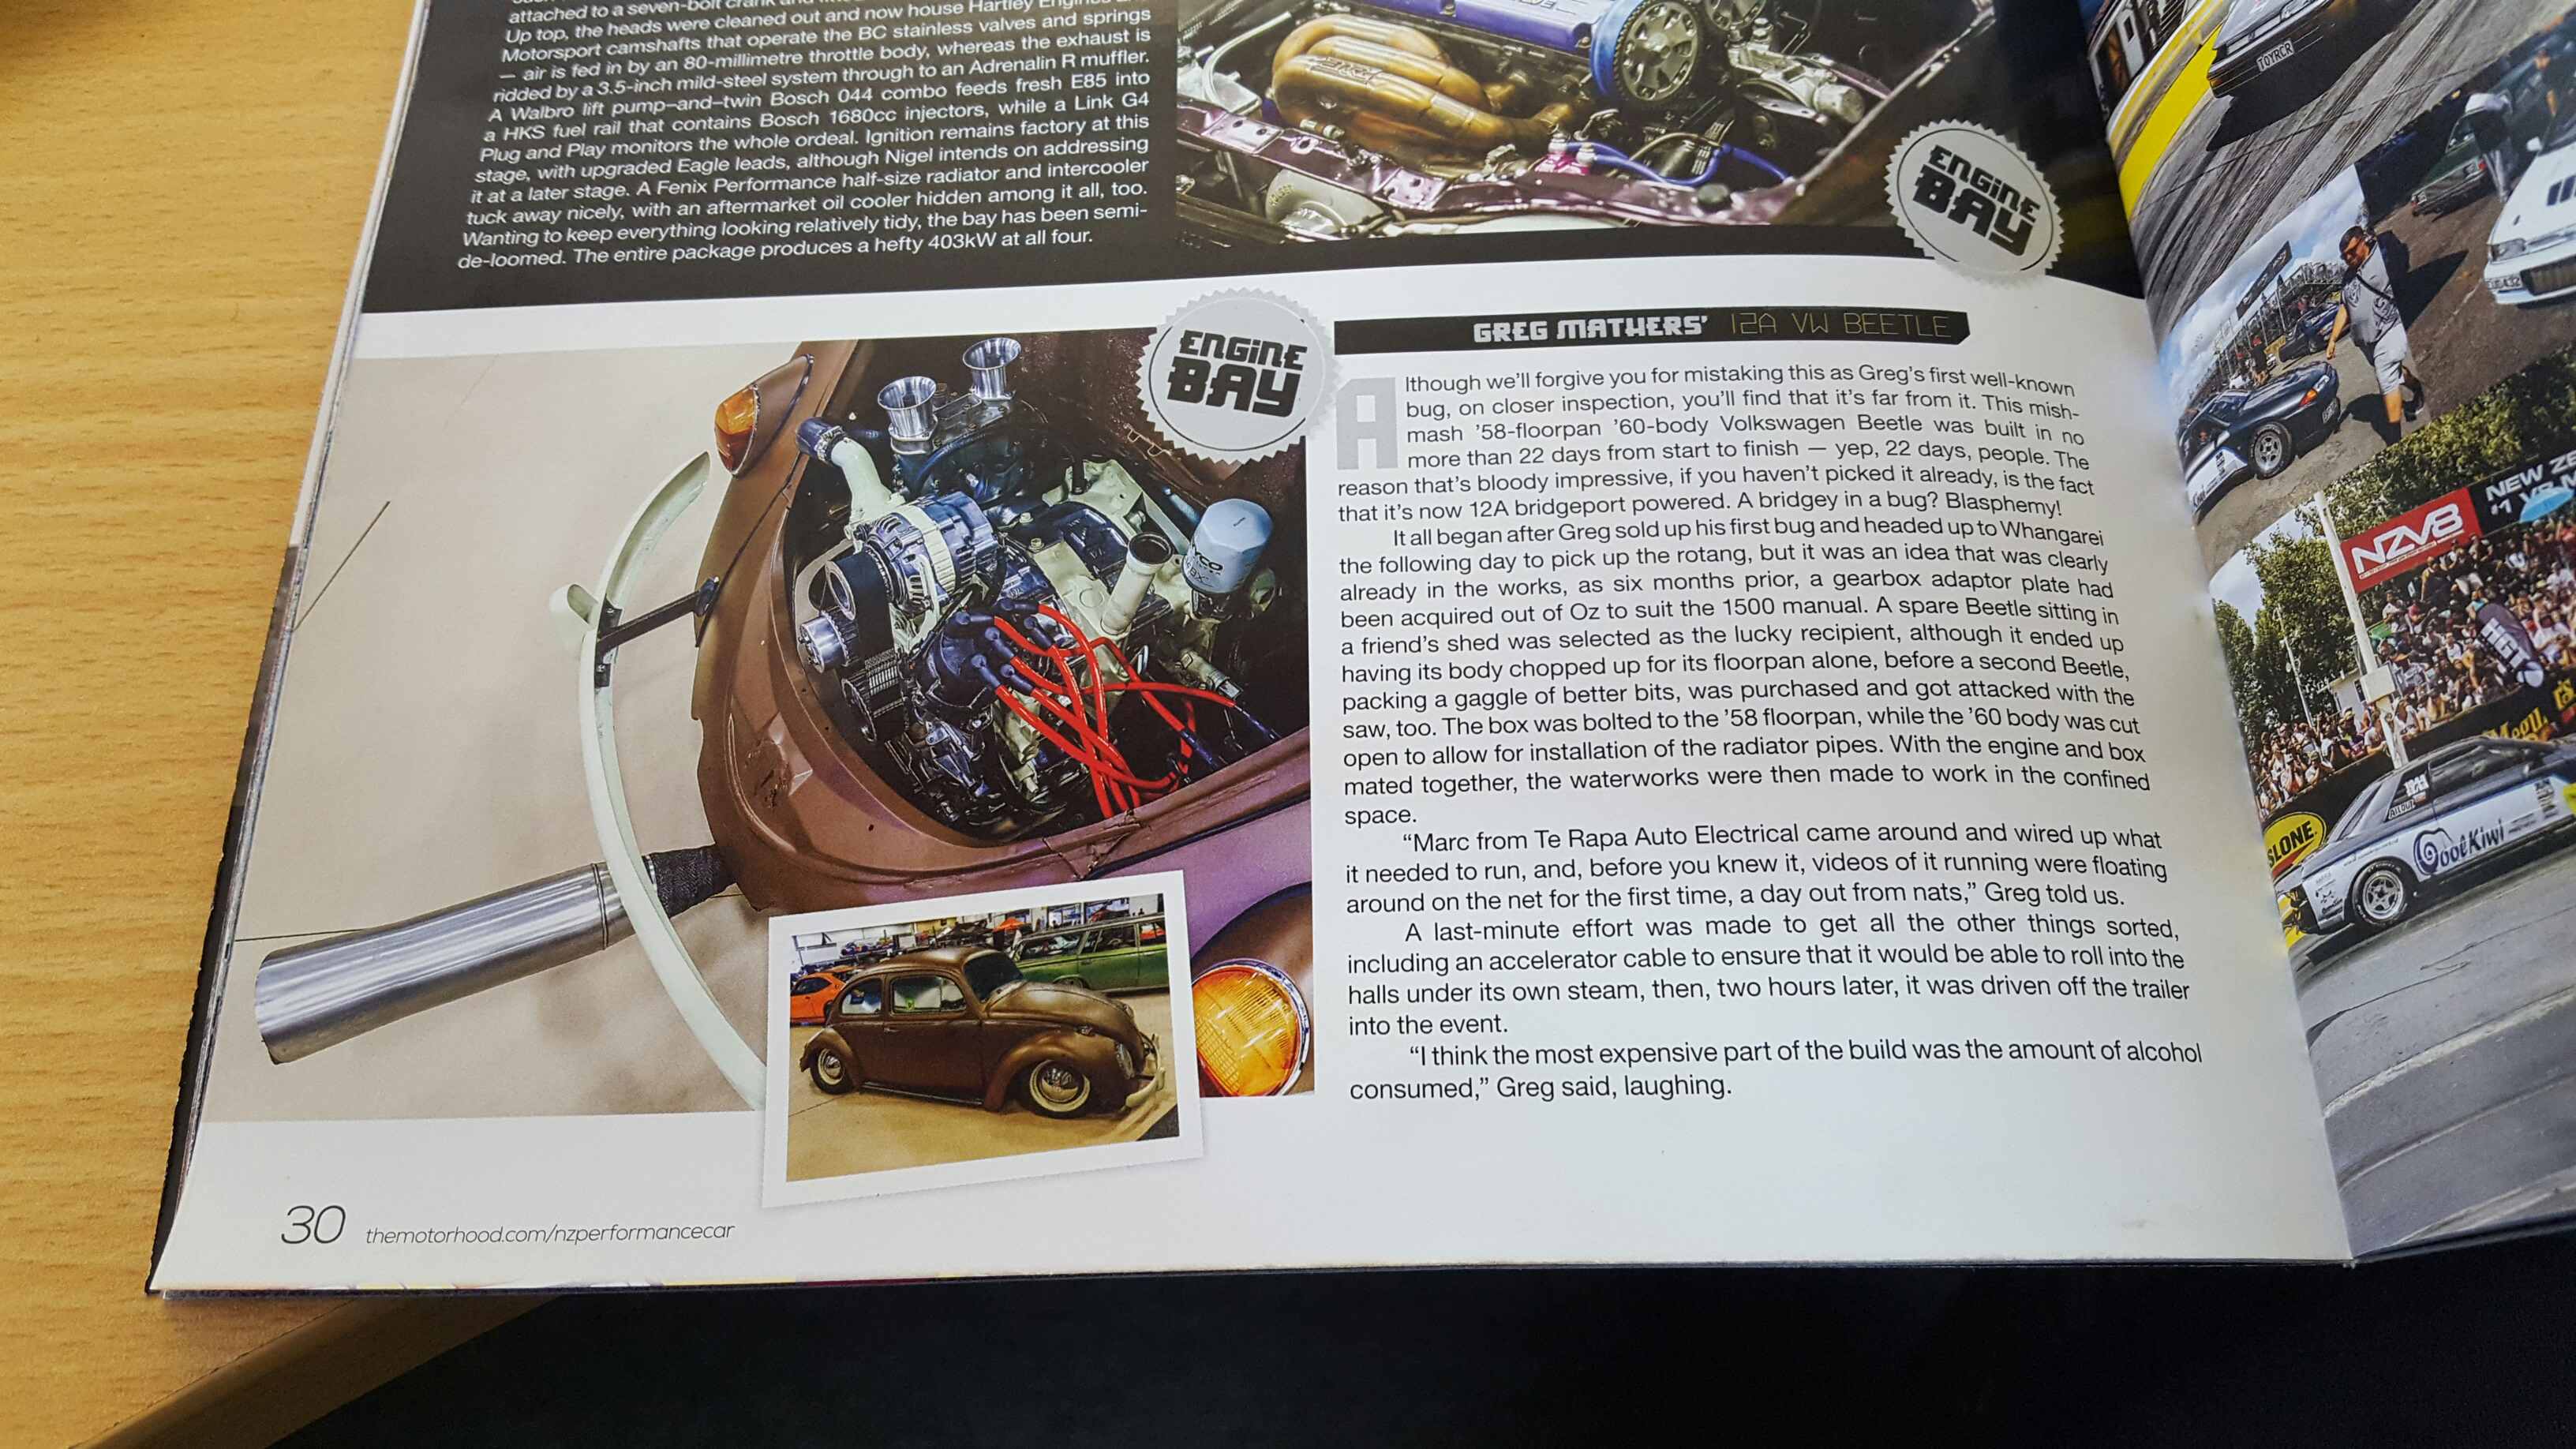
drove this for the very 1st time today. not bad for 22 days ago it was on axle stands and i was cutting the other floor pan out.1 point
-
She's on the ground and goes. Well kinda goes. Not that bad for 22 days including this morning
1 point
-
As of today, I've owned this old piece for ten years! HAPPY 10TH ANNIVERSARY CAR!! xoxoxox Regards, VG.1 point
-
You can see this one doesnt even have any counter weighting. Its just round! The later ones were counter weighted and weigh about 35kg. Still a monster! Has a multiplate clutch which I guess acts like a flywheel.1 point


.thumb.jpeg.384ff72c8d2b0ee0d34a7bdedb55bdcf.jpeg)
This leaderboard is set to Auckland/GMT+12:00