
Leaderboard


Popular Content
Showing content with the highest reputation on 12/15/15 in all areas
-
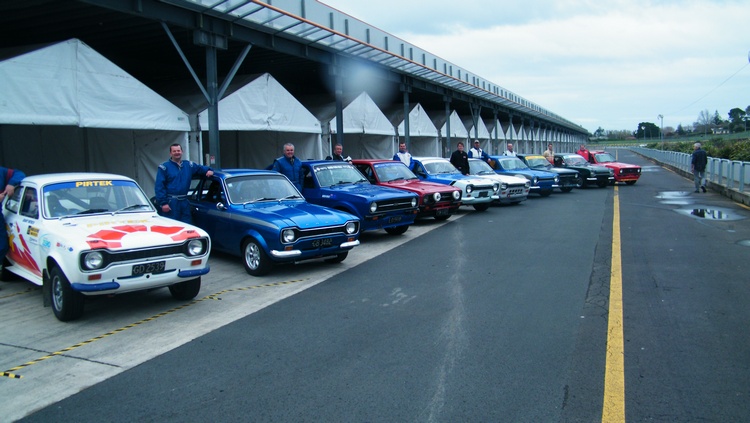
Howdy Pard'ner A few more bits and pieces of progress: Powder Coated goodness. It's a nice feeling looking underneath and not thinking damn son, you nasty. Also replaced the front wheel bearings because yuck Had the front rotors skimmed. Looked like the pads have worn down at some point, I wonder what song they would play on an old record player. Also found an old WOF in the sun visor. Might be good proof for the plates? And the ones I know you're probably here for... All complete and ready for re-reg just waiting to hear from LTSA about the plates. Hasta la Vista, BABY Hoping to be ready to potentially take her to Nats if time off is approved12 points
-
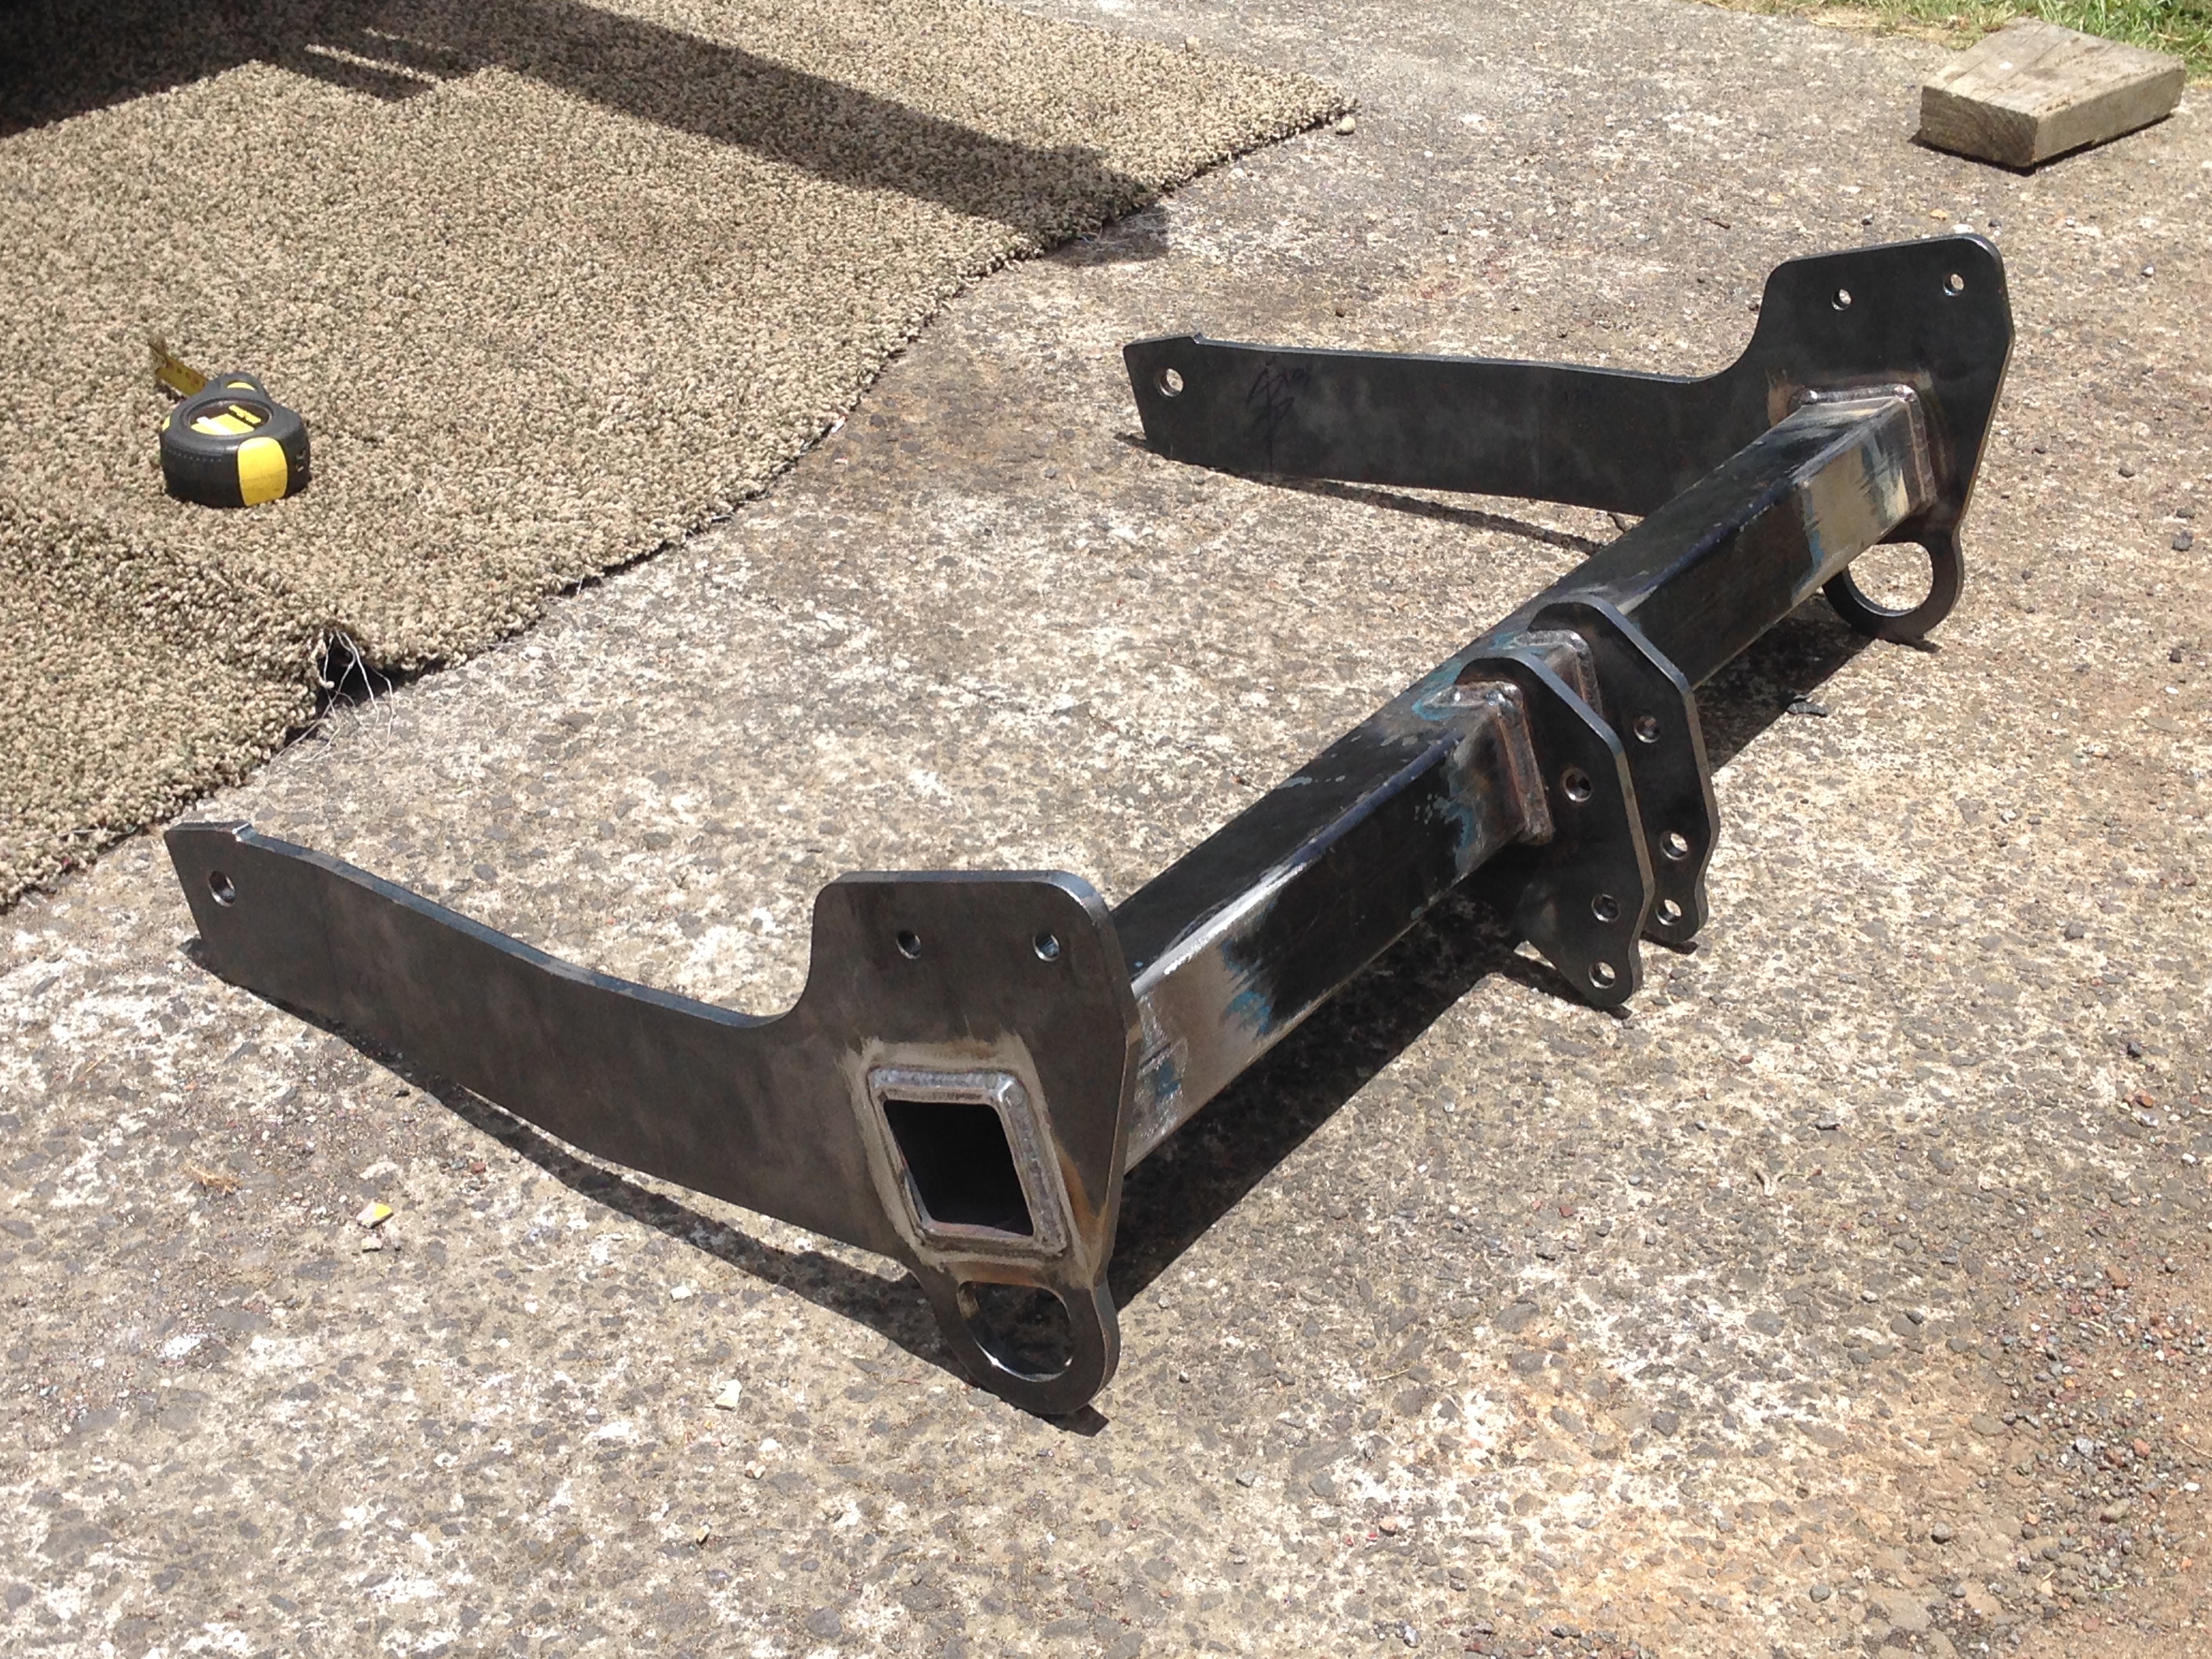
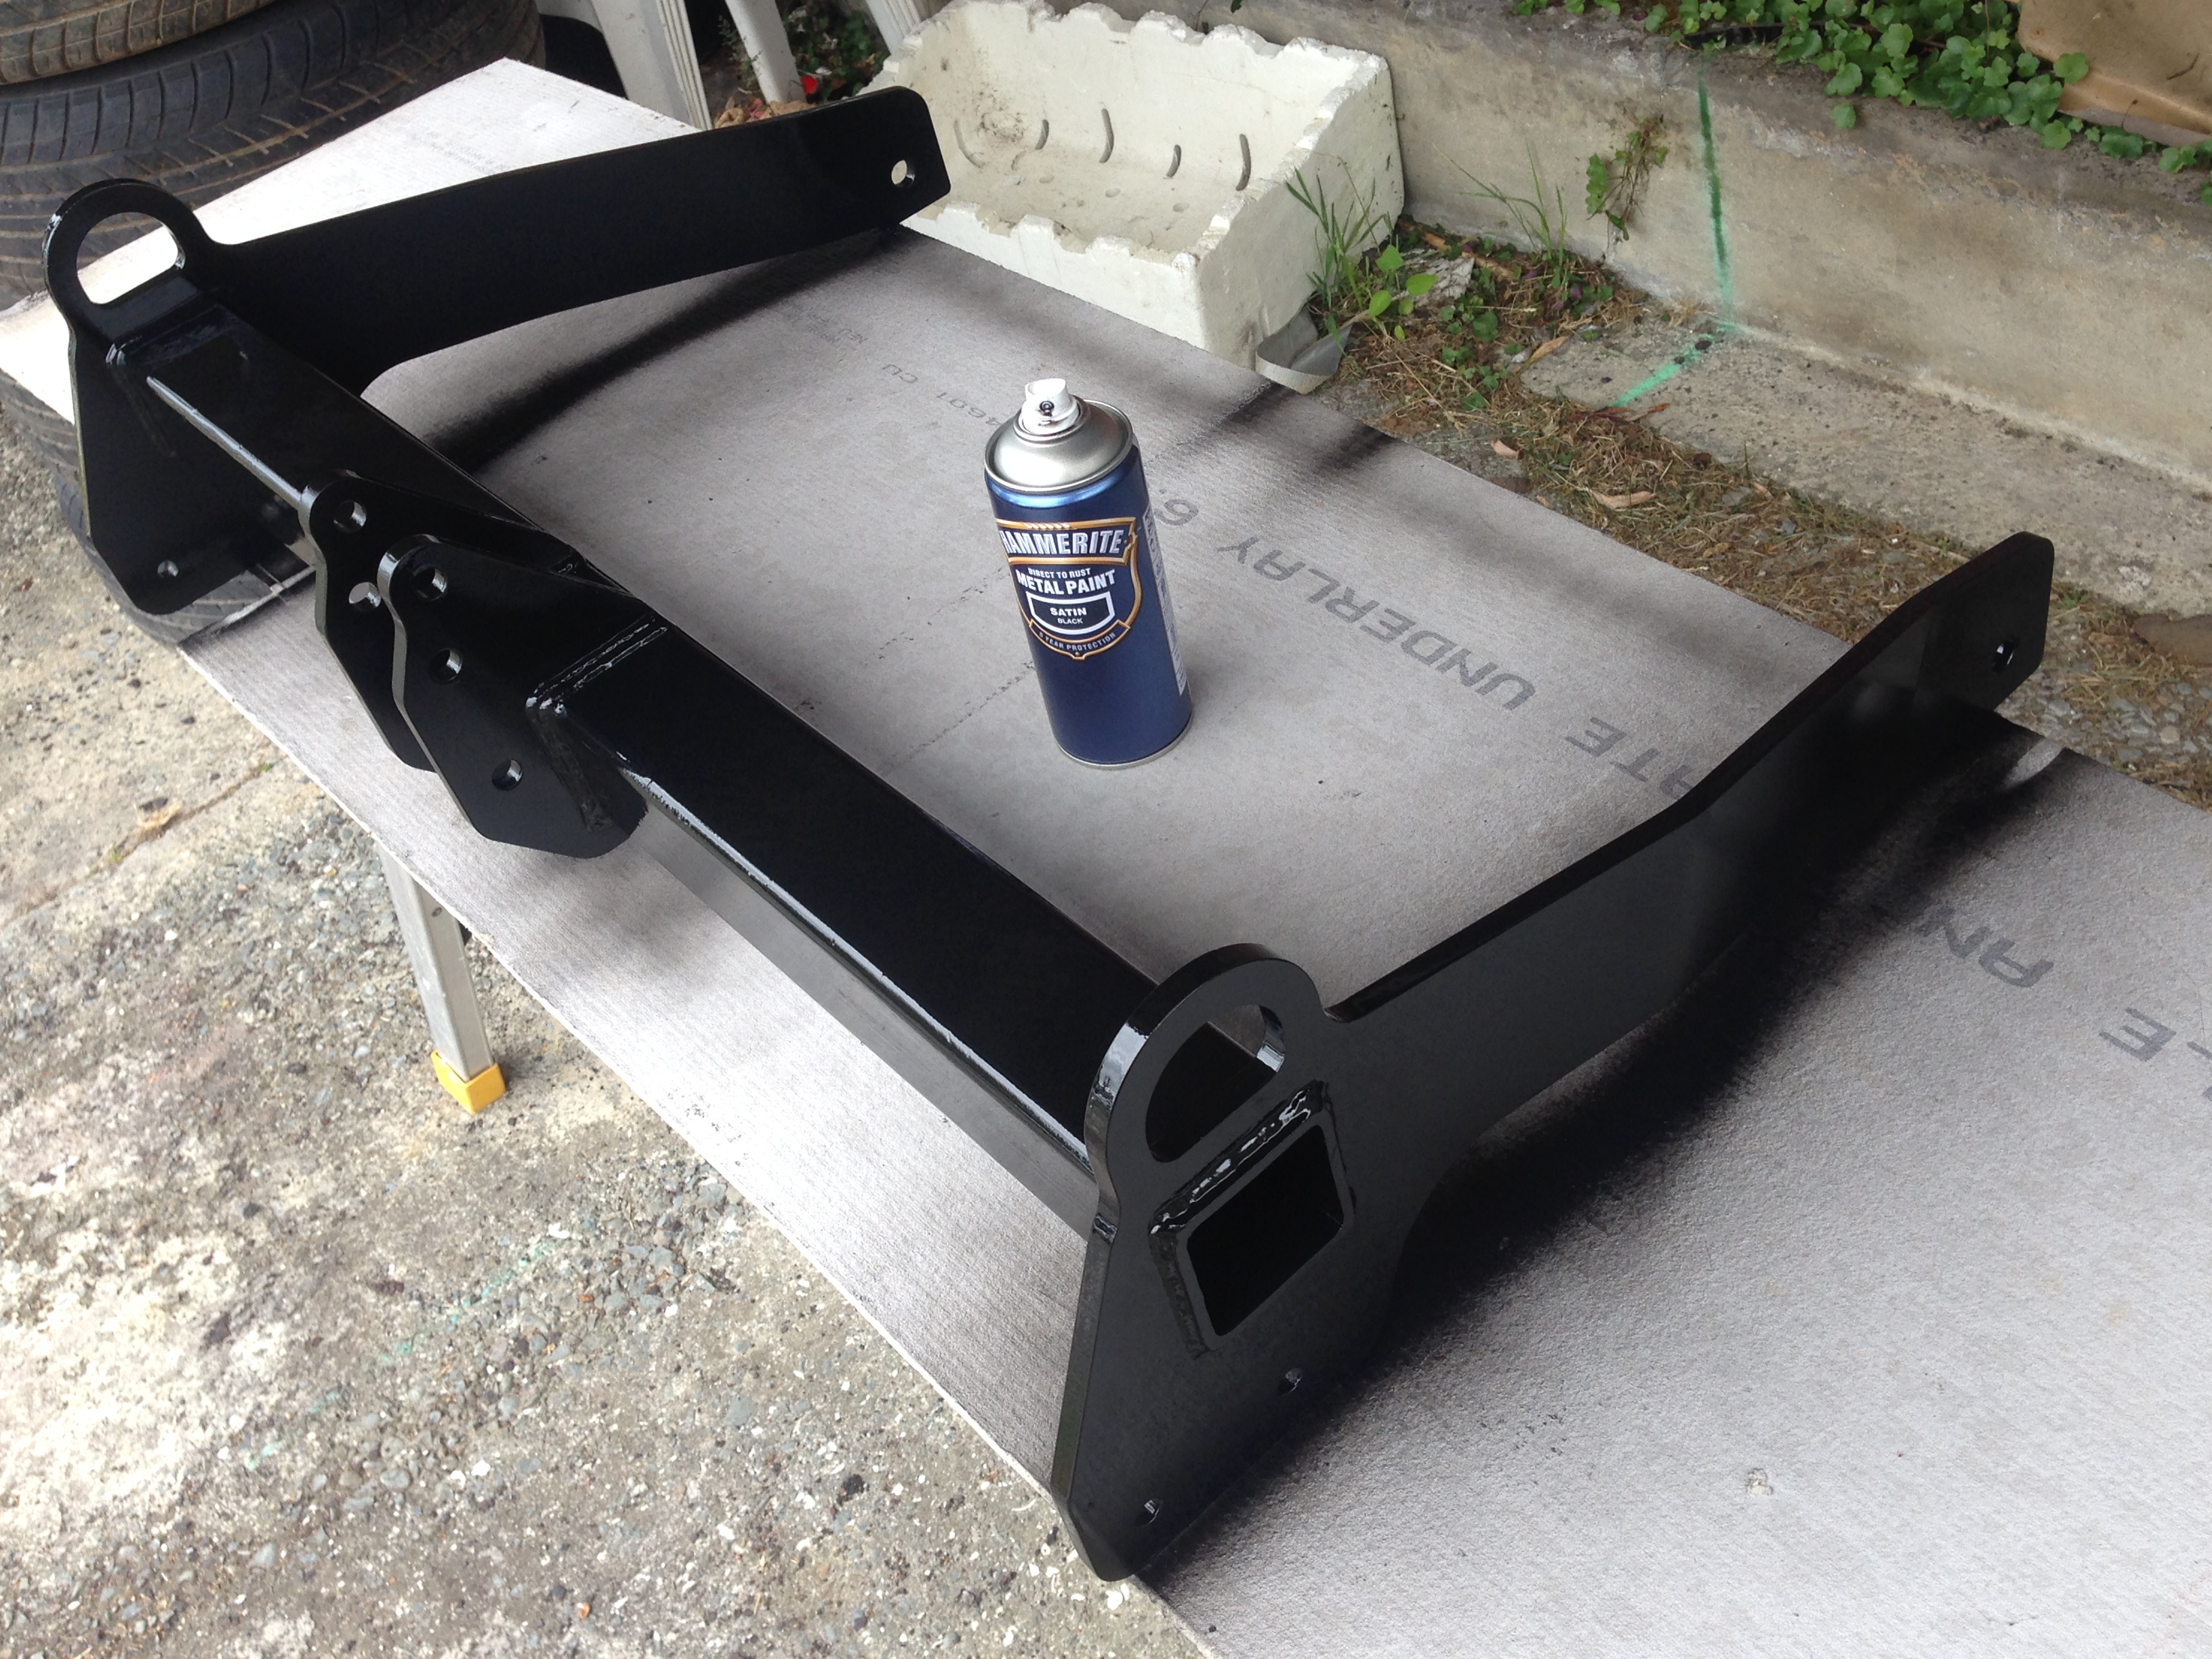
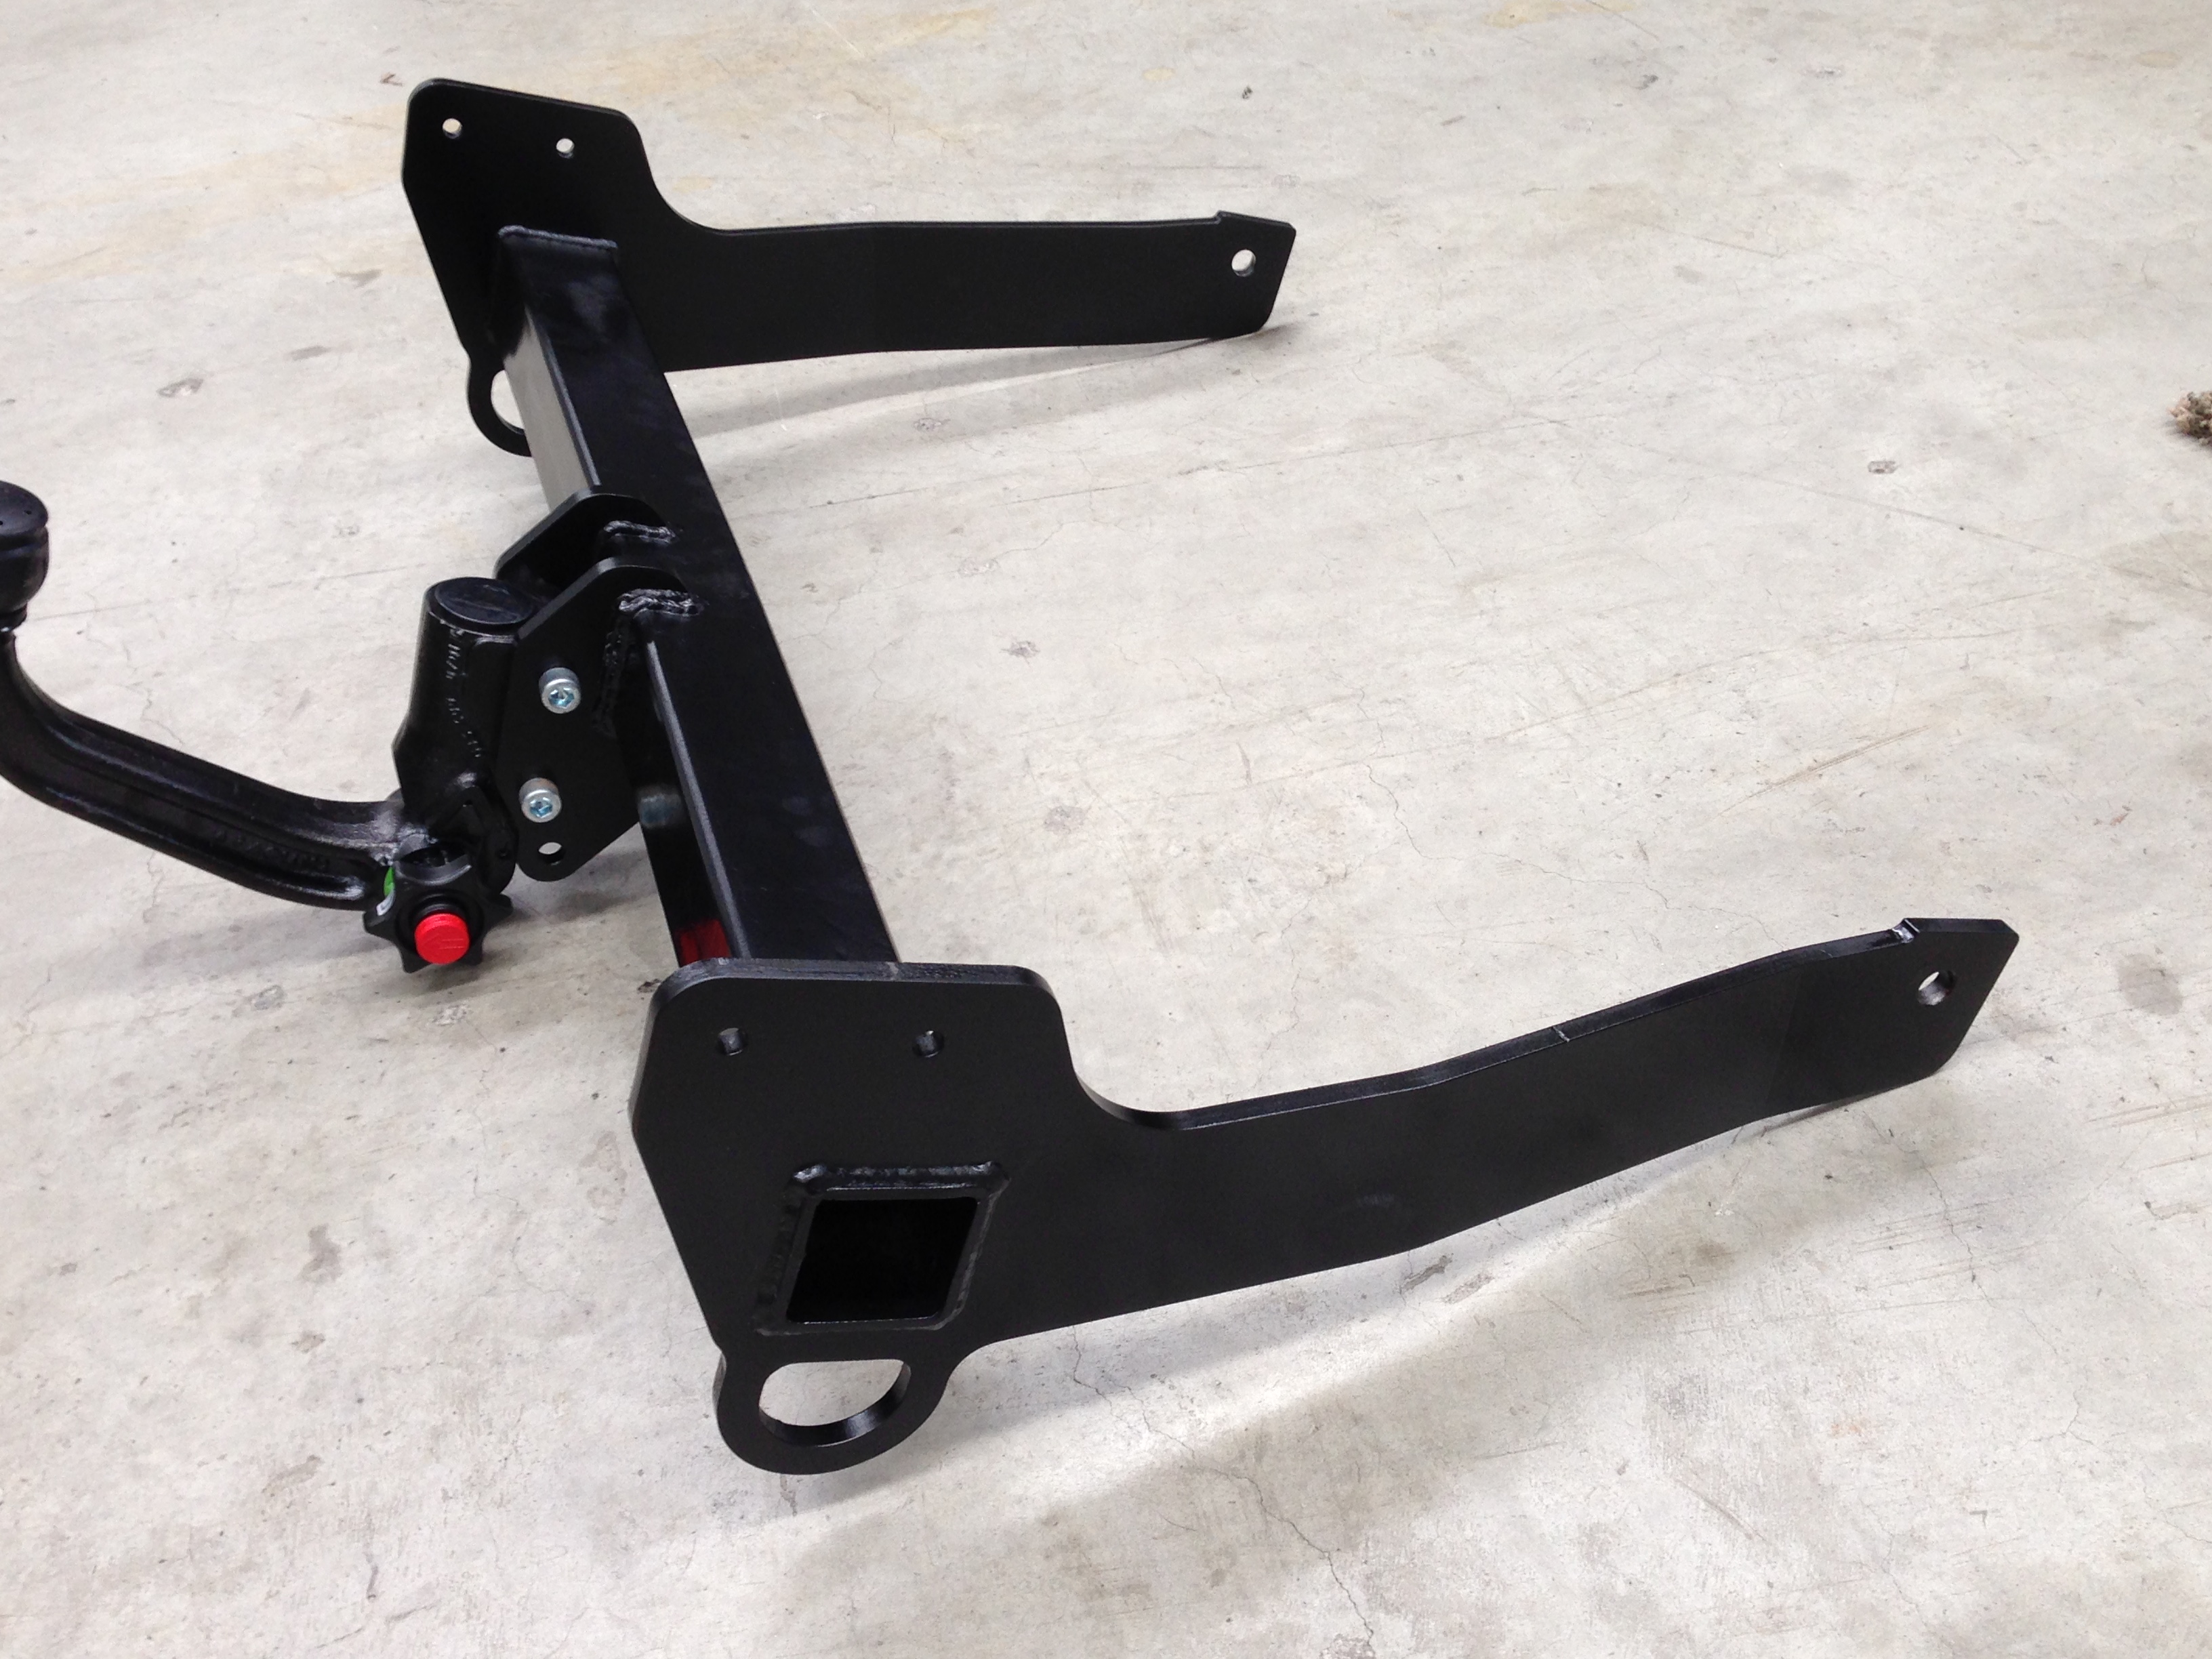
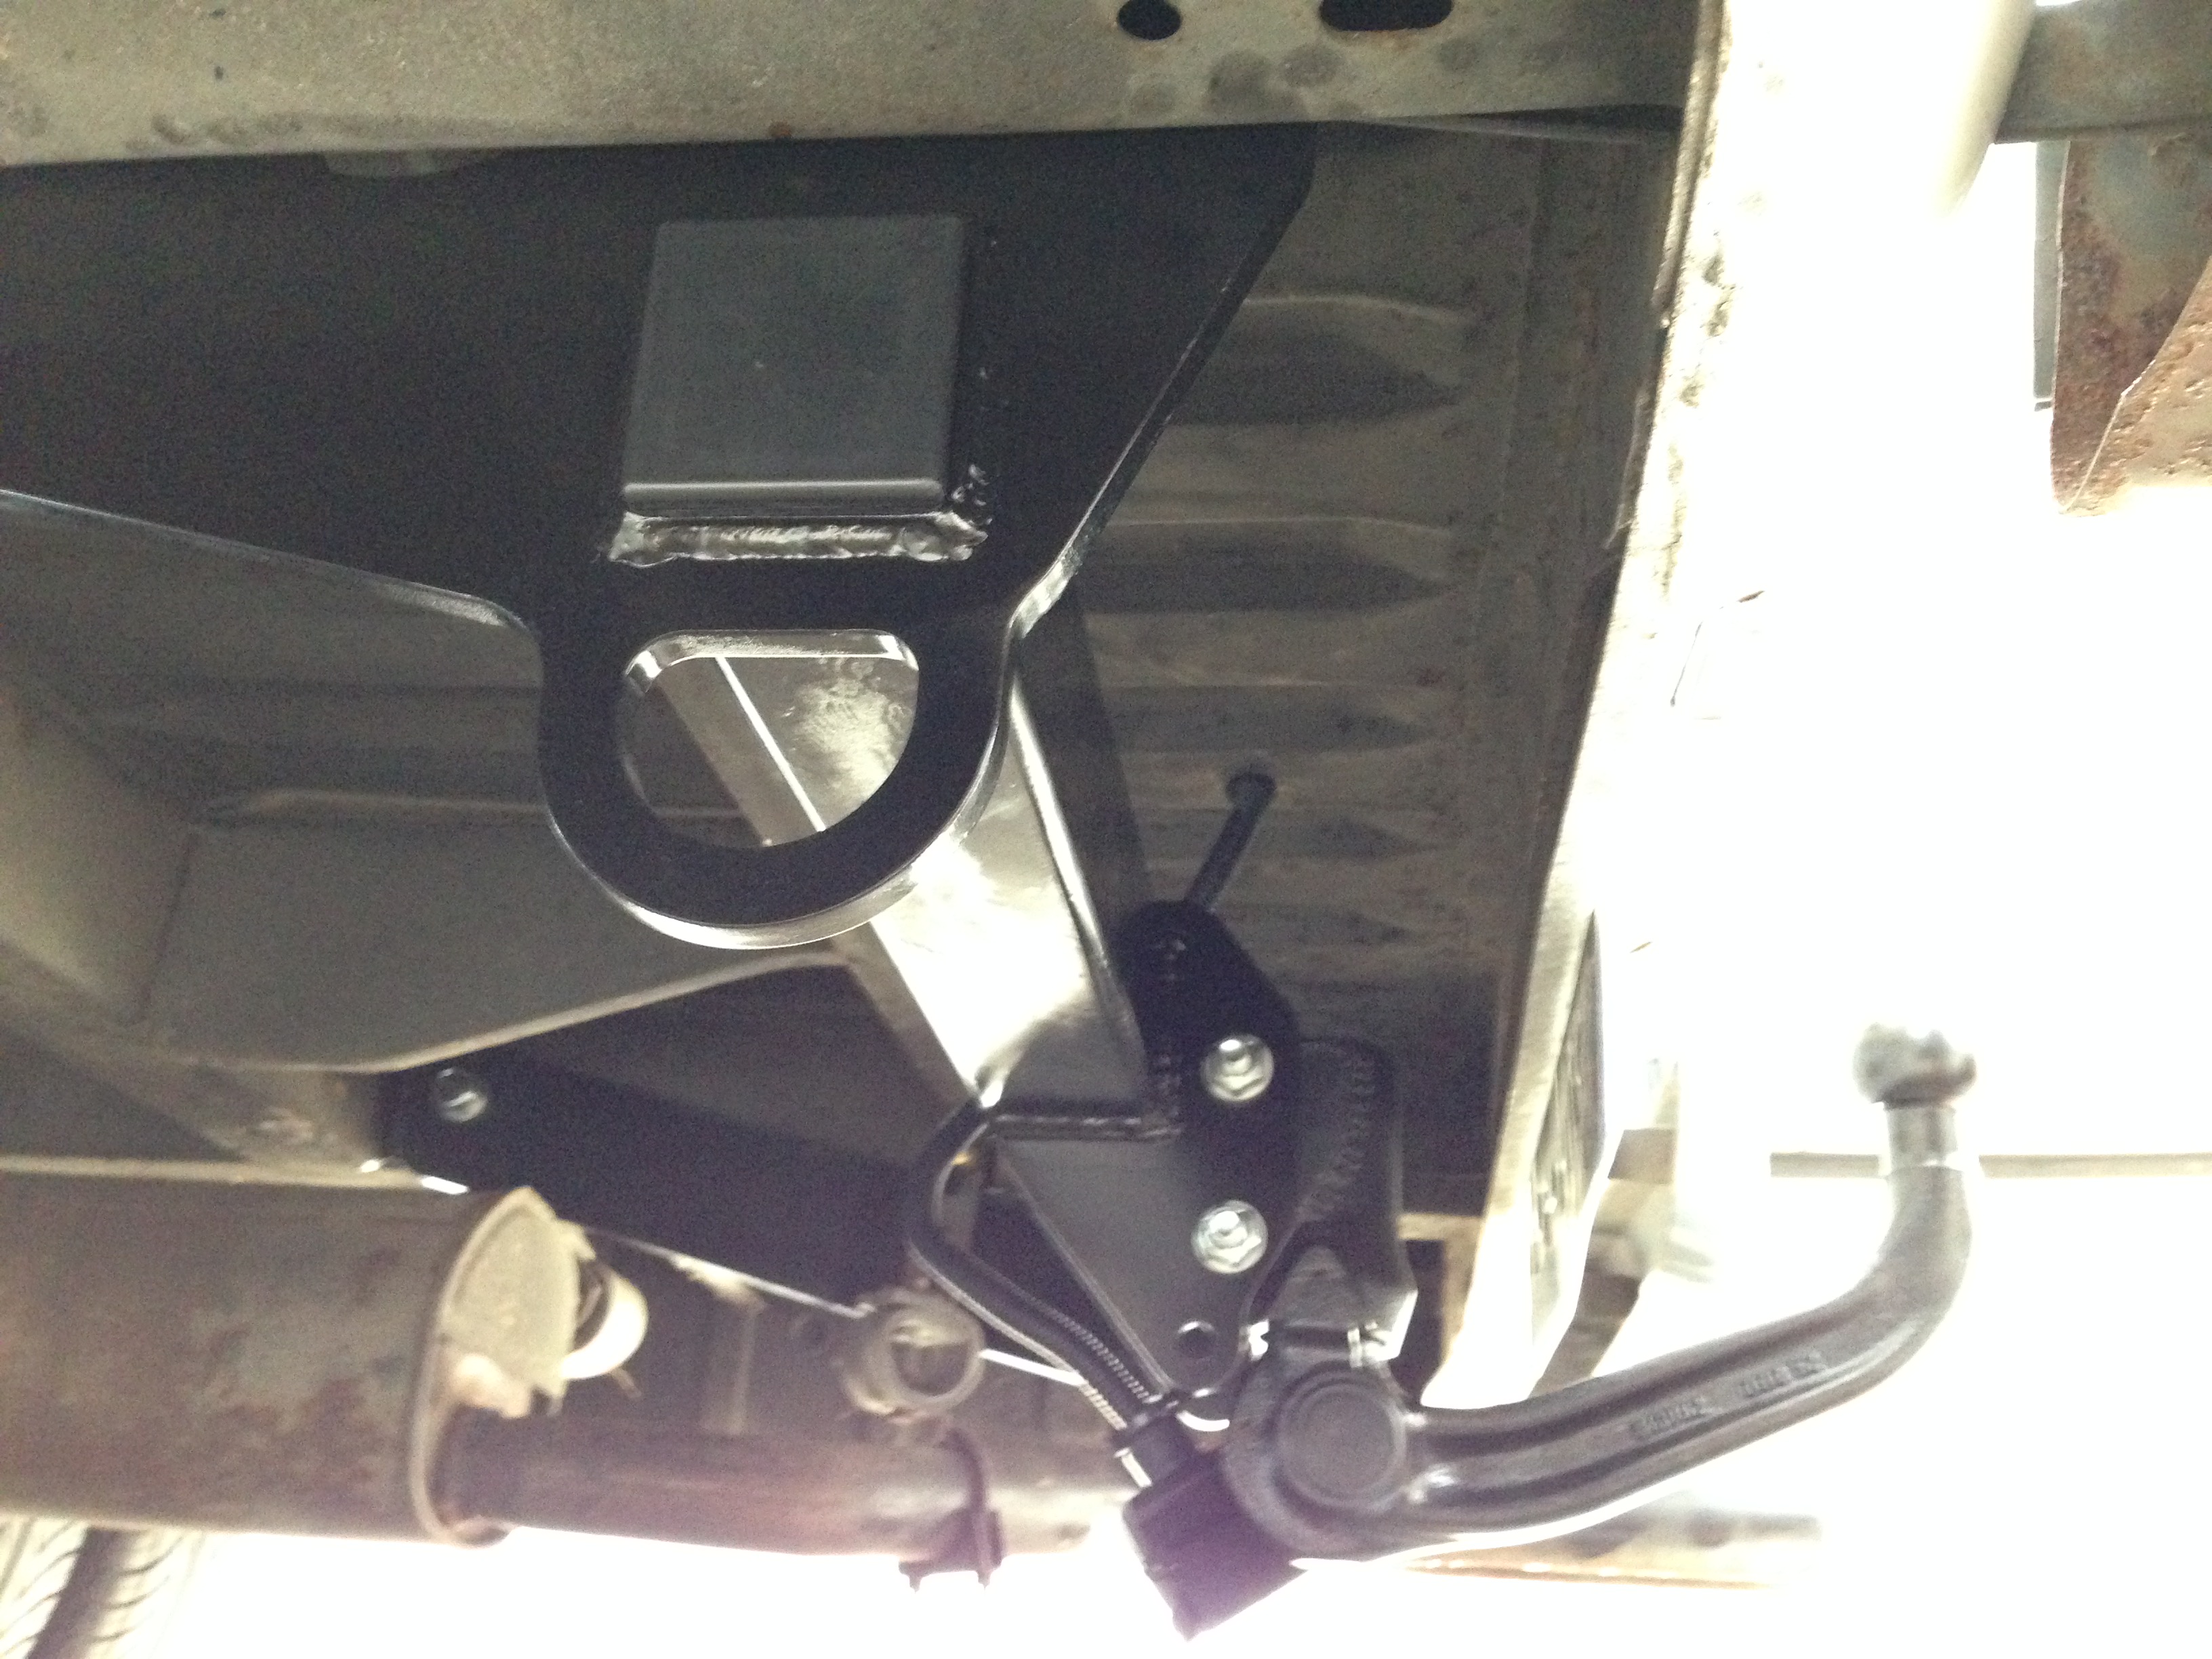
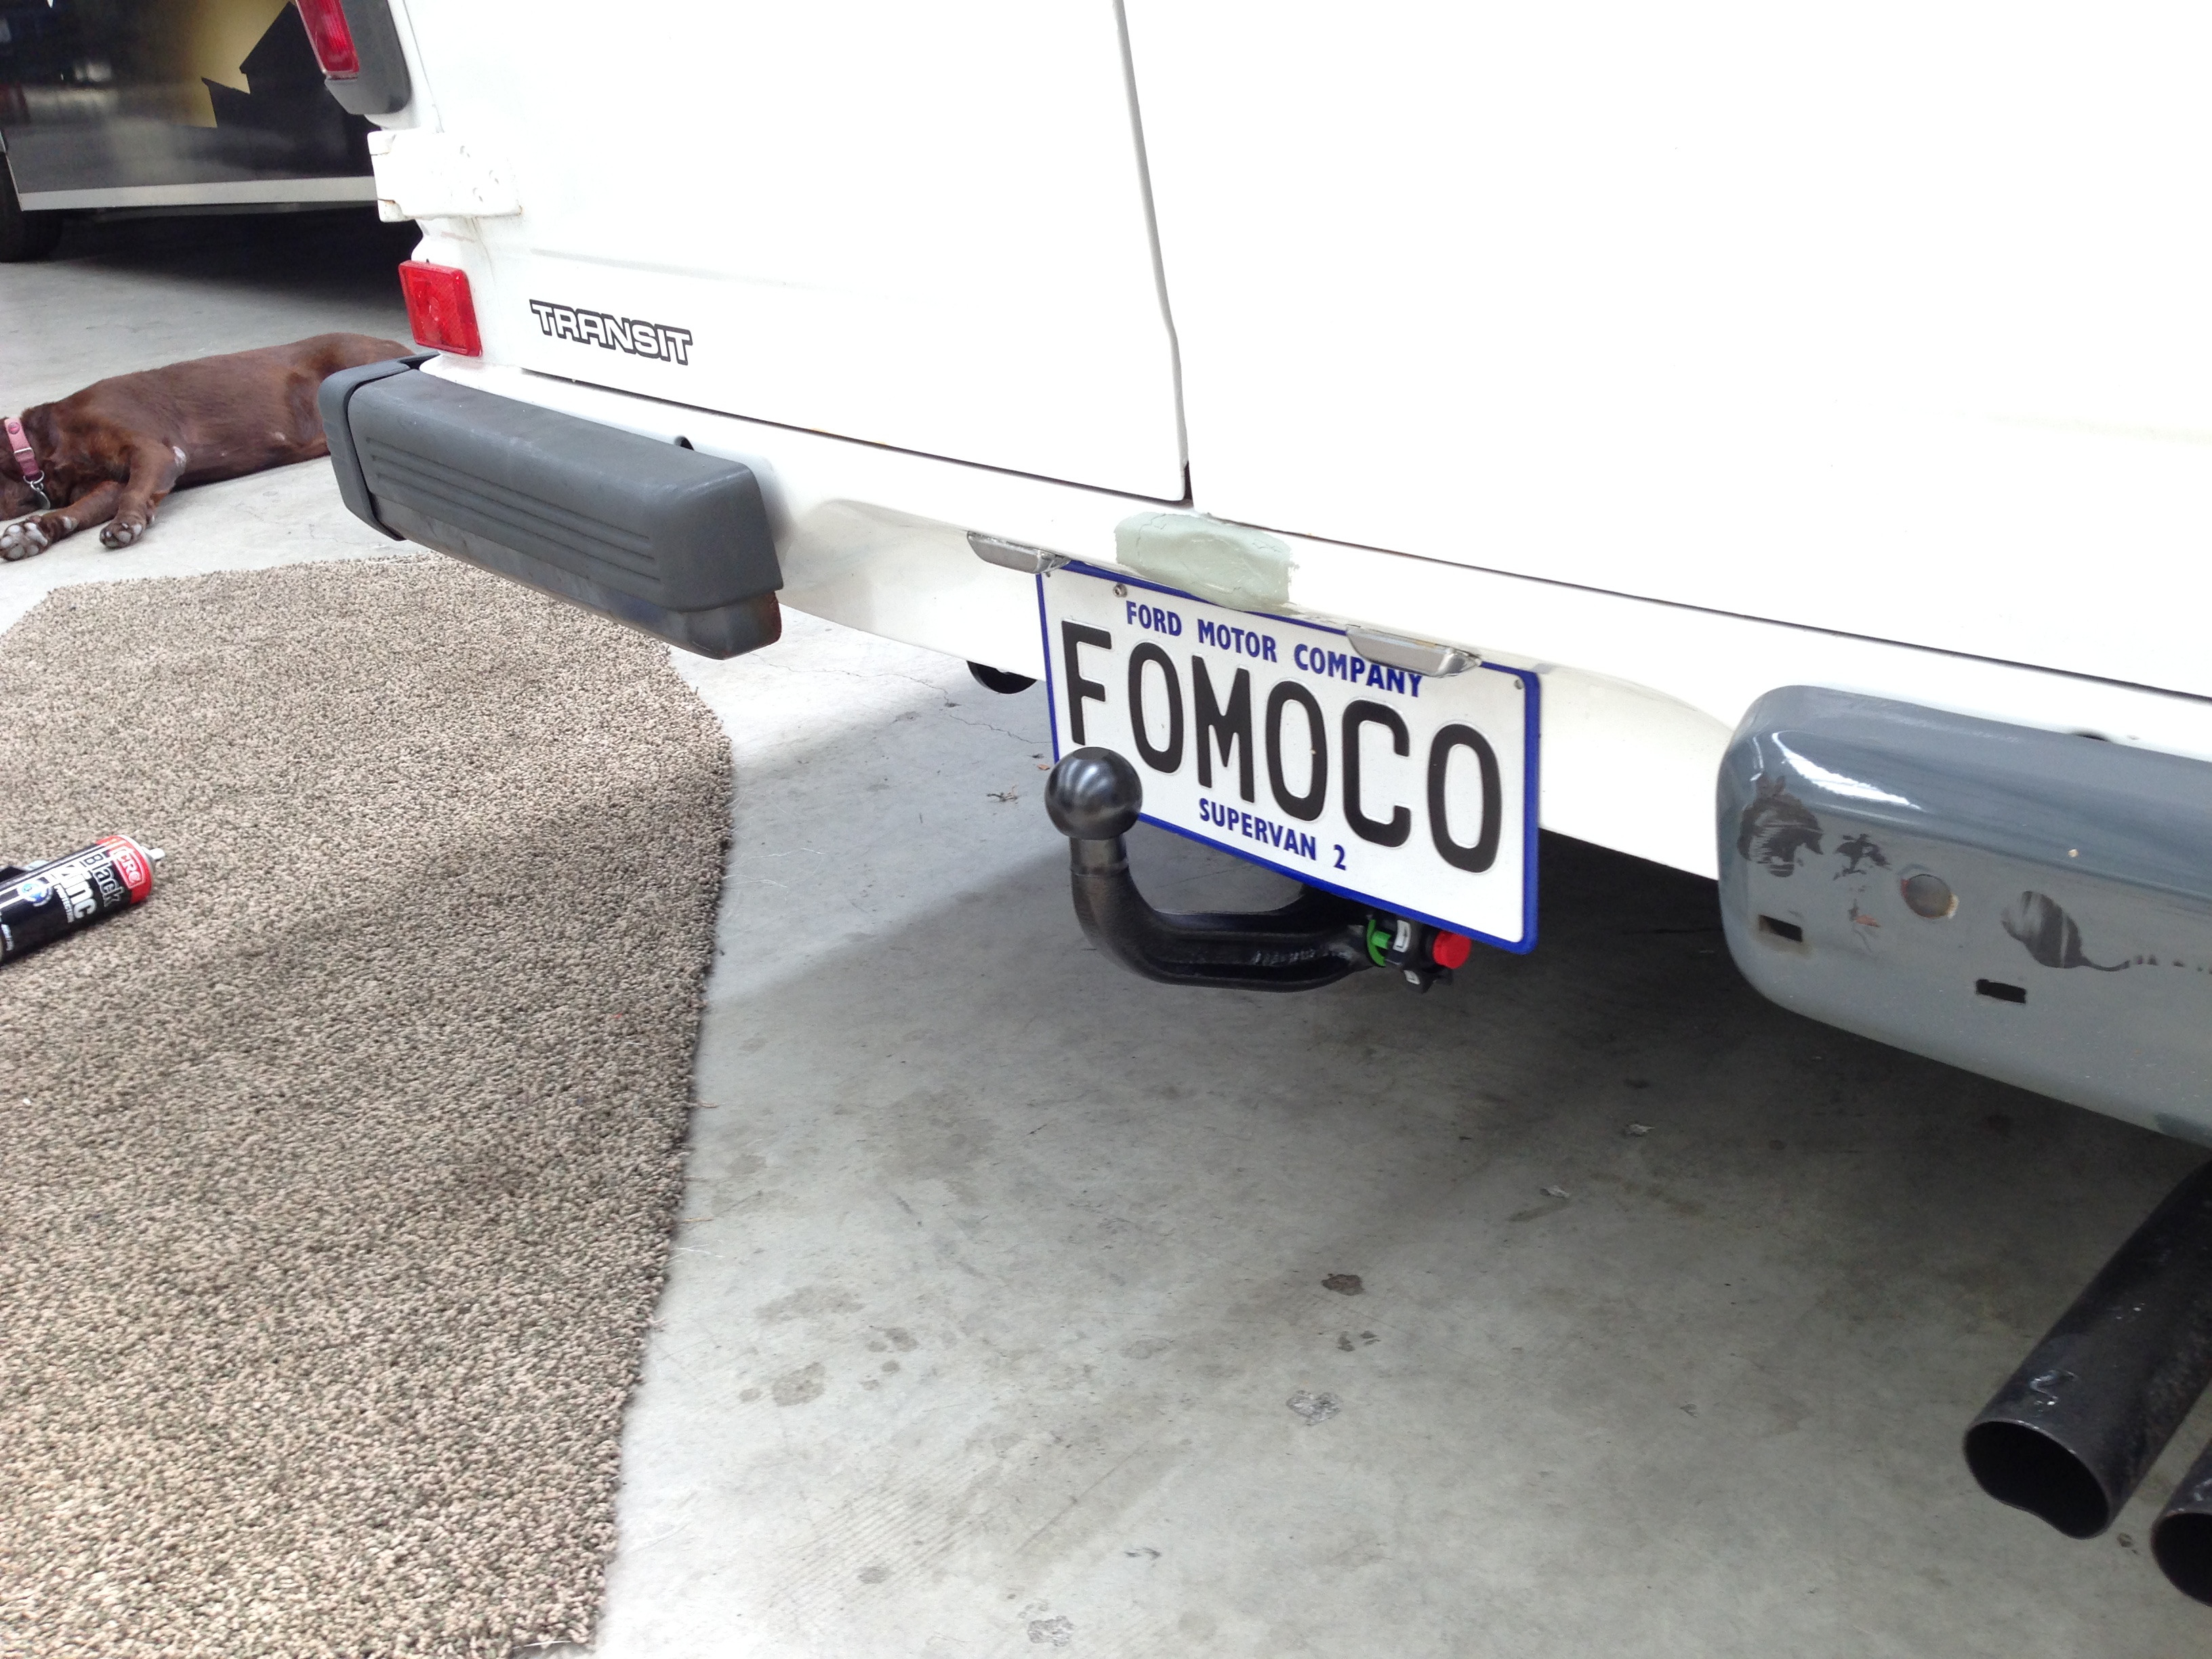
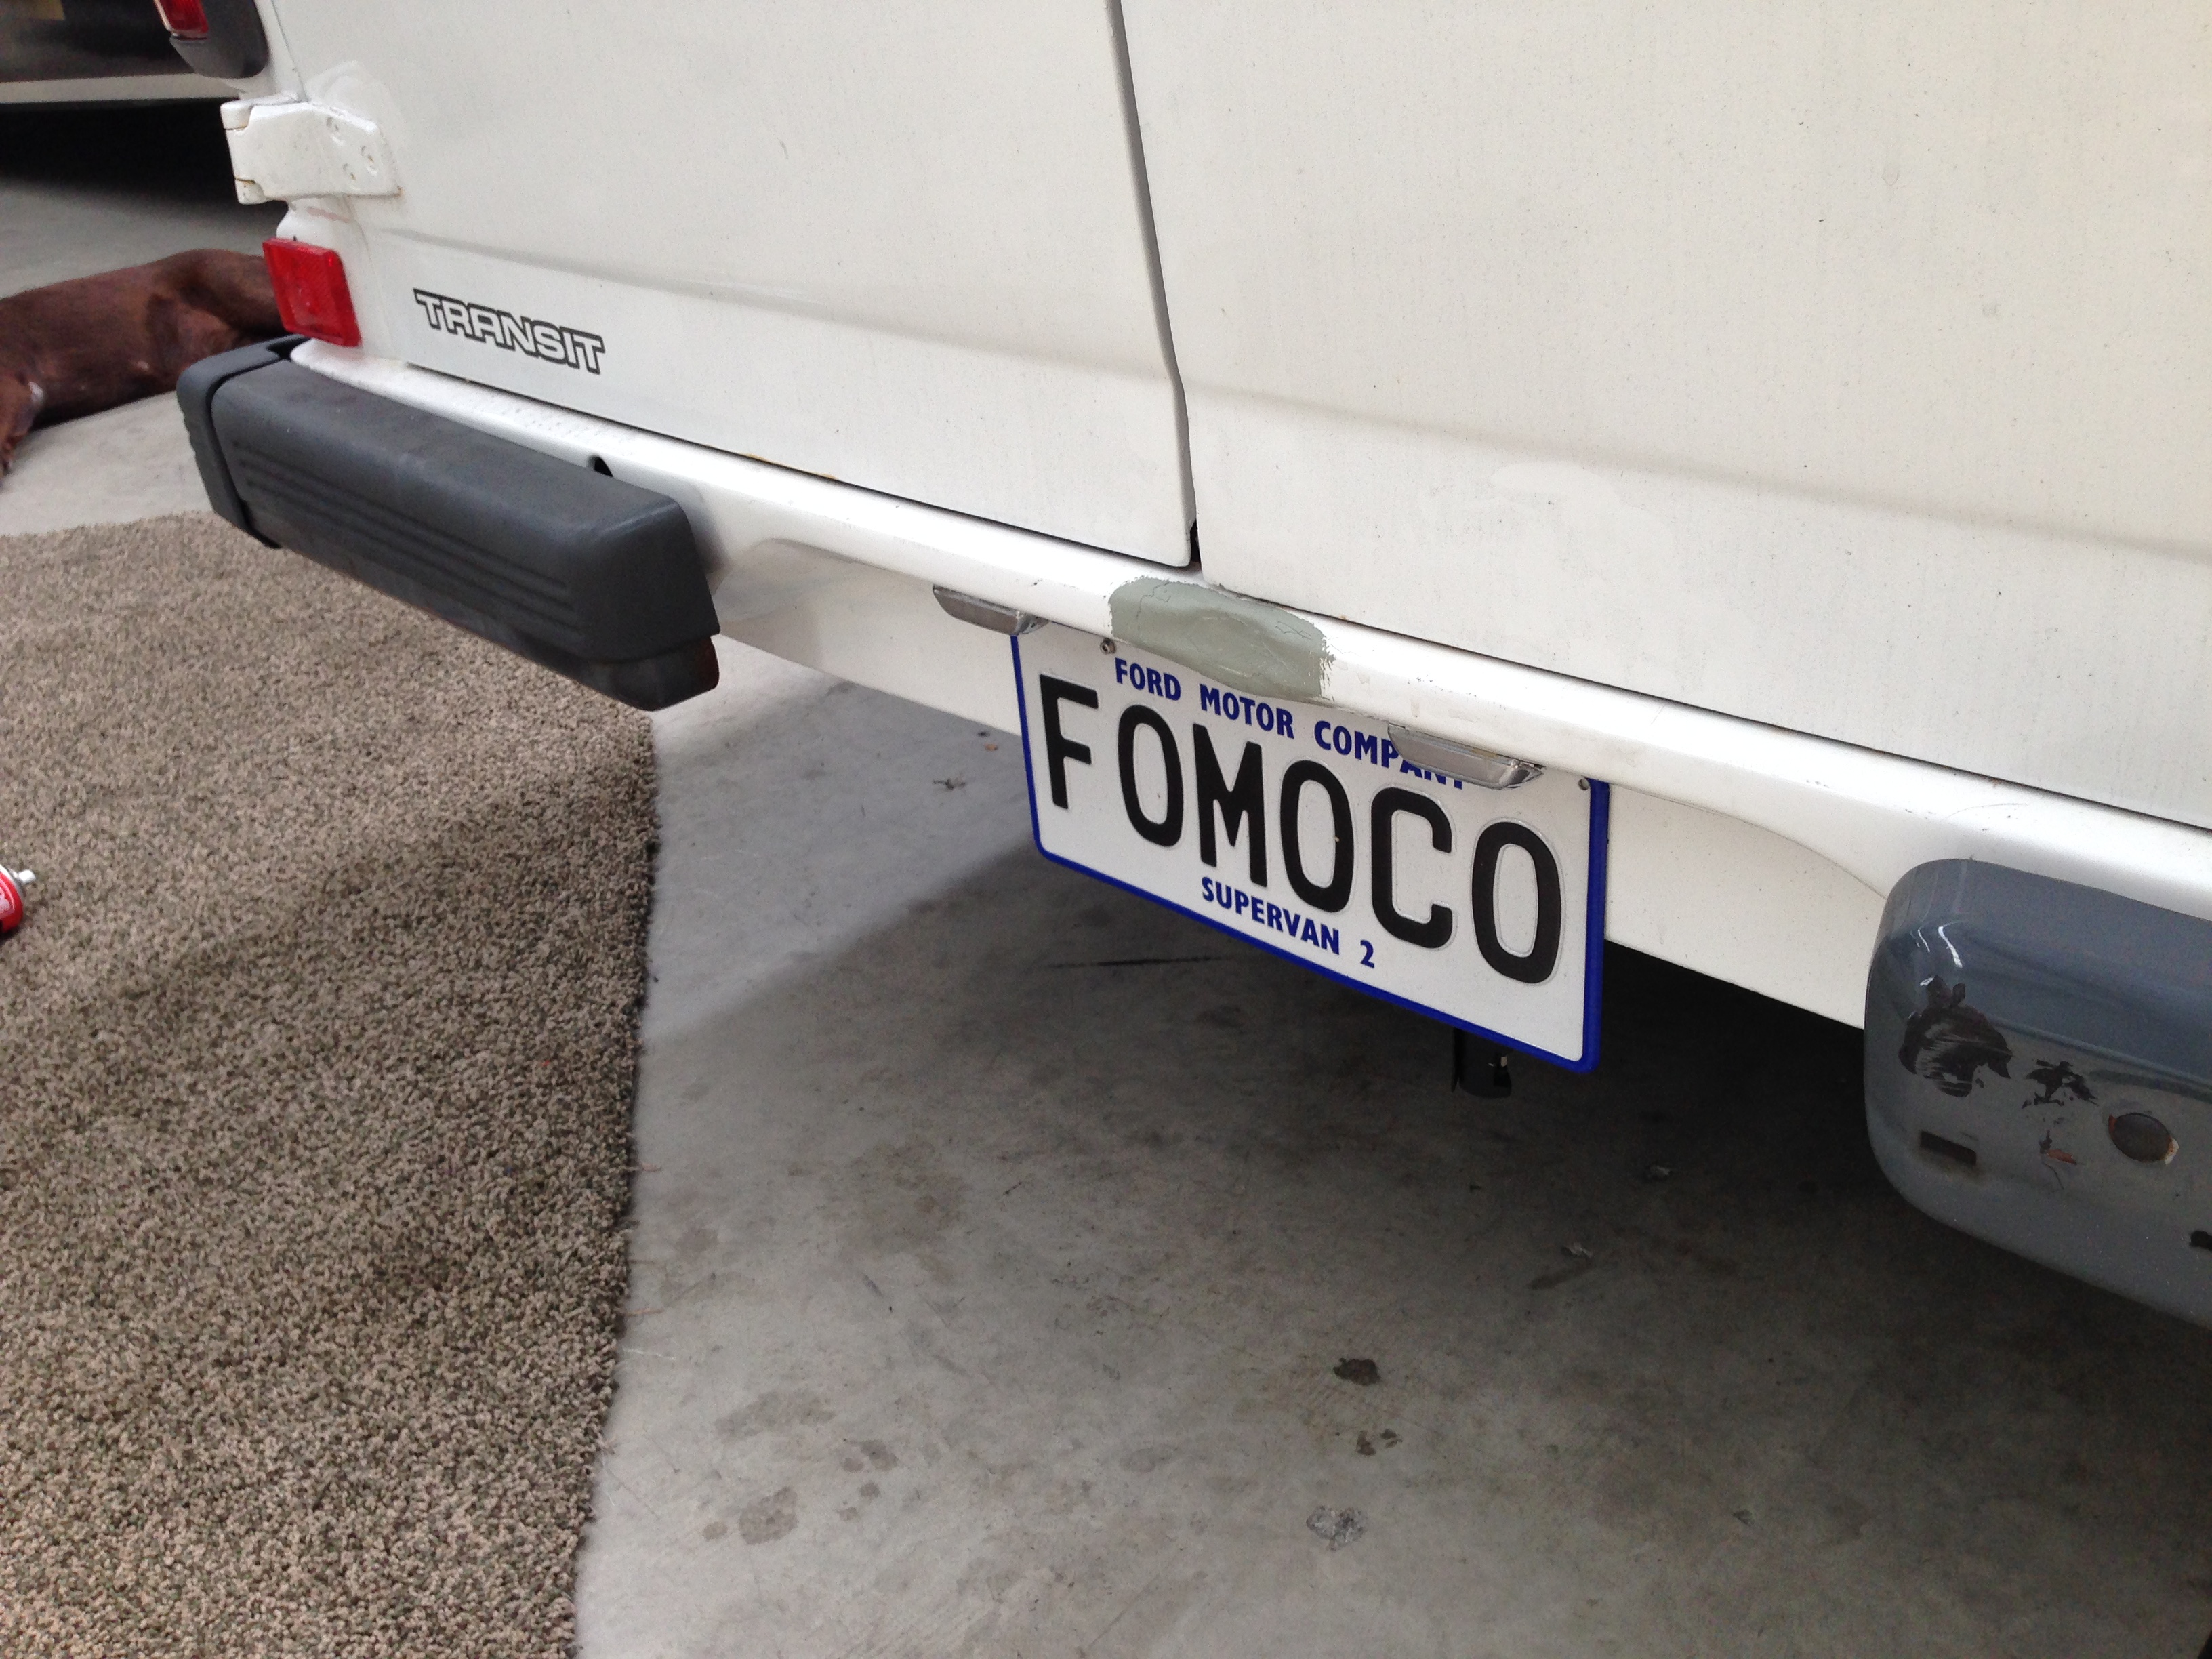
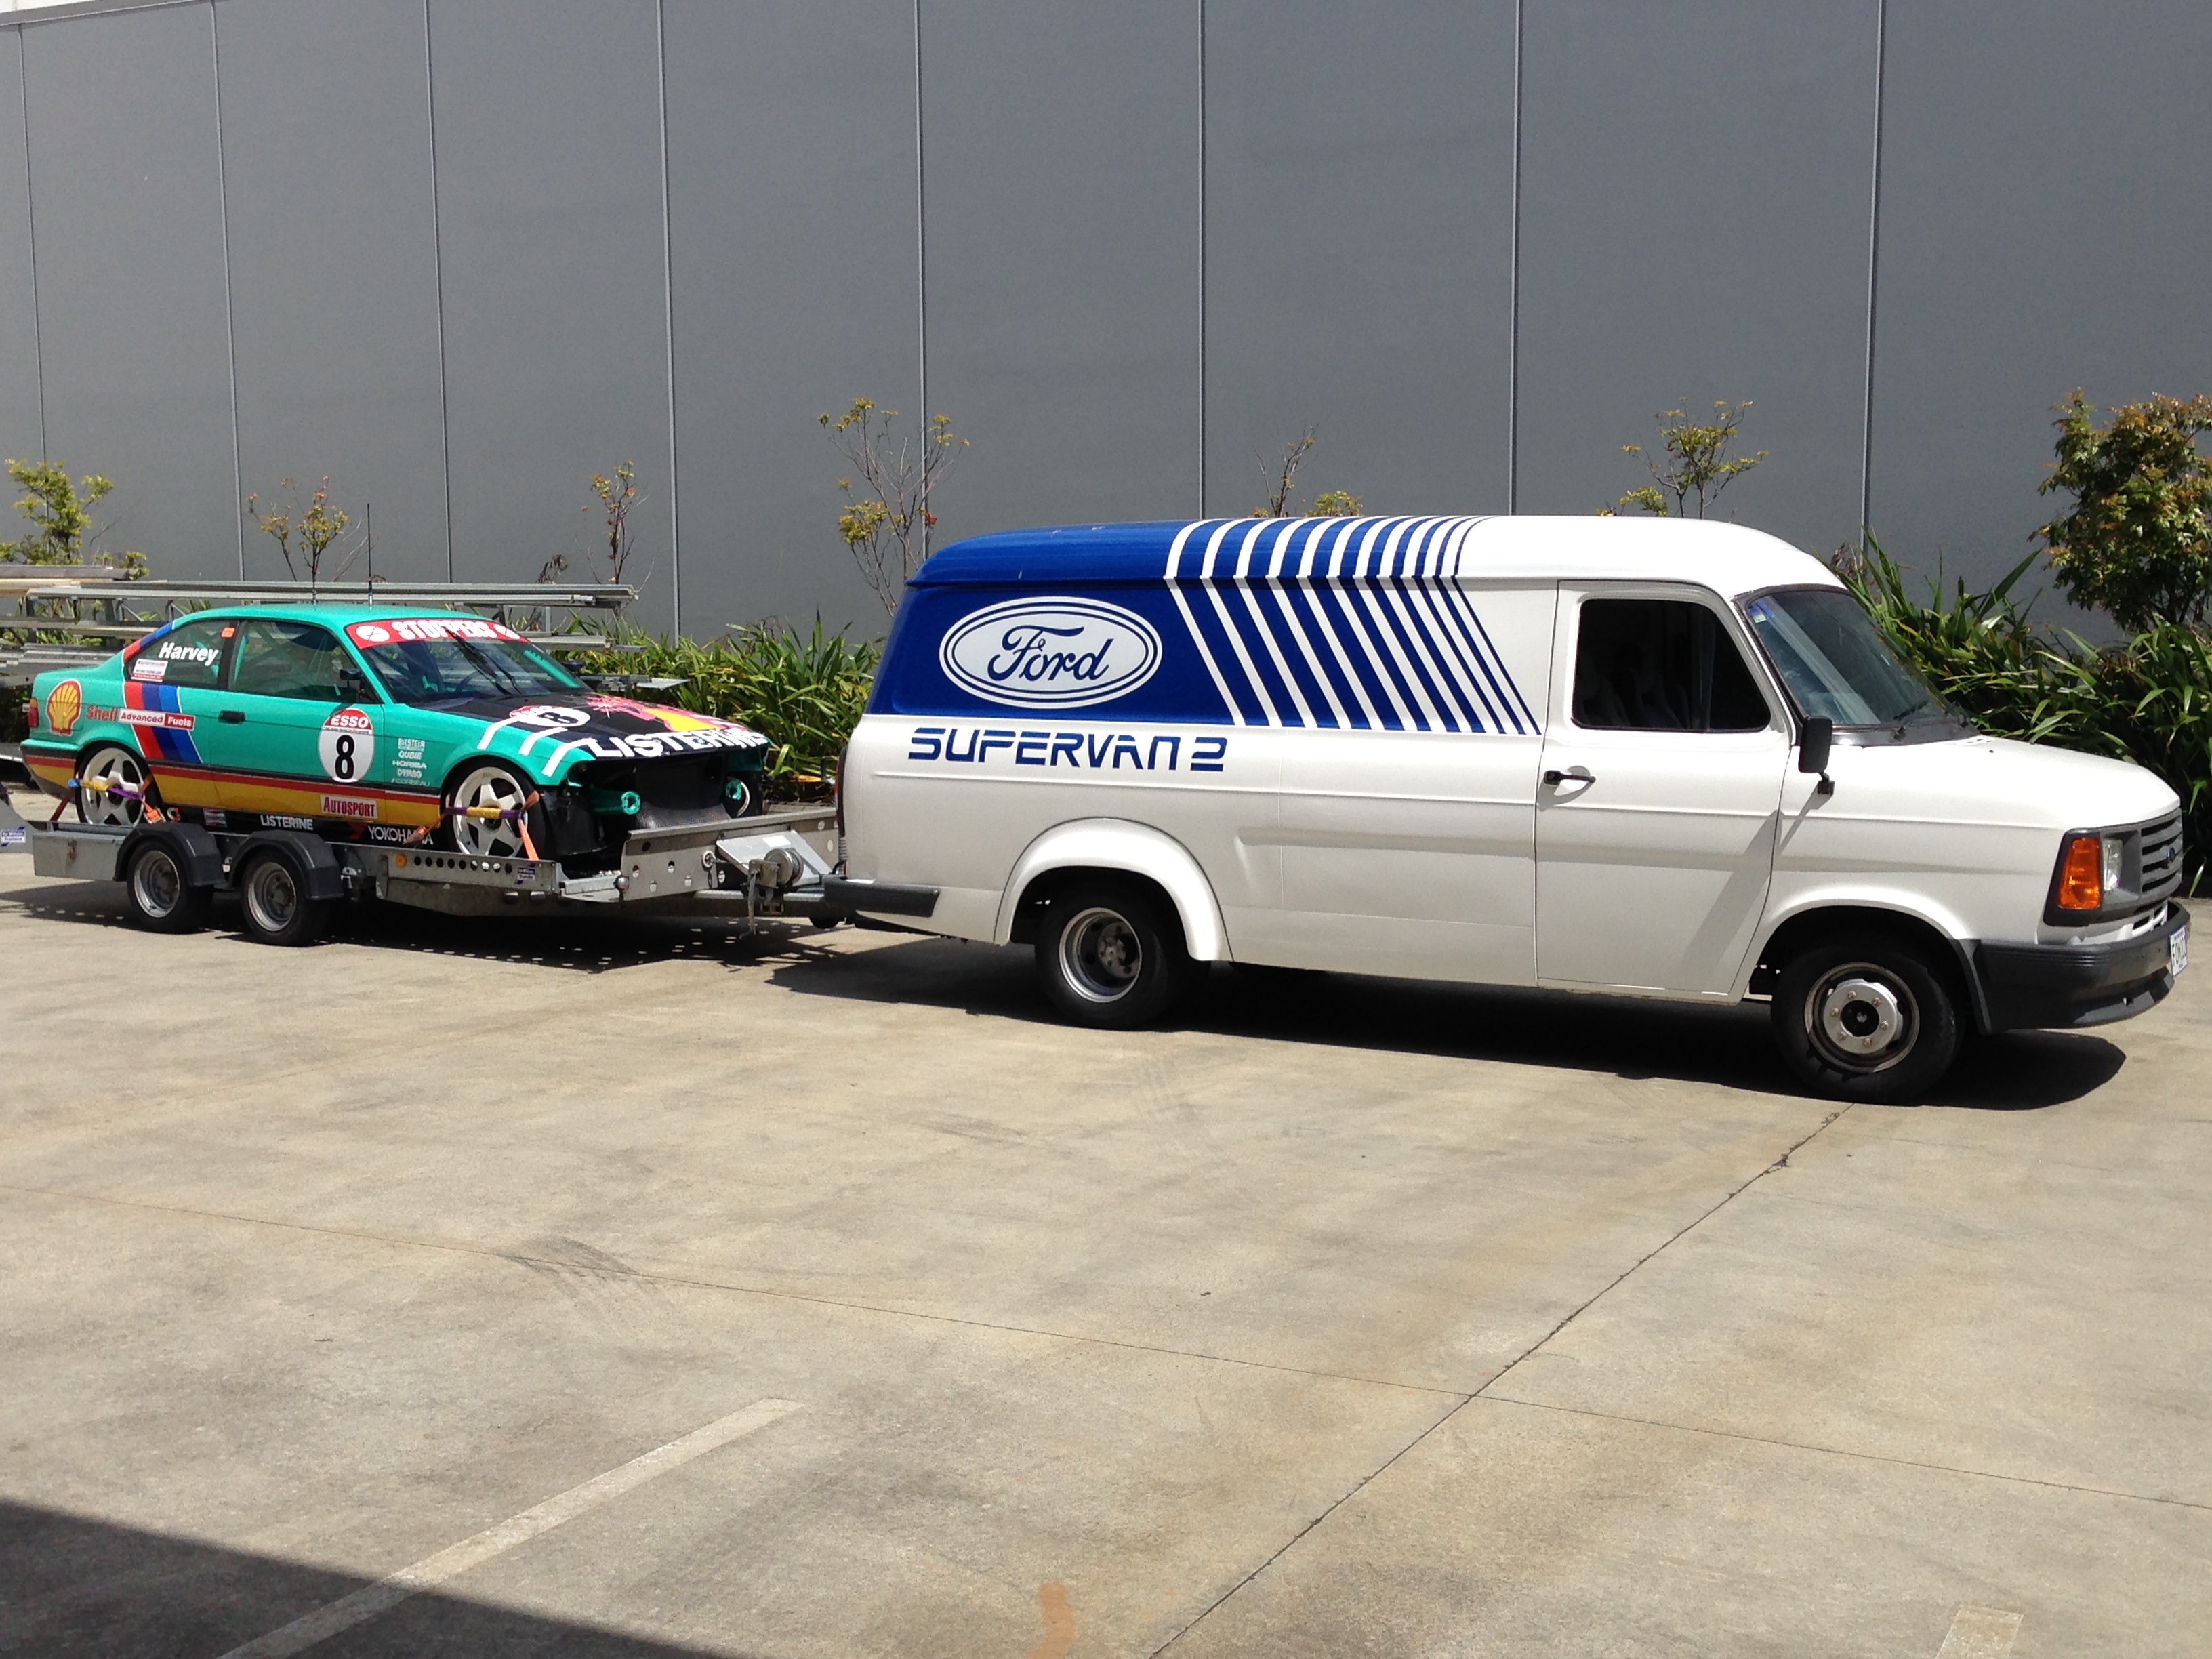
SV2 was bought with the intention of becoming my new tow vehicle, to replace my LDV 400 "police van". I went and got a quote for a towbar to be made for it, and was a bit shocked at the price of $1000 so I thought, "bugger that, I will make one myself" I really wanted a detachable towbar, so I scoured trademe and found a NOS Westfalia kit for a Subaru, which was rated at 1800kgs. I bought this, and set about chopping it into small pieces. In the end I used only the gooseneck, receiver, and a section of the square crosstube. I drew up some templates on autocad for the side and centre brackets, printed them out and a bit of a test fit, then sent the drawing to the shop to have them cut out of 10mm steel plate on the waterjet. The main side brackets needed a couple of kinks to follow the chassis rail,and then another test fit before welding, and they fitted a treat. Got my fabricator to weld them up for me, my welding is okay, but needed the skill of someone really good for this job, as failure is not an option! A can of black Hammerite and looking better: gooseneck and receiver fitted: And installed, still need to make a mounting bracket for the electrical connector: Now you see it: Now you don't And what better way to test it than find one of the most expensive race cars in the workshop, put it on the trailer and take it for a drive 30 minutes across town! Van towed beautifully, and has plenty of power for the job. All up, I came in a few hundred dollars shy of the price I was quoted to make a crappy fixed towbar, and this included me buying a 50mm gooseneck as well, because the kit came supplied with a 1 7/8" gooseneck. So I am a very happy chappy : )
 8 points
 -
So, i just wrote a massive yarn about this then my computer had a meltdown so heres a summery. I brought this off guypie while i was in hamilton for work. I did skids then pulled it apart. It is currently at the powdercoaters. plans are, wide wheels, exhaust, slam, take the loom out, eventually drop a 125cc in it, then ride it. Pics.. How i got it: How i want it to look:7 points
-
Now normally I get my ol man to tackle the wiring because, well, wiring scares me. But with the drag day looming closer and my ol man busy with other things it left me no choice but to do it myself. As the Mitsubishi wiring is heavily documented on the internet it wasnt that hard. I had a few questions that were either answered by my ol man or by Fuel. The wiring loom I had was damaged. It looked like the previous owner of the VR4 was running an aftermarket computer and had cut all the wires right at the plug making it impossible to repair. Going thru my ol mans garage (which has been nick named the "Mark-muda Triangle") I managed to find a VR4 wiring loom that I thought I gave away. Problem with this loom is that it was missing a lot of the plugs on the engine bay side. So I decided to make 1 good loom from the 2 Starting to repair Somewhat organised Back to the car itself, I made a bracket that the oilcooler bolts to. I had some lines made by ENZED (highly recommend) So with everything on the motor it was time to slam it in the hole This is where things started to go pear shaped.......7 points
-
Bring kids. Someone brings Chees every month6 points
-
Well hopefully this is engine in for the last time but something tells me it won't be. But got powdercoated bits back today. Just sat in place because waiting on auto sparky and spark plug tube gaskets.5 points
-
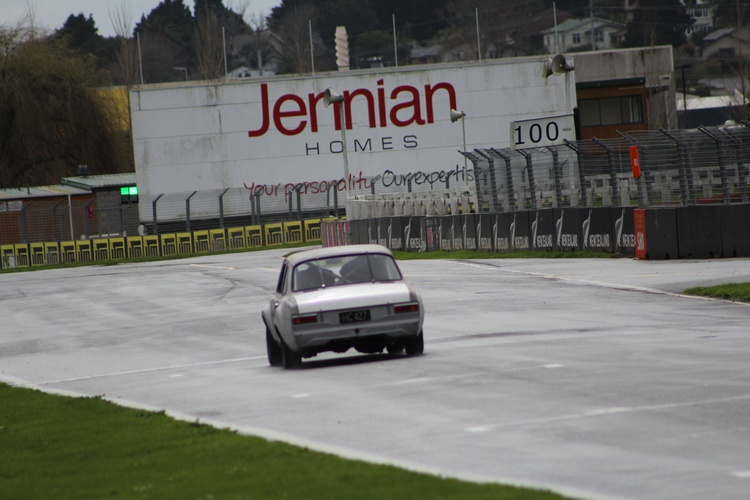
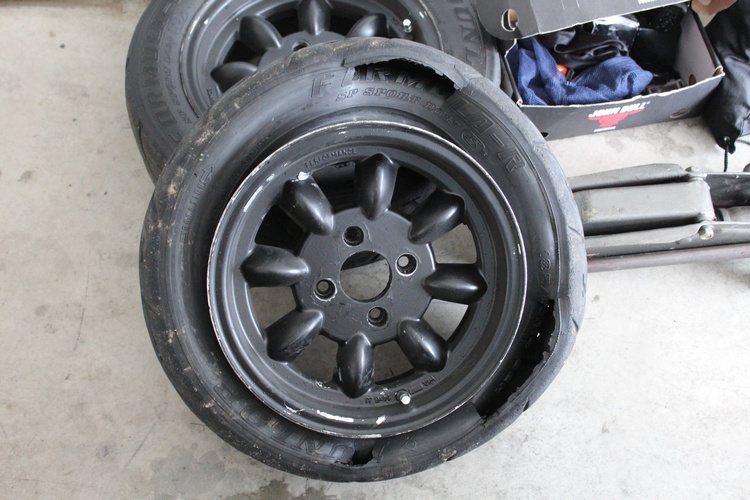
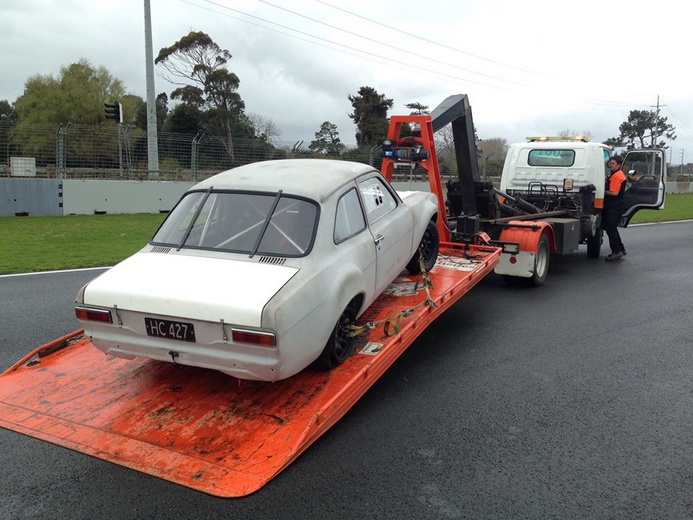
Too Much fun Until this happened Great first outing in the car , a few setup issues with the pedal box and then tyres that didnt want to stay on , but overall very happy
5 points
-
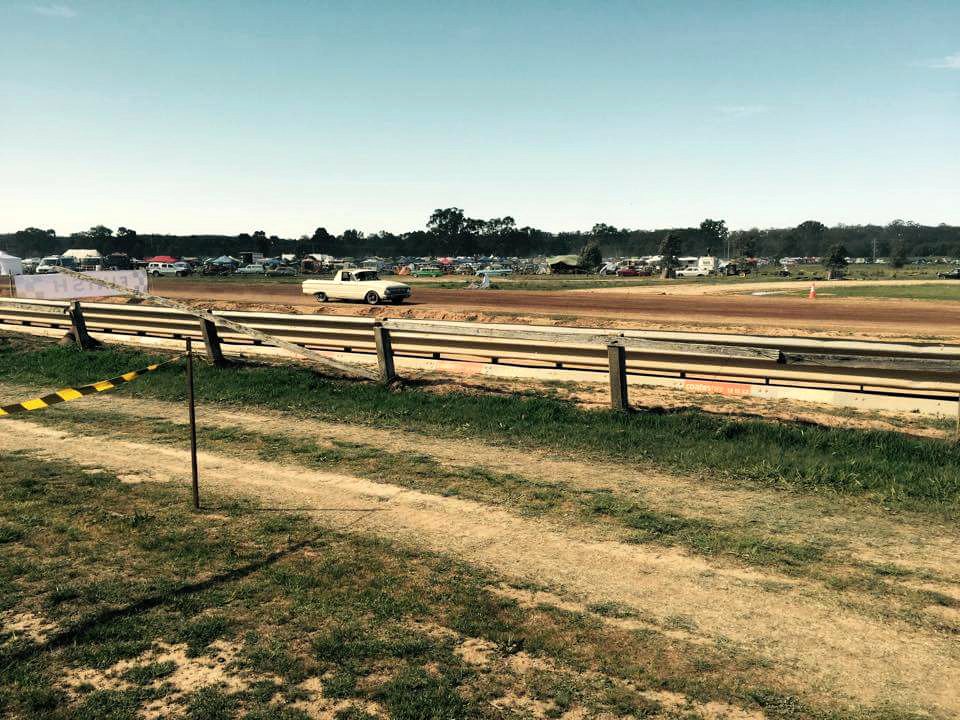
went to OS Drags on saturday, great fun day with plently of variety, and shits and giggles. pics talkies (^pic shamlessly stolen from Niswhale who posted it in the Dragday pics thread ) car ran well, shaved 0.7s off last years times, and was very consistent. Made it to the third round of DYO, but was pipped by Veggie who eventually won - again!5 points
-
Sunday after Drag Day I set the tappets, installed the clutch and swung the engine back in the hole Hellloooww Strill have to get teh gear box in - Do you even lift Bro? Friends? -+-+-+- Just hefted the gear box in, went pretty well with a jack and two small furniture trolleys, and all my socket extensions, just the fiddly bits like linkages and stuff to hook up now. So thats the front 2/3rds of the running gear sorted, and half the rust. Just brakes, diff, and the rest of the rust to go, but that means chopping up the parts wagon, which means having a running van to store and move the bits which means rust repairs on the van, which ill do over the christmas break ahhhg bloody cars.5 points
-
Set up the roof rack, looks pretty good but I might need to chop it more to make it a bit lower. Shifter is now higher than the roof courtesey of some free reo bar from work4 points
-
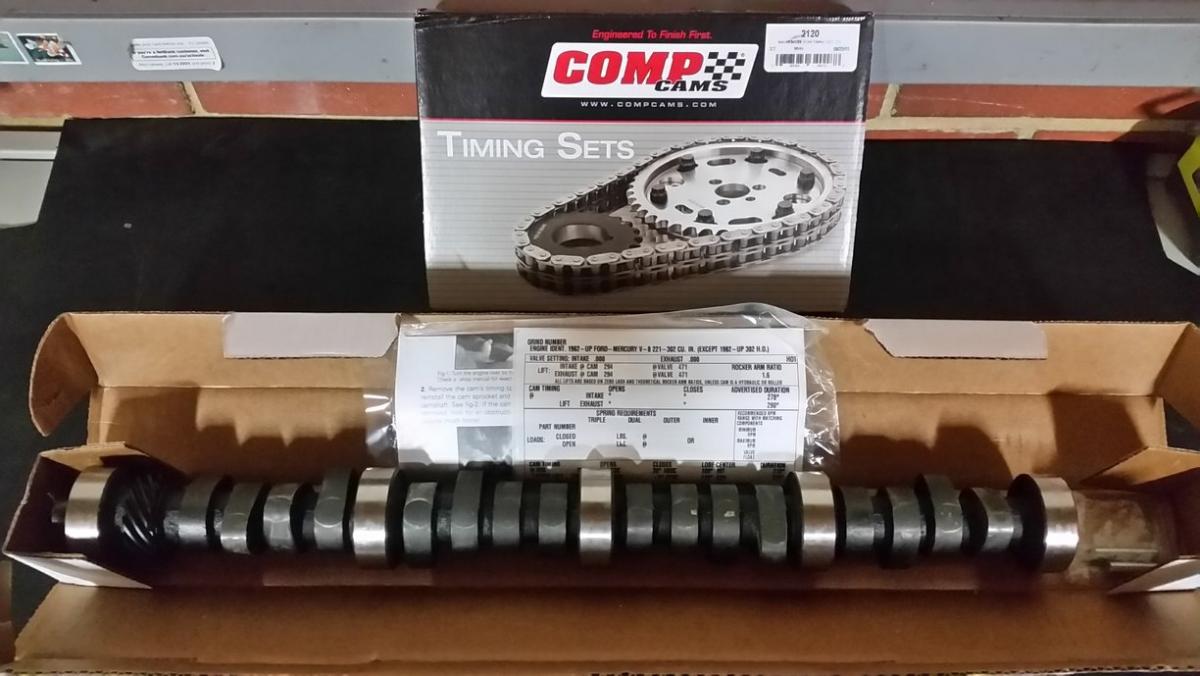
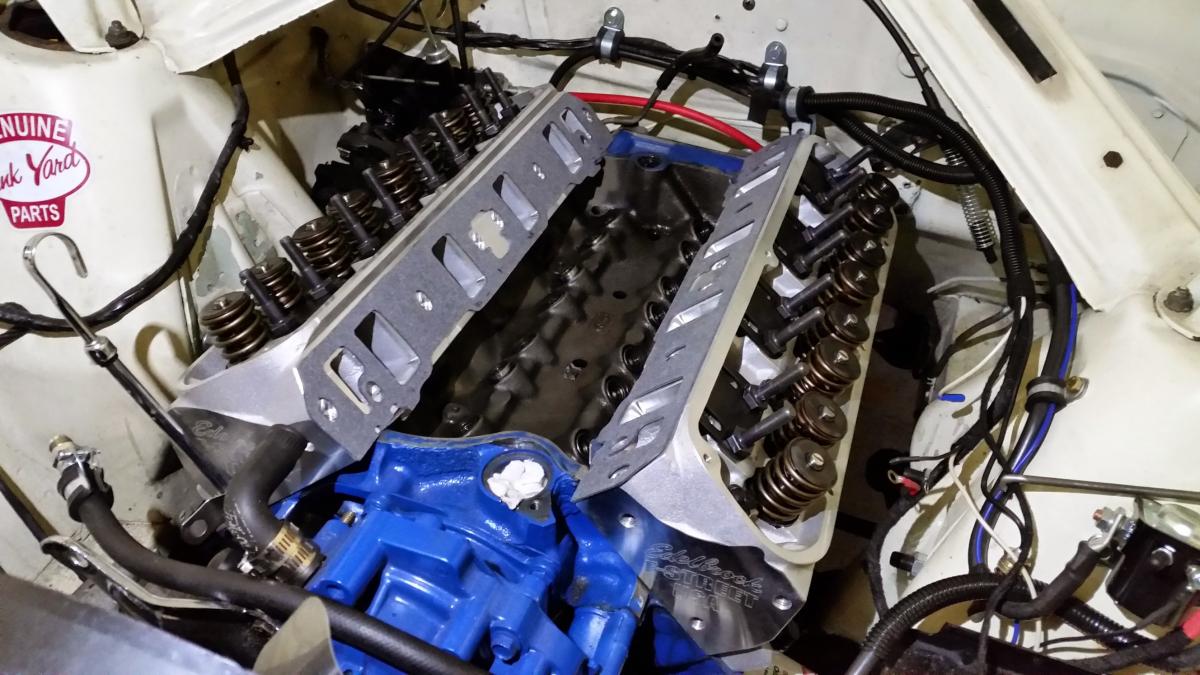
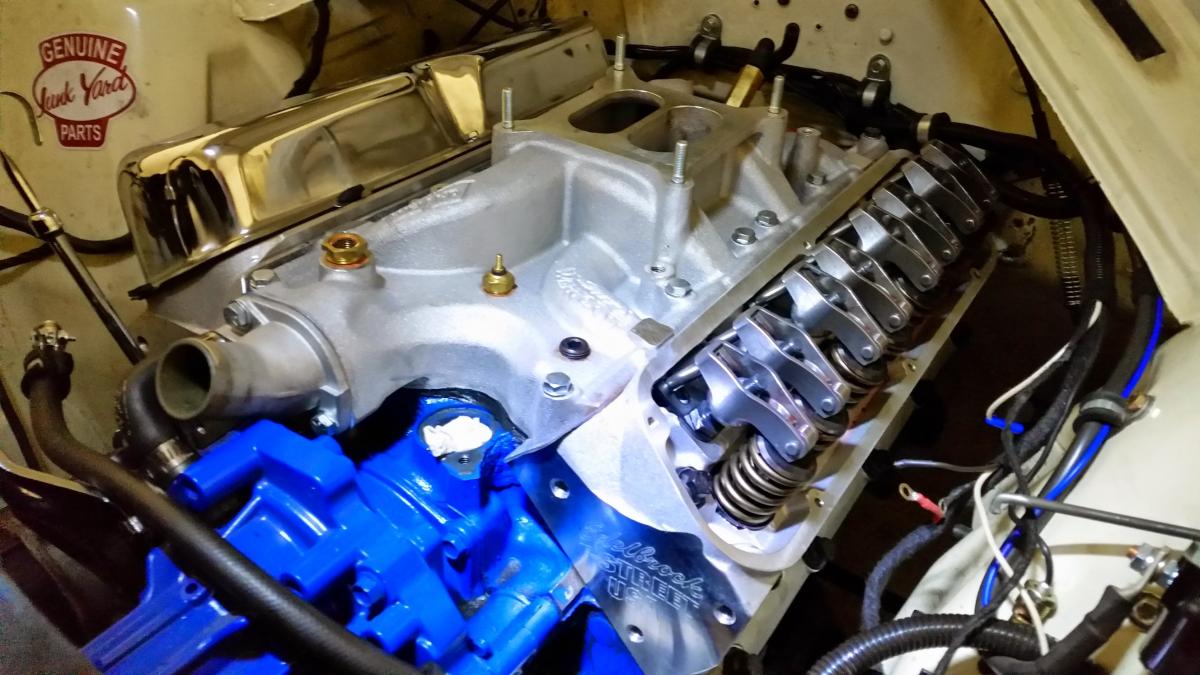
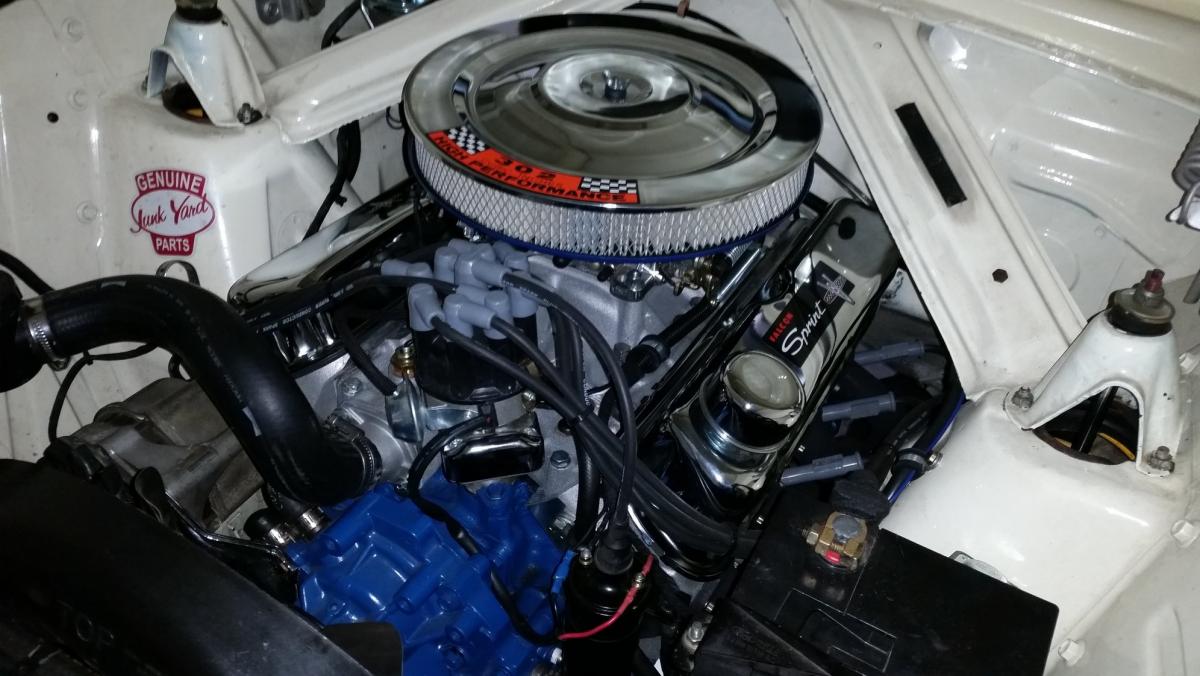
Oh page two now?! Ha, anyway, moving right along to the present and this just turned up from summit. I was not too keen on putting a cam in when I had the heads off etc, due to that becoming another potential hassle, when I really wanted to get it back together asap. Now its all bedded in I can wake the old 302 windsor up! Specs are the following : Basic Operating RPM Range:1,800-5,500 Intake Duration at 050 inch Lift: 218 Exhaust Duration at 050 inch Lift:228 Duration at 050 inch Lift:218 int./228 exh. Advertised Intake Duration:278 Advertised Exhaust Duration:290 Advertised Duration:278 int./290 exh. Valve Lift with Factory Rocker Arm Ratio:0.471 int./0.471 exh. Lobe Separation (degrees) 114 Basically its the biggest cam I can fit with a stock torque convertor, it sounds great on the youtube clips I had listened to
4 points
-
So got on to work on this today, I suspected the fuel pump was not doing its job. After googling around I learnt there is a jumper in the engine bay to turn the fuel pump on, I jumped this and listened out for it and heard nothing. I found the connector for it where the fuel sender is and checked for voltage, all ok. Lastly I took the top fuel hose off the fuel filter and attempted to make a petrol waterfall, and there was none. Emailing around all the wreckers now to try and find something before end of year! The bummer about it being the fuel pump is that on this car you have to remove the petrol tank to get to the pump, dangit! I sprayed a bit of ether down the throttle and it coughed and revved for a moment so hopefully that means there isn't anything else wrong. anywho heres a picture of the engine because no one likes a picless update4 points
-
Saw this pop up in a buy/sell/swap group on Faceballs last week for next to nothing. I ignored it for a few days and decided I'd go see it if it was still there on the weekend. Low and behold! It was. So here she is: She was running on pick up but was last used on a farm so the engine and such was super dirty. Slowly took the plastics off. Plan on ditching the rear plastics but I'm gonna try fix up the front legshield, or source another one if possible. Sadly the fs50 legshields seem to be few and far between. Not even reproduced anymore, unlike the fa50 or fz50 ones which can still be sourced pretty easily. And that was as far as I got on the day of pick up. Got back to it last night and she's running again. Planning on tidying up a few things like the wheels, exhaust, filter. Get her road legal shortly and ride through the summer before giving her the royal treatment next year.2 points
-
Yeh, apparently some other dude was going to buy it for vintage cart racing, but didn't show up, so I got it. He was a bit dark when he heard I cut it up. Bouns of old cart is low chromoly content, so easier for numpties like me to weld. Now that the utes done, I can get back to working on this.2 points
-
As you may or may not see in the video above there was oil on the cambelt. It was a bitter/sweet moment as I was wrapped that my wiring was good and the motor kinda ran, but theres an issue. This video was taken on the Monday before the OS Drag Day. At a quick glance it looked like one of the tensioner bearings was releasing oil/grease past its shield. So we gave up that night. I returned the next day and found a big pool of oil on the ground. There was a pinhole in a weld where the sump was modified. Unable to fix this in place, the motor had to come out. This was the Tuesday before the OS Drag Day. I was unable to work on it on the Tuesday or Wednesday due to work Christmas dinner and looking after kids. The Thursday before the OS Drag Day I had my good cousin Ants (owns the noisy VK Commodore) come round to help. He zapped and fitted the sump up, replaced a front caliper and fitted the motor back in the hole whilst I did the important stuff like fit the locked diff and fender mirrors. We fired it up again and still was spraying oil from somewhere on the front of the motor. I had the ol man help out on the Friday before the OS Drag Day and have one more crack. I bought some more oil seals (crank, oil pump and balance shaft). I say more because we had already replaced these during the cambelt replacement. As he started to unbolt items he found that on of the hydraulic tensioner bolts were loose. He bolted everything back up and sure enough, no more oil spray.....whoops. 9:30pm rolls around and he has the car running as best as he could. At this stage I havent even got it on the ground let alone taken it for a test drive. 10:00pm I take it for a drive around the carpark. I give it a mouthful in 1st gear and felt good. I get braver and hoon from 1st to 2nd and then it bogs and runs like balls! Like its in limp mode (no power, over fuelling) I then realise that I didnt hear the external wastegate open. I found that I didnt hook it up and the motor saw full boost which at this stage I think ive cooked the motor already...... 11:00pm I wash the car then load it on the trailer hoping that someone may be able to help me out at the strip. 12:00am Tow car home pissed off that I wont be racing. Managed to get home at 1:00am Saturday, the day of the OS Drag Day I dragged the car down to Meremere and try to start it to drive it off the trailer and it wouldnt start. We push it off and im thinking we should have kept it on. As I inspected the engine bay in daylight the problem was evident. An intercooler pipe had blown off. We clamped that back on and it fired up and ran good. Took it for a little test drive and all was ok. I managed to pass scruitineering and took it out on the strip to help dry it out which was a good opportunity to test it further. It was running great Photo credit - MichaelJFox I took it out for its first run and managed to get a 15.25 taken it somewhat easy 2nd run I ran a 14.39 - I was over the moon at this point. All I wanted was to get in the 14s. The car was running awesome. As the day went on the car performed very well. A massive contrast to how the car was running less than 12 hours prior. So all in all an awesome day. A lot of late nights payed off and I met the deadline. Many awesome people to thank Heres a vid of the fast time i managed Now to tidy it up and drive it over the summer2 points
-
Moonshiners.... I'll be in Wellington Sunday the 27th of December with four friends over night as catching a ferry across the strait to South Island the next morning on our way to Rythmn and Alps If any of you guys are around, moonshine ride or something? Maybe? Or pointers for good things to do? Chur2 points
-
had amazing success with a set of fucked R888s. 205 50 15s. things that i didn't know when i first strapped a set of semis to my car, they are wider at the tread that an exactly the same size road tyre so if your guard clearances are right on the limit they will touch/rub. the side walls are stiff as fuck so your car will dive all over any undulations in the road if you drive on the street with them. my ones were fucked but they had so little grip in the wet that it was frightening. anything over 50Ks and you were going to die. i drove from AK to taupo on them and apart from diving into any slight surface deviation in the road they were fine. it didn't rain, thats why I'm still alive to tell the story.2 points
-
We'll be around!2 points
-
So! Fitted my louvreshades: Need to clean my windows. Also mocked up a nx1600 coupe digital instrument cluster on the parts car: They look like this: Which I think is pretty badass!2 points
-
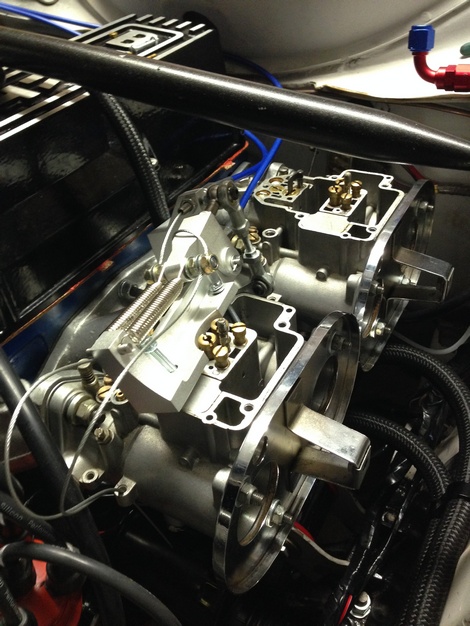
PWM fuel pump controllers, enough pump for over 1000hp @ wheels, not more excessive fabrication than you'd normally need for a fuel system big enough to make that power and when normal driving you don't have to feel like you are in a dental surgery and your fuel doesn't end up needing it's own radiator.2 points
-
2 points
-
The N/A 4G63 DOHC has been going great guns and has never let me down at all but it was time to upgrade. I had been looking over Fuels and Yoeddynzs V6 builds and thought I like the way the V6 looks mounted North/South. Plus, I wanted to do something else other than the 4G63T swap. So I got a 6G72 N/A from a GTO (thanks DJZ) and scored a GTO for the wiring loom, ECU and sensors. As I slowly (and I mean slowly) plotted along with this I realised that this is going to take a while and with the OS Drag Day coming up I decided to bail on this swap and took the easy option of the 4G63T I had stripped an E39A VR4 earlier this year and hung on to the motor. My original goal has to put this motor into another Sigma wagon I have and turn it into some sort of drift thing, much like Kelvins Corona wagon. So I slapped the motor on an engine stand to give it a good clean and to replace all the serviceable parts. "Mota and box good" When I removed the front cover I found the balance shaft belt had snapped. Took a gamble and decided to continue fixing this motor. For the turbo side of things I am using the turbo setup that was in my EX Lancer. I scored another manifold off Tank that I will eventually use on the Lancer. So, out with the trusty N/A 4G63 I had to convert back to manual steering box as the powersteering pump sits right where the turbo inlet will be. No biggie as the powersteering sucked. VR4 use a different AFM so my modified AFM housing wont work. Had to find a VR4 airbox and cut it up again to fit inside the filter CUT FIT2 points
-
Took it for a decent drive out to chopped back in october with some fellow old school members, you might have heard about it in other threads? If not go check it out! Such a rad event Took it for a skid in the dirt drags.
2 points
-
Wow, just realised I haven't updated my build thread in awhile, A lot has happened since April haha. Fitted my choice new E street heads Also fitted some new Comp Cams roller tip rockers All back together now = happy
2 points
-
i dont disagree, also speeno said they were oldschool so its official2 points
-
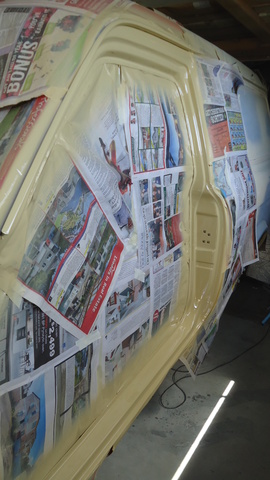
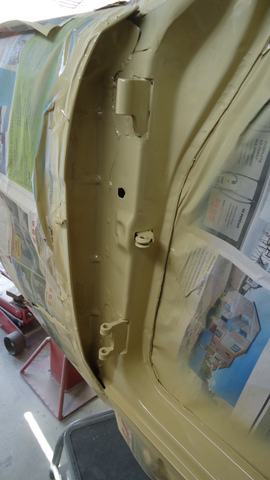
painted roof again. while its wet you can see in the gloss how the shape looks and I'm happy with it now so this will be the final coat of primer on the roof. if i get time after work tomorrow night I'm going to colour one of the door shuts. 2015-12-14_09-53-10 by sheepers, on Flickr2 points
-
Started making the exhaust...2 points
-
2 points
-
Got this back on Friday.... Ran out of gas 100m down the road hahah Cheers Highlux for being the saviour Days off work are Sunday and Monday so got some trim on yesterday morning before some commitments in the afternoon Am very stoked on how it came out Has developed a fuel problem so will check everything is all good in the metering unit tomorrow night, spent two hours today with the old guru on pi stuff here in Tauranga today has told me what to look for and sorted me out for parts with a troubleshooting book he put together so hopefully get that done tomorrow and put the rest of the trim on If we get it done tomorrow with minimal costs involved will be ordering coilover parts this week tooooooooo, very excite Plus roofrack is being built this week ready to put on the car on sunday we decided on something along the lines of this made out of stainless that fits in the existing holes from the last roof racks2 points
-
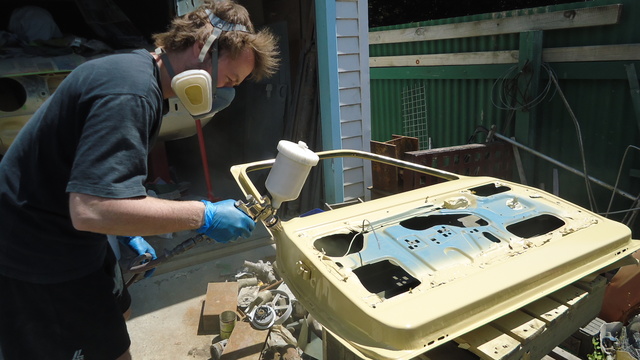
update time. Had to fix a heap of small problem with the doner panel just small fiddly stuff like this. where the ends were spot welded down. a tiny bit of rust and a bit of damage from taking it off the old car. did as much as I could before getting the inner and out vent panels sandblasted. I damaged three of these, wasn't as bad as I thought to fix. I also welded up the drill hole in the window frame, as I still have the spot welder i thought it will make a nicer job than big old plug welds, i was right. bit of a close up, only just see one spot weld on the side there. everything seems to line up! So I started welding it all in place, scary! not finished yet, should be done this week. getting there! that's the last of the rust in the shell done!2 points
-
Also picked these up from the sand blaster today and dropped to powdercoater.2 points
-
2 points
-
Finally got around to taking off the passenger door. Not as easy as undoing 4 bolts, hinges are welded on. Had to use a special tool to punch out the 2 pins and separate the hinges. Stripped and sanded back the door frame area, the side of guard where it attaches to the guard and inside of the door. The passenger guard was a replacement and put on when the van was painted orange so absolutely rust free around this area (Bonus). Primed the door outside because it was a hot day. Dried up really quick, easy to spray. But then when i sprayed the van door jam area i forgot to tell myself this wasn't going to dry as quick and ended up with a sag on top. Shit happens
2 points
-
Heres Pics of the new one: and home at last It does have the 4th minilite style wheel in the boot =)2 points
-
Aaand today, a bit more progress on the rust, BEGONE! BAM! I actually did cut and weld that but forget to take any more picks till I'd finished So thats the whole passenger side done as far as rust/metal work goes. *** Thought i would pull the clutch master from the spares car to see if i could cannibalise any bits from it to take to the brake shop with the calipers - it wasnt looking good in the car all oxidised and rustly looking but once i got it off : KAPOW! Oh yeah! It has previously/recently been resleeved with a nice brass sleeve and was not even seized at all The parts car has just paid for itself twice over, and after a clean and reassesmble, the pedal box is all completed. Car is also on the ground and awaiting some more weight in the front. Im just waiting on some o-rings (or valve stem 'seals') to reassemble the head and put it on the block before i lift it back in.2 points
-
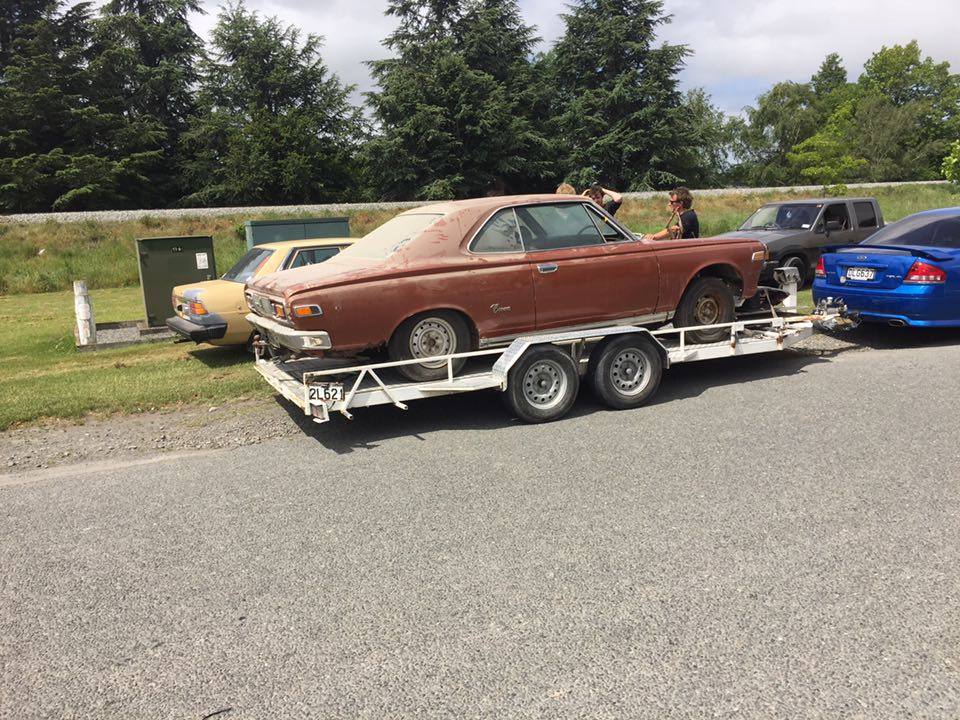
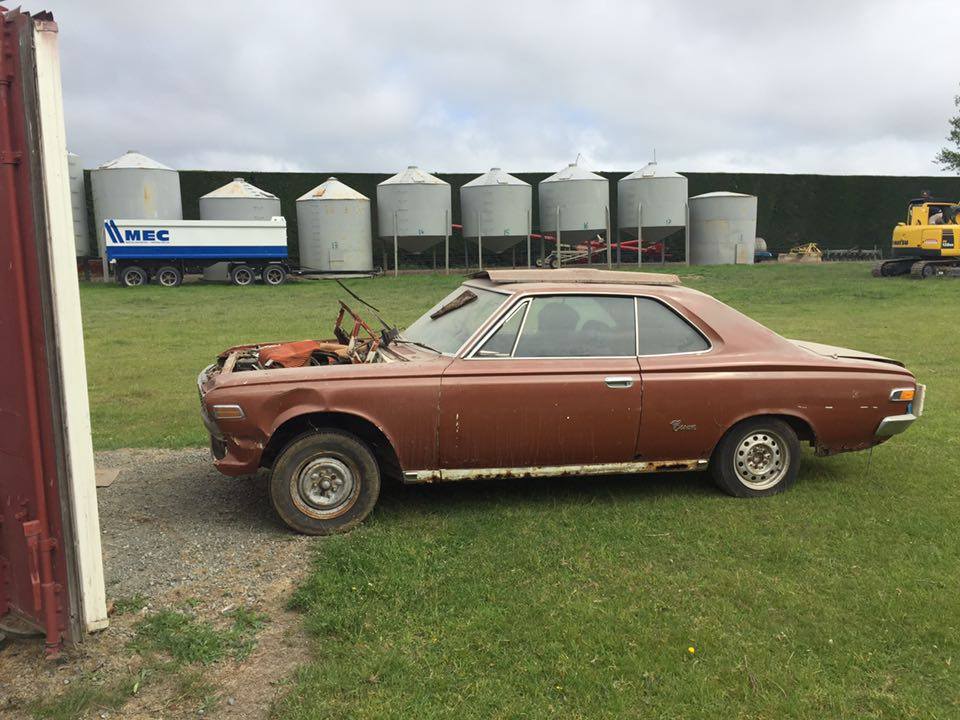
Discussion Thread hey guy just starting my build thread of my 1969 ms51 crown coupe. wont be starting the build for some time. I have been after this crown coupe bran find for over 3 years the guy finally let me buy it, it needs a fair bit of work as its just a rolling body at this stage. dereg and rusty eg sills and rear guards seams to be mostly there apart from motor and box. has been off the road since 89
1 point
-
### Due to Photobucket being a pack of complete fuckwits, I've removed all the pic links to shorten Fred up a bit. ### So I got side tracked once again, with the offer of a go kart frame. I made it longer so myself and the GPX750 motor will fit in it. I've been fiddling with it on and off for a few months now. Any ways, pretty basic business, just the old road bike powered go kart lark. Annnnnnnnnnnnnnnnnnd that's about where i'm up to. Regards, VG.1 point
-
Haha man this is cool. Why can I never find a cheap 501 point
-
I hope you bought that compressor while on special and not at RRP haha. I have been considering it too as my last one was just too big for my small shed1 point
-
Nobody will want my newer honda parts so I have found something under the house1 point
-
the thing I like the most about this is that its in the main project thread trololololololol /good jerb, miss my GT liftback1 point
-
plenty of factory vehicles have a single layer of sheetmetal as a heat shield so that would be fine.1 point
-
Im sure a few people will like this bit chromie but some impressive engineering involved http://www.duccutters.com/AndreasGeorgeades-v12.tpl#.Vm5XjRmYbqD1 point
-
Can you go to a bodyline or something?1 point
-
i had a go at drag racing this just for a laugh. it actually did a skid but i don't have any photographic evidence of it….. it is slow but i was happy to break the difficult 20 second barrier. 2015-12-13_10-54-19 by sheepers, on Flickr1 point
-
I will also have a bunch of stuff to giveaway as I will not be taking it to the South Island. Heaps of NOS Mazda R100 panels and parts, that kind of thing.1 point
-
It drives really nice apart from the diff whine very low geared 4.7 screams its head off but it loves it. almost got the tune sorted just trying to iron out a rich cruse and slight hesitation off idle but runs great. Suprisingly those lockrite diff lockers are quite streetable does u turns tight corners with no scuffing few clicks but locks well when wanted. just need to glue the rear windows in get me some handbrake cables made and new seatbelts and cert time everything passed crack testing too even the wheels so was stoked with that1 point
-
Found the reason the car wont turn over Lack of clearance between teeth on flywheel to starter motor causing it to bind Made some mods to the starter gear Turns over but but wont start properly checking over the carbs and found the accelerator pump assembly had come apart Back together again First start up....finally http://www.youtube.com/watch?v=94XKnQGsmwM]
1 point
-
pulled the front end out to give it a clean up, the total loss oiling system has kept the parts under this grim in good nick, but its so gross. boots on the ball joints are unfortunately split, (putting good thick coating of dry grease on EVERYTHING but they feel like they are in good order. I will worry about them later, they may be able to be re-booted. Cut the blind splines in the torsion bars to lower the front - FIAT has helpfully done 2/3 of it already about 20 seconds of being very careful with the cut off wheel in the grinder later not exactly machined, but they slotted in one spline lower first time The battery on my camera ran out but I got one shot of all the front end tidied up and ready to go back in: Ive installed most of that it back in pending a few parts still to arrive. EDIT: ReInstalled front suspension - note the split ball joint boots :/ Looking forward to getting it back on its wheels1 point
-
today i finished welding the patches in the roof. 2015-11-08_03-54-03 by sheepers, on Flickr 2015-11-08_03-54-15 by sheepers, on Flickr 2015-11-08_03-54-56 by sheepers, on Flickr so thats it. the welding is on this car is done. milestone etc. the eagle eyed among you will have spotted that the sun roof is still a gaping hole. I'm kind of not counting that because although it still needs to be welded and ll be welding it, Peter is in charge for that bit and he'll do it when he gets a chance. i can't really dictate when it gets done so ill pretend its not happening or some shit. lets just say that all the welding (except of the rest of the welding) is done! excellent.1 point


.thumb.jpeg.384ff72c8d2b0ee0d34a7bdedb55bdcf.jpeg)


This leaderboard is set to Auckland/GMT+12:00