
Leaderboard


Popular Content
Showing content with the highest reputation on 07/21/15 in all areas
-
Updates on our tower of turd. But first- a pretty photo from a couple of weeks ago. Awesome sky! Right. Back to the palace of poo. We left off last time with a distinctly unfinished looking building. Since then its been top coated and the door frames, front wall on the lower half and trim bits filling in up to the apex's have all been seen to. Its looking heaps better. It still has my planned wood slat overlay to finsh the exterior off plus a couple of other little bits but otherwise the exterior is sorted. That's a relief. We have also put down stone along the path. Was getting slippery in the rain. Next up was to roll up the stainless poo chute. I cut rings from treated pine to glue around the exterior.Then clad the exterior in Rimu we planed and cut to size. Topped off with a nice wooden toilet seat. We were building this lot one friday night a couple of weeks ago- because we are such hardcore party goers. Anyway- the Pukekos didnt invite us to their party and the Wekas ignore us. I cut a big hole through the floor and passed the chute through. Its screwed down from underneath. The whole thing turned out grand! Quite happy with it. Much nicer than a silly square box like most compost toilets Ive seen. With this design its not taking much more floor space than a normal toilet pedestal so you can actually get your heels back when it comes time to venture forwards and wipe away dangleberries, clingons and tugnuts. Riiiight. With those lovely mental images out of our heads lets just move along yeah. Onto the thunderbins! First off I need to sort out some ventilation for the bins. Winter time is OK because any pee sitting below the drain away wont really smell. But we all know how bad a loo can smell in summer if not vented. Even though this design should see very little urine sitting in the bottom of the bin I still want a decent fan system- especially if we get a hot summer day combined with a visit from the Tasman netball/vollyball/cheerleaders team and they all need to go for a squat. Computer fans. Cheap- often free. I picked up two decent sized ones from the Nelson recycling centre. Only need one but good to have a spare. The fan ony draws about 0.2 of an amp so barely anything. Checked it and it works well! I needed a housing that would allow for easy maintenance and swapping of fans so I made one from cedar and made it to suit the 70mm drain pipe fittings we bought. From this elbow there is now a 3m long vent pipe with mesh and a stainless rain hat on top. The whole lot bolts to the rear wall as such... Then onto the Thunderbin. I riveted a length of pipe down the inside. Just one rivet up near the top was enough. This is to supply air/allow wee fumes to get sucked up to the top as the bin fills. Then I used some steel mesh supporting plastic barstools left over from the concrete shed pad build. These hold up an old oven grill. Over the oven grill I laid some alloy mesh and that's held tight against the sides by a bent piece of 5mm steel rod. The grill mesh and rod will all be made out of stainless steel for Thunderbin two but we were not going to make another trip into Nelson for this one. It can be changed over to S/S when we empty it in 12 months time. Over the mesh I laid down some newspaper. I felt happy in the knowledge we would be shitting on some random swarmy looking real estate agent.. On the newspaper I put layer of leaf litter from the bush floor. Then a helping compost from the bottom of our compost bin, which included worms. Then more leaf matter. I'll let you guess what 'plops' on top of all this lot. The bin rolled into place. We bought a spare lid for the bin. This has been cut out and another rolled stainless chute slides up over the main chute. Its attached and sealed securely to the lid and stays always in place on the chute. When it comes to bin swapsies time the rubber seal, an old bike tube, is rolled up, lid and sleeve slide up, bins swapped and lid placed back down. The lid is sealed to the top of the bin with foam rubber. I have gone belt and braces in making sure no flies will get in. So long as people leave the bloody toilet seat down after the have finshed the evacuation/reading car magazines process! Any excess wee that makes its way through drains away downhill to a 20 litre container out side. This can be checked easily and emptied back into the toilet to be re-absorbed or diluted with water and poured around in the bush so feeding any trees. [/url] The bathroom is a lovely place to be. It gets really early sunshine and warms up really quick. One can sit with the top half of the door open and look through to the bush. Hannah has started the floor. Insulation is down and we have run a heap of Rimu we got from sidesways sickness shane for the floor. Will look great. After that is done its then onto building the shower cabinet , sink and plumbing etc. Oh we also took time out from the bathroom build to finish clearing the hillside up to the main track just along from the bathroom. Wow- so many natives rescued and now ready to flourish in the new found sunlight and we now have yet another huge pile of gorse to cut up for firewood. Photos mid clearout.. Plus a while ago we scored this 'interesting' mini Easter Island head. It was down a bank outside Ladaspeeds work. Hannah was working there so shane helped her lift it into the car and she brought it home. Its now hiding up in the bush waiting to surprise. Would be a bit trippy if one was on 'shrooms and came across this at night. I'll finish off with a photo of the gully down near our driveway entrance. In the colder weeks we have had it doesn't thaw out. Pretty damn chilly down there. Quite cool the vast difference in feel compared to the north end that gets the sun. Compared to this the same day...13 points
-
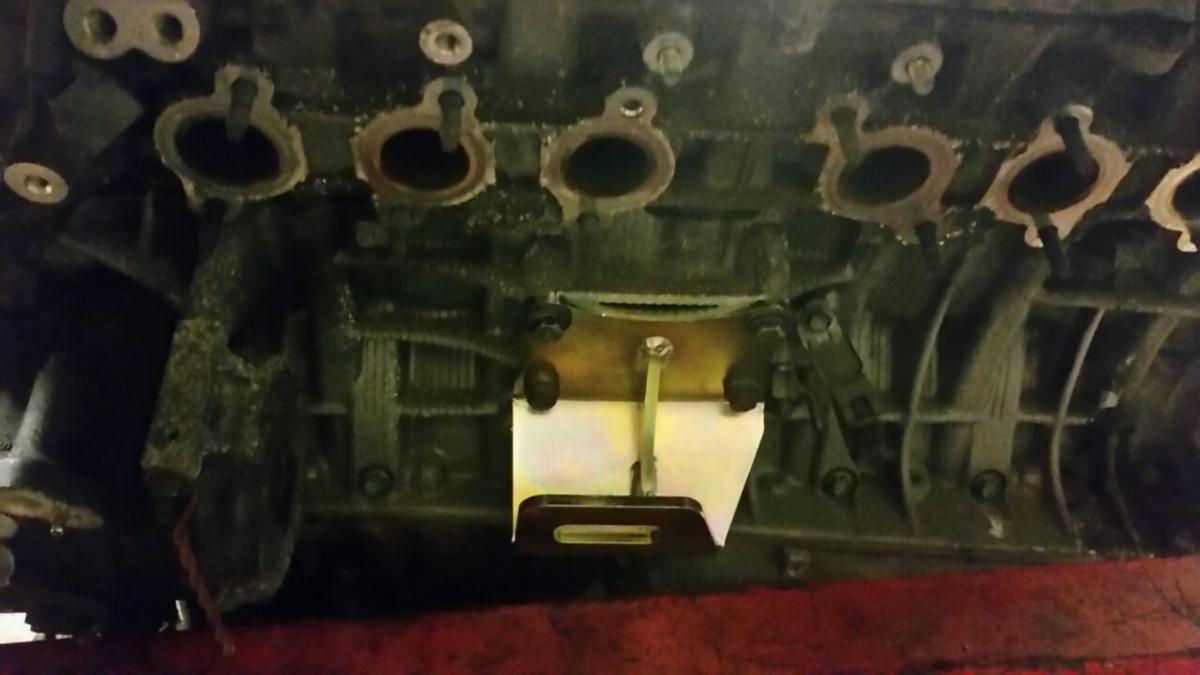
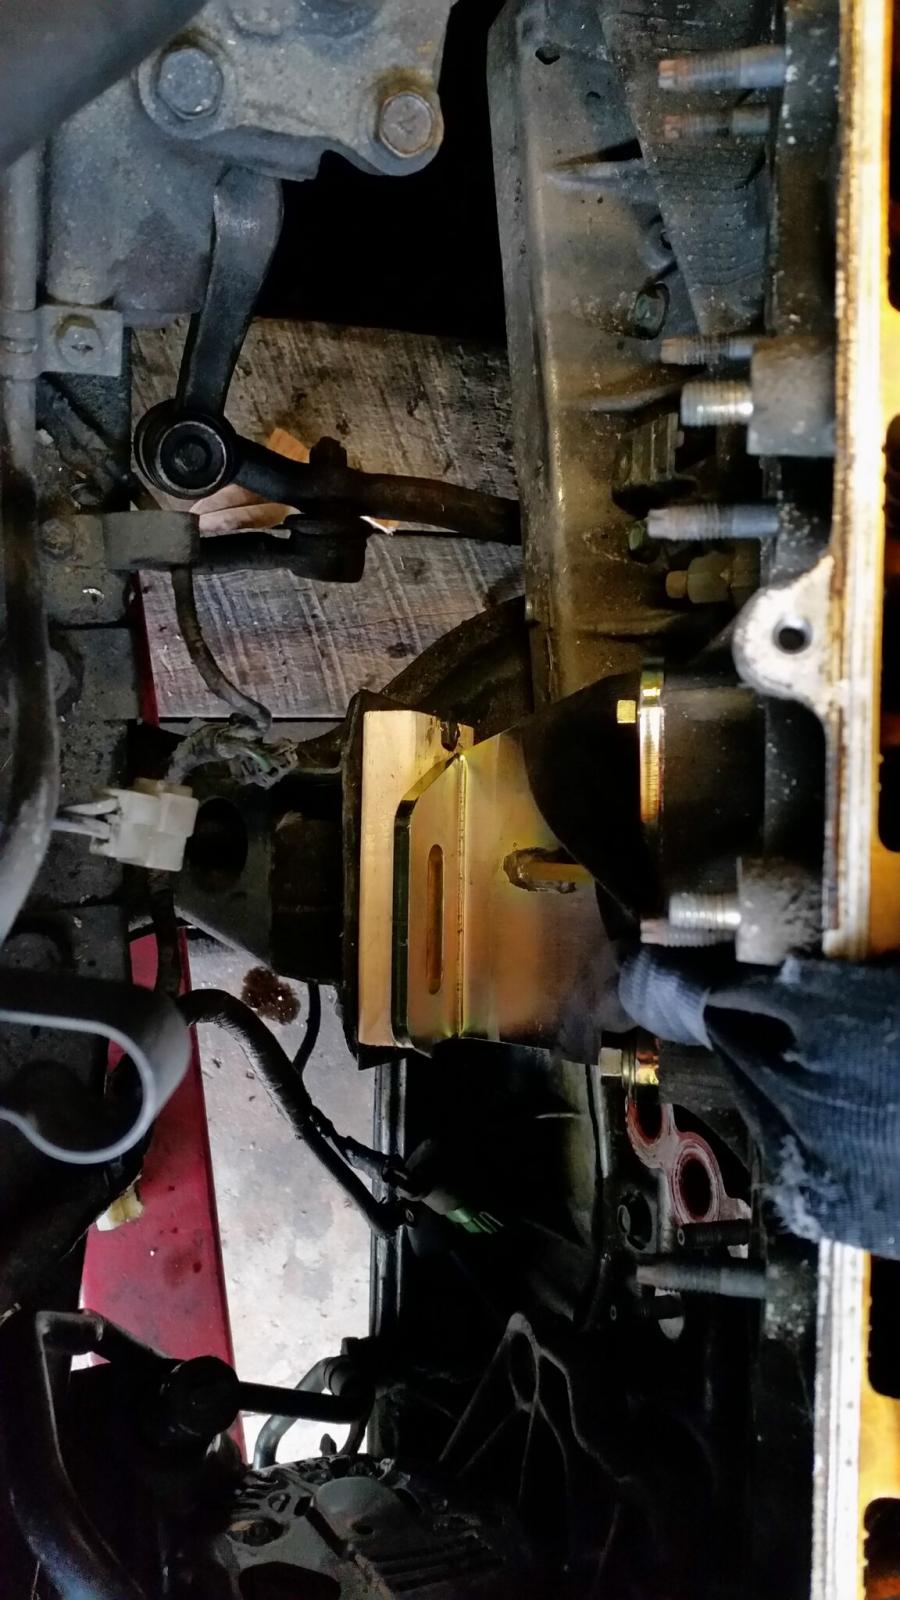
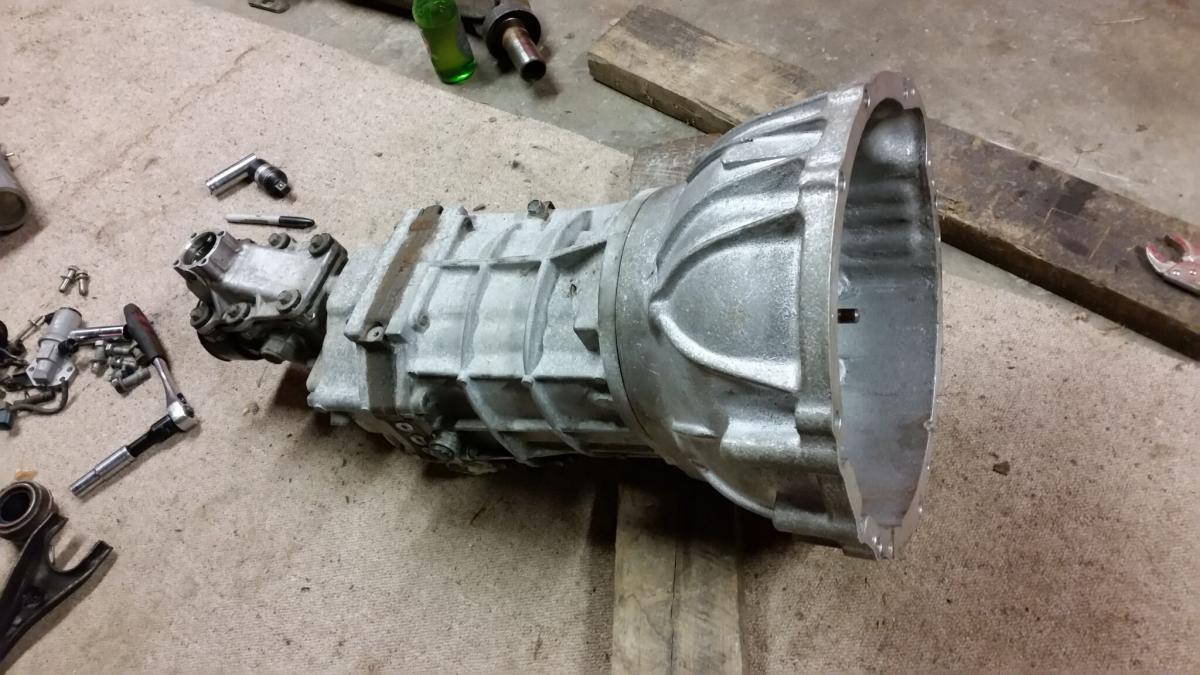
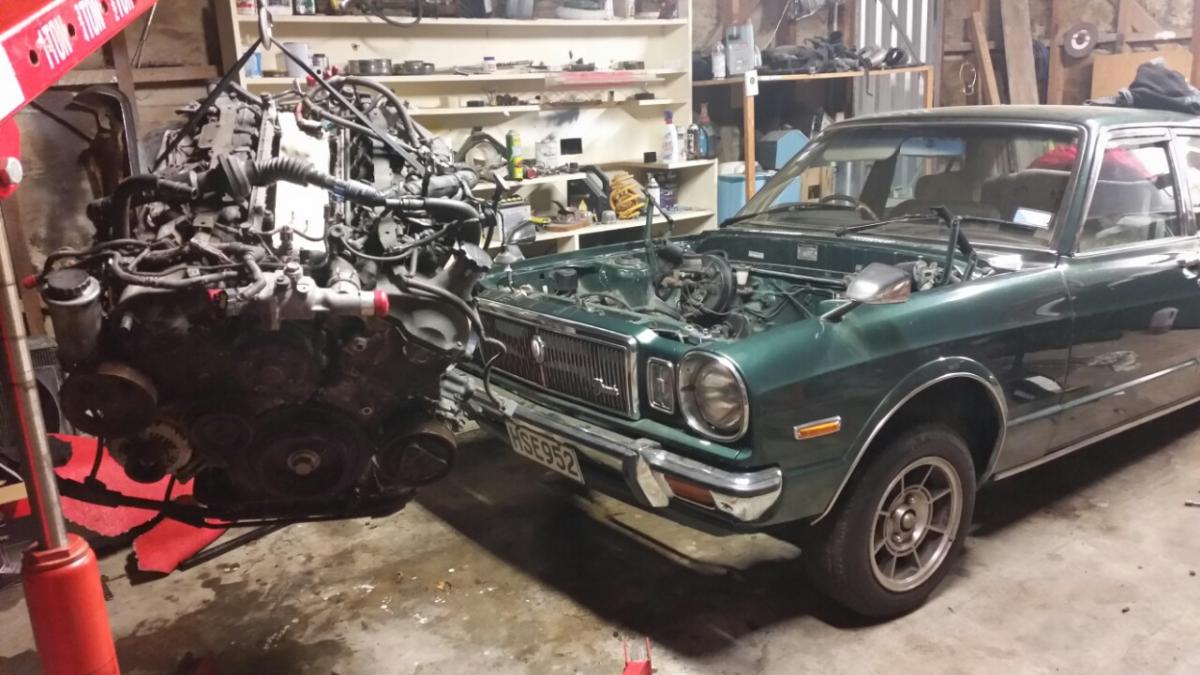
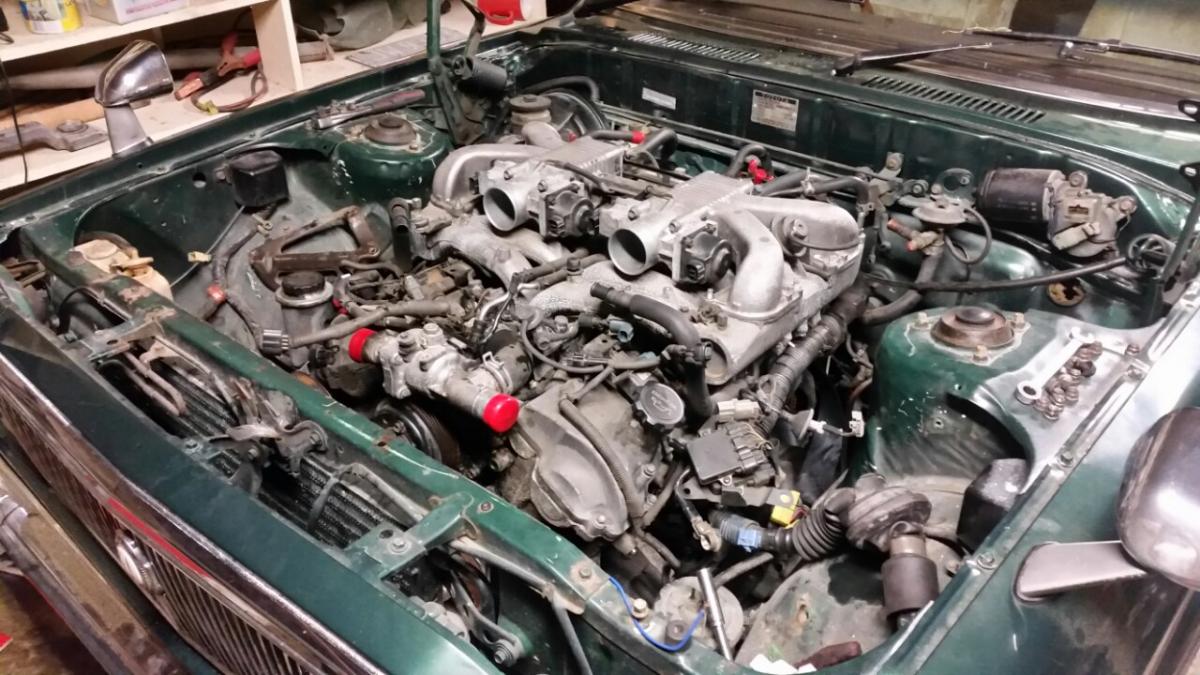
So a bit has happened just haven't had time to update. Noticing the V12 engine mount pattern is the same as the 1UZ, so I ordered a set of 1UZ to M series engine mounts from xcessive racing in the states. I measured the differece in V angle between the mounts bolted onto the engine and the subframe (seeing the v12 is a different degree to the 1uz). The differece was 18 degrees, so I got an engineer to bend the mounts out another 18 degrees. Now they are the same as the subframe. I now need a 30mm engine mount I can adapt and that side is sorted. Managed to score a 1UZ Celica with an R154 so figured I would take the R154 out and sell the rest. So now I had a R154 and the 1UZ clutch and flywheel. These bolted straight onto the V12. I figured I might as well save the hassel and splashed out on a R154 to 1GZ bellhousing. So now everything is bolt on. Made some wooden engine mounts as a dummy and sat the engine back in. Tonights mission is dummy everything up and fit the engine box in. According to my tape measure, the factory gearbox mount will bolt to my R154 and the engine will sit in the middle of the engine bay. I would have preferred it to sit back a bit further ,but 25mm isnt going to kill handling or asthetics. Still leaves me plenty for radiator. Have also cleaned up and painted the rocker covers in my traditional wrinkle black. Will try and keep up with updates as is moving pretty fast now.
 8 points
 -
let the record reflect that KY just suggested camo yinyl wrap8 points
-
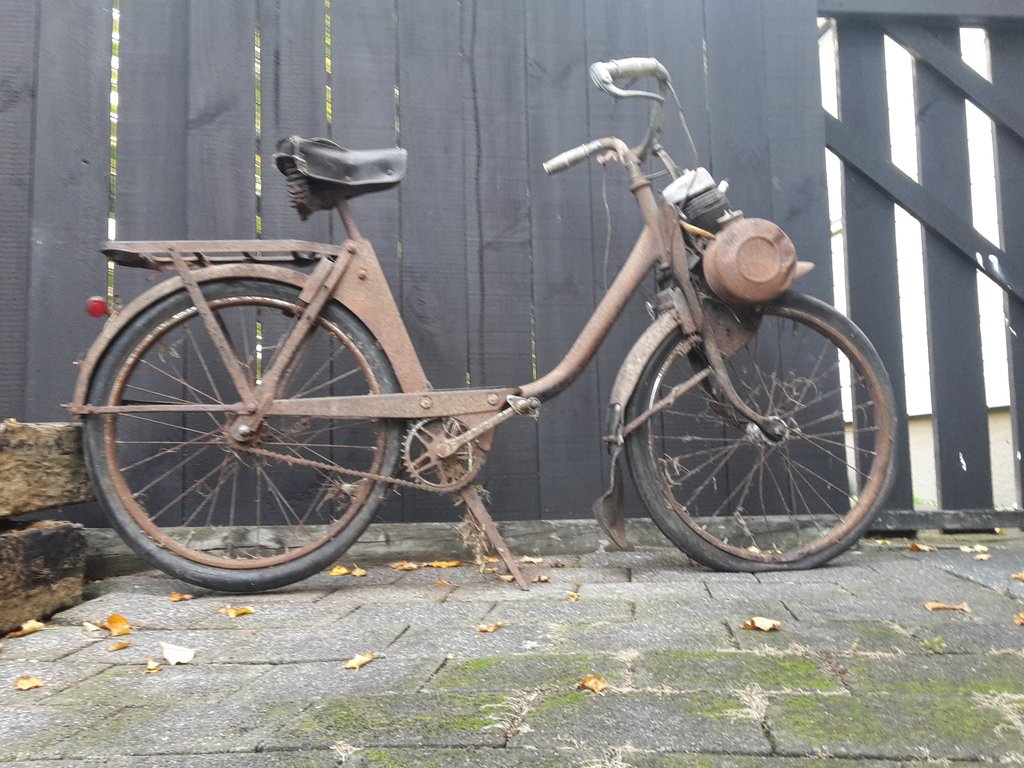
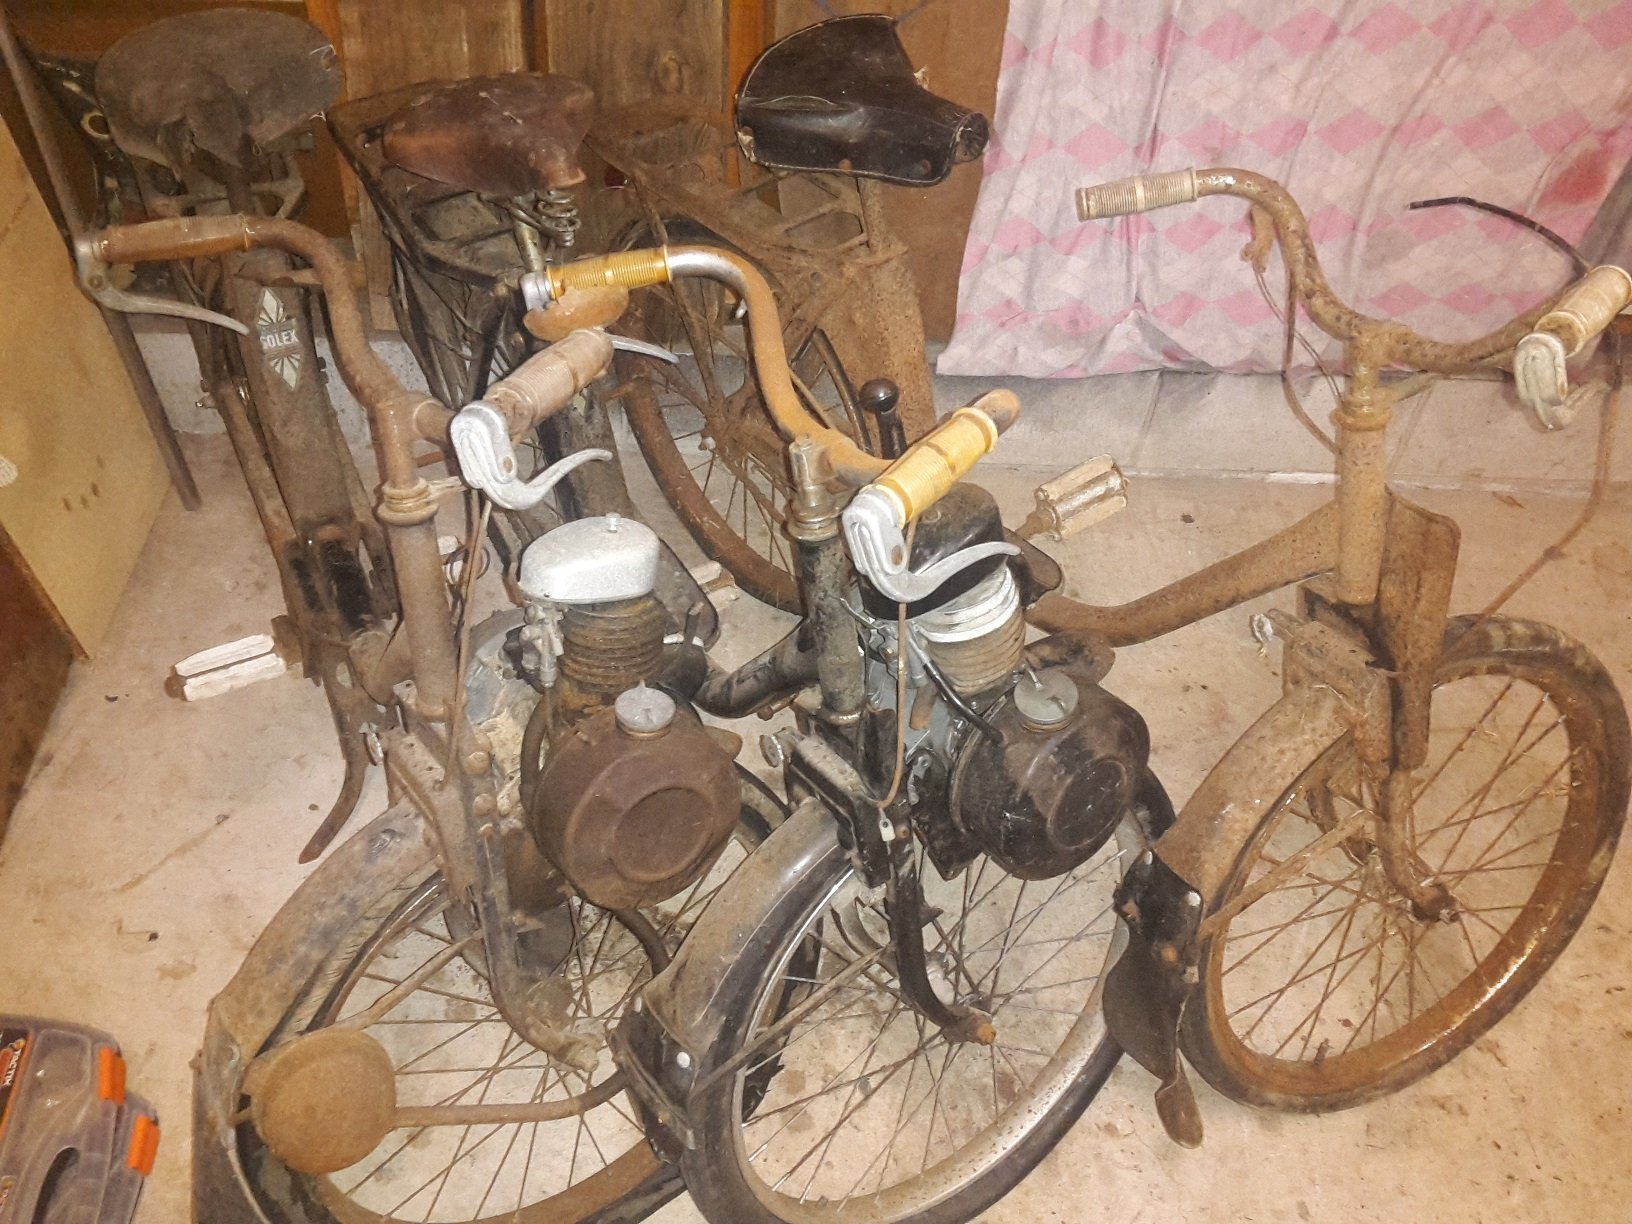
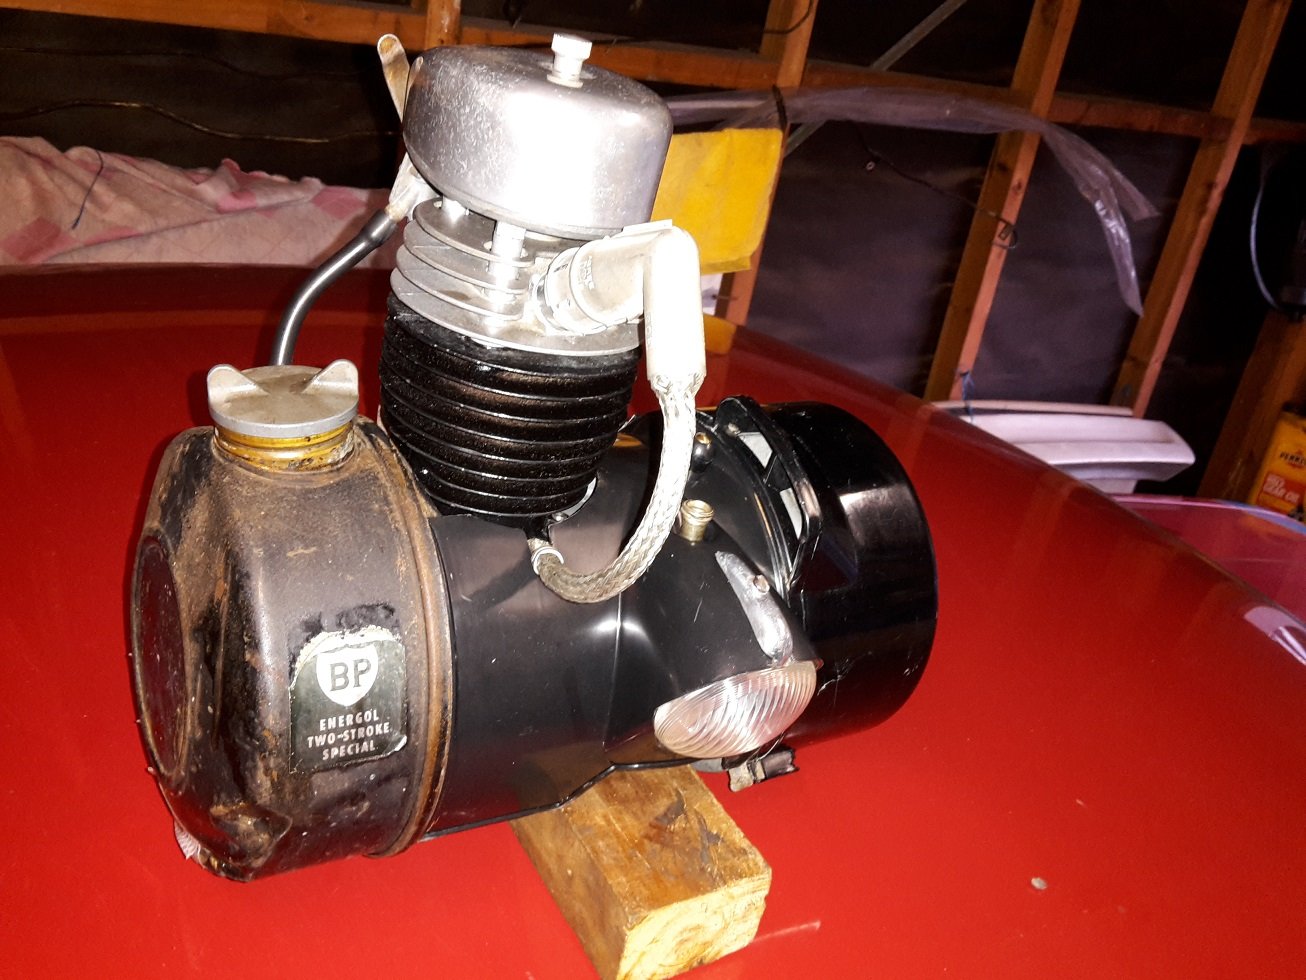
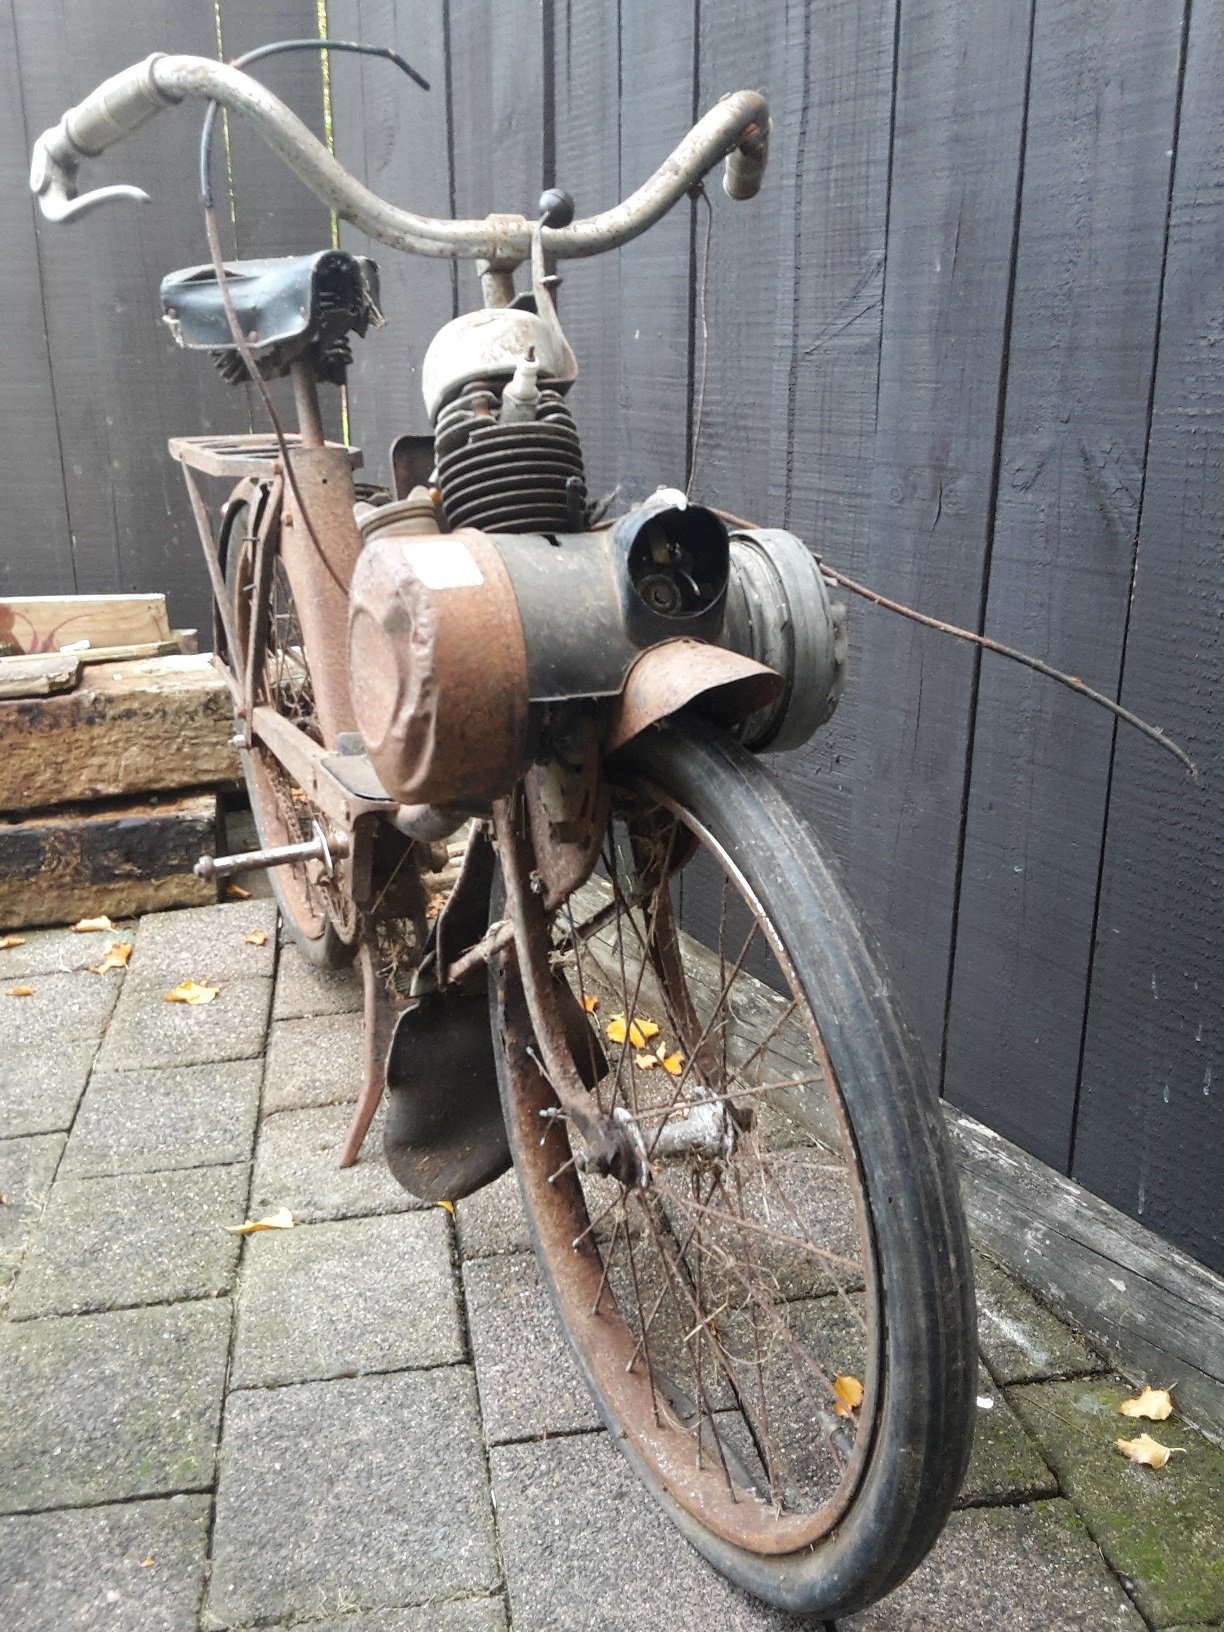
So... a day off sick(sick in the head maybe). I was bored, and looking at trademe and I stumbled upon a moped that took my fancy. So i brought it It turned out to be a 1959 VéloSoleX 1700 49cc - in completely rust-spec mint condition(rooted) ...christened P.A.M (pedal assisted motorbike) by my wife . . . If that wasnt bad enough, i found two more locally so naturally hit buy now on those too (now im really fu#$ked in the head) original purchase on the right - another 1959 1700 on the left and a very original 1961 2200 model in the middle I set about quickly dismantling a motor and learning the intricacies(breaking) of small 2-stroker motors. After a week of cleaning, honing, part hunting and reassembly - IT WAS ALIVE!! One day i shall have at least one looking awesome and be hooning down to the local patisserie - ordering le baguette and crumbing it all the way home.
5 points
-
get some autostrada modena in 5x114.3.......5 points
-
Been here for a few years and thought i should probably start a build thread on at least one of my cars. Always had a huge soft spot for these wagons after us having one as a family car virtually my whole childhood and hating it, now i love them ironically! anywhoo picked this up from featherston on saturday, shimmied over the rimutakas in the other wagon, fella selling it cracked up as me and the missus arrived in the same car as i was buying! Shot back over the hill in it and fuck me did it drive like a dream, being the 4wd version it handles about 1000x better than the fwd wags. Of course as soon as i got home it pissed down, therefore hindering my excitement to have a decent look over it! Thankfully sunday was a mint day, got underneath first thing in the morning and had a good look, Stoked at how not-fucked it is, i only paid $300 for it so my expectations were very low haha. Some idiot had taken the old aerial out and not filled up the hole so ALL the water ran straight to the drivers floor so inside was a stinky shit-pit, moldy, rotten carpets all throughout, Thankfully Pick-a-part had a mint wagon up there with mint carpets and the same colour too! Pics: The PAP donor carpet car Carpet out Dank old carpet out! Got the new one in and it's so much nicer now! Havent got pics yet thanks to short winter days and working late, Took for a warrant yesterday and failed on fuck all! *Driveshaft hanger bearing fucked *rear shock bushes *exhaust leak *steering rack boot split Was dreading trying to find hanger bearing as it's quite a hard to come by model, but rung the good cunts at hutt city autoparts and got a new one waiting for me in the morning! Plans are: * Mud tyres * Plasti-dip it matte green * Spotties * Try find longer springs for a bit of a lift4 points
-
We just got rid of that tercel and this shows up...4 points
-
Attemped to draw 1GG intake flange for the start of ITB manifold this week. Need to print it out and check it against the head. Need to sort out front Suspension as it looks crap. So sent front arms away to the babe that is Beachlander to have them lengthened. Then I can match the front camber to the rear. Anyways. Images etc. And a short video : https://www.facebook.com/RiversideNZ/videos/vb.129303667111435/942889649086162/?type=2&theater3 points
-
thats cos you have a wagoneer's taste bizzo yeah van lookin good beave, dangerously close to may as well slam it oclock..? and not to detract from it's sweetness.. but you have a hat on, a spare hat, a new visor, and the sun in your eyes.3 points
-
you guys rule.3 points
-
Whens the woodfire heated hot tub being built?3 points
-
Beaten to the Modena call. They will look the biz on an SW20 too, period correct even! Plus 3 piece so you can get barrels made up to suit the car perfectly. Put a WTB advert on the Japanese wheel classifieds NZ Facebook page and I bet you'll find someone with some for sale.3 points
-
Second motor on the rear wheel3 points
-
Dude. Just get some wheels in 5x114.3, it is the easiest PCD to get wheels for. Someone will do a wheel close enough to those that it doesn't matter.3 points
-
I had a productive day today, I was on call with work but didn't get called in so I was effectively paid to work on this thing I should have been in a rocking chair smoking a pipe while whitteling away at this. Only one more plank to put on then just sand the hell out of it. I wanted some better looking tyres and came across these bad boys on trade me, the price was right.... Free!!! I don't know that they will fit for sure as they are quite a bit wider but if they do I think they will look awesome! I started on the exhaust today, I am making 3 other dummy pipes along with the real one that run into a 4 to 1 collector then a wee muffler. I hope I can get it looking good, it sucks being such newb welder, my first weld was this projects first weld.... I started on the steering too, its a bit of a random set up as I want the body to be removable with out too much hasstle. Another picture of the tail just because im loving it at the moment. Cheers again Skinner for the wood!!!2 points
-
Fuck, I knew someone would say that. I DID NO SUCH THING!2 points
-
Yeah getting pretty sick of re-doing stuff though, I don't mind if it makes the car better but some things are a bit stupid....2 points
-
I hehehe'd Also, just chiming in because [sw20 owners thread] We've got a gen 1, faded red, targa top, auto SW20. The worst iteration of an MR2 ever made. Still fun to drive though If you want to keep driving an MR2 for any length of time, just save the money and get a gen 3. Better car in every possible way. Red gen 1/2 NA SW20 is a poor mans MR2, not a poor mans Ferrari2 points
-
Also here is how the front hubs were done I don't know why they weren't pitched halfway between the old ones, the shop that did them specialize in this sort of thing so I just assumed that they would be ok. The other thing I did was re-do the driveshaft loop, the one I did to suit the type 9 was for a much smaller tunnel so I just grabbed one of those universal (yeah right!) kits then chopped it up to make it fit. I have fitted it to the car so that's another job done.2 points
-
Chucked a visor on, looks mint Cheers seedy2 points
-
Yup count me in. Pretty sure we could get mini man in on this. His little shed is a sweet little set up as well. Edit. Try add go karts into this as well?2 points
-
fuel rails arrived. need to mod the manifold a tiny bit and they should fit. Untitled by sheepers, on Flickr2 points
-
got over the rear end being so soft so lowered it a bit more using R32 front King springs and new KYBs. made a huge difference, still hits the ground but no where near as bad and is alot nicer to drive when by myself. next up is to lower the front some more and fit the ADThree spoiler i brought from Japan.2 points
-
Peter finish the passengers door for me. he made a whole new top for it, a new inner bottom and a new bottom outer skin. looks mint. Untitled by sheepers, on Flickr Untitled by sheepers, on Flickr Untitled by sheepers, on Flickr Untitled by sheepers, on Flickr so i gave it a scuff up and primed it. i also finished the boot lid and gave that a second coat of primer too. Untitled by sheepers, on Flickr Untitled by sheepers, on Flickr2 points
-
Title was extremely misleading.2 points
-
heres some more of it bolted to the superdupercharger. Untitled by sheepers, on Flickr Untitled by sheepers, on Flickr Untitled by sheepers, on Flickr2 points
-
Untitled by sheepers, on Flickr2 points
-
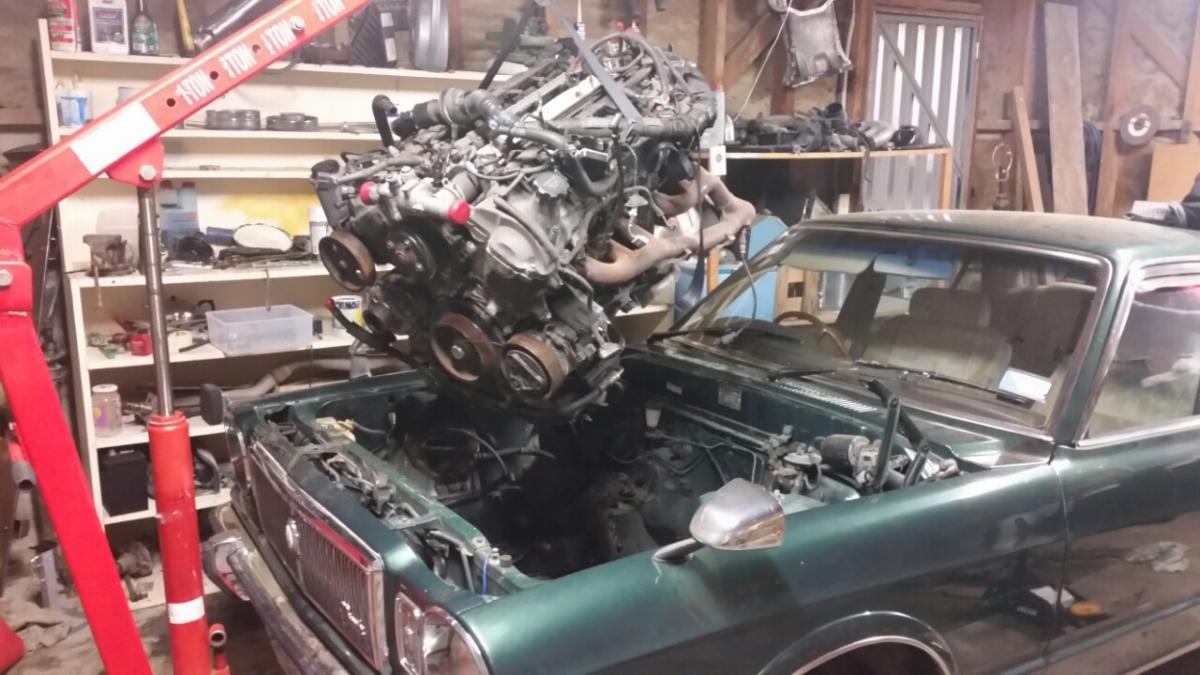
This deserves its own update The engine was off the stand for a reason. In she went... Exhausts need a tweek to clear steering box and rail but have heaps of room to move them in towards the block. Sump fits perfect and the engine mounts are pretty much on top of the subframe mounts. Still heaps of room for radiator. Was meant to be.
2 points
-
what comes first ? the amp shutting of then the spike because to me it really sounds like the amp is hitting thermal overload , and the spike is because the current draw suddenly stops when the amp turns off instead of frying itself . you need to check that the amp is not overheating .1 point
-
Hi everyone, I'm trying to find out if a power steering rack can be turned into a manual one, legally? I understand the workings of the internals, as in the torsion bar etc and I know that the input shaft is not connected directly to the pinion gear. I understand that a ps rack can fail if it is used when no pump etc is connected. Anywhere else in the world, (not nz), they just weld the input shaft to the pinion. But after reading the hobbycar manual it says that no internal part of the rack can be welded. What are my options?1 point
-
More like this: Sweet mirror trick Not like this:1 point
-
Yeh Im with you on that one, as well as the may as well slam it train of throught.....will keep my eyes out for some suitable wheel candidates. Might go nab a few more bits from the vanette at pickapart and figure out how to lower it.....transverse leaf and all make sit a bit fun1 point
-
visor def changes the look of this wee van. i still think black steels, thin whitewall and a mini hubcap would look sweet!1 point
-
I think you need to consider vinyl wrapping the commode with a photo reproduction of the bush behind it, so if you were looking from a distance, you wouldn't even see it.1 point
-
Oh definitely you can crank heaps more in some of the rbs ive done are at 20deg on 14psi. Also make sure you set your hardware latency properly if you haven't already done so. export your table and save it. Then set the entire table to 10 deg. Set your timing light up and rev motor to say 3k you'll notice the timing wandering either direction. Adjust the hardware latency untill its rock solid at ten degrees. Really important with megasquirt as they do wander around a lot if not set properly. You may end up with 30deg when your map says 20deg etc1 point
-
I'm gonna come to this and meat all you guise1 point
-
You can also use a program called virtual dyno for your advance tuning. If you set it up right its pretty dam close all you need to do is log a wot run in probably 3rd for the road. Open the log file with excell and trim it from say 2.5k to or 8(or whatever your running it to) open the log in virtual dyno anf itll spit out a chart. Do it for every extra deg of timing you add and watch it untill it stops making power then drop it back. You can also observe what adding in or taking out does for the lower end of the motor. But to be as accurate as possible it needs to be repeated on the same piece of road or whatever. Start logging Go through the gears untill 3rd cruise at 2k untill such point then plant it. Keep it planted untill you hit your upper limit. Trim log open changa timing repete etc.1 point
-
Put on a showoff sticker that looks factory Used one of these to make the guard look all ugly like this Aaaaannnnnd thats it1 point
-
What you have there are the rules for low volume cert. Here are the wof rules https://vehicleinspection.nzta.govt.nz/virms/in-service-wof-and-cof/general/lighting/direction-indicator-lamps In NZ you don't need indicator lamps on the side of the vehicle, but if they are fitted (like all modern cars) then they have to work.1 point
-
I had a beautiful set of wheels on my mr2 in the sizes you want. They pop up! Just don't be impatient. Have the money waiting so you can nab the perfect wheel when needed.1 point
-
You don't need them. The car was not fitted with side indicators when manufactured.1 point
-
Good to know, I'll give it a test at uni tomorrow. The specs are in the FSM. Maxted - I was only going to make one, but could possibly make a couple more. Would just have a simple 16x2 LCD readout that would give the three rotor face readings, nothing fancy .1 point
-
No anton that would mean you had passed out before both meals1 point
-
Made them a bit taller as per request also.1 point
-
Stripping down the Group Heads while I'm finishing off the boiler and pipe cleanup. By far it's the most complicated part of the machine and a lot more needs to be done than people realise. Most tend to think that servicing the group head is replacing the shower screen and head seal with new ones, like those on the bottom right of the picture. It it's done properly then all of the components on the bottom half of the pic. need replacing along with a couple more seals I haven't stripped out yet, sometimes springs need replacing as well and occasionally the jet housing (tall bit between the 2 springs). All this needs a good soak in hot cleaner and then I'll start rebuilding the group heads.1 point
-
Update time. Wow! I thought this would be a quick little write up but actually turned into an essay length spiel. Best you put the kettle on... So a fair bit has been going on in our little valley. I've been trying to remember to take photos but usually get carried away and have finished whatever before I remember. I did go up to the ridge a wee while back and take a pretty photo or two of the sunrise. Very nice up there. Cant wait to build a cabin for that place! Coming back down to the truck via the ridge track- Tuis playing morning tunes in the Lucerne tree next to truck. Since getting that lathe in place the shed has been getting used and sort of just evolving in doing so. Things/tools have found a place. With the winter weather it feels cosy- especially in heavy rain. Really needs a wood burner or waste oil burner for the colder days because man can it be chilly in the evening. I will make something but accept that it will only heat up a little area and be hugely inefficient trying to heat it all. Maybe something arond the main bench/lathe area would be good. One thing that we are both stoked with getting is the hoist. We could only afford it because we bought the secondhand lathe instead of a new chinese lathe. The bank balance is getting low as and we ummed a bit about spending the coin on a hoist but so glad we bought it instead of waiting because man its useful! I ordered it from trademe and had it delivered to a Nelson depot. Just managed to squeeze it in the van for a slow trip home which saved on the silly rural delivery charges. Shane came round the next day and helped put up the main structure. It went up pretty fuss free and seems fine for a cheaper chinese hoist. I can see where the costs are cut when compared to a Heshbon etc but its strong and well built where it needs to be. Currently we just plug the hoist into extension cord. Must order appropriate lecky supplies and lights then wire up shed! It dwarfs the Viva. Oh yeah- also note the steel rack we recently built. Was great to get all the steel we have found while clearing the block out of the rain and inside. Stepping away from the workshop we have been busy with many other things. First off we needed to get the ever growing piles of firewood out of the coming winter rains. Into our pile of telephone poles and old iron and we built this. I also nabbed some old wooden shed doors left outside a nelson garage doorplace. Free to take- i like. These I turned into a storage bin for all them little offcuts of wood that are a pain to stack. So now we have some storage but will need more. We have at least 50 pine trees big and small to chop down over next few years. Some in the gullies will just rot or be made into north shore style bike trails. Many we can use to keep us warm. Then that little sailing boat. The sun and the rain wont help it at all plus it was in the way- taking up space I could fill with another old car. So more telepoles and the 6m lengths of NEW iron that had been left in the bush edge by previous land owner came in handy. We built this... (turns out to be also very handy for lawnmower, old pushbikes and bike trailer storage) Meanwhile our neighbour has offered us her field which was overgrown with gorse and blackberry for the past 20 years. We wanted to clear it out so our view was nicer and had been intending to ask her if that was cool. Then she just said one day- hey how about we make it into a fruit orchard. OK ! So it was out with the scrub cutter and chainsaw and with a couple of days hard graft we had it all clear. It looks so much better and the soil is amazing as it originally had two pigs there then getting nitrogen fixed by gorse for past two decades. Next step is to plant it out but for now its just great the have a view with out gorse and masses of blackberry. Before.. During.. After... That little fence we have left up to plant grapes and kiwis on. We are both still very much newbies when it comes to growing things but no being stressy types what grows will grow etc etc Our neighbour- well shes very green fingered and will help us out heaps. Plus there's the nerd net for info. Main thing is I'm enjoying this whole land thingee and planting stuff way more that I thought I would Then there is the track up to our ridge. We had been planning to clear it for ages so a day or so with the scrubcutter and now its way nicer to walk up. Horse and Jen happened to turn up one day whikle there were up here for holiday so they got a tour of our freshly cleared track. We have now almost cleared out the building site at the top where we are planning another cabin build. Not photos of the now cleared track but I did take this one the other evening when we went up to watch the sunset and drink beer. When we got to the ridge a huge deer went storming away from us over the gully. Quite a sight ! What is cooler was the picture on my beer bottle... Speaking of tracks.. Hannah went away on a few days trip with her sister who was visiting. While they were gone I hooked into the start of our first mtb track. We have always planned the first track to head as gently as possible up to the ridgetop- a gentle enough gradient for an easy ride or walk. I really wanted to get something done while hannah was away as a surprise. I cut, dug, raked, carted, stacked, walked, toiled, bashed a track through the Kanuka grove just behind the cabin over two days and built whole first track. I really enjoyed it and worked through till it was almost dark. I was knackered at the end of the second day. Hannah got back from the tramp and I surprised them both with my new track. Its still a touch too steep to ride up easily up so Ive worked out a path for a track that seperates off where it gets steeper and will head back towards the truck then back again. Pretty much..more hairpins = more track = easier gradient (but also = more work....) Big thing getting built right now is our outside bathroom. We have had this planned ever since first viewing the property but had not yet decided on where, what and how. The 'what' bit we have sort of picked away at since before moving here. Discussed over coffee or beer (but not both) we have gone over ideas that have come about from years of using various homemade showers and dealing with a variety of toilets. Fascinating stuff. The 'where' bit sort of just fell in place once the cabin was up in its new location. Its on a slope backed with bush which is ideal for what we envisaged. Situated halfway between the cabin and the back of the shed its in a handy location for us and the cabin and its private with lovely views. The 'how' bit is just evolving as we build. Its an elevated building over composting toilet system. For now its the well proven batch type setup with wheelie bins. Rotated as they fill with a minimum of 1 year composting in the bins before going into a seperate compost area up off the driveway for another 6 months. Then the compost can be used in places like the fruit orchard and areas we are building the native bush back up. From all the reading we have done this is total overkill as far as dealing to any pathogens but hey. No harm there. Its going to be awesome having a decent setup that has a minimum amount of moving shit about, he he, and not have to pay or worry about involving outside services like septic systems. In the future Id like to build our own 'Clivus multrum' style system, a setup that uses a sloped bottom vessel and is continuous in operation. You can buy 1 m3 capacity units made in plastic if you have a spare $4000...which is an absurd price considering our 25000 litre tank cost $2600. I'll use stainless steel to make the structure. But that still involves more pingas and time which we dont have- the latter due to the longdrop filling fast. The grey water will be treated using a reed bed system. This is pretty easy espicially on our type of land because of the clay below. The water will only go down so far and then move along. Moving water through soil is the quickest way of treating it. It does not take many meters before any nasties are dealt to. First off we dug out the bank. This did take quite a while. I had to take breaks and sit down to sip at beer while looking at the mountains. We would take turns at this after Hannah saw how nice that looked. Eventually a large 'void'? was created and funny enough a hill appeared somewhere else. Much of this hill appeared next to the graden because there's some very lush dirt with some mighty fine looking well fed worms in it. Kevin just watched or chased clods down the slope. We also had this fella stroll out of the dirt where we had sadly destroyed his underground lair. What a huge bugger he (or she) is. I released him later further up in the bush but not until Id worked out what brand he was.. Turns out he's of the 'Stanwellia' species- related to trapdoor spiders and quite rarely seen as usually underground. His burrow was massive and we had sliced right through it with the spade. See here for another one.. http://www.nzherald.co.nz/nz/news/article.cfm?c_id=1&objectid=11307026 Then we planted four H5 treated poles set well down into the granity clay below. A thick plastic groundsheet runs up past the decking and right up the walls sealing in the treated plywood clad basement. The decking is insulated below with 40 mm thick insulation and the inside has reflective foil insulation. We want to create a heat trap to keep the interior as hot as possible so promoting a decent heat in the compost. Inbetween building we cleared out the bush around that area. When intially clearing the land last year of gorse we worked up to the bush edge and only so far in. We had left the gorse hiding within because its dying back anyway. But this area was still pretty bad so a few hours and we not only had a lovely little spot but yet heaps more firewood. Some of the old gorse was huge! So much more light into that area and on the bathroom. The pile on the left is gorse from just that little area. Above this we've built a nice solid little bathroom that measures 4 m2. It'll contain sssb - the shitter, a shower, a sink and a bench. Then we built steps using some more of the telephone poles. Its quite high up and we have to allow for our olds etc when they visit so easy to climb steps they had to be. Must build a rail soon because man I'd hate to go trippin off that ledge... We have made a little track through the bush and once tidied up will be a sweet way to walk to the bathroom from the truck. The steps come right down to this track. We picked through our pile of Rimu, picked out some possibly nice bits- possibly because you really cant tell until it goes through the planer. These became window and door frames plus some rafters. When the main shed was delivered the piles of sheets were protected some extra packing sheets in a dark grey colour. There were just enough of them to clad the roof with a decent overhang. Sweet! We still have a little left over for another wood shed too My old boss gave us a whole heap of wood leftover from his house build. All Cedar, Macrocarpa and some Douglas fir. Ideal timbers for building things with! So the Douglas fir we ripped down and planed then made doors with. They are barn style doors and Hannah has oiled them. They look nice. Photos later of them completed but heres a action shot.. Hannah painted the outside of the window frames with paint left over from the housetruck. Then I scored 4 litres of 'mist green' paint from nelson house parts. Its the same colour as the water tank and similar too the main shed. It should help the building blend into the bush nicely. I have a neat idea on an overlay method using random wood to break up what will other wise look like a tall painted ply building. I think it will work well. We will see. Here is the building so far with the primer coat on...1 point
-
Is it faster than you car? These go hard lol.1 point
-
through further experimentation it has become evident that the car will drive and obtain full lock with the chassis 40mm off the ground. it scrapes a bit on the lumps in the road though.............1 point


This leaderboard is set to Auckland/GMT+12:00