
Leaderboard


Popular Content
Showing content with the highest reputation on 06/13/15 in all areas
-
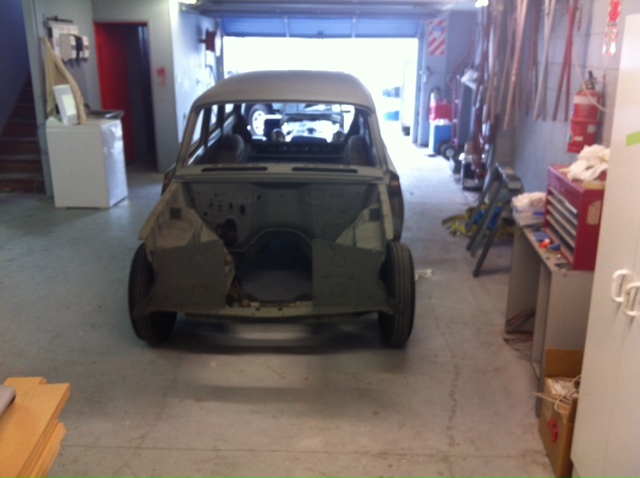
After 6 months this car is now mobile again! Thanks Dad (mo999) for the help this weekend. We put in my old crank, new bearings and mated it to the unknown condition Mini gearbox from Zerbra (which seems to have most of it's syncros but goes well, very quiet). It's running good! Oil pressure is normal for British car. Gearing is a little taller so better at speed. Speedometer is only out by 5km too. Very happy. Even still has a WOF. Will be at the next Auckland monthly meet with it. Although I've noticed the exhaust has been pushed up and the pipe twisted (maybe happened on the tow truck?) so it broke the rear mount and is now hitting the floor. Need to get it on some ramps or a hoist and shove it back into place with a new mount. IMG_4317-Edit by GuyWithAviators, on Flickr Discuss here.7 points
-
took this 5 mins ago4 points
-
Here is the fuel pump cradle, complete with a sealed electrical bulk head from MSEL. Here it is installed in the tank through the cut out I made in the floor. Makes it a lot easier to work on, means I dont have to drop the entire tank just to get to the lift pump. Added some -6 bulk head fittings. Fuel in from lift pump, surge tank overflow, fuel rail return and fuel out from the Bosch 044 pump. Had to make some 3mm thick aluminium washers as the sheet metal was too thin for the bulk head nut to do up tight. I had my mate Graeme at SMS fabrication tune me up a surge tank that I drew up for him. He's got all the gear to cut and fold sheet metal, and hes a bit of a whiz on the TIG welder when it comes to aluminium. Here it is mocked up. Brought an Aeromotive fuel regulator, mounted that on the fire wall. Made a few changes to the fuel rail to make it easier to make up the fuel lines. Decided to go with braided lines through out, although a little more expensive it was going to be easier to plumb up and make it alot simplier. With the fuel rail back on, regulator mounted and bulk heads to the surge tank fitted I started to make up the main and return fuel lines so I could get the car back on the ground. I wanted the fuel lines to hug the underneath as much as possible, but with the stainless braided being quite abrasive I was worried that it would rub on the steel causing all sorts of shit. I ended up ordering 10m of 20mm clear heat shrink to cover the fuel lines to act as an insulator. Hard to tell from the picture below, but the lines have been covered in the heat shrink. Underside and engine bay side of things were all sorted, dropped the car back on the ground and began working in the boot to finish it off. Purchased a rivnut gun to mount the tank and fuel pump as well as the block off plate. With those mounted I could make up the remaining fuel lines, so after mocking a few lines up and getting an idea of what fittings I needed to purchase, it was done! Primed up the surge tank and checked for any leaks, which there were none, so plugged the Bosch 044 pump in and checked for any leaks in that circuit, which there was, and see where the fuel pressure was set at. I had to tighten one fitting a touch more, and replace a copper washer on the fuel rail. No leaks, but the fuel pressure was still at 5 bar (what the reg was set to out of the box, atleast I know it can handle 5 bar!) so I dropped that down to 3bar. So a few weeks later it went out to Hitech Motorsport again to have the engine tuned on the Link Atom G4+. Got them to setup 2 boost maps to switch between, low boost is 9psi, and high is 16psi. Green line is high boost and pink is the low. Power curve gets a little peaky on the high boost map after 6500 compared to the low boost which holds the power right through to 7500. Could be to do with the boost dropping a 1psi or so up there, or maybe turbo inefficiency? Still plenty of power though! Probably need one of those fancy new billet comp wheel turbos to spool things up quicker. Saying that, and even though boost graph looks dull, it doesn't feel like there is any lag. You can put your foot down in any gear and it will pull hard, and the power curve definitely confirms that.4 points
-
Another small update. Good news = We had a healthy baby girl. Bad news = Garage time is pretty low for now... I'm on the home straight, the last of the planks have very little bending to be done, shouldn't take too much longer...3 points
-
lol i blow 2k on headers and now JZ ? no ha3 points
-
Done some more work and then 7am this morning2 points
-
LS can fuck right off. JZ is sweet but really the only thing that suits this car is a 1GG with a straight pipe2 points
-
December 2013.. Holy shitballs batman. Has it been that long? Ehem..... Hello You! And welcome... To Starship Cortina. A lot has happened in the last 18ish months... A plane disapeared. (Conspiracy? How the hell do you lose a whole f%$king plane?) I've almost rebuilt the entirety of the Girlfriends Shitty Nissan. (This isn't a thing against Nissan's. Just the girlfriends p10 Primera is a shitbox) And Starship Cortina hasn't moved an inch. Until now... ... Well. She still hasn't really moved an inch. But. I've made some progress. For a 40+ year old paint job. That blue stuff is sticking pretty well... I can feel a tiny bit of momentum building this week... Half an under body stripped. Having some thoughts on Diffs. Read about a worked 2L pinto sending 168rwhp into a 2L Cortina diff and getting diff chunks in his diff oil more than once in the last 12 months. I won't be putting a 170 horse through it. But... I don't really wanna stick with the ford diff if it's only goal in life is to fill my diff oil with diff chunks. (I HATE buying new diff oil. that shits expensive... Oh and so are diffs that aren't in chunks) Might have to have a measure with the tape. I'm sure I read somewhere that a 80s hilux diff isn't too much work to get in. Tune in next week when I'll have finished stripping the paint and strengthing up the shell. Berate me for my lazyness and sheer lack of ability to work on cars for the last year or so, And tell me all the reasons a hilux diff isn't the way to go: //oldschool.co.nz/index.php?/topic/40329-grimmys-71-mk3-cortina-zetec/2 points
-
Before pics, carb sent off to be rebuilt, Stripping engine down for rebuild.2 points
-
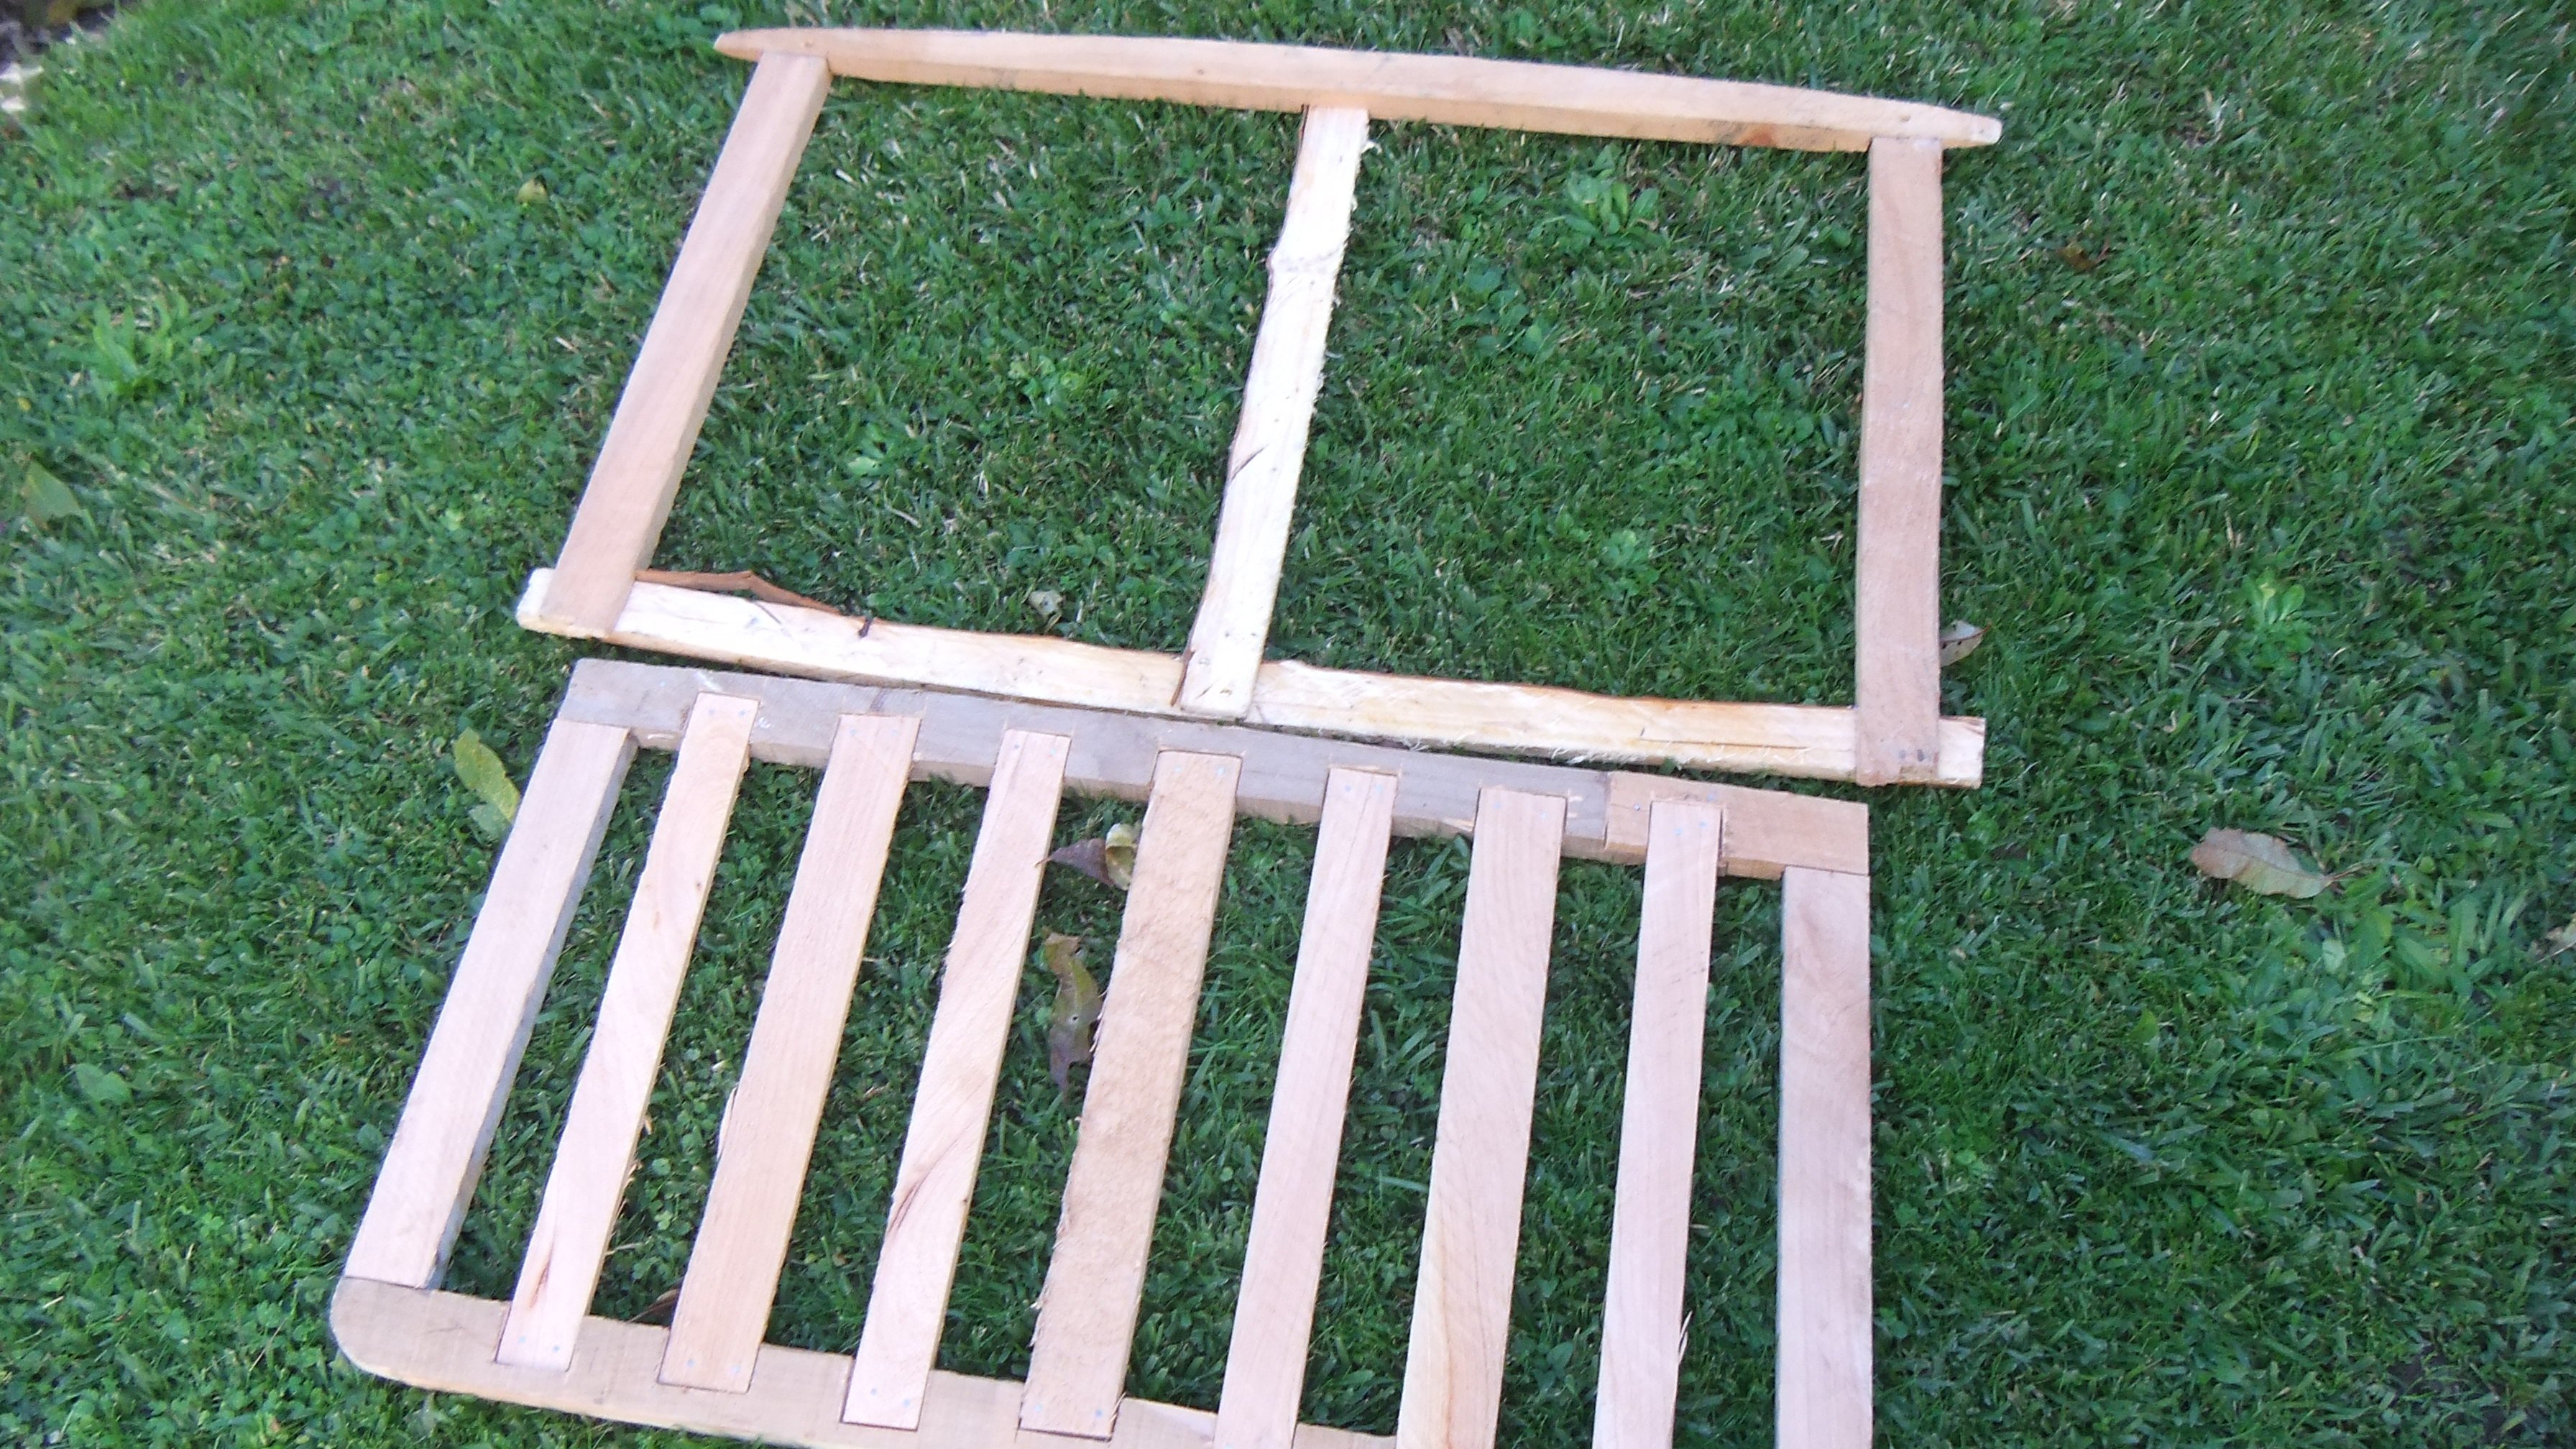
This seat is lacking in padding. Has more padding than the alloy bomber seats i was thinking of making. The wooden frame is based on the original seat frame, except the originals had coil springs and horse hair padding. i don't know how to make horse hair or coil springs. Bundled reeds tied up with flax as padding. Not that comfortable. Probably alloy buckets would be slightly more comfortable? Edit: After 3 years of driving, the bundled reeds have proven to be good enough, at the time. Only now (February 2020)are they losing their springiness. Guess i should find some seat foam soon. Lucky the 'wastelands' as some people jokingly refer to the place i live, is no longer suffering from the 2009 GFC. Could be a new GFC with concerns over that virus (common cold?) coming from wuhan lately though..
 2 points
 -
Over the weekend I got the gearbox mounts done, welded some nuts to the folded plates that sit inside the chassis rails then welded them in and finished off with some patches in the floor Then it was on to the handbrake mount, I took the brace thing out before I cut the old tunnel out and moved it back 150mm, problem was the tunnel is a completely different shape at this point, so I cut sections out of the back of it and welded it back together then widened the front by adding some steel back in. Some hammering and grinding later and I had this. Then welded it back in place It looks pretty much factory which was kind of the point so I am happy. Got a few other little jobs done but they were mainly filling in all the speed holes that the car has collected during it's life. It's weird but I have pretty much run out of things to weld, might be time to get another shell and start again....... So now I can start putting it back together, maybe with one last distraction, A few years back someone was selling a roll cage for an Anglia on Trade-me, I got it for like $20 or something, it was only a main hoop which doesn't meet the new MSNZ regs (it's only dia 38 tubing)and some braces but I figured it might be useful to have as a template or to throw in for a laugh but now I am thinking maybe I should put it in to attach the harnesses to as it does meet the rules for cert. Anyway I am undecided as to whether or not it will actually make it in yet but I have set it up in there and I will see if it grows on me or not. As I said I can now start putting it back together so the updates from here might be more interesting2 points
-
spotted I'm hugely proud of this. The same issue as the immaculate ZERO3 as well, A++2 points
-
So, been driving past this example for the past 3 years on my way home, got turned around once, and was under covers for most of the time, but one day the cover blew up, spied the corner showing the 16v Badging, so naturally I burned that into my brain. Fast forward another year and the cover disappeared. Been trying off and on for the last 6 months when time allows to get this.. South African Assembled, GTI 16v - thats the twincam rather than Povo spec 8v GTI - just that little more special. 105,000km Full leather interior. Comes with a small selection of spare parts - Including spare flares. Rego on hold so no tough compliance this time! Has already had the bumpers swapped out for the "Big Bumpers" Small amount of rust on one inner guard which I need to attend to. Plans? - See how well it goes and how reliably, but if its any good I have had thoughts of weekend/motorkhana car. Lower + 15" wheels (BBS or similar) and sticky tyres..1 point
-
So after 6 years of not owning an oldschool car I thought it was time I did something about that. I decided at the end of last year I'd try to buy a GT6. However, I wanted a Mk2 as I preferred the more 60s styling, the problem being these are stupidly rare. But luckily I managed to be the first to offer money for the one that briefly appeared on Trademe last weekend. I picked it up from Whakatane/Rotorua/Tauranga (its a long story) yesterday. Drive back went well other than the speedo doesn't work and the headlights are dangerously bad for the last two hours in the dark, Its a 1970 and has had quite a lot of money spent on mechanicals recently. It needs the interior redone and theres a small amount of rust in both rear guards and the drivers door. Given I bought it site unseen I was pleasantly surprised. Its reasonably standard though has a few upgrades like brand new Mikuni flatsides, electronic ignition, hotter cam, GAZ adjustable shocks etc. Goes well though it is rather loud at 100ks despite having overdrive. [/url] ] If you look closely in this photo you'll see a piece of wood holding the tailgate up. Its supposed to be held up by a torsion bar by the hinges but like most this isnt working anymore and they're no longer available. So it has gas struts except these are just as broken. It has the factory option rear seat. These are like hens teeth apparently and having now experienced it I can see why noone chose them. Single worst rear seat ever, theres no leg room, no shoulder room let alone head room and you have to climb over the back of the front seats as they dont go forward enough to go around them. Here is the rust in the rear guards. As you can see drivers side is the worst of the two though the passengers is worse than this photo makes it look. Plans are to do not much to it in the short term as my mortgage is looking a bit sick but medium term plans are to continue tidying it up.1 point
-
once again i have acquired another car that is not an austin... (regret that username) BUT never the less this is my new project was a freebee off my mate who is moving to the uk and for some odd reason he though i would like it.... and i think he thinks im the only person who will put work into it. so first things first is WOF and i need >window wipers >lift side steering arm boot ( im think its that rubber thing) >reverse lights (and according to VTNZ its too low but who said i had to go there for wof...) hopefully can get around to it all this weekend, the only thing i dont want to do it the reverse lights because i am terrible with trouble shooting electrical problems so if anyone has any tips for that it would be much appreciated. Plans for this beast includes fixing the front bumper, paint both bumpers gun metal grey, then primer the body because surprisingly its pretty straight and virtually rust free. not planning on spending heaps of money on this so thats why its only getting primer. and also sounds, needs sounds. there are some slight mechanical issues that need sorting too, there is a wicked tap in the engine (well i think its the engine, dad thinks its something else) and it leaks autotrans fluid and diff fluid so ill have to take a look at that too.. anyway thanks guys, update probably after the weekend if i get wof!! >discussion<1 point
-
I love the ood akai stuff must get another set up when ibreturn1 point
-
im not reading what everyone has already said but i vote make it look like this i see you liked that shit on my fag book gooooooooo on do it!!!!1 point
-
Dissapoint JZ time obviously1 point
-
Oh man this is so choice. I bet it feels so low to the ground when you're sitting in it. Such cool little cars. Good choice and cool to see more stuff like this on OS.1 point
-
Hey guys not much of an update sorry I finally got my hands on a suitable piston kit was difficult finding a suitable size in NZ I ended up getting a tkrj one off a guy here in Chch who advertises on trademe. That all fitted up nicely and is back together with new gaskets. The other thing is does anyone know if they are the current owner of this bike? I will need to get it registered soon and realise that it probably needs to be in my name to do so.1 point
-
Whats the plan stan/sam? Clone of mine would obviously be super cool. Shame about the A series1 point
-
You can get 2k put in spray cans if you really want. Just gotta boot it home fom.the paint shop before it goes off1 point
-
Im sure i posted in here my commer has some plywood backing, with the spring base of a bench seat bolted to.that and covered. So i would look at cutting up something else1 point
-
Cracking Into some more panel work1 point
-
Went to Saeco bearings and ordered some new ball bearings. For future reference in case anyone needs the info: Pedal Ball bearings are 5/32", 11 balls per cup. Steering ball bearings are 5/32" , 16 balls per cup Crank ball bearings are 1/4" 9 balls per cup Will update with wheel bearings when I get to them unless someone else still has the info?. Grease, I'm using a Lithium Complex EP2 as that's what I had in the shed,1 point
-
Yay! Ha, now you'll have to fix Austin. No more excuses1 point
-
Steady on. Confusion has been resolved. As usual, I am right.1 point
-
OH SHIT CONFLICT AT HOME! MUM AND DAD AREN'T TALKING! IMMA STAY AT JOHNNIES TONIGHT SO I DON'T HAVE TO HEAR THEM YELLING.1 point
-
I'll see you guys and girls there!1 point
-
well thats nearly 2 more months evaporated. im sure ive made more progress but not alot to show for it mostly boggling over how to do various things and planning what needs to be done to meet project deadlines which this in now on. of course this means the 124 had to fail a wof yesterday too of course, but i digress. tonights work, foot plates for drivers side seat mount rails. of course where they need to go is right where there are compound curves in the trans tunnel. a couple of hours of bashing steel on steel and blocks of wood and thinking what was that bussiness sheepers goes on about stretching this or shrinking that then more bashing and fits ok then I decided to have a wire wheel party1 point
-
Been a month and all I've done is chang the oil and put a shiny air filter housing on it, Oh and new rocker cover gaskets. I've ordered a calibration kit for the carb and will attempt to fix the exhaust and trans leaks .1 point
-
Does anyone have any tips for getting the outa tie rod end off. I need it off in order to change the rubber boot but it's been stubborn as fuck.1 point
-
+1 on don't primer it. Primered cars suck IMO1 point
-
don't stick primer on it, all the cool kids love that fucked looking paint, it's called patina man.1 point
-
Photo shoot. Now to find another pair of 225/40s for the front.1 point
-
YEAH BUDDY! SWEET WHIP1 point
-
Wooden parts need to be replaced with metal and the metal needs to have someone go over it with a better welder, i really need to acquire a proper MIG or TIG..1 point
-
So exhaust done, I had to finish of the changes on the hot side of the I/C piping. I machined up another one of these adaptors This rotates the intercooler elbow that bolts to the compressor housing 60 degrees, so that it points to the front of the car, instead into the manifold or strut tower. Welded a boss on to said elbow, added a 90 deg hose barb for a pressure signal to the wastegate. Bolted it up to the adaptor I machined earlier and fitted it on the turbo, which meant I could finish installing all the hose joiners and clamps. Ditched all the blue joiners and went for black stuff, also went to an 3" intake pipe instead of the 2.5" I was using previously. With that done it means its pretty much all sorted, except I decided to relocate the boost control solenoid to reduce the length of the lines. Oh and because race car, I made a racing light weight race pipe for racing because race car loud race pipe tip... yeah. Basically just a 3" tip, I put a V-band on it so I can swap back to the muffler if noise became an issue (which it was) With everything back together and ready to go on the dyno again, in typical fashion, I decided to pull some more shit off it so it wasnt going haha. The AE85 fuel tank has always been a pain, from mounting the fuel pump, to the lack of baffling and the surge you get below half a tank of gas... Made the decision to finally sort this out by putting a proper surge tank setup in it. Bought a Bosch 044 and a 10 micron Aeromotive filter from NZ Performance. Always a pleasure dealing with them! So after talking with NZEFI about whether I'd be able to use the Bosch 044 on the same electrical circuit as the DW300 pump (which shares with the ignition), we came to the conclusion that I would be pushing the current draw to high, and also the fact the DW300 pump wouldnt be suitable as a lift pump I purchased a low pressure lift pump to replace the DW300. The good thing about this lift pump is that it only draws 1amp, so it drops the current draw to much more suitable level. NZEFI have been really helpful with any questions and queries Ive had since purchasing the Link G4+ Atom from them. Pulled the tank out to drop the new lift pump in, and I could see a fair amount of sediment in there, aswell as really small fragments of what looked like rust in the DW300 filter sock... Not something I want going through my new pumps or injectors! 15mins researching of how to clean a fuel tank and I found that hydrochloric acid was recommended, which was good as I had 15-20L of this. So stripped the old paint off the outside of the tank, filled the tank up with hydrochloric acid diluted with water. For anyone doing this at home, make sure you're wearing suitable protective gear, dont want to get any of this stuff on your skin or breathe in the fumes! Let the acid do its thing for a few hours, added some baking soda and let it sit for a bit then drained it, then filled it back up with water and a few cups of baking soda to further neutralise the acid. After draining that, the tank basically looked like new inside, stoked! I filled it back up again with water and some "Super Ripper" cleaner, let that soak to remove anything left behind and went through a lengthy drying process which involved pumping hot air through it with a heat gun. With inside clean I masked off the holes and removed any rust on the outside, painted it with a rust kill etch primer and then finished it in satin black. I just needed to get the lift pump in there now, but I was sick of staring at this old fuel pump cradle... Soooooo I made a new one. Machined up a few pieces and welded the lot together, added some Fragola -6 adaptors so I can run braided line from the tank to surge and vice versa. Ill leave it here for now1 point
-
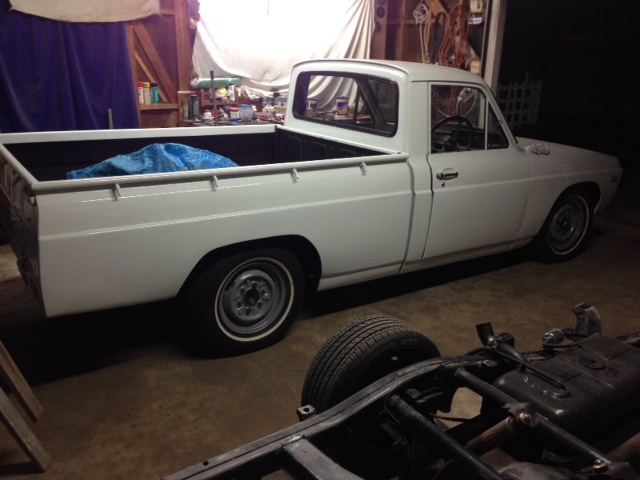
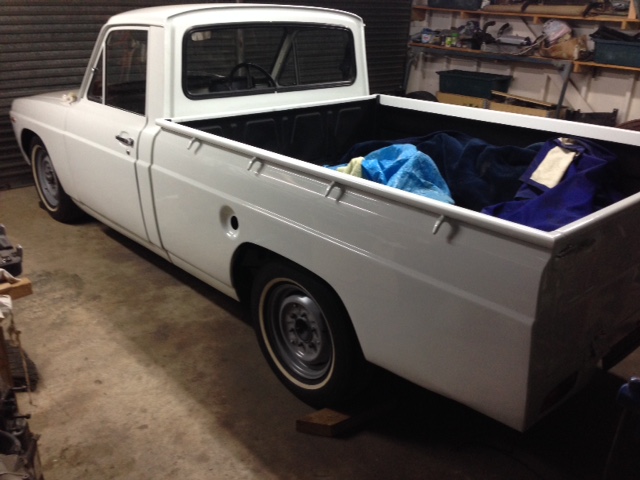
got the well side on, stoked to get it all swapped over with no damage
1 point
-
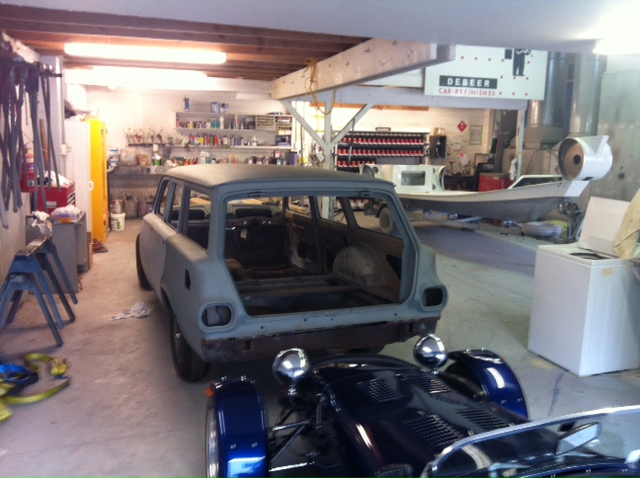
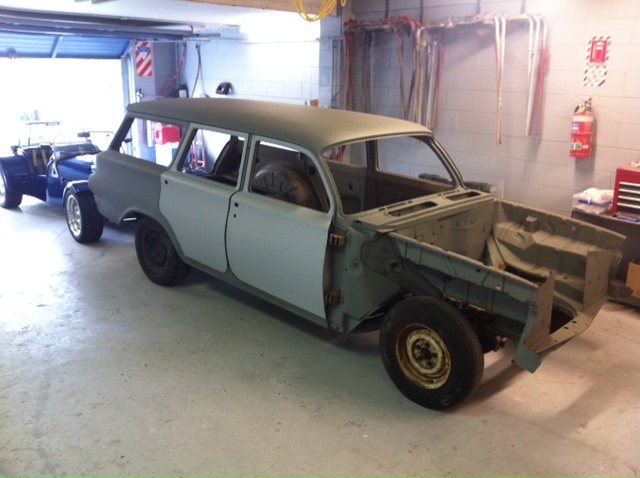
I swung by the Panel Shop to get a couple of photos to prove that the car has moved. Time to get the bonnet and front panels stripped of the should be shiny bits and off to be blasted. I keep forgetting how small these cars really are, especially now there is some space around it. Lastly I have bought a modified chip for the VT 5litre I have to go in from a Guy named Tony off trademe. The big thing is the chip has the VATS disabled. The tune should take the motor close to HSV specs. This should be fun, 190 Kw in a car that weighs 1200 kg with 215 tyres on the back..
1 point
-
heres a picture of the spoon i use and the hammer i use to hit it with. Untitled by sheepers-ra28, on Flickr Untitled by sheepers-ra28, on Flickr this is how i use the end to get up behind the surrounding panel. obviously its on the inside of the panel... Untitled by sheepers-ra28, on Flickr and this is the heavy end that i use once there is enough gap to get this between the two skins. ts got a nice curve to it so i can add a bit of concave shape to the arch. Untitled by sheepers-ra28, on Flickr this is the thin end and how i would be sitting it to do the crease at the top. Untitled by sheepers-ra28, on Flickr1 point
-
alright so ive been asked "how do you stretch a guard?". the answer is its not easy and i want to make this very clear, i have only done this twice. i am not an expert by a very long way. i was told how to do this by my mate Peter the panel beater and that's the grand total of my experience. peter was very clear in his instruction and he told me that if it starts going wrong DO NOT try and fix it. he would come and sort it out for me. i have fluked it so far and have not needed his help to fix anything. so, with that said here is a run down of what i do as best as i can communicate in text. please ask questions and ill try as best as i can to explain. ill take some pictures tonight that will help. 1. Mark out where you want to put the new fold where the guard lip will start from (the new arch line) do this on both sides before you do anything else. 2. Drill the spots and separate the inner and outer skin. 3. Fold the outer lip down. 4. My “spoon” is a broken trailer leaf spring. It’s perfect for this job because it has a skinny end with a bend in it that allows you to get right up inside the panel and onto the back of the flat parts of the quarter when you need to pull the panel out a bit. And the other end is thicker and had a curve to it so it makes putting a convex shape into the arch easier. 5. Using a spoon (whatever that turns out to be) very gently work around the lip putting a crease in the panel for the new arch line, pull the spoon towards you and hit into the car. I use the pick end of my hammer to make a nice tight crease line. The skinny end of my spoon is great for this bit. 6. Once you have a crease hit the spoon from the back to stretch the lip, once again work slowly back and forth, don’t try to move it a great deal with each blow, take your time and it will come. At first I use the skinny end because there isn’t enough gap between the outer guard and the inner guard to get the thick end of the spoon between the panels. At this stage I’m hitting the back of the spoon with the largest hammer I have. You can hit the spoon fairly hard and you should be able to judge how hard to hit it. If it looks like you’re moving it with each blow you’re hitting it too hard. If you can’t really see anything happening with each blow but it’s moving slowly then you’re about right. 7. Go back and forth between checking/maintaining the crease and stretching the lip out. Once in a while use the spoon and the light panel hammer to get any obvious dents or bulges out of the arch and to work the stretched material into the shape you want the arch to be. 8. As you go you’ll find that the top of the crease line will move in towards the centre line of the car. Get the spoon up behind the flat part of the panel and gently bring it out. 9. DISCLAIMER!!!! As I said I was told how to do this buy my mate Peter the panel beater and he said very specifically “if the quarter panel around the arch starts to buckle STOP and I’ll come and fix it”. I’ve been lucky enough in the two times I’ve done this that that haven’t happened to me, I have no idea how to fix it if it does, but if Peter said that the only way to fix it was for him to do it then it must be very tricky indeed. 10. Try to get some shape in the lip (either concave or convex, don’t matter it just gives the lip strength when it’s finished). Once again, my spoon has a great shape to the end of it to help with doing this. 11. The bottom corners are tricky because you have to transition from where the panel was originally to the stretched part through the top. It gets more difficult when it comes time to reattach the inner and outer skins. You’ll just have to suck it and see because it kind of “happens” as you go. 12. When the outer is where you want it start on the inner. 13. Fold the inner lip down. 14. Beat the inner with a ball peen hammer to stretch the inner skin (don’t hit it hard enough to dent the outer) don’t worry too much about the shape, all you’re doing is stretching the steel so you have material to work with. 15. Use the spoon and hammer to move the inner out. Make you crease line around the top in the same place as the outer and work the inner the same as the outer, slowly. I find that if you hold the spoon on the outside of the inner skin pulling it towards the centre of the car and hit the steel right next to the spoon outwards it stretches nicely. You can work your way forwards and back doing this. 16. You might need to give the inner a few goes with the ball peen to stretch the material enough. 17. When the skins are touching again and your happy with the shape (check the flat panel above the guard and the fore and aft parts of the panel for flatness/correctness - usually it goes in and you’ll need to get in there with the spoon and tap it back out) it’s time to weld it back together. 18. Because the two skins are now different lengths you will need to scribe the fold line onto the inner and cut the inner back so the outer folds around it. This is going to be very difficult to explain in text so I think I’ll try and draw what I mean. Untitled by sheepers-ra28, on Flickr Untitled by sheepers-ra28, on Flickr Untitled by sheepers-ra28, on Flickr Untitled by sheepers-ra28, on Flickr 19. Use heaps of clamps right around the lip to clamp the two skins together in place. Check the surrounding quarter panel for correct shape. There is no going back once you start welding. 20. Tack the centre first and work outwards front and back from the middle welding the edge of the inner to the outer where the fold will eventually be. Use the smallest tacks you can because these will eventually be “inside” the lip and if they are big it will make the bottom of the lip all lumpy. 21. Then fold the outer back under. Fold it with pliers until you can hold the dolly on the outside and hit the lip up from the inside. Don’t hit the lip inwards at any point, it will distort the lip and the panel above. 22. When it’s up tight against the inner clamp it and weld it in place. Start in the middle and tack it moving outwards. Hey presto! Finished!! Easy.1 point
-
Took the engine out of this tonight, thanks Neal for the loan of the engine crane. IMG_1607 by GuyWithAviators, on Flickr No more wooden engine mounts IMG_1611 by GuyWithAviators, on Flickr IMG_1617 by GuyWithAviators, on Flickr Tomorrow will split the engine and gearbox and swap the new bits over then hopefully get it going again! And give it a long overdue wash. Most people would have given up on just an Austin 1300 after all these engine/gearbox problems but I quite like this wee car. /it's not worth anything to sell.1 point
-
Managed to get to Waihi from Auckland for the Leadfoot Preview, stopped once at Drury and again just before Thames, longest drive to date and no problems! February Galaxy of Cars at Western Springs, parked up with the NZ Vauxhall Owners Club and walked around looking at cars all day. Sun is shining, weather is sweet and the car is running great albeit a bit noisy and fumy.1 point
-
back in highschool a friend of mine had a mid 80s Holden Barina GS (a Suzuki Swift) which was 1300cc and possibly injected. It had a digital dash and showed what gear you were in and would flash the gear number you should be in when the revs got too low or too high. Was sweet going down the desert road at 180km/h frantically flashing 5 5 5 5 5 while being in 4th gear at some stupid amount of revs1 point


.thumb.png.46e518f714cdc319554c389f990e75a4.png)


This leaderboard is set to Auckland/GMT+12:00