
Leaderboard


Popular Content
Showing content with the highest reputation on 27/06/24 in all areas
-
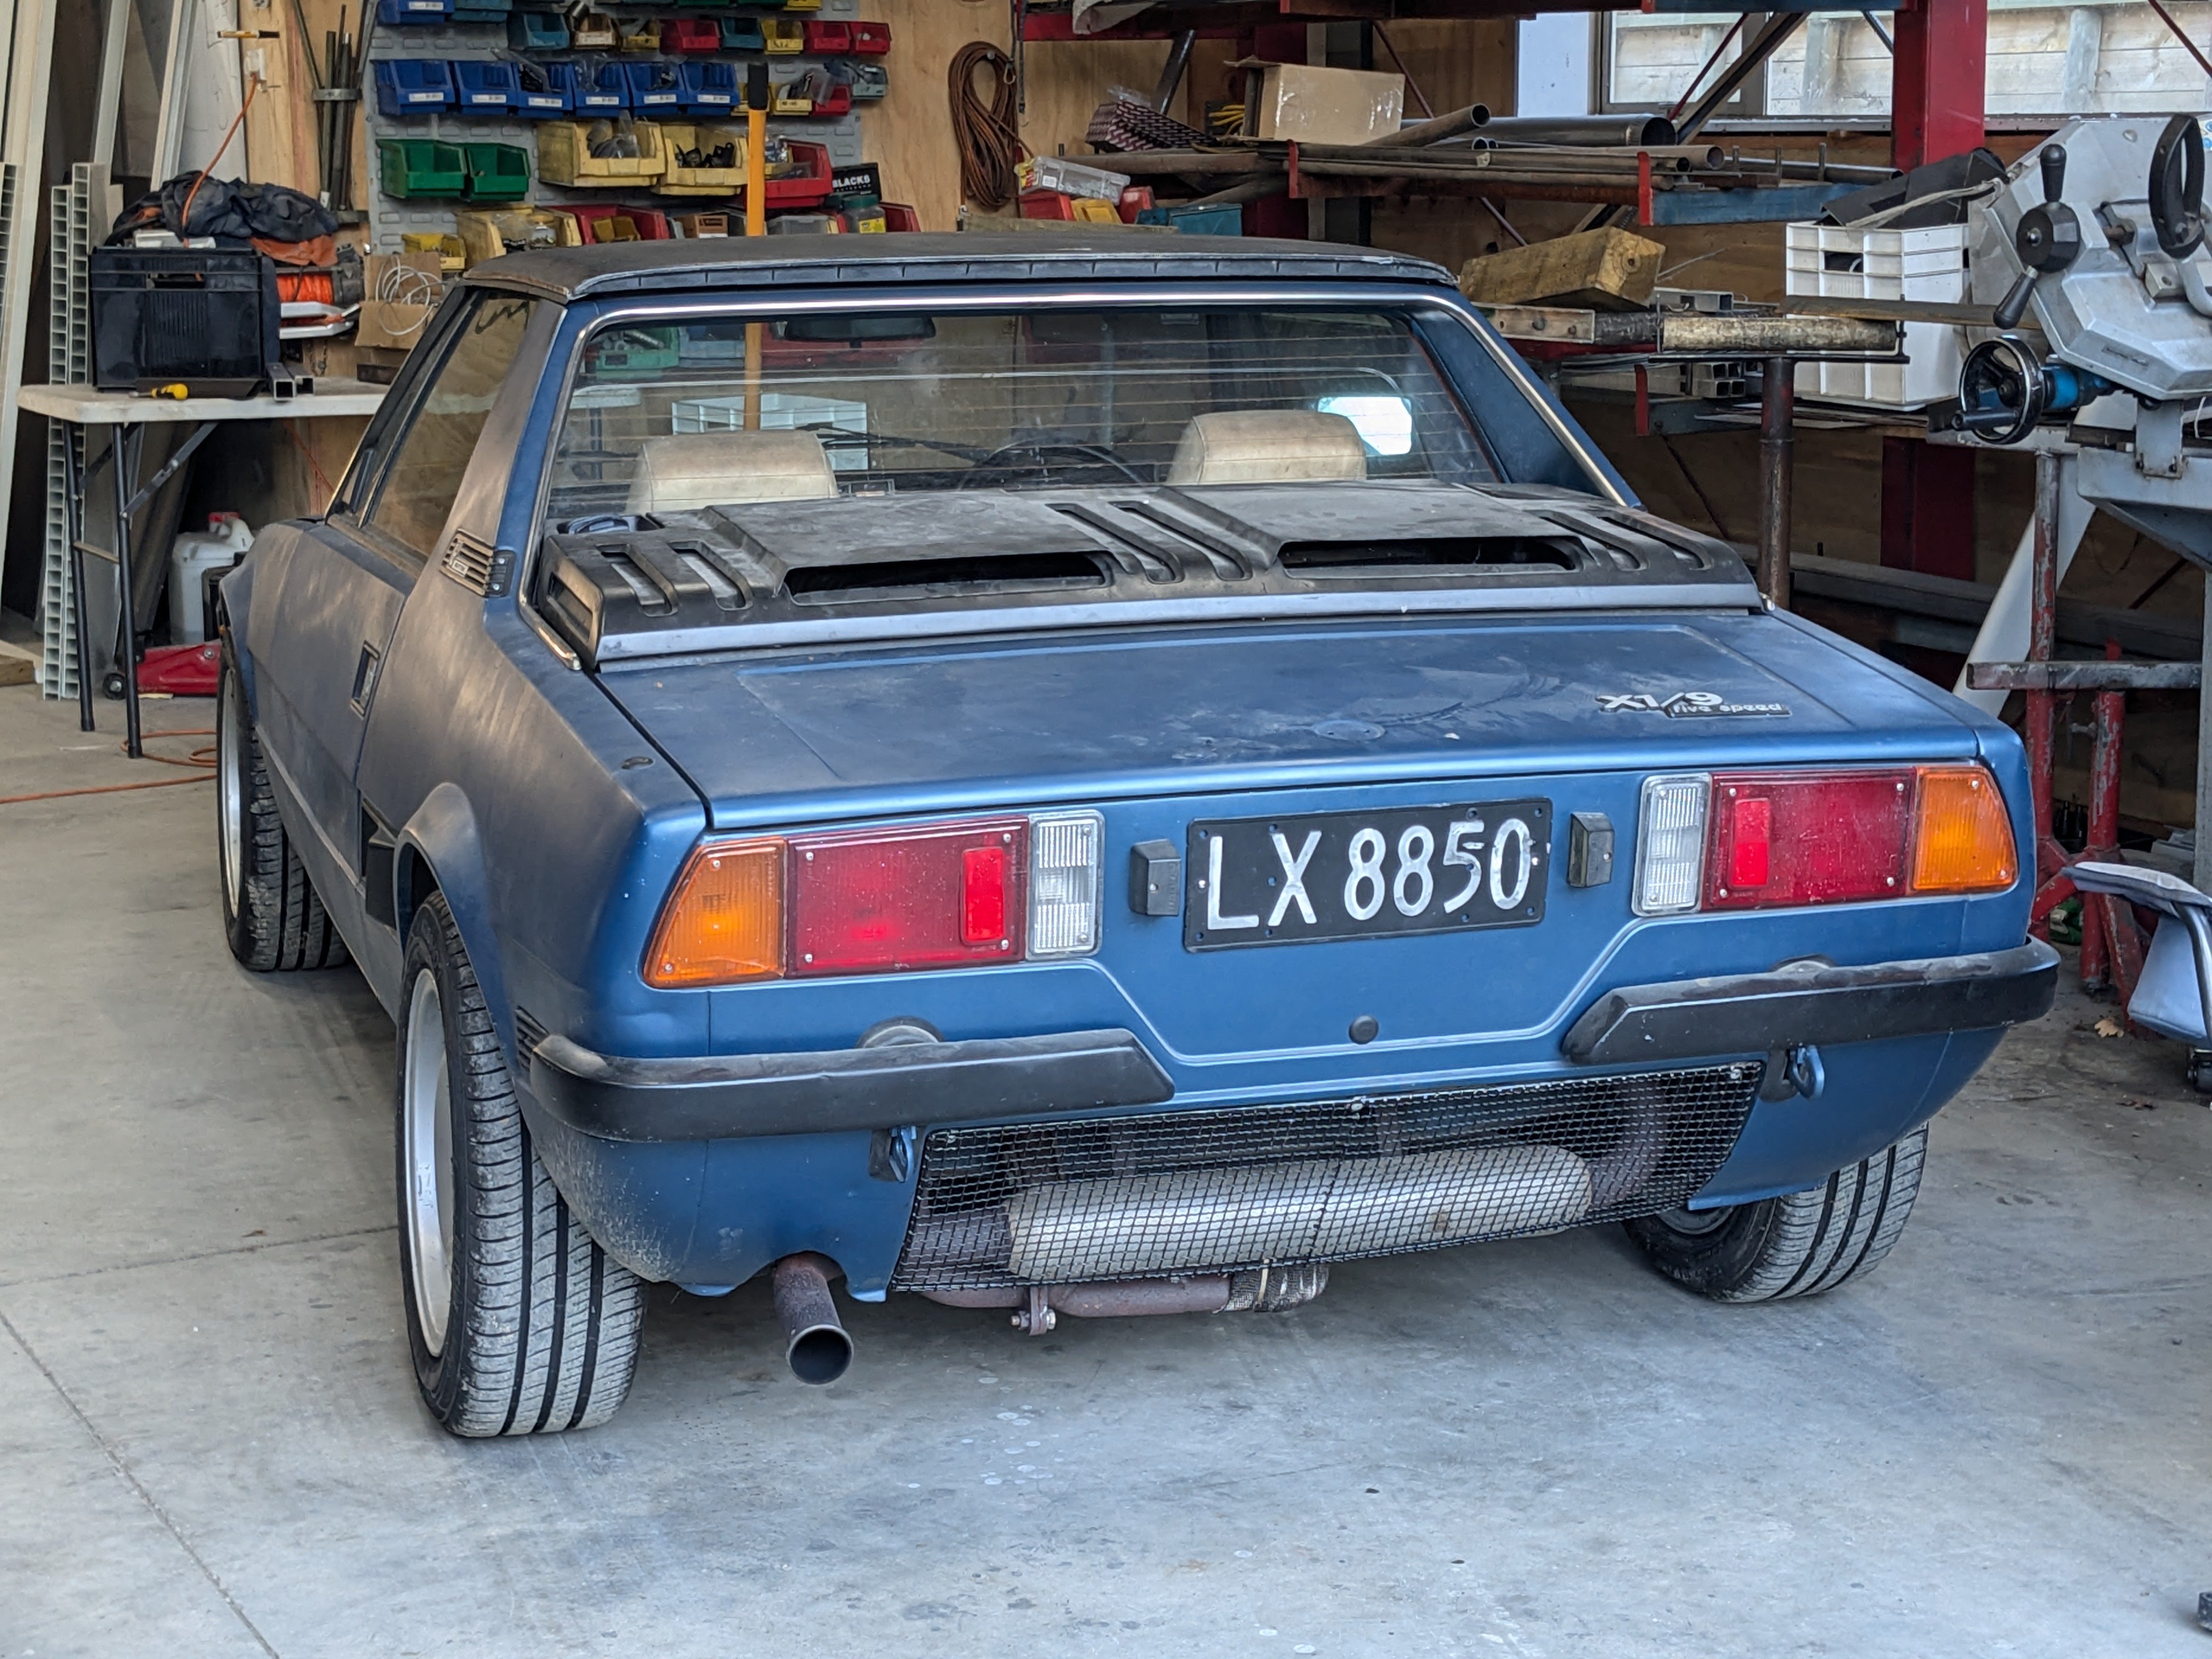
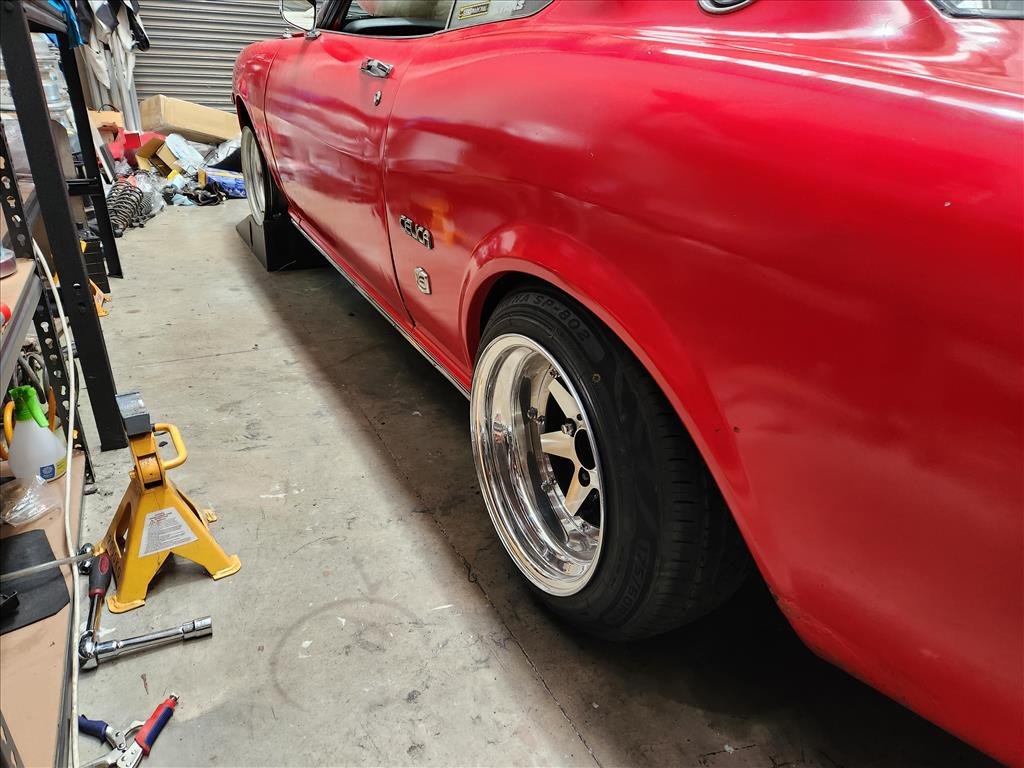
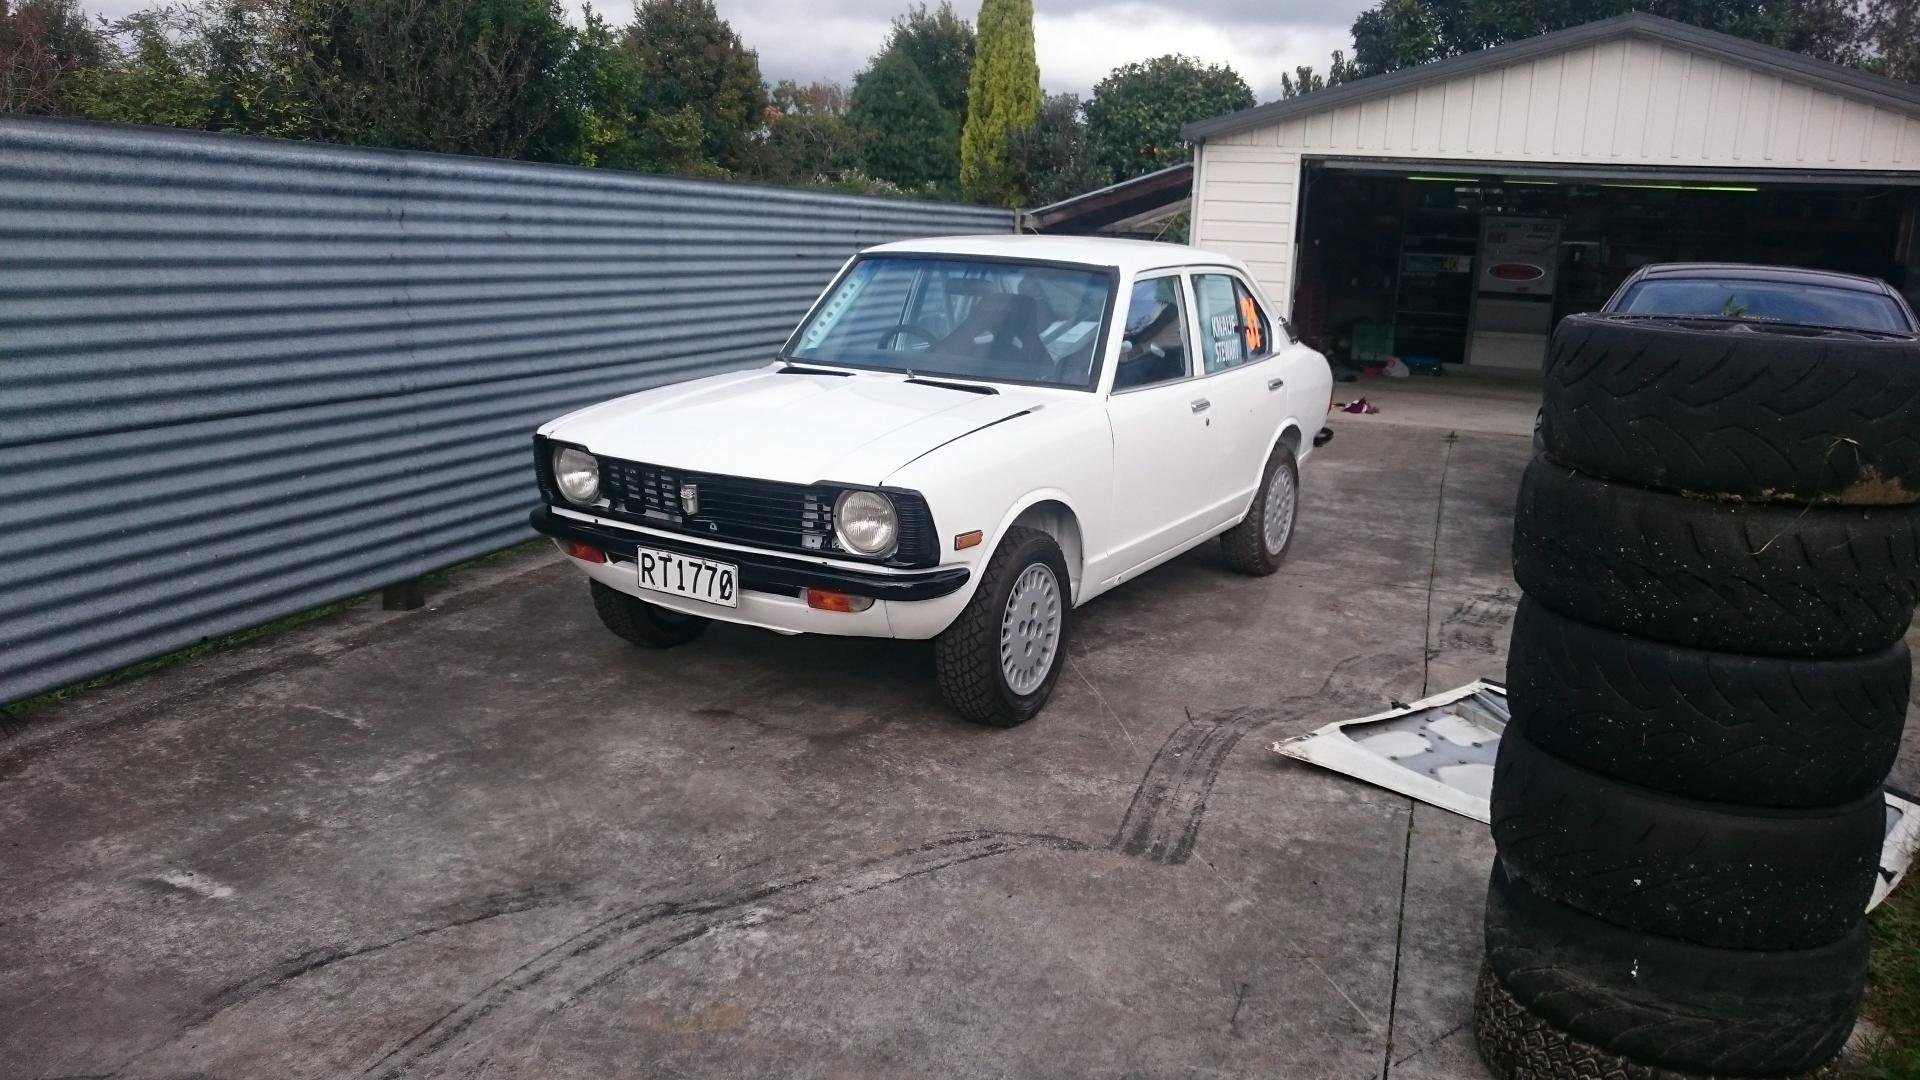
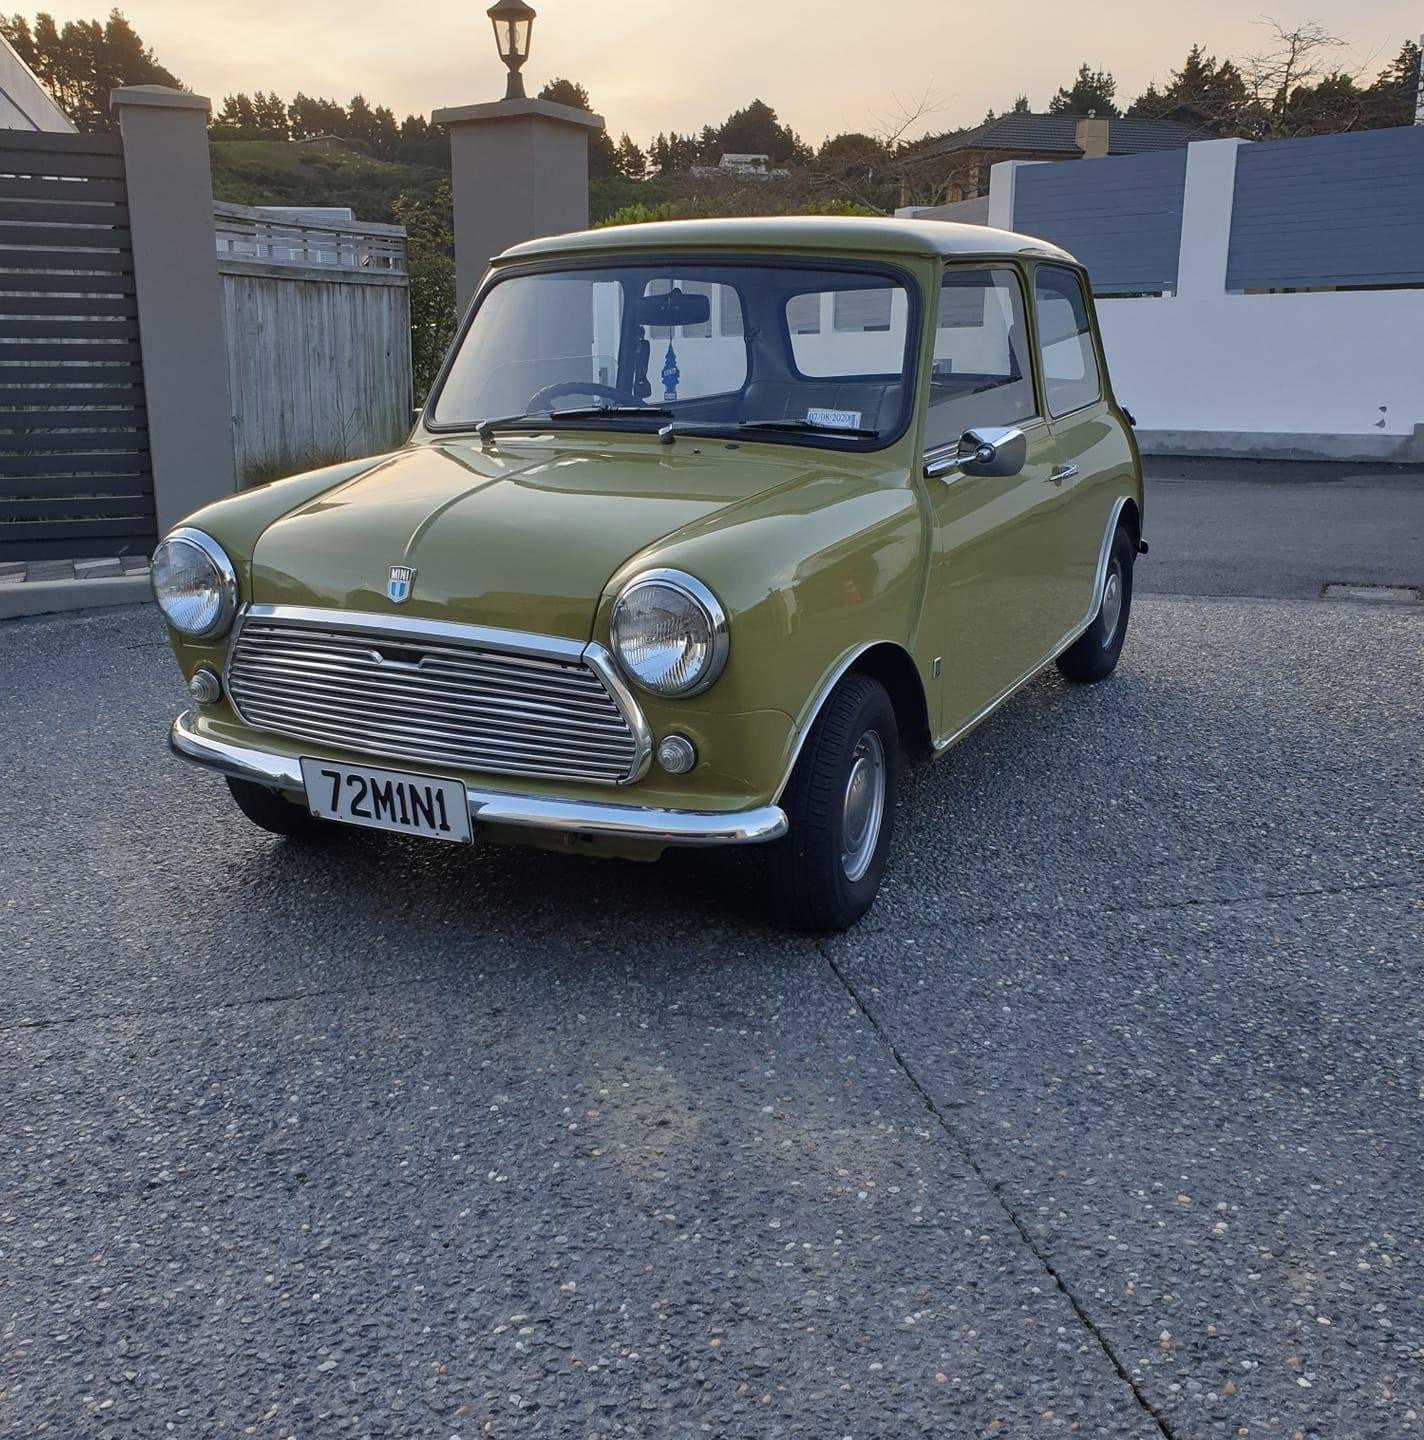
Picked these boys up today, 185/55-14 Kumho. Turns out there are very few options in this size... They are pretty much exactly the same weight as the CD58's. Now it turns out that the hub is a bit thicker on these so the bolts won't work, there is only a few mm of engagement. Stink. Now if I was the sort of boy who were to research the fitment of these rims relentlessly and thoroughly I would have realised this early on and come to the party prepared.... Which I am and so I did. These arrived from Midwest Bayless a week or so ago. I also drew up and printed some centercaps with the 'Fiat' logo with a nod to @h4nd's ever useful input into things. So then I simply bolted the boys on, although as per my research I removed the front factory 5mm spacer. The previous tyres were a bit bigger at 175-70/13 so must have clearanced things a bit cos there is very little rubbing. I may need to heat the inner guard a bit and push it in but Ill wait til the rubbing shows up well. Anyway, that shit looks fucking goooood. And it feels much tighter on the road, so a complete win.
 21 points
 -
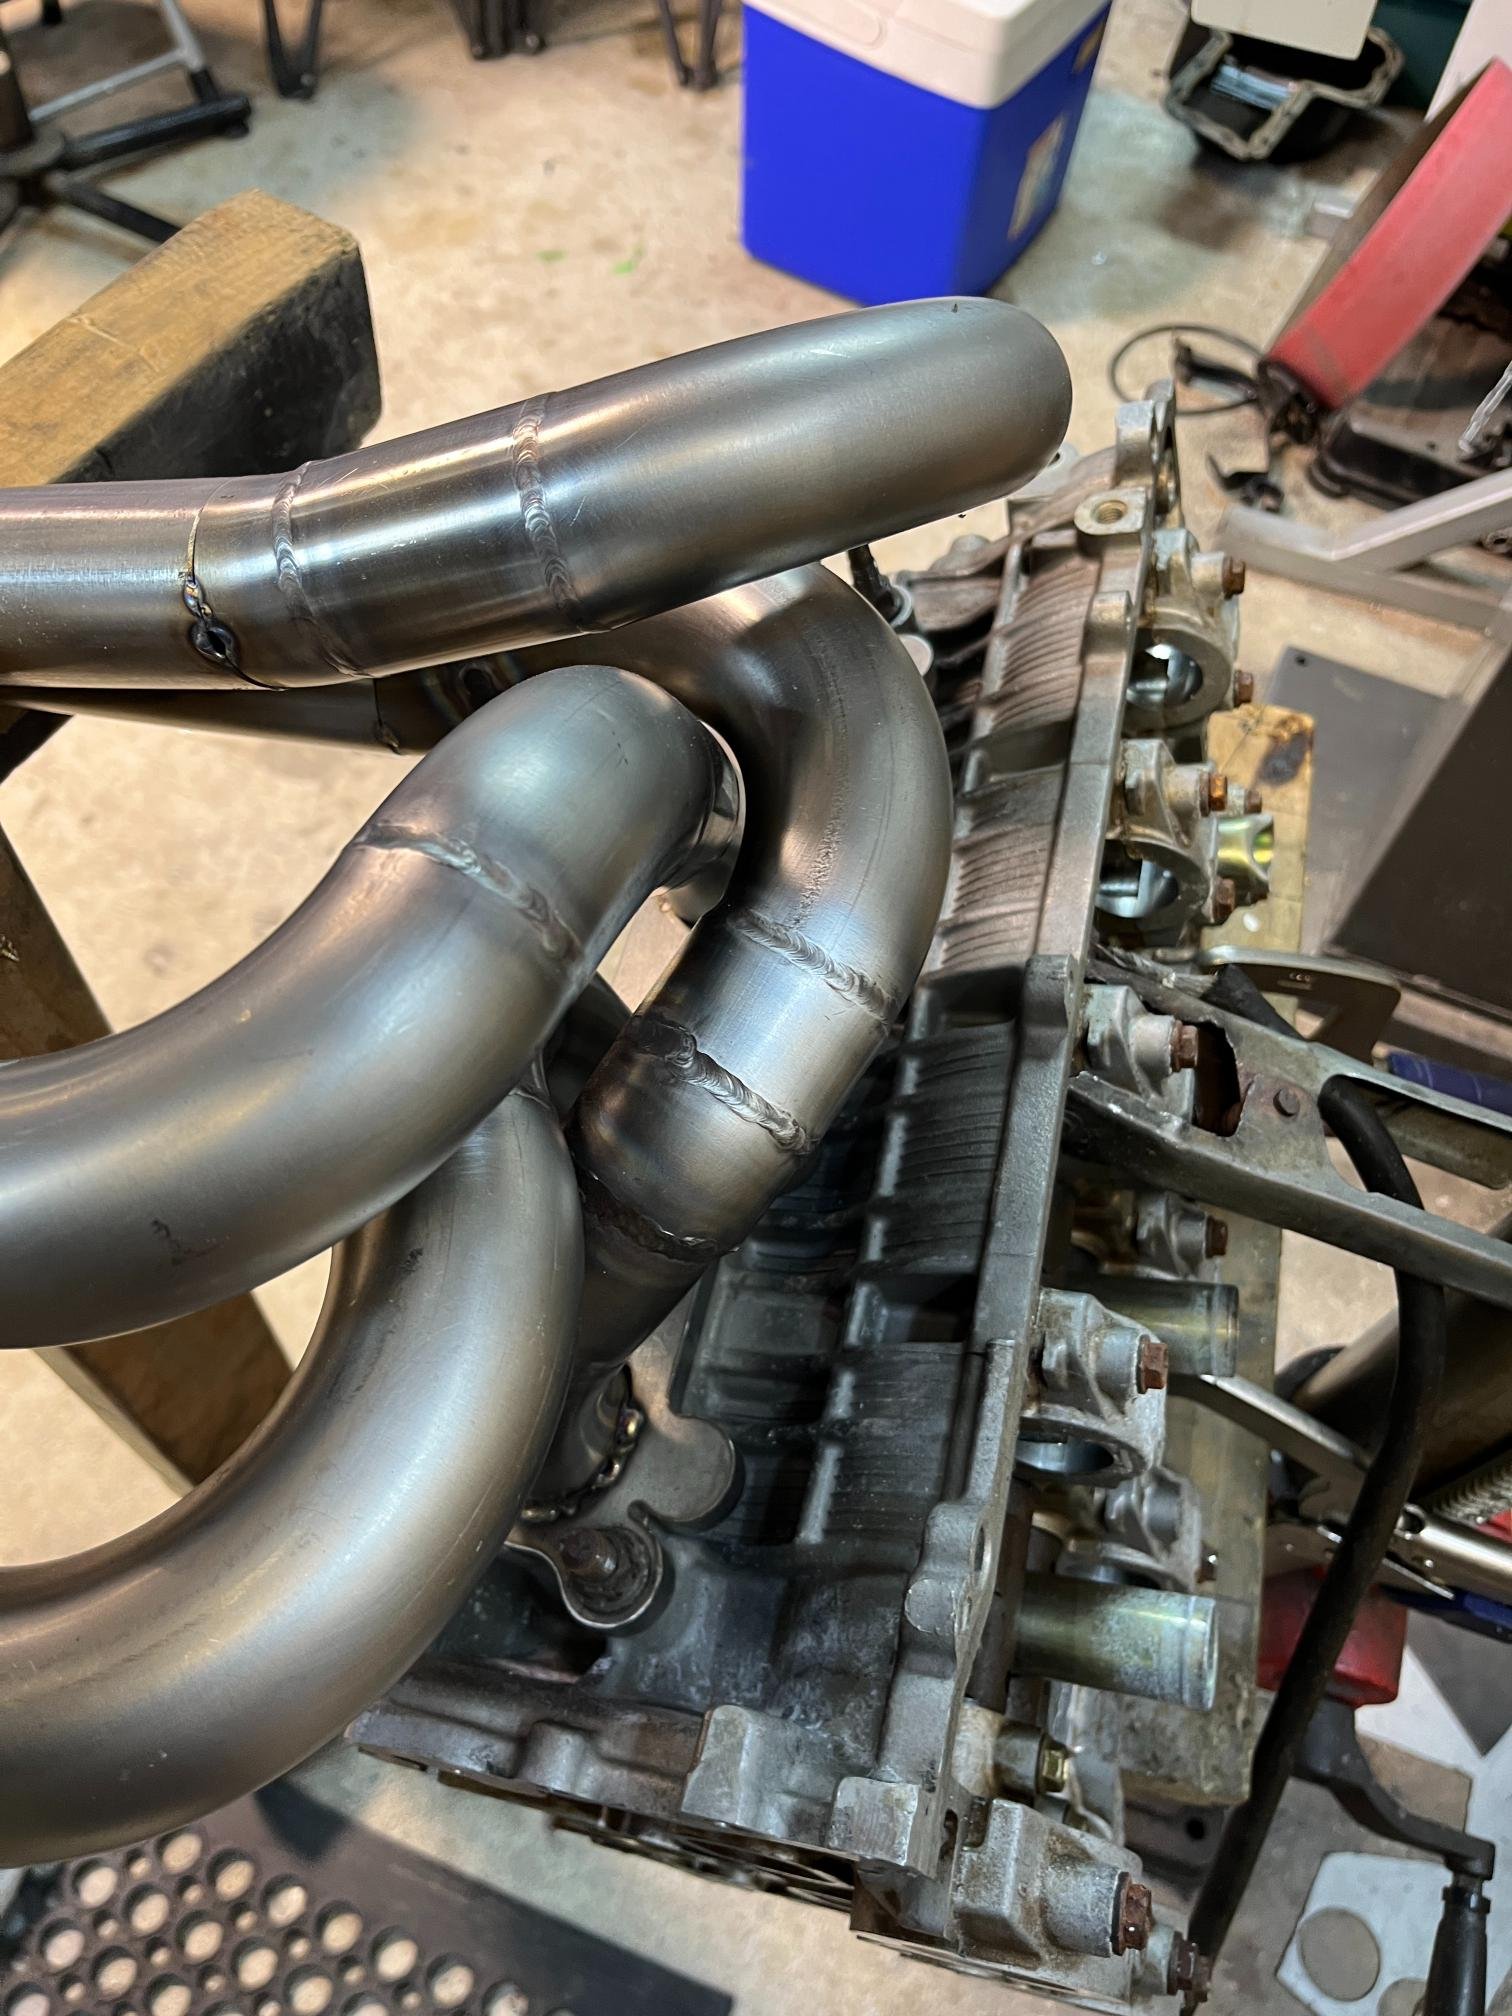
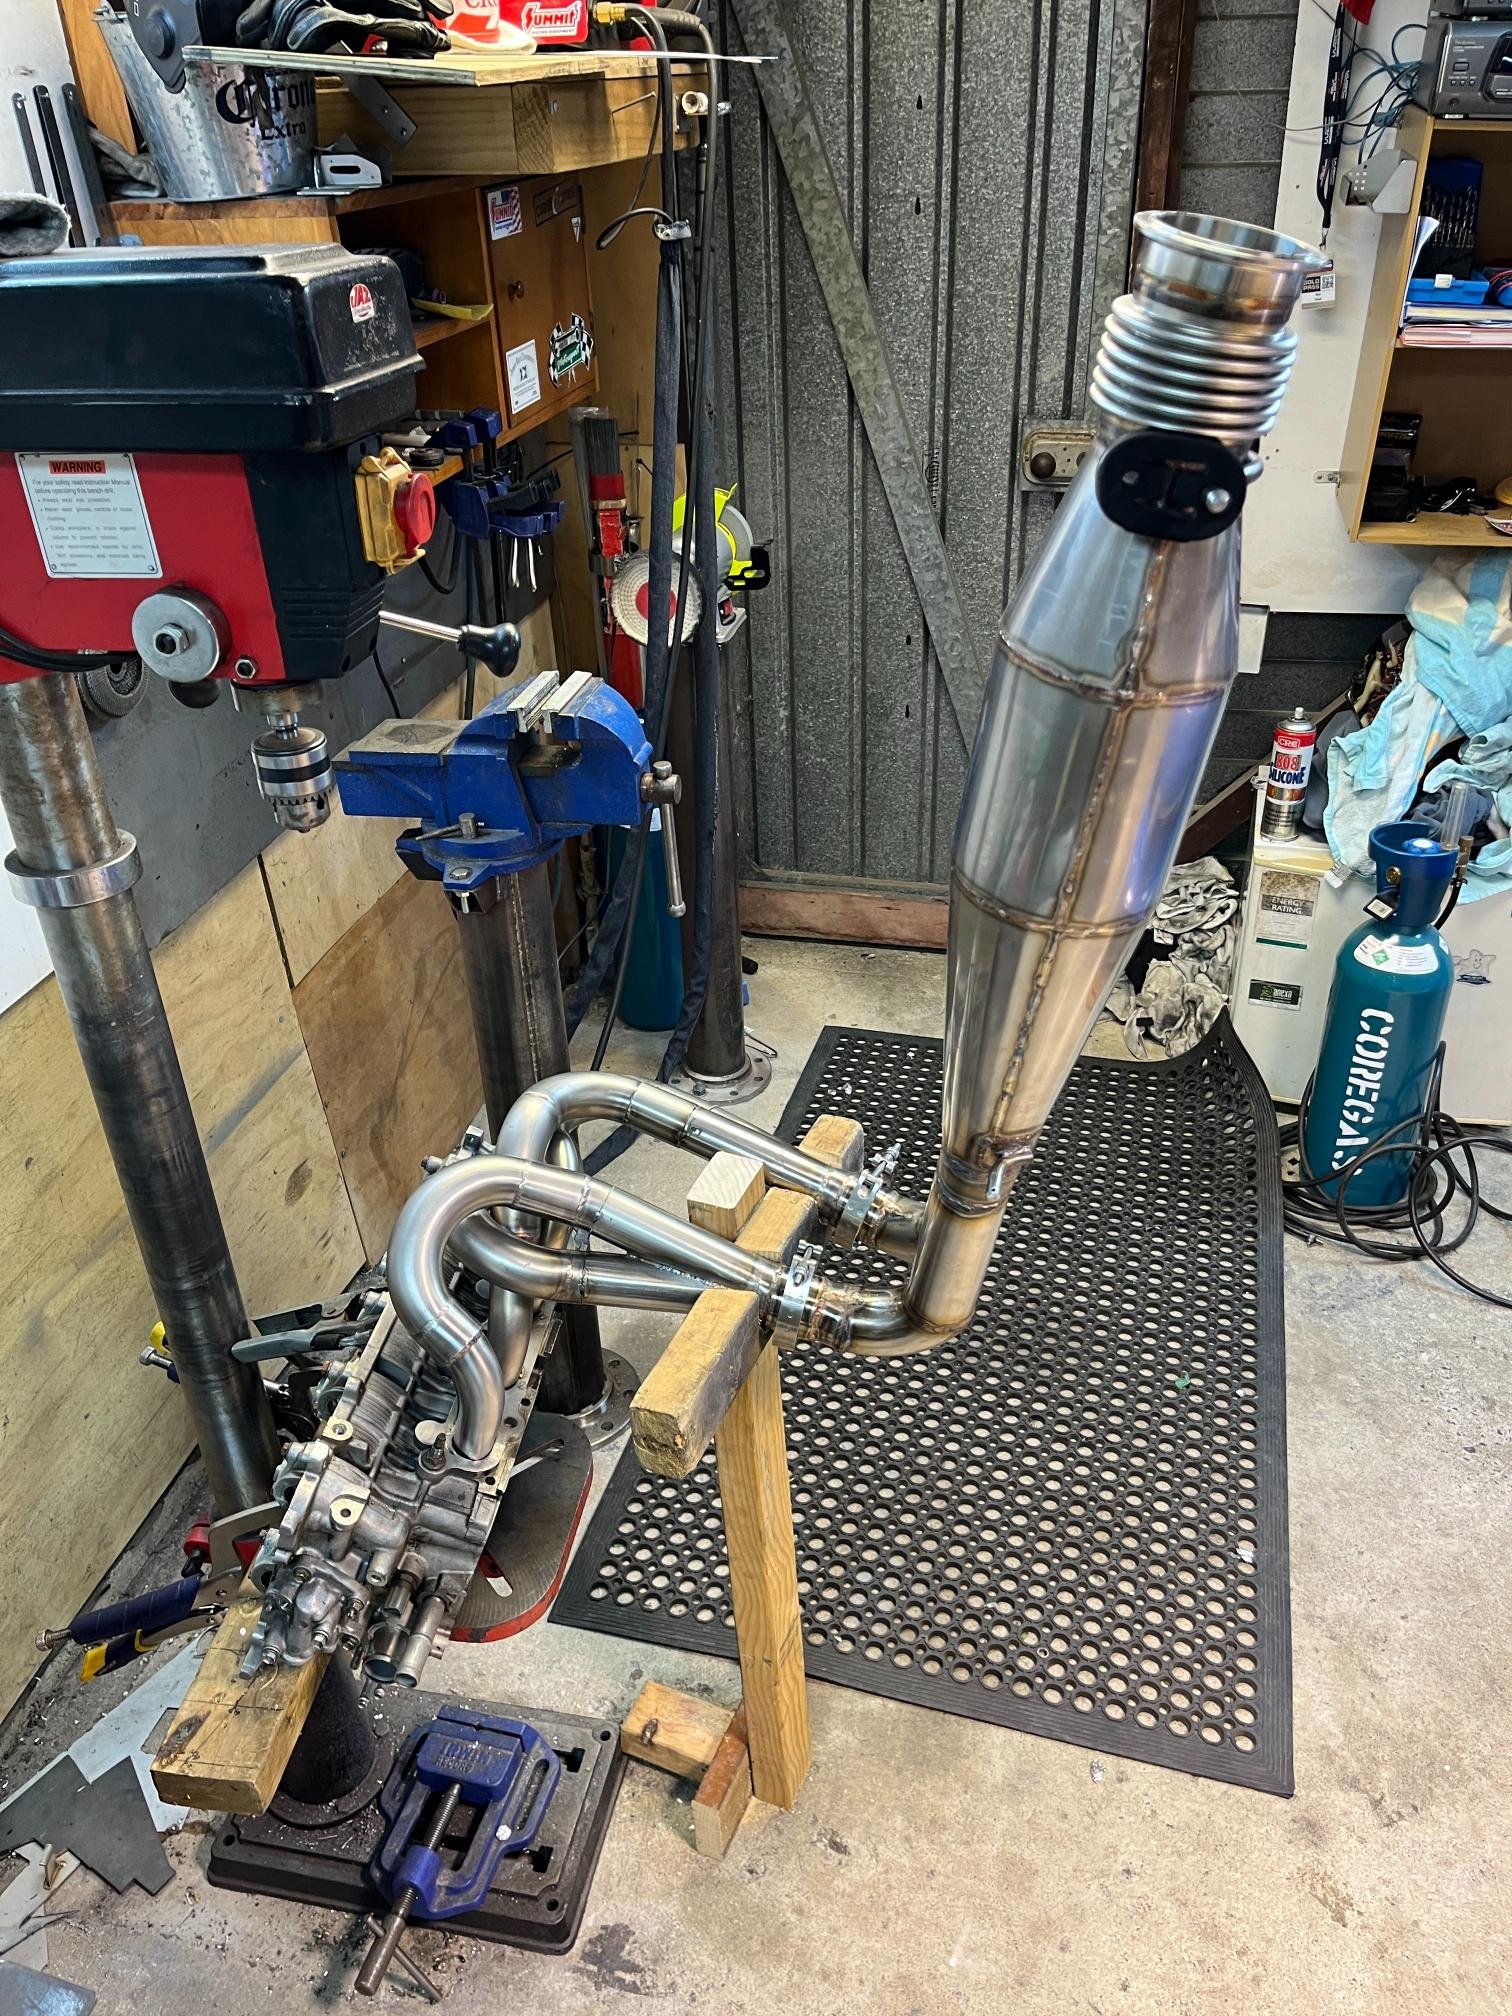
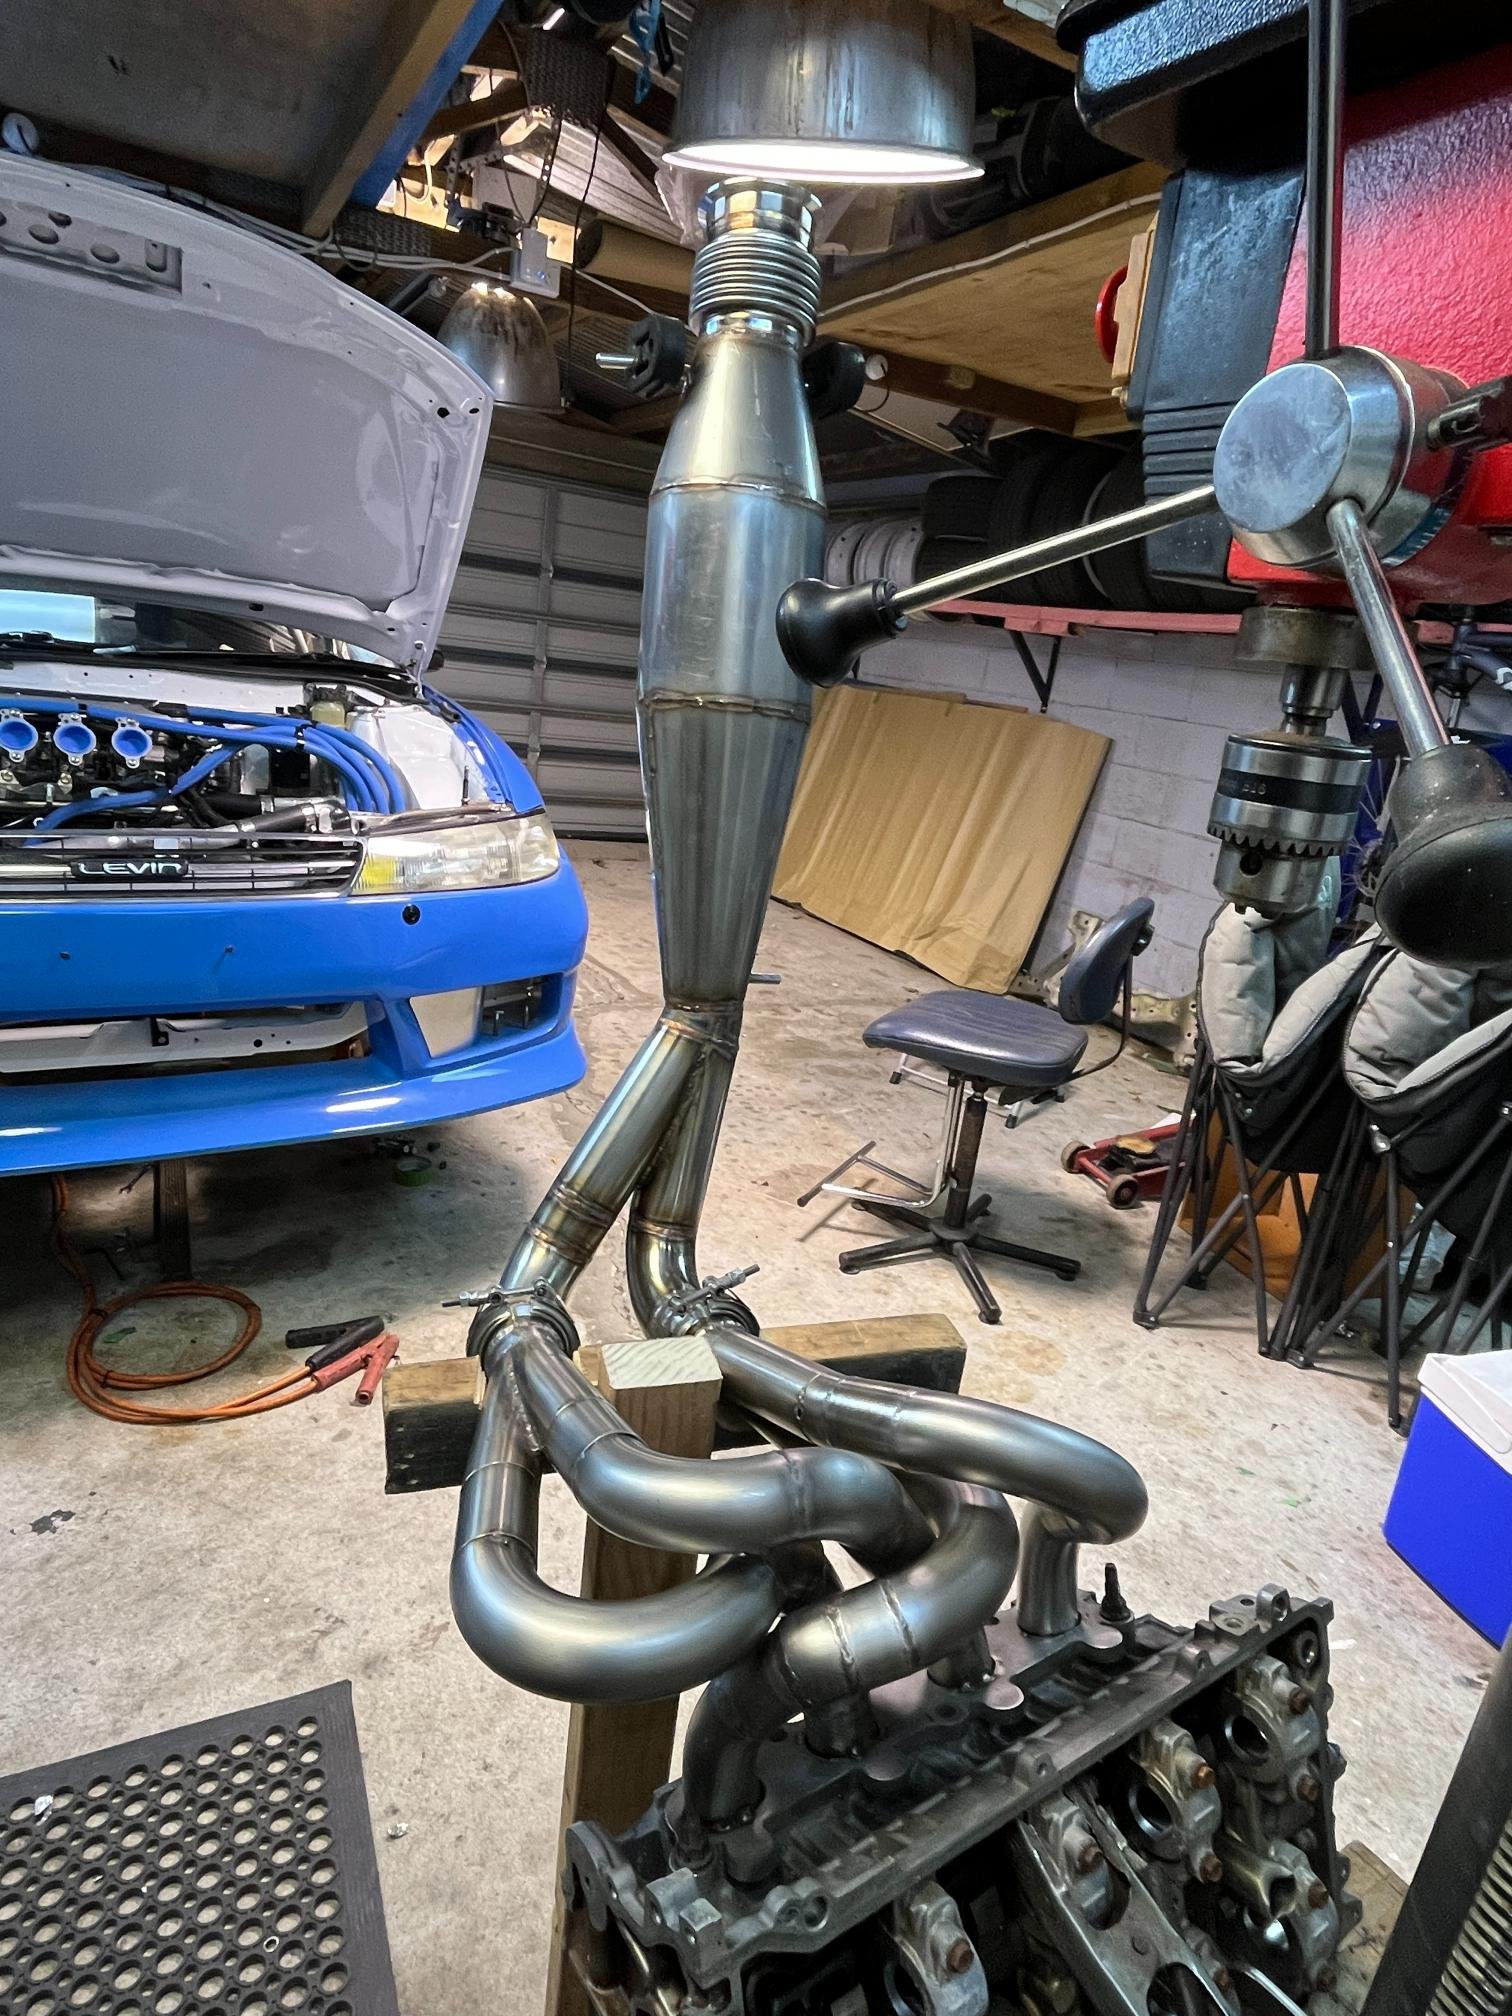
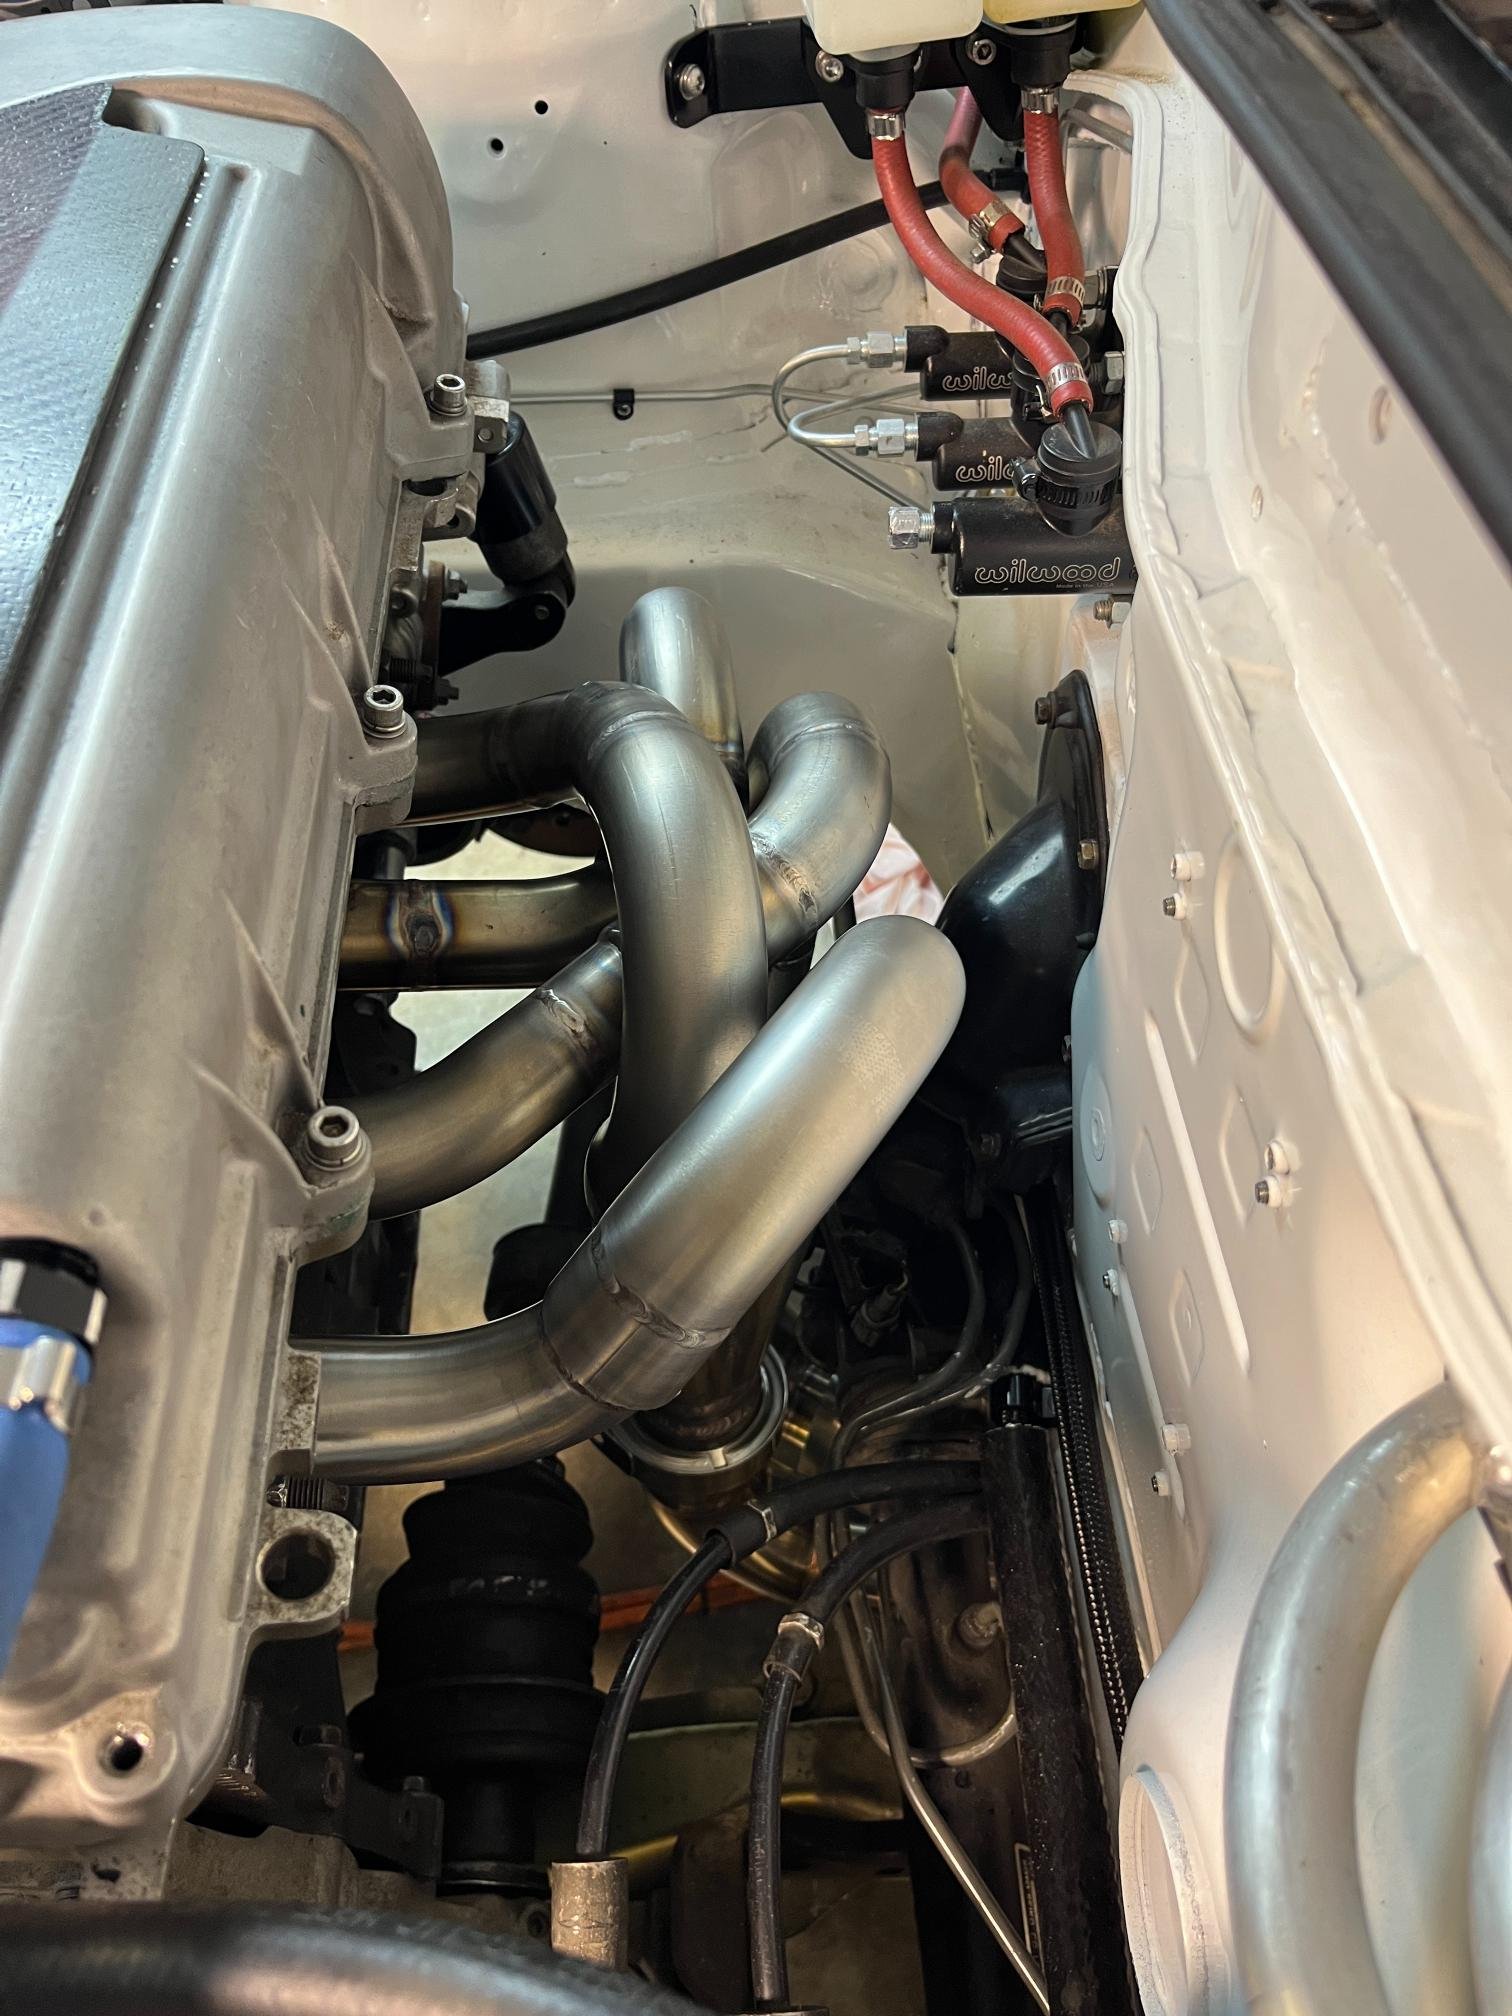
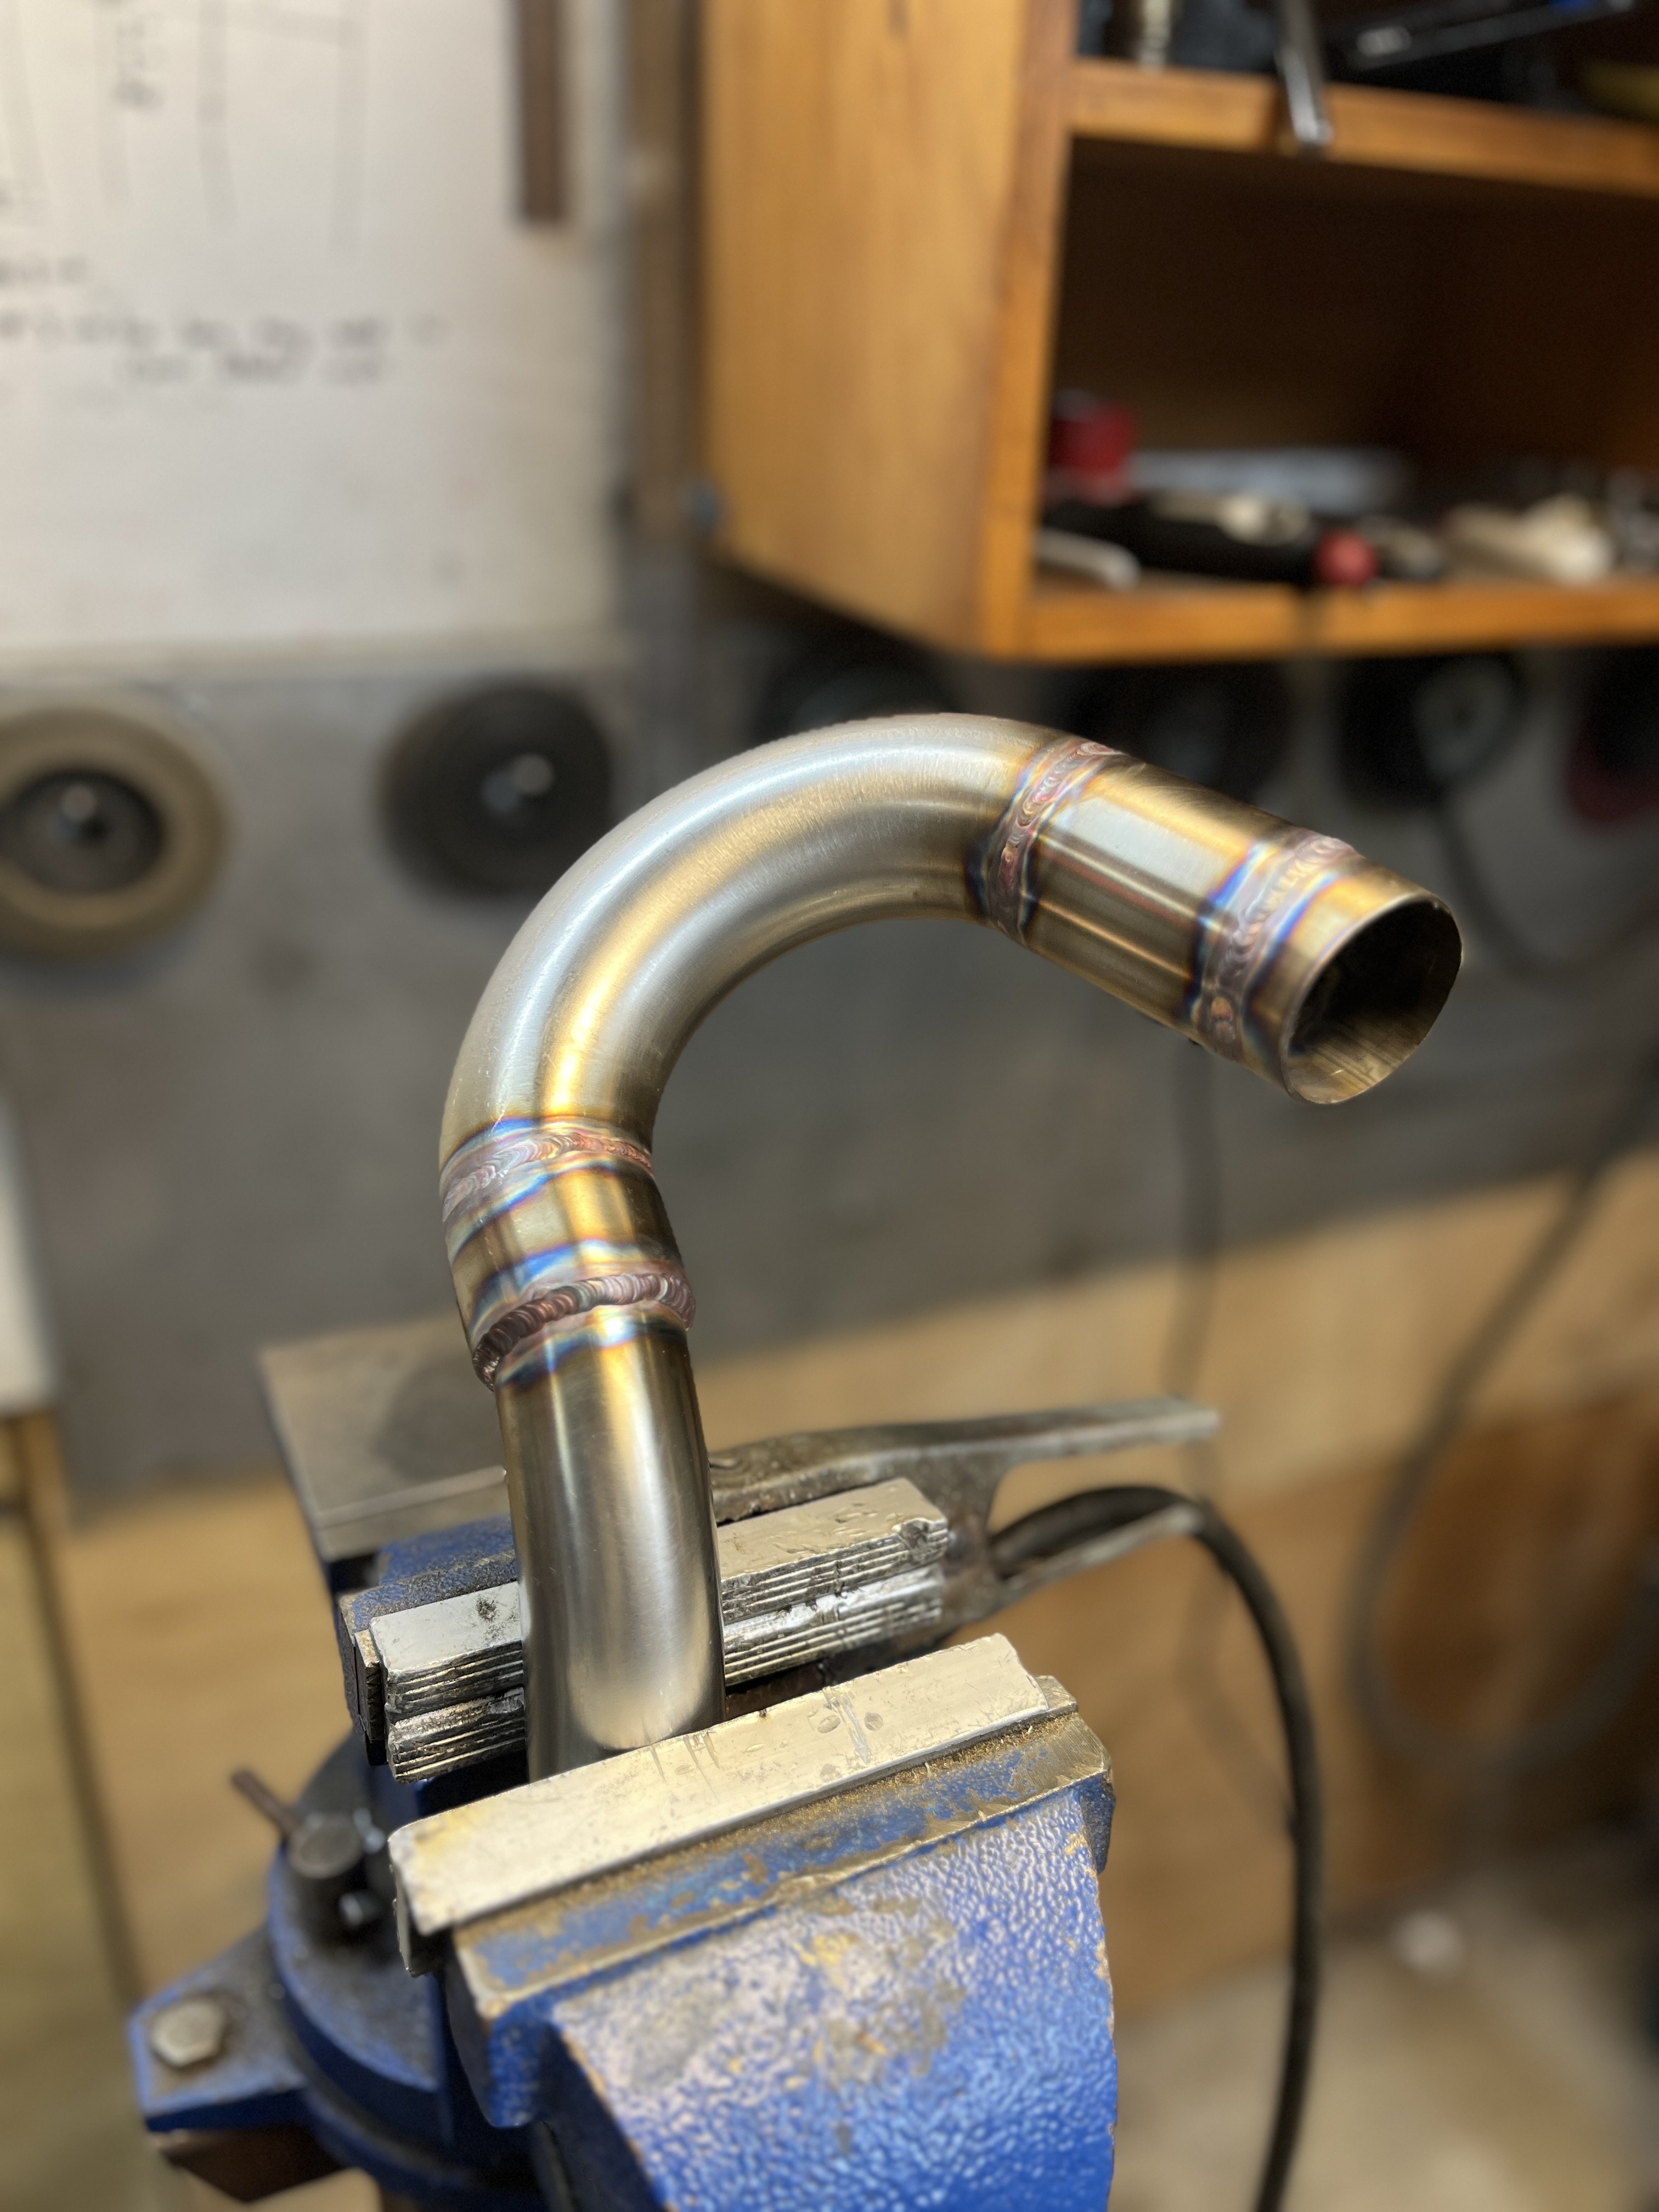
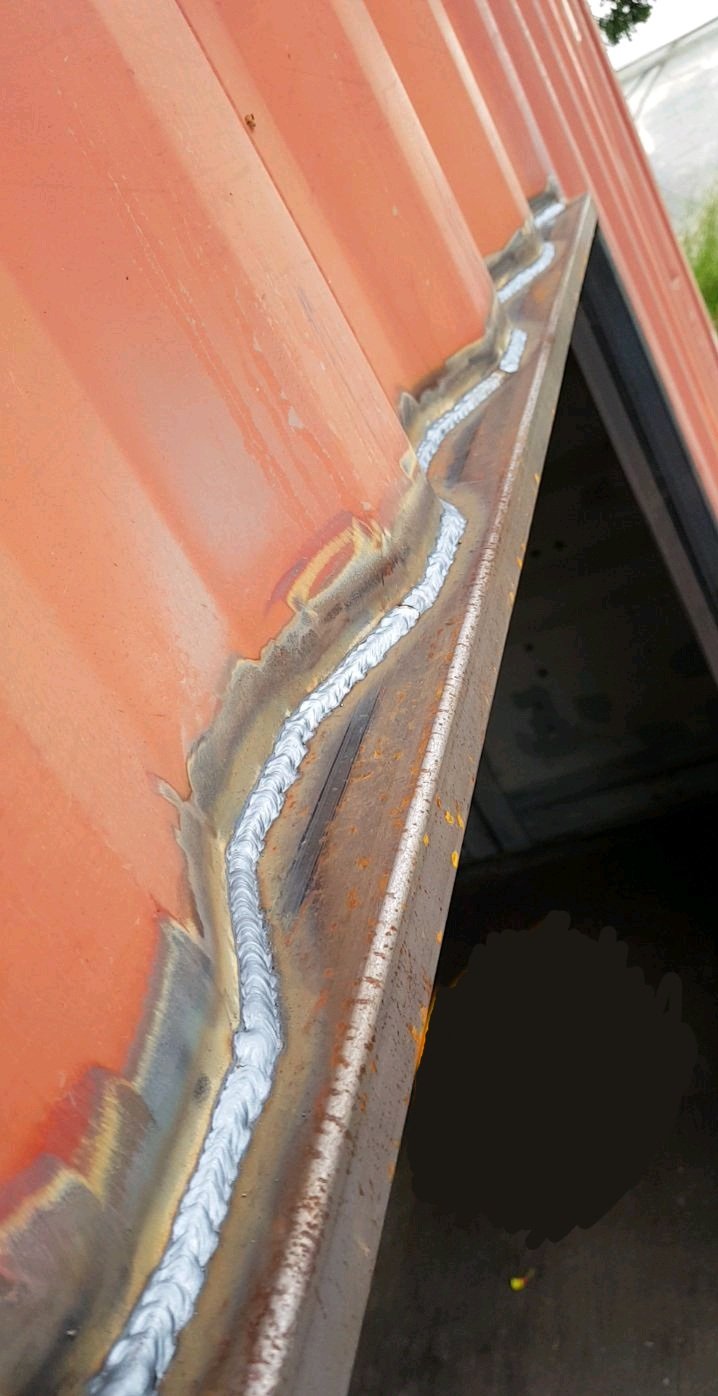
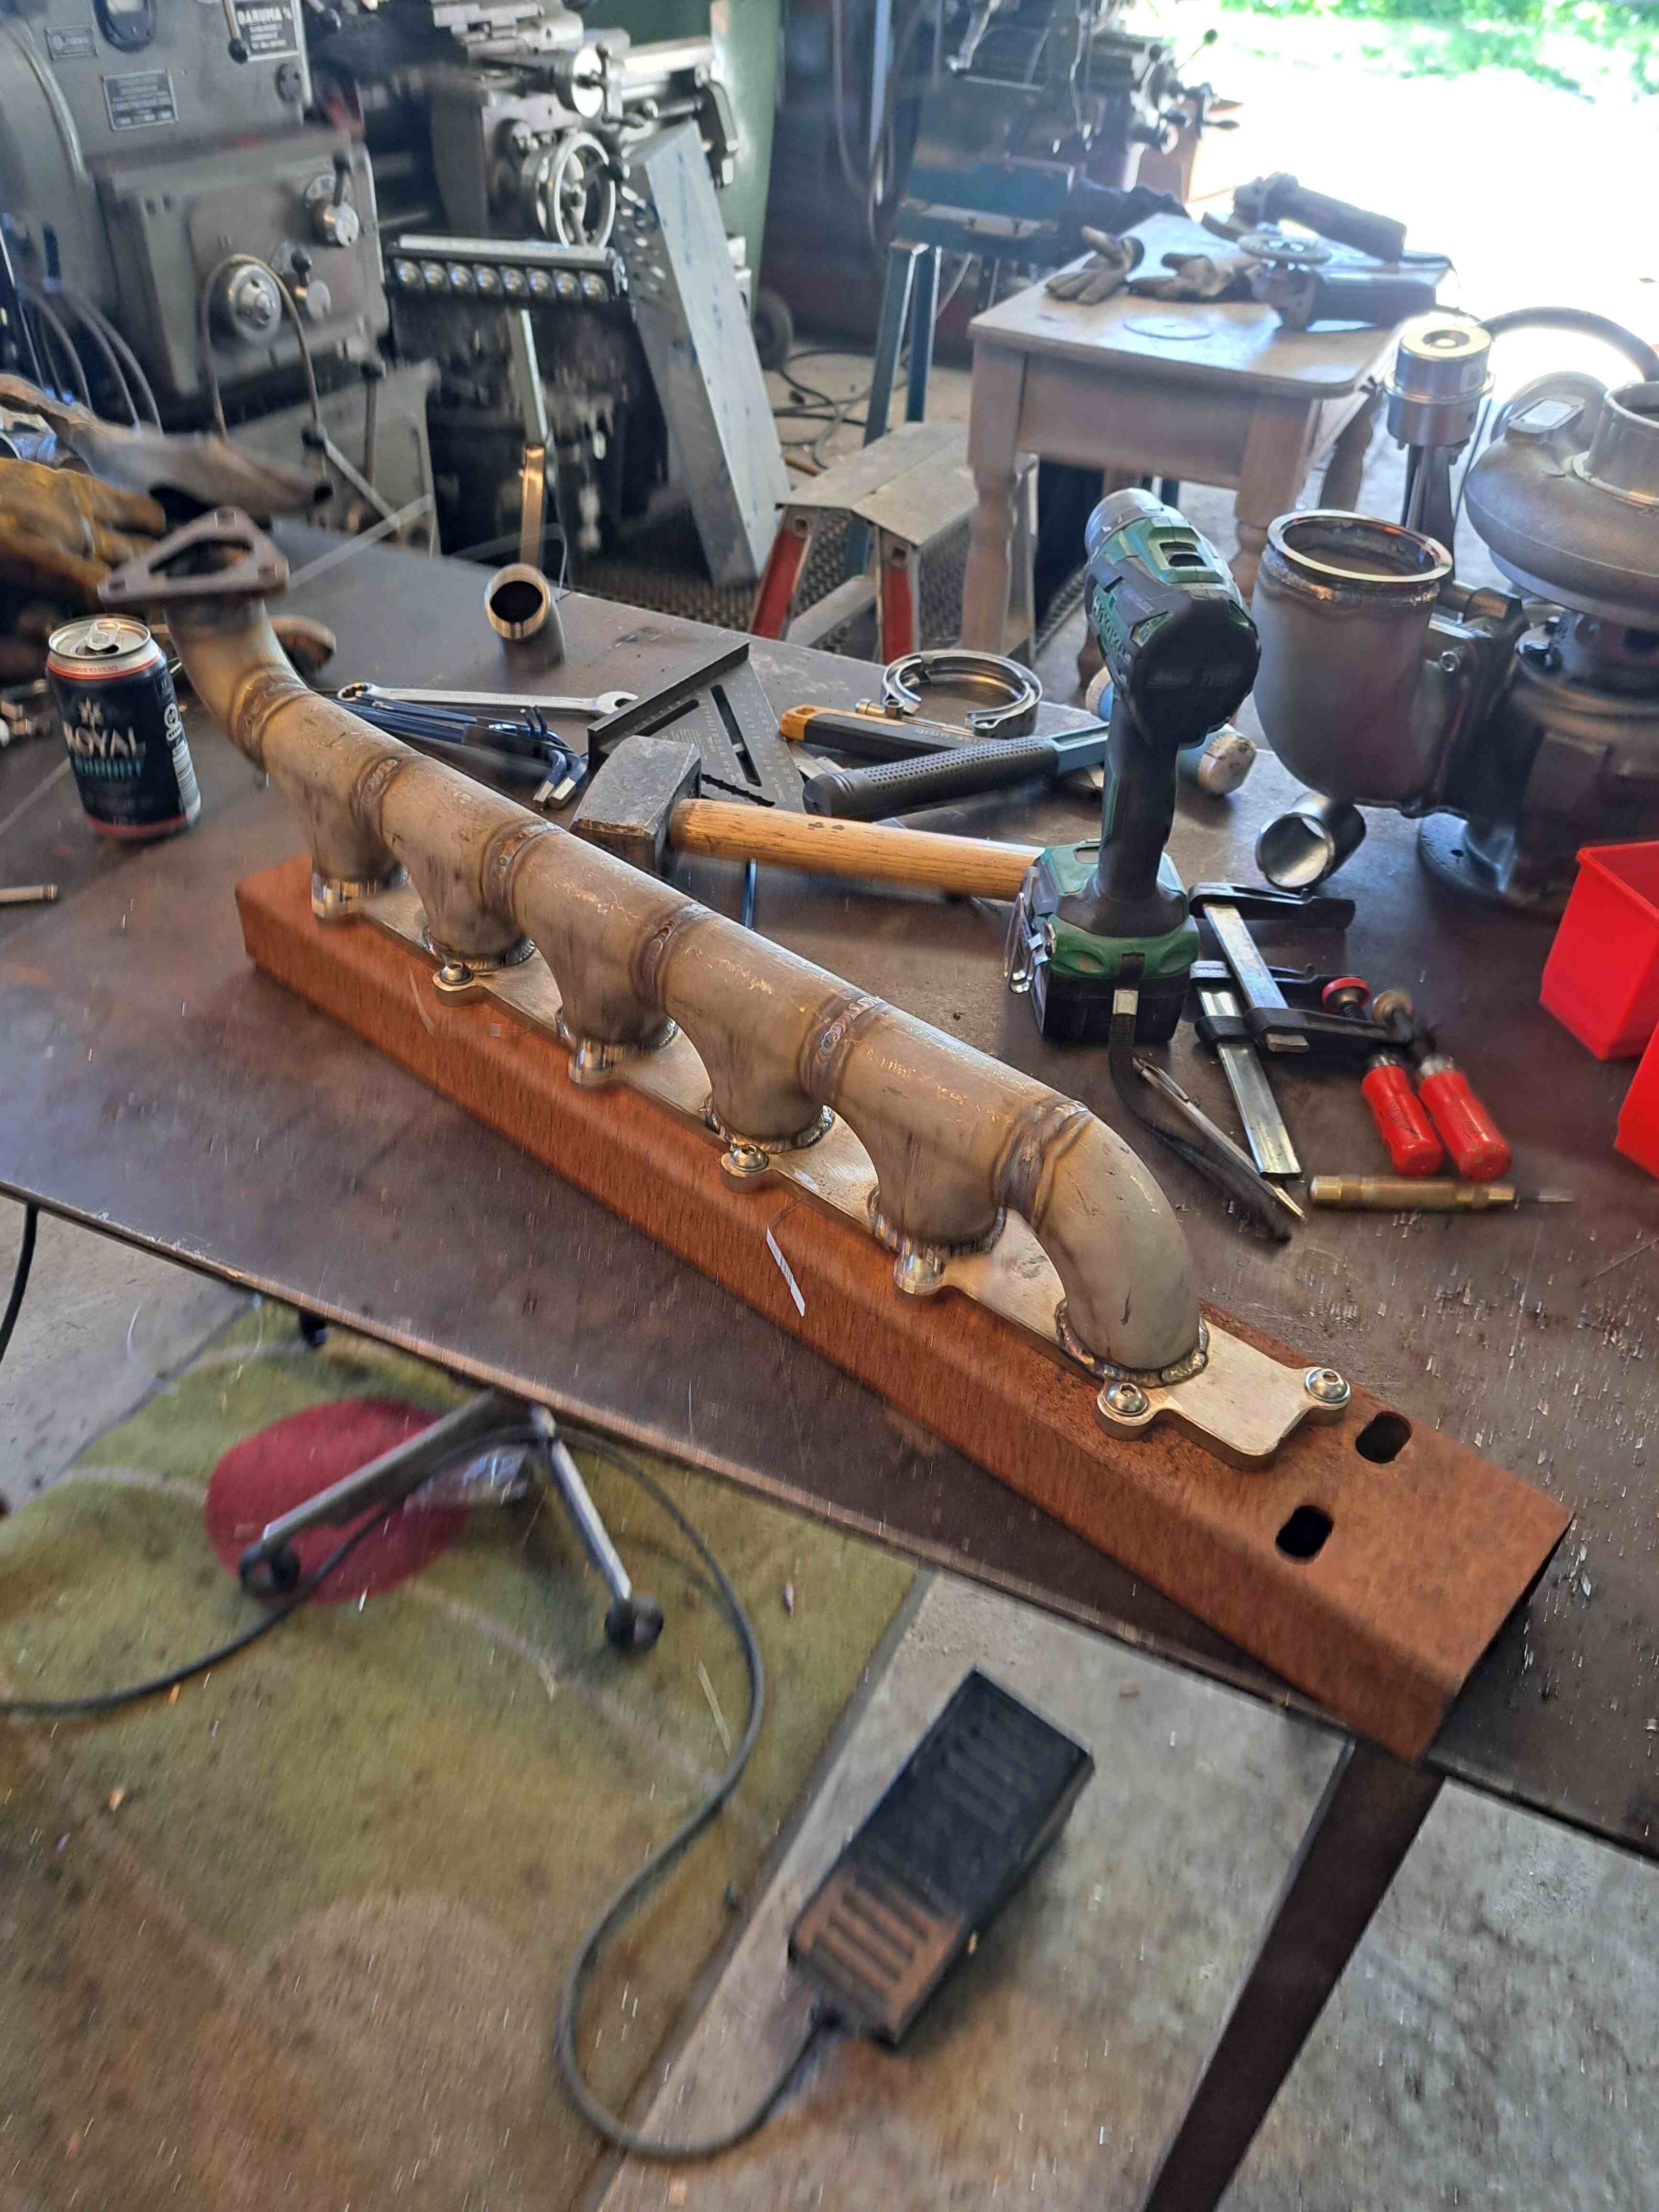
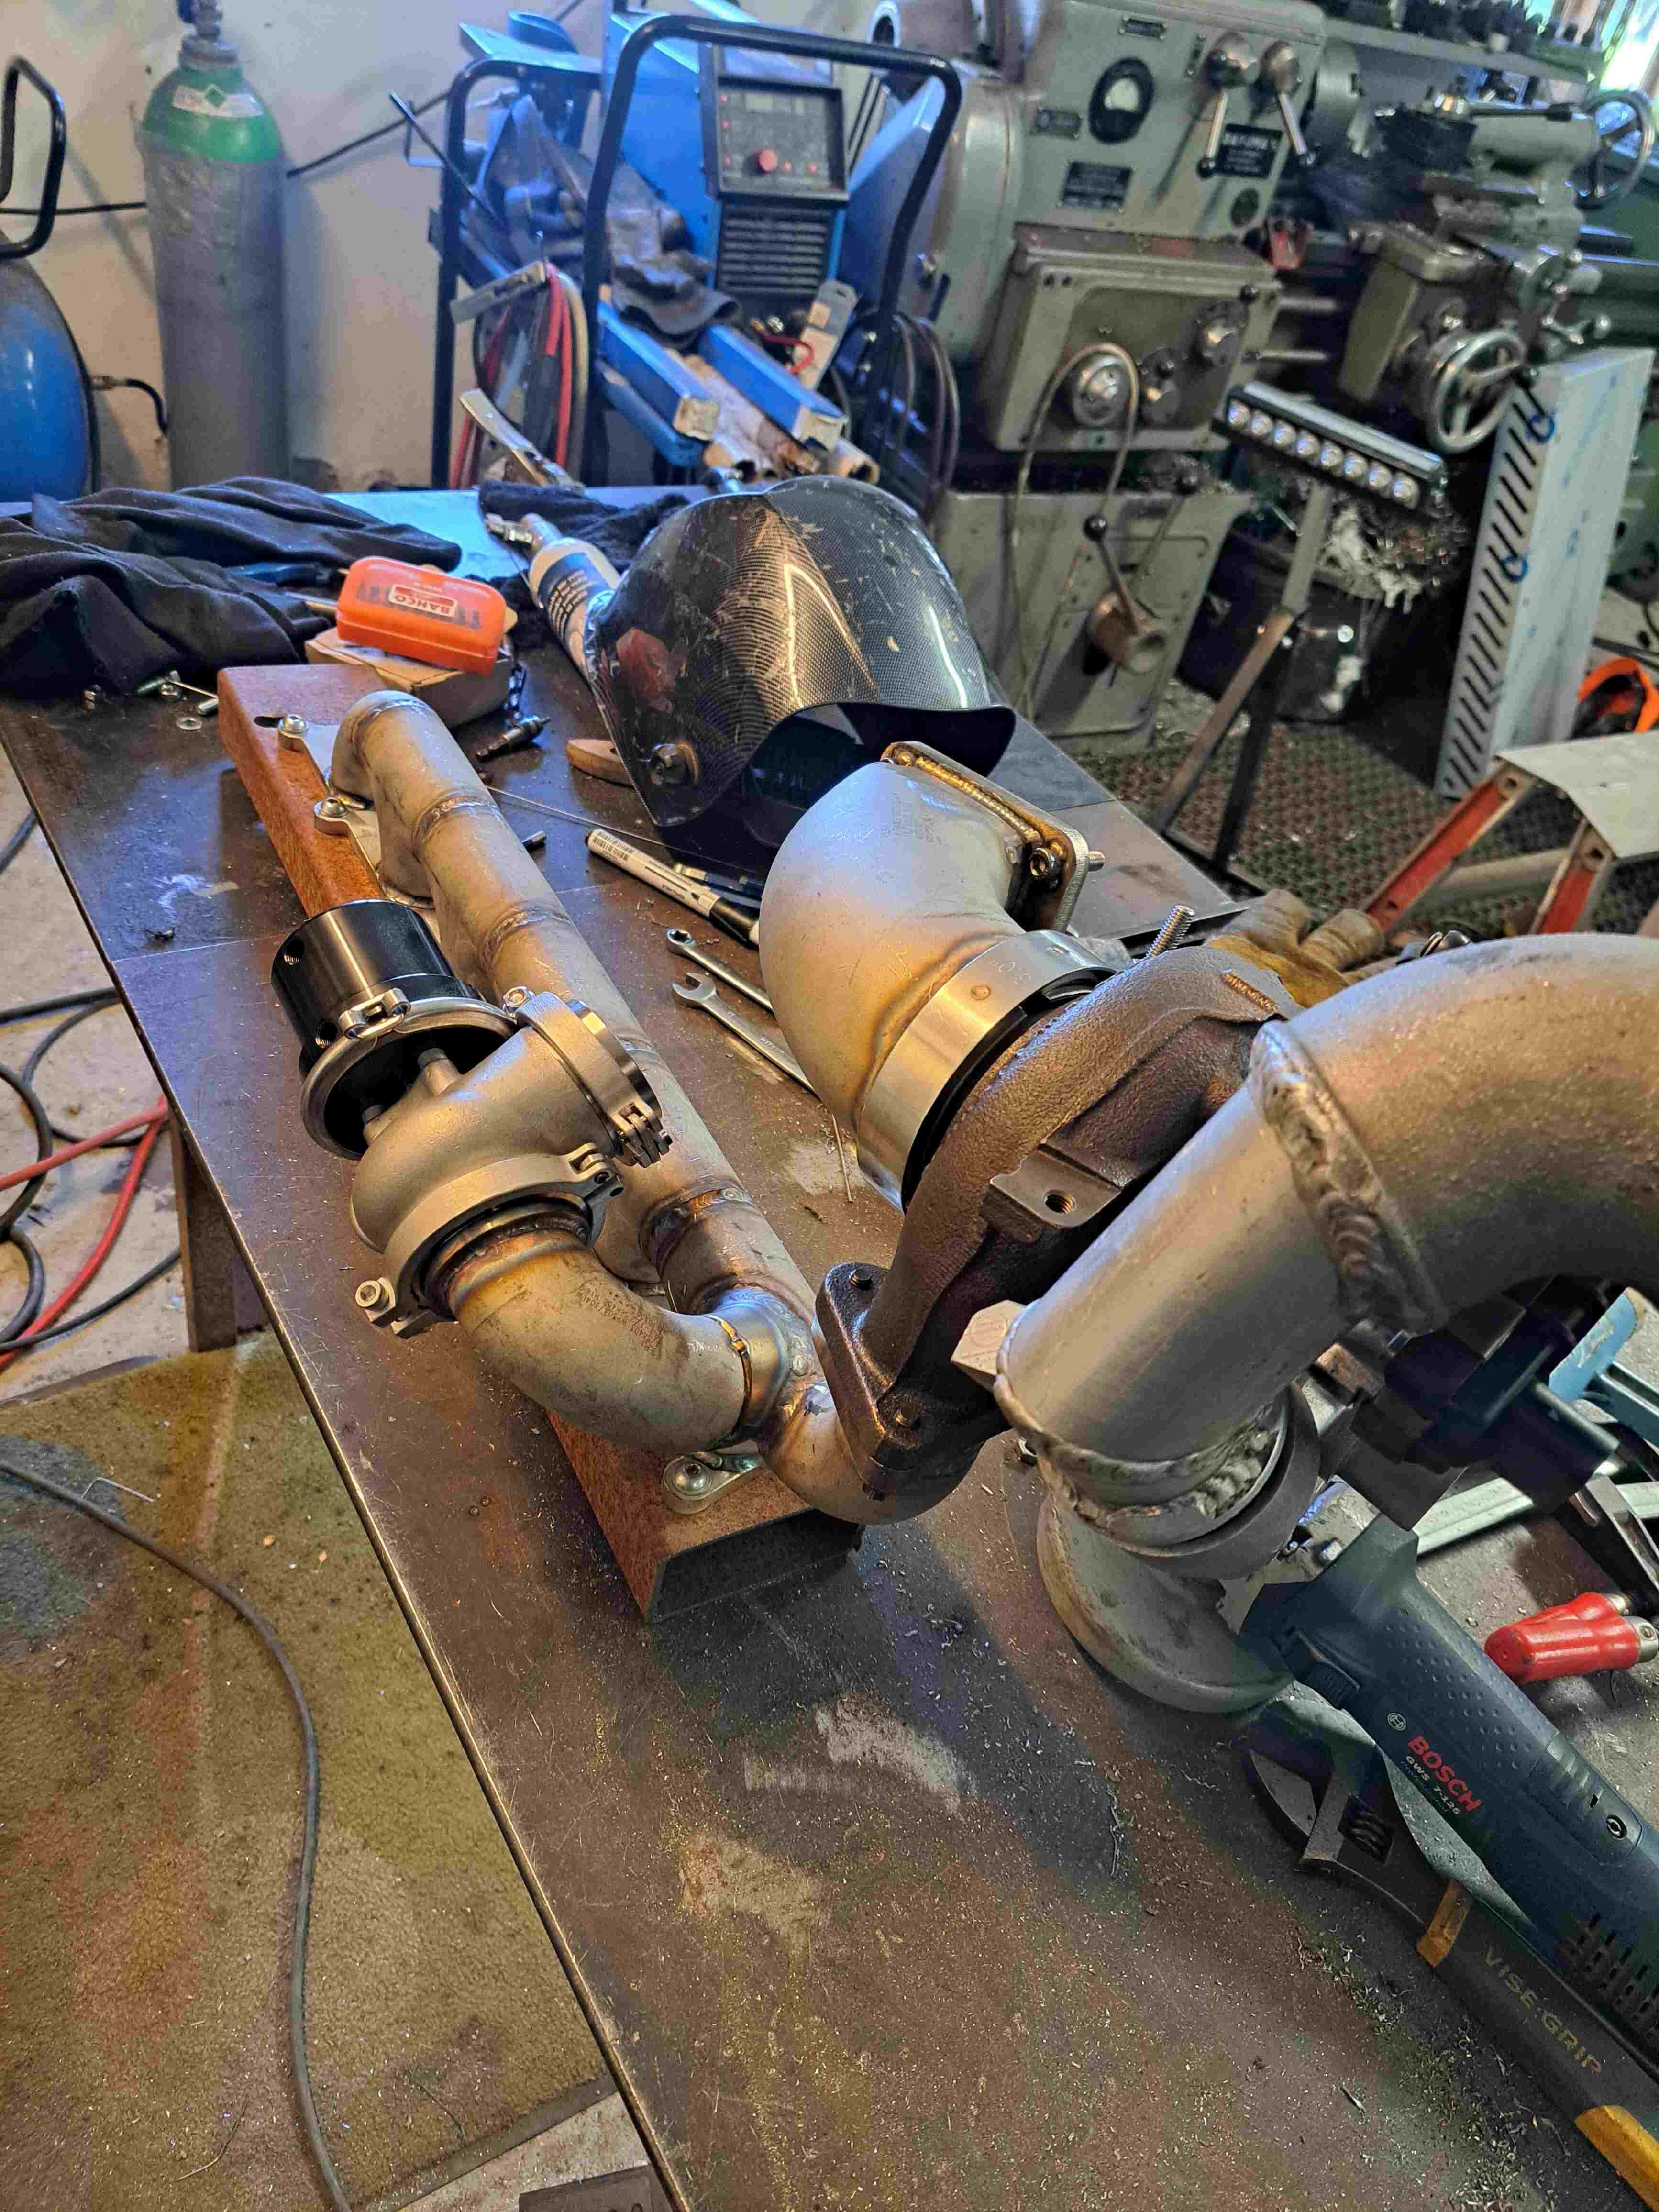
Oh boy, this has been a process. Welded up first 2x primaries which then completely changed the positioning of the v-bands so had to adjust everything to suit. Certainly understand why people recommend to start at primaries and work your way back. Purge welding has gone well, took a bit to get settings right and get rid of bad habits. Pretty happy with welds on the last primary I welded up! Got it out of the car to do flange welds and last collector welds for each primary. Jigged up a spare head on my drill press and some wood to support the V-bands. Hoping this will minimise warpage as there isn't any room for movement or the V-bands won't seal. Will drop a exhaust valve from each cylinder and use this to purge. It's pretty tight in there. Only a few mm clearance in a few spots!
10 points
-
Made a start on stripping interior tonight after a bit of a fuck up of a day at work Carpet out - maybe 3 or so suspect looking rust spots but nothing terrible. Almost 40 years of grime and filth and the car was bad too Reckon the carpet is a write off - what's the go-to thesedays for replacement? Knox still the go? Old boy gave me a few parts. Shit they love old crap and just sticking extraneous shit on cars. My boat was the same, just barely functioning crap everywhere. Plan is to minimise all this stuff. Speaking of boats - went for a fish before work out by Tiri and nabbed a few nice snapps Next move is a deep scrub of the inside, find a matching driver's seat in the delicious 80s brown/tan, clean up the surface rust and then start on the door cards/roofliner etc. Alongside this, remove both bumpers and see what is hiding beneath. Interested to hear what others think about body lift vs suspension lift too. What's the go team?8 points
-
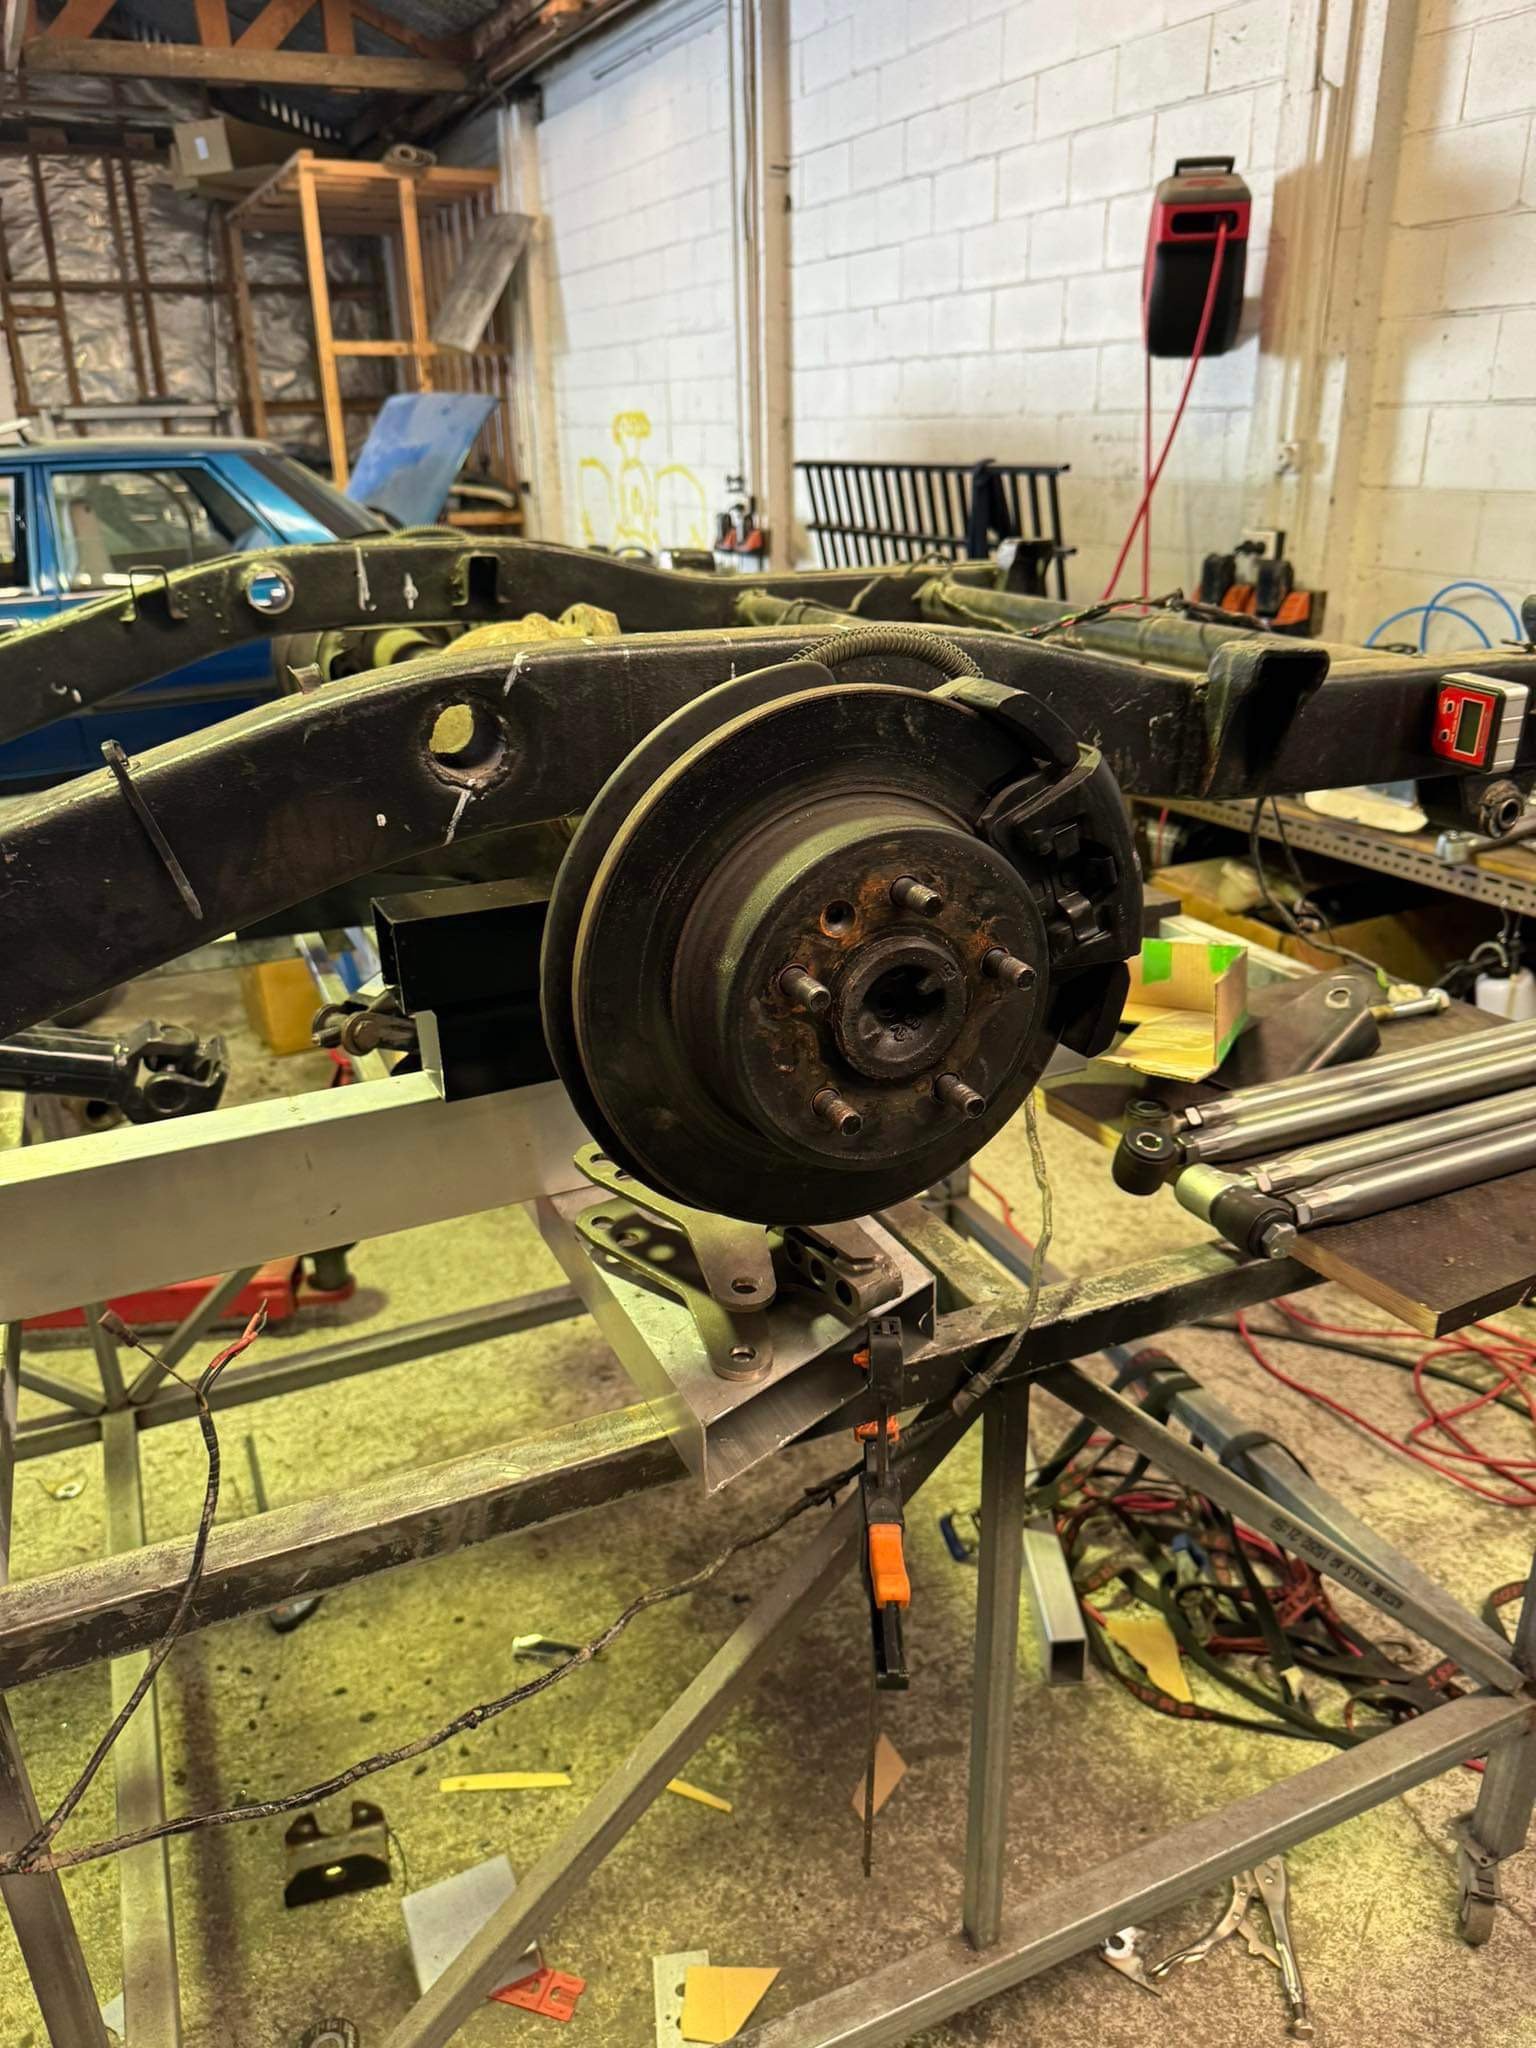
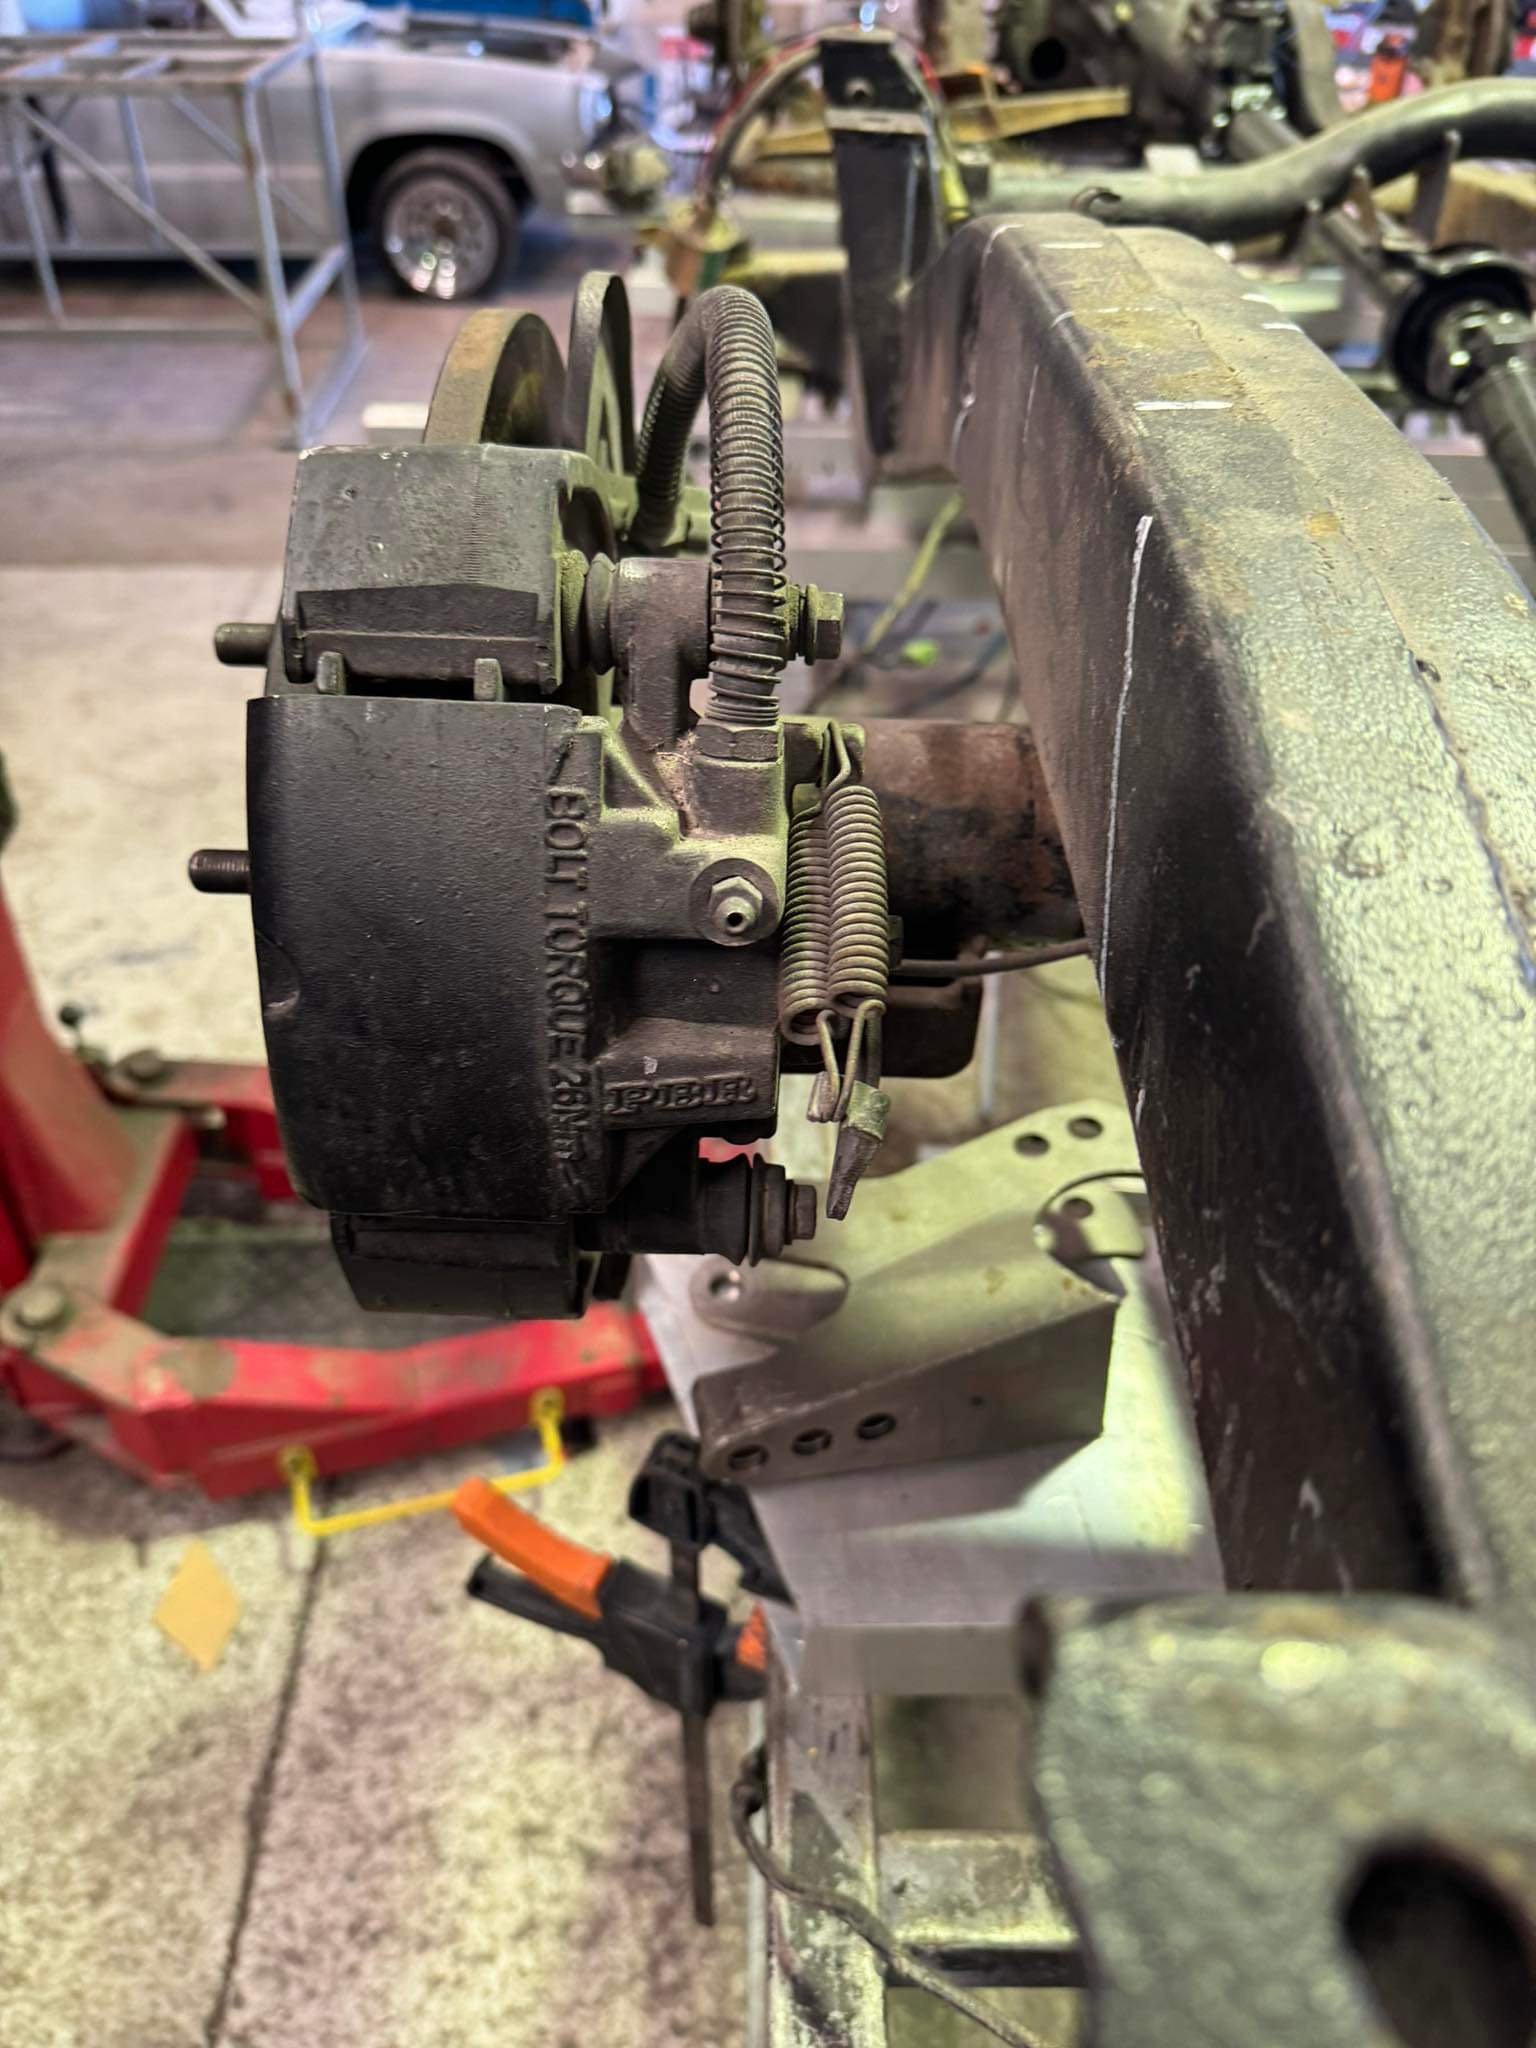
5 stud time picked up this falcon diff off the tard 2.77 gears, lsd and disc braked. it is also 30mm narrower than the b1600 diff so allows for more dish. also the big bonus is the 280mm rotors and integrated handbrake in the caliper. the leaf perches sit outside of the ute chassis which means I can get this set up quickly without having to spend all weekend cutting off and grinding back the perch welds.
6 points
-
Helped a mate make his tiny house, when you plan your cutouts if you care what it looks like see if you can terminate the cut on the same part of the profile on each side. We use shs welded in for framing windows and doors etc. It all went pretty smoothly except for him being the most accident prone person on the planet. Kept him clear of power tools, welder etc and he fell off the ladder whilst brush painting the frames after I had welded them in. His forehead no match vs the corner of the floor. Cue trip to A&E and some explaining to his wife.5 points
-
So after much contemplating and research I am going to go down the route of the tried and tested JZ route for the engine. Worked out the time involved and extra cost with the 2gr-fse conversion etc just made it too much of a headache. Replacing straight 6 with straight 6 makes logical sense and has been done on other MS50 Toyota's across the world5 points
-
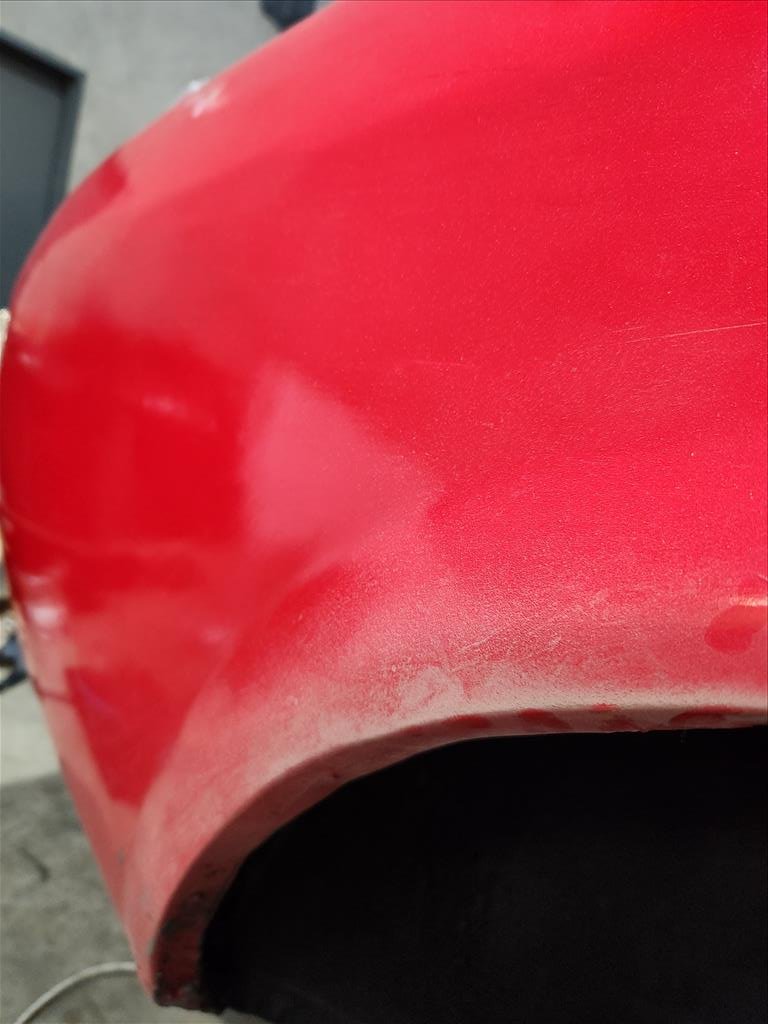
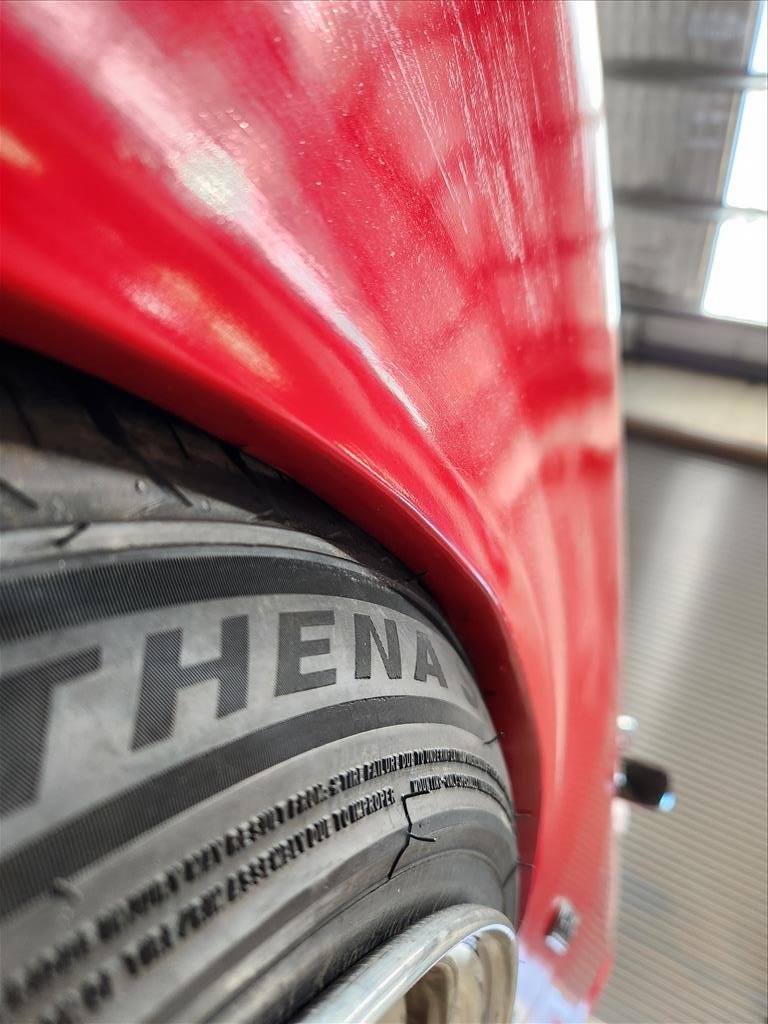
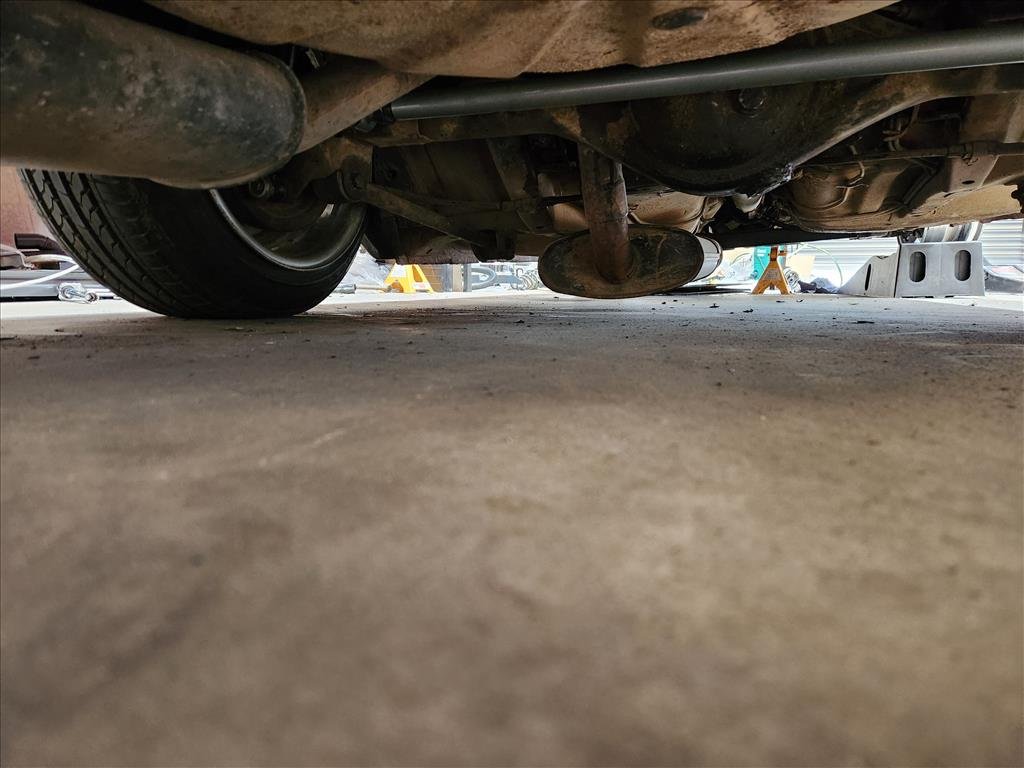
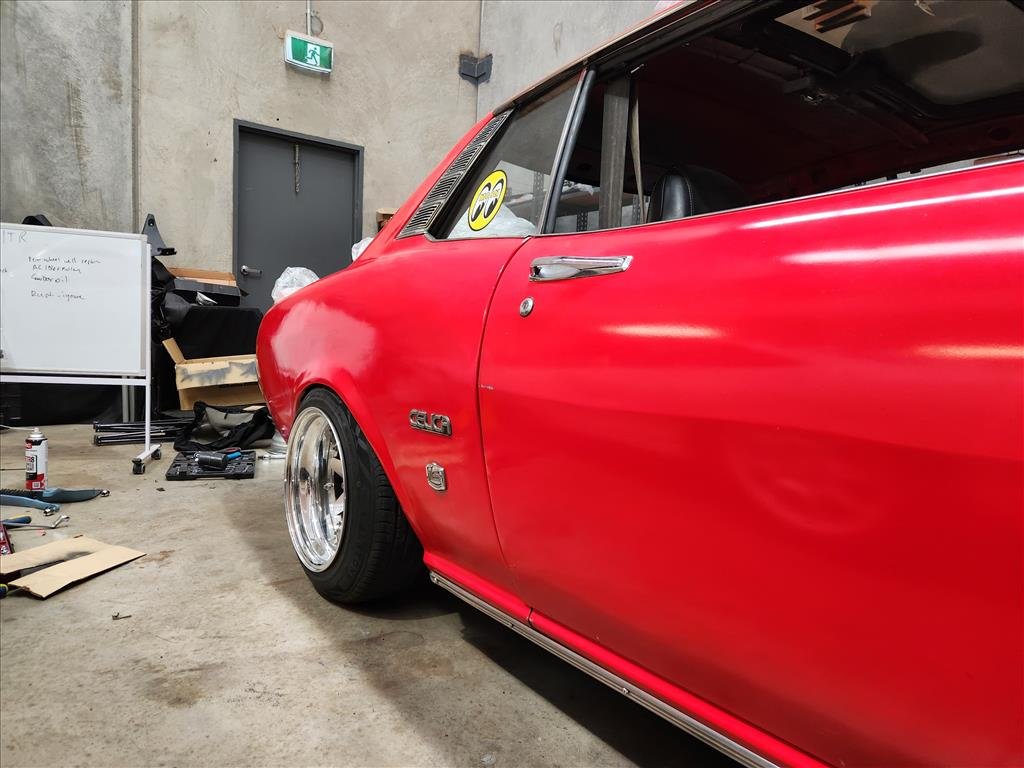
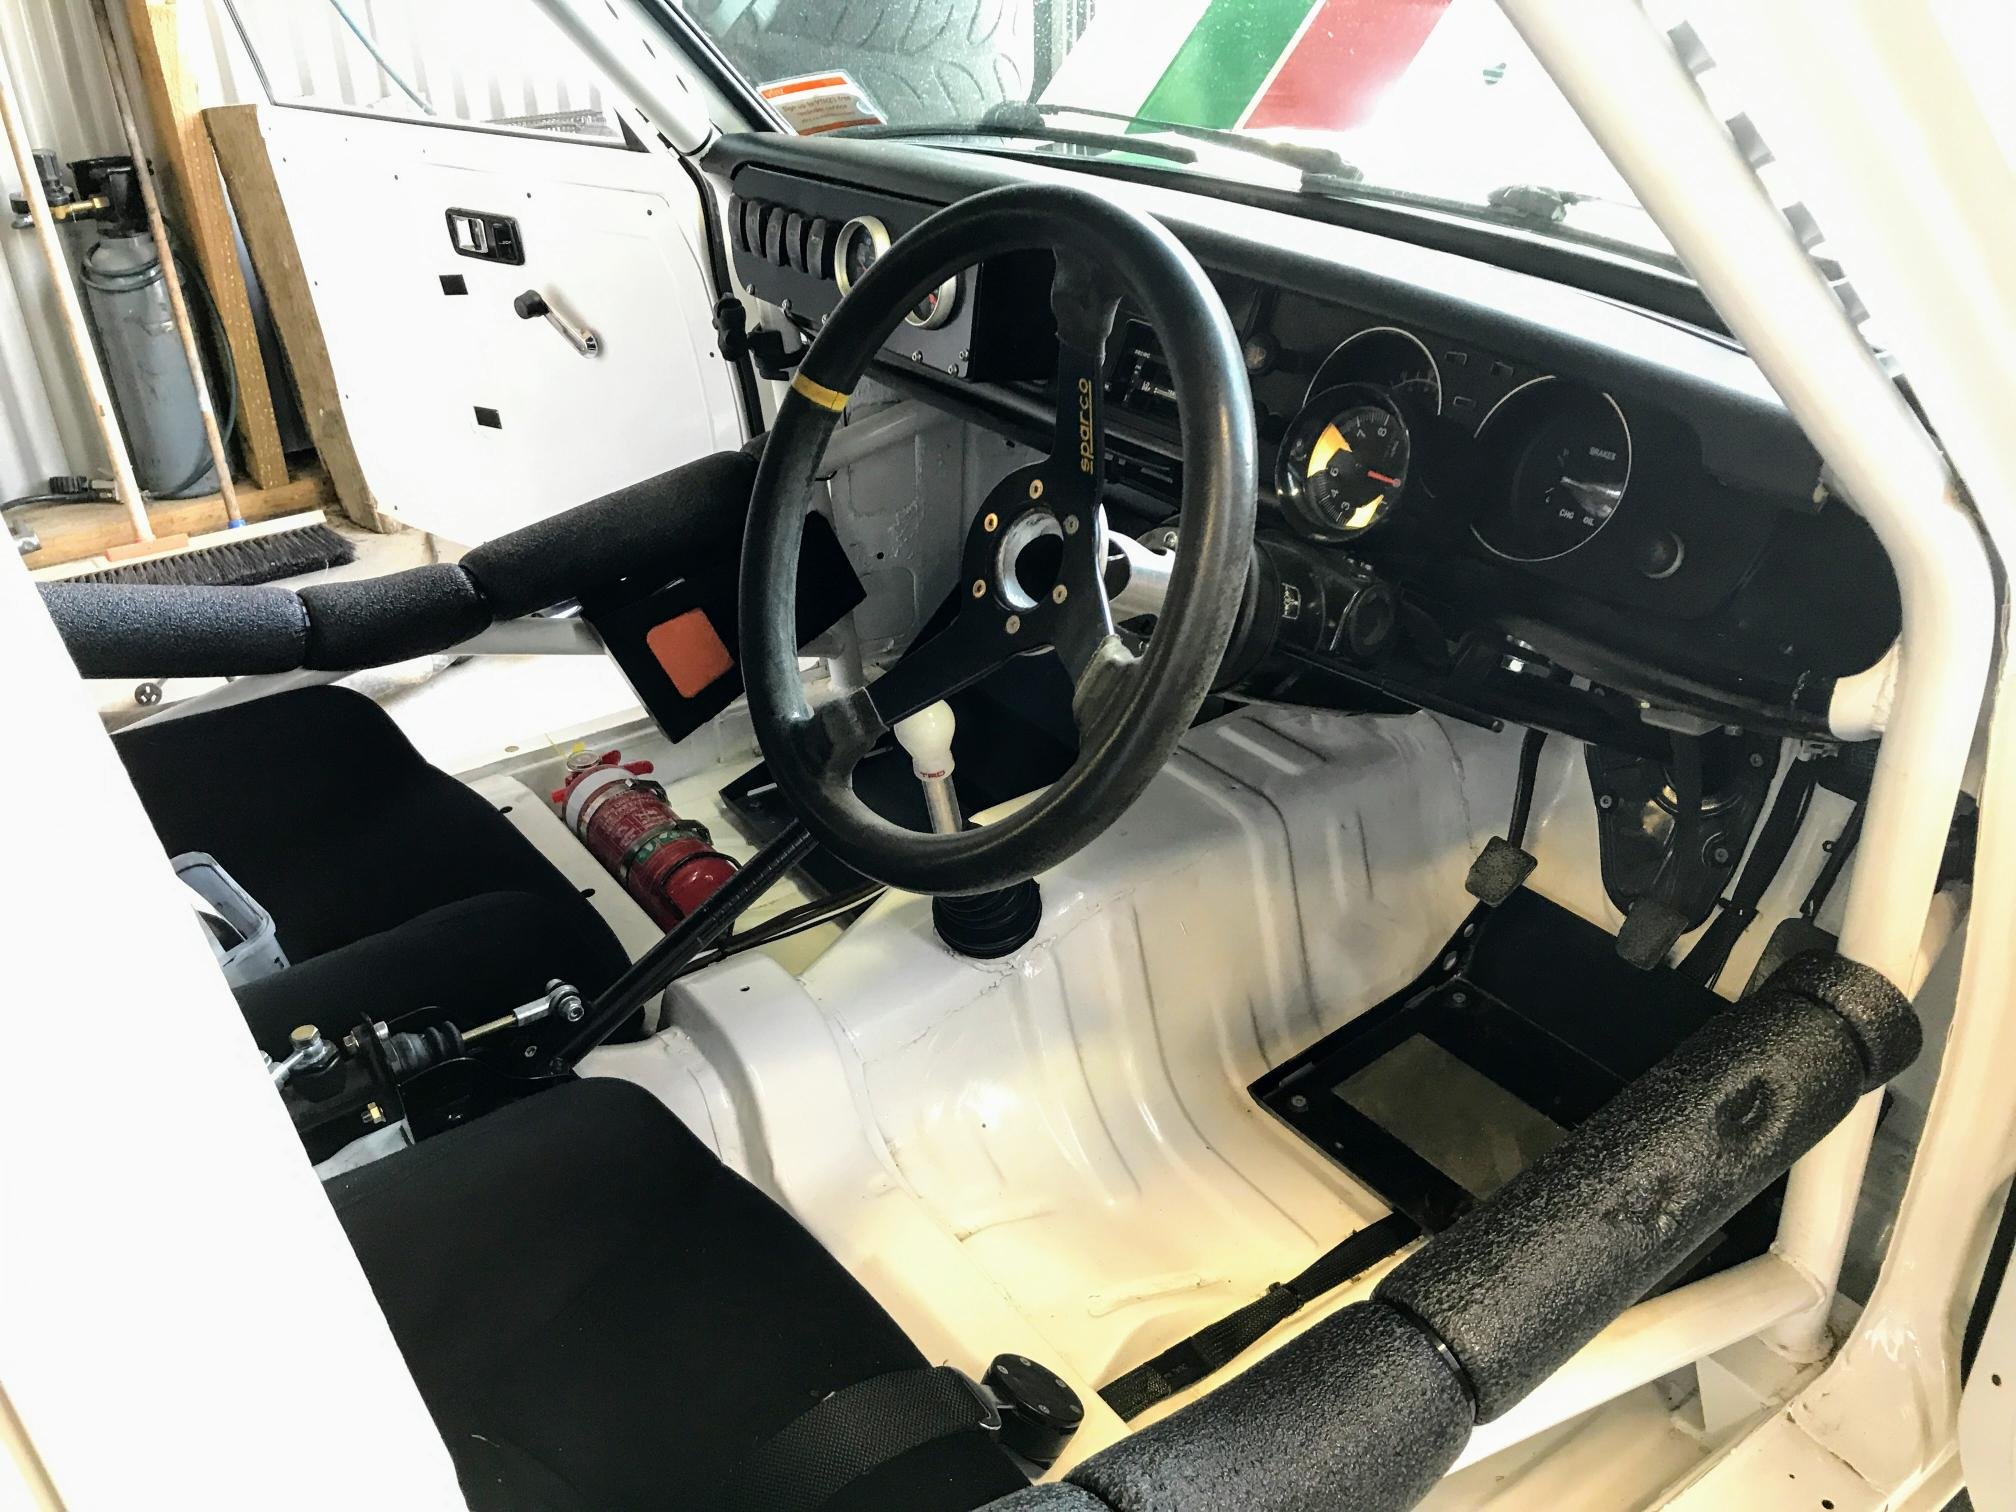
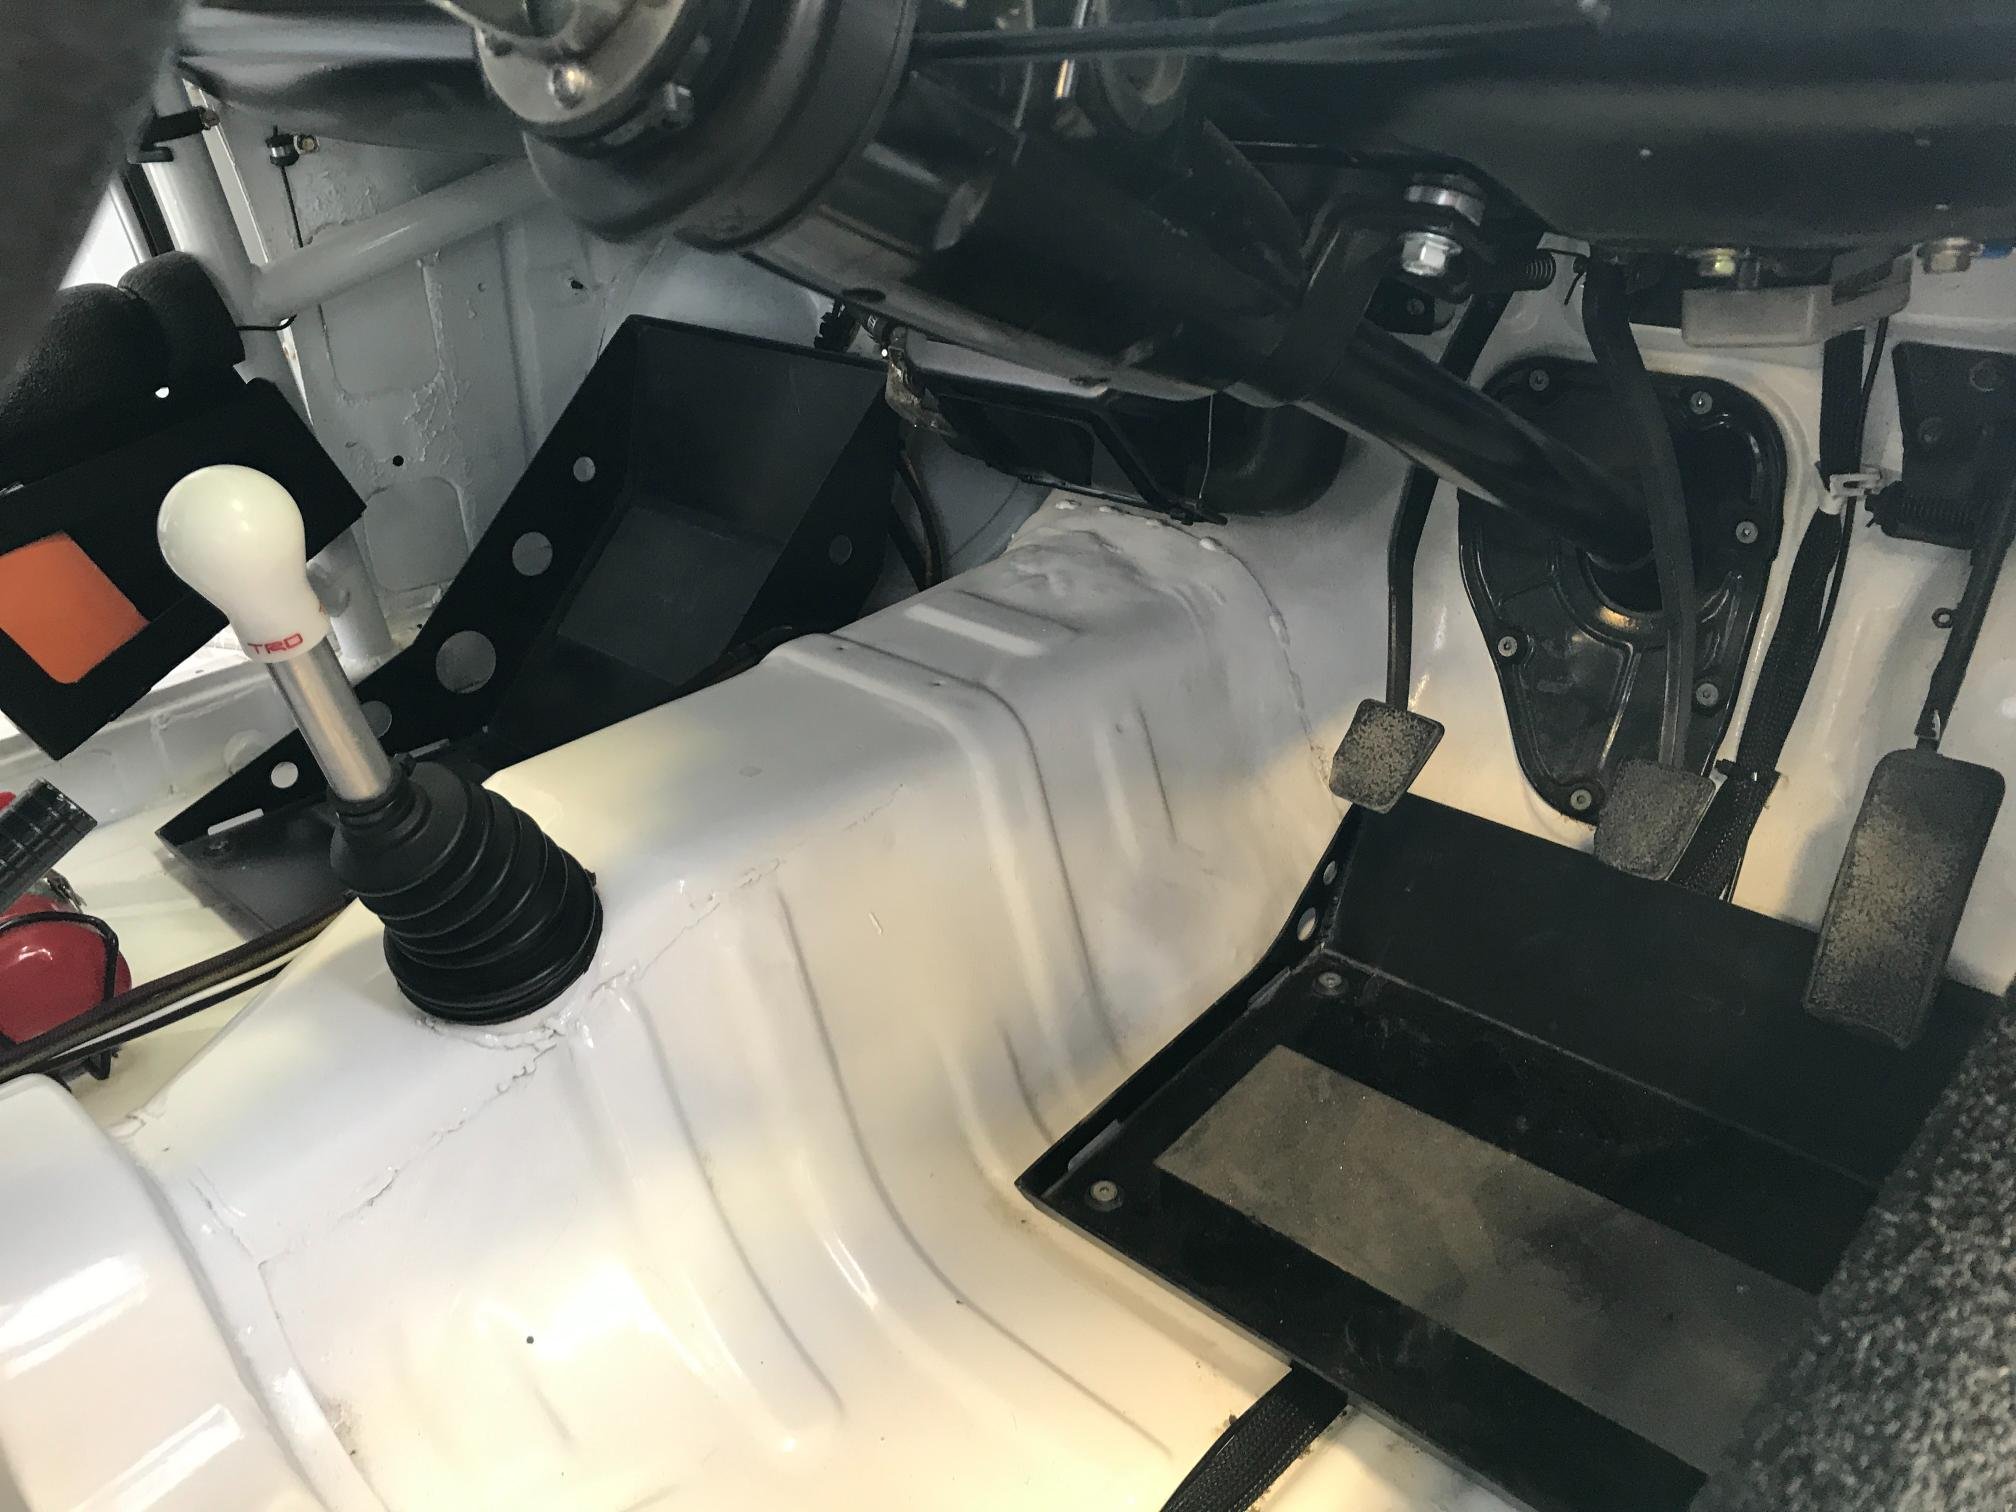
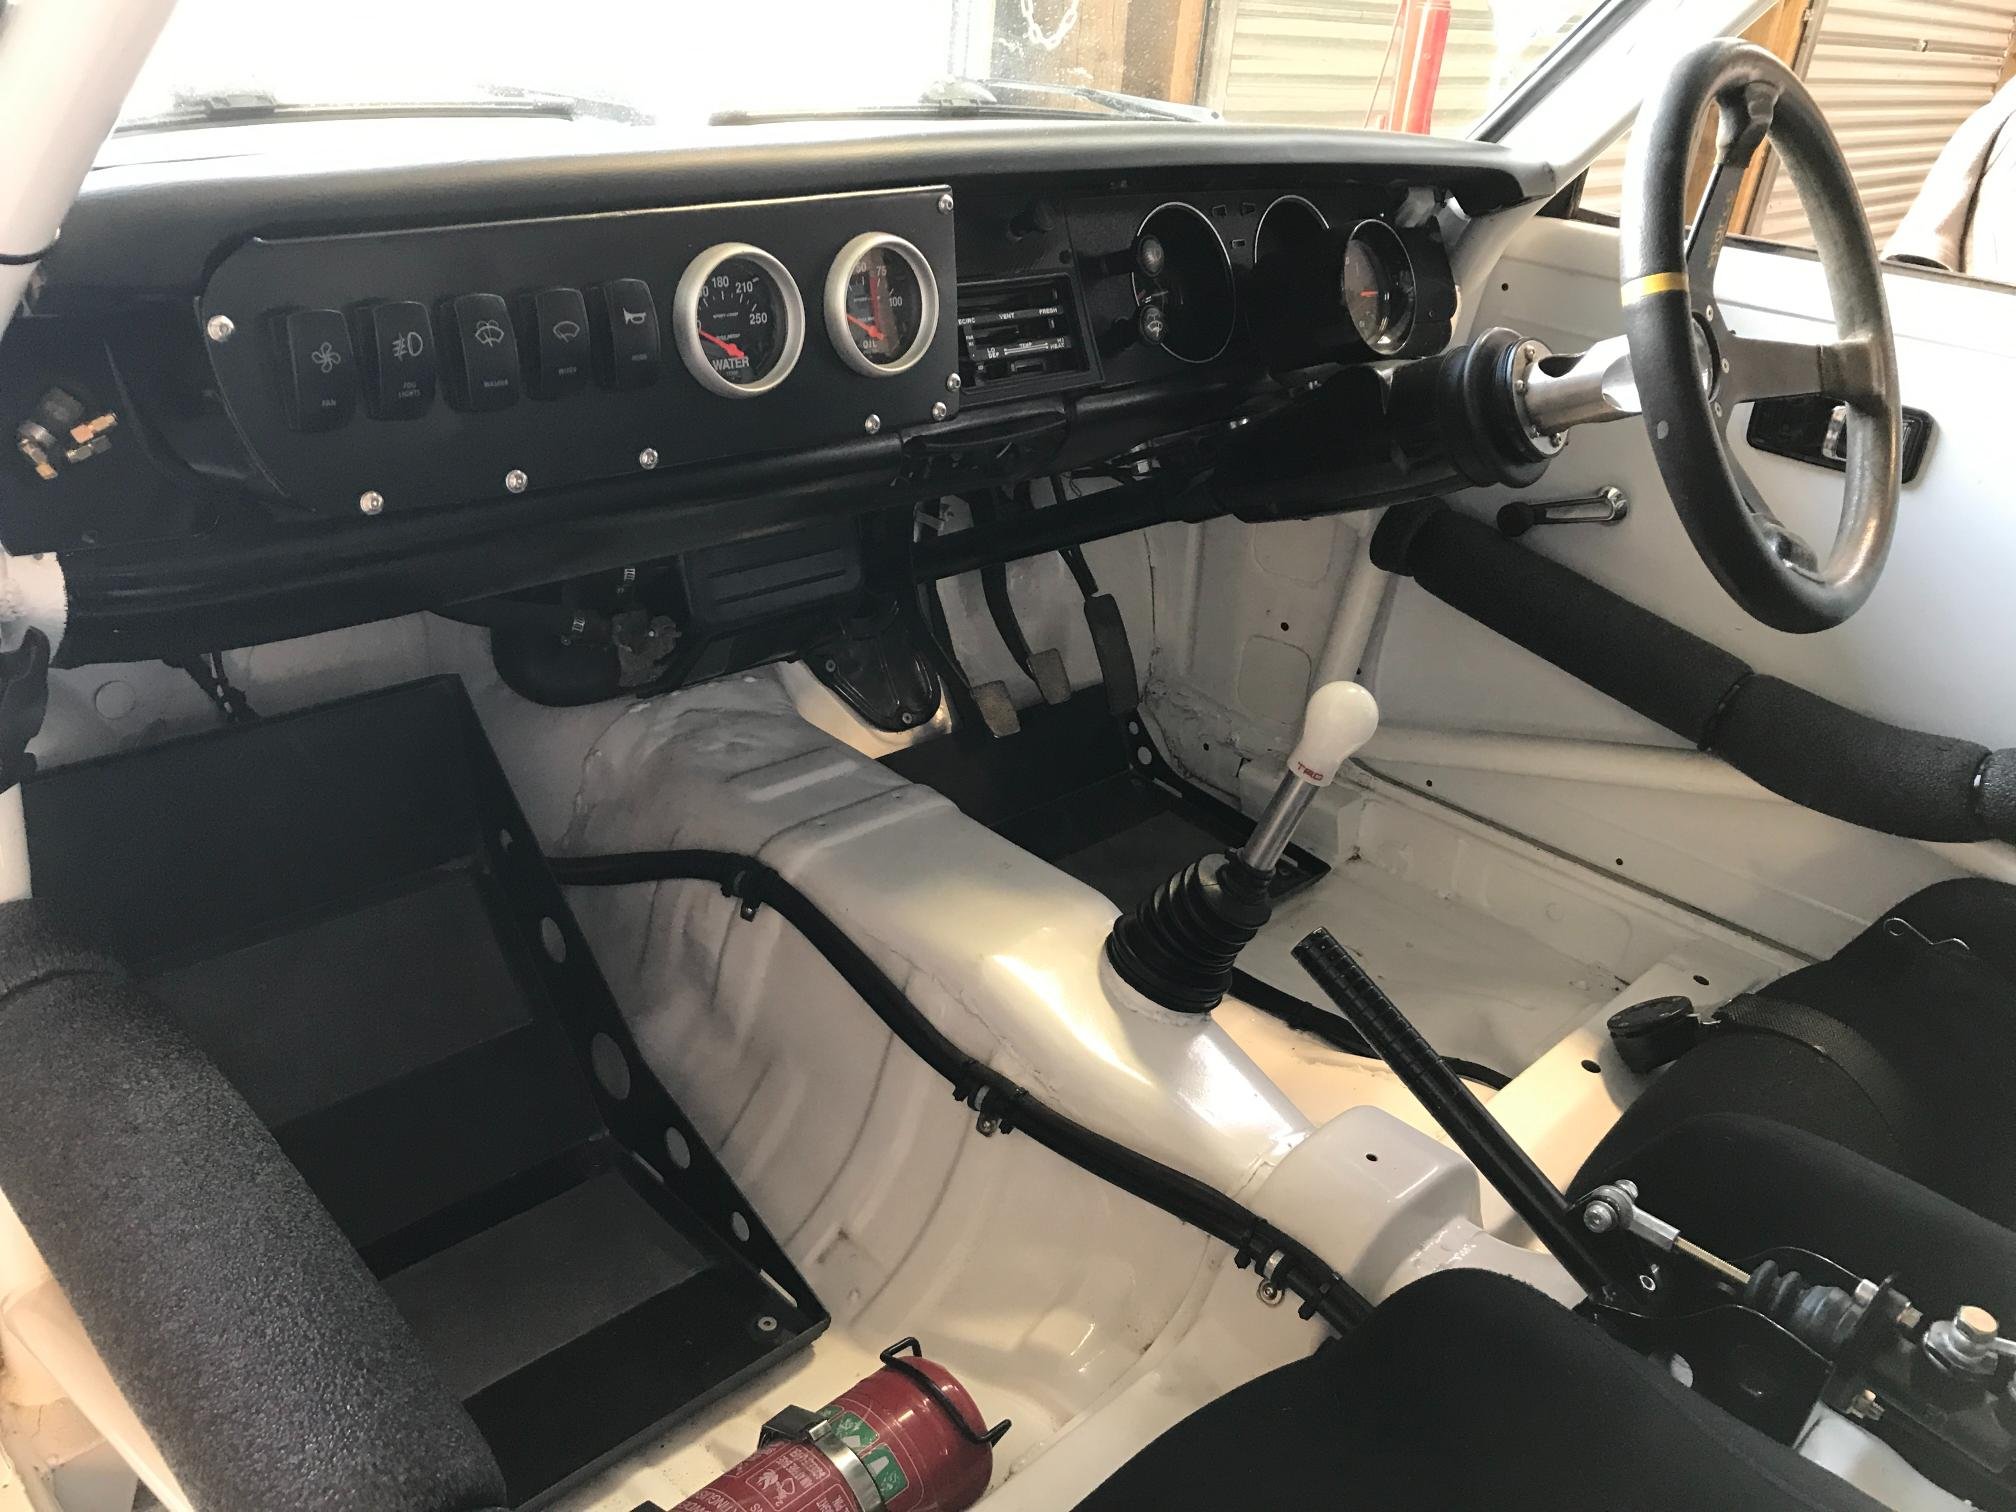
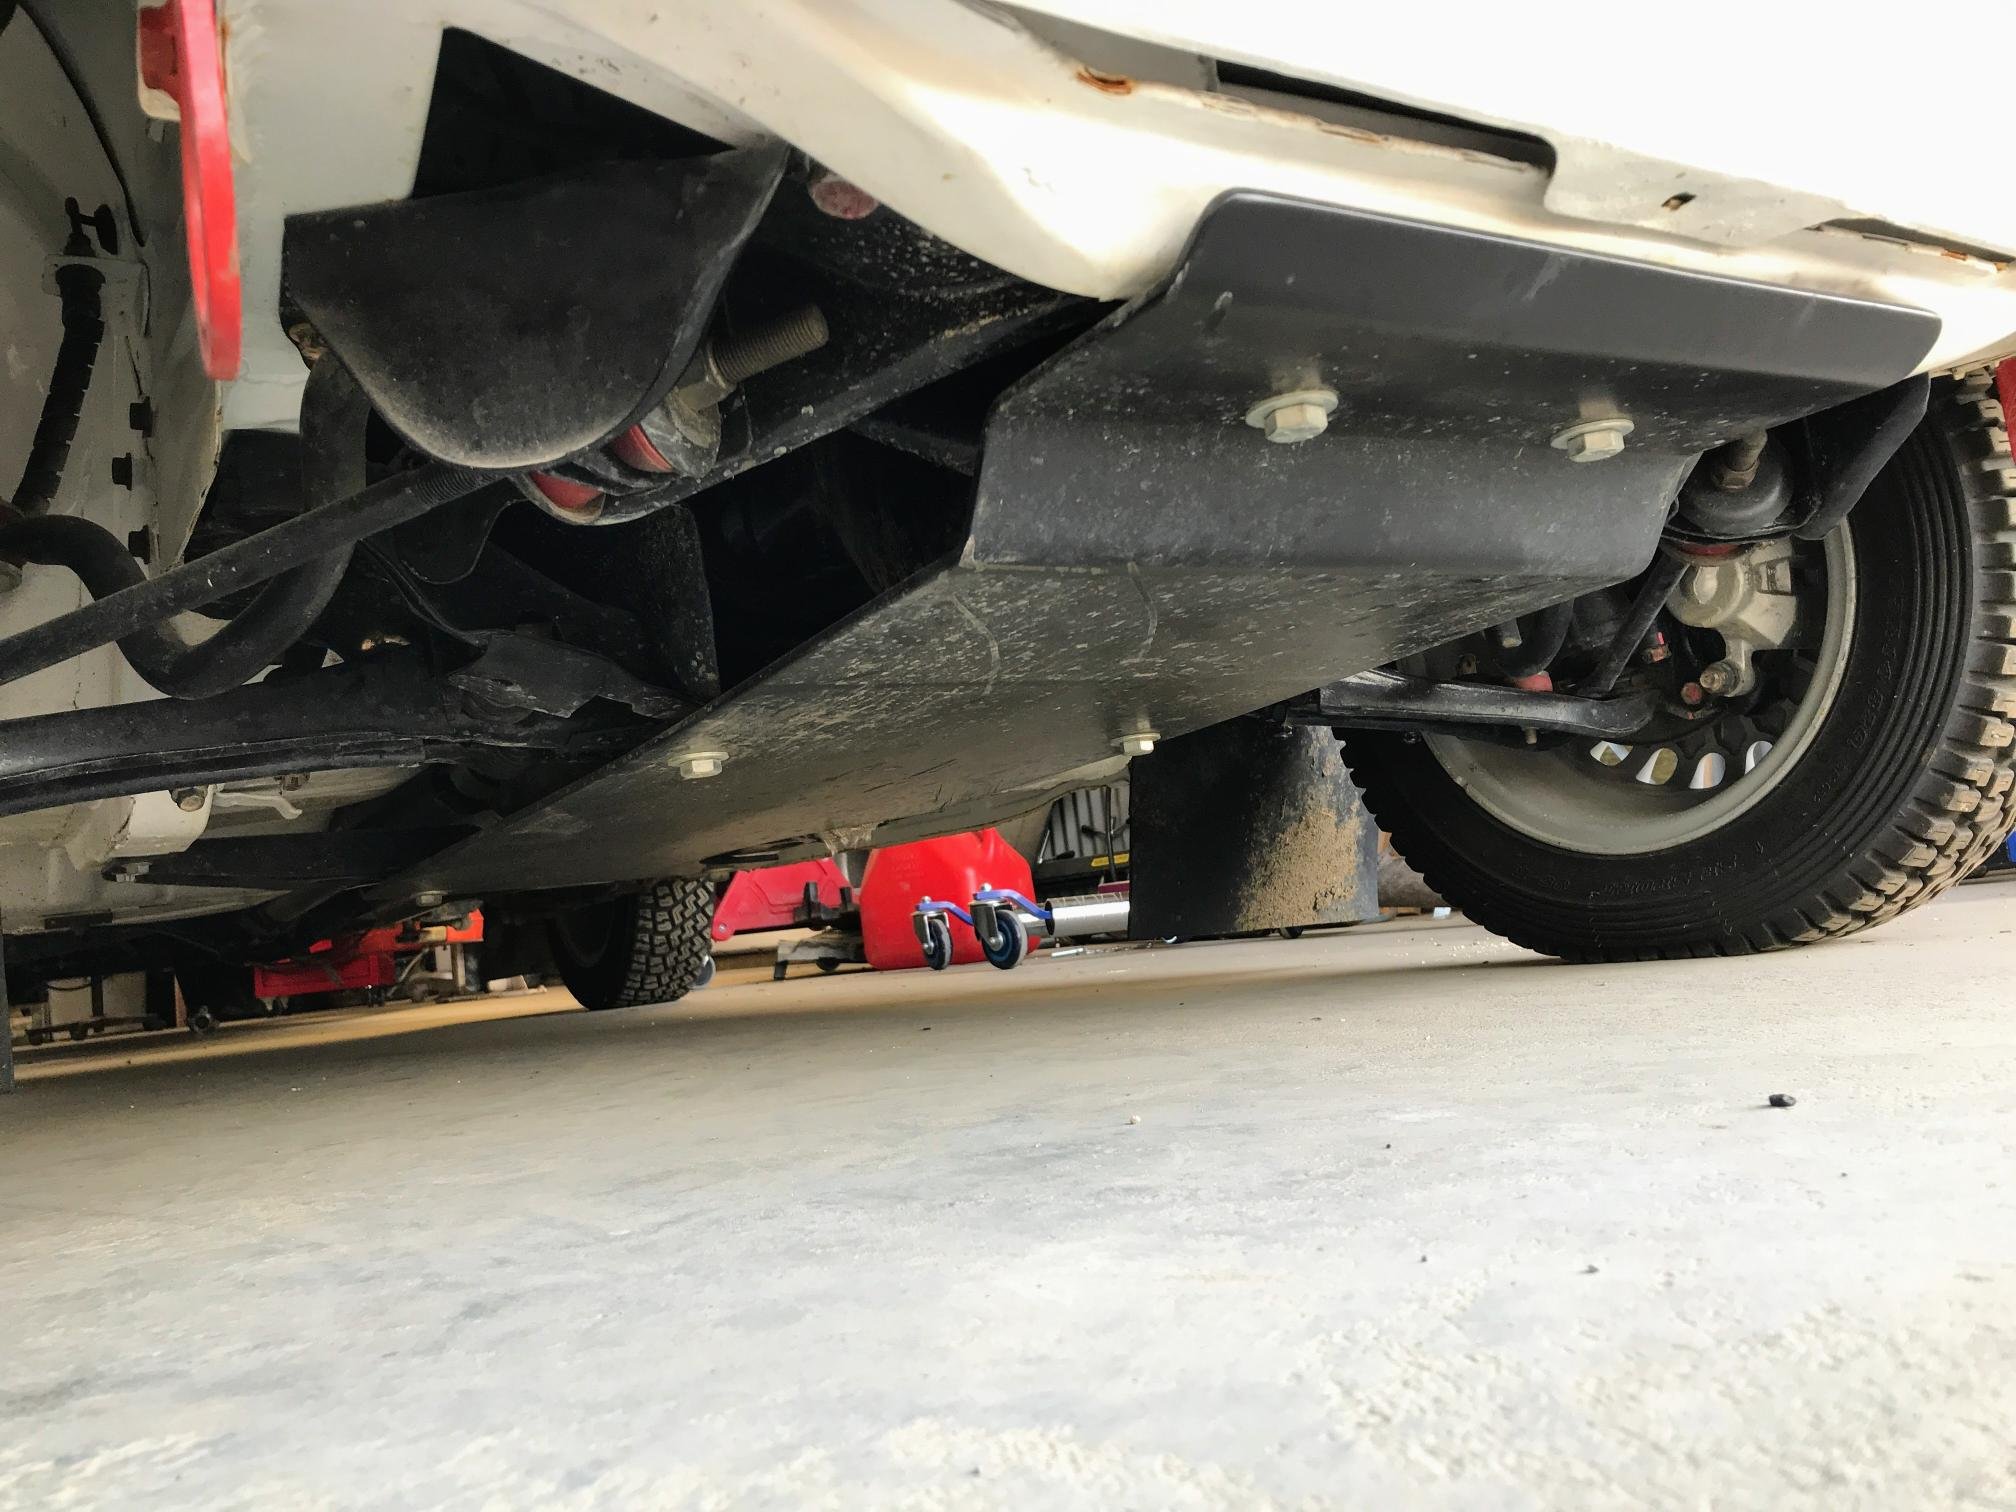
While those other wheels are off getting fixed up the Celica is kind of immobile because in my infinite wisdom I never thought to get the tyres I took off those wheels put onto some other shitty wheels I have laying around. As a result I can't really move it around however it is now a great time to get the Longchamps to fit on the back as they are the intended wheels for the time being. However, we have a problem and I'm not talking about the paint/panel work. I did some more fiddling with the panhard rod again (quickly coming to hate that) and kind of got it a bit more centred but that wouldn't quite do. This was my first time cutting the inner arches of guards so I'm definitely not going to show how that went but let's just say there was equal amounts bog as actual metal in these ones. Oh, I also cut the springs in the back but realised after I did that I had cut them at the wrong end LOL. However that kind of worked showing me how the car could sit. I'll get some more and cut them at the proper end next time as I imagine the actual ride quality will be quite bad now. This is basically the perfect height for me in the rear, granted it is currently jacked up at the front a bit but I think even when it's even it shouldn't change too much. I think we'll have clearance for movement but won't really know properly until actually taking it out. I did get it fully angled and it did seem to clear just before hitting bump stops so could be OK. The passenger side is sitting a little higher it looks like? Could be an illusion from the wheel not being in quite the same place though. I was able to cut the passenger side guard much nicer than the driver side as I had a better idea how to do it quickly and more smoothly. I'm thinking I might just slip a 3mm spacer in there to get it about even and call it a day. I will need to go back and flappy disc the cutting so I can goop it all and try to seal the rust in otherwise it will be a problem in 20 years. Plus if you look under there (please don't) it looks terrible and also it's pretty sharp. Ah and let's not forget the exhaust that looks like it's going to delete itself soon.
5 points
-
Have done alot of mods with windows, doors, ranchsliders etc but never cut it completely apart to lift height. Once you get a 9" grinder, life is infinately easier. do not waste your time with smaller. Plasma works well if you have it available with decent amps but I find large cut off discs easier for long straight lines when cant use a guide bar due to the profile. As above, use RHS 50x25 as frames for windows / doors as the 50mm size gives good width to sit in and weld against where the frame needs to be straight and the wall itself has a dent/wobble. it is pretty amazing when cutting a few meters out the side how much that whole panels flaps around. Have tried angle iron but more of a hassle. When cutting, dont cut right to the cnr leave 5mm each side on at least the upper cnrs so it holds the panel up and doesnt flap around, then when you have someone to hold it and not drop down just cut those little tabs left easily. they become quite heavy so be prepared. if you plan the cuts well you can use to cover over dented sections or patch untidy sections on the wall to make it look pretty on outside if you arent cladding it. considered doing similar, joining two together but the weight and not ease of moving them around easily that closely to perfect joins side by side, has hindered it going further. Really easy to brace the roof better to hold it up but yeah. Those canvas things that go between the two containers end up way cheaper. Slab 40k? my 108m2 shed floor i getting quotes for is between 8 and 12k. so much be a big concrete pad! excuse the poo weld, in terms of using the RHS to frame like so so gives good straight edge for doors windows to butt agaisnt..
4 points
-
I have bikes if needed also. many bikes. many many bikes.4 points
-
I see what you did there and I hate you for it4 points
-
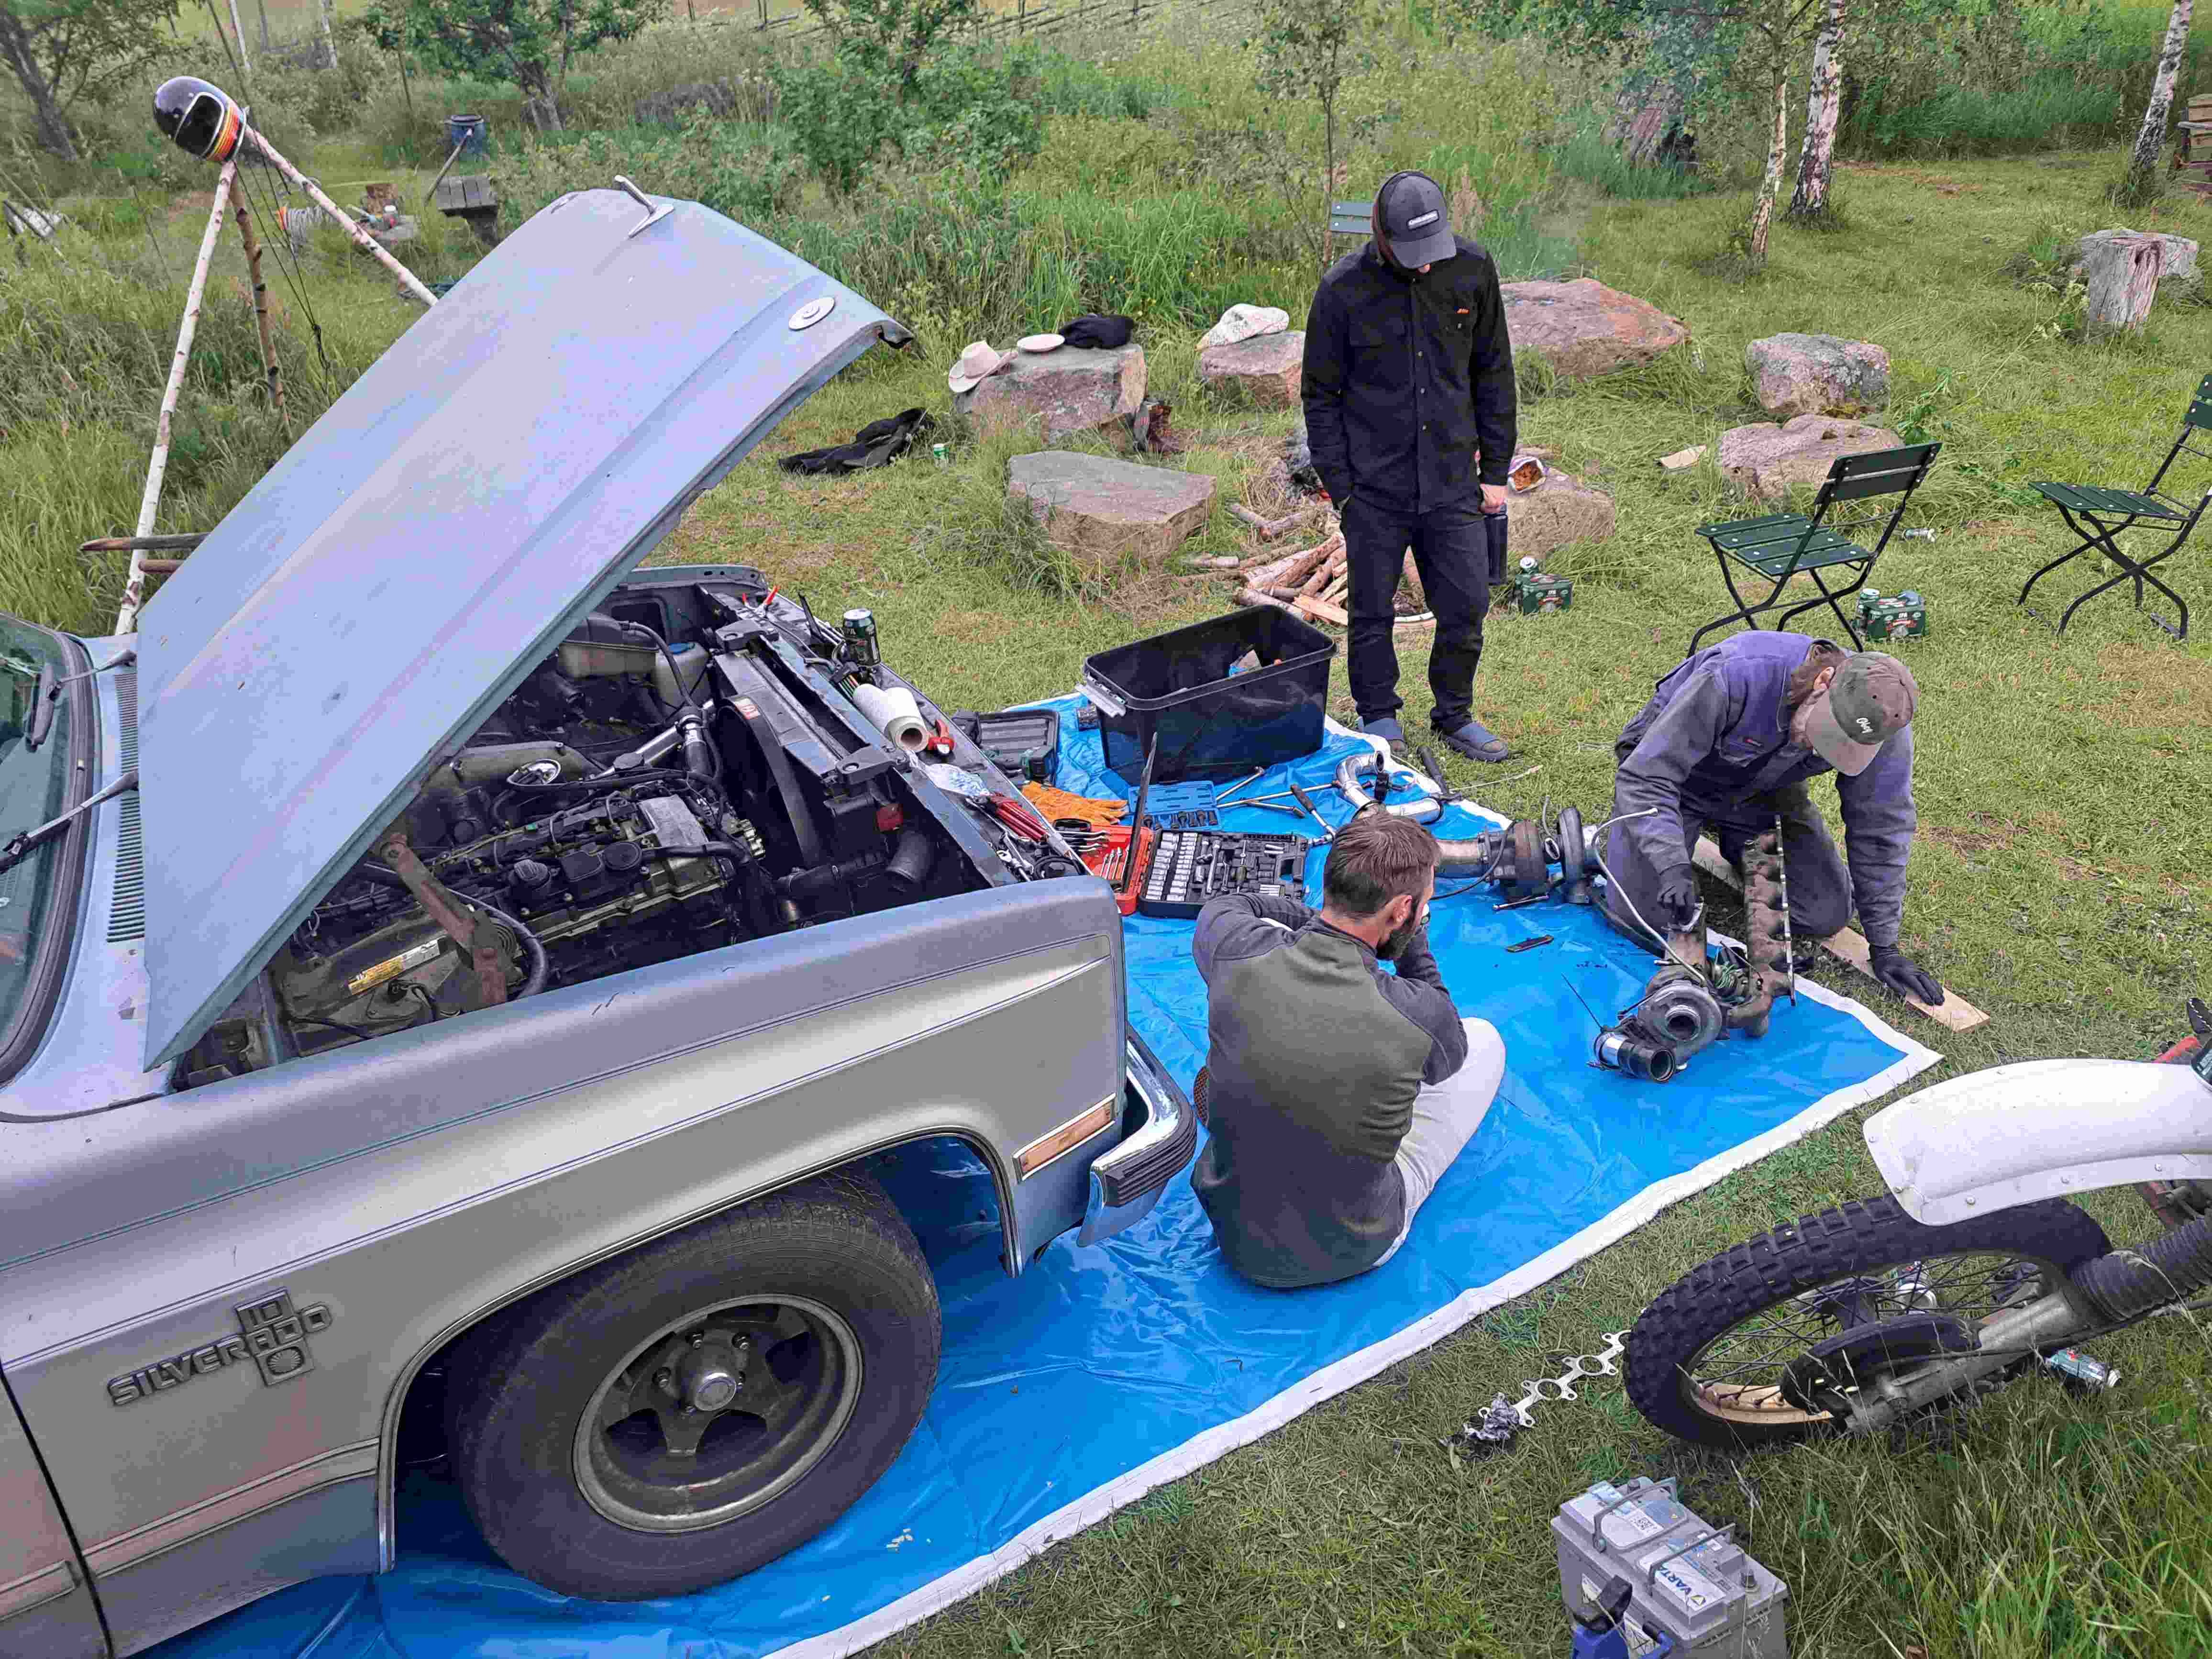
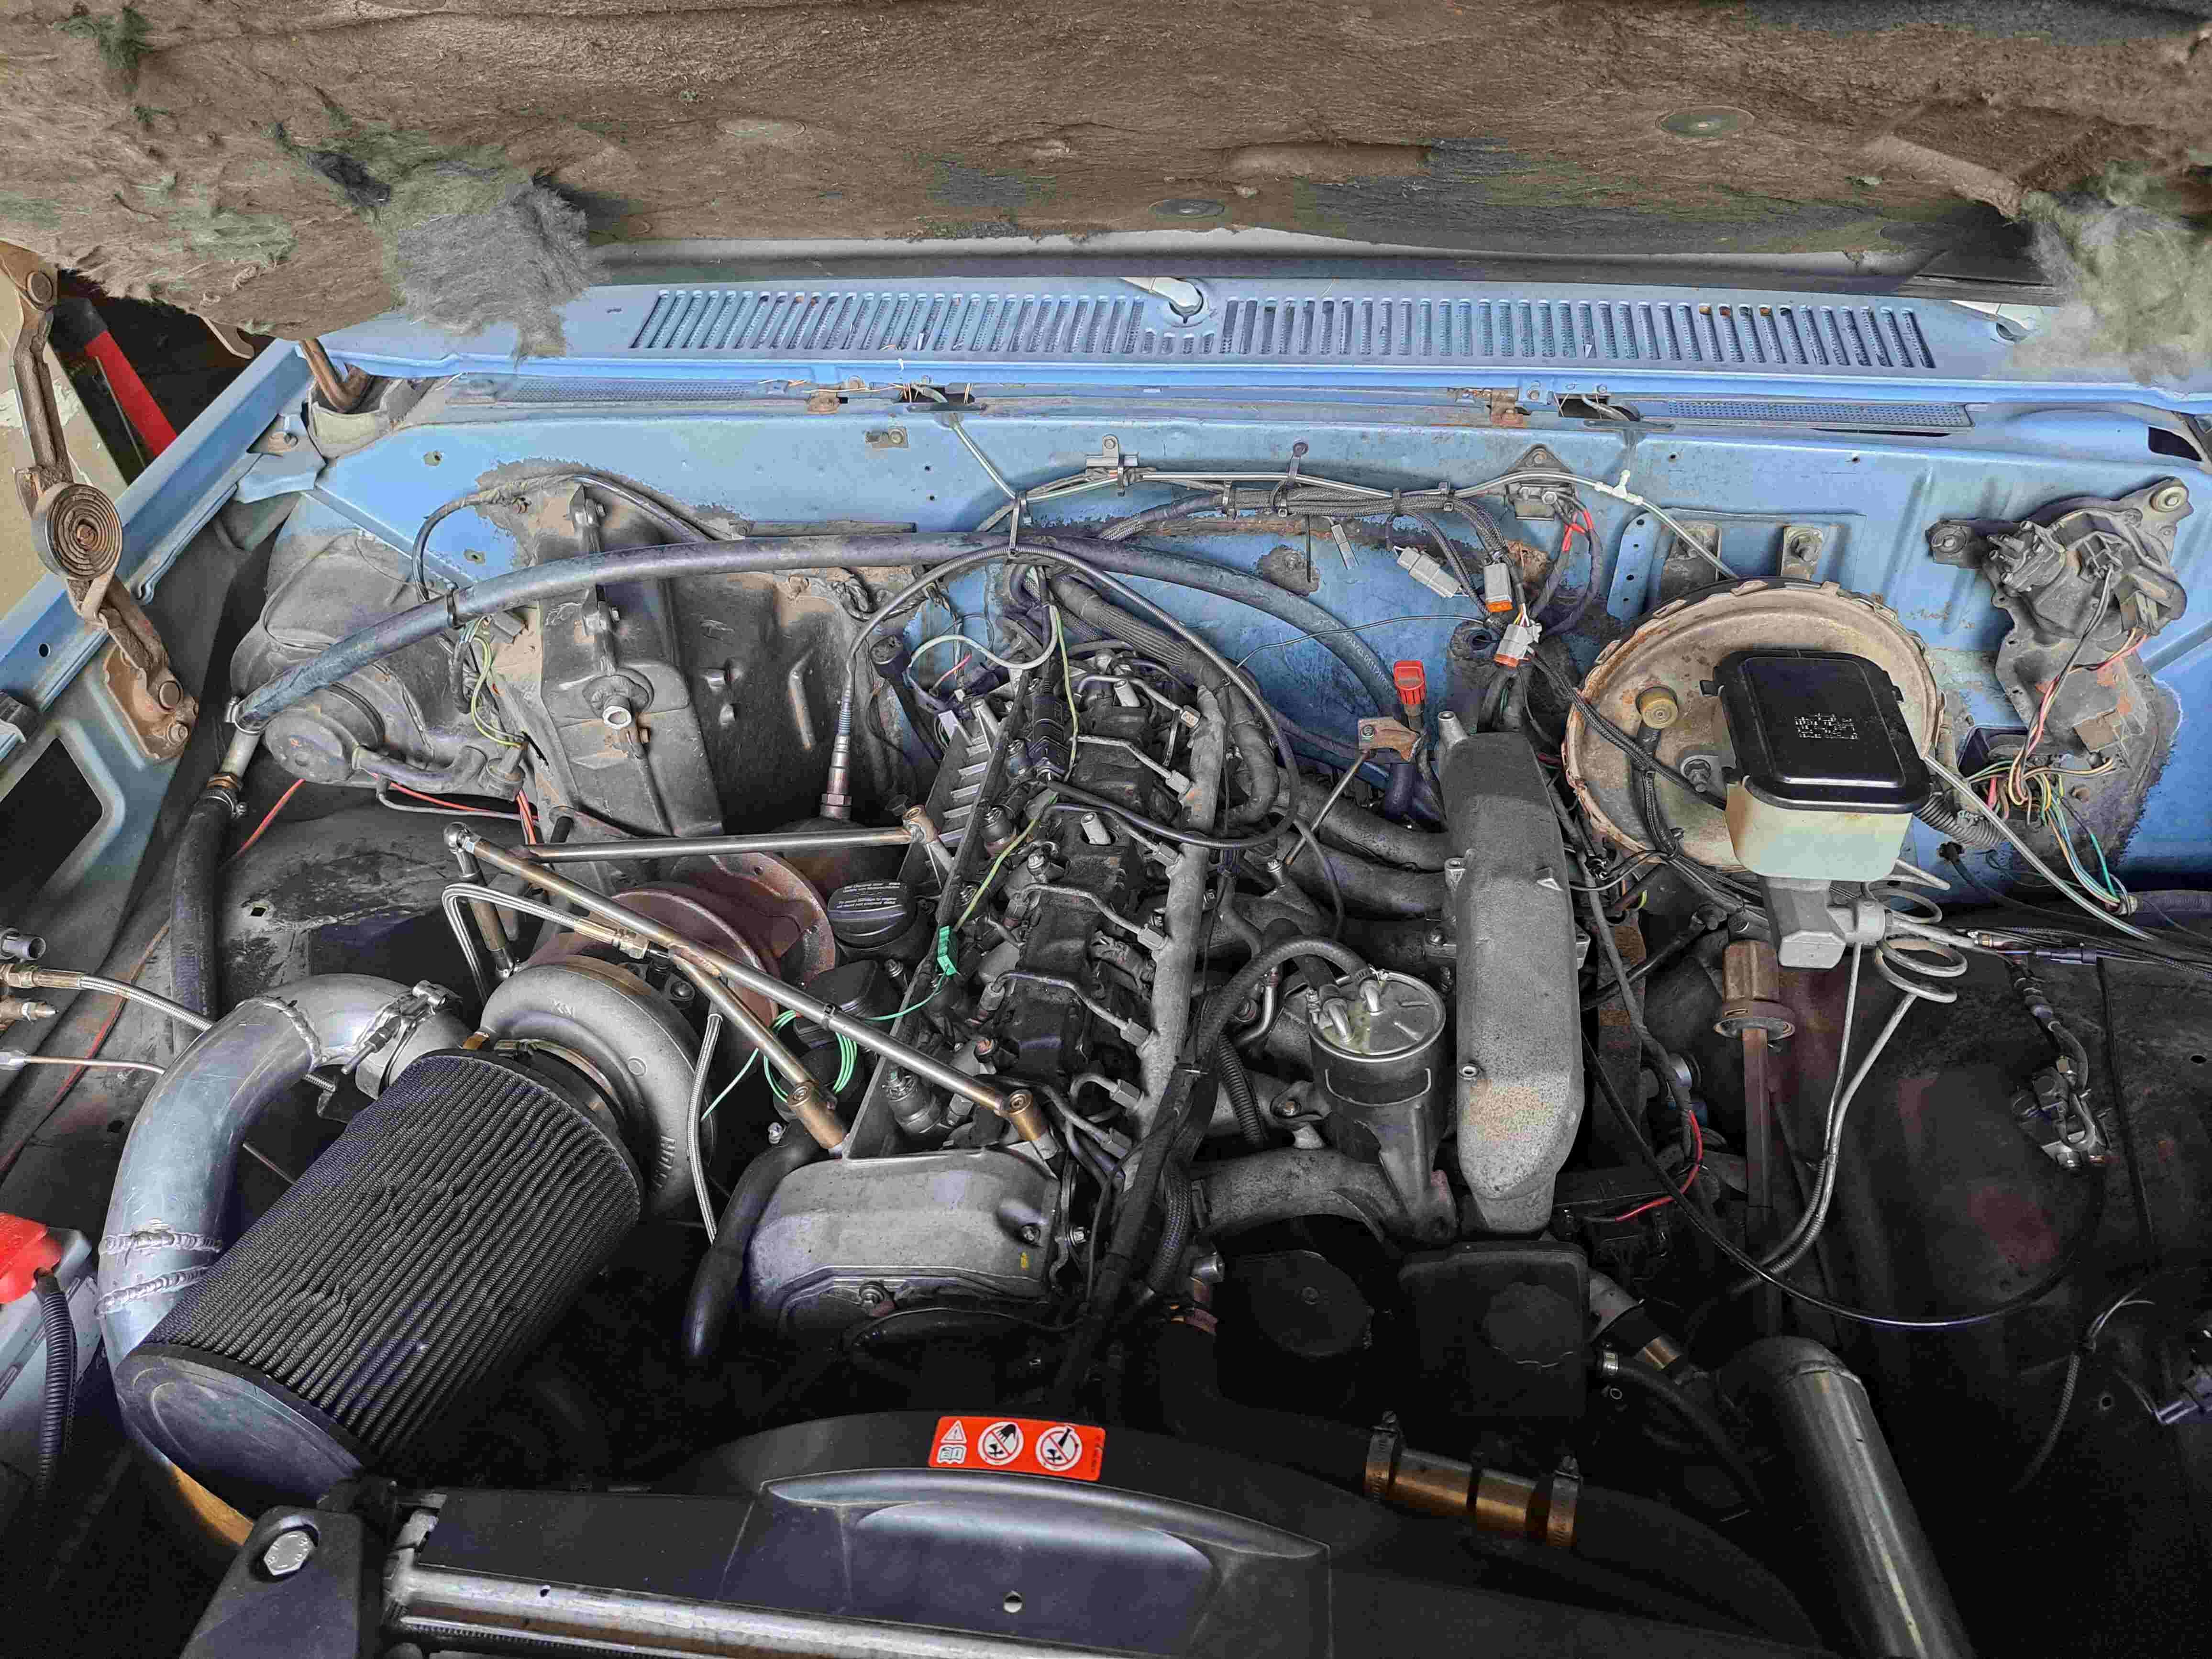
Around 11 pm everything was back together and a short test run proved that all systems were go. BED TIME... Early the next morning everything was loaded up and with Alan Jackson on the radio I set off to meet the boys for our 5 day trip around Sweden. Everything was great on the first day, turbos were boosting, beers were drunk and all in all a good time was had. At some point We had bought some Drag Radials from a dude around Stockholm, I got ZEB to pick them up for me, and I had mentioned that if everything was going well then we could come and get them, so we woke up early and hit the road for the 5 hr each way road trip. all in all it was going well, I had the laptop hooked up datalogging and all was good, we stopped for some diesel and I let my buddy drive, the pull onto the highway from the gas station proved too much for the heater core, which promptly exploded and dumped water into the cabin and vents. We stopped, by passed that and fixed a diesel leak while we were at it, and continued on our way. With me on the laptop and old mate driving we made headway on the tune, with each page up producing school girl giggles and soon enough the 3 bar map sensor was showing 3080 mBar and the egt was 950 degrees in the datalog. All was good, until around half an our out of our destination when the dreaded manifold tick reared it ugly head, not entirely unexpected as I hadn't had time to surface the manifold after welding but it turns out I had a lot to learn about turbo manifold afixing. Anyway, we limped back to base camp and pulled the turbos to try and fix the leak. It ultimately turned out unsuccessful, but we tried, we limped the rest of the trip and at some point the lift pump relay gave up the ghost, so with that bypassed and many more beers drunk we made it home. With only 2 weeks until street week pressure is on, but it seems as if things are do-able...
4 points
-
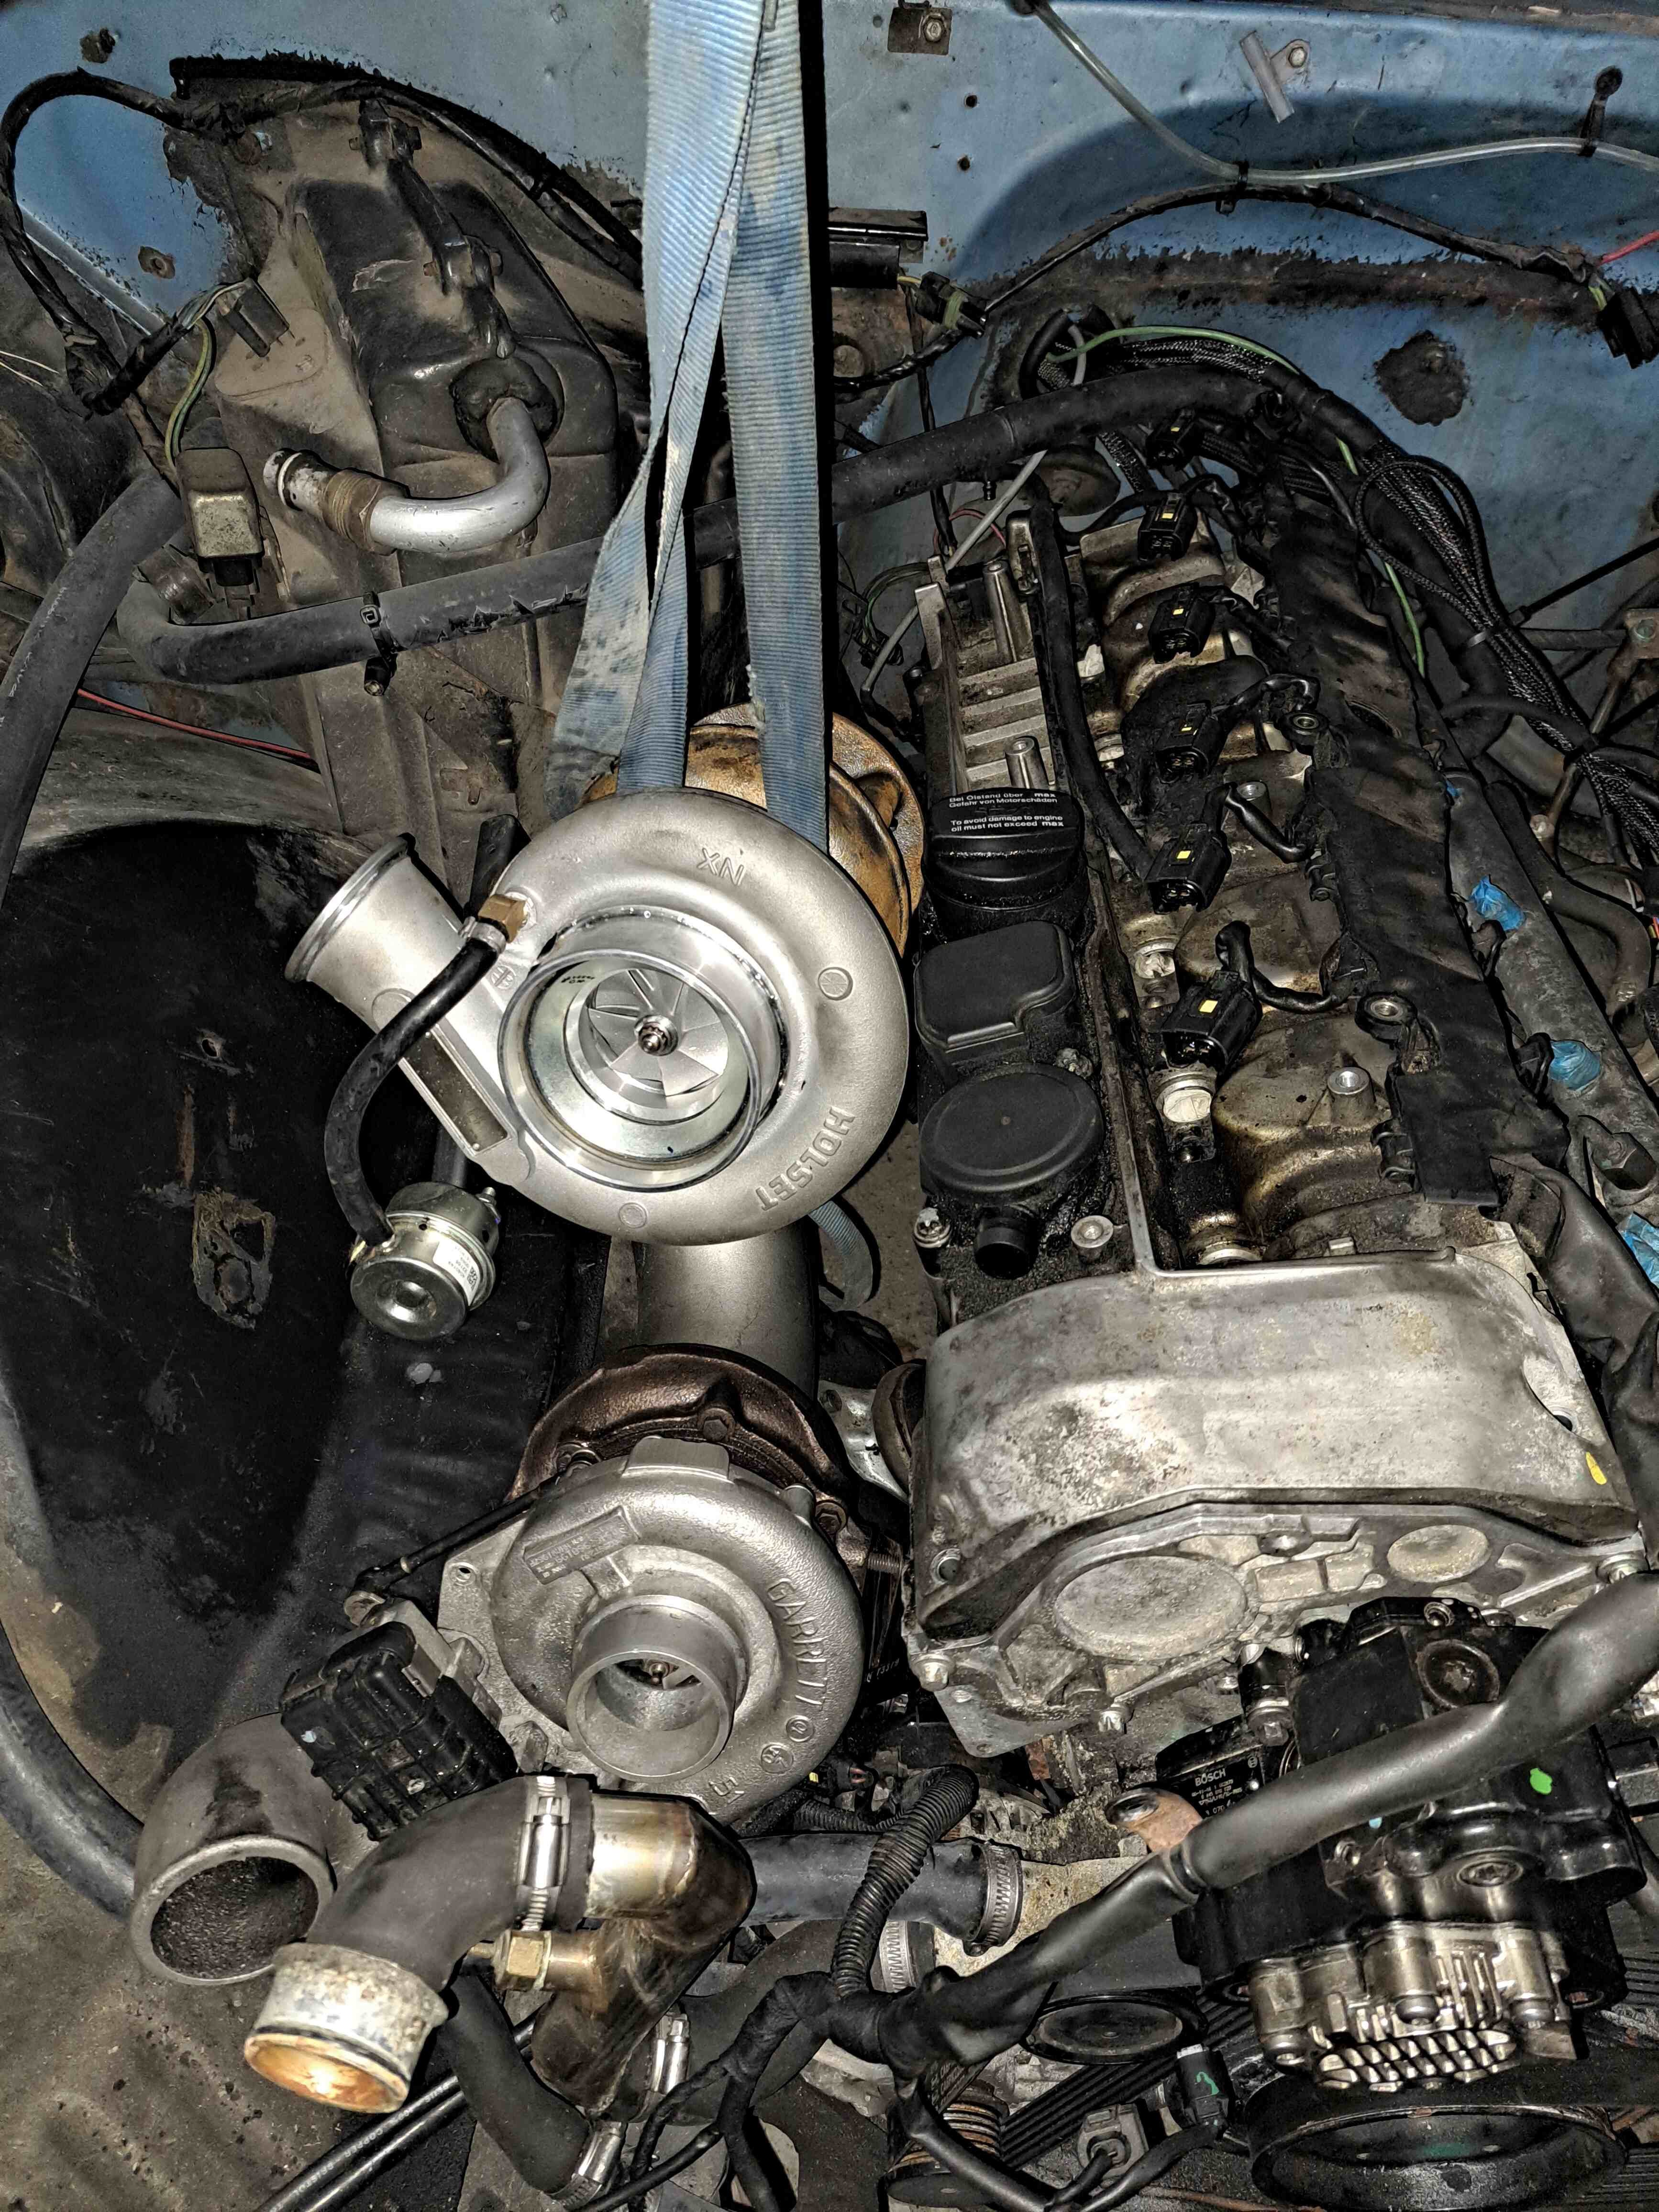
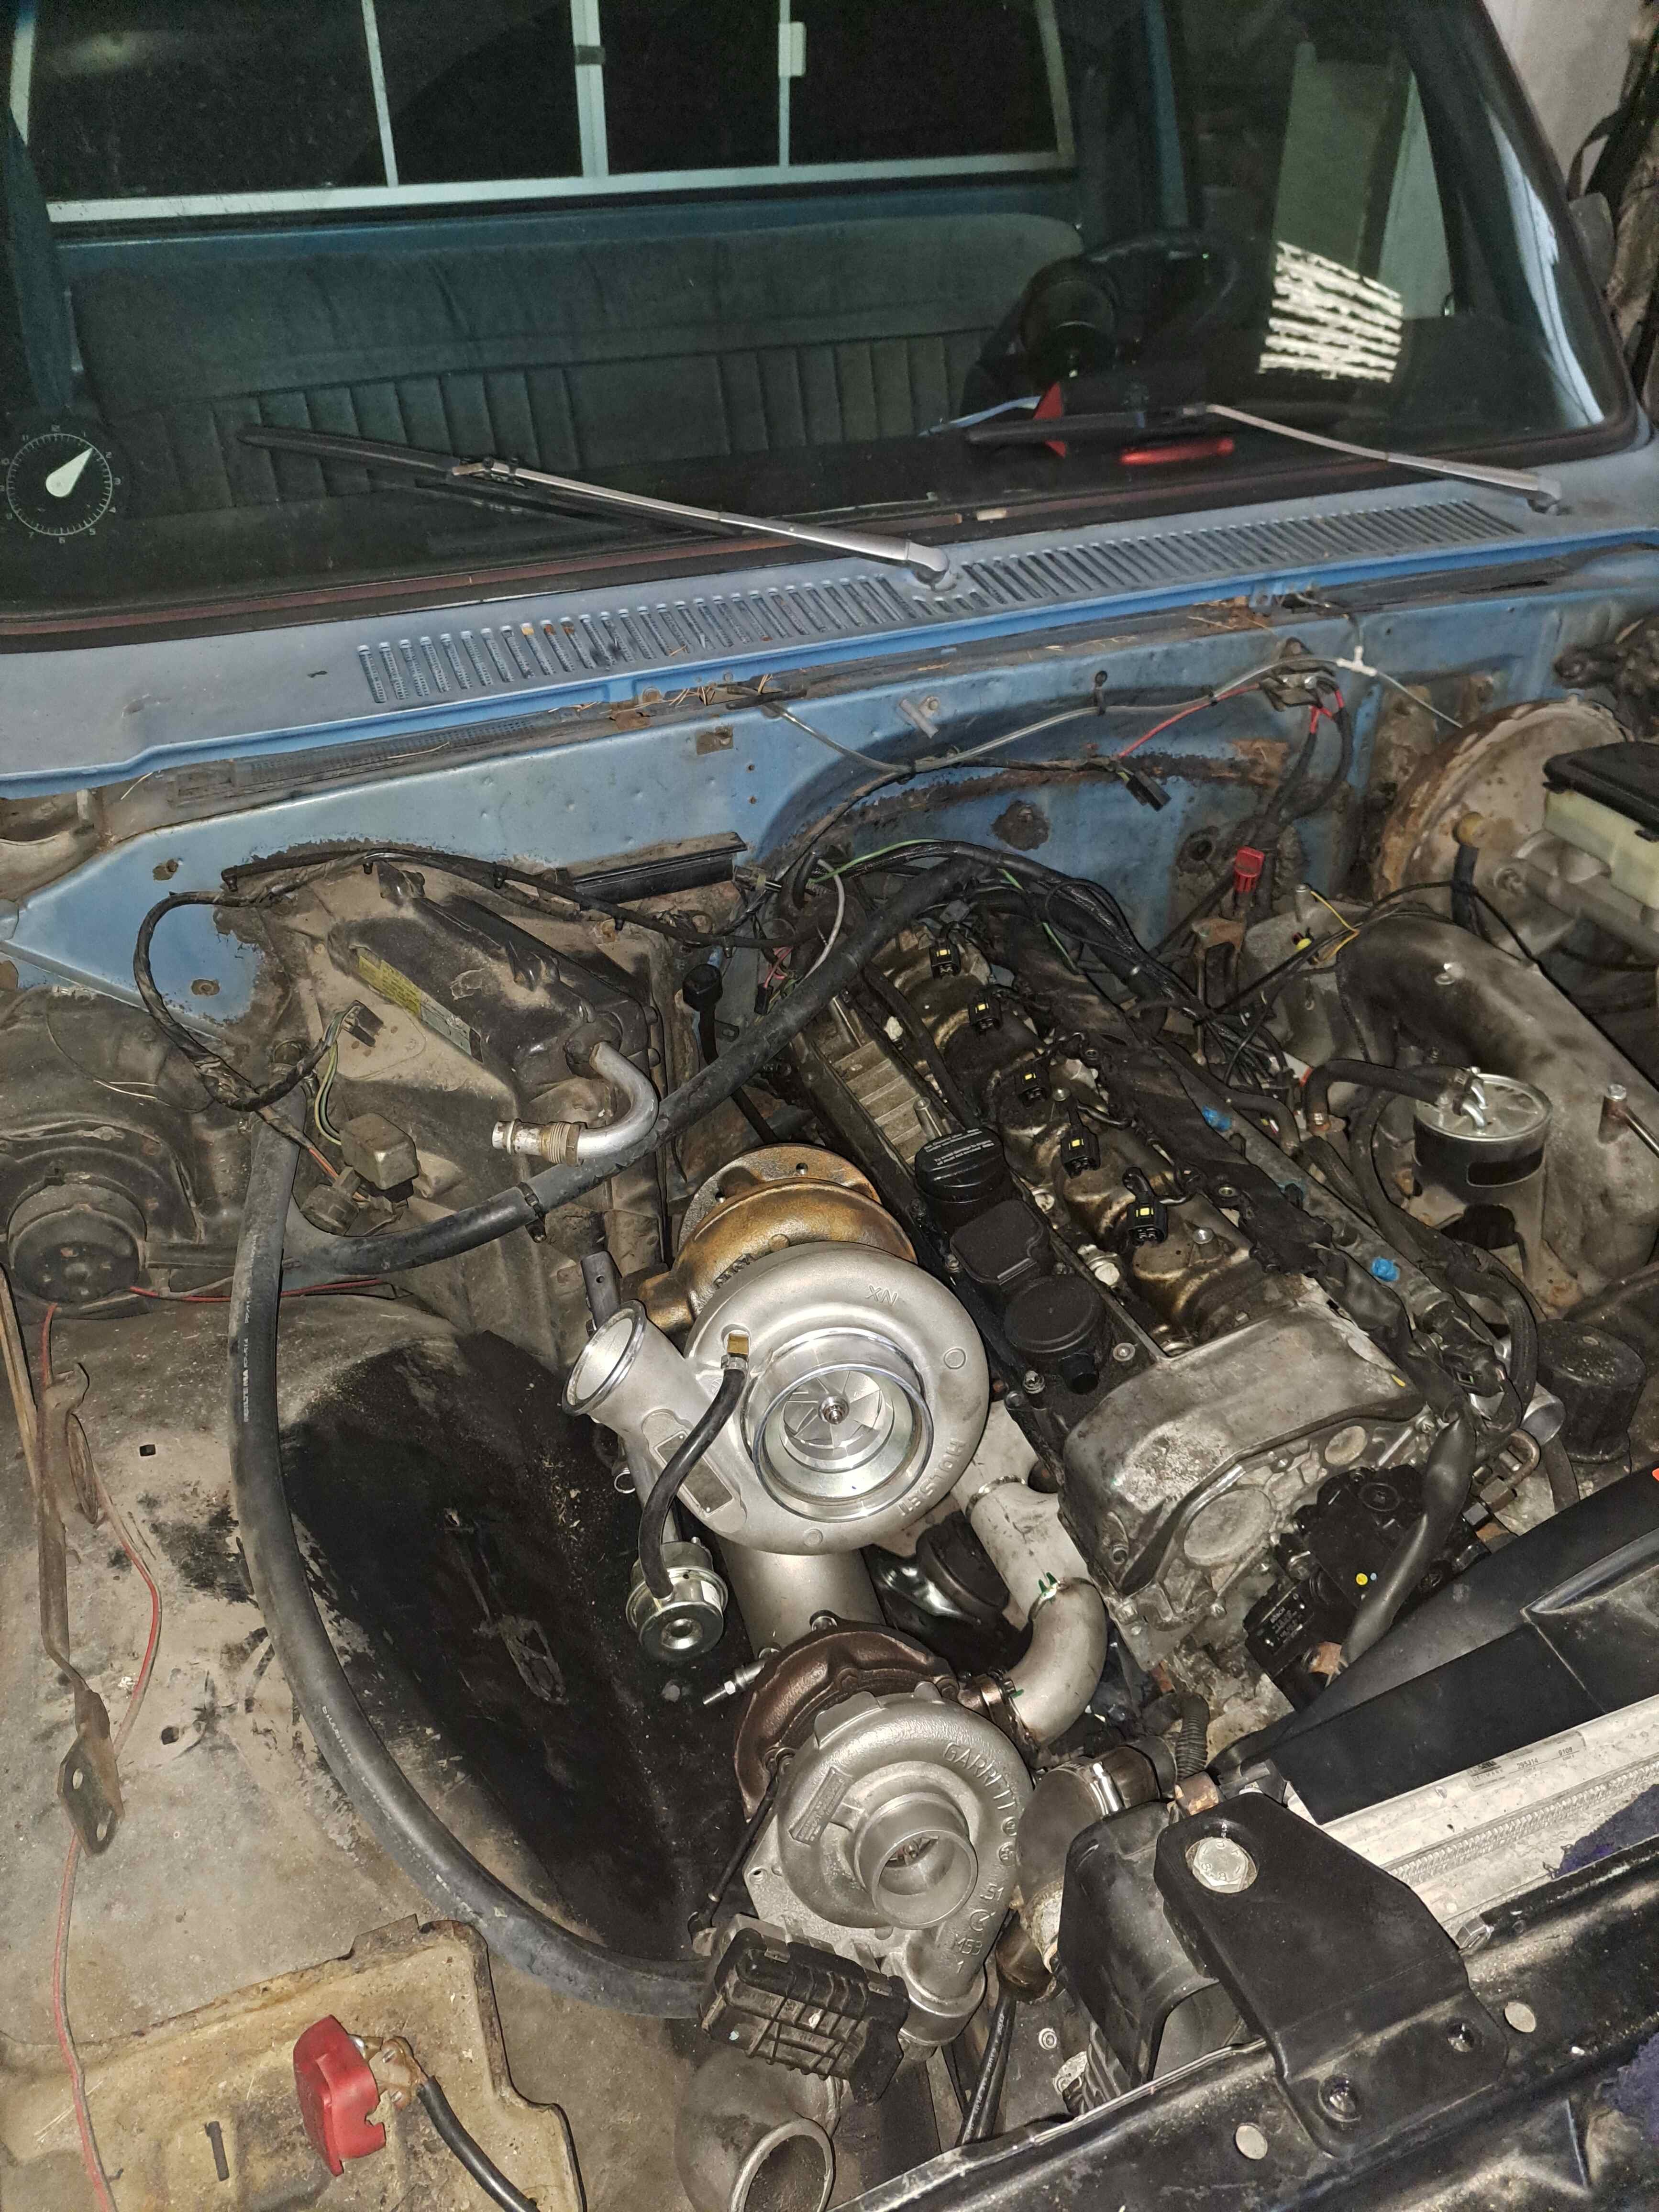
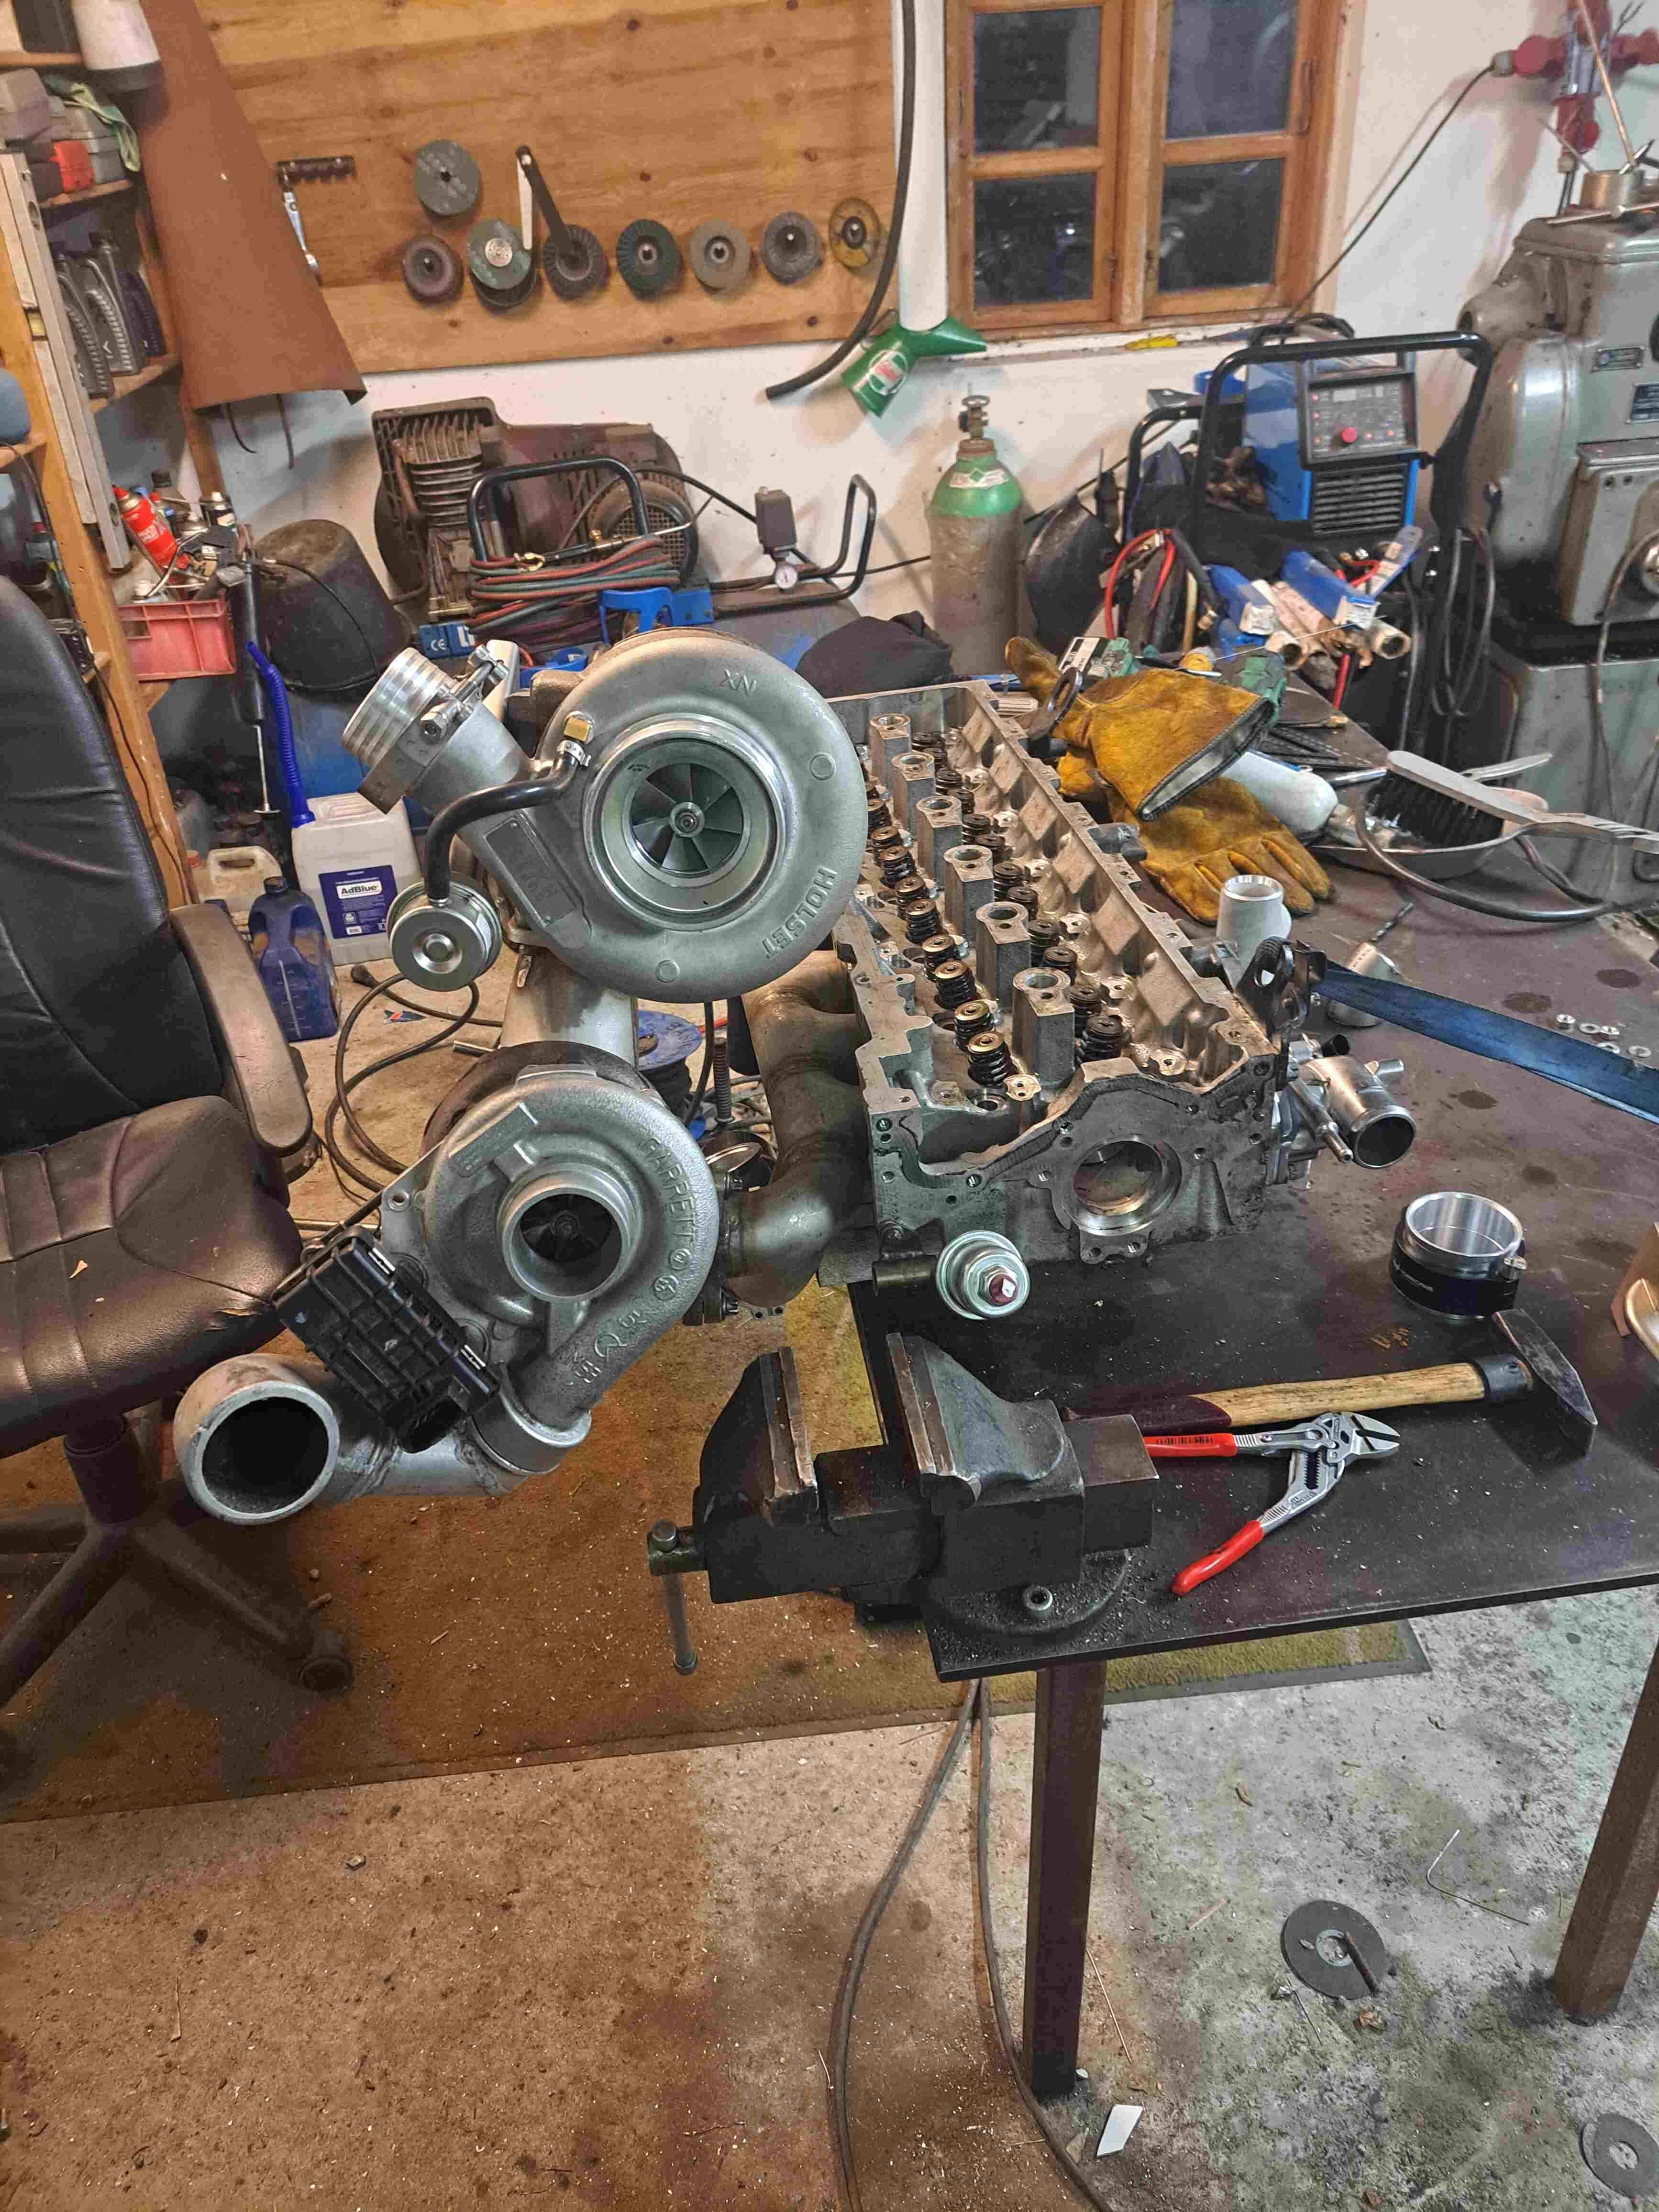
Ok, so the thrash was real and no updates can happen whilst under time pressure. Plan was to get it going for my MC clubs year trip and use it as a sweeper vehicle, long story short, we made it... The basic idea is to put the HX40 compounded over the stock turbo, the goal was to keep the stock drivability but be able to max out the 400 cdi pump. I quickly found out that the C10 engine bay is designed for a SBC and not a Mercedes Diesel with compounds, but never the less these go here...
4 points
-
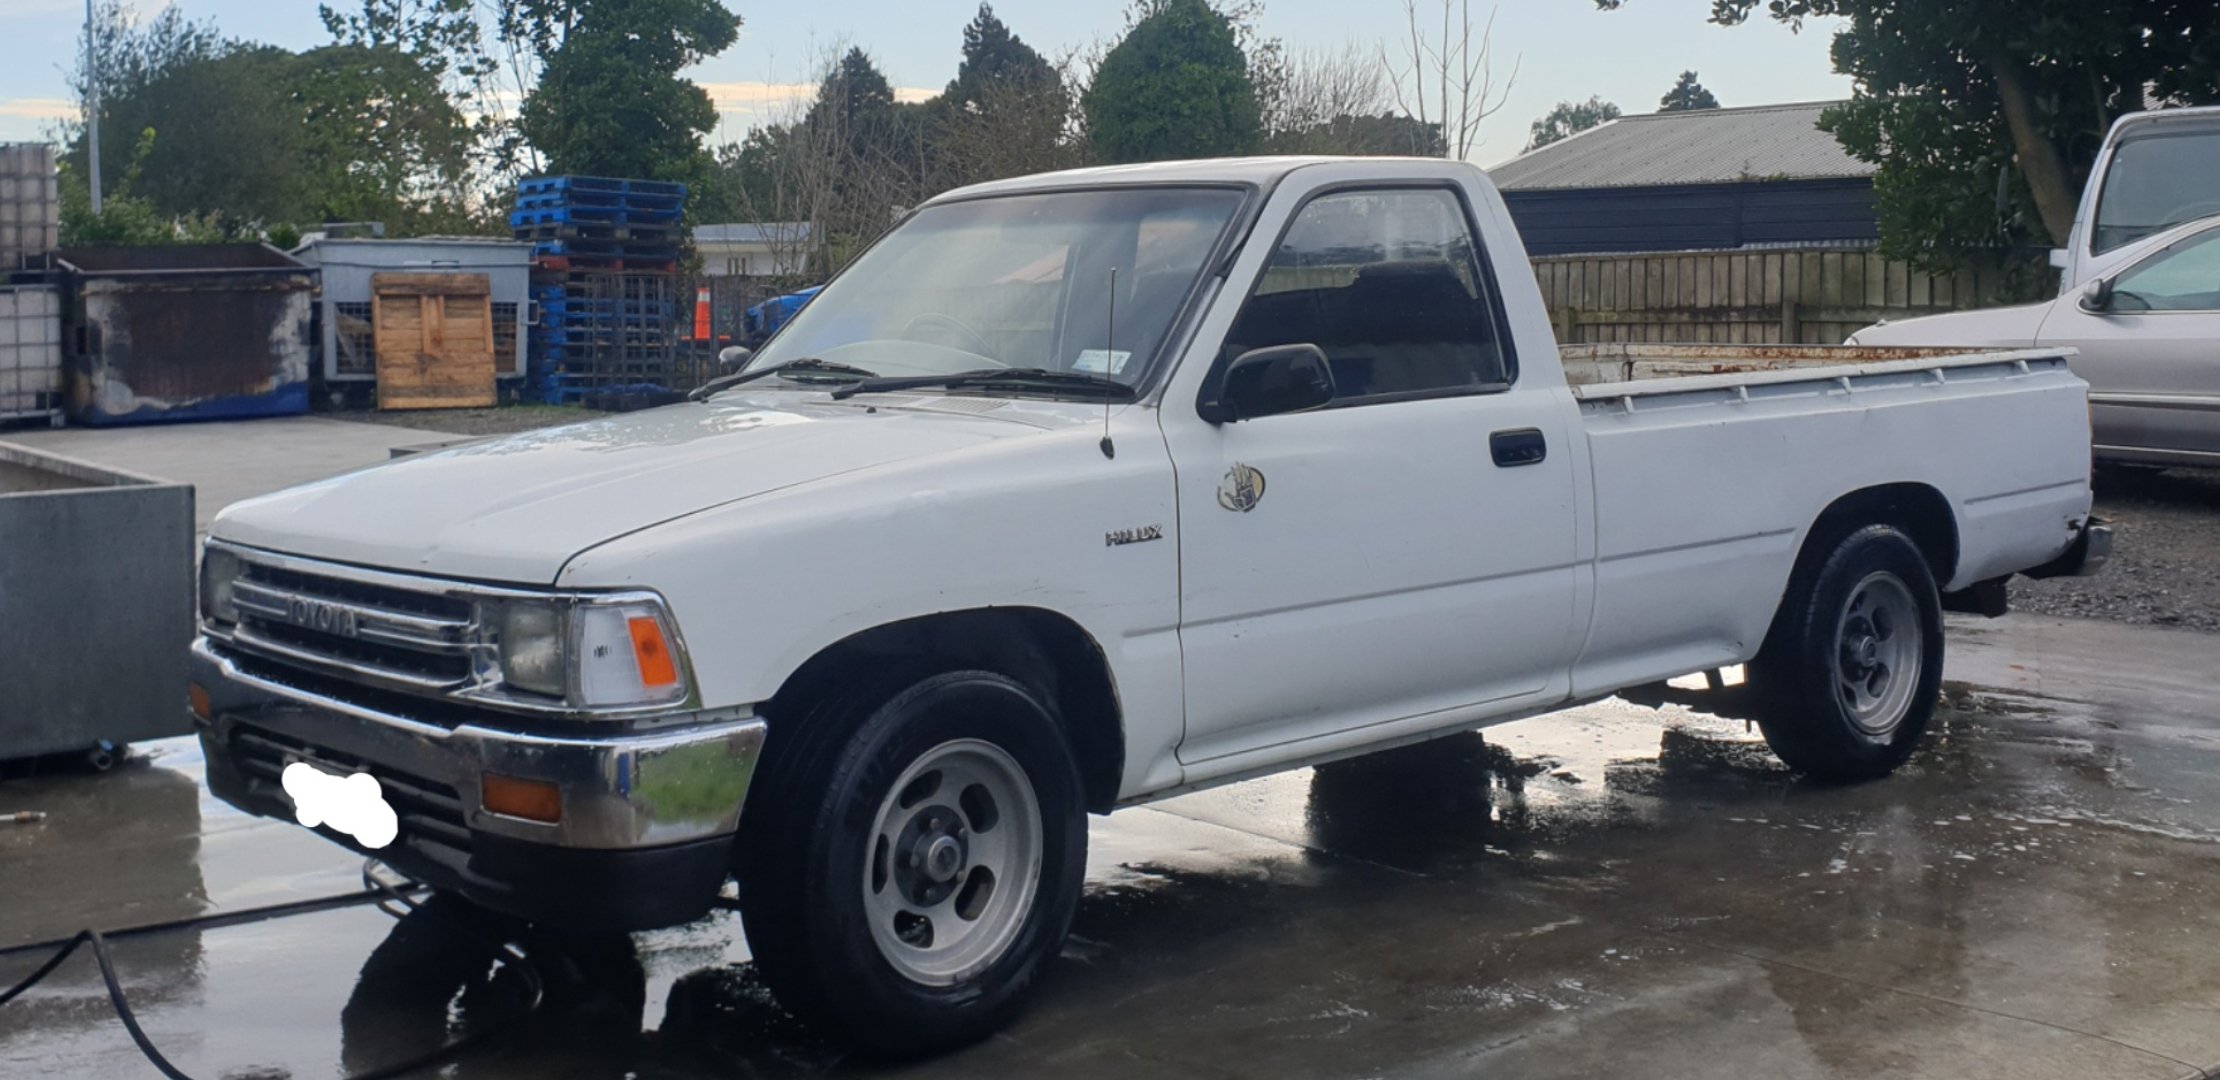
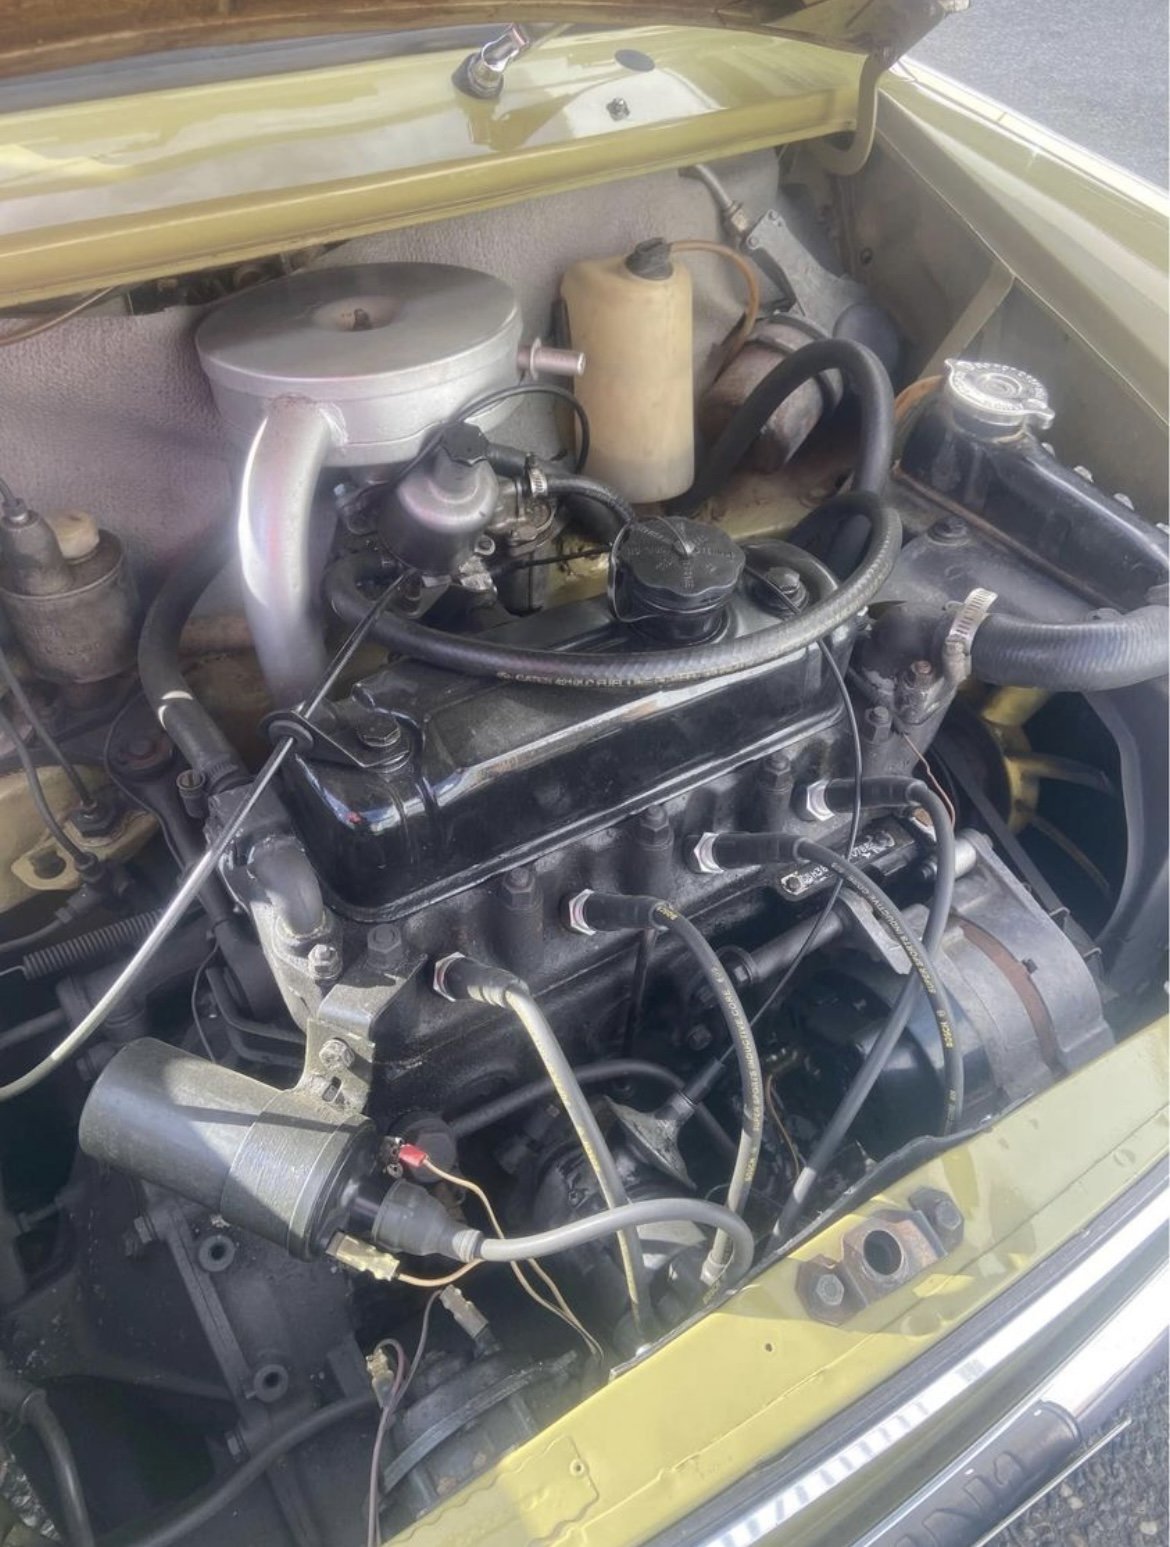
Fair bit of water under the bridge since I was last here with a project - I think 2008 with my ill-fated Sapporo. No need for too many details, but after a decade of studying and then building a career, I finally am in a position to have a project again. Picked this old gal up today - a touch of rust about but nothing terminal. A mild resto-mod is on the cards, replace all the flogged stuff, give it a slight lift, some mildy chunky tyres, keep it simple and pootle about the place towing my similarly aged boat. Retro feel, none of this punishing business you see on the mall crawlers everywhere these days. Inspired by what the Land Rover guys get up to - something that will age well and suit my advanced years. Has the 2.6 Astron with a 32/36, 5 speed and goes pretty well - torquey and stinky. No plan to do anything to the engine aside from tidy it up, perhaps a non-rusty exhaust and service it well. I drive a Gen 4 Paj (silver one in the pic below) as my daily so I am a real tragic... I also own a 1940s ex-bach that needs even more love than this piece, so progress will be glacial I imagine. Pretty much forgotten everything about old cars so no doubt this will be next seen aflame floating off the Hibiscus Coast (where I now call home). If someone wants to make a discussion thread, feel free but I won't be offended if not. Parked up in its new home - the place where projects come to stall Chur boes3 points
-
If I wanted your approval I would just swallow everytime.3 points
-
Ol mate looking prety decnt
3 points
-
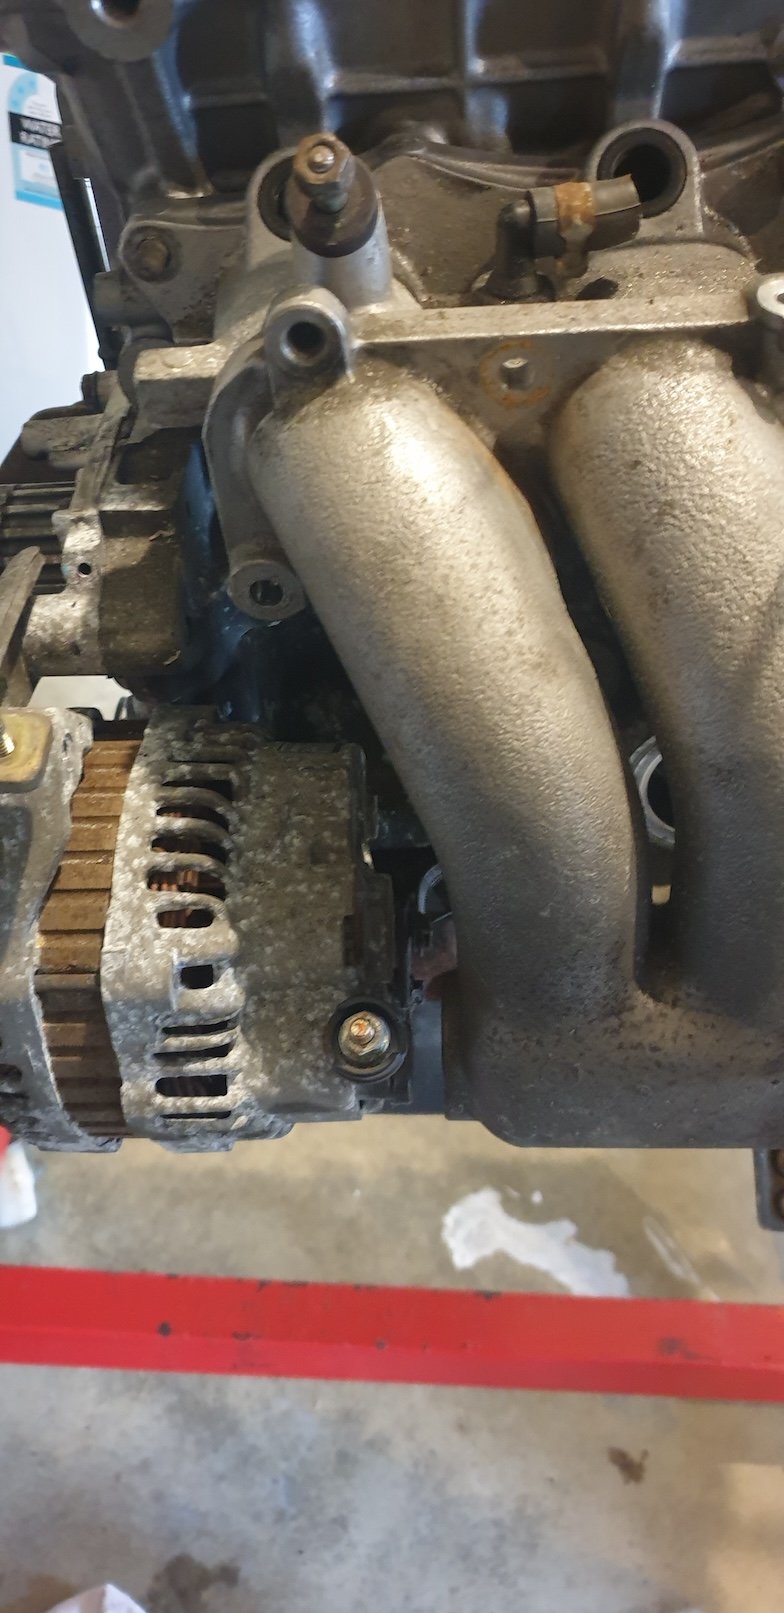
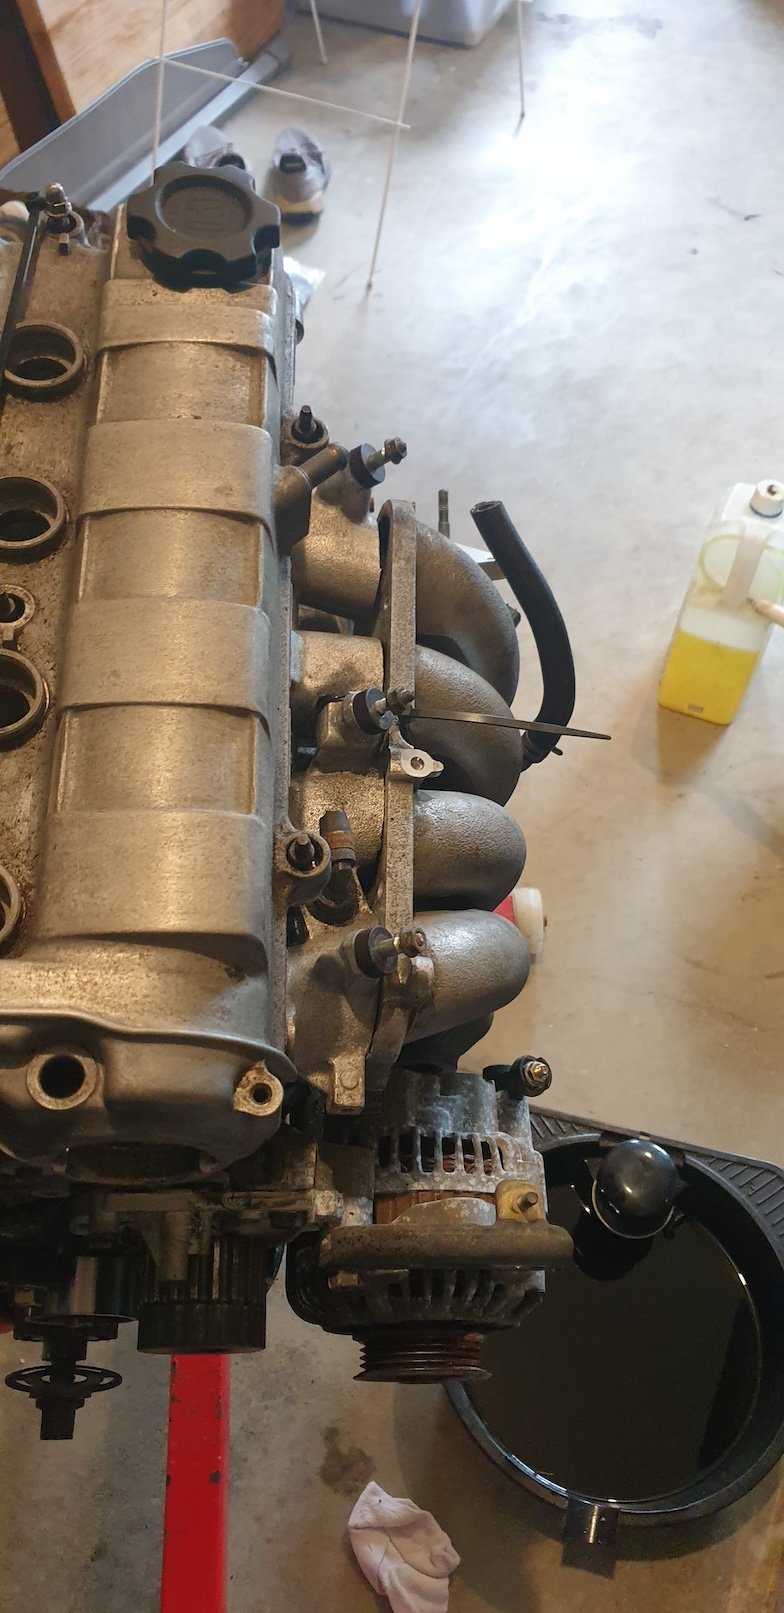
So now that a year has passed I think I can post a broad update here, more a "shopping haul" than anything because I haven't really done anything specific to either the car or engine. I've made the *highlights* bold because this will be a lengthy info-dump. Forced Induction: Borg Warner B03G turbo from a CLA45 AMG (2.0T). It was cheap enough to outweigh the downside of being too large. Not sure if I will stick with it. Part number: 18559700002 Comp wheel: 6+6 blade, 47.6mm inducer, 62mm exducer (extended tip 65.8mm). Turbine wheel: 12 blade, 55.2mm inducer, 49mm exducer. Twin scroll turbine housing, 0.71A/R (I think, it has .71 stamped inside the turbine housing so this is a guess?). The turbo is a bit too big, it specs out somewhere near a BW EFR6258 just with a slightly smaller turbine wheel, and twin scroll. I'm hoping the honda manages fine with this, people run some pretty stupidly big turbos on sohc d-series. If it ends up being too big down the track, I'll happily downsize and use this for a future project. Using the v-band (mentioned below) I should be able to change turbos easily by just welding a flange to the new turbine inlet. Flange for an electronic diverter valve built in, even though the pre-facelift M133 motor didn't have the diverter valve on the compressor housing. I can use the GFB VTA9488 from the facelift m133 which GFB confirmed should bolt right up. Will move to some OEM electronic wastegate actuator, rather than the factory vacuum-closing actuator as it seems painful to work with. Water-cooled core, which is kind of annoying because it means more hoses. Journal bushing not ball bearing, which is fine I guess, saves on cost. Ideally ball bearing would be better, but $$$ for new ones and hard to find used BB turbos for cheap, as OEM's don't really seem to use them? It was pretty trashed The thrust washer was completely worn through, the compressor wheel had been rubbing on the compressor housing. The housing is not very worn, but the compressor wheel itself was destroyed. I've ordered a rebuild kit (incl. backing plate, comp wheel and turbine/shaft) from Turbocentras in lithuania of all places. I'll need to find a way of getting the wheels/shaft balanced as a set. Also ordered a replacement wastegate flapper+bushing. This had the typical euro IWG failure where the bushing completely eats the shaft, resulting in a bad rattle and exhaust leak, plus slow spool due to lack of wastegate seal. The oem flanges are annoying Turbine outlet was some OEM v-band style with an expanded/spun mating surface, which is impossible to find and couldn't be bothered doing myself. I will replace this with a 3.5" stainless v-band. Turbine inlet is some OEM twin scroll 3-bolt flange, which I will have to do a bit of wizardry to replace with a 2" v-band and keep twin scroll, but I think I have the solution in the works. Compressor outlet was a 2" hose barb, which is technically fine but I like the idea of having all o-ringed aluminium couplers, HD clamp style. But i'm forever broke so cheap chinese knockoff HD-clamps will surely work. Compressor Inlet/filter I don't really have to care about it for a long time, as it has to be running to ingest shit. Intercooler I will be using the smallest water-2-air intercooler I can find (or make). One reason is this car doesn't really have a good spot for an a2a intercooler that wouldn't be hanging in front of the front bumper, but also because they seem to be quite efficient (in terms of both cooling and space), especially for low power applications. It will probably add a bit of complexity with having an additional heat exchanger, but the packaging benefits (and easier intercooler routing) make it worthwhile, I think. Smaller intercooler piping should mean less volume to pressurise when coming on to boost, and less volume for the engine to consume when the diverter valve opens. I'm not a turbo guy so I did the research and found that for my target airflow numbers (maybe around 420cfm peak, to be generous), 2" IC piping is plenty to keep air speed below mach 0.3, less than the commonly quoted mach 0.4 where inefficiencies creep up. I'll put the intercooler right above the gearbox, with the IC inlet coming straight from the turbo's compressor outlet, and then feeding directly into the 2.5" DBW throttle (flared from 2-2.5" as close to the throttle body as possible). I'll be designing the intercooler piping and intercooler itself to minimise any hard bends, and try to use gentle radii wherever possible. Reducing hard bends in the system and reducing overall cold-side length should help with overall efficiency. Turbo pictured below after removing the old turbine/compressor wheels, and also with the v-band, just to make the post more fun. I should really tidy up my bench... Intake I was given a K24 RBB (k24 vtec) intake manifold, and had already acquired that RAA (non-vtec) manifold that I had earlier. RBB is larger volume, not sure by how much but its pretty obvious from looking at it that its just larger. RAA smaller volume, could end up being better for responsiveness on the 1.6? This is something I'd need advice on. Also was given an oem K24 DBW throttle body, which I will weld a 2.5" aluminium clamp to for the intercooler piping. I haven't really made more progress getting the intake manifold welded as I was waiting on that throttle body before welding to make sure I left enough room. Pics below what the intake manifold looked like just barely hung on the intake manifold. It just clears the alternator, and is suuper compact against the side of the block. That is the RAA manifold, where RBB is a touch larger but still very small overall. Chassis I haven't taken any more pictures nor moved the car yet, but based on the last time I saw it, the car has a bit more surface rust on the paint than was in the original photos, I will be stripping back whatever I need to, using deoxidine to treat the bare metal and then epotec primer. Will worry about proper paint waaaay down the track, for now thats just to stop the rot from spreading. I've put some thought into what will happen regarding the moving components of the chassis: In the interest of sanity, keeping as much stock as possible would be good. BC Gold coilovers are still made for the 1g civic, so this will probably be a go. Although that will be after the car is at least running. I'll need to replace all of the brakes, to match the power, but using oem stuff is a no-go. The civic is 4x120 from factory, with discs up front and drums at the rear. This is annoying for wheel size and replacement brake parts. I've found that based on the bearing sizes, I can probably get oem driveshafts that work with my gearbox and pick up matching hub centers for those axles, as long as they are 38mm pilot size. I can then use a 38mm ID, 72mm OD, 40mm deep wheel bearing (reasonably common) to replace the factory bearing, which had a slightly smaller ID and less depth. This way I'll be running 4x100 disc fronts, and make up some caliper adapters to run more modern front calipers. Driveshaft length will be interesting, I haven't really looked too far into what driveshafts I will need but there is a small chance I'll need to have some made with a shorter shaft to match the narrow track width, and engine being slightly shifted back compared to most D-series swaps. Rear brakes are undecided. I was looking at finding a rear subframe and just swapping the entirety of the rear suspension/brakes, but this seems not worth doing. The older guides use wagon knuckles to do disc brake conversion. I found someone saying you can use '88-91 EF civic hubs bored out for the 1st gen rear bearing, and use 92-95 EG rotors, calipers, handbrake cables. The engine bay will need some modification to fit the engine still, mostly around the snout of the gearbox. Everyone who does a D-swap in these chassis modifies three main areas: firewall, drivers side chassis rail and passenger side chassis rail. Firewall I've resolved by changing the intake manifold as mentioned previously. Drivers side (gearbox side) chassis rail is a huge modification to clear the snout at the end of the gearbox. I'm not sure it needs to be quite as big as some people make it, but it definitely needs a good cut taken out of it. Overall, I'm hoping to lower the engine a small amount also by modifying the sump to be shorter, with wings and baffles. This should still let me keep enough oil volume but have the engine low enough to reduce the amount of modifying of the driver side chassis rail. Passenger side (timing belt side) chassis rail is often trimmed to fit all of the accessories. I'm only running an alternator so I'm planning on either facing down or buying an aftermarket single-belt crank pulley to reduce the cut required on this side. Ideally I'd make no chassis modifications, but I won't know how bad the interference is until I actually get the engine in the car. Pictured below is someone else's chassis modifications to show what I mean about notching each side, all credit to their post on honda-tech.com. ECU uaEFI ecu, with an adapter board made to run a better automotive connector. I'm still cheap, but this time speeduino doesn't have the features I want. Ideally I want to order three, one for the mazda, one for a future project and one for this, but I might get 5x made by JLCPCB as the price really decreases with quantity. The ecu has the hardware to support 2x DBW controllers, one will be used for the throttle and other will be used for electronic wastegate. It has enough other I/O for pretty much everything else I want to do. rusEFI firmware has quite a bit more complexity and features than speeduino so there will be a learning curve, but that's where the fun is right? Engine Literally haven't touched the ZC bottom end besides spraying it with a waxy water displacement coating a few times to prevent rust on bores/bottom end parts. Still need to notch the bottom of the cylinders and girdle for the rods, then assemble with new gaskets. I did get given a d13 block, which is almost identical to the ZC block except (from what I can tell) 7mm less deck height. So with a 7mm spacer I can use this block for mockup purposes in the chassis with the ZC head, while I wait on money to continue with the engine itself. I plan on not really doing much to the head except source cheap-ish HD valve springs and get the cams reground for a bit more lift/duration. The head is otherwise in very good condition and has brand new valves/guides so it will stay as-is. Anyway, back to another year of doing mostly mazda stuff before posting some inconsequential update!
3 points
-
This was a theme on the maruia moped melee too. (Hence why i was ripping on him)3 points
-
Please assemble it the night before, and dont test it untill the actual ride. This is the Richard we all know and love!3 points
-
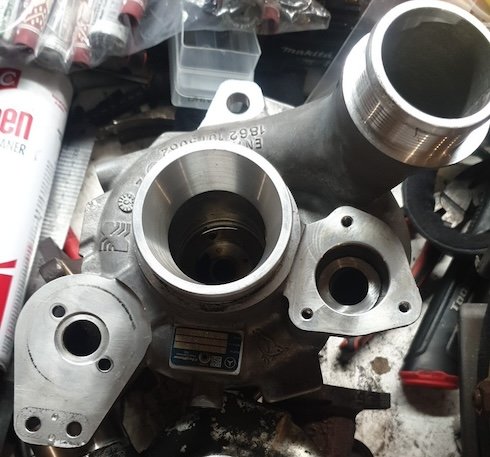
Quickly add a few sch40 stainless T's and bends, then call it a manifold. Once I was satisfied I could actually make everything fit I got to welding it up.
3 points
-
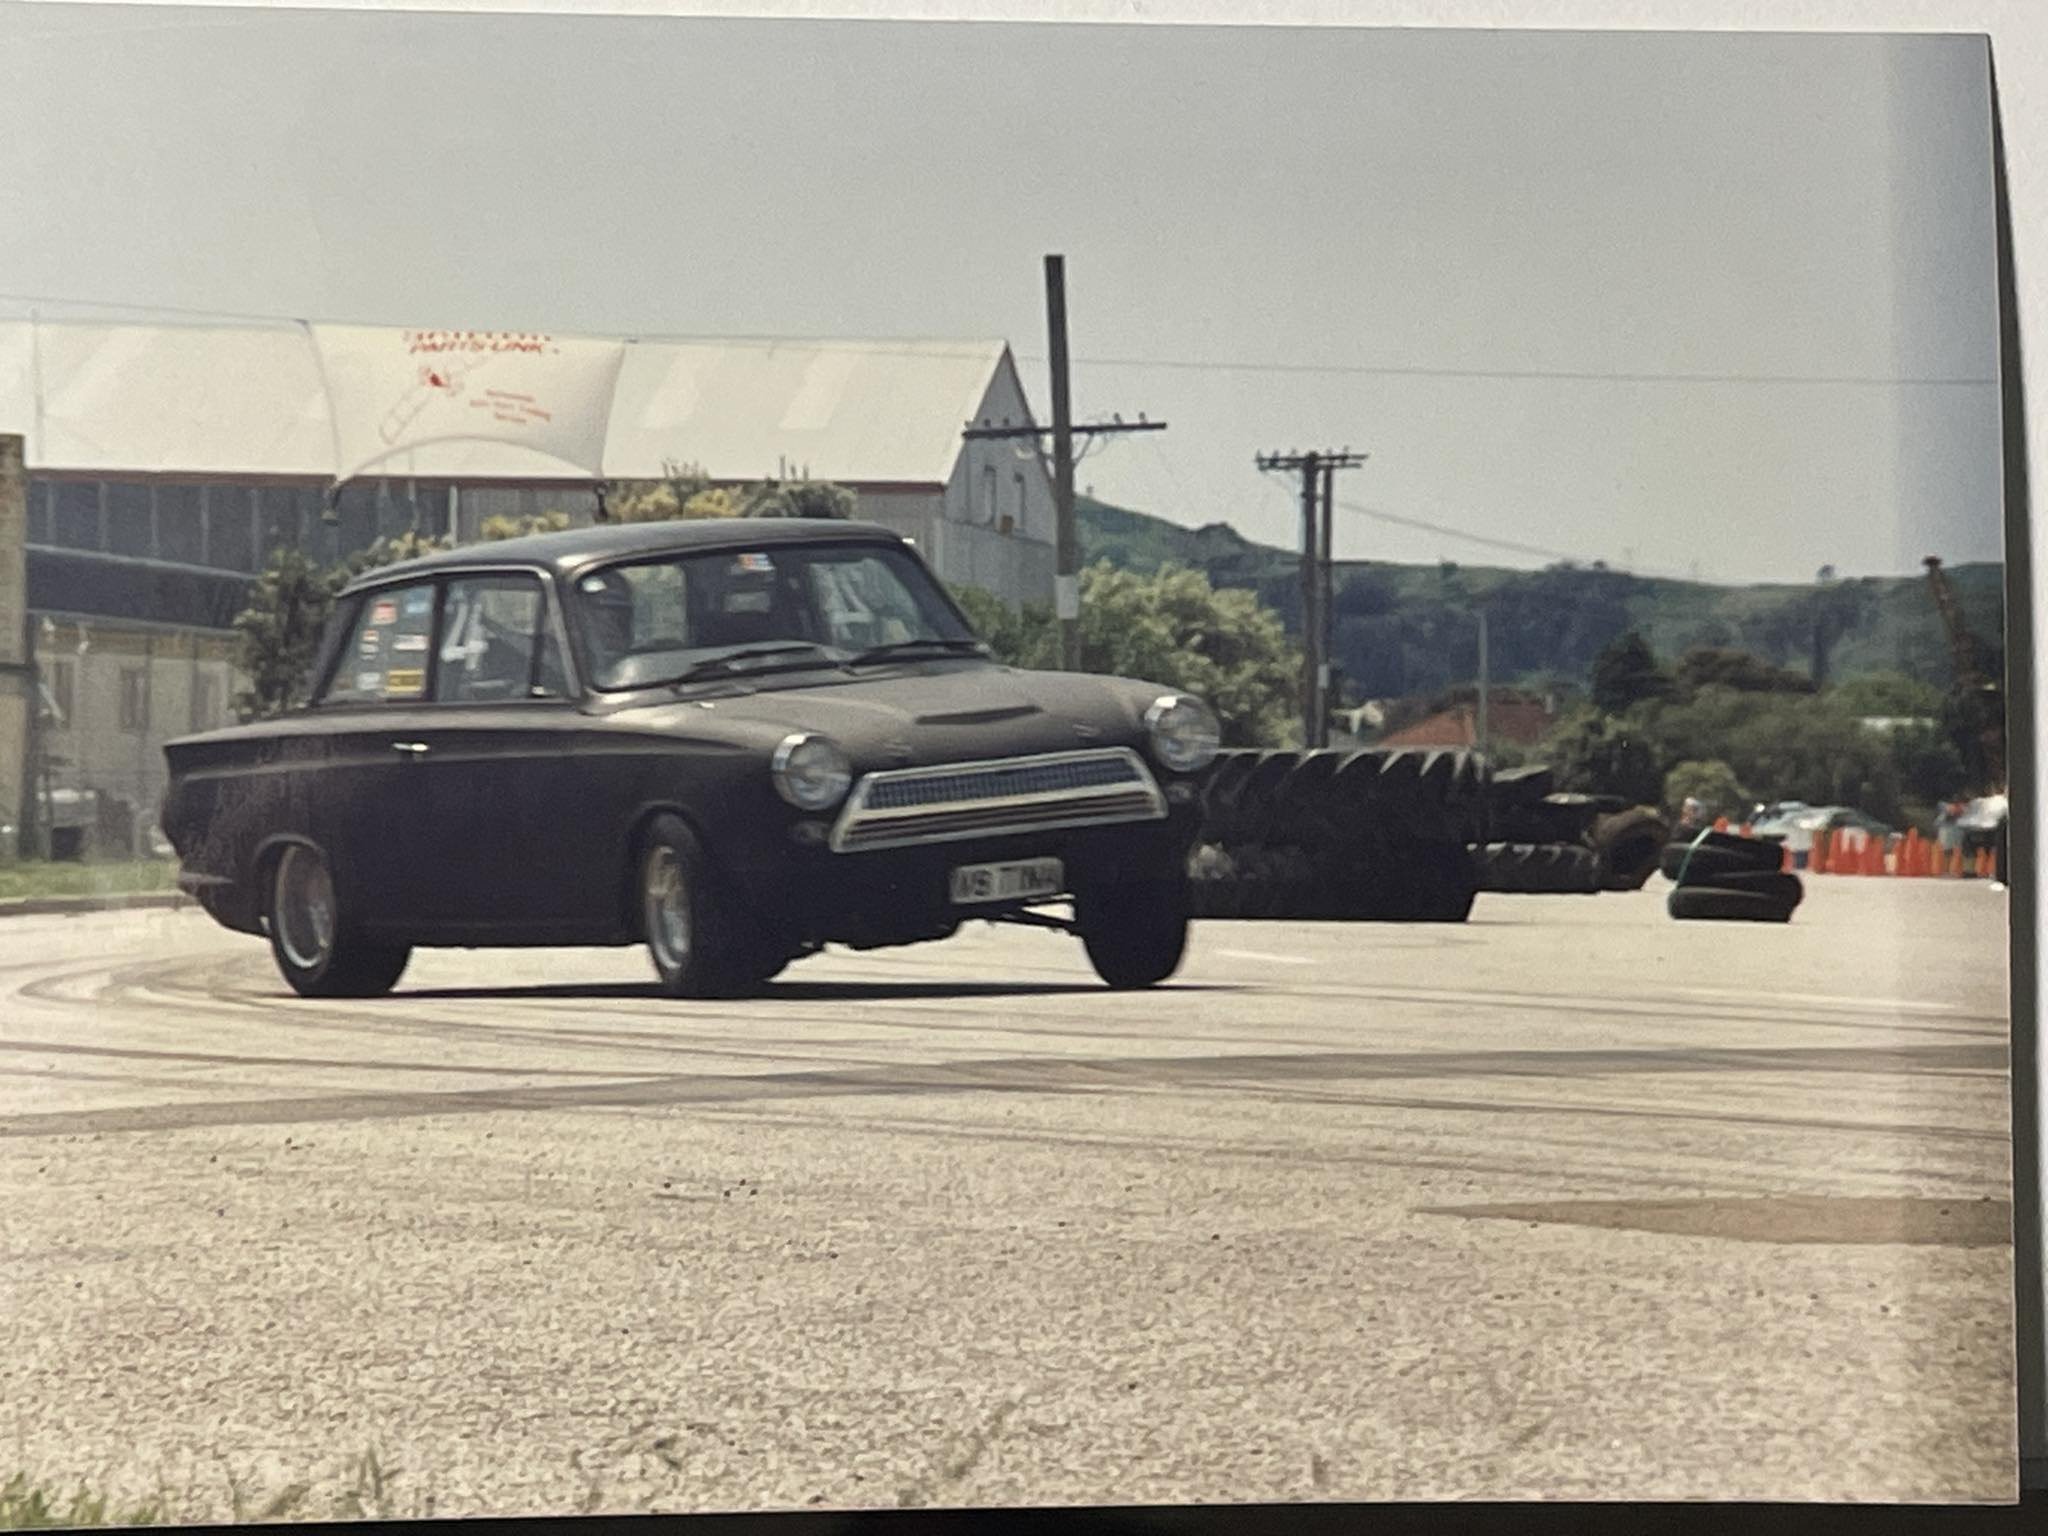
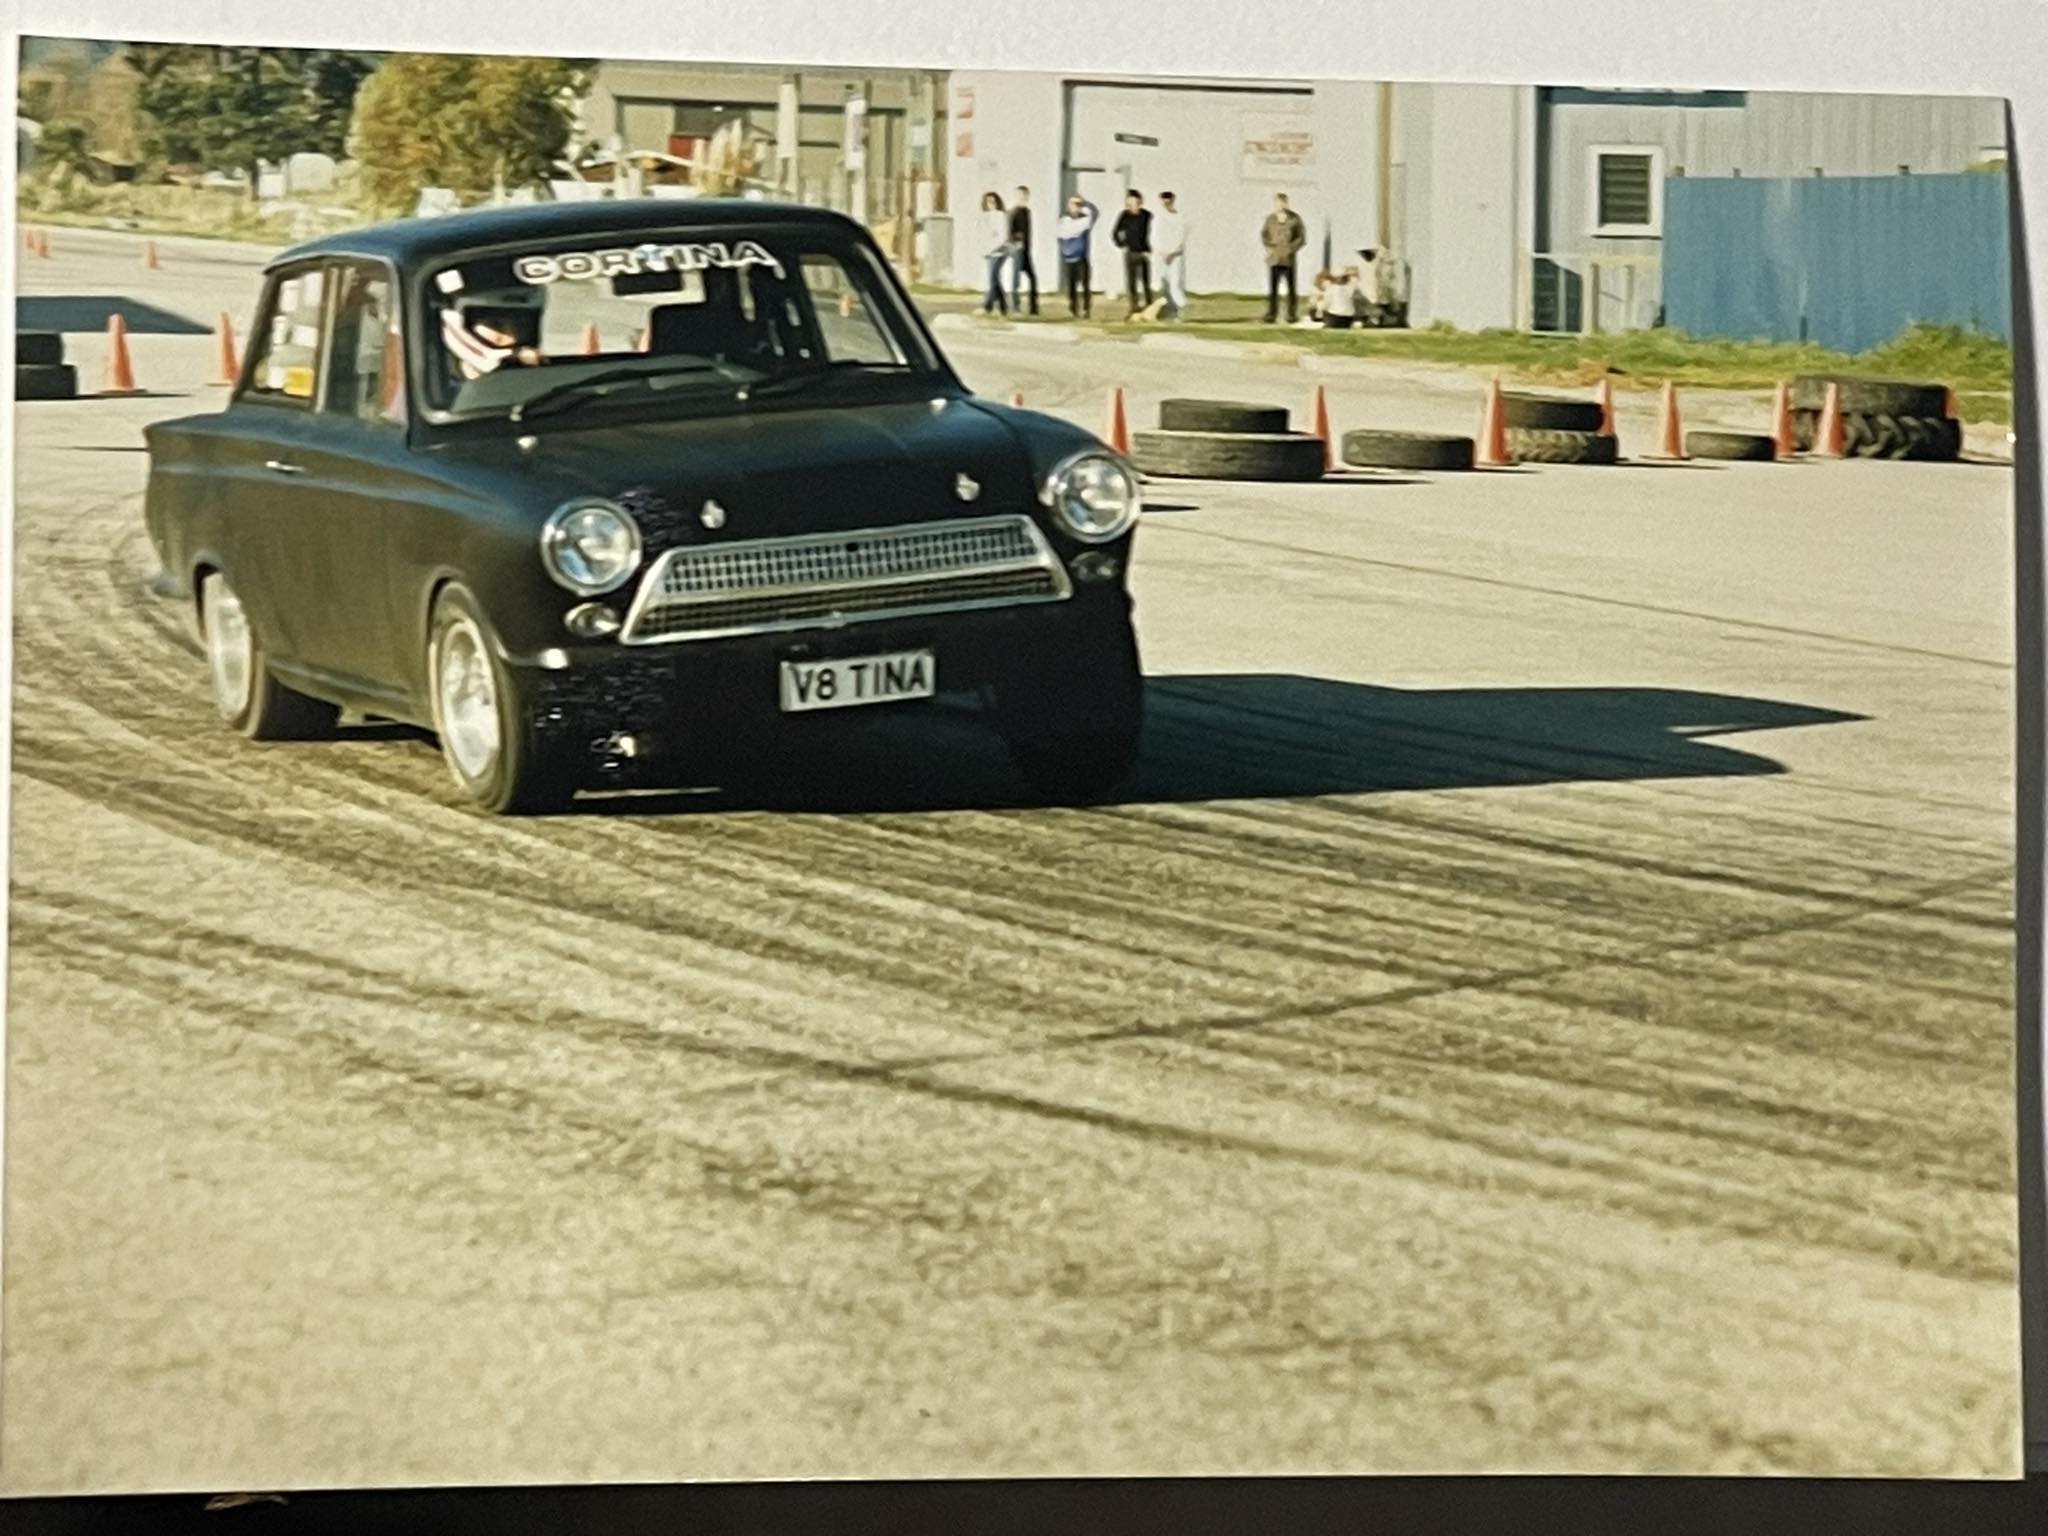
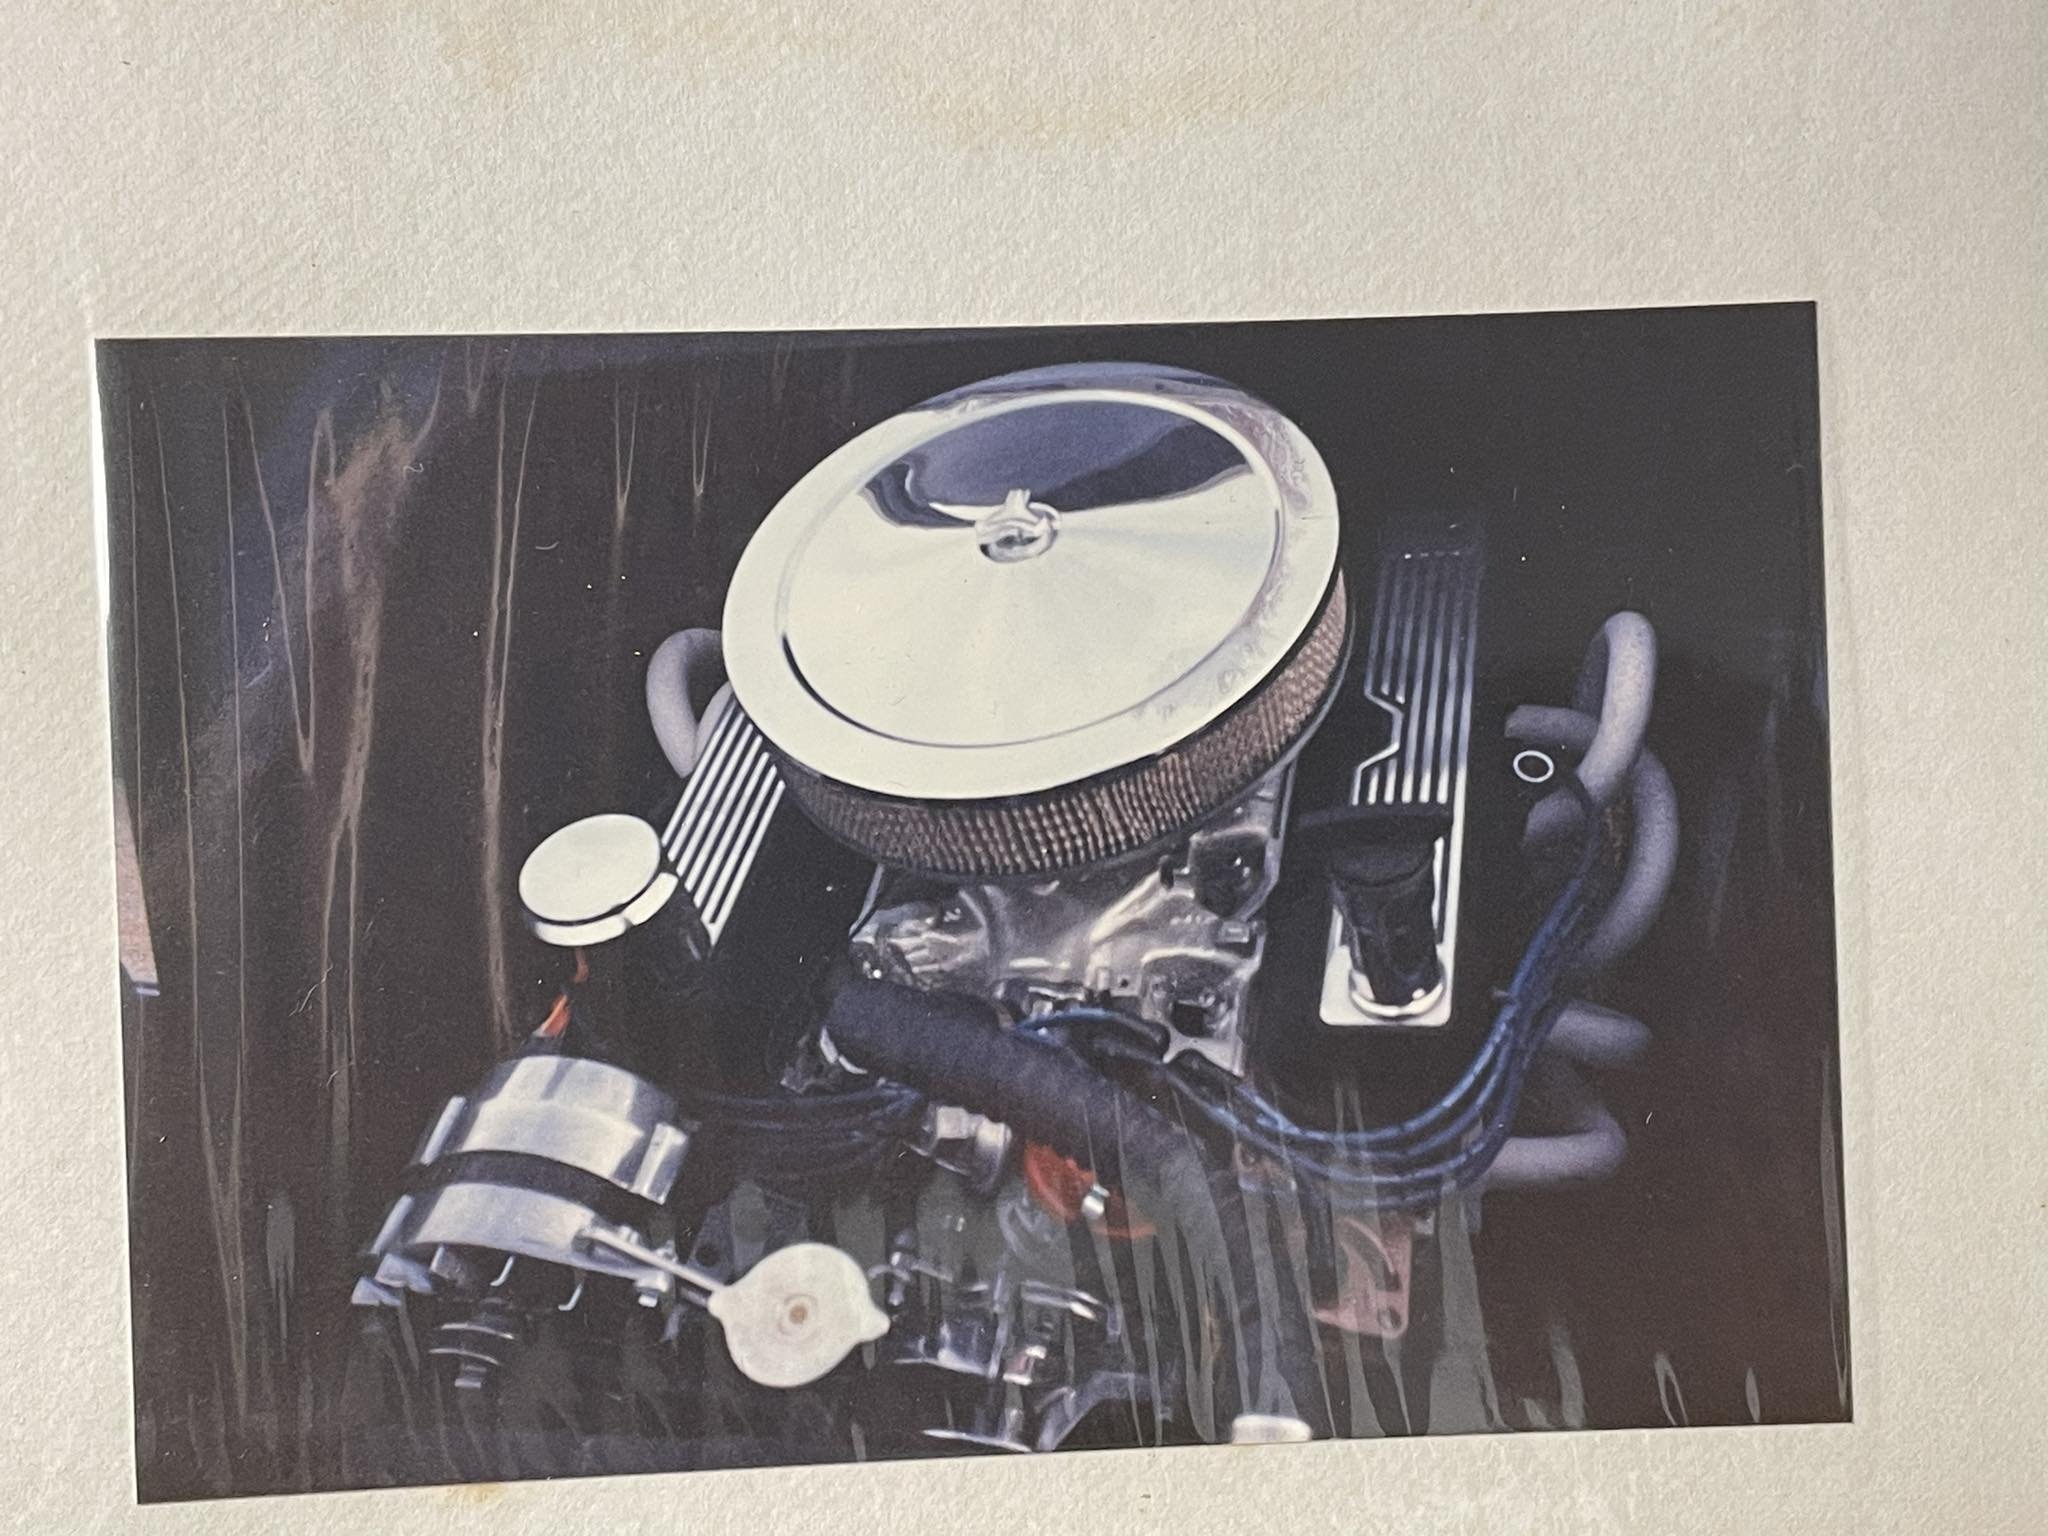
I have always liked Mk1 Cortinas. My first car (inherited from my mother!) was a 1962 1200 Deluxe 2 door. I remember it well. Red vinyl seats, white exterior ( was pale green but had been repainted white at some point) skinny wheels, crossply tyres and rather slow! I passed my driving test in it and got my licence 2 days after my 15th birthday, good times! After a succession of engine swaps, first a warm 1300, followed by a 3.0 V6 (while I was still at school) and finally the full banana with a 3.5 Rover V8, Toyota 5 speed, nine inch rear and full roll cage. I raced it in several car club events, before selling it in the early 1990's. A couple of pics of me racing just prior to selling it:
2 points
-
New shoes look sweet man!2 points
-
Yes, he did a very good job of keeping the support drivers company last year2 points
-
Time to reassemble and call it done! actually I got some AliExpress flake, after being inspired by the likes of This guy on YouTube. Scuffed up and masked an old WRX bonnet, Two types of flake, one coat, two coats, and three coats Bust out your drug dealing scales, measure out how much you’d like ~ I decided 5g per 600ml of clear would work nice. Here is about 150ml so 1.25g of flake is needed. My pics aren’t very clear because lighting/toxic clouds/not warming the clear up but here’s the rainbow: And the silver i found the third coat to not be enough so dumped a bit more in and redid it. But I’ll be going with the rainbow - 10g per 600ml with a very light coat followed by two coats should give me the subtle effect I’m after. With that being said I’ve started wet blocking my panels down. Didn’t get far as I’d like due to my compressor shitting the bed; will do it without the help of an air gun and my compressor should be running by the time I have all panels prepped for the rainbow2 points
-
Cleaned it and started masking But first I sprayed some under seal on my sills Wet the floor, cover up the walls and other stuff etc, fly spray around but not on the car and here we go Lots of isocyanates The next day I didn’t have the same water issues this time, but I did get a few bugs in my paint from when I thought it a good idea to raise the shed door in between coats. I used a bit of masking tape to “pull” them out and apply a little extra paint to affected areas. This worked well.2 points
-
Also, Expressing interest. A couple of things would have to work out. But im a solid maybe.2 points
-
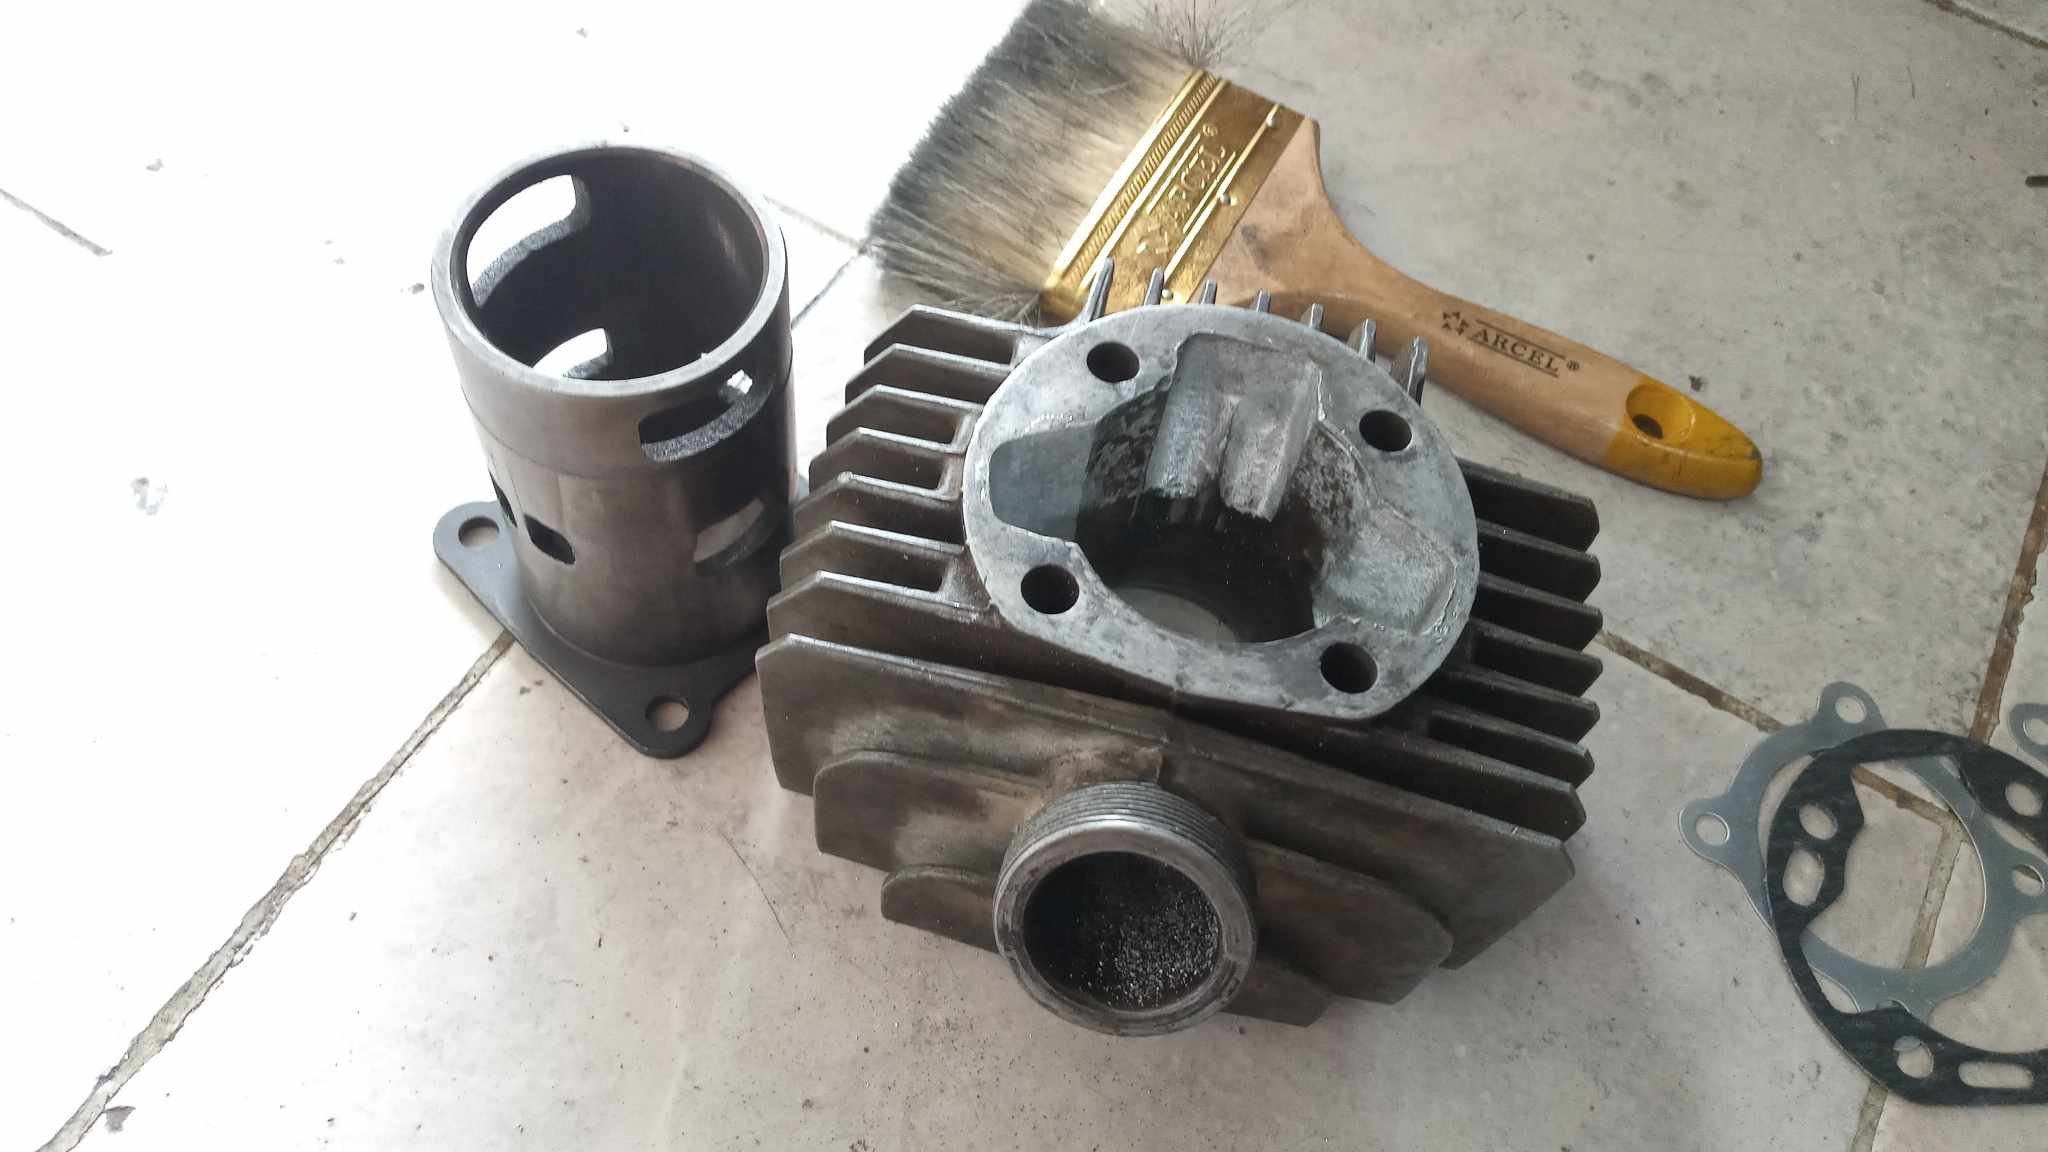
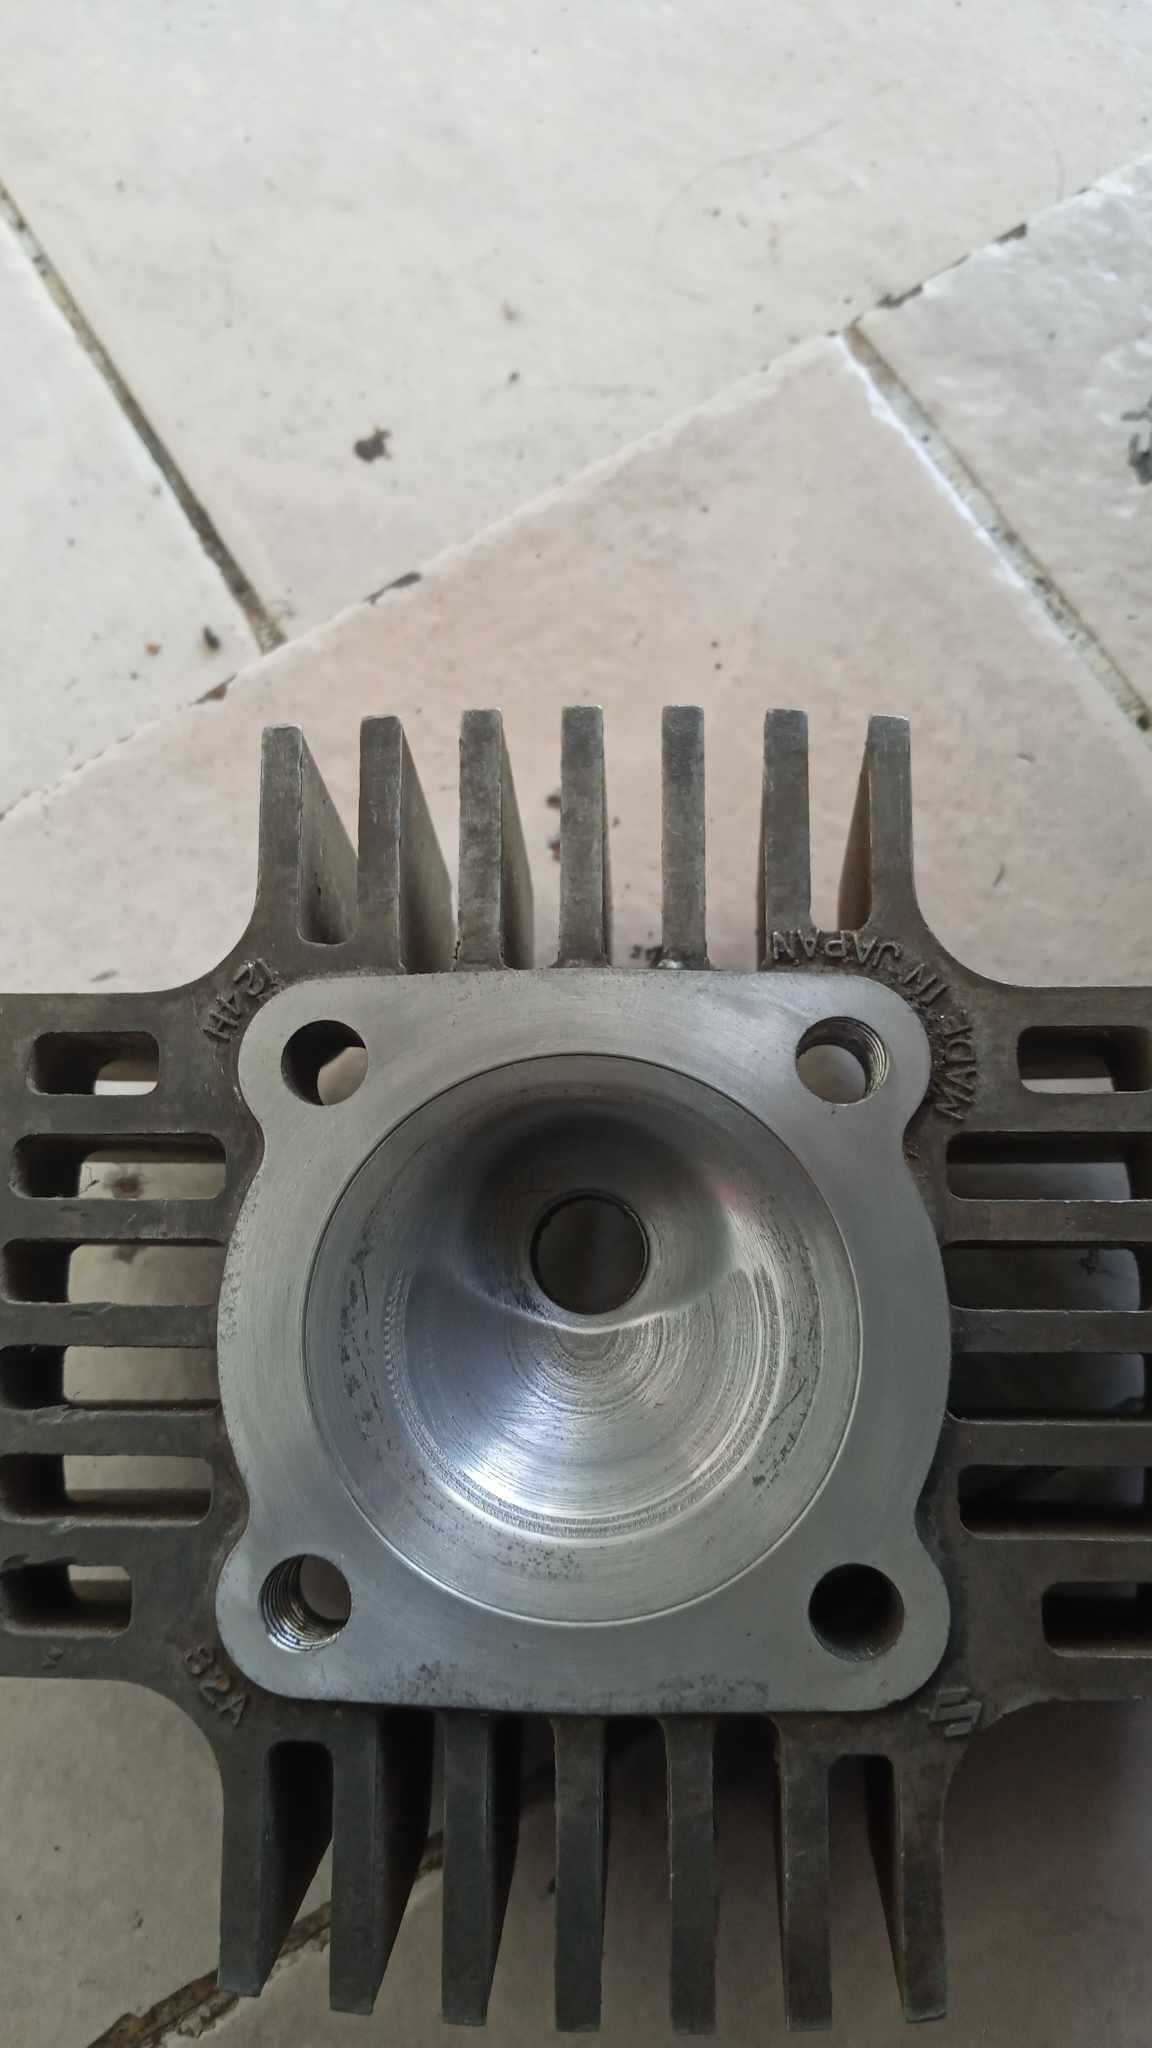
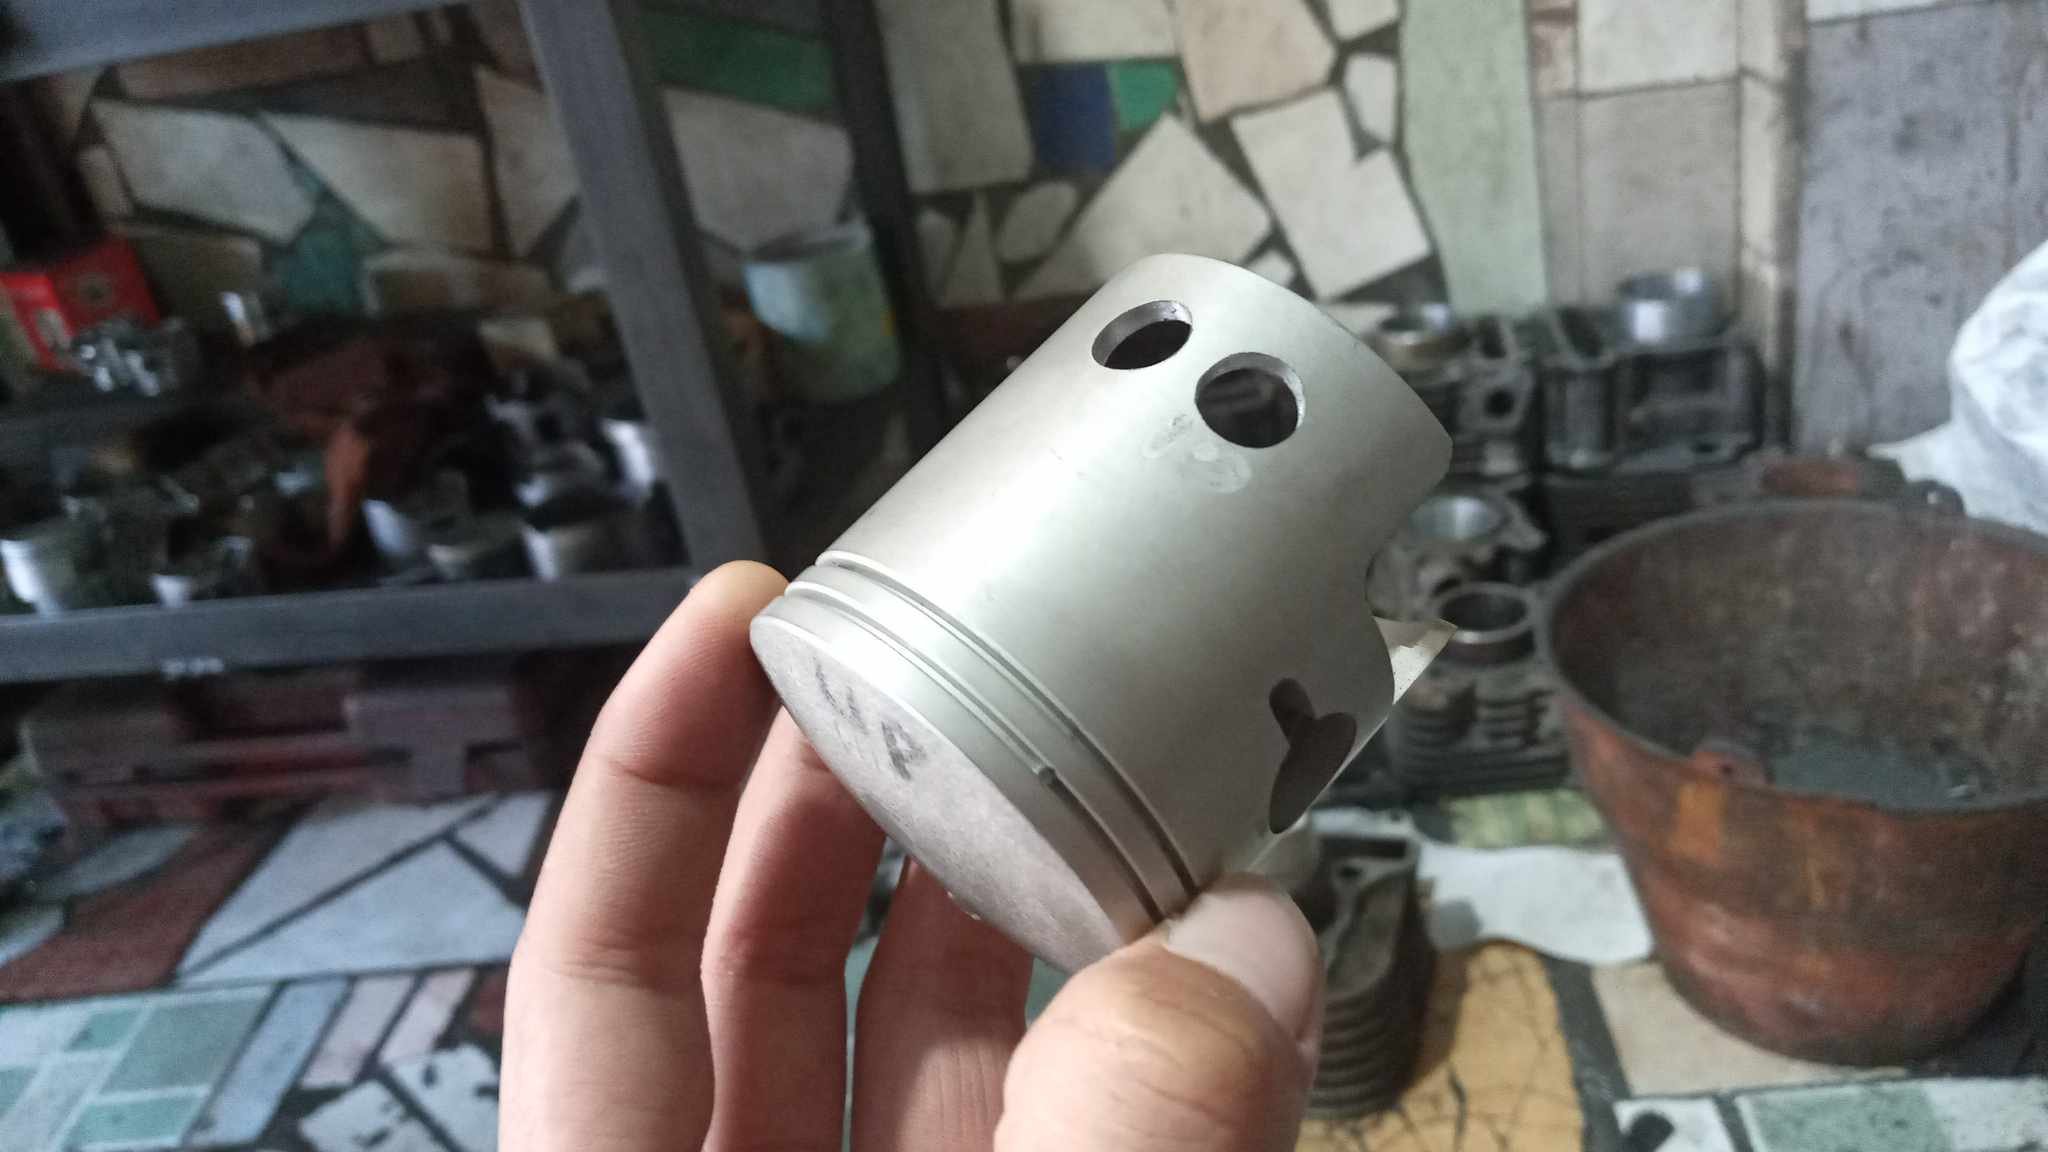
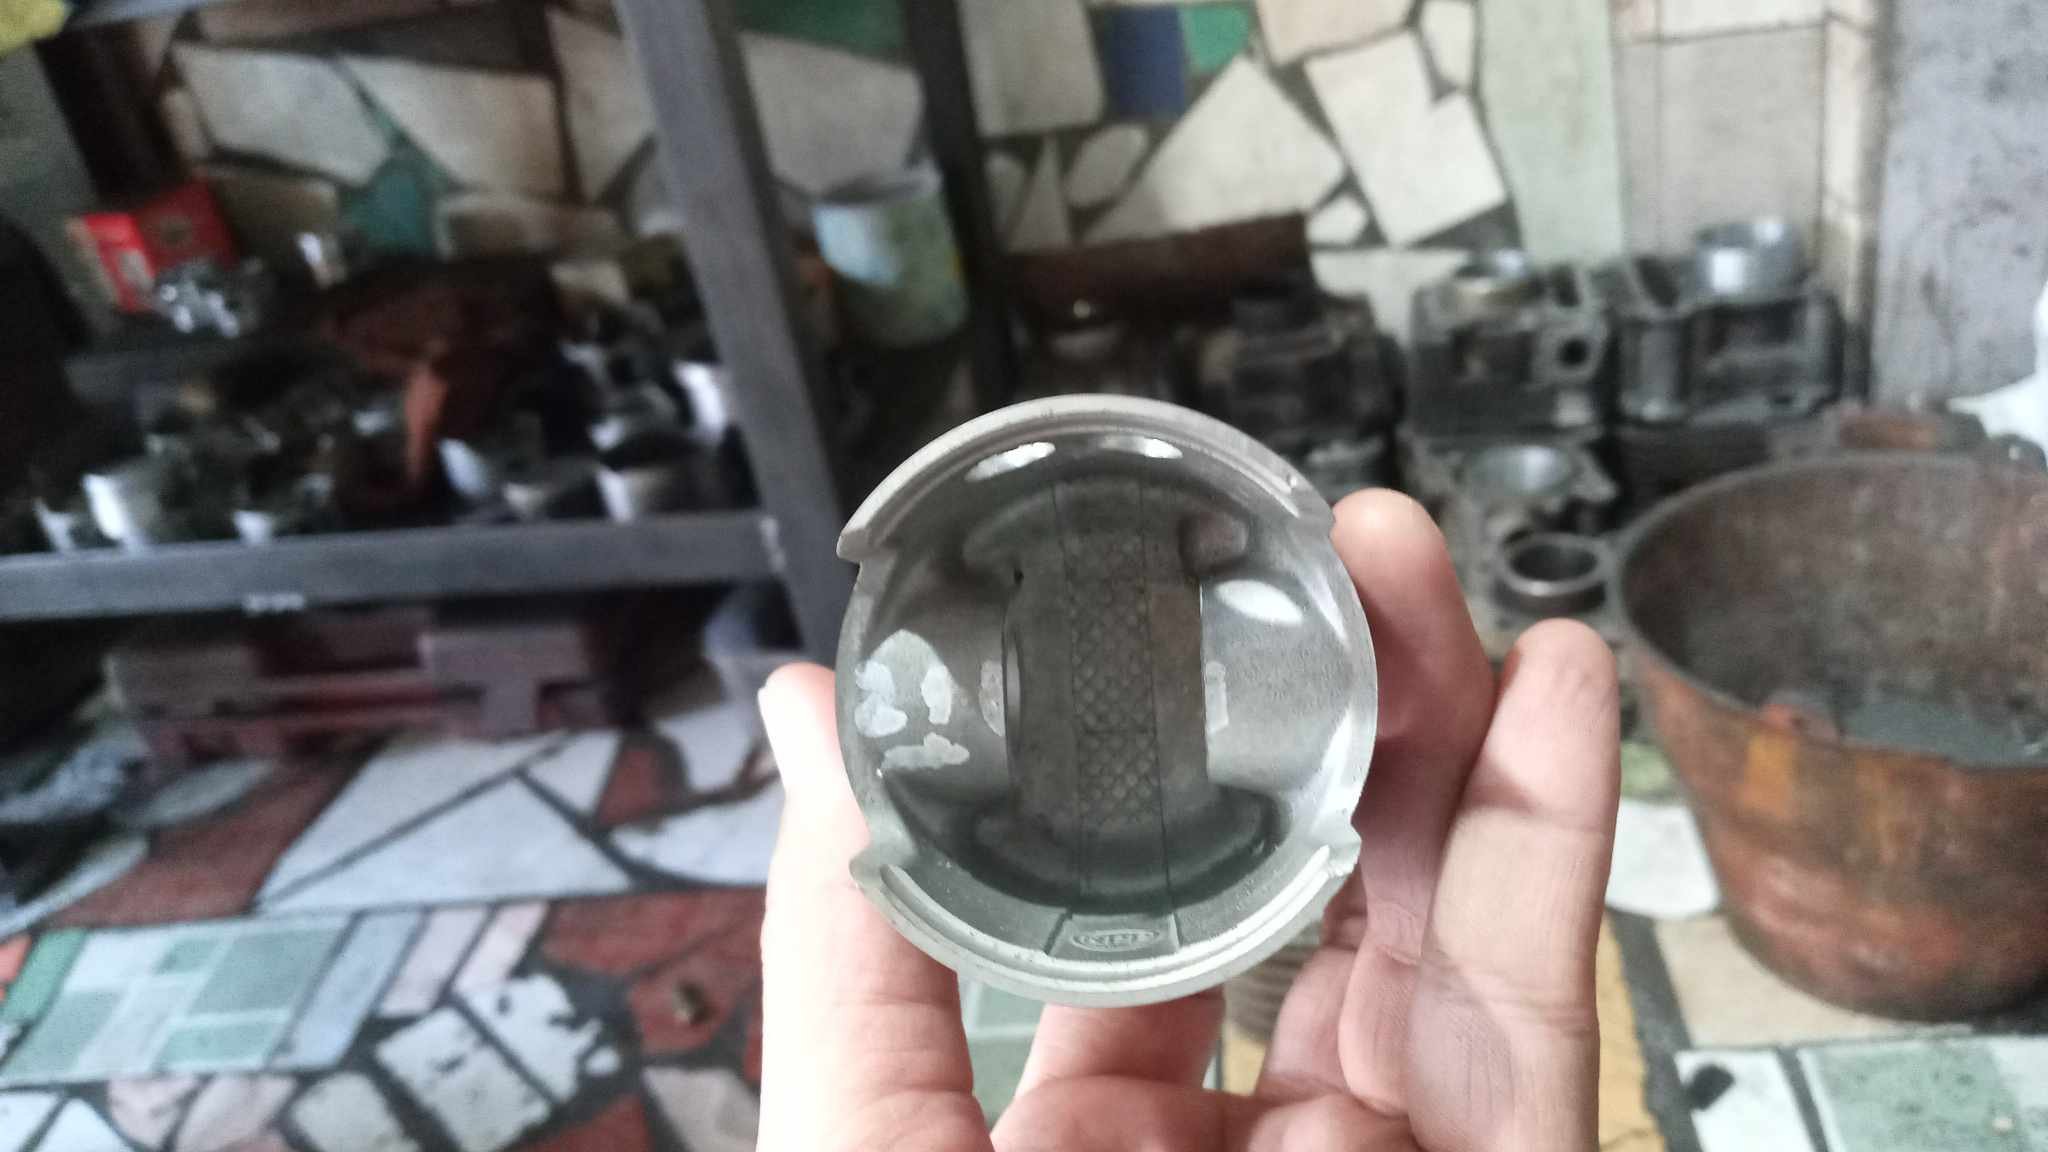
My trusty Suzuki A100 will be arriving for this event as a Suzuki A125... Currently having a cylinder re-sleeved and ported in Indonesia.
2 points
-
I feel the need to address my desire for black wheels as the now 19:1 ratio is making me examine the why of this. My motivations for modding a car are probably skewed compared to many people. Imagine if you will that there is a scale that spans practical mods across to visual mods. I am sitting squarely on the practical mods side of this scale, ie I cannot express how little interest I have in a show car vs a race car. I can appreciate the hours and care that goes into a show car, but I can foam for hours over the pared down practicality of a race car. I cannot pretend I am not excited by the way these rims look like they are going to fill the arches out. This is an obvious visual mod, however my actual motivation is better rubber and less sidewall so it drives better, the visual changes are a happy coincidence. Hence if the wheel are performing the job I want them to, then excellent. If they are looking kind of bling, like I put them on purely for the visuals then that does not excite me. At that point if they happen to get a coat of mattyB, it brings everything right back to practical mods which is squarely and entirely in my wheelhouse. Additionally my perverse nature genuinely enjoys the thought of some nice Maserati wheels getting spraybombed so that no one knows what they are. I have not painted them and I will see how things look, but do not be surprised if wrongness occurs at a later point....2 points
-
Start plumbing all of the 1000 lines up, it is starting to look like a thing at this point. At around 5 pm the night before We had to leave then this happened... This is what it ended up looking like.
2 points
-
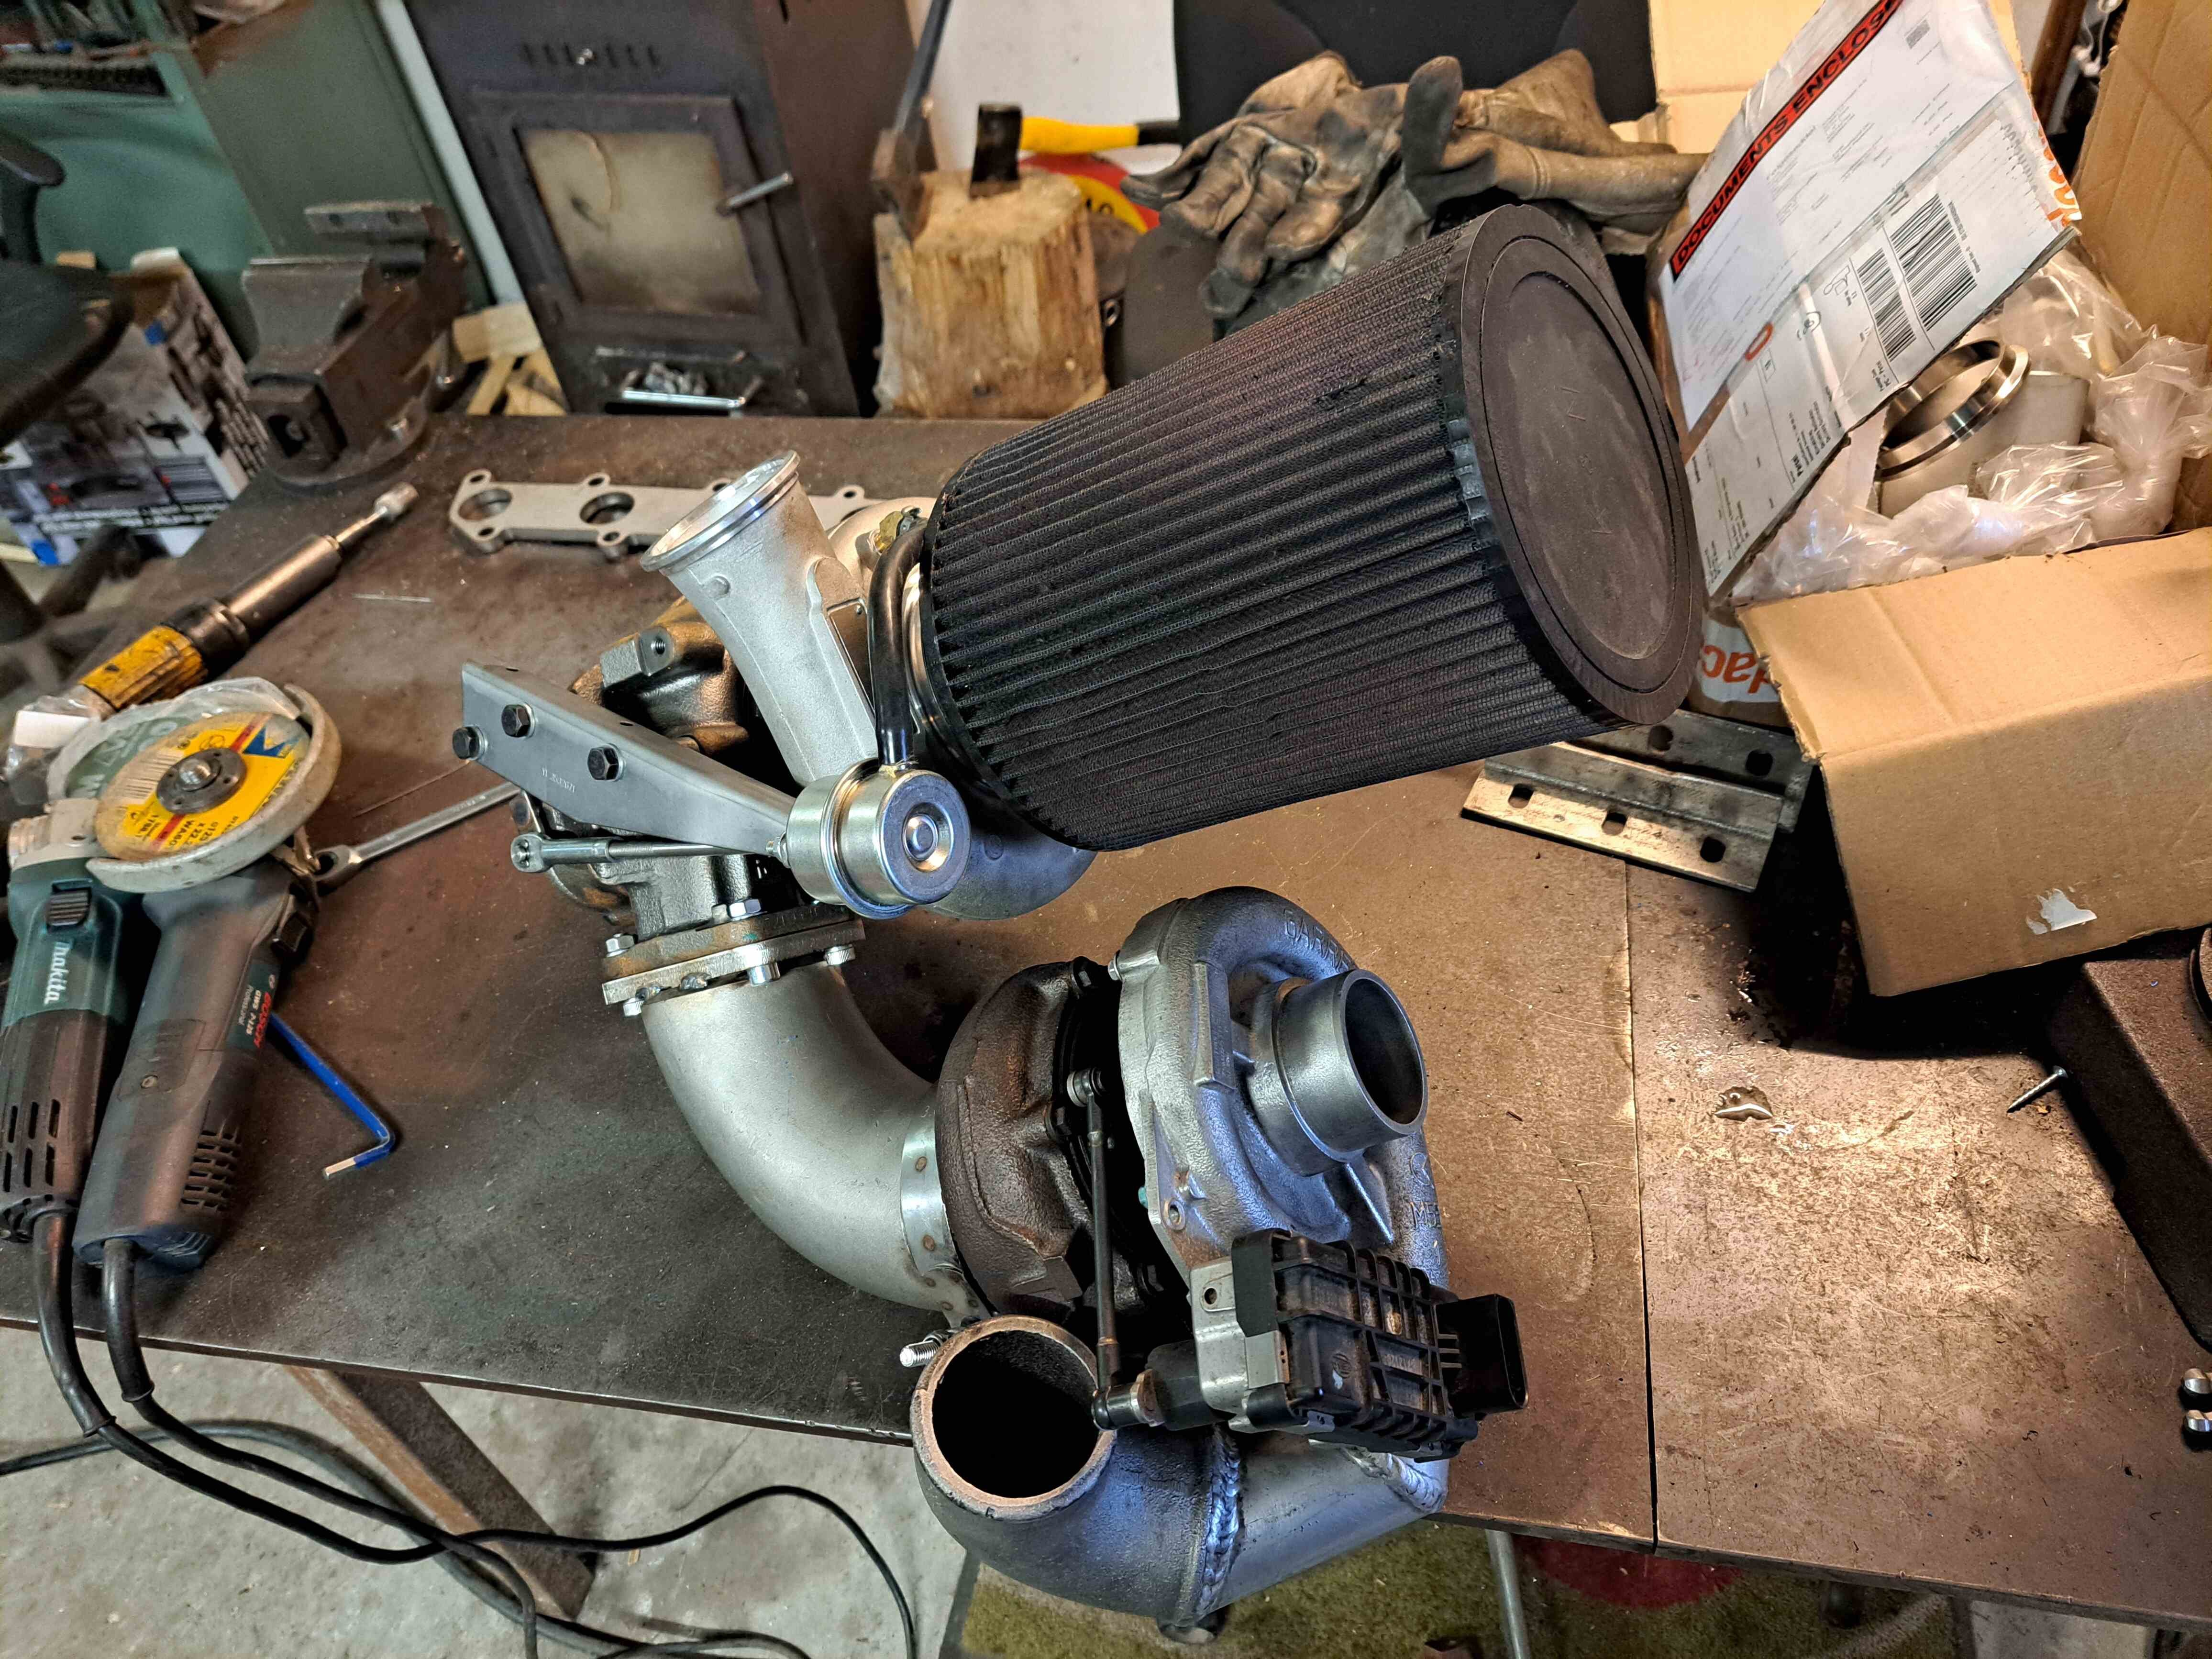
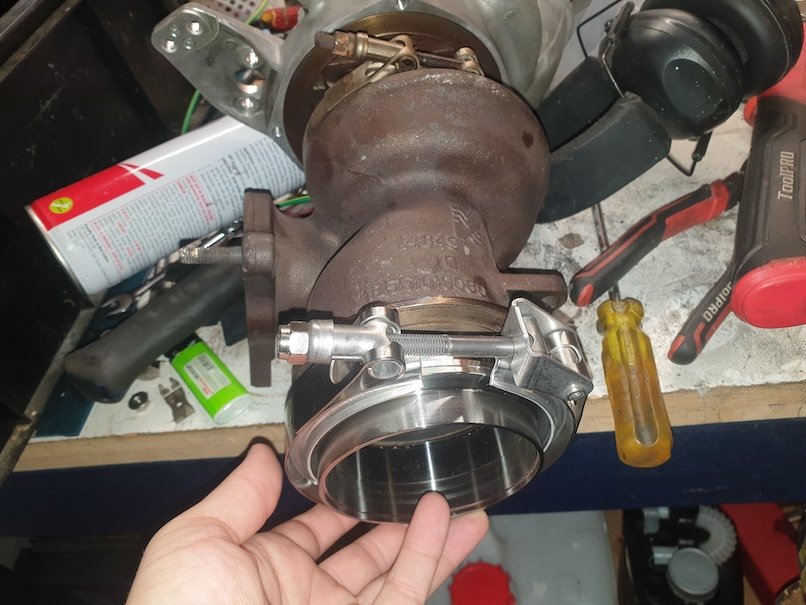
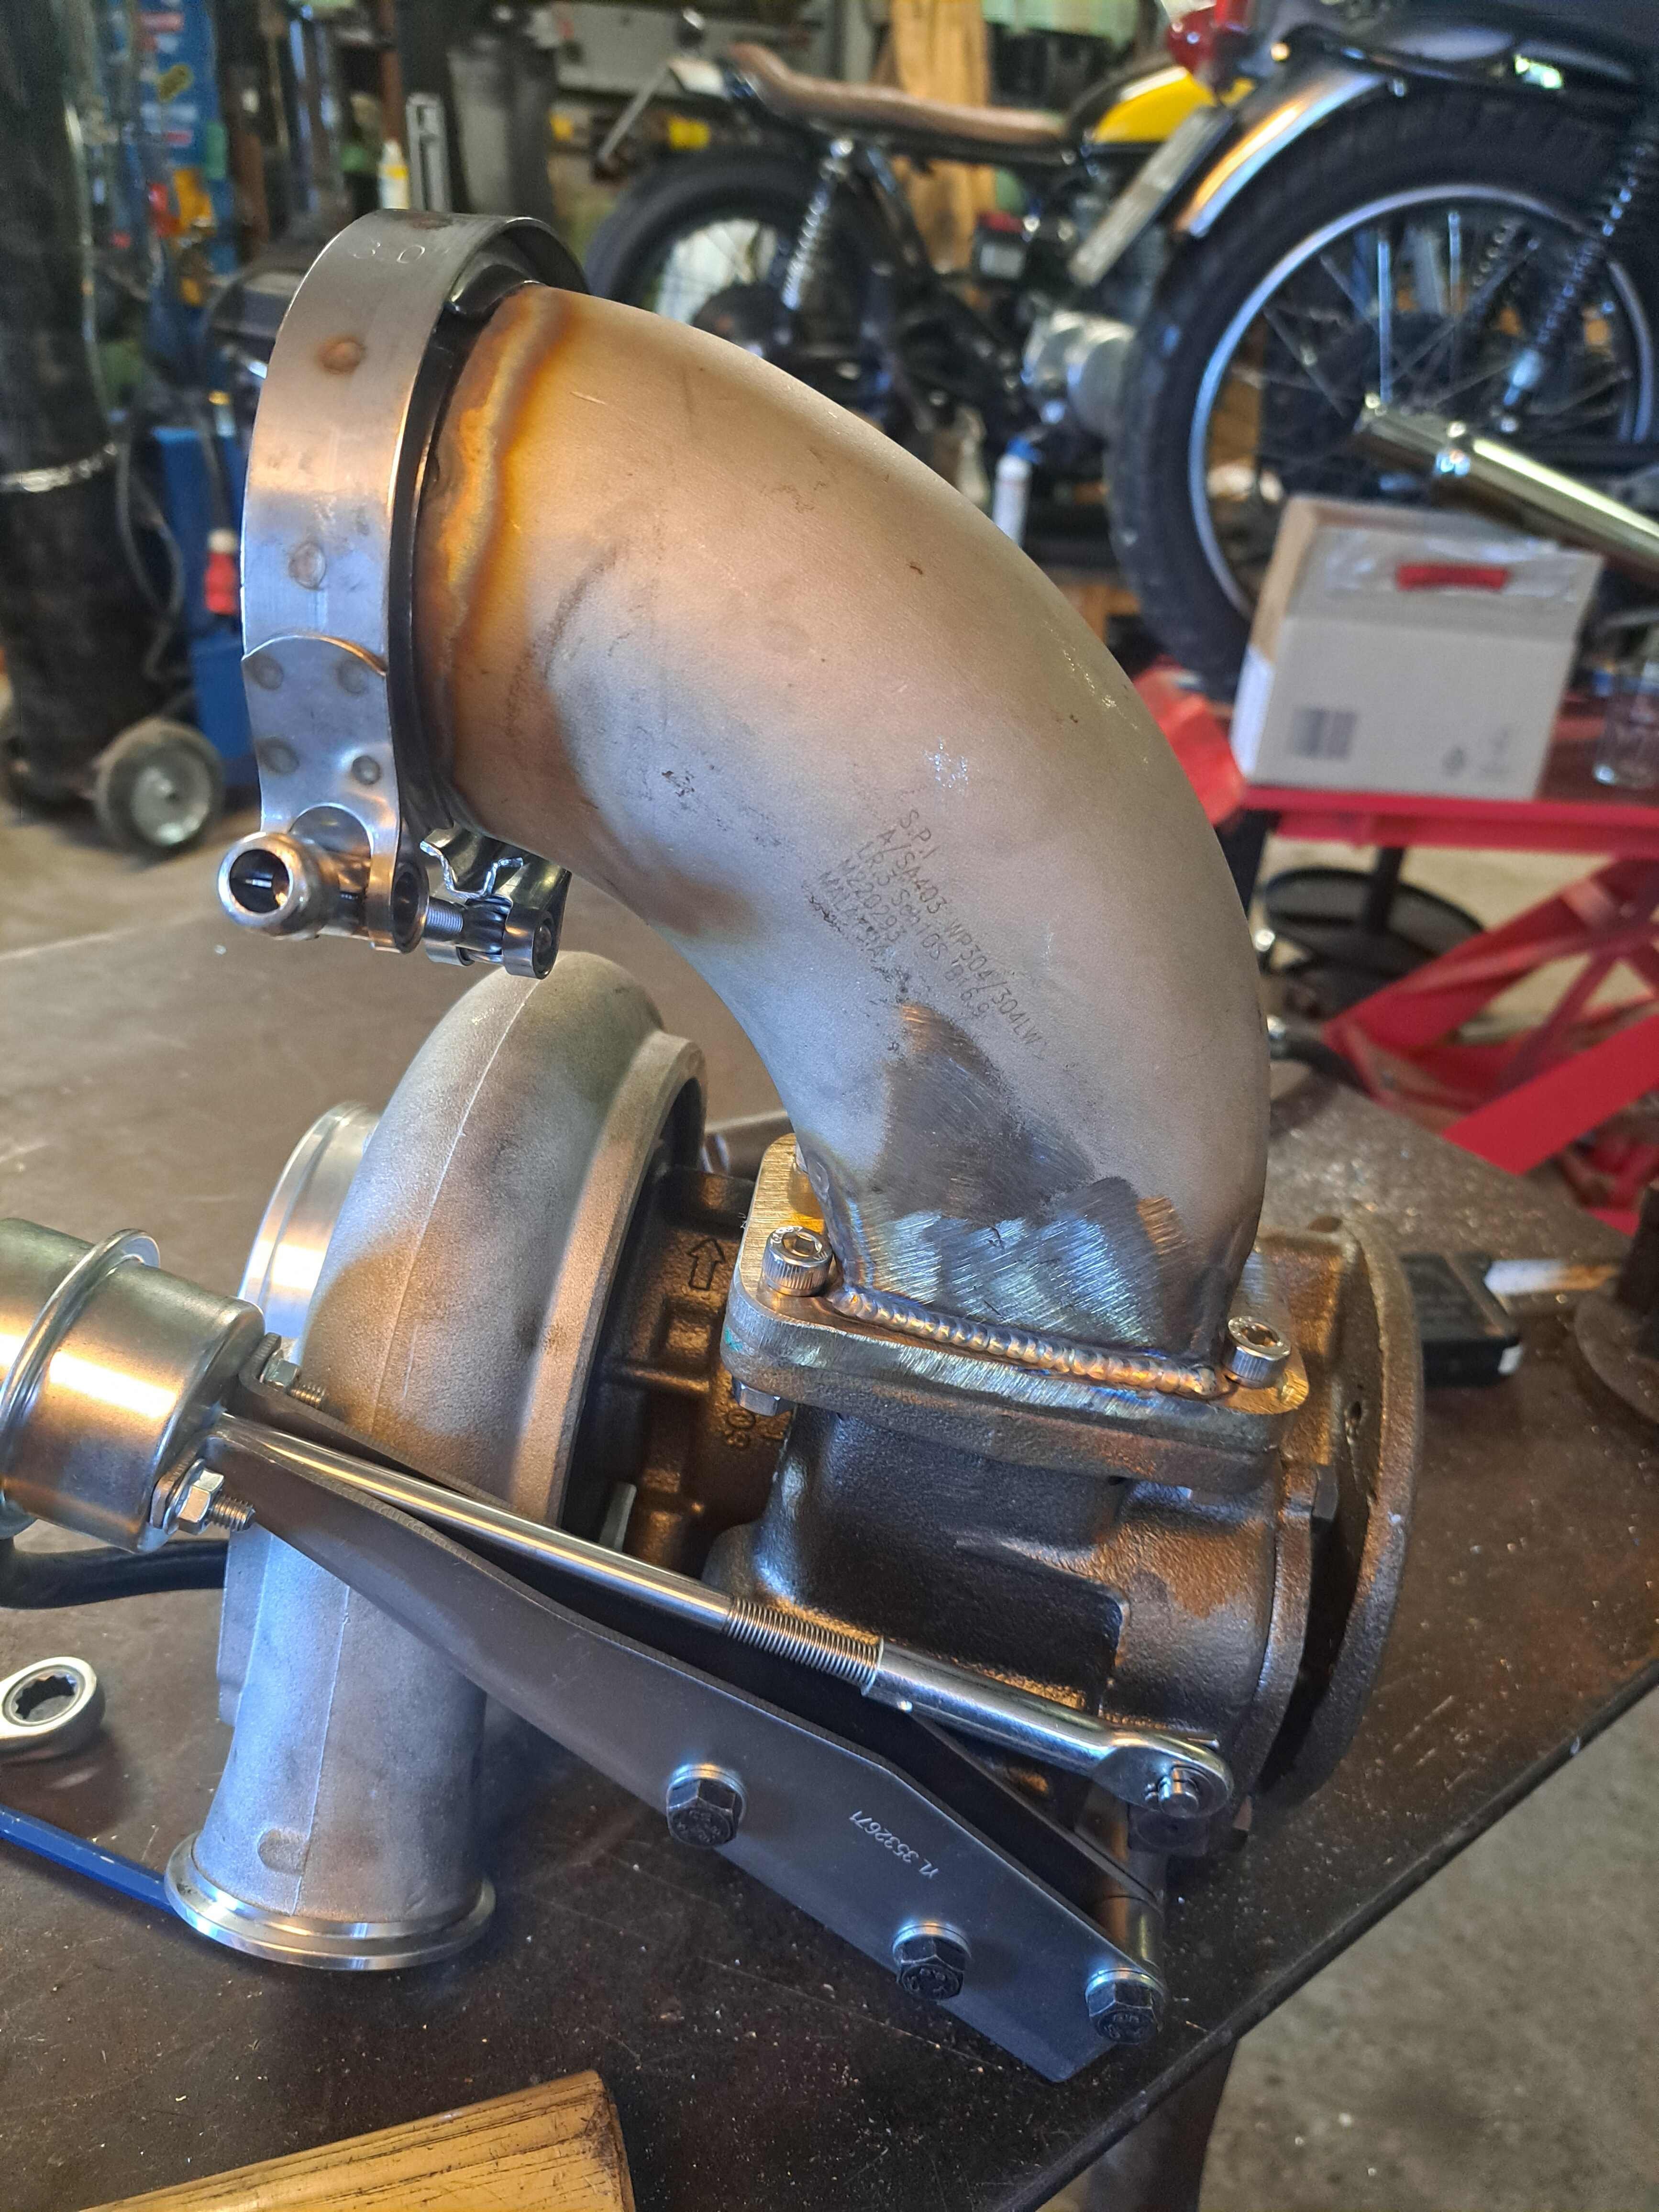
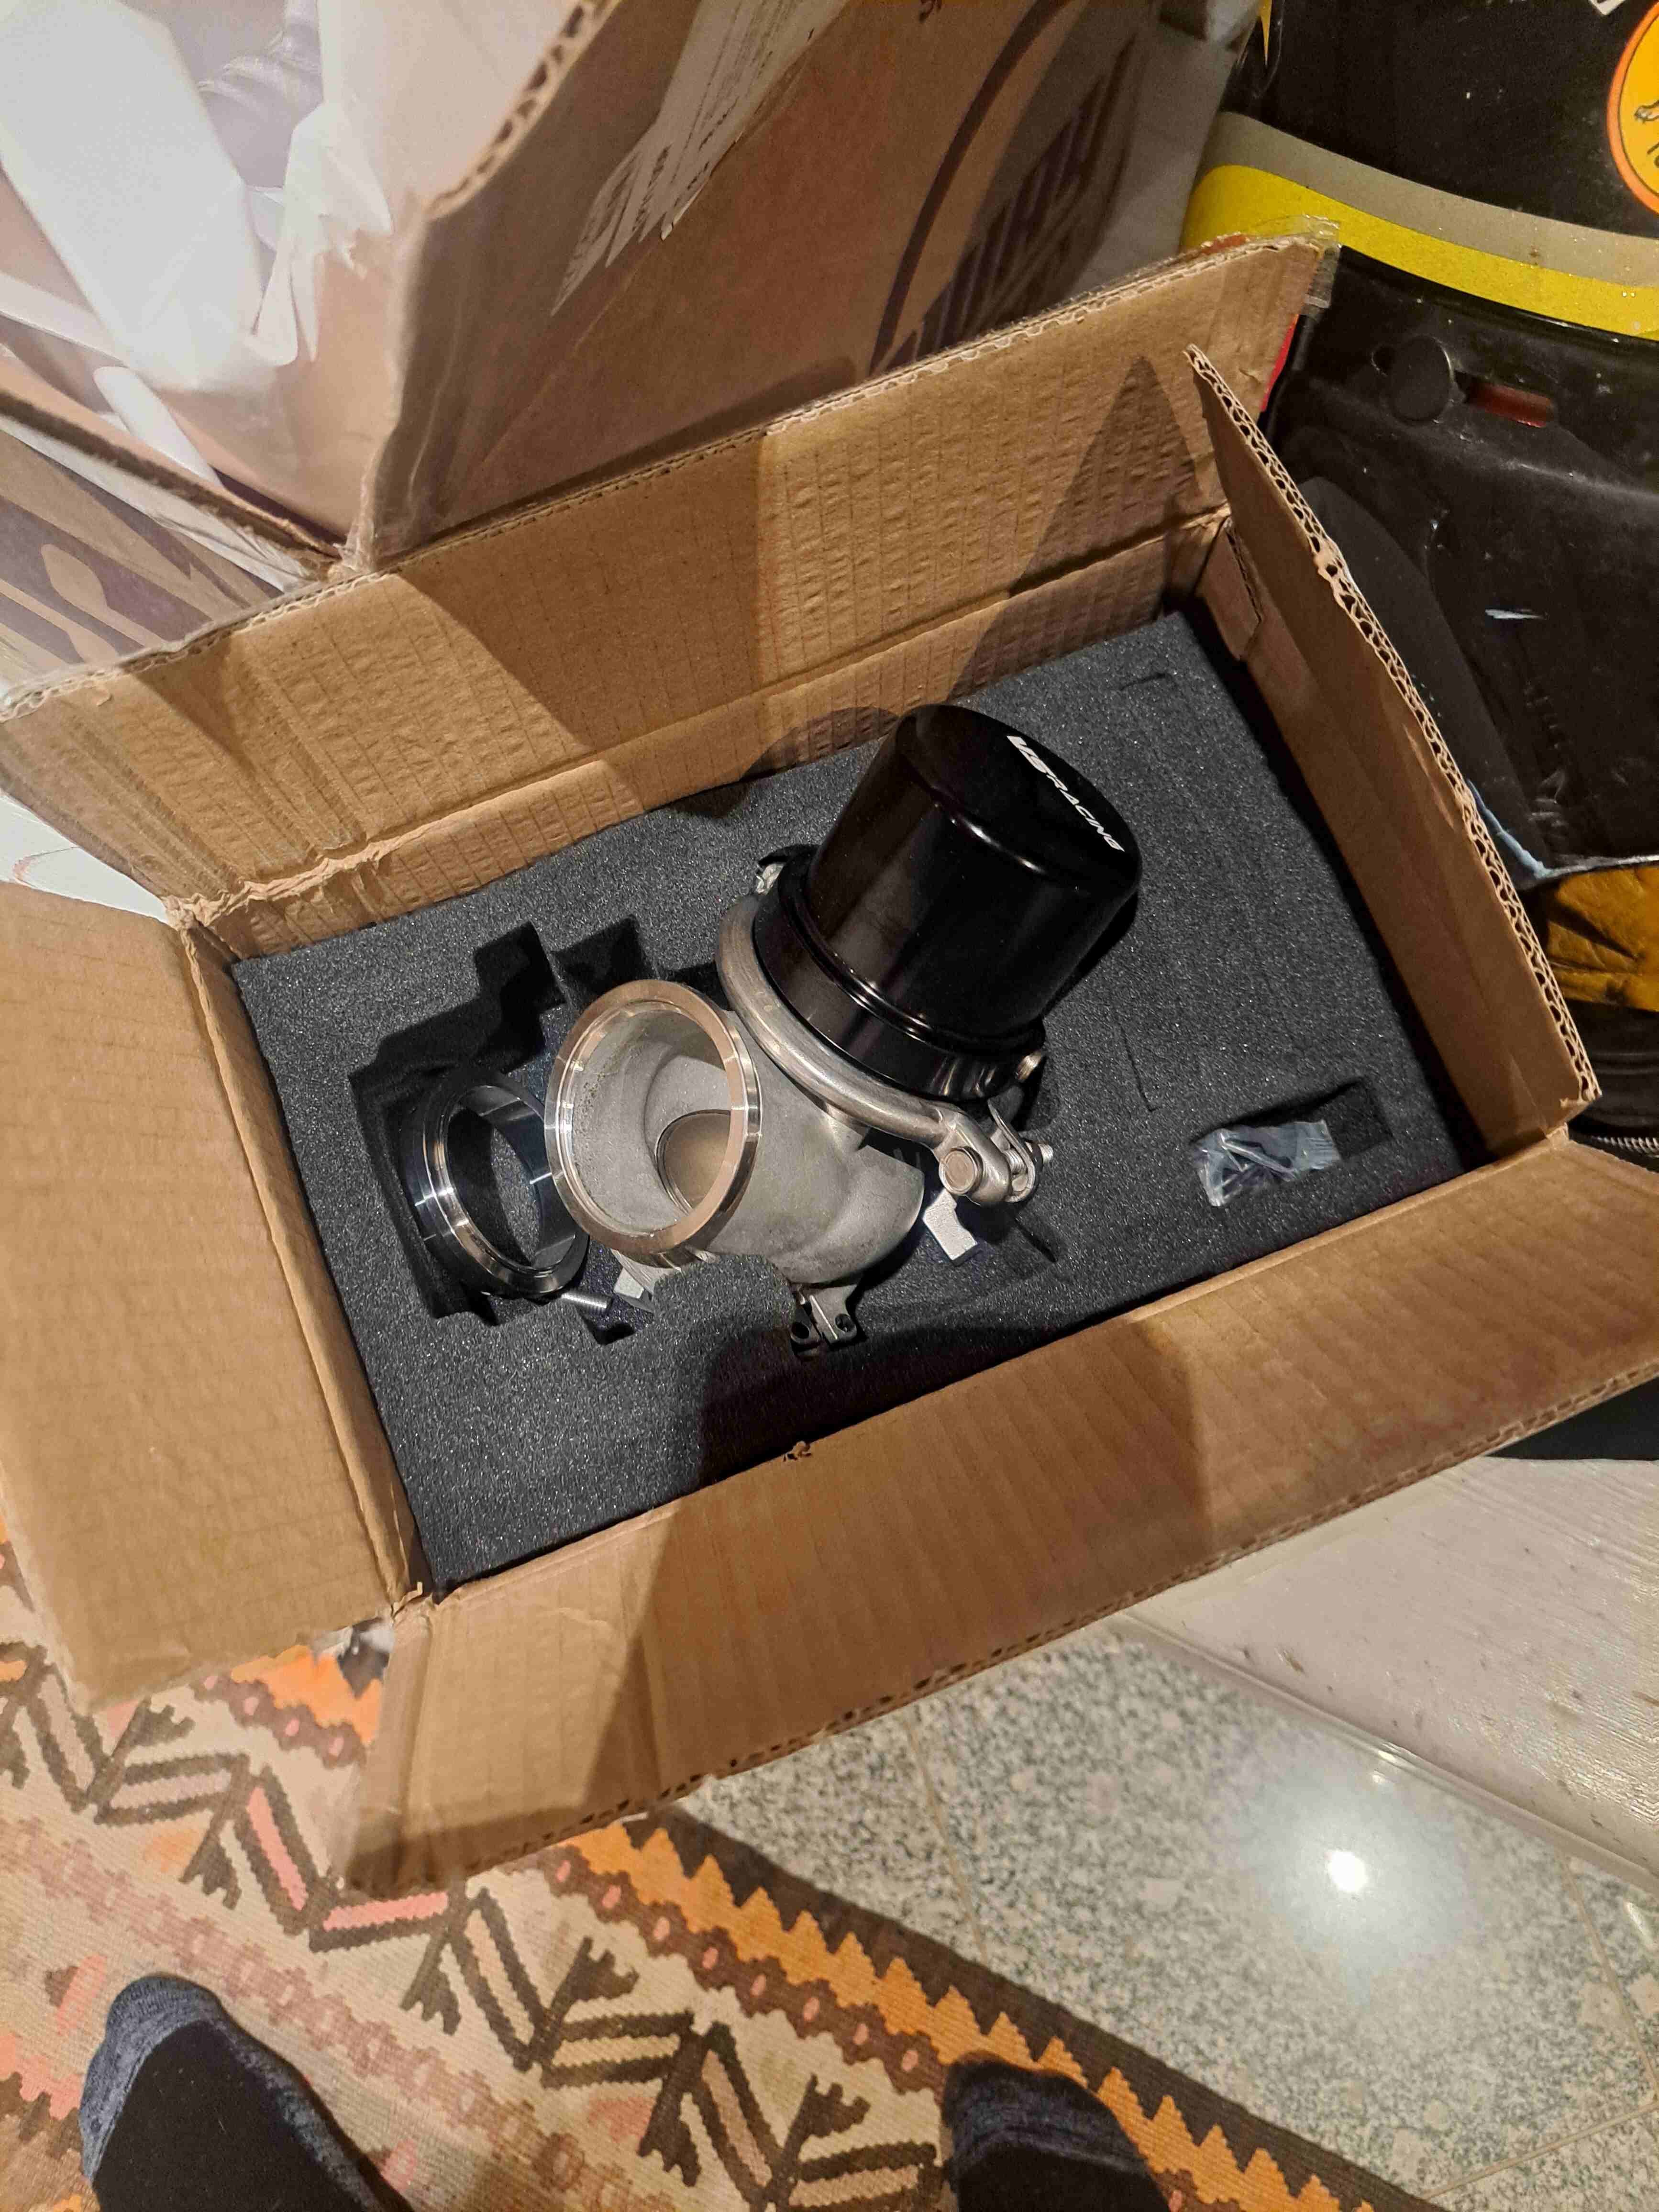
It was about here that the wastegate showed up. I decided to go for a 50mm VS Racing gen3 wastegate, mostly because I really like the idea of the piston instead of the diaphram, since I will be controlling it with emap then it seemed like it would be more robust. So I'll just put that here... BTW Don't @ me about the manifold design, things fit where they fit ok... We also pulled the head so we could do valve springs, it seemed prudent with the impending boost. These things have a o-ringed oil port for the turbo feed, so I made that little adaptor on the front of the cylinder head so I could use the stock oil pressure sender and have a better place to take the oil feeds from.
2 points
-
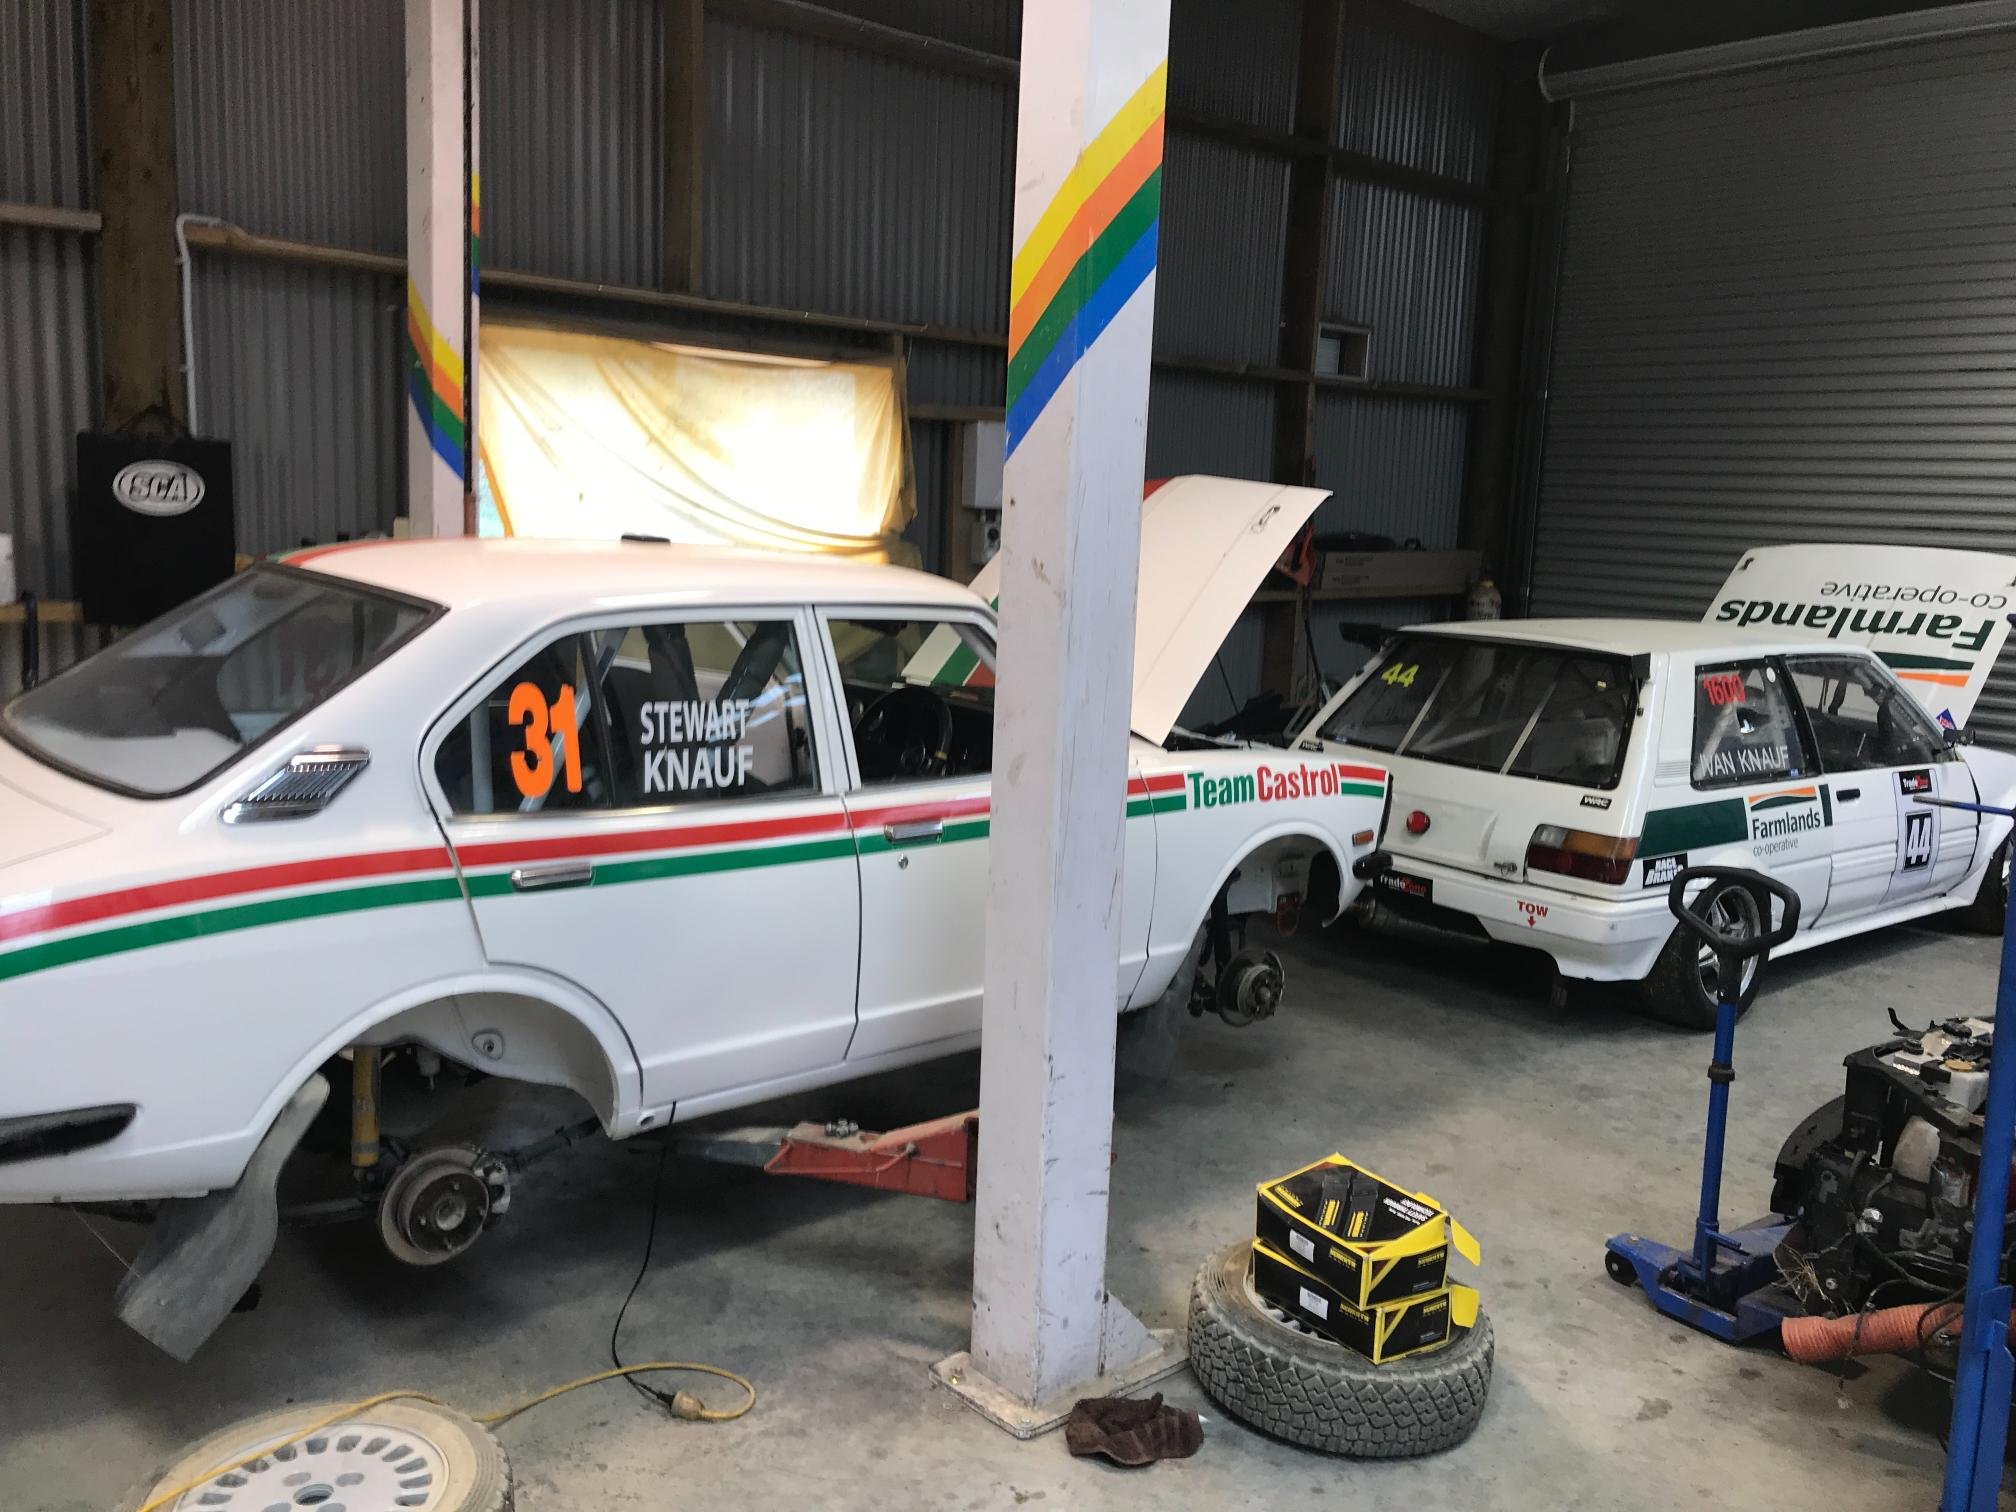
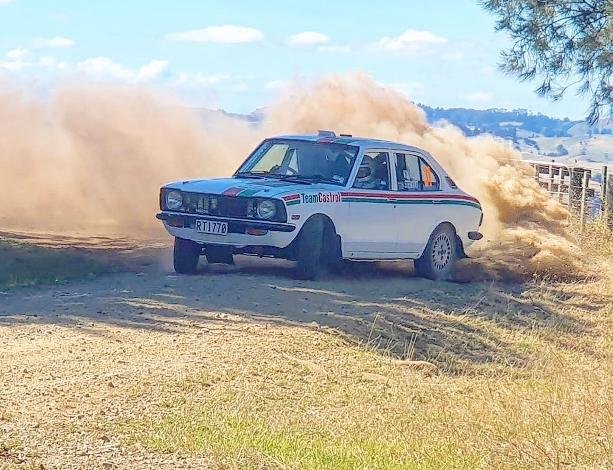
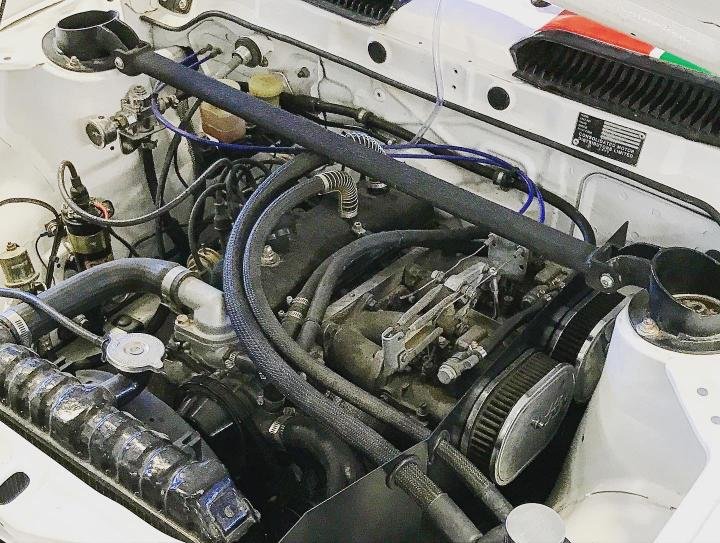
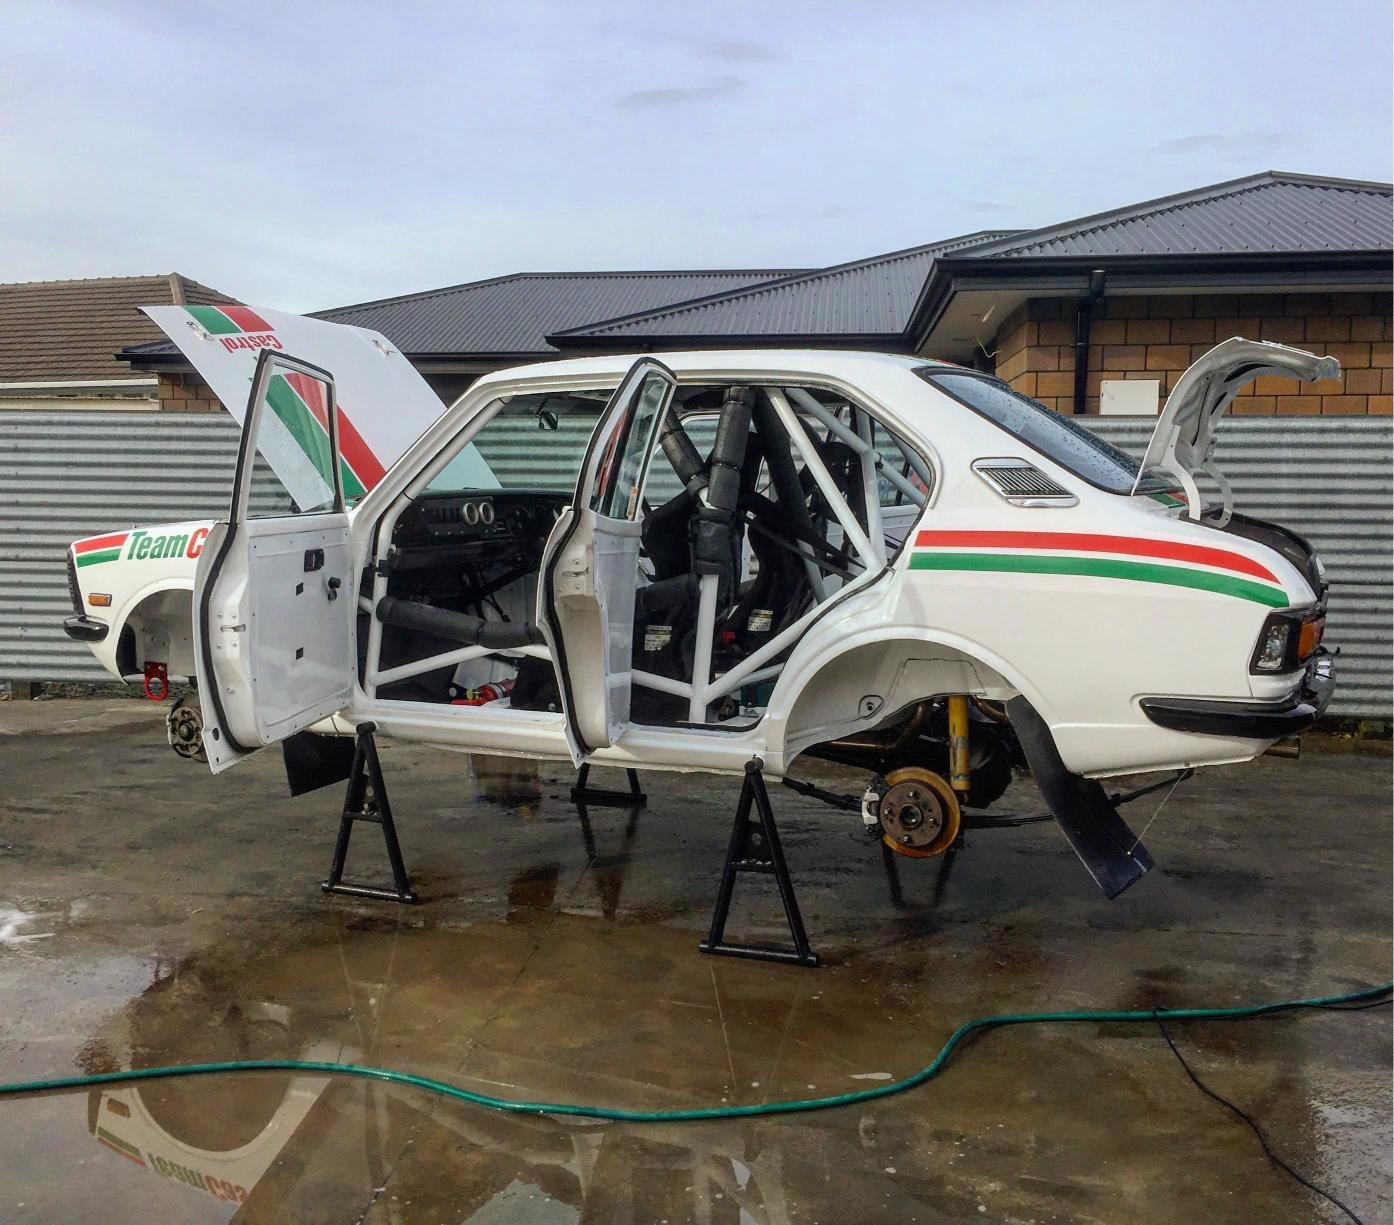
Oh wow, somewhere along the way I forgot to update this thread!! A lot has happened since 2017... I bought a house, got married, both Nick and I had kids (with our respective female counterparts) and to be honest this car sat in a corner/under a tarp outside waiting to be used for the majority of the last 7years or so. Here are some finished photos Then it got the castrol livery because retro racecar things Sat in storage for a few years at the farm. Did one or two small events. Replaced a clutch, diff continued to whine unbearably and generally ran like a piece of shit on BP98. Car was never 100% but the answer was always it needs money/effort spent on it and we both had other priorities. A year or two back I was doing some testing with timing and it blew a headgasket. I suspected it had been not ideal for some time as it seemed to run better afterwards. Compression tested at 220psi or something silly. Car was supposed to make a comeback 2023 but I was too committed to finishing my Levin to do any kind of motorsport... Soo now its 2024, my Levin still isn't finished (but at least its close!), and we've decided to commit to doing at least Daybreaker rally (and maybe Waitomo if all the stars align). - Picked up a new 4.7 crown wheel and pinion from Weir performance when I was in USA earlier in year (was real cheap with no freight!). Diff bearings replaced by Geartech. - Engine currently stripped down, cam being measured so we can come up with a plan to slap together a usable motor. The engine has always been too high compression (13-14:1) for the fuel. - New flywheel needed - Find some second hand tyres & do some skids. Looking forward to throwing some stones and talking shit again. Will try to keep this thread a little more updated as we figure out what the engine will look like.
2 points
-
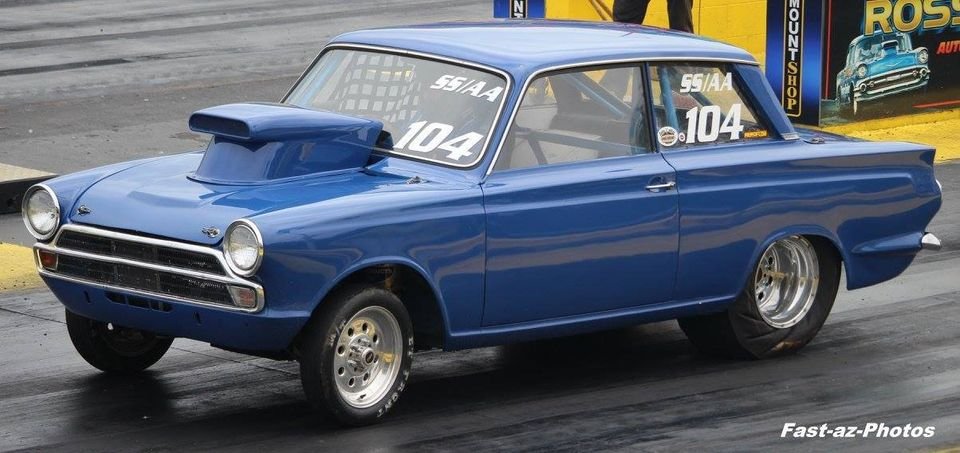
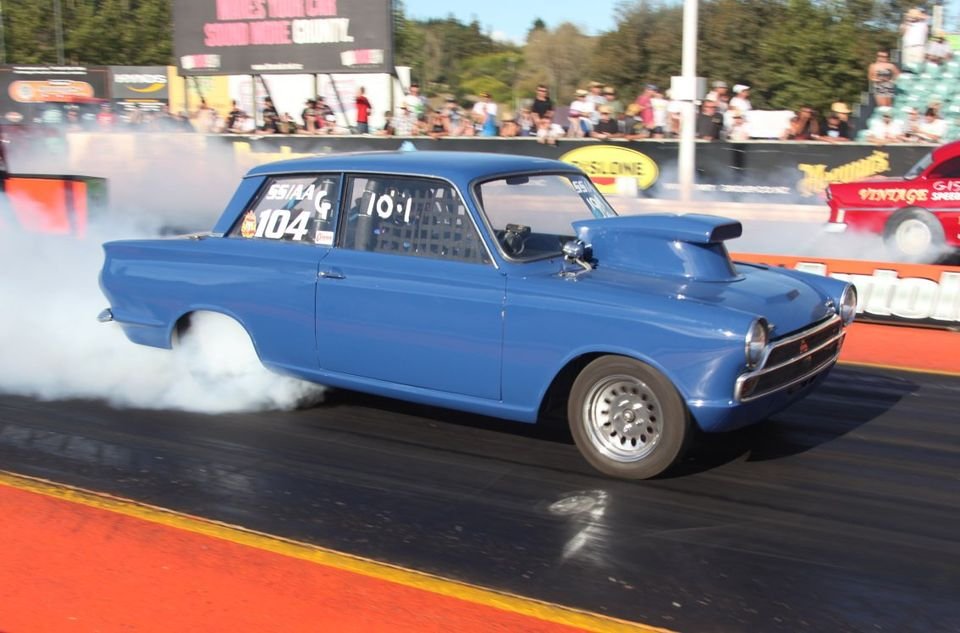
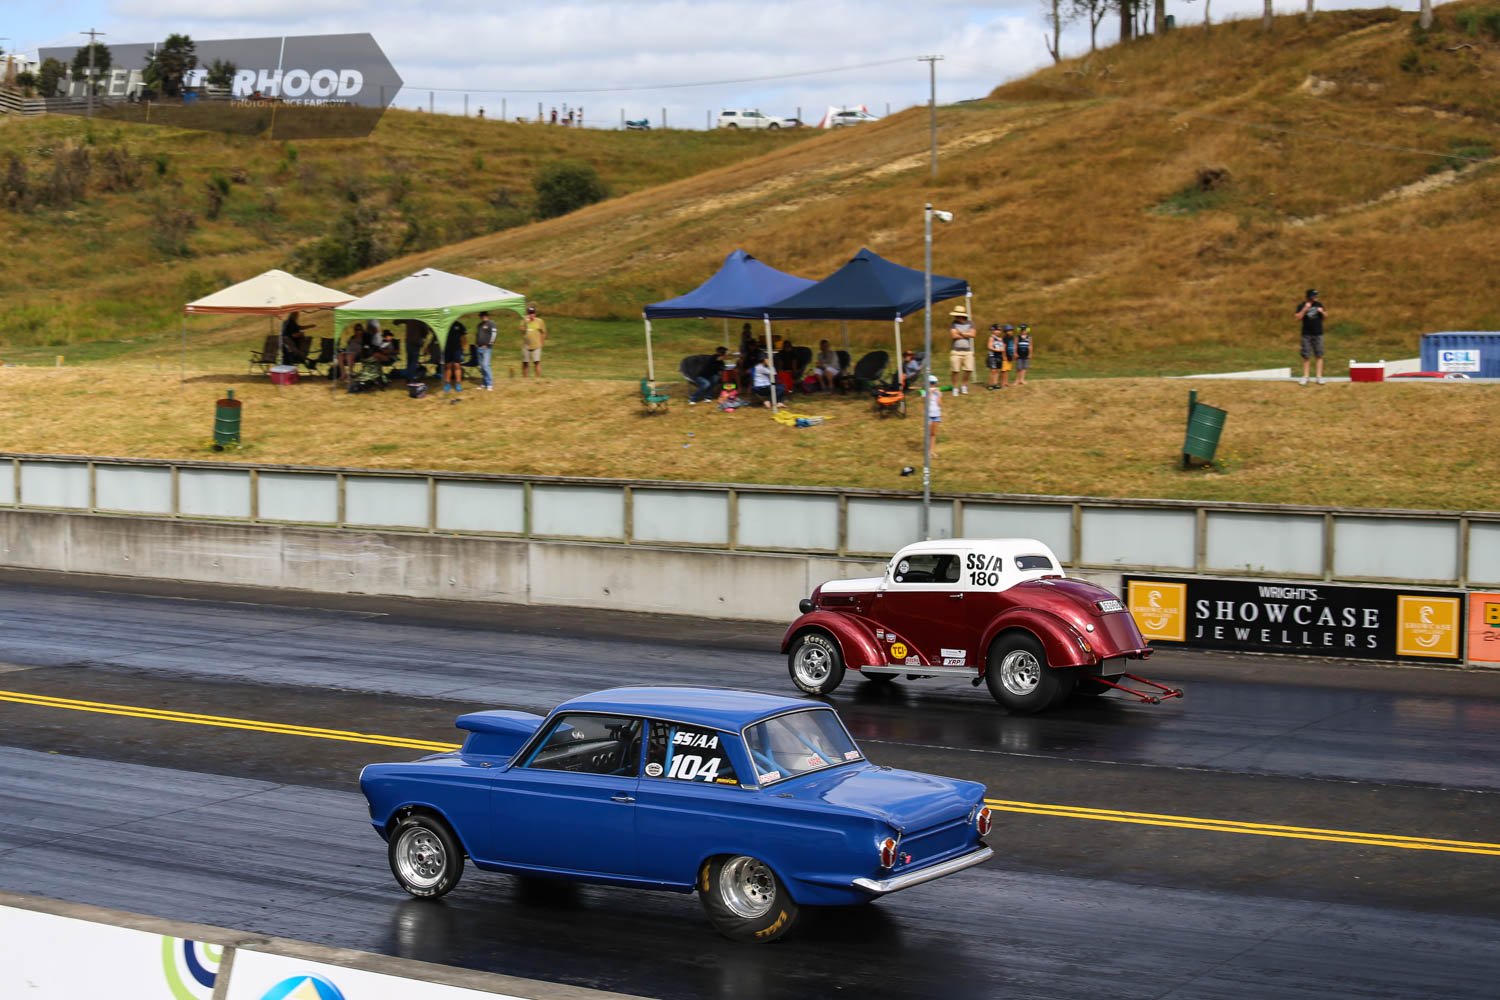
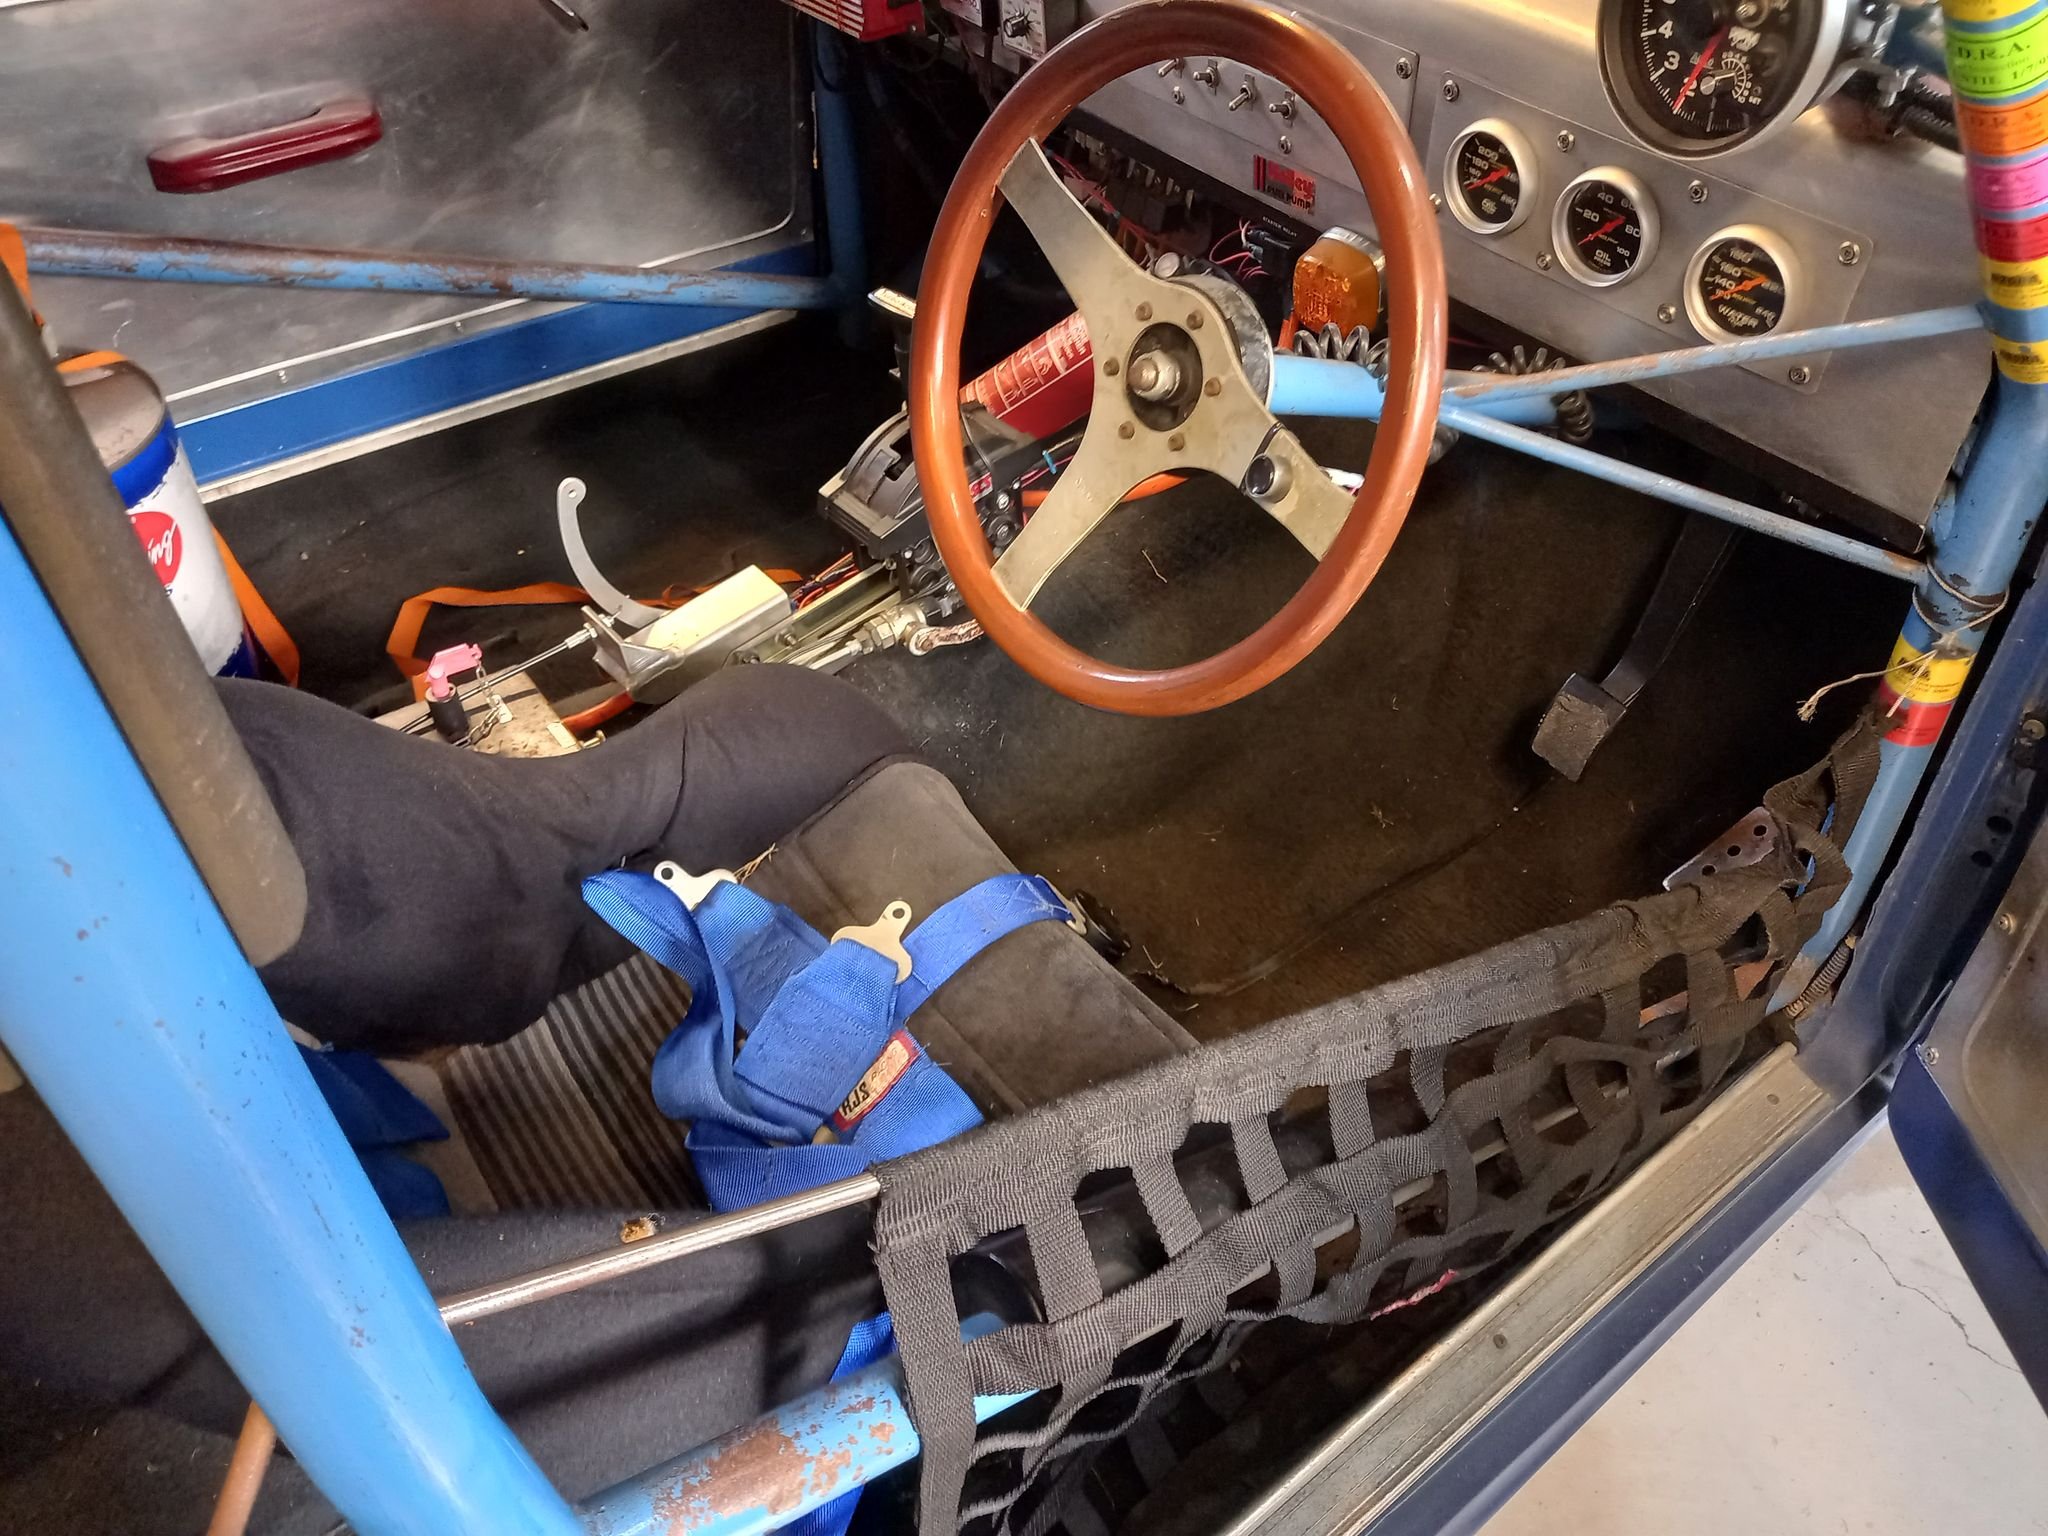
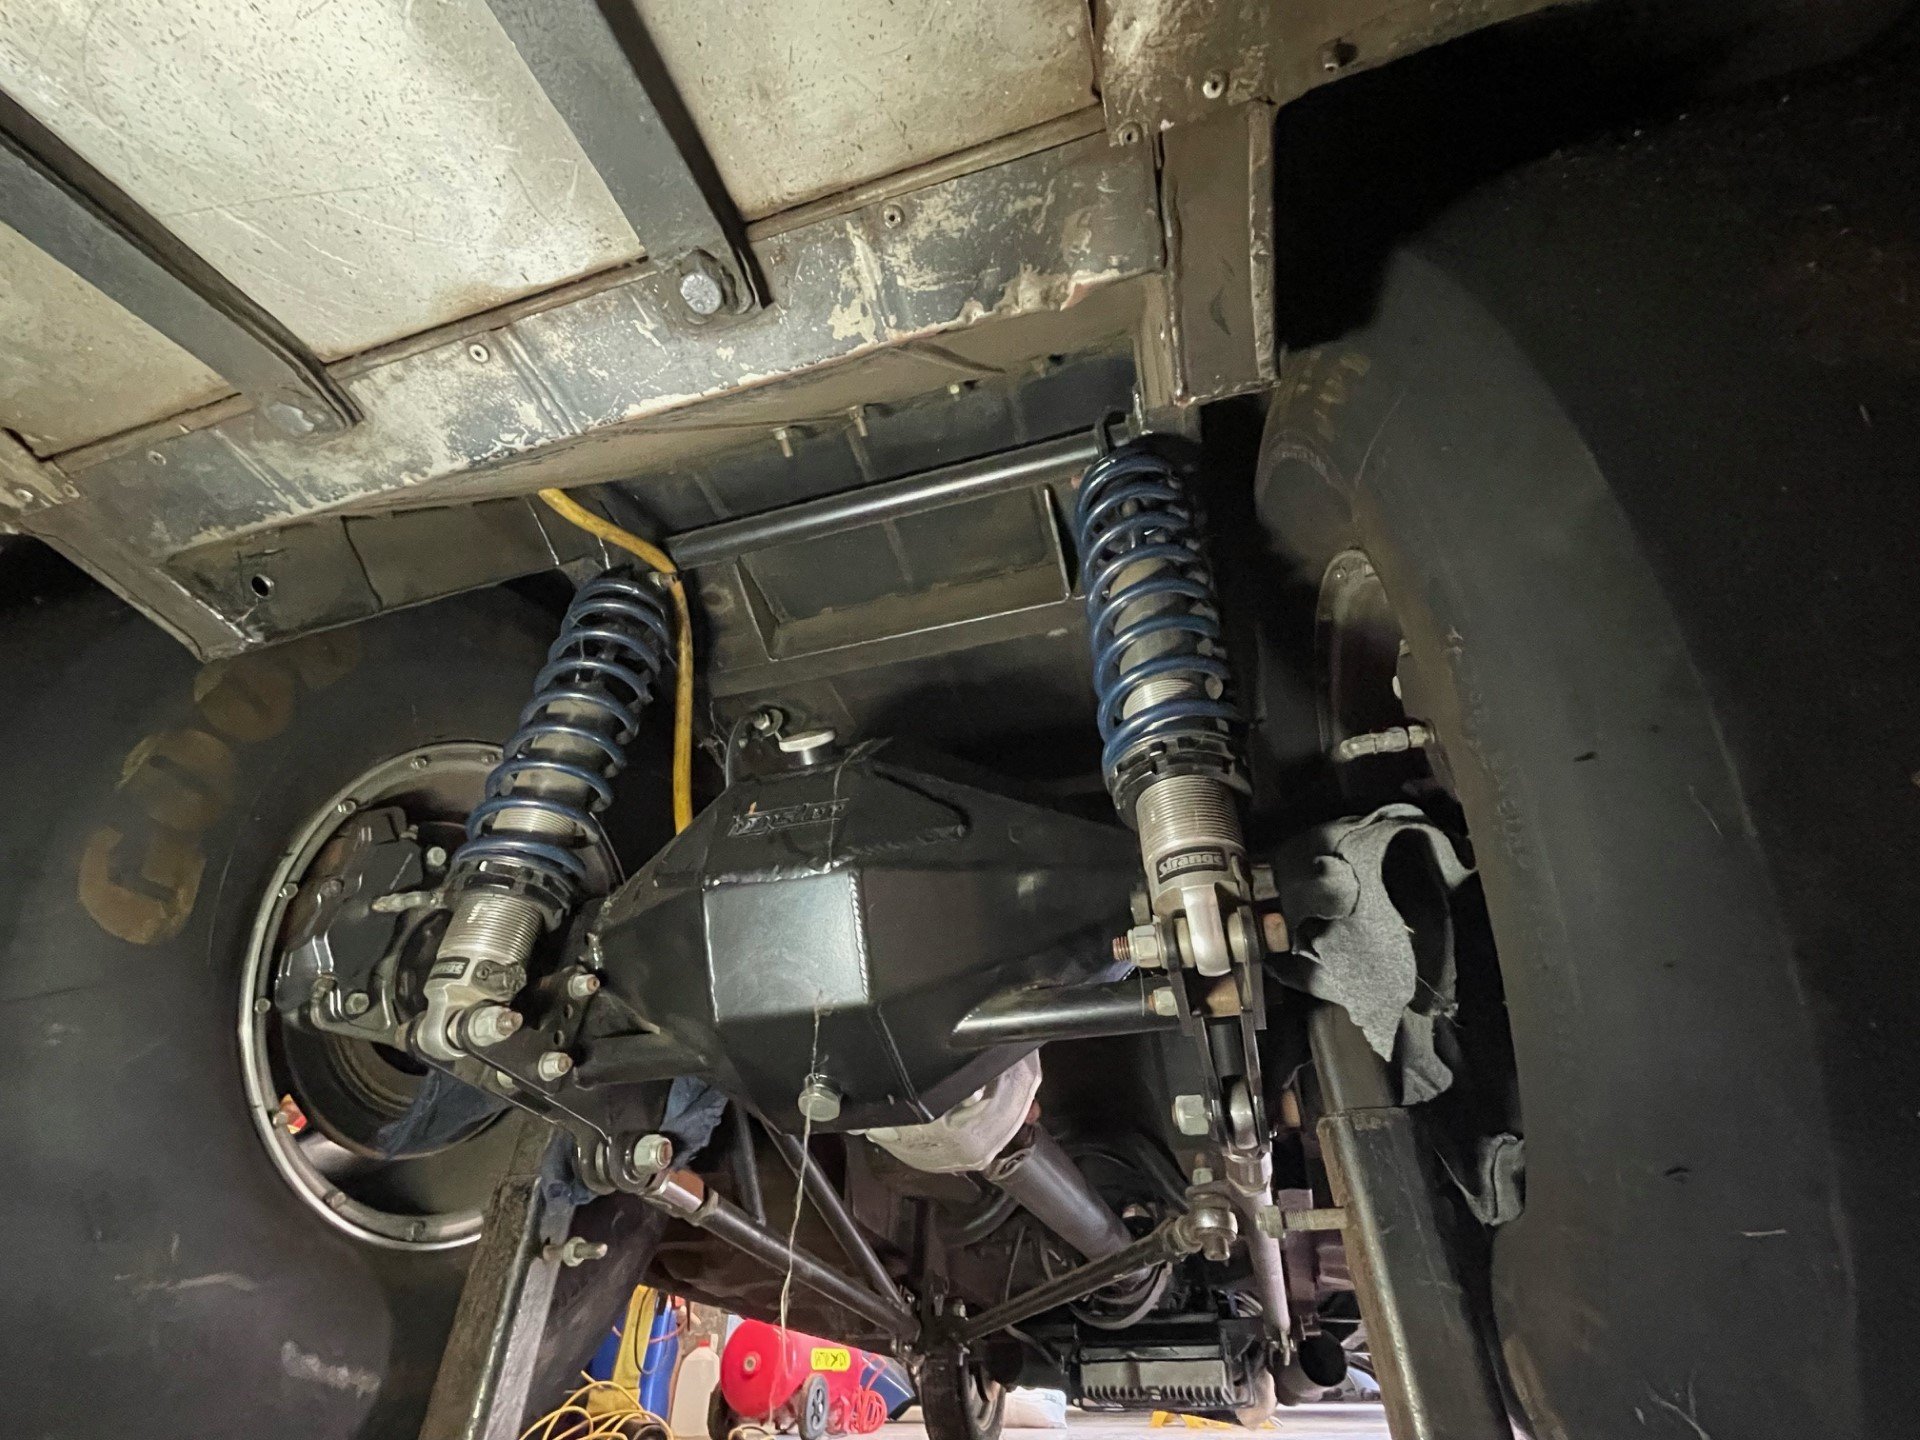
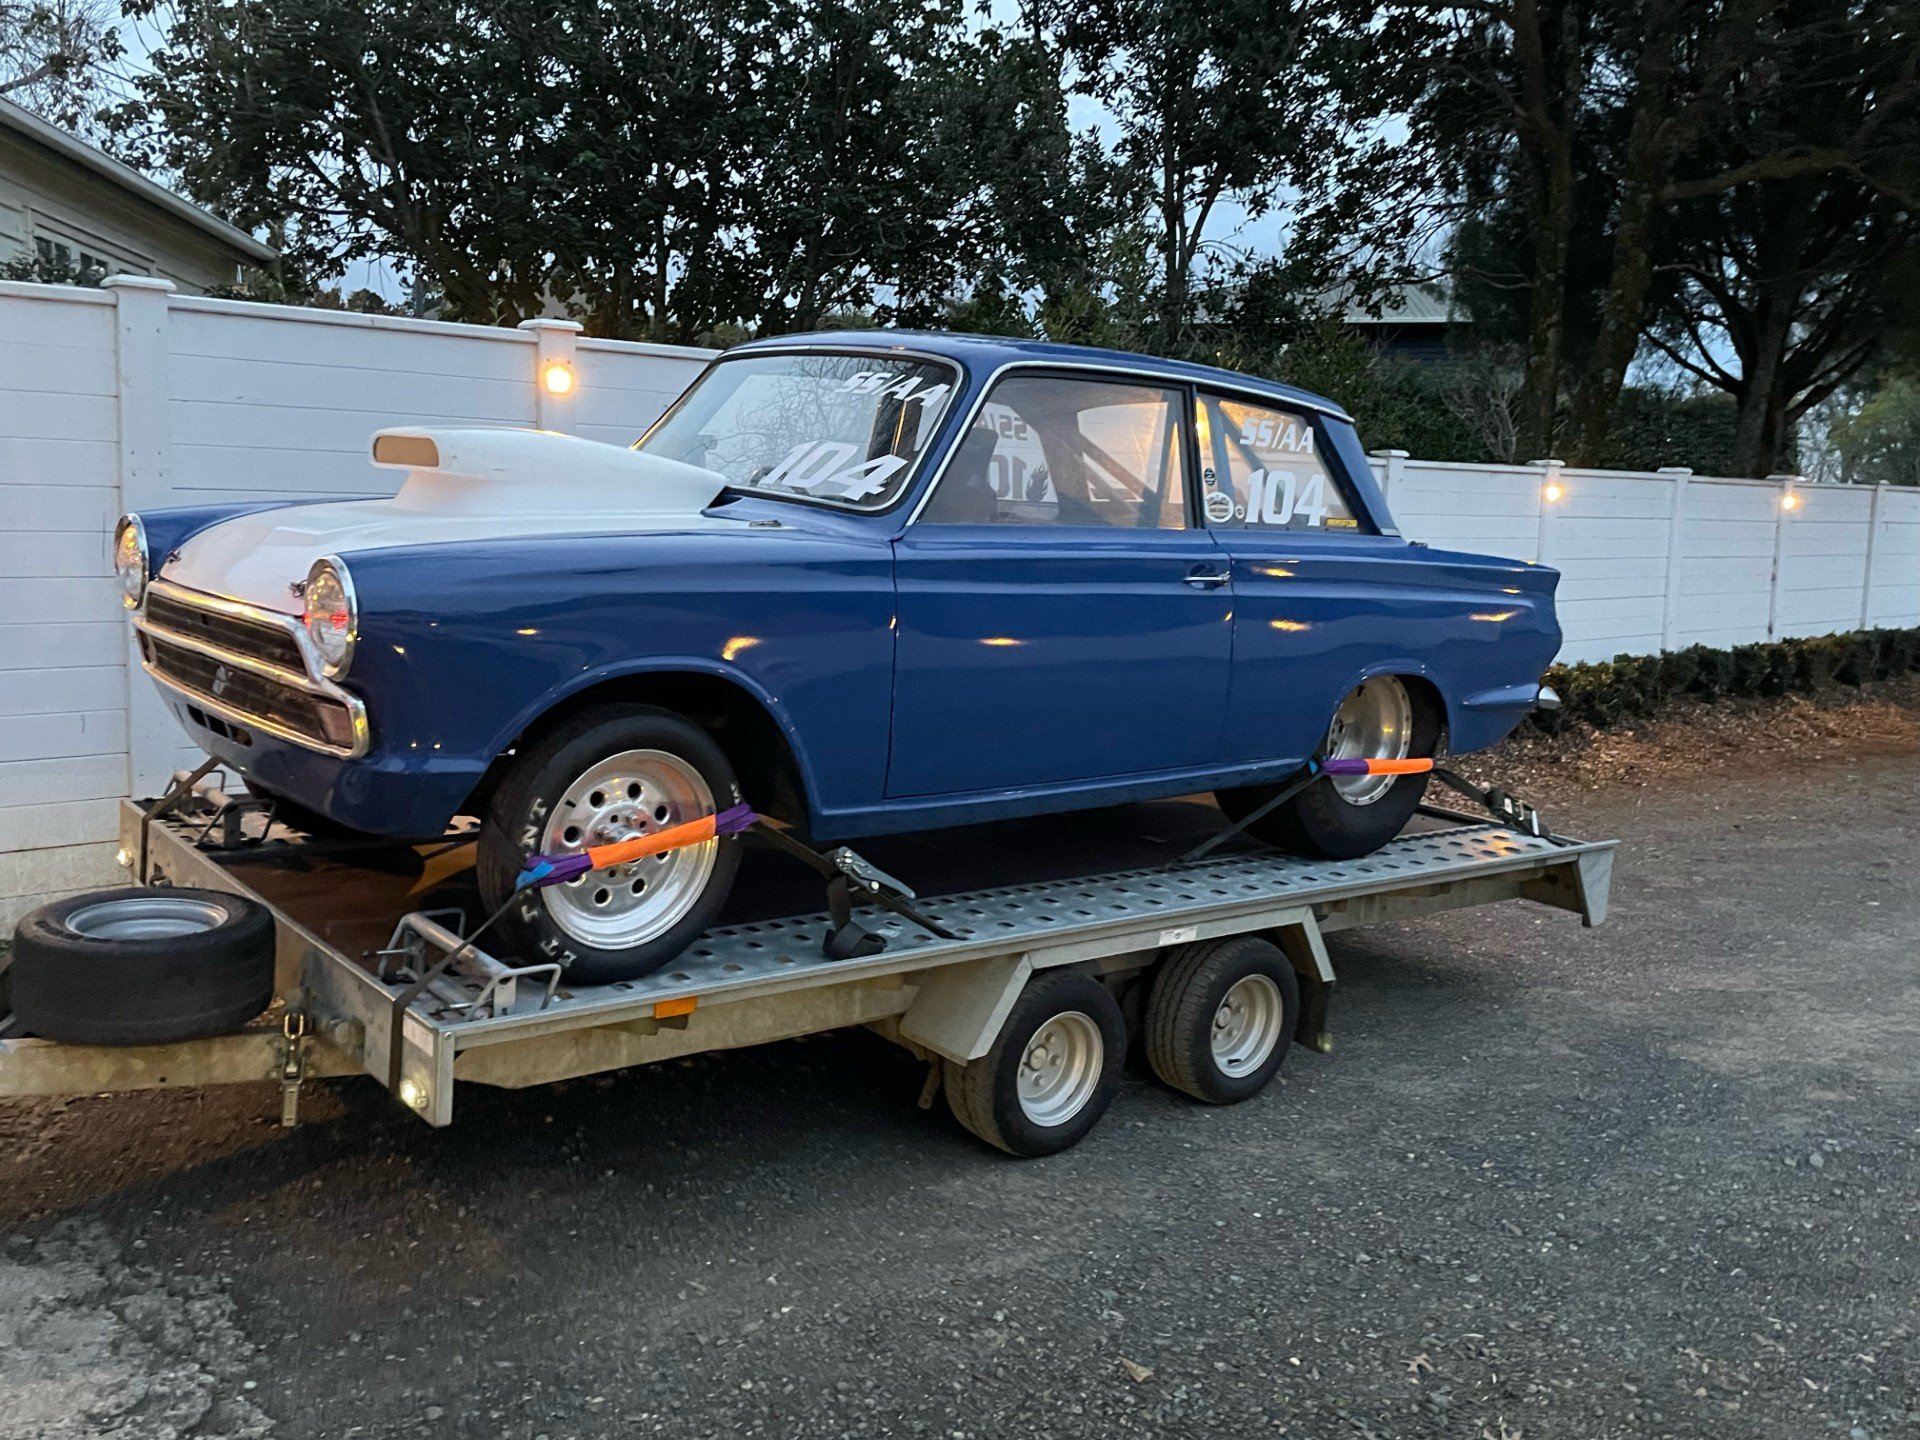
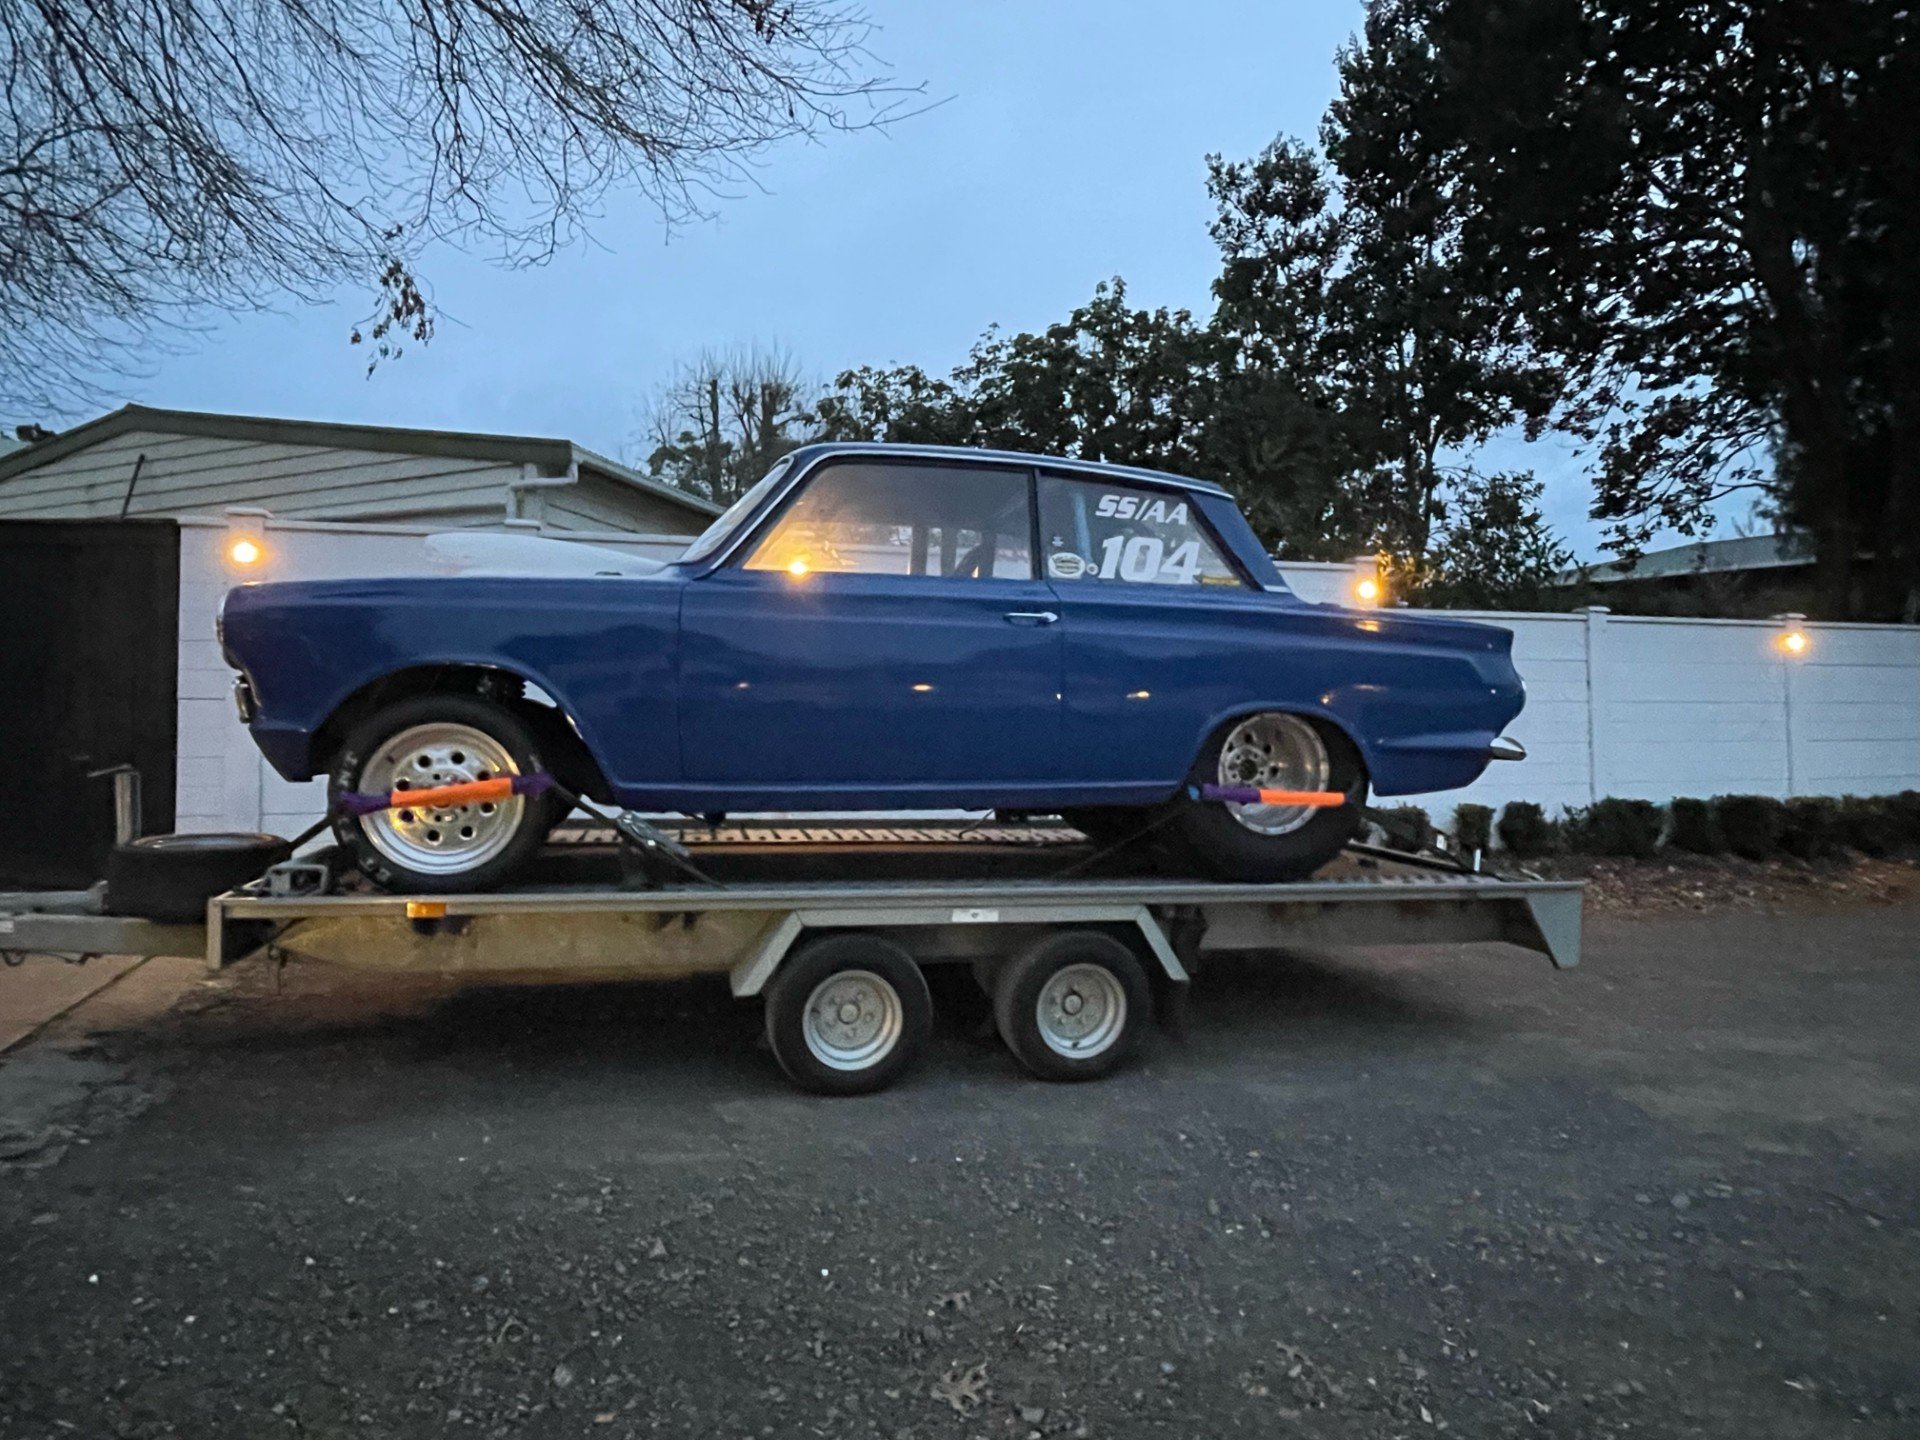
A few more Cortinas in between, and fast forward to beginning of May this year. Trawling through FB marketplace, I spotted this car. It was built in late 1980's, same time I built mine, and current owner was selling it less engine. It was running a 393 Cleveland with around 600hp, with a 150 shot of Nitrous. He had run a best of 9.0 @ 150 mph, not bad for an old Cortina! I went to Papamoa straight away to view the car, paid a deposit, and collected it on Saturday last week. I haven't decided exactly what I am going to do with it yet. It was deregistered when it was turned into a drag car, so I am going to investigate making it road legal again. Would be fun to drive to car shows, or nip down to the dairy for milk! If that proves too difficult, then it will stay as a drag car only. Either way, I would like to go drag racing, so focus will still be on keeping it primarily as a drag car. Engine is TBC, although most likely a V8. It is very well built, and has some good parts fitted, half chassis rear, big tubs, very short fabricated nine inch with Strange 35 spline shafts, brakes and double adjustable shocks. Weld wheels 15"x12" rear and 15"x4" front. Front suspension is Ford Escort Gp.4 style struts, with Escort rack, rear end is ladder bar. A few pics of the car racing, and prior to engine removal, and then on the trailer after arriving home on Saturday.
2 points
-
Epotec 408 epoxy. 2-3 coats. I did most of it with a brush. Took fucking ages, over 4 days. Near the end I remembered I had some small fluffy rollers and discovered they were much faster and also got in little divots that the brush just skipped over.
2 points
-
Chopping up the Imp shell took longer than expected. I'm pleasantly surprised at how solid they are for what is just a budget small car. It was also even rustier than expected and I'm glad I was not tempted to try and make something of it. I had to get this shot... ...and this shot. All chopped up... I rescued these bits. I have no idea where I'll stash them. Maybe hang the nose cone from high up on the workshop wall, led lights fitted into the headlamps. I've now got a full spare set of suspension arms too. These could come in handy as bench top jigs if I look into mounting disc brakes on the back etc. We took the remains to the scrap man the following day and he gave us $78 in return. I had paid $200 for the complete Imp so it now owes me only $122. Or I prefer to look back at the pies, cakes and coffee we both had in town after seeing Mr scrappy. Back to the Impy project. I now really only had a bit of wiring to do plus some other little jobs. Wiring first. A bit of work in the 'frunk' to clean up the fuel pump wire routing.. Drained the last of the coolant out while I was there.. glad for the handy drain plug I had added when building the radiator in. Work where the car needed to be on the hoist was over with but before I lowered the car onto its wheels I grabbed these shots which I really like.. Onto its wheels and rolled away for the first time since fitting the flat six. Wow. Pretty neat occasion in itself. Happy to see it still sat at the same height. Looking forward to weighing it in the future and seeing how much lard/muscle/festive season insulation its put on. I was now able to climb in and out of the doors easily and sort out the final wiring. Stuff to be done was running the power and ignition wires to the ecu, water pump wires and some sensor wires forward then make it look all serviceable and neat enough. I had to extend the water pump temp sensor wire so the controller could be mounted in a sensible place. Take note of this last bit as I'll be coming back to it... With the wiring now sorted I could move onto finishing of some other loose ends so to speak. But first I had to start the engine up in the car and check it worked. Which it did after I swapped the two fuel lines in the frunk about so the feed did actually feed the correct line etc - only discovered when I was under the car with a container to clear the lines out of any debris and it came out the other pipe. Whoops. So yeah. The engine just started up with no fuss on first turn of the key. Simples. Sounded great. The was no water in the system so I just ran it for 30 seconds, gave it a rev and let out a little giggle. I then painted the parcel shelf cover thing that I'd made in the last update... While that was drying I made a little lever for the exhaust valves. I started with an old pulley that I'd originally made for my V6 Viva.. Ran a long length of bicycle brake cable through from the engine bay into the interior via the routing that one of the original Imp heater hoses took. Connected the dots with a tandem brake cable inner.. Out with the rivnut tool and put a couple into the inner sill. Lever mounted... Sound levels turned up to 11, small kids scarper, nuns faint and dogs howl in the distance* when lever is turned as such. *Hopefully. Next up was filling the cooling system with water. Not coolant. I've learned from that mistake and I'm sure I'll be having to remedy some sort of issue which might involve emptying it out again. Turned the electric pump controller on and noticed it telling me the water was a balmy 54 degrees. It definitely wasn't. Its winter here (apparently) and the water was 15 degrees according to my volt meter temp probe. That bloody sensor wire! When I lengthened it by about 800mm I used 12/0.15mm gauge wire. The original sensor wires were 17/0.15. I didn't think 5 strands @ 0.15mm were going to make enough difference to change the reading but how I was wrong. So this was where I was working early evening yesterday... I rummaged through my extensive supply of cables, picked out a few that might be ideal and started with some beefier speaker cable that had many more strands. I didn't count them as tiny. I just connected it up and tried it out. Bang on! Both meters read exactly the same. I tidied it all up and we started the engine. Ran it up to temp which took ages because by now it was only about 11 degrees. No leaks and the pump seemed to bleed of air easily. Hannah took a vid of me giving it a cheeky rev. Such fun. You'll see that in the next vid. Interestingly and annoying is that the exhaust valves don't seem to do anything to the engine note at idle. Maybe they will make a difference when asking more of the exhaust? It was by then too late to go out for a hoon. I still had to fit the belts, all of the seats, the nice blue parcel shelf engine hole cover and also the actual engine bay lid. So I spent the evening finishing these tasks off. I'd love to have driven it because it was a clear, albeit cool, day. Lots of heavy rain expected the following few days. Oh well. It was great to see the interior back in. Although the recaros don't match the interior colours I just love seeing them. I like this pic. Old and new. 'West German' seats, old imp interior, sneaky megasquirt and usb cable. So this morning it was finally time for the big occasion. There were so many things to go wrong, not work, be noisy etc. We just popped a tool box in the front, plugged the laptop in and went for a drive... Wow. It works! The clutch pickup point was spot on, gear change seems fine in a mechanical way. The gearbox was quiet. No whines. The engine was completely out of tune and we couldn't really tune it properly on this short drive. We did about 12km but a combination of the very cold morning and a very efficient cooling system meant the engine wouldn't get above about 80 when on the move so for much of the drive it was still on warmup enrichment. I now realise that I should have upped the temp setting on the pump controller. I think the default is 85 degrees so it pretty much had the pump running full time. I want this engine to be running at 95 degrees C. But hey - great to know the cooling system works well at cooling. The exhaust is more than loud enough. There's no insulation above the engine cover so that will refine the interior when cruising and how cool it is to pop into a 5th gear!!! Again, due to lack of tune I couldn't really note what the gearing is like. I never really gave it the full welly because my dash rev counter wasn't working (I have a sneaky suspicion I plugged in the wrong signal wire that currently goes no where) I just drove the car and enjoyed the fact that this moment was finally happening. Hell - it was March 4 years ago that this engine first arrived on a pallet. The things that were not so good.. The clutch bite point got lower and lower until it was tricky to get into gear. Either failing slave or master cylinder. I suspect (and hope) its the MC. Its a bit fumy. Granted it was running pretty rich and the rear cover I've made is not sealed properly. The gear lever knob moves back and forth with the engine/transmission movement. Not annoying and only noticeable if you keep your hand on the knob (chuckle) while accelerating. I had figured it would because its a very slop free mechanical connection. Maybe stiffer engine/box mounts might help but then I could expect to have more noise in the cabin. The weather was a bit shit so we went home, had coffee and cake and I looked over the car. It leaks oil. Typical. It was weeping/dripping from the point between the heads and case sides where the oil drains back into the sump then running back with the airstream and spitting onto the muffler. So there's some of the fumes then. Only happens when the engine is running but its enough to be an issue I want to sort out asap. The leaks are here. This side where it leaks straight onto the cooling pipe and runs back... The other side.. Nothing to leak onto but its still getting flicked back by the airstream onto the muffler... Here's a head gasket. You can spot the drain hole. Its only pinched up at the bottom by one 6mm bolt. If I knew then what I know now I'd have added a thin smear of threebond sealant on each side of the loop to be sure. Oh well. The mess it made on the muffler. So that's where I'm at. We checked the clutch. It works fine on the hoist. Bite point still at halfway?. No obvious leaks or traces of fluid from a leaking slave cylinder. Fluid level was fine. I'll check the m/c tomorrow. We bled the system again just to be sure. Only other thing I could suspect would be a dragging spigot bearing but I cant imagine that being the case. Its a new sealed bearing. As for the oil leaks. I'm going to try removing the lower water pipe in situ and get enough room to apply marine sikaflex 291 or similar. Its under no pressure so hopefully should seal ok so long as I get it super clean beforehand. We will test it all again, leaks or no leaks, when the rain stops (rain warning for our district this weekend) but for now I am simply chillin' and relaxin' and celebrating the first drive in a flat six powered imp that sounds pretty glorious.2 points
-
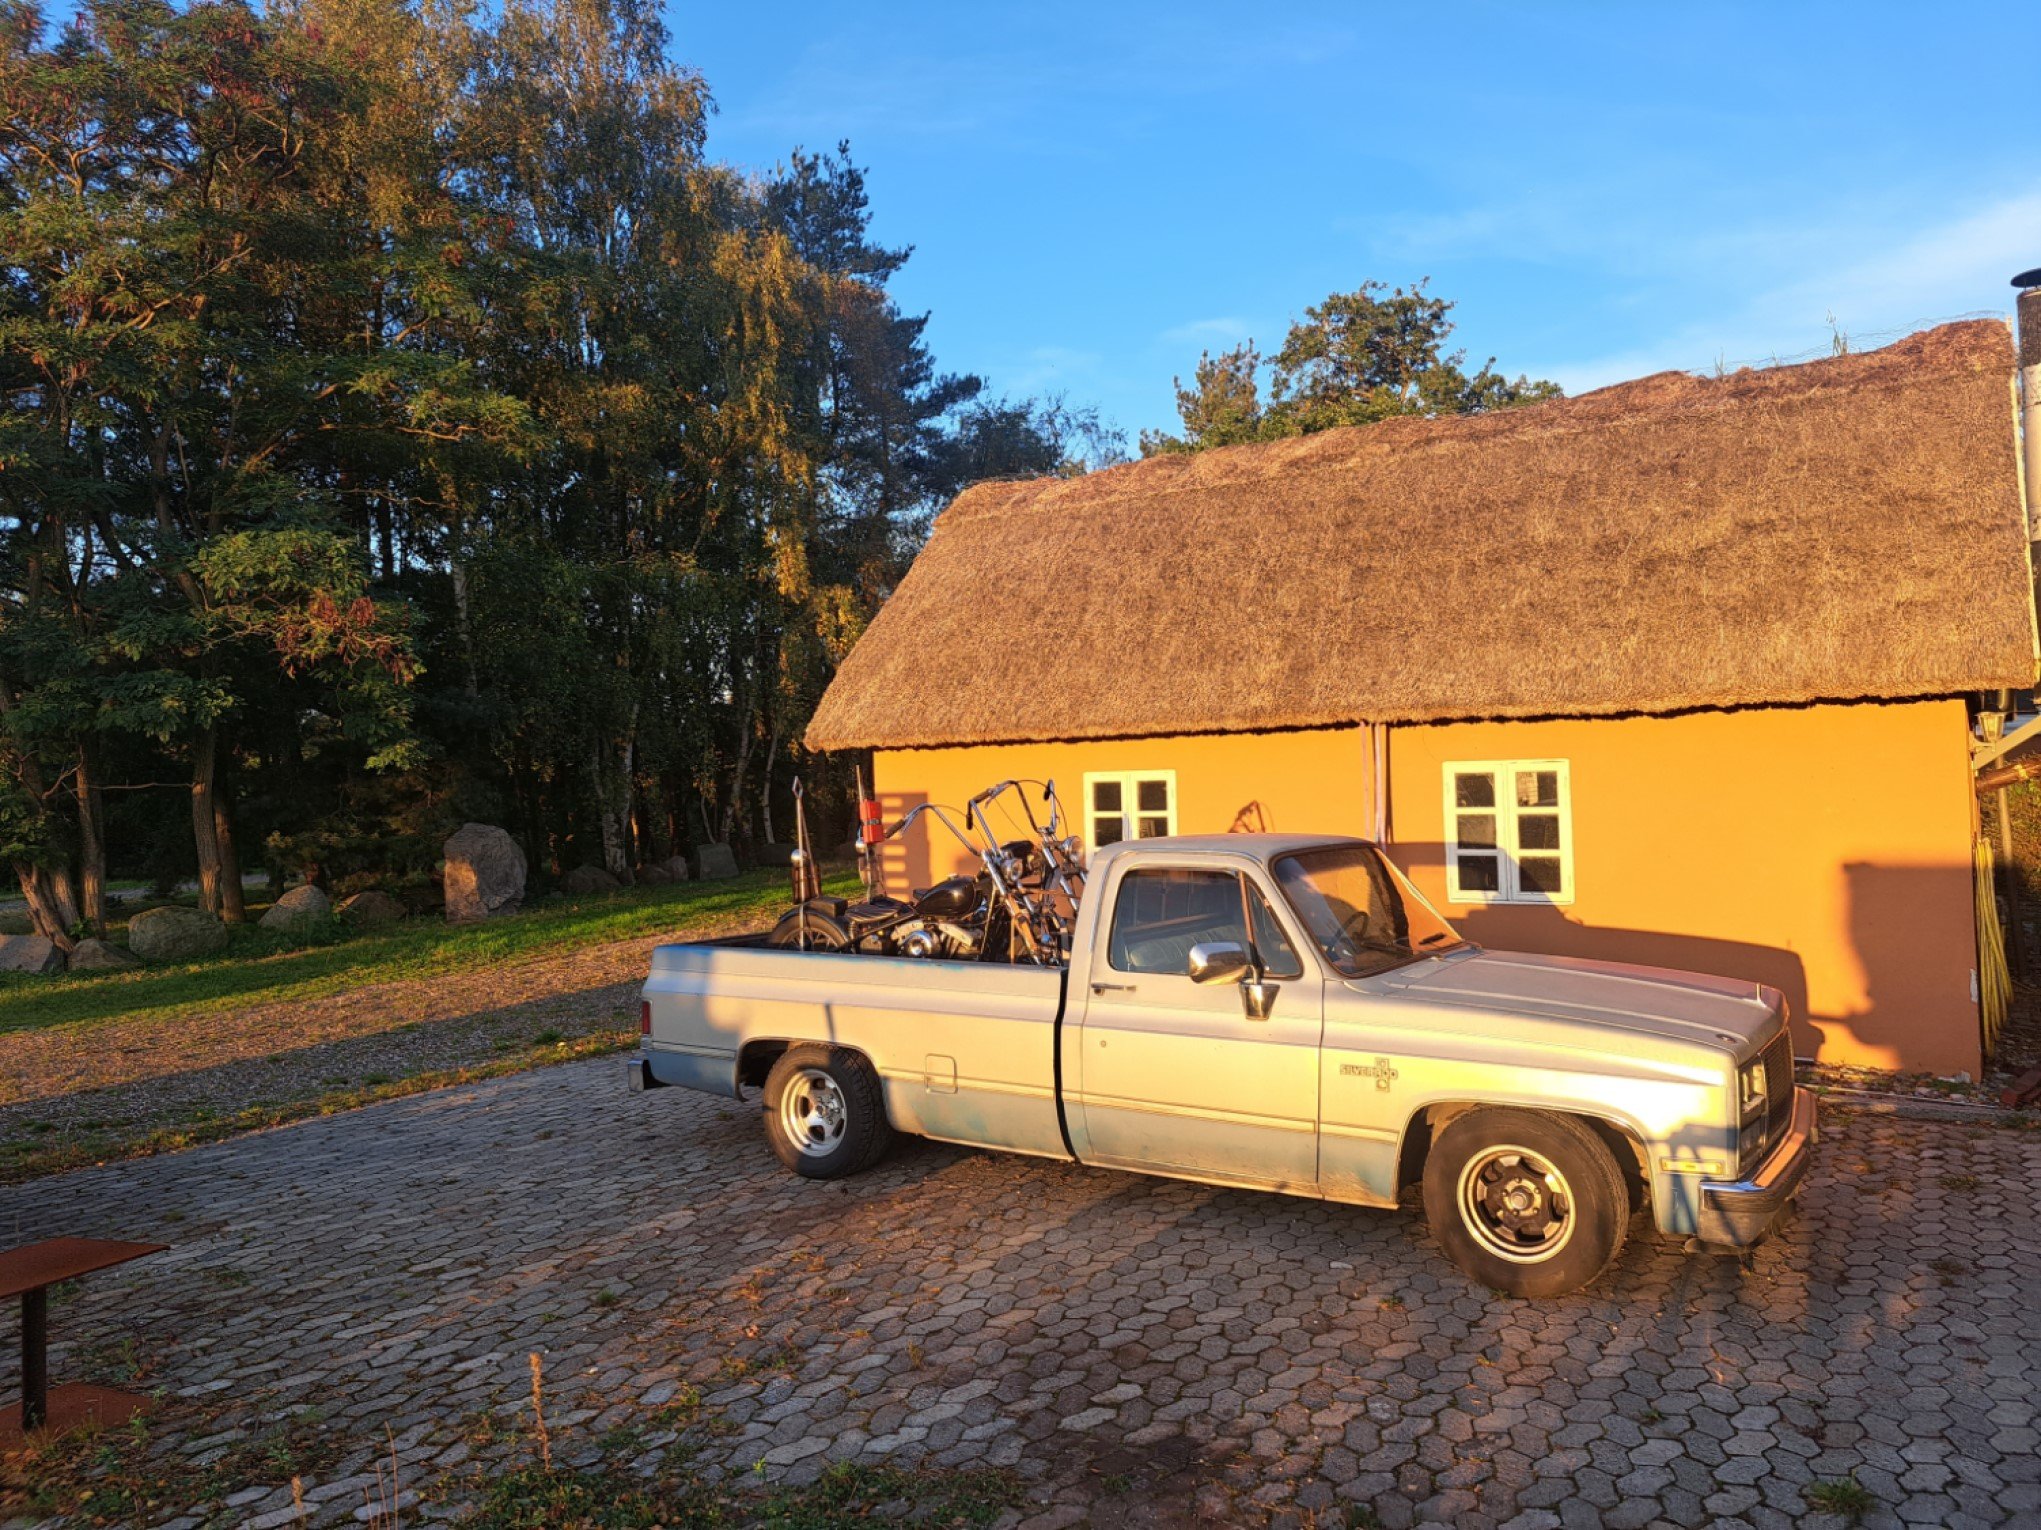
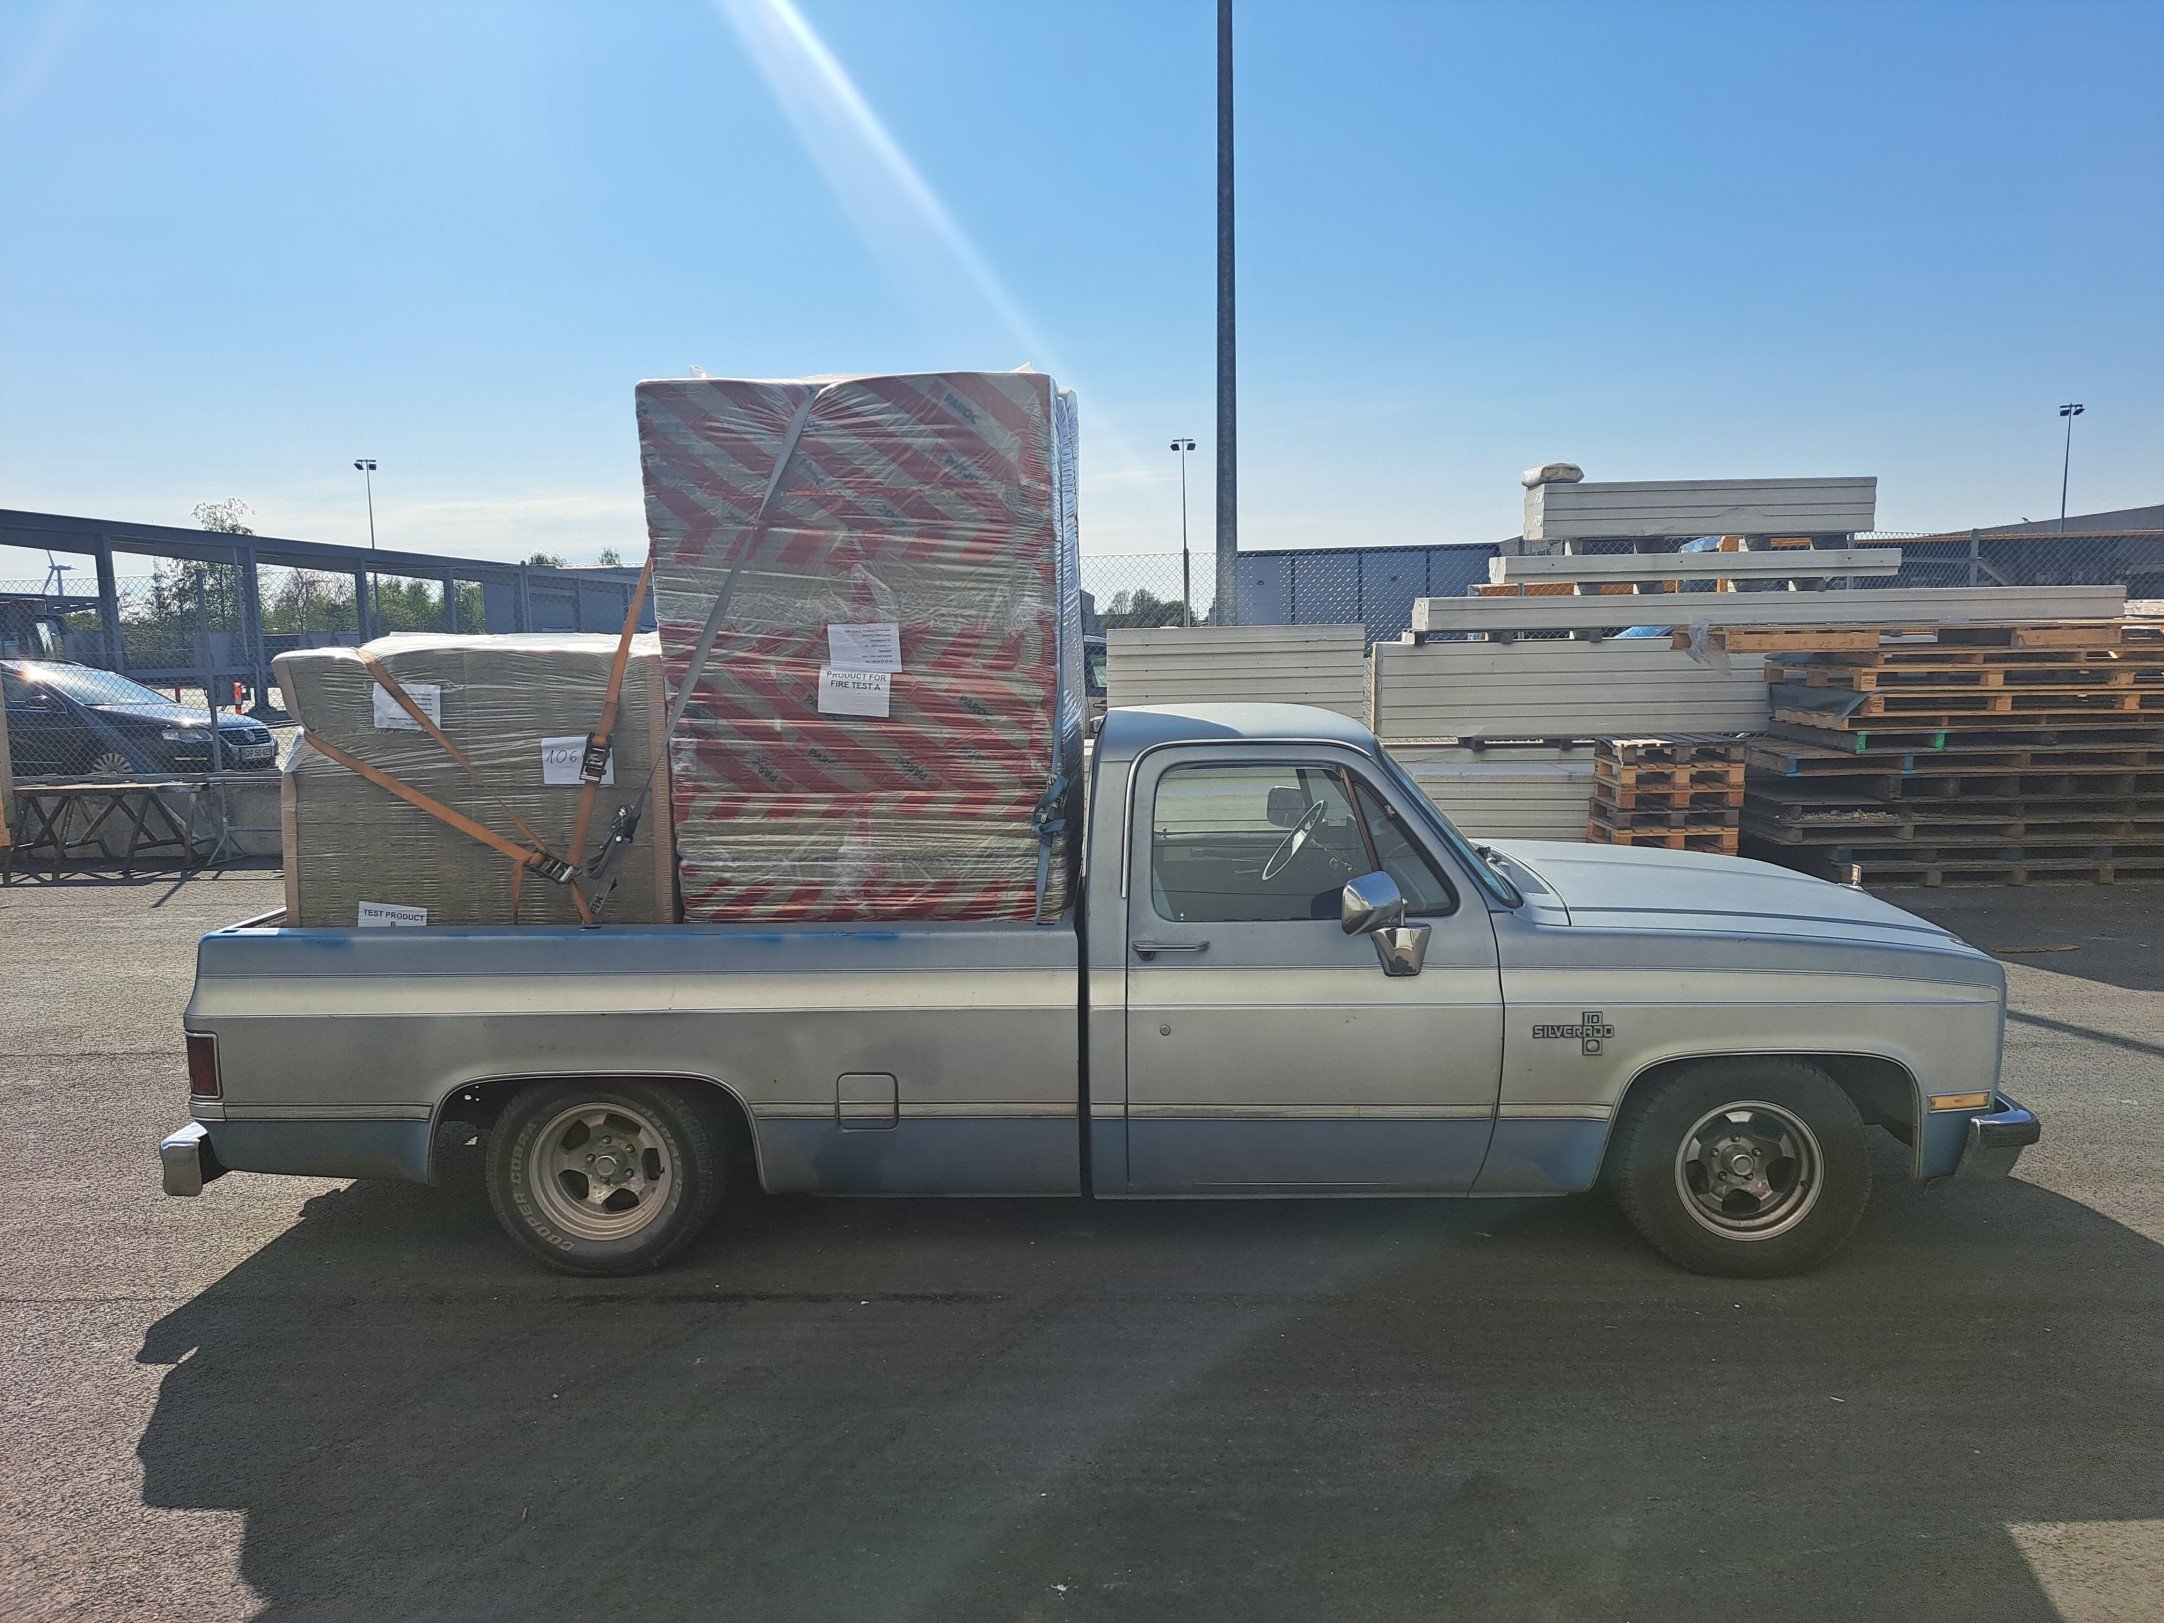
Yo, Long time no see, I figured that because im about to embark on phase 2 of this heap that I should probably make one of these. Anyway, I needed a new daily so I went shopping and found this sweet 82 long bed, I was after a long bed specifically as I needed/wanted it for my shop truck to haul choppers round with. The 350 had a sweet cam and gear drive so it sounded cool and had the requisite chop chop but the 4km/l fuel consumption meant that the daily part of the new car purchase didnt work quite so well. Luckily I had done my due diligence before the purchase and also bought a 2005 Mercedes Benz E320 cdi. Anyway @98cc hit me up and said he wanted to come visit so I put him to work and we pulled the 350 out and swung the OM648 in. Then at some point a @peteretep came and visited so we did some more work, anyway, I had a deadline, I made it, the truck got its maiden voyage with its new motor around Norway chasing a bunch of bikers, good times. Basically the rundown of the swap were: OM648 3.2l inline 6 diesel, the same one the Blacksmoke Racing dudes use. Baldurs Control Systems DID1 stand alone ECU 722.6 Mercedes 5 speed Auto with lockup OF Gear TCU 3 inch intercooler Built 10 Bolt with 30 spline axles, 9 inch housing ends and bearings, Eaton Trutrac and 3.08 gears. At this point it turned into my summertime daily and did truck things Then doing the usual facebook marketplace thing late at night I found a truck camper for sale, so of course I had to have that... At this point I found the limit of the 1/2 ton suspension so with the camper and the 6/8 drop that it has, so I had to do something, I made a bag over leaf setup in the back to help with load carrying capabillity. So about here is up to date, the engine swap is legit, it now gets 14 km/l and will happily cruise at 120 on the highway, because of the 8 foot bed it hauls all manner of things without asking, and does a skid. Discussion
1 point
-
So I always said to my wife you don't have to worry about me with other women but buying stuff of fb marketplace is a different story. fairly clean had a respray at some point has one or two spots of surface rust but is pretty solid where it needs to be and the best part WOF and reg. very original no radio interior very good and has a aftermarket heater fitted. Seller slapped a fresh clean sheet wof on and I picked it up on Tuesday. have done usual service stuff as no idea when it was done. oil/filter clutch and brake bleed ( brakes were really good but the clutch was disgusting) cleaned and repaired the heater fan rheostat so the heater fan is now working. replaced the missing handbrake handle cover replaced the worn door opening lever only issues are it is a little crunchy on the 3/2 downshift, it has the pudding stirrer gearchange so once you get used to that its not too bad. The clutch bleed made a difference to the downshifts and I adjusted the pre verto clutch to spec tonight as the stop was fine but the overthrow nut was too tight. Had to purchase a couple of larger imperial spanners ive never had the pleasure of requiring and hoping to take it out in the next few days to see if thats also made a difference. Future plans are to just enjoy it with the family, could benefit from a matching pair of front tyres and need to get seatbelt mount put in the back for mr 2yo. maybe do extractors and a twin hs2 conversion to give the old 850 a bit more pep but it runs very well as is. have ordered the plates in black and a refurbished steering wheel.
1 point
-
I’ve got all my parts and car painted! finally. Due to limited space, things have to get painted in stages They’re given 24 hours at least to cure, then I carefully tape some thick cardboard on the edges, and set em aside. Until a door fell off the one shitty stand I have, giving it a small dent in a corner and other small damages It happened to a few other guys at the panel shop I used to work at, never me, but everyone gets a turn eventually Theoretically it’s a bit naughty to use filler as it can map out the repair and show through the paint, I should’ve used glaze over top but was in a hurry Also fixed up the fry up on my bonnet, i ended up being able to feel the repair due to the many layers of paint so put on some glazing putty and sanded it smooth. This turned out well. Sorry no specific pics of the result I got the paint on pretty well, I gently heated it up putting the tin in a bucket of hot water as recommended by Pete’s Hobbies on YouTube and it helped a lot it went well: but I did have an issue with water in the paint because I didn’t check the filter enough. This was mainly in the bonnet.1 point
-
Ive been in negotiations with a north island osgc to use a spare bike. Aside from that its just a few plane rides, and a few nights accommodation to book.1 point
-
I think Dave Strong rallied one years ago. He now has a more modern Jazz/Fit with a v6 in the boot1 point
-
That would be the ultimate dream but not atm. I'm looking forward to working out all the bolt on Honda lego bits that work with this.1 point
-
hello. while i was trying on the full fearing i noticed the bmw headlight had a rattle. had a closer look at it and found the reflector had broken. so i shot out to @Kimjon house and put some bird shit on it. i mean, no one will ever see it other than you guys reading this post. so you guys can judge me. quickly slapped that back together and had a couple mates keen on a ride the next day. bike went well and i noticed not long before the above image i could hear something rattling. nothing to bad but annoying me. had a closer look at it was my front fender, two of my bolts had come lose from not been locnuts or having loctite on them. couple of cable ties as on the road again. you can see my new black cable ties above. took it to the Hamilton motorcycle club for their monthly club night. and done some more running around and while the small rides i had noticed my lights flickering. was thinking it was a voltage issue. so started digging around and found a loose wire. slapped a plug on it and that didnt fix it so i started looking at voltage regulators i was talking to @flyingbrick at this stage and he had a manual down loaded and done some reading. said i had low oil pressure that was causing the flickering. so time to check the oil quantity. drained it out and realized it was pretty low :/ i only drained it out as i couldn't see the level through the site glass. so pulled the side cover off to see if i could clean it. queue my daughter taking photos of me while trying to keep her occupied lets see what i can get in here and clean it thats a bit cleaner back on and some new oil time to take it for a ride. thought id go see @Geophy and he wasn't home so caught up with @Dogwatch, while i was there i realized i lost my oil filler cap tried to trace my ride back and kept an eye on the road to see if i could see it. but i had no luck, just covered my pants in oil. hit up @MostlySuzukis to see if his gs1200ss had the same thread as mine. he had a couple other bike engines at home that were also the same as his gs1200ss so shot around there and he gave me a spare. not exactly the same as the old one but it is fixed and gets me riding again. speaking of riding. got out of work early and hit @MostlySuzukis up to see if he was free. headed over and headed south. headed down the west side of the waikato river. stopping off at a few good spots on the way down over all a good ride started using riser app to track my rides. is a really good app, tracks some good stuff and can offer different roads for rides that you possible haven't tried before on the way home i also booked it in for a wof check, be good to see what it would fail on and get myself a list together. over all 10/10 motoring keen on some more bigger bikes1 point
-
6 stud wheels are the best. Literally that extra stud moves the decimal point in the price tag over at least one place. Its insane how worthless they are.1 point
-
Yep, I hear you guys. I think it's the quality of the components that they are using that lets them down. An example is the IAC which is a GM part out of an 80 something Camaro. Would have been okay if they had used a genuine AC Delco version instead of a cheap no name brand. I could have thrown a whole heap of cash at replacing every cheap component with good quality OEM equivalents, but I figured it was time to cut my losses and run.1 point
-
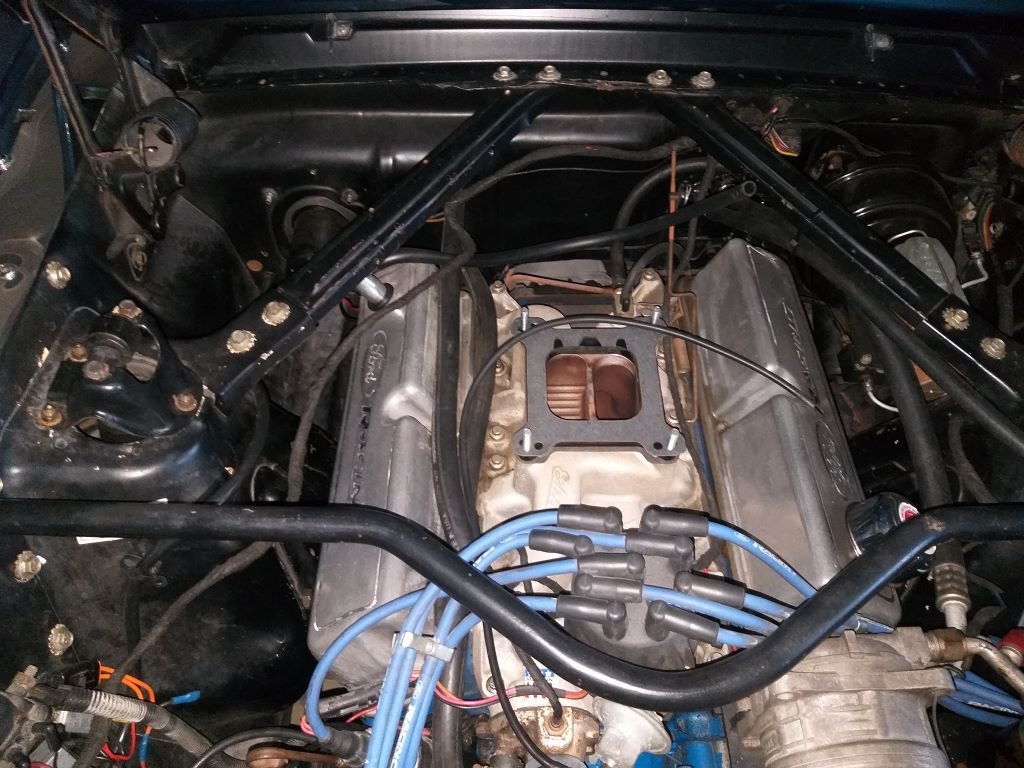
Long time no update on the old Mustang so here goes: So, the EFI was working like a champ and then it wasn't. All of a sudden, no start, just puffs of black smoke on cranking and a strong smell of fuel. Checked the pressure gauge on the little swirl pot. Fuel pressure was building up normally on ignition but dropping to zero on cranking. Pulled the air cleaner and she was dumping fuel like no tomorrow. Faulty injector methinks and of course the system was just out of warranty. Must say that I'm a bit over this system, just too temperamental in my opinion. Pulled it all out over the weekend and chucked it on Marketplace at a hugely discounted price, just to get it out of my sight. 944 clicks later and the system has just headed off to its new owner in Victoria. I was totally honest with him about the issues, but he seems unfazed, so I've got to admire his bravery. So, it's off to the dark side for me with a refurbished Holley 450 CFM featuring sometime in the near future.
1 point
-
Anyway, routine maintenance:
1 point
-
It took fucking ages to find a pic of Sir Pete. Such a dark horse.1 point
-
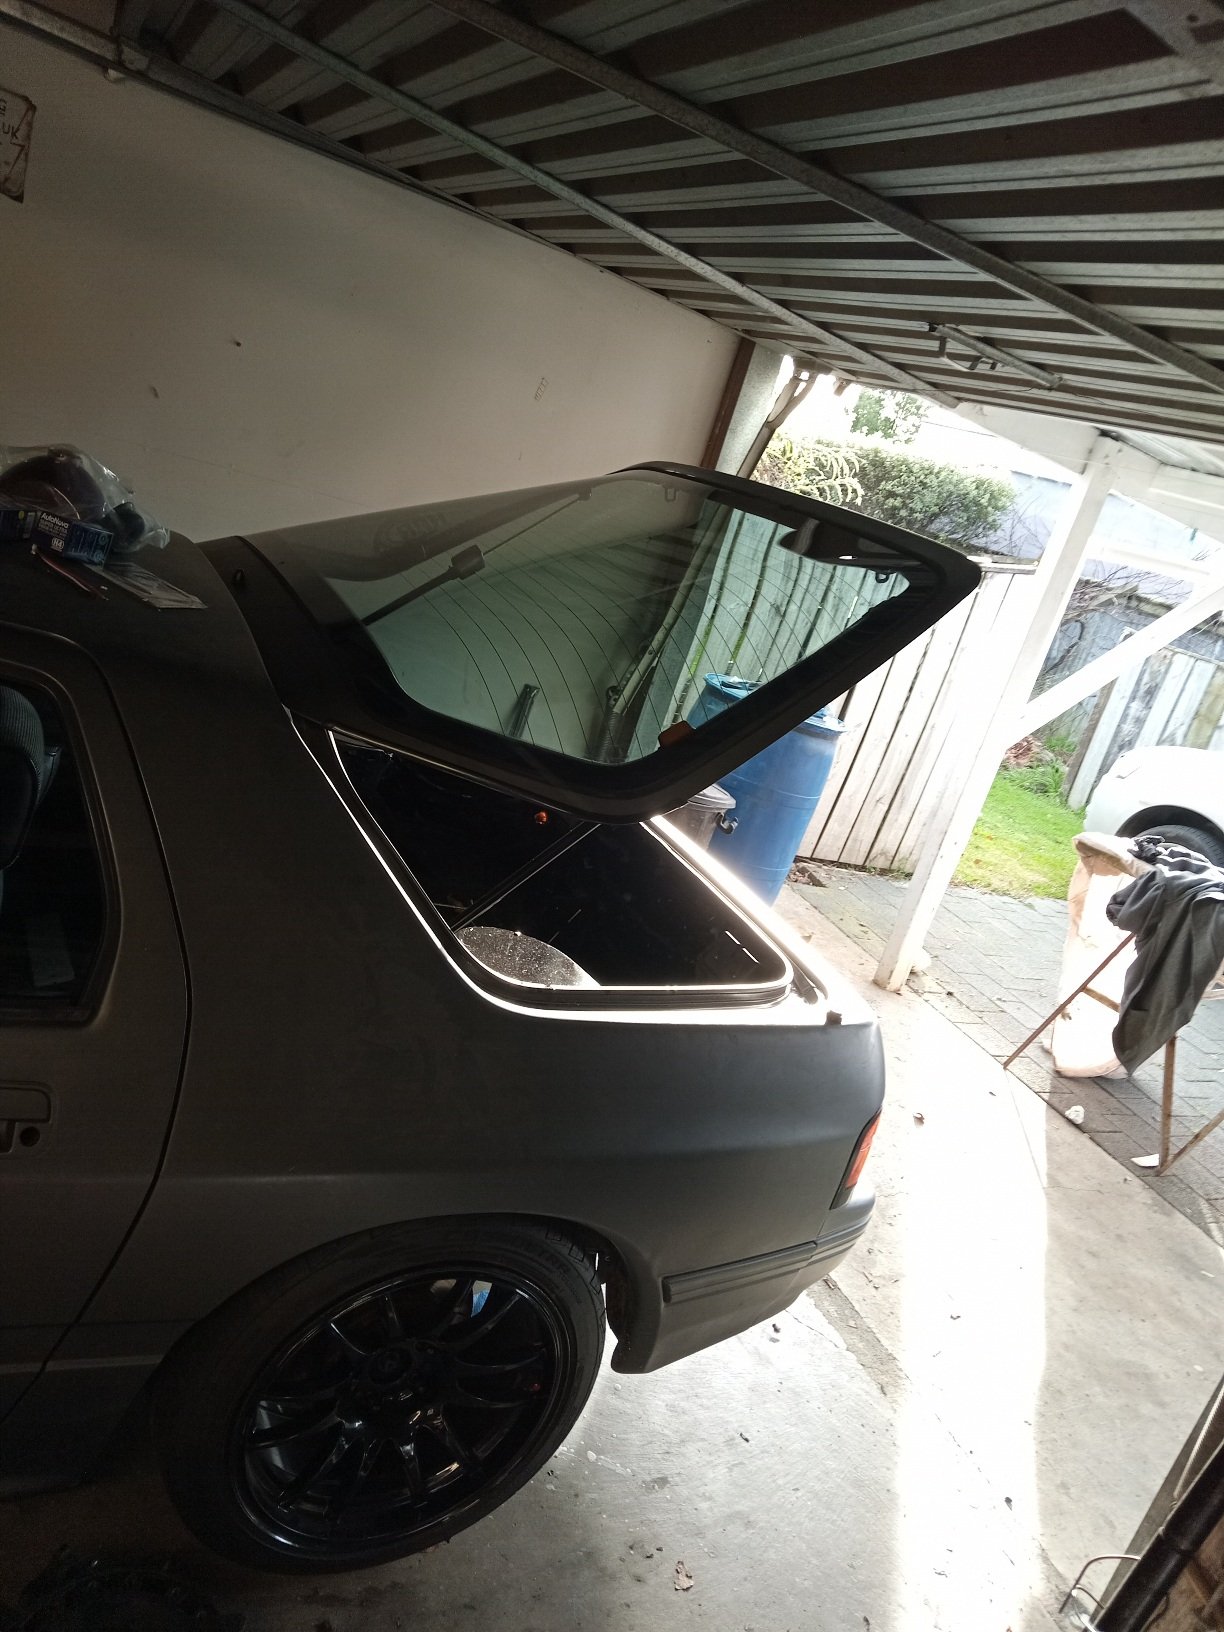
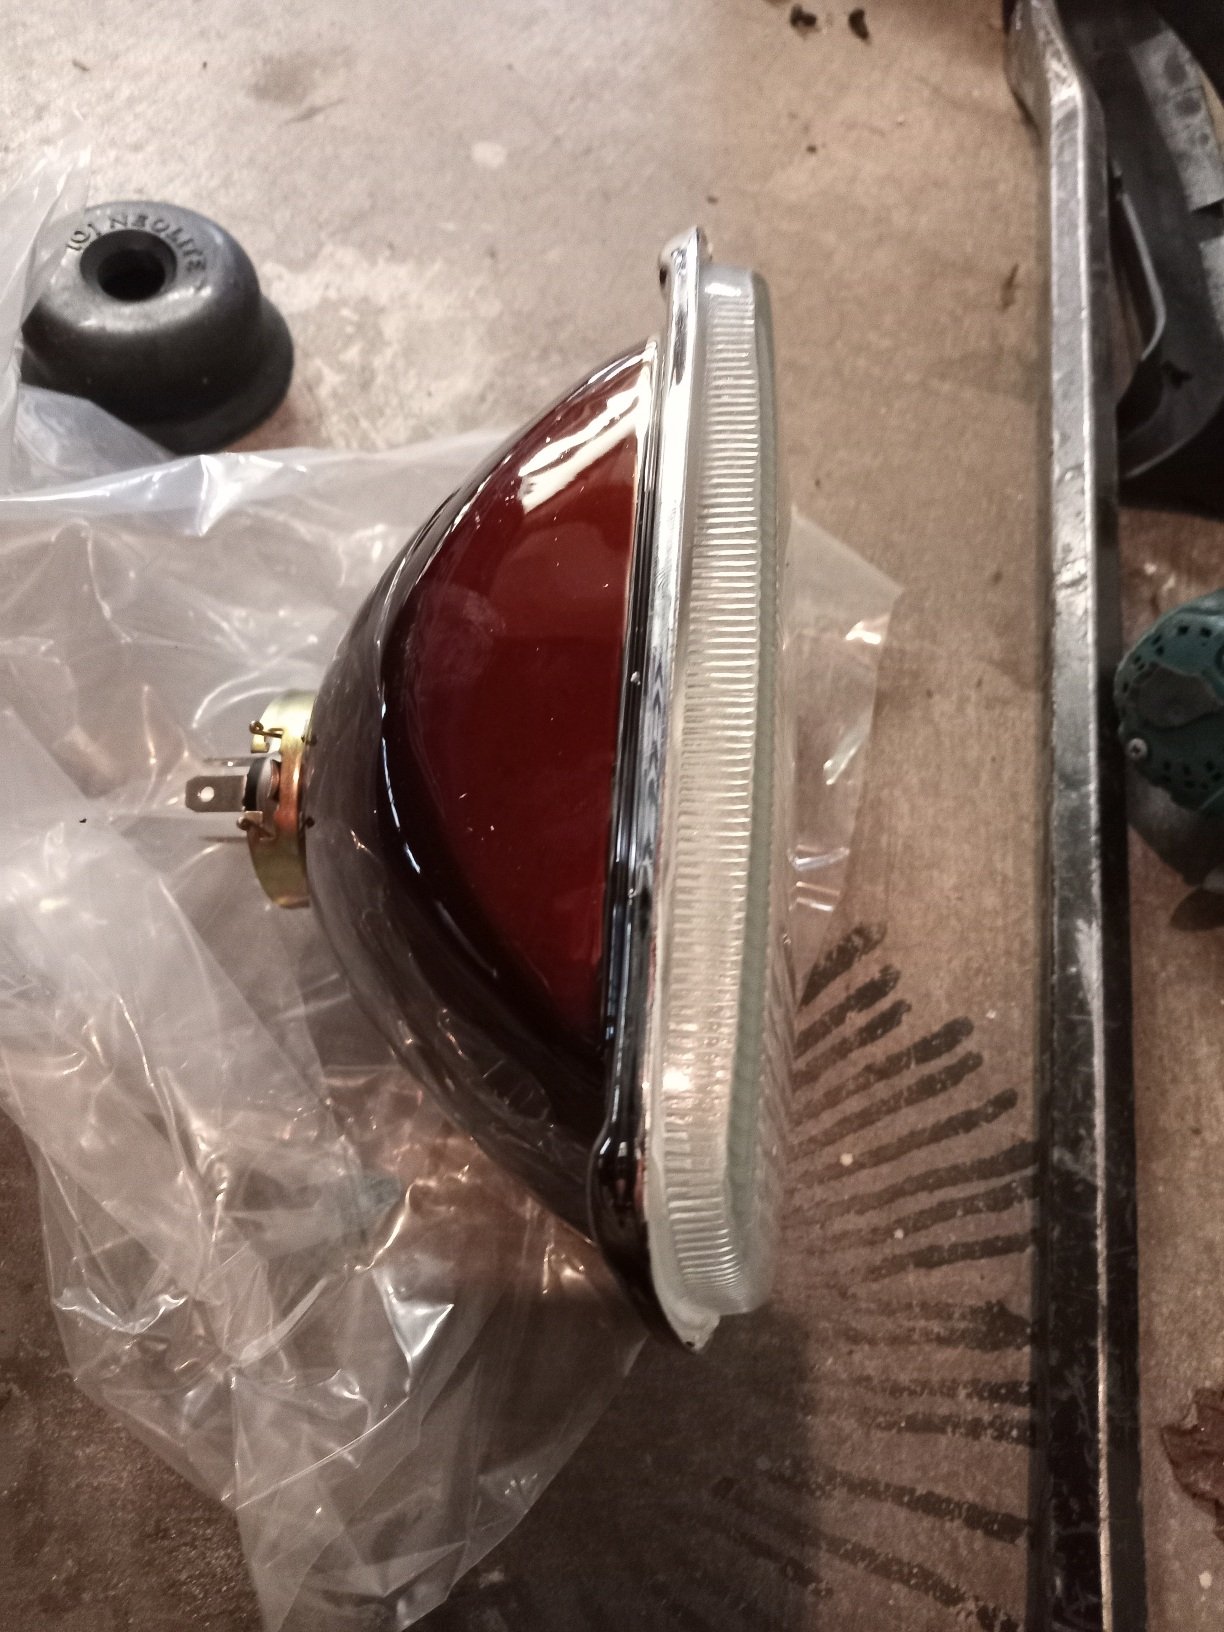
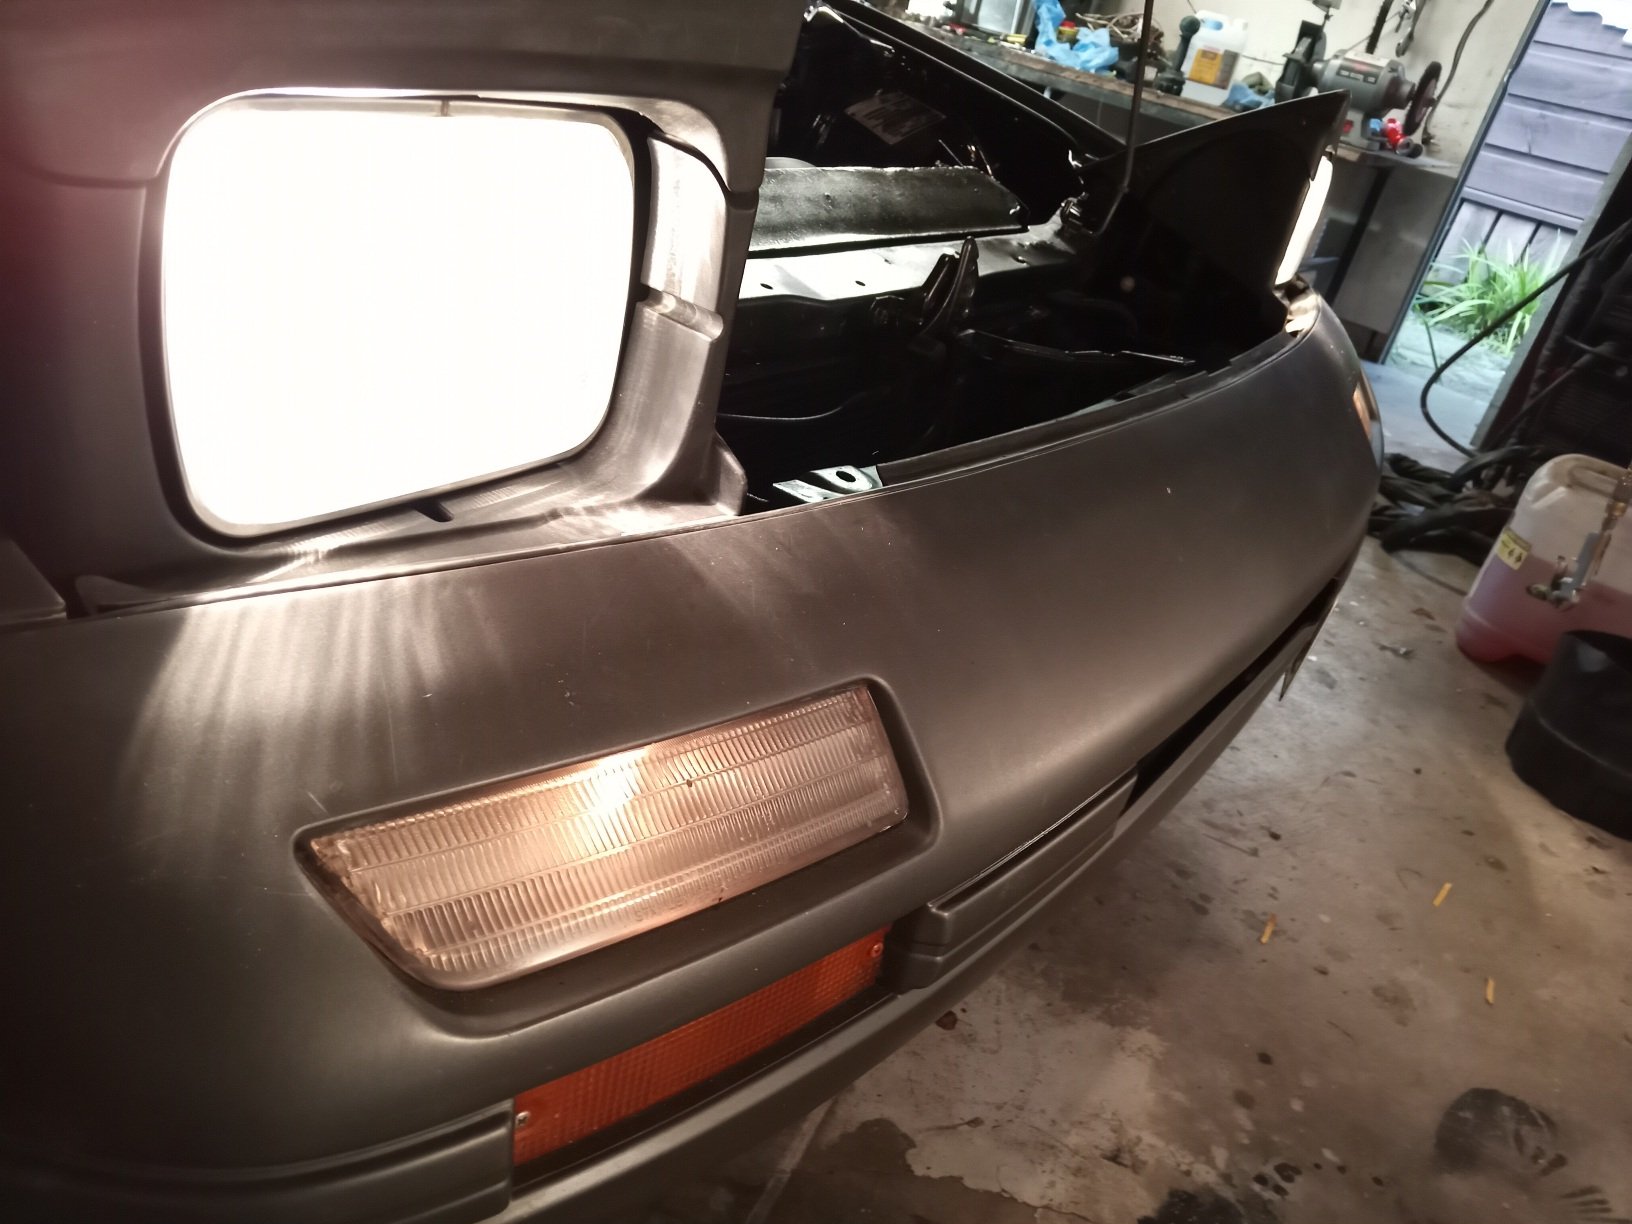
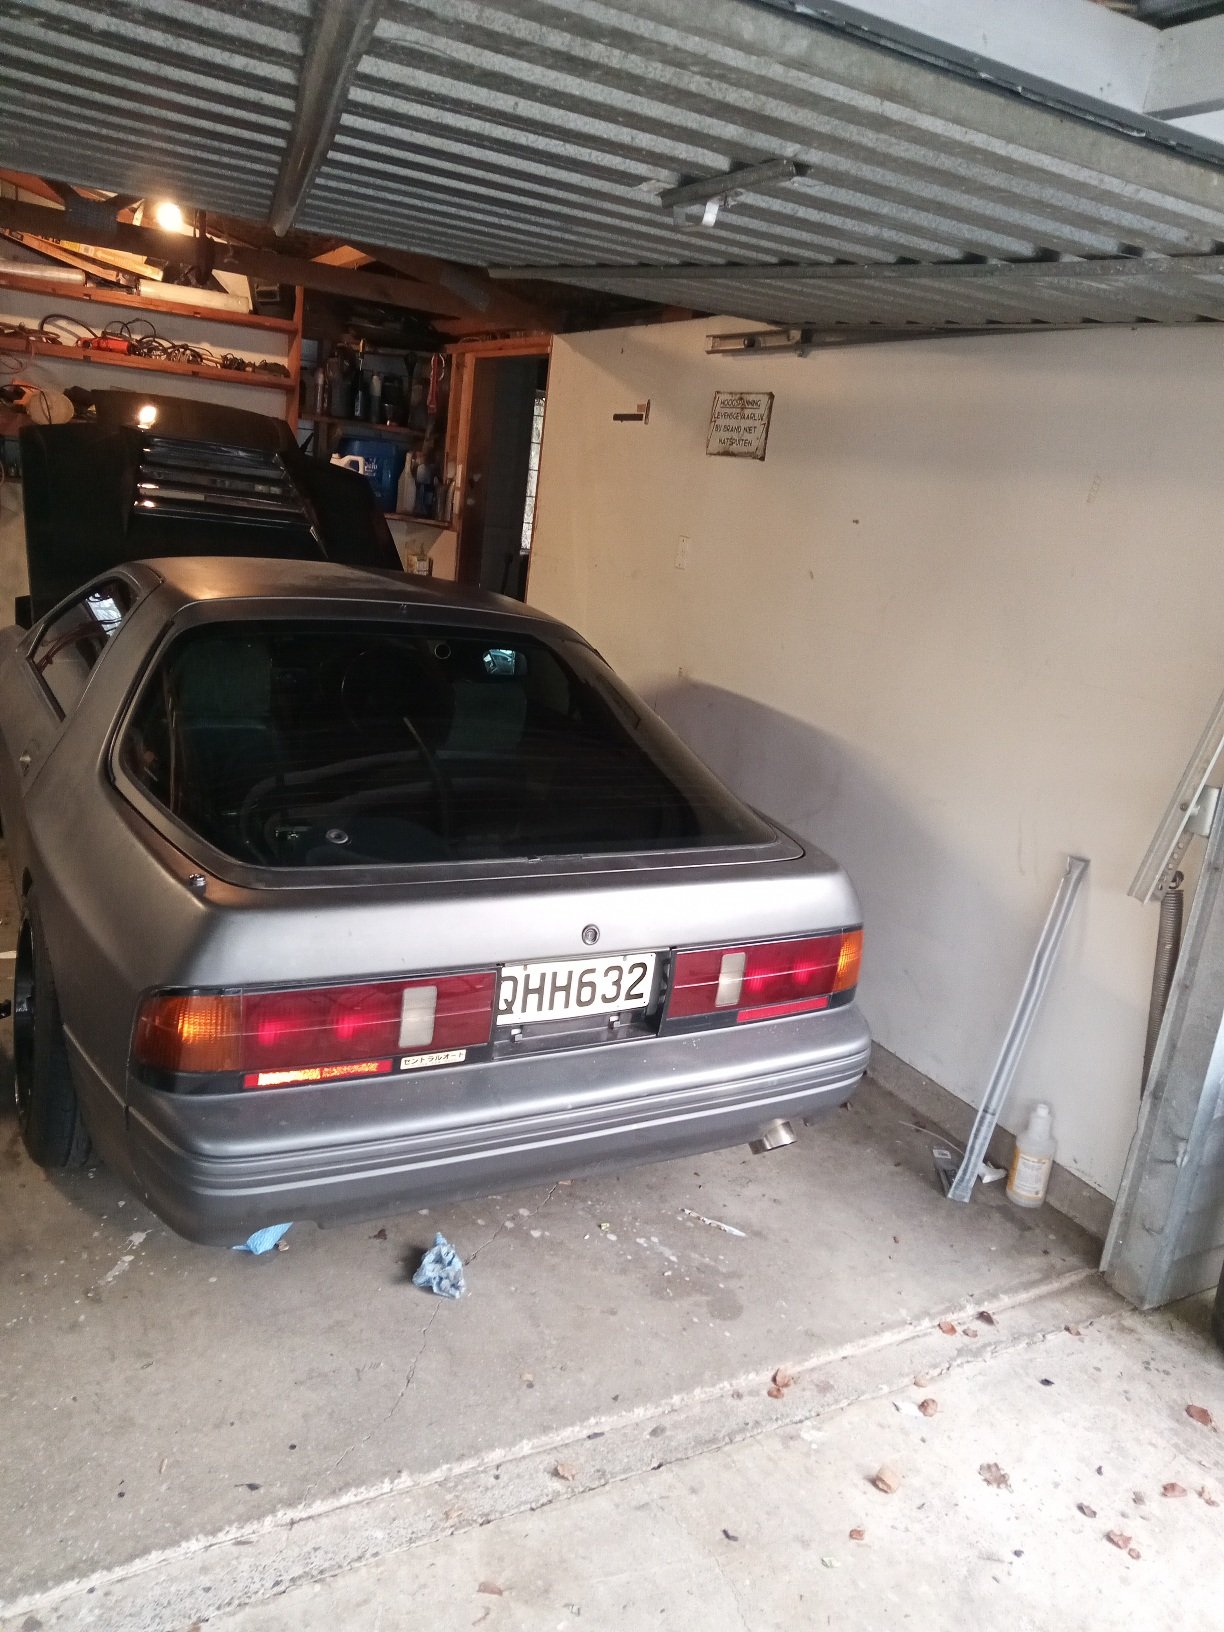
Got new hatch struts from rock auto, only needed one on passenger sidesuch a relief having that stay open on its ownlights converted from sealed beam to h4/replacable bulbs... this fixed a blown one and easy to change in future...tinted side windows myself and got hatch tinted by dr tint for 90$, pretty good price i think. 35% og mazda seals
1 point
-
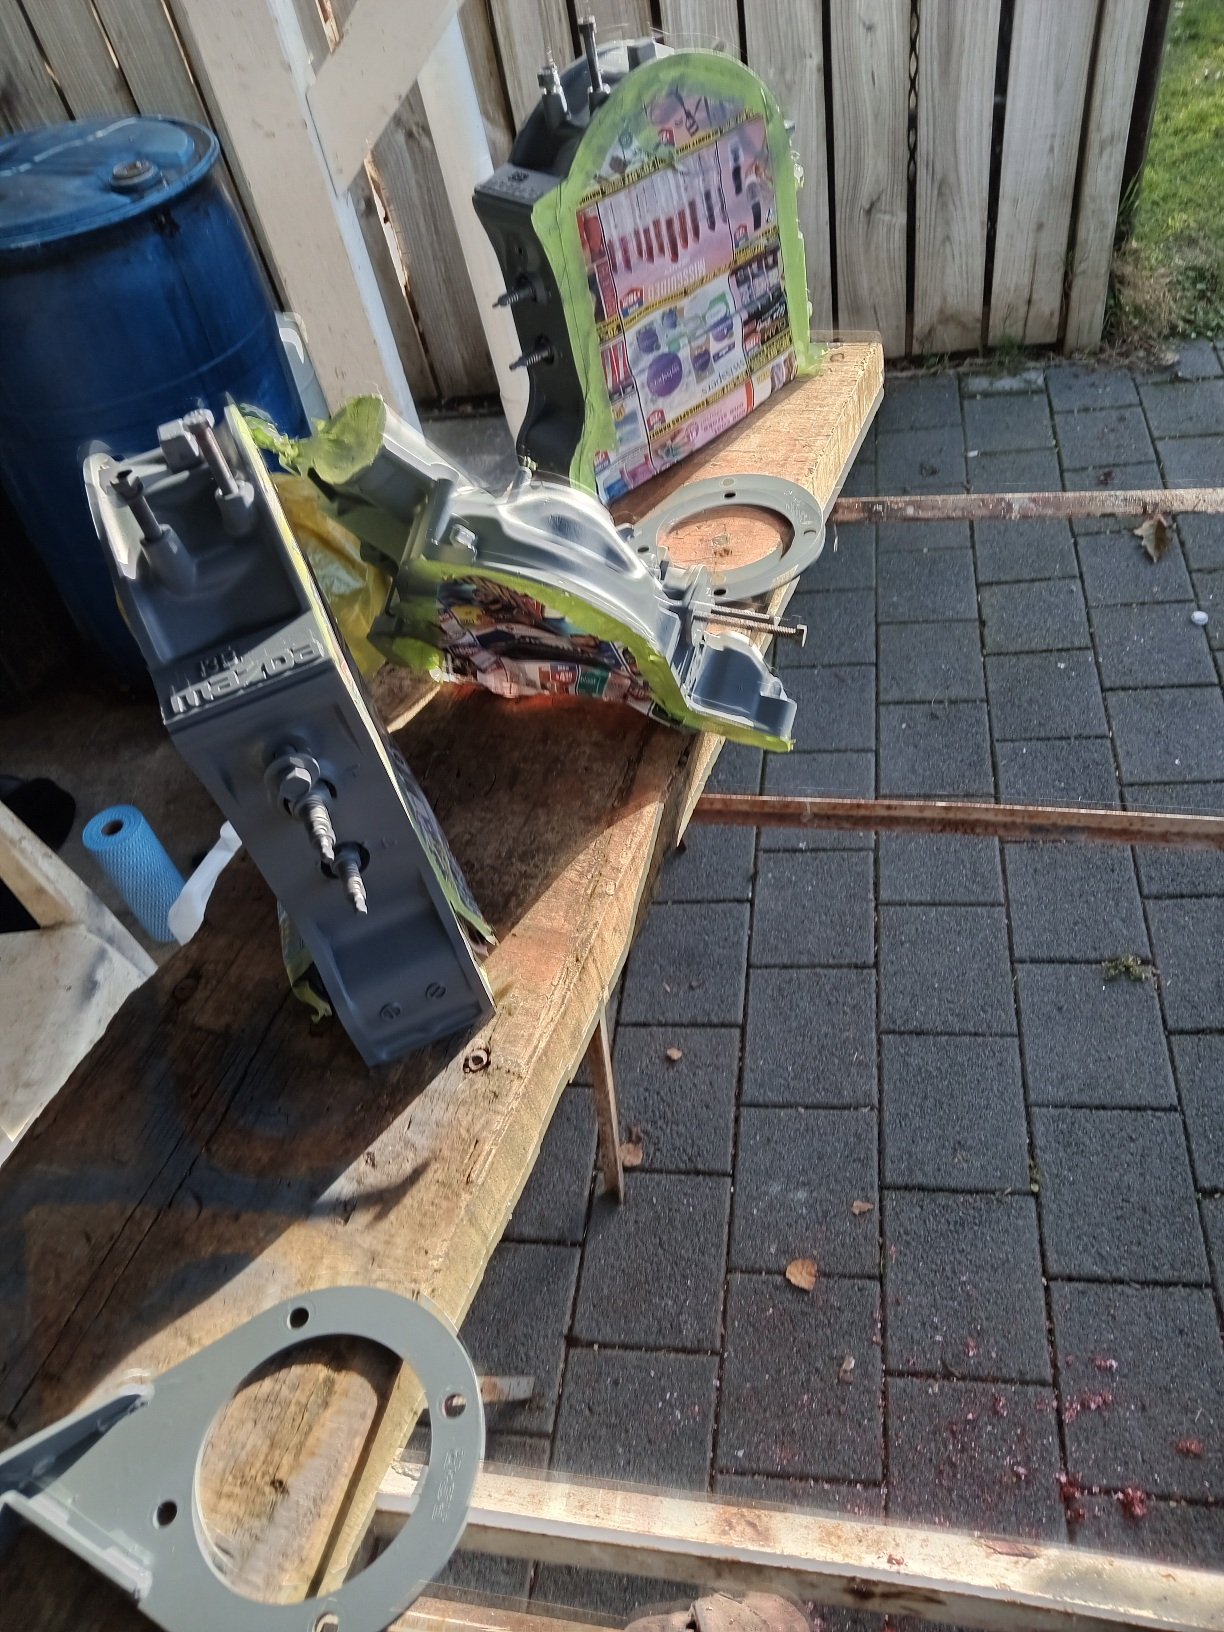
decided im going with a blue theme on this one, stripped some partsetch primedcaliper paint, hope it stands up to the heat...
1 point
-
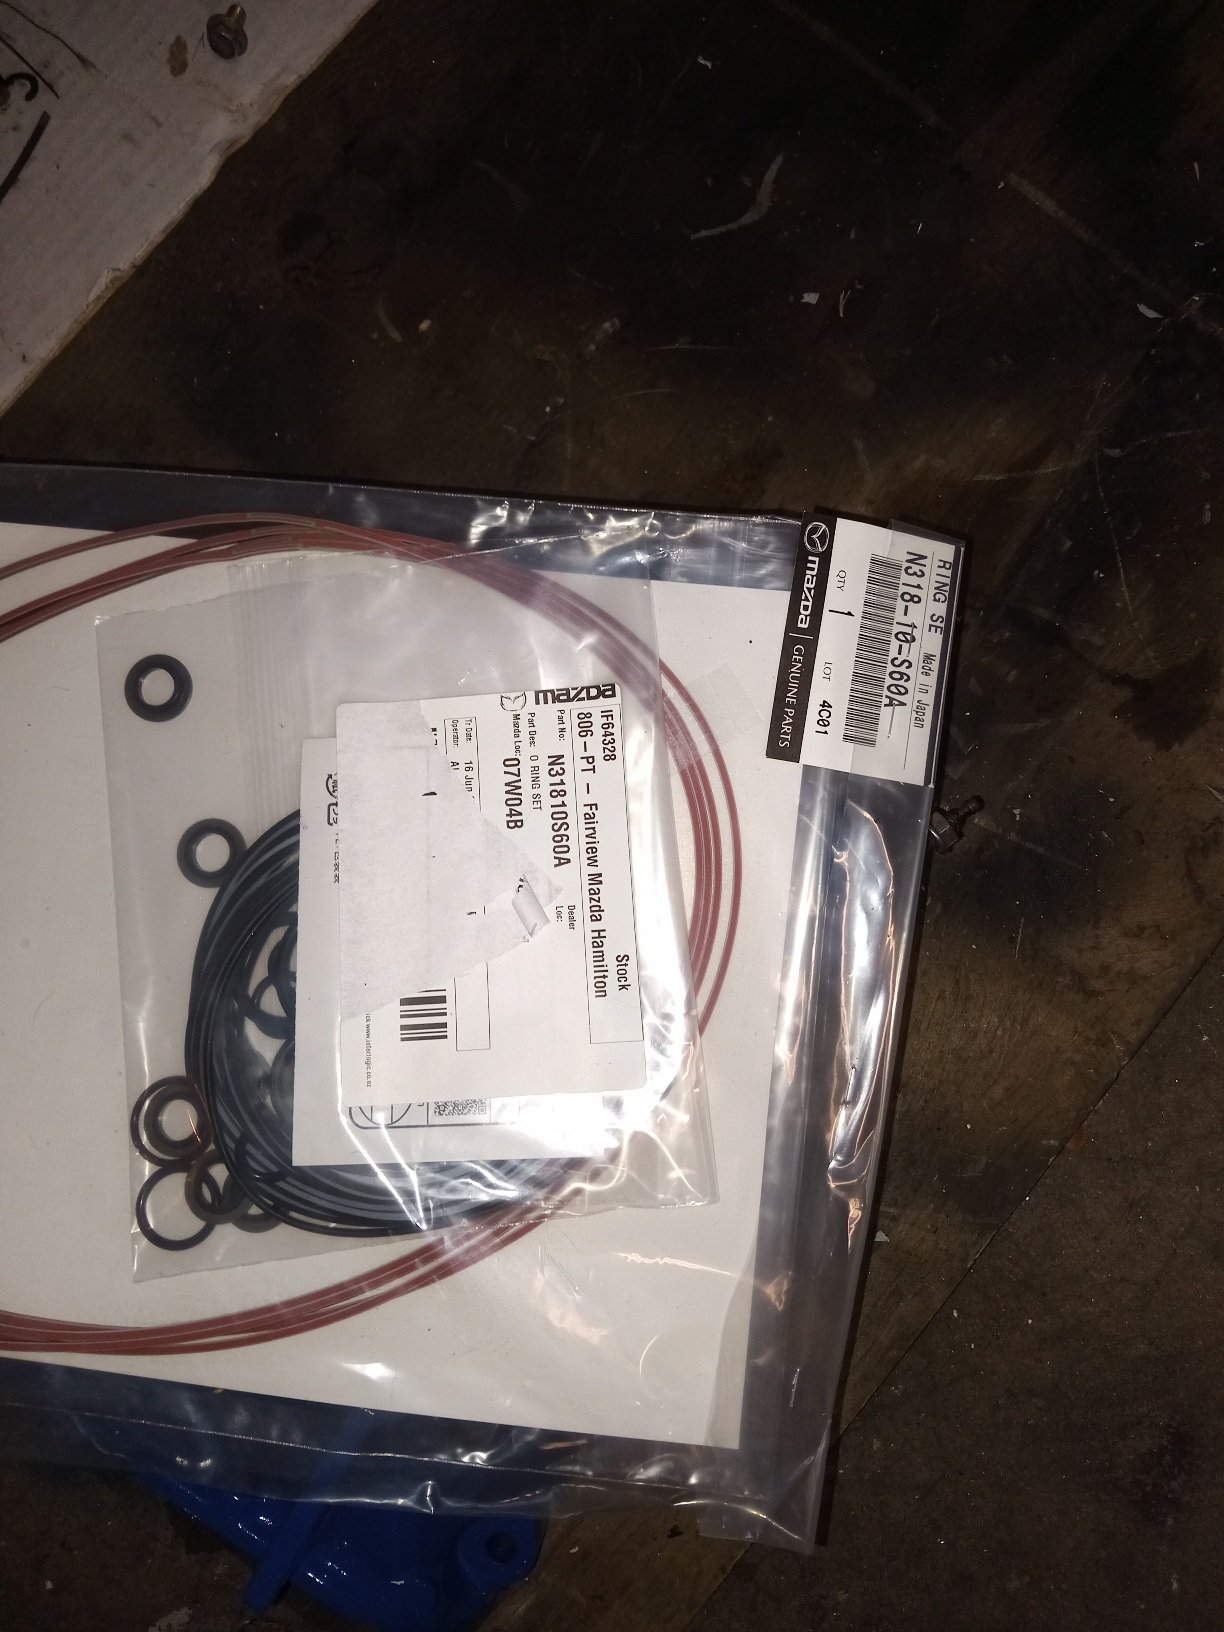
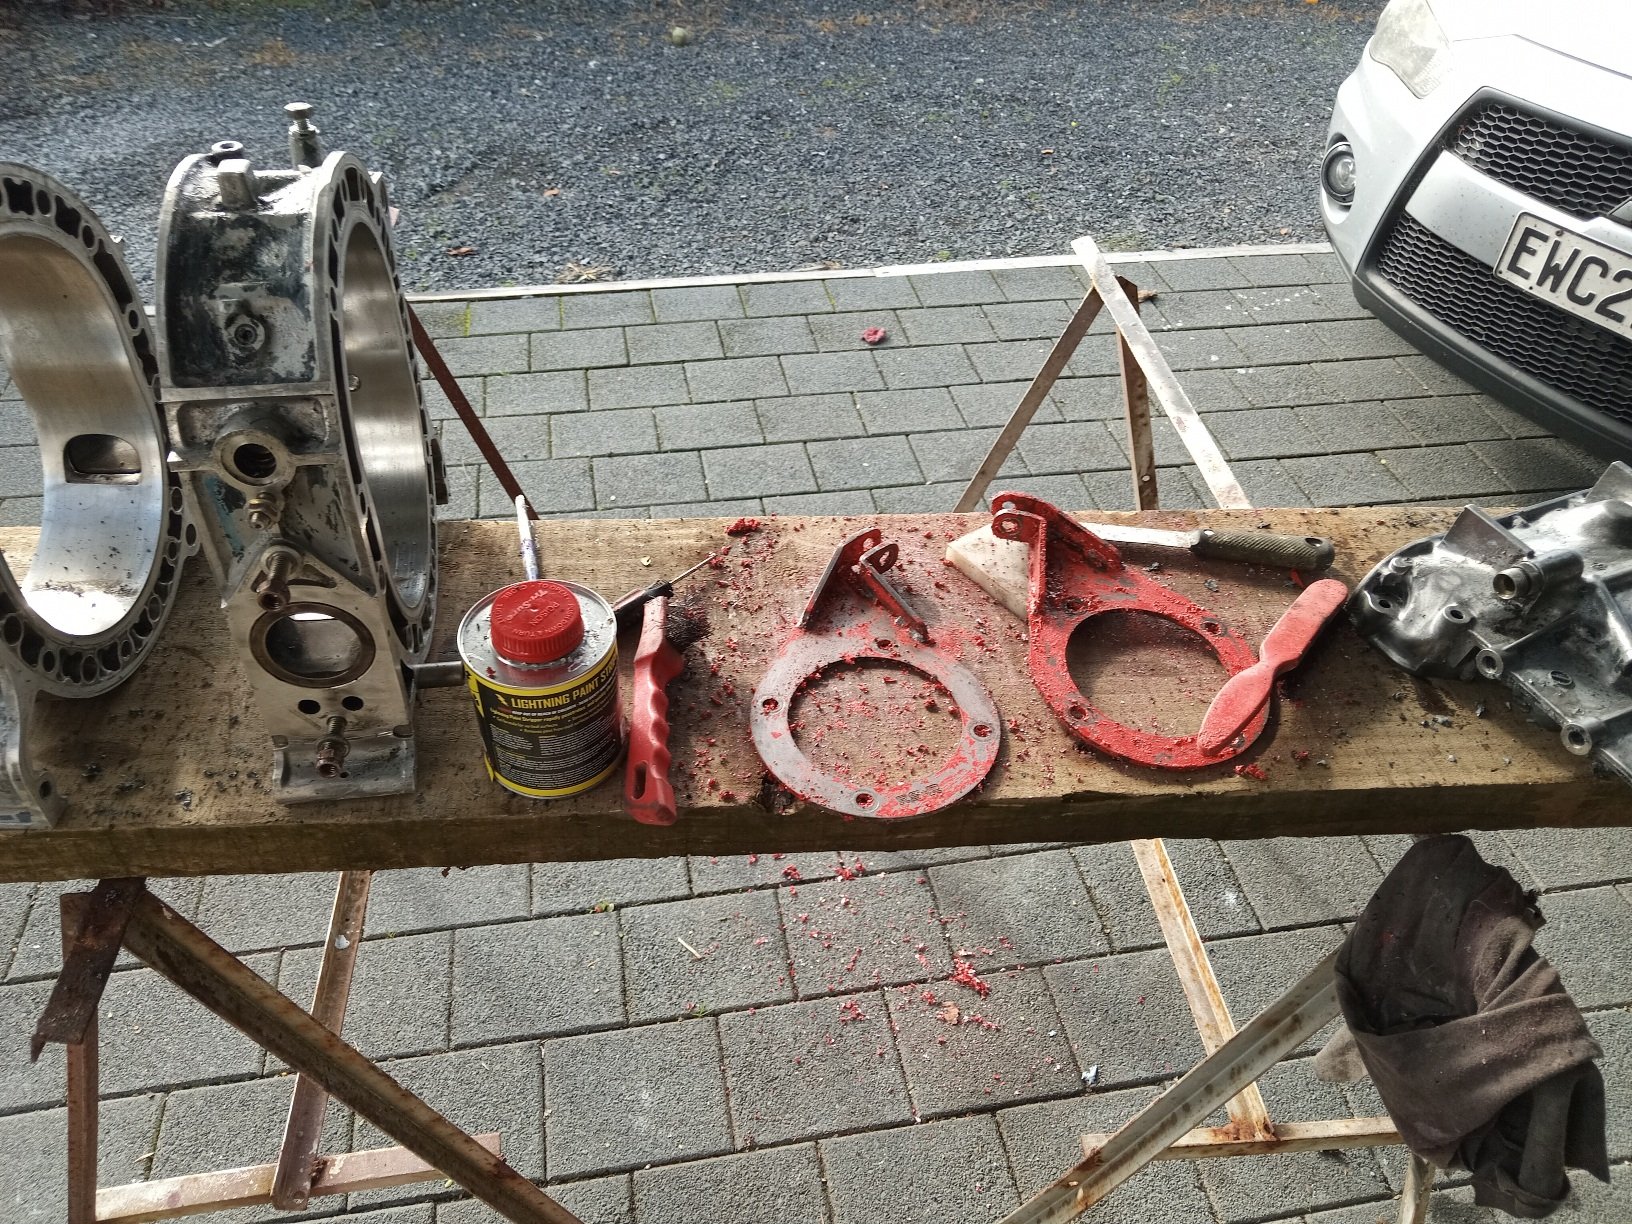
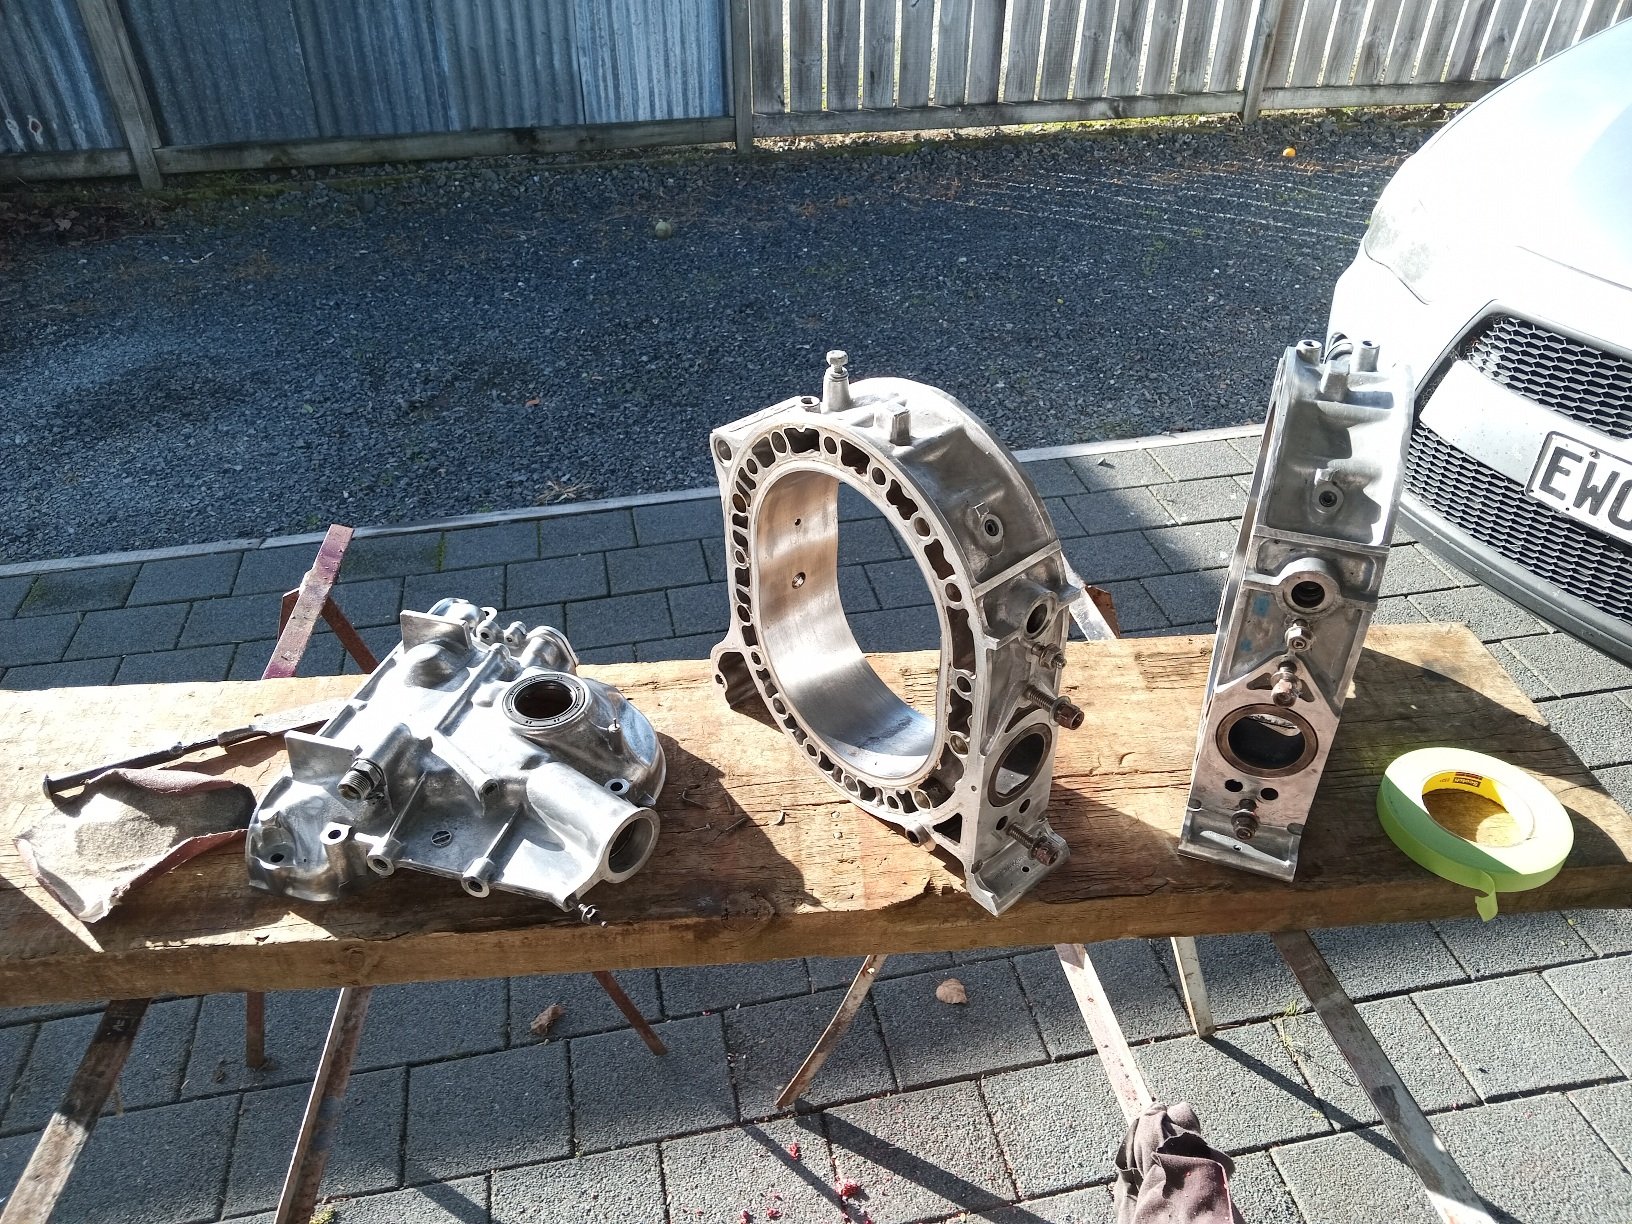
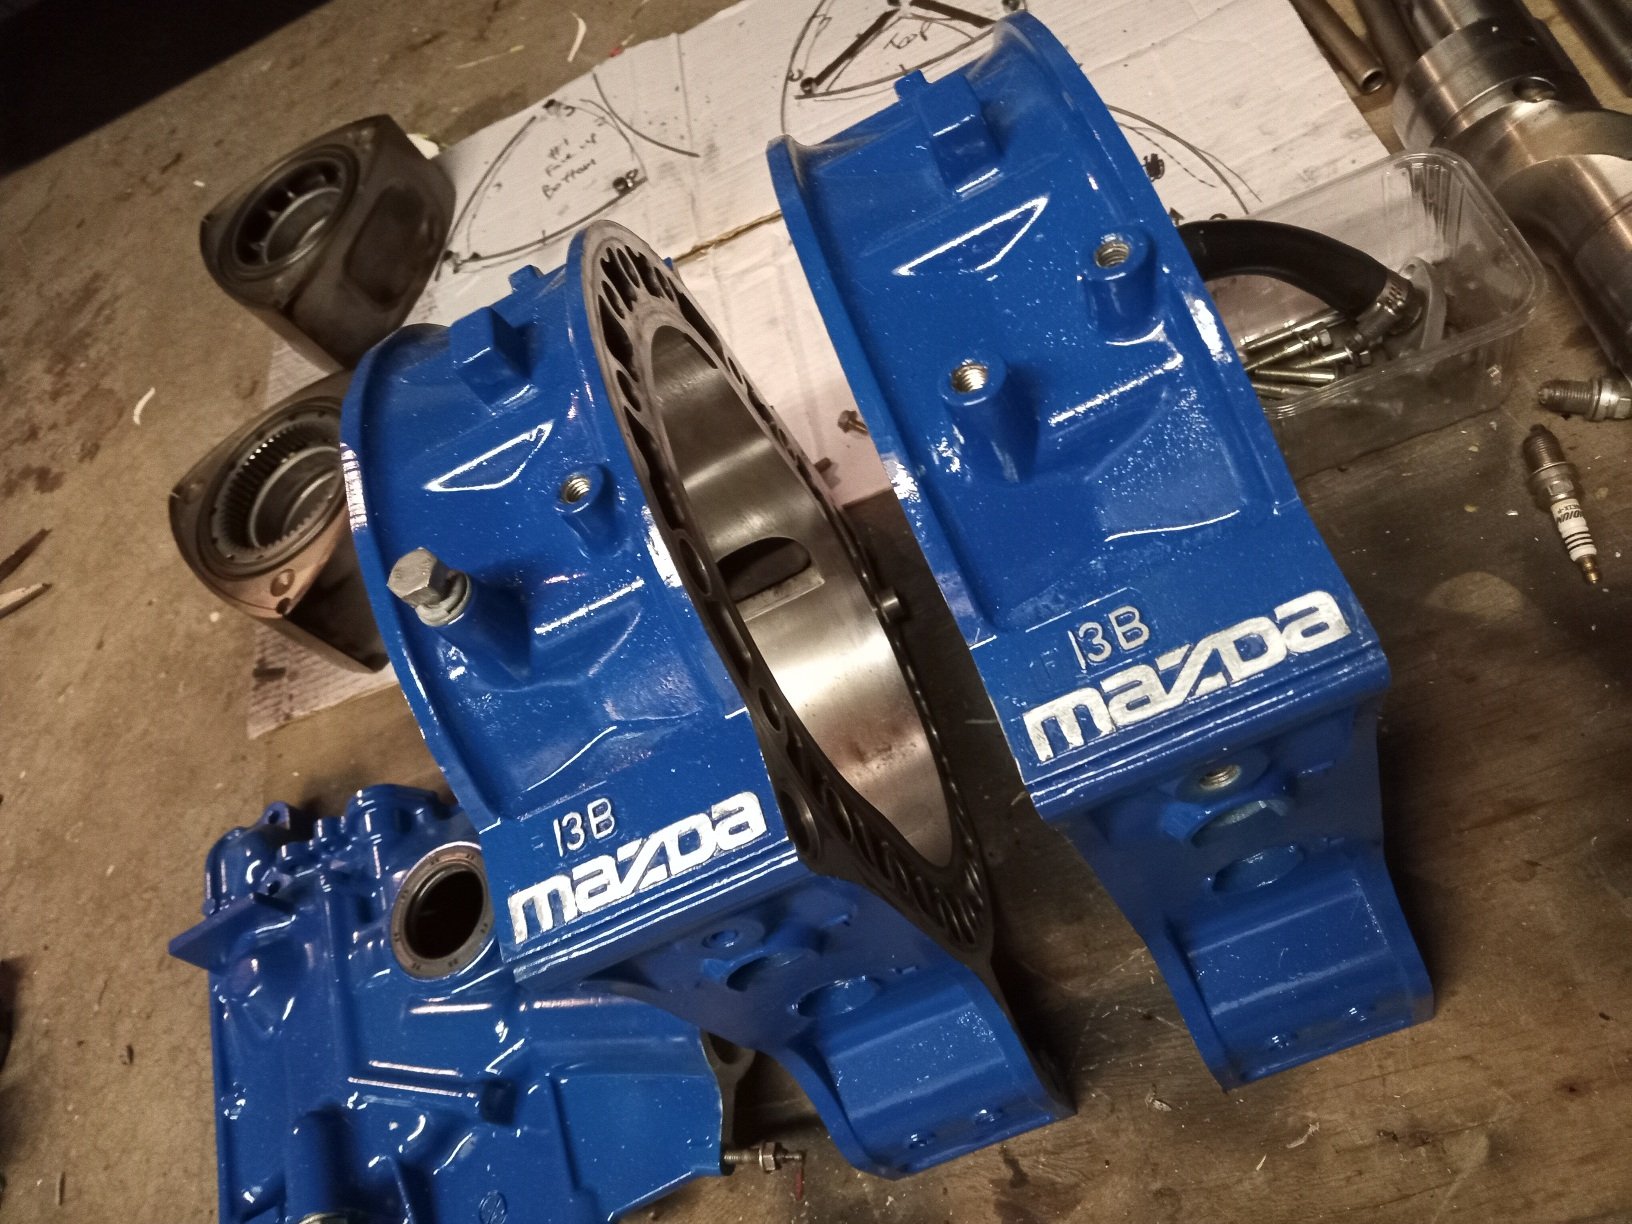
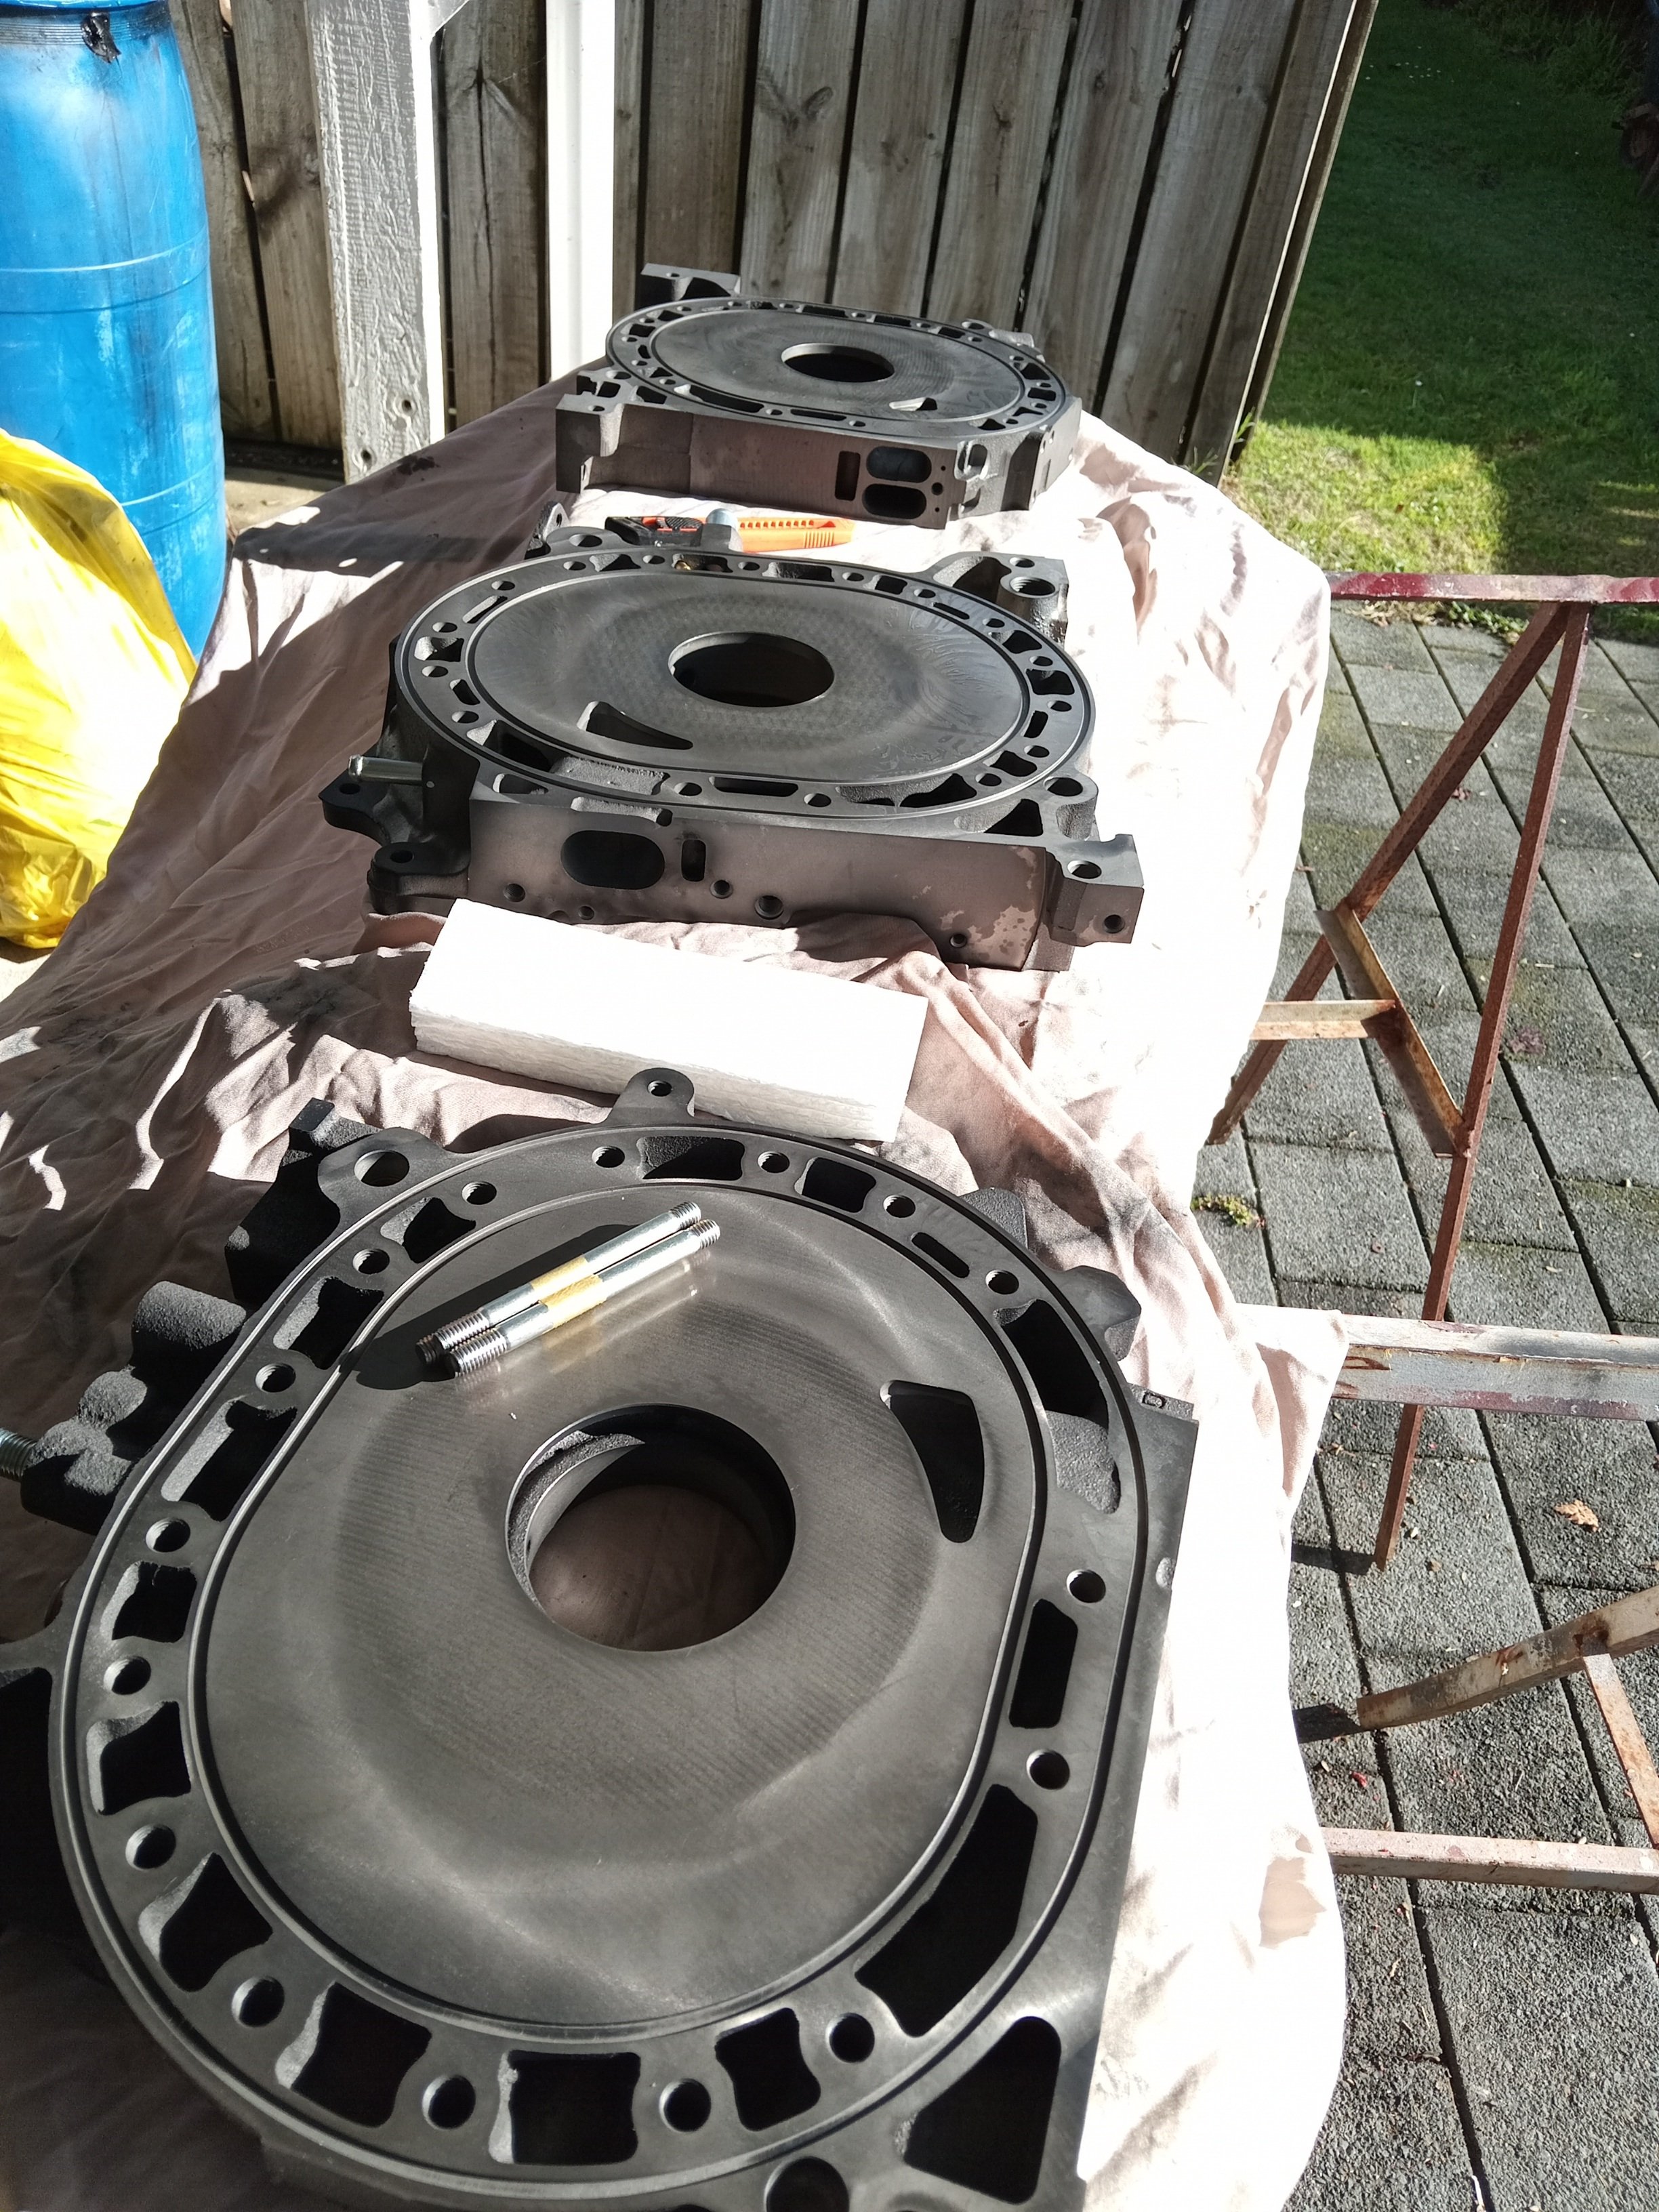
New irons from mazda they are at sprint RE getting a big streetport and drilled for the dowels, injectors getting tested there too, s5 irons-better and stronger than s4, more posts soon.
1 point
-
Straight 6 is going to be way easier. Problem with any more modern engine is the cast alloy sump which are structural parts of the engine to some degree, I think the BMW mentioned above has a fancy (and giant) variable volume oil pump sitting in the sump so you would have to dry sump it to make it fit. NA 2JZ are pretty good, you can jump on the brake and do a sweet burnout pretty easy (which is the test if your engine conversion was worth while)1 point
-
BMW B58 with a ZF 8HP box and live happily ever after/fix oil leaks forever. It's the modern 2JZ really.1 point


.jpg.1101d0c52d81bfbbb832e5c82c471c76.jpg)
.jpg.4beae19c1504bd06a68a78a7c3a6ea1a.jpg)


This leaderboard is set to Auckland/GMT+12:00