
Leaderboard


Popular Content
Showing content with the highest reputation on 04/25/24 in all areas
-
Old guy next door who loaned me that big van, died a couple of years ago, and his daughter isn't really coping with home ownership. She's been away ~3 months looking after an ex who was having heart surgery. So I had a bit of time to think as I wombled around doing this, and concluded doing something for a neighbour was pretty appropriate for Anzac day.
 13 points
 -
8 points
-
I'm all good with the current safety inspection of older cars, one thing I though.... I think there should be slightly more leniency for the testing of brake imbalance on old historic /classic.. I want the convenience of going to a vtnz, but I don't want the ballsache of having to get a 50 year old braking system to be as accurate and repeatable as a modern day equivalent when the car weighs under 700kg and probably couldn't do a 17 second 1/4 mile..7 points
-
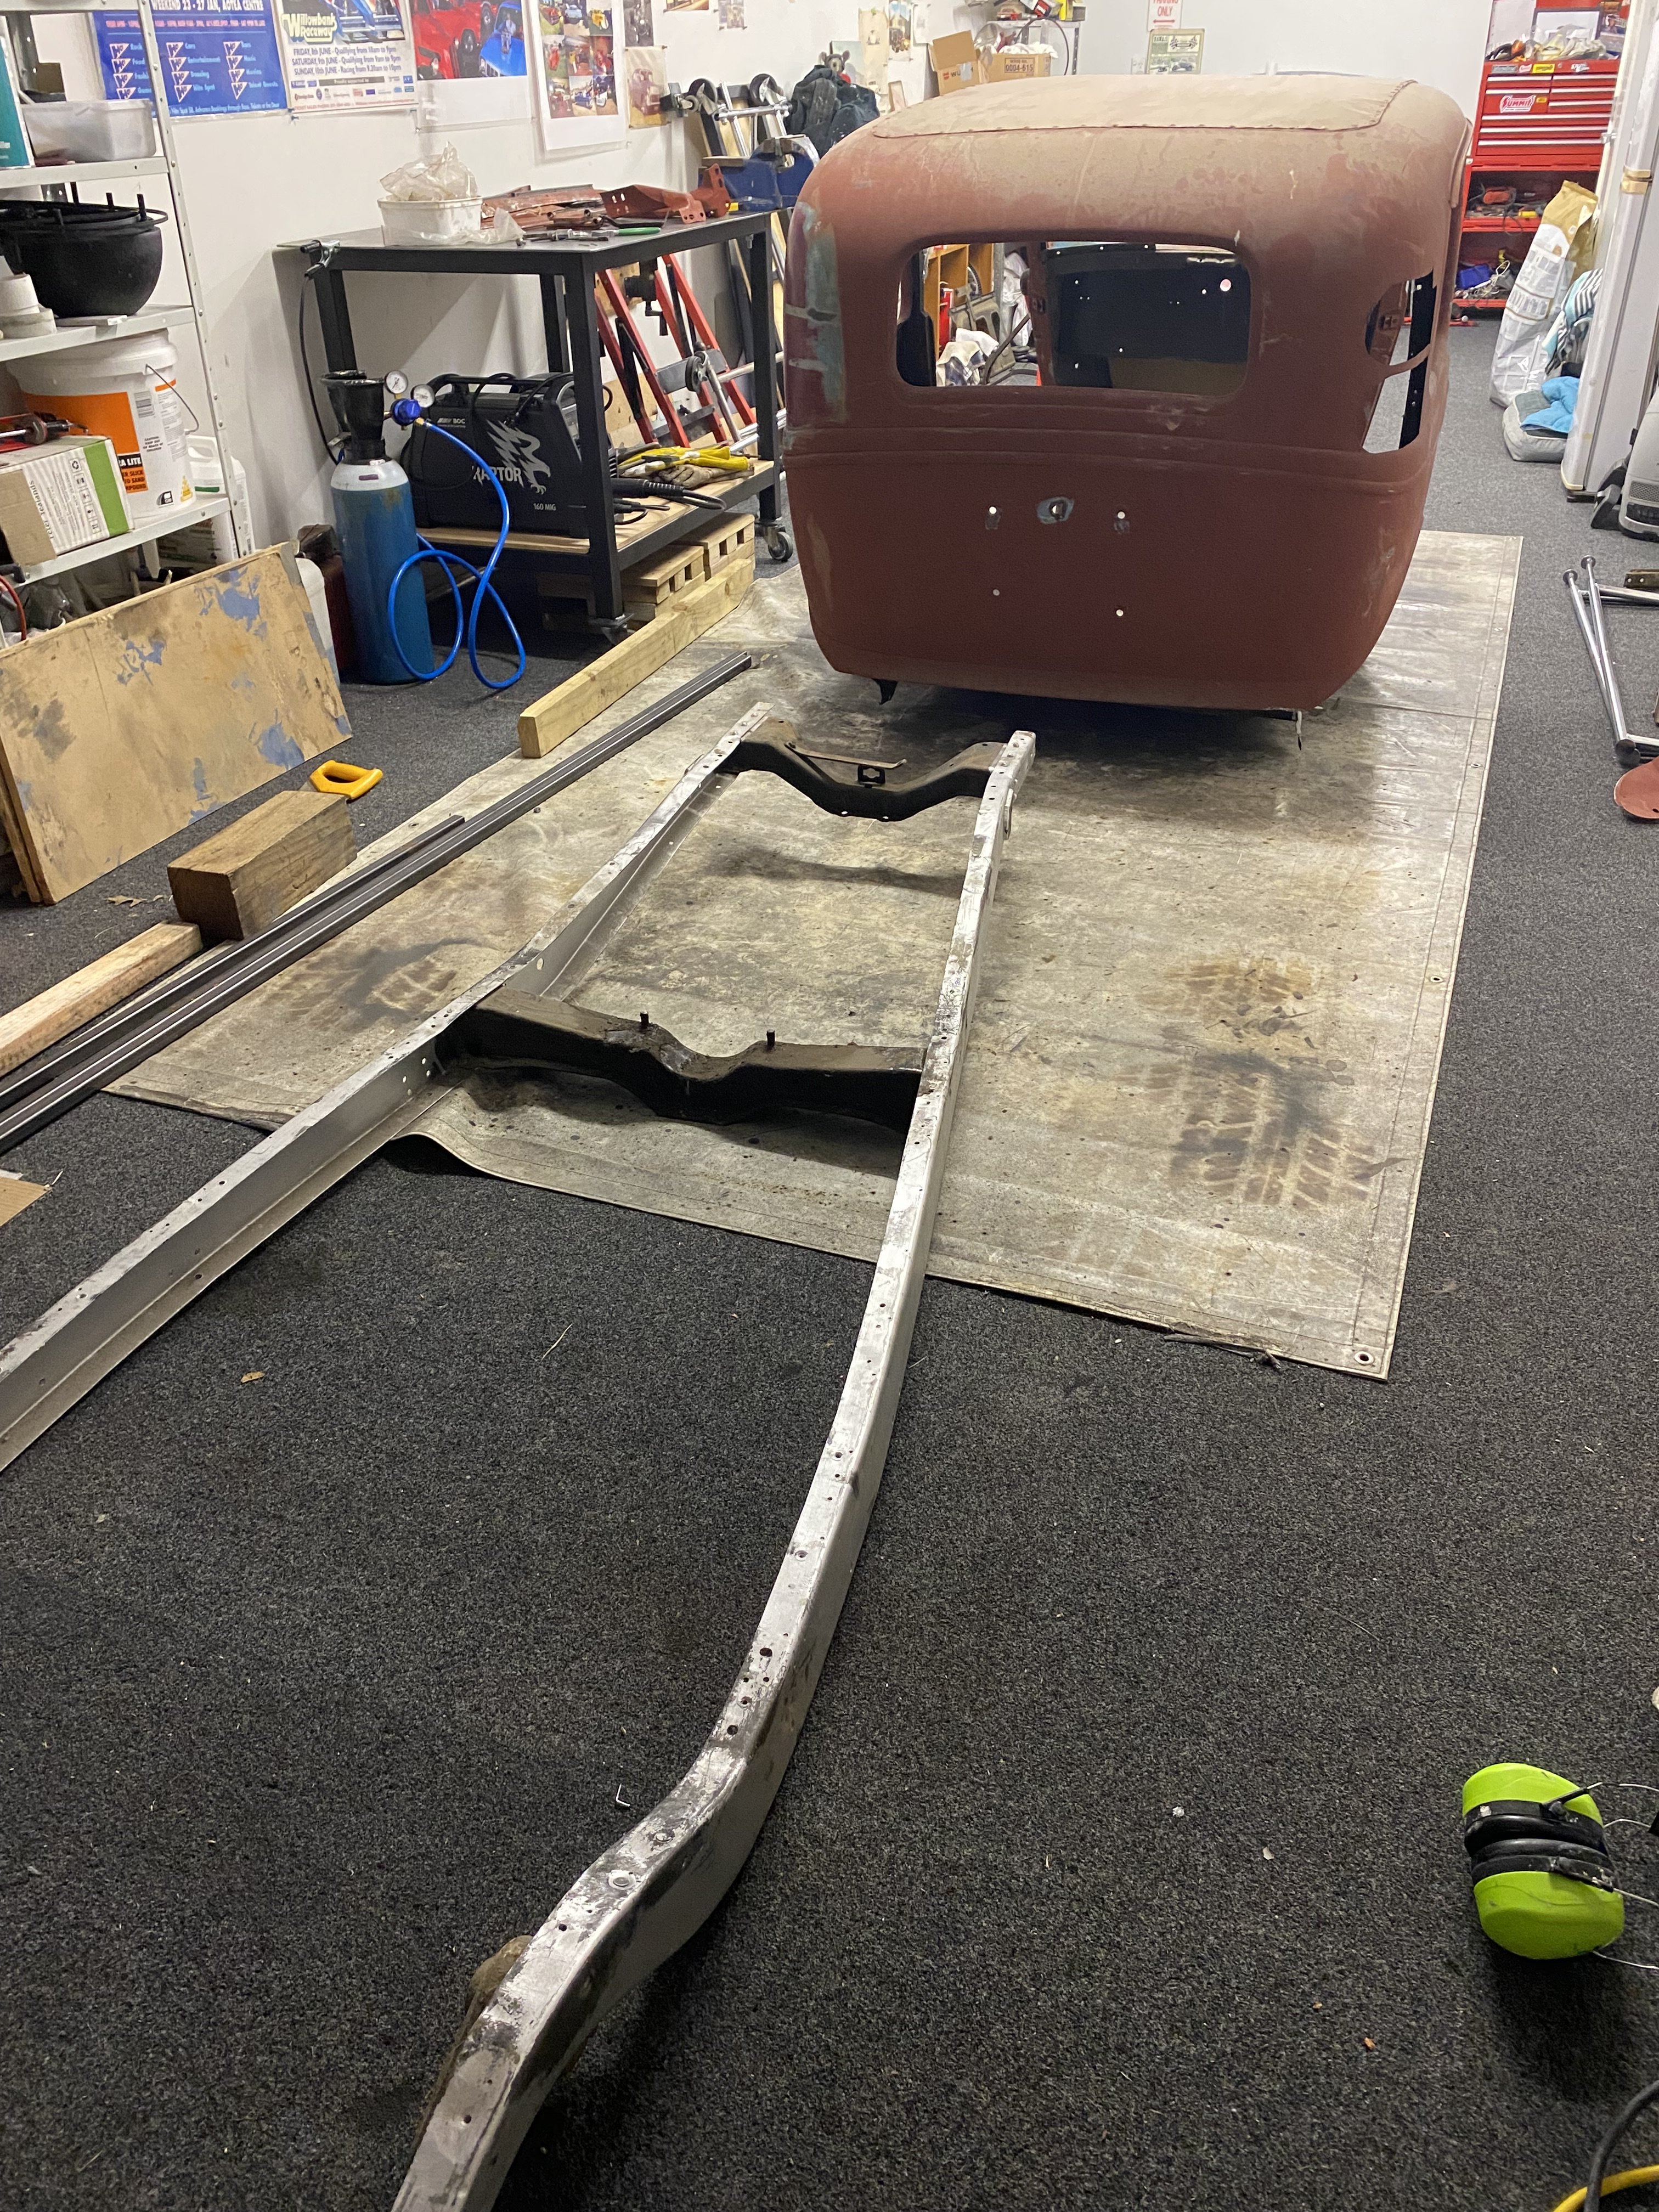
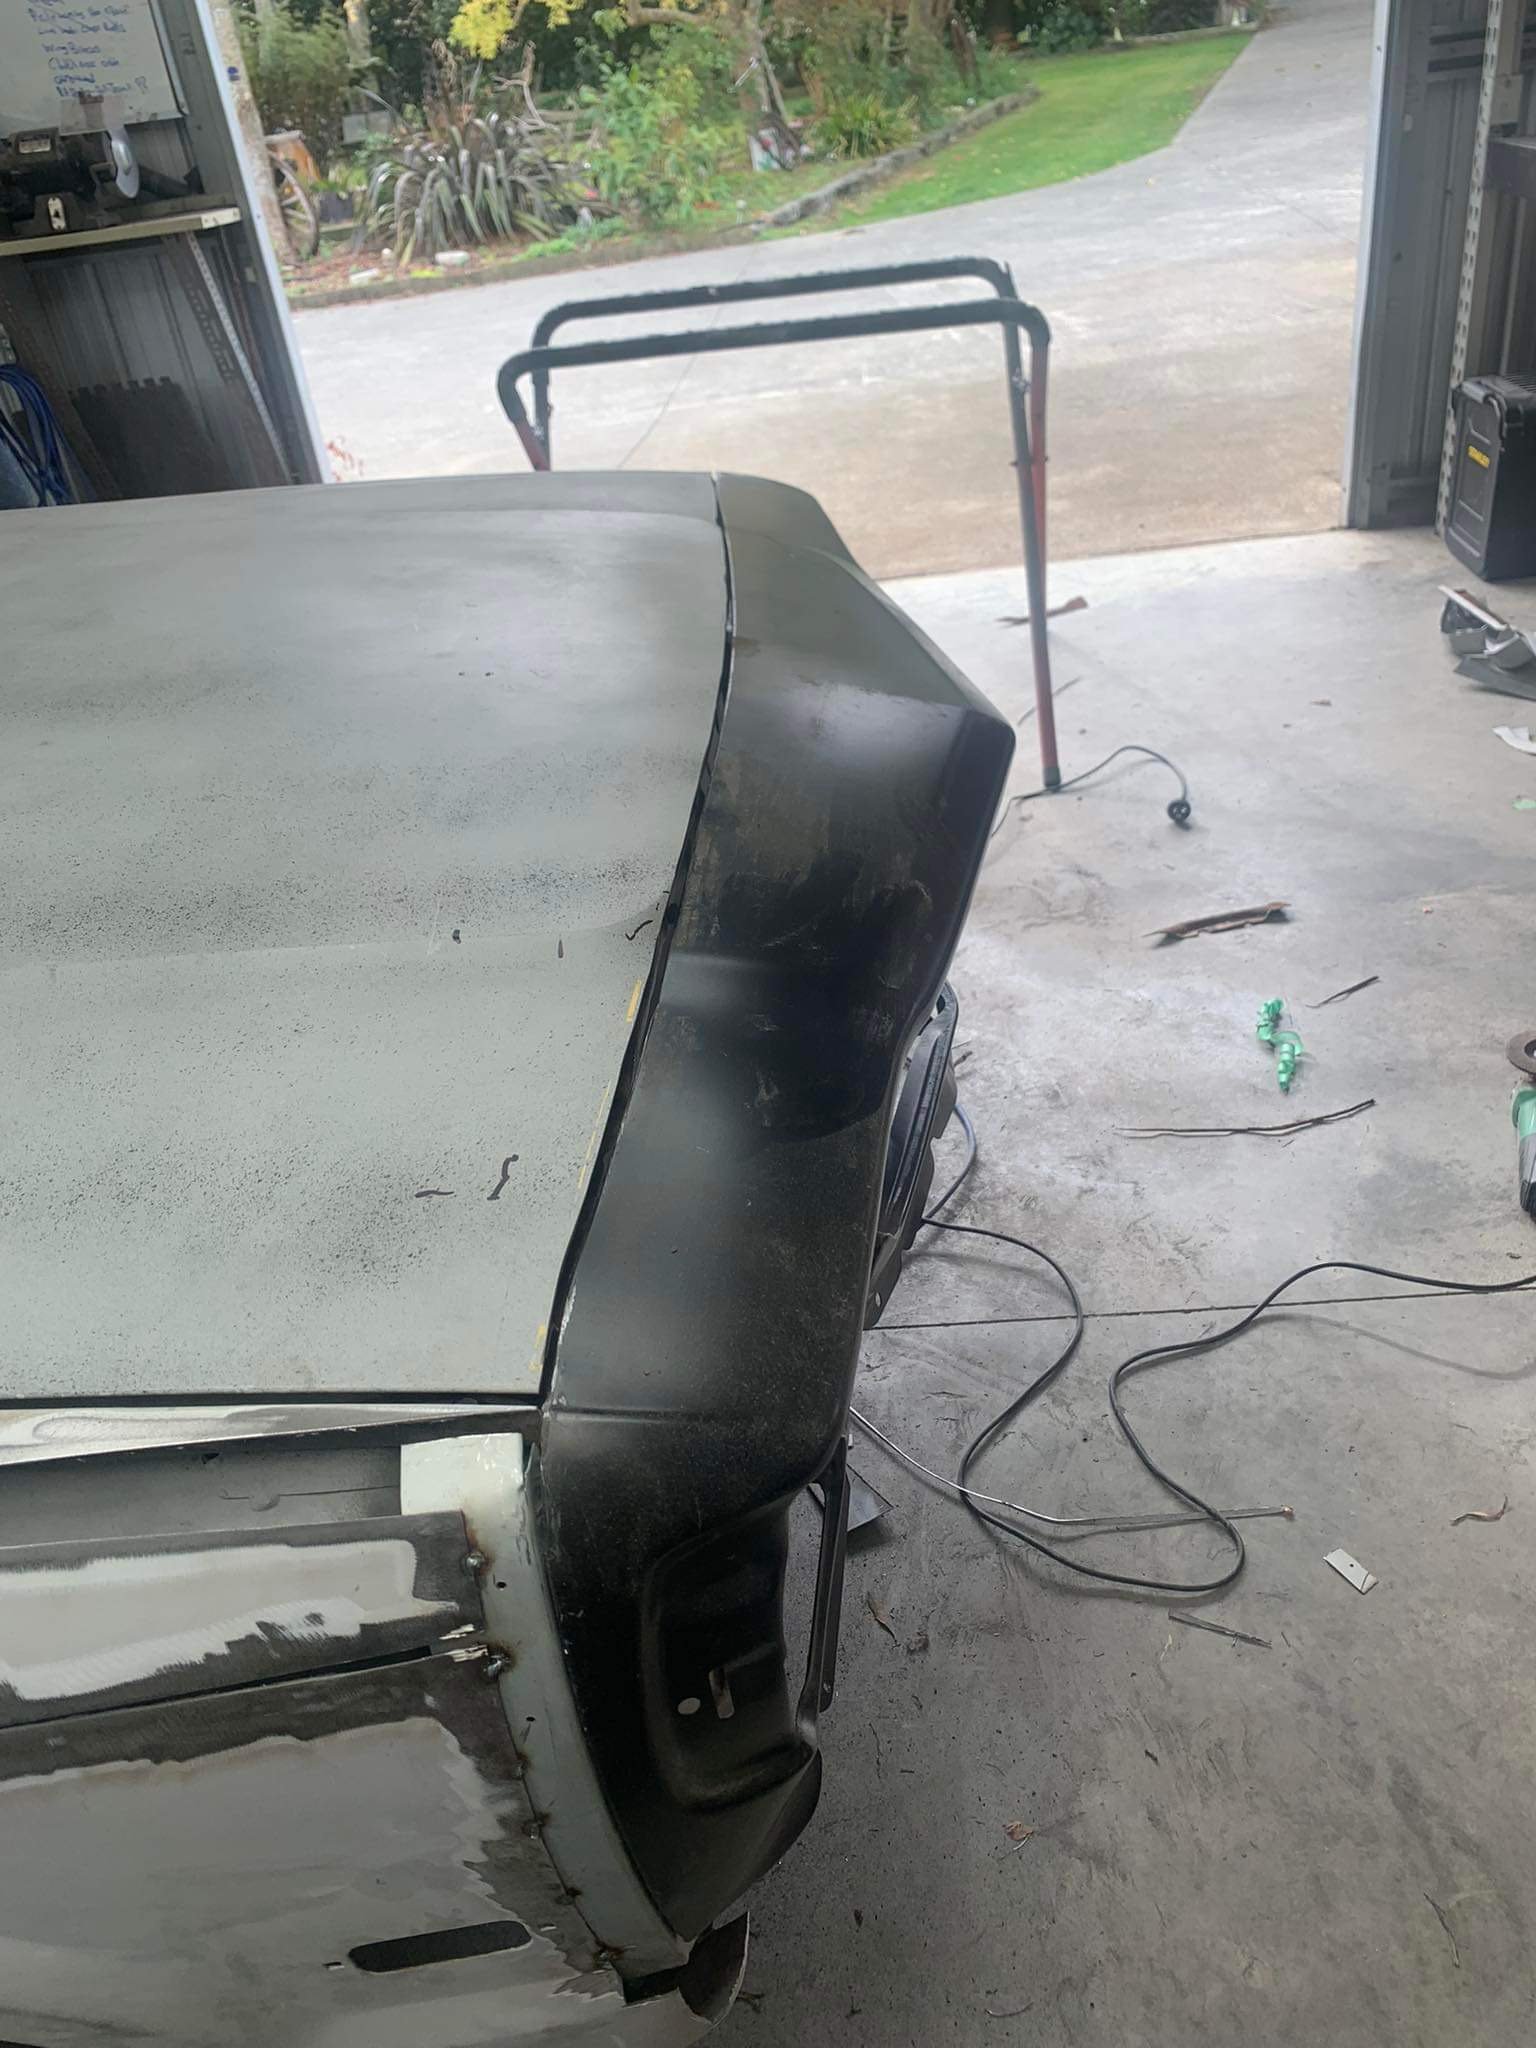
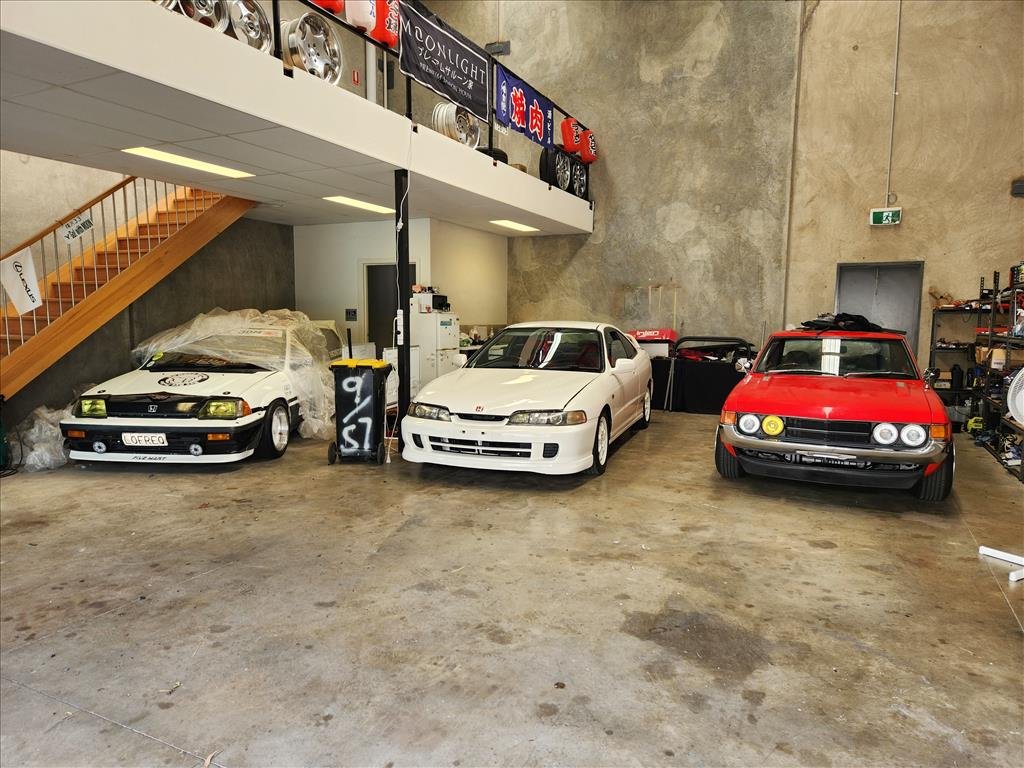
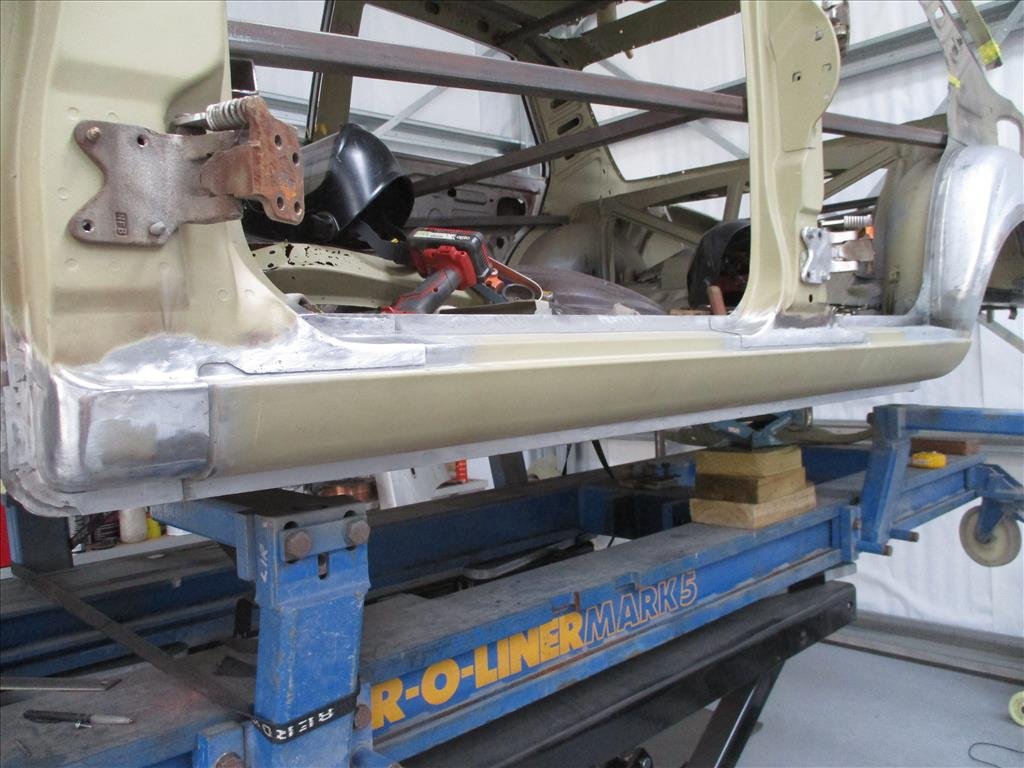
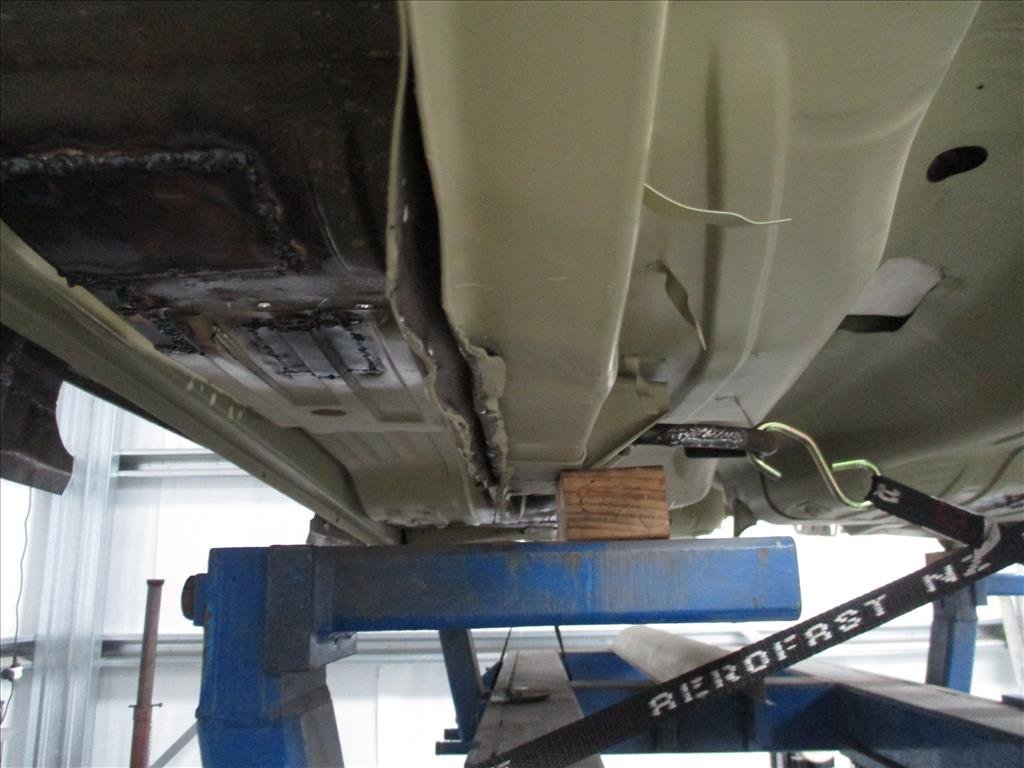
Went out this morning to pull the front bumper off and check out how things look. Got carried away but at least i know most of the front end is in good shape now.
7 points
-
Unpopular opinions (and wall of text from a non-expert) incoming. As a workshop that does a lot of newer stuff - the 3 year first WOF works pretty well for 99% of people. The average driver round here does about 10-15,000km per year. By the third year, it's time for tyres... The majority of those cars are inspected annually for servicing anyways so a cut tyre, puncture or crappy wiper blades gets picked up then. Hardly ever do bulbs or anything else within the first 3 years. If someone does really high mileage and kills their tyres quick - an annual WOF check would pass them, then they'd be bald within 6 months because the time between 1.5mm of tread and a bald tyre isn't very long for a high mileage driver. My argument for keeping 6 month WOFs on the older stuff is that things seem to go from OK to broken much quicker. A wheel cylinder starts leaking, brake caliper seizes up or a rubber bush splits or something starts dropping oil onto the exhaust. It's not that the cars are inherently less safe, they're just at that age where things fail from time more than mileage. So I'd put a 20 year sliding scale on 6 monthly inspections. The current most dangerous cars on the road (that we frequently fail) are the 2002-2012 high mileage shitters that get little maintenance and zero fucks given by the owners. They roll in with cords hanging out the tyres, one headlight out, valve covers pouring oil onto the manifold, ball joints knocking, smeary windscreens you can't see out of....and do you know what - they all passed the last WOF a year ago. The WOF requirement is really there to force people to at least get the car checked by a professional. It makes absolutely no implications that your car is safe to drive at any point other than the 45mins the WOF inspector looks at it. It's hopefully checked to a standard that most things would last to the next mandated check. We currently can't expect drivers to be responsible for knowing if their car is safe to drive because people are idiots and there's very little accountability. I'm pretty sure in blighty, if you got pulled over with 4 bald tyres - that's enough points for loss of licence? So whats the solution. It's fucking complicated. I don't know how much a slightly chafed seatbelt webbing, non functioning tail lamp or a stonechipped windscreen actually contributes to the accident rate and I don't trust the government to know or tell us the truth either. Perhaps we can continue fine tuning the inspection process to focus on the items that really make a difference to safety and spend less time failing cars for 34% tints or a slightly crusty rubber bush or a tiny bit of scabby surface rust on a subframe. TLDR: Tyres, brakes and lights should absolutely be checked often. Maybe other things don't need to be?7 points
-
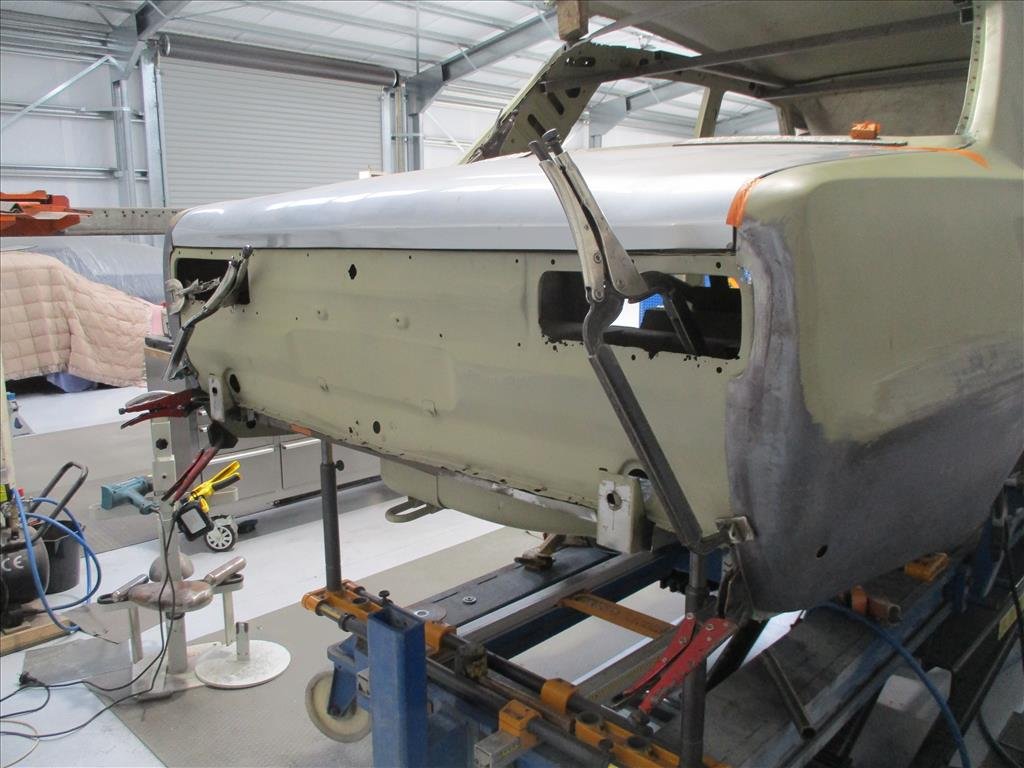
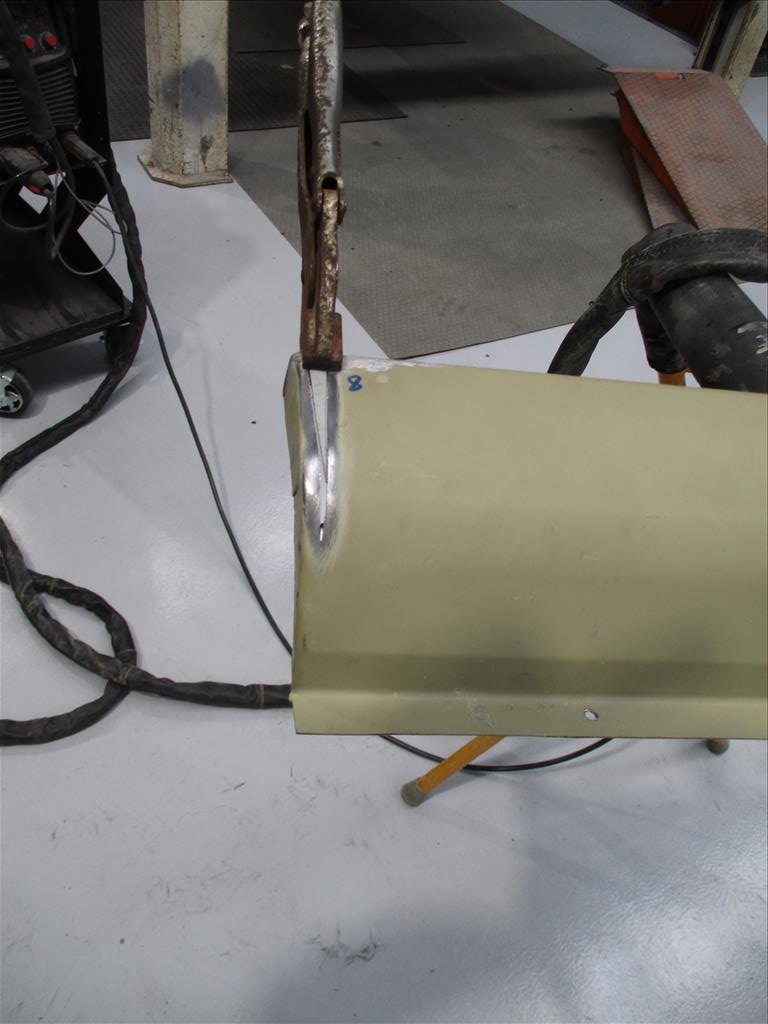
Started some wiring fitted looks mint pity you can't see it for throttle body..... suppose that is the idea. More to do just a bit of soldering to finish off and put in braided sleeve so it can shed heat. Discovered the ignition coils could flip 180 degrees bolt straight back on and wiring is basically perfect once unwrapped reaches dead easy and won't melt on wastegate, heat shield will be a good idea though. Airflow meter new location on right side of engine bay set up in photo.
4 points
-
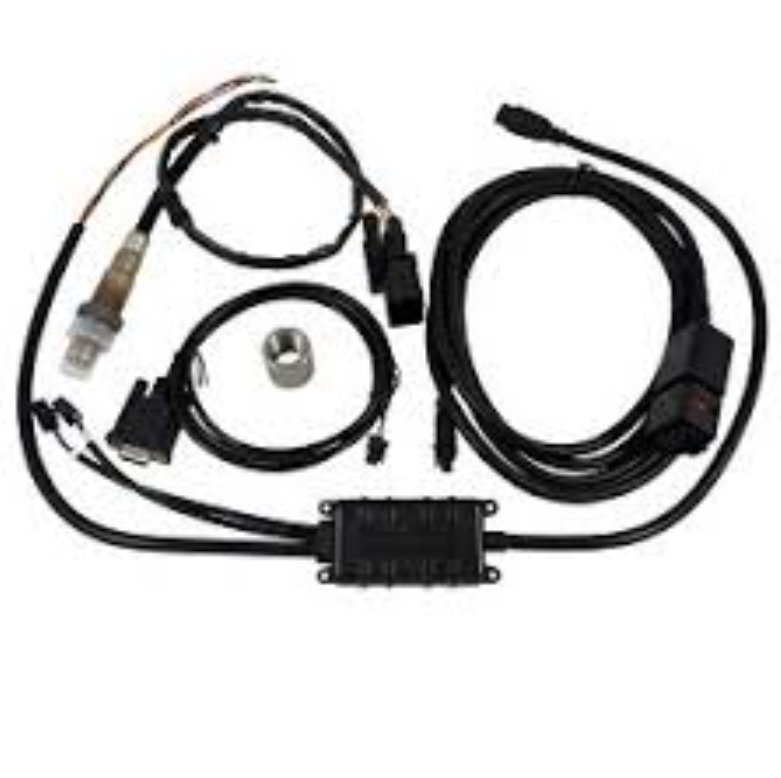
Can see a wideband sensor fitted in downpipe in above photo started installing the unit for that under dash too.
3 points
-
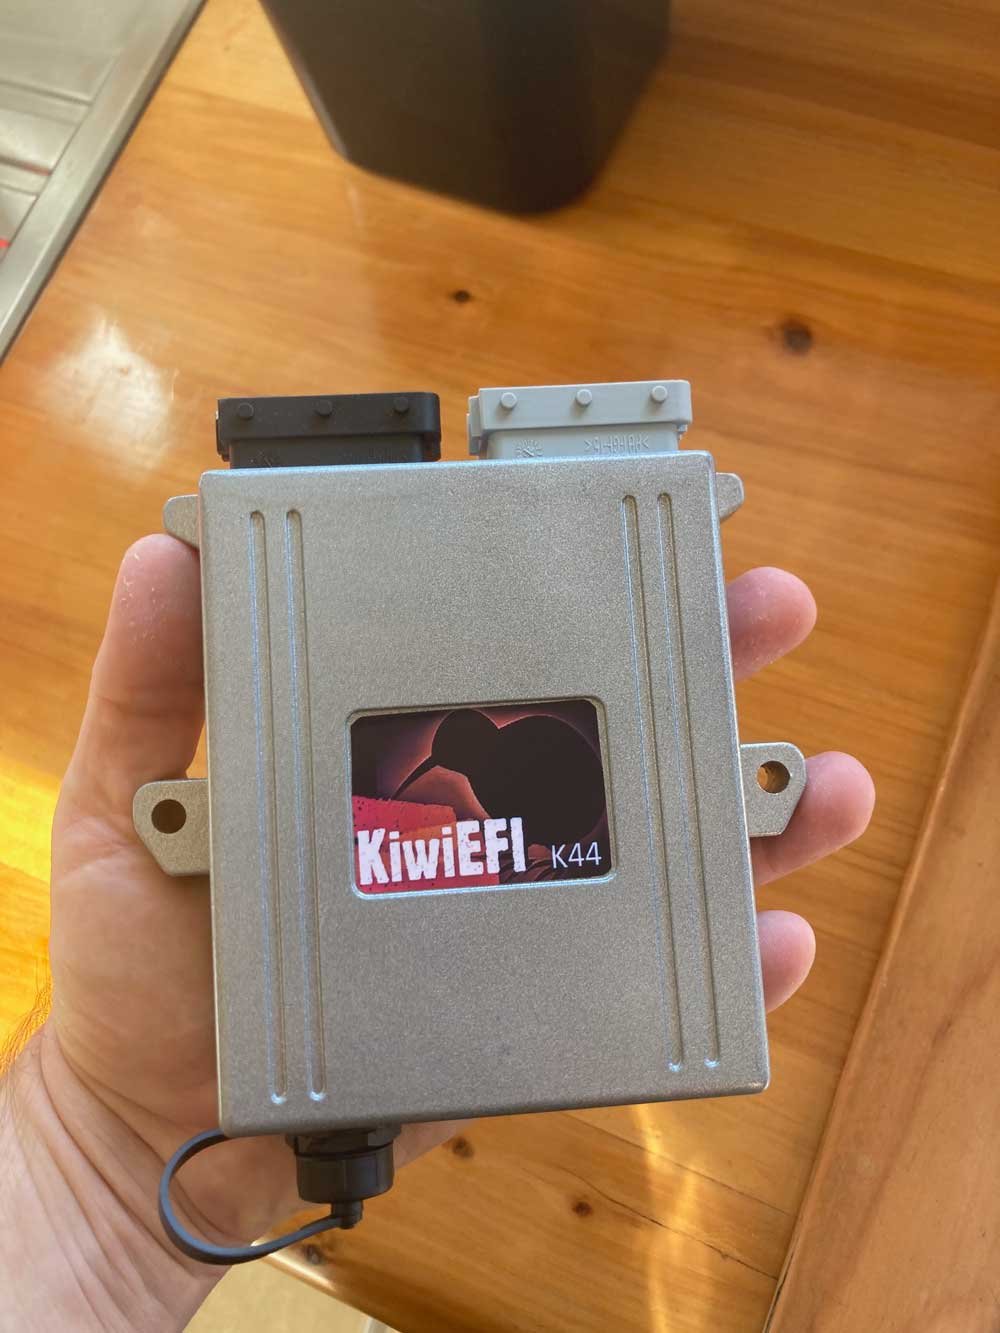
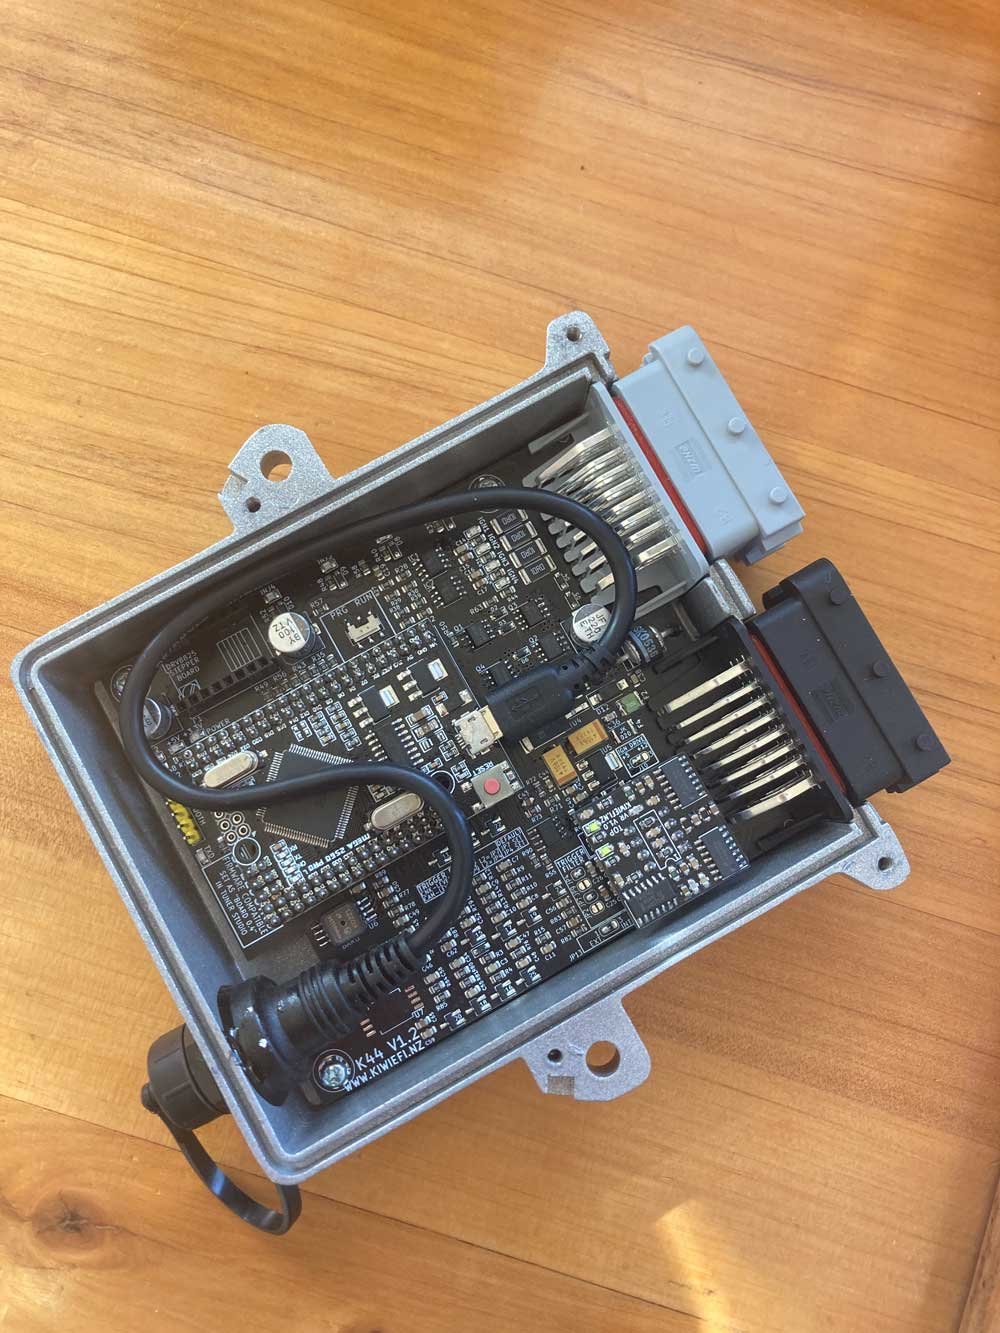
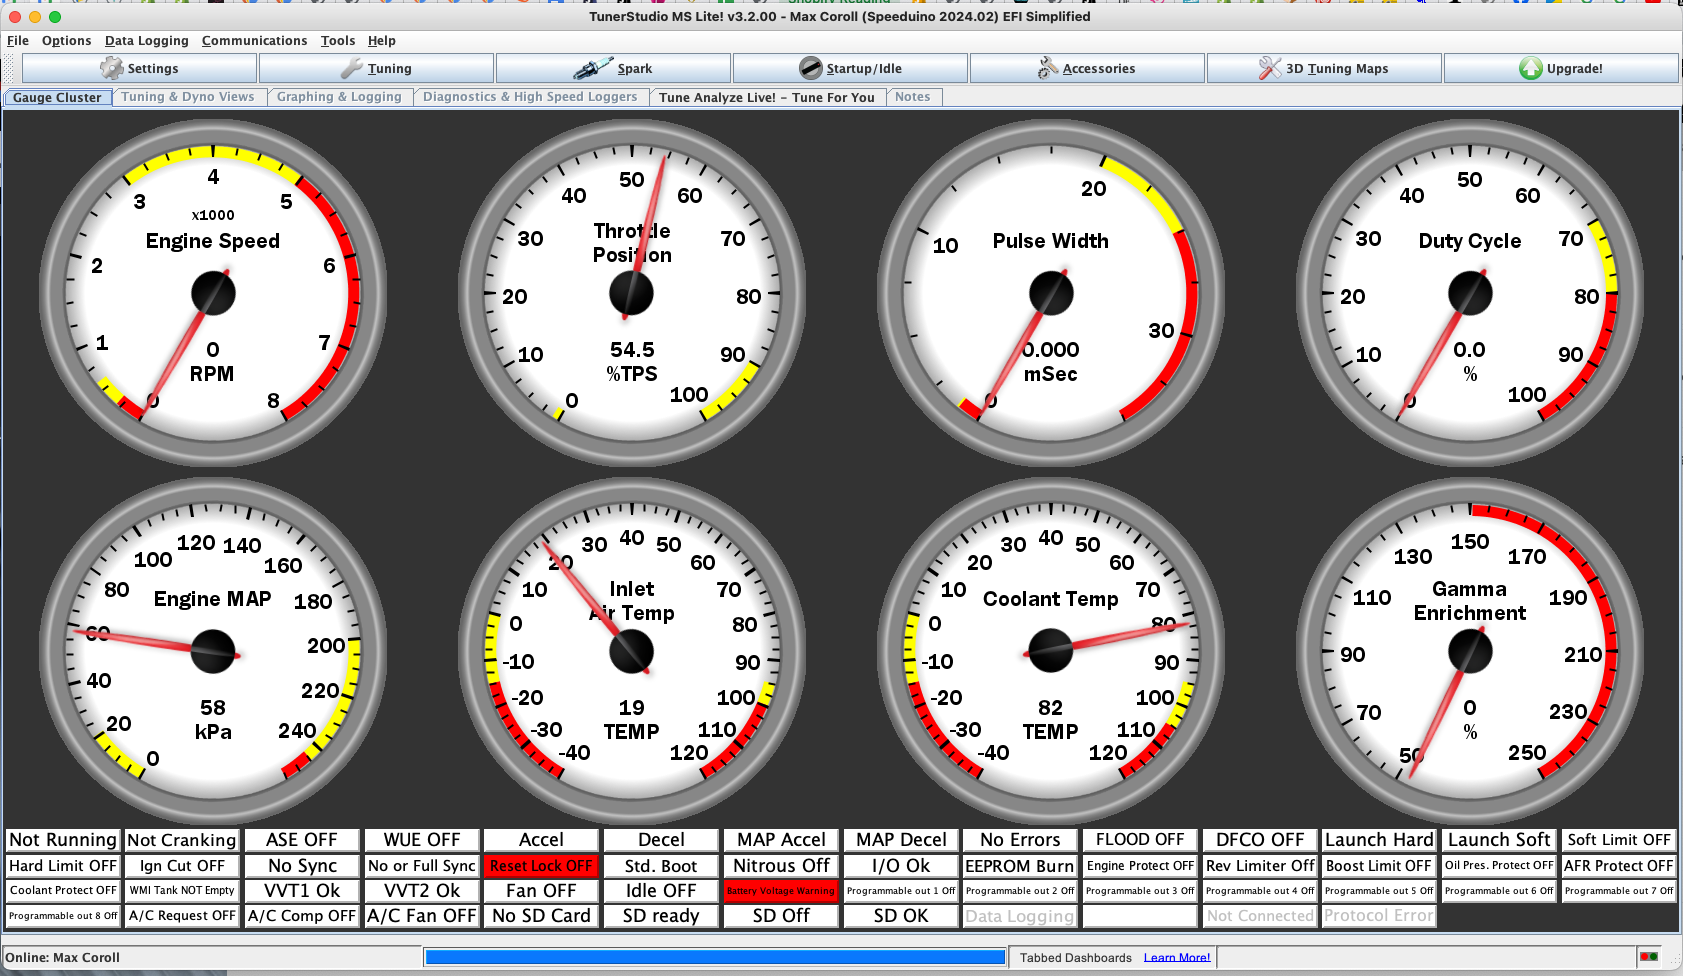
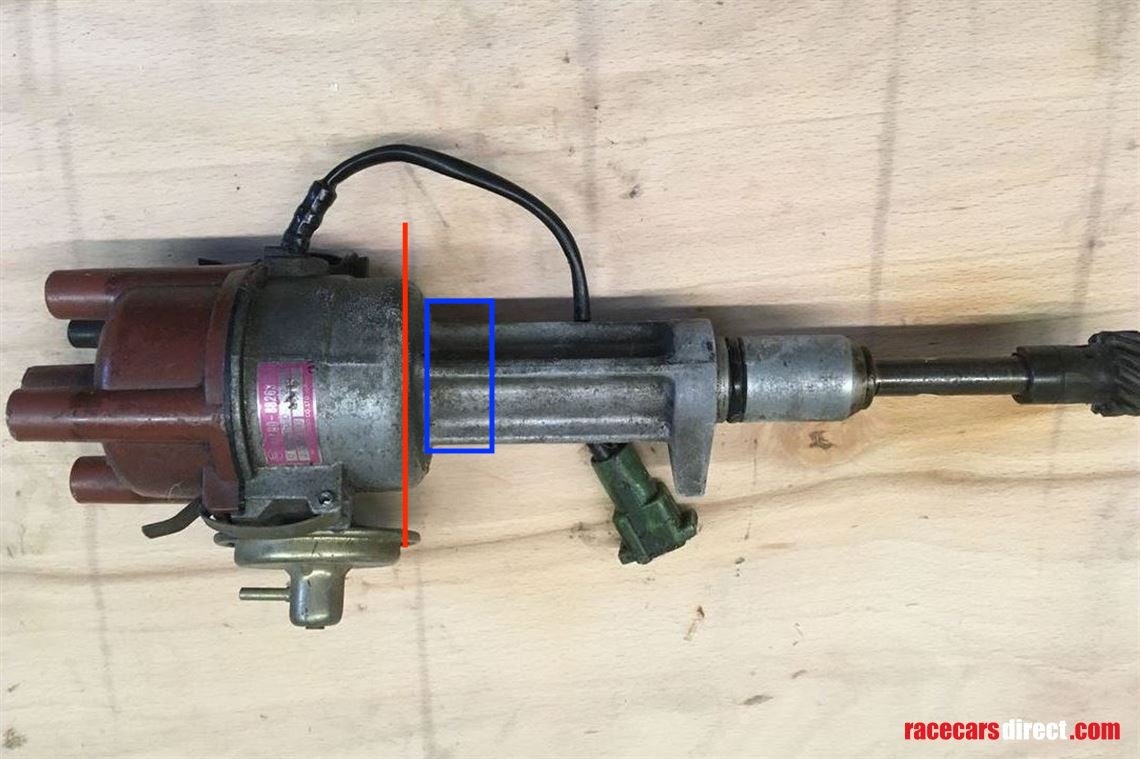
The ECU has arrived, consider me impressed. The micro USB is a bit janky, but that's neither here nor there. It's been fitted with a VR conditioner and configured to suit the Toyota 24+1 trigger setup. It connects to TunerStudio which I'm quite happy to see has Mac support. Now I just need to resuscitate a laptop, as I don't think my Mac Mini will work very well in the car. I went and saw Max on Sunday and we stood and stared at the two disassembled dizzies for a while. The guts of the 4AGE dizzy are too big to fit in the 2TG dizzy, so it sounds like there is going to be some sort of choppy choppy sleevey sleevey action going on. We're looking at potentially cutting the 2TG dizzy off at the red line, turning the blue section down and turning the base of the 4age dizzy down to be joined with a sleeve and joining the two dizzy shafts somewhere in the mix. Max also pointed out the oil port on the side of the 4age dizzy for lubrication and told me he was gonna lie awake at night designing something in his head. I guess my next step is to start stripping the 2TG loom down and working out what I'm keeping, what I'm removing and what I'm adding, along with what is already in there that can be reused. I'm already planning to run the map sensor and IAT sensor off the AFM wiring having done this previously on a Silvertop to Blacktop 4age swap, and I know I'm gonna need some more injector and ignition wires.
3 points
-
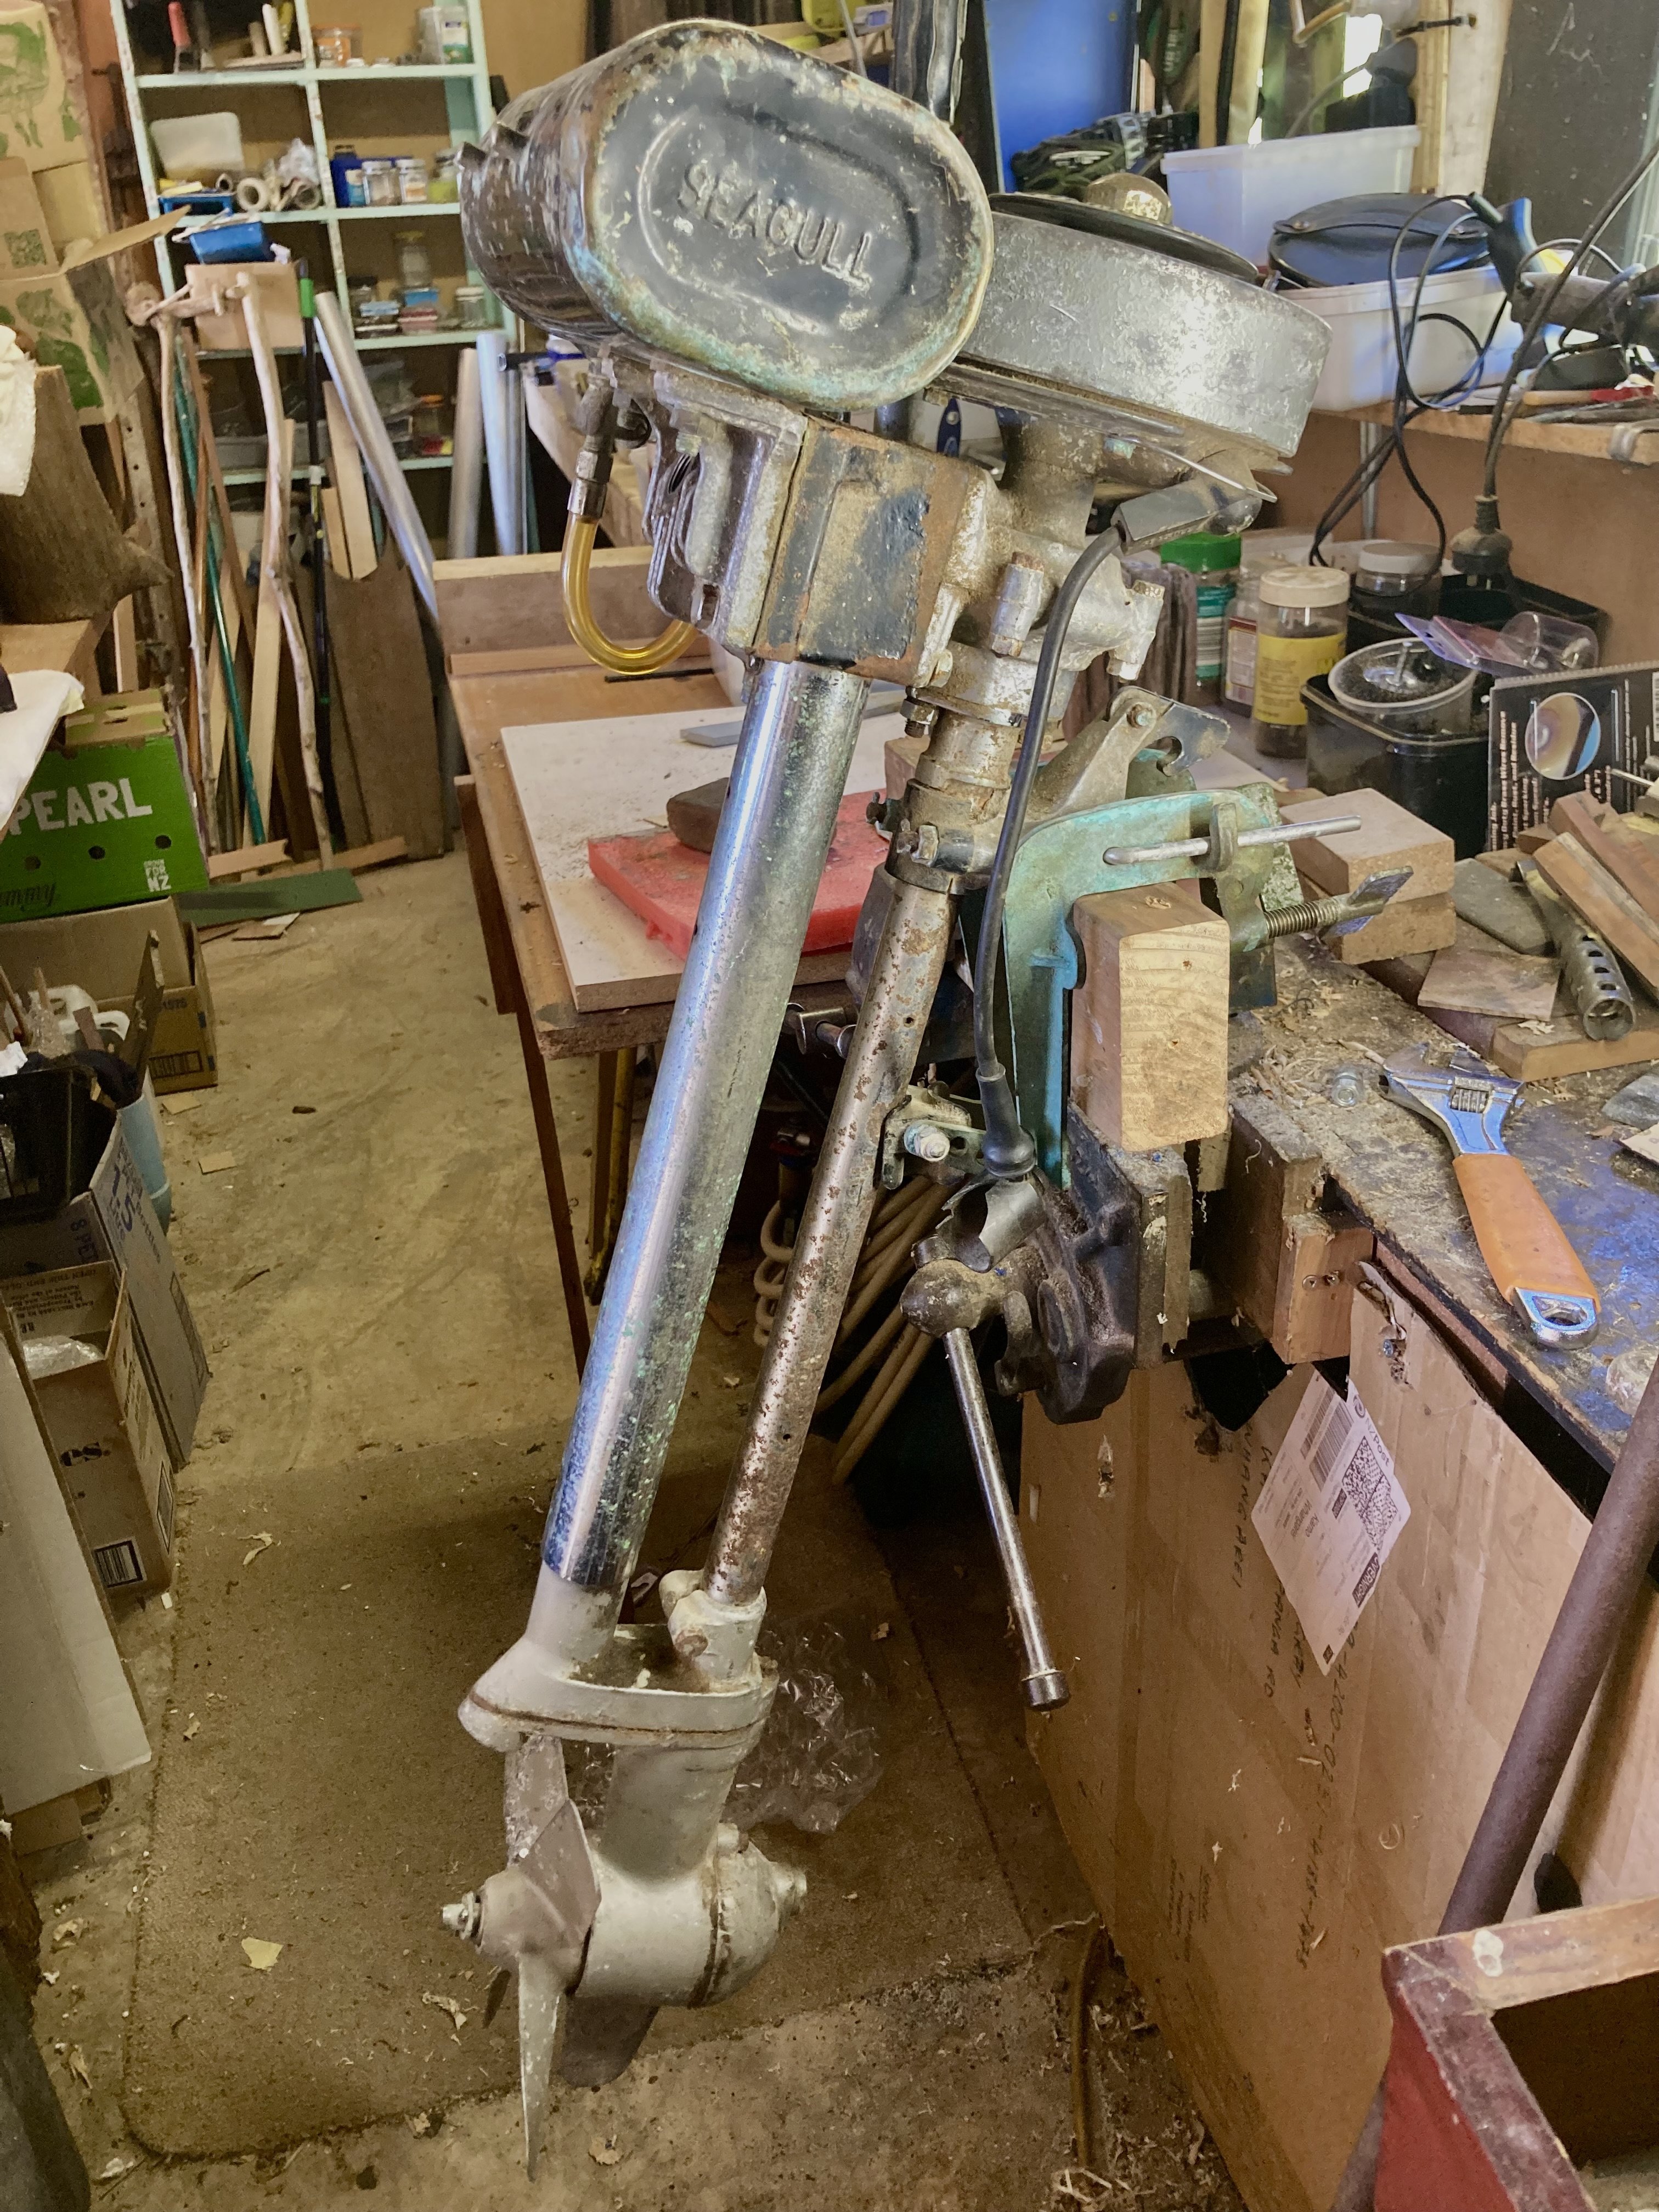
Ok soooo, I have a v8 Corolla project that's been off the road since 2010, a Lifan go-kart project, and a couple of later model Corollas sitting in the driveway to tidy up and sell among many other things so I decided that grown-up thing to do would be to buy another project. This one is 2-stroke, something I know a whole lot less about, and as old as my Mum. Dad is a boatbuilder, so it was much easier to get him on board for this project, and he's even let me store it in the woodworking shed. The guy selling it priced it based on what he'd seen a fuel tank listed for on TradeMe. The motor turns over by hand, but the prop doesn't turn, and it sounds like it's a shaft rust issue. I'll dig into it at some stage, but for now creating a thread on here was much more exciting than actually working today. I see the Seagull Barrys race them, so it might be a good chance to buy a silly little boat to put it on.
2 points
-
This statement doesnt require any context whatsoever. If it were 2010, id be puting this in my signature.........2 points
-
Finally got a nice clean Wildcat wheel, console to be soon, hmmmm need to go faster
2 points
-
You can guarantee that'll be a fuck up too.2 points
-
MX5's can fit car engines np! Such a practical car.2 points
-
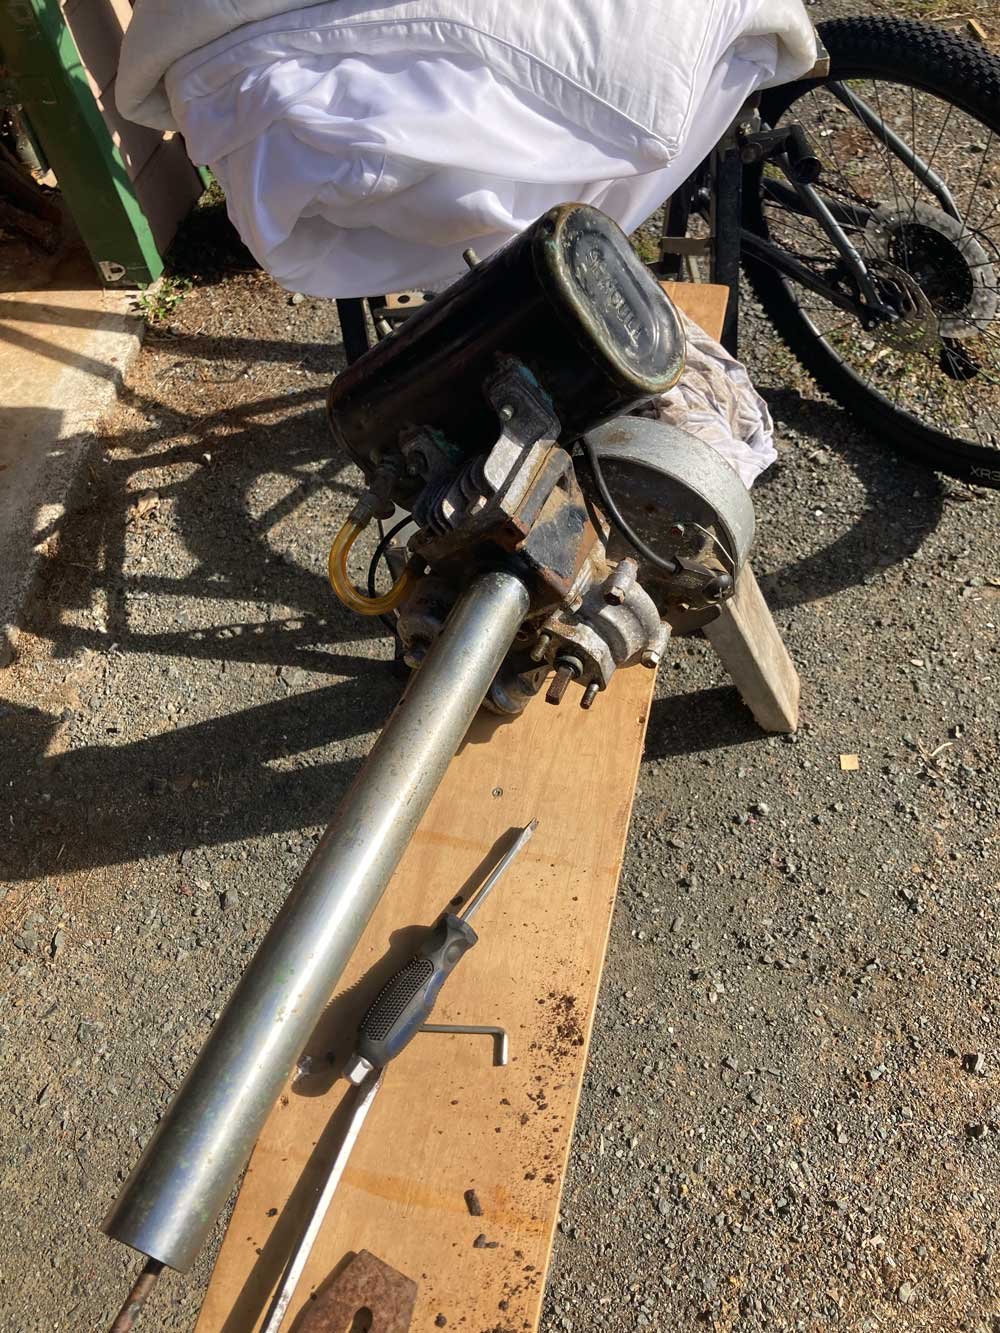
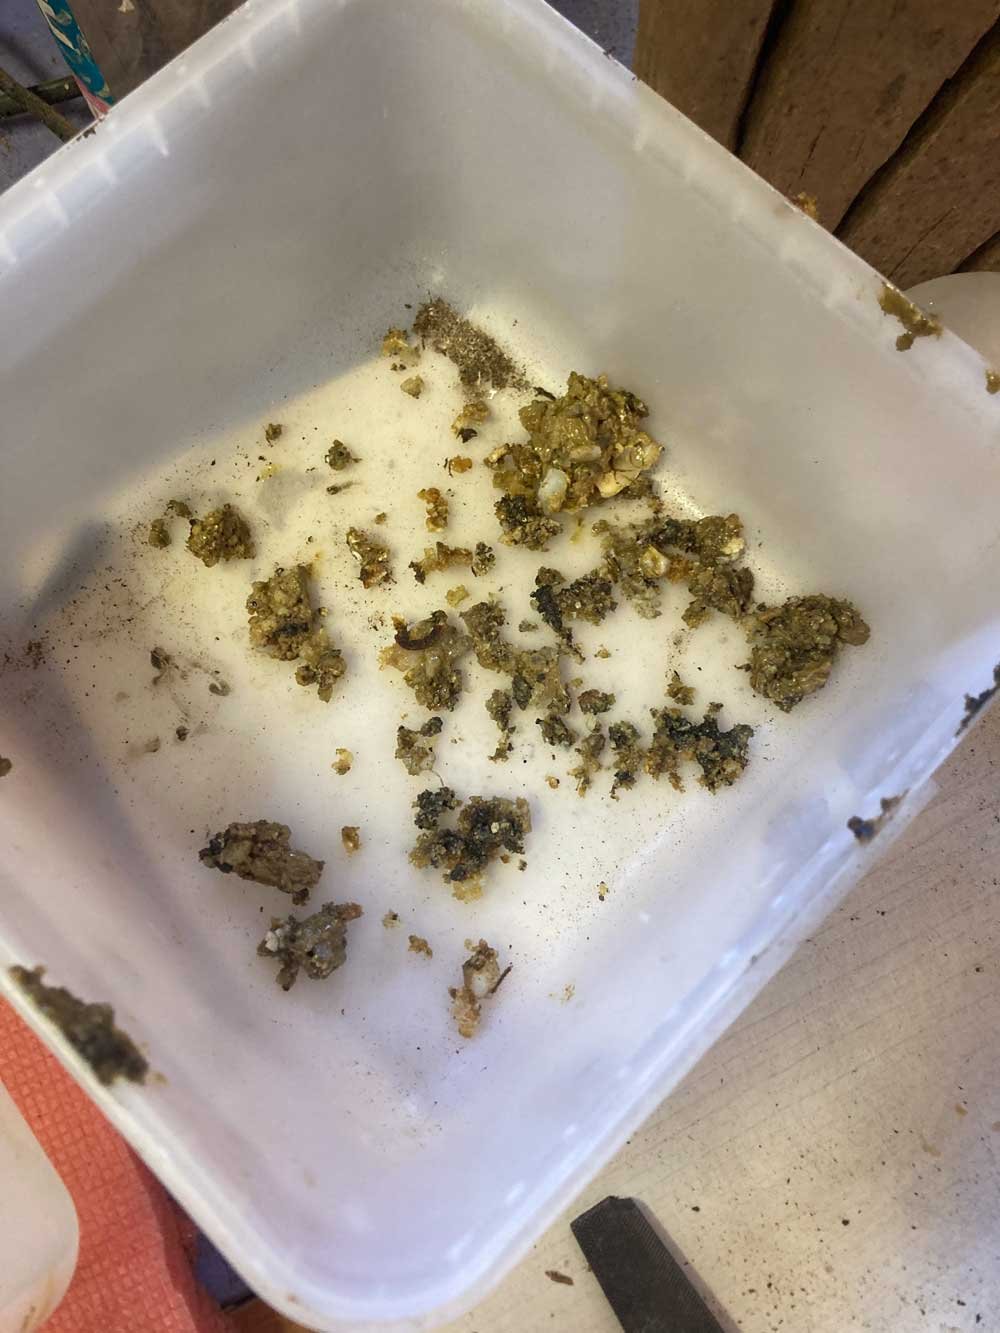
How it started ^^^ vs how it's going So I mentioned to Dad that we needed to get the leg off to see if the driveshaft was rusted. I didn't mean now. Dad decided now was a great time. So we've spent however long it's been between that post and this post pulling it apart. We've split the top of one flat head machine screw, broken a bolt, scooped out a couple of cups of this weird shell/grease mix, poured the driveshaft out as a fine powder of iron oxide, and now we're trying to work out how to remove the machine screw with the broken head to release what I'm gonna call the pinion gear.
2 points
-
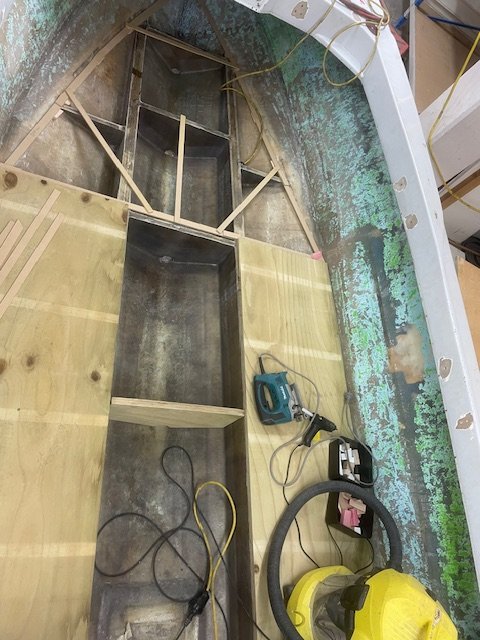
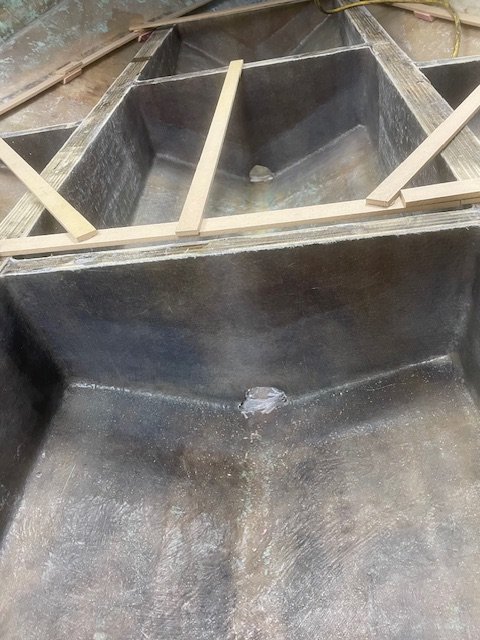
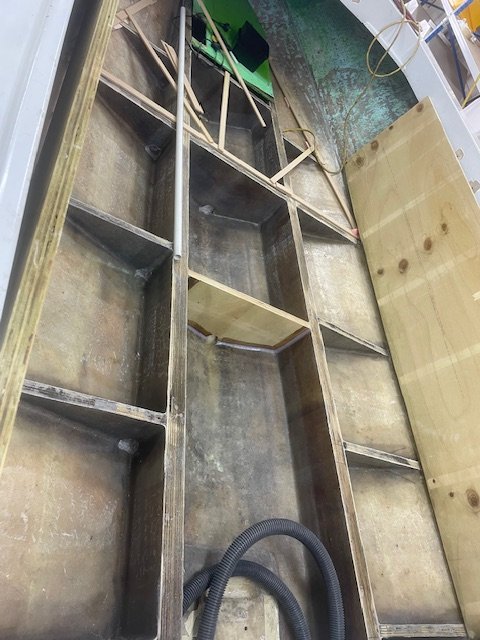
Uncle Neemia has been working away at this, one more bulkhead to go in, then it will be “flowcoated” with gel coat to make it smooth, and then the floor can go down, the flooring plywood will be encapsulated both sides with fiberglass, as much as I dislike wood, I couldn’t justify solid composite (coosaboard) material and I didn’t want soft foam core flooring.
2 points
-
Continuing on with my how much can this thing carry series. Realistic flag added post production to avoid legal issues down the track.
2 points
-
*girly screams of excitement * just got these through
2 points
-
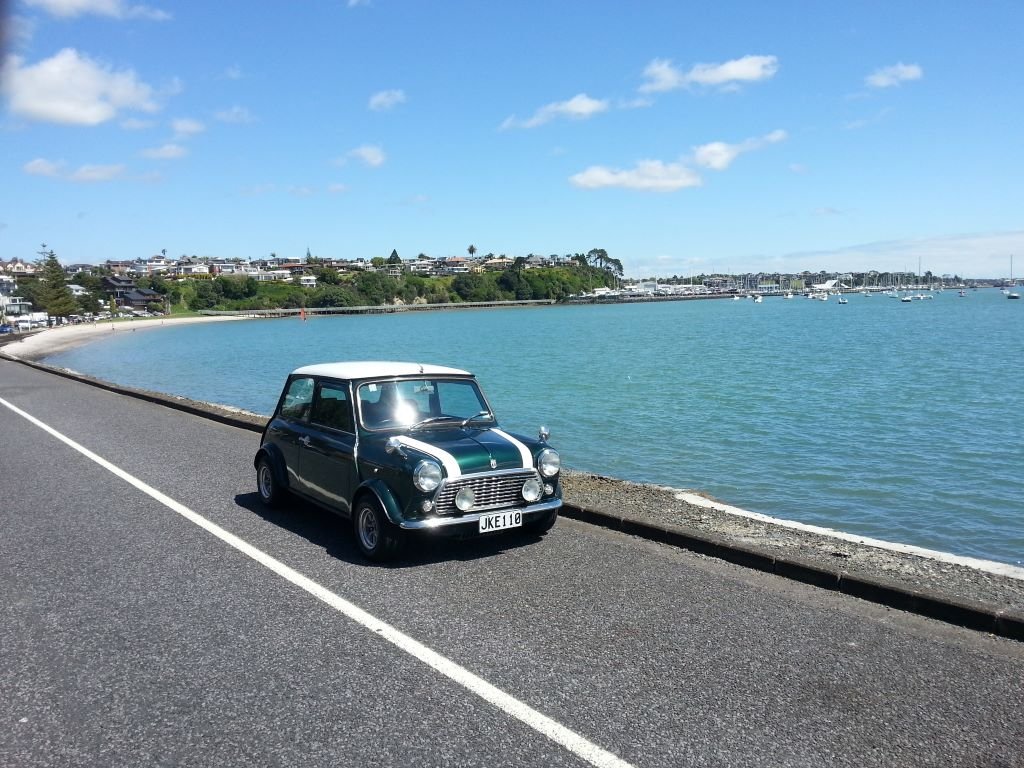
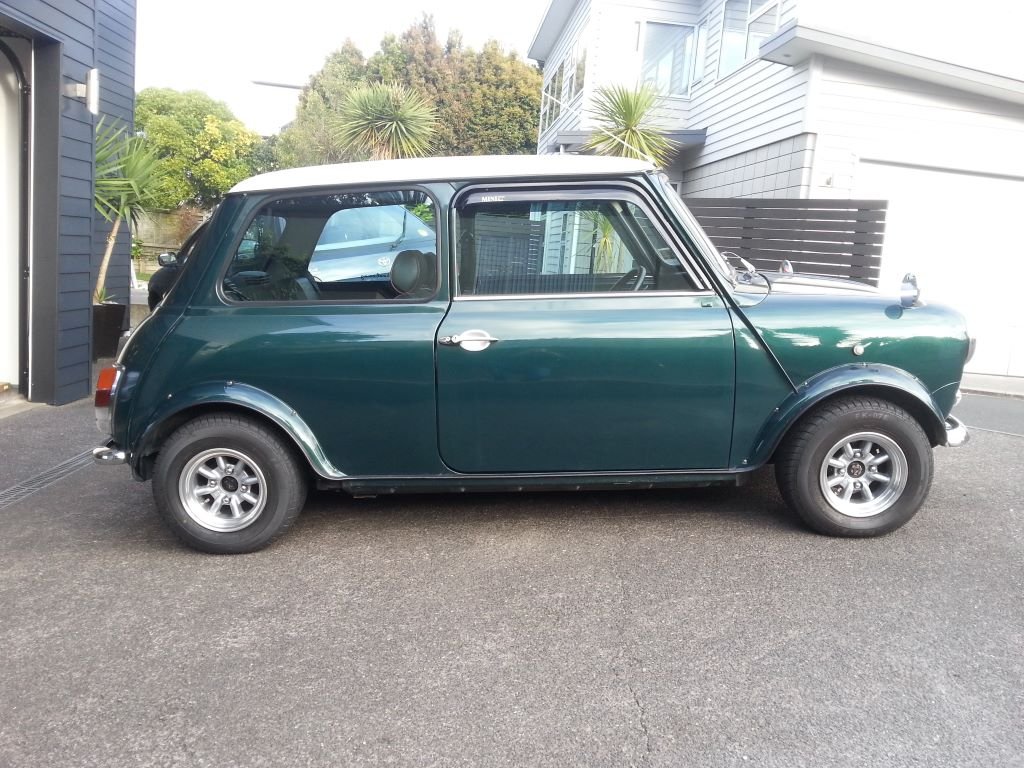
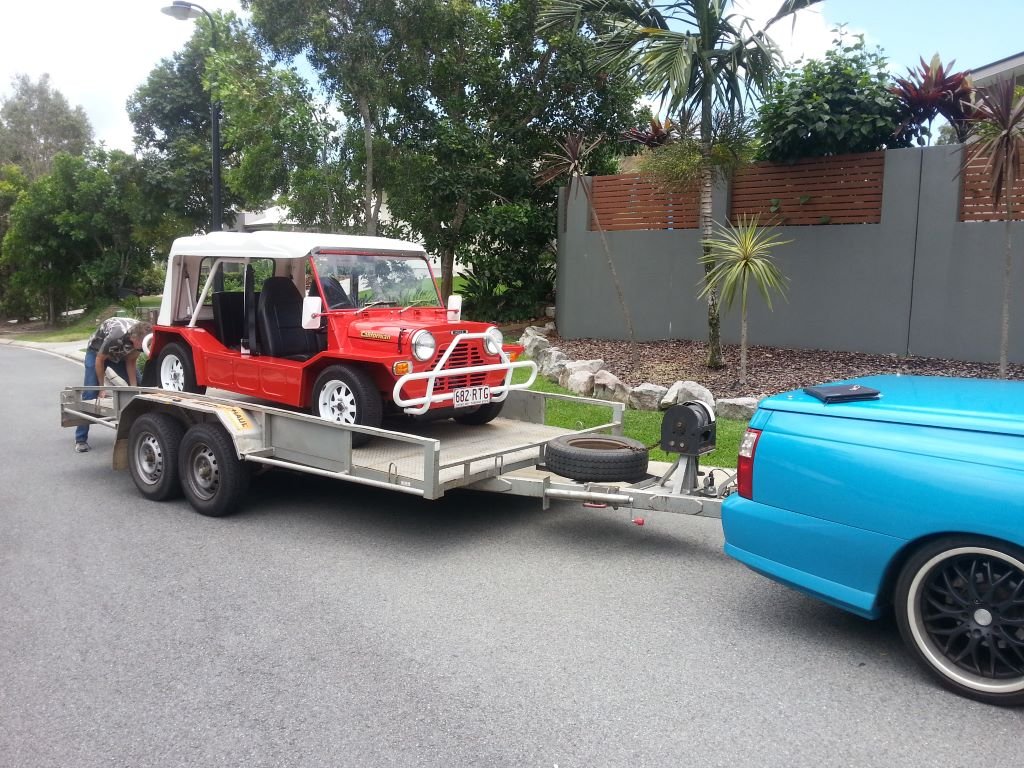
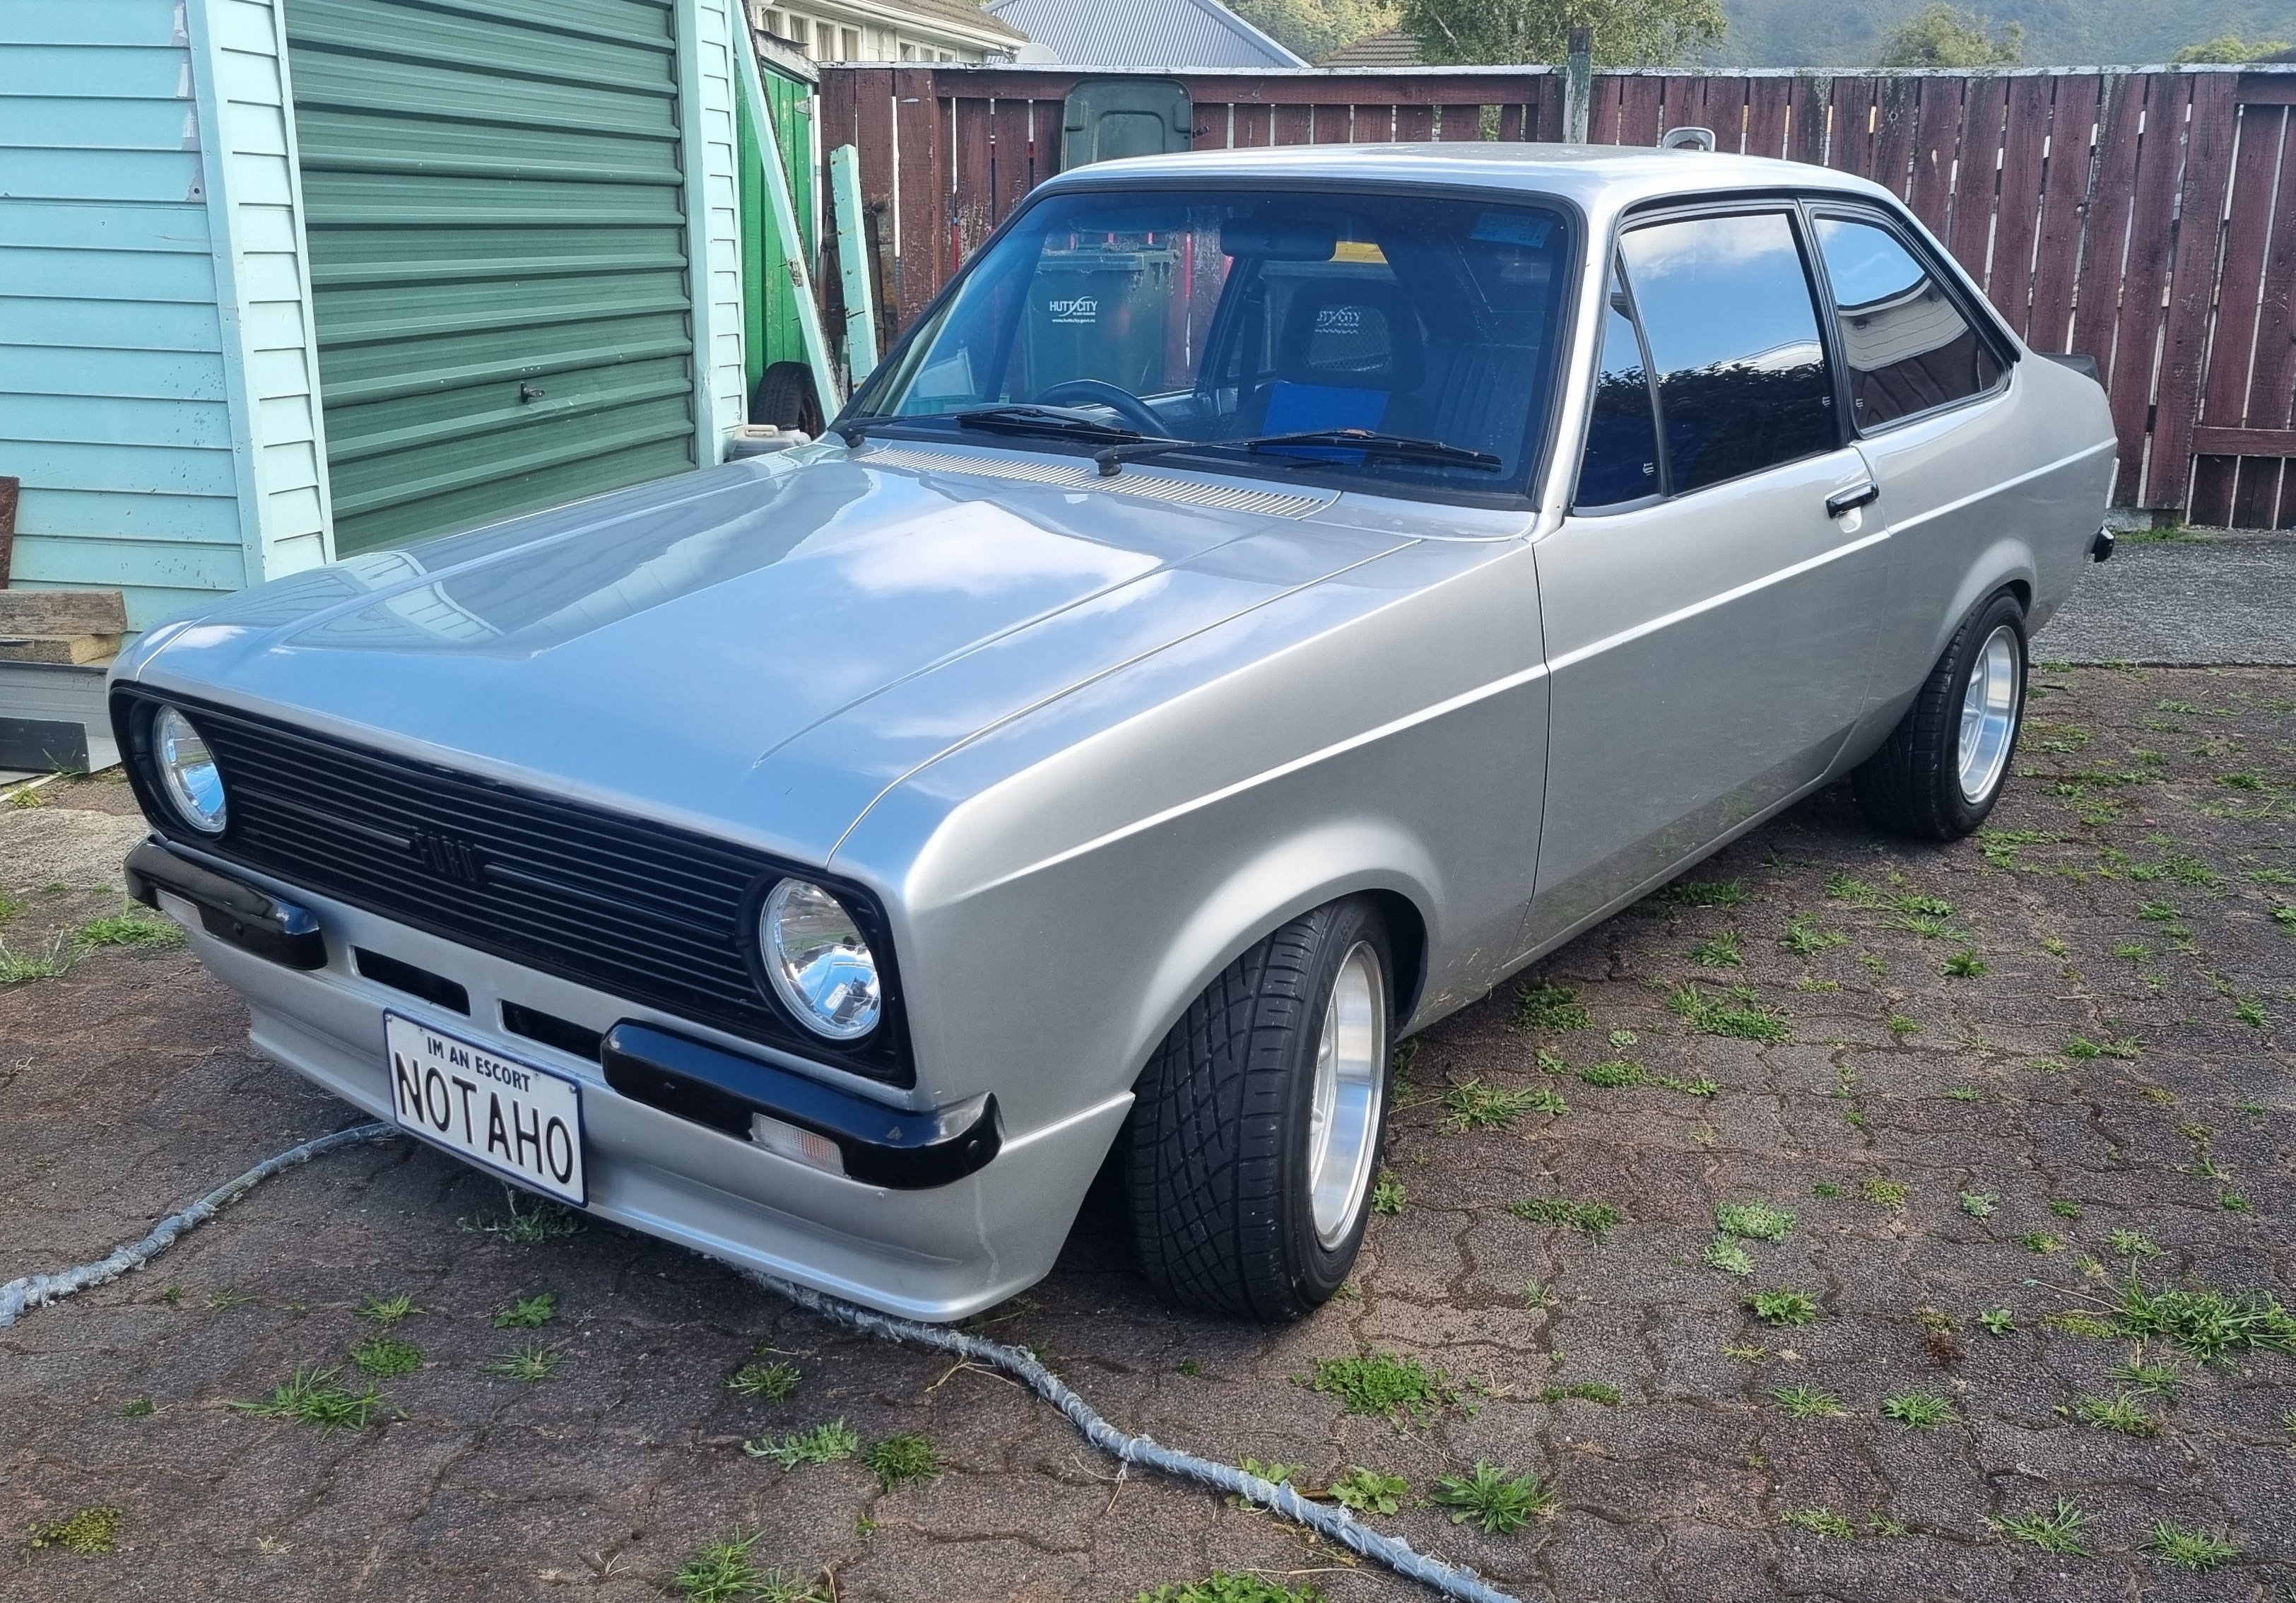
We have owned this little Moke for about 4 years now and since I'm starting to do a bit of work on it, I figured I'd start a thread as it might be of interest to others. So, first up a bit of background. When we lived in NZ, Mrs Flash owned one of those newish 1275cc SPI Rover Minis. It was a Jap import that someone had done quite a bit of back dating on. A lot of the changes were fairly subtle, but the most notable things were the fitting of 10-inch Watanabe rims to replace the original 13-inch units and the removal of the modern dashboard that was replaced with a classic centre mount speedo. The car was a little rocket and super fun to drive. Sadly, we made the decision to sell it before heading off on our Australian adventure and last I heard it was somewhere in Christchurch. So fast forward a few years and we are now permanently OZ based and looking to get back into some classics. We often thought back to the fun that we had with that little Mini and decided that owning another little Leyland would be good. The climate over in tropical Queensland lends itself to something a little more open and so we set our sights on a Moke. After checking out a few we ended up pulling the trigger on a fully restored 1100cc powered 1974 Californian look alike that was going for reasonable money. When I say reasonable I really mean that after doing my own sums I concluded that I couldn't have restored a clunker to this level for the money that was being asked. So, after swapping a few calls with the current owner together with the studying of some detailed photos a "deal in principle" was struck pending final inspection. We grabbed a hire trailer and headed south down to Noosa hoping to be returning with a loaded trailer. Gave it the once over, took it for a quick drive, some cash changed hands, and this happened: In my next update I'll talk about the maintenance undertaken to date and then a little bit about the current work being done. Thanks for looking.
1 point
-
The HB Viva went to a new home and have this new project arriving next week
1 point
-
It’s at this point you need to take a deep breath.
1 point
-
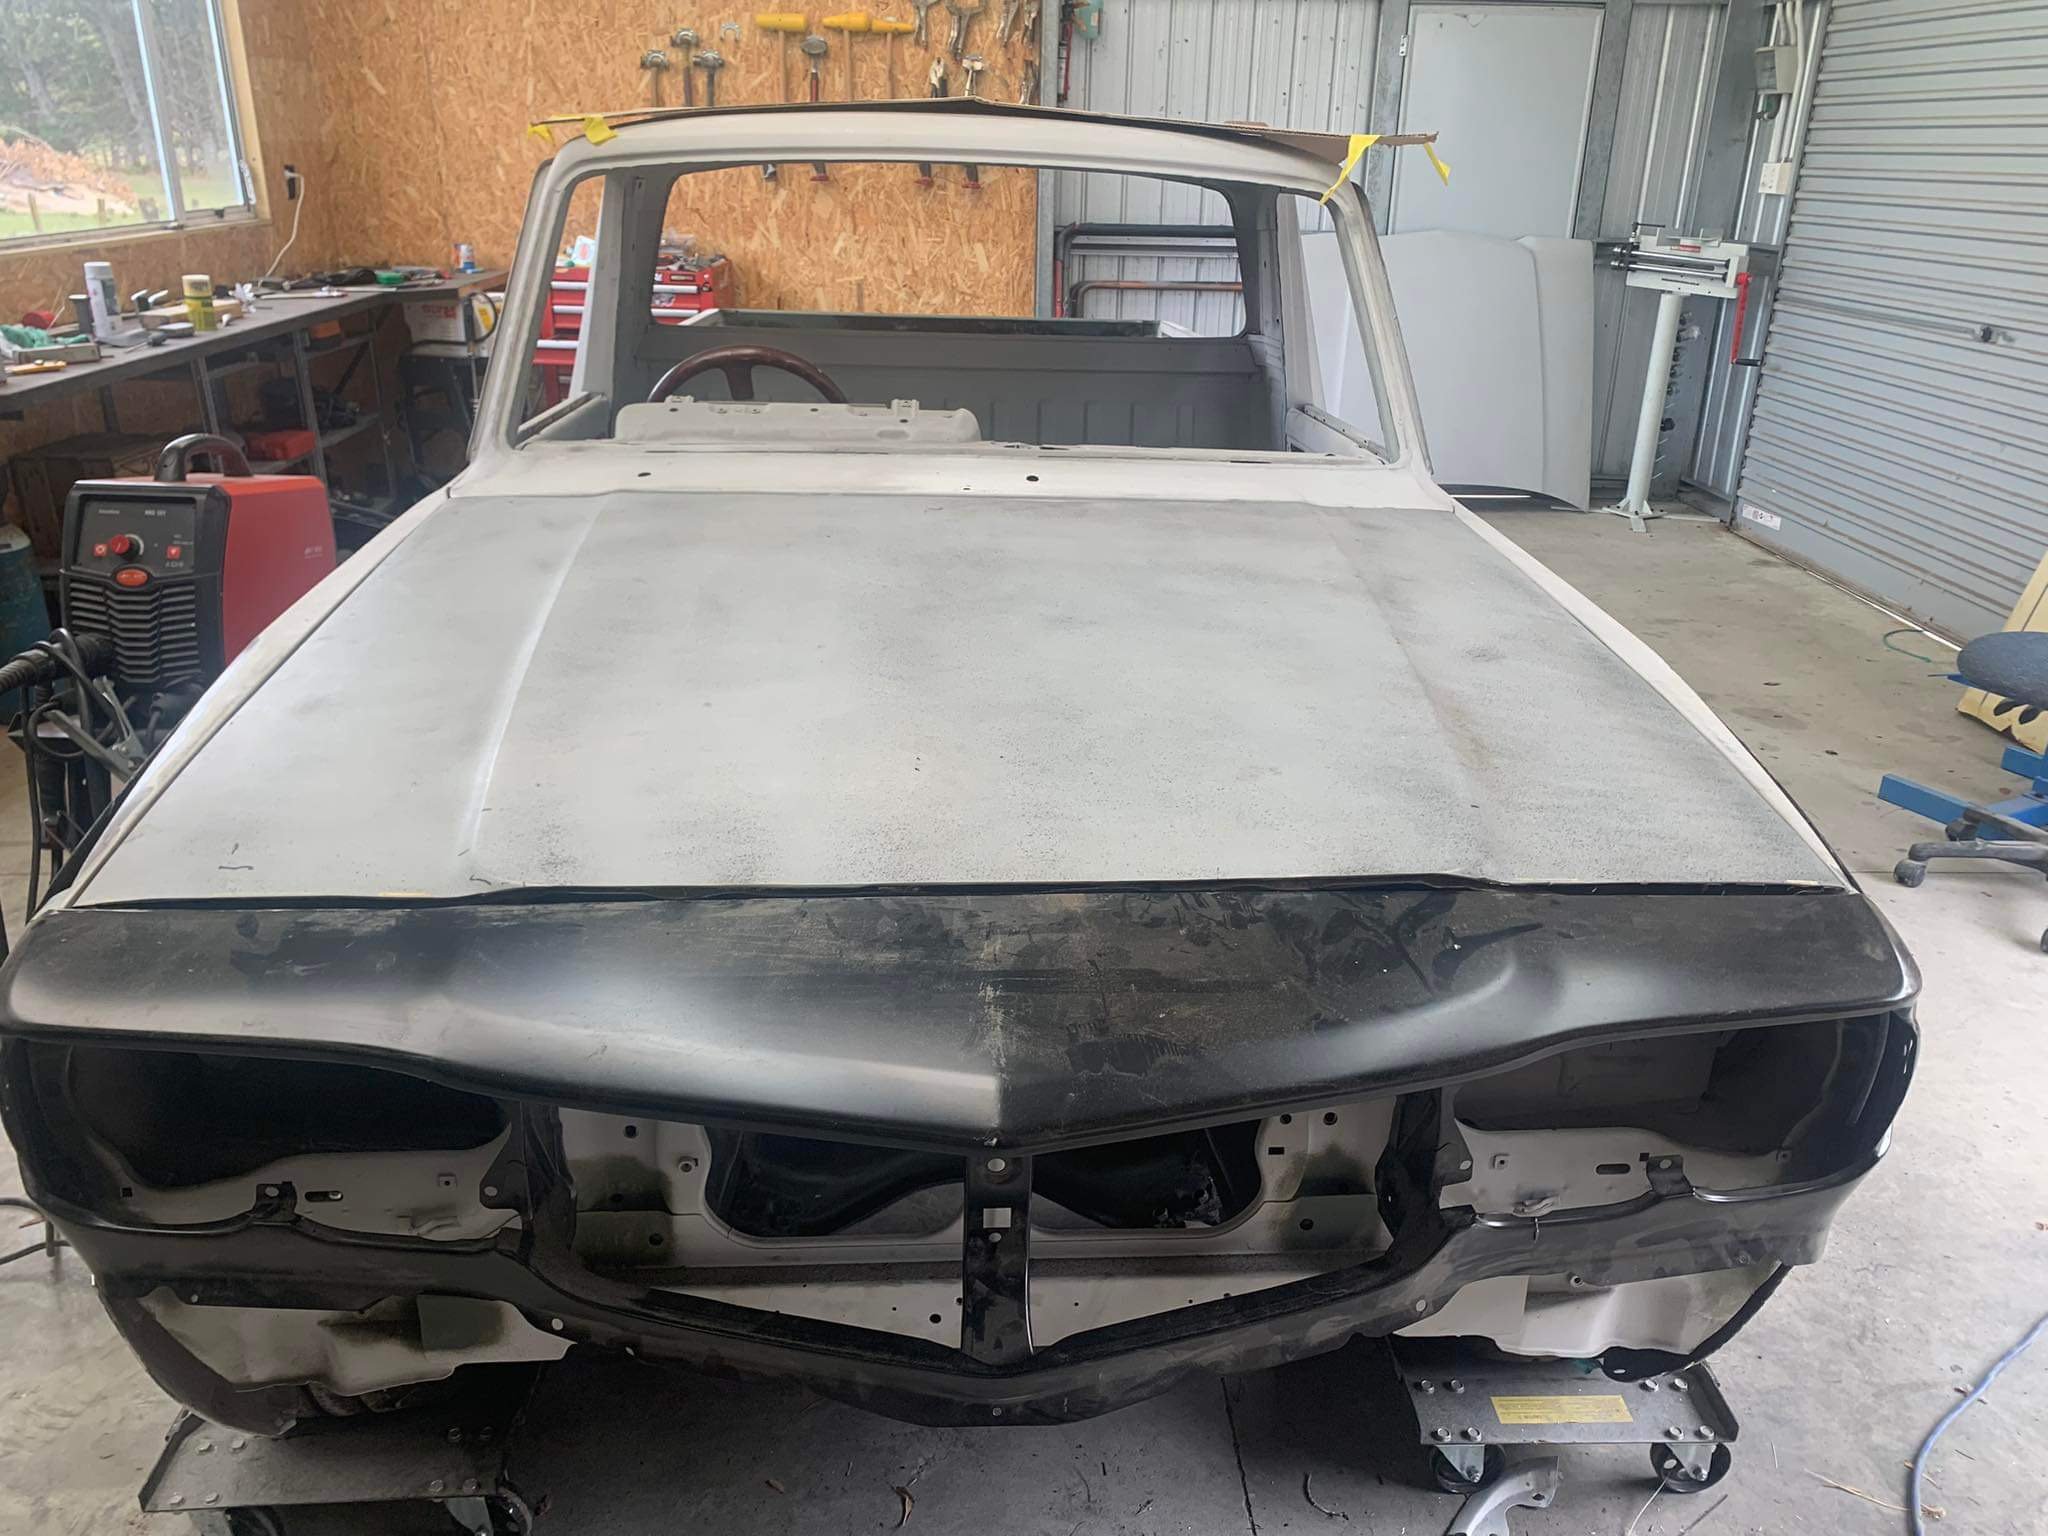
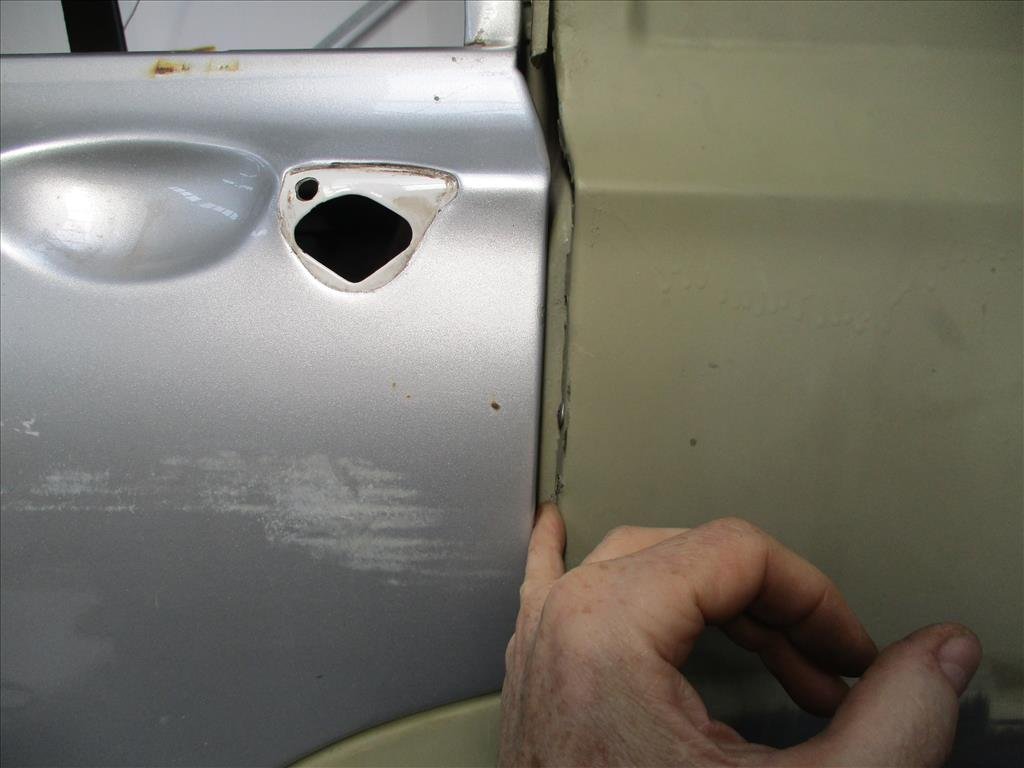
Drivers A pillar is no good. Fixable though. Found a hole under the wiper panel too, will see how bad that really is when i pull the dash out. Not looking forward to it tbh.
1 point
-
the simple fact that people can back out of/ enter their garage during darkness, and not pick up on the fact that one headlight has blown, truly fecken astounds me. what other obvious things do not compute behind their retinas1 point
-
Trademe. Fkn iPhone keeps changing words like a politician1 point
-
Yes inlet Manis are different and they're also more expensive. Fc plates are fine for what you are doing with them. Well capable of 5-800 hp reliably with just decent stagey. Unless u can get FD parts cheap - good luck with that lol Greens are about 2900 for a set of new plates then u can have them cnc ported for not alot more. If everything else u have is good then sweet, job done1 point
-
And they think a firearms register is a good idea...1 point
-
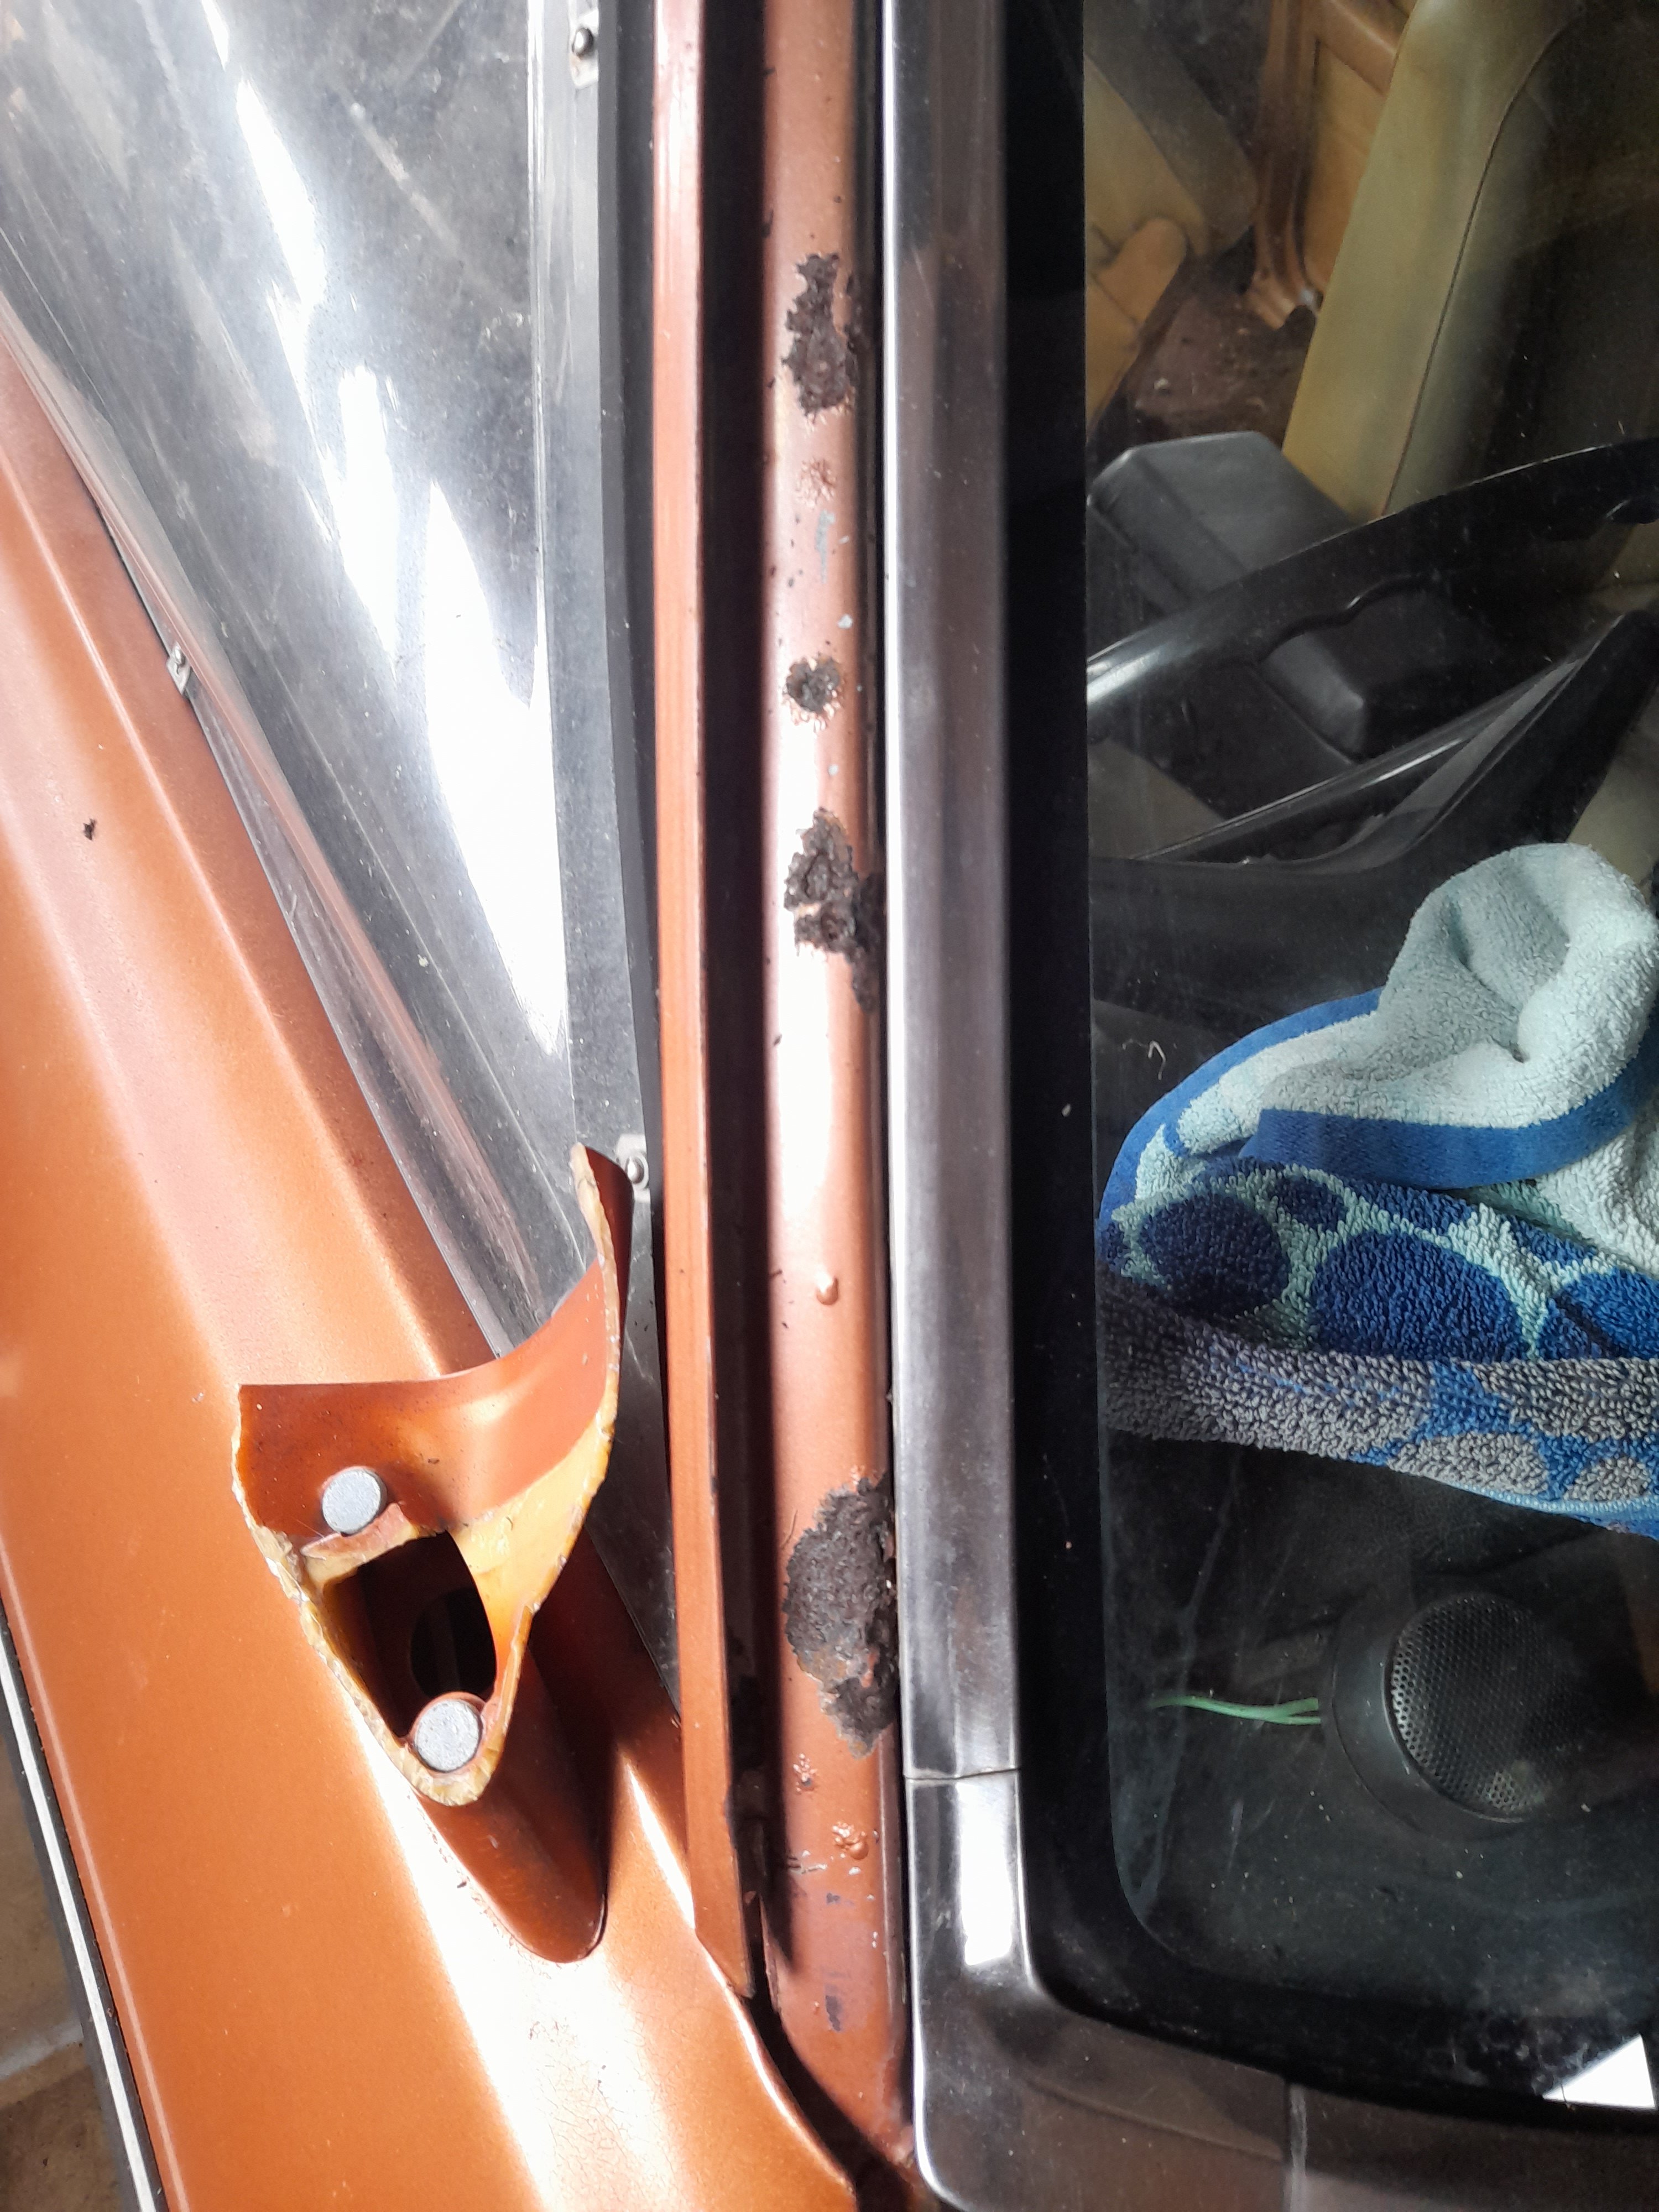
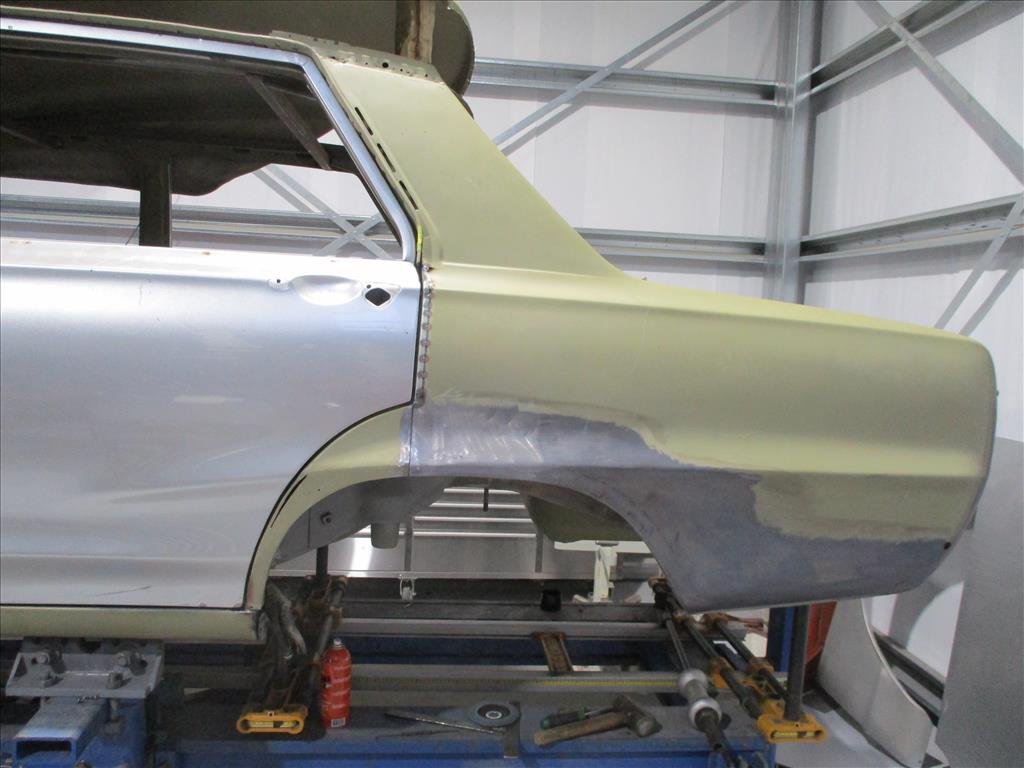
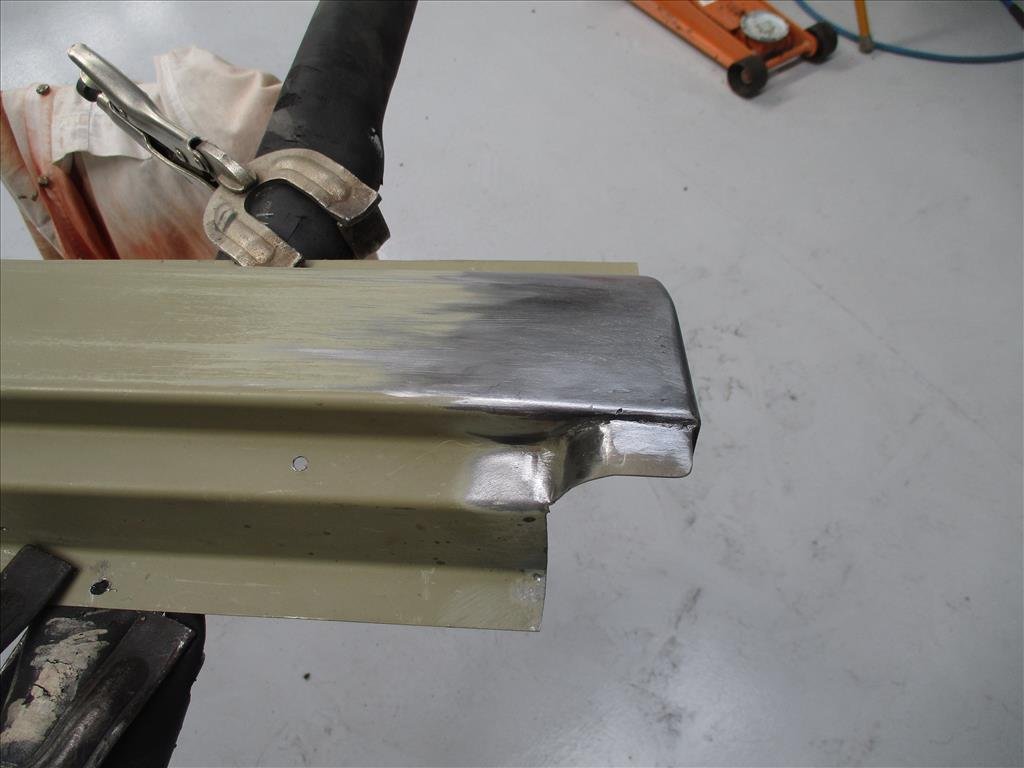
Panel Barry is a stickler for door gaps. Suppose he wouldn't be panel Barry if he wasn't a gap commander. These dogleg panels (his words) which cover the front portion of the rear arch were not lined up well with the doors and it was throwing off some other things. These little panels have always been messed up since I got it, probably since 30 years ago to be fair. So out comes the cutting and welding tools again. The doors also weren't perfect so fixed that up on both sides. I'm happy to hear, and his words "This is the end of the real time consuming type of repairs". We'll see about that I suppose as he works the front.
1 point
-
However, during the pre purchase inspection I picked up a few things in the engine bay and suspension wise that placed some doubt on how far the mechanical restoration had been taken. Nothing major, but just little signs that some items still needed attention. On getting it home, the first thing that I did was to fit an electronic unit to the existing distributor in the hopes of resolving an intermittent misfire. We then clocked up about 1000km during which time I was almost constantly fiddling about to try and get the timing right. In desperation I eventually pulled the dizzy out for a closer look and discovered excessive play in the shaft, so I ended up ordering a brand-new distributor from MiniSport in Adelaide. The new distributor came with its own set of electronic internals already fitted so the old unit went into the parts bin. This solved the misfire, and we ended up enjoying another 500km of trouble-free motoring until one day the Moke just suddenly cut out and left us stranded at the side of the road. Luckily, we were close to home, so I walked the rest of the way and returned with our Holden ute and a tow rope. After a bit of troubleshooting, I pinpointed a fuelling issue which turned out to be a faulty float valve. Got a new one sent up from MiniSport and we were back in business. Shortly after that the actual carby started playing up - again excessive wear - and we ended up ordering a reconditioned SU from MiniSport. Since then its literally been an annual oil and filter change and the fitting of a new battery and we are now up to around 2400km of travel that we have undertaken since purchase. And that pretty much brings us up to this point in time. In my next update I'll cover some additional maintenance work that has happened over the past few weeks. And no one likes a pictureless update so here is a group photo of our small fleet:
1 point
-
I havent done any v8 stuff. but on 4 cylinder 1.6L making around 175hp at engine. this is close to ideal setup , after the collector its 2" then tapers up after the vband to 3" into a glass pack. after that you can get away with more sins. So yeah if you want to get fancy with it, carry on tapering down your collector to 2", run 2" for for a bit, then chuck in a 2" - 2.5" exducer cone with 2.5 inch reso's directly after that, bigger they are the better. some of the small ones dont really do much. think of the reso as the exhaust ending. after that do what you like really. merge into a single 2.5 or 3" and add mufflers till its quiet enough. you might grab a little bit of power off the bottom and in the middle doing it that way. otherwise your original plan will probably work fine
1 point
-
1 year wofs for cars that are 10 years old. This is a rolling date. 6 months wofs for everyone else. While we are responsible motorists, you only have to look at the state of some of the cars and vans driven around here that shows there is a blatant disregard for maintenance when it comes to new New Zealanders and tourists.1 point
-
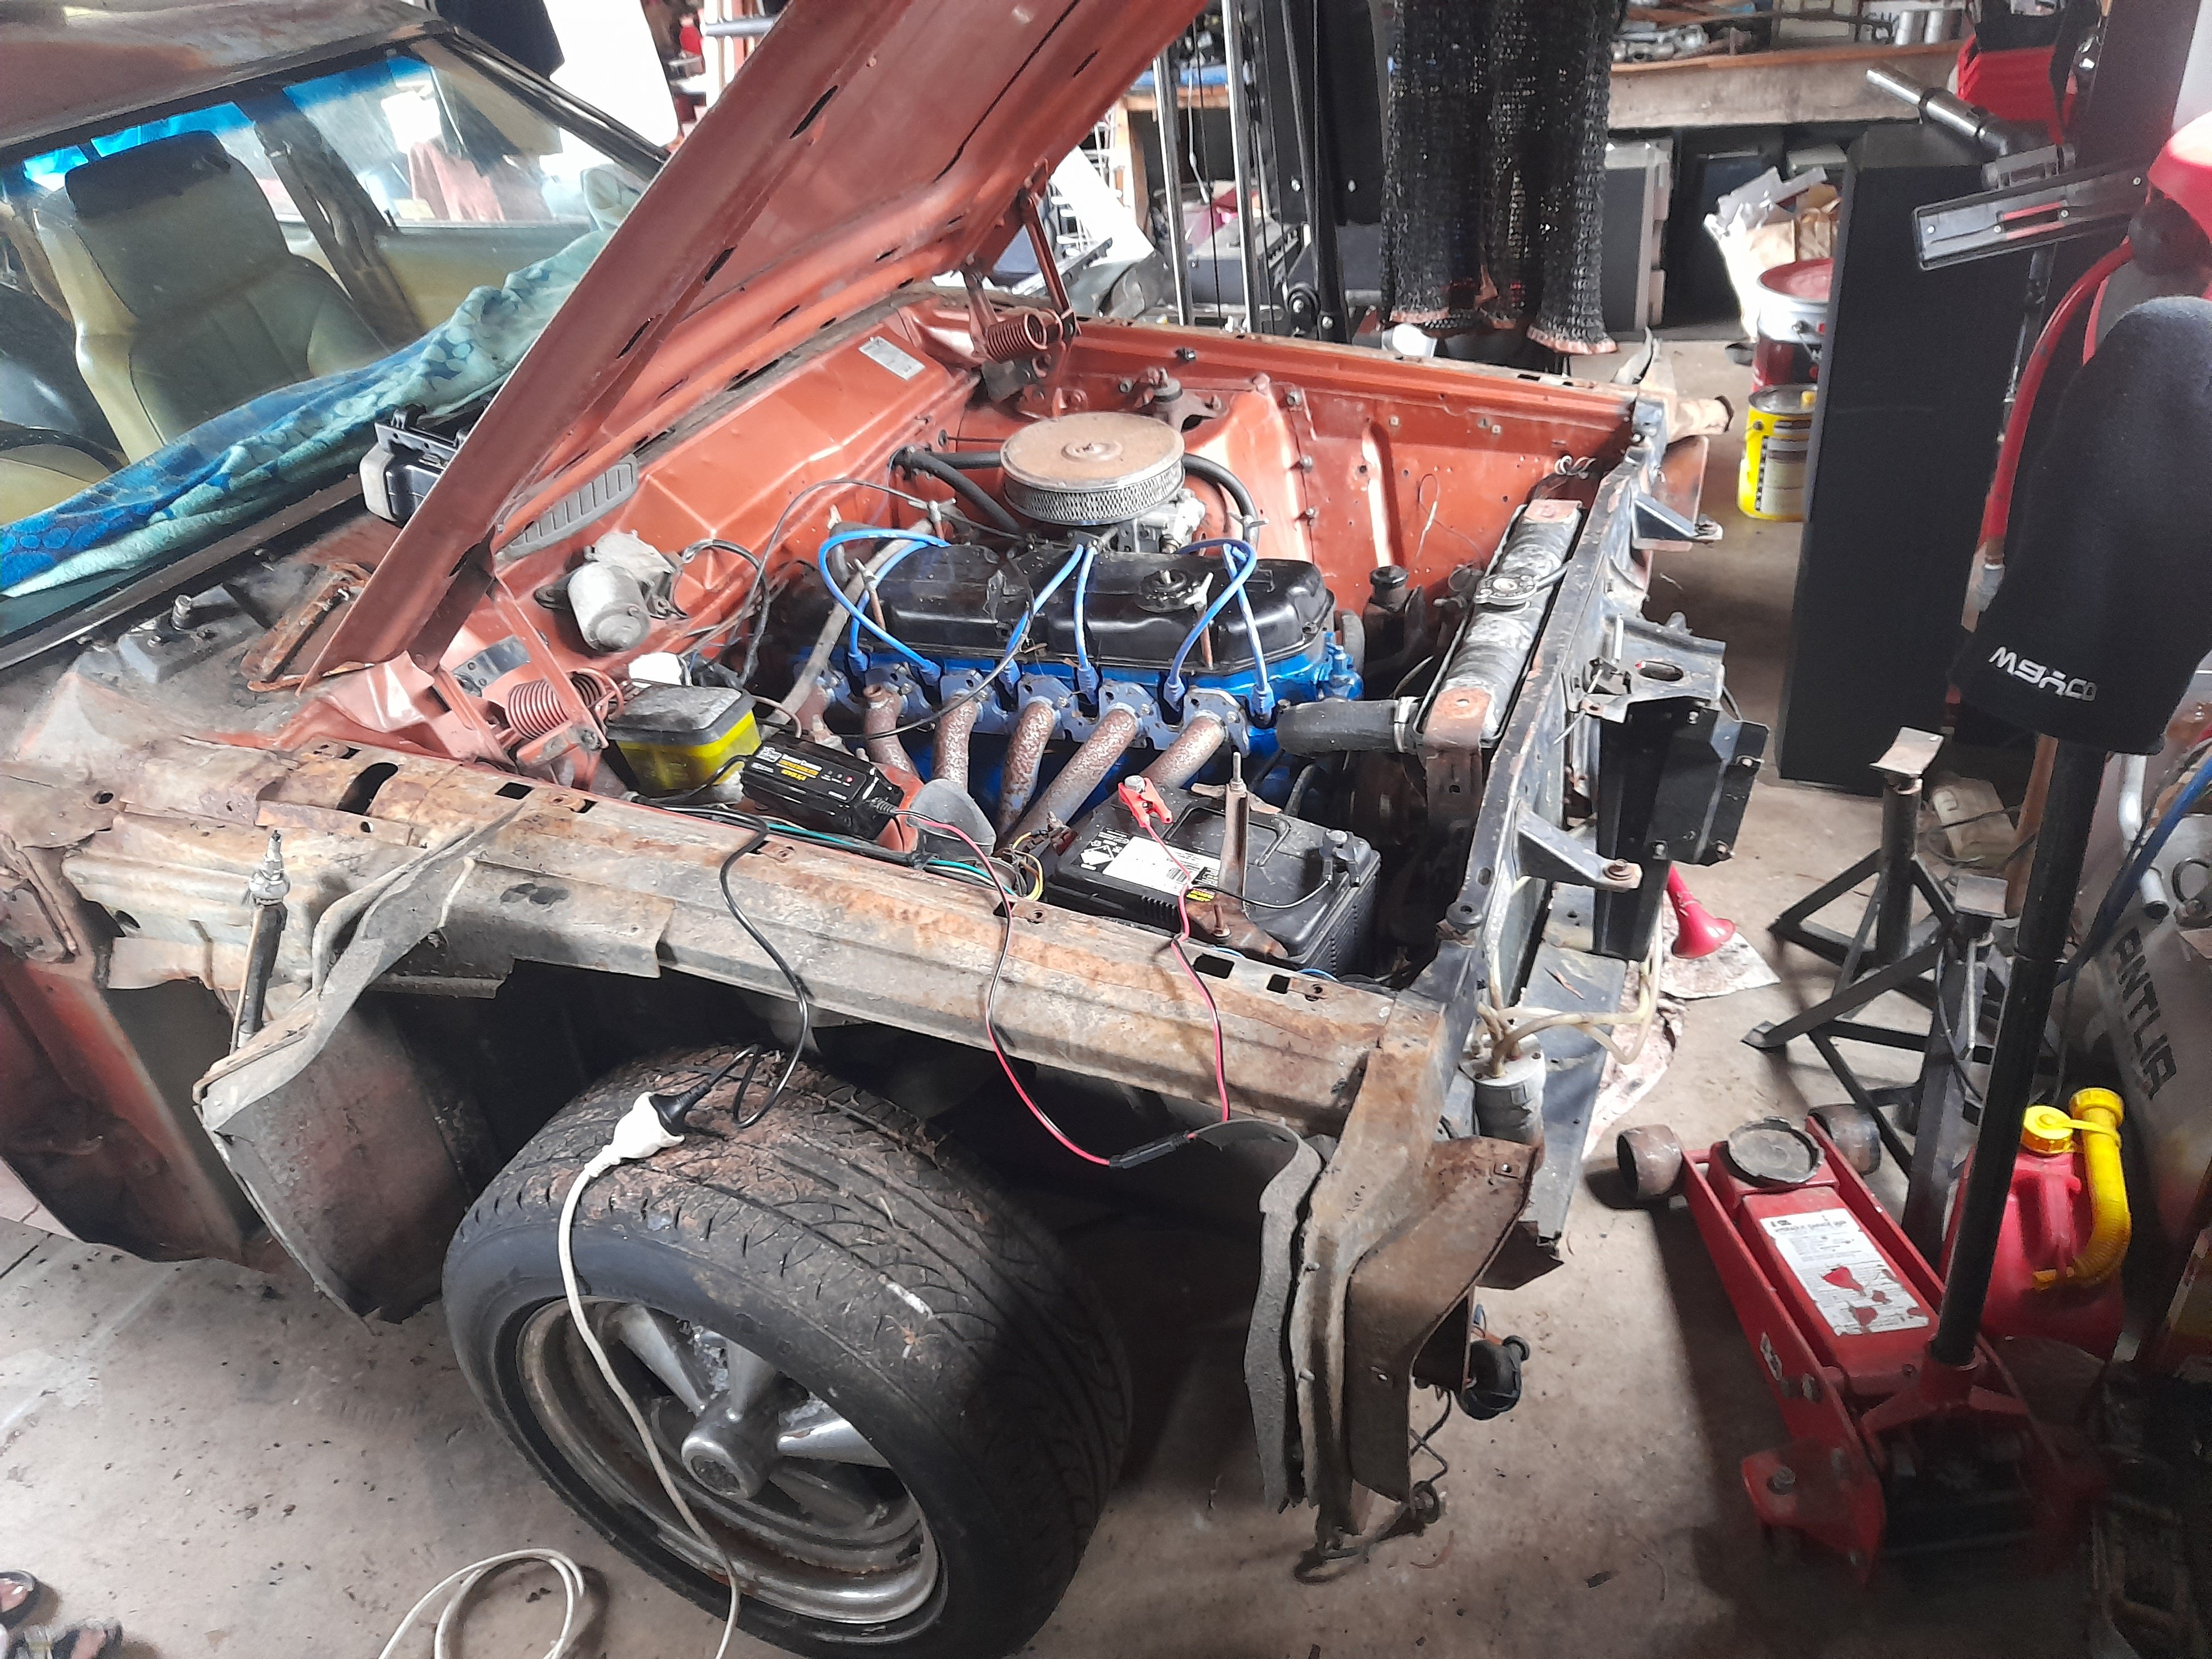
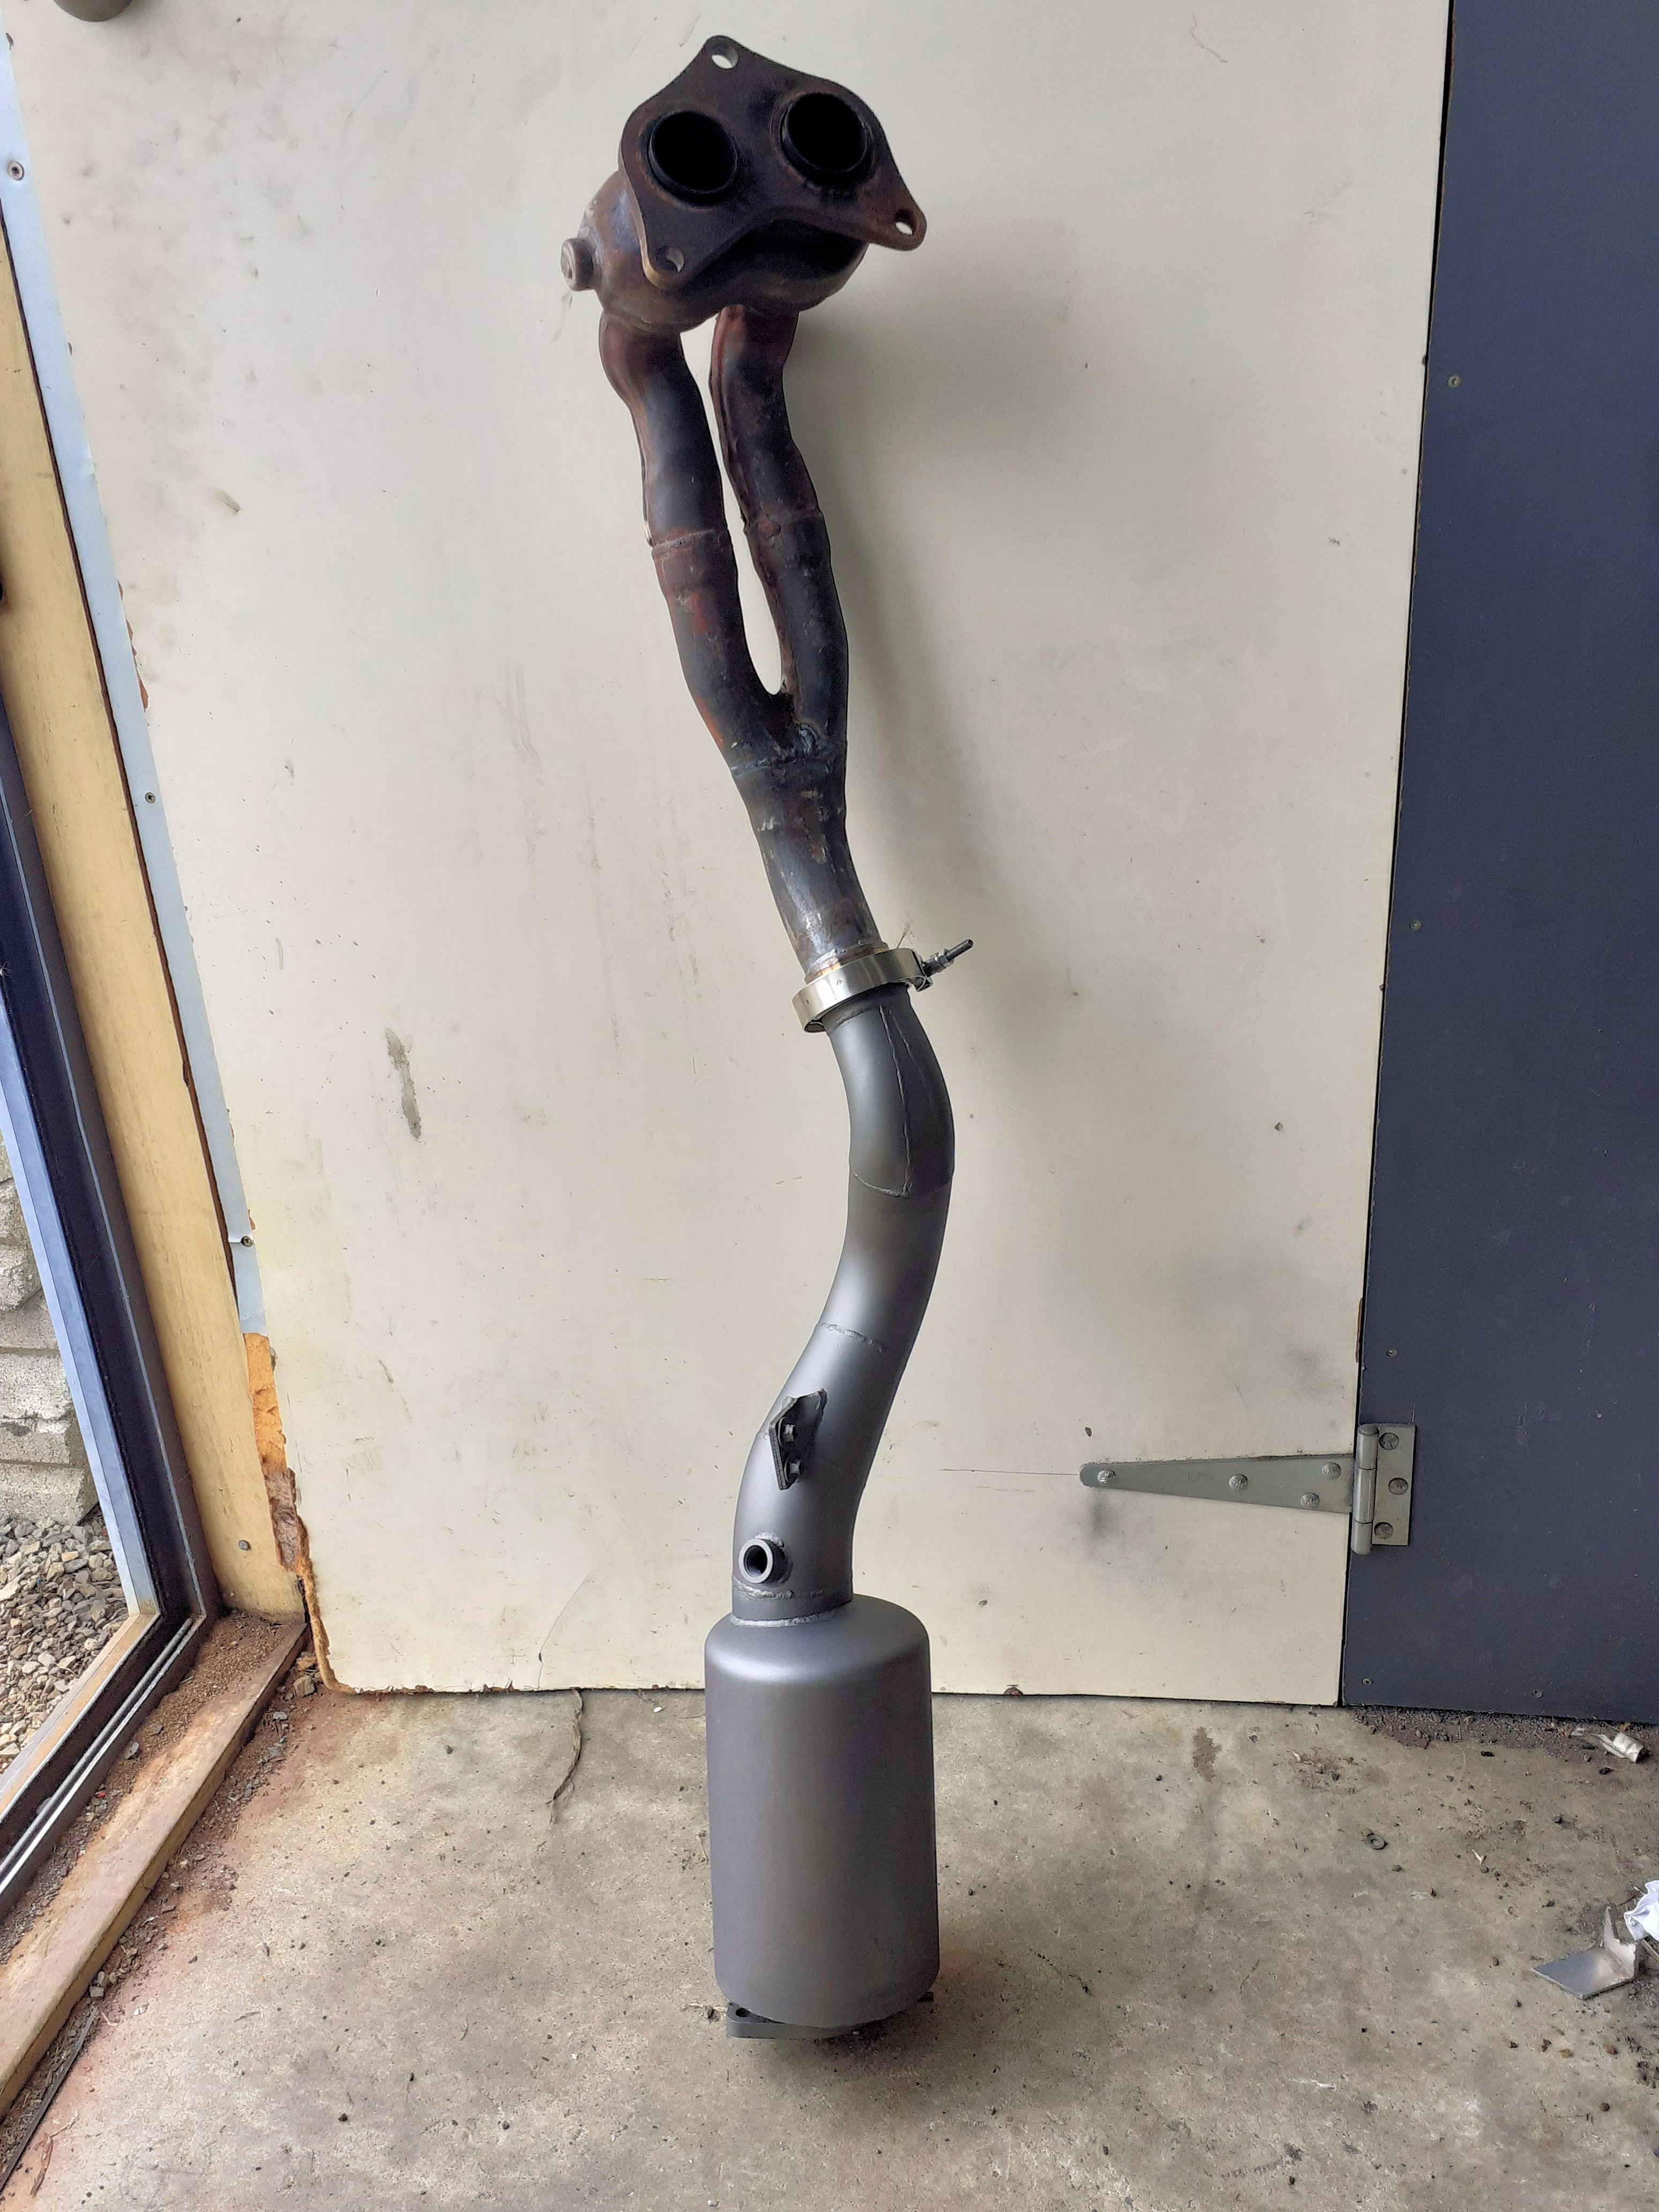
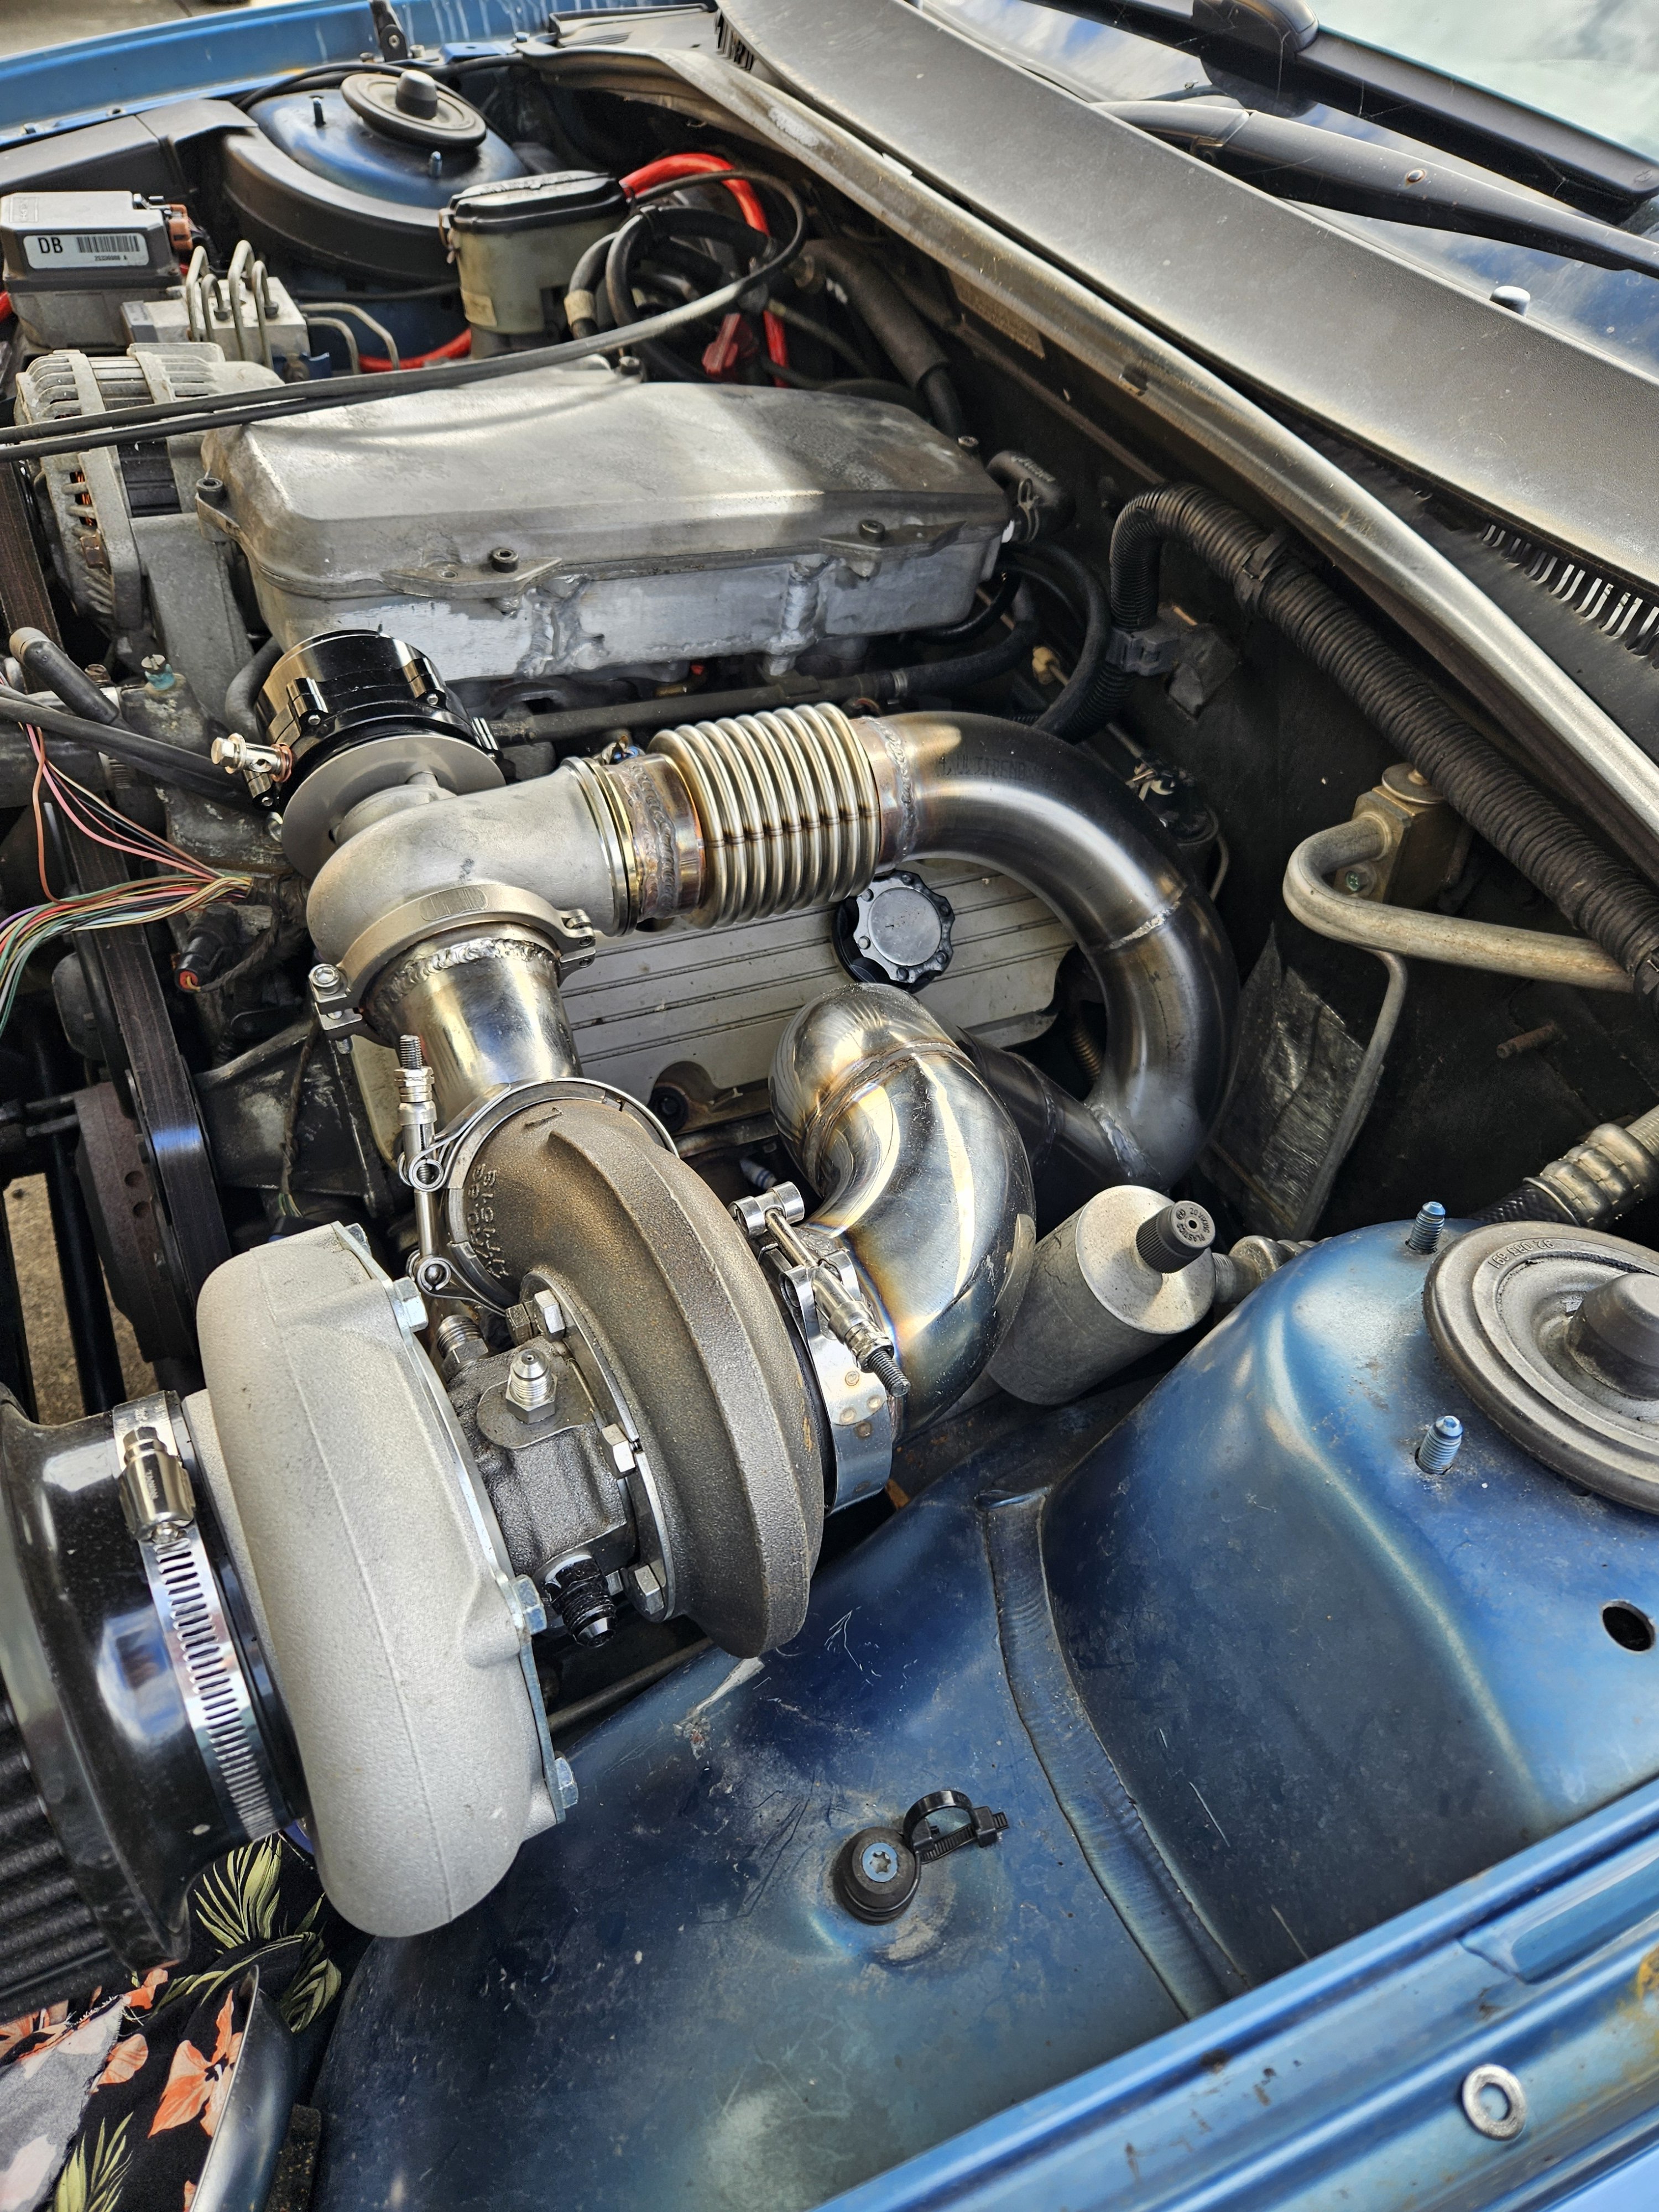
My crossover pipe ended up clashing with chassis rail has ended up becoming a stupid complicated thing only really so it fits the existing pipework locations..... I may end up chopping it off and have it enter just under the turbo instead of the collector, as I think it may end up been a restriction. Also time to fit the wideband sensor I bought ages ago off @Honda Ass Dragger and it integrating into the pcm.
1 point
-
Not much to see but have flipped rocker covers over so i can access the oil cap wouldn't want to top up hot but you get idea. New gaskets too billet cap so it doesn't melt.... Have started on wiring not ultra complex but coil packs need to move.
1 point
-
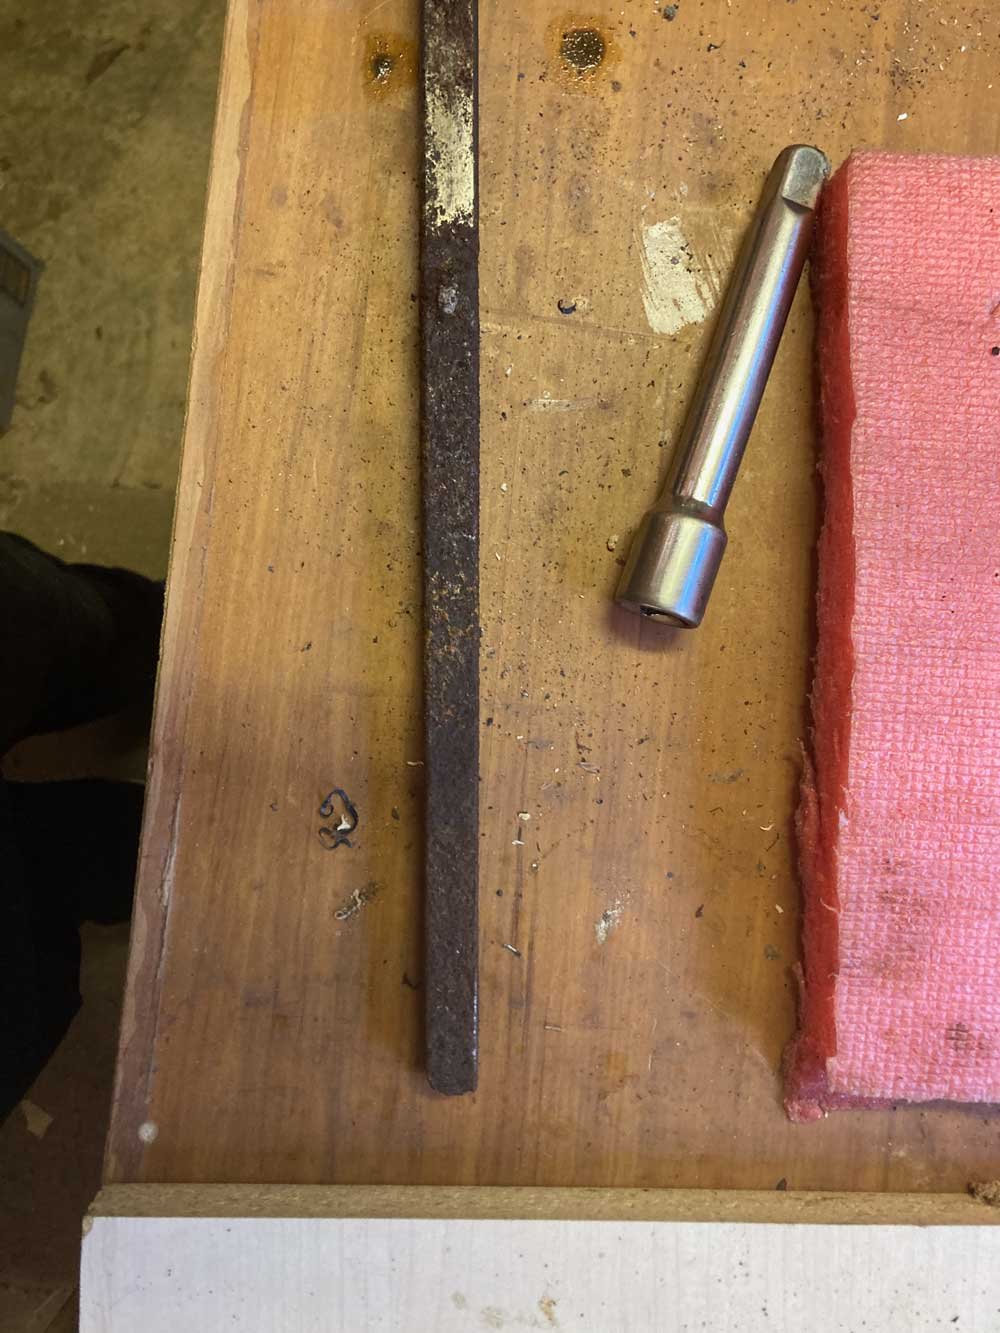
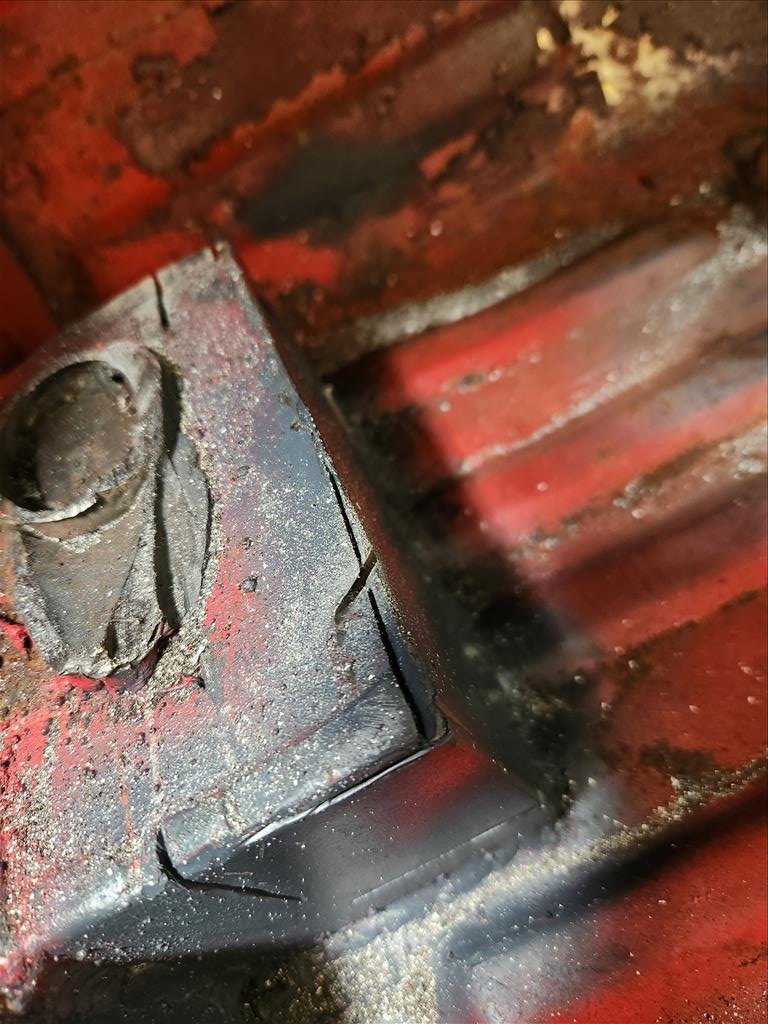
I got it all back together and has all of its gears so I'm calling that a win. It also does not appear to be leaking any transmission fluid, another win. So then I looked to the wheel bearing situation, and smashed that out. There is a dedicated X1/9 forum, Xweb, which has a lot of excellent info and how to's. I found a great pictorial run through of the process and set to. I did need to make a special tool to remove a locking ring but that was no drama. Octagonal lock ring fuckery. Special tool made by a special tool. That and the engine going in meant Sunday was quite a big day, so I left the tie rod end for tonight. On the basis of this minor last task I booked the car in for its recheck and a wheel alignment. After work I went down to sort it, only to find that the rod end is the wrong one, and about 50mm too short, GAHhhh! It took two weeks for the last one to arrive, I am so disappointed. Anyway. Previously to this weekends shenanigans I had done some messing with the jetting, and drilled the mains out to 130 from 125. So I took it out for a short run so I could bleed the cooling system properly and check the AFRs which were much improved, as was the idle to main circuit transition, so that at least was good.1 point
-
All of which is getting silly - simple rules for what should be a simple system. Annual wof's for all cars.1 point
-
Does it need external checking every 6 months to be 'safe'?1 point
-
That's not what I said, why would doing a 1 year wof check on a 1999 car be any more risky that a 1 year wof check on a 2000 car? Do you actually drive an old car? The 6 month wofs are a pointless waste of time and money.1 point
-
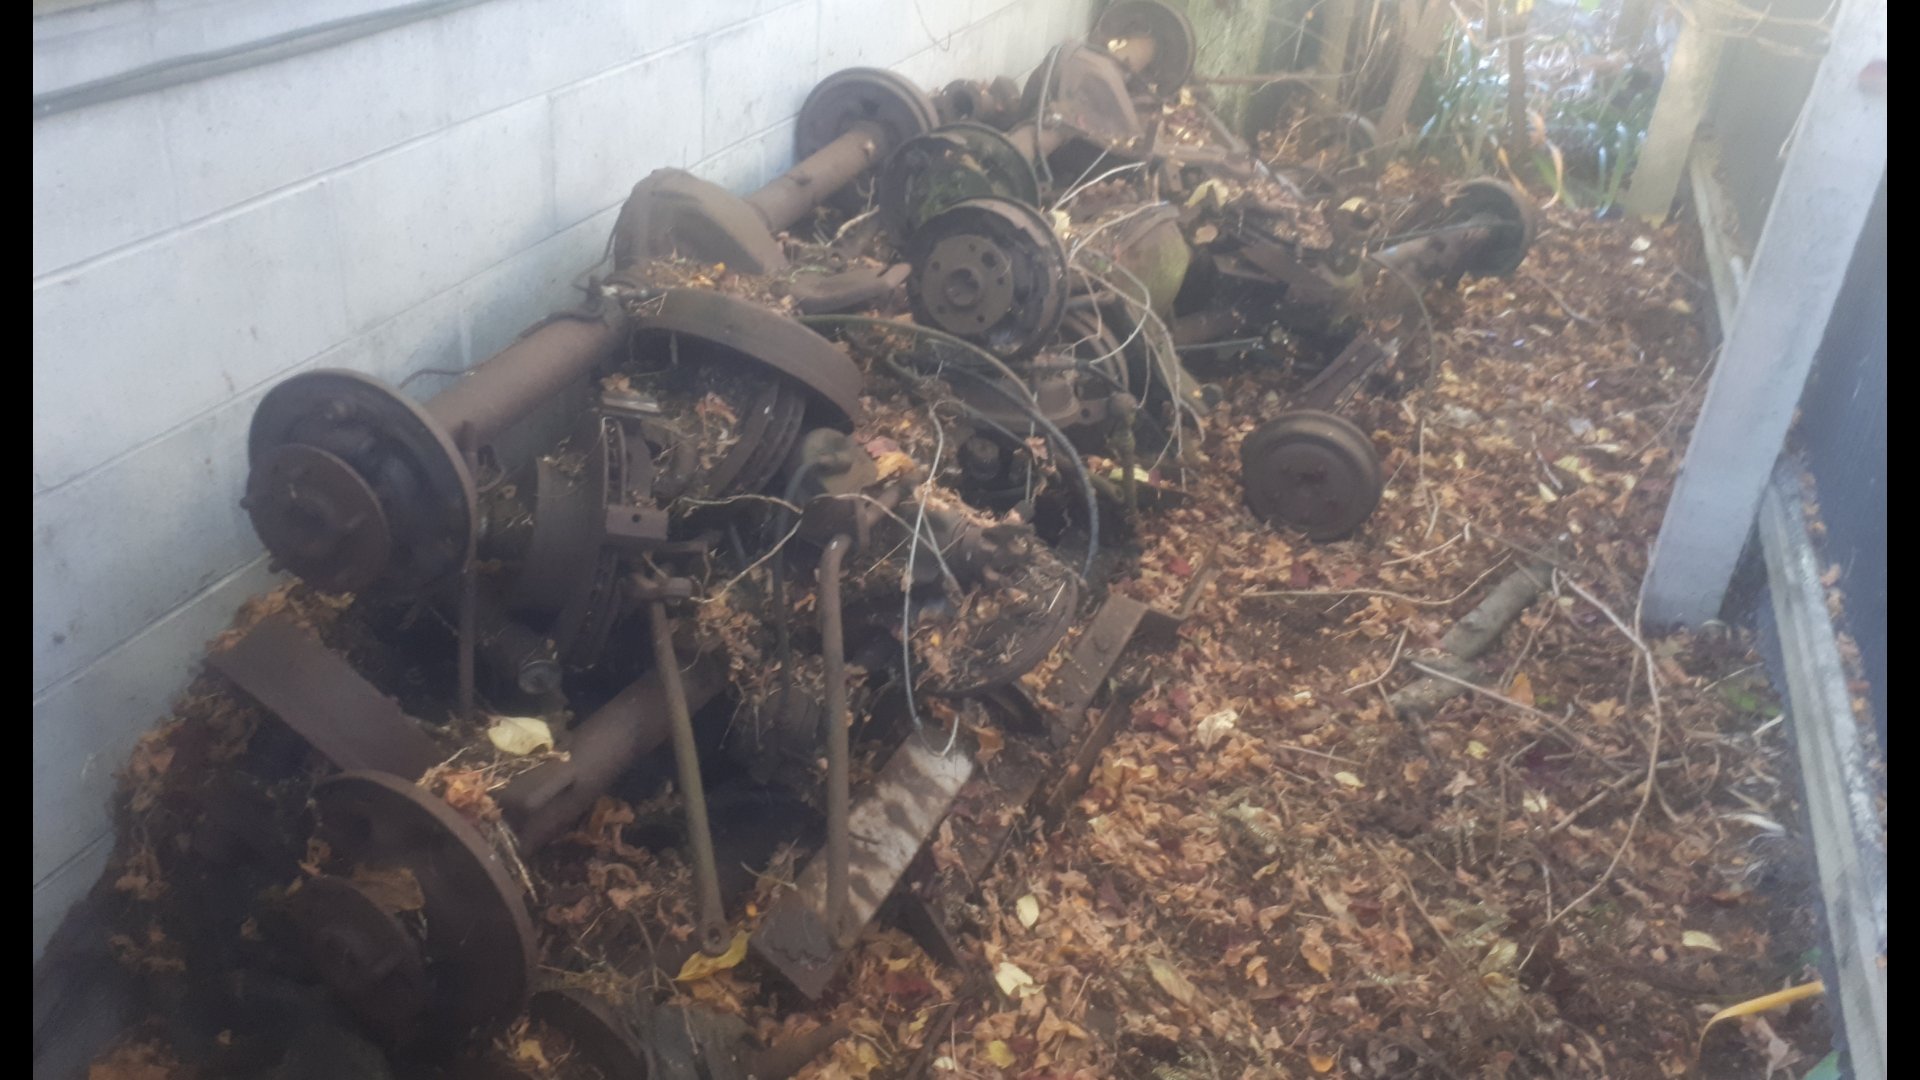
Believe it or not i worked on this today. I went over to mums to sell a valiant diff to a rooster off marketplace. While i was there i set about refitting the copper radiator. With a view to giving the block a good flush before fitting the purdy new rad. I got that in. But decided there wasnt enough day left for the actual flush. (We spent ages digging through my pile of diffs, turns out i have three spare VG diffs) I went to start the old bitch up, cos i havent heard it run for ages. But the fuel pump didnt seem to be able to fill the fuel filter. So i gave up on that too. Ill take an electric pump over some time, and finish what i started today. Pic of the pile of diffs for thread.
1 point
-
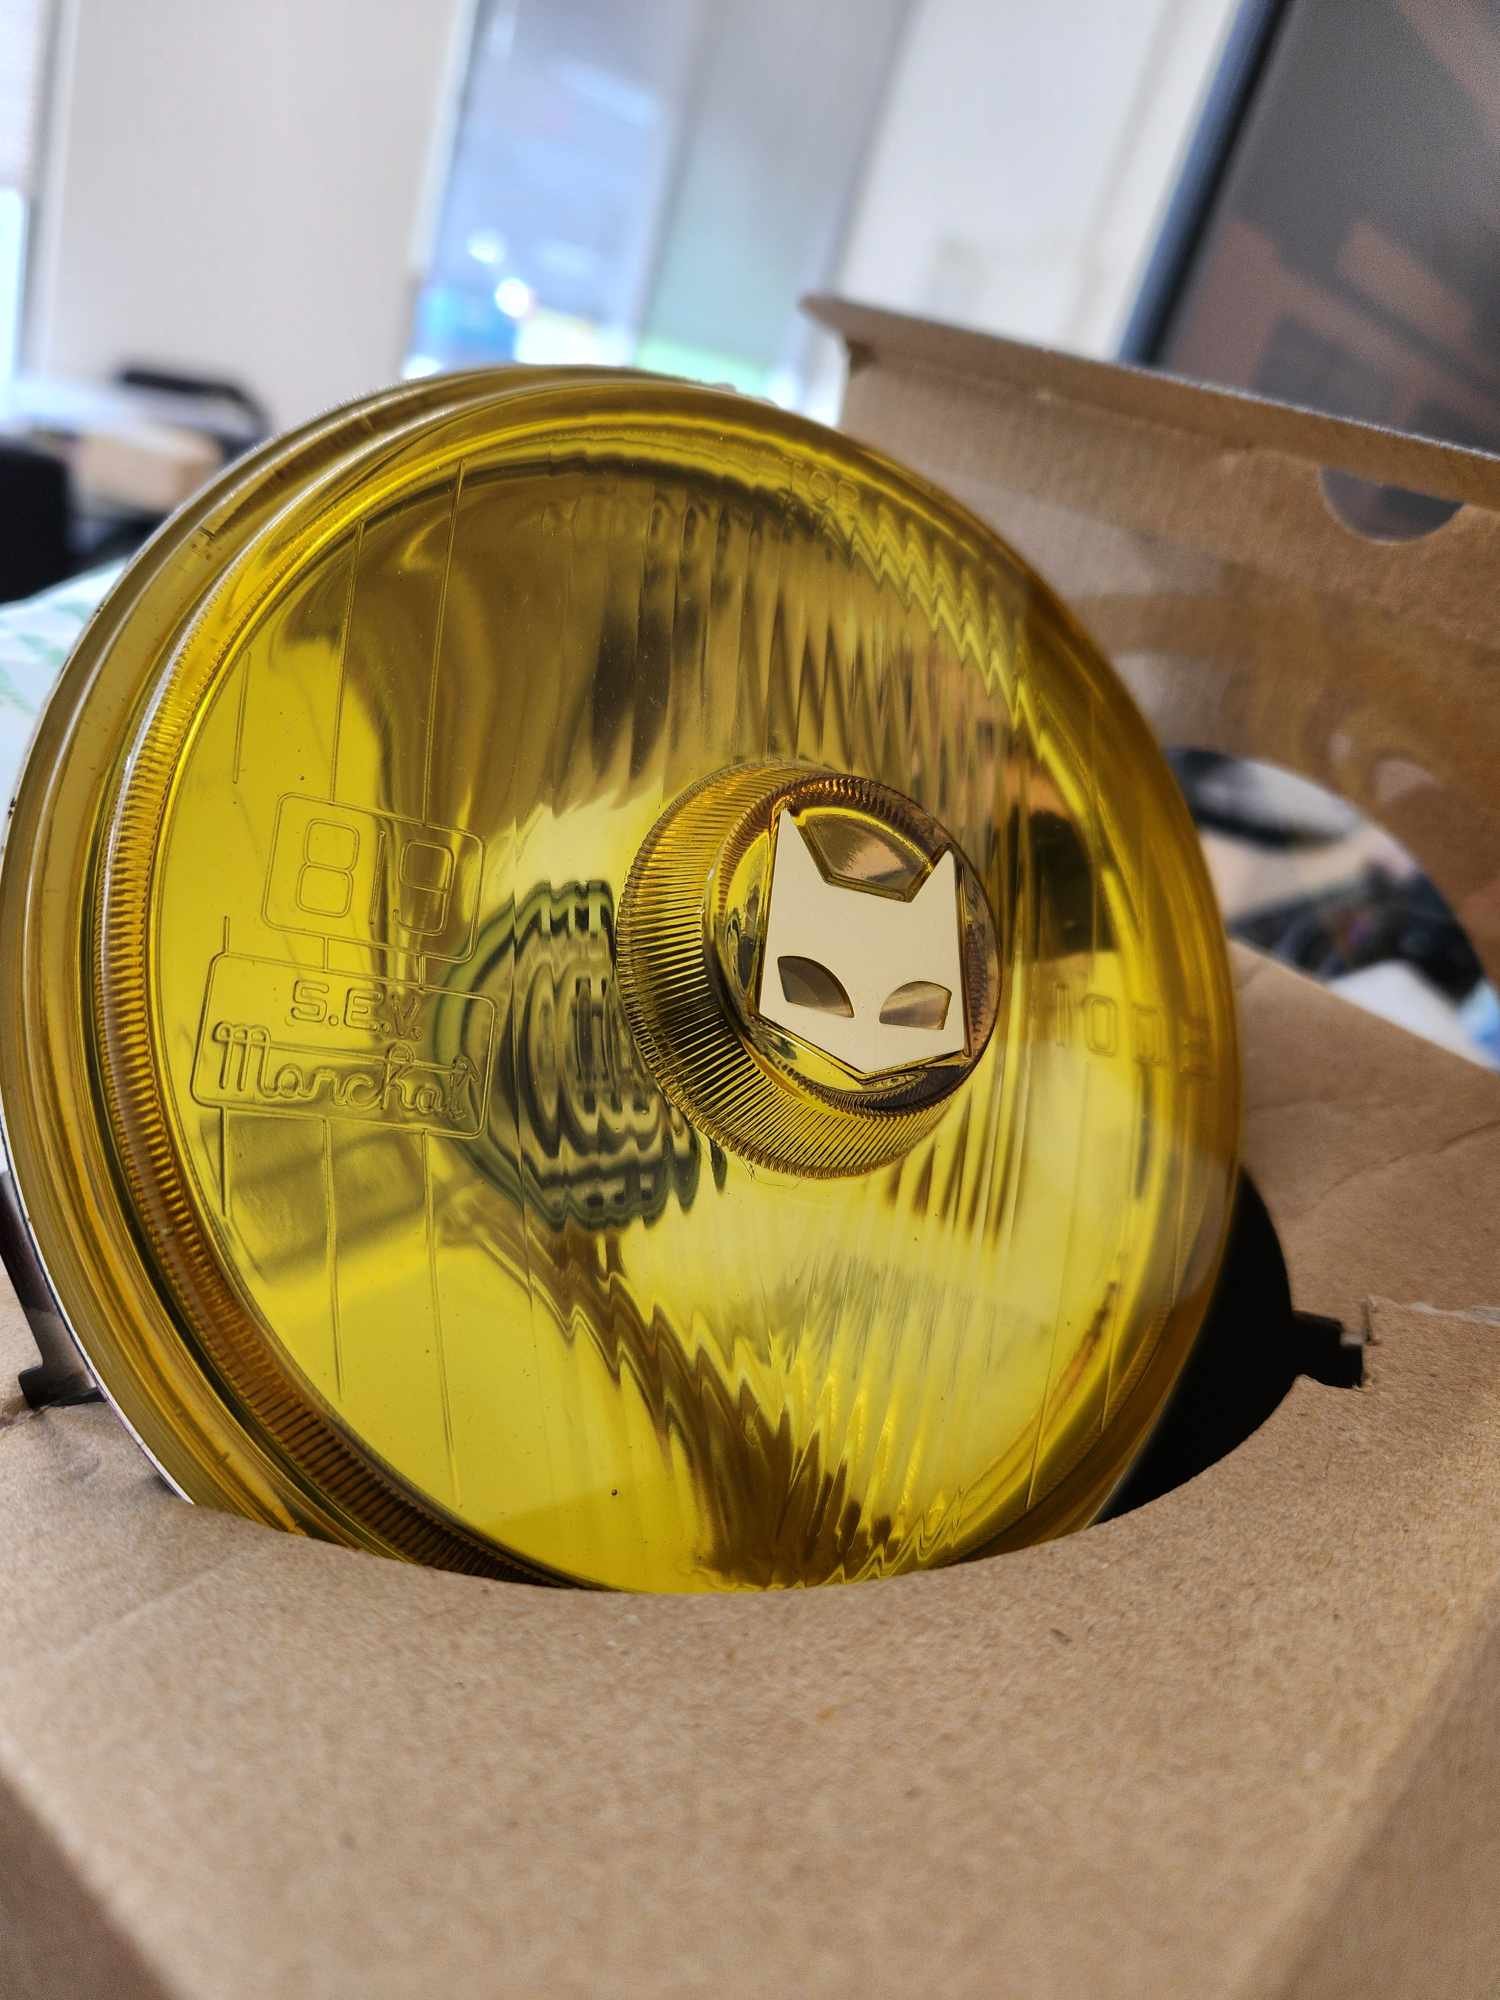
Not too much done today, but I did get a replacement headlight for the one I broke ages ago when I was fitting the others. It was not actually intentionally meant to be a blank space. SEV Marchal! I always liked the look of yellow and of course the sweet cat logo. I will just run one, a little bit of style perhaps. Plugged it in and it works fine so that was easy. Although I need to figure out why the passenger outer light turns off when the high beams are on. Not super high on my list of priorities seeing as it's unlikely to ever be used anyway. I finished putting undercoat on the driver side so installed the side metal trims just using some screws. Not the best but it's what I could find that fits. Gotta fuck with the dick you got. Not sure they will stay in there securely so I'll have to keep an eye on it. When I was out taking these photos just down the road some guy gave us a toot and a thumbs up on the way past and I was only out there for about 2 mins! Unfortunately (but probably not unexpected) my front demister blower isn't working. I can't remember if it ever worked but I might look at trying to get that going again as it could come in handy. The rear demister I'm fairly sure is totally cooked but that's not such an issue as the front.
1 point
-
I actually have a massive boner for early Jimny 2-strokes. An old guy that comes into work has one, I'm trying to get put into his will so I can get my mits on it. Anyways, I have done a bit more on this thing. Don't laugh at my lack of wood working skills, I fucking hate working with wood. So I made the front guards, bit of a weird shape to try and make out of wood, mostly because of my being a tard and all. A bit of fiberglass & resin, a hint of bog, and they should come out pretty good. Then I got started on the bonnet, which is probably the most complicated shape on the thing. Added some wooden ribs, and a couple of dowels as reference marks, then put real thin MDF under them to keep the foam in, then filled the gaps up with foam, then carved the foam with a hacksaw blade and Stanley knife, then chucked a couple of layers of fiberglass over it, to give me a firm base to work with. It actually came out really close to correct, so will need very minimal amounts of filler. Next was lights. My B-I-L used OG dolphin torch reflectors/lens' on his Jeep, that he cut down to the correct size. New dolphin torches have four round LED bulbs in them, so don't look anything like a head light. The only torch I could find that was roughly the correct size, and also sort of looked like a real headlight was some budget items from Bunnings. I pulled them to bits, linished & sanded the OD of the lens down as small as I could, but so that the reflector still fit into it. I then cut the holes in the body to suit these. The front grill will hold the lights in, and also down size them to roughly the right scale size. I also found a Toyota badge that used to be on my 86 (before I got a legit one) that's pretty damn close to the correct size for this, but not sure if I will use it or not. The back lights were way easier, I found some LED lights on Ali that were the right shape and scale for this thing. They are meant to be in corners of the bumper IRL, which seems silly, as they would get smashed real easy. I added in a bit of wood roughly the same shape as the real bumper, and set them into this, so they are a bit more protected. There will be a steel bumper under them mounted to the tow bar in the future, so it should be quite a challenge for the kids to smash them. That's pretty much where I'm up to. Regards, VG. xoxox1 point
-
New beam’s laminated and machined from @Ned’s 3d scans, amazing outcome for such a big surface and “low cost” scanner Realising I don’t have enough talent for structural fiberglass work, talented uncle Neemia from work took over and is doing an excellent job, a layer of glass is over the inside of the hull and the beams bonded in place to be laminated over the top of.
1 point
-
Regale me with your HQ related tales of triumph and woe, and ownership hints and tips here ^1 point
-
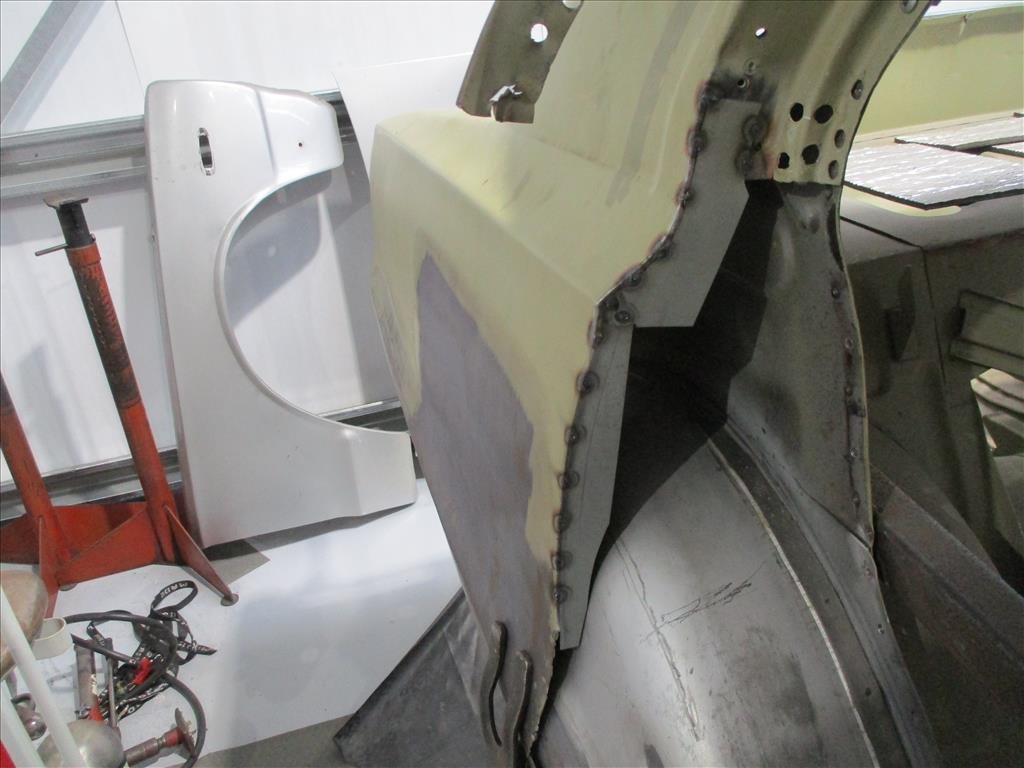
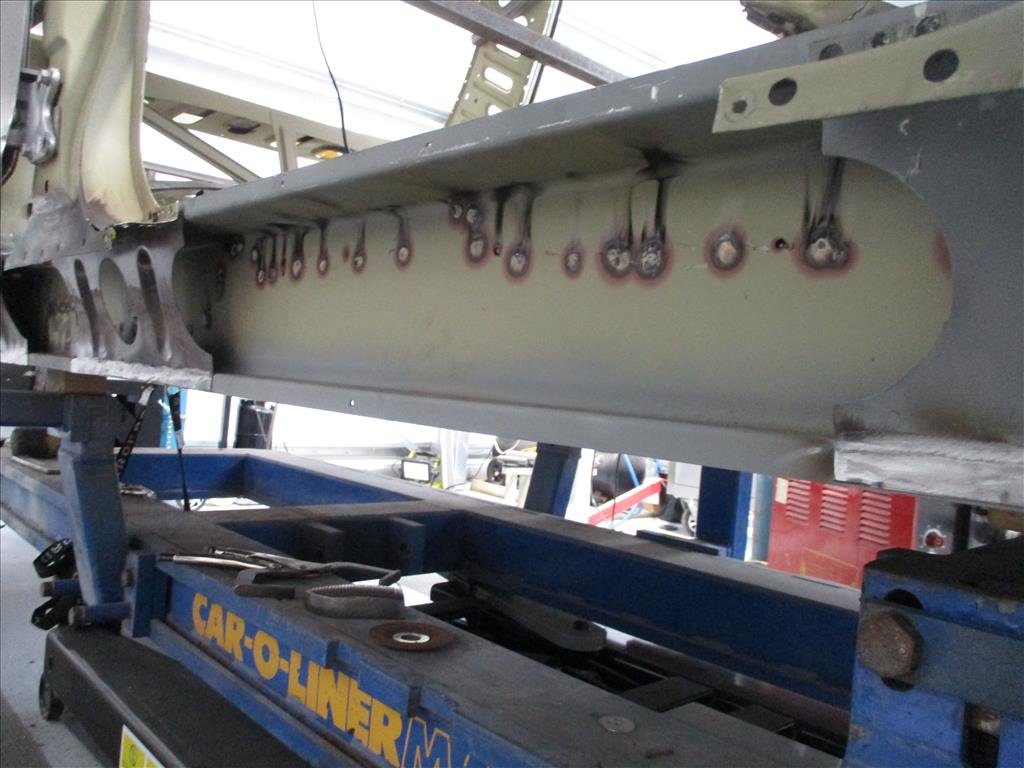
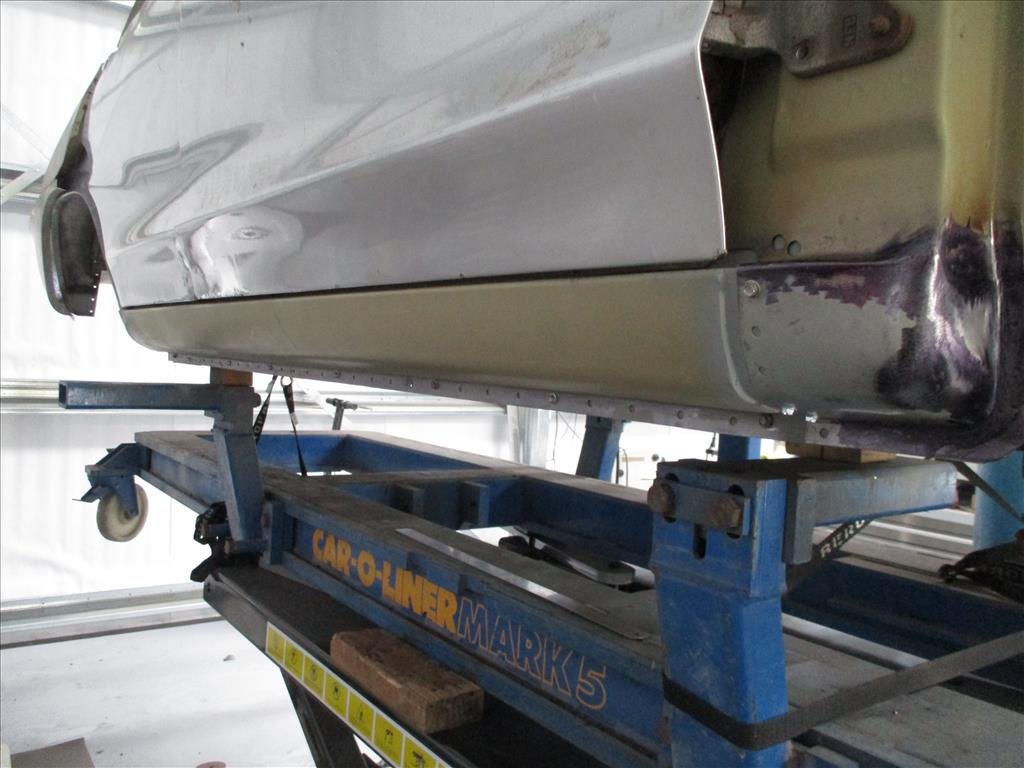
I won't bombard you with 50 more Panel Barry Hakosuka photos but this one is a huge milestone. The majority of the fabrication and rear end structure have been completed and the final weld up is on! The chassis is now razor straight, likely straighter than when it came out of the factory. I can't remember the last time it had a rear end on it? It's been over 5 years for sure. The back panel you see there is the original one which he's using to get the correct holes for welding then will be replaced with a brand new reproduction item that I've provided. Onto the front and to my amateur eyes it doesn't look nearly as bad as the rear but I'll leave it to the professionals on that one. He will have a poke around, clean up what can be cleaned up and replace what needs replacing.
1 point
-
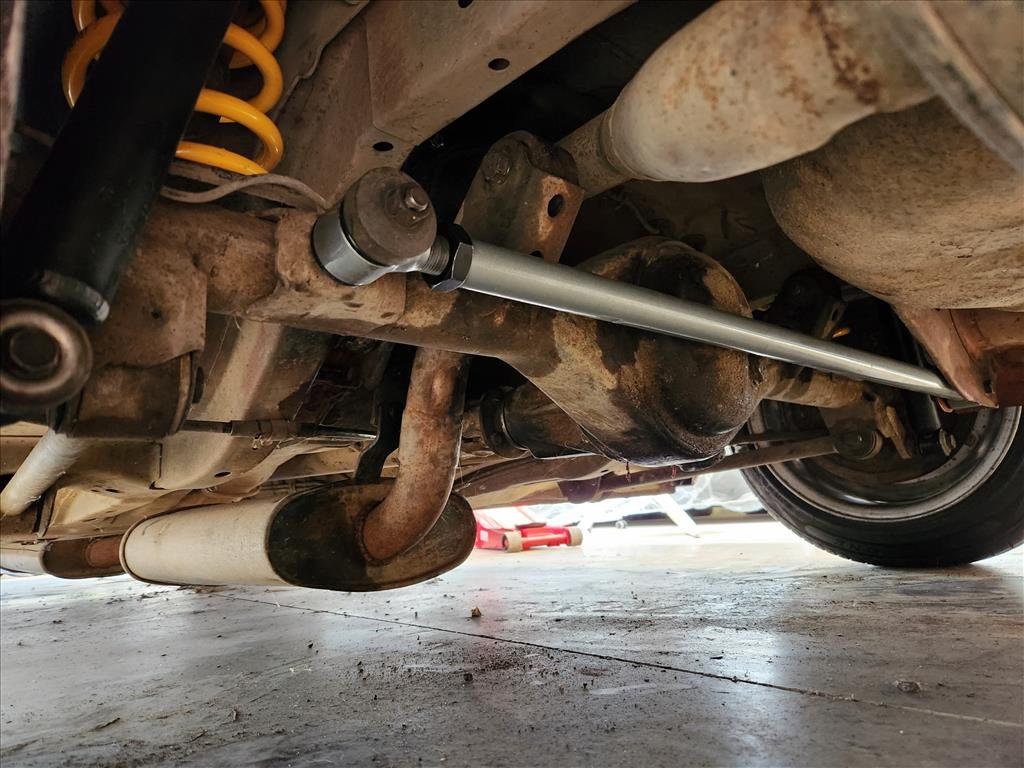
Trust me to turn a one hour job into two days. Ever since I had the SSR MK3s built there was some fender scraping on one side in the rear (which is why I decided to switch it up briefly and have one side swapped around front to back). This is partially because the rear arches are probably uneven and filled with bog and partially because I had the wheels built without measuring anything. Seeing as I was doing a Whiteline stock order I added one of their adjustable panhard rods and try to square up the rear diff. First issue was one of the nuts stripped threads so I had to cut that off and made a hash of it, then I was trying to do this job without unbolting the 4 control arms which meant the diff was super hard to move around so I gave up and went home to sleep off my hangover. Day 2 I straight away unbolted the four control arms and life was considerably easier. I need to get another castle nut to replace the one I cut off but otherwise it's on now. Also a little bonus is the control arm bushes appear to have been replaced so they're still nice. Seems like I was also adjusting it the wrong way so rectified that and I think it's about even on both sides now. Keeping in mind the guards are filled with bog so also not really even. I was thinking about doing a slight one way height adjust on the rear but might leave it for now until car is back to driving and see how the clearance is. Long term plan is not to use those wheels anyway.
1 point
-
All legal beagle, any cruises etc hmu,will head upto cars in coffee, few things to do still but that's any car really, needs gearbox badly and decide on a new engine, time to give her a beating
1 point
-
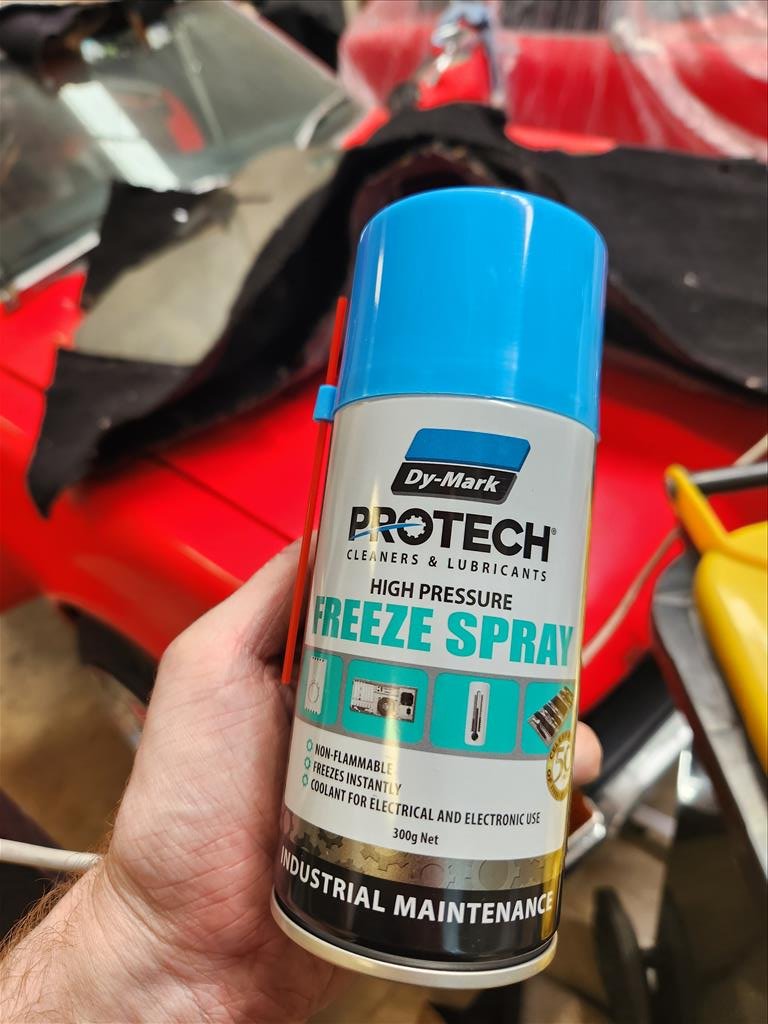
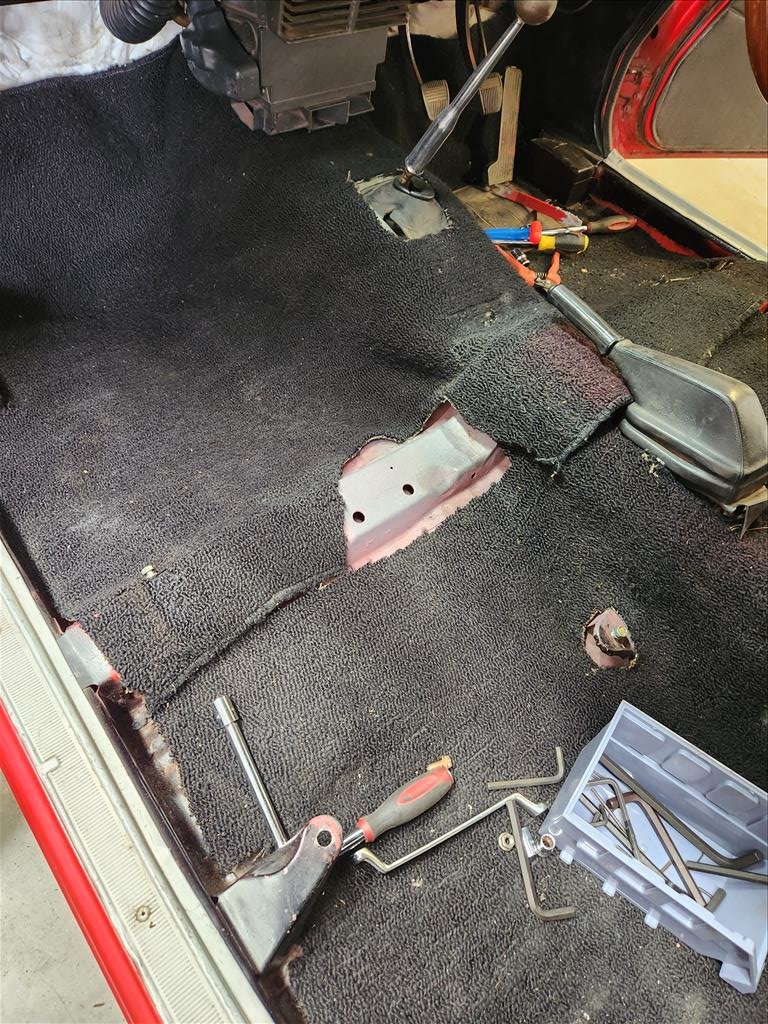
I picked up a saw during the week and had a go at cutting, didn't get very far before the blade decided to become smooth and basically just polish things. Smoke fell out of it too. So today I learnt there are different blades for cutting different thickness of metal. I've now spent my life savings again to buy a bunch of blades for chonker steel. If that doesn't work then I give up and will just get new carpet and cut around these stupid boxes. I did conduct a somewhat successful experiment with sound deadening though. I was reading about how to remove sound deadening without dry ice and this freeze spray stuff came up a few times so I gave it a shot. It didn't work too bad but it would be a ludicriously expensive way to actually remove large portions of sound deadening. Just getting the chips of this little bit used up the whole can. I haven't really worked out where the cuts for these boxes will be done but hopefully when I start to cut things it will make more sense depending on what access becomes available.
1 point
-
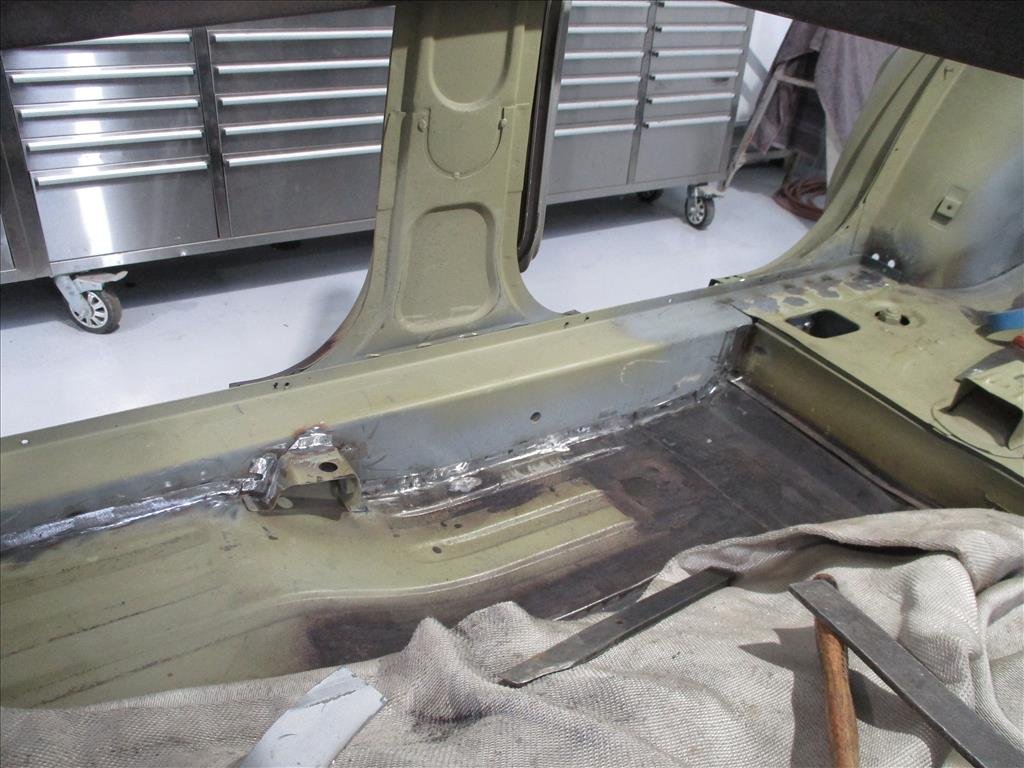
Another email from panel Barry come through recently. He's been spending time cleaning up the sills and preparing for the final weld in as well as getting all the welds in the rear floor/boot area ready to support the rear end going back together.
1 point
-
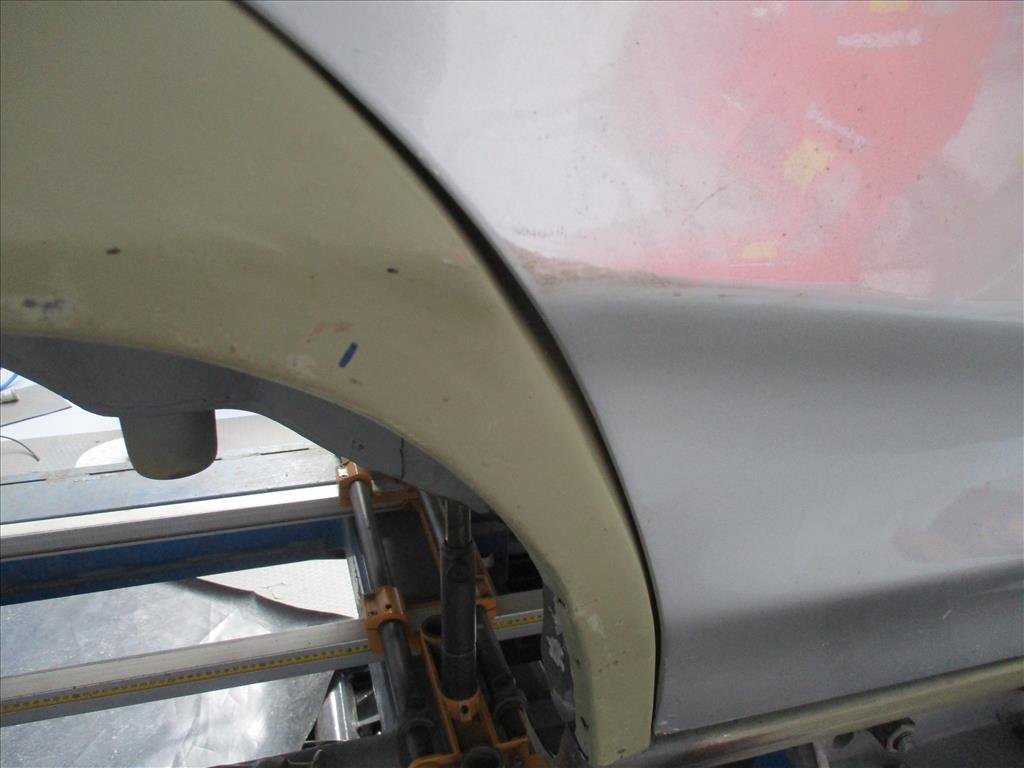
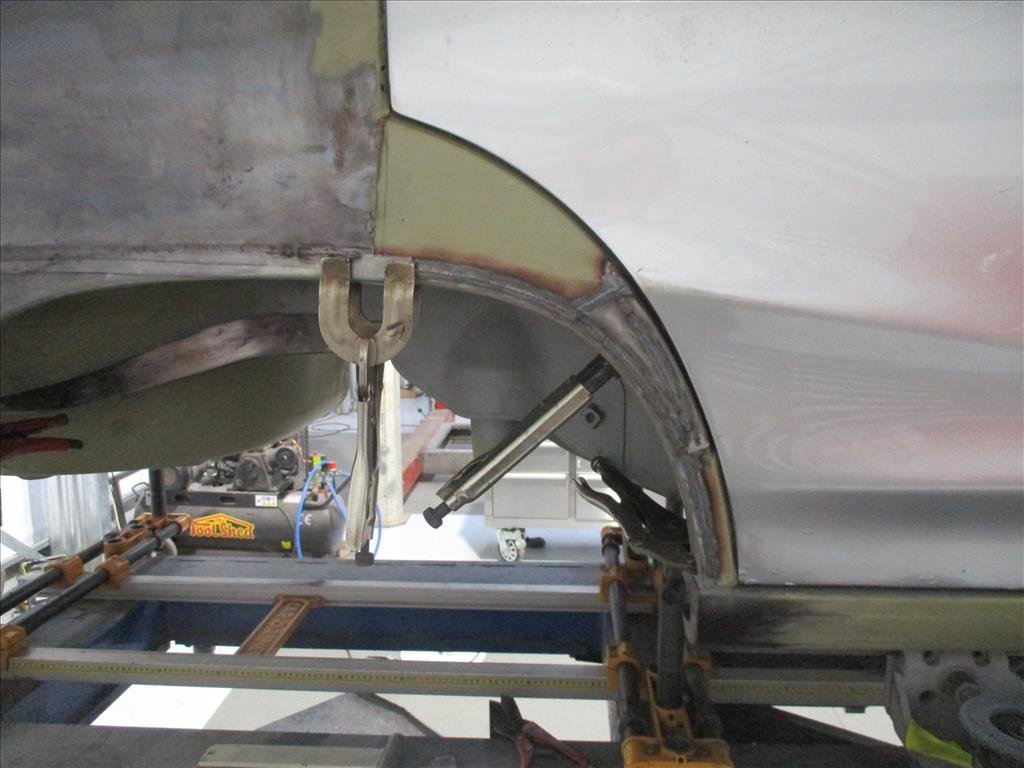
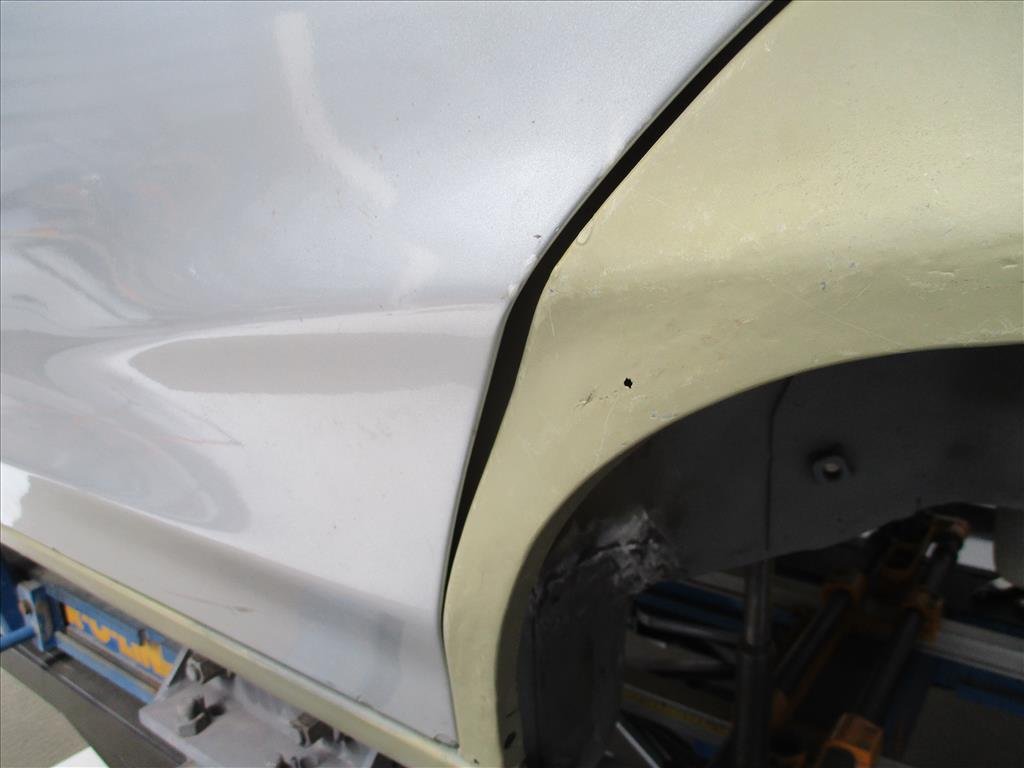
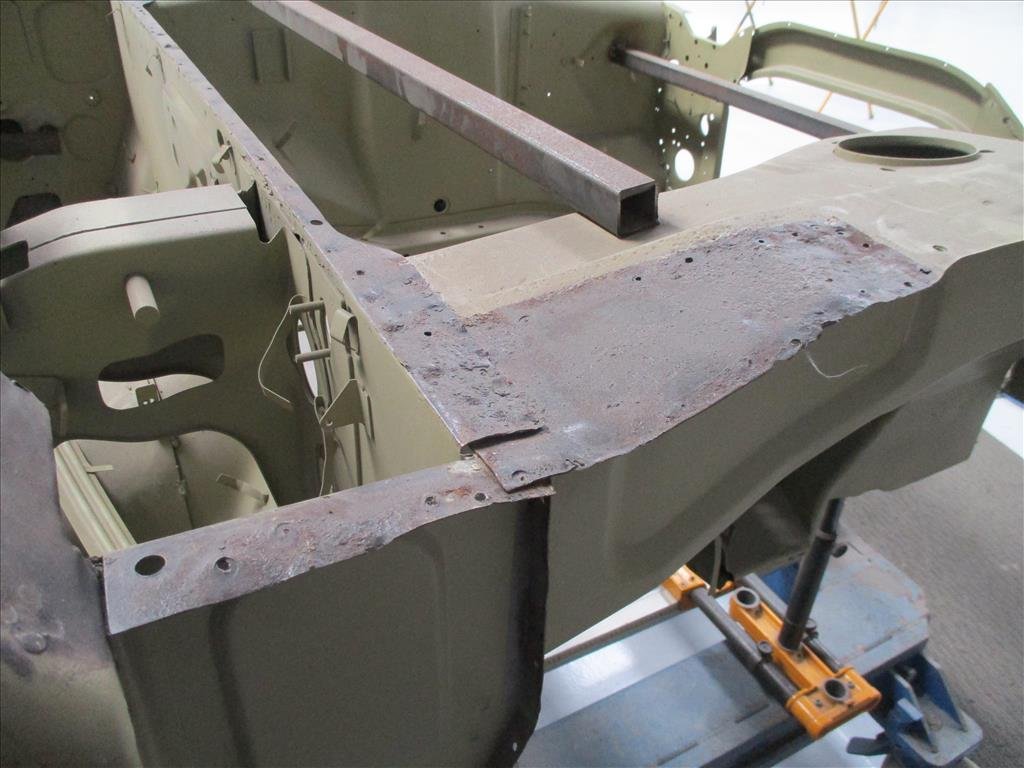
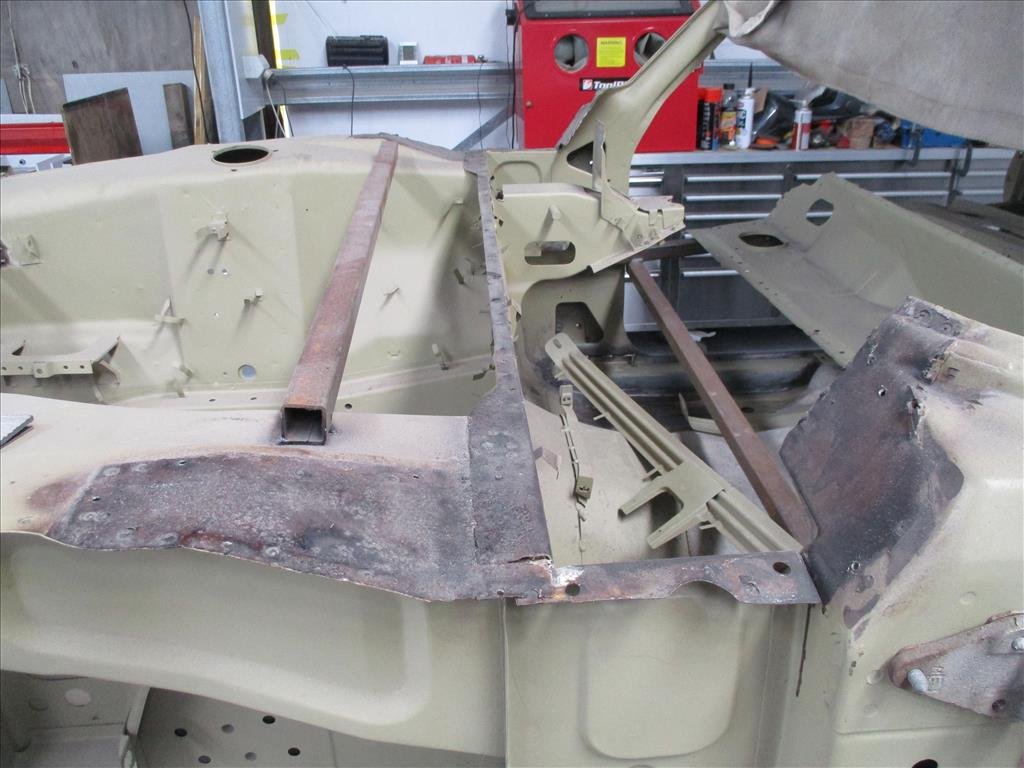
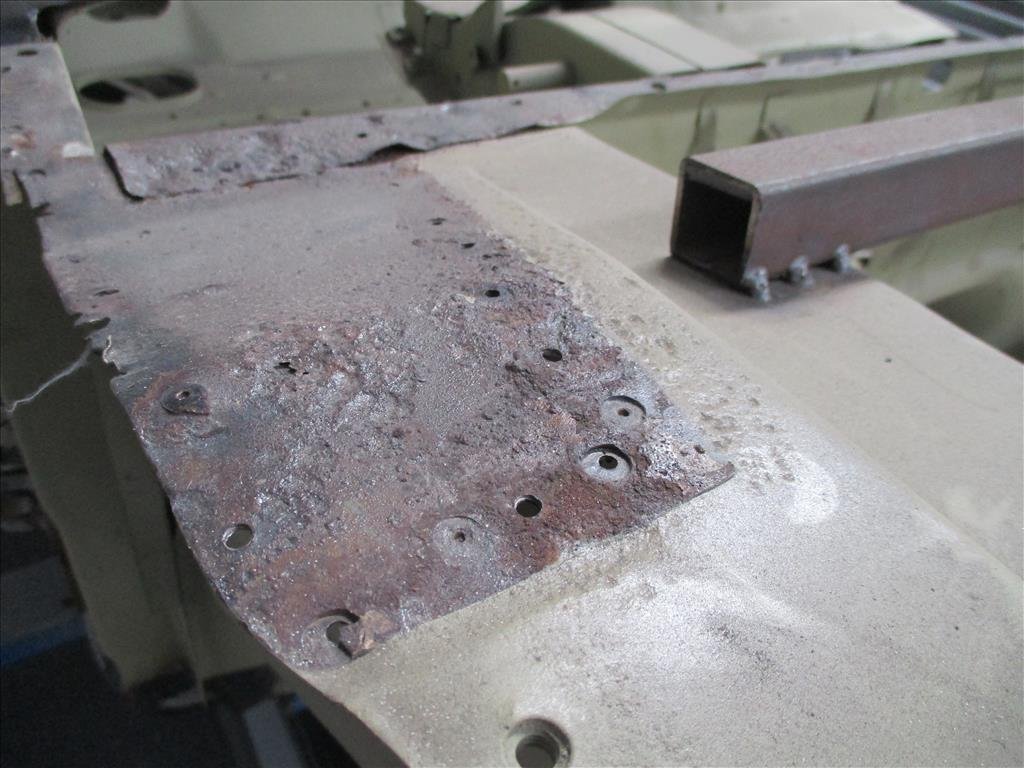
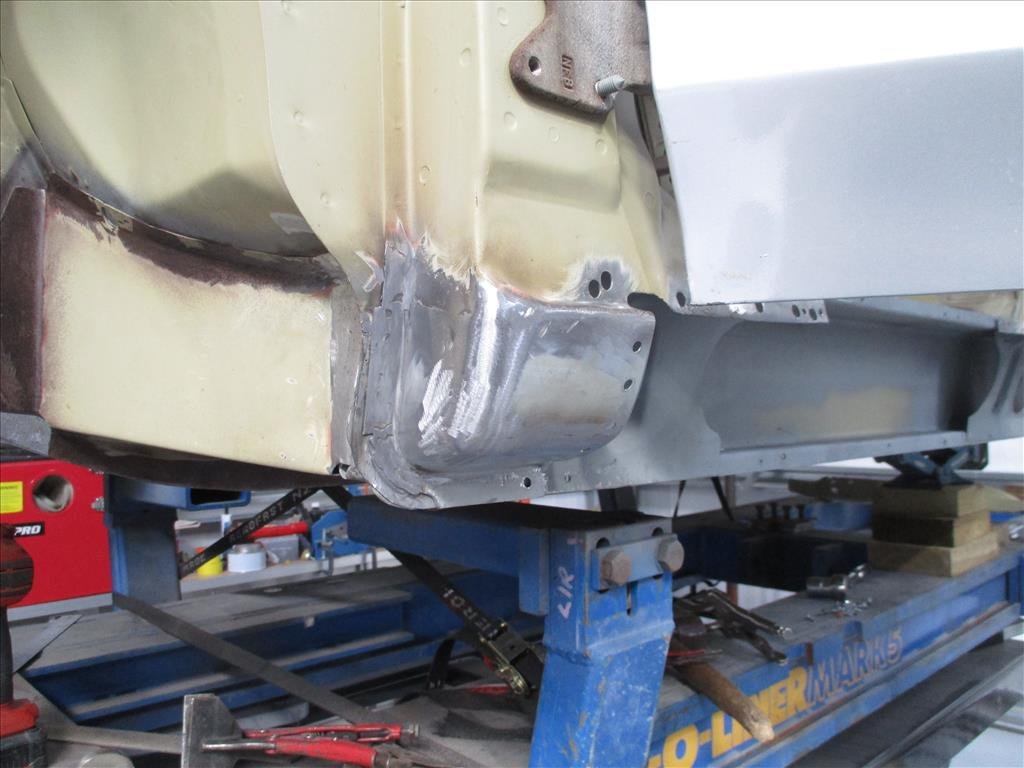
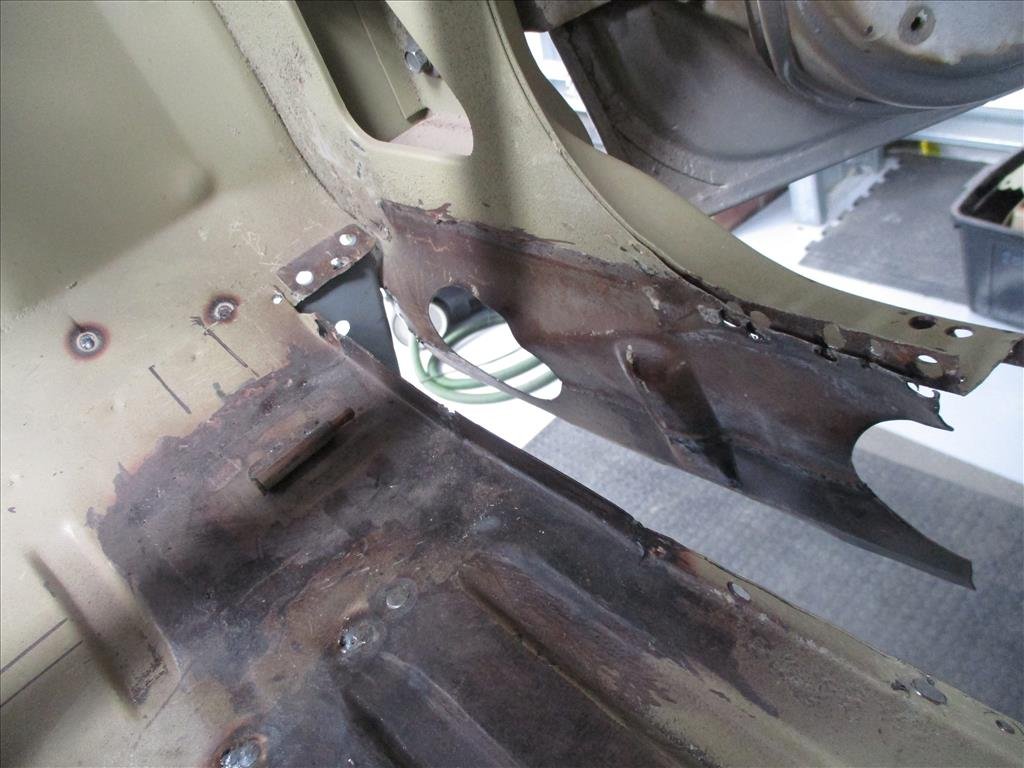
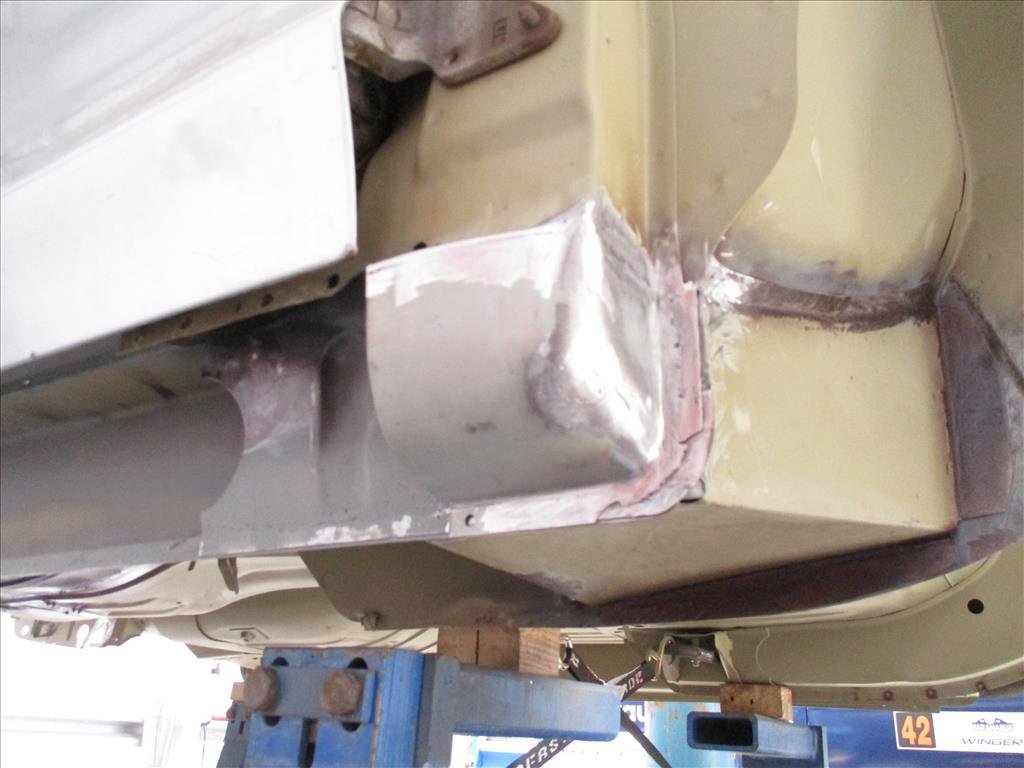
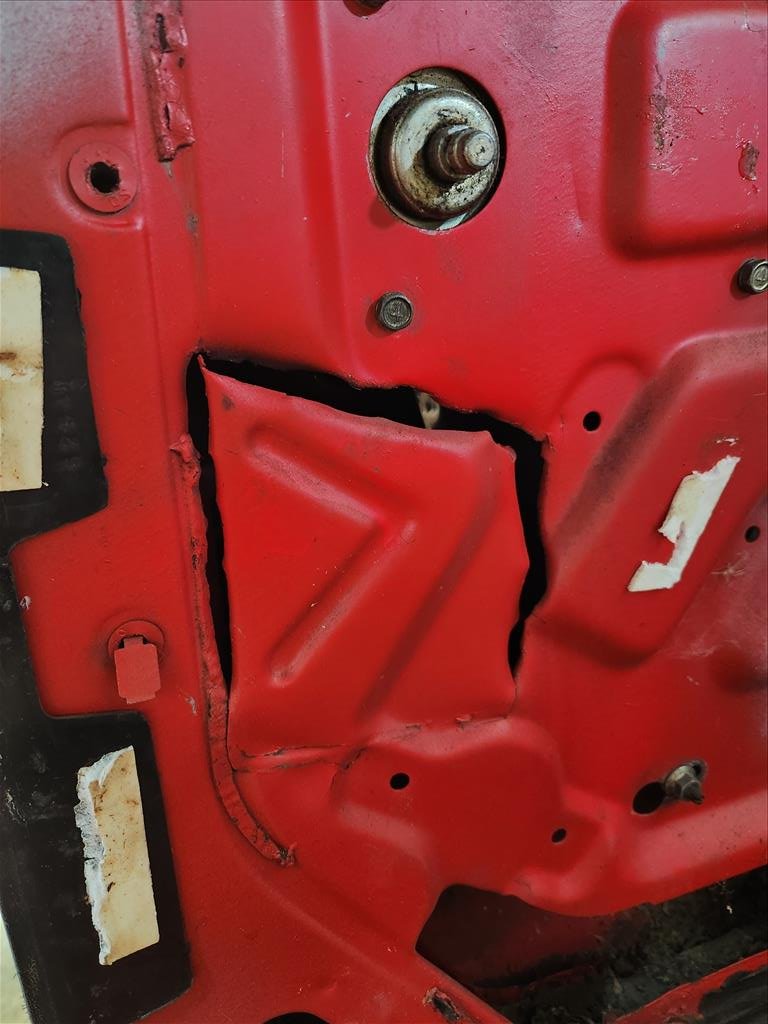
I might've jumped the gun on a previous post saying the car was quite straight, turns out there was a bit more to do.. Chassis rails were mulched from forklifts as mentioned earlier and once the car was pulled straight it was apparent more things were not in great shape. The side sills on driver side had to come off and be modified as well as the chassis rail torque boxes. Some more rust was found underneath (to the surprise of nobody) so they were recreated. I was a little worried about this part of the b-pillar as it was pretty pitted originally especially where it connected down with the inner sill but that's looking much better now. Door gaps looking mint. So yeah these are the kinds of jobs which take ages but aren't really exciting to look at but needed to be done to ensure it can survive another 50 cycles around the sun.
1 point
-
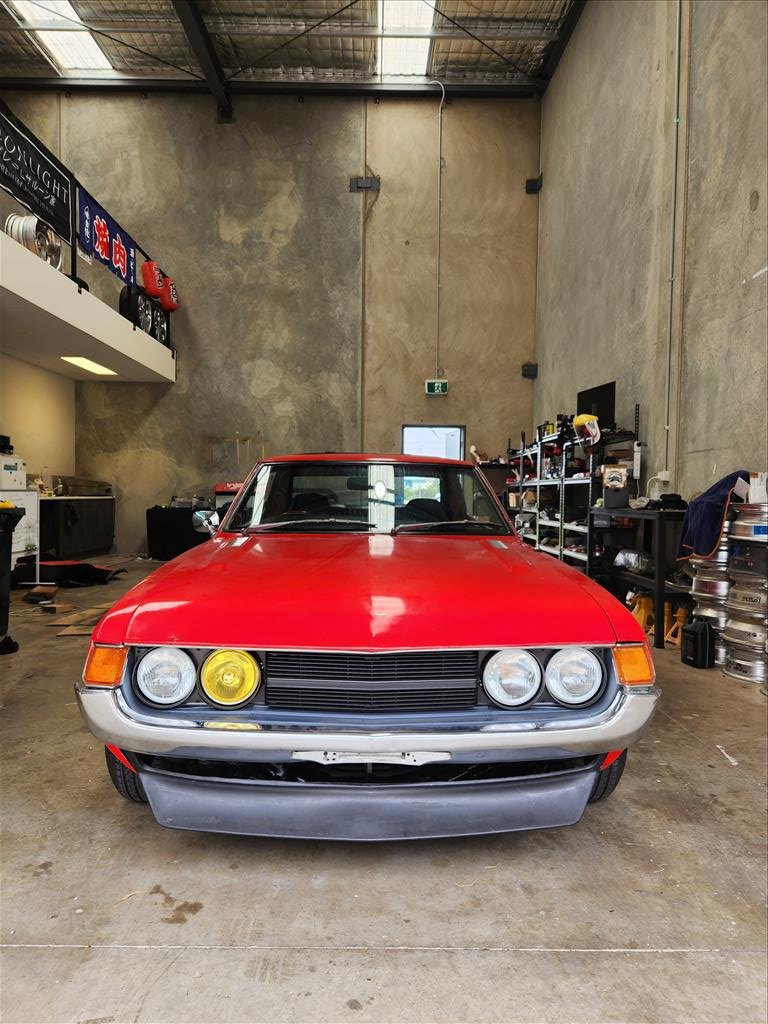
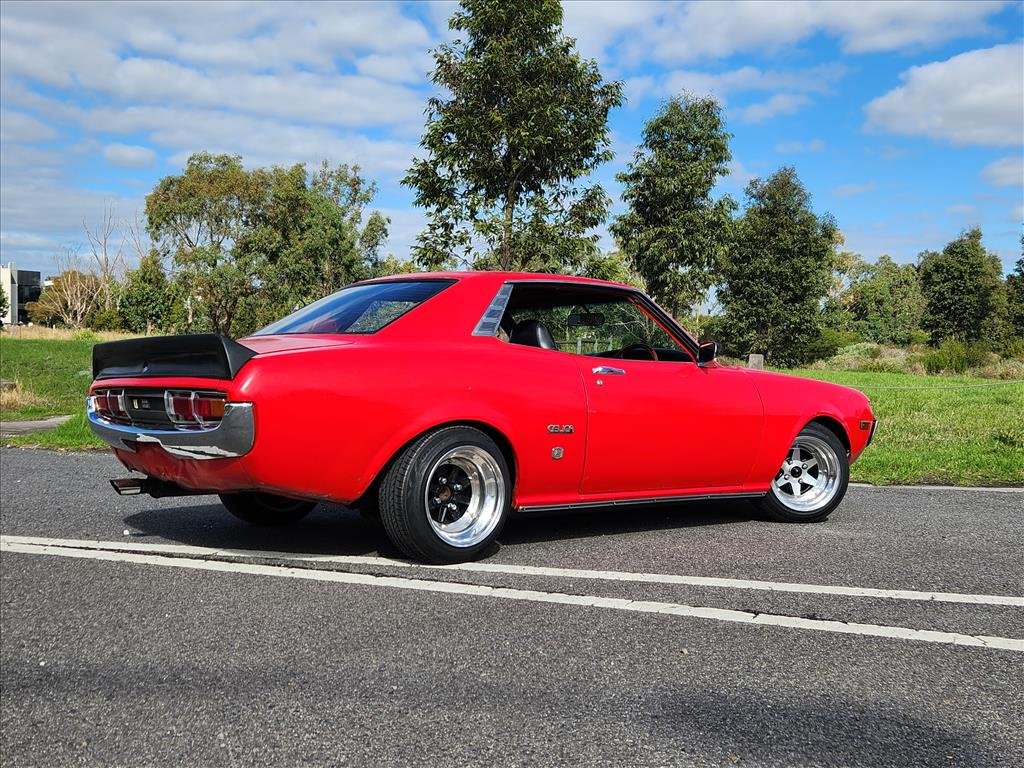
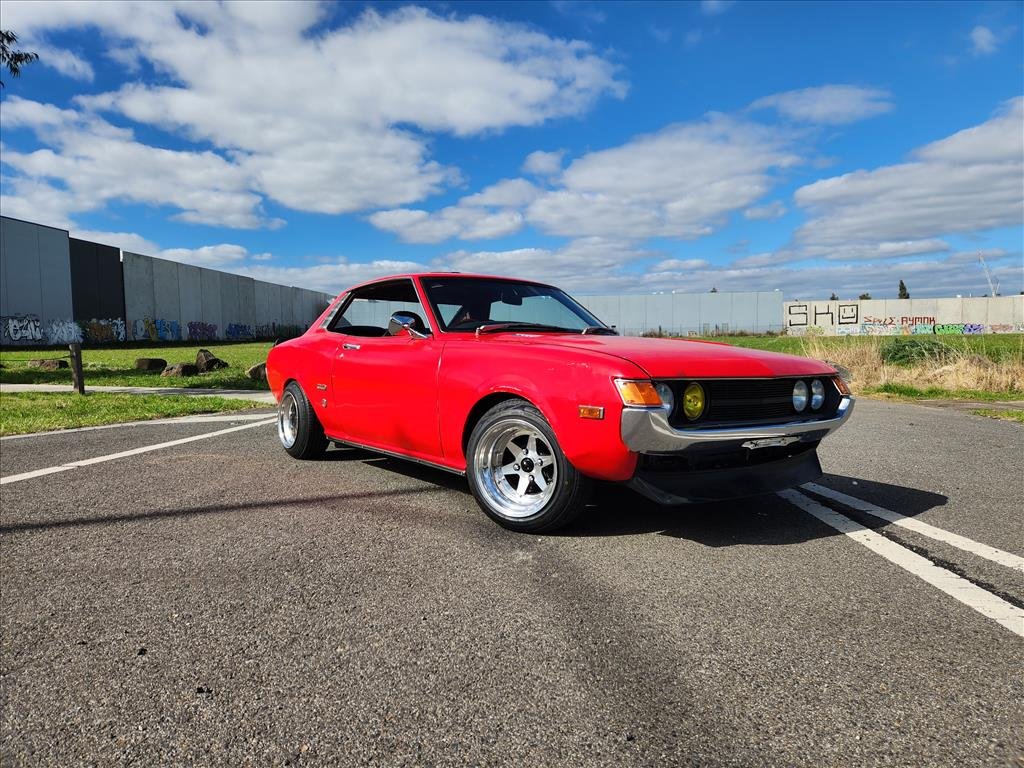
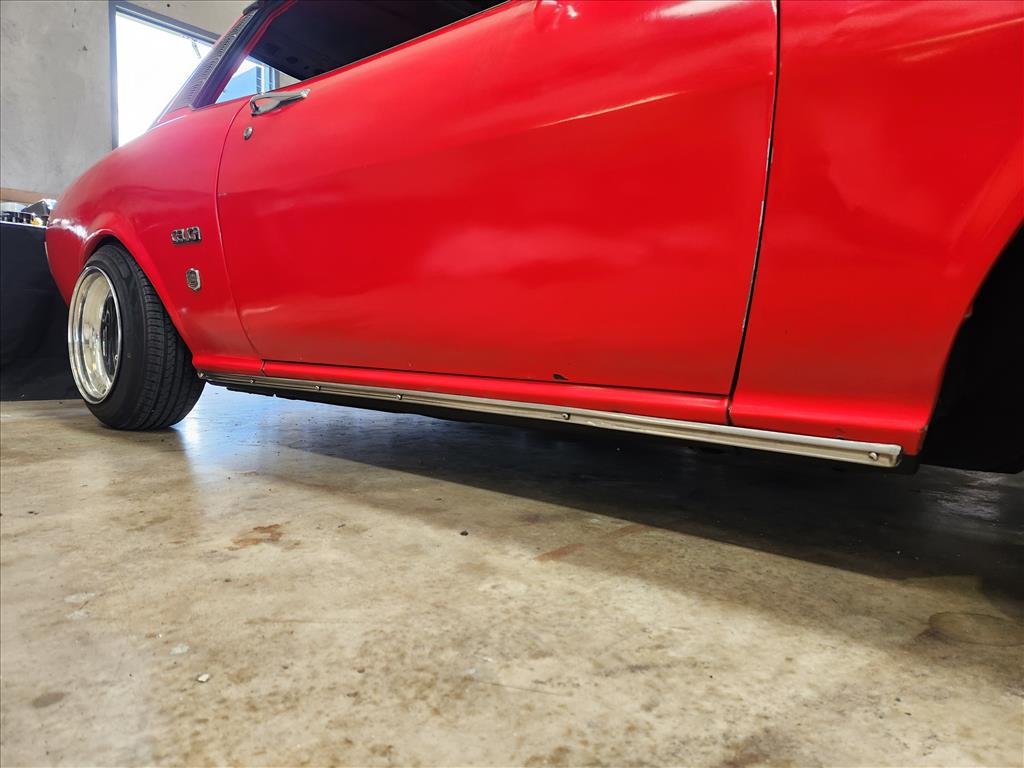
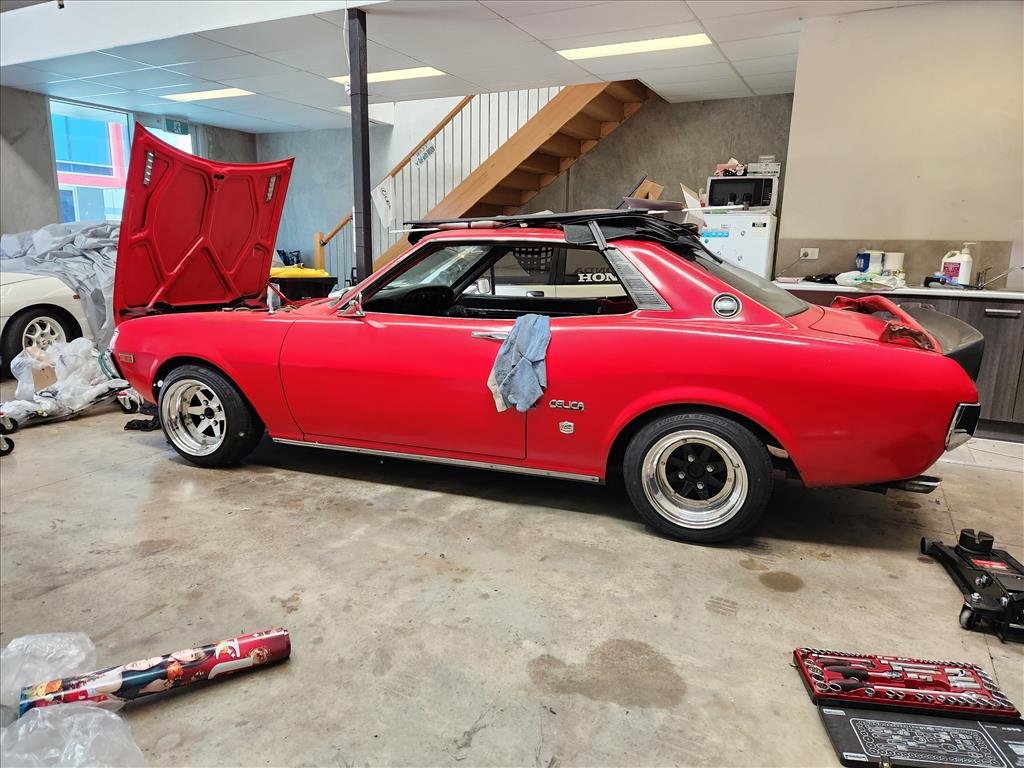
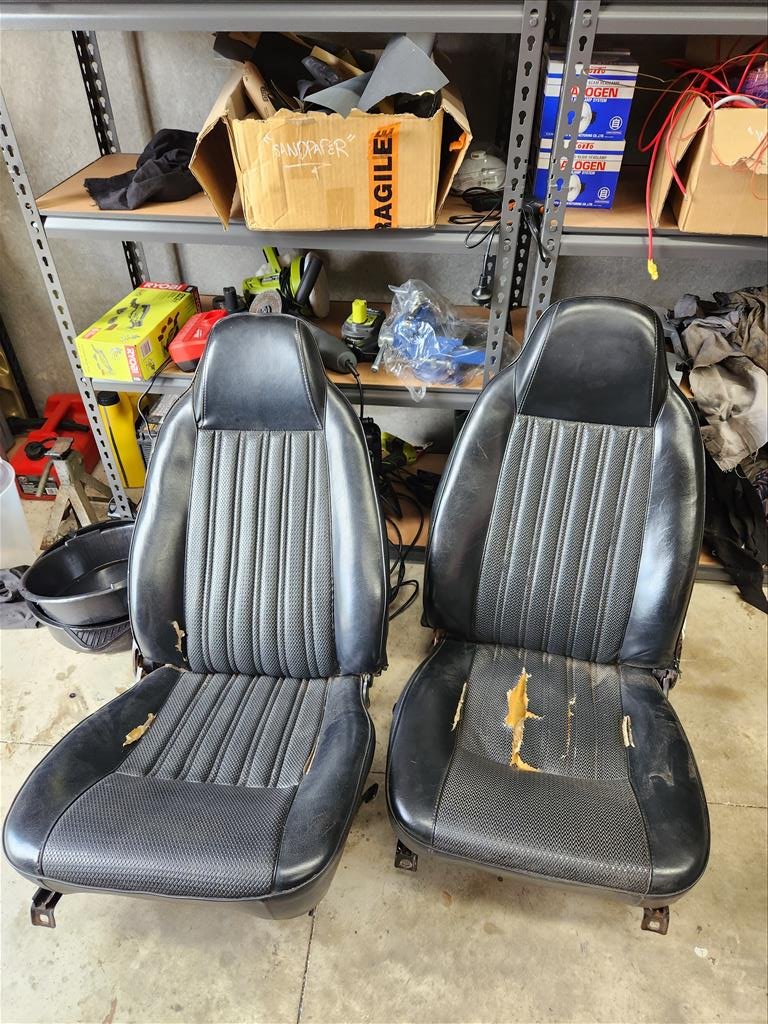
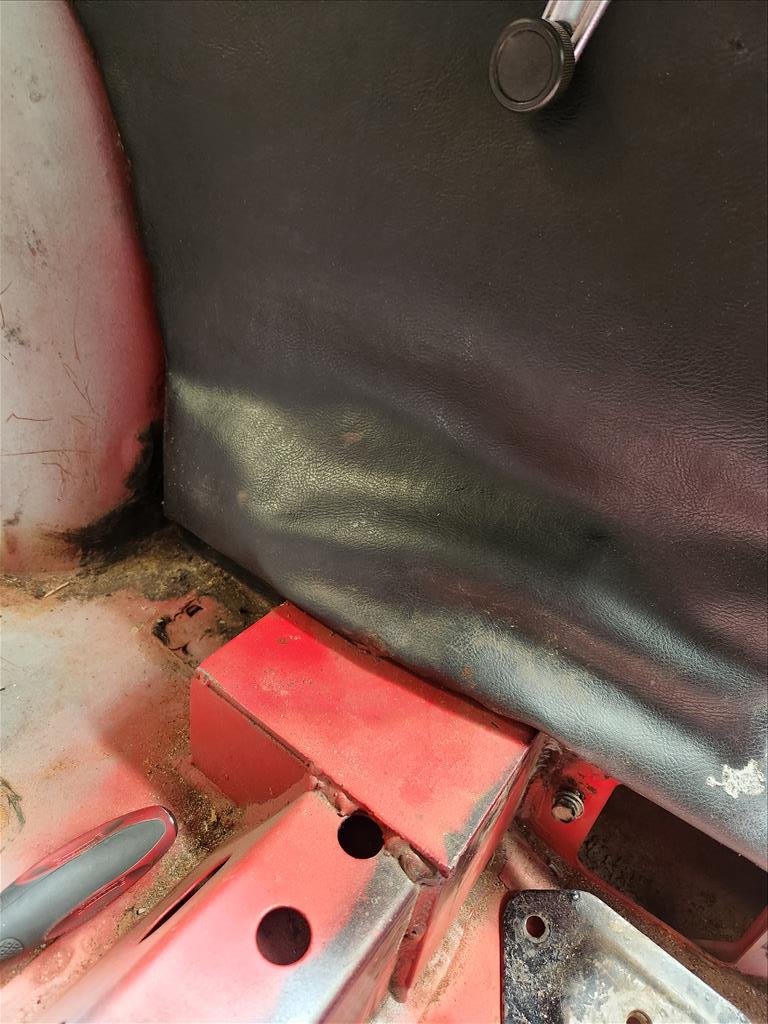
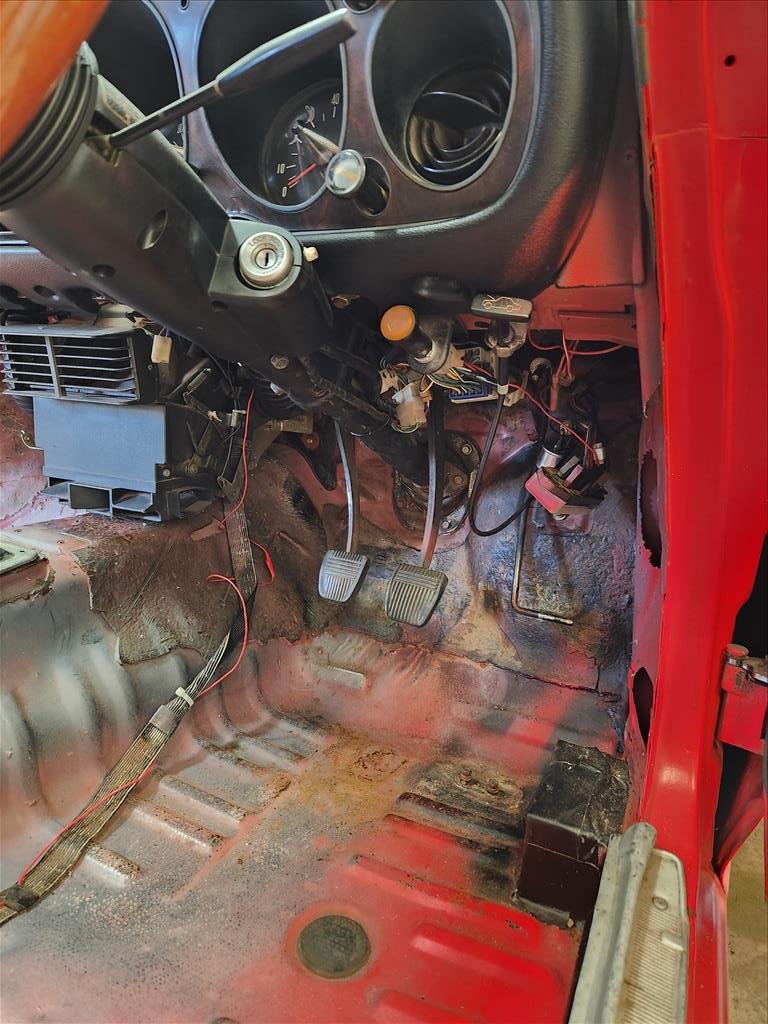
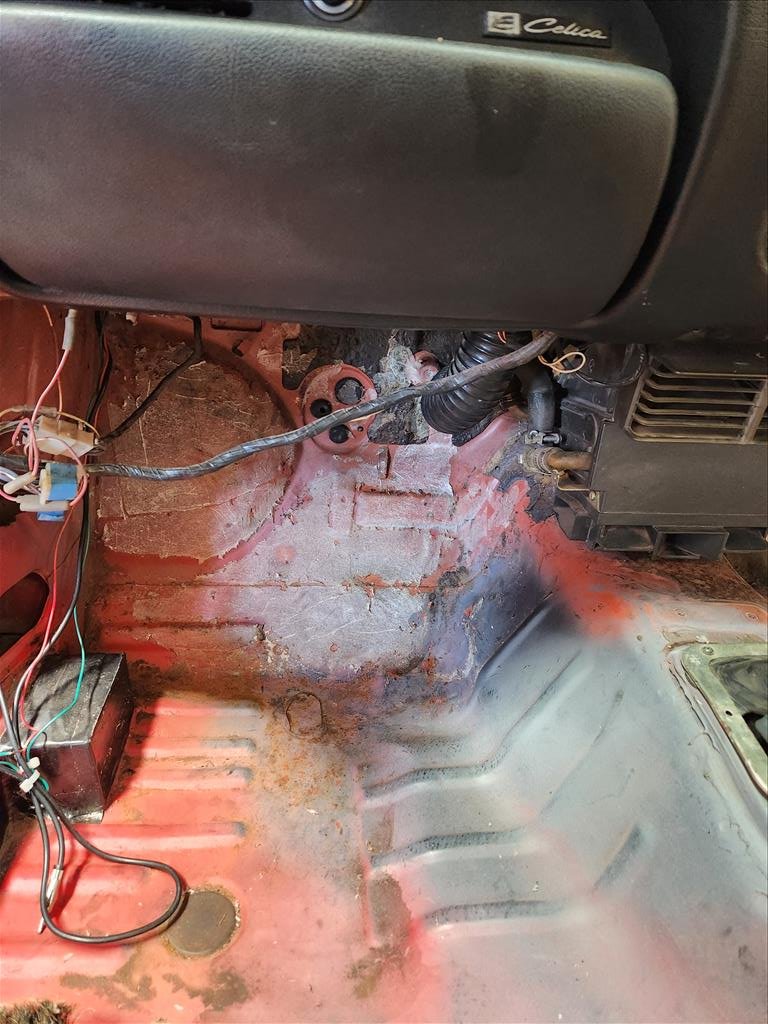
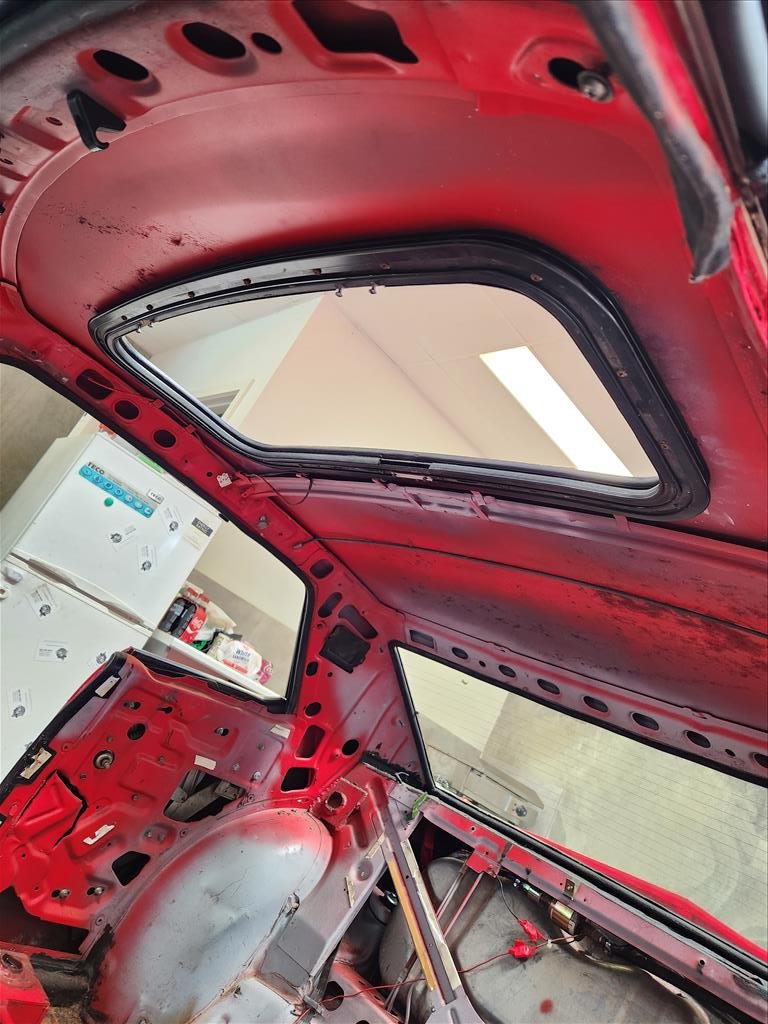
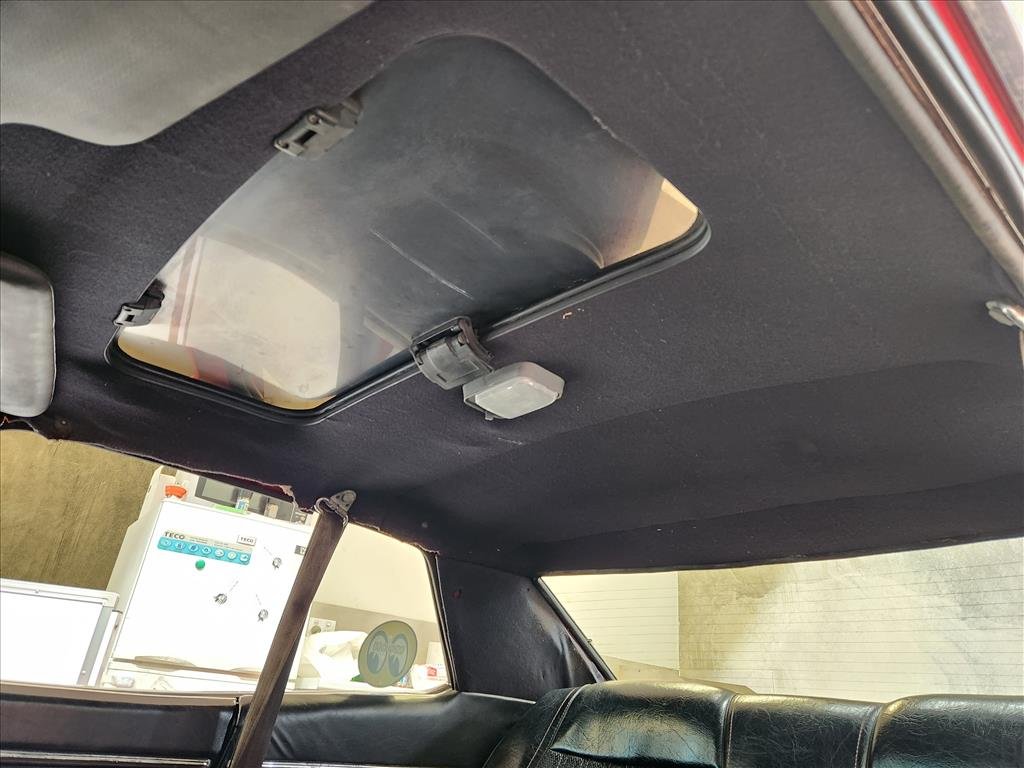
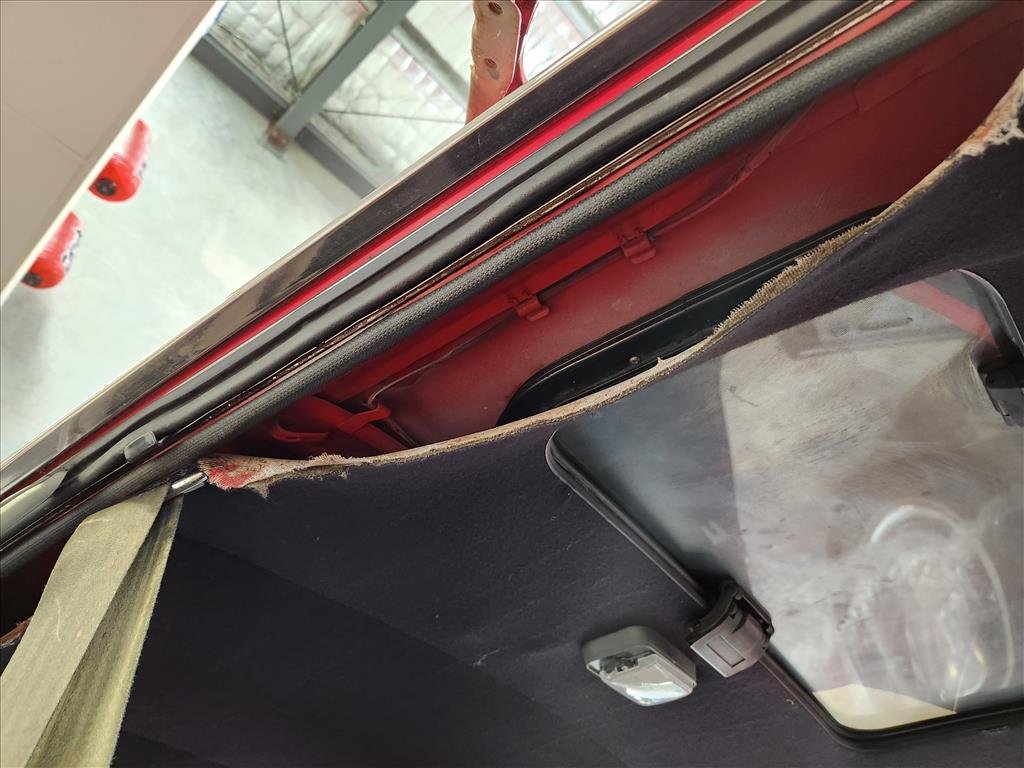
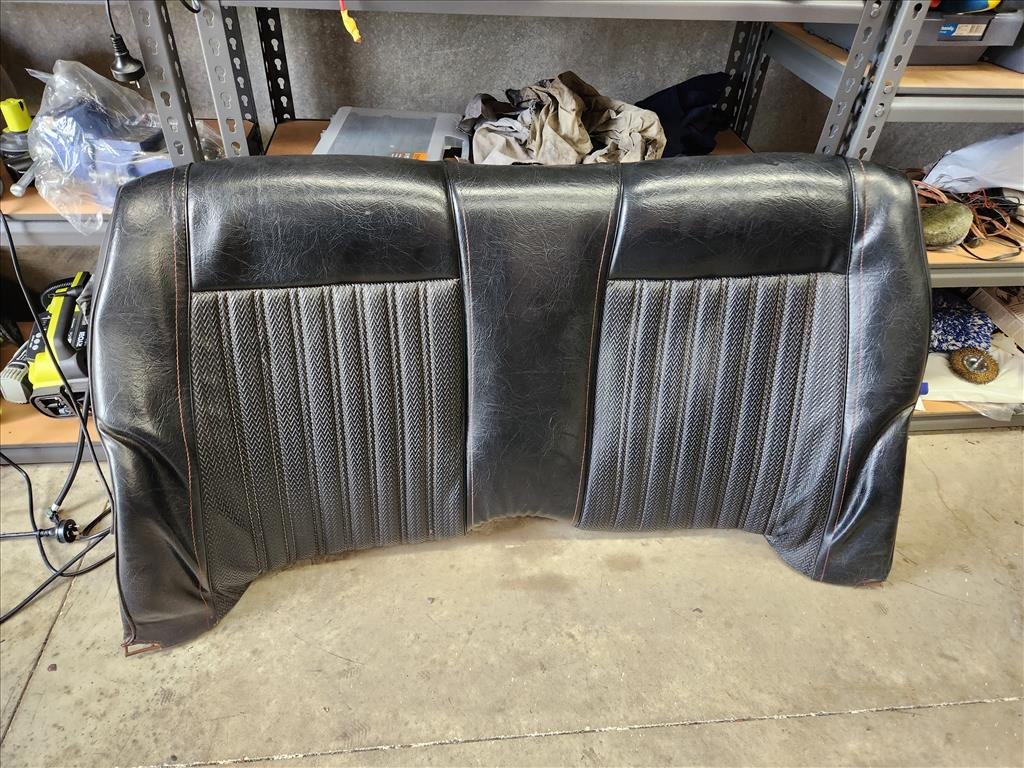
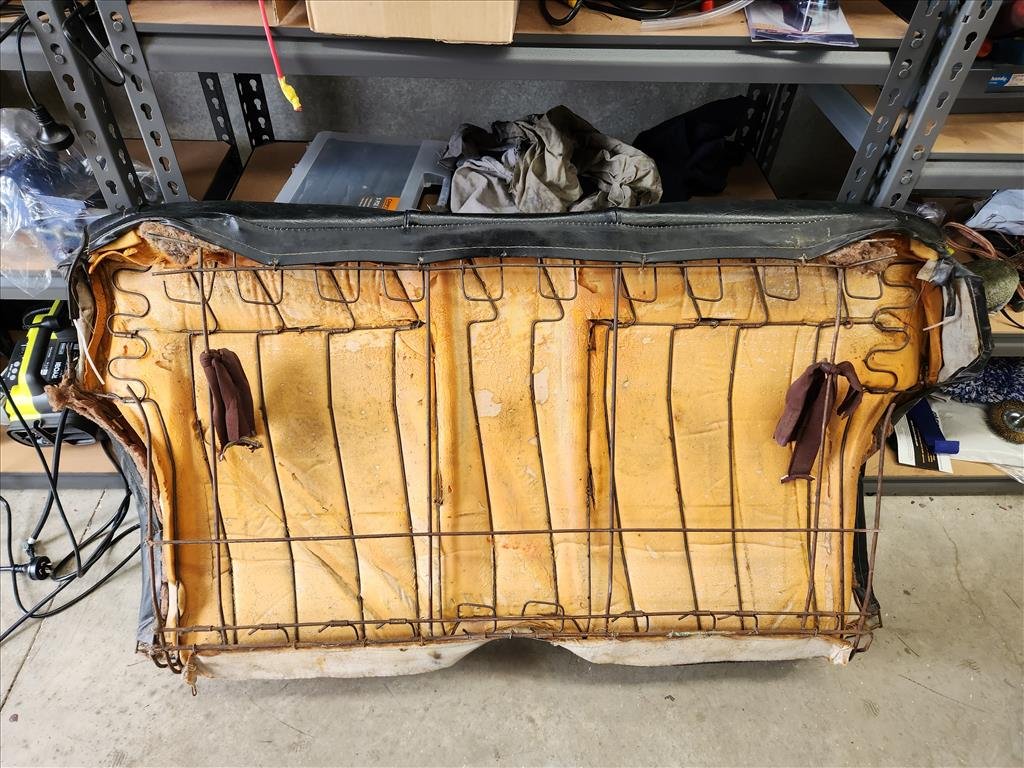
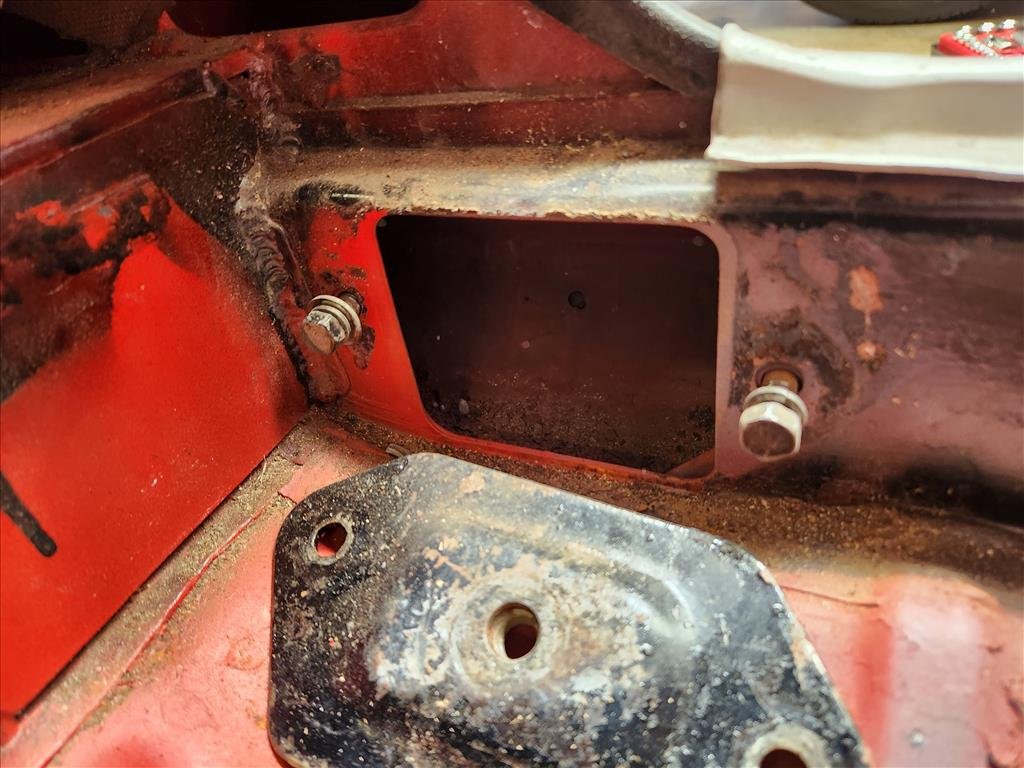
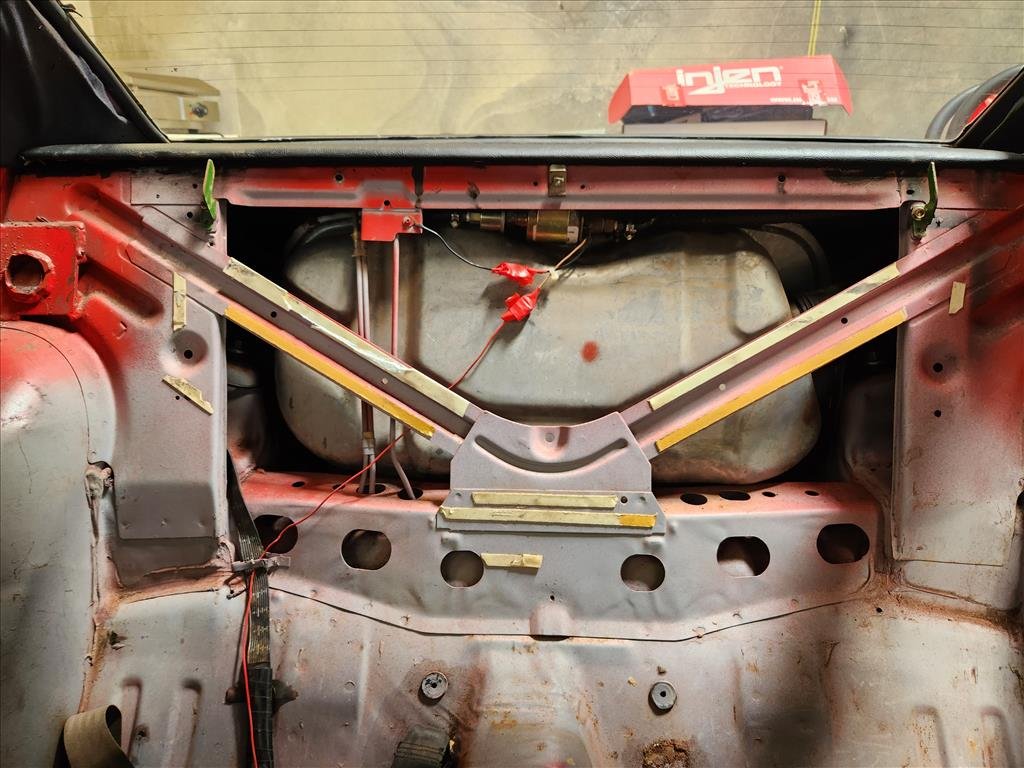
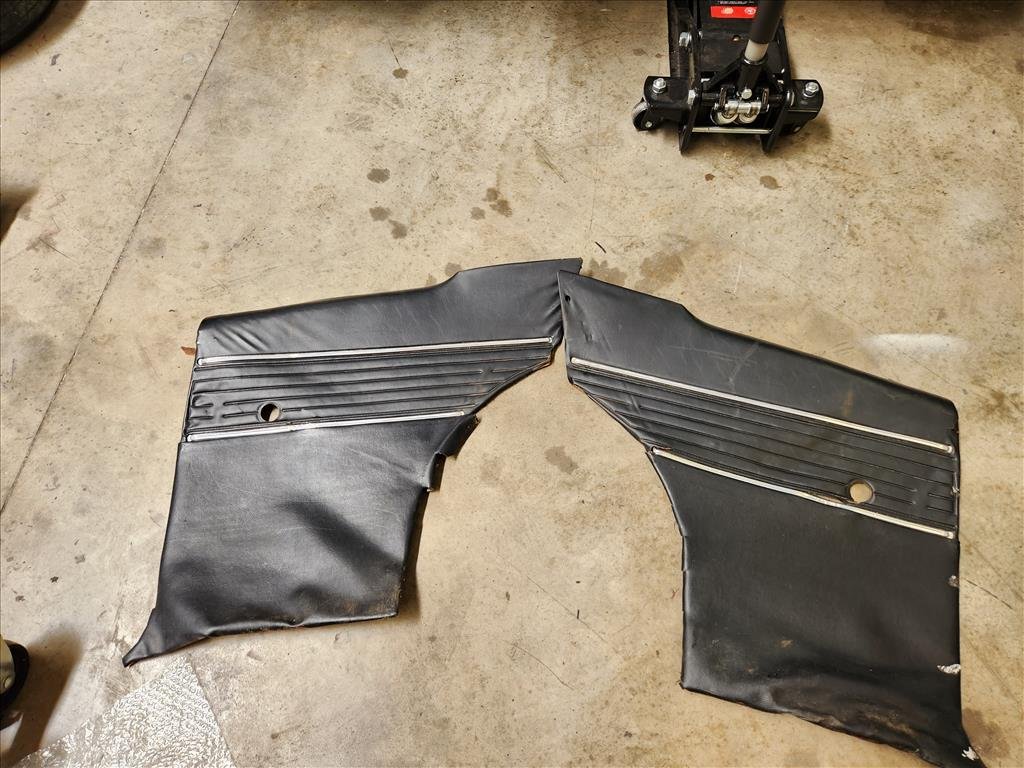
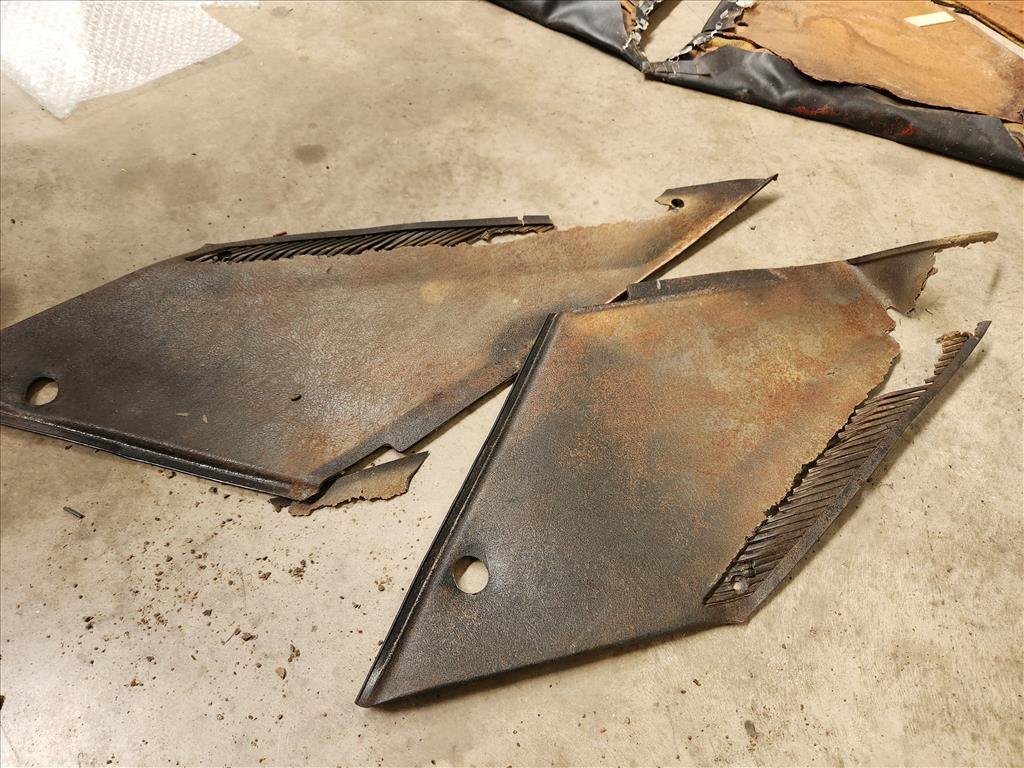
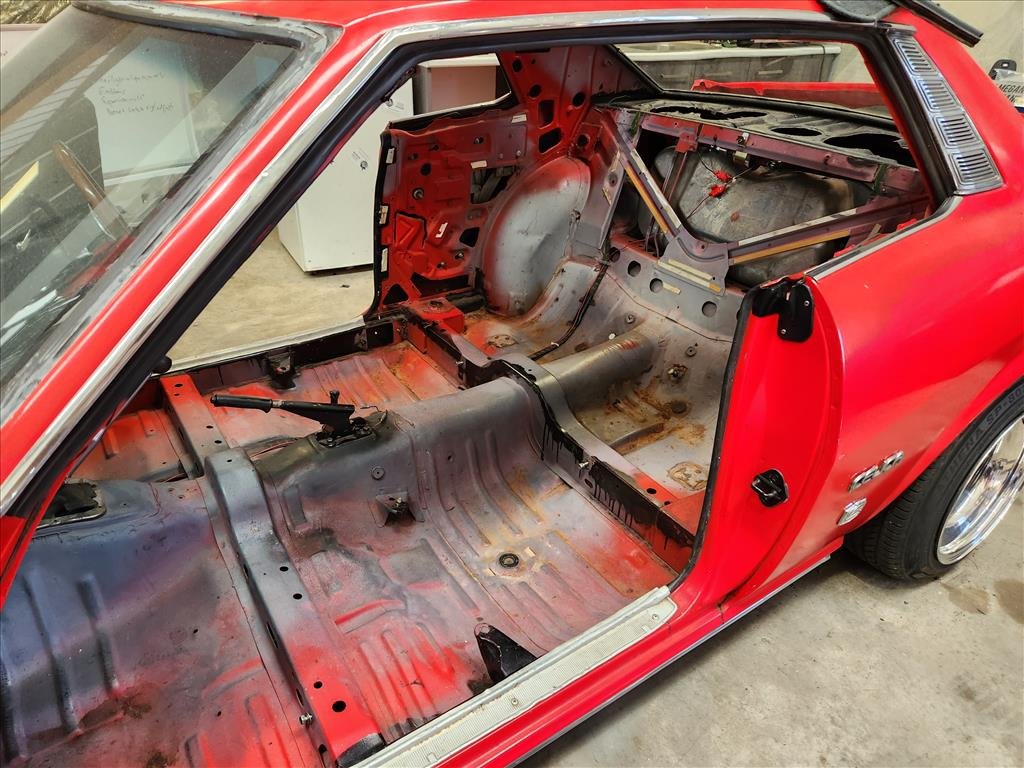
56k Warning (hahaha) there's a few photos and a whole lot of carryon in this post! As I mentioned before, this year is interior year for the Celica so the first thing to do is tear it apart. Unfortunately the front seat covers are pretty mangled, rear covers may be salvageable but there's a guy here that does really nice OEM-spec covers for front and rear so might just get a set of those eventually. I will need to get a new rear seat set before I can do that though as it's been bent up and cut for the roll cage that was in there before. This roll cage also means there were mounting blocks around the place like these ones which cause the side trims to be a little messed up at the bottom. I don't think I will be able to cut this one out easily so might just have to live with it. I have to get all new trim panels anyway as you can see these are completely mangled. Thankfully these seem to be available as well. Something else that's mangled is what was behind the trim panel on the rear driver side. This window winder is stripped meaning the handle doesn't work. It looks like sometime in the past they might have tried to think about fixing this by cutting an access hole. It's not fixed so I don't really know what happened there but I would like to try and fix this so I can get sweet pillarless action. After I saw the dramas with getting in here from the Speed Academy videos maybe I'm a little bit happy they decided to do some bush mechanics on this part. Speaking of access panels, thought this was interesting. This car is perfect for running drugs as it turns out. In reality I think this may have been a hole for retractable seat belt? Unsure exactly as the replacement seatbelts mounted to this extra panel that bolts over the top of it, bit odd and probably put in for ADR approval or similar. Seatbelts will need replacement as well but I think I'll just pretend these cars did not have rear seatbelts and do the front only until someone tells me off. The front driver seat was interesting, I can't even blame anyone else for this one as I was the last person to put this seat in. Suppose I did the old "it's future Alex's problem", yeah future Alex isn't super fond of that as it turns out and yet, there is no effort to change habit. Threads are for losers anyway. Another thing to get sorted while things are all apart is the fuel system. Once upon a time an electric fuel pump was wired in, wiring job looks like something I would've rigged up honestly but it needs to be properly done. For one the pump is in the wrong place so that needs to be relocated and it's not on any kind of relay or anything so it runs all the time as soon as you click it over to accessory on the key; I don't think that's correct. I'd like to install a fuel pressure regulator as well to keep it in check. The roof lining has been cactus since I bought the car and probably has been screwed for years before. It's just some cheap fabric that has been kind of glued up there and would've been done when the sunroof was installed; probably in the 80s. I tore it all out and will have to work out a plan to replace that. I won't be coating the roof portion but I wouldn't mind slapping up some squares of sound deadening. Carpet needs replacement as well; I think this was a kit once upon a time but honestly it looks like leftover garage carpet, yuck. Replacement carpets are available in much nicer material these days. Also this white insulation looking stuff under the front got me a little worried. 50/50 on it containing asbestos according to Google images so I masked up with some gloves and tried to tear it out. Frustratingly it's stuck down really well on the passenger side so even with the wire wheel on drill I couldn't get all of the stuff off without spending all my life in there. It's good enough to coat over I reckon. Thankfully driver side was much easier as they were lazy with the application. I plan to remove the dash and everything anyway to get it cleaned up under there as there's a bit of messy wiring as well as the heater core seems a bit locked up (I can't change the heat on the slider) so want to have a look at that, or maybe remove it? Don't need heat if you don't drive it. You'll notice the little boxes in the front as well that I need to cut out which will be a super fun (not) job before I can start coating so that might be one of the next jobs on the line. That brings us to the end where it sits now. Stripped out mostly, vacuumed but not cleaned up yet. I will get the brush and anti-rust spray out for that little surface rust that's kicking around. As for the coating I plan to use bedliner then decide if I want to add additional sound deadening or not; haven't quite decided yet. Bedliner is hardy, it's fairly cheap and it will be covered by carpet anyway so should be fine. I haven't decided exactly how far up I want to go, whether I do all the areas without trim or just the floor areas. This is why I need to get the rear windows working, how sweet is that pillarless life.
1 point
-
We went to the MG club's training day on the 22nd for the Alto's first real thrashing, along with my mate in his amazing EK9. The first thing we did was promptly run into @kws's excellent street-cum-track-cum-street nuggét... There's no way you haven't seen his thread but it's here if you haven't. Much more interesting than this one. His car is much faster than mine owing to its track history, especially after he dialled up the boost. I sent it around the track but he didn't stay behind me for long. I didn't really have any plan, I just put her on the track and went for it. I've been on it a few times in the MX-5 so just kind of dusted off my knowledge with the idea I'd just have some fun, get used to the car and see where things go. Didn't set up any timing apps or anything. I had two great laps, passed a few cars which I was quite anxious about earlier in the day, I didn't want to be the guy that races ahead on the corners and holds people up on the straights On the third lap I ran into traffic but went for a pass on the final straight. Then I heard and felt something strange. I was right next to the pit exit so I took it. As soon as the car slowed down I knew something was really bad - it squealed super loud. Bystanders described it as "like a duck being beaten to death". With many eyes on me, I limped it over to the shelters and reversed into the final place it'd be running that day, and with shaky hands popped the hood and (briefly) demonstrated the noise to the accumulation of peoples. It's really interesting how little of a plan I had. Not just in terms of prep - I'd brought zero tools or anything of the sort (and came in a brand new white t-shirt) - but also how little of a clue I had of how to move forward. I probably just looked like a flounder. I knew there was probably no chance we were driving out of there and everything just sort of squished my brain at once. So I'm really glad that NZ has an incredibly wholesome car scene. Our new friends Andrew (who a co-worker has coincidentally been trying to get me to meet) and Isaac wandered over from the other side of the fence, Kws lent his tools, and Josh's mate Ian was also nearby to lend some bits, and we started diagnosing. The crank turned by hand okay, and made the noise. We disconnected the accessories and it still made the noise. We took a small sample of oil from the drain which looked OK. When briefly turning it via the starter, it clearly made a repeating weow-weow-scrape-weow-weow-scrape noise implying doom on one cylinder. Yeah, it fucked. Andrew almost immediately proved how much of an excellent human being he is and offered to drive one of us back to his box truck in Wellington, and stay with it to assist in loading the Alto, meaning he drove between Feilding and Wellington 4 times that day. Leonie went back with him in his excellent S660 (which I wasn't far off buying at one stage) and the rest of us helped push the Alto out the front gates for a late pick up. Not that it needed much of a push - a brief shove would have it moving on its own for quite a long time. I got a lift back in the EK9 when my mate was done on the track and joined up at Thomsen automotive to help unload. I really should have swapped roles with girlface and feel pretty dumb for that. The next day, the shop gave me the bad news: it's run a bearing, there is glitter magic in the oil filter. They actually have managed to find an engine in NZ but the price for them to install it is not palatable, especially with our inclination towards DIY and our new friends' excitement at helping out. Andrew once again, unprompted, suggested he use the box truck while it's empty to ferry the Alto back home. What a guy. He then also insisted that he help us remove the engine. His price is that he's going to nag me for a bigger turbo set up. Fair. So we got stuck into it the next day. The car has a couple of surprises. 1. The boost hoses are blue, the calling card of aftermarket, but otherwise all seems stock about the turbo. Given that the car didn't come with a stereo, we're thinking that the previous owner likely was running a bunch of mods and took them all off for resale. 2. A ton of the car has miscellaneous tape, padding and other stuff, presumably to help with road noise. It's a 4 year old car with 124,000kms when we bought it, the guy must have done a lot of noisy travel! While we were there we blinged out Andrew's S660 with a plate surround that we'd had on our own yellow Honda Fit back in the day, which was hanging in the garage after we switched it over to a red car and it was no longer ironic. Day 1 we got almost everything disconnected sans the drive shafts and gear cable brackets. Day 2, with much struggling, we got that final crap out of the way. Andrew's partner came by to help rein in the raw ADHD surging through the garage and organise things. Action shots. The oil looked okay, but the filter contents told the story. EK9 mate had given me an engine stand a while ago for the starion, which I hadn't yet assembled. I threw it together and it held its first babby engine We got the oil pan off and immediately we could see toast. Look at the colour difference between 2 and 3. Conrod #3's bushings were very unhappy. #2 was also bad (not pictured) with some gouging. #1 was okay. After taking the crank caps off we found TWO spun bearings v.v Also a thrust washer was dead, but not sure what died first... So what happened? We dunno the root cause, but clearly some kind of oil starvation occurred. Kws says the engine isn't known for corner-based starvation, there aren't even aftermarket baffles for it because it's such a short deep sump. User error? I don't think I did anything wild on the track but I'm also a nub. Existing issue? We don't know the history of this engine or car, but the evidence of past mods and the mileage indicate that its history is something exceptional. We'll keep tearing it down and see if we can see any smoking gun. It really sucked to have this happen but I'm trying hard to find the silver linings of this. I made some new friends. We get to play with an engine and we'll be able to put "replaced a broken engine" on our DIY CV. I also like the idea of the car rising from the ashes like a phoenix, stronger and better, by giving it a lower KM engine with a bigger turbo.... The plan? Kws is checking out part numbers and costs to get new crank and conrods etc over. We could rebuild this engine if the rest of it tears down without error, but I'm cautious about putting good parts in bad. More likely we'll import a new engine. There's also the engine that Thompsen sourced, if we want to spend more $ for a faster turnaround with a warranty. We're doing a bit more research here because apparently we want a 2019+ engine as it resolves a thrust bearing issue from earlier engines and these seem to be a fair bit more pricey online. I'm probably buying Kws' Greddy intercooler :0 I'm probably finding some way to buy a bigger turbo and ECU flash, possibly with new injectors. We'll replace service items like the clutch etc while it's out, that was a PITA!
1 point
-
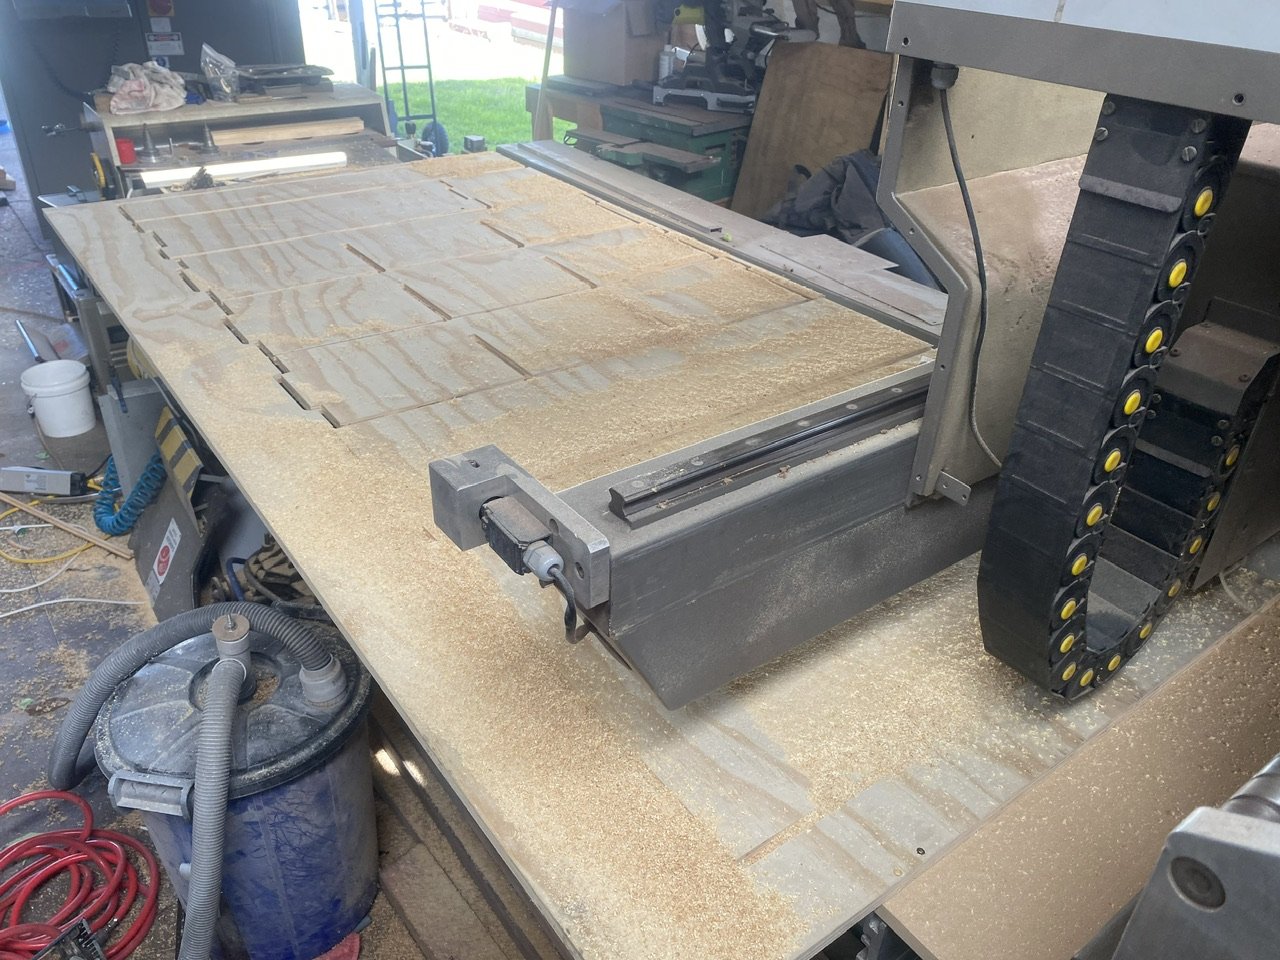
GF wanted some fancy shelves in the lounge, she timed asking just right on the same day as I was getting the cnc running again. A day of design, three sheets of ply and press the green button. Slot together and a few screws to be sure.
1 point
.jpg.c472fa6721301e28f293a24cf337a896.jpg)


.thumb.jpeg.e0a4bff61111e0c8c7396950fcc94da1.jpeg)


.thumb.jpeg.384ff72c8d2b0ee0d34a7bdedb55bdcf.jpeg)


This leaderboard is set to Auckland/GMT+12:00