
Leaderboard


Popular Content
Showing content with the highest reputation on 10/22/23 in all areas
-
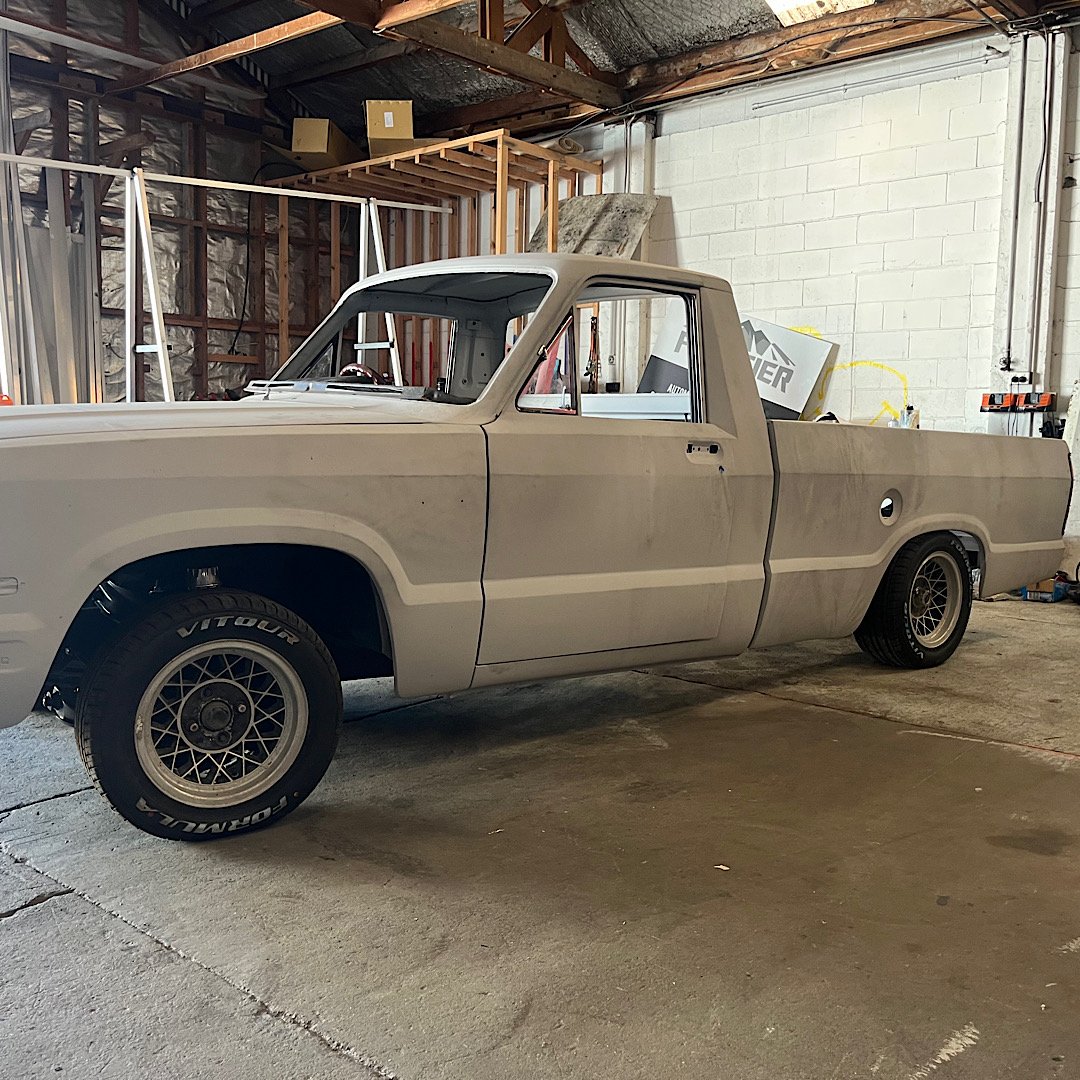
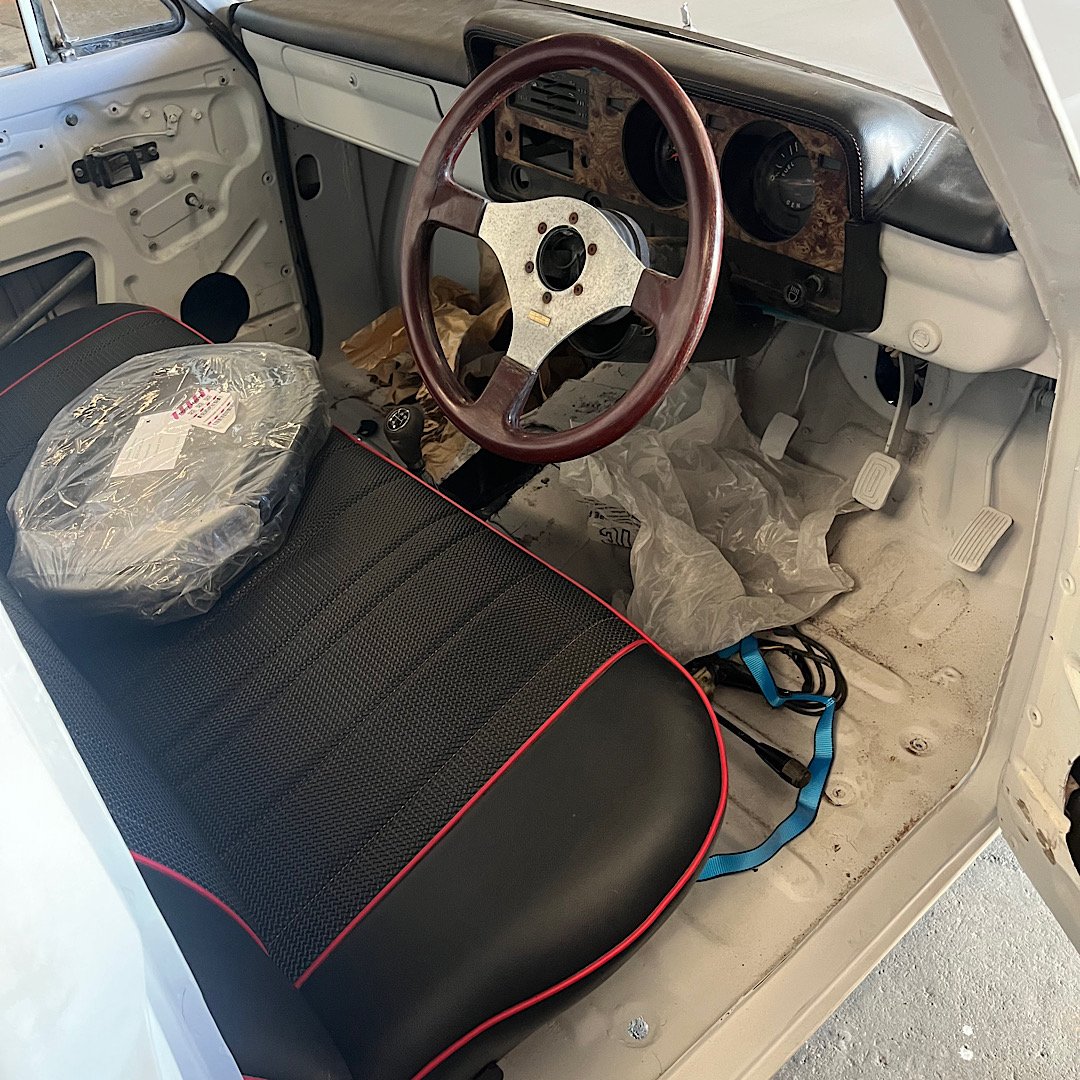
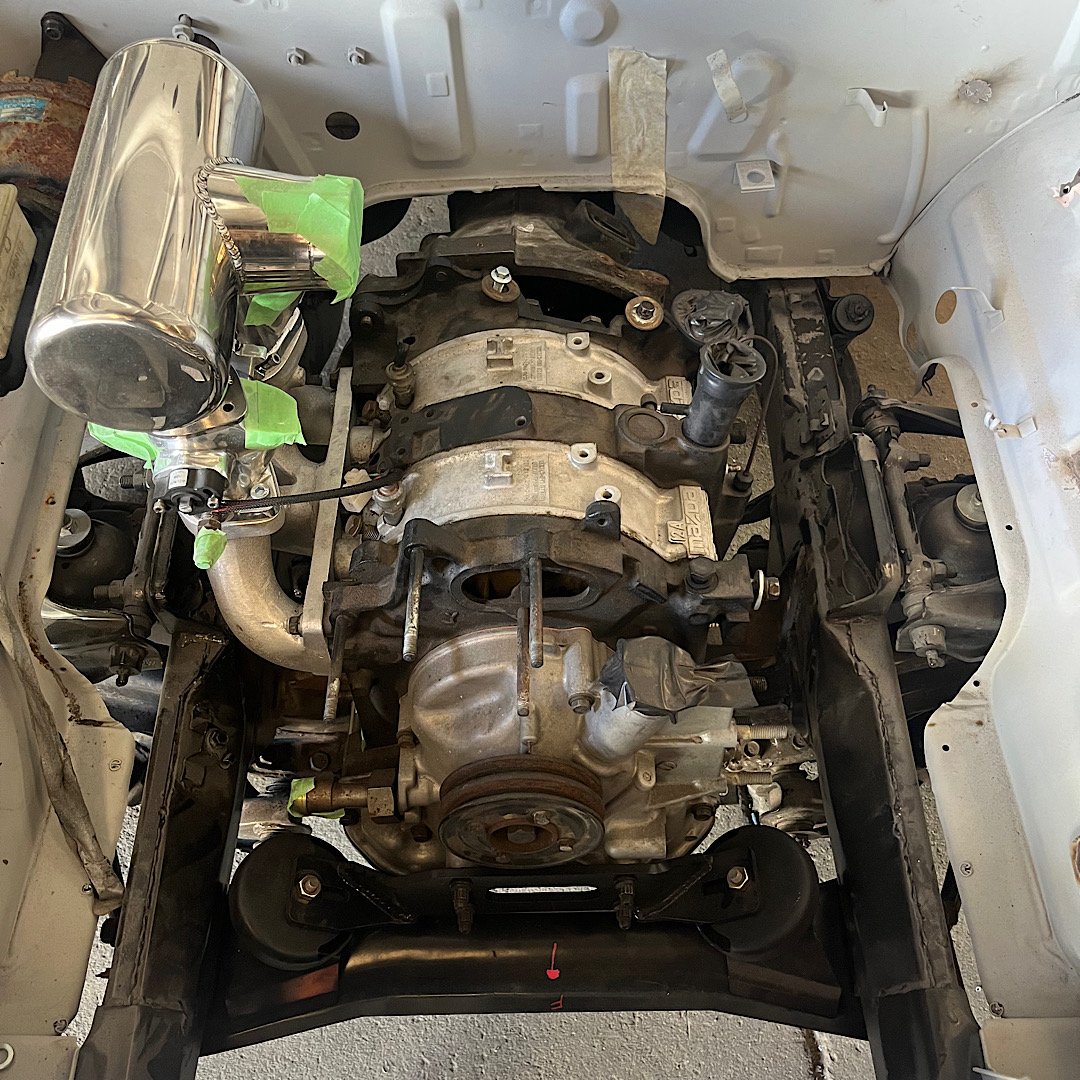
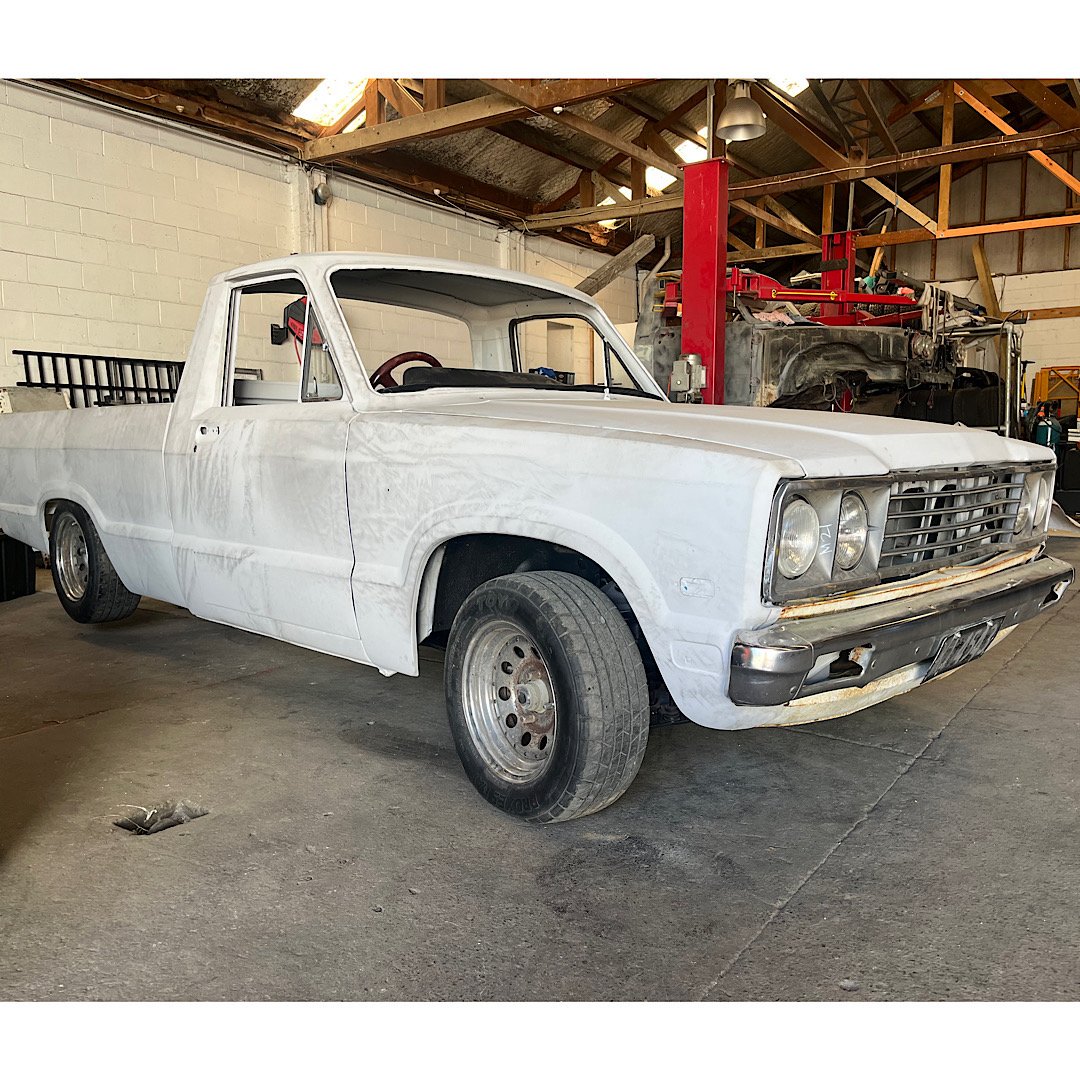
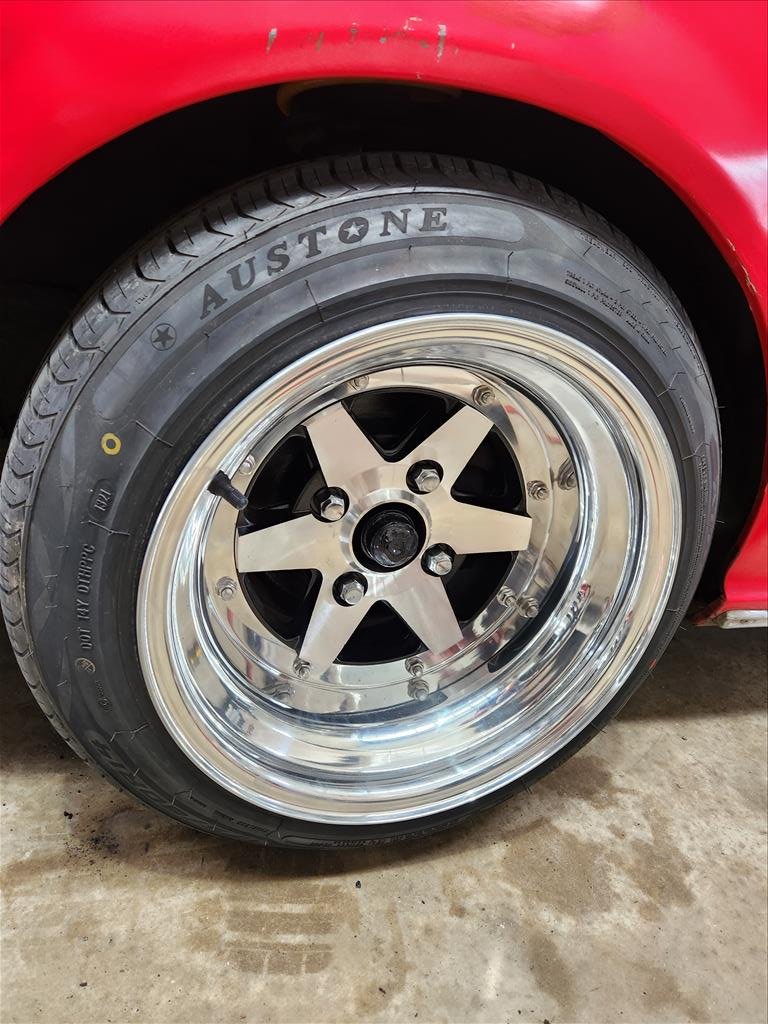
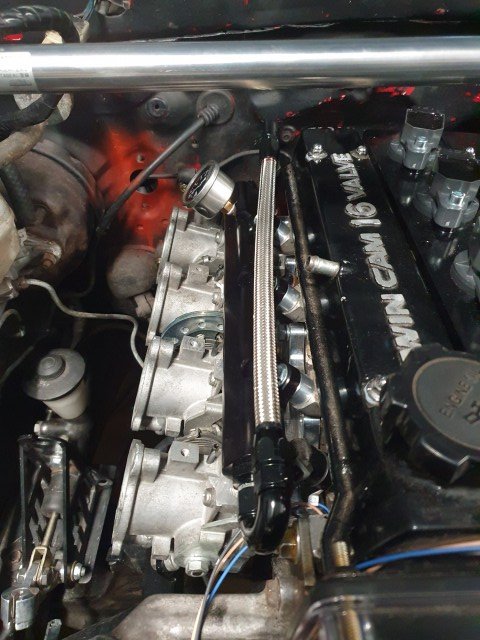
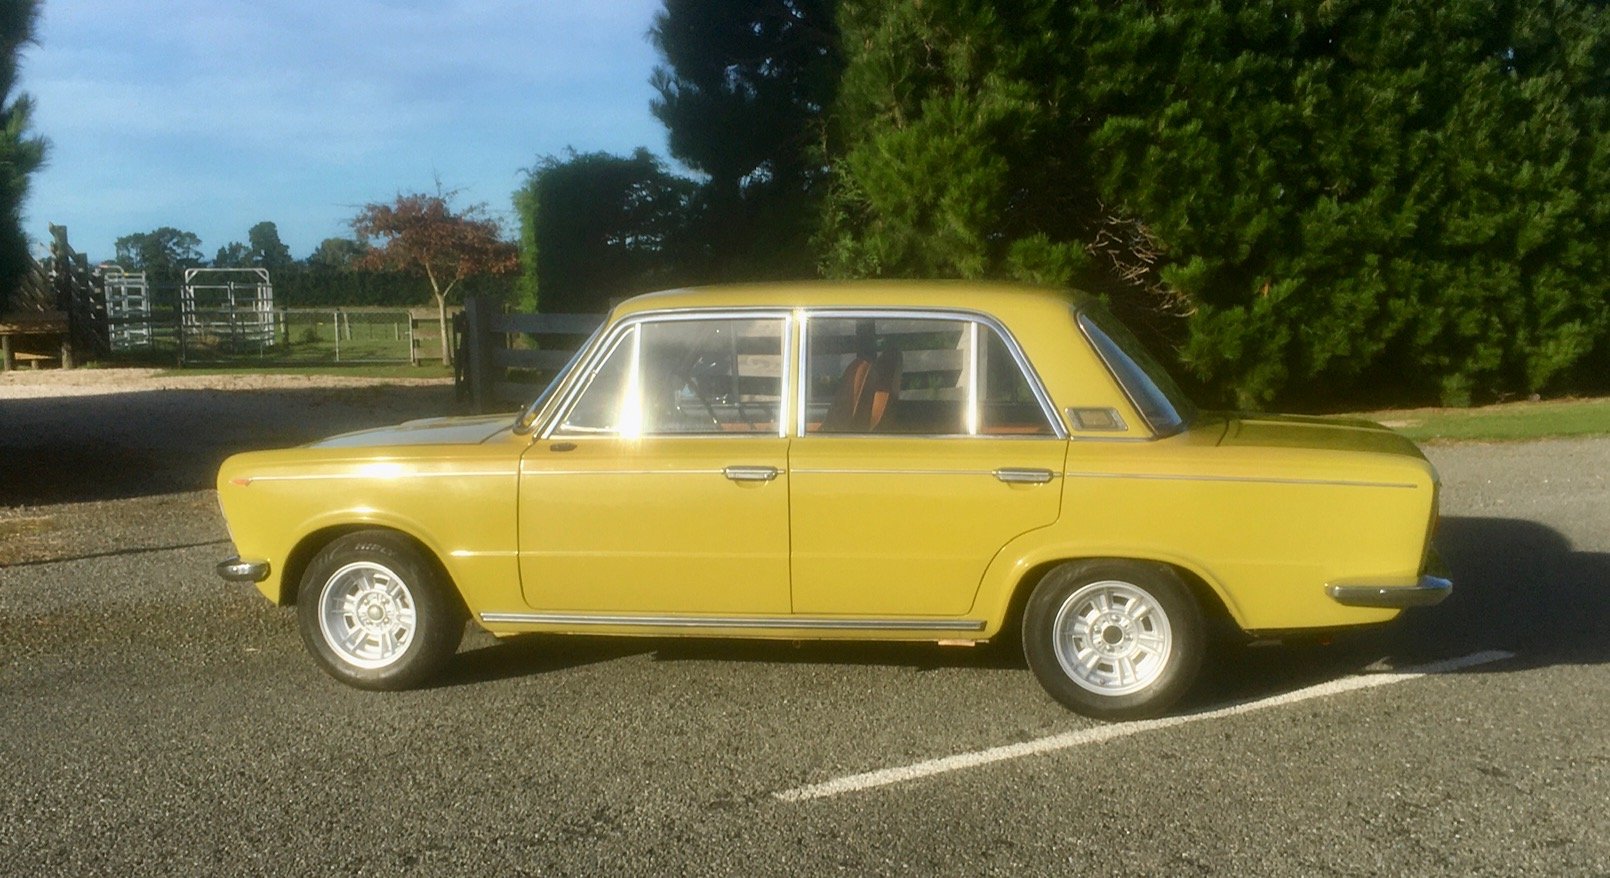
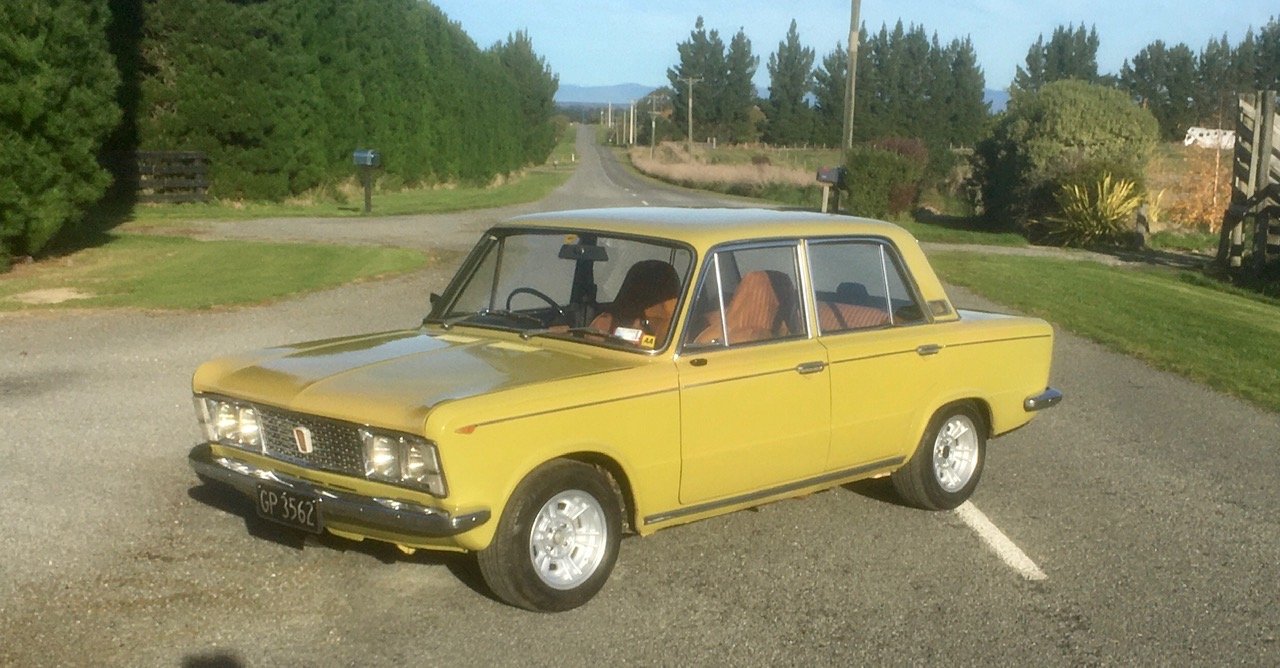
Finally (finely?) got it across the line yesterday afternoon!!! Repair certifier got back to me, said he would drop in a dealer plate on Monday if I’d bring the car in Tuesday. It has laid-up insurance cover with Classic Insurance (great to deal with!) which means it’s not covered if it’s driving. I was able to change up to fully comprehensive and they only charged me a difference of $54 that gets me through to February which is when the laid up cover was due for review! Went to start it Tuesday morning and the battery was too lame to crank it.. jumped started off the falcon and all was well again. Only thing I could think of was me finally tightening the clamps and found a bad patch of contact. Jiggled, sanded, no real benefit. Charged it at work while I was waiting to get the word to bring it to the shop.. Didn’t get word. The next day he said come over about 3, I text to say I’m on my way. Car started fine, turned off and on when I got there to test, nice! waited 20 mins for him to appear and had a chat, he was impressed and said it should be pretty straightforward from here. Went to move it over the hoist and it wouldn’t start. Good look. Jumper-pack and parked, lime-scooter back to work just before close. It sat at the structural repairer certifiers panel shop for almost 2 weeks, the Compliance guy was asking me how it went daily but I’d heard nothing and wasn’t getting replies. He started pestering him on my behalf. Get a call on Sunday nite saying as far as he was aware it was done and just needed to shore up the paperwork. I didn’t hear shit till Thursday morning, he says he’s aiming to have it finished and round to compliance today. Fuck yeah some excited nerves, still stressed out but on the edge ever since dropping off, no word. Friday morning I get an email of a Read Recipt from a message I sent him 2 months ago so I figure he’s looking though my files and everything and today might be the day, but the compliance guy had openings early week and was alone at the end of the week, not to mention it’s a long weekend. 8:20am ‘it’s good to go’. Now were short staffed at work but everyone knows the situation so I lime-scootered over, it’s all covered in panel shop dust but I grabbed it (wouldn’t start) dropped to Vince at i4Checkpoint. He was stoked to see it but said it’s gonna be here all weekend,sorry..but it’s nice and safe. 3pm he calls and asks me to bring a handful of cash a over and I can take the car to get some plates. Well that’s a surprise! Emptied the till and added to my walking cash so had enough, caught a ride with a sprint courier heading in that direction and paid the man, got the forms and jumper-packed me out the door with a WOF and a 17 digit vin plate attached!! Few points to fix but I’d figured out some of them on the maiden voyage the other week. Now I didn’t want to risk that battery bullshit again so went straight back to work, grabbed the Datsun and ripped round to the local AA, filled in the last bits on the forms and waited patiently (impatiently) for my spot at the counter. One of the cheaper transactions from the Gubbmint and I was reg’d for a year and had some big gay white plates! Rip back to work, and across the street to the battery place which had nothing under $300. Remembered the Mrs has a battery stand at work so pinned down and grabbed a big Koba for much less, back to work in 5pm long weekend traffic, stabbed it in the hole and she’s been a honey ever since. Took it out to get dinner as well, all dusty and shit. It was a fucking slog, absolute emotional roller coaster and doesn’t come recommended if your like me, but there was a hell of a relief driving it home completely legit and insured against the rest of the world. .phew. Today I remedied the issues, fitted the swaybar, flared the top of the front guard where the arch meets the inner stay a little, repositioned one exhaust that was tapping the rail from time to time, fitted the front spoiler, washed and dried it, changed to mopar bonnet pin escutcheons and took some pics for you fine folk. We’re by no means finished, I’m a serial tinkerer so I’ve left some jobs for later. Have a scotch, I fucking am!21 points
-
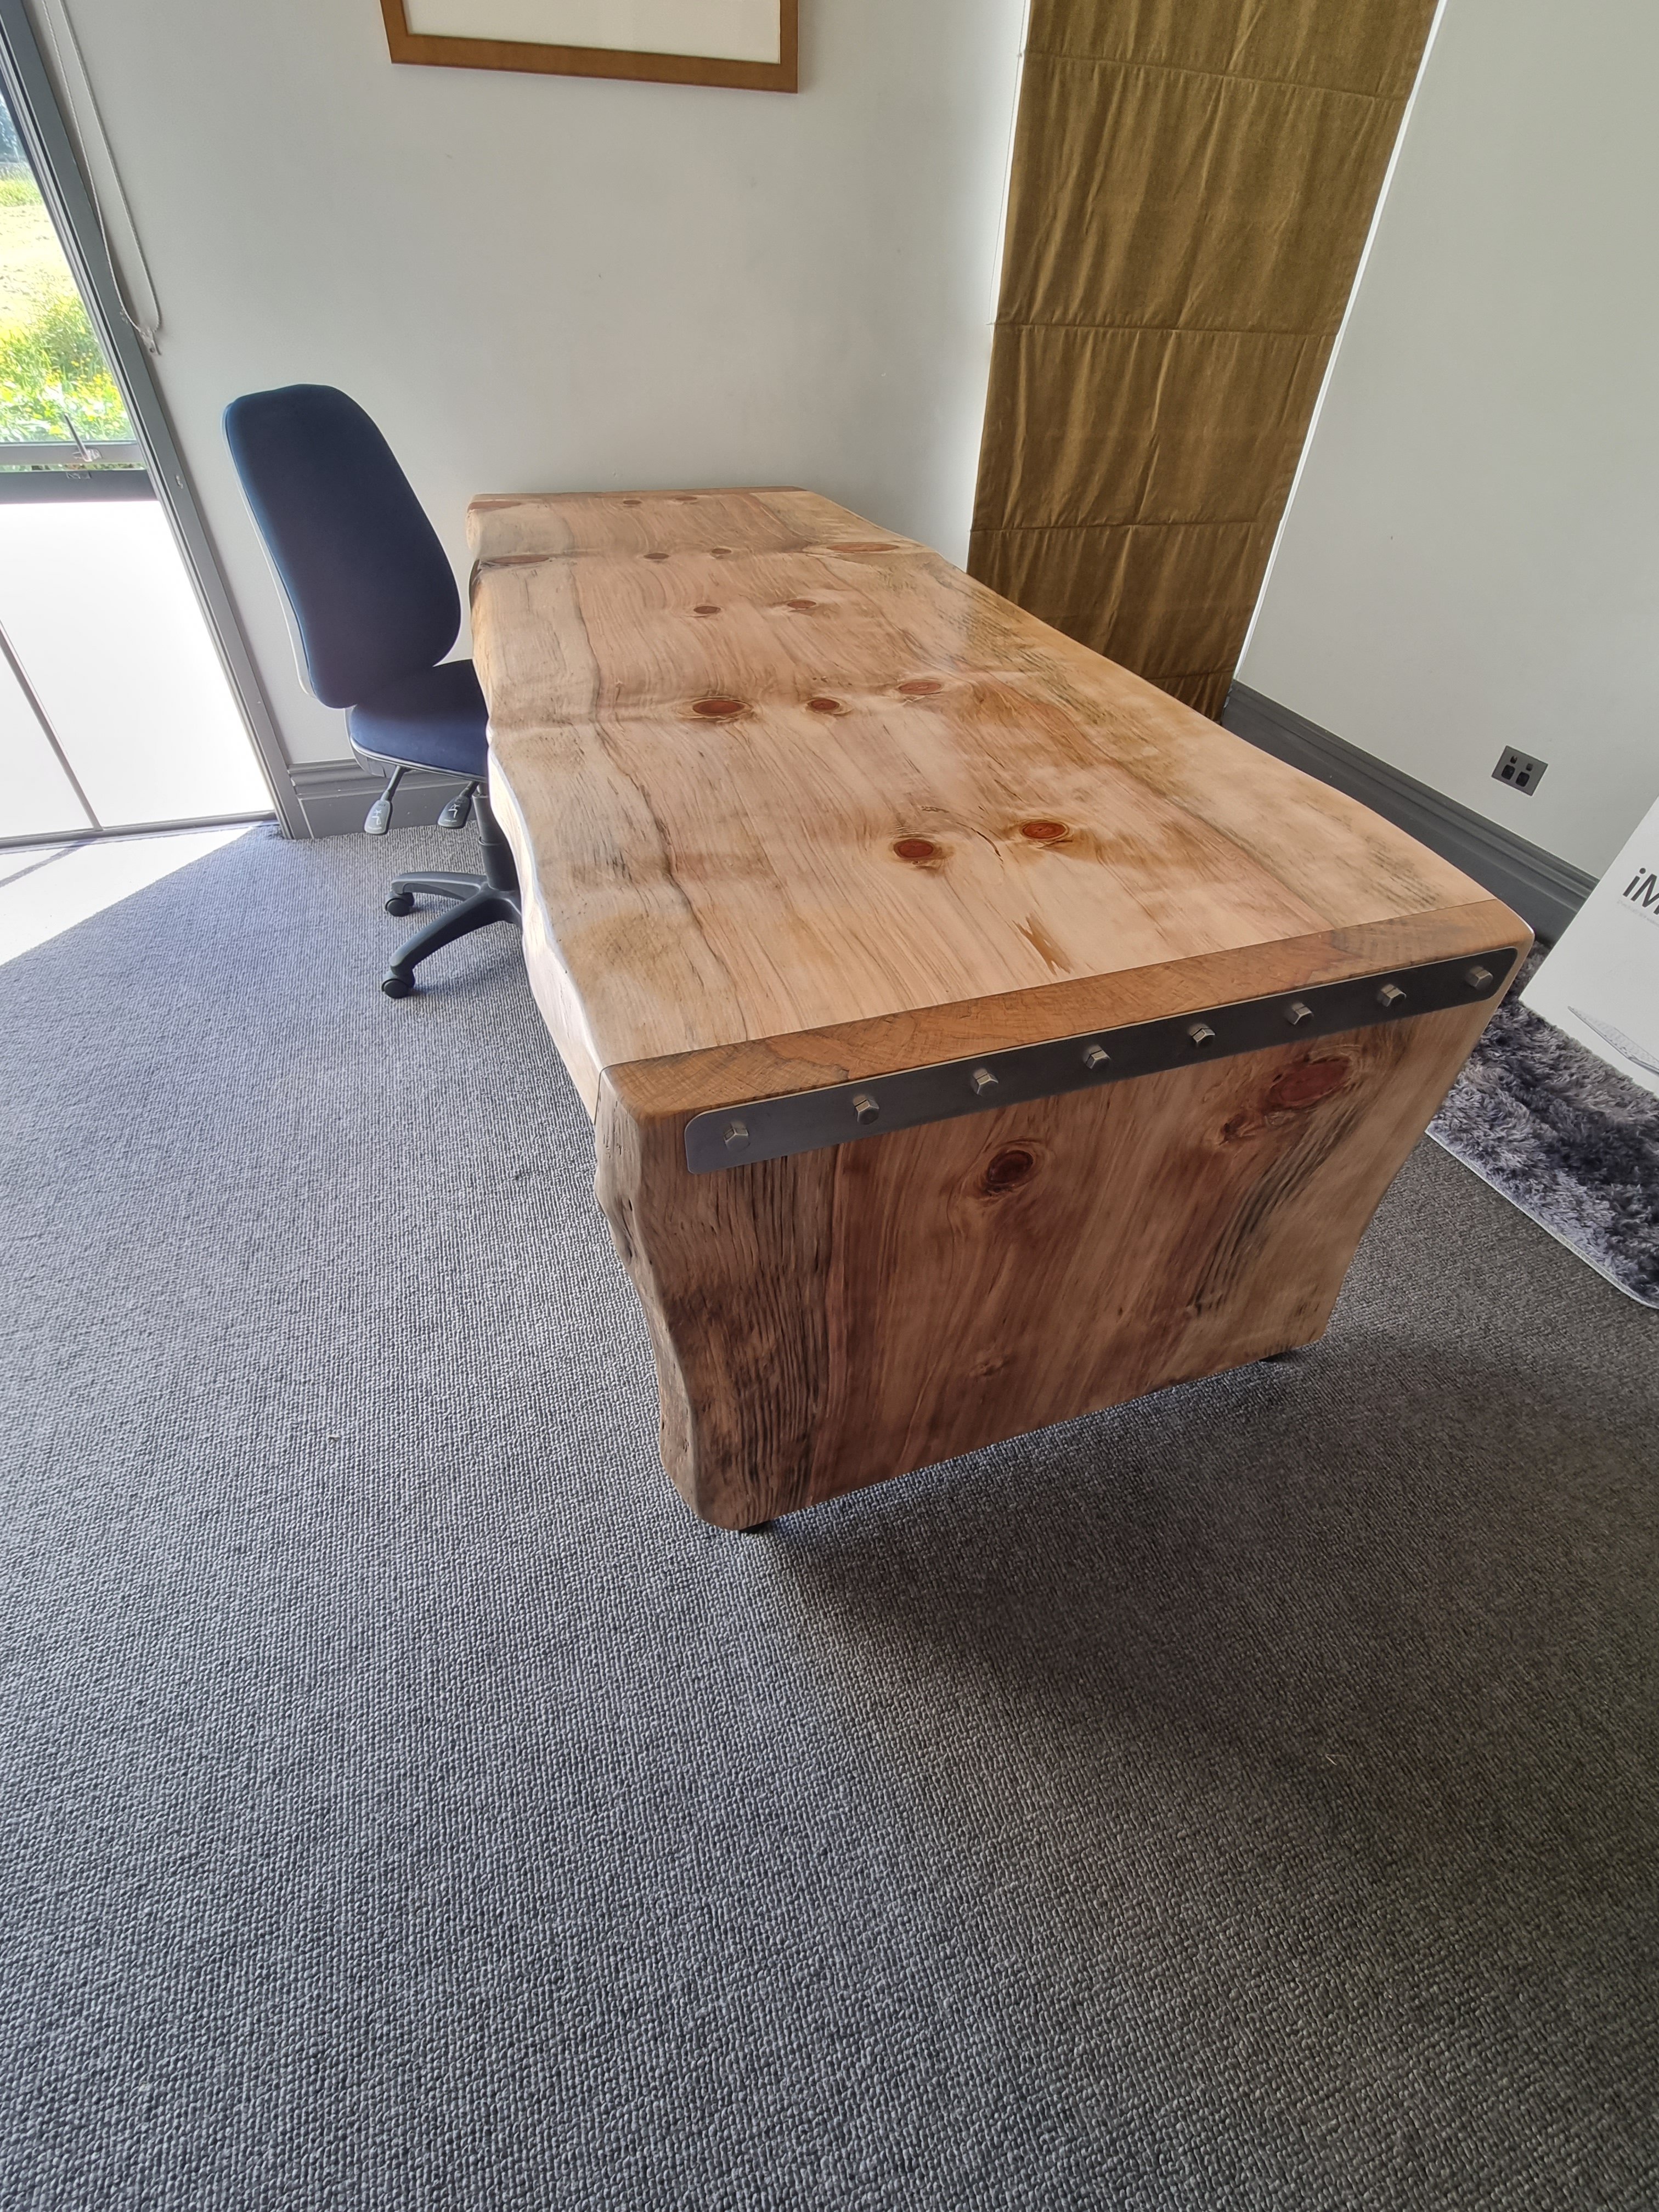
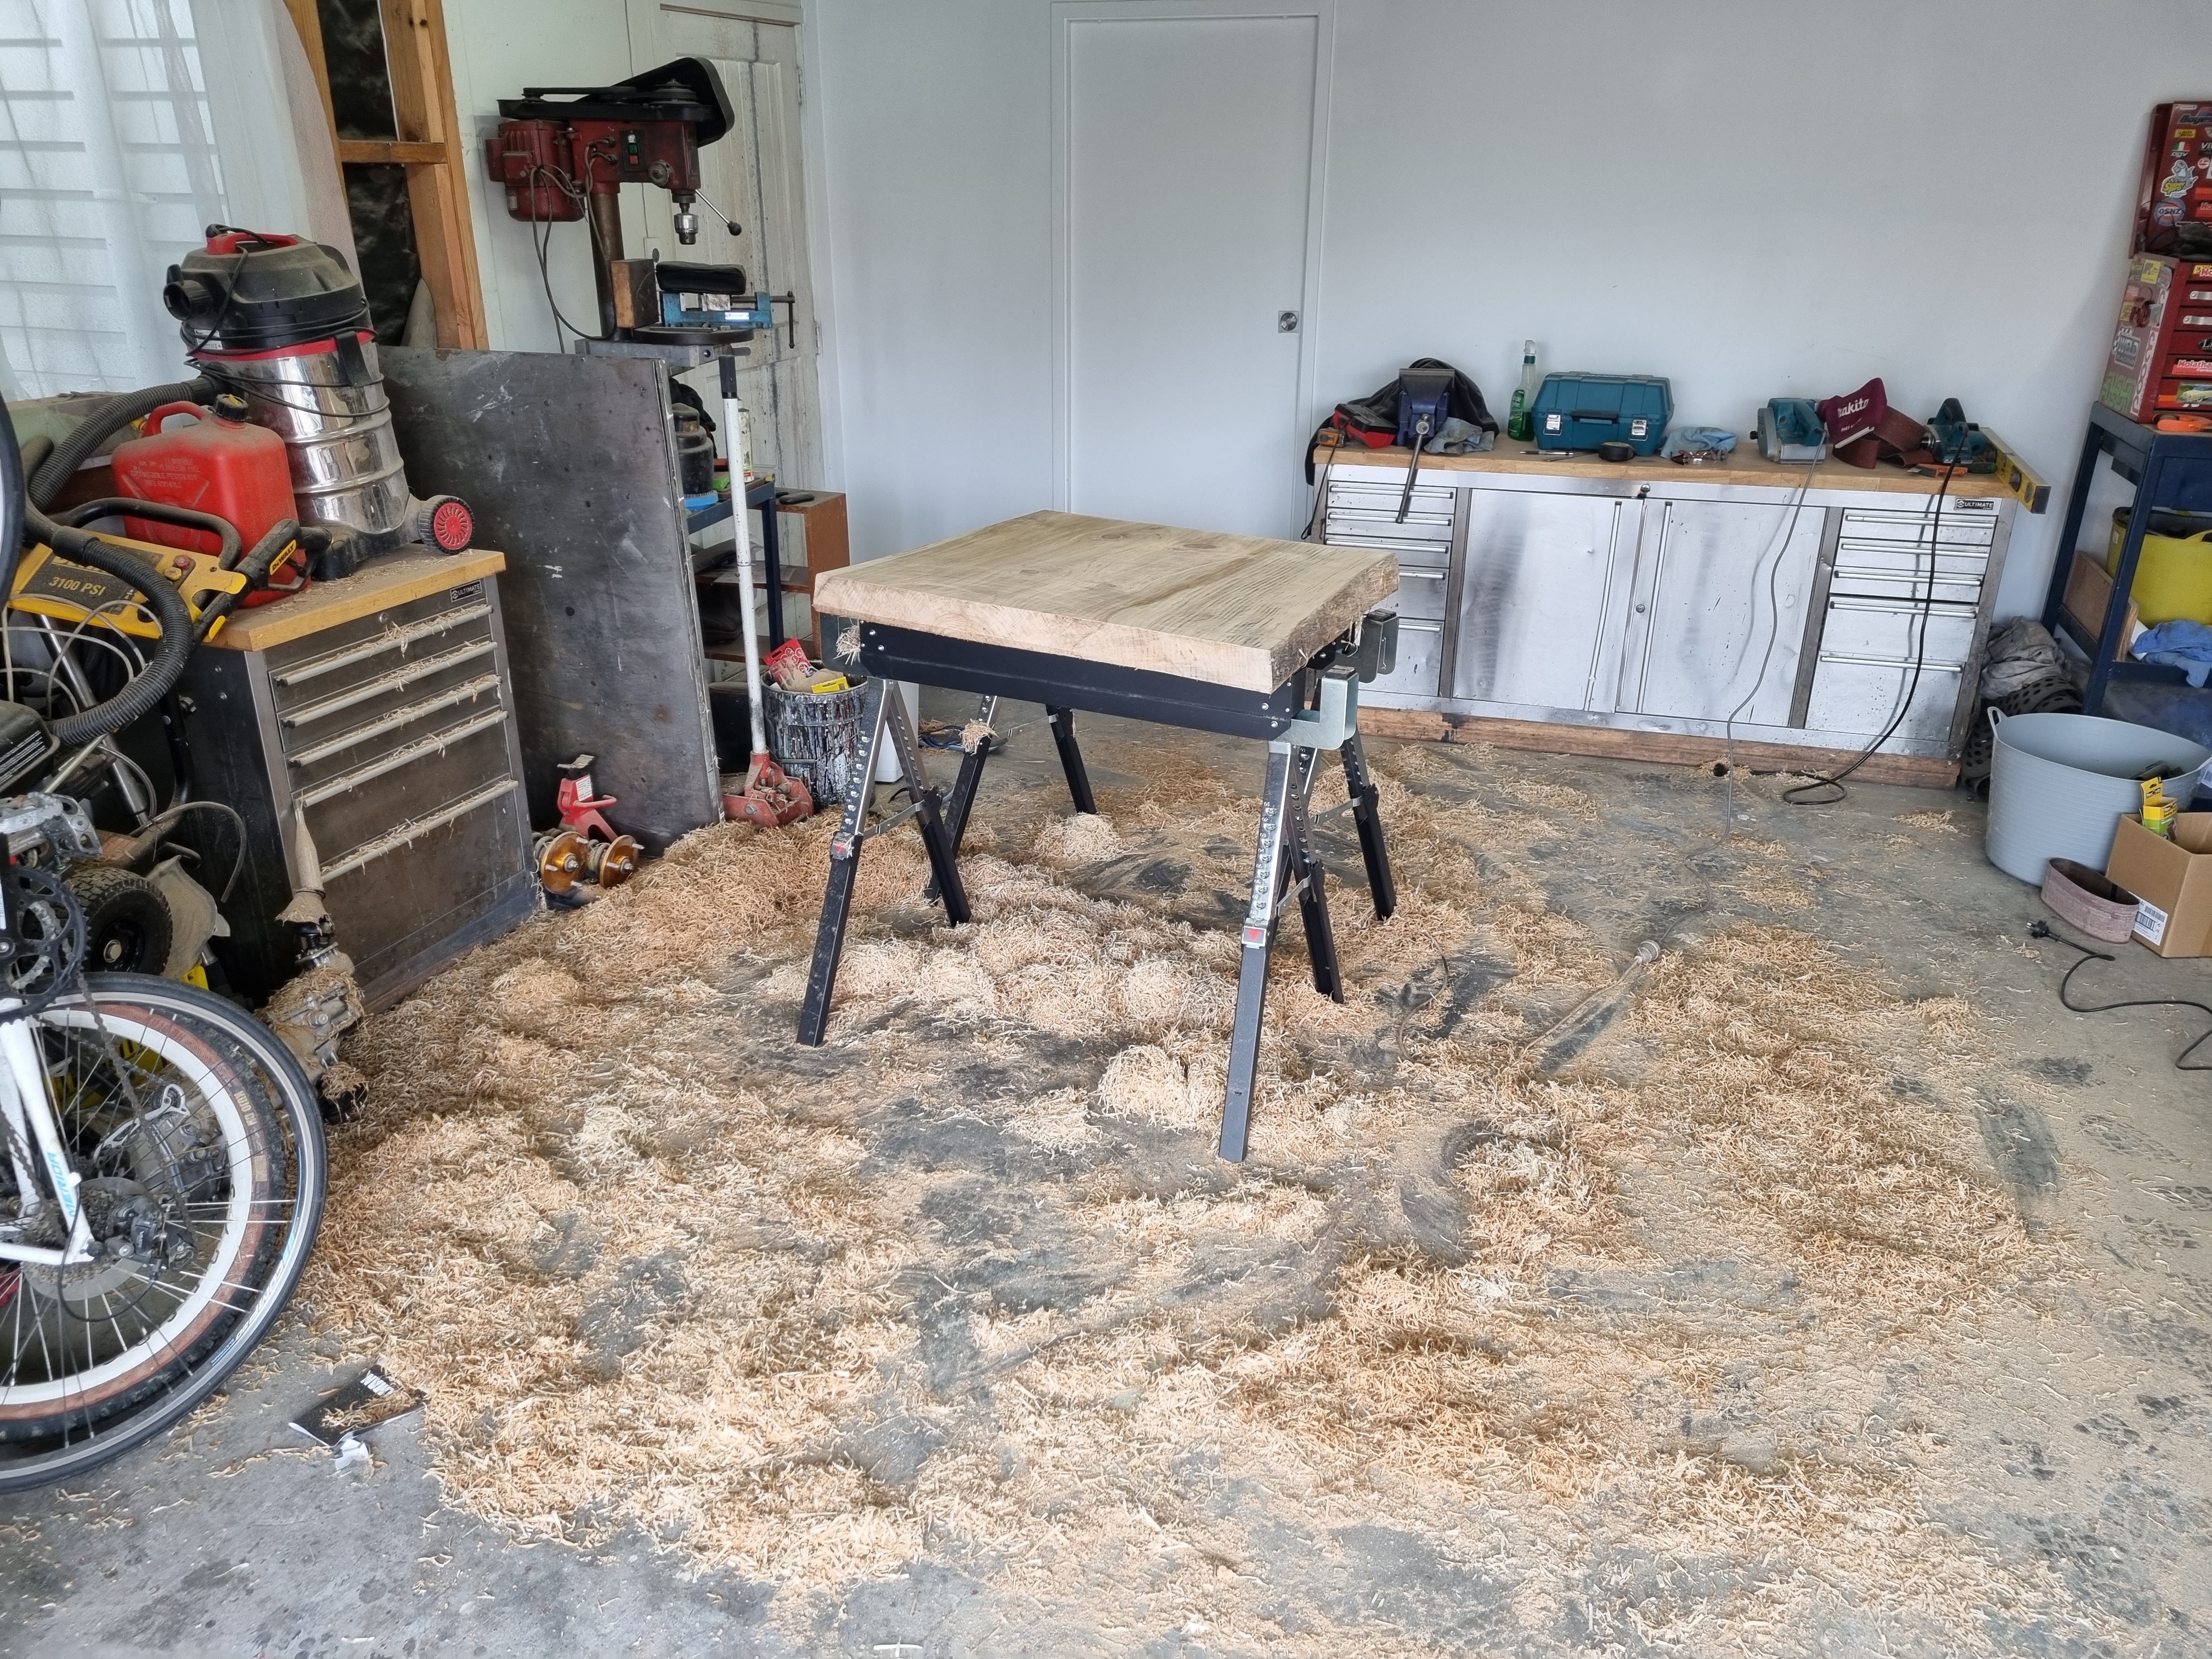
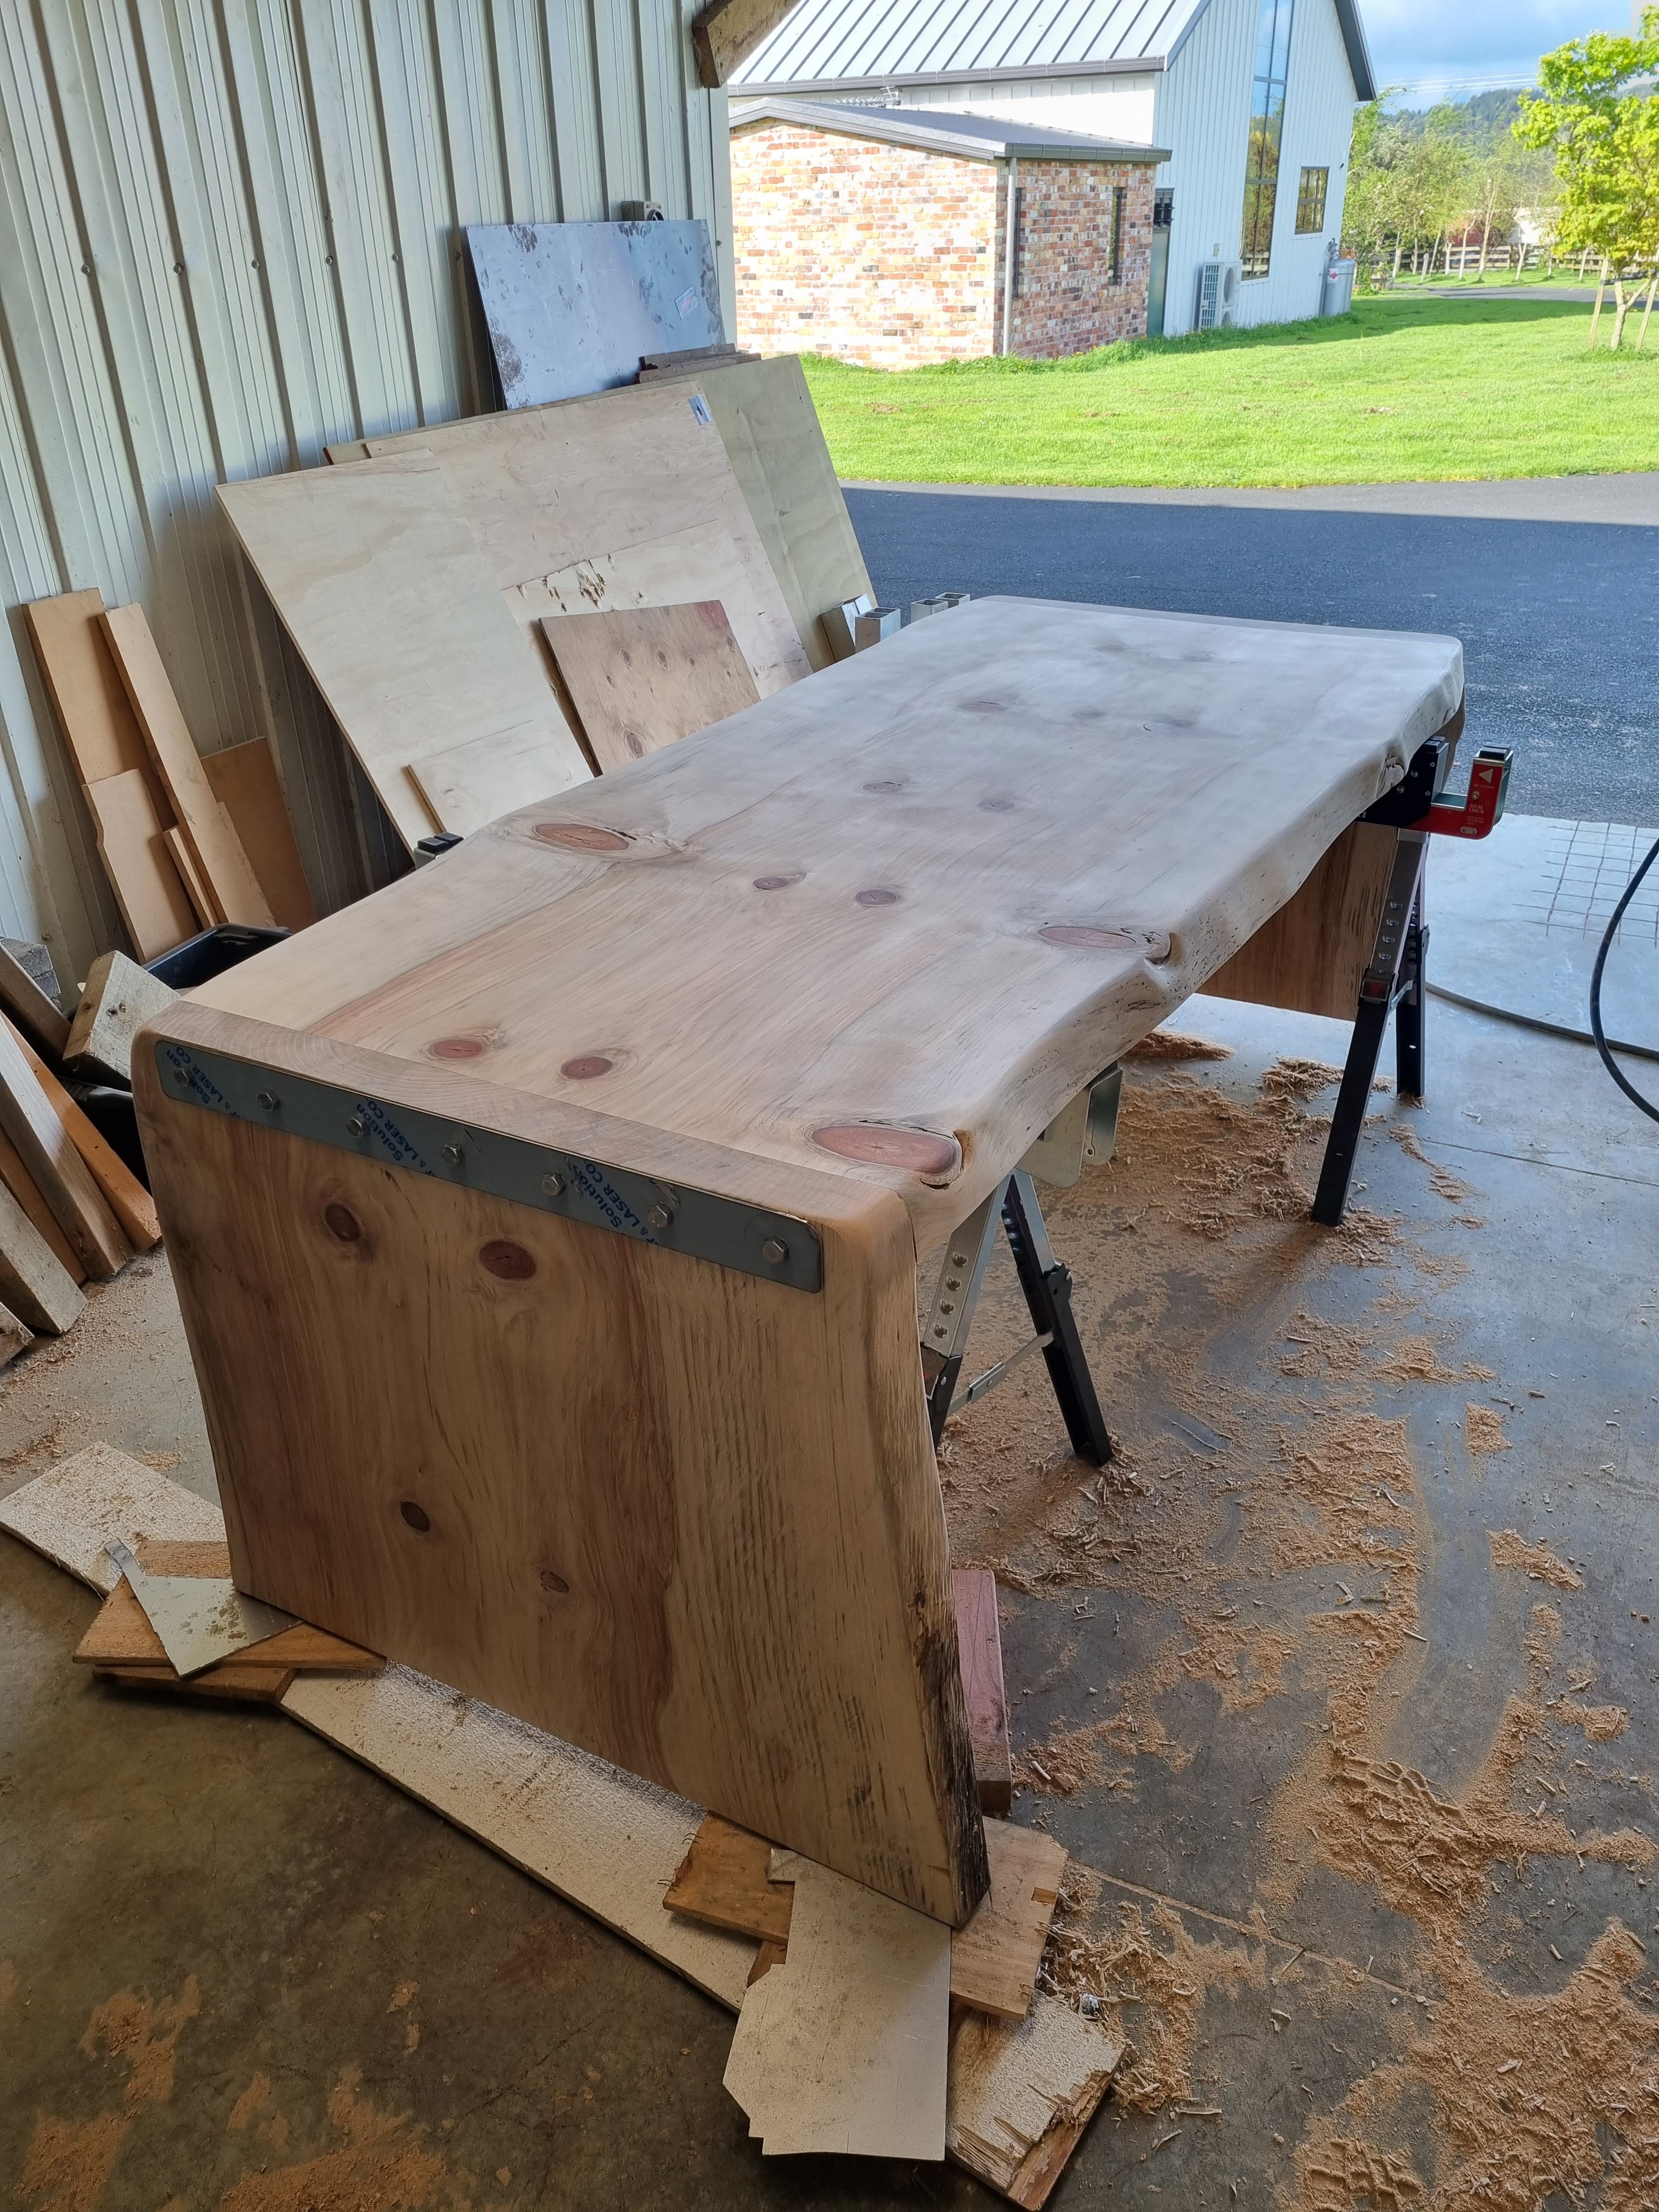
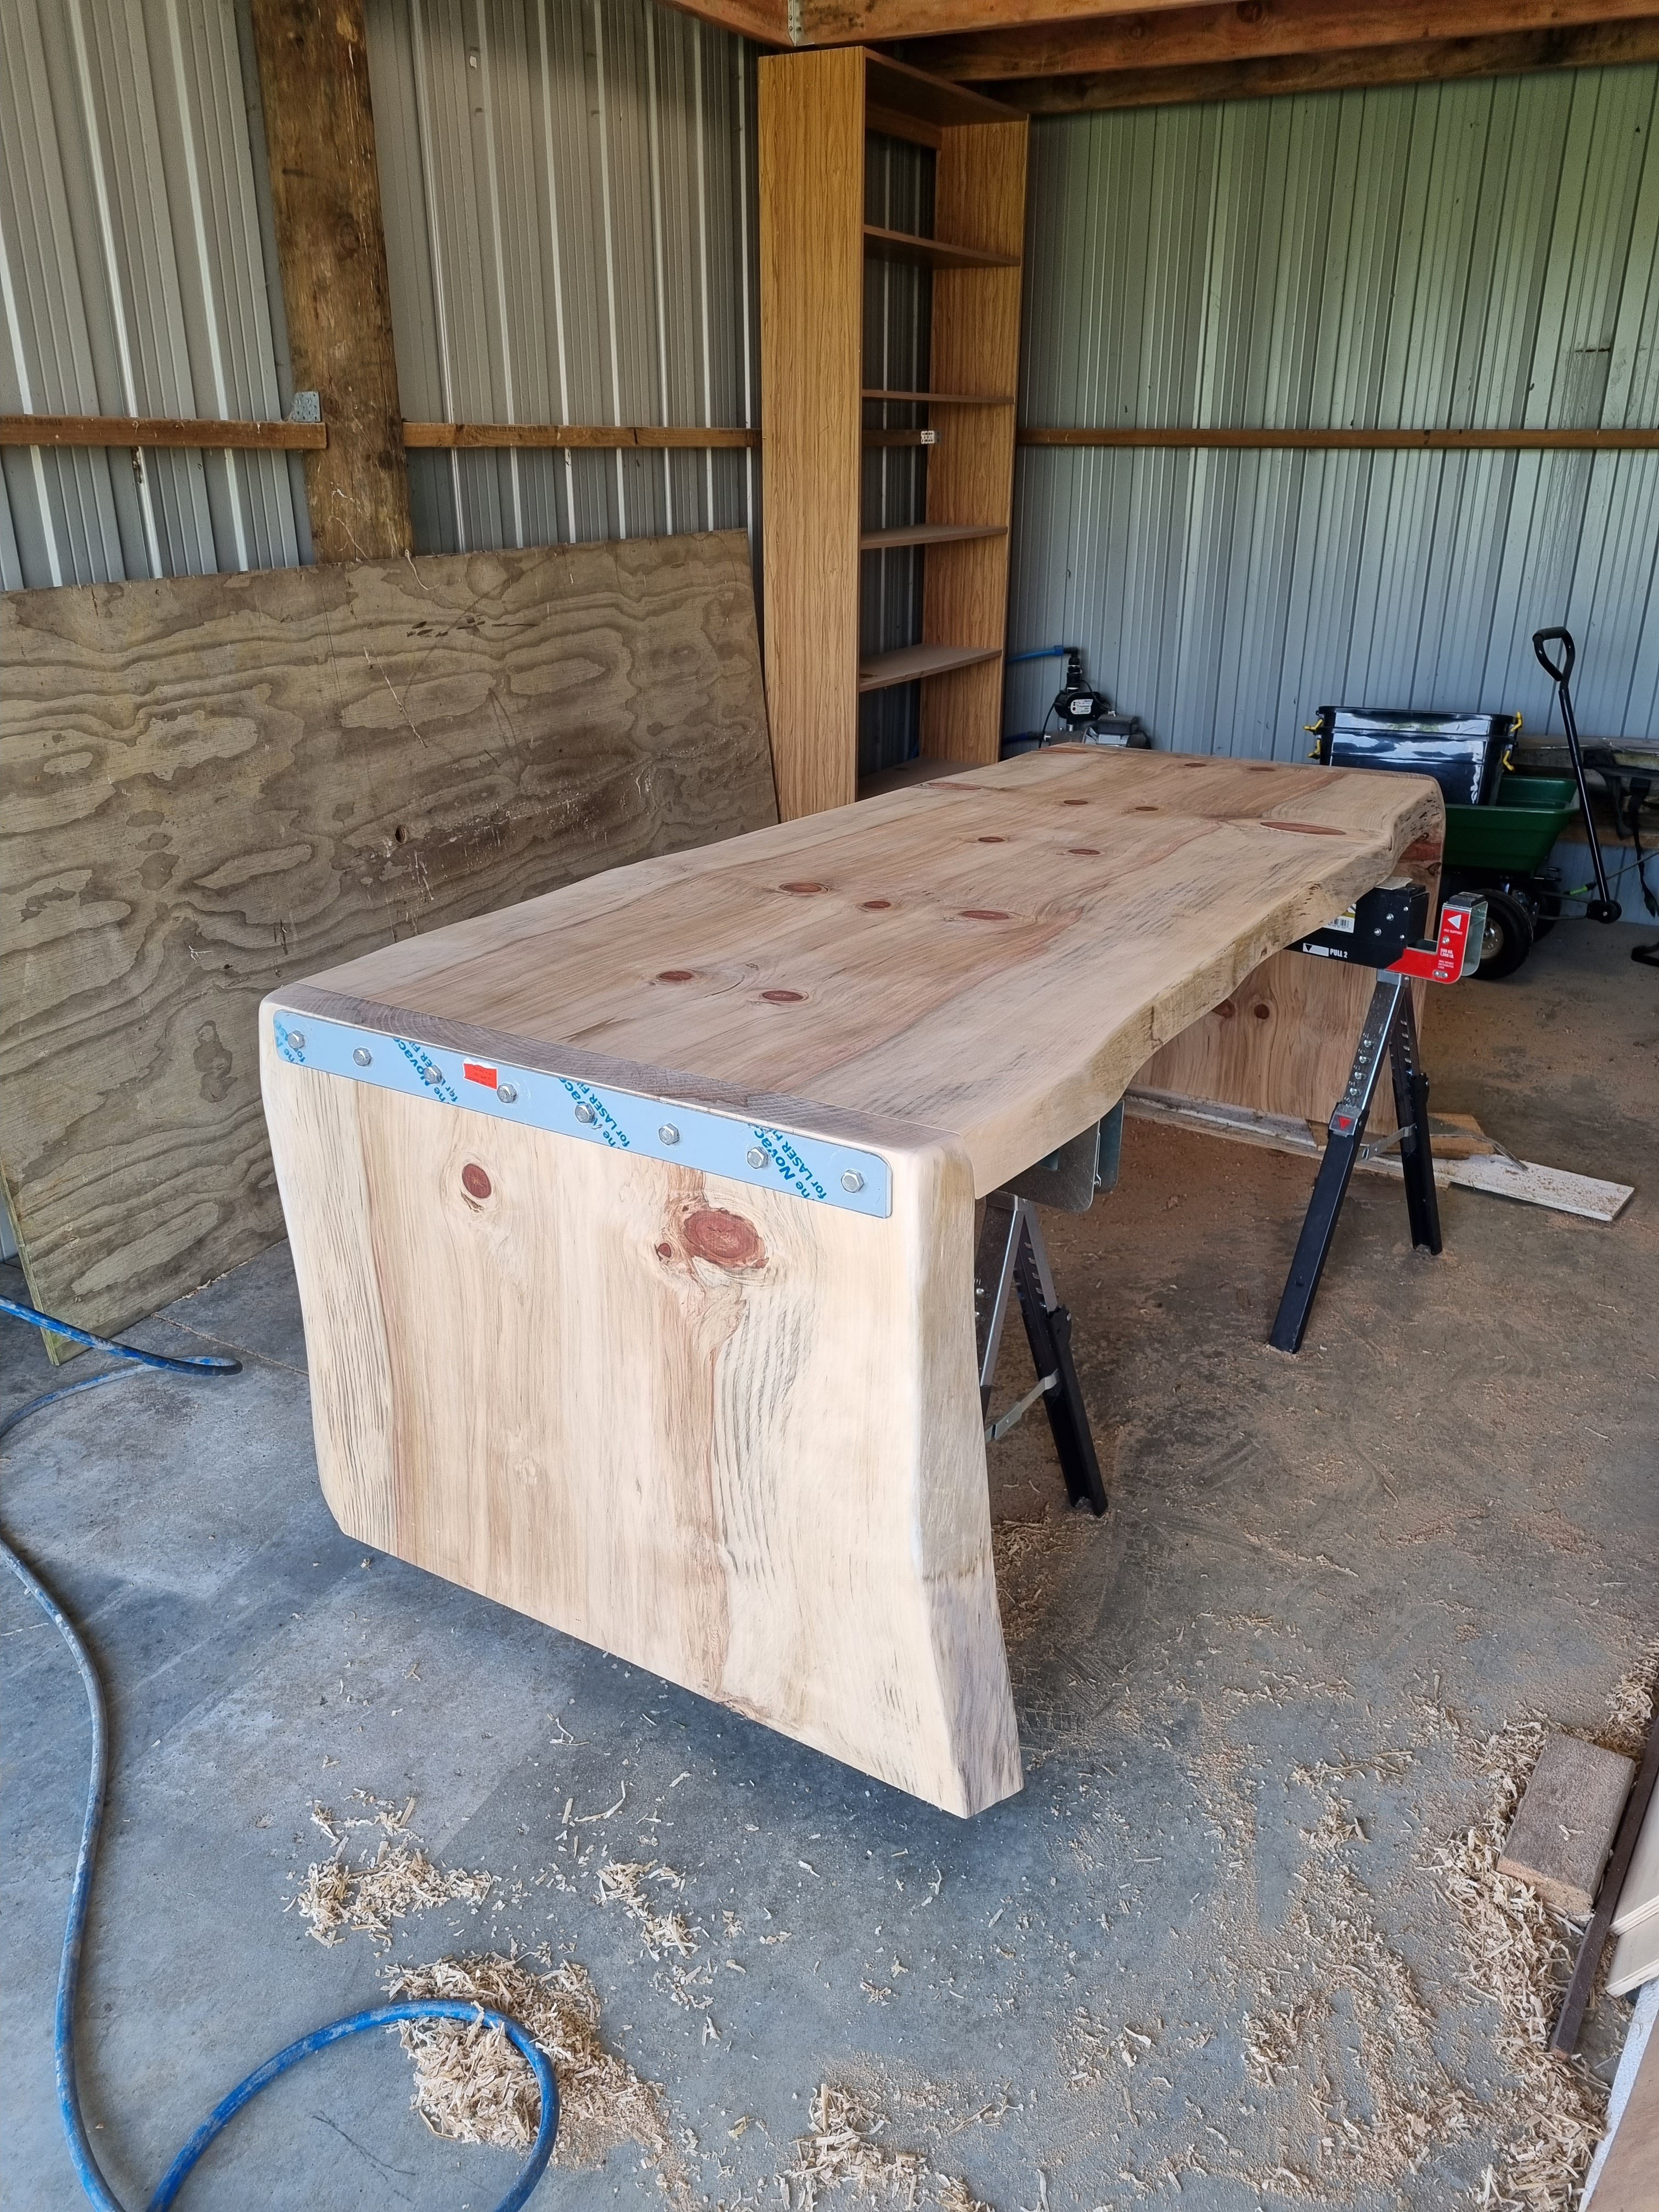
Desk is finished and I'm pretty stoked with it.
 14 points
 -
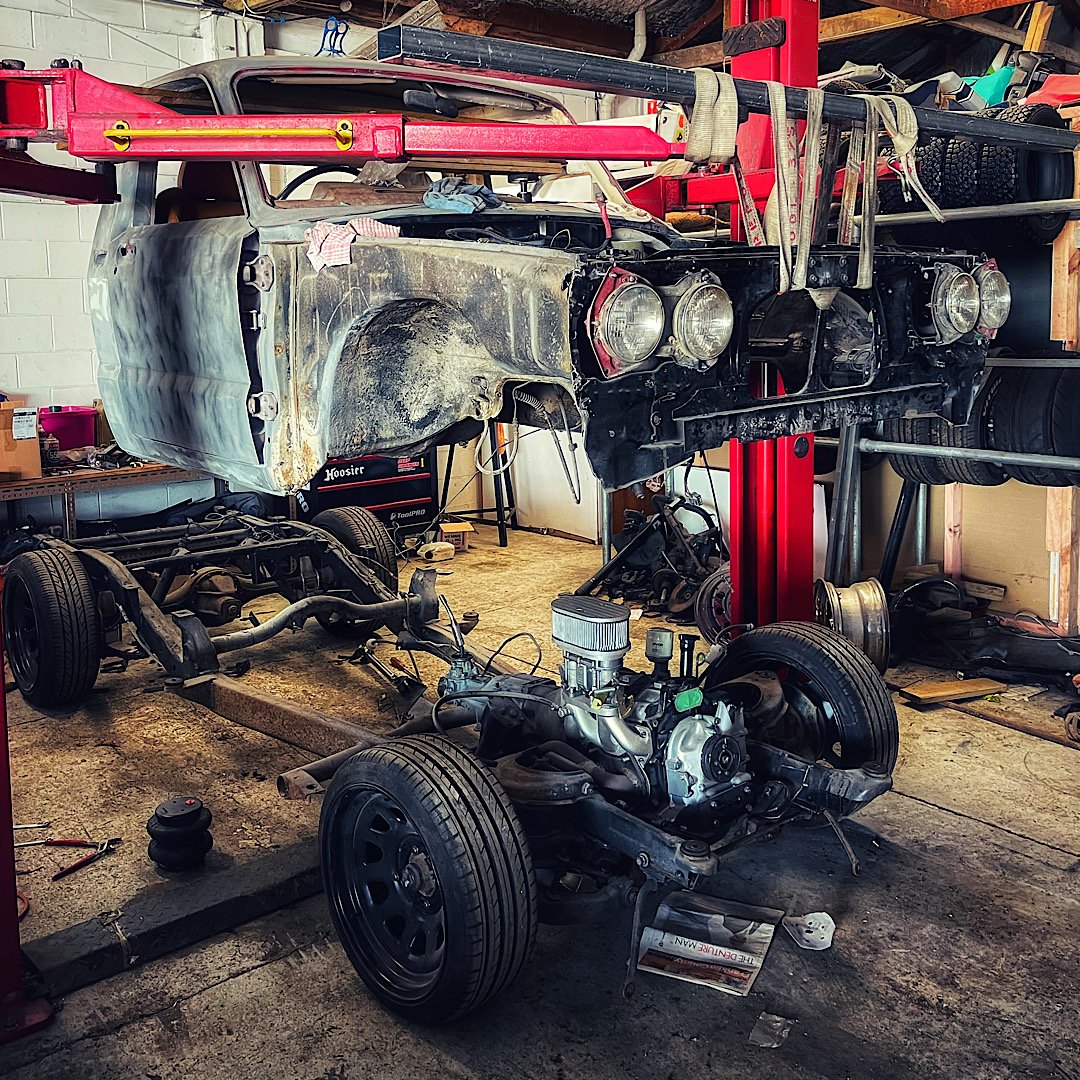
Newest addition to the fleet is this b1600. the body has been full rust deleted and epoxied. rear tray floor has been deleted. body wise I only have the engine bay to smooth off. Have been considering deleting the inner tubs though which would make it slick as haha. he has had a new tailgate skin made up and there are 2 other tailgates with it interior: seat has been recovered, dash too recovered but is missing a corner piece to the forward trim. needs a roof lining and carpet, new door cards cos the ones with it are just nope. the hubs and axles have been received to 4x110 , I test fitted my 4x10⁸ hotwires and freaking love it. engine: rebuilt 12a turbo block with turbo box has a factory turbo manifold (rare af). New turbski. Another AR70 turbo which is more suited to a 13b. Has exhaust manifold flanges and a half made turbo manifold. microtech ltx8 ecu set up and injection perfection minus injectors. Even has the turbo hat. bunch of parts etc that’ll just go in the bin tbh suspension: dead flat rear leaves cobra springs in the front, but Jesus what a lift!!! They’ll be deleted asap. this is the 78 shape so has the early round gauge dash, originally column slam. My favourite. oh and it has a gay Adrenaline R rotor shape muffler and a Gilmore drive kit. oh oh oh and a soles lock kit for max winning. so what’s the plans with this one???? well I’ll pull the 12at block out, drop in my 12a j. paint it and reassemble it, get it on the road. the other one , I will continue with the air ride and 4 link. Manx once the body is tidied I’ll finish the rx3 front. im thinking that I’ll sell the 12at, microtech , turbos etc. I prefer a raspy ear biting NA keg thoughts???
9 points
-
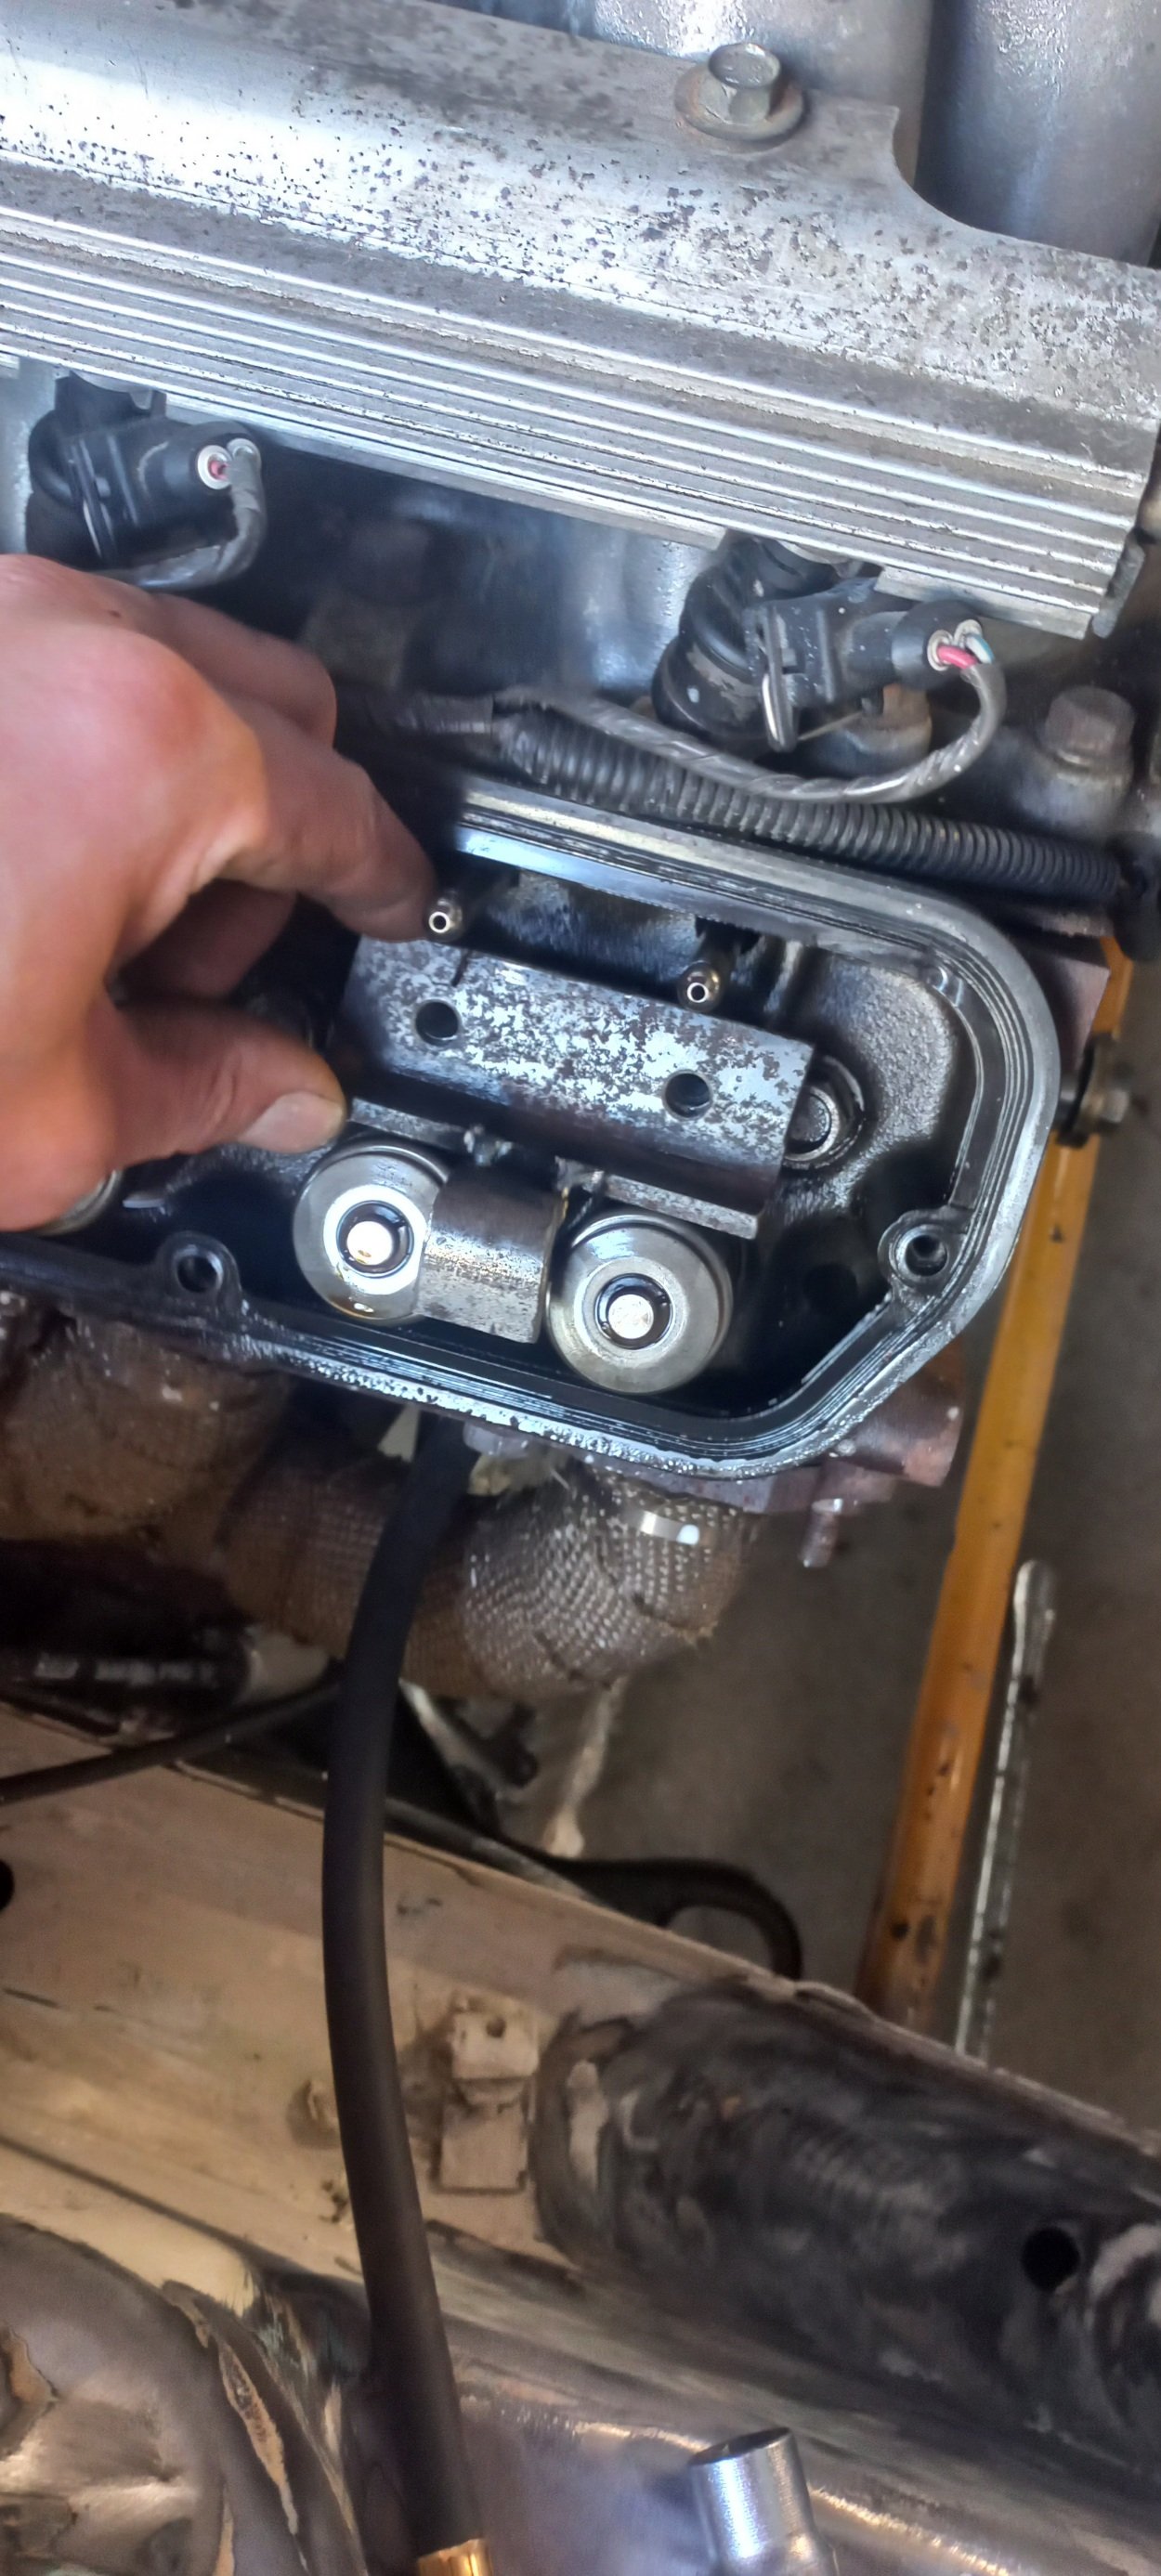
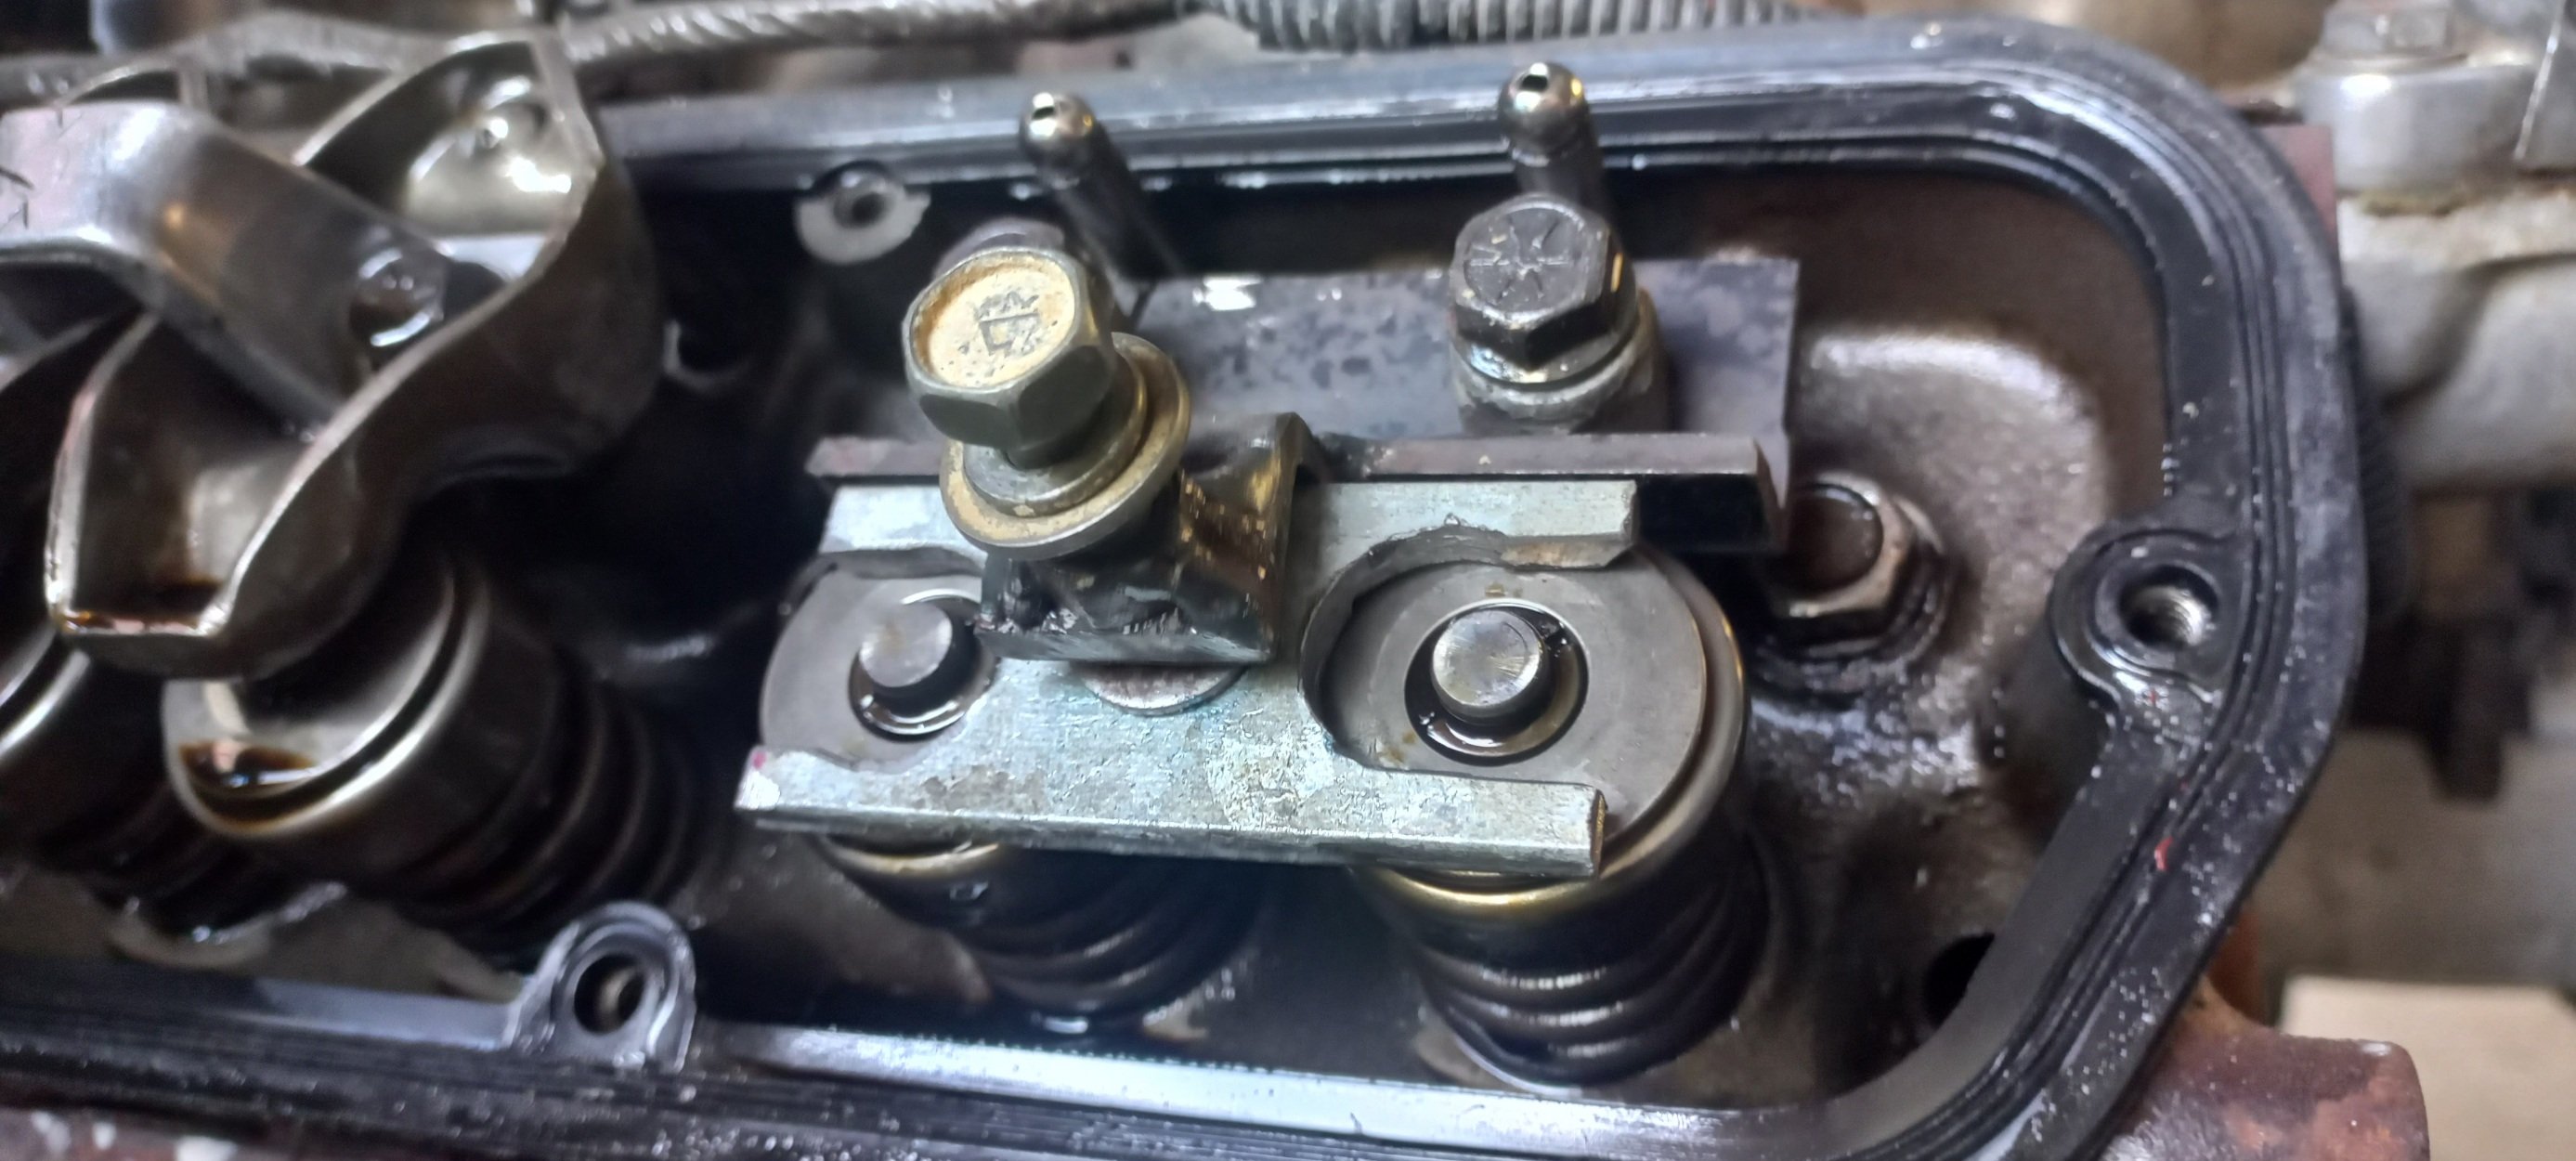
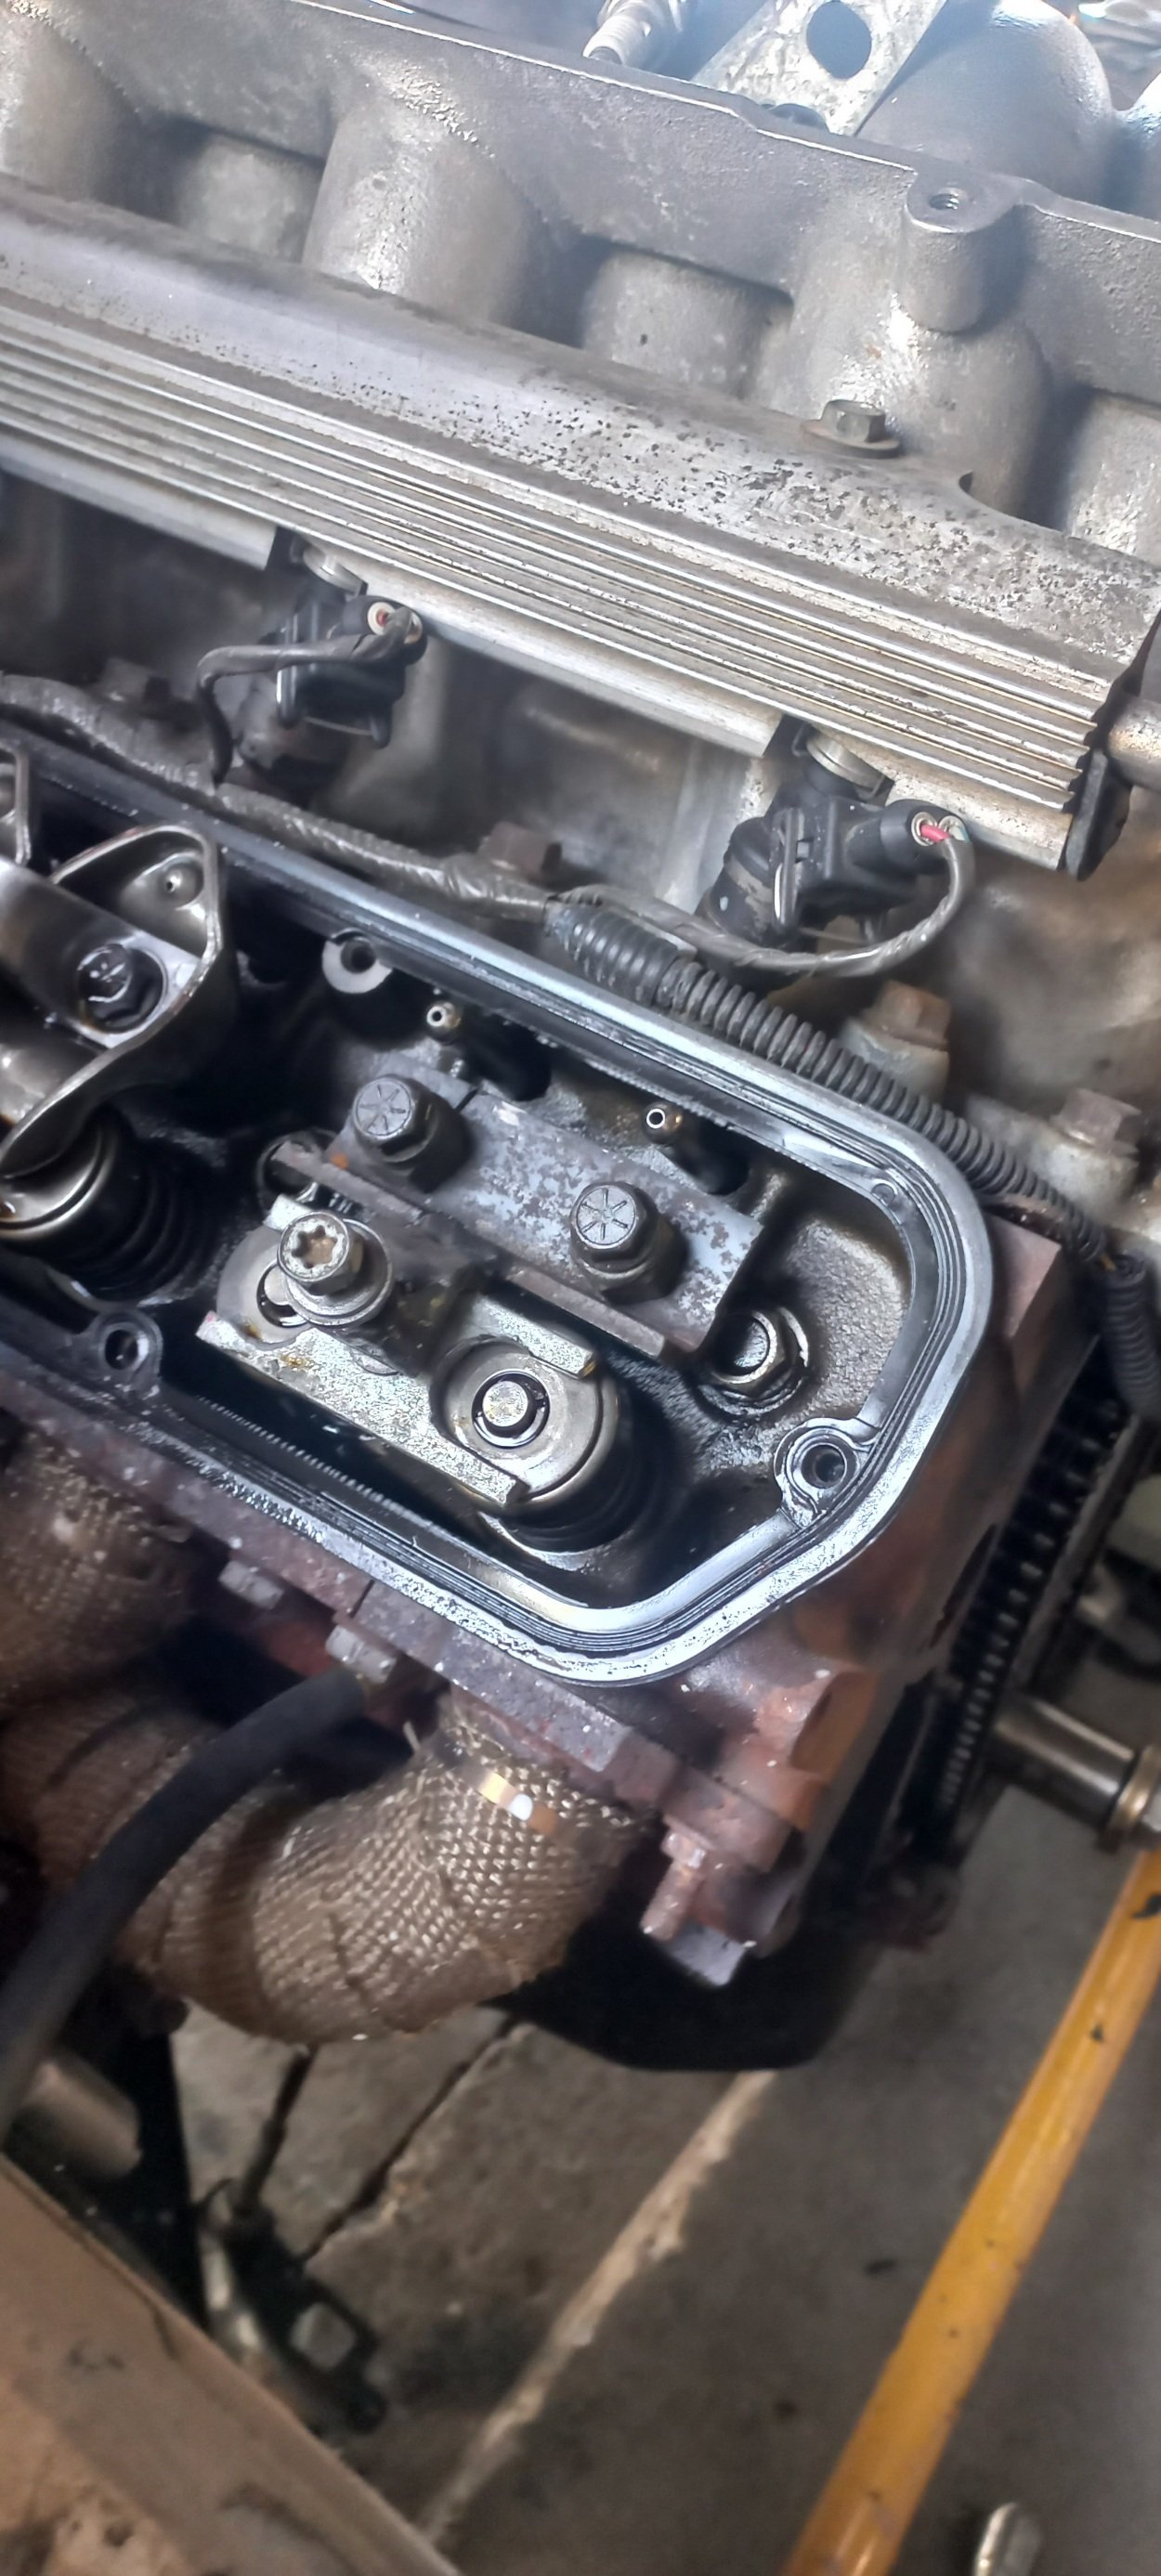
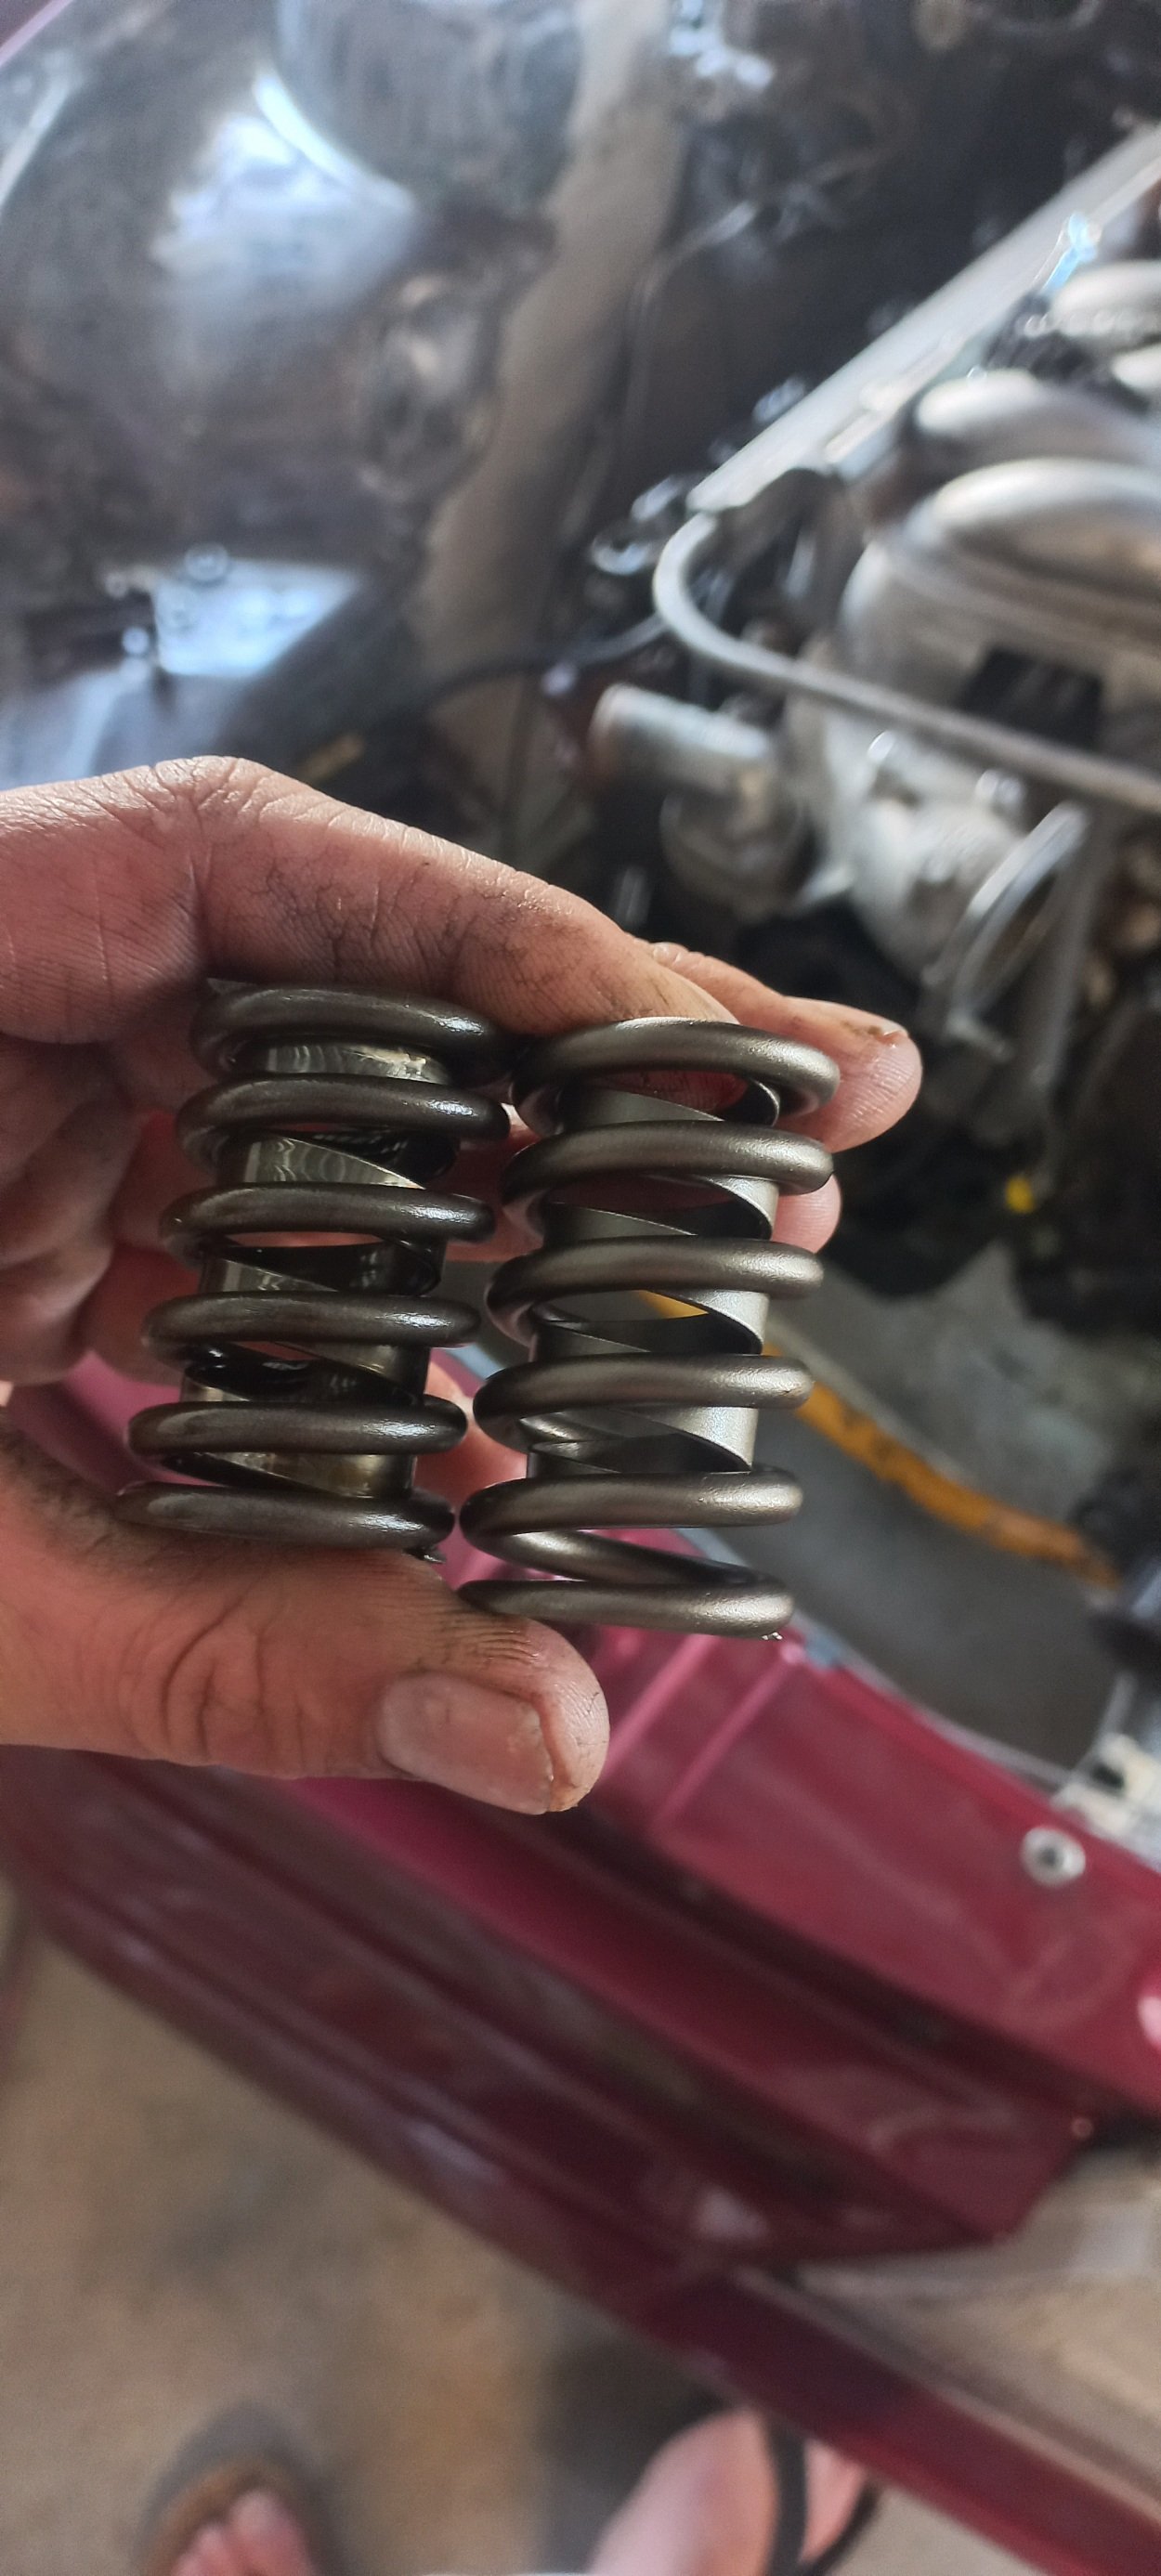
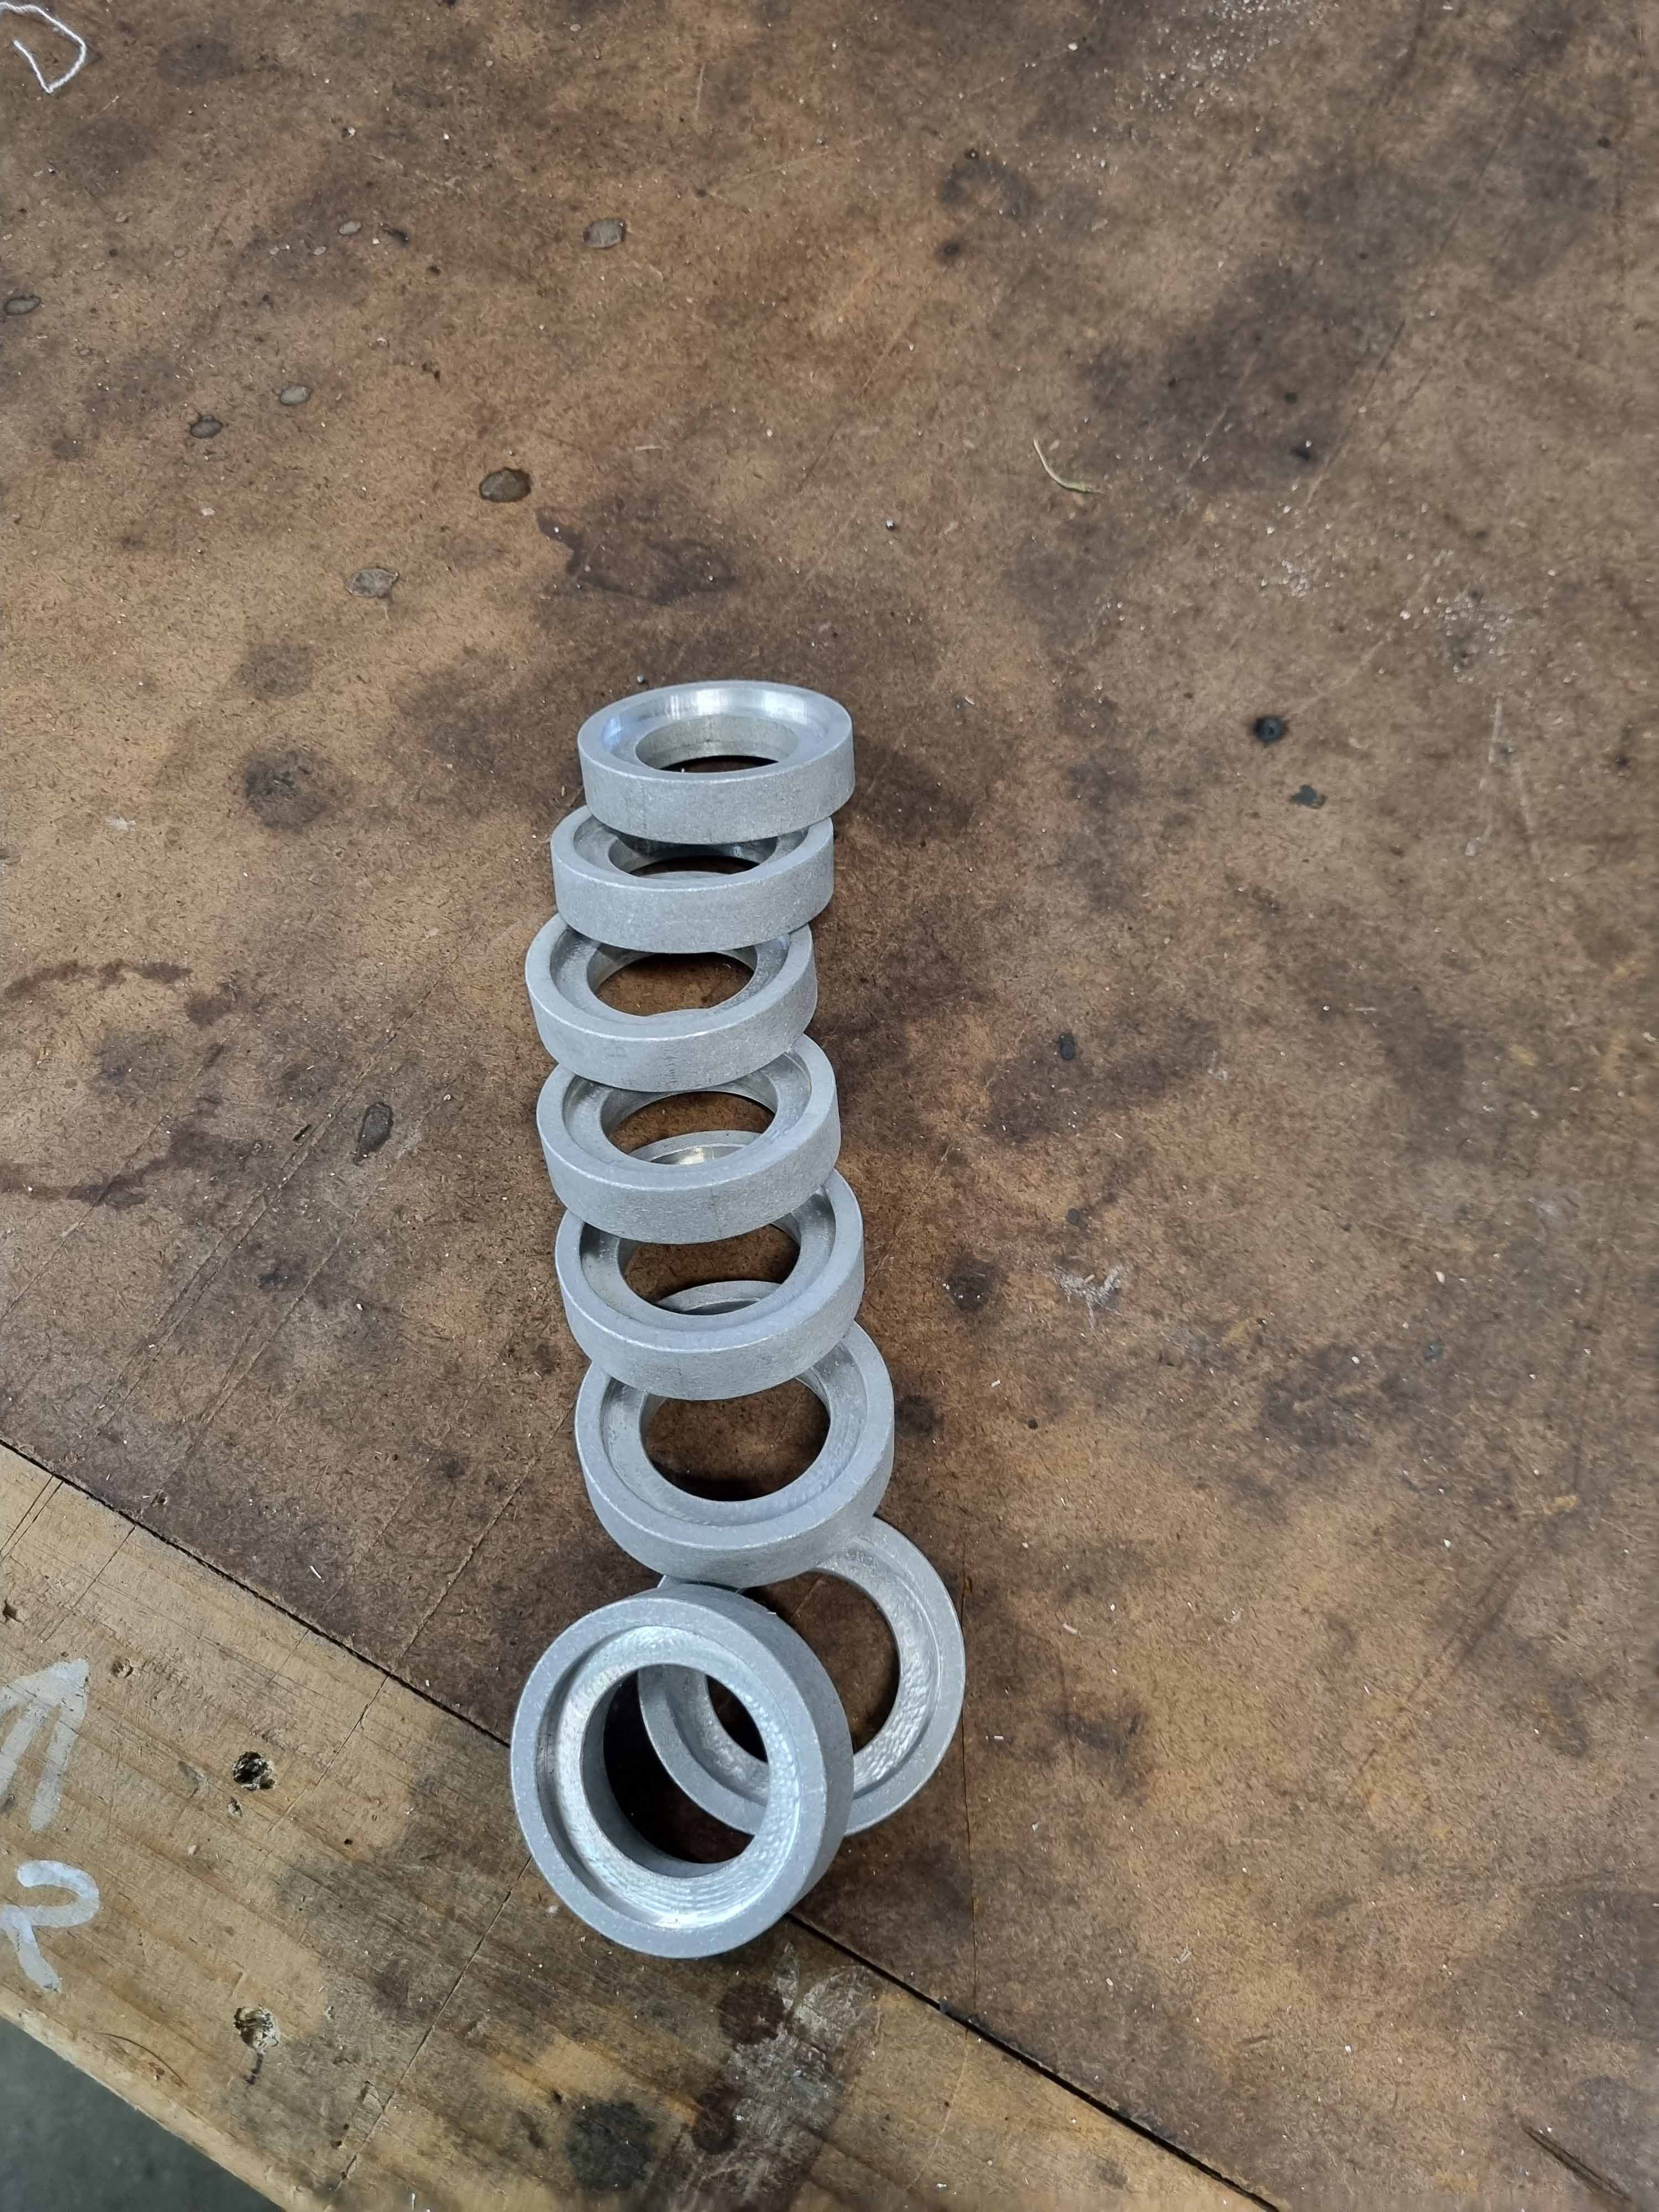
Made a little valve spring compressor thing to compress them out of some 5mm steel, have managed to do one bank today, definitely more pressure on the valves now, used air to hold valves up while swapping them out, tedious but not a hard job. . .
4 points
-
3 points
-
Robots go here....2 points
-
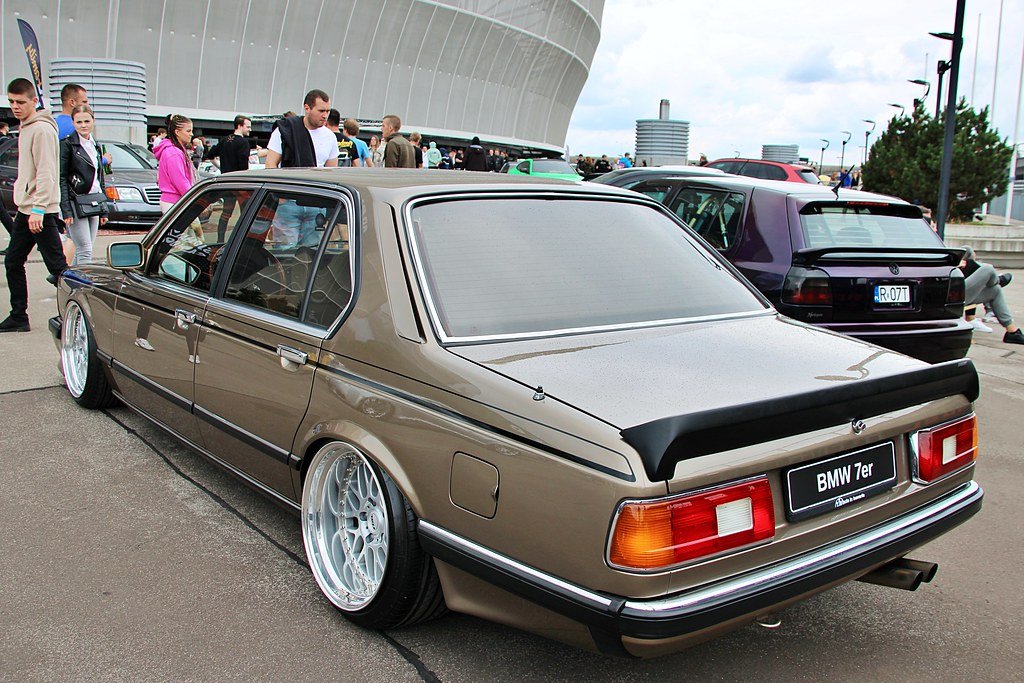
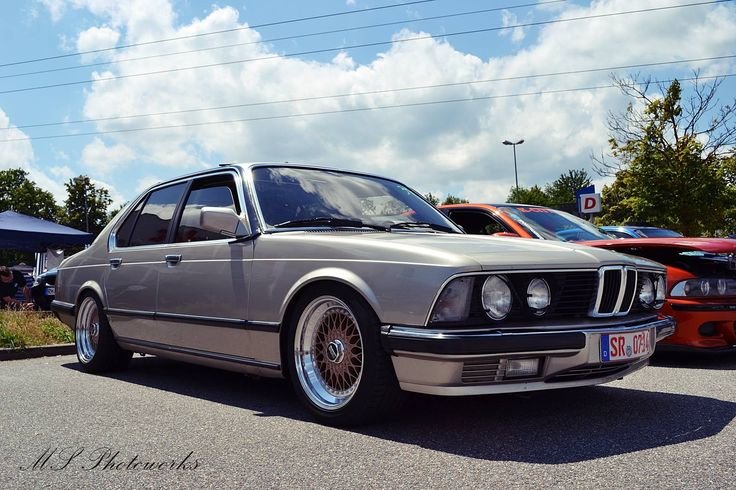
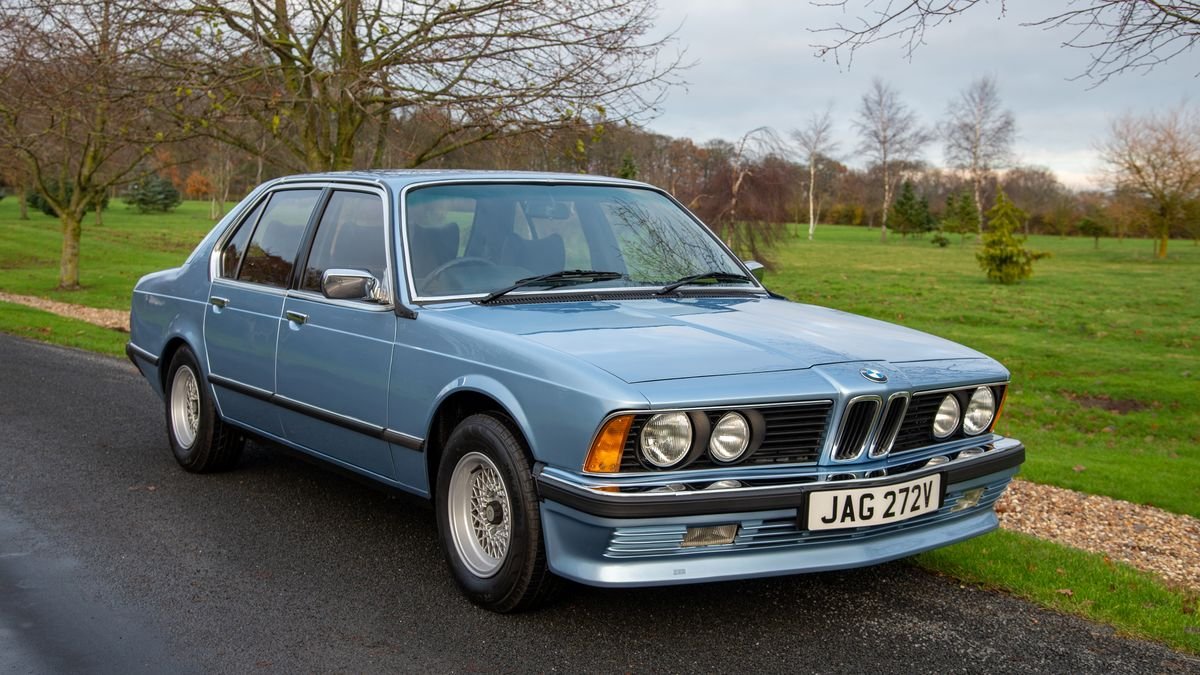
Mattts E23 BMW 7 Series Land Yacht?" What an exciting adventure you've embarked on, juggling projects and adding a classic to your collection. Your story is a testament to the allure of vintage cars and the love of the open road. Firstly, it's commendable that you're investing time and effort into your "Corona" project. The decision to take it slow and do it right is a wise one, especially when operating out of a crowded garage. The anticipation of your new 4-bay workshop being built in the future must be driving you to ensure everything is perfect when it's time to dive back into that project. However, every car enthusiast knows that it's hard to go for too long without something captivating to drive. That's where your impulse to acquire an old 7 series comes into play, and it sounds like a fantastic decision. It's not just a car; it's an experience waiting to happen. Your connection with this particular 7 series, which you previously encountered on the motorway, adds a personal touch to the story. It's as if fate brought you two together. The fact that you reached out to the seller initially and then revisited the idea shows that the desire for this vehicle lingered in the back of your mind. g The negotiation process, where you offered 3/4 of what he was asking and he grudgingly accepted, adds an element of intrigue to the story. You managed to strike a deal that felt right for both parties, and that's the beauty of these transactions – they are as much about the connection between individuals as they are about the car itself. The fresh warrant of fitness on the day you pick it up is the kind of pleasant surprise car enthusiasts dream of. It's like starting a new chapter with a vehicle that's ready to hit the road without any hiccups. The test drive, during which you must have felt the essence of this classic car, was probably the moment of truth. The 7 series, known for its luxury and performance, must have showcased its charm during this ride. Finally, your decision to document this journey with a photo is an excellent way to capture the beginning of a new chapter in your automotive adventures. It's not just a car; it's a story in the making, and we look forward to hearing more about your experiences with your "Land Yacht." In the world of classic cars and restoration projects, every acquisition has its own unique story, and yours is a delightful tale of seizing an opportunity, pursuing a passion, and adding a new chapter to your automotive journey. Enjoy the ride, and may your BMW 7 Series bring you many memorable moments on the road ahead.
2 points
-
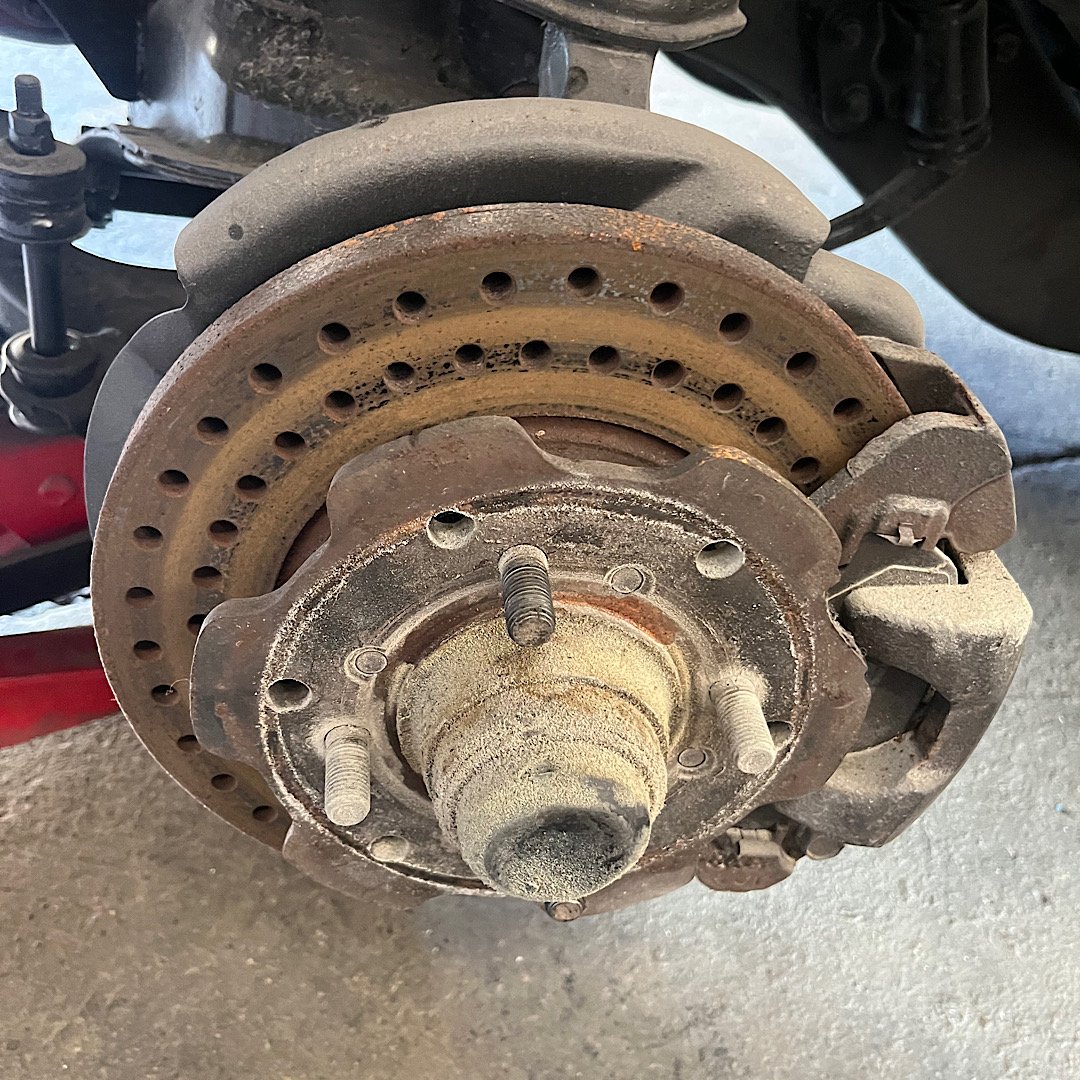
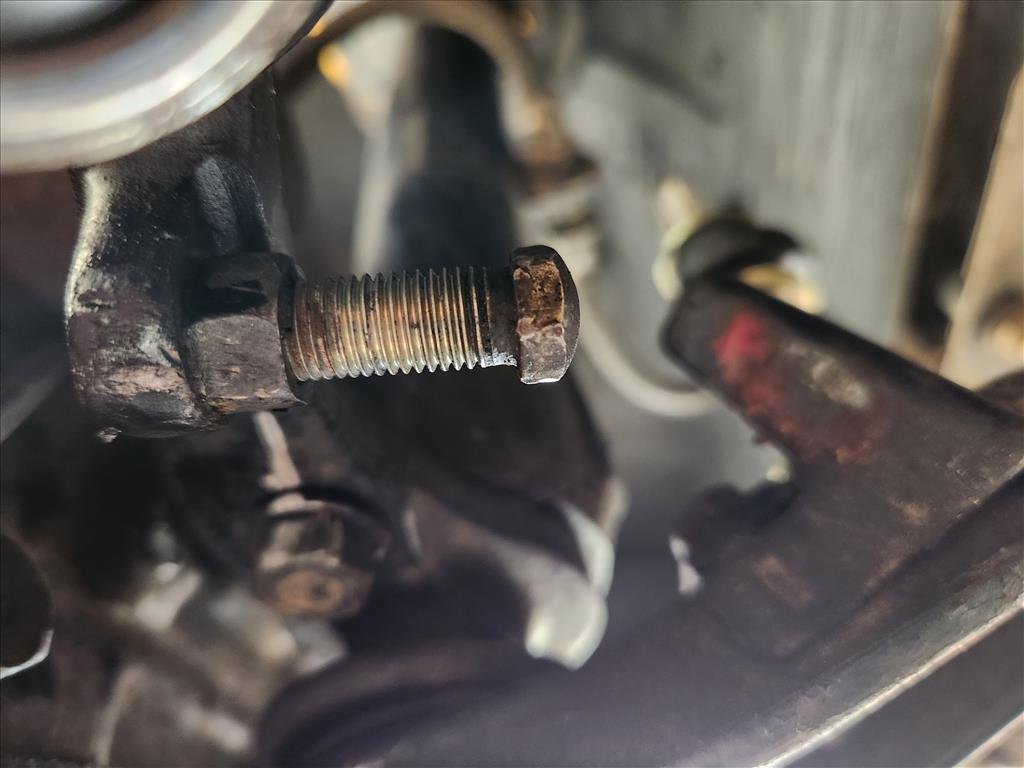
No leaks so far underneath.. I haven't really driven it around since cleaning up though. I did have a closer inspection at the front arms and sure enough there are some lock stops on there. Both of them were wound right in so I wound them out about as far as I could without them falling out but still it hits the inner guard. I could get longer bolts or could just ignore it, probably will choose option 2 as it's the most cost effective solution. Also while I was in there I tried to replace the grease caps for the front hubs but seems like my replacements didn't fit so I just blasted the old ones with some super cheap black paint, turned out about as you'd expect. I'm thinking I need to find some proper toe arms for the front as those old style ones are a bit of a bitch to adjust and the toe definitely needs fixing up. lol S600 is so small
2 points
-
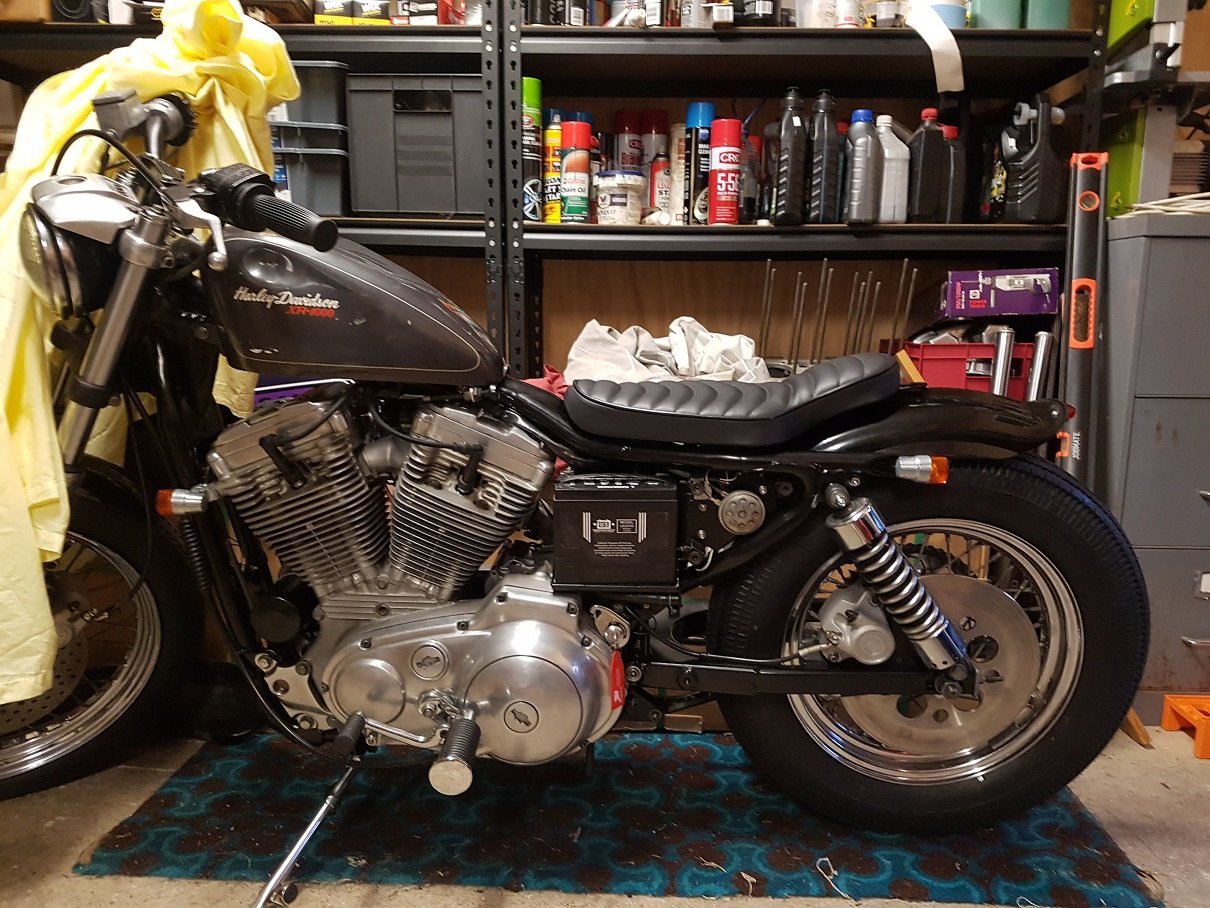
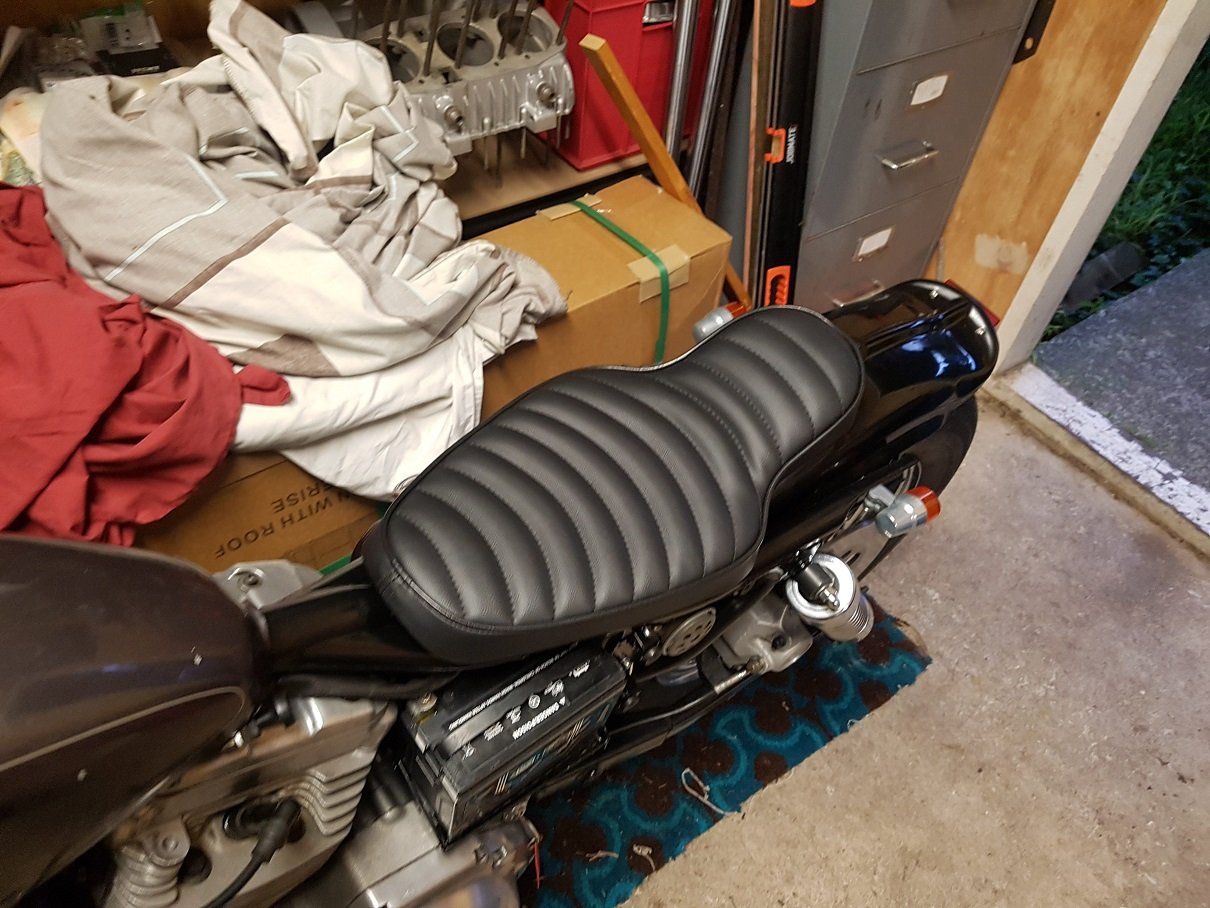
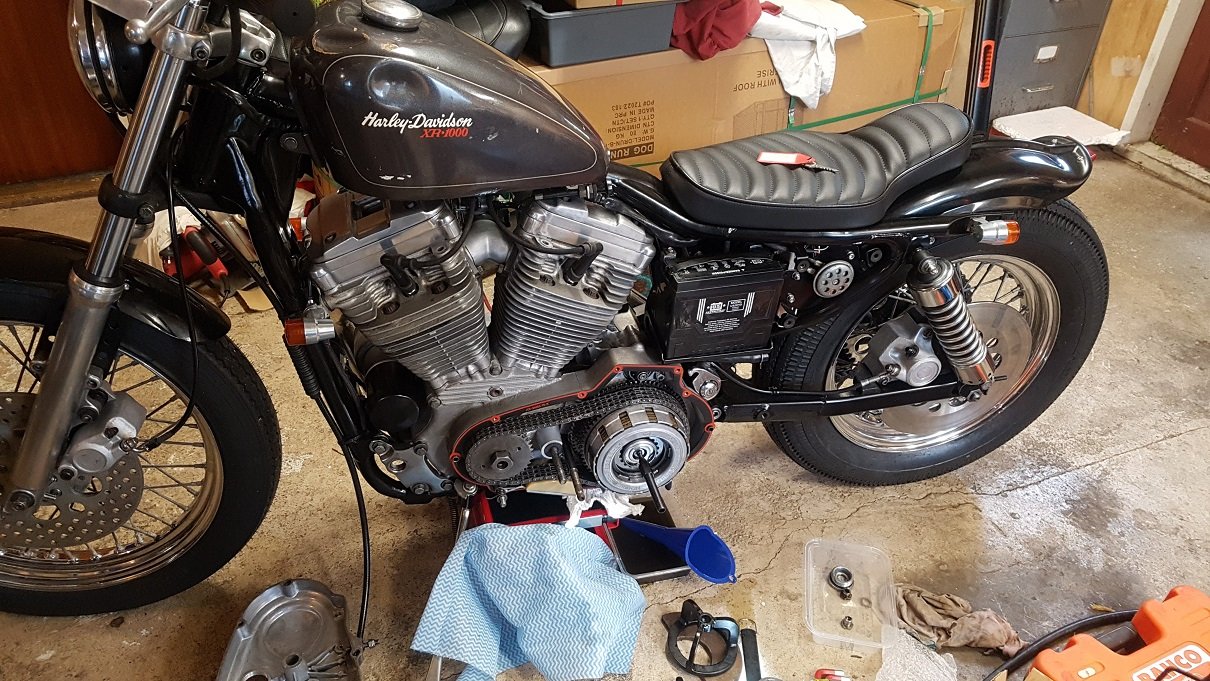
Small update on this. New seat turned up in August. Looks great. Fitted a micro tail light which you can see under the rear ducktail. The bike starts and runs like champ. Starts first pop even after sitting for ages. However the clutch had been stuck. The mechanism works fine, but i assume the plates have stuck/rusted from it sitting for the last 10+ years. I tried freeing it by doing a burnout with the clutch in, but it was proper stuck! So pulled clutch apart. Cleaned, and put back together. Clutch works a charm now! All i need to do now is mount numberplate, and fit a speedo and then its ready for a wof! Just intime for summer. This should be a lot of fun. Its actually a tiny wee bike, should be great for ripping through the wellington hilly streets!
2 points
-
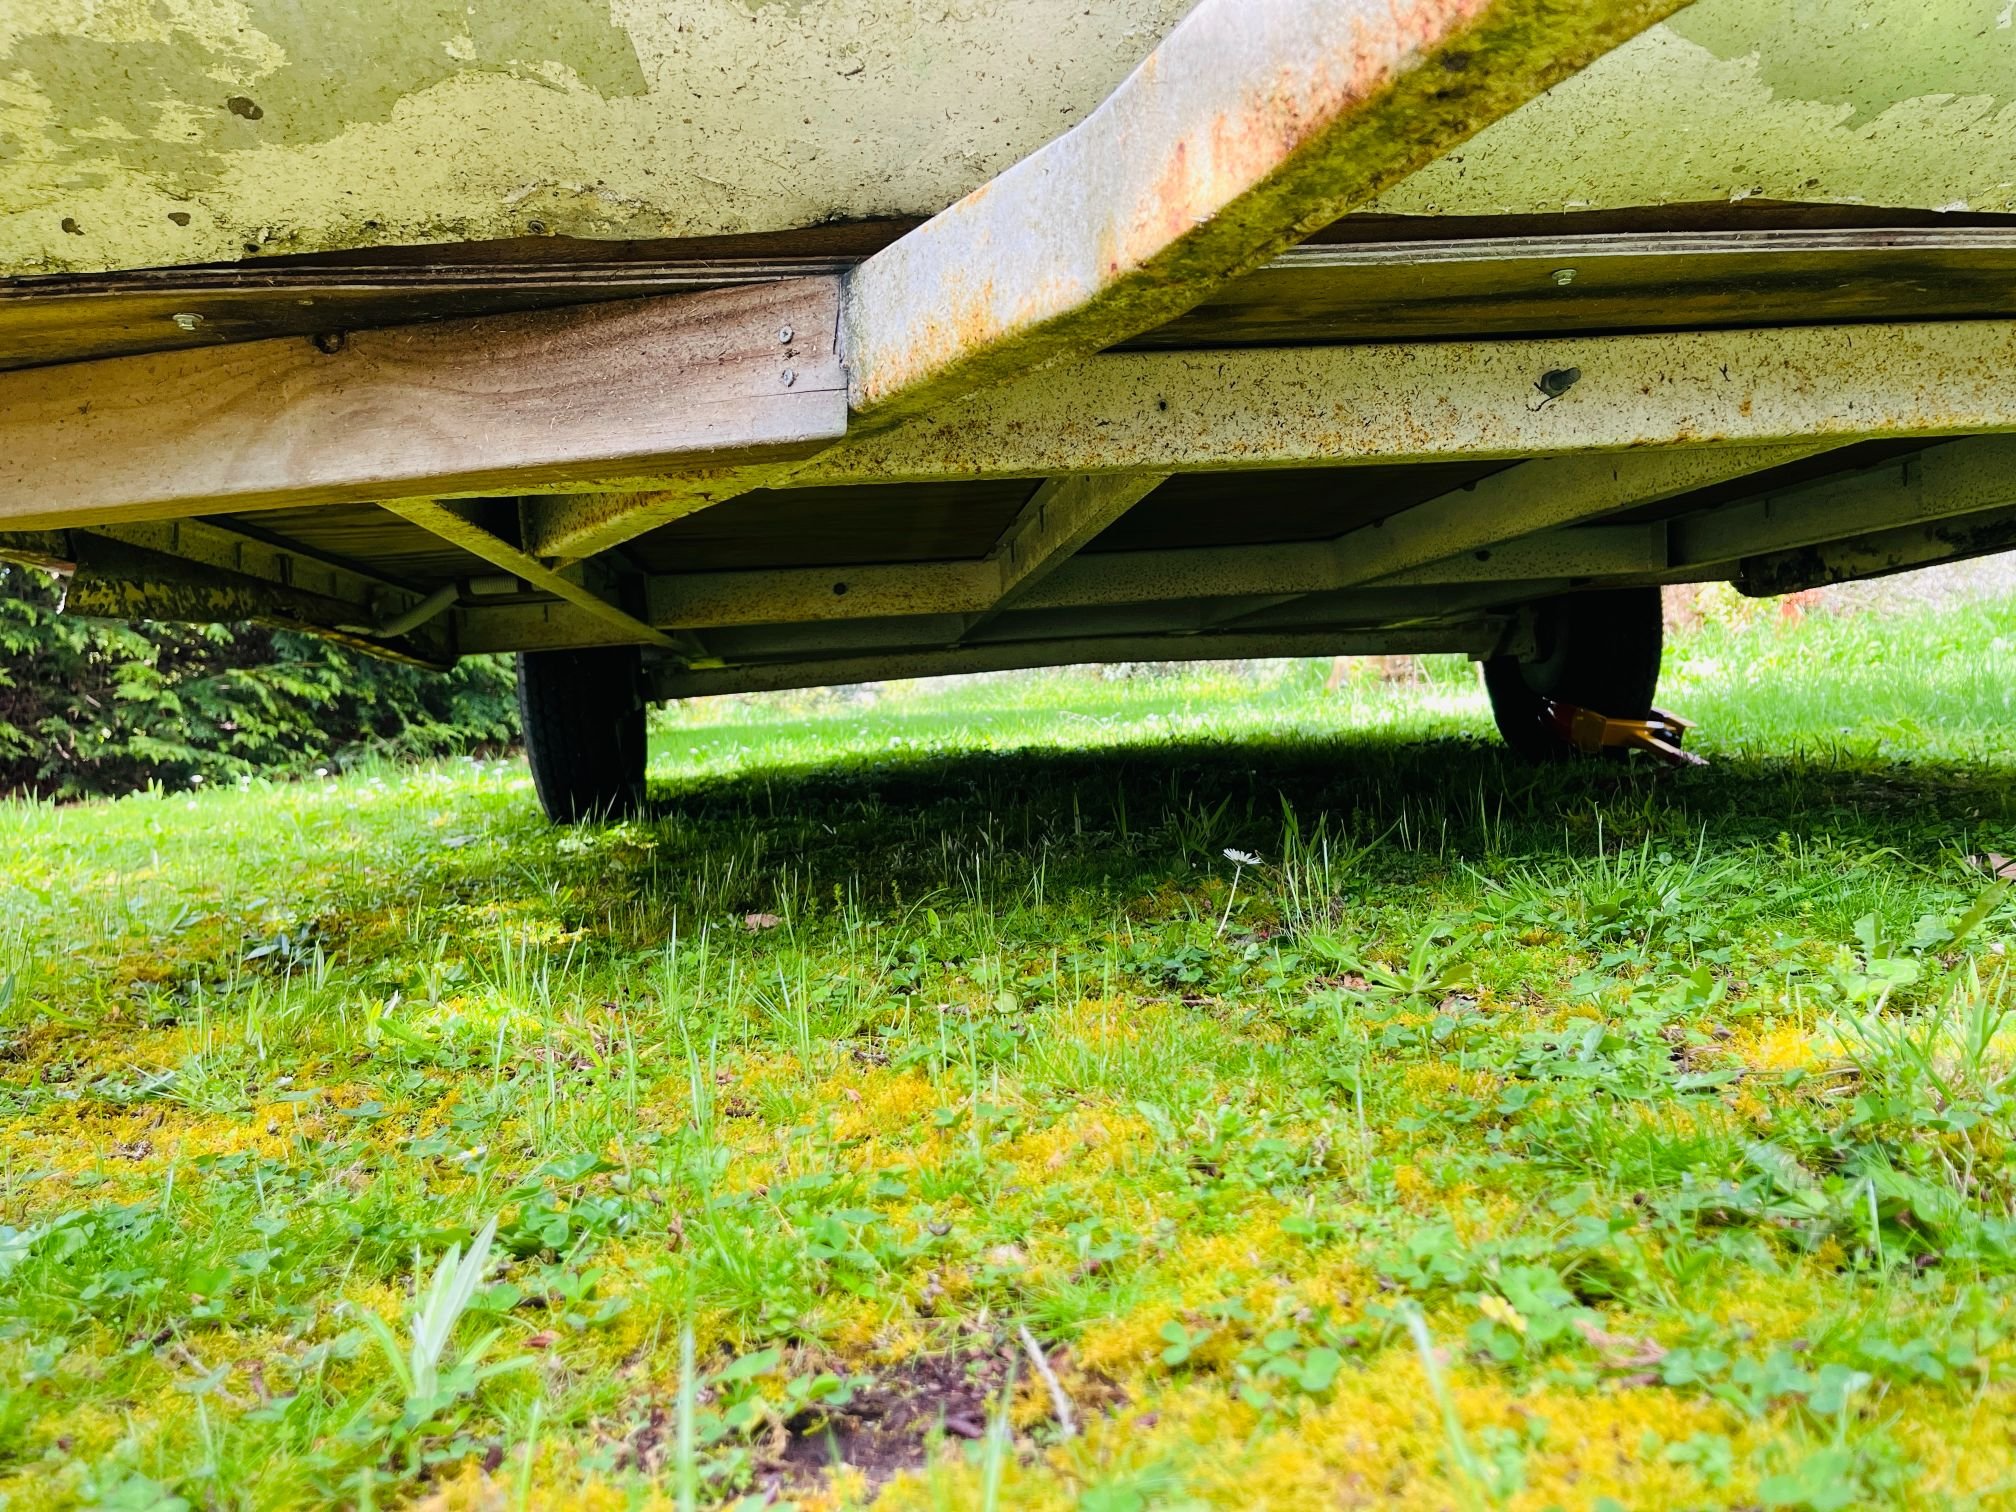
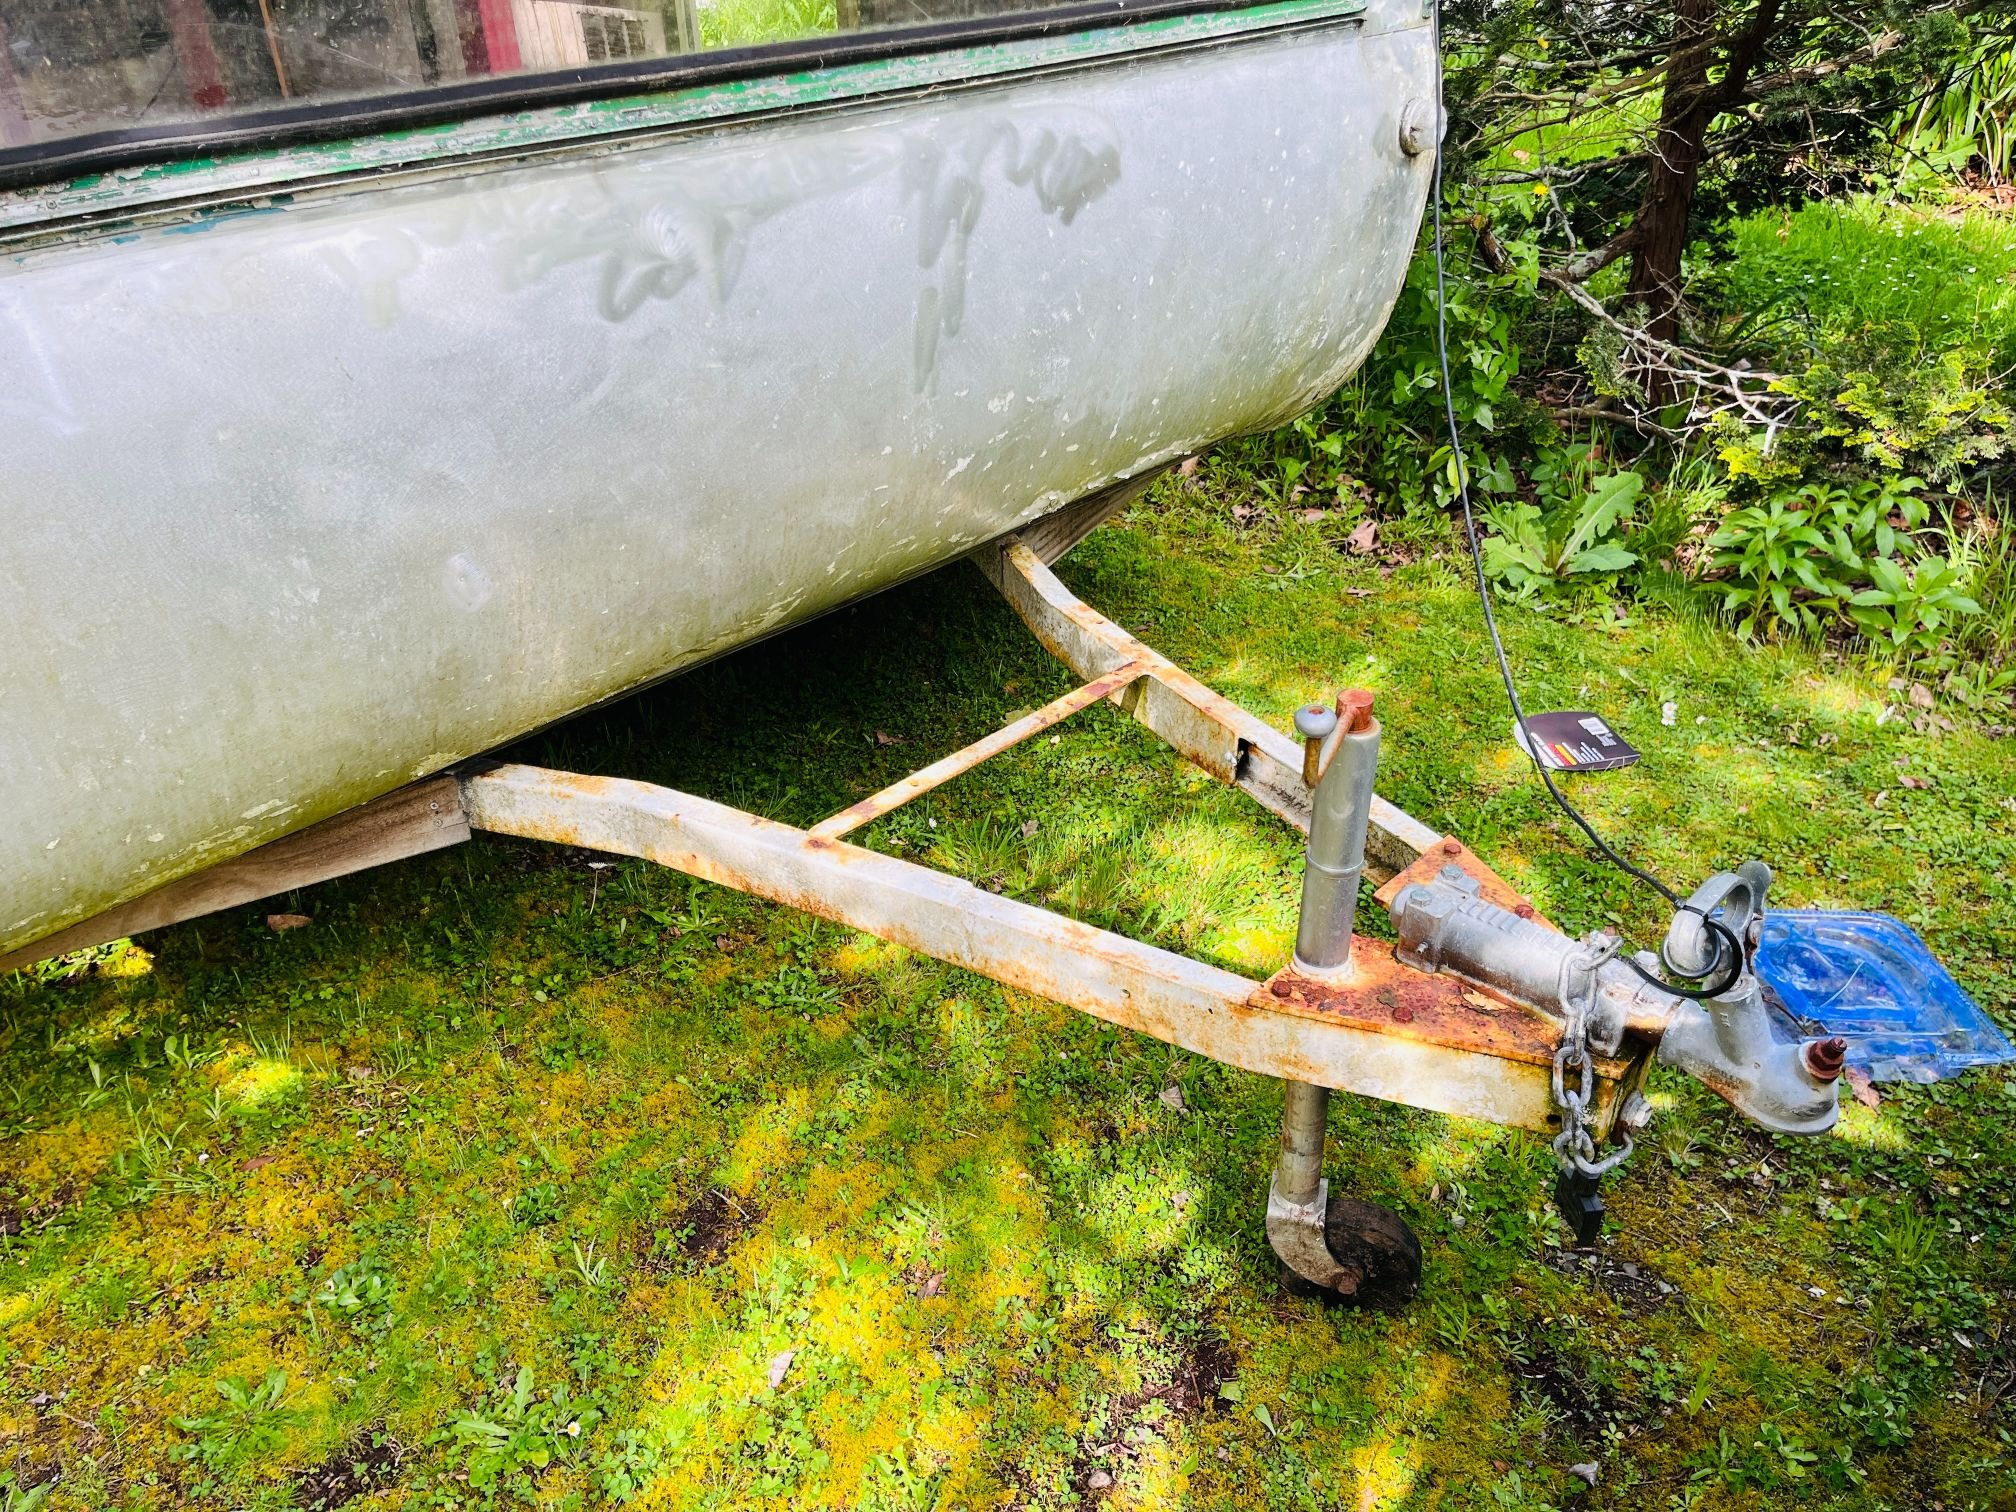
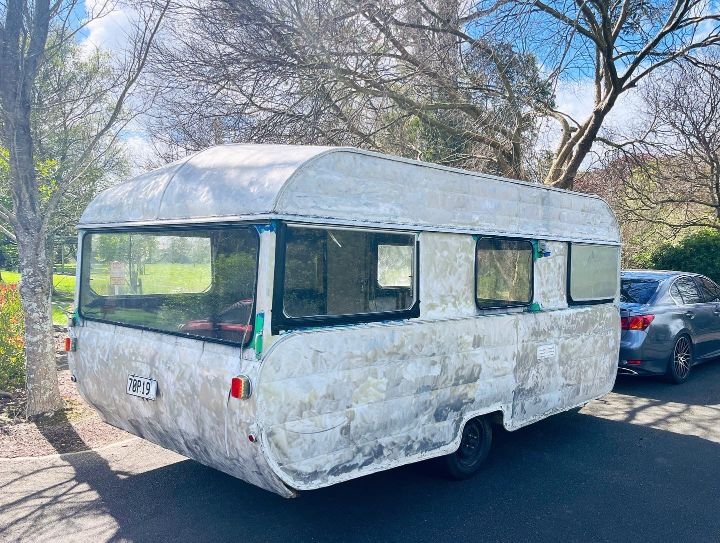
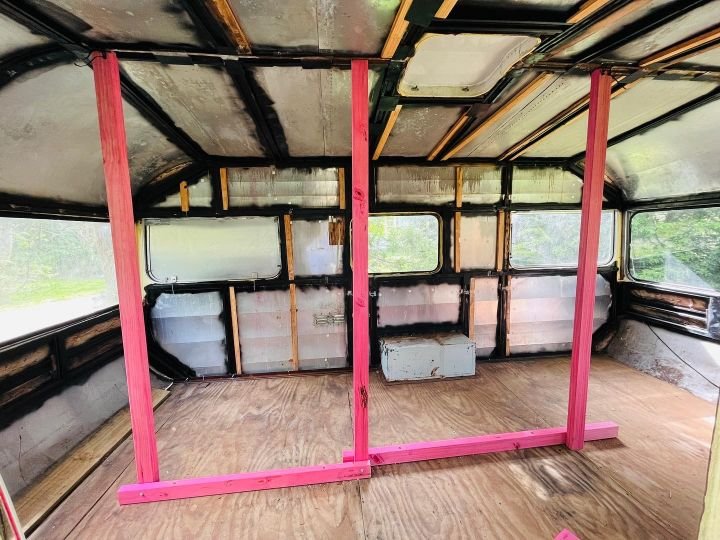
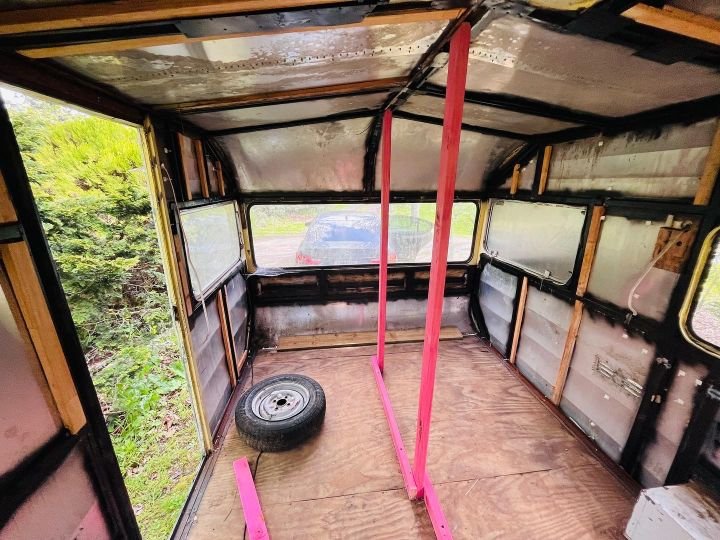
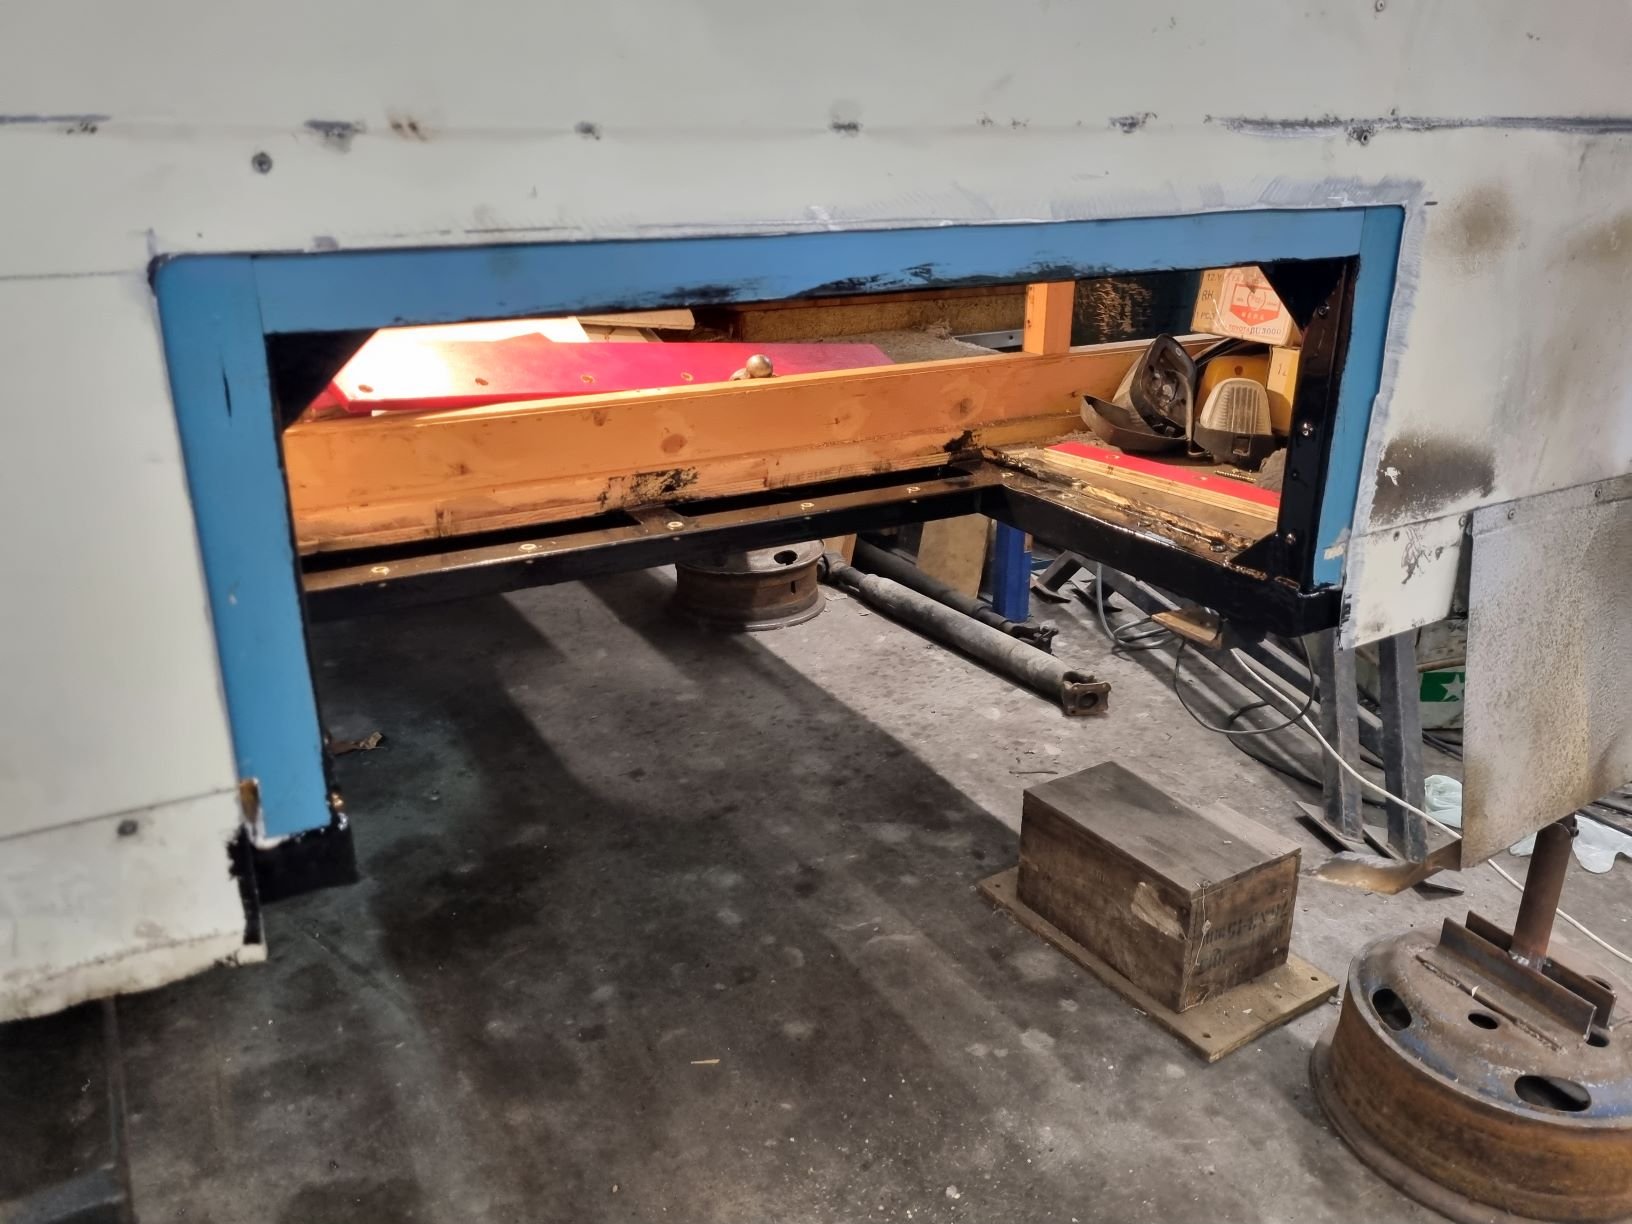
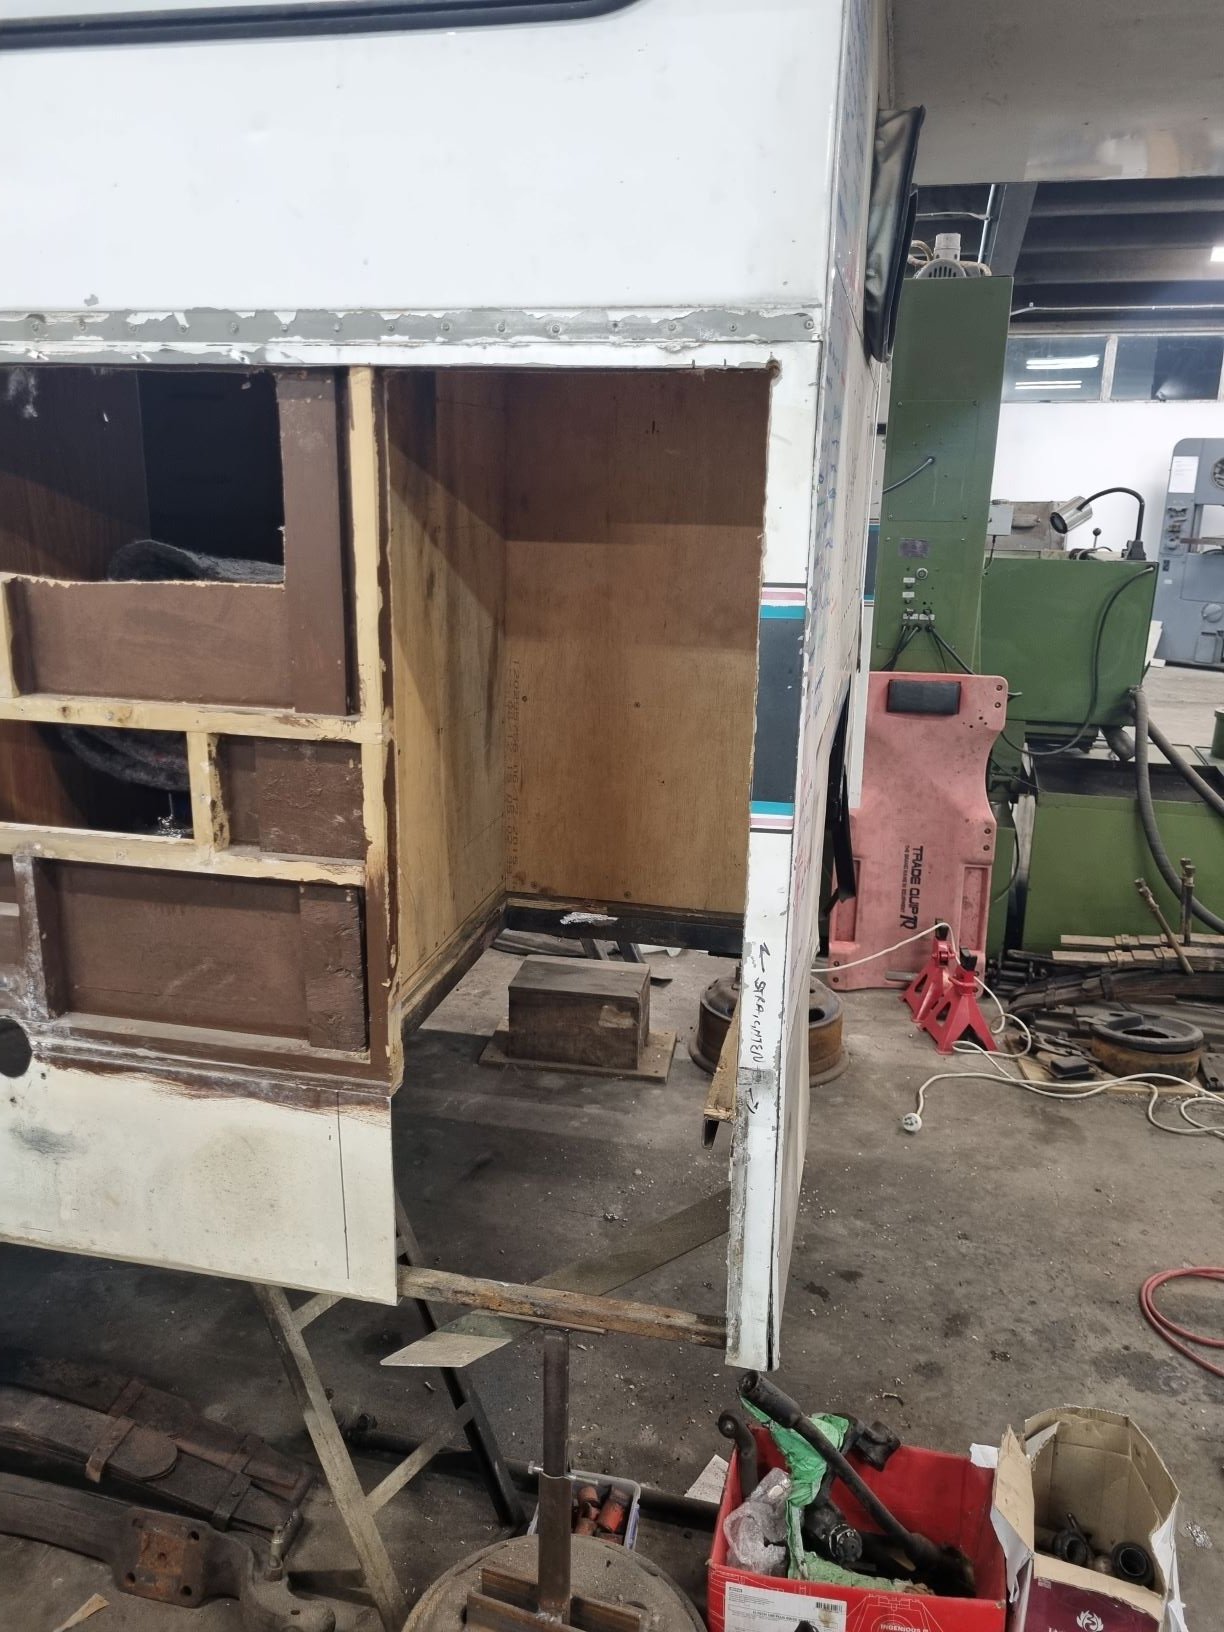
I've enjoyed reading other people's 'other' projects including campervan stuff so will try to post some non-car-related stuff I get up to when I'm not working on the Levin/Corolla/Subaru or Lexus.... So we purchased this sight-unseen at the other end of the north island. Previous owner had stripped it back, had a baby and then realised how much work it is. What could go wrong?!? Last weekend, I towed from Paraparaumu back to palmy with the front of the body flapping around in the wind, roof collapsing etc. 100% dodgy. Wasn't actually attached as welds had broken. It's a 15ft generic 80's caravan. 1930mm inside height currently. Bearings and frame seem to be in OK condition, everything else needs some work. Good thing it was cheap. Aiming for basic use summer 2024 and completion by summer 2025 as finishing the Levin is taking the priority currently. We were looking for a blank canvas to start with so this should be perfect once we address some key issues; - Replace roof skin & frame. Aiming to make it 100mm higher in the centre - Replace front and rear panels (lower) - Relocate a few windows - Repair frame, particularly where it's been cut to run elec wires. Might rebuild parts of it to allow optimal window placement. - sandblast & paint frame. New tow hitch/weld mounting plate - New brake calipers (brackets and discs already there) - maybe replace 12mm floor with new ply Have now propped up the roof and bolted the frame back to the trailer in preparation for towing it back to Hamilton.
1 point
-
Awesome result - my 12yo daughter said "Is it for sale? Please buy it!" so I guess her tastes are improving - reformed Tesla enthusiast.1 point
-
Wow just farking wow, that is such a epic effort mate! I remember seeing the first pics of this and thinking you are farking nuts! I think most people would have run a mile. Well done.1 point
-
See you pests at Port hills rd NPD at 11:30.1 point
-
Genuinely stoked to see you get this done and legit, congrats Such a massive undertaking, I hope you get a lot of enjoyment out of it1 point
-
Fuck yeah bro, what an epic journey.. Know that roller-coaster well so I'm stoked for you.1 point
-
Mate, I am so chuffed for you. What a well-deserved outcome to an epic build. Happy motoring.1 point
-
I don't think Bunnings do CO2? Got anywhere that services fire extinguishers etc local? If you do that will likely do CO2 filling, used to get my airgun tanks filled at the local one1 point
-
an update without pics, may take some tommorow. Today my engineer friend and I welded up the 250's frame . He did a mint job and Im super happy with it. He welded in "plugs" inside the frame itself so the frame is stronger than its ever been. He also welded in 3mm plates at the bottom of the frame as sacrificial plates so they will wear instead of the repaired area of the frame. Like I said , Im super happy with the result ! Next on the list to do is sort out the rusted in swing arm bolt , I think Im going to have to gas axe it out as its super rusted in and the allan key head is fucked. Then after that , paint strip the frame and prime and repaint.1 point
-
Congrats man well deserved after such a huge amount of work. Hopefully I get to experience finishing my chev one day haha. Enjoy the shit out of it1 point
-
1 point
-
1 point
-
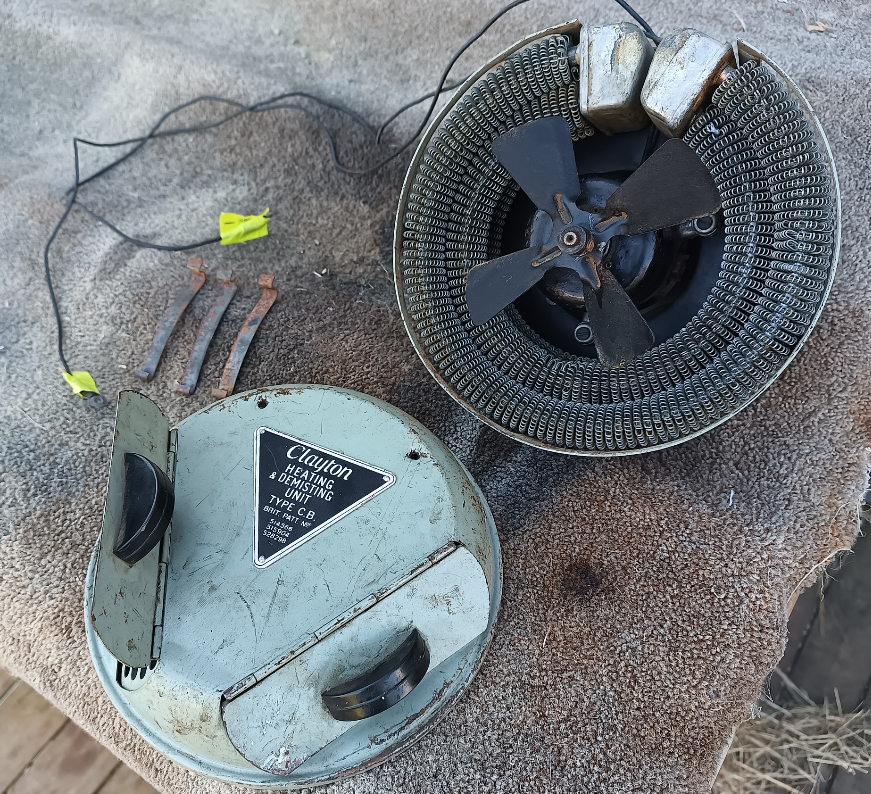
So I went with this one. Will vent nicely to the windscreen too. I zapped it with some power and it is 6 volt. I hit it with 12v for a laugh and it nearly took off! I gave it a little service which included cleaning out about 50 years of muck and dust and oiled any moving bits. I'll give it a little black paint then figure out how to mount it later on.
1 point
-
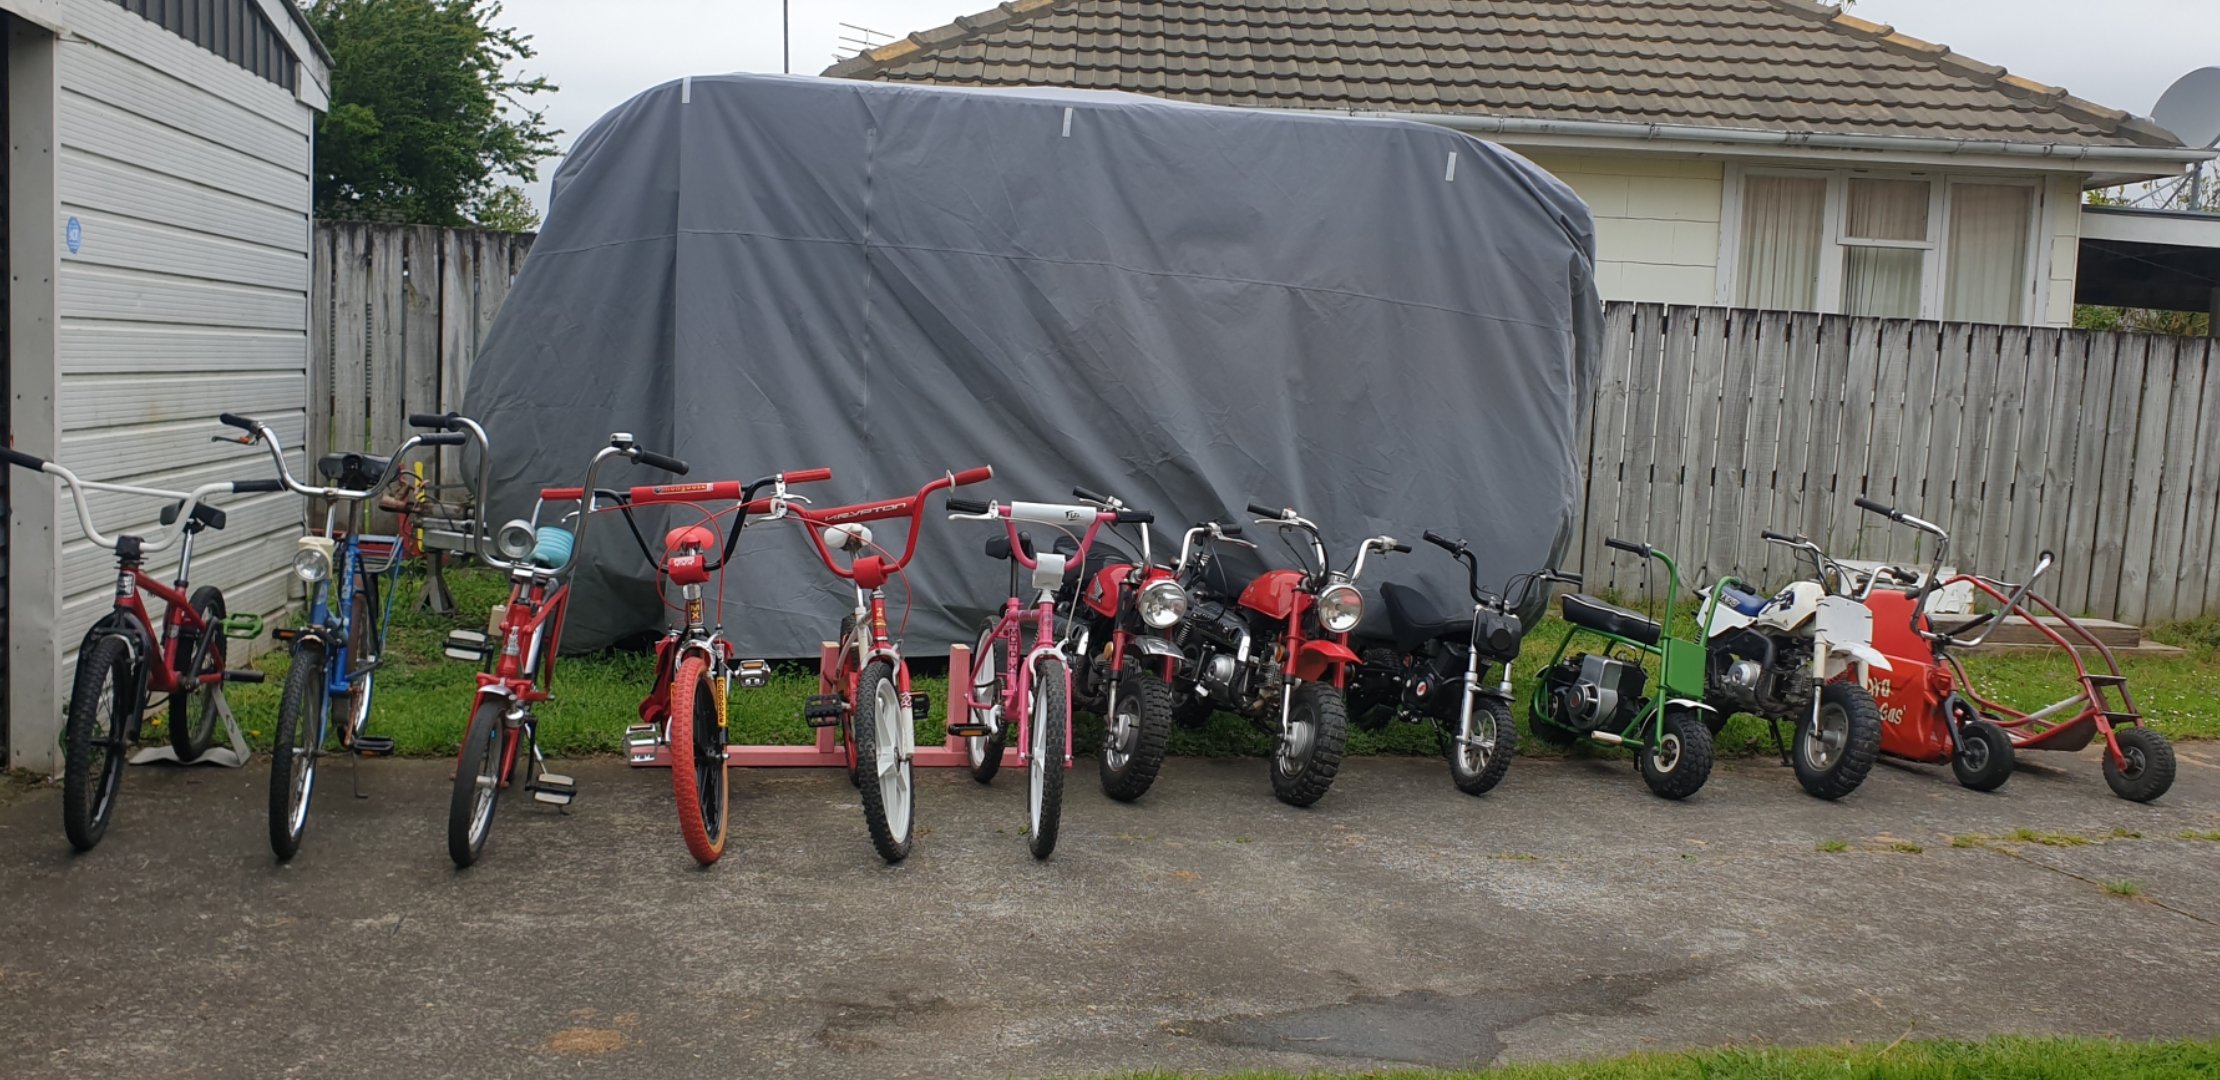
Its not everyday i manage to get everything outside Fora big shed clean. Feeling good everything is rideable too bring on summer
1 point
-
1 point
-
Liteweight caravans fan club on FB is good for info on these old ducks even the owners of liteweight are on there and have much barry knowledge1 point
-
All the parts now the work...
1 point
-
Can get 1200 kits for them pretty damn cheap from the states. 883 is enough for me at the moment. I've got other bikes for going fast. Not that i can ride fast... hah.1 point
-
Back in the day I knew three guys with the small Evo's. All of them finished up taking them out to 1200. One of them actually sourced Branch's booklet on tuning the Evo - and gave it to me to do his heads. Still got it somewhere here.1 point
-
Yeah, primary cover gaskets are the same. I'm sure you could fit the primary cover on a later model ironhead and vice verca. Clutch has alternator behind it (they only did this for the first few years of the evo as it was a bit of a sucky setup). And has a pull release instead of a push. Quite a lot nicer action. And its easy to select neutral when its running! Still havent taken it for a ride yet. But should be a blast. Will do some laps this weekend. Have taken 50mm out of the forks, and dropped the back 50mm too. Feels like a tiny and compact bike. Plus there is nothing to it either. Just an engine and 2 wheels really. I relocated the key to under the battery and cleared all the VOES and other wiring, hid the coil behind the oil tank and setup all the wiring there. To keep it clean under the tank. Will get some propper pics soon. But i actually put in quite a bit of effort doing subtle things to keep it looking as clean as possible, but also looking retaining an OEM look. Want to keep it minimalist too so need to figure out where to tuck the speedo to keep it clean. I've tried to do this build as cheaply as i could. The most expensive thing i have done was getting the frame blasted and powdercoated for $400 and that was worth every cent. The shinko tyres were from a 15% off at motozone, and the seat was spendy at 350nzd landed. The rest of the bike is just elbow grease. This has really been a budget build. Reusing all the fasteners (after wire wheeling them), cutting front springs, 2nd had trademe shocks, and lots of autosol. Pretty happy for how this has turned out. It looks like a very tidy wee bike. Especially considering the condition it started with. Has been a very rewarding journey.1 point
-
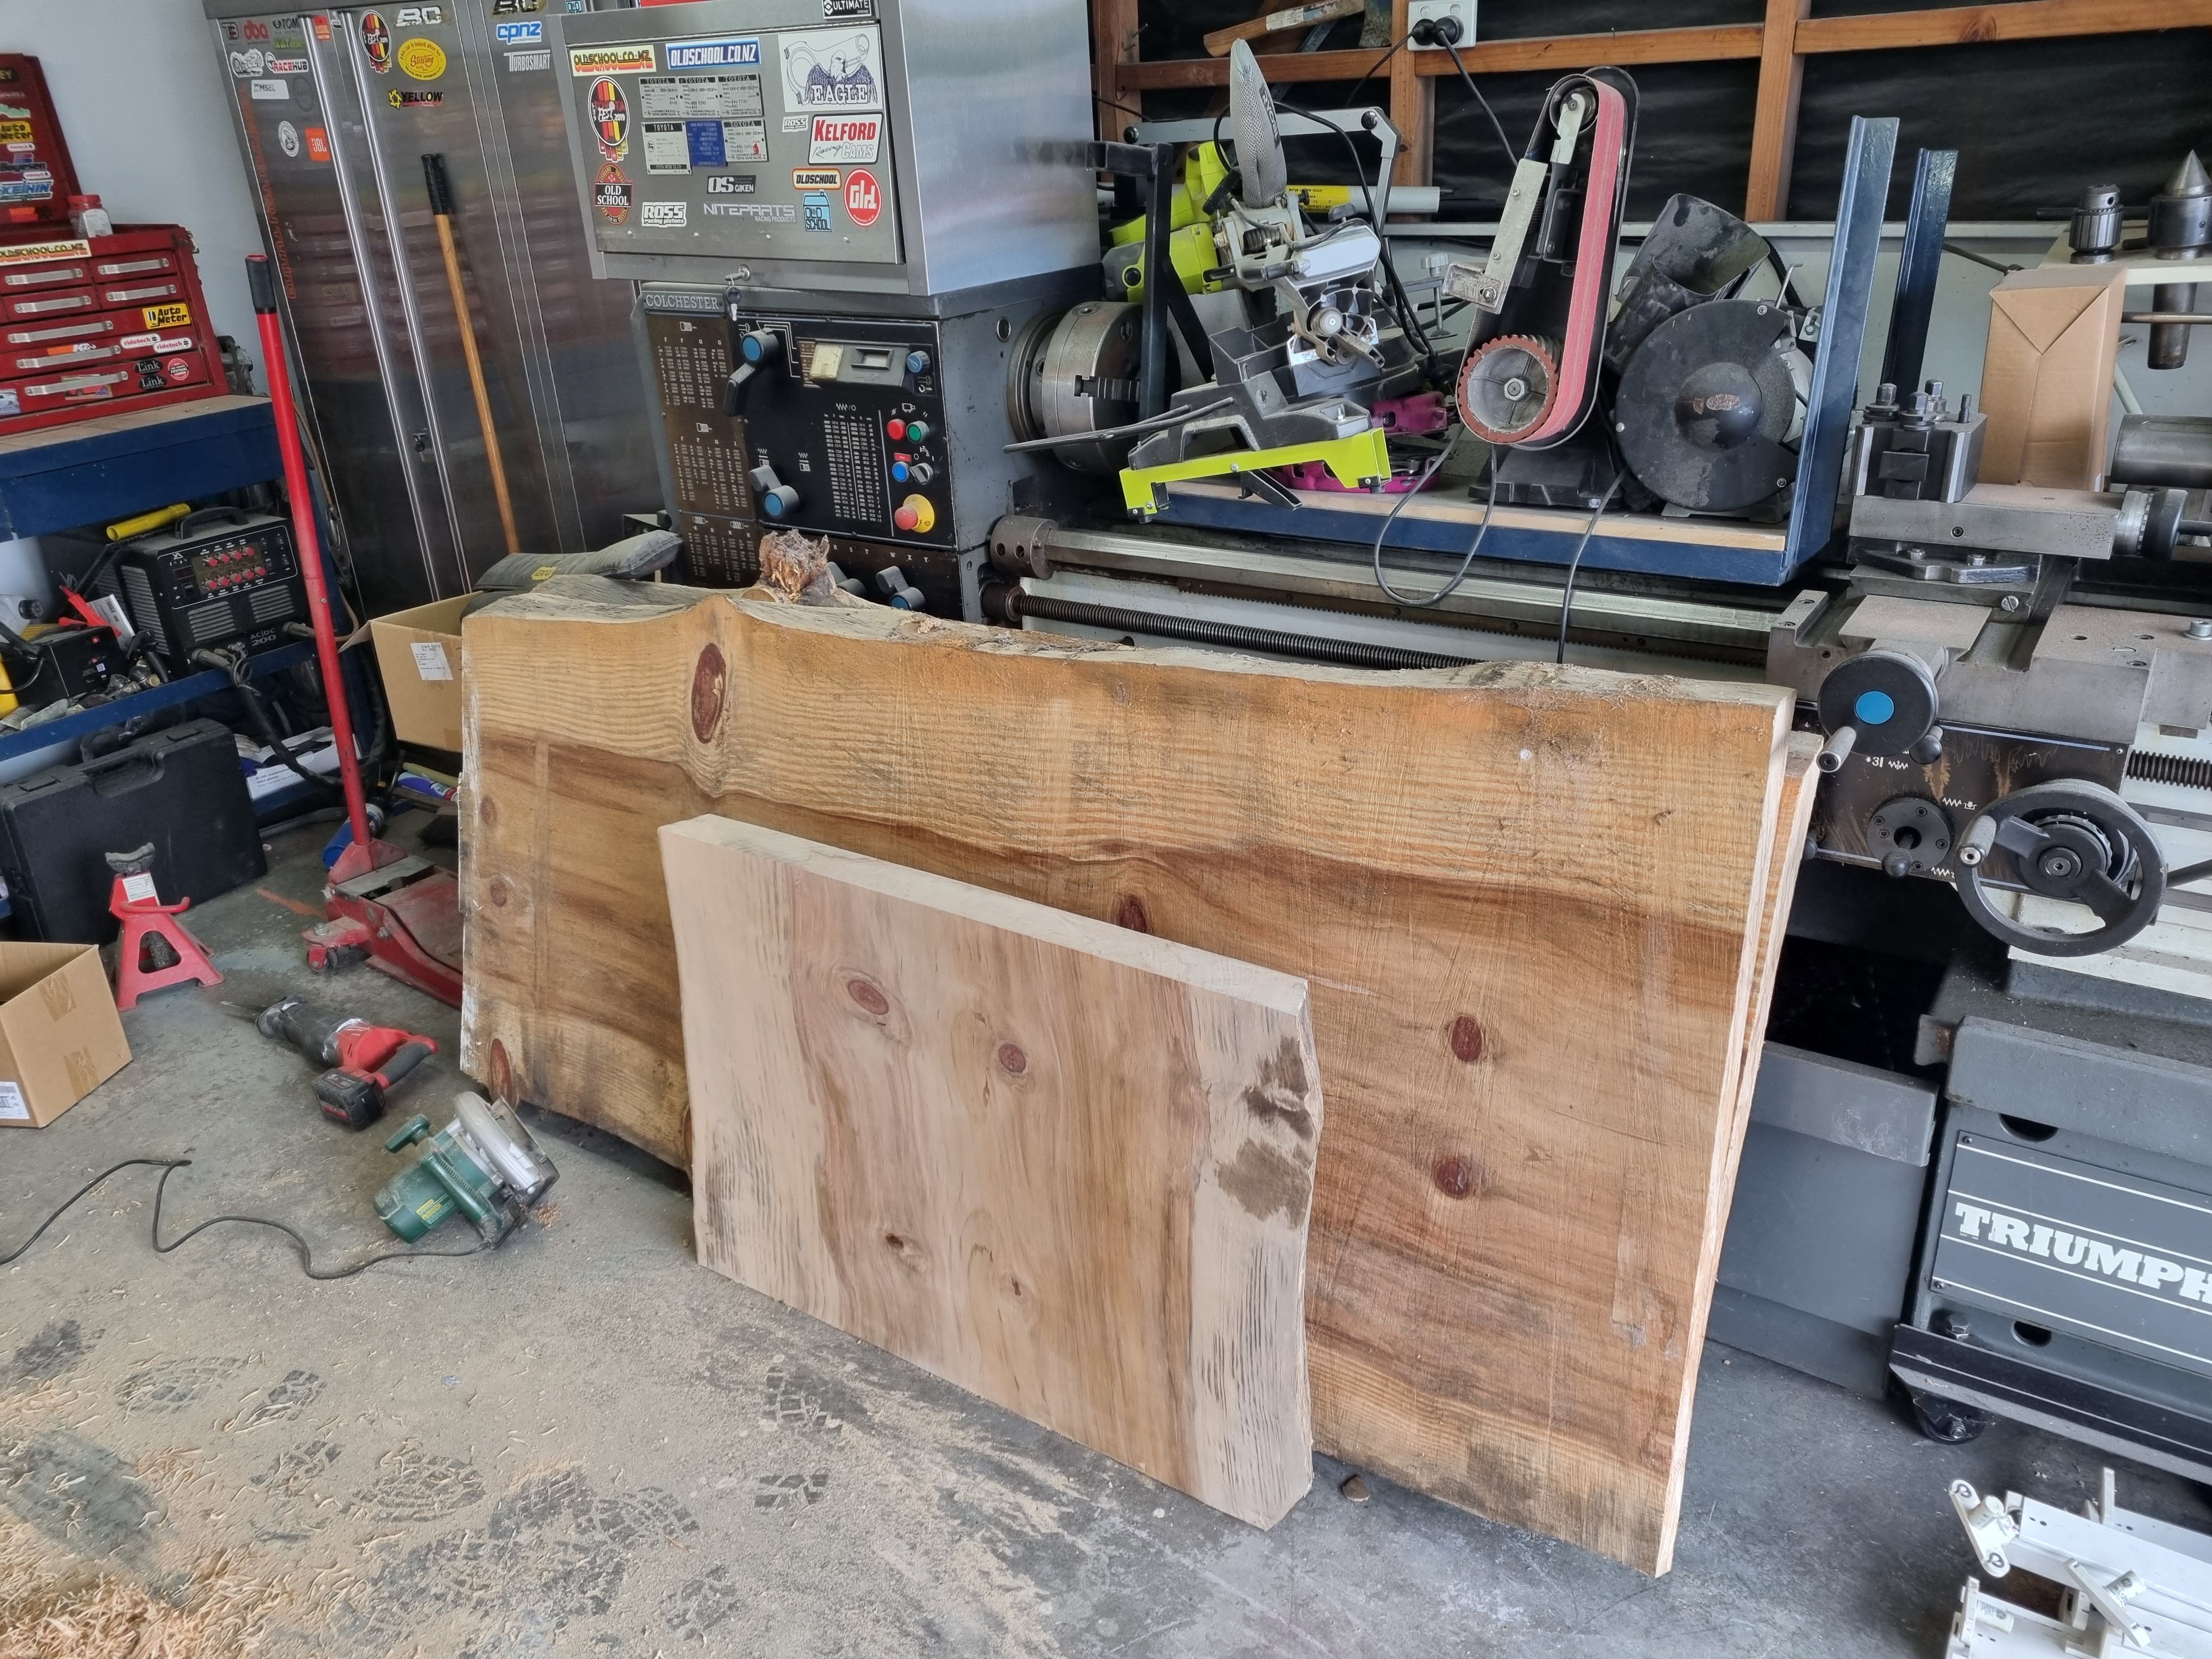
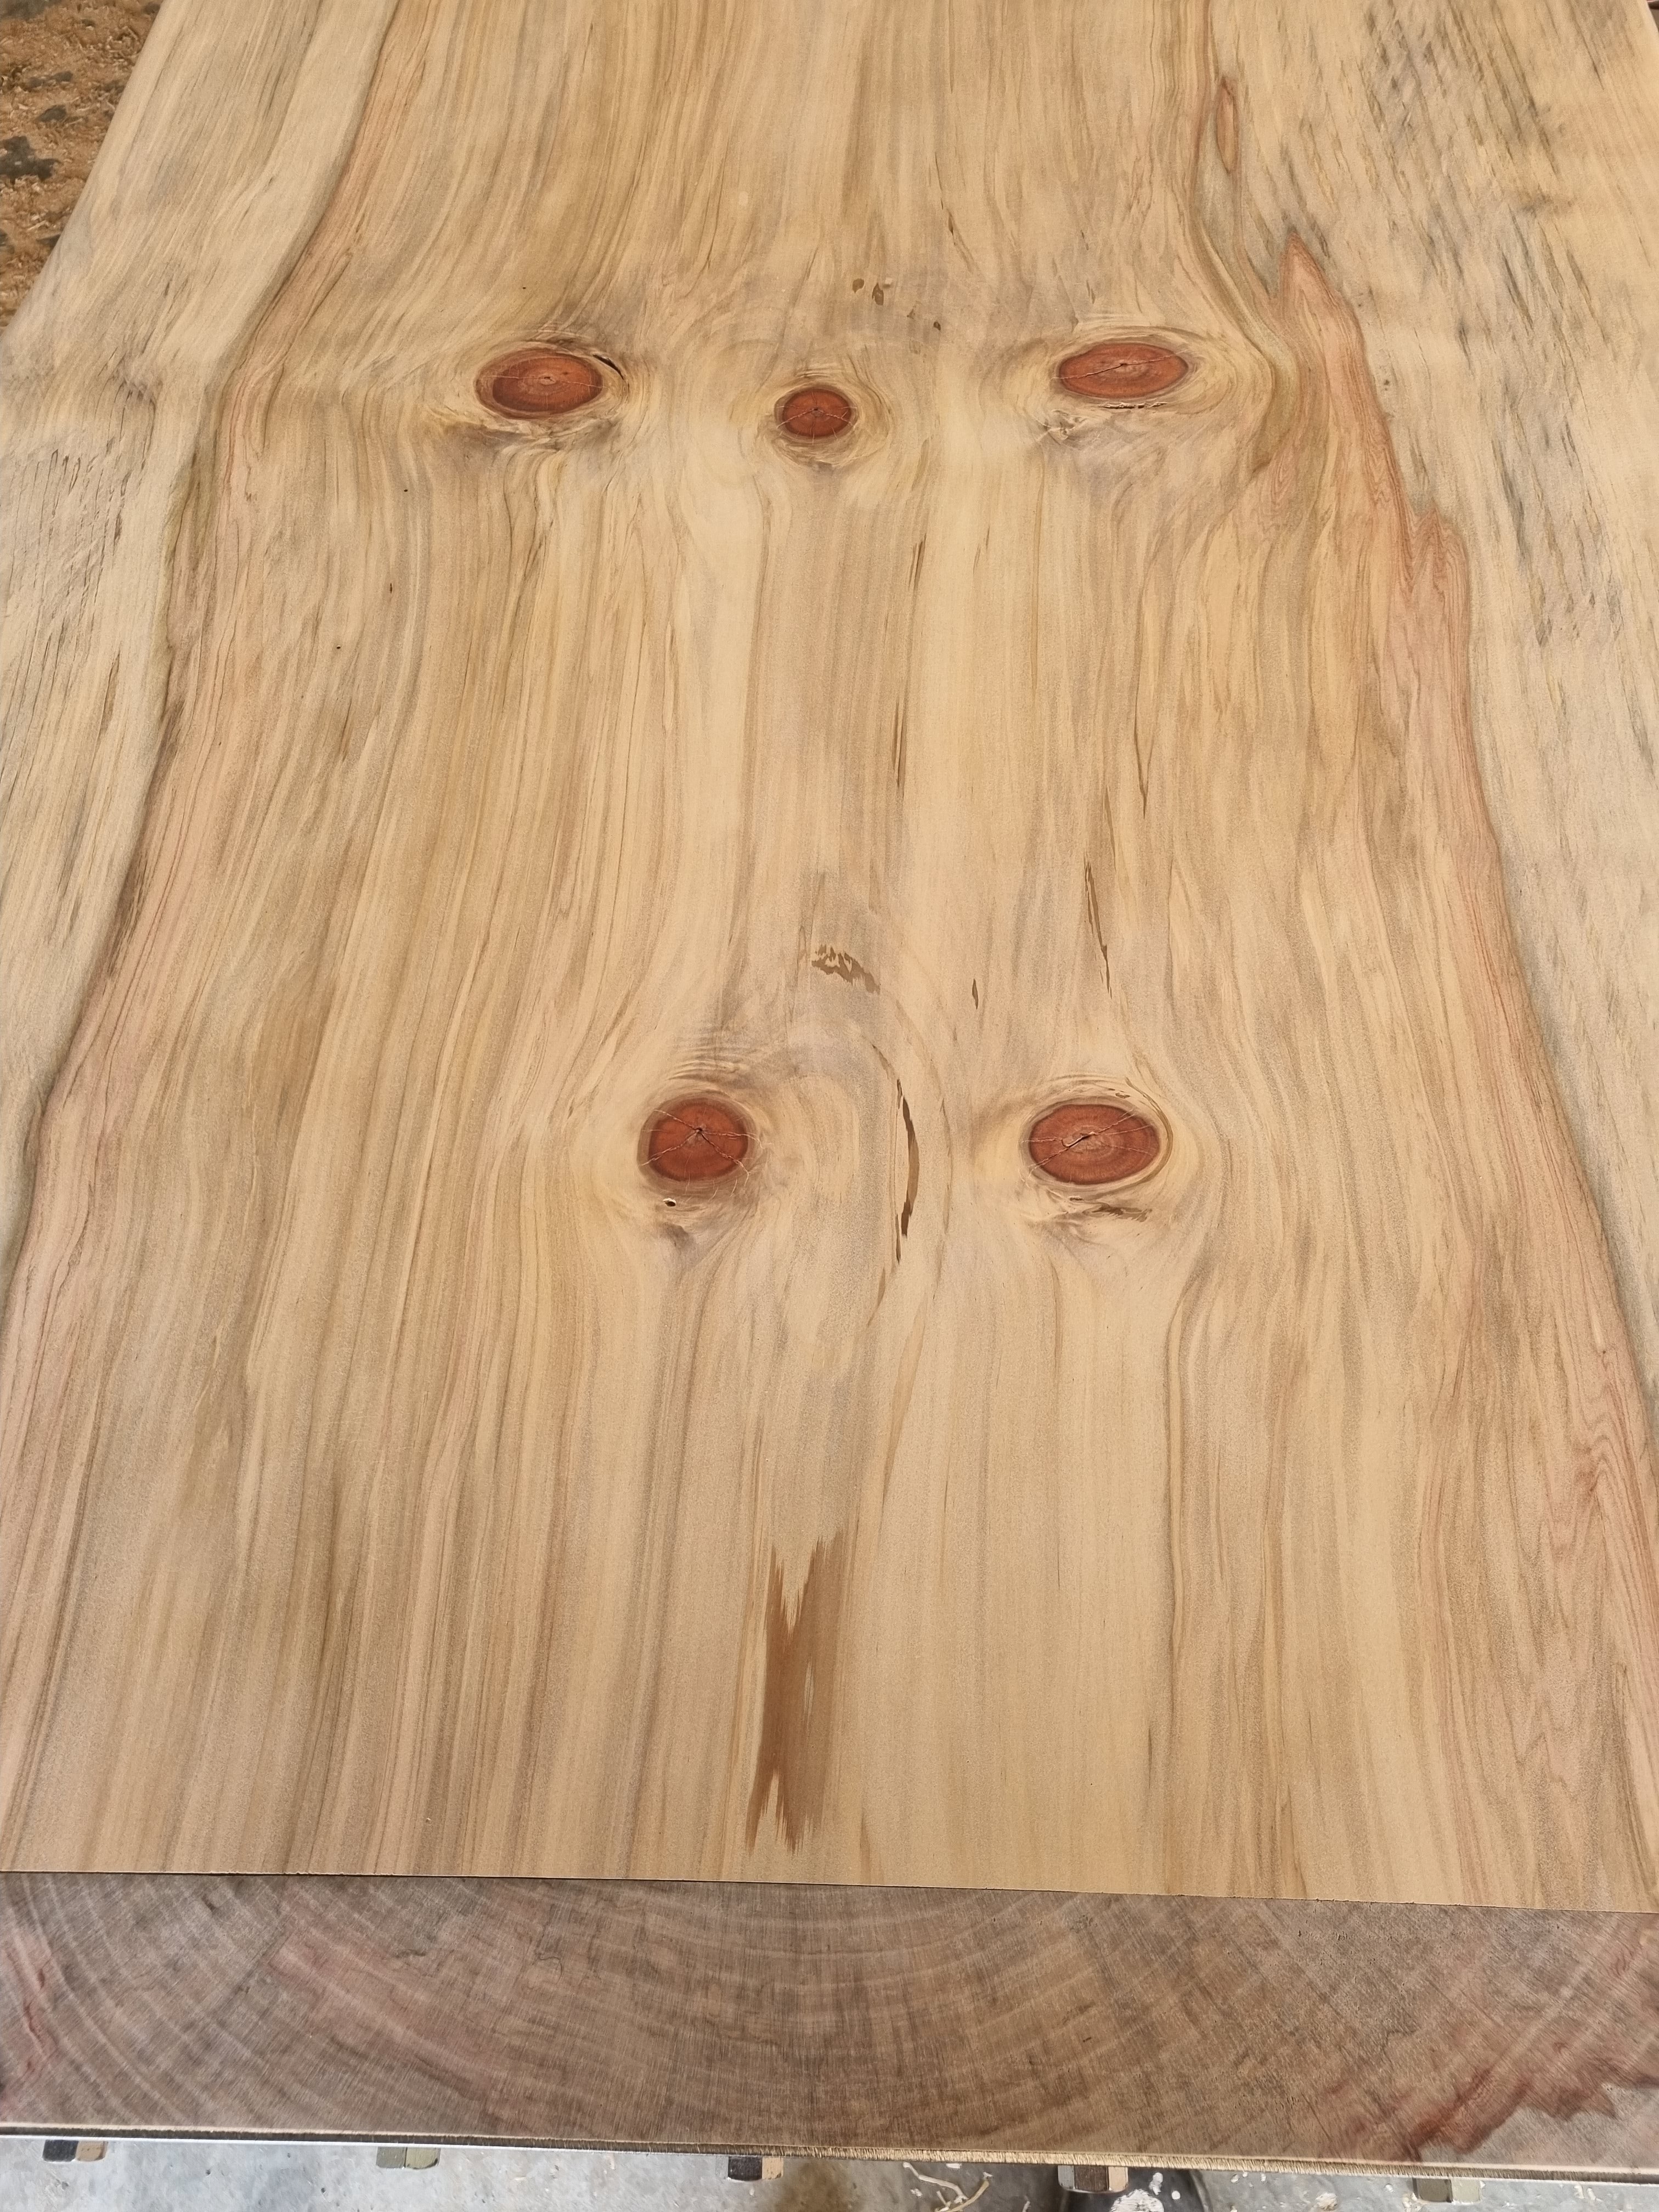
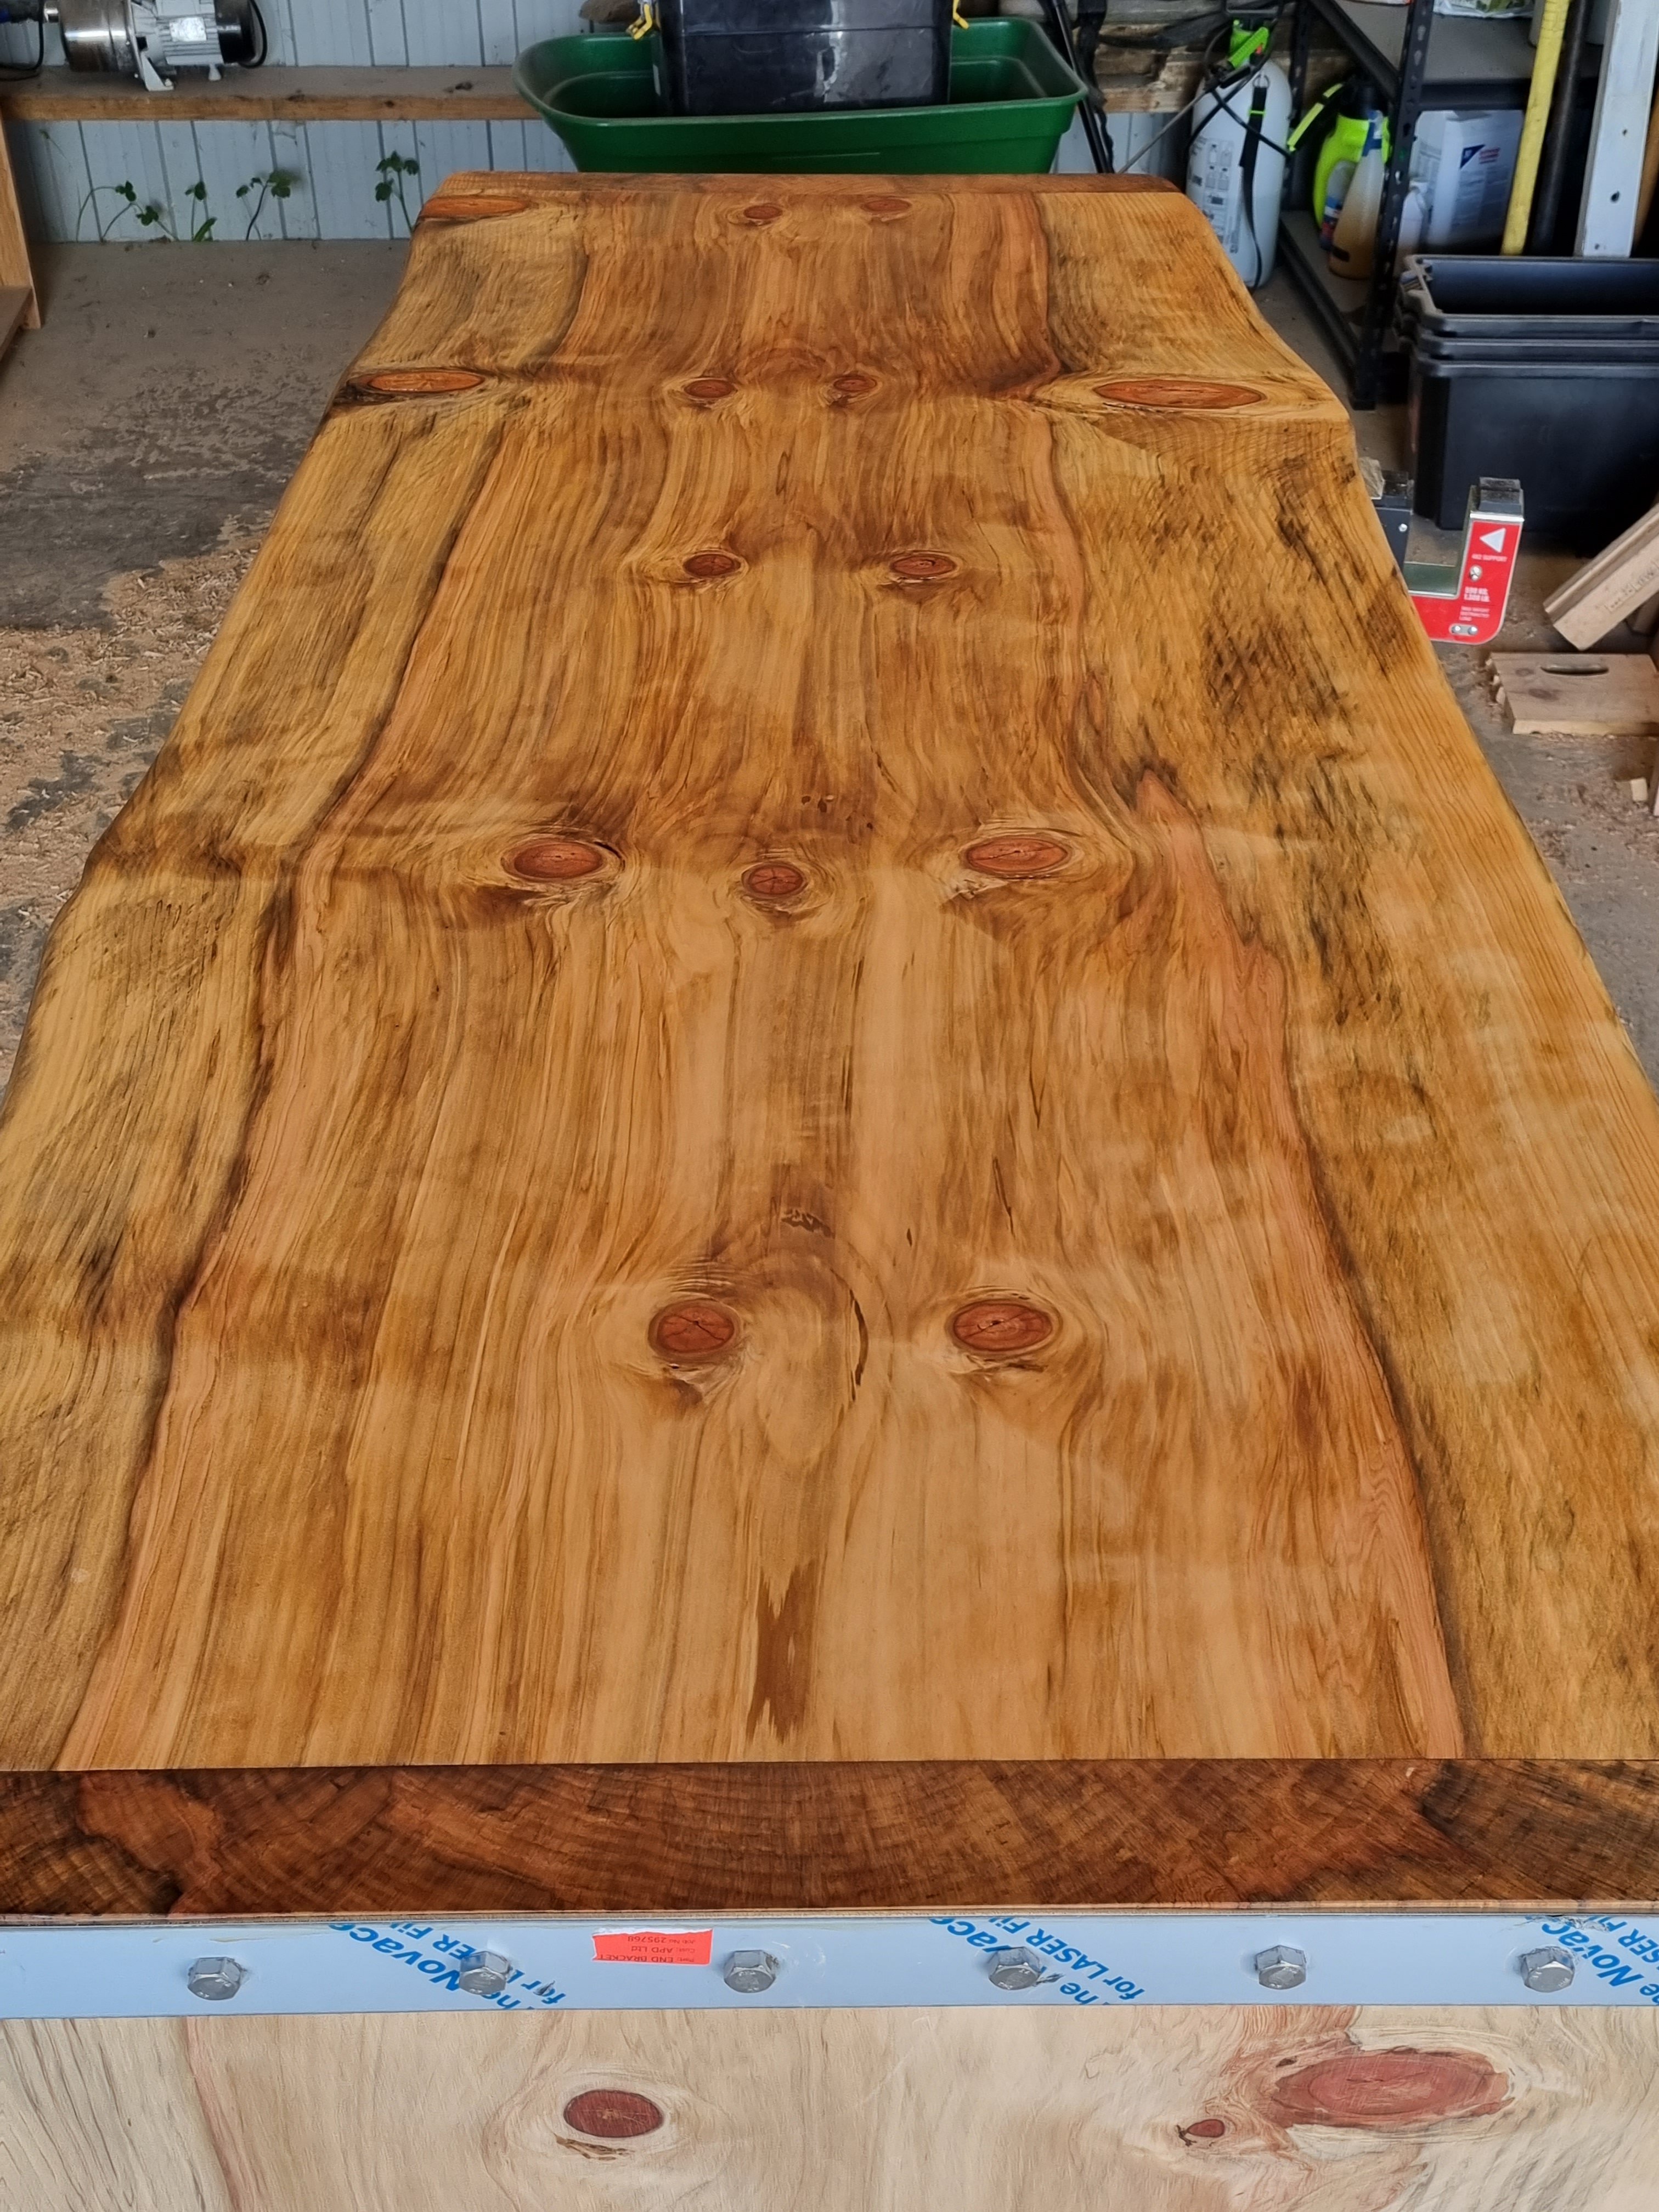
I made a table/ desk out of a couple of slabs of Norfolk pine. Planed about 15mm off the faces and sanded it. First with the belt sander then up to 240 with the orbital. I've just put the first coat of Danish oil on it Haven't done the legs yet, I'll take them off and do them in a more back friendly position.
1 point
-
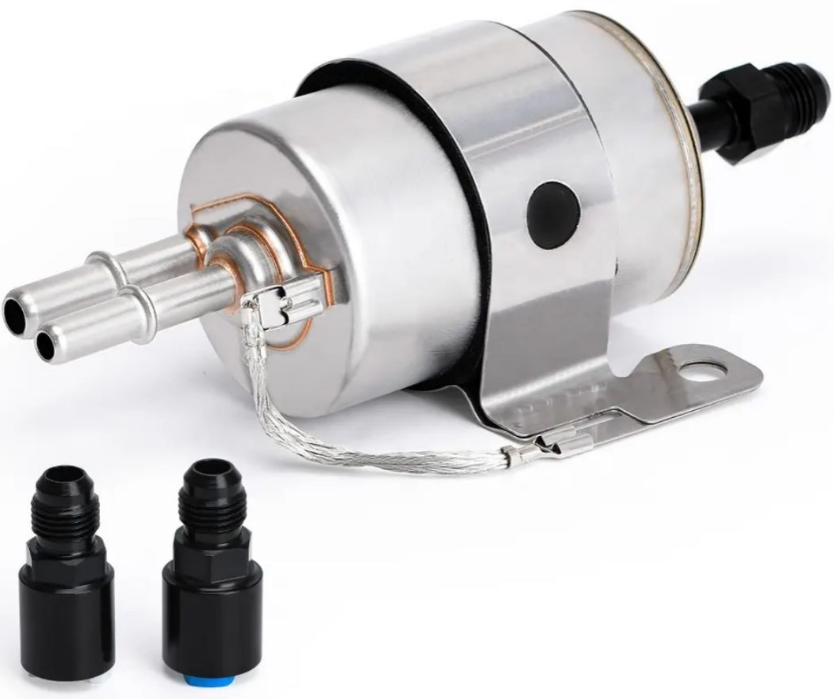
Fuel system update, we thought that there has got to be a cleaner and easier way of doing this. Decided to order a C5 Corvette filter/regulator so it will just have a single line running to the fuel rail and the return to tank will be much shorter. Fixed at 60 odd PSI, and no vacuum reference required. That'll simplify a few things in the engine bay, and has the nice GM quick connect to -6 lines so all the fittings I've acquired should work well. We'll redo the single line so it looks much neater than it currently does. I assume this will work, why don't more swaps use this?? UPDATE: I decided to not be lazy and ended up running a adjustable FPR in the engine bay and running a feed and return. I overcame my laziness.
1 point
-
1 point
-
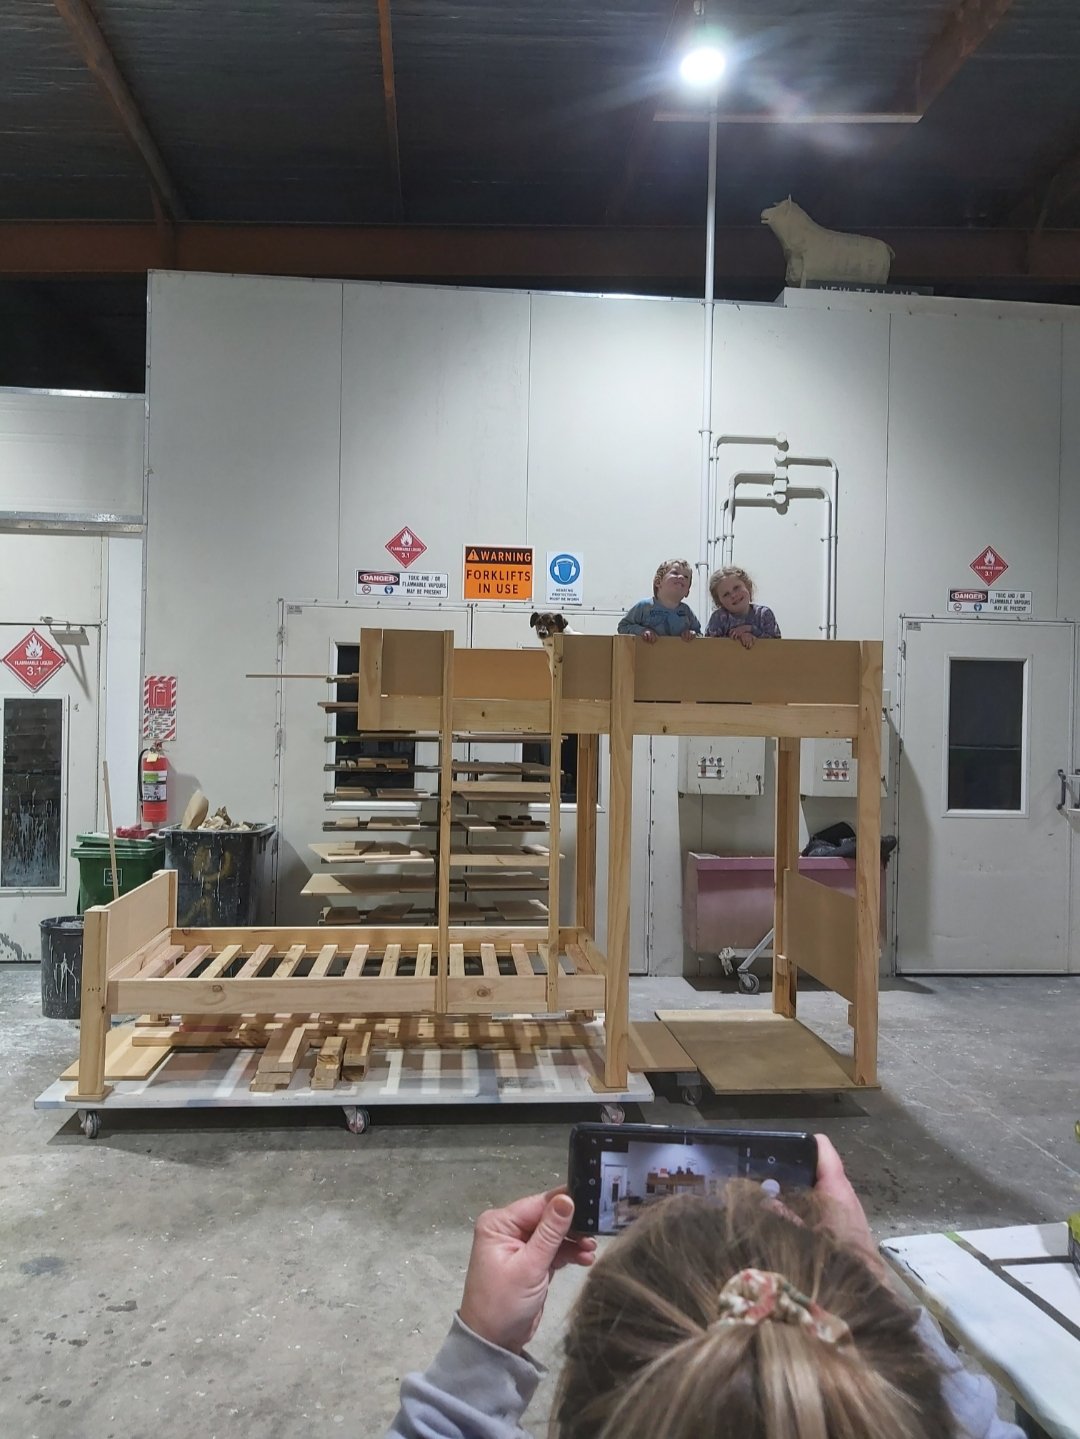
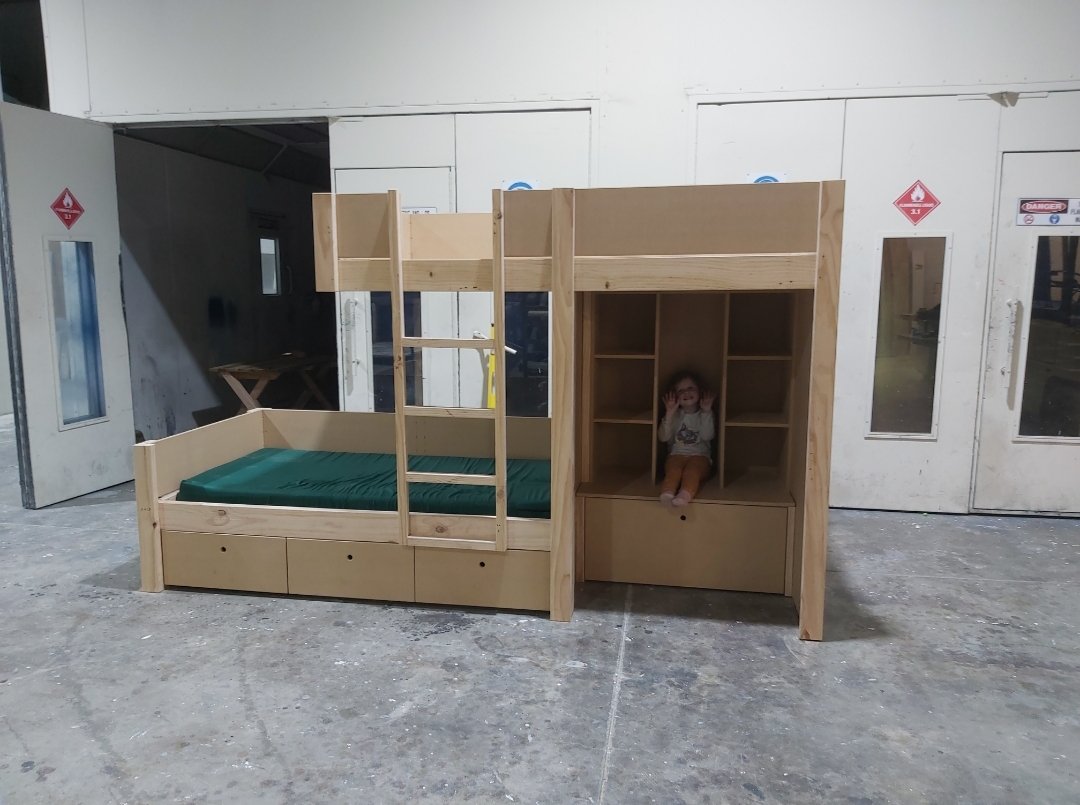
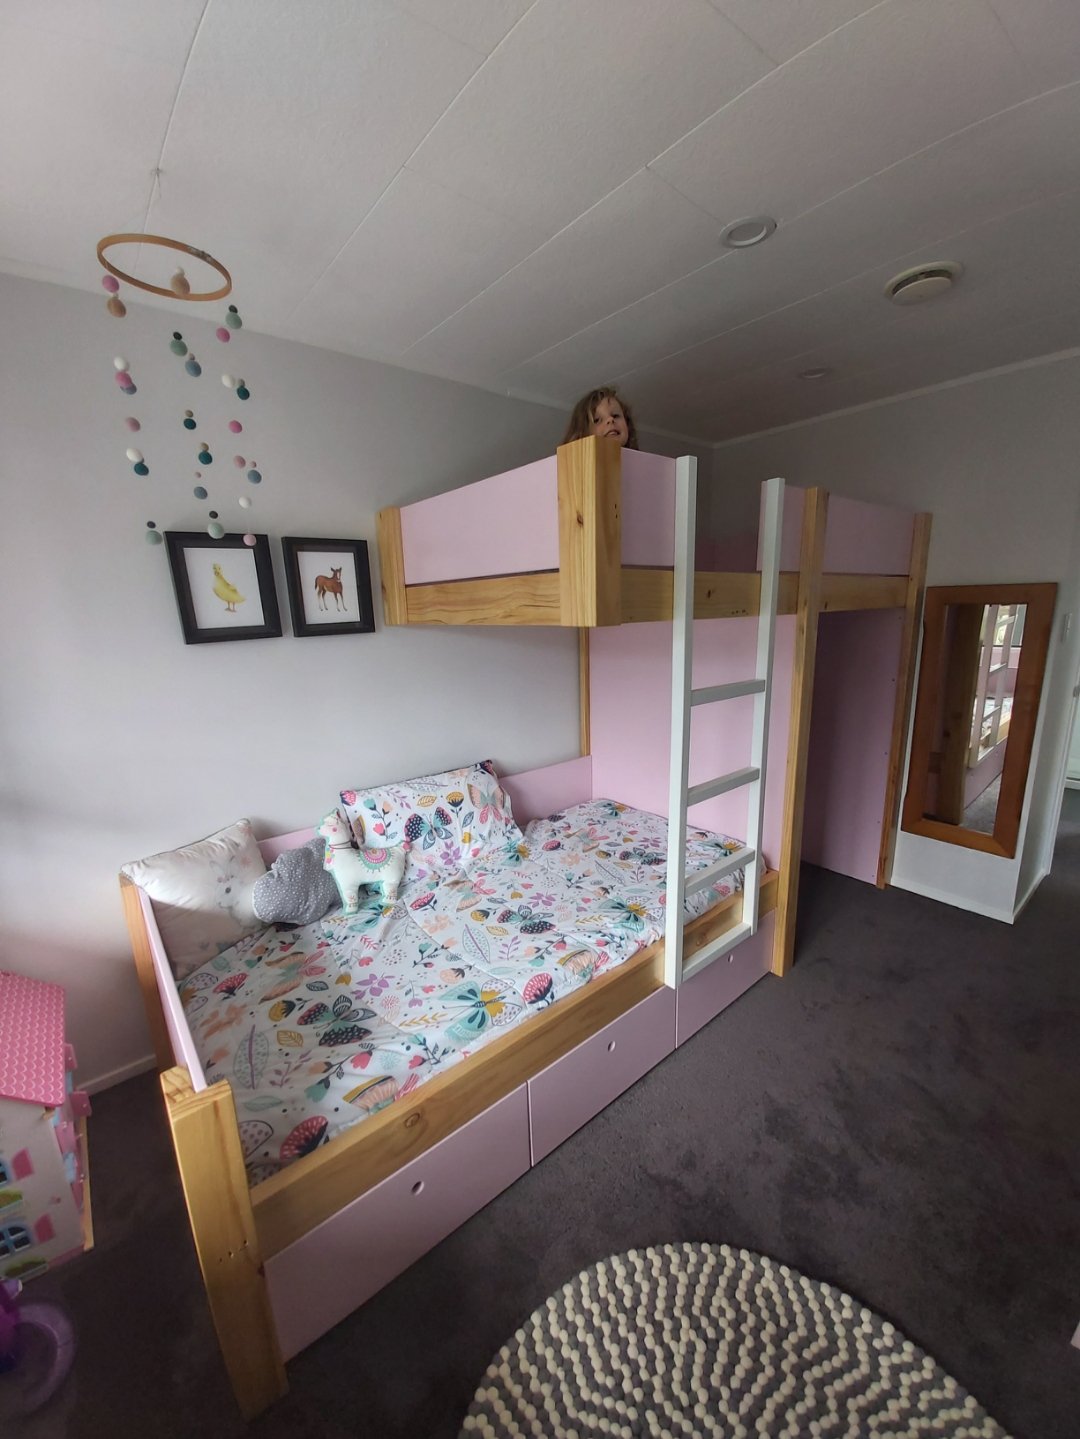
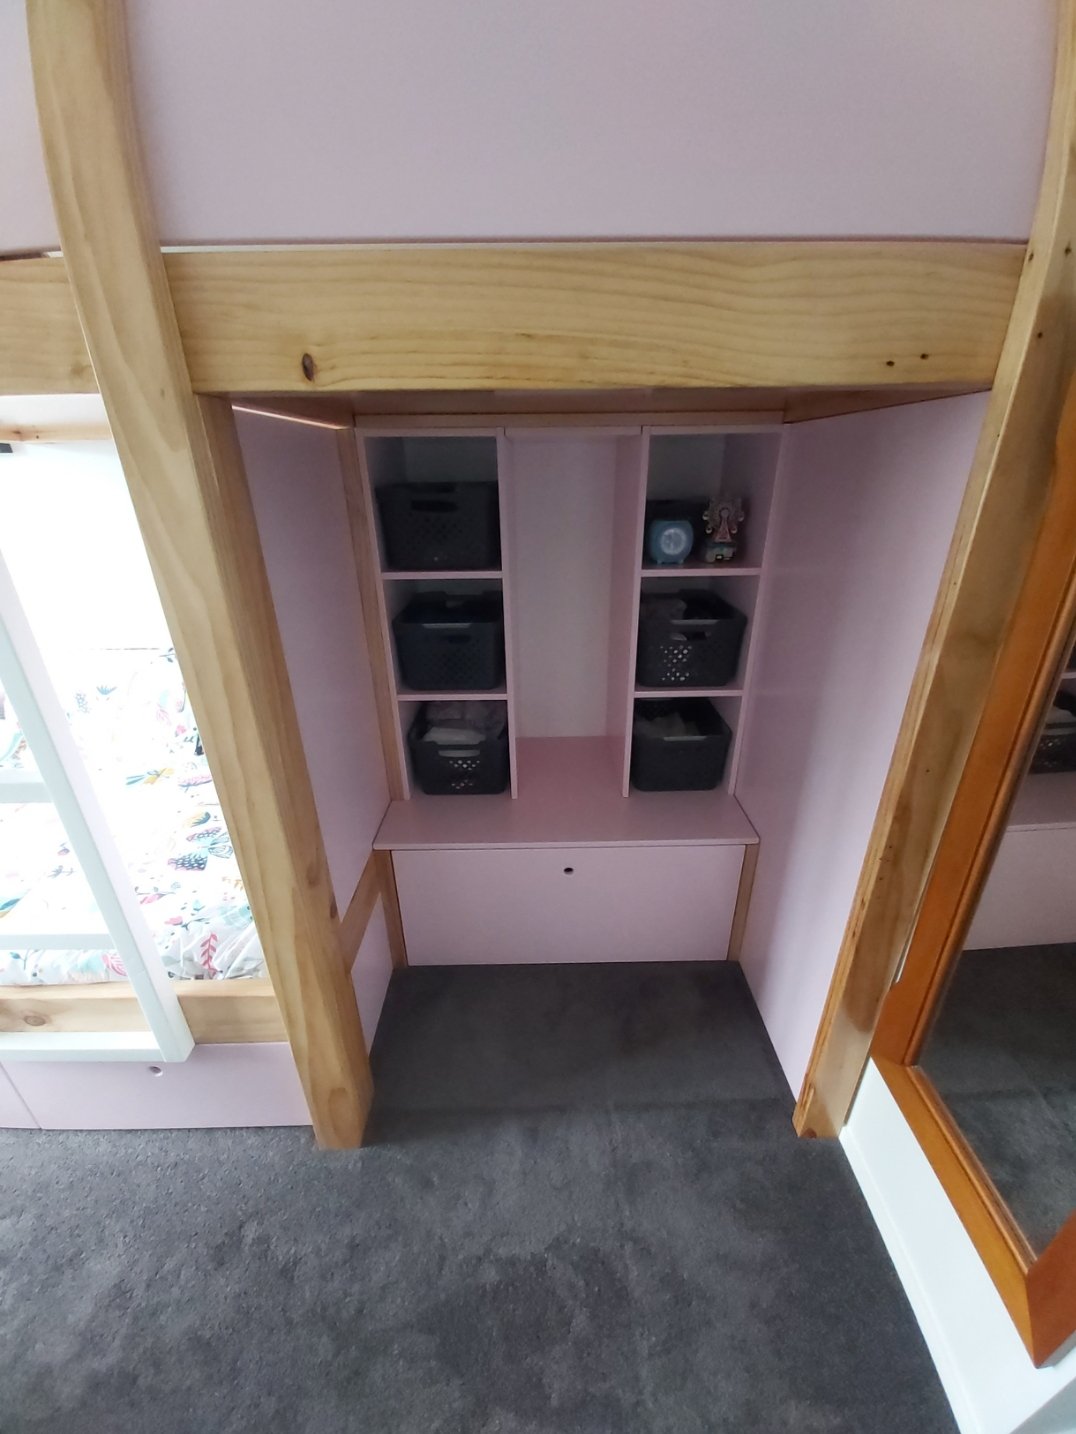
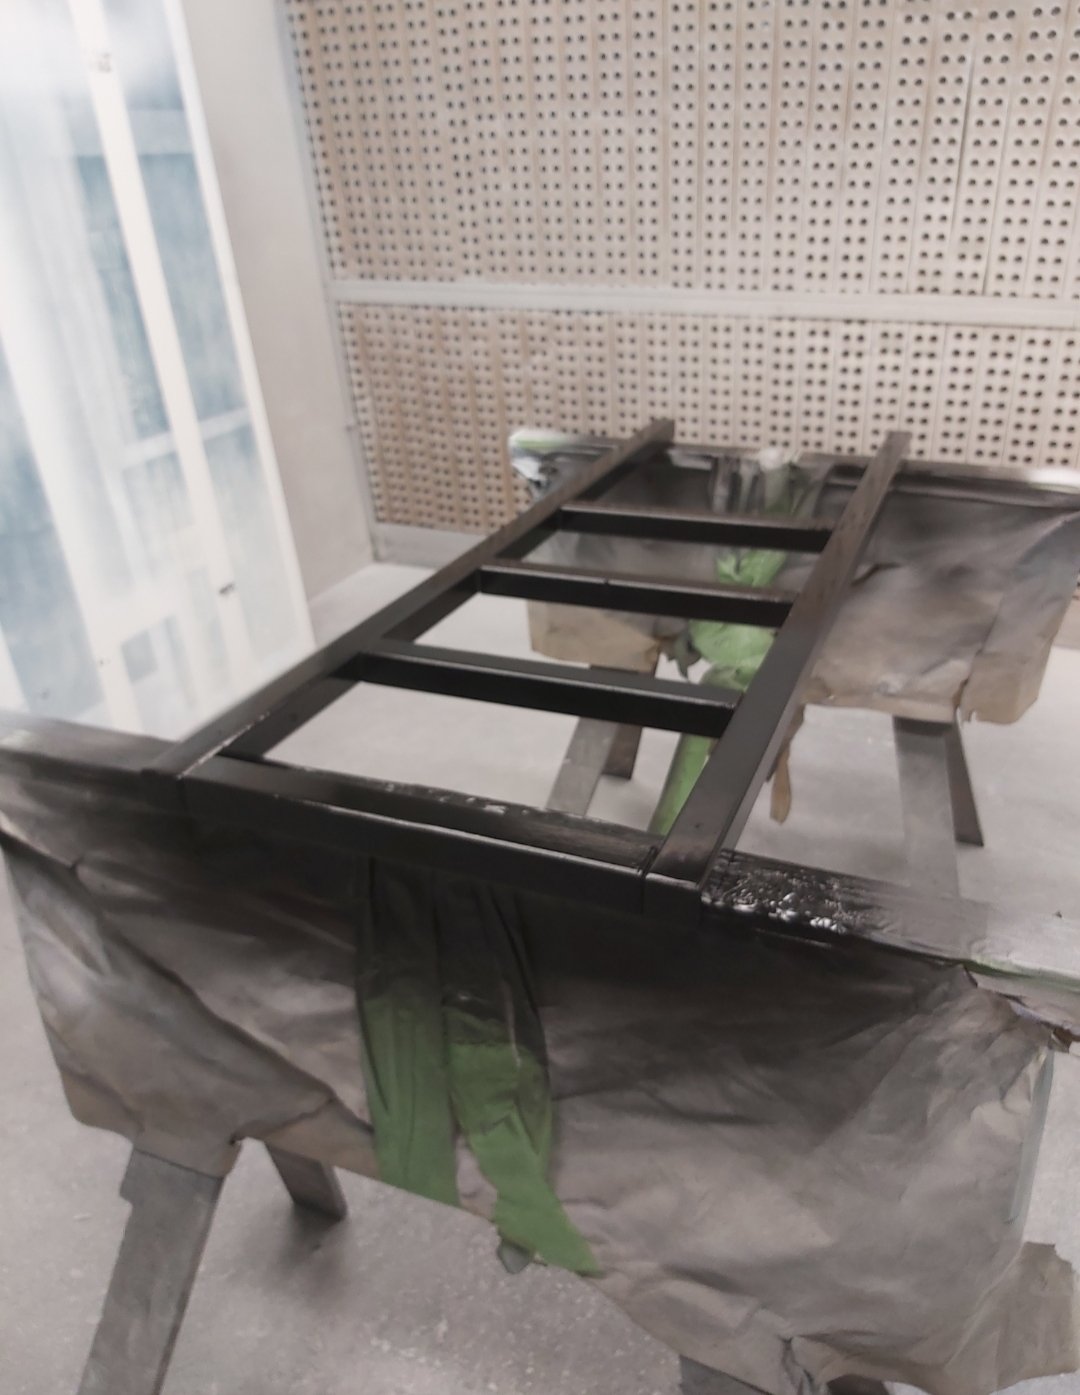
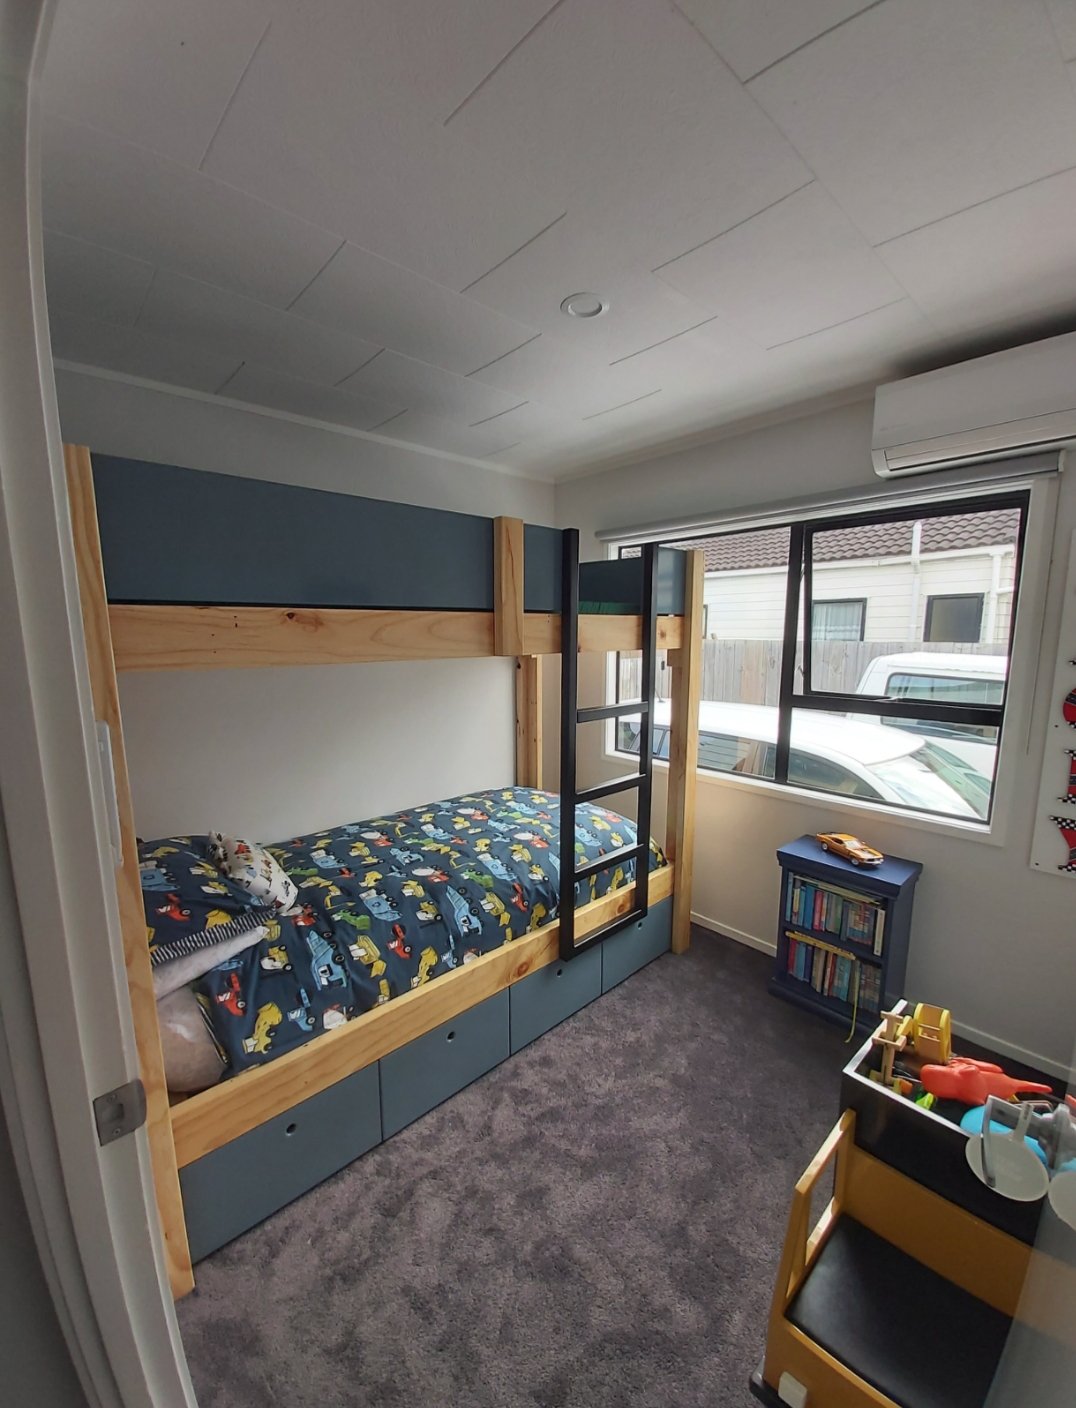
Of course we had make one for each kid. This one slightly different as we removed her wardrobe when we did the renovations to fit the fridge in the new kitchen so we incorporated the wardrobe into the bunk bed.
1 point
-
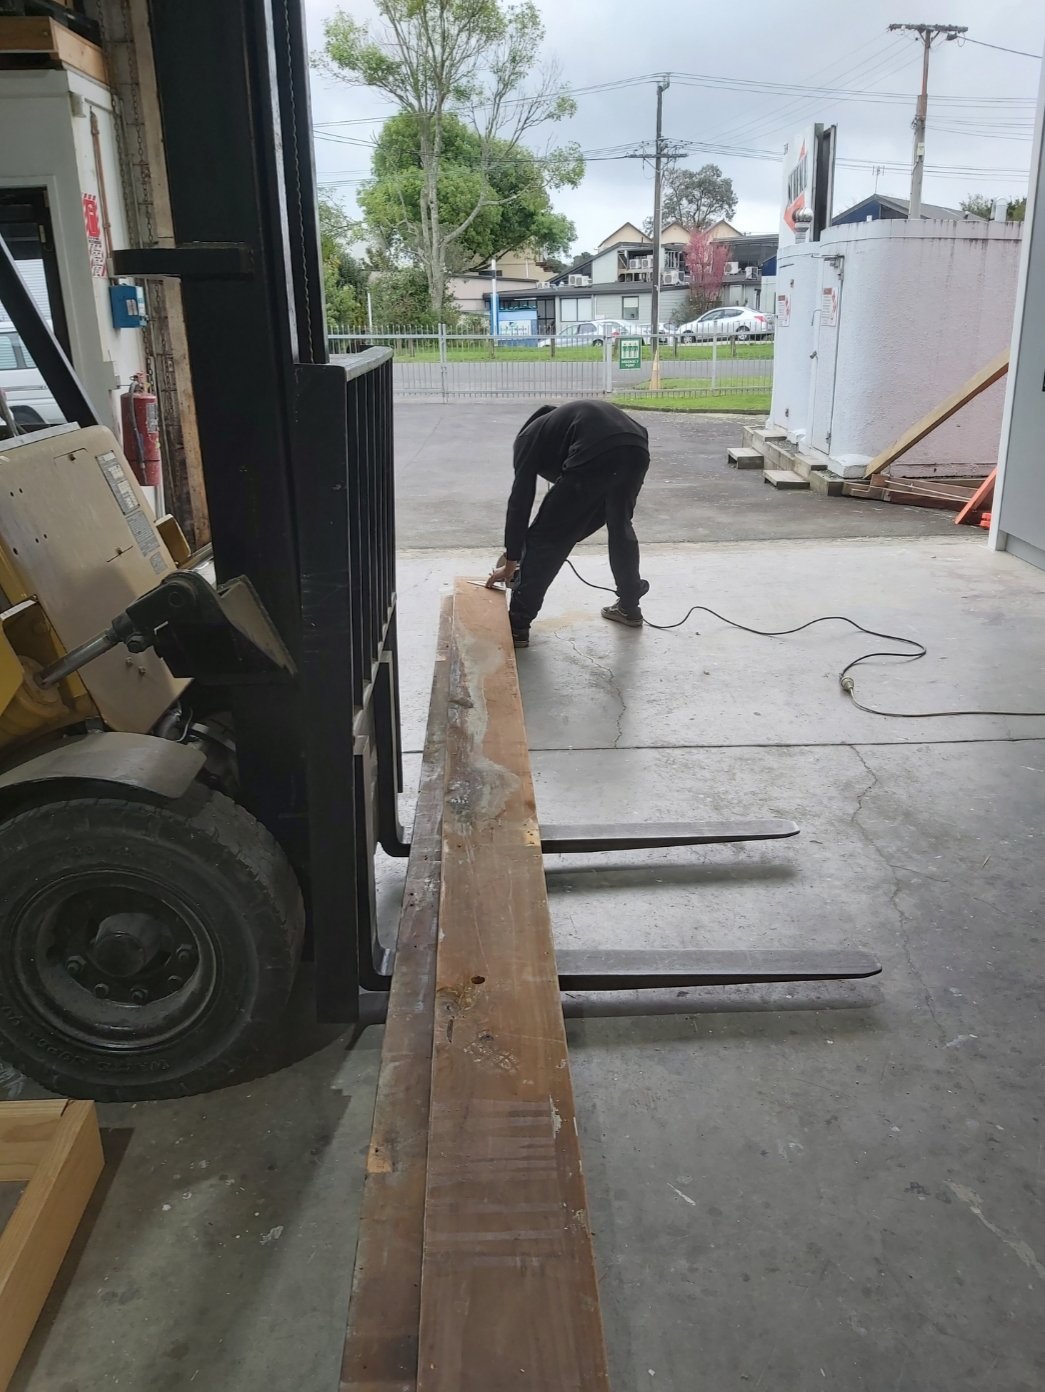
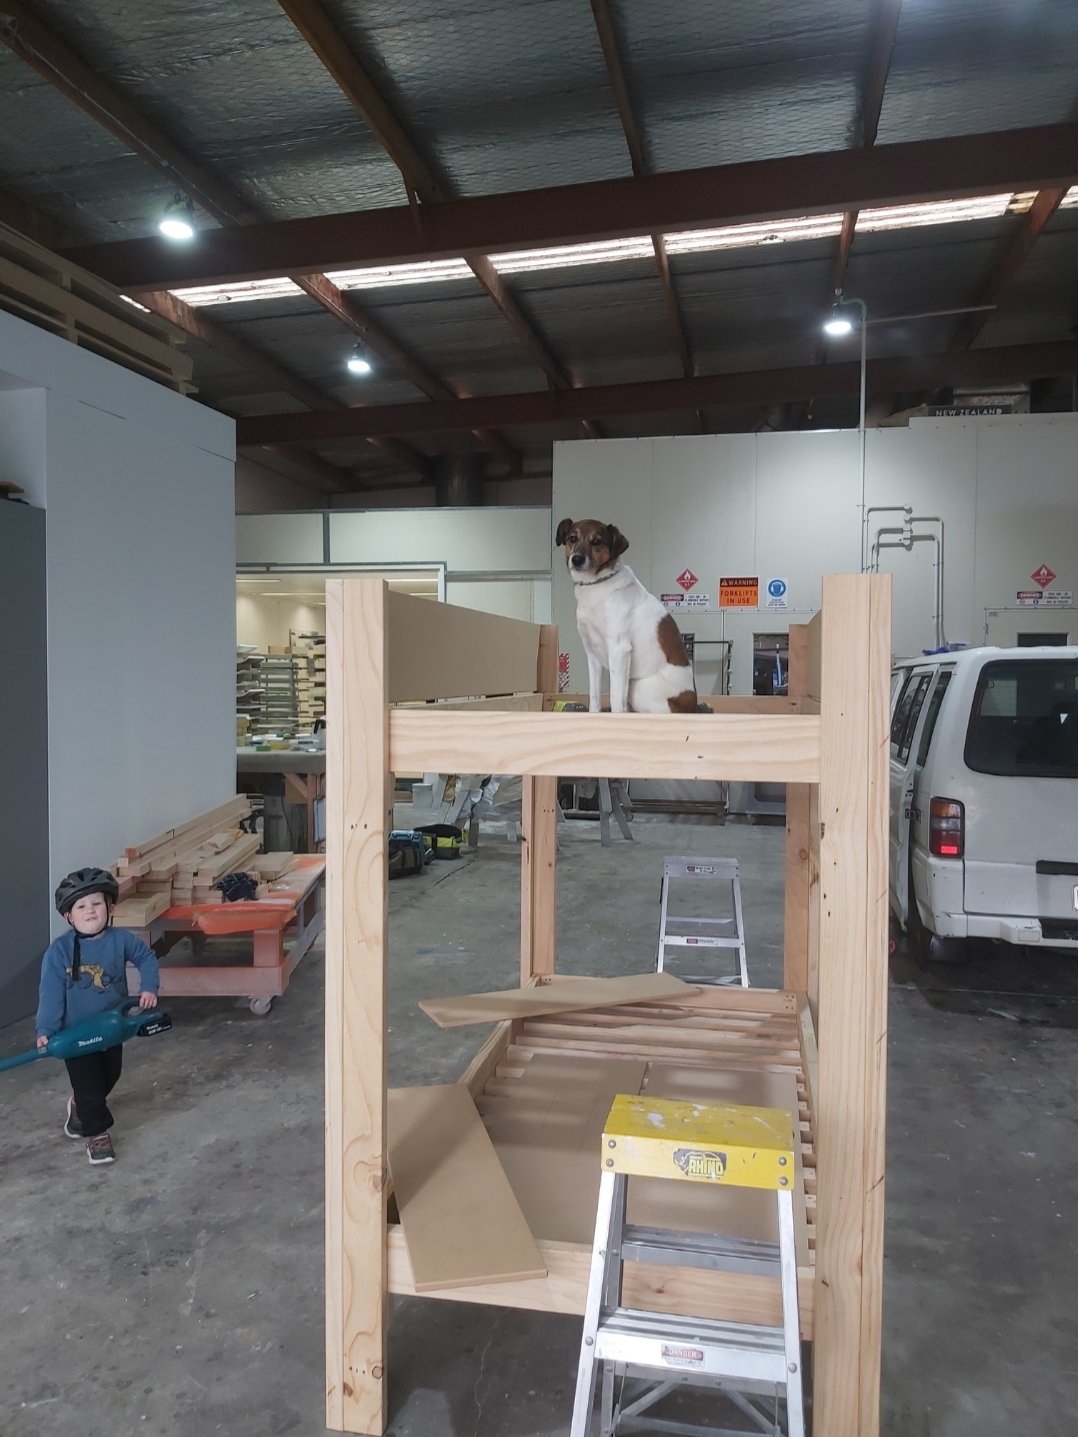
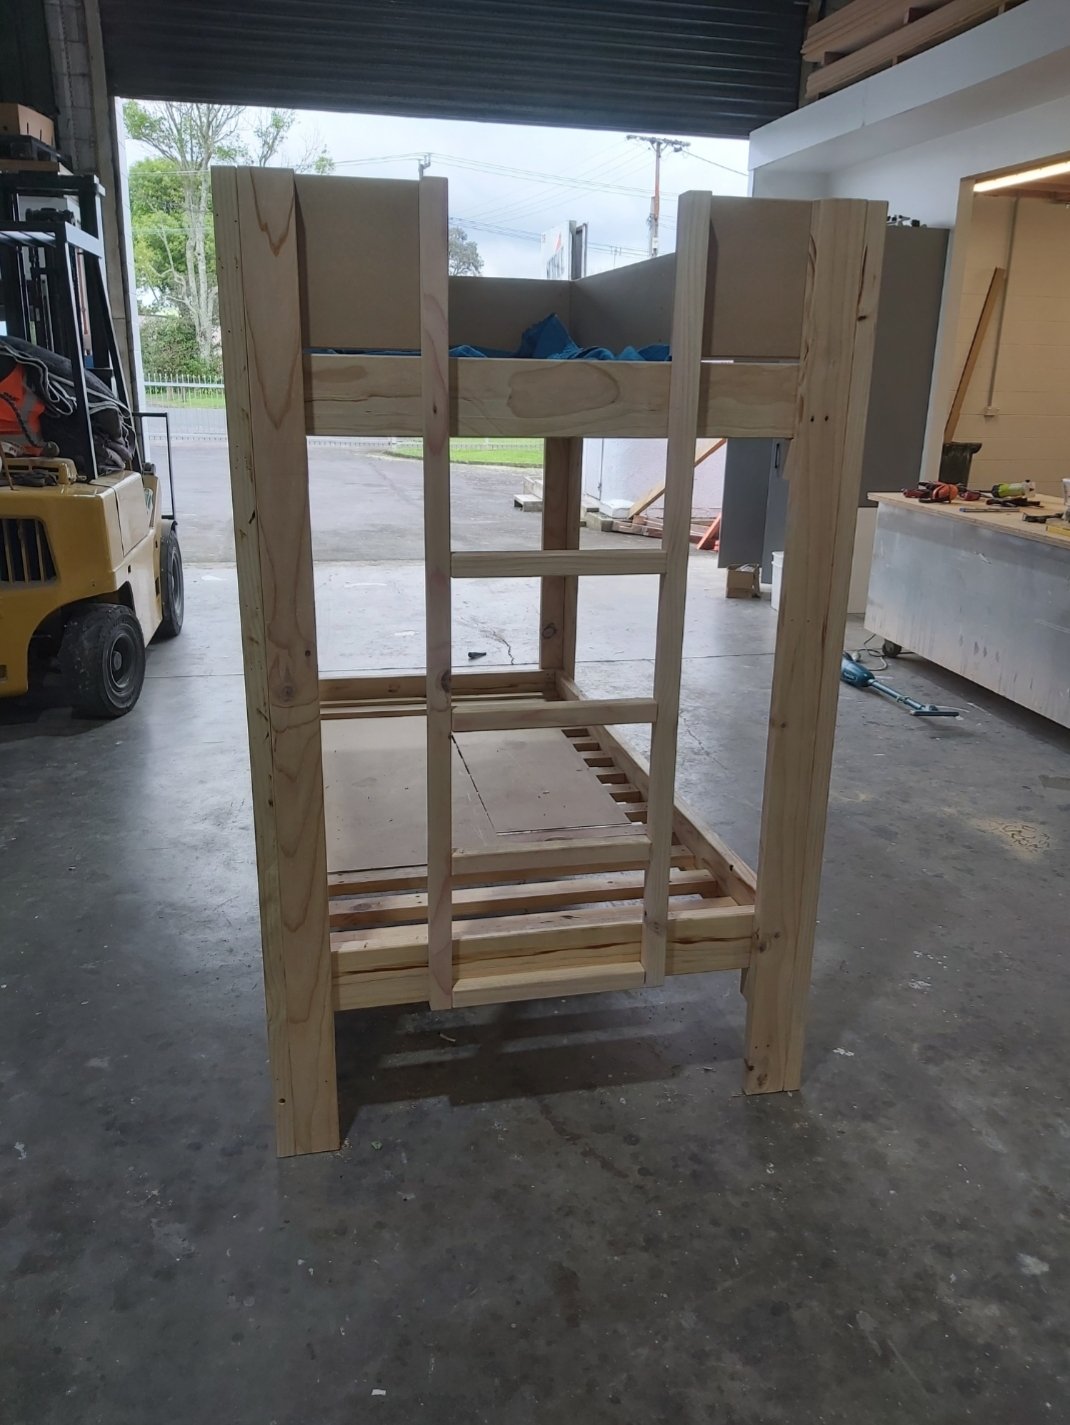
The wife and I wanted to make the kids bunk beds for their birthdays this year. Didnt really have to much of a plan on how to make them watched one youtube video got the general idea and got to work. Middle of last year we removed an old spray booth from our factory but kept the timber. Which worked out perfectly. I ripped it down to size put it through the thicknesser and it came out better than expected. It was a great project for the family got the kids involved and learnt heaps. First photo is timber before going through the thicknesser. we ended up moving the ladder. not enough space to climb up. I painted all the parts in polyurethane as thats what I do for a job. The gap between the beds is a 1m but we wanted to future proof ourselves hopefully get more than 10 years out of them.
1 point
-
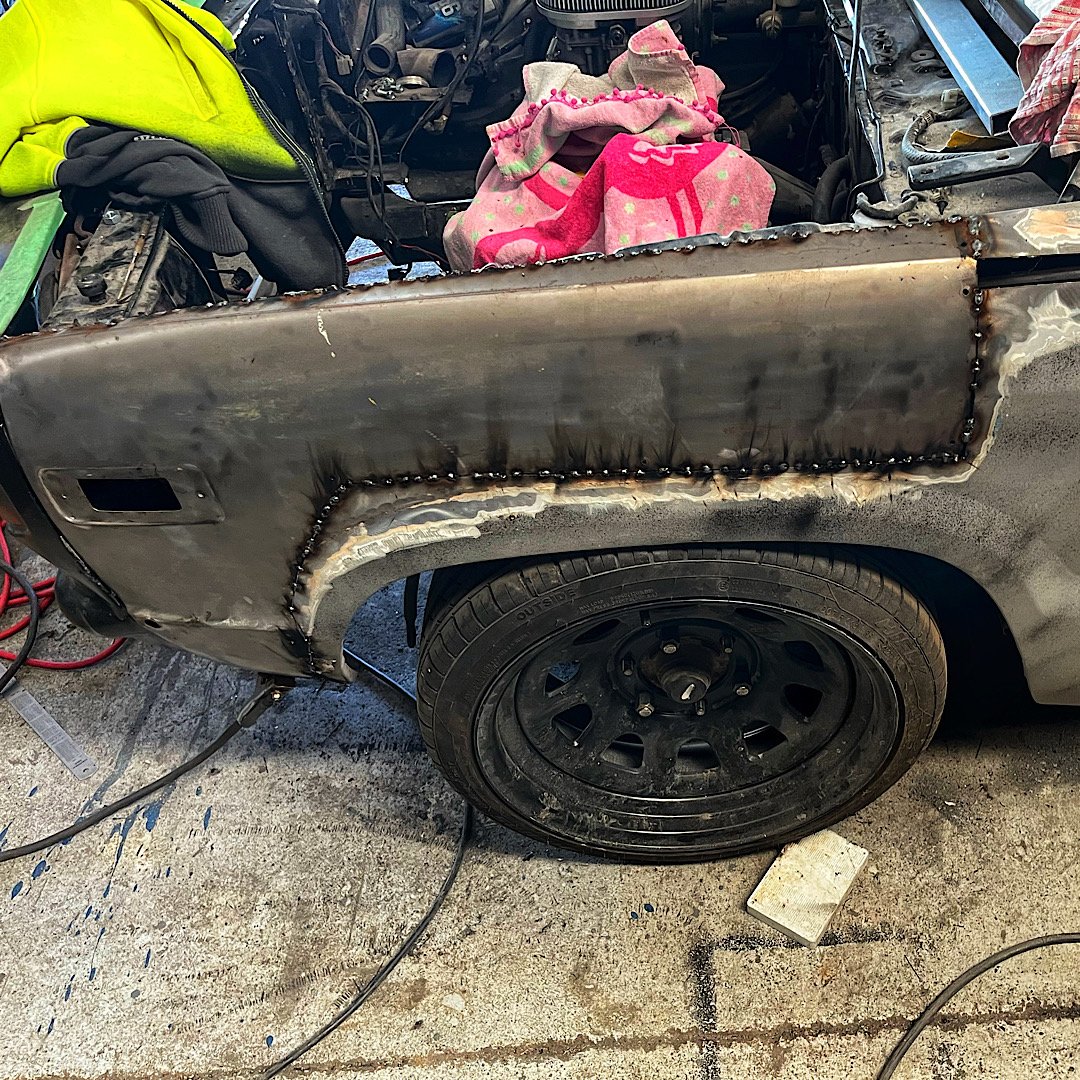
Decided to lift the body off the chassis today. so had to tack the 2nd guard together. got it mostly done, then started with the upper fillers, but called it there. pulled the guards and nosecone. lifted the body up. now I can figure out the front bag mounts. looks like the only way to go is to cut the entire upper spring cup away from the chassis. the upper A arm mounts to a bracket over the top of the rail, so doesn’t touch the spring cup at all. the lower A arm will have the spring seat removed and a cup and plate fizzed in. upper bag brackets will mount off the rails and be gusseted. should be all G
1 point
-
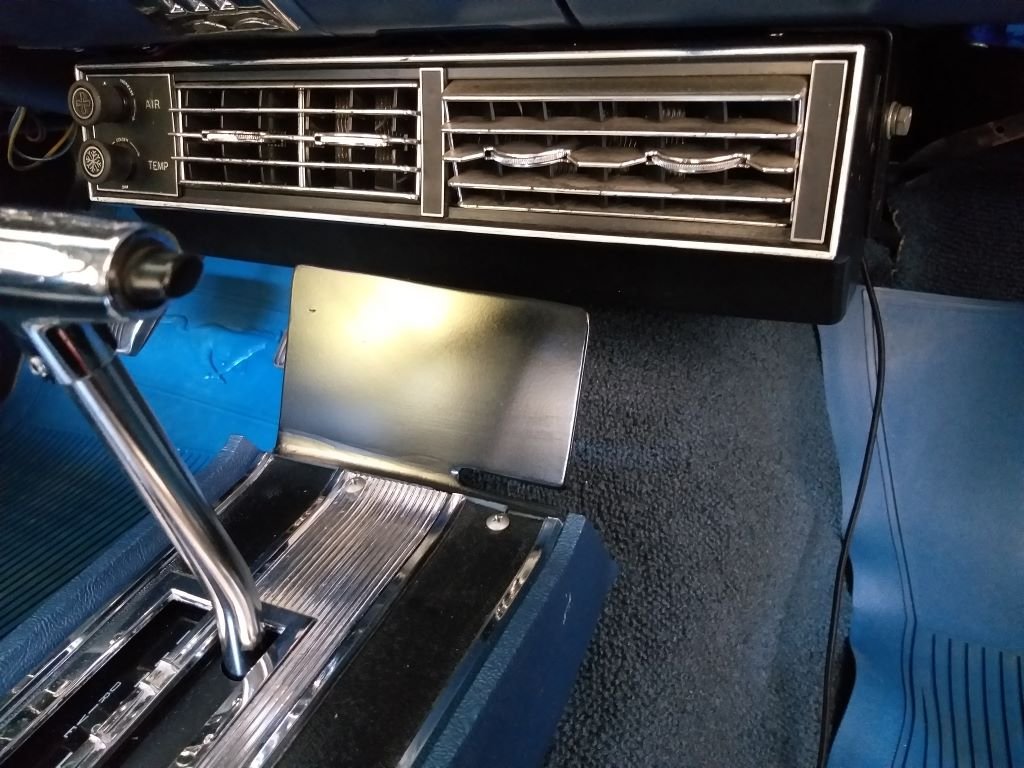
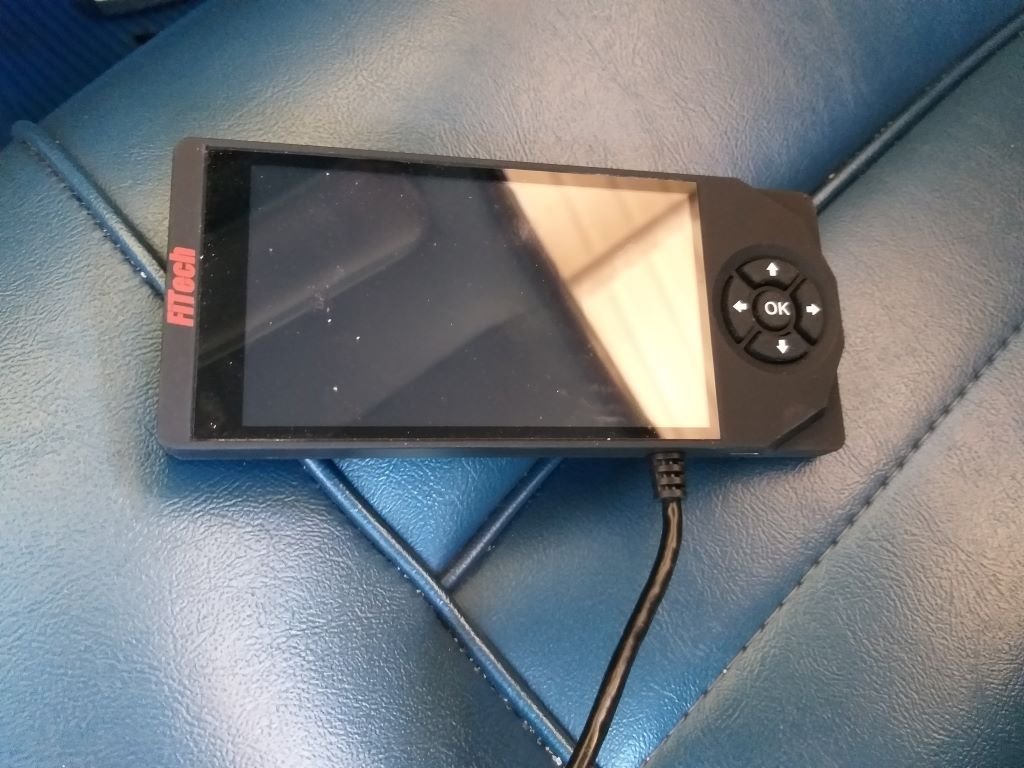
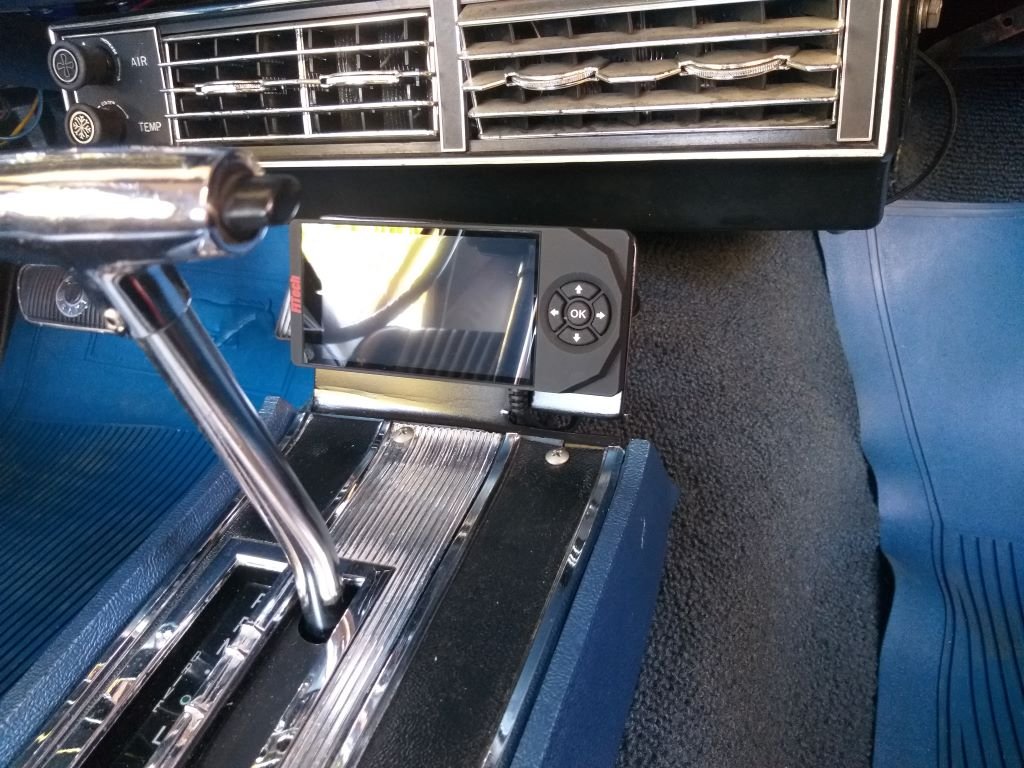
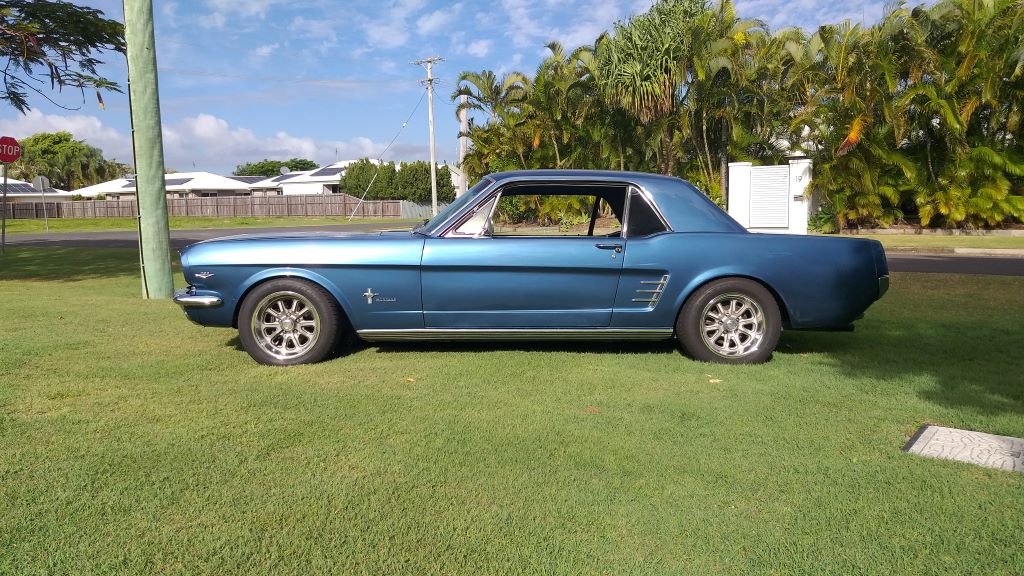
Apart from the occasional bath, the poor old Mustang hasn't seen much loving since late Feb. We still use it heaps and every now and then I play around with some of the EFI settings mainly to see if I can improve things from an exhaust fumes perspective. Just before winter I disabled the settings that add extra fuel on startup and cold running and this has solved the excess fumes that we were experiencing on startup. It did result in some extra cranking needed on really cold mornings, but I reckon that is a small price to pay. When the engine is warm we are still experiencing excess fumes at idle, so I thought I'd play around with the idle air controller. But before tackling that I thought I'd sort out some kind of mounting bracket for the little hand held controller. The system is supplied with one of those long flexible holders with a suction cap for windscreen mounting, but it looked cheap and nasty and way out of place in the old Muzzy so I binned that a while ago. Since then the touch screen has been floating around the cabin and just generally making a nuisance of itself, so I eventually banished it to the glove box. After giving it some thought I figured I would mount the LCD to the front of the centre console which is missing its end plate anyway. So first up I grabbed an aluminium plate offcut, gave it a little bend and trimmed it to size. Cut a little slot to hold the cable, cleaned up the edges, spritzed it with some satin black and then test mounted it. Chucked a bit of velcro on the mounting plate and the back of the handheld and it is now nice and secure. Doesn't look too out of place. Celebrated by giving it a quick bath.
1 point
-
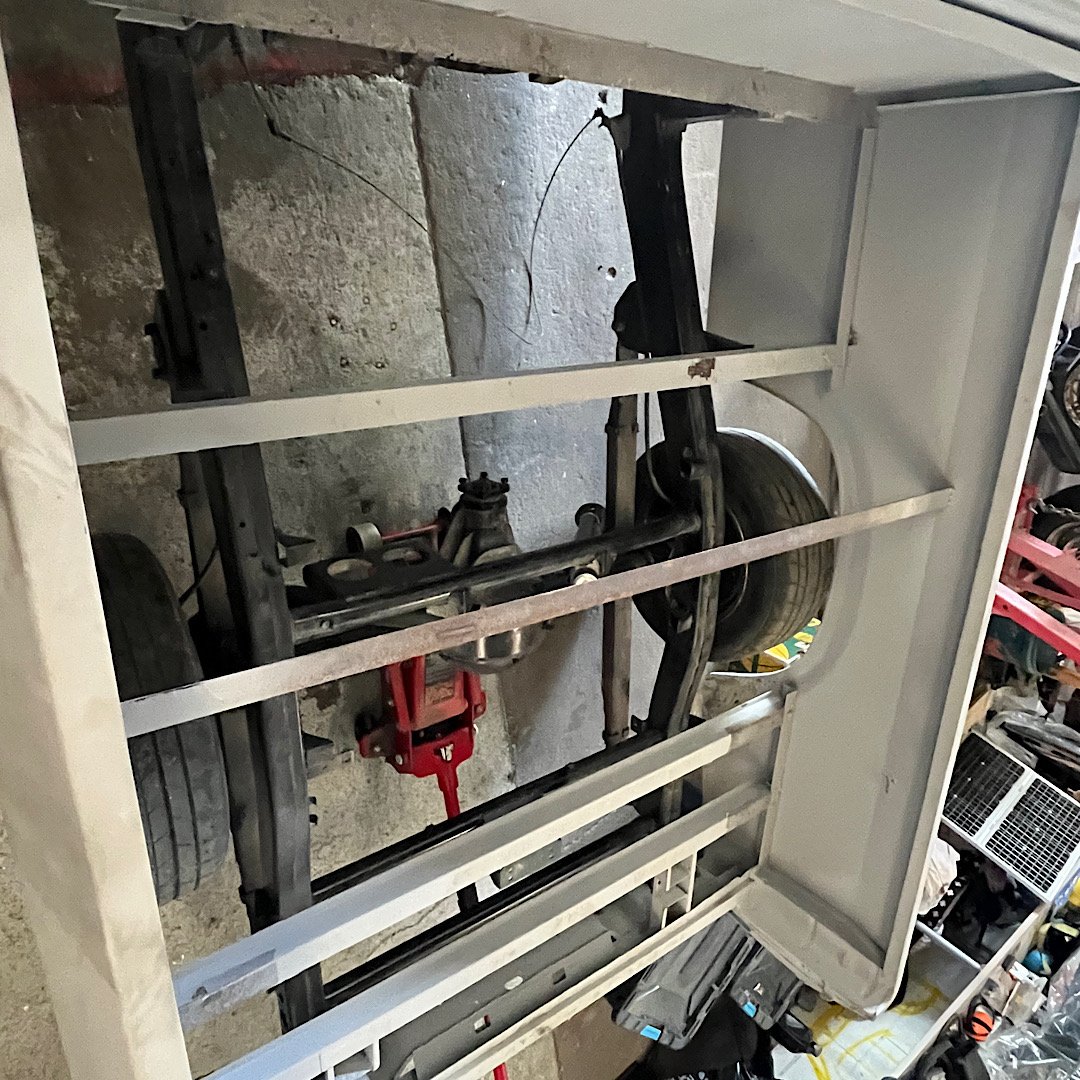
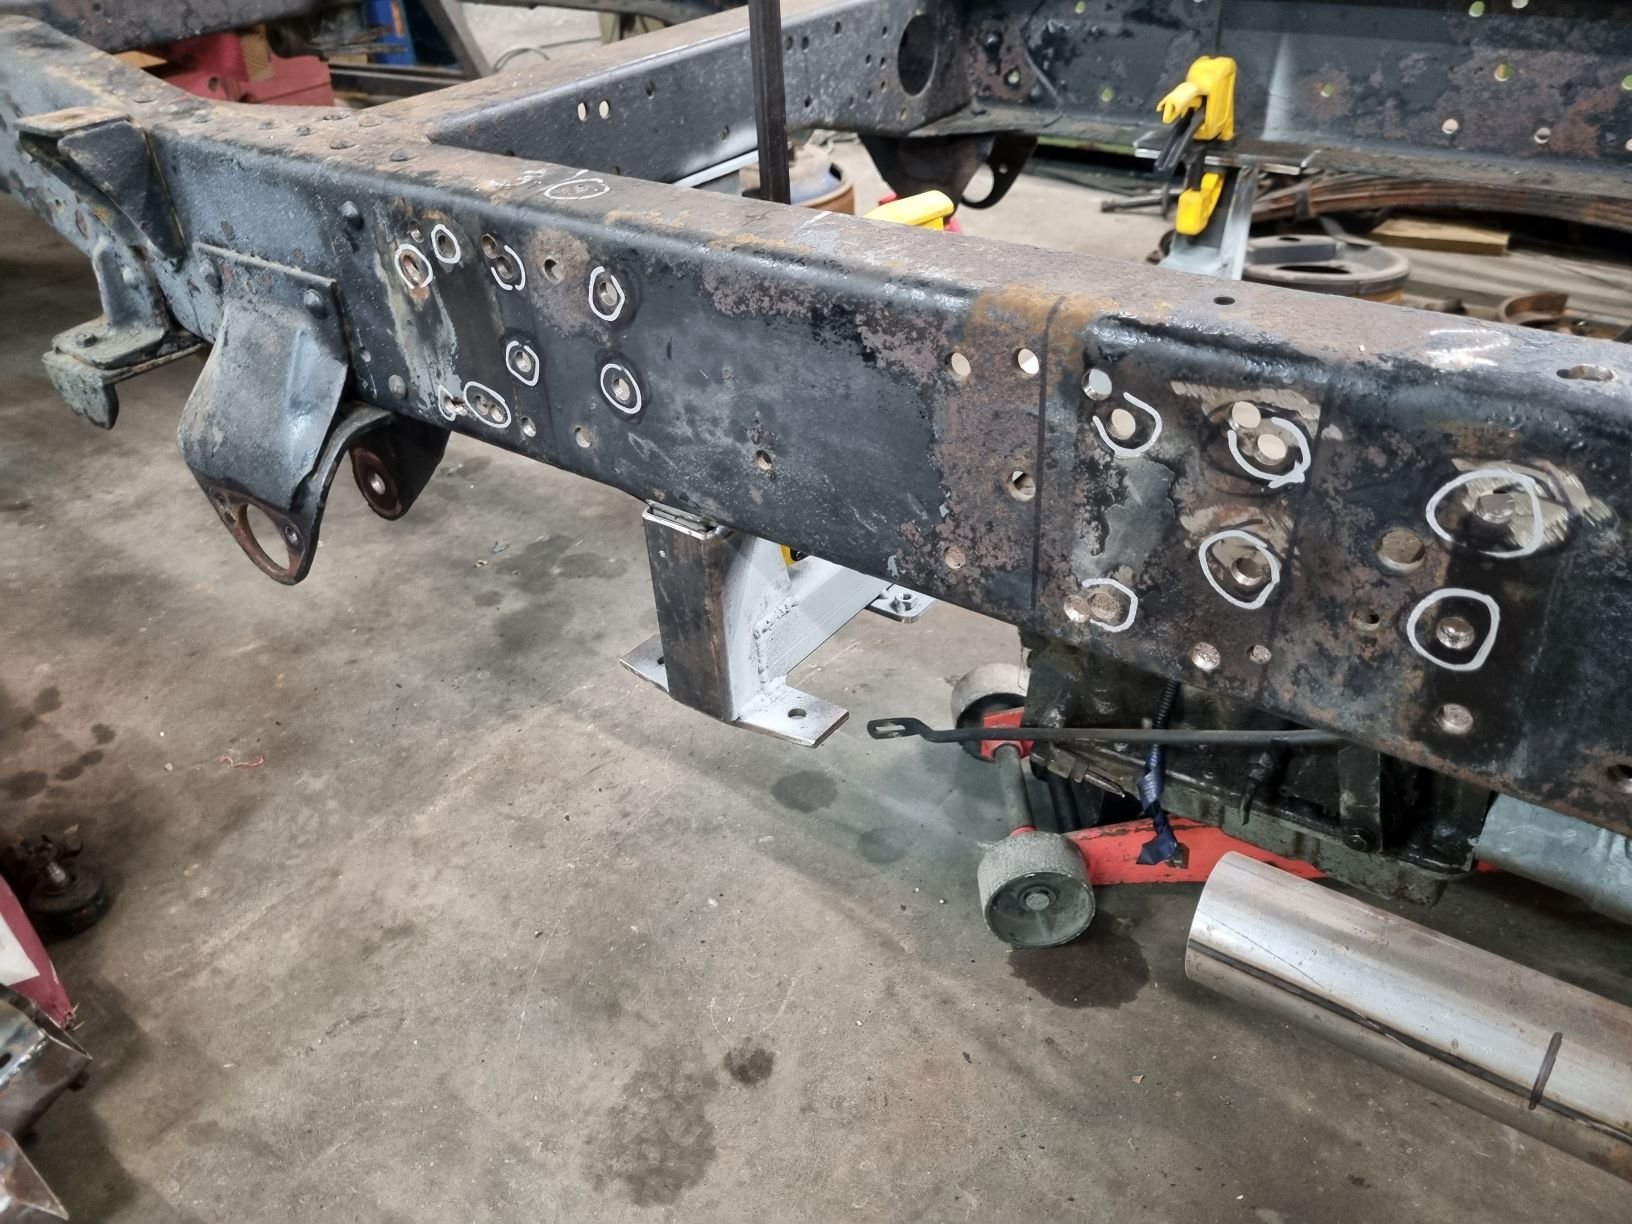
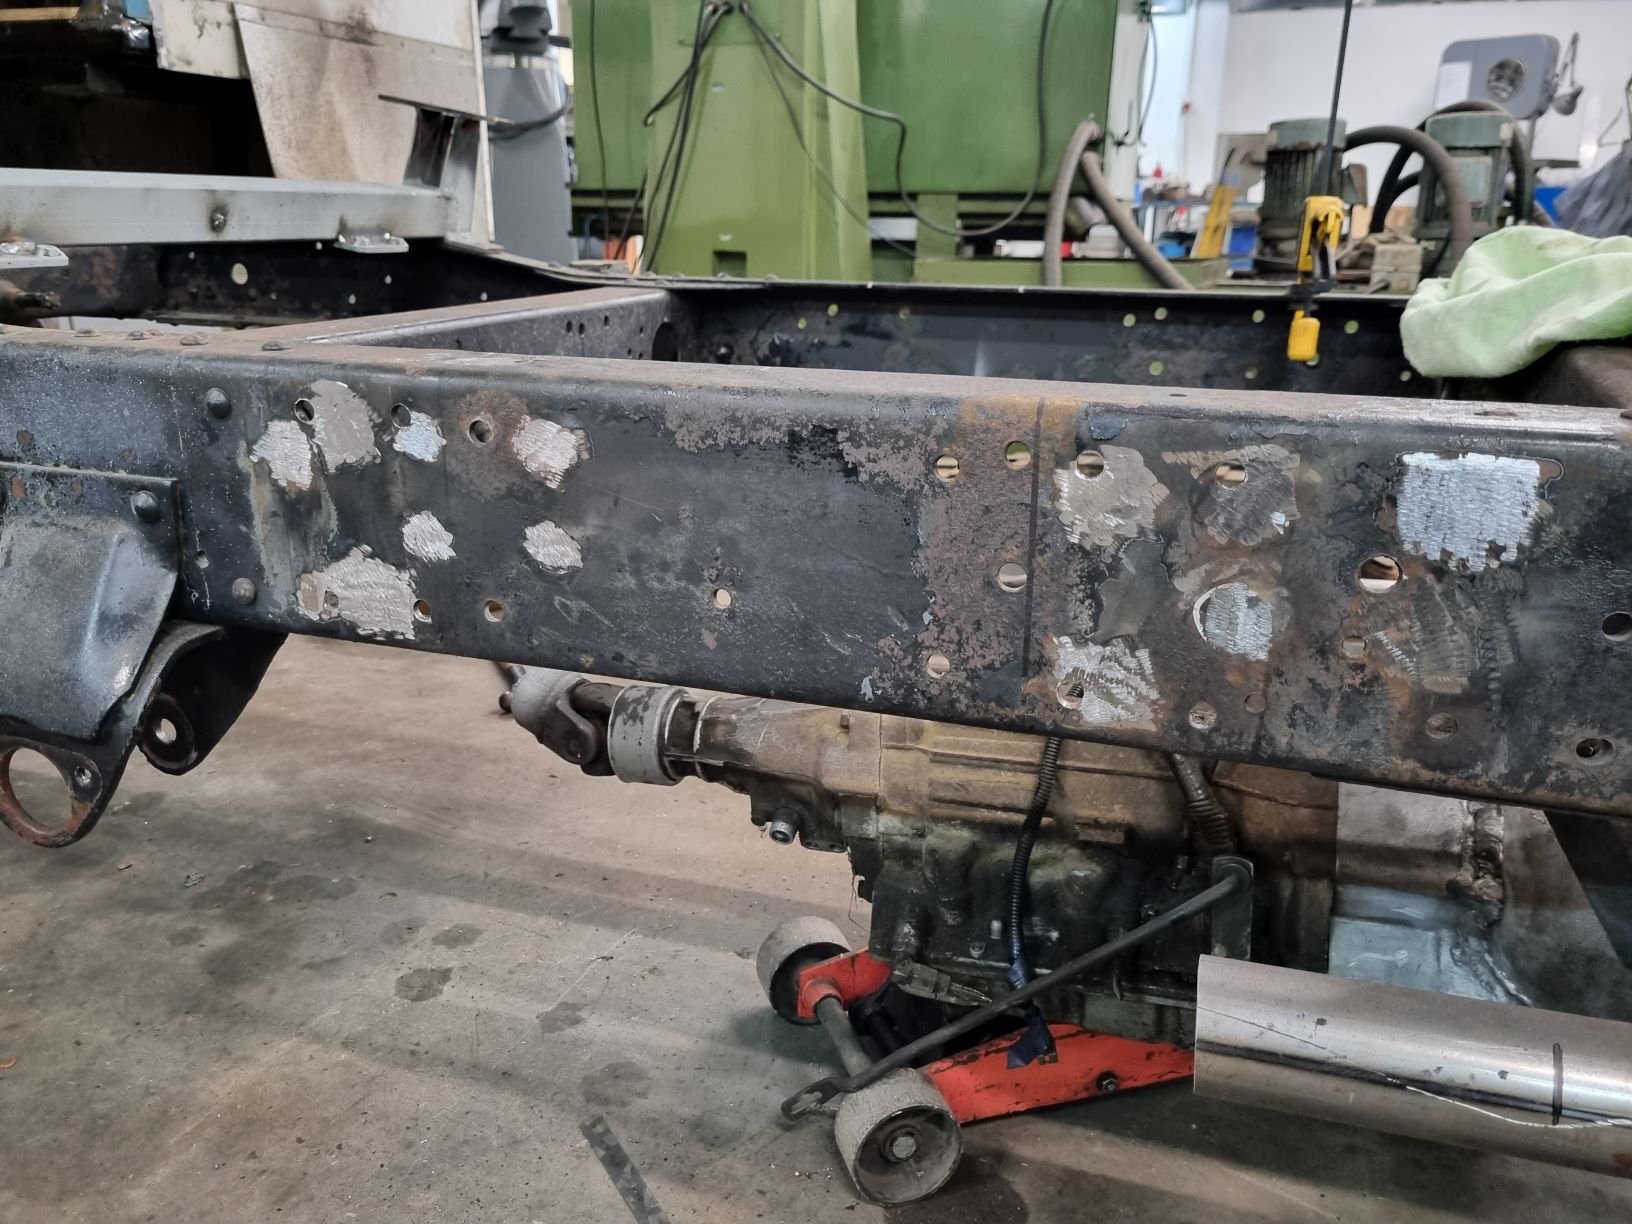
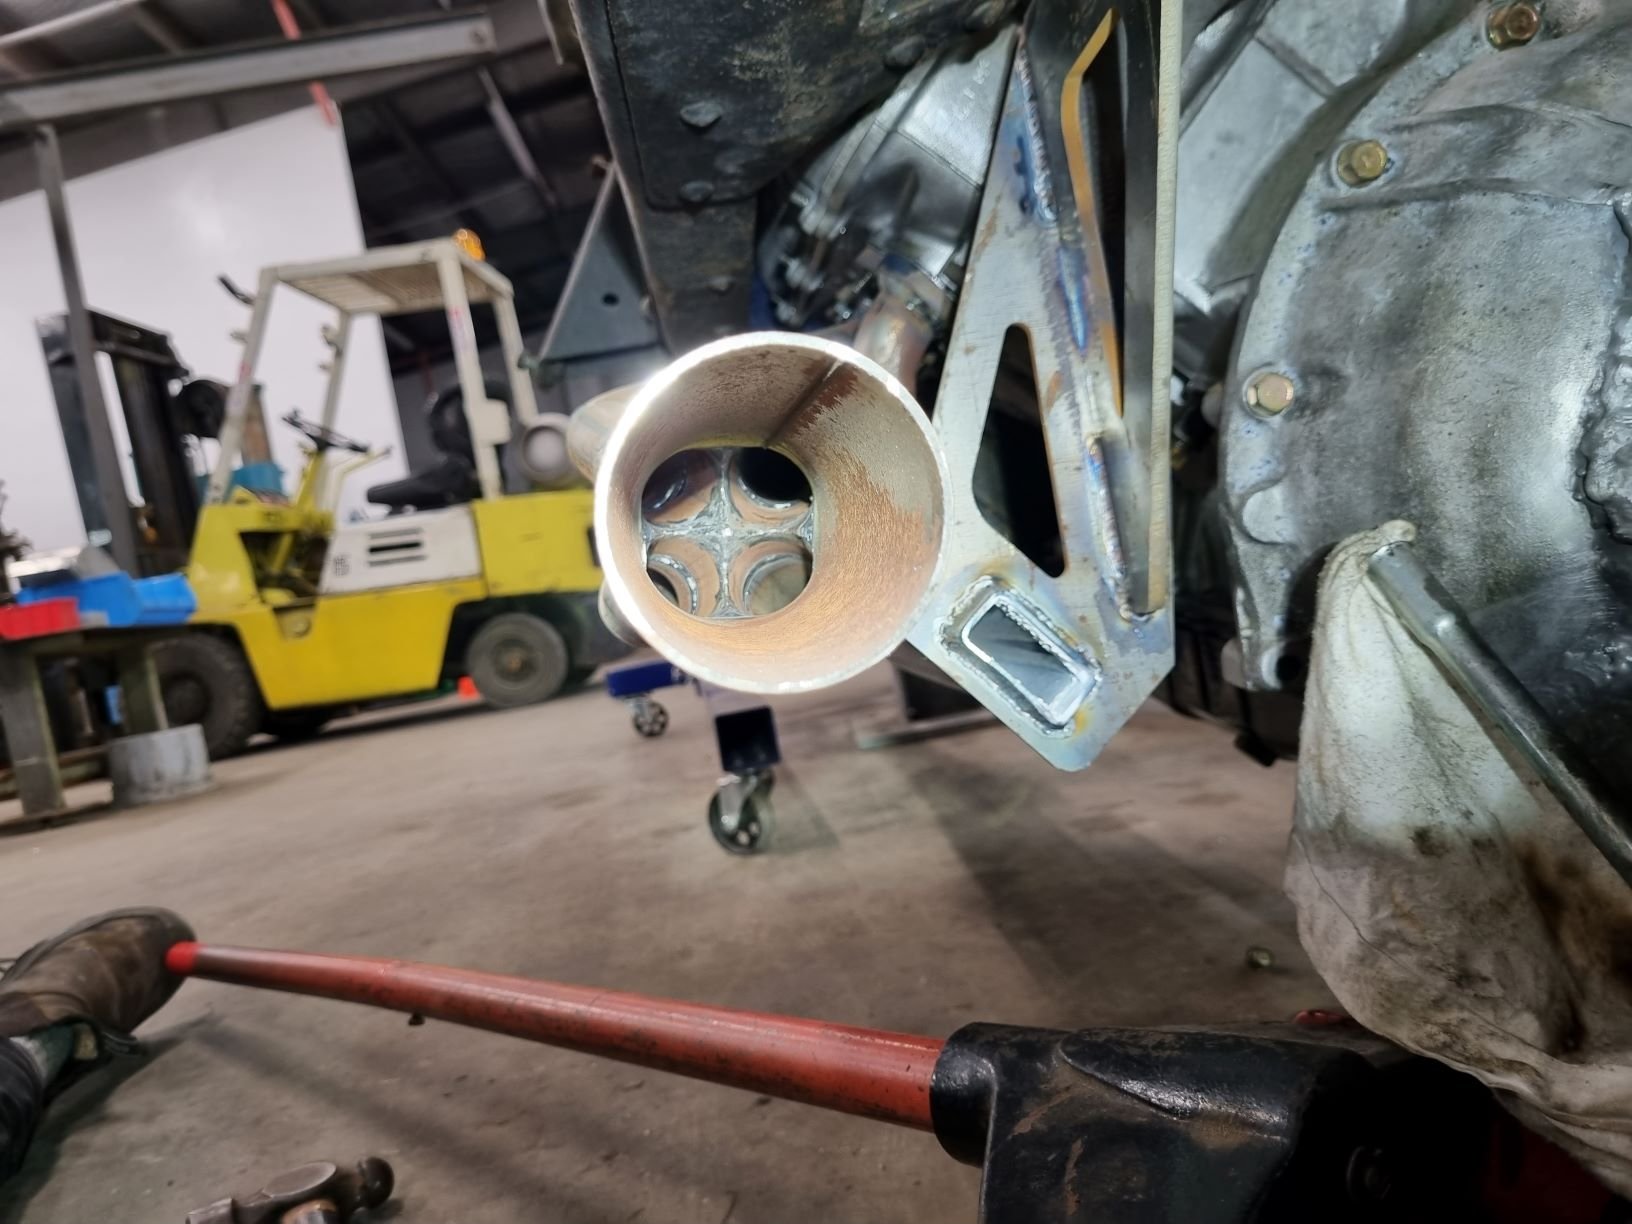
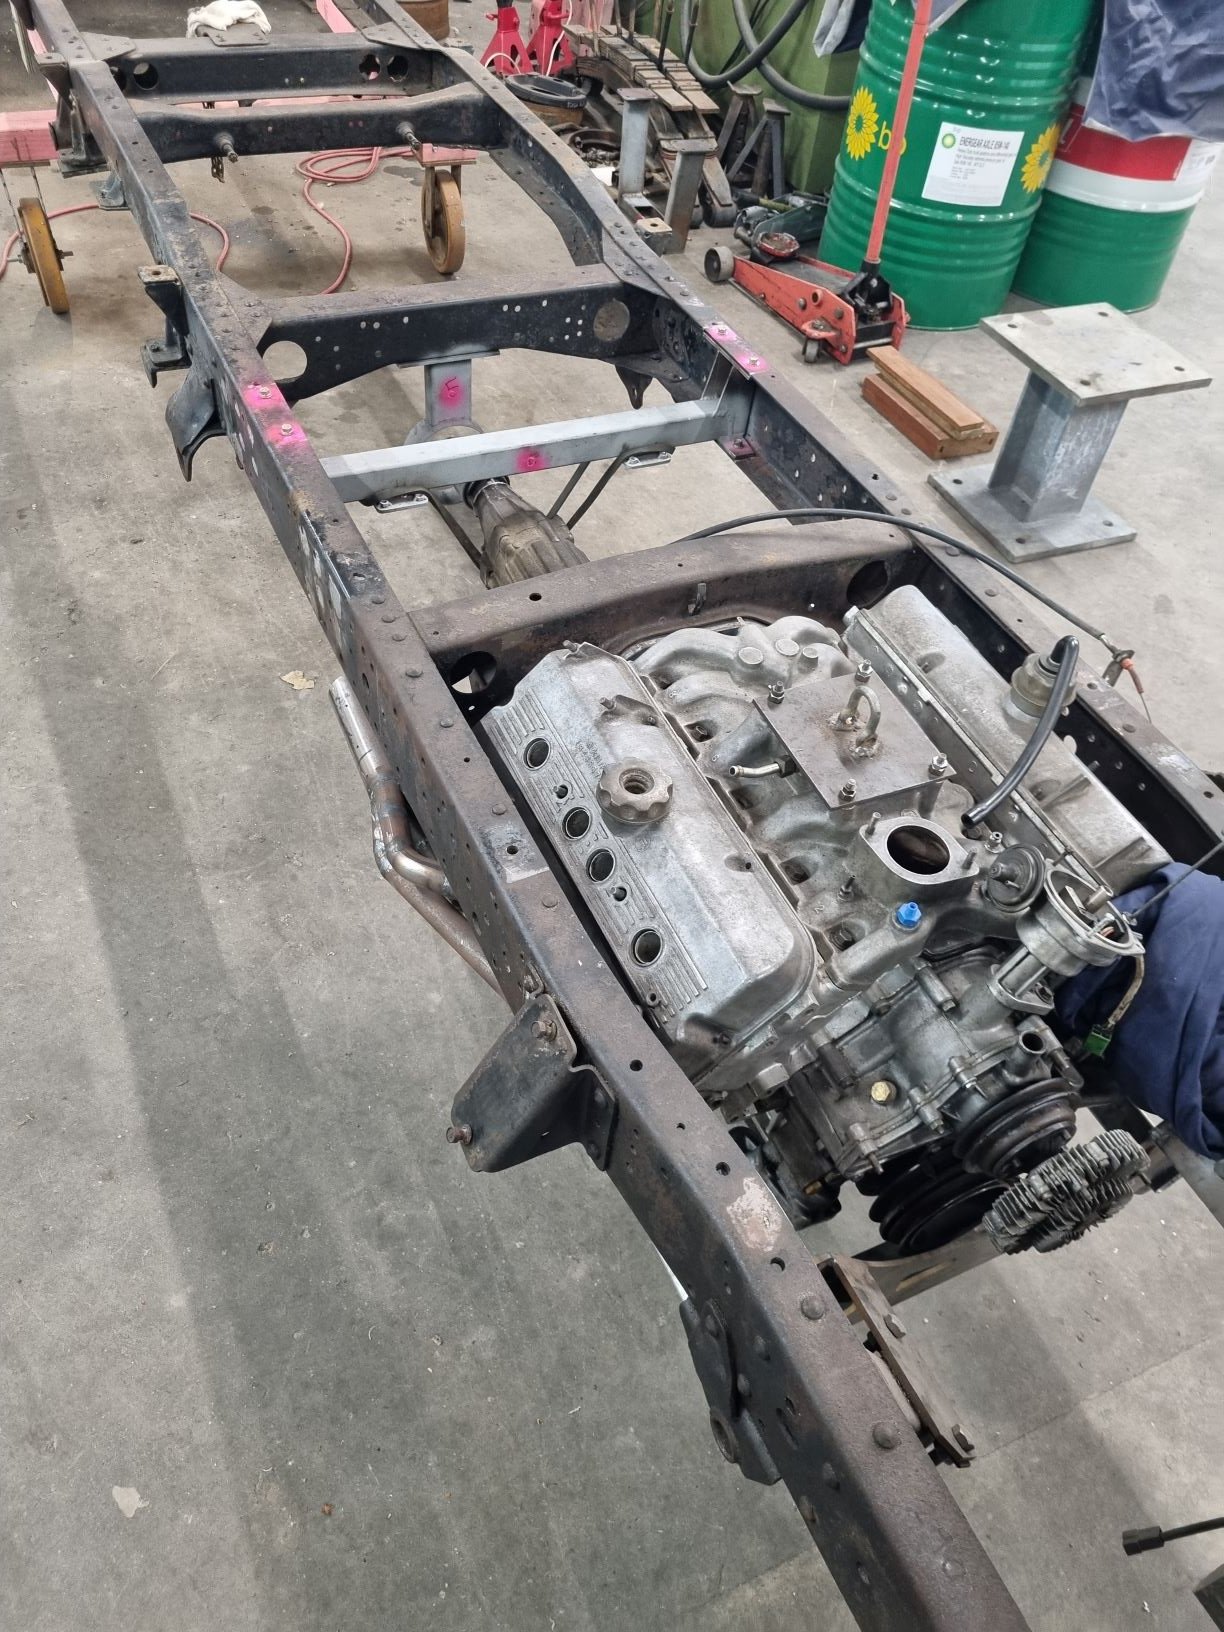
Next mish was to fill some swiss cheese in the chassis rail on the fuel tank side. I moved the mounting holes, but also there were a lot of holes there already and it was looking a mess. I also got a shot up the end of the collector, just cause... I finished the driveshaft hoop also. Again butty, but functional. Ive really only got the diff handbrake to complete, and a few bits turned up this week for that, so I will be turning my attention there in the coming weeks. I moved back to tidying up some of the body interface. Painted steel, put rivnuts in holes etc for mounting engine cover. Got stuck back into Califont and battery locker, cut out some more unnecessary shite and the old battery tray, so this is kindof ready for a bit more lining and framing up for batteries etc. Will need to at least decide on a battery format before I go further here. Would like to start reinstating the skin and framing up a door for here soon too. Ive also started looking at other body related stuff, with the impending end of major driveline fab thats where my next bit of attention will turn. I also remounted the fan on the outside of the fan shroud instead of using the shitty radiator zip ties I had previously, as suggested by someone. Hindsight is a beautiful thing, as is perhaps laying off the doobs and beers when fabbing shit. I think I should have cut the shroud back a few inches to make purdy, but its done now and space is not a constraint here so Ill live with it.
1 point
-
Re-torqued the head, re-did a ticky tappet (still ticks…grrr) and then put the bonnet back on. Looks like a proper car again. I need to sort the rear wheel clearance so I can go for a decent drive. Here’s some overexposed late afternoon potato pics. Front springs have settled well. What say you?
1 point
-
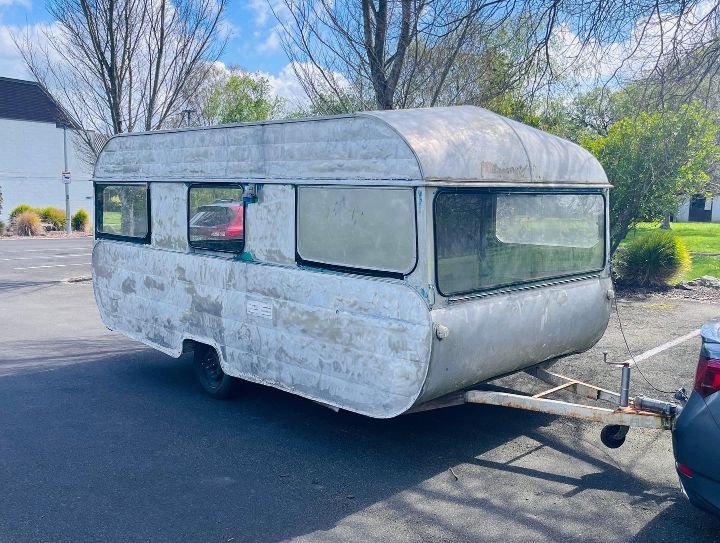
So with selling our old place and moving house, the caravan got parked at a mates place and unforunately one of his rams took exception to its new paddock intruder Insurance is covering it all so Ive dropped the caravan to be repaired at Motorhome and Caravan World in Hamilton. Dave there worked at Liteweight for many years so its in the best hands to get fixed in time for summer. Will udpate when its back!
0 points


.jpg.31088bc63bd8362845cb7c3ab9104a76.jpg)
.jpg.9b00059b3345eafe6dfc1e210fe9787e.jpg)
This leaderboard is set to Auckland/GMT+12:00