
Leaderboard


Popular Content
Showing content with the highest reputation on 10/07/22 in all areas
-
Done. Now a @Roman problem haha I'll quietly leave the room now. can sense the growing anger, due to the lack of graphs
 30 points
 -
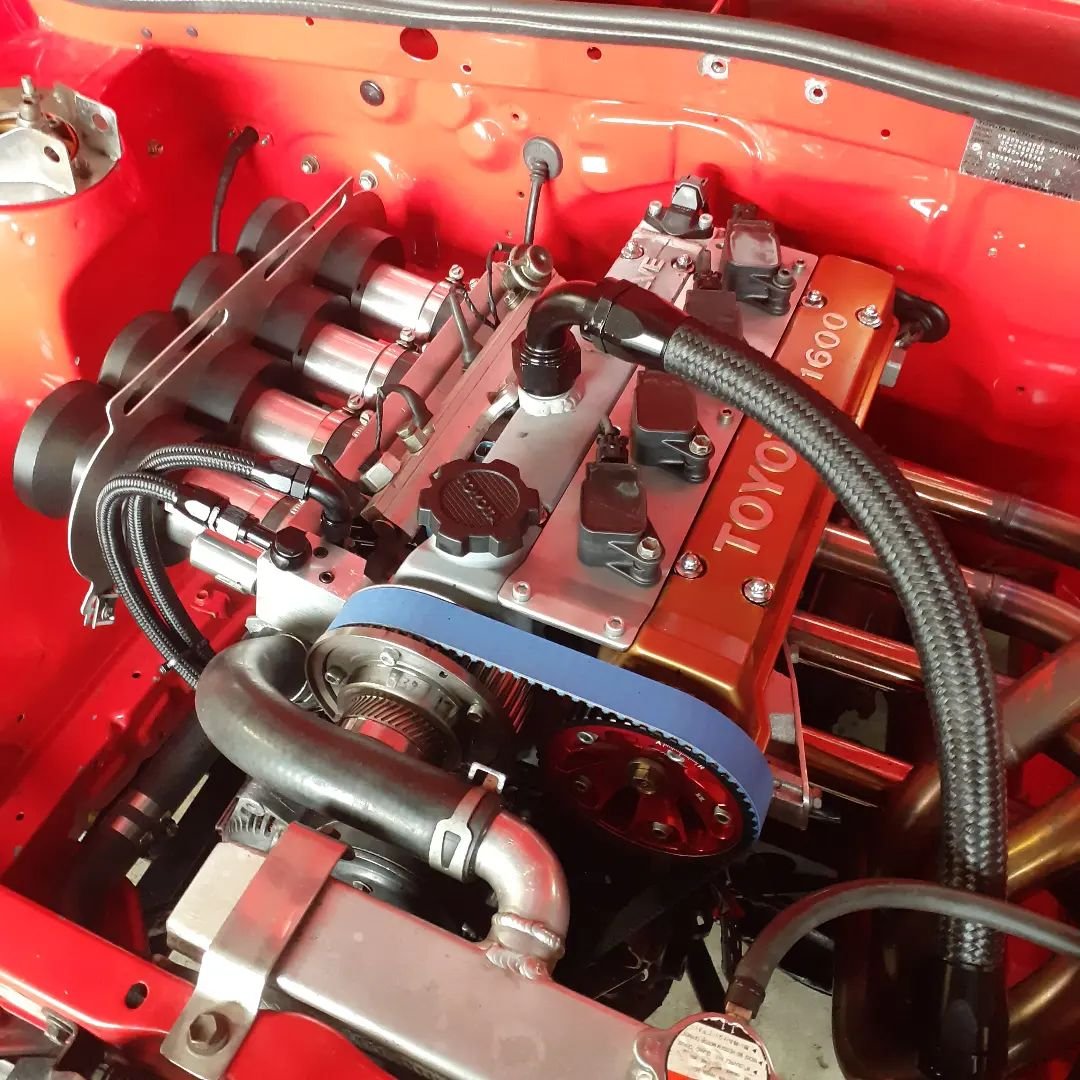
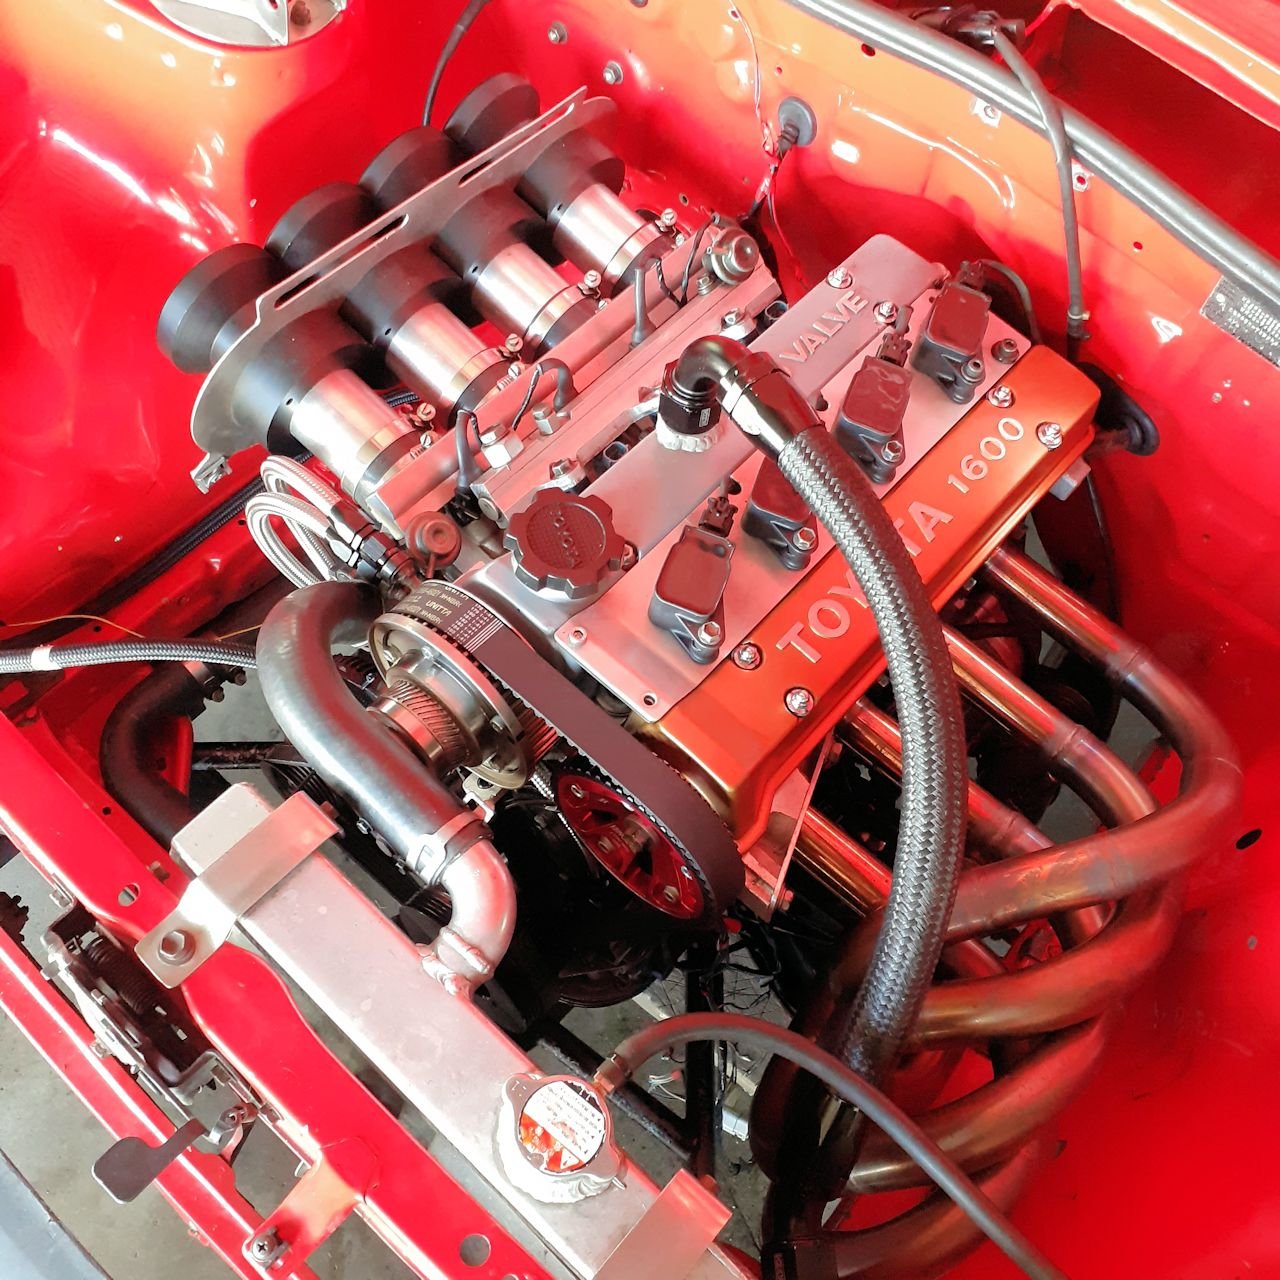
So, I'm onto version 2 of the vvti setup. main difference is the solenoid setup. the original setup I had the solenoid remote mounted. as was easier to do it that way and to confirm would all work. but ocd couldn't handle all the lines. more chances of leaks and stuff breaking. It had 4 lines. Pressure feed from engine, drain back to sump and 2 for advance/retard New setup eliminates the advance/retard lines. So just the 1 pressure line (feed from engine) and drain line to sump. yeah im still using the dipstick tube for the drain, ha. Solenoid now mounts in the block right by pulley and bolts to the other part. so all the advance retard ports and wizardry happens inside the ali blocks. Doesn't look too out of place. have done a small amount of run time with it. All looking good so far. Also moved the cam sensor. before it was hidden in the spark plug valley. but getting the clearance right was a pain, since the covers can move around side to side on the studs Now its on the top at back of cover. I had a little accident with the bran new genuine timing belt, so had to get this blue thing to get me going again.
24 points
-
So I failed at the first hurdle - has a bit more bump steer than the alignment man is happy with- it’s not terrible but border line passable. The rack conversion I have is meant to be zero bump steep but it seems the only bit I supplied is the issue - the mk1 Capri struts. Turns out there a multiple versions of bolt on steering arms for Capri/RS2000 and the version I have is the flattest/least drop.I did track down some tarmac steering arms online that look to be what I’m after but the left hand side is out of stock until next year. So instead of faffing around trying to get hold of second hand steering arms that might work the alignment man has decided to make a start on sorting out rose jointed ends so he can dial out all bump steer- he’s got the tidiest mk1 Escort I’ve seen in a long time so I can’t really argue! Have still been driving her a little bit, went to the Rotorua swap meet/mud fest this morning and picked up a neat mint rear boot badge. Got carried away on cleaning afterward, washed, clay barred, polished and waxed. Not a bed way to spend a rainy afternoon- should invest in a DA rather than doing it by hand though. Hopefully not too far off getting the steering sorted and the on to cert.
15 points
-
After running the engine a few times I now know a thing: will the bike waterpump cope? No, not at idle at least. Not surprising though, it's a tiny thing trying to push water a long way. So the first revision is to ditch the mechanical pump for one of these. The controller adjusts flow based on temp so I can remove my thermostats and therefore some complexity from my setup. I still need to remove the mechanical pump and plumb the new one in once I find a good spot for it. As for the other unknowns, the new pump will help test the radiator and assist the air bleeding which looked promising i.e. roof hose was warm. On to other important issues, how to listen to 'NZ Hiphop Bangers Only' when parked (it will probably be too noisy to hear the intro to Deceptikonz Fallen Angels when driving). I am keeping the factory radio but wanted something with modern connectivity, basically an amp, speakers and a bluetooth connection. I bought this little Alpine 3516 amp, swapped the din plug for some rca inputs on the side, picked up some Pioneer TS-X5 speakers as they were the only ones that I could see that would fit on the tiny parcel shelf and finally a Fusion marine BT unit. Goes ok for what it is.15 points
-
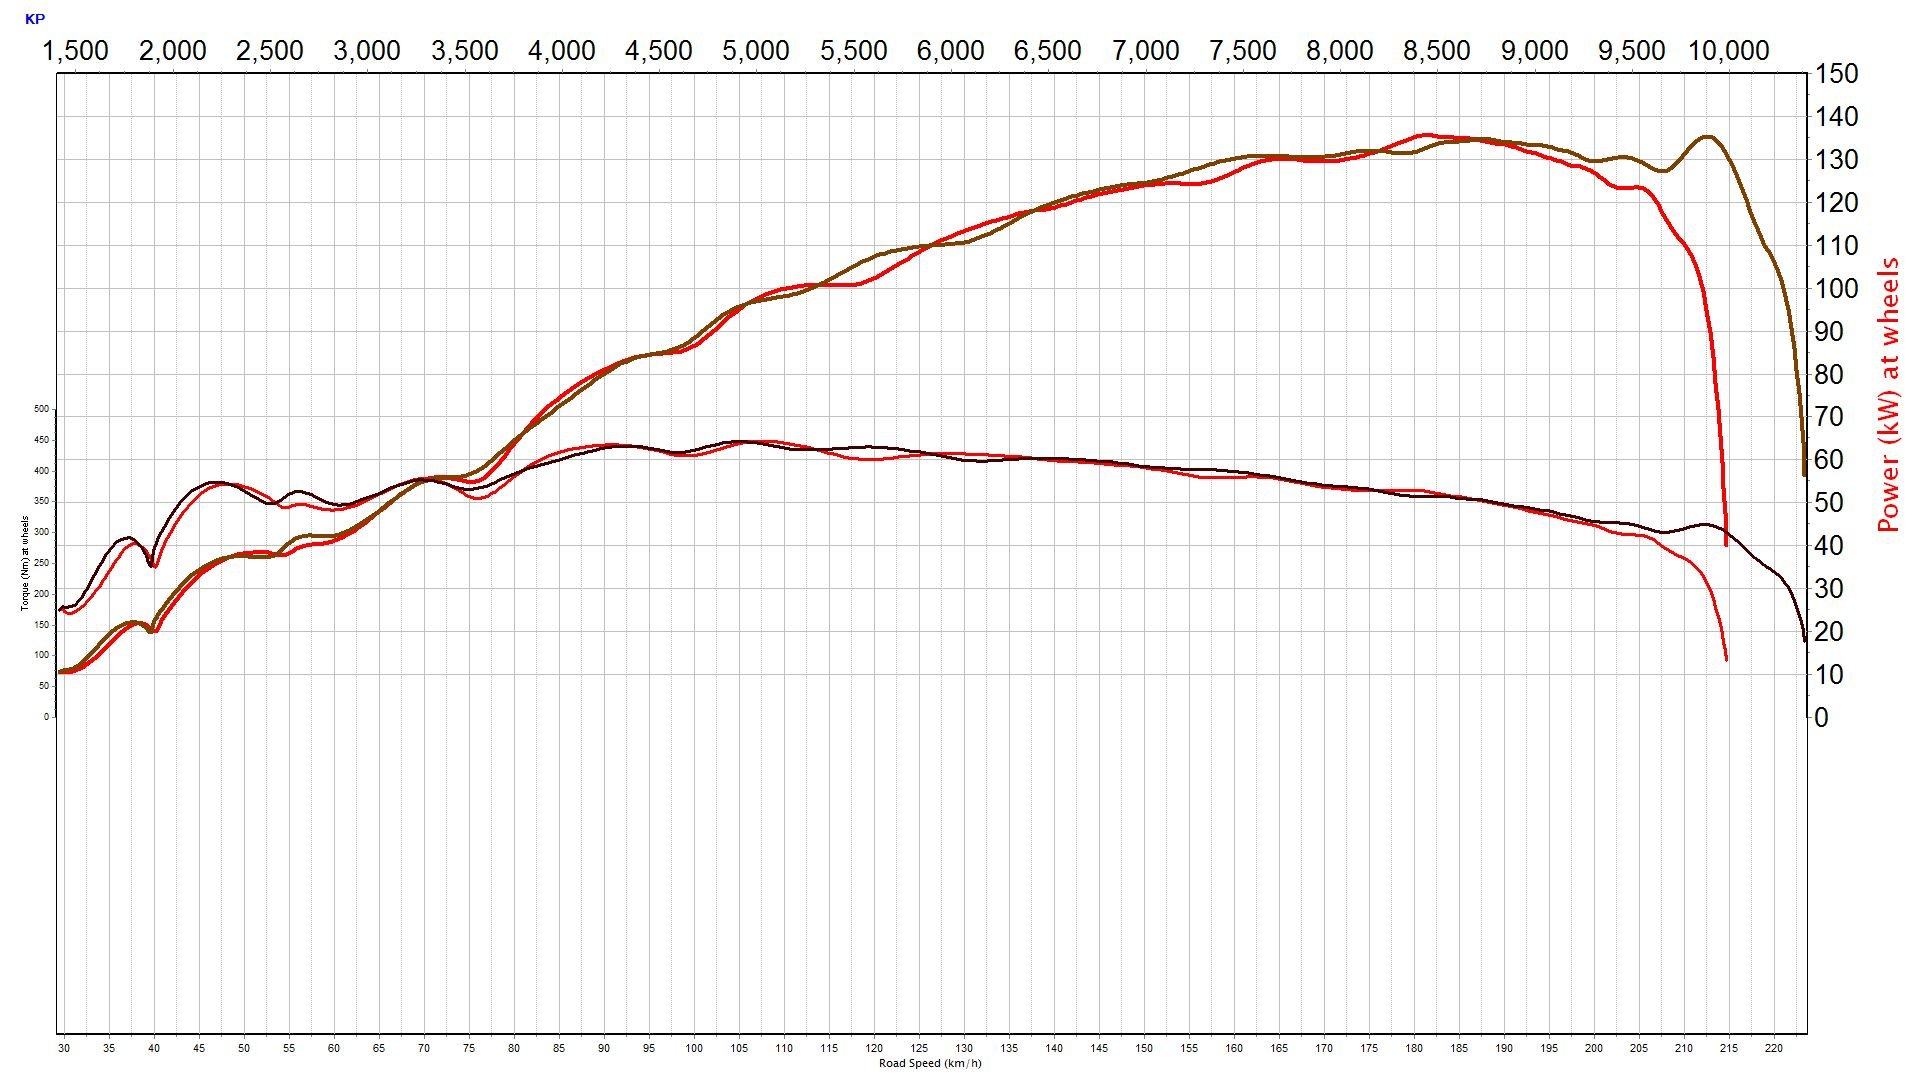
Can someone tell me if this a normal amount of smoke for a 4age? seems about right to me? 10200rpm on stock 2nd hand oil pump and 300,000k pistons/rings and crank. seems like the winning combo Yeah it really needs to come out. but want to put some run time on the vvti setup. Had a little play with some shorter intake runners. looses the peak off the top as expected, if just jam them on. same deal as with fixed timing. but after tuning the vvti, was able to pretty much match the peak of the longer runners and gain power after peak. Holding on real well right out to 10k with the little 193b cams. Looking good for the end game setup red is normal intake runner length dark brown is 40mm shorter - ignore bump at end of run dyno tends to have a frizz up there at that road speed. Both with vvti dialed in.
12 points
-
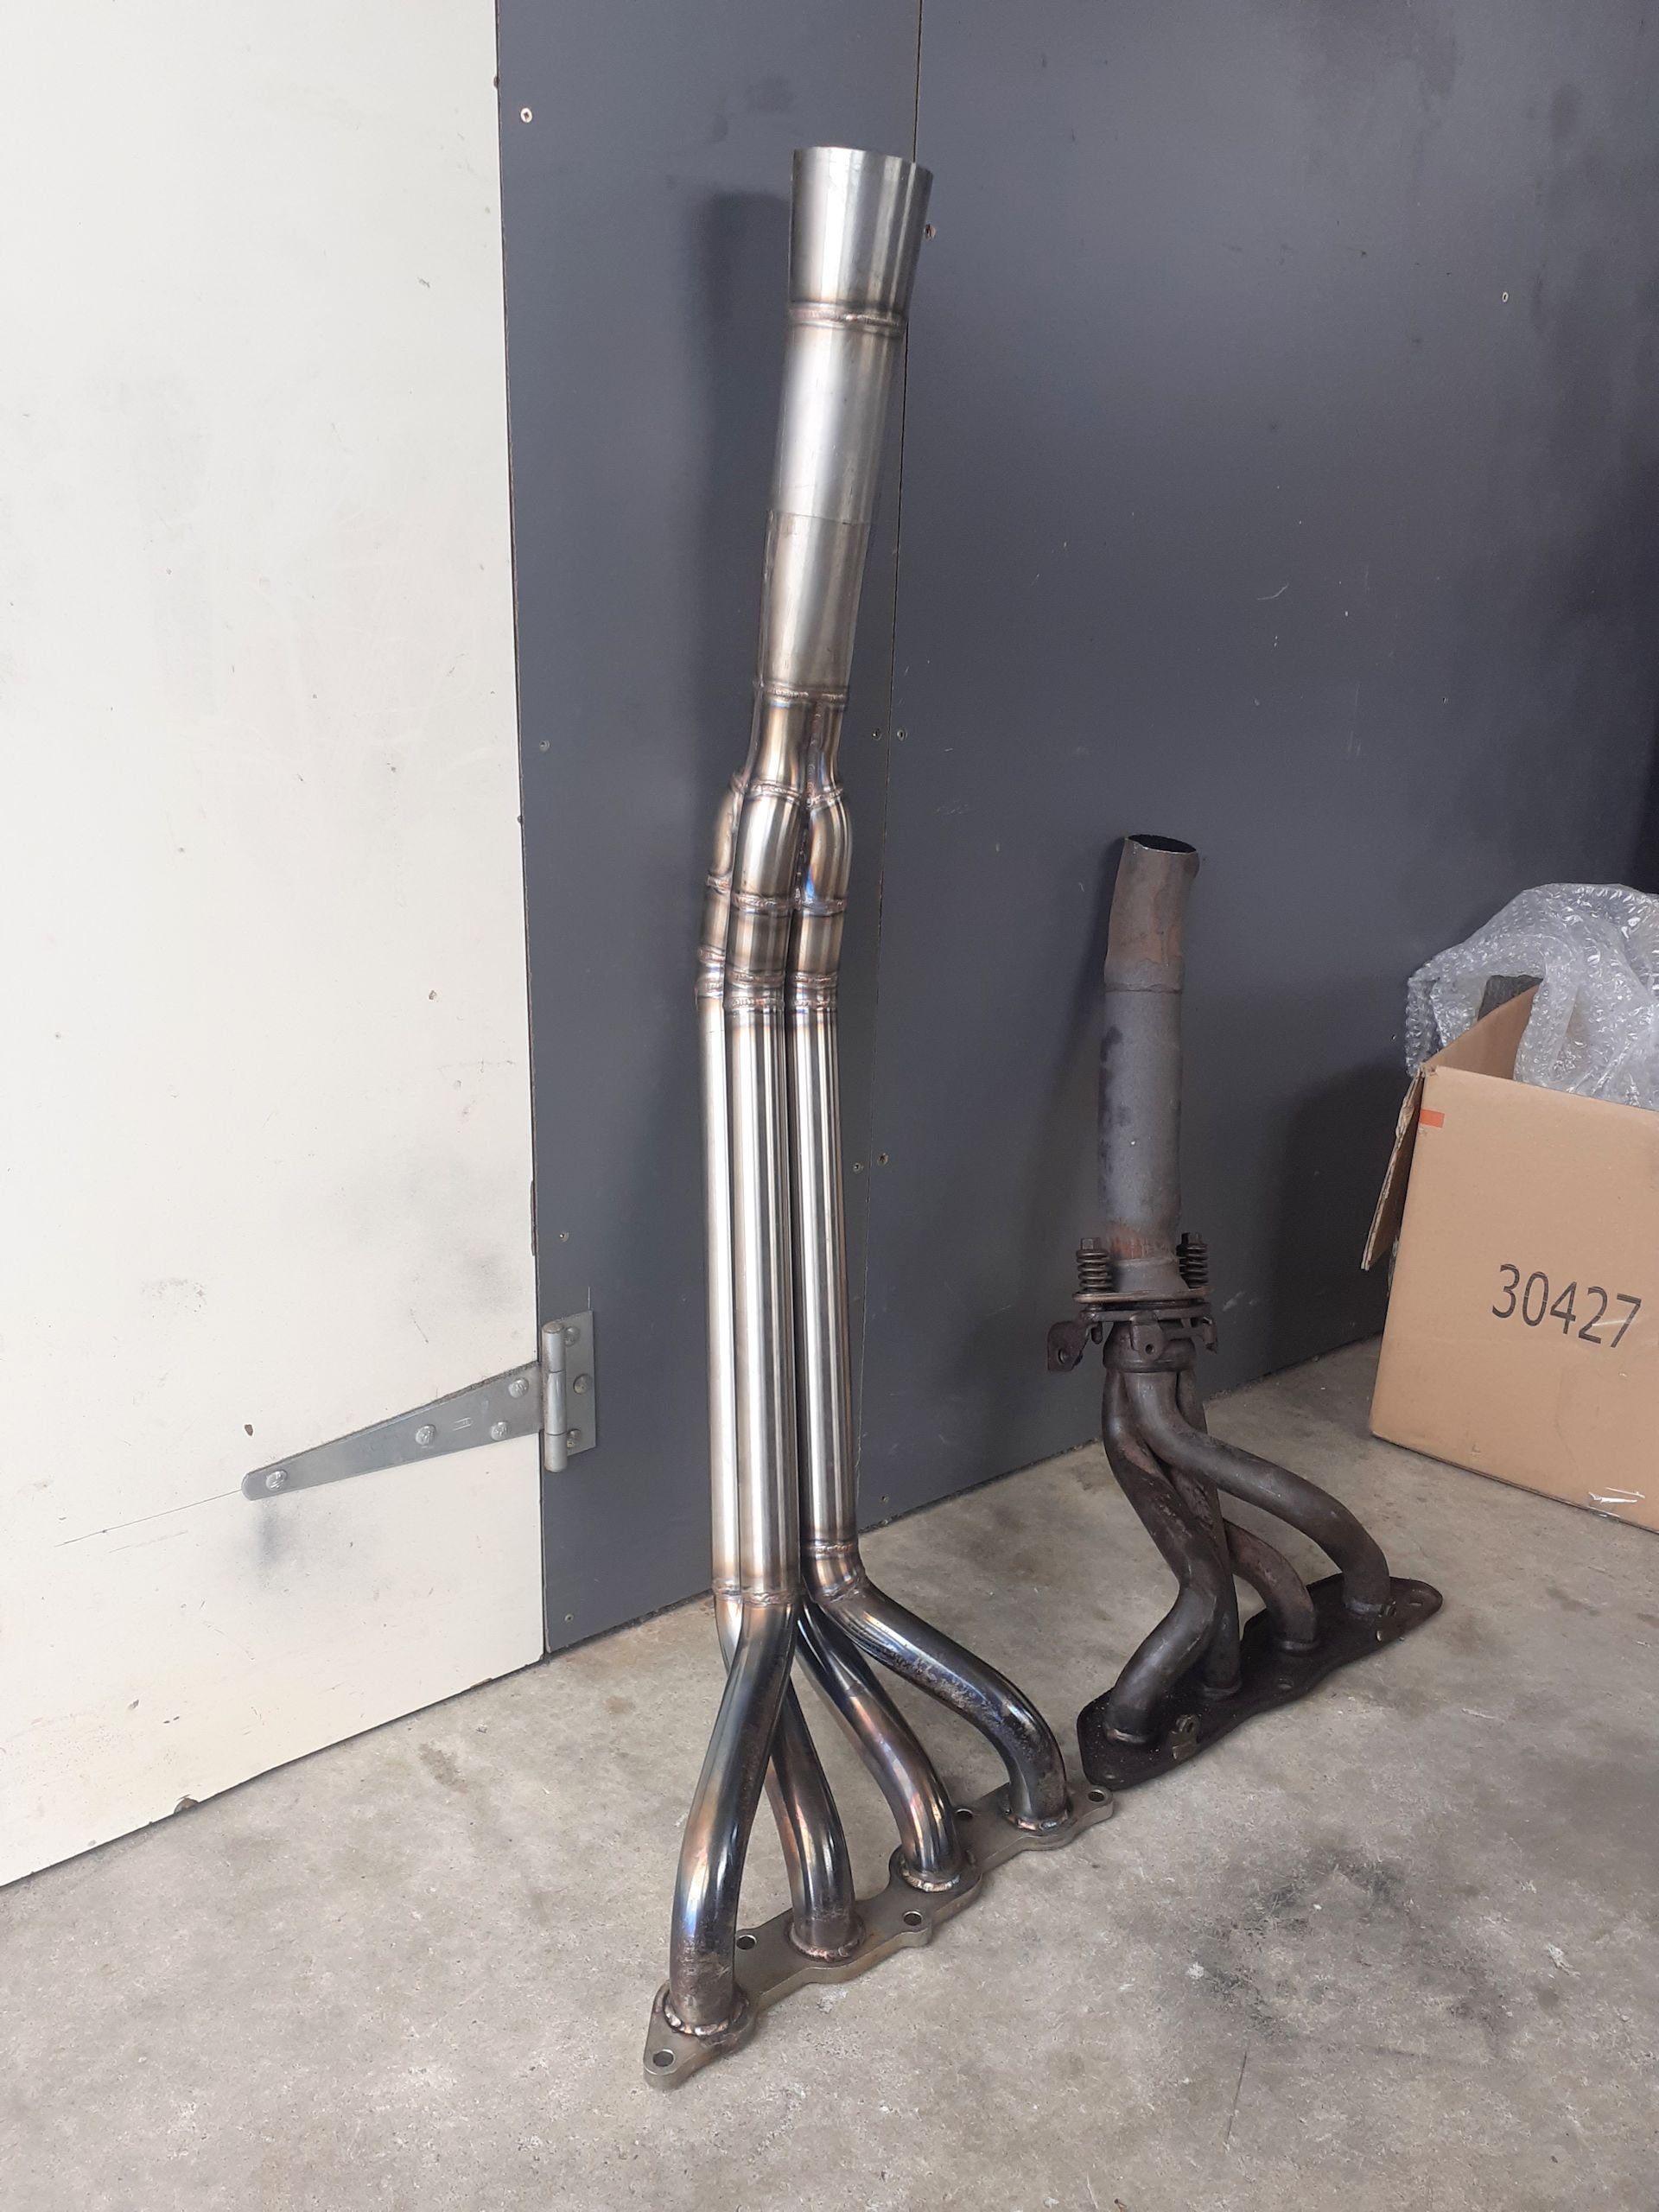
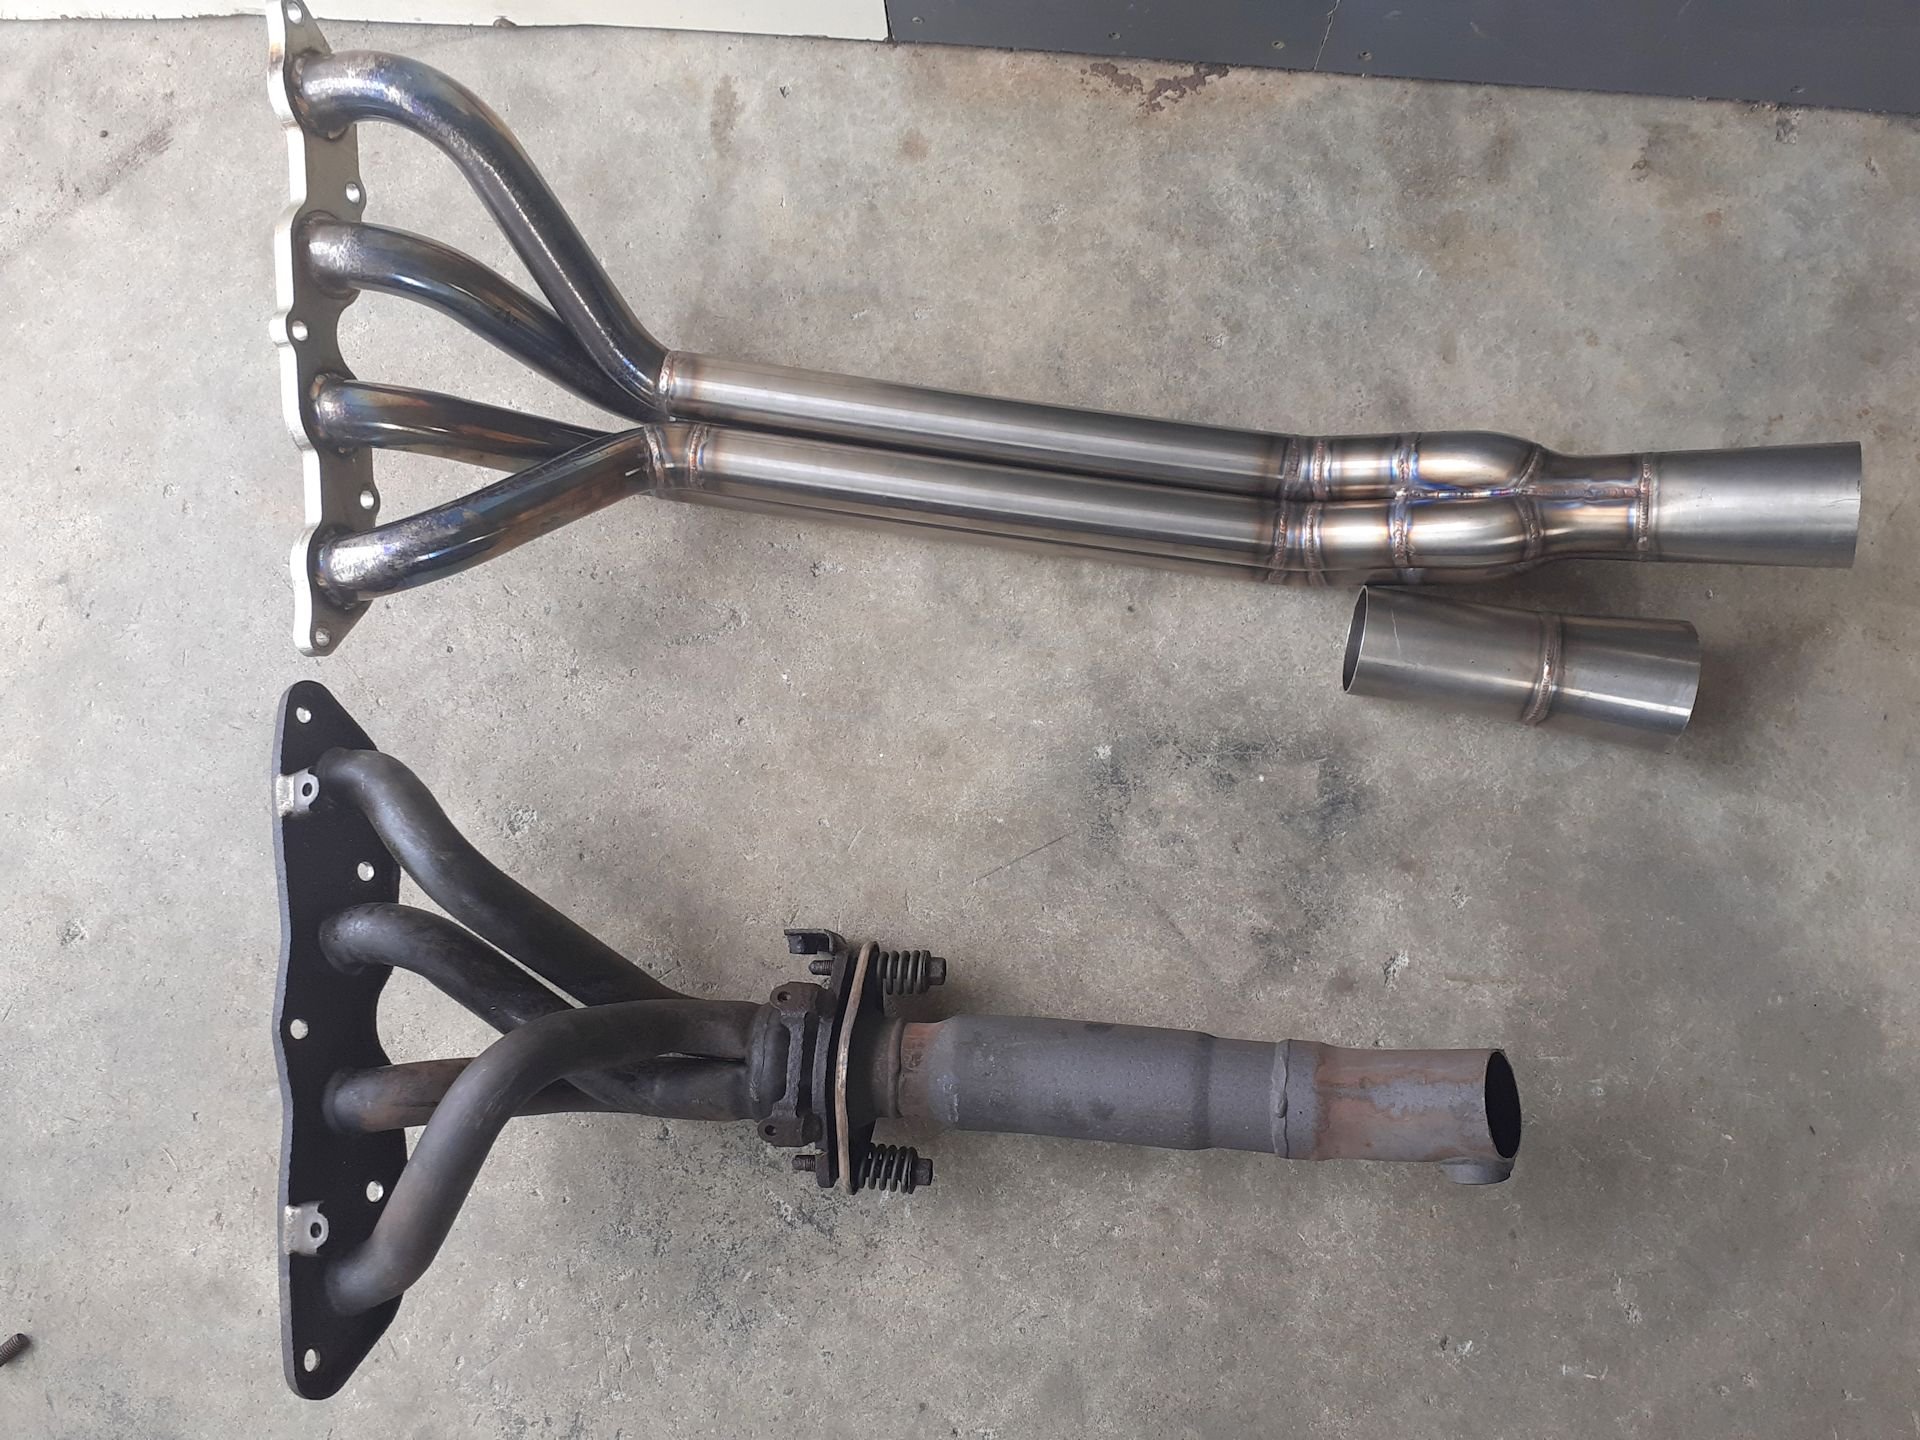
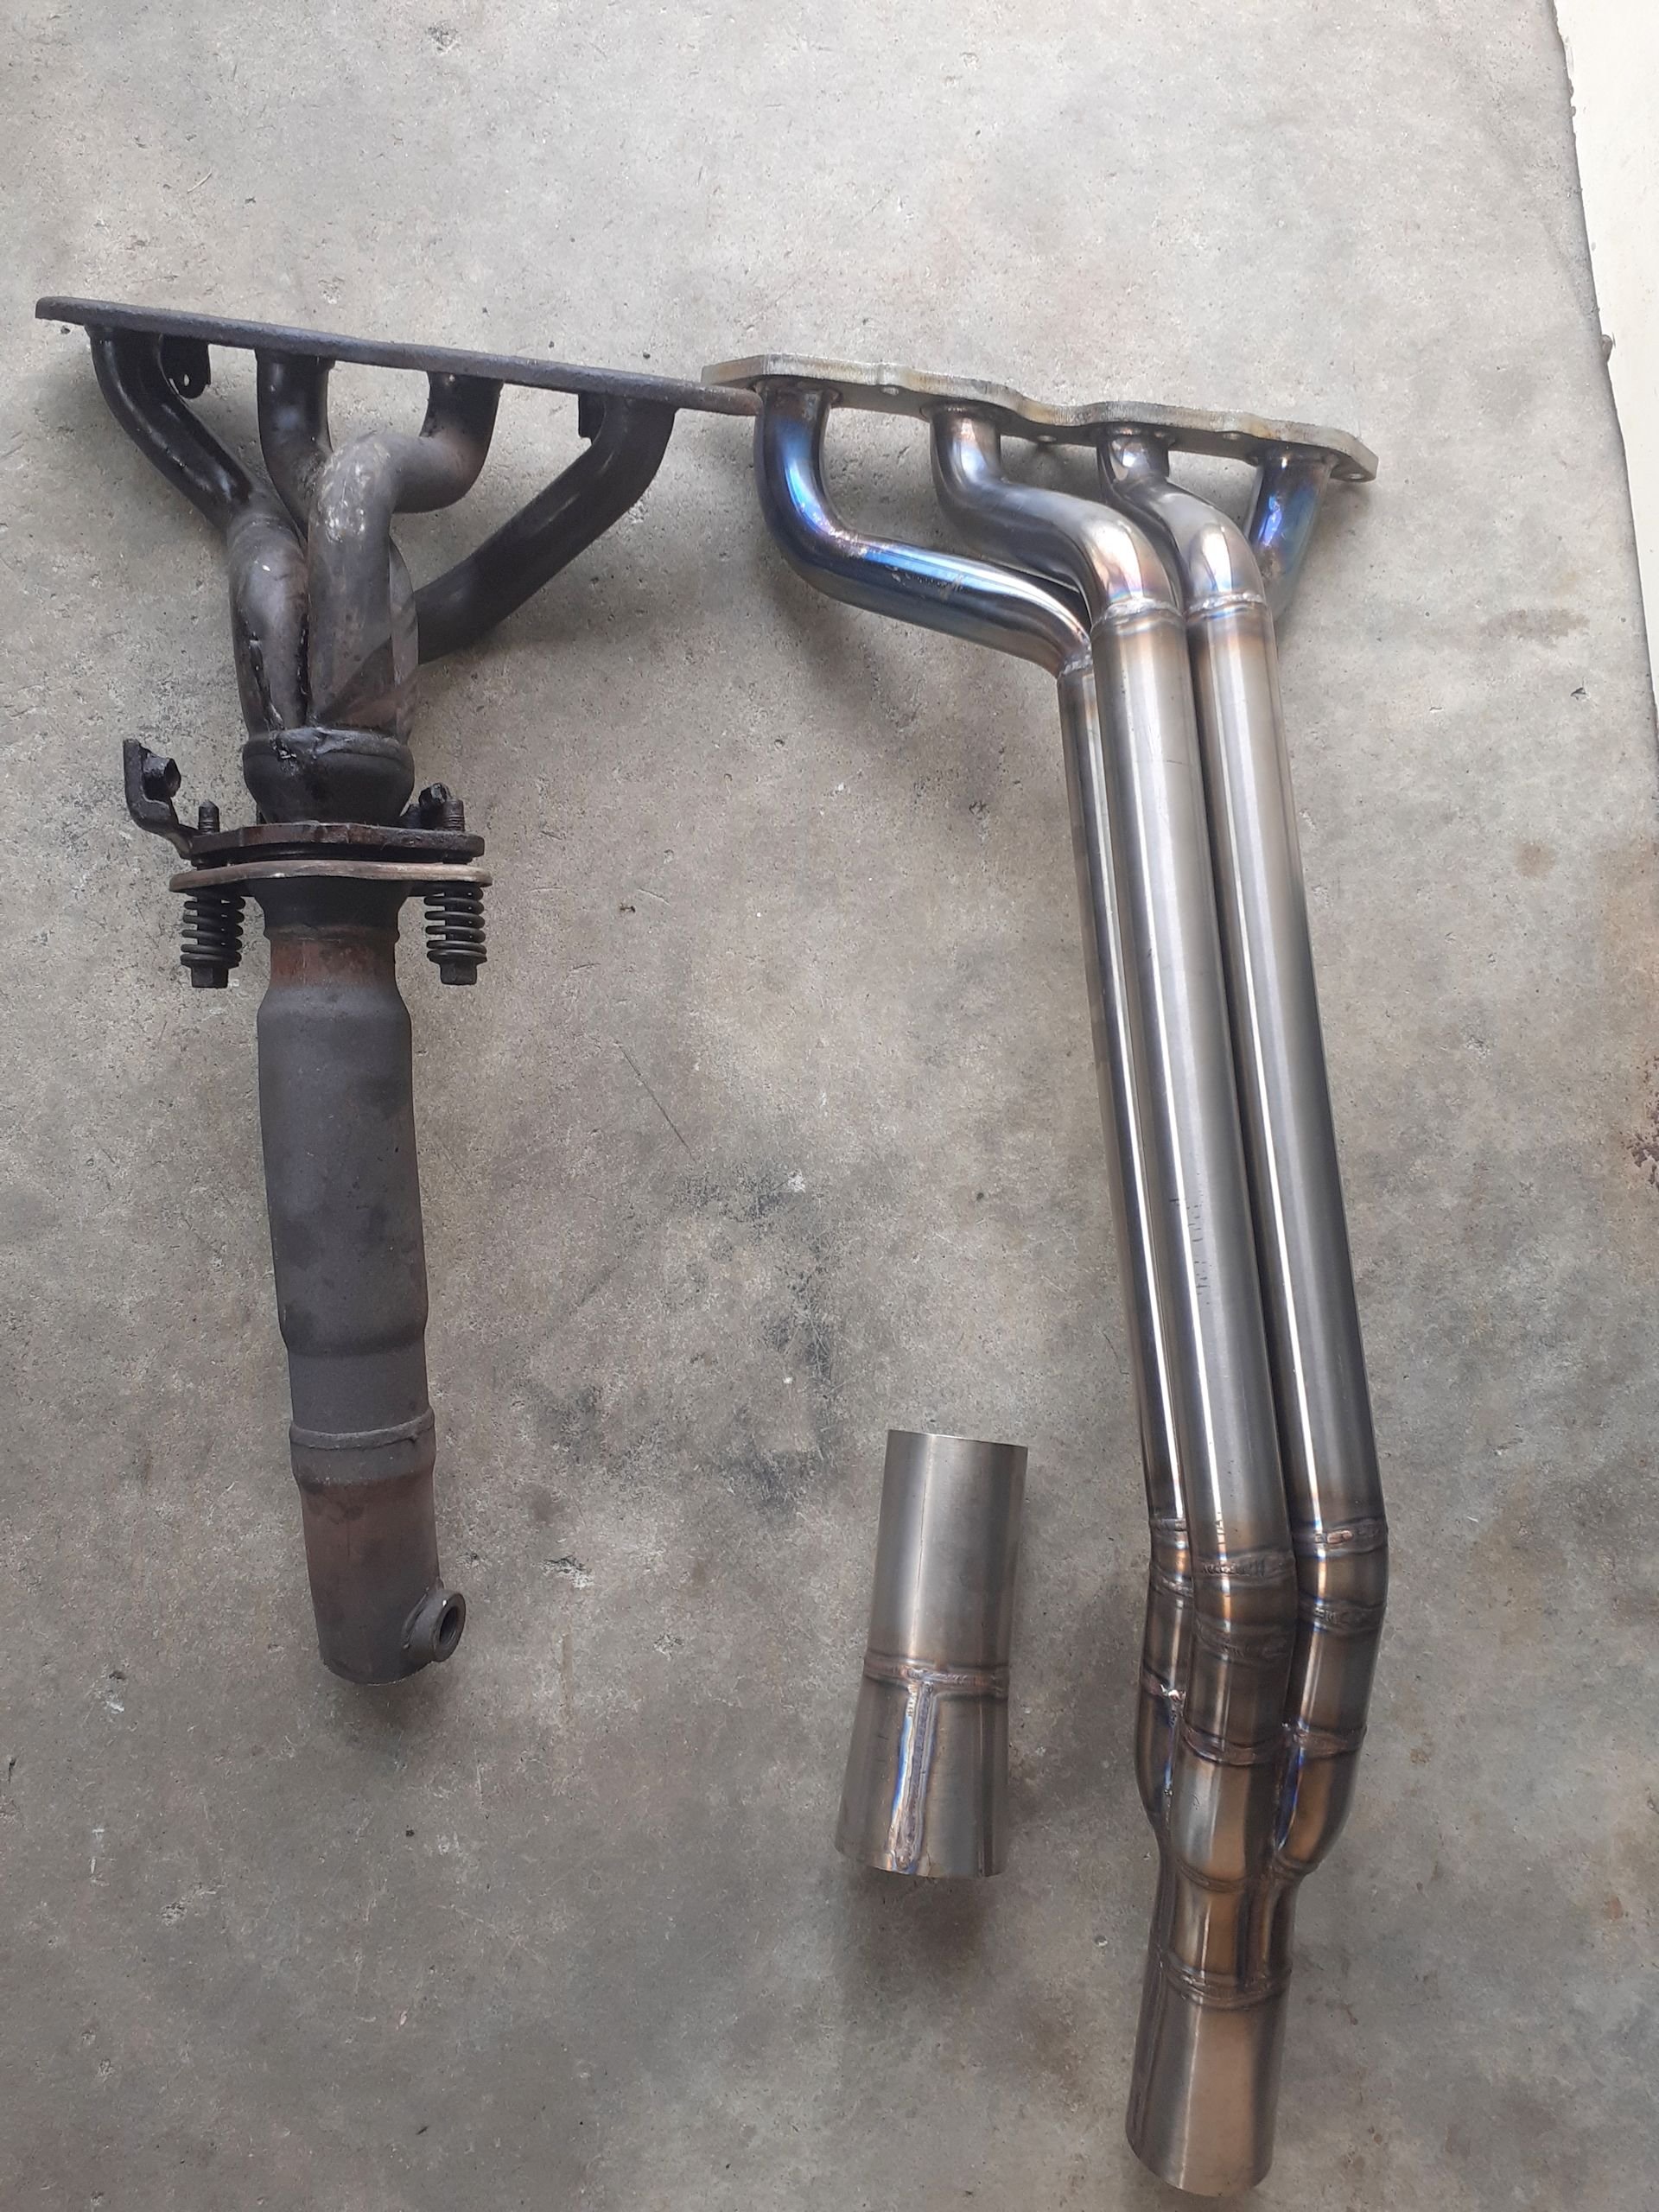
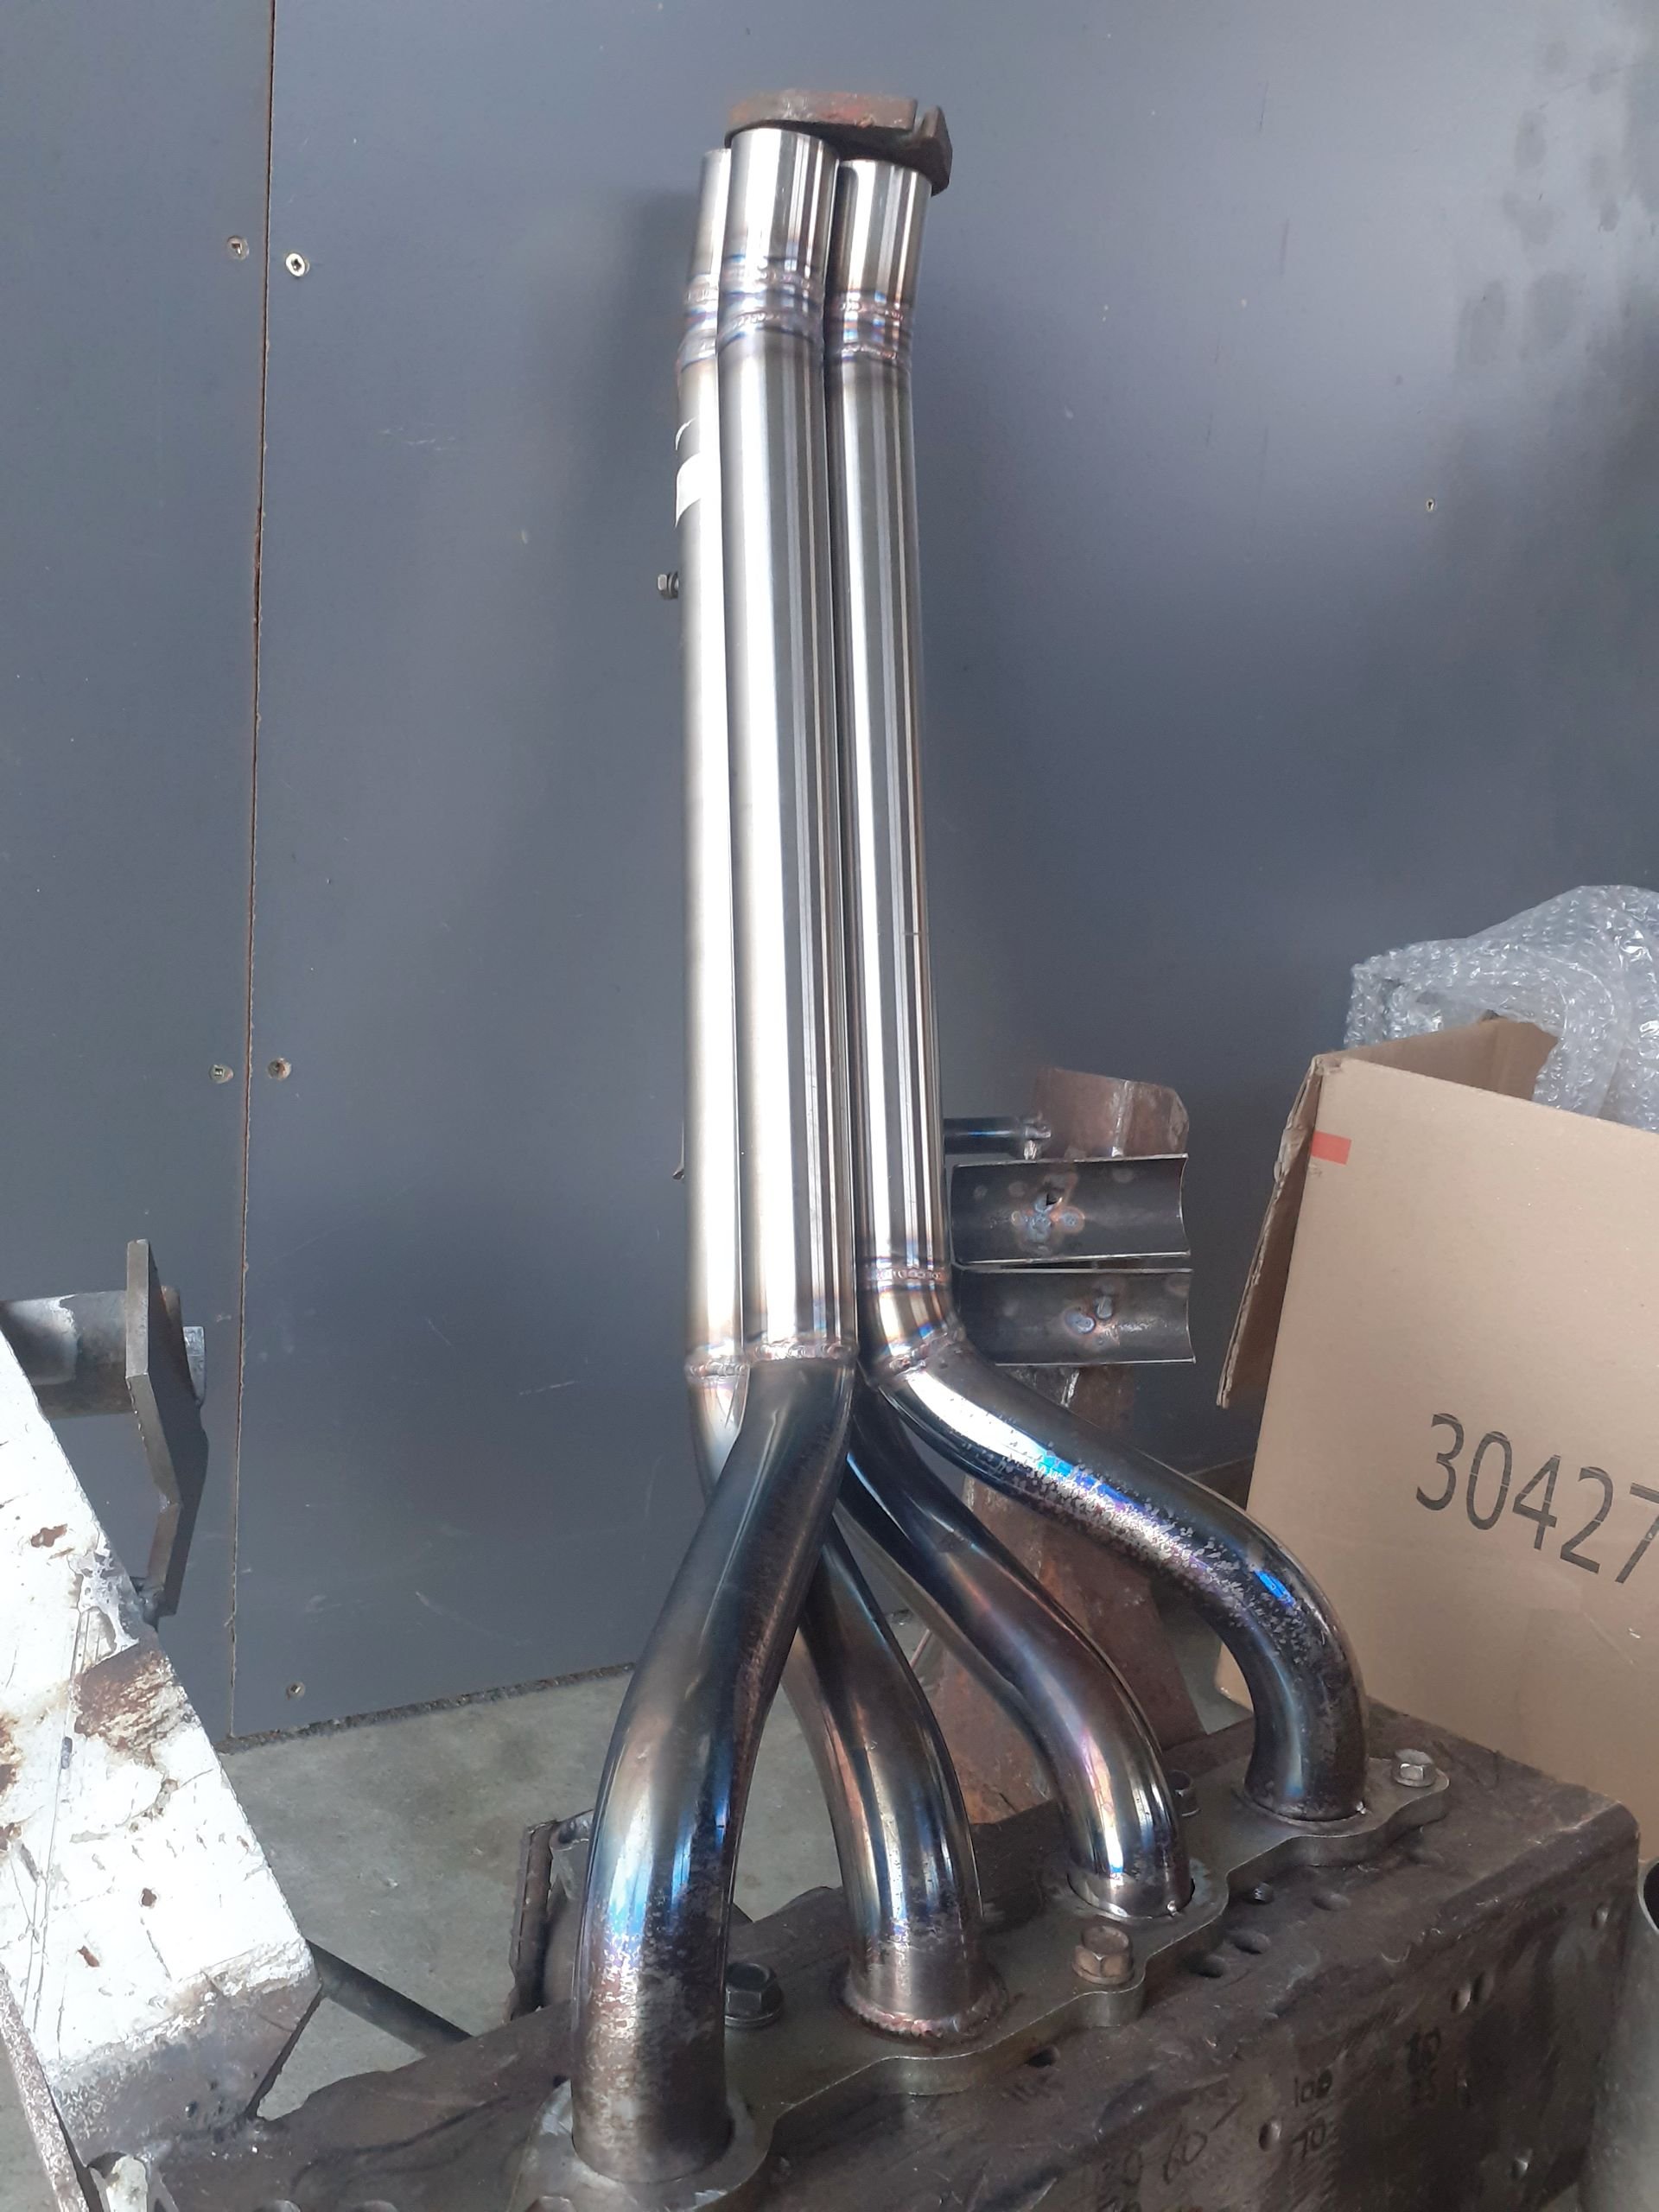
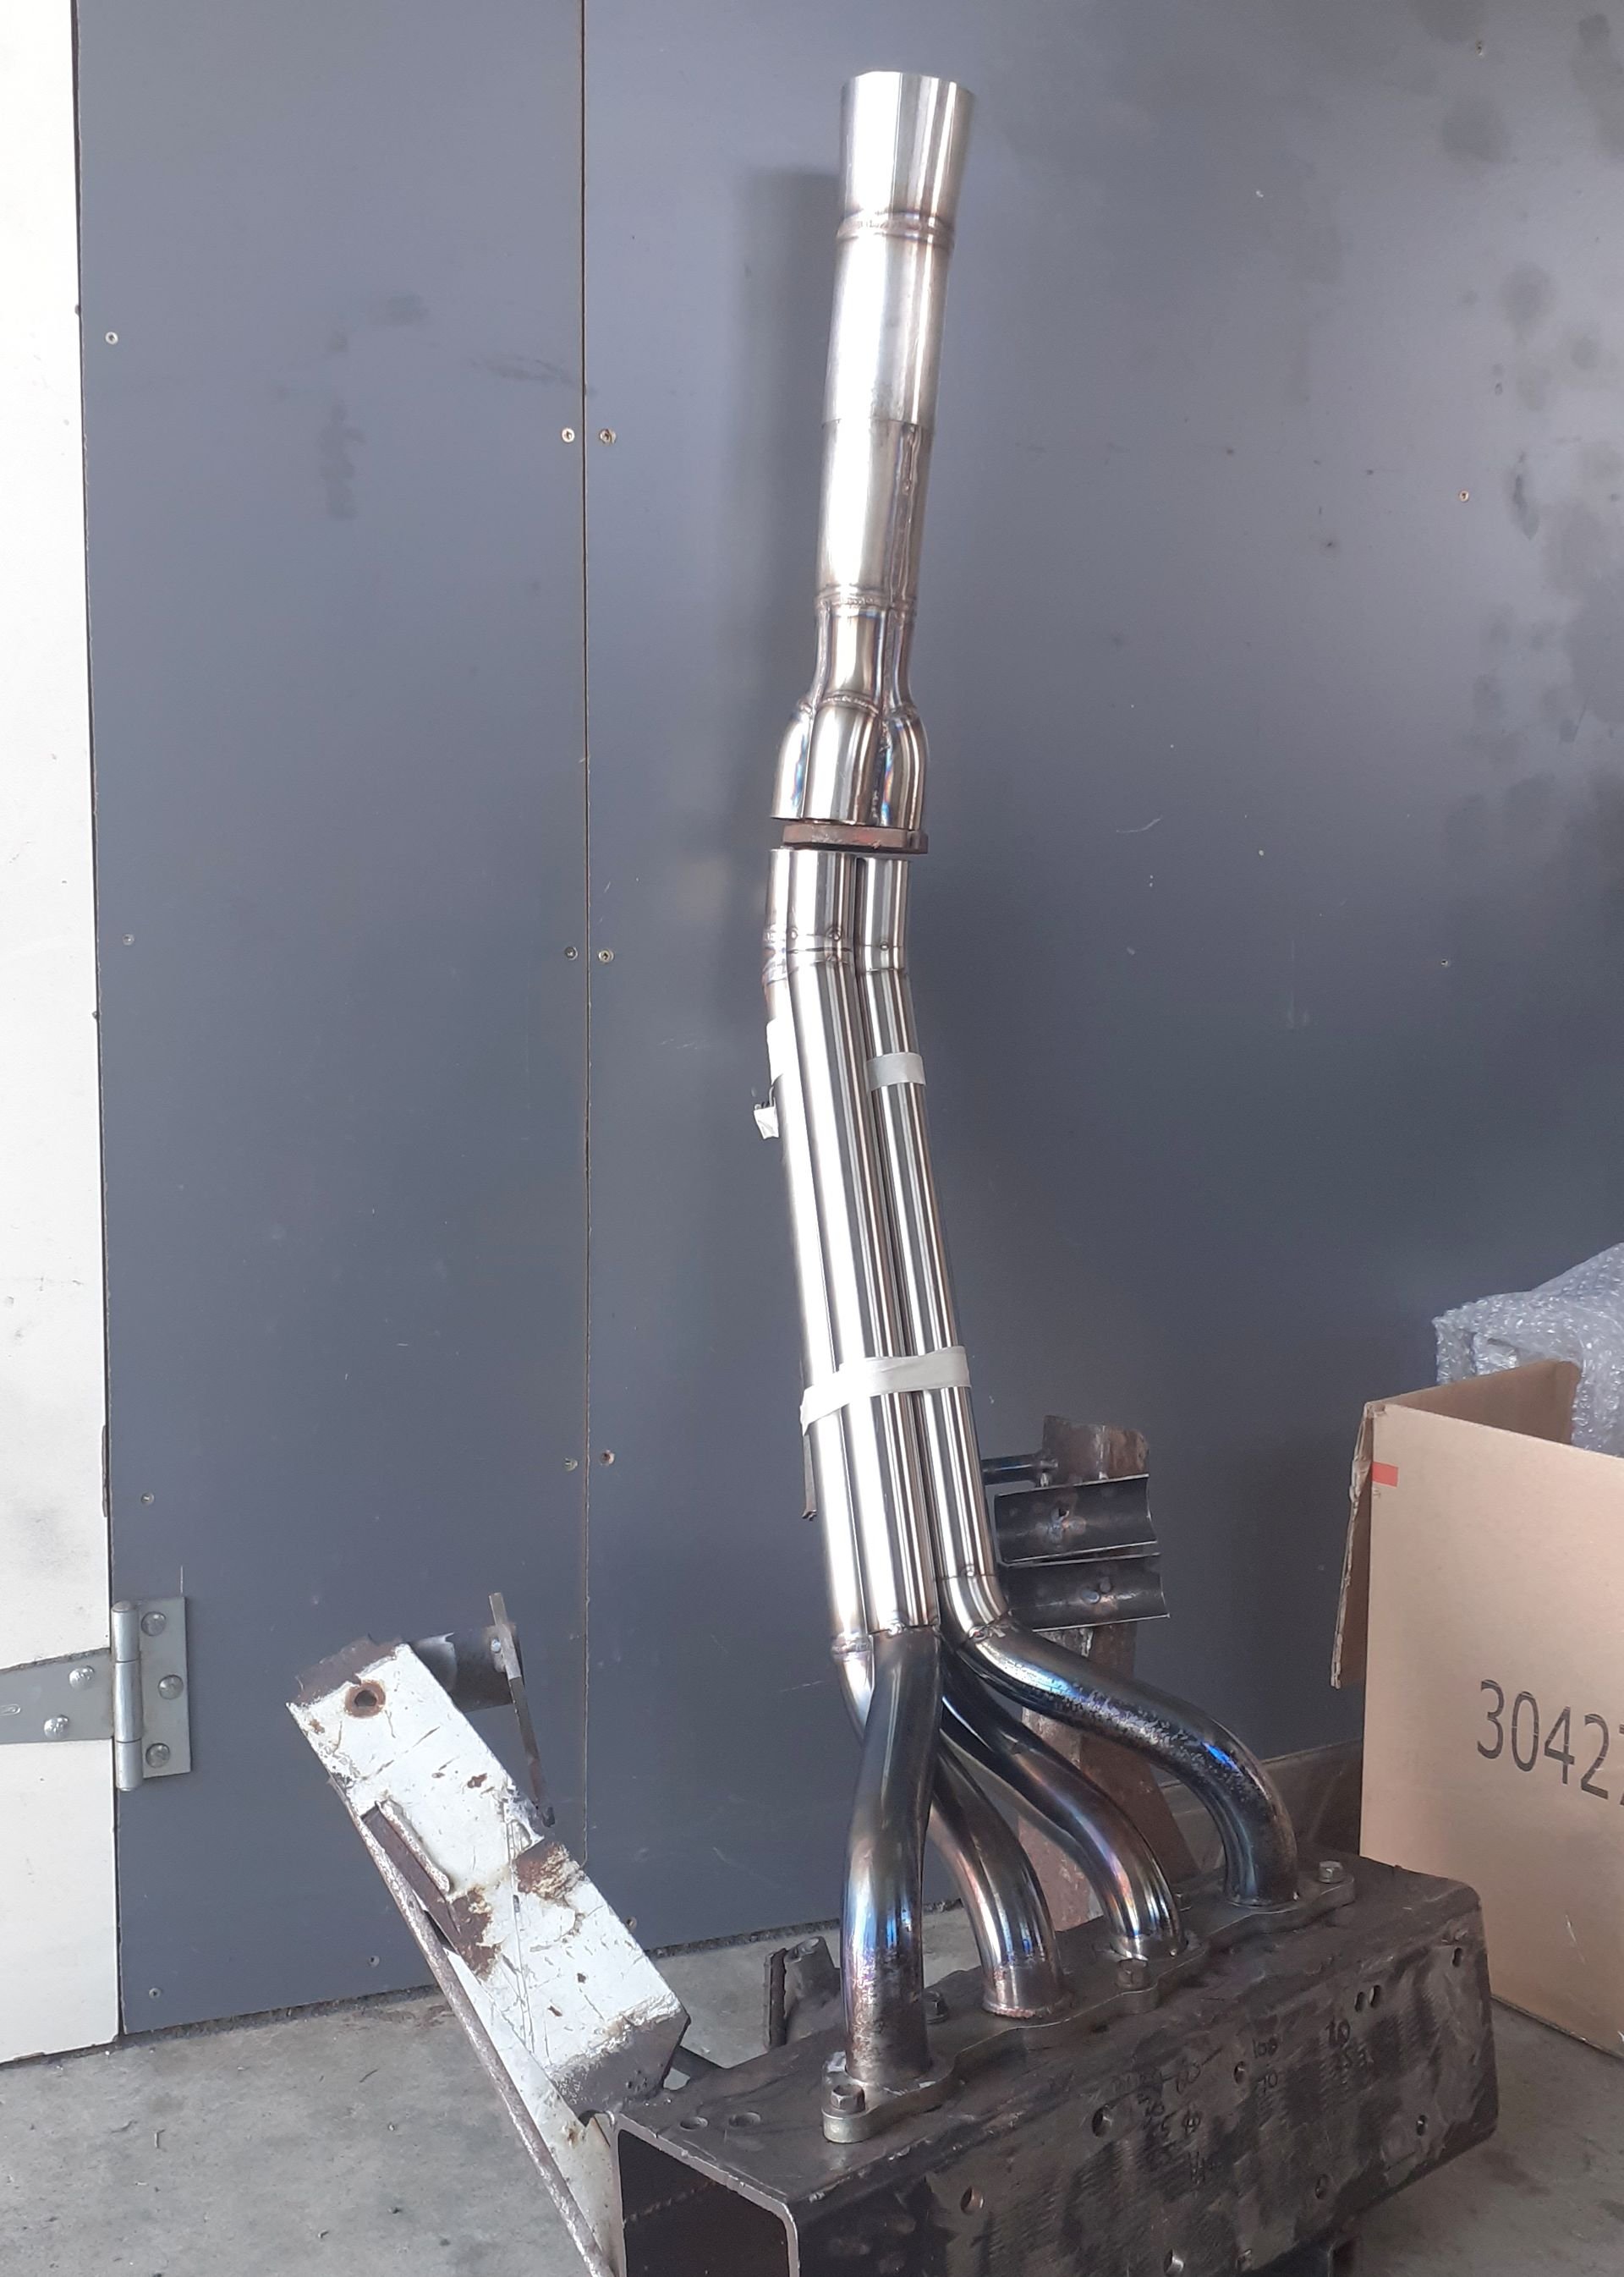
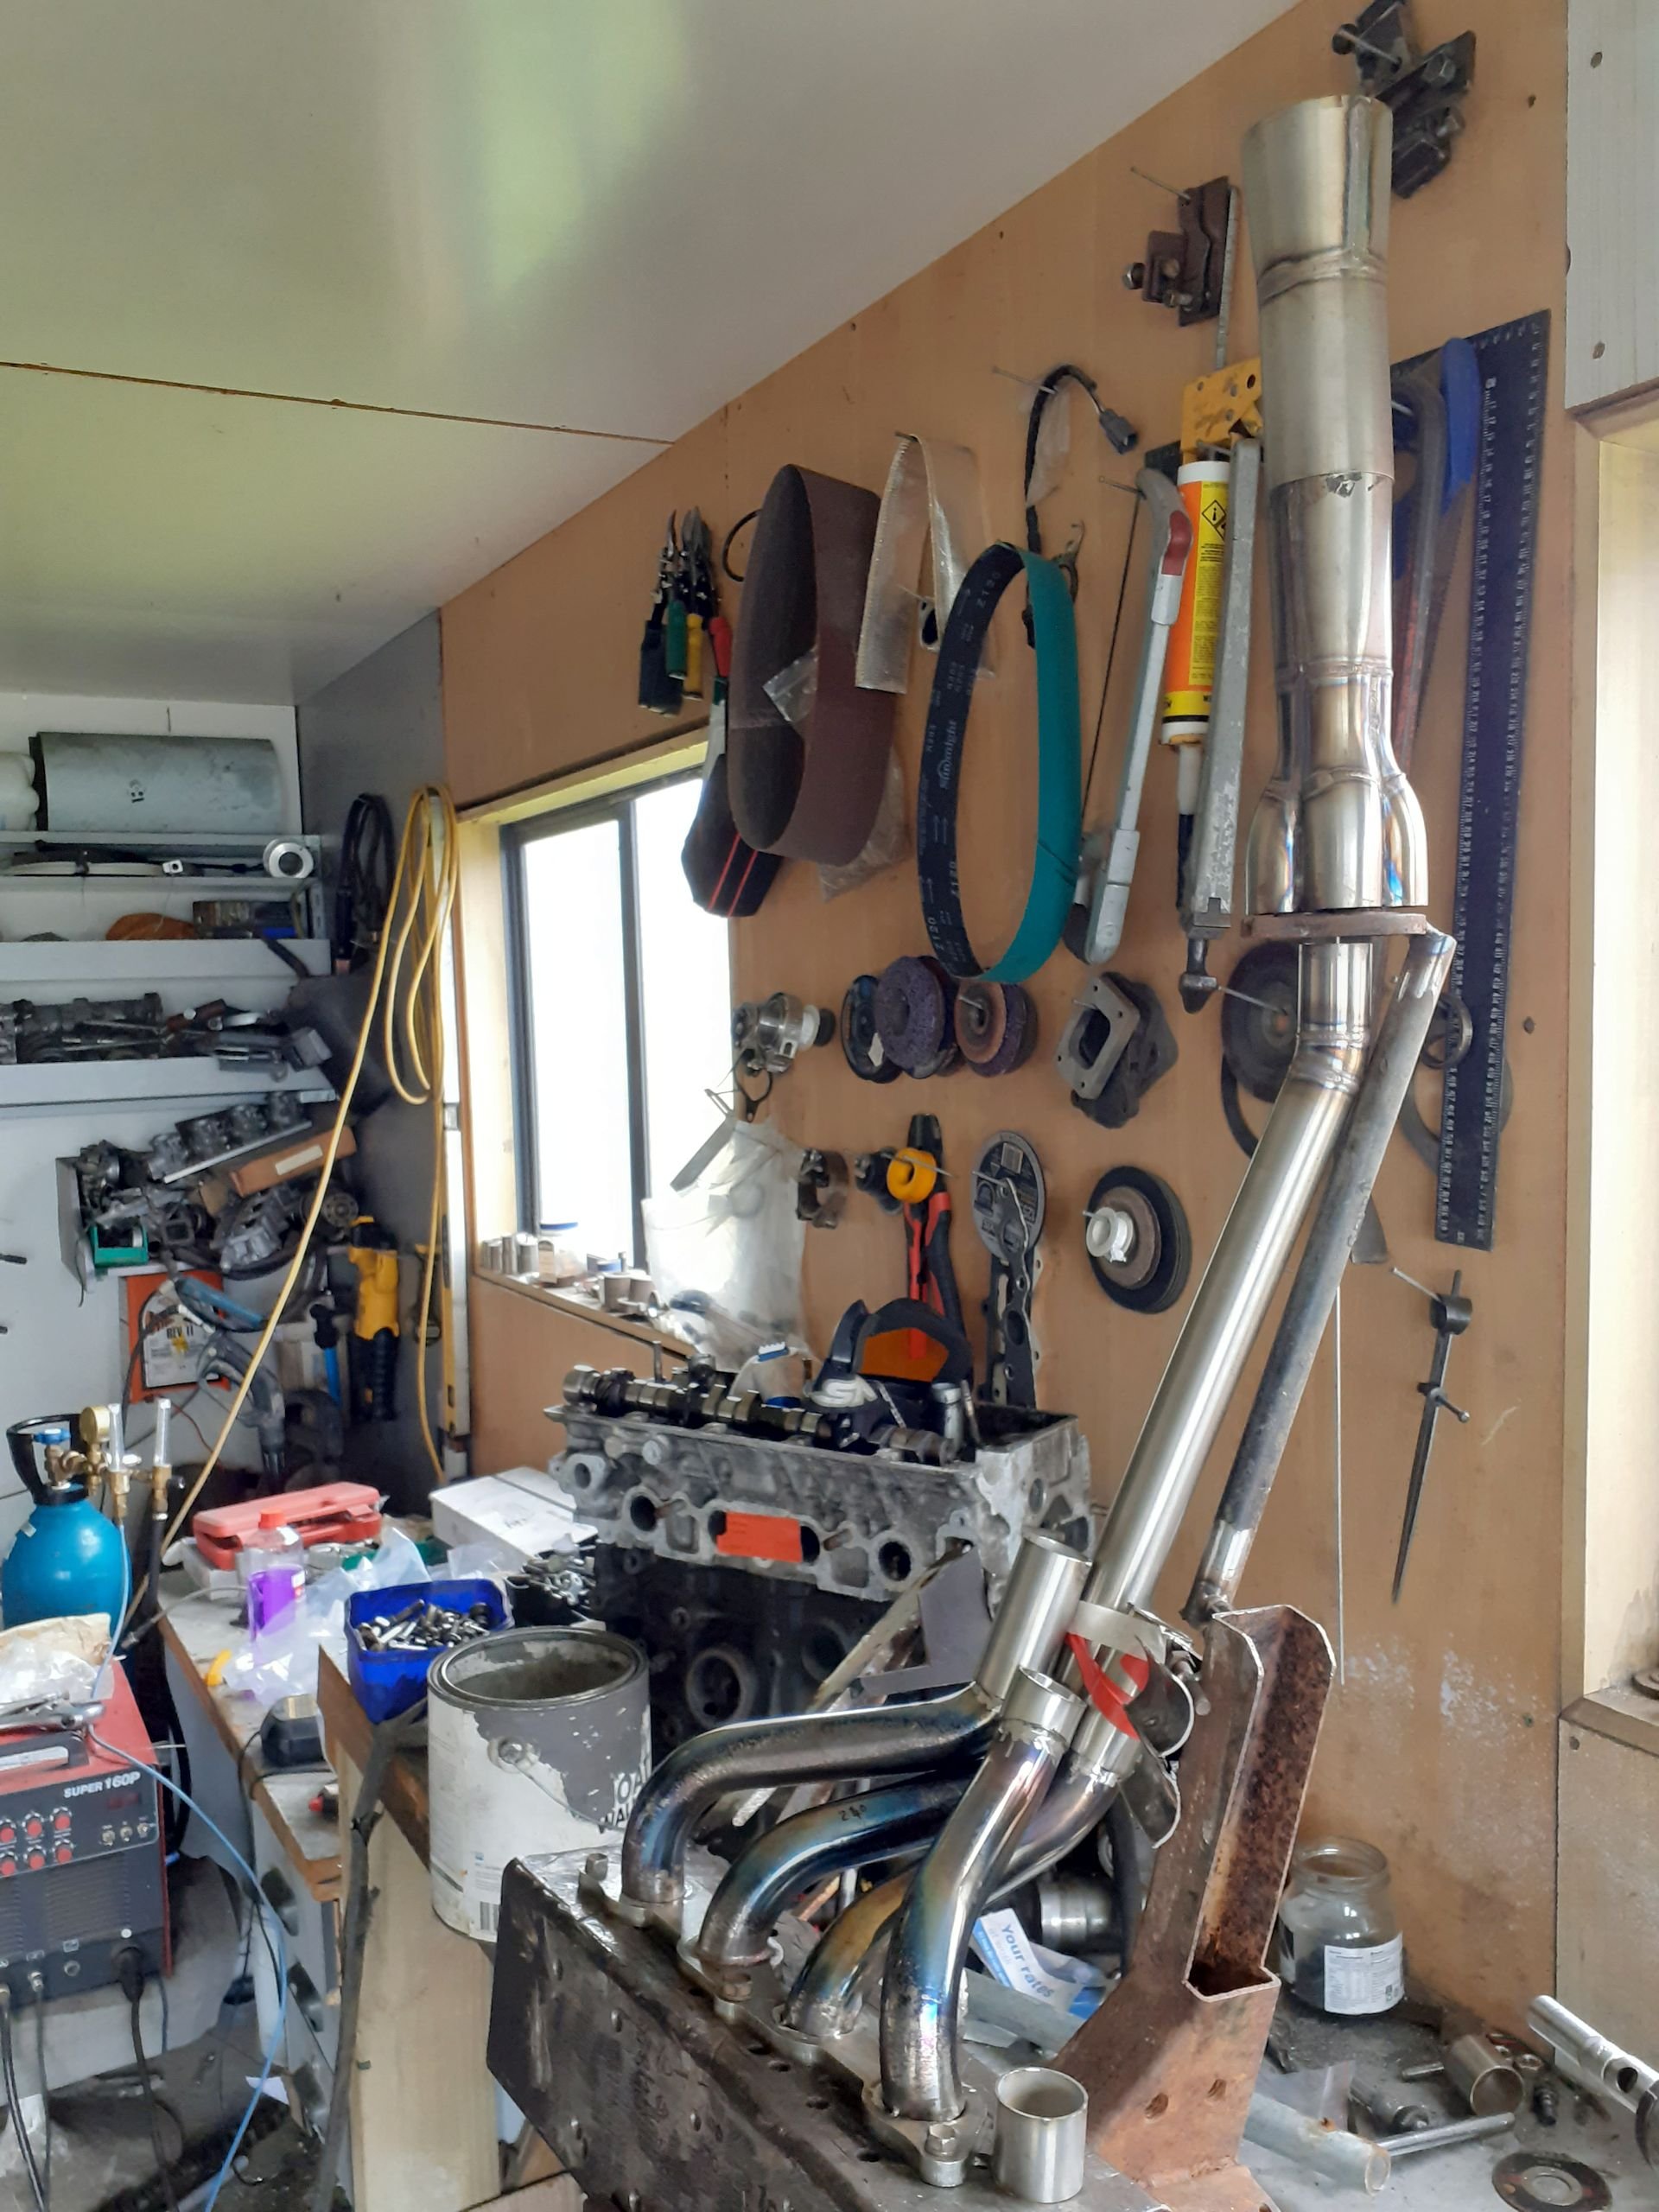
Far out. I can honestly say I never thought I'd have a fabricated exhaust manifold of this quality, on ANY car, and I certainly never imagined I'd have one like this on the Echo haha. Cant express how awesome this is. Cant wait to get it finished and fired up!12 points
-
yep runners made and welded. that was the easy bit, about 3 hours work. there is over a day just in the collector. just gotta weld runners to flange and stick the collector on and hope they fit haha
11 points
-
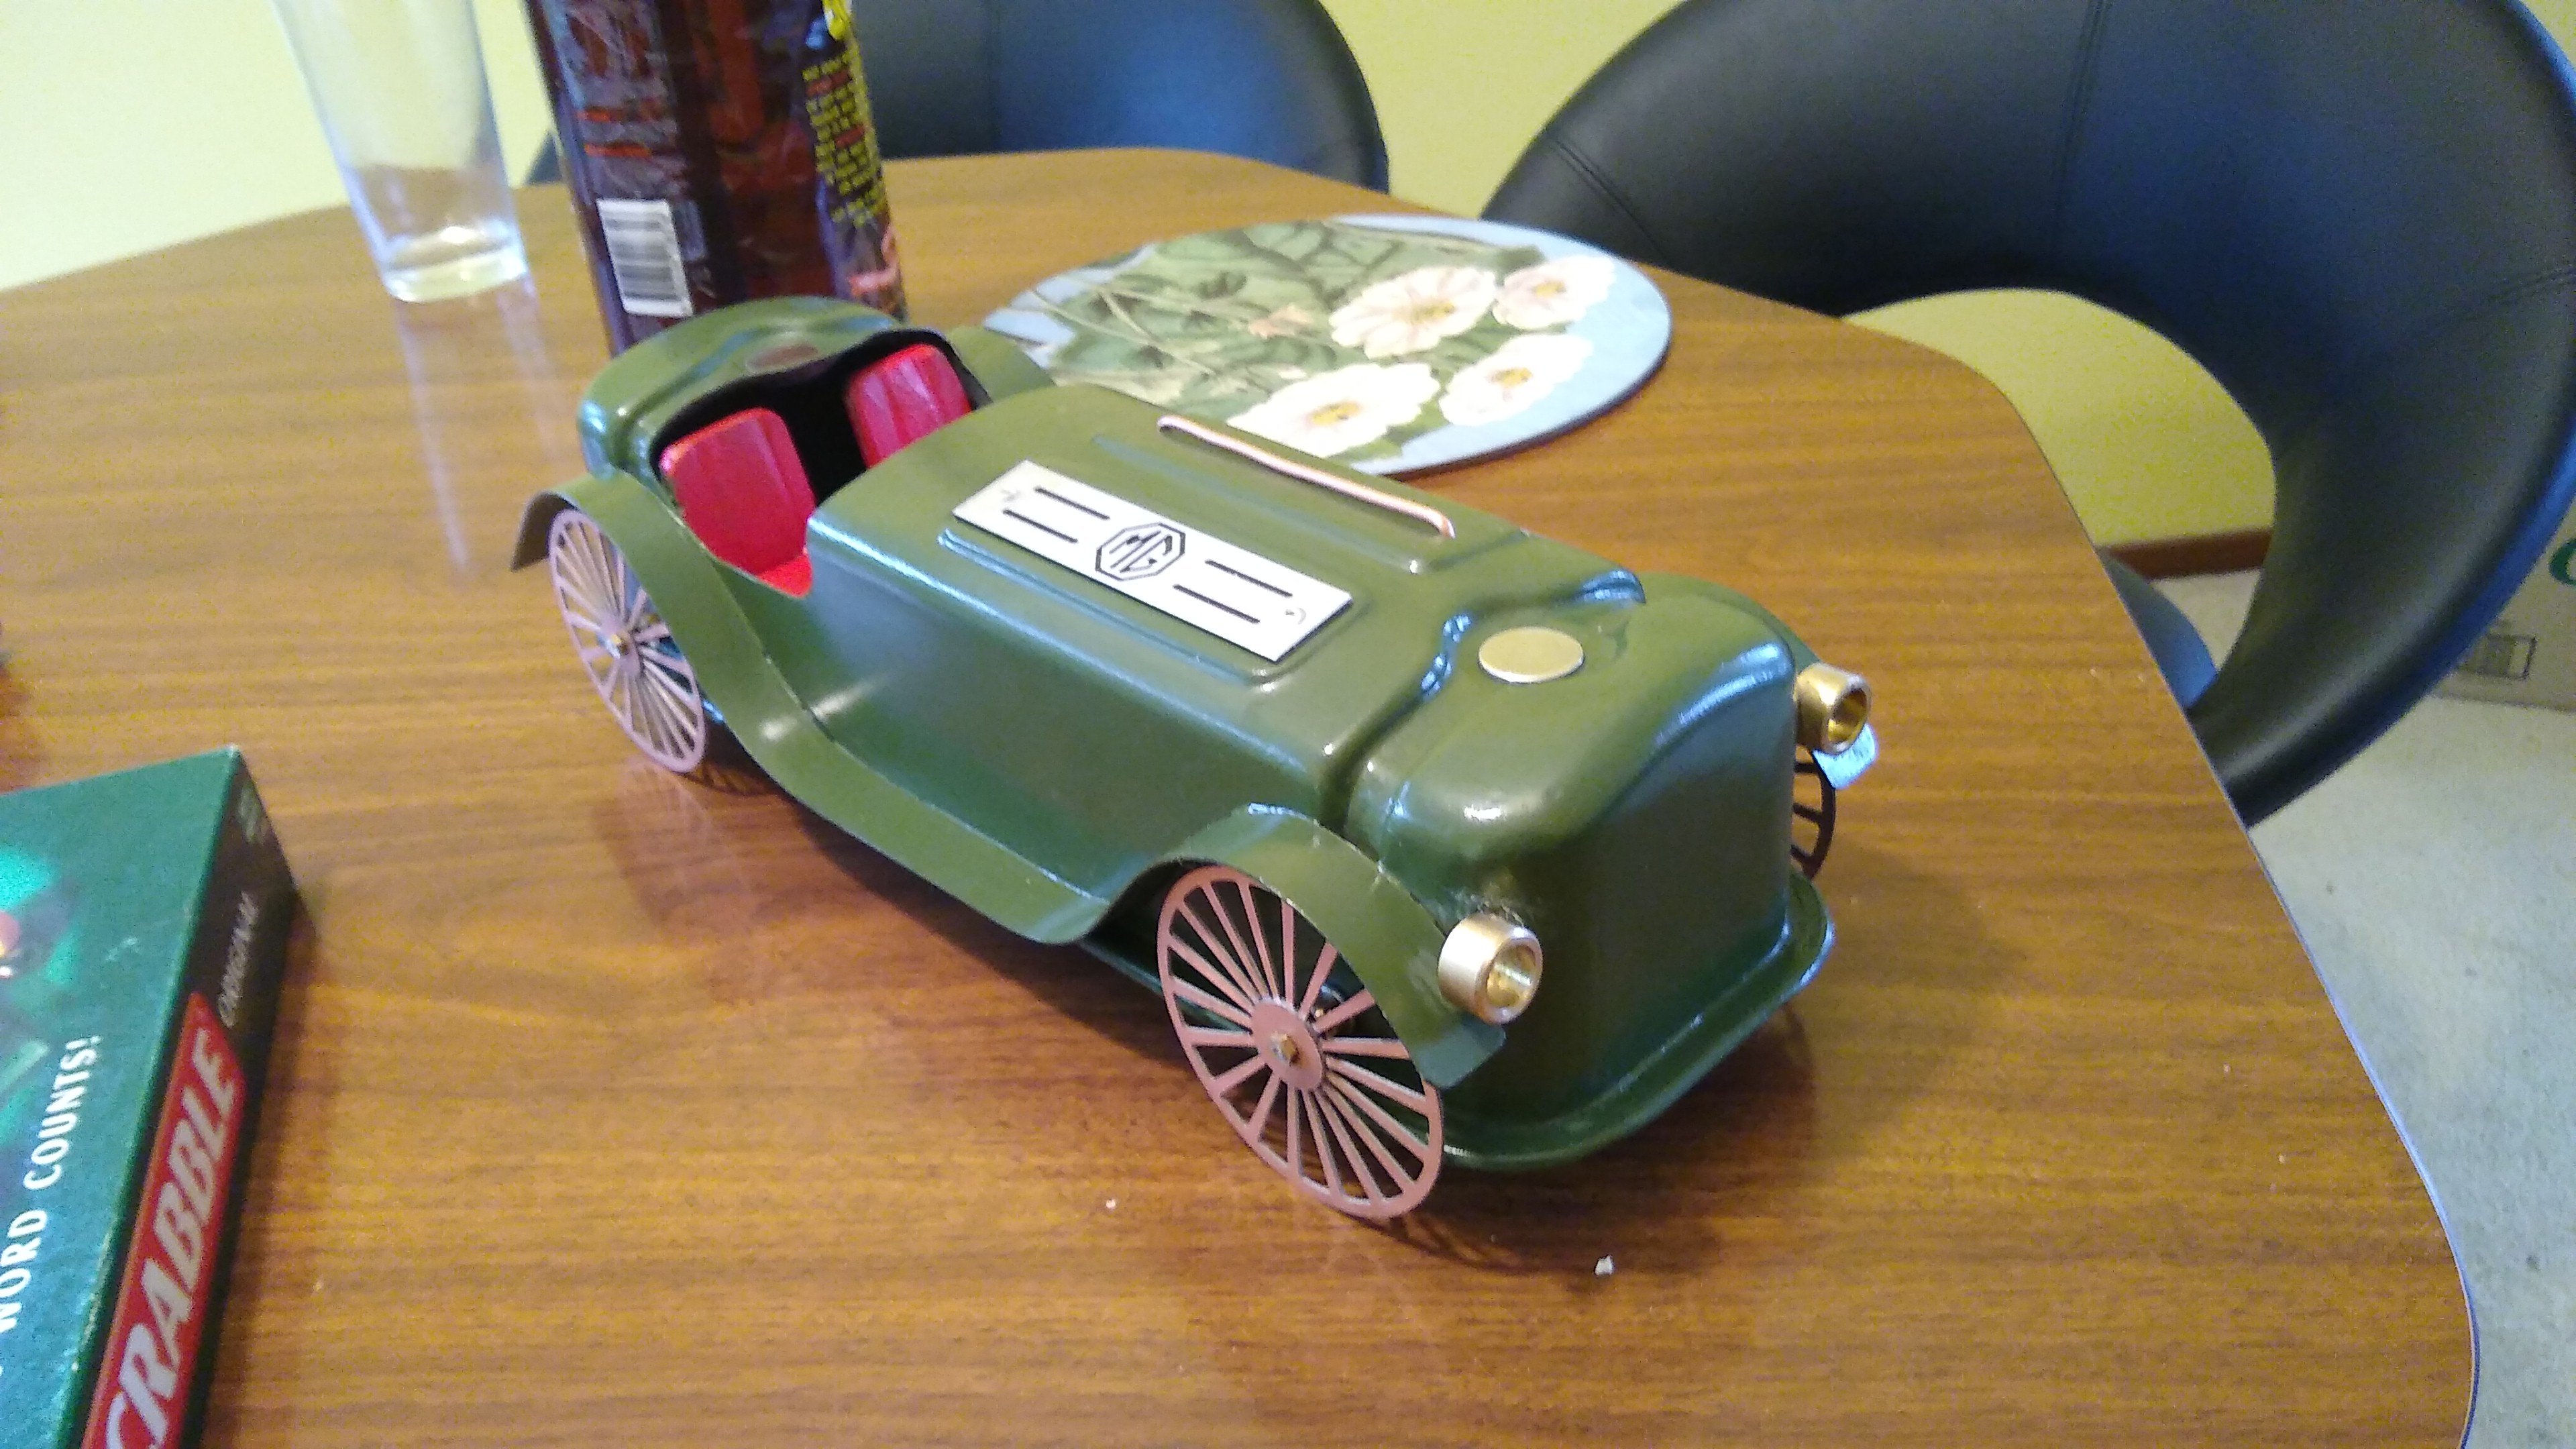
Been making this valve cover racer for the annual MG club competition. I don't actually have an MG, nor am I a member of the club... Still have a few mechanical and style bits to do on it, but it rolls now. The MG plate on it is machined from some magnesium alloy that I cast and extruded a while back. Other bits from that same batch ended up holding pig skulls together for medical experiments.
10 points
-
Started on the other side
10 points
-
So had the car out to a track day with the new driveshaft and I can finally say the vibration issue is solved. So that's a massive win. Here's some footage (track day so no passing allowed on corners) Car Handling Car handling is taking a bit of getting used to, traditionally when i was mid corner and I put the power down it would want to oversteer. When you get on the power now it actually get's more grip in the rear but also turns in more, which is a very unusual feeling to get used to. But a positive one that I need to adapt to. I ran a 1:36.500 without going crazy on 4 year old tyres and 15 degree day (with only one clear lap), which is down to what I was doing before, so that's nice to finally get back to that. Next target is PB of 1:35.800. Water temperature Water temperature is still an issue however, just hard to get it up to temp quickly. Which won't work for one warm up lap then standing start race. I've been trying to avoid putting in a thermostat as there isn't a lot of room and it's a clean simple setup at the moment (the stock setup is long gone as it weighed 5kg and was in the way of the engine mount) So I finally bit the bullet and after 2 weeks of mucking around with stores in the UK finally managed to convince someone to take my money and ship one out to me. I got the smallest I could find, it takes a classic mini thermostat (82c). I've drilled a 2.5mm hole in the thermostat to keep water circulating through at a reasonable speed. Space is very tight to fit it in and I didn't want to muck around putting it under the intake manifold as it would make it a real pain to service if needed. I only just managed to fit it at the top inlet on the radiator with some gentle persuasion of the oil cooler ducting, not pretty but it works. EWP Setup So my original EWP setup (by the tuner) was a running the water pump at Frequency of 0.6Hz (we will come back to this) and I had been changing the table to try and get it to find a happy medium by itself, so between 80 and 92 degrees letting it scale up as required. This just wasn't working (without thermostat), and I was concerned with the frequency what impact that would have on the pump life as it was basically stopping and starting it 0.6 times a second, which didn't seem like a good idea (but I'm not an expert in this area). So I sent support email to Davies Craig (who make the water pump) for advise on its limits as I was a little concerned by how it had been setup by the tuning shop. Their support staff rung me and spent over 45 mins on the phone to me going through the possible causes and solutions. That's amazing service for just a simple water pump. They said the pump should be fine for my setup (I was thinking it was overkill) and that they hated restrictors and didn't recommend them due to it restricting the max flow of the pump. The best guess was that the radiator was super cooling the water, so when running through the engine it was to cold and so never allowed the engine to get to the right temp, and then when flow increased it dumped a lot of cold water into the engine block, detected it was cold then slowed the pump again. Basically the pump was running too slowly (which seems exactly like what you want when your trying to get the car up to temp). They also confirmed running it at 0.6hz was a bad idea, after some discussion on the pros and cons of higher vs lower frequency (higher = less noise on the circuit) we went with 100hz. And a completely different table. The idea is the thermostat always has steady stream of water flowing over it through the 2.5mm hole so it's bulb will always be reacting fast to the water temp, it allows the whole circuit to heat up and also means the water is flowing through the block faster so means more consistent readings at the ECT sensor and spends less time in the radiator. So up to 82 degrees the thermostat controls that flow, as soon as it goes over that the thermostat starts opening and allowing more flow so so should self manage it, the EWP is then set to max out it's flow as we get closer to 100 degrees, so should eventually settle at a happy medium. Testing on jack stands shows quite a different characteristics in how it gets up to temp and holds it, so I'm cautiously optimistic we might have solved the issue (bar minor tweaking). But on track is vastly different in terms of air flow, so need to get it out for another shakedown. Racing starts 14th August, so need it all sorted by then.8 points
-
Ahh, she was a bit wet and miserable at 6.30 this morning til 7.30 or so. I thought I saw you wander past the van but you weren't holding a duck so wasn't a hundy on i.d. Saw @UTERUS and @Ned an aisle over but didn't see them again but caught up with @Mop Head , @Beaver and @GuyWithAviators. Wasn't a bad swapmeet considering traders were down. Got a box full of 4bbl Holleys with 2 450cfm tunnel ram carbs for $100.00 so worth the trip.8 points
-
Have pulled the intake side cam cover off and on number 4 the clearance on both shims is the same and within factory spec of 0.15mm to 0.25mm. Turned it over with the key a few times to see if there was any sign of a bucket getting stuck and it looks totally fine. Compression tested number 4 and it's got nothing, to confirm I tested number 3 and it has good compression. So that at least tells me the bucket isn't getting stuck and keeping the valve open, because its all the way up and there is no compression. Next I'll take the intake manifold off and see if it's possible to see the back of the valves.5 points
-
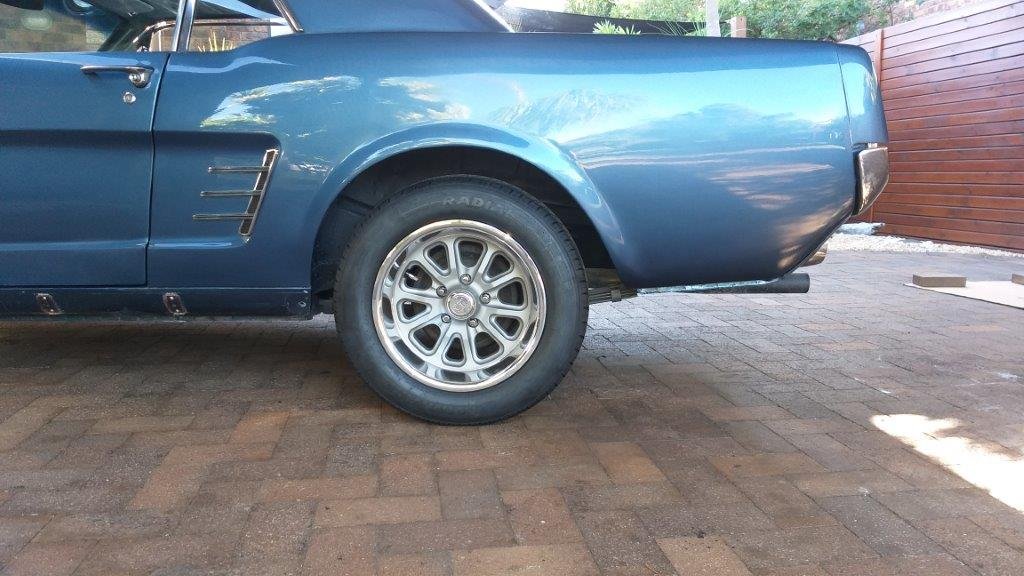
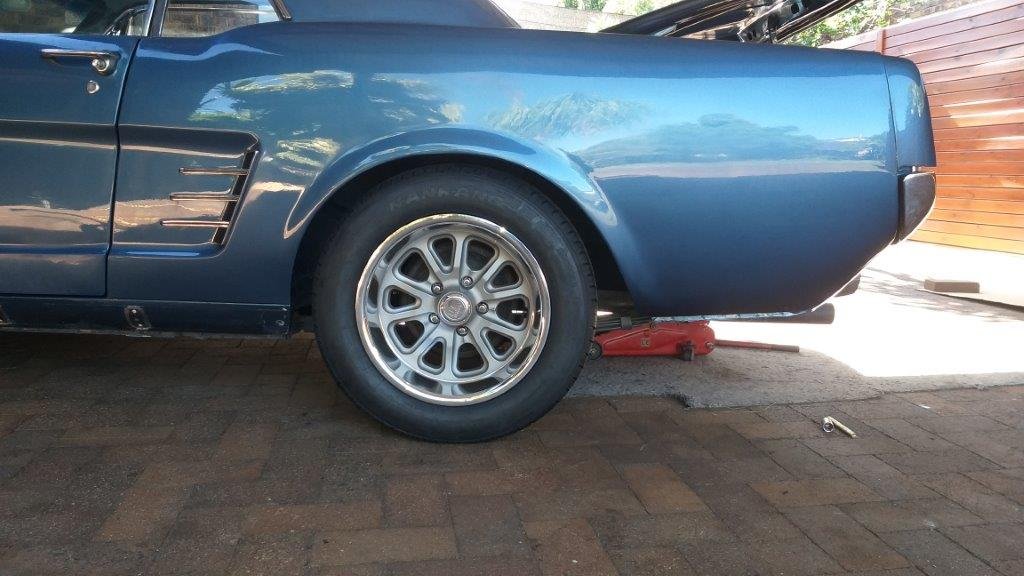
Yesterday arvo the courier dropped off my replacement set of lowering blocks and the supplier got it right this time. So this morning I chucked them on. Result is 2 inches of additional low. Much better me thinks. Best I crack into the front now as it's looking a bit like a gasser. Before and after shots for your viewing pleasure.
5 points
-
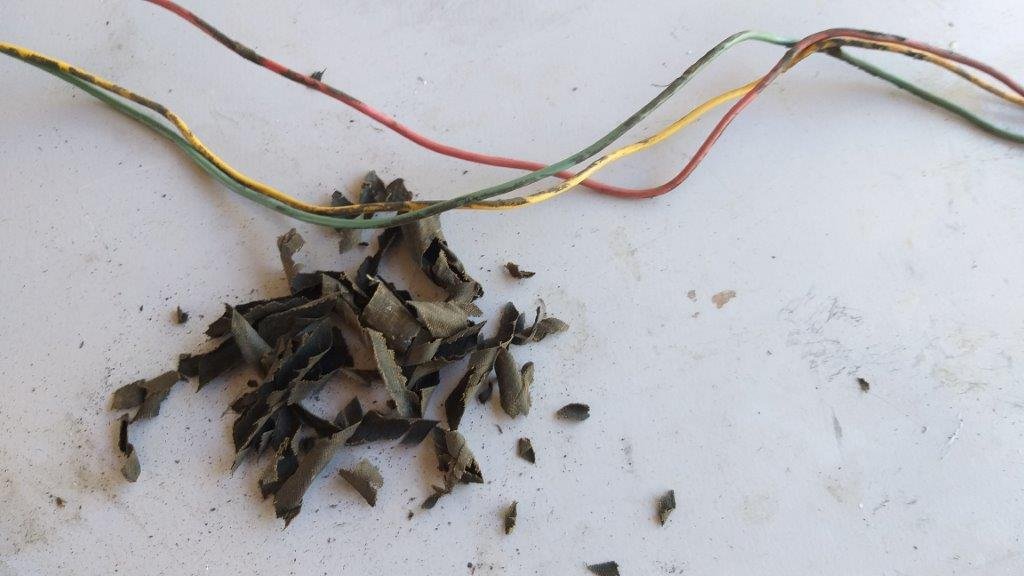
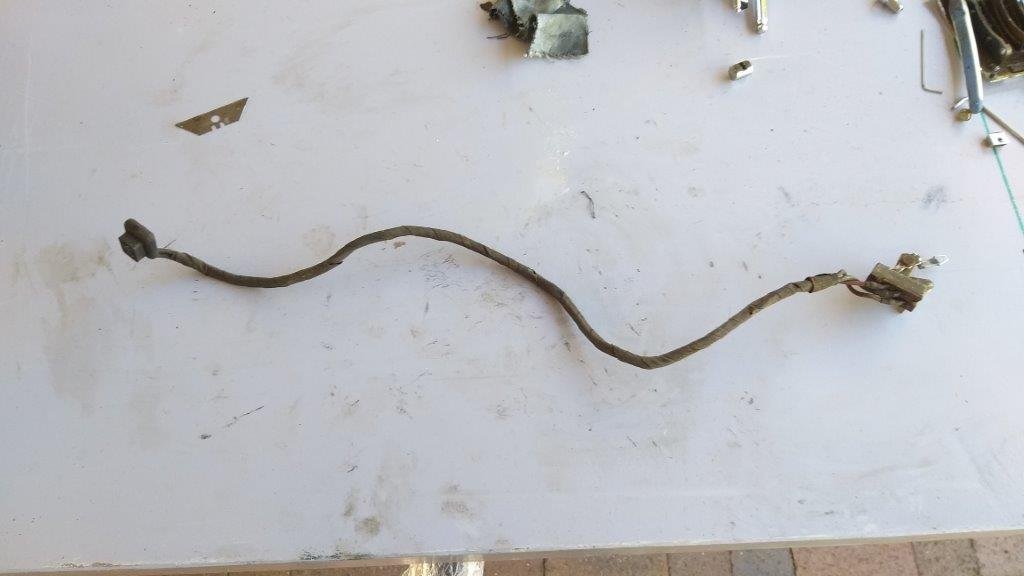
Spent a bit of time cleaning up the switch and wiring and then replaced the perished cable wrapping with some fresh cloth tape. With that behind me I fitted the new face plate and control knobs and mounted that sucker. And that is the first bit of new bling fitted to the dashboard. Cable action is nice and smooth too. So I am one happy camper. Onwards and upwards. Thanks for looking.
4 points
-
If there is a couple of ya im happy to come up one weekend day for a tutu? And get you dialled in on the tig. Not the right person for bodywork though. I want more people to be able to make cool shit so if I can help someone im more then happy to.4 points
-
Yeah back when you could buy a kp starlet with 4age and t50 for 1500 bucks haha4 points
-
That looks like it's gonna sound bloody impressive4 points
-
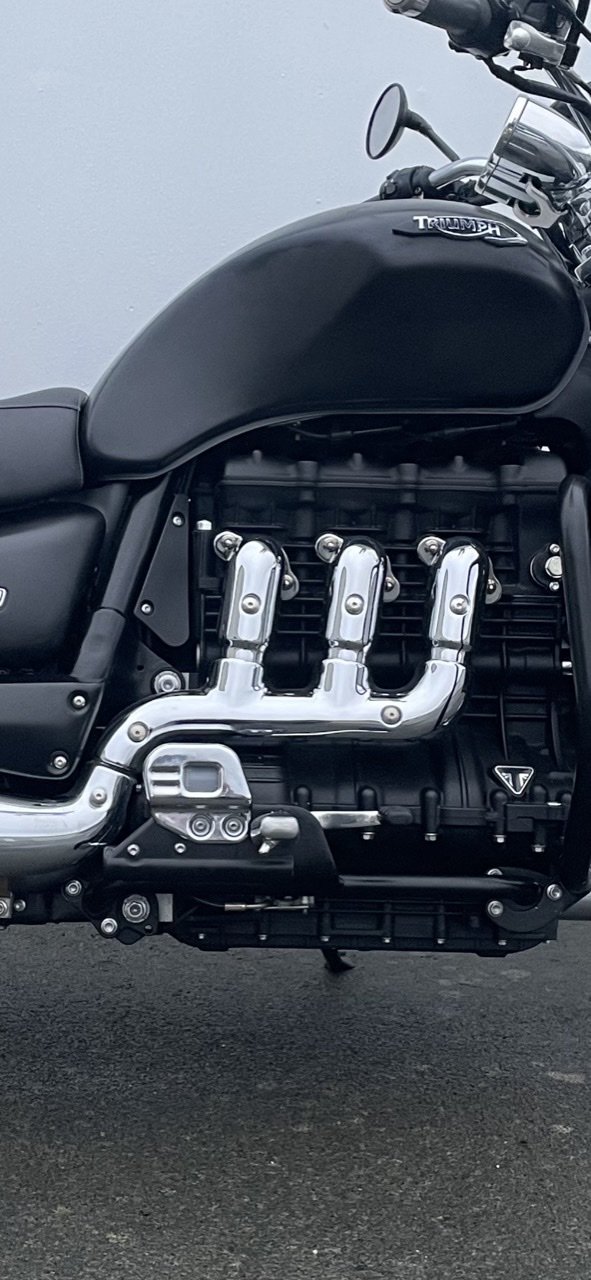
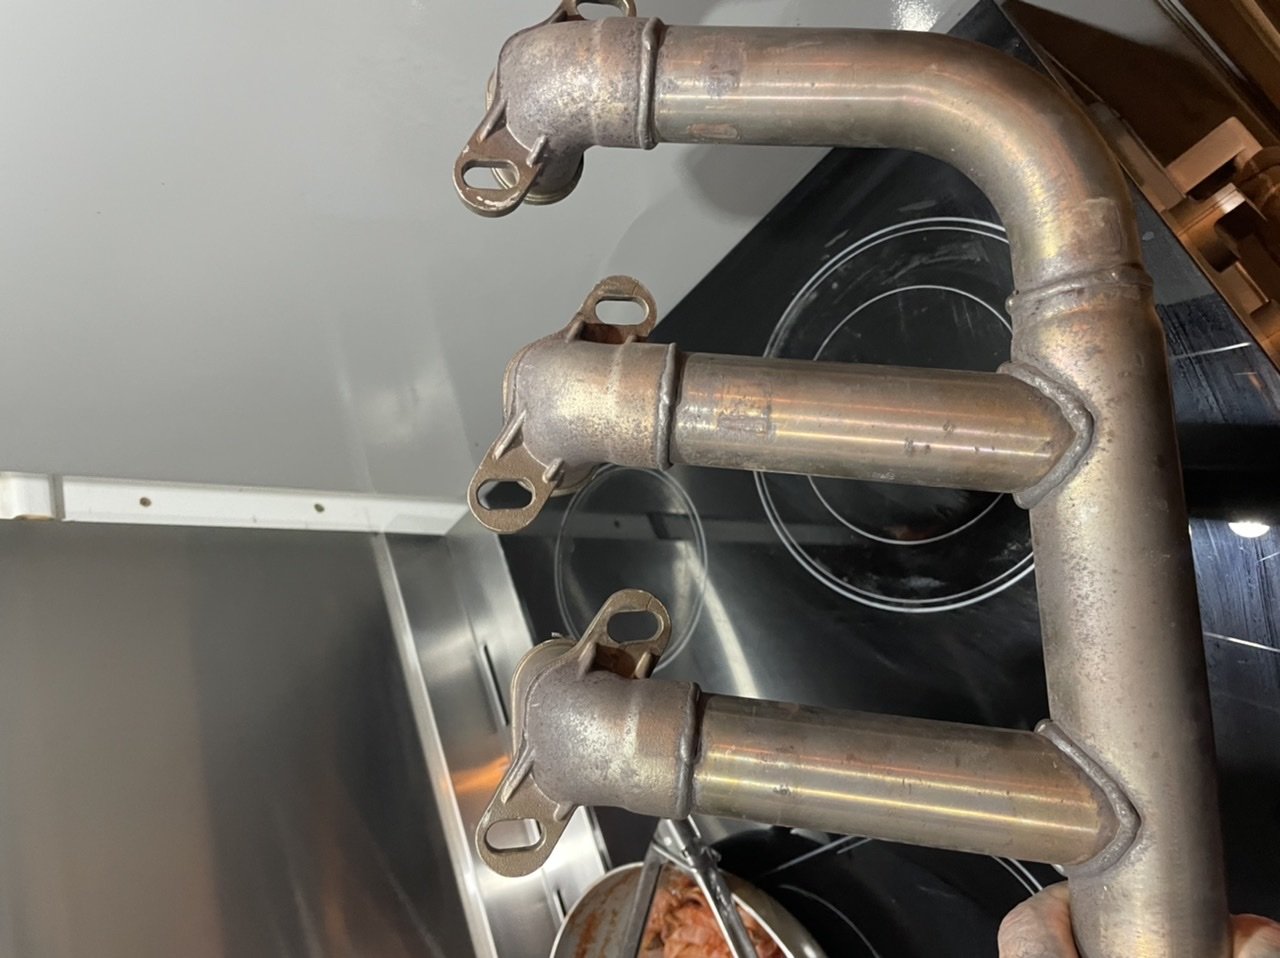
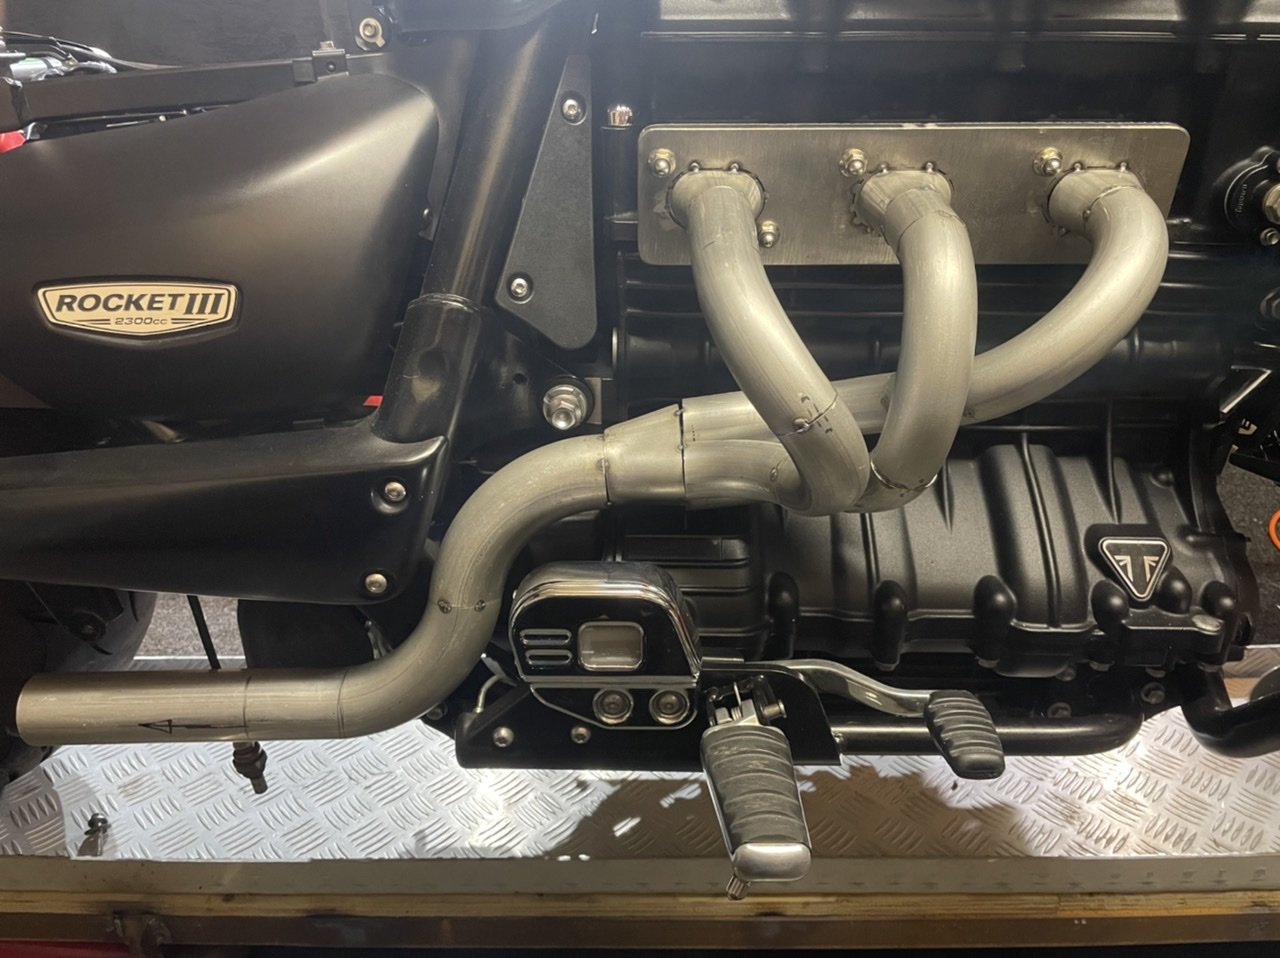
Built a set of extractors for a triumph rocket 3. From this. To this.
4 points
-
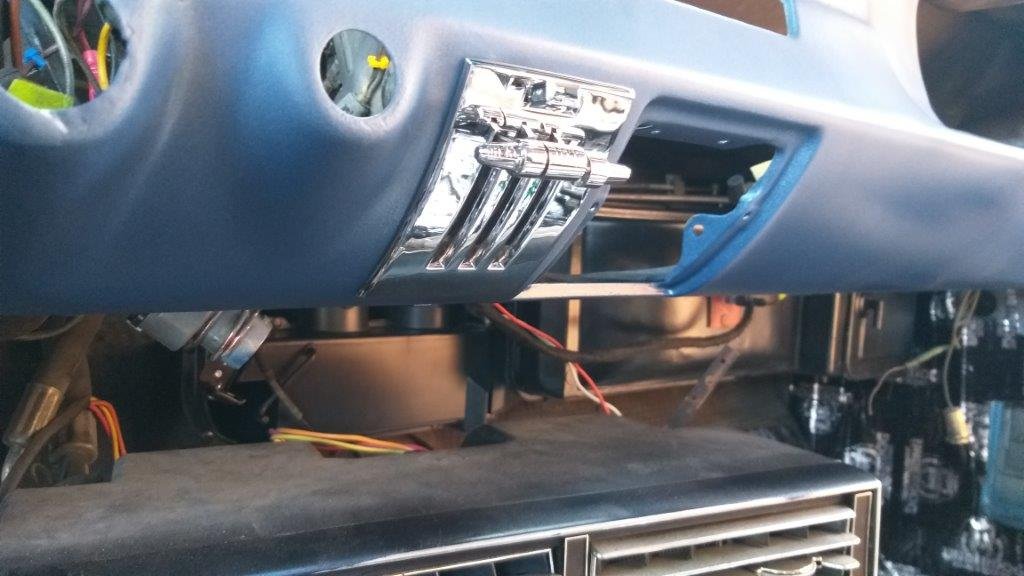
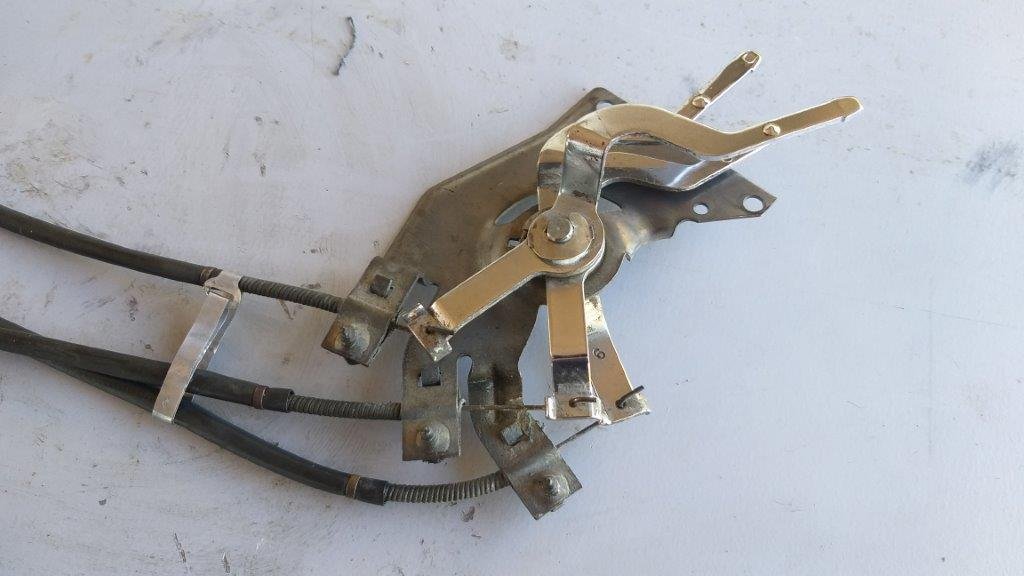
With the heater box in place, the next step was to fit the duct control cables and blower wiring. First step was to refurbish the control cables and mechanism. I had already sourced a repro front panel and knobs finished in Taiwan's finest chrome, but at first glance the little levers that poke through the panel appeared to be badly tarnished. Turns out it was just a bad case of built up grime. A bit of autosol on an old toothbrush had the levers looking mint.
3 points
-
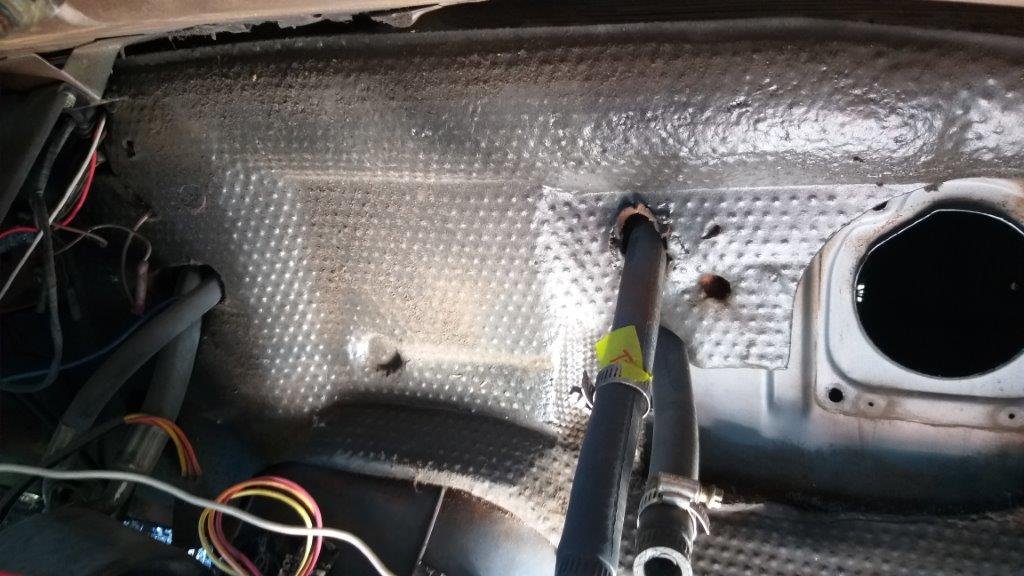
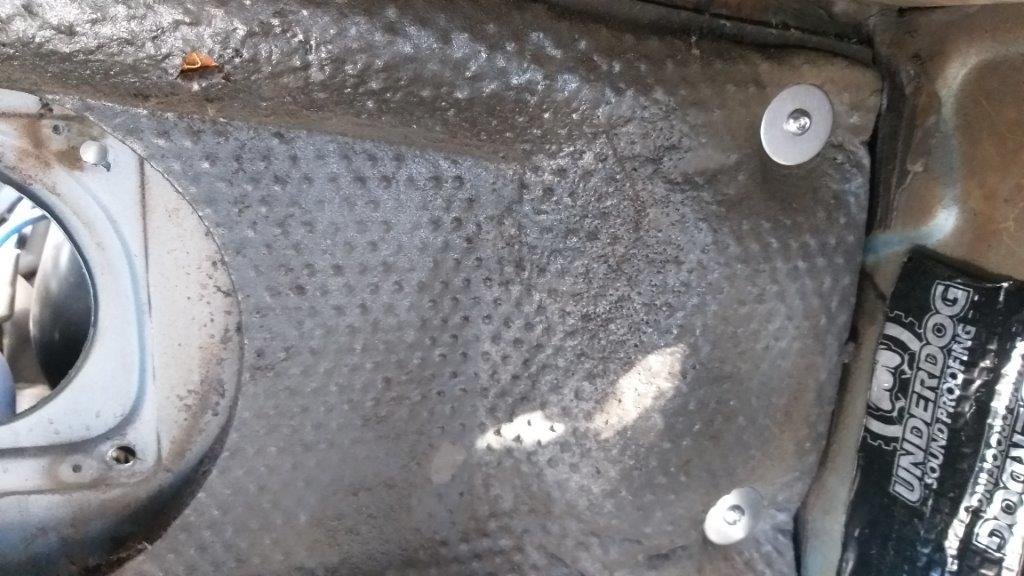
With the firewall mat now secured I moved on to fitting the heater box. Nice !
3 points
-
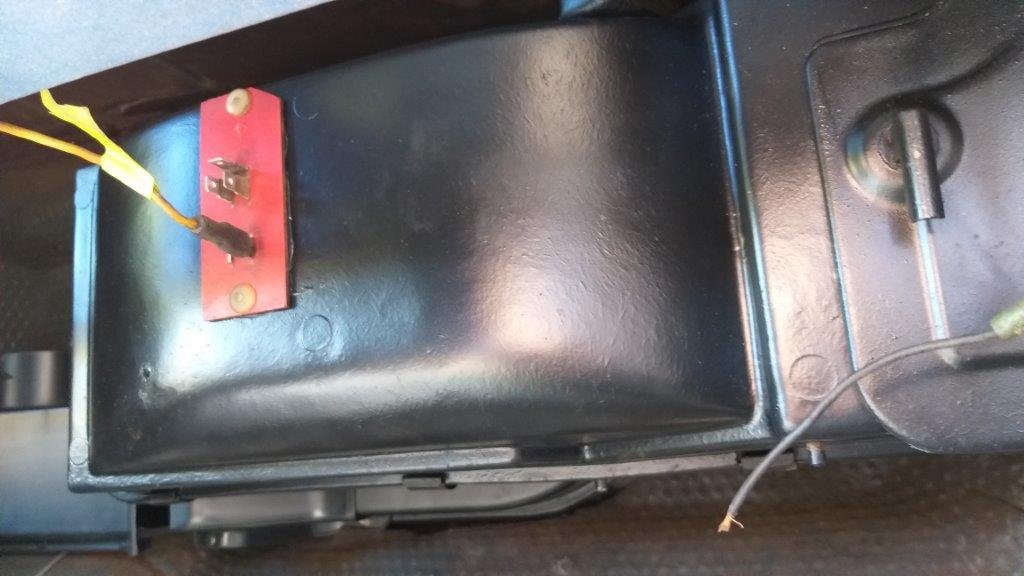
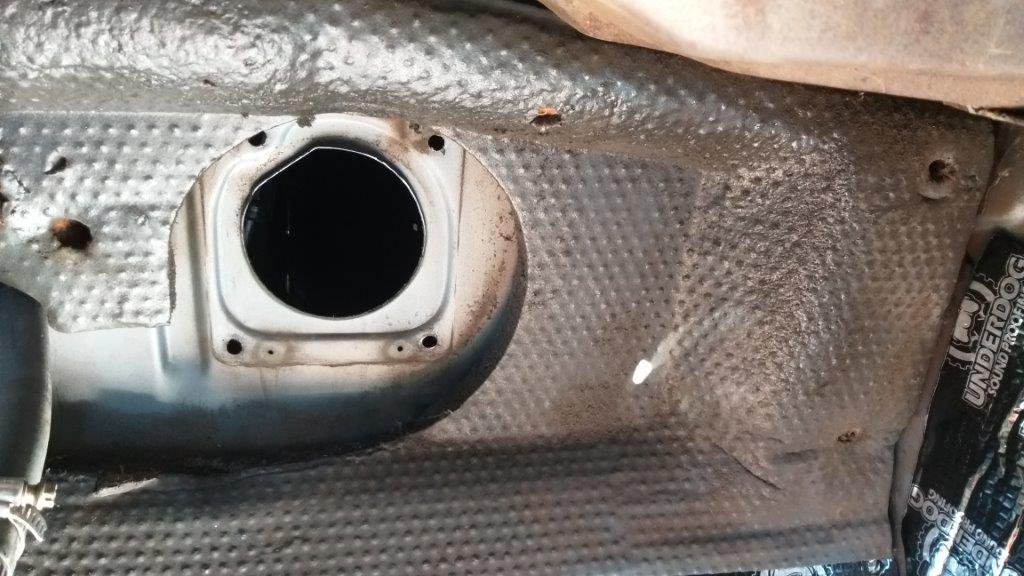
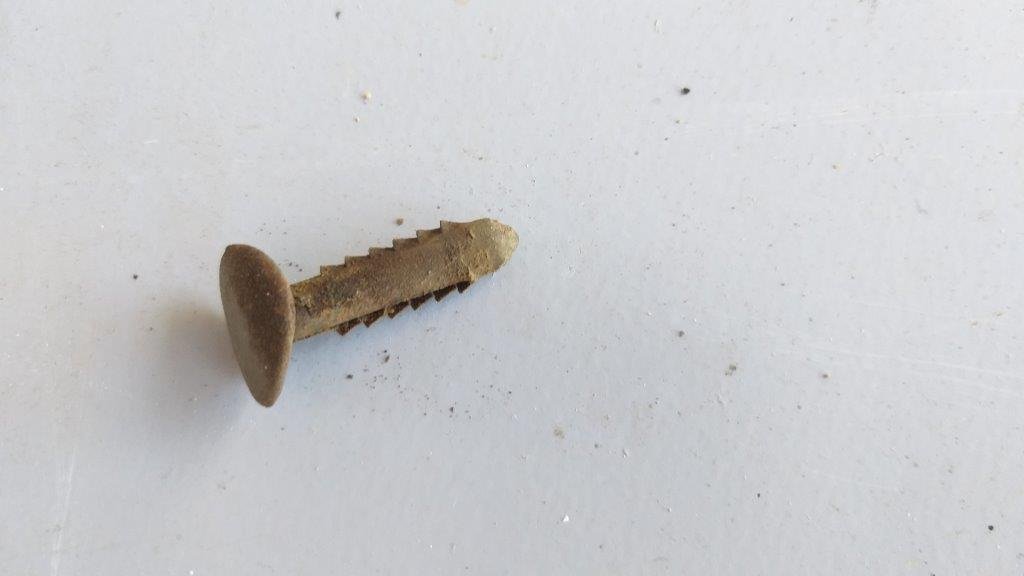
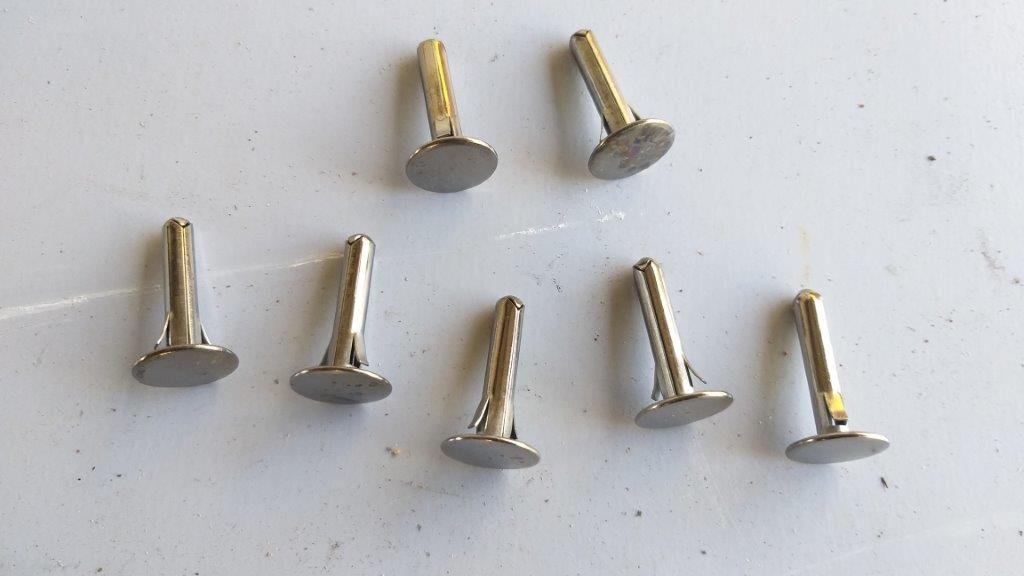
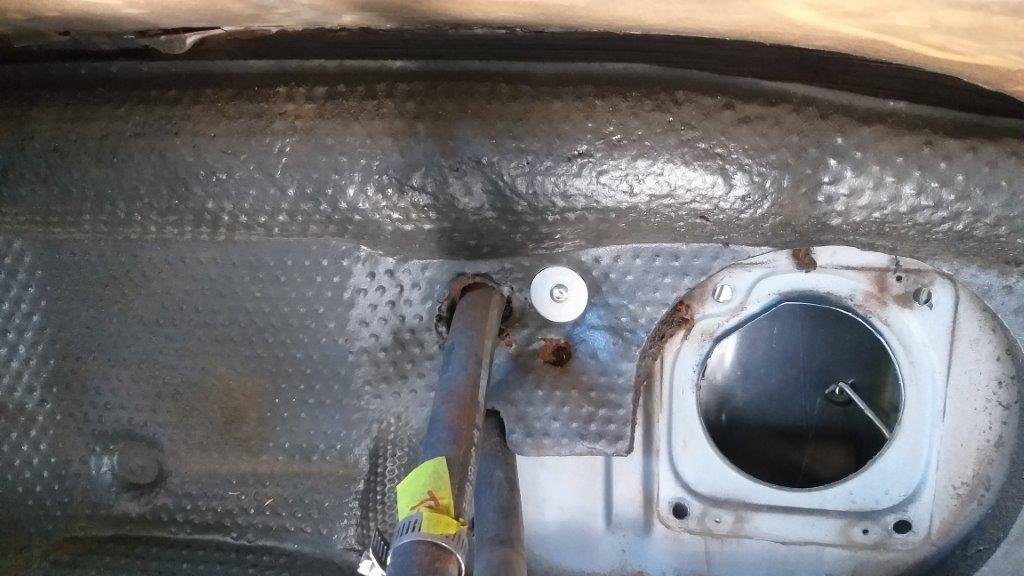
Today's plan was to fit the refurbished heater box. But, before that during the strip down I had noticed that the firewall sound deadening mat thingy - although in good condition - was hanging loose and flopping about. Traced the issue to missing plastic plugs that push through the mat into factory drilled holes in the firewall. In one of my parts orders I included a set of the upgraded metal plugs, so I figured I was good to go. Not. Turns out I should have looked more closely at the mat as the mounting holes have been torn open to the point where the plug heads are not big enough to hold the mat in place. Faffed about with some stainless steel washers on the plugs but then the little prongs wouldn't push through the firewall due to the thickness of the washer. Bugger. I could have trimmed the little tabs a bit, but I figured just go straight to plan B. Ended up fitting some stainless steel button heads with said washers and it worked perfectly.
3 points
-
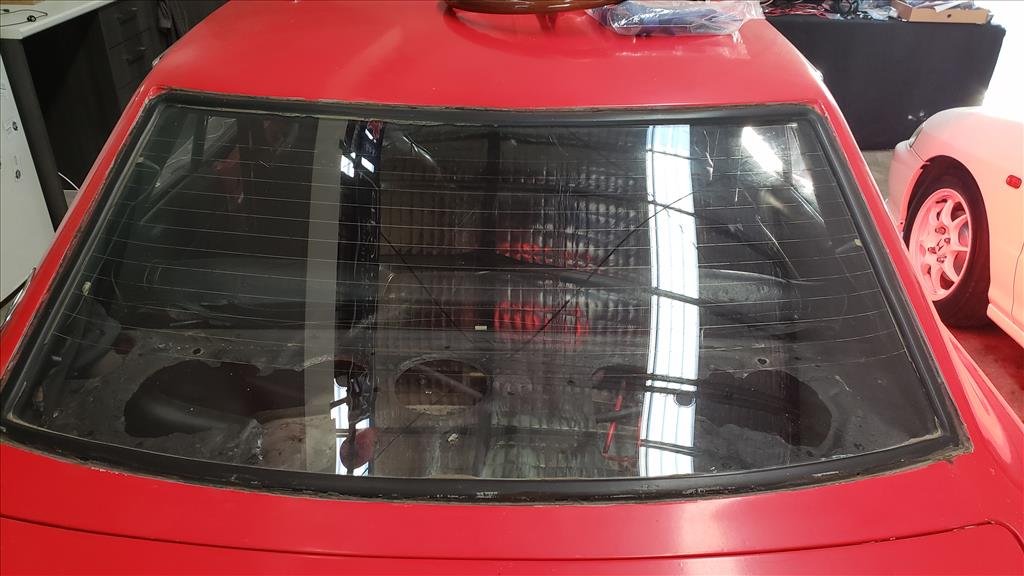
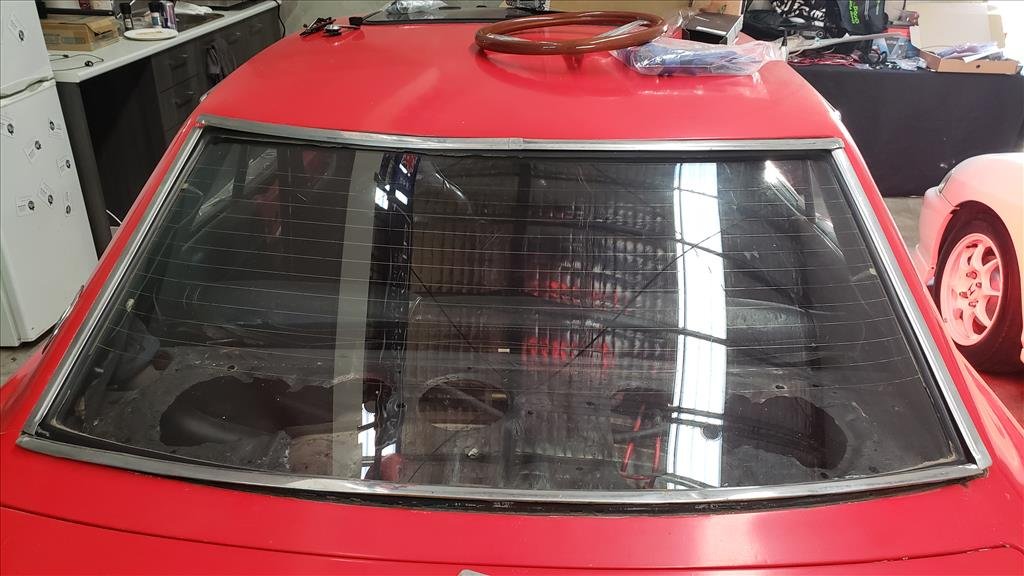
Got some window trims! Both front and rear, they're pretty out of shape and missing all the clips etc but they won't be needed for years yet I don't imagine as it's a windows out job to fit them. Still, good to have in the hoard.
3 points
-
Dyno booked for Wednesday Rangi up a intake while I wait for the factory arm to arrive. I'll ask tuner to pull off factory airbox and see what gains/losses there are. I'll try and get the factory heat shield over the exhaust too, it'll need some trimming but will be nice to have it stock ish3 points
-
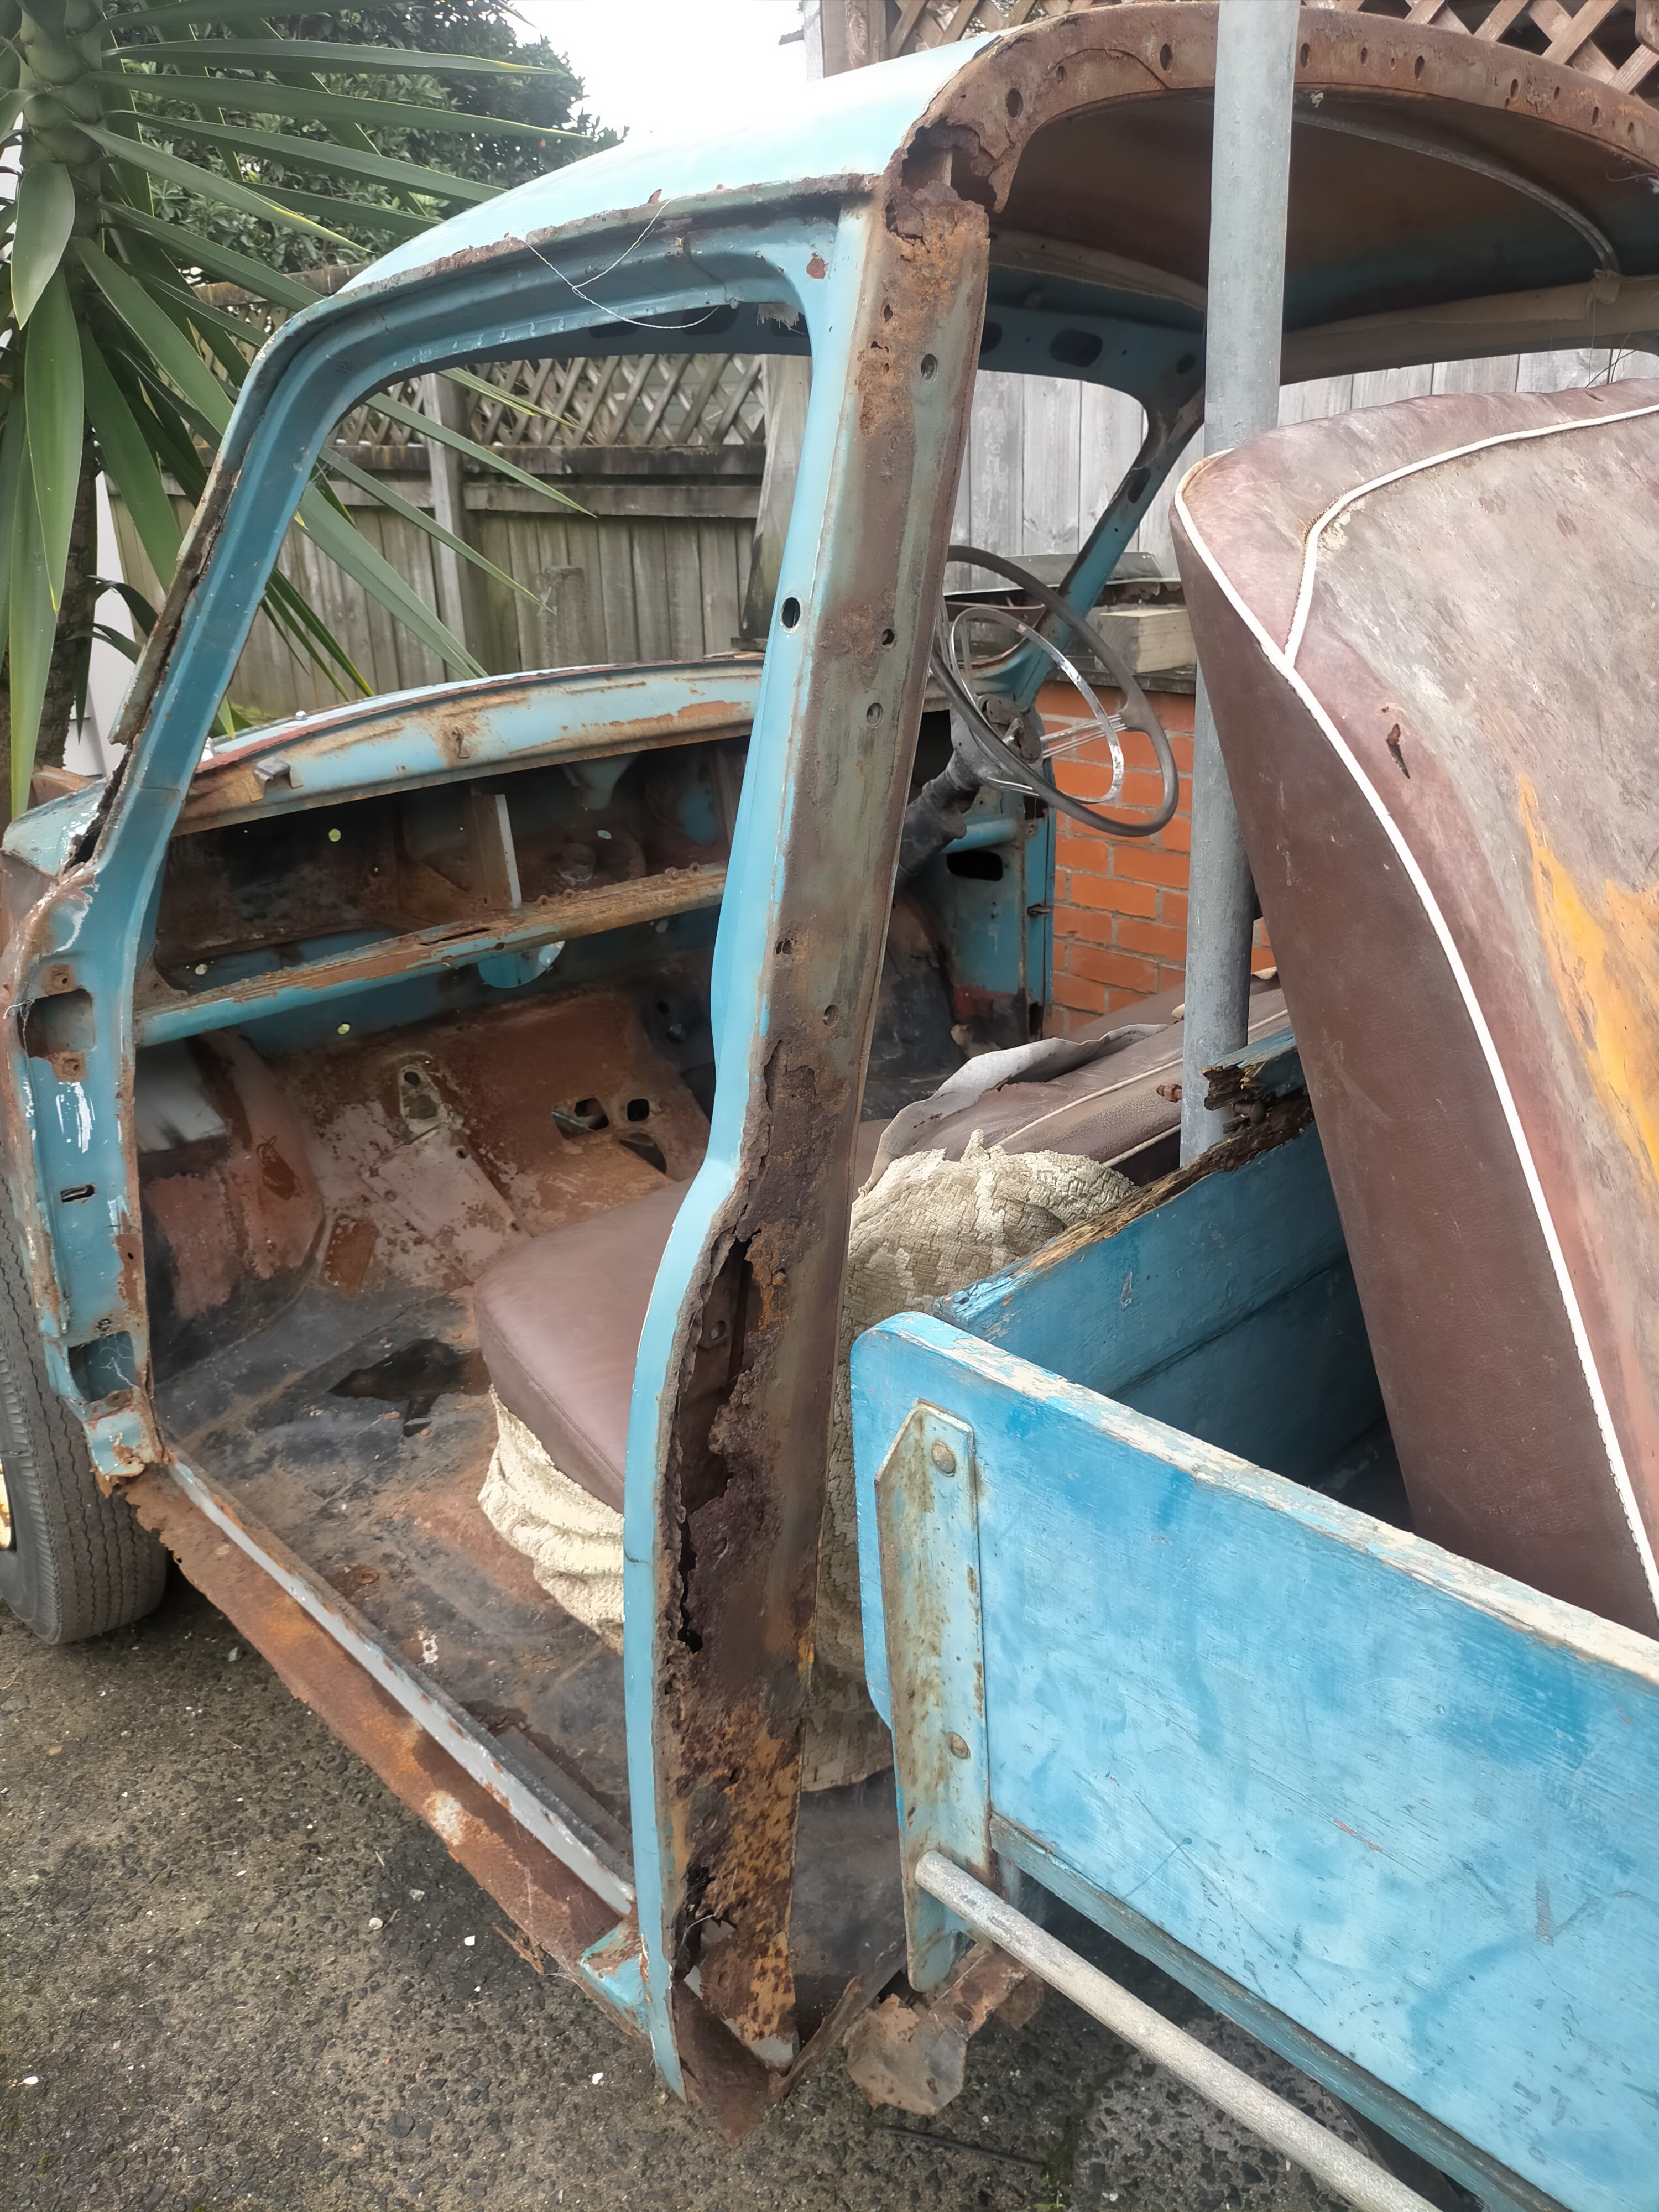
There's not much holding the B pillar on obviously the rubber gasket between cab and rear was a bad idea.
3 points
-
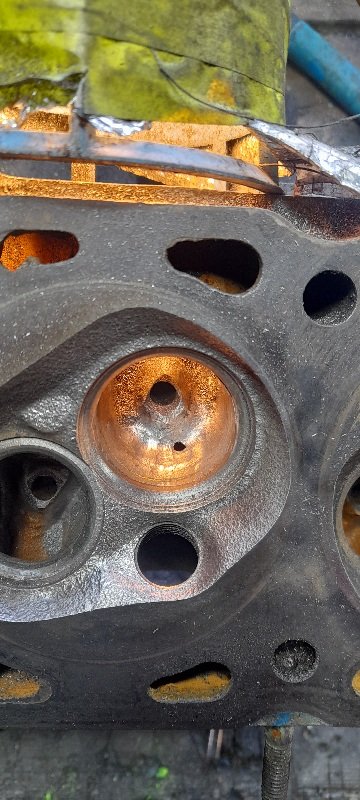
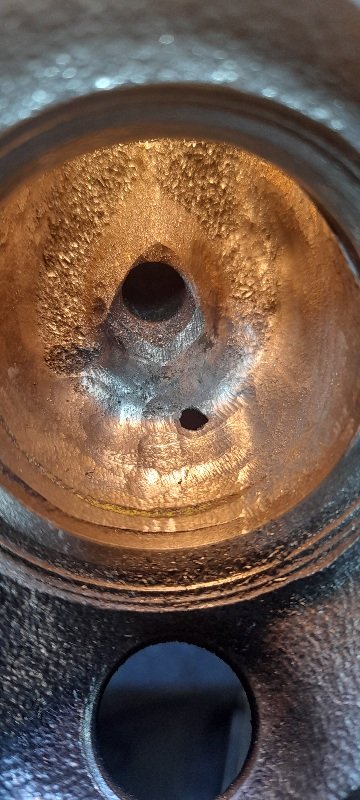
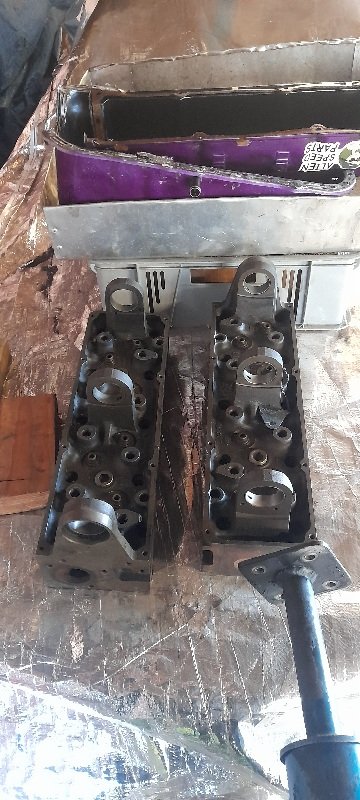
well I hadn't done much in the past week .. thought I would finish up some cleaning on the head .... and this happened ateast I know how much is tooooo much now. good news is I have 2 other heads ..stripped ,cleaned, and Crack tested . bad news is I have to start again also my oil squirters have arrived in nz ....I wonder how long they will take to get to chch from Auckland
3 points
-
Wow! Probably cant get a working T50 for that anymore haha3 points
-
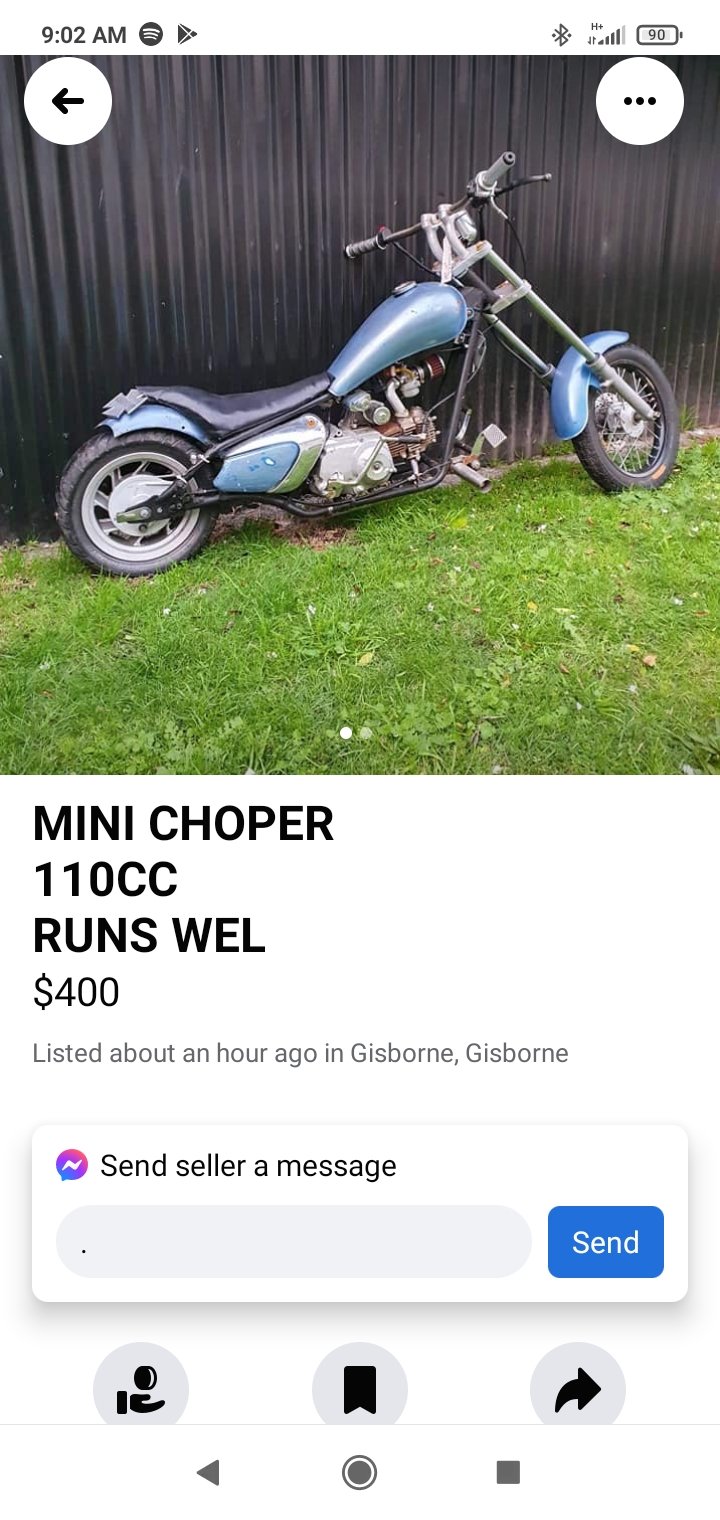
Anyone gonna buy this dunce bike backup and have it waiting in Gisborne for them?
3 points
-
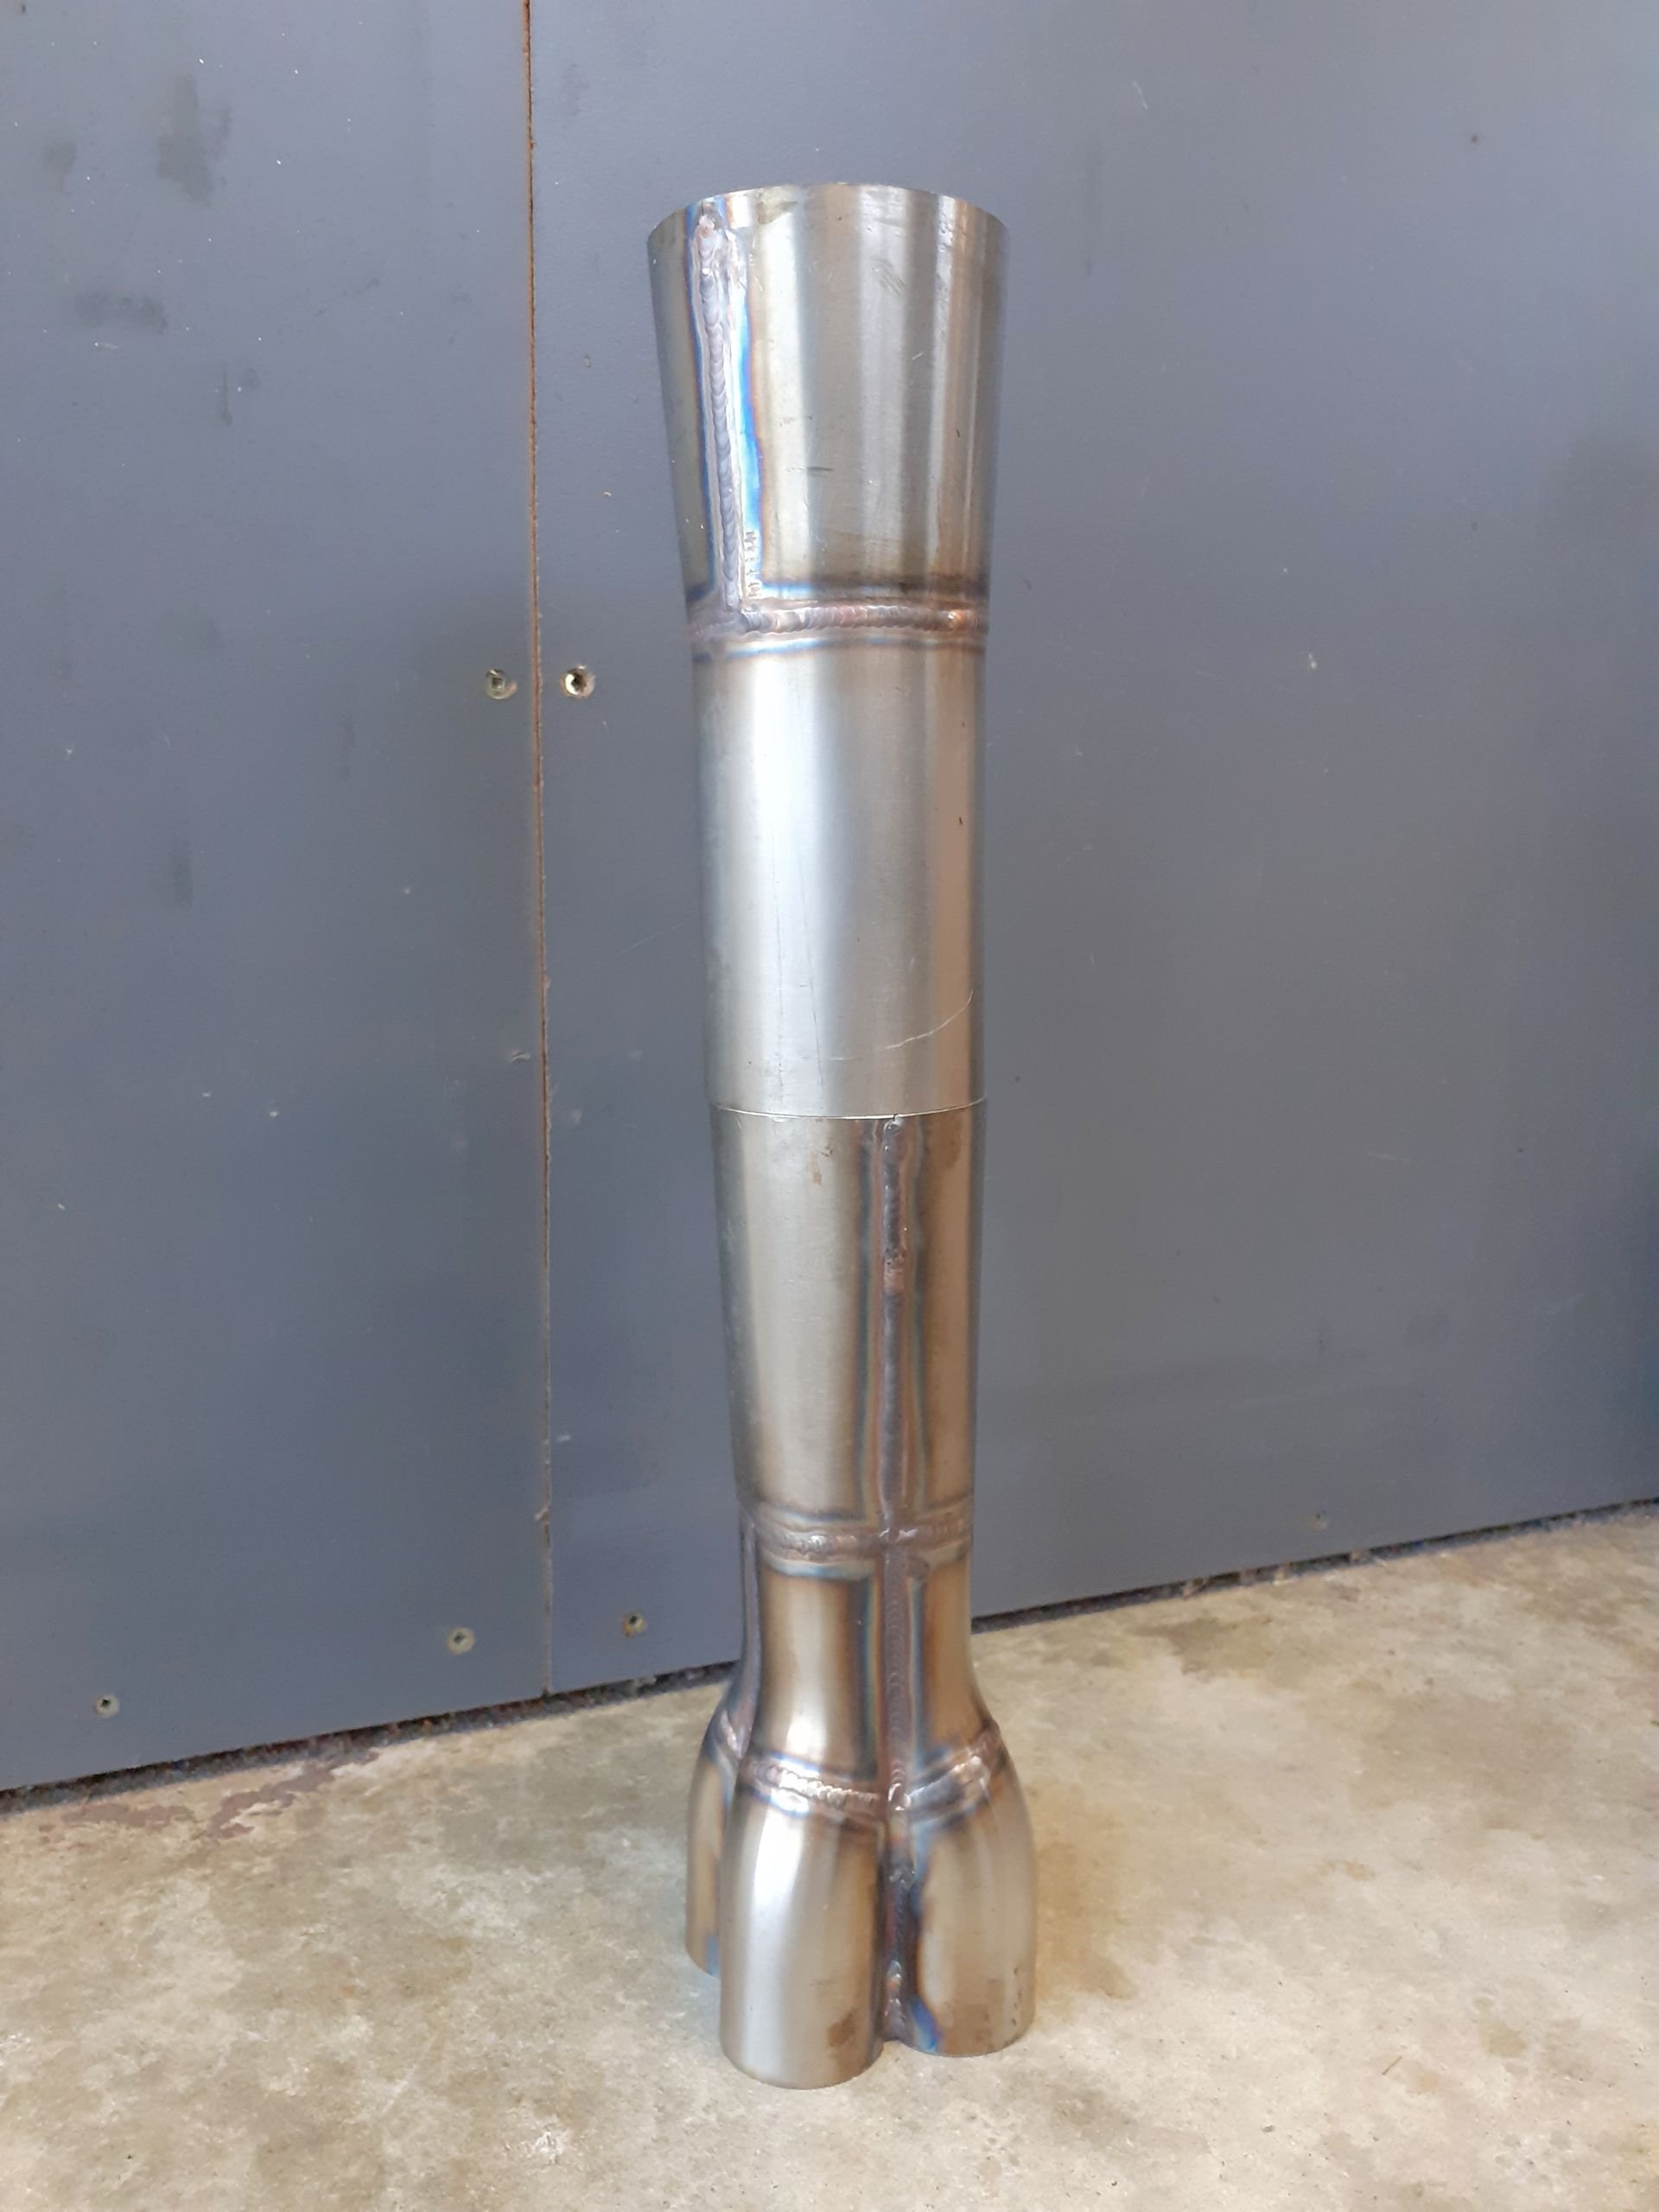
Far out, looks so good! It doesnt look so worryingly long now that the 4 pipes are on there haha. Looks more like it belongs on an F1 car than an Echo3 points
-
It depends what you are calling the "exhaust" There is plenty to be gained getting the sizing right after the merge. Lots of people hit me with "such and such motorbike or race car doesn't run an exhaust that big" In a motorbikes case, just happens the length of bike is about the right place to end exhaust. same deal with race car. either the car ends or not a full length system. Banging a 3" pipe on right where all 4 pipes join together will probably loose power yes. but going big at the right place onward, is the way to go. I'll place money that most of the gains roman will see, is in the midrange along with a bit of peak power3 points
-
KPRs dyno testing shows exact opposite of all this on a variety of 4AGE combinations. 3" pipe gains power everywhere, over a smaller pipe. And actually surprisingly picks up the most gains in midrange. Then headers only makes slightly more power than that. About the gas losing its velocity, I've heard that mentioned a lot but I dont think this makes sense. Because if you double the rpm, you double the velocity of the gas in the pipe. So if this held true you'd expect a 3" pipe to gain top end when the airspeed is higher again, and lose midrange. But it doesnt happen, the opposite does.3 points
-
Can't argue with that In other news, can we fire up that go fund me page again, roman gonna need a longer car kinda silly seeing it all out in a straight line like that. the length is roughly same as what i run on 4age still waiting on the straight pipe to show up. gone about far as can go now. collector and cone section 100% done I'll leave the last bit off. as really winging it for fitment now.
3 points
-
I understand that a turbo cuts down on exhaust noise quite a bit.2 points
-
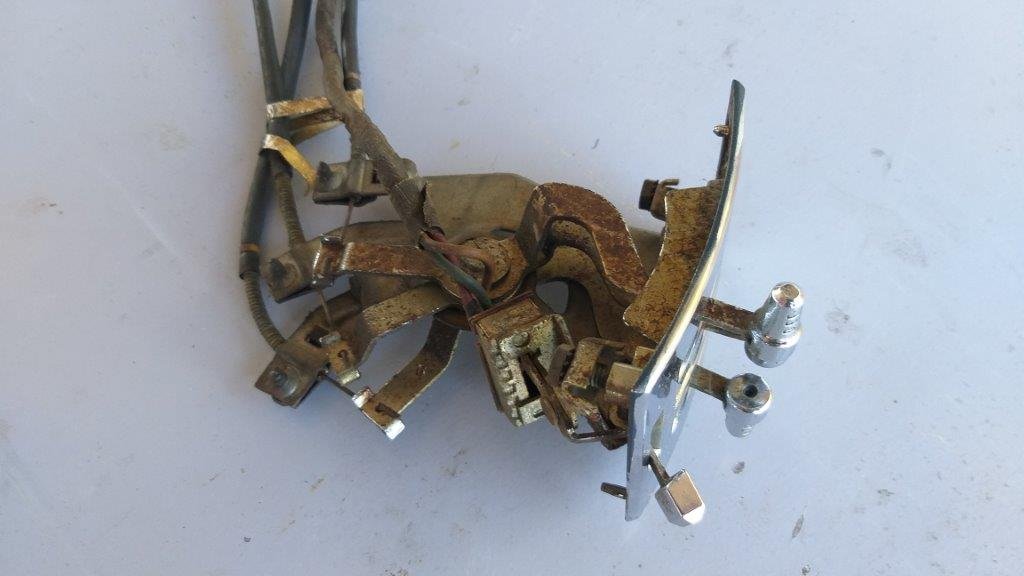
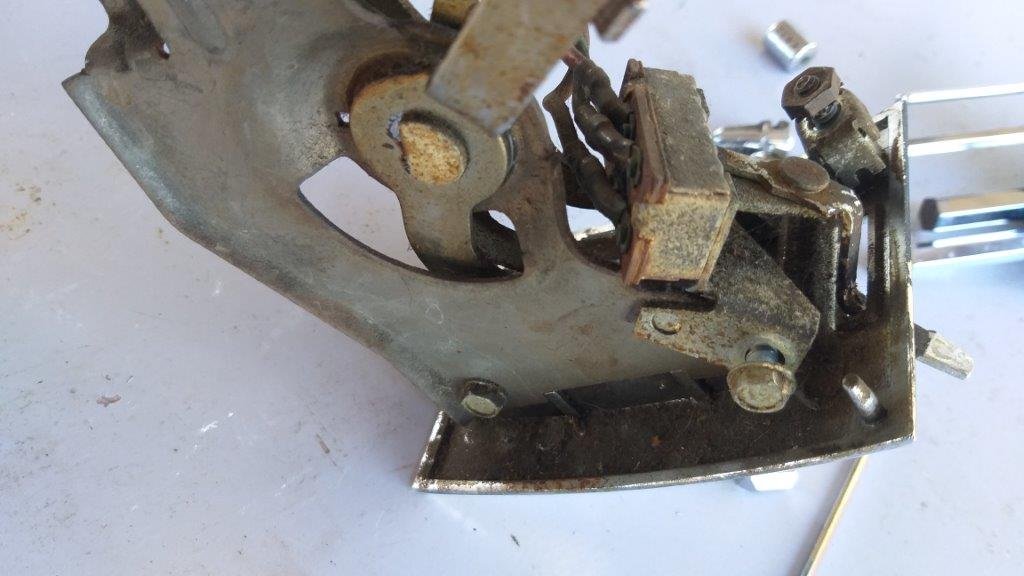
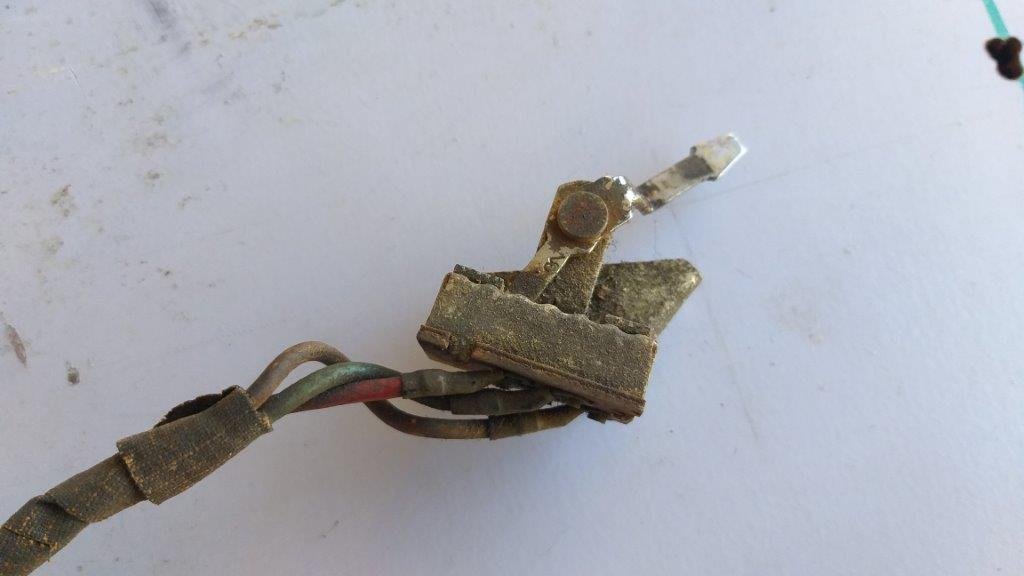
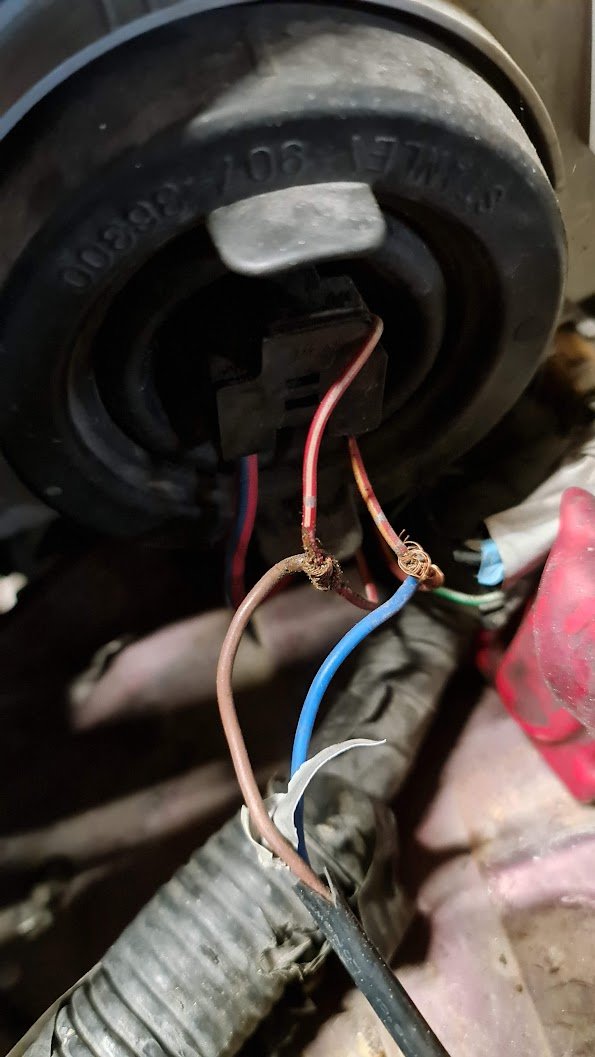
I then turned my attention to the blower switch and wiring harness. First thing I wanted to figure out was how the bloody thing works as the wires run directly from the control panel to the heater box with no obvious input wire feeding the switch in the control panel Had me really confused for a while, so I asked Uncle Google and it turns out that it's quite an interesting setup. The back of the blower motor sits in the engine bay and is permanently wired with a positive. It's the switch that is earthed through the dash mounted control panel. The three speed settings are achieved via a set of coiled wires that hide behind the little red plastic tab on the heater box. Bloody clever these Mericans. Photos of the crusty looking switch and wiring harness:
2 points
-
Found a pair of chrome Terrano steelies for $40 and a couple cool Hotwheels. Successful meat.2 points
-
I learnt to ride on a mini chopper like that - everything else feels foreign to me.2 points
-
Not the best turnout of vendors this year. Think the threat of the weather put alot off but it was actually pleasant for once, not raining or freezing cold2 points
-
yea that has nothing to do with the place we were trying to buy. all gone now and things are very, very different to 6 months ago so we're going to sit tight for a while and rejig things here to better suit the market.2 points
-
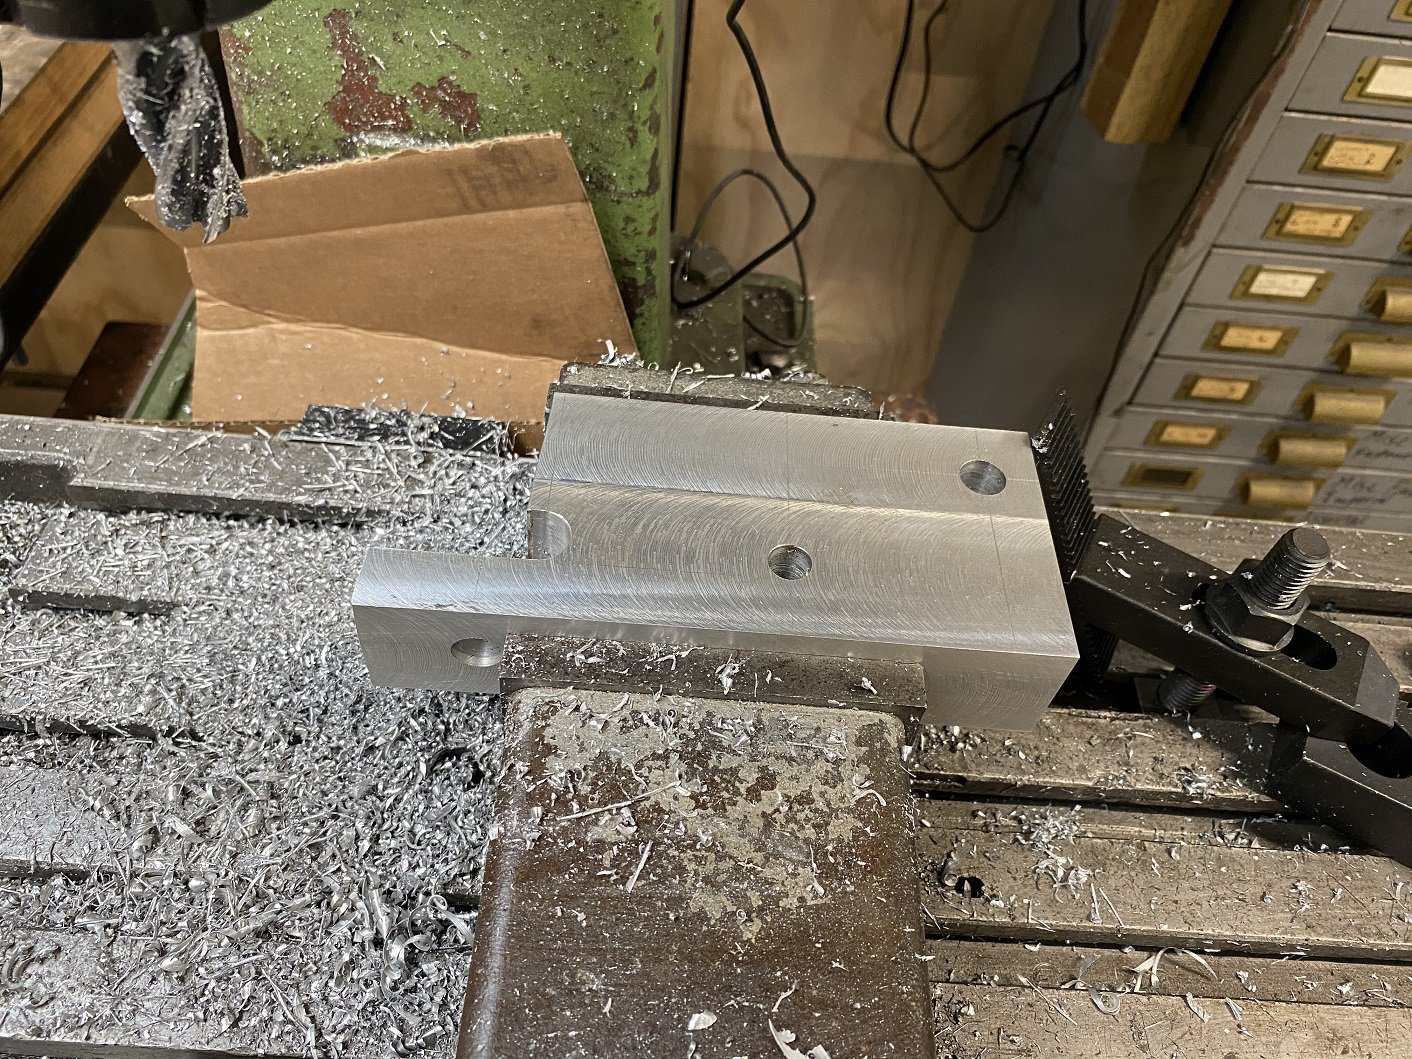
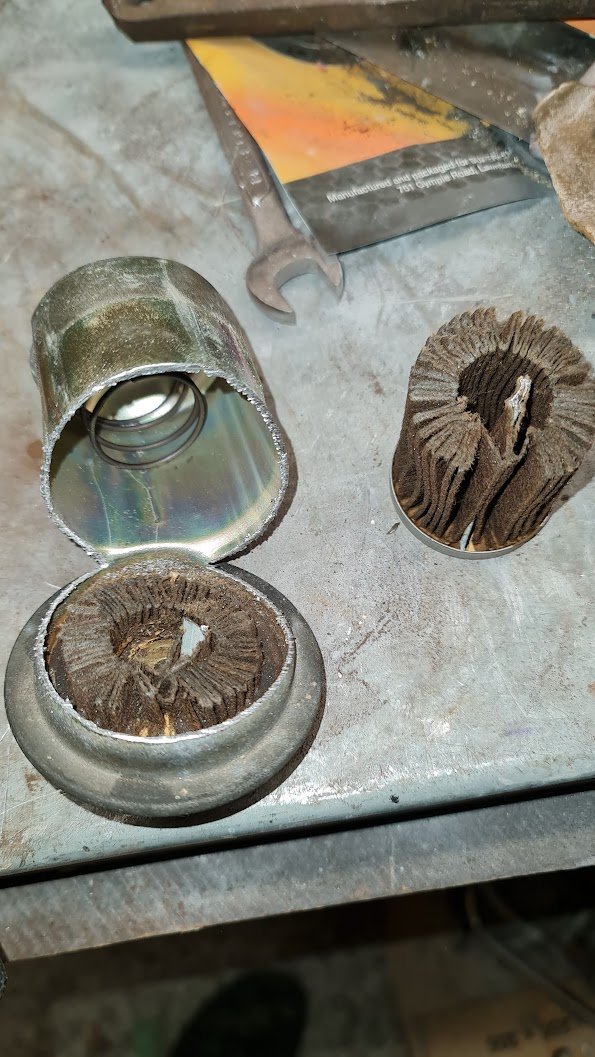
Working out how to machine the steering arm with some aluminium I had. Much easier to machine than a big block of steel, that I don't have. I used the bandsaw to cut out that corner, much faster than turning it all to swarf. I had plans to machine the balljoint taper(the hole on the left) using the lathe. As it is now, I should be able to fit it in the big 4 jaw to center the hole. But I just tried a practice taper in some scrap and it seems real close, but the finish is not as smooth as the oem hole which I don't think is good enough. I'd buy a taper reamer, but OMFG they are expensive. Also, as far as I can accurately measure, the taper is 4 degrees(per side) and I cannot find anything that size. I think for the steel version, I'll get it profile cut as a rectangle, so I have my reference surfaces, but also cut out most of the material I need to remove. So I don't have to spend hours at the bandsaw cutting the outline, I would just need to cut some tabs.
2 points
-
Yeah, flows more. but kinda means your exhaust is too small if makes more power. After the end of that pipe, idea is to simulate no exhaust. biggest straight through glass pack can fit straight after it. the rest of exhaust just needs to make it quieter, while adding little exhaust pressure as possible So yeah echo with 3" exhaust2 points
-
Well, it's most of the bits to make an engine, anyway. As part of the purchase agreement of the car, the seller said he had "Some spares" that would come with the car. I didn't know what and didn't really bother to ask (any spares are a bonus, and I have lots of spares as it is, so it's just more to add to my collection). When we were in good standing we were going to meet up a couple of hours north of where I live, as he was coming down to visit family, and I would collect the parts then. That all turned to custard once I realised what a bastard he was, so I decided to just write the spares off. A week or two ago the seller got in touch and said he had the spares and was willing to crate them up and ship them down, at no charge to me. This time he alluded to what the spares were "it's the original engine and some other bits". As this was the first time he had mentioned anything about the car not having its original engine, I was a little taken back by this revelation, not to mention this would have made collecting the spares a bit of a surprise if I chose to take the Swift that day. I would be stupid to say no, so after some back and forth on things like "how heavy is it?" "will I need a forklift to move it?", we arranged for the crate to be sent to my local freight depot and I would collect it with a friend that has a van. As it turned out, the engine was in more bits than expected, which made it much easier to work with anyway. It arrived in a big crate, but we ended up unloading it into the back of our trusty Honda. The block being the heaviest part, and even that is only 30 odd KG and can be (just) lifted by one weakling. It's funny how much space an exploded diagram of an engine takes, compared to the assembled unit. The Honda took it like a champ, riding low in the back but with plenty of suspension travel After work I unloaded the car and got my first look at what I had obtained. First, I could see in the photos, but it was good to confirm it was the correct stamped 31A engine, with the correct 9.75:1 compression ratio. I was wondering if it was the original stamping or not, but the layout and font style is consistent with the stamping on the 11A engine in the car currently, it just looks rough as guts. I purchased an engine stand, but haven't set it up yet, so I'm yet to remove the pistons from the block and check the bores, but from the top of the bores I can see, they look like they would go again with a light hone. The pistons appear to be the correct high compression ones too (shallower recess in the crown). The engine is completely stripped, other than the pistons being left in their bores, and the lifters all being stuck in place. The crank isn't looking too hot. It has light surface rust on it, but the journals are all scored to some degree too. It should be reusable with some machine work though, even if oversize bearings are needed. The cam behind it is looking quite tired too. I plan on replacing that anyway, so no issue. The first signs of issues began when I found the oil pump gears. I was told by the previous owner that "it looks like something went through the oil pump" and he ain't wrong. One of the gears is properly chewed up, but only one... The bottom of the oil pump housing looks fine, with only minor scoring, which is about what I'd expect for a high KM, somewhat badly looked after, engine The bearings were next. These were all nicely dumped into a cardboard tray, and they're all kinds of bad. The majority were through to the copper, and all of them had some scoring. They should be a nice dull grey with an even, smooth coating. The big ends were worn. Ignore the scuffing, that'll be from knocking around in the box. And the main bearings are really worn. This one even has an extra oil channel ground into it I don't know what on earth happened to this bearing, and if it was whilst it was in the engine or not, but its ugly From the numbers on the bearings, they appear to be standard size, original bearings. Likely the ones the engine was built with. The good news is that the heads are the original EFI heads This is most obvious due to the injector cutouts in the intake ports. I bet the heads currently in the car don't have these. Annoyingly as far as I can see, the rocker assemblies weren't marked, so I have no idea which side of the engine they were originally on. Same with the pushrods, they are all just dumped in the box, so I don't know if I can/should use those again. Probably not to the pushrods, but maybe the rockers will be fine with new pushrods? Pending inspection of them and their shafts, of course. The plan this weekend is to get the block on the engine stand, get the pistons out, and see what the liners/bores and pistons are like. If they aren't too bad, this engine will be saved. I will need to measure the heads, as going from the used composite gaskets in the box, they have likely been skimmed once already, and they can only be skimmed so far before needing replacement. I will also look into whether I can use the newer 3.9 heads as the valve stem seals are far better than the SD1 style. It looks like the engine was super tired, and not that well looked after, even before the oil pump shat the bed and dumped bits of metal throughout the engine. I did want to upgrade the car to a 3.9 or 4.6, but if I can put the original, numbers matching, 31A engine back into the car, I think that is best.2 points
-
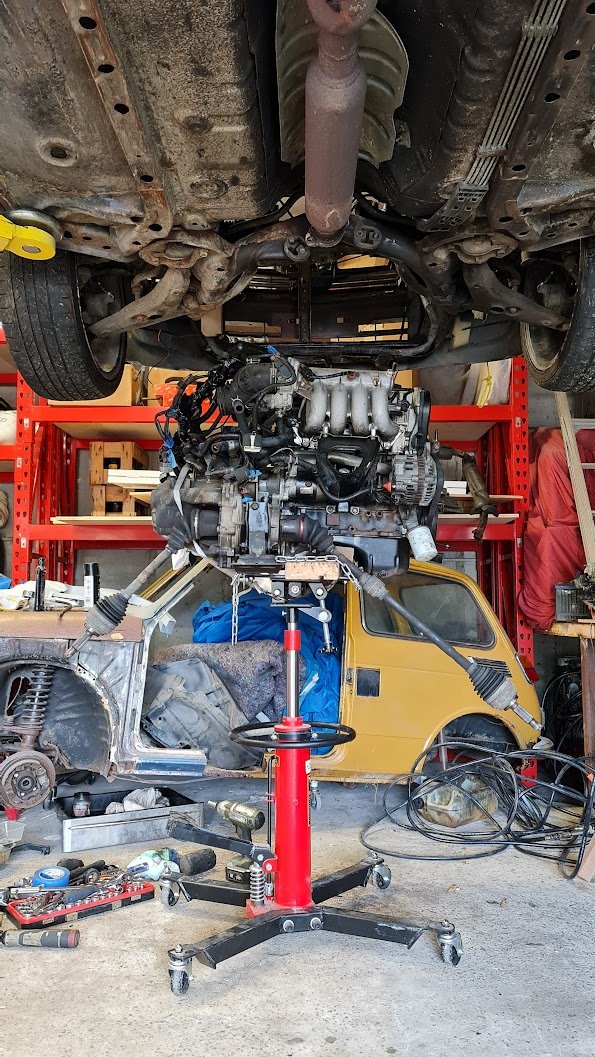
My 200sx 1jz car lost compression on the dyno last week so needed to get the 'parts lancer' off the hoist, so put the 4g15 in and got it rolling again. This combination of transmission jack (500kg rated) to position and lift the engine up in stages plus the hoist to lower the car over it works pretty well. It's in: Wiring is a bit different but have got it turning over at least and confirmed the clutch is all working. Will look at the rest later. Found some amazing twist and tape wiring in a few places: Also here is the fuel filter cut open, this is the one which I suspected might be causing fuel starvation on the mivec/parts car. Doesn't look great but not really as bad as I was expecting. Could still be blocked with tiny particles. Have now moved it out of the garage since the wiring doesn't require it to be on the hoist.
2 points
-
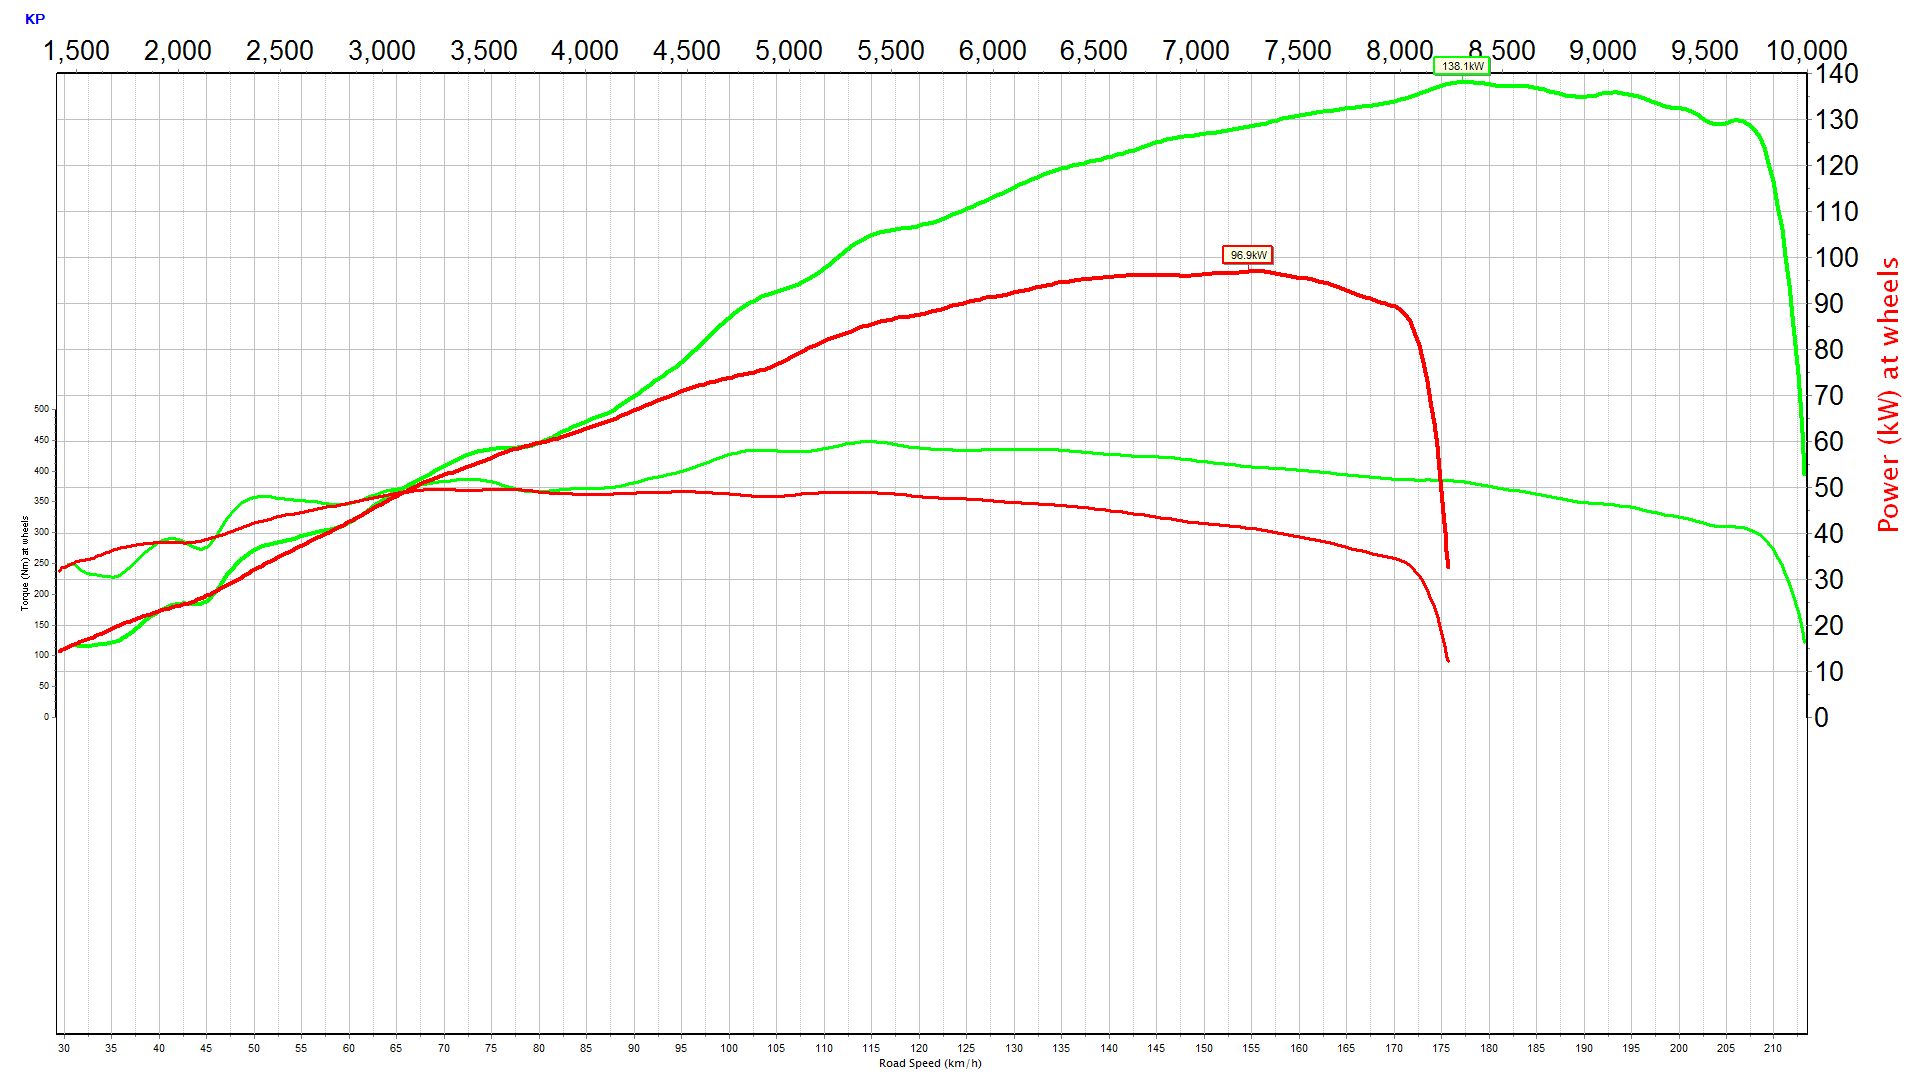
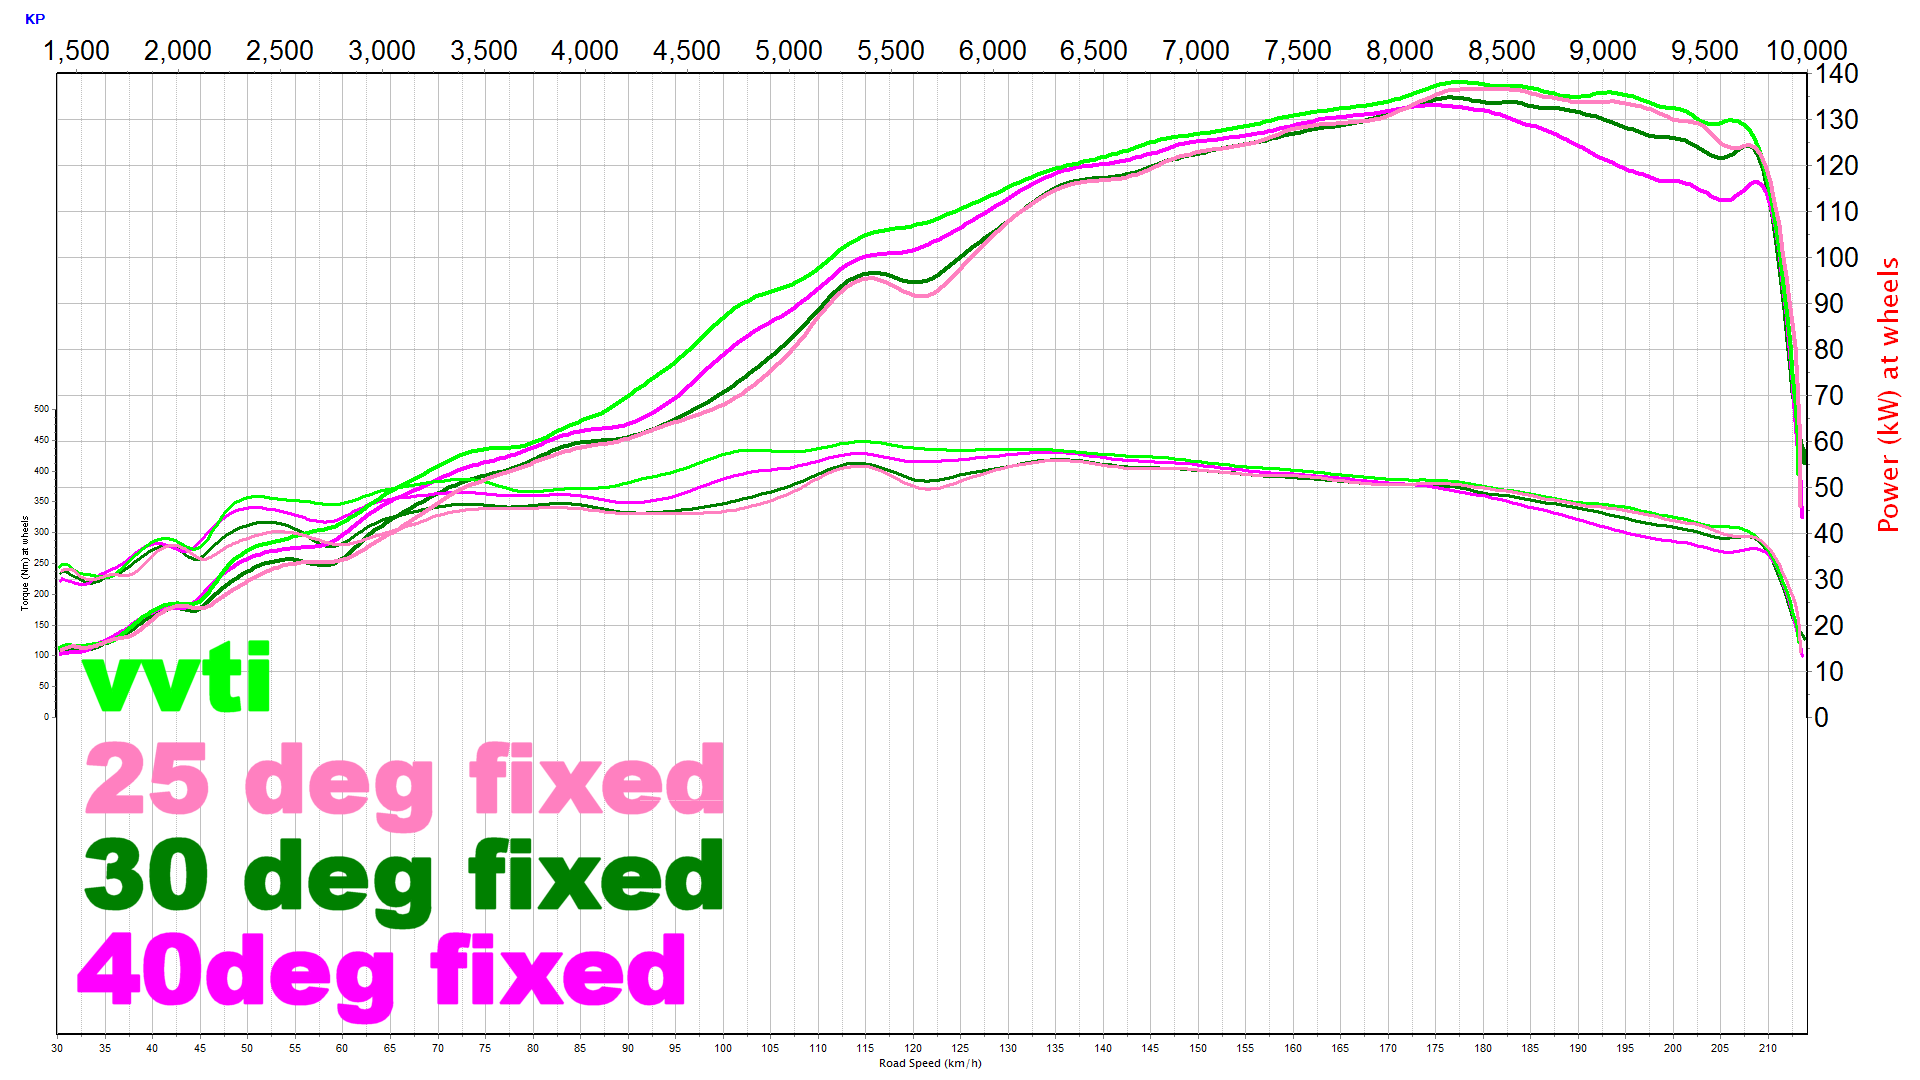
More graphs and loud noises , shows better how big the shift in cam timing is2 points
-
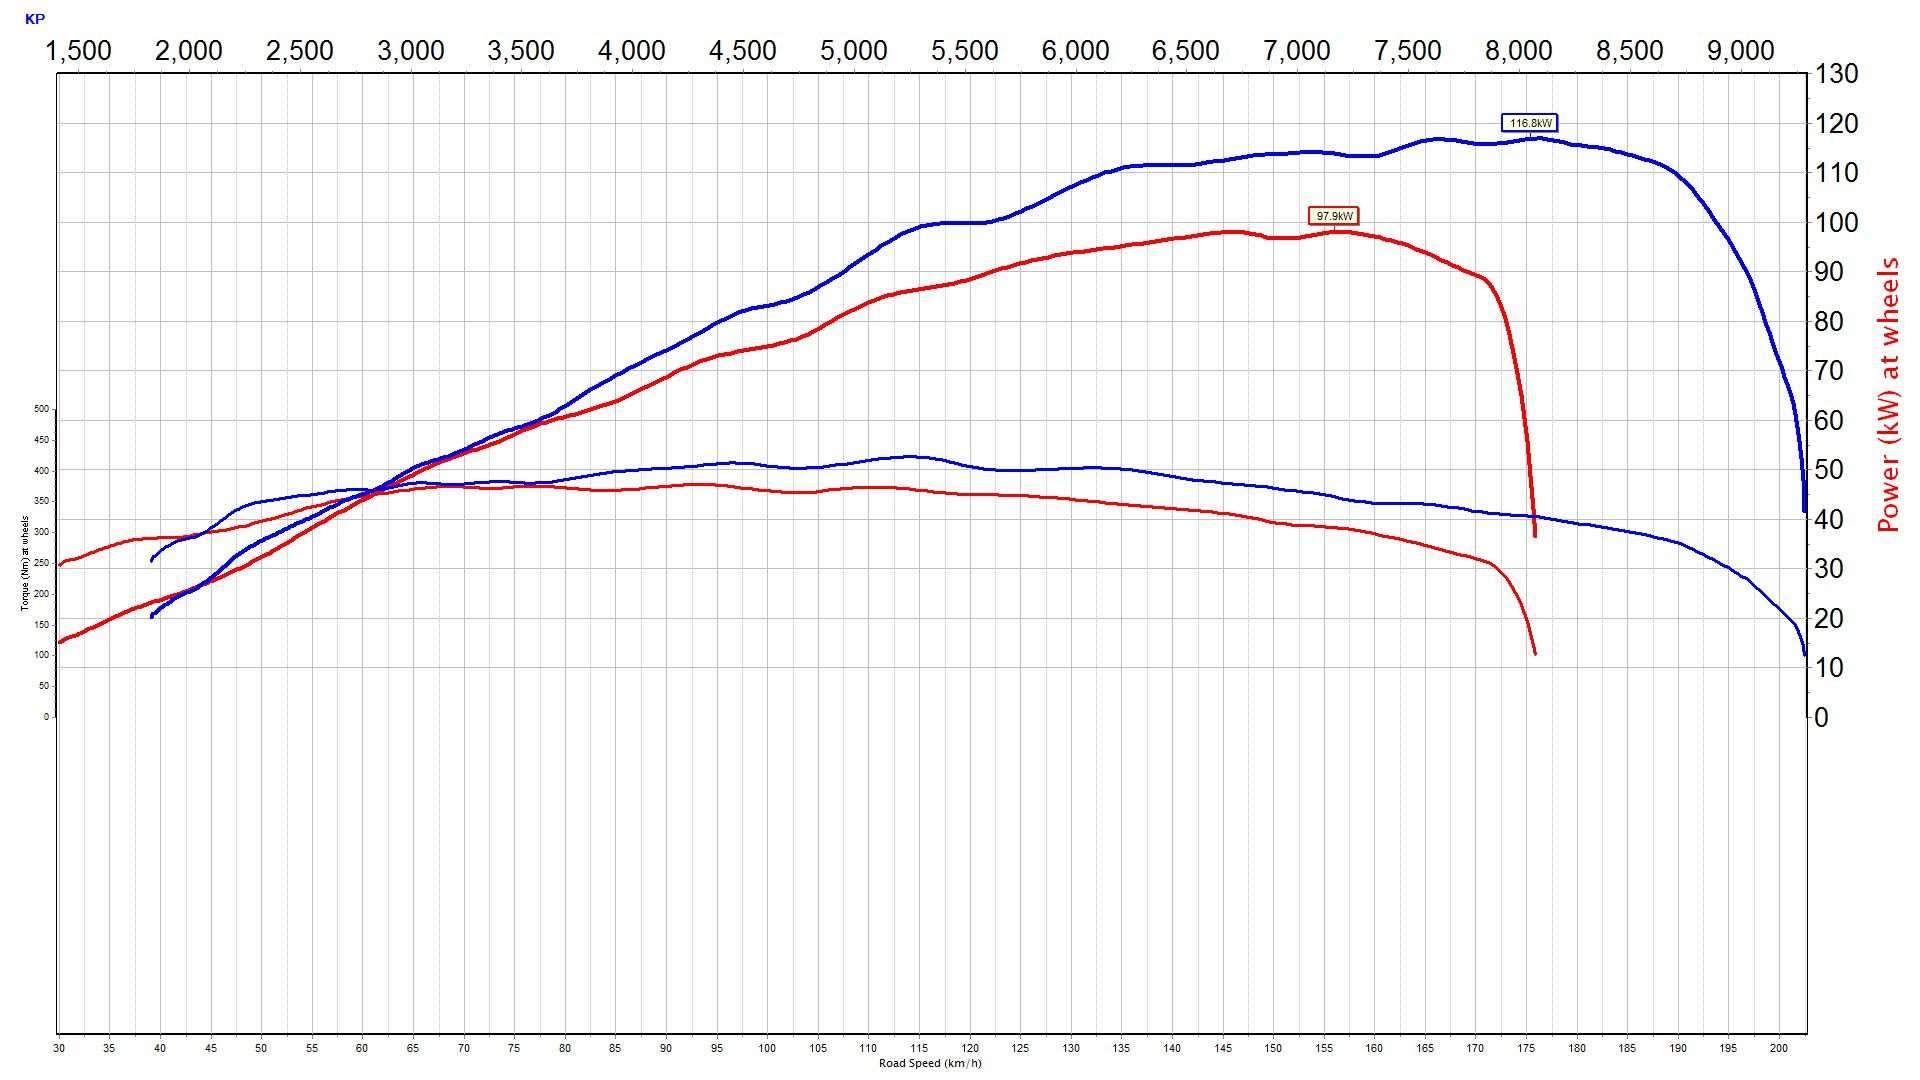
You'll loose bottom end using big cams and modifying your NA engine. Ok i'll take the hit at 1700rpm The vvti works amazing on the bigger cams, nothing like the weak gains on the stock cams. Some fixed timing compromises: Light Pink (salmon?) 25 deg- pretty much matches the peak power. but massive hit in midrange Green 30 deg - kinda blah. may as well run 25 as above ^ Pink 40 deg - probably good compromise for midrange while not loosing a whole heap of peak. good if didn't want to rev past 8500. Bright green vvti - all the power everywhere. actually using way more range that i thought i would need, about 45 degrees. I didn't spend very long at all on the vvti map. so some tweaks may get another kw here and there. and yes it made 138kw!
2 points
-
going by the pic of your exhaust, you should be able to still fit a reso after that abortion of pipes ^1 point
-
Grabbed new head gasket this morning. Dowels didn't fit so it needed some careful filing Bit of honda bond around the oil drain passages that are different There are 84mm vtec spec head gaskets and also a couple of options that are intended for this application but everyone has been out of stock or delayed on them Heads on with new bolts Replaced the thermostat/waterpump pipe o rings and fitted that before I forgot1 point
-
Mixed success today Got valves/retainers all sorted today, Went to put the gasket on and it was a tight fit with the dowels, Head gasket didn't survive the process Cut/welded/seal sealed the block off/shifter mounting plate I'll tack/weld the nuts on so its not a mission to change in the future. I'll etch prime it then give it a good dose of underseal so its factory azz gee All the gears work which is nice https://imgur.com/DBGSZH51 point
-
While I was on a pickapart mission I saw there was a accord with a heimholtz reso so I grabbed that - Will have to do some more reading/sciencing to figure out pipe length/sizes etc. There is space above the rear muffler so I should be able to fit it, with the new headers I should be able to fit the cat and the other resonator1 point
-
Tool some brave pills today and got out the extension and the holesaw Took a couple of cuts to find where the top was. Hind site says dropping the subframe would have made that easier but the cbfs were strong The shifter lines up nicely with the console which is nice, I might need to cut/weld/adjust the shifter so its not so far back but I'll wait until its bolted in and the steering wheel/column back in Cv boots arrived for the rear, Fitted them and the crv diff when I was under there CRV diff (right hand side)looks slightly different but bolts in the same1 point
-
So I pulled the head off looking for bendy valves in cylinder no3. but all looked good. guess kinda makes sense the rings are toast in that cylinder will all the smoke. the whole thing was built with worn out old junk and all the bores look horrible. but need to test more stuff. so put it back together with a trd head gasket. that had been reused, i lost count how many times. stock 1.2mm trd .8mm metal. some copper coat and back together again Still smokes like a train as expected. try not to let it idle so doesn't fill the cylinder with unburnt fuel.. seems to have gained about 3kw. 2kw at worst with the trd head gasket 100c run same as above, 120kw on stock cams!
1 point
-
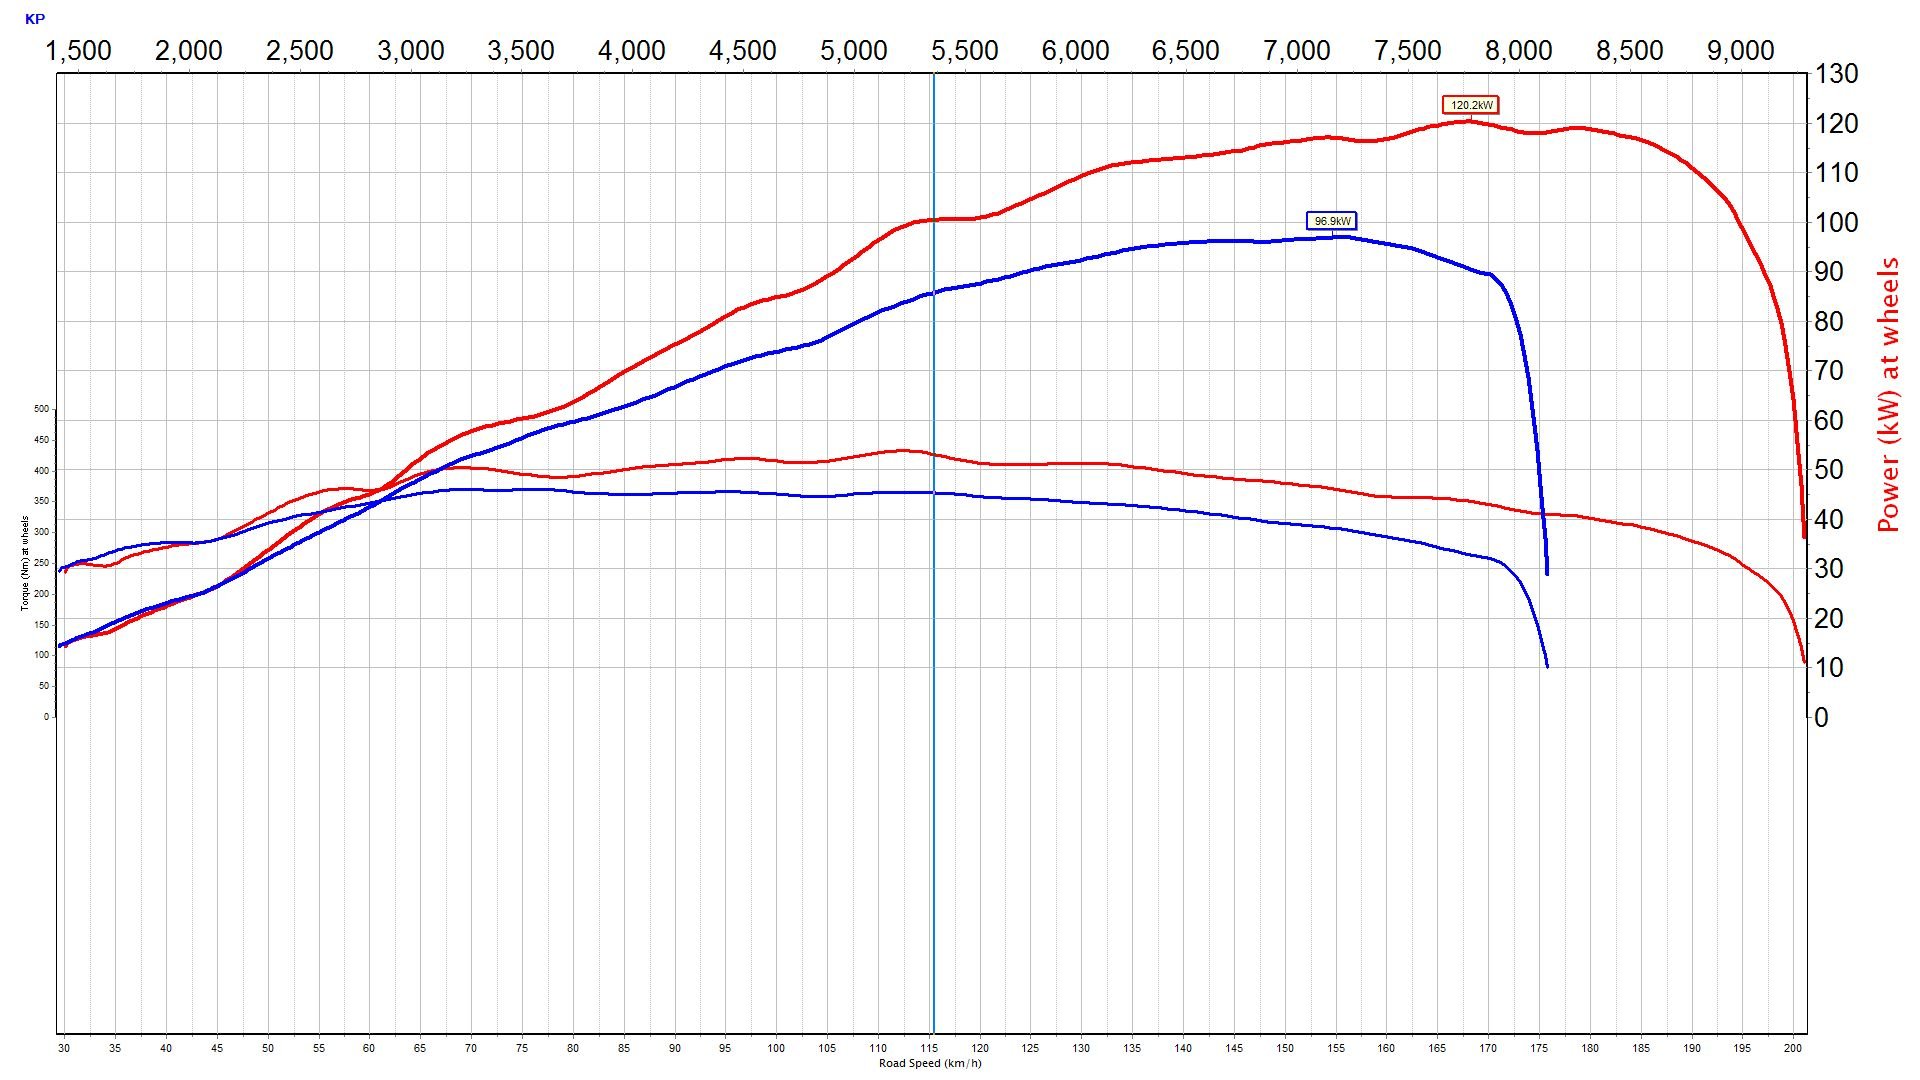
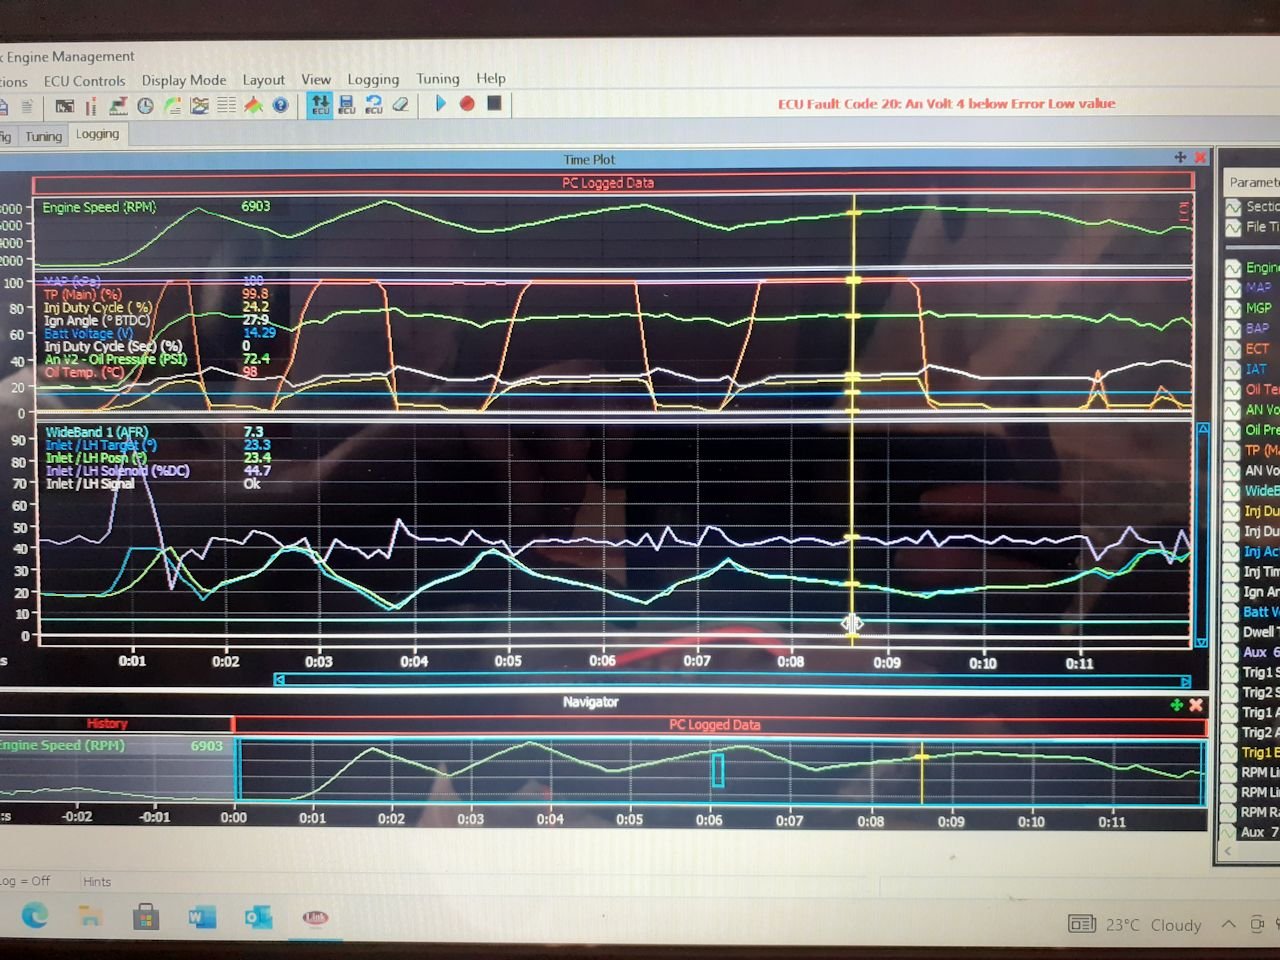
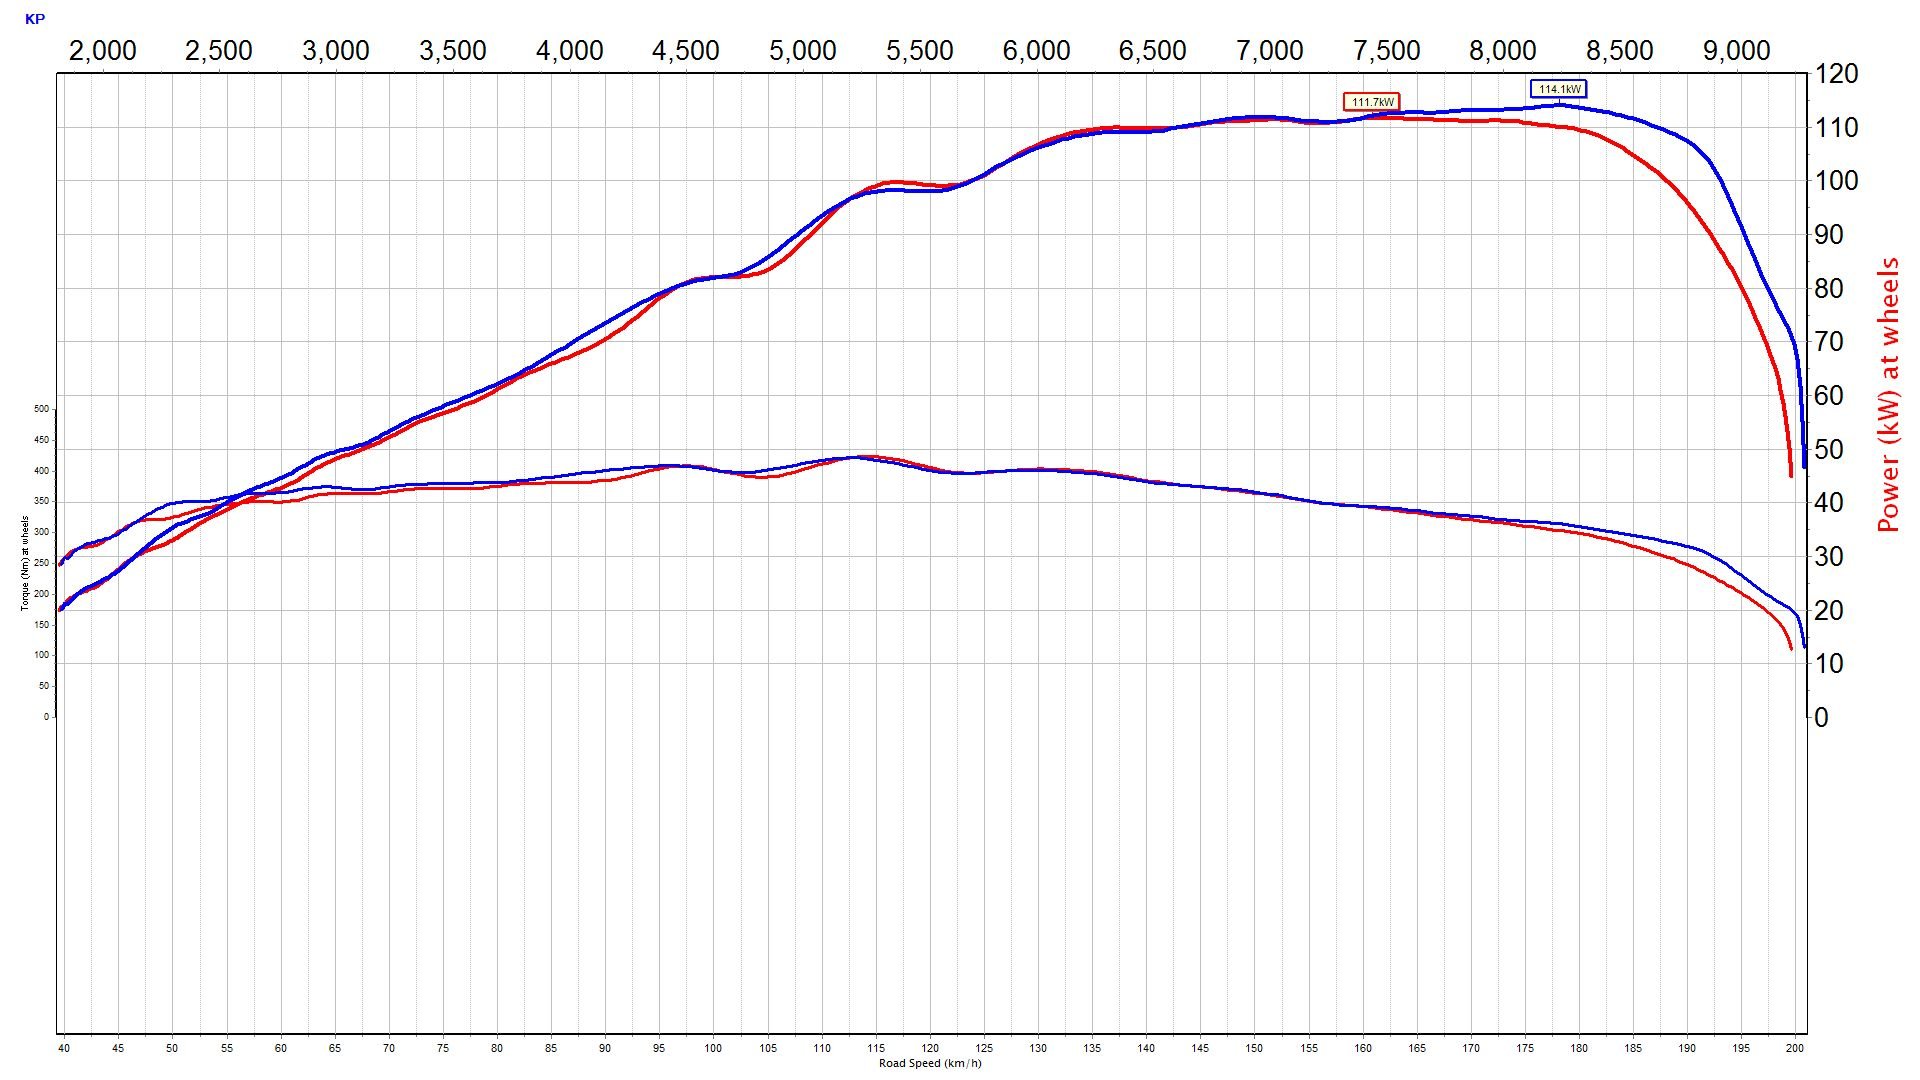
Ok, so i ignored all the oil leaks and bent valves, put it on the dyno. most of its working as planned. im not sure how fast its meant to respond. this is unloaded 1st,2nd,3rd and bit of 4th on dyno. which is a bit faster than it would accelerate on the road. It doesn't keep up in 1st, which is borderline free revving. but the rest is pretty good. some adjustments probably can get it even better. first attempt I had it setup for too much advance and not enough retard. so skipped a tooth on cam belt which got it pretty close. after a few runs with cam timing fixed at different settings, built a rough vvti map. using around 35 degrees of travel throughout the rev range. It could go a few more adjustments, as can see in the graph below where the fixed timing slightly edges it out in places. Doesn't look super impressive, but weak stock cams will do that Red is vvti holding 28degrees throughout rev range, which simulates the best compromise on a fixed timing setup blue is my rough vvti map To get that 114kw peak on a fixed timing setup would lose a huge amount of midrange After that i had a play with the exhaust cam timing, was slightly off. then run it up at 100deg oil temps. i usually run tests at 90 or 95 because easier to keep there. but hotter oil will make more power Almost 117kw with stock cams (not even bluetops) and some bent valves and an amazing amount of smoke coming out the exhaust. must be some kinda record? red is stock ish bigport. same good header and exhaust. stock intake. same cams!
1 point


This leaderboard is set to Auckland/GMT+12:00