
Leaderboard


Popular Content
Showing content with the highest reputation on 24/10/20 in all areas
-
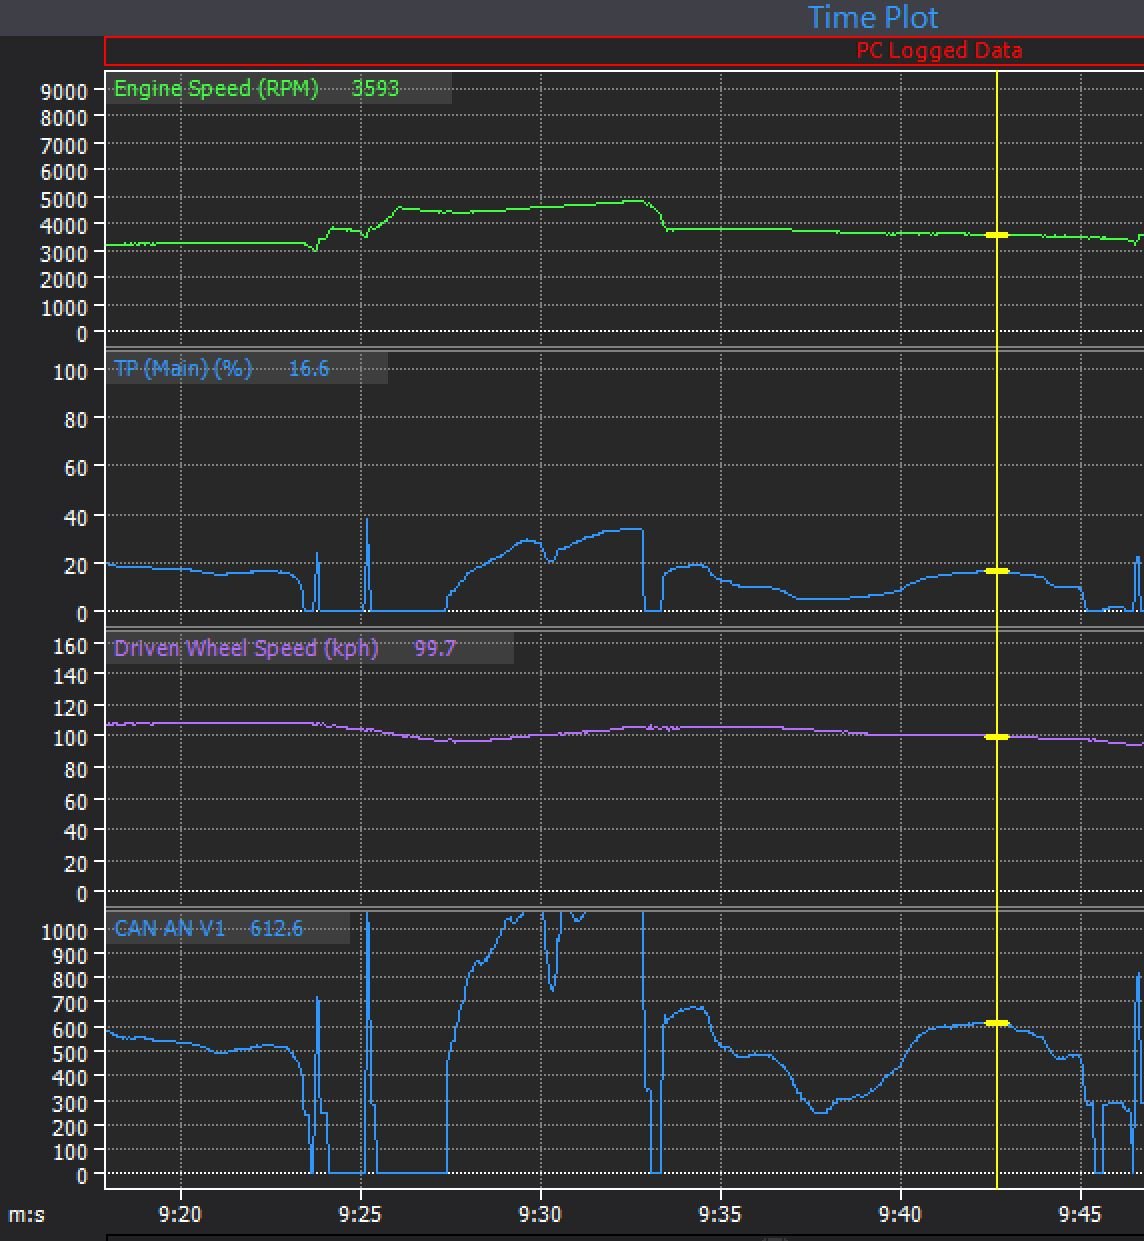
Wheels and tyres on. Ride height that would make @ajg193 beam with pride. At first the new setup was very dissapointing as they still skidded up super easy off the line - but it turns out this was just getting all the marbles off from the last time they were used at a trackday. They got much better after a bit of a scrub through some backroads and a bit of temp in them. It's now got hugely more cornering grip, more grip from standstill, but there's still problems with getting off the line. It now either bogs quite heavily, or, it spins up the left hand side wheel. Then once it's spinning you have to back right out of it to get it back. Both options are slow. boooo. I dont have the budget or will to live needed for an LSD install. Being primarily an ECU weirdo my first thought goes to setting up launch control for it, so it can cut cylinders until it gets grip again while staying on full throttle. But you can never fix a physical problem with software. only band aid it. So forget that for now and fix the physical problem first. I think it spins front left because of the motor and fatty driver on the right hand side of the car. The very soft factory springs exaggerate this imbalance. I've been thinking about how I might be able to even up the grip. First I was thinking maybe I could preload the front swaybar. The links arent adjustable but it would be possible to use some shims under and over the swaybar bushes to rebalance it. Then I was thinking that when the car launches, if the front left tries to lift its the rear right that resists it. So maybe I could put a spacer on the right rear spring to preload it some more. Then thinking further... Maybe I could just fuck around with tyre pressures instead and forget all that haha. Will see if I can get it more even just with pressures, then look at next easiest option. It might be that this all pretty much just goes away with some stiffer springs. Also these have quite long rear shocks, I might have a fossick around in the parts bin at Dads place and see if there are stiffer substitutes of a suitable length. If a stiffer rear shock could stop the front lifting until its up to say 30kph then it would probably be problem solved. Also, will make a canbus dash again learning from stuff from Carina. For starters I've just got simple communication going, so sending stuff both ways and testing it works. I'm using the Instant Fuel and Driven Speed values to get a L/100km figure that I can import back into the ECU logs. So CAN ANV1 with a reading of 612.6 means 6.126 L per 100km. Handy for trying some different settings to find best economy. But will add a screen and some nerdy features soonish.
 9 points
 -
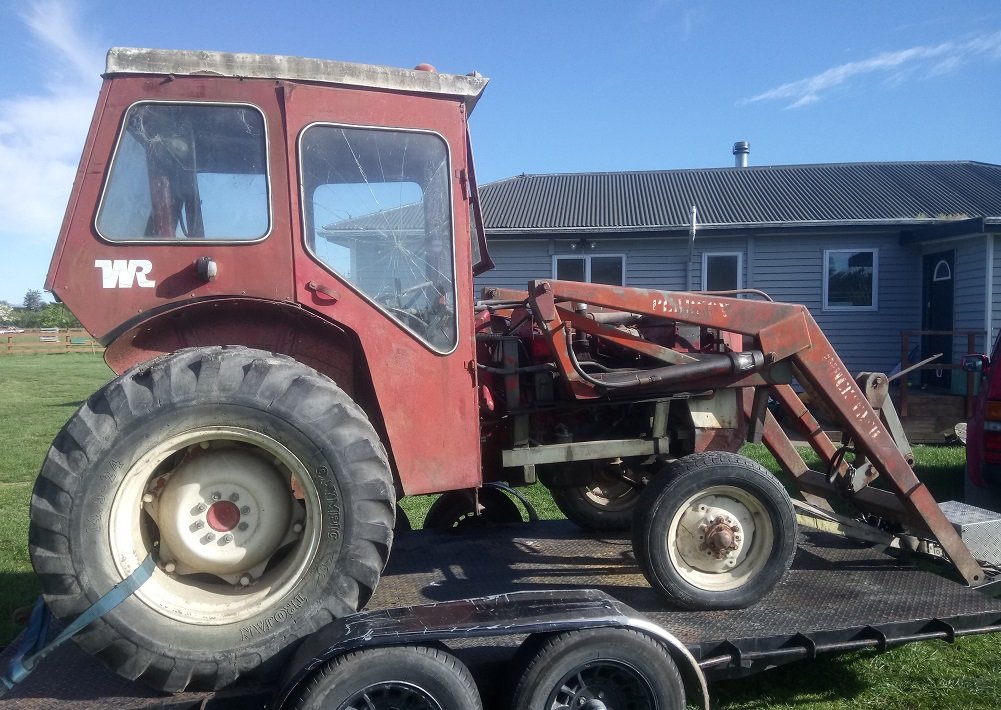
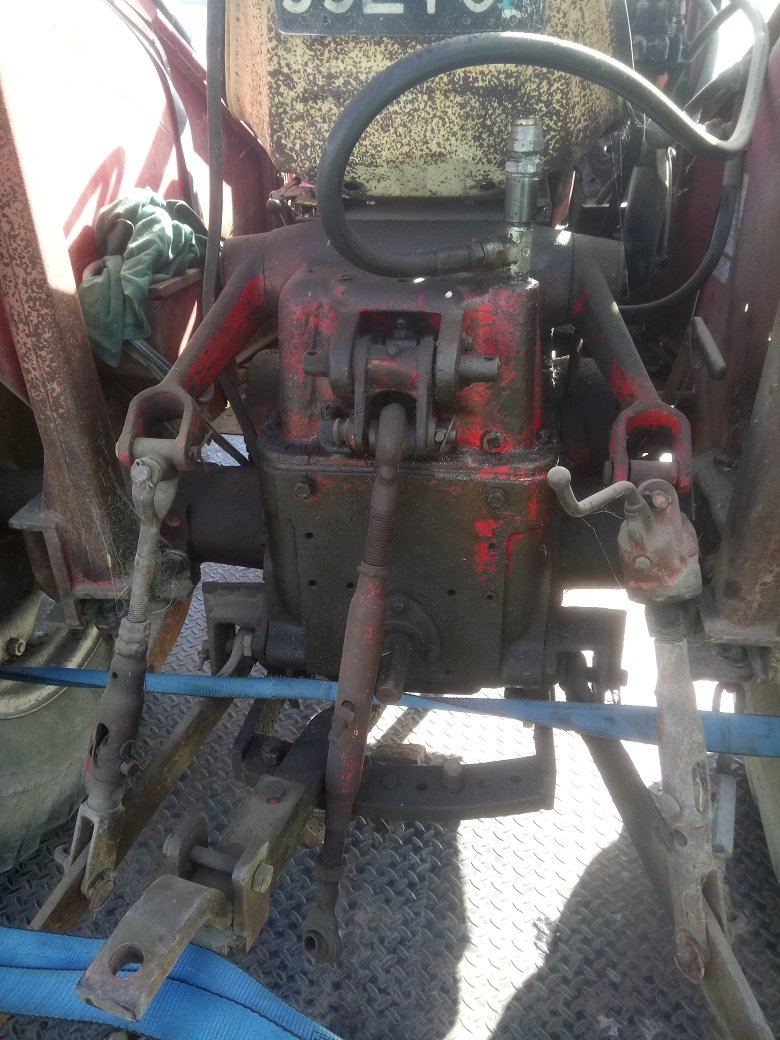
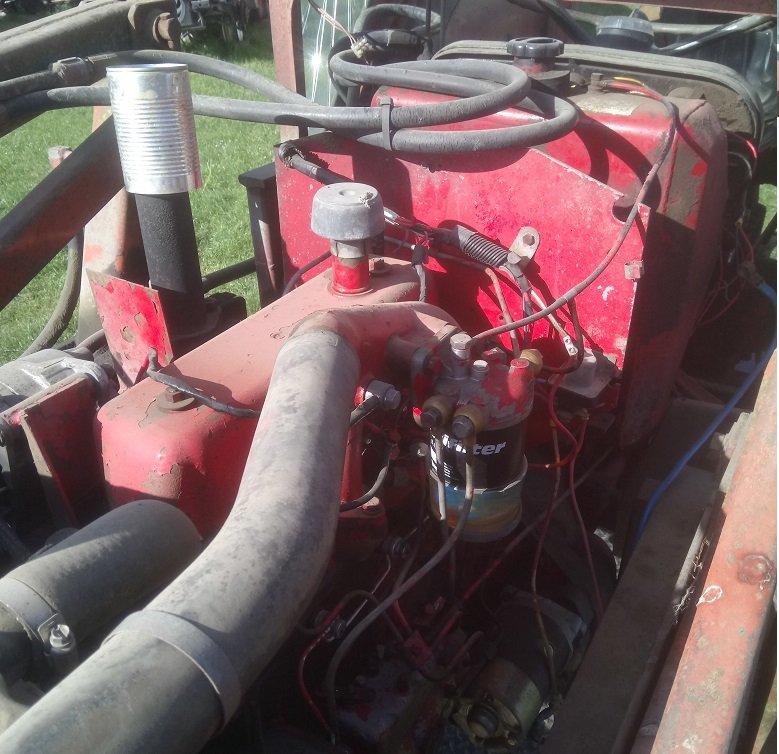
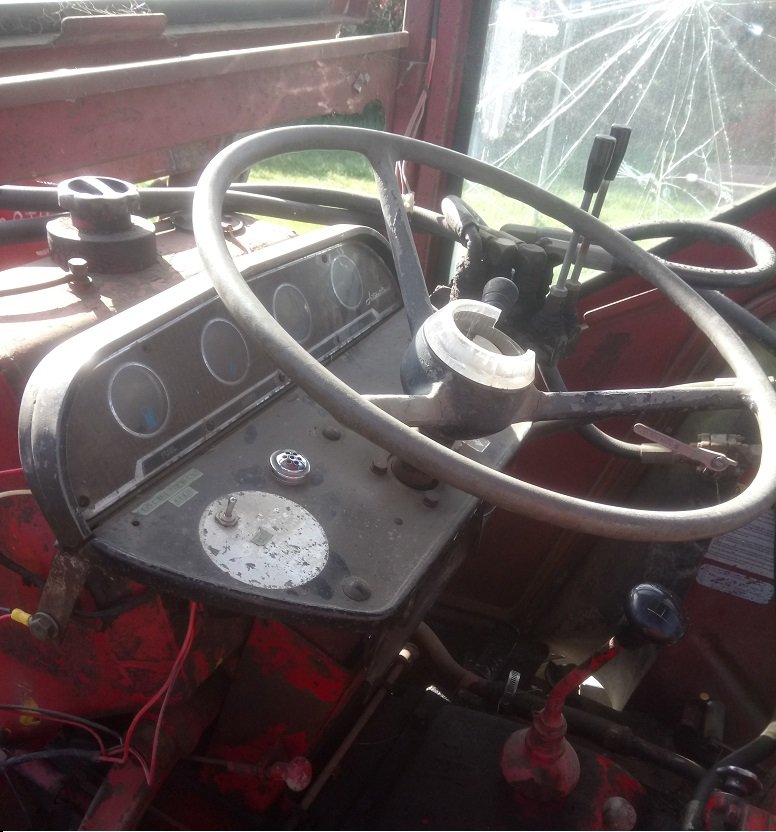
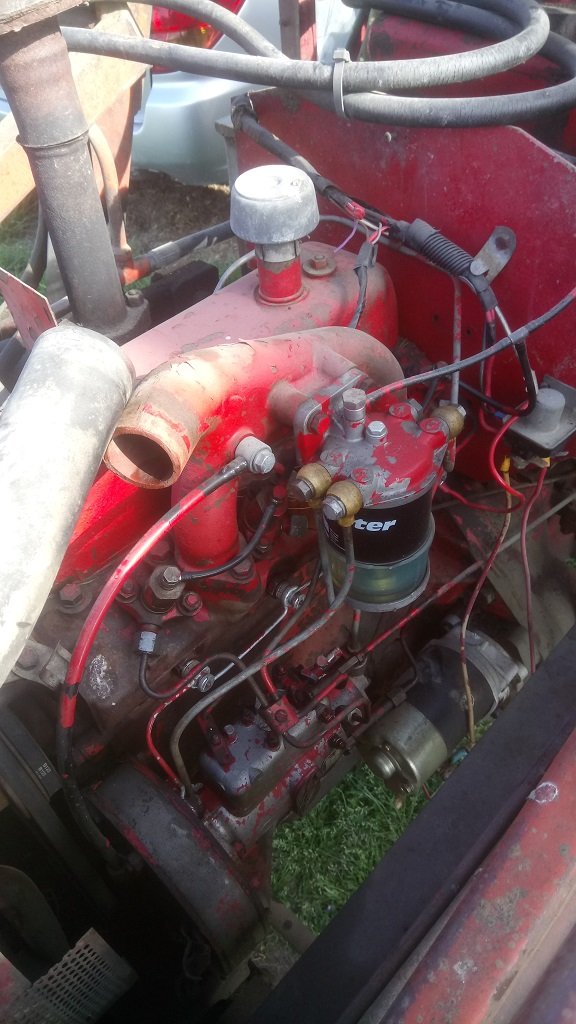
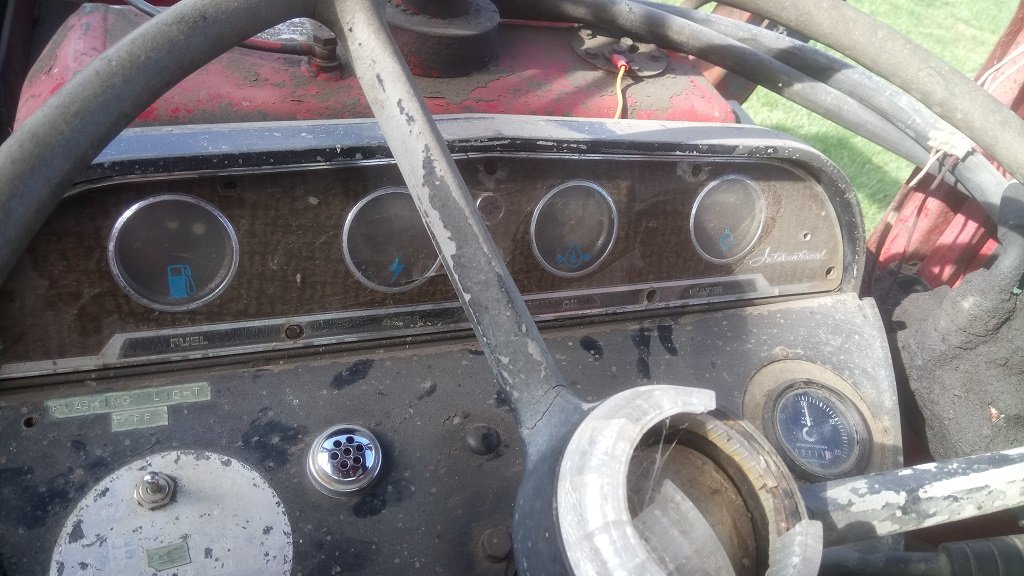
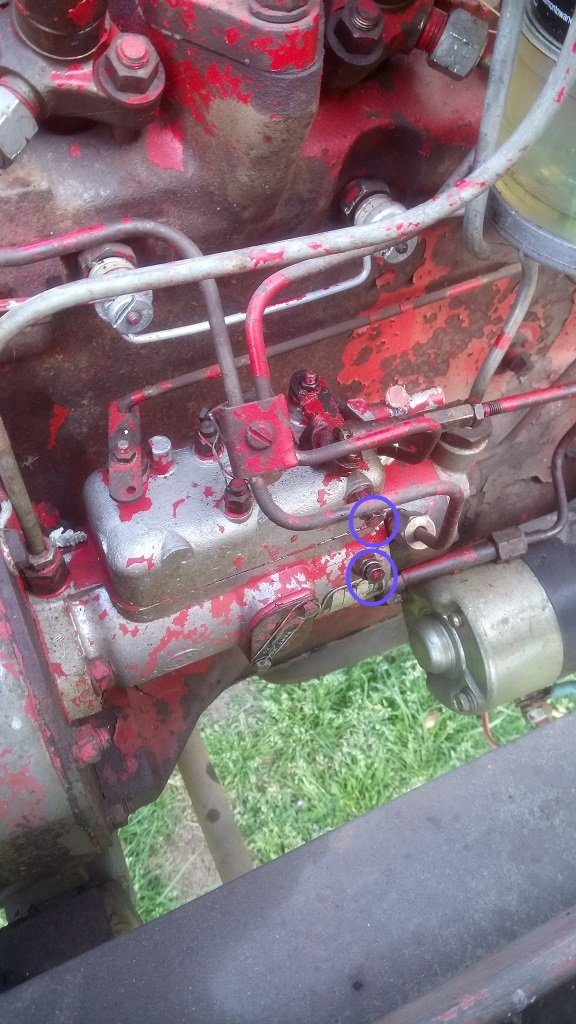
Well I dont know if i need help in the head or just help lol. I went and brought this International 444 sight unseen and not running. Came with bucket, hay forks for the front and a plow thingo for the rear. Mostly want to use it for lifting and shifting stuff, you get sick of manual labour on 10 acres after a while. I got it pretty cheap and i think it has a fuel delivery issue rather than the motor being the issues. Old owner said it got harder and harder to start after being left for longer periods. I tried to bleed the injectors last night but im getting plenty of fuel to the pump, the pump just isnt delivering fuel to the injector lines - im thinking something up with the pump, as the hand primer pump is getting the fuel through the system and back to the tank, fuel filter is full etc but the "kill" lever is awfully easy to move back and forward (i dont know if this is normal). Just seems odd with no fuel coming out of the injector lines when cracked off (ive bleed a few LD28's in my time lol) I also havent worked out what the black switch to the left of the key panel does, and have already noticed some dodgy wiring. Looks to have a new starter, and alternator and a rebuild hyd pump so just those are probably worth what i paid for it. Anyway heres some pics - any advice is appreciated
5 points
-
Would you be interested in doing some plywood trellis type panels for me? I just have some random designs (tui, grayfish, fern etc) that I'd like profiled out for a feature wall plus a few more to sell. Like this: (Lol, jokes )
5 points
-
Boom 12 dolla paint job.. Ant bad
4 points
-
So I removed the RH/starboard exhaust today and stripped back all the bog in that side of the stern. Discovered the exhaust outlet on that side was cracked half way round and the seam between the stern sheet metal and the bottom of the hull had cracked in one place and been buried under bathroom sealant. So I cut out the existing exhaust outlet and what I'm guessing was a previous engine's exhaust outlet next to it. Patches are made up, new exhaust fittings are made up....time to go and see the man with the lightning gun to put it all back together. I also found another poorly repaired outlet hiding underneath all of that filler. I think it probably used to be the engine tell tale or maybe bilge pump outlet that someone has covered up. There's a nice crack around it which has been leaking a little. Feel a bit umm...concerned? Since skimming this thing flat out across the lake the other week blissfully unaware of the hidden horrors. Then again it's a boat. No WOF, no worries. Good enough is.4 points
-
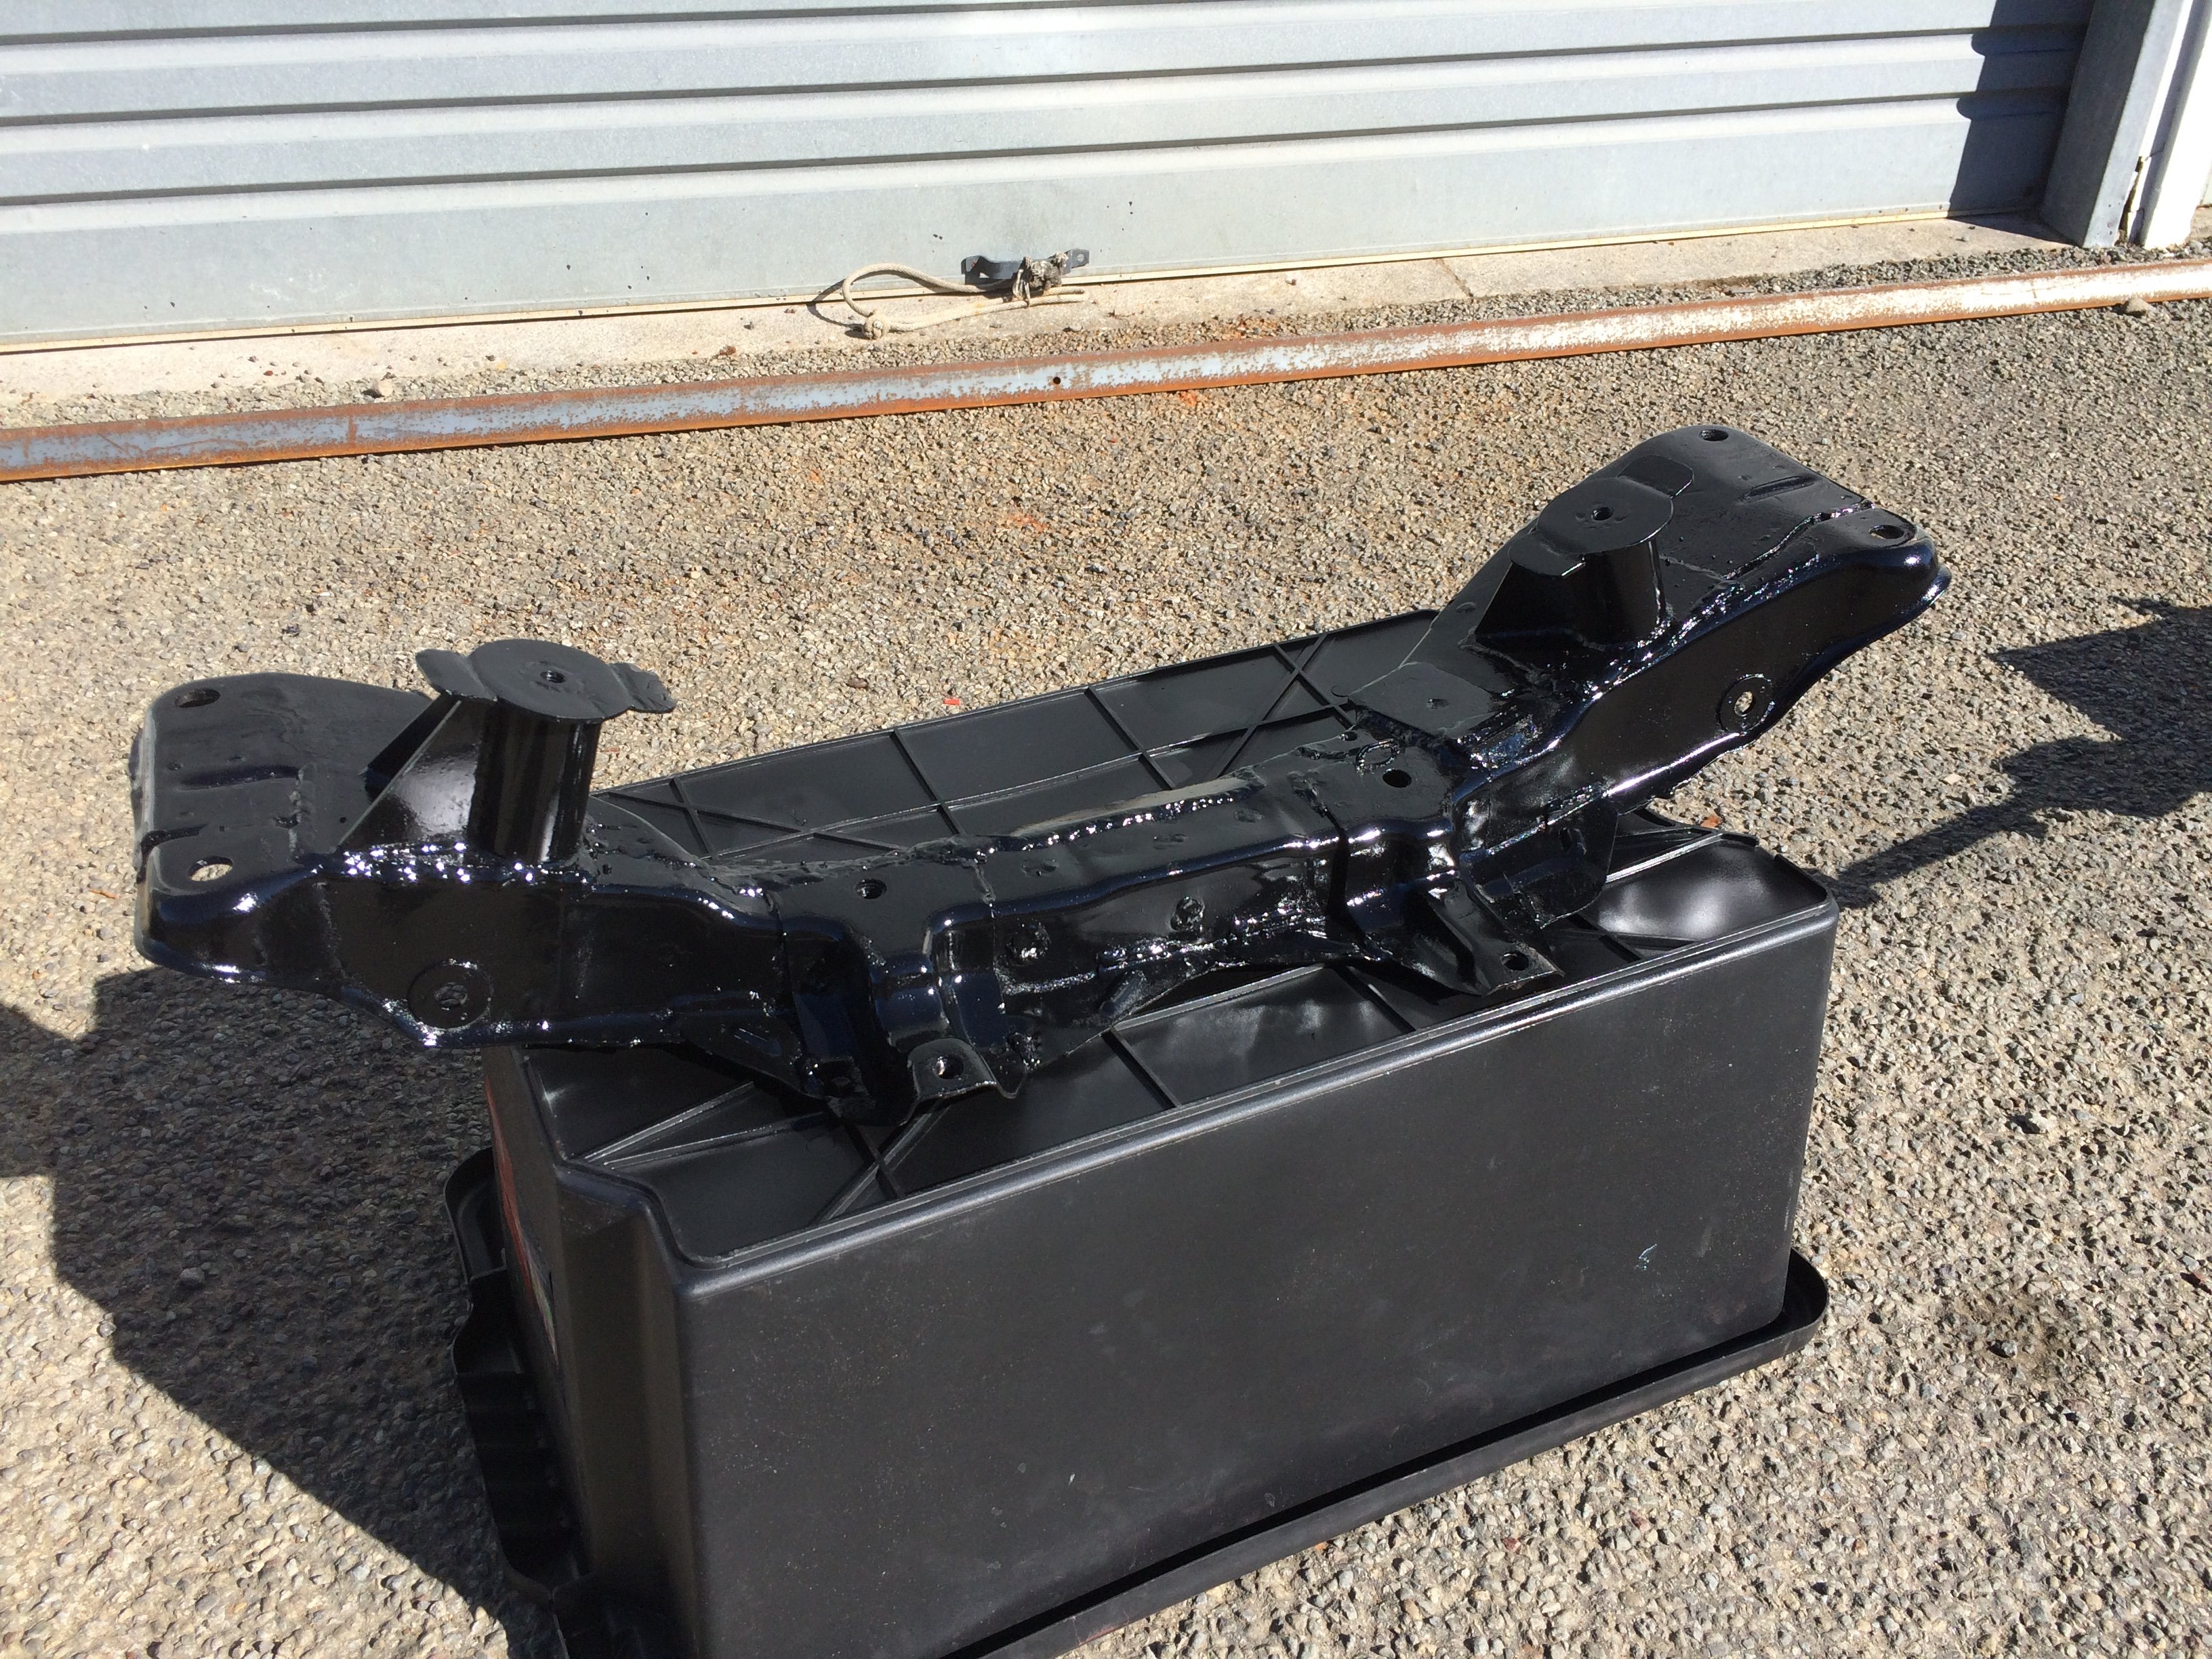
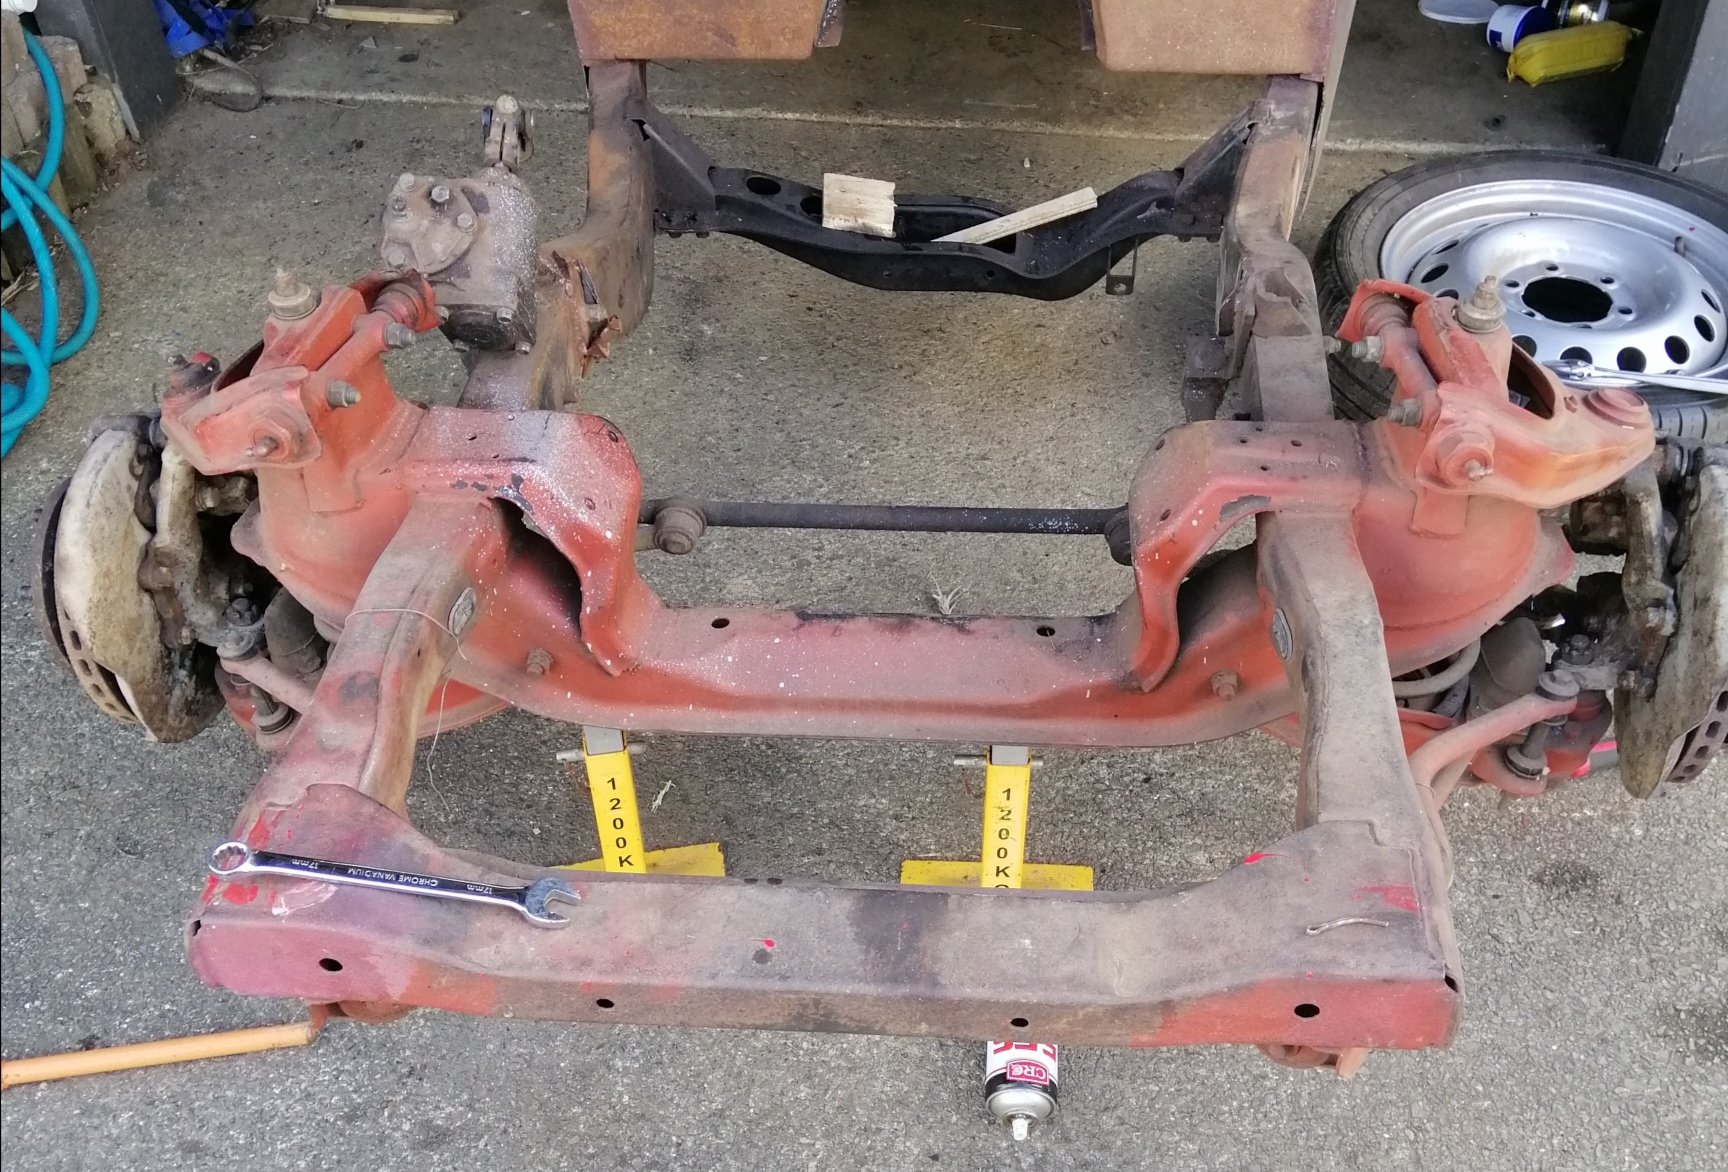
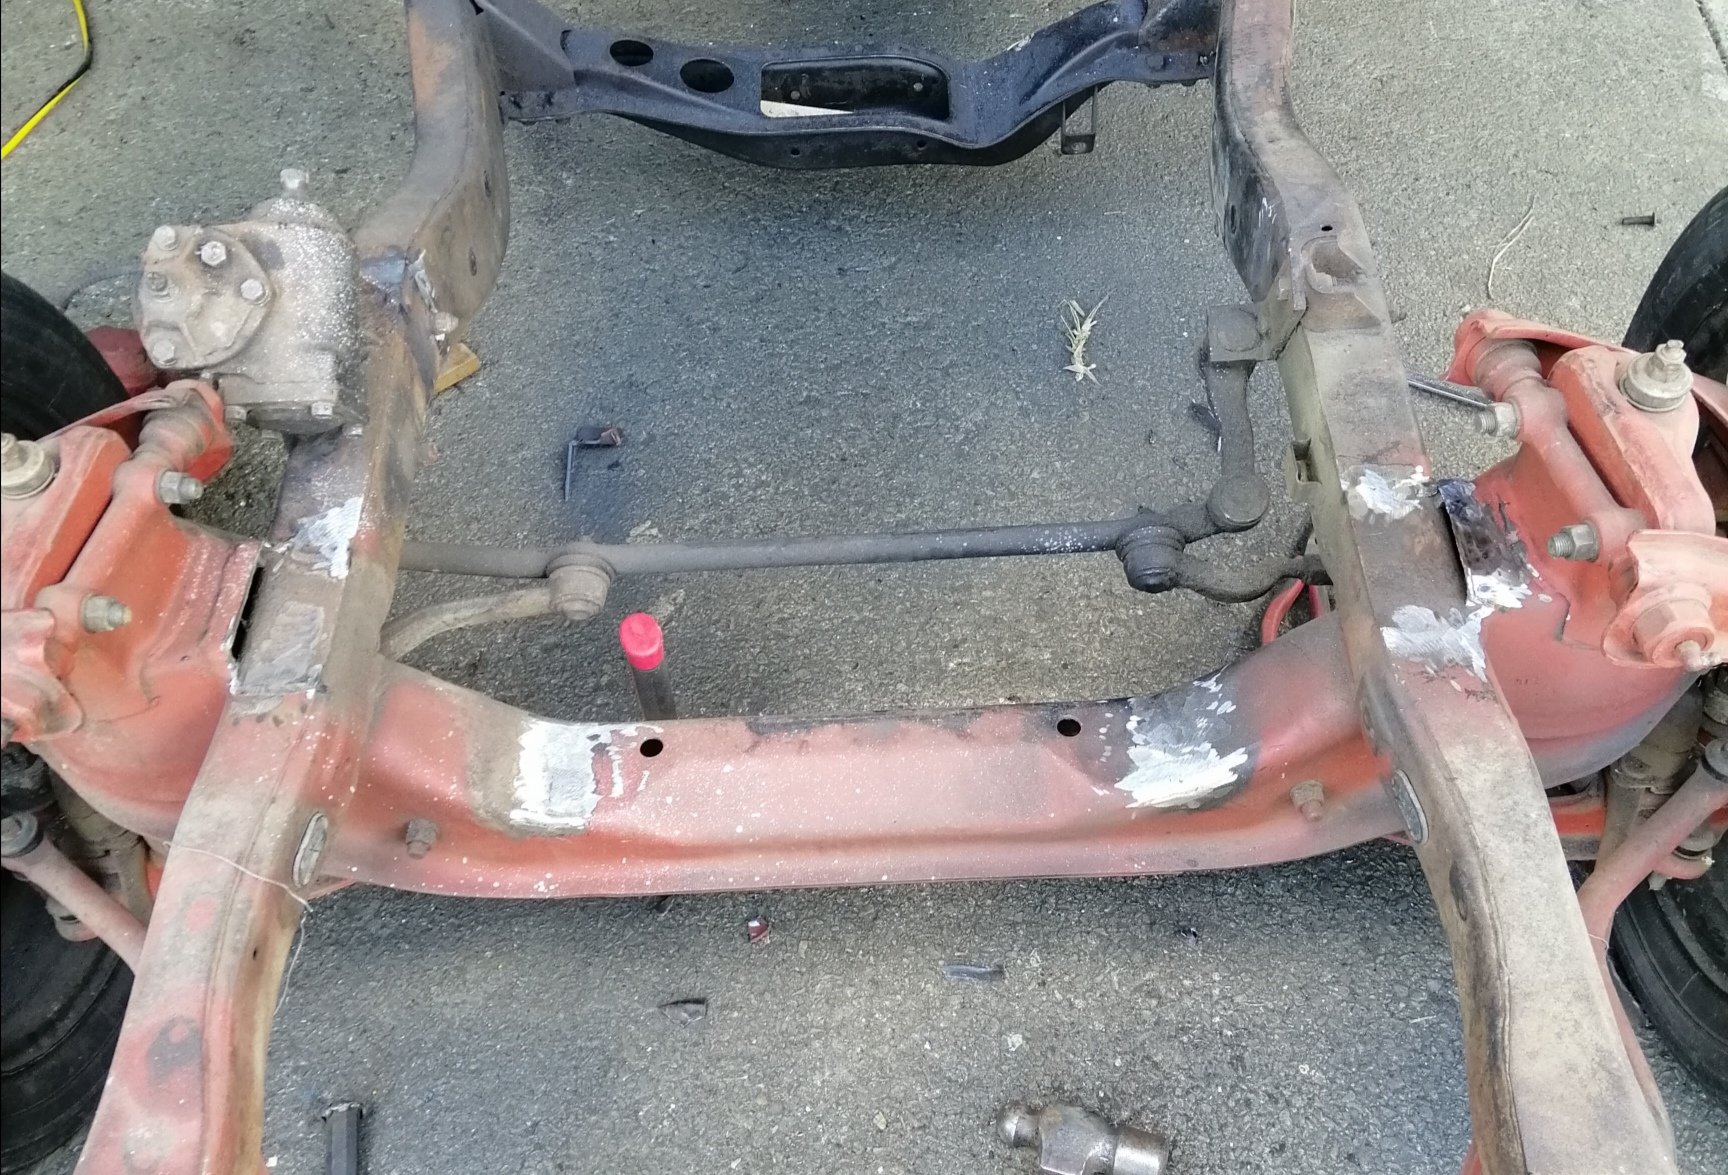
Quick degrease and rattle can resto for the crossmember and castor arm brackets. All coated in epoxy black which should stick well.
4 points
-
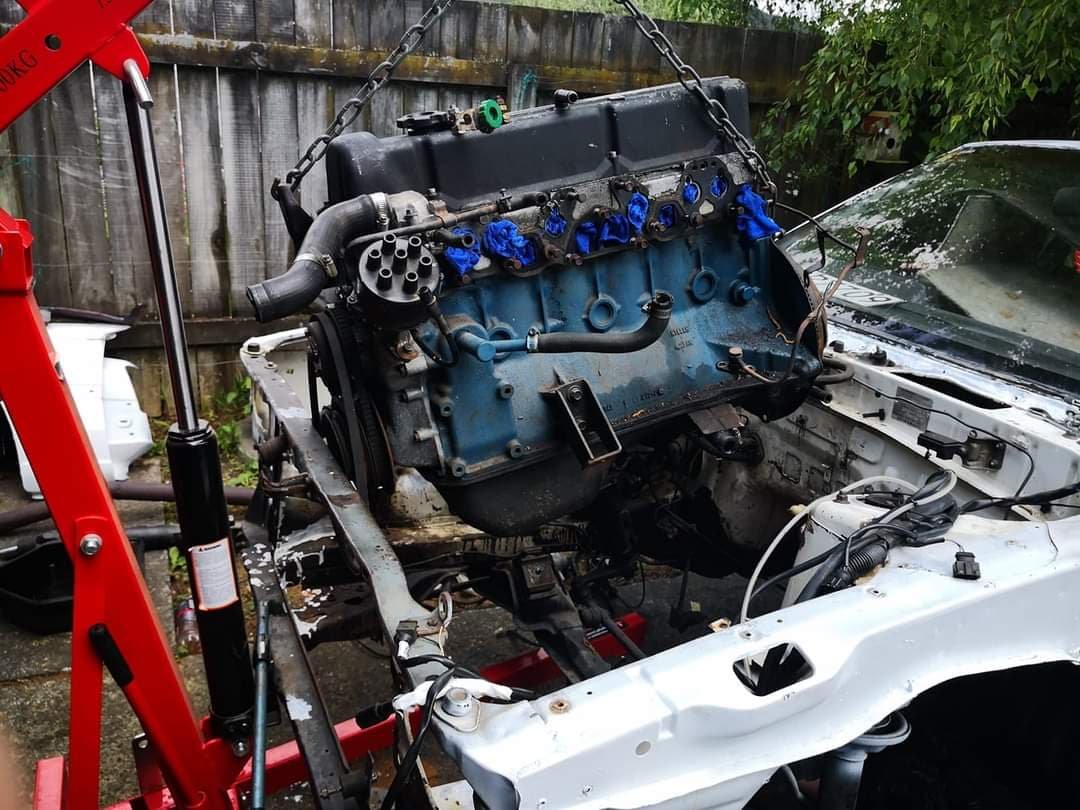
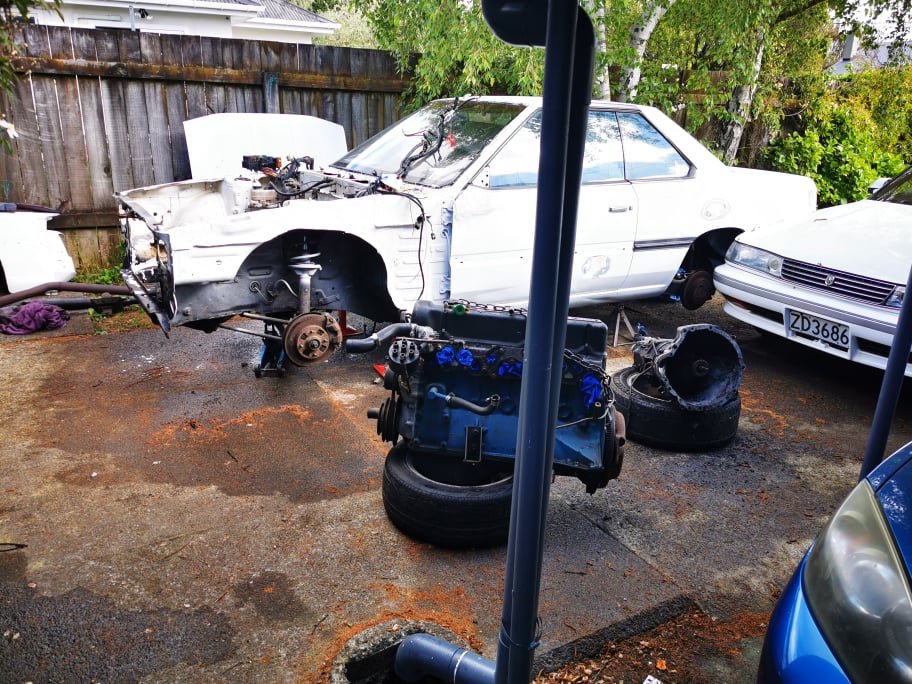
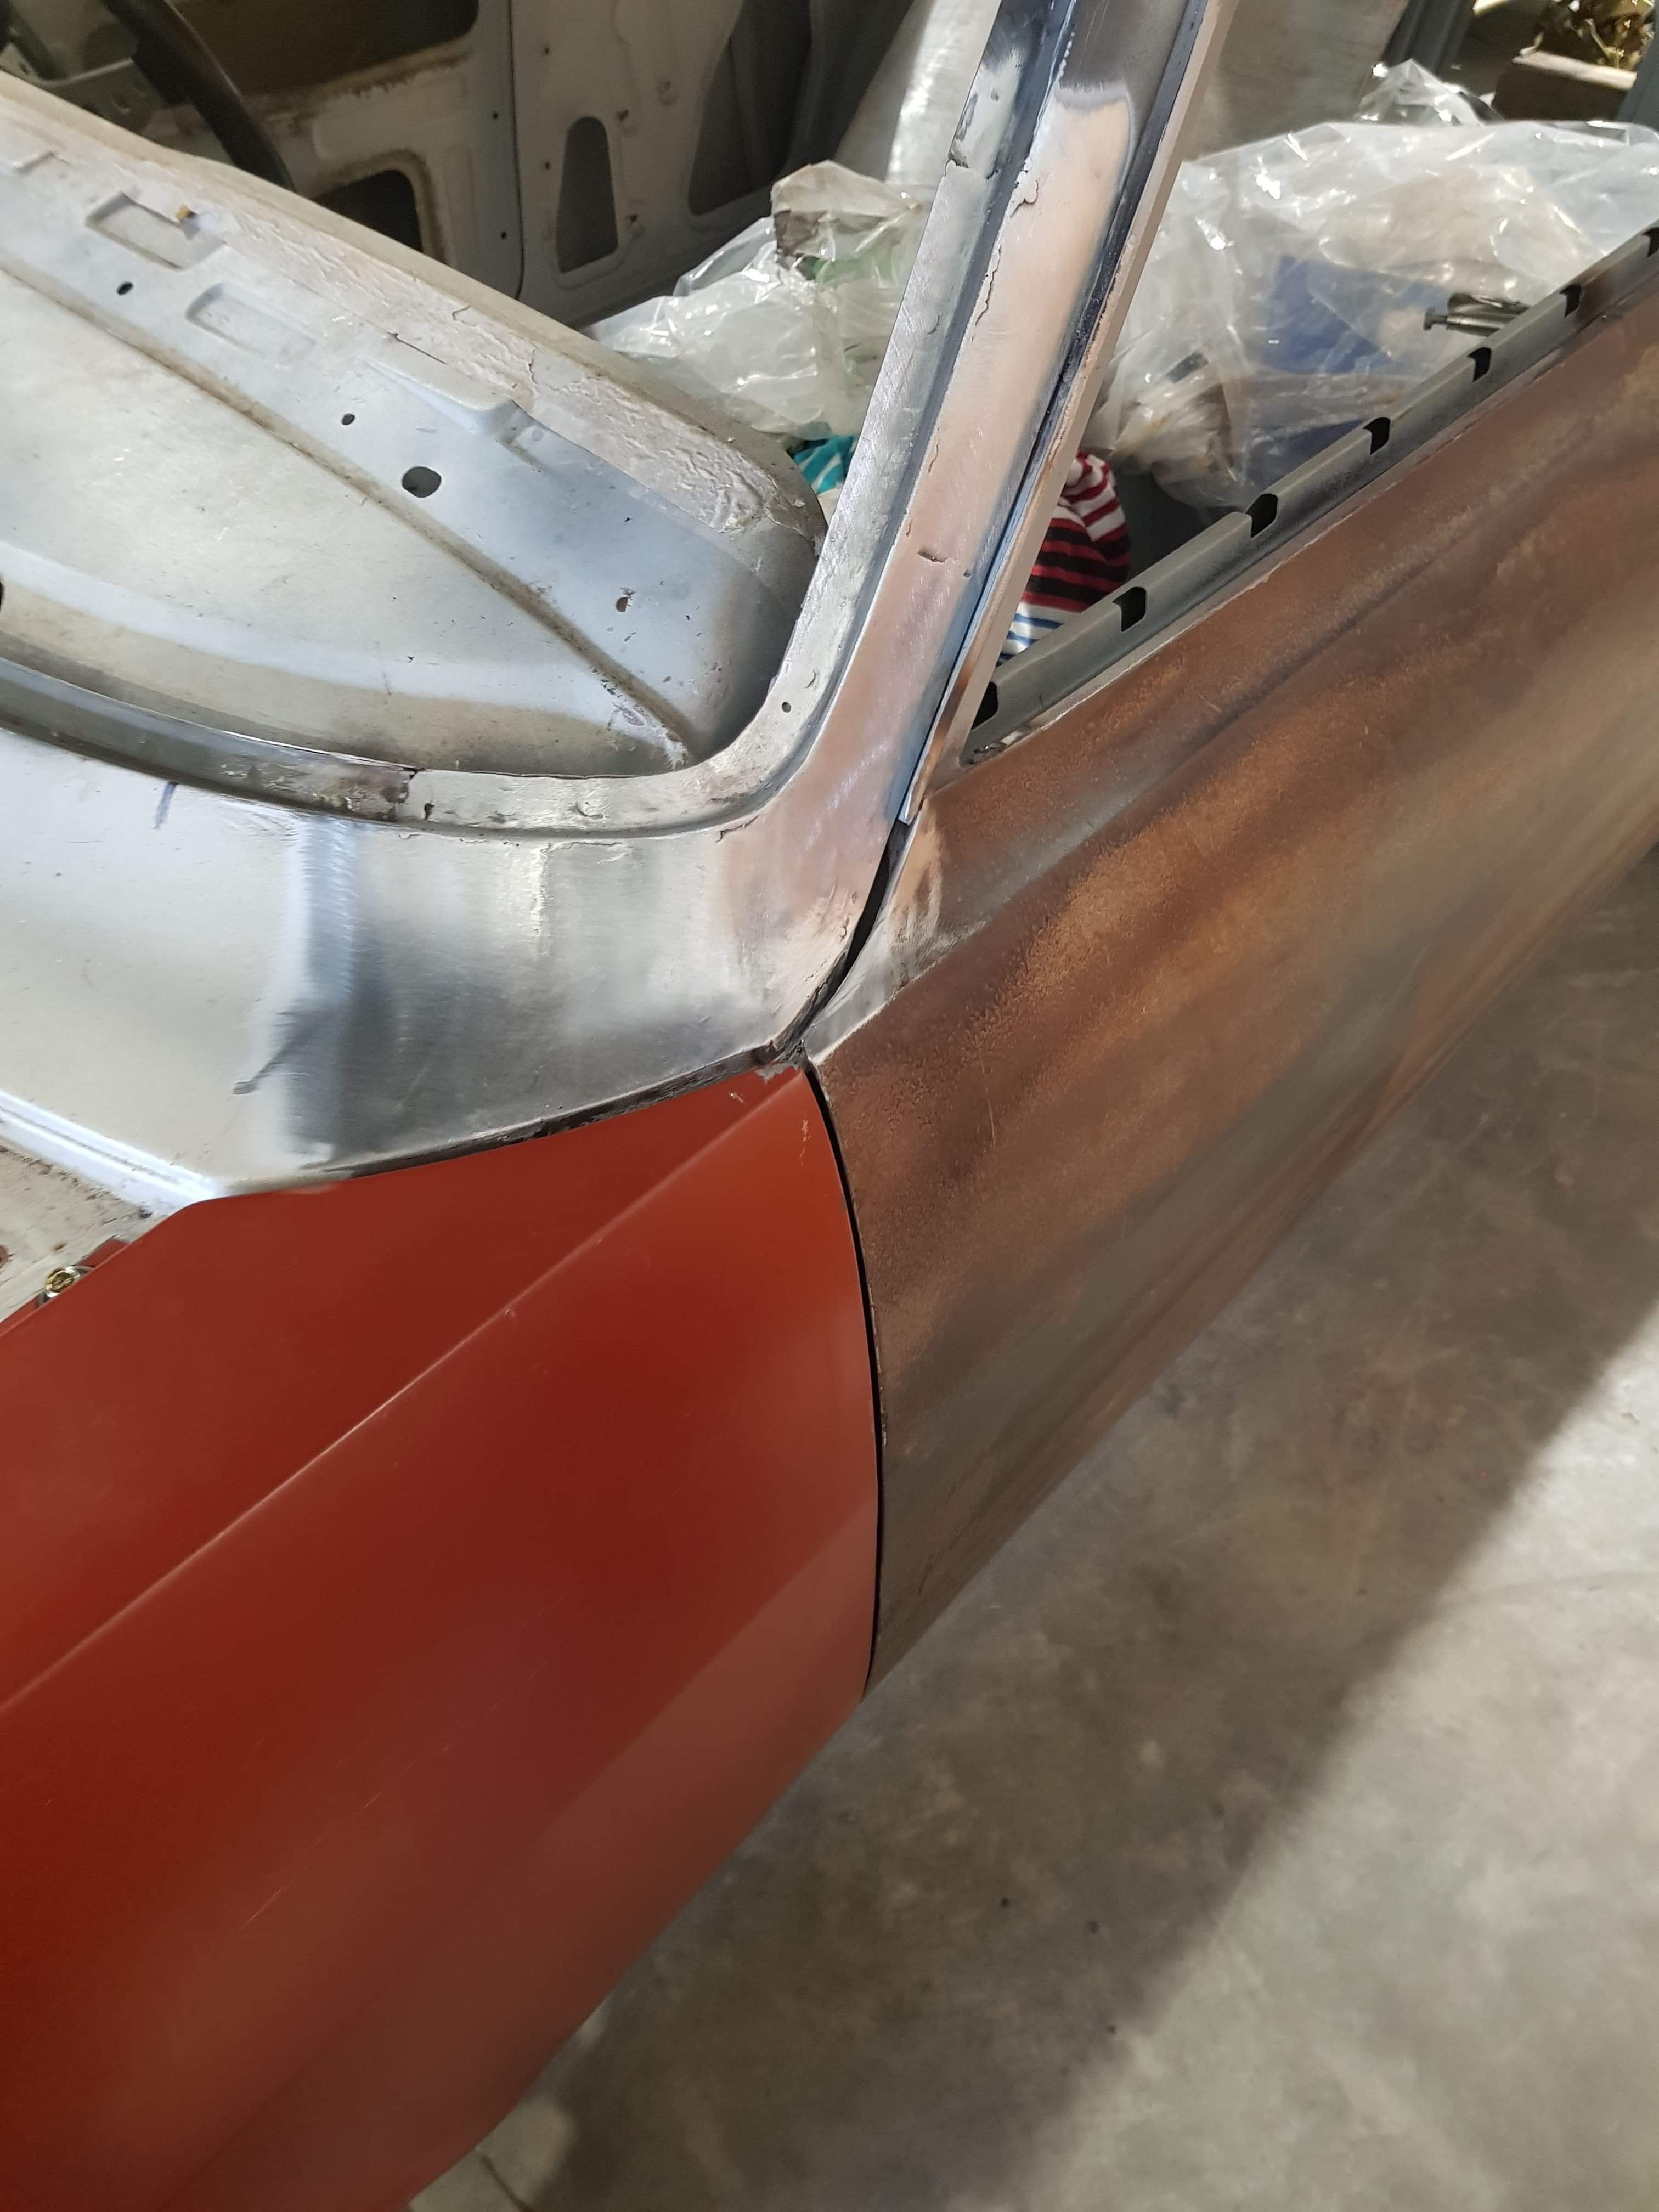
So thanks to the long weekend, I had some time to finally pull the engine out. I started by dropping the driveshaft, exhaust and then the gearbox as I didn't have much room to go back once I had the engine lifted up. Ended up having to drop the front of the car down to get the engine over the front radiator support but i got it out in the end. There wasn't much left connected to the engine by the time I dropped the gearbox and power steering as I'd already removed the manifolds. Believe it or not, This is the first time I've pulled an engine out of a car. I've done manifolds and gearboxes before but never a full engine so i guess there's a first for everything. The mighty L20ET doesn't look too bad honestly so I'll probably just clean it up, degrease and repaint it and put it back. There's some work still do be done to the manifolds and turbo though and I'll have to redo some coolant lines for the new turbo but I'll most likely do that before i put the engine back in the car. Unfortunately its gonna have to sit on this tire until I get an engine stand when they are on sale next. I'm going to try and clean this engine bay up a fair bit over the next 2 days, fix some rust and then paint the whole thing again with the factory 002 white. It should turn out pretty good. I'm also going to need a new power steering pump as this one doesn't work anymore. How half the driveway is looking at the moment, Trans and gearbox out with various parts of r30 floating around the place. Hopefully I can get the bay sorted out pretty quickly. I'll properly underseal all the underneath and put in the s13 front suspension whilst i have everything up and out just to make my life easier.
3 points
-
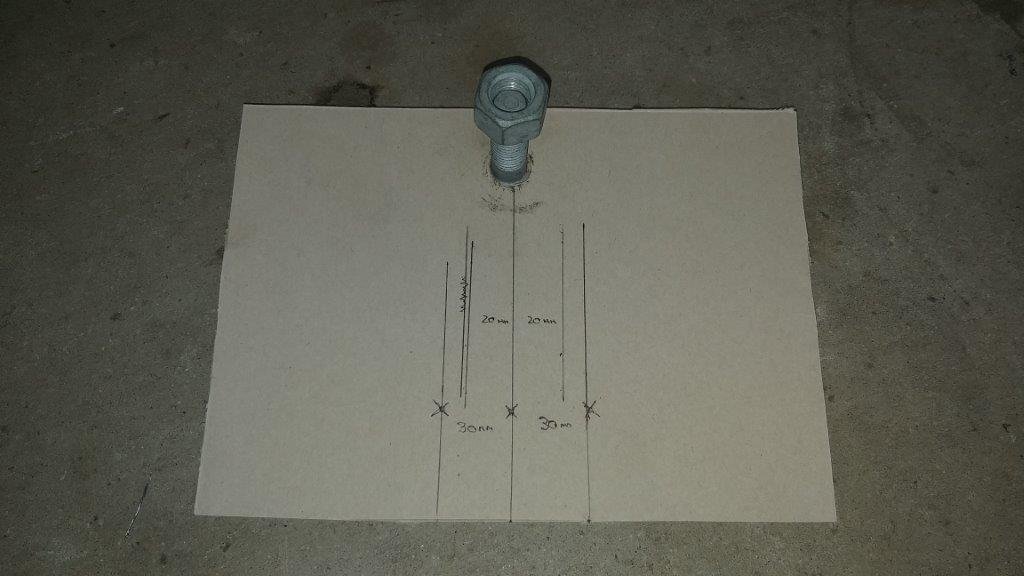
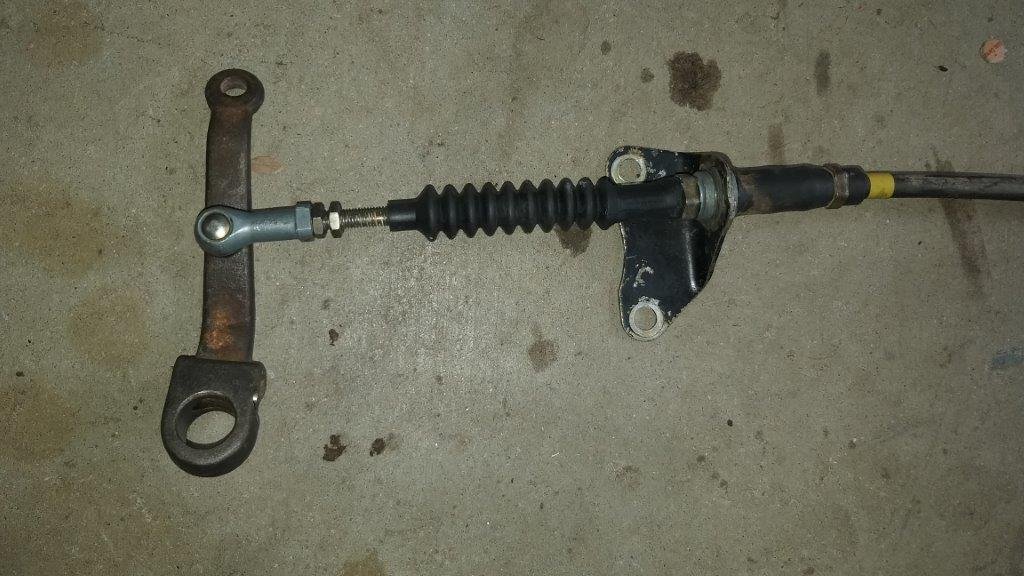
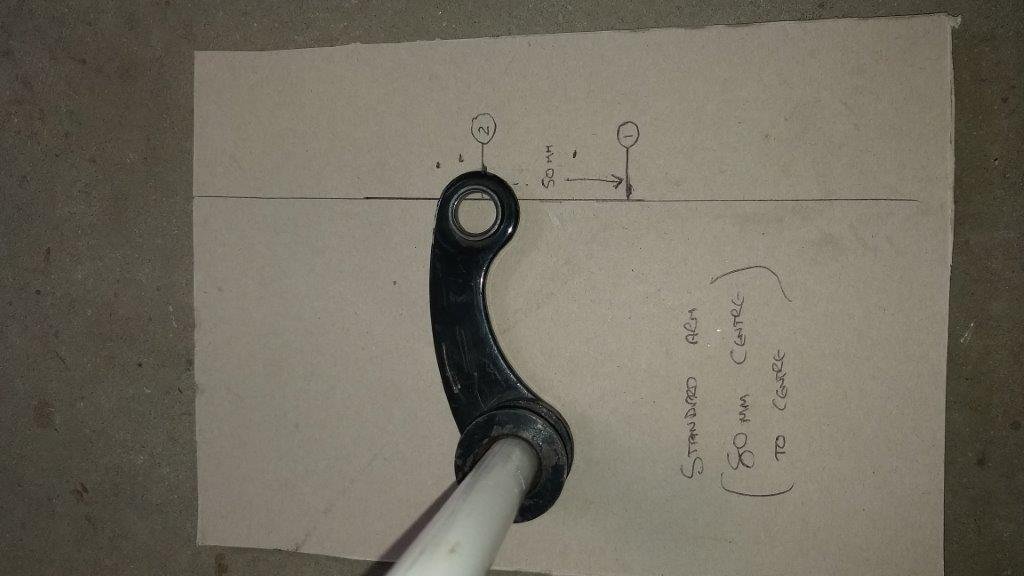
I had a cup of tea with an extra spoon of sugar as my cable related findings had caused a bit of a shock, and I then went for a quick lie down under the Thames. Now my old Mum used to have a saying that she would often wheel out during my youth. I can still hear her saying in her broad Scots accent "Fools rush in where angels fear to tread". Lying on my back I figured now was as good a time as any to put that saying into practice. So I quickly pulled the gear shift arm off my mock up gearbox and made up a rough little chart depicting the swing of the arm on some cardboard. Rough as guts but you get the idea. I figured I would try to work out the ideal cable mounting point that would give me sufficient travel to match what I think I can achieve at the column. Did some quick calcs and then poked a hole closer to the pivot point. Chucked on the Starwagon cable with the little ball joint. Even the bracket on the Starwagon cable looked promising. I refitted the gearbox arm and temporarily clamped the little bracket in place and gave the loose end of the cable a quick tug. Lo and behold the selector moved. I had to tweak the position of the bracket a little, but I quickly managed to get the lever moving forward and backward perfectly. The force needed on the cable doesn't feel excessive, so I may be in with a good chance here. I did a quick measurement on the cable and I've managed to reduce the throw to 20 mm either way. A total of 40mm is well within the movement specs of the Starwagon cable and should work for the front lever too. I just hope that the shift pattern won't be too short up at the column stalk. I'll need to confirm that early in the new week when I get the column back. So all in all not a bad result for a quick bodge job.
3 points
-
Got a trial version of HSMworks so I could check out 3 axis stuff, made some trial cuts; This was the third attempt after fucking with the speeds and feeds, pretty clean;3 points
-
3 points
-
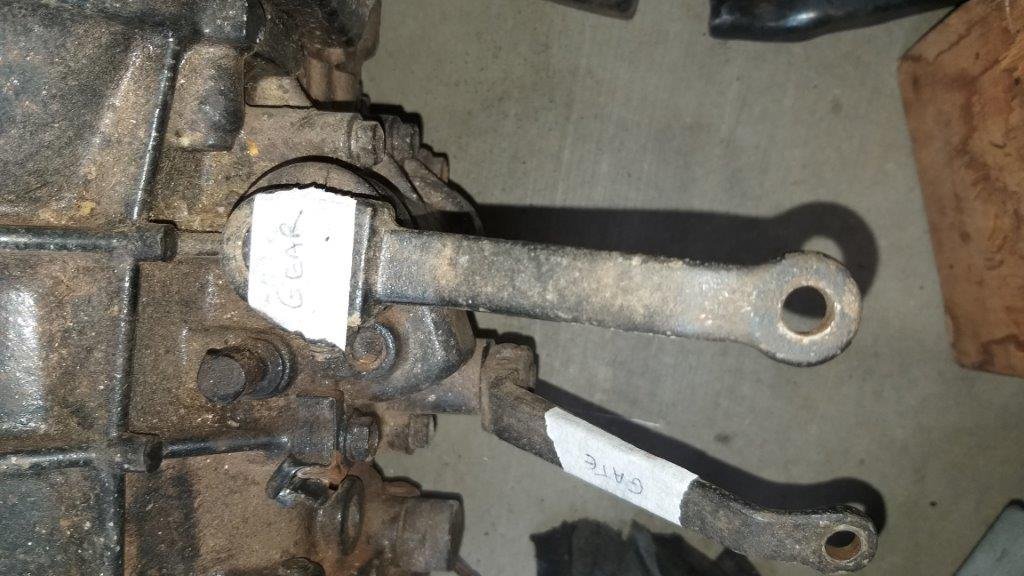
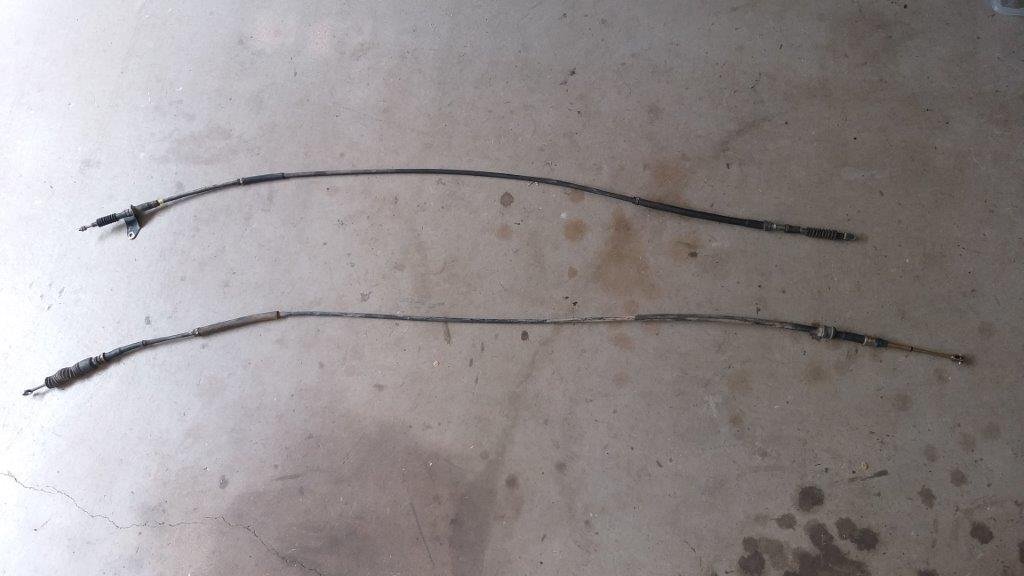
It's gear selector cable day here at Rough & Ready Restos. I'm still a novice at this sort of thing and geometry was never my strong point, so I decided to move forward in baby steps. I started off by double checking the orientation and throw of the gear selector arm on the 5 speed HiAce gearbox. I was able to confirm that the arm moves 30 mm forward from neutral for gears 1,3 and 5 and 30 mm backward for gears 2, 4 and reverse so total movement required on the gearbox arm is 60 mm. I then dug out the "cotton reel" / pivot arm combo that I hacked off the end of the Starwagon column shift a few months back as this is the bit that I am already using for the gate selector mechanism. The aim of the game was to check the movement available. I grabbed a bit of cardboard and mocked up the pivot to take a few measurements. This arm moves in an arc so with the cable in a fixed position there is only so much movement available before I exceed the cable tolerance. Took a few measurements and I've got a maximum of 50 mm movement on this end. 50 mm at the front and 60 mm needed at the back means its not going to be as straight forward as I was hoping. So on to the next step while I contemplate this little challenge.
3 points
-
Been having a right bastard of a time lately tracking down an electrical gremlin. Pulled into drive and it just turned off last friday after driving from Auckland back to Huntly and wouldn't restart, after 6 attempts it finally threw a check engine code for the crank angle sensor which after a mad panic i got my hands on and fitted (which is behind the harmonic balancer) and nothing wouldn't start. Called a mate whose a decent mechanic directed me to the ignition module which i removed plug blew out with air and refitted finally it ran! But like utter shit till warm, these aren't as commonly available in nz nor particularly cheap. Limped to and from work for a week letting it warm up first new module has arrived been fitted and seems good thank fuck for that!3 points
-
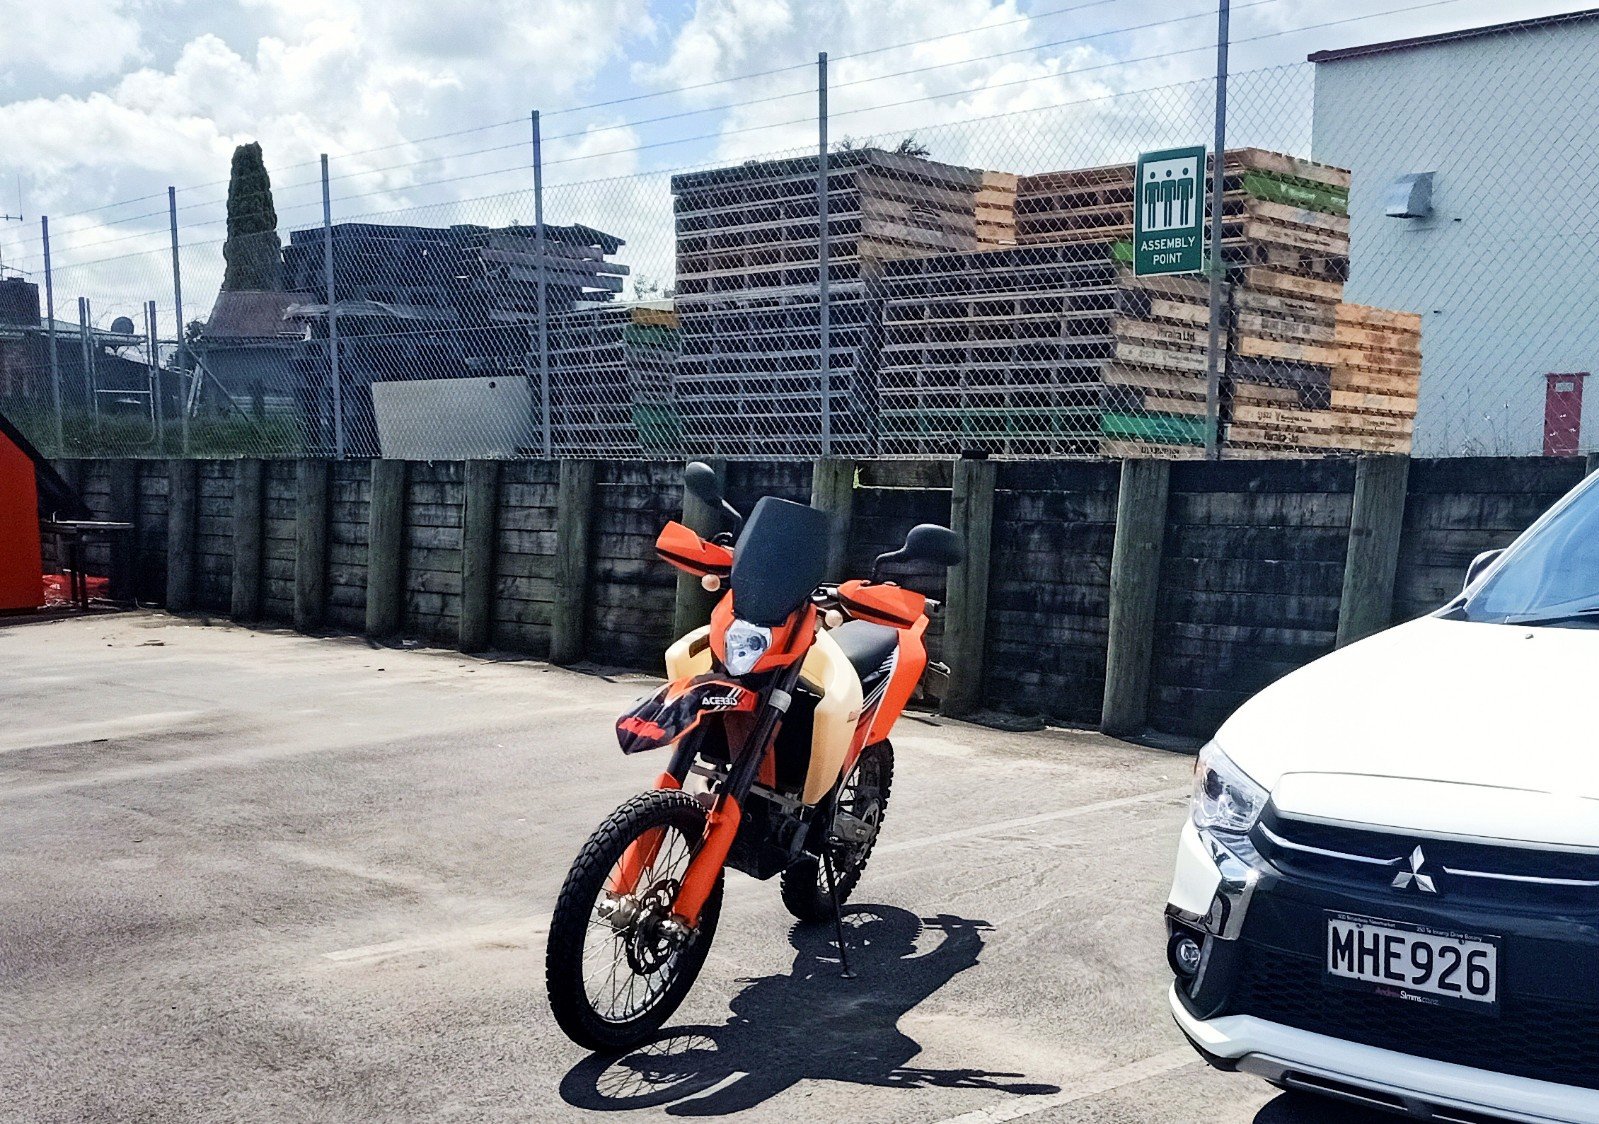
Got a 24L fuel tank from a guy in aus. Not noticable while riding (it's narrower than the bars so who cares) and means I can do much more than 150km before fretting. Took it to work today too, that was lush.
3 points
-
That pump looks similar to Fergie ones of that era. Dunno if you've tried, but, try cracking open the two bleed points on the side of the pump, hand pump till they burp all the air out, then crack open the lines at the injectors and crank and you know the rest
2 points
-
Paint is a bit average but for 12bux prety happy
2 points
-
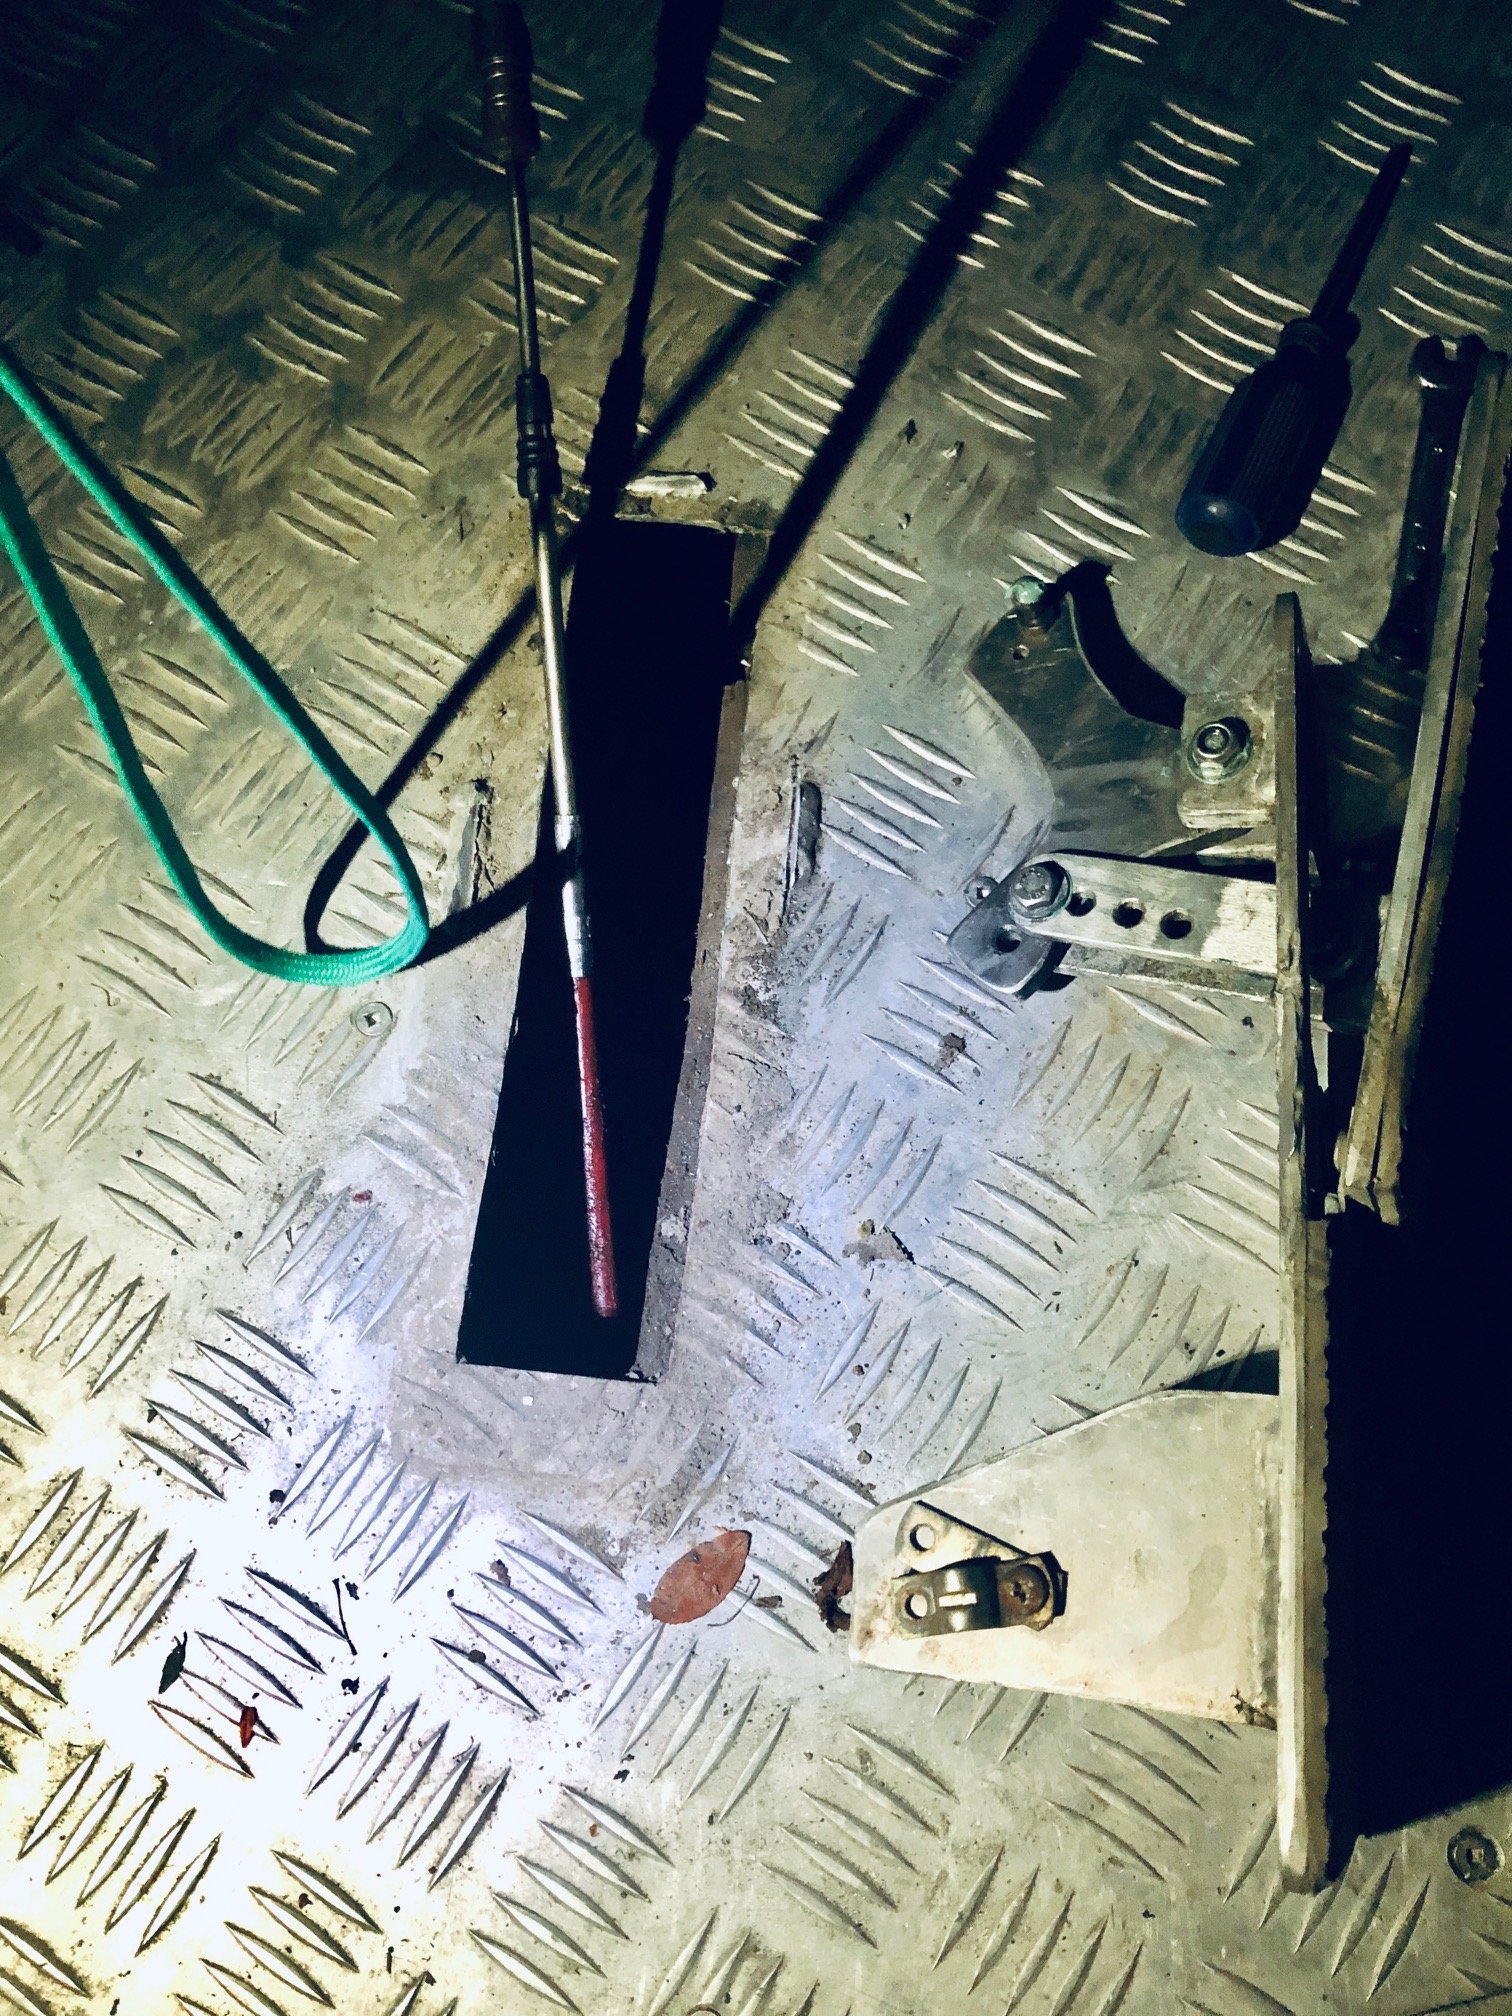
Looking at what fittings I will need on the new cable I'm leaning towards a small ball joint on the gearbox side. On the column side my first thoughts were to go for a loop as this would be the smoothest way to get the arc motion that I need, so I mocked this up quickly by fixing the loop on the Express cable to the Starwagon pivot lever using an old seat belt bolt that I had lying around as its the perfect diameter for both the cable and the lever. The shank was the perfect length to allow rotation too. Whilst this setup will work for the gear selector I don't think its going to cut the mustard for the "up and down" movement that will be occurring at the same time for the gate selector. Another ball joint may be the way to go. Getting back to the mismatch between the gear selector (60mm) and column selector (50mm) movement, I'm thinking the easiest way to solve this issue would be to shorten the length of the gearbox lever to get it to match the 50mm column movement, but a shorter lever will result in more force being required and I just don't know how that will behave once everything is together. I won't really know until I try. So in conclusion : I have a mismatch in throw required on both the gearbox and column side The amount of movement available on the column stalk is unknown until I get the column back from the engineering shop I have a cable that is too short That same cable has insufficient movement to get me where I need to be Further work is needed on the cable end requirements It's time for a lie down. Thanks for reading.
2 points
-
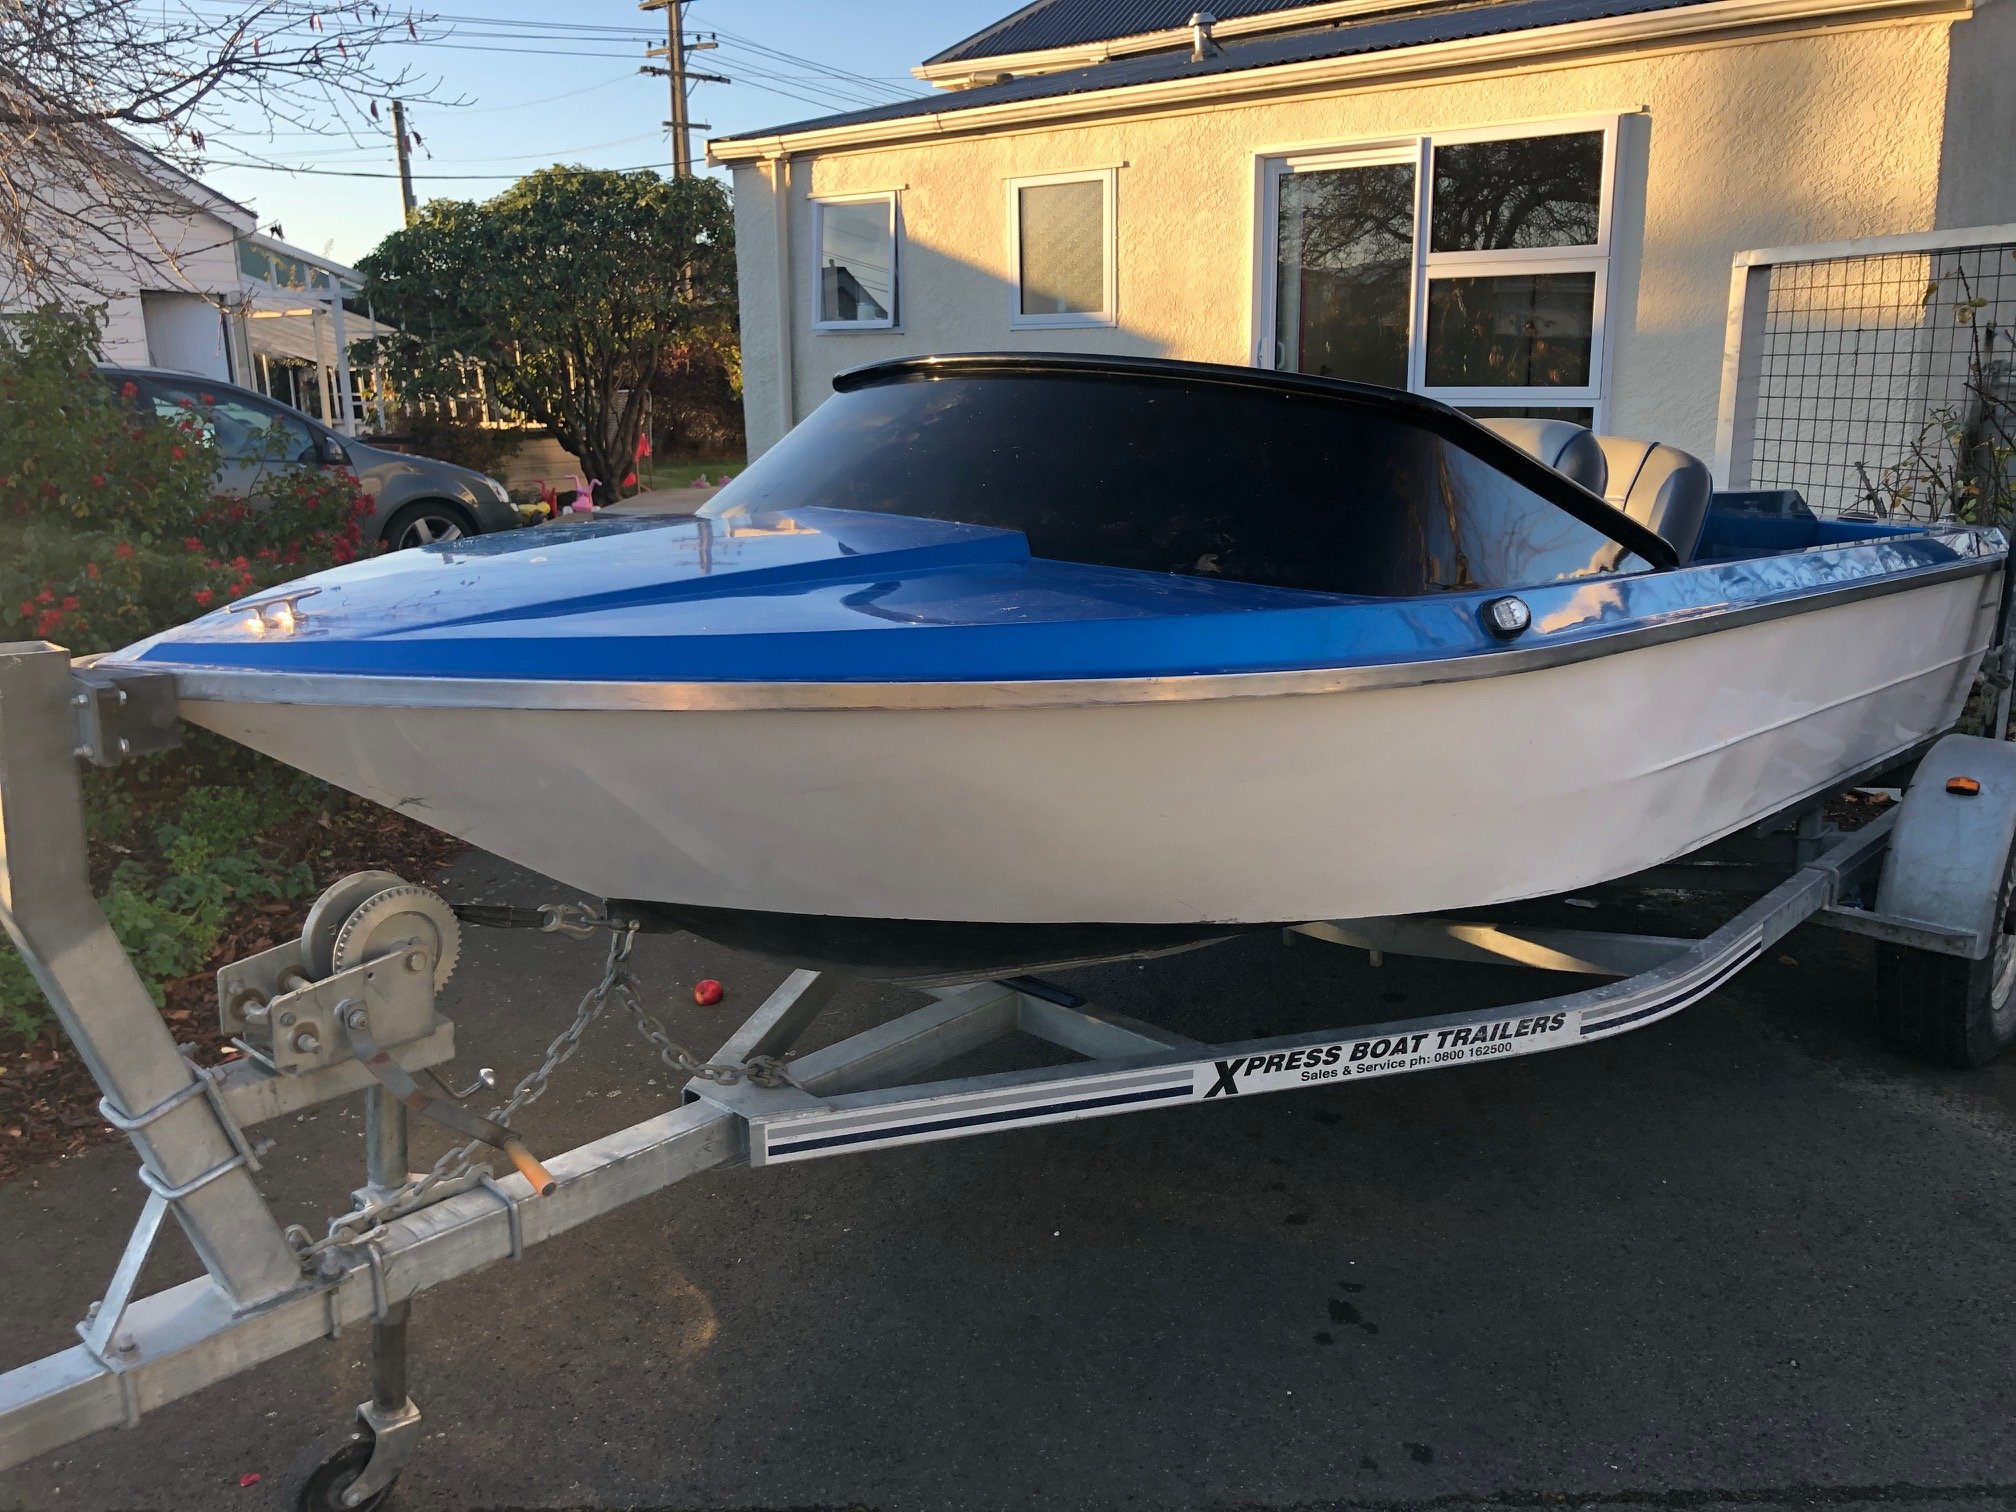
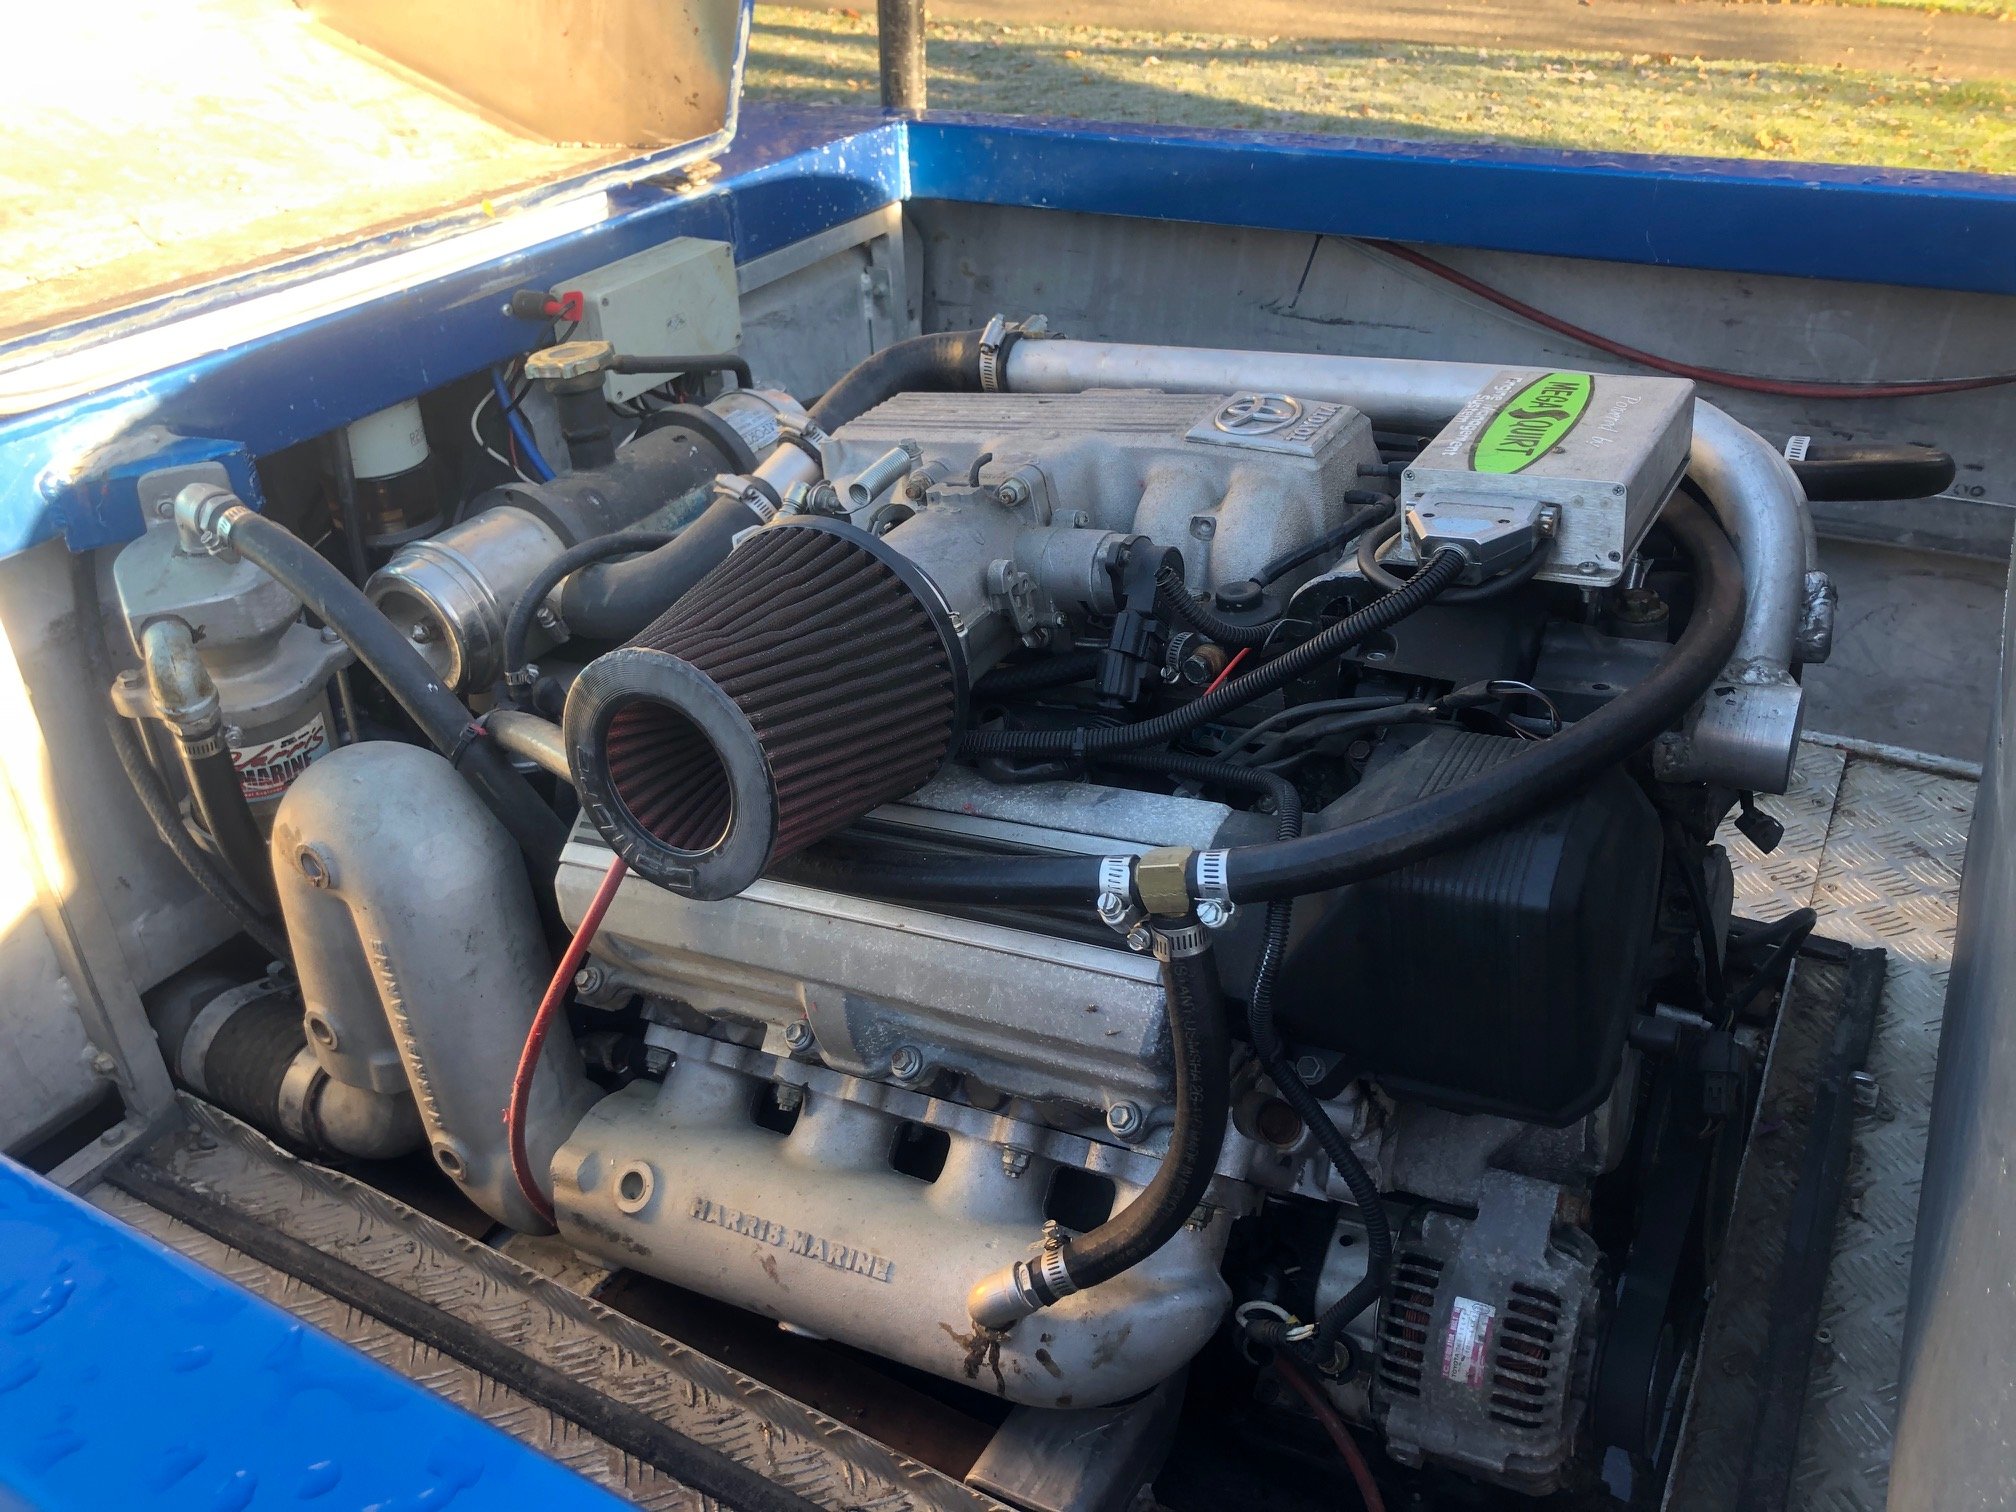
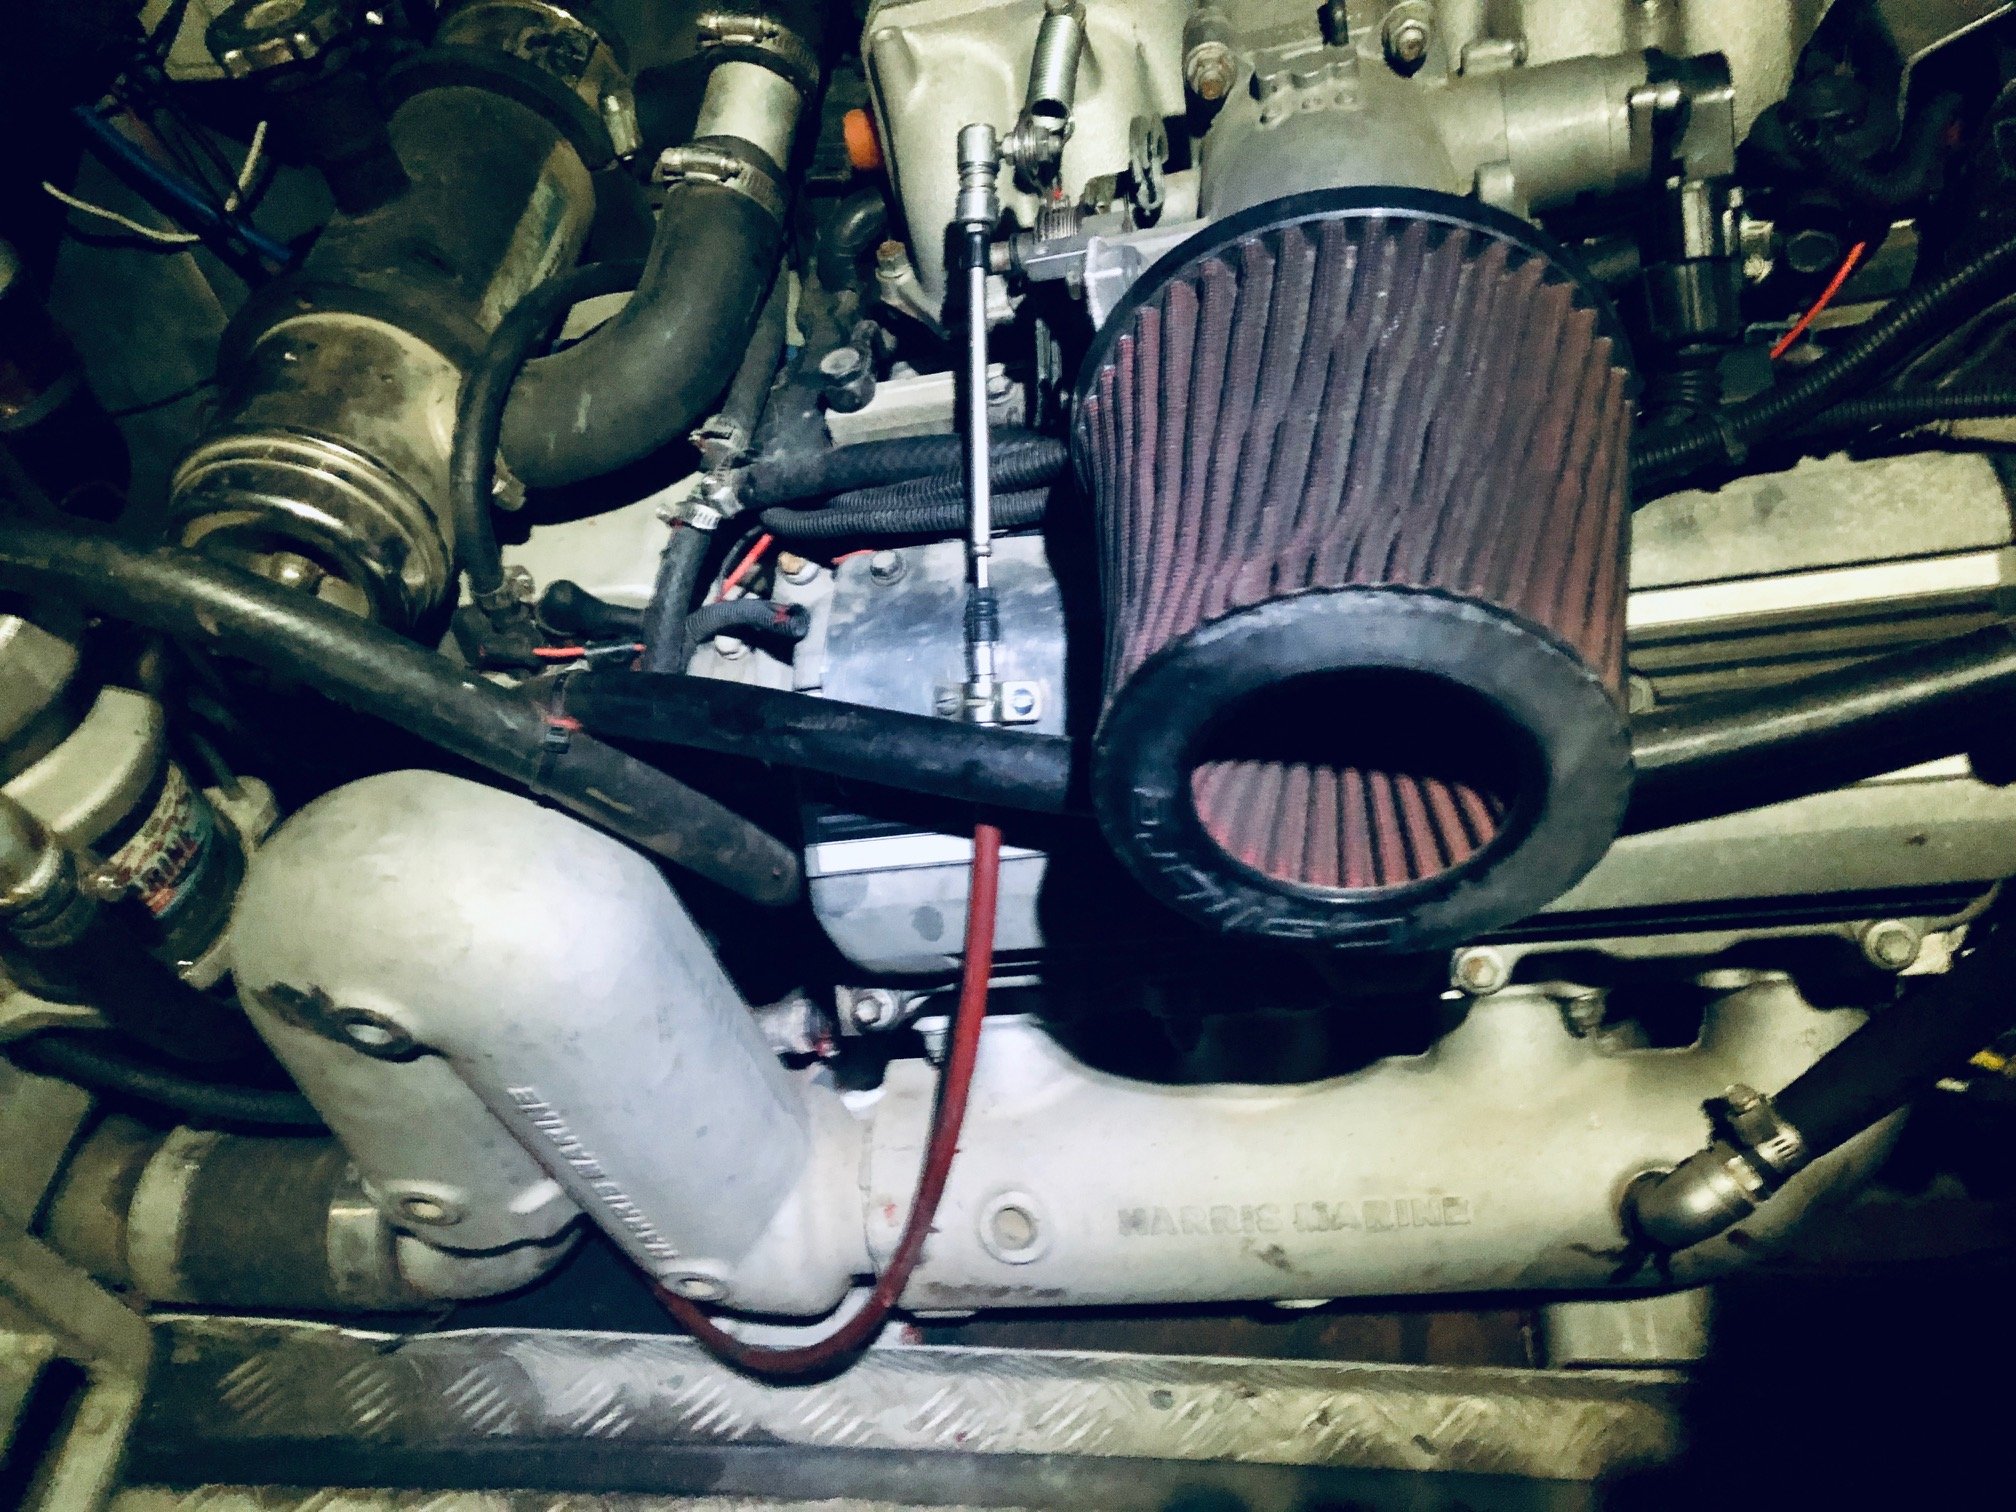
Since I cant help my self and started pulling it to bits within 20min of having it home, this is going to have its own built thread.... I don't yet know who built the hull, the design/manufacture of it makes me think it was done by a firm rather than at home (unless that builder was quite good at alloy). Its got quite a unique dash layout so hopefully if I post it a few other places then someone will ID it... Either way this thing has done some work... plenty of gravel rash and quite a few hits in the hull. It has plastic covering the centre keel but it ripped around the intake so that will need to be done in time.... Running gear wise we have gen1 1UZ with an old MS1 running it (more on that later...), the jet unit is a 2 stage 'ProFlo' which is essentially a modern remake of the Hamilton 770. Someone has run some of the cooling pipes wrong. It has a heat exchanger so the exit water needs to only flow out of the risers, someone has added a 'tee' for it to go into the front of the manifold heater, with no where to go that water is going to get very hot after a while.... Found out that the fuel pump is wired directly to the key (not happy about that), but it has some other pluses.... two ~45L tanks into a centre filter/sight bowl and a decent gravel trap so someone knew enough how to set it up.
1 point
-
This is good for some fundamentals of panel forming1 point
-
Also the fuel stop levers on them are pretty floppy, so don't expect much resistance there. IIRC the top cover of the pump comes off easy enough.1 point
-
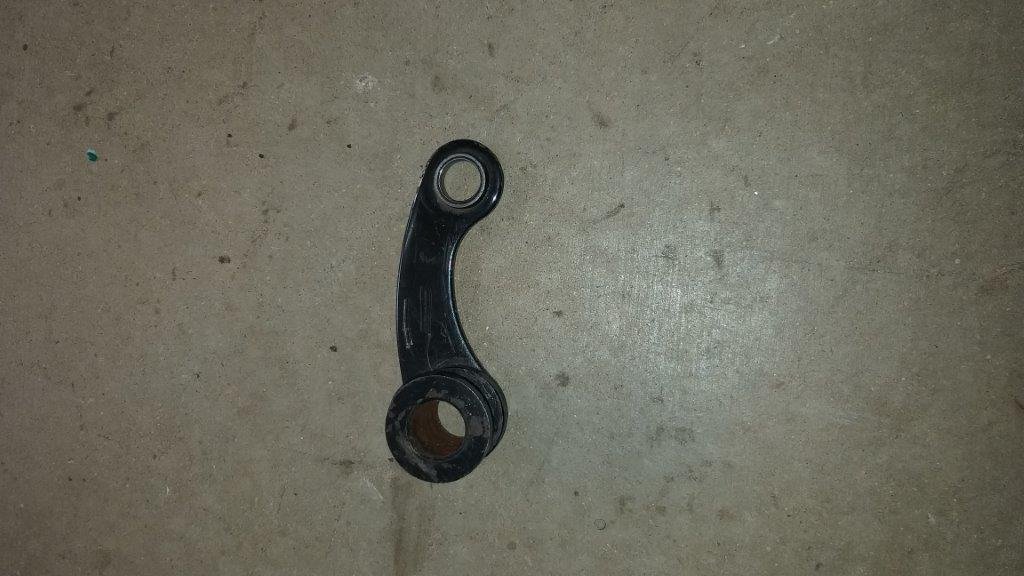
Next I grabbed the two remaining cables that I have in my stash. The top one is out of the older Starwagon and the bottom one is out of the newer Express. Since the movement of the column pivot lever and the gearbox selector lever are at odds with each other I'll need to loop this cable around the back of the gearbox so I get a "push" on the box to match the "pull" on the column and vice versa. Neither cable is long enough in its natural state, so I'll need to get a longer one made up, but I've still got a way to go on sorting this out before I need to worry about that. First off I needed to check the movement available in each of the cables, so took a few measurements and was able to confirm that the Starwagon cable has a total movement of 48 mm and the Express cable 40 mm. So I now know that I need 60 mm of travel on the gearbox, I've only got 50 mm max available on the column lever and my cables will only give me 48 mm or 40 mm respectively. Yikes, that's not good ... So I'm thinking I'll definitely need a longer cable with different fittings made up that will give me a greater deal of travel. There is also one important piece of the puzzle that is missing in that my Thames column shift is currently sitting at my local engineering shop, so I can't check how much rotation on the column the shift column actually gives me. So I'll need to get that back to check it. This stuff is doing my head in.
1 point
-
No worries mate, Shit floats1 point
-
Caffeine and Classics? This Sunday1 point
-
Yeah I've been here for three days1 point
-
Open invite if you need anything in Westport - I’m on call Saturday so will be at home or I would beg for a passenger seat on adventures The red wings motor caravan assoc are at Reefton racecourse so there should be lots of GILF action in the Reefton pubs for you Motorbike racing greymouth Sunday so heaps of bikes on the road in wannabe racer mode - means heaps of cops on the coast for the weekend - I got random tested last night1 point
-
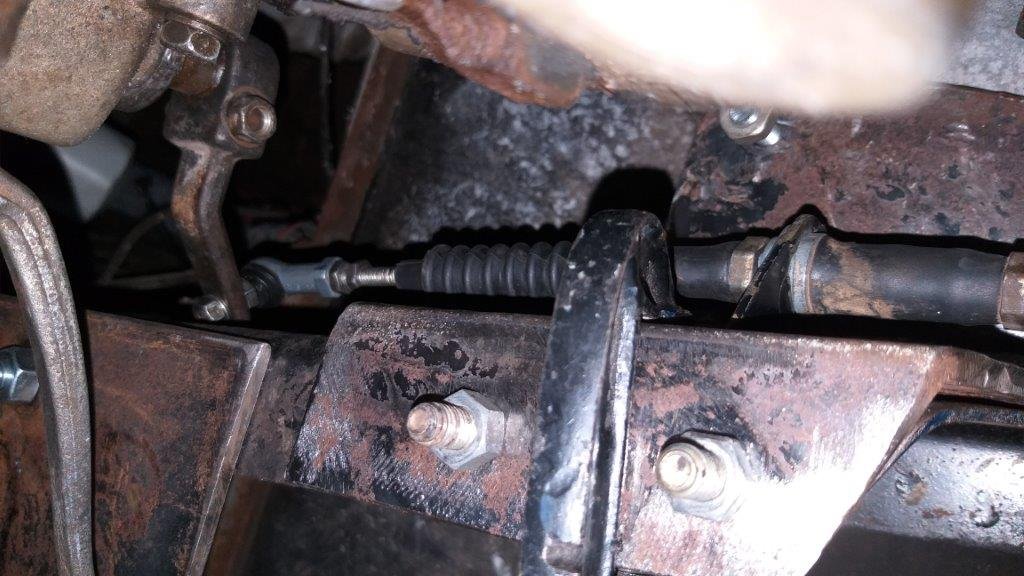
I've done as much as I can on the front bracket for the gate selector cable. I've left it extra long and have just temporarily clamped it to the chassis leg. I'll only be able to work out the final bracket length once the bobbin on the column shift rod end has been fabricated and mounted so I'll leave the final trimming of the bracket and positioning of the mounting bolts until then. Gave it a quick test by moving the pivot lever by hand and the gate selection works like a charm. I'll start on the gear shift cable tomorrow. Thanks for reading.
1 point
-
It’s getting very close to paint time! Please remind me to visit the sandblasters if I ever decide to paint an engine bay again... I have some more cleaning and sanding to do before we lay down some epoxy primer on Monday. Hopefully we’ll see colour in the next week or so!
1 point
-
Hah very cool! Never heard of Ultem 1010 before. In other news, I've heard rumours but never seen it done till now. Look how well a 2ZZ fits in these. Glorious!
1 point
-
There are many levels of compensation needed in my situation1 point
-
I'm confused?? I thought the truck itself was the compensator?1 point
-
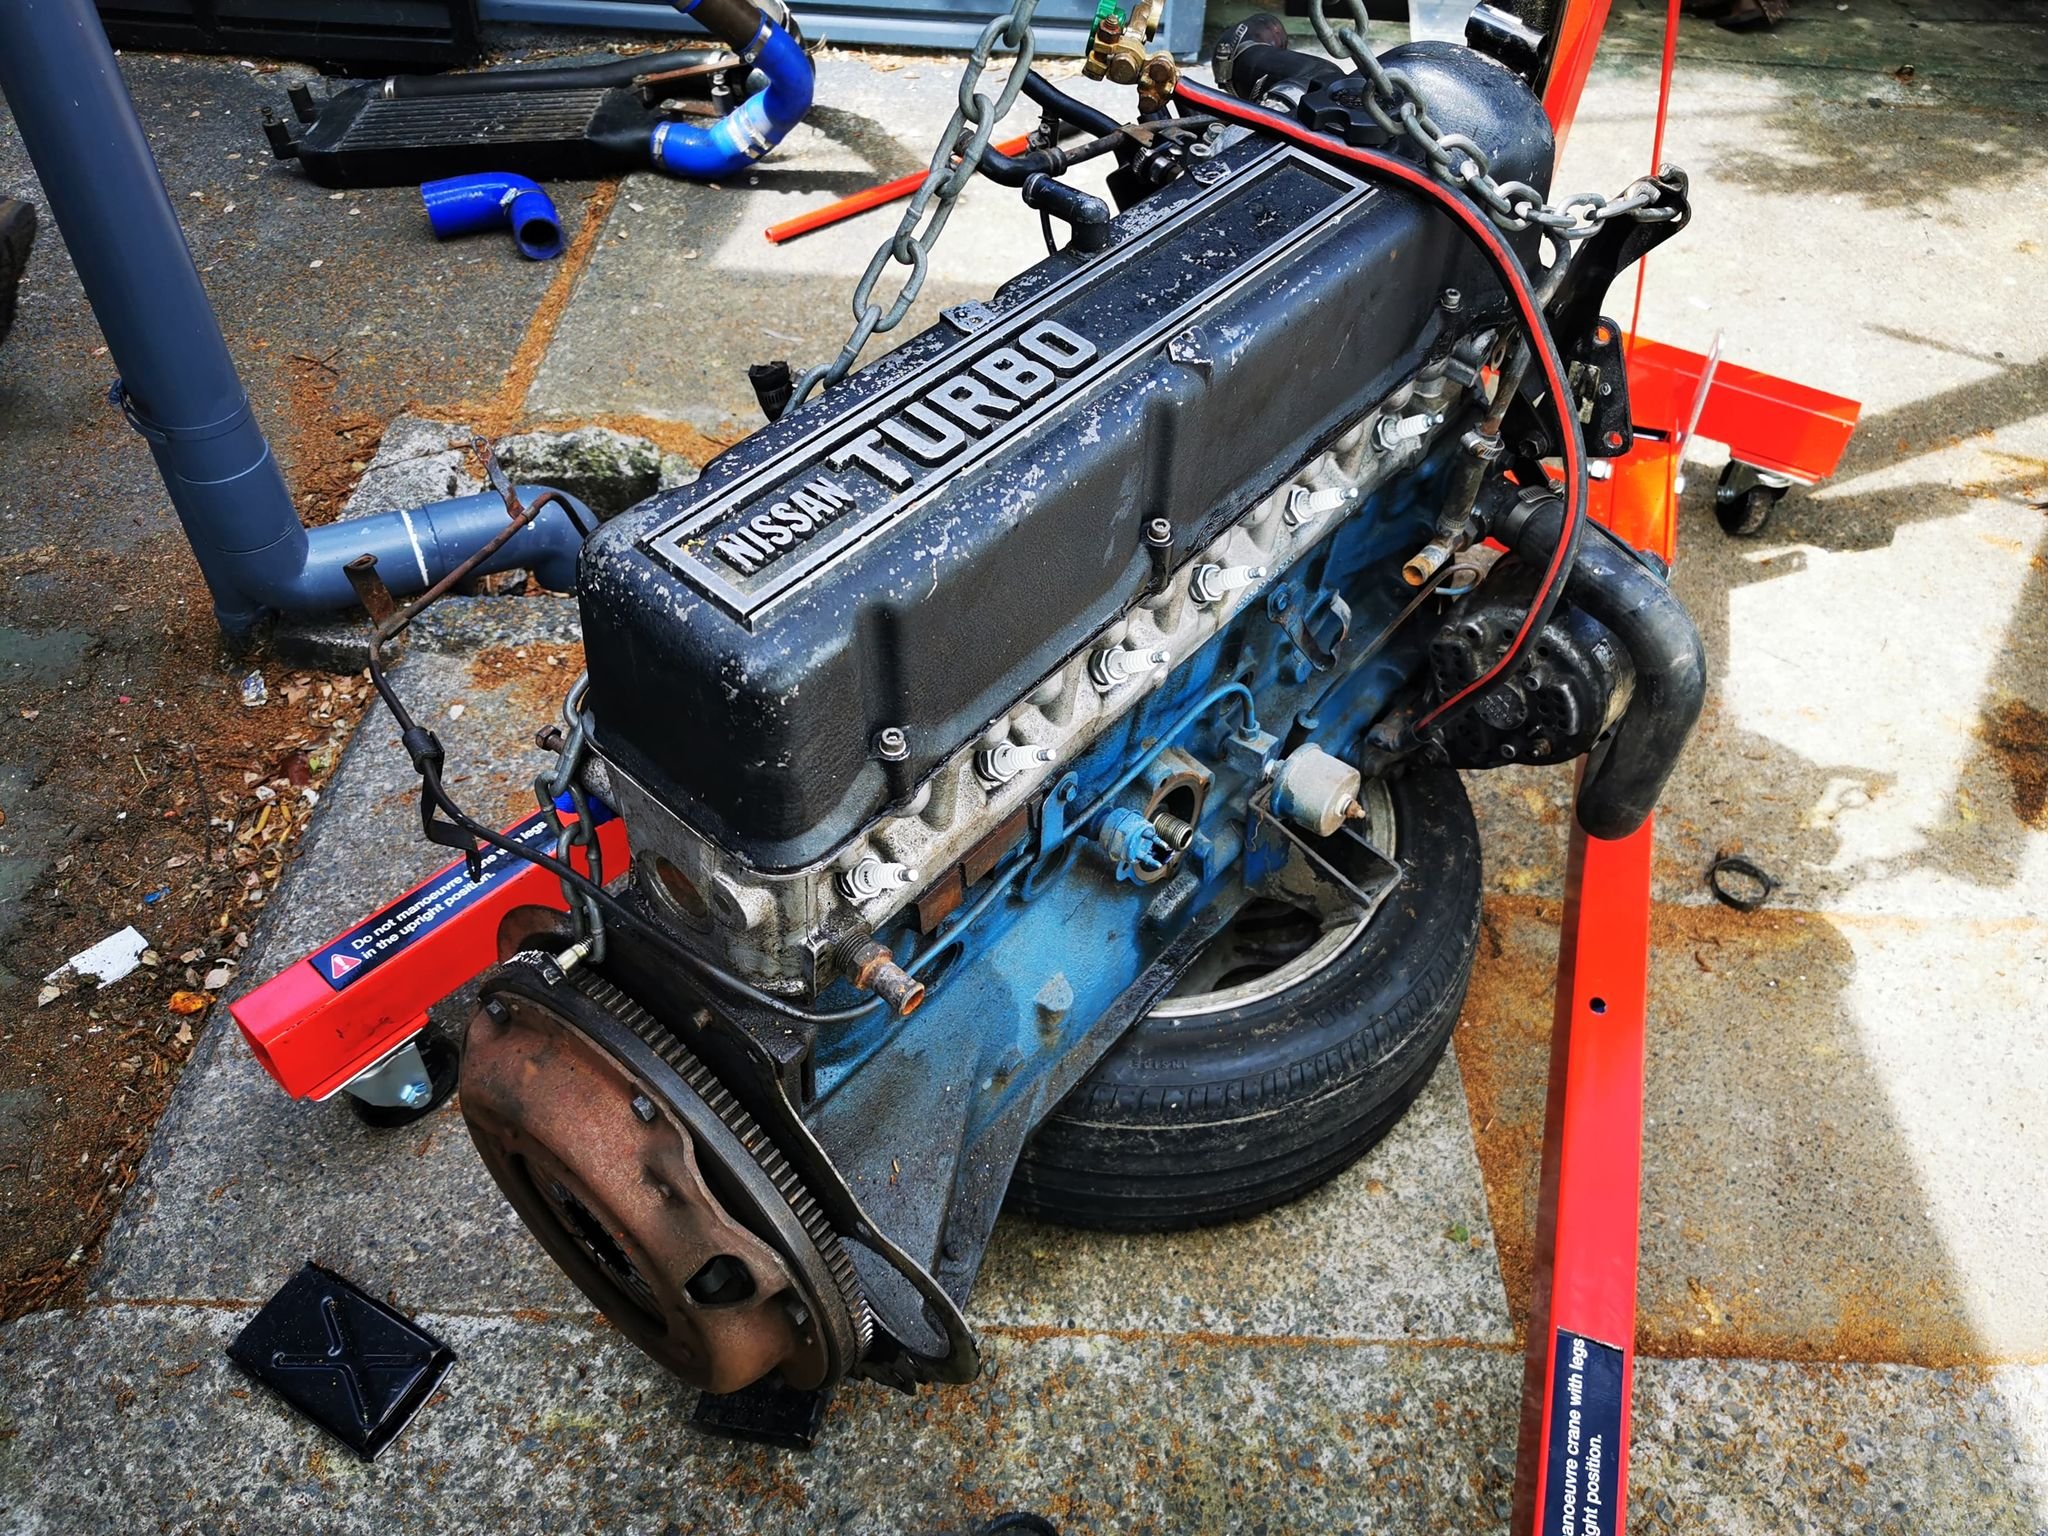
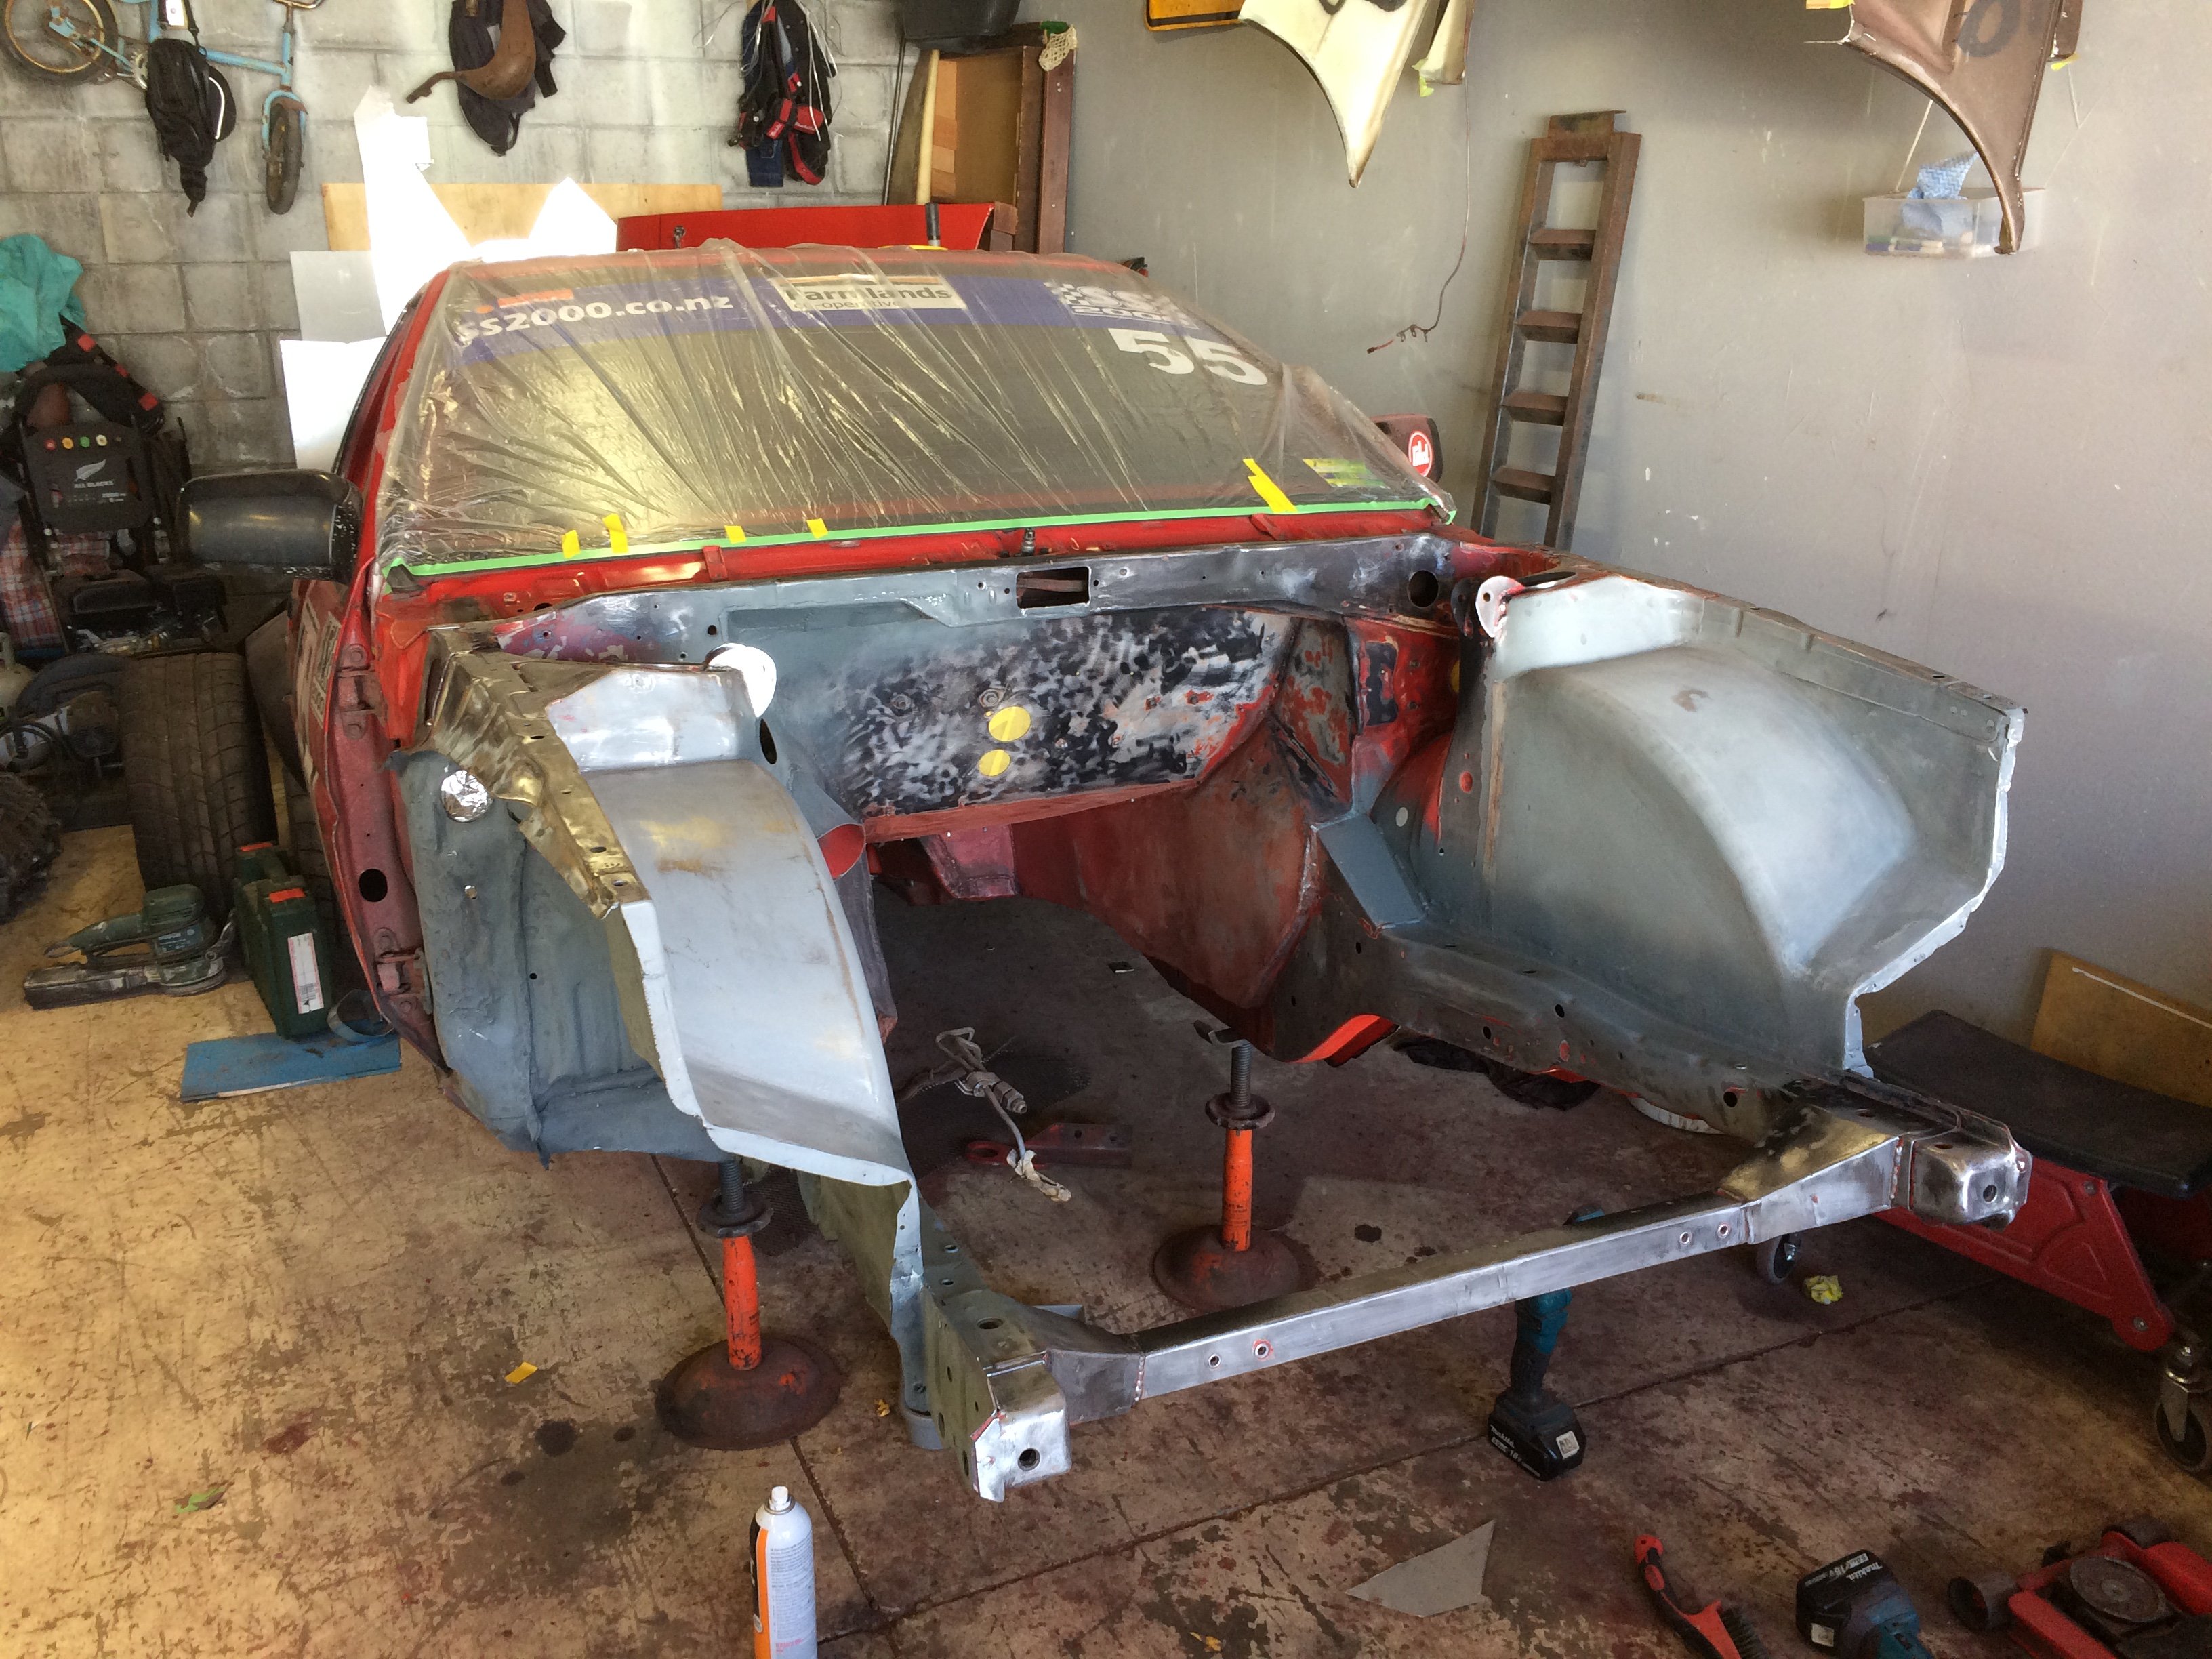
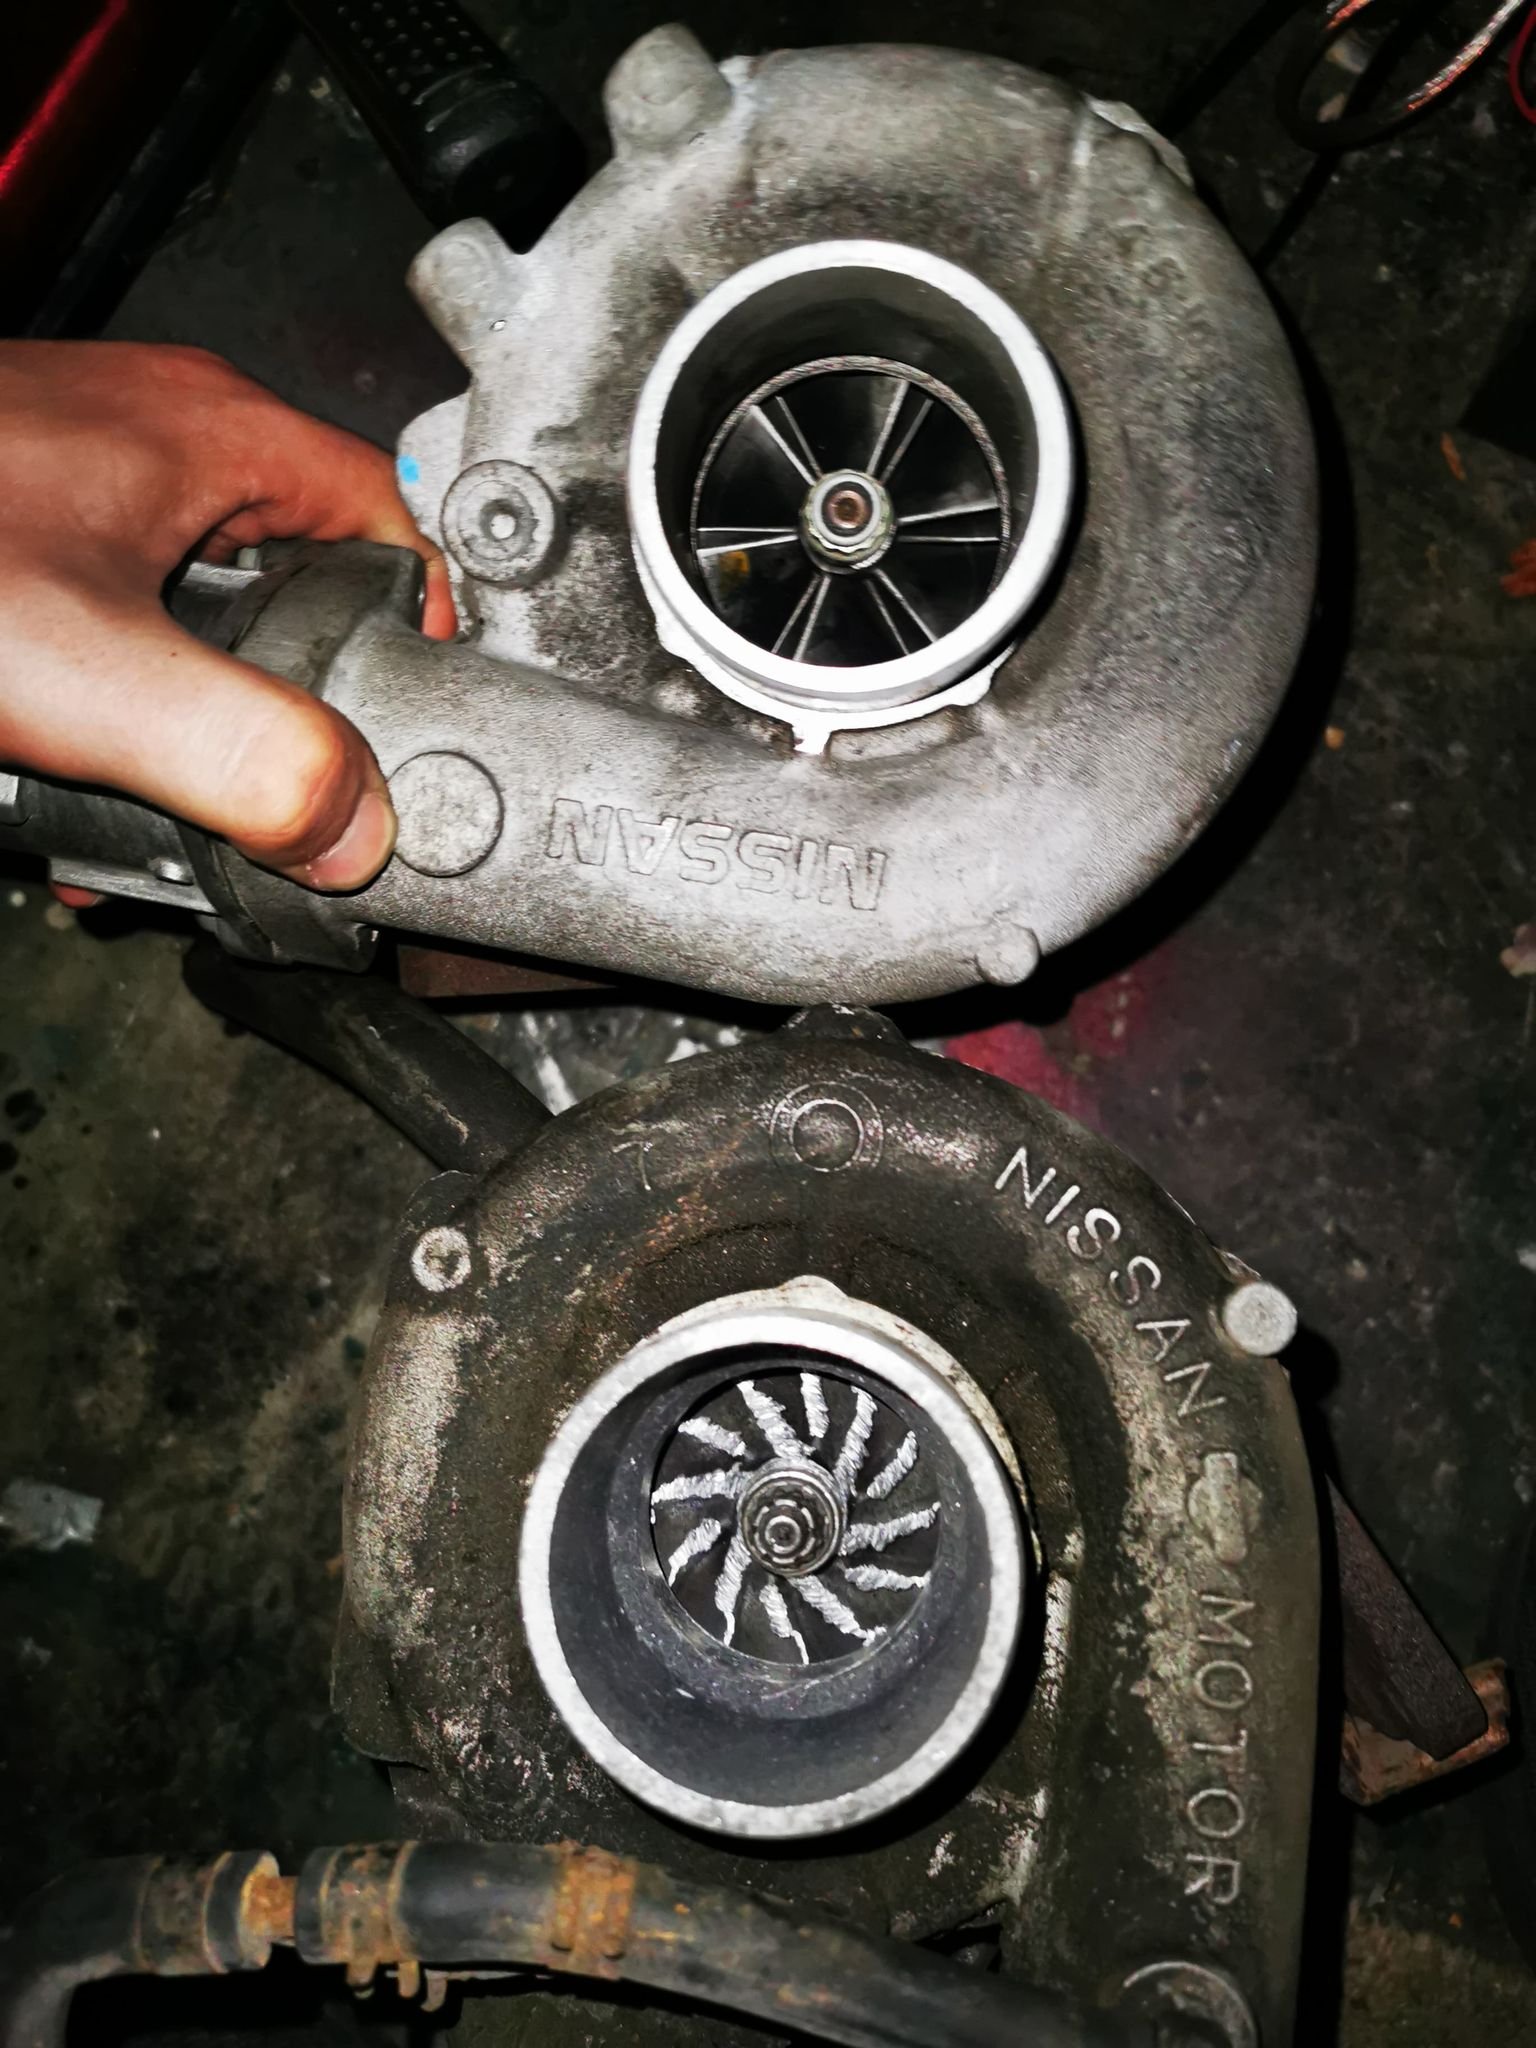
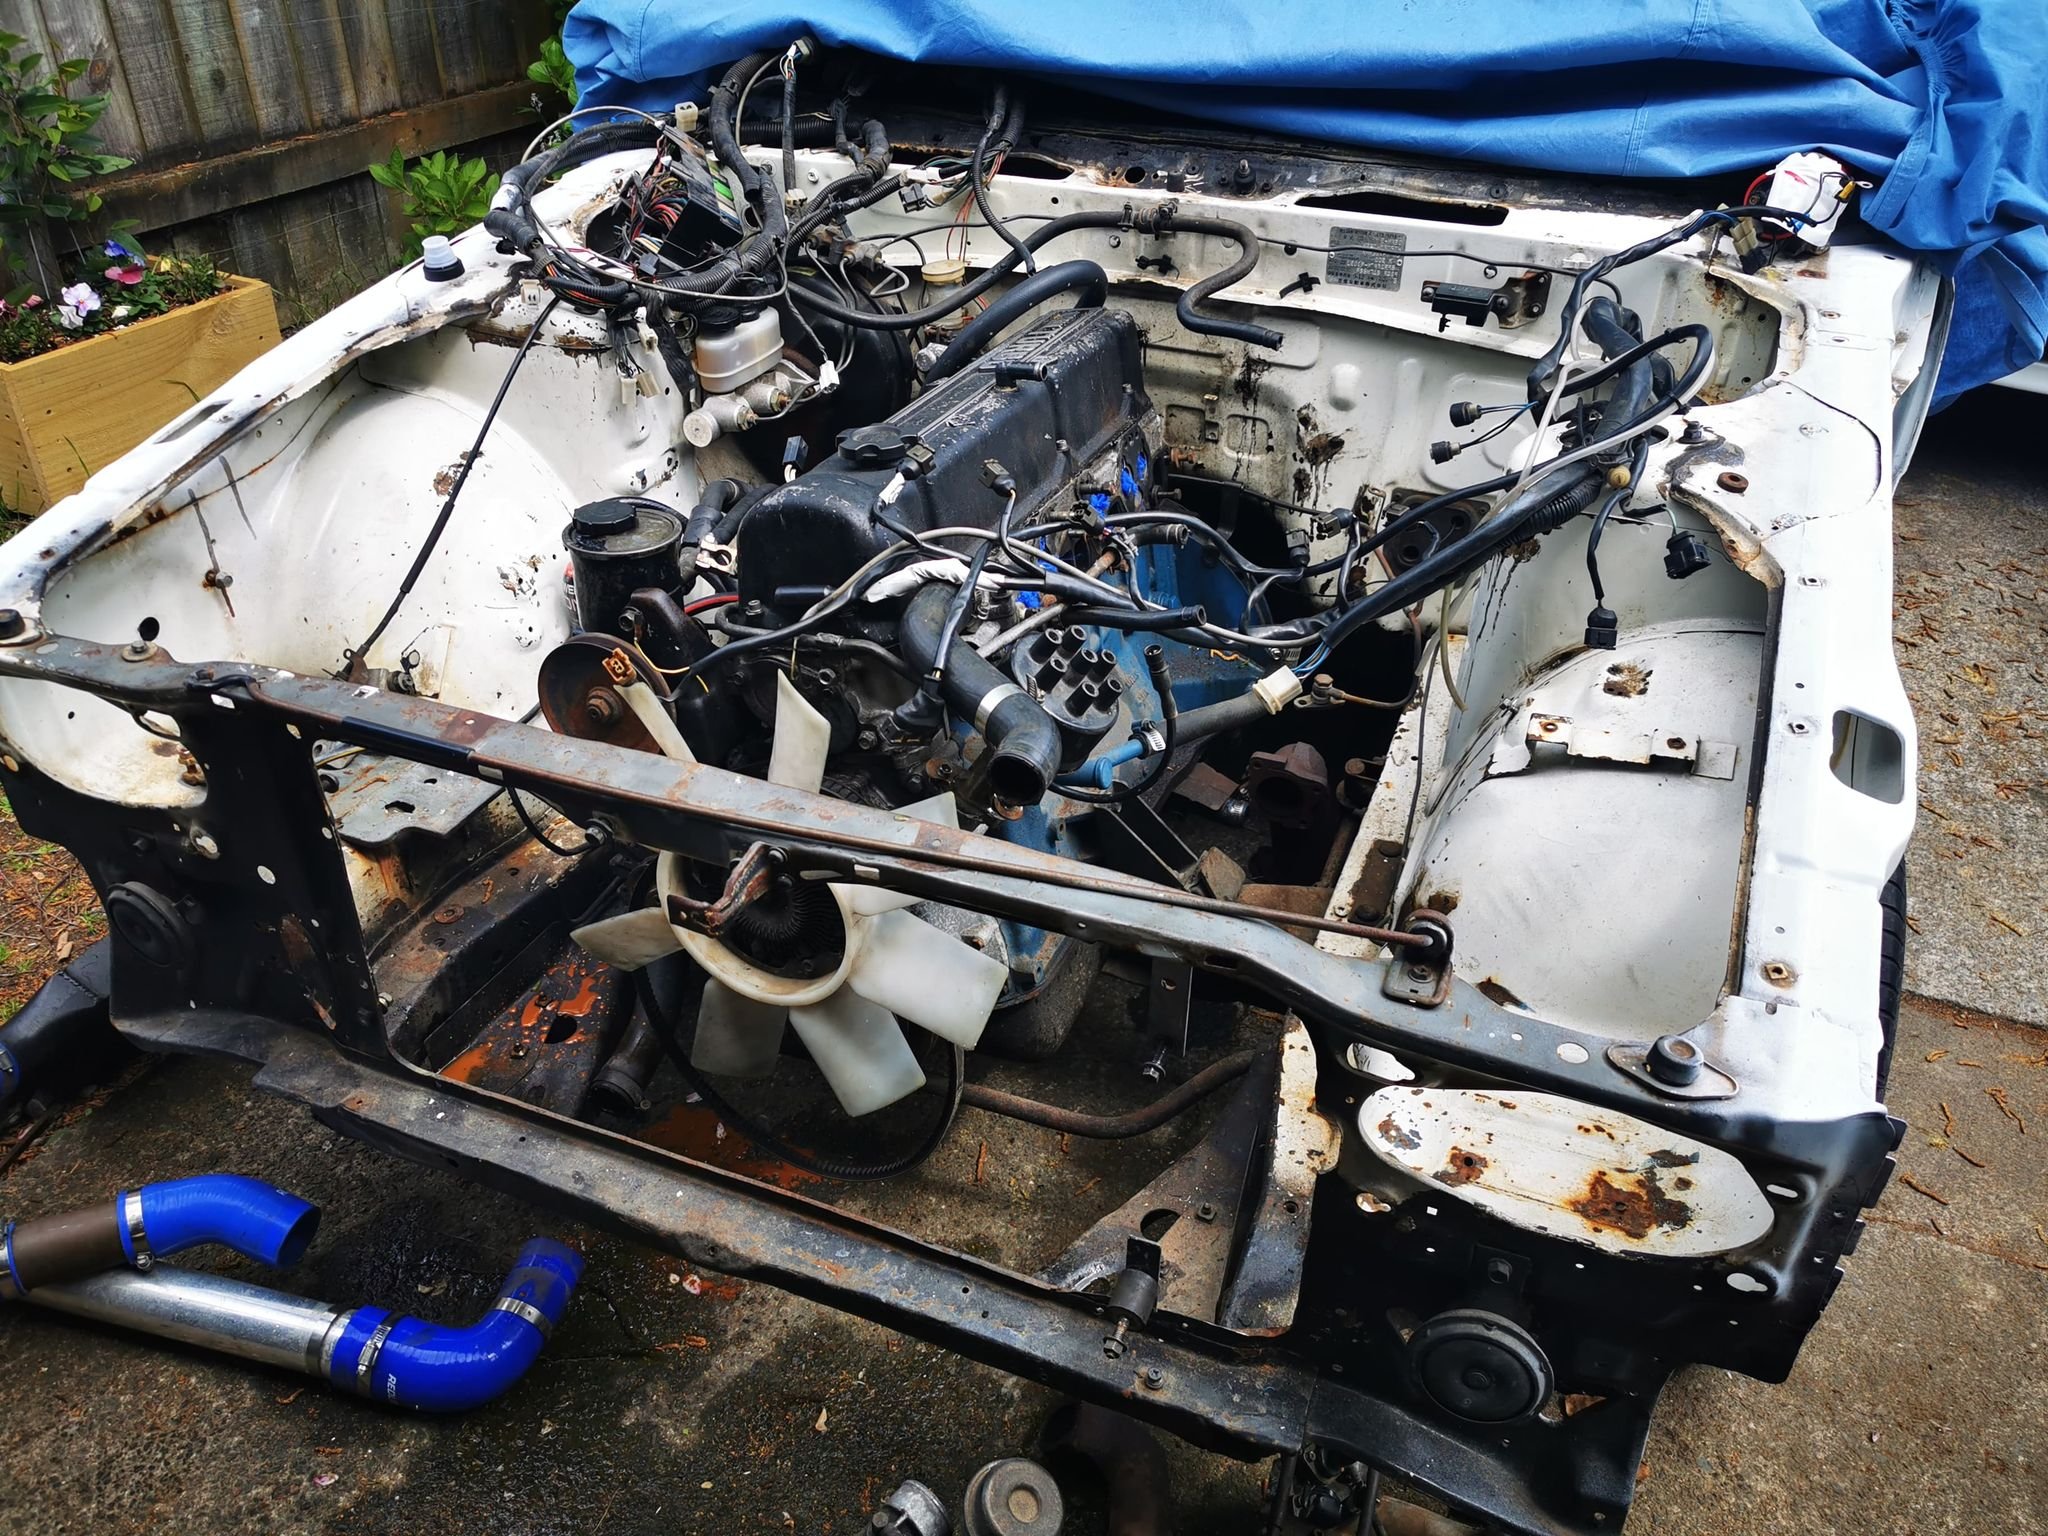
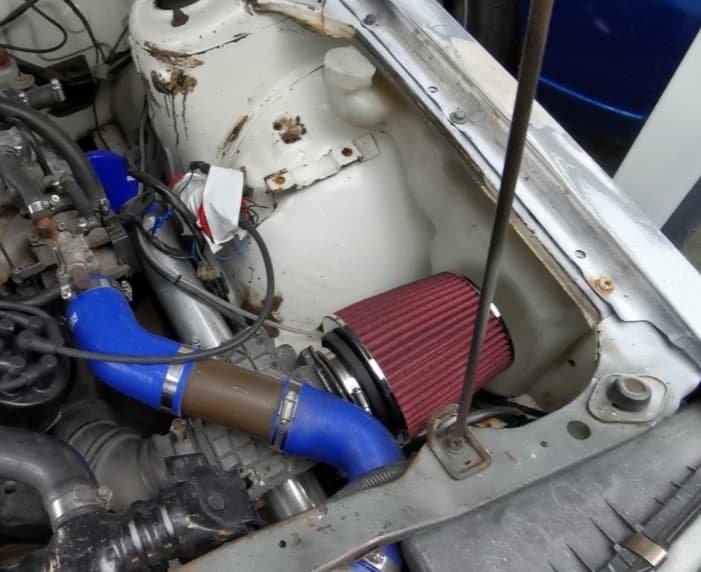
So here we are today. I've pulled mostly everything off the engine. I have the exhaust out and driveshaft out. And I'm planning to remove the gearbox today or tomorrow and then last the engine. I'll repaint the whole bay whilst i have everything out and just give the whole thing a general tidy up. The intercooler piping was horrible and I'm going to be putting in a new front mount intercooler and radiator and tossing up the idea of putting an oil cooler in as well whilst everything is apart. Unfortunately I still don't have access to a garage so keeping track of everything is a bit of a mission. I also worked out why it sounded like a hair drier and I'm surprised it was even making boost. there was a stud missing on the intake manifold and the turbo had pieces of metal all through it and in the intercooler intake piping. Here's a pic of the old l20 turbo versus the new 25det one that is going in. I'm also going to be putting in a new fuel pump at the same time as well as relocating AFM, tightening the AFM spring and putting new injectors in. I'll also be cleaning up the intake manifold and removing the rest of the EGR system that's left. Hopefully the next update will be the engine and transmission out and the bay being prepped for paint and the engine work being done.
1 point
-
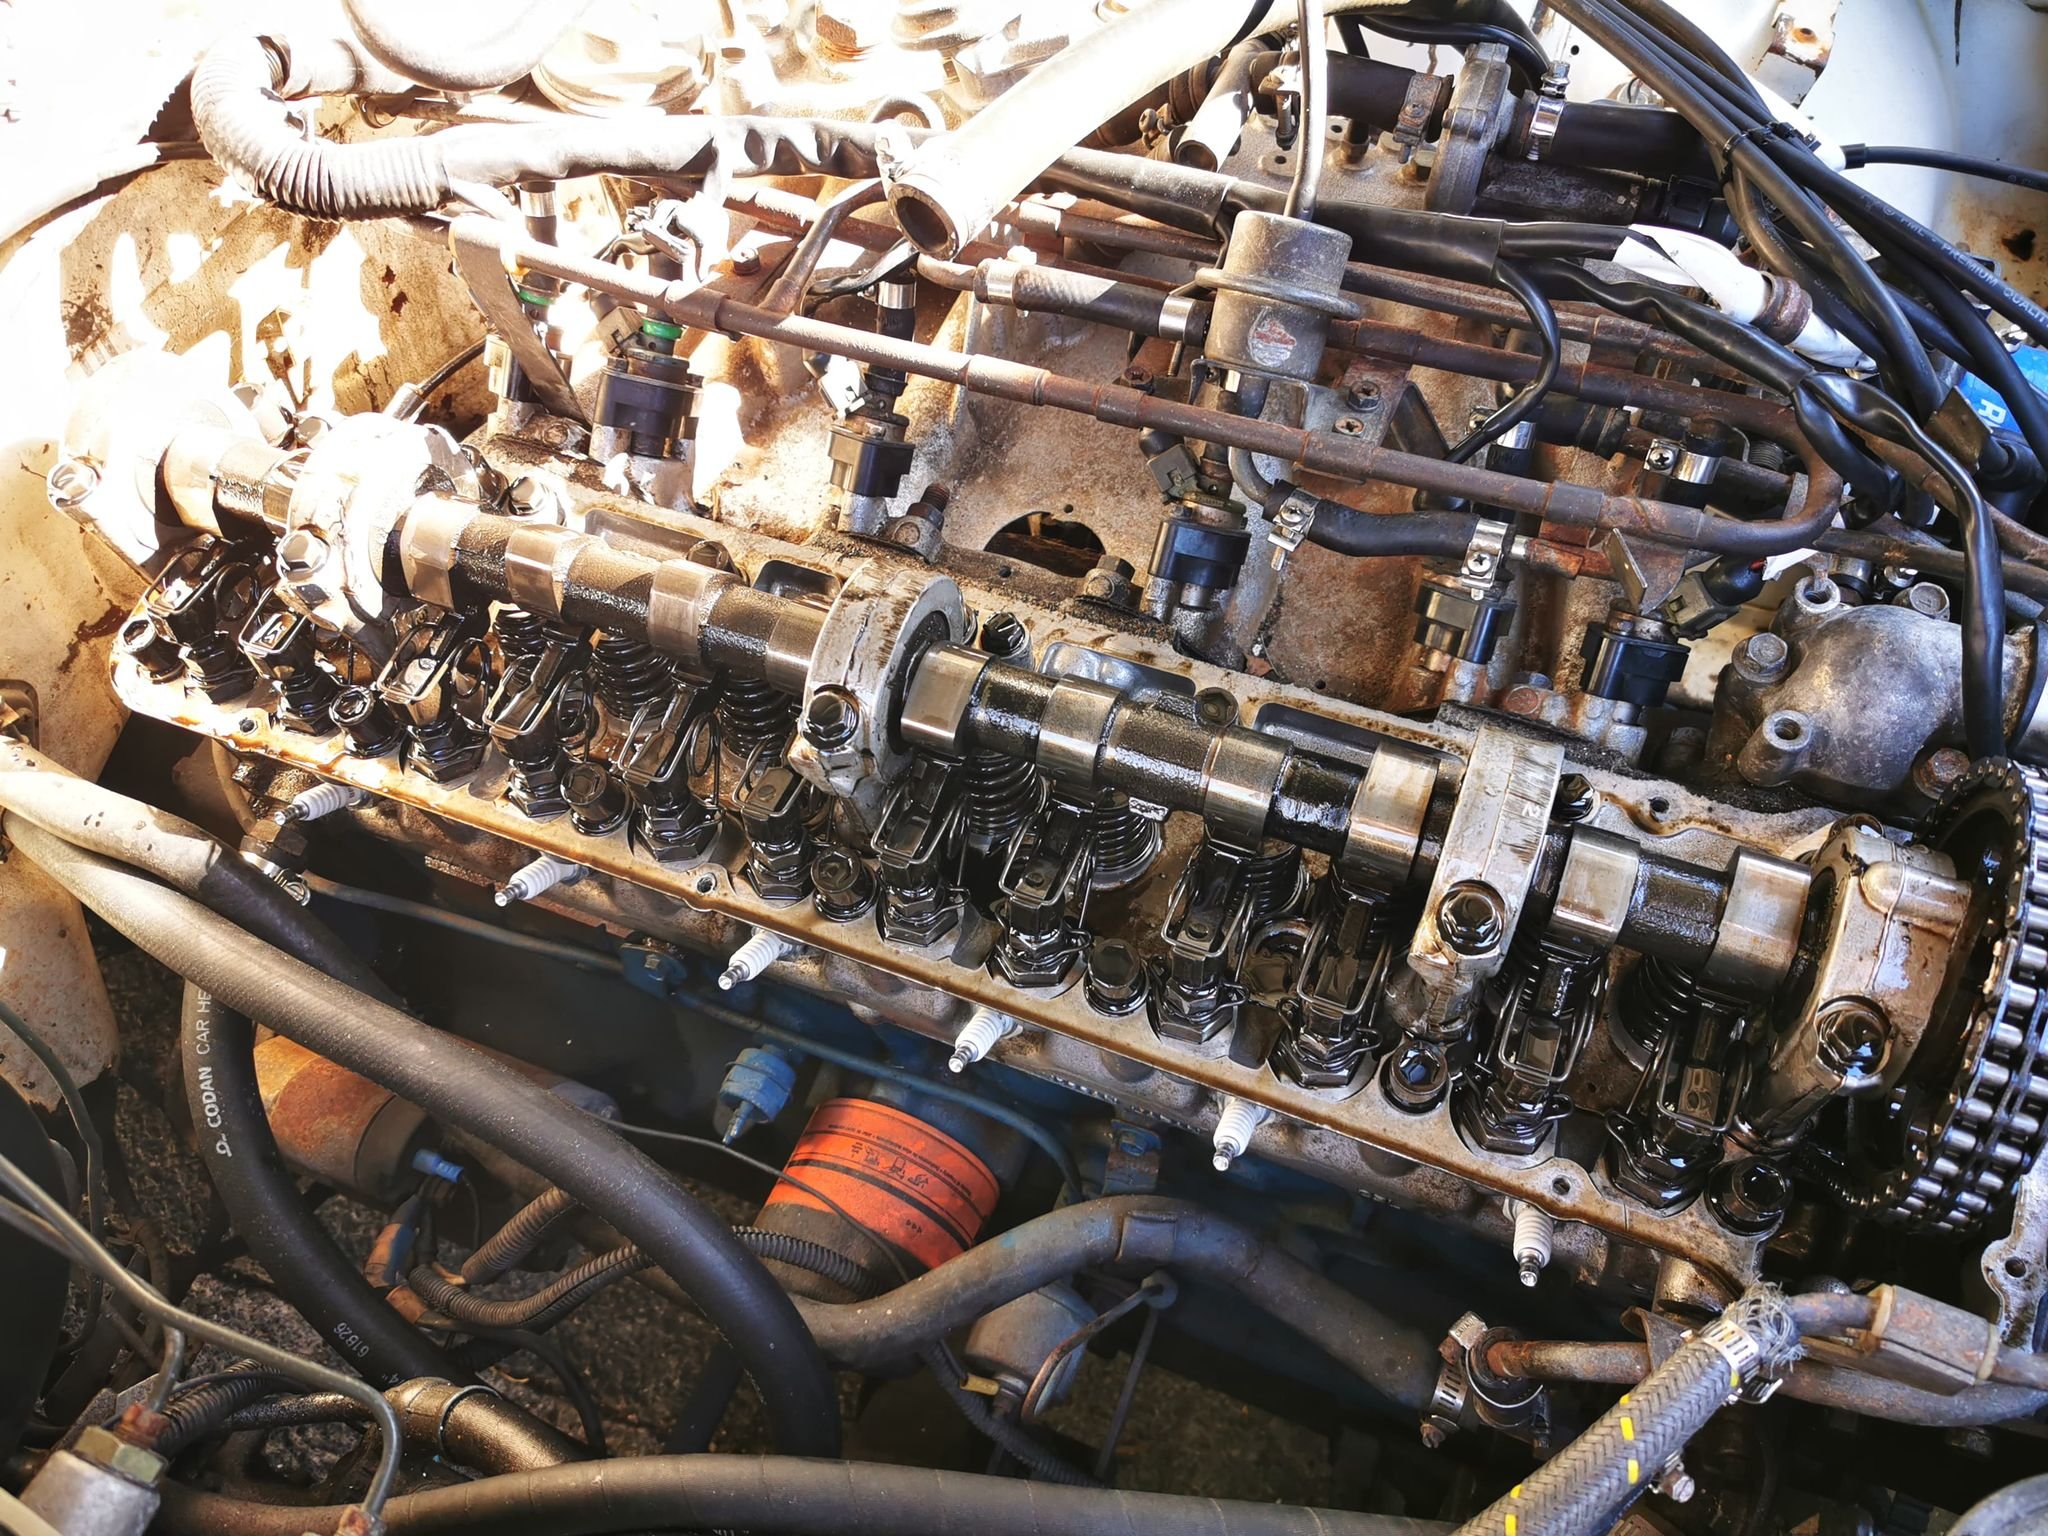
So throughout owning this car, I've been trying heaps of little things to get it running better on the engine side of things. I've replaced the sparkplugs, coil, distributor, ECU, rewired a bunch of the loom and although i got it running and boosting, it just felt.. off.. I was blowing oil out the back of the valve cover due no a dodgy gasket as well which wasn't helping my cause. Cold starts are rough. It will idle like shit and then suddenly come to life. So I decided fuck it and started to take the entire engine out. I checked the valves and timing to make sure nothing was wrong there when I replaced the gasket and everything seemed in good working order to me at least. The engine bay is not a pretty sight. I also picked up this steel wheel 25det turbo to put on and some thermo fans from a Primera, Just have to make them fit with a new radiator. Doesn't look too complicated but it will be the first engine i would have pulled out but i guess we have to start somewhere.
1 point
-
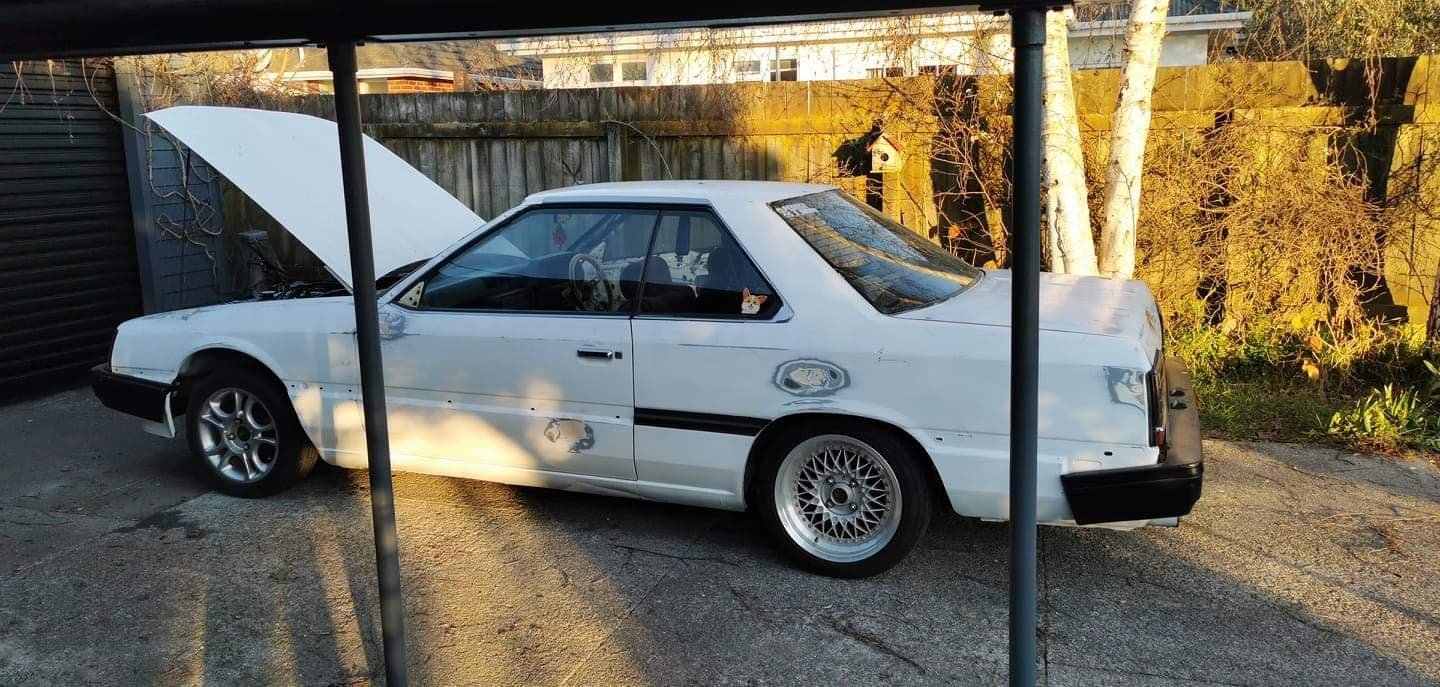
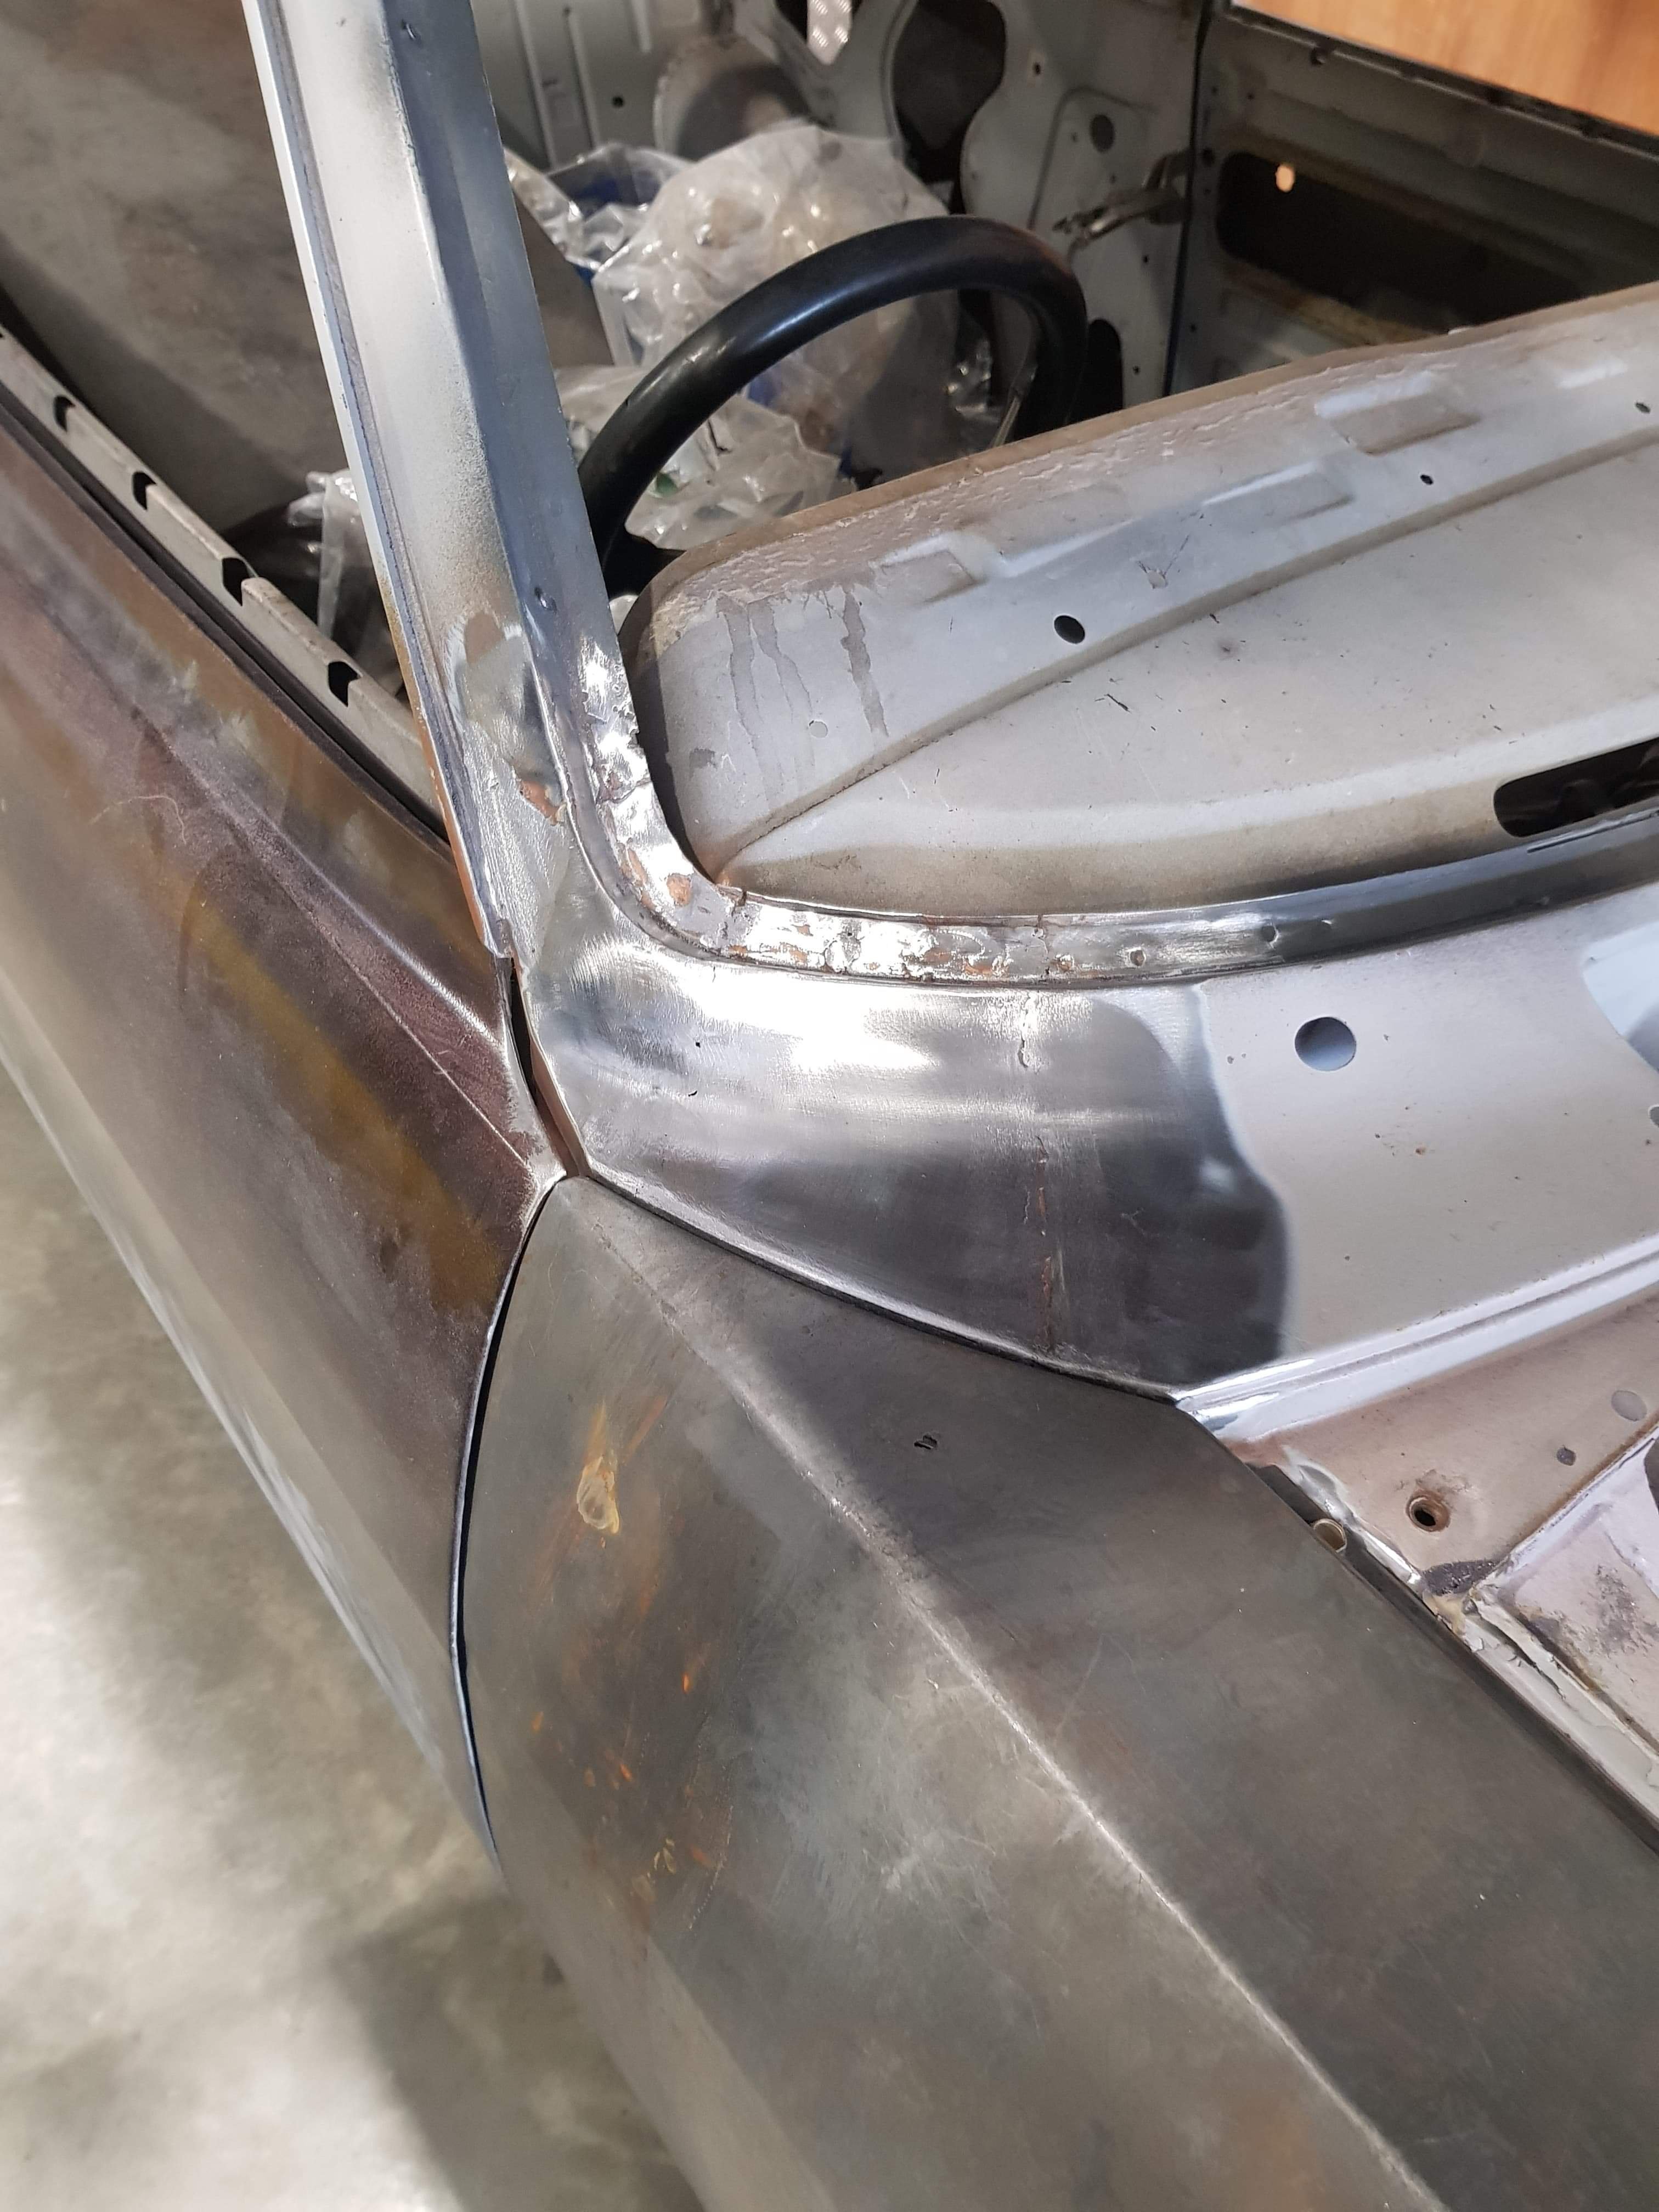
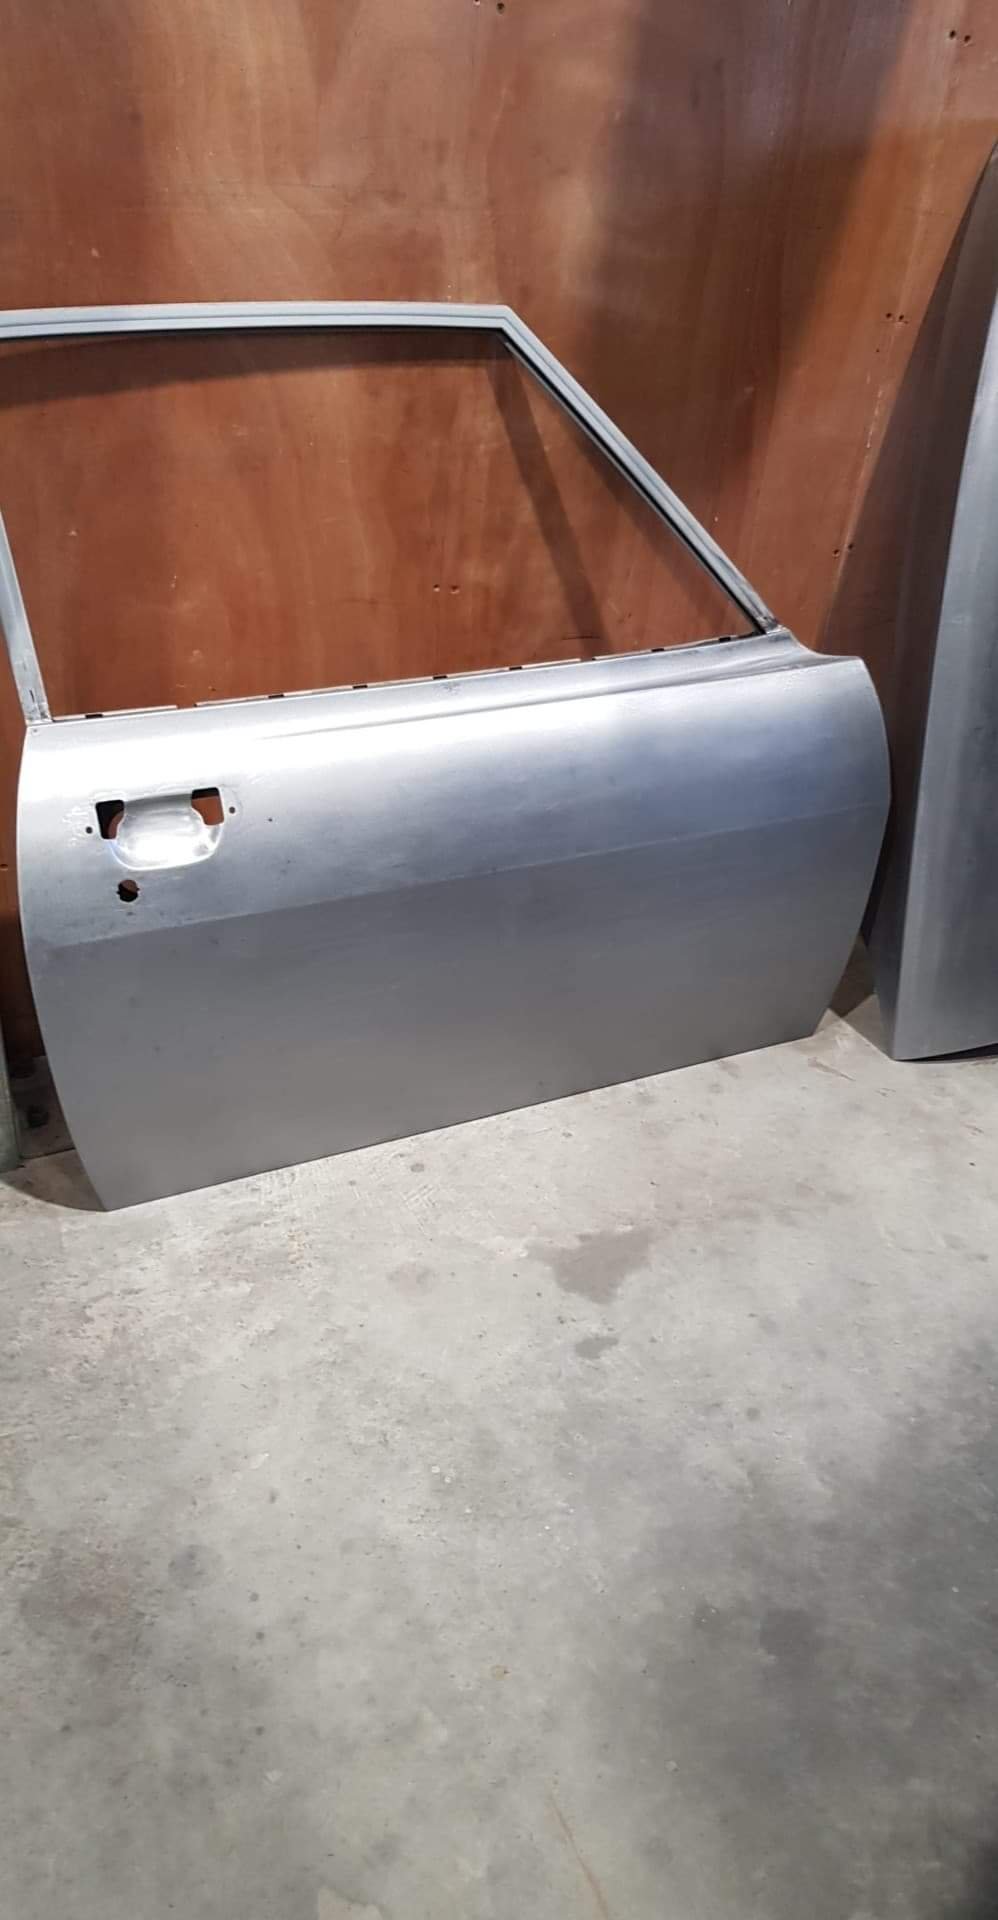
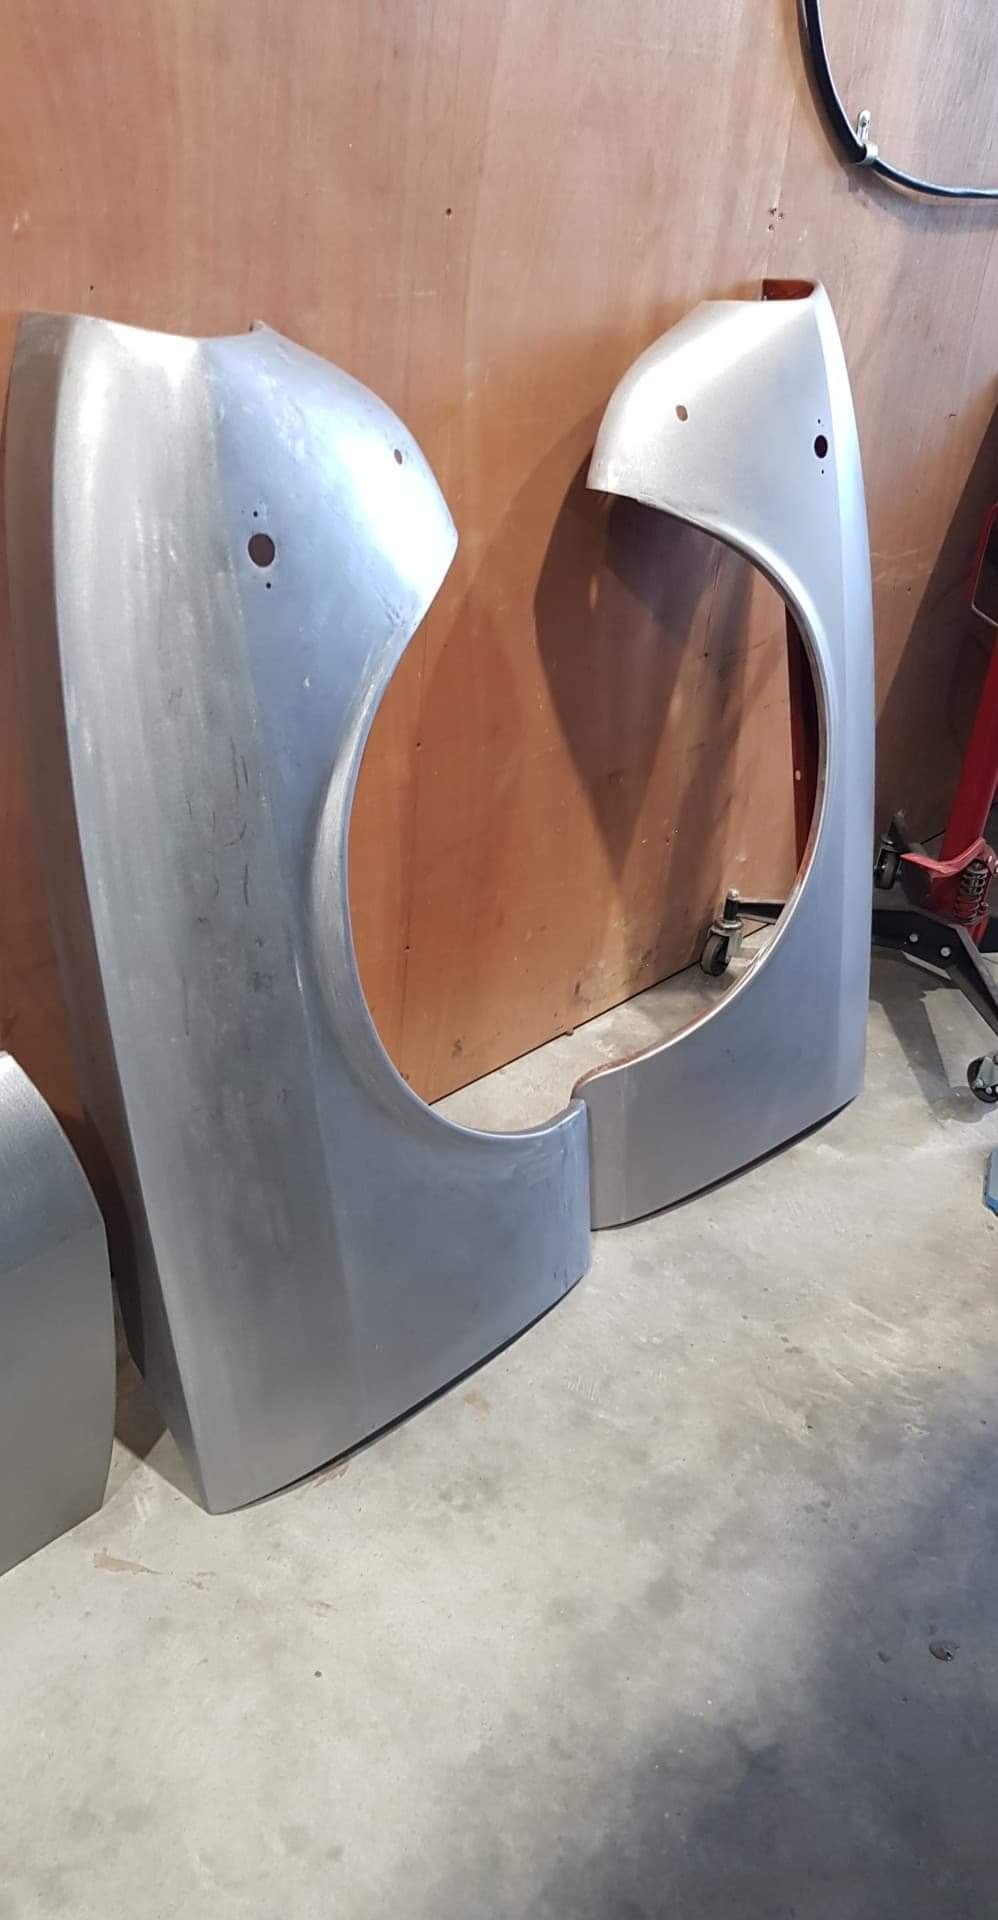
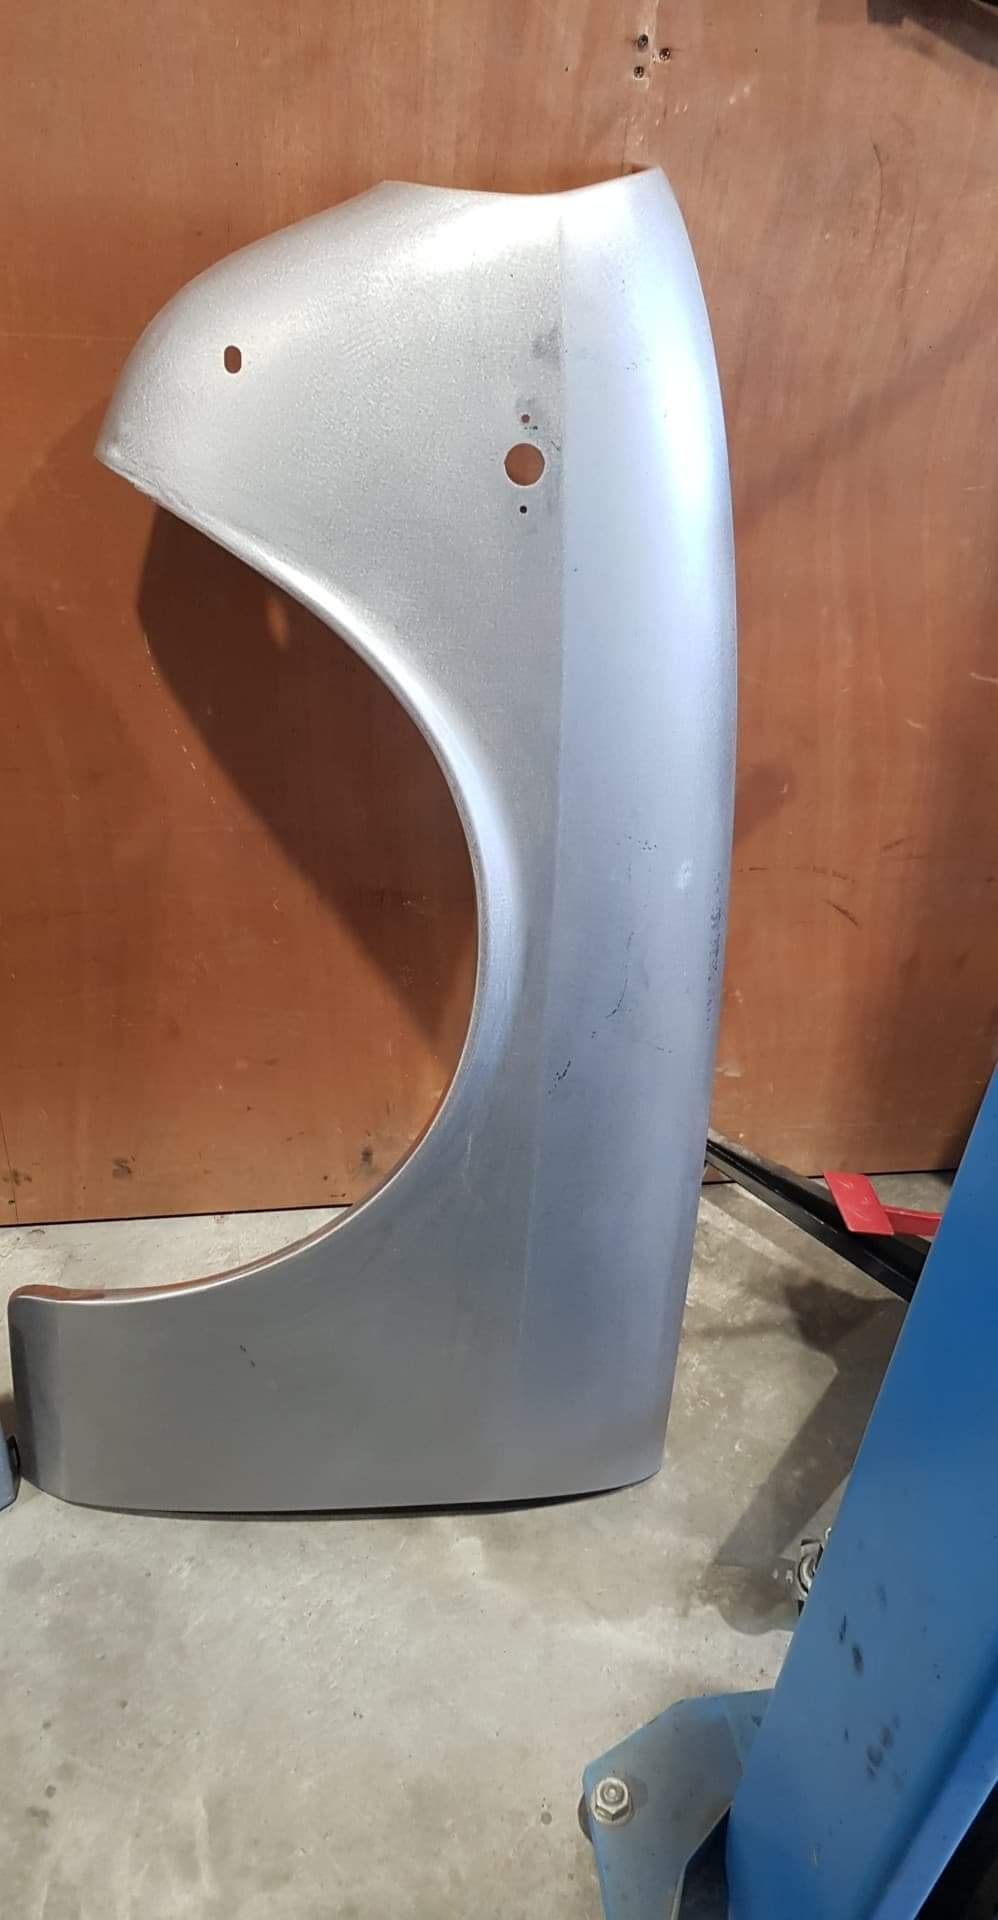
So this is how she's been sitting for awhile. I lost motivation to work on the R30 over winter and didn't get much done. I got a set of KYB shocks for the back but they're a laughing stock over the Monroes it had in it, So i just gave the Monroes some good old one way Makita treatments until I order the new TSD shocks. I already have the whole front end conversion waiting to be put in when I take the engine out. She was drivable but barely so it was mainly for just rolling it around the driveway. As you can see, I've had to sand down a lot of areas and bog in a few dents. to get everything flat but it's coming along well. the rear wheels fit nicely but i may put a higher profile tire on later down the line. Once the weather improves I'll start prepping for final paint as well as removing the old exhaust, gearbox and engine for some TLC Over-all though it's looking a lot better than when it came off the trailer and it actually drives now. Although I have no power steering. The next update will be up to date and how it stands to this day (21/10/2020)
1 point
-
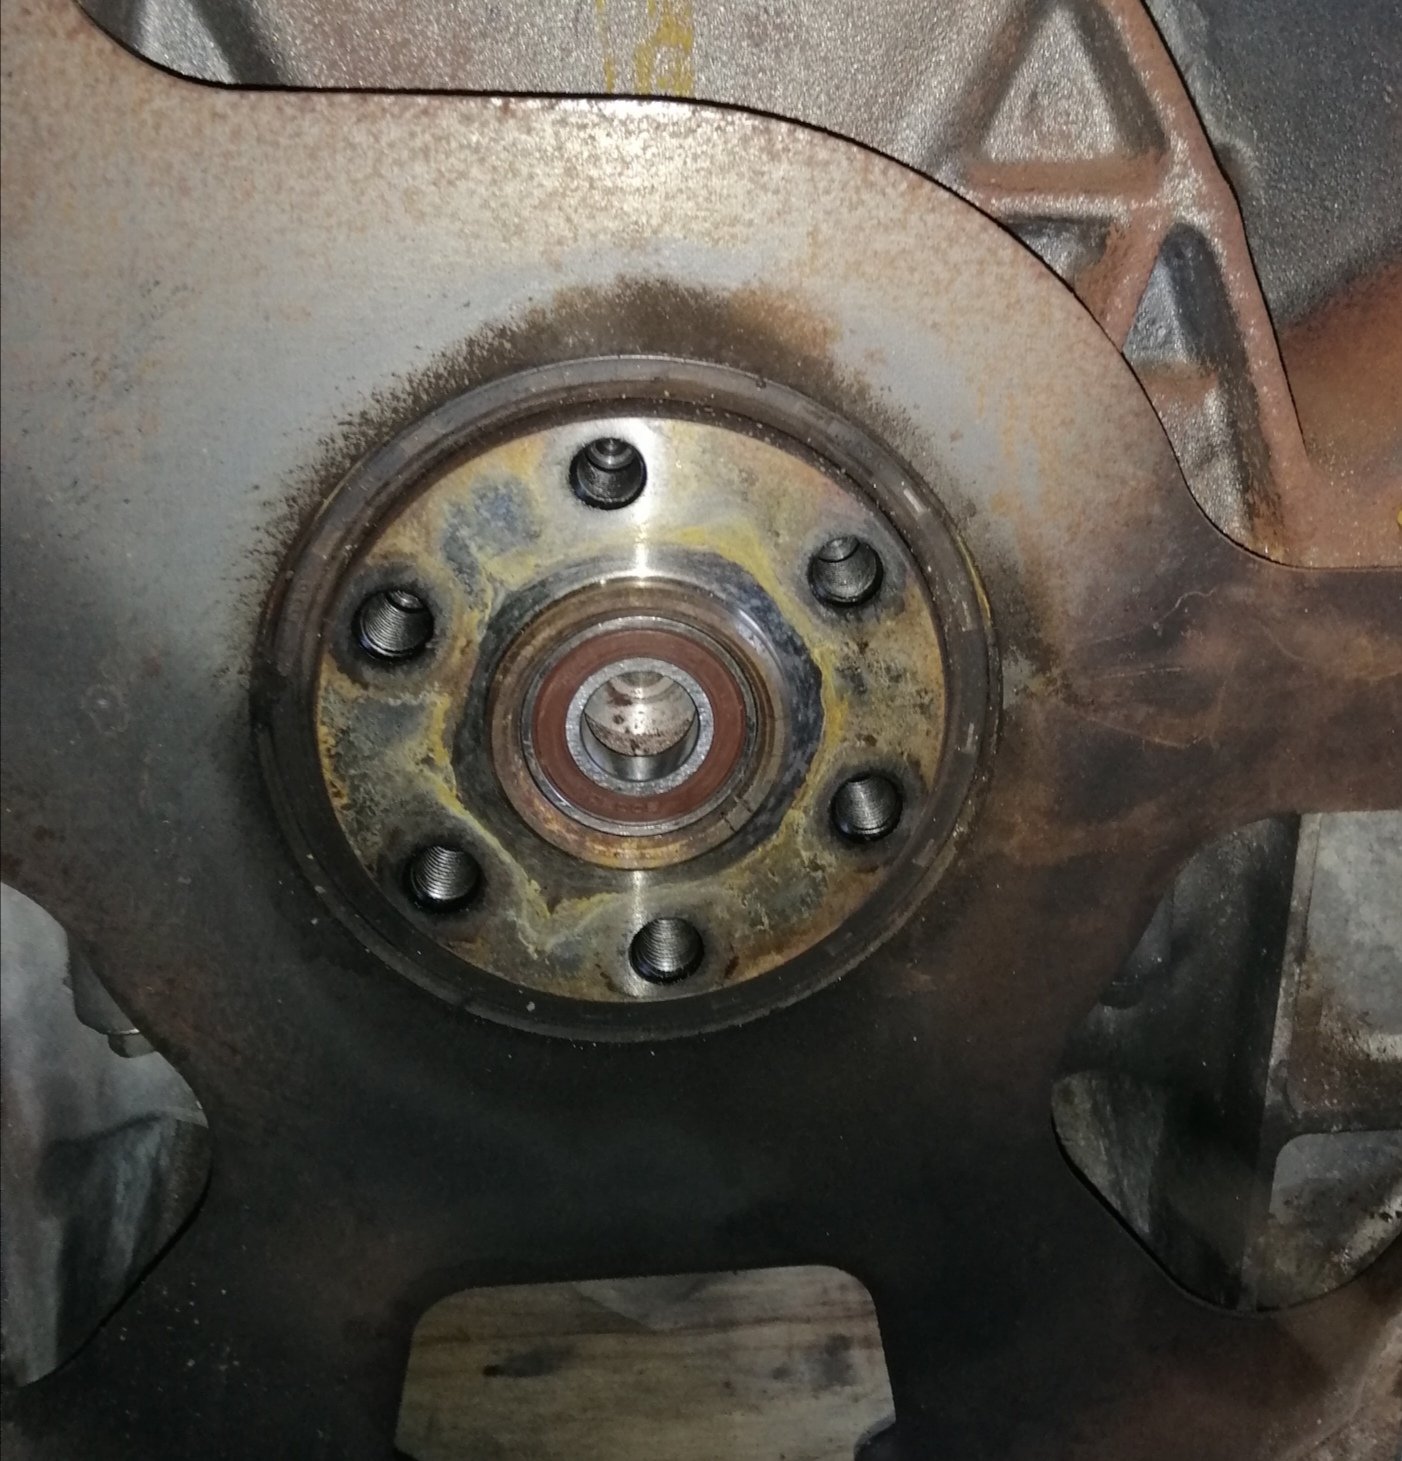
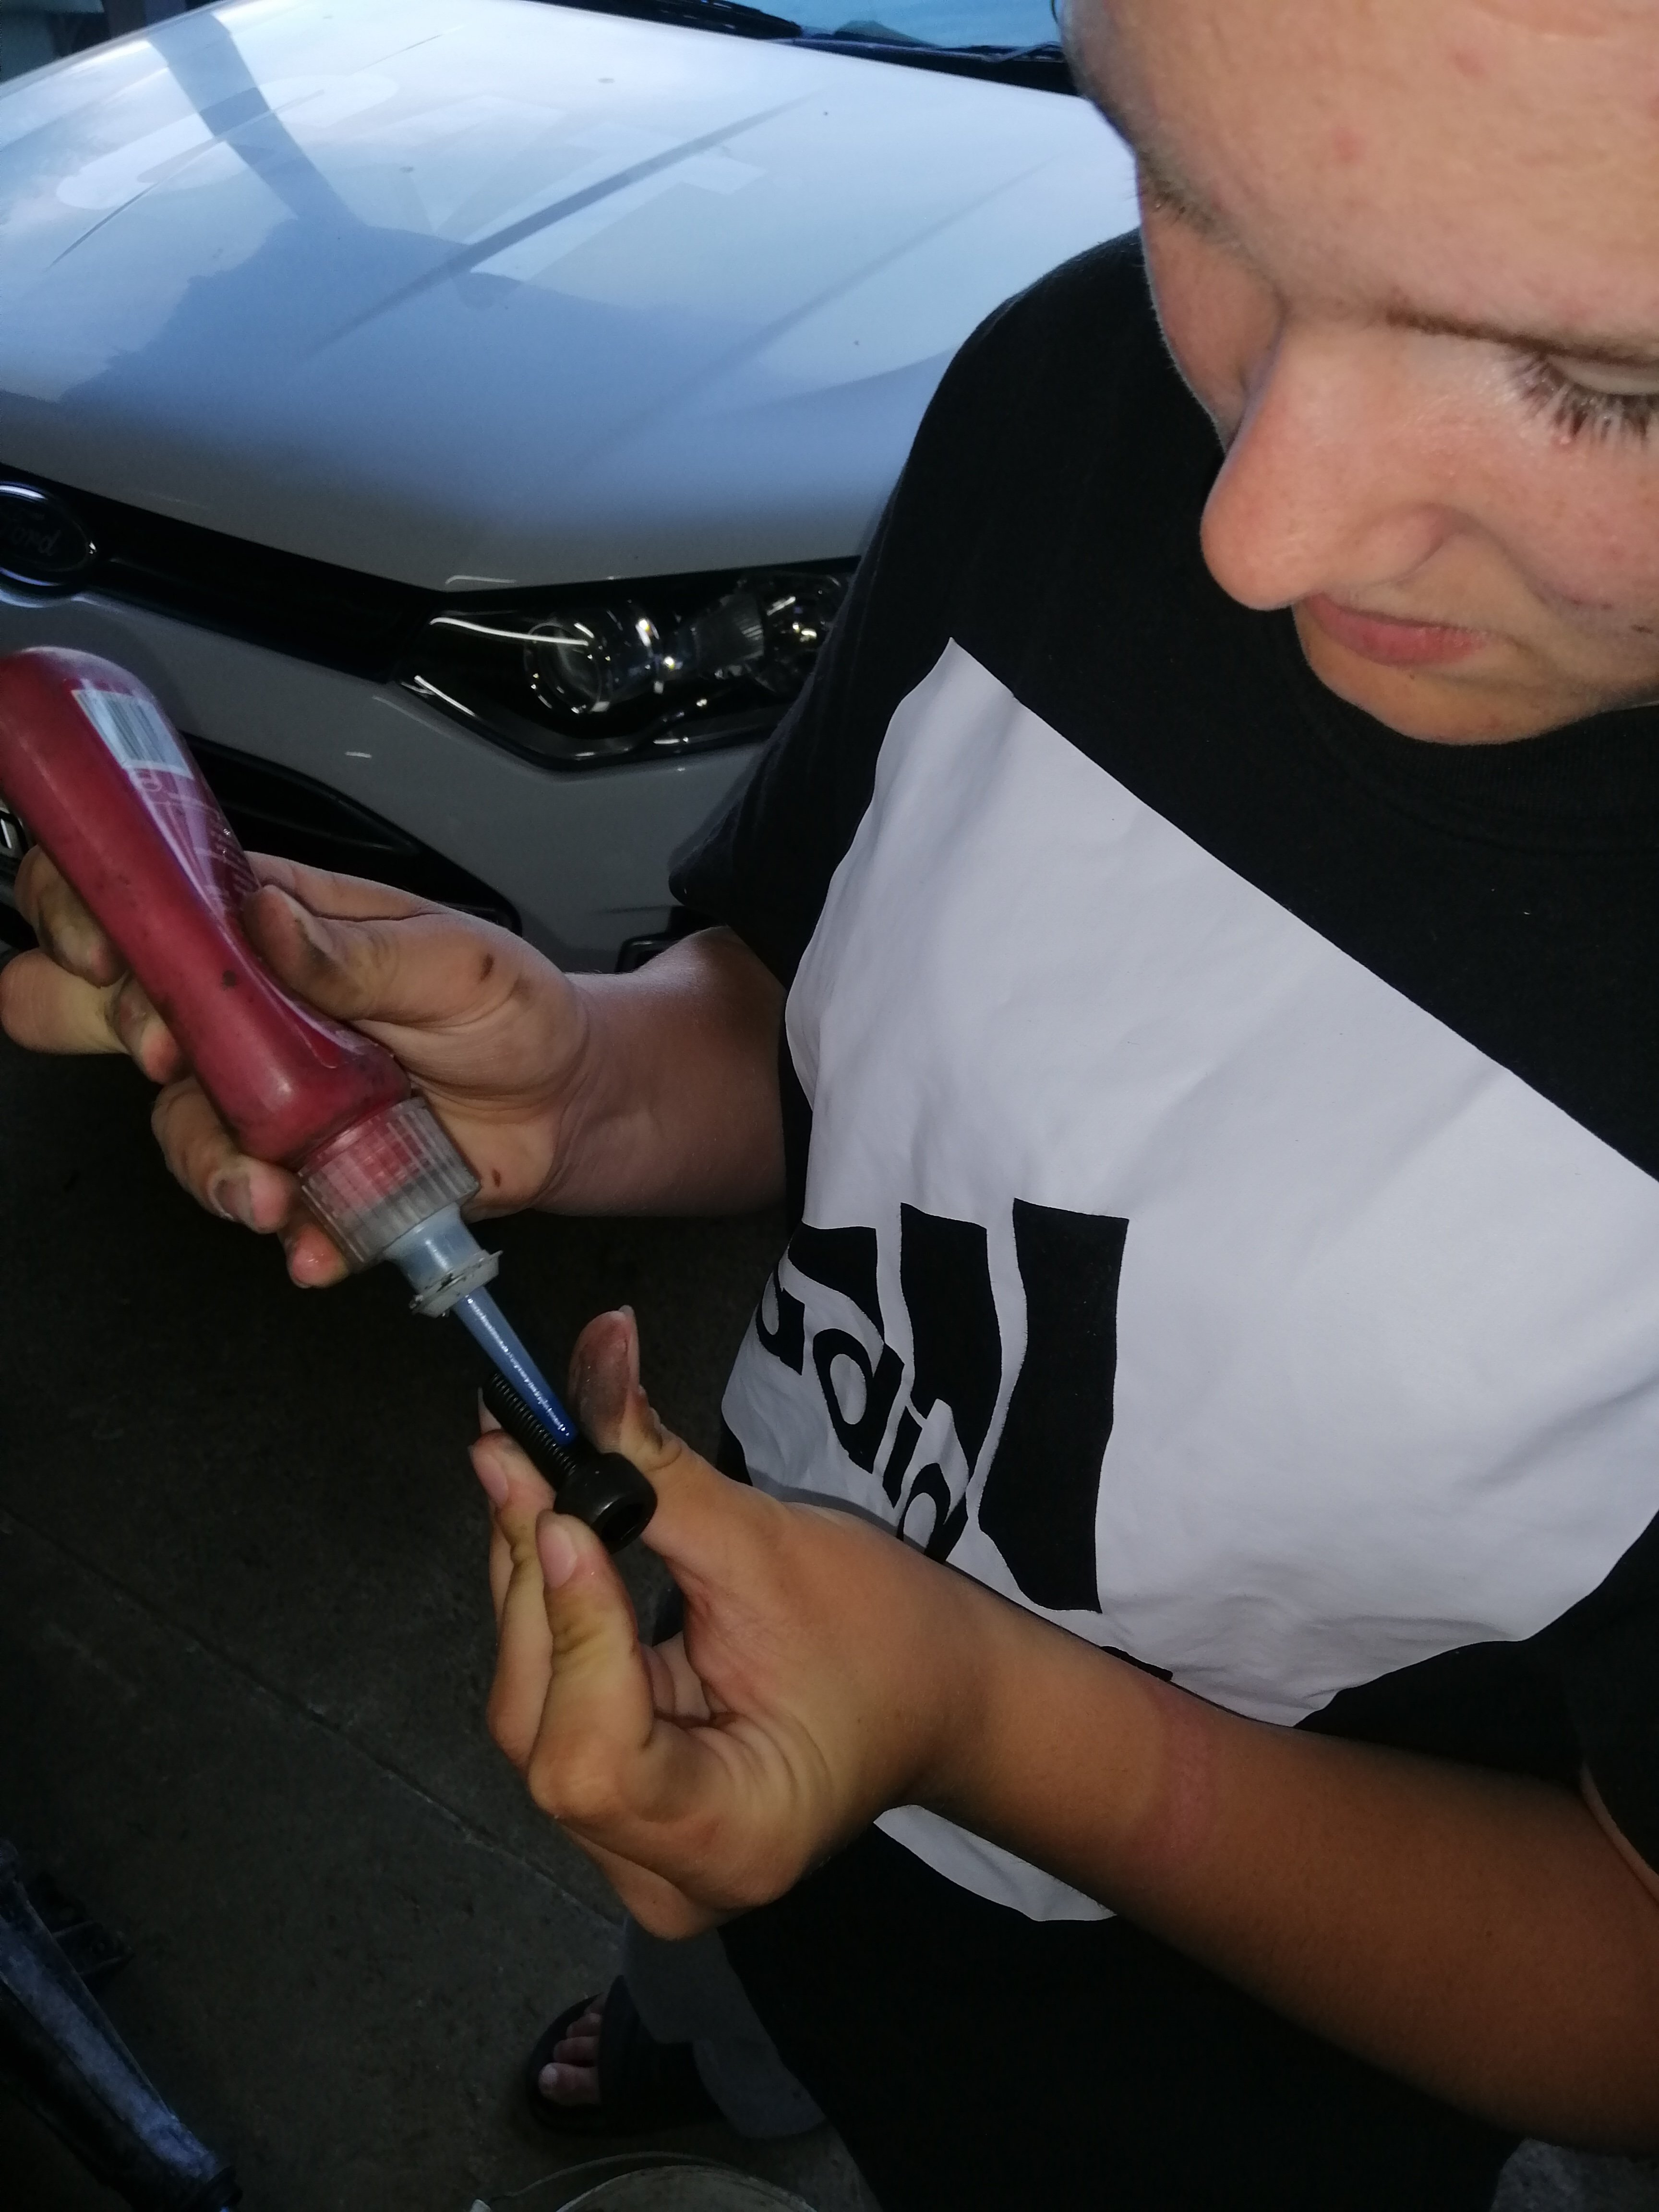
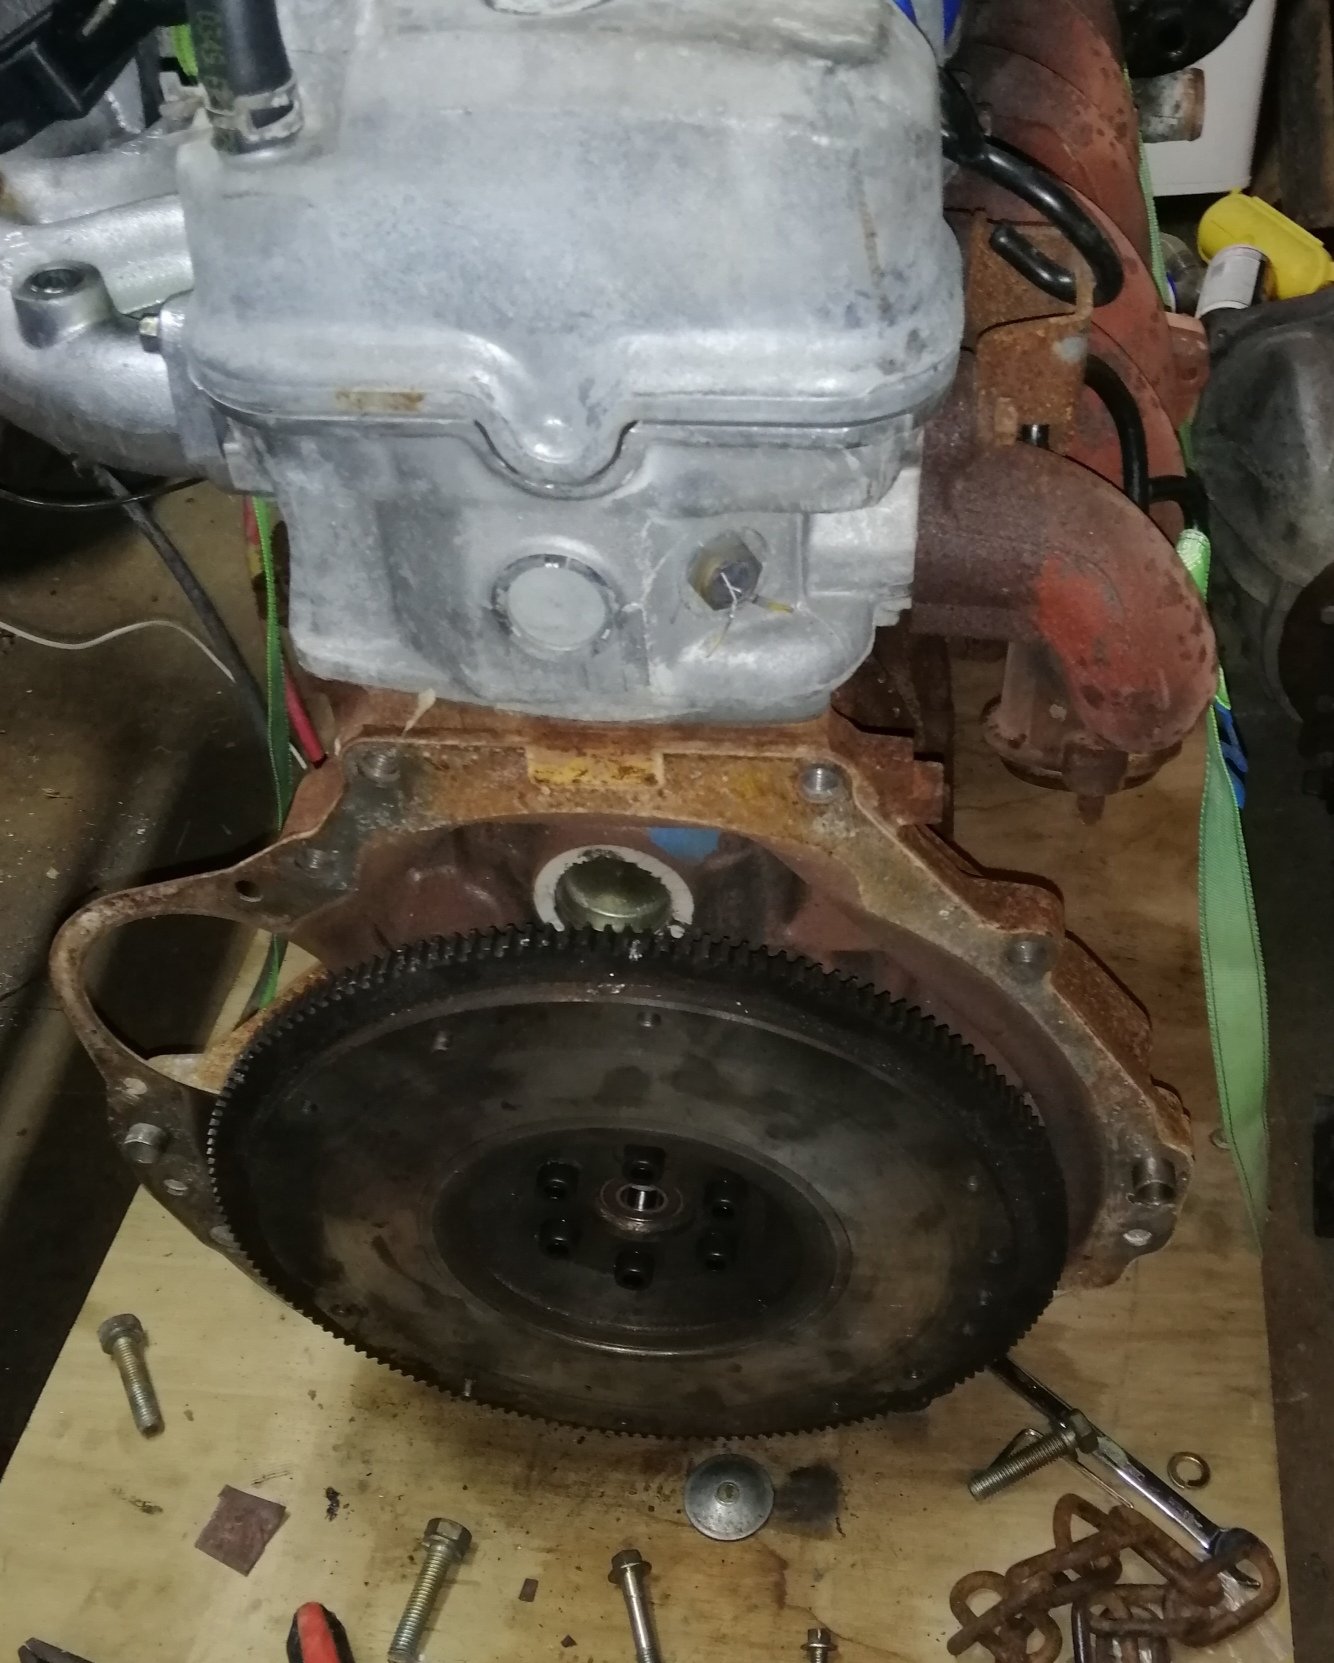
Had Miss13 as an assistant last night. First was punch in a spigot bearing. Part number 6003-2RS for future reference. Bit of hands on experience in the way of roughing up the flywheel. Fit flywheel, found 2 bolts don't line up! Quick call to Dad to confirm and he has struck it before. Also confirmed in Fordforums. Mark out the two offending holes and slight finesse with a file. Forgot to photograph this stage. I made a couple of tiny packers and put them in the voids to take up any play that may occur. In speedway circles it is common for guys to bore all 6 holes oversize, but this has a tenancy for the flywheel coming loose. This is a better alternative. Gave Miss13 the job of applying Loctite threadlocker to the M10x1.25x30 12.9 capscrews (quoted for future reference. Torque to 100nM, spec is 83nM, was recommended by Fordforums member as at 83nM he was finding flywheel coming loose. He used this method, (slightly longer capscrews, Loctite and a little more torque) and has had no further issues
1 point
-
The other day we went further up the main valley here and our friends let us pick apart this old cottage on their land. Sweet as cedar windows set into Rimu frames. There was also a big copper water cylinder there for grabs. We are going back to get the french doors before the place gets demolished by a digger. Shame really because the location is bloody amazing! By a river looking at the mountains. Then this afternoon we had a surprise visit from a fella here on oldschool who has been following the housetruck build and this thread. He's a builder and often has spare timber left over from housebuilds so he so very kindly thought that we could make use of it, along with a load of left over fastners etc! Far out- this was such an awesome gift to receive - the timber is exactly what we need to start with framing out the interior rooms in the mezz ! So a huge thanks goes out to Morris @CPR Sierra for going out of his way to help us out. He is restoring a sierra xr4i with a cossie body kit and I am hoping I have convinced him to start a build thread on here. I like sierras and its very rarely I ever see one about these days.1 point
-
1 point
-
1 point
-
east cape is coming up so thought i better actually fix this from last year/make it faster. started off by making up a new seat and brackets to hold bits and pieces this weekend, will fire it down to Lewis and he can work his magic on it for me. then stripped it down to a bare frame and packaged all the bolts up to get sent off to get re zinc plated. will do the standard sandblast and powdercoat for everything to tidy it up. next is motor work, big carb upgrade, stainless exhaust etc. will see how motivation goes and how distracted i get by other projects1 point
-
Cut the remnants of the Holden engine mounts off, and while at it decided to cut the original Mitsubishi ones out I will need to reinstate a gusset from spring tower to the chassis. I separated the engine and box and removed the flex plate. I'll source some longer bolts for the flywheel and some for the pressure plate. And it appears Dad may have brokered a swap, my spare 3 speed for a single rail 4 speed, from what I can gather it's had a cut n shut done on the shifter and cannot be fitted back into a Falcon. 3 speed is in his possession so I'm waiting on him, if not I'll put it back in with one I got
1 point
-
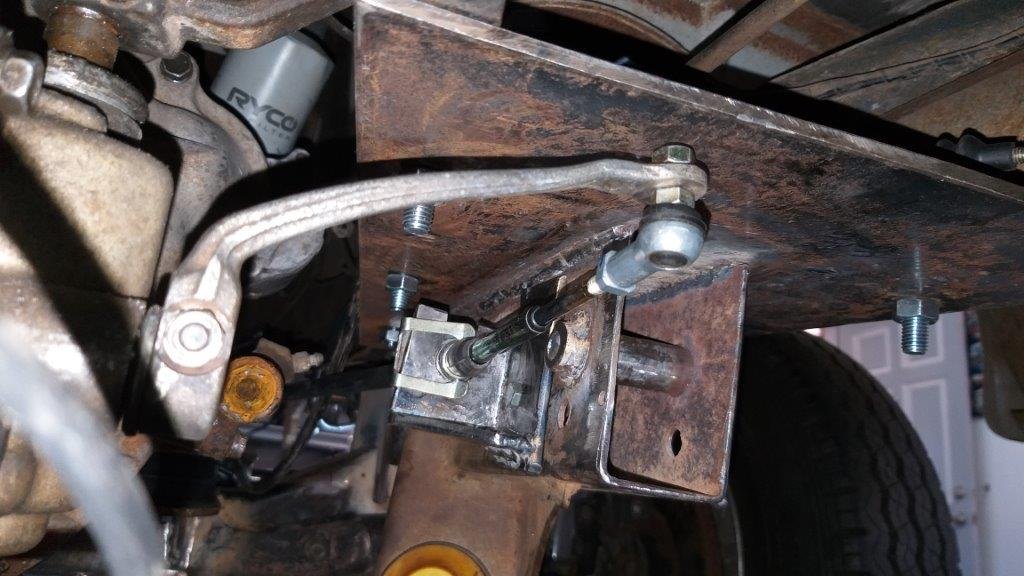
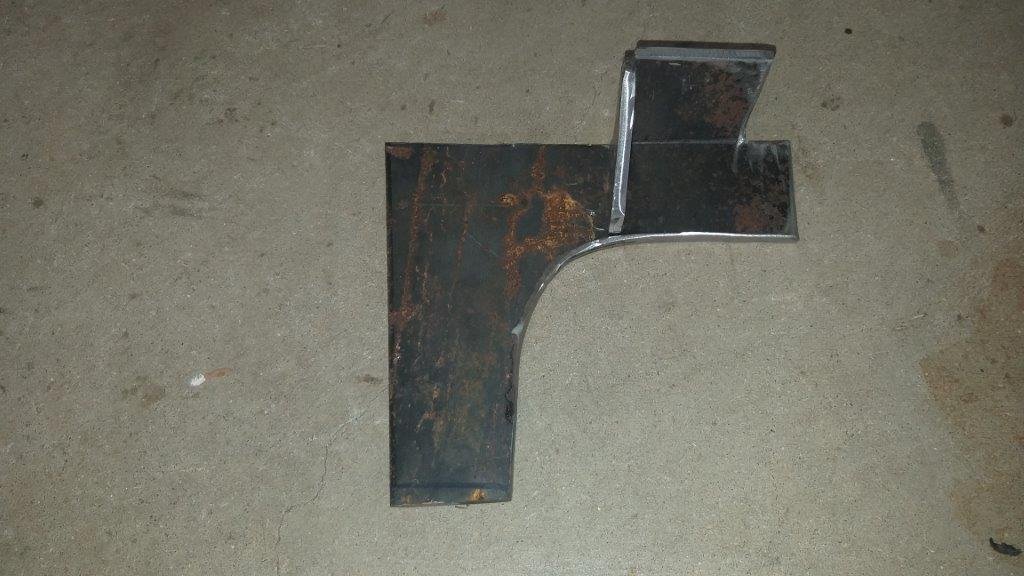
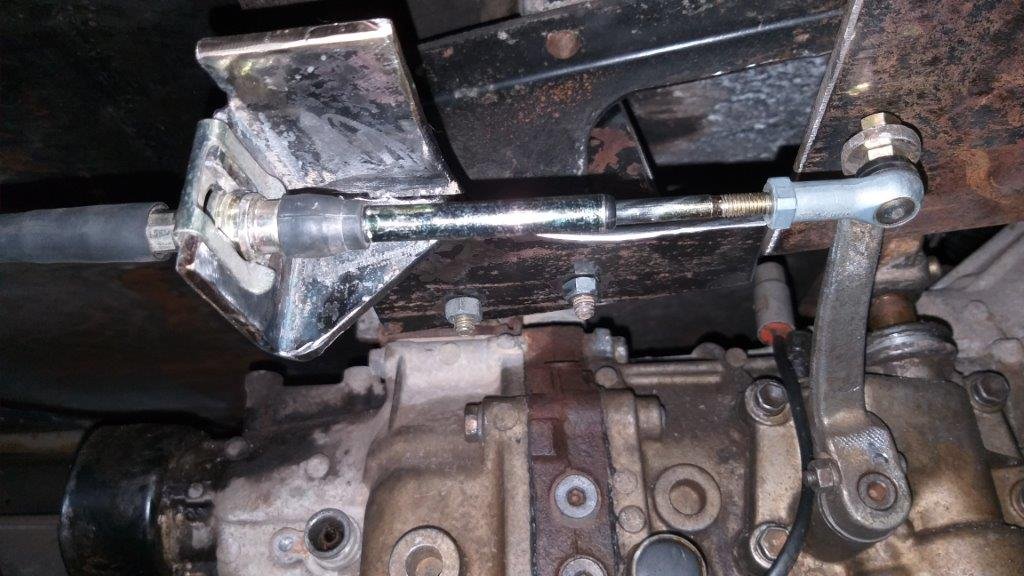
Talk about two steps forward and one step back. Sitting last night and thinking through the plan of action for today, I suddenly had an uneasy feeling that I had got the gearbox gate lever movement incorrect. So first thing this morning I headed over to the HiAce donor and put the original column shift through its paces and sure enough I cocked up yesterday. So the cable needs to push when I had it pulling and vice versa. So back under the Thames for some more puzzling and all is not lost as I was able to trim the bracket that I fabricated yesterday to suit the correct movement. It's now bolted on to the side of the strut rod mount and the cable heads straight forward instead of having to make the lazy loop across the gearbox tail. But wait, there is more ....... With the orientation now correct the cable that I scavenged off the newer L300 Express is long enough to do the job ! Total win as the closest place to get a longer cable made up is down in Brisbane which is almost 500 km away. Gotta love the vast open spaces of Straya. Anyhoo, now that I'm back to where I thought I was yesterday, I can now crack into the front bracket for this cable tomorrow. Thanks for reading.
1 point
-
I then carved a copy in some steel plate, folded it up in my vice, gummed the thing together and poked a few holes in it. Then chucked it in for a try. Gave it a quick test by pulling and pushing on the other end of the cable. Thought the lazy loop might make it tight, but it slides really easily, so I'll take the win. Just needs a bit of trimming and a general tidy up which I'll do first thing tomorrow before I crack into the next one. Thanks for reading.
1 point
-
I'm in What about @sentra @locost_bryan @sheepers @rich1179 @Shakotom @ul9601 @Styles @cletus @Tumeke @Snoozin @V8Pete @tortron @punkoutnz @SOHC @michaelme @Avenga @MIRAGE-MAN @Thousand Dollar Supercar @Ghostchips @Ghost @Hurmeez @Snorkpipe @xsspeed @The Bronze @The Dude @ae85 fiend @63Ragtop @MichaelJFox @rusty360 @Matteybean @66gt @Mr Vapour @Corbie @SOHC @sluggy @Sambo @Not-a-number @Taistorm @zep @f100_dreamin @Ashkellybarr @sleeektoy @rivalrx @dabuzz @mk2marty @shizzl @beachlander @mlracing.co.nz @Sourkraut89 @slacker.cam @piazzanoob !!1 point
-
Looking at the pinouts it shows that theres an alternator "M" pin which goes to the ECU which is something new to me. It looks like this is a PWM signal that shows how much load is on the alternator, so that's cool! My other car has a vitz alternator on it but I think it's an earlier 3 pin one. But I might swap it over to one of these too. As this will be great for keeping the idle stable as I can use electrical load as a load axis on the idle speed controller. It's always been annoying to turn on the headlights etc and have the rpm dip on my other car. Because of quite a light flywheel. It looks like these ones possibly dont need the dash light to energize themselves either as they've got more smarts inside. And they regulate the voltage based on engine bay temperature so charge to a lower voltage when engine bay is hot. So it doesnt boil the stuff in the battery. I didnt know there was anything fancy about newer alternators but there you go. Sounds like some of the ones that are newer again are ECU controlled for how much current they draw too. So they use feedback from the M pin to regulate the load based on conditions. So it will load it up heaps when you are on the brakes but if cruising along on light throttle it'll reduce the charging voltage to reduce parasitic load a bit. Pretty cool I might see if I can find one of those alternators as it would be fun to play around with.1 point
-
Vid isnt the greatest and my dad didn't learn to hold it landscape but here is a quick blat up the Taieri river. You can only go ~6km up the gorge and it quickly goes from placid to some heavy lifts to completely un boatable - didn't go as far to show those parts.1 point
-
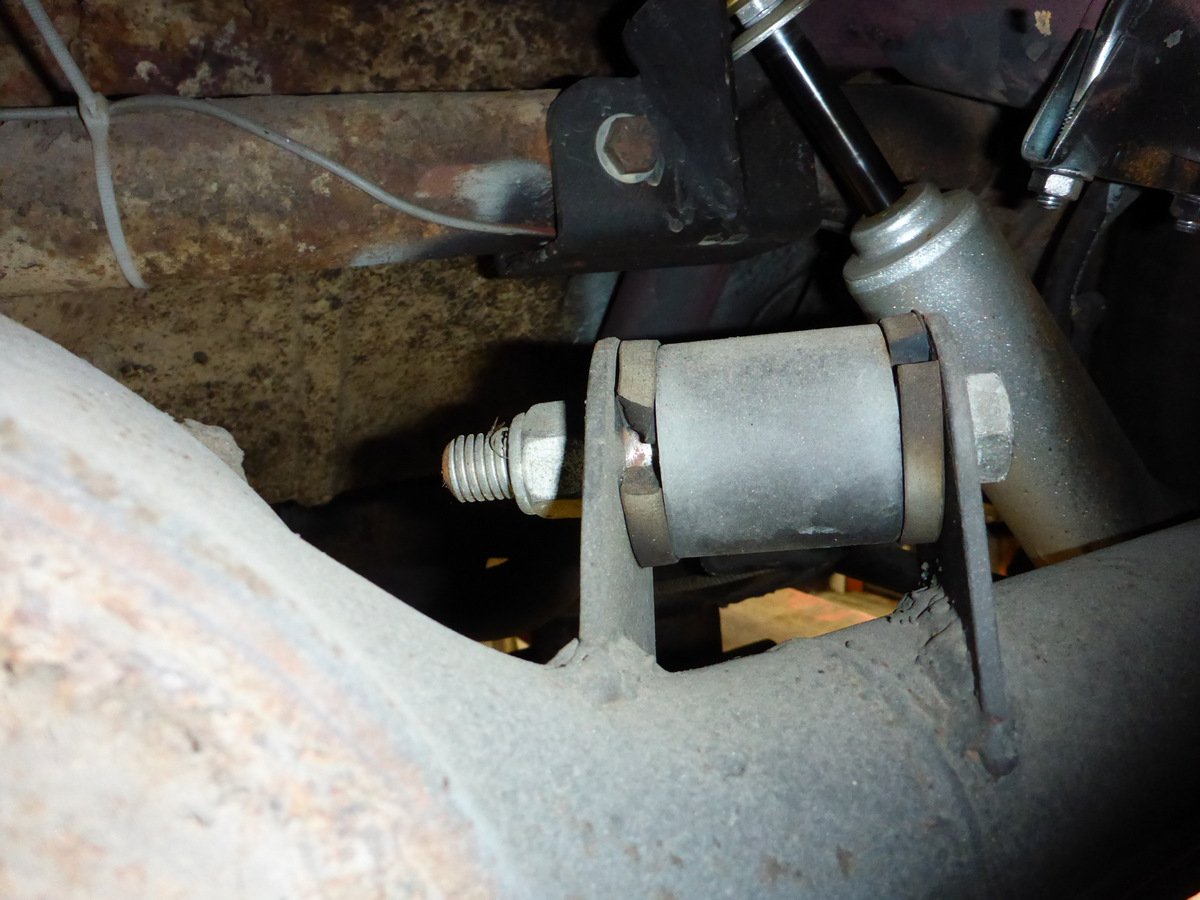
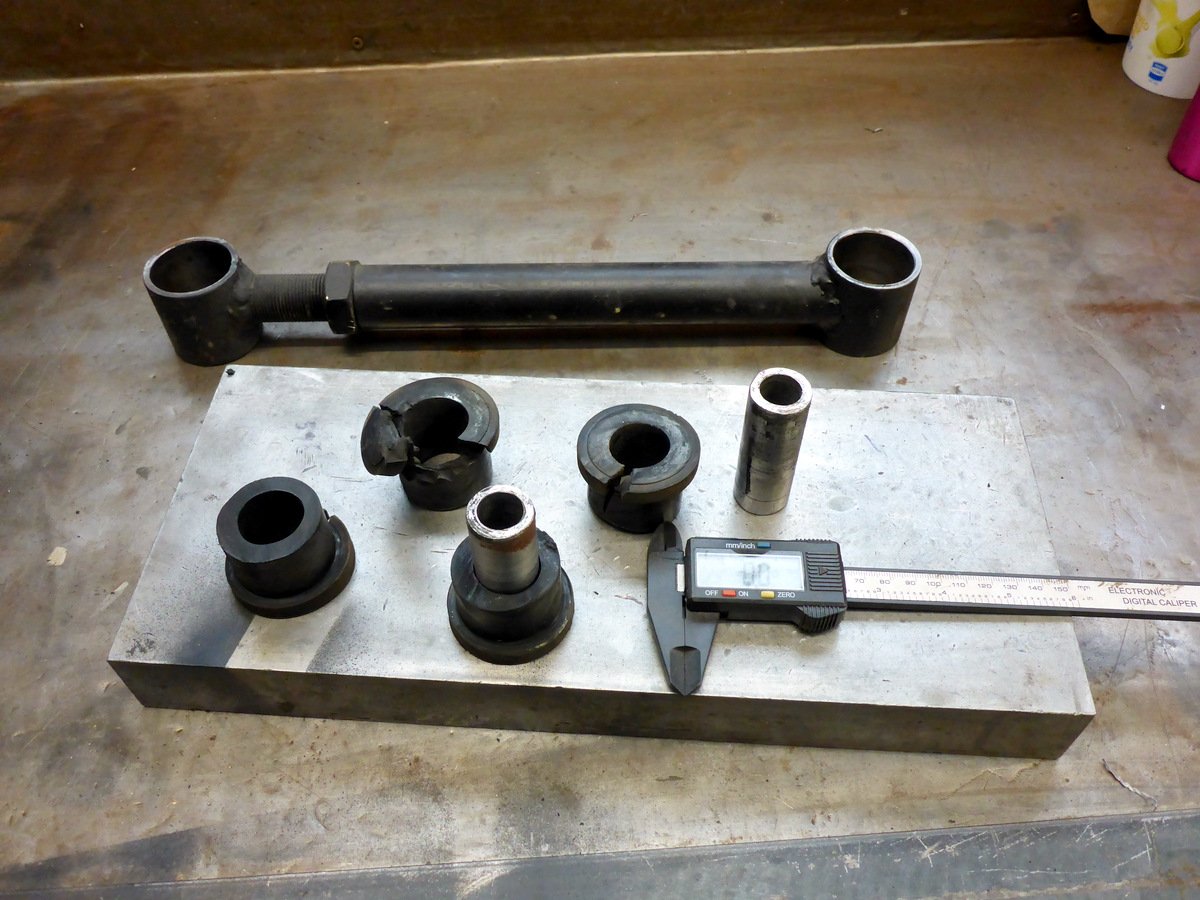
This split bush has been noted on the last couple of WOF checks, thought it was time I replaced it (while the Woodie is off the lift) Yep, pretty toasted, the ones on the other 4-link bars look OK. Might smear some rubber grease around the new ones. Luckily I kept the receipt for what they are from, dang Mitsi parts!
1 point
-
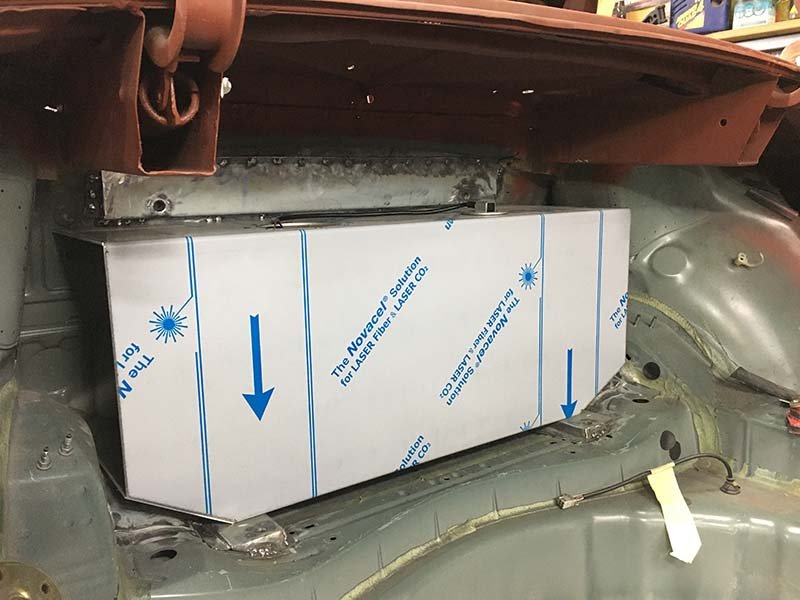
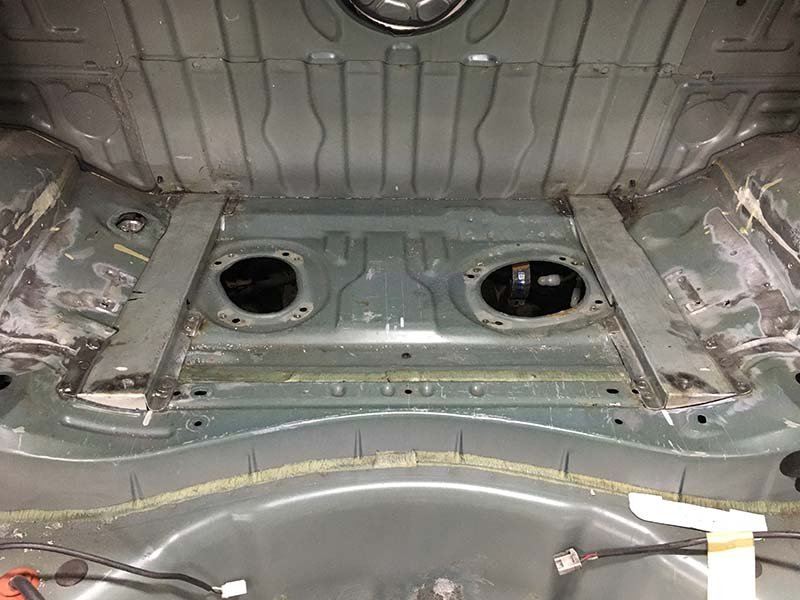
Made some floor flatten'rs for the alloy fuel tank to sit on.
1 point
-
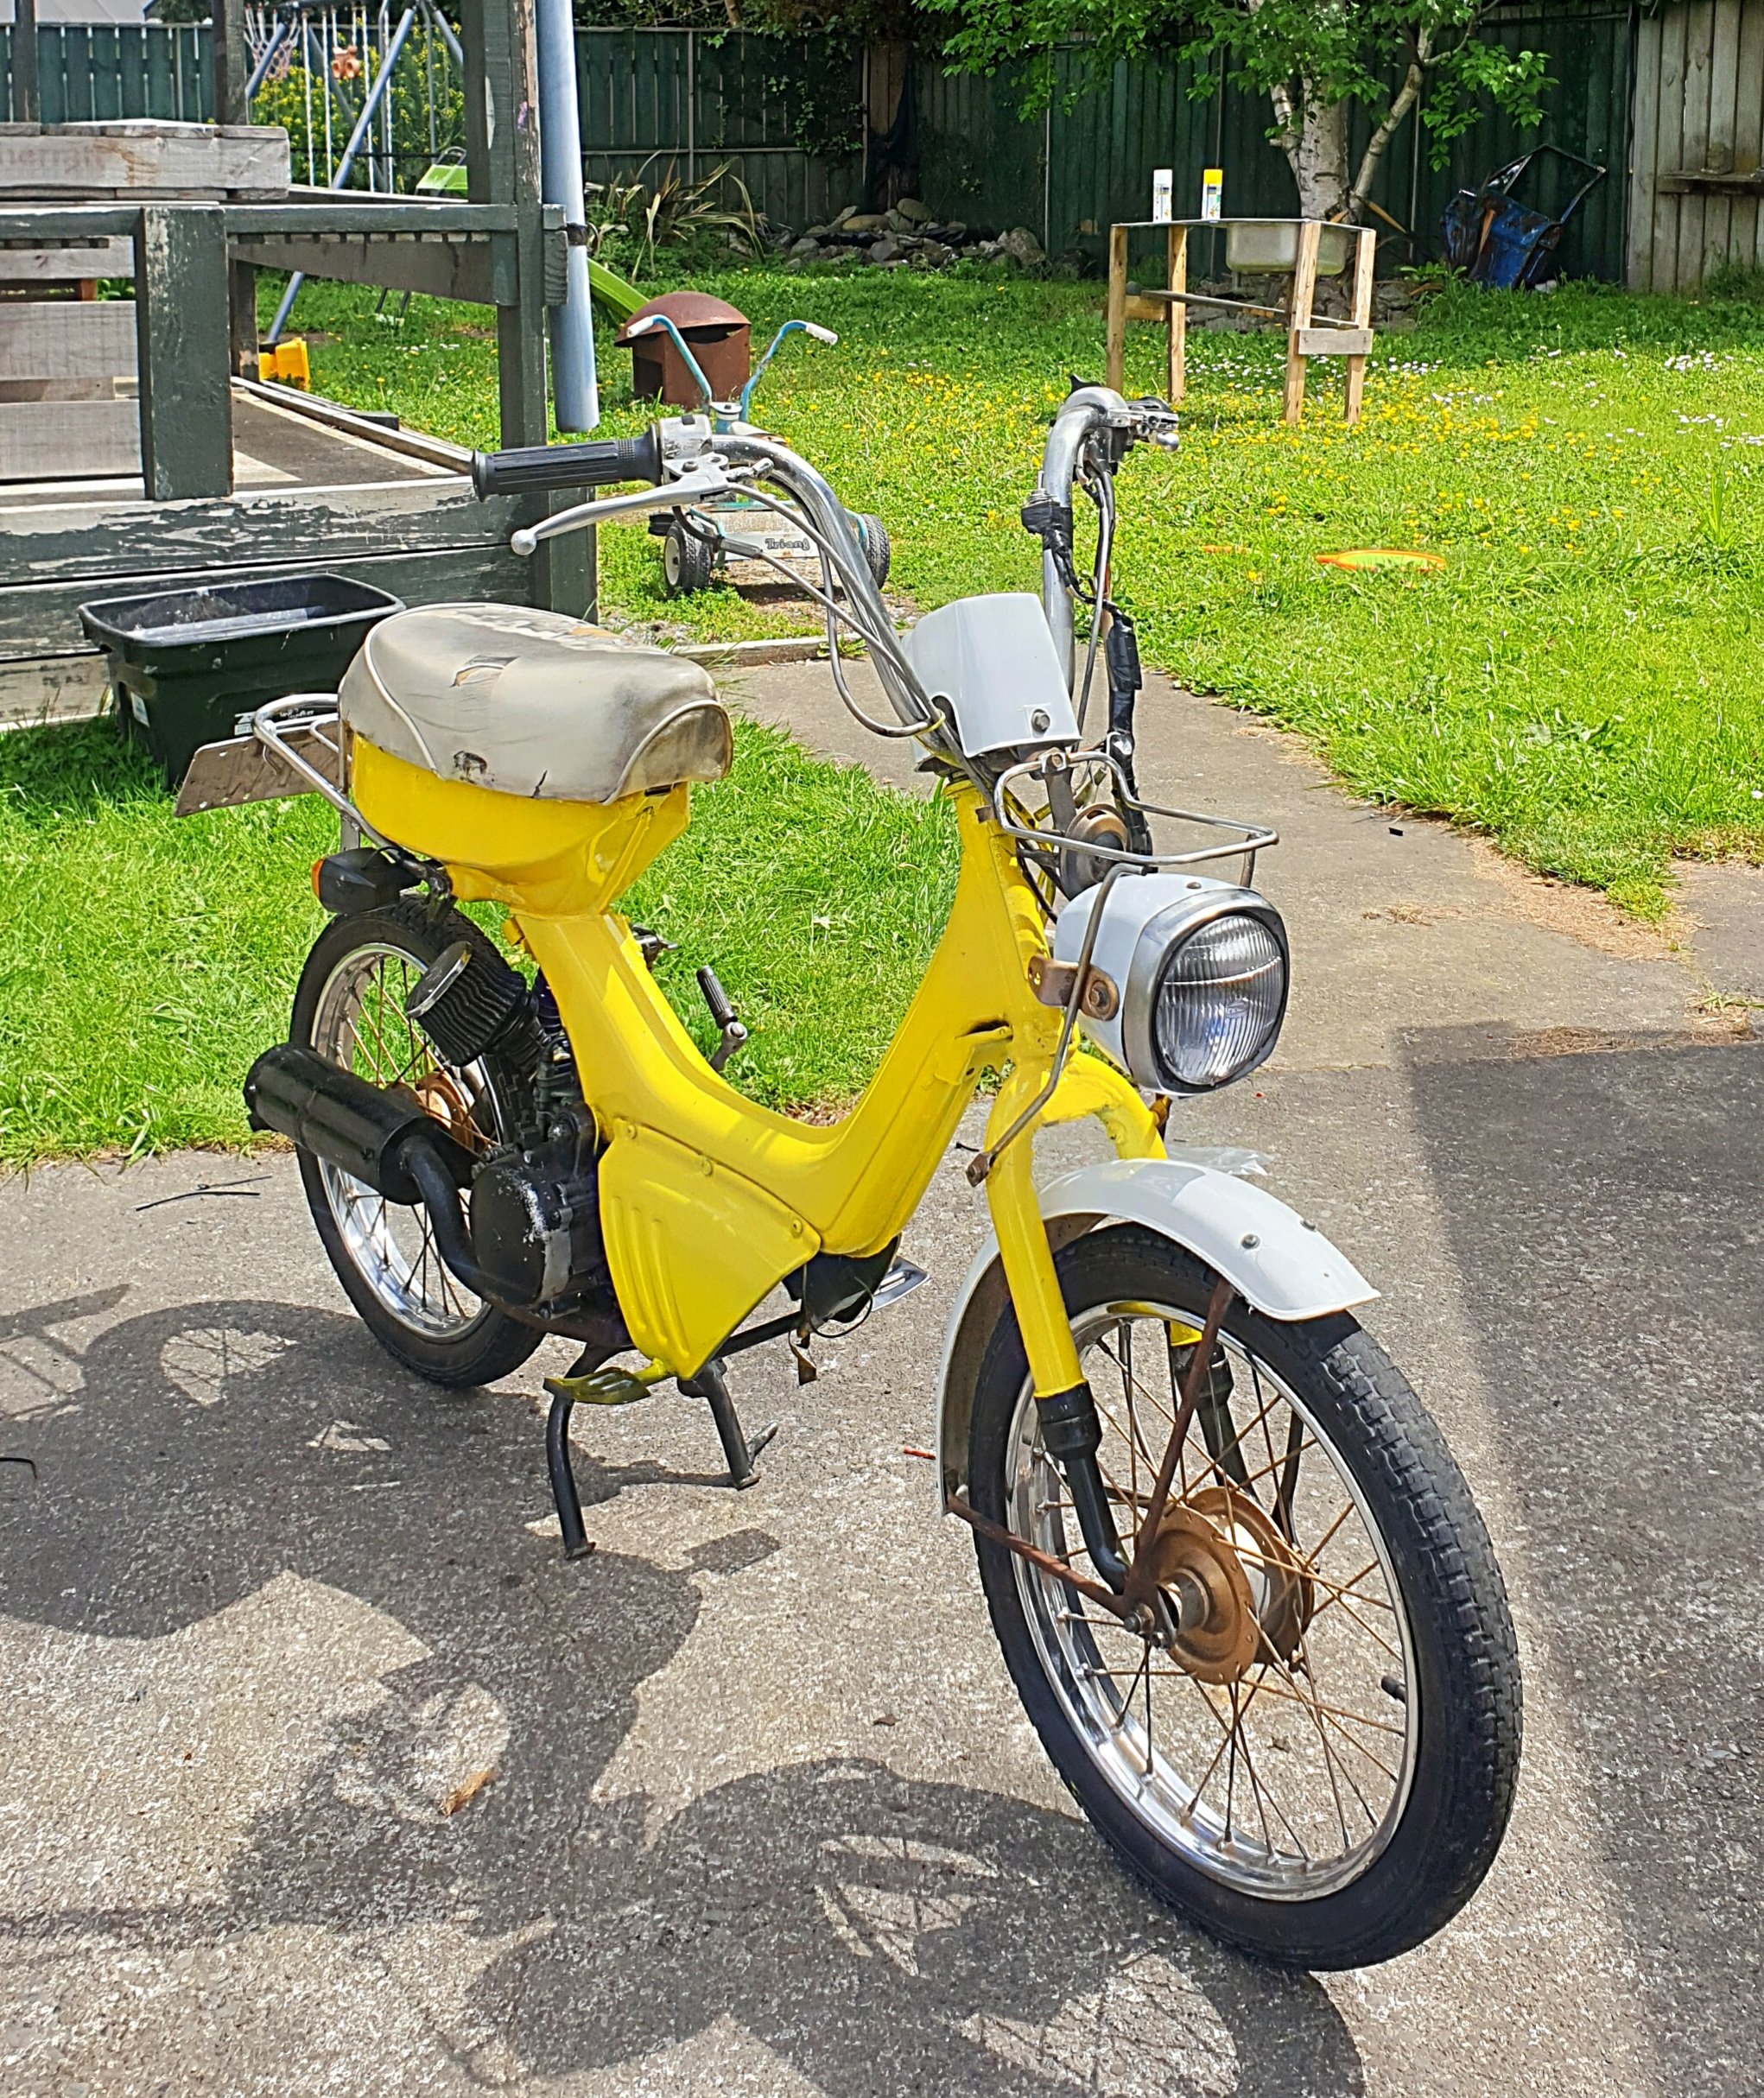
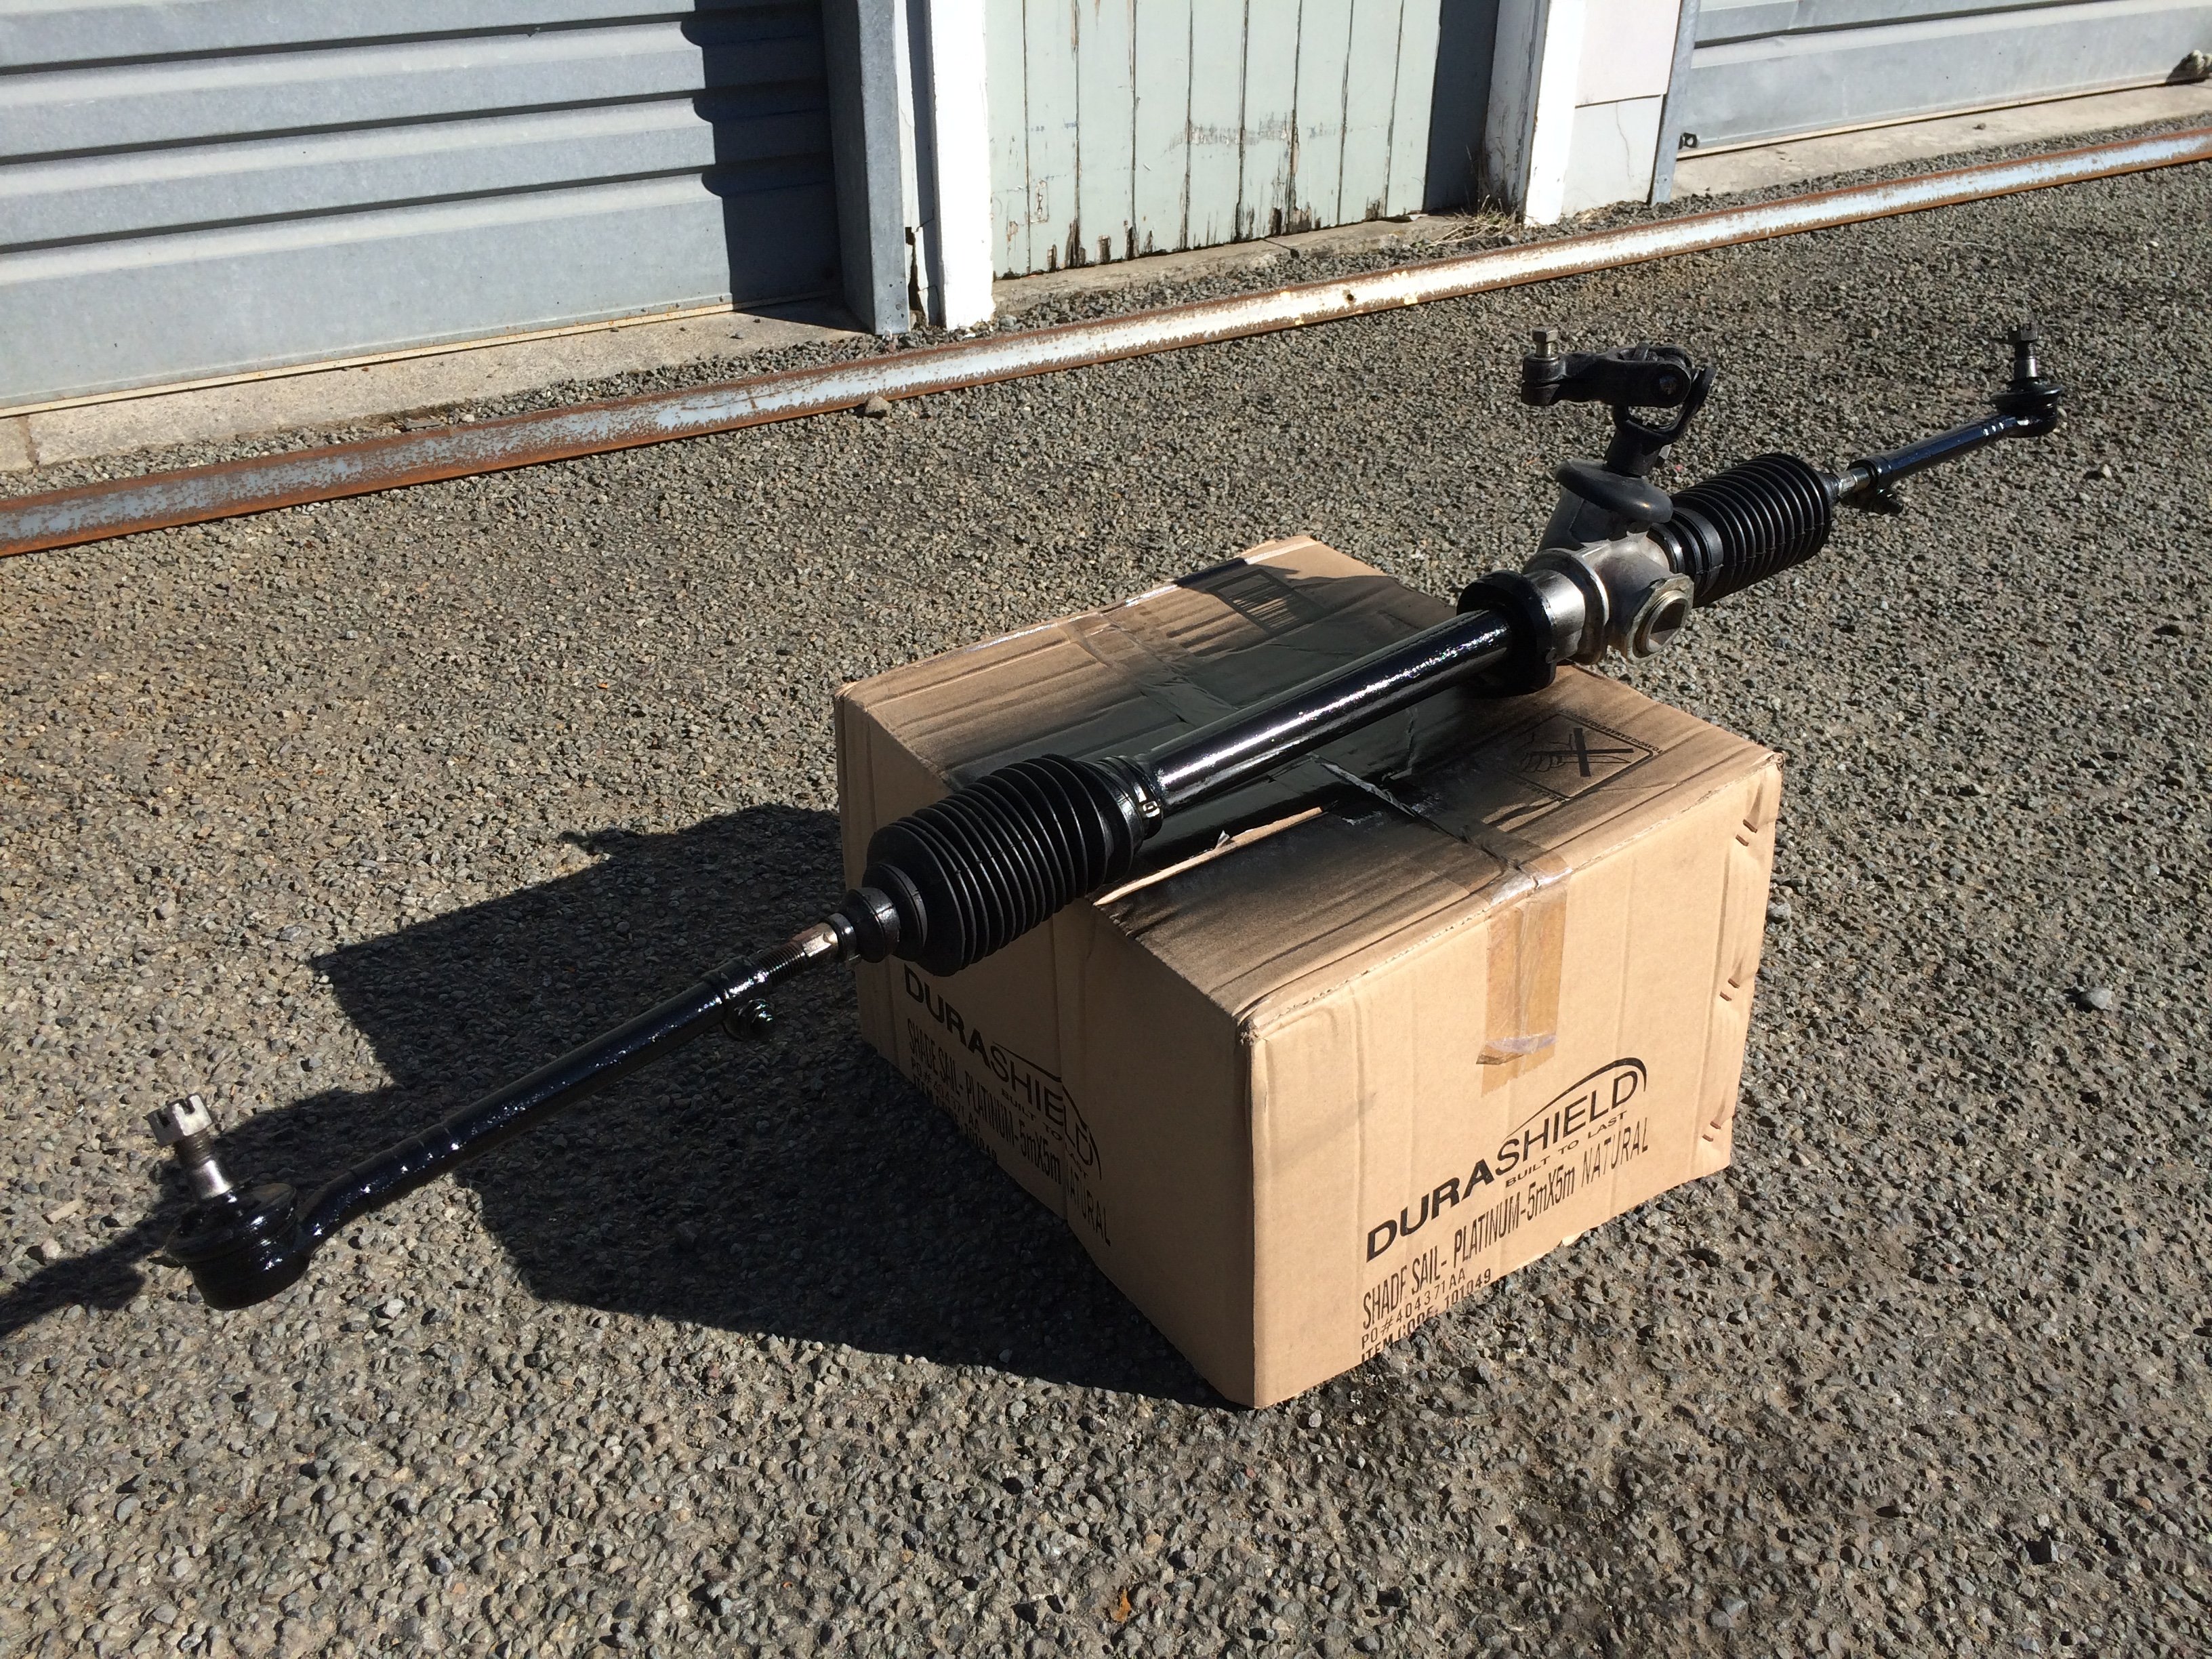
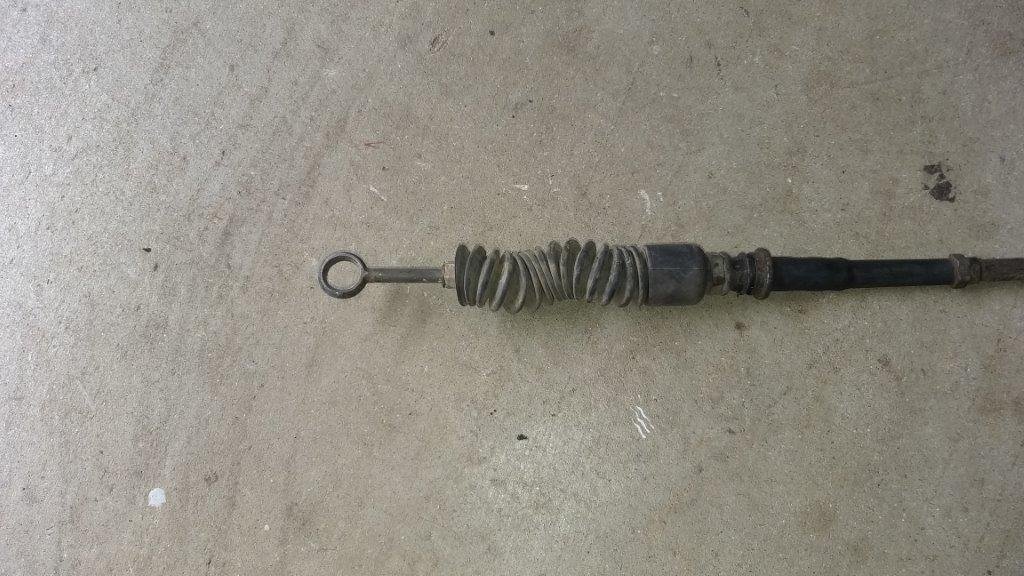
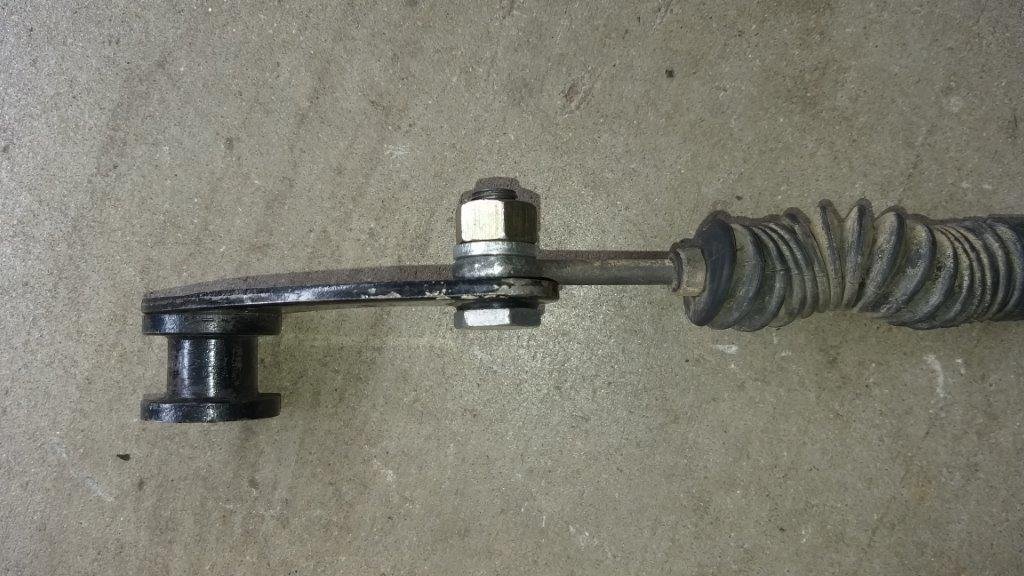
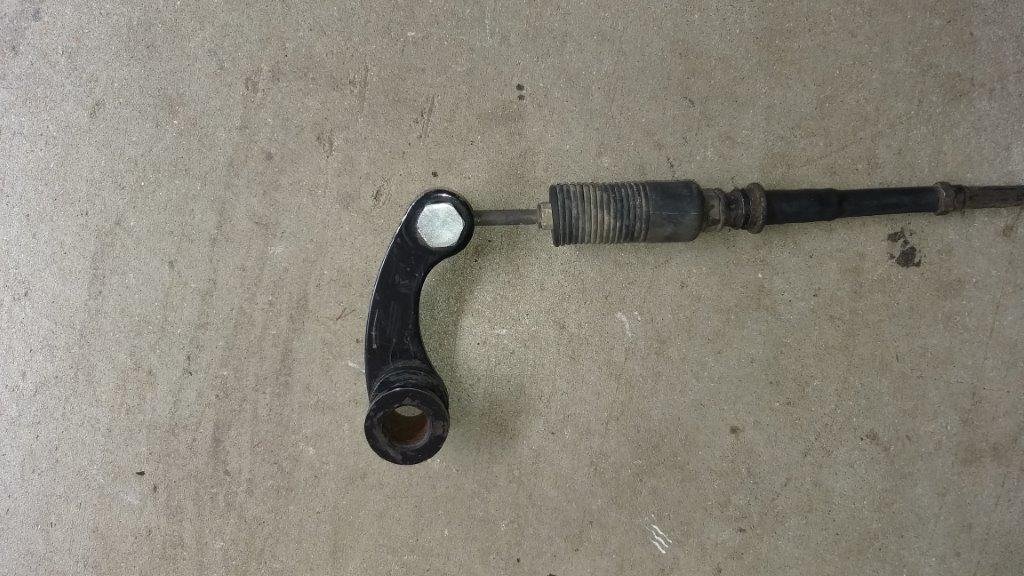
Latest repairs for last WOF. New set of tyres. New tie rod ends. New steering boots. Shimmed rack and pinion to take the slack out of the steering. Wheel alignment. Also replaced the fuel pump last year due to it leaking, (aftermarket external). Still humming along (sorry team, not much for threads on the interweb) Cheers Charlie.1 point
-
Nanged it up to Hanmer for the official unofficial Hanmer meet, was a laugh going up Jack's pass 4 up in it, spent a lot of time dodging potholes and other rough road issues haha. Didn't skip a beat all weekend! Such a great little car, love this thing much more than I should haha.1 point
-
More goodness underway!
1 point
-
Some more tweaking tonight... apologies crap pics at night with head torch... The more I got into the throttle setup I found 2-3 other things I didnt like. First was the foot pedal... Its a home made affair but functional enough, pivots on m5 bolts with nylock nuts. Doing nothing drastic I just ensured there were washers at every pivot, used a dab of marine grease everywhere and snuged it up so it moved smooth with min drag. Drilled at each corner to hold it down to the checker plate (with ply underneath) The cable was next, ideally you wouldnt use a morse cable here, you'd use a normal cable to reduce friction and have a return spring at both the pedal and throttle body. I think they did this to get away with one (heavy) return spring, and coz Jet Boat. Anywho it in a bit of a coil in the bottom of the bilge so I pulled it out, checked for kink and then re-routed in a gentle curve round the back over the top of the jet unit - its quite a long cable.... Then the throttle assembly itself... lots wrong here, the clamp holding the cable isnt square to the throttle shaft so its tweaked the pivot sideways, the spring is barely holding on. Also since the arm has been pulled its now contacting an alloy boss on the side, both the position of the cable clamp and the protecting sleeve is preventing full travel of the cable. Result being that this thing was only able to run 1/2-3/4 throttle at any point in time... Bunch of small tweaks.... moved the cable clamp, removed the cable sleeve and cut down the offending boss. Now we have full throttle and it returns correctly to idle position when you take the foot off the pedal. This will do for now, ideally I'll run a proper cable at some point in the future. Made me think... previous owner reckoned it wasnt as powerful as it should be.... did I mention he was a mechanic and managed a workshop....
1 point
-
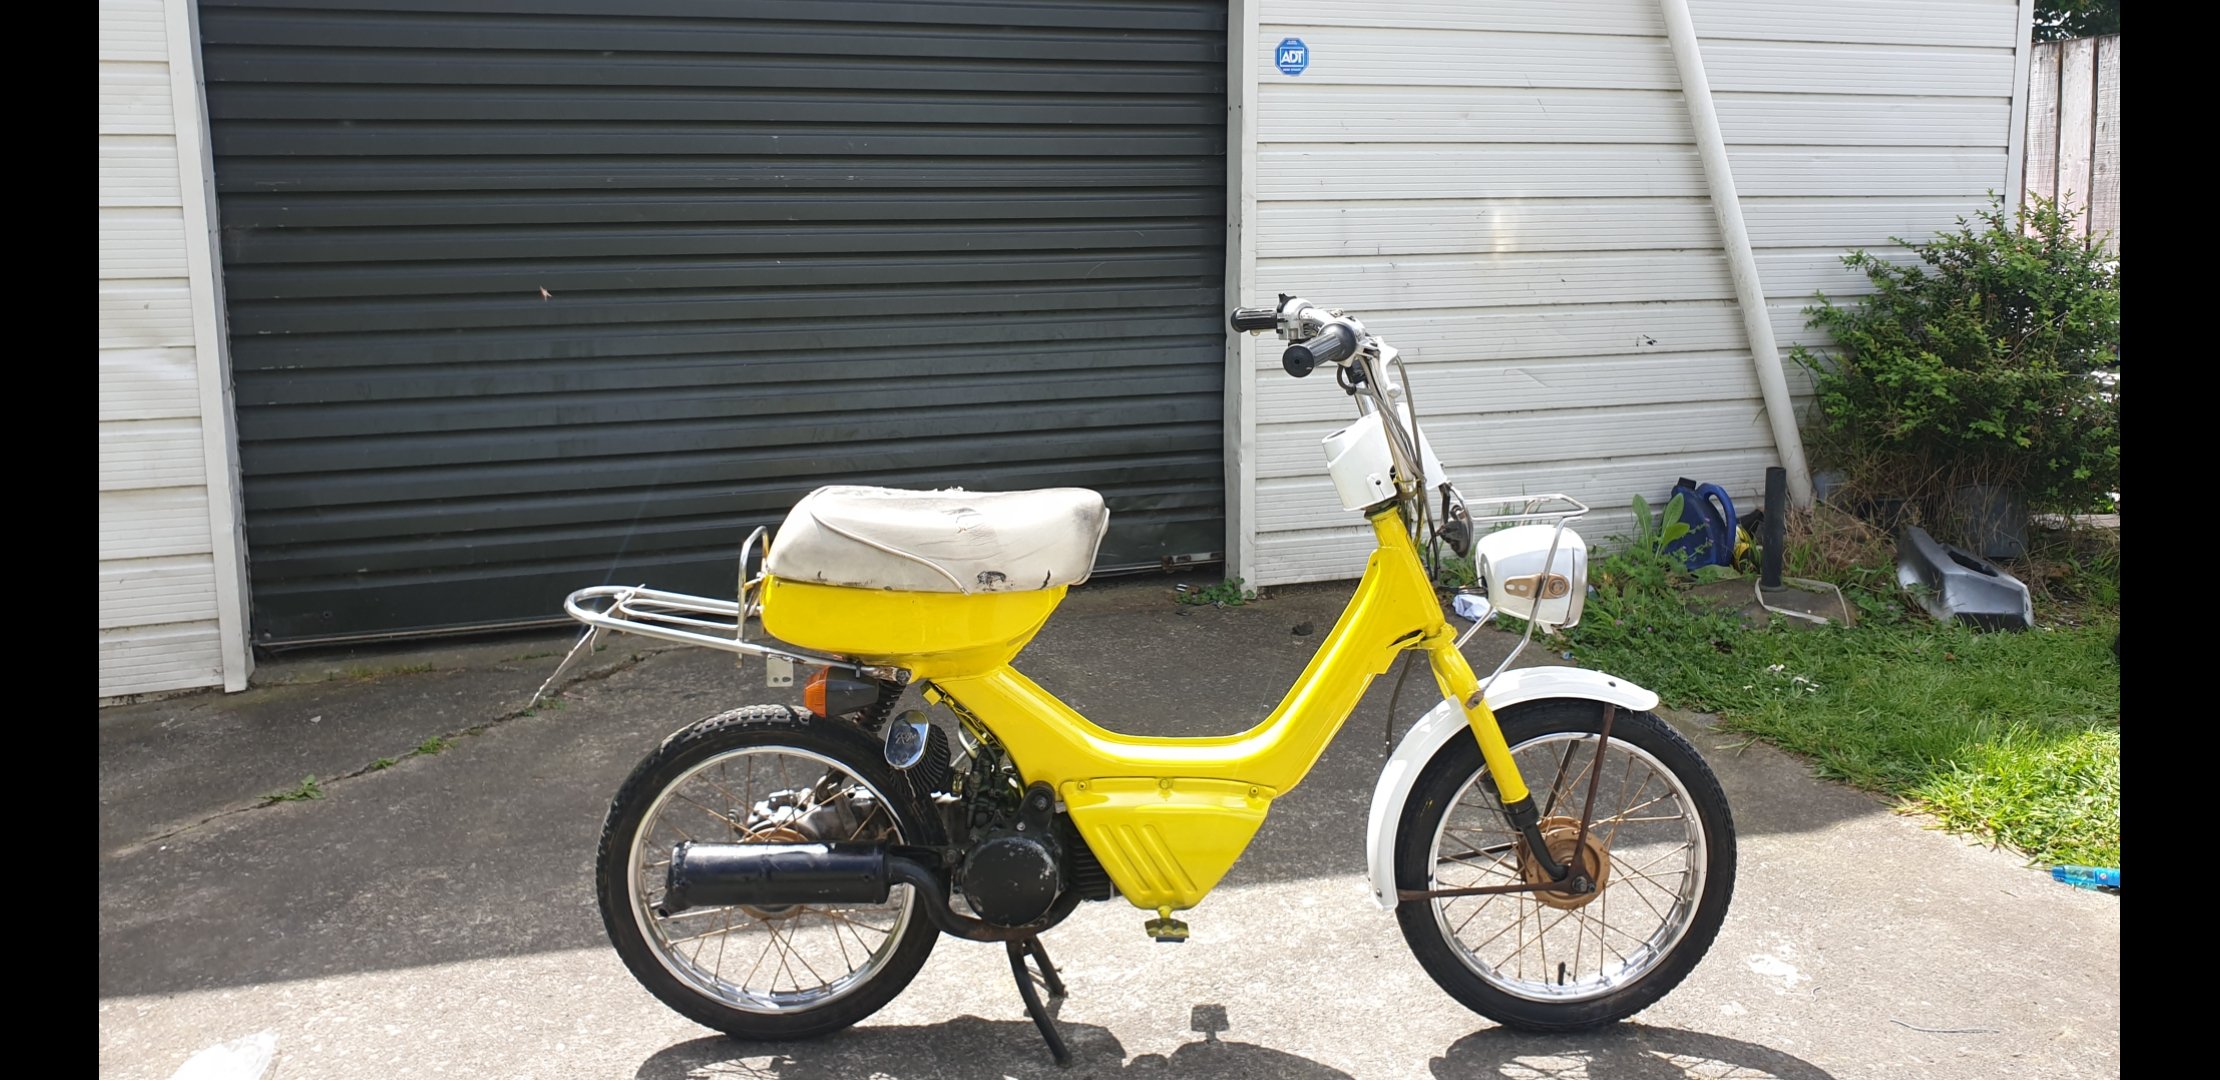
did a bit of long overdue maintenance on this thing, I vibrated the speedo to bits with too much gravel riding on the motu, ordered a mmc speedo and slapped that on, waiting for my new headlight to arrive too. old new replaced the clutch which was long overdue, started slipping before distinguished gentleman last year and I packed some washers behind the springs to give it some more clamping pressure and just left it but as it worked I just never put my new clutch in, decided to smash that in and man it feels so much better, leaver is so much lighter new spring on the right vs old ones1 point


.thumb.jpeg.b39a639a8ff8a614681c3c9dca730a70.jpeg)


.jpg.094f4d06bf1a270e43aaec4f38075000.jpg)


This leaderboard is set to Auckland/GMT+12:00