
Leaderboard


Popular Content
Showing content with the highest reputation on 03/22/20 in Posts
-
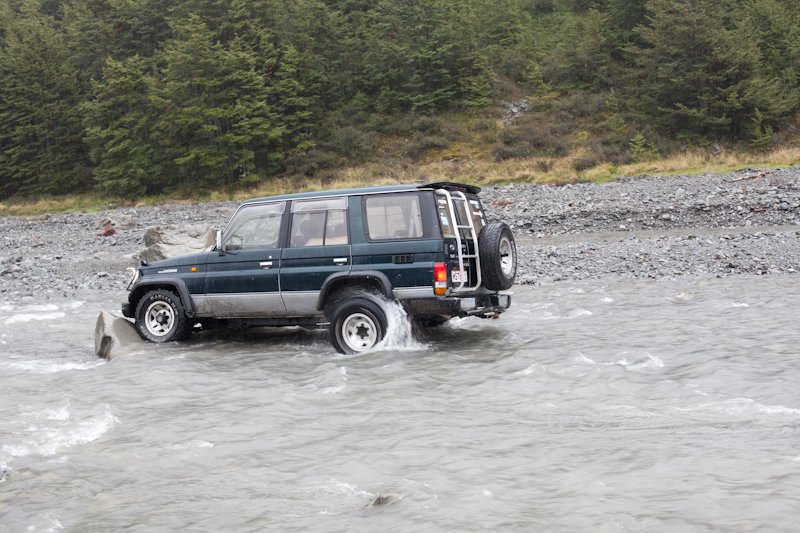
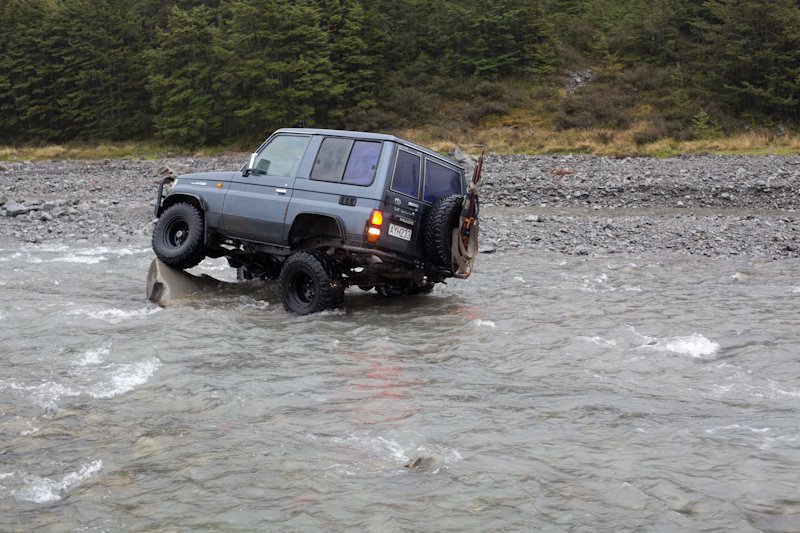
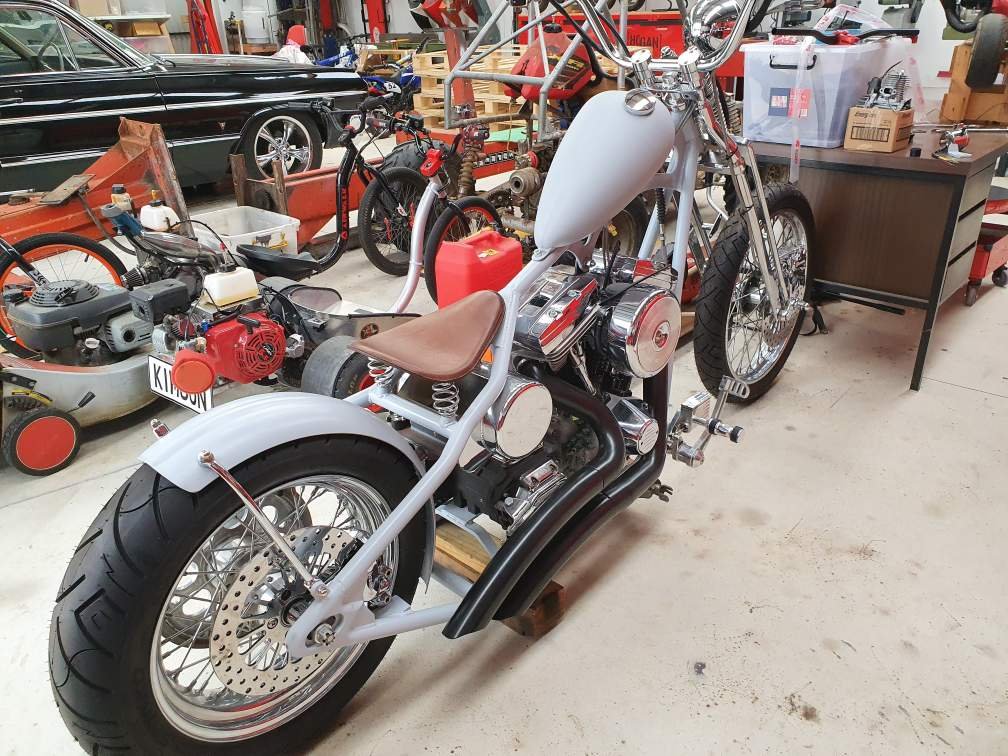
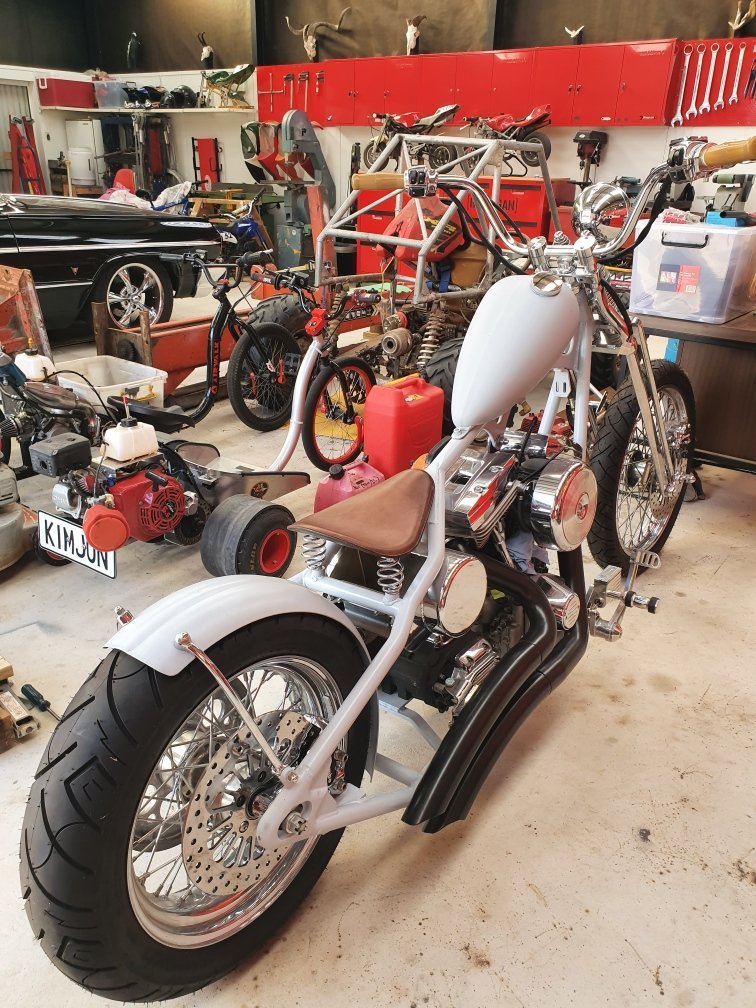
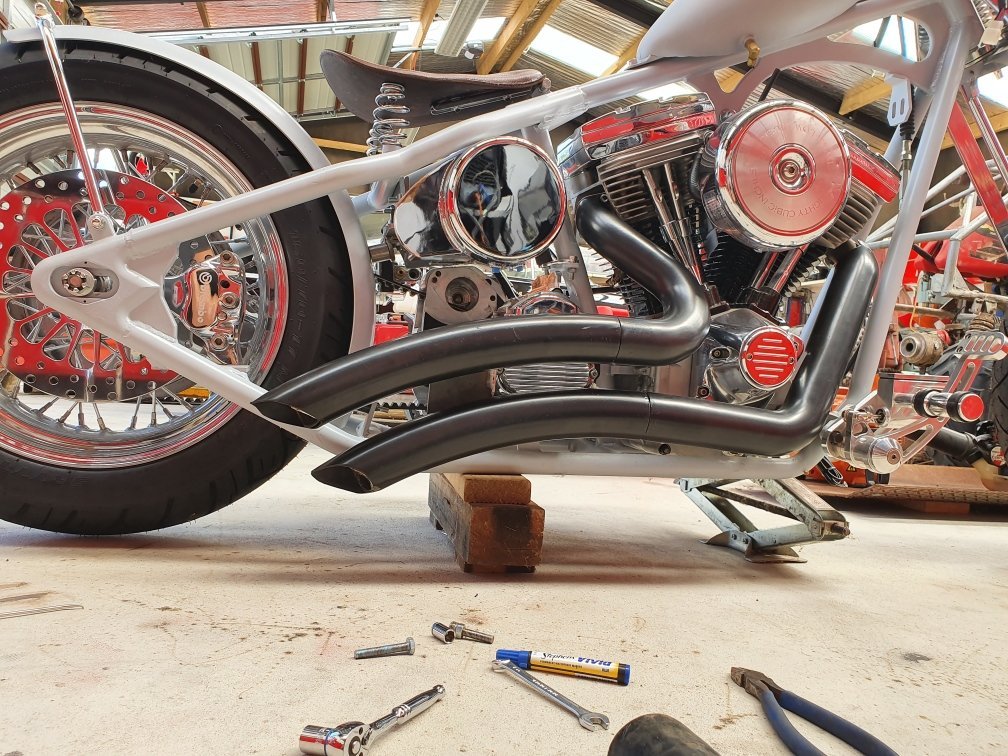
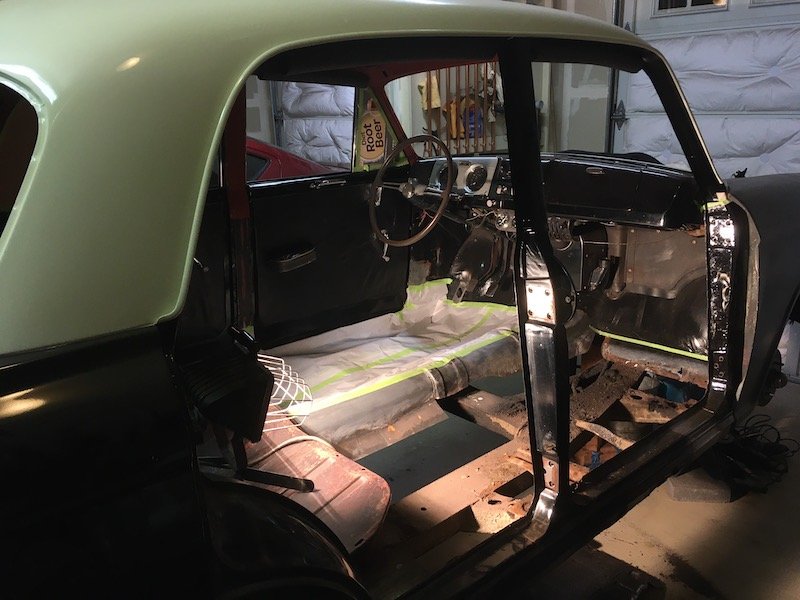
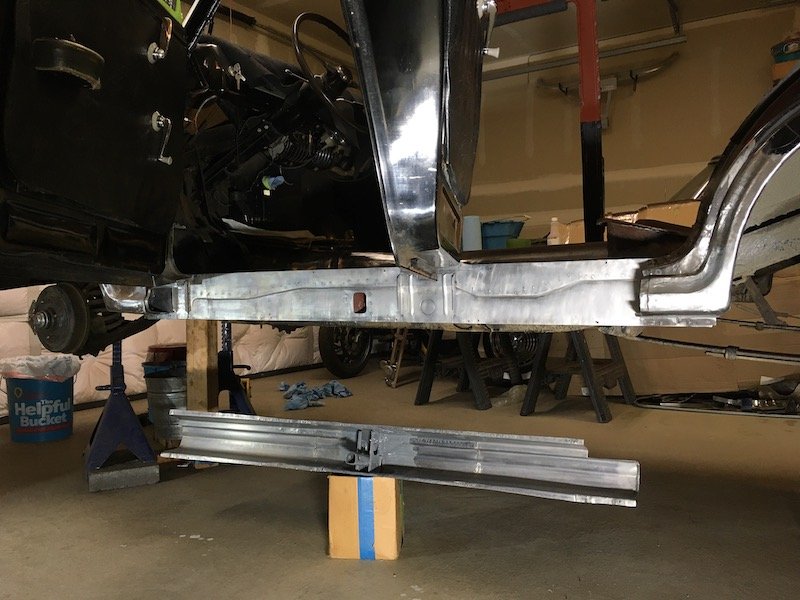
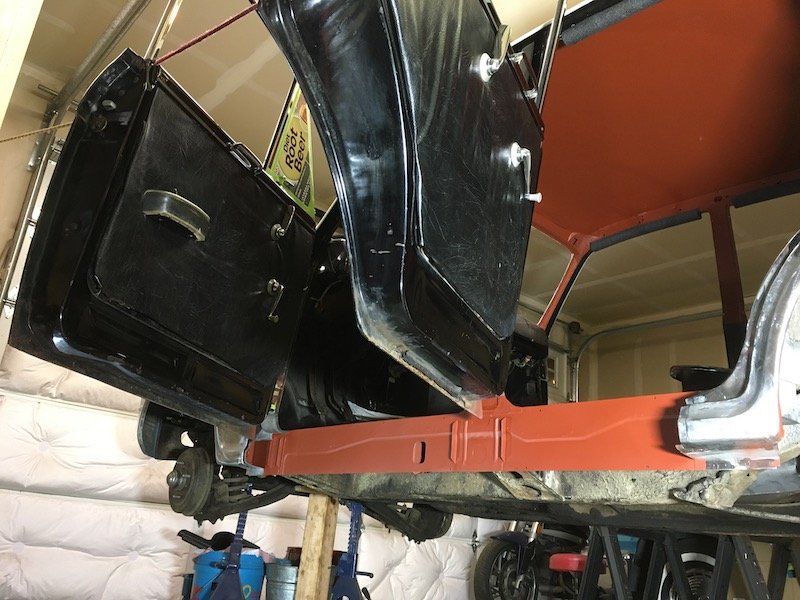
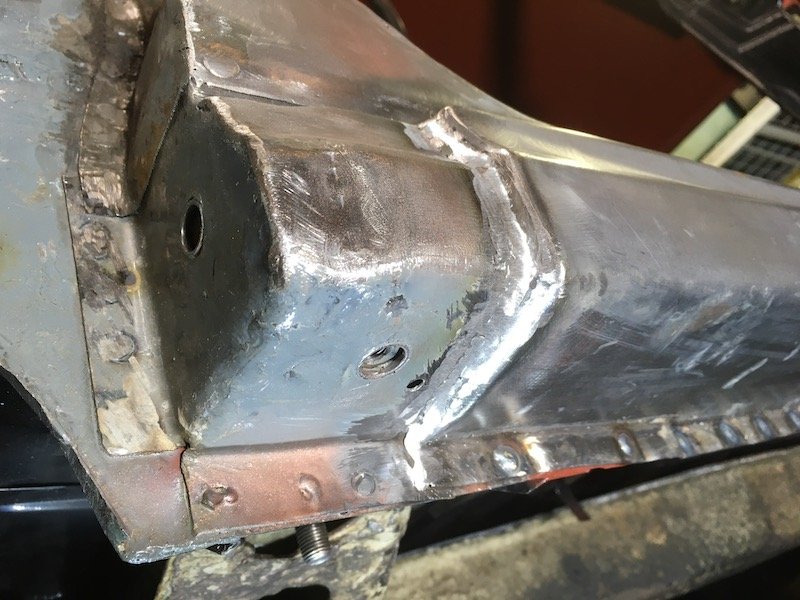
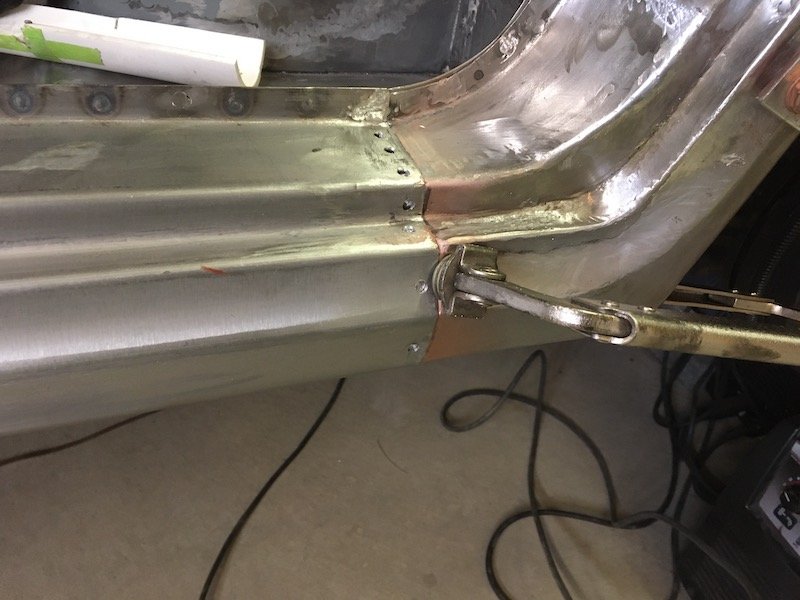
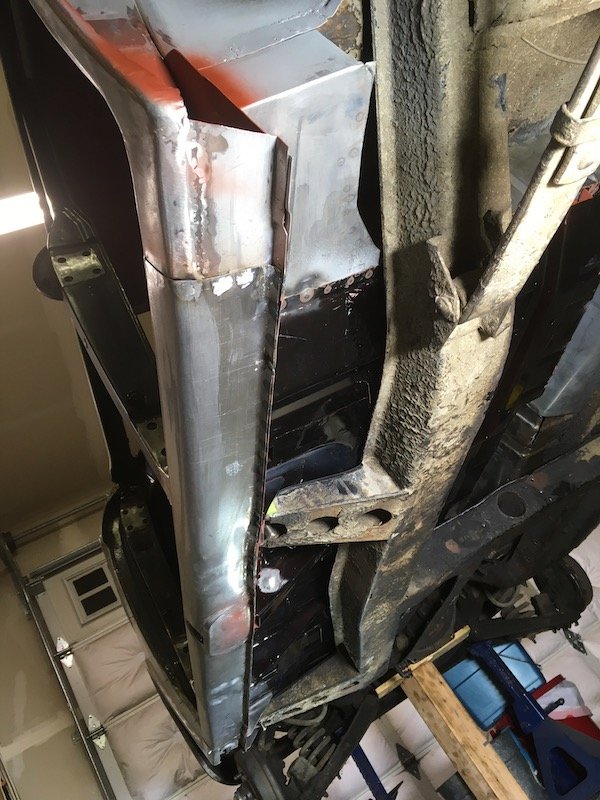
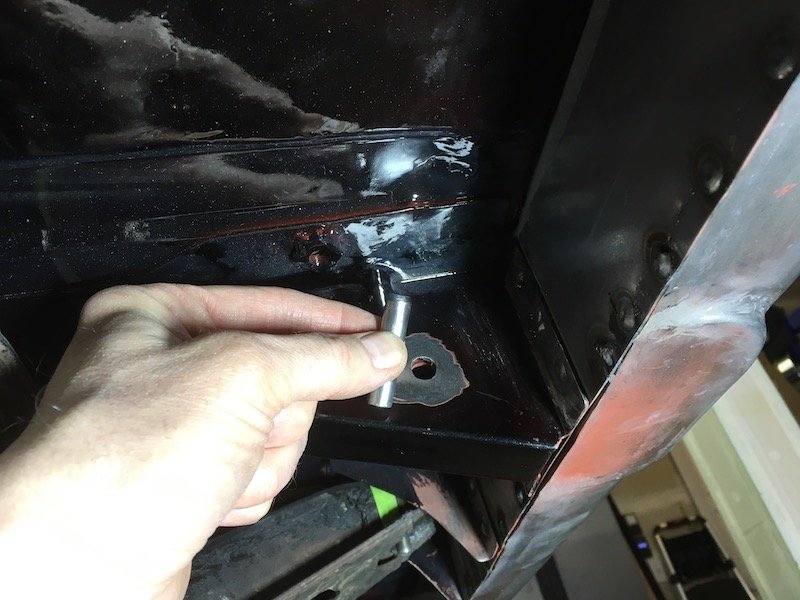
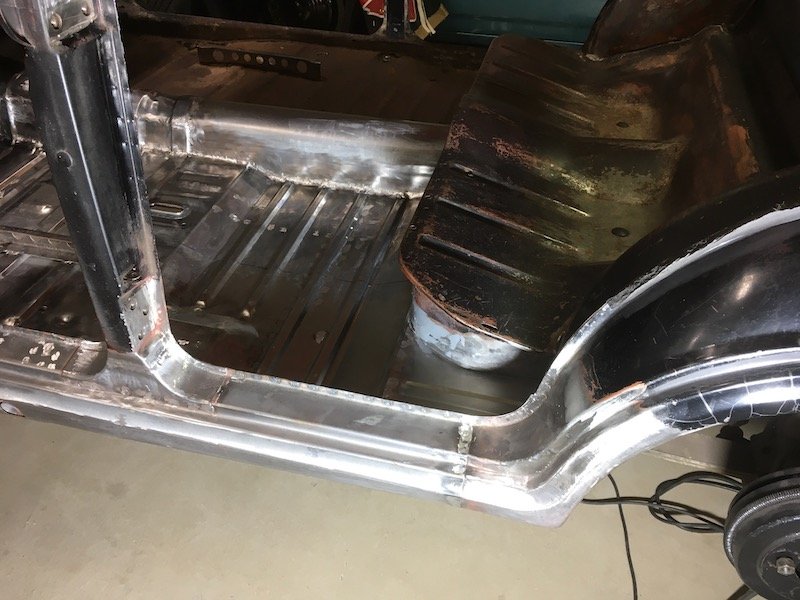
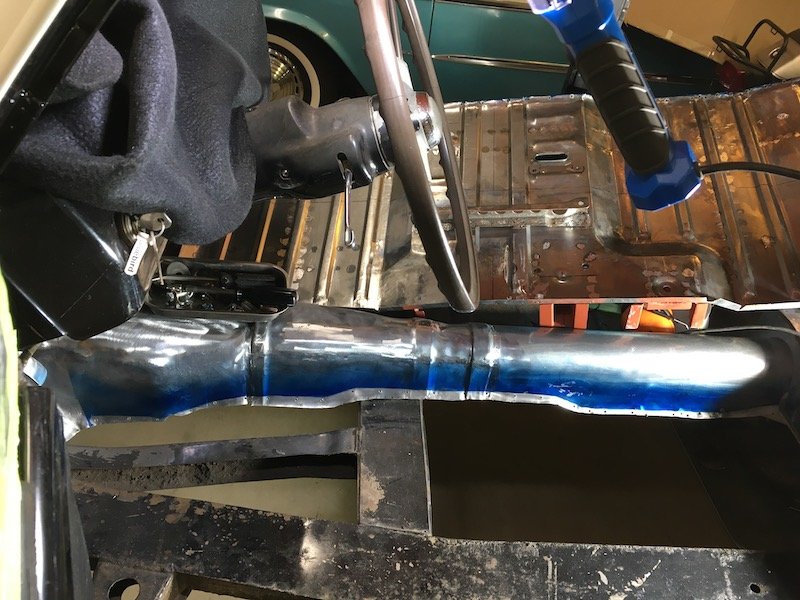
Not much chevy left. 50mm to drop further, few more little bits to cut out. Looks weird as hell. but seems to be working so far.
 9 points
 -
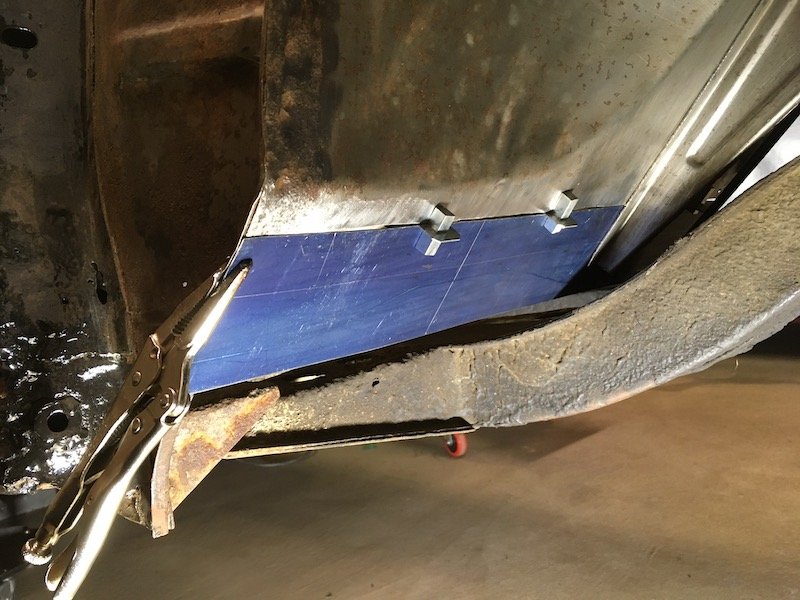
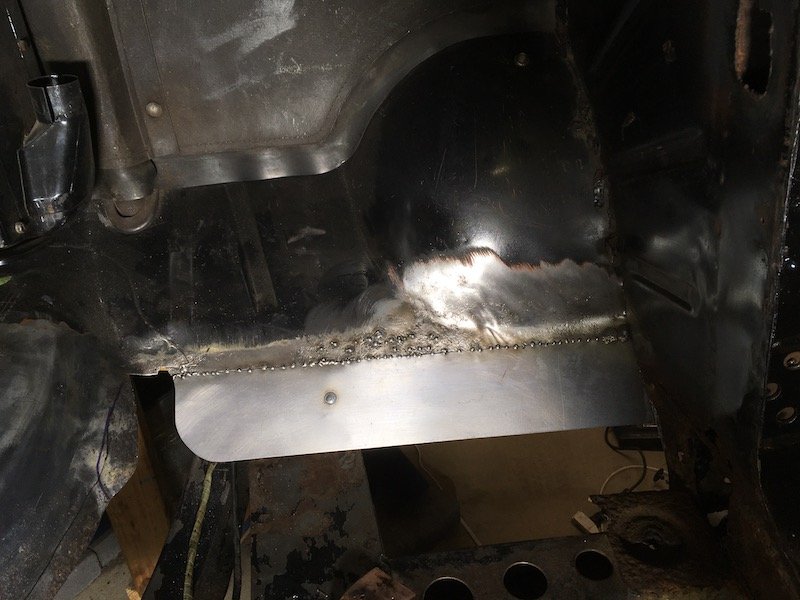
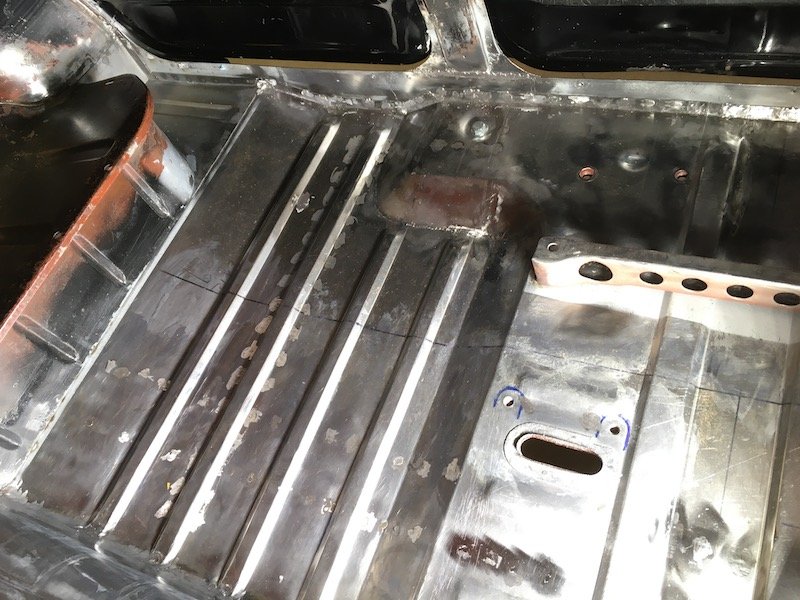
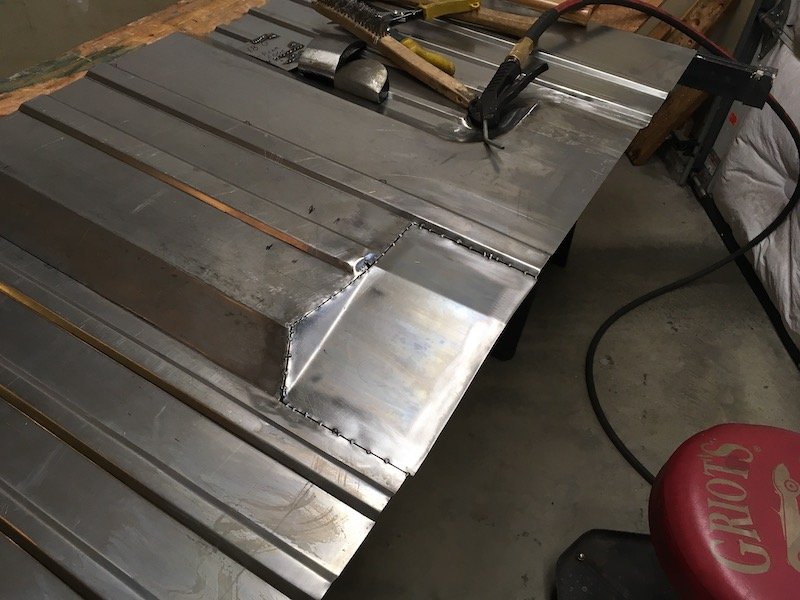
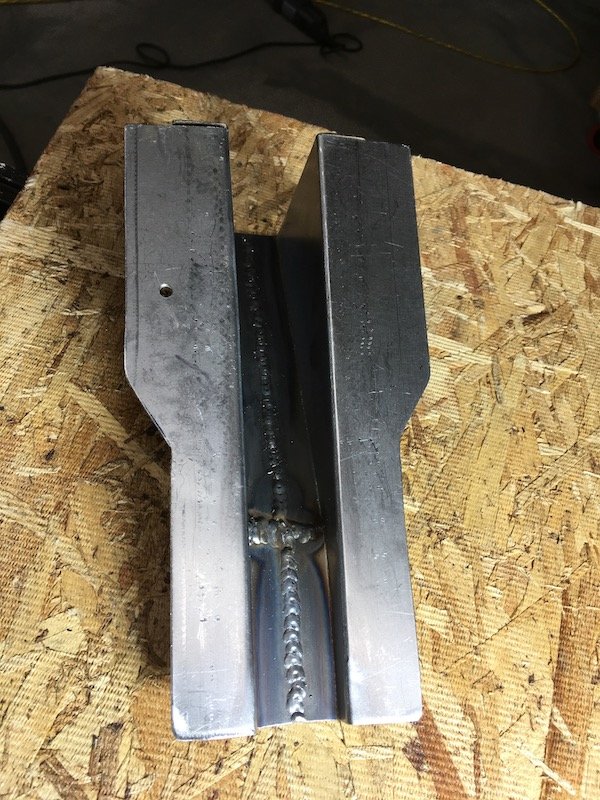
Building the 1961 Datsun 310 Bluebird - Replacing the toe board. Found some scrap metal just large enough, made the toe board and welded it in. Trimmed and checking for fit. Fought some indecision whether to butt or lap weld. Went with the butt weld for a flush join. This scrap had been destined to become the left inner sill plate until I realized it did not match the original thickness. Made a thicker sill and threw the thin one into the scrap pile. Tack welded. Some rust craters above the weld line are filled in. One plug weld connects to the support bracket underneath. Stitch welded between the tacks and ground flush. Moving on to the side of trans tunnel next. Discussion: https://oldschool.co.nz/index.php?/topic/60267-marts-pl310-61-datsun-bluebird-sedan/ Build: https://oldschool.co.nz/index.php?/topic/60264-marts-pl310-61-datsun-bluebird-sedan/
8 points
-
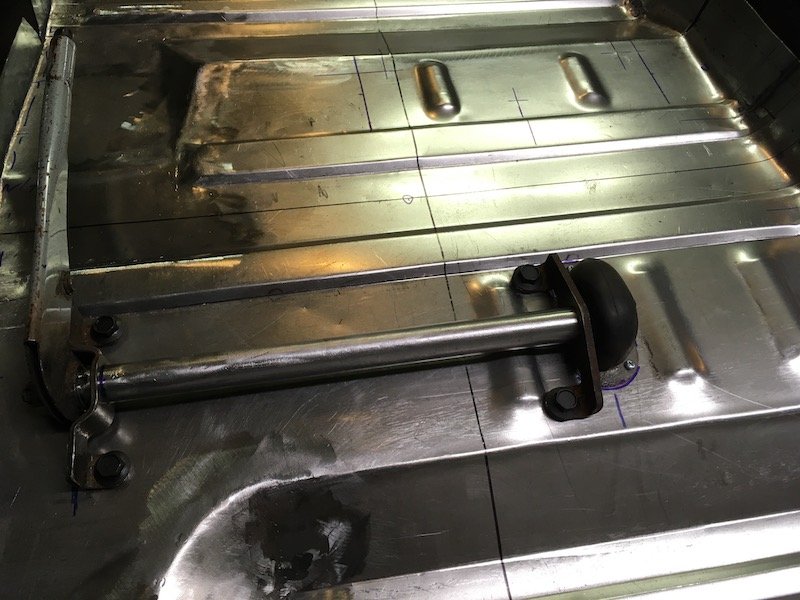
Suspension brace didn't fit with new plenum. probably could have made the plenum 15mm shorter and it would have. but good excuse to make lightweight version brace. Almost ready for test run to the wall of shame for the old one7 points
-
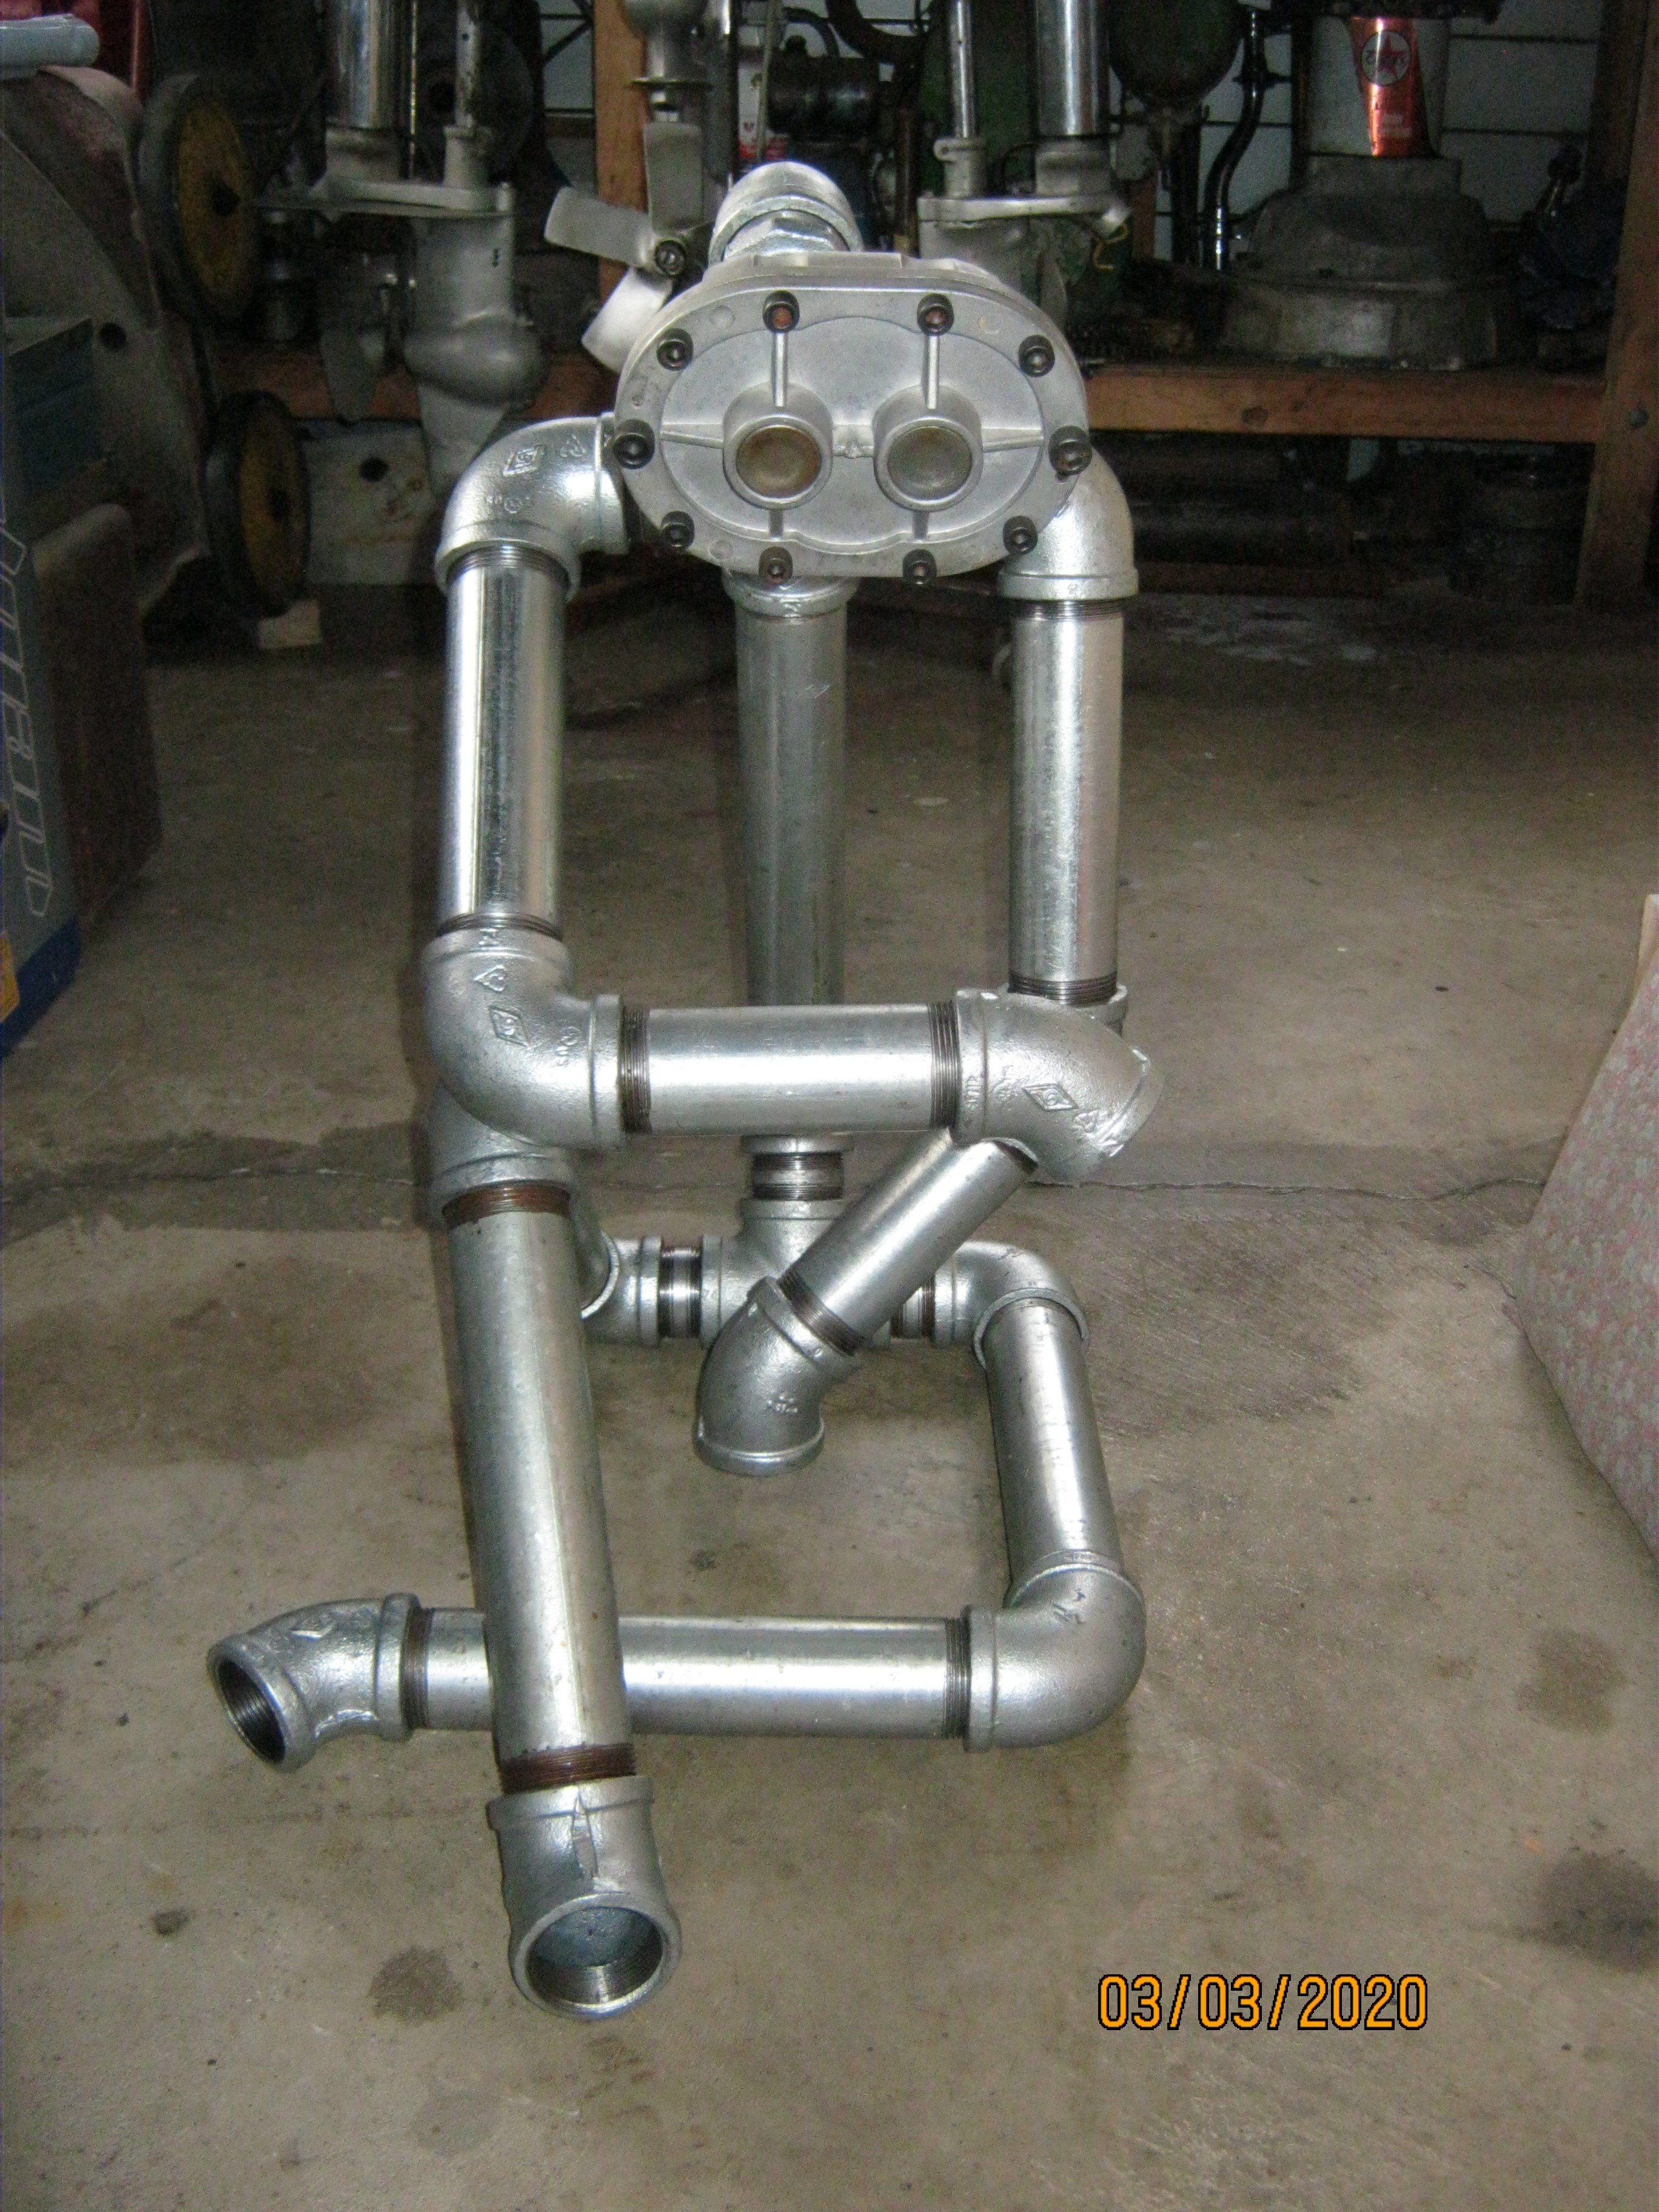
I was quite taken by a pipe guy on the instagram pics & vids thread so built one for my wife. Working out a lady to go with him now.
6 points
-
How's the freakin serenity
5 points
-
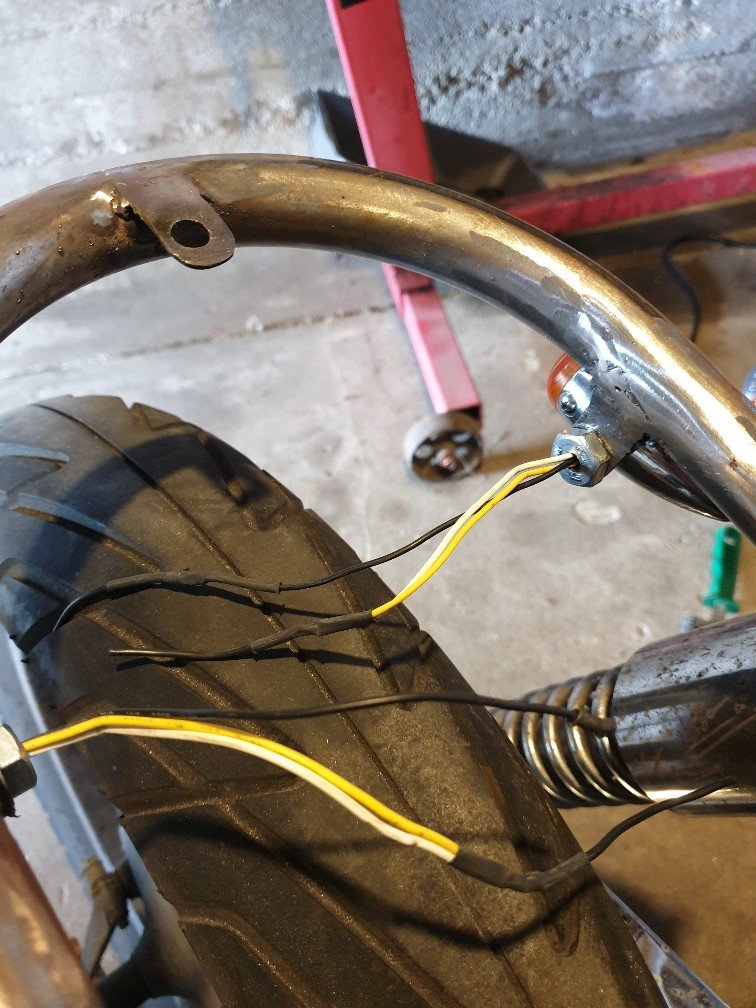
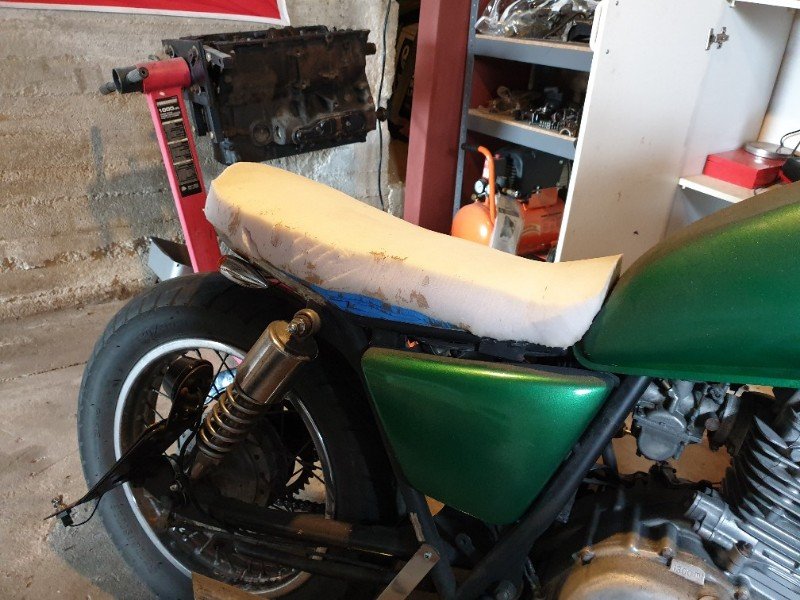
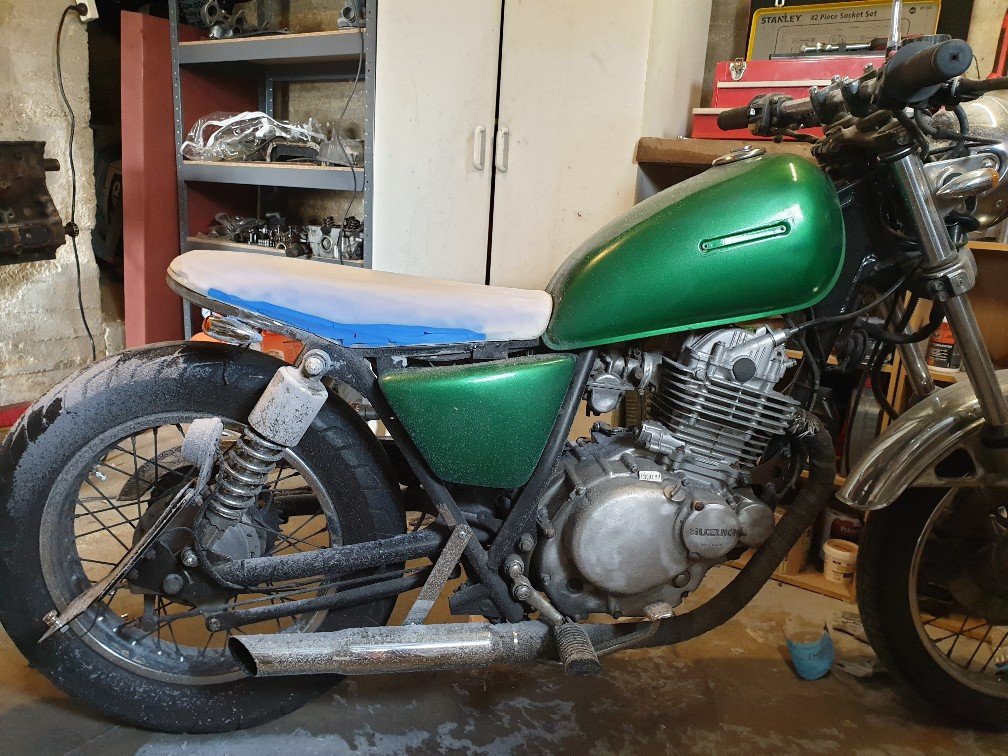
A week or two ago I got my indicator mounts and seat stay done (just three tabs with holes in them) I cant weld but they should at least stay put.. need to lengthen the wires and get them reconnected later Also got some time in the shed yesterday and was able to smash out shaping the seat I had gotten some foam off a mate who's work had an upholstery department no longer in use. I also used many layers of old yoga matt to build up the dip in the middle of the seat. Ruff cut it after the glue had dried and shaped it with the grinder and a flappy disk yesterday. Pretty stoked I can move on to making a cover now, need to get the misses to teach me how to sew. (Same mate also gave me a large roll of black vinyl intended for outdoor furniture so should last as a bike seat no problem)
5 points
-
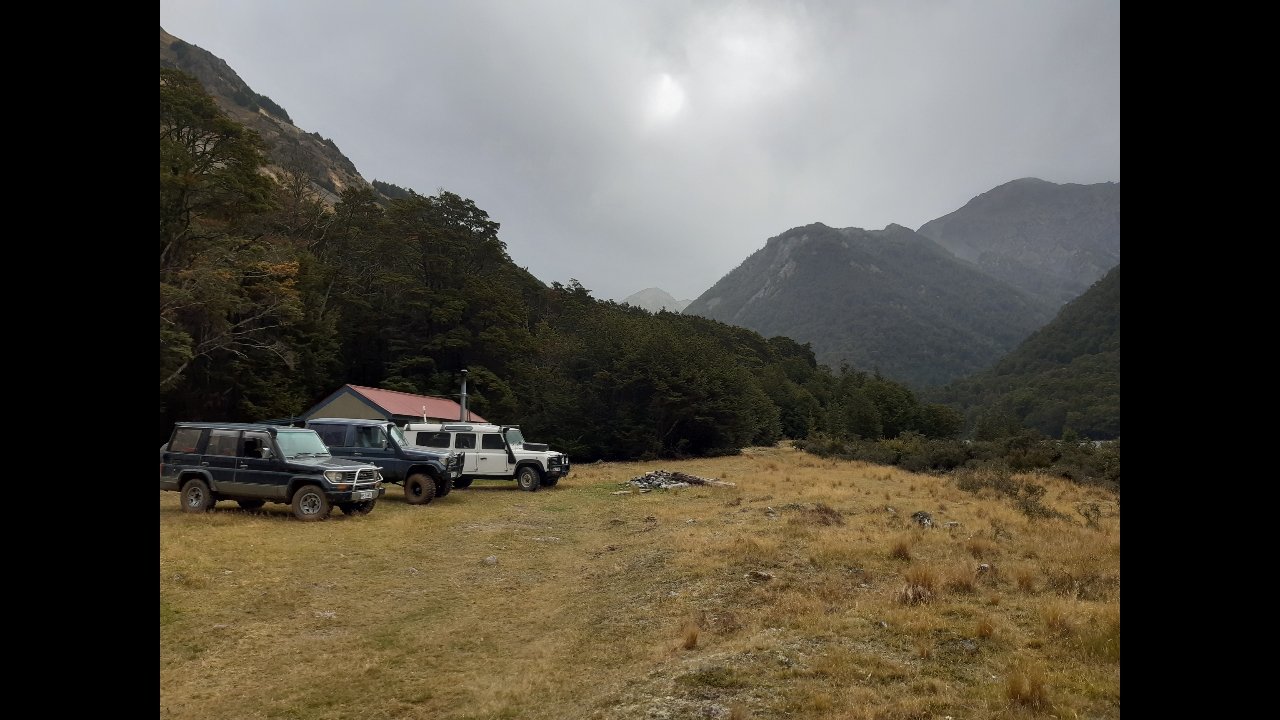
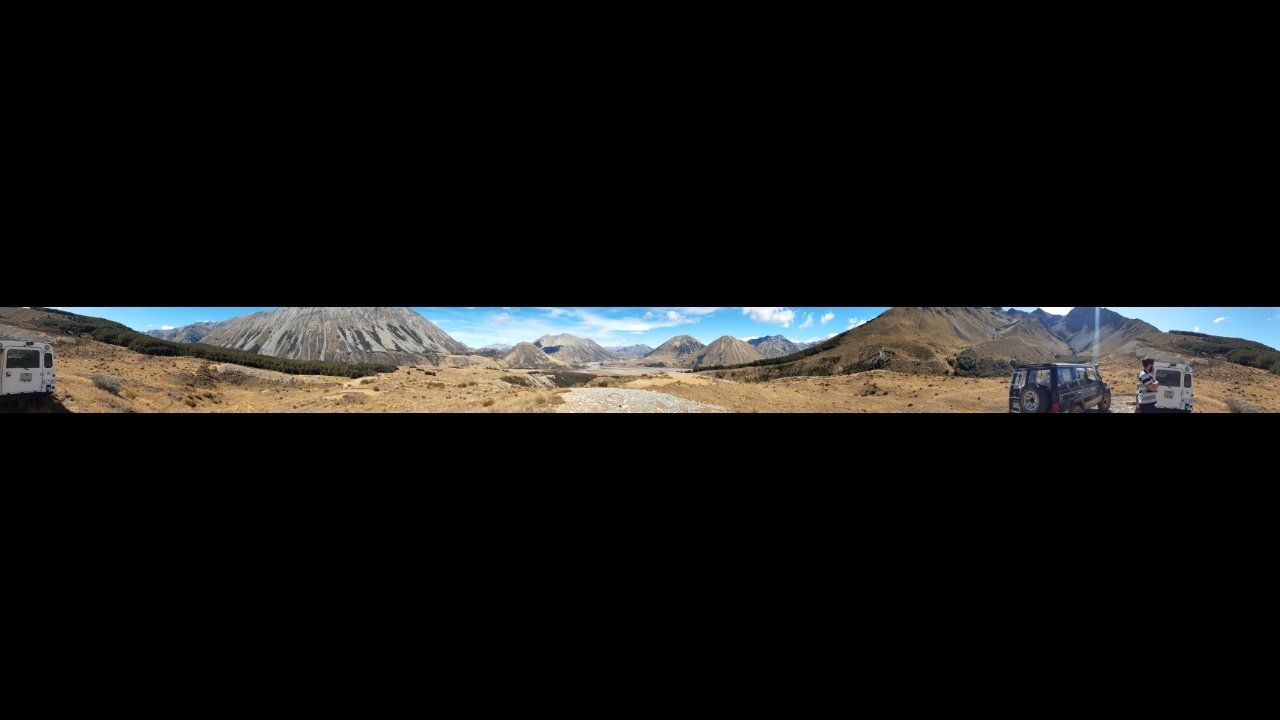
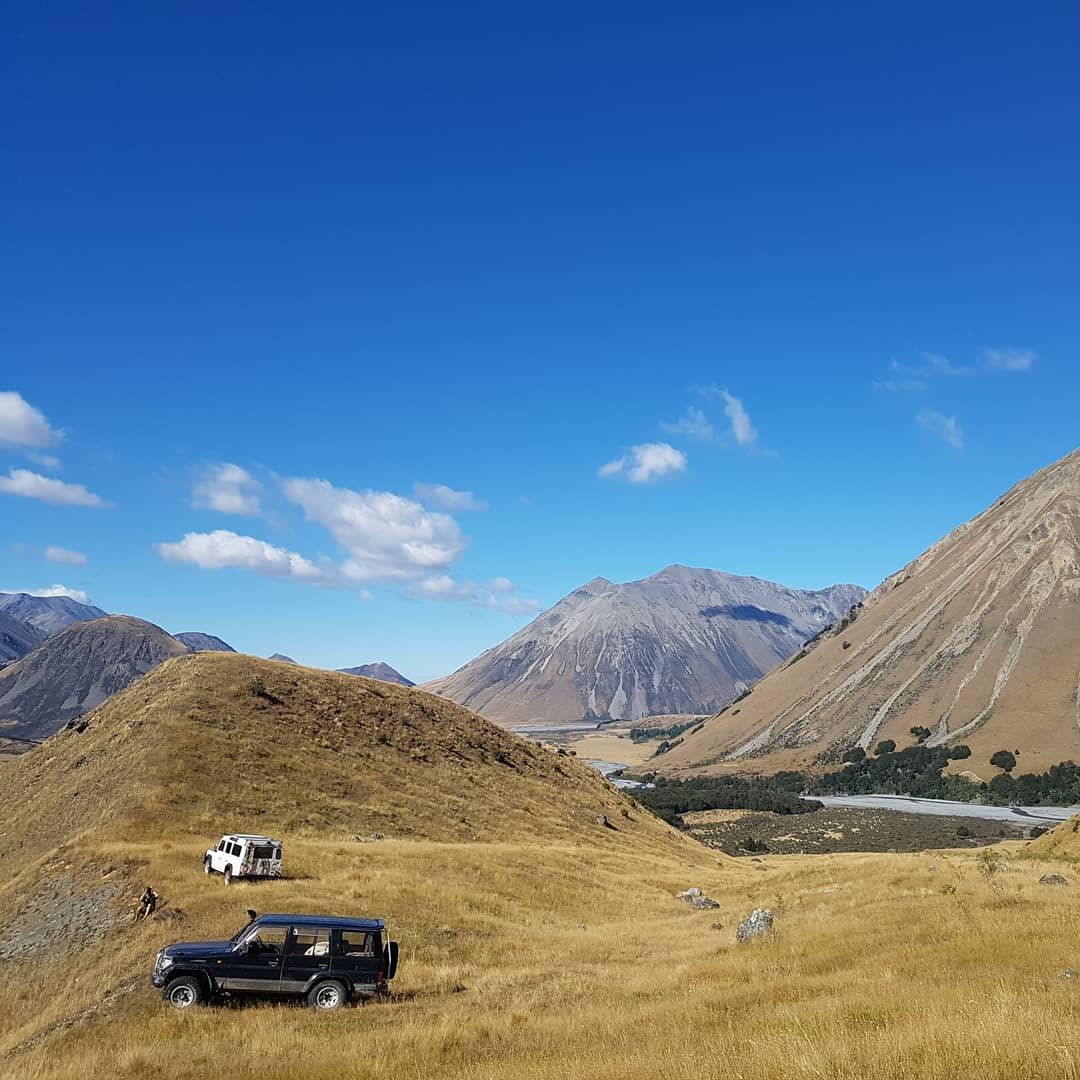
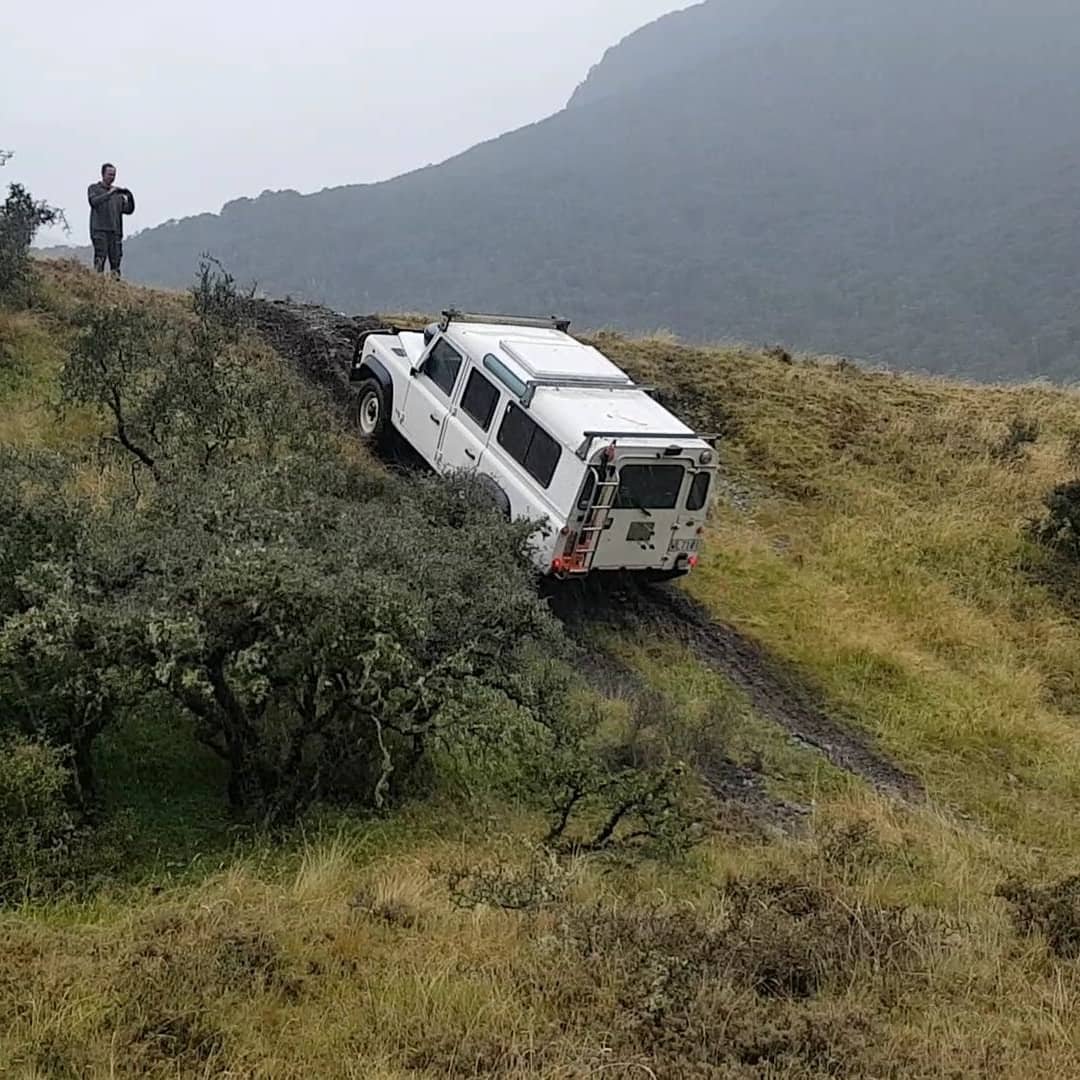
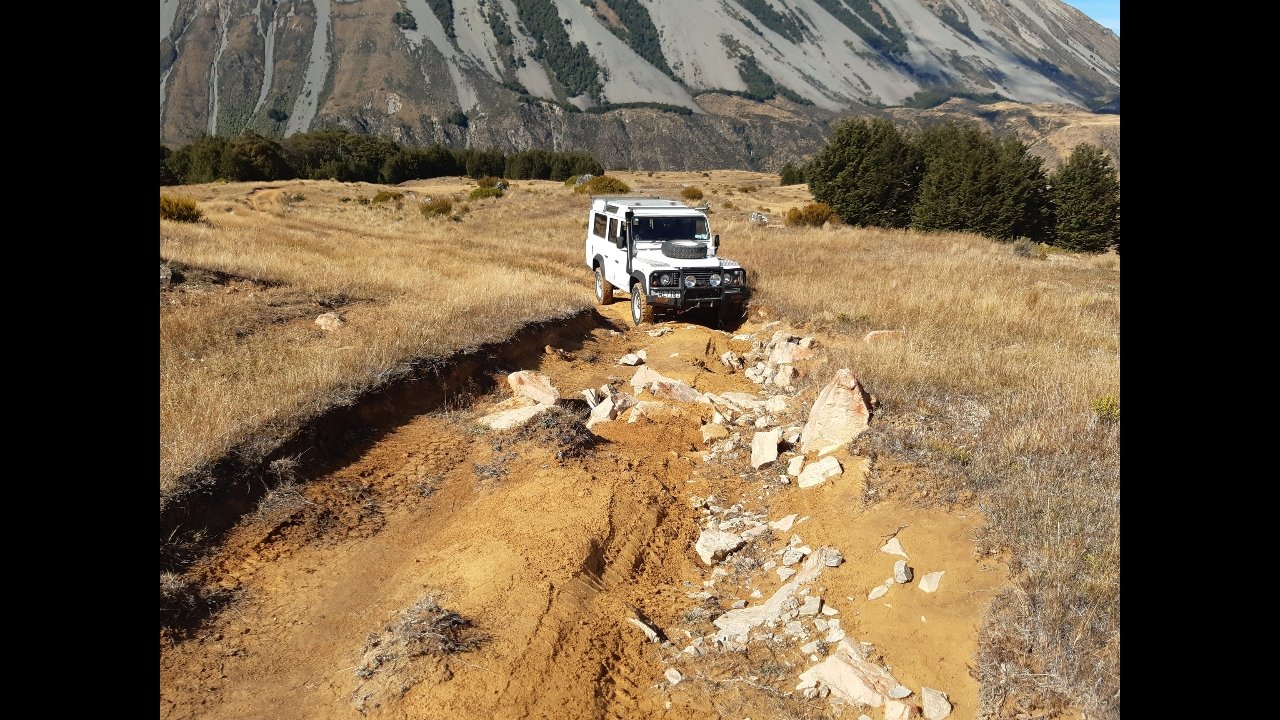
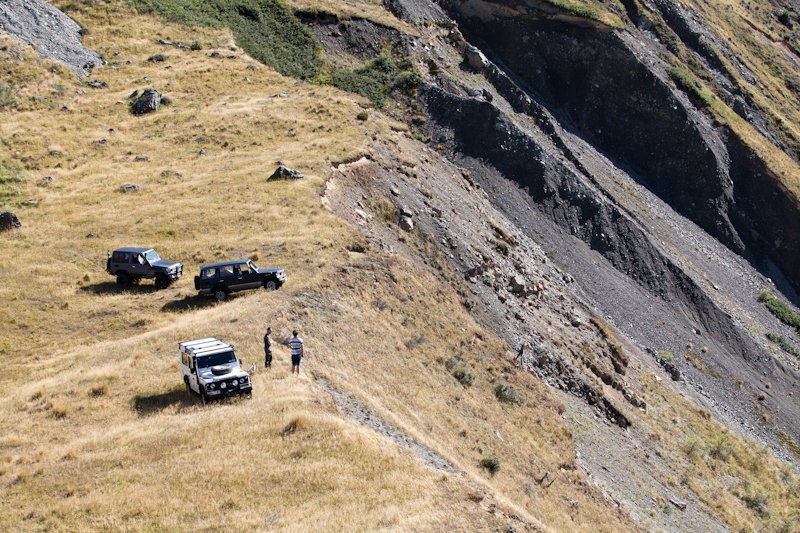
Such a good trip. Scenery was serene Keen for rnd 2 at some point. Need to fine another choice location l
4 points
-
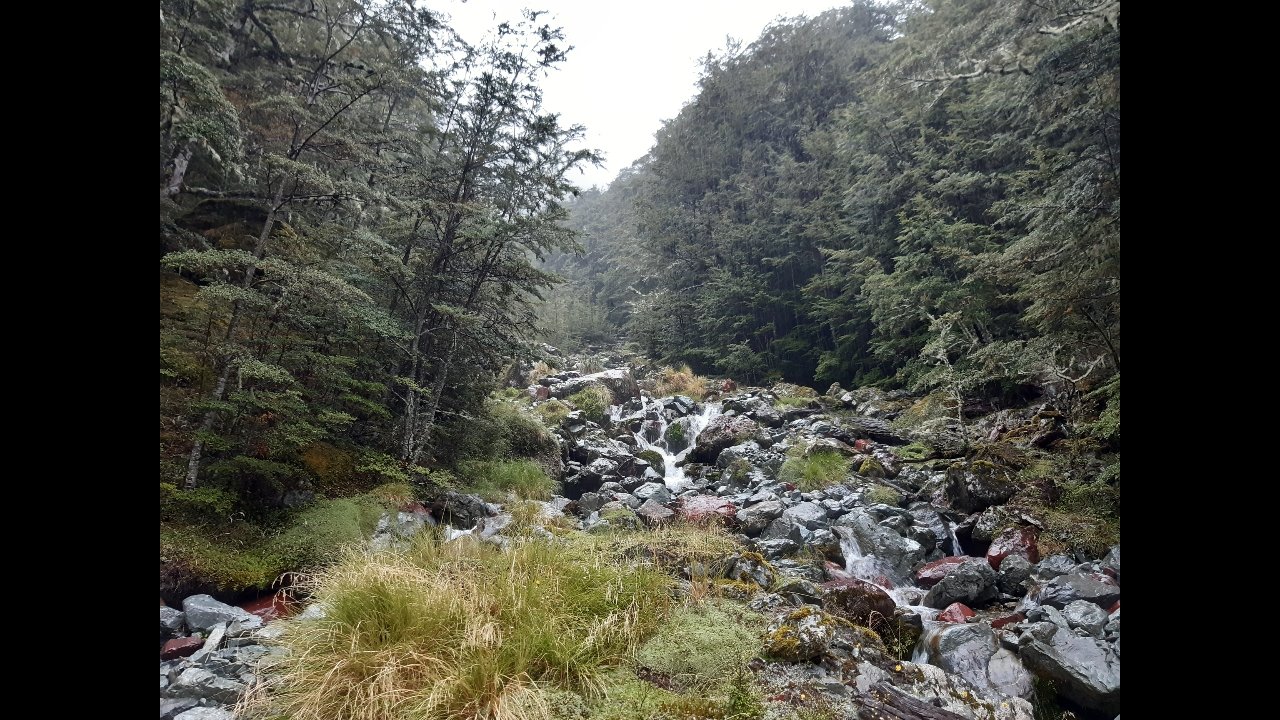
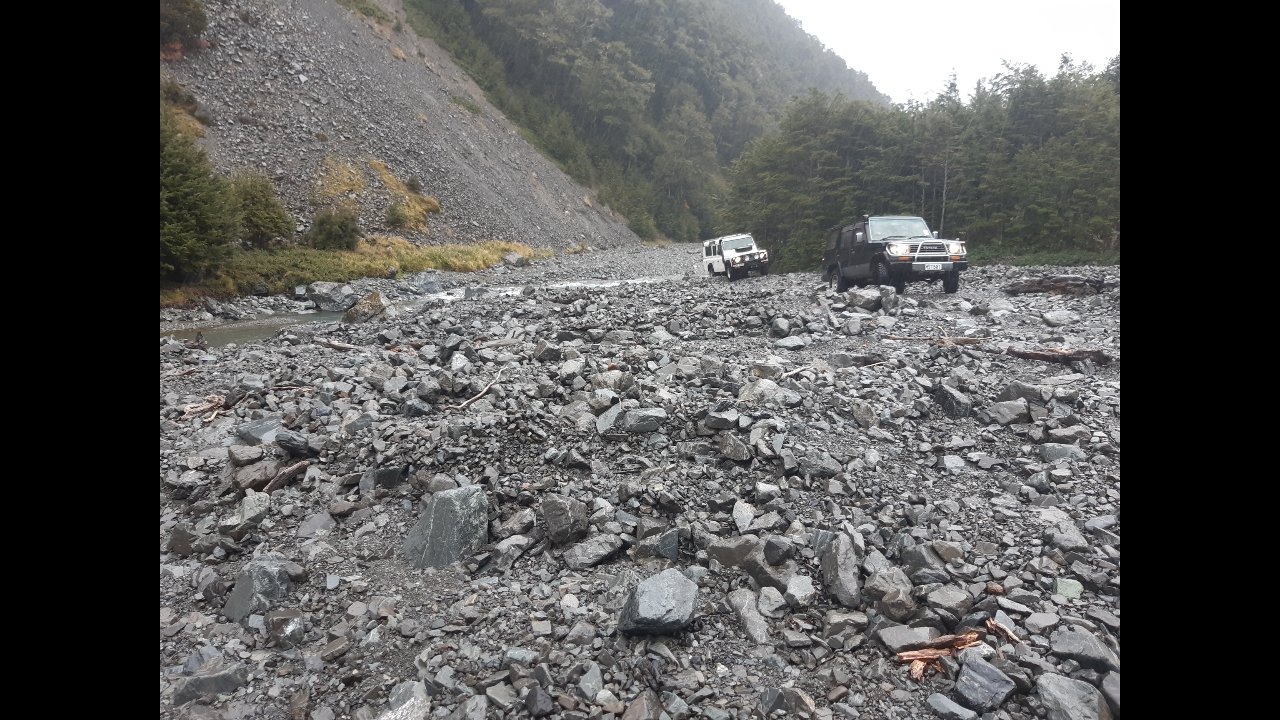
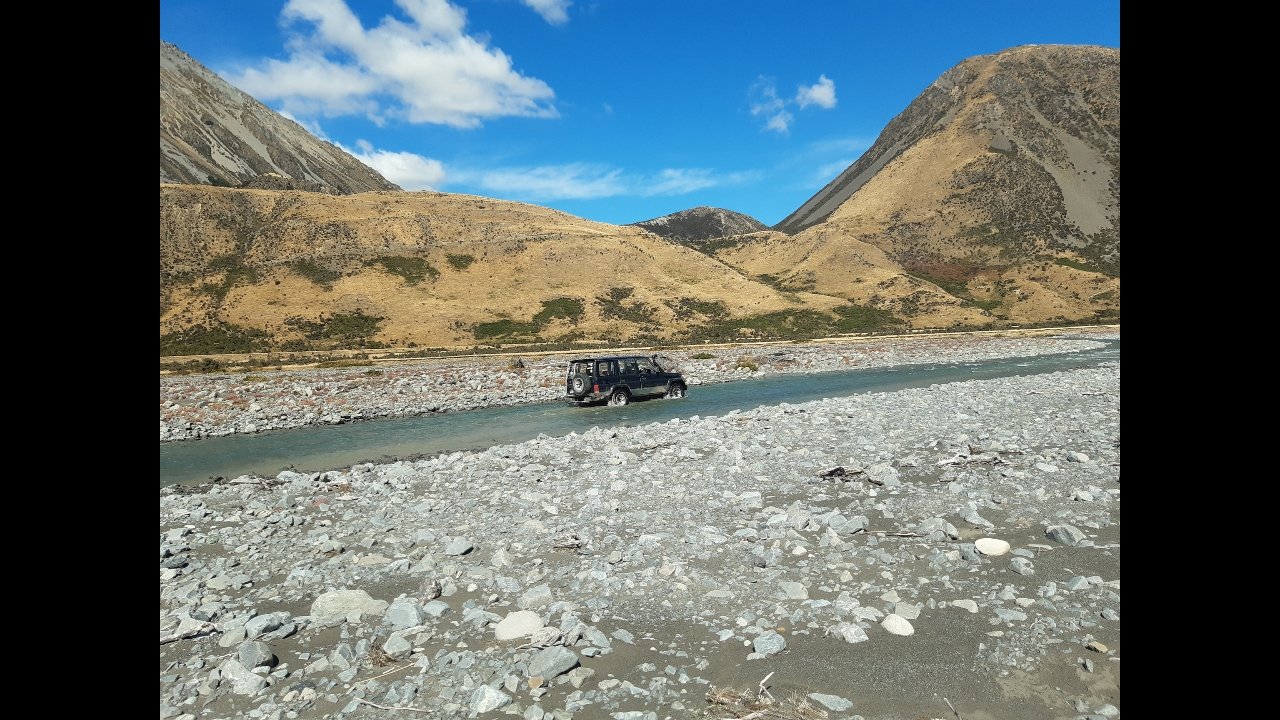
Heh, water and rocks Also clay and rocks
3 points
-
They're not all bad
3 points
-
My mate Olaf gave me a hand to make the big gate so that's done. Then I ran power and sensor wires to the motor drive base plate and Nick the sparky gave me a hand to concrete the pad for the rail.
3 points
-
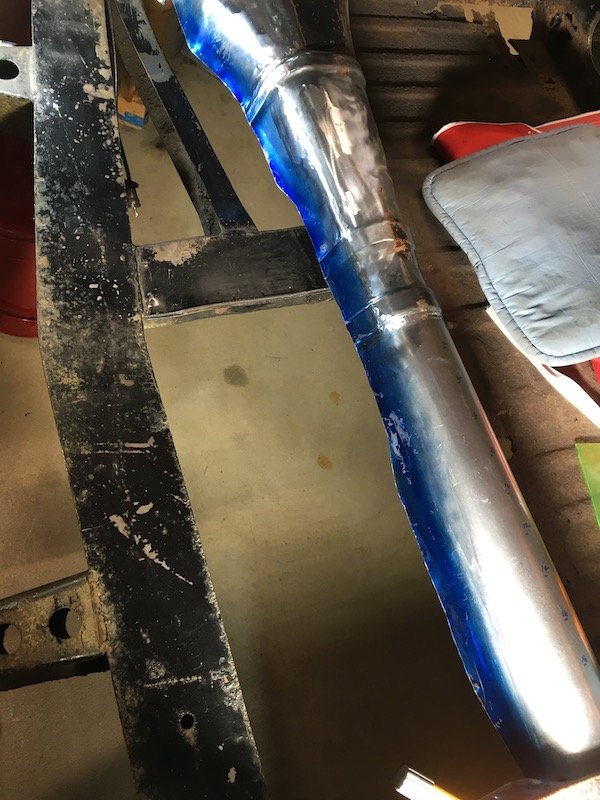
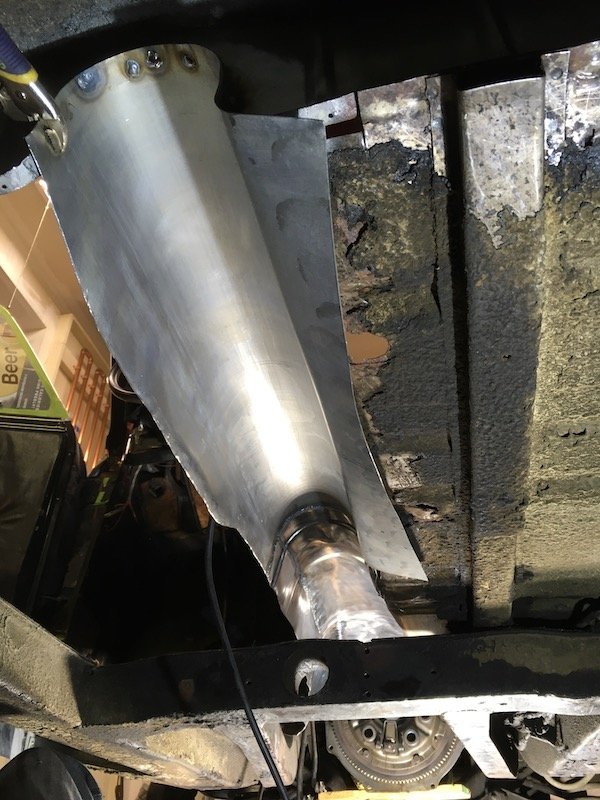
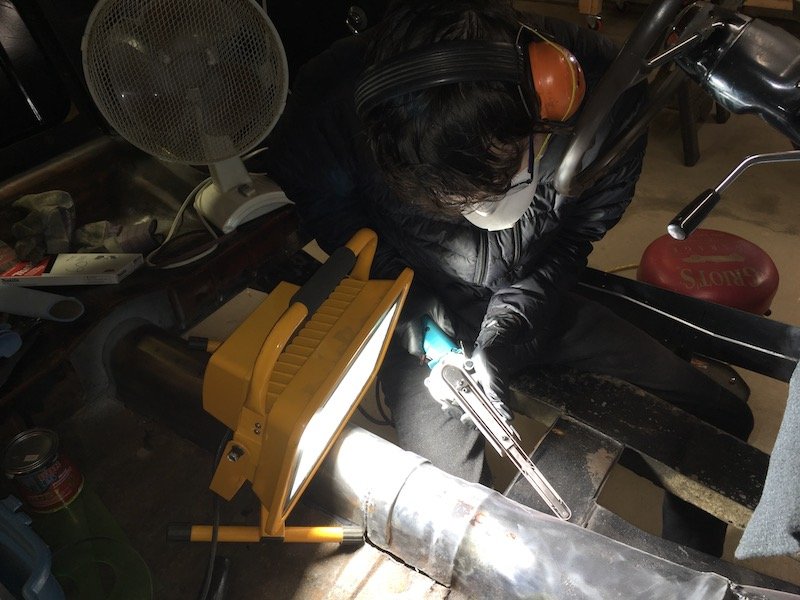
Attacked my exhausts - cutting a fair bit off them, all in order of gaining a few inches of ground clearance. Then I shaped it a bit more to mimic the upper one: Before After Trying to follow the line of the rear leg angle as much as possible. Before After It's just sitting there loosely at the moment, but looking about right. I liked it better before...but there's always a price to pay in exchange for some practicality. I think I would have gained a fair amount of "lean" before it hits now. Probably 10° or more additional???
3 points
-
All the serenities So many pictures to go through, epic weekend, top blokes, much lols and one winch in need of non rusty power terminals...
3 points
-
Went for a 5 day camp couple weeks ago I have a roof tent or a tent swag that i would normally use Was doing one night stops and was solo so tried a different setup,with rear draws and rear seat folded down had a flat surface so brought a single mattress and slept in the cruiser I could have my awning with kitchen underneath setup in 8 mins. Diffently wasnt roughing it had my engel to keep food and beers chilled and the cruiser has rear screen so watched a movie most nights with proper Dolby surround sound lol Mate has a 4wd space gear with pretty sweet set up aswell
3 points
-
Enjoy it boiz, gutted I'll miss it.3 points
-
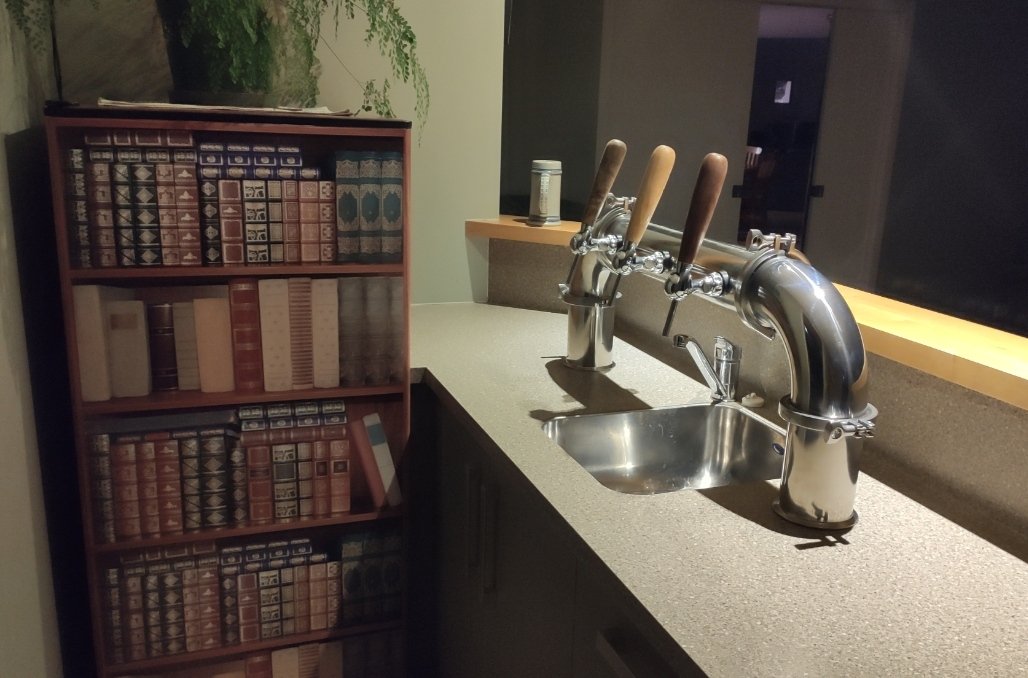
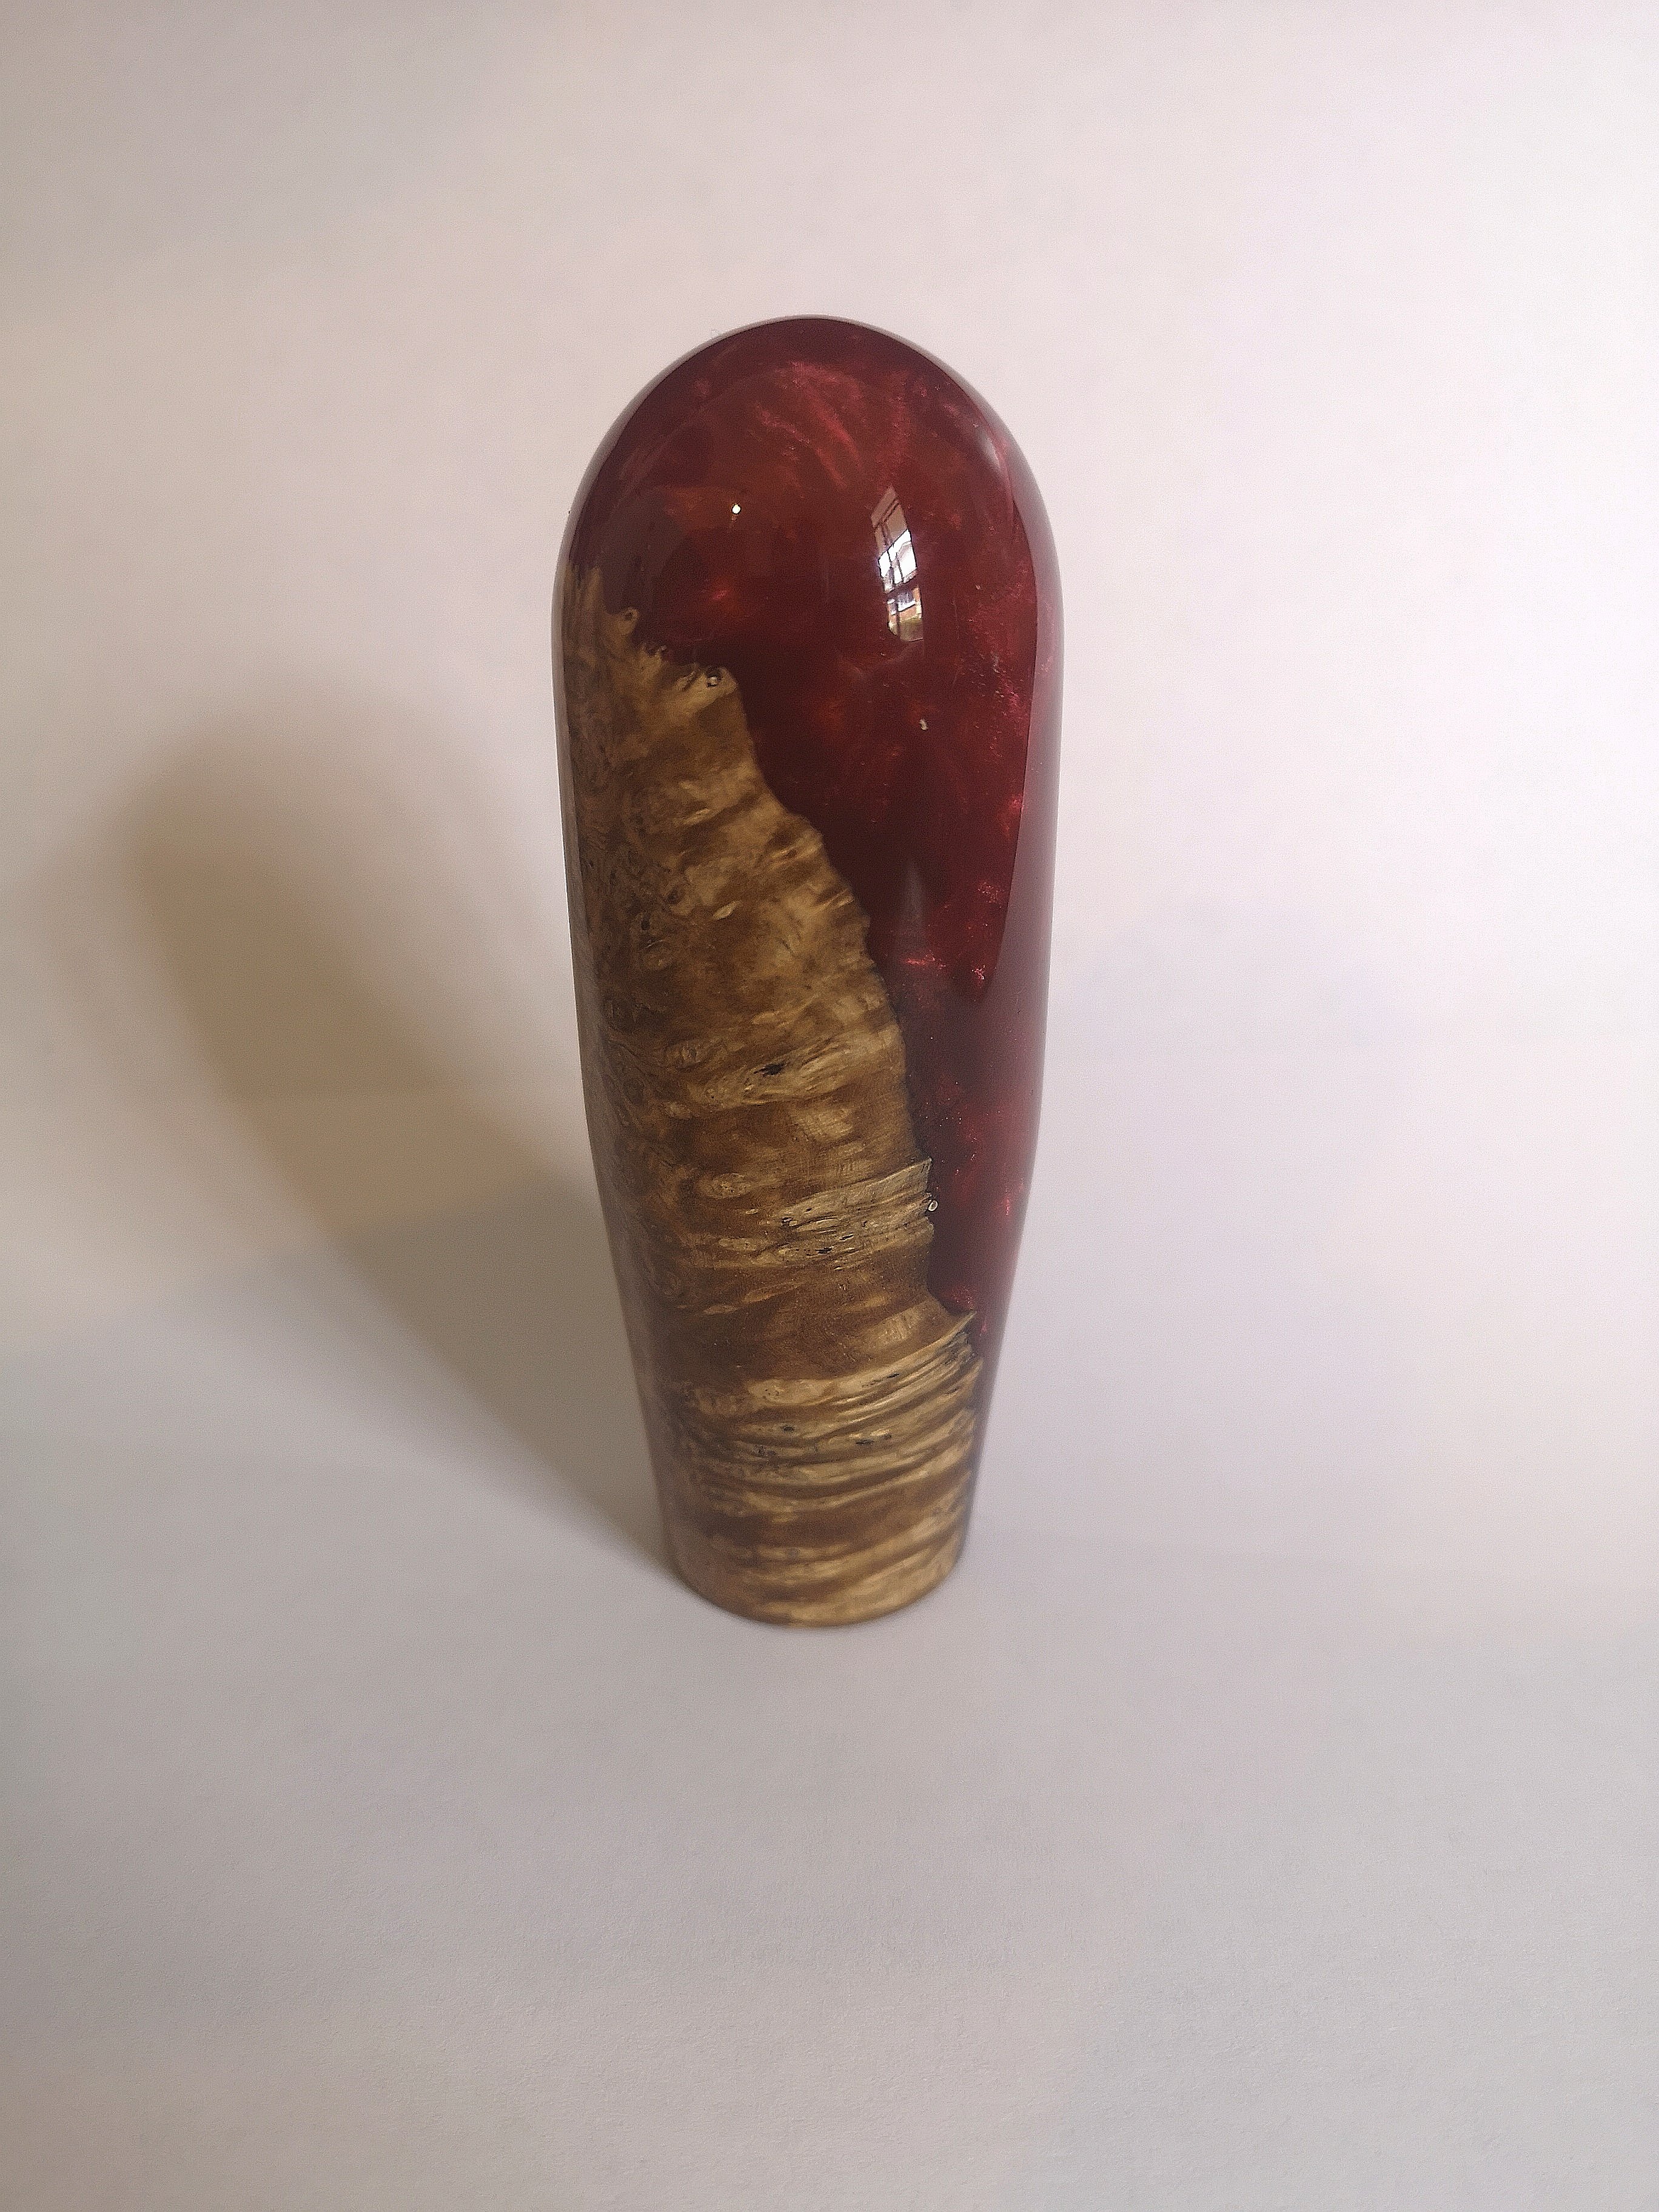
And here's what the inside of the fridge/airbox looks like: And as finishing touches I vinyl wrapped the serving fridge and spun up some new tap handles: Kauri Puriri Final product:
3 points
-
thanks guys, we are really happy with it. and i built a fence. well, me and a mate put the pailings up. now i needt o build the two gates and paint it. easy. 2020-03-15_04-41-40 by sheepers, on Flickr 2020-03-15_04-41-33 by sheepers, on Flickr3 points
-
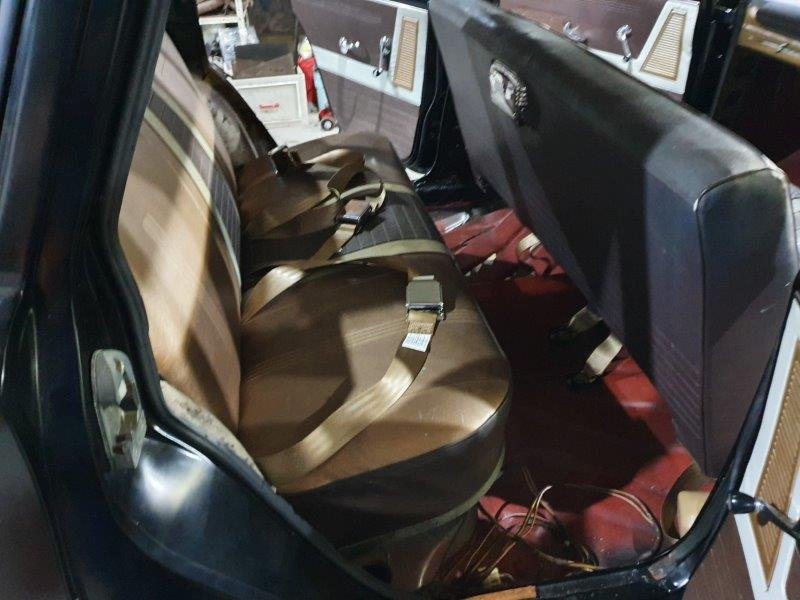
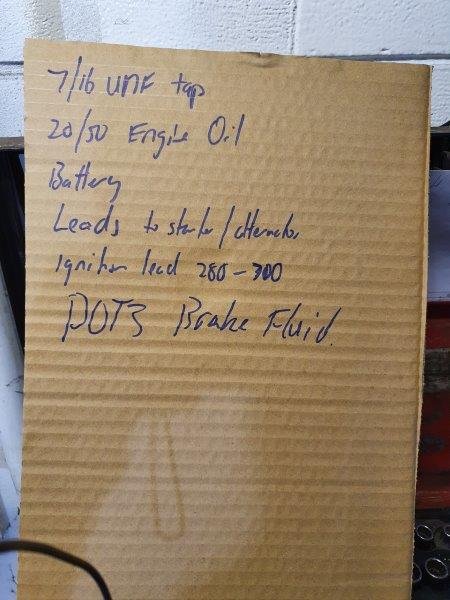
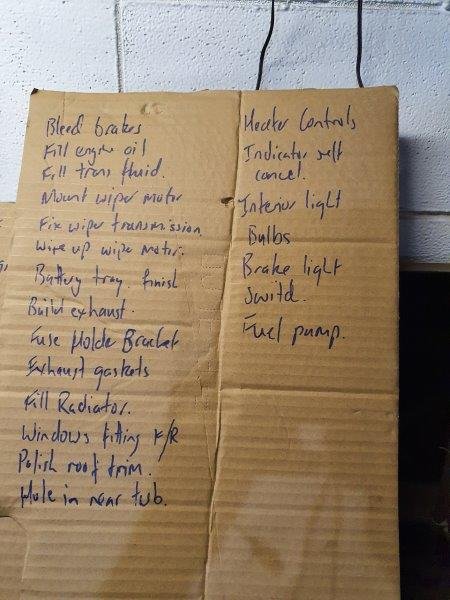
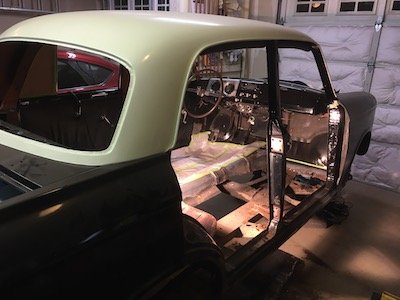
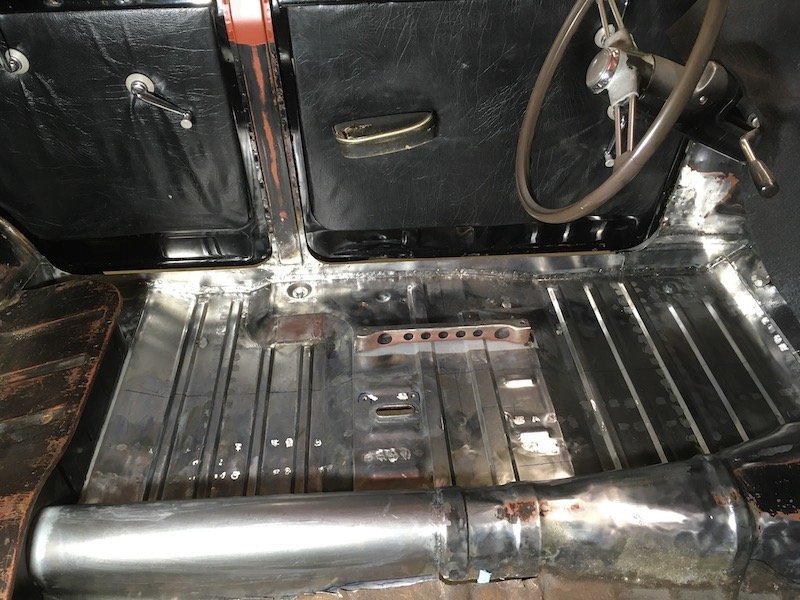
Still more progress, I bought the nuts to put the bonnet spear on that I had re-chromed months ago. The chrome cost about as much as I paid for the whole car, worth it though. Rear seat belts and seat in. The mounting points for the outside belts were about 3mm too low and the beads of the bolts would not go in without undoing the double plate, which meant jacking the car up and taking off the back wheels. Another 5 minute job that took about half an hour. I tried the back seat out and there is enough leg room for me to sit in the back with the front seat all the way back, for those who don't know me I'm 6 foot 5 tall. Even though these cars aren't that wide, they are reasonably long. Here is the list of stuff to buy, tomorrow And the list of stuff to finish the car, it is probably missing a whole heap of stuff. I started off with bleed the brakes, had a not very old bottle of brake fluid. I found all the fittings that never got past being hand tight and made a mess on the floor. The fittings are now tight and I'll get more fluid tomorrow. The joys of building a car over too many years and forgetting stuff that is only half done.
2 points
-
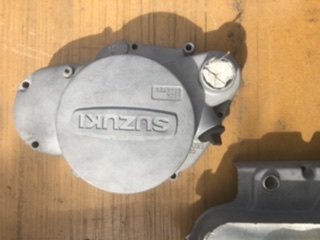
I’ve been doing a few bits and pieces on the TC. Mainly just waiting for the clutch parts to come in. I quizzed the ladies at Vinz and they looked up my rego in their system. Said last reg pre 1991 so no brake declarations required which is good. Blasted and painted engine covers. Blasted the bash guard and etch primed it. Engine cover pictured is straight out of blaster.
2 points
-
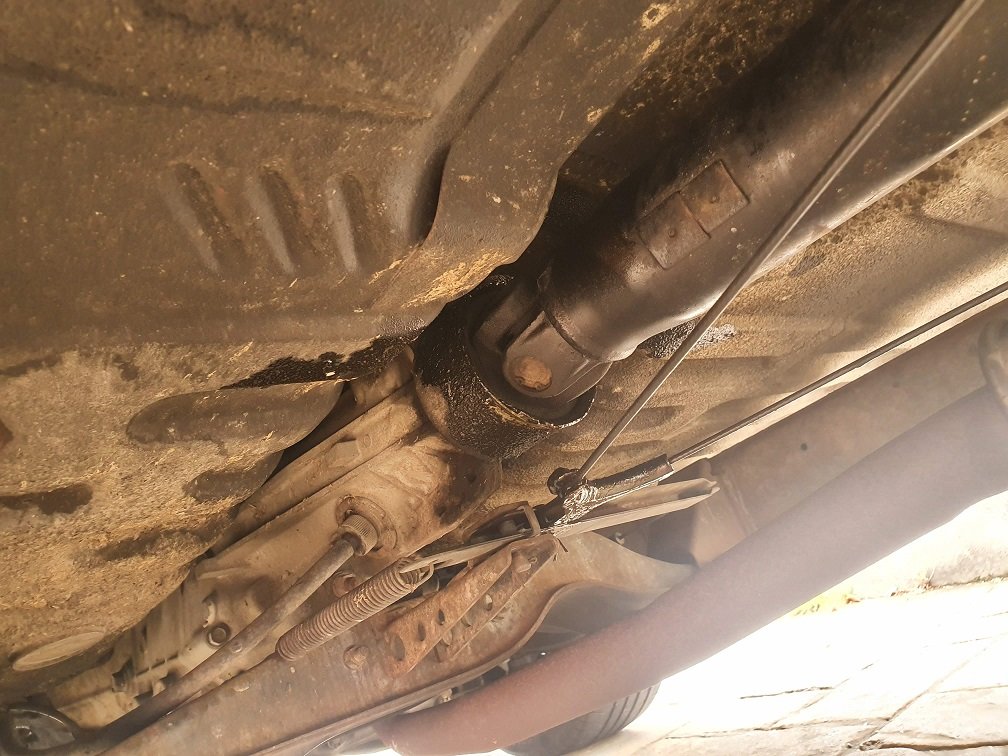
Haven't had huge motivation level behind working on this the last month, so not a lot of progress really. Work is pretty hectic atm with the whole COVID-19 thing... I suspect I'll either get absolutely zero time to work on it in the next month, or the Uni will close down and I might have more time that I know what to do with... Anyway, I drive this thing with headphones in most of the time, listening to audiobooks. This means I don't hear all the sounds it makes. My headphones were flat the other day, and I drove home without them... Really really odd noise was coming from the gearbox area, related to vehicle speed. Didn't take a lot of sleuthing to find the problem: This was completely dry just a couple of months ago when I put the new diff in, so it's let go in a pretty decent way. Managed to get a replacement seal and the use of a hoist as I don't like rolling around on the ground if I can avoid it. About a 15 min job to swap it out, took longer to refill the gearbox than swap the seal. Seems fine now, no weird noise and no leaking... I sort of suspect the output shaft support bush might be flogged out, but this gearbox will be replaced once the new engine goes in anyway, so as long as it holds oil I'll be happy. Silly regular maintenance instead of mods. Lame. Front left wheel bearing felt a tiny bit loose too, so gave that a nip up, and tightened the hand-brake cable too. Once I fix the exhaust leak at the manifold - exhaust point it would probably actually pass a warrant!
2 points
-
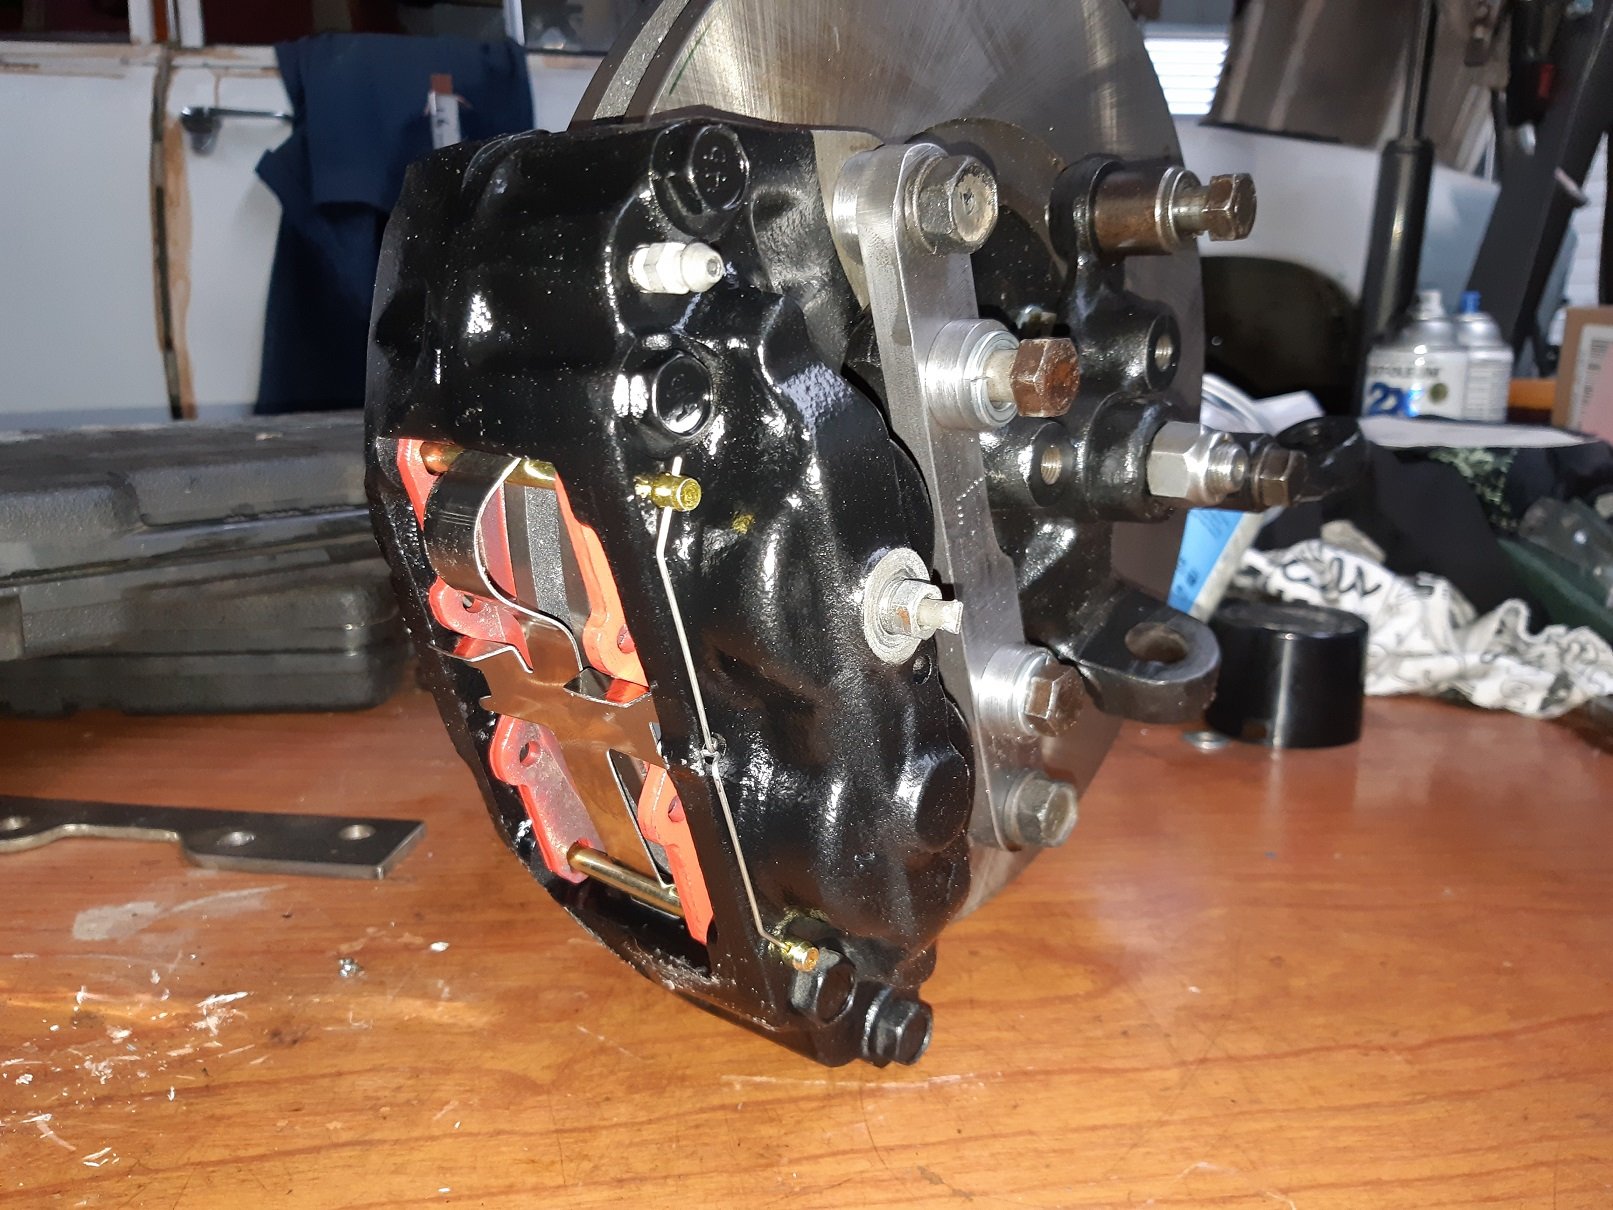
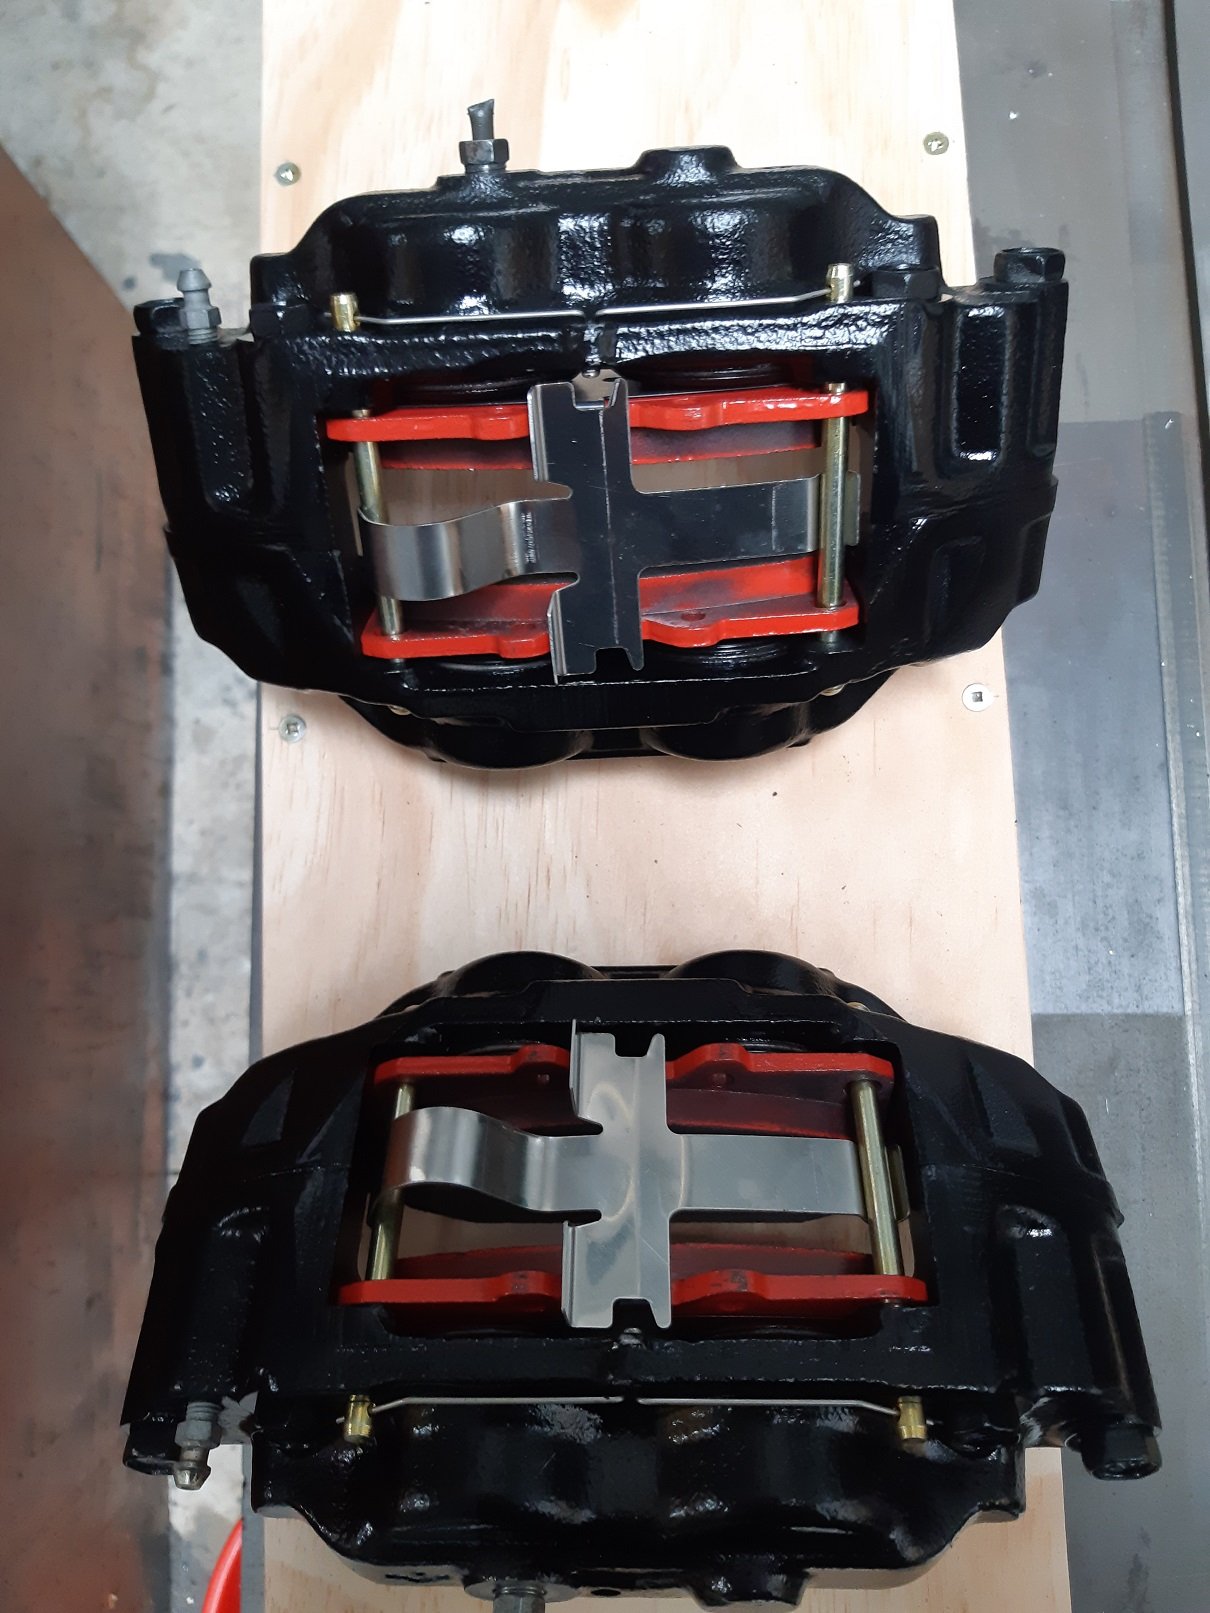
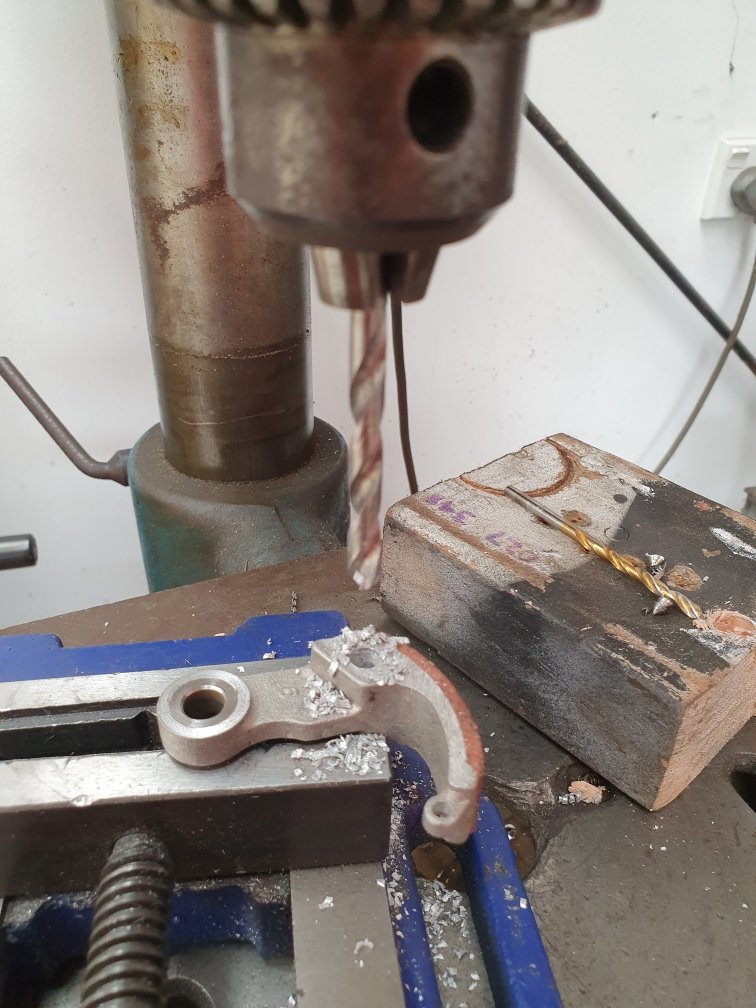
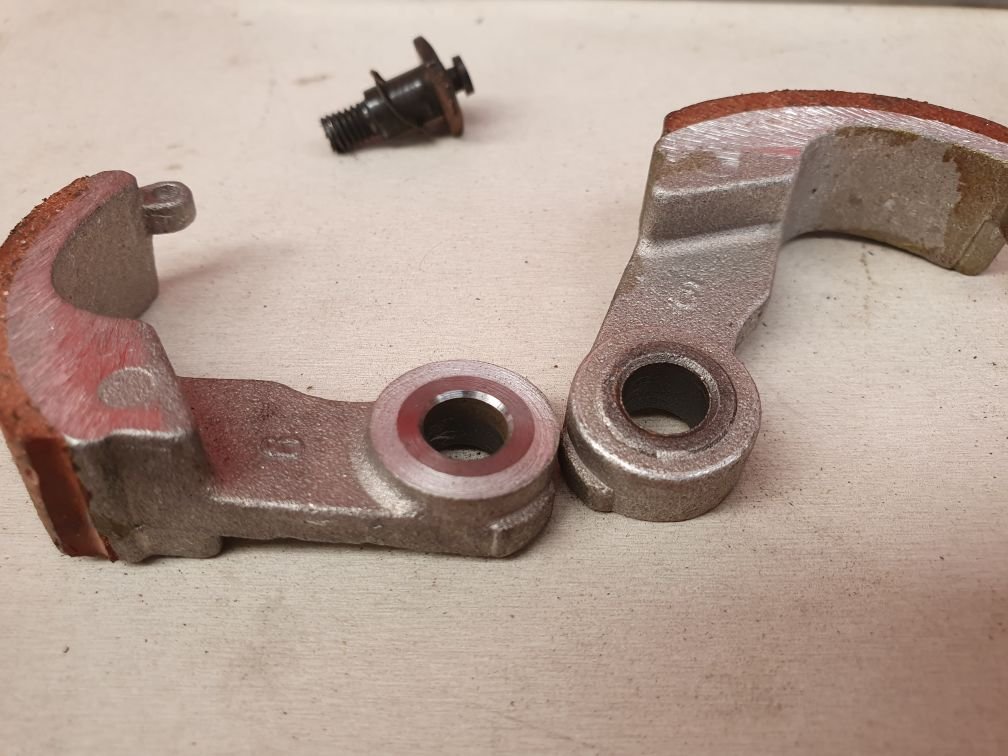
Calipers are rebuilt. I had to use the original retaining spring ring things that hold the seals on as the replacement ones were too short and made the seal bunch up between the ends. I made 3 sets of spacer before I got the thickness right so the disc is in the middle of the calipers. The spacers still have to be tig'ed on and the brackets painted.
2 points
-
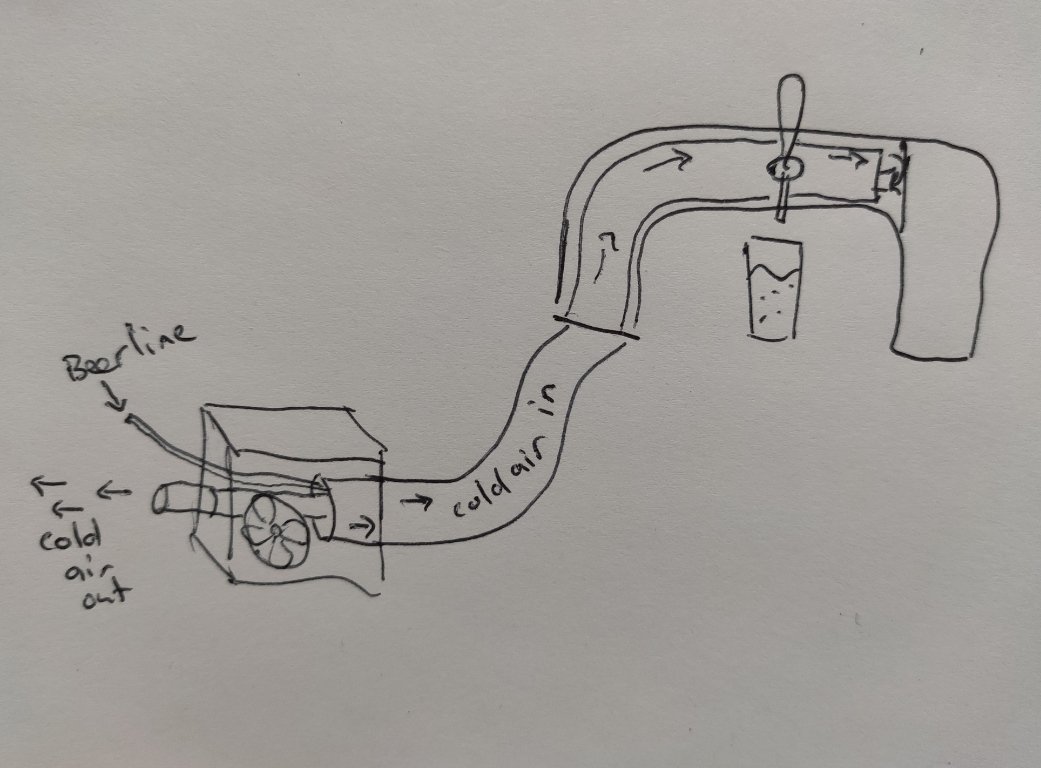
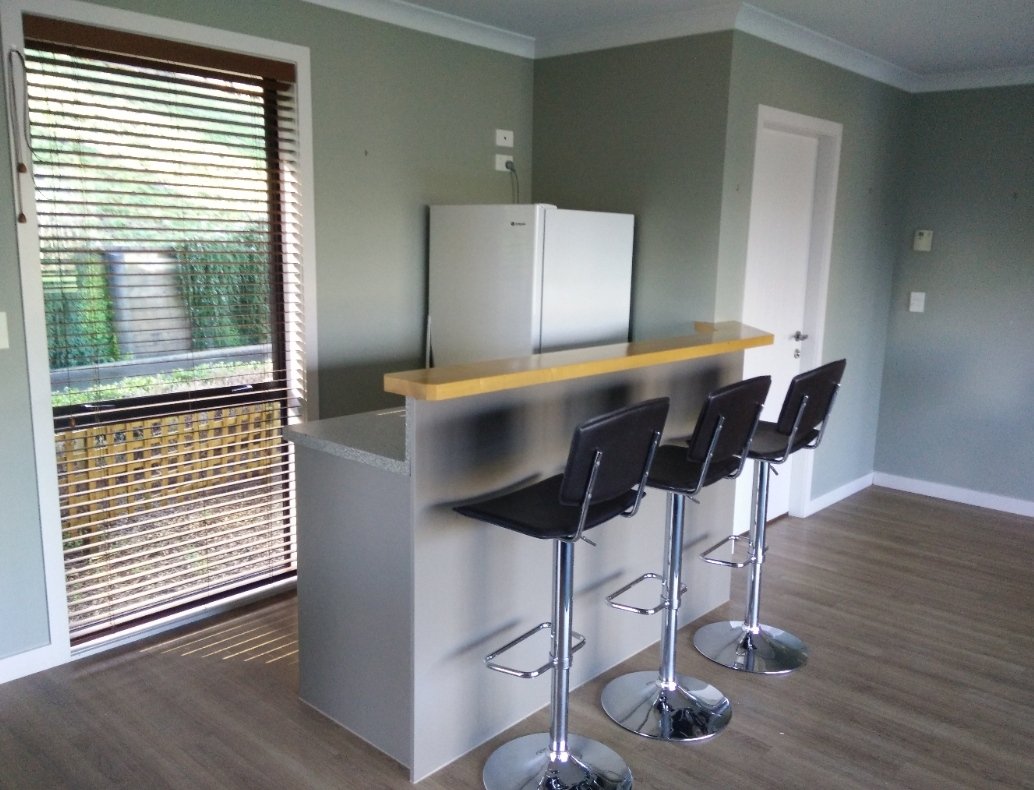
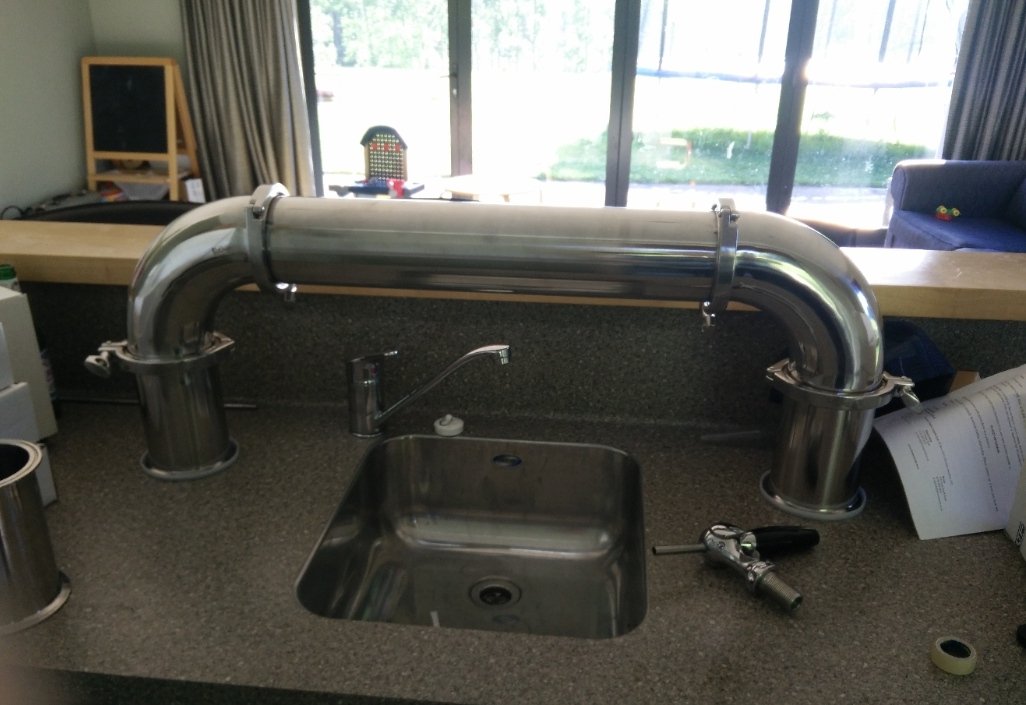
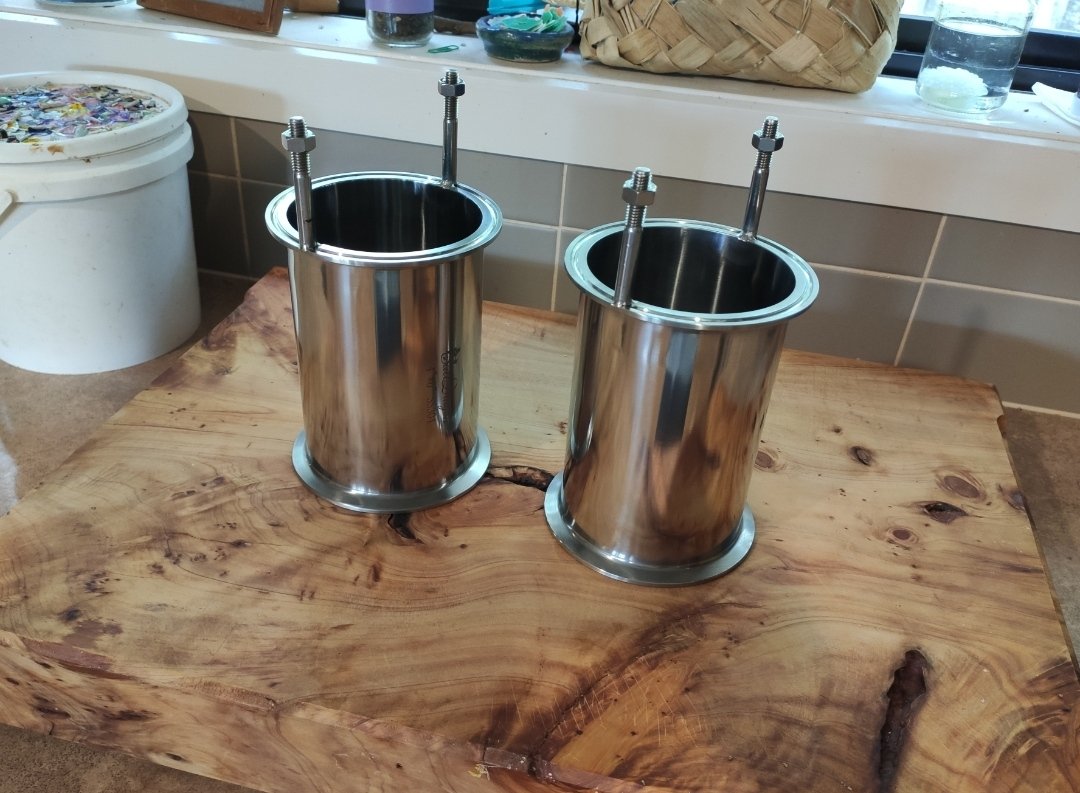
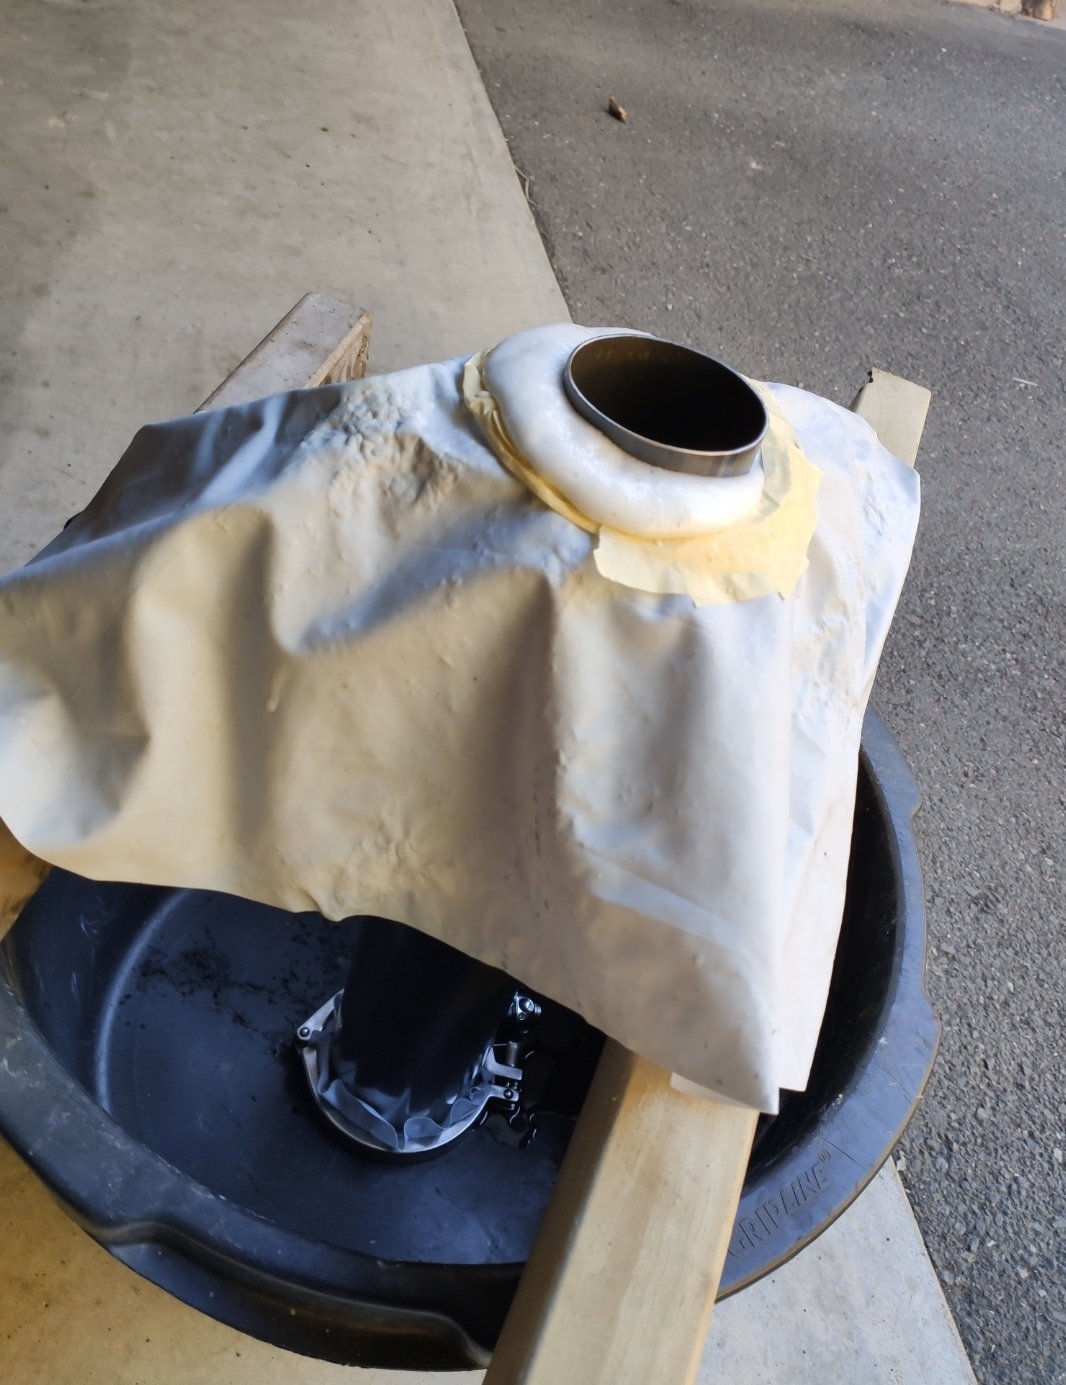
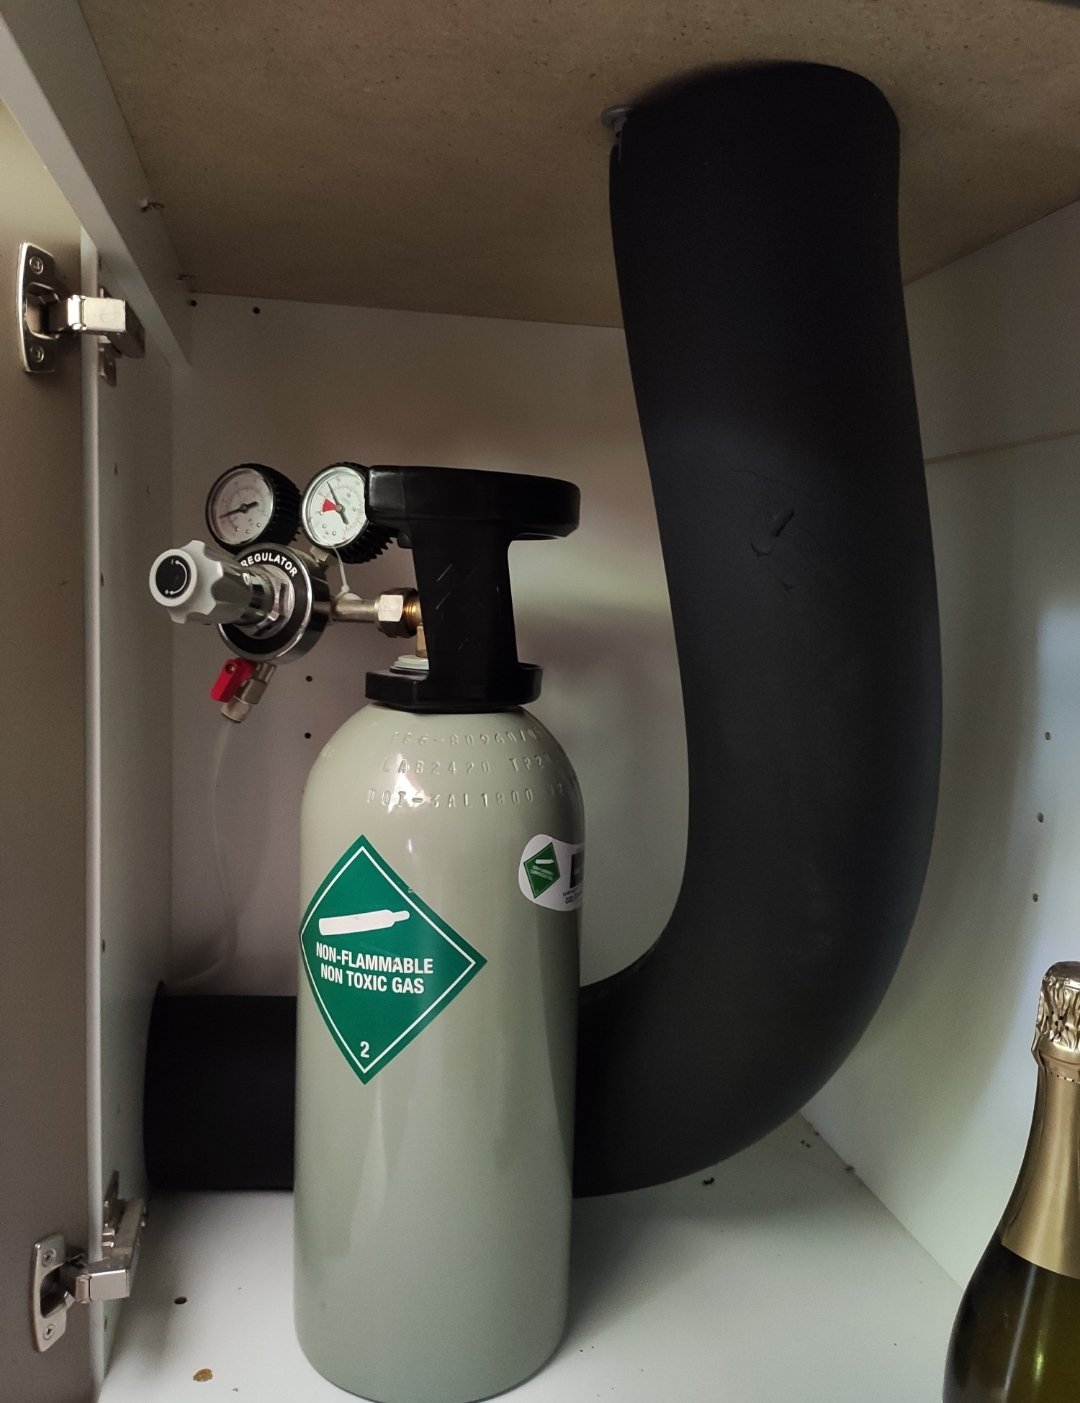
Another project that's been distracting me from getting the damn Hilux finished: Home bar/beer delivery setup As can be dredged from the archives of this thread I am a keen home brewer, and have wanted to setup a fancy beer font setup since our new house already had a basic bar: For the font I bought some shiny Italian taps and some 4" sanitary tube and elbows (dairy spec), that uses triclamps to section together. Here is a test fit (sans taps): Then welded on some legs to fix it to the bench, and buddy CNCd up some tap adapters radiused to the tube. These are acetal as you want the taps insulated from the font so the fridge doesn't have to work too hard. Delivering keg beer from a remote fridge sounds easy enough (recall tui ad), but there's actually some engineering involved as the temperature spike that happens to the beer when it leaves the fridge and hits the tap causes the CO2 to come out of solution = glass full of foam. So somehow you need to keep the beerlines and taps cold all the time, and since I wasn't prepared to spend $1000's on a commercial glycol-cooled setup, I decided to try an air-cooled design ala: Basically in the bottom of the fridge that houses the kegs is a plastic box with a CPU fan pushing cold air up a main tube that houses the beer lines and exposes the back end of the tap to cold air. The tube also contains a smaller diameter return line that allows the air to turn around and return to the fridge to complete the circuit. The first implementation of the above did not really work out, I used some ~3" diameter plastic 'oil suction hose' as the main tube and I was hoping the 5mm wall thickness would be enough insulation, but the font got really cold and the fridge ran pretty much constantly. At that stage decided to go all in and cast some insulation into the font body, which was a bit scary given the cost of the stainless pipe: I also insulated the section of tube that runs between the fridge and the font, which together with the above got the temp leakage under control.
2 points
-
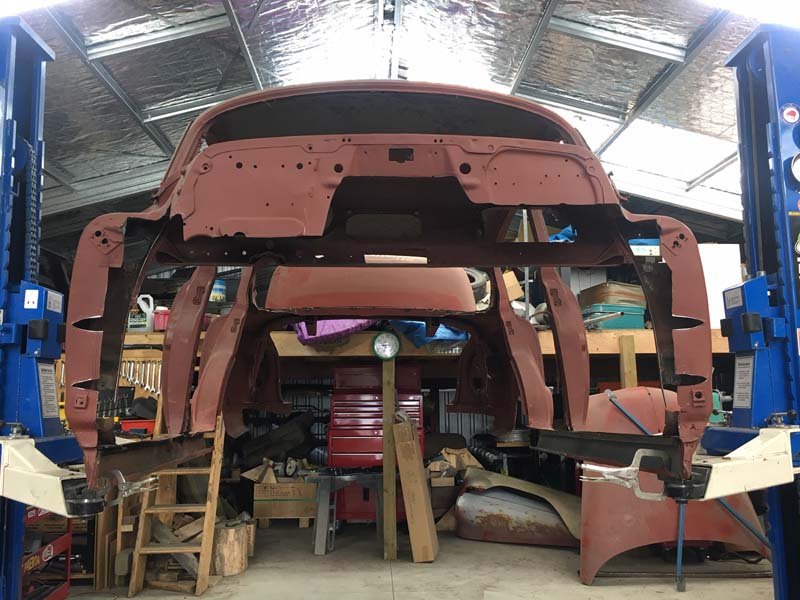
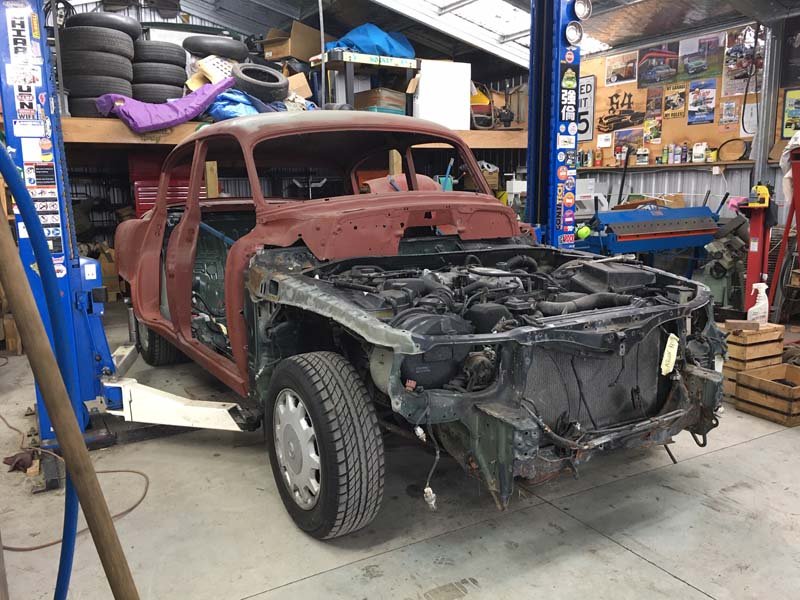
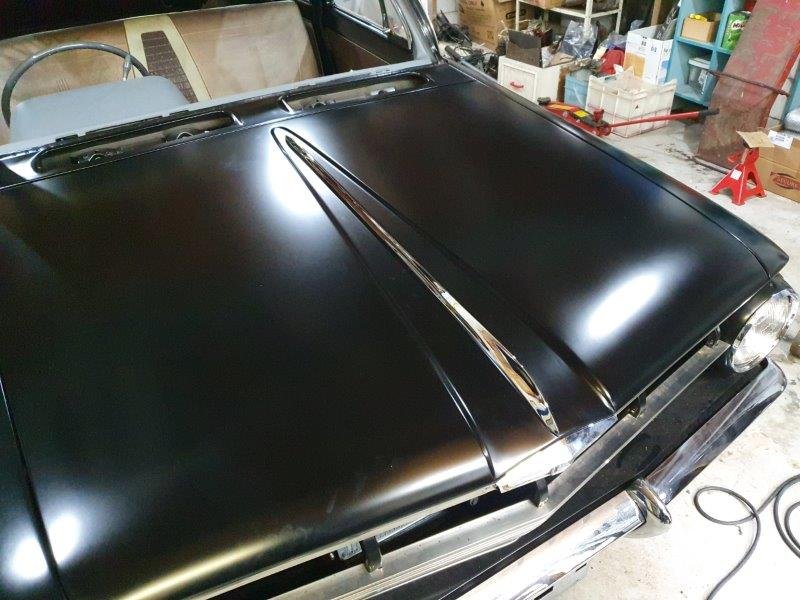
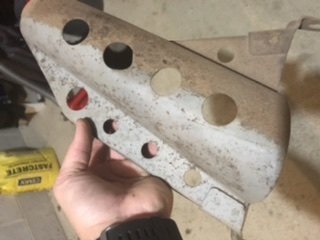
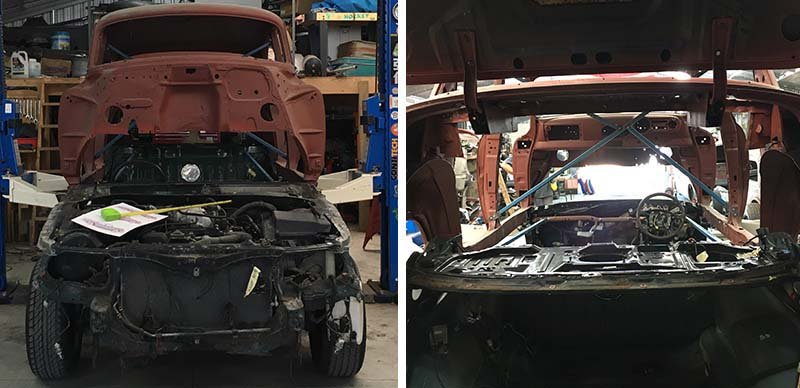
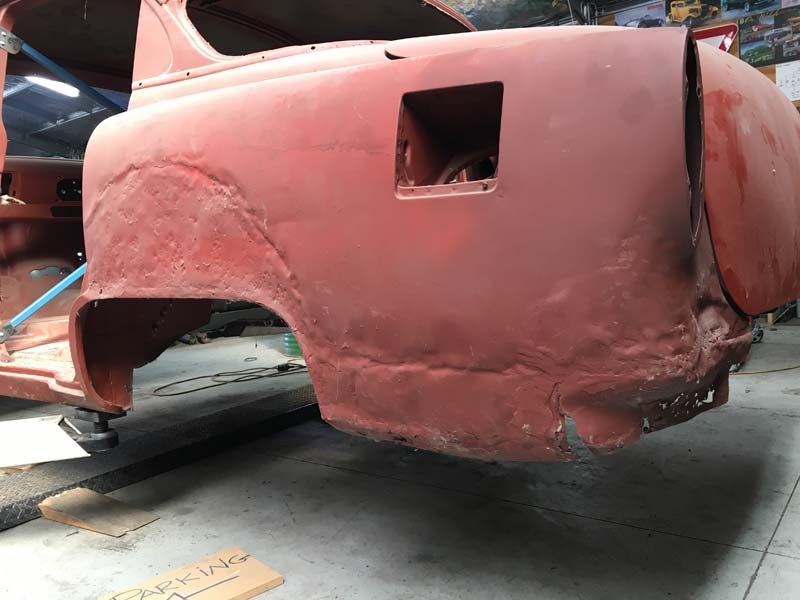
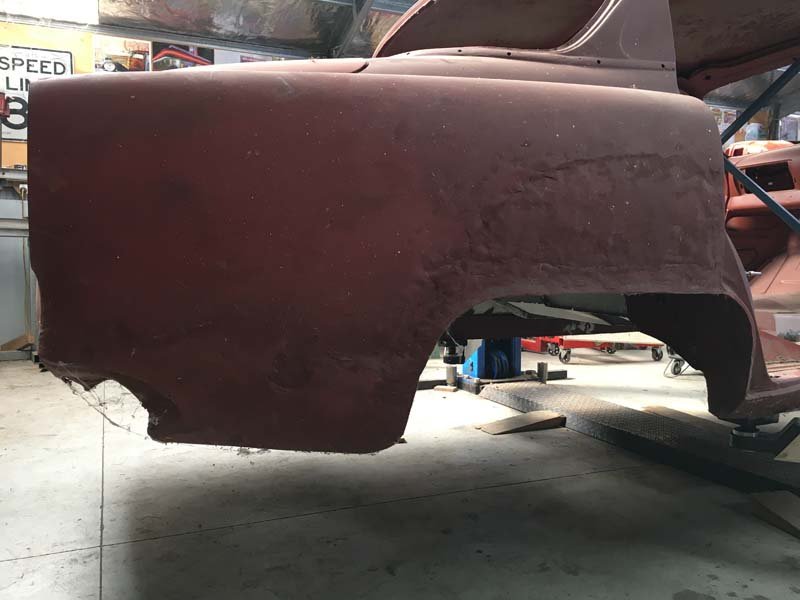
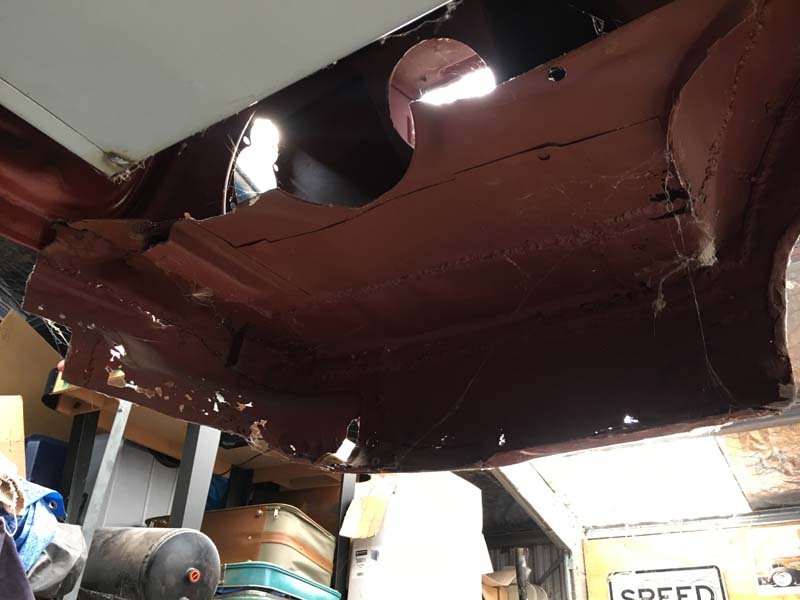
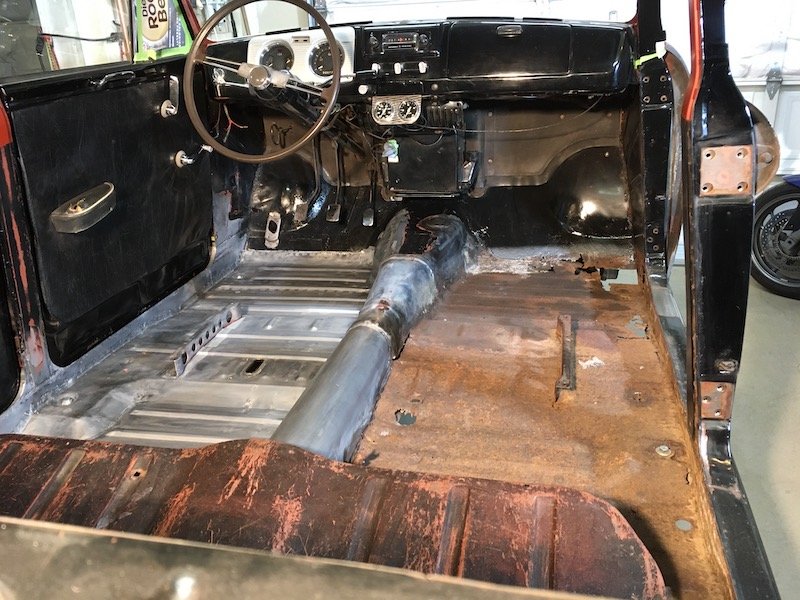
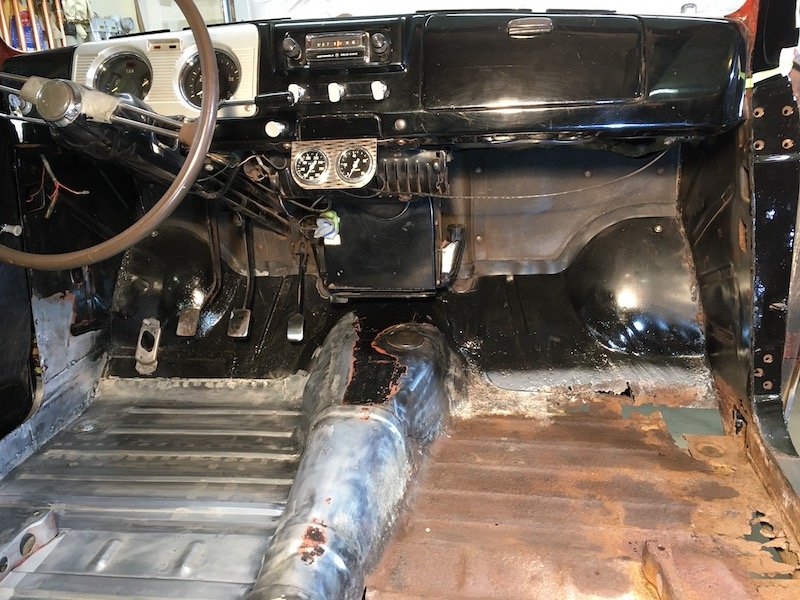
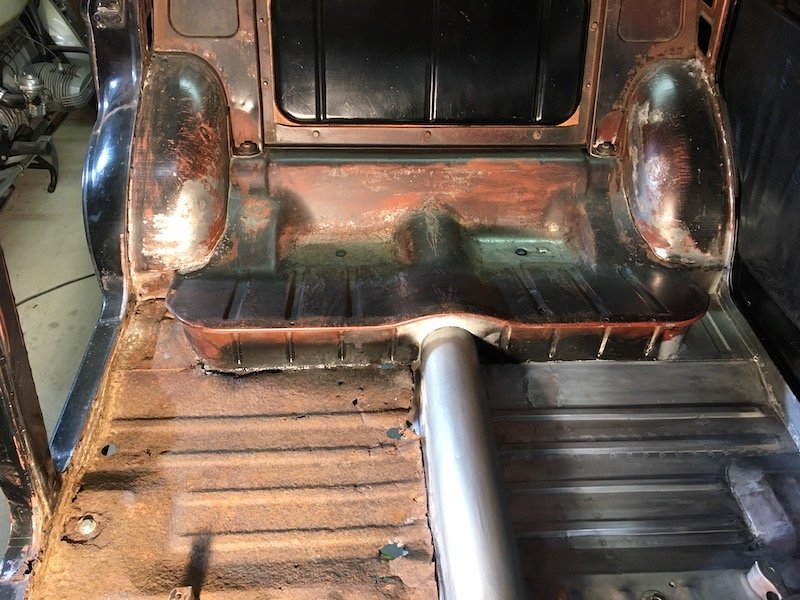
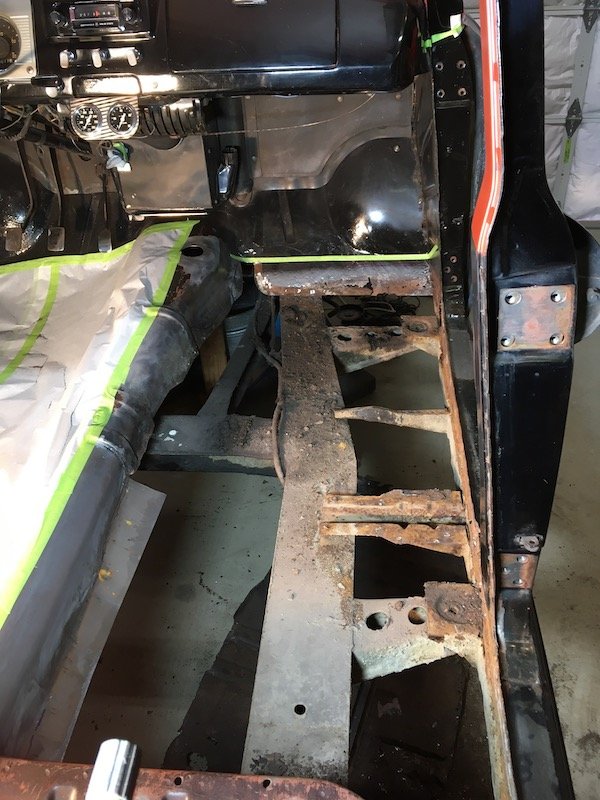
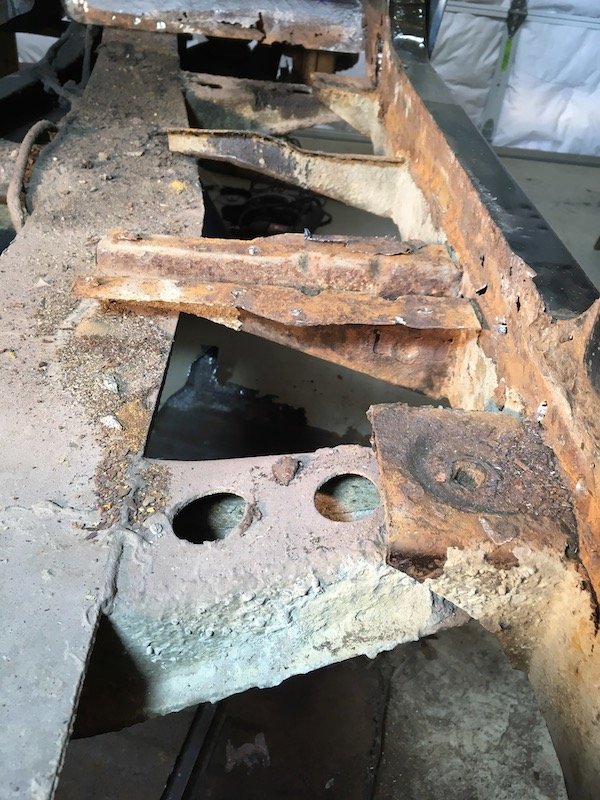
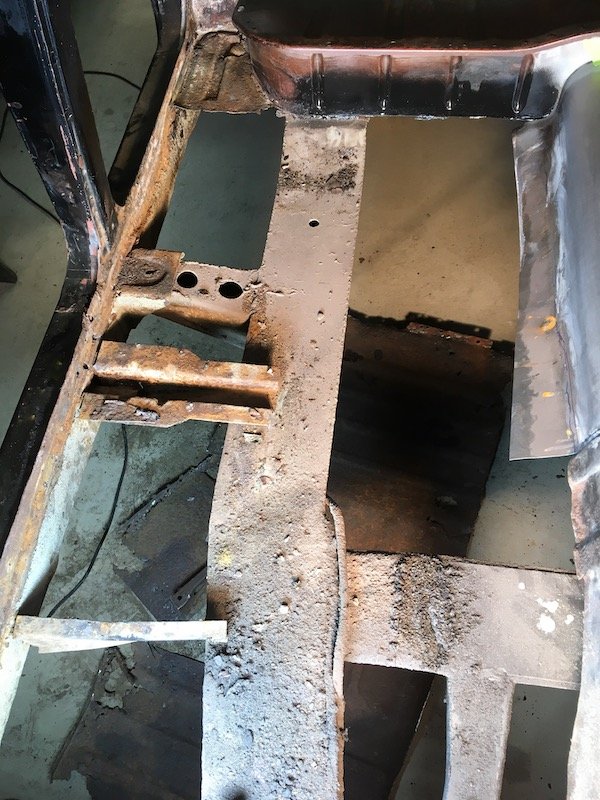
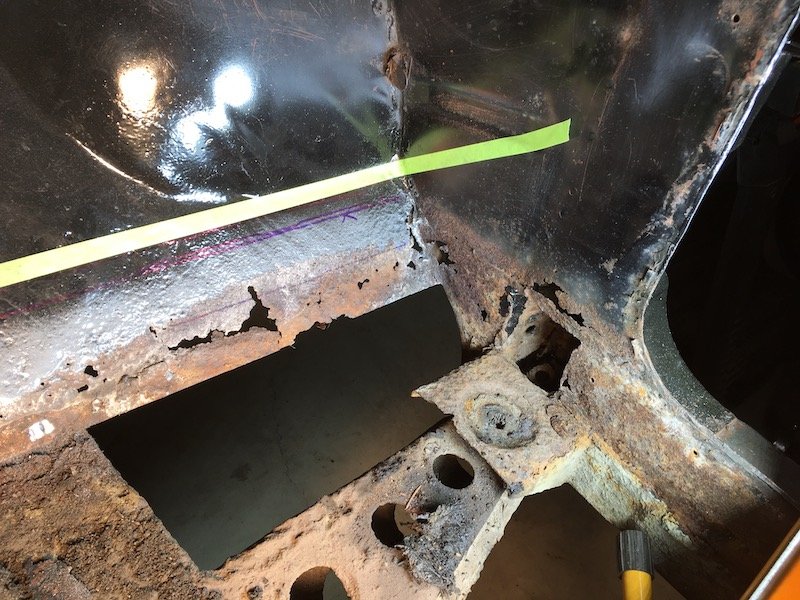
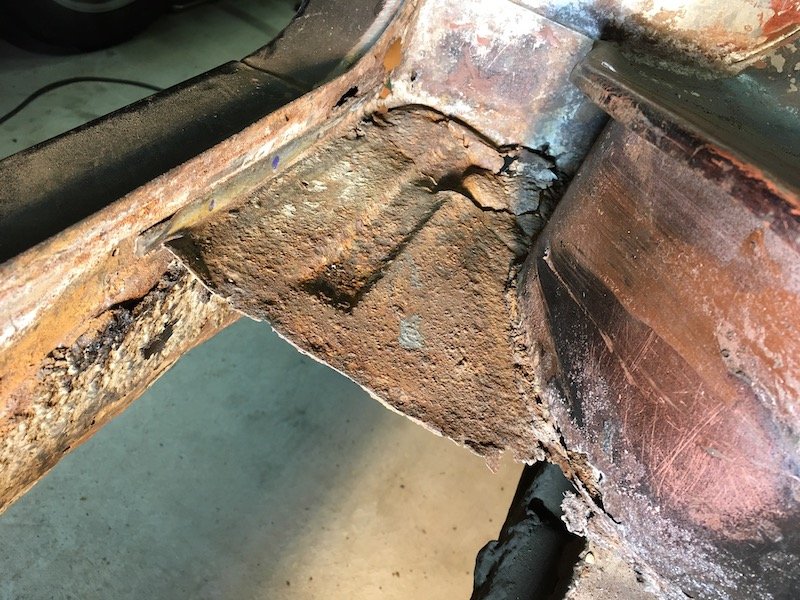
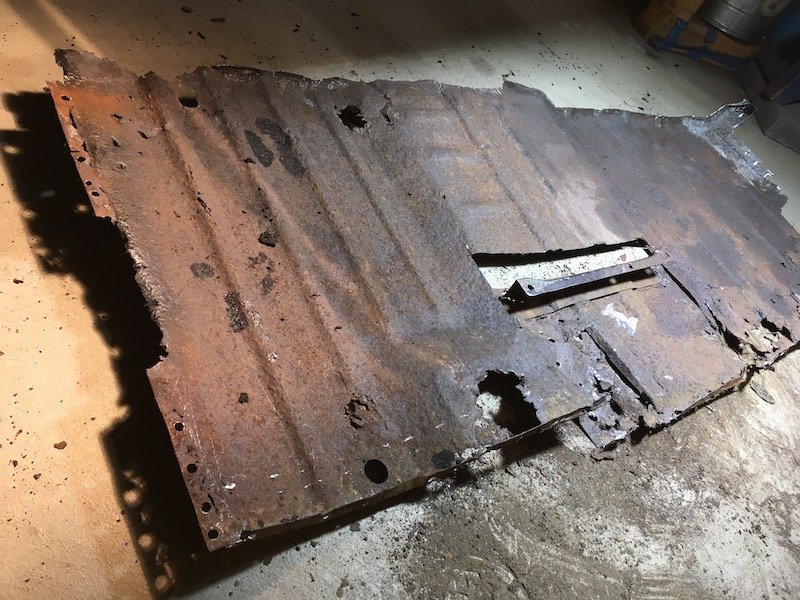
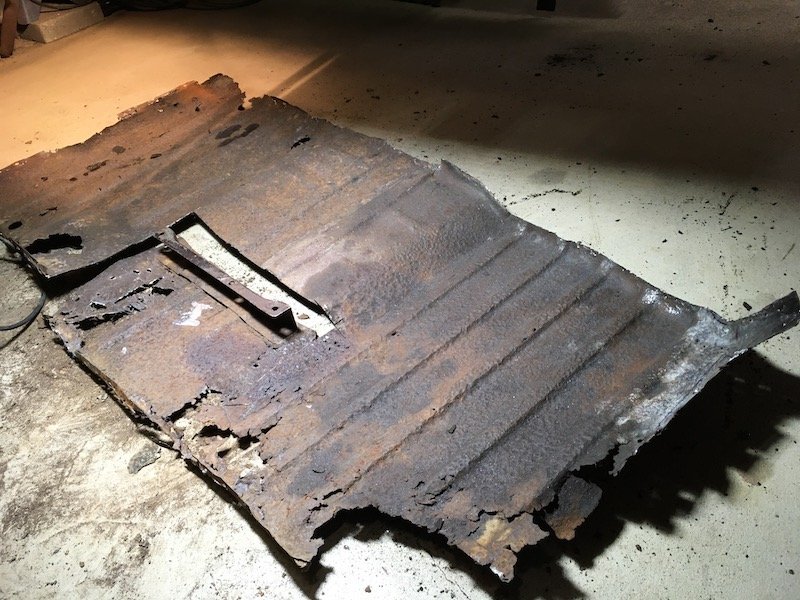
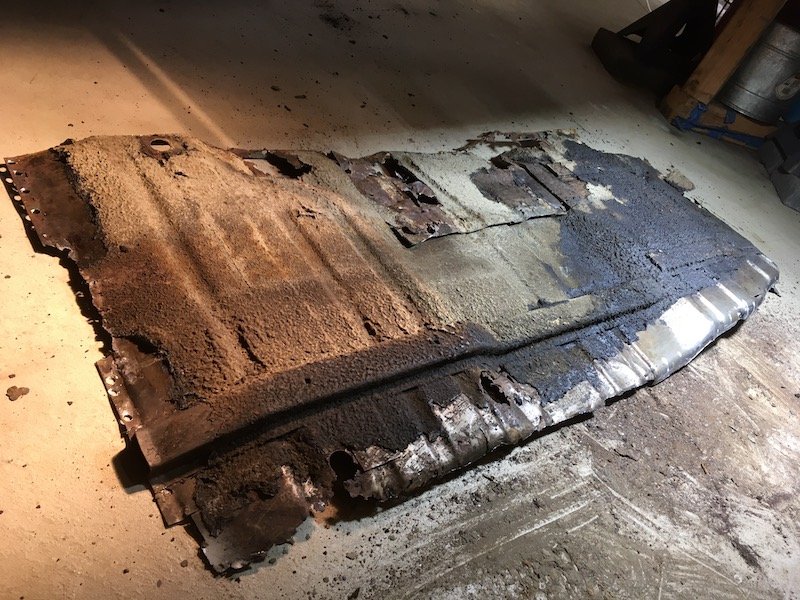
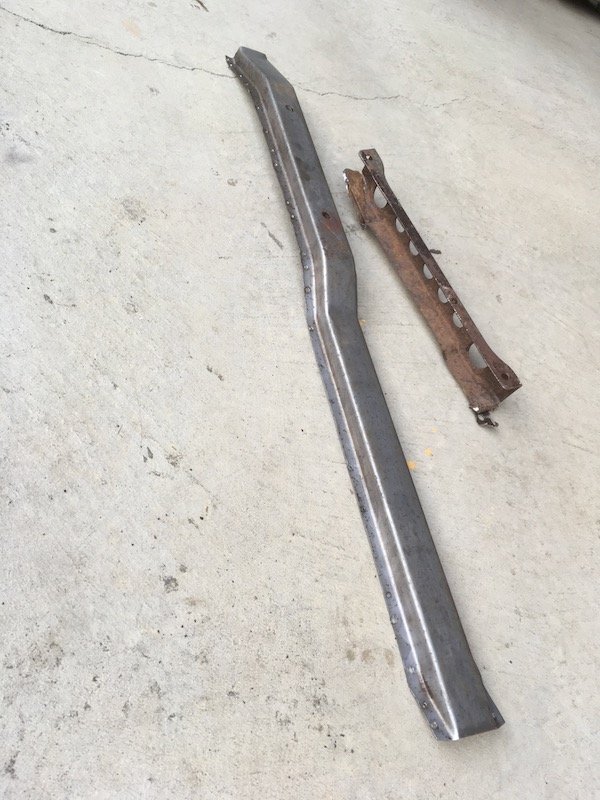
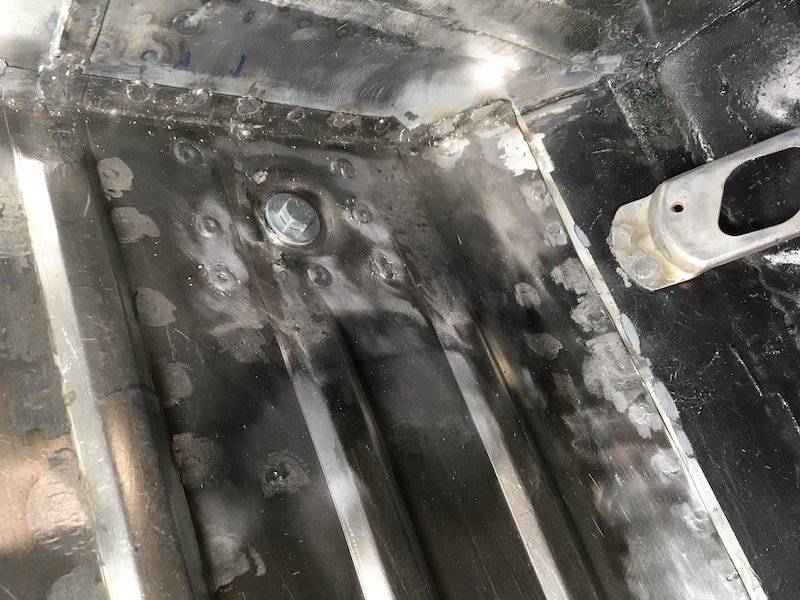
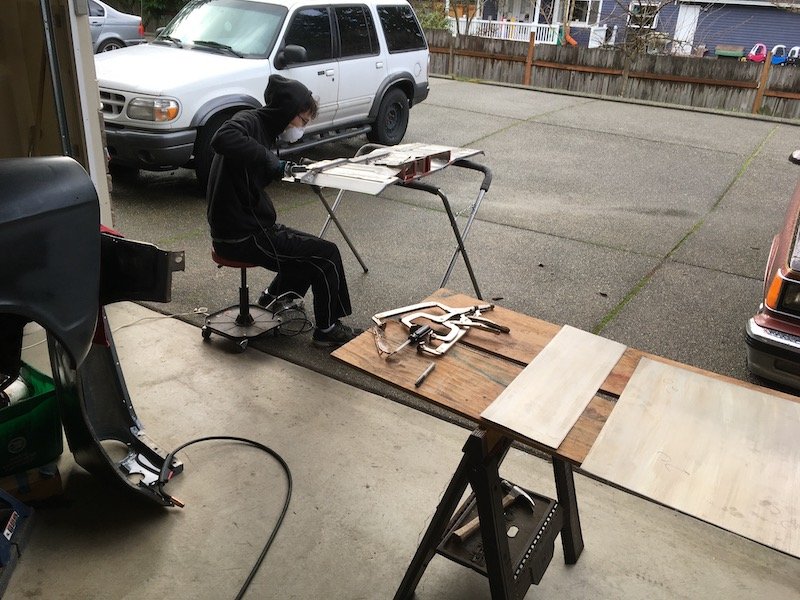
Thought i would include a couple of photos of just how wonderful the body is of this old chevy. I do however have a couple of replacement panels for the rear quarter panels and the tailpan. Todays progress, was to remove the chevrolet floor and bring the two halves a little closer to see what else will need the chop.
2 points
-
This pic Reminds me so much of
2 points
-
A speedy erection is the main advantage I think.1 point
-
1 point
-
It is steel. Ideally I would like to weld/get it welded but I don’t have one and it’s probably cost prohibitive to get someone to do it for me? Tempted to get a welder so maybe I could use this $30 air box as an excuse to get a $500+ welder1 point
-
steel? weld it. i suppose you could fill with jb weld or similar1 point
-
Expensive coilover shocks going in so he doesn't want to modify them. (Running the shock and spring seperately though.)1 point
-
Suzi 250 project ready for rego inspection, fitted some lower bars which I'm thinking about flipping and going lower. The new muffler was a little noisy so added a baffle and some steel wool to shut her up a little. Second hand fenders and paint, exhaust wrap, new seat some electrical tinkering, oil, filters and new plug, she's a goer!1 point
-
Awesome, gunna go grab a bag of coal for the hut, maybe a box of beer is in order too1 point
-
Last couple of weekends I stripped every last part of the front suspension down and prepped it for paint. Sent the steering rack for a rebuild and crossmember for blasting and powdercoating and got the crossmember back today. This Saturdays job is to paint all the bits and reassemble with new buses, joints, links etc. Should be tight as a goldfishes anoose once its all back together. Pic 4 Fred
1 point
-
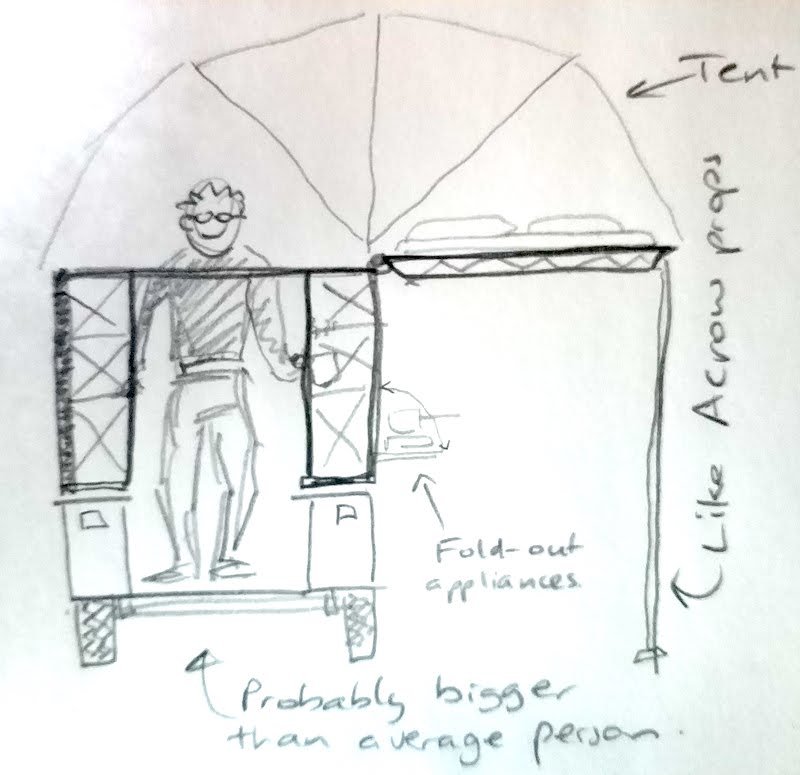
Dunno how I missed this thread for so long. This is exactly what my next project is going to be: an adaptable self-contained camping trailer. No loo though in my plans. Something like this: This above pic shows it half erect; the roof keeps folding to provide a sleeping surface. And a bit like this: I'll be basing it on the trailer I built a couple of years ago: My version's going to be different from the concepts above though. My idea is the roof folds over, opening the already attached tent and form the sleeping platform to the side, but the trailer is open underneath the tent. The idea is you can stand up in the trailer, out of the weather and the climb up a bit onto the platform for sleeping. This is a very rough concept: It'll be a little 'home away from home' but incorporate: - Solar panels charging a 12v battery system, including lights - Built-in air compressor for the inflatable mattress and MTB tyres - Pseudo-plumbed* in LPG for cooking with a fold-out cooker, both under the sleeping platform and inside The bit below the sleeping platform but above the trailer itself will have canvas sides (one bit bit that wraps around) so the entire thing is weathertight both for travelling and camping. My overall plan is to have the top half as a demountable unit that I can partially disassemble for storage for most of the year, leaving my trailer for general use and MTB shuttling missions, but a super convenient camping trailer for a couple of weeks of the year. The sleeping platform is likely to be aluminium to make flipping it over easier. The rest will be RHS steel. Fold out awnings for shade and storing bikes etc under when camping. Ideally, it wont look like much when travelling (It's not a big trailer), but once on site, a couple of minutes and she's good to go, with no need to climb outside and into the tent. This is my problem with pretty much the style of all camping trailers including teardrops - you struggle to shelter if the weather's inclement, but my version provides standing room. It's cosy but there's room for a couple of people to move around, cook, storage etc. My wife's a crafty type and awesome at sewing so she can make the tent unit including a fly for rain and warmth. BTW, the top camping trailer is AUS$32,000. It does have some techy features (built in solar with charge controller) so as usual I though "Bugger that; I'll make one" * I don't want to have to get an electrical or gas certificate, so the LPG won't be permanently mounted.
1 point
-
The brakes were pretty mushy, so olm8 @JustHarry threw some new brake soft lines at it so the pedal had less sponge. The old girl was started and given a run but she was a bit asthmatic and had a case of the misses. A trip to Christchurch was needed to suss it out, so luggage was packed. Obviously there was a list of stuff to do to get things ready for a warrant but they were all abandoned when Harry saw the Weber 28-36 and intake manifold. We whipped the old off, modified the exhaust manifold due to the open top into the old intake (bit of flat plate robbed off another project) modified the linkages, fuel lines and slammed it on. At the same time I threw a new set of plugs, points, leads and rotor at it, and we sourced another 12v coil from an abandoned Toyota. Performance is now tortise-like instead of slug-like. The carb is running too lean so I assume some bigger jets will need to be sourced. It does blow big flames out the top though. The gearbox is round the wrong way. 1st / 2nd is where 3rd / 4th should be. I assume it's been a column change gearbox with a floor change selector fitted. Also likes to jump out of 4th gear, but a bungee cord should fix that. Next I removed 30+ meters of unwanted and additional Barry wiring, some projector spotlights and we managed to get all of the electrical stuff working. Need to find a indicator switch, or at the very least a two way switch for indicator function. This one is goosed. Also need to remove the Barry indicators off the bumper and re-wire the indicators into the park lights like factory next time I'm down. Note Barry indicators, and a bumper off something - not this car. Things I need to find: Rear Latch mechanism for the tailgate top part / and bottom part You can see where there has been a random door latch to hold it down in the past. Think we can do better. Couple of bits of trim and at some point a passenger door as it looks a bit sus. New windscreen seal for winter. If anyone has some parts or knows of a wreck hit me up. Pretty sure I have forgotten most of what I need. Also there will be a bit of rust work on the RHS sill that Harry is keen to take on and a misc list of other stuff before she's ready to be inspected. I've also been talked into installing some slam and Tridens or similar. A chair bowl to @JustHarry @Carsnz123 @- i5oogt - @76rolla_gurl1 point
-
I did a thing. Well, quite a few things, actually. I jumped at the opportunity to buy an '84 Cressida up in Whangarei. The car had quite a bit of rust and was in fairly rough shape. However, it had a full manual conversion and 1G-GE, so I had to have it! A deal was done and I drove the wagon up to have a look at what I'd bought. Leaving it at a mates place in Whangarei I later had it transported down to my place in Auckland where it has now unfortunately met its demise. Thankfully, I've now got plenty of spares for my wagon and also for my X61 sedan project, so it's sacrificed itself to save two others. The 1G-GE heart has gone off to a fellow X60 wag owner so it can get out on the road. Anyway, ripped into the wagon Saturday morning. Old foot handbrake out (which involved removing a bunch of interior), new pull type handbrake in, auto out, fresh flywheel and clutch in followed by the W55 and driveshaft and we're back on the road. Night and day difference over the auto, that's for sure! It now has reasonable power, can get up hills etc without much struggle. So good. Also found that painting the brown interior parts with automotive 2K basecoat works a charm. It's all I had and it worked perfectly. I just need to find a nice blue leather shift boot to finish the console off nicely. Aside from the manual conversion the car has remained much the same since the last update. A few shock/spring changes is about all. Next up is to get the 2JZ on an engine stand so I can give it a good service and detail/prep to go in. - Also, ran a whole lot of 20 second runs at OS Drag Day last year. Hopefully I can chop that right down with JZ power. The car has come so far in the 10 odd months I've owned it. Excited to modify it more in coming months. Good fun!1 point
-
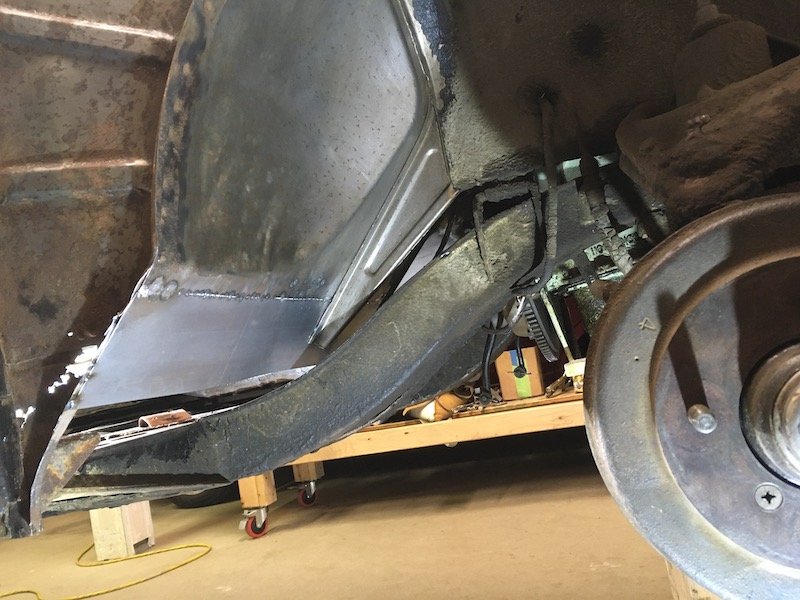
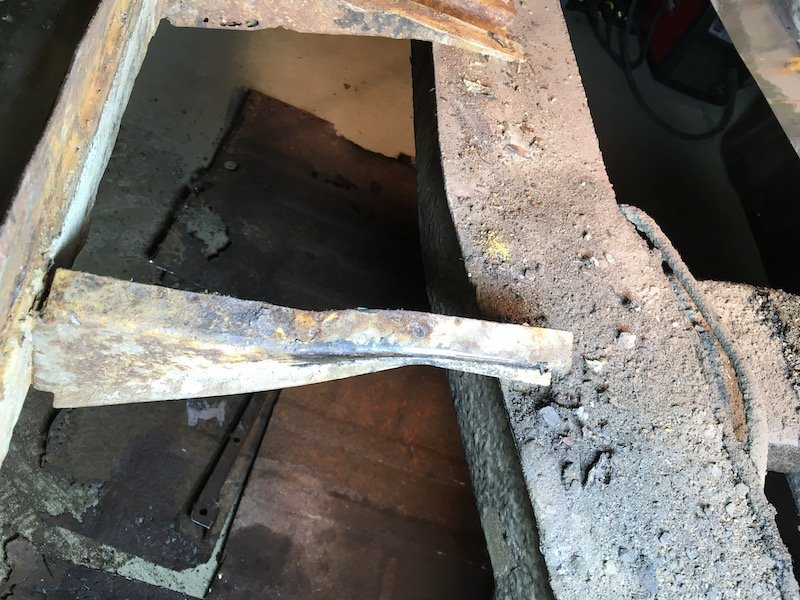
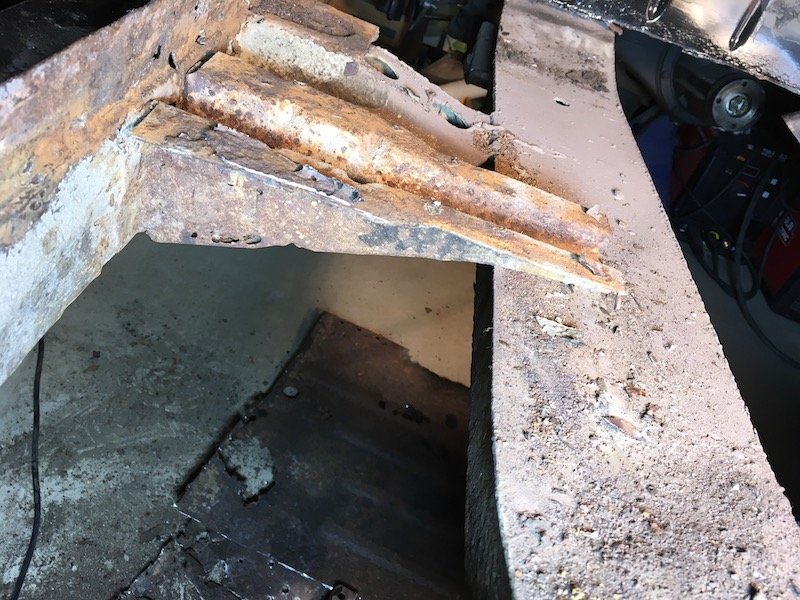
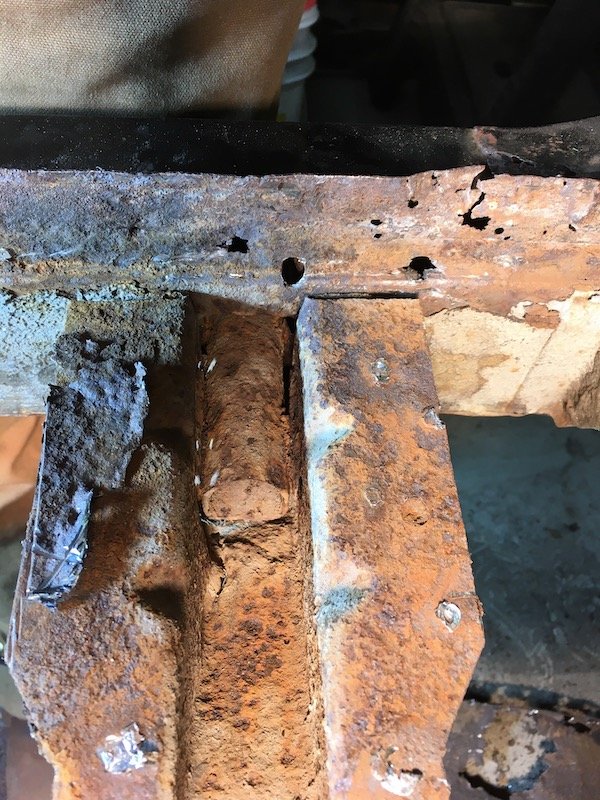
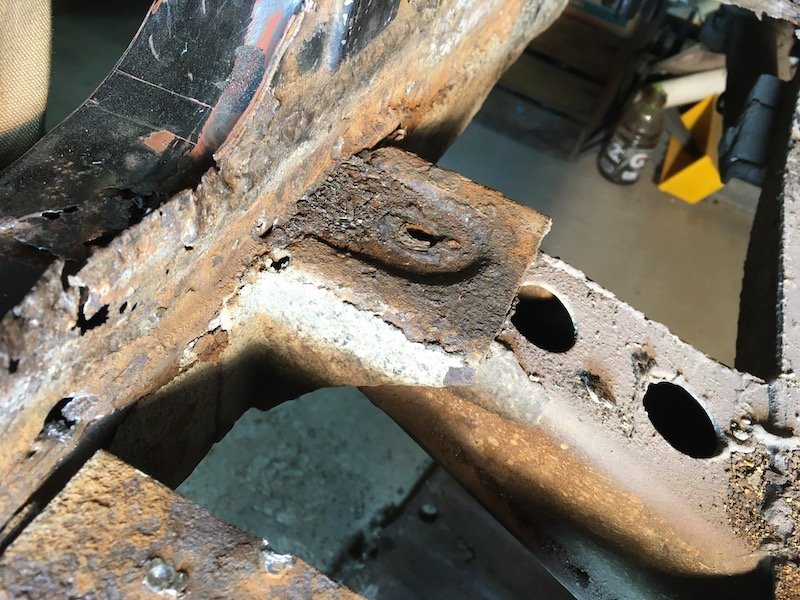
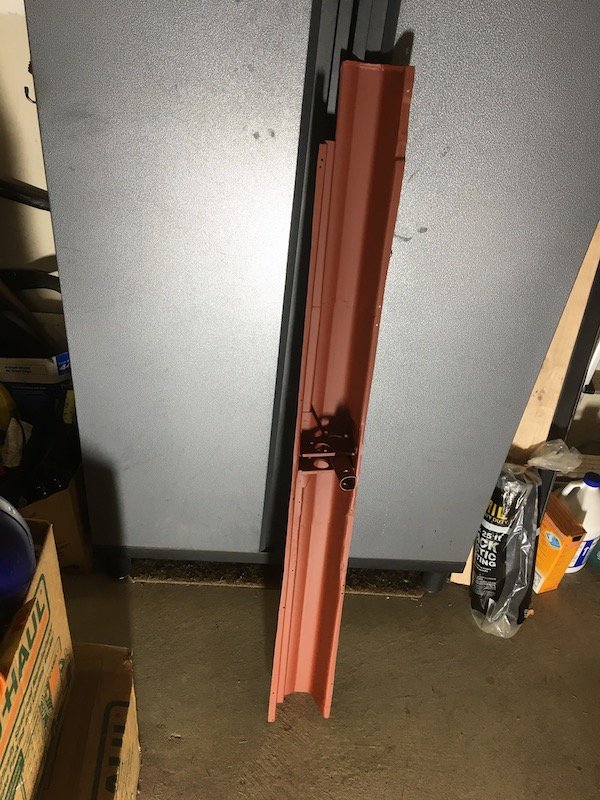
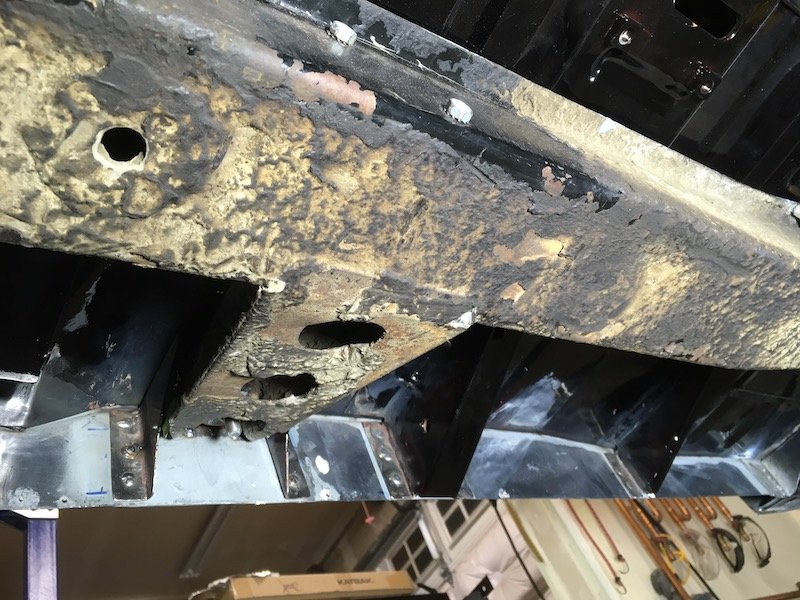
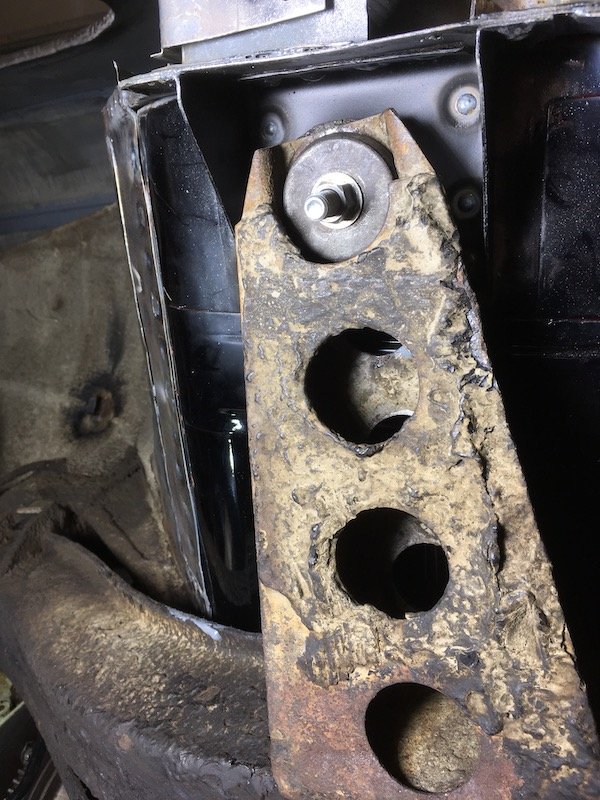
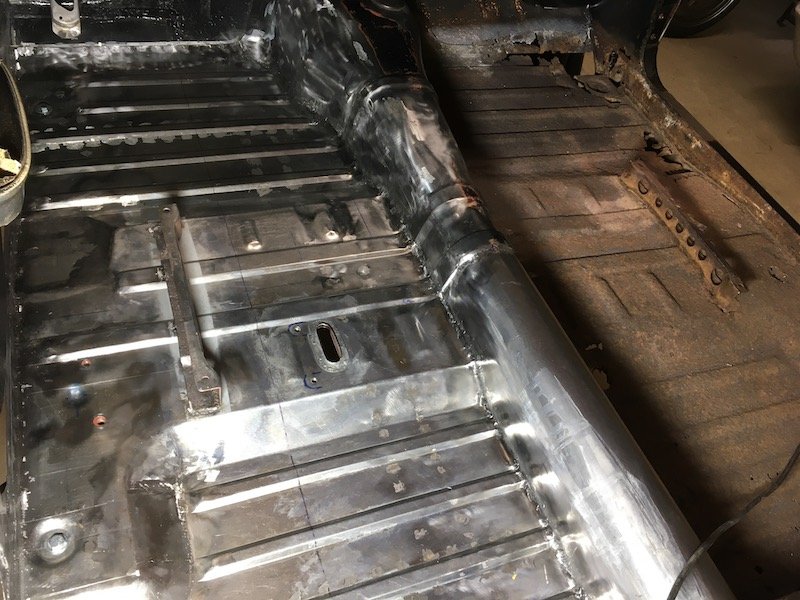
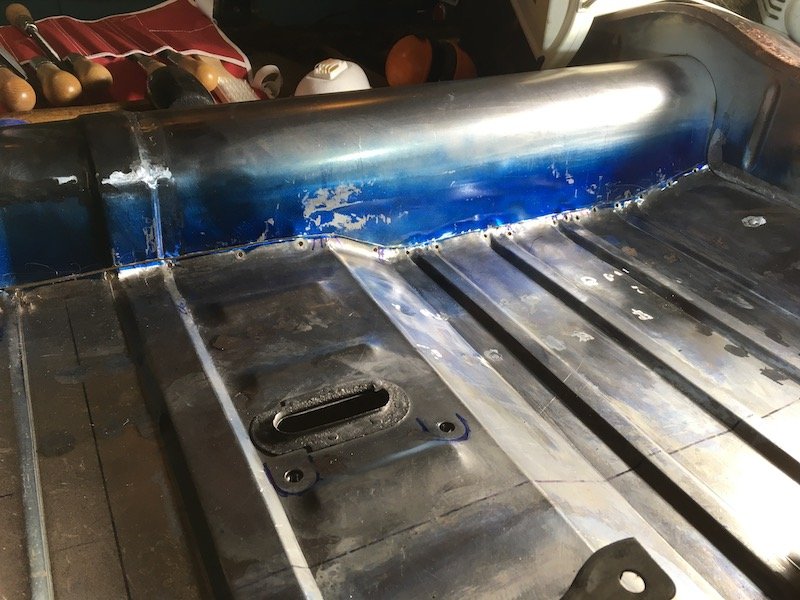
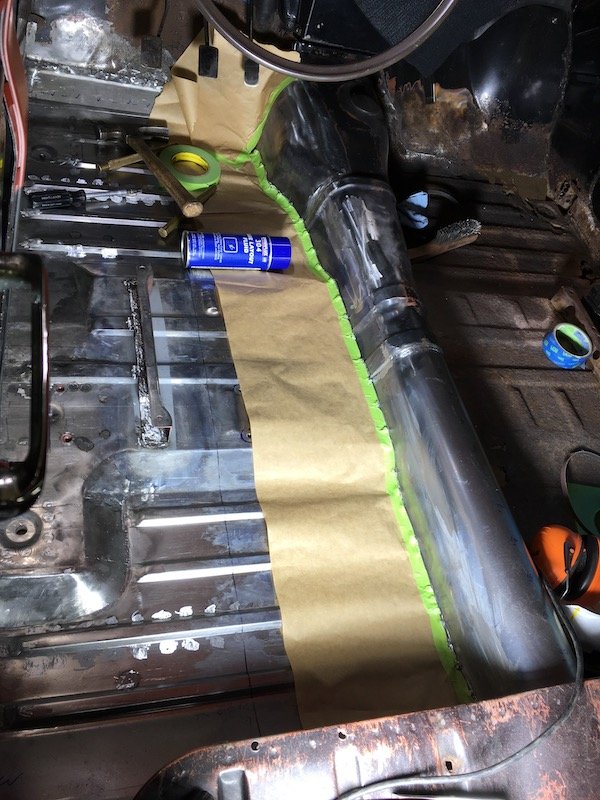
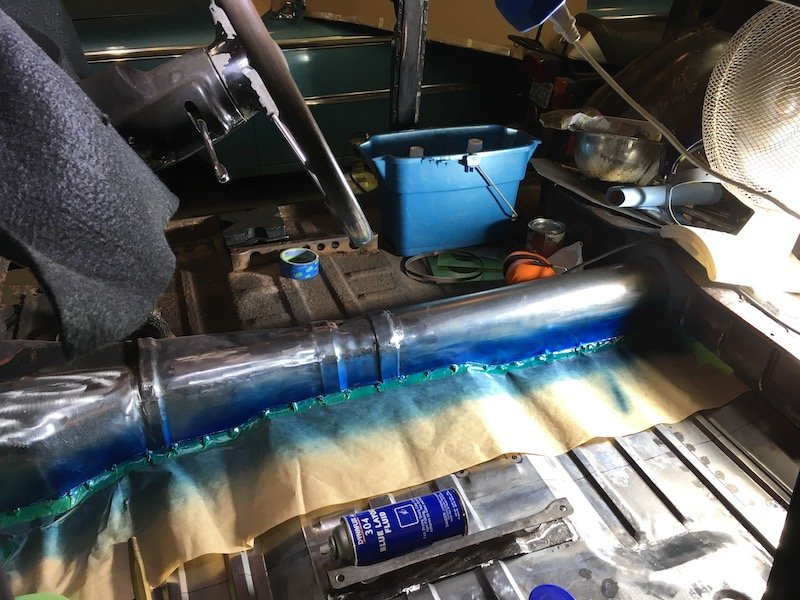
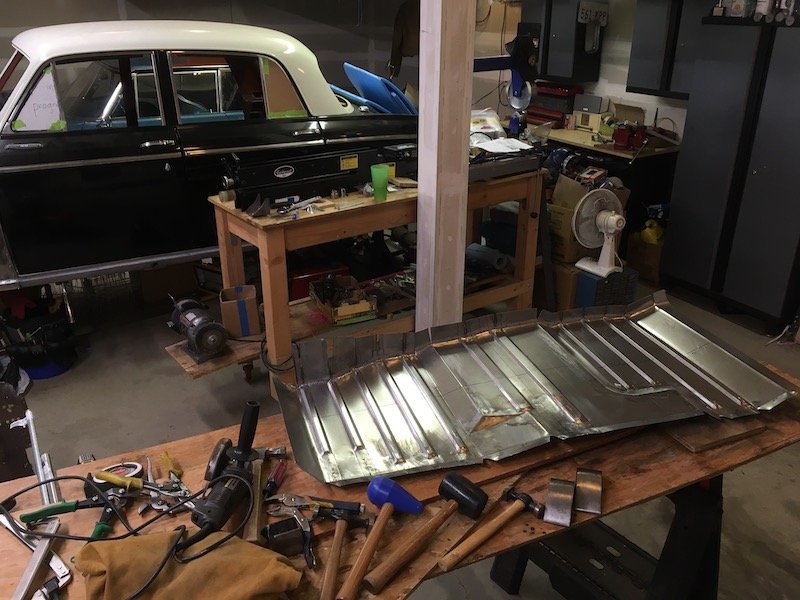
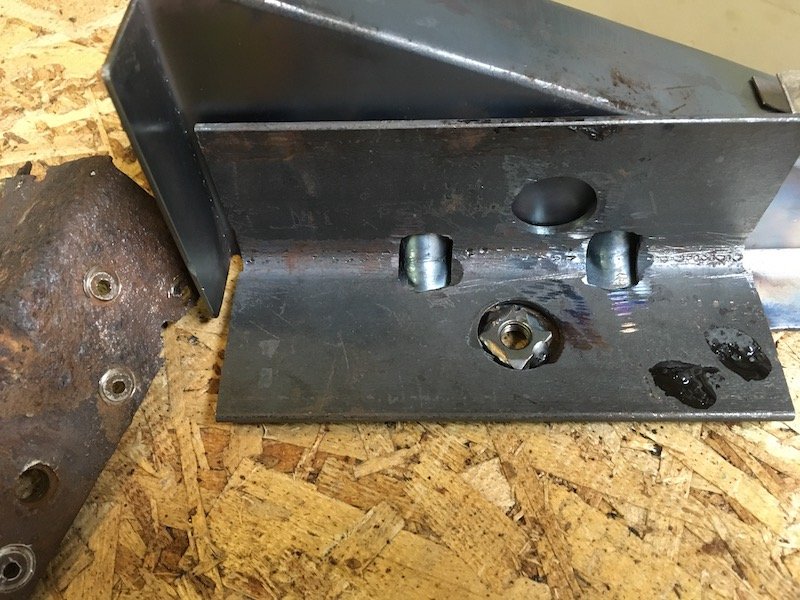
Building the 1961 Datsun 310 Bluebird - Removing the rusty right side floorpan and inspection. Finished the left side of car and I'm now just starting the right side. Recording and assessing the before state of the right floorpan and adjoining structure. That big hole on the middle lower right next to the tunnel is where an aftermarket seat belt was bolted directly to the then thin sheet floor by a previous owner back in the sixties. Sketchy. No secondary doubler plate, exhaust seal or anything. Local floor thickness remaining was nothing. Potential belt tensile restraint strength was zero. Plan is to salvage and repair the seat support bracket. The bottom flange is rusted out and the rest is not too bad. Measuring up the rotted toeboard before cutting the floorpan out. Plan is to cut the toeboard out later along the tape line. Cut the floorpan out. Survey of the underfloor brackets. Looking forward. Looking aft. Frame is not rusted, just dirty. Front A-post and body mount bracket. Rotted. It will be replaced. No. 2 (moving aft) bracket. It is twisted a bit due to some sort of abuse impact, and salvageable, but will be replaced since I've already made a new one. Side of body and jack lift point bracket. Rotted out on bottom. It will be replaced. B-post and body mount bracket. It might be salvageable. Floorpan, side of rear seat pan. Rotted. It will be replaced. Already have a new one made. Lower edge of rear seat pan vertical structure will be patch repaired. The remains of the removed right floorpan. Rust attacked it from the top down. Bottom view of same. An asphalt base underseal coating was applied against the otherwise bare sheet metal by the Nissan factory. This coating was relatively effective, it just didn't help the top side much. The only salvageable parts (so far). And the work continues... Plan is to go around counterclockwise and repair the perimeter structure starting with the toeboard before launching into making a new floorpan. Masking paper on the left side is to keep the cutting and grinding particles off. I'm also going to cover that completely with a protective welding blanket. Discussion: https://oldschool.co.nz/index.php?/topic/60267-marts-pl310-61-datsun-bluebird-sedan/ Build: https://oldschool.co.nz/index.php?/topic/60264-marts-pl310-61-datsun-bluebird-sedan/
1 point
-
So, funny story to tell. ( @Raizer please read, in case I've given you a bad lead on where to buy stuff from) I noticed my brake lines didn't have printed markings on them, unlike the photos the guy had on his website. So having been through a cert before, got worried I actually have no proof that the lines meet any standards. So I emailed him, asking for something in writing to show he used the correct parts. I got a weird response about how the website photos are 12 years old and manufacturer's don't print id marks on their lines anymore because customers don't like the writing on their custom bikes and that legally he can't show me any paperwork as it breaches his contract with the distributor of the brake line company... (bullshit). So long story short, after a few emails he offered to refund my money. So basically I think the guy was full of shit. Anyway my PayPal account received a credit and I've got my money back. So I'll take my $125 refund, add that to the $140 I was going to spend on the new rear line, and get exactly what I want here in NZ. Over double the price...but all legitimate, not dodgy underhanded tactics.1 point
-
So, i was wrong.. it wasn't the intake that was restricting it on high boost. Still starts to brick wall around 200kw Red line is the new setup, Blue dual setup Not following what it does on low boost: Decided to test the pressure drop across the crappy china intercooler. I'm not fancy enough to have 2 map sensors. so these are back to back runs. Red run is measured pre intercooler. Blue post 1.5psi maybe doesn't sound so bad if were running 30psi. but at this boost, its 10% pressure loss. The way it gets worse as power and rpm increase suggests its junk also. was almost at the top of my list to replace anyway1 point
-
Ok Just finished putting on the snuffleupagus. looking good so far! red is the dual plenum. blue new runs from all the other testing i done up there ^ somewhere blue: new plenum with correct runner length. green: weld elbows with dual plenum red : long ali bends with dual plenum pink: dual plenum bolted straight to throttles New setup wins everywhere. when back on the normal 13psi should get interesting1 point
-
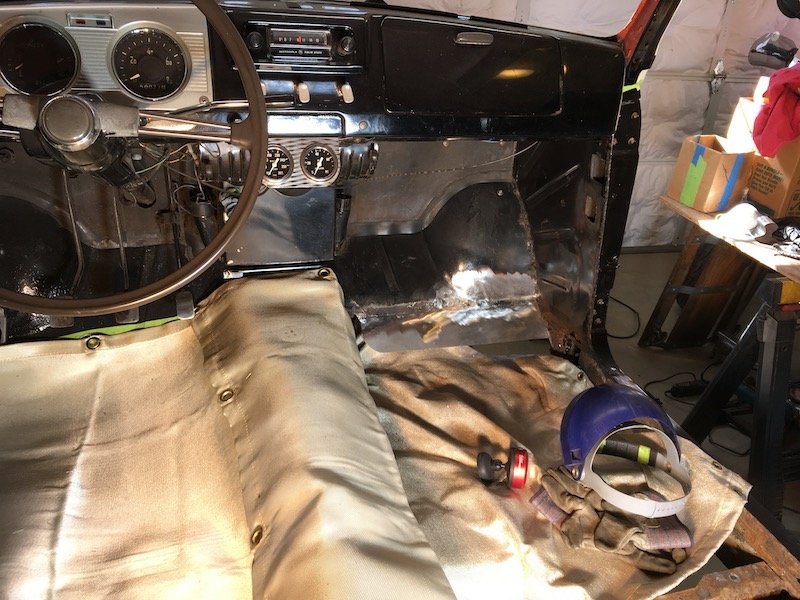
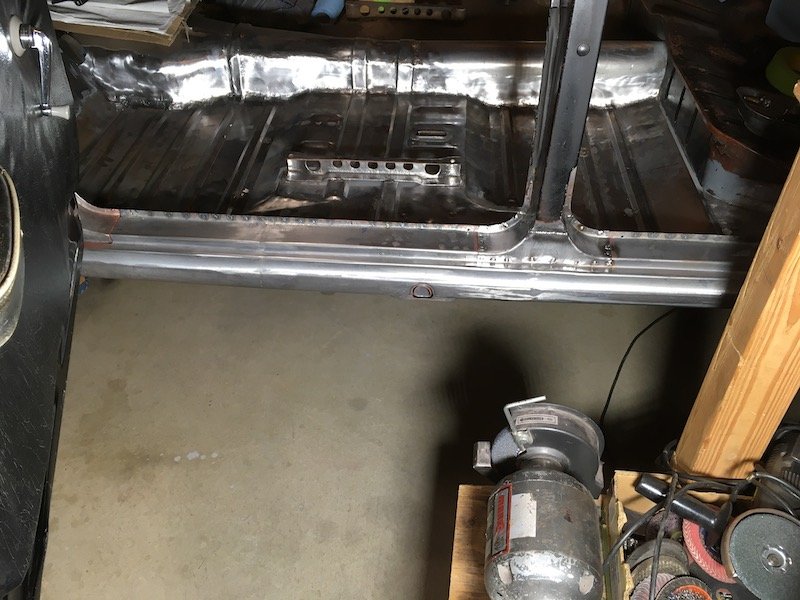
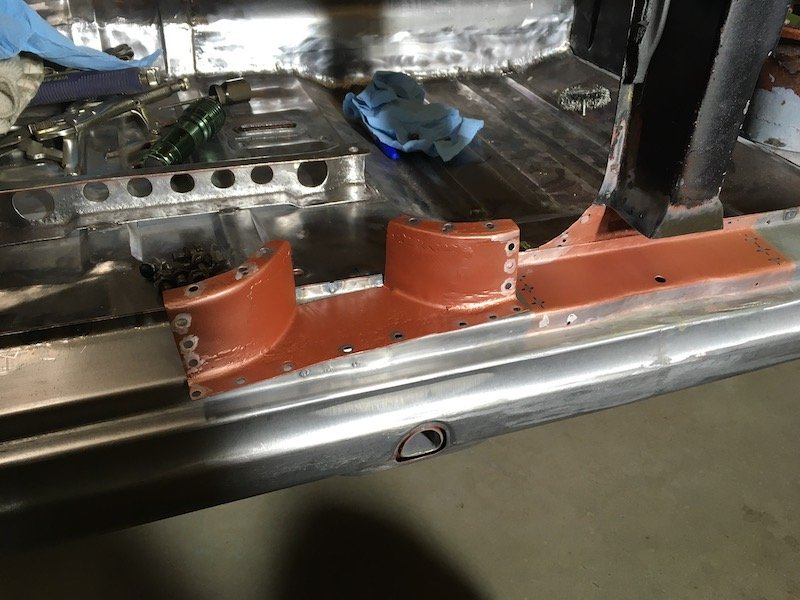
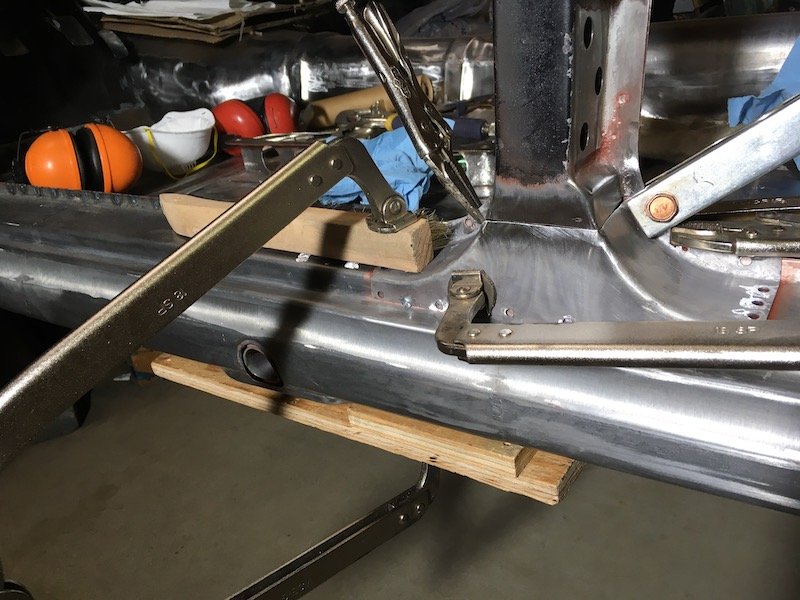
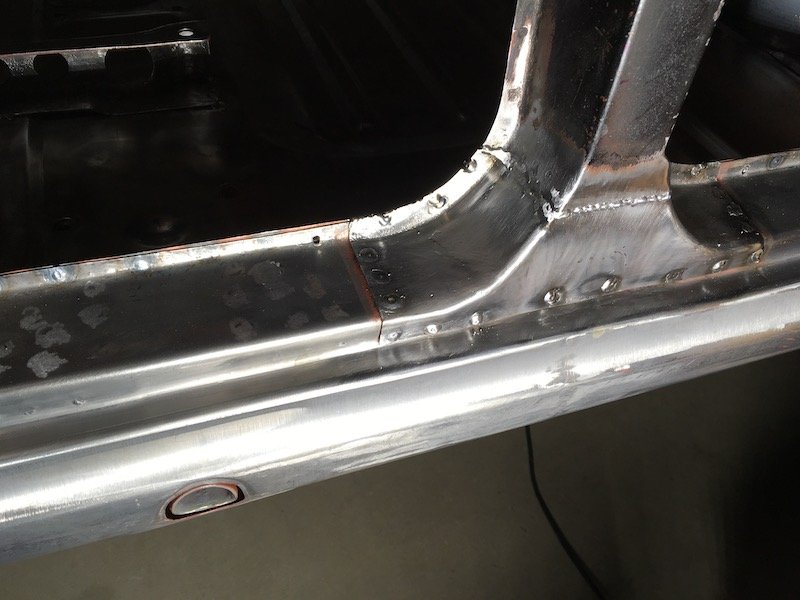
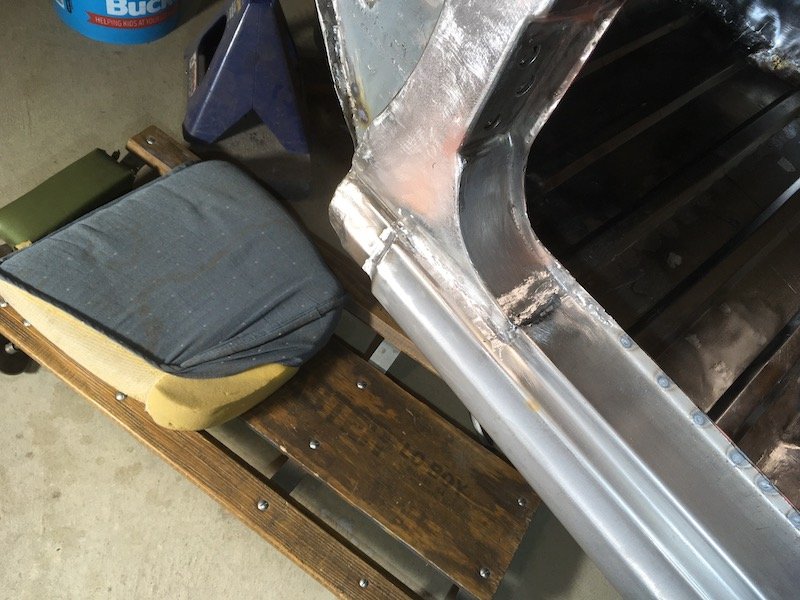
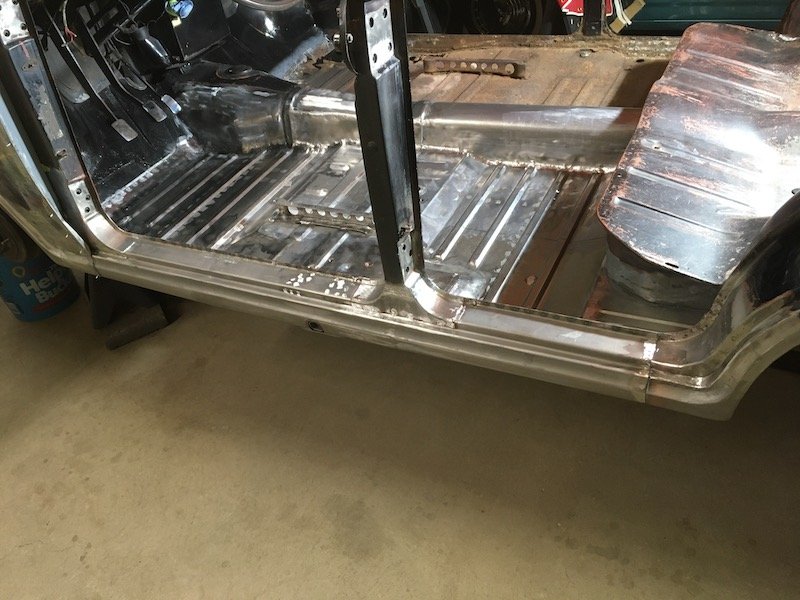
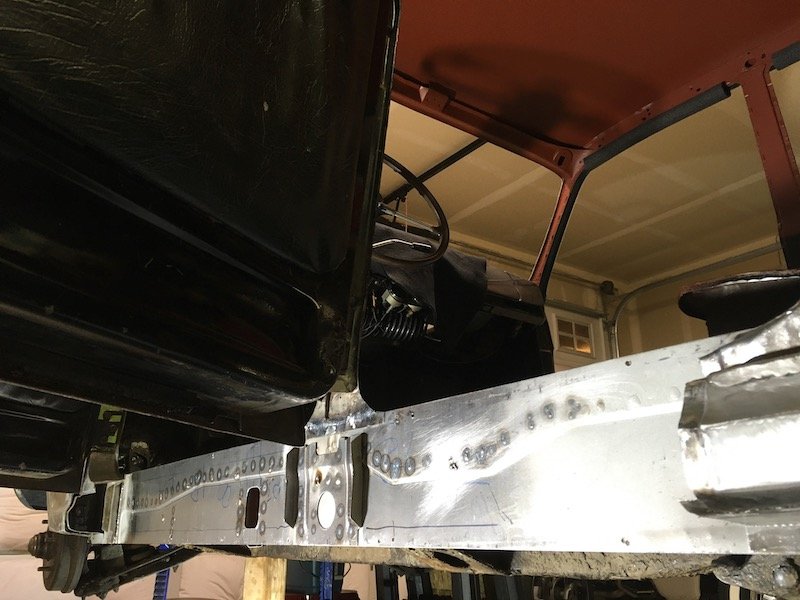
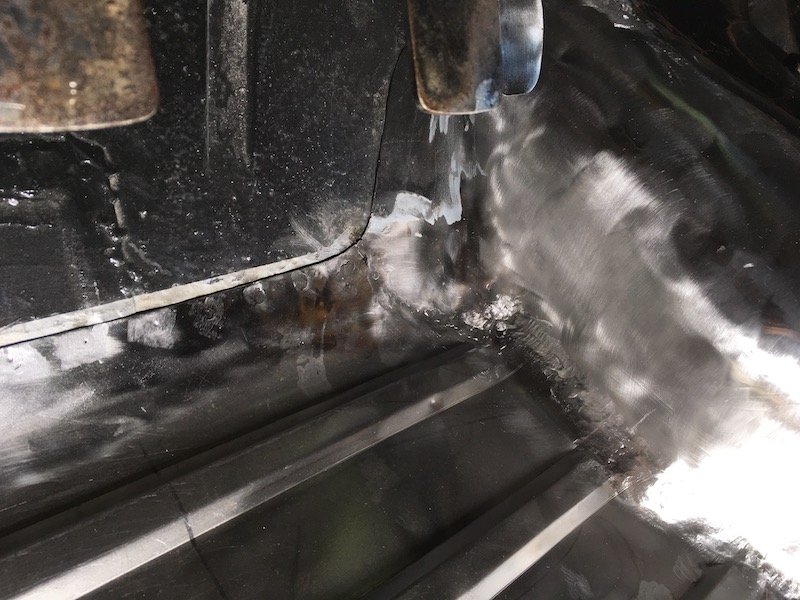
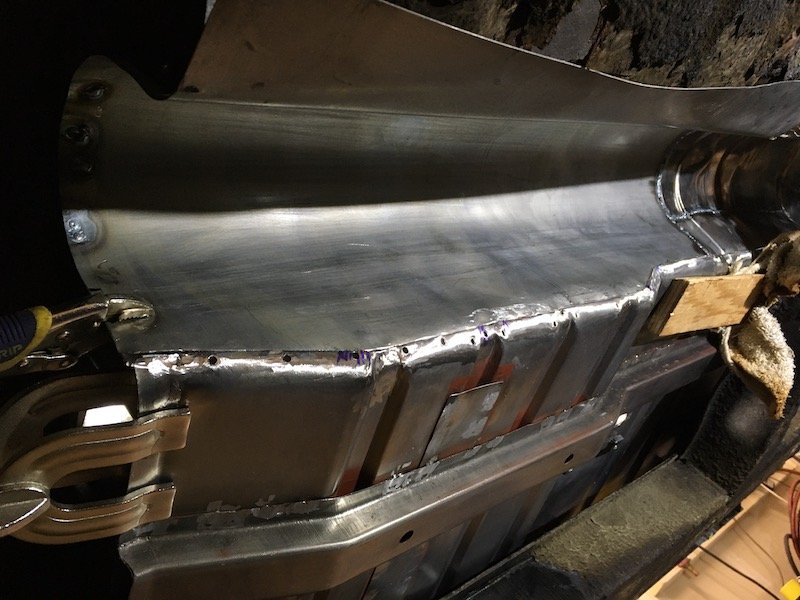
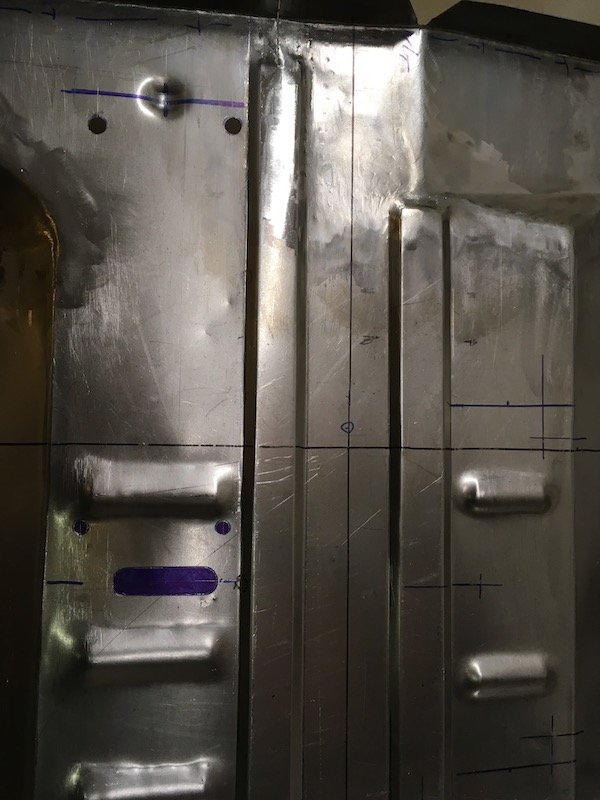
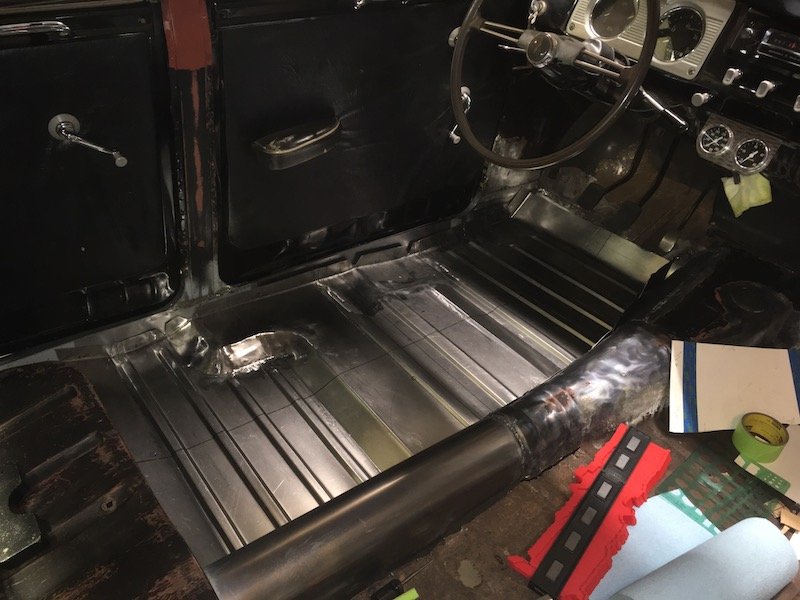
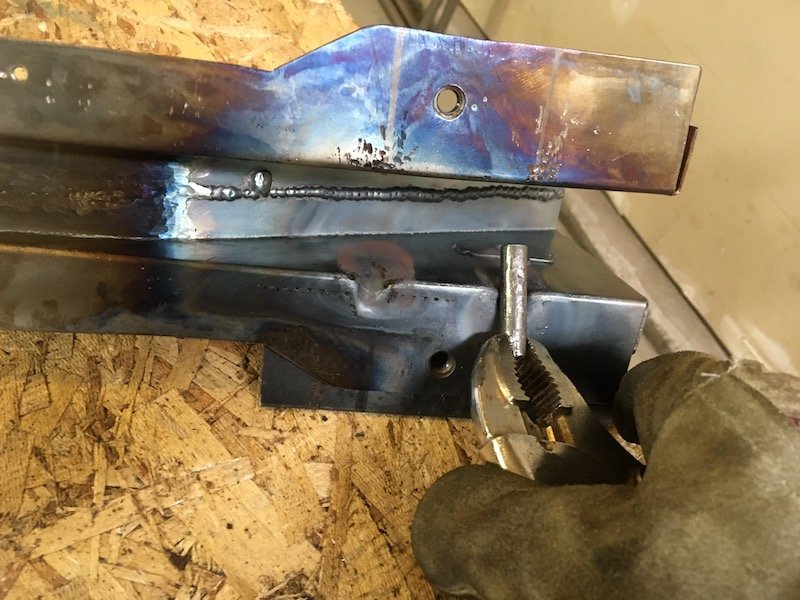
Building the 1961 Datsun 310 Bluebird - Painting the insides of the inner and outer sill and welding them into the car. Metal cleaned, etched and zinc oxide conditioned. Epoxy primed inner sill. Epoxy primed outer sill. Ready for plug welding. Doors getting in the way. I'd left them on for keeping a check on fit and gaps. . Made dozens of plug welds to attach inner and outer sill together and then went to work on the B pillar base and ends of sill. It's always a lot of fun to weld stuff shooting the wire feed straight up while laying on your back. Clamp and weld the aft end. Clamped it up and welded. A little rough but eventually cleaned up nice. Pinned it underneath at the body jack pipe to support bracket with a solid 3/8 inch rod. Maxed out the MIG power and wire feed and made eight ugly fat tacks then ground smooth. Shaping up with lots of now permanently attached and shiny metal, It has way more corrosion protection on the insides than original. A stark contrast to the right side now. Discussion: https://oldschool.co.nz/index.php?/topic/60267-marts-pl310-61-datsun-bluebird-sedan/ Build: https://oldschool.co.nz/index.php?/topic/60264-marts-pl310-61-datsun-bluebird-sedan/
1 point
-
Getting really into making these gear knobs. Few more I've finished recently.
1 point
-
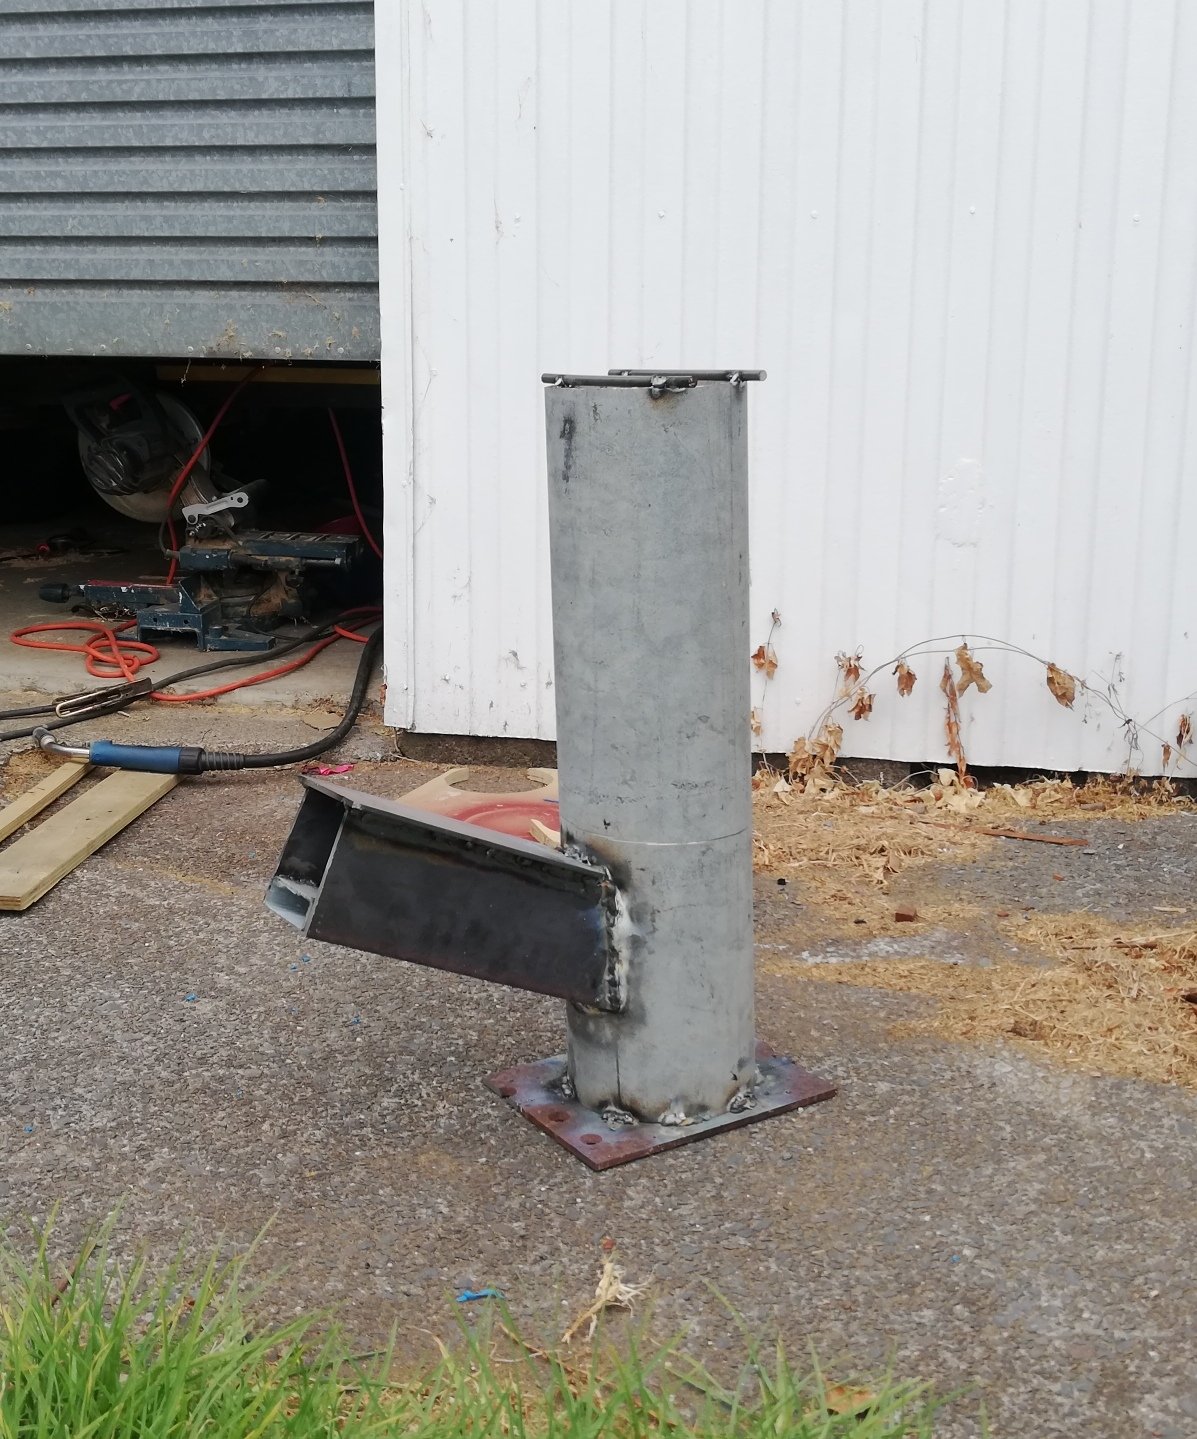
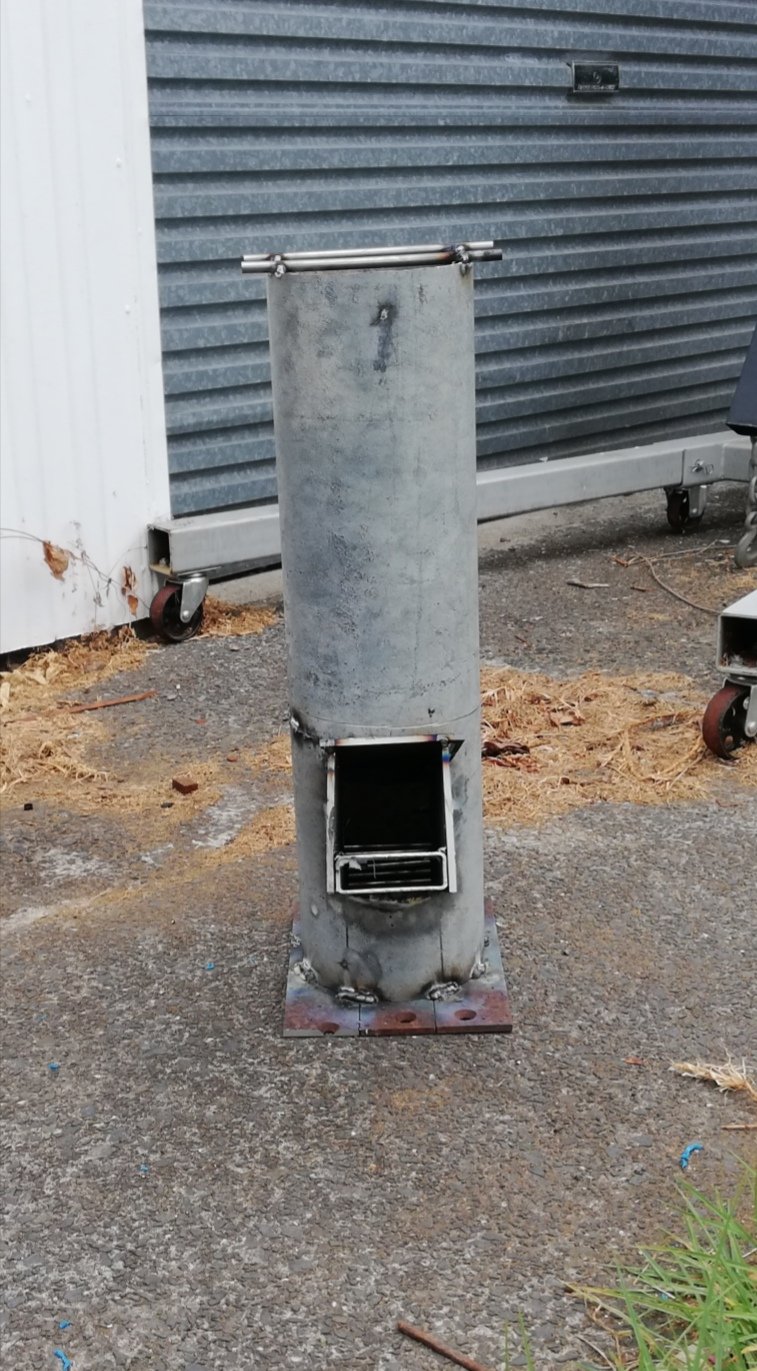
Had some pipe left over (it's also splashed in pigs blood from homekill, so it's a pleasure to weld yum yum) A decent little length, looked about BBQ height, so I scrounged up all the rusty scraps that were too good to throw out, and made this rocket stove. Should have cleaned it up better and not welded outside in the wind. But a tidy up and some Potbelly paint should tart it up. Once I've cranked some temperature in it to burn off the galv as I don't want zinc in my food. lower bit is solely for air intake. Might fandangle something up to control it for simmering. Although fuel is probably the best way to control temp.
1 point
-
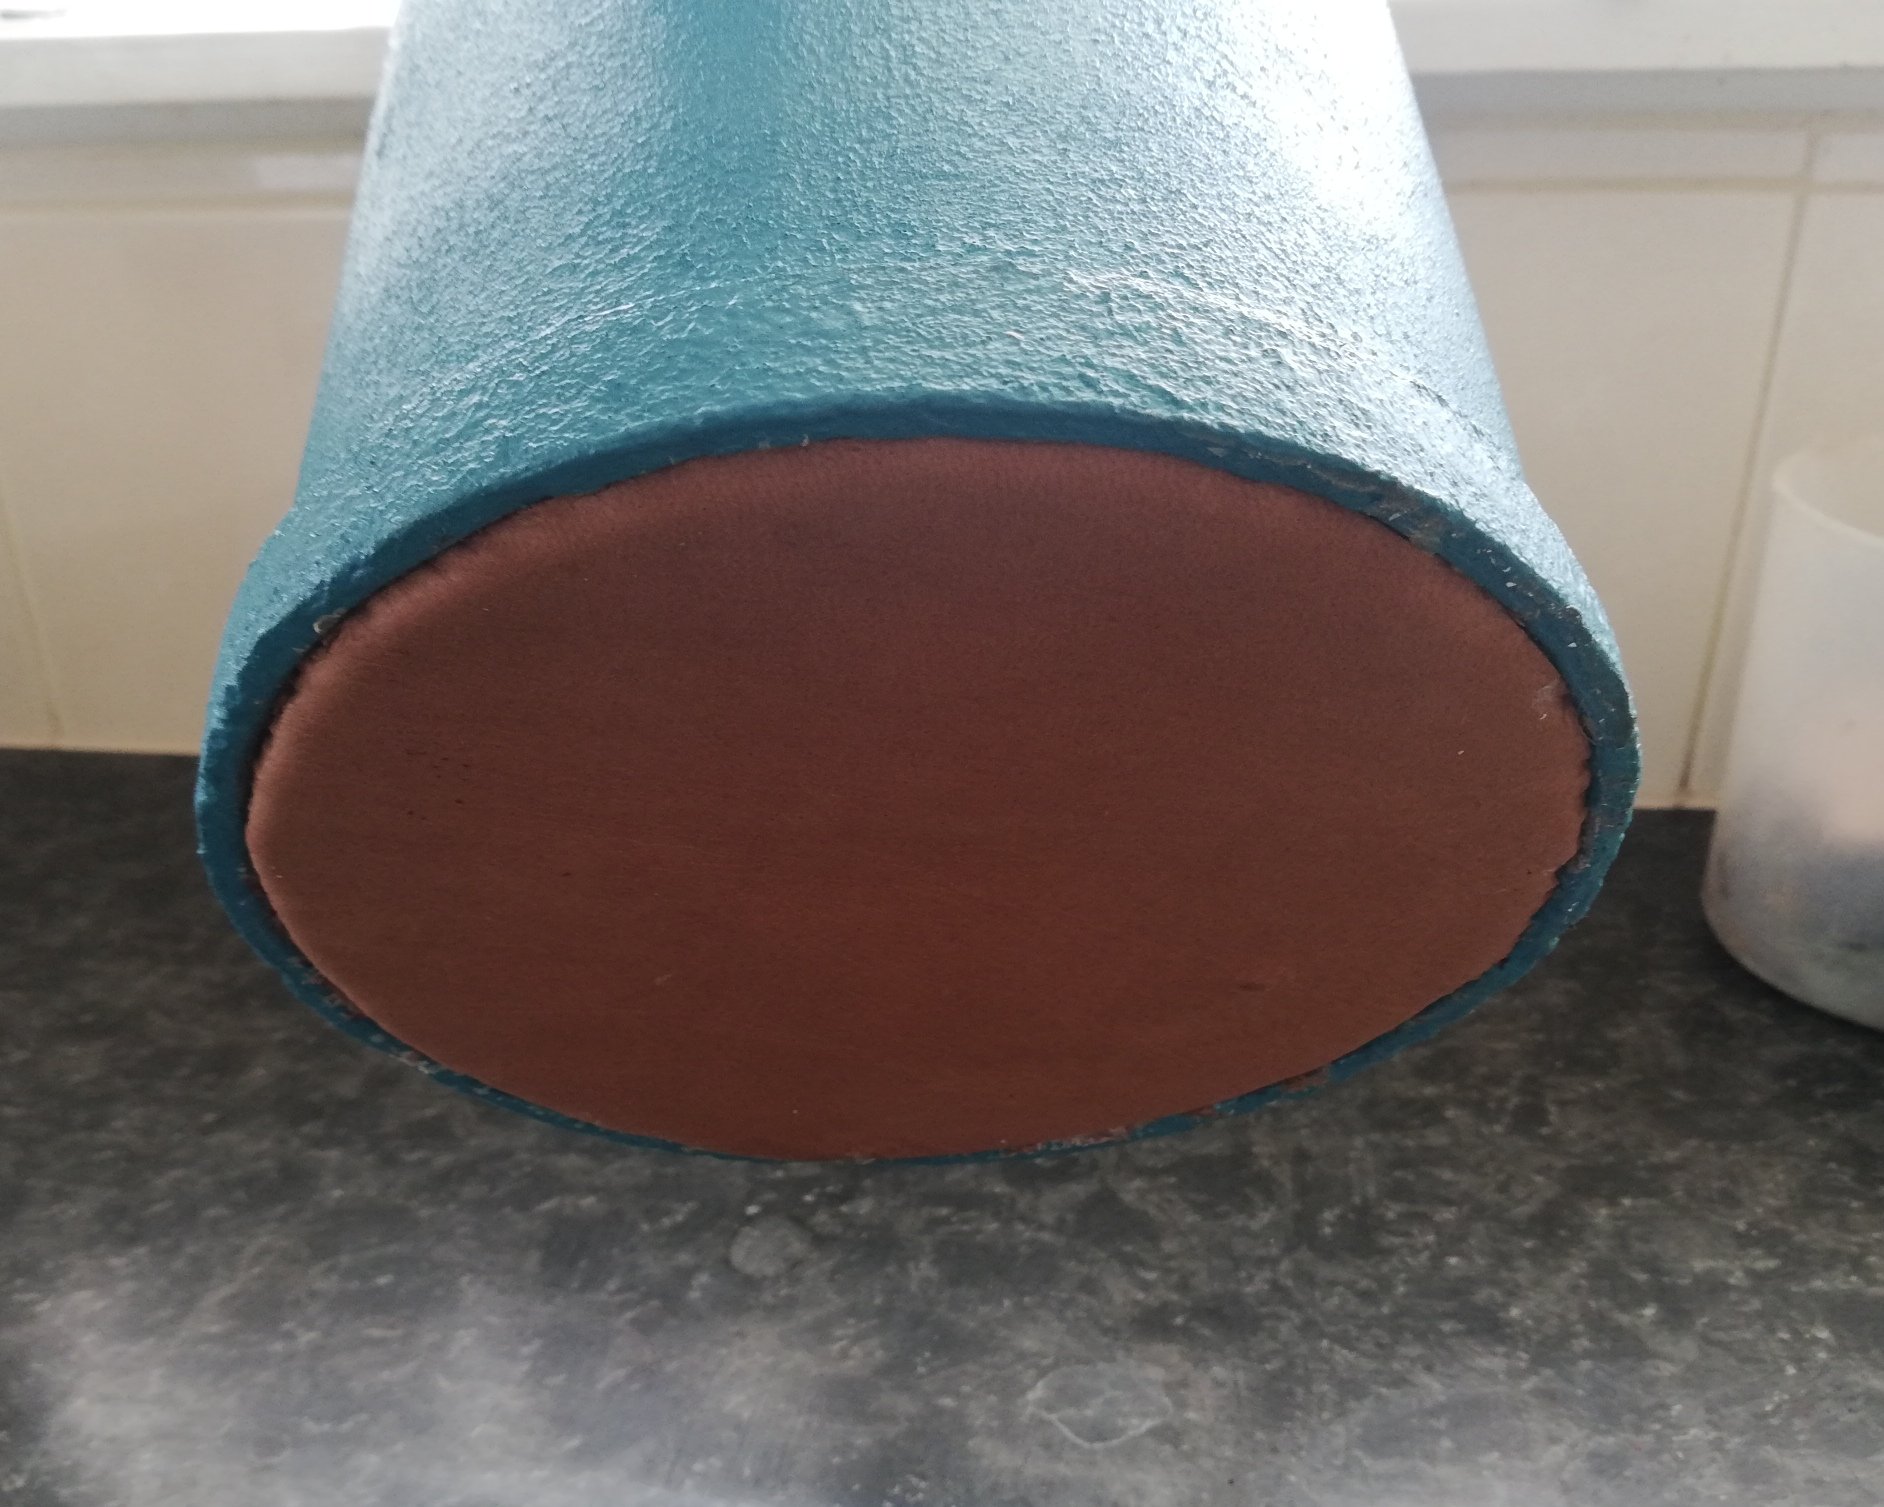
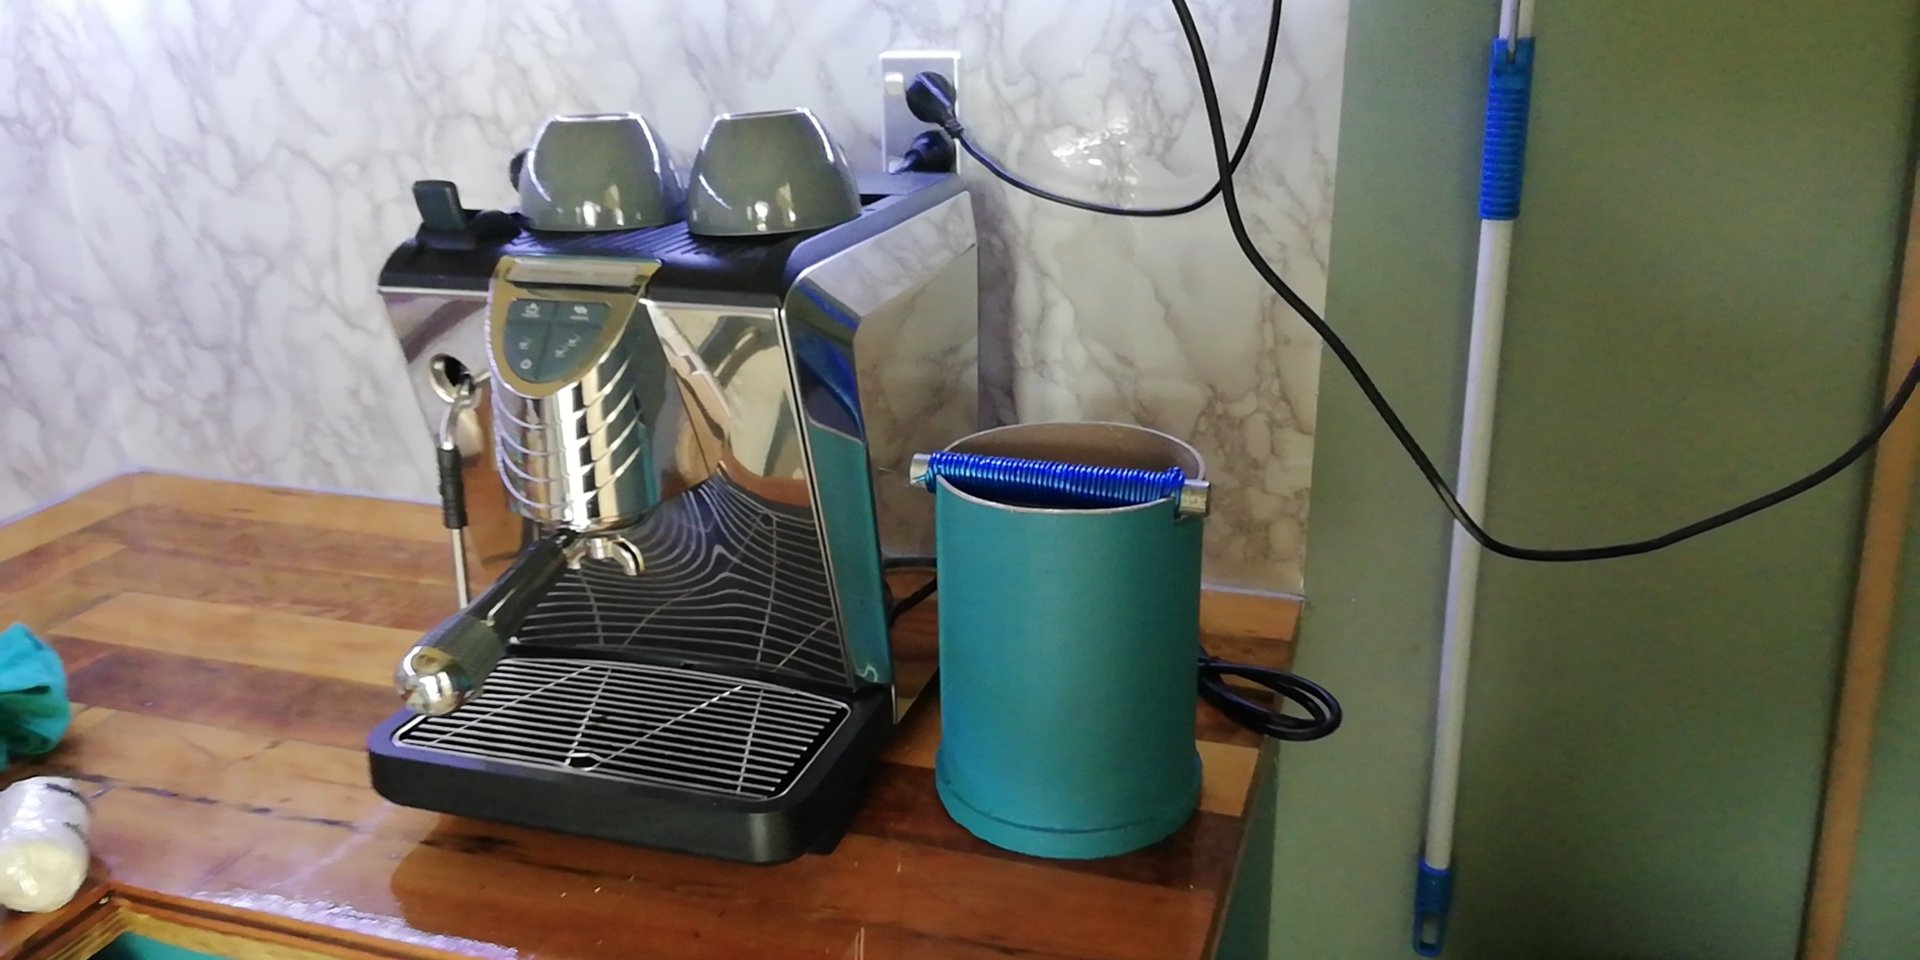
Knocked up a knock box for coffee grounds Scraps of steel pipe, plywood, leather and washing line
1 point
-
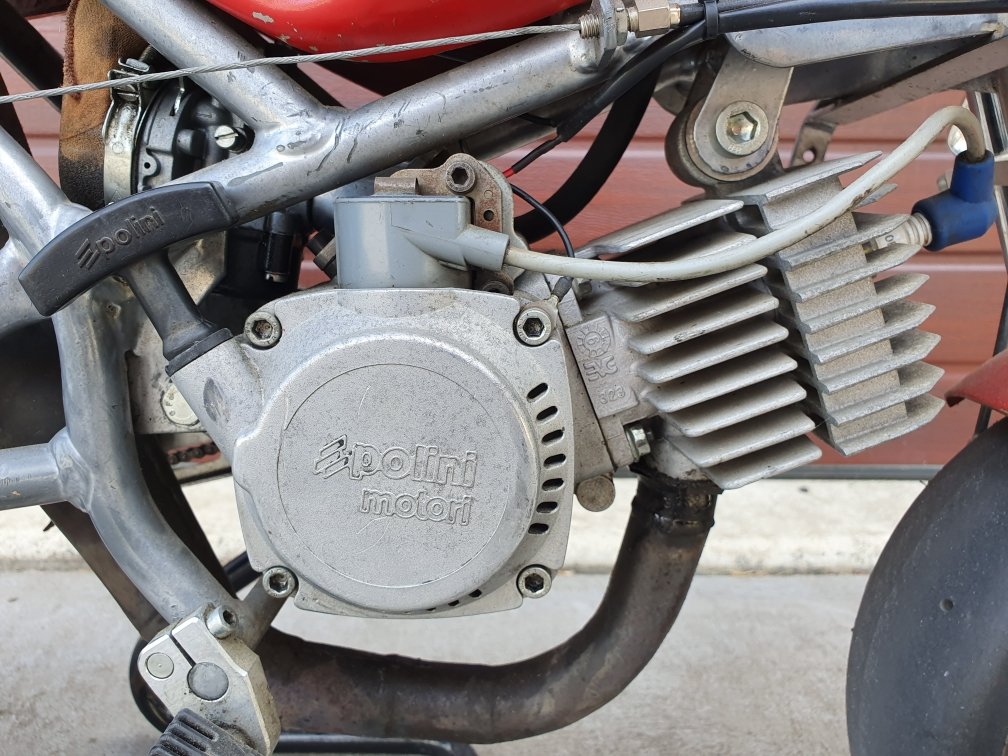
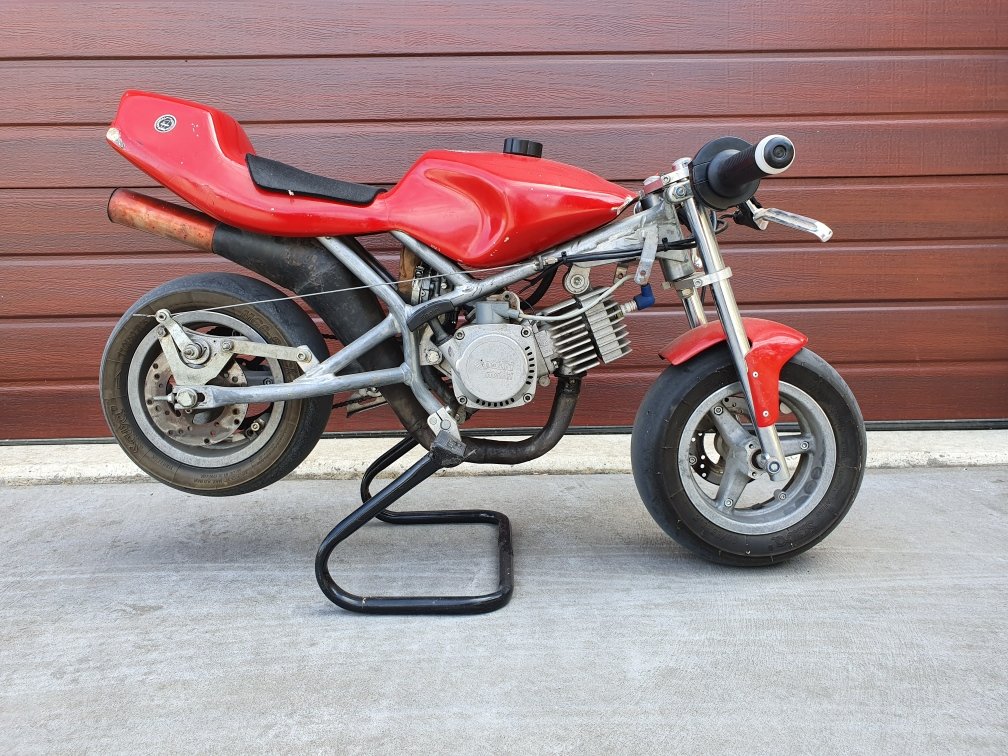
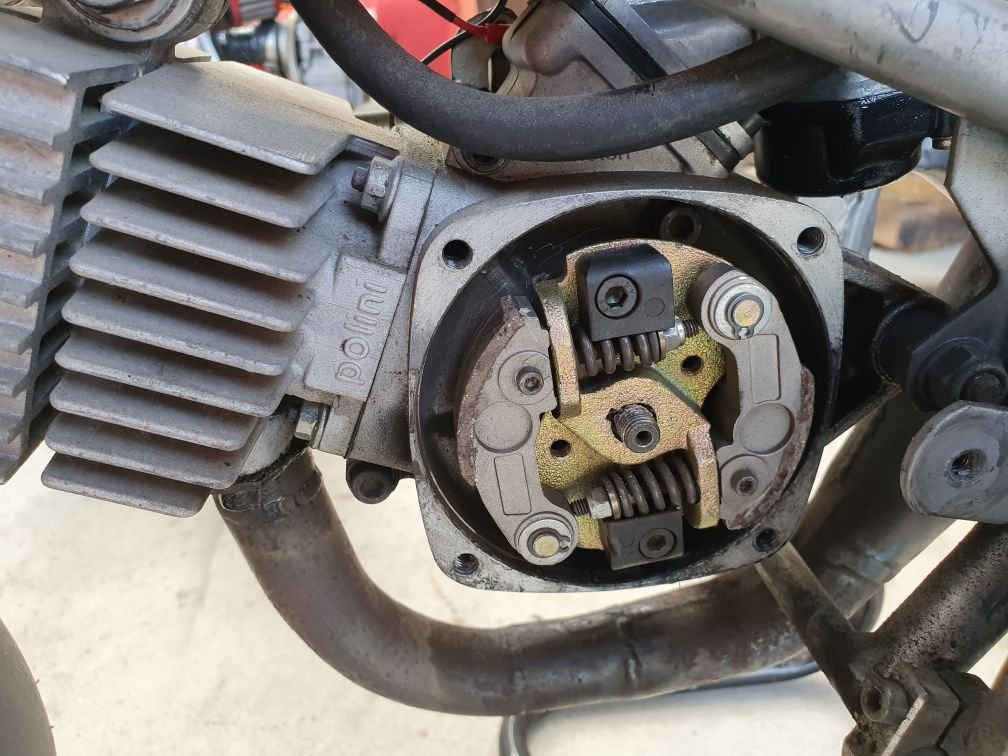
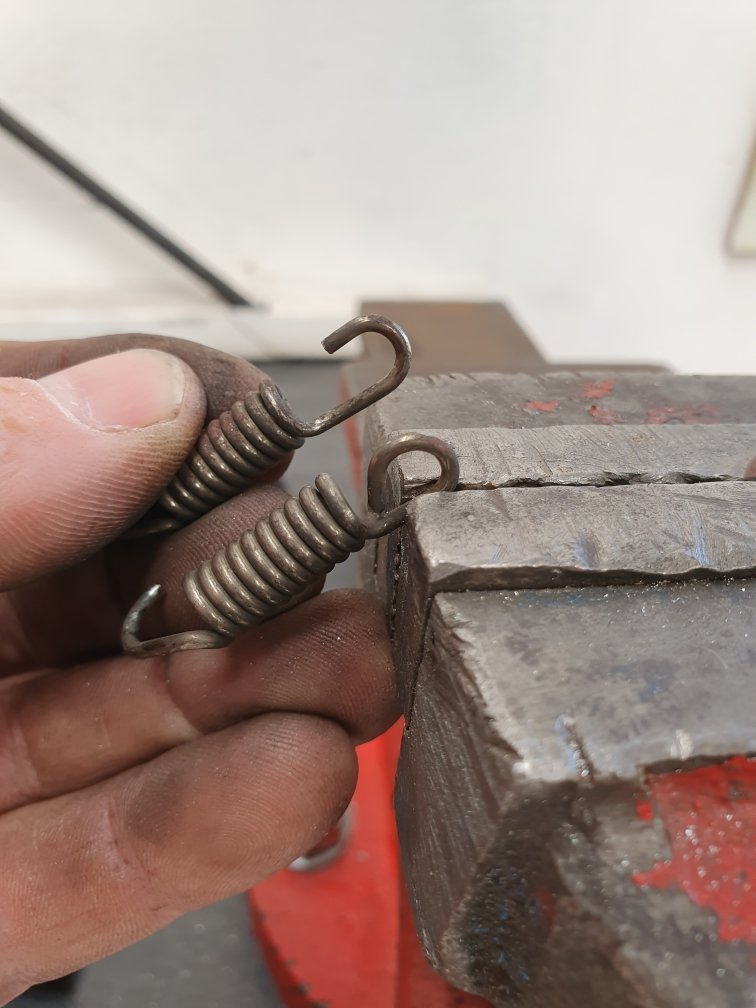
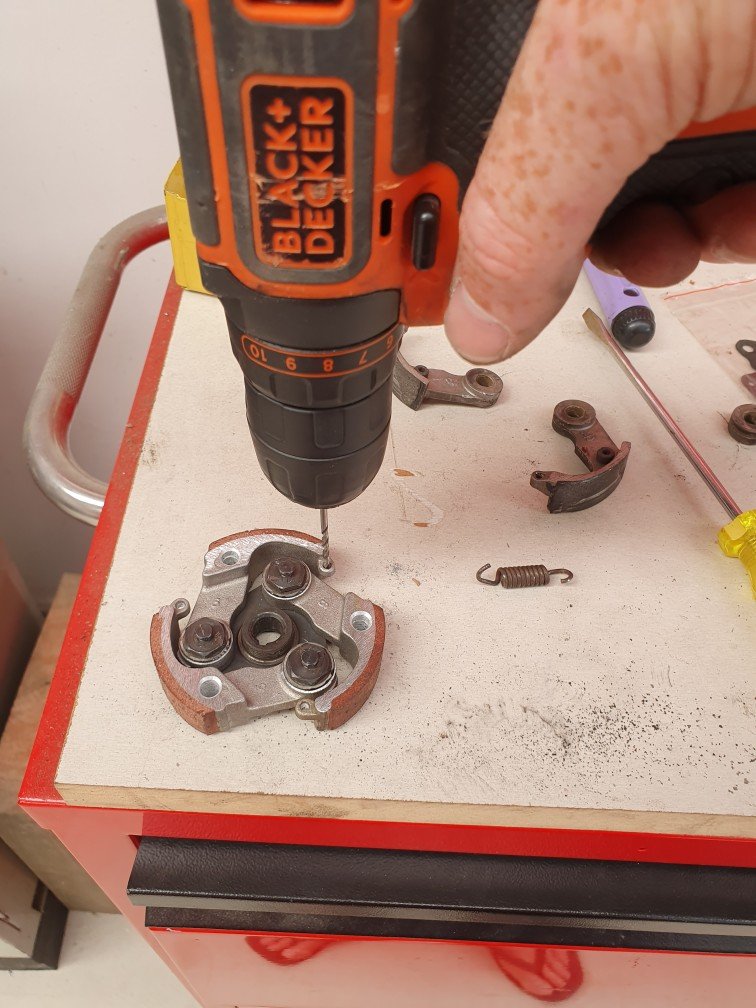
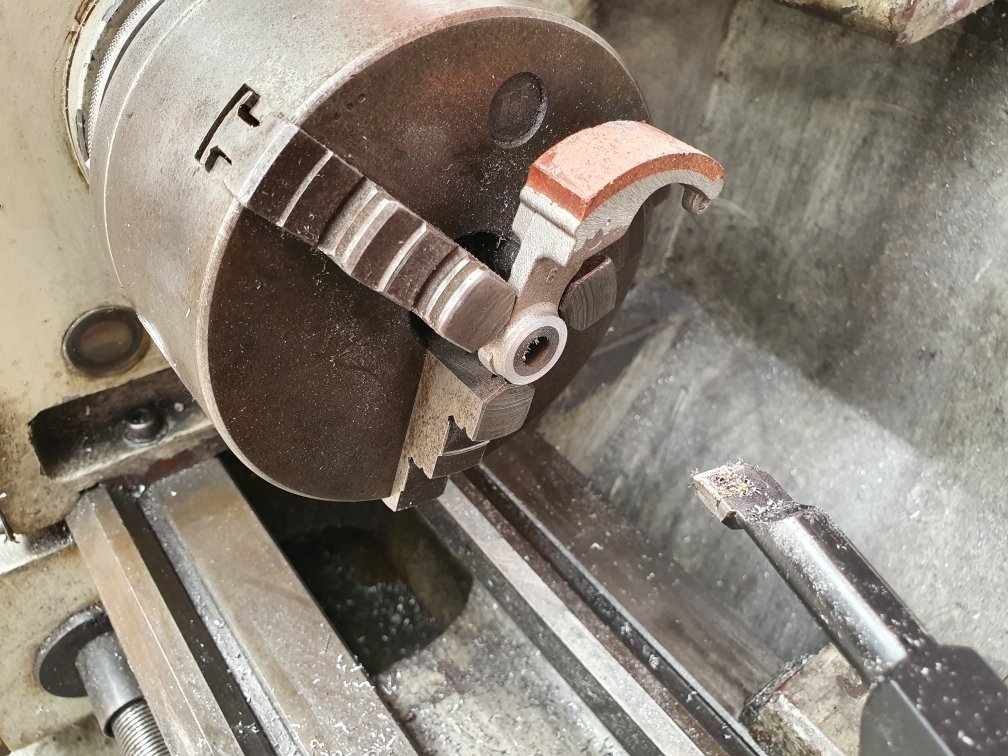
Okay, it's no secret I'm into some pretty niche things. Gopeds, drift trikes, lowrider bikes, skateboarding, gokarts, tallbikes, etc...etc... none of them are popular in NZ by any stretch of the imagination. Now this is about as niche as it gets. 39cc of polini awesomeness! It puts out 6.5hp and sounds like an angry beehive!!! Pops wheelies when the powerband kicks in...its mental. I picked it up a few years ago, with the goal of cutting it up and putting the motor on a goped. As it turns out, its basically the grandfather to the pocket bike craze and is highly collectible in Europe, some selling for over €2500. So needless to say, I won't be cutting it up anytime soon. The clutch fucked out, so I brought this "high performance" clutch. Well if the goal is to add excess weight to the rotating assembly, shift the engagement rpm down low where it's not making power and decrease speed, fun, your will to live as much as possible...then yes, this clutch excels in all those areas. I had other goals, like simply returning it to being awesome like it once was. So, I brought a Chinese clutch for a 49cc kids motorbike, that didn't fit either, then modified it to fit the polini by adapting the new clutch arms to fit the polini hub center. I cut the arms down in the lathe, to fit the polini bolts. Drilling to lighten the arms, this raises engagement rpm. Shortening the springs to put more tension on the arms, this further raises the rpm. Drilling the arm spring pockets to remove the shit casting marks to allow smoother operation, and allow the much fatter polini springs to fit. Back in and running like a dream! I know its ridiculous...I know. However its definitely one of those things that fits the saying "don't knock it until you try it". Not in the way someone may say having sex with men feels awesome "don't knock it until you try it"... no, nothing like that. This is more in the have you ever driven a rotary category... it's only purpose is to make you smile.
1 point
-
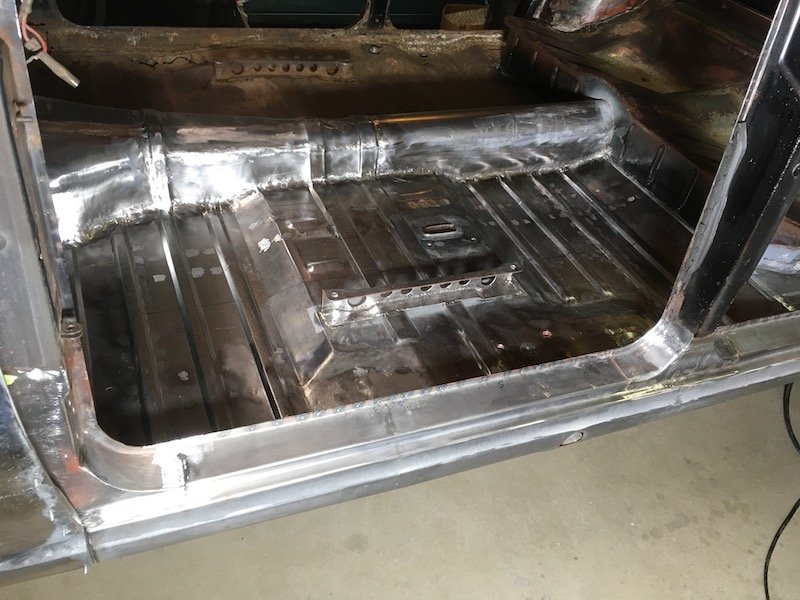
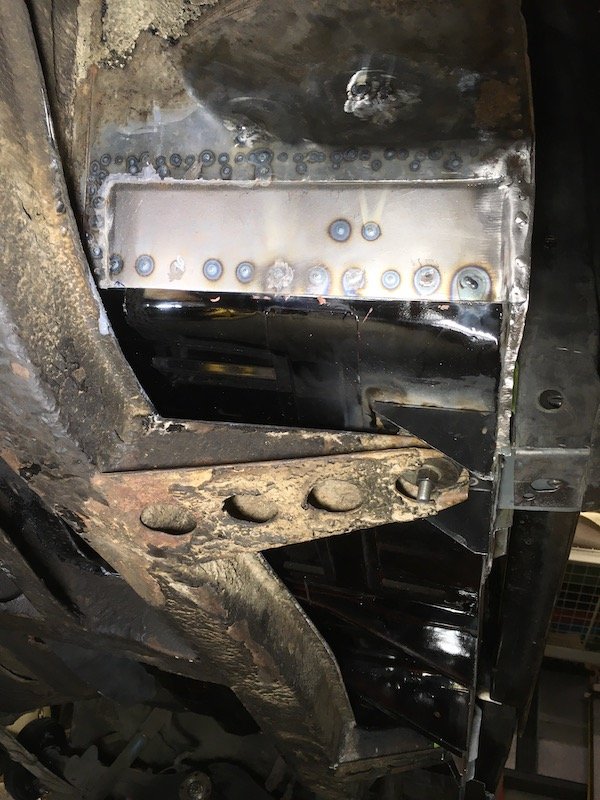
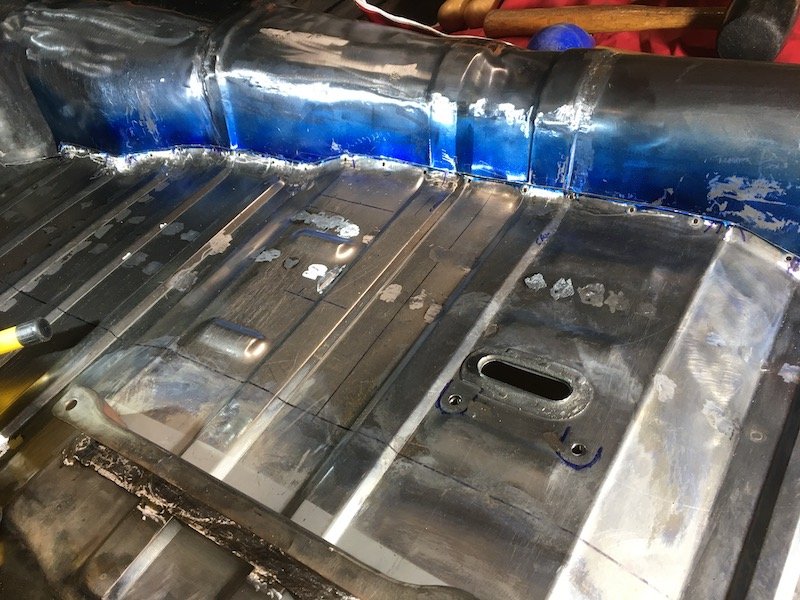
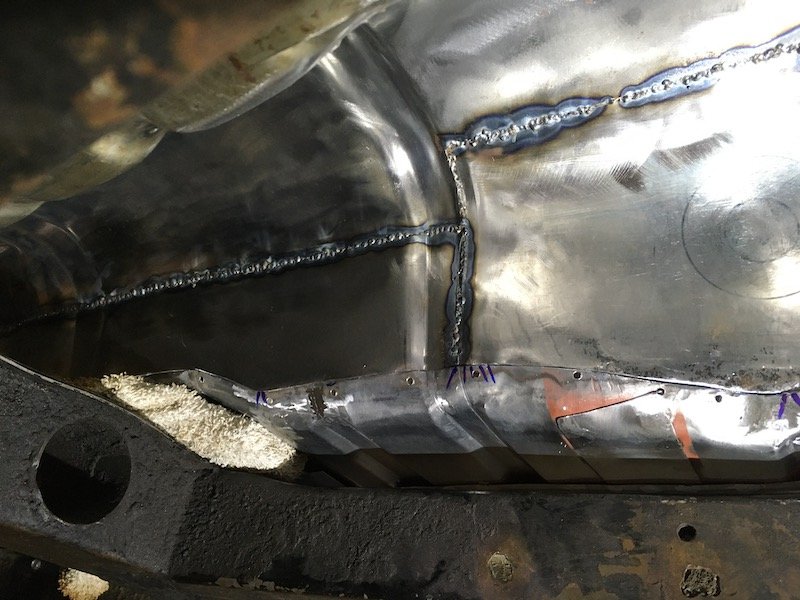
Building the 1961 Datsun 310 Bluebird Floorpan - Painting the underside and finally welding it into the car - Part two and last of the pics. Continued from previous post in the thread. Underside photos and a few more. Support bracket flange weld attachments to inner sill. Floorpan lap weld to prior toe-board patch. The far upper toe-board welds were from a couple of years ago and made a little too cold and random. I run the welder hotter now to get more melt thru and flatter welds. Sometimes though too much as in the extreme right weld melt thru. From previous post, the ideal weld melt thru I try to get. A nice shallow convex button of material. The outer sill will be welded onto the car next once I get all the hidden inside surfaces of both inner and outer coated with an epoxy prime. Should be a relatively easy task with no crawling back and forth under the car with my 60 plus year body. Too cold today though, freezing temps are prevailing. More topside pics of the completed work. Weld heads ground near flush for a clean look topside. Minutia. The black vinyl shown covering the door cards is not original. Probably from a late 60's redo. The original red and burgandy material remains underneath. The arm rest was salvaged from an ivory white parts car in mid 70's and sprayed black. Bezels for door handle and window cranks also salvaged from same PL311 parts car. Originals, PL310, were about same color as steering wheel, dark brownish gray. More of same. Again. Complicated and cramped location to access with welder. It was a little bit easier to get at this area. The structural welds to the A post body mount bracket will be left as is for best strength. The Hi/Lo headlight foot switch support bracket was salvaged and re-attached, but I had to replace the bottom flange due to rust thin-out. Yeah, so that's about it for now. Time to take a break, organize small tools and heal up from the under-car torture routine. Discussion: https://oldschool.co.nz/index.php?/topic/60267-marts-pl310-61-datsun-bluebird-sedan/ Build: https://oldschool.co.nz/index.php?/topic/60264-marts-pl310-61-datsun-bluebird-sedan/
1 point
-
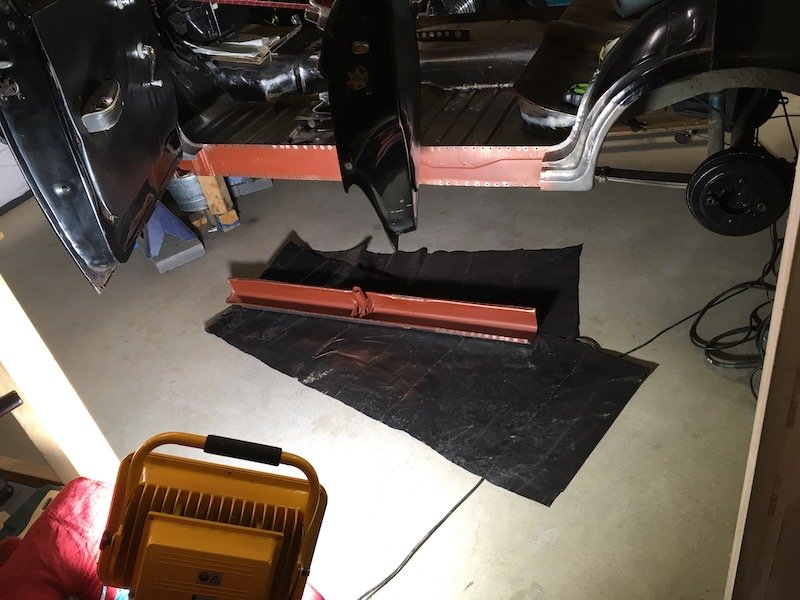
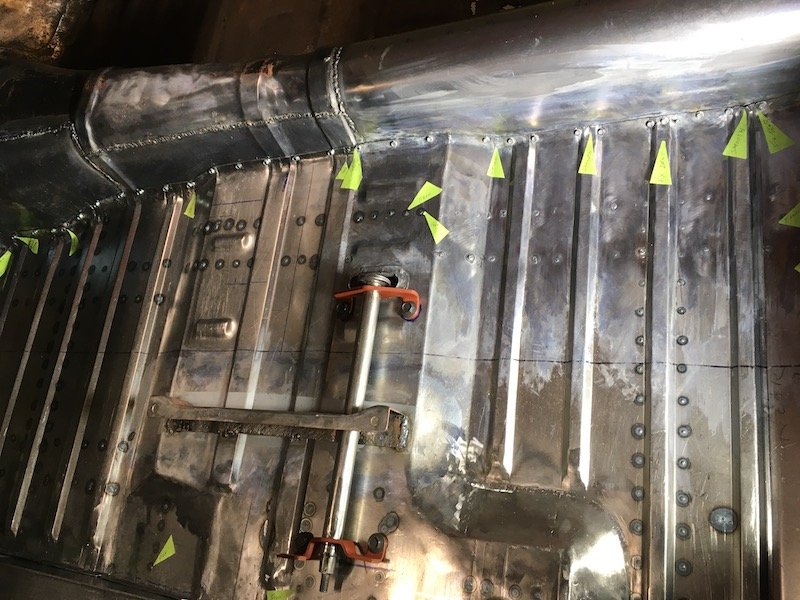
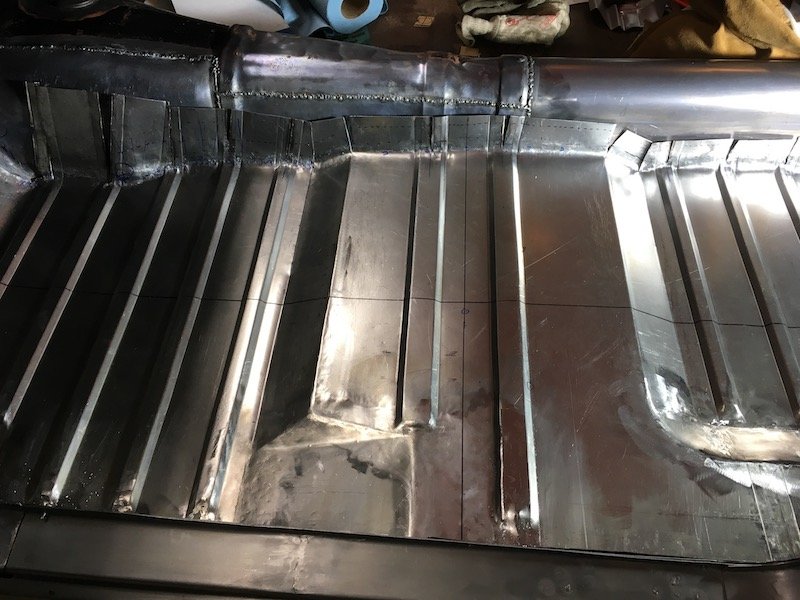
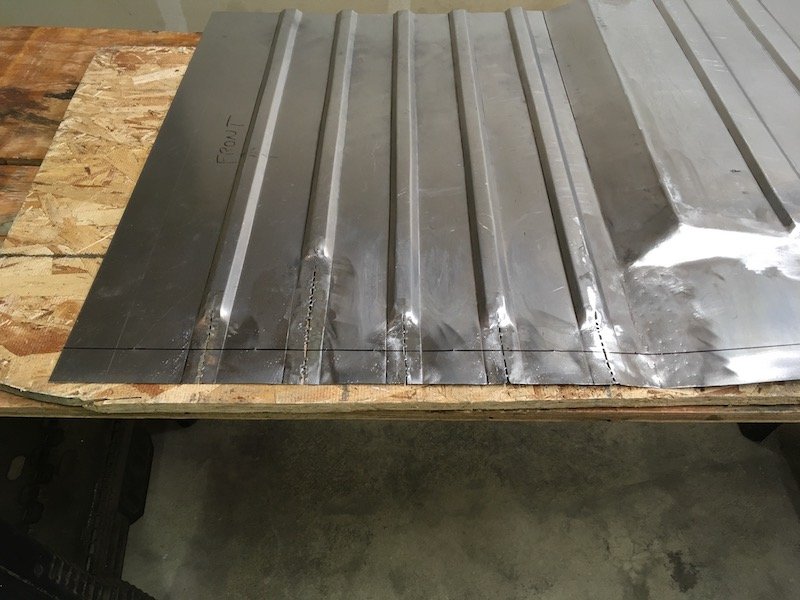
Building the 1961 Datsun 310 Bluebird Floorpan - Tunnel trim completed and floorpan edge conforms nicely! Trimmed and fitted. Trim was three steps. First a rough cut with an angle grinder cutting disk to within 1/4 inch of the scribe line, then manual cut with tin snips the rest of the way, finishing with hand filing to clean and de-burr the edges. It's very tempting to just start welding it now. Just need to paint the underside and weld it in - finally! Discussion: https://oldschool.co.nz/index.php?/topic/60267-marts-pl310-61-datsun-bluebird-sedan/
1 point
-
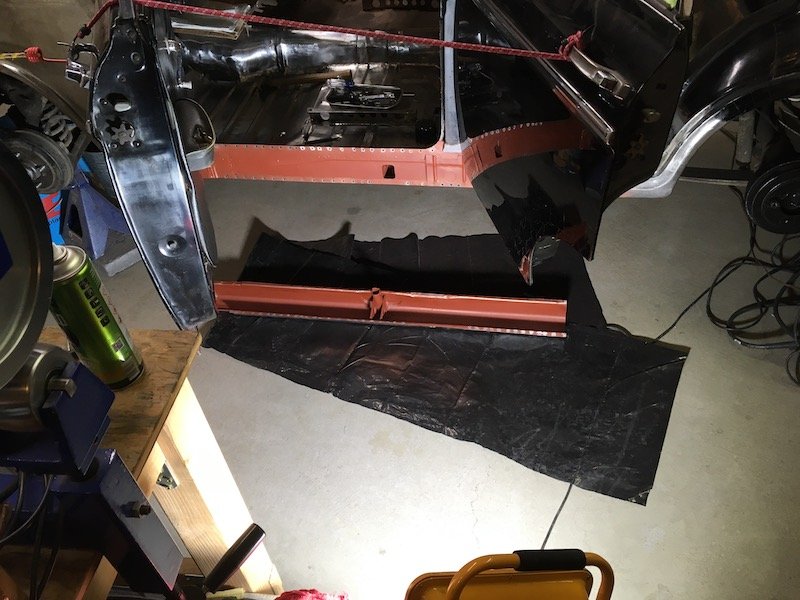
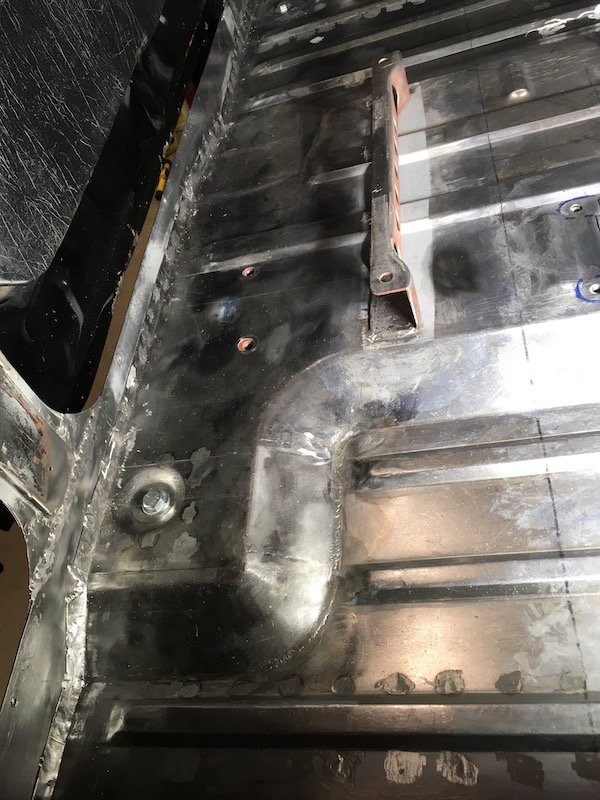
I'm trying to speed this project up a little bit. It's been over two years now since I began tearing into the Bluebird. The final fit check of the left floor, with it screwed down flush against the tunnel. Various inspections and fit adjustments are completed. I did some recruitment. The Apprentice. My son volunteered to help. Cleaning up my overly thick MIG welds on the tunnel. Preparing to paint a trim line on the tunnel. Painted and edge scribed with blue layout fluid. Tunnel is now ready to trim. Discussion: https://oldschool.co.nz/index.php?/topic/60267-marts-pl310-61-datsun-bluebird-sedan/
1 point
-
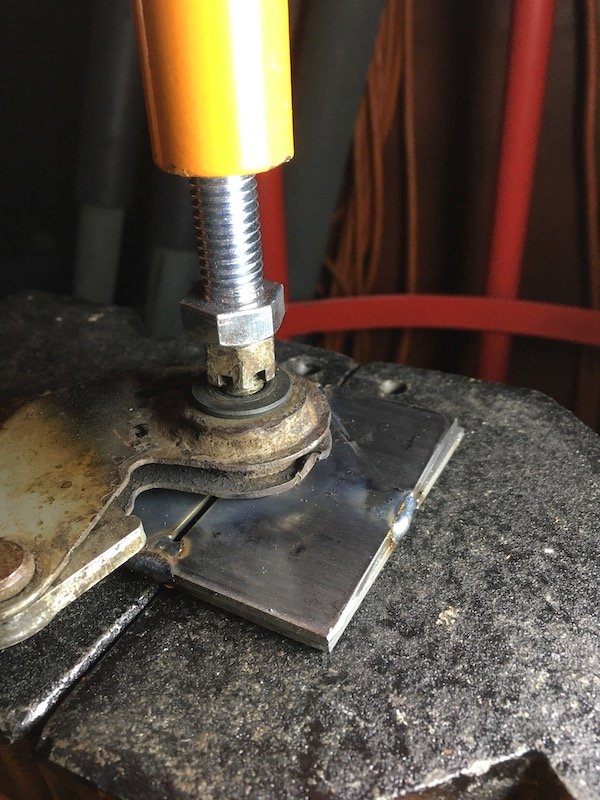
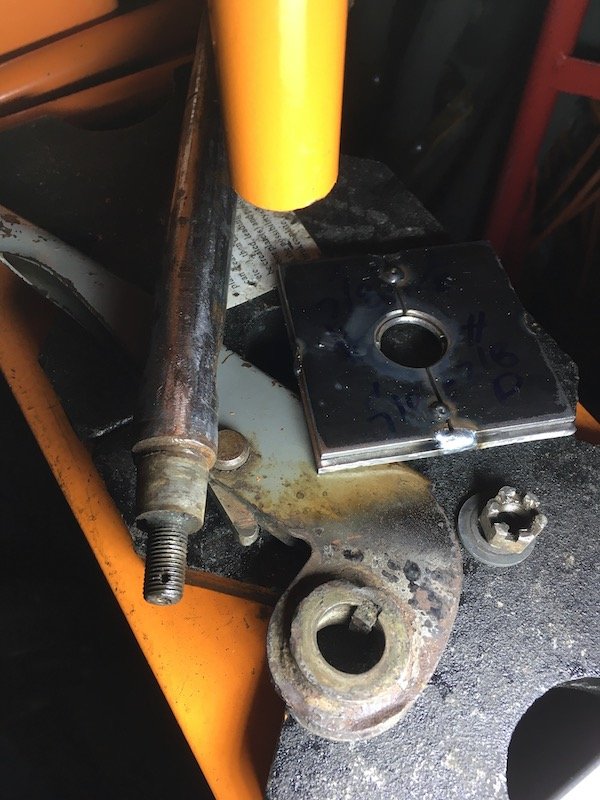
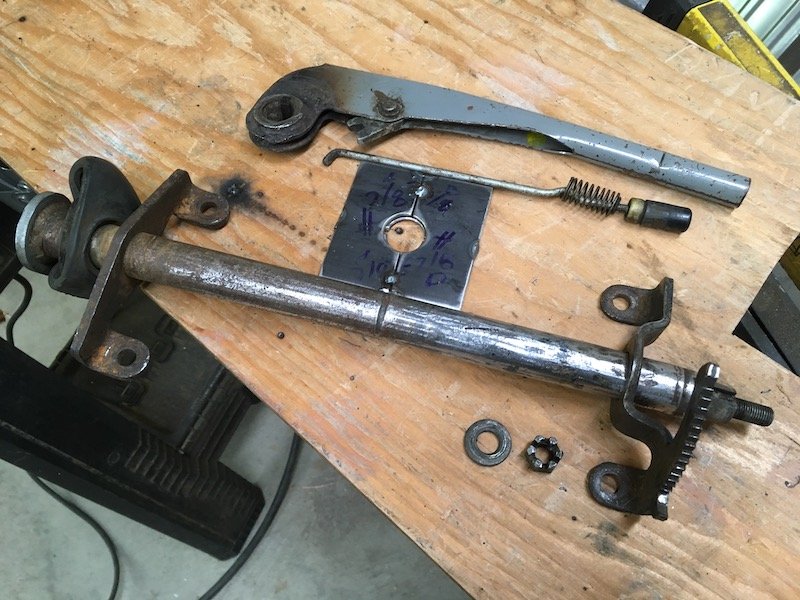
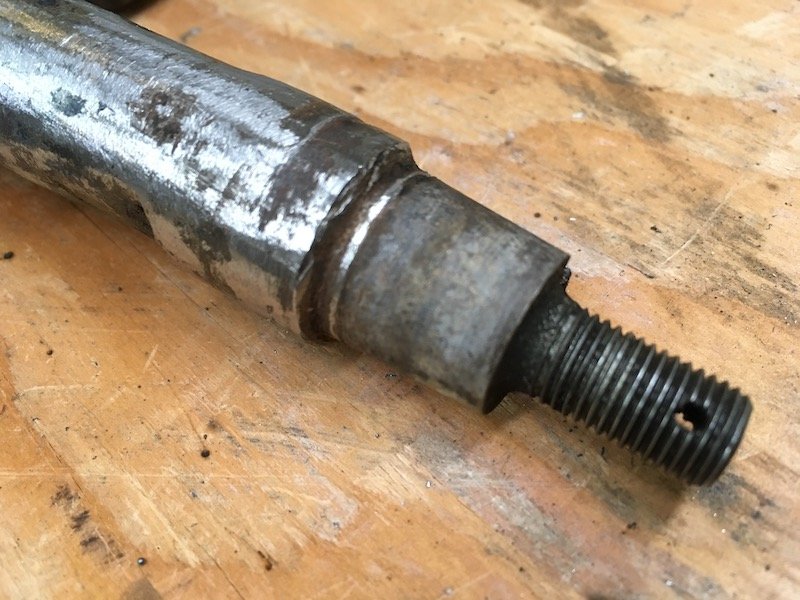
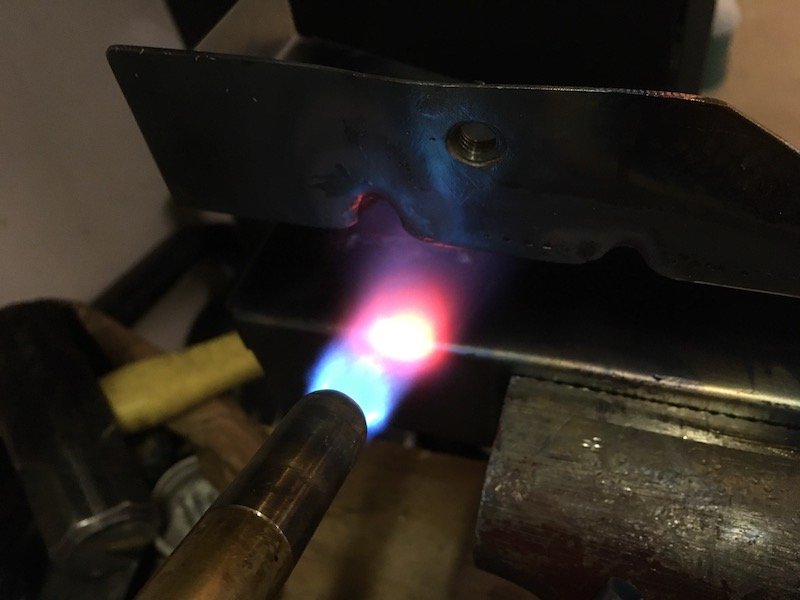
Building the 1961 Datsun 310 Bluebird Floorpan - Disassembly of the parking brake hand lever. Repair and fit checking the brake assembly installation against the floorpan. Adding the divot for the lever end. There was a problem getting this parking brake lever assembly off of the car in the first place. I need it now to temporarily attach it to the floorpan and locate the attach points and underfloor clearance cutout. The lever or arm was seized on the tapered shaft. I cut the seat bracket to remove the whole assembly and deal with the problem on the bench. Unsuccessfully, it was soaked in penetrating oil, beat, heated with a MAP torch and pried on with screwdrivers and a gear puller. Finally, I fabricated a very tight fitting, double plate steel backside restraint and popped it out with the hydraulic press. Success! At nearly 12 tons of restrained hydraulic force, the shaft popped out with a very loud bang. The abused and bent shaft and other related parts. The contact groove in the middle was cleaned up and filled with MIG weld. The bend of the shaft was corrected by beating on it. More weld metal was later applied to the shaft impact zone here and filed flush. ID of the lever. Laying out the attachment points and cutout penetration through the floorpan. Another simple tool fabricated from washers to make the same factory dimple below the lever pivot. Lever pivot dimple. Error made. Discovered I miss-located the bolt hole locations on the underside support bracket. Error was about 1/4 inch. These holes tie this structure into the mounting support above the floor for the parking brake. Above two pics shows how far off the support bracket holes were. The flanges should have been touching the inner sill. So I had to cut the square nuts off, fill the holes with weld and do these over again. More posts soon… Discussion:
1 point
-
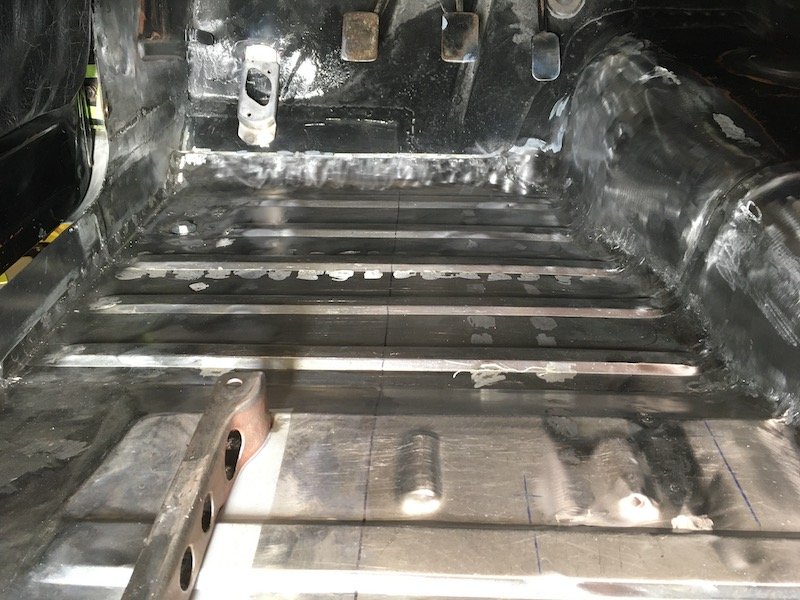
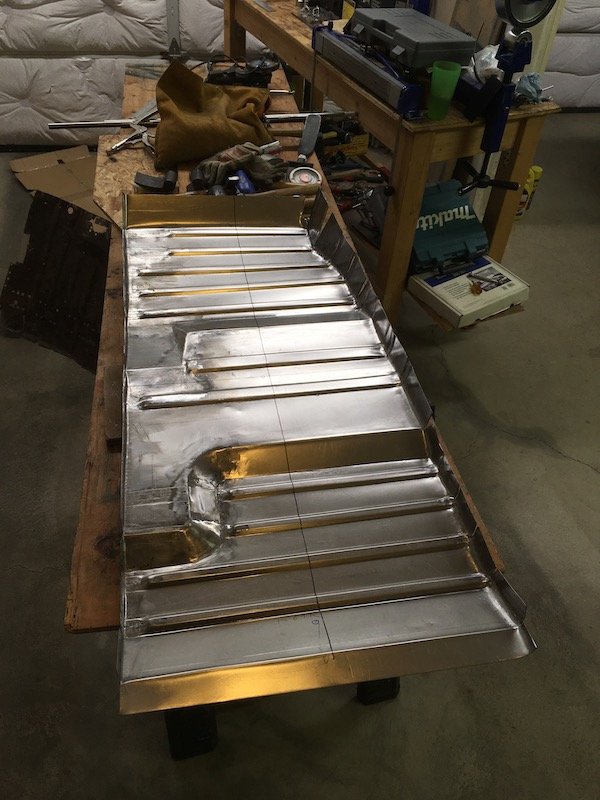
Building the 1961 Datsun 310 Bluebird Floorpan - Trimming the perimeter. Started off by taping together a big piece of cardboard. Then carefully trimmed it to fit between the inner sill, toe board, tunnel and rear seat box. Added extra margin with heavy paper to the edge. This was laid into the floorpan. Then I pie cut and panel beat the mating trans/drive tunnel edges to merge in accordance with the cardboard/paper template. The other edges were bent similar but with less beating since no blend radii were required. The result. First of dozens of fit checks in car. It looks not too bad for a start. It's a lot better than the rusted out floor that was there. Visible progress finally! I left it this way for a long while since the excess material made it a bit easier to grasp the floorpan by the edges and pull it out after each fit check. Much later, after doing several other feature additions, bend/panel beat tweaks, and satisfied the trim edge plans were stable and would work, I taped and trimmed all the finalized edges, then applied an angle grinder cut-off wheel and tin snips. Trimmed. Next up is duplicating factory body mount indentations and other stiffening features. Still lots more to catch up on. Might take me the rest of the day to upload it all. More posts soon… Discussion:
1 point
-
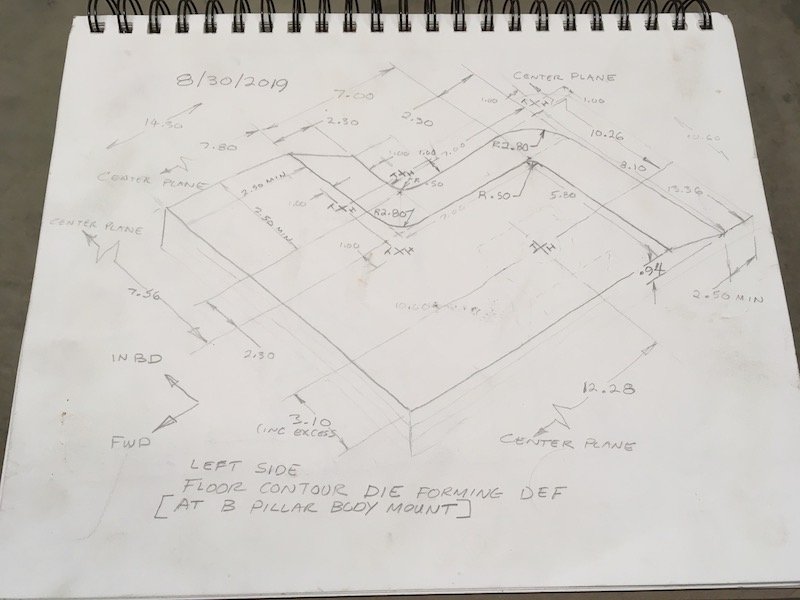
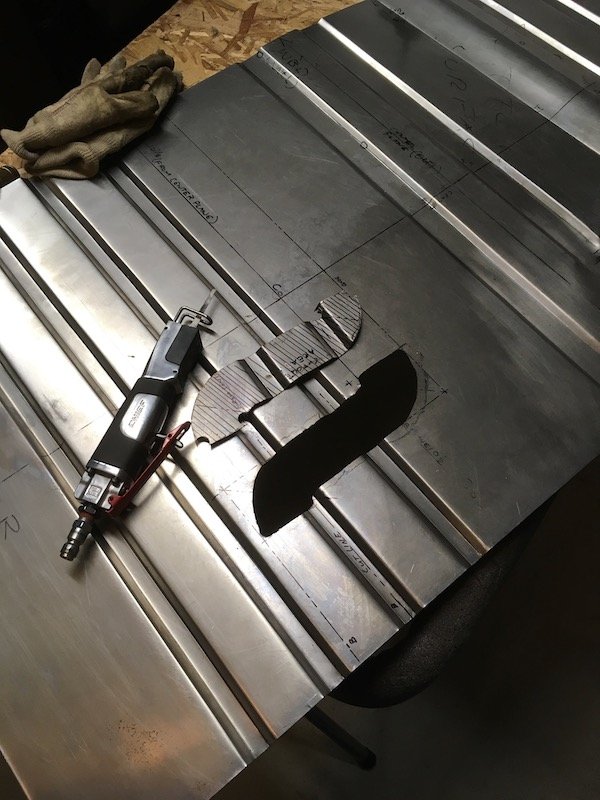
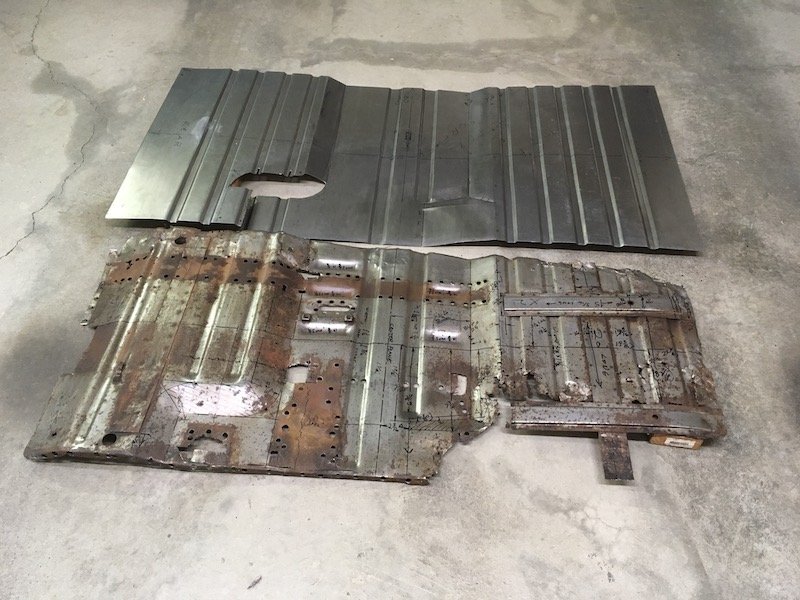
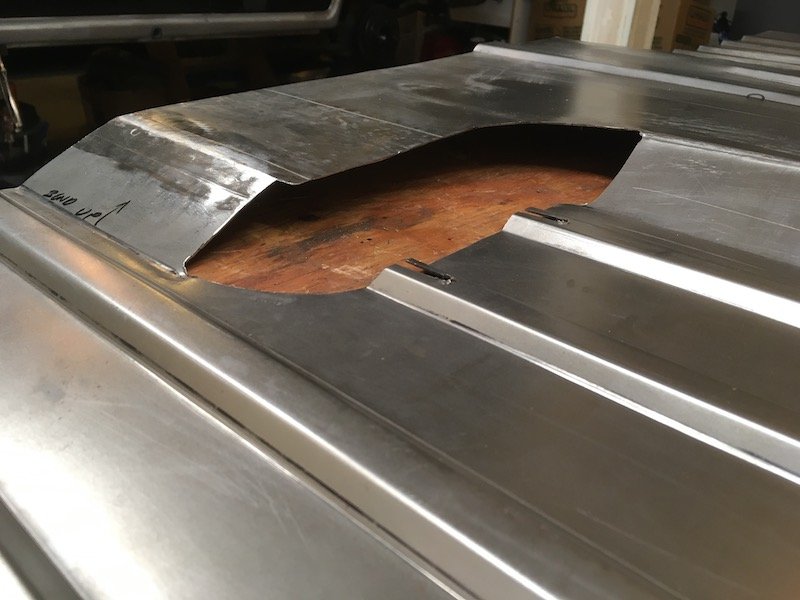
Building the 1961 Datsun 310 Bluebird Floorpan - 3D shape cutouts and weld in. So I first attempted to make a male and female die set to do the necessary metal forming but quickly discovered this would not work for me. The force required to squash the metal together goes up exponentially with the formed area size. Since I don't have access to giant presses I chose to cut and weld the shapes into the new floorpan. Started with a sketch from the remains of the existing floorpan. Made a strategic cut, flatted corrugations, made some bends and welded the loose end. 3D area is welded closed with two conical shapes and a rectangle patch. Same treatment was applied to the 3D parking brake lever ramp area. Then started cutting, tack welding and flattening the corrugations where needed. Next up is rough trimming the perimeter. More posts soon... Discussion:
1 point
-
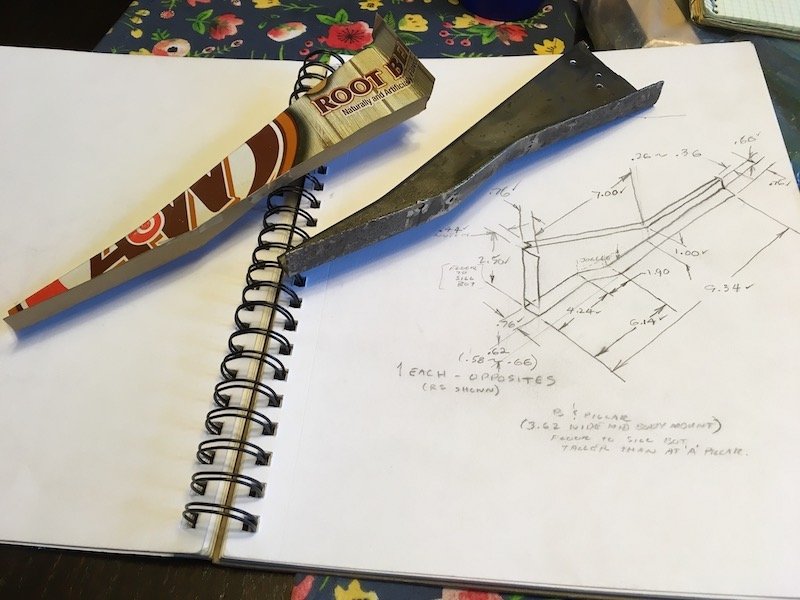
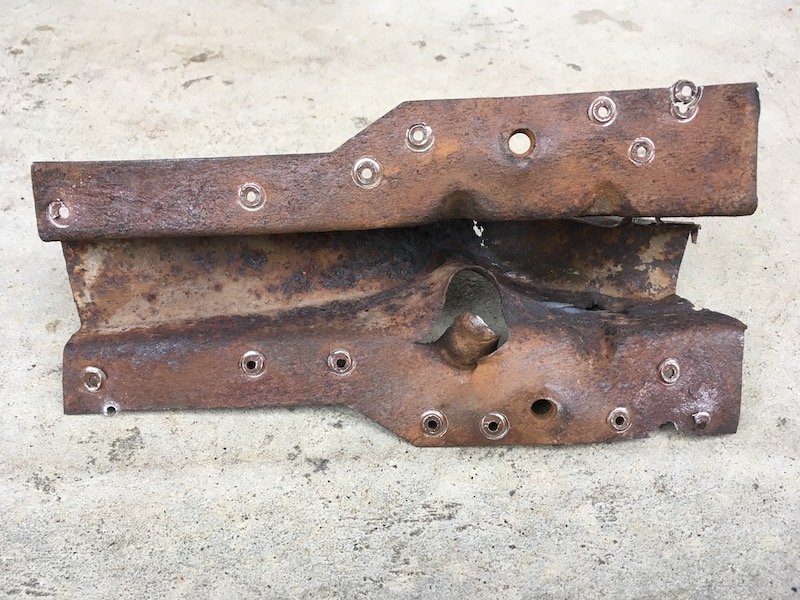
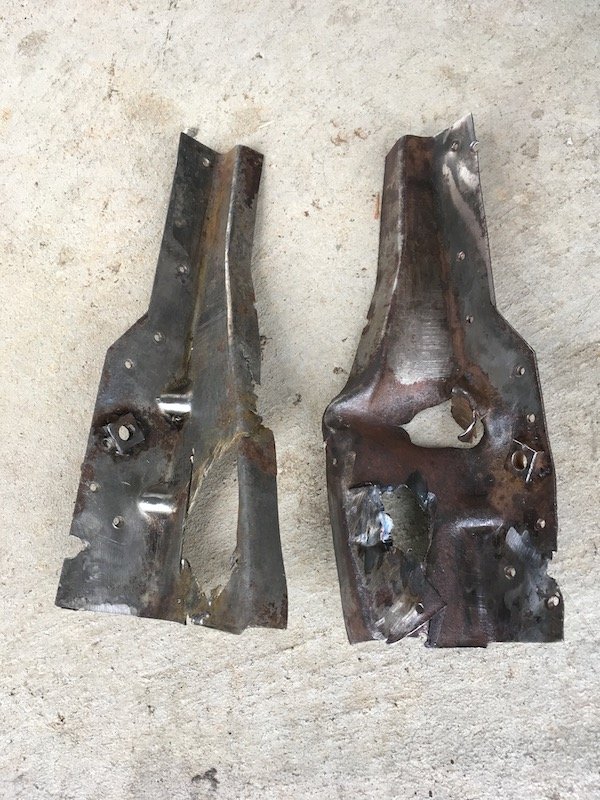
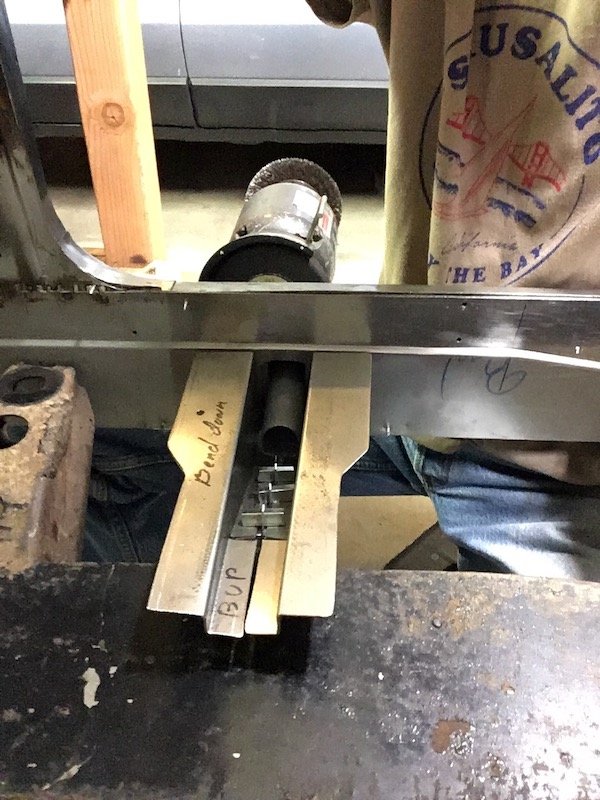
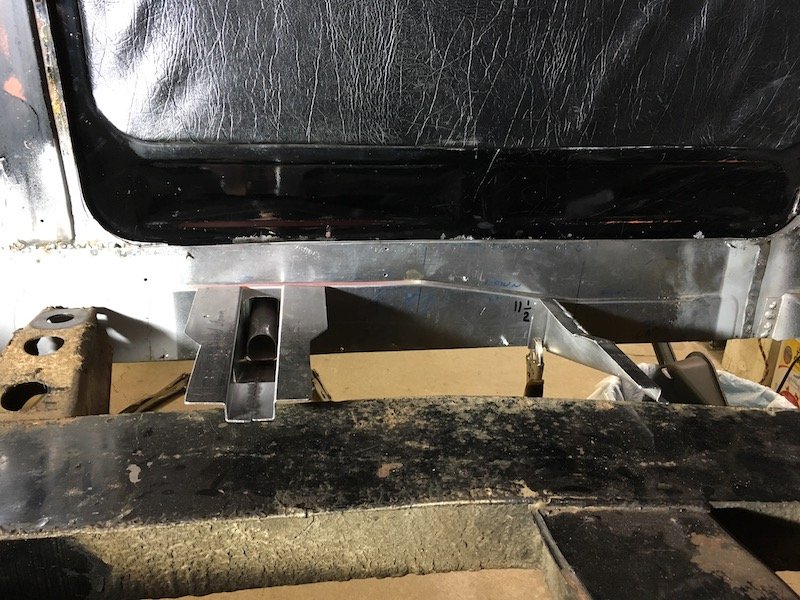
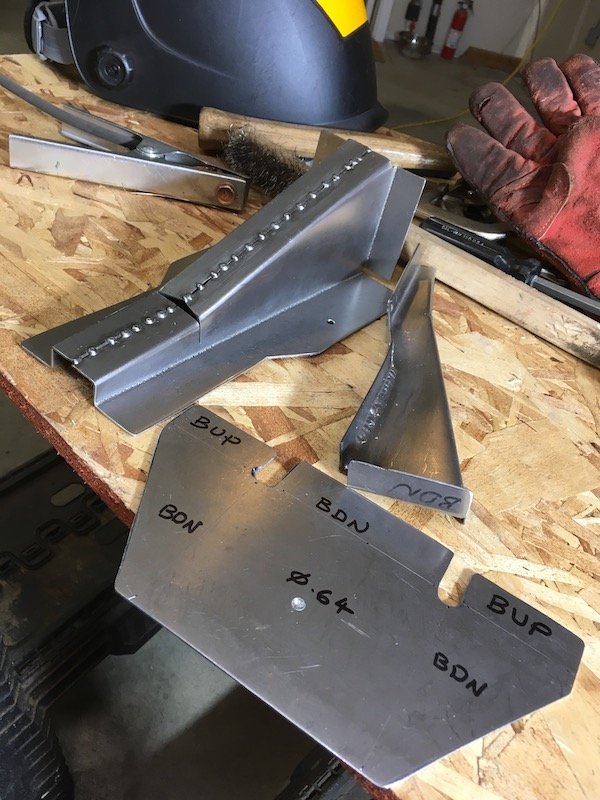
Building the 1961 Datsun 310 Bluebird Floorpan - Details. I have a large number of photos and so I'll split this update into several posts to minimize any load delay. Picking up the story from mid-August 2019, beginning with making underfloor bracket replacements. The first of two bracket replacements, all the others were salvaged from the existing floor. This first bracket is simple, but I had destroyed the original by cutting off the flange that attaches it to the inner sill. I just sketched up the right side bracket while laying under the car. Left floor bracket has the flanges bent in the opposite direction from the sketch. The second bracket that needed replacing. The underfloor support, inner attach for the lift jack pipe and parking brake lever attachment. It appears to have been destroyed by road debris that was run over by a previous owner. My guess is piece of rebar hit at 60 mph by the front tire that was kicked up and pierced the underside. The damage included a hole in the floor and a severely bent steel shaft for the parking brake. I split it in half for measurements since that's that way I'll make a replacement and then weld it into one. It includes minor complications to be duplicated such as the gusset bumps and welded on 5/16 - 24 fine thread square nuts (which are hard to find in 24 pitch thread btw). Made the halves out of 1.5 mil. Initial checks against the inner sill. Making parts and finishing up the welds. Then I welded on the square nuts, fuel line clip and forged the four gussets into the corners with 3/8 inch rod, some heat from a MAP torch, and backed up with angle iron. The hole in the middle is where it will get pinned to the lift jack pipe. Nissan had brazed the original attachment to the pipe sides but that's not practical for me since I'm welding this to the floor first and attaching to the pipe last. The heavy oxidation was later cleaned off with a soaking in muriatic (hydrochloric) acid. Additional posts soon... Discussion:
1 point


.thumb.png.46e518f714cdc319554c389f990e75a4.png)
.thumb.jpeg.e0a4bff61111e0c8c7396950fcc94da1.jpeg)


This leaderboard is set to Auckland/GMT+12:00