
Leaderboard


Popular Content
Showing content with the highest reputation on 02/03/20 in Posts
-
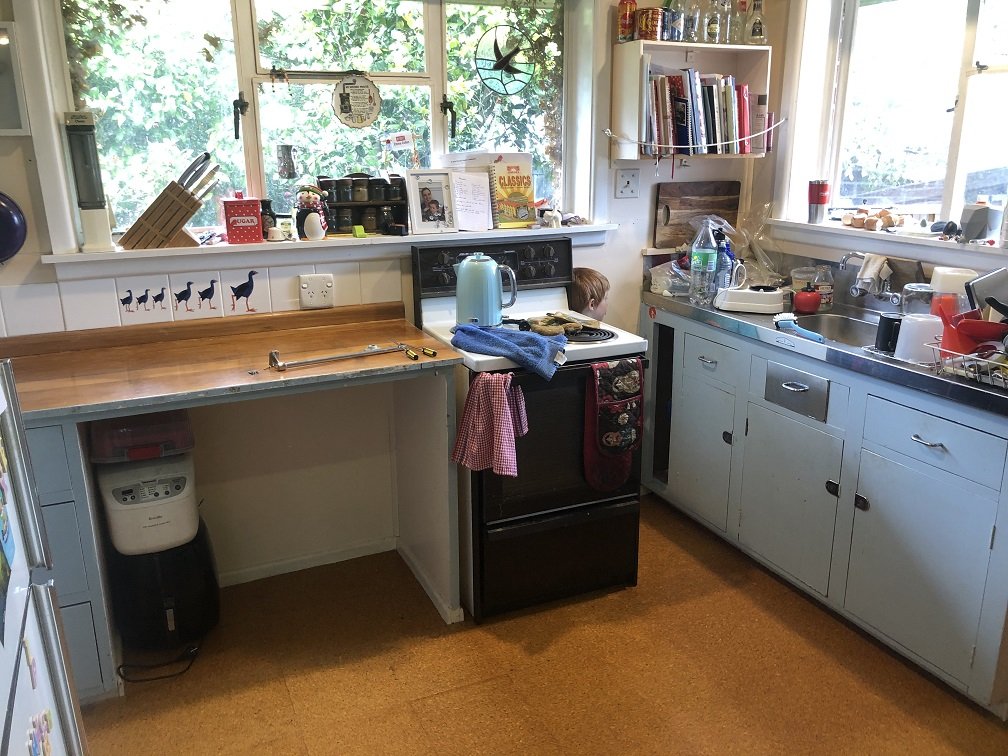
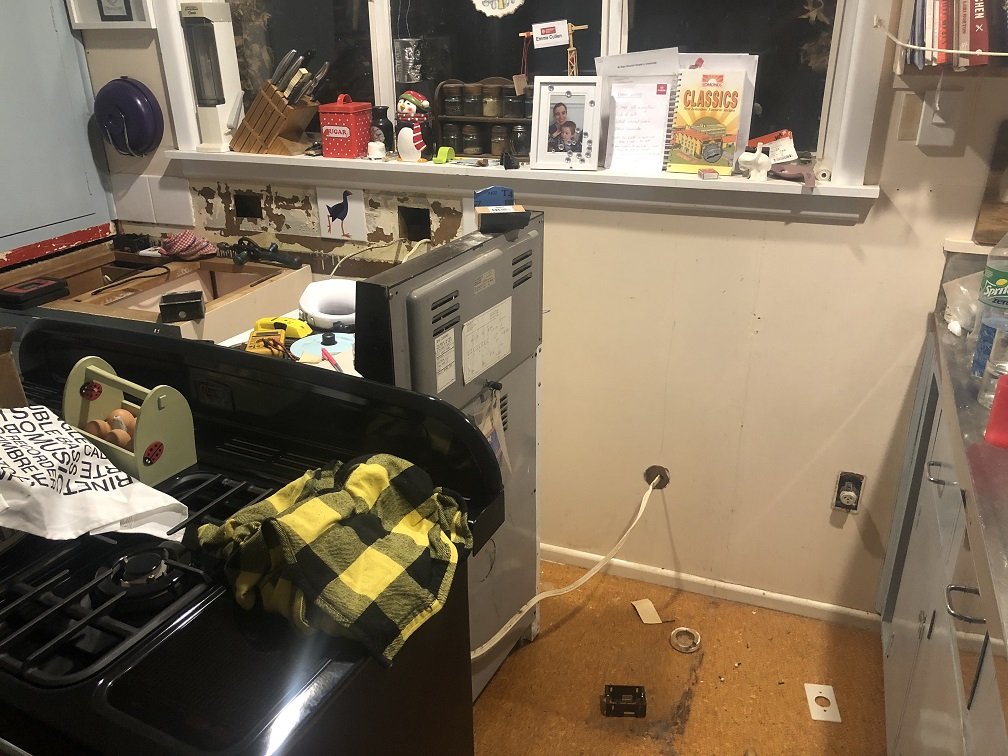
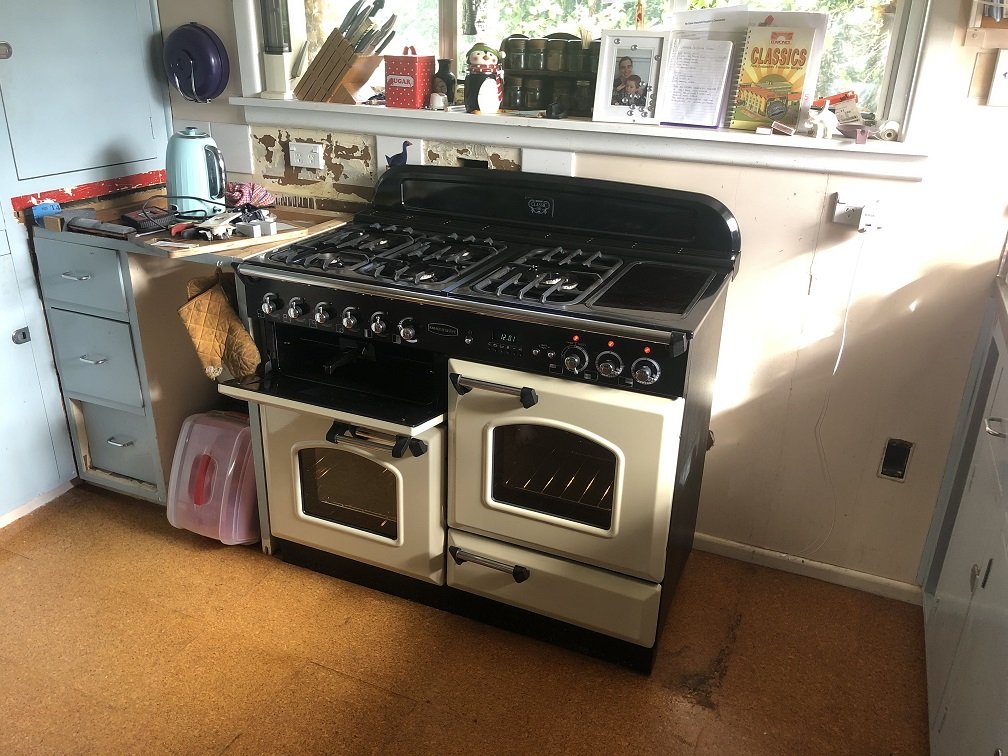
I needed to install the oven I fixed up from a few pages back. Kitchen Tax is real though, people talking about spending all sorts of silly figures on kitchen reno's. I decided to throw it in myself, bar the gas plumbing. I quite like the old cabinetry so I just built up a new cabinet to match the old, save replacing the lot. I also uprated the range plug & switch & shifted the outlets to suit the new benches. A bit of tiling and edging to finish off, but now we can get stuck in to cooking up a few feasts!
 16 points
 -
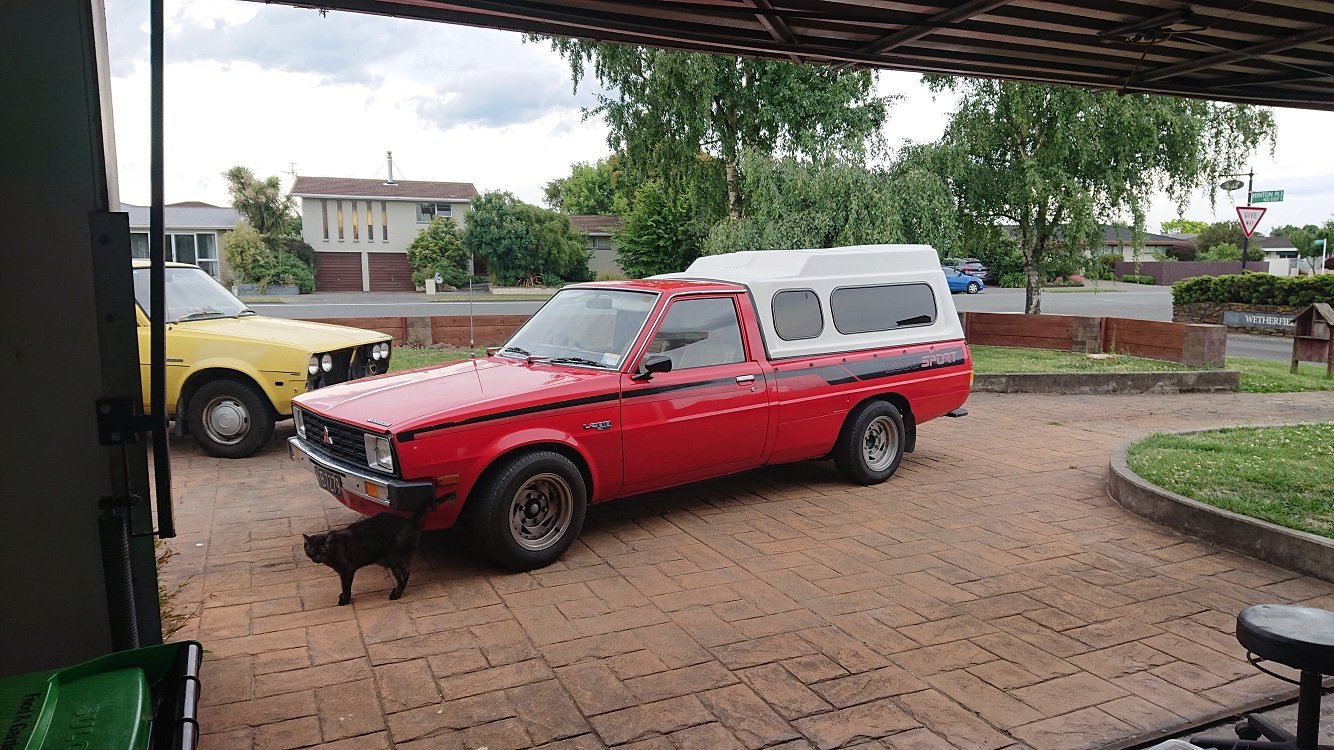
camping was legit. we cruised on up the motor way and done a few stop offs on the way up. had to deliver some rx2 carpet and beth wanted to stop in at her Auckland office. we made it to kai iwi lakes and got a sweet photo set up camp and got straight into it a nice photo of @Mrs 64valiant happy to be camping in a kombi with a wof, reg and insurance. with our newly acquired fridge our battery we purchased for our house side of thing wasn't quite cutting it. So i ended up having to go for a drive each day while we were camping. this wasn't really much of an issue for me due to really enjoying driving the kombi and wanting to explore what we have to offer in nz. so one day you probably saw in spam i took @sentra for a drive to a romantic beach. old @manlymanman and @Mrs 64valiant 3rd wheeled our cute date. we also went on a group adventure up to Opononi and to see Tane Mahuta. bloody hippies in there old cars old Tane Mahuta is a pretty large tree! Liv was kind enough to get a couple of cool pics of the kombi driving through the Waipoua Forest Beth and i had a rough work out on how much gas the kombi is using on our way up to kai iwi lakes. i think it worked out to be around 9.4kms per letter which is what my subaru out back does on a average day. gets to about 11.5kms per letter on the open road but not as much smiles per miles thats for sure. while we were away we decided if we wanted to stay in one location more than a day we would need to go for a drive or we should get a solar panel. that comes to todays purchase. done some online looking and worked out that if we wanted one it would probably be better if we got one that was fixed to our kombi other than another thing we have to pack and unpack which is on the bottom of my list of things to do. my main reason of going with this one was the size and the fact i got it today. it fits perfectly inside out roof rack spot on the kombi. cant be seen form standing at grass height unless you are tall unlike me but also means i dont have to go drilling holes anywhere and having the possibility of water leaking in. so with wagnats approaching very fast ive got 3 days to mount this in place and wire it up so i can still service it or get to it when i need to. well thats me for now. we will see you later14 points
-
Havent been on here for a while but in the mean time have picked up a 52 Chev pick up that the plan is to have going for Beach Hop 2020. Running the OG 216ci straight 6 and 4 speed on the floor. Solid original truck with only a couple of bits of minor rust, A heap of newish chrome was on it, interior has been redone at some point and truck was more or less running and driveable. Stage 1 plan for it is: - Rust & Bang a few dents out - New timber deck -Artileries & Big whitewalls with new hub caps & beauty rings -Fulton Visor -6V to 12V Conversion -Heap of minor badges, mirrors etc -Slam -Vin -Roll 2020 Beach Hop Pics of when i first got it.
9 points
-
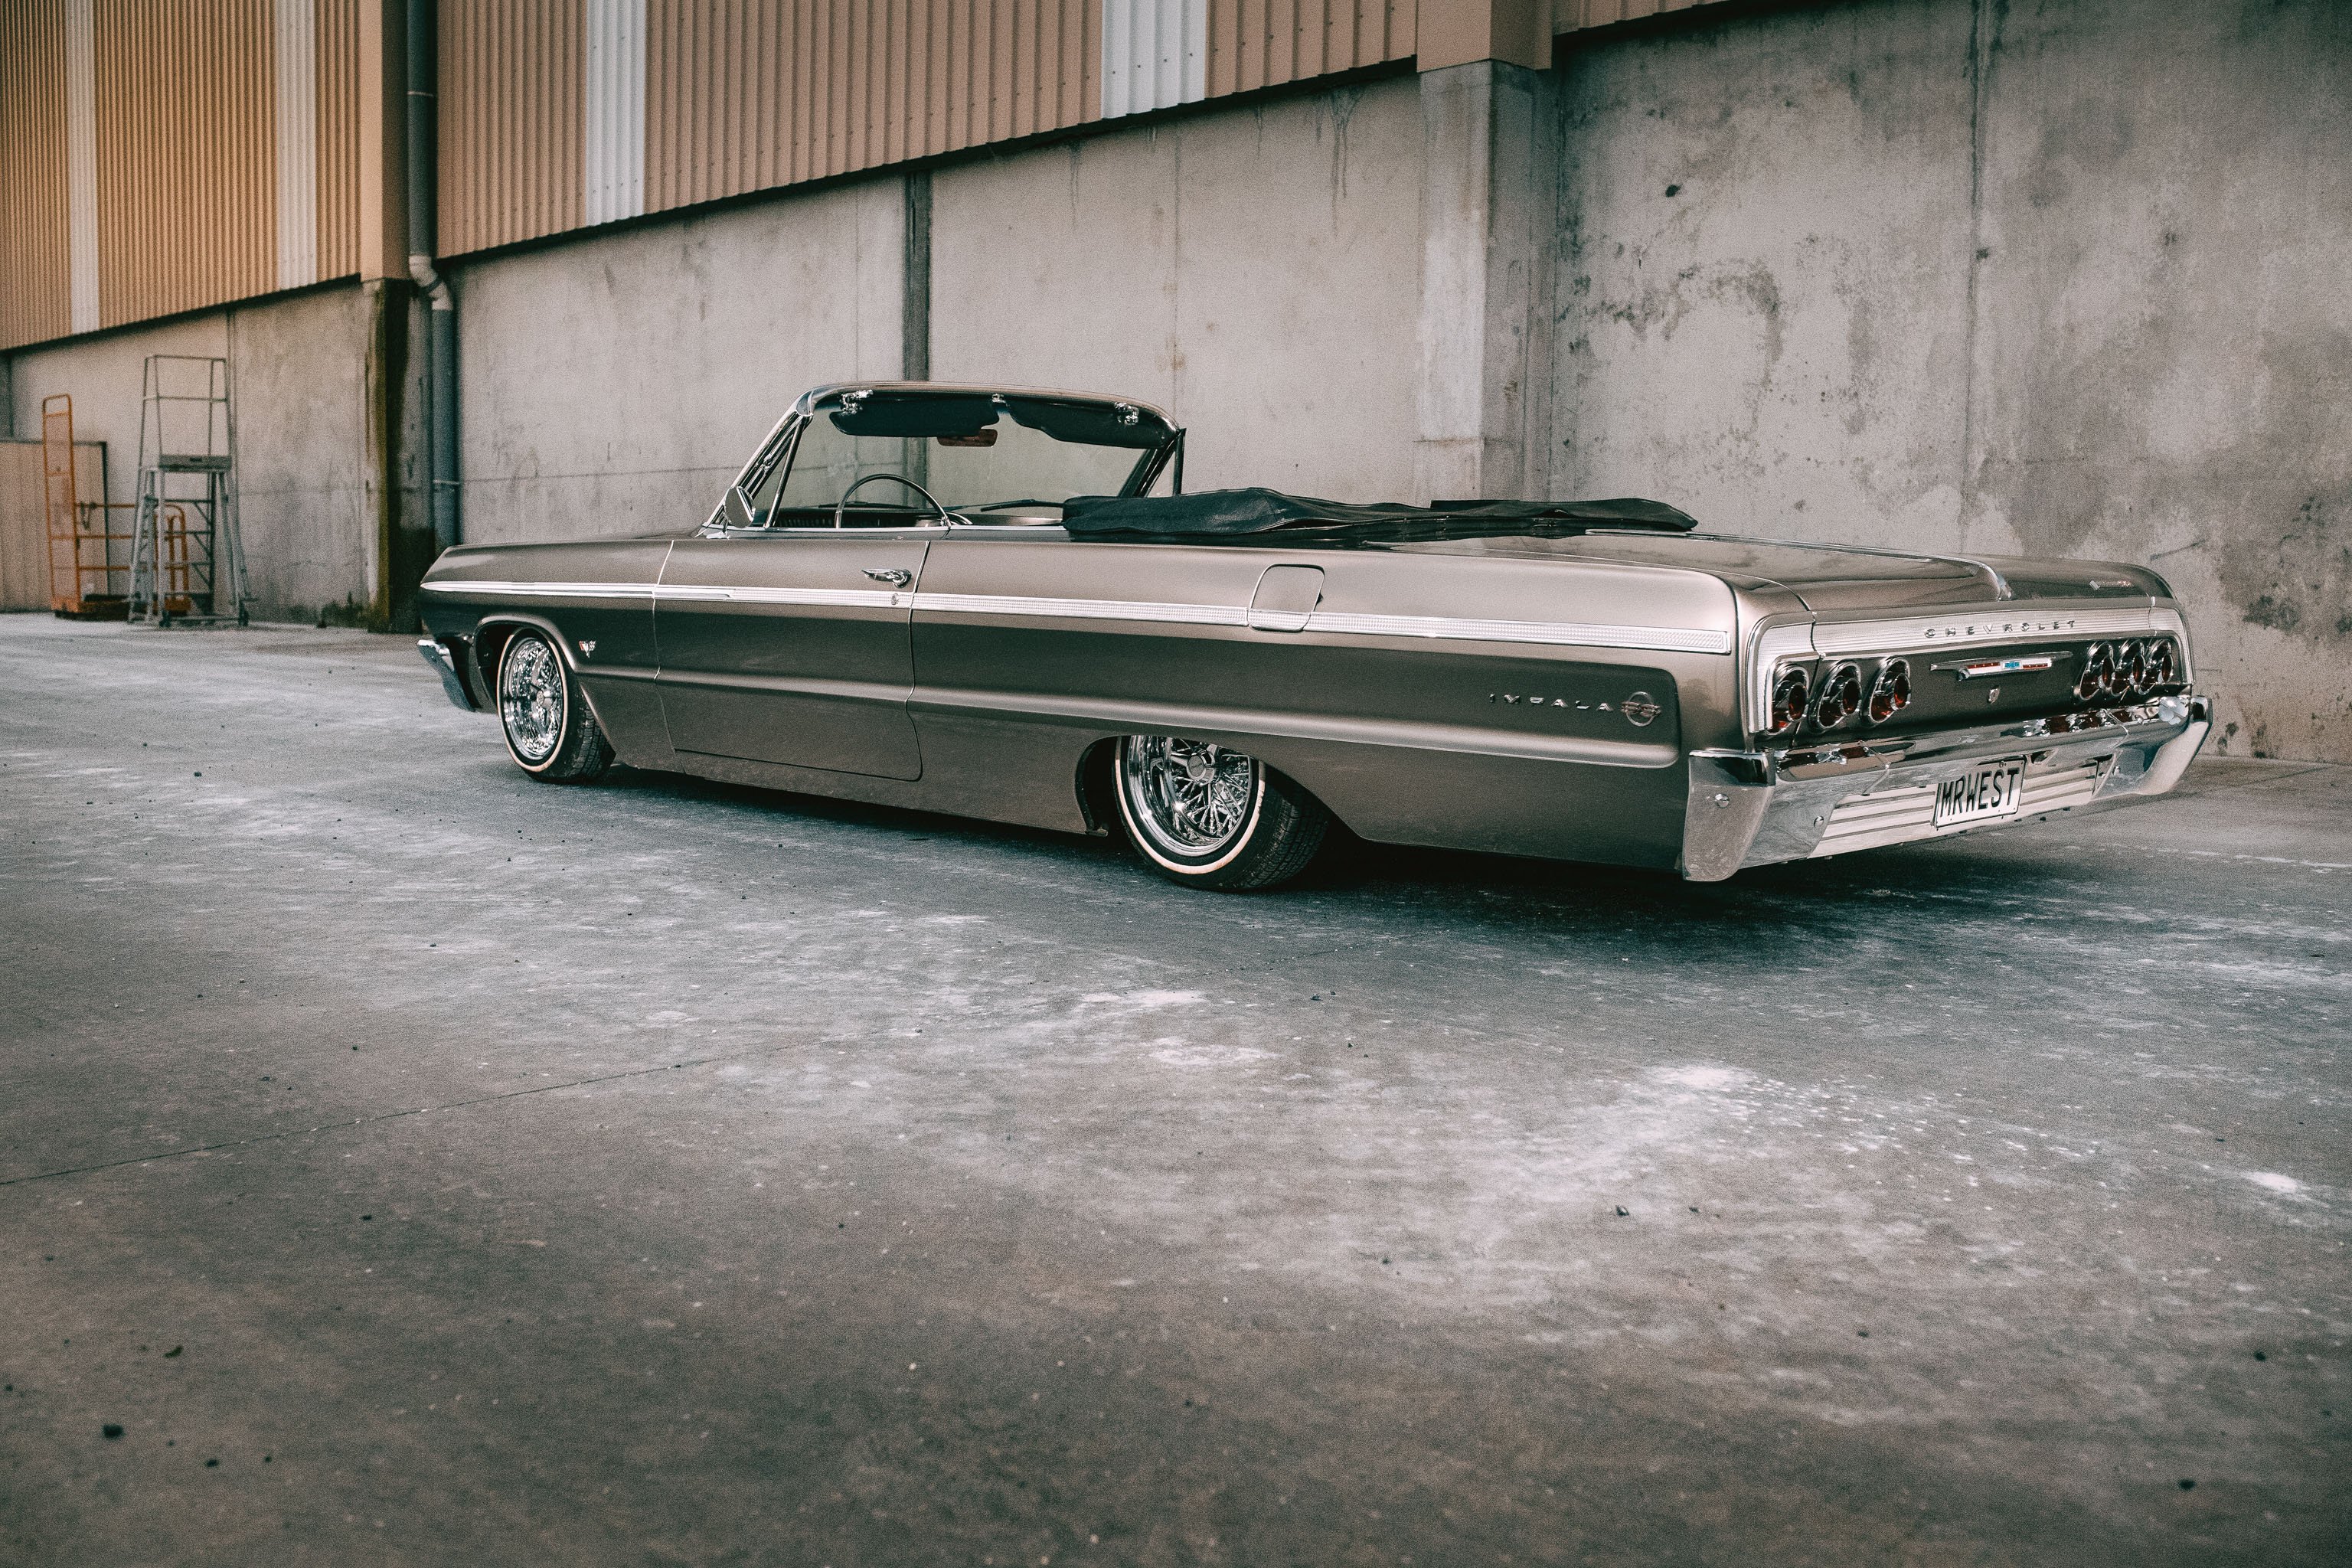
NZV8 mag feature, Beach Hop mag cover car 2018 and has been driven all over the show and doesnt seem to miss a beat! https://oldschool.co.nz/index.php?/topic/34313-the-westpala/page/10/#comments
9 points
-
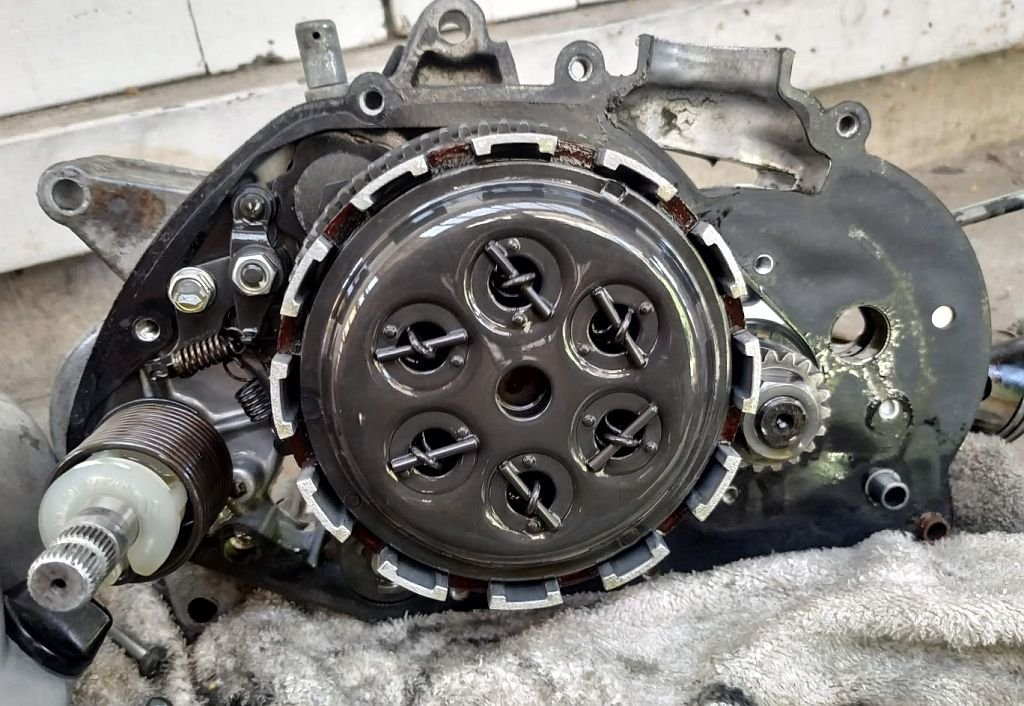
Another day stripping the crown - got the head off and it still wont turn over
8 points
-
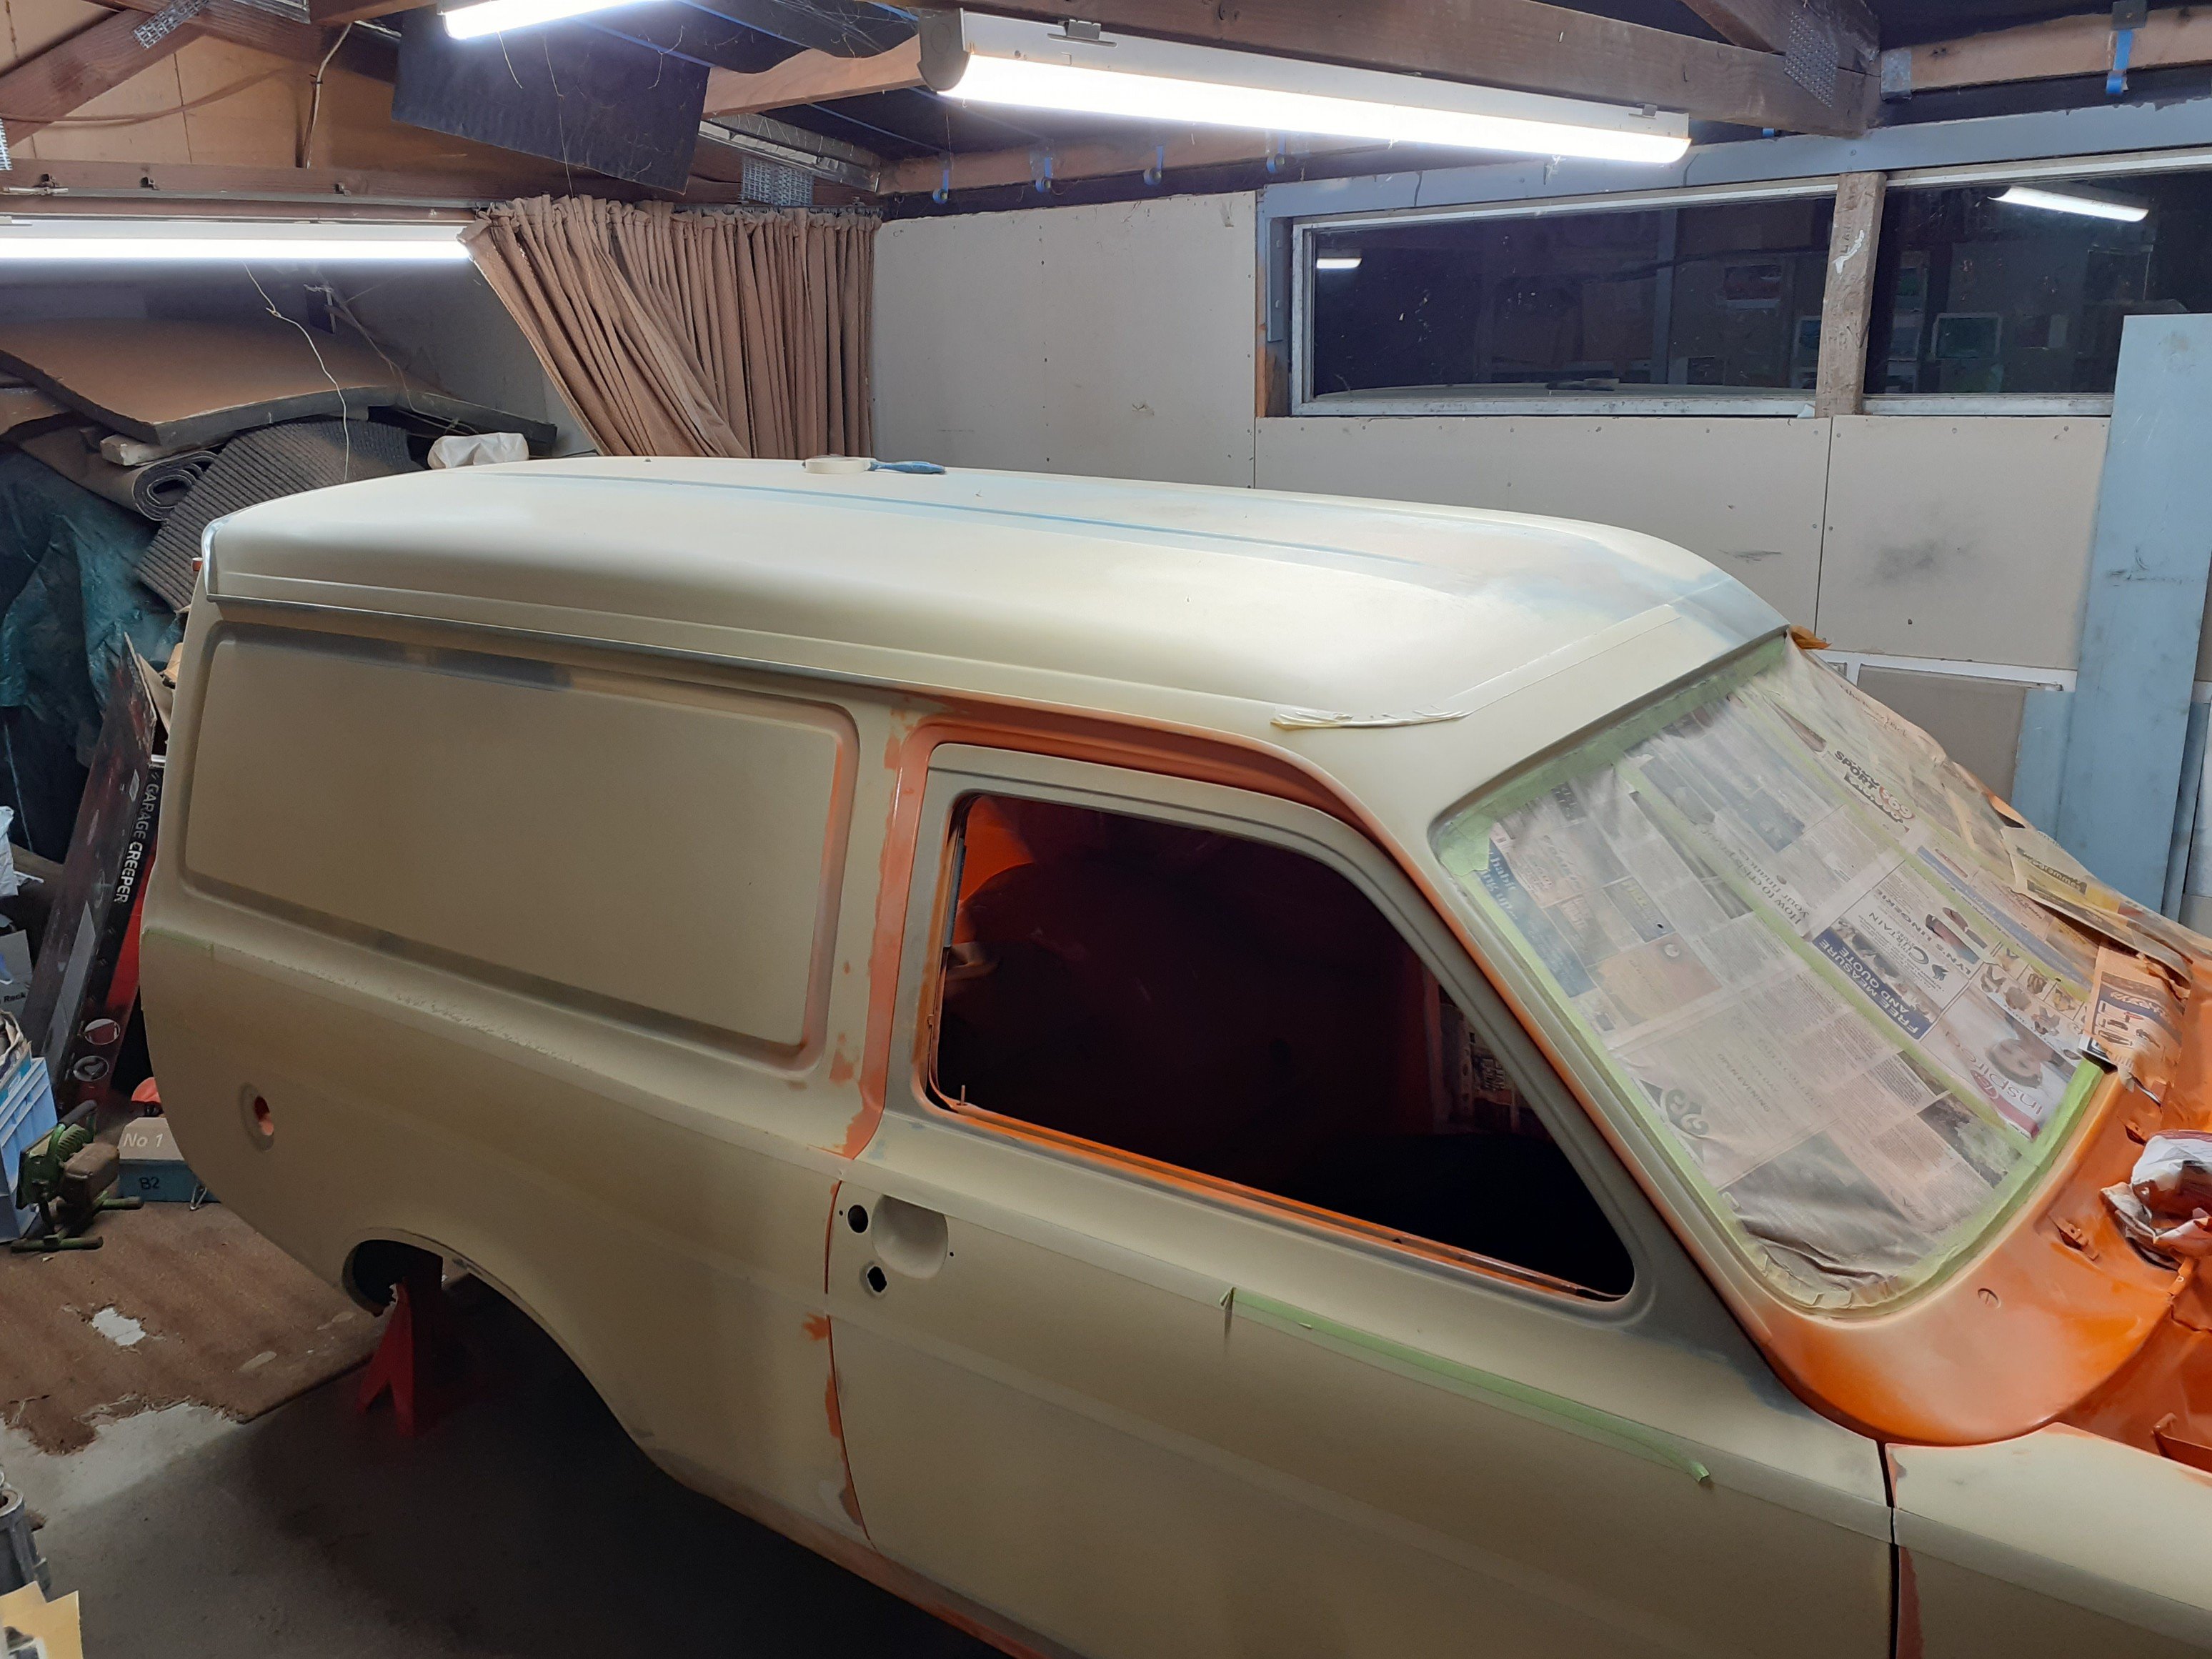
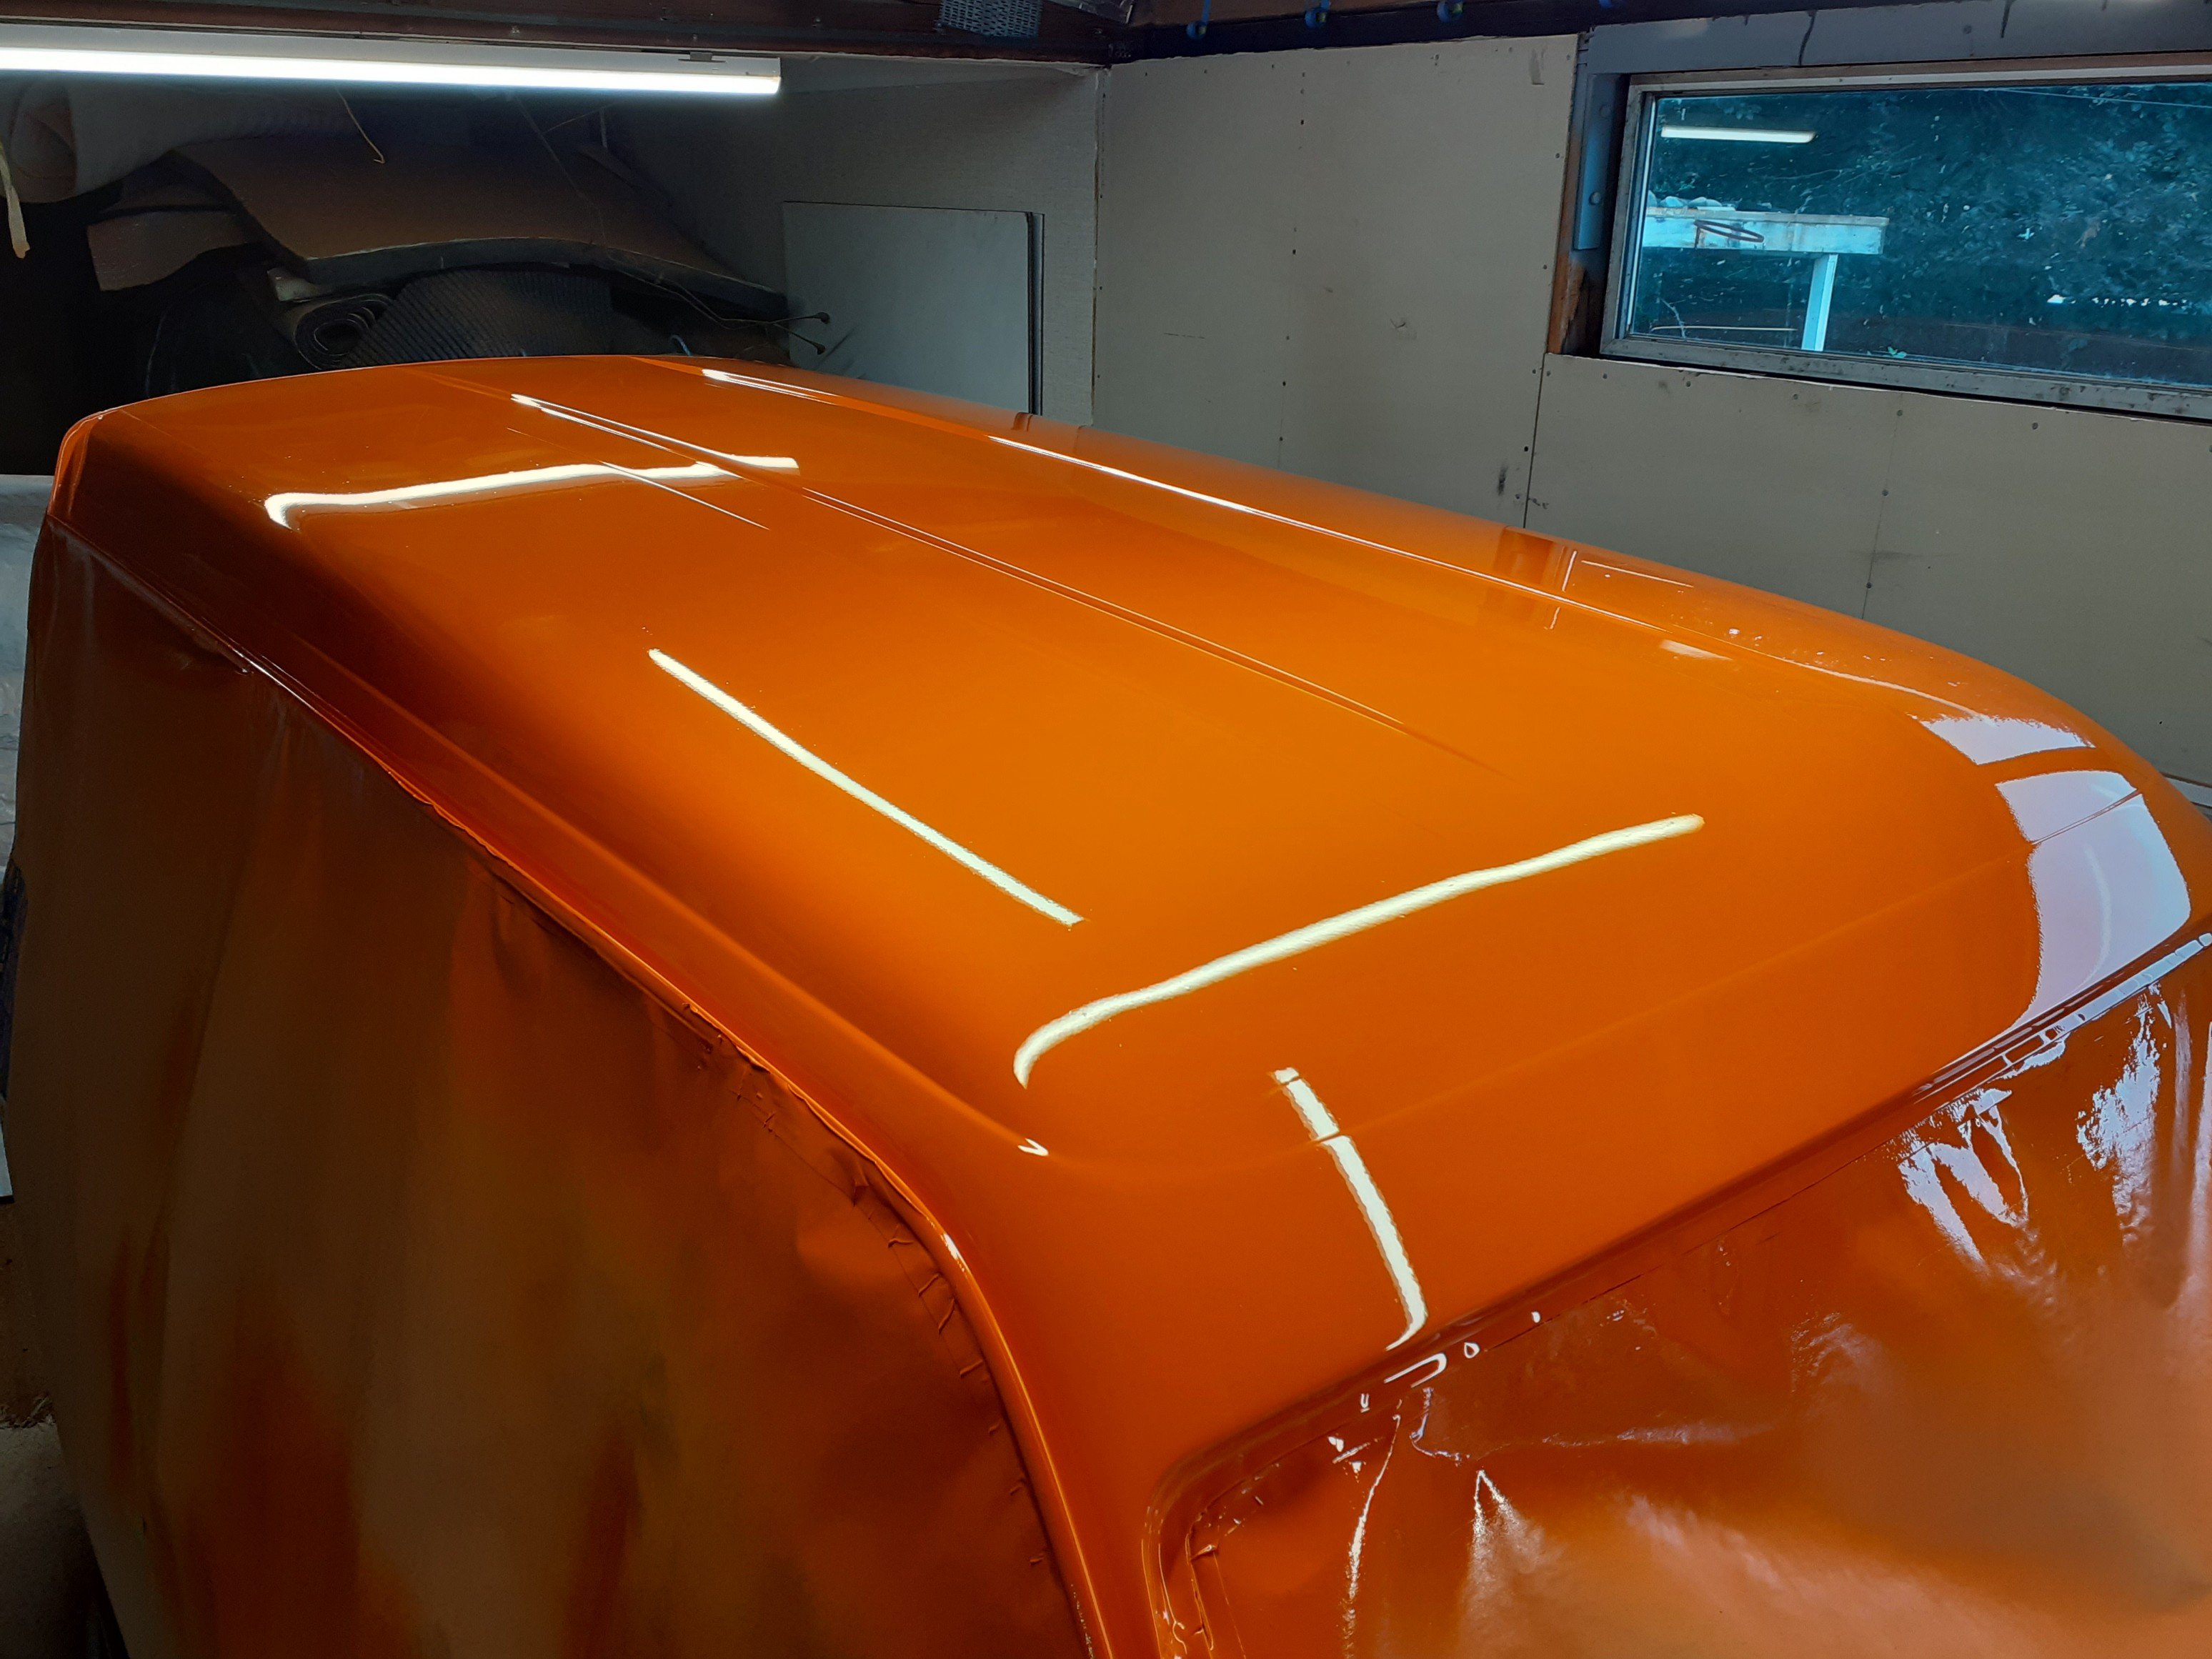
Finally getting back into this after a few months away. Have decided to paint the outside in two sections which hopefully makes it a bit more manageable. The obvious way was to section off the roof. The other reason for doing it this way is to ensure there is plenty of paint in the gutters which are prone to rust. By sectioning it off, it gets painted when the roof is done, and again when the sides get done. This ensures maximum paint without making a mess. Have been sanding for the last couple weeks. My weak little office arms really struggled with painting the roof today but I'm pretty happy with the outcome.
8 points
-
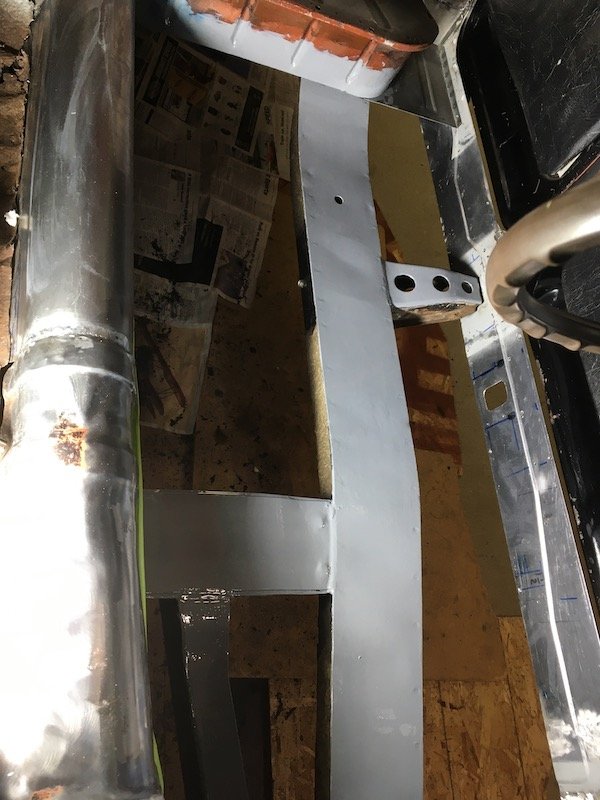
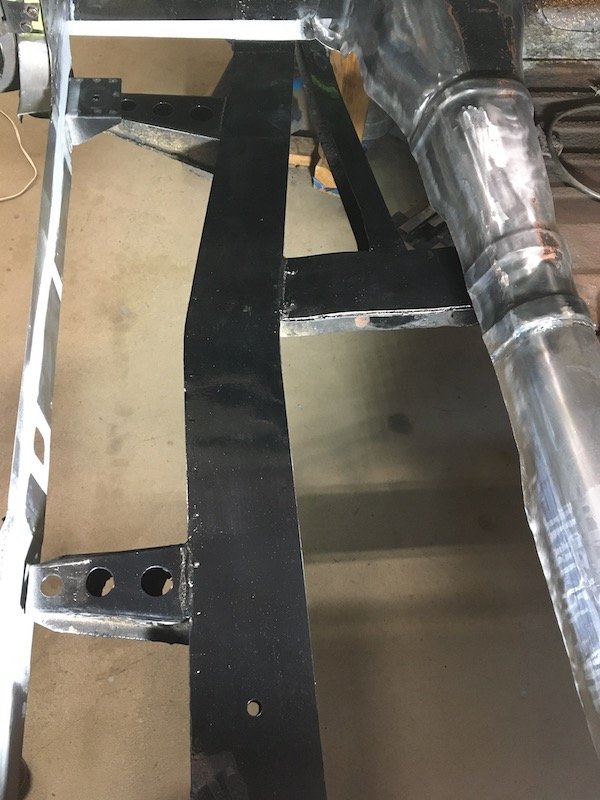
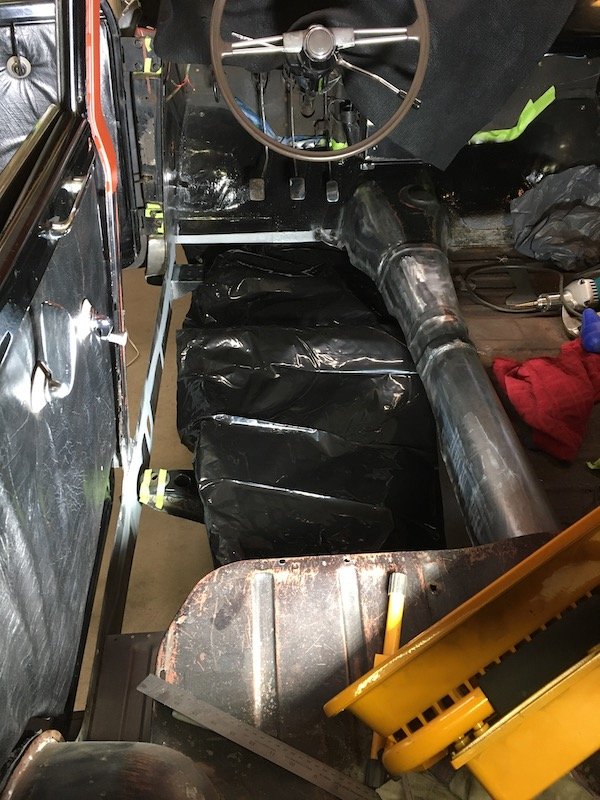
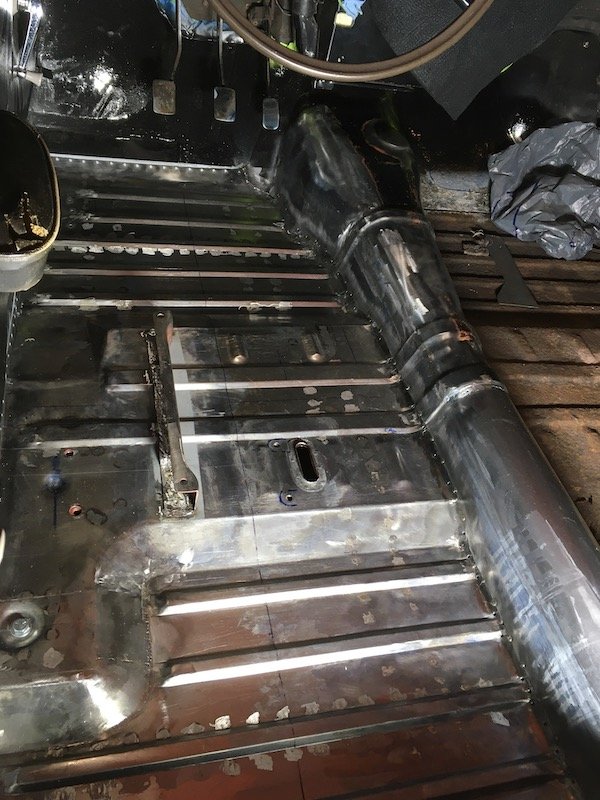
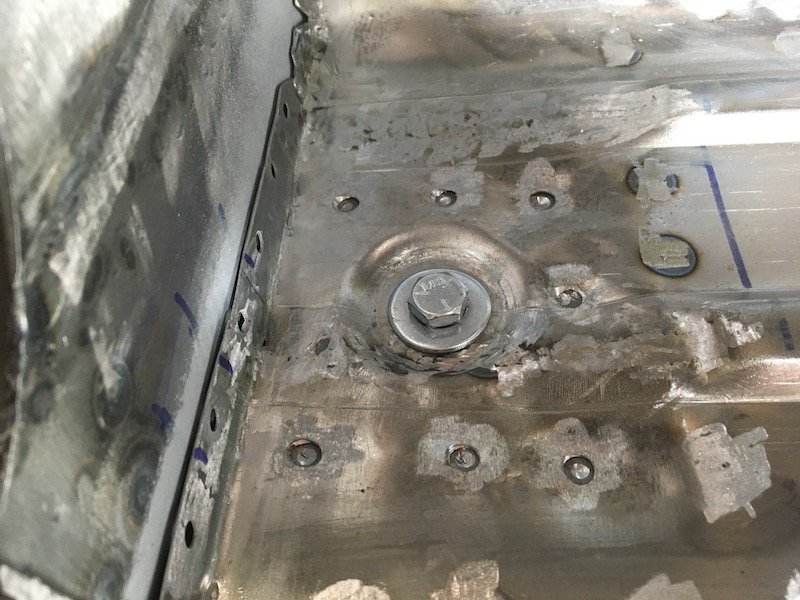
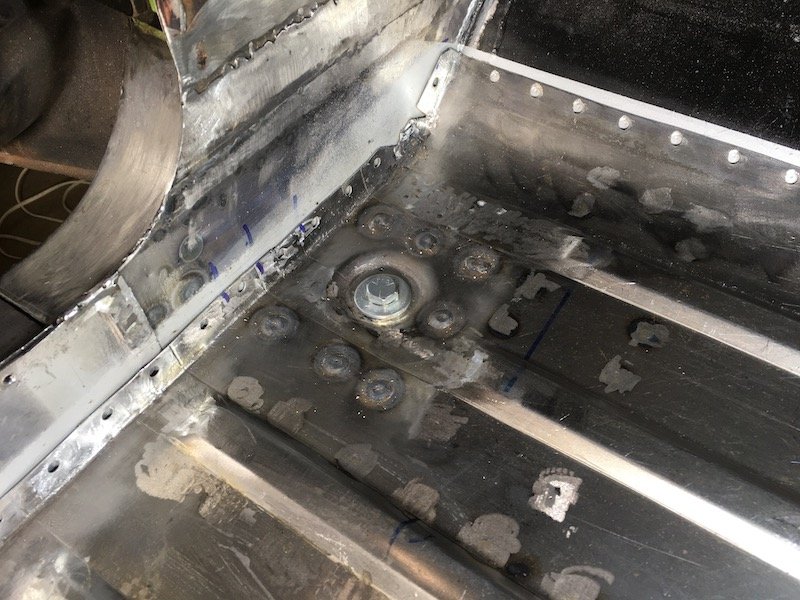
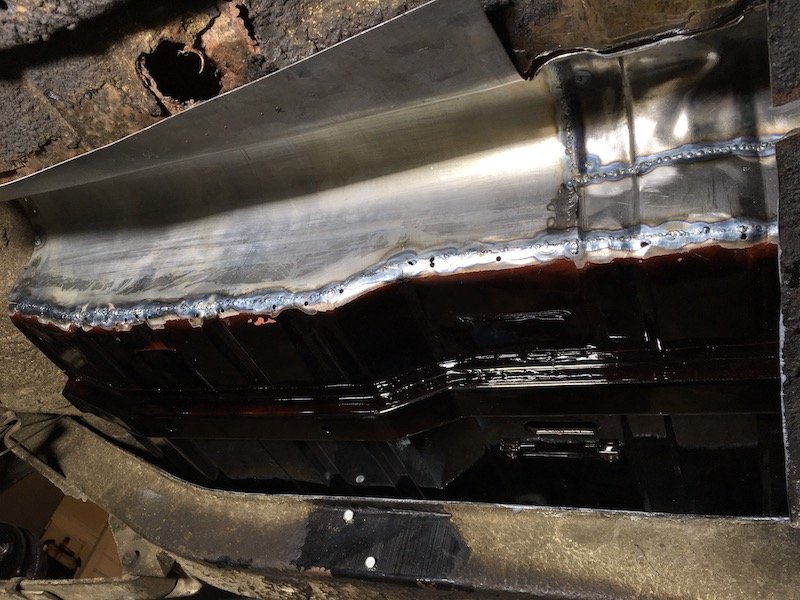
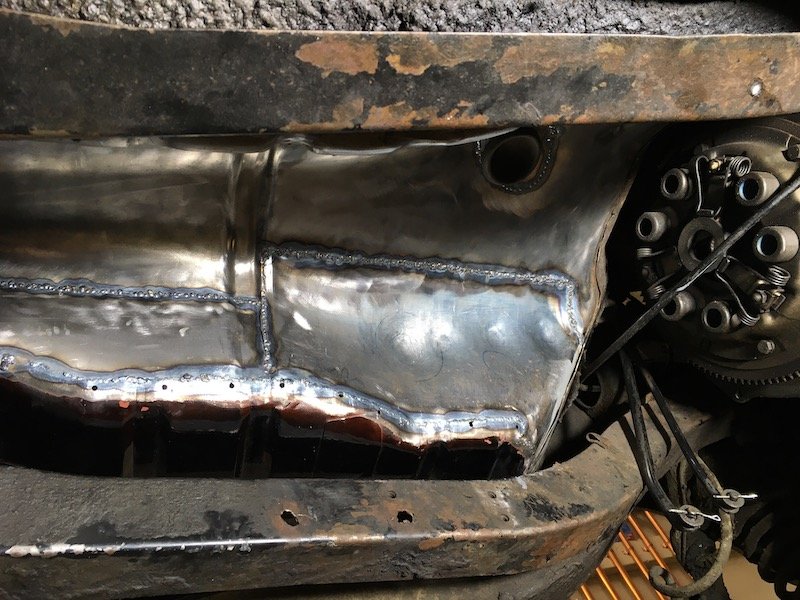
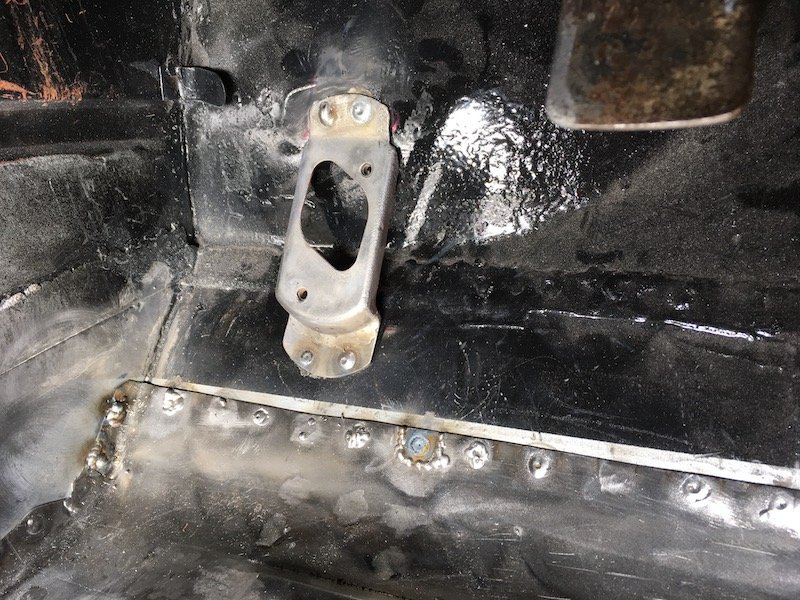
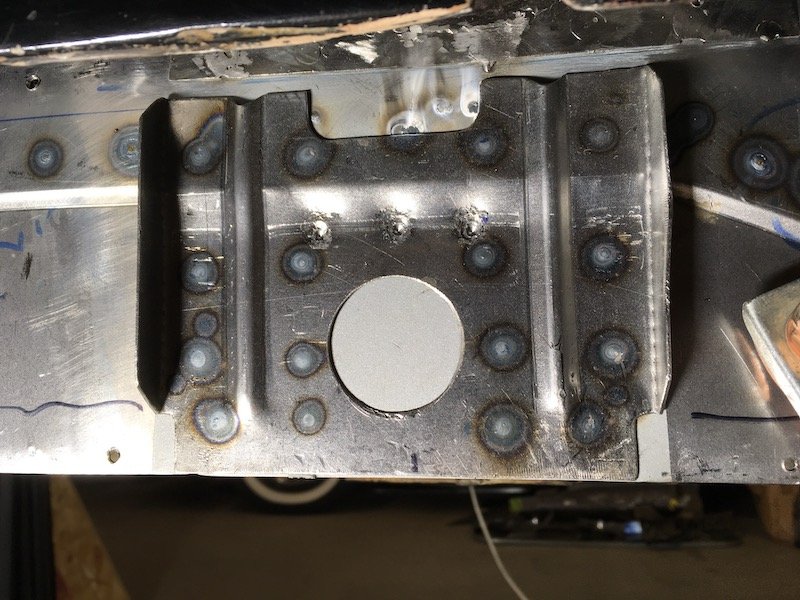
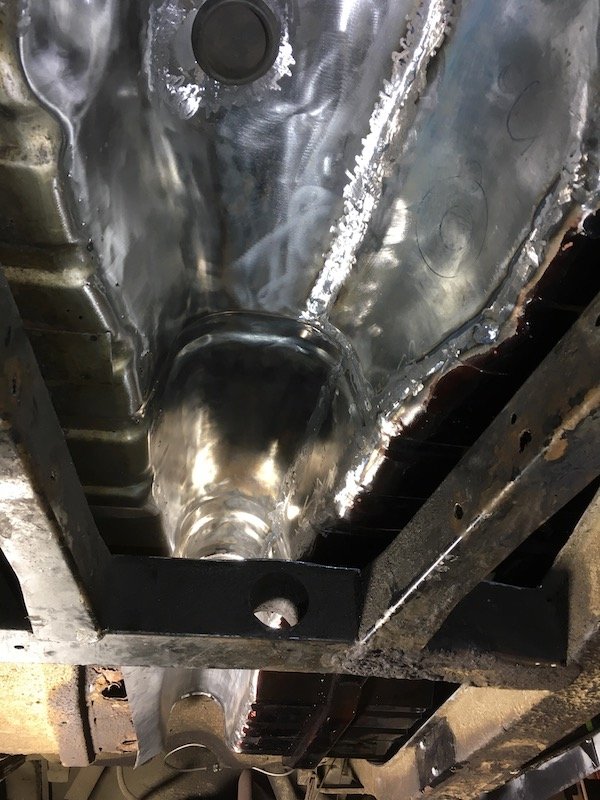
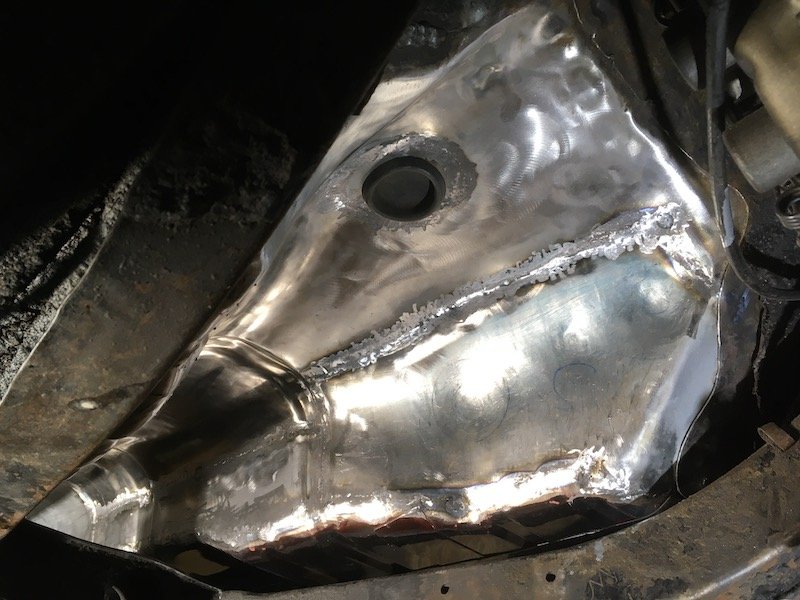
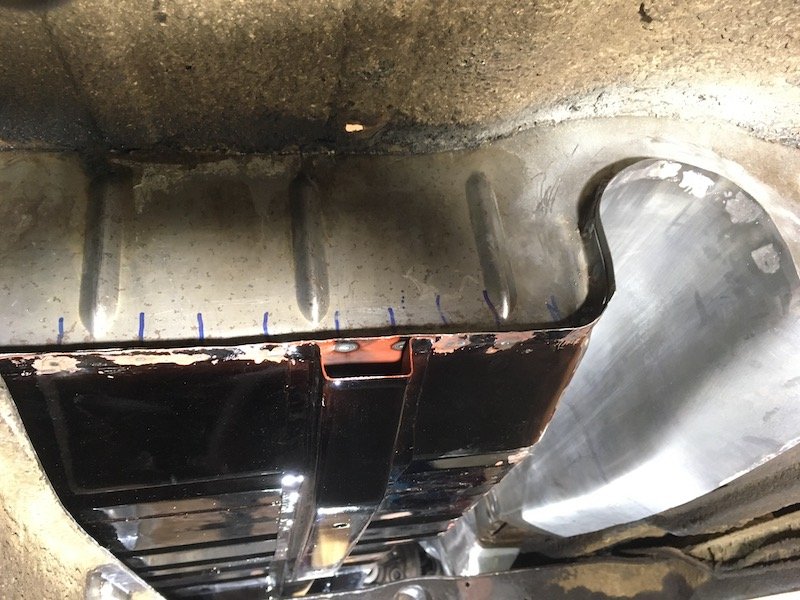
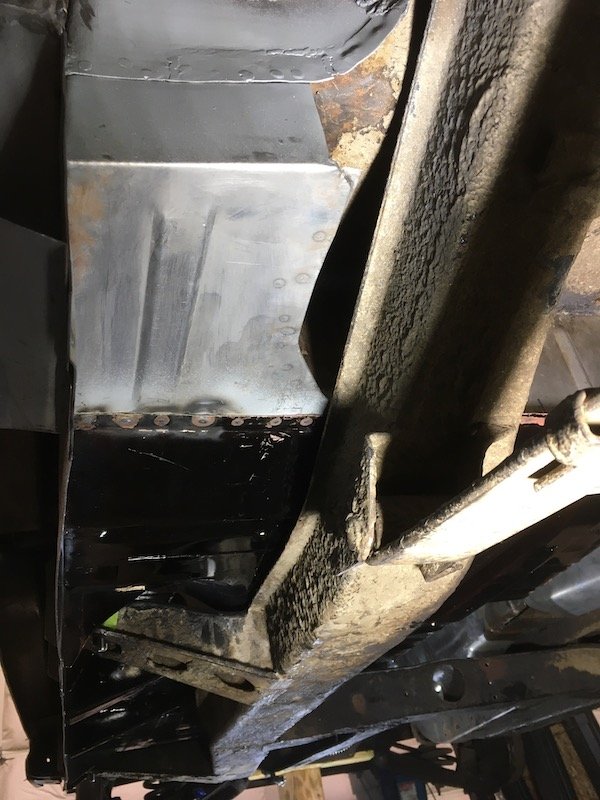
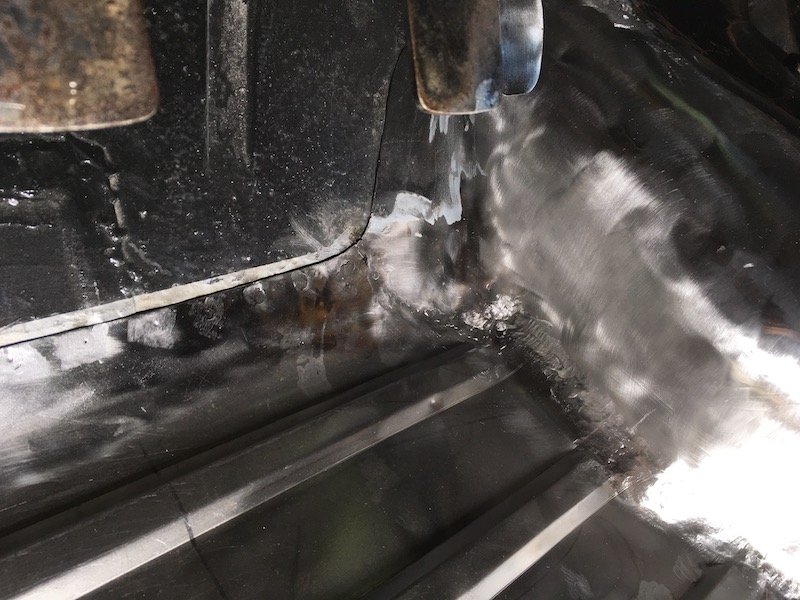
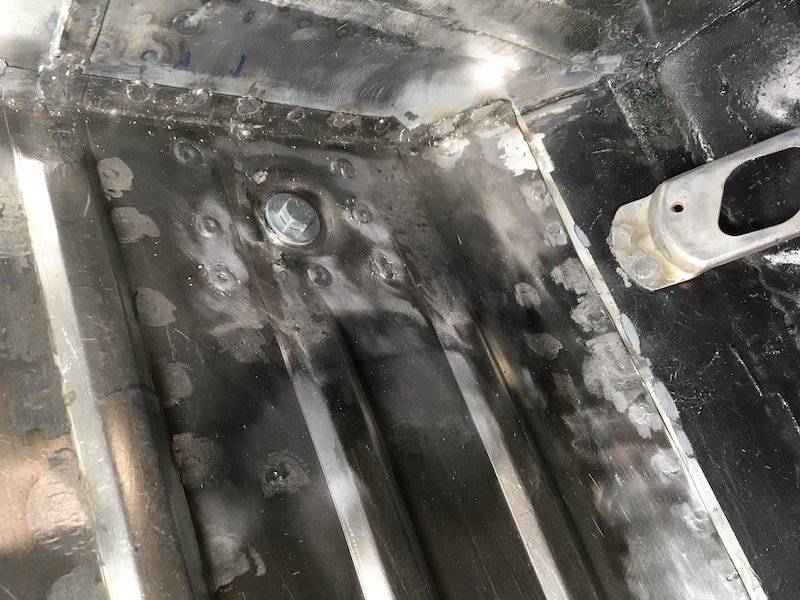
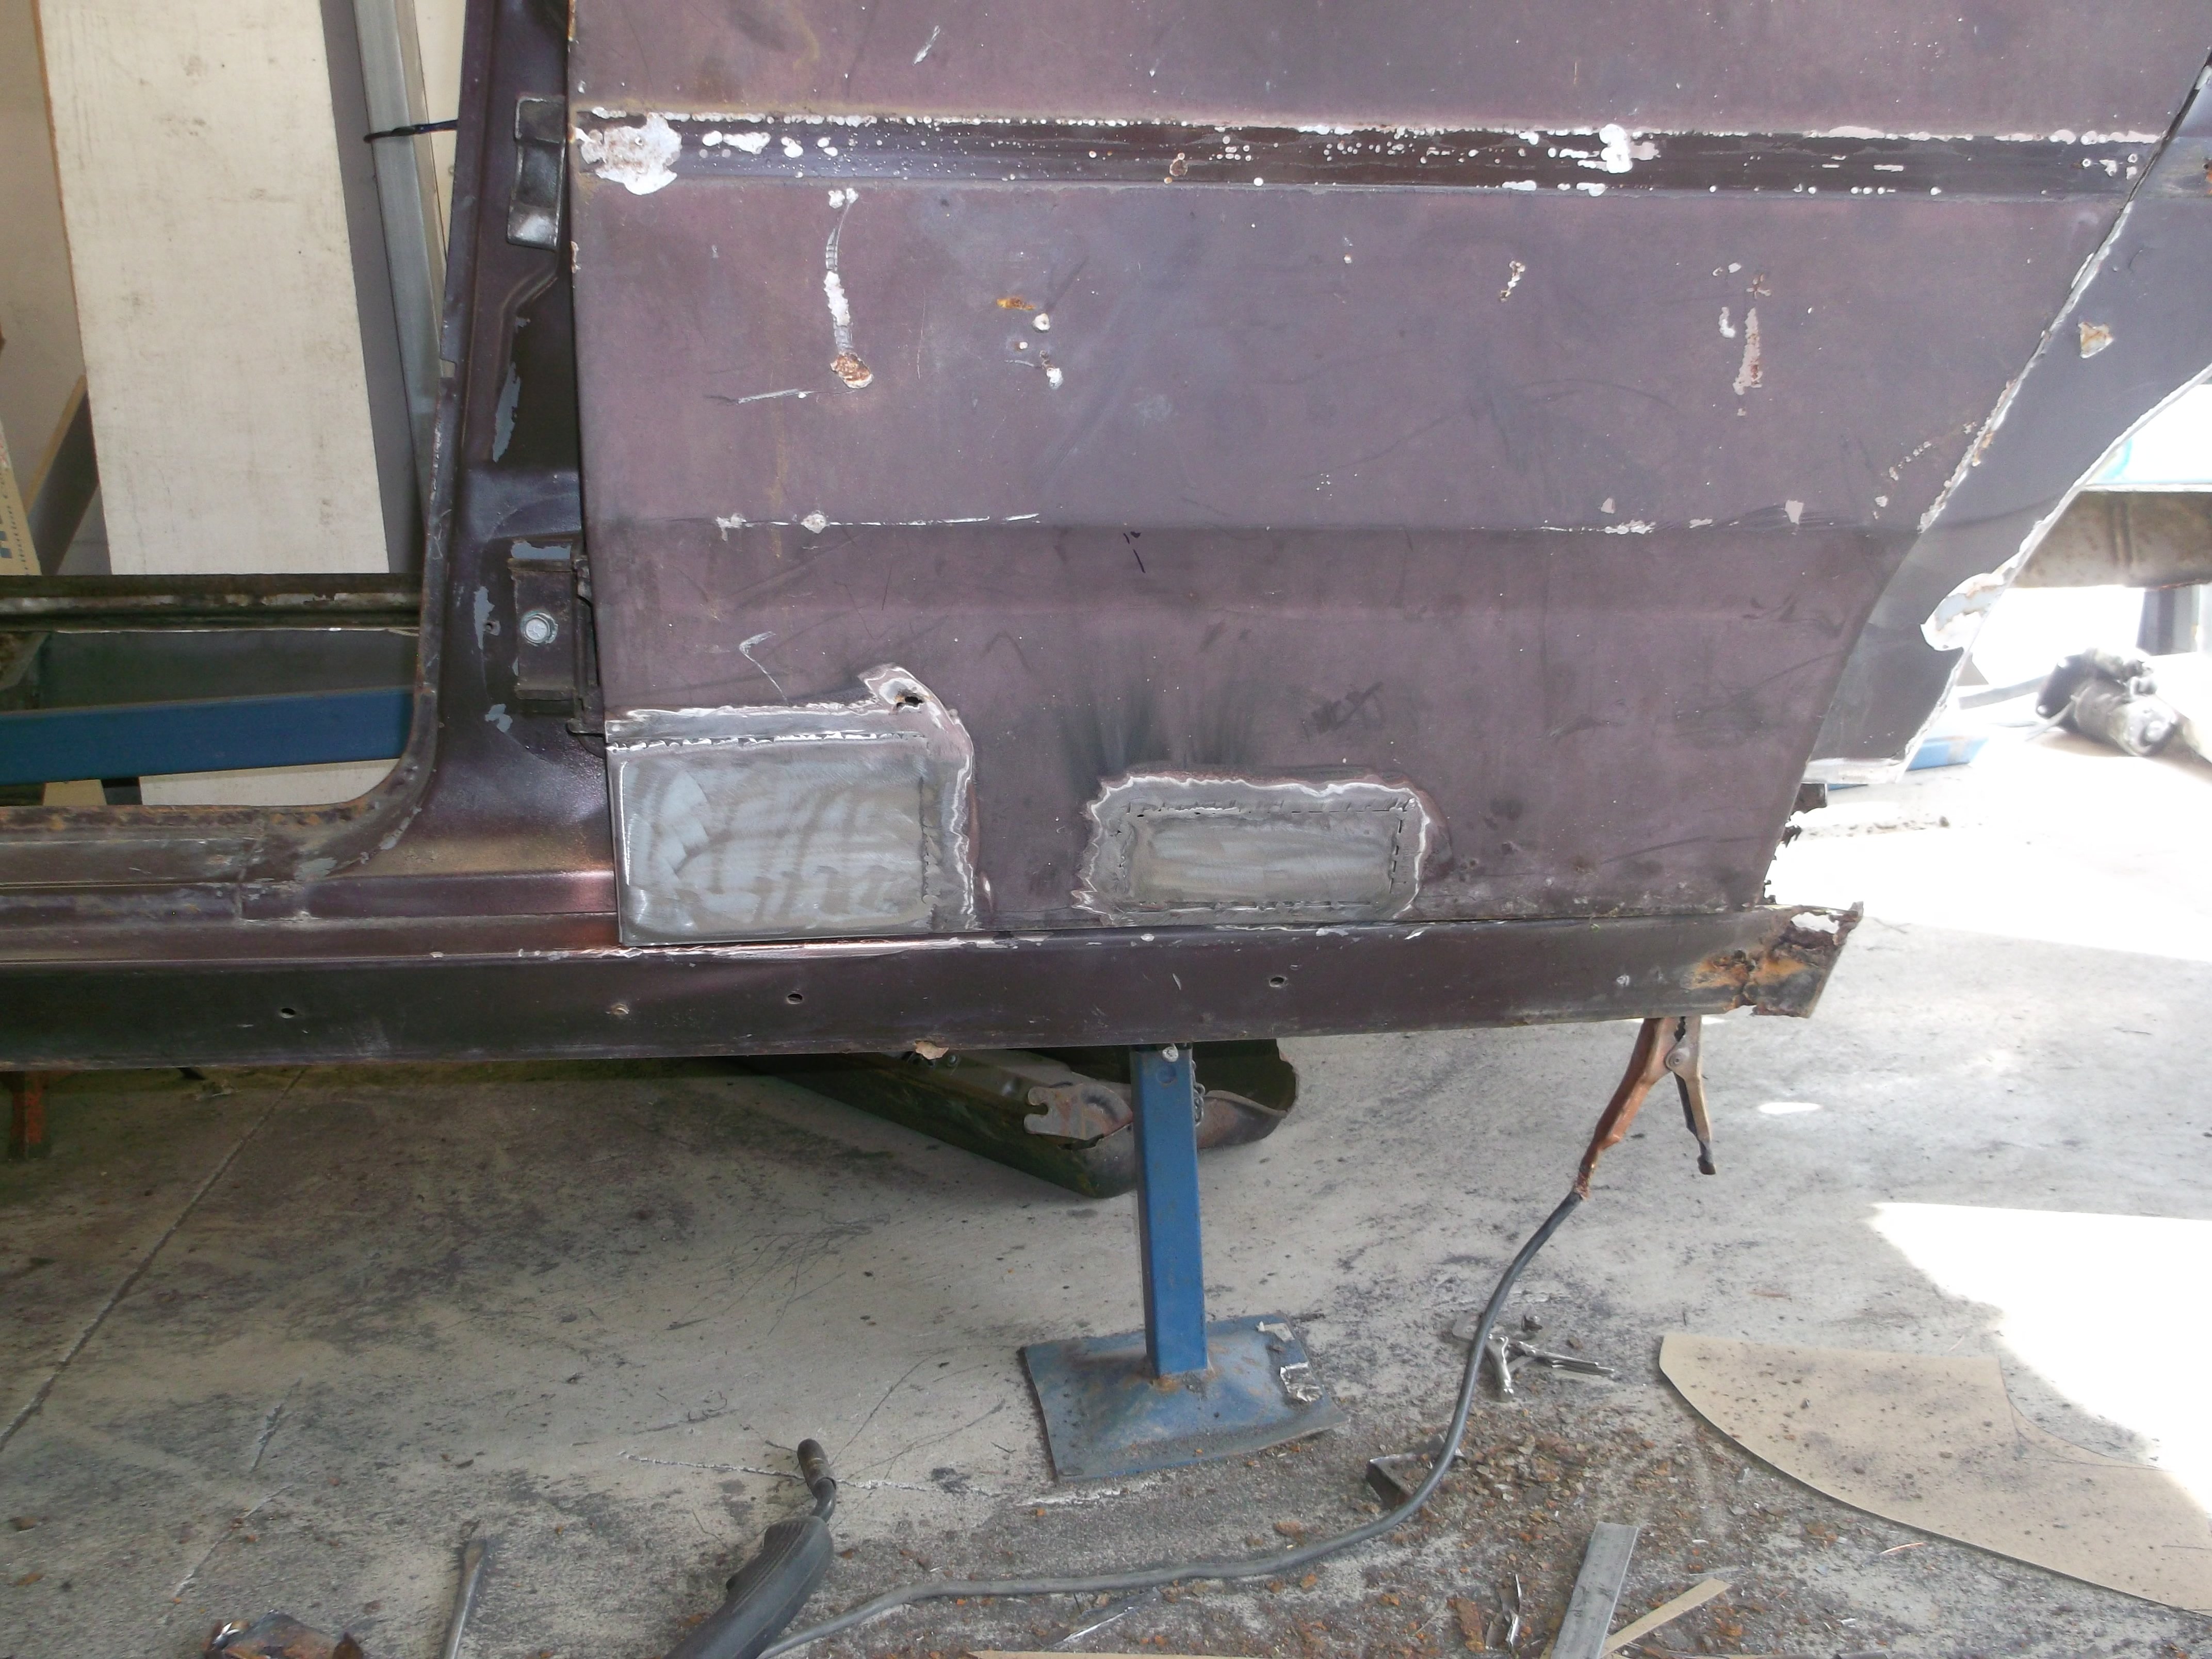
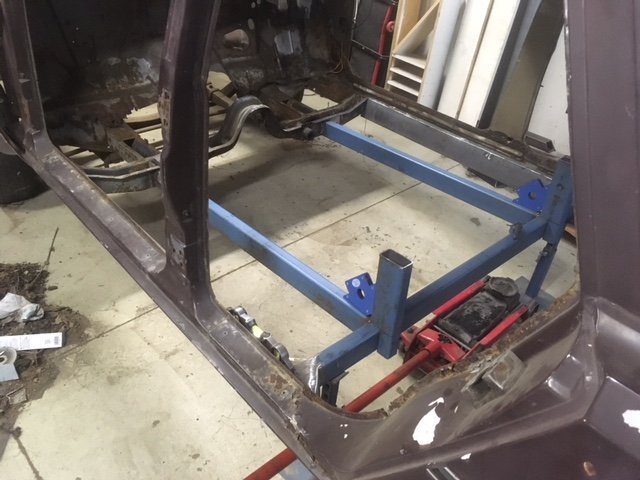
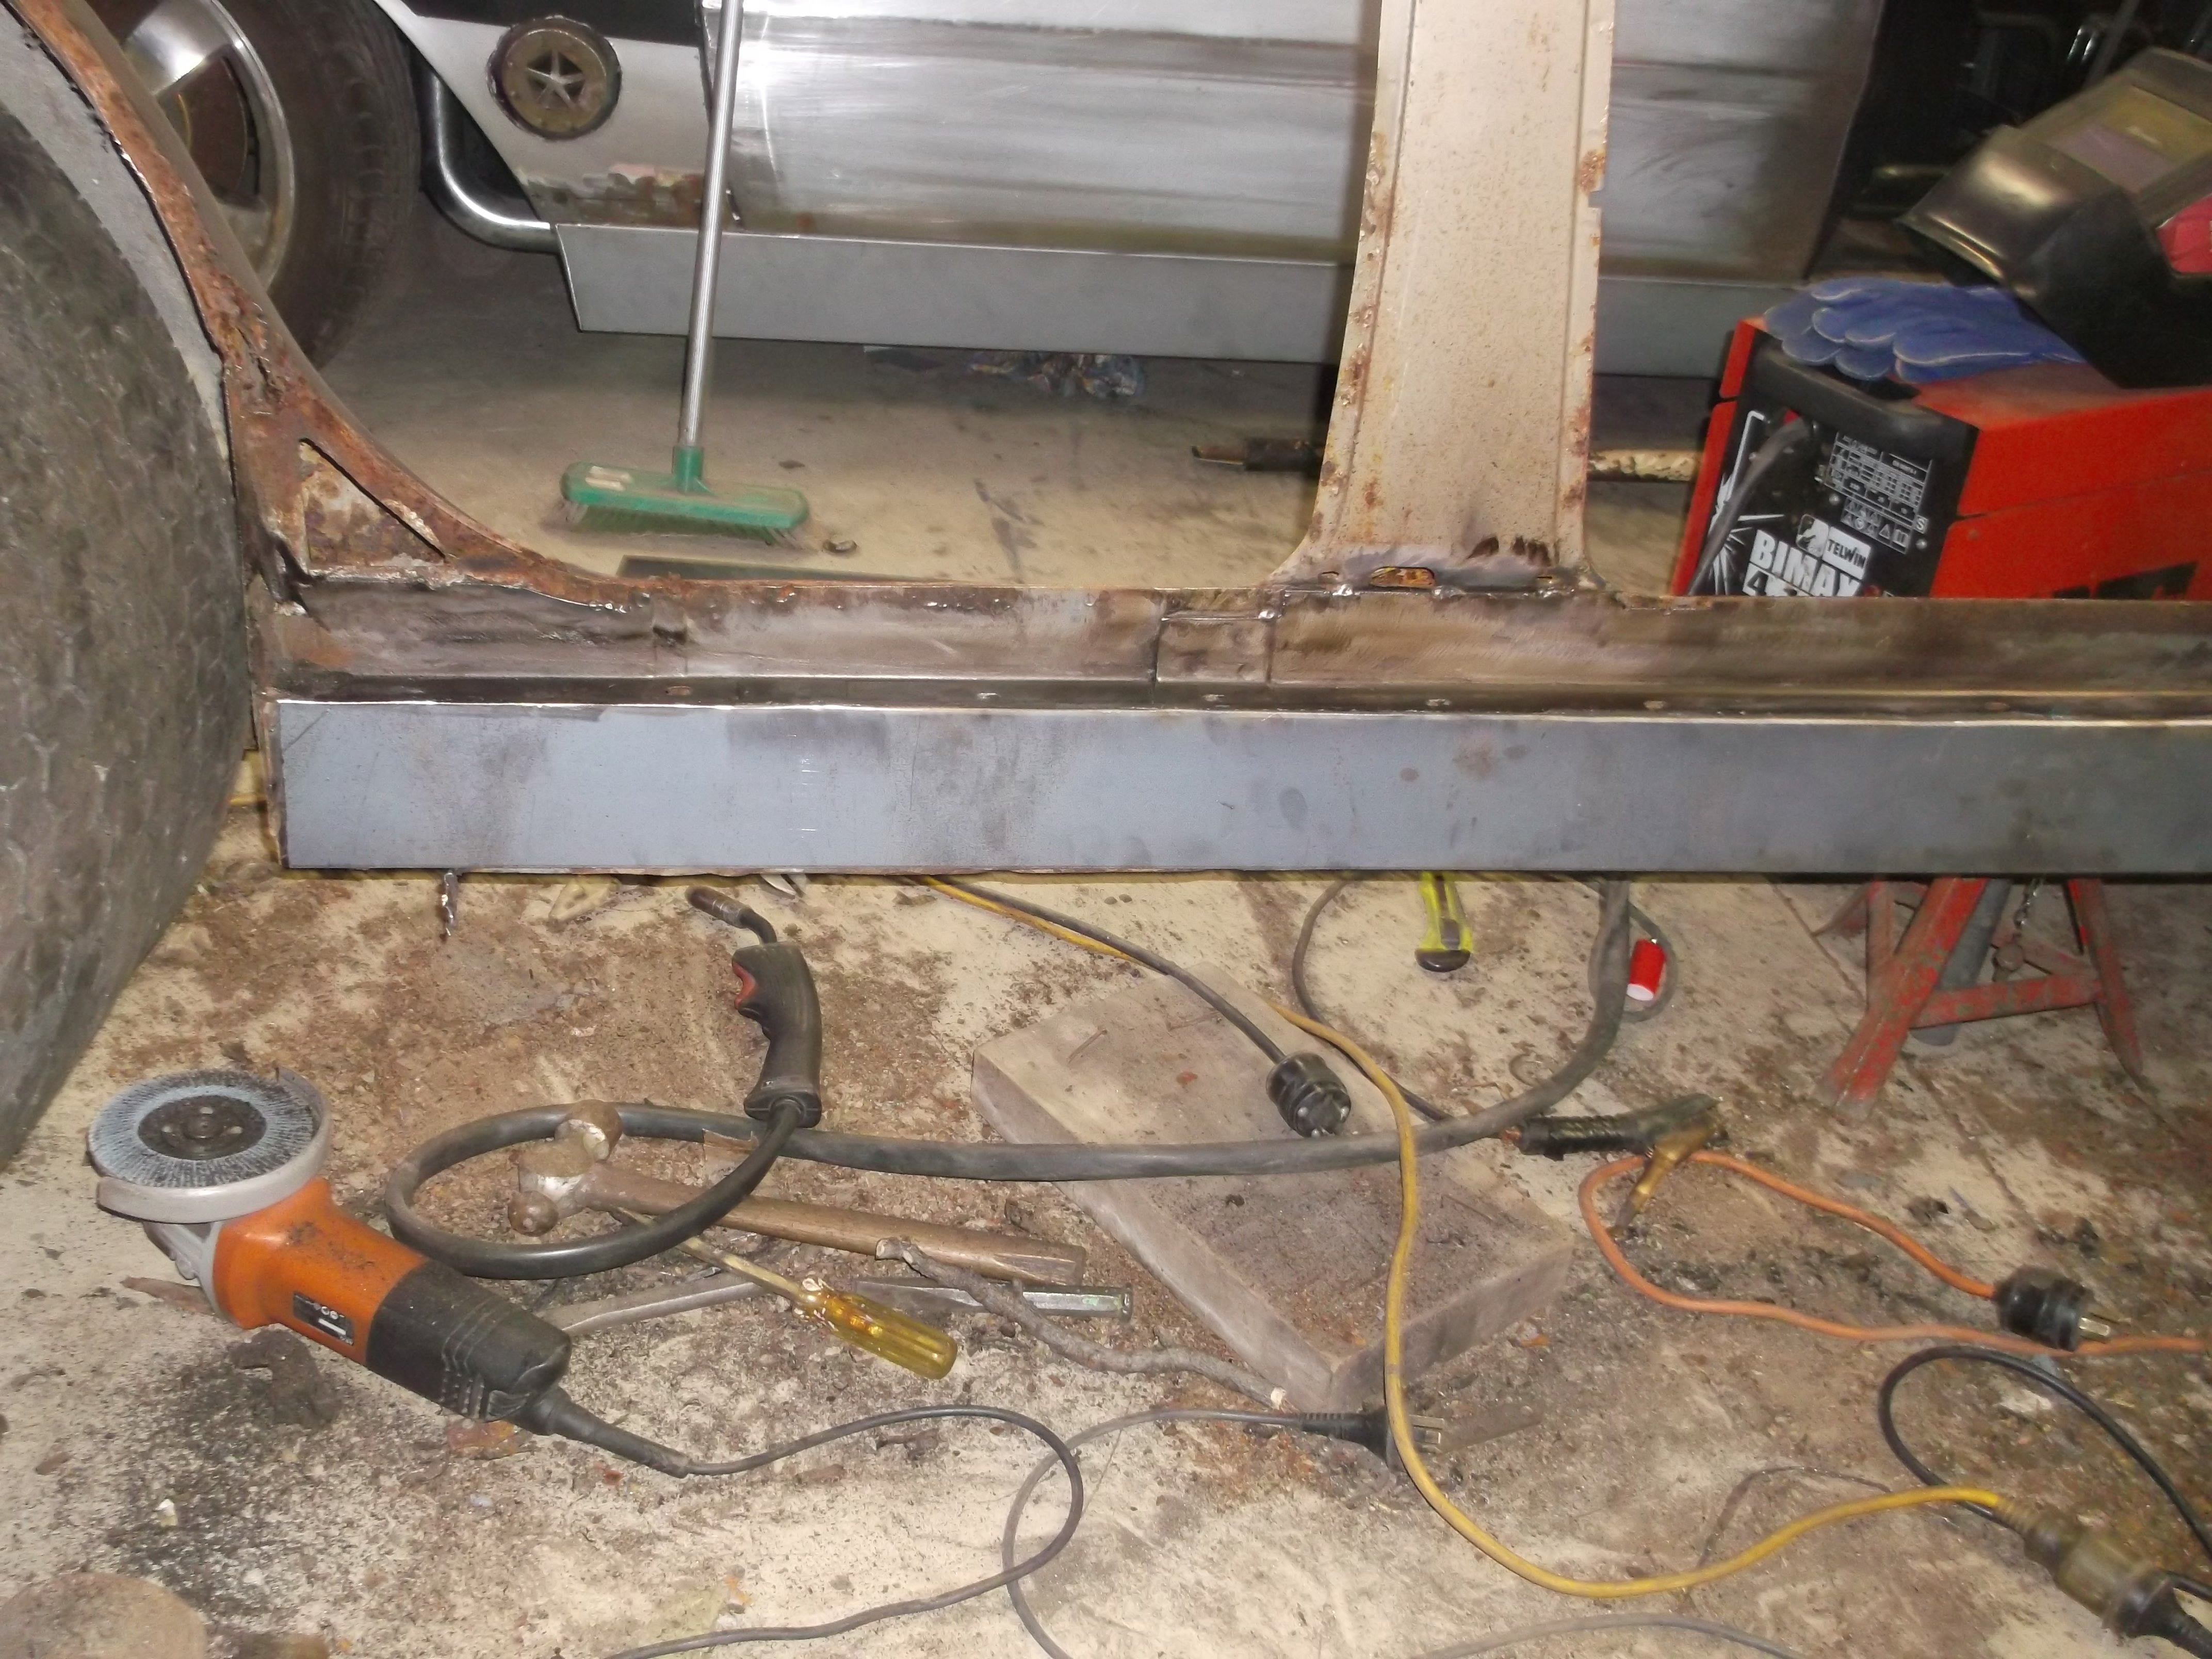
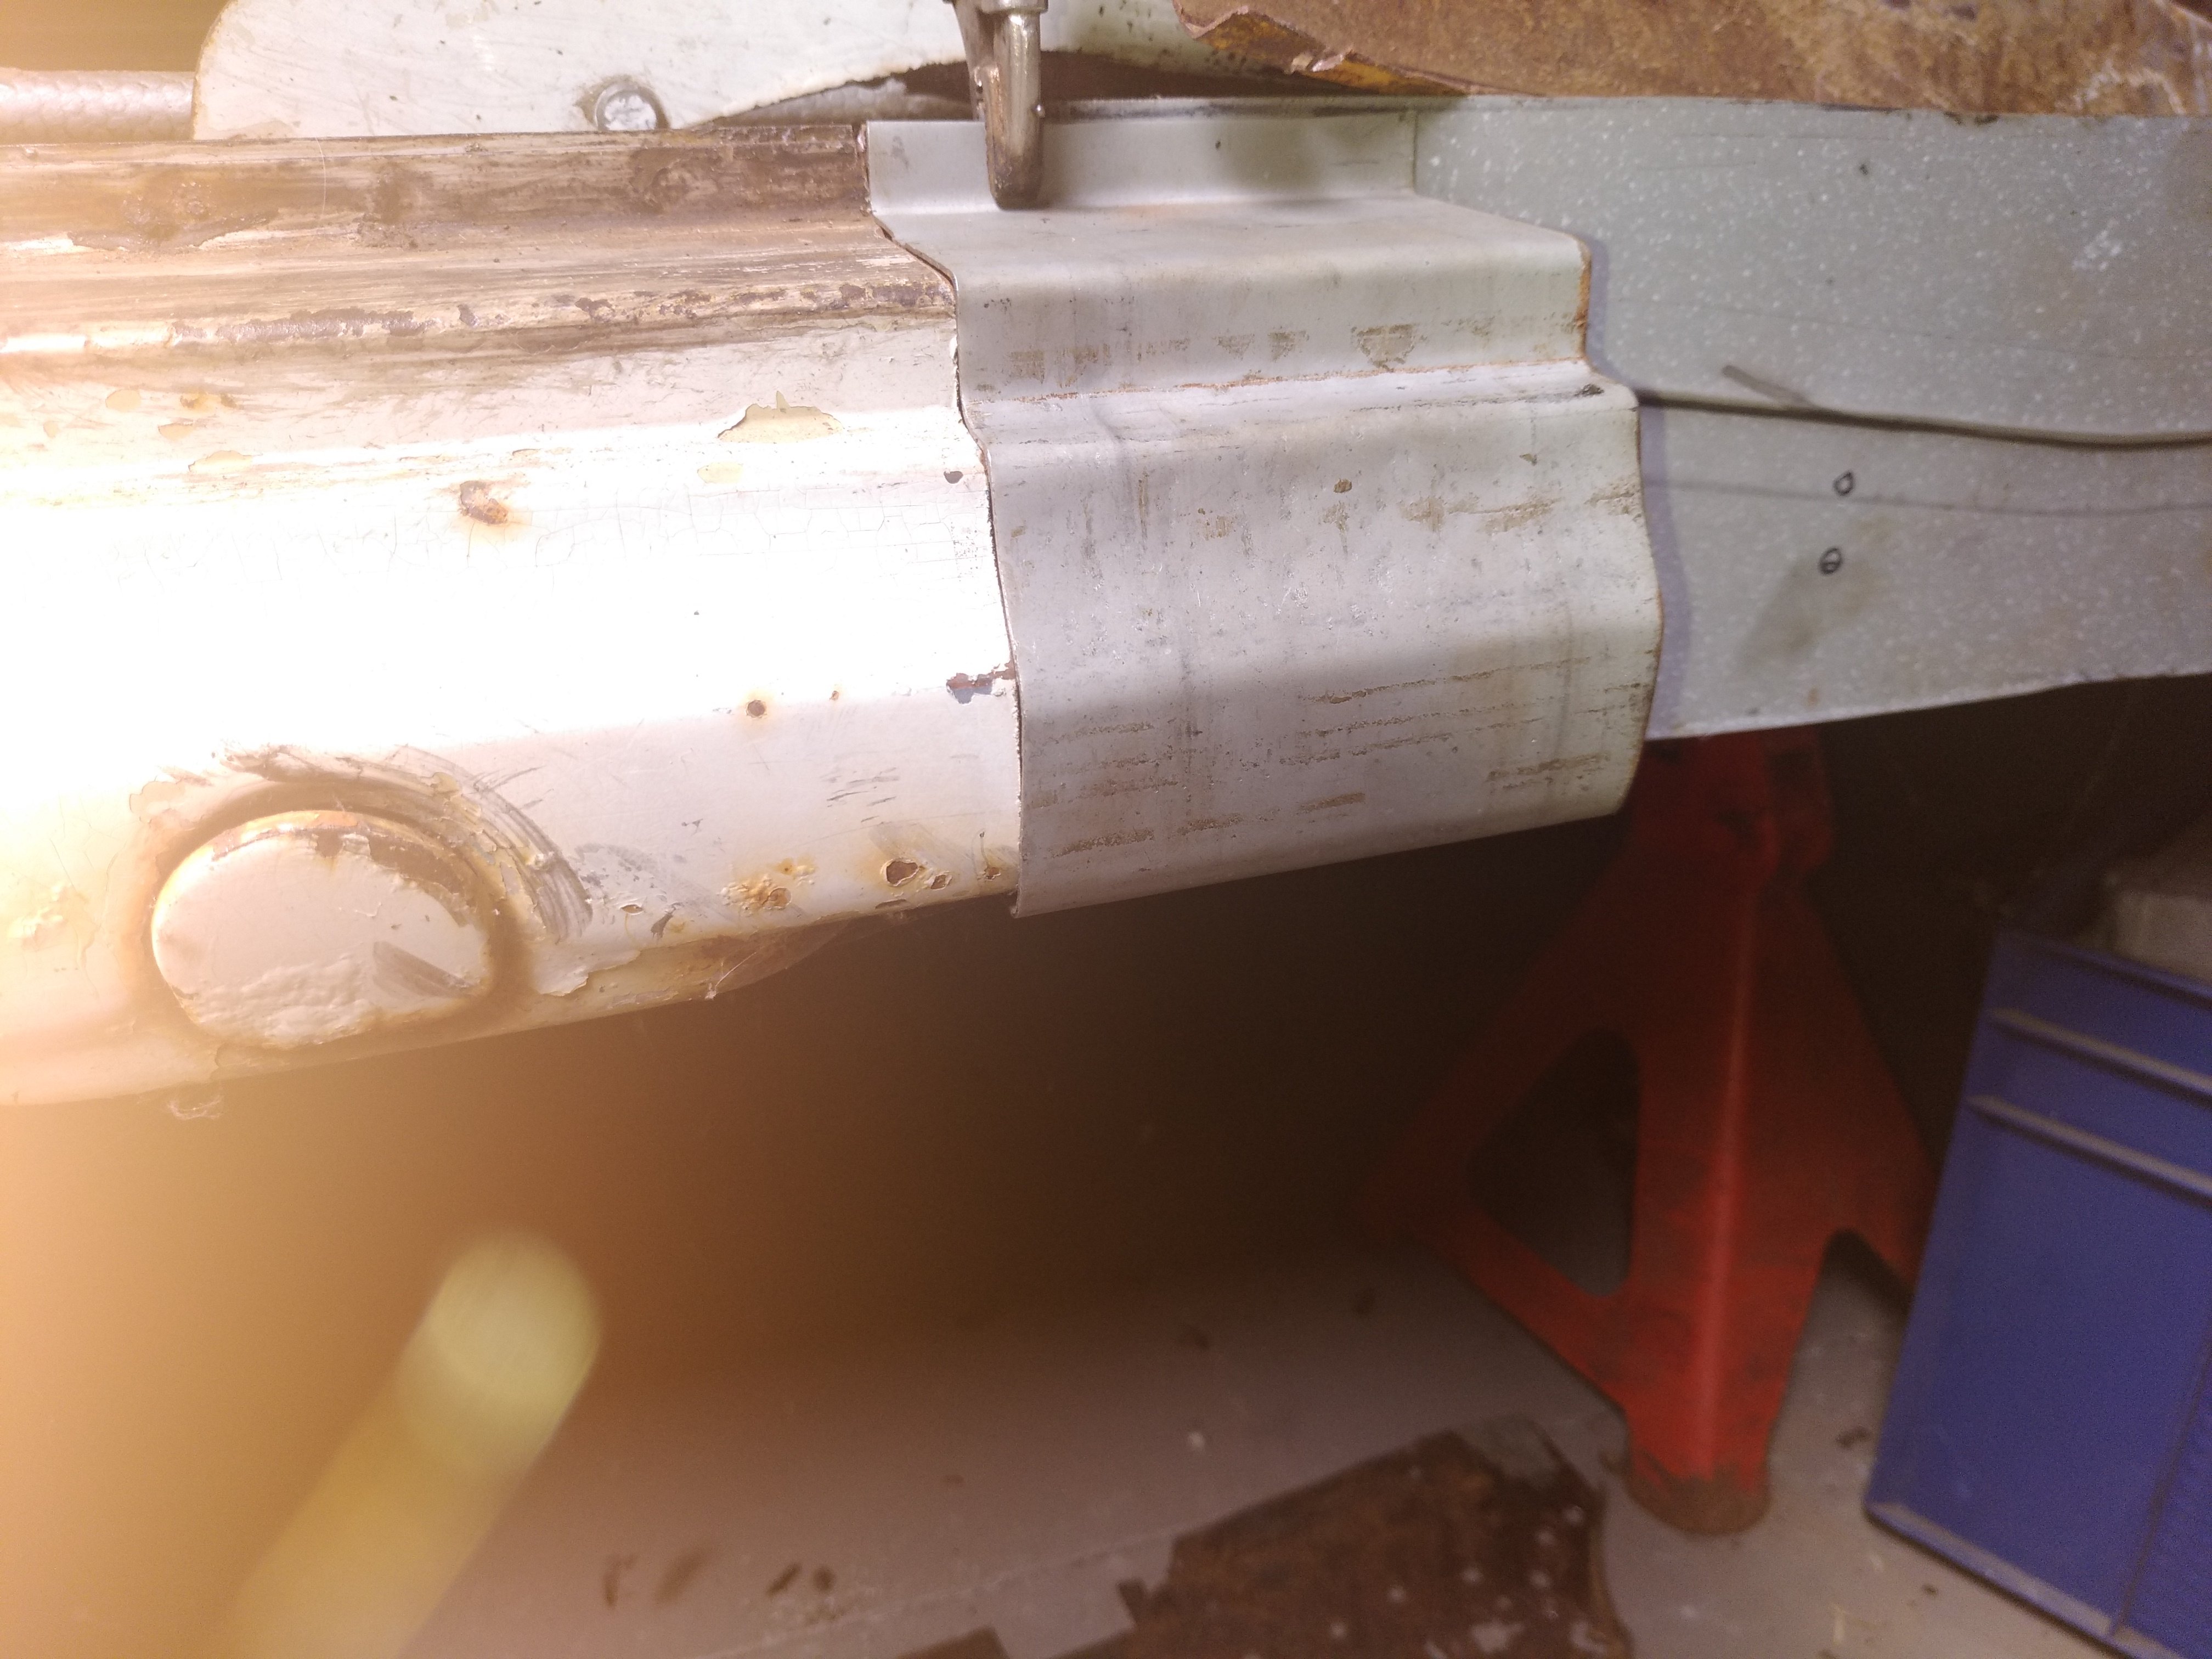
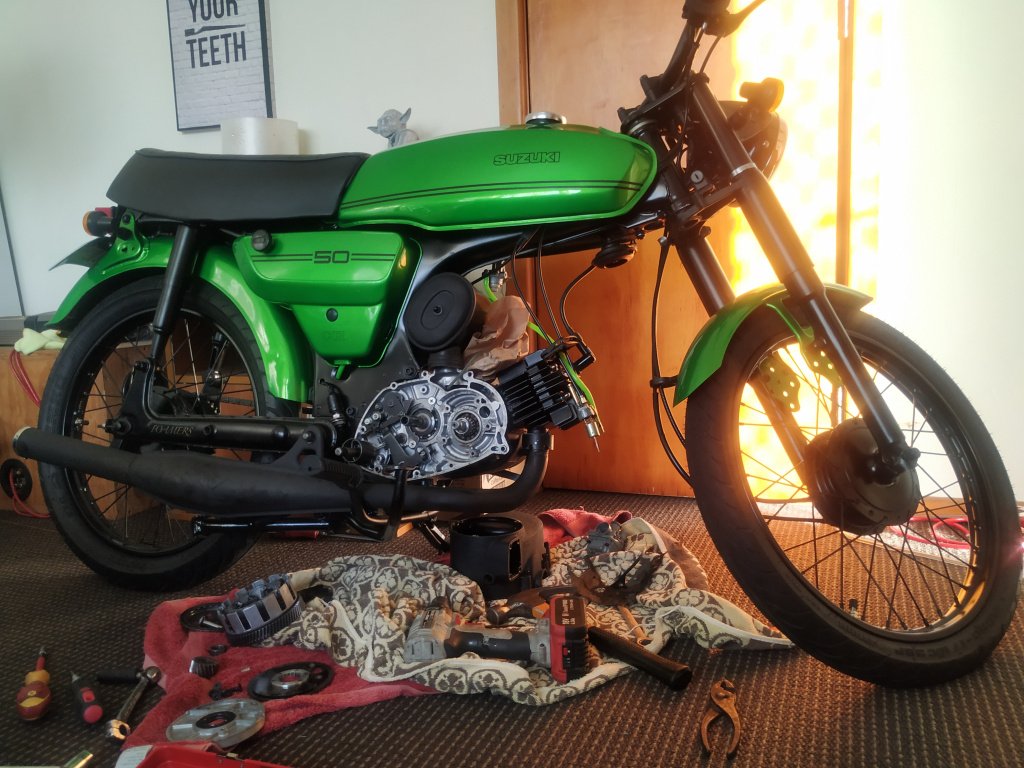
Hi everyone. Its been 4 months since the last update so explain whats been going on. thought, no point getting a wheel alignment with fucked ball joints so i removed these. and well, just go buy new ones it was the most scary drive of my life driving to the wheel alignment shop. obviously i didn't get it as close as i thought i did. the day before my 30th i went to get gas for the kombi i found myself underneath it tapping the starter motor, thinking it had shat itself after about 3 months of use. it was the ignition barrel that i had brought instead. so we by passed some wires and my i have a cool push button ignition. from here i was egar to actual put a wof on this car and get a few things sorted. one was my tail lights on it. seemed to have been a bit weird. well turns out i had a normal indicator stalk on the bus. mine should be a U.S one. turns out they made new ones, which are shit so that got returned and i ended up getting a 2nd hand one from a mate in Thames. put that in but the ring that gets tight on the center shaft was a little flogged out so i made a spacer so it would tighten up. all sorted and my tail lights and everything works well now. next up i decided i wanted to upgrade from points CB performance magnaspark 2 is legit. im not going to try explain the brains of it but if you have 2mins just watch this we went on adventure to whitianga for a vw catch up, which was cool to see everyone. ended up doing some on the side of the road repairs. the light was staying on so i just removed the power and pushed it back in its hole. Ice Creams Kombis All of the bugs I was using it for a work car quite a bit and just getting good use out of it. It was getting close to xmas now and i was pushing Beth to go away in the kombi over our break, but she was pushing back to have the rust done. so i talked to a mate and he got busy doing the jobs he felt comfortable doing. everything out! turns out i don't have any photos of what he done but look what i done. actually here you can see some out riggers on the other side done and painted grey. rust be gone brought this channel from the vdub shoppe along side a few other peaces. had to cut and bend it for some reason, cant remember now. the U channel was welded in 1st and then this these panels came with the kombi when we brought it so i kinda knew what i was in for. looks something like this ohhh i remember why the ends of the U channel were bent. they go to the inner sill which you can see here in the above image and in the below image. you can also see another out rigger welded in close to the hoist arm, and above the hoist arm is another one that needed to be welded in. got that from the vdub shoppe also. The inner sills came with the kombi for both sides. the inner sill was welded in place in the above image and we then placed the outer sill replacement panel on, put a scribe in the white paint and then i went about cutting the amount off that we no longer needed. came across some bog pretty standard for a car of 50 years old that was probably worth scrap value at some stage. nice straight line. outer sill tacked in place waiting on a @bobby1930 to tig it up. put the front and rear section on as well. i went through and plug welded the bottom of it all in place while i was able to get away from work. the following night bobby came over and tiged it all up and i was able to take it home while drew was away on holiday, allowing me to finish the rest of the rust. it was good to have it home. i managed to get away for two days over new years and came back to work on the 3rd. so we didn't make it away in the kombi but we made progress. on dads anniversary of 15 years i stopped working and had my day to myself and got this kombi water tight. went like this. old mate @Geophy came over with @Beaver and i put him to work. well actually both of them went to work. they both had large help with me drilling the plug weld holes to the I and U beams that were under the floor floor all welded up. well now it is after adding these other peace's of steel prior to all this i saw @oftensideways put a bunch of sound deadening in his little kp starlet and hit him up to see what he was using. Turned out the brand was kilmat and it was a crap load cheaper than dynamat. for example there is a dynamat kit on trade me for 369 for 3.3 square meters so around 110 a square meter or you can get kilmat for 43 a square. Or I paid to have it fast freighted and it still only cost me 58 a square. I ended up ordering this just before xmas and it turned up on the 7th of jan while i was doing the floor. this is now the day after dads anniversary and i really just wanted to get this stuff on. boom all done. for reference i got the 50mil stuff (lighter) they do a 80mil one but not in 50squar feet so that's why i didn't go for that one. i will probably use the 80mil stuff in the front half of my kombi. link : https://www.amazon.com/Kilmat-Deadening-Automotive-Insulation-dampening/dp/B0751G6TMV back to work i went. old @Bistro and i went shopping for some rubber grommets for his car. He brought a couple of different sizes which one didnt fit his car but man what a great fit it was to my kombi. i was now aiming to reach kumeu car show but i didnt quite get there. so i just went hard out on just getting the kombi sorted for @Neds birthday week away at kai iwi lakes. so straight to it. time to do the upholstery before everything else goes back in. ahhh whats that little black thing for greg you may say. well. it turns two lights on and the fridge. what you have a fridge?! well i didn't at that point but Beth came across some money so we splashed out on a 49 letter fridge ohhh i now needed to do my headlining before i could get a wof. as you see i dont have one here but you can see the new LED interior light foam down 1st to pad it out. help with sound deadening as well. i also filled the pockets on the side you can only just see two done here. boom we have a headlining wanted to paint the side of the van where i had done the rust repairs, so i done a botch job on that. and painted it white. now you can see how bad the bog is. oh i also added a house battery to the kombi to power the lights. i got this sweet gadget from super cheap which allows the charge to go the 2nd battery but wont drain the main car battery when we are camping. back to upholstery. put some black carpet down in the back then covered with with a bed. a rock and roll bed that is now that was in time to move on to installing the fridge and cabinet. 1st part was to sort out the sink. hole in the floor and it now drains in the center of the bus now that is done the fridge can get screwed in perfect fit. now back to more upholstery, here is a before hand of my drivers seat. a during and a after not bad for 1am upholstery. made Beth a little holder in the cabinet we also put shelves in there the weekend we went to whitianga shit i still had some more rust to do before a wof but we did get a wof beth likes to pull the sheets up and just keeps pulling them when we are in bed. been the kombi doesn't really have anything to tuck the sheets into i sewed a buckle to the bottom of the sheet and the quilt. which goes around some brackets under the seat ready for camping7 points
-
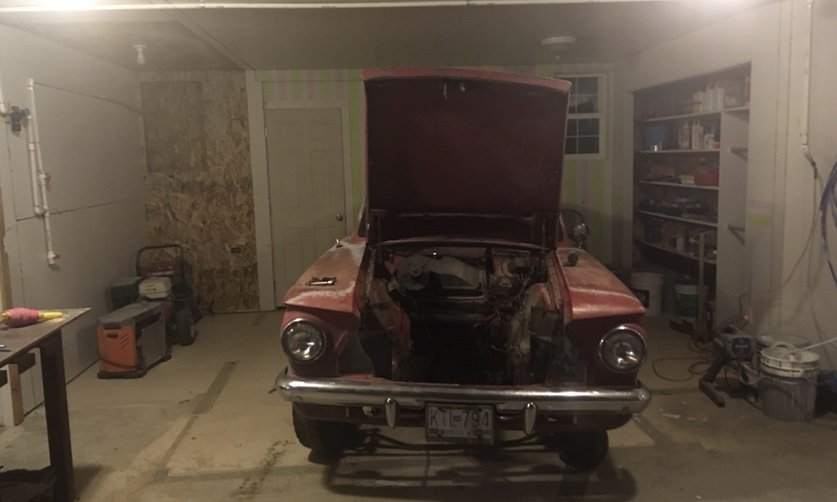
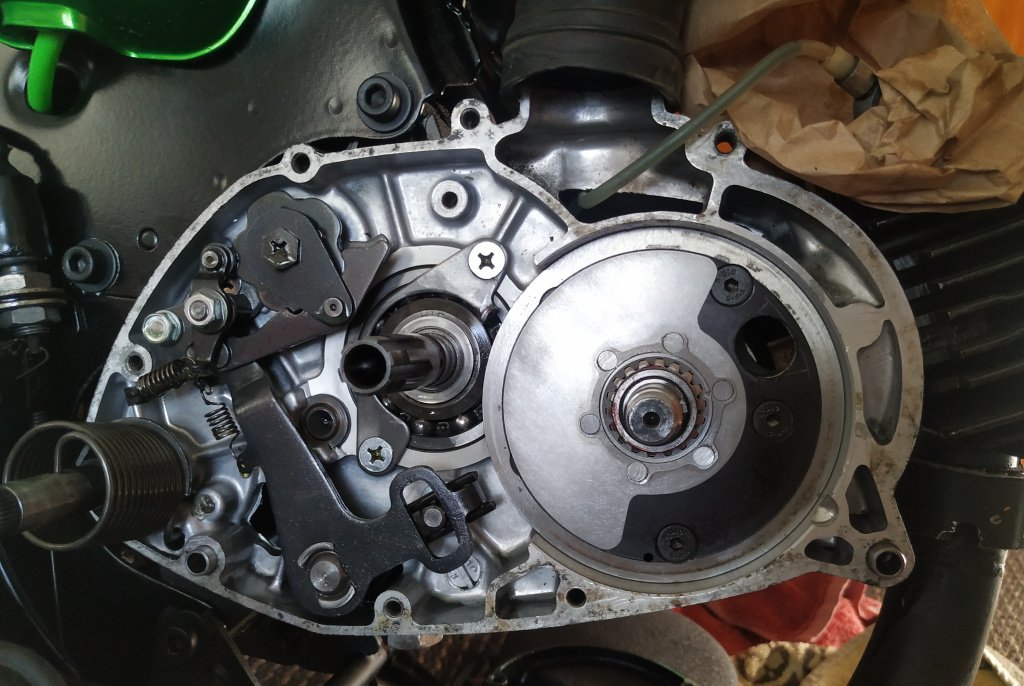
put a headlight relay in to take the load off the wiring in the headlight switch. Toyotas switch the negative at full current through the headlight switch and after a while they like to set themselves on fire. so Nick the sparkey wired in the relay. put the front back on and did more tidying of the wiring inside the car. which was such a mess that im to embarrassed to show a picture of how it was. ill put the headlight back in the drivers side too. so its better now, still not finished but there's not much left to do then the wiring is finished and i can have a go at starting it. oh, its got oil pressure and fuel pressure without leaking anywhere. 2020-02-02_01-43-52 by sheepers, on Flickr 2020-02-02_01-44-14 by sheepers, on Flickr7 points
-
10,000km clocked up in the last 3 and a bit years since its been on the road. https://oldschool.co.nz/index.php?/topic/34313-the-westpala/page/10/#comments
5 points
-
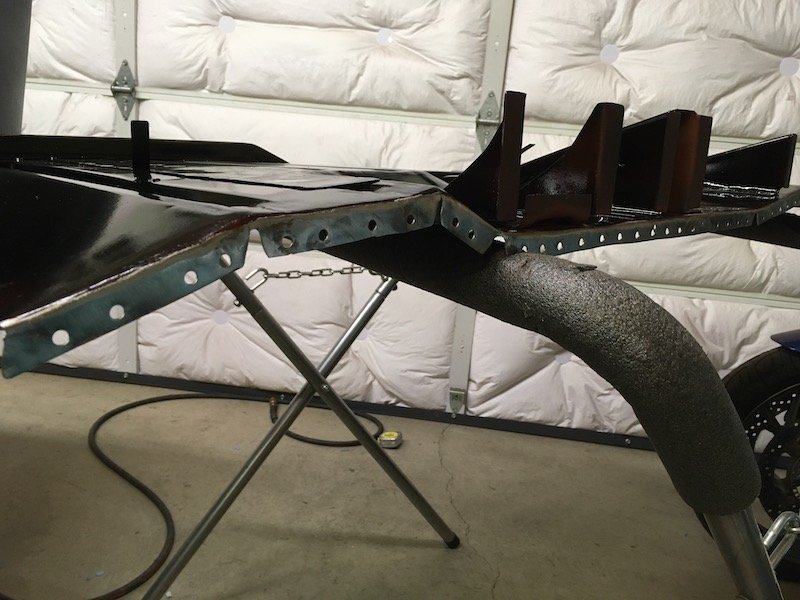
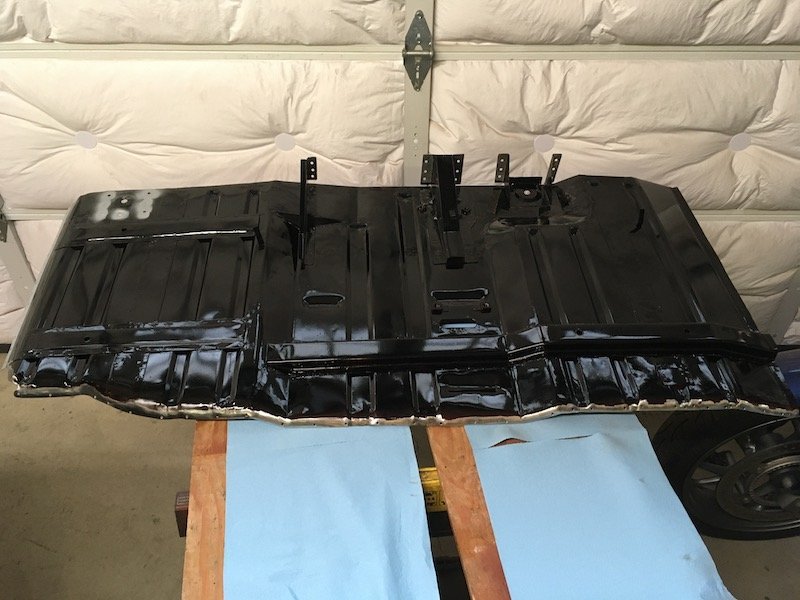
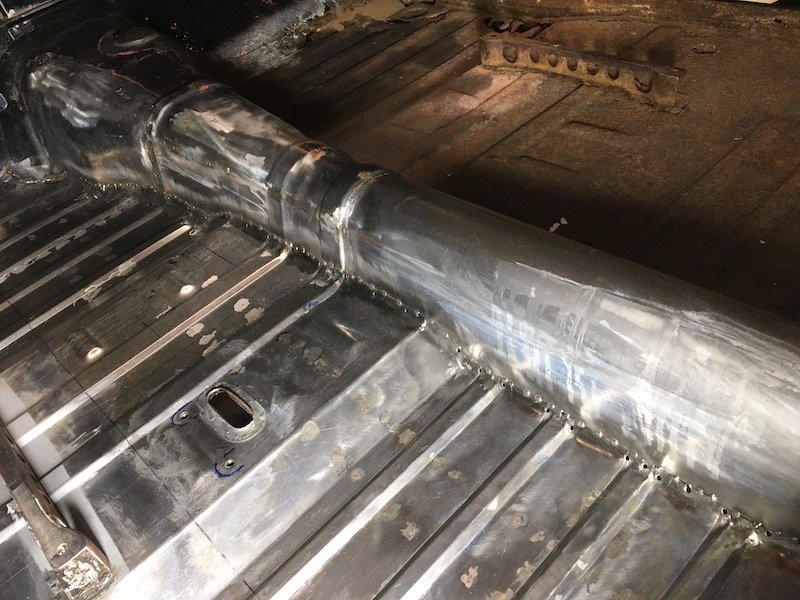
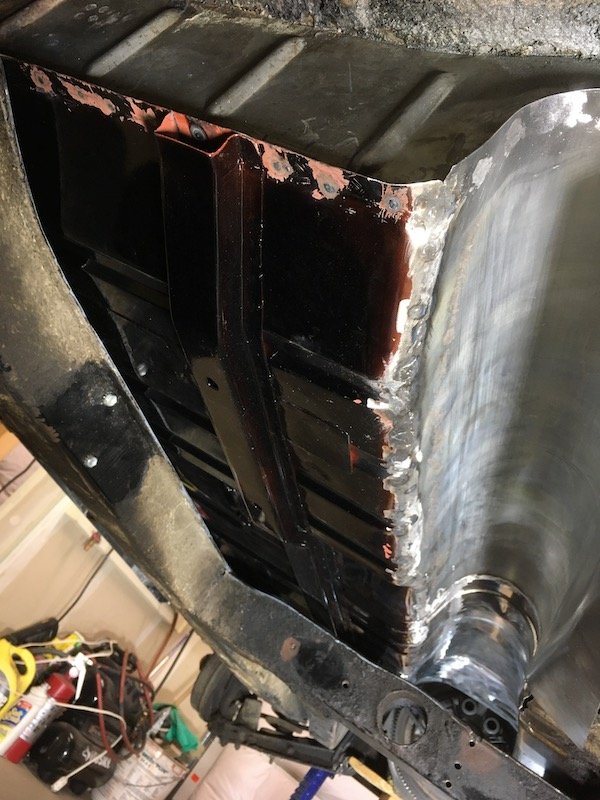
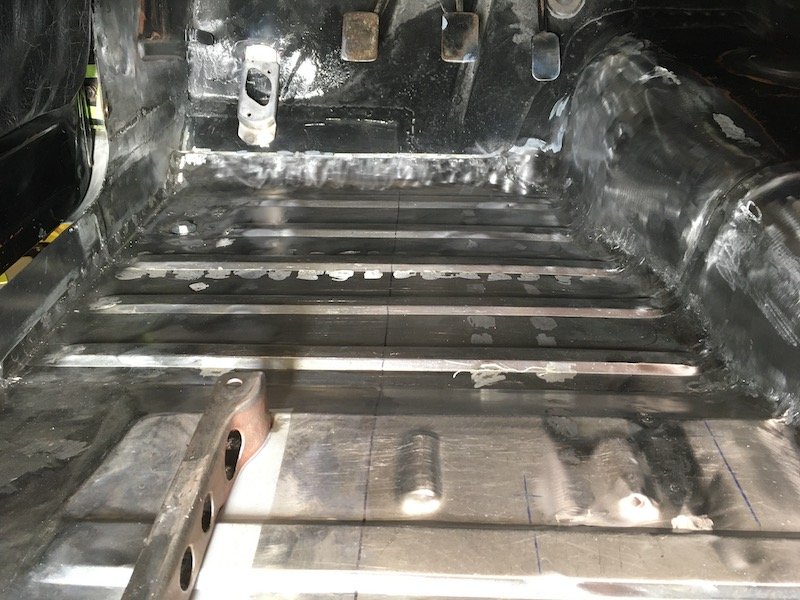
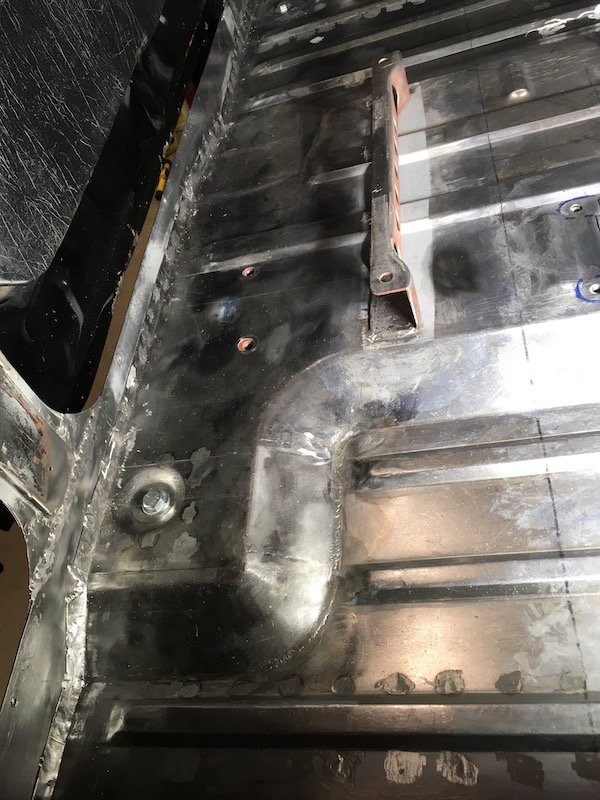
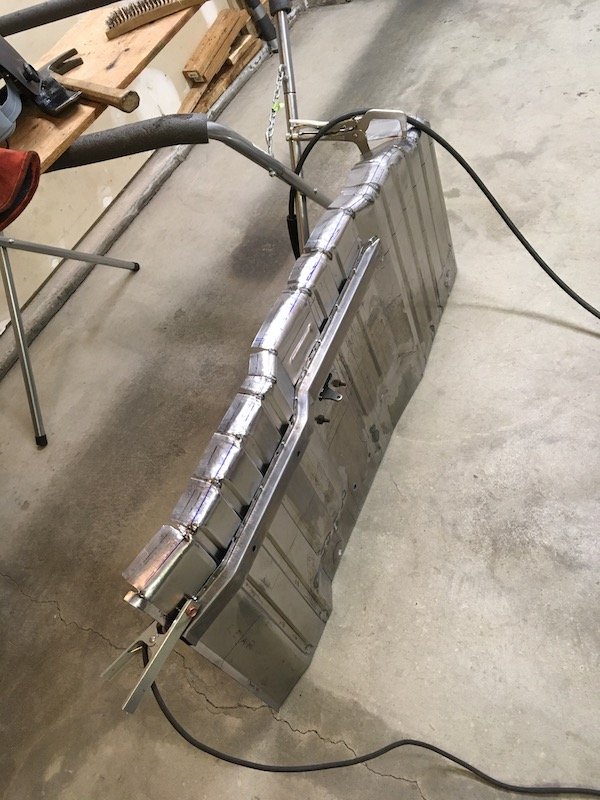
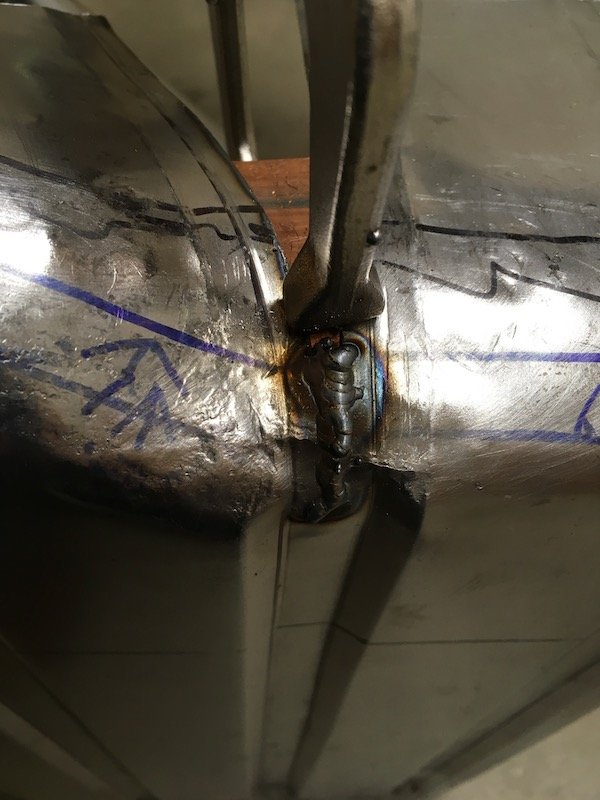
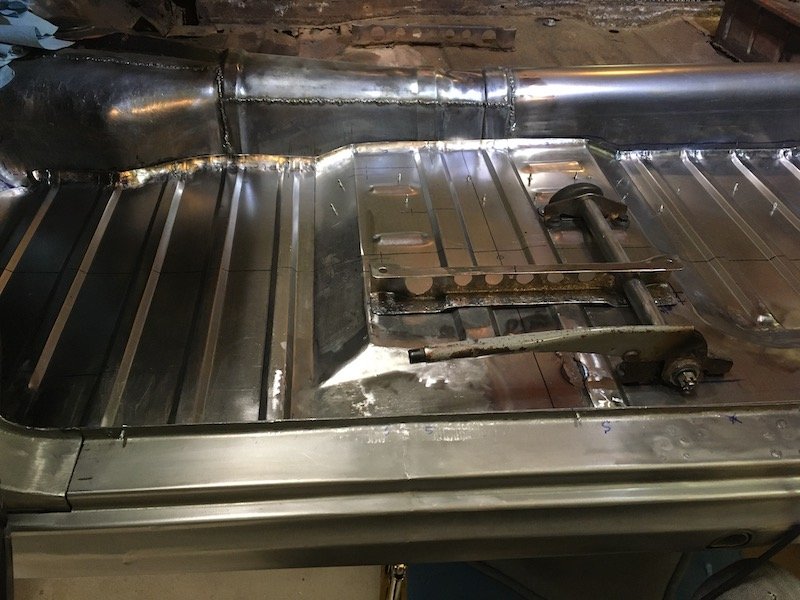
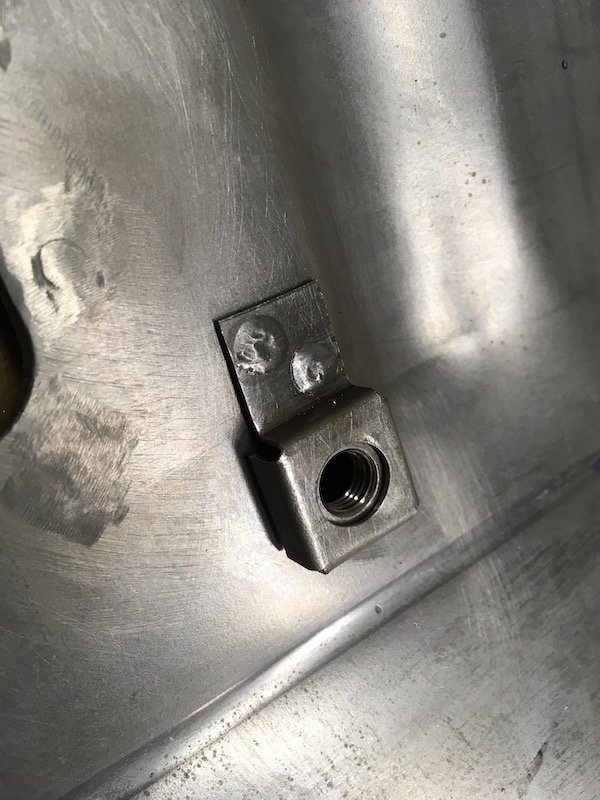
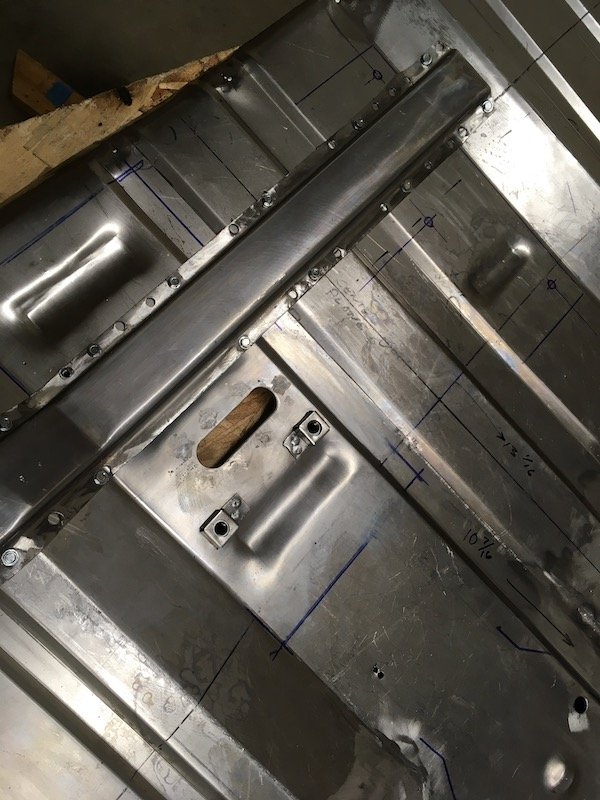
Building the 1961 Datsun 310 Bluebird Floorpan - Painting the underside and finally welding it into the car. Prepped and painted the underside of the floorpan with automotive exterior paint finishes (epoxy prime, base coat, clear coat). No fillers, lead or anything else to hide my handcrafting. Curing in a dry and heated space. Painting this side now saves me the otherwise awkward situation of trying to protect it once installed above the very wide frame rails. Painted the tops of the frame rails, and some other adjacent surfaces, with POR15 and rustoleum black. Meanwhile, the floorpan was prepared for plug welds with lots of holes punched and spaced an inch apart. I laid down some plastic to keep the frame rails from scraping the underside of the floorpan during positioning. A series of widely spaced tack welds were made a the butt joint to the tunnel. Conformed, drilled and readied the A post floor to body mount bracket for weld. Plug welded! Floor is not coming out now. Got good melt thru of the weld on the underside of bracket. Then just kept adding more tacks to the tunnel joint. Thought it was a good and tight enough joint at this stage to try a TIG weld. It was NOT. Total failure right away (no pics, too embarrassing ) ; I made more holes than actual weld. More practice required. Reverted back to MIG weld and eventually fully tacked the joint. Filled the positioning holes later. Underside - aft. Underside - forward. Added the HI-Lo Beam switch bracket. The last of the welding ops. Here I was trying to weld three sheets of metal together at the base of the B post. It can't be fully accessed from the other side while the body is mounted on the frame. Sill stiffening bracket, inner sill and body mount bracket horizontal flange. Failure. The first weld on the left drilled hole did not even hardly heat up the bracket on the other side. The arc just goes sideways to take the shortest path. Drilled the weld out and made much bigger holes and at least half way into the bracket flange, last in the stack up. This bigger hole, shown on right, helped. The weld still did not result in visible melt thru on the other side though it did attach to the flange. I followed up with edge tacks to at least keep it fixed on place until the body and frame can be separated later. You can see the impossibility of getting the torch directly on the face of the flange. The rest of the welds to the inner sill were no problem. Just some inconsistency, but all other welds showed positive weld through and good attachment. Plug weld spacing of the floor outboard flange was an inch apart, slightly tighter than factory electrode spot weld methods. Some random underside pics after welding was complete: Had to plug weld these blind using an inspection mirror to aim the MIG wire on top of the pinch weld joint. Not easy but very fun to watch the melt thru from below. View is looking forward and up at the side of rear seat floorpan (or step) and lap weld joint. Hit my pic upload limit. To be continued in next post with some other views underneath and closer topside details... Discussion: https://oldschool.co.nz/index.php?/topic/60267-marts-pl310-61-datsun-bluebird-sedan/ Build: https://oldschool.co.nz/index.php?/topic/60264-marts-pl310-61-datsun-bluebird-sedan/
5 points
-
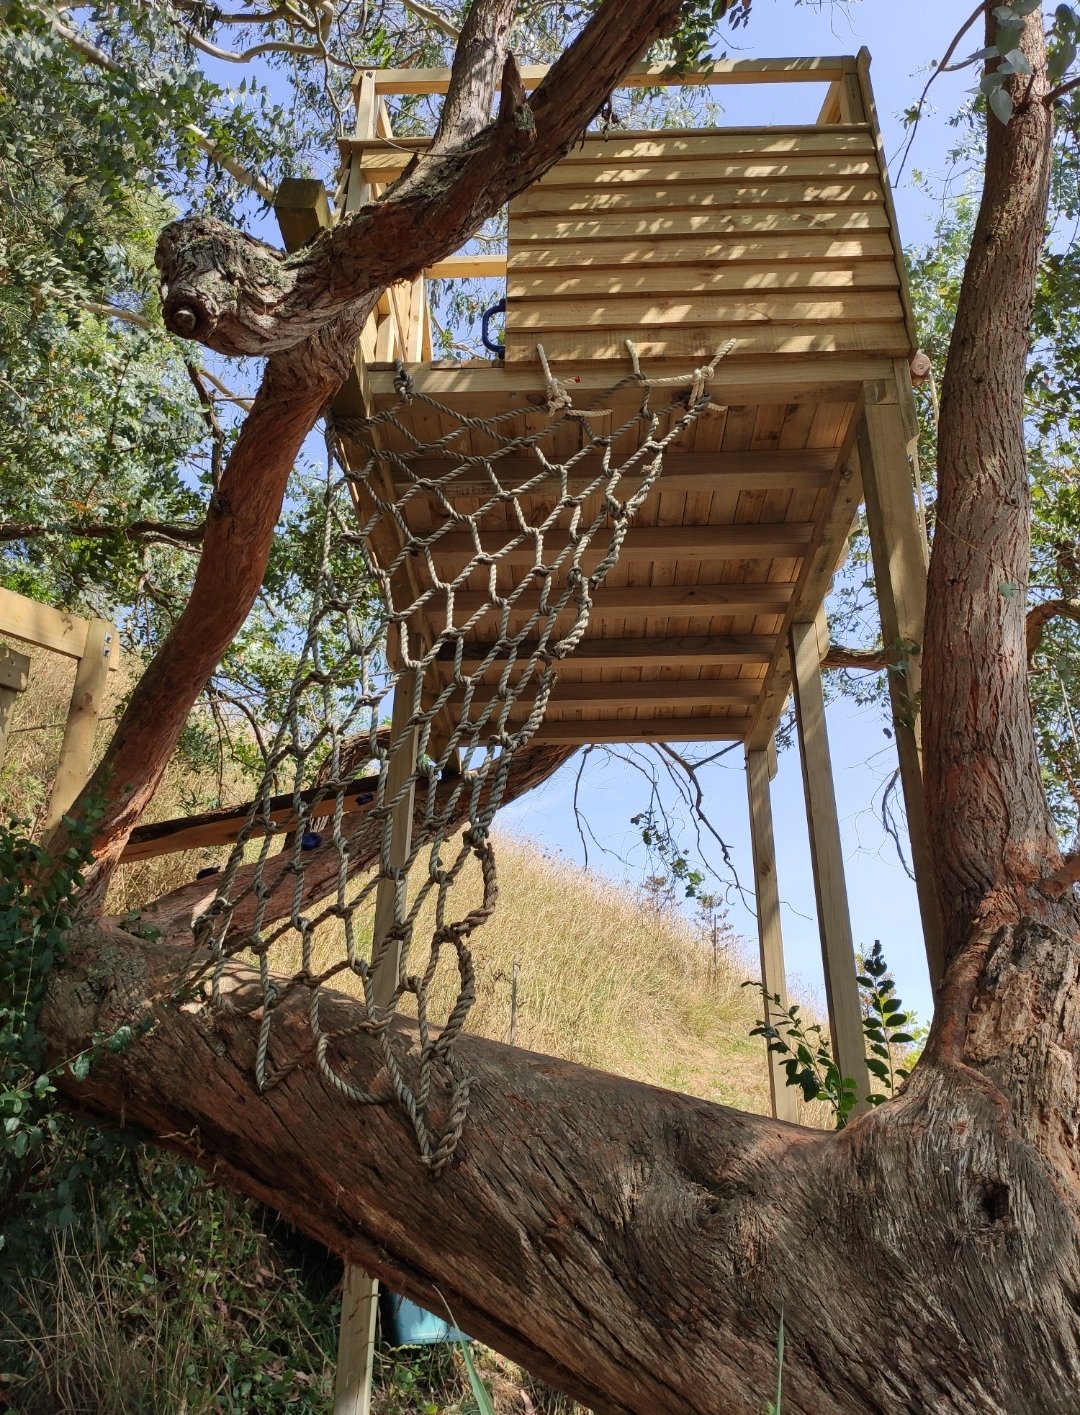
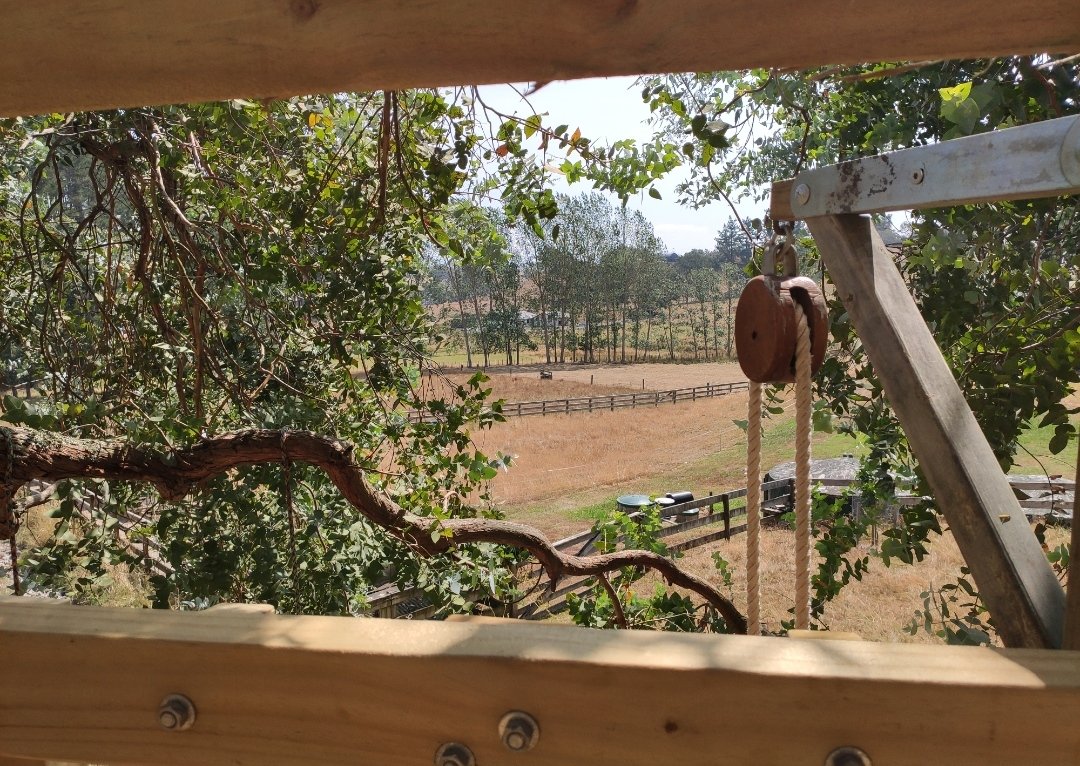
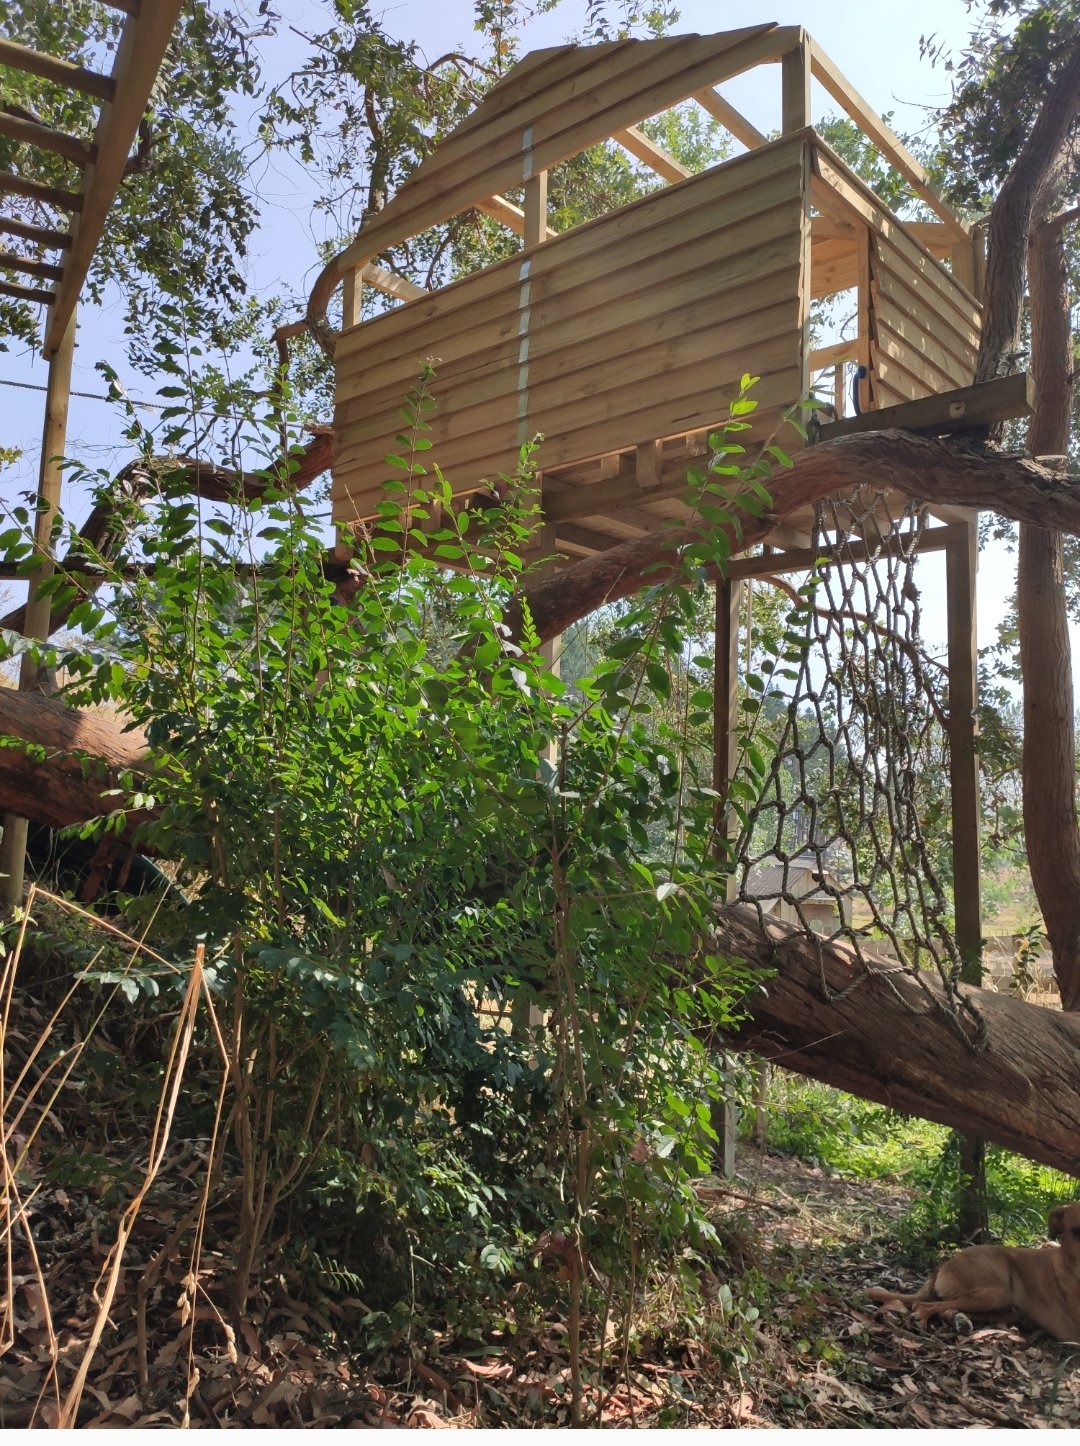
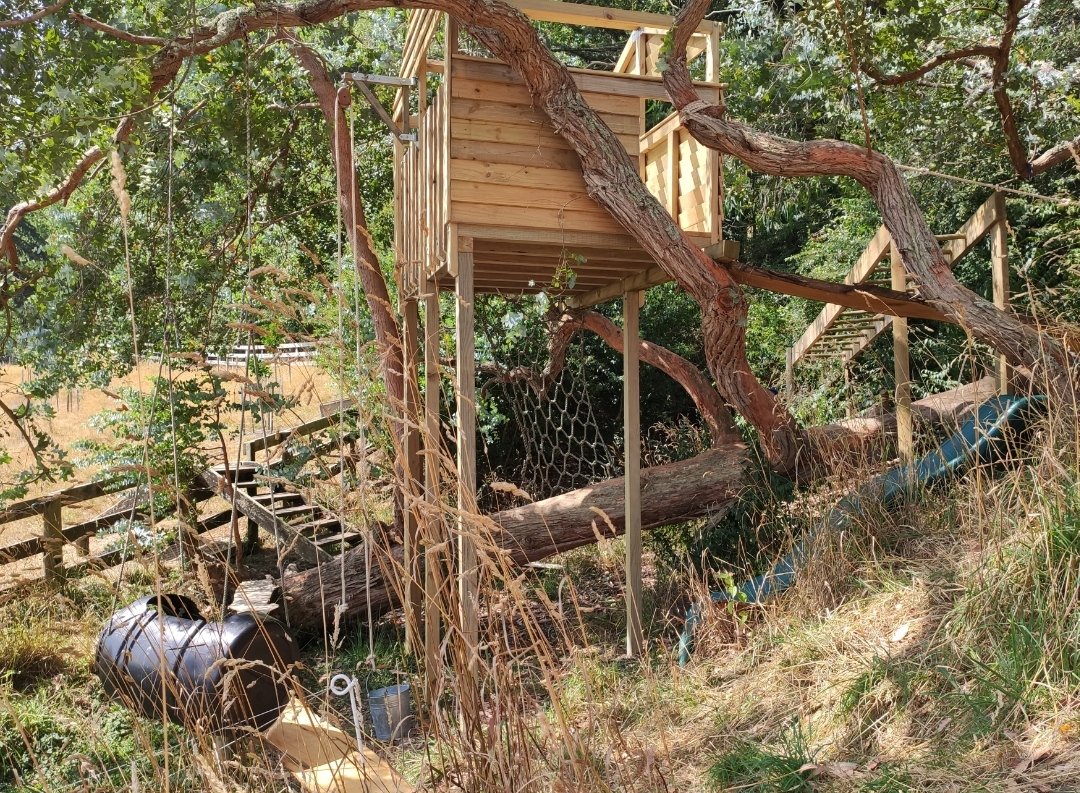
School holidays project with the boy, super fun building this kinda stuff get to channel yet inner 8yr old. Still needs iron and a few other things, but mostly there: View from the top deck, stoked with the pulley scored it off TM as salvage from some old ship
5 points
-
I’ll have to fix the Pole-Smoker, it barely survived Te Urewera undertaking. And make some concessions for essentials when travelling without a support vehicle: Beef Jerky A cigar BYC kit Im in. And probably @anglia4 And probably @Itchybear And probably @dadblackwood4 points
-
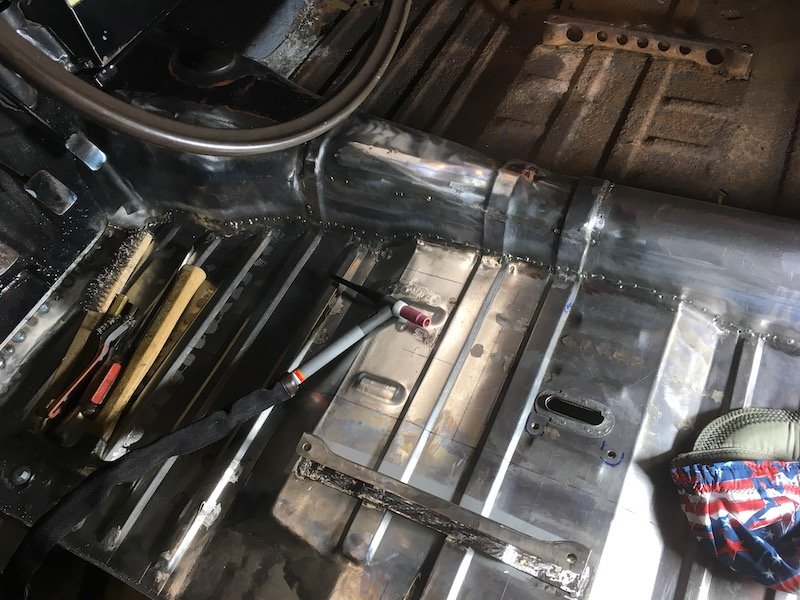
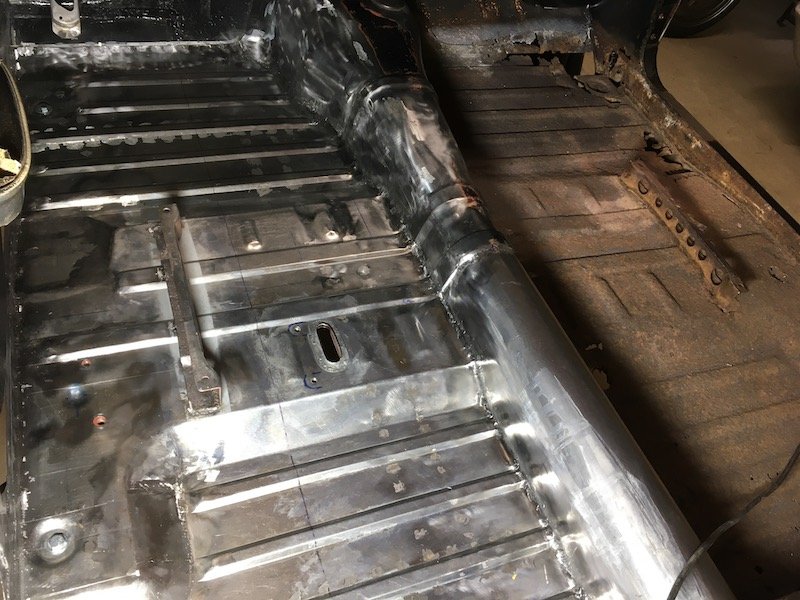
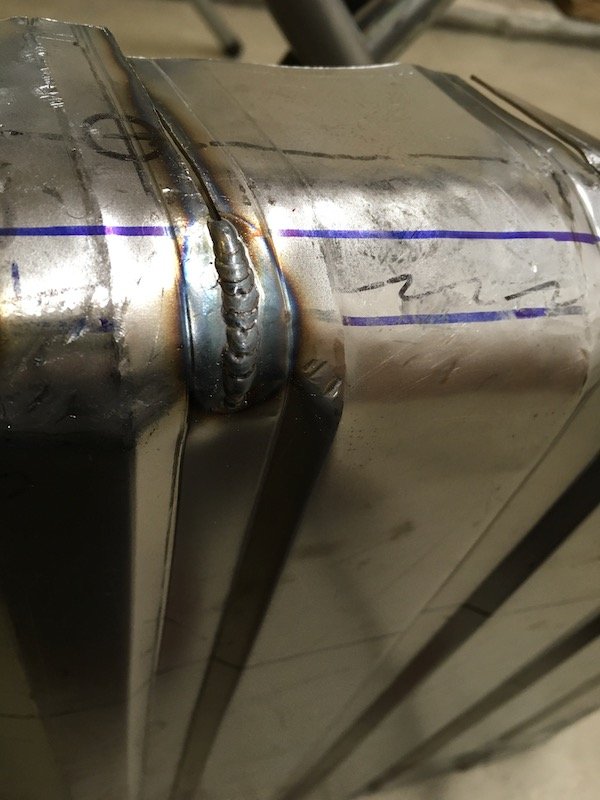
Building the 1961 Datsun 310 Bluebird Floorpan - Painting the underside and finally welding it into the car - Part two and last of the pics. Continued from previous post in the thread. Underside photos and a few more. Support bracket flange weld attachments to inner sill. Floorpan lap weld to prior toe-board patch. The far upper toe-board welds were from a couple of years ago and made a little too cold and random. I run the welder hotter now to get more melt thru and flatter welds. Sometimes though too much as in the extreme right weld melt thru. From previous post, the ideal weld melt thru I try to get. A nice shallow convex button of material. The outer sill will be welded onto the car next once I get all the hidden inside surfaces of both inner and outer coated with an epoxy prime. Should be a relatively easy task with no crawling back and forth under the car with my 60 plus year body. Too cold today though, freezing temps are prevailing. More topside pics of the completed work. Weld heads ground near flush for a clean look topside. Minutia. The black vinyl shown covering the door cards is not original. Probably from a late 60's redo. The original red and burgandy material remains underneath. The arm rest was salvaged from an ivory white parts car in mid 70's and sprayed black. Bezels for door handle and window cranks also salvaged from same PL311 parts car. Originals, PL310, were about same color as steering wheel, dark brownish gray. More of same. Again. Complicated and cramped location to access with welder. It was a little bit easier to get at this area. The structural welds to the A post body mount bracket will be left as is for best strength. The Hi/Lo headlight foot switch support bracket was salvaged and re-attached, but I had to replace the bottom flange due to rust thin-out. Yeah, so that's about it for now. Time to take a break, organize small tools and heal up from the under-car torture routine. Discussion: https://oldschool.co.nz/index.php?/topic/60267-marts-pl310-61-datsun-bluebird-sedan/ Build: https://oldschool.co.nz/index.php?/topic/60264-marts-pl310-61-datsun-bluebird-sedan/
4 points
-
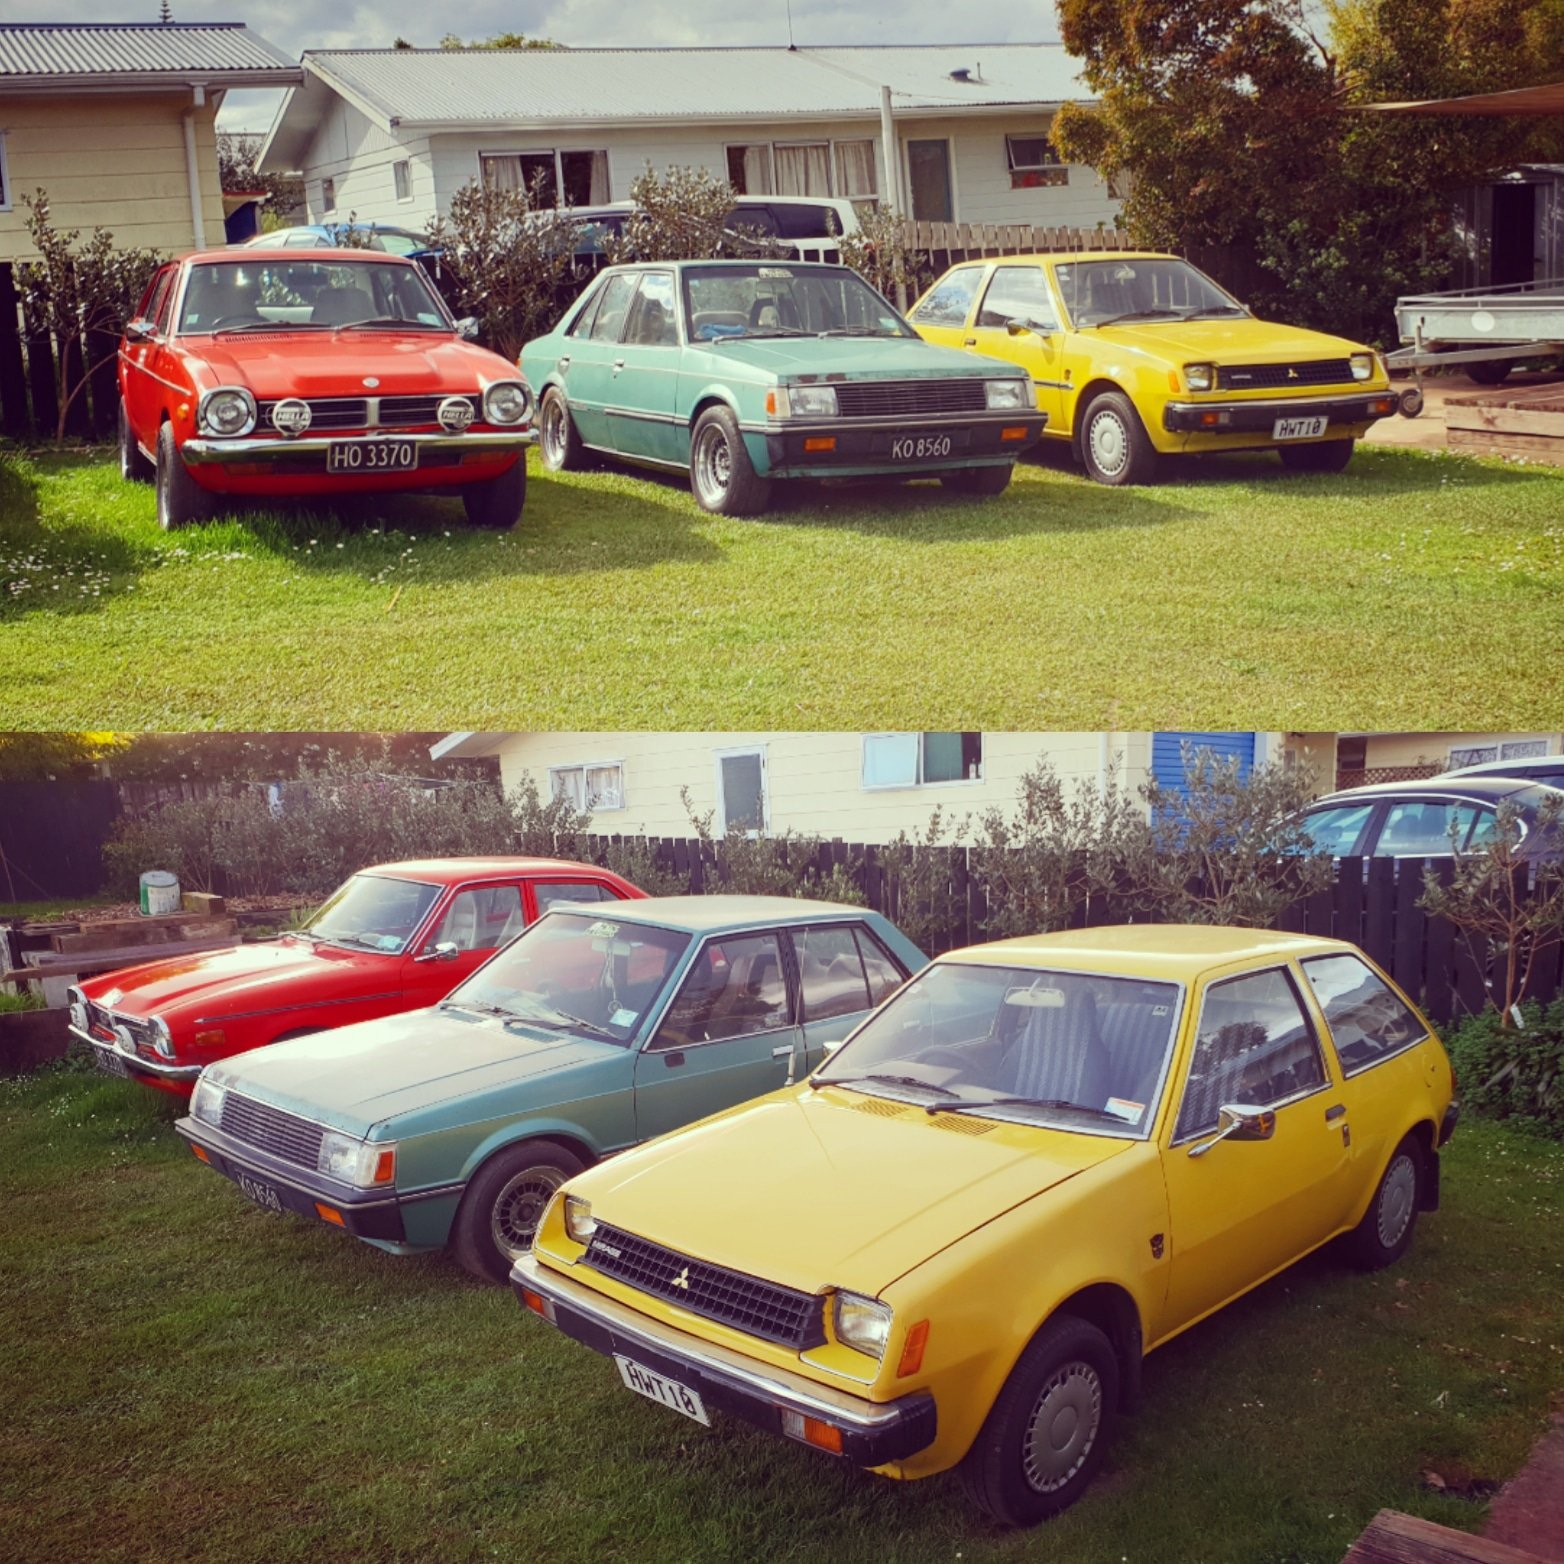
Okay so this is my nana spec mirage that I daily drive, only things not factory is the seat covers, stereo and window tints She runs the big block 1.2 liter power house with a race shift kitted 3 speed automatic transmission. Doesn't like going over 80kph but that's just a safety feature to keep your license Currently on the hunt for a steering rack if theres any around? Costs roughly $60 to fill from empty and that last me two weeks sometimes, cheaper than driving my bt50. Would look sweet lowered on some 13s or 14s but other than that I'll just drive the shit out of it discuss nana's skid hack here:
3 points
-
OS boes, i have semi organised a group ride aimed for small bikes on Saturday feb 15, 2 weeks away. Most may have seen this on moped Nz Facebook page but if not come on doooooown. proposed route HERE from Facebag page Anyone in or around the Bay come for small bike pest, where we will sample the finest of Hawke’s Bay. The ride will begin at the pools carpark by the port entry, meeting from 9:30 and leaving at 10. We will ride down Marine Parade then a few back roads to Havelock North, climb to the top of Te Mata Peak and marvel at some delicious views. Then carry on through Hastings CBD, along Omahu Road and a wee loop through the Puketitiri Hills back into Napier. Then conclude with a few how ya garns at Shed 2 on West Quay. The ride is just under 100kms and with a few stops to regroup and refresh should take 2-3 hours ish. There is the opportunity for bonus gravel road riding or extending the route if enough interest... or if you wanna hang around for the weekend then we can drum up another ride somewhere! I can potentially provide some accommodation for out of towners and a place to park a few trailers/vans/utes etc This will be a good chance to come and meet some other small bike pining weirdos, have a few beers and enjoy the lush roads and scenery that Hawkes Bay has to offer. The ride is aimed for small bikes less than 250cc. But we wont discriminate if you wanna hang out on your big boy bike. Open to suggestions on changes to the route or other roads to ride! I have left the ride relatively short for those on smaller bikes and kept off highways as much as possible. There will be a fair bit of open road riding so make sure you own the road, but being respectful to other drivers etc. but you already knew that. Got any questions just holla at me!3 points
-
Just finished writing a trilogy on the K-Jetronic system. If anyone is interested in an obsolete fuel injection system, have a nosy. https://www.tasteslikepetrol.net/2020/02/bosch-k-jetronic-basics/ https://www.tasteslikepetrol.net/2020/02/bosch-k-jetronic-part-2-testing/ https://www.tasteslikepetrol.net/2020/02/bosch-k-jetronic-part-3-tuning-and-fixing/3 points
-
Keep hunter body loom and run engine off MX5 loom? Just strip out any MX5 wires you don't need.3 points
-
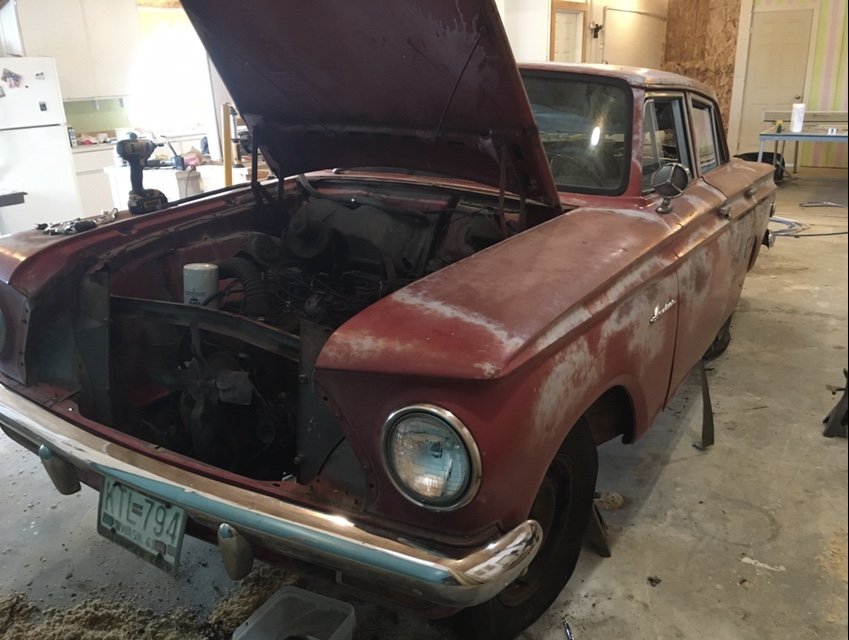
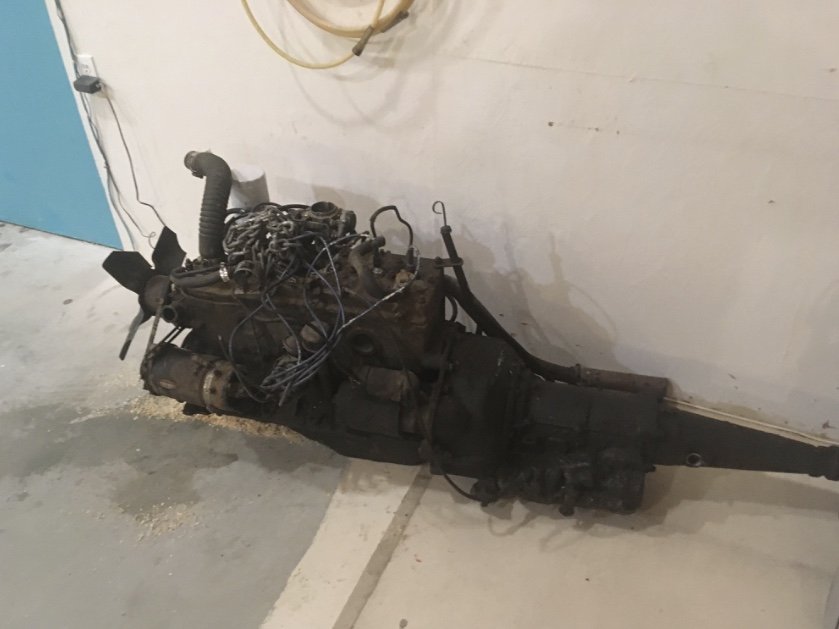
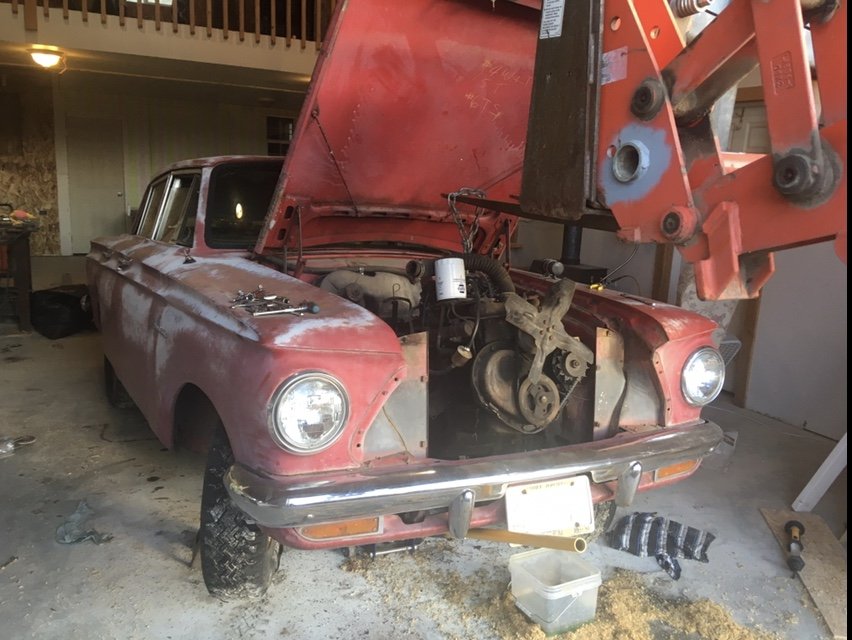
Anybody still holding ya breath? so ya never could get the brakes apart and I realized this project needed more time and money than I had at the moment. So off to the weed patch while I built myself a house and spent every penny I’d ever saved and some I haven’t yet. Best part of that is I now have a nice warm shop and needed something to tinker on. Pulled the Rambler up and evicted a few mice, holes in the floor are maybe a tad bigger but no real new problems. I’ve been thinking of finding a donor rig for a repower. The Rambler is leaf sprung rear wheel drive so I’m thinking a complete drivetrain would solve a buncha problems. Been eyeing crashed two wheel drive pickups on Craigslist and FB. For now I decided to pull the engine and tranny and see about welding up my rust problems. Coupla holes in the floorboards and the drivers inner fender is going to need some work. The simplicity is amazing, coupla hrs and a tractor assist and we have a empty hole drivers side tires leak air so bad I had to pump them up half a dozen times to push it 20’ into the back corner...... and yes the back corner does have purple and green stripes on da wall . lush I know gotta say the flathead has sex appeal, all da cool kids want generators over alternators
3 points
-
My inner 8 yr old just weed his pants in excitement/jealousy...3 points
-
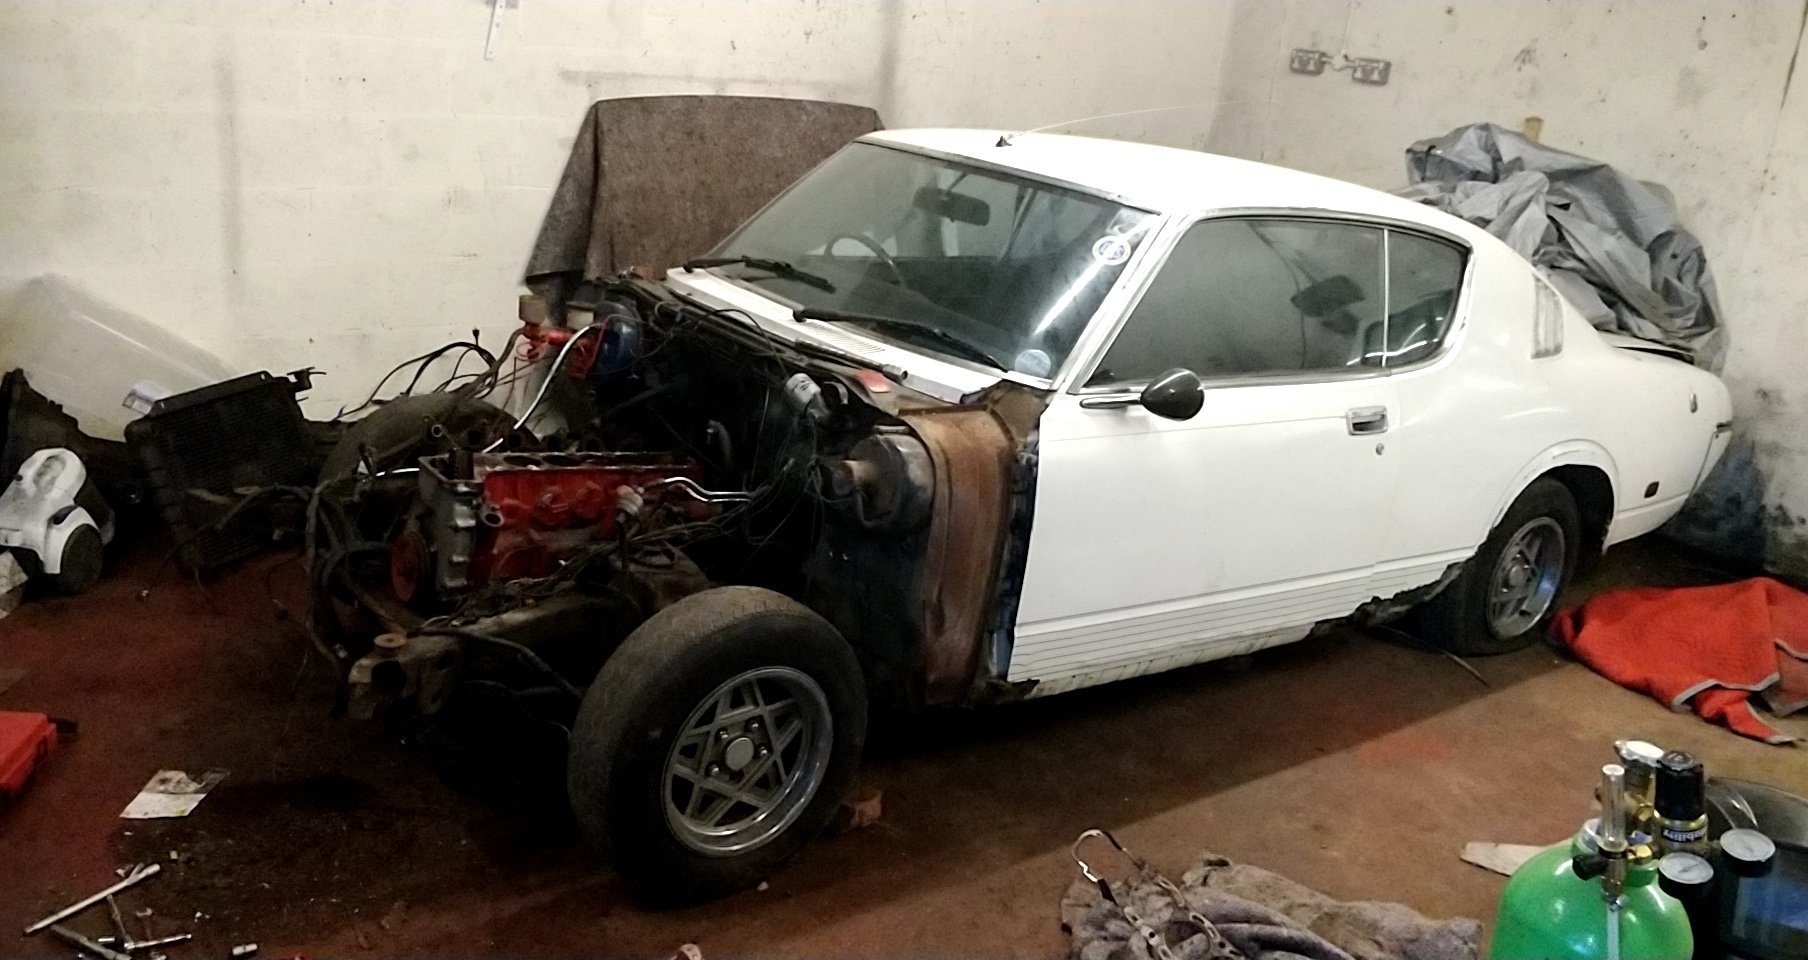
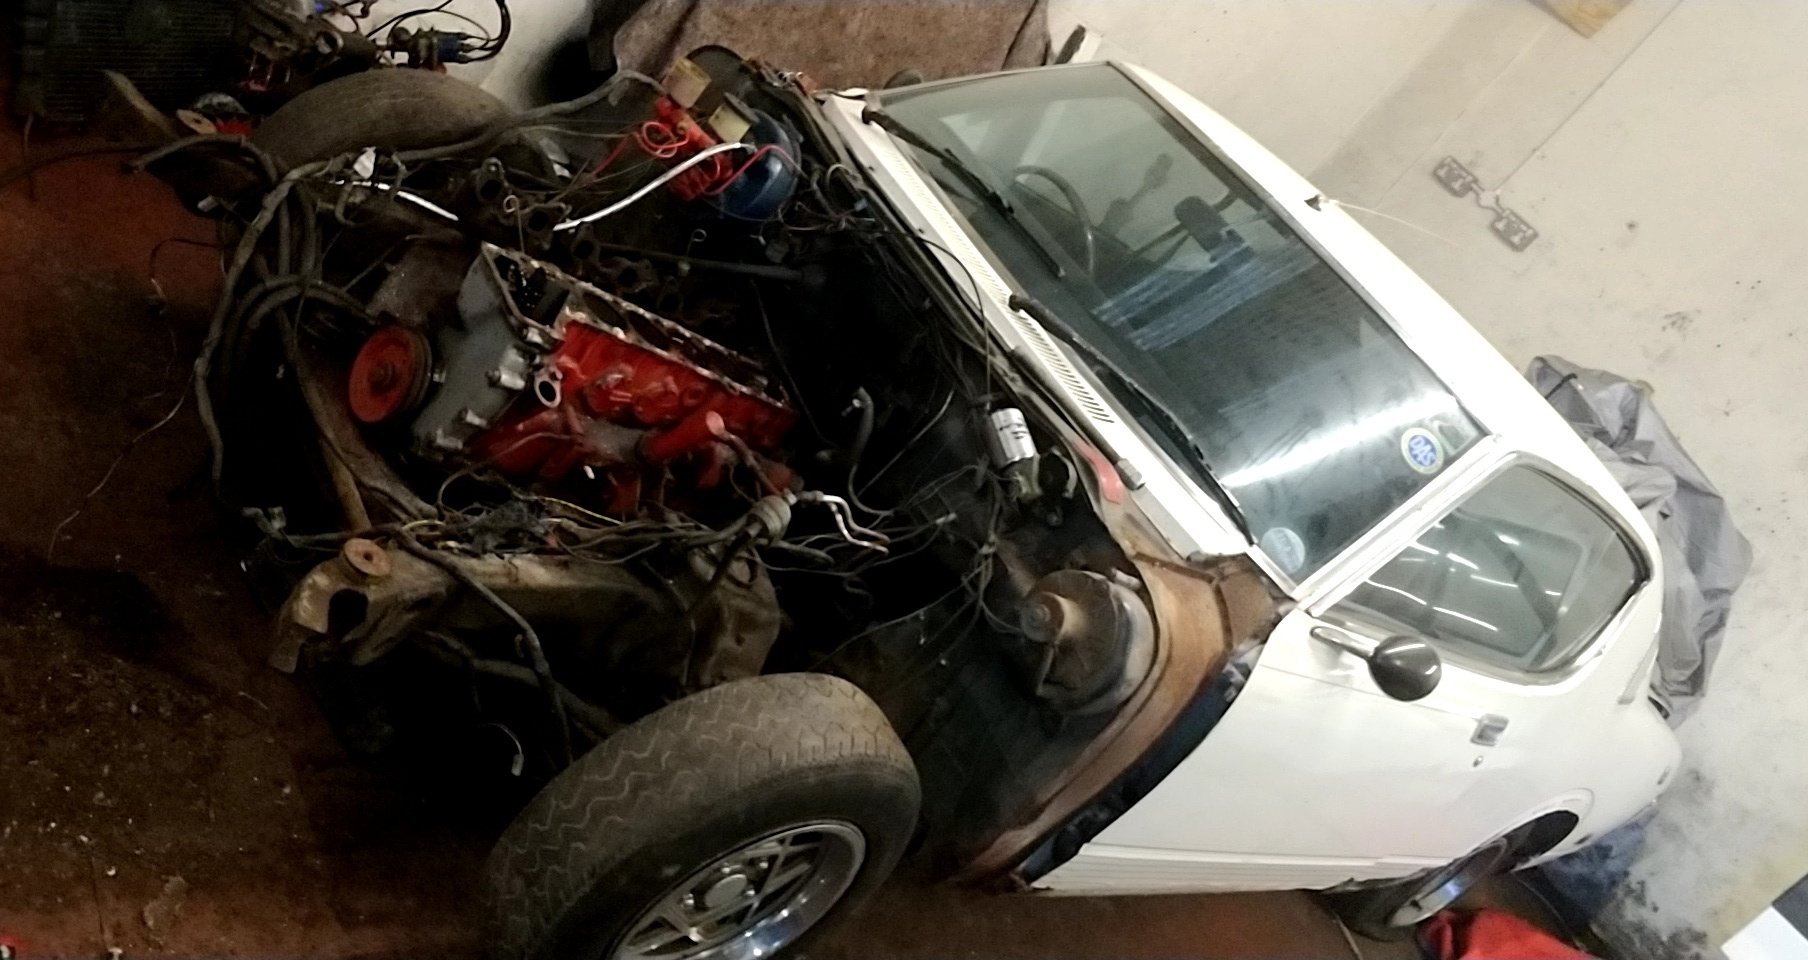
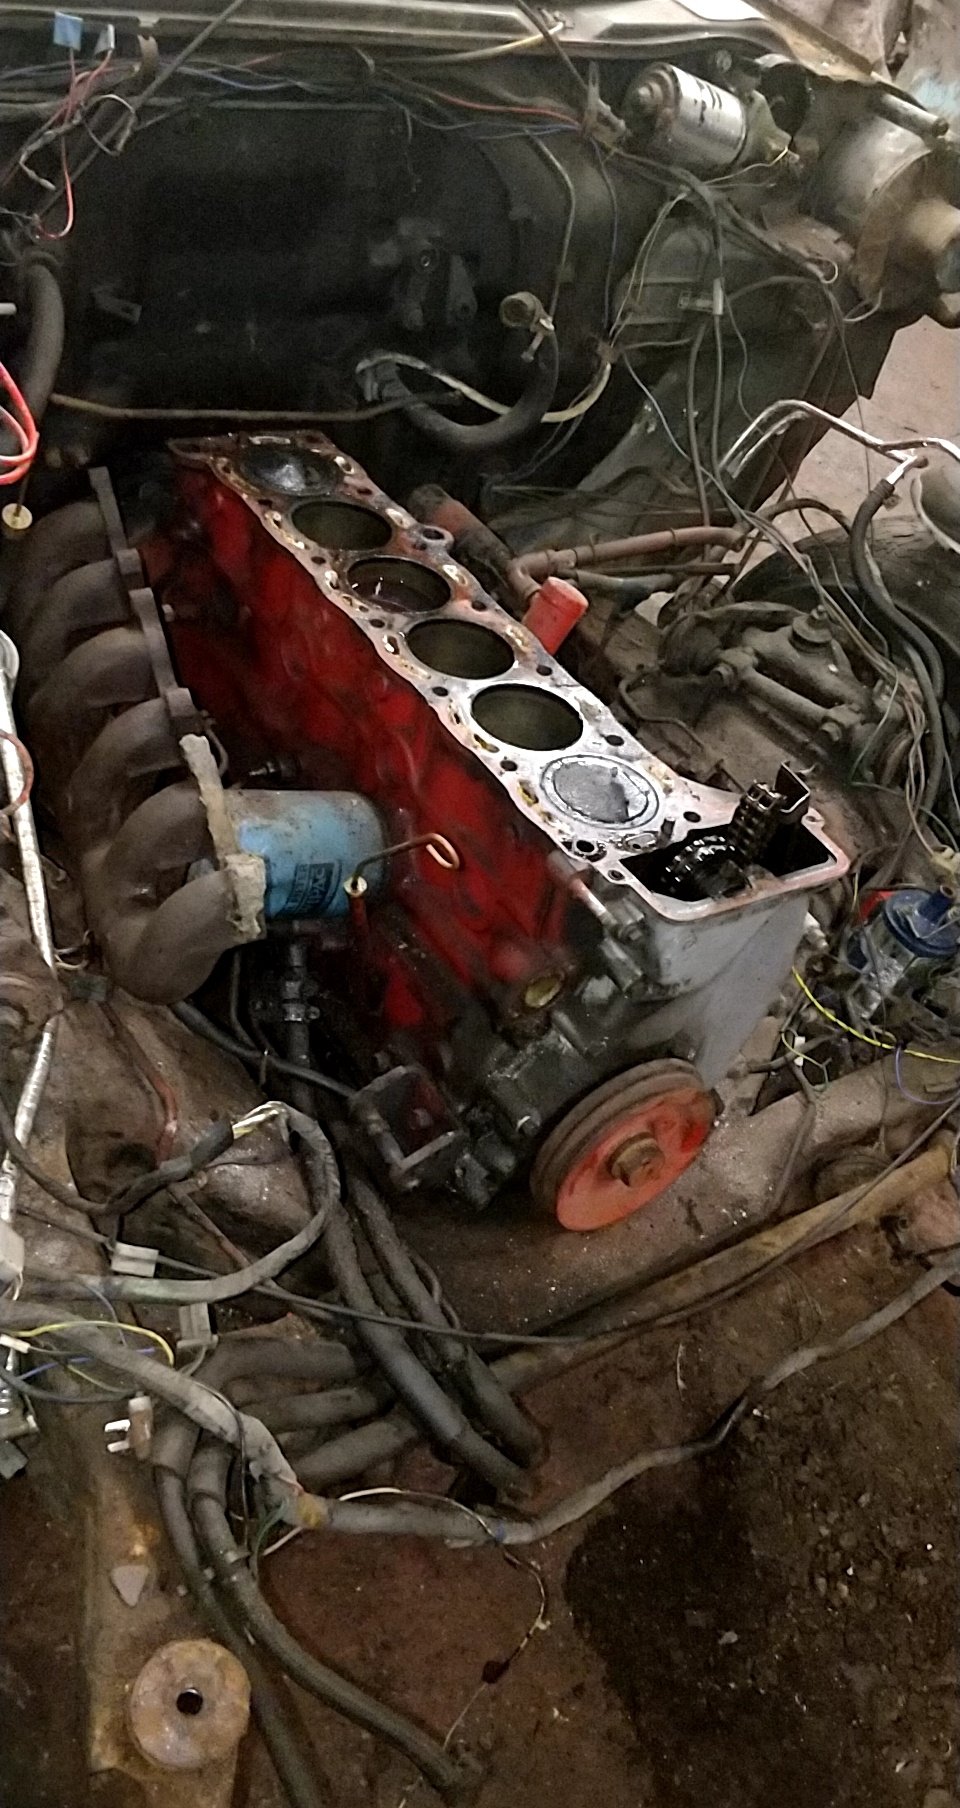
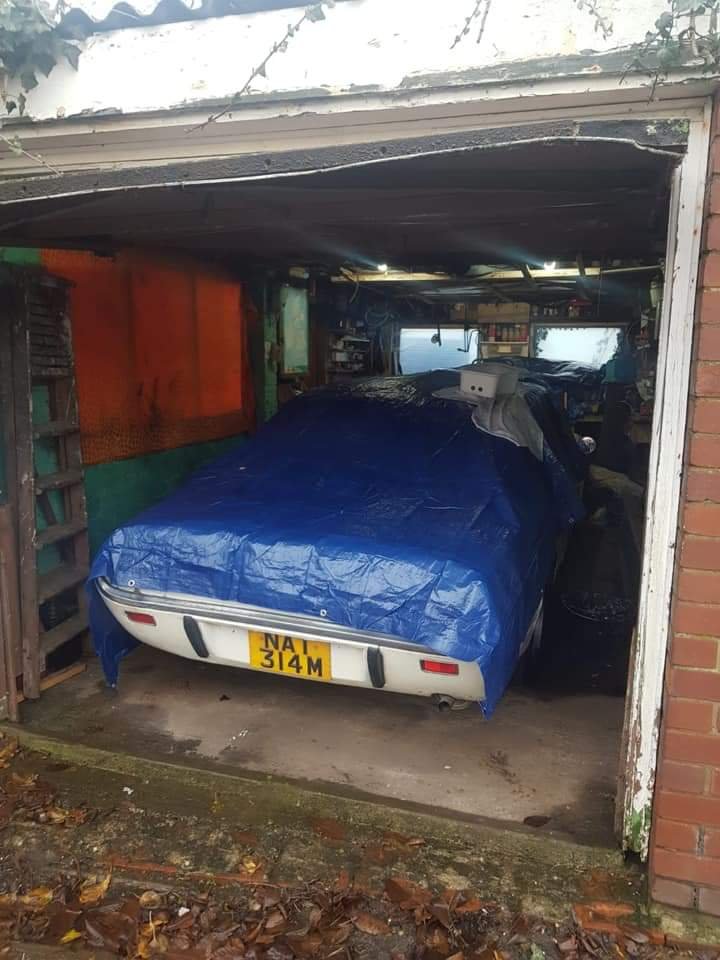
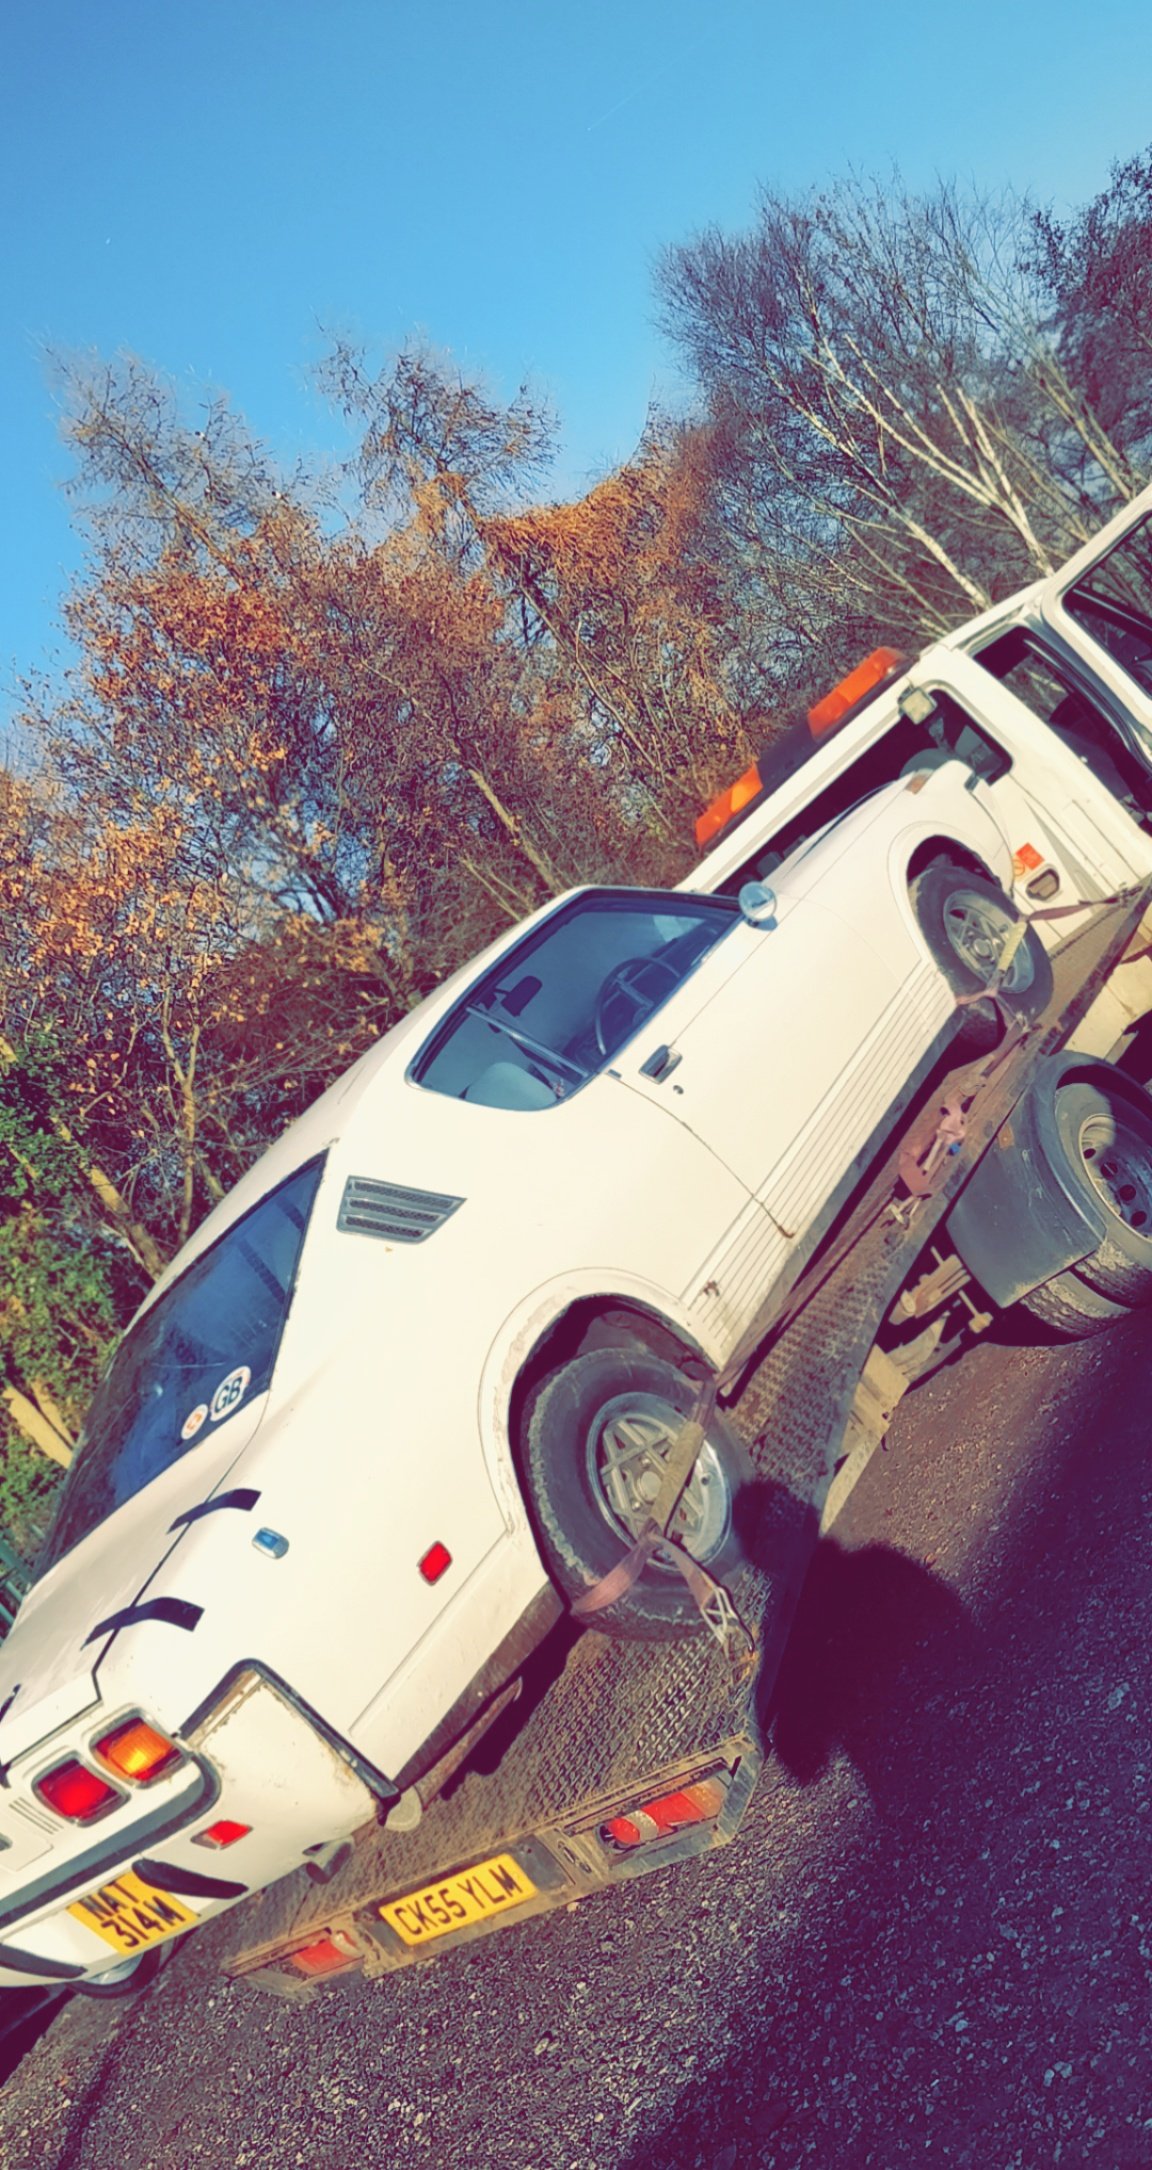
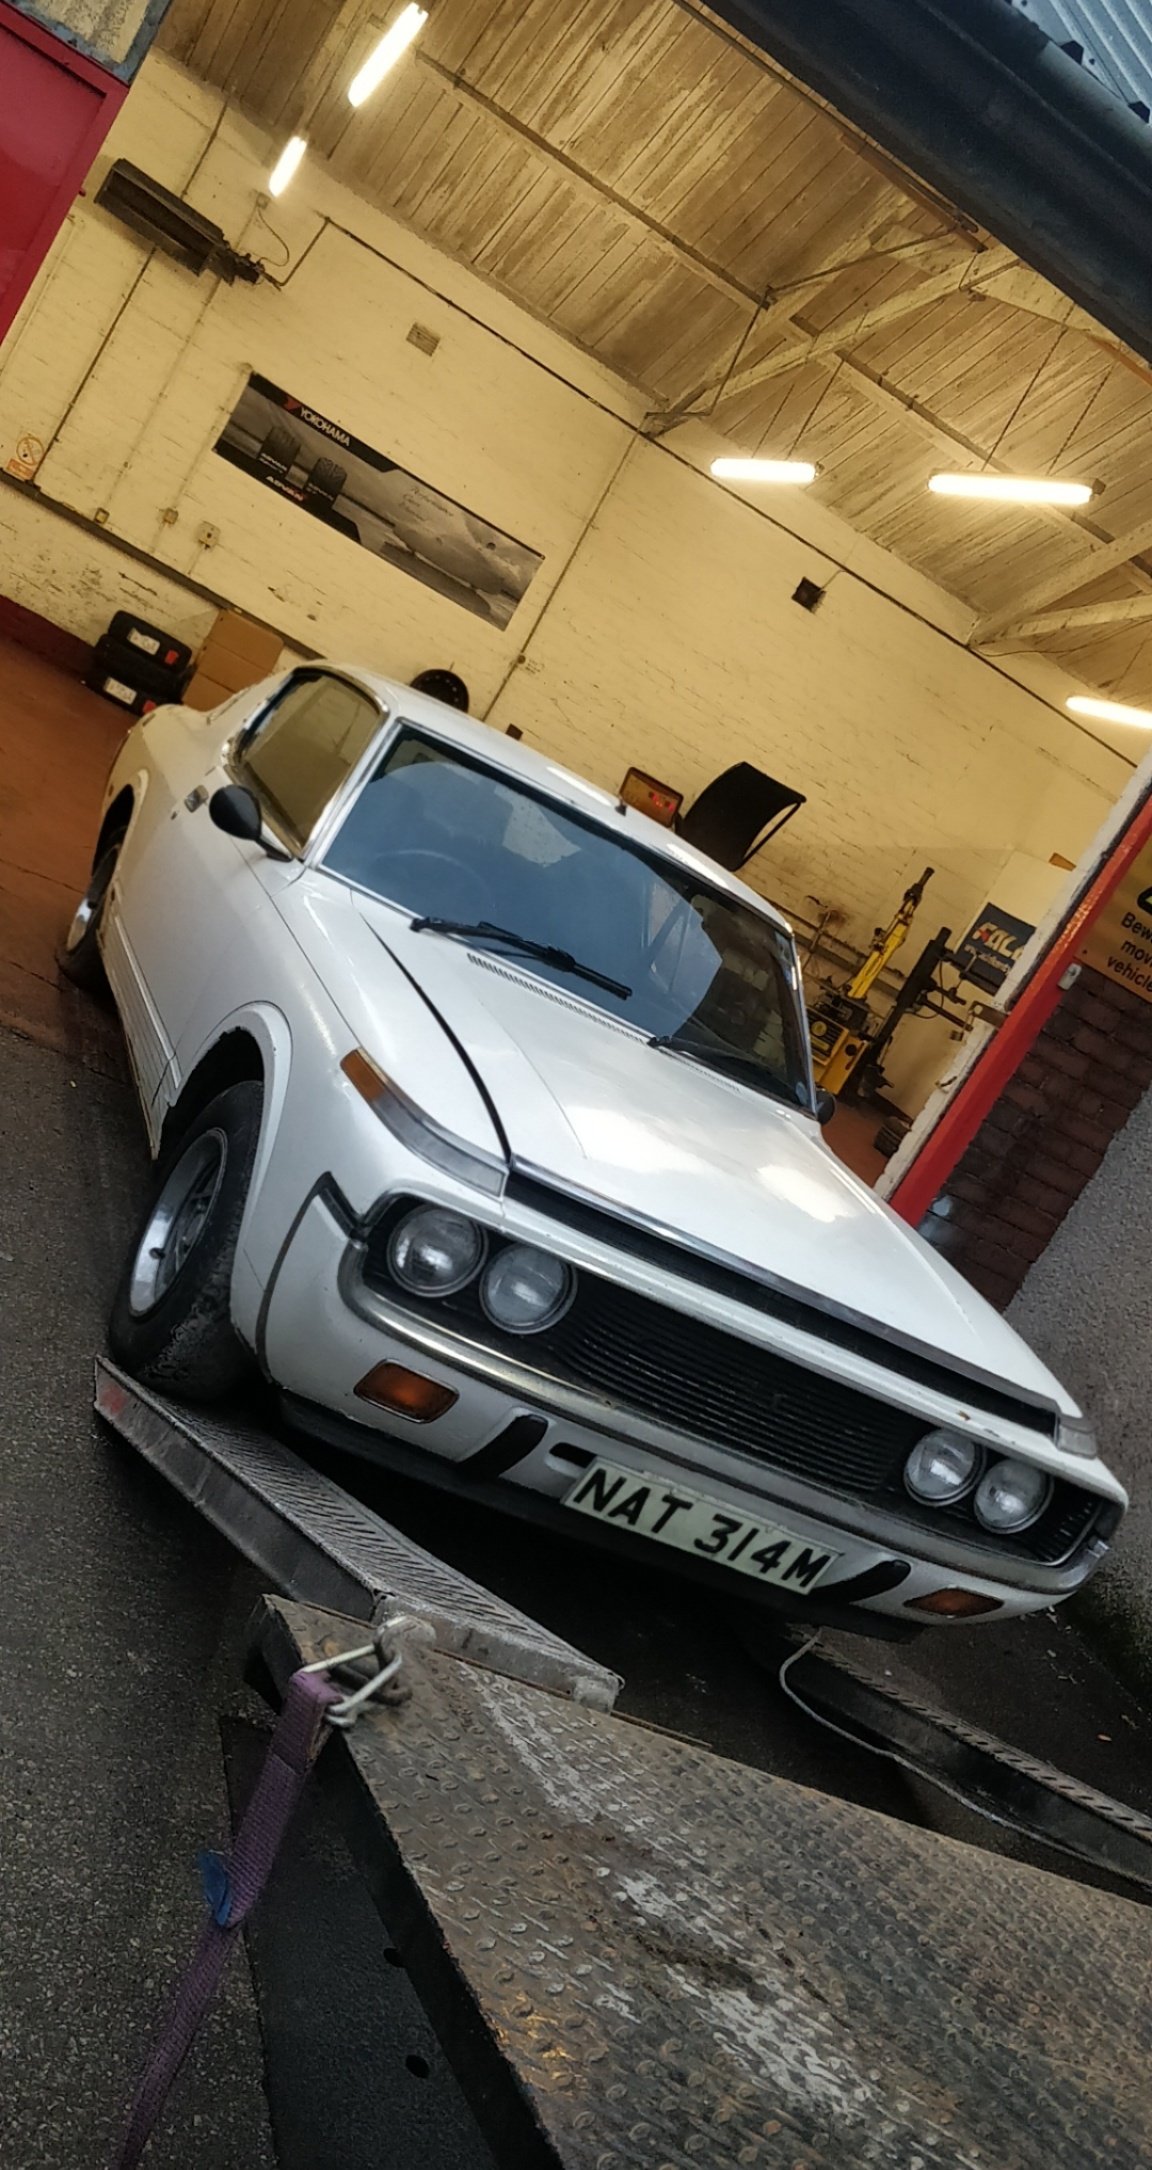
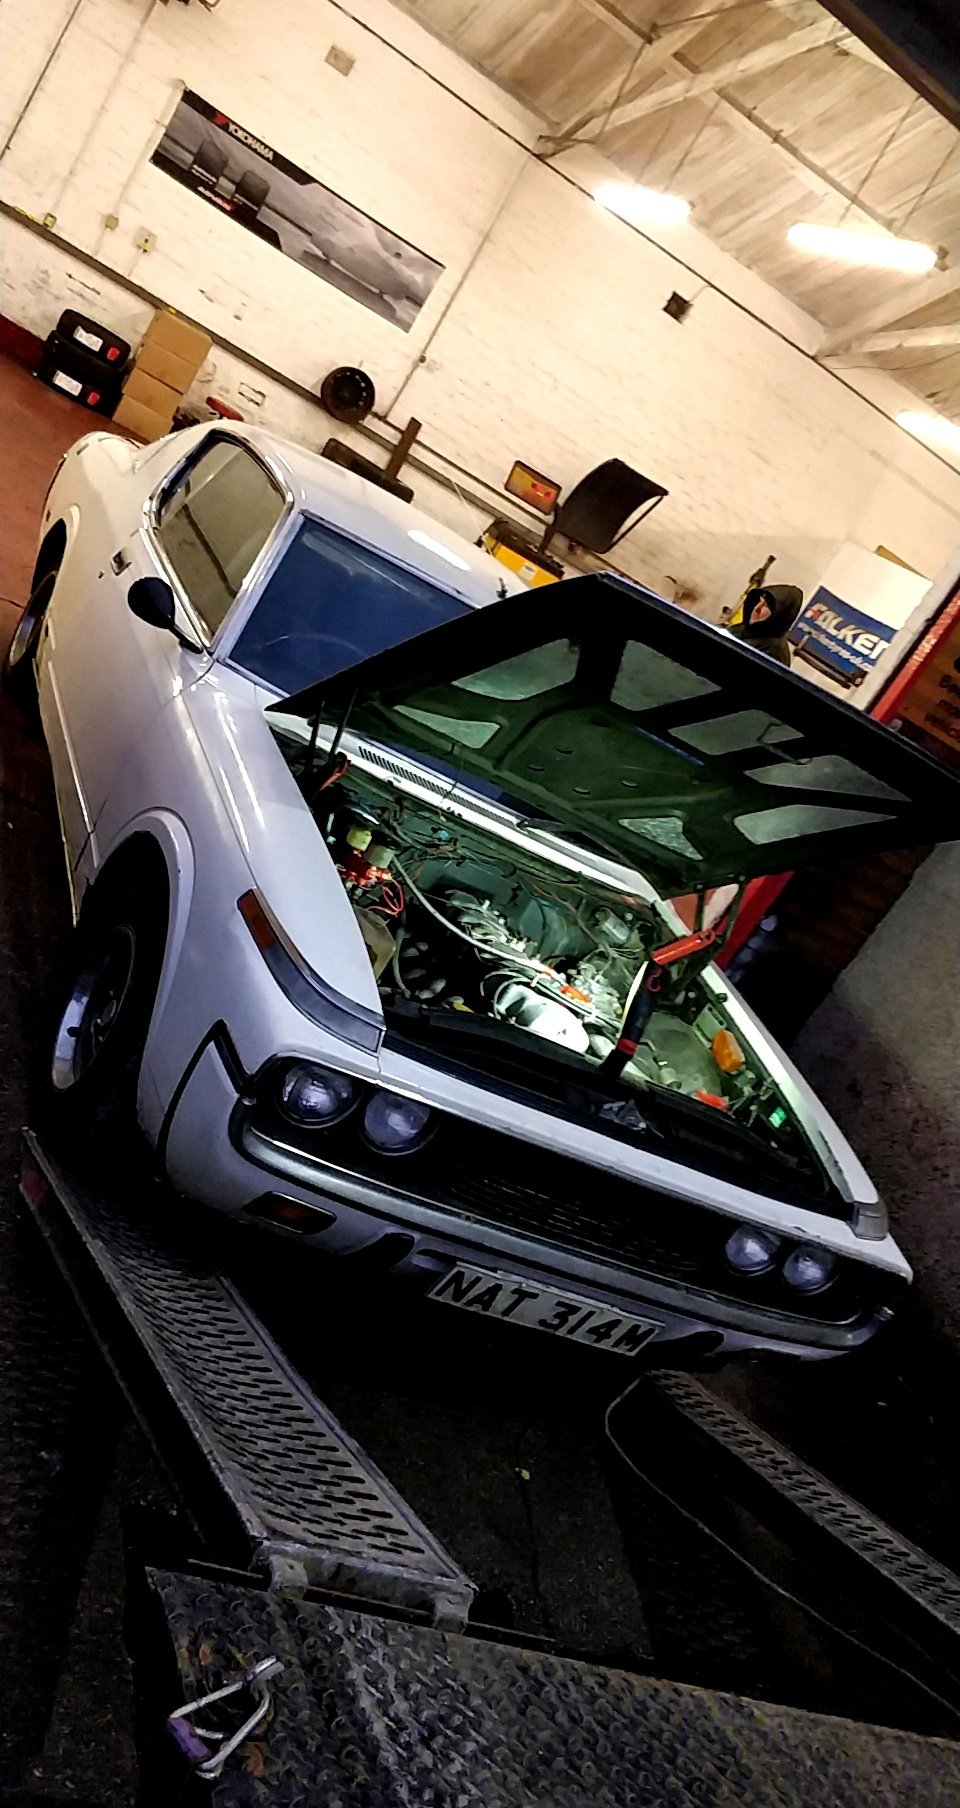
Recently collected my latest project... A 1972 Toyota Crown MS75 Custom Coupe. One of just a few known to exist in the UK. Previous owner had it since 1979, sat since 1990. Aiming to make it useable, then make it mint at a later date. If anyone has contacts for parts it would be appreciated.
2 points
-
POSTPONED TIL ALL THIS VIRUS SHIT IS OVER WITH Hello and Welcome Mr L. Warnock and myself would like to invite interested parties to a weekend of riding small bikes through the backroads of the Bay of Plenty sometime in March, the plan is as follows.... Dates set as 28/29 March Saturday - Meet in Mount Maunganui in the morning where there will be space to park vehicles for the weekend and head off via the harbour bridge and through Tauranga town to Welcome Bay where we will head into the rural hinterland and cut through to Te Puke via a scenic backroad that is mostly sealed with a small section of gravel in the middle of it, from Te Puke there will be 2 small sections of highway to traverse as we jump inbetween sealed backroads which will take us to the seaside township of Maketu for a bit of a relax by the ocean. From Maketu we will head back inland to Paengaroa where there is fuel to top up the thirsty steeds before a decent stretch of backroads(a mix of sealed and gravel) through farmland/forestry and native bush to end up at Lake Rotoma where after another small but scenic section of highway around the lake there is a nice reserve to enjoy a bit of a rest and a swim in the lake for those that are keen, from Rotoma its up Manawahe Road past the infamous helicopter corner of WRC fame to McIvor road which is a steep gravel goat track off the Manawahe hills to the Rangitaiki plains where we will hoon down Braemar road, have a quick look at the springs at Otakiri(where china is stealing our water from) and head back along a stretch of main road to Edgecumbe. Turning off at Edgecumbe we will follow the Rangitaiki river along more back roads to where it meets the sea at Thornton where there is the option to hoon along the beach for a few kms(or cut back along the road and meet up with the beach riders) just before Matata. In Matata there is booze/food/fish n chips/petrol etc right across the road from the camp where we are staying which is the Matata DOC camp. Its only $8 for the night and still has showers/proper toilets but is camping or roughing it for the night spec, the camp caretaker is going to fence off a corner of the camp for us all to take over. Beach is right there for a swim and can walk to get supplies if you run out of beer. There are other indoor accommodation options available indoor for those that want them but is up to you to sort this. Day 1 Main Stats: About 180kms of riding Mix of gravel and tarmac- roughly 50/50 3/4 gas stations to fuel up Food/beer/fuel 5 mins ride from accommodation Accomdation for the night at Matata DOC Camp $8 for the night pp https://www.doc.govt.nz/parks-and-recreation/places-to-go/bay-of-plenty/places/matata-area/matata-campsite/ Sunday - After a strong coffee and a cigrit for breakfast we will head off from the camping ground and straight back into the hills via Herepuru Road which starts off sealed then a section of gravel and back to sealed as we reach Manawahe Road again, back up Manawahe Road we will turn off at helicopter corner and head around the back side of Rotoma onto more gravel and native bush. Once in the native there is a side track called Porters Road which is basically some sweet pumice tracks with ruts/hill climbs where we can hoon around for a while do some jumps and test hill climbing skills. After that back onto Manawahe road which will take us out to Pongakawa and back on to sealed roads with some short sections of gravel then across SH2 and out to Pukehina where Lee has offered his place as stop for a BBQ lunch. After lunch and a cruise up Pukehina Parade its back onto Old Coach Road and follow a similar route via Maketu and Te Puke back towards Tauranga. A detour off the route down will take us through a short paper road and back into Papamoa where we will cut thru suburbia for a lap of mount main beach to pest the boomers and back to where we started on Saturday morning to conclude the ride. Day 2 Stats: 180ish kms of riding again 60/40 mix of sealed and gravel riding 4/5 places to get fuel BBQ lunch at Pukehina Backroad hoons and a cruise of the Mt to conclude the weekend Not to steal @johnnyfives thunder but the ride will be of a similar pace and conditions of the east cape rides for those that have done them Expect lots of narrow roads of the sealed and gravel nature, limited cellphone coverage in places but sweet scenery, lush swimming spots and great times on small motorbikes in the backblocks of this beautiful country. At this stage there wont be a support vehicle so you will have to be 100% self sufficient with carrying your camping gear but all the supplies you need the night are 5 mins down the road from the camp and having a reliable bike is a must because if you cant fix it roadside you will be on your own sorry. Entry Form https://www.emailmeform.com/builder/form/5YSMcG918TE13j Koha/donation to attend will cover the lunch on Sunday and incidentals2 points
-
Keen pending successful reassembly of this jigsaw puzzle2 points
-
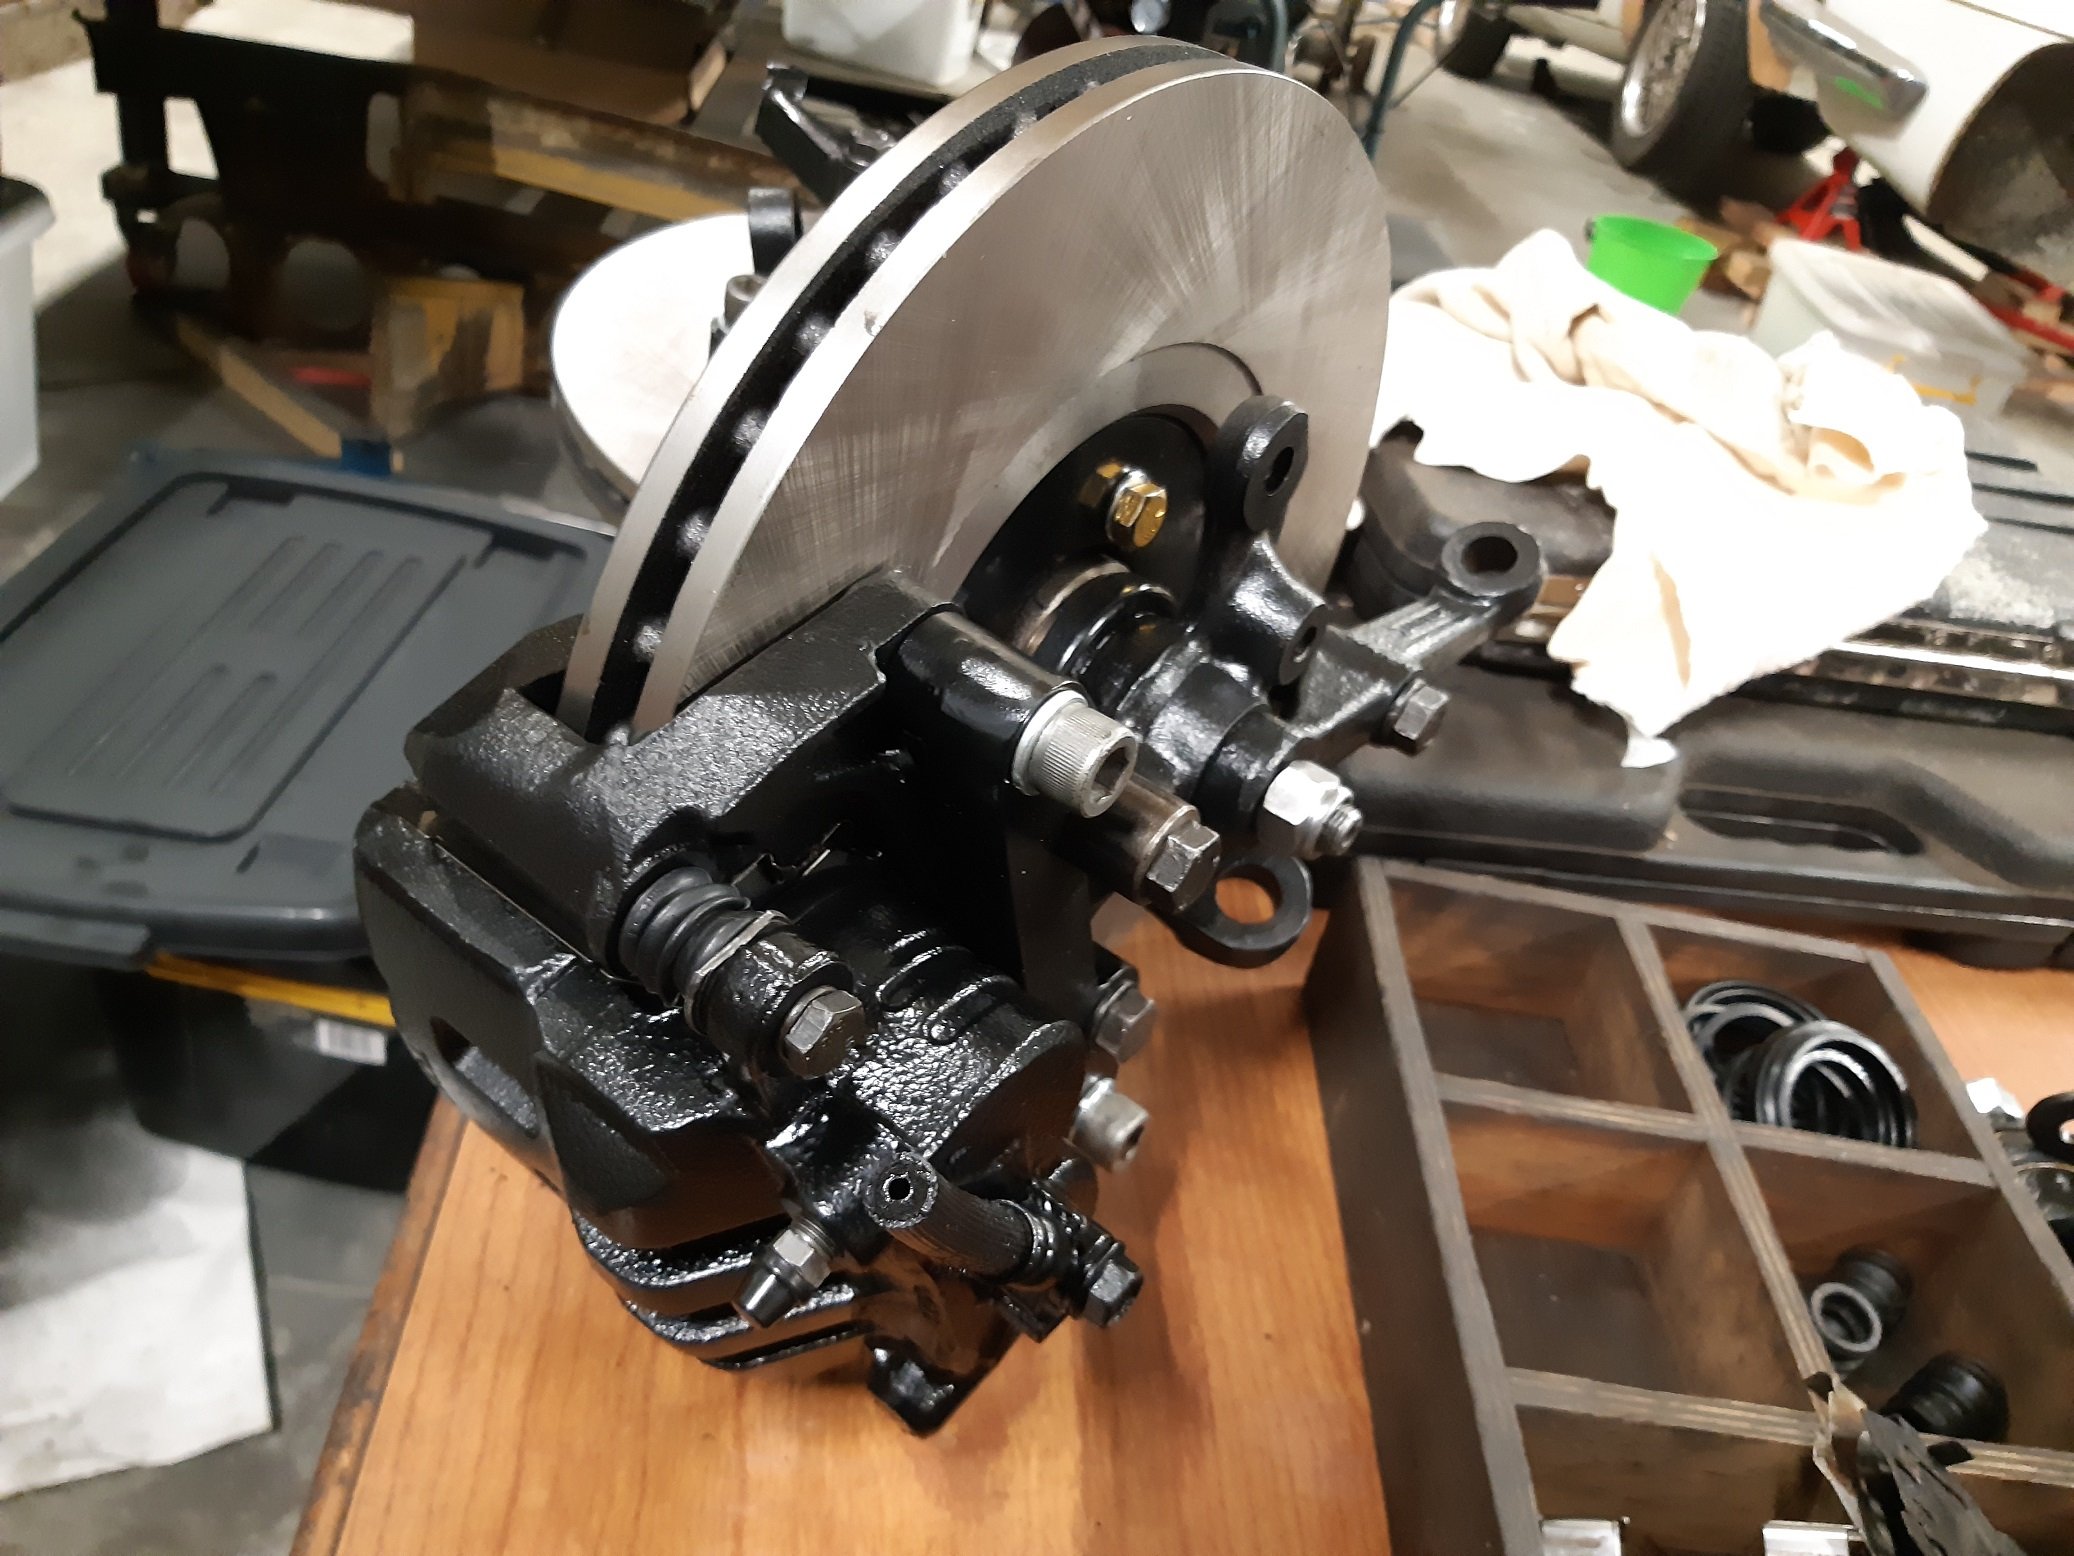
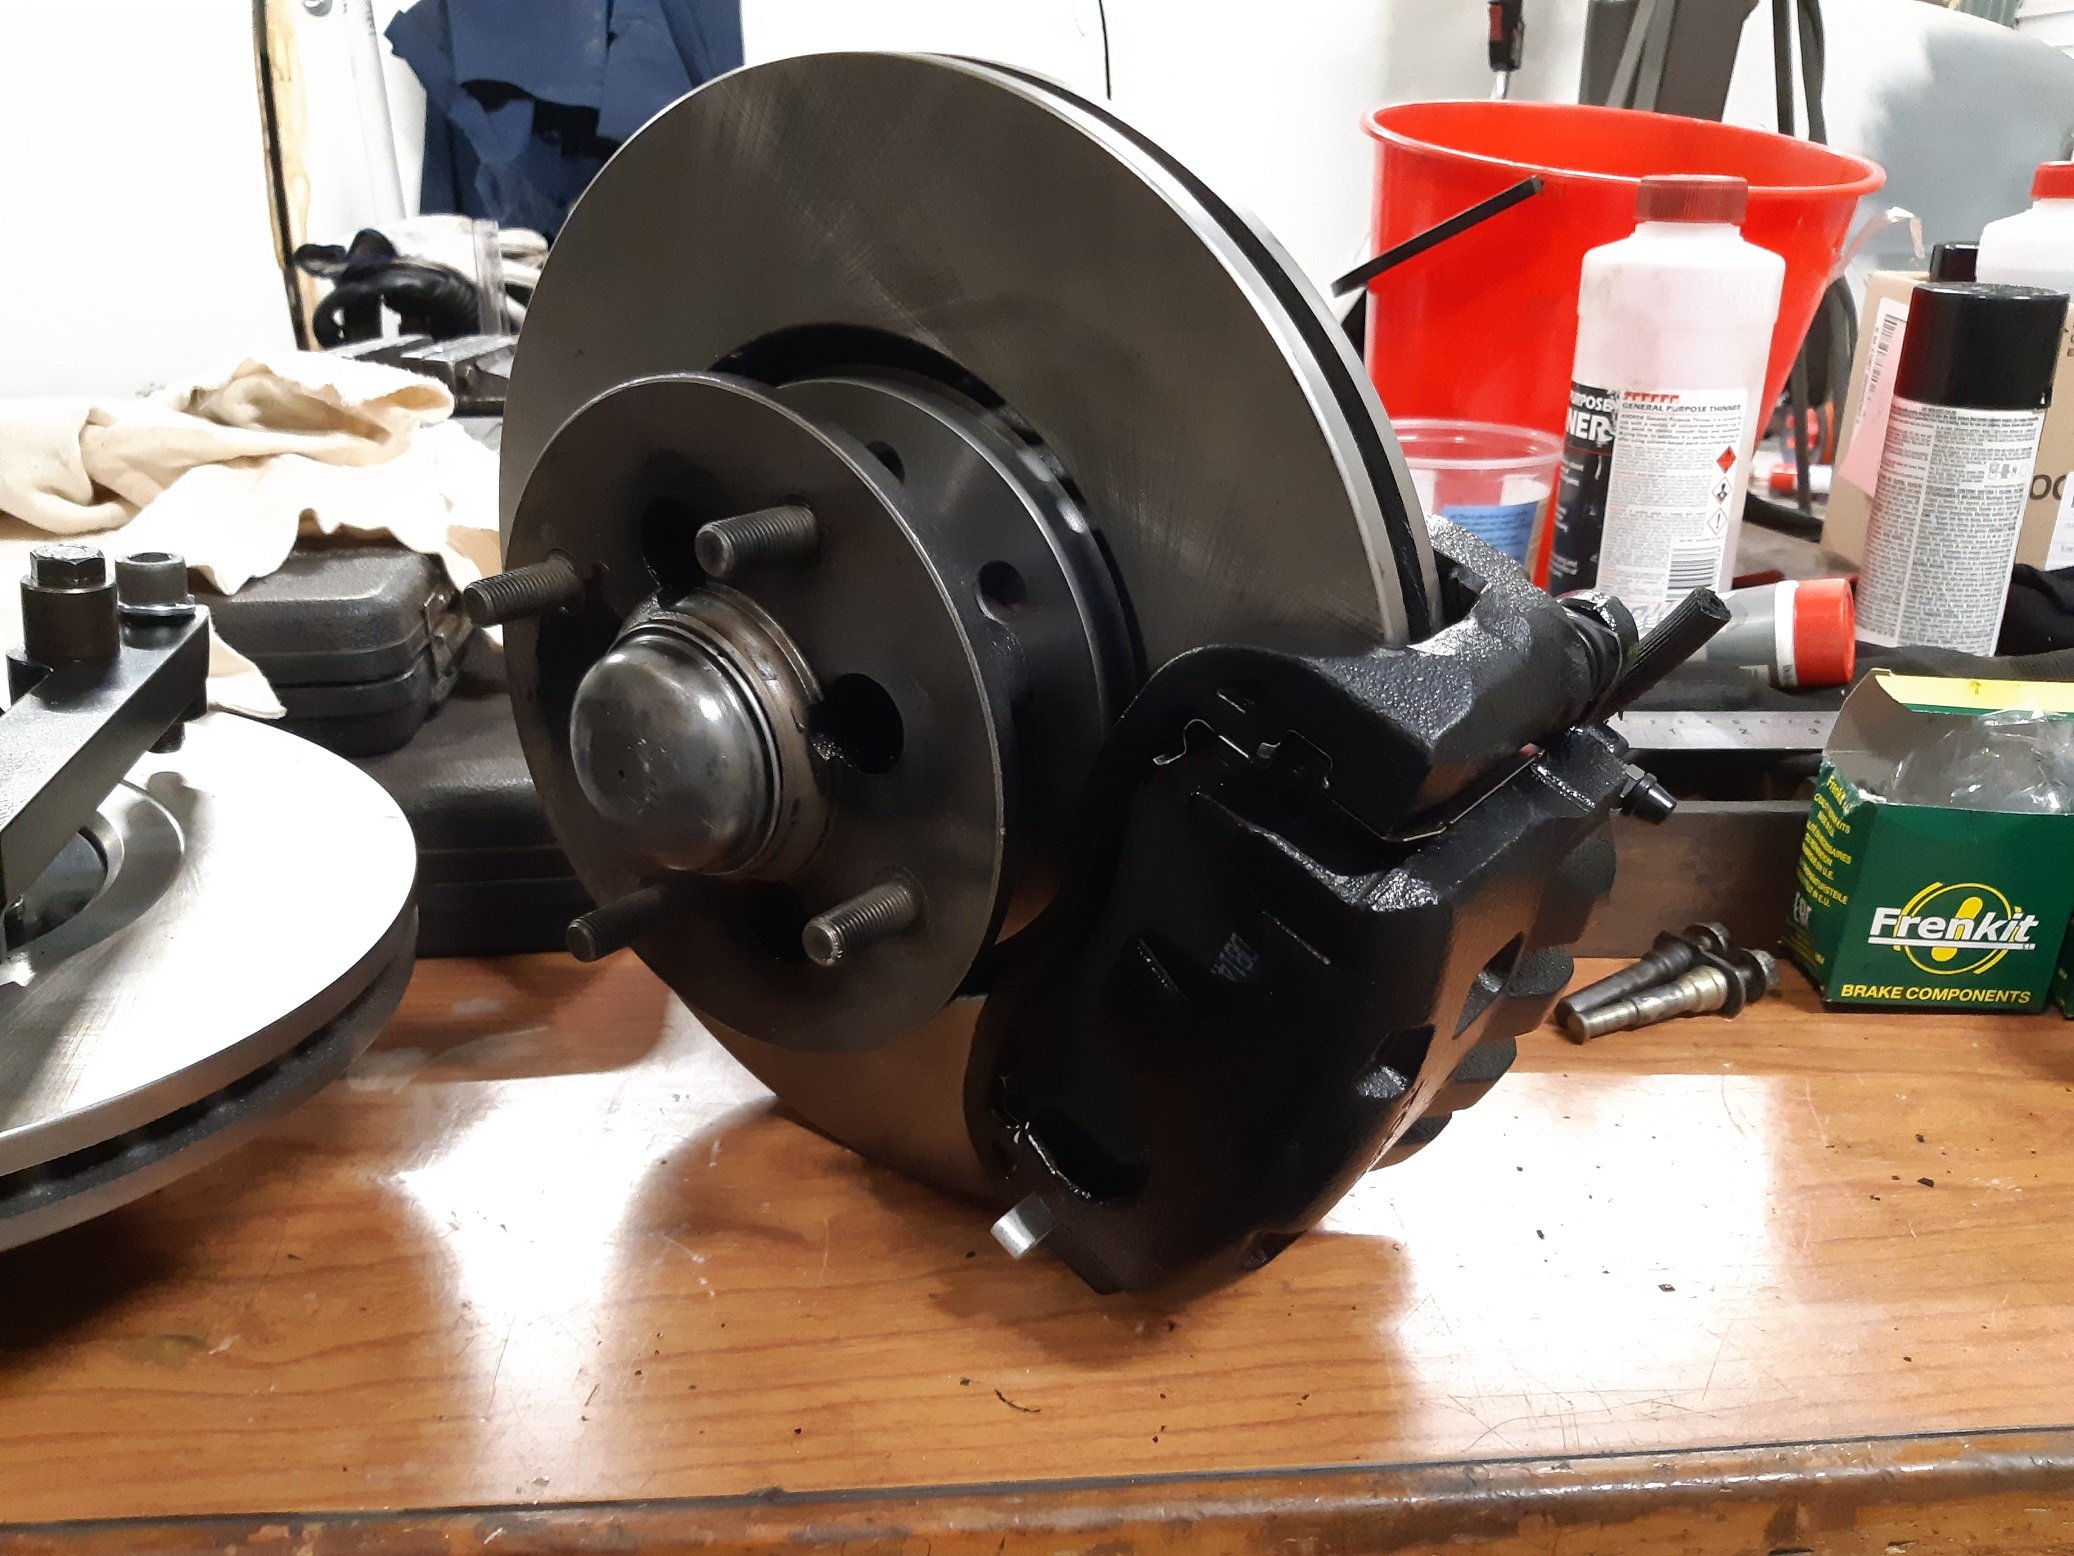
And I got the rubbers on my way to work. Thanks Greg at MPAutoparts. It wasn't cheaper, but I get instant gratification, and I'd rather give Greg money than 'Murica. I rebuilt the calipers after work. I dunno, but with the rubber gloves and the lube and the rubber parts and trying to fit things where they just don't seem to want to go, but then they do and it feels good, rebuilding calipers just seems slightly lewd. Here's the left one, I'll let you imagine the right one, or you can just look at your screen in a mirror.
2 points
-
Woops forgot about this and got re-stoked. deffs upgrading to Xr250 for this and boomer ADV’ing wtb: bark buster givi top box and garman gps2 points
-
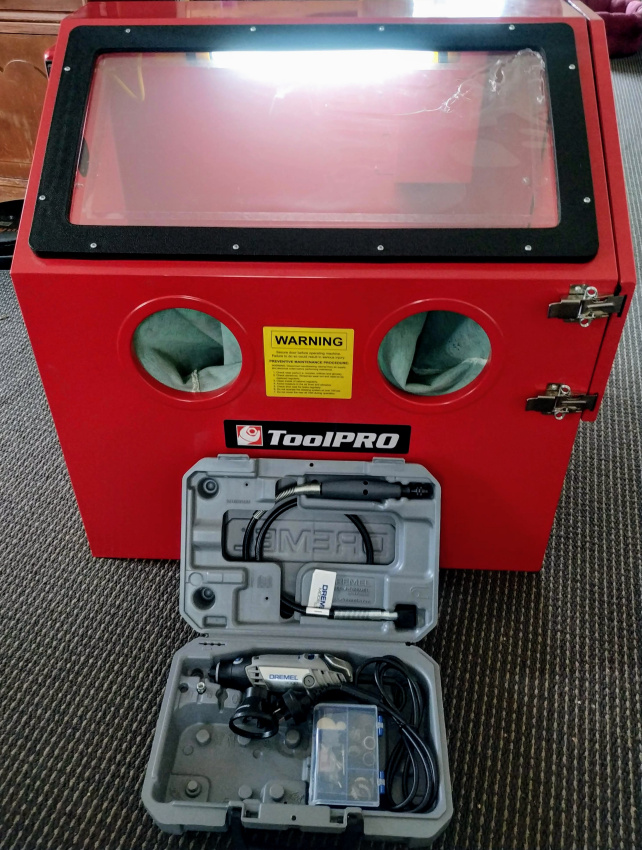
Got it all fully stripped over the weekend Finally got around to getting the blast cab into the shed tonight Before: During: After* That was at only 40psi, works very well! Bit higher pressure gives a shinier result, but I'm painting it after anyway so this is fine. *By after I mean as far as it's going to get as the angry pixies were escaping the starter cap in my compressor lol
2 points
-
Headlight with LED running lights was todays arrival. Fits good and looks like it should be there. Even had mounting points for the front indicators2 points
-
Having some kinda issue at normal boost level. (13psi) suspect clutch is starting to slip. or possibly some kind of airflow issue, as it pretty much brick walls at 200kw even on 16psi boost. So in the meantime re did the tests at 6psi boost Red line is the same length at green line in above post. - long pipes cut down 25mm Blue line is with weld elbows - suspension tower in the way so had to use tighter radius bends Green is normal setup all of the runs were done within an hour of each other So yeh, maybe another 20 -30mm shorter should be the sweet spot. Not really what i was hoping for but still some not bad gains through midrange - around 5%. The good thing is that 5% multiplies with boost.2 points
-
Indicators turned up today2 points
-
Crikey! Its been over 3 months since I last updated this thread. The reason being I have been busy just enjoying summer and driving the Imp whenever I can. Its such a hoot . I'll use any excuse I can to take it for a hoon. We have now covered over 3500kms since getting it on the road at the end of May last year. Considering we work from home so no commute I was quite surprised at how much its had! Its been incredibly cheap to run (very easy to get over 40mpg while still having a laugh) and is sooooo much fun to trash along on windy roads. The reception we both get whenever either of us uses it for a shopping run etc is fantastic. It really does make people smile- which is nice A few various friends, some from Oldschool, have also taken it out for a good thrash. Its really interesting seeing how different people drive it, their style, ease with the handling and gear change, confidence. Generally they have all found it super easy to drive and all seemed to love the handling. If only it had another 50 bhp... I have done a few little jobs here and there to improve it. Back in the last exciting episode I left off with some sexy photos of a new Hitachi carb. I swapped the relevant linkages/cable stops I had made for the previous carb across onto the new one , bolted it in place and hoped for the best. Started the car up but flooded it because the new carb seems to have a more effective choke. Cleared it and started it proper. Straight away I noticed how better the engine sat at idle. I few twiddles of both the throttle stop screw and the idle mixture and I had it running sweet at idle. I then took it for a hoon up the road. WOW- what a difference. No more flat spots, the transition off idle was smooth as, the transition onto the secondaries was smooth. No stumbling when coming to a stop and a super smooth idle. The jerkiness at slow speed in high gear was gone. Overall a huge improvement. Best $120 I'd spent in ages!! Here's a pic of said wonder carb.. Next job on the list was to improve the brake pedal feel. They work really well but I would still prefer a firmer pedal. I knew that the original Honda Civic brake hoses on the front were far too long, needlessly long. So that was a good place to start. I ordered a pair of new stainless braided hoses from Nelson brake services, impressed I was with the previous set I had them make for my Viva. $55 each which is a bargain. I fitted them and noticed a big improvement in feel. much nicer firmer feel with a better defined bite point on the front. But it can still be better and I think that its possible the brand new Lada master cylinder fitted has a slightly weak seal. If I press hard on the pedal and hold the pressure the pedal will slowly sink. I can also pump the pedal up a bit harder and I have done so many attempts at bleeding it I am pretty sure there is no air in the system. @NickJ ever so kindly sent me a spare set of seals he had. However Nick has warned me that they are from the same vendor he got the master cylinder from, which did come wrapped up in newspaper with these two fellas on the front... Interestingly the seals are a odd shape I have not seen before in a brake cylinder. They have a curved edge, like a worn o-ring outer rather than a lip that is forced against the bore like most brake seals I know.... I thought this was possibly the problem but after some googling it turns out that this master cylinder design and bore diameter is a very commonly used item across many Fiats, ladas and some other brands. So the seal design must work fine in use. Hannah's mum has come over from Blighty for a holiday and essential sun. So over a few weeks previous to her boarding her plane I kept an eye out on Ebay UK for anything interesting. She ended up bringing this stash of goodies... Apart from the very obvious Marmite with proper actual taste I bought a Haynes cutaway book filled with lots of Terry Davey's best pics, plus two old magazines with road tests on Imps- one of which was printed at the release of the Imp and is filled with heaps of articles, photos and fold out pages with extra large exploded diagrams. A total treat for any Imp nerd and one which kept me thoroughly delighted while reading it in the sunshine on coffee breaks... Lastly and more recently I have decided to sell on my Viva wagon. I'm not using it and have utterly fallen for the charm of the Imp. I would rather someone else make something of the wagon and what money I get for it can go towards this car (as well as another few projects in mind, and probably pushbike stuff...) So with that in mind I decided the VIva did not need fancy Recaro seats but the Imp does. The Mx5 seats are ok but not quite as figure hugging as I like, nor do they seem to offer the same lumber support that the Recaros do. Plus the Recaros just look so damn nice and fit in well with the little nippy go kart like car ethos I like in Imps. I was worried about them being a lot heavier but they only weigh 3kg more each. I can live with that for the comfort they offer! So I had to add some slightly wider spaced mounting points. Because the mx5 seat mounting points were welded on the back/inside of the box sections before they were welded on the floor I had to instead make up some flanged threaded bosses... which I then tigged in place (rather then risk mig splatter everywhere)... It was when tigging I remembered the steel was zincalume and made my welding a bit messier then I had hoped as the fumes came through... But all good and strong. I shortened the reach adjust levers while I was at it.. I also had to fix the mountings for one of the plastic covers which no matter what I did with the old push in plastic rivets would always come loose and rattle about . I machined some wee stubs and epoxied them in place... This (blurry..) pic dates the seats somewhat... (kids- ask your parents) I finally mounted them in proper and they look great. Much better to sit in and they also swing forwards further than the Mx5 seats - which to be fair really were never designed for a car with rear seats were they. The Recaros have a more suiting mixture of grey and black which suits the interior better I think. However I'll still keep looking for some suitable red leather sports seats much like the ones in my previous Viva for they were the best looking seats I've yet seen, although being slightly wider for 'larger" Alfa Romeo drivers and covered in slippery leather they were in use a little less hugging than these cloth Recaros. So that lot takes us up to date. Next on the list is to fit some carpet, now that I seem to have finally sealed the windscreen properly although the car has not seen much rain recently- its been so dry here since the start of December. I'm still tempted to play with injection. I bought a spare engine for $100 from the local wreckers. Its a 1500 and has the later oval port head. Larger ports and larger valves. We stripped it down together and its pretty good as far as wear goes on the guides etc. Certainly a good head I can clean up and fit without any machining. I have a inlet manifold to suit. However.... I may still yet re-power it with another engine, yet decided on. I do really like the idea of regaining my rear parcel shelf, currently cut to allow the valve cover to go through, because its missed and would be very handy for the weekly shop! Datto engine in the van after pickup... A tiny little tool box a found at the warehouse which was just soooo cute I had to get it... Goes here.. A tiny little trailer we built for some locals kayaks. Had to size it up... I sold the race car shell and it headed south to Queenstown on what was a comically huge transporter. Fuck I laughed... My Imp making other normal cars look huge... Finally my parting shot- because well... I just like this photo2 points
-
ended up getting 45,000L roughly a day out of it, haven't got it tested yet but haven't got sick or the shits. the water goes through a decent filter setup down to 1 micron, put a 750w sump pump with float switch down the well to pump to a 35,000L storage tank. so happy been able to sleep better not having to worry about running out of water, kinda wished i had documented it better as more people could build these as its not difficult. if i build a pool i will probably dig it by hand too.2 points
-
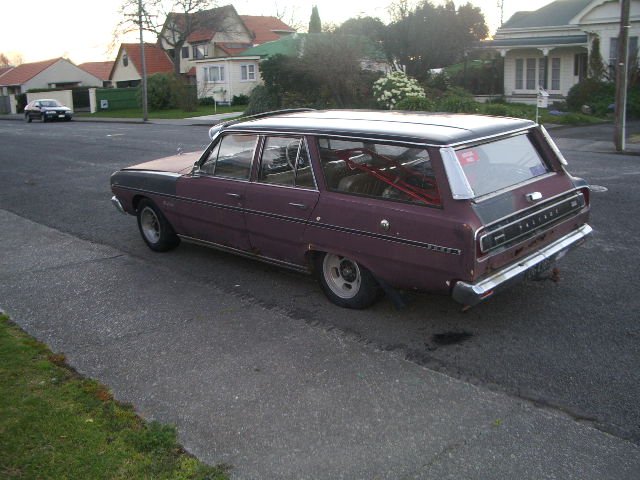
This ute has been a constant fixture in my life for many years now, and its pretty easily my favorite vehicle I've ever owned. It's never let me down, when something does break its so simple you can fix it on the side of the road, and it just gives you 'feel good' vibes when you drive it :-). I bought it from the original owners year ago, and it had never been more than 20k's from Sheffield (where it was sold new) in its life. It's in good nick for one of these, with no major rust issues to speak of. The cab corners are all good, and the wellside is also rust free and pretty much dent free inside too. The canopy has never been off it, and the tray has always had a ply-wood spoil board in place. The interior shows its age though, with dash cracks and worn out bench seat. I've done a bit of work to it over the years. Did a major overhaul of all the suspension and brakes a couple of years ago. Everything under there is brand new or rebuilt. 2" blocks in the back, 2" drop spindles in the front with 2nd gen vented brakes. 1/2 a coil off the front to get it sitting even. Everything poly-bushed, wheels are $50 cheapies from trademe I tidied up. They're probably due another tidy up by now, but I think i'll be changing them out for something else (wider) in the near future. For the first years of owning the truck it was just a weekend vehicle, used for taking the garden waste to the refuse station, helping people move things around, etc. I had euro-diesels as I was commuting big k's each week for work... However at the beginning of 2019 I scored a fantastic job in Christchurch, so I no longer have to spend 12.5 hours a week commuting to and from work. When you add that into your work hours each week, its just too much time being idled away. As of a few months ago the euro-diesels are sold and the truck is performing daily duties. So, its time for the second round of major modifications: 4g63 SOHC 8V. TD05 Big 16G turbo (EVO III). Galant MPI injection. 2nd Gen 5 Speed gearbox (possibly with a Starion gearset, if the ratio's are better). 3.54:1 gears, with and LSD center. Starion seats fitted general interior update. I'm hoping for a good 200 buff horses to the rear wheels. Truck weighs in at around 1250kg's, mostly at the front I assume, so it should make it pretty lively with an LSD and 195's. Should be able to get better economy too, with the 5 speed (currently its a 4 speed) and the taller gears, and better fuel system. Not for the first few months I'm sure, as I'll be deep in the loud pedal a lot I'd say, but after that I'm hoping things improve ;-).
1 point
-
few pics of my new build, this old wagon has been siting here behind my shed for 10 years , so time to do something with it , too rusty to fix for the road so drag only
1 point
-
That’s a funny looking lifan Jim see ya there eh1 point
-
More just driving! The fuel line banjo bolt came slightly loose and I could smell fuel while driving, pulled over to see it spraying fuel everywhere. Not ideal. Tightened it back up and problem free for the rest of the drive. Drill the bolt and lock wire? Loctite? A different kind of fitting? What's the go to for these? (weber dcoe)
1 point
-
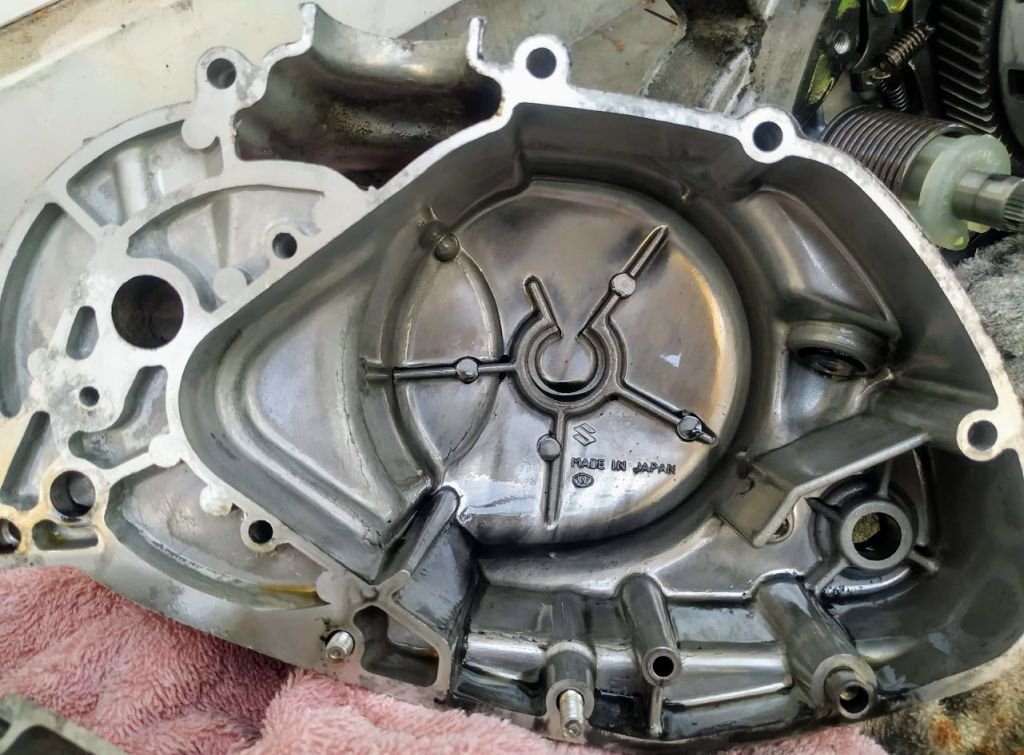
Starting to think this engine has never even had the clutch cover off in it's life! Screw heads showed no sign of having a Phillips in the JIS heads and I even had to use the impact screwdriver on them to get them loose (why didn't I buy one years ago?!) Everything looks to be in perfect condition, and other than what I believe to be clutch dust/gunge covering a few things it's even clean inside! Bit more stripping and another degrease and the cases will be ready to go in my new toy
1 point
-
1 point
-
1 point
-
1 point
-
Try as might I couldn't get the speedo to work, then the rev counter started playing up too. I bought most of another cluster and swapped out the speedo but it was an earlier version and wouldn't work either. It was worth it tho for the complete front plastic bit, which was broken on mine. Apparently the clusters are a bit shit anyway so I started looking for aftermarket ones, this was fucking depressing, like $480 bux each for a Speedo and tach. I rang Young's automotive just to see what they could do but got the same story. Then the dude asked me to hang on and came back saying he had some old stock isspro gauges in mph that he could do for 200, fuck yea I said. Getting these to work was interesting, but once I had it sorted I cranked into the mounting. This was the problem, all the shitty tracks and plugs on the fpc right where I wanted to put the gauges; So after mounting the gauges I recreated the shit I needed for the other gauges and lights from some prototyping PCB board, kind of rough but within my capabilities; The gauges are smaller than the originals, but not too stupid looking. I got a plate laser cut to cover the too big holes and where the odometer was. Because the Speedo was in miles, and the odometer would also be in miles, I just calibrated it so the miles show as kilometers and used a black permanent marker to black out the shit that contradicted that lol. When I hooked it up half the lights didn't work and I thought I had fucked it up, but it turned out half the bulbs were blown, I replaced those and good to go. Not sure what happened there.. Good to go. I also got it hot to see if the fan cycled, it didn't and it turned out the fuse was blown as it was a bit small. I put in a bigger one and checked again today, all works as expected. The rad must be effective cos the fan runs for 30 sec then takes 5 mins to start up again when sitting there idling. I also put a manual switch in there just in case. The power steering is leaking but this is just an o ring issue, I will sort that next.1 point
-
Truck Norris1 point
-
Practice piece needs lots of improvement
1 point
-
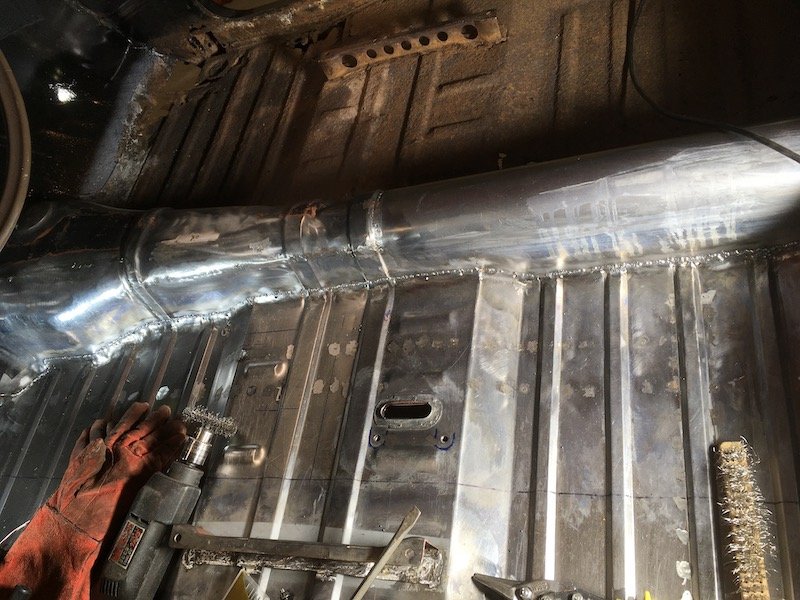
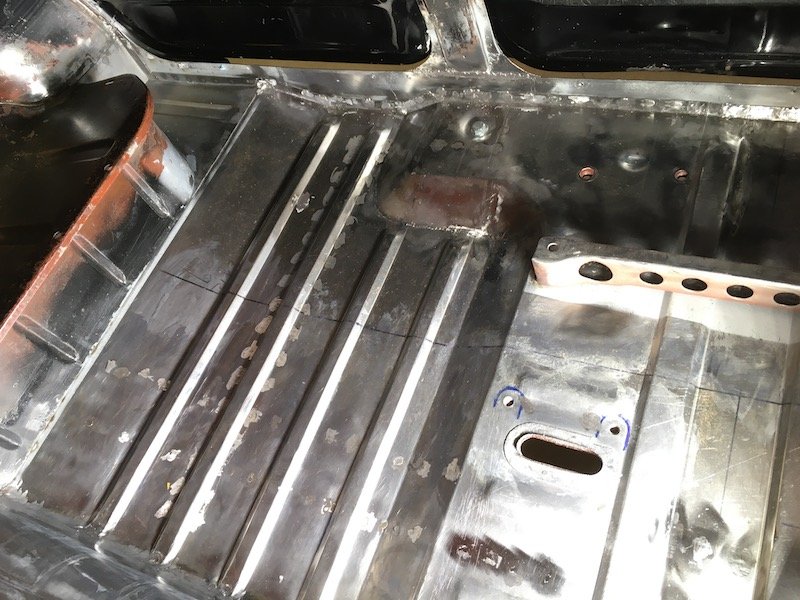
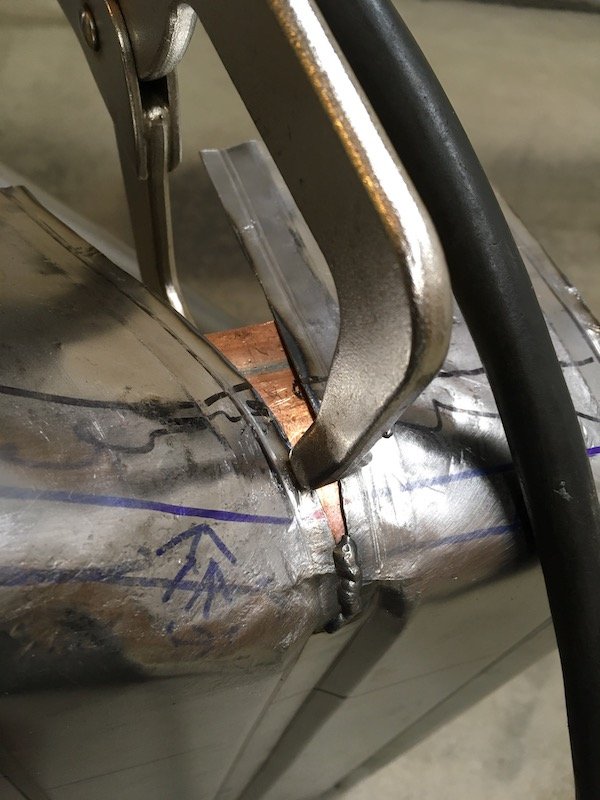
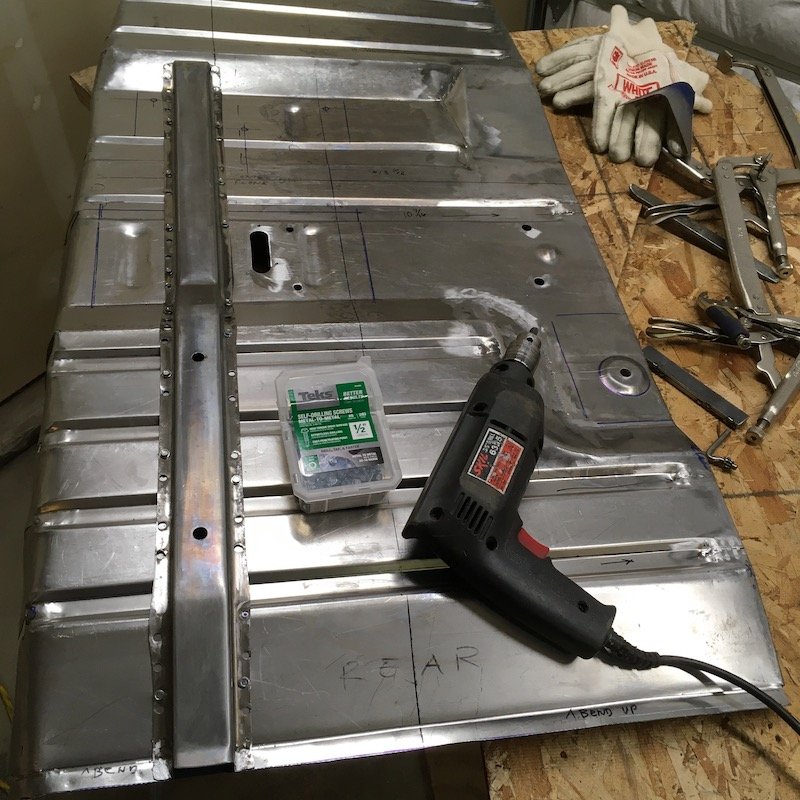
Building the 1961 Datsun 310 Bluebird Floorpan - Welding up the pie cuts along the floorpan edges. Making reproduction nutplates. More fit checks. Getting closer to completion. Some little things. I used Teks and temp fastened the underside support to conform the floor shape more accurately. And backing up a little bit from the thread post where I fully trimmed the flanges, I needed to first weld up some gaps. There's seven bends in contour along the fore and aft direction. That results in 14 pie cuts along the edges to be cleaned up and welded. Not so much on the outboard flange against the sill since these will be lap joints against a flat inner sill, but required along the curves of the trans tunnel edges. I'm keeping my options open to butt weld or lap weld against the tunnel. I back up the wide pie cut openings with copper from a split and flattened pipe. The blue line marks the extent that needs to be filled, the remainder I expect will be trimmed away. This one was kinda ugly. I just grind the excess away later. This one was a little easier to fill. I ground the welds and then, after final trimming (described earlier), did yet another mock fit with the floorpan below The fit is looking awesome! Almost pro maybe, but I have nothing from the internet to compare it to. Then I built some tiny reproductions out of 20 gauge sheet to look exactly the same as the original floating nut plates that get welded to the underfloor and support the inboard bracket of the parking brake. The 5/16 - 24 square nuts are extracted from some much larger purchased repo GM nut plates and inserted into my much smaller Nissan look alike single tab repros. Next post will be cleaning, preparation and epoxy priming the soon to be permanently welded closed cavities on the underside of the floorpan. And then followed by welding on ten or so parts. More posts soon… Discussion:
1 point
-
So this is weird and is starting to fuck me off quite badly. All week I have been able to get it to run and idle no problem, but as soon as I hit the throttle it dies. If the fuel screw is wound in it revs higher but the throttle does nothing. When I crack the injector nuts it bleeds well but always seems a bit bubbly/foamy. Yesterday I swapped out the injector pump for my spare to see if that was the issue, shit is exactly the same. Today I set up an entirely separate fuel supply and filter to eliminate air leaks into the supply, shit is still exactly the same. What The Fuck? The intake is disconnected from the turbo, but at idle the turbo is pushing a bit of air, so I don't think it's restricting anything. Fuck I am running out of ideas. The next thing I will try is to take off the throttle arm and see if I have just set that rotation back way way too far. There is a mark on the top of the shaft and corresponding etches on the arm, but these are at 90 Deg to each other. I have modified the arm and potentially have lost the correct positioning. Any other ideas from you smart bitches? Edit; No need for more input, that was the problem. The throttle shaft has free movement so I set it to run through that movement. It turns out that that isn't throttle movement, it starts after that and is sprung. Some minor fucking with the position and it idles and revs just fine. Whew.1 point
-
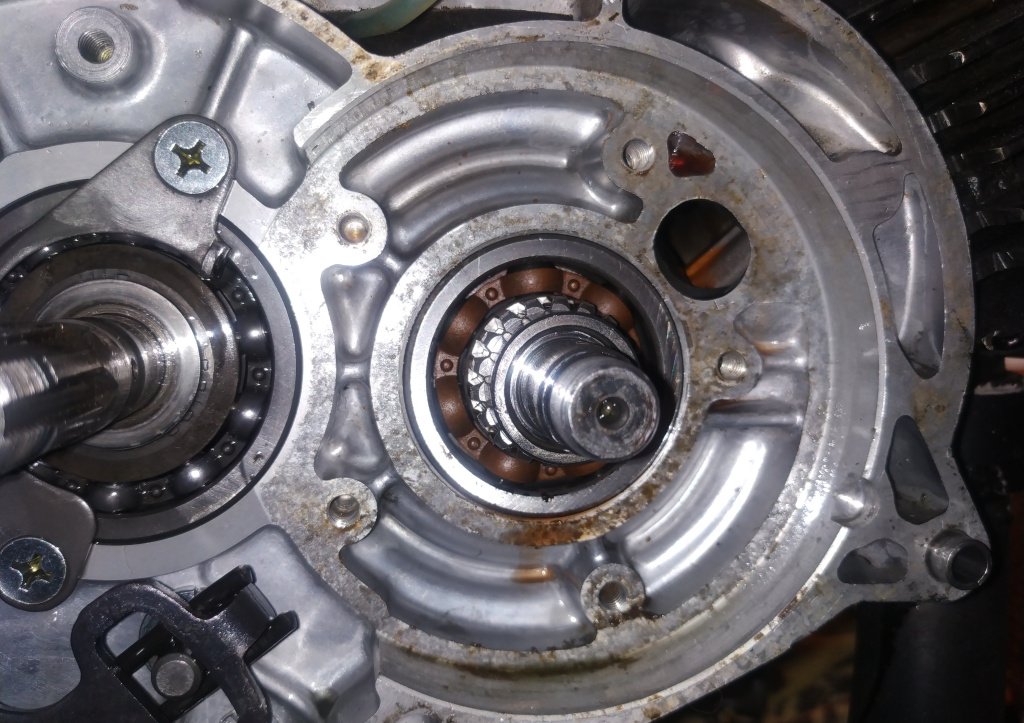
Old disc was sloppy as fuck on the drive spline, was pretty sure that's where the noise came from. Can't wait to get my hands on another engine to do a full rebuild and port, can see so much room to improve on the factory castings!! Managed to get hold of the specs for the factory Suzuki R-T disc, so after checking and double checking I got cutting The worst of the noise is gone, thinking one of the bearings is responsible for what's left now. Cutting the disc has given a decent gain, it's still not fast but it's a LOT of fun to fang about in town at least. Need to pull a few degrees of timing out, hearing a bit of pinging at WOT and under high load.
1 point
-
This would have been in '85. It was from Oakura, white with 2 gears available on the column shift. Rust holes behind the back doors you could fit a hand into. We drove it back to Hawera around the mountain to avoid the popo with only 2nd and 4th gears. I heard the engine blew up shortly after I sold it. That was a 1600 crossflow that i put in with a floor change box, I didnt have many tools so I cut the hole for the gearstick with a cold chisel and a big hammer. The paint was terrible, I put more than 4 litres of bog into it along with some roofing iron to support things. I learnt how much I don't like painting things when the hours of what you thought were spectacular prep ended up with a sweet grapefruit finish. Hopefully I have learnt some things since then.1 point
-
Pretty keen on the new burger1 point
-
oh so keen on a burger tonight1 point
-
young @Archetype even got some sick hand tattoos as well.1 point


This leaderboard is set to Auckland/GMT+12:00