
Leaderboard


Popular Content
Showing content with the highest reputation on 10/09/19 in Posts
-
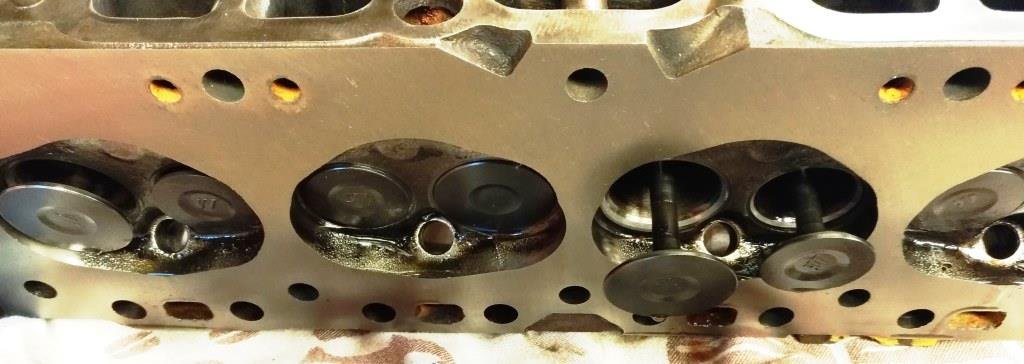
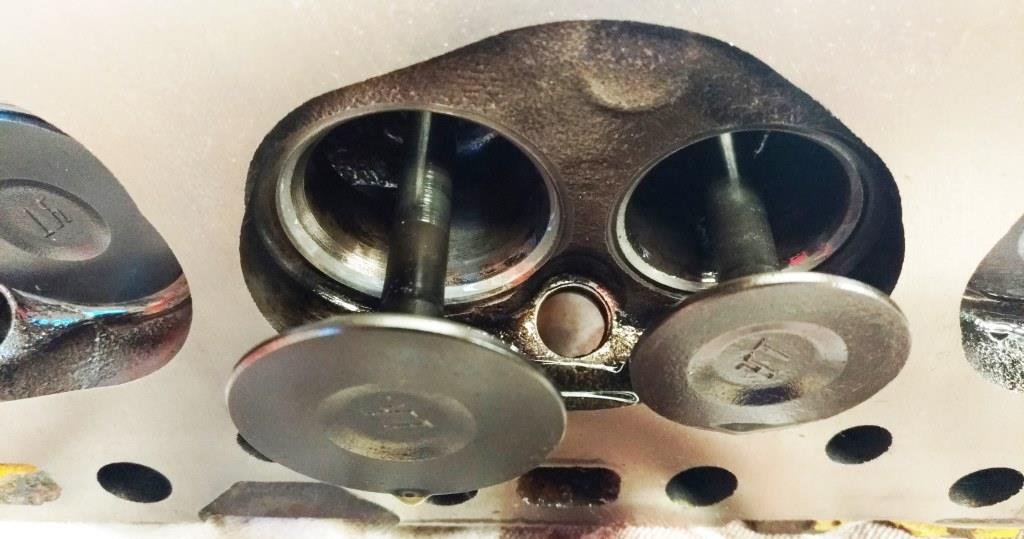
Dropped the head off at a local reconditioners for a leisurely soak in the cleaning bath and a very light skim (I suspect 3 & 4 cylinders had been talking to each other). Have to say I was blown away with how good a condition it was in once all the damn black rich running carbon had been dissolved. Cleaned the valves and gave them a light lap. Enlisted the help of an “Oldschool Holden Spring Compressor” I had lying around which made light work of the double valve springs and all it needs now is a fresh coat of the obligatory “Torana Yellow” paint.
 10 points
 -
Yawn... Might slap some white on this bitch next week. Also might not.7 points
-
Hole in the exhaust was an easy fix, but is somewhere i think i will be visting again eventually Stuck all the many many chrome trims back on And backed it into the sun then down the road and reversed up the drive - this side has been drying for a few weeks so it got a quick polish with the big slow grinder then bunged the trim back on this side too, now its all back together. Last pic of a car in this shed got to be parked on the lawn in waiting for me to bung it into storage for a while sheds now starting to fill with boxes and about 2 vanloads of stuff taken to and from storage and the op shops6 points
-
My brother got his plates approved from pictures, but they weren't from one of those suppliers. We drew them up ourselves and had them CNC machined. Just because it was approved doesn't mean it is legal5 points
-
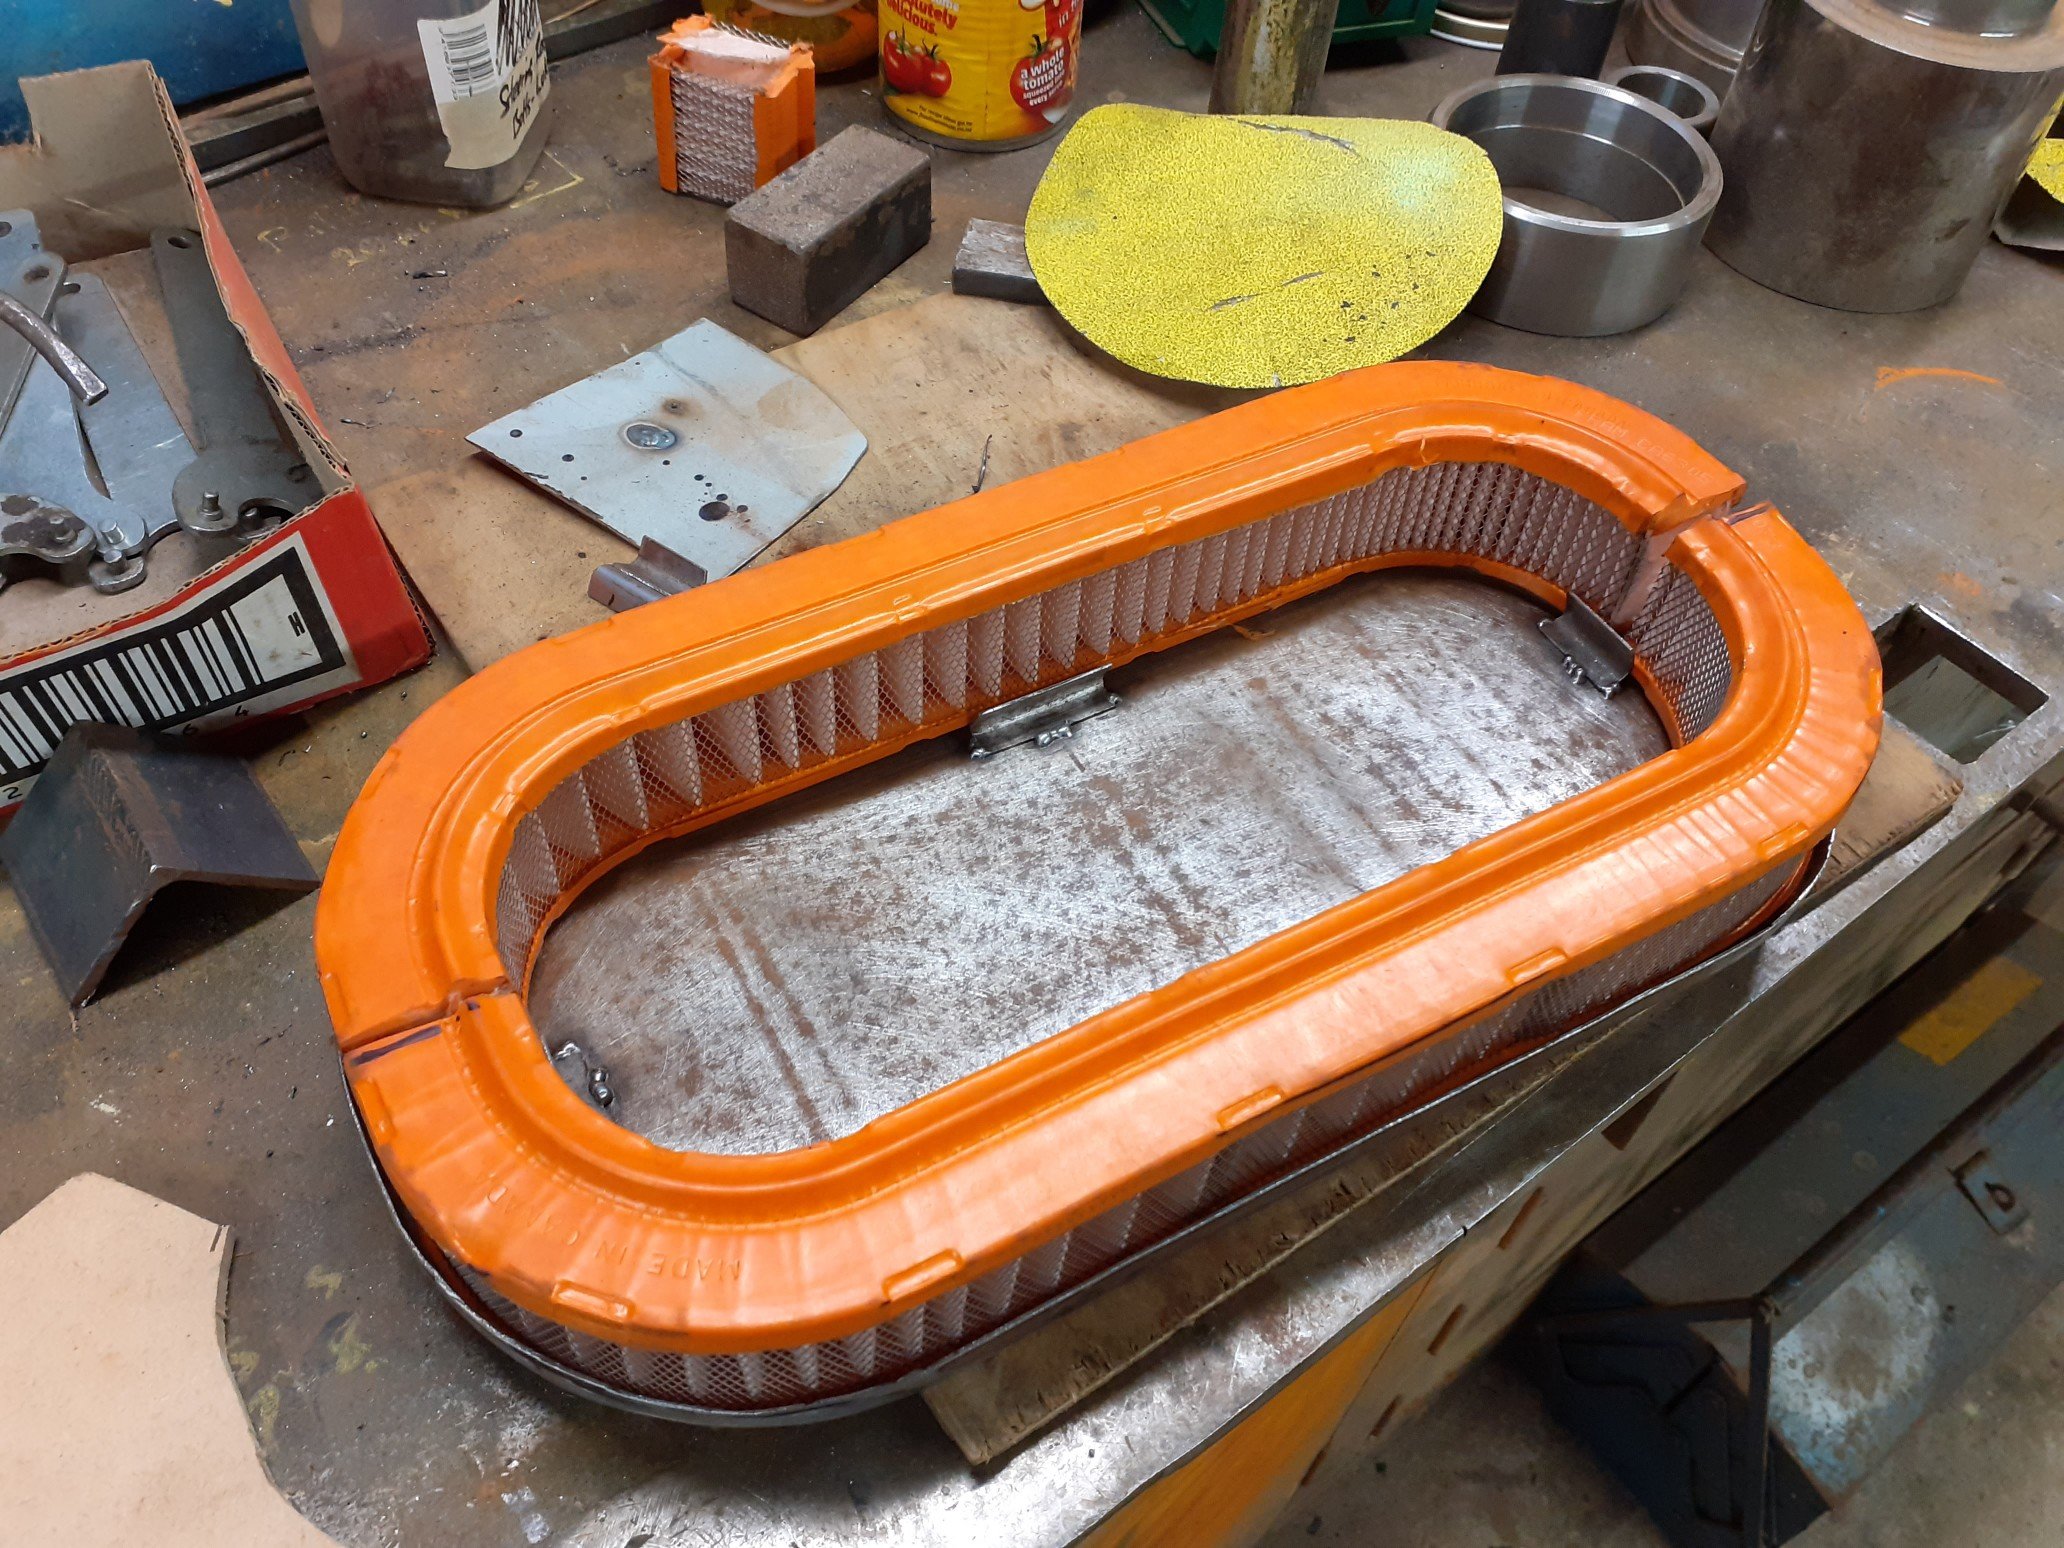
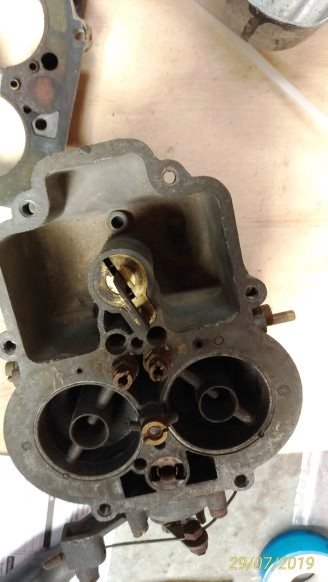
Got this a wof in august. Needed to replace a few things like steering rack, engine mounts and a brake cylinder. Kind of put it on the back burner while working on the orange van and house. I played around with the jets in the bike carbs and felt I got them a bit better. Still seems to run rich at idle, pilot/fuel screw screwed in quite far, and doesn't have the pick up at mid range when I put the foot down. Yet to investigate too much. Have started to make an air filter housing for the carbs. Using a cut down filter from a Hyundai pony? It was cheap at a swap meet so I built the housing around that. Carved up a wooden template and used the press to make the initial swage in the lid. Folded and cleaned up the edges before pressing and drilling holes for the thread studs to hold it all together. Will probably just clearcoat it. Next step is to actually tune the carbs better.
4 points
-
Legally the plate has to have been supplied by the government or in more recent times a government agent for the production of plates.4 points
-
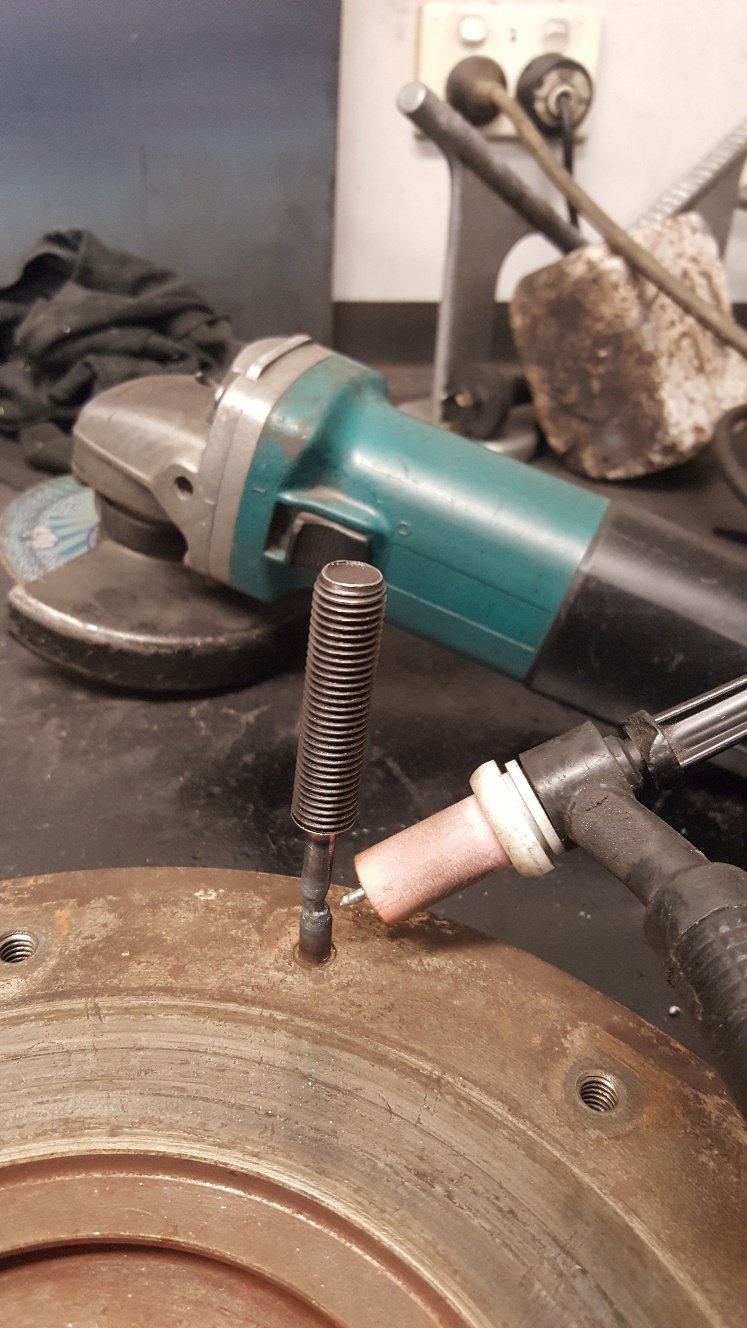
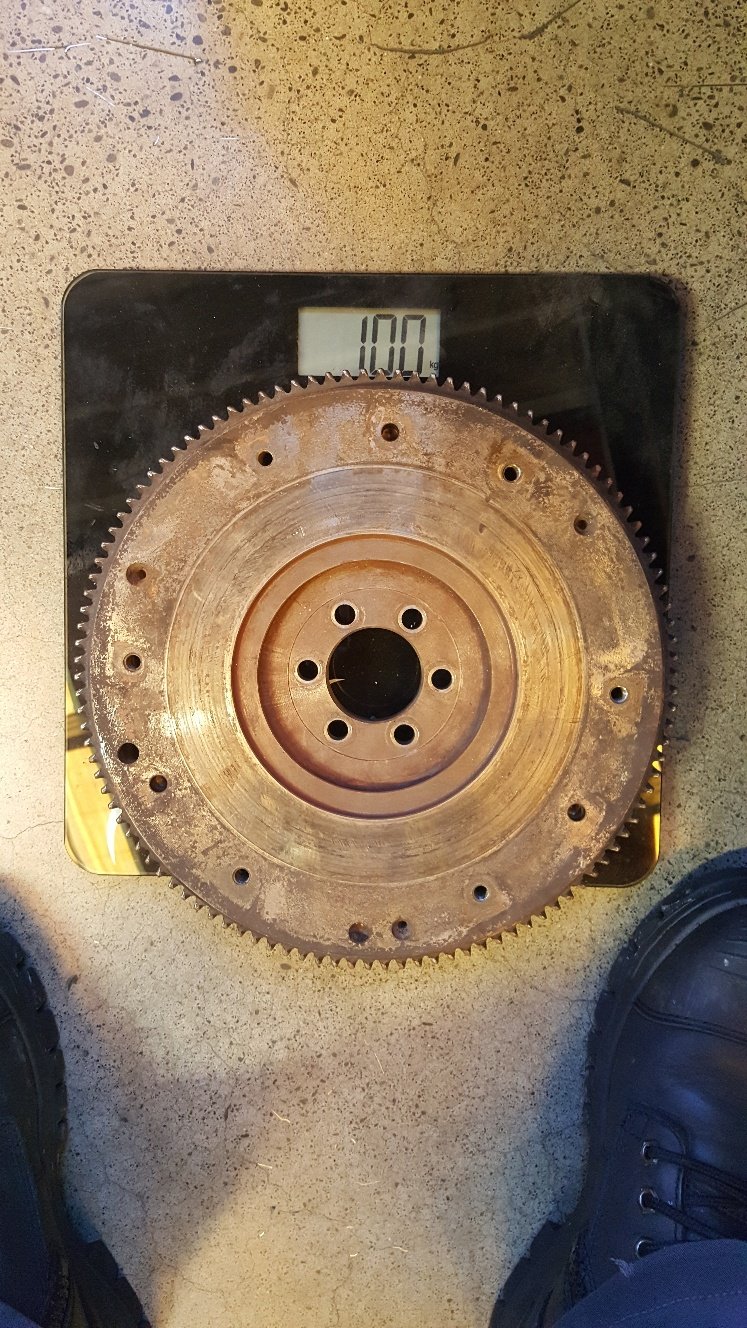
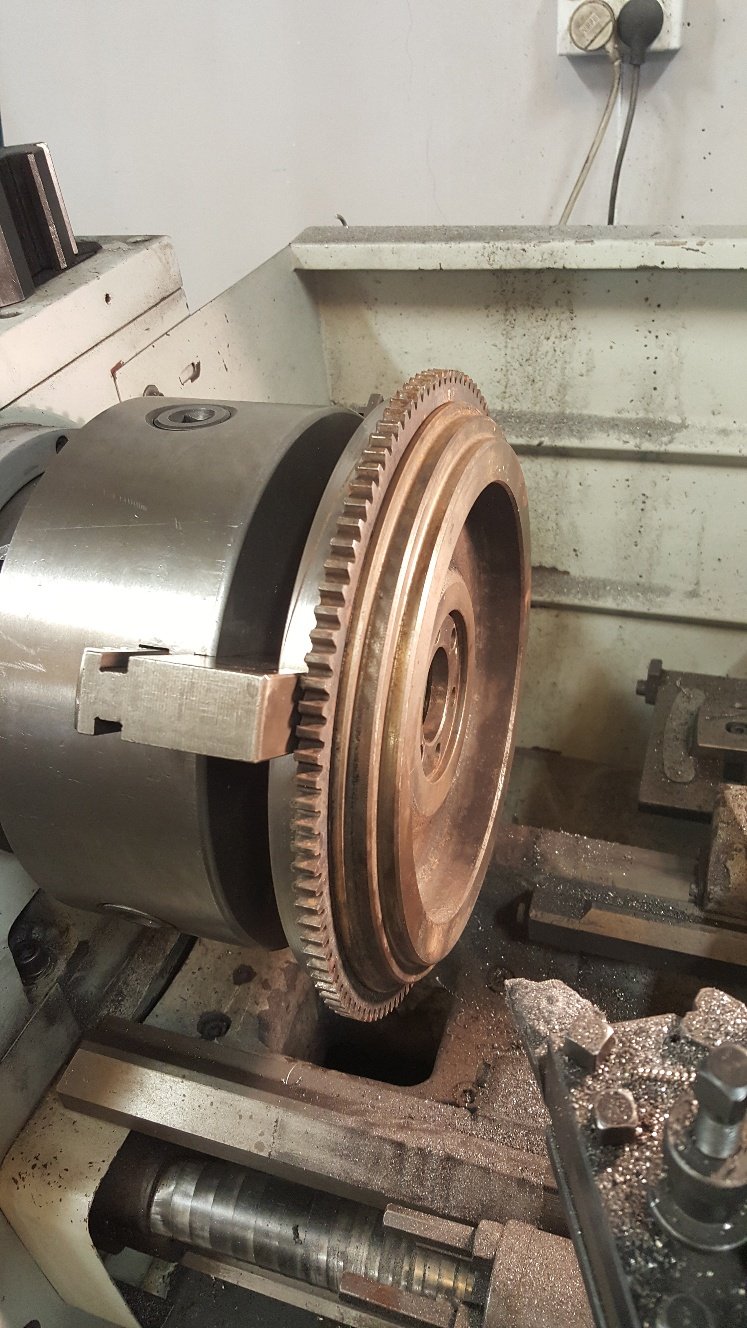
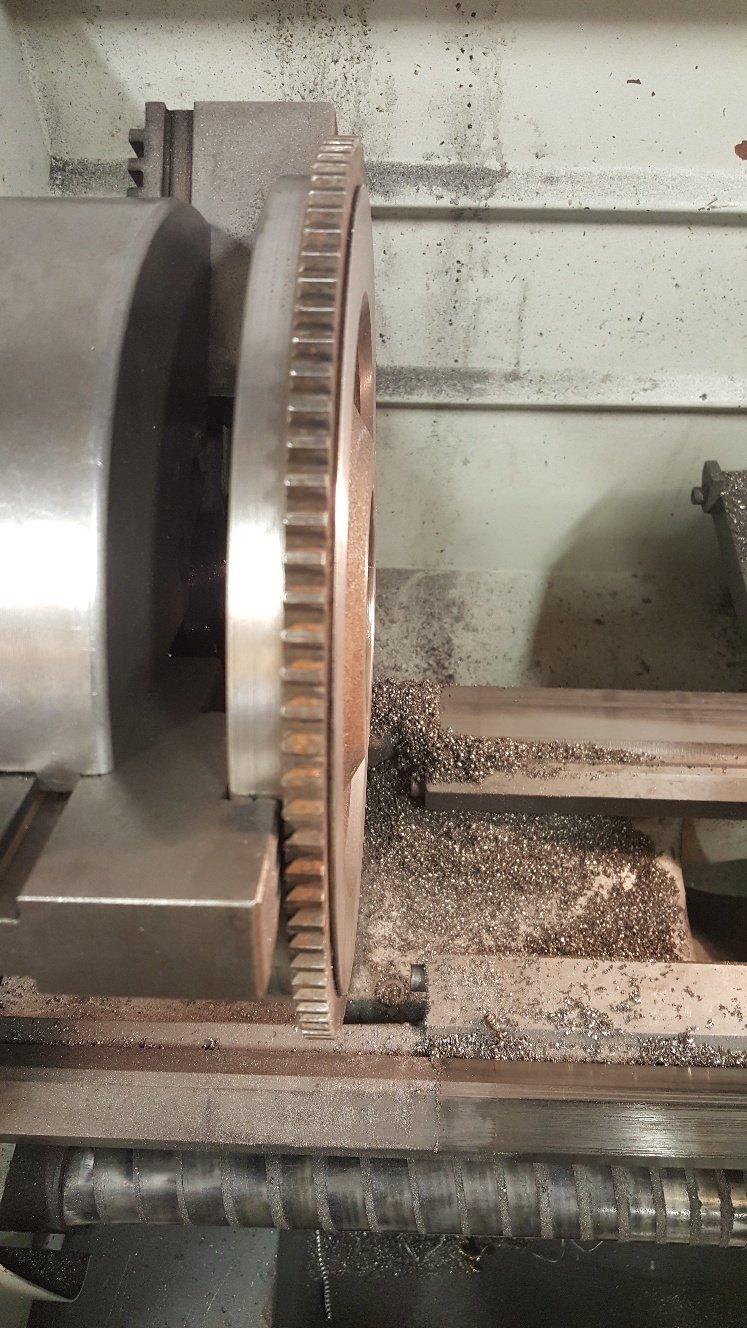
On to the flywheel. First remove the dowels Weld a stud to the dowels to attach the slide puller. Weigh it. Into the lathe. Sorted. I also machined the face in the lathe. I machined the outside area where the pressure plate clamps down .5mm to give the pressure plate more clamping load. Weighed it after.
3 points
-
I've ordered some cable stuff so I can make the clutch, throttle and brake cables for the cub. The new Gy6 head arrived today. The casting quality is pretty shit house. I gave it a bit of a tickle up with the die grinder Finished off the exhaust and intake flanges. They are bigger than factory now. Intake flange is now port matched to the head and ready for me to find sone tubing3 points
-
So Hannah and I took the Imp for a two day road trip. Part business and part holiday. On Friday we drove up to Lake Rotoiti, Nelson lakes national park. On the way we checked out some old classic cars a fella owns who wants me to do a load of bodywork on. The Imp drove really well. The sun was out and the music cranking (some ambient tunes from David Tipper since you ask). We had a good coffee and then a nice walk on tracks around the lake. That evening we drove through to my olds place in Blenheim. A nice day out. Here's some photos... Chilled out at my parents, a feed of fish and chips, wine. A grand way to finish a day. Following morning we set to head home. Filled the Imp up, did some maths and allowing for a very optimistic speedo we reckon on around 40 mpg. Not bad considering the gearing at 100kph. Headed home, sadly into rain as a cold front was moving up the Island. Drove long way via Picton and Queen Charlotte drive because narrow twisty roads and go kart car... Over the Rai Saddle, sitting with the flow of traffic. I give the car some stick to pass a motorhome up the saddle and then when cruising down the other side the wee car does that thing.... 'JOLT!' The car does a small but very noticeable stumble. Like a tiny rev limiter. For those that have tuned megasquirt, or maybe other EFI, it felt like when you click burn. "What was that?" Hannah asks. "Shit- I don't know but it felt like an ignition thing, not spluttering fuel thing" I reply. We both go quiet. I almost want to turn the music down and listen for any untoward mechanical sounds that might be there. But I don't. I'll play it cool. Don't worry. Don't get Hannah worried. It was probably just a... fuck. I don't know. I'll just say nothing, drive a little slower and whatever it was will be a memory soon. The silence is piercing. Now I notice every bloody vibration. I'm watching all the gauges like a jet pilot. All the time my mind is going through all possible scenarios. What could that have been. What if we breakdown? 3km pass. It seems ok. I start to relax. Only one big set of hills to go. I pass another rental car, most likely the scurge of the kiwi roads, a Nissan Tiida. I dont know because I'm still having a mini stress.. 'JOLT'. Here we go. This is happening. This time its for good. The car dies and I have to quickly think where I'm going to stop to fix it and quick before I slow too much and that silver blob I just passed drives up my bum. I spot a forestry road on the right, coast across to it (whilst trying to make it look like nothing is wrong so saving face for all classic drivers who get the "oh old cars are so unreliable...") I pull to a stop and the engine splutters to its last road driven rotation with a bang. Bugger. Remain calm. Reception on phone? Not a chance. Tool kit in boot comes out and we go through all the obvious things, concluding that it is indeed the ignition. Annoyingly it was the ignition module, of which I didnt have a spare. If it were points I'd have fixed it. Such is life. Luckily the rain had stopped and double lucky that across the road from the forestry road we parked on was a farm house. The kind farmers wife took us in, let us use her phone and fed us tea and biscuits. I called a mate out with his trailer. We have AA membership however its the basic cover that would have got us to a garage. I knew a Garage wasn't going to fix this and we'd still have to get home. Yeah nah. Stuff that. Mate turns up with his trailer and we have a choice as chilled out trip home. We fed him dinner and it was all good in the end. Big thanks to @Sanfiddy for rescuing us! Oldschool spec favours. I only took one photo of the day... So that was that. On Sunday I removed the dizzy and then the module. It fails the tests as predicted. Here's the troublesome module... Come Monday and at my local wreckers looking for a module. I dont want to spend $120 on a new one when I'm about to fit full engine management. No luck locally but we were in Nelson on Tuesday and I found one at a wreckers there, cheap too. Fitted it that night and brooooooommmmmm The replacement was a proper Hitachi module whereas the one that let its smoke out was a no brand cheap one. Even felt lighter if that means anything. I took the broke one apart and it looks like a little cityscape inside- heck it would scare a Barry used to the kettering system... I also managed to score a spare couple of dizzies, converted with accuspark. My bench looks like a bomb went off in a hitachi factory... I'll need to fix them up, check them out and then I could always have a spare setup in case. That is until I fill the Imp with boxes of electronics and then there's no chance Mr AA man can help me. It'll be like every modern car- useless when broke. In other news- this turned up from China the day we left for the lakes... Its a brand new Hitachi 306 clone, all for not much more then a full carb gasket set costs. I had ordered this before I had scored all the other Megasquirt bits. Anyway- I'm still looking forward to trying it out because my worn out carb is about as good as I can get it. The new one looks so shiny. I'll report back with my findings on how deep the quality goes...2 points
-
2 months til Urewera nicotine and nangs so time to try make the TS50 go again. After doing a bit of research I figured out that I needed a motor from another mono shock model as the gearcase is a different shape to a TF125/DS80. Much barry spec searching found a late model monoshock TS125 was a thing so started looking for one that was cheap enough to take a punt on the engine fitting. Found a $100 "blown up" shitheap on marketplace that @datlow the GC picked up for me and even delivered it from Wellington. Turns out with some brakekleen in the carb it runs fine, gearbox sounds like a bag of dicks but I put some oil in it and its happier. Piston/rings look fine through the exhaust port Encouraged that my blown up engine runs pretty good I pulled it out this arvo and offered it up to the TSfiddy engine hole. Tight fit but still lots of room to add mounts once I somehow hold the engine square and in line with the chain. Stoked to have something thats finally going to fit with minimal work, just make 3 mounts swap stator and coil to get 12v off the engine then sort out some sort of bodged together spanny2 points
-
LH inner side cover was all smashed up with 3 chunks missing and the lower sprocket cover tab was missing, I gas welded it up, proper fusion welding not low temperature brazing.
2 points
-
knock detection is easy enough. I just use a donut style sensor and a small audio amp and headphones. Think it was old mate @Roman dave? that was using laptop mic input then headphones out to do similar thing, via some software. i kinda like the amp idea since aren't changing from analog to digital back to analog. but may not be an issue. biggest thing is knowing what your listening for. some engines with noisy valvetrain it can be a pain in the ass to catch it early. quiet engines are easy. using the ecu to detect knock can be done, but is a pain in the ass to setup and alot of them suffer from false alarms. you pretty much need to knock the engine to set it up also. if your octane/knock limited best to go the audio way. advance timing till have light knock. then back it off 2-3 degrees. thats your timing number.2 points
-
Maybe don't fly the union Jack on this trip2 points
-
That's a big 10-nope rubber ducky. You can have power steering deleted in a rack but it must be done by a known and reputable steering specialist and an invoice must be provided to the certifier as evidence. No idea how they do it, but that's why they are the expert and I'm not. LoL (if you are unsure of your steering specialist is known and reputable then talk to your certifier for a name he trusts)2 points
-
Yea that wouldn't pass even with ndt Any welding on a steering component that is critical for steering control cant be welded2 points
-
100 sounds amazing. can get away with a bit more on 98 than 95. just have to try it. tune with knock detection an example: going from 95 to 98. let me run another 4psi boost and gain 30kw on a 1500cc engine2 points
-
Yep yep Got the deck back from coating, reassembled most of it and bought a couple of sheets of stuff for the decking. By some miracle two sheets 1220 wide fit perfectly in there, it's almost as if some smart cunt had put some thought into that. Then I spent some time this weekend starting to put the engine back together. Much care was taken, including plastiguaging the bearings to make sure that bit wasn't a fuck up. The only thing I didn't do which I potentially could/should was replace the rings, but the bores looked ok and the rings looked fine. We will see how badly it smokes and how shit the compression is, then I will mask all that with a turbo. I figured I would do a proper rebuild on that other engine once I have some funds built back up, if it is needed... Need to put an oil return into the sump before I seal it up. I might even replace the valve seals if I get excited. Also, every time I go down to the shed I see this, it is evocative....2 points
-
putting motor back together. sump is all back on. the sump had some ground based accidents previously so i made a thing to stop it getting such a kicking. 2019-10-05_12-44-55 by sheepers, on Flickr 2019-10-05_12-44-48 by sheepers, on Flickr then i continued on with the rest of the assembly. i put some playdoh on the piston and checked valve clearance which was all good. got the water and oil pumps on and the heads. the toyota full gasket set does not have lip seals in it which sucks balls so i have no front crank seal, which menas i cant put the timing belt on. 2019-10-05_04-32-32 by sheepers, on Flickr2 points
-
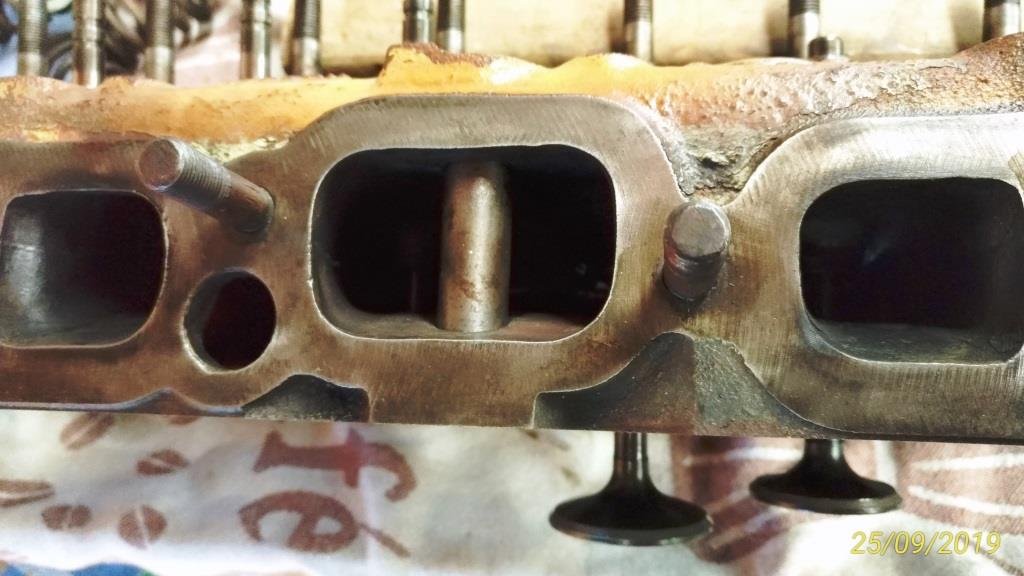
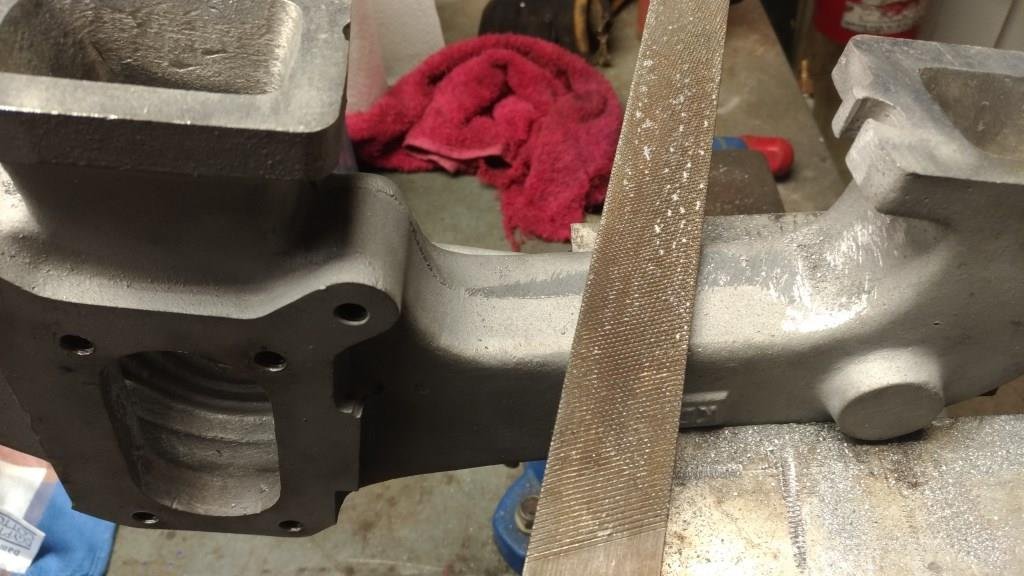
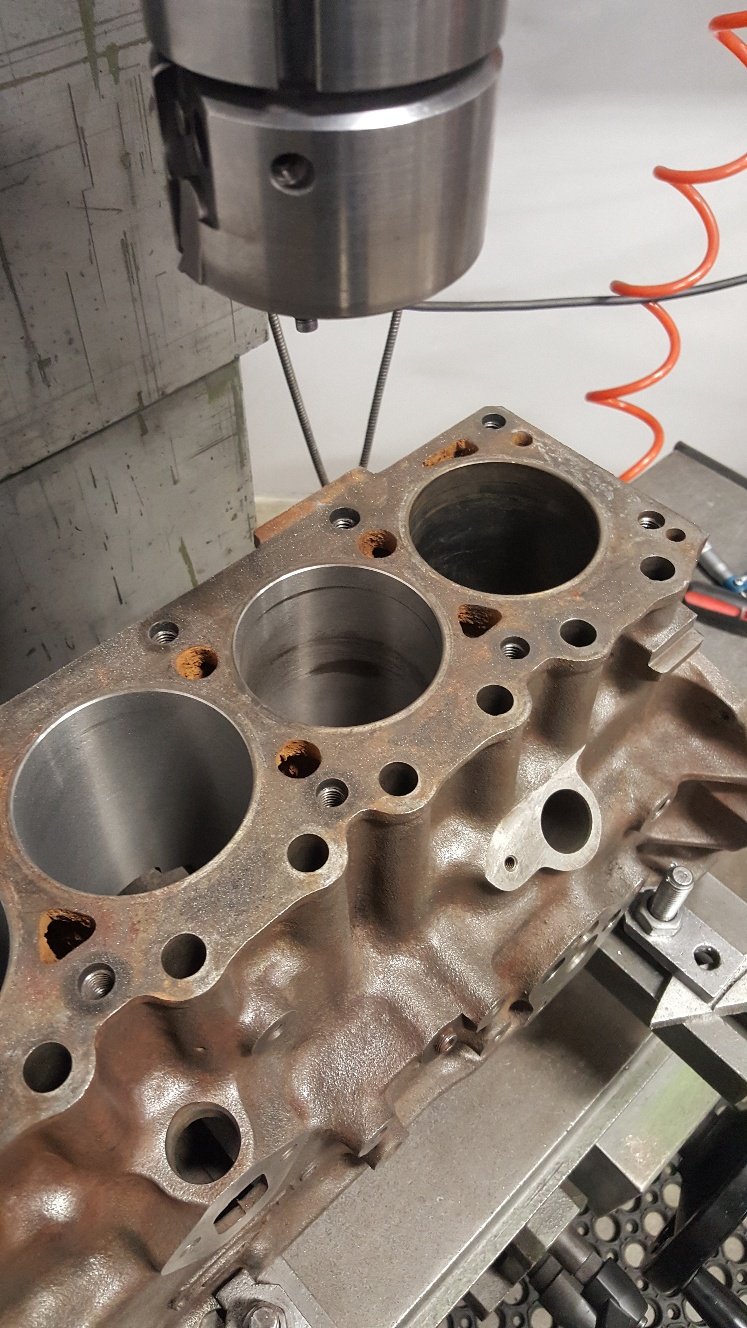
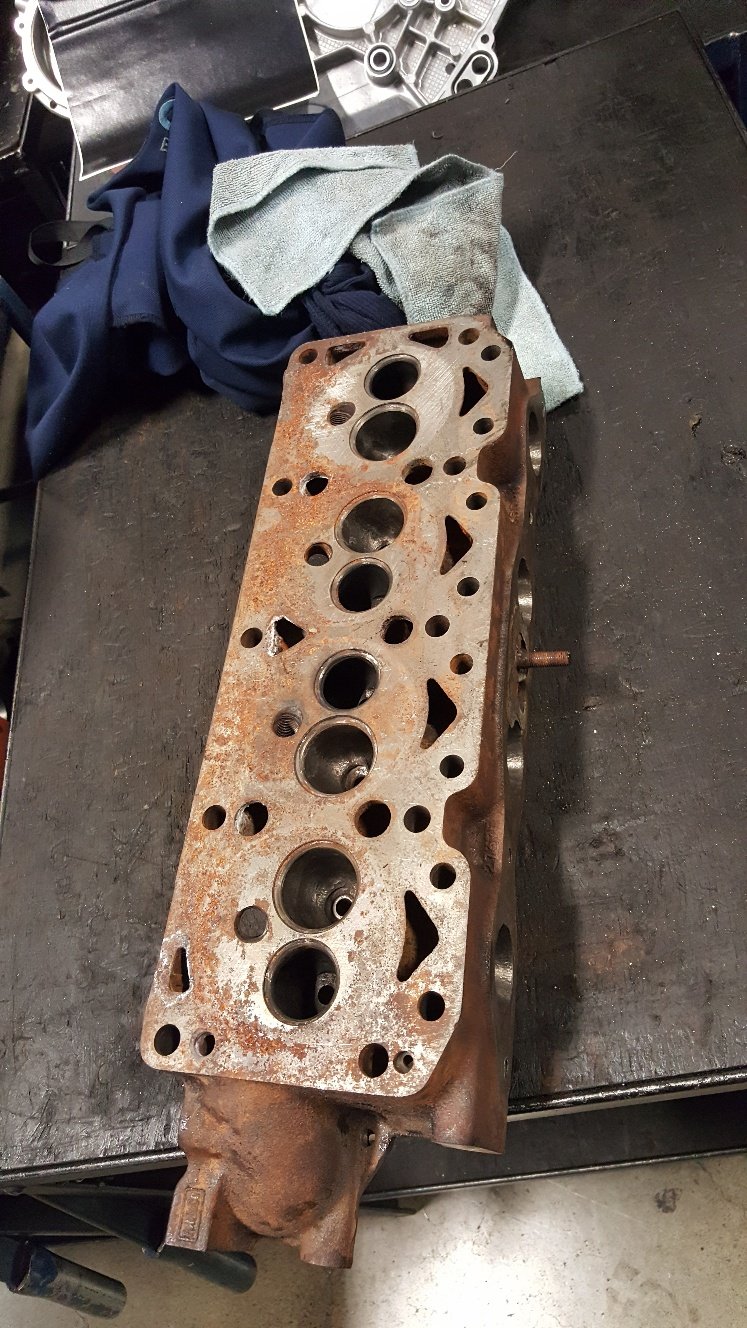
I’d been keeping any eye on a bloke in Whangerai who had been trying to sell a 186 on TM while doing his damndest to scare off any potential buyer by abusing anyone who had the audacity to ask a question on his auction. God I love those grumpy old traders! He was insisting that someone had painted the standard head yellow and refused to post any pictures of the inlet ports. After some months of his relisting I finally put the poor deluded old sod out of his misery by buying it for $300. An early 2-hour drive had me rolling down his driveway at 8 am in the morning, one look at the inlet ports confirmed it had at least a stage 2 Yellow Terra head. When I suggested that as an honest principled rogue, I felt a moral obligation to throw a little more coin in the pot he started accusing me of being a ‘lying young upstart that was talking through a hole in his f***ing head’. As I beat a hasty retreat up the driveway waiting for him to set the dogs on me (with the booty in the back of the van) I had to admit that at 63 years of age, despite the verbal tirade it was great to be called ‘young’ – ya gotta love those grumpy old guys! Couldn’t wait for to to get the head off but work pressure had me waiting for the weekend. As I said in the 1st post of this thread ‘sometimes you just get lucky’ - I stuck it in the engine stand, flipped its lid off and discovered a rather virgin stage 3 Yella Terra covered with the type of carbon that only prolonged over rich running can ever produce. Double valve springs and classic 70’s inlet porting. And just relish in the vintage YT valves! Once cleaned up the flat top 30 thou over pistons felt firm in the bore so Rigamortice and I made the call that we’ll clean up the head, sort out the appropriate sump/pickup combo and see how it runs.
2 points
-
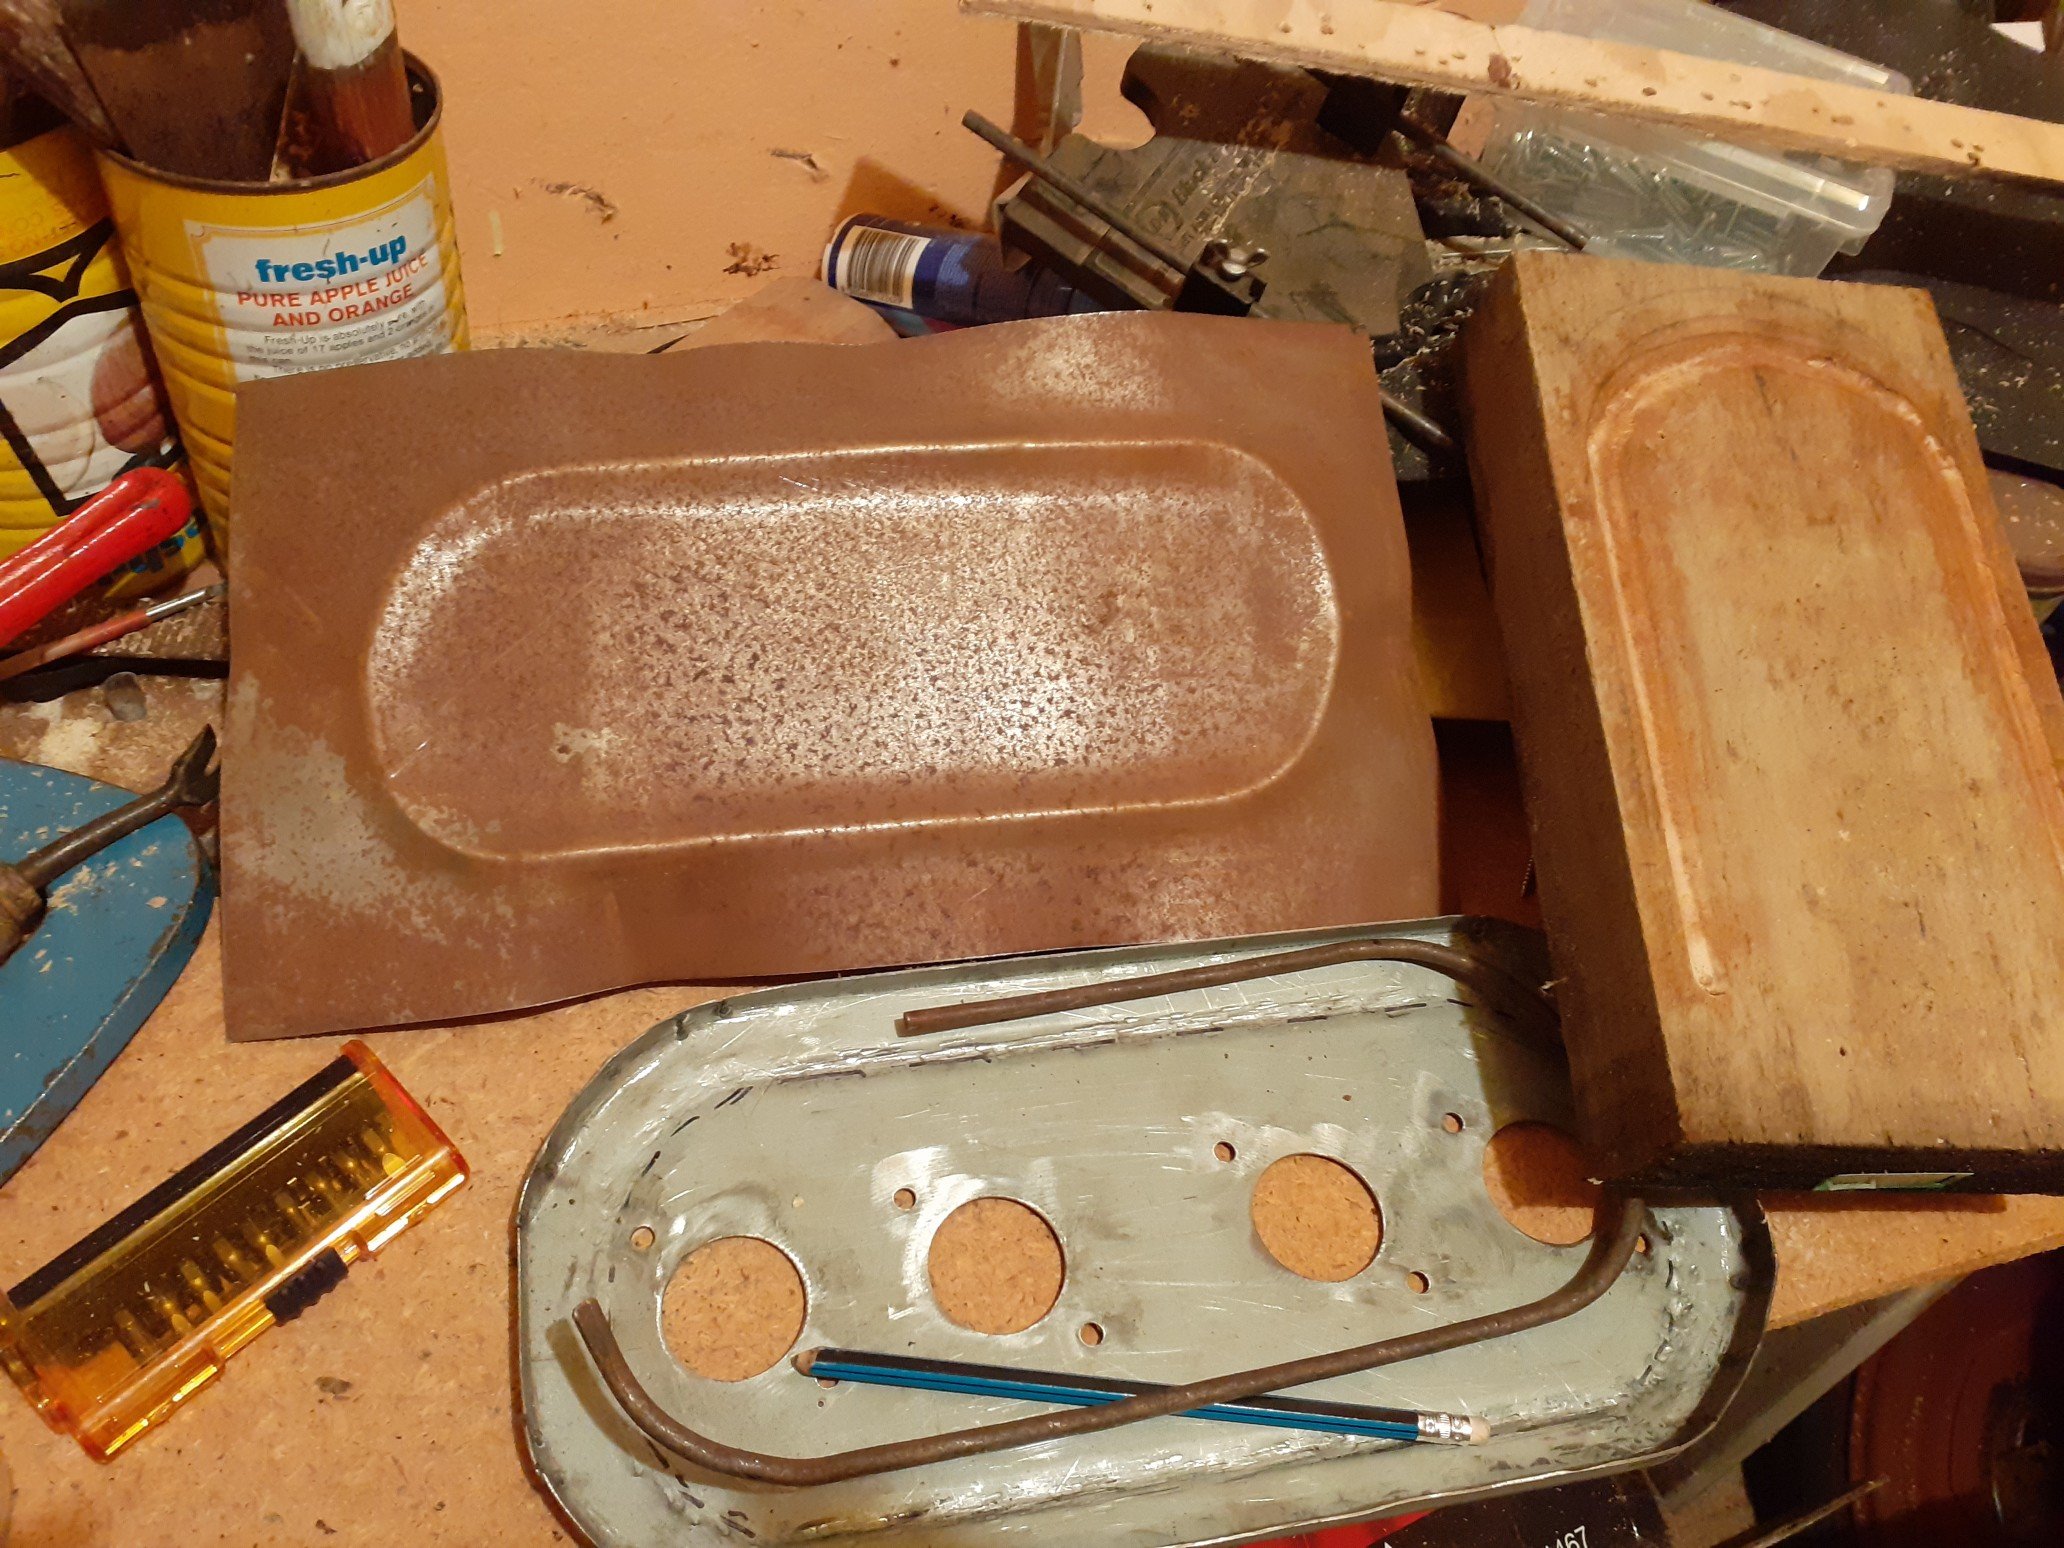
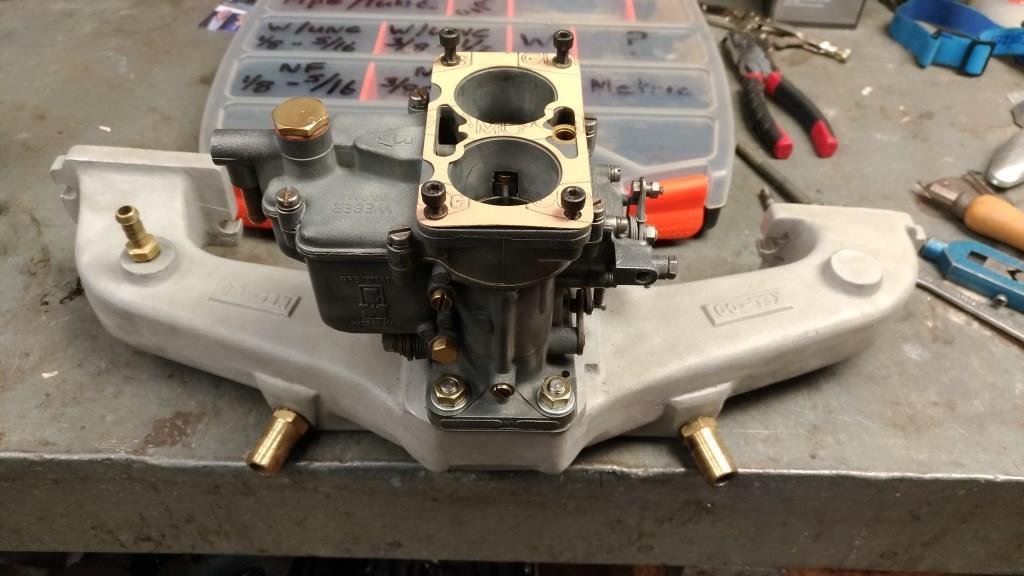
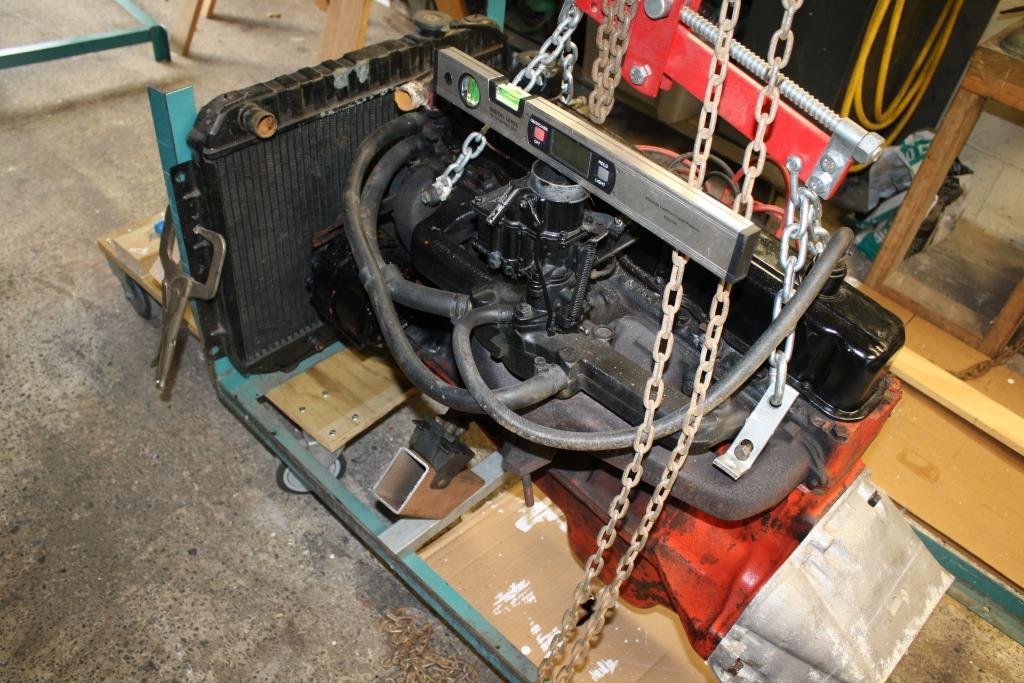
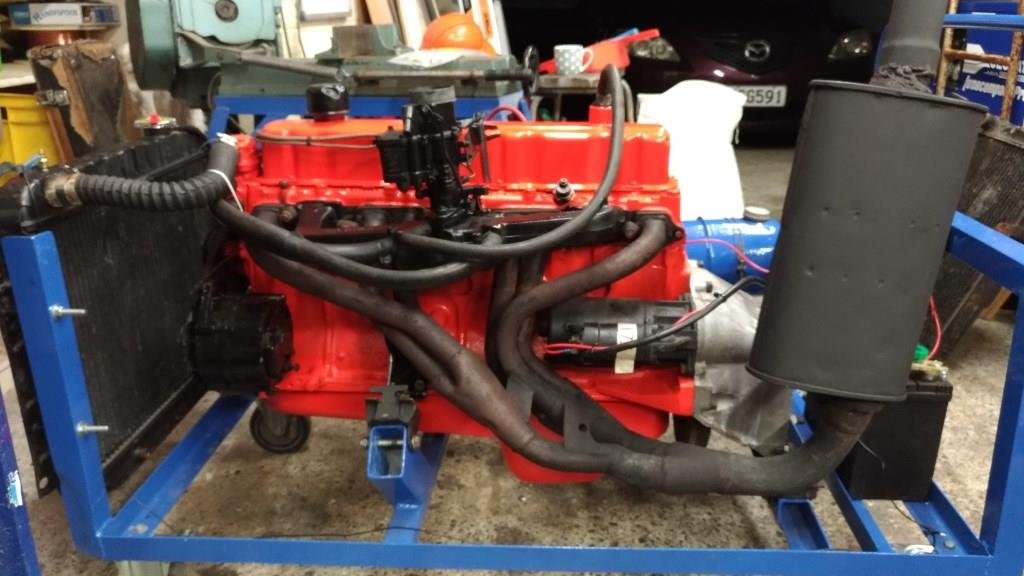
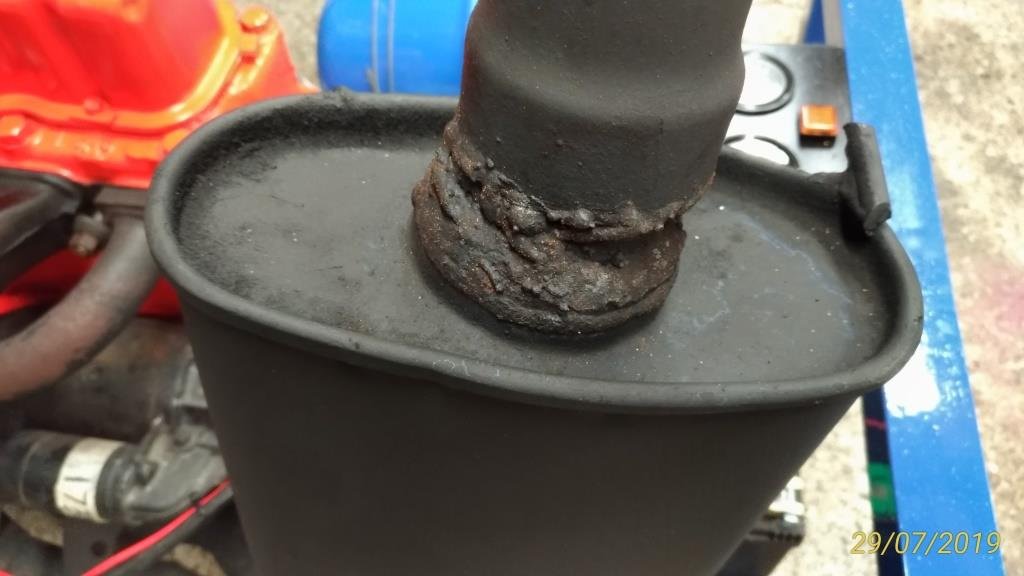
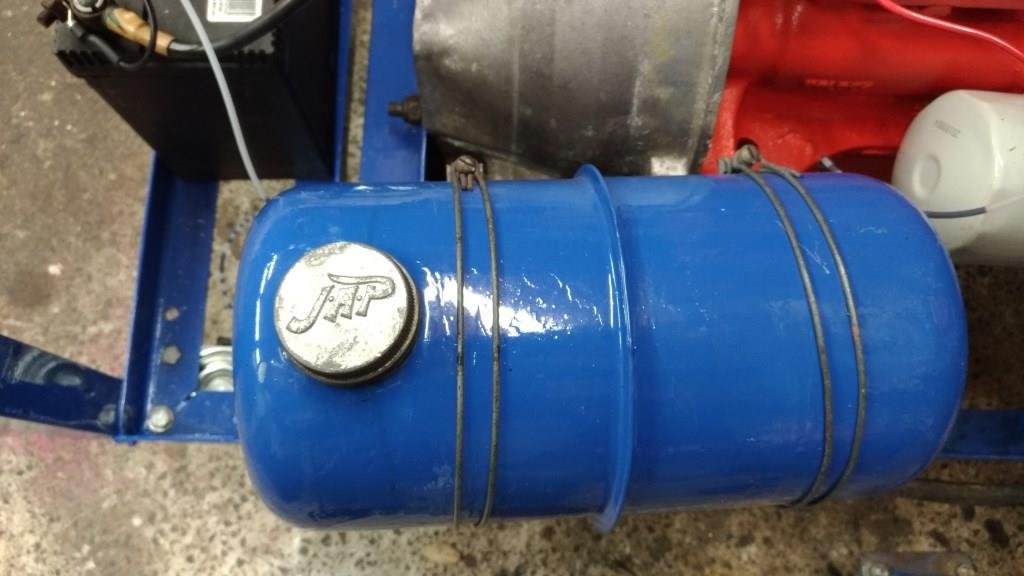
Thought it was time to clean up Rigamortice’s vintage Kel-Co manifold to get the DCD Weber back where it belongs. Couldn’t resist the temptation to cut off unwanted bits, file off casting marks and give it a blast in the new blasting cabinet (only a baby one but all I have is 12 cfm). Have to say I was pleased with the results. I’d been thinking about building an engine start-up cradle for a while, found some old castors, raided the obligatory under bench scrap steel pile and started cutting and welding,……… and cutting and welding,……. Once again happy with the end result, particularly the “Hillbilly headers” fabricated from parts saved from the rubbish bin. I just had to incorporate the “inglorious welding” I found on an old muffler! And how could you not love the 1950’s JAP fuel tank. As an added bonus you can even run motors up on it! (My favourite Torana 2850cc 9 port, stock standard but what little rever – Brock discovered them before anyone else). First 2850 start-up on the new cradle
2 points
-
As those who are more familiar with us will know both Rigamortice and myself have a great affinity for the environment and take climate change (i.e. the thing we used to “call global warming” before it got cold again!) very seriously. Stricken by remorse and overwhelmed by guilt over the tons of negative carbon credits I’ve released on the global economy through years of motor racing, driving cars for the love of it, and behaving like a typically irresponsible older ‘Oldschool’ member I have acquired an EV! You may scoff at the fact that it’s a clapped out old warehouse sweeper with buggered batteries saved from the scrap heap but to Rigamortice and myself it is a powerful symbol of our indefatigable commitment to a green and politically correct future. With help from my brother providing advice, encouragement and the Wild Turkey may I present the definitive green, negative carbon credit, EV solution to taking the wheelie bins out when you live down a long driveway, (what could possibly go wrong!). Commentary and camera work courtesy of the ever lovely Mrs sr2.2 points
-
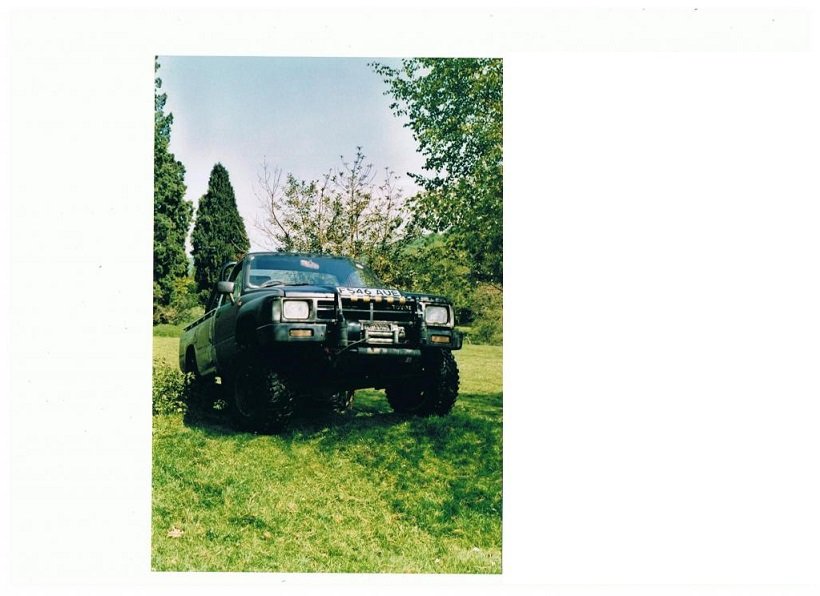
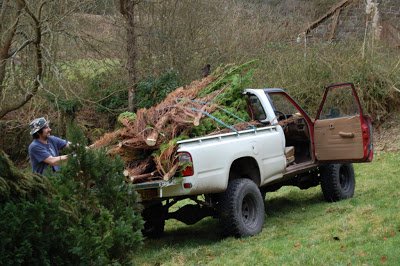
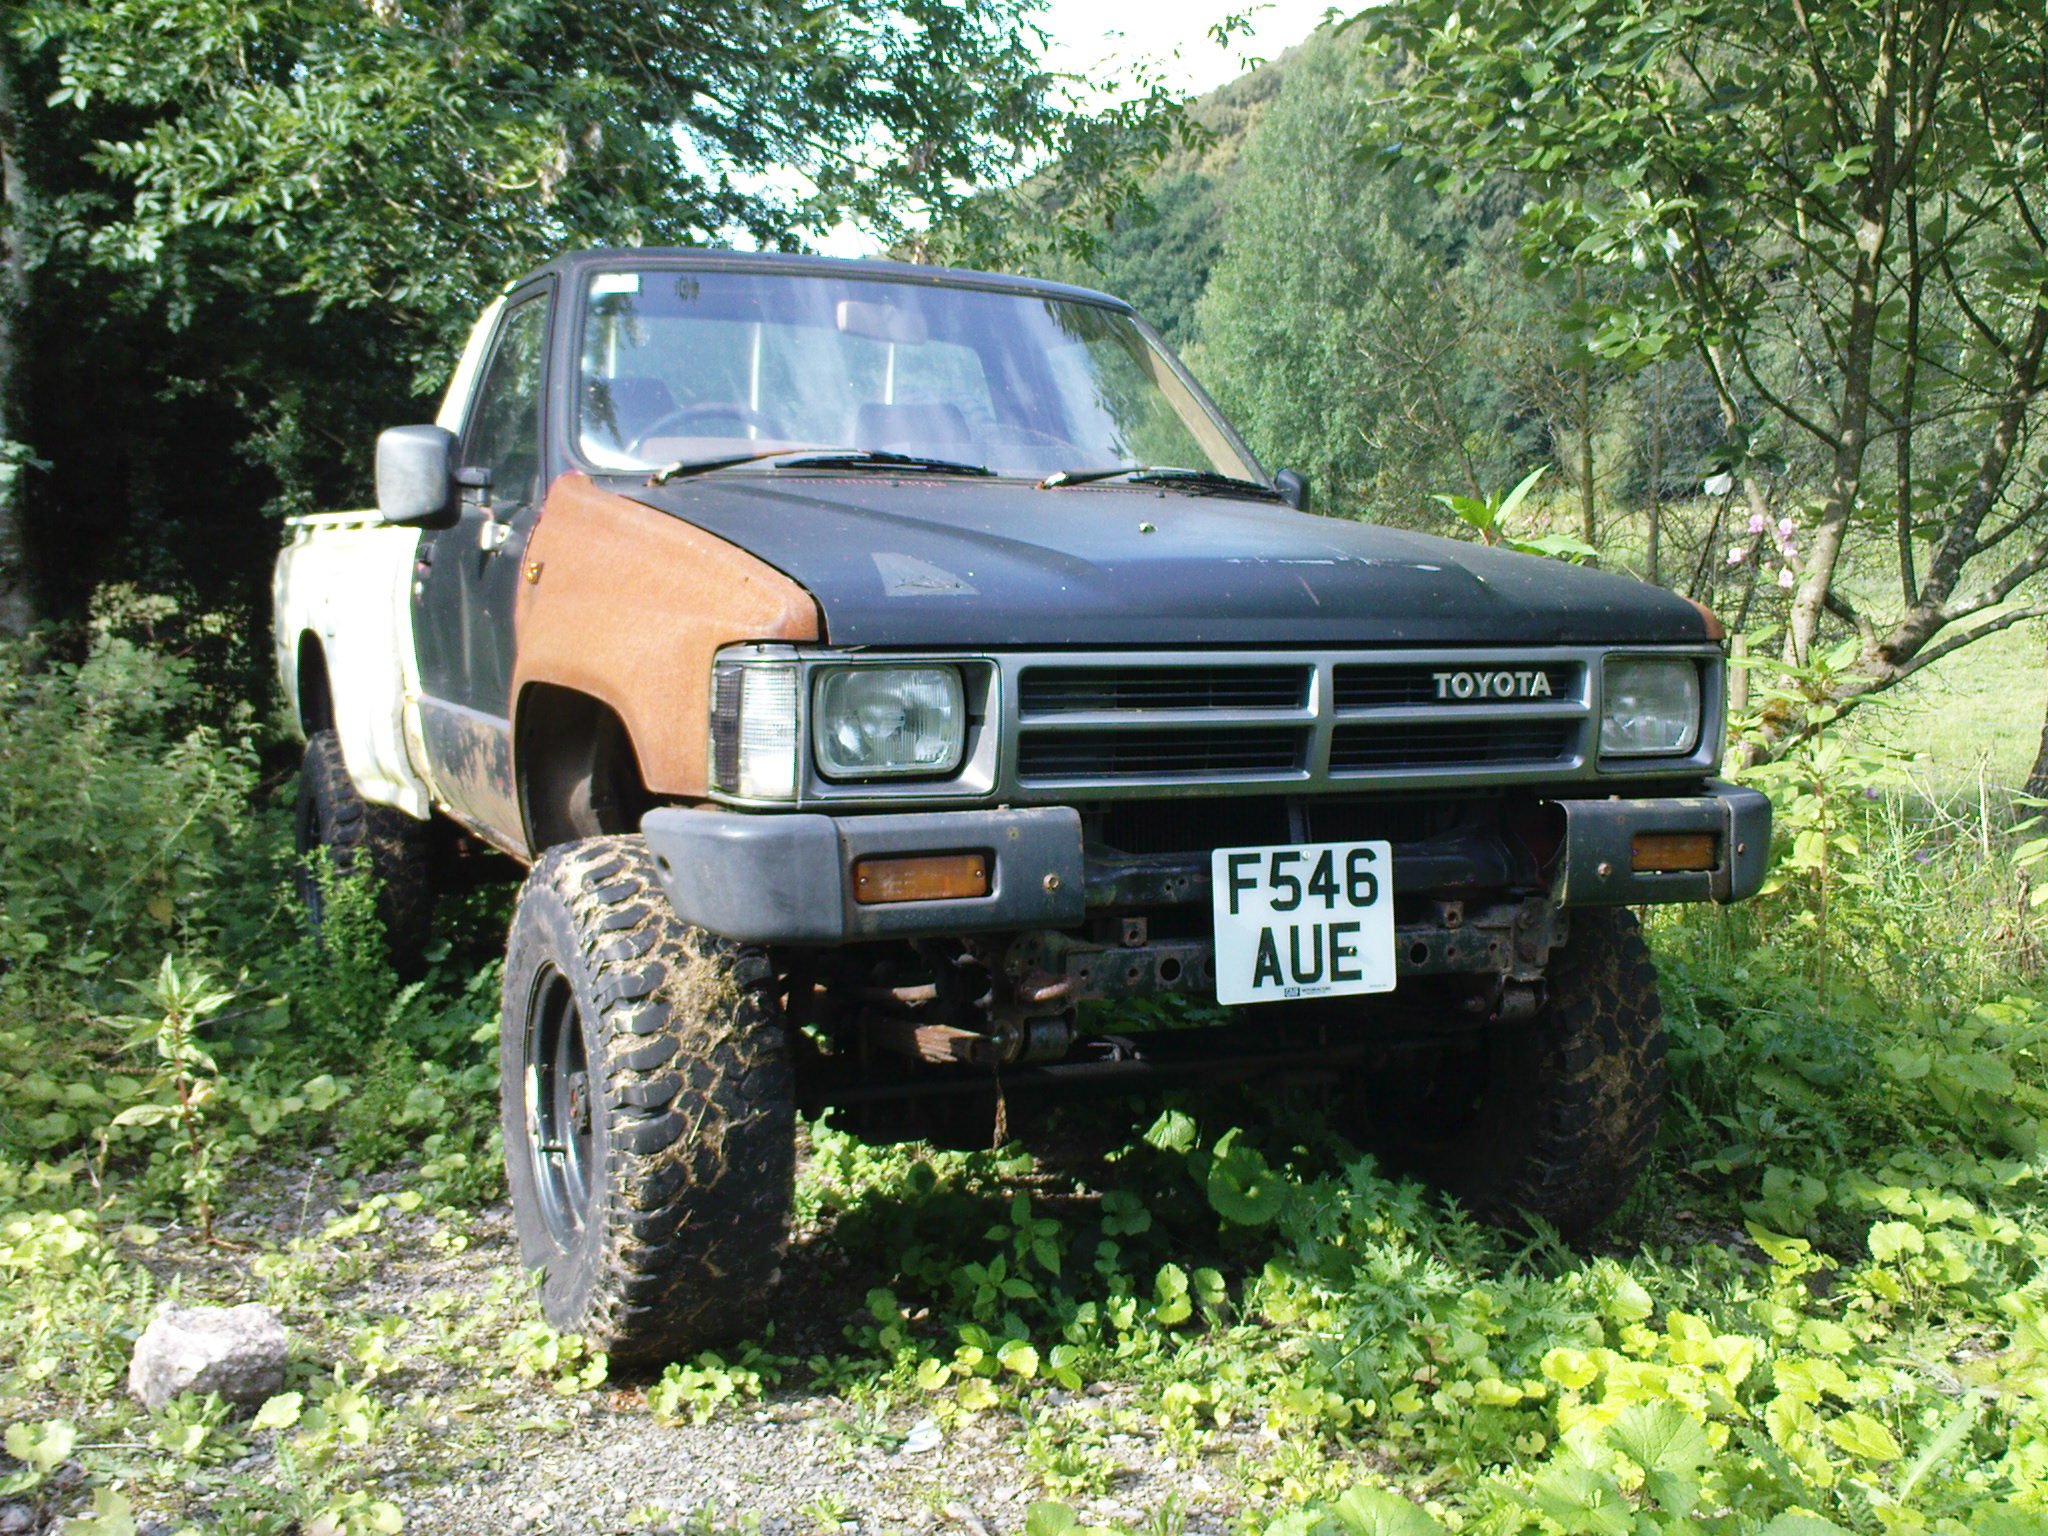
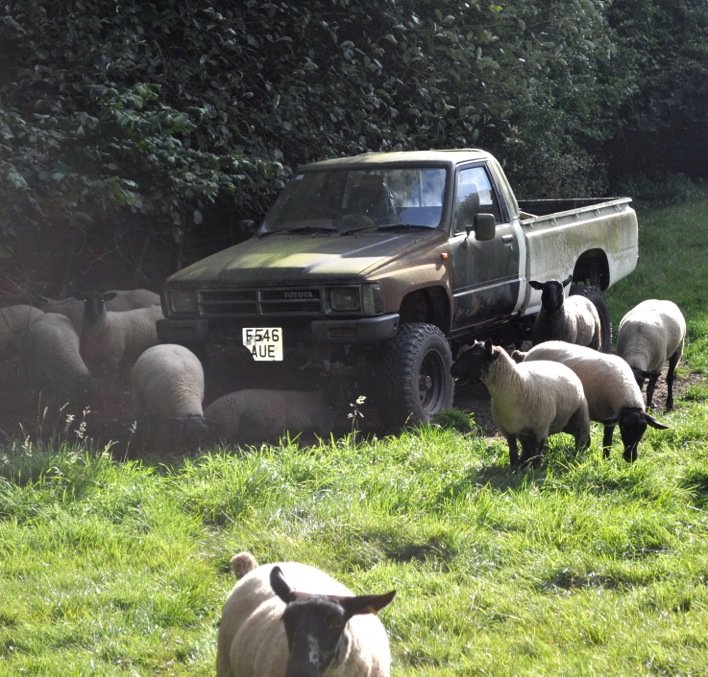
I bought my '88 LN65 Hilux in 1996 with 128,000 miles on the clock. It had spent most of its life owned by a bloke who drilled charges in quarries. The bed was pretty fucked from having drill bits and tubes chucked in it and quarry lyfe had left all the panels dented and rusted. The interior & chassis were packed with stone dust. The bed was eventually condemned by the MOT tester as it was just welds on welds ( "don't bring this piece of shit back here until that mess is sorted out "), so I luckily found a brand new MK 4 bed on ebay and it mostly fitted. I also fitted a 5000 lb winch as i was using it to deliver/install stuff into tricky spots. It was my daily until 2009 when one passenger seat and two growing kids was getting too complicated so I parked it up in a corner of my folks land. I'd refused various good offers for it over the years, largely because Mrs Shuzz said I wasn't allowed to get rid of it. Anyway, life is changing and I don't want to overwinter in the Bug again so I thought I'd have a bash at getting it back on the road. A mate who TIGs has said he'll weld the body up for me because " I'm always doing stuff for him". GC, A++, etc. Soooo..... History pics in chronological-ish order, up until last year.
1 point
-
Yeah that is a good price. I've bought loads of ply from that fella. Some good hardwood ply. Its all mainly imported and probably made from Orangutan blood but yeah...its cheap.1 point
-
Yeah the laptop trick works well, but you need to setup your laptop to have a direct pass through from input to output. So it basically goes Input > amp > output otherwise its too laggy if it needs to go through any processing on the laptop. Cant remember how to do that but its somewhere in the settings for the mic jack I think.1 point
-
just make sure you put your donation in the honesty box. Don't want to anger the locals,1 point
-
It can be done. That’s all I wanted to know. Cheers1 point
-
you asked...... & that is what this thread is for (sometimes better to do & not talk about it eh1 point
-
Nah you should be fine. I've bought a lot of the bits for my Plymouth from rockauto1 point
-
1500 trouble free k's in this stopped at home to a god awful squeeling sound...... mild panic ensues while looking for the source. Some mad cunt had installed a spark plug boot on a boost line as a 6mm to 12mm hose adapter, as you can imagine at 20+ psi it puffed up like a balloon and eventually exploded. One more mysterious check engine light issue sorted. This thing sounds fucking sweet coming on boost now with the rear muffler deleted, Traction control light gets a hammering going through winding roads to work
1 point
-
I still own this car
1 point
-
The Nelson Car Club is running a standing 400m on Valley Road on Sunday Oct 6 Cost $70 check out their website/Facebook for info. I'll be there in the X1/91 point
-
Well its been a while since I've updated this thread. Mid July was where I last posted up anything of worth. Little Imp got parked up in the corner of the workshop so leaving anough space for our neighbours to make use of the shed while we took off to England for a decent holiday. Hannah got to catch up with her family, we both did heaps of cycling and running, had plenty of sunshine and beer plus I got to go along to the retro-rides gathering 2019! As I always do I had a fantastic time there and came away with boosted Mojo and lots of ideas. Before leaving the UK I ordered a few spare parts for the Imp... We got back to NZ in September, just in time for the start of spring. The Imp was sitting there tucked away, a tiny little puddle of oil under the sump just like a good little English car should have... First job was to fit the shiny new lenses. Hannah jumped straight into that, an easy but so very satisfying job to do... We then took the steering rack out and fitted the new centre gaitor. Hooray for a rack that holds oil... Having decided I was pretty happy with where the temp gauge needle sits once fully warmed up I carefully measured the resistance across the potentiometer I'd been using to adjust it. I then made a little joining lead fitted with a resistor of the same value. This replaced the adjustable item and should be it for the temp gauge. At some point in the future I may well make a new instrument cluster to suit the dash as I rather fancy having a rev counter in a place that I can actually see it ok. We have been driving the Imp since getting back to NZ as much as possible. On its first journey out since back I got this pic... We've had a few decent trips including a one really neat drive all around the local valley roads and hills, some gravel roads etc. Its so fun to drive. I'm really getting more confident with the handling and how to get the most from it. The engine seems fine and loves a good trashing. The carb is still a bit iffy with that worn out primary spindle still allowing some air to sneak in. I have ordered a new carb from China and will see how it goes. It was cheap enough to try and when I eventually fit injection I can sell the carb on. Whilst out on that really fun drive I got this photo. Shame I only had my phone as the sky was quite moody... After lots of driving I checked the plugs. They look fine with what I think looks to be a good colour... I thought it better to fit the fire extinguisher I bought before our holiday. It tucks away neatly behind the drivers seat... In other news I have been collecting many different parts needed for a conversion to fuel engine management. I just scored another megasquirt one (2.2) ecu plus a full loom and some edis bits - this time from our mate Rob in return for me doing some machining work for him... I need to decide on a few bits needed and also in which direction to go for the inlet layout. Maybe Itbs but maybe a plenum with a single tb. I foolishly dillydallied about when there was a full set of cbr900 ITBs on trademe for $55 including injectors and loom and subsequently missed out on them. At the time I wasn't sure about the suitability but for that money I could have made them work. Not sure on ideal throttle size but they were 40mm each which given the Datsun only has 30mm inlet valves I figure they'd have been plenty. Then I would have had all of the doorts! I'll keep looking... I'll be using a 36-1 trigger wheel, also supplied by Rob. Luckily there is ample room to mount it on the back of the main pulley. Both MS1 ecus I now have use the earlier version 2.2 board which don't have built in VR conditioner circuits. I can make a VR conditioner board and use VR sensor, of which I have many. Or I could use the Edis setup (which has a VR conditioner built in and uses a VR sensor) that came with the MS1, of which I suspect the ECU has been supplied already configured to use. I have never used Edis before. Hmmmm? Its a bit ugly and clunky though. I dont like the quite large ignitor box I'd have to sit somewhere. Or I can go with a Hall sensor but then I'll have to locate one from a wreckers- but what car? As usual I want to do this conversion as cheaply as possible because its just more satisfying for me that way. In my first few casual searches it seems that they are quite pricey and can be a bit frail or temperamental in use? More research is needed, of which I must say I do find to be one of the most fun parts of modifying! Oh also - I fitted a new speedo cable and now have a speedo needle that doesnt wibble-wobble all over the place. How thoroughly modern!1 point
-
Rust repairs and painting gives me the shits, would much rather be doing exciting things... like smokey 11's Anywho, some more progress, back bumper was hiding some gems which needed dealing to.1 point
-
left that alone for a while, i was in a huff and also busy with other stuff finally gave it a wet sand and filled all the shitty little fisheyes with icing, and put another pretty thinned coat of blue down and it turned out much better pulling off masking tape is the best. then lashings of dinitrol.1 point
-
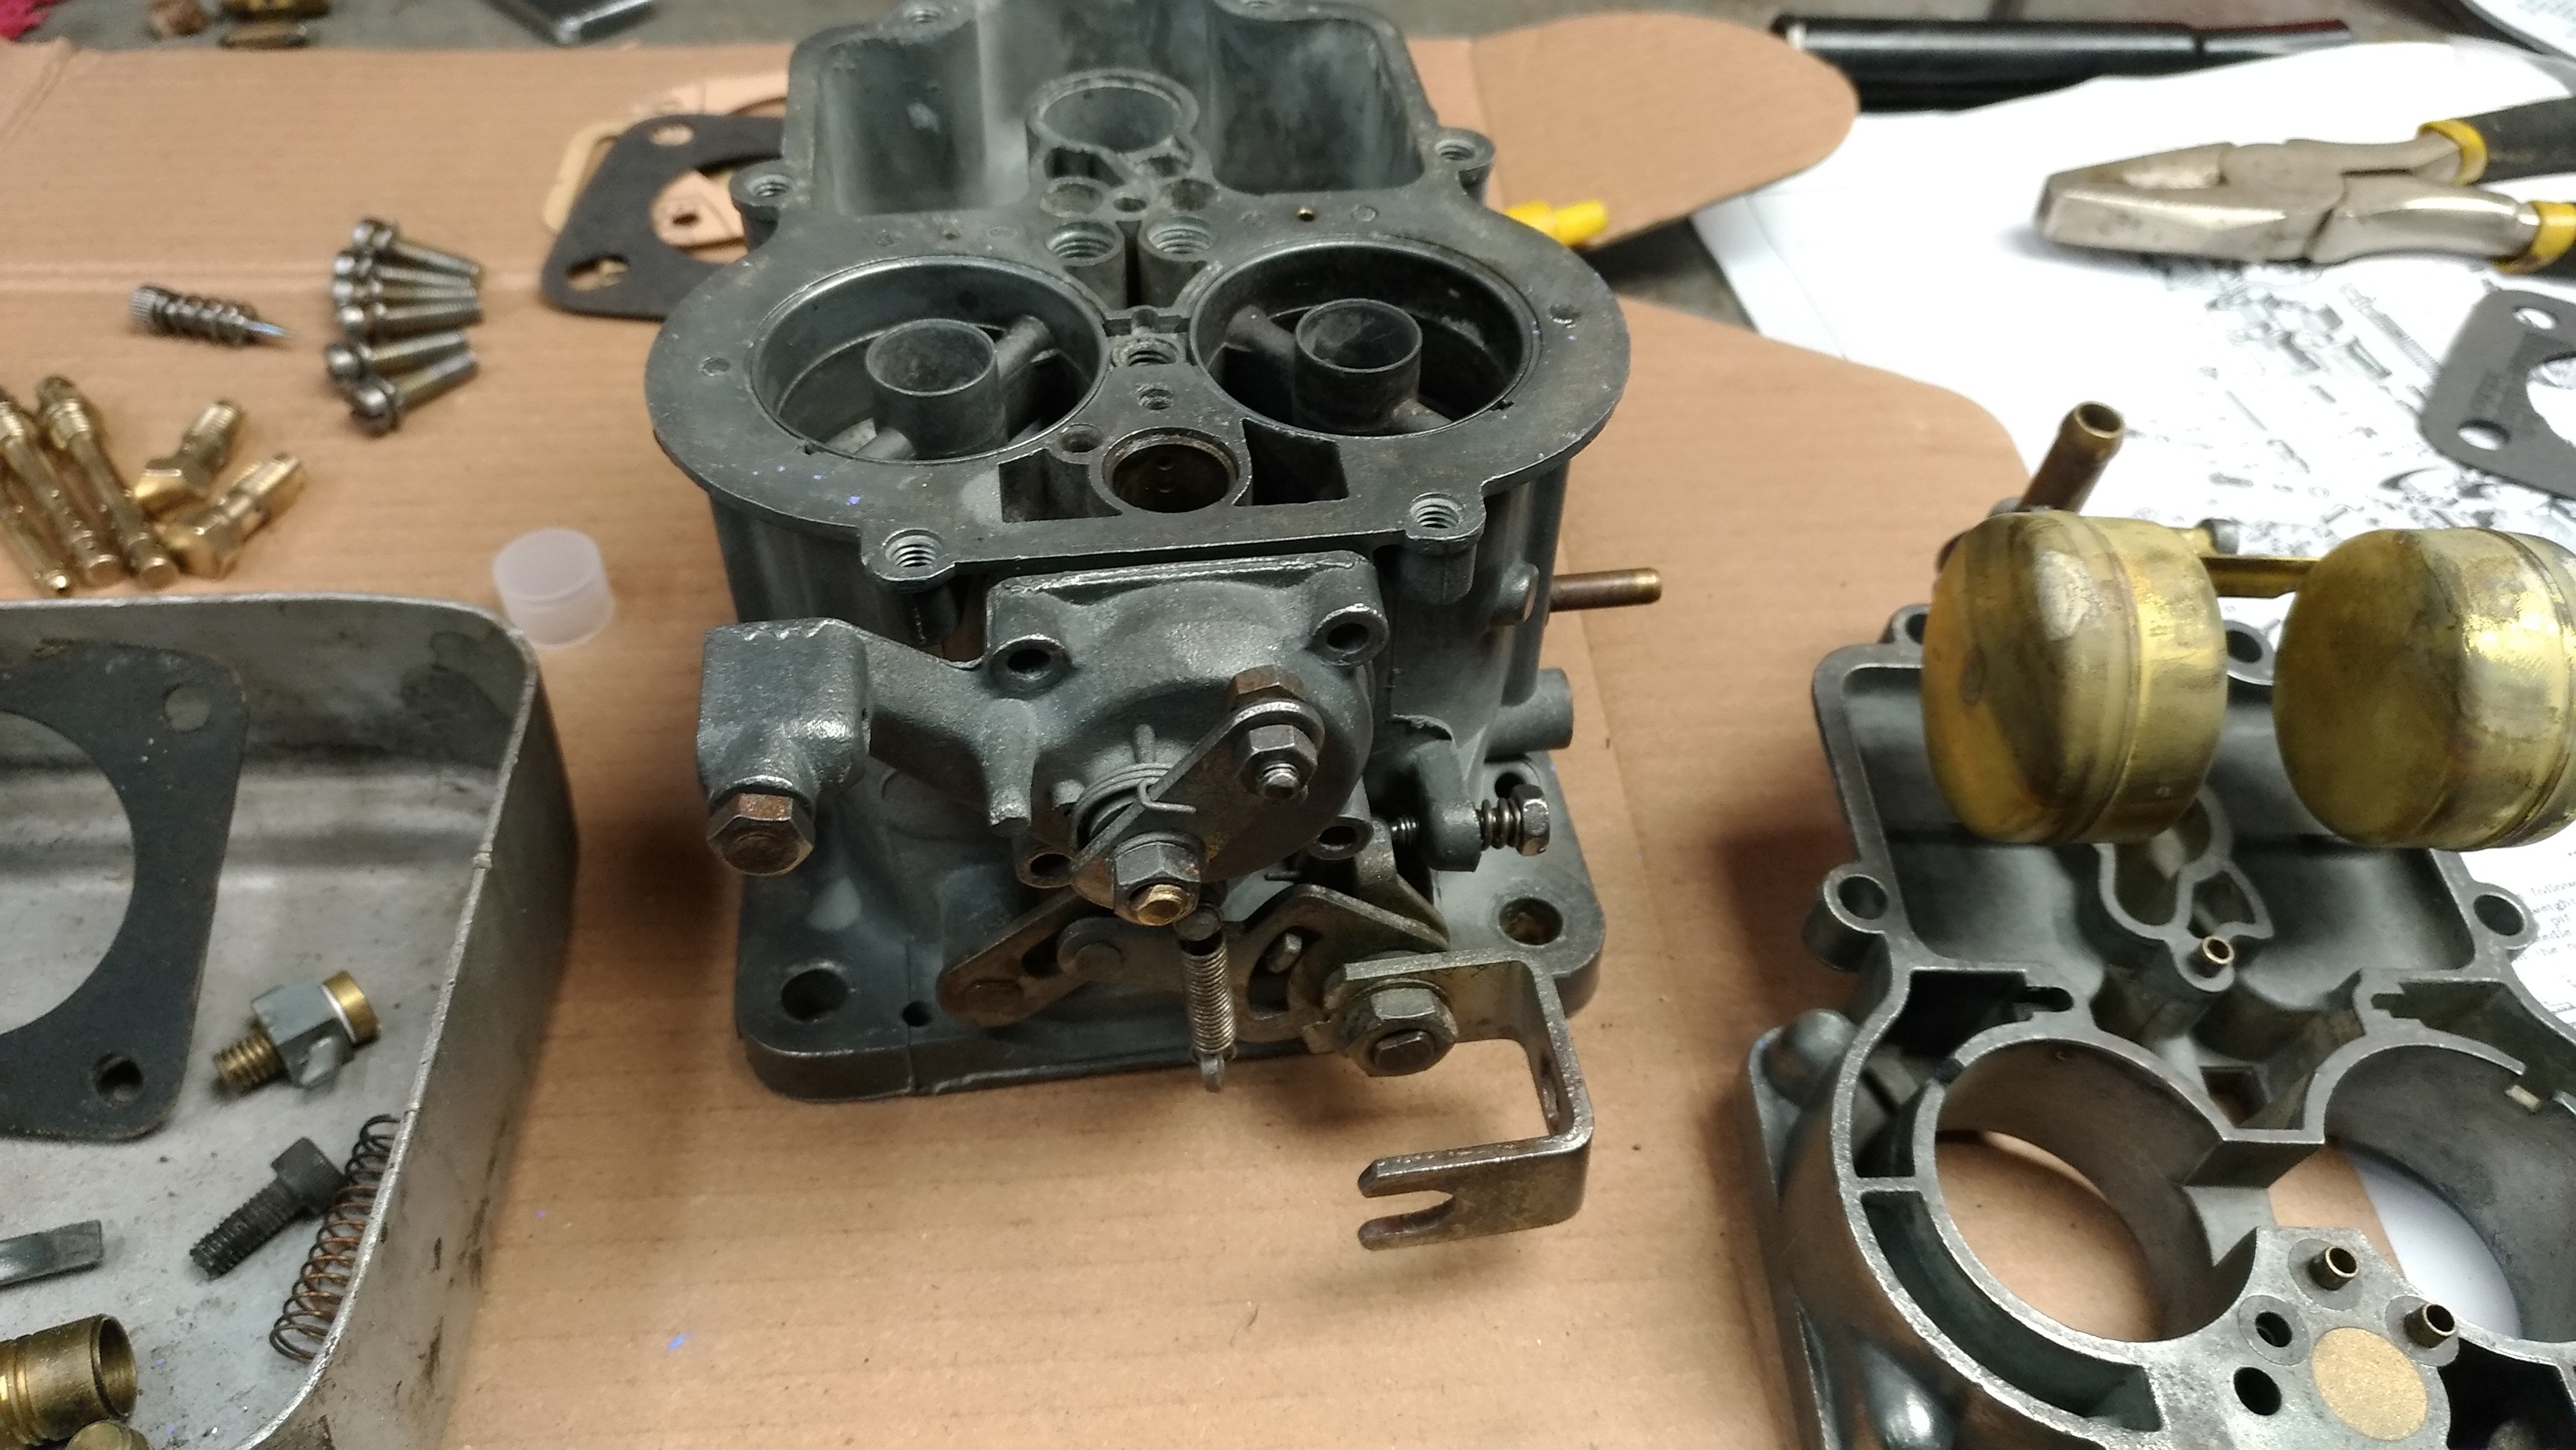
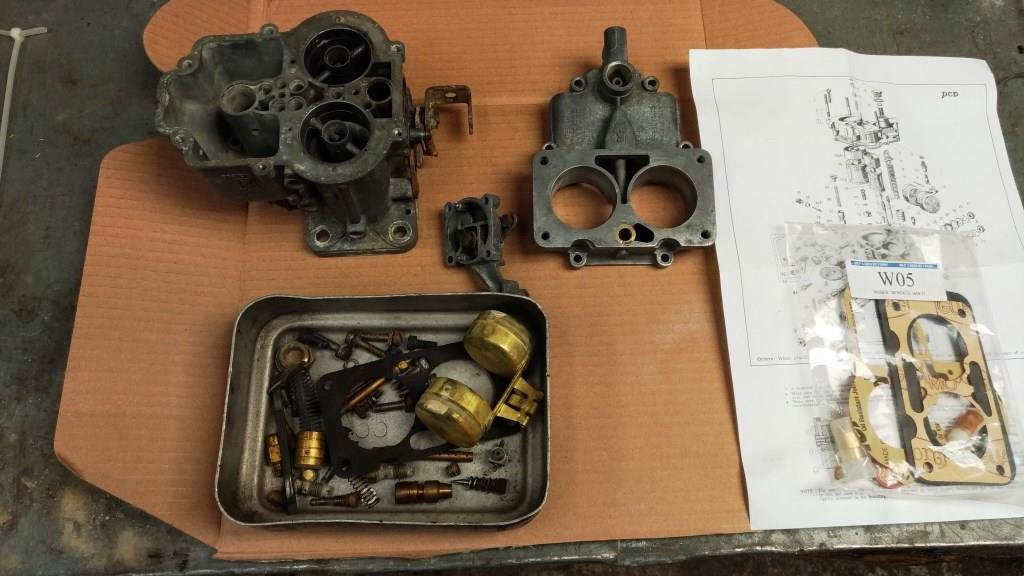
Thought it was about time to have a look at my favorite DCD Weber; we go back a long way, purchased new in 1974 it was looking a little 2nd hand. Stripped it down and on closer inspection the throttle spindles showed little almost no wear and the call was made to give it a good clean and assemble with a new float valve and gaskets. Finally located a rebuild kit from MLP Carbs in Victoria, (don’t you hate it when bloody Aussies turn out to be the good guys……!). After an enjoyable evening in the world famous sr2 man cave rattling the neighbourhood with Pink Floyd playing loud and ½ a bottle of cheap (ish) pinot noir - one more job’s ticked off the list.
1 point
-
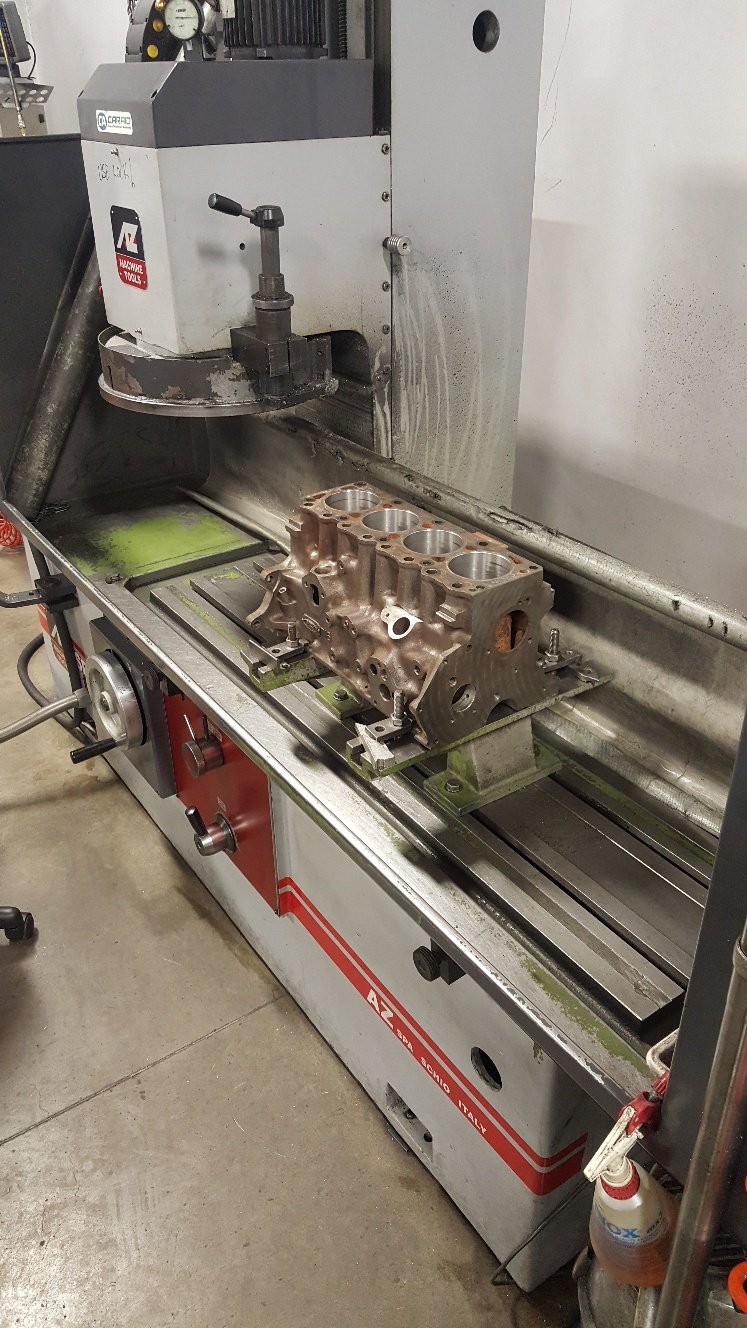
After making the call to take the block out to 60 thou oversize (hard to argue with an internal micrometer) the hunt was on for suitable pistons. Problem is these motors were designed to run on leaded 100 octane petrol (yes real lead, the stuff pre-millennial ‘real jokers’ used to have in their pencils!) and the best we can buy in our modern times is BP98. To add another problem both the head and block had probably been decked a number of times and I was now planning on pushing 208 CI displacement into a 186 head. With flat top pistons off the menu I managed to track down a set of ‘new old stock’ .060” over JCC dished pistons in Australia complete with pins and chrome moly rings. You have to love the 30 plus year old tea cup stain on the end of the box, if they could talk I'm sure these ‘new old’ spares could tell some stories.
1 point
-
Apart from putting primer on those patches above, nothing has happened with this for nearly two years while ive been playing with the ute and wagon. Both are relatively sorted now, so I have tidied some crap out of the garage and peeked under the car cover and found this: This is after pumping up all the tyres and dropping off the axle stands. Looking forward to pushing it outside and seeing what still needs to be done (probably everything)1 point
-
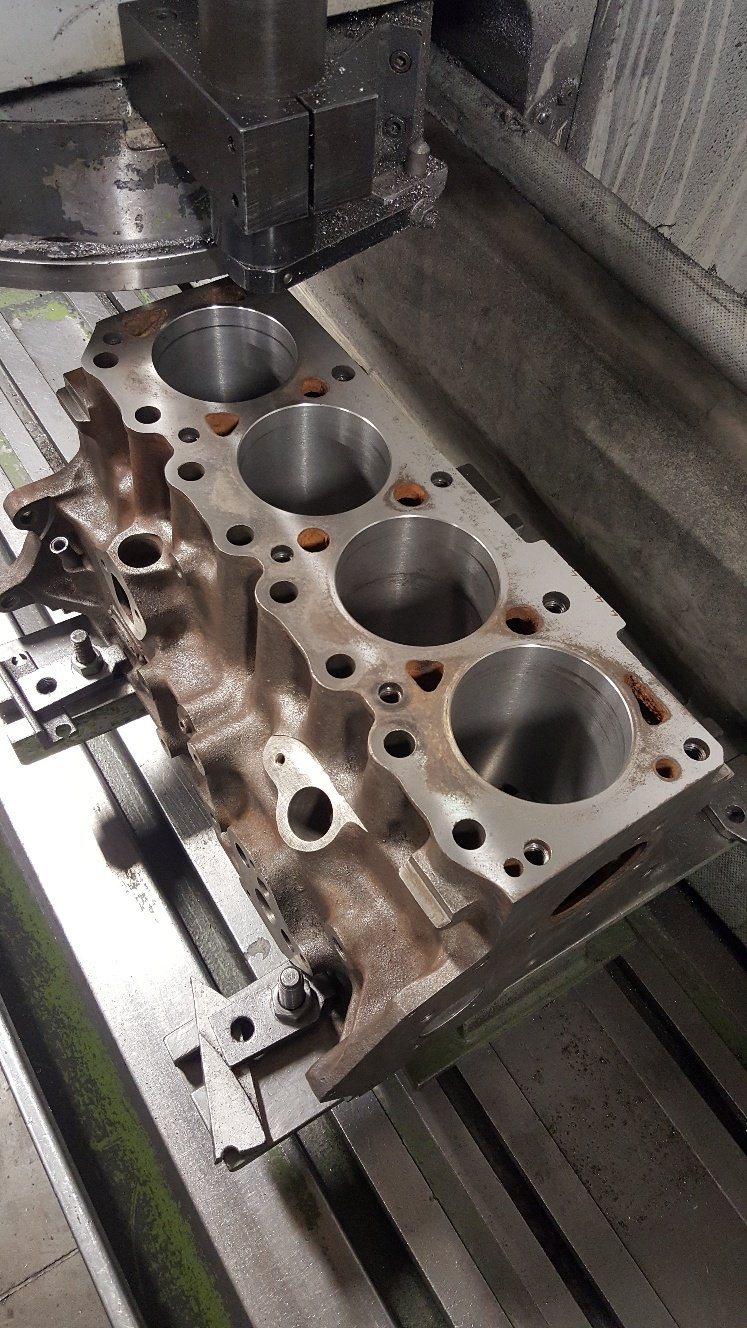
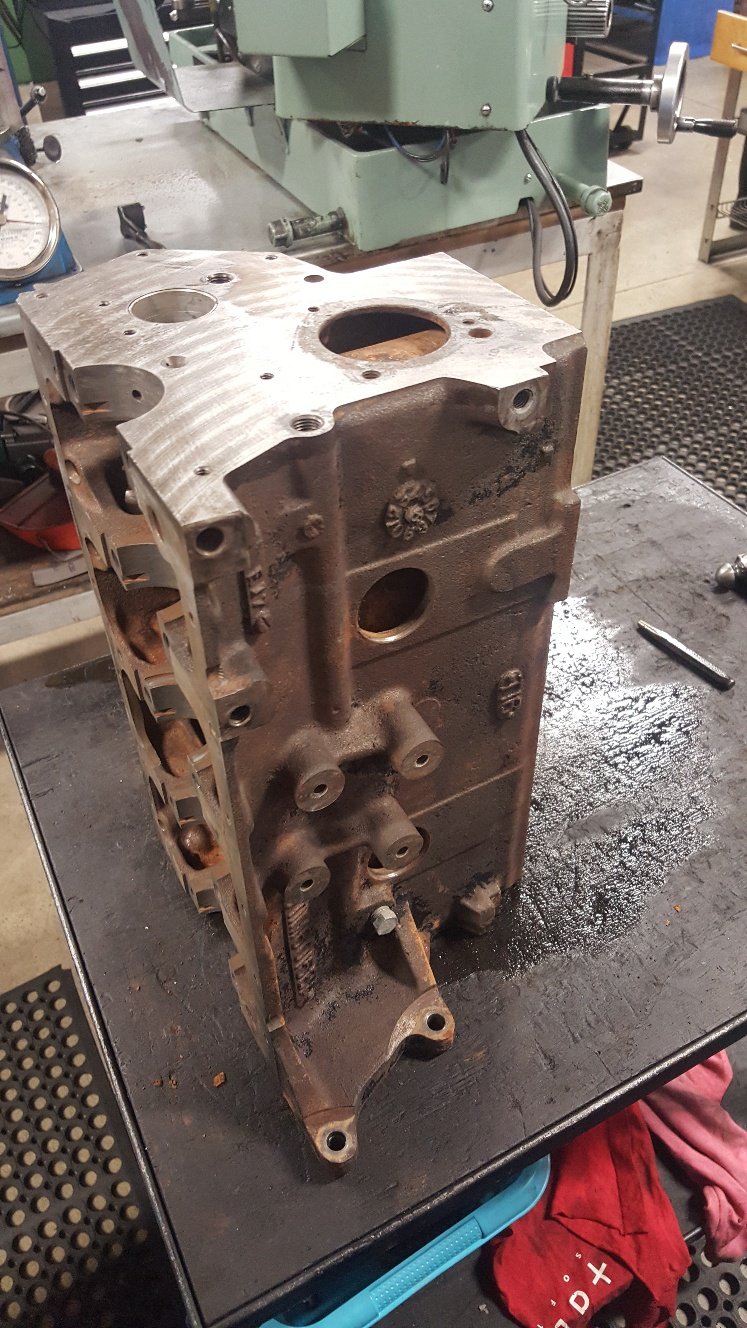
So I got the block into the boring bar. It's pretty straight forward boring a block. Doing a cylinder liner is a bit more involved as far as the boring bar is concerned. This block is at 30thou over or .75mm in metric. I have bought 40thou over or 1.mm pistons. It has a bit of wear. But hopefully it's should clean up once it's honed. This picture is of a test cut. So you dial the boring bar head into the bore. If you have a decent amount of wear it pays to slightly offset the bar towards the wear so you clean all going well at the next oversize. So in this picture you can see the boring bar hasn't totally cleaned with this size cut. I have only set the bar at 81.90mm. So I have .1mm or 4thou to hone out to get to our finished size of 82mm. We generally like to leave this amount to hone to achieve good rk rvk this is the depth of hone pattern. I'll go into that a bit more once we get to honing it. Once we've finished honing we normally go to the surface grinder. The top of the block is a little corroded so I'll probably take a few cuts to clean it up. So I've done a light cut to see how it looks You can see it still needs more off it. In this case it's not a issue to take more off the deck. When you are dealing with a late model diesel or performance engines that have been set up with good tight clearances it pays to watch how much your removing as you may have to detop your pistons as they may start getting to close to the head once assembled. Also valve reliefs can also need deepening. But this is more so a issue in extreme cases. This good old xflow should be fine. But i will be checking all this later once i can dumby the engine up
1 point
-
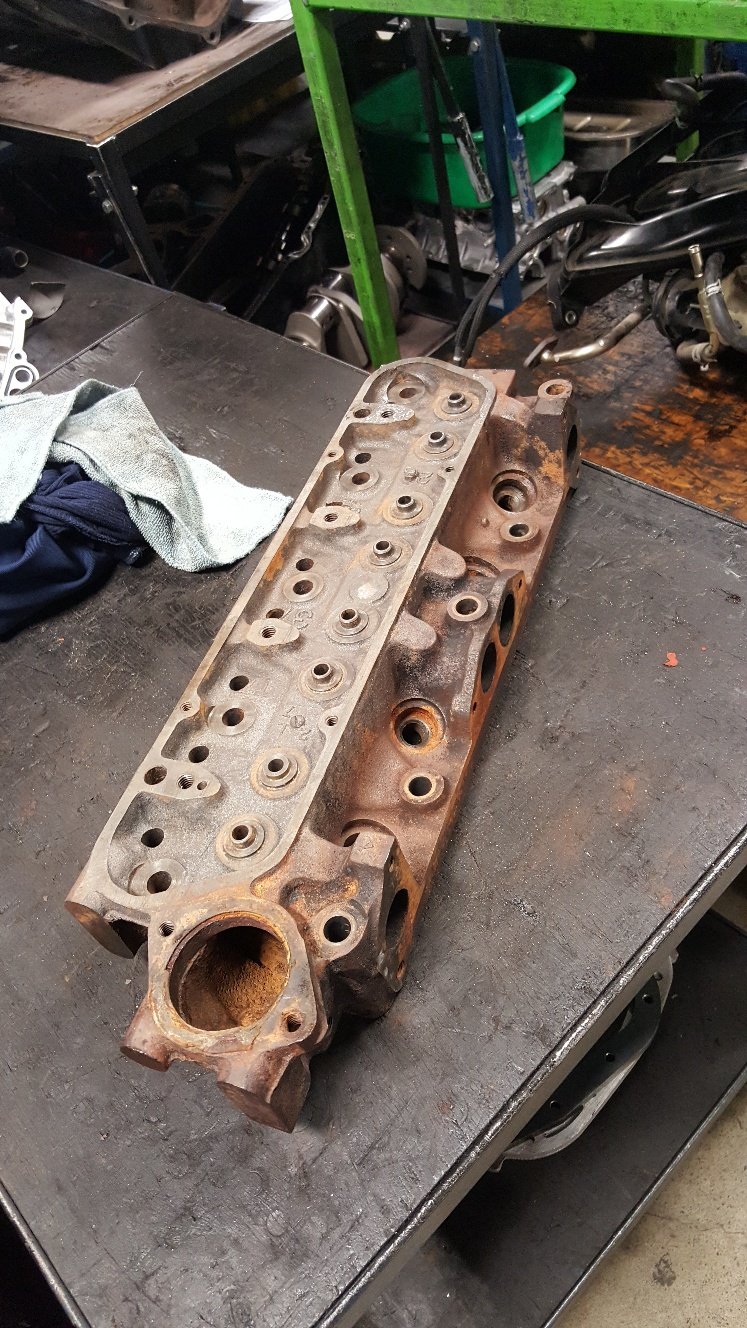
So I forgot to get a picture of the molasses. But here's a couple of pictures of the head once out. The molasses sort of just loosens the rust. Then you have to wire brush to get the rust off. I didn't put the block in what we call our hot tank as I haven't removed the cam bearing.. Our hot tank is only for ferrous metal. And the cam bearings would react with the acid. The cam bearings are in reasonable condition and this is build is on a budget. I run the tap through the head bolt threads and main threads. Removed all the gallery bungs and frost plugs. I found a decent build up of rust at the rear of the block that i chipped out with a screw driver through the rear frost plug hole. And also gave the block a good wire brushing. I gave all the machined surfaces a sand up with emery tape on a file.
1 point
-
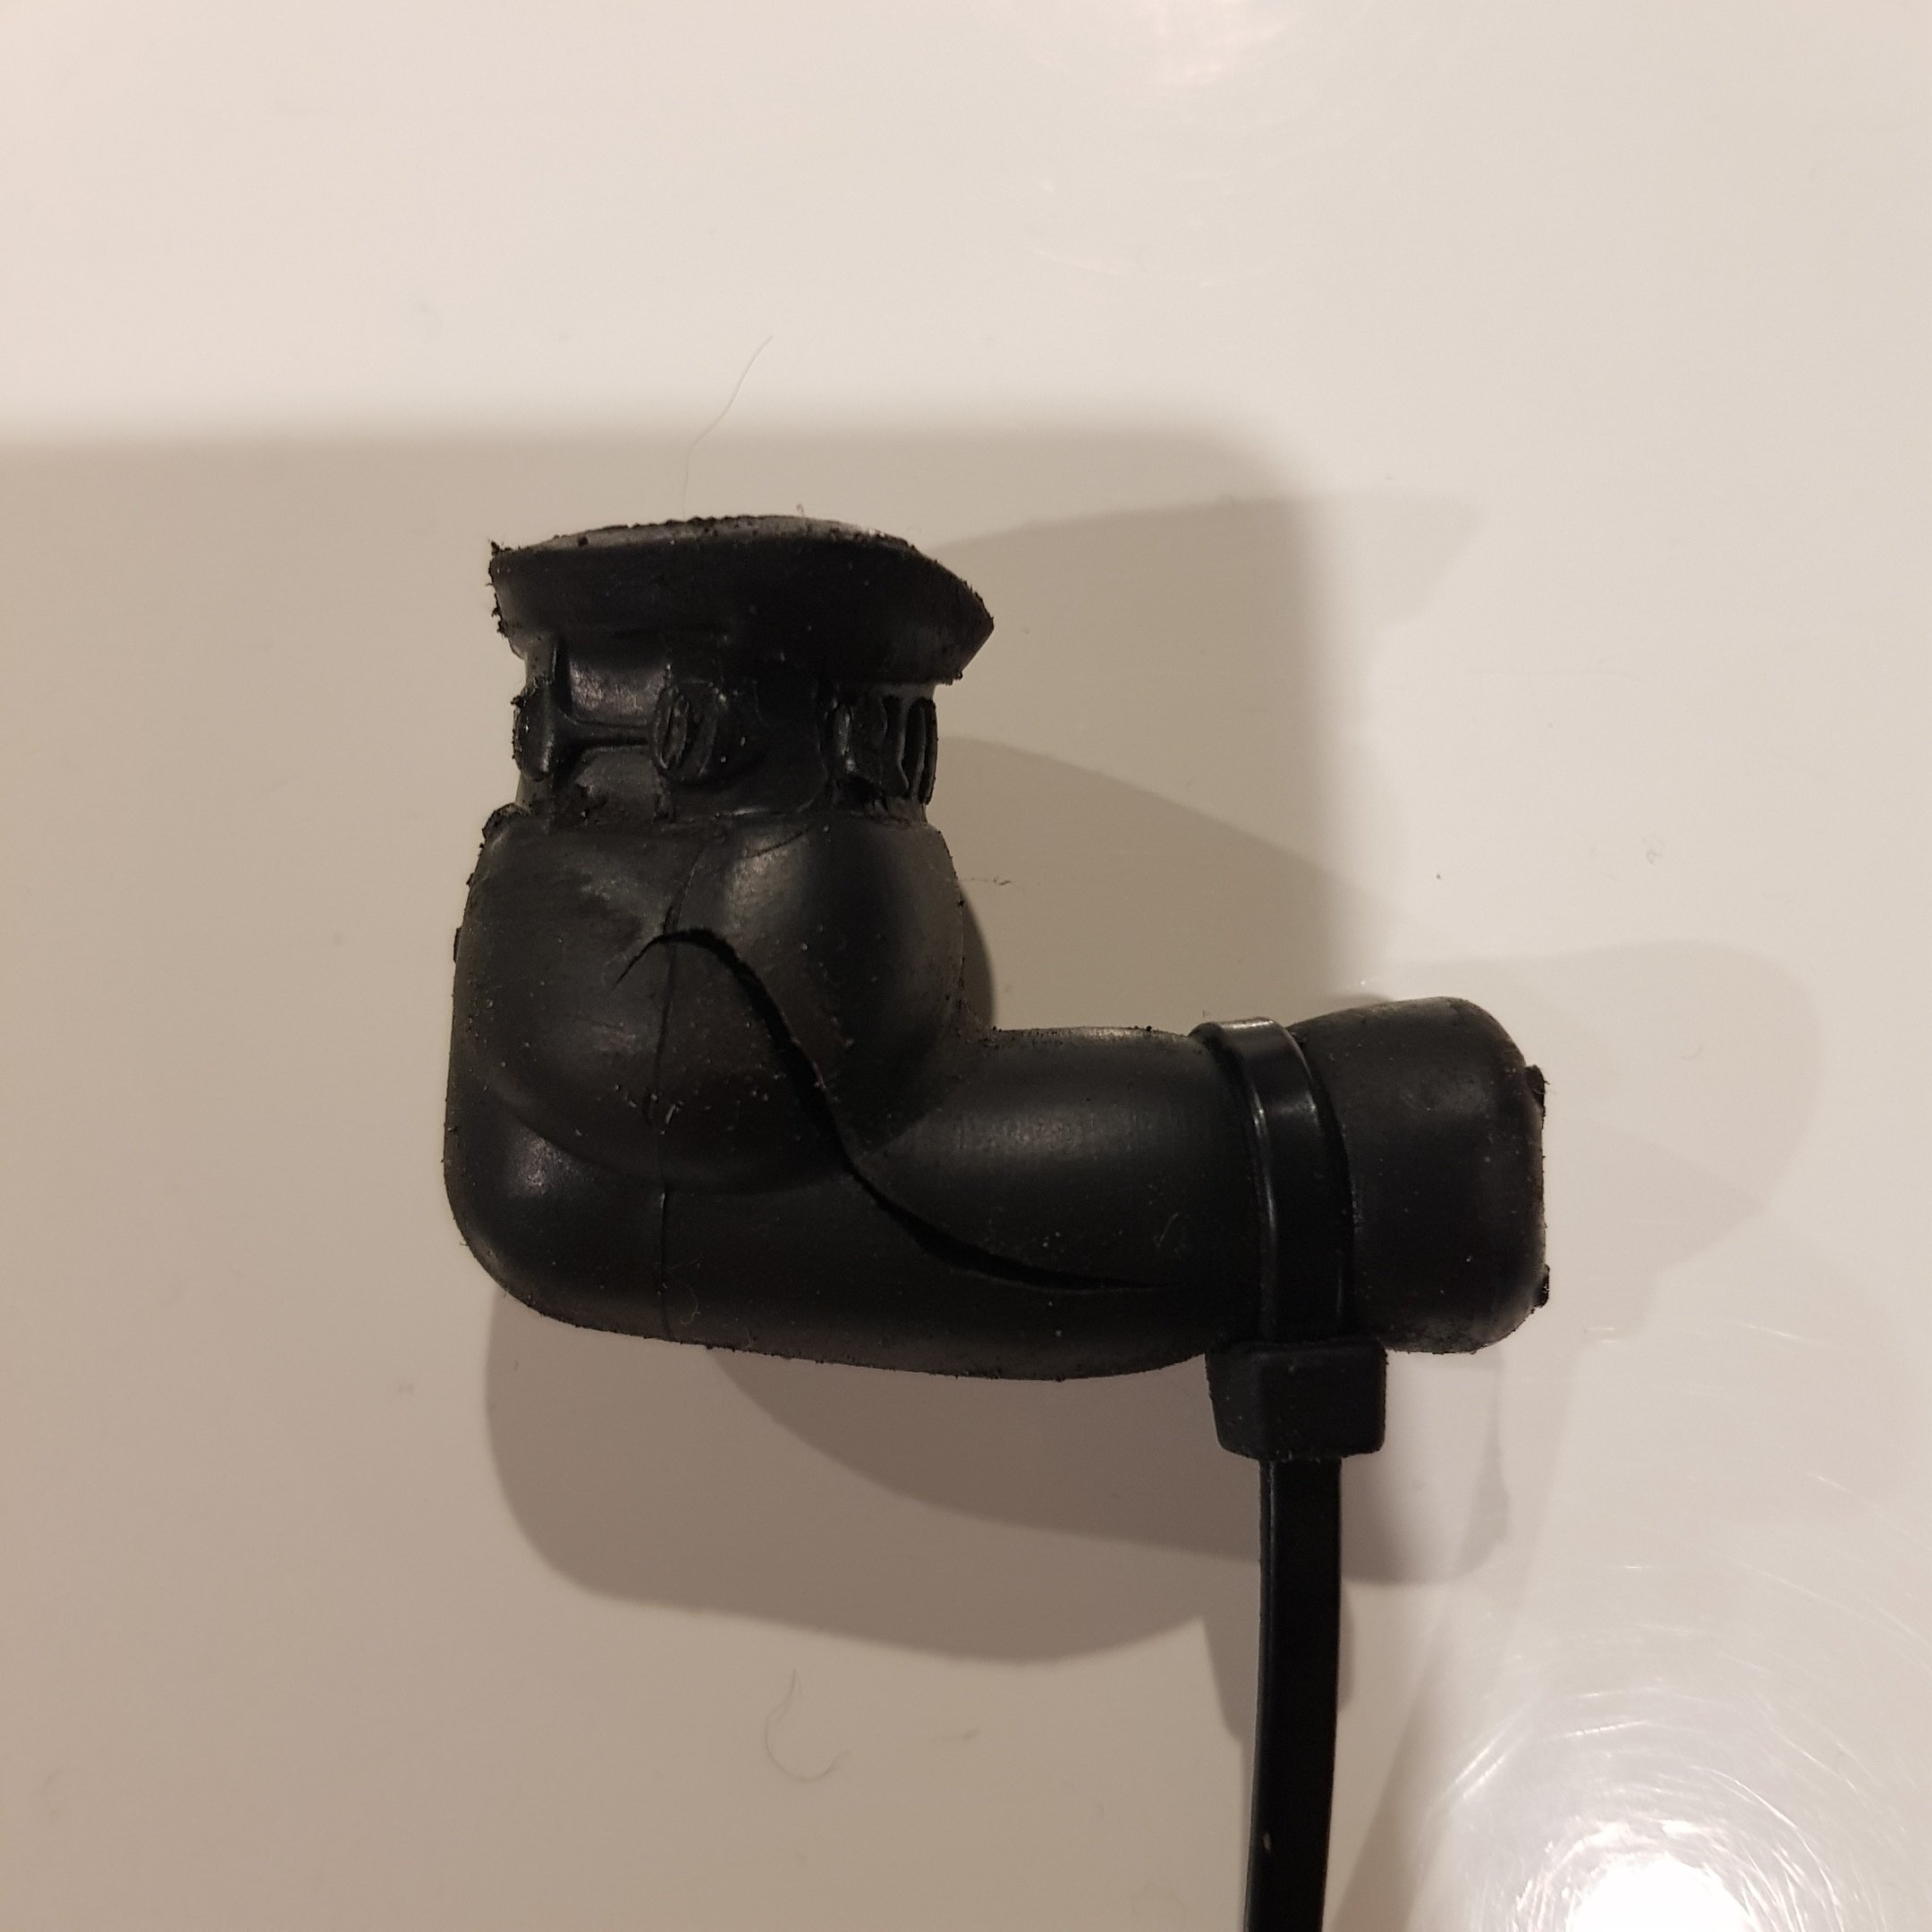
The little IMP is now all road legal !!!! I refitted the carb this morning, hoping for the best but it was still terrible. I just couldnt get it to idle below about 1500 rpm and it had a big flat spot on light acceleration. So I gave up and we drove it to town, the long way through Kaiteriteri so I could have some fun on the windy road there. Wow its fun! Soooo much fun. Even with an engine that wouldnt pull properly, horrible flat spots, tyres that are definitely too high in pressure, a few clanks from the yet to be fully secured pipework, noise from the un-insulated engine bay shelf, noise from no carpets, fumes being drawn in through the old heater hose routing holes etc etc... it was still fun. It really is like a big go cart. The steering is lovely. Gear shift is great. Brakes getting better as they bed in. The temp gauge sat pretty much bang on an indicated 80 degrees C whch I reckon is more about 90. Fan only came on when we stopped, as expected so I was really happy about that. We got to town and straight into the booked WOF slot. Our local friendly wof man just loved it. Kept saying how cute it was, how neat the install was etc. Really impressed. Did all the check things as usual, test drive and it was all good. We looked about all the neat stuff in his workshop.... WOF attained and we went to the local council and got a years license. $47 - yay for old cars. Did a shop at supermarket, did the proper look back over my shoulder at my little Imp, sitting there in a sea of bland grey modern cars, looking sooooo tiny. On the way home we popped in to show it to another couple of fellas who run a nice country workshop and had sorted out the tyres for me. They too loved it and the older fella reckoned it was running way too lean and certainly had a big air leak somewhere. Then off home, this time driving over the much steeper longer climb. No worries even with terrible carb. No increase in temp. Yay for that. I got home and removed the carb. Discovered two things. Firstly. Spot the schoolboy error here... Yep- That accelerator pump can go downwards for sure, but not if the lever pushing it down cant go up at the other end! My air filter base was stopping it. This also meant that along with only a tiny bit of travel I was also not getting the secondaries to open properly. Easily sorted with a hole, some alloy and some epoxy. Second thing- this... There goes my air leak. Air getting pulled in through that huge split, past the accelerator pump piston and into the venturi. Well at least I am pretty damn sure that this is the culprit! Reporting back with findings soon.....1 point
-
Hannah got to drive it yesteryear evening. She loves it I knew she would. Hannah's first classic was a little imp super she bought in the UK and she joined the imp club back then. Did a few local meets in Oxford. This was her first drive of one since then. We popped down to the beach last night... The little car is going well but for a stumbling idle. I cant quite tune it out because the throttle spindle was so worn. So last night I took the carb off and stripped off the linkages... The gap is quite large! .... I'll keep a look out for a better carb body but for now I have to improve this one. So I went through my collection of rubber washers and found one to suit, which I did. Its a good snug fit over the shaft and sandwiches in neatly between the body and the first bit of linkage... Then the other end. Nothing to sit a washer on. So I dabbed a bit of automotive silicone on top and let it set. It flexes enough to let the shaft turn so its now well sealed... I have yet to try it out. The car is booked in for a WOF today so wish me luck1 point
-
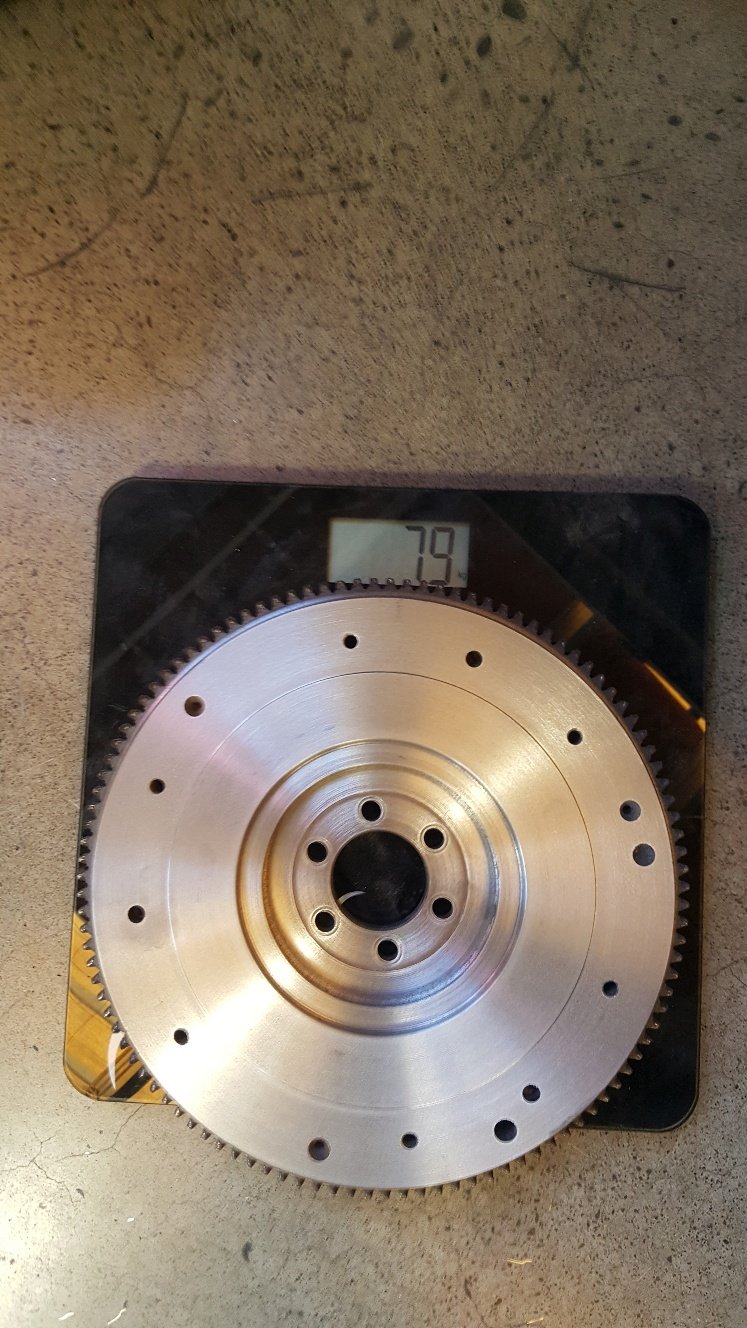
Righto. Exciting news. However I shall start where I left off. So last time I moved the car under its own steam resulted in quite literally its own steam, all over the floor when the heater matrix decided to give up. I swapped that out with a spare unit I had, replaced that seal in the clutch slave cylinder, fixed another couple of wee things and prepared it for the big drive. I also lowered the platforms on the front dampers and got the car down to a much better height. I may well raise the front by around 5mm later on so to get the camber a little less negative. I'm not a huge fan of excessive negative camber nor does it aid in handling unless corning at 9/10ths all the time. The car looks so much better low all round. I took some photos.. Now lets take it for a drive! This time I made it about 1 metre further then last time. Then I stopped to look for the cause of a terrible rattle coming from the flywheel/clutch area upon engaging the clutch only. I suspected the spigot bearing (which foolishly ...when will I learn... I thought was a bit worn but it would be OK..) Upon Hannah sitting in the car depressing the clutch for me to investigate the sound, the drive to the box stopped. Bug-ger! I thought it might be a broken friction disc hub etc. Same scenario as last time... push the car back in feeling quite a bit pissed off and this time we both went for a decent run. Get away from that car I thought! Proper exercise is my go to thing for instantly feeling happier So that night whilst in the middle of engine and box removal I discovered that the clutch slave had pumped out, again, and was holding the clutch in I released the bleed nipple and the clutch fork returned home So I now suspected two things here: Either the flexi hose had broken down inside and was restricting fluid returning quick enough so instead the master refills from the reservoir. So I had a new hose made to rule that out. Or was it the little one way valve within the master, of which I had made a new spring for to replace the missing item, opening too easily. Possibly it was easier for the master to draw fluid in quicker via that valve then refill from the returning fluid from the slave. Hence the slave was getting pumped out with each push of the pedal. It stayed out in increasing amounts by about 4mm each stroke! So I bought a new 'proper' spring whilst I was at the brake shop too. So there it sat- engine not exactly where it should be. But I do like this shot though... So out with the engine and trans. I made a wooden cradle this time which I lowered the engine into. It made it much easier and meant I was able to have the engine and box sitting on the large mobile steel bench and I could then work on it at a decent height. I removed the transaxle, then the clutch, adaptor plate and finally the flywheel. Gave all those bits a clean. The flywheel has been lightened quite extensively and weighs up at 6kgs. A standard item is about 9kg... Here is a good shot of the alloy adaptor plate that joins the box to the engine. Its quite nicely made... The spigot bearing was indeed pretty worn once I had a good look at it... It was indeed allowing the first motion shaft to just tap inside the release bearing guide tube. I bought some Phosphor bronze and made a new spigot bearing. No photo of resulting new bearing- but rest assured it looks pretty much like the old one but this time without enough room between its bore and the shaft to house several Badgers. I reassembled that lot and had a looksie at the transaxle reverse gear plunger... I was not happy with how much effort there was involved in moving the gearstick into the reverse plane. I knew what was 'grabbing' and had an idea on how to improve it... There is this lockout plate that rotates in an arc as you move the lever across the gate in neutral. There is a spring loaded plunger that has to be pushed in to select reverse. However the edge on the plate is very sharp and rather then sliding over the plunger as it pushes it in it digs in a bit. I could feel it through the lever. You can see it here... You can see scrape marks on the cone of the plunger... So I gave the edge of the plate a gentle tickle with the grinder.. I also took the corners off on the plate here... where they slide through the slots as you move across through neutral here ... Resulting in a much nicer shift. It will be improved further when I get a proper ball for my shifter and I suspect my flexible coupling at the end of the shifter tube onto the transaxle is a bit too flexy. The trans was reunited with the engine and slung back into the Imp. It all went back in nicely. This morning we re-bled the clutch system and YAY !!! It works better with the slave returning instantly. Filled the cooling system back up, having added a bled nipple on the thermostat housing which improved the bleeding of air from the system hugely. I'd also forgotten to mention that a fair while ago a fella on the Imp forum mentioned that my stainless tubes tat run under the floor should not really be touching each other all the way down. The hot one will heat up the cool one. Not good. I didnt think too much of it but it bugged me so quite some time back I ended up ovalising them which gave them clearance all the way down... I also made a throttle stop so not to break the cable... With that it was about time to go for a drive.. Success! This time no rattles from the clutch area, clutch worked fine, battery was good. Ran it up to temp and bled all the air out. Temp went up to about 80 degrees C indicated and sat there. It was a fantastic sunny and pretty hot Autumn day for a drive. All the smoke from oil spills, coolant spills etc burnt off. I checked the timing which was about spot on at factory setting. Gave the carb a tweak so the car idled nicer but it'll need more attention. It has quite a worn primary throttle spindle and I think that combined with that light flywheel makes it hard to get a super smooth idle. Enough is enough though. I finally took the plunge and did this....... I came back beaming. It drives pretty well. Wanted to stall when stopping, because of that lumpy idle. Has a slight flat spot down low but once on the secondaries it fair flies along (well.. for a Datsun powered Imp) It sounds much better then I was expecting. I parked it up and checked all the usual things. No obvious leaks and the fan came on after I adjusted the knob on the thermoswitch. Fan is loud but works really well- very efficient. Happy, relieved, excited. We both sat down on the sofa, had lunch and a cold beer and admired the little blue car in the sun. Yay1 point
-
And we have colour...,
1 point
-
the valance, the last stop on my round the 125 tour of rust. doesnt look toooo bad, i guess? LOL. Dirt and crap from off the front wheel gets into the upper panel from the bumper irons hole and makes its way to the lower section that has no drain holes of any note, so it rod rots out the front of the control arm mount. Top stuff. pretty happy with the patch i made Also let in a later model radiator vent. My car has never had cooling problems even with the 2 litre engine and a radiator that is a decade over due for a recore, but seems silly not to have extra flow - the big holes end up behind the bumper. Also seems silly cutting out solid metal You can seen the cross-member closing-panel all in above as well, double skinned like factory. pick below is from inside, you can see the curve of the valance panel opening by the bumper holes, so dumb. tac tac tac, grind grind tac, tac, grind, etc, pretty stoked with the patch tbh, always seems to comes out better on the bits no one will see! Thats all the rust on the body (till next time!) so i can start layering on the bog now, and start on patching/swapping the doors around1 point
-
back to the middle of this side, i was thinking about how to attack this area while doing the other bits. Annoying design and lots of acute angles bleahhhhhggg oh well, chop chop. You can tell why they always rust here! Right behind the wheel into a tight corner with factory leaks into and around the A pillar. This is was replacement (not new) fender, but i needed to chop a lot out to get at the a pillar properly anyway, and it is sized nicely to the end section of the fender thats not welded. the the 'channel' is actually a hook for the top of the fender as there is no access to weld it, so i could just pull it off once i drilled out some spots where it folds over behind the door recess. I rebuilt this whole area last time, all the rest is still good. looking a the piece from the engine side, the 8mm lip hooks on the channel. Thusly: I put a good bead of seam sealer on both sides before tacking it in, and more on after from under neath. The channel will be filled to just below level with seam sealer too, like the other side (i didnt do this last time) And done. A couple more patches on the front valance to do, then its all filler, no killer1 point
-
moar rust :/ started from teh back working my way forward. A lot of bubbles and chips and seam at the base of the C pillar and boot and also boot to valance stripper disced back but no holes, so thats nice, still have to bog it back up again all the same. Anyway thats boring no pics. First holes are in the sill below the rear door, you can just spot a butt weld where i previously replaced the section forward of here: Still nice and solid and clean where i got paint in: This is why you should always do it properly - i tried filling thin spots last time and it doesnt work long term... a bit of CAD and then to the machine shop! And then in lots of time at all, BAM! a bit o primer for appearances sake, tends to catch on fire and contaminate the weld if it gets hot Nice! (this never happens the first go) tack tack tack tack tack tack tack tack tack tack grind then DA, done, and next bit1 point
-
and the wheel arch, there is was a 6mm factory hole just inboard of the tub seam in the apex of the guard for a plastic fuel line clamp to mount. Good one. I have also been here before, check out the thickness of the wob (thats me!) on the right over my last patches and the paint archaeology on the left inner arch repair patches made, getting a solid non popous base for the needed bog skim to join up the previous patches was more important than getting it perfect nice and slow tack wait, move, tack wait for less warpy, but also more grindy after skim number 42, its like it never happened apart from the offerings of oxide Car is now turned around with much the same to do on the passenger side, aiming for drag day1 point
-
base of the C pillar where pinholes in a previous repair and not cleaning out the panel seam properly have come back to bite me:1 point
-
So, ive extended the garage, its a shelter station modfied to suit the spot with a tarp instead - the trademe ad under-guesstimated the measurements but the mods i made meanthe van will fit under it and i can still put it up normally with the proper cover in some other place, one day. Not 100% weather proof but 100% better than nothing Anyways, 125 has sat ^there ever since the last update, but i have picked a few scabs, starting from the front:1 point


This leaderboard is set to Auckland/GMT+12:00