
Leaderboard


Popular Content
Showing content with the highest reputation on 28/04/19 in all areas
-
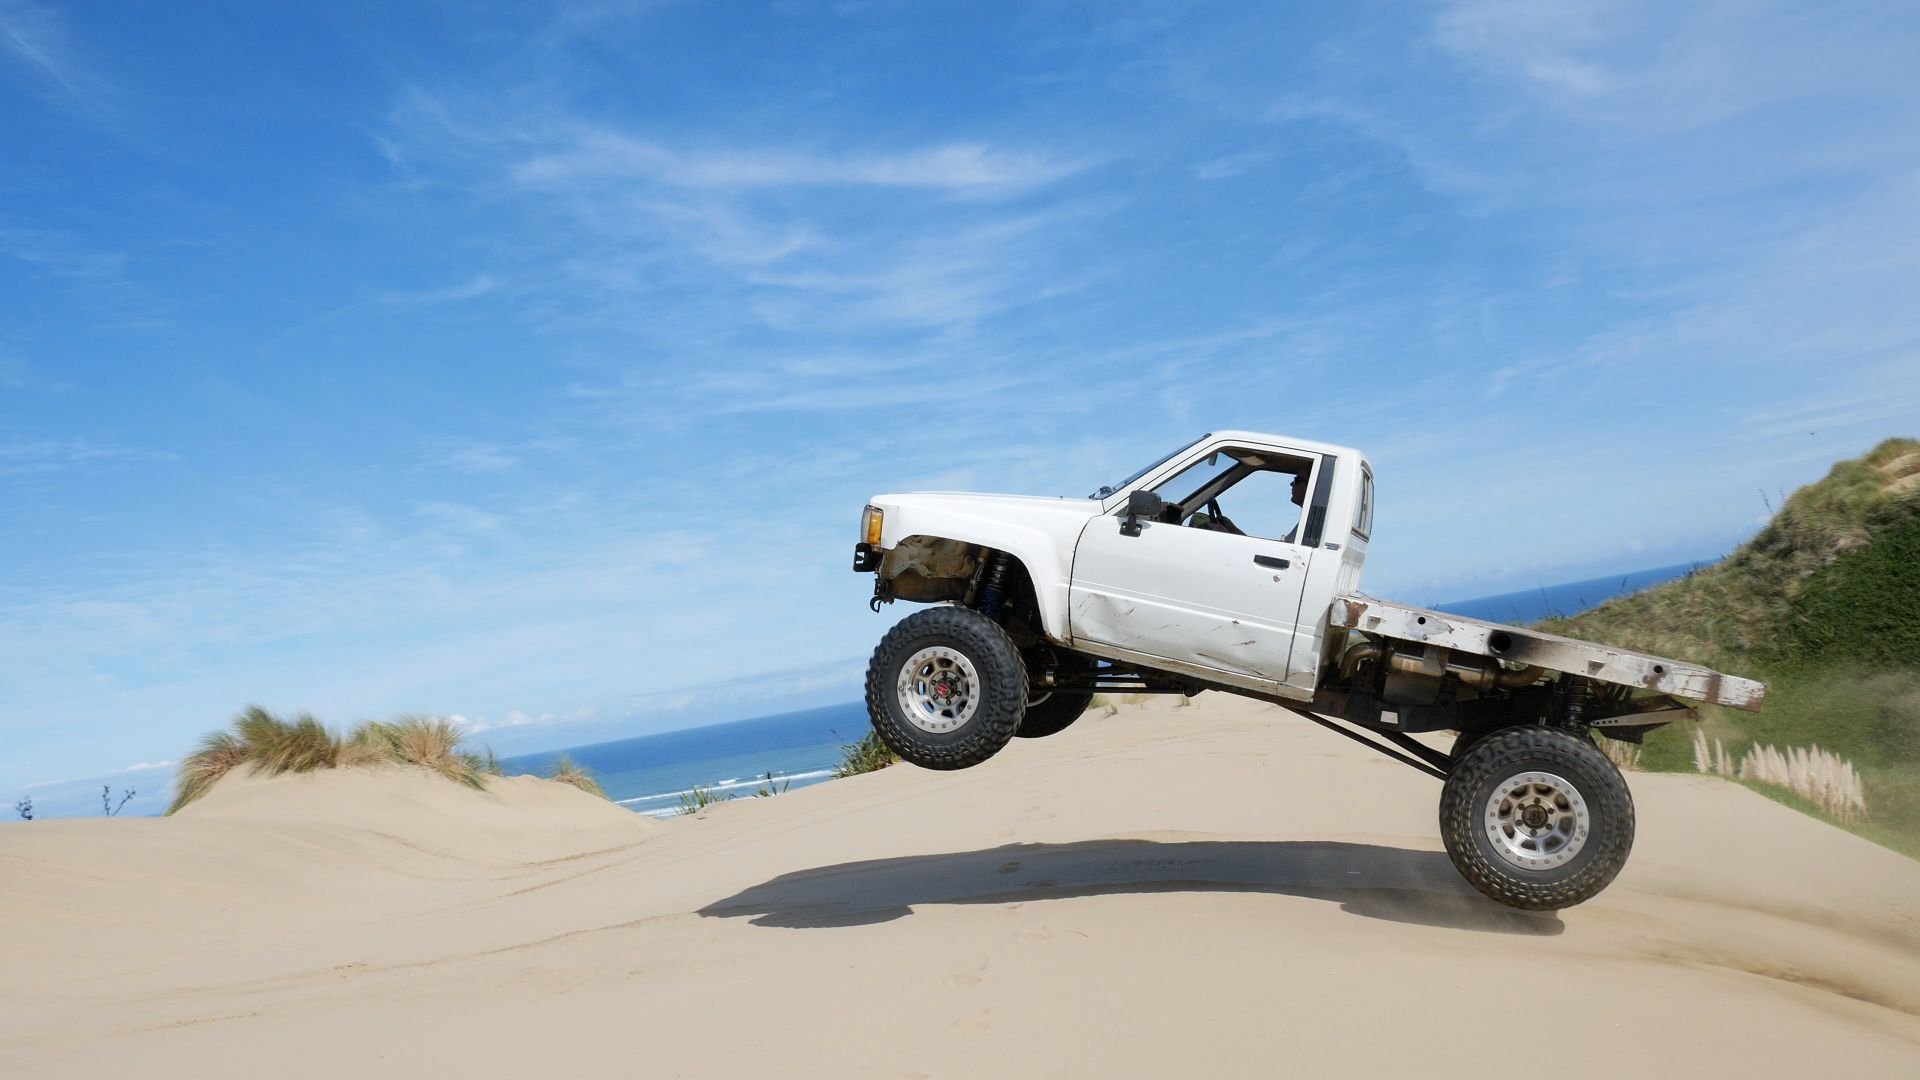
So yeah, took this to the beach. About to go out to the shed and watch it dissolve into a pile of rust. but for now a video: Gearing isn't the best for sand. but other than that and melting the clutch once, it went real well24 points
-
Do a wheelie bro
 16 points
 -
Not a lot happening as i am still broken as fuck, but pain is just signals in the brain so I ignore it and carry on as much as I can. Passenger seat is in after significant dicking with the engine cover. Way less welding needed to the actual seat though. The inner bit of cover might need a bit more bracing, but it lifts and clears the seat ok. I will make sure the rad cap is positioned in this gap. I even got the wife to sit in it to make sure it was comfy enough for her, she seemed generally satisfied although the hood lining got the stink eye.6 points
-
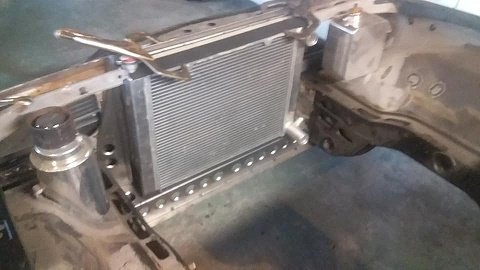
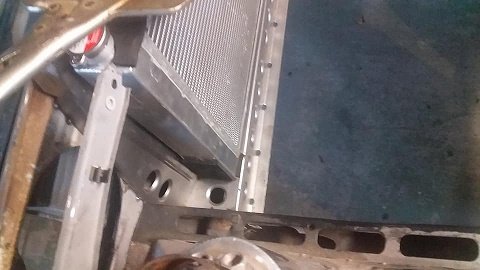
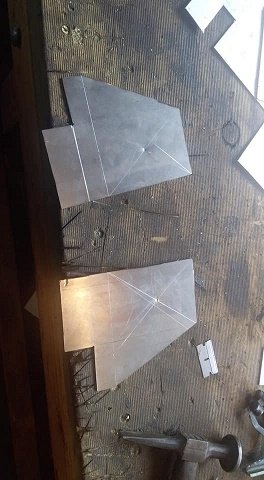
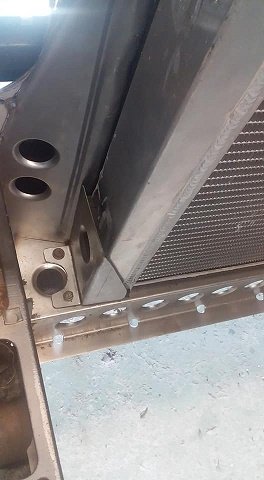
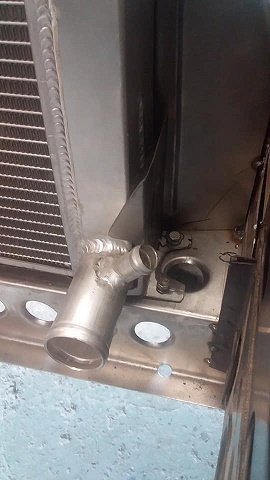
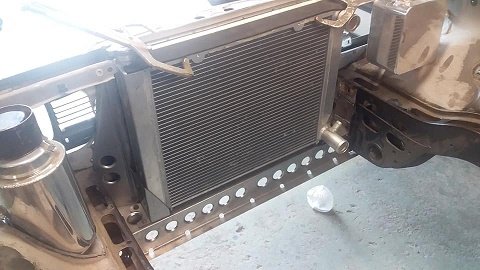
made the bottom radiator brackets.(was going to flod up some alloy tabs and weld them to the rad but i want to be able to get replacement parts off the shelf and bolt them in with out modifying them ) still need to do some trimming on them but they work..i also used adhesive rubber on all the rad sides.
6 points
-
Its been a while, for two main reasons, but I'm still here, and for now, so is the BMW. The first reason has been that despite putting some KM on the BMW, it's been pretty reliable and solid. I even ticked over the magical 300,000KM mark the other week. The other reason is that a while back I was offered a car that I basically only have one chance to own in my life. There is a very long story around how I still don't have that car, but basically I have been trying to sell the BMW to get funds and space to buy the other car, but without success. I have had a stupid amount of stupid people wasting my time, which infuriates me, but still no one has fronted up with the cash. This leaves me in a limbo of sorts. I'm reluctant to give up on this other car and keep the BMW, as I likely won't get another chance for one again, but I also can't keep dropping the price and losing my arse just to push a sale quickly. So since I'm still stuck with the car, I'm also limited on spending money on it, or working on it. There are a few things that I will do to the car IF I keep it, but at this point I still don't know what's happening. In the meantime I have picked up a few things from Pick A Part. They had a coupe with a complete boot carpet, which I picked up so at some point I can rip out the boot install and go back to having a functional boot. I also grabbed a few cosmetic bits that were a bit shabby on my car. All cheap bits that aren't easy to get. One of the most important cosmetic bits I got was a new headlight switch. I hated seeing mine every time I drove the car because it was badly worn/scratched/scuffed. It also didn't light up like it should. You can see how horrible the legend around the dial looks, but even the I/O on the vent above is badly worn. These are super easy to remove, with only one screw on the underside of the dash surround, going up into the switch housing. Remove that, and gently pull the switch forward (I hold it by the dial). Its clipped into place in the top of the vent, but it'll come free with some wiggling. The wiring is fairly short for the foglight switch, so take care not to pull too hard or you can break that switch. The headlight switch wiring connector has a collar that twists around and the plug will come out. The replacement I sourced has a broken switch for the headlights, so when you turn the dial it doesn't click like it should. That's OK, my current one works fine, so I will swap them over. First pull the dial off. It's a press fit There are two things to note when that is removed. First, the light pipe in the back, at about 10-12 o'clock position. This is how the bulb feeds light to the notch on the dial, so it lights up. The other is the large plastic nut. I used a set of large needle nose pliers to turn this and remove it. Once removed, the whole switch will come away from the fascia. This is a really good time to replace the bulb, which is inevitably blown. This can be done with the switch still fitted to the fascia, but it's easier to push the bulb out the front, than to pull it out the back. The bulb is in a large plastic holder. If you push on the top of it, it will push out of the back of the switch The bulb is a small "grain of wheat" 286 bulb. Now, I believe the original BMW bulb was 0.3W and about $10 a piece! Madness. In the past I have chosen to use the much brighter 1.2W bulbs readily available on eBay. They do obviously run hotter, but other than a shorter lifespan, there doesn't seem to be any issue running them, but do so at your own peril. I went this route again this time. Now it's time to strip the good switch from the old fascia. With a new bulb fitted, install the tube into the good switch. The end of the tube is keyed to only go in one way, but be careful that the bulb passes clearly through. If the bulb isn't seated correctly, you can smash the bulb inside the light switch.... I found out the hard way. Now install the good switch on the good fascia, reinstall the nut and dial. Plug it into the car (without installing it) and test that everything works as it should. It should light up with the key on. If all is well, reinstall it into the dash and fit the screw. So much better! I couldn't stop there. I had the bulbs out, and I knew one other thing wasn't lighting up in the car; the climate controls. This is another thing I had to fix in the first M3, as that also had neither the headlight switch or climate controls light up when I got it. This is also an easy fix. First pull all four dials off. They are a friction fit. Next remove the two screws (one under the fan speed dial and the other under the vent control dial). Now the fascia can be gently pried forward until it pops off The back of the fascia is pretty cool. It has a series of light pipes to distribute the light from the single little bulb, to all of the areas around the dials that need to light up. The buttons (recirc, AC, demist) are all lit with little LEDs on the back plate. The little bulb lives dead center near the top of the unit. Gently pull it forward and it will come out of its holder. There is some discolouration around mine, and it did have a bigger 1.4W bulb fitted by the previous owner, but no distortion of the plastic or anything. Pop a new bulb in and turn the lights on. Now clip the fascia back on, insert the two screws, refit the four dials and you're done. Bling bling. And with all the other light up stuff The last thing that didn't light up was the ashtray. Turns out the whole bulb holder is missing, but not to fret, I picked up a replacement at Pick A Part today also. A non-smoker package pocket to replace the ashtray. Fixes the light not working, and also gives me somewhere to put my phone. Win. Great success. Now I can see things in the dark. Hopefully soon I will know what's happening with the car. Either it'll go to a new owner, or I will be ripping the boot install out.4 points
-
Friggan lol
4 points
-
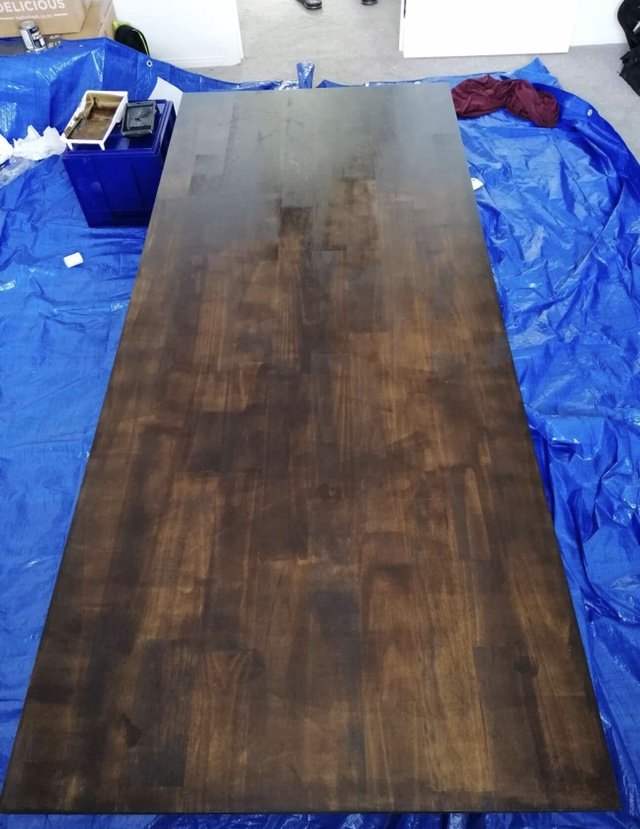
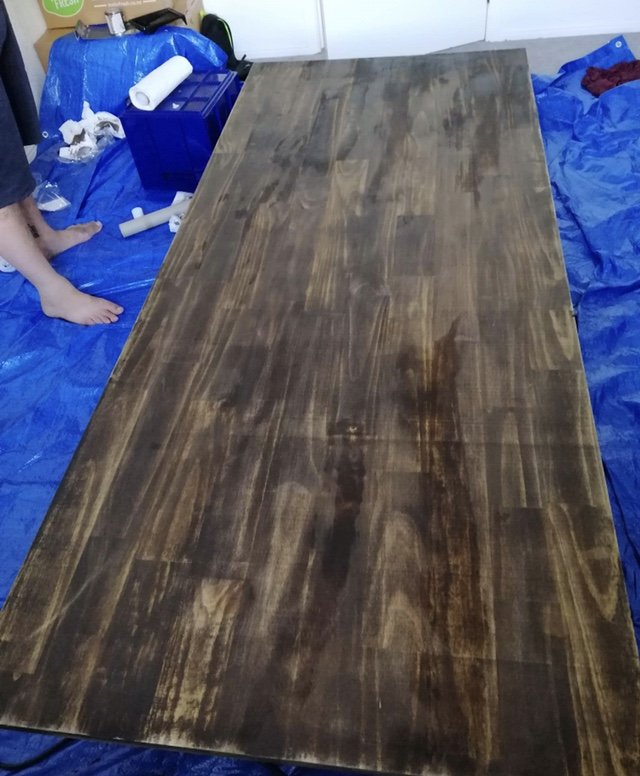
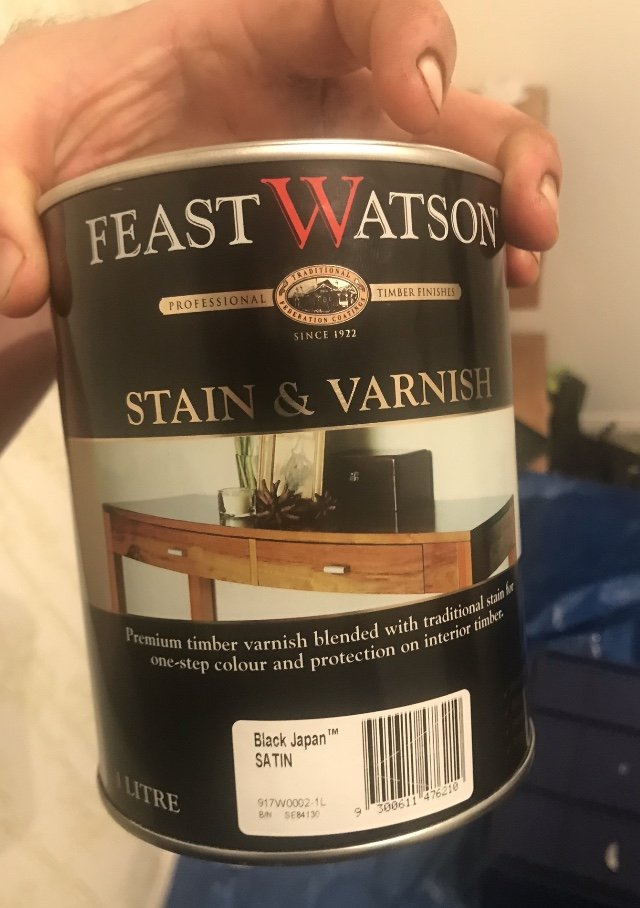
Bought a house last year so I’m a lot more budget minded now, that and what I don’t spend on the house gets spent on cars so every cent counts being a Jew on everything but cars I’ve decided to try my hand at some super tidy furniture for the house on a budget. started with a dining table. luckily I did some elect work for one of our fabricators at work so I’m getting all the legs steel, fabbed and painted for free picked up a pine laminate slab from Bunnings. $115 for 2100x900 and about 30mm thick using the stain in the picture plus a clear with Saturn finish. They were around $70 a tub. Probably only use about 1/3 of them for this so about $45 worth of stain for this. so about $160 so far for the table didnt sand the slab at all, wanted to leave the high spots and rough bits. did the first coat super thick with just the jap black, and actually looked a lot darker in person then the photo, darker then the last photo sanded it all back with worn out 120 grit, this took all the high spots back and brought through the grain and edges. next mixed the clear and jap black 1-5 in favour of the clear and that’s how it sits now. ill probably give it another coat with 1-4 and see how it looks. plan is to get another two slabs. Cut one into two 450x450 side tables and 1650x900 cut to width for coffee table. the last into 2100x450 for two tier TV table. legs will all be retangular box tube, painted in Saturn black and the timber to all be the same stain and thickness
3 points
-
Need to find a fender deep river to wade through, should rinse off the salt. I love how in all your videos yours is often the only victorious truck on the hard bits, is that flattering editing or are you really just owning the safaris/cruisers (and rangers lols)3 points
-
@azzurro Are they Weber 152 made in Spain versions? if they are it’ll be the progression holes causing the issue. Or lack of, there should be 4 or 5 holes but the 152’s only have 3. The 4th hole should be directly over the butterfly. Have a look how many holes it has, they are under the bigger brass flat head cap screw on the engine side. One for each throttle body. Edit, like this:
3 points
-
bit more carb tutuing, upped the main jet to 135, better on transition, but maybe too rich on WoT. diddled with the the idle mix, ok, but still a bit funny. Read and reread my various carb books. decided to tweaked the floats, as the carbs are on a 12* angle to horizontal, (max recommended is 5*), the lower or inside side float will tend to cut off the needle valve earlier than it should making the fuel level low, especially in the upper or outside fuel well: ...and as it is written, so it comes to pass... Bent the inside float up a bit, and left the outer as it was (factory 25mm). Average fuel level is probably still a bit low, but too high will be bad too. WAAAAAAAY better now, i think the idle jets were sucking a bit of air every know and again or something, and the progression flat spot is much improved as the ETs have a few more holes covered. Tweaked the timing a bit more advanced as well (12-15* at idle) and the whole thing is now much livelyer. Idle is smoother and i leaned it back to a 'steady' 13.5 AFR, at 800rpm, when before it wouldnt idle under 1000rpm or 12.5 AFR At WoT AFR is dipping into the low 10s sometimes even the 9s, so i will try the 125 mains again. Time for a few other things (there is always something!) REDUCING NOISE Steering tie rod vs exhaust downpipe interference caused a disconcerting rattle though the steering wheel on hard right (parking style) turns These pipes are 80's muffler shop specials and will be replaced eventually, meantime a wee tickle from Mr Grinder on the excess threads appears to have the desired effect INCREASING NOISE 'customised' some op shop $5 low impedance (6ohm) speakers using a skill saw, ply offcuts and builders adhesive that i really think have nailed the 'builders least favourite apprentice' aesthetic. They fit under the back of the seats where no one can see them, and are 11ty times better than the old 4inch pioneer box speakers, and were within my budget, I am not ashamed. Related, I also installed a switch so the head unit will run without the key in the ON position (dash lights on, fuel pump chunting away). This hack is needed because my 'cheapest on ebay' Ducato ignition switch doesn't have a flippin ACC position. Now that's austerity. Chucked on a new sticker holder sticker And piled the girls in for a hoon. For the first time it feels like its actually running well, which means i will be using it quite a bit more.3 points
-
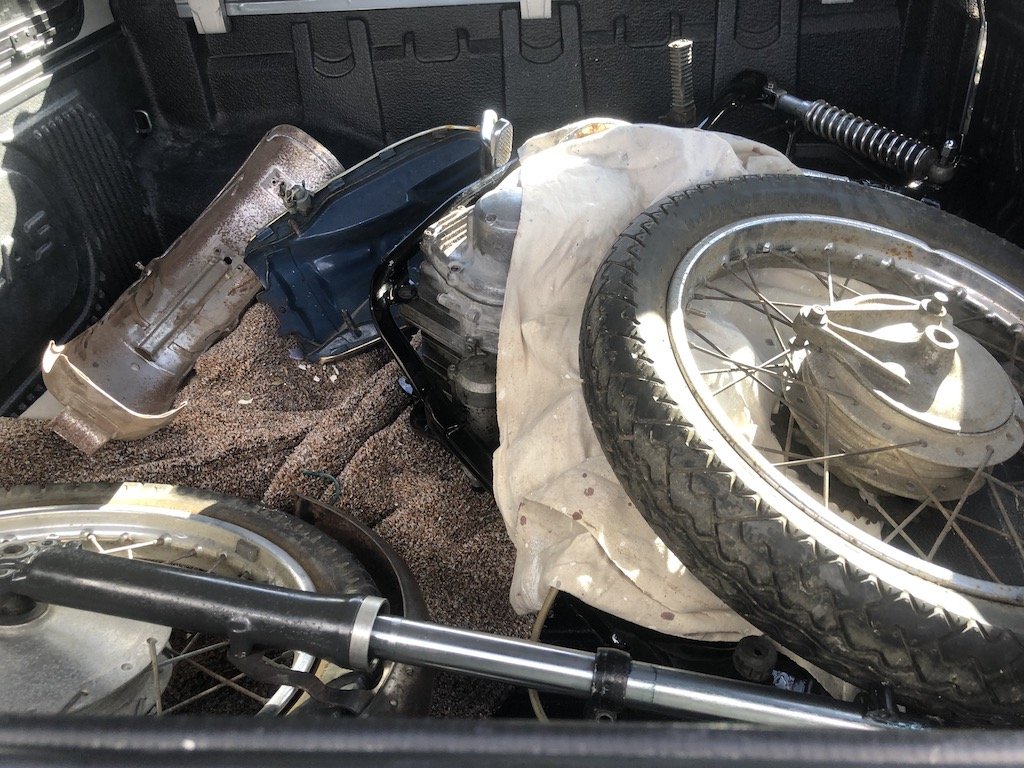
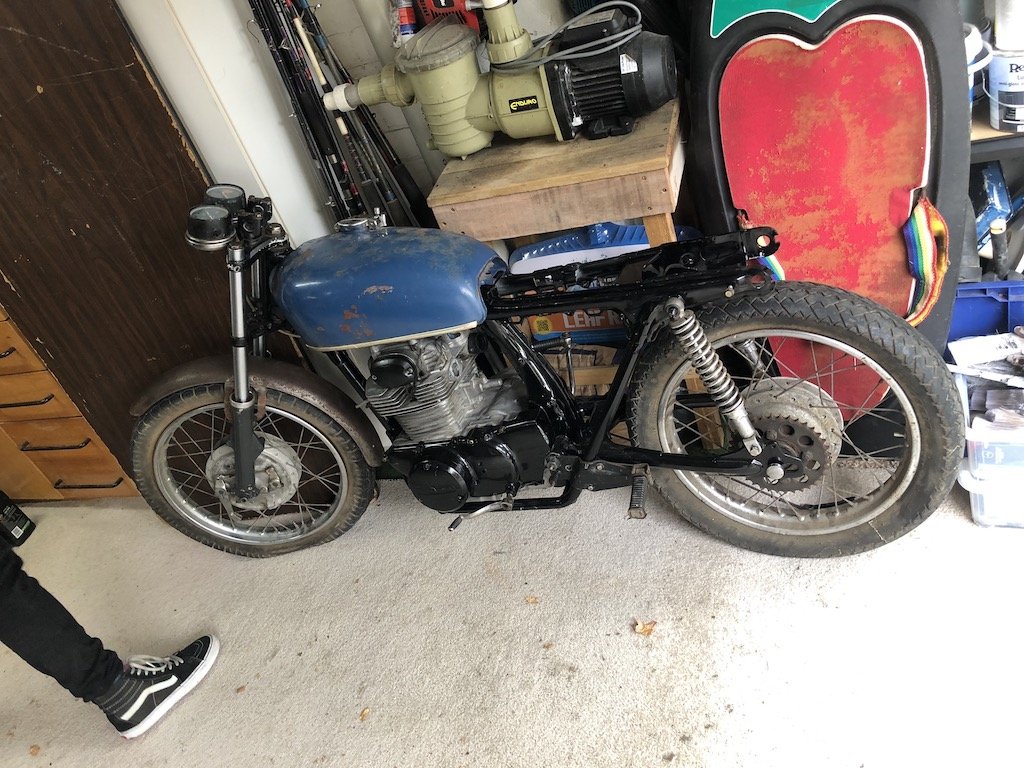
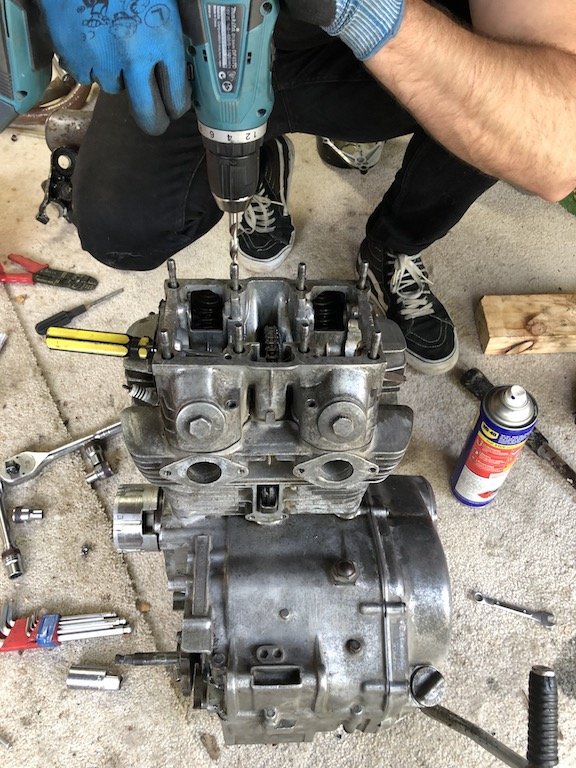
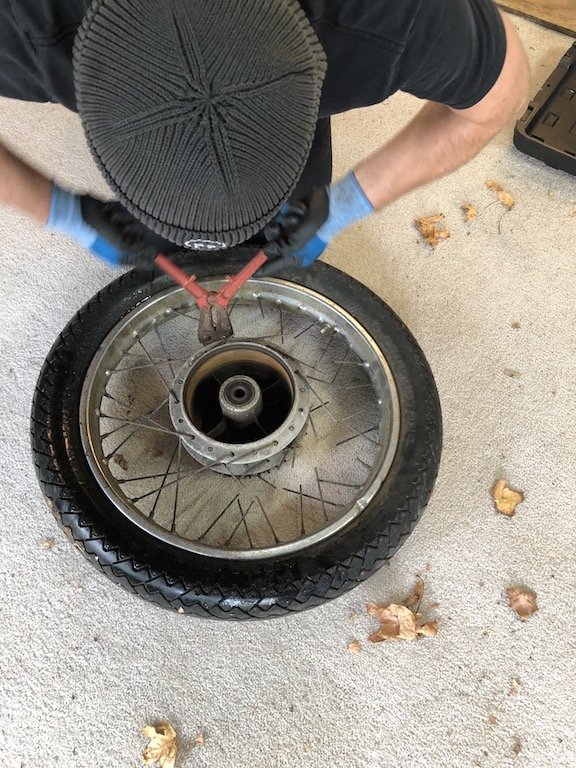
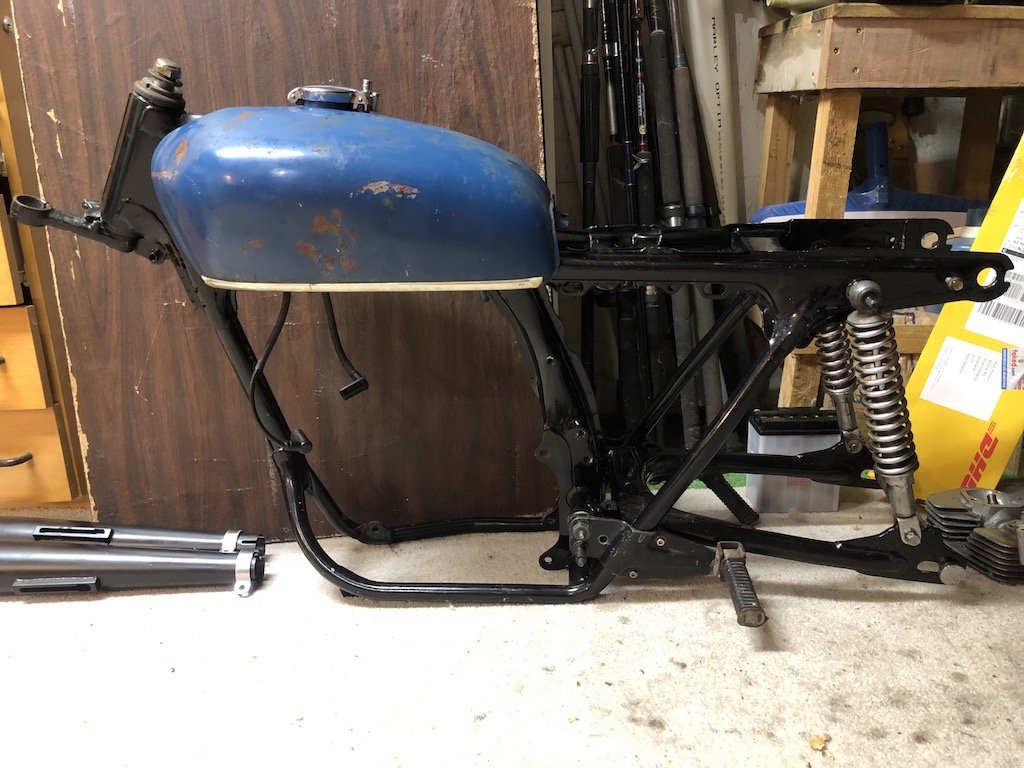
Me and a mate had been looking for new project bike for a while, trawling through Trademe and FB marketplace. This CB350 popped up as an unfinished project that the previous owner wanted move on to fund some of his other Honda classics. Perfect tank shape and in the condition where we don't feel bad chopping and changing a classic. As all good projects start, I picked up the bike in pieces, threw it in the back of the ute and raced home to check it out in detail. Did a loose mockup and pretty much everything thing is there. The previous owner painted the frame which was a nice surprise, however for some reason cut off all the mounts and tabs for the the seat and foot rests/side stands. Plan is to cafe racer it, clipons, rear sets and wider rims. Loving the OG tank colour so the blue will stay, we'll add the Honda wing badges like on my CB250k. Decided to strip the whole thing down in order to get everything vapour blasted, pulled down the motor and that looked like it had been recently rebuilt as it has oversized pistons and the hone on the bore was fresh. The lower front engine mount had snapped off so we split the cases and will be sourcing a new one. Also got started on the rims; Pretty old and rust so we’ll start again with these. Current status:
2 points
-
Got that all repaired and going into the last race of the season had a few things to sort out. Brakes were leaking at the rear still, so i pulled the calipers apart and found the seals were not the same size as the standard Toyota ones, really annoyed as they were done here in CHCH at great expense by a well known company. While I was at it I replaced the front ones as well just to be safe as they looked like they were starting to leak as well. I've had some 1mm Titanium brake pad backing plates made up for all the calipers which I'm hoping will protect the seals until I can replace the calipers all round with proper race ones. Been a bit concerned going into Winter that if I have to race in the rain that I won't be able to see out of the windscreen due to fogging (I do run anti fog) so I hacked the original windscreen venting to take a feed from a bilge fan which will take hot air off the floor (above the exhaust). Had the diff in to be checked after the hit it took, and have changed ratio from 4.3 to 4.5 so hoping that's going to give a nice boost at the end of the straight.
2 points
-
It does pretty well against safaris and the likes in the mud/dirt. but not really night and day difference like in the sand. The lower tyre pressure, power and less weight combo makes it work on the sand. sits on the top and arab spec it on the limiter. plus can just send it over any bumps with the coilovers and hydro bumps2 points
-
Hell yeah, launching off the top of the dunes when the others couldn't even make it up is pretty boss2 points
-
I added another gay Honda to the collection (temporary) today. I wasted no time in putting the factory shocks back in so I could nab the konis for the crx. The teg is reg on hold but has a bit of A pillar rust and a rust hole by the rear window. I'm hoping some other sicko buys it as is or I'll part it out when I get back. Its got aftermarket cams exhaust and prelude brakes. Got a few goodies for the crx and shuttle too, spoon baffled sump, spare cv shafts and starter. Koni damper adjustable shocks and a set of hawk pads for the big brakes on the shuttle Oh and a b20 with spare type r head. I got lucky and the b20 has the higher compression pistons - it should be about 10.4:1 with the vtec head. I'll slowly get parts and build the 2 litre up for the crx as the b18 is getting smokey2 points
-
cool.. so cool The only idea I want to stick in your head is..... Patrol arms are really stiff they hang up on the pin end.. The eye style of a 80 series are much nicer I think from off road point of view.2 points
-
.2 points
-
While this was all happening last night I was at home sick. Greg was only allowed to drive it in and out of the workshop without me there. Today we will go up and down the service lane......with massive smiles on our faces.2 points
-
Bit more progress, have built the intake pipes and mounts to get the filters where I want them. The filters replace the fog lights and sit in the front bumper so should give nice cold air, but building the brackets to get them to sit in the right place was super fiddly, hope I never prang the front end as everything is just so... Being low to the ground I also wanted to shield the filters from dust/splash back from the front wheels so I picked up a couple of $10 mini rubbish bins and cut to suit, they made nice little cowls and there are decently strong with three anchorage points to the old fog light mounts. 3" intake pipes come directly off the turbos, are mild steel so will coat with something, maybe the same coating used for the headers (Cermakrome). I plastidipped the chrome ring of these filters but forgot to do the chrome button inside, may yet do that also as wanted these to only be noticeable to the trained eye... Mounted the pipes and rolled the ute outa the shed for the first time in a year to take some glamour pics, hoping it will help with motivation (which is pretty low). See what I mean re chrome 'button'? Whaddya reckon leave as contrast or black out? This pic shows there is progress at least, can also see the new rad I bought for it. Bought the radiator based on being the right width, and relatively short as will be using a dual in single centre out intercooler so the TB pipe will need to go over the top of the radiator. Rad is supposedly for JZ converted S13s so Im hoping its gonna cool OK, either way is definitely shiny enough... EDIT > Filter pic with BJ for more Oldschool love2 points
-
I guess I finally got enough courage to fix the rest of the rust. Had plenty of spare time over Easter so thought I'd better do something and was sick of having a puddle on the floor each time it rained heavily. The rust hole under the wiper motor was the worst of it, kept putting it off because of the location and how tight the space is to get at. Ground the mounting plate off, the rust was a little worse than I thought it was gonna be. Made a patch to fit and then cut a much bigger hole. Took a few attempts to get the patch the right shape. All welded in, didn't come out too bad. Got a rust cut from Olds Cool Autos as the wiper mount was a bit past it after I cut it off. Carefully removed the lower skin and gave it all a sandblast. Welded it in place after testing the wipers still worked properly. Had to pull out the mig welder for the first time in a few years since i couldn't get the rear plug welds with the tig. Mig does plug welds nicer any way. The drivers door had quite a few holes on the bottom. Also had some tiny holes on the outer skin in the front corner, was easier to just cut that whole piece out and make a new patch. Made a couple of patches for the inner skin and welded them in, then brushed on some paint. Next made up the outer skin patch, welded that up and then hammered the edge over. The outside has a little distortion since I couldn't get a dolly in there properly to stretch the weld out, but nothing a light skim of bog won't fix. Another few patches further down which finished off the rust in this door. Was a good time to fill up the original side mirror mount holes. Cutting out 6mm diameter circles wasn't that easy! Underneath the fuel cap was some more rust coming through. Sanded it back and just the top needed replacing with new steel. Rust killed it all after patching it and then seam sealed it back up. Both A-pillars had some rust coming through, no holes though, so rust killed them. Still need to fill the antenna holes.2 points
-
Yup, yup. I know it's criminal, but I'm an old man now, with a mid life crisis impending plus I'm doing a fair number of Km commuting each day so I needed something cheap, reliable and I felt the need for some mod-cons like A/C and cruise control. There won't be that much to this build, but I do intend on modifying it to get it looking somewhat right. Because right now it looks a bit like an Uber and I feel I should be named Muhammed 806 or something. I plan on changing that fairly quickly, so I've just eyed up some Tanabe DF210 lowering springs from Japan. This picture is meant to be on DF210's but freshly installed on stock wheels so it should be promising if they settle down after a thousand miles and with some bigger rims and tyres to fill the guards. With that in mind I bought me this set of 16" Advan RG's and going to chuck on some 205-50-16's or 205-55-16's to give it a tiny bit of stretch on 7" rims so I also hope to fill in the guards about 1/3" - 3/4" more than the stock 195-55-15's do. Also one of the first things I plan on doing is removing the front number plate and mount, then try to hide it discreetly as possible in the lower grille recess. Kinda like the look of the deleted front plate bracket in this pic. Oh yeah, I've also ordered a front lip - which I hope will look fine but it's cheap enough so will not be a big loss if it looks shit and I bin it. I liked the JP Vizage kit the best. Not too wild. But still US$1K+ freight, painting and fitting. So extremely unlikely to happen FYI - this is stock height, then freshly installed DF210's and finally 1000 mile+ settled in height. Oh yeah I forgot to say, I'm getting the windows tinted next Thursday - try and hide my shame somewhat.
1 point
-
Burger Knight. An old loner on a crusade to champion the cause of the appetite, the stomach, the tastiness, in a world of parking that's located above the store.
1 point
-
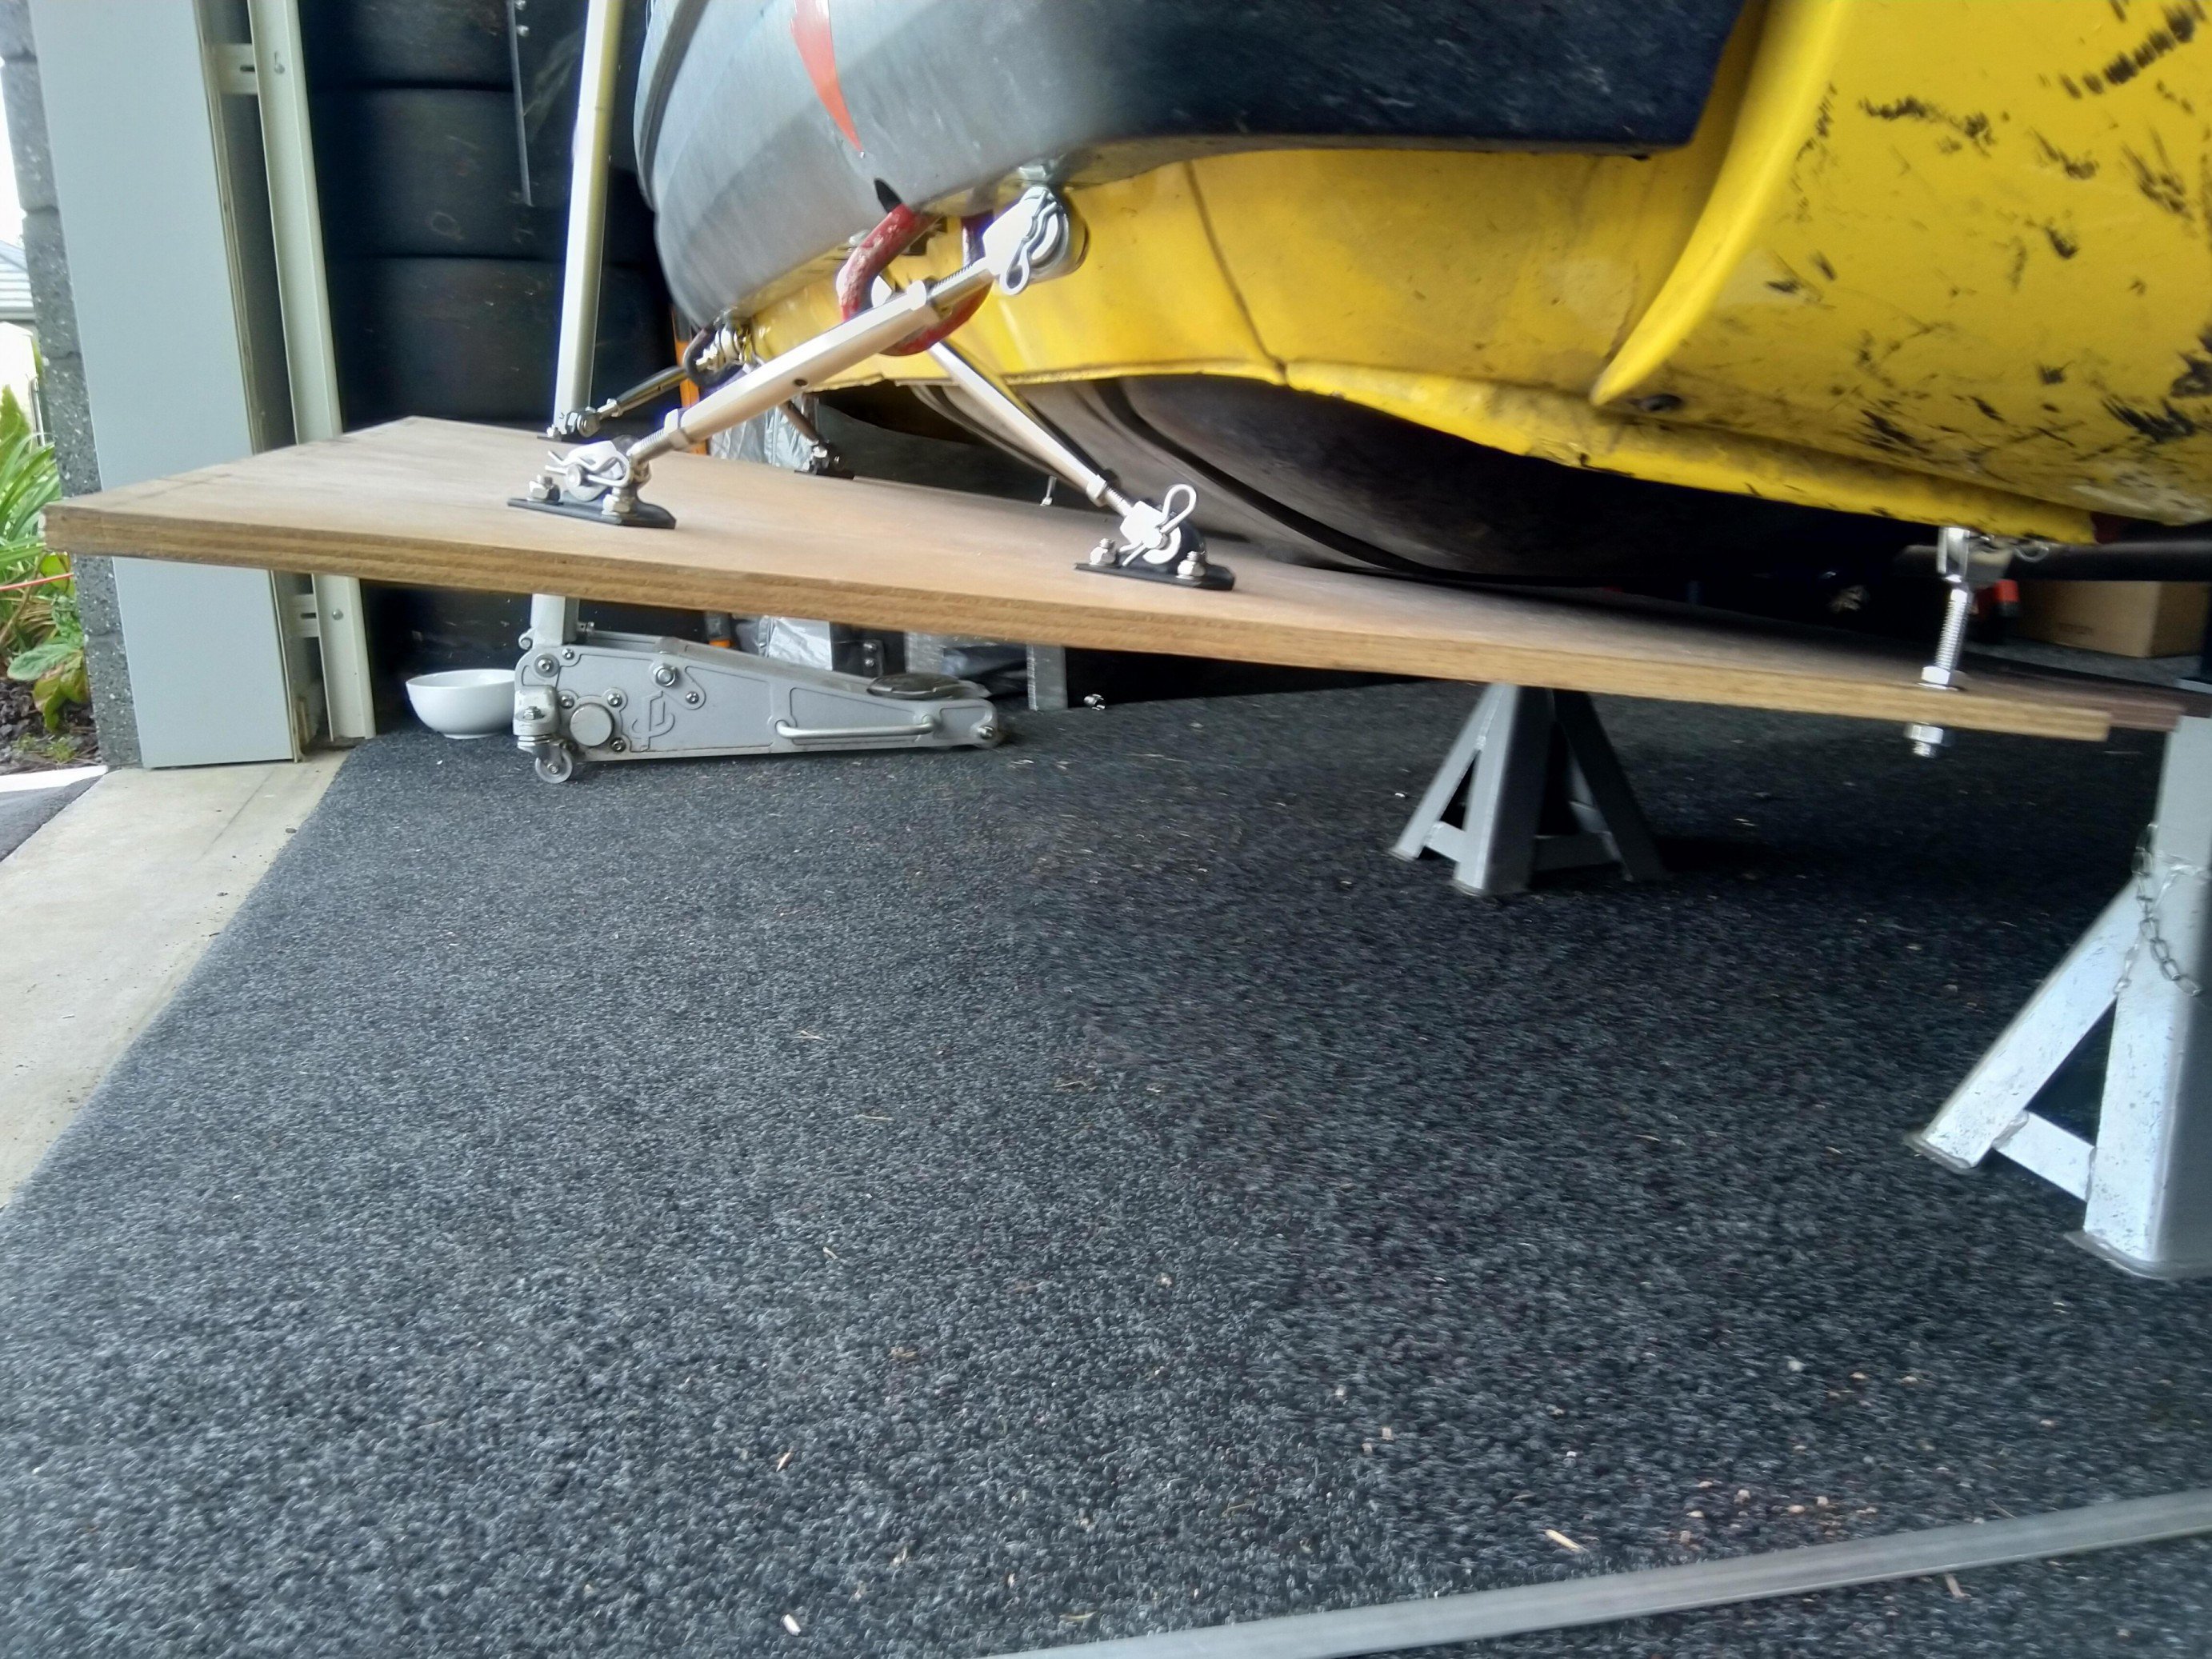
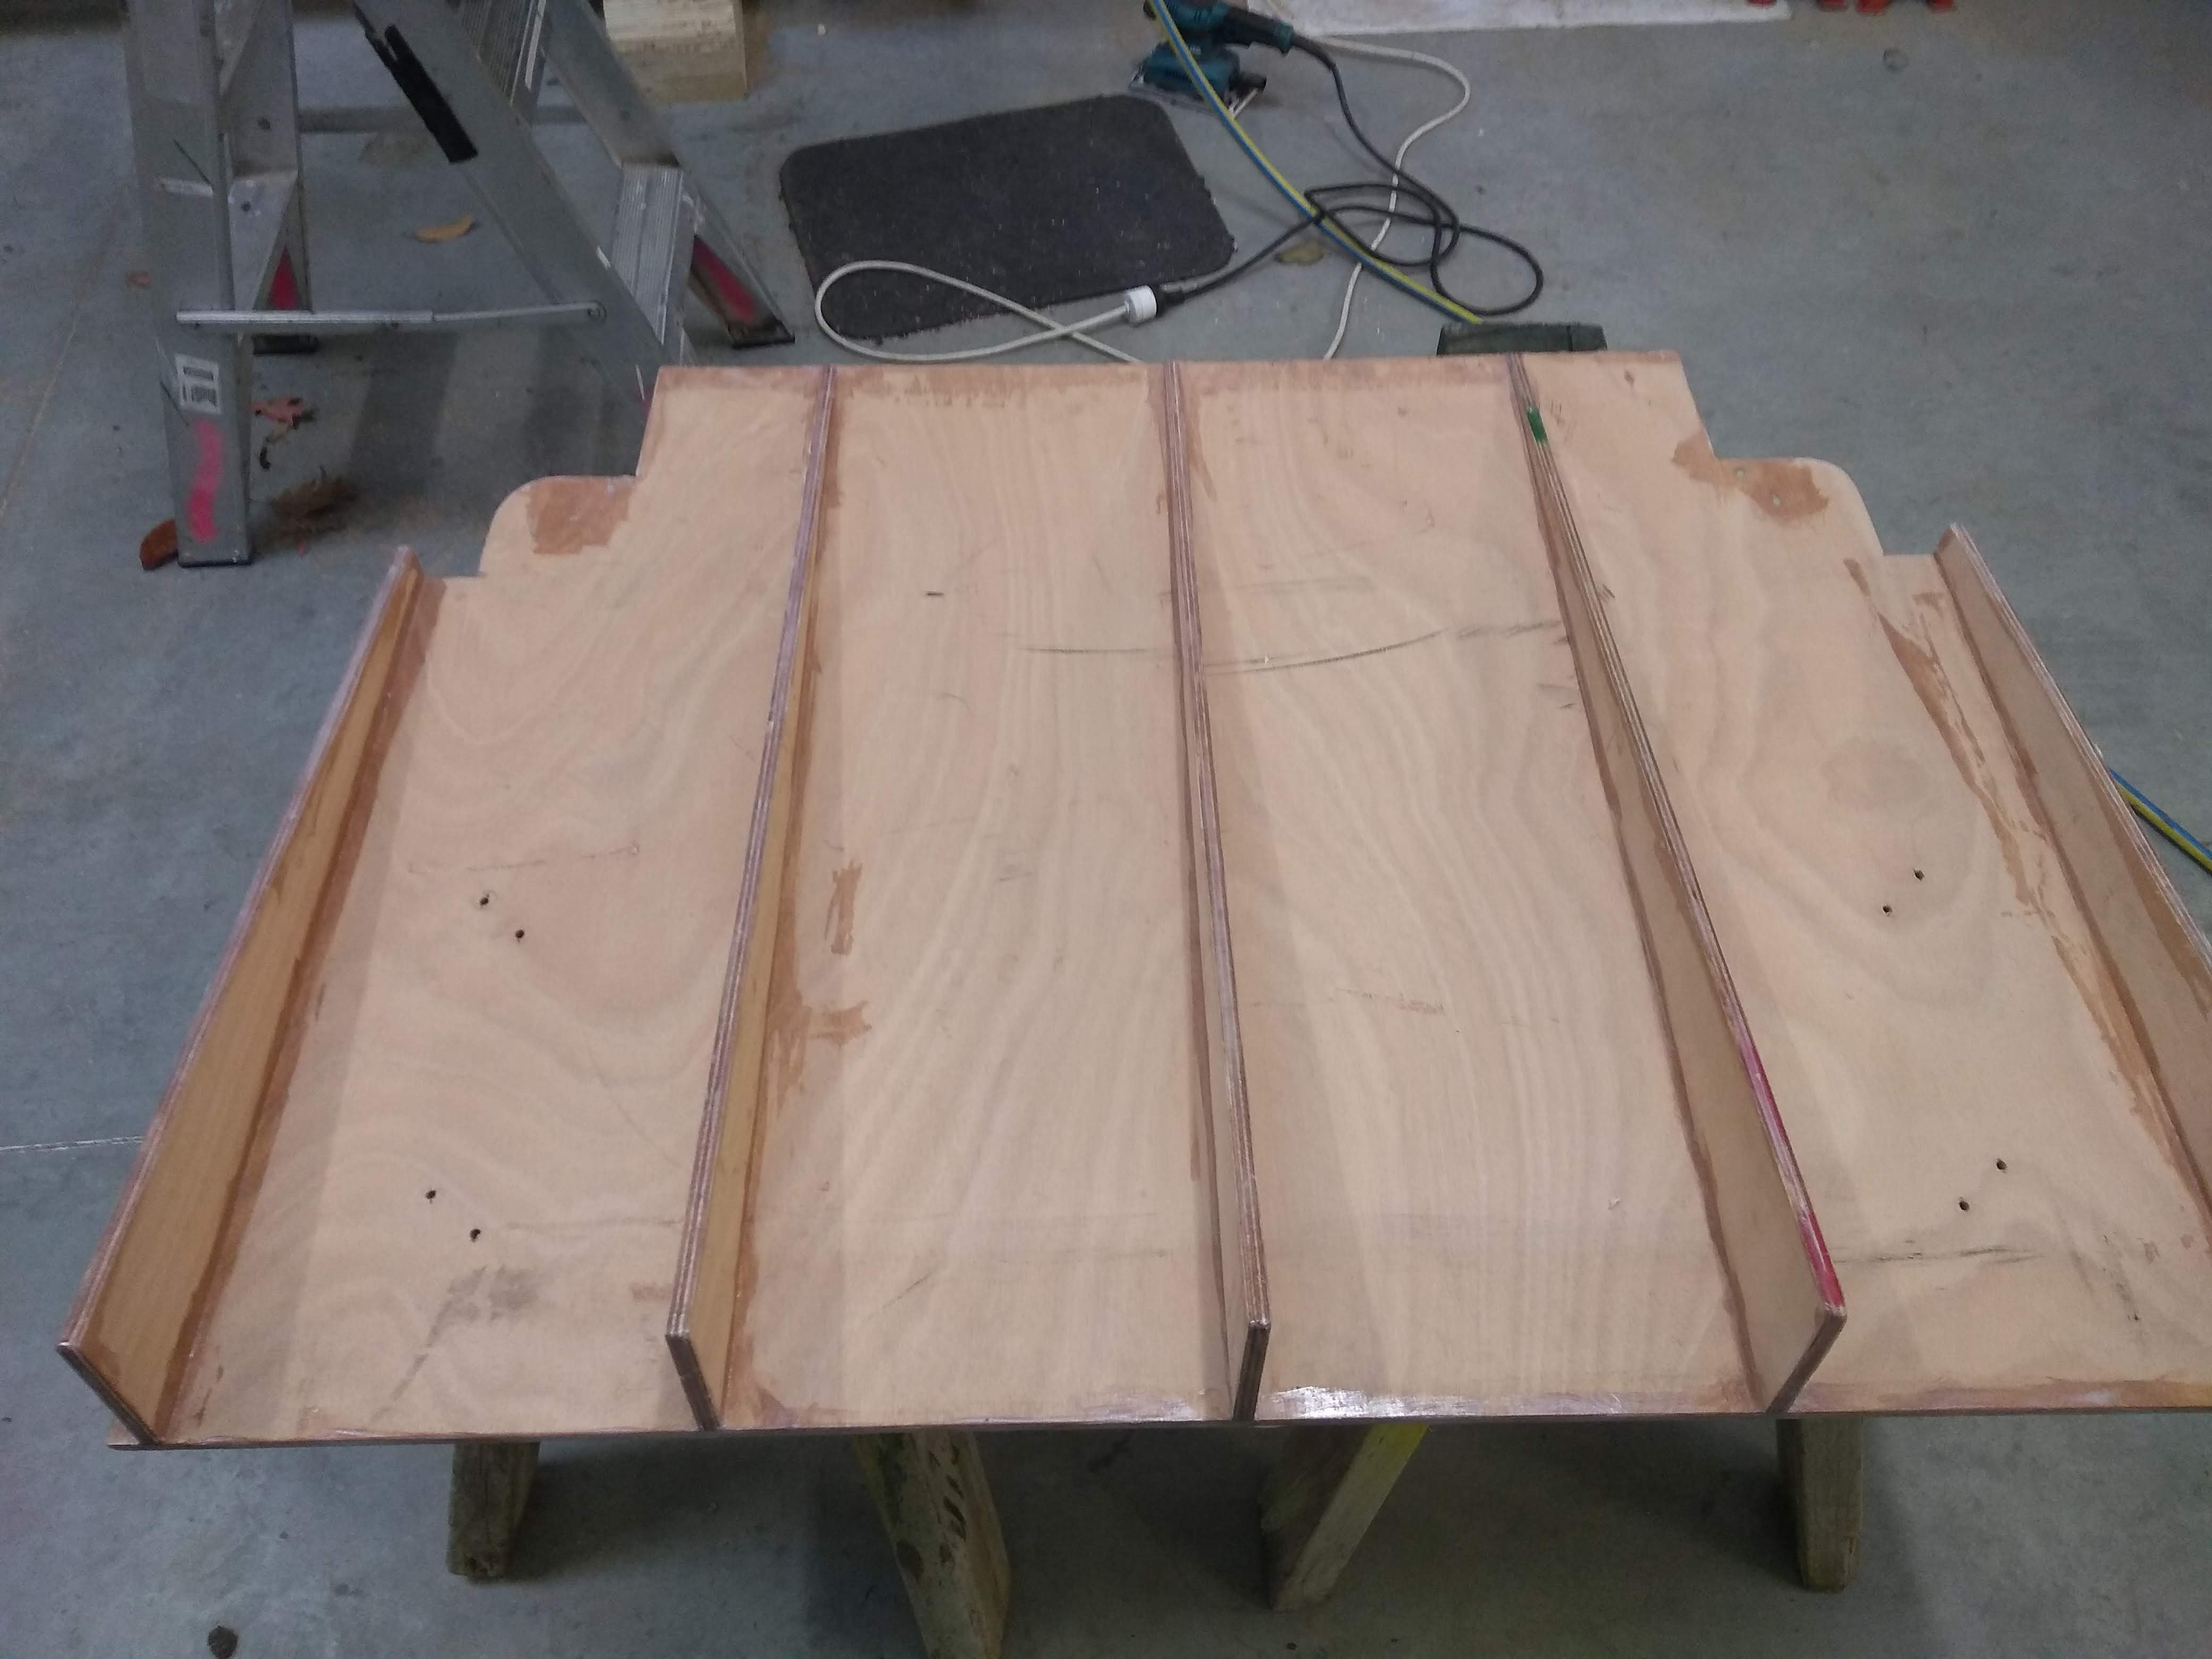
And finally to balance out the splitter I created a diffuser, again out of 12mm ply as that was easiest (prototype for now), mounting was really tricky but got their in the end. Have made some strakes for it and it's getting painted black to match splitter. It's height and angle adjustable, and is again quick release as i'm guessing it won't fit on the trailer. All ready to go for the last club day of the season Sun 5th May (Next weekend).
1 point
-
@Willdat? Did a bit more checking/recalling. If you google sr20det F1 plug you will find what you need I think.1 point
-
Orange needs to got to Start from ign switch, and black to ground. That's all I needed to have wired up to get mine to run. I did this a long time ago, but that that it was my notes say, and how the (unfinished) car is wired, and it did start and run OK. I've got a scan of the FSM, but the EC section is 10MB, too much to upload here.1 point
-
Look up nico club forum. They had all the fsm's for all the different years and models I did the same on heaps of rb's 10-15 years ago and it was usually just a few pins difference. I think it's way easier to have the correct loom if you are trying to run a stock ecu as there are sometimes random resistors taped into the loom in different models1 point
-
Yea ATM there is not a lot of droop, I suspect the shocks might be standard length. This means those bushes probably won't bind, but there will be limited articulation. When it is running I might take it up the hill behind me, see what it goes like and sort things accordingly.1 point
-
The secret is wheel speed1 point
-
I love how easily this thing can scramble up hills.1 point
-
This is a not so amazing up date. (turn back now) After fixing the ignition getting the car going then have it die and burn a trigger out I replaced it put a tank of fuel threw it around town. Today I drove over the Takaka hill ginger careful. No AA roadside assist. It's all in my head that it's going to not make it.. It glided threw 240K of solid driving without issue. Here It is at collingwood. I think that issue can be put to bed. The tyres still have 5mm tread I need to finish them before wraping the Superstars in a better choice of tyre. Thinking slightly stretched and lots lower in profile. What do you guys think ? 205/80 is way to big in the sidewall for the new rims ?1 point
-
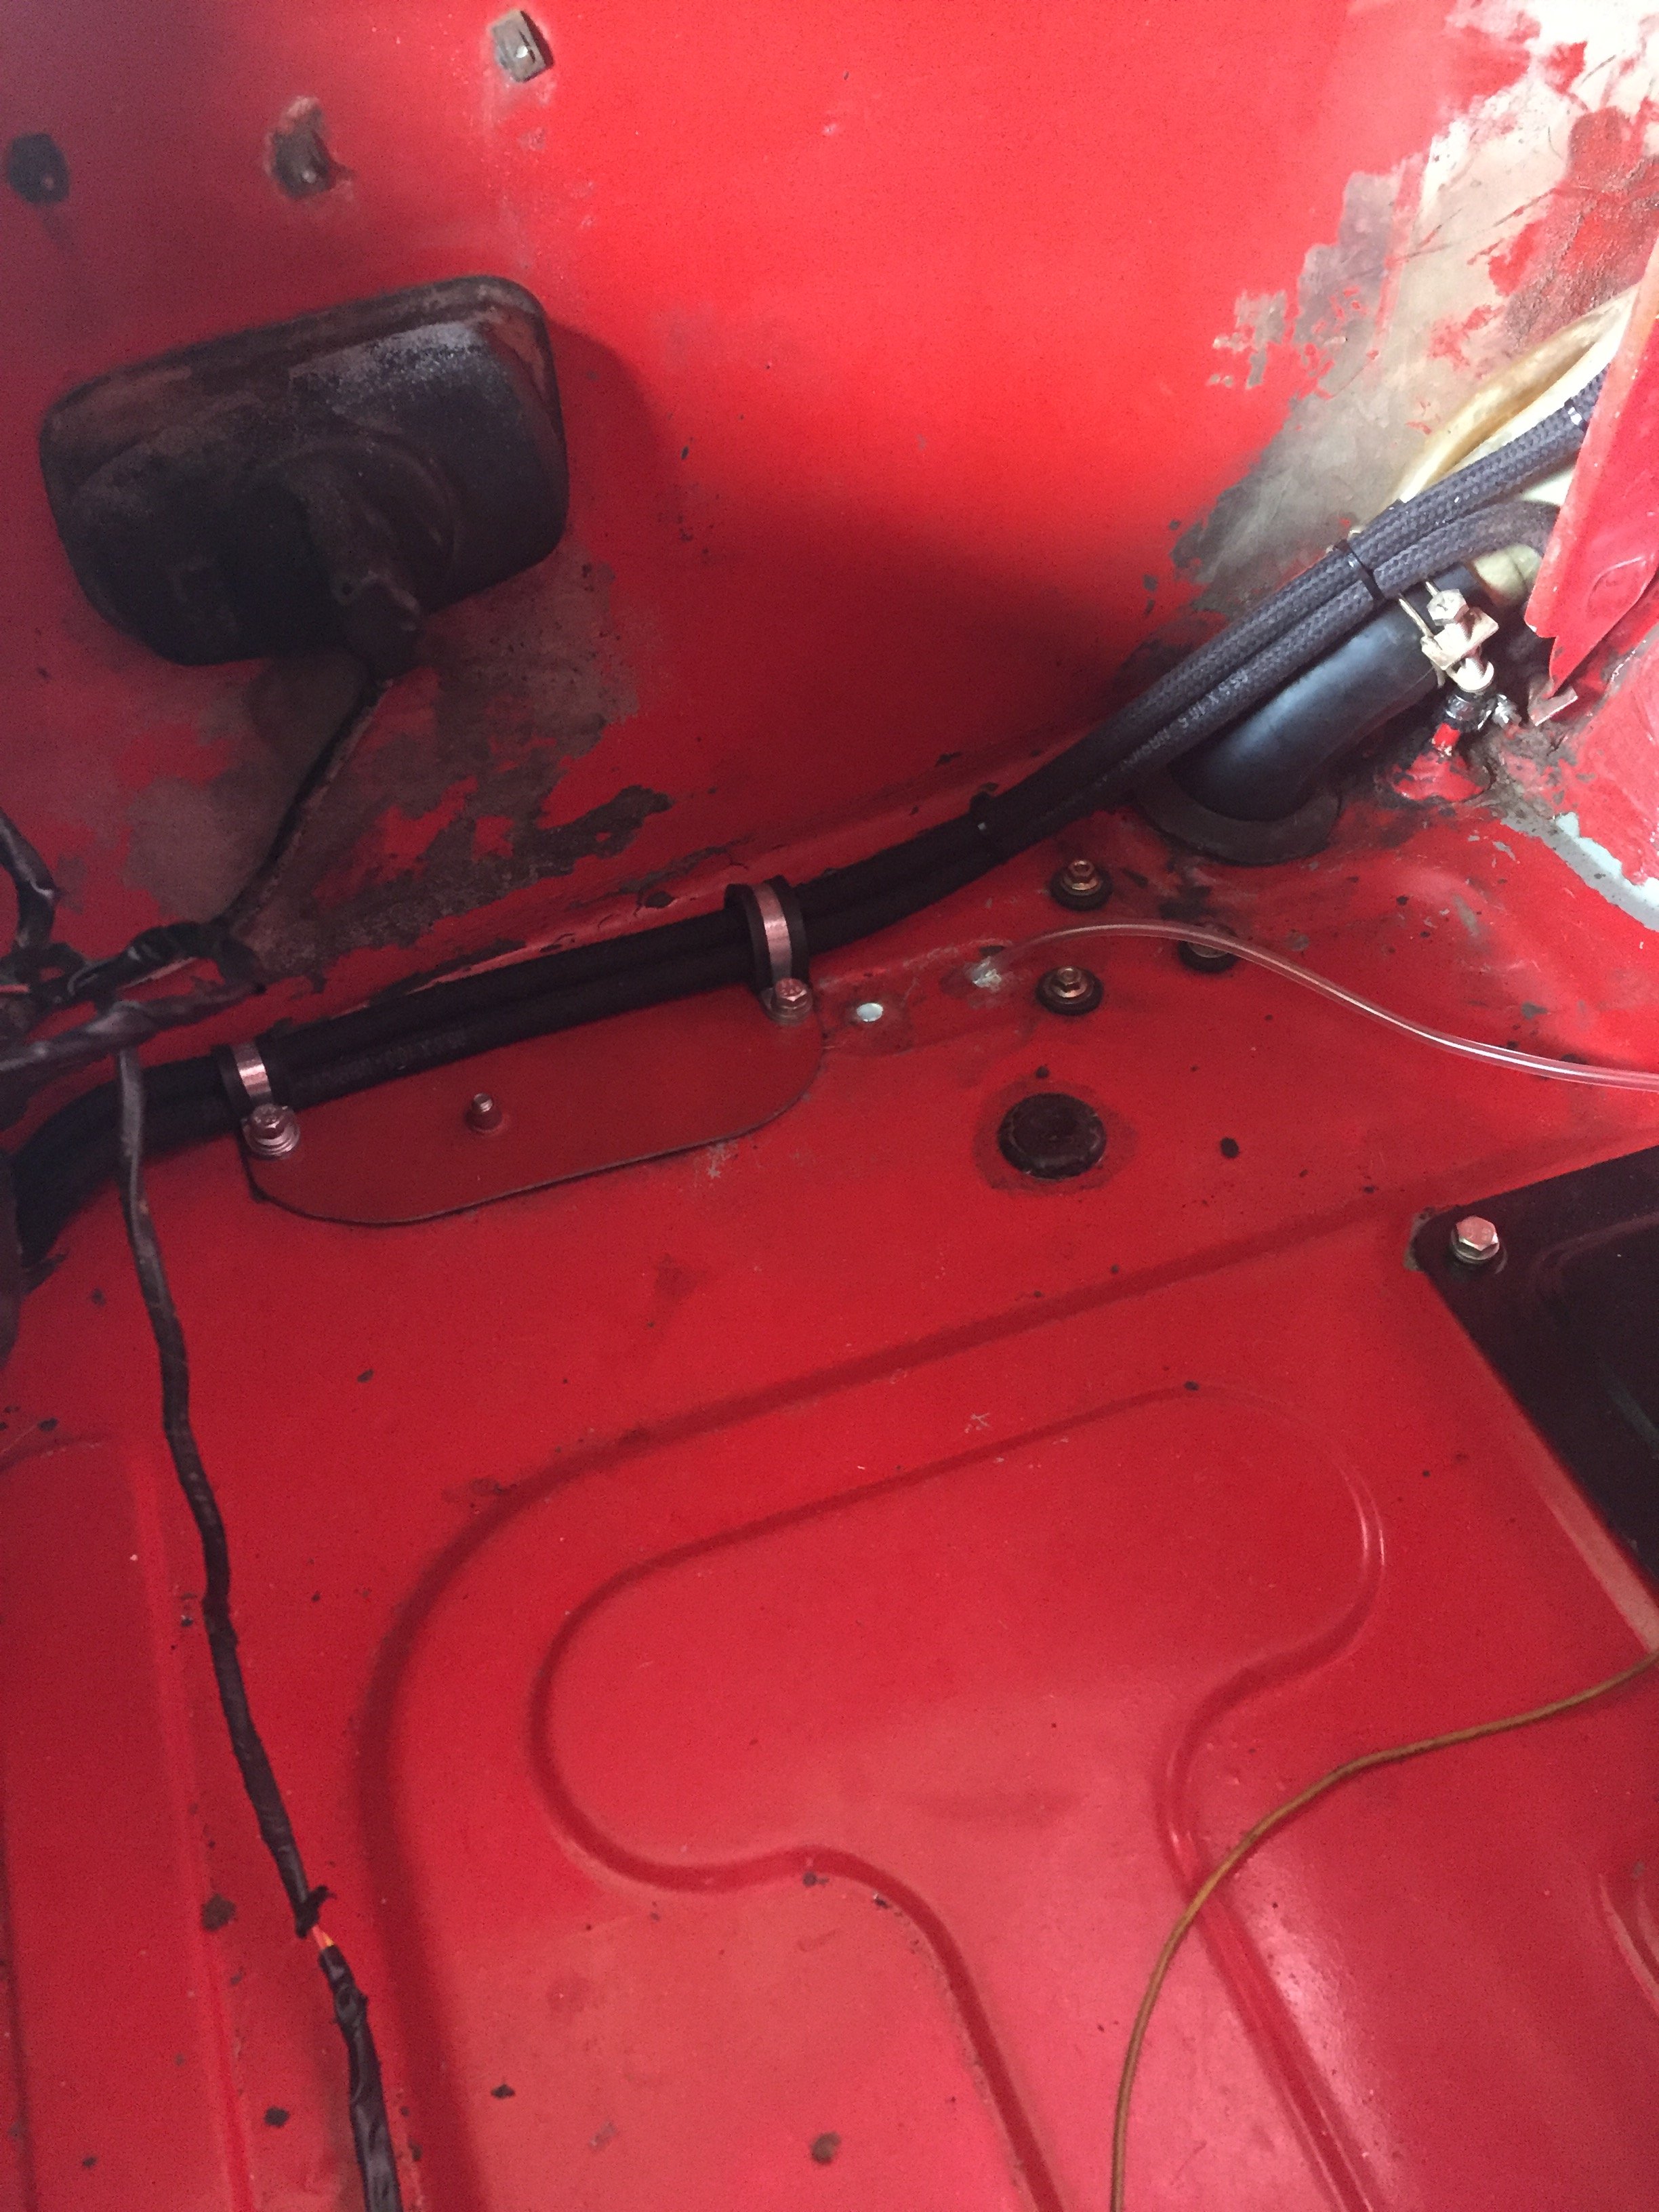
Another cert job ticked off the list - secured the 2 petrol tank vent pipes. I also remade made a rear brake bracket and prepped the diff for welding it back on. Another job potentially ticked off the list.
1 point
-
right i am meant to be cleaning the work shop right now but i kinda cant be assed and i feel there are a few people that would like to see the details on what its taken to get the bus driving. we left the detailed post at i was off to get my flywheel skimmed up. there was a lip on the other side but for some reason it seemed to have been a sleeve on it or something and i had planned on having to take that to old mate geofphy to get cleaned up but it kinda just fell off when i picked it up. job done. Paul was busy on the phone again but it was sweet i still had jobs i could do, so i proceeded with putting the head studs in want to know why there are three different sizes? well in this photo there are four but dont look to close the longer 8 are for the bottom four on each side, we then have two short short ones for the middle on each side at the top, and then we have two medium size ones for the right hand side of the motor and now we have left is one long and one short for the left hand out side. here is why we have a long one. the casing nut is really far in the block so this is why we need the long one. i went over a few of these with a tap as some were a little funny but most of these were finger tight. and that's a photo of the finished result i ended up lock tightening this bad boy as it was pretty much finger tight and was very lose he holds on the fuel pump btw looks some what like this, thanks to google you'll see this in photos to come. next was the pistons, now on the top of the pistons you will see an arrow, that arrow goes to the fly wheel, and well if you are rebuilding an engine you might not be able to see the arrow so on the bottom of this you will see the little bulge on the piston, that is the equivalent of the arrow. and always place out your circlips with your pistons so if you lose one, you should be able to tell now, top tip. don't do this drunk cause things will go wrong and you'll have to do this again tomorrow. Pauls friends learnt this the hard way you can kinda see the little bulge on the right hand side piston where the vivid mark is now if your clever you put the inside circlip in so you slide the gudgeon pin in with out having to go through the head studs. i guess you'll do it a few times before realizing how much of a retard you are and figuring this out. i probably would have done this tbh. we also put the oil pump in and torqued that up, also put goo in it to oil doesn't come dripping from it. i got told off for been to efficient and maybe putting the studs in a tad to far for these bolts to go on. but hey they worked right..... perfect if you ask me. next day now, time to clean the heads. and what do you know bloody norm (parts lady) has packed the wrong heads so i go back and yell at paul, who yells at norm and i yell at norm and well then norm gets the other heads which she got told to grab to begin with. lets see if my new barrels fit in this lot huh. hey hey we have a winner. time to clean these. and then back to the hot water so it can evaporate even thought they wont rust. it was at this stage i got shown this cool two peace crank hows that for cool........ it even drove broken. just made a funny sound. ok time to get back to the engine. time to put all the studs in the heads for the exhaust, intake and the rockers. all done. before i knew it Paul had slid the barrels on and i was over here putting the new oil cooler together now this isn't a factory oil cooler for a standard fan shroud which you would see on most beetles and early kombis. this is what they call a dog house. a dog house fan shroud works a little different and instead of the oil cooler been in the middle and the heat from the oil getting pumped onto the left hand side cylinders it gets air pumped out the back and the air just disappear not heating up those cylinders. here is a photo of one in the shop that paul used and showed me. note the oil cooler there out the back. and here is a photo off google showing you with the extra tin wear on how it works now i asked Paul should i have one of these. he answer was yes. but not cause i said yes, yes cause..... and then explained what i just explained. it was a pretty no brainier why we should be putting one on the engine. i just come across this image as well you might find it help with my bad explaining here is a standard one and the oil cooler usually goes between the letters a and b pretty much and the heat from your oil just gets spun around and onto your cylinders ok so i also had to change the oil cooler bolt. from a standard one to what we are now usuing. doesn't it look so cute. the one on the left is the old guy. we went to see if my windage pus rod tubes would fit next fuck me i just wrote this next section out twice now and hit ctrl z to go back one steep and lost it all fuck me i'm not doing this again or i'm not going to have a fucken computer come tomorrow!! FUCK back to my windage tubes. this is the difference between standard and windage tubes well yeah the next photo is of mine cut down to standard lenght haha this isnt that funny after writing it the 3rd time now ok so now that they are done time for the heads to go on now. and my next job was to do some more cleaning, im getting pretty good at this cleaning stuff now. so cleaned they were and paul chuck the rods in and bolted the rockers up and checked the tolerance and put them at 6 thou while i was off next door doing something else. i asked oh nice were are your feeler gauges, he point at his tool box and said some where in that thing if you want to find them and check. i ended up asking how on earth did you work out what 6 thou is with out using them. his response was when you have cars driving from hours away to your shop and you burn your god dam fingers from checking tolerances you sure as hell learn quick how much 6 thou is and its _____ amount of turn from touching. ok so yeah i didn't check this guy knows whats what. next is the rocker cover and gasket, now what we do here is we smear a little grease on the asked both sides and then slap the covers on. want to why we put grease on the gasket? well the detergent in the grease eats the cork gasket and glues it together so they dont suck in or fall out of place. wish i knew this when i had my 1st bug after it happening so many god dam times on my way to and from leadfoot. old @Archetype will be able to tell you about this experience as well. was not good. so the engine now looks like this as you can see we now have the alternator stand on, yup an alternator not a generator, those can go in the fucken trash. one less thing to fuck out, these things are self regulating as well. next is the tin wear. that wont be hard its all brand new and will just screw right on i laugh so hard!!!! this is what people must think when they but kit set upholstery haha. yup had to modify these peaces to fit. i think it was a total of 5 peaces i cut or modded to fit. and then i took this photo for the Instagram people i really like it. and it was also the end of that day. another day now. next on the list was making the intake bolt up and work. but firstly this bus has vacuum operated boosted breaks. and the vacuum comes from the intake. these intakes come with a little hole in them that we plugged up as its to small and kinda in the way once you try and put everything else there. so we have to drill a new one and find something to make it work as these hoses are huge. drill said hole here. you can also see the black grub screw that was filled. time to dig around in this and we came up with this tapped the hole and put some cement around the fitting before we put it in. call that job done. its at this point its fucken great that Paul has a shop like this with all these little things laying around and taps all different sizes. shits pretty legit now yeah that didnt fit as well, the runners on the intake on the left hand side was a little long, so Paul used and hack saw which would have been as sharp and a bread knife to cut it down to begin with and well yeah had to be cut down some more, i used a grinder with a cutting disk on it i proceeded to ask if he wanted it cut straight or on the piss like he did, got told to shut up smart ass and cut it, and cut it straight! haha bolted it all up and put the carb on as well. time to slap the exhuast on. 1st job 1st j pipes. but wait a min. lets cut some more tin wear haha. these are j pipes btw. they go from the rear of the engine under the block and out the front to meat the other half of the exhaust, factory ones of these have big fins on them and a box around them which heats up and that's were you usually get the heat from for a beetle or a bus in side the car. here is an example of what factory ones look like now the moustache bar. now i know your asking what on earth is that? well this bolts to the engine and acts and the engine mount to the body of the bus. looks like a moustache doesnt it? now for the front half of the exhaust. these usually have heat risers on the top. The heat riser forms two important functions. It prevents ice forming under the carburetor (caused by the fuel evaporating and cooling the inlet air below freezing - icing will eventually block the manifold and stop the engine. (straight cut and paste from google here) but mine were blocked off. they do serve a good purpose. me and my friend grinder sorted this out also Paul put the alternator on at the same point i was doing this. he asked me if i wanted the flash nut or the standard nut, i said whats cheaper, well standard nut it was...... only until he found i had a flash nut for my main crank pulley, but he put a crap nut in there to match my cheap ugly bolt up the top. we now had to put an oil filler neck on this. these come straight for difficulty or bent for a bit easier. guess what guys, the straight one comes black and the nice shiny looking one comes in bent..... well fuck me ok put the bent one on but if ya god dam doing that put the shiny bolts on, so old crapy bolts off and shiny ones back on. this is what im talking about here. these go on the alternator stand this is the straight one and black well now thats on lets put some oil in it time to put it on the engine stand shull we. and that's the night we started it. ( i also just copied all this and put it into a word document in case it didn't save and i was going to be pissssssssed off )1 point
-
Yes, still going.. Been a bit slow as for the last 2 months I've working in queenstown, but took the 10 day easter holiday and knocked out the rest.. Trimmed the bottoms of to stop the warpage while I figure out how to attach the trim.. 10% wastage? And I'm 80% through my stash of mac, think I ordered enough to go tight with no negative detail.. Still want to build a shed somewhere so it can go towards that.. I still need to figure out what I'm going to do round the bottom.. Initially I was gonna put stone (more specifically Oxford basalt which is black) around the bottom but the cbf factor is high with that, I then decided I'd just stone where the columns are and infill with roughsawn timber stained in the same colour as the spouting.. But now I'm not so sure, ss some of the stumps aren't evenly spaced and there's a couple of points where the house canterlevers over the nearest stump by and 500mm.. Decisions decisions...1 point
-
You mean drill out these things? Got a bit more done today. Have been looking at the driveshaft bearing hanger mounts and thinking they need some added strength. Not sure if they were just a bit misshapen outa the factory or the last engine moved them around but they were definitely a bit bent outa shape. If the latter then was gonna get a lot worse with the new engine setup, so straightened up anded some more steel. Before and after below, added a big piece of 5mm plate to the front side of the mounts which ties them together and boxes them in and also some 10mm bar either side to stop lateral movement. About 10x stronger now Id say, I dont have a hoist so this was confined upside down tig action so pretty tricky welding1 point
-
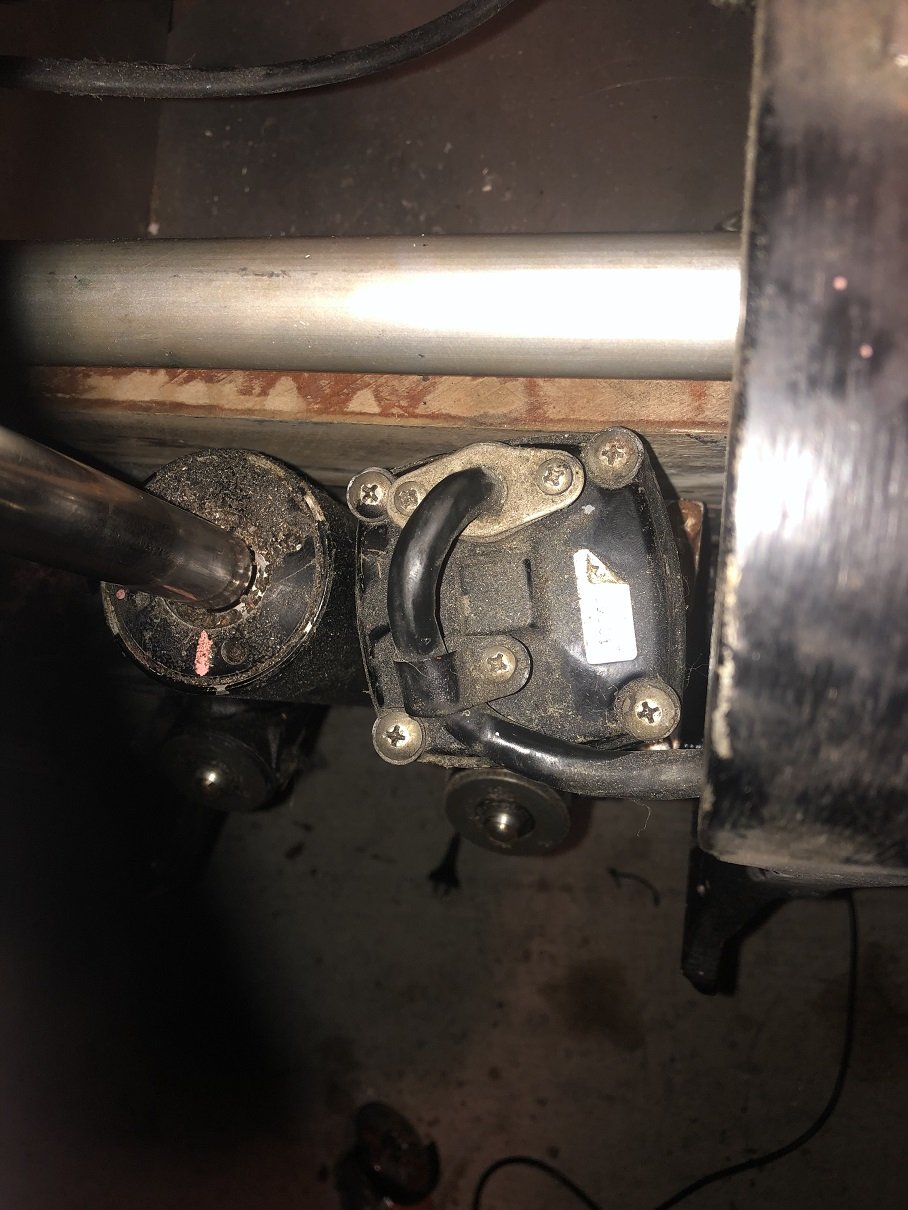
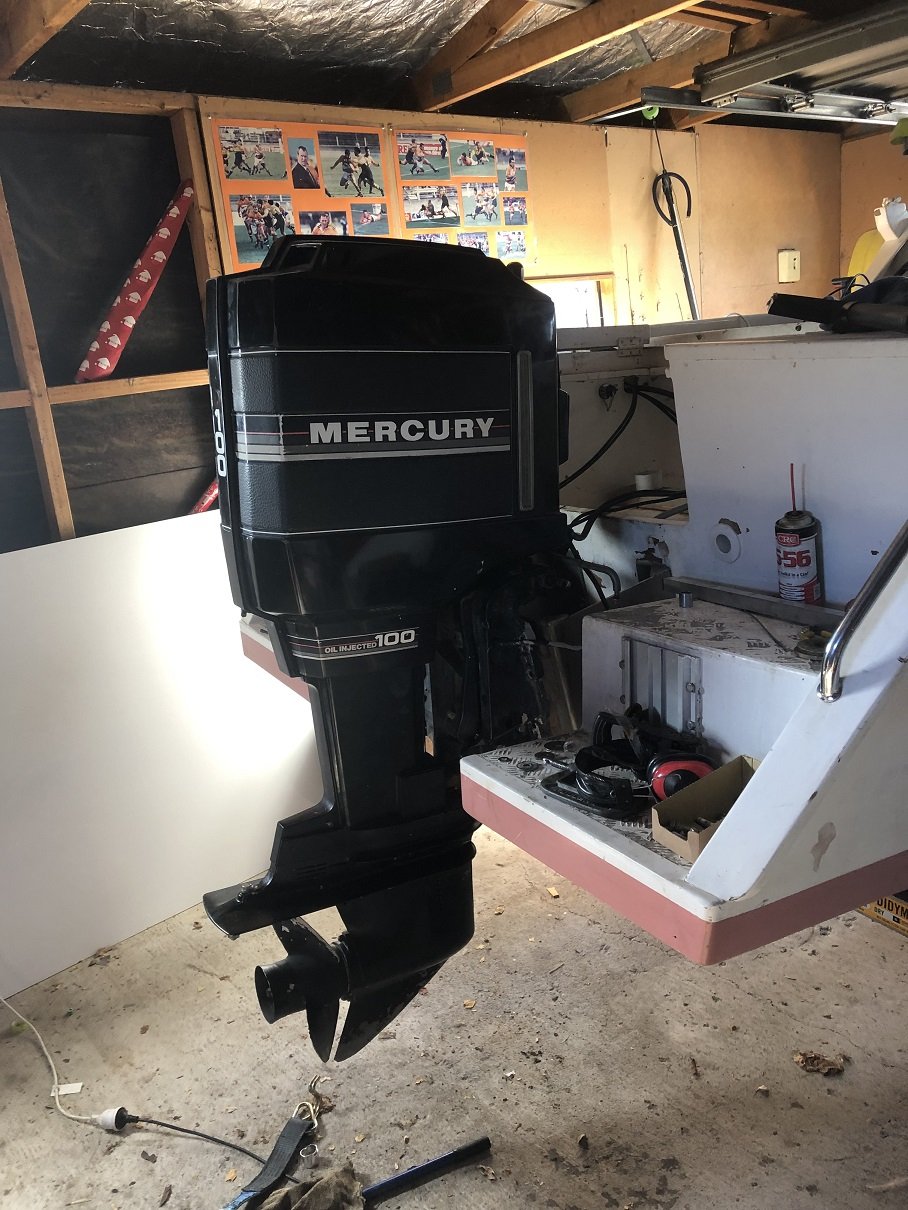
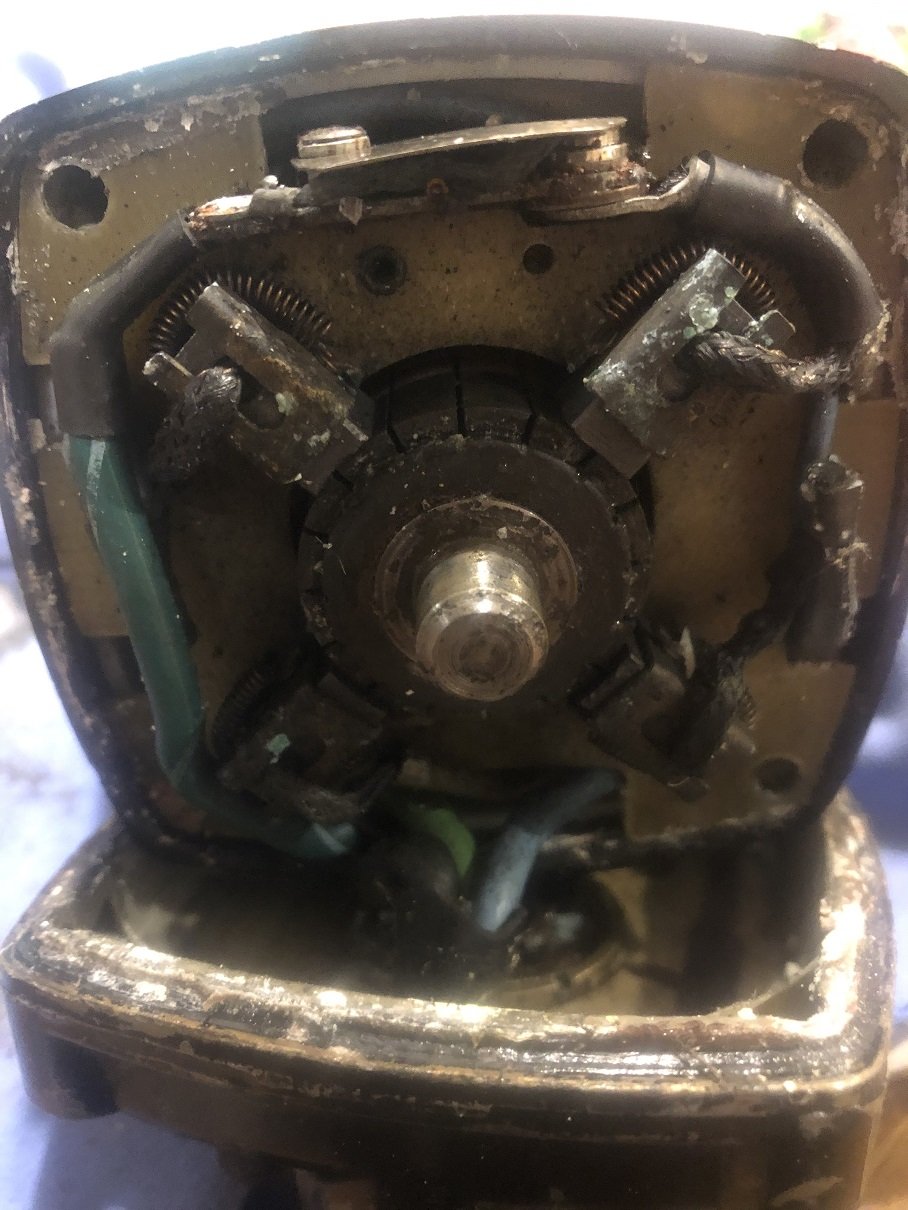
Took old motor off, put new motor on. Wired new motor, went to trim it up, solendoids clicking but no movement from pump motor. Bugger Had to remove one side of mounting bracket to get at this bugger. Cracked it open to find that the commutator and bushes were covered in oxide Sanded them back and hit it with a liberal amount of contact cleaner Put back together and is working ok, a little noisy and a little slow, will replace in future. Leaves me with this- Ready to start on a fine day with no kids.
1 point
-
Side sharn, back in 96 I had a KE30 I bought off a guy in my rugby team for two jugs. (It was a "bit rough". Removing the steeing wheel I tugged and wiggled it. It came off suddenly. And the wheel smacked me in the face hard af. I was sure my nose was broken. Lesson Learned. I've never forgot that.1 point
-
Got some more done. Painted the factory extractors and the air filter casing Picked up the new proportioning valve from mitsi this came in a pair so have a spare. And installed it conveniently in place of a female bracket on firewall Began to bleed the brakes but unfortunately the rear wheel cylinders started leaking argh.. It's over extending and leaking out of end of piston sleeve. I took one back and a replacement is doing the same thing now...the guy matched these up and no listing for orginials and these are off 70-81 I think Corolla and coronas.. Frustrated I'll leave it for time being and tackle it again in a day or 2. I had adjusted the auto adjuster so it was wiggly to get the drum on but still extends to far and leaks1 point
-
Got the drivers seat in and sitting nice and snug. The steering wheel is about 40mm higher than factory with my steering setup etc, but I am a maxi frame size so the more legroom the better, and where the seat is placed is super comfy for me, with all the controls nicely to hand and heaps of legroom. Unfortunately this meant a wee bit of a hole. Firstly I welded in a brace to replace the bit of probably important body mount stuff that I had to clearance. There is a whole lot of weld through primer on the back of that. Then I fashioned another bit of sheet metal to fill the gap. There is a bit more welding to do on the inside by the engine but I will do this when the cab is off next. The same deal also has to happen with the removable cover, that will be tomorrows job. Unfortunately the steering pump could do with being still a bit lower to clear everything, plus the seat belt mount frame thing that holds the socket and sits behind the cover will need a bit of loving too. I looked at the passenger side seat as well, this will need a bit of clearancing but all on the engine cover, not the body. That's next on the list probly.1 point
-
Update - all items on the list are done apart from adjusting the hand brake and moving the rear hard brake line up a tad on the diff. I fired the coupe up today and idled it for 20min the drove it up and down the road to get some heat into it. I wanted to monitor the temp and ensure the fan is doing its job and that the rad isn’t spitting any fluid. Pretty sure some neighbours applauded when I turned it off. That just made me turn it right back on. Cert recheck 14th May and toad test. Here are are some pics from today
1 point
-
And you know crowbars are the v.i.p supercharger tensioner1 point
-
The wheels went out to Pine engineering. I was not stoked with the old fasteners. One lip was suspect. Actually a lot of stuff not real flash. I was not disappointed I had them done by Pine either.1 point
-
these ones had equal length shafts so i left them where they were and trimmed them Good Question! Mainly cause I used up my car time and had to do something else. Next day i did go for a hoon, went ok (better than the single carb!), but rich and lean spots and hanging on idle, etc, carbs not going back to idle in balance, etc So, I pulled off the carbs tweaked/ground back the linkage a bit more (master and slave levers were interfering with each other a bit), drilled the carbs mounting holes to 9mm (from 8.5) for that little extra bit of slack, reset the float levels, (12mm for these newer ones with a 26mm droop vs 8.5 and 15mm for the older style) pulled all the jets and gave them a clean out - two main jet stacks were not fully seated, and one accelerator pump jet was blocked ground some of the dizzy scoop on the manifold some more (while i could feel how thick the wall was with the carbs off) installed carbs and rebalanced/set idles etc hooned Great success, but does have a lean point off idle (progression holes?) and is a bit rich elsewhere esp on WoT, thinking of upping the mains to the 135 i have (up from 125) but also increasing the air corrector to reduce the richness at higher rpm (190 currently, no spares), but that is for later. Engine runs and pulls much better than with the single already, sounds great on song and has a pleasing burble at idle, and near silent on cruise with an instant response to stabs of the jandle. reccomended1 point
-
Did you consider any other similar hybrid type vehicles before deciding on a prius?
1 point
-
What you don't get from the vids is how utterly amazing this thing sounds. Pootles around off boost and sounds very lucid, then all hell breaks loose. #wouldjumpagain1 point
-
Done another little run last weekend. no drama's, just a few more dents in the door.1 point
-
starting to get this ali welding sorted. half my issue was the torch and cup setup was junk and leaky. got a new gas lens setup and the old china welder is working legit again center section between the 2 mufflers Need a couple more bends before can finish the exit1 point
-
Exhaust is pretty junk. has be cut up and beaten with a hammer to fit around the link setup & crossmember , because couldn't be assed making a new system at the time. after all that it still vibrates on the chassis Originally was going to make an ali muffler to keep weight down. but had this old stainless extinguisher hanging about. Drilled some 3" holes and chopped and end off. brought perf baffle for it and a reso Packing done. it sucked to weld because its super thin, maybe 0.9mm. but its pretty much the same weight as the reso and alot lighter than the one on the truck. lets see if it blows up looking through both mufflers. Since i was too lazy to test fit it before i built it. it doesn't actually fit where i was planning on putting it. have found a new spot for it, but more parts required.1 point


.jpg.4788453673b7e299006a46b2daedf177.jpg)


This leaderboard is set to Auckland/GMT+12:00