
Leaderboard


Popular Content
Showing content with the highest reputation on 04/22/19 in all areas
-
Sorry I’ve been a bit quiet, been busy with mrs car, change of work, wee motorbikes and then lazy. i did do the H165 diff swap! My boss went away for 3 weeks and left me his car so I took the opportunity to sort it then. No great pics but after I cleaned it up I hit it with some black zinc and then spare 2k black my flat mate was using. black zinced the springs and bolts and brackets and shit, swapped the shoes and cylinders etc over, cut the old shock mounts off and welded to new diff, swapped the hose mount to opposite side, tidied and swapped hard lines and handbrake cables and made a small bracket to move the cable mount about 50mm across. Cbf cutting it off and rewelding and painting again. had to shorten and balance driveshaft using the larger rear flange off Ute to suit the new diff. Also scored a factory style output seal for the box with the the steel shell through a supplier at work. i don’t like the new ratio ill keep an eye out for a different head I guess. Have spent ages adjusting the brakes and starting to get somewhere. Then a yarn cam up of a NOS roof skin in a blokes shed roof. calls were made and it showed up a few weeks later. Was damaged in transit yonks ago and the guy tucked it away for a rainy day. well everyone knows my roof is fucked from a fire way before bart and I had this so it’s forever changing shape and now the bog has cracked. Time to re-roof it. Now because it’s a datsun, of course the cunt was rusty despite never touching a car and being dry its entire life.. It had a few dings and scrapes but most hammered out well, the rest will be done when it’s stuck to the car so I have some rigidity. i buzzed it All back and wire wheeled the Deep bits and hit it with 2K epoxy etch to seal away the baddies. The inside was much better so just got rust converted after wheeling. sorry to the neighbourhood for 90 minutes of this bitch singing on the panel stand, very harmonious for a Good Friday. so yeah, dunno when I’ll attach it now. Means I should do new rubbers and change to a better screen, a real headlining at the same time too. $16 points
-
Its been a while since the last update but i have been chipping away at this project. I finished the weldathon on that bus and it was picked up the next day. The owner is really happy with my work and it turns out he has quite a collection of classics. He now wants to bring me some of the cars, including a mk1 mini cooper, for some rust work. Cool! While the bus was taking up space I had been sneaking in some work on the wee Imp. I fitted the engine up to the transaxle, weighing the engine first. 87kg with the flywheel in place. Not too bad at all. Not super light like the standard Imp all alloy unit however I have moved so much stuff to the front that it should still be well balanced. I do love the idea of an all alloy Nissan cg13 twink from a K11 Micra- however that would require a full re-certification. I prefer the idea of a Goldwing engine engine more! I digress. So anyway- I had slung the engine in place using a lump of timber and a ratchet strap. Worked fine. Then started making new engine mounts and cross member. I was not happy with the state or look of the old one and knew it could be far better. Not really a lot to say about making fabricating it all- the usual story of lining the engine up exactly central and building things to connect. I wanted to make sure that the exhaust manifold and starter could be easily removed without touching the cradle. I probably over built it with extra bracing (I even ended up adding extra gussets just before painting it, because ocd paranoia) but all up it still only weighed in at around 7-8kg. In photos. I didn't take many as work progressed on this bit really quickly.. Clearance under the car was still really good, considering how low the sump looks from the back. I think an optical illusion due to the rear panel not being in place. Then painted in black epoxy.. Next up was the exhaust. The manifold that came fitted was running really close to the drive shaft! Enough that it would contact when the car was lifted off the ground. There was quite a bit of damage, dents, poor welds and other bits that needed attention so I chopped it all back and carefully shortened the bottom pipes then systematically pieced it back together. I required quite a bit of forward thinking because the access to weld to pipes all the way round was really tight. No photos of work though as I was so immersed in the process I forgot to take some. Really happy with the result though. Fits perfectly, cleaner runs and still equal length (as if a Datsun A12 with a carb the size of a small cup would care. But hey, every little helps ) Later on I painted it and then wrapped the upper pipes to ward off heat from the inlet and coolant pipe. I know some dont like heat wrap but I think its great! Its worked well on my last several car builds. Luckily I live in a dry enough area to get away with it and not worry about potential corrosion. With that sorted I moved onto the rest of the system. I have always had a picture in my mind of what I wanted it to look like and I wanted it to be rear slung with a side exit to avoid the car filling with exhaust fumes. Apparantly these early Imps with the roof vents can suffer from fumes being pulled into the car by the vacuum. I also had a rough idea on how I would build my own silencer and there wasnt anything available that fitted my ideas with a price I liked. I had built one for the Mazda Rx3 and it worked well. Money is tight (I'm too tight..), time is plenty and I love making things so I started building. Using the pipe from the original straight through muffler.. Then fabricating my silencer using some ideas I nicked from Google along with extensive coffee fueled airflow thinking in my mind. I have no idea on what it will sound like but it was a fun process and looks neat. The stainless pads worked well in my last muffler along with some glass matting I got from the neighbour. I'll report back In photos... I had a pipe bent to 90 degrees and added mount points to the muffler so it slings up under the rear valance. I made a stainless heat shield to deflect heat away from paint and bottom pulley. You'll see that later. I have yet to decide on the length of the exhaust tip, cut it and then weld it on to finish. Then the inlet. Because the Datsun engine sits flat in this Imp, unlike the rear sloping angle in its usual Datsun 1200 home, the carb is not level. I chopped off the mounting face and milled the manifold at angle to suit. Then I welded it back in place. Carb is now level. I filled in an unused vac hole, cut off the extra unused lugs and gave the whole thing a clean up till it was nice and smooth. While I was playing with alloy I made a new alternator bracket... and had to rebuild a very corroded thermostat outlet. it was knackered... I was given a better spare by a nice fella with a Datsun 1200 ute but it pointed upwards. My outlet, most likely from a van, points down and suits the pipework routing I wanted to do. So I had to fix it. I found a suitable piece of alloy pipe on an old scooter handle I had rescued from the local scrap metal pile at the dump... Much better! Then onto the pipe work in the back... Just a case of sussing out a neat route to suit my tastes, remain easy to work on and remove and allowing for a potential Davies Craig electric water pump just in case the Datsun pump is not up to the task (and also because I do rather fancy the geekiness of the little display unit not to mention how much better it could work) With the pipes sorted I replaced the transaxle output seals because well, for $20 it made sense to do them now. I machined up a stepped tool to make sure they went in straight and to the correct depth. New seals.. Then mounted the brand new BMW couplings I bought from Rockauto. I had to make some spacers to suit as they are narrower then the stock Rotoflex couplings. With the car on the ground the driveshafts sit almost bang on parallel to the ground which is good for their longevity. I didn't fancy reusing the red Nolathane couplings that came with the race car because whilst strong in shear and rotation they didn't have much flex in and out which would impose quite large stress on the transaxle casing as the rear suspension went through its motion I felt. I then did some fun little jobs (but its all fun really..) like cleaning and painting the starter and alternator... I dug out my old art oil paints and mixed up a suitable orange to paint the inside of a very faded rear indicator lens. It'll do for now but I do look forward to locating and buying some better ones when I go to Blighty in July! Then began the wiring! Like all my other previous car projects, I enjoy this part immensely. I love the challenge of hiding as much of the wires away, re-configuring the circuits to suit add ons or just to make them better. In the case of the Imp, which has no fuses fitted at all (until the later mk3 Imps came along) this was an essential item to address. It also has a terrible dash wiring layout whereby you have to unplug everything to remove the instruments. Almost everything seems to run off just one piddly feed wire coming from the key. I'll sort that lot out with some plugs. Add in some relays for the lights, fan. Wires for a potential electric pump, sound system, high stop lamp (I have a neat idea floating about in my head for that) and making sure its future proof because later on I would like to inject this engine. I have also added in a tail to attach a trailer plug to. Because that will be a thing So I had two extra looms going spare which I pulled apart. I now had a large amount of extra wires for my project. Wiring isn't the most exciting thing to take photos of. I have now finished the engine bay wiring and I'm pretty happy with it. Now I've refitted the rear valance panel and exhaust and can lower the car down and start on the interior wiring. I'll be making a removable fuse box/relay unit and fit it under the dash if all goes well. Some photos of where I'm at now...log burner in use as the nights get colder. Sofa wheeled over to middle of workshop for max stereo imaging whilst I drink beer and play with wires... Wires hanging from engine bay.. Engine bay completed (missing hose clip noted..) but for an over flow tank from header tank to fit. I will build a better two part tank in the future I think. Exhaust tip length yet to be decided and cut. Note stainless heat shield. Bumper also to go back on, with bottom mounted rego plate.11 points
-
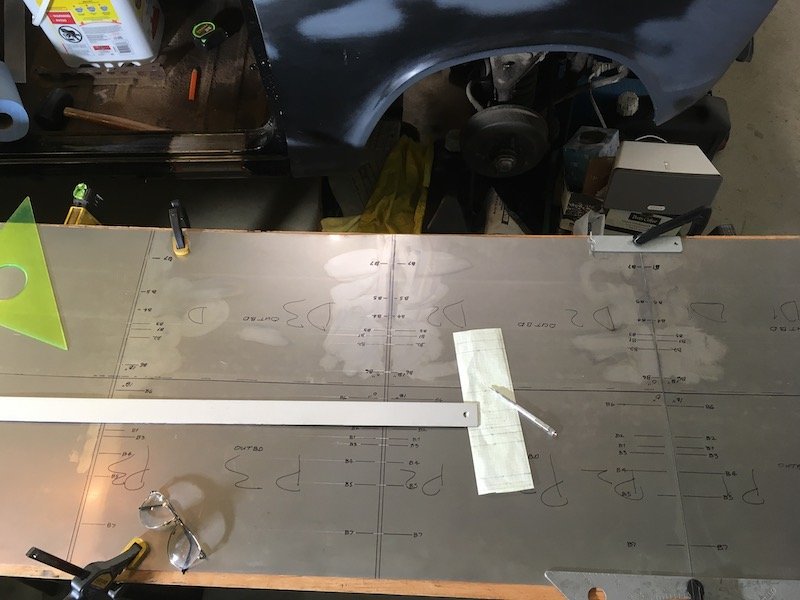
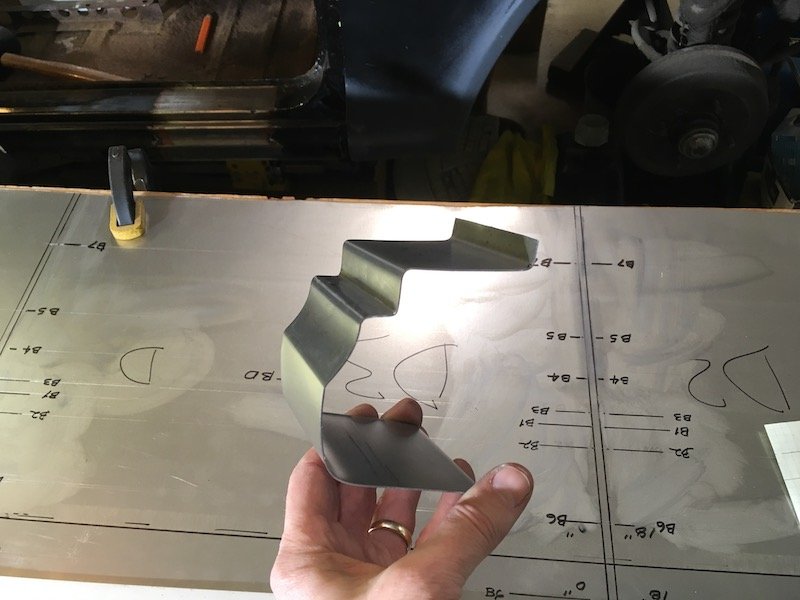
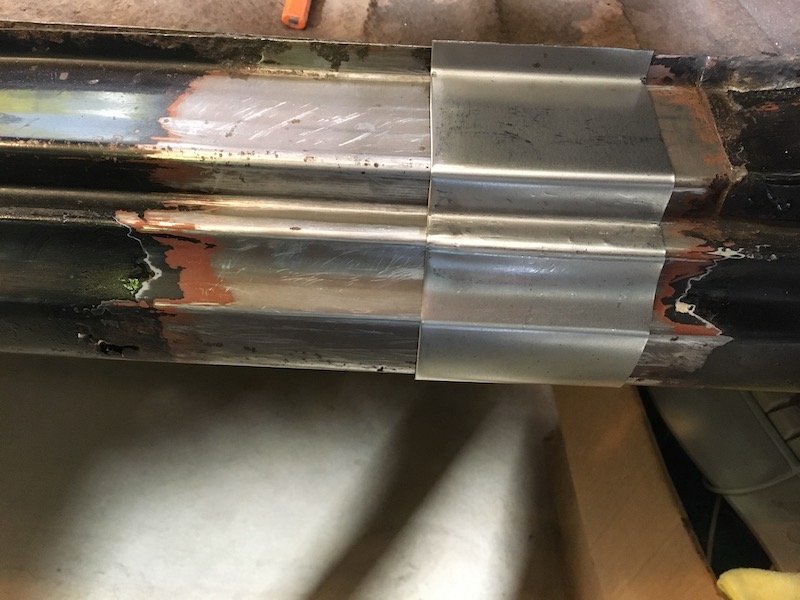
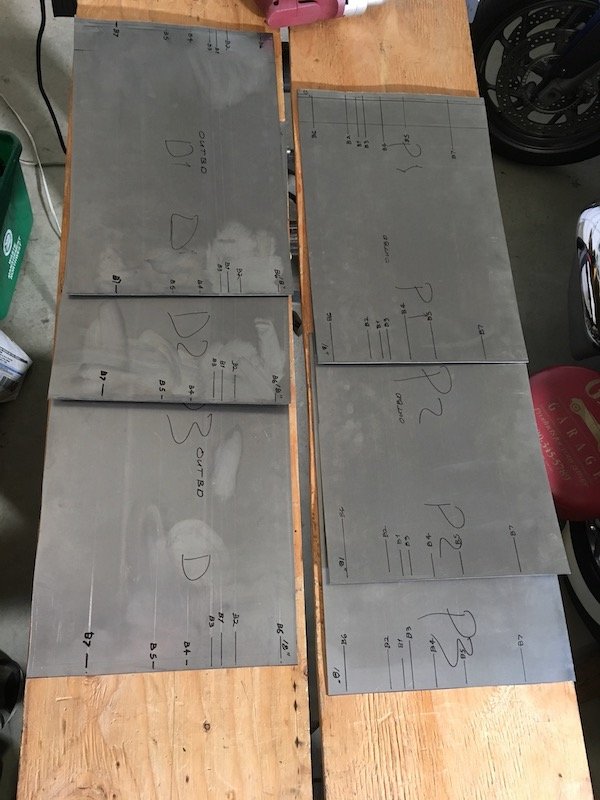
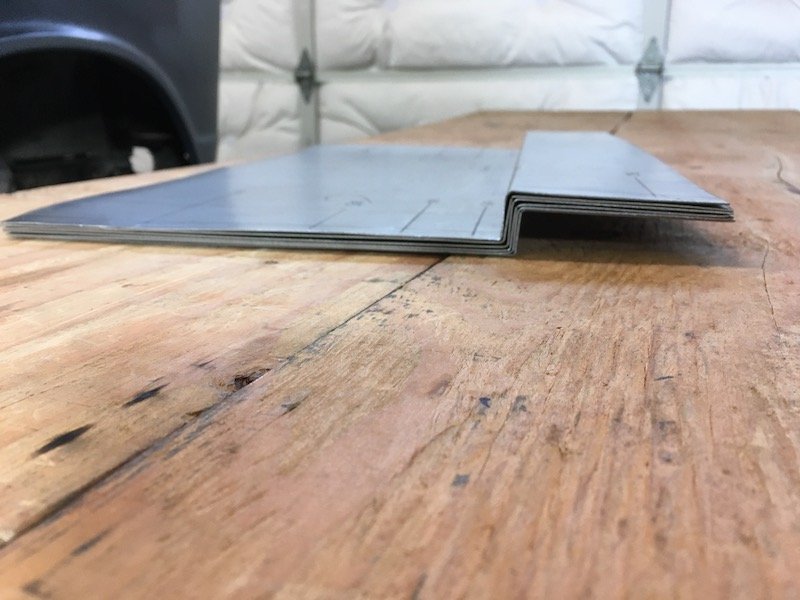
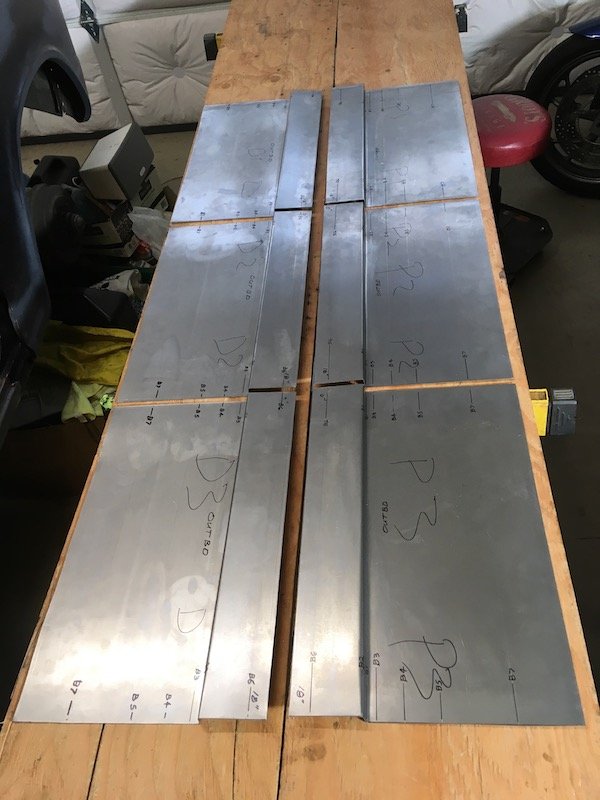
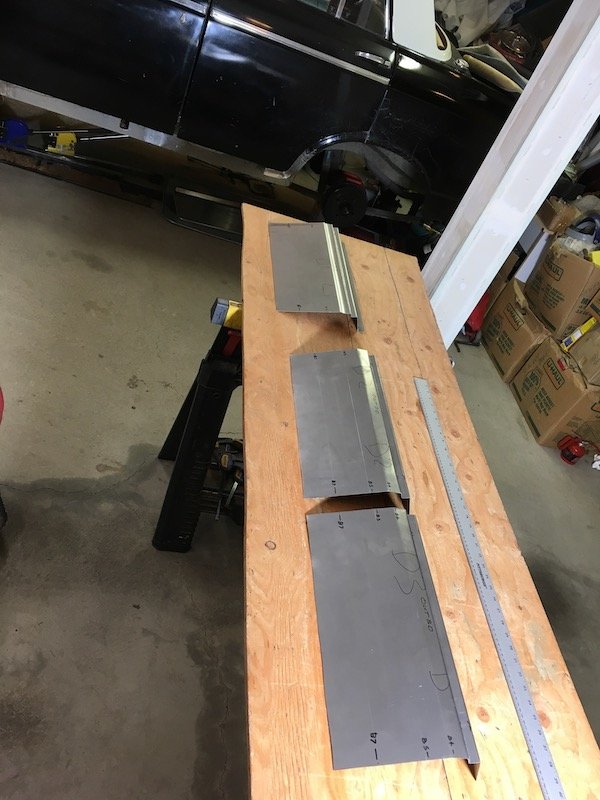
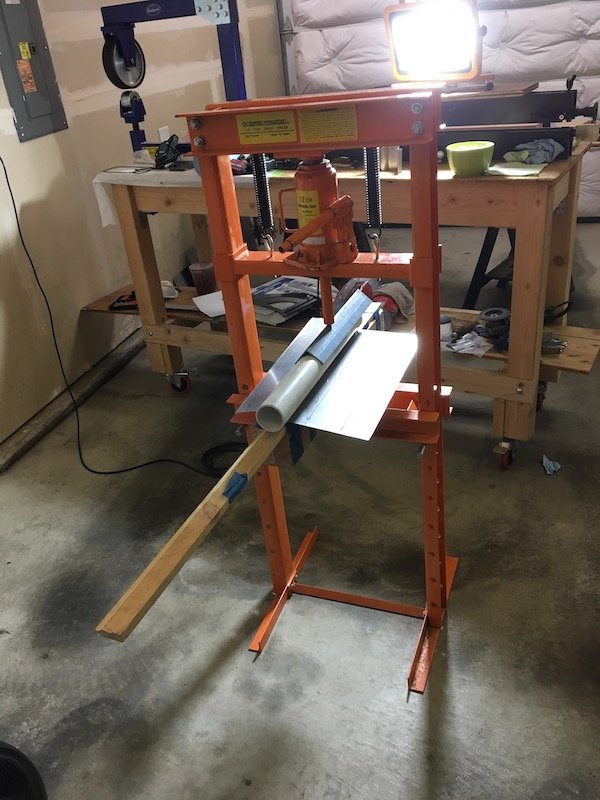
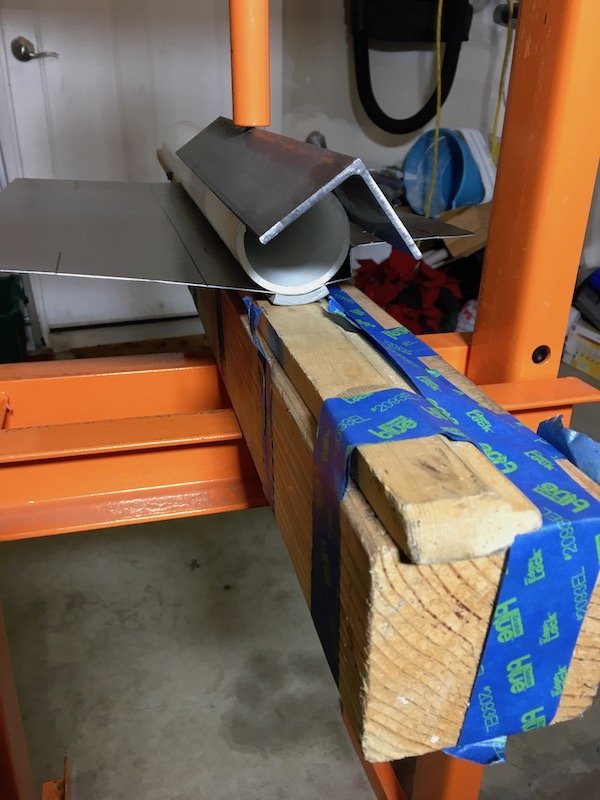
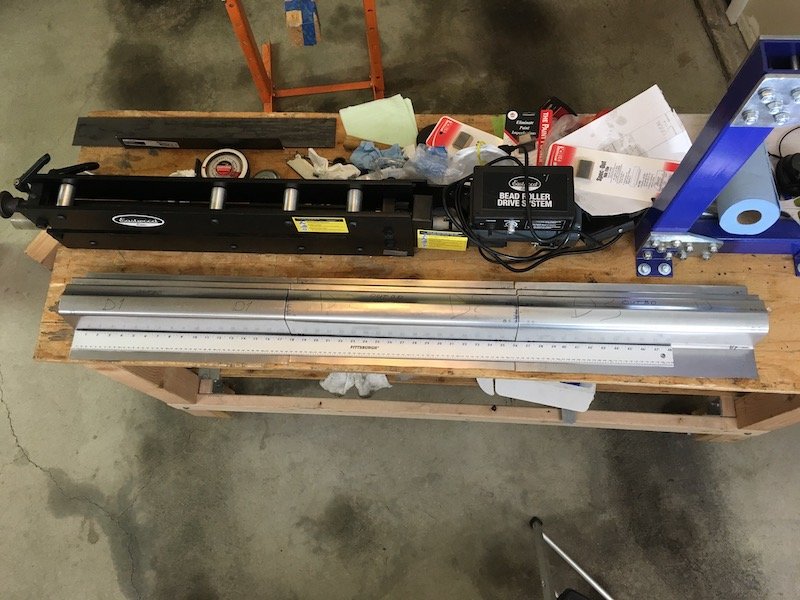
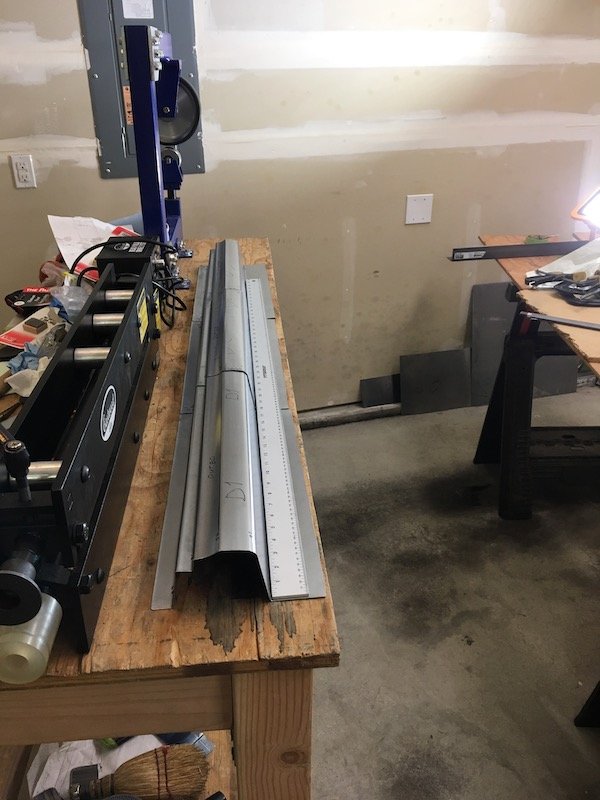
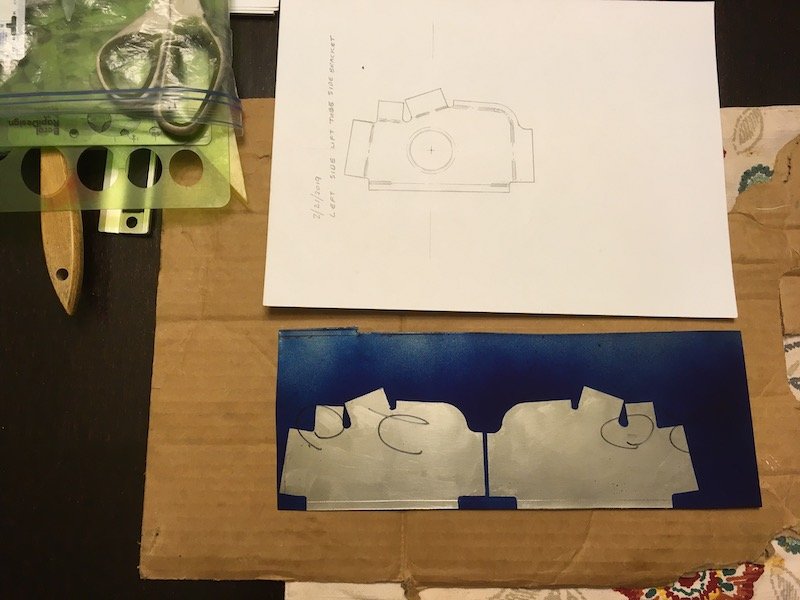
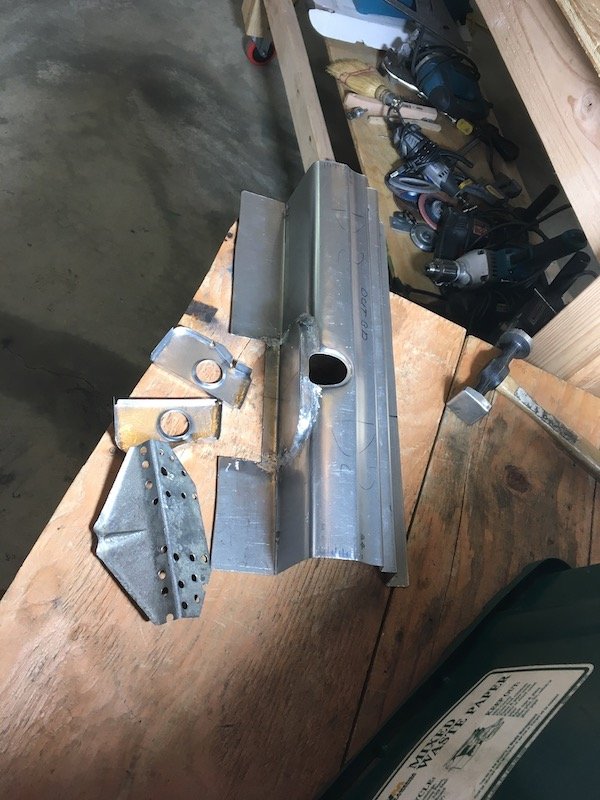
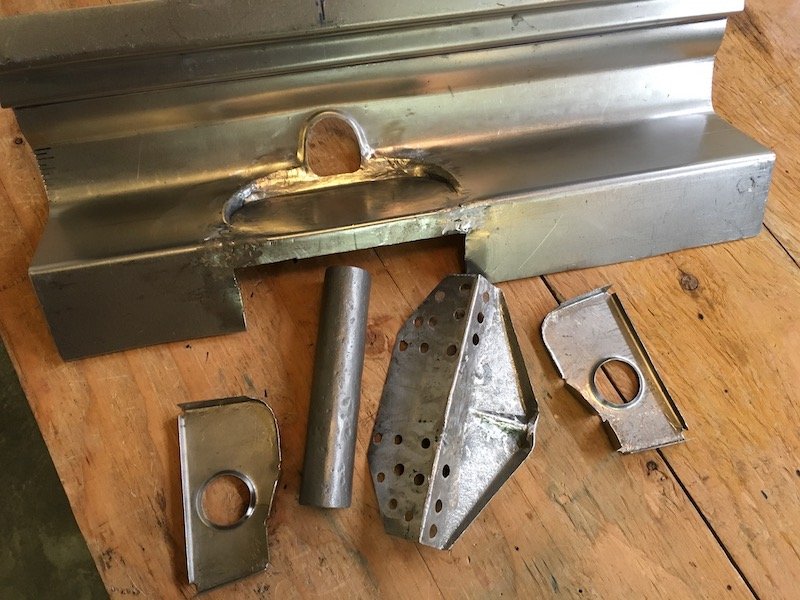
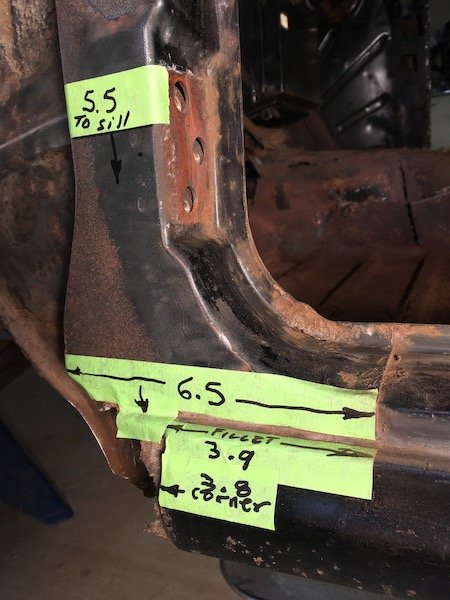
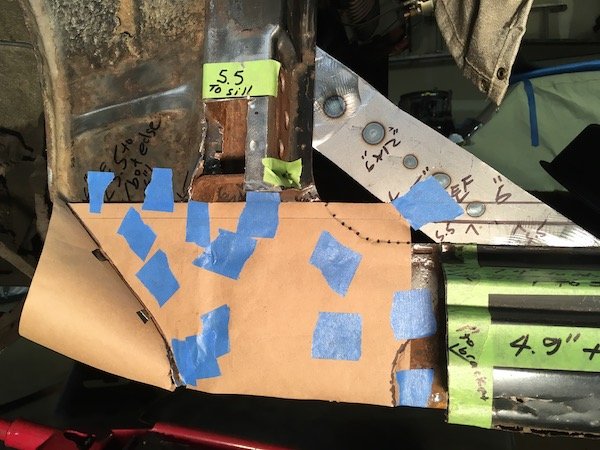
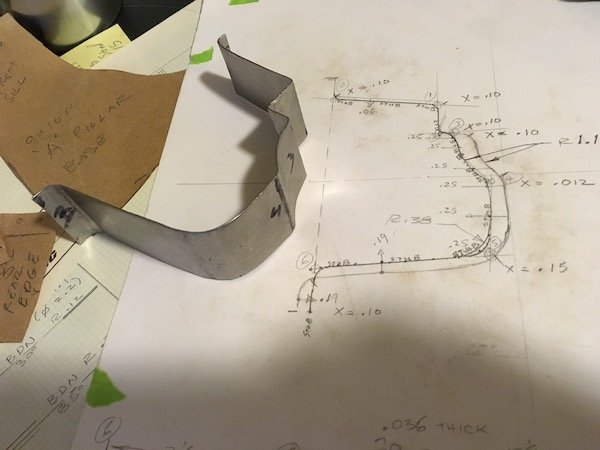
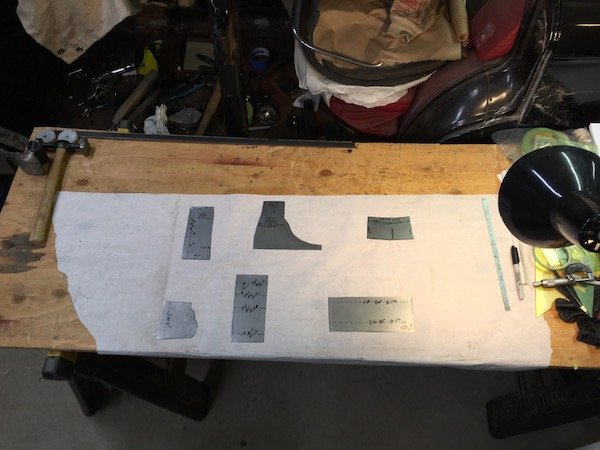
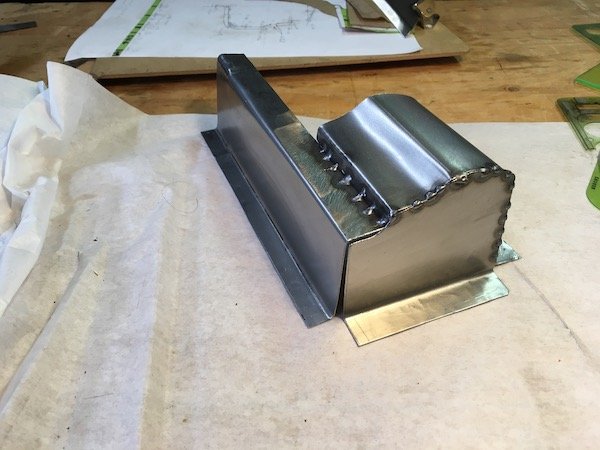
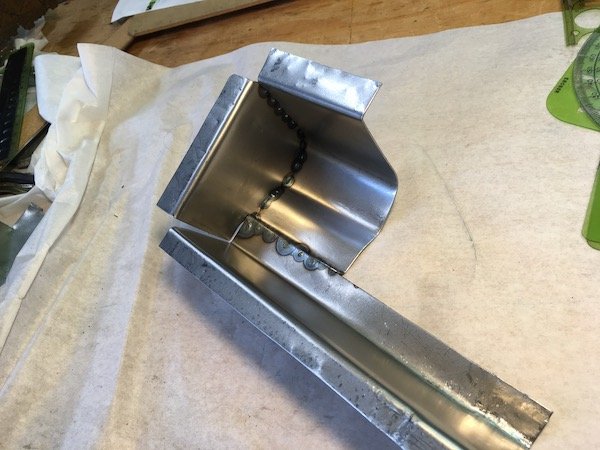
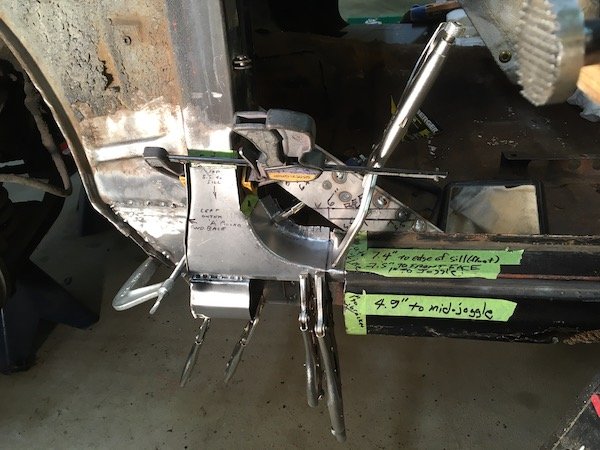
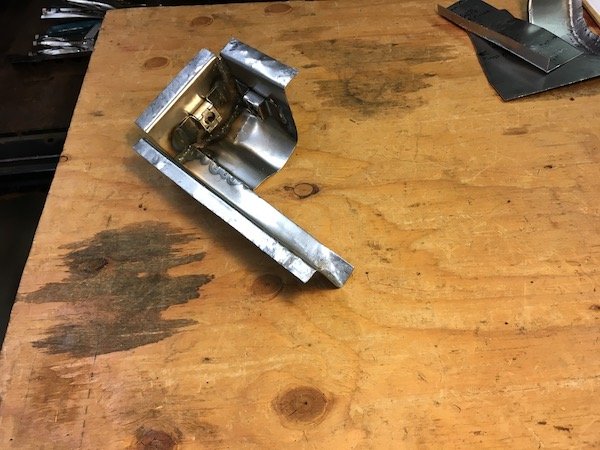
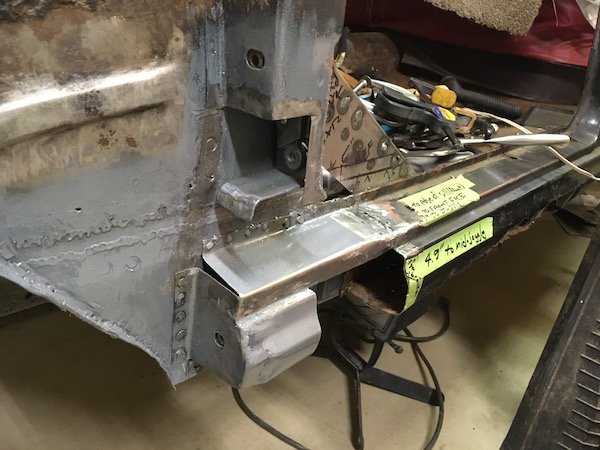
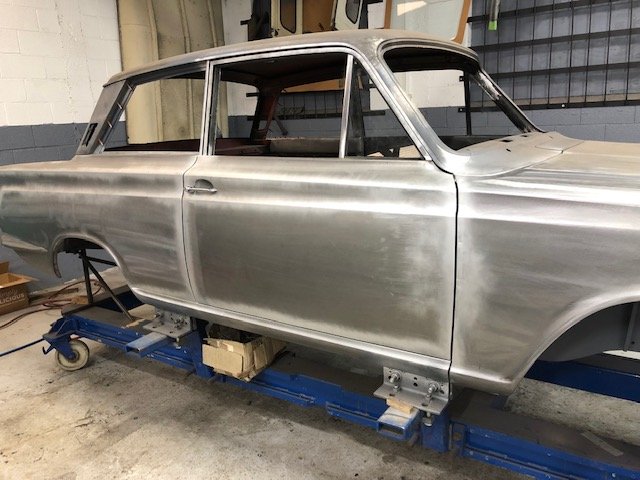
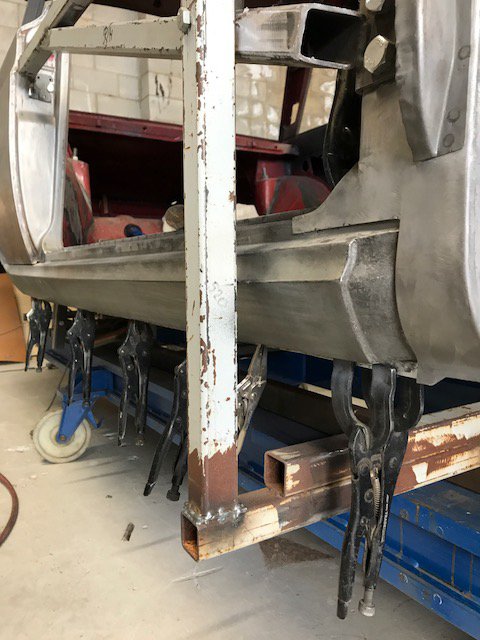
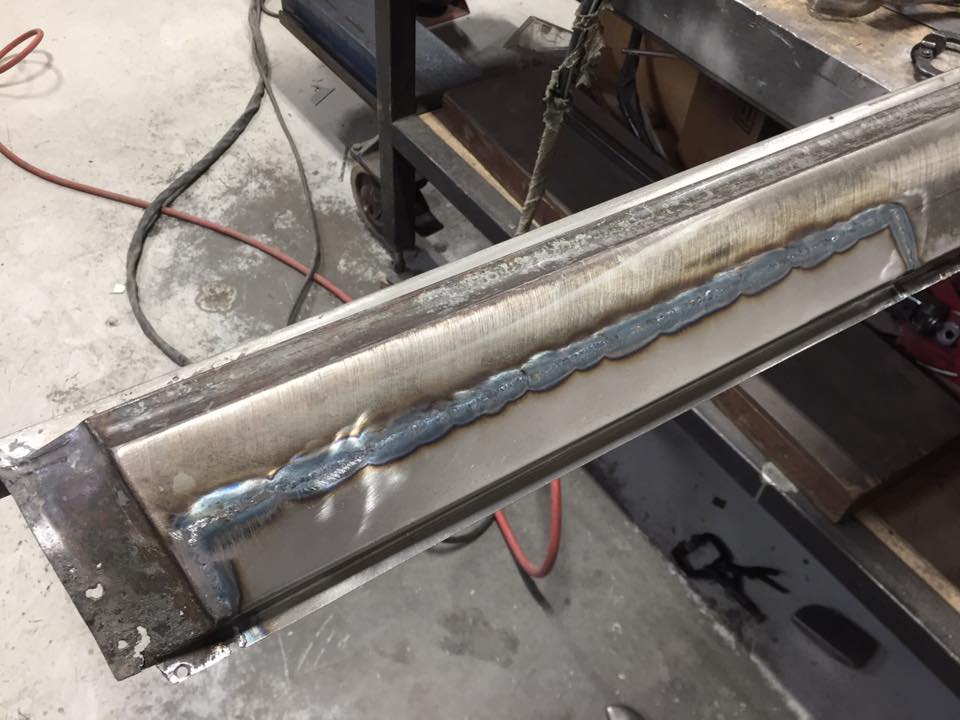
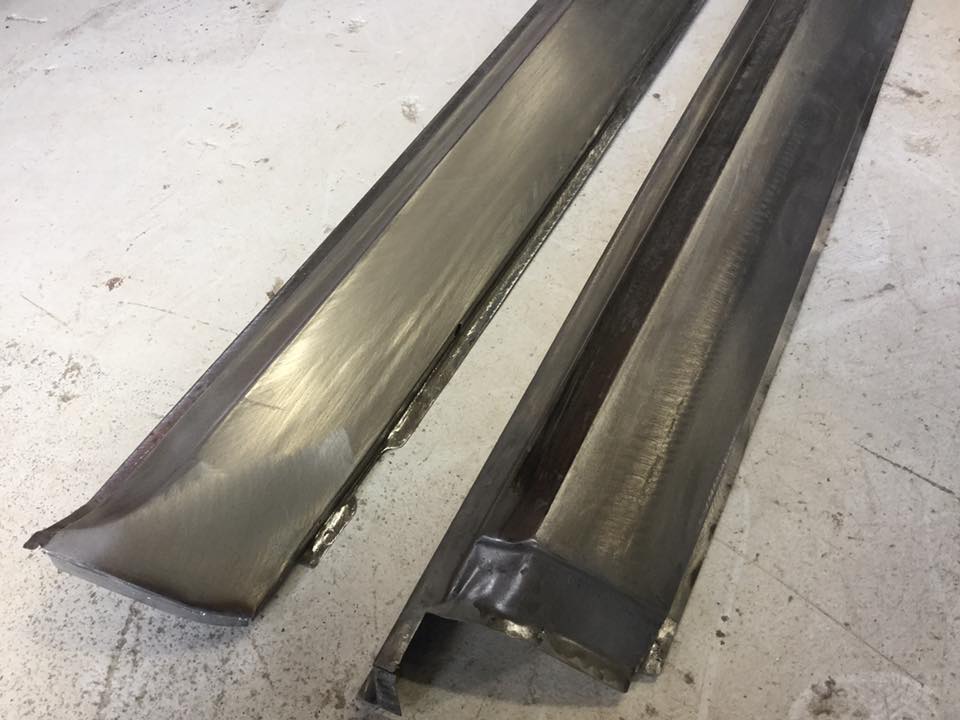
I got a little out of sequence. I should back up a little and show the making of the three outer sill segments that began about six months ago. Three segments because the metal folder tool only can do a 20 inch length maximum whereas I need about 54 inches total length. I also need to make offset bends. So there are a lot of challenges to make the sill. Makes it all the more interesting to have a go at it. Anyway, I have run into difficulties in duplicating the exact profile but it's good enough for usable parts on the left side. Maybe the technique can be improved upon for the right side. On the righthand side of the car I carefully measured and made a card template of the least rust damaged profile. Then began experimenting with and adjusting the seven bend line locations to figure out a way to make a sill. This is unlike a usual and simple sill that just wraps under the door more or less. The Bluebird has several visible body lines and a concave shape in-between. Plus there is the side of sill penetration for the jack lifting structure shown previously. This Bluebird outer sill is made of 20g sheet. Layout of bend lines The prototype profile Fits like a glove on sanitized right hand side Cut out six 18 inch long panels of 20g for left and right (D for driver's side or left, P for passenger side or right). Bend lines are marked more sharply by scribe marks so I can get good alignment when it comes to joining the segments together. B1 and B3 bends are offset bends and very close. This proves to be a problem Made the offset 3/4 inch bends for all panels (B1 and B2). Not perfectly uniform but close enough So far so good! As mentioned above, now I start having a problem at bend 3. This needed to be a tight offset bend from B1 at just over 1/2 width. The folder will only do 5/8 minimum (yet it was advertised as capable of 1/2 inch offset). Not good. I have to start compensating by moving the other bend lines to keep the visible body lines on target. The plan is to adjust the pillar bottoms to fit the adjusted sill profile, at least on the left side. I'd like a better plan for right side to get the true profile so I can leave the pillars unaltered. I'm considering having the folder plate milled down to get a true 1/2 inch offset bend, but that still leaves me with three separate segments to weld together. Either that or start over and make the whole thing as one hand formed piece by hammer forming each bend over a solid 90 degree edge of some sort. That might be wishful thinking. My crude setup for making the concave curvature between bends 3 and 4 Sandwich the sheet between plastic pipe, angle iron and squash it Checked out the fit of a couple of segments relative to the doors and the lower edge. Checked out as good. Three completed sill left side segments lined up on the rollaway workbench. Decent alignment of three segments. Looks like I can make it work when it comes time to join them End profile view of three outer sill segments all in line, just for kicks Discussion: https://oldschool.co.nz/index.php?/topic/60267-marts-pl310-61-datsun-bluebird-sedan/
 9 points
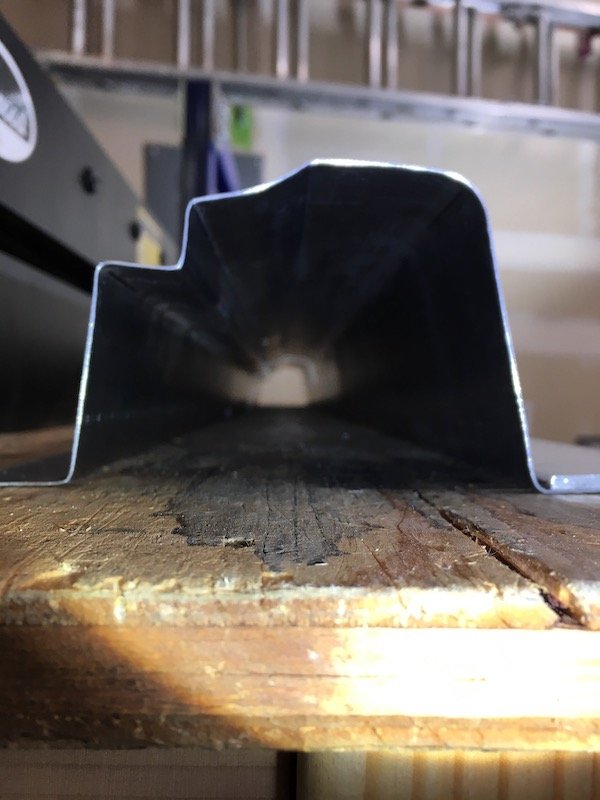
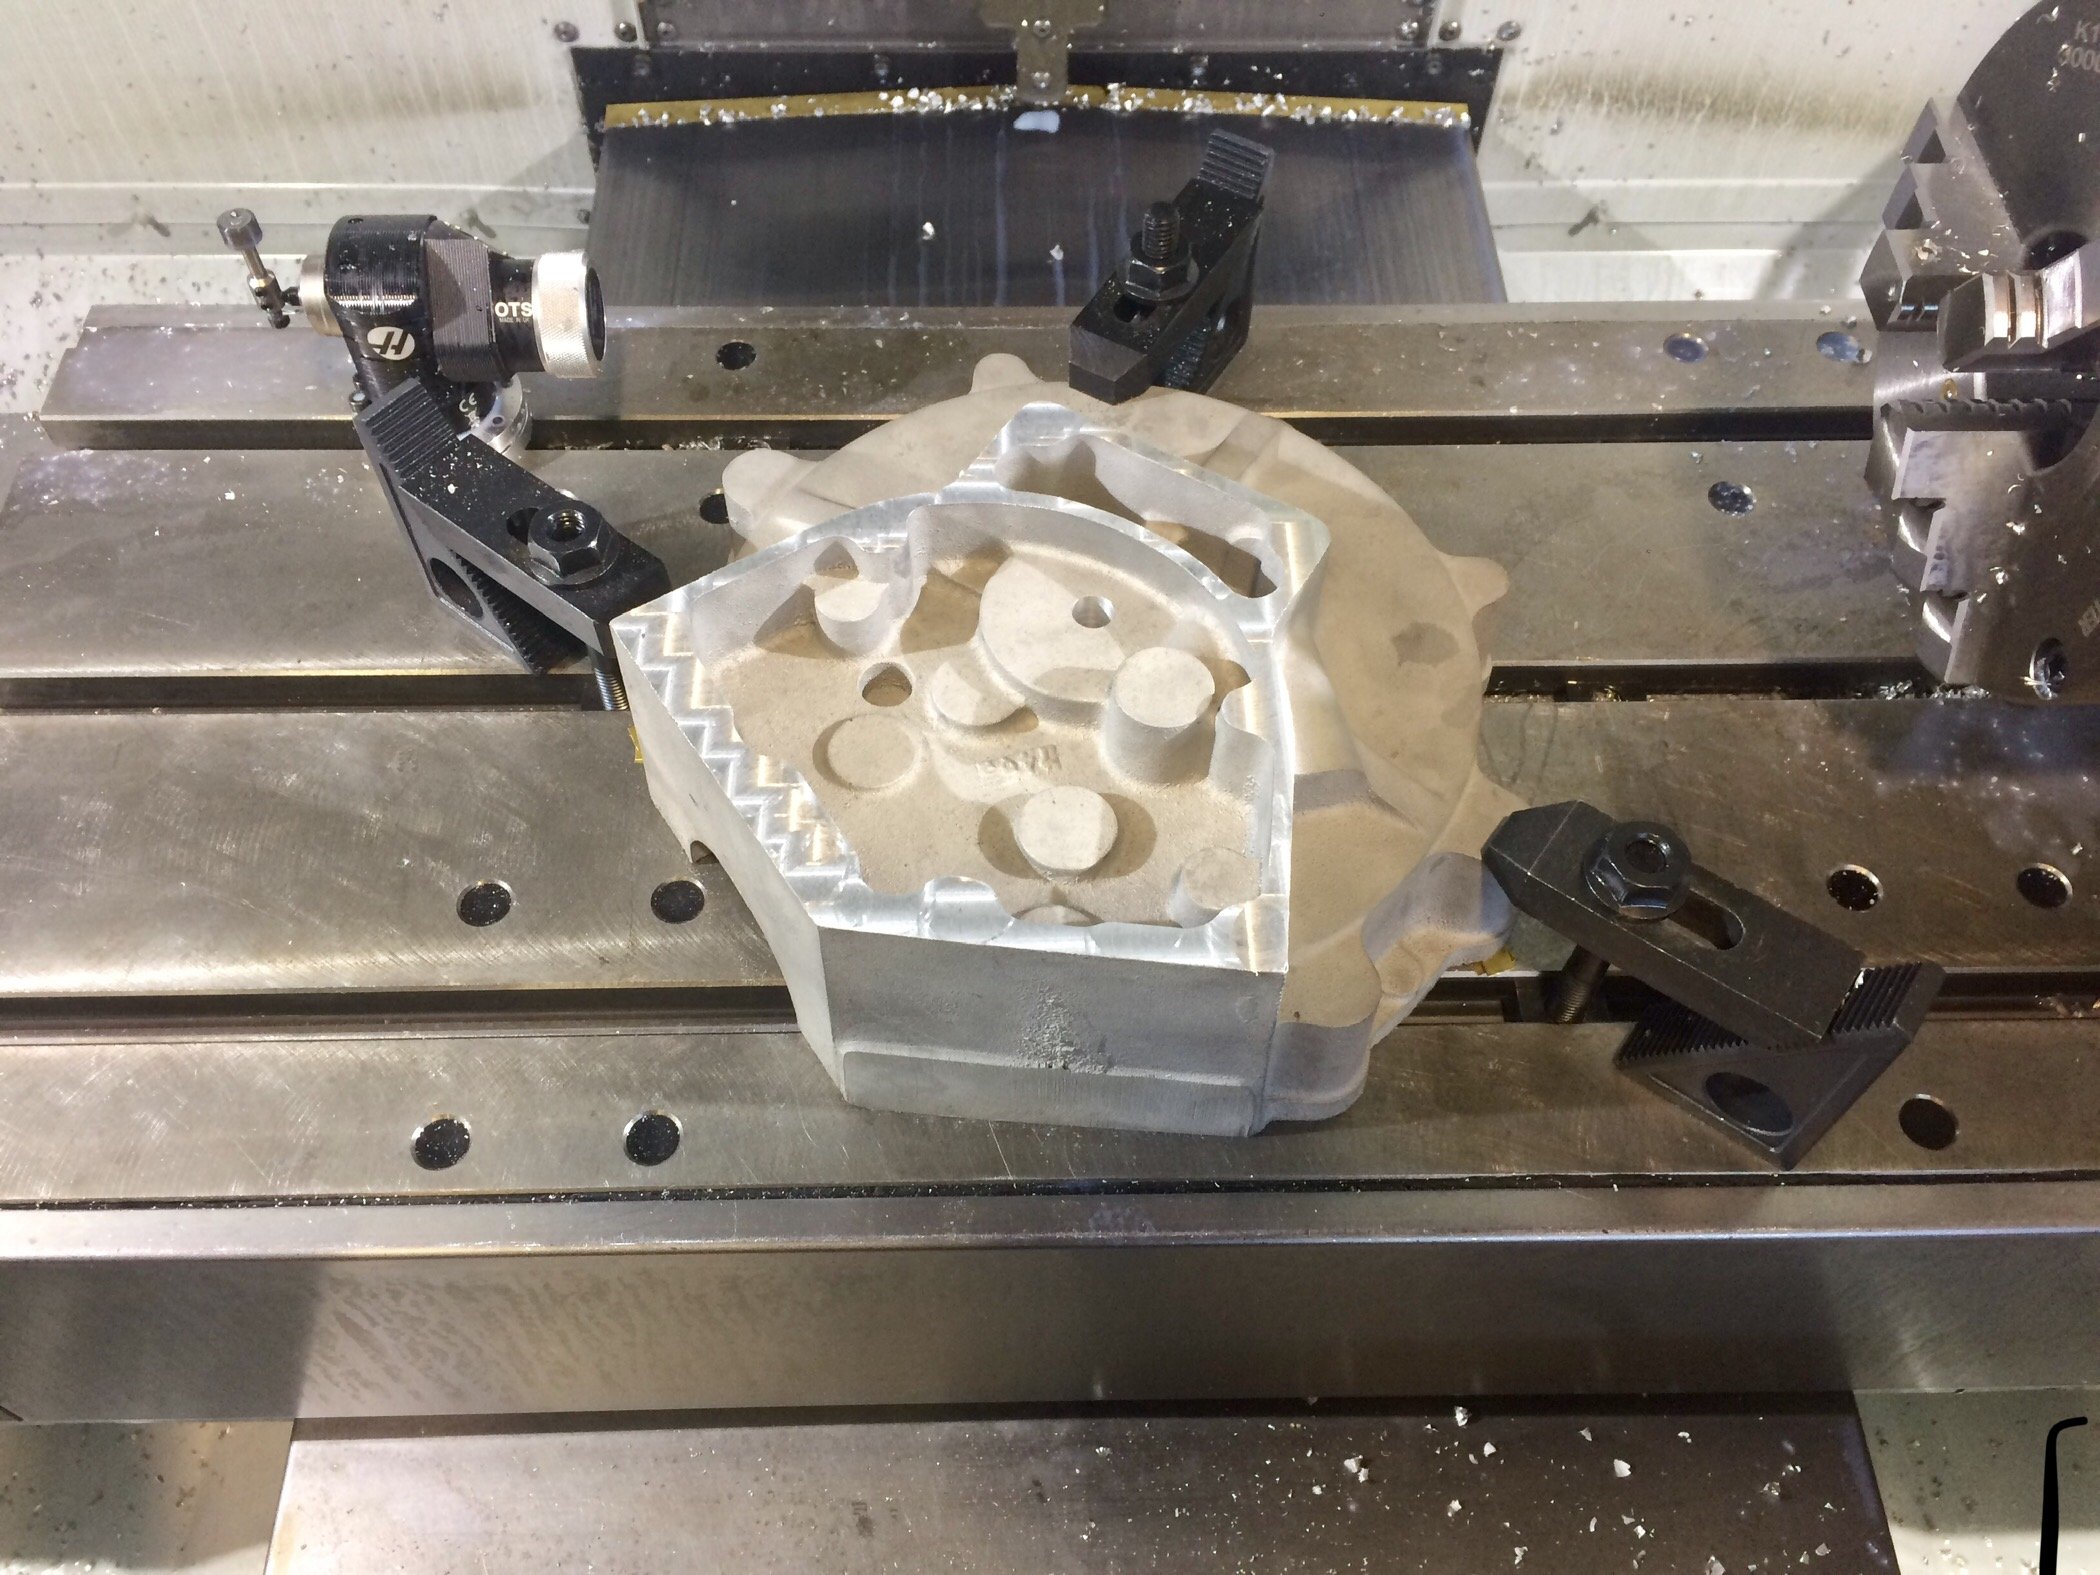
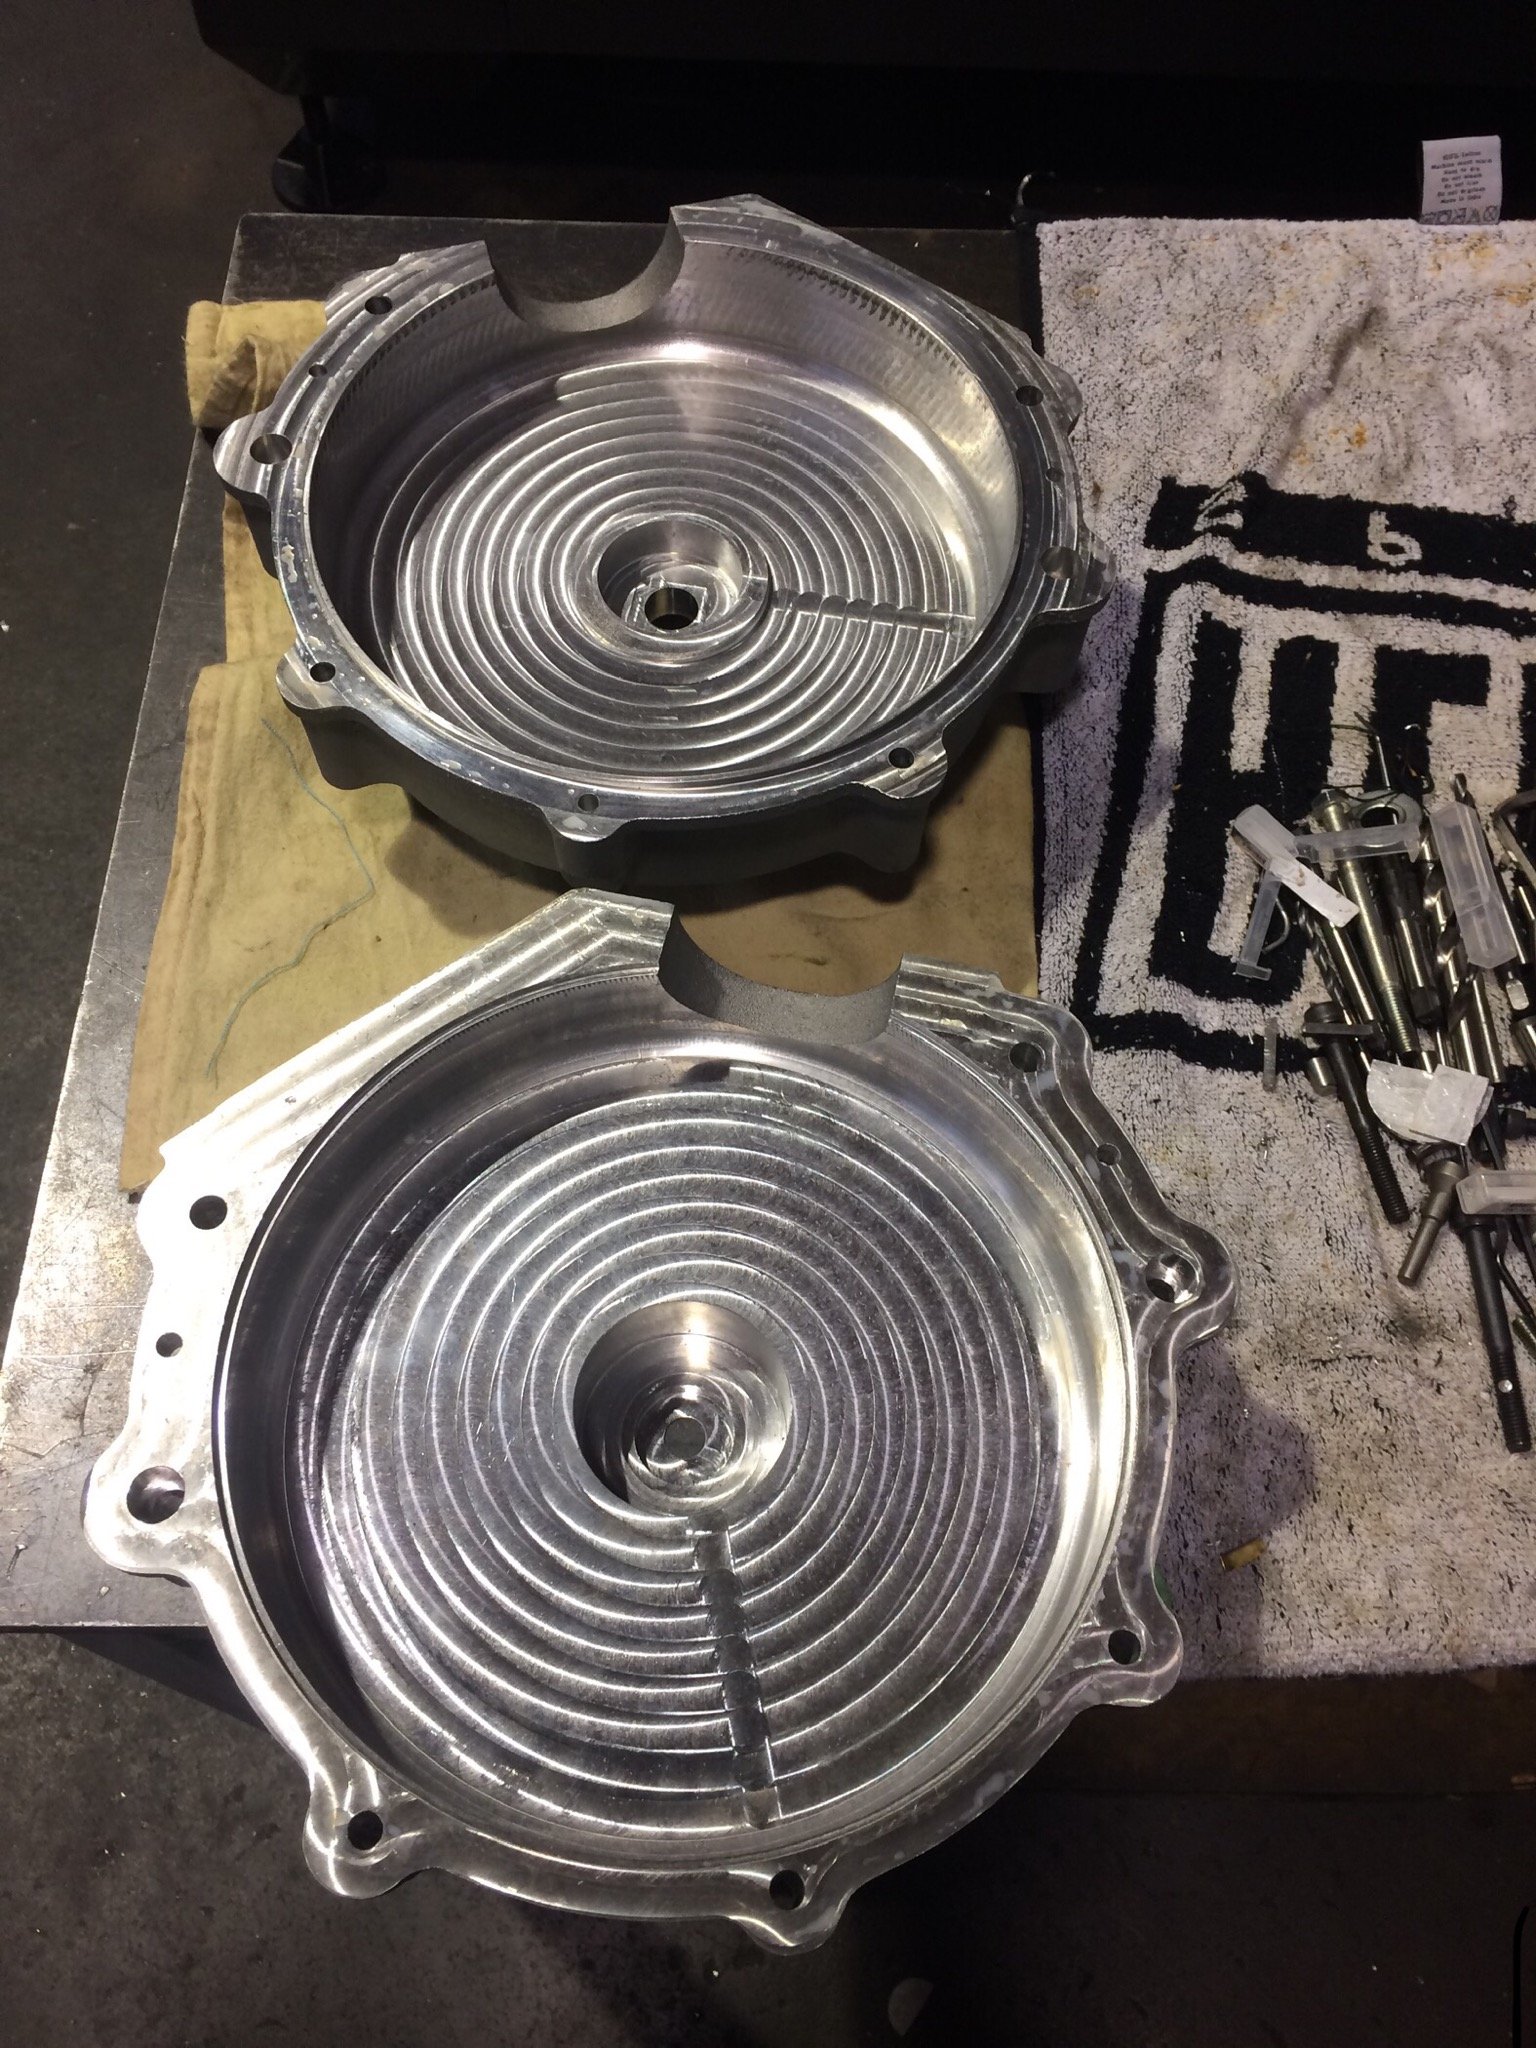
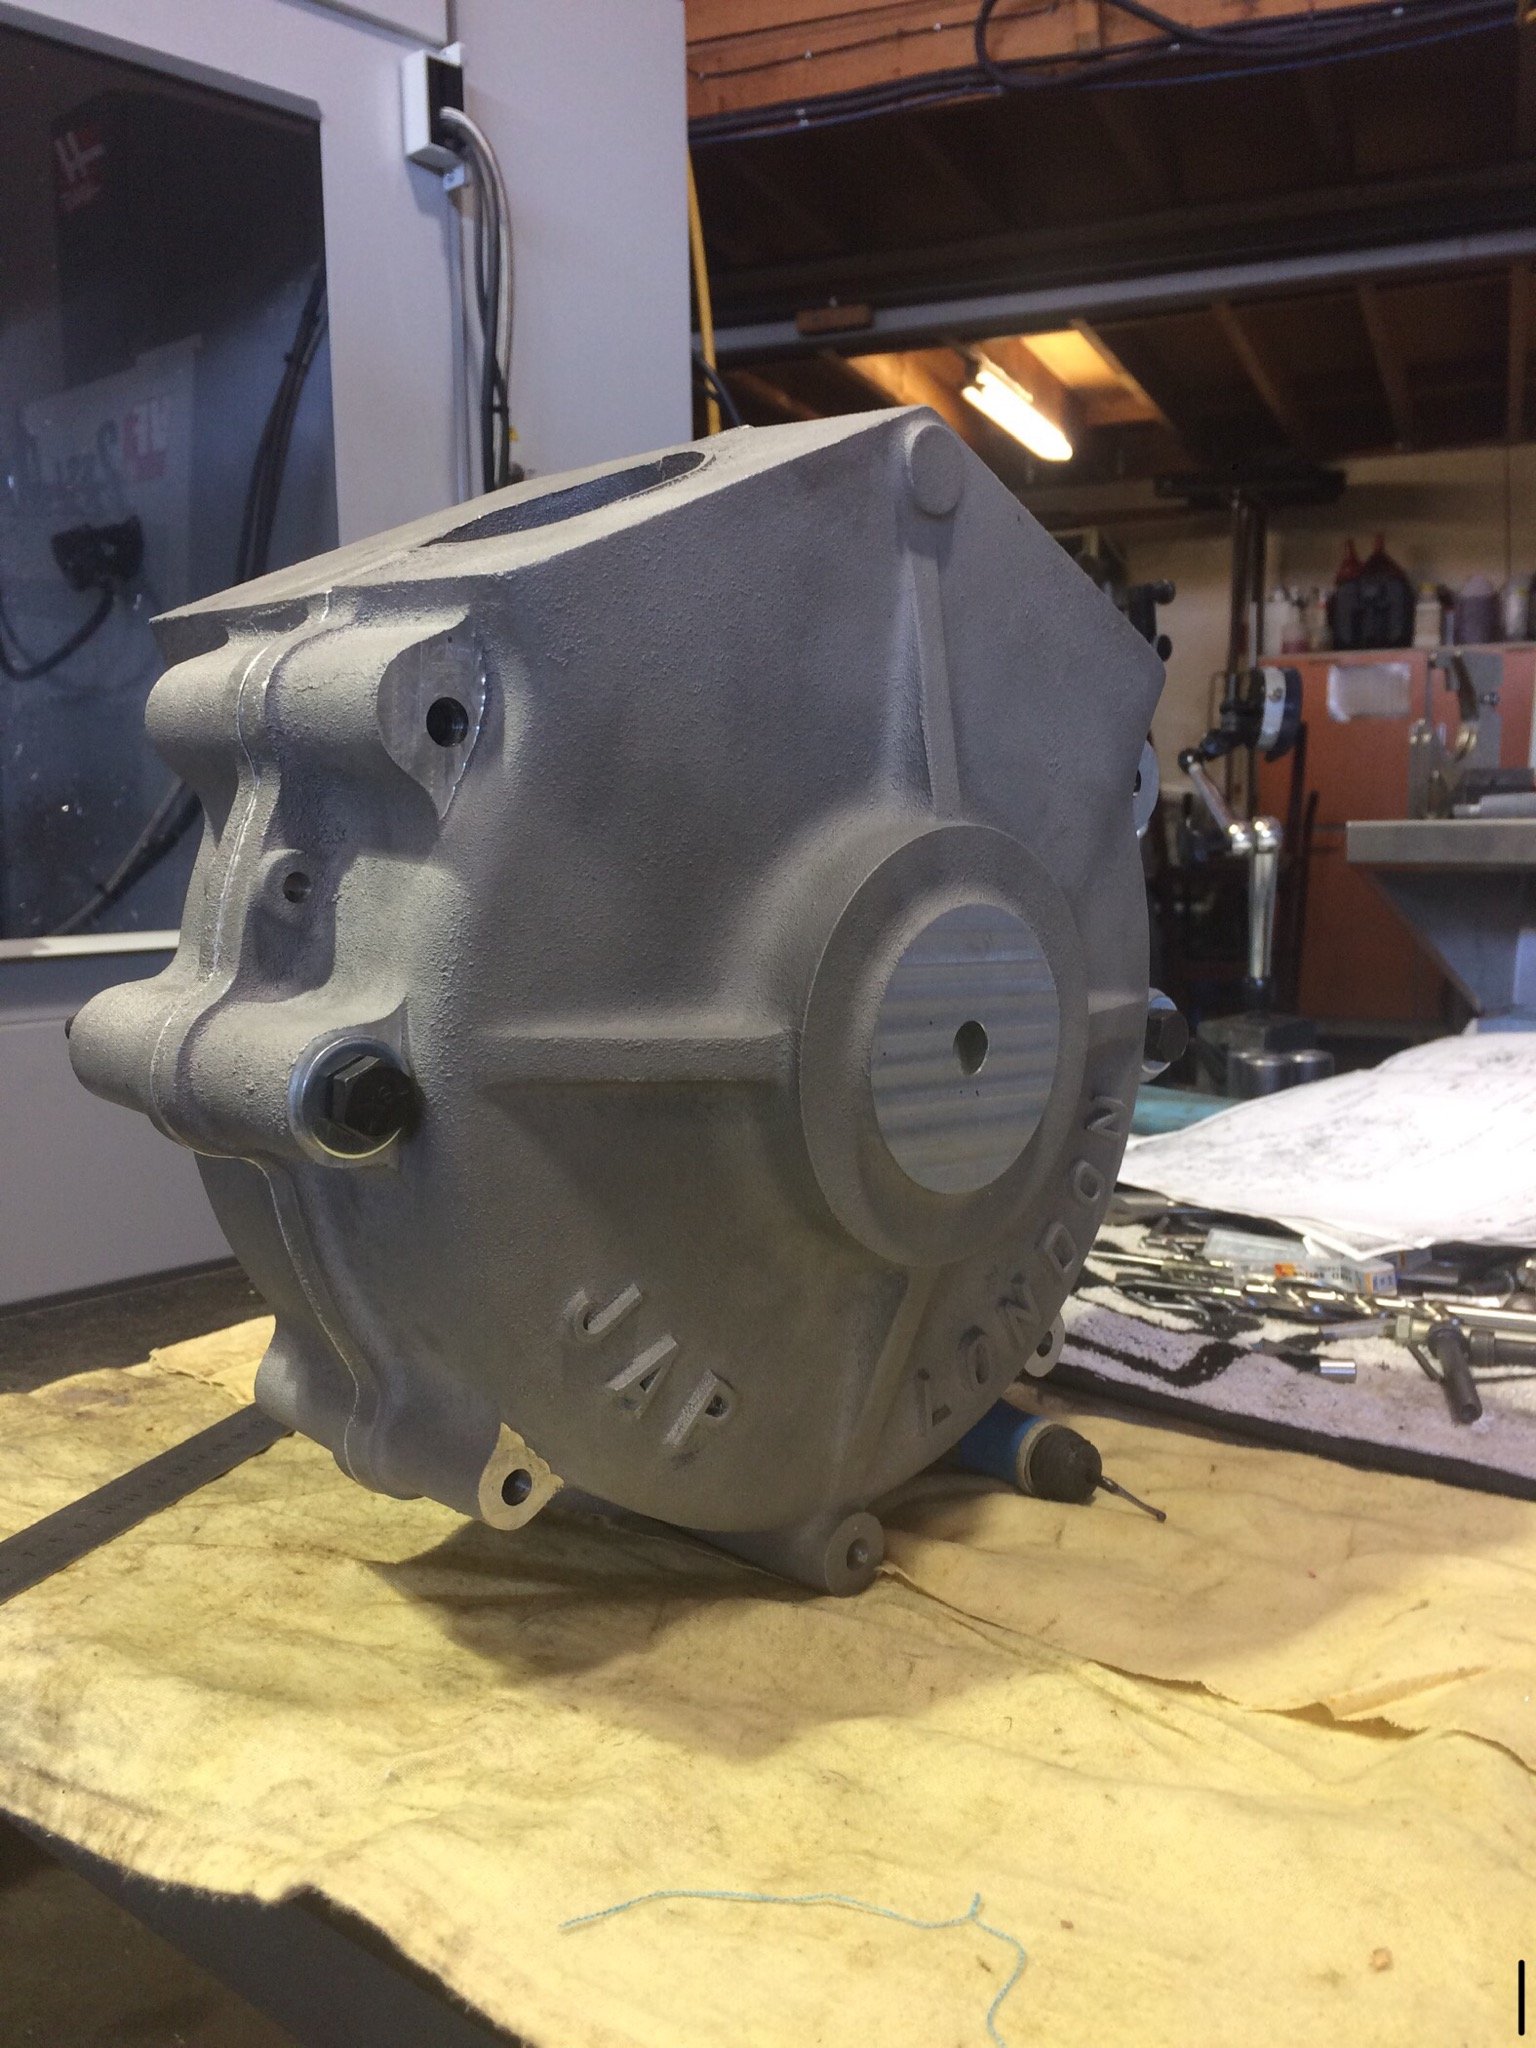
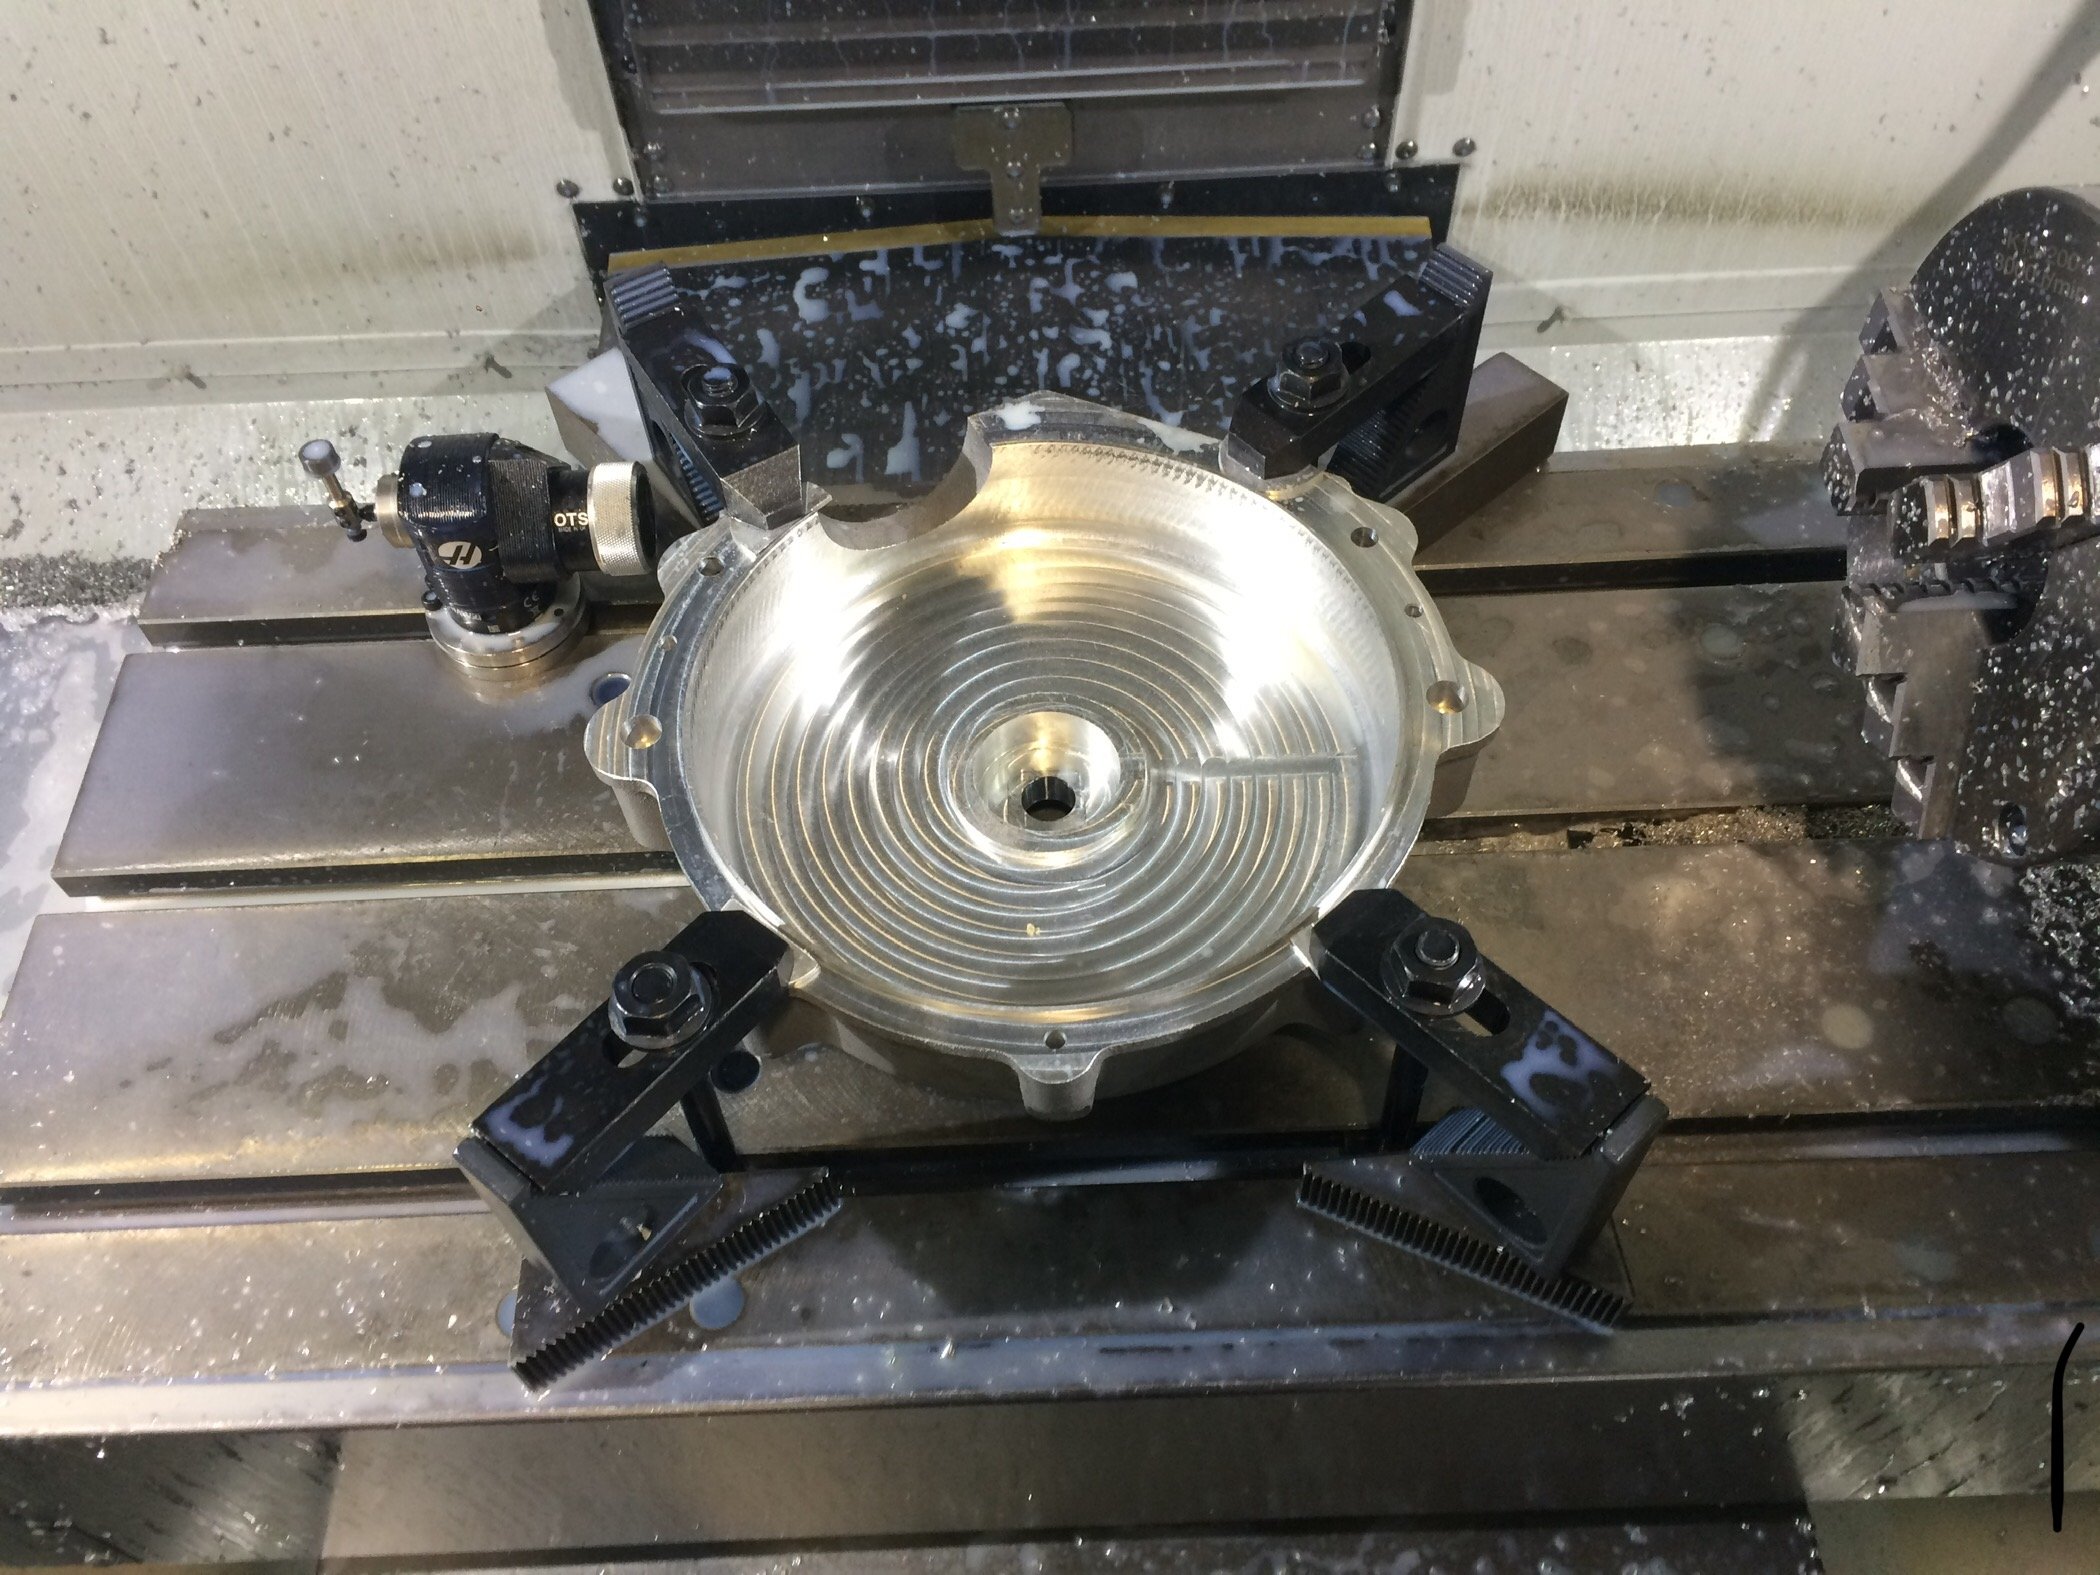
 -
Cheers mate, na I think I will be doing some flicking through the Wiseco piston catalogue when it gets to that stage... Wow awesome, would of been great working at Mcintosh. I think I saw that engine run a few years ago when I was visiting Ken. Were the Hemmings heads original upgrade parts for sidevalve engines? I take it the guy with KTOR on the floor would never part with it? I’ll be making my own flywheels with press fits throughout, will get a 1.5” dia drive mainshaft with the bearings in have. A bit better that the original..... Have got the timing side case machined to the same stage now. Facing the timing cover mating surface as first reference. Flipped over and same stuff done as first half Internal features finished on both half’s. And with a couple of bolts holding it together. Next job get the timing cover bolted on
8 points
-
Looks good man, rustic AF Another homebrew project in the works atm, brew buddy's missus wanted us to brew her some cider - things got outa control from there, naturally Scored some apples from block down the road, noticed a bunch of laden trees in his front paddock and cold called the dude and turns out he has no interest in them - so 200kg of free apples for me Next came processing machine, stainless innards 3/4hp insinkerator + $25 warewhare stool: And press is still a work in progress. Was tossing up a cheap bearing press but then decided to build something with more majesty for the shed - because medieval...8 points
-
After some soul searching, I'm Gona supercharge the marina engine. That should save me from wanting to supercharge my sidevalve. Flanges are readily available off the shelf now days, I struggled to find them 10 years ago. Already have a v pulley for it. Will probably just make up a plenum to bolt to a standard or twin carb intake, and fit some basic lcbs.7 points
-
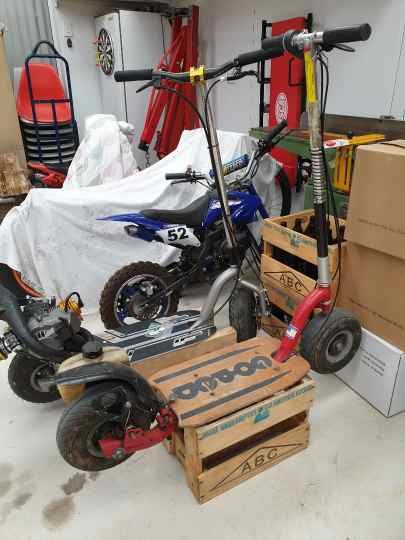
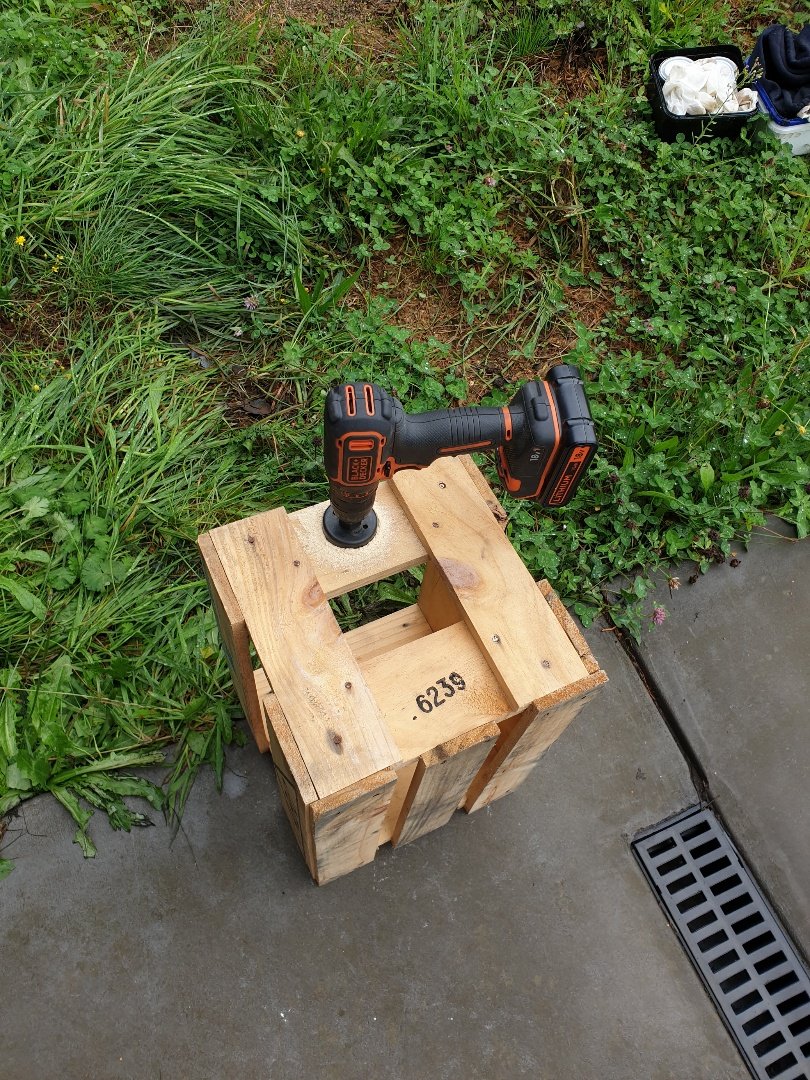
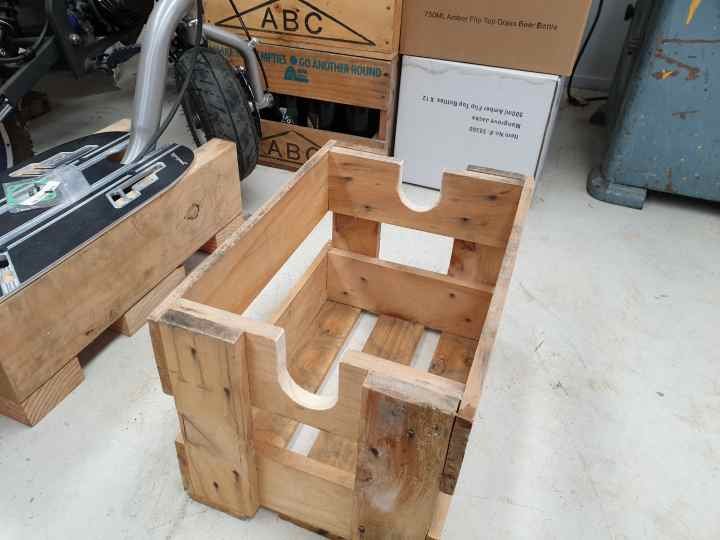
Drinking too much piss isn't all that bad. You get to hang out with your mates, talk shit and occasionally come up with the odd good idea. So when your first world problems begin to get you down...I look towards alcoholism to solve them. Problem: Fucking gopeds everywhere, I'm sick of tripping over them!!! Ah yes, I have alcohol- therefore I have a solution! And just like that, all your problems go away once alcohol is involved... Boom!!!
7 points
-
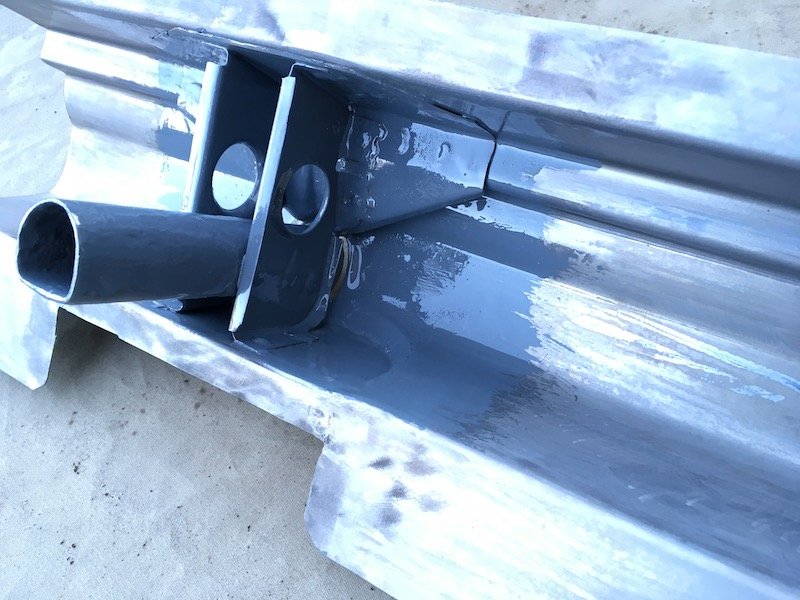
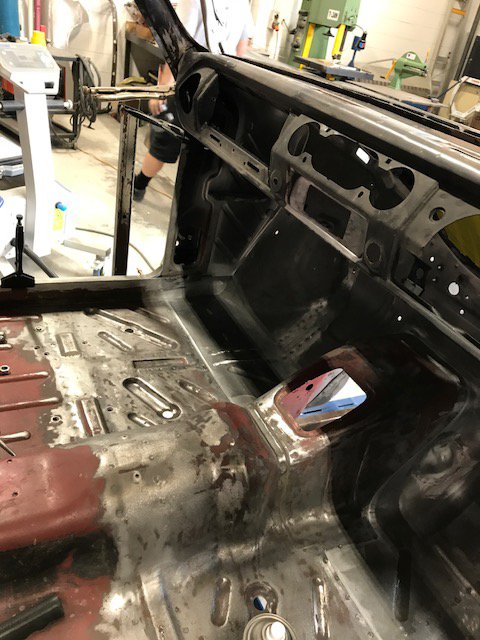
Got the drivers seat in and sitting nice and snug. The steering wheel is about 40mm higher than factory with my steering setup etc, but I am a maxi frame size so the more legroom the better, and where the seat is placed is super comfy for me, with all the controls nicely to hand and heaps of legroom. Unfortunately this meant a wee bit of a hole. Firstly I welded in a brace to replace the bit of probably important body mount stuff that I had to clearance. There is a whole lot of weld through primer on the back of that. Then I fashioned another bit of sheet metal to fill the gap. There is a bit more welding to do on the inside by the engine but I will do this when the cab is off next. The same deal also has to happen with the removable cover, that will be tomorrows job. Unfortunately the steering pump could do with being still a bit lower to clear everything, plus the seat belt mount frame thing that holds the socket and sits behind the cover will need a bit of loving too. I looked at the passenger side seat as well, this will need a bit of clearancing but all on the engine cover, not the body. That's next on the list probly.6 points
-
Nice. I bought it on the colour alone. Cheaper than painting my other one.... Please do. This forum needs much more minor content6 points
-
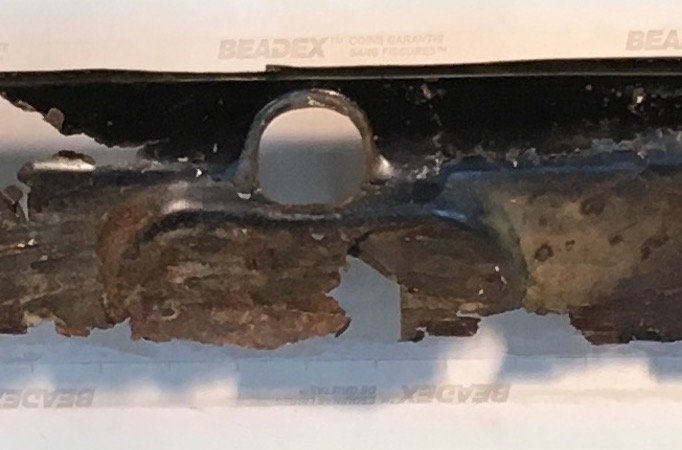
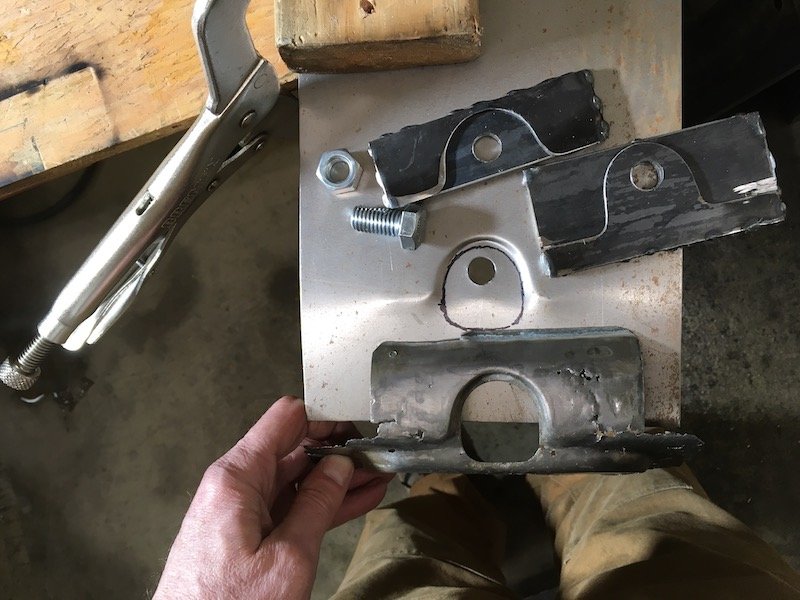
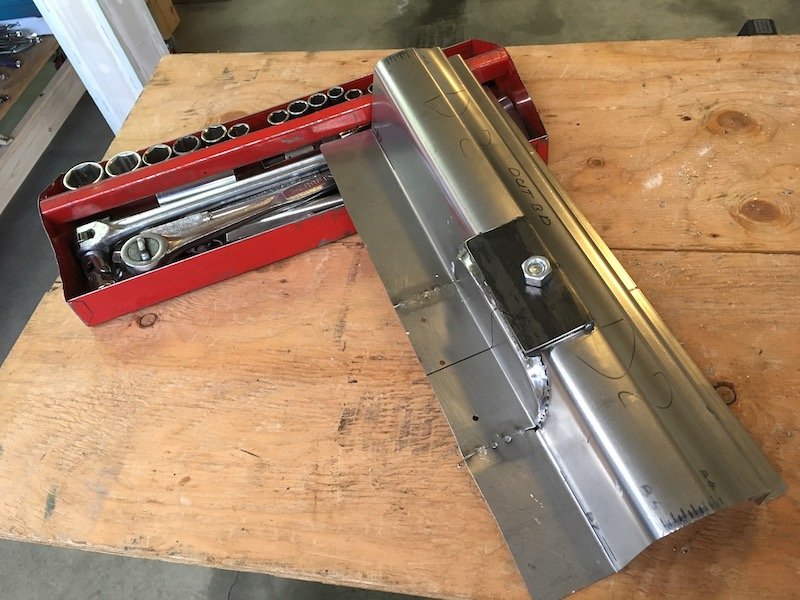
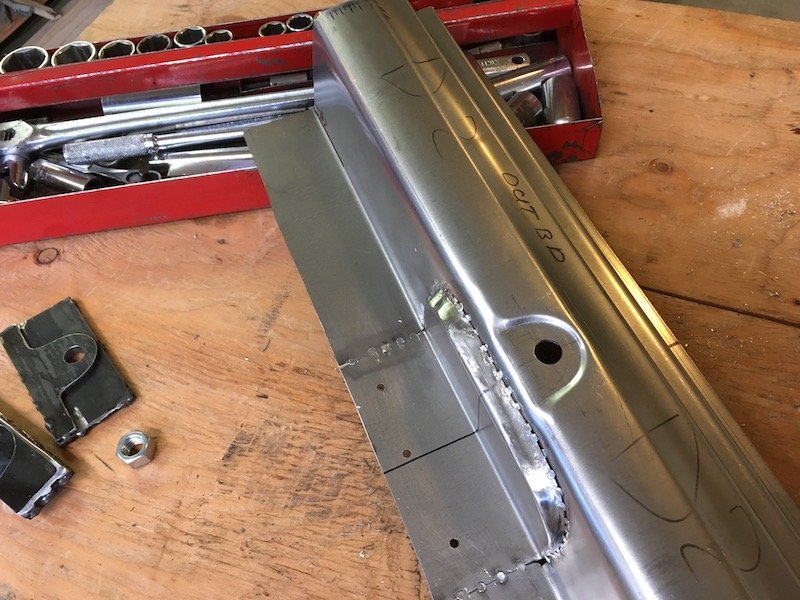
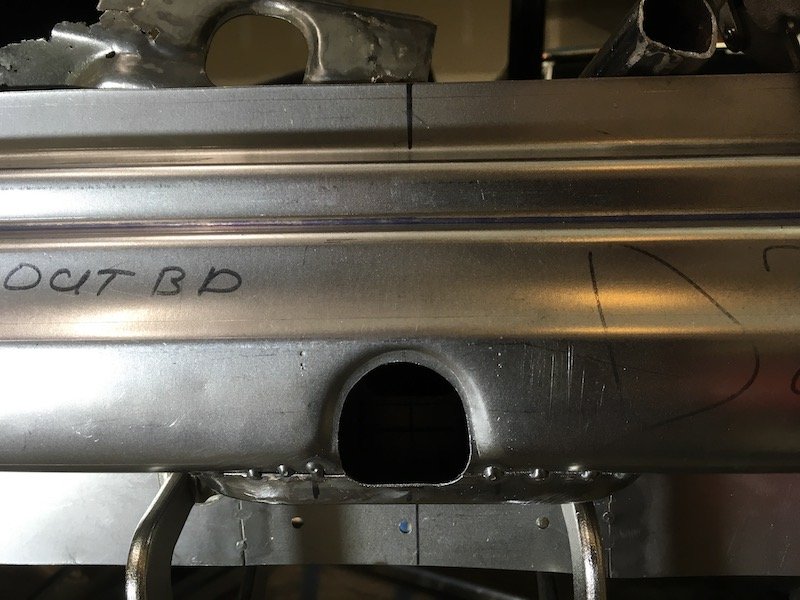
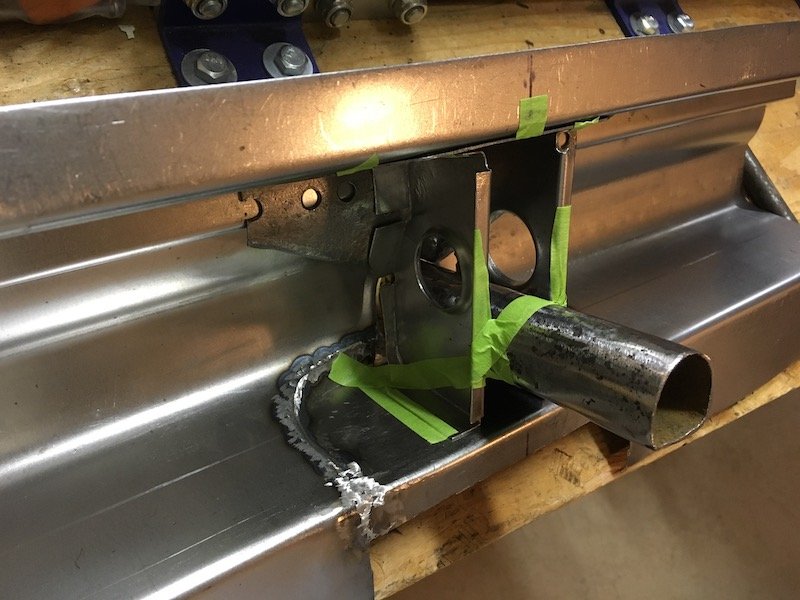
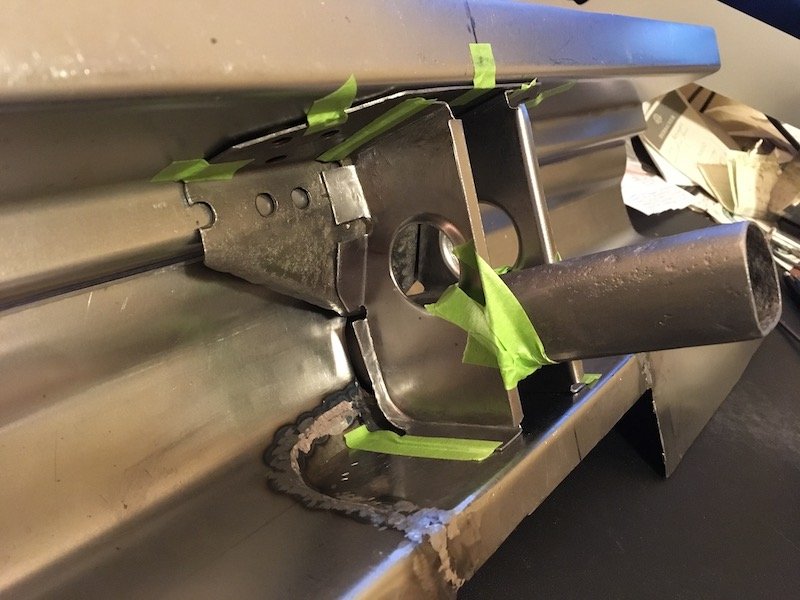
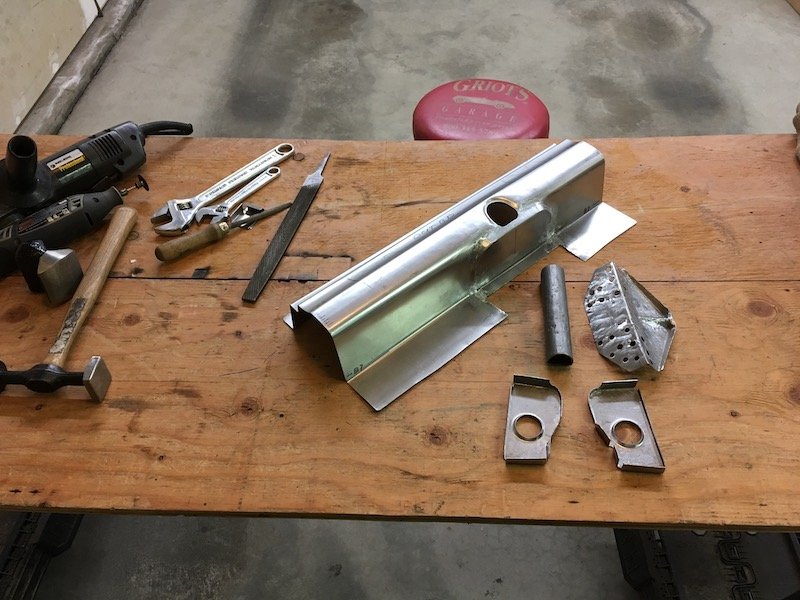
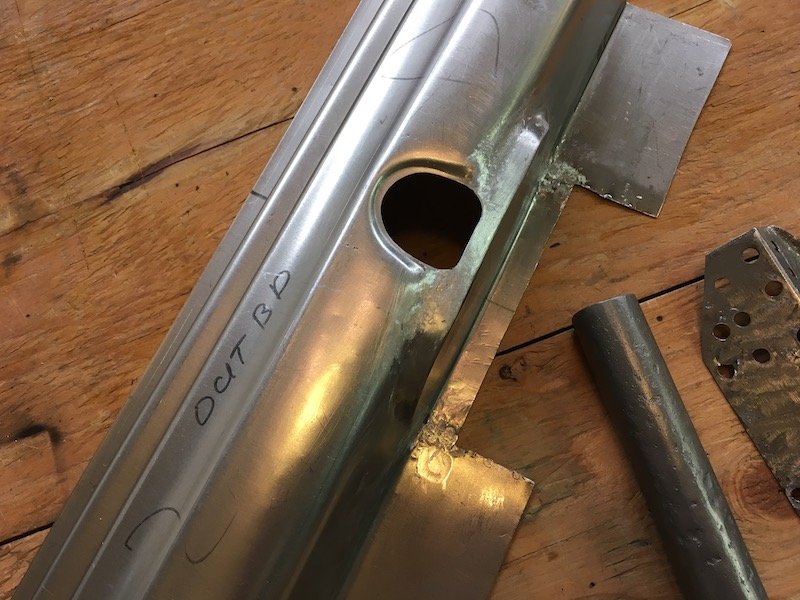
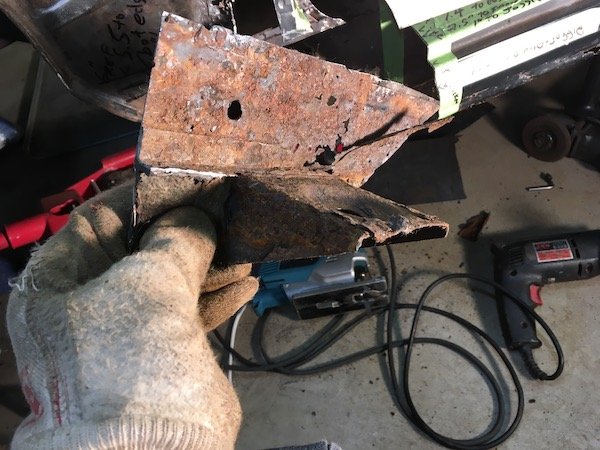
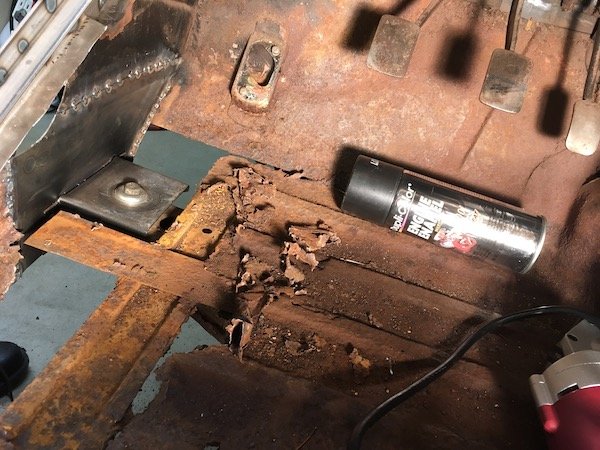
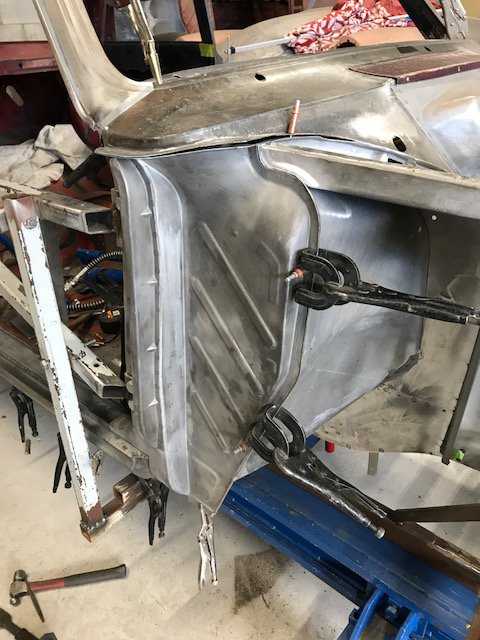
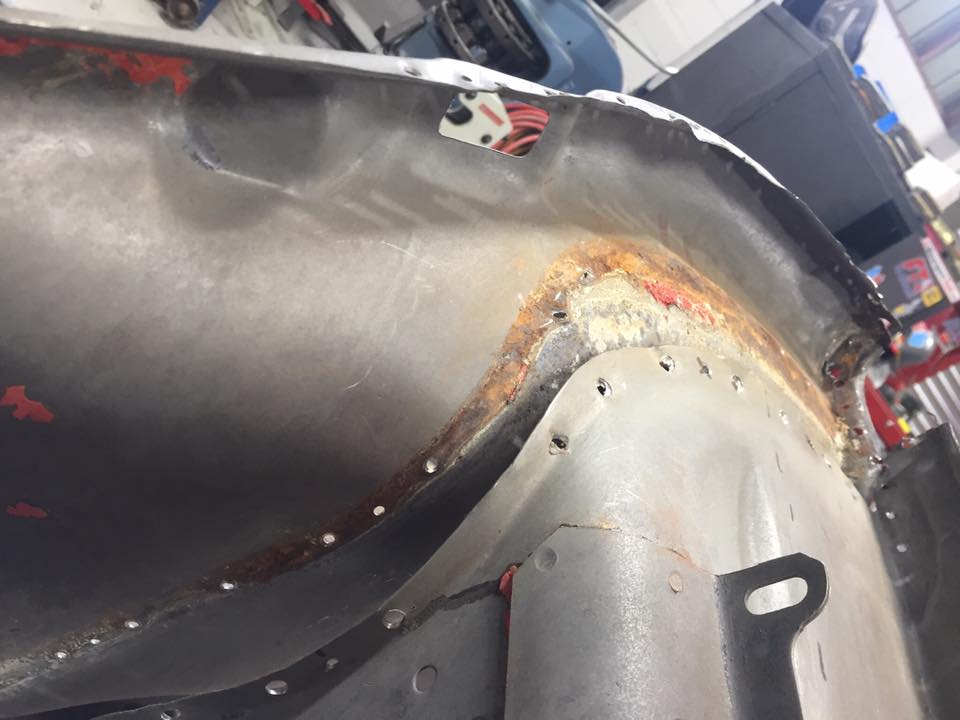
Build of the lifting jack structure Original outer sill panel where the lifting jack pipe was Inside the sill are the remnants of the jack bits Made a forming die to recreate the indented outer shape, test looked good on scrap piece so went ahead Simple as sandwich the panel and tighten the bolt Looks not too bad! Closer examination. The extra metal around the bolt hole gets trimmed out to match original. The lower pop out section (to left) is welded on and then cut off. Wrong position darn it ;( Straight on view after trimming Moving on to recreate the inner vertical stiffening brackets. Takes a bit of imagination since only about half of the originals remained Bits getting ready for weld Checking bits out for fit Sand blasted the original pipe free of rust Now really ready for weld Welded and checking results for fit against inner sill Coated with POR 15 for future rust protection. Turns out this coating can catch fire real easy and sustain flames. Next are the three outer sill segments to be welded together. I've kept a lot of extra flange widths, top and bottom, to resist warping. These flanges gets trimmed back to about 1/2 inch. Discussion: https://oldschool.co.nz/index.php?/topic/60267-marts-pl310-61-datsun-bluebird-sedan/
6 points
-
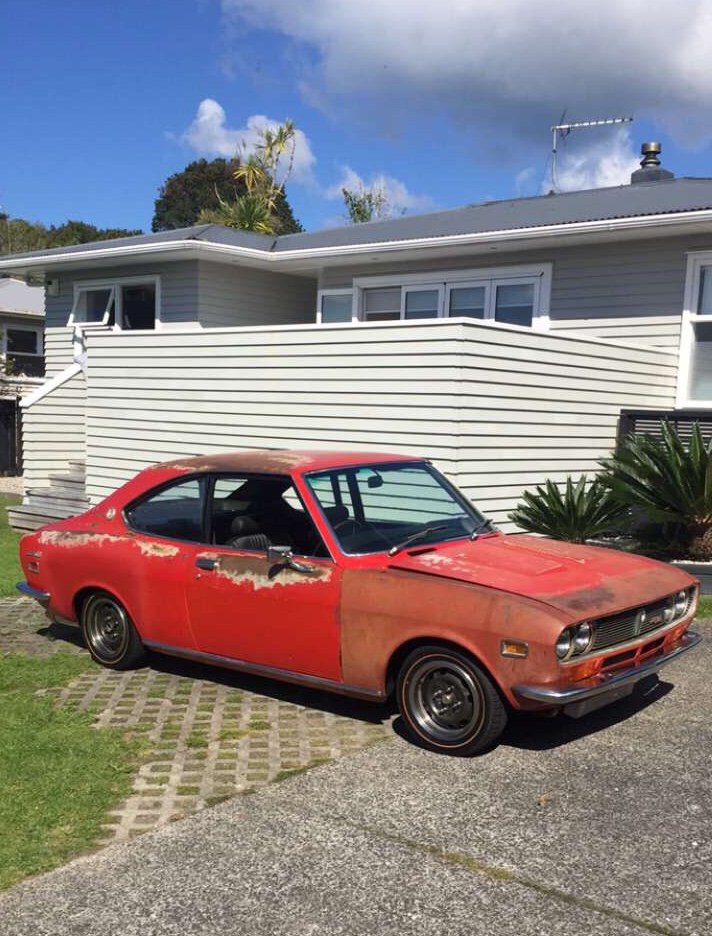
did a bit more. i gave the patches i put in a bit of a tidy up and made the whole car red. i got some rattle cans matched and just used them. i fucked up a bit on the passengers side around the wheel arch and didn't cover the primer enough so now its showing after i gave it a polish. ill blaze some more paint on that bit and call it good. i started trying to polish the paint to see if it would come up ok. it didn't. its better i suppose but the paint is pretty fucked. anywho, ive only done one side. ill paint the whole car at some point but i was kind of hoping it would come up a bit better. 2019-04-21_12-54-05 by sheepers, on Flickr 2019-04-21_12-54-20 by sheepers, on Flickr6 points
-
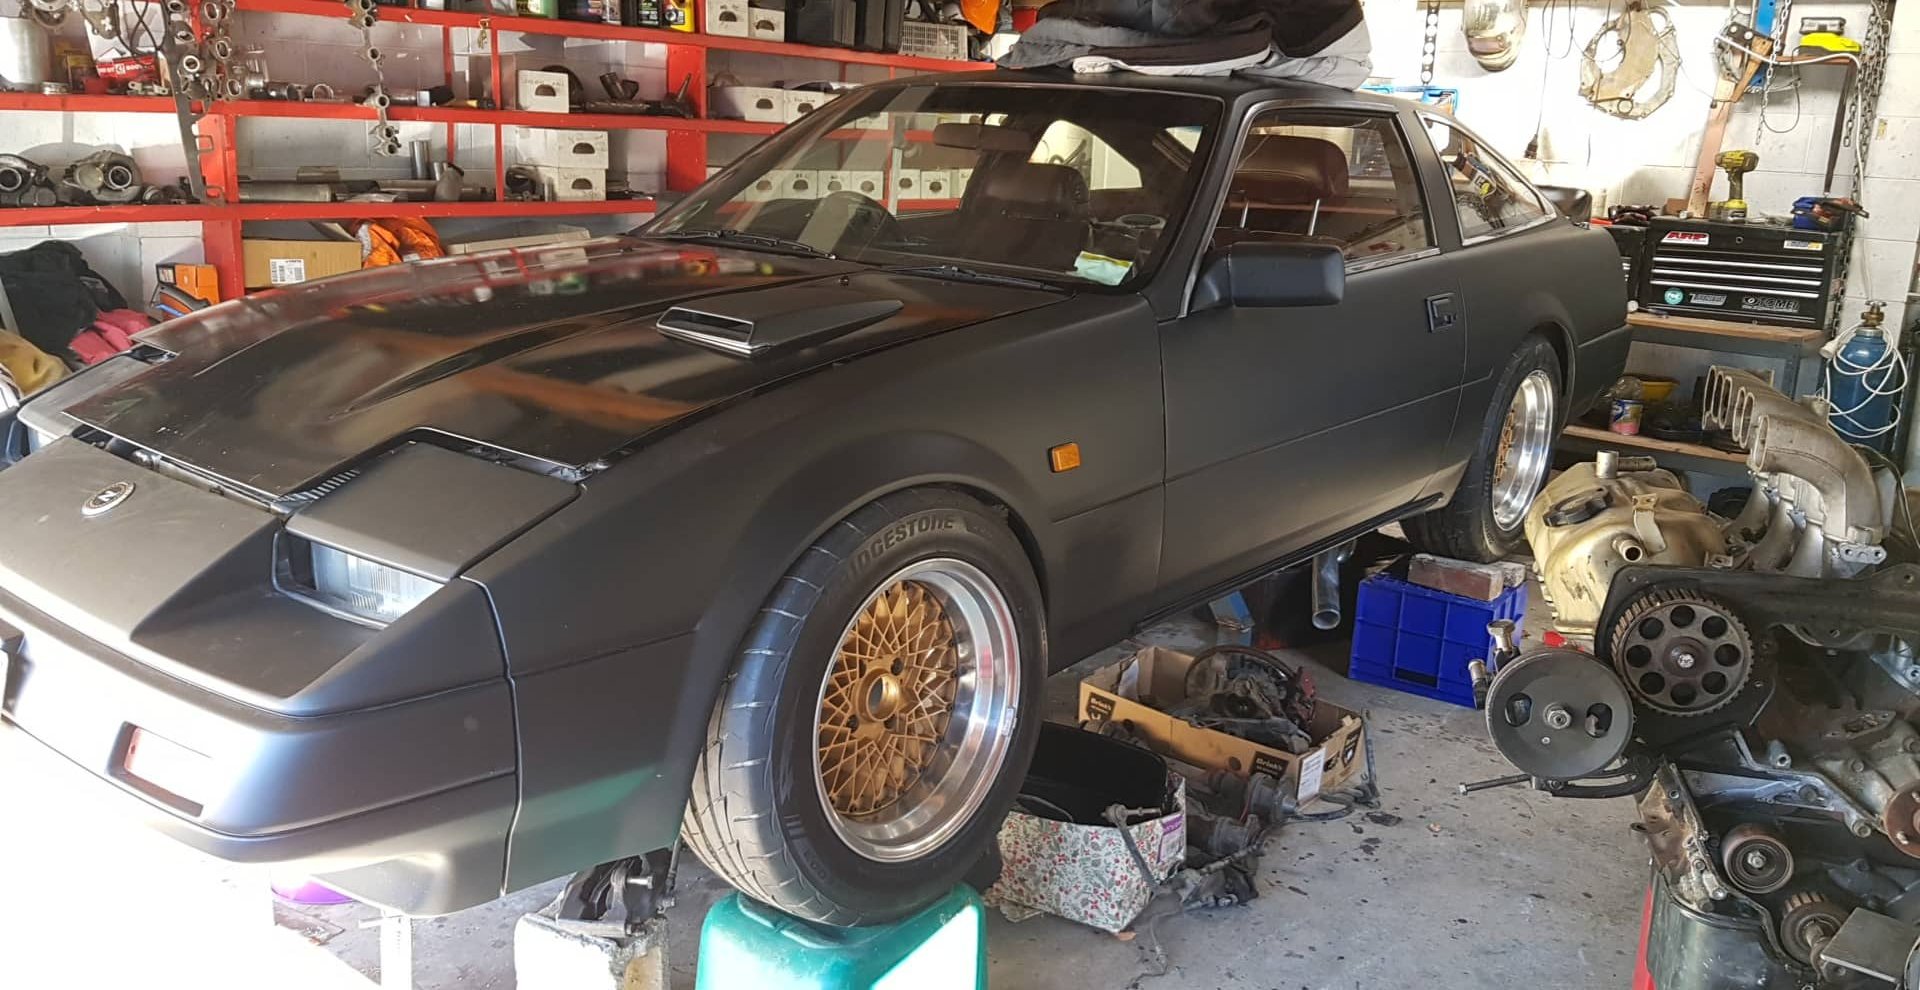
After ordering some more frost plugs last night I found the ones I thought I had today. Have been working on sorting out the rest of the engine parts I'm missing and also the balance shaft removal bits. I'll probably take the head to work tomorrow and drill and tap the holes for the cam angle sensor. Z is now in storage so will bring the Starion home maybe next weekend. I haven't really said much about the car but most of it is in Zac's thread. It's got S13 front suspension and coilovers, I'm not sure if it's got calipers and rotors on the front but I've got some R33 GTS25t stuff if it doesn't, it's got coilovers in the back. It has a hybrid Nissan and Mitsi front crossmember than needs to be finished (for converting to a rack), I will probably end up changing to a Nissan steering column I think. The wheels and tyres are new and haven't been driven on. Being an '86 it's 5 stud and I believe it has a bigger diff than the earlier cars. The paint was done a few years ago but the car hasn't been driven since it was done. I'm going to try and track down a smaller TD06 (like a 17C) for it, either buy or make an exhaust manifold. I've got a later Evo ECU which can be tuned (sort of like a Nistune) which I may or may not run. ~300rwhp should be pretty achievable and hopefully not break the gearbox.5 points
-
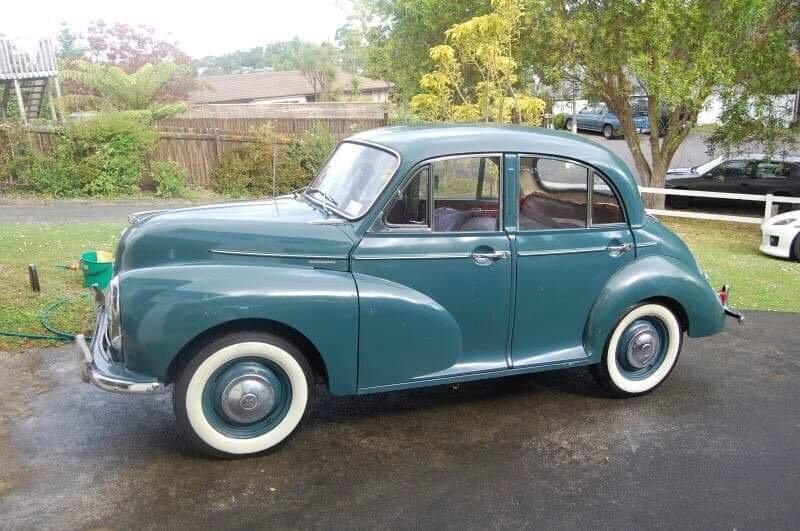
This was my old Moggy. Sold it to a guy on here who rebuilt the motor and now it’s a promo car I think.
5 points
-
Sounds like a well thought out way to buy a car5 points
-
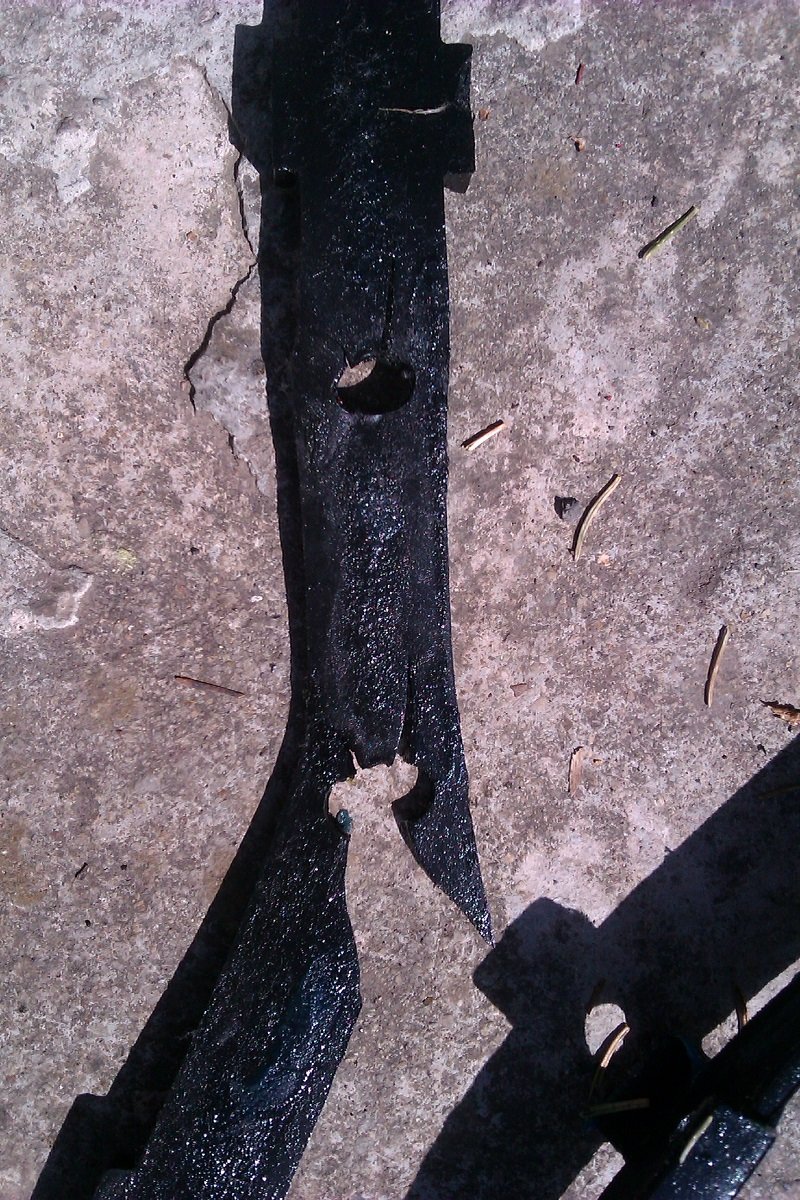
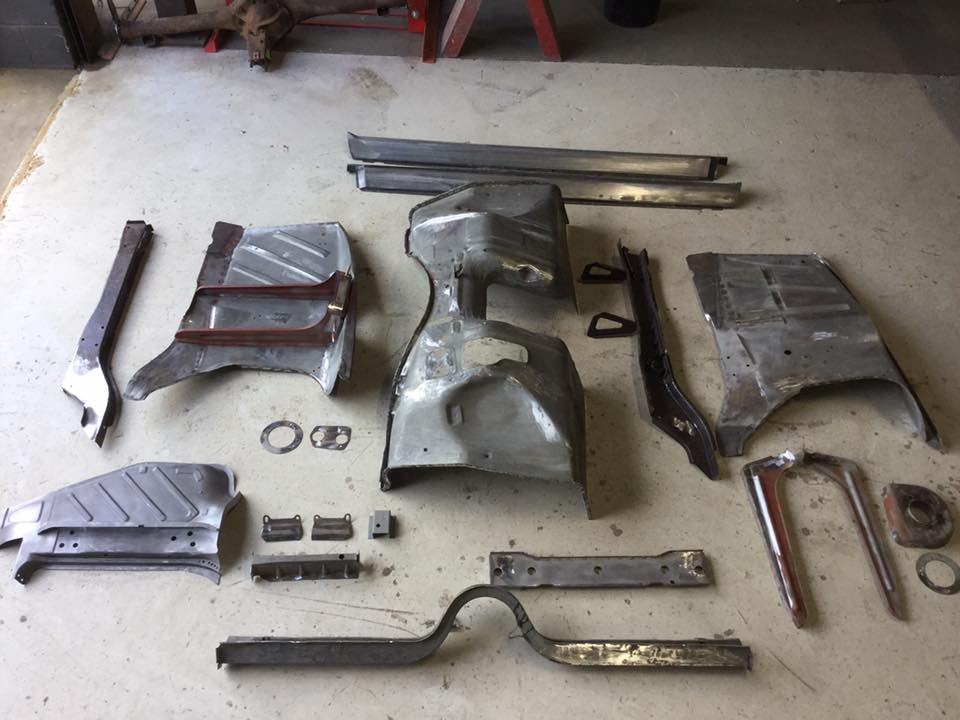
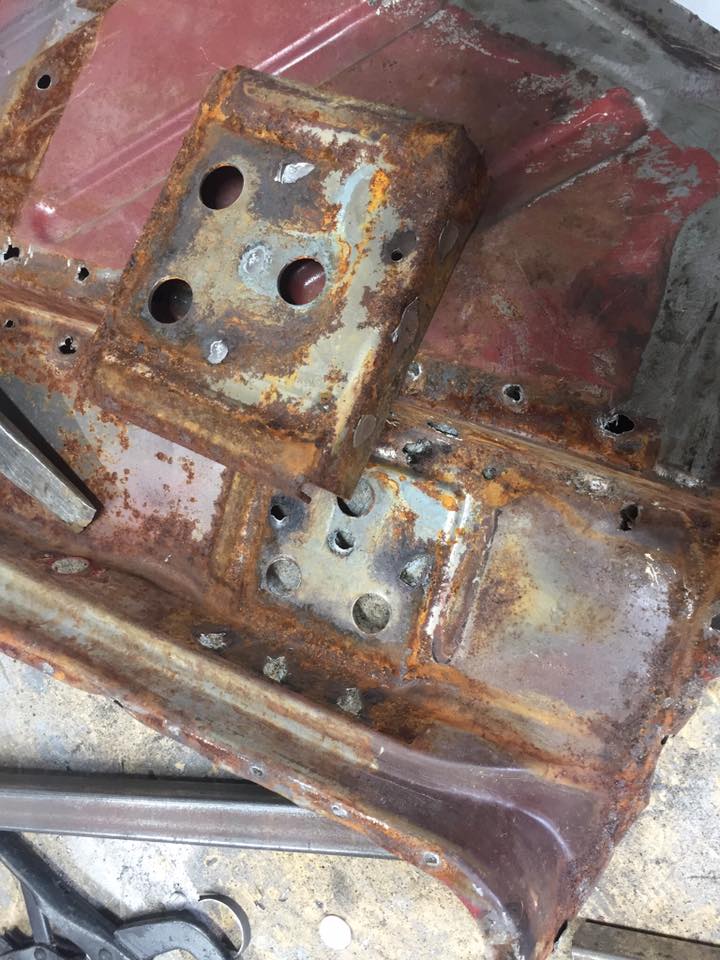
Tentative list of work Replace RH chassis leg Replace LH chassis leg front half Replace RH tie plate Rust RH Sill Rust battery tray Poor patching boot floor rust Crack in engine mount tower New hard brake lines front Replace suspension bushes Fit brake light Install rear indicators Buy driveshaft Assemble front brakes Engine and gearbox Install heater and under bonnet stuff accessories5 points
-
So Easter Friday the Middy went out an left me at home with the kids (who are on no screen time for Easter) so while they played outside I played in the garage, found another great use for the hoist separated the trans and motor then used the hoist to lift the engine off the k frame an trolley I built so I could get it on the engine stand. Dropped the sump to have a quick Nosey inside, which further confirmed my lack of service history there’s a reasonable amount of sludge, there was also a random small washer pulled a big end cap off crank and bearings look good all in all pretty happy with the condition. Should make for a good build to finish the day I returned to stripping underseal pretty happy with the lack of rust I’ve found5 points
-
Installed the carbs today. She's really coming together. Not to much to do now Purchase and install M-Unit + finish wiring. Fabricate a number plate bracket and rear indicator mounts. Install tachometer blanking plug. Maybe purchase new tires (I'm wanting something dual sport). Fill with oil, set points and timing and start her up!
4 points
-
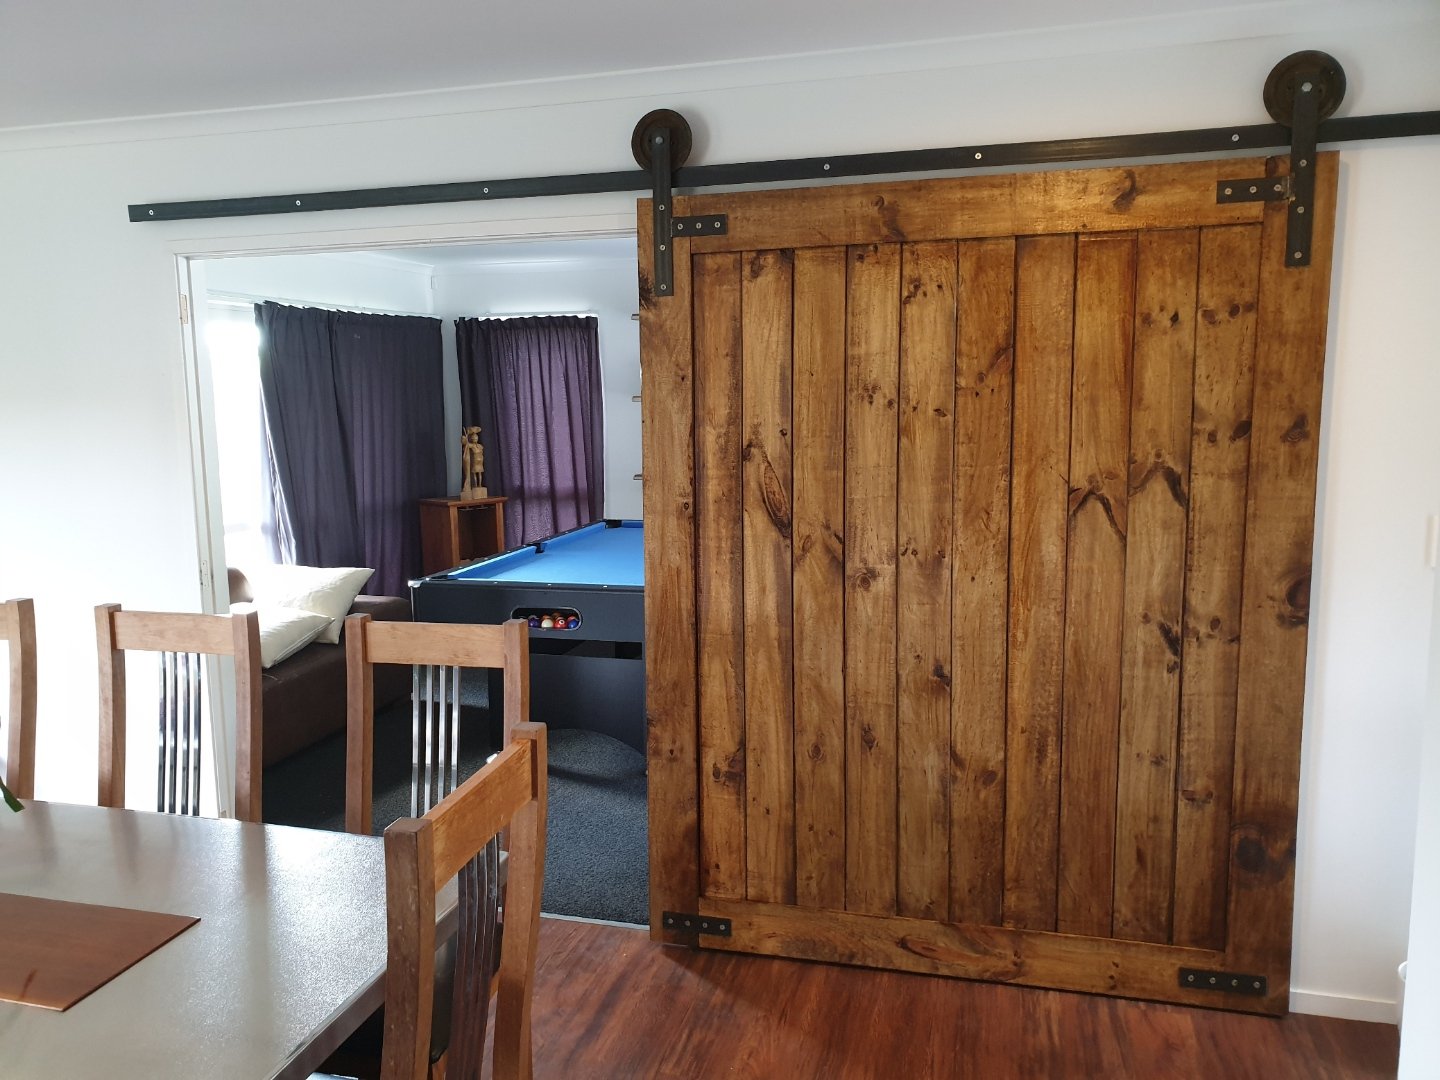
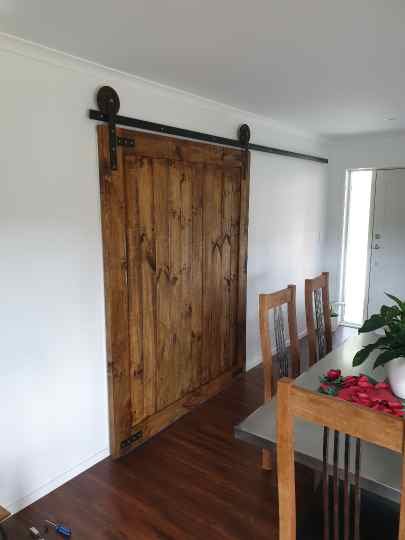
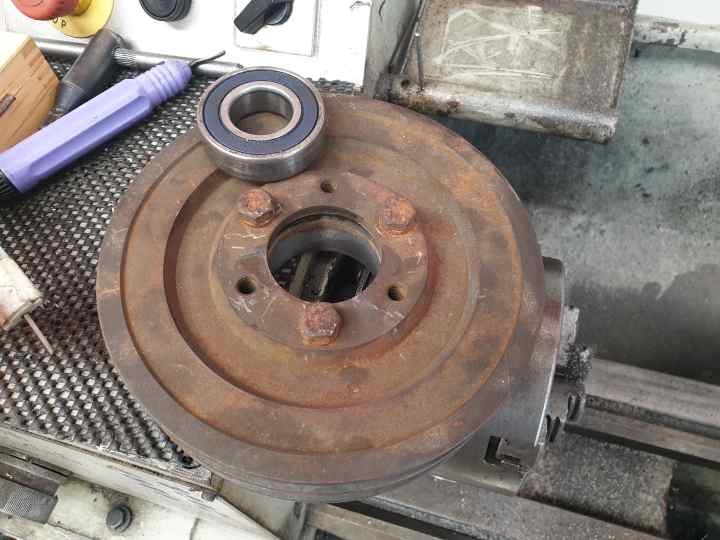
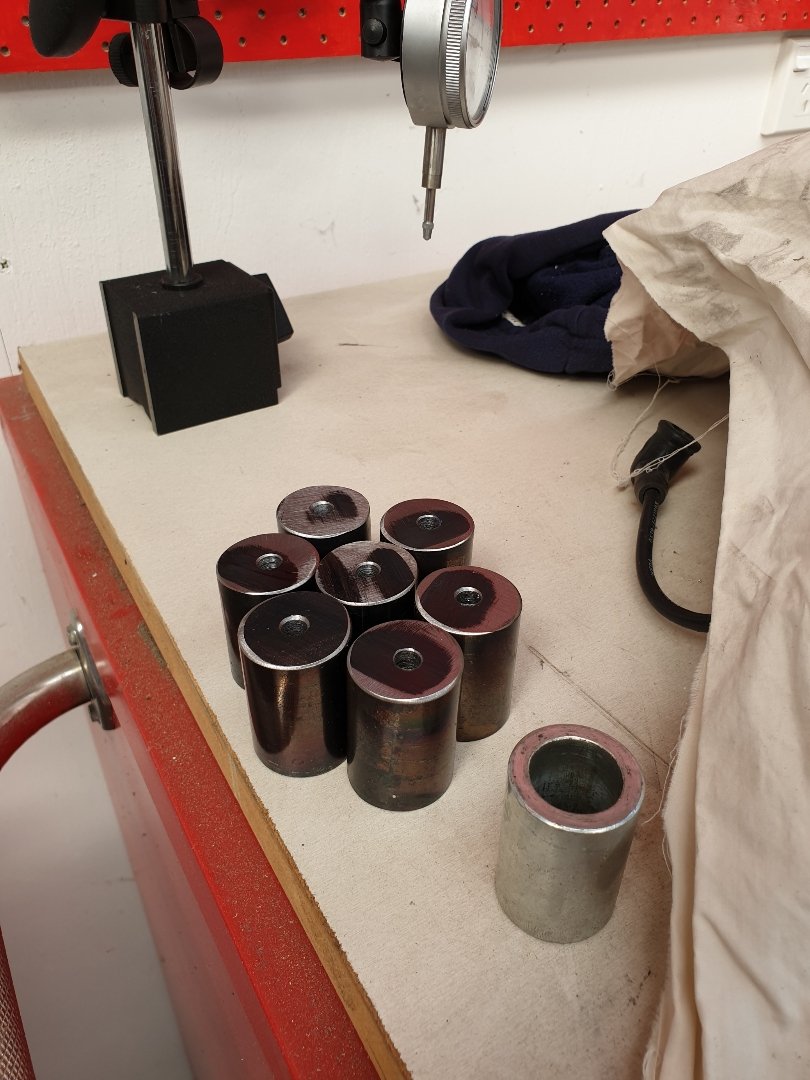
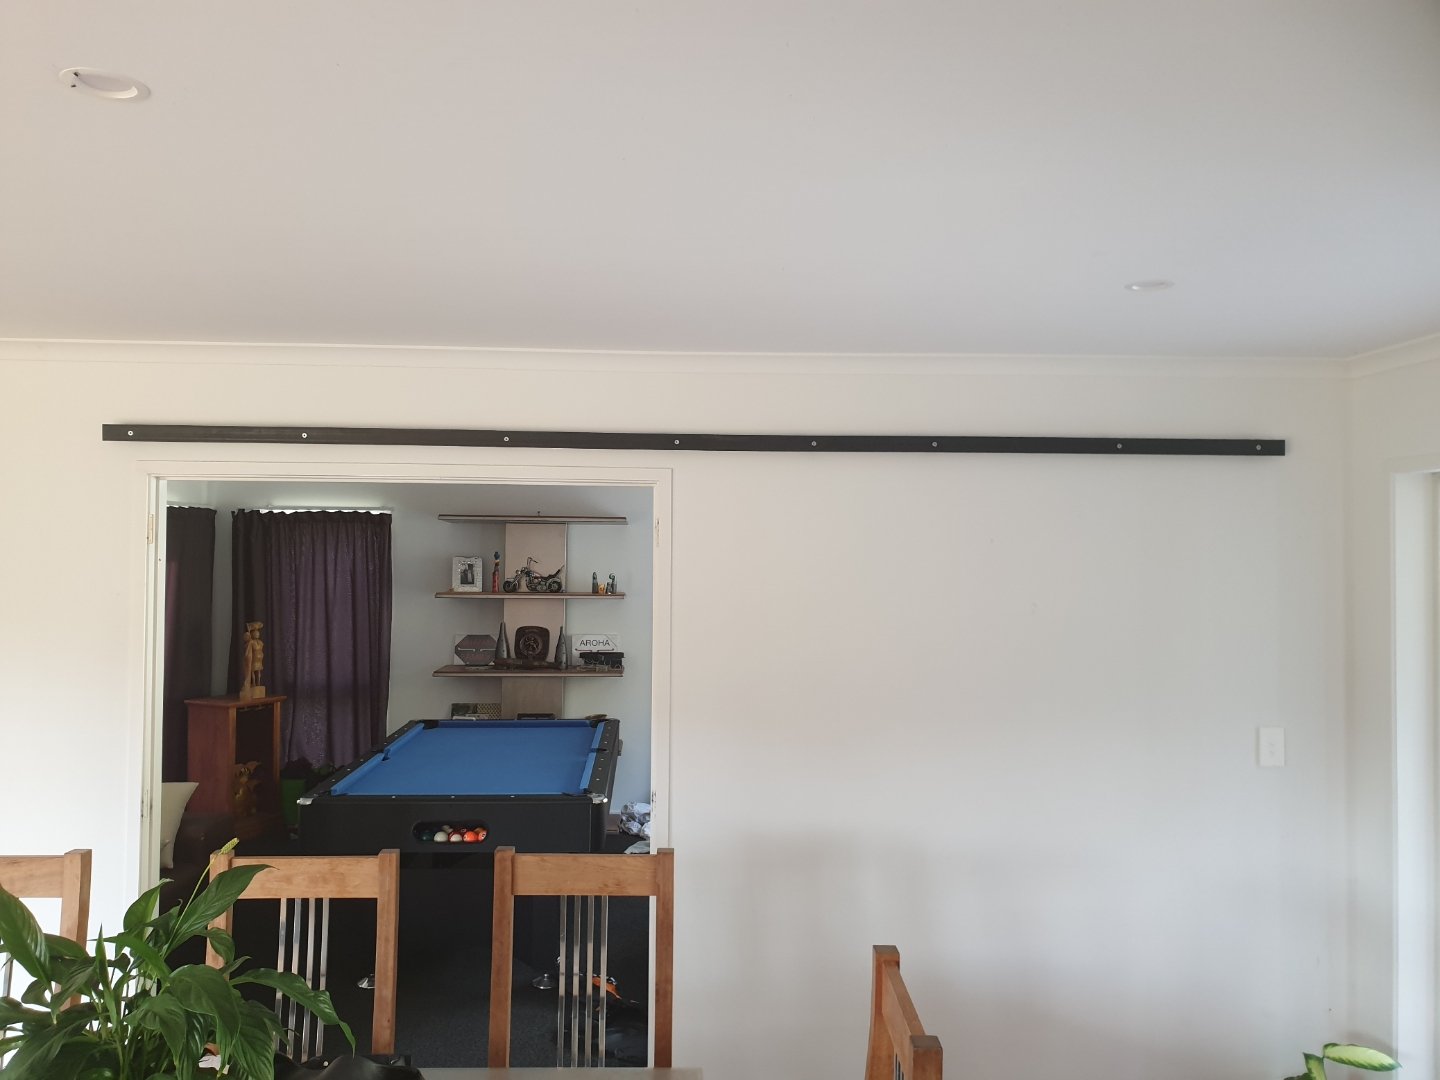
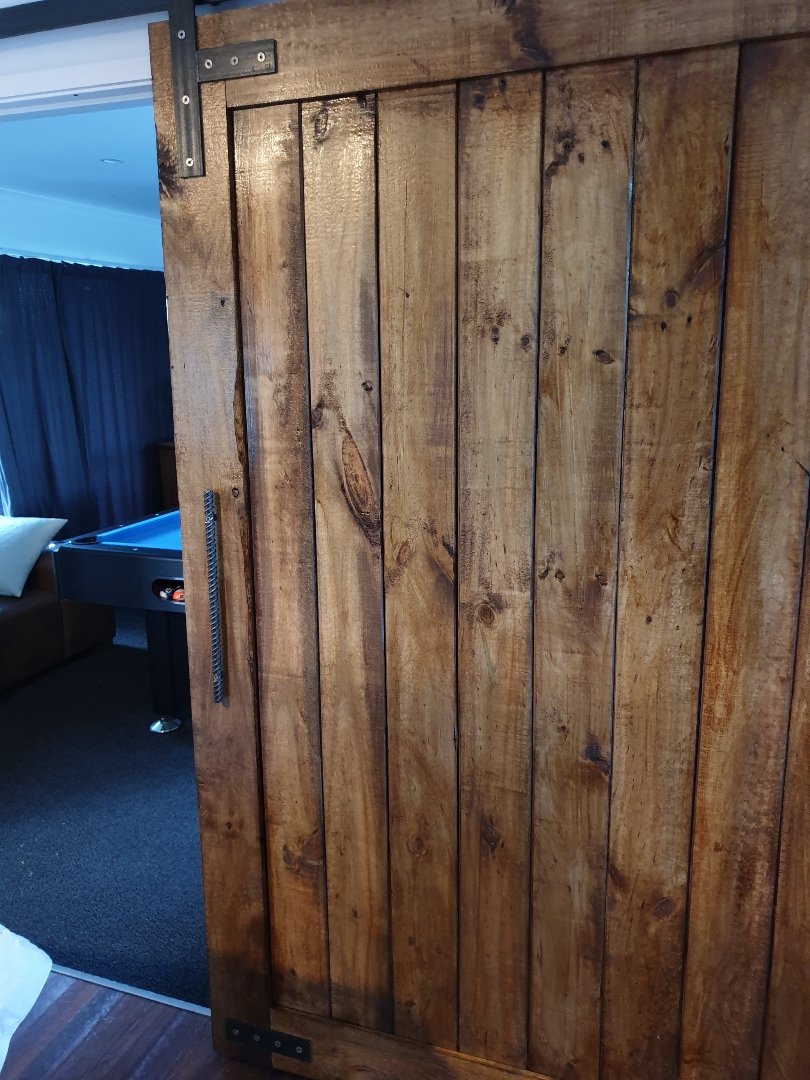
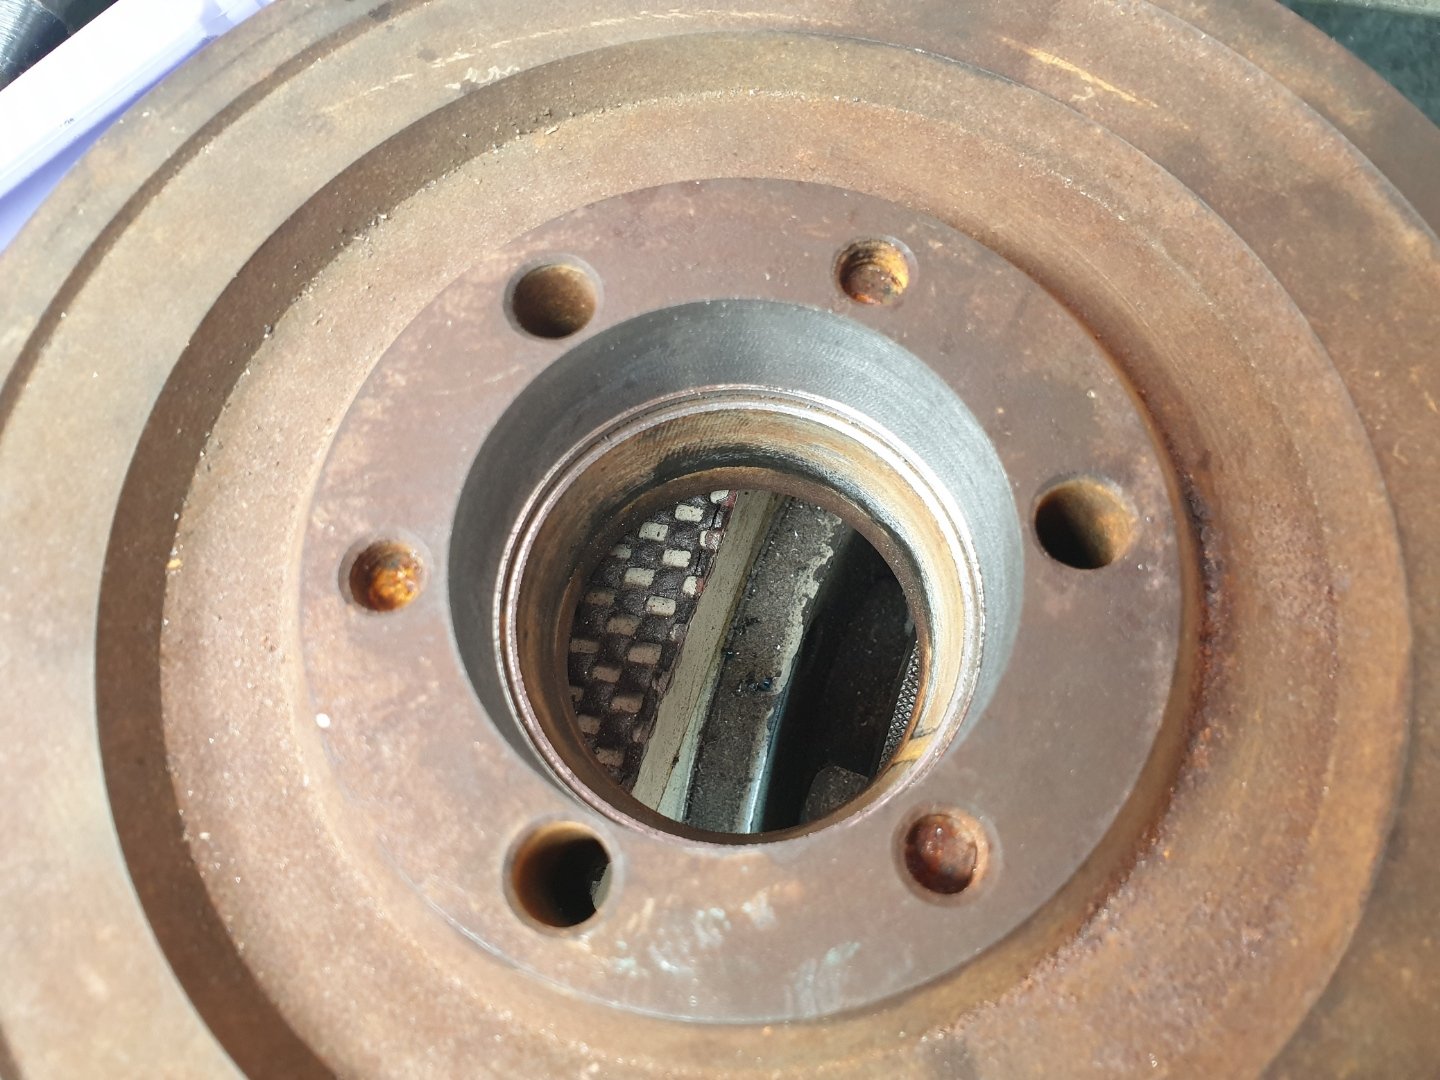
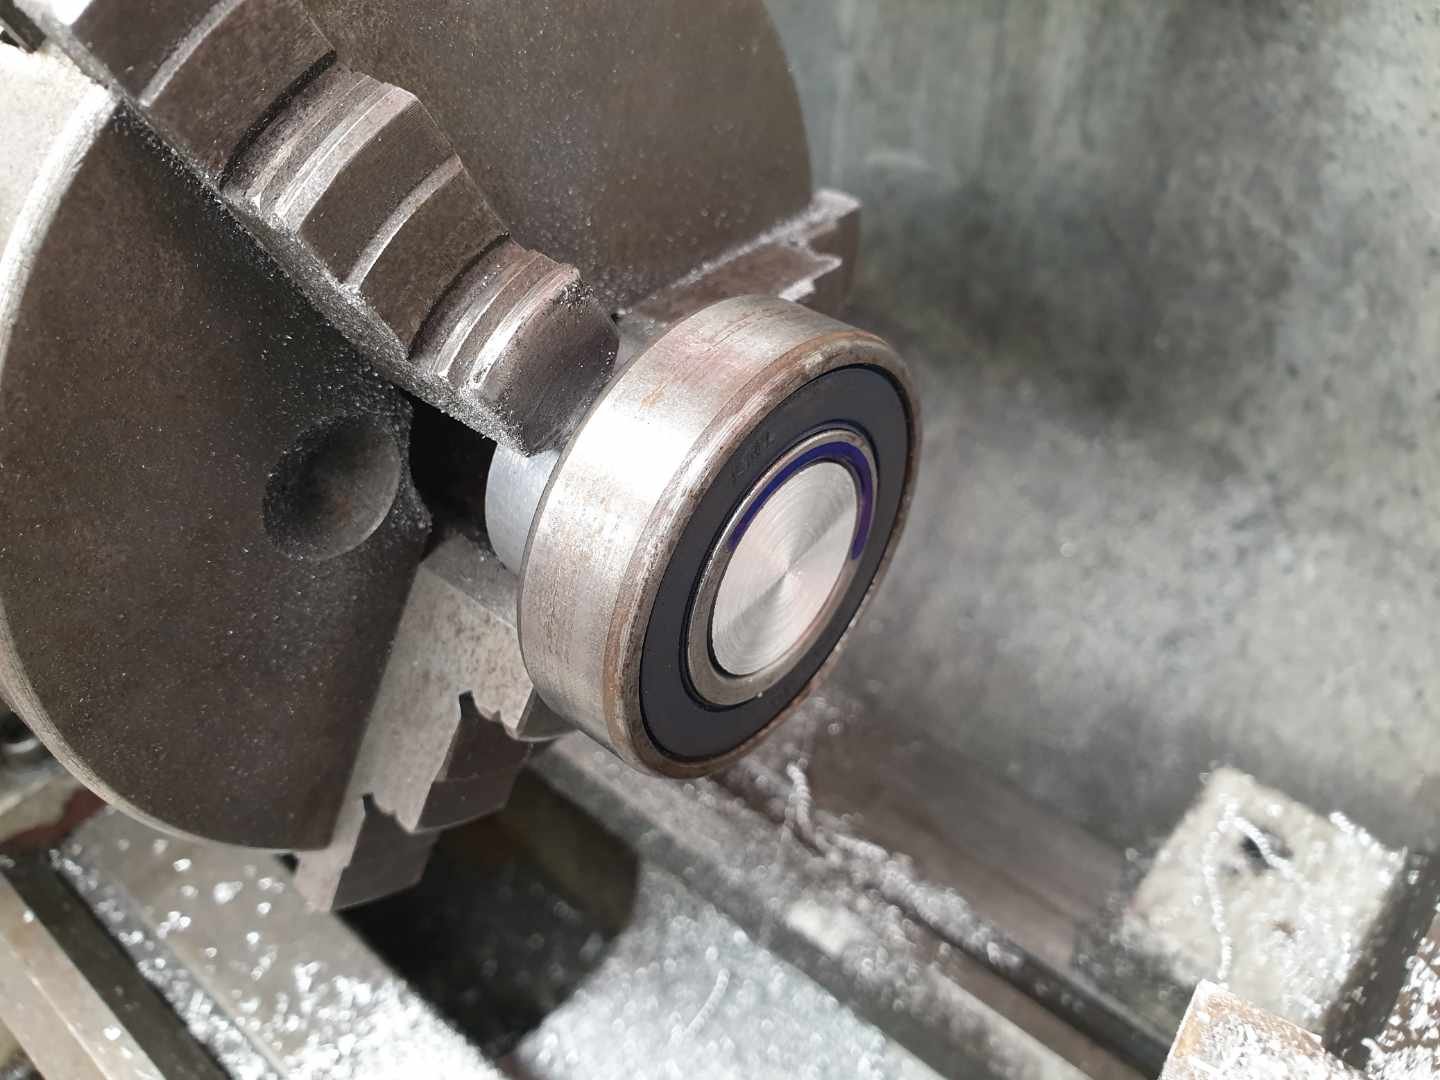
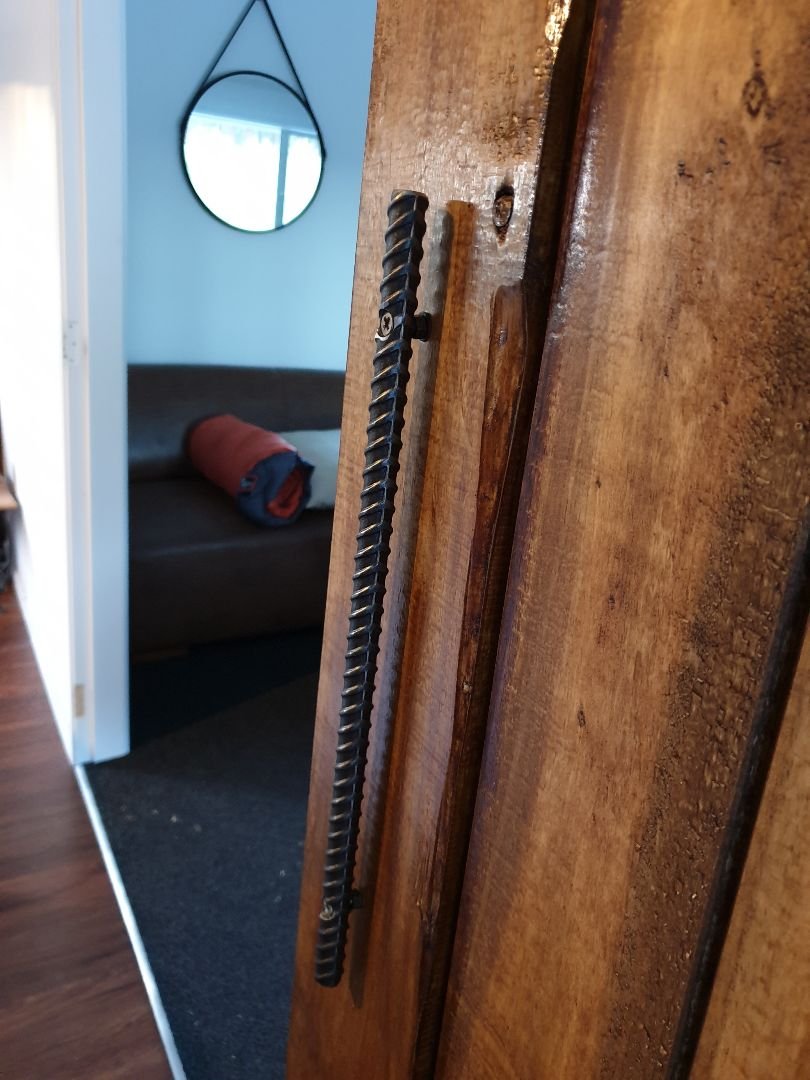
Love the e-kettle above...wicked! Finished the barn door today. Been a public holiday I totally forgot that shops aren't open. However this just made me have to come up with creative solutions, rather than buying ready made. So: Standoffs made. Then using the above standoffs I attached the rail to the wall. It's just 50x6mm flat bar. The same stuff I made the hangers out of. Then I used some left over parts from Pete's velobike. And machined in some recessed pockets to hold some leftover harley bearings. Then I had to make mini stub axles for the bearing to attach to the door hangers. And tadah!!!! It works!!! Added a big handle made of rebar. As they say "big door - big handle"... I've also added some stops, "so it doesn't go off the rails" and a floor guide for it to track on. Pretty happy with it.
4 points
-
Update - all items on the list are done apart from adjusting the hand brake and moving the rear hard brake line up a tad on the diff. I fired the coupe up today and idled it for 20min the drove it up and down the road to get some heat into it. I wanted to monitor the temp and ensure the fan is doing its job and that the rad isn’t spitting any fluid. Pretty sure some neighbours applauded when I turned it off. That just made me turn it right back on. Cert recheck 14th May and toad test. Here are are some pics from today
4 points
-
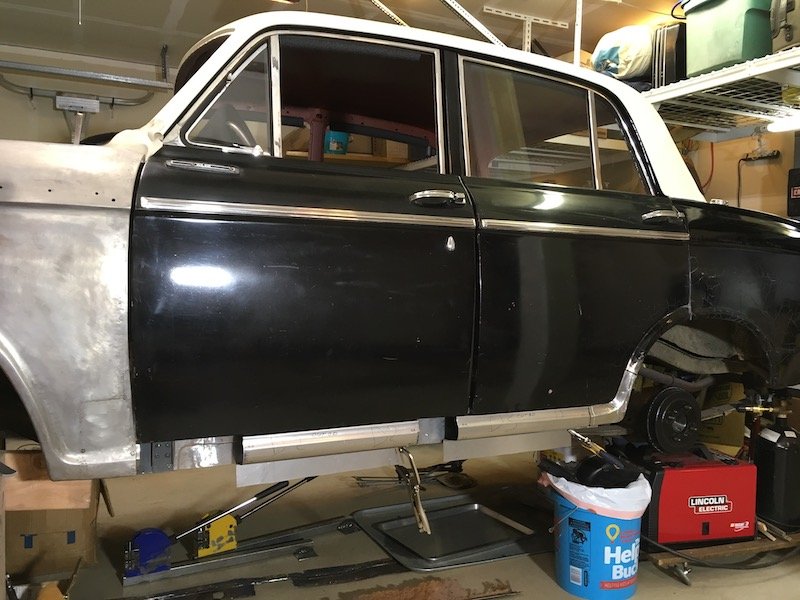
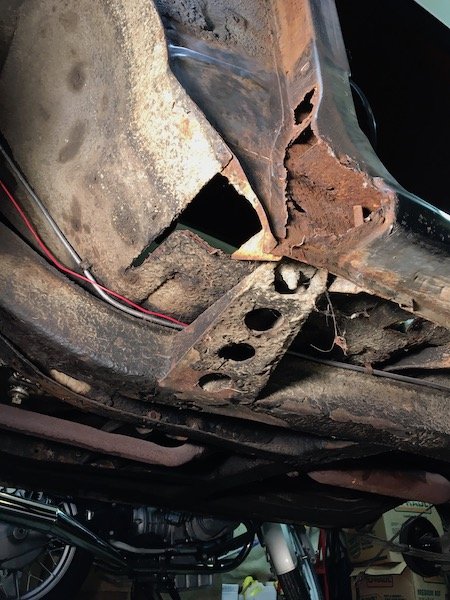
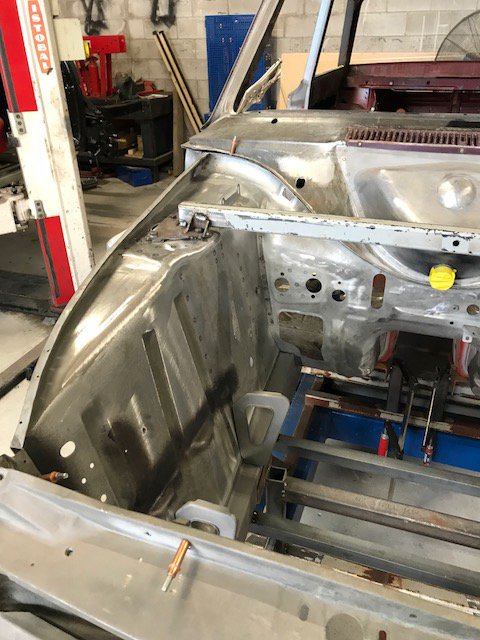
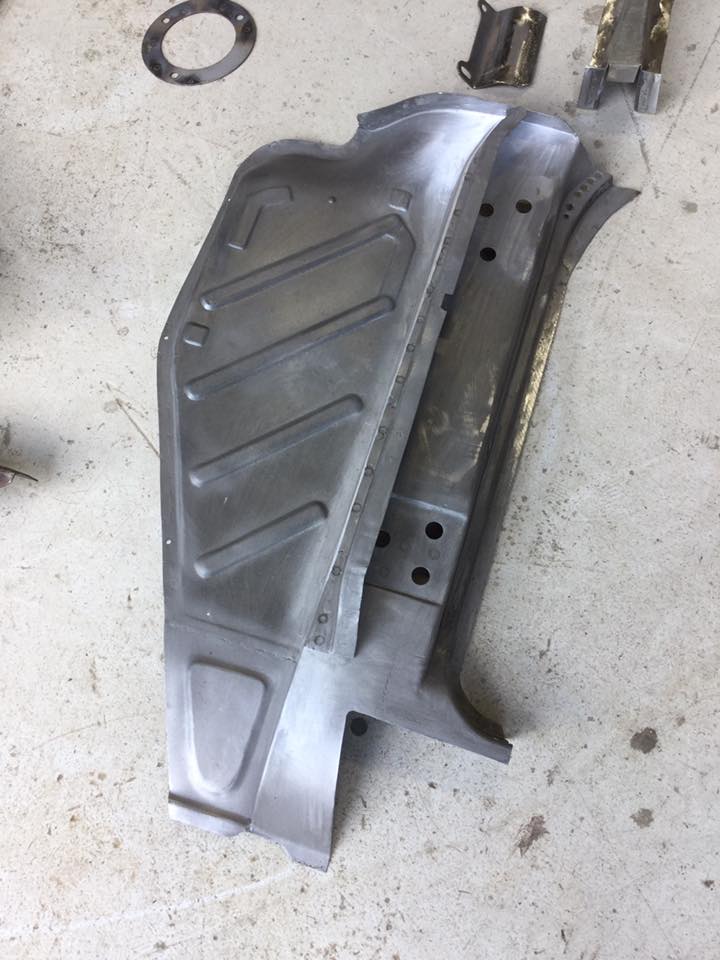
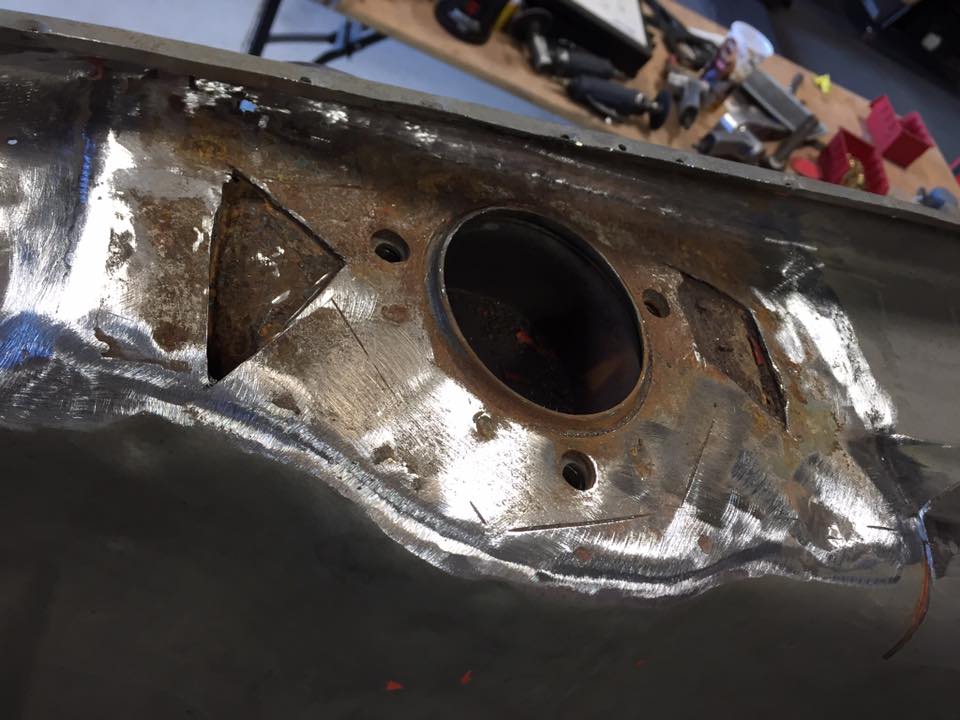
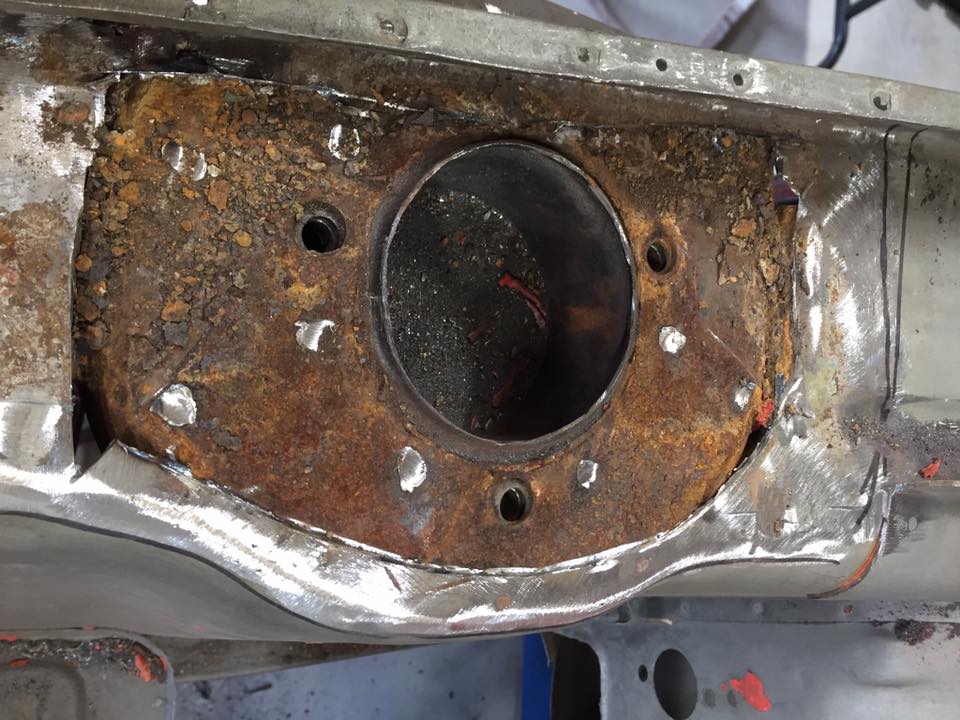
I've done and did it again. Sight unseen, I didn't expect no one else to bid. You know the story..... Its a 62, fully retrimmed interior, and a half decent paint job. Big pile of receipts, it's had a lot of money spent on it. Unfortunately it's got dead Rego, fell off the system 10 or so years ago and has been passed around a few owners since then, mainly sitting in their sheds till they give up. Not with me though! Main issue is that the chassis rails are shot. Usual Morris minor rust. Someone has attempted to make new ones in short sections and made an effort to weld. I wouldn't pass it, so neither will the inspector. So I have just spent roughly the purchase price in new quality UK panels. Rhs needs the full length done as they have tried to do the whole thing (£££ in postage )LHS there's enough of the original left in good order that I can get away with a half panel. Some wobblyness and rust in the RHS engine bay tie plate, so got another of those as they are cheap enough. Possibly it's had a prang on that side at some point too. Have a stack of paperwork stating various rust repairs done about 20 years ago in Nelson, so il have to check those out too. Plus a couple of half pie attempts at small patches from the last owner as well. Nothing major, she's not a mitsi. Other main issue is there's no engine, box, or driveshaft. I have a 1100 with the head off and a smooth case box (possibly the one in the paperwork that's had about 2k spent on an extensive rebuild only a couple thousand km ago) and a 1275 marina engine and ribbed box, which I'm told runs. Car however should have a 950. I'm leaning towards another 950 and see how bad the gearbox I have is. If I needed to cert it id want to modify a bunch of stuff to make it worth it. Have a supercharger here, or maybe just out the body on a Suzuki 4x4. Maybe next one. Otherwise just the usual Morris problems. Brakes are all in bits, tyres although very low km are now dry rotted. For some reason there's indicators on the front but has never been any on the rear. Looks like the suspension bushes are missing (it's also on lowering blocks and sitting on its bump stops). Hoping for an over winter refresh.....3 points
-
Just buy this and be done3 points
-
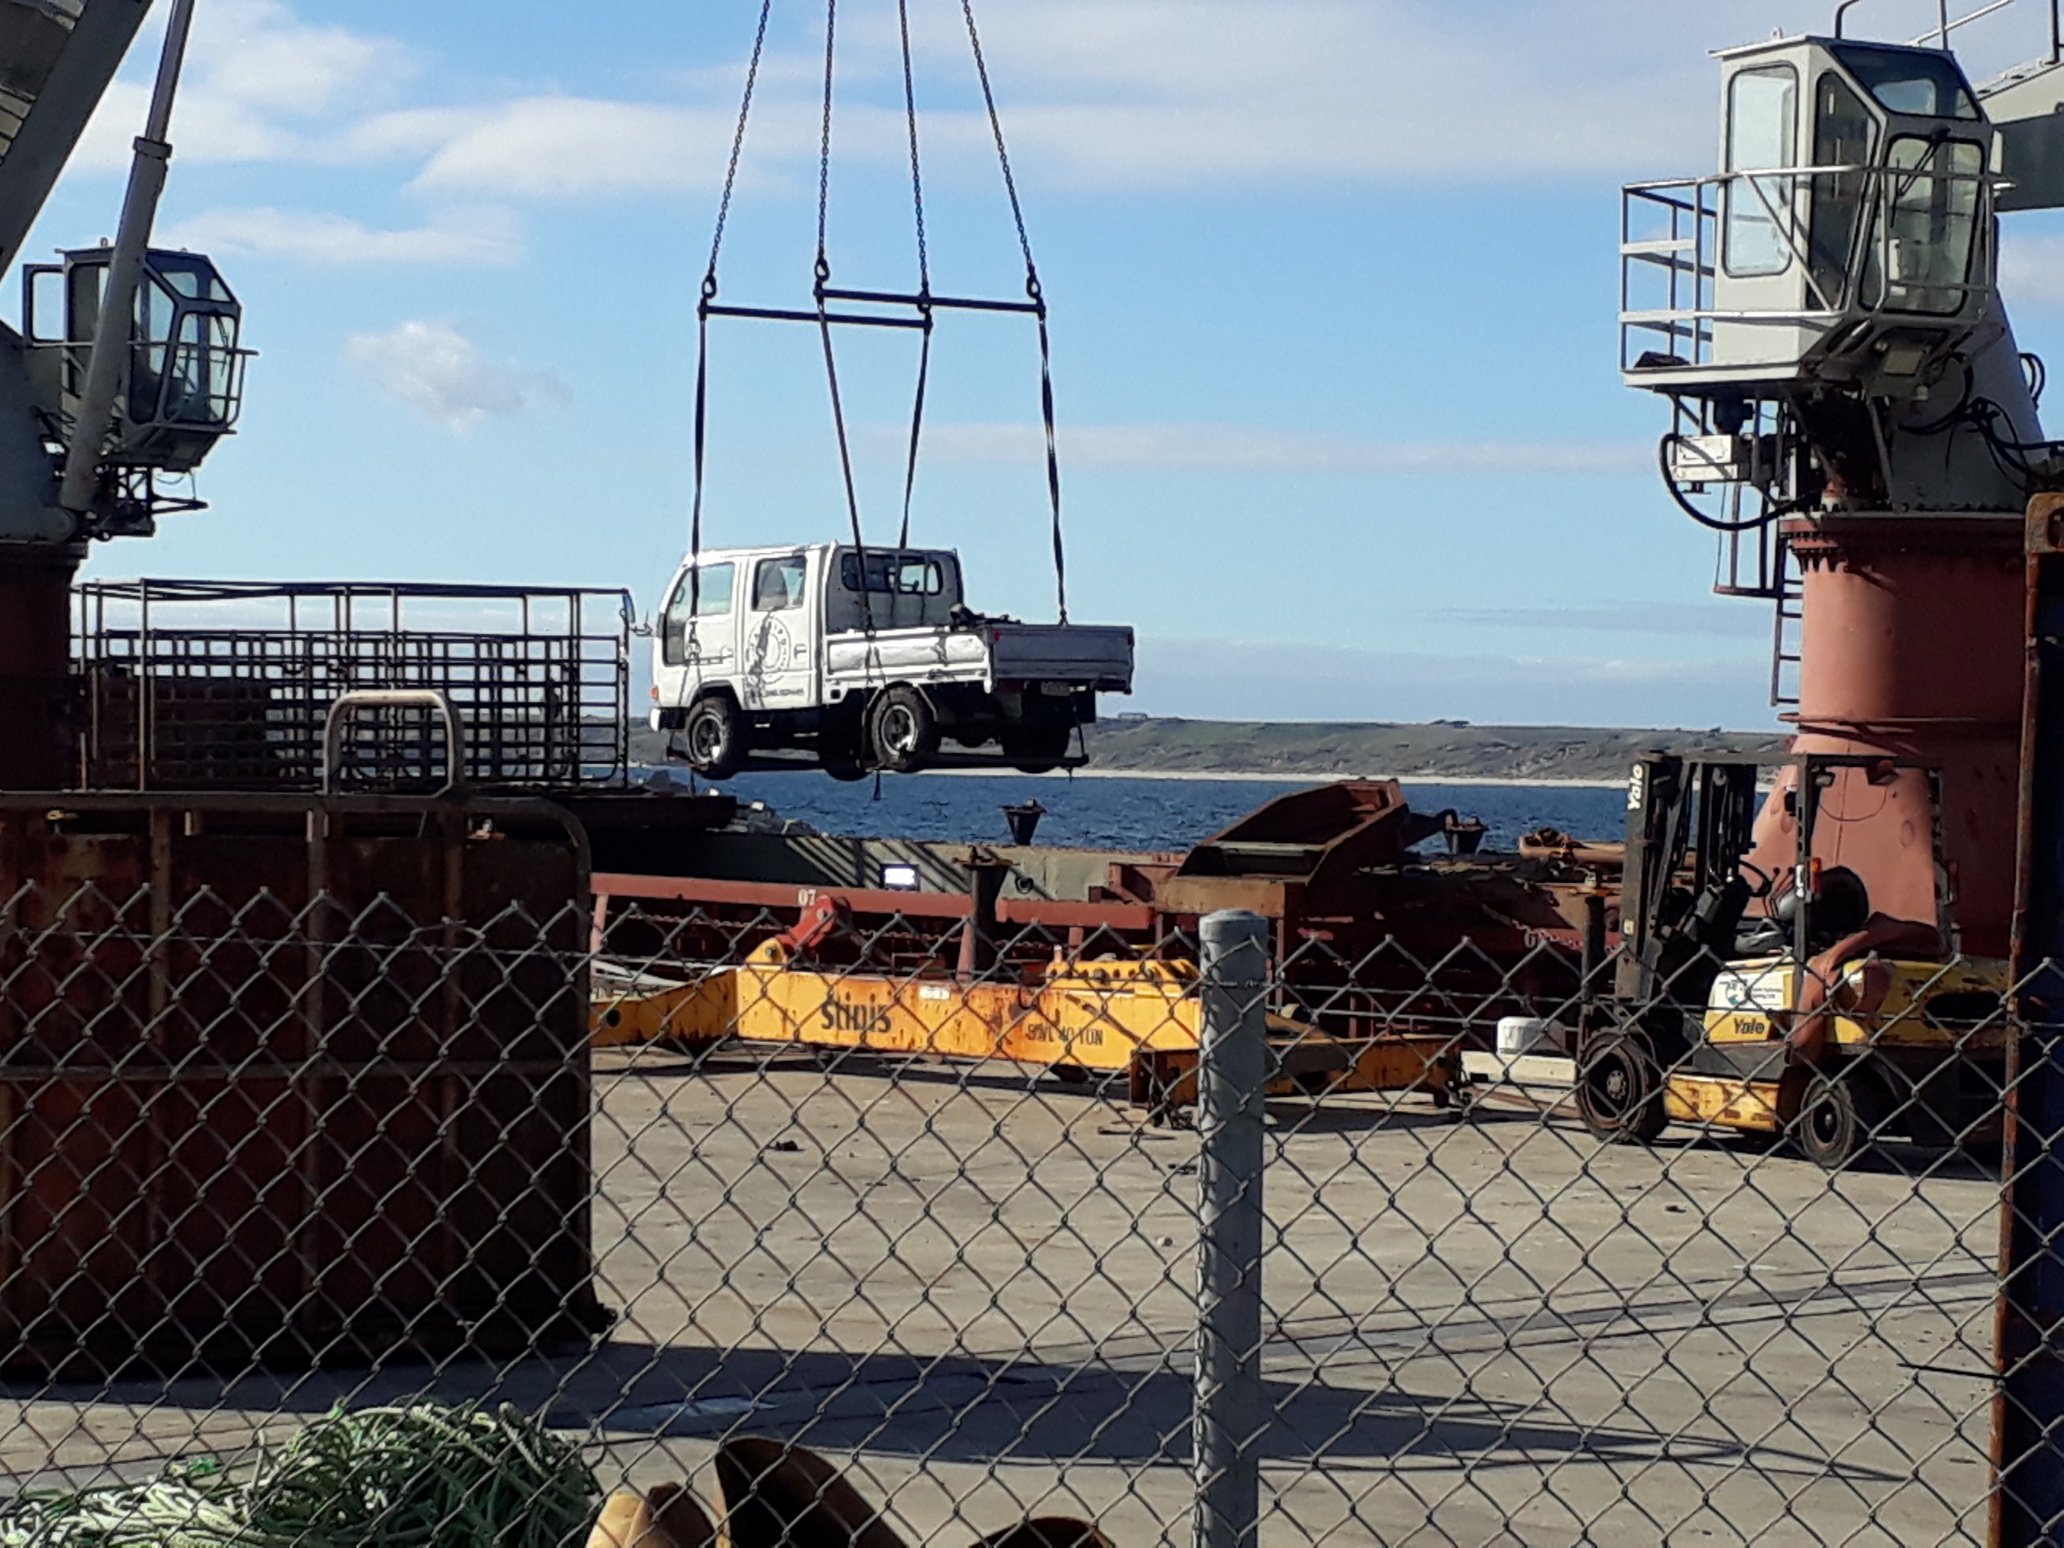
Chatham Island's Nissan population just increased by one.
3 points
-
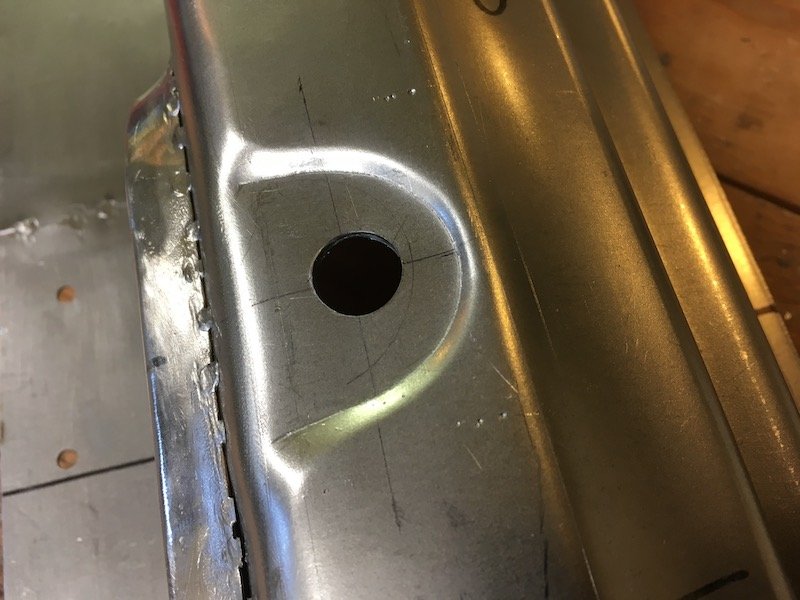
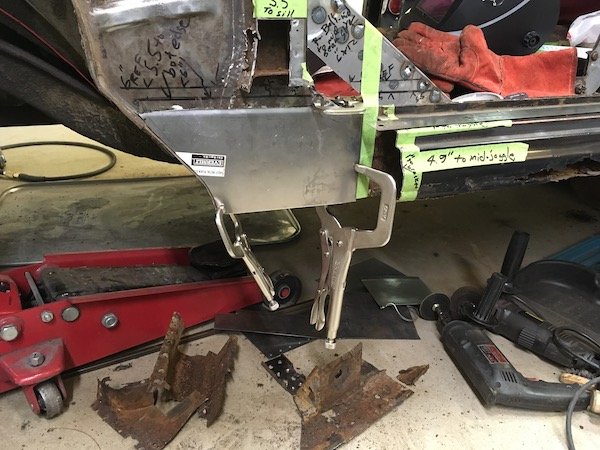
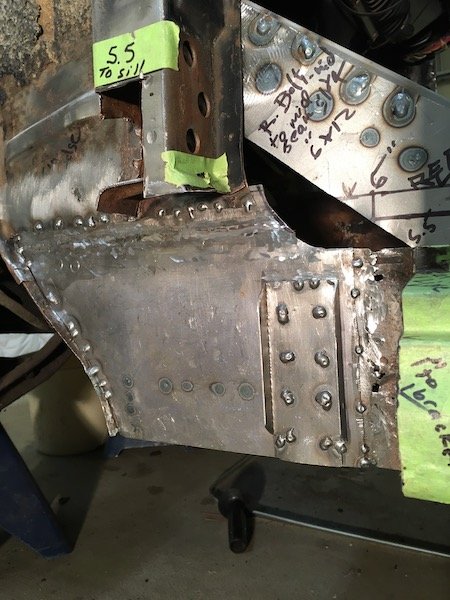
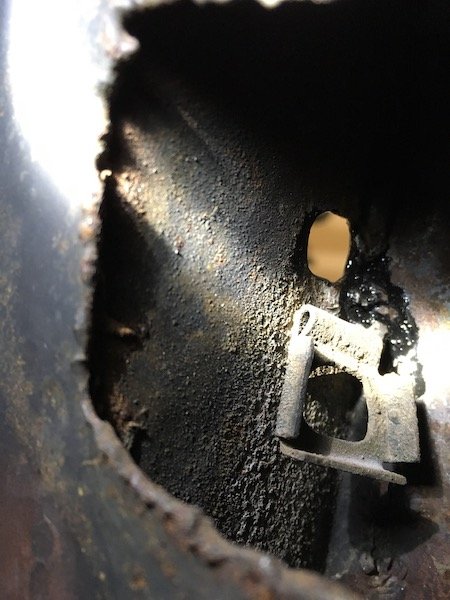
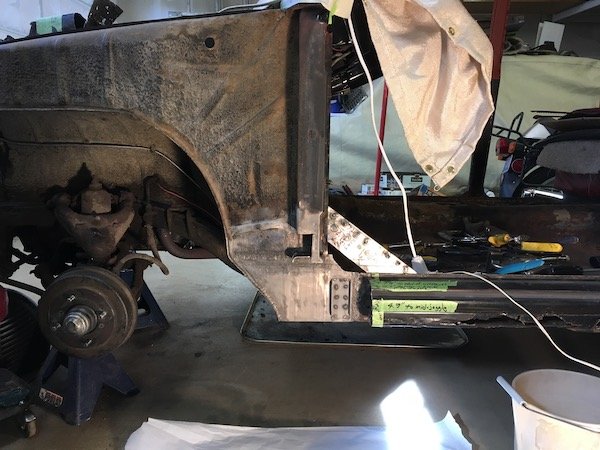
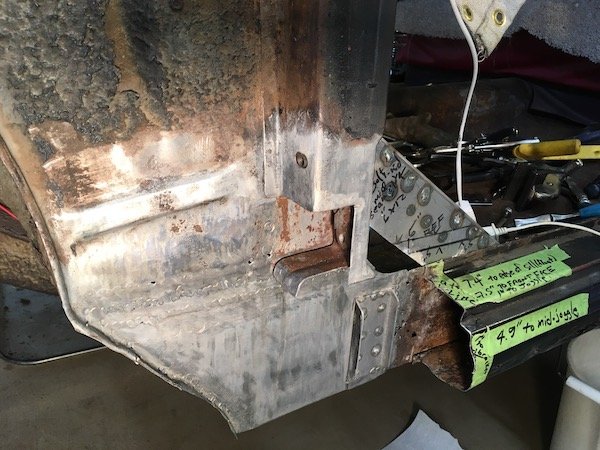
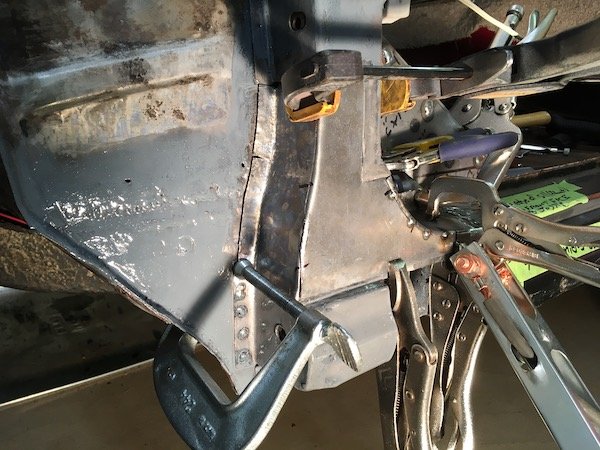
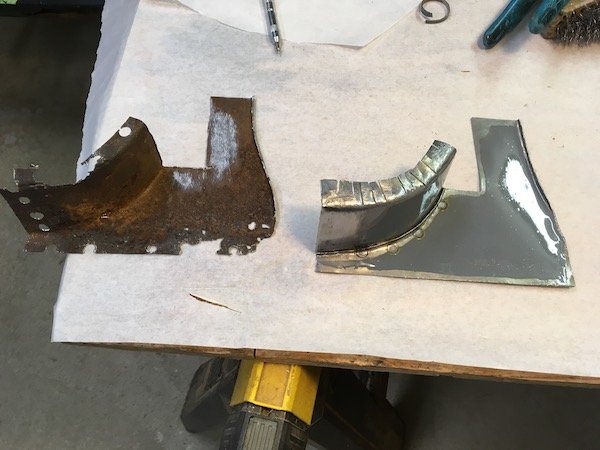
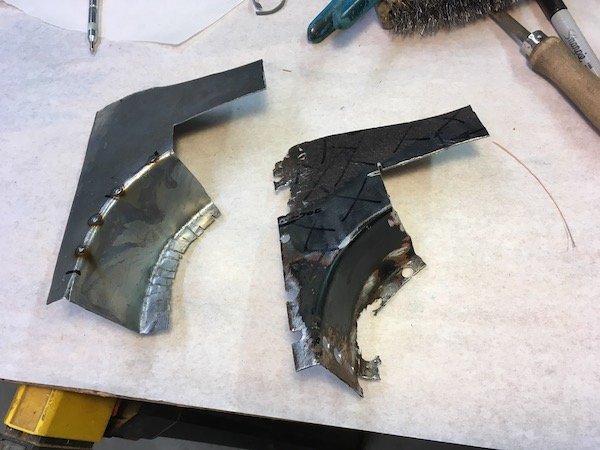
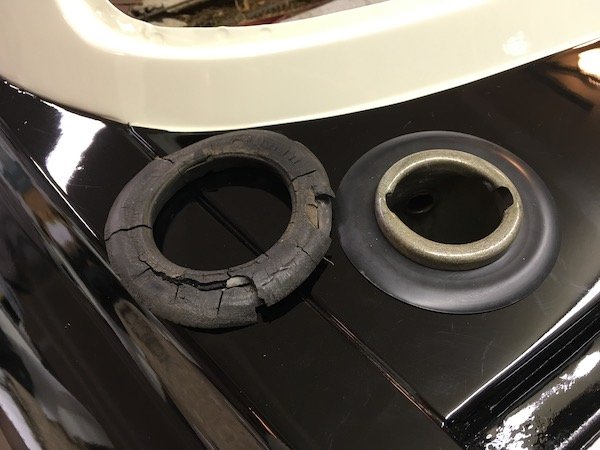
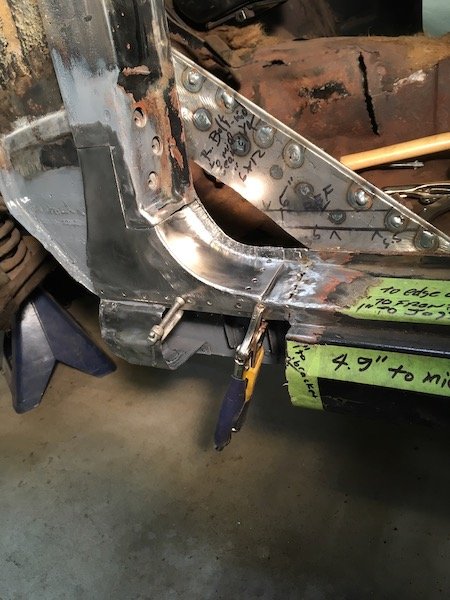
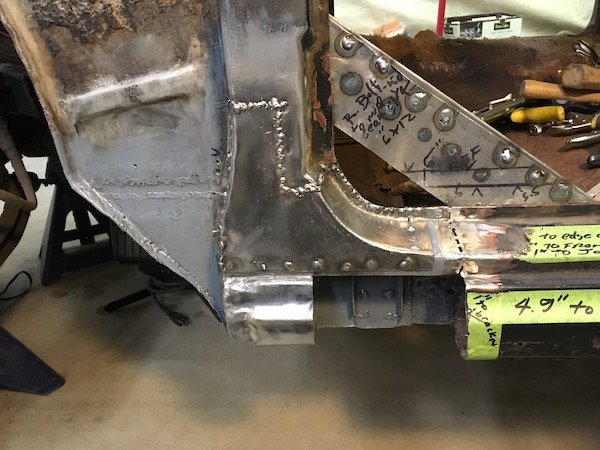
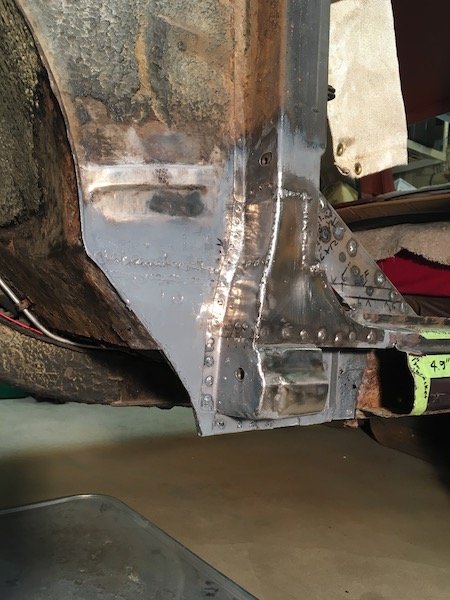
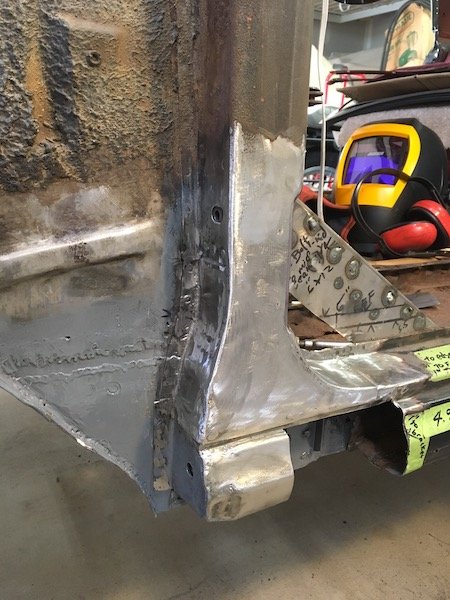
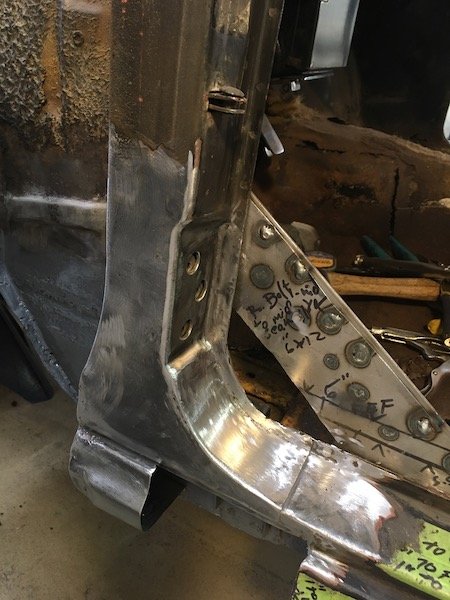
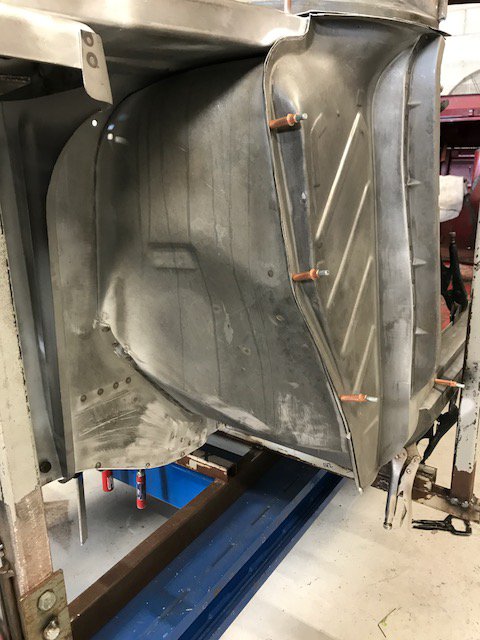
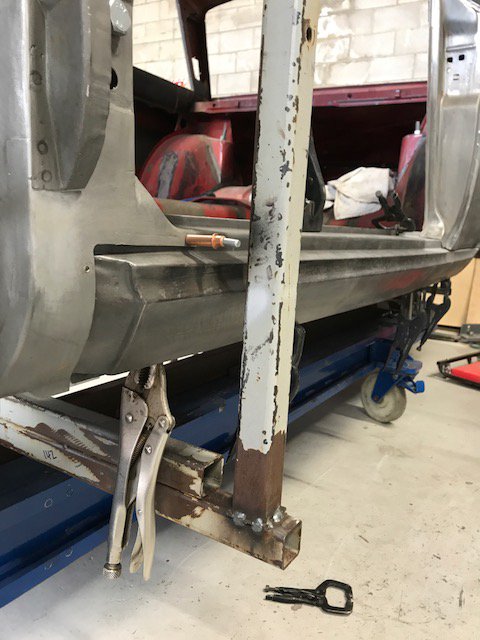
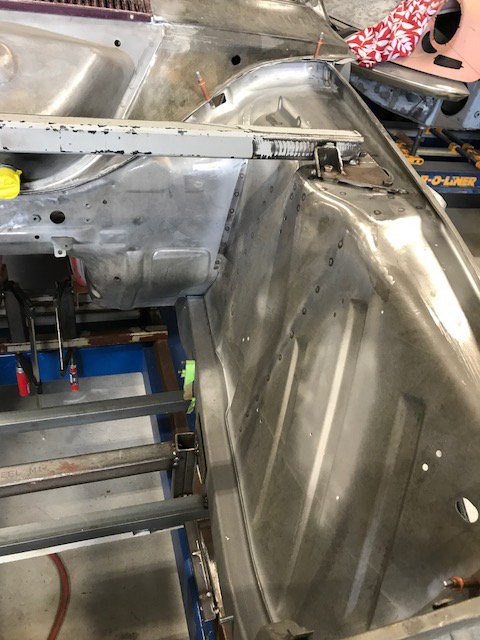
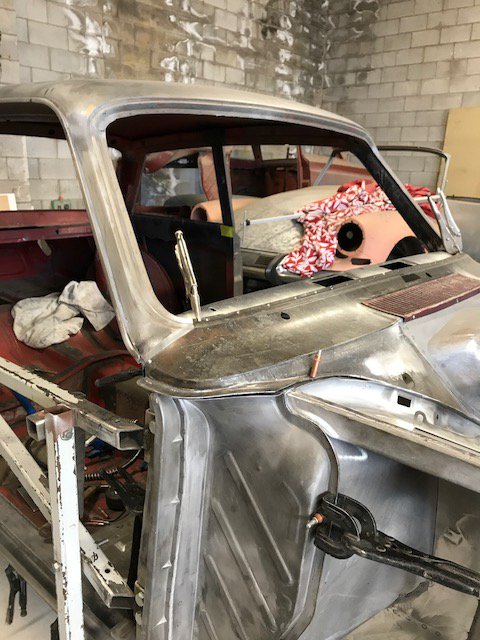
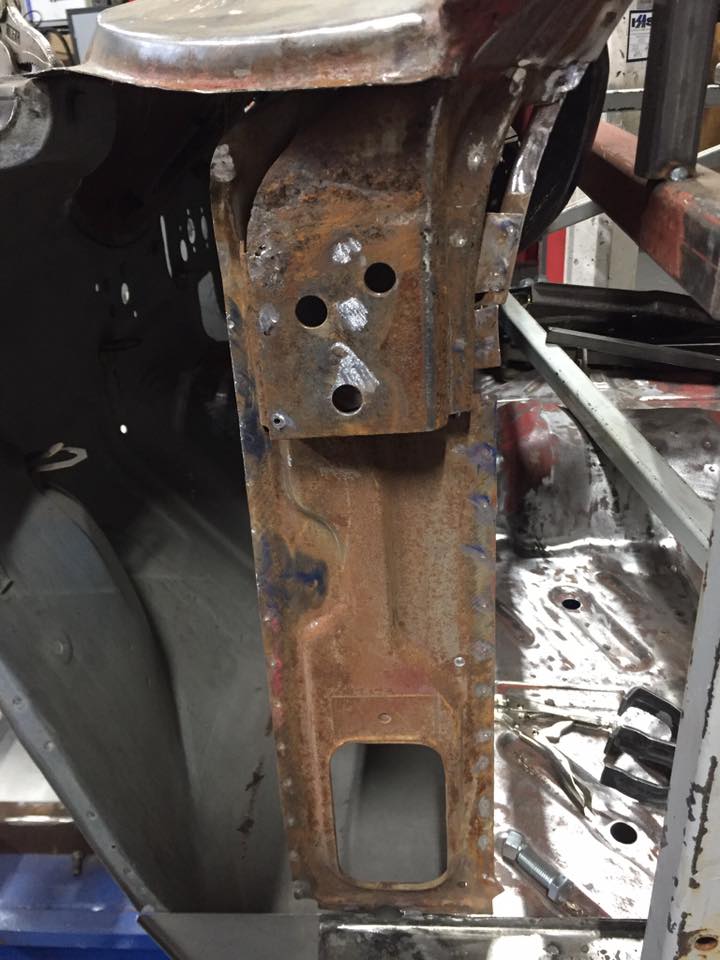
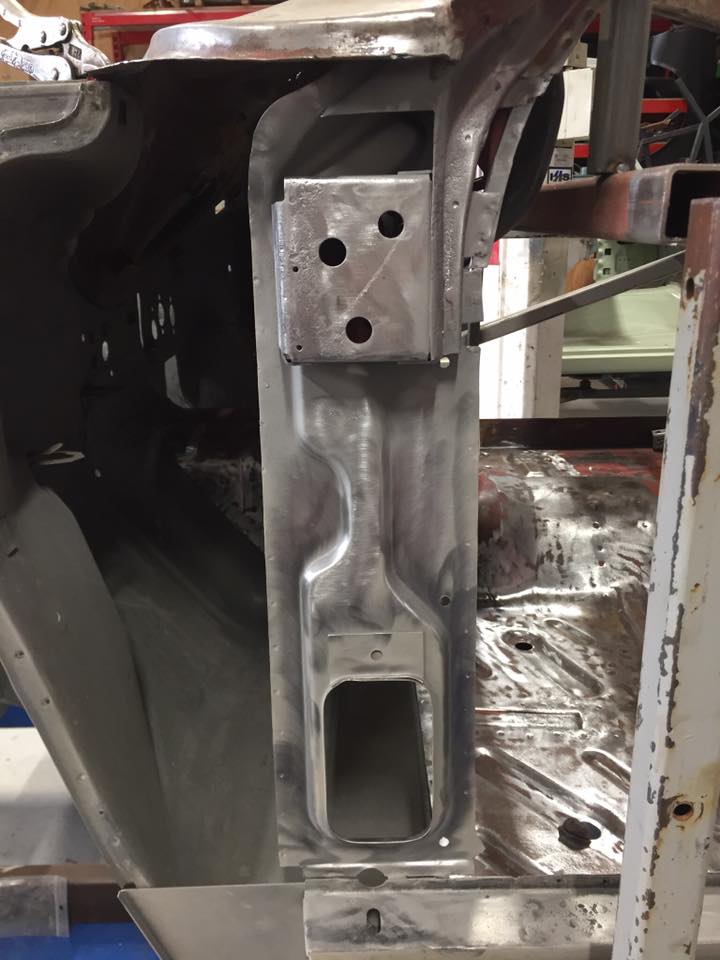
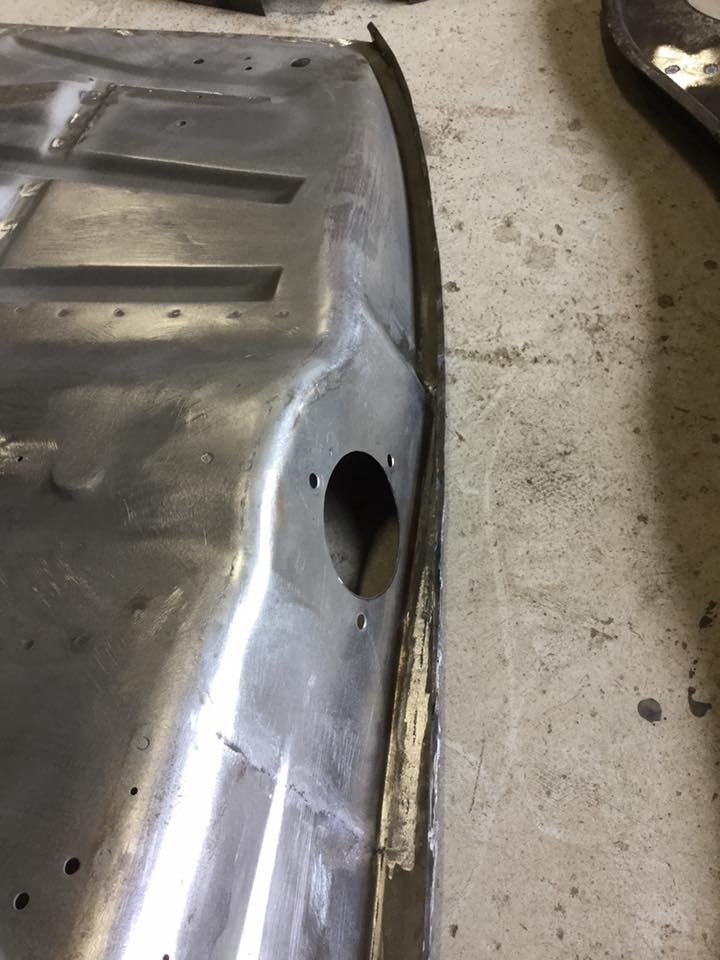
Repairs to the 61 Datsun Bluebird left hand side 'A' pillar (or post) The starting situation. More than a little rusty. Several portions are completely gone. I started by making reference measurements Cutting the remainder of the forward sill stub off Reinforcement was added before cutting the inner sill plate out. Making a paper template for an inner sill patch Cut it out Sizing up some 16g steel sheet Finally the patch, gusset plate and body mount bracket (on inboard side) is welded. Had to do it twice as it was placed crooked the first time. Still learning how to weld with the MIG. I should have turned up the heat for these welds against the 16g, still a bit cold with too much build up. The rest of the inner sill going aft will get cut and replaced later. Inboard side Did some sketching and cut out some flat bits to make the rest of the pillar They may not match perfect, since some of these cover undefined areas, but they are better than empty air space! Beginning of the outer sill forward stub Forward sill stub inside Initial fit checks, and adjust and fit and repeat Added the floating nutplates A view of an original style retainer for the square nut. Bent over 180 to get a wrench on the nut after torching a hole in the inner panel. Notice only one tab is welded to the metal. From the right hand side pillar that is toast. The area is phosphoric acid etched and prepped for weld and protective paint where it can't be reached later Another viewpoint Beginning to weld it. Finally I'm getting the plug welds hot enough to penetrate well and lay flat. The reproduced upper bits. Didn't like the pie cuts but it worked Same as above, flipped over This metal work was getting tedious. For a diversion, I located a Nissan rubber grommet to replace the rotted rubber on left. This is the typical state of the rubber parts all over after nearly 60 years. Okay, back to the business of welding the parts onto the Bluebird... Prepping more of the soon to be hidden innards Get it welded! It's taking shape Getting there Now to just grind and sand the welds flush It looks not too bad. Solid metal again! The rest of the outer sill will be reconnected at the stub joint much later. Next posting will be removal of multiple parts, including; outer sill, 'B' pillar bottom, 'C' pillar (or dog leg) and remainder of inner sill.
3 points
-
North Shore Rotary Club present a 1995 Workshop Coupe (as it has only 2 doors). Back in December old mate rot808 and I bought a workshop on the North Shore for a bit of classic rotary storage, which is great because families get excited to free up their garage space but realistically it means we can now buy more Mazdas. It's a tilt slab studio spec thing with only 2 doors for less whores (maybe why the brothel unit shut down opposite us but thats another story). Based in a group of 13 or so units which keeps the bodycorp and maintenance down heaps, the neighbours are great because from the ones we have met they have classic cars, two units are mechanics, and one races Targa. Built in '95 most the other units were converted to mezzanine all the way through, but ours in one of a couple left standard with a smaller mezzanine, and more room for cars. Even 3 phase for eventual hoist storage options. The upstairs is a fair size for office/lounge area and for collection of naked lady supercar pics. The funny story about the pics is that we won the Ferrari one and was one road away from collecting it as a man brought out the Lambo one to side of road. We immediately stopped and did a u-turn to ensure it was free. It was "after 10 years in the garage my wife told me to choose between topless lady Lambo or bottomless lady Porsche", so after admiring the other choices we chucked in the Lambo and went off to pick up the Ferrari. Functionally it can host 2 Mazda's, and tightly 3. Cleared out for overseas adventures it can host 4 (thanks to our specific bathroom measurements to not exceed two Mazda's door to door) and the 5th Mazda can of course be hosted with eventual hoist but we don't own 5 (... yet) Rocked up to meet the ex-owner of the workshop in my car, to find out he owned RX7's and the guy over the road has an FC outside his too. Bonus features not listed in sale agreement are weekend rotary burnouts - did not realise this, quite happy with the outcome. So we grabbed some workshop toolboxes and shelves to act as a kitchen for an industrial theme. Even added the slam bike for a feature, and $3 plants which I eventually forgot to water and they RIP'd. So it's come a fair way in 3 months considering it's a blank canvas to try design. The bathroom was extended out with help from Mr Ryan Fels, and I left him and rot808 alone too long and they made a ridiculous small door under the stairs with handle at bottom (it's all functional now though so great job guys). Then I taught myself how to gib-stop & subsequently developed stronger language skills. My mate Leonard (the fridge) was $10 on Trademe, won before we even had the workshop, but didn't check location… so down to Tauranga and back for one of the best purchases… second only to the fabulous Rothmans cigarettes dairy sign which required pick up and storage by the lovely Danger Dane until we could fly it home. So now that it was all painted and ready to go, we had the idea to invite a concrete grinder in to take off the paint I had just applied. Forward thinking does help these situations but anyway. These 2 guys came over from a company called Auckland Concrete Grinding and worked for 3 days perfecting the floor, grinding it back around 3mm and coating it with a couple layers of penetrating sealer and coater that smells like Tolene, to become water and stain resistant. Thankfully we don't own British cars so didn't need another 3 protective coats. The results are far more impressive than we thought, we assumed a light grind would just be a lighter grey finish with none of the speckles visible but they did an amazing job. Even got the back wall coated to act as a splashback. Before, During & Afters: So that's the basics of the downstairs for now, and after sorting out the plumbing and wiring downstairs we will then start to tackle the layout. First point of confusion how to lay things out... Will be updating some of the projects as I get time, feel free to follow along and give recommendations etc.2 points
-
Not sure why you're telling us to calm down when called out on a dick move, but ok you do you.2 points
-
Must look out my flamed van pics...2 points
-
Yes a Morris minor, fitted out with parts from the worst car ever made. A most excellent choice2 points
-
Same colour as my Morris Minor.. may I should put up a build thread of mine and we can swap ideas2 points
-
yea sorry this build has gone faster than my spare time to write out the next post. so for the mean time i would like to show you what you can achieve in 11 days after work doing a few hours here and a few hours there. A huge thanks to Paul. now dont worry i will go into detail on what we have done and how i went about it all, but i feel the need to show you guys and gals this. Cheers team, we might just be driving George the kombi over the Easter & Anzac break.2 points
-
all working now. 2019-04-15_08-43-48 by sheepers, on Flickr2 points
-
Imp work has taken a back step due to this rusty old 4wd bus thing that has come in for work... However we are both still sneaking in plenty of time on the wee car. Its so exciting to see it come together that we cant help it. Hence I have also been fairly quiet on the forums etc. So when I left off last time it was door cards I think. Or painting the engine. Yeah- that little engine. It looks quite pretty with a little blue bonnet on its head I must say... Now the doors. I cleaned out the threads on the hinge plates, oiled them, cleaned and painted the old screws and then we carefully manoeuvred the doors into place and set the gaps. I knew they would come up good because they were good on the car when we got it. They do look good. They look factory. However I think this car was assembled on a Friday afternoon at the NZ Todd Motor Corp and they had been into the beers already. The wing tops, factory, don't quite match the profile of the door tops, factory, which don't quite match the door or sill bottoms. Factory. Looking at other Imps I think this is fairly par for the course on what was a cheap run around. I'll live with it Then it was the careful task of fitting the 1/4 light windows and the rest of the glass and runners. I rummaged through all my window parts and pieced together the best I could from the stash... I had to lengthen the front glass runners to suit the new bailey channel seals that I'd bought. The new type is soft backed whereas the old ones were steel backed. The runner extension bridges a 40mm gap between the bottom of the 1/4 light and the runner. I folded up a profile the same, butt welded it, cleaned it up and all good.. I fitted the runners, the best glass I had (or so I thought at the time having since now found extra windows hidden behind the lathe which appear to be even less scratched) and then fitted new weather strips on the outside. All very posh for a 53 year old car. Then the door handles. Again it was into the stash of parts. Hannah had already selected, cleaned and polished the best handles of the bunch. I went through all the door locks, hatch lock and ignition barrel managing to get a working set which matches one key. Always a nice thing. I had to make new handle rubbers as the old ones were completely perished. Trying to cut neat holes in thick rubber is never easy but over the years I have made a set of hole punches to suit. I needed a new larger one though... which then made neat holes... Handles fitted and working fine we moved onto the door cards. Actually genuinely excited about this because after the restoration of them came up so well we knew they would look ace against the blue. Even not to bad with the mx5 seats. Nice clean shiny interior handles too along with freshly painted door bins. Very happy with it all... The Mx5 seats dont look too bad in there but we would much prefer to have some red seats.. To match the rear seats which I reckon look great!... I had also fitted the door seals. Not original and a bit too thick to start with but once I cut the bottom out they now now squish perfectly and work well. However- they have either shrunk or were never cut long enough to start with leaving a gap an inch long. I shall have to fill it with some more of the same profile. Now the doors were done it was onto finishing the transaxle rebuild. Ages ago we had scored a later stronger mk3 box from an Imp at the Marshlands graveyard in Christchurch. This car here in fact... I then had a right good collection of boxes... I had stripped down the broken box from the racecar which had some chips in the teeth and was generally in a bad way. These transaxles are so cute (if a gearbox could be cute?..). So dinky. The little diff. Nicely made wee boxes... The later mk3 box has a stronger casing due to extra ribs being cast in around the diff support bearings helping to stop case flex. There is also a breather hole built in a neater way in the back plate, the diff spider gears run the side loads against bronze bearings rather then just the bare cage, the output shafts have pressed on drive lugs rather then just held on by nuts. All the sort of little tweeks one expects as a cars design gets improved through its life. Sadly when we removed the box from the car, which was on its side, I had forgotten to release the gear change coupling from the shaft. The box at one point ended up hanging its weight off this and bent the shaft plus broke the casing. Initially I thought I could just swap the end casing over but they are a different design. There is a breather hole plus the o ring seal that seals the shaft was moved from the shaft itself to the inside of the alloy guide stub (in order to move wearing the alloy down from an O ring attached to a shaft sliding with the hole to fixing the o ring so the hardened shaft now runs within the ring- good idea that man) Photos of broken bits. Note the different casings... I had to fix the casing. I skimmed it flat in the mill.. Milled a step down... Made a small tool with some HSS to machine an inside groove... Machined groove in alloy and a step to on outside for a slight interference fit into plate lug which was then tapped into place with some retaining compound... Cool. Sorted. Then I did some cooking... and pressed a brand new frozen bearing into the case to replace a fairly rough feeling old bearing... I had to weld a block of alloy into the bellhousing to take the pivot ball for the Datsun clutch assembly and then the whole lot was reassembled... Then I had to do a three point turn within the available space, easy with an Imp, so I could par it in a spot with better access to the rear. Next up is to sling engine in place and make a new crossmember to suit because I dont like the one it came with.2 points
-
1 point
-
Doulama has some marina disks, think I might redrill them to the correct yuck Brit pcd Actually might be good for my other minor1 point
-
Yep, that's fucked. /plonker
1 point
-
Drivers door complete and only the boot lid to go and body work finished. Still trial fitting parts etc and once done it is off for the final blast and prime then off to paint.
1 point
-
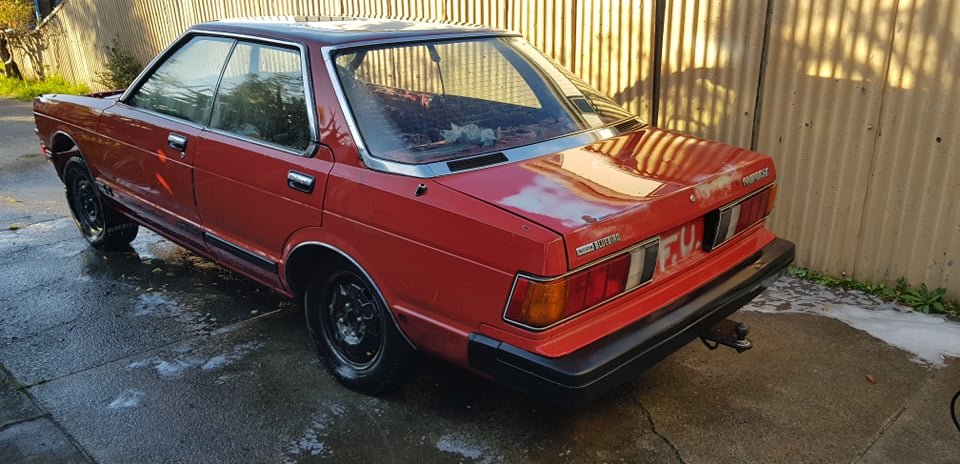
Woah....been awhile since I updated this. Got some notifications.... This has been sold onto a dude in Auckland, reluctantly. . .Been building a Z31 300zx turbo since and recently acquired a 910 hardtop 4 door. I'll be creating build threads for these at some stage
1 point
-
1 point
-
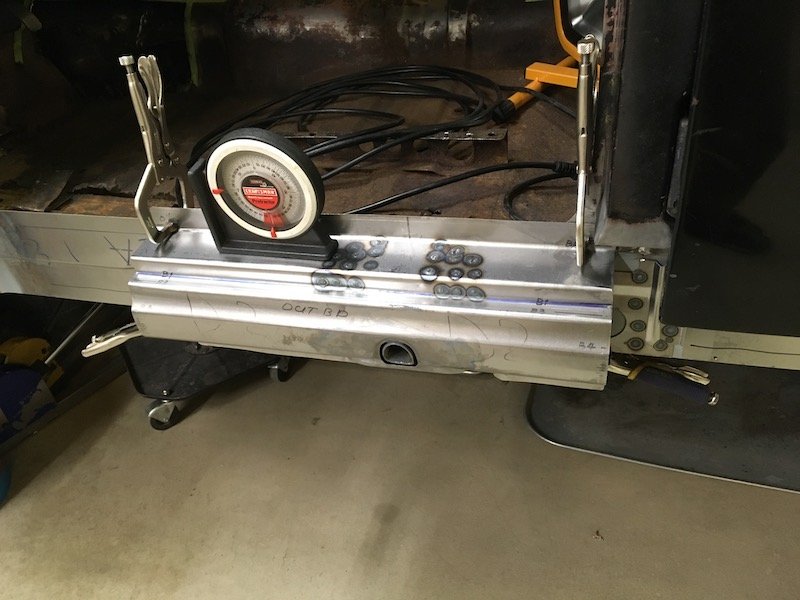
A bit more progress. I bought some Vitara seats from the wreckers, these are the same frame as the ones I put into my bus so I know they can sit pretty low once you start cutting and shutting. They are a bit more supportive than the Dyna seat, and they have the added benefit of being a pair, not a single. Banana for scale; I removed the bar that runs along the back of the seats, this allows the seats to recline into a far more comfortable position. It will go back in when the seats are installed and I know how much clearance it will need. I will need to split that engine cover lengthways and add another hinge and latch. This means I can still get into the rad space without removing the passenger seat. This shouldn't be a drama. I also checked the bump steer situation last weekend, first with the factory setup, then with the new arrangement. The new setup turned out pretty shit as my positioning of the new steering box did not put the tierod exactly in line with the factory setup. This was due to some geometry that I had to guess at a few weeks ago, but when I moved the box up 25mm this made a huge difference, it is now slightly better than the factory setup which is a big relief. The brakes look pretty new with minimal disc wear so that is good. About there is where things have stalled as my back went out pretty badly and I spent a couple of nights in hospital. I'm home now and itching to do stuff but I should probably take it easy for a while. I am going to have to get serious about losing my belly as I am sure that would make a huge difference to the situation. Fat old fuck that I am.1 point
-
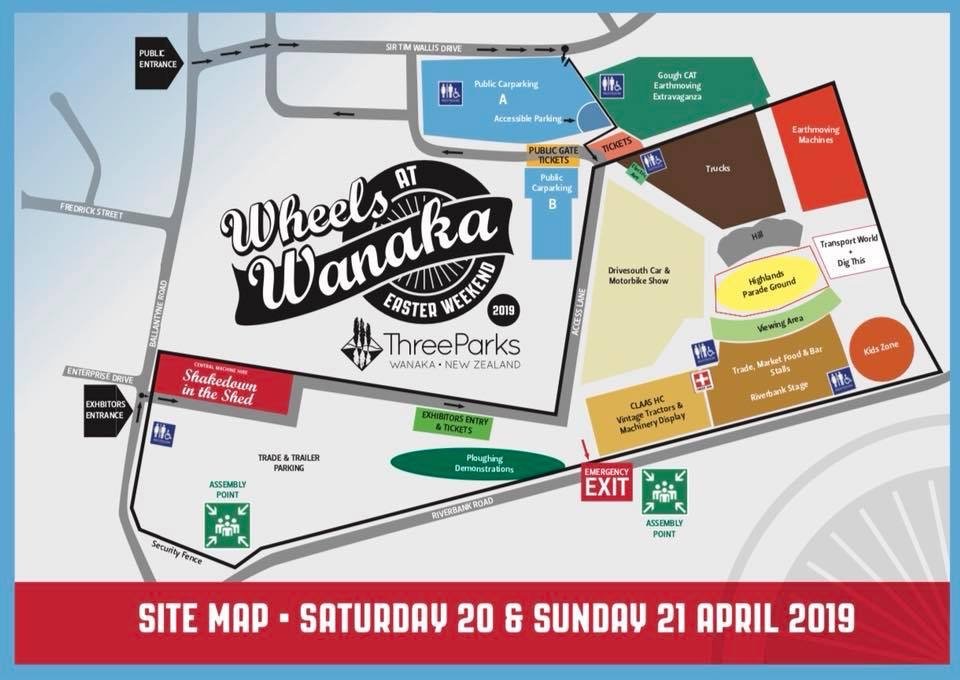
I will be there, normal car activity. Yay the Barra.1 point
-
And these!! Painted rocks with the kids one day.
1 point
-
1 point
-
Made this at work.
1 point
-
Update for those interested Repair Cert PASS Compliance and WOF all PASSED apart from the below 2 points - tighten hand brake cable - fix slight leak in return line to gas tank brass fitting Cert Clint did the cert on Friday and I’ve attached the list. I just need to work through that list and take it back for the brake road test. I also need the old old owner from USA to email that he sold me the car - I keep in touch so that won’t be an issue. Now to work through the list and get this sled legal. Am I happy? Yes, the answer is YES!
1 point
-
Concrete mayte1 point
-
I just couldn't help myself but take this photo... Having fun stripping remaining bits from the other two Imps, cleaning and painting bits and generally playing about with what is a big model car. Proper update soon.1 point
-
Wow! Its been a while since I've updated this thread. Work on this wee car pretty much ground to a halt after the last update. I got busy with other peoples cars for work and then took off to the UK for a holiday. 4 weeks of sunshine and loads of cycling. Nothing to do with cars at all. The one car that I spotted whilst there and liked was this absolute gem... Drool. Anyway. Got back to NZ and spent the next few weeks dealing to property jobs and more customer jobs. Finally last week I pulled the Imp out from its spot and finished off the panel work in the back. Now there's something we have to go back in time to jog memories. Normally in order to jump time I would just jump into my trusty police phone box as seen here in the Viva thread.... But I have had ongoing issues with that mode of transport. Things like oil leaks from aged seals and fading paint to name a few. So I sold it on at the end of summer to some fella called William who I met at the local market. Strange bloke. Not seen him since. With that machine gone I realised I had a desire to build another. Maybe a Delorian? Nup- prices had gone up beyond what I could afford at the time... so I based my new creation on one of Britains finest machines made. So now folks I shall introduce you to the Princlorian... With my new creation I was able to travel back in time to show you all a period in my Imp resto that I regret wasting time on. So in the beige wonder we shall travel through Hillman Imp time.... Whoops. That's too far. Hang on, try again... Oh dear. Must be the electrics. The fella at the motorist discount centre told me it was a 'new old stock' Lucas flux capacitor! Try again.... Ennnnggggrrrrrr!!!! I flicked the wrong rocker switch. Sorry. Hang on.. Righto this is annoying. But I think I've worked it out. Here we go... FINALLY!!!! Right. So way back when I first got the replacement shell I spent a long long time doing this... To this... I now wish I didn't. Instead I should have just chopped it out. Which is what I did in the end and had mentioned it in one of my last posts. Well with it all gone my next job was to rebuild it all. This is what I did last week. Imp back in its work spot with customers cars waiting... Working on building up ones shelf.... (terrible) To suit the fiberglass engine cover that came with the race car.. Fill in the blanks.. With that finished I rebuilt the rotten gutter above the bay.. Hannah has painted the lot in epoxy primer and I started on the front end which had been bent at some point when the shell was moved- probably a lifting strop or something I guess. I was originally thinking I'd have to cut it out and let in a straight front panel but actually after about an hour with lengths of wood, a jack, hammers of various sizes and many different shaped bits of steel Hannah and I managed to straighten it out fine. Very happy with result. Before... After... Now I need to remove the rot from the front of the bonnet. I carefully hammered out a small dent. Hannah laughed. It could have ended up like this scene... https://www.youtube.com/watch?v=1IL22sLF25s Then I can modify the front end to take the radiator. I must crack on because summer is coming quickly and there's so many other jobs we want to do here ! Planning on selling the housetruck this summer and building a new house trailer so that is one huge amount of time that I'll need to find. Please keep tempting me with racey little Imp photos and encouraging chit chat here... https://oldschool.co.nz/index.php?/topic/58205-discuss-here-about-yoeddynzs-little-imp-project/& Alex1 point
-
Well well well... I started cleaning engine looks to have a leaking rocker cover gasket and rear transfer case gasket so ive ordered them in. This weekend i picked up the car! 22 hours auckland to wellington and back i had a crown in my garage The ford steelies dont come with it. The ones under the chassis are the original crown steelies theres also a set of cheviot rims. Chassis is from a ms63 wagon that was alot worse than this car so it was sacrificed for this sedan to live! It also has the power steering box but has a manual collumn and they dont mat up. No pump either though Once i got home i started to sort through everything there is auctually a shitload of stuff inside and in the boot in boxes! Its like fucking Christmas! But better. The exterior of the car was in abit more of a rough around the edges than i had initially expected. I brought this car without personally seeing it bar a few photos but was too good of a deal to refuse. It literally has buggar all rust just needs a panel n paint which i will do before i re assemble. The black doors are also off the wagon and have electric window mechanisms. No rear doors though but electric on the front 2 would be pretty lush The radiator support panel has the worst of the rust at the bottom its buggar all really. I was really amazed at how heavy all the panels are these things are bloody tanks! 2x grilles and headlight surrounds only 1 set of lights tho Some stuff is labelled. Still got its lush spare wheel cover too Some spare springs im guessing from wagon not sure if standard or lowering. Fuel tank is off the ms63 wagon not sure if ill be able to use looks different shape Some vespa wheel nuts 8mm? These useful to anyone on here? Can have them if so. And the interior. Its a very nice red leather and not in bad condition. Unfortunately DJ cut holes in everything owned this has cut holes in front door cards twice in each one, parcel tray and a pillar plastics ahhhhhh the horror!! Also found the engine loom in a box in the boot too! Why people would do this to such a car is beyond me Cool steering wheel though Was in process of battery in boot. Wires are cut under rear seat so itll all come out Cars last wof expired 10/2013 and went vtnz 11/2013 and failed on minor stuff Decided to check the boot wells out for rust and was quite surprised Someone has previously por15 but theres something going on down there needs further investigation Underside needs some patching Found some other old stuff Seems legit. Checked down bottom of guards for rust and none there! Just needs a clean up i think previous owner has done some. Makes it easier for me Ok so its not too bad i may aswell tidy it all up while im reassembling it and give it a panel n paint while im at it. First steps tidy up the underside of the body. I orginally thought i would make a timber frame for the body to sit on so i could slide chassis in and out from under it. The body is currently just floating on it theres no bolts in it. But now im just going to cut some left over 100x100 fence posts 250mm long sit them where the mounting points are on chassis so i can get under there easy enough and its still mobile. I will put couple strops around floor pan and chassis rails to keep it secure. Some bedtime reading. Will update as i go thanks for looking1 point
-
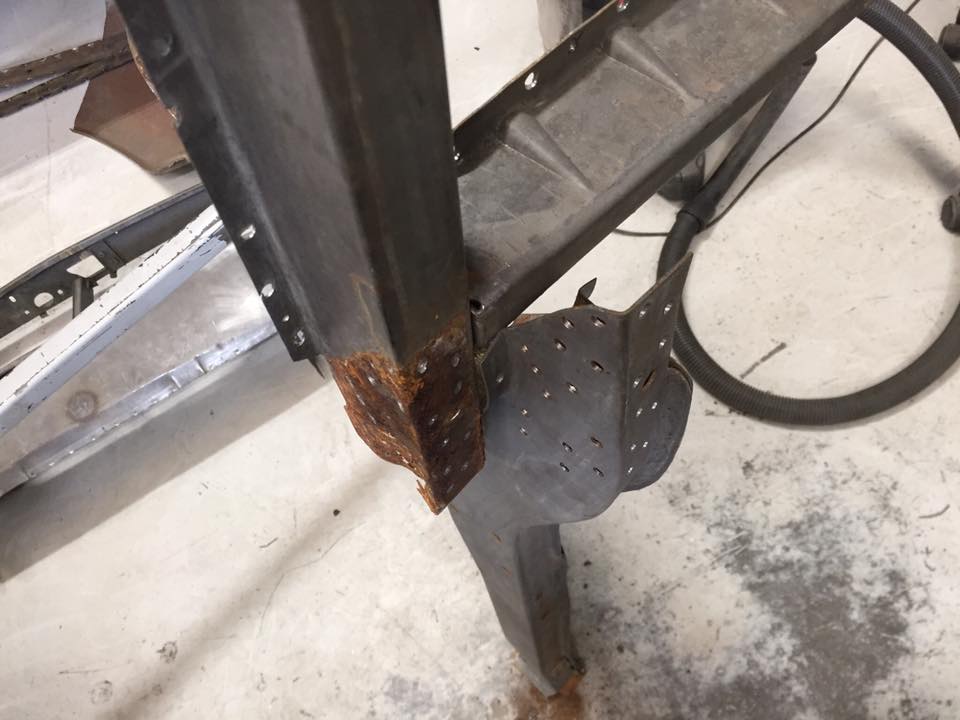
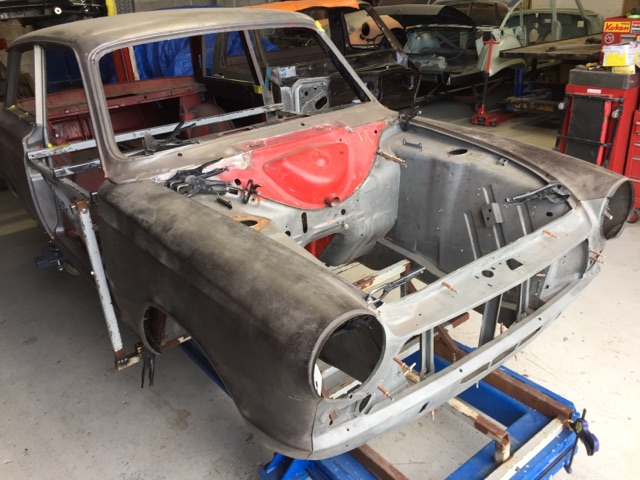
Cortina is looking epic with the front end all together. Both A pillars all repaired and the sills back on ready for final welding. Next job is fitting the front guards and front panel.
1 point
-
Excellent progress happening on the front end. All stripped and ready to go to the blasters and then the big reassembly. Everything as far as possible will be spot welded as per original and all internal cavities treated so it won't ever rust again in my lifetime. One of the A pillars was still all factory untreated steel inside from 50 years ago. No wonder they all used to rust bigtime. Sills are all done and come from the 4 door we chopped up ages ago. These have been modified with the correct 2 Door drains etc so exactly as per original. Also the repro underwing kits turned out to be pretty average, they would be fine for a race car, so fortunately the originals with a bit of cleanup have come out mint. Bloody annoying you pay big bucks for repro panels and they turn out to be a shit fit and need lots of rework to get anywhere near fitting.
1 point
-
Progress with the front being mocked up and all the points are spot on. A long way to go yet but moving in the right direction at last.
1 point


.jpeg.ef59de6afbbf6f31315a91380539a132.jpeg)


.jpeg.9a37bc131bbda1b309ba67c93d0194c0.jpeg)


This leaderboard is set to Auckland/GMT+12:00