
Leaderboard


Popular Content
Showing content with the highest reputation on 08/27/17 in all areas
-
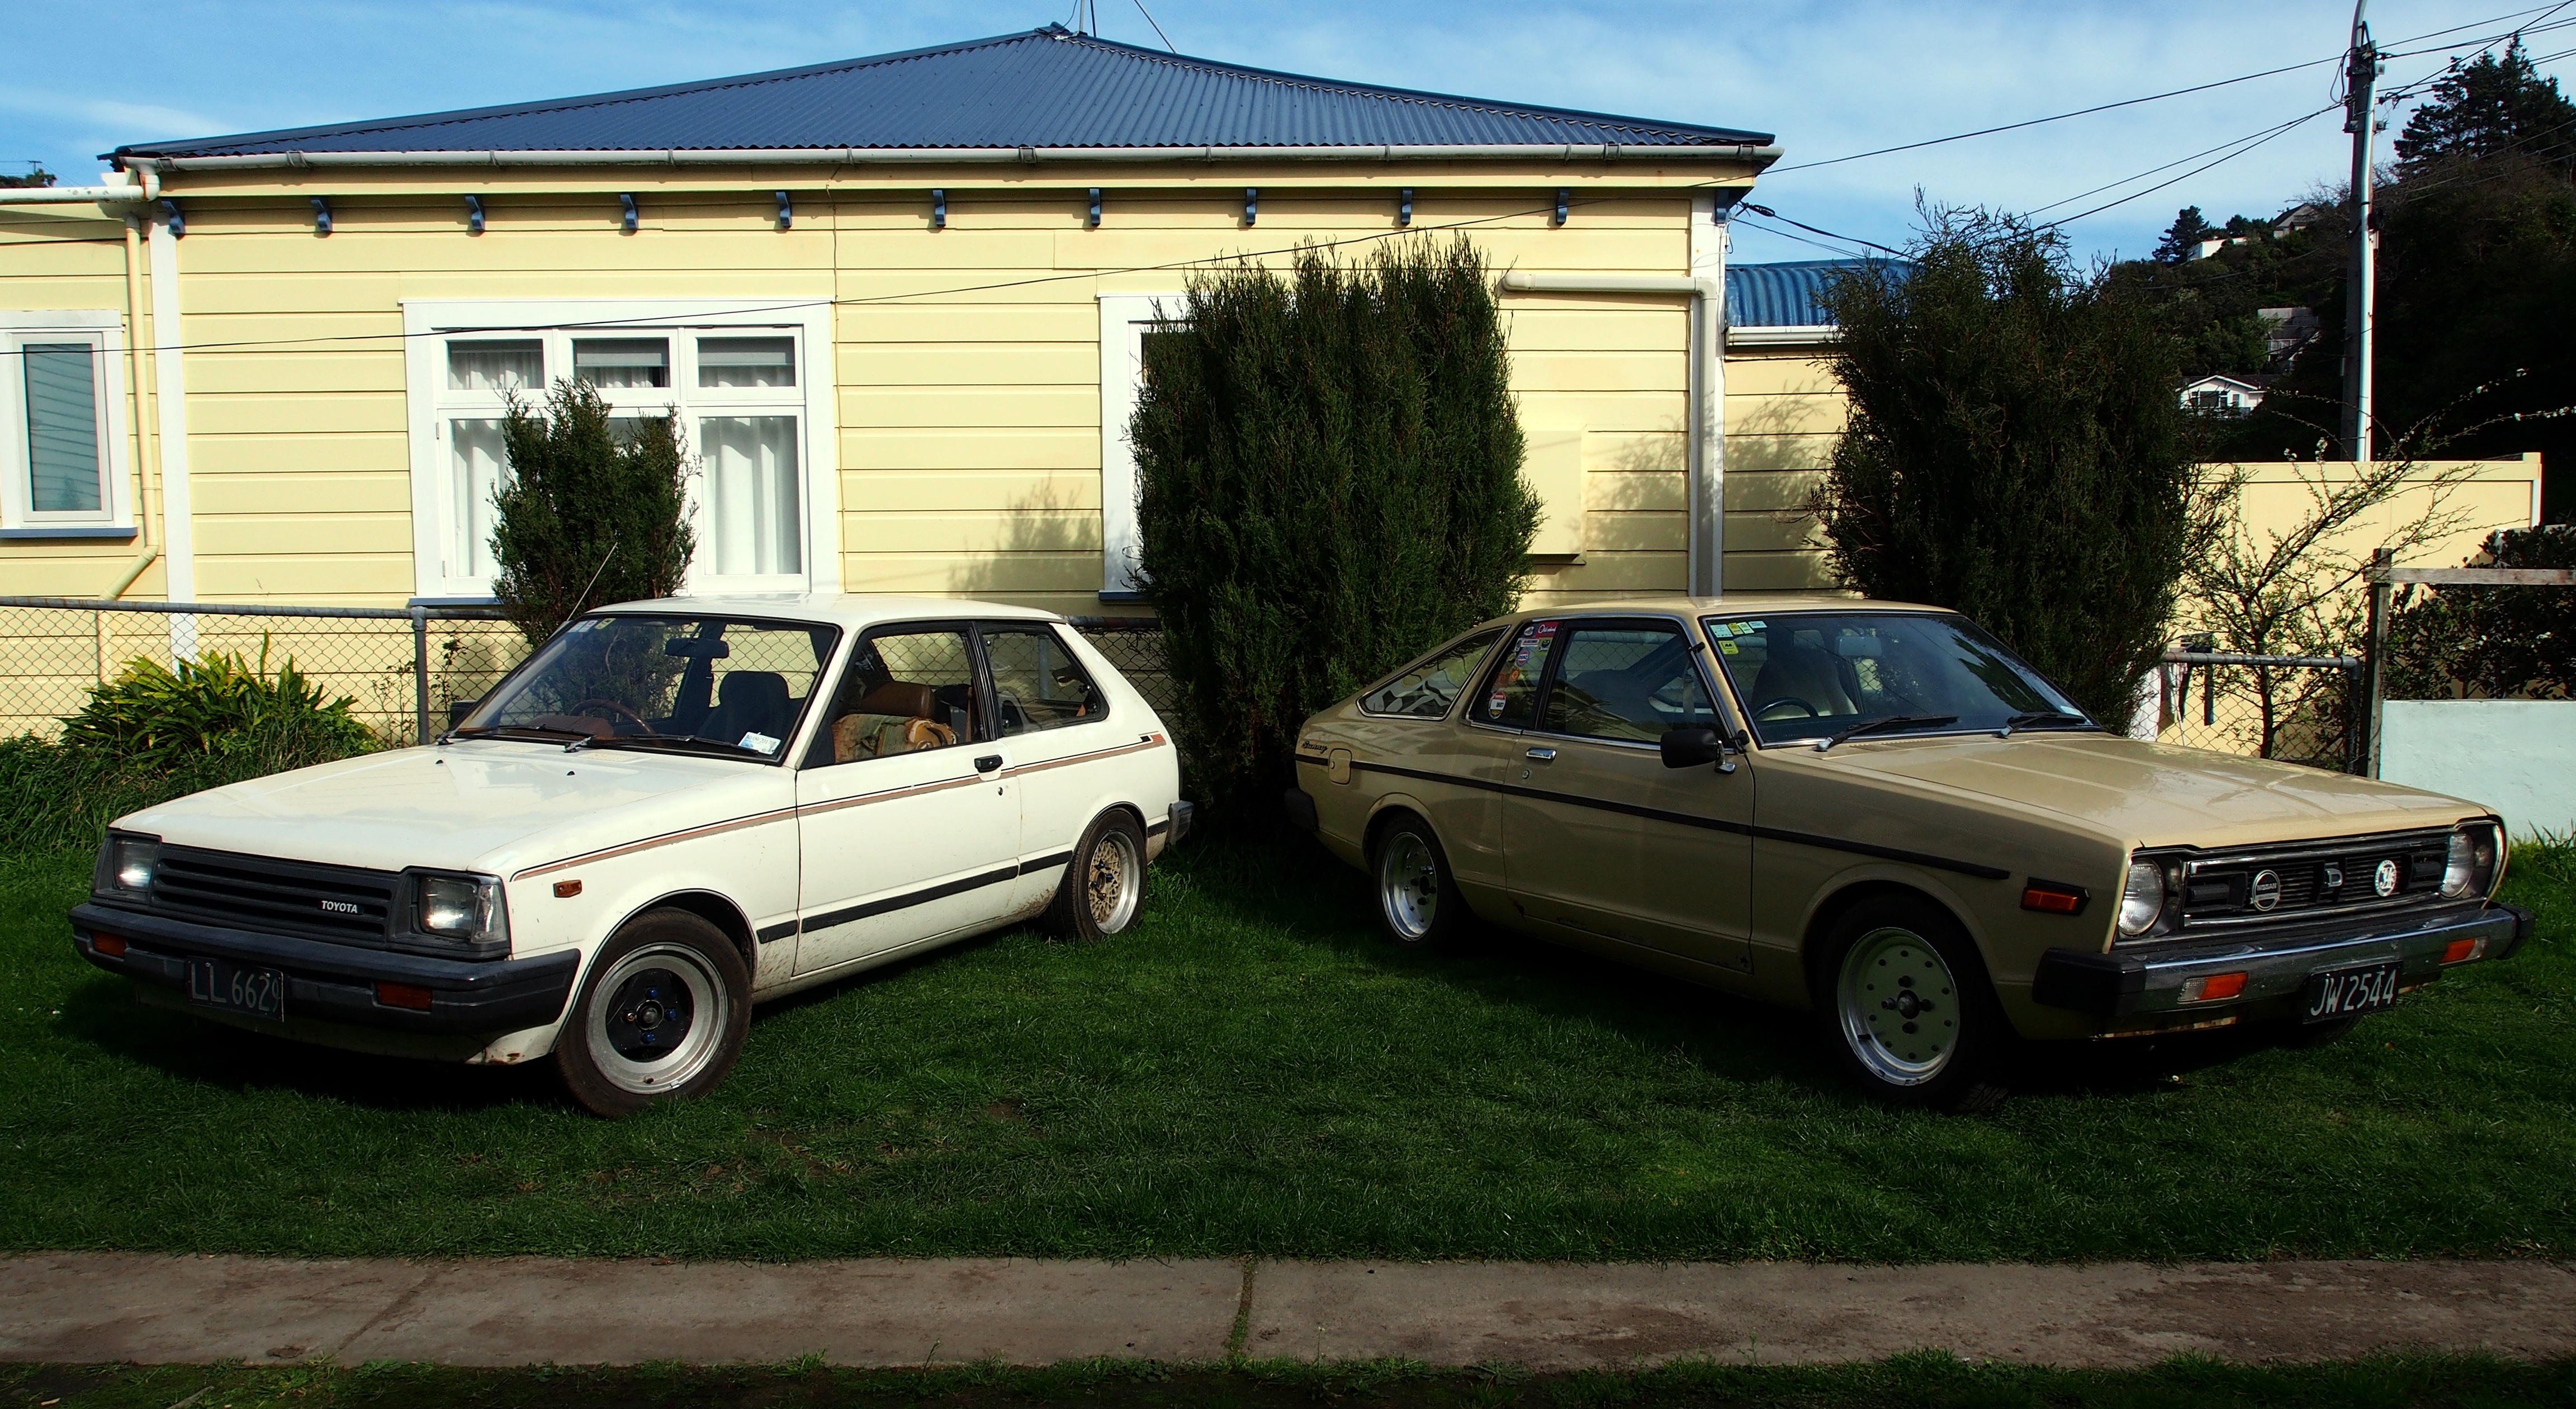
Cheers heaps to @AllTorque for taking an hour out of his arvo off to sort my wheels and tyres out. Wodda GC chur. The 7" rear wheels were a bit to rubby so have put my 6.5 mesh on the back, just tucks in the guard so pretty happy with that. Also got some tyres on my wider Mark 1s for the back of the Sunny which I've been meaning to get sorted forever. Time to run my own backyard TS Cup.
 8 points
 -
Bit more cutting, bending and attempts at welding Good grind and paint/heat wrap will solve it Only one little leak that I can find! Need to get a throttle control that will fit with a disc brake lever in place, a late model Gyro park brake lever assembly and ignition now7 points
-
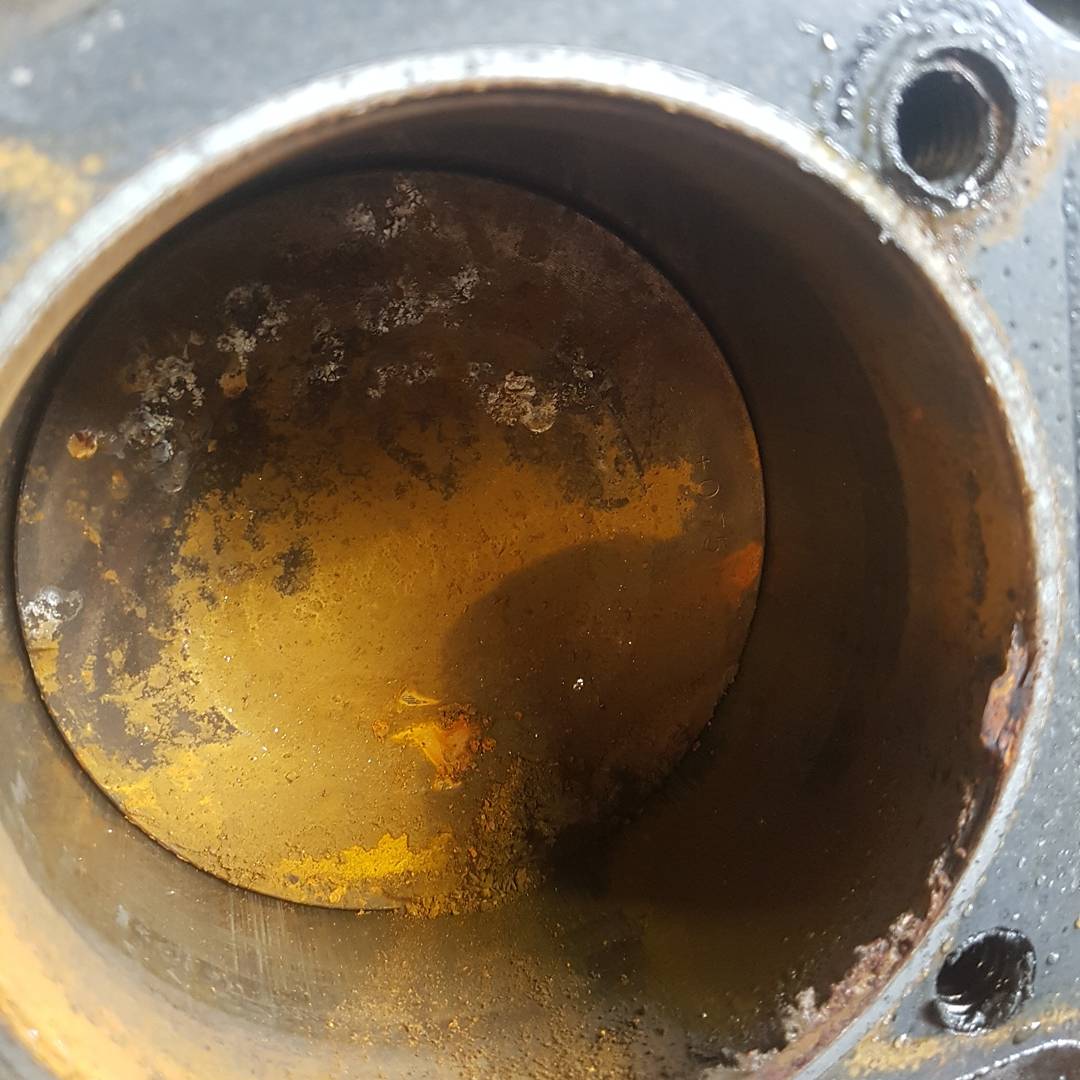
Tapered the end of one of the mandrel bends so the ID is a hair bigger than the port of the Malossi cylinder. Obviously went back and filled the gap I missed lol Attacked the exhaust from @MopedNZ with a hacksaw, almost fucked it, dunno WTF China blend metal they used but it really didn't like the welder, had to drop the amperage way down to stop the edges melting away and it just wouldn't weld cleanly (likely user error but still) Getting there, gives me plenty of room for improvement when/if I attempt MK25 points
-
@Shakotom's Sparkly FA50 goes hard for what it is. On dirt tyres. On public roads.
4 points
-
Was super awesome! Holding up traffic and really bringing down the tone of AKL city. Thanks for coming along @azzurro & @cletus, rad scoots! Keep an eye on the Moped NZ page for more photos and videos. - and upcoming events https://www.facebook.com/groups/1639560922975814/4 points
-
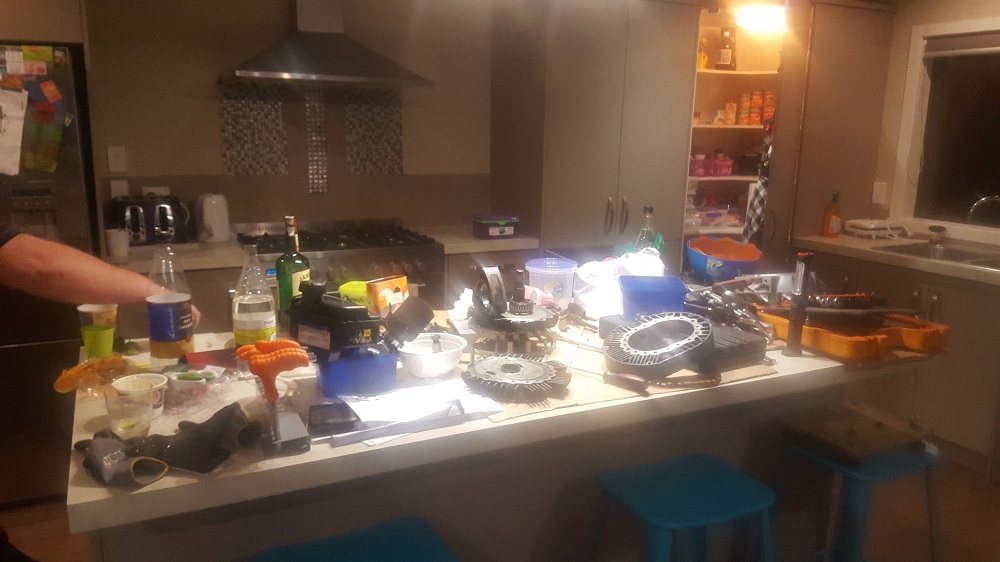
Putting the kitchen bench to good use
4 points
-
The other job, was to mount the ARB's. I had a pair of 27mm bars custom made, and mounted the front bar to the front axle, using the U clamps and brackets supplied. I made my own top mounts, and welded these directly to the front subframe that the engine hang off. For the rear bar I drilled through the shock mount brackets, welded captive nuts inside, and bolted the clamps to these. I made my own chassis brackets, and welded these on. That should stop the rockin' and rollin'!4 points
-
2017 Event - A few of us are planning to ride on smaller bikes from Whakatane(ish) around the East Cape and back over 3 days, at the end of November when its nice and warm but not too busy. No requirement on bikes, something unsuitable and small is preferable though. I'll be on a CT110, VG his NBC110, couple friends on scooters(~50cc). Looking at about 600km, about 200km/day. Thinking a riding speed around 50km/h should give plenty of time for looking around and activities and sightseeing during the day, but not too fast for the smaller bikes. Where possible the route is off busier state highways so there will be some longish sections of windy gravel, but little traffic and no rush means you'll be fine. Accommodation around Whakatane, Hicks Bay, and Gisborne should be easy to arrange, be it campgrounds, cabins etc. There will be a ute and/or trailer that can carry fuel/luggage/spare bikes as well if anyone wants/needs to sit out any parts. Coast trip Total by John Bell, on Flickr Things to see and do on the route may include but not be limited to Serenity Lighthouses Wharves Churches Time travel. Horses, all of the horses Gangs Waterfalls Slip'n'slides And some of this You got 3 months Holla at cha boy, what do you reckon?3 points
-
Huge thanks to those of you who came along. I thoroughly enjoyed myself and I hope you did also. We managed to snap a fair few necks, make some ears bleed, add to the chaos in the CBD and even get approving nods from the 5-0 Watch out, there's new kids on the block.
3 points
-
If enough people think I should, then I shall do it on a FA50. 600km is chump change.3 points
-
Top ganging all! Great way to see the city, and good times, even timed it perfectly with the weather3 points
-
Nuts to butts on a FA50 for 600km @MopedNZ3 points
-
Thanks for organising it! Was great fun . Def keen for next time3 points
-
Probably gonna need to take second dibs on the spare bike with my current luck. Though if I can't put something together by then, I deserve to ride in the trailer. Trying to source a 3 wheeled dream at the moment. Stay tuned.3 points
-
The Mazda is home now and it's in really good nick. I didn't realise quite how nice a car it is. It has cruise control, climate control, AWD, sun roof that both slides open and tilts open, heaps of leg room for the back seats, as well as the big boot. When we towed it from the transporter company depo it went into gear to begin with, then I put it back into neutral and it wouldn't go back into gear after that. It was making a horrible death rattle noise from the trans for some of the tow and nothing at all for others. Messing around with it today, it felt like it was in park for all the gears and rocking it back and forth did nothing until it popped and started rolling. It still wouldn't go into gear though after that and would just roll down the slight slope that it is parked on. I'm going to talk to the transmission man up the road tomorrow to see what it would cost to sort the trans out because I'd actually really like to use it as a daily now I've got it. That said, if it's not just a simple fix and going to cost big bucks to fix, I'll pull the engine and sell it as parts. It'd be a shame really but that's the way the cookie crumbles. In other news, I did some more work on the chassis leg repair channels this evening. If you remember back to earlier in the week, I folded up the inner channels and managed to put a fold in the wrong bloody place to fit properly in the outer skin. Tonight was spent trying to remedy that. This is the before shot. The plan was to hit it with some heat and try to flatten out the fold. Doing it cold would probably make it crack so hopefully the heat would help prevent that. I didn't take any midway photos because I was busy juggling a gas torch but I'll put a stop to your waiting and show you the end product. It's a little warped but nothing fatal and it should pull straight once it's been folded up again. Next job was to put the fold back in but in the right spot. I measured the inside of the outer skin panel and did a little bit of maths as an excuse for the guess that actually gave me the new measurement. Then, not having a sheet metal brake man enough to do the 2mm steel, I moved over to the press. I made sure to line everything up perfectly before I started and checked it against the other one while it was only bent through a small angle to try to catch it early if it was wrong. Once I got it started in the right place on the two round bars, I moved over to the V-block you can see to the right of the picture and finished the fold. It turned out like this: Which is to say snug as a bug in rug. Perfect. By using the same method as the outer skin I put the cut-aways in the same places as the stock car. This is, step drill to make the radius, then cut the extra steel away and clean it up with the flap wheel. Then I quickly zapped up the seam in the lower (upper in the previous photo) flange to finish off the overall folding part of the job. I quite like using the TIG on this heavier gauge stuff. Something about 70 odd amps going into it is just so satisfying. I subsequently ground this back to clean it up nicely too. Next was to add the "crumple zone" kink with my fancy custom press dies. I lined everything up as best I could and started to press it in. In hindsight I should have done it the other way up because to begin with it just folded it into a V shape and it wasn't until I flipped it that it came back to straightish. This is how it turned out "hot off the press" (see what I did there?). And this is after some fettling and dicking around to make it fit again. I'm happy with that. It'll definitely do the job. Next I trimmed off some excess along the top flange using the tin snips. In hindsight, I should have just used the grinder because the 2mm sheet is a pig to cut with the snips. Especially the last little bit. Especially when you slip at the very end and slice your finger right open and bleed all over the shop. So now my finger looks like this and I'm going to get it cleaned and dressed at the clinic tomorrow. I've got popsicle stick splints on either side to try to stop me from bending the knuckle and opening up the cut. I even managed to catch my ring finger but not nearly as badly. So the plan for tomorrow is to get my finger sorted, then finish getting the inner rail final trimmed and offered up, possibly even tacked in place. Also I'll get the transmission man around to have a look at the Mazda if possible. Let me know if you want to see a video of it not working and I'll chuck one up. Someone might have an idea. For now though, I'm going to focus on not bleeding and catching some Zs.3 points
-
I all ways get asked to weld something that is in the bush or at the bottom of a paddock and I carn't get my MIG there or my AC ARC is way too heavy and most people dont have a 15 AMP plug, thought I would make this. This is a welding alternator that has triple bridge rectifiers and super heavyduty windings. and it has a 240 volt DC 15 AMP power supply, very potent! The idear was to fit this to your vehicle so you can weld and run a grinder or light or anything that dosn't mind DC. Has a throttle knob to adjust engine speed witch controls the AMPS when in welding mode. 240V output, My plan is to mount it to a trolley with a Honda GX390 motor witch I got given, it had no muffler had had been sitting outside for 3 years and had locked up, I got it free and it seems to start and run very well, I made a glass pack muffler witch is very loud and I might need to rethink. I have a trolley with cast iron wheels I will mount all the shit to, just need to find some pulleys and get a couple pillow blocks, I will need every ounce of power from this motor.3 points
-
No actual progress today. Sat around at the accident clinic for three hours waiting to turn this Into this. It's a bit bloody over kill but such is life. At least it was free. In future I'll just fill it with antibacterial goo and tape it up. It would save so much time. Oh well. I have school off tomorrow so I can get some work done then.2 points
-
And thanks to roadboss and chief tone lowerer @mopednz for taking plausable deniability.2 points
-
Semi tempted, chaly currently does 0kp/h as I cant make it start. Dax is still in the garden shed in pieces and DJ could potentially make it. However..... at this stage Im locked into doing night shift cover on that weekend. Will try see if someone else can cover it2 points
-
Wish I could Afford a set! so dont think so atm! Awesome! Glad to hear its not anything out of the ordinary for a Holden. Yes my motor has been a pain but its hopefully going to be alright ( just break, fix, repeat)2 points
-
At miter10 mega they have a big range of car and truck battery's some of them were covered in dust and looked like they hadn't been moved or touched in a very long time, how long should a battery sit on a shop shelf before its no good to sell if the shop did give a fuck? when I was walking to the counter a guy ran out the door with one and he got away to,2 points
-
Been a while since posting, so much driving happily I did have to rebuild my diff, bugger I took no photos but pretty cool setting the pinion and carrier preload, shame about my rubbish condition cwp... The urgency for this job was of course in aid of attending another Chrome Expression Session!! Two days of solid track cruising with no issues except for a dropped alternator adjuster bolt (but not the gilly belt thankfully!) I was pretty keen to throw new 165/65R14s on my Equips but my tyre guy couldn't get them to bead, hence the miss-match, running Riverside R-109 14x7j out back with the new tyres (stretching the sidewall so they can be mounted to my 8j later) I wore the wrong flamin' shoes too, dress shoes are not conducive to heel-toe but I sure made it work regardless! On to the pics So much chur @Snoozin
2 points
-
2 points
-
Update time. Vivadom daily driving has been pretty damn good. Especially when 2 months ago I finally got around to changing the voltage settings for the wideband O2 sensor on the ECU so that the ECU would get the same reading as what the Innovate gauge shows. It’s a common setting fault and took all of 5 mins to get them to read almost the same. What does this mean though? Well for ages the ECU and hence the tuning program, Tunerstudio, have been receiving a ‘leaner’ voltage than what the engine was really at. This meant that in tuning the final outcome was always a bit too rich. When the ECU was in closed loop ego control it would take my preferred AFR table settings and adjust to what it thought was correct.. which was not. With the ECU now getting the proper signal we re-tuned the car on the way back from Blenheim to Motueka. It was too rich everywhere and after not long was leaned right back. Driveability remained the same, but tail pipe smells improved J I have not gone super lean, sticking to around 15~15.5 on cruise. We filled the tank back up in Motueka and the cars economy had improved returning 32 mpg (8.8l/100km). There is still room to improve but happy with that. So this was all good and everything was fine and dandy for the last month or two. Then the other day while leaving town I started to hear a teeny whistle sound. I just put it down to the throttle body making the sound because sometimes it does just this. The other thing I thought it might be was the idle control valve. I didn’t look into it any further. However, over the next few drives I noticed it was hunting a little at really light throttle openings, like slowly accelerating away from standstill. Hmmmm?... Then that whistle again, this time when I got home one evening. I popped the bonnet and listened around. I couldn’t pinpoint it but when I ran my fingers around the back underside of the plenum box where one of the runners joins I heard the note change. An air leak. Bugger. I looked with a torch and could just make out a little crack on one of the welds I had machined down…hmmmm. Bugger. Oh well.. I was planning on doing a modification to the throttle body pulley so why not sort it out now. I drove the car into the Viva hospital and started surgery. It didn’t take long to pop the bonnet off, unplug all the bits needed and start removing the inlet manifold. The trickiest bit was the return fuel line which was stuck to the pipe and hard to get too. One hour after having parked the car in the surgery and picking up the scalpels I had the manifold on the bench. I worked out pretty quickly why the manifold had cracked where it had. To explain how we need to pop into the police box and go back in time…. Maybe not that far though. Lets try again… Nup.. still too far. This time… Errrgggg. Again… Oh dear lordy..one more time… Ahh… that’s better! Righto..now remember this original plenum chamber? Made from some bent up 2.5mm alloy sheet. It had buckled diagonally when welded and I had then set up the runner heights to suit when I tacked them in place. I had to try and straighten it so it sealed correctly (using our house as a press).. It all worked out OK at the time because it flexed enough to seal when bolted down to the runner flanges. However a few years later I had that backfire and blew the lid off. I then fabricated a new plenum from 5mm alloy sheet and its was nice and straight.. It did not flex. This is how I think the crack happened. I decided I was not going to try to weld up this little crack because I knew the heat would warp the runner flange and nothing will seal. So I bought some posh looking South African epoxy putty, a bit like minute mend or quicksteel. It requires a lot more mixing than the others but sticks really well and smoothed off nicely. Kevin kept guard while it set. While the inlet was off I did some measuring and worked out the dimensions for a new offset/eccentric throttle body pulley. Then I machined down a lump of alloy bar and ended up with a new pulley. I got to use our new mill with a 2mm slot drill ( I could have used a hacksaw and file but this was more fun..) The new pulley effectively gears down the cable pull at the start of the throttle pedal travel and speeds up at the end making for a much easier off idle transition. You can see the difference between old and new here.. No more kangarooing down the road for people not used to this engine with its lightweight flywheel etc. I refitted the inlet manifold, plugged everything in and tried it out. WAY BETTER!!! Went for a drive and its so much easier to ease the throttle on out of corners or from standstill. Much more user friendly and I now wish I’d done this mod ages ago!2 points
-
Found this on trademe in Christchurch, not much to go on from the online pictures except the Barry housepaint touchups, looked pretty untidy but was cheap enough to grab sight unseen. One owner since 1984. Headed down to grab it last week and yea, pretty rough, interior is torn up from 20 odd years of having a lawnmower thrown in and out of it. Hardly any rust though and can't see any old repairs so yea all g. Smells like grass and 2-stroke. 2k and 4 speed, goes like a sewing machine, super well maintained so that's a plus. Was like a go-kart back to picton, used less petrol than my 2008 Kia hatchback, bloody marvellous. Roadtrip shot: Bought some cobra springs and started testing what would work Tri-spokes ended up pretty perfect, 6" on the front and 7" on the back. Bit of rubbing so might look at smaller tyres but the 185/60 fills the guards pretty good. Here's how its sitting. So project finished I guess, will add tidier interior bits as I find them, maybe cut out and treat the small bits of rust and do a mild guard roll on the back if I can find a roller. Wheels could do with a polish. But just details ya know.1 point
-
It was a stunning day outside today, so I decided to get out and do some much needed work on the Rover. Way back in December last year I did some work on the right hand rear door, replacing the failed window regulator, reconditioning the window switch, and fitting a new door handle gasket. I needed to do the same work (except the regulator) on the other doors, but it’s just been put off time and time again. Today I decided to bite the bullet and just finish the work. I started on the left hand rear door. Step one is to remove the door card. Once again, its secured with one screw in the carpet at the bottom, and a screw in the handle recess. A whole bunch of clips later, and the door card is off. This door looks like it hasn’t been worked on before. The moisture barrier didn’t have any replacement tape on it, or damage. Yes, apparently the duct tape is genuine BLMC fitment. I removed the handle surround and the handle so I could partly remove the barrier to gain access to the door innards. The old tape was very hard and the adhesive was slimy and sticky. I peeled off as much old tape as I could around the top and sides (left the bottom undisturbed as it was holding fine). This is the back of the door handle. There are two small 7mm nuts that you back off to loosen the handle. Once loose, you can just slip the new gasket over the handle and tighten the nuts back up. Done. Out of all four handles, this one was the only one that had some old gasket still in place. Super brittle and crusty. New gasket fitted. Much improvement, and the handle feels nice and solid now The other job I did whilst in the door was to lubricate all the rails for the window. I didn’t take any photos of this because it’s a flippin messy job, and mostly done blind. I covered greasing the rails in this post. The window was already pretty good, but now it’s smooth and fast, and I know it’ll keep working happily for a bit longer. Speaking of windows, another job I did was to refurbish the window switch. I popped it out of the door card and took it into the garage for cleaning. I know from the other door that the switches are prone to corrosion, but are easy to clean. Most of the window switches, except the drivers one, are a bit dodgy and need a few tries before they work. Off with the cap, and the extent of the corrosion was visible. Well that wont be helping anything. Serious corrosion on the base terminals, and the pin wasnt flash either. Some scraping with a fine scraper, and some sanding and I have nice bright contacts again. I smothered the lot in dielectric grease before assembling. With that done, back on went the door card, and I moved onto the front passengers door. Much the same as the rears, there is a screw in the handle recess, but this has a screw up top instead of in the carpet. With the door card off, I was greeted by another door that looks like it hasn’t been worked on since new. Although, unfortunately this one has some issues with the moisture barrier…. in the form of a hole A hole, which no matter how careful I was, just kept getting bigger and bigger. For some reason the plastic in the middle of the sheet was super brittle and fragile. It just shattered and crumbled when you look at it. The rest of the sheet seemed to be fine. I lubricated the rails, and cleaned the window switch on this door too. The window is now very smooth and the switch works every time (previously worked about 1/10 times). The door handle gasket was a bit more special to do than the rears. I had been warned about doing these as the handle is a prick to get at. Its tucked up and hidden, and unlike the rear, has no access hole. No worries, using my trusty random screwdriver, a 1/4″ wobbly extension and a 7mm socket I could reach one of the nuts. I found that if you insert the screwdriver above the white plastic door lock lever you had a pretty decent clear shot. The other nut, closer to the front edge of the door, can be accessed with a 1/4″ ratchet and 7mm socket…. and sticking your arm inside the door. Its tight. With the new gasket on there, back on went the moisture barrier…. with some new duct tape and some creative hole patching. But of course I’m not done there. See that little speaker up there? Yeah, its stuffed. No foam around the cone and bits have been falling out of the door for ages now. I had to fade the radio to the rear so the fronts don’t distort. Time has not been kind. Four screws and out it comes. It’s in this cool little mount which protects the speaker from water. Popped the old speaker out, and BAM, the new 4″ Pioneer TS-G1045R speaker fits like a glove. I even reused the original screws. Plugged it into the standard wiring, and away we go. Couldnt be easier really. Peeking through the door card. And onto the final door. The mighty captains door. It all comes off like the passengers one, except for a few more wires to disconnect. This door had been opened at some point. Someone had used more masking tape on it. Unlike the rear one this tape wasnt blue, and was only at the bottom. It was still old as though. Heres a slightly more detailed pictorial on accessing the door handle nuts, featuring my small torch. Hey nut Hey screwdriver Being friends Easy. New gasket made a ton of differences on this door. It’s always bothered me, being the door I use all the time, that the handle was loose as a goose and clunked around when I opened the door. Now it’s solid as a rock and feels good. Another thing that bothered me was that the door card was loose when I pulled the door closed. It turns out this bracket from the door card to handle recess (which is bolted firmly to door) was loose and turned sideways, and missing the screw. I reconditioned all the switches on this door too, so they all work without issue now. Another new speaker slotted in, and I refit the door card, and now its tight and glorious. It doesn’t feel like im going to hulk the door card off when I close the door now. Over all, it’s a job well done, and a job worth doing. I shouldn’t have put it off this long, it was actually an easy job to do, it just took ages. Now I can listen to music without having the sound faded all the way into the rear of the car. Winning.1 point
-
3 months should be plenty of time to get multiple bikes ready! But yeah, even sharing the bike with a couple people could be an option. Or double up if you're into that kind of thing.1 point
-
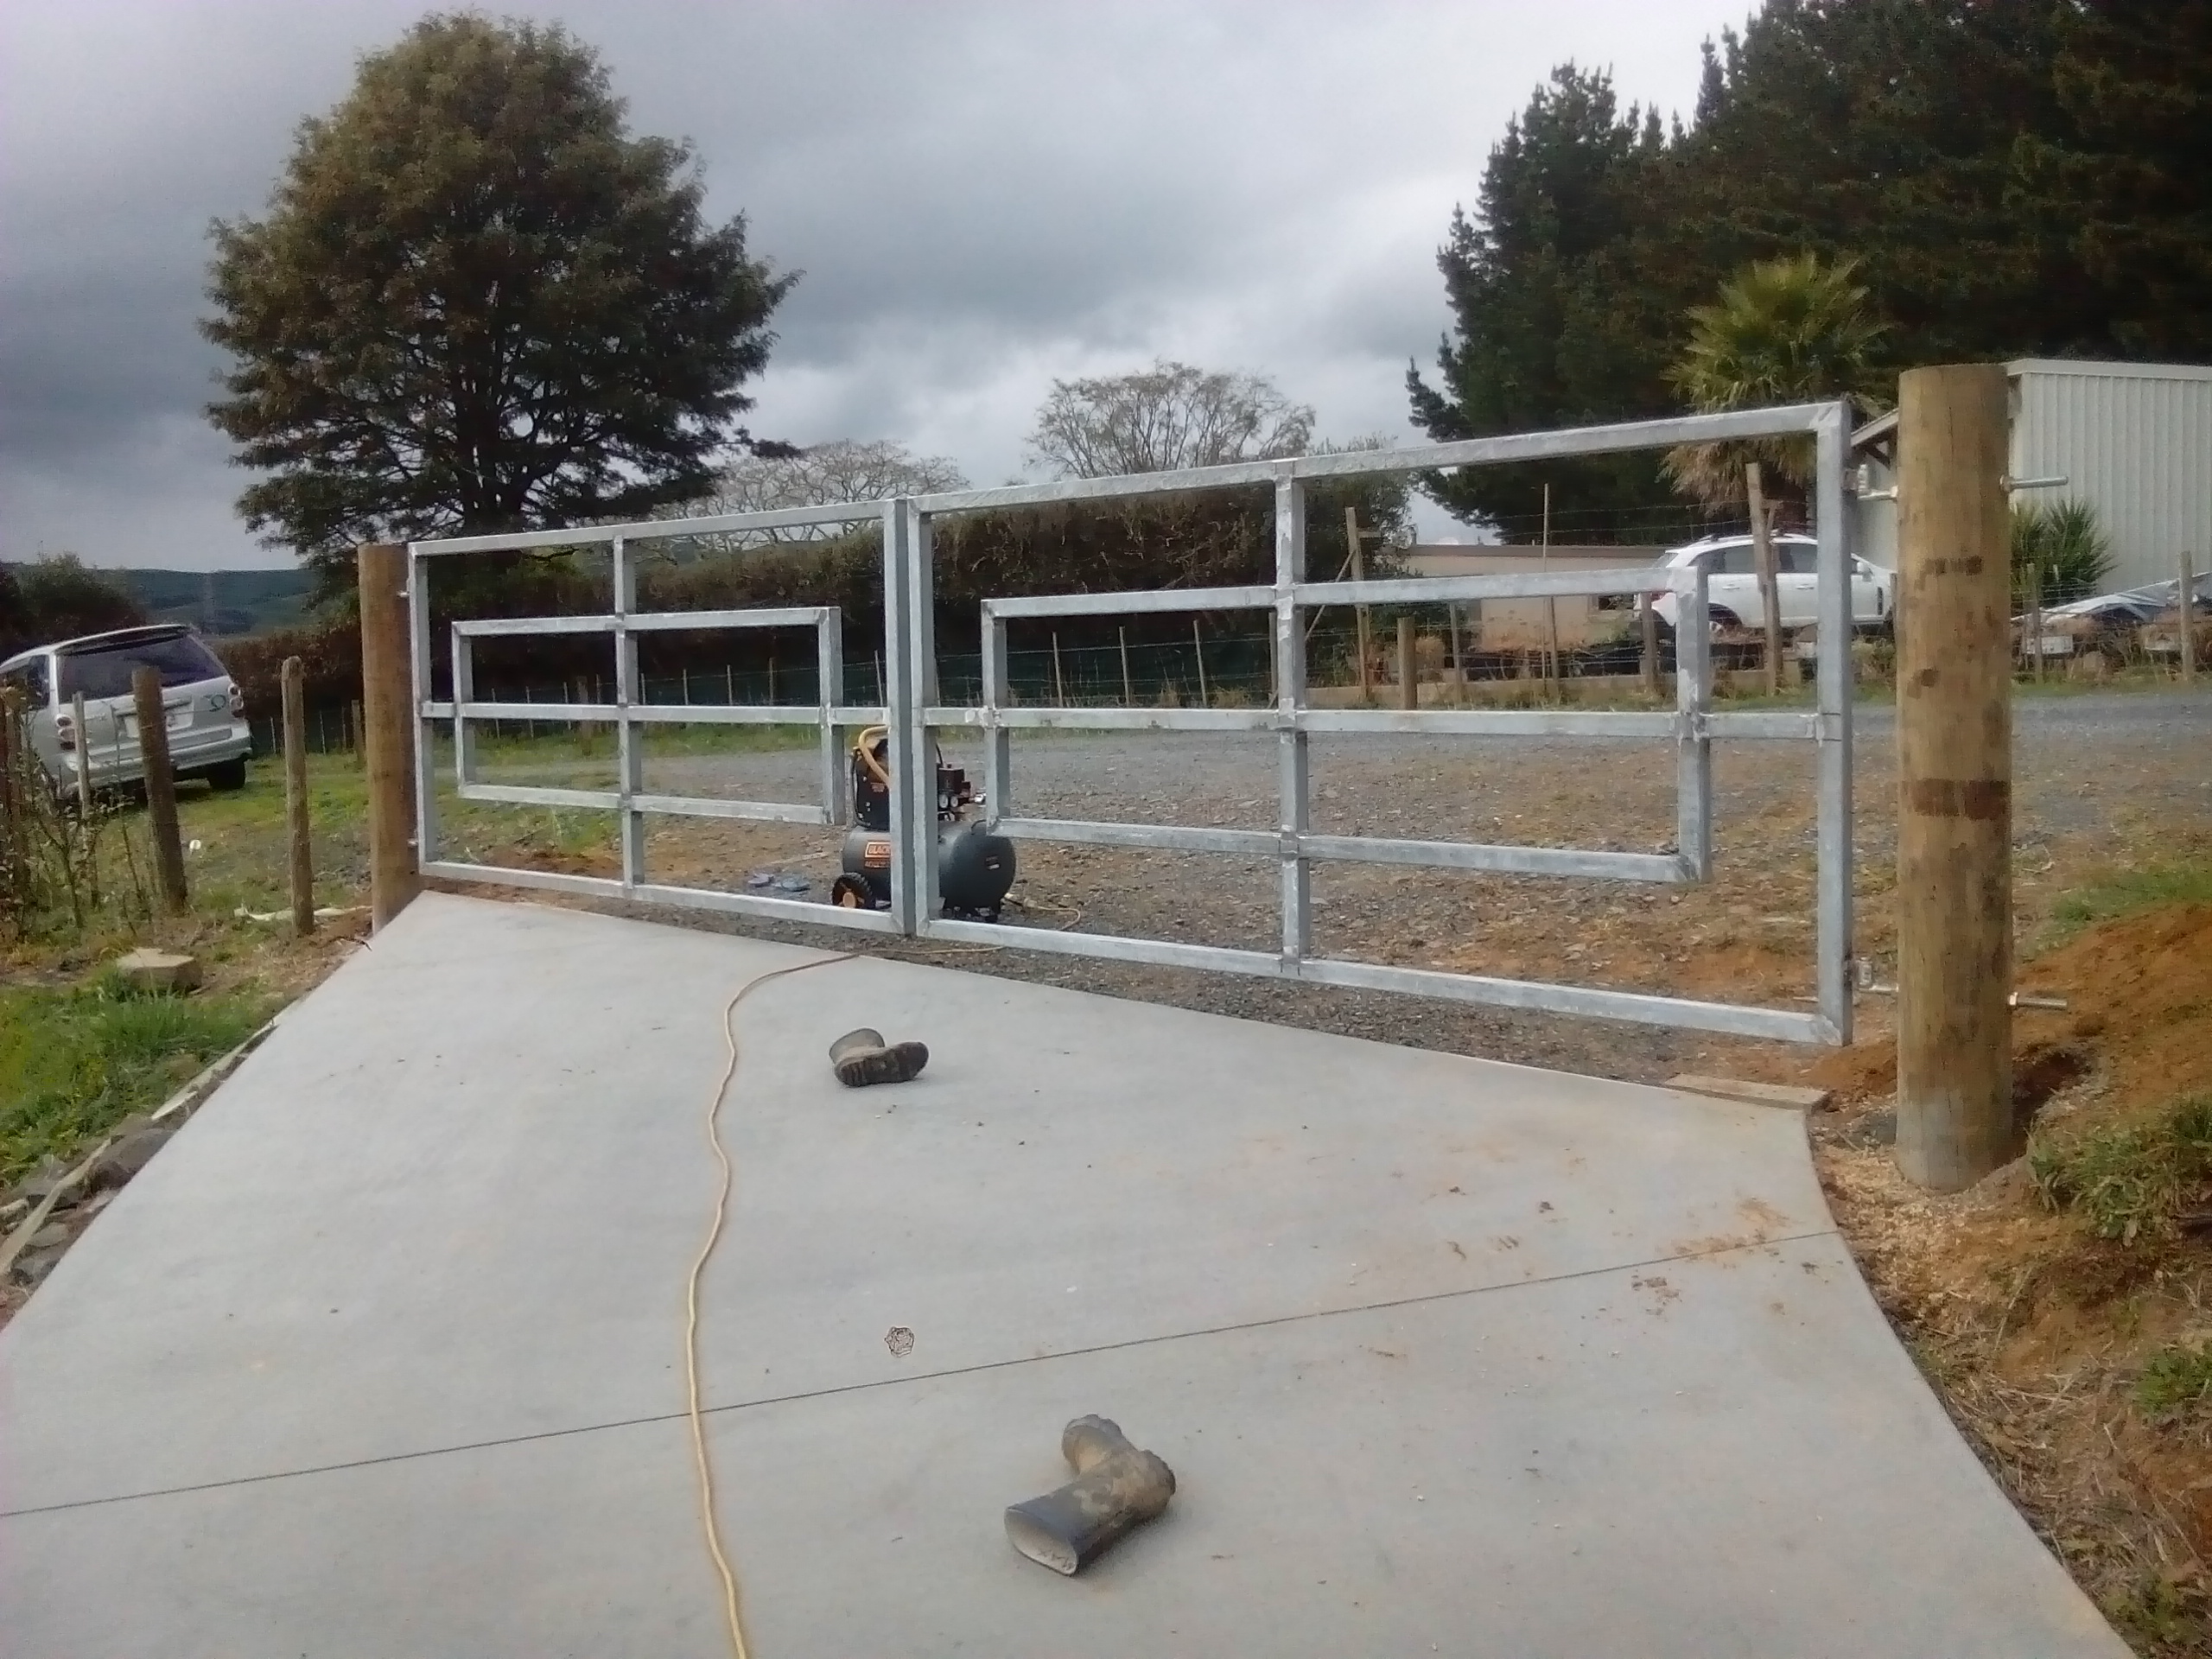
Posts in Holes drilled, hinges fitted...and gates well hung (okay, that joke got worn out a fair bit). Then it rained! So painting them black never happened, and the gates are now back in the shed. Waiting on a fine day to paint them outside, as I don't want to deal with over spray issues right now in my shed.
1 point
-
plz join us in november, 50km/h is all it needs to do1 point
-
Weed out the weak parts until it's reliable1 point
-
Ive seen plenty of Holden Rockers go like that. They really are rubbish. New motors that have sat for any length of time before being started are a problem. Good Luck with getting it sorted!!1 point
-
It can depend on the battery too. CAT batteries used to sit on the shelf dry and you would then pour in the water etc and "activate" it. If they're like that they can probably sit for years.1 point
-
Got a cheap motor for this... some guys stateside have butchered a fc to fit1 point
-
I'll ask him if you can make an offer on it ay?1 point
-
we are going to reuse the old internal doors in the new house. i took them to be stripped and this is the result. 2017-08-24_11-38-36 by sheepers, on Flickr in other news more weather boards are on and the spouting is finished. also some of the windows are in.\ 2017-08-25_01-57-48 by sheepers, on Flickr1 point
-
agreed. anywhere central would be fair but the closer to cbd the busier the area will be. couple sweet carparks out pukekohe. the burgerfuel out here has a sweet carpark n being in the middle of bloody no where is never full. and as I always hear in the radio "just half an hour from the city" maayte1 point
-
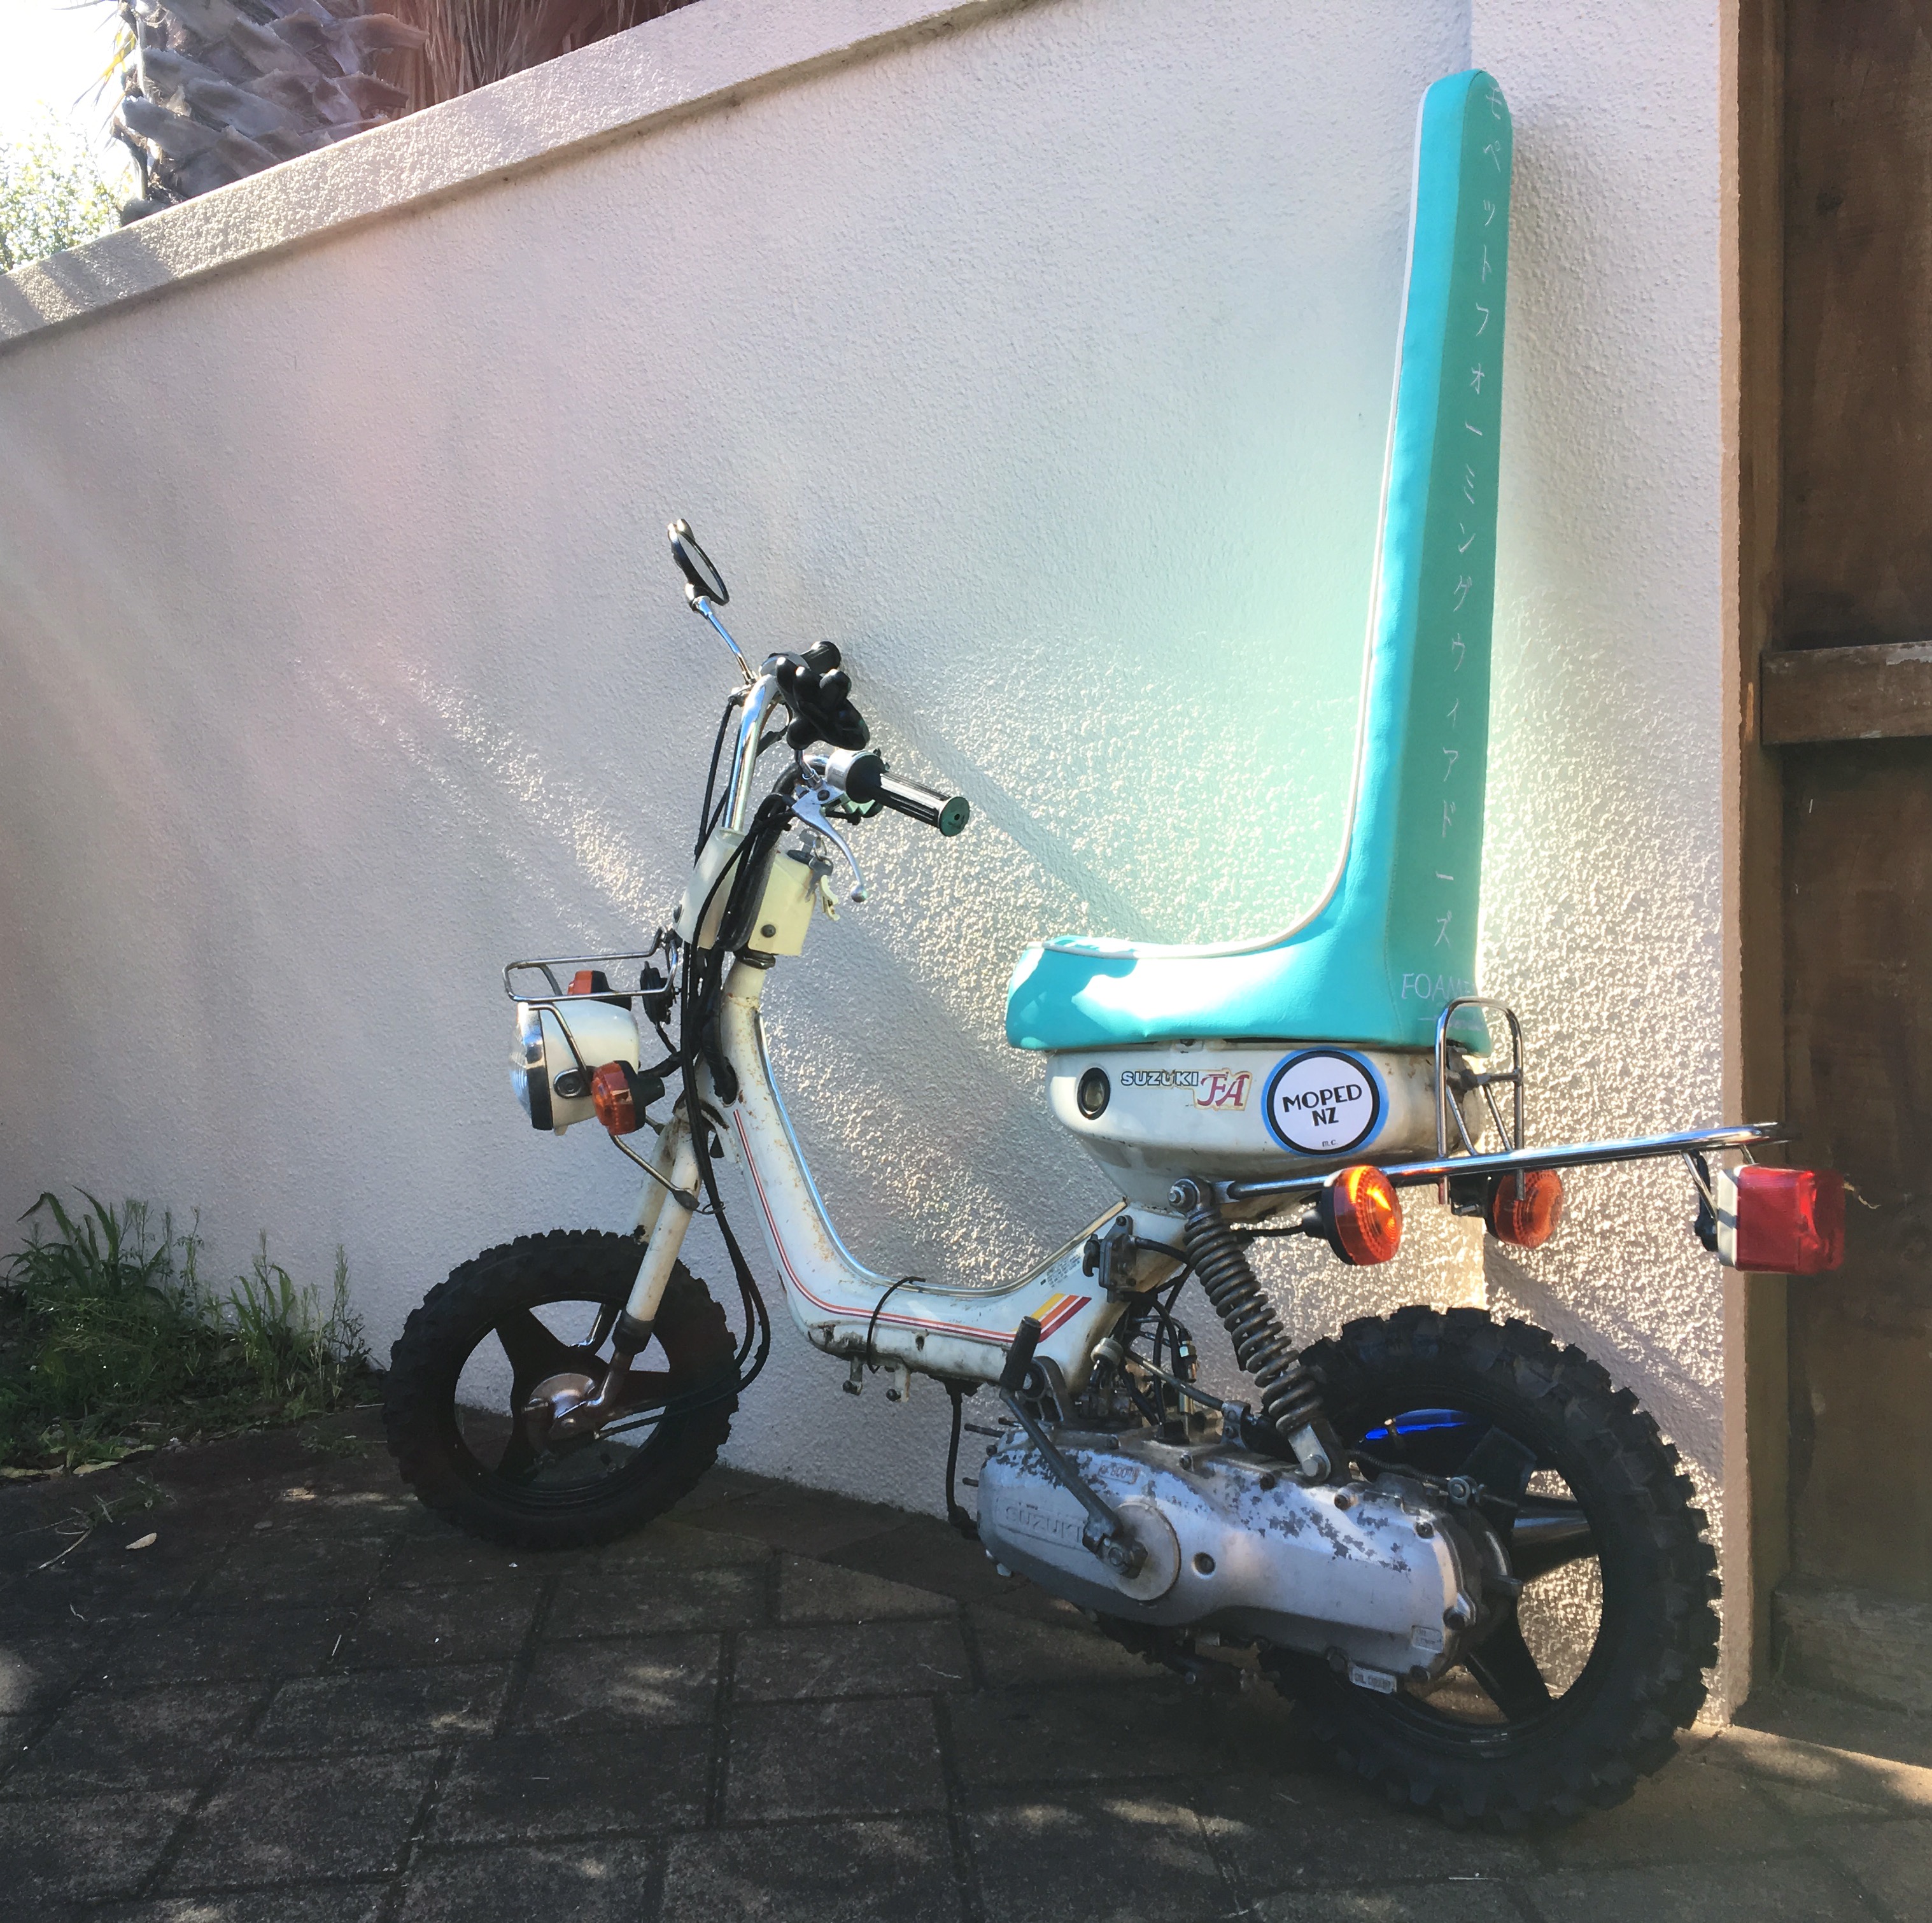
Gary is having some moments, that's for sure. Ordered the 60 kit from treatland and fit the thing, ran mint for a little bit. Didn't have the right jets for the standard carb so I leaned it out a bit and had a blast, it was fun until the baby soft seized.... Took the engine apart to find minimal scoring on the barrel and piston, cleaned it up and snapped a piston ring putting it back together. Damn. Put the original barrel/piston back on to find that after every 3rd or 4th kick the motor would give a horrifying metal on metal squeak. I've managed to track down a new transmission/bottom end in Hawera which I'll get here soon hopefully. Ordering new piston rings too and gotta wait for them to come from the states. Sadly gary may not be ready for the weekends Auckland ride, but I may have another FA to chuck the seat on for the day and hold everyone up. Big thanks to @Shakotom Garys seat looks good though. It's given me sweet inspiration for future paint work. I've also decided I need a legshield. Can anyone help out with one? They're near impossible to find...
1 point
-
1 point
-
Update time on Viva two.... Lesson learned. Don't leave Vivas parked up for two months on damp ground. I went to move it the other day and the clutch is stuck ! I have tried all the usual things to fix it and no luck. Its now sitting out there with a stick holding the clutch pedal down. Funny thing is that I have only recently worked on a mates Viva HC and it had come in with the same problem, which meant we had to remove the box and free up a very corroded clutch. The reason for this mighty wagon of mine being laid up? Well it ran out of WOF at about the same time as I had picked up a genuine Viva '90' engine. I had plans to fit it but its not happened yet. Hannah went to the UK to see family and brought back some parts, seals etc so next week we will tidy it up and fit it soon. What is a Viva '90' engine you ask? Its the uprated 1159cc engine that was offered as an option on HB vivas, and standard in the Brabham spec model. It has higher compression, high lift cam (that found its way into the 1256 Chevette/Viva HC engine), twin outlet exhaust manifold and Stromberg carb. Possibly some other things too.. some foamer can quip in here.. It all combines to give a very useful jump in power from 50 to 70 bhp! Twenty extra ponies is not to be laughed at when you only start with 50. My wagons chassis plate states in the options that it came with one of these engines but at some point it has been stolen from the car. The engine I have scored actually came from this ropey old car here... ...which Slacker Sam had bought and then sold on to the fella I bought the wagon from. He split the car down as it was rusty as (although some of its shell has also made its way into my wagon) , hung on to the motor and I managed to score it a few years later for $100. Its been rebuilt and apparently goes really well he said, useful for towing other Vauxhalls around etc ... Came with all new ignition parts too. Pretty happy with this lot and looking forwards to fitting it! I have cleared a little area in the workshop to work on it....1 point
-
Folding up the channels had some mixed results. I got the first folded up with a bit of fiddling around but it turned out good. The second must have been not quite on the line or something but it came out slightly to big to fit properly. This is both channels fitted into the outer skins. This photo sort of shows how the second one doesn't fit nearly as good as it needs to. My plan is to try to heat up the fold and flatten it back out so I can refold it in the right place. Failing that, I have more steel so I can always just make another one. I'd rather not waste it though. Sorry for the small update. The Mazda should turn up tomorrow. Should be fun.1 point
-
Well it's been a while but I'm finally getting back into it now the weekend's come back. I made a start by cutting out the part of the inner guard that needs replacing. It took a bit of cutting and spot weld drilling but it came away easily enough. Before: And after: You can see a really dodgy "repair" that's been welded over the outside of the rail, probably something to do with the collision that caused all the buckling in the inner wing sometime in the past. I doubt it would have stood up to any sort of cert and it looks hideous so I'm going to cut it from just behind it and get rid of the whole lot. The replacement panel is all made up months ago before I realised how much of a mission the whole job was going to be. Everything you see here is going to be replaced. Before I can do that though, I have to cut out the bad stuff. I started by cutting the whole lot off just where I said. Now to stop all the stresses building up in the same place I'm not going to join both the inner and outer skins at the same point. So I'm going to carefully peel the outer skin back without damaging the inner skin and join the two in two different steps. So, here's the peeled rail. Came away pretty simply. This is the new outer rail mocked up to see how it will fit. Snaps on nicely so I must have made it pretty damn close to the right size. It's way too long currently but it'll be trimmed down to size later on. I learned a couple of things from cutting off the end of the rail. It's a little more complicated than a straight rail on the internal skin. There's a pressed kink, obviously some sort of rudimentary crumple zone. It sort of looks like a shadow in this photo but it goes between the two cut away parts. Now as much as the thought of a pristine front end and a steering column through my face in the event of a crash is appealing, I'd rather not screw up my pretty teeth. Therefore, I'm going to reproduce these features in my rails. I'll have to figure out a set of dies to press them in. On the Mazda motor front, I've got the car turning up on a truck either Tuesday or Wednesday so the next exciting chapter in that saga will begin soon. Until then, more cutting and head scratching today.1 point
-
I class "modern" EFI as anything OBD2 compliant. Around 2000 onwards. Although you could also base it on the emissions regs it complies to1 point
-
There's really no need to remove a cat anyway, they're no more restrictive than a muffler. The engine is tuned to utilise the cat for emissions purposes, which does sacrifice some performance and economy, but since ditching the cat has no affect on the engines tune there's not really anything to gain. Unless it's blocked, but that's highlighting another issue with your engine.1 point
-
Registered or built? My wof guy is a mate, and a GC. BUt even he once said there was no way he'd ever remove a cat from a modern car. My CBF it too high to open them up and remove the gizzards and replace with a perforated resonator style internal pipe. Yes, I have ALL of the CBF's.1 point
-
spray bottle of soapy water, gentle does it, it will just pop in1 point
-
Doesn't always work, especially if it's German. Car too serious to fall for that.1 point
-
so, jam jars filled with the correct gas and your sensors dangling inside them, a bunch of cheap slimy electrical tape, SHAZAM?!?! i know, brilliant.1 point
-
gyro550 by John Bell, on Flickr1 point
-
I reckon you should put your time and money into just fixing the engine you have. You might be pleasantly surprised at the condition inside when stripped. That motor in above link could well have issues.. you'd never know until you get it. Plus it'll need the counter weight swapping over because its an auto so wont be a straight swap.1 point


This leaderboard is set to Auckland/GMT+12:00