
Leaderboard


Popular Content
Showing content with the highest reputation on 05/05/16 in all areas
-
I built this Homocycle a couple of weeks back Richard aka Big Value Buddy gave me this, very small, KHS road bike. I already had an old 70s road bike that was probably the right size for me, but the frame was too big for my liking, and after some googling I found out it is worth a few pennies to the right person, anyway........ 01 by Hayden Rowe, on Flickr In all her glory. I already had the seat, I use to ride BMX, and really small mountain bike frames (like 13.5/14 inch frame small) so found I didnt really like big/correct size road frames. 02 by Hayden Rowe, on Flickr I also didnt really like road bars aswel, and to come full hipster circle, flat bars are where its at 03 by Hayden Rowe, on Flickr 04 by Hayden Rowe, on Flickr Got some wider flats pedal, Note how small the frame is by how close the pedal comes to the front wheel 05 by Hayden Rowe, on Flickr To give it a slightly more modern/custom look, I ground the rear brake external cable runs off and drilled holes to run it internal 06 by Hayden Rowe, on Flickr 07 by Hayden Rowe, on Flickr quick sand.. 09 by Hayden Rowe, on Flickr 2K primer 10 by Hayden Rowe, on Flickr 11 by Hayden Rowe, on Flickr De-Golding 12 by Hayden Rowe, on Flickr BAM! and the gold is gone 13 by Hayden Rowe, on Flickr Got some sram levers, and brown grips to match the seat 14 by Hayden Rowe, on Flickr Green down, and brush painted the black on, also paint pen'ed the gold pinstripe on 15 by Hayden Rowe, on Flickr turned out pretty good 16 by Hayden Rowe, on Flickr 17 by Hayden Rowe, on Flickr then 2K clear 18 by Hayden Rowe, on Flickr Melted the gold abit, but i kinda dont mind how it looks 19 by Hayden Rowe, on Flickr 20 by Hayden Rowe, on Flickr 21 by Hayden Rowe, on Flickr I brought some new brakes aswel, bit more meat/ braking force to them, also got a head set that was wrong... 22 by Hayden Rowe, on Flickr .....so just mocked up for photo..... 23 by Hayden Rowe, on Flickr 24 by Hayden Rowe, on Flickr and with the bars and seat in/on 26 by Hayden Rowe, on Flickr 27 by Hayden Rowe, on Flickr 28 by Hayden Rowe, on Flickr Then I made some stickers 29 by Hayden Rowe, on Flickr 31 by Hayden Rowe, on Flickr 33 by Hayden Rowe, on Flickr ....swapped heatset for the correct item, fitted new chain and finished assemble. 34 by Hayden Rowe, on Flickr 35 by Hayden Rowe, on Flickr 36 by Hayden Rowe, on Flickr 38 by Hayden Rowe, on Flickr want to get new wheel levers and spray the seat post ans maybe seat rails black aswel 39 by Hayden Rowe, on Flickr 01 by Hayden Rowe, on Flickr 37 by Hayden Rowe, on Flickr Pretty happy with the end results. even if it is a homocycle.13 points
-
11 points
-
Ahh - finally! 8 or more weeks ago I ordered some axles. Took the long way to get them to NZ by using surface freight instead of air. Worked out cheaper this way for me. They still cost me close to $600 kiwi (each) when all was said and done. They are beauties though. Currie 1541H 35 Spline Big Bearing. I ordered special HD retainers to allow me to run a fabricated disc brake system. I have chosen to run this size of stuff due to owning a couple of Strange Nodular Iron race heads left over from previous times. I was going to sell them then thought wtf - run them. I work with Hilux axles most weeks. This is the difference between the two. I considered making my own but the challenge was finding a suitable core. Its hard trying to locate a shaft big enuff to take 35 Splines that is not attached to a big fuck off truck hub at the other end. The problem with this is that by the time you turn it down to a car size you are in the soft portion of the axle - so ya fucked. Anyway ... progress.9 points
-
The first few pieces all sanded down then epoxy etched and then primed Also managed to free up the jammed buttons so the buttons work fine now and had a good look inside, it appears there is still a couple bits broken, the link that lets you change between no-sale/cash isn't there and there is another piece/arm/link thing on the other side that looksl ike it should have a lever attached to it that would come out to the user and I can't quite tell where it would join but that's just sitting loose in the unit which is a little bit of a shame as these things are probably past me being able to fix now but its still awesome you can ring up cash amounts and it makes the bell go, you can also turn on and off the bell. All the mechanical working of this thing are insanely awesome.8 points
-
Copper shrimp I made from 45mm copper pipe and other copper scrap8 points
-
low added. front still needs to come down a bit more but thats almost right. 2016-05-04_05-11-01 by sheepers, on Flickr 2016-05-04_05-12-30 by sheepers, on Flickr8 points
-
I made this when I was 11 from 2 solid chunks of wood and a DIY kit steam engine6 points
-
So my mum is turning old this year! (happy Birthday mum) and she likes old things so im tidying up a old cash register for her Birthday present. So this is the Beast! Purchased it as 'was going... until kids pushed multiple buttons at once and it jammed and the draw won't stay closed anymore...' so it's a bit of a gamble hopefully I can get it to go again. Elsa stickers came free!5 points
-
Pics of friend5 points
-
She may want the kpizzle in or around her mouth. She's asked if you can text/call her. I'll pm you her cell number... safer than putting it up here for all you dodgy cunts!4 points
-
Mazda BT50?4 points
-
Fair enough too! On the left...4 points
-
So no updates cos had a life for a bit (Sabbath last weekend \m/ \m/)... Anyway, been slowly cleaning up old bits, replacing connections etc, and hit the shed last night to made some studs and get the inlet manifold on... Then spent this morning getting covered in half-set sealant pulling it off again, after lying awake knowing that I'd buggered it up... As I was torquing the water neck I noticed one thread was slightly stripped (felt it at only 15 ft-lbs) and as I had everything ready to go I just put a longer bolt in it and it seemed fine. Of course with the crappy Ford thermostat housing setup there is no way to get this lower bolt out again if it's too long once the inlet is on, as it hits the back of the water pump, and is a bastard to get at (memories now of overtightening this bolt with a spanner in the past trying to stem a leak)... Now I'm sure it would be fine, and it's only really a matter of lifting the inlet to replace if I had to, but in my haste I'd also forgotten to: put any anti-seize lubricant on the s/s manifold bolts, test the new thermostat So the inlet's off again and cleaned before the goo set, and I'll tap out the dodgy 5/16" thread to M10 and put it together properly, knowing I can replace the thermostat easily if need be (things that are not quite right bother me). Also ordered new set of hoses just because I'd rather replace them now while it is easy, plus got this catch can to plumb into the PCV line, as I am a bit concerned my baffle mods are going to mean a bit of oil being pushed out... So for the cost of a couple of gaskets and a little effort I'll be much more confident in my setup. Do it once, do it right eh...3 points
-
you could get a slab of some nice wood and make the rim if thats what you are doing tho2 points
-
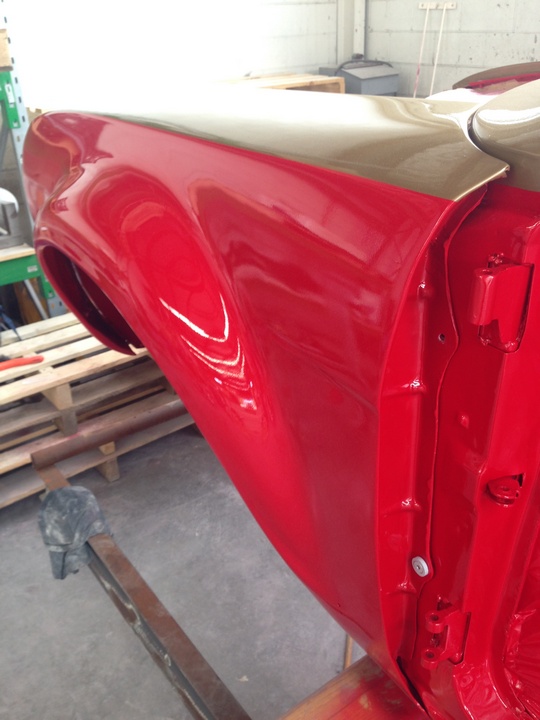
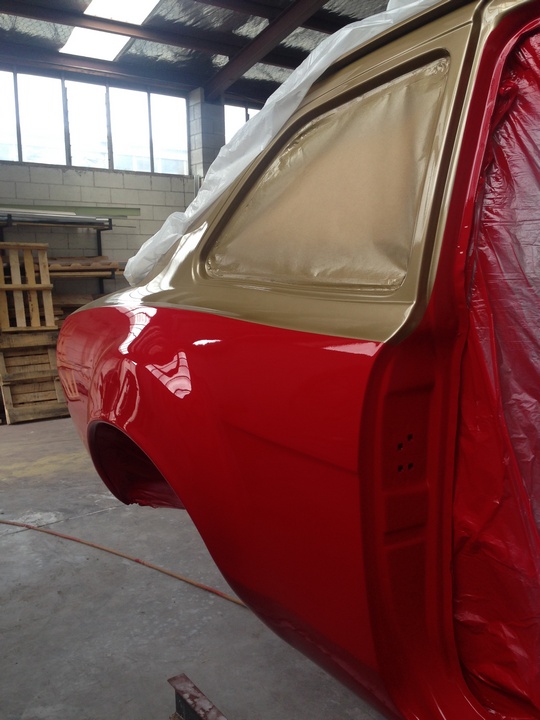
Ok sorry guys, have been really slack on updating this (and working on the car) I have painted the engine bay and refitted the engine and the car is now at home in my garage. The inside of the doors and been filled and painted and the outside ruffly filled but will probably require work once hung to make body lines match up. The outside of the tail gate has been filled twice as the first time the primer bubbled up, arguments over it being there was 1k etch used in spots where i sanded through when filling or humidity blisters, either way doesn't matter was striped back and redone without 1k primer and using the booth to prime, the inside seams were sealed up like the doors and the inside and outside of the tail gate have been painted. Did a little actual panel beating on the front guard and started to investigate why the wheels don't sit even;y in the rear guards but havn't sorted this yet. I have also finished my Bathroom which was a overlapping project and ate up a lot time, I have also started to clean up my garage so I can get some more solid work done on the escort. Hopefully I'll so some better updates with some more pictures soon! Every post needs a pic!2 points
-
While pulling apart found a small fortune inside... at the rate I was pulling out stuck coins I thought the unit might end up paying for itself Ended up with a few coins of various ages and places but shy of them paying for the unit, one of the coins was a collectors millennium coin which is a little bit cool2 points
-
So pulling it apart was all imperial which was fun Also someone had been in here before as a couple fasteners weren't matching2 points
-
The Maroon Hoon2 points
-
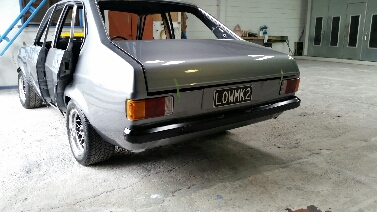
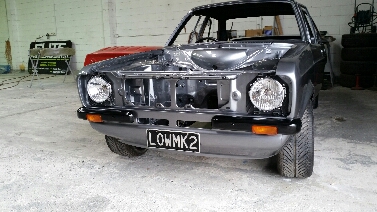
More importantly, when are you lowering it?2 points
-
one does not need to fuck with the rack. I put you wrong earlier, rally car has TE71 X-member with KE70 rack mounts and rack, (AE70 unit is in spare shell) the RH engine brace is easily modified by machining (or grinding) the bosses off then counter sinking the holes that attach it to the block. get countersunk cap screws(may need to have heads turned down) to replace standard bolts. the bolt that retains the steering U/J to the rack is replaced with a button head cap screw in doing these 3 things, 15-20mm clearance is achieved taking the brace off allows the bell housing to flex, with inturn stretches flywheel bolts, resulting in flywheel walking off the crank. VERY FUCKEN DANGEROUS !!!!!!!2 points
-
I have a white car. Think she is interested in coming to Auckland?2 points
-
Dang, there's a lot of bondo there but she's still a very pretty critter.2 points
-
Here's my suggestion for alternative route back to Auckland. https://www.google.co.nz/maps/dir/Railside+Pl,+Dinsdale,+Hamilton+3204/Rutherfurd+Rd,+Orini+3792/Waikare+Rd,+Waerenga/Falls+Rd,+Hunua+2583/Settlement+Rd,+Papakura/@-37.4238838,174.8351401,10z/data=!4m32!4m31!1m5!1m1!1s0x6d6d22163584f7f1:0xb27881ae30620b74!2m2!1d175.2530895!2d-37.7845328!1m5!1m1!1s0x6d6d40742c8b9825:0xdc7ffc715bf266c2!2m2!1d175.2428089!2d-37.5439508!1m5!1m1!1s0x6d6d43b5c04df807:0xb71fb26acda500!2m2!1d175.2243031!2d-37.4297241!1m5!1m1!1s0x6d72afa745632497:0x7c7627dbe91f9a01!2m2!1d175.0770459!2d-37.0649867!1m5!1m1!1s0x6d72ace6d46a6c65:0xfb8b8013100f0af2!2m2!1d174.9650701!2d-37.0658256!3e0?hl=en2 points
-
on the car, but still jacked , had to take off the L/h hub and bring to work... pic with cap just cause i like em!2 points
-
Built a trap thing for stoats ferrets rats 'chogs Also been making some kids pikau packs Need a sewing machine to make canvas ones2 points
-
So thought I would do a write up on a project I did for my brother over summer/for his 21st birthday present. So he has a mini that he absolutely loves and he saw some roof racks online and wanted to do something along these lines... Did some research and couldn't buy anything suitable talked to me and did some CAD modelling to do something way cooler than that. Wanted to add some curves to it as the mini isn't a very square car so squares would look weird on it. Curving the roof rack in both directions looked good and wanted to create a 'floating deck' with no stays in the corners so it looked lush/kinda like it wasn't attached. Wanted to do it all out of stainless so it is shiney AF. Used 3/4" dairy tube as its easy to work with and aesthetically was the right proportions for the mini. Send cad files to autobend and they rolled and bent the tubes to suit. had to cut + weld to length (ignore my rubbish welding pls) Got it all welded up and test fitted good My brother did some woodwork with Kiwa?Kila? wood and came up real nice! Pic showing clamp/mounting arrangement Turned out pretty good and looks sweet. Best thing is its super practical also. Just did a west coast trip in it with his girlfriend and they could stow their luggage on it. Here's a few sweet parting shots of sweet south island west coast.2 points
-
So i figured i should finally throw up a project thread for this discussion: //oldschool.co.nz/index.php?/topic/30375-flibois-1971-toyota-corona/?hl=%2Bfliboi%26%2339%3Bs+%2B1971+%2Btoyota+%2Bcorona its been close to a year since i took ownership of this fine piece of Toyota engineering, it seems a few people have had contact with it over the years, all around the country. I bought it from a guy who rescued it from an idiot that was putting a rotory in it. he put an 18r and 5 speed into it. I put a weber 32/36 into that engine, thanks to help from Mutiny and from Valiant, and countless OSers that offered advice, will eventually be running dual 32/36. First thing i did was throw the sweet headlight grills on that have been in my fathers garage for years, back when he owned a corona the next model along. i enjoy my music so i put together a tidy boot setup to make use of the weird shaped space towards the back of the boot, ended up with a rather large stereo while still having very usable boot space, Pioneer head unit, Response 6.5" components in the doors, fusion 6x9" & 4" on the rear shelf, Alpine v12 4ch and Precision Power 4ch amps in the boot rack, kenwood dB+ sub woofer in the boot setup, Incorporated spare wheel well in the boot setup. Probably overkill, but a majority of the gear has been gifts, and i couldn't sell it for what its worth to me anyway. Plus cant argue that its a damn nice sounding system, its really balanced. i also upholstered the parcel tray and the dash top with the same black carpet. then i bought some 17"s cause that's what the cool kids do. i picked up a harly exhaust tip for $20, welded it to a small barrel muffler and welded it on, i like the engine note, not particularly louder at idle and cruise, but can get rowdy when you play with the revs. then sold the 17's cause they didn't fit right and i had a craving for more a3a 50% thanks to Ridal 50% thanks to Ewan at Hayotonka.com Then some idiot drove into it while i was out purchasing paint. from this to this, at least the rear bumper is getting sent away for straightening and re chroming Thanks to 4ag_Addict for the new lights and to my mate Brian, Briannz (just joined looking for a dato ute) for working at the panel beaters i can trust. im picking the car up monday, and then getting stuck right into panel and paint, will update with pics as this happens. Also have a brand new black carpet kit to go in, water temp, oil pressure and vacuum gauges to go in, a mk1 golf big front lip to modify and fit and an Evo 4 (?) oil cooler ready to plumb up as soon as i buy the lines.1 point
-
After going to the meet last night and being told I should post a thread on my cars I figured I may as well. So here goes. Link to discussion: //oldschool.co.nz/index.php?/topic/48067-m-ms-1985-bmw-e28-525e/ This is my BMW e28 525e that I picked up 2 years ago. It's auto last owner had if for around 7 years and took decent care of it. Registration was on hold and no WOF, needed a few things but no big deal, just stuff like new rear shock mount and some rust holes in the drivers floor to be fixed. This is how it was when I just got it and cleaned it up:1 point
-
Hamilton swap meet is just around the corner. whos coming down/up/across for the day to have a gork? Also same day im having an open day at the shop (midnight upholstery) last year i done a vw day and we had about 35 odd old vws around so this year ive invited every one else along for the day also. Hamilton swap meet is held at the classic car museum1 point
-
is actually 16.5 inch, is that close enough1 point
-
Awesome. that's all I needed.1 point
-
standard back space, 2 " band welded into 5" so yes 7"1 point
-
They look good! Burgundy is a very good colour choice. Care to tell me what dimensions your rims are? I'm guessing 7 inches wide with 3 1/2 inch backspace? Thanks.1 point
-
they were 4x8" hq rims and 2x 6" skid rims that are duncans1 point
-
ooooo yes this is looking ace!!!1 point
-
Holy crap shack boy these are looking fucking lush! Cant wait to see mounted1 point
-
Also that. On the van we have a small tarp that ties to the roofies with some extendable poles + guy ropes which is great, but the van is a lot taller and larger inside i was just going to reuse that set up initially, but maybe with a larger tarp to maintain the total covered area but reverse the inside vehicle to awning space ratio. Also, fuck mozzies, so some sort of doors-open-mozzie-proof-sleeping-box-bed-extension may need to be arranged. A bit of ply between the doors resting on a small tab at the door base and the main floor would work for the bed extension, so just need the roof and door opening bit made up + zips and clips.1 point
-
Been way too busy last month to even touch the car, bumpers are stipped but not sure if I should paint them or leave them as-is (since the rest of the paint on the car is falling off..) "New" plates on the car Also need to clean the engine to try and find the source of the oil leak, although I suppose it is to be expected with 360,000 of wear and tear.
 1 point
 -
wee bit more progress, made a number plate/reverse light mount with lights I got from AALAWS grandads shed and a random bit of ally sheet also got it registered (2016 Ford Escort Trailer) Lady @ VTNZ wouldnt let me look through the pile of plates she had (BUT WHHHHYYYYYYYY!!!!!) but I guess it says "For My '58" and the numbers are pretty close to those on the 125, so whatevs. Other suggestions welcomed on a SAE. Just need to find time midweek to take it for a WoF. Cut up some ply for the floor - instantly filled up with shit again Also bought some some vinyl and some fancy gold foil underlayment. I should have just got the cheap stuff without foil as the foil came away from its foam backing which the vinyl was glued too and made the roof sag. Rip it out and more glue between the layers i guess. May bang in a roof support of some kind to help the ceiling stay up and also to mount a light to. Still need to install carpet and interior stuff will steal all that from the van as well as the sink and etc. Storage will be an issue as theres not really enough room to raise the bed or stow thing up high so stuff will just be loose until bed time i guess, but there is a lot of room underneath for a fresh water tank and the spare tyre (will also check the vans spare winderupperer for possible swapsies).1 point
-
So in absence of doing any actual work on my racecar, I've been doing a few events in my daily Levin testbed/hack around car in the aim of knowing exactly what suspension setup I want in my racecar. The two things I wanted to determine were; 1. What springrates to run on track to eliminate my previous tyre outside edge scrubbing issue and crippling understeer? 2. How does front swaybar go on the track and on the road + how does this effect spring rate required? 3. Is their a happy medium between a track/road/targa setup I could achieve? So in order to scientifically prove this I entered a trackday at taupo and booked myself in for an epic tarmac hillclimb. I had the same Tein coilovers in the car I ran in the racecar previous to rebuild so had a decent reference for how it drove. Used 400lb springs front and rear with Cusco swaybars front and rear along with the same old Semi slicks that have been sitting in the shed for the last 3 years.. Things went well. Lapped around the 1.46 mark on Track one in the afternoon. In summary from trackday; 1. Front swaybar was awesome. No understeer at all and perfect front/rear balance with rear stepping out when I wanted it to. Spring rates were perfect albeit a lack of suspension travel probably helped me out 2. open diff was painful but wheelspin not as bad as expected. They are shit and effect handling SOO much in a fwd car. 3. People who drive Skylines and GTR's are a bunch of pansies. Come on people if my 100kw POS road car can beat your uber power car around the track you're doing something wrong! All in all lots of fun and doorty noises were had Next up was the Tarmac hillclimb - 9km's of epic targa road on Pekanui rd (by Ngutunui school) Raised the car 20mm to try get some suspension stroke/stop the shocks from bottoming out. Other than this did nothing. Made some good noises Ended up 4th in class and doing pretty well. Everyone was impressed by it for a cheap/low cost basic car. Enjoyed tarmac driving a lot and gave me heaps of motivation for racecar doorty things. Things I learnt from Tarmac Hillclimb; 1. 80mm suspension travel in each direction is not enough even with stiff springs - bottoming out unsettles the car something chronic and makes it want to crash into the scenery 2. Spring rate was slightly too hard, need to aim for 350lb front springs and standard front swaybar 3. Damping is KING. controlling bump and rebound settles the car and makes it feel like you are driving on a cloud. I used a lot of left foot brake to settle the car as much as possible but it still wasn't enough to really push the car or be comfortable when something unexpected comes up. Tein's are not up to Targa driving style and epic MCA's are required. Considered Bilsteins but thing won't be cloud-like enough for a light car. So now I've done my testing with this car it is for sale so I can focus on doing gravel stuff in rally car and making progress on racecar. All proceeds will go towards buying some shocks for racecar. If anyone wants a really cheap quick road legal track/club car let me know. Keen to get around $5k for it.1 point
-
My long 4-2 stainless primaries are fully wrapped, have been for ages and no sign of cracking / corrosion / etc etc. And they've had some pretty hefty high rpm beat downs and every other driving scenario. On a previous engine I had stainless extractors wrapped as well, the only evidence of the wrap being there was when you took it off and it looked brand new underneath the wrap and shit everywhere else.1 point
-
spent ages (like fucking ages) at Nicks shop last night trying to get spark. no joy, the module we were trying to use wouldn't switch the trigger coming from the dizzy pickup. but, i did manage to take the best parts from the two distributors and build one good one so the action plate is now a lot better and the air gap on the pickup is much more consistent. late in the evening we found a module for a 2TG on line so Nick is going to order that today and that should make it go. 2016-04-22_06-25-32 by sheepers, on Flickr1 point
-
Just a couple pics of the front and rear lights and bumpers going on. Ordered a new grille last week so that should arrive tomorrow. Also blacked the plates as one was a bit bent and barked up. Might try to get a couple doors together today.
1 point
-
Yes motivation is peaking!! nice to see a car again, nice to be able to walk around the shed without having to move something first. Back window time, Started unfolding the gutter. previous repair left a little to be desired. decided to just cut the whole thing out. there wasn't really much holding the panel in at window frame, the sides are buggered anyway and when I took the donor car apart the spot welds under the vents where right bastards, this must be one of the few area's were the spotwelds could actually be seen on the car, but they are so well finished that they are completely invisible from the top/outside, making drilling them out tricky. sorted. I'll go back and clean up the scrappy bits on the weekend and remove whats left of the window frame. here's the old one with it's replacement. this is the inside, I had thought about just cutting patches out of the new panel and patching the holes, but after seeing this side, I'm glad I've removed it completely. I'm also going to remove the second vent panel that the engine lid hinge's attach to, as there is rust stains running out of there, only time to do it, so might as well! yeah yeah yeah!1 point
-
Managed to the the old girl out to the Hamilton monthly meet last Thursday. Unsurprisingly the car handled much better with air in the tyres Also replaced the windscreen rubber in the weekend. I have also removed the bumpers to take them to Onehunga Electroplaters to get a few dings out and add some sparkle.1 point
-
It's ALIVE! After sending the Z to Speedwell in Hamilton to get the carbs looked at, she's purring like a kitten. The old boy said all the needles were gunked up from stale fuel and the slides were stuck. Looking all snazzy in the fresh air. Also gave the radiator a proper flush and got a nice tray of gunk out. Might have been helpful to jack her up to get the tray under a bit more... Tinkle time! I really like this photo haha a little accident. To do list: -Shocks -Windscreen rubber -Exhaust and muffler -High stop light? -Sort out slow voltage discharge1 point
-
Greets Amigos, Since last update, The gearbox is back in with new clutch assembly, frost plug and crank seal. After that, we looked into the brakes which were bled for maybe 45 mins before all the air was out (hopefully). The rusty old pressure plate Shiny new clutch plate Also installed this weekend are four new heater hoses and a pertronix electronic ignition system which was suspiciously easy to install... one of the hoses ripped to bits as I took it off so probably worth the time it took to replace them. Heater hoses are my new pet hate! Awkward little suckers to get to but worth replacing since they are the 40yr old originals. Also installed were a new inner and outer shifter boot I got from the states. Now she's going to Speedwells in Hamilton to sort out the carbs and get her running properly. Currently only one carb is working so 3 cylinders are firing. Really need the compression to build up so we can see if the brake booster brings the spongy brake pedal up to a good spot. After that's done, it's just shocks and a windscreen rubber to put in and we can go for a vin check. Cheers, Reubin1 point
-
Gearbox time!! Everyone's favourite time! With significant help from my good friend Nick (Cressy) the gearbox has been removed as well as the driveshaft and half shafts. The universals in the drive and half shafts are super notchy and have been sent away for refurb. I figure I don't want to be going in there again for as long as possible. Now the clutch assembly... not so pretty as you can see from photos! The main frost plug has been weeping coolant into the clutch assembly so the flywheel, clutch plate and pressure plate have been sitting in about 25mm of water for the last god knows how long. Needless to say the clutch and pressure plates were fused together hence the lack of gear-change-ness. I had anticipated this so already have a replacement clutch kit ready to go. I also got the flywheel skimmed by the good fellas at Waikato Clutch and Brake who previously serviced all the brakes. Now to take the scrubbing brush and degreaser to the rear of the block to make it nicer and put everything back together after I have the shafts back. I also got a new rear crank seal for safety. Things are coming together slowly, just ticking things off the list. Super excited to illegaly drive her for the first time soon haha! Churp Moment of victory! EEEEEEEEEEEEEEWWWWWWWWWWWWWWW gooey rusty muck1 point
-
Righto, so things are moving on and the work has begun. I have replaced the rubber fuel lines in the engine bay, replaced the voltage regulator, had the alternator reconditioned, had the rear wheel cylinders and front calipers refurbished. Now on to finding some shocks to replace the leaky old ones which won't be passing inspection any time soon. Here are some snaps: Bits of bits of bits Polish takes 20 mins per wheel but looking nice. Because dat ass1 point


This leaderboard is set to Auckland/GMT+12:00