
Leaderboard


Popular Content
Showing content with the highest reputation on 03/25/16 in all areas
-
Just before leaving taupo I bashed the front of my car into the ground (again) Drove home okay, but figure it's time to sort this out properly. Pulled the sump off, looks pretty bad... AND THEN WHAT THE FUCK IS A SCREW DRIVER DOING IN MY SUMP?! Couldnt believe my eyes when I saw that, must have been there for a long time So perhaps I've fixed an engine rattle as well... I've got a spare oil pan to fit, big thanks to Pe-arce foe this. But I'm hesitant to do so without coming up with a better way of protecting it, I certainly dont want to do the same thing again. I'm thinking some slightly harder springs up front will help. Raise ride height a little and reduce travel a little. Then come up with some sort of bash gaurd.12 points
-
Sooooo, unicorn shit has been aquired. Genuine TRD new old stock (thants right brand new) k50 close ratio gear kit. And not only one kit, but two, although the second is missing 5th gear, got lost someone in its last 30 years of storage. So pine right now7 points
-
I bought a new toy. I've been looking for an RN30/40 for ages but I've been pretty fussy, with one of the harder conditions being that it needs a wellside. There are fuck all. Then this came up, I was like meh, extra cab, but bonus 4x4 tub and guards Plus it's got this!!! Plus it's engineered, and only cost me 3.5K. So fucking cheap. So I went to look, drove it, sounds amazing, bargained the price down a bit, then went home and organised the $ and picked it up last night. It's got a few things to sort, typical hilux rust, high beams are out, shit wiring job on the stereo etc, but it'll make a way better daily than the boring corona I'm retiring. Cheers Matt Discussion Thread5 points
-
pfft, if it only needs water seals then that's what it gets, gaskets come in a tube these days5 points
-
Next week I'll fit an electric fan and pretend it's still a cooling issue, not water seals.5 points
-
Time for fuel tank - this job got entrusted to Jon and EUROChris at Strange Workshop. My requirements basically centered around not having any external pumps or additional surge tanks, I wanted to keep everything contained within the original tank confines beneath the car as a means of minimising clutter. Project_KP61_4AGE (163) by Richard Opie, on Flickr Stock tank. What a thoroughly uninspiring piece of crap. Acid dipped as I knew we'd be chopping it up, so why not purge the shit out of it somehow so we didn't blow ourselves up. Project_KP61_4AGE (2338) by Richard Opie, on Flickr This was an investigative foray into a spare tank I had, just to see what we were working with and to map out a location to pop the pump and eventual intank surge-tank arrangement. Project_KP61_4AGE (2352) by Richard Opie, on Flickr Project_KP61_4AGE (2381) by Richard Opie, on Flickr Project_KP61_4AGE (2404) by Richard Opie, on Flickr Project_KP61_4AGE (2436) by Richard Opie, on Flickr The requisite section was measured up and chopped from the shitty fuel tank, and transcribed across to the nice, shiny unmolested tank. This was effectively sized to accomodate the pump with some space around it. Project_KP61_4AGE (2327) by Richard Opie, on Flickr Project_KP61_4AGE (2407) by Richard Opie, on Flickr The inlet/outlet fitting flange was also salvaged from the scrap tank - although in this case it started life as the flange for the fuel filler pipe but was large enough to permit a hole size that suited getting the pump assembly through it. Cut, grind, linish, weld, done. A little bit of panelbeating was needed on the uneven tank surfaces. Project_KP61_4AGE (2414) by Richard Opie, on Flickr Project_KP61_4AGE (2451) by Richard Opie, on Flickr Project_KP61_4AGE (2481) by Richard Opie, on Flickr Chris folded a box up out of fresh steel and got busy welding it all together. Capacity sits at about 3 litres for this. Project_KP61_4AGE (2453) by Richard Opie, on Flickr Project_KP61_4AGE (2467) by Richard Opie, on Flickr Measurements satisfied, it's time to chop up the actual fuel tank. No pressure... Project_KP61_4AGE (2489) by Richard Opie, on Flickr Project_KP61_4AGE (2487) by Richard Opie, on Flickr Pop it in the hole maaaaaate. Levelled up so the surge tank's on the same plane as the fuel tank itself and shit's pretty well sorted. A little bit of trimming of the hole in the tank and it'll be an ideal fit. Project_KP61_4AGE (2562) by Richard Opie, on Flickr Project_KP61_4AGE (2569) by Richard Opie, on Flickr Project_KP61_4AGE (2585) by Richard Opie, on Flickr The fitting to accomodate the AN fittings for the return and feed lines, as well as support the pump via a cradle was fashioned from the spare fuel filler, the filler neck chopped off and a plate tacked across the top. The (dummy mounted to check space in this shot) AN fittings have been welded to pipes which sit below, with a soft line to run to the pump itself on the feed side. Project_KP61_4AGE (2604) by Richard Opie, on Flickr The pump/cradle itself is pretty cool I think. This is just bent up from ~5mm steel rod, welded and braced to the abovementioned plate. Pump's just the Joe average Walbro. Project_KP61_4AGE (2618) by Richard Opie, on Flickr Finally, the surge tank/pump/cradle/bulkhead combo deal perched outside the tank. Holes drilled in the surge tank as this area sits above the original bottom level of the fuel tank and of course we'll need to permit SOME fuel to flow into the unit. Final welding still to take place but afterwards, the tank will get a treatment/seal, the fittings will all be re-passivated and the tank given a coat of black paint to tidy it all up! Thanks for reading Bought not built.5 points
-
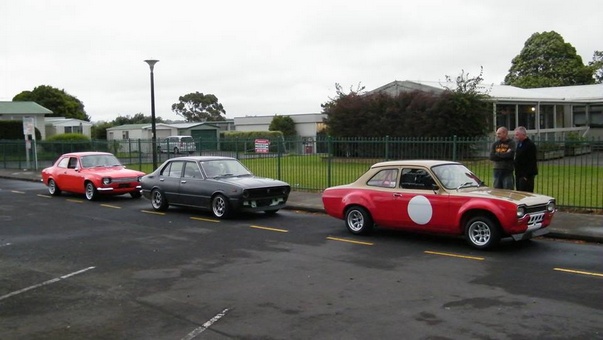
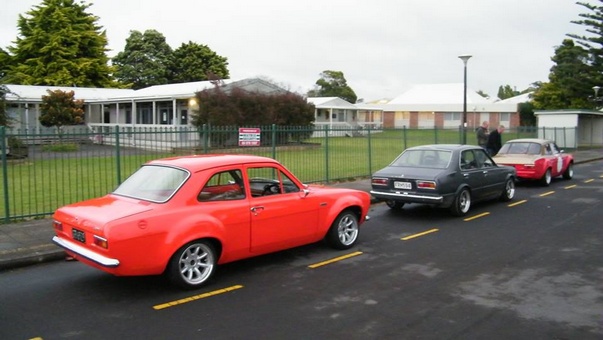
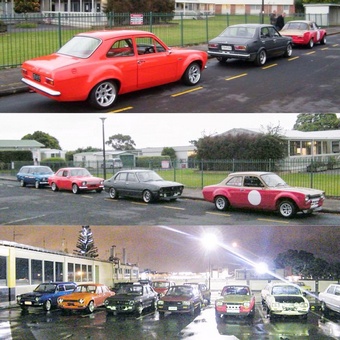
Got a few of the crew together and cruised along to the Auckland oldschool meet
 4 points
 -
Ive been pretty slack... But my engine/gearbox are in and ready to be wired up. Gearbox ended up being a W58 which is an added bonus. Anyone know any local (dunedin or around) auto sparkys interested in wiring it up?4 points
-
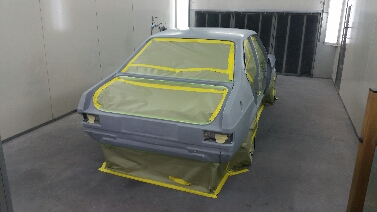
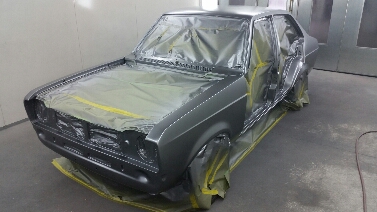
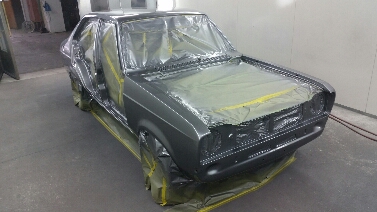
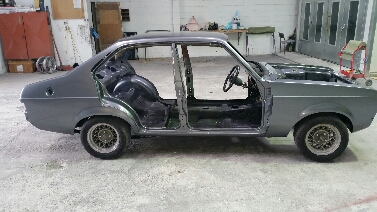
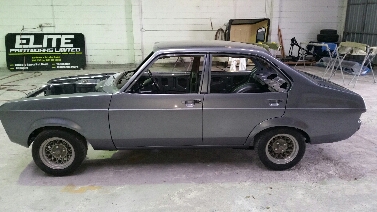
And today after all customers had their cars back for the Easter break and after nearly 18 months since I started,the body was in the booth and masked up After degreasing,checking everything was right,degreasing again and checking again color was on Letting the basecoat flash for 20 mins I hit it with 3 coats of clear And a 40min bake later out it comes Bootlid on And finally doors Real happy with the result and how straight it's come out...not bad for a painter lol Well I've had a guts full of cars for the moment so going to hook up the boat for a couple days fishing and diving. Thats all for now. Chur
4 points
-
Slab of titanium for sparks pls3 points
-
Got a little tipsy tonight.. May need a new boot floor! This and the A pillars are the worst bits, the rest is pretty solid thankfully.3 points
-
Couple of screwdrivers stuck to the outside for protection?2 points
-
2 points
-
Time for a power bulge!!http://search.thewarehouse.co.nz/m/product/Just-Brand-Wheelbarrow-65L?SKU=11914252 points
-
My old man has an unrestored one of those engines like the one in your pics, it's a sheep shearing setup. It was mounted to a skid but it was big and rotten. He'll never do anything with it though...2 points
-
Funny you say this, last weekend he was at a 2 day vintage engine/tractor/cars jiz fest out at Karaka I think. Him and his mate loaded up the transporter with one of the Alice Chalmers tractors, the Anderson and took a campervan. They obviously failed to factor in the adequate amount of booze required as he text me at 2am wanting a delivery of Jack Daniels. The old man has an old rusty but awesome Massey tractor he's getting running (was seized) and probably 10-15 engines around the place. Will take some more photos when Im over there next.2 points
-
I love the stationary engine blokes. They stand around their old chuffers in funny hats, discussing ancient technology and admiring each other's contraptions - often wearing tweed and smoking a pipe. Something to aim for...2 points
-
My old man has an addiction to buying old stationary engines and tractors. One he has restored is 1914 (or so) Anderson hit and miss. He did a ground up rebuild then made a cart for it so that he can take it to vintage shows etc for other engineaholics to jiz over. He was using wooden wheels which look naff so I found some steel at work and made him some wheels. He's got a couple of old Listers he rebuilding at the moment and some weird of single cylinder engine that starts on petrol then swaps over to diesel? Keen to restore a couple myself, try to set one up to pump water up out of the lake below my house.2 points
-
Alright this is the beast. Someones disconnected the oil mixer I think, can someone have a look here and tell me whats up? Do I have just to go fuel tank with premix -> carb -> success?2 points
-
That colour is stunning! Looks so deep and flawless! Gonna keep that in mind for when the mini is ready for paint...(so in about 20 years at the rate Im going)1 point
-
Haha, or fit the wheel barrow wheel to my sump.1 point
-
I'll be heading over tomorrow1 point
-
Had you been missing a screw driver? haha. You could look at raising the engine 7-8mm (which shouldnt have to much effect on much else), and same with ride height, to give you another 15mm sump clearance?1 point
-
It has been a few weeks since an update, I was hoping to have everything done and painted by this point, but theres still a fair amount of work to do. I finished off the rear end/diff rebuild on my brothers car and got that all back together and driving, which has free'd up some space and cleared my plate so to speak. With my attention focused back on the front clip for my car, I was able to finish off a majority of it. Got the front tub end cap panels welded on which added a lot of rigidity back to the tub section. Picked up a new intercooler from Fenix. This one is slightly larger with 500x300 core, instead of the old 380x230 core. So intercooler and oil cooler mounts were added to the front clip, along with radiator and bonnet pin mounts. Made up some headlight mounts and got those welded on. The plan was originally going to be to have the entire head light mount to the front clip, so removing the front end was easy. At this stage only the inner mount of the headlight is attached to the front clip, and the standard outer mounting bracket still attaches to the front guards. Got the new tubs mocked up, they still need a little more trimming and tweaking here and there. Will remove the engine before I go ahead cut the factory tubs out and weld these ones in, which is pretty much where I'm up to at this stage.1 point
-
Sun's coming out, reckon it should be an alright day1 point
-
Give segedins a call. They stock guides,, valves and seats ( well they did a few years ago) Dean (dene) or Paul will be the ones to talk to .1 point
-
WOFs are for faggots1 point
-
Biggest question is: did you deliver?1 point
-
You never know where that camshaft has been....!1 point
-
Glovebox lid - had an hour spare so knocked this up: It's in 1.6mm aluminium with returns around the entire perimeter. It's also compound curved to match the dash.1 point
-
If you have lots of small holes to fix say in a floor pan. I've seen a restorer do this in a 55 chev. Screw a strip of panel steel to a sheet of ply then holesaw out a pile of discs in a drill press so you have no hole in the centre. You can then holesaw out the rust in the car and weld in your discs been round the shrinkage is very uniform a quick linish off of the weld and a gentle tap around and its perfect. Screwing your sheet steel to ply give you something to hold onto while hole sawing and some weight so you wont get sliced up if it grabs. You can get creative to using a bigger disc holesaw out some rust say in a corner of a door bend the disc to shape in a vice and trim it to fit with tinsnips everything will have a round edge again minimum shrinkage.1 point
-
So I went to Marton and picked this Gemini coupe up on Saturday for $1000. It's 99% complete and not completely rust fucked. Even drove it on and off the trailer. G200z It now looks like this. I'm going to build a rotisserie for it in my spare time. I'm meant to be working on my shed/home so progress will be a bit slow to start with!1 point
-
No updates as the Mrs bought a bloody spa so having to build a deck for it... Happy wife happy life! That's Easter buggered.1 point
-
So went to Toyota Fest at the weekend and thrashed the shit out of the Mark II at Highlands. First time on a track and man was it amazing. Most fun I have had in years. Managed to finally pop a turbo. I have always said when I pop one of the twins its time for a single turbo conversion so its all on in about a month when my mate can start on it. Going to get the head rebuilt as well as its got an oil leak in the headgasket and needs stem seals done. Already have a single turbo manifold, so need to source turbo, injectors and probably get a Link Atom wired in. Will take pics as I go along. Car was left in Cromwell and getting shipped back tomorrow.1 point
-
So I got in a day's work sorting out the front end a bit and then lookin' at it closer than I have the frame is both bent and twisted so it's taken a fairly major hit at some stage and that initially kinda perturbed me but eventually I figured I could wedge it under my car, just the frame, and most probably bend it back where it's be better suited to going in a straight line. I cut up the handlebars and tack welded then into a more suitable guise and then mounted quite the nicely shaped speedo I had lying about which is somewhat art deco in shape and I do like art deco. Then I made some headlight clamps. Next step I think will be doing a front mudguard as well as a seat base as I've got access to an english wheel and what might be a silly idea that half of some aluminium tube rolled through the wheels will become mudguard shaped... the seat though will need multiple bagging against a sandbag before it goes to the wheel for smoothing, Over the past few days, as well, I've been researching that totally esoteric and arcane art of expansion chambers and also been down to chat to the man at custom chambers to the extent that I basically understand he uses a computer program to work out the dimensions for specific requirements given the setup of things such as ports, carburettors and powerband placement... which admittedly I can't really be bothered with but, at the same time should be? I understand that form should follow function but I am somewhat too a fan of the idea that form can define function and the idea is that a really natty and suitable expansion chamber would have a header pipe that curls up and over the barrel and then the chamber does it stuff as it curls over the motor cases then snakes along the side next to, but not too close to, where the battery is with the, now I know the nomenclature, stinger over the rear shock and between what would be my lower left calf. And I know too that that is like shouting at failure of function to come and be my best friend but at the same time I might be lucky and it does actually do what I require of a motor with power. I have found a fellow who has published dimensions for a chamber for an AX100 with a really good description of what he understands as the hows and why's which is really quite detailed so if I can combine this with getting the chap at Custom chambers to run some approximations of what I have through his program I can kind of put the two together and see how close or far apart they might be. He, at CC, has also said he can just do the rolling up of cones at a labour only cost even whilst I wouldn't actually mind having a go at that....1 point
-
Spews water out the overflow at ??? temp and I was hoping it was the radiator or cap, solution was to replace both. Chinas finest from redline. Outlet faces the wrong way. I stared at it for awhile and thought "what would rookie dave do?" then cut that bitch off. Cut other un needed things, drilled some things etc and forgot to take a photo of it in the hole. But don't worry, it still got real hot and blew lots of water out the overflow bottle.1 point
-
The low ones are where the windows are going. I might offset the ones in the back wall though as per Adoom, easier to nail. This timber is old and hard, I have had to drill the boards to start the nails to avoid splitting.1 point
-
For those not on FB heres tonights post, Proper photos and engine bay/interior to come but for now: Talk some shit! //oldschool.co.nz/index.php?/topic/34313-the-westpala/page-71 point
-
fuck this thing need a massive dose of low. anywho i installed radiator shroud. you can see the fan is a bit closer to the radiator and might do a bit more than move air around itself. 2016-03-20_06-18-07 by sheepers, on Flickr 2016-03-20_06-17-53 by sheepers, on Flickr1 point
-
Hi people, I would like to title this post: The success of rubber and the failure of man. Last trackday at Taupo - I only got a handful of laps and managed a 1:56 which is a new personal best! So I knew the car had some more time in it with a bit more practice. This thursday just gone, I gave it another attempt. With some better lines, I managed to scrub a whole extra second off my time, I was super chuffed with that! One of the differences to last time though, is more negative camber in the front (going from 0, to -2 degrees) So the car was feeling great, the initial turn in was superb. I was feeling suuper confident, doing some kamakaze runs into the sweeper which I overcooked a few times trying to brake too late... And then for the first time at a trackday this happened... Woops! I had a huge lockup, and flat spotted my front left tire down past the tread level. It felt like I was driving on a cube, not ideal. So off I go to the local tire shop. "Hi, do you have any 205/50/15?" "Sorry dont stock these" "wtf? Shit." "Try the place around the corner" Off to the second place, same answer... nothing in stock.... shit shit shit. until... "Oh, I've got some second hand semi slicks though" "Go on" "Two R888s for $60 fitted" "Done deal!!" Frigging amazing! So I get them fitted on the front wheels, then smug face back to the track. After running out of people to smugface to while telling my story, head back out... Very mindful that I'd have a lot more grip up front but still the same out back... So I wound out a bunch of the rear bias. Out on track... Holy shit! Sector times keep tumbling and tumbling, GPS is showing going faster and faster through sectors. Life is good I had a few... err.... incidents while getting used to the different grip level Getting more confident on the brakes... Sector times dropping like crazy... And theeeennnn.... Smoke coming from the front left, brake fluid smell and a knocking noise... shit I hope this isnt the wheel hitting the caliper or something. Back to the pits... I take the wheel off, and all is well. What made that noise and smoke then? Oh... Oh fffs. GNNARRRRR! My first experience with semis, over in about an hour because I noobed the braking again. All smugness instantly erased from my face haha. My fastest lap was only 0.2 seconds quicker than road tires, because it was hard to string a whole lap together without having the rear of the car come loose with the grip imbalance. Regardless, I was absolutely fizzing about how well the car ran. The 8000+ rpm rev limit now has just brought the car alive. I called it a day, and headed back down to the tire shop with my tail between my legs. Feeling like an absolute noob for wrecking the tires they fitted about an hour ago. "So, ahhh... I wrecked one of the tires, my bad. Do you have anything like a 195 or 185 that I could get home on? Just a normal road tire" "Yeah I think we've got some 185s here, same deal as before... $60 fitted" "done deal!" While he was taking the semis off, he said "Oh yep, this one is flat spotted pretty bad! Leave this one with me, and take one of these others so you've still got a good pair" Holy crap, could an experience with a tire shop possibly get any better? So with my car amazingly intact, and a decent pair of second hand R888s in the boot. I head off for another 2 days of tootling around the central North Island, as pictured below. Smashed through a few tanks of gas, with the engine running like an absolute dream. Ran 90% of the time with cruise control on, and enjoyed the scenery. I made it back to Auckland in one peice with no major issues. Best trackday experience ever! Big thanks to Tom / Testament for helping me out over the weekend.1 point
-
1 point
-
My old mighty 81 vauxhall Chevette with a little twist to it. Bought this car 3 years ago for my sons first car all stock standard. Few months later, it blew a head gasket. We decided to strip the engine down and to sell off in parts. I had decided to take it off his hands and have been looking for a project for a while. I found a Nissan sr20de engine with 5 speed gearbox that had been worked on, lots of money spent on the motor with forged internals etc.. And bought this engine for a cheap price! The first time the engine was going to be placed into the car, the sump needed to be tubbed so it could fit over the x member and an oil cooler was fitted to give it extra capacity for oil. Custom radiator was fitted, front brakes and callipers had to be changed to Audi rotors and holden Astra callipers for it to actually stop!! The good thing about this car is that it is all certified!Heavy duty clutch also fitted in and lightened flywheel. The whole build took just over a year to get it all certified. Surge tank,high volume petrol pump and battery are in the boot.She has never had any problems, never broken down, and runs extremely nicely! Good change from 50hp to 180hp.Drives and handles well and surprises a lot of people1 point


.thumb.png.b2aee08688778d18bdc7b3e3c1852d9c.png)


This leaderboard is set to Auckland/GMT+12:00