
Leaderboard


Popular Content
Showing content with the highest reputation on 03/08/16 in all areas
-
Old School Nats last weekend in National Park and visited a friend at Horopito while i was down there: Ol' mate Colin was very surprised to have someone interested in it Ol Barry: "Do you have one of these?!" Not so old Barry: "Yes, two, + 2 more tail gates making 4", lewl. Got all four monsoon sheilds and the dizzy, shields were cheap, but the dizzy was not (check out the drive!), but happy on average Cap is 'new' and my one is missing one of the cap clips, and spare parts are nice to have. Apart from those bits the car is pretty rooted. Still has its back brakes (I should have grabbed the hand brake pads!) but i doubt i would have been able to jack it out of its hole or get the wheels off.9 points
-
after multiple fuck ups on my part involving welding the cam cover back together then breaking it again numerous times i finally got it sorted, in that Mike gave me another one with cooler text on it. the other one is usable but this one is way better. so this evening i attempted to paint it and highlight the letters. what a fuck around. so i got there in the end. I'm not a fan of painting clear straight onto aluminum but Richie wouldn't shut up so i did it this way. 2016-03-07_07-19-04 by sheepers, on Flickr 2016-03-07_07-19-13 by sheepers, on Flickr 2016-03-07_07-19-23 by sheepers, on Flickr9 points
-
Car has had wiring finished, tested and removed. Now I'm stripping for paint. Have to mount the new Tilton Pedal box and that should be the last of the fabrication finished. Also got the rear brake bits made up. I think I have all the puzzle pieces now.8 points
-
2016-03-08_07-44-31 by sheepers, on Flickr6 points
-
Story time. The temp gauge usually only just registers, but on Saturday on the way to the swimming hole it went right up and the heater was blowing pretty hot too, I figured a faulty thermostat and clearly a fucked heater tap cos 30 degree days and non turnoffable heaters suck. As it never really registered full temp the heater obviously wasn't getting noticeably hot. Sunday morning I open it up and find no thermostat at all.... then the spare cars engine also does not have one. There is a listing in the internets for one however. i track down the right number and surprisingly Repco has one, it fits into the spare housing i took along to Repco so i get it along with another gasket. Installed it and go for a run, it quickly gets up to what i consider a normal temp and stays there...sweet. Driving home the stereo starts going crackly, then I turn a corner and my leg gets burnt by steamy hot coolant dripping from the heater valve. Not too burnt cos it is using the stereo to cool things down on the way through which is kind of considerate of the old girl. Fortunately I have a spare heater tap in my massive parts stash, this one is actually fully functional. I install this after pulling out most of the dash, then hop in for a quick run to get it up to temp. Everything is sweet, but on the way back turning into my road I hear a distant crash, which turns out to be the stereo falling onto the road cos i left it on the boot during my test drive.... So a win and a loss, karma is restored. I have also now bought another BT stereo....6 points
-
So I wanted another van, ive had 4 in the past and they are handy for camping, general manly chores, sleeping in when drunk, hauling go karts/bikes/car parts whatever. I had a look at a couple of older vans, a C20 datsun that i was too big for, my head was hard on the roof. I also had an early L300 organised to purchase off a panelbeater, but it turned out to be too rotten for him to fix economically. Also had a look at an 88 hiace but the motor was chooched. I decided i didnt need another project so went and had a look at this it was quite cheap, but it looked terrible due to it being a painters van, it was covered in paint and generally filthy, i bought it off a car yard and i think they CBF touching it, they staff said they used it for moving their own stuff and runs to the dump. Anyway under the ugliness its a really good runner lowered it this evening, s14 springs i got for free in the back with 2 coils cut off, torsion in the front so that was easy. Will get some different stiffer springs for the back as its a bit soft, these were only a test Will probably put some 14 or 15'' rims on it, and i might get the turbo off a factory turbo deez one to chuck on5 points
-
Engine bay shot.. As you can see, the rocker covers, air cleaner & alternator bracket are a lovely patina of pitted cheap chrome. Dislike the rocker covers especially though, so while I was wandering around the Puke swap meet last weekend I happened across these cool old Weiand one's. Unfortunately the seller would only sell them as a set with the "matching" air cleaner, but for just over a hundy I thought it was a good deal. Sanded the fins down to the alloy & cleaned them up a little bit then chucked them on. Nice improvement there I think4 points
-
i just chucked them on to see what they look like. the photos look a bit weird because the light is reflecting weirdly, or some shit like that. 2016-03-08_04-40-17 by sheepers, on Flickr 2016-03-08_04-40-26 by sheepers, on Flickr4 points
-
Keen! will pack some chairs and an extra sump plug.4 points
-
Wife's father passed away and most of his tools "disappeared" what was left was pretty naffed and my wife isn't really the DIY type so I bought one of these for 12 from Kmart stripped it cut it in half And put an old hand drill to good use (missing handle and the chuck was naffed)4 points
-
I might have a problem..... clearly not enough BMW's3 points
-
OK, cam update. This was the message I left NZ post last week: Hi. I have a package that arrived damaged today from the Portland US Youshop warehouse. This is a camshaft, heavy steel and it is snapped in half, so completely useless. The damaged goods enquiry page seemed to direct me to courier post, I have talked to them but am not happy with this, as my contract is with NZ post/Youshop and I expect to deal with them (you) to deal with any issue. I have attached photos. I have used Youshop many times without incident, I trust this will be resolved quickly and with no cost incurred by myself. Regards, etc… Heard nothing from courier company (as expected) but did hear back from NZ post yesterday: Thank you for your enquiry. On behalf of New Zealand Post I apologise for the situation that has occurred. In order for us to assess the damage to your item, we require you to take the item and all of its packaging material to your local PostShop and send it to the address below: That’s fine, but I told them I needed this part asap, and I wasn’t happy with the lack of information. Hi, I will return the package to a NZ post shop tomorrow. I am still unsure of the process however. It is disappointing I have had no explanation of the process to follow or likely timeline. This is a part I need urgently, the engine is out of the car awaiting this part, and I had intended to fit it over the weekend. As I cannot afford to wait for an assessment and bureaucratic delays, do I proceed with ordering a replacement and deal with redress later? As of this morning the package has been returned and I am none the wiser as to what happens next. I asked for a tracking number so I know when they receive it (which cost ME, despite my protestations, so I am already out of pocket) and I’m a bit grumpy knowing it will probably be a fortnight before I can get a replacement... I have also contacted Comp Cams just asking if this has happened before, and what kind of force it would require to do it, just out of interest… I was sort of hoping pics would be enough evidence so’s I could add the snapped cam to my pathetic ‘OFFERINGS TO THE GOD OF SPEED' shelf Which, at the moment, consists of a slightly scuffed FA50 piston. Burt Munro I aint…3 points
-
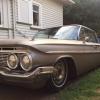
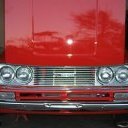
Well things have finally settled down a little bit for me to start a thread on my new old car. Selling my hatchback was a massive headache but so happy it went to someone in the end who reckons he'll have on the road in about a year (he's a panelbeater which helps I believe). I flew down to Christchurch a couple of weekends ago with the old man, & after having a good chat with the previous owner we jumped in & roared off. Been a while since I drove a LHD car, last time was about 15-20 years ago in my mates old '76 mustang, but it didn't take too long to get the hang of it. And dad piped up when he saw that I was starting to wander over the centerline too which helped. The trip was a blast. 4 hours sleep the night before & barely half an hour on the ferry made for an interesting drive toward the end - especially driving through the night in pouring rain with the windows leaking. Fun times. Took a coupla pics just round the corner from the previous owners place Took a couple of days, but the hatch got picked up & I was able to park the Camaro in it's new spot Discussion topics greatly welcomed here: //oldschool.co.nz/index.php?/topic/52171-jeds-74-type-lt-camaro/2 points
-
I pryed off the front cover with a small screwdriver, took my least favourite card from my wallet and cut & glued it into place using a pritt glue stick. It seems to work well and blocks out the lights too http://s9.postimg.cc/62ef6e8fz/image.jpg2 points
-
I had a 77 Camaro for a good number of years.Only car that I have owned that would happily sit on the red line in top gear (2.78 diff made it about 130mph). 350 chev is pretty basic. Performer intake is a step up, although with a stock motor the biggest advantage is saving a bout 10 kgs in weight over the original cast manifold. That 600 cfm carby is plenty. A good 2.5 inch twin exhaust is important. Headers are a problem, most hang down low get bashed on the road. If that is a points dissy chuck it away and put in an HEI. Get either a genuine GM one or and MSD. Don't buy one of those cheap Chinese ones, they are junk. Chev motors have really mild cams, put in some thing with around 215 degrees duration at .050 lift. Do all that and assuming the rings are OK you will have something nice to drive, goes well and wont give a lot of grief. Edit. After writing this I looked at the build thread and see headers are already there. Definitely get rid of the cast iron intake.2 points
-
and I kinda want to avoid using a factory 80s ECU because Mitsubishi EFI wiring looms don't tend to be stand alone from the rest of the car - and given the car is auto the ECU will be expecting to be connected to an EFI specific trans computer too. Unless I have a complete parts car, I will have to buy an ECU, trans computer, complete wiring loom, distributor, air flow meter amongst other things from a wreckers. I figure it would be easy to just leave the carby trans computer in place (just needs to see TPS input) and use an aftermarket computer with map sensor that can feed a tacho output to the factory digi dash.2 points
-
Cough... twin cam..... sure its in a mazda but a sweet result v.s the SOHC option...2 points
-
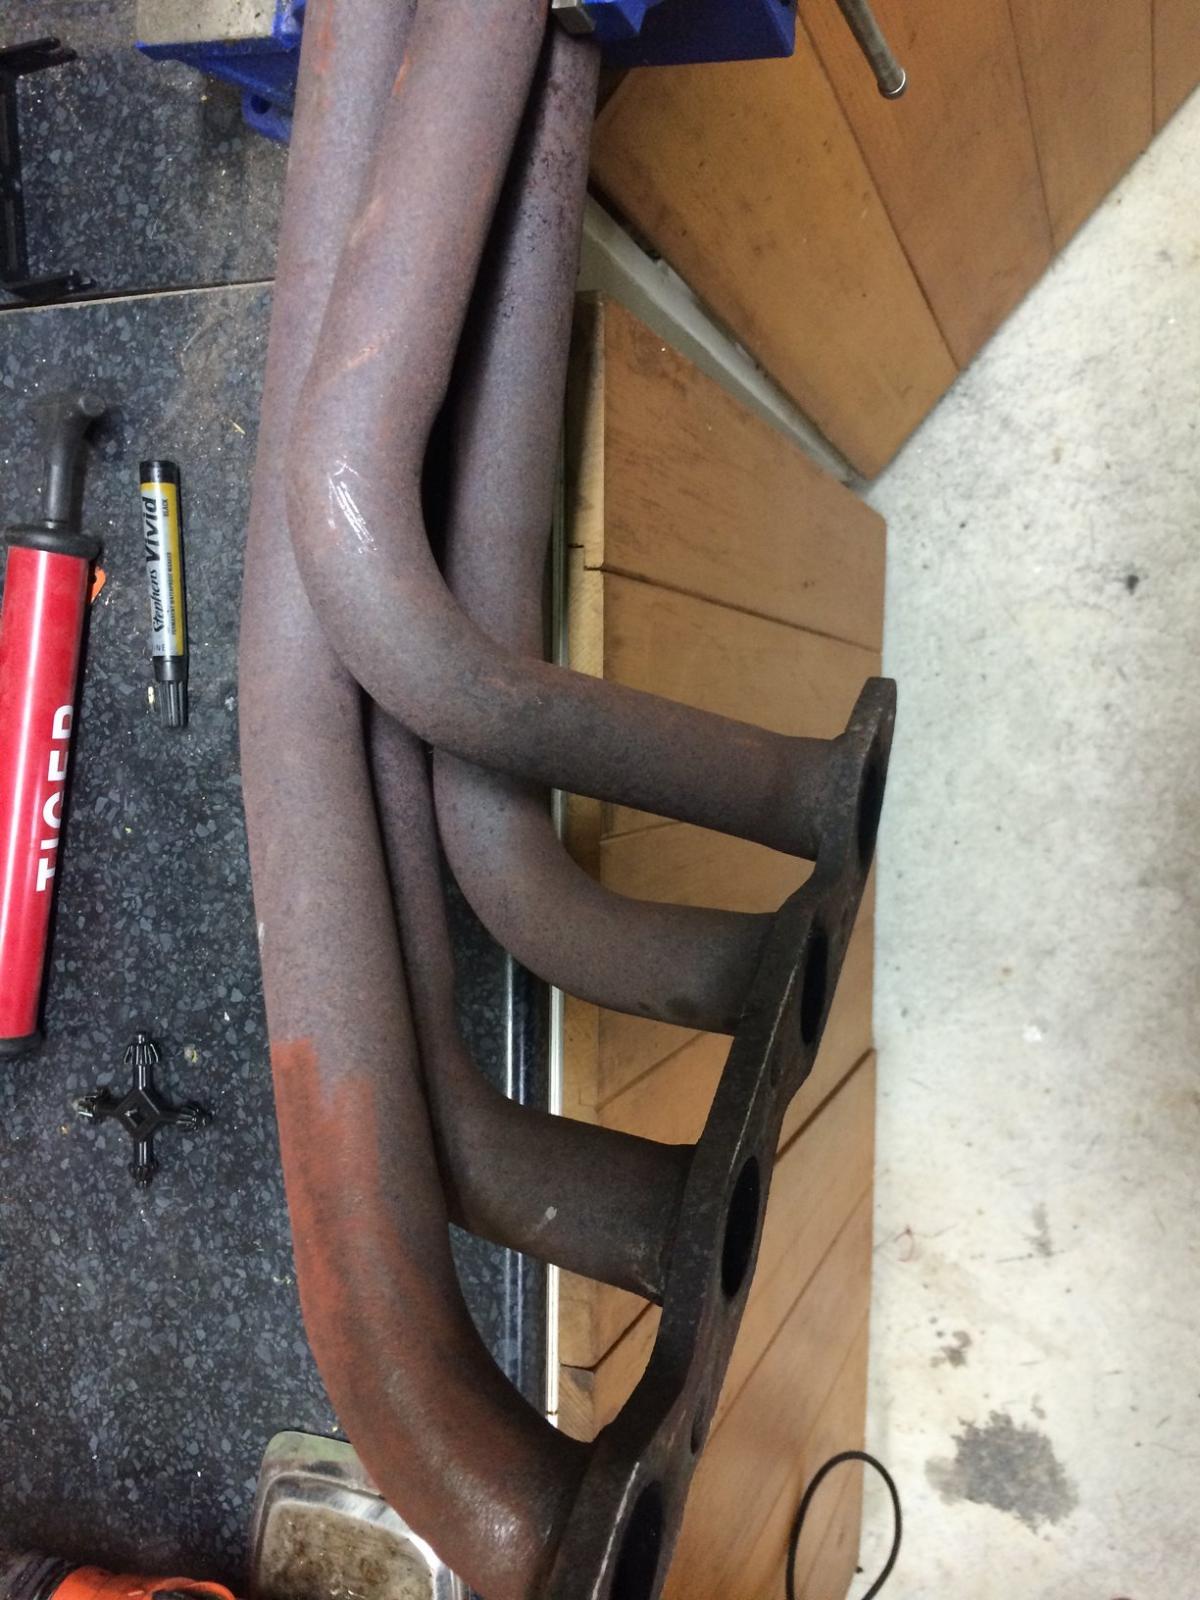
Got around to doing some more on the new extractors. similar design to original's but cant do a direct copy due to pipe diameter2 points
-
//oldschool.co.nz/index.php?/topic/49929-pbaines-1985-ae86-corolla-levin/ Well, I have bought myself an AE86 in from Japan. Always wanted a Sprinter Trueno but ended up with a Levin as it costs a lot more for the Trueno (probably 4-5k NZD) but to be honest, after getting this Levin here I am over the moon. As an AE86 always does, there's a bit of rust here and there. It does need a repair cert but the fella i'm dealing with is very helpful so should be good to work with him to get it all sorted. Engine is built to N1 spec, and goes like the clappers! Needs a new CW & P though, as it is massively high strung at the moment and I sit at around 4200rpm at 100k so definitely not ideal at all. As it was in Japan at Stacked (best guys to deal with, highly recommended. Was shipped via AutoHub which was 100% hassle free) THEN It was time to get it on the boat. But not after removing the side skirts and raising the suspension, with the greatest method of adding nuts as spacement. It was on the top of the list to go 'remedy' from the VINZ inspection too Lastly Here is the VINZ inspection sheet.1 point
-
Here goes! Ever since I sold the RT40 I have had a yearning for another high powered old Toyota. Two years of grinding away at renovating a shitty house and I finally have the time & money to enjoy an OS car again. Priorities changed somewhat however and the idea of starting a project like that from the beginning after this house renovation scared me and my bank balance. So after some arm twisting and dinner cooking for the mrs it was decided to go and search for something "finished". This little car was mentioned to me by some Oldschoolers and I had followed the build thread of it over on Toyspeed since it's inception. I guess I'll start with some specifications from the previous owner (because I'm lazy) and pictures from today after I had given it a wash, machine polish & wax to a level I was happy with! Discussion Fred Engine: Model: 7A-GTE Block Internal Spec: Factory crank shaft, Forged ross racing pistons and top seal rings, H-beam rods, ARP bolts throughout, toga race bearings and oil pump Cylinder Head Spec: Rebuilt Factory 4a-ge 20v blacktop vvti head with Supertech Valve springs and TRD steel headgasket and ARP headstuds Intake system: Factory 4a-ge 20v Blacktop ITB’s and MRP 2-peice plenum with 3” intake Turbo system: New Holset turbo supplied by steve murch, x2 Tial 38mm MVS wastegates, MAXfab custom thickwall stainless steel manifold, HKS ssqv bov, Fuel System: 60L Jazz fuel cell, carter lift pump, surgetank, bosch 044 fuel pump, full braided Teflon lines through to 800cc SARD injectors, turbosmart FPR-800 regulator Ignition System: x4 1nz individual coils mounted to a CNC’d made-to-suit aluminium adaptor plate Exhaust System: MAXfab Full 3” stainless steel exhaust system, x2 inline mufflers through to custom dump tip Cooling: 3 Core custom aluminium realdeal radiator with electric fan, setrab oil cooler and 500x250x56 tube & fin intercooler with 3” inlet/outlet Engine Management: Link G3 ECU (upgraded to g4 Firmware) with 4-bar MAP sensor and electronic boost solenoid Engine Bay: de-loomed engine bay, custom aluminium oil catch can, custom aluminium overflow bottle Other: gilmer drive pulley kit, remote oil filter kit Driveline: Gearbox: W55 supra 5 speed gearbox Flywheel/Clutch: Quartermaster twin plate clutch with billet flywheel to suit with ARP flywheel bolts, willwood reverse cylinder mount pedal box with remote reserviors Differential: 4.1 ratio LSD shortened hilux rear end Other: custom 1 piece driveshaft with custom driveshaft hoop Suspension: Shocks: Front – shortened shocks and modified OEM struts fitted with coilover sleeve kits and custom CNC’d camber tops Rear – adjustable shocks and reset and stiffened leaf springs with custom made anti-tramp bar setup with chromoly rods and QA1 rod ends Others: Cusco TE27 front strut brace, custom made swaybar to suit engine position and nolathane bushes allround Brakes: Front: 4-pot FD3s s6 RX7 front callipers and sloted rotors with steel braided brake lines Rear: s13 single pot claipers and rear sloted rotors Wheels and Tyres: Wheels: 17x7” (F) and 17x8” ® genuine work meister s1’s Tyres: Pirenza 205/40/R17 all round Exterior: Panel & Paint: Prep and paint done by Jason price, finished in a custom holden green Other: New indicators, park lights and headlights, all new window and door rubbers/channel, straightened and rechromed front and rear bumpers, doors and boot fitted with solex locks Interior: Seats: x2 Racetech 1000 bucket seats and factory rear seat Steering Wheel & Gear Knob: woodgrain steering wheel and stainless/bronze gearknob Gauges/Meters: Autometer cobalt digital boost gauge and autometer cobalt oil temp water temp and oil pressure gauge Audio: Pioneer Bluetooth headunit mounted in glovebox and alpine typr-R 6x9s in rear parcel tray Performance: Dyno Power: 320kw @ the rear wheels on 23psi with previous masterpower turbo setup, have since gone to a smaller holset unit for more response, currently making 280kw on 20 psi and full boost at around 4000rpm1 point
-
I'm no chebby expert but 600 should be ok on a warm 350, really depends on how much flow your system has. Mechanicals are cool but suck more gas on a daily driver, and a well set up vacuum secondary set goes pretty well. I've got the same carb and bought a set of variable springs and quick change system for mine so's could tune the secondary operation. I used to think you had to feel them come on like an extra gear, but properly set up they should just open up smoothly rather then a sudden surge of power. Car looks great incidentally, good value 70's Mericana and should be a good honest driver. Just out of interest, when did these things go to the horrible 305 boat anchor?1 point
-
EFI all the way if you ask me. My car now returns 10L/100km and is only tuned for WOT for drag day, and a little bit of auto tune for part throttle, and super rich at idle and just off idle so plenty more gainz to be had... And that was towing the teardrop and 3 days worth of food and booze for 3 people as well as all the other gear I packed. I'm 100% on the EFI band wagon now that my starlet is converted... So much better already, and it's a pretty ahit setup still with a single throttle body and spark through the dizzy etc...1 point
-
Something Mexican by the looks of it.1 point
-
Try Getlow customs (I think) in Hamilton, he supposidly made a clip on cover that went over that covered the individual corners and went through a cert, In saying that mate went through a cert recently with the Accuair controller and didnt get anything said. I will have to go through this soon as well1 point
-
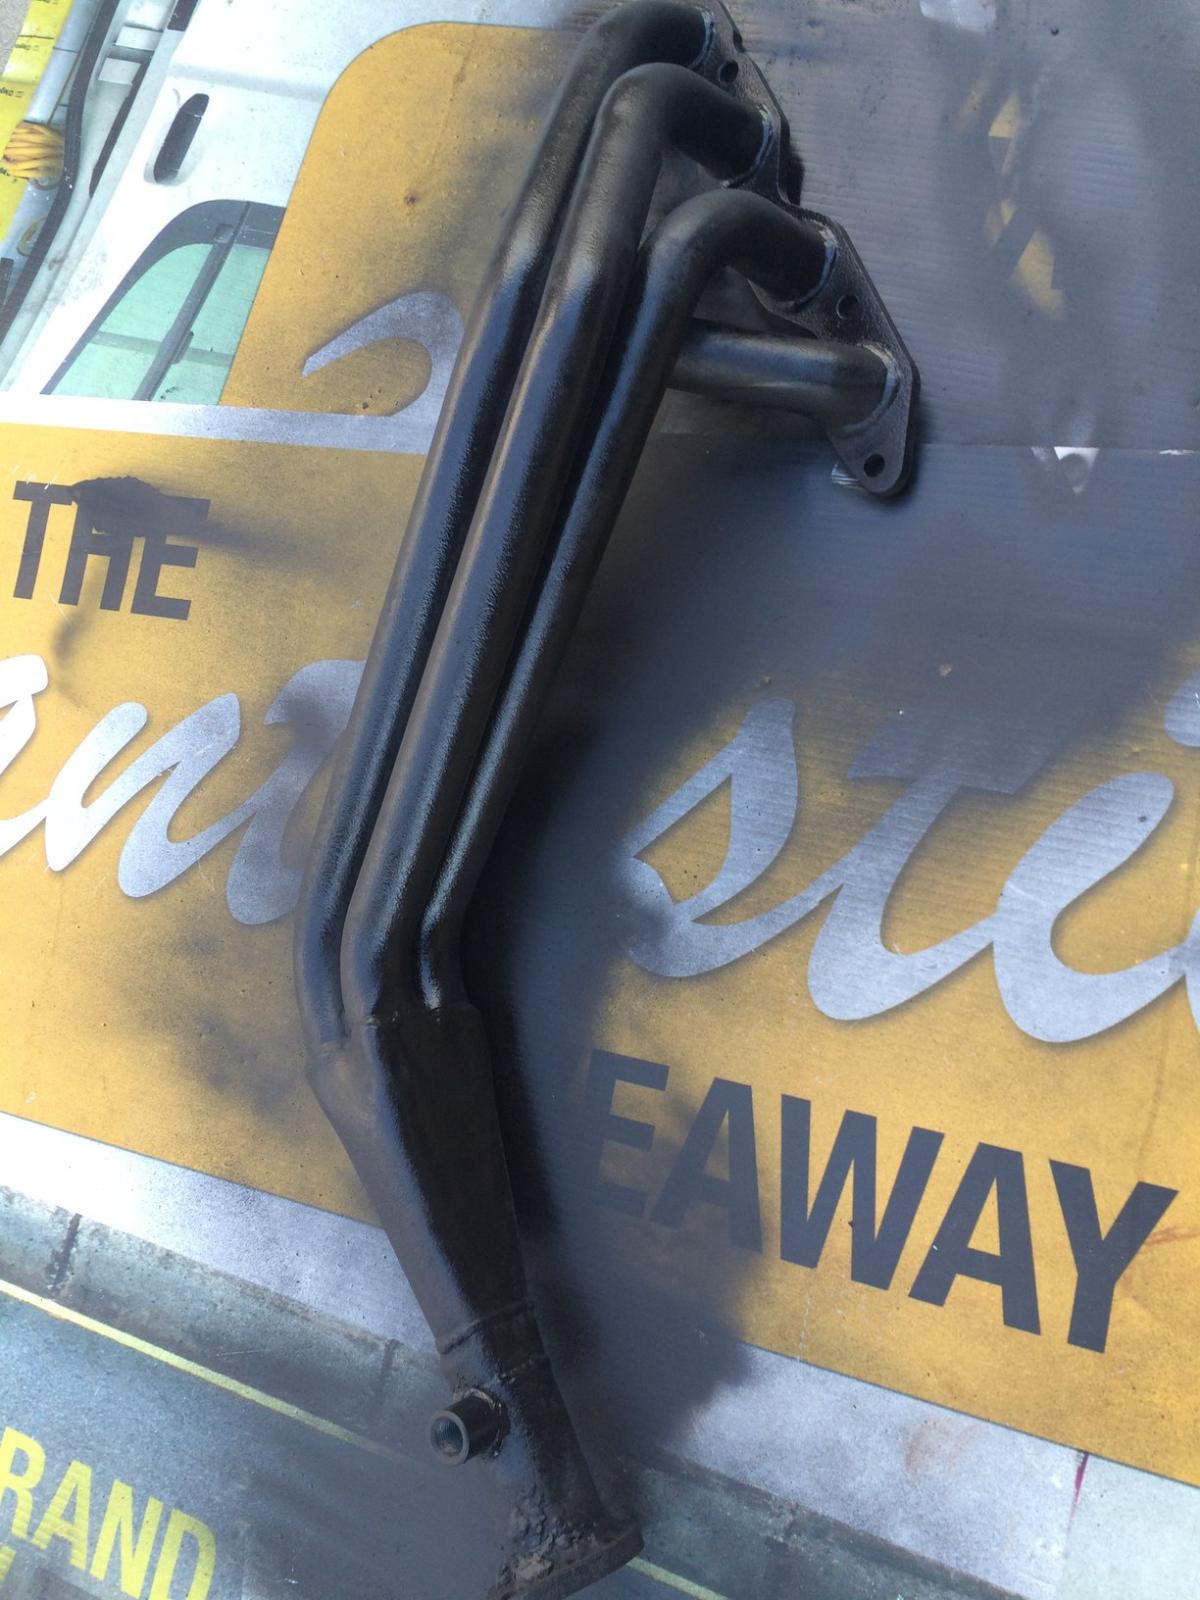
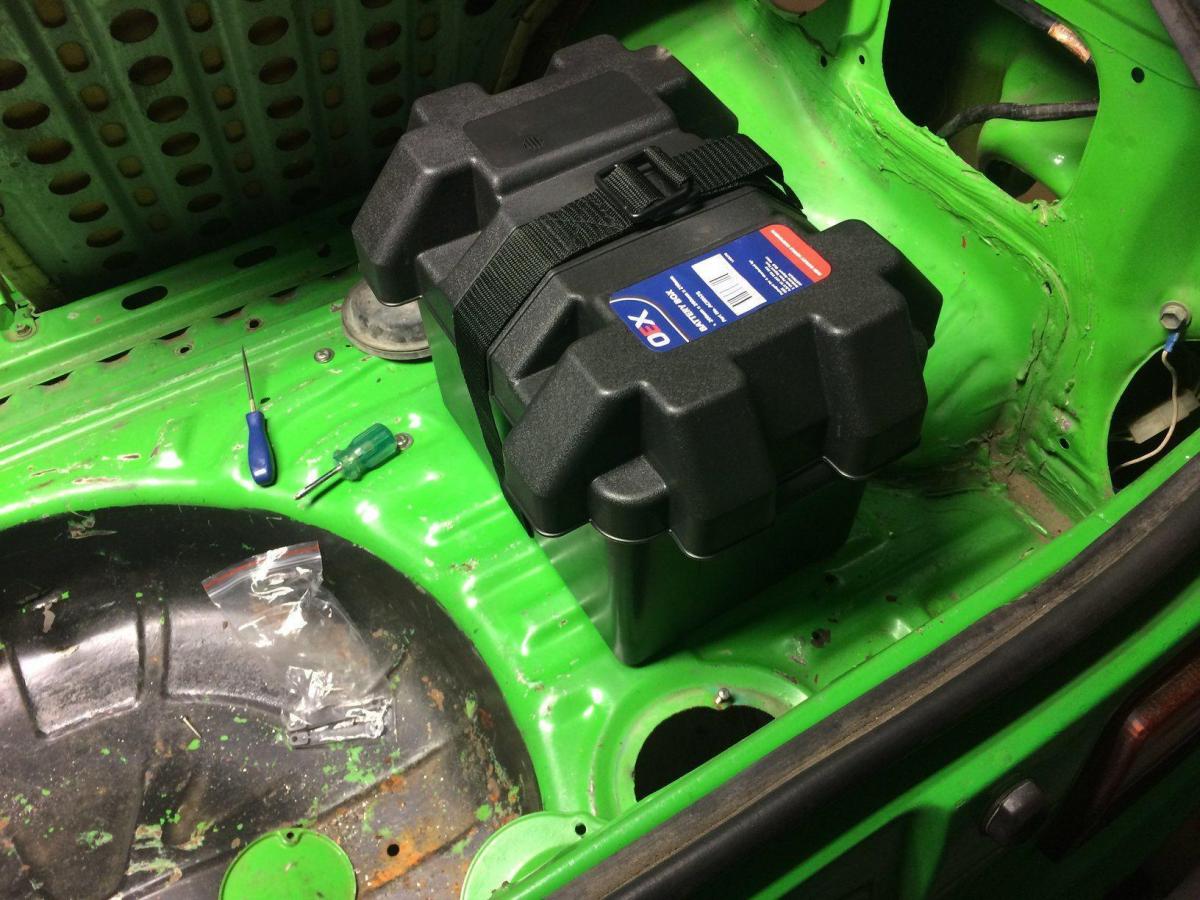
its the little things that count. Last night dropped my fuel tank and fitted the battery box. got some heat proof satin black and gave the extractors (with fitting for wide band) a buff up and a paint. trying to do something every night so I can get it all going asap
 1 point
 -
ahh, okay, thanks Damien, should I try to get an old one or are there new ones readily available too? you have no idea how much I want to man.. but unfortunately, I feel like I'ld be out of my depth doing that with all the extra mods1 point
-
North, south, east, and west. I do it all baby This is made from part of an old house in Te Awamutu. Must be native, the sides are rather hard. The rest I ripped down from beams using a circular saw1 point
-
do not get arrested again Lee1 point
-
sweet looking car, i like the colour. also +1 to the wheels look fine1 point
-
Cool Gs and G-strings. See you there. Good spot. I'll bring the Frisbee; that legitimises purposely not unpacking it after Nats.1 point
-
So I entered this in the 4&Rotary Jamboree here at Manfield, didn't come away with any awards but did end up the track for good 20-30 minutes doing a so called 'cruise' If cruise means fanging it as much as you can, then that's exactly what we were all doing. Only letting about 30 cars on the track at a time so was well spread out. Didn't stop the quicker cars smoking me though! I also mad dashed to paint the 14x7j Hayashi street's that I had on the front, as per the above images where they had been sand blasted by previous owner so were in need of a quick paint and sand. Chuffed with the result of a 1/2 pie job Will get a go pro and do a good video whenever the next time will be Mingle me //oldschool.co.nz/index.php?/topic/49929-pbaines-1985-ae86-corolla-levin/page-21 point
-
So this year has been gayballs as little time for this thing until recently. Made a clevis and mounting plate and got my later model commodore booster mounted. Then I traced a heater box flange onto some aluminium and made a blanking plate. Today I glued it into place and will remove the few screws once it's well and truly cured. I need more damn mix gas1 point
-
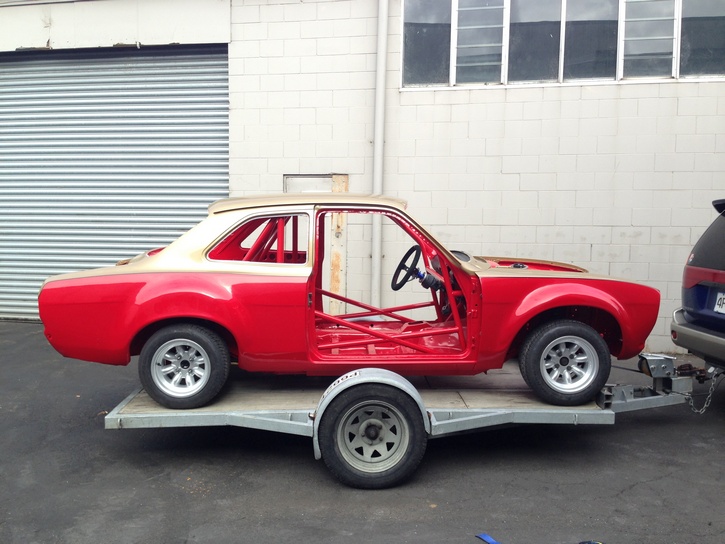
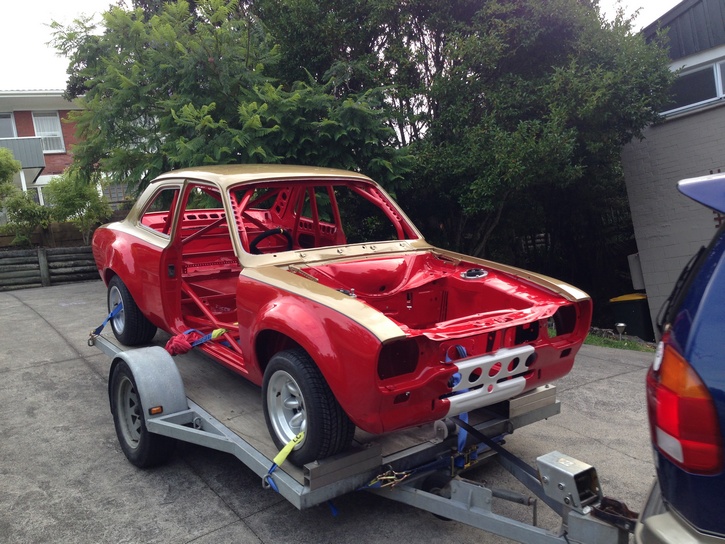
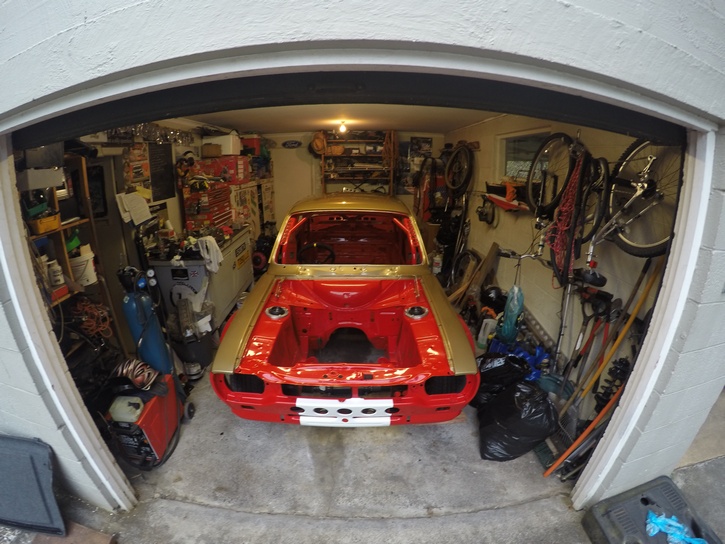
On the trailer Made it home Back in the garage Time to get assembling before the next cert inspection
1 point
-
Lady Gruntfuttock is away to watch maradonna, or someone, so bit more kid-time than usual this weekend. Did get a little done today between child minding and rain showers though. Gave the bits I had previously stripped a week or so ago another clean... Then it got a bit rainy, so I cleaned up the water pump and sump bolts. Lot of silicone on the sump ones... And used the engine paint spray bomb on some bits. Debating curing these in the oven while home alone, or just letting engine heat/time do it... Until it cleared enough to use my outdoor spray booth. Having a clean gun made a HUGE difference, learned a lesson there. Actually learned a couple, as I had neglected to replace an o-ring in the air trigger system so had air pissing everywhere till I stripped and assembled the gun again... Think the driveshaft is the biggest thing I've painted... And quite pleased with the spring stretchers I cobbled up to get paint in... So a lot of little bits got their first coat, weather permitting tomorrow I'll get another couple on, and they'll be ready to go back on the car in a week or so. Good to make some progress while waiting to hear what's going to happen with that snapped camshaft...1 point
-
still fucking around with the rocket cover. i welded it back up and its ready for paint i just got side tracked by the dizzy. so i took the dizzy cap off for probably the first time since ive owned it and it was a disaster area inside. like it had been full of sea water for the last 10 years. I took the dizzy out and attempted to take it apart. every screw broke the head off when i tried to undo them and the vacuum advance plate was locked solid. I eventually got the thing apart and to my surprise the mechanical advance mechanism seemed to be working fine. it was a but rusty on the mounting plate but ok apart from that. so anywho it took me ages to clean all the shit and rust out of the vacuum advance plate and get it free again. then i had to drill all the broken screws out and re-tap it all. thankfully both the diaphragms on the vacuum advance module were working fine and had no leaks. then i packed it all with grease, set the air gap and put it back together. I put it back in the motor and tried to get it to run and the timing (which I had marked and then put back in the same place) was out by miles. When I eventually got it to run it was advanced by about 50 degrees. Im really surprised it ran at all like that but it did. Had to go back two teeth on the drive cam to get the dizzy into a spot where it was close and had adjustment to move the housing around. Once I got it close and started trying to set the timing properly it behaved really erratically. It would be sweet at idle, then Id give it a little rev and the timing would wander around all over the place. It kept doing this and I got pissed off with it and revved the shit out of it. after id done that it settled down and worked as it should. Turned out id put so much grease into the mechanical advance mechanism that the weights weren’t returning properly. After id revved it and flung all the grease out a bit the weights could move freely and it worked perfectly. All good. So it was time for a road test, got to the end of my road and pulled half way out into the main road and it died. Turns out the fuel pump had shit itself. So, push it back in to the garage, figure out what had happened, chuck another pump in it and drive it round the block. HEAPS better. So after all the kerfuffle the dizzy is now good as new but I still haven’t painted the rocket cover.1 point
-
Now featuring wof and reg! Bring on nats I say. Also threw a new water pump, hoses and thermostat at it today as well as removing a metric tonne of crap from the radiator. Have run out of time to sort radiator properly before nats but this haven given in the best chance of getting there and back. Also, wag lyfe. Fuck yeh. Discussion //oldschool.co.nz/index.php?/topic/41006-beavers-87-gloria-wagon/page-41 point
-
Hi people, I would like to title this post: The success of rubber and the failure of man. Last trackday at Taupo - I only got a handful of laps and managed a 1:56 which is a new personal best! So I knew the car had some more time in it with a bit more practice. This thursday just gone, I gave it another attempt. With some better lines, I managed to scrub a whole extra second off my time, I was super chuffed with that! One of the differences to last time though, is more negative camber in the front (going from 0, to -2 degrees) So the car was feeling great, the initial turn in was superb. I was feeling suuper confident, doing some kamakaze runs into the sweeper which I overcooked a few times trying to brake too late... And then for the first time at a trackday this happened... Woops! I had a huge lockup, and flat spotted my front left tire down past the tread level. It felt like I was driving on a cube, not ideal. So off I go to the local tire shop. "Hi, do you have any 205/50/15?" "Sorry dont stock these" "wtf? Shit." "Try the place around the corner" Off to the second place, same answer... nothing in stock.... shit shit shit. until... "Oh, I've got some second hand semi slicks though" "Go on" "Two R888s for $60 fitted" "Done deal!!" Frigging amazing! So I get them fitted on the front wheels, then smug face back to the track. After running out of people to smugface to while telling my story, head back out... Very mindful that I'd have a lot more grip up front but still the same out back... So I wound out a bunch of the rear bias. Out on track... Holy shit! Sector times keep tumbling and tumbling, GPS is showing going faster and faster through sectors. Life is good I had a few... err.... incidents while getting used to the different grip level Getting more confident on the brakes... Sector times dropping like crazy... And theeeennnn.... Smoke coming from the front left, brake fluid smell and a knocking noise... shit I hope this isnt the wheel hitting the caliper or something. Back to the pits... I take the wheel off, and all is well. What made that noise and smoke then? Oh... Oh fffs. GNNARRRRR! My first experience with semis, over in about an hour because I noobed the braking again. All smugness instantly erased from my face haha. My fastest lap was only 0.2 seconds quicker than road tires, because it was hard to string a whole lap together without having the rear of the car come loose with the grip imbalance. Regardless, I was absolutely fizzing about how well the car ran. The 8000+ rpm rev limit now has just brought the car alive. I called it a day, and headed back down to the tire shop with my tail between my legs. Feeling like an absolute noob for wrecking the tires they fitted about an hour ago. "So, ahhh... I wrecked one of the tires, my bad. Do you have anything like a 195 or 185 that I could get home on? Just a normal road tire" "Yeah I think we've got some 185s here, same deal as before... $60 fitted" "done deal!" While he was taking the semis off, he said "Oh yep, this one is flat spotted pretty bad! Leave this one with me, and take one of these others so you've still got a good pair" Holy crap, could an experience with a tire shop possibly get any better? So with my car amazingly intact, and a decent pair of second hand R888s in the boot. I head off for another 2 days of tootling around the central North Island, as pictured below. Smashed through a few tanks of gas, with the engine running like an absolute dream. Ran 90% of the time with cruise control on, and enjoyed the scenery. I made it back to Auckland in one peice with no major issues. Best trackday experience ever! Big thanks to Tom / Testament for helping me out over the weekend.1 point
-
Removing the brakes: The brakes looked pretty neat, but I had to press the cylinders out with a grease gun. Totally jammed. In the meantime I am testing derusting objects with electrolysis. Derusting objects with electrolysis works above expectations must I say1 point
-
Screw you guys i'm going to the moon1 point
-
So greg was all like NATHAN DOESN'T WORK ON HIS HOLDEN ENOUGH so now I'm here showing I have done a bit this month. Windscreen out and started patching the rust holes round the perimeter.1 point
-
Oh thanks man. I'm glad people are enjoying it. Re. the hose... The photo looks worse than it actually is. I probably could've cut the hose fractionally longer but it's not too bad.1 point
-
Serious wood for those Halliday wheels. Fantastic workmanship. Epic build.1 point
-
They need a bit of a tidy up but keen to see how they looked so put some old 225/50/15 tyres on to roll round the workshop. \ \ \1 point
-
Aaand today, a bit more progress on the rust, BEGONE! BAM! I actually did cut and weld that but forget to take any more picks till I'd finished So thats the whole passenger side done as far as rust/metal work goes. *** Thought i would pull the clutch master from the spares car to see if i could cannibalise any bits from it to take to the brake shop with the calipers - it wasnt looking good in the car all oxidised and rustly looking but once i got it off : KAPOW! Oh yeah! It has previously/recently been resleeved with a nice brass sleeve and was not even seized at all The parts car has just paid for itself twice over, and after a clean and reassesmble, the pedal box is all completed. Car is also on the ground and awaiting some more weight in the front. Im just waiting on some o-rings (or valve stem 'seals') to reassemble the head and put it on the block before i lift it back in.1 point
-
So finally ordered the correct an8 fittings for the fuel rails. Third time lucky. Managed to order M8s and M10s the first two times. Muppet. Started plumbing the fuel. Got engine completed back to the firewall. Will be running braided line along the tunnel inside the car. \ \ \1 point
-
pulled the front end out to give it a clean up, the total loss oiling system has kept the parts under this grim in good nick, but its so gross. boots on the ball joints are unfortunately split, (putting good thick coating of dry grease on EVERYTHING but they feel like they are in good order. I will worry about them later, they may be able to be re-booted. Cut the blind splines in the torsion bars to lower the front - FIAT has helpfully done 2/3 of it already about 20 seconds of being very careful with the cut off wheel in the grinder later not exactly machined, but they slotted in one spline lower first time The battery on my camera ran out but I got one shot of all the front end tidied up and ready to go back in: Ive installed most of that it back in pending a few parts still to arrive. EDIT: ReInstalled front suspension - note the split ball joint boots :/ Looking forward to getting it back on its wheels1 point
-
Installed the first thing from the parts car - the coolant reservour bottle strap still had the original italian transfer on it i put some clear coat over it to make it last a bit longer Then finished putting the engine bay back together (actually just scratching and fingermarking my new paint) most of the engine bay things were very oily and dusty but they came up a treat after a soak in the mystery solvent from the rusty can, some paint and an oil/grease up as required. rewrapped the loom with self amalgamating tape cleaned and greased the gear linkages painted brake booster and brakets, new brake master cylinder, cleaned reservours (will probably swap them to 124/125 style as the lids on these ones have a grotty rubber seal that will leak) Put in the giant MM coil from my 125 (snapped a terminal off the original one removing it) l still need to patch the loom to it; missing the factory air horns but this one came with instead and it works fine - they have a switch under the dash to swap between 'country' (the air horns) and 'town' horns (a standard piezo type in the wheel arch). pretty much ready to have the engine and box dropped back in but I have since taken off the brakes (look ok), and 60% unbolted the front suspension to pull it all out for a go over and refresh, and sort out a blind notch in the torsion bars1 point
-
Today's progress has consisted of 2 steps forward, 1 step back. Cleaned out 20+ years of crap from out of it = step forward x1. Getting the roof lights working = step forward x2. Breaking the window winder handle while resetting its position = step back. (it dug into my knee when the window was right down or up) Getting the tailgate to close against the seal = step forward/step back if the car was intended to be a covert gas chamber? Found the motor for the for the "loading window" while not dead, isn't far from it. Apply power and it makes a sick humming noise but nothing else notable happens. It looks like a pretty standard window motor, but its tucked in a pretty crap spot to get at with big hands!! -just realized I've got a 9 year old with little hands and a taste for pocket money... Nothing else of excitement to report as of yet, but stay tuned... Ooh yeah figured I might as well show you guys the insidey bits too! The vacuum in our workshop = less suck than a $2 whore, will give it a proper clean out soon. First time the seats have been uncovered since 1992! I'm sure that's still a relevant map! Brand new/2 year old fender mirror Sounds like an RB gargling a bucket of ball bearings ie: Awesome! A krafty piece of Kiwi ingenuity It's only about 1/2 a meter longer than the Altezza, it feels about 5 meters longer to drive though haha The eagle eyed among you will have noticed the factory AM only radio and possibly the 1" speaker siting in the ash tray thats connected to my ipod. Plan there is to install a period correct tape deck in place of the AM set up, some modern speakers in the doors covered with old grills that are yet to be acquired from a local wreckers yard. If it's a working tape player a Theodore Huang style line in will be the go, otherwise I'm thinking of stashing one of those mechless headunits in the glove box.1 point


This leaderboard is set to Auckland/GMT+12:00