
Leaderboard


Popular Content
Showing content with the highest reputation on 01/12/16 in all areas
-
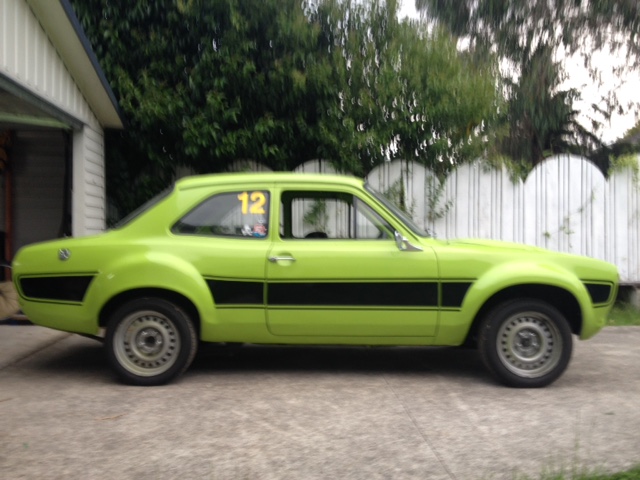
Finished rear fitment with wheels mounted to axle, I have to raise the front slightly beacuse the tyre rubs on the top in the inner guard with people in it Mounted one broken headlight and put the switch on the bonnet coz I can do what ever I want and with no window and a tiny car its easily within reach when seated. this photo makes the rear look like it has lame camber but its actully stright up and down Only 11 days and heaps of work until i need this driveable, so there probley wont be any posting till after its done.14 points
-
As per dream shed thread. This isn't really my "dream" shed but it's close enough for a rough cunt. So like, way back when I was 21 I bought 6.5 acres with the intention of building a house one day. I was a builder at the time which was perfect as there was no way I'd be able to afford to pay someone to do it. Fast forward 6 years, now single again with plenty of time on my hands and living with the olds while I sort my shit out. I decided it was time to do something with the section, but building a house was too difficult on a single wage, so I decided to do a workshop and live in it. Months and months went by. I drew plans, got quotes, talked to the bank, got a 2nd mortgage etc. Seemed like an eternity to get everything sorted. Mid December, just before I went on holiday before Christmas. I mowed the lawns and sprayed the drive.10 points
-
With the help of my old man in his John Deere 6010, we erected some poles and braced them up ready for concrete. Starting to take shape, looking something like an American style barn.10 points
-
kk i painted my rims......... and then stuck my hub caps on kumeu this weekend4 points
-
Got her running last night. Took a while and we had to siphon some fuel back up the line because the pump wasn't coping with the air in the system, we reset the timing and did the valve clearances (roughly for now) and away she went. Still have to pop the hubs back together and give it a tune but after that should be good to go!4 points
-
This weekend we have removed the engine from the Simca, and some of the front plate work. From the front parts about 30% of the bolts broke off due to rust. Plus a couple of cages of the square nuts in the beams come lose. Not an not easy to loosen job. A large area was covered with a thick greasy substance, which made it difficult to find some of the bolts. In the meantime I was cooking my bumper parts in my bigger Mr. Fusion container. Since it is virtually impossible to get new or good bumper parts for a Simca in New Zealand, I want to de-rust the bumper parts and smooth them out with filler. After they have been sanded I want to try to wrap them with chrome wrap. I have seen some photos on google with acceptable results http://s176.photobucket.com/user/vette427sbc/media/1955%20Chevy%20Hardtop/99529699-EA12-4280-AA01-9218812B887D-30987-00001B0AAC6CA6CA.jpg.html. (New bumpers from Europe will cost probably around 1500 or 2000 Euros, more value than the whole car) Rusted bumper part: Derusted bumper part: Sprayed in black zinc spray: Taking the engine out: Guitar photo:4 points
-
/spam. Car from work today4 points
-
I was building a Ford Escort Mk1 gasser and documenting the build on here and on facebook, but a few things made me totally change direction. After spending a huge amount of time on the Escort chassis, I still wasn't happy with the compromise of it. That coupled with the amount of new (read bloody expensive) panels needed to make it as good as I wanted it made me lose a bit of interest. Total interest was lost when I started to build the engine and found a crack through one of the bores. So the shell/chassis and all of the engine parts were sold off (at quite a handsome profit I'd like to add), and I concentrated on my bike for a while. Then this popped up for sale. It's a 1938 Ford model 7Y (which is dimensionally and physically similar to a Ford Pop). It's very straight and solid and was bought complete. The nice stuff from the Escort build will find it's way to the 7Y, so it will still be 'Cheatin' The Reaper' - just a genetically modified version. It didn't take long to strip it down to just the body, leaving the chassis to be sold off along with the engine, gearbox, interior etc I designed a new chassis, made out of 75x40x3 steel box, which is at this stage at the moment: Front suspension is parallel leaf springs. I made the shackles & mounts: Then narrowed the drop-tube axle to suit: I found a nice and perfectly sized fuel tank on TradeMe and made the crossmember to suit. This is 75x40x3 box again, with 3mm gussets: I've bent up the hoops for the rollcage (no pics yet) and am just waiting for a nice full day to get the whole lot jigged up and welded together. Rear axle will hopefully be a Jag IRS. Engine will be Ford V8. Body will be chopped about 2.5" and front end will be fibreglass flip front. Keep checking either here or on facebook: https://www.facebook.com/mk1gasser/3 points
-
way to flash to drive through mud. or put on a shitty hilux.3 points
-
Officially on Holiday by this point. I shoveled a truck and a half of builders mix (6-7 tonne?) into a concrete mixer, along with about 35-40? bags of cement and water. Pouring it into my old mans trusty wheel barrow, operated by the best parents in the world. This was on that same day where some of NZs towns reached their highest temps in years. (took a day and a half to fill all holes) No time/effort left to take photos. Corona's were consumed.3 points
-
With the brake booster gone and compact Wilwood master cylinder now mounted on the firewall with the adaptor I machined, I had a heap of space behind the strut tower to fill. Enough space I could fill it with a catch can. Made a paper prototype to check the fit and then as usual left it in the good hands of Adam at C's Garage. Hes become my regular ali welding expert lately haha, works out good though as he often needs bits and pieces machined up here and there. Quality workmanship as always... Made up some -10 AN lines and it was done. Catch can crossed off the list! Next thing which has been bugging me for a while, was the shabbiness of the front panel. Obviously been in a crash (or two) before I bought the car, and the less than average repairs were starting to show with seam sealer peeling away from rusty bare panels, cracks in the upper rad support and even in the lower crossmember where the castor arms pick up from. So I went to the extreme and rather try to repair crap, I chopped the front off decided to start from scratch with some tube instead. Start of the top tube bent up. This is a bolt in piece. Hoping to make it so I can unbolt it and remove it with the headlights, grille, intercooler etc all attached to make engine removal and maintenance a breeze. Lower tube (38 x 2.6) welded in place with some gussets. Made up the castor arm bracket mounts. Notching them was a little tricky to get a nice fit, first one took over an hour, and the second one only took 15mins to get right haha. Evidence of the damaged panels there. That will get some more hammer and dolly work before it all gets painted. Added some 3/4" tube to the lower tube so I could weld the lower rad mounts on. And playing with the idea of doing some small tubs with the cardboard template. They take up a bit more room, but I dont have a lot to put in that space. Made up some end caps for the front tub/wings. This will add alot of strength back to those front tubs, also tidy up the front a bit also. They are just taped on atm as I need to dimple die those holes. Will have some more updates soon!3 points
-
Separate the gearbox: End if life for the water pump: Luckily I found a spare in a box somewhere: Removed the front parts. Many bolts and nuts broke off: The front parts are waiting to be processed:3 points
-
Put the rear window in, went a bit cray cray with the sealant tho, as discussed it's bostick 5615 mastic.. Whoops.. Front window ready to go, just need to get another tube of mastic.. Had a small fail with the rear window, as the rubbers are original and 50 years old they're kind of weak and when I tried to do the cord method when installing, the first hard bit it came to split and the cord pulled right through.. doh!, can't really tell anyway and when I finally paint the whole car I'll put new seals in.3 points
-
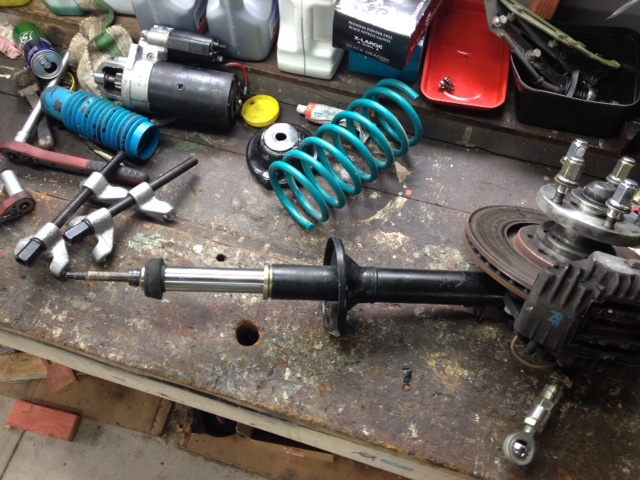
Open wide... And YES! In at last! Some bump stops on the Bilsteins and in they go as well And rolled her out of the garage, all the better to admire her Must have been a bit excited to blur the picture... Not as low in the front as I was hoping. Down maybe 10-15mm vs V6 on old springs. Still more low needing to be achieved, but that can come later.
 3 points
 -
So last year they had a fiddle with the system classes & whatnot Majority of the info you want is here : https://www.nzta.govt.nz/vehicles/licensing-rego/ though if you're like me & your car make/model isn't listed then there's not much info specifically relating to "Classic cars" or "Vintage" So I asked directly via NZTA Facebook page & received the following information via PM Posting this info in the effort it may help or be informative if you spy any private info that should not be shared or this is in the wrong section/useless then feel free to let me know or delete & I'll happily edit or amend information correct at the time of posting2 points
-
Seriously? when the family expects me to turn up in a Lada its pretty much a first class upgrade!2 points
-
Hiya want to borrow my Morris 1300 and roll up in style?2 points
-
Over the holidays I didn't get as much work done as I had hoped. A big Christmas and boxing day left my enthusiasm very low, as well as a decent new years for the first time in years, didn't help progress at all! (Dating game thread for info lol) Rafters up over Xmas/NY period. A few girts attached on the side and rear wall (can't do others until slab is poured) Purlins started on my last week of holidays. Not a bad view of the Tararua ranges. My mate the skylark? came to sing for me everyday (more likely attracting new lady friends). He thinks this new place is made just for him! I have now returned to work, so progress will be a lot slower!2 points
-
The next job was to set up some profiles. I think the permit finally came in just after this. Whew! Just in time to start work over the Christmas break. Holes! These were dug by a bobcat with an auger attachment. The center rows are 1200mm deep and 600mm wide, outside rows 1000x600 and intermediate poles 600x600. The day after permit arrived, I booked the inspection for the footings/pole holes.2 points
-
His 4age extractors wont fit the 3SGE that he's mounting in the car now, so he's remaking them.2 points
-
thanks for the mount! Worked a treat, just need to finish up door swap and get it to work to finish exhaust and its done!2 points
-
Overdue update Fuel system mostly done, went a bit overboard here. 3/8'' stainless tube, made the surge tank out of a used cal gas cylinder from work, bosch 044 pump etc Drive shaft made. 900mm of tube Really needed a hoist to make a proper job of these lines. Had to slide out from under car to make every bend. Managed to do each line in one piece which i'm stoked with even though there a bit kooked. Going over the diff was most painful Need some flexible lines to go here to the fuel rail Gearbox cross member mk2 And I've been working on the intercooler and piping Wanting to mount these coils on the cam cover so i can run short leads. Made up a bracket out of 3mm flat bar, its a bit flimsy under the weight of these coils so might have to beef it up a bit2 points
-
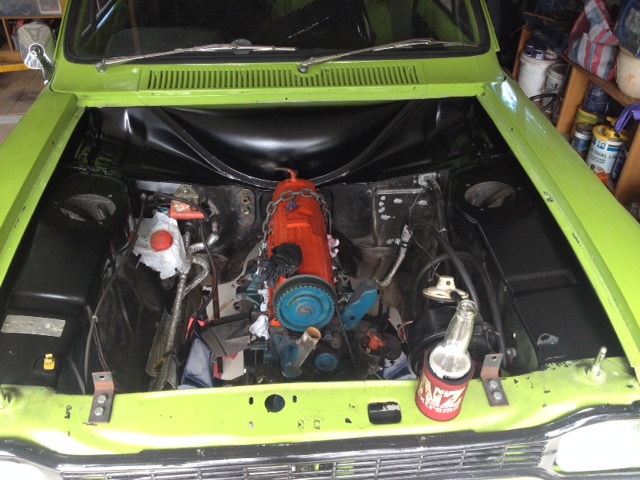
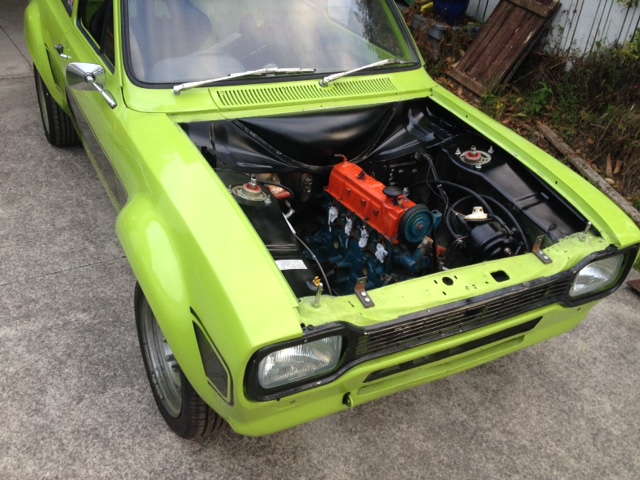
A couple of my good mates and I gave the underneath of the bonnet a lovely paisley pattern. Love it or hate it, personally i reckon it looks awesome - complements the green rocker cover and the gold really pops. Now to tidy up the support members....2 points
-
A week ago I got the keys handed over from Colin, the dad of the previous owner of this Simca. Me and my son have checked the Simca, and we found out that some parts underneath are pretty rotted. On one side the sill is a large black hole with a view to the inside of the car (interesting though) Our goal at the moment is to get it back on the road. The second goal is doing the cosmetic upgrade. It looks like the car has been resprayed somewhere in the seventies. The original color is maroon. I haven't decided if I revert it back yet. Front side: The bumbers have been sprayed, but underneath the paint they are fairly rotten. The doors need a bit of welding The rear bumpers are rotten too. Under the bonnet: A engine with a name:1 point
-
my brake bits have been dribbling in from around the world, and i can now assemble the front brake calipers. Calipers are cast with FIAT/Girling and are also used on Dinos and Panteras and some other super expensive and rare cars, but also including (thankfully) old volvos (amazons and P1800s), which have a large aftermarket suppy, so are also avalaible new, all from Skandix.de (reccomended) Gulp. pads are fairly easy to come by, as used on only the finest british tat, these were only $9 on rock auto New cylinders in - fitting the rubbers is a bit of a trick! Read to bolt back on with new soft lines Just waiting on an ebay purchase for the rear cylinders, and some handbrake hardware and the rears will get the same treatment (will see about the rear pads being reshoed at a later date) and once installed i can drive it out and turn it around to get at the drivers side rust - untill then ive kinda run out of things to do.1 point
-
Pah!!! Has been serviced and will have a new rad by then is freeking, bulletproof man! Will easily drive anywhere in the North Island! will put toolkit in the back1 point
-
Living in one bay (48m2) and bedroom will take up the rear half of upstairs (another 24m2 ish). I need the front part of the middle bay for a 2 post hoist 96m2 of workshop, which is smaller than I currently have at the olds farm, but it will be much nicer and better set-out.1 point
-
Awesome. Jealous.1 point
-
I have booked the northern end of the Buxton campsite Bring some tarps and ropes for a communal shelter1 point
-
I think it's a good idea, prob should be a January meet really, maybe a BBQ in the car park after the burnouts..1 point
-
Isn't fate the central plot device for most Gwyneth Paltrow movies? Not a fan.1 point
-
a few days late but here is the update. Engine mainly connected, still need to sort throttle cable and pedal and finish off the fuel lines I kept the whole bike loom because im shit at wiring, anyway its hidden in that box. Bench seat ended up as two smaller seats because it was easier and im lazy (still gotta finish drivers seat) (if you were wondering the thing on the axle is a dildo care of a board birdflu) Made the roof rack abit lower. i need an old brown belt to strap the tank on. Also need to mount the roof skin Axle! test fitted now back to fatty for key ways.also lacking brakes which it the next main hurdle Hubs....1 point
-
Ahhhh teflon, It's like Christmas at my desk every morning.1 point
-
Some updated pictures I took this morning. Unfortunately a bunch of water got under the clear on the trunk lid and now looks horrible. Luckily it can't be seen on the photos so you guys can just pretend you didn't read that. Coming sideways soon in a hood near you.1 point
-
Aw fuck yeah. Yetchh you are the man. All going well I should be revin ready mid next week.1 point
-
Anyone who has an old car can park inside driver gets in for free. Def can come park up with us1 point
-
Can't book the camp site it's a first in first served deal on the big camping area. I'll be heading out Thursday night to set up if anyone wants to join me?1 point
-
Well we have been busy busy, Mr Greg aka Midnight Upholstery aka 64Valiant has done the roof pre Christmas and it looks tumeke!!! Brakes have been all fitted and bled up, Accuair/Airbag setup and E-Level is all set up bar powering up the ECU. Motors all together with the ITB's, Any day it will be off to a mates shop to get wired, exhaust fitted, radiator mounted and a few misc jobs to make it run, Getting closer by the day!1 point
-
Removing the brakes: The brakes looked pretty neat, but I had to press the cylinders out with a grease gun. Totally jammed. In the meantime I am testing derusting objects with electrolysis. Derusting objects with electrolysis works above expectations must I say1 point
-
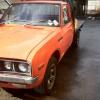
Finally organised shipping at a reasonable price. Turned up today (over night delivery!!!) Was pretty stoked. Theres definitely a bit of damage from when we tried to bring it back on the trailer but oh well, shit happens. Also the shape isn't as nice as Sparkles, I was using that as a guide to go off of. The top of the tray doesn't flow in as nicely and the tailgate says Nissan which is a bummer. i am planning on getting another tailgate and either doing some sheetmetal magic and putting Datsun on there or shave it and get a decal made. Will see. My thoughts are its a cross between the 720 and 620. For now the plan is to remove the damage at the bottom, shape it/remove some small imperfections and then paint it. while the painting is going on i will do the drivers door properly and the driver front guard is ready for colour. Hopefully have the whole ute painted soonish. Also... quite obviously.. needs LOW. Look below and share opinions here Note tray is just sitting there1 point
-
righto so good things happened tonight. this - unfortunately i didn't block out one of the old paint seams on the roof enough, and it is highly visible which even tho its a rally car it does piss me off. but i will have to get used to it. seen here- hopefully most of it goes back together this weekend1 point
-
k so i managed to get the hatch to clear, by using the bigger hammer method. used the rubber end of my bacho rachet as a dolly and smacked the panel till it cleared. it put a few bows / bends in the roof line as seen here below, but i didnt give a fuck at this stage / its only a rally car. so hatch is hung now, and its all ready to go to my mates booth for top coat. Now that the body is out of the way i got to a few other little jobs, made an alloy mount for the batter isolator switch now that my battery is going in the back. this will go just behind the handbrake. also made new seat mounts. the old ones were mish mash fucking ugly / unsafe things that came with the car that have the worst birdshit welding i have ever seen, are made of so many different pieces and some of them are panel steel!! the rules are the must be made of 3mm steel at least, i made them at my cousins workshop and the smallest flatbar he had was 5mm, so they are overkill but meh they will be safe and are a bit more simple than the last ones. now for the exciting bit. Father in law just sent me this photo of the diff assembly he has built for the car, so stoked. Its an escort diff with a 4.4:1 CWP and Quaife ATB LSD, he made a jig for the starlet mounts and swapped everything over. He has re drilled the stud to 4x114.3 and lowered the bottom arm brackets by an inch to help with squat / traction / i dont know but he does. cant wait to get the locked 3.7 out of the car and get this bad boy in!!1 point
-
Back in te hole1 point
-
Back on the hunt again ! I emailed loads of Importers but almost all of them were vague about pricing, time scales and duties I would be liable for once it landed here. One firm gave me a complete break down of costs at both ends and were recommended by someone I knew so they got the job. Once everyone had got in touch it was all systems go ! They gave the car a tidy-up. A nice man arrived at CCN with a transporter. Vid-Yo ! He then drove to the sea side and put it on this. Then started it's 8 week voyage to the UK. However sad it may sound I tracked it all the way back and checked for webcams on the way. I missed it through the Suez Canal and past Gibraltar but caught a look in Calais. ( that's in France...). Eventually it landed, went through customs and was on a Transporter to my house. This is the first look I got at my Hako (or any Hako actually). Very excited. I backed it out of the transporter and looked at it in the pissing rain. They are so much better looking in the flesh, lots of subtle styling I'd never noticed in pictures and wider than they appear. I was well pleased. Gave the driver a cuppa and some of Carols baking, talked about cars for a bit and then he pissed off. That was it then, happy bunny. Sent some pics to David and the boss of CCNagoya put them on his blog. It was the first car they had sold abroad and I think they were even more excited than me. http://www.nccmeeting.blogspot.jp/2012/04/blog-post_29.html Roughly translated..... It's all great, Hako got to the UK, everyone's happy. etc... Next time.... More pics and drivel.1 point
-
Set up the roof rack, looks pretty good but I might need to chop it more to make it a bit lower. Shifter is now higher than the roof courtesey of some free reo bar from work1 point
-
Slow progress Put some switches on the dash that do aboslutly nothing. Started on mounting the radiator and making an exhust Also started making a seat out of copper. Petrol can that i aquired that will hopefully sit on a small roof rack and gravity feed the engine. Parts to hopefully turn into a rear axle1 point
-
Been pretty slack with updates. Have been busy though. Although it seems I start something, hit a bit of a road block then start something else before finishing the last, so lately I have been trying to get those unfinished bits done before starting anything else. So Im still yet to finish the rear section of the exhaust. With the new raised height of the exhaust, when the diff is at full droop, it will be sitting on the exhaust. Original plan was just to get some cheap shocks that were short enough to clear, but I may wait and get a set of coilovers for the rear. USD sucks right now though! With the exhaust manifold off, repaired and improved (hopefully), I turned my attention to the turbo. The exhaust housing had a broken stud in it, so this was the perfect oppurtunity to get that sorted. Removed the housing and set it up in the mill. Dropped a carbide endmill in the hole to remove the stud then went and tapped it for a M8 Helicoil insert... Sorted. I noticed that the internal wastegate, which had been welded shut, had started to crack a little. Probably nothing to really worry about, but I machined out the internal waste gate valve/shaft, and machined up an insert to go in the now gaping hole. I made the insert longer than it needed to be so that it protruded into the port of the housing, to remove the "trough" for the internal wastegate valve. Once I had welded the insert in, i got the die grinder out and removed the protrusion and blended it in with the port. Reassembled, ready to bolt back up. With the manifold back on the engine, I could make up some braces to support the weight of the turbo and manifold. If you can remember, I welded some tabs on the manifold for this earlier. Machined these up. 6061 Aluminium, and some bronze lined left/right hand rod ends. Front brace installed (also got a secondary cam belt tensioner from Barry Manon) I decided I needed to add an oil cooler, so I purchased a 180x350x73mm core from AdRad. They only had the 350mm wide core in 73mm thick, which is a bit overkill, atleast I know it will be more than enough. Ended up cutting the core down to 100mm, so it will fit nicely under the intercooler. I was busy at work, so I got my mate Adam from C's Garage to fold up and weld some end tanks onto the core for me, as well as the mounting bosses I had machined up. Finished product: Purchased a Grex thermostat oil cooler sandwich plate from NST. I was very limited for space, and for options mounting it, either with the ports facing to the front, or to the rear. Had to machine up a new union bolt to mount it as well, the Grex one was too short. I made a start on making the oil lines, but I need to mount the cooler to get the lines exactly right, theres some work in the front end of the chassis I want to do which is stopping me from mounting it, but more on that later. I wanted to delete the brake booster, to get a better brake feel, and as a bonus free up some space in the engine bay. Was originally going to use the standard brake master and bias valve etc. But for a couple hundred bucks I could have a Wilwood master and bias valve, so fuck it, bought that, which will get rid of all the messy brake lines on the strut tower. Machined up an adaptor plate to mate the Wilwood master to the firewall. Mounted the bias valve on there too. I dont think I'll need the in-car adjustment, just set and forget. Had to machine up a longer clevis for the brake pedal too, complete with weight reduction pockets. Just need brake lines to finish off the new master setup now. Last item on the update. Welded some -10 fittings to the valve covers to make a proper catchcan setup, then painted them with wrinkle black. Pretty happy with how these turned out. Discussion //oldschool.co.nz/index.php?/topic/48043-pedrac3rs-1985-ae85-levin-discussion/1 point
-
Put ply on the tray, then got it stuck in a mud hole poser. hellaflush1 point


This leaderboard is set to Auckland/GMT+12:00