
Leaderboard


Popular Content
Showing content with the highest reputation on 06/15/15 in all areas
-
studio stove in and burnin'. been a good few days overheating the place and trying to dial in a winning fire recipe to last into the night without giving me the sleep-sweats14 points
-
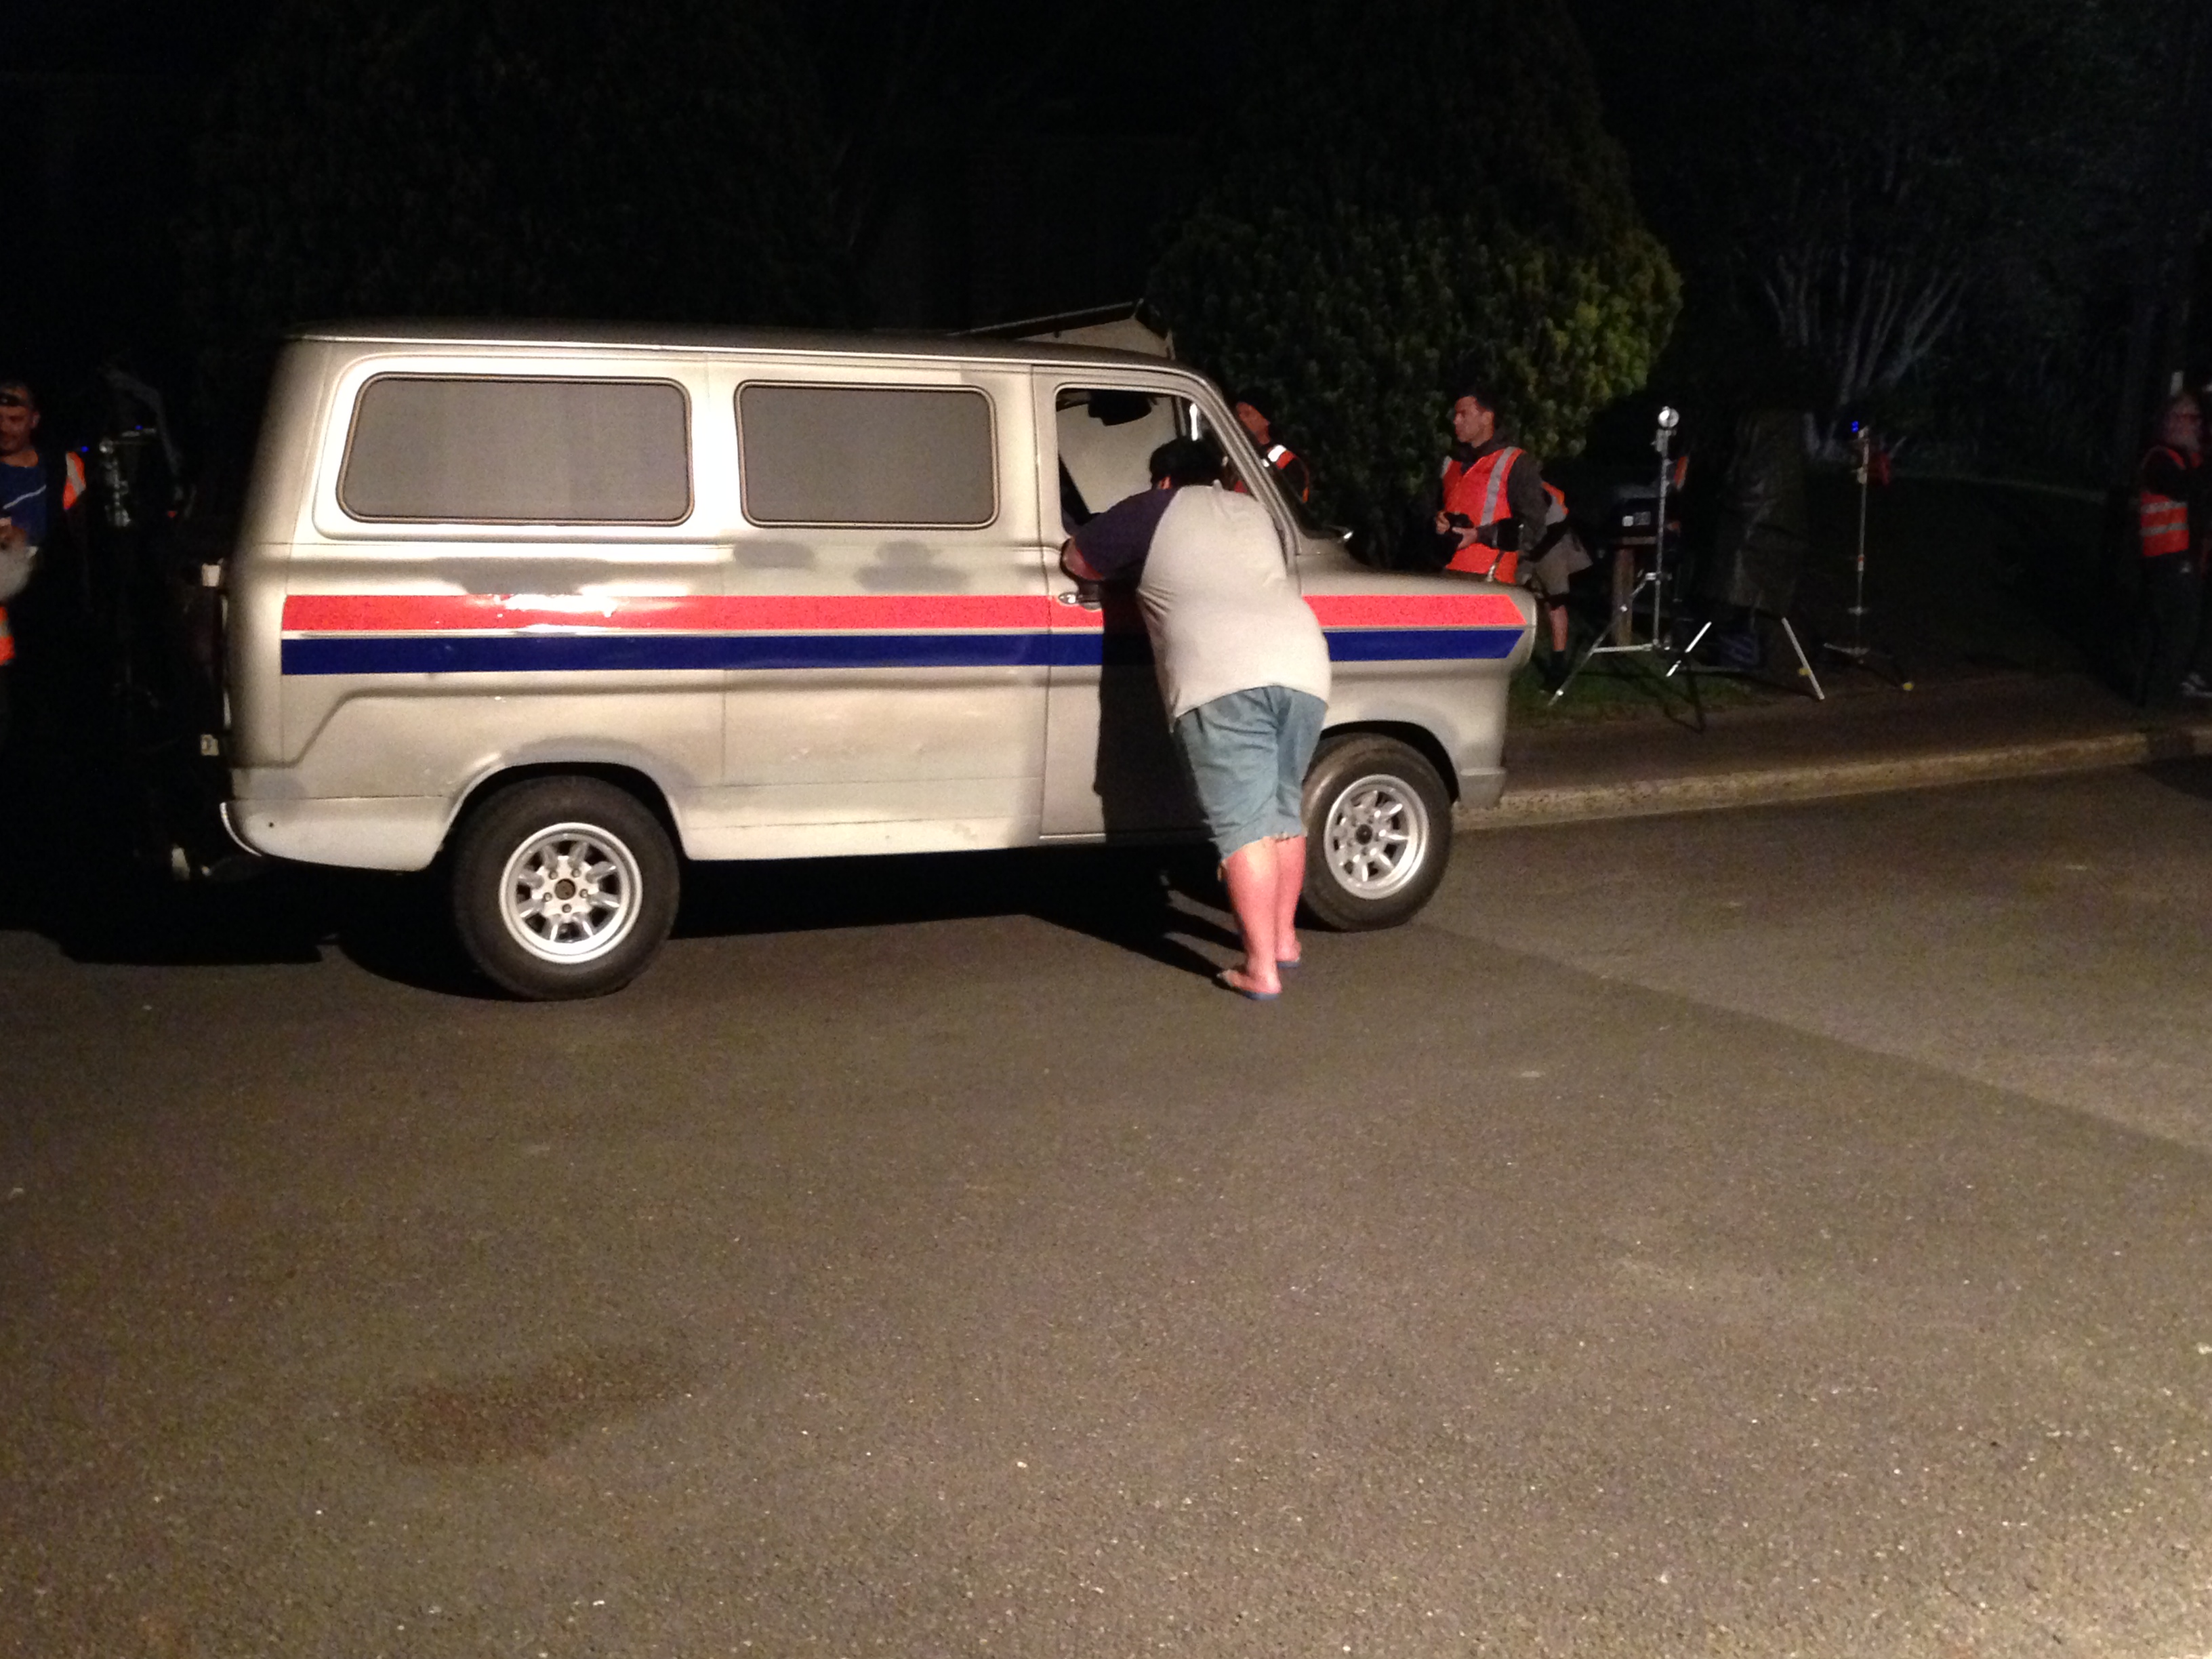
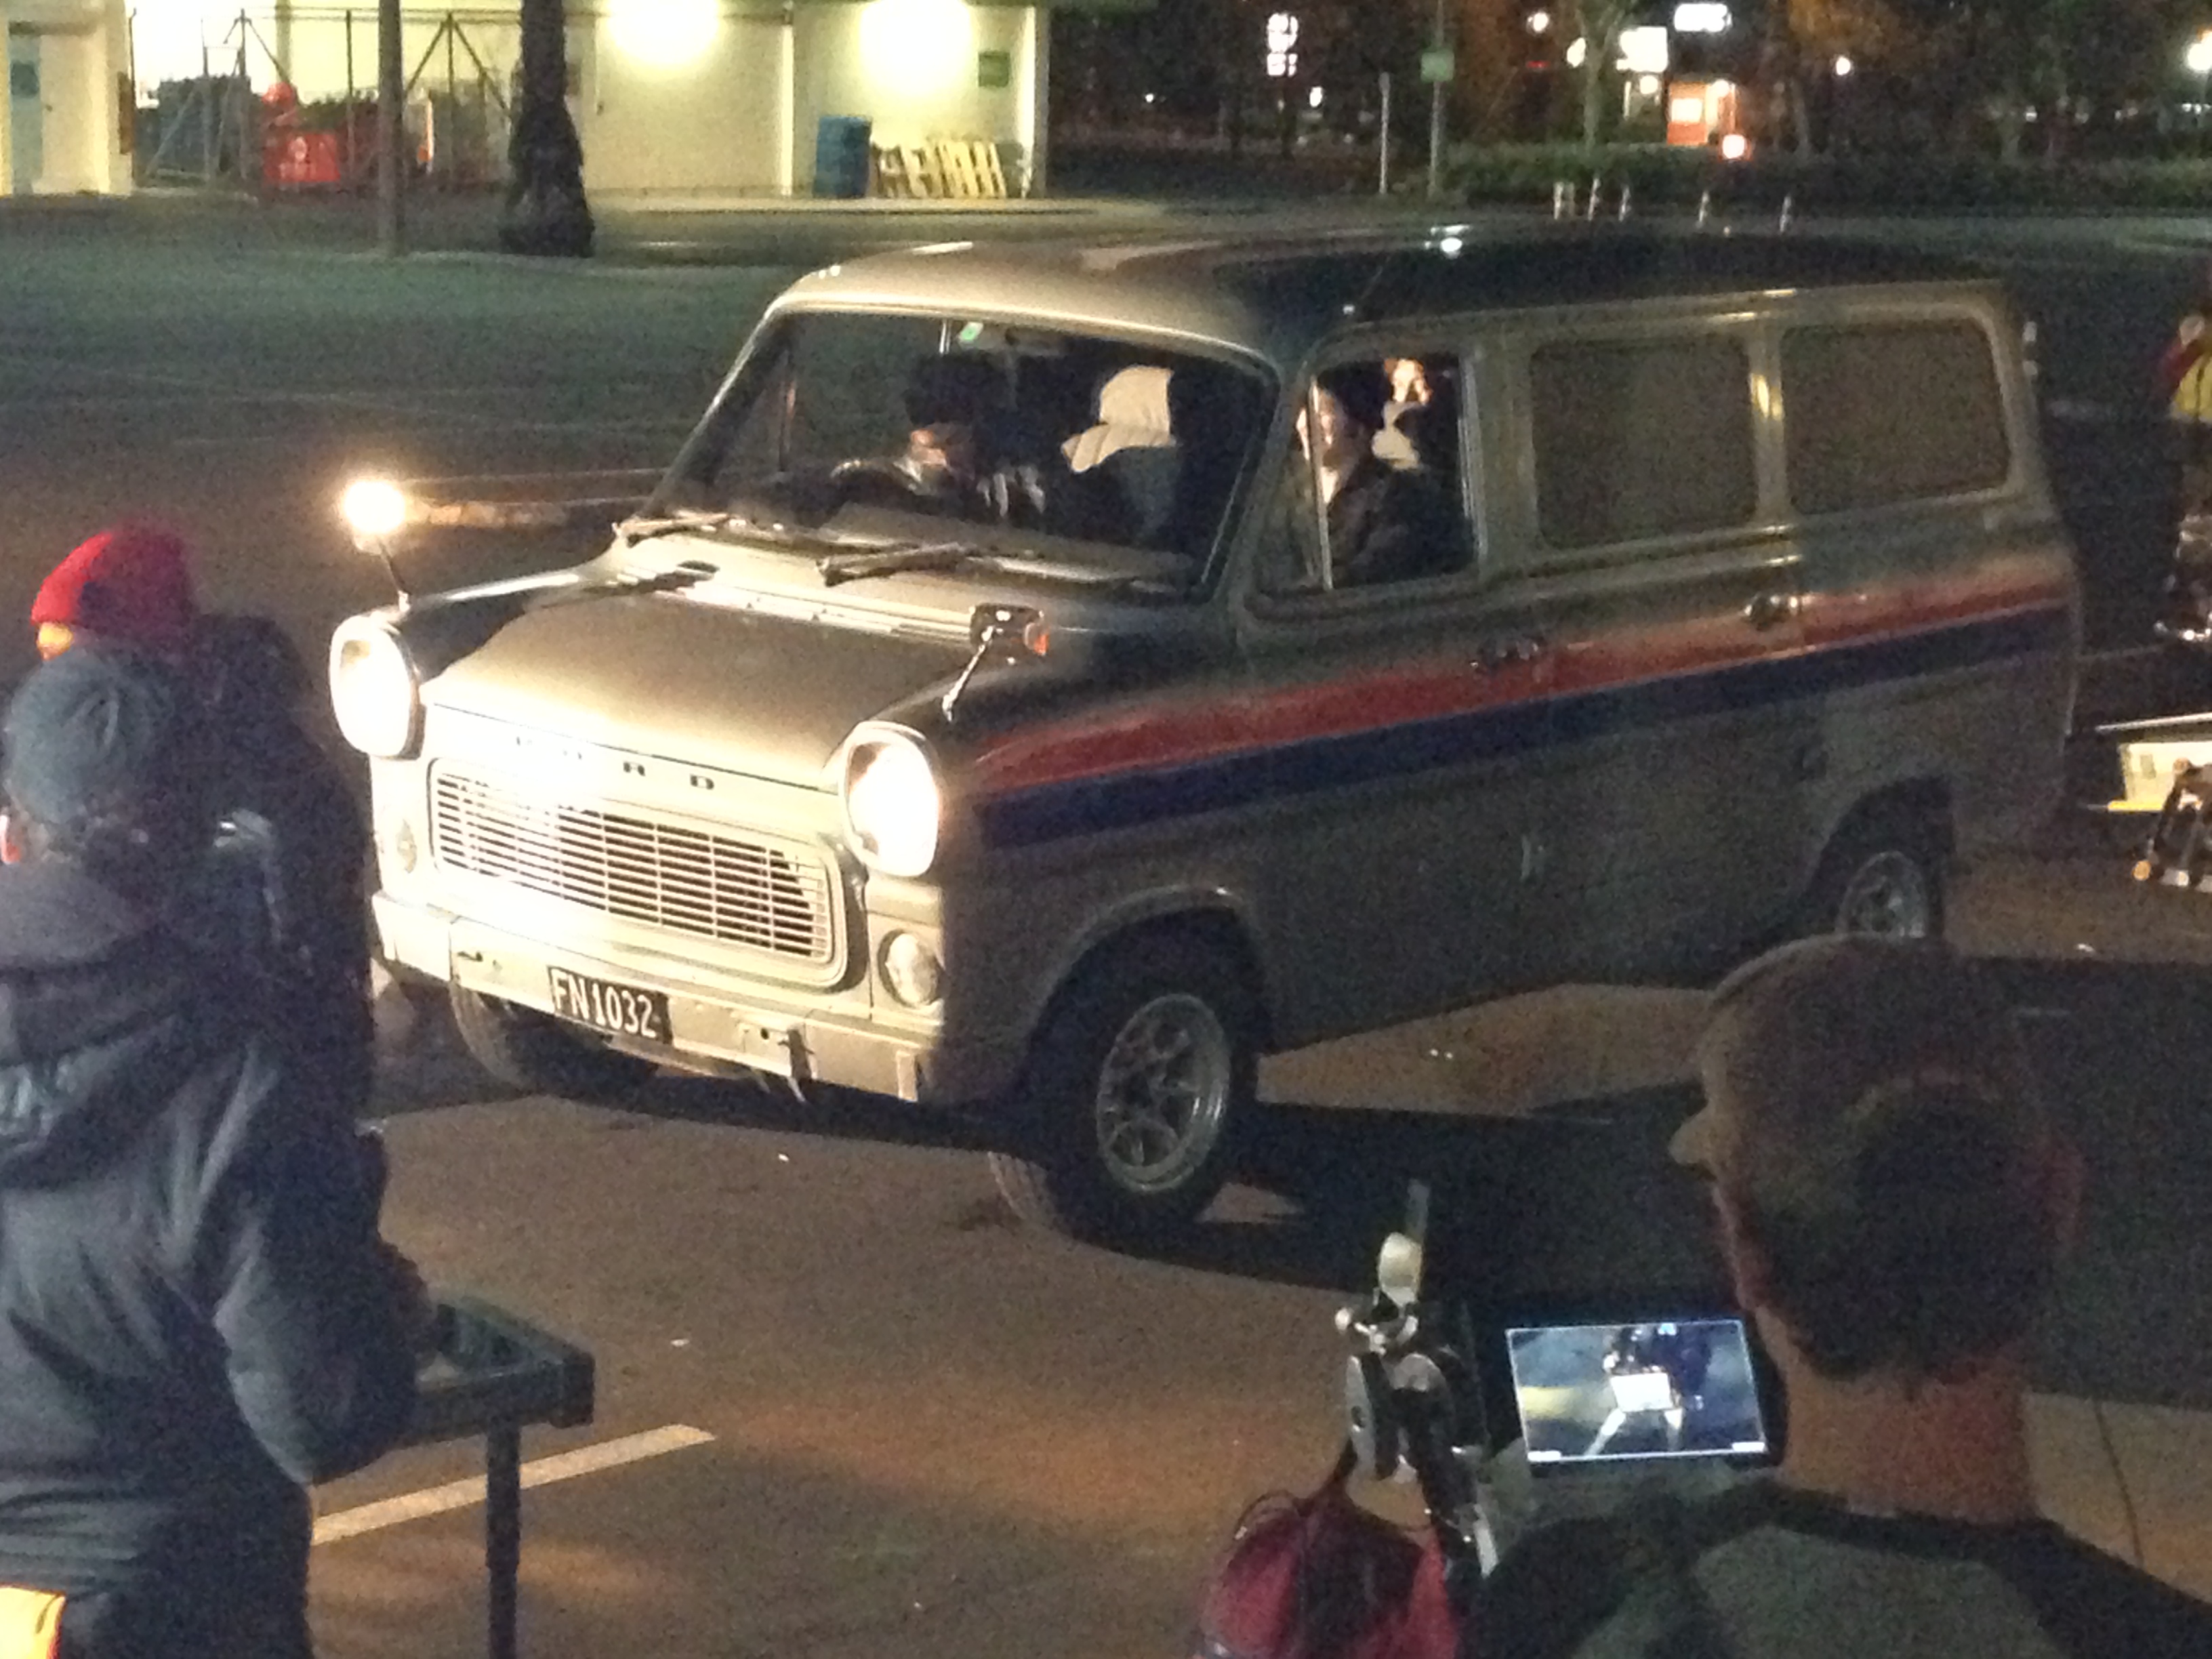
Lots more of the old silver Transit in last nights episode, my white Mk2 also features as the paddy wagon used in the "dawn raids" as well as Jackson's plumbers van which is the armoured cash van. A few pics from the set: http://www.tv3.co.nz/WESTSIDE-Season-1-Ep3/tabid/3692/articleID/114634/MCat/4513/Default.aspx
 14 points
 -
Hey guys, pics of my recent build - datto 120y. running gear was sold as mini stock parts and I bought the bare shell and then later tracked down all running gear, interior etc. Had some rust which I fixed and after 18 or so months, went for its re - vin and passed. 12 days later drove it on its first proper drive from Wairarapa to Palmy for the Four & Rotarys Jamboree meet at Manfield //oldschool.co.nz/index.php?/topic/48815-120whys-75-datsun-120y/10 points
-
the last few days and nights disappeared into grinding dust up my nose and welding spatter in my hair first patched the floor where the old seat mounts has cracked it cutting followed by much bashing then some welding and a couple of hours of cleaning that damn blue paint off more welding then, endless in and out of bits and grinding this and cutting that and eventually welding things to fit the seat rails getting there, but still much to do.10 points
-
Goddammit I ended up adding a new shed to the tour. It has 450 cars and we will be having a guided tour by the eccentric resident curator! It's handily located on our way from one shed to another. And just to turn down the heat a notch, I would still like some more sheds to add to the tour roster. It doesn't have to be big, this is more of a social gathering anyway so anywhere with ample parking and/or interesting shed dwelling items will work.5 points
-
so i rung a mate who owns a beetle as well who used to have a 1800 in his and told him to come give me a hand to pull my engine out and he mentioned he had some parts that may be of use to me since his new engine will be bigger and better and using all new fast parts and what not. he flicked me a text at some godly hour this morning going i left some stuff at your back door. half expecting a bloody upholstery job. turns out it was all of this clutch, fly wheel, thrust bearing, crank pully, air filter, oil cooler and rocker covers with breathers welded into them. amazing!5 points
-
Maybe try some museums / private collections and see if they want a sweet old unmolested Datsun in the mix?4 points
-
Another small update. Good news = We had a healthy baby girl. Bad news = Garage time is pretty low for now... I'm on the home straight, the last of the planks have very little bending to be done, shouldn't take too much longer...4 points
-
This wee bit here was one of the more difficult things I've had to do during this. It's in the boot on top of the wheel tub sealing against the outer quarter panel. There's one on the other side too. But it firewalls the boot over the tub and will prevent me having to fill all the holes up the c pillar , in the back of this photo and also won't need to seal off the area between the door and wheel tub inside the car so should save a bit of weight.3 points
-
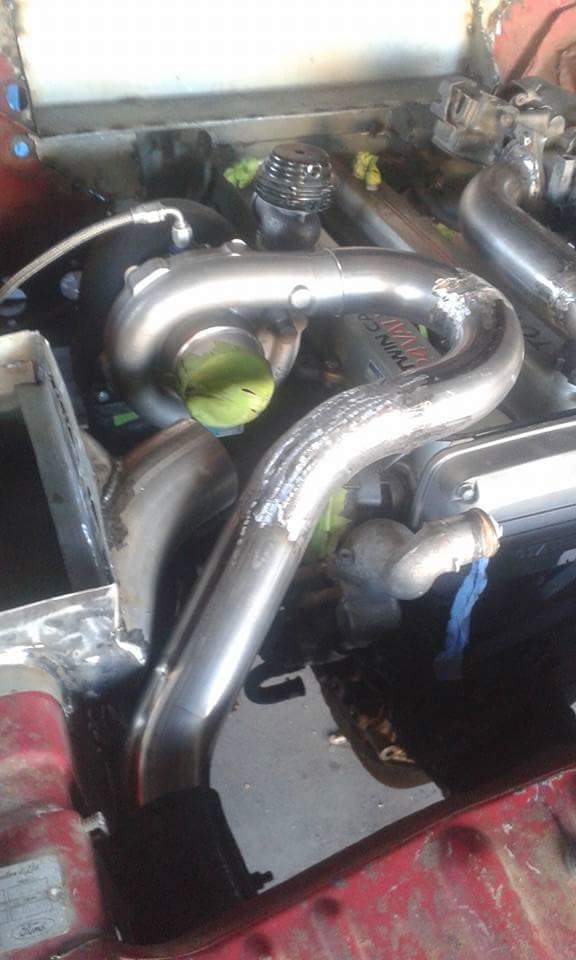
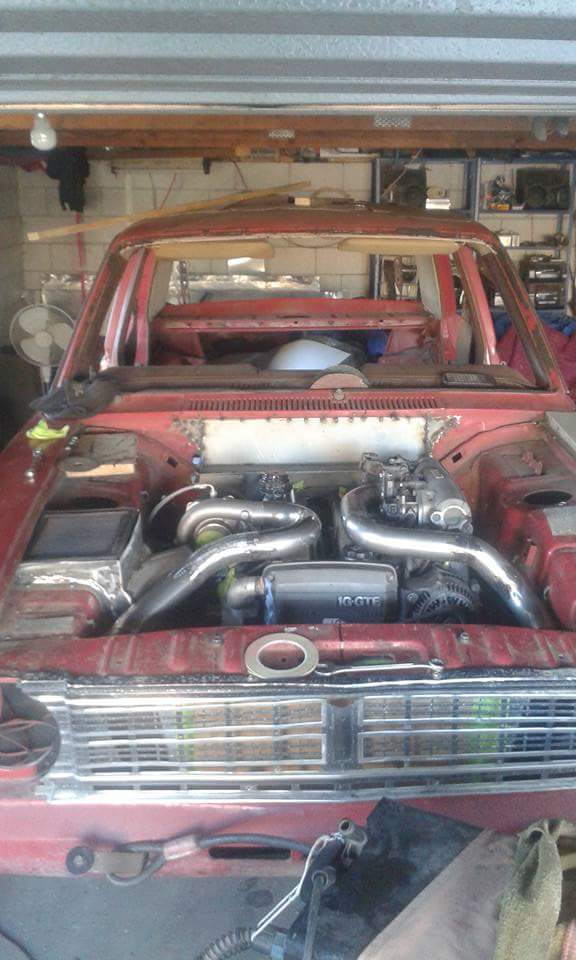
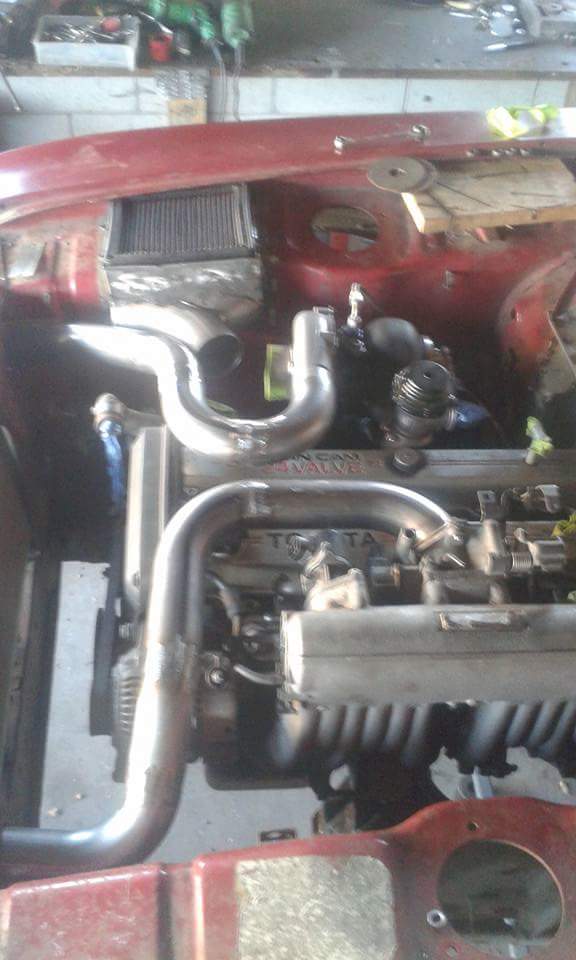
I finished making the hot side intercooler piping today and also made the brackets to bolt the air box to the engine bay. All in all I'm pretty happy with it so far. And only need to use 4 silicon joiners in the whole set up from air box the intake fannymold.
3 points
-
mates come back from pulling his uncle out from the fence/mud and told me its a twin port 1600. also got told to go out make an offer/persuade him with big bottles of jamesons whisky and i will probably walk away with it. off to the liquor shop i go after work i think.3 points
-
Today a mate and I spent the afternoon welding up all the little holes in the firewall. I've just done a rough count and we filled over 60 holes and still haven't done the lower kick panel. I've done a little bit of welding before and my mate had never tried so I showed him how and he ended up doing most of the welding, not bad for a couple of amateurs. Before, resembling Swiss cheese: And after looking much more clean shaven:3 points
-
Side B done. Heaps of clearance now.3 points
-
If you read a few posts back, you'll see I bought those Fortune Auto coilovers with the intention of solving some issues with travel associated with the old ones. So today we made a start on that process. As below: IMG_3015 by Richard Opie, on Flickr IMG_3022 by Richard Opie, on Flickr The first thing to do was of course, chop up the old coilovers. Rules dictate you must weld the new tube on no closer than 10mm from the cast knuckle, have a length sticking up inside that's equal to or longer than the diameter of the original strut tube and a minimum of four 8-10mm plug welds. So they were chopped accordingly. IMG_3048 by Richard Opie, on Flickr The drill the plug weld holes, clean paint from the surface and position onto the stub accordingly. IMG_3059 by Richard Opie, on Flickr Ensure a tame Sheepers is handy to operate the wonder magical metal gluing machine and stick the two components firmly together. TIG is required by the cert jokers. IMG_3086 by Richard Opie, on Flickr IMG_3091 by Richard Opie, on Flickr You should end up with something along the lines of the above if the instructions are followed correctly. IMG_3094 by Richard Opie, on Flickr Around this time, following a cup of tea while everything cooled down Sheepers realised that he had an NDT kit type thingamajiggerydoohickey stashed away somewhere, so duly retrieved it. OK so I need to have these NDT'd anyway and have the appropriate paperwork for certification but we figured why not, it'll help knock any cracks on the head now rather than later if any were present. IMG_3099 by Richard Opie, on Flickr It's all very simple - you clean it thoroughly with the supplied cleaner, then apply a liberal coat of this dye stuff. Proceed to wait for it to dry then wipe off excess. IMG_3107 by Richard Opie, on Flickr Next you unleash the white powdery spray stuff, and again coat the surface liberally. After letting this dry, you can then see any discrepancies in the weld. In this case there was a small pinhole that needed touching up and all was well. Official NDT this week, weld brake line brackets on, blast, paint, and reinstall maybe by the weekend if everything pans out! I don't expect the car to sit too low on these without an engine due to the heavier spring rate but we'll soon see. Thanks for having a nosy at my thread!3 points
-
Hey man, the eBay runner May or may not fit ive got some you can have if you want to try them as they didnt fit in my ta22 rails... I used a 25mm roller from bunnings. I threw out the packaging for them but I'll call into bunnings tomorrow after work and get a photo of the ones I used, they were $15-16 for a pair. I had to grind off the original roller pin and punch it out then used the existing hole that was left. I got a grinder with a cutting disk and cut a slot in the head of new roller pin so I could get a screw driver in there to lock up the nylock bolt on the back. Here's a pic of one and I'll post up some more pics/info tomorrow Untitled by matt postle, on Flickr Cheers Matt2 points
-
motor has started making a knocking noise.... bugger. just brought another pinto from trademe for $200. will chuck it in this week for the next meet on sunday. i need a bigger shed....2 points
-
Battle of the Zs2 points
-
2 points
-
Look what was waiting for me when I went to leave for work this morning! I wonder what's inside? IMAG0197 Straight to my door - do not pass customs - do not collect $$$ - score! Very good service 13 days door to door2 points
-
Wait not dodgy electrical work im ......................not....................sure....................i .......................know .......... Jokes it will be sweet. But i am enjoying repetitively spaming your shed build thread.2 points
-
Hey man, Good to see you persisted with her, like you said most people would have given up. It's cool to see you didn't! Hopefully now you have those issues sorted you'll be able to get out and enjoy driving it! P.s - Have you tried tacking a bumpy paddock at 80km/h such as in the video in your signature, lol.2 points
-
Ok so it was a bit of an interesting weekend on the car, I had the cert man come round on Saturday to look at the work I had done and make sure it was going to be all good for me to put it back together. The result of that was kind of mixed really, basically he was happy with all the mods that I have done to the body and everything relating to mounting the motor so that was all pretty cool. There are a bunch of things relating to bits that I thought were finished that I am going to have to sort out though so that was a bit disappointing. The worst of it is that the hubs and axles that I had re-drilled to change the stud pattern aren't going to be any good, when they re-pitched the holes they have placed them right beside the old ones instead of going halfway between them so there isn't a lot of metal left between them. This is a bit of a piss off because rather then do it myself or get someone at work to do it I paid to have it done by people who do this sort of thing all the time. It is the same deal with the axles but they are a bit worse as there isn't enough room to space them like that as there are some other holes that get in the way. The other thing is the calliper mount that is welded to the diff has been mig welded instead of tig welded (I should have known that so can't blame anyone else for that one) and where it is welded to the end of the axle is actually a cast end so yeah I pretty much fucked that one up. So what it means now is that I am going to have to re-do the rear brake mounts (might do a bolt on arrangement this time) and figure out a plan for the axles, luckily I have been hoarding parts for a while and have spares..... Oh yeah, I also need to decide whether or not to go for a motorsport authority card as I would need it to run a cage and the harnesses and also to have the race seats in a fixed position rather then on adjustable rails, so I will have to make some enquiries this week and figure out what it is likely to cost So I guess the positive is that there is nothing stopping me from putting it back together so I thought I would get on with it. First job mount the radiator, all I had to do was drill 4 holes and trim a bit of sheet metal back along the top at the front. So out comes the grinder and I rip into it, the first thing I notice is that the metal seems pretty thick, I thought there was only 2 layers at this point but as I grind it back I see 3 and one of them seems pretty thick, then when I go to drill the holes I mark them out and when I go to centre punch the hole a big hunk of bog falls out. So I start stripping it all back and find a bunch of patches placed nicely over the top of rust holes then bogged up to make it look nice. Bugger, so both sides are pretty rotten and patched and it is all going to have to be cut out and fixed, there is some weirdness where the bonnet hinge attaches that I knew I was going to have to deal with at some stage, I just didn't think it was going to be so soon. And here was me thinking that I had run out of things to weld..... Anyway some pics Patch on the LHS Patch on the RHS Patch on the top and the damage and rust on the hinge mount And what needed to be removed At this stage I called it a day, it has been one of those weekends, not sure if it counts as progress as it seems like I have taken a backwards step. Looks like it might be time to put in another leave form......2 points
-
Block all bored, decked and painted. 2.1 litre capacity! In other news, even though totally the wrong stud pattern, I couldn't pass these beauties up. 14x7 BBS mahle, with probably a fairly low offset. Have always wanted to run 14s on the car. So now it's decide to run E12 5 series front hubs, and redrill? rear, or run some adapters. Regardless, these will probably be a while off yet. Should look pretty shmick all polished up with some 185 55s or similar2 points
-
cut some stuff out, shifter bracket, console brackets, rear parcel shelf brace and seat mounts made an arrangement of box section to hopefully keep it straight when its on the rotisserie. it bolts to the seatbelt anchorages, door hinge mount and base of the rear pillar. i might add another one that goes across between the 22 points
-
Not sure if I posted these wheels up before, but here they are. They're a Dunlop TE, 14x6.5j. Got them quite cheap off Trademe. They have an unsually big center in them for a 14" wheel, almost a like a 15" center with 14" shells, which I quite like because my SSR MK2's have a small center and you cant see any of the brakes behind them. Anyway, decided to widen these too. Here they are with the raw 3.5" shell from Gavin Bateman after drilling a new PCD through the lot. Had the lips and spokes polished, centers painted. Would love to have a full set of these!2 points
-
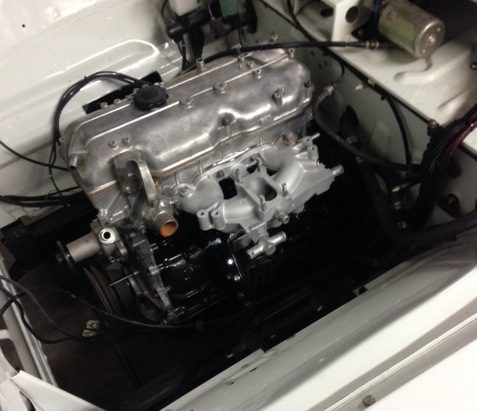
Just about have the other engine ready to go in. Just a couple of things left to sort out.2 points
-
Untitled by sheepers, on Flickr2 points
-
My engine exploded! IMG_40302 points
-
So, been driving past this example for the past 3 years on my way home, got turned around once, and was under covers for most of the time, but one day the cover blew up, spied the corner showing the 16v Badging, so naturally I burned that into my brain. Fast forward another year and the cover disappeared. Been trying off and on for the last 6 months when time allows to get this.. South African Assembled, GTI 16v - thats the twincam rather than Povo spec 8v GTI - just that little more special. 105,000km Full leather interior. Comes with a small selection of spare parts - Including spare flares. Rego on hold so no tough compliance this time! Has already had the bumpers swapped out for the "Big Bumpers" Small amount of rust on one inner guard which I need to attend to. Plans? - See how well it goes and how reliably, but if its any good I have had thoughts of weekend/motorkhana car. Lower + 15" wheels (BBS or similar) and sticky tyres..1 point
-
Wait, what? UJ has a ranch wagon?1 point
-
Hi guys, if you are needing rust repair, restoration work or a lot more done in the Manawatu / Hawkes bay area get in touch! I am currently based in Dannevirke (soon to be palmerston north) , but do have a tow vehicle and trailer. All my work is guaranteed to a very high standard, and i can work within your budget for the best possible out come. If you would like to check out some of my work, head over to my facebook page, https://www.facebook.com/hewiesgarage?ref=hl , or get in touch! Tim Hewitt Hewie's Garage Restorations P. 0274205357 E. hewiesgarage@gmail.com1 point
-
Those could be the way to go, look a bit different in shape but for $11 US its probably worth a shot. Looks like with those you just drill out the original studs and bolt them in. Yea potentially, probably pretty messy though. Let me know if you have any luck.1 point
-
Ebay, ra23 window runners. Being toyota i reckon they'll be the same. There is also a draw roller that works buti don't know the details. Matt spitfire will know about the roller style thing. I think he found something at bunnings1 point
-
Awesome, didn't think they would stock them. Will pop down on the weekend, cheers!1 point
-
I think they are releasing it on DVD once the series has shown, so I will grab a copy. Originally they wanted 5x Mk1 Transit vans, the story was they would steal a new van every time they did a burglary. I laughed when they told me this, I said they would not find 5 of these old things that were left running, at least not in Auckland In the end they used the silver Mk1 twice, and put stripes and changed the wheels to make it look different. And we used 3x Mk2 Transits, which we will see more of in the remaininig shows.1 point
-
See if you can get some refractory brick seconds from Pyrotek or something perhaps although granite might well work better anyway. I 'unno. I know we have a stack of random refractory and furnace bricks (some seconds) here but getting them to you would be cost ineffective. If I ever make it to a Wagnats, I could slap a pallet load in the goon and really sack it owt.1 point
-
duno. mate/worker was putting some shit in the shed and was like hang on a min what is this vw engine doing here. turns out his uncle was planning on building a trike that he could ride (hes in a wheel chair) and never really got around to it, quite a few years ago. so my mate/worker just got a phone call to go get his uncle out of some mud (got stuck in his wheel chair) so i may be able to tell you when he gets back.1 point
-
Yeah, good to see it back on the road man. Rota next?1 point
-
^^^^^ That wagon is soooooooo clean! Spotted it at kumeu.1 point
-
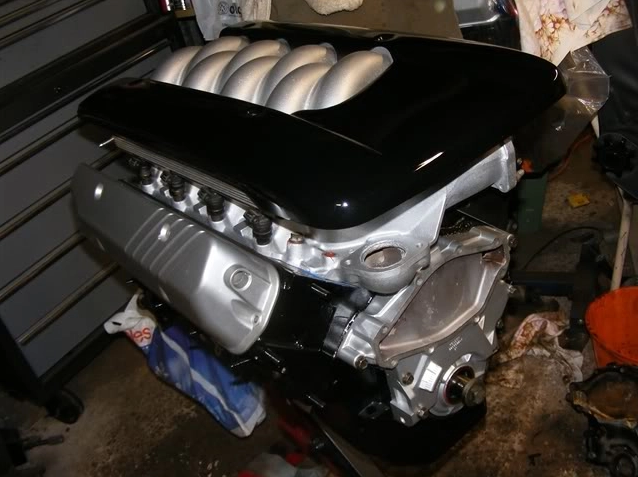
Turbo manifold finished. Made a start on the exhaust. Got a blank plate made for the dizzy, came out quite nice in stainless. 1/4'' stainless tube for turbo oil feed with swagelok fittings. Took so long to get right I will probably have to run the waste gate outlet towards the front then down and back. Well that's the easiest option anyway Discussion: http://oldschool.co....uss-1ggte-ae85/1 point
-
You all will be so jealous when you see my new exhaust1 point
-
took this 5 mins ago1 point
-
OH SHIT CONFLICT AT HOME! MUM AND DAD AREN'T TALKING! IMMA STAY AT JOHNNIES TONIGHT SO I DON'T HAVE TO HEAR THEM YELLING.1 point
-
got intake manifold back today from being bead blasted looks really good
1 point
-
Bought a lowish mileage one of these today. Going to buy a carby manifold and stick with good old analogue fuel and spark, The motor in particular that I have bought is a VT Commodore 304 that's the last of the aussie built V8's. I got it now cos it's a hard to find motor as only the first series 1 VT's had the 304, after that they went to the 350 LS1. The VT is different from every other 304/308 because it is factory roller cam, 4 bolt mains and is already clearanced for 355 stroker crank. It's closest relative is the 304 Walkinshaw motor from the VL - but they are as rare as hens teeth and apparently 10K for a complete one. I've been told that the heads apparently flow 400hp from the factory. So if I really want to get carried away I could snap up a 355 stroker kit and chuck that in. But the line needs to be drawn somewhere. Who knows though I may end up putting this motor to the back of the shed while I save up for a stroker kit and monster Rawb cam - jam that in and then proceed to blow multiple gearboxes. Hahah.
1 point
-
Currently I have the Gloria in at Engine Specialties on the Noth Shore getting a whole lot of engine work done to get the ol girl freshened up. I lucked out as the guy had a short block that had all the work done to it that had been sitting in his shop for 2 years as a guy had over $2500 put into the block and hadnt come back to pay for the work done. I scored it for $1250. The crank has been machined and balanced and the bores all done with flat top pistons. They are going to port and polish the head, chuck a mild cam in, change my old points over to electronic ignition, feed the engine gases back through the exhaust, put on some air filters, polish up the valve cover and pretty up the engine before it goes back in. Should be around the 185hp mark when all completed.1 point
-
Don't know if its applicable where you are but careful they don't hit you with a fill cert for >600mm. Also is that a panther?1 point
-
I managed to reverse the explosion and it goes Excuse the jumpy wife when something falls off the bench in front of her1 point
-
I had to notch the radiator support panel slightly to get some clearance between the radiator and underside of the bonnet. IMG_2044 by postlematt, on Flickr fitted the NOS celica badge to the rear filler panel and blacked it out along with the tail light sarrounds. IMG_2034 by postlematt, on Flickr IMG_2039 by postlematt, on Flickr also resprayed the under seal and primed the engine bay. IMG_2068 by postlematt, on Flickr figured i do a test spray with the new paint. IMG_2073 by postlematt, on Flickr dont think it turned out too bad at all, exactly the colour i was hoping for! IMG_2092 by postlematt, on Flickr1 point


This leaderboard is set to Auckland/GMT+12:00