
Leaderboard


Popular Content
Showing content with the highest reputation on 03/12/15 in all areas
-
So i got the ute from the tow company today and as soon as i got it home i tore it apart to see the real damage, and luckily enough for me there is no chassis damage!! and the engine itself seem fine too all suspension and steering components are all still in tacked and working fine managed to straighten abit of the wheel-well out with a fence strainer and a tree... worked quite well both radiators are fucked so they camp out too SO, all in all it not as bad as first thought before during after and almost all the shit i need to replace and the best part is the doctor said i can have tomorrow off, and with friday saturday being my usual weekend, i have three more days to get stuck in!! discuss here11 points
-
This must be some kind of record...for me. The first door took 5 years to reskin...and this one took a week and a half. And it only took that long cos I ran out of gas for the welder. So I guess I should start on removing the engine or something.10 points
-
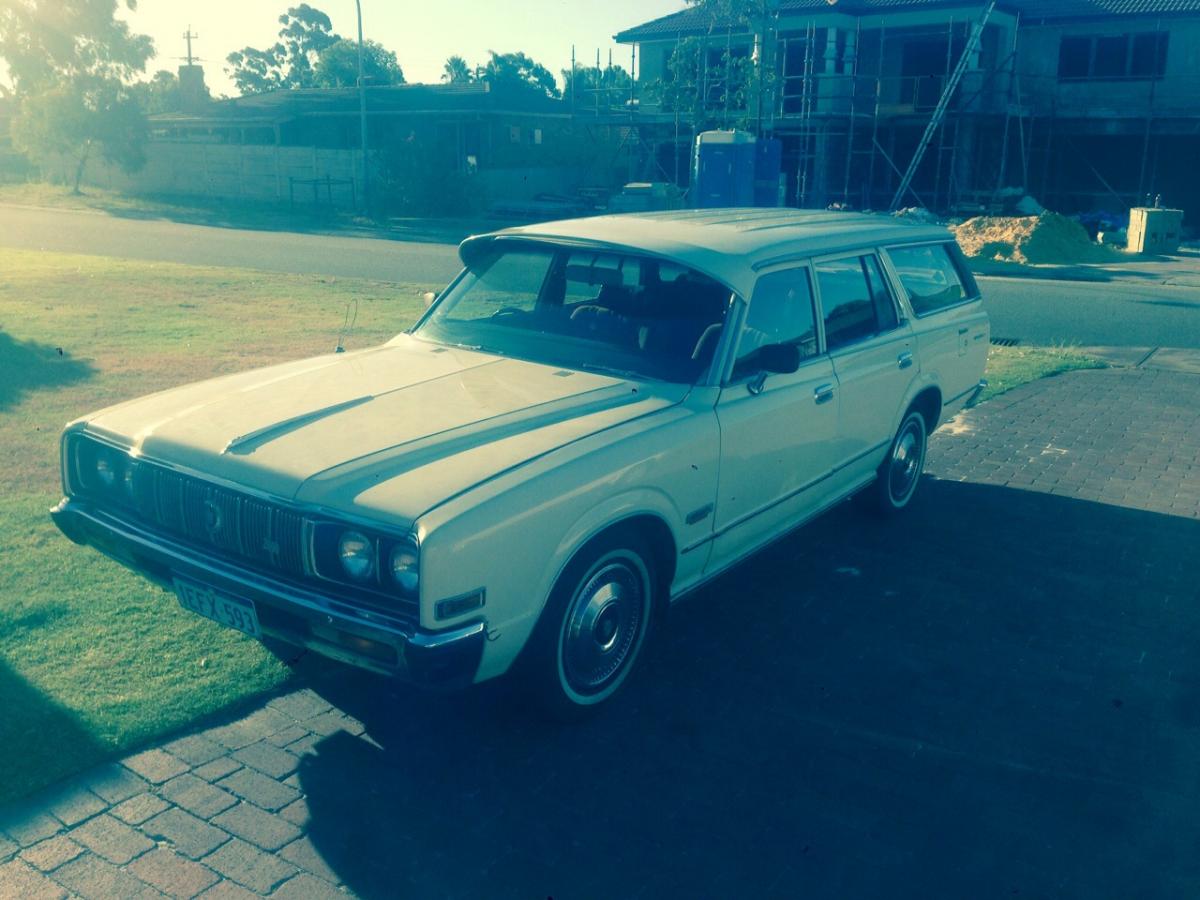
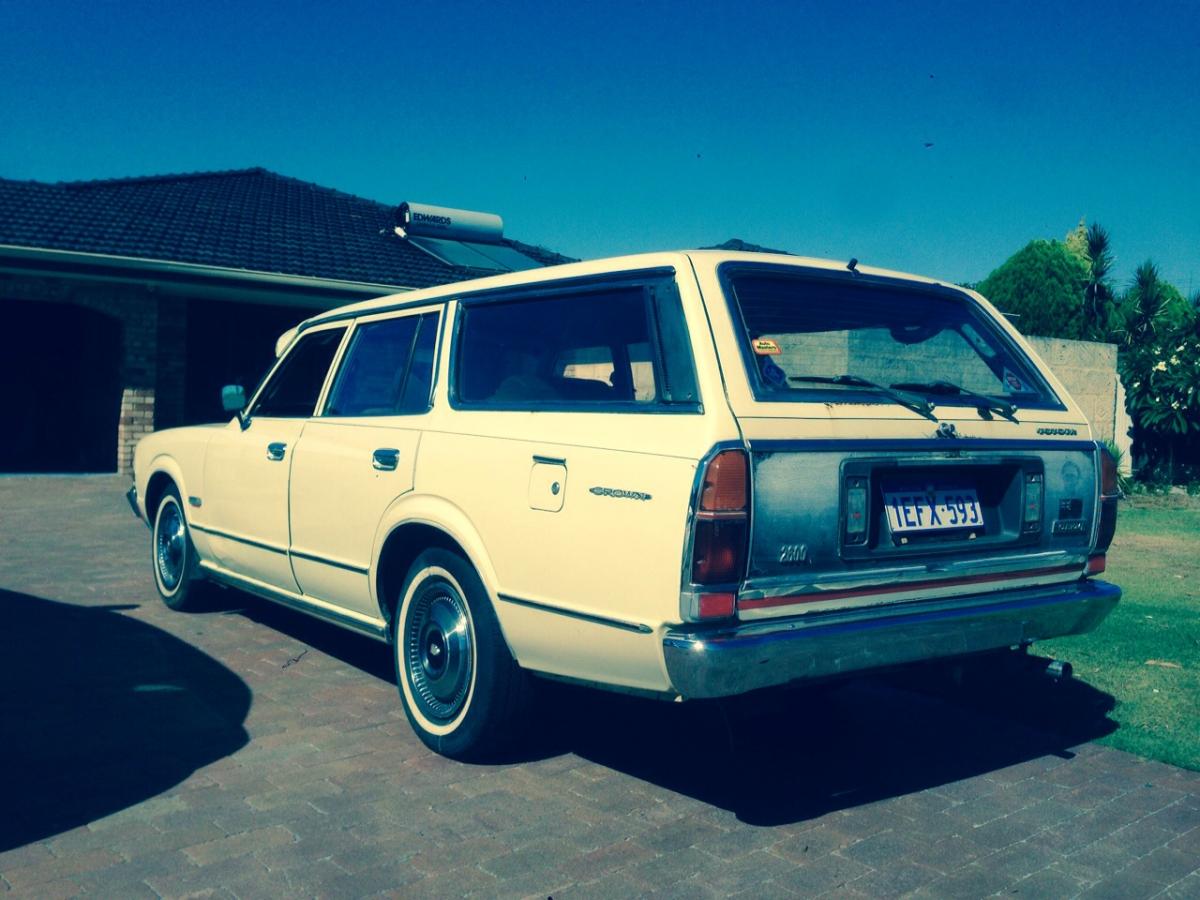
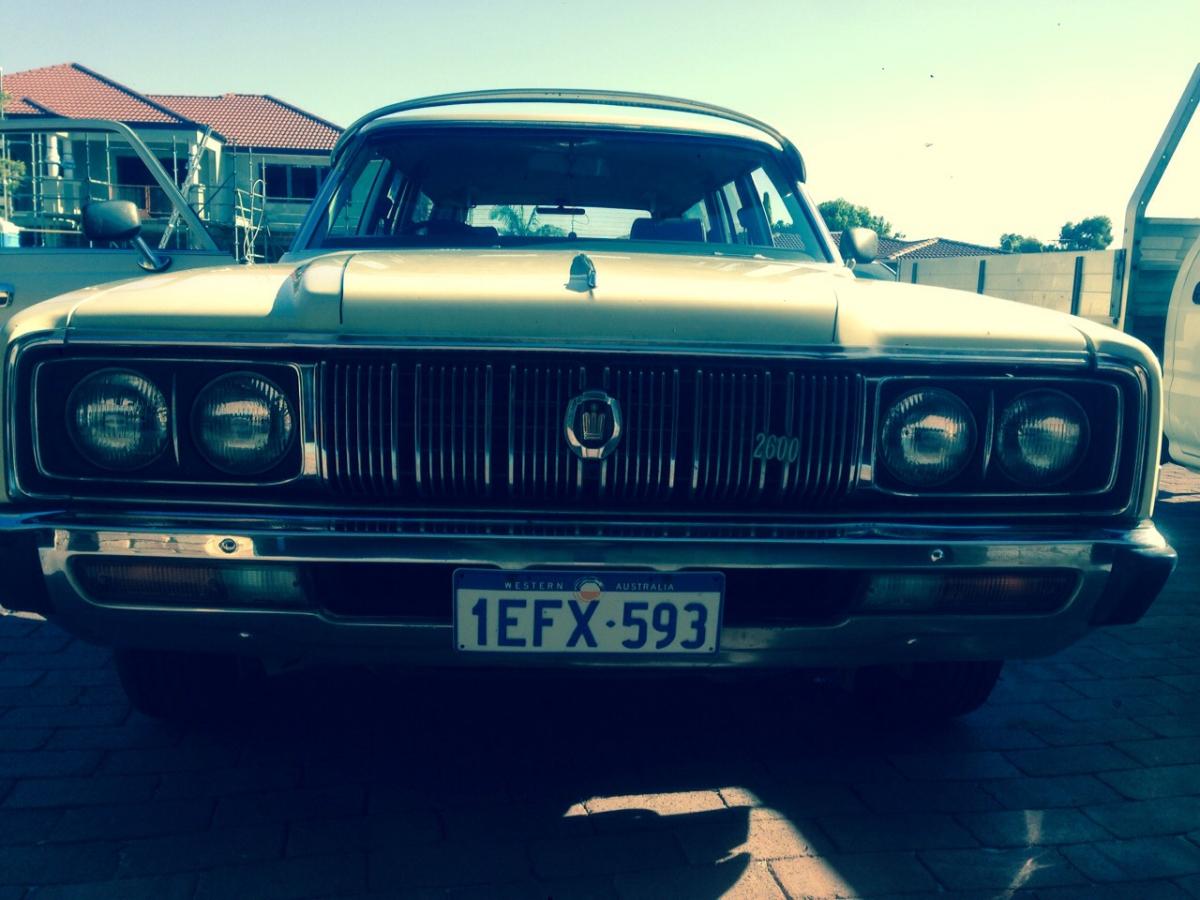
Here's my 1976 toyota ms83 crown wagon. I recently purchased and intend to use it as a cruiser maybe tow wagon later on down the track She's pretty much standard running the 4m and 3 speed auto, Body is in pretty good nick for its age, bit of rust in the tail gate and a few other small bubbles here and there. she's got 85k on the clock, not to sure if it's been round though. - still has the original manual and service log book inc. purchase date, dealer etc although only the first 5k service leaflet has been filled out in it. Interior is in really good condition too with just the carpet on drivers side foot well being a bit worn and ripped other than the porno brown interior is good. list of current mods and how it got it - Head unit and 6" speakers in front doors - Pimp as exterior sun visor - White Walls - 4 extra switches mounted in dash Future mods in the near future inc. - give it a tidy up here and there - Lower it a few inches - does any body know if ms85 springs will work all round? I would deff say the front is the same only the rear I suspect could possibly be different. - figure out what the 4 extra switches do...or are supposed to do....don't appear to do anything at the mo...probably will remove but will need to figure out how to cover up holes or get new panels. - Give the old 4m a tune - Install 6x9's and maybe a sub in the boot. Future mods in long term future inc. - send back to NZ when I move back one day - Panel and respray - Drop in a 1uzfe with ITBs for the sweet sound and also looks....or may look at a UR family v8 (1ur-fse, 3ur-fe, 2ur-gse
 6 points
 -
All that list ^^ got done, including new set of plugs. Went for re-check today, and the brake test. That test was quickly followed by a wrecker yard crawl looking for a master cylinder with a 7/8 bore. Pulled one from an AE101 that looked workable. Drove home, slapped together an adapter plate from some 12mm steel and re-did the line ends with metric fittings. Back to Levin for a re-re-check by 4:30pm. Stops heaps better now. I think everything is done, except for the paperwork, and anything that LVVTA might question. Anyone want a 1977 Thunderbird master cylinder? This is the new one. Since the lines have been swapped side to side the bends are even more wonky than they were before.4 points
-
4 points
-
I vote go somewhere else3 points
-
Finally a trial fit for the left hand side, every single panel has been replaced and it feels like I've spent many nights cutting profiles. I pre-drilled every single hole on the new panels to match the existing chassis holes so I wanted to see it it all came together, couple of slight adjustments (0.5-1mm) here and there but in all it seemed to come out OK. A bit more shininess with a splash of etch primer.3 points
-
+1 to that, see it everywhere! Looks wicked. Loved this one haha3 points
-
Fuck beaver I hope you get better soon! We need to get the cert on your car done man! How do you even get such things. You make out with posum hunter lady?2 points
-
cheers guys, im stoked with how its coming along. hahah yeah its a jap import and they all came stock with aircon, still worked and everything too. going on a parts mission today. *fingers crossed*2 points
-
flag making it the monthly meet then. ain't no one gonna want to get caught up in that.2 points
-
I hope you flicked that project.2 points
-
Hey I'm looking to hopefully get the wagon certed in the Easter break. So was wondering what im likely to run into. All im doing is cert for 14x8's and lowering just with custom springs made and shorter shocks but below 100mm. With legal tyres (195/45r14 falkens) it will likely be around 60-70mm. I need it done resonably quick because im hoping to be done so i can drive it down south to my new place. Currently trying to find what certifier to use as apparently Taupo can be a prick and Tauranga has a 70mm height limit. Cletus you wouldn't happen to be interested in doing it maybe if i trailored it up?2 points
-
Is there anyone around that could lend a hand this weekend? I need to put shims in the rear of my mk2 golf. I have no tools not even a jack as I moved here a month ago to study. Hoping someone on here will be able to help? So I don't have to pay someone to do it beers can be provided etc etc1 point
-
Right, so I bought these headlight grills to add more nana accessories... Went to fit them and thought fuck it I've pretty much got the whole front off anyway, I'll black out behind the grill. Annoyed the hell out of me having it body colour behind there so got straight to it! 1st coat down, next one tomorrow when I've got a bit more light.1 point
-
options for creating a USB flash drive, that would burn half a laptop down. http://kukuruku.co/hub/diy/usb-killer1 point
-
Seems a shame to paint all that work now... Paint the roof/Clearcoat the sides1 point
-
You can come round to mine on Sunday and use my tools / touch your diddle over my triumph. I'll be doing some work on her on Sunday cos of her breakdown at Nats. Im in feilding1 point
-
Its where you're car doesnt start so you keep winding you're motor over and jam heaps of gas into the sump. Then when it does finally start the fuel lights up anf blows you're rocker covers off. Something like that. Ask Leebo3 about it.1 point
-
How about cutting some small strips of aluminium to bridge behind the grill stripsand the main part and use a metal epoxy to affix? Cool project, always wanted a 2002tii1 point
-
update. In hospital. Have pneumonia. Surely that's worthy of an award1 point
-
I was gonna take pics of some pistons I have after work today. No need now1 point
-
Nice!! Yea VG, mine had aircon too but needed regassing to ripped it all out. Will prob refit when I put in new engine. aircon is the bombs. just ask sparkle1 point
-
It's a good idea, can we re schedule? next munf?1 point
-
yea can do man.1 point
-
Oh wow is that a DE vs DET pic! Have been looking all over the internet for a picture like that! LEGEND. Will rug up a better light to go down the bore.1 point
-
Based on those valve cutouts they look like DE pistons (ones on the left)1 point
-
Might not have to wreck the white one, its salvageable after all. No chassis damage so just need body panels1 point
-
yea ill have a go at it. do it on saturday if your free. cost you the princely sum of 20$ or 1 six pack of little creatures pale ale. (or whatever the one in the yellow packet is) between now and then if you could soak it in simple green that would make welding easier. cheers. 021429522.1 point
-
Its a bit much rake I think, will look better with less and handle better. Looks a bit to stretched out in my opinion atm1 point
-
Wah wah, we hadn't even finished filling in the wof form and Maggie had already failed. Apparently the tread has to be completely under the bodywork, making our flares completely redundant. If she'd come with bolt on flares from the factory they would have passed no worries, even if we'd swapped them to aftermarket ones ourselves - seems a bit backwards to me. Our options at this point are... - Cross our fingers and take her somewhere else. - Pump the suspension up so much that you can hardly see the poke and take her somewhere else. - Get some fresh tires for the old steelies and put those on every time we go for a wof. $$ - Get the new wheels/flares certed. $$$ Does anyone have any experience with bolt on flares? Lots of minis seem to have them? In other news, GuyWithAviators kindly helped us pump up the left side suspension with his nifty pump so we now can get in and out of the garage! Cheers Andrew. We drove it home like this - at least Sammy1222 had a floaty ride. Temp sat at the high end of normal all the way (as usual). We evened up the suspension when we got her home, sitting perfectly now. So yea next step is to sort this wof situation out, then swap out the clutch and beach hop here we come.1 point
-
Update to follow featuring filthy carb turbo convo1 point
-
Cheers Dude, A bit more of an update, seems to be turning a corner finally. Stripped the badly corroded top panels out as usual there was a bit of corrosion to deal with on the frame but thankfully it was only superficial this time. Top section treated and ready for some shiny bits. And here's the shiny bits all joined and ready to be trimmed to size, it seemed easier to join everything and make one long strip (7.2m), matching the joint spacings on the panels below. Actually it was a bit of a 'mare trying to get them dead straight without a decent straight edge, so some fishing braid came to the rescue as guides.1 point
-
Changed it up a bit.1 point
-
Ahhhh, how about that serenity?...1 point
-
An hour well spent reading this. Jelous beyond words.1 point
-
My cat curled up on the roof of my anglia this evening and watched me service my mountain bike and repair the lawn mower. I think she has been in this thread and is as envious of kevin as I am of you and your new shed.1 point
-
The chassis mounts for the upper bars are made from some square tubing I had that happened to be the correct size. I've seen this done on the net, and it makes it easy to fabricate and plenty strong. Somewhere about here should work... After the slight setback noted above, where I realised that the housing on the 9" is not centered between the wheels, I got it all together on both sides. Plenty of jacking up and down followed to check clearances, and it all looked good to me. After getting back from camping in late Jan I finally got the 1" all thread and half nuts (those nuts are expensive - $15 each. If I'd known that I would have bought regular nuts and cut them down in the lathe) so it was time to make the bars adjustable. This involved grinding off the tacks and welding the end to a short length of all-thread. Then the link is shorted up and an inspection hole drilled 1.5 diameters down the tubing. I did have to do one of these a couple of times after failed the 'measure twice cut once' test, mainly because the pinion angle was way out on my fixed length bars. One hunky adjustable triangulated 4-bar top link. Since it is for the rear suspension it can be mig welded (by me) and doesn't require crack testing. Hopefully the certifier is happy. With all the links in place I adjusted them to centre the housing in the car and square it up - just done with a tape measure to reference points on the chassis. I had the wheel alignment done yesterday, and the computer said the rear thrust angle was 0.00 degrees - i.e. the housing is exactly square in the car, so I was pretty happy with that. Hopefully the cert man (Andy Smith) is happy with the design and execution.1 point
-
The drivers side door is almost all welded up. Then I wonder why my welds are getting shitty...turns out Im out of gas! BLOODY TYPICAL!!!!! Oh well will get a refill on Friday and get back into it. Will be able to get onto the surface rust on the inside though so atleast I wont be standing round with a thumb up me bum with nothing to do.1 point
-
So trying to keep up the momentum! Remove the drivers side door skin. This is the puke that was inside the doors. This one isnt as bad as the passenger one but still pretty shit! And get this bit of new steel tacked in before I have to go make dinner. So lets see if I can keep this up for the rest of the week...actually I wont cos I have to go to dinner tomorrow night. BUGGER!!!!!1 point
-
A little something to nibble on before bedtime. Tyres on Sat. Running like a champ atm, lets hope it stays that way. Discuss1 point
-
Exited the shed last night, first time since May 2014 (I need to work faster!) First test drive went 'ok' ish, until the compressor clutch locked up and the air line blew out with a big bang Cue slow drive back home on bump stops. So, need to sort that and fit a one-way valve to the compressor line. Had a beer after that episode, and left the car outside. Washed it today, need to clean up garage then get it back in to pick up the issues. Looks cool dumped though. Before wash And after.1 point
-
In keeping with tradition of not doing what I said I'd do next from my previous post.. This'll make it heeeeeeaps easier to mount the M20 and jazz it up A popular fix for fitting the M20 into these engine bays is to hack the top of the nose so a larger radiator can be installed and be brought forward. However, I've read that people have opted for not cutting up the nose by using a wasted spark setup and an electric water pump for the M20 as these can be remotely mounted. Doing this can save a fair bit of space at the front of the engine. So I might look into that! Been having a tough time deciding whether to restore the bottom of the nose back to original and roll as is, or buy a fiberglass airdam and stick it on. The airdam option will be by far the easiest, but I'm liking the original bumperless look more and more. Restoring the nose to original is beyond my amature tom-foolery, so I'll have to way up the two options financially and do some pros and cons. Hmm. Next up: get the engine in there and make up some mounts. Might be hard to do it properly without gearbox/clutch/bellhousing1 point
-
She lives! And so far no sign of over heating! The new thermostat might have done it.1 point
-
even nzta dont believe in trailer wofs1 point
-
Today I went into full-on Mr Bean mode Drove like this all the way from Albany to Westgate, she was mint. Bungee cords are bloody handy. Also went out into the paddock and took some photos the other day, turned out quite nice with the sun setting behind some trees and whatnot! Now my new years' resolution is to try and sort out the interior of the car, as it's currently a combination of black Mk1 trim (not original for the car) and some 1980's mini seats, in combination with some pretty average bluey-black carpet which looks a bit pants. New interior bits will probably just mean a lot of money though, so it might have to wait a while!1 point
-
It's got an electronic throttle body, when you pull the cable it only moves the throttle plate 45 degrees. Anything above that is controlled by the ECU and whether it 'lets' you have full throttle etc. So it's got a TPS that measures what you're wanting to do, and then a TPS on the other side that the motor uses to determine where the throttle plate actually is. It works well enough but if you're going to an aftermarket ECU best to just bin all of that junk and turn it into a normal cable pull throttle body.1 point
-
super glitter metallic spec floor paint PLZ1 point
-
Hey all, Haven't really posted, last time I did I had a '74 D Super. But now I have an '88 Mini Mayfair. Had her for about 3 weeks now and she's been really good, bar the bit where fouled plugs and dirty air filter choked her up a bit. All sorted now and good to go again. She has 13" Mini Lites with GAZ shocks 1275 A+ engine Repainted about 2-3 years ago holding up well She's in pretty sweet shape really. Discussion Thread //oldschool.co.nz/index.php?/topic/43212-izzys-88-mini-mayfair/1 point
-
S14 Motor. Boom! Expensive head-shot.1 point
.thumb.png.46e518f714cdc319554c389f990e75a4.png)


This leaderboard is set to Auckland/GMT+12:00