
Leaderboard


Popular Content
Showing content with the highest reputation on 16/12/24 in all areas
-
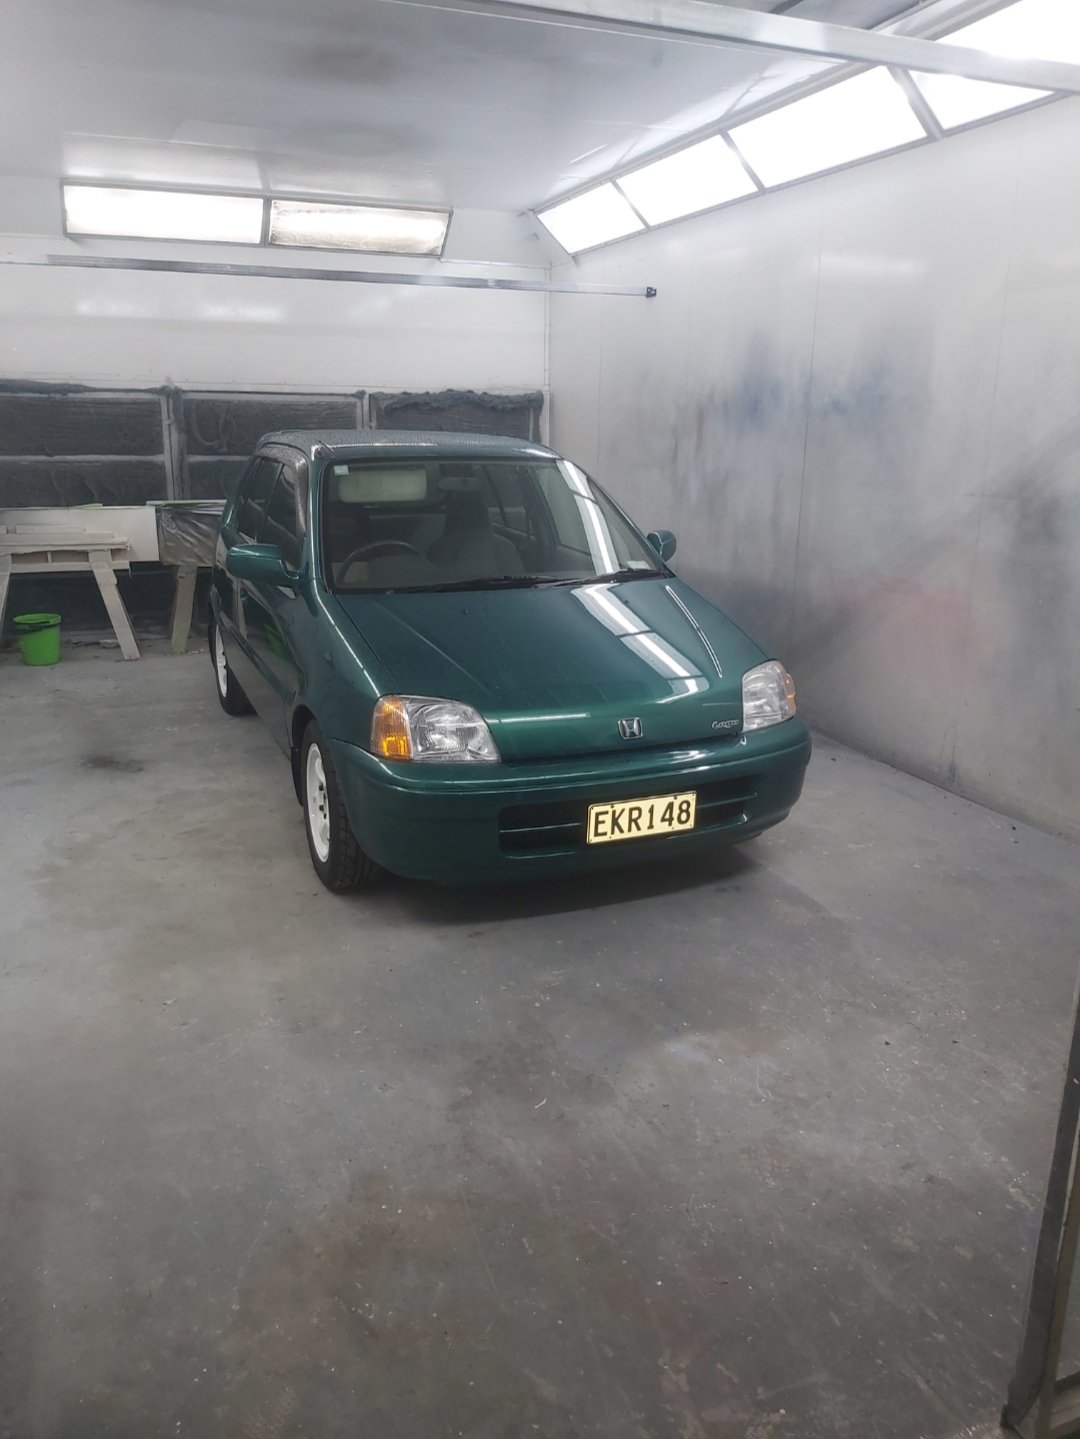
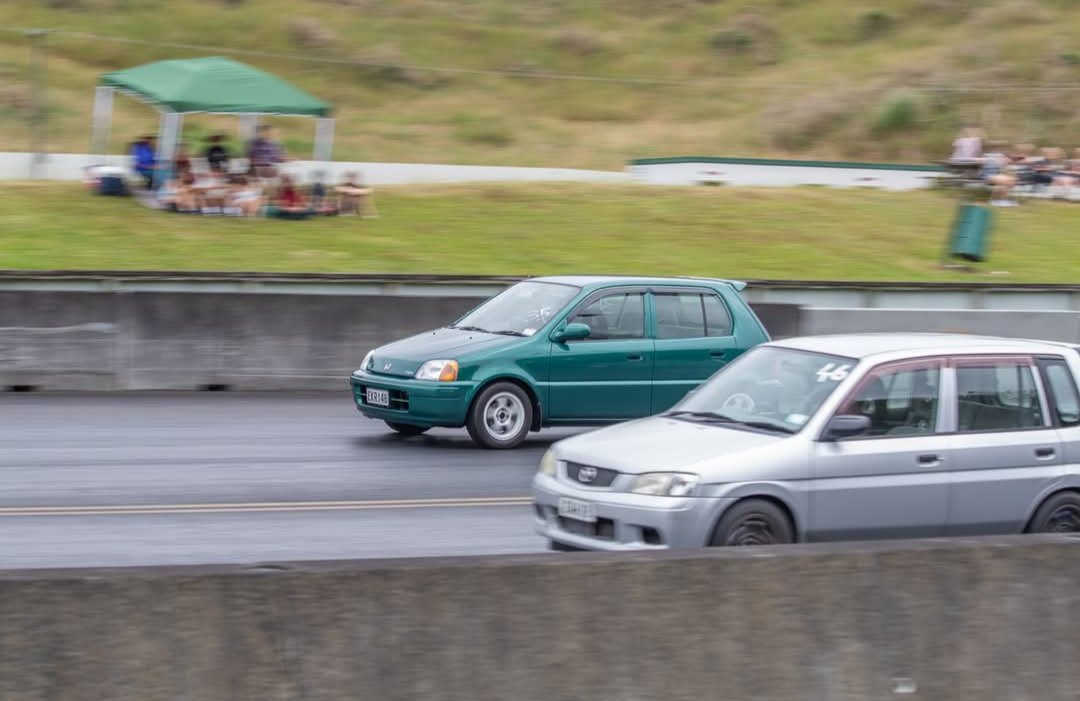
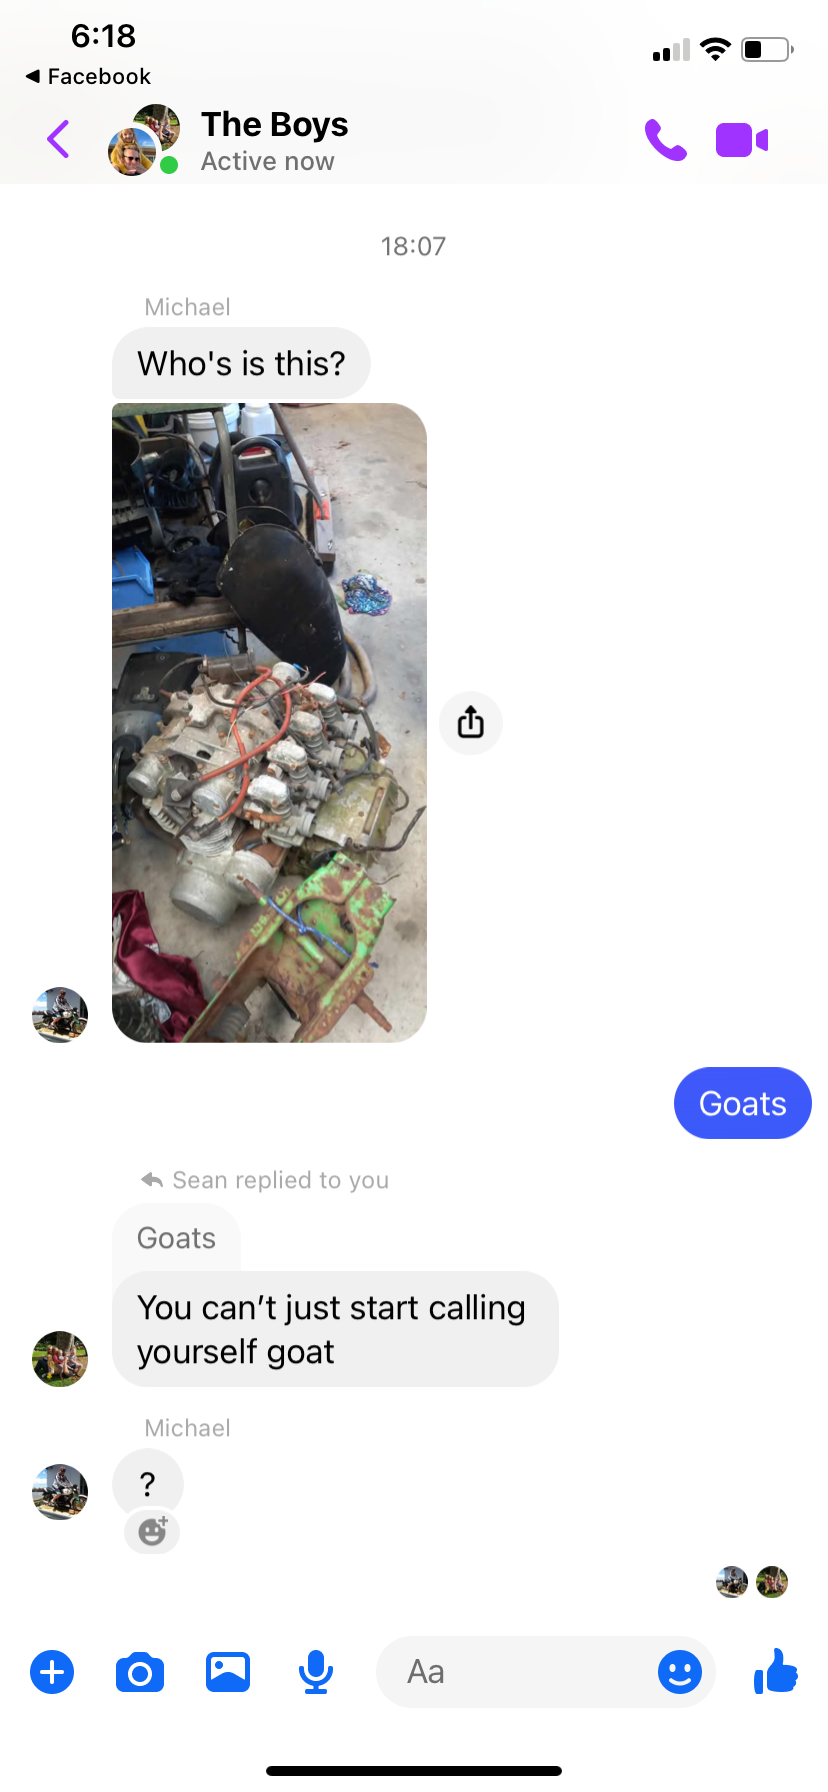
A lil bit back I was ordering some audio stuff and a mate wanted an amp tacked on to my shipping, so what else was I to do but tack my own impulse buy onto my own shipping? I wanted to get back there anyway to tidy up my temporary twisties from hardwiring my dash cam. So once again the stereo comes out... Ugh I agonised about what constant +12v to splice into, but all of my candidate wires just gave me a bit of pause either because the wire seemed a bit thin or it was a critical circuit. So in the end decided to just use a fuse tap. Reliable, reversible, and a lot less stress about choosing the right circuit. I think I went with the horn one in the end. Have to do a quick test before final install of course... And once again the front seat makes it way into the back I was originally going to run the wires along the sill, but after laying everything out I would have been just barely too short. If I'd spliced into something on the driver's side I'd be fine, but in the end I'm happy with the route I chose - it just involved getting more of my arm blind feeling under the carpet. The wires won't rub or catch on anything. The bum sub is secured using hook tape - it isn't going anywhere! I'm no car sparky, but I'm not really happy with the job the electrical place did installing my stereo last year. I think now days I'd have given it a go myself and done a better job. But it's not egregious and I'm probably just hyping my own non-abilities up. At any rate, I soldered my twisties; first soldering since I was in high school, but it's done. So okay fine I'm almost certainly hyping my own abilities up. But they're solid and won't go anywhere. I taped them up with fresh electrical tape to blend in with the rest of the work I also tidied up the routing of many of the wires and also added some labelling. The new sub goes pretty hard. I had the equaliser a little too bass heavy... .... Crazy how much just a little bum sub can change the listening experience in a car. --- I was ordering some amayama stuff for the MIL and decided hey might as well put some cheeky other stuff in the basket... As is tradition, I copied KWS' mirror mod. Basically I'm swapping the mirror out with a different but similar OEM model that has a dipper switch (84703-81A14-6GS + 84782-76G00). I also splashed a bit and got a new wiper stalk from a Jimny with adjustable intermittent wiper speed (37310-74P20). KWS already detailed the mirror swapping process and all you need is a screwdriver. The wiper stalk is also pretty easy. First, the steering column bottom cover comes off with one screw and a light pull. Of course there's tape on it. The stalk is held in with one screw that is obscured by the steering wheel; fortunately, turning the wheel 90 degrees gives access to it. There's also a clip holding it in. The top column cover is very flappy at this point and you can easily get at the clip with a flat head. So strange that they wouldn't just ship this variant on the alto. How many cents did they save not doing so?? Installation is the reverse, clip and screw it in... replace the column covers... Not much movement otherwise. She's still our daily driver and is doing great, trying to spread the gospel of the tiny 660 car wherever it goes.9 points
-
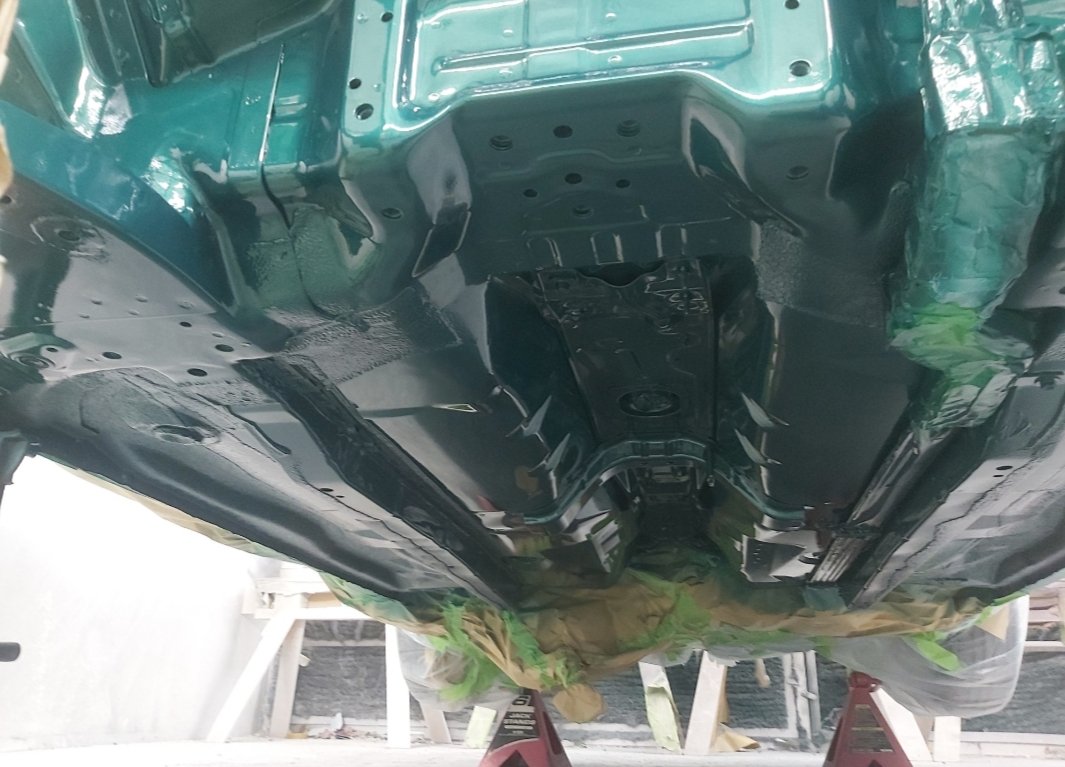
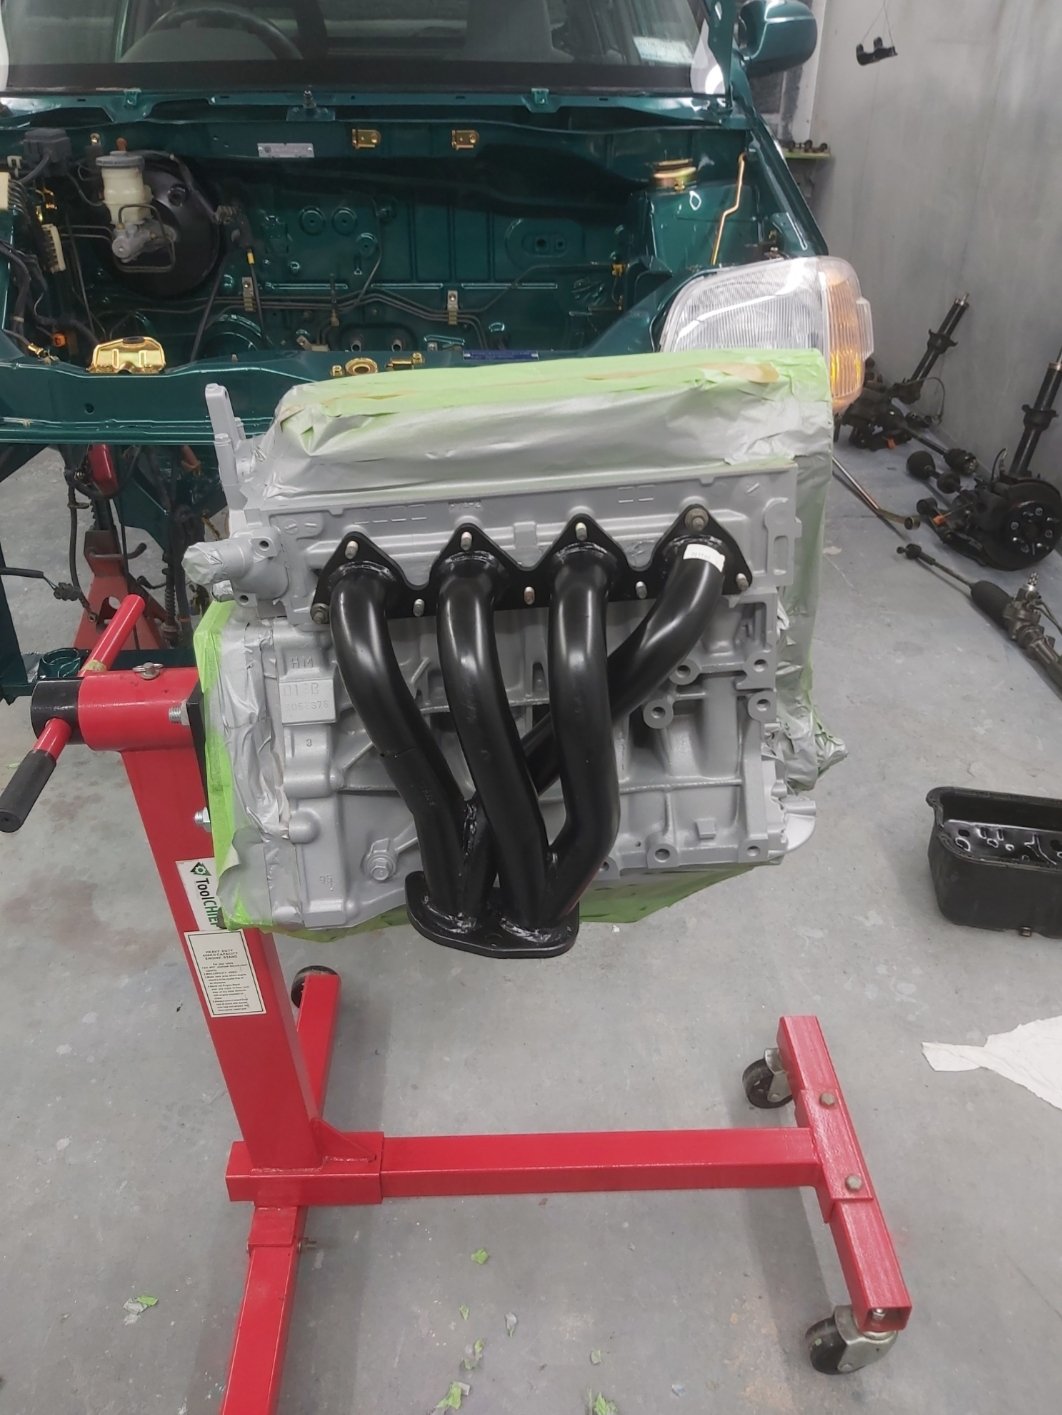
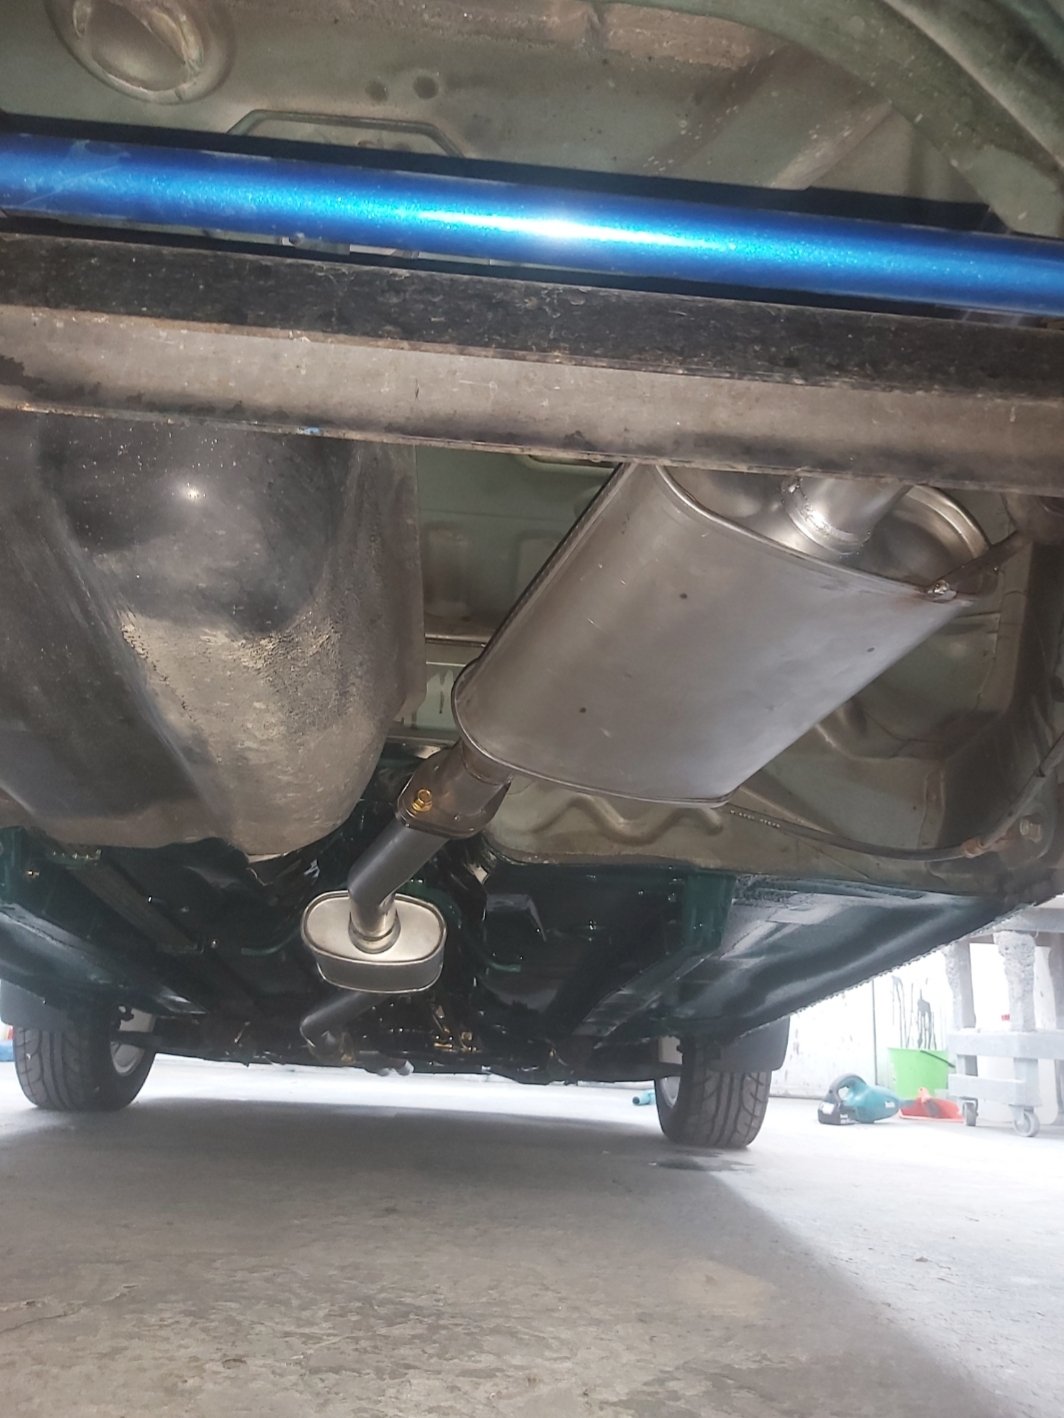
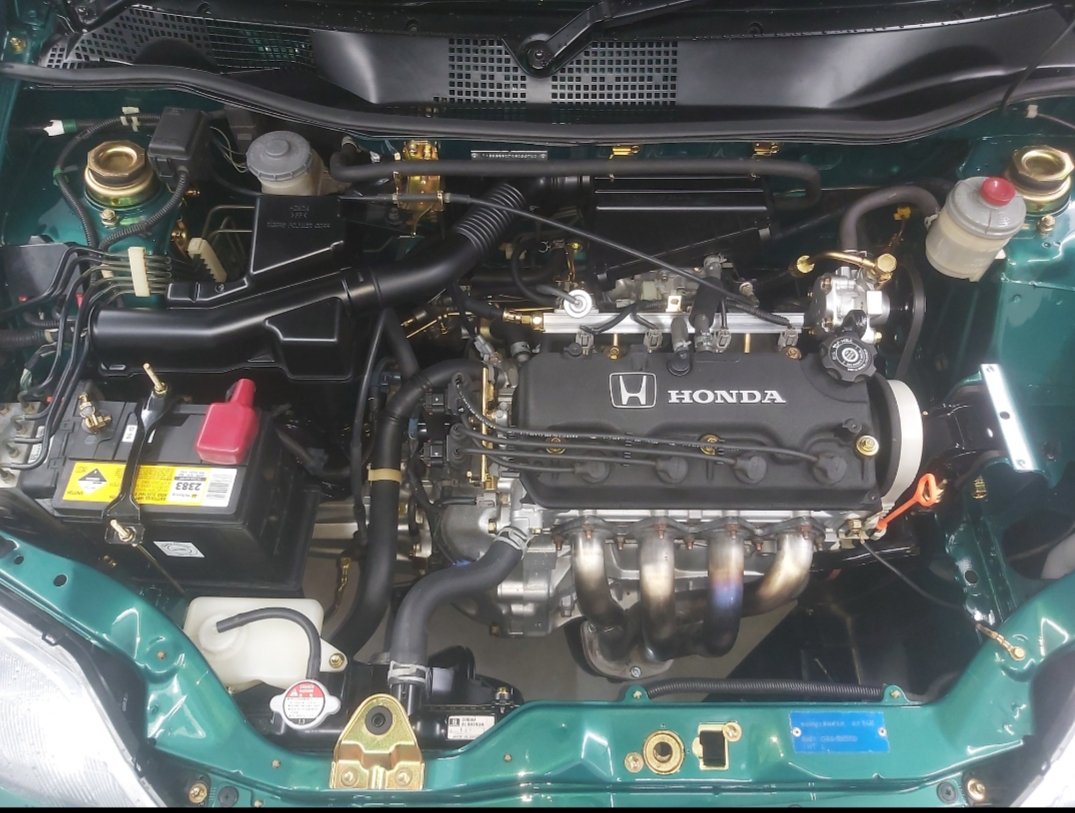
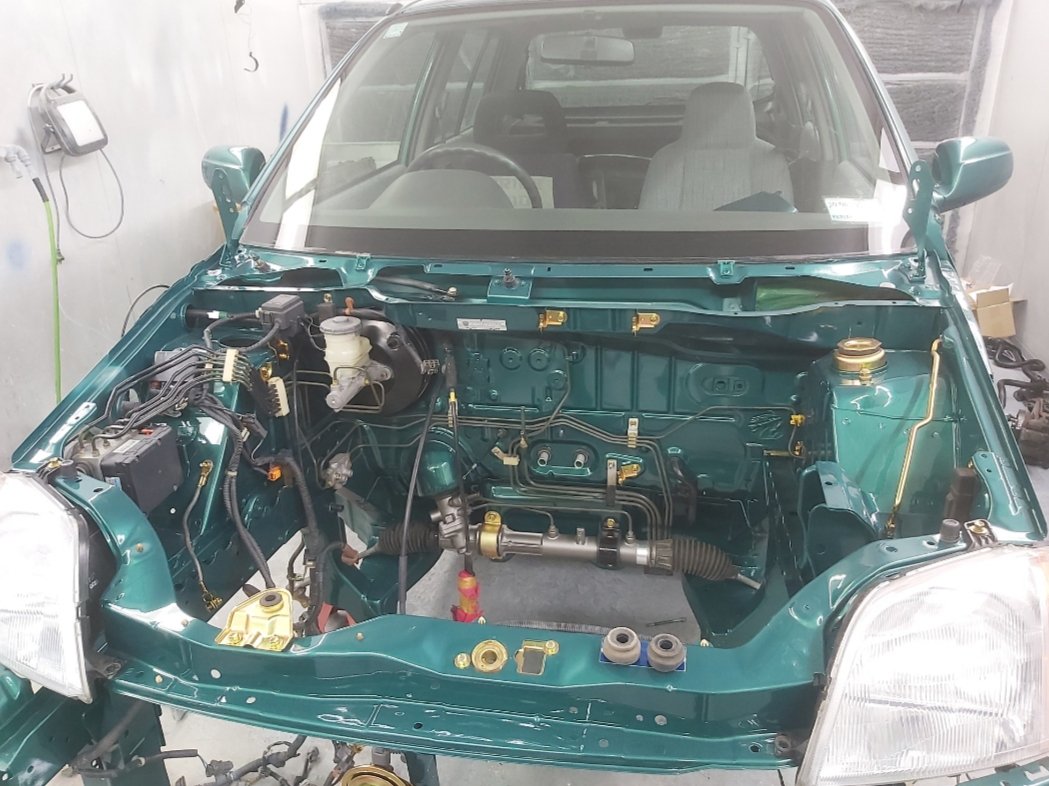
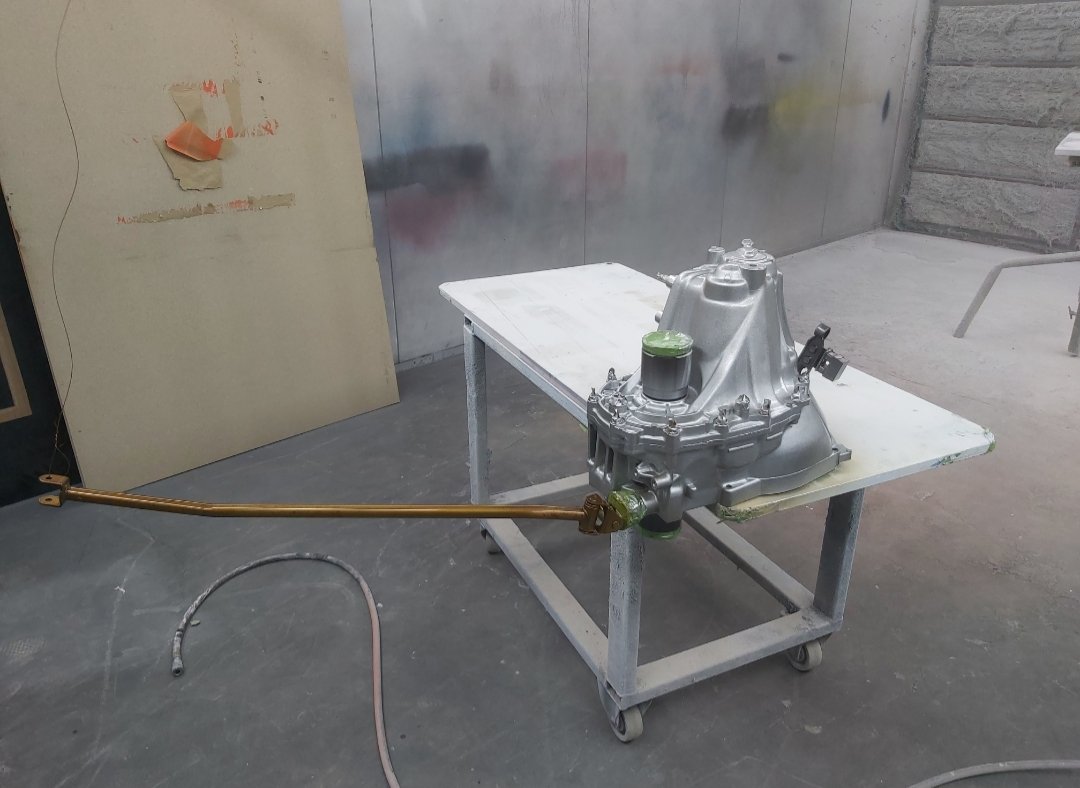
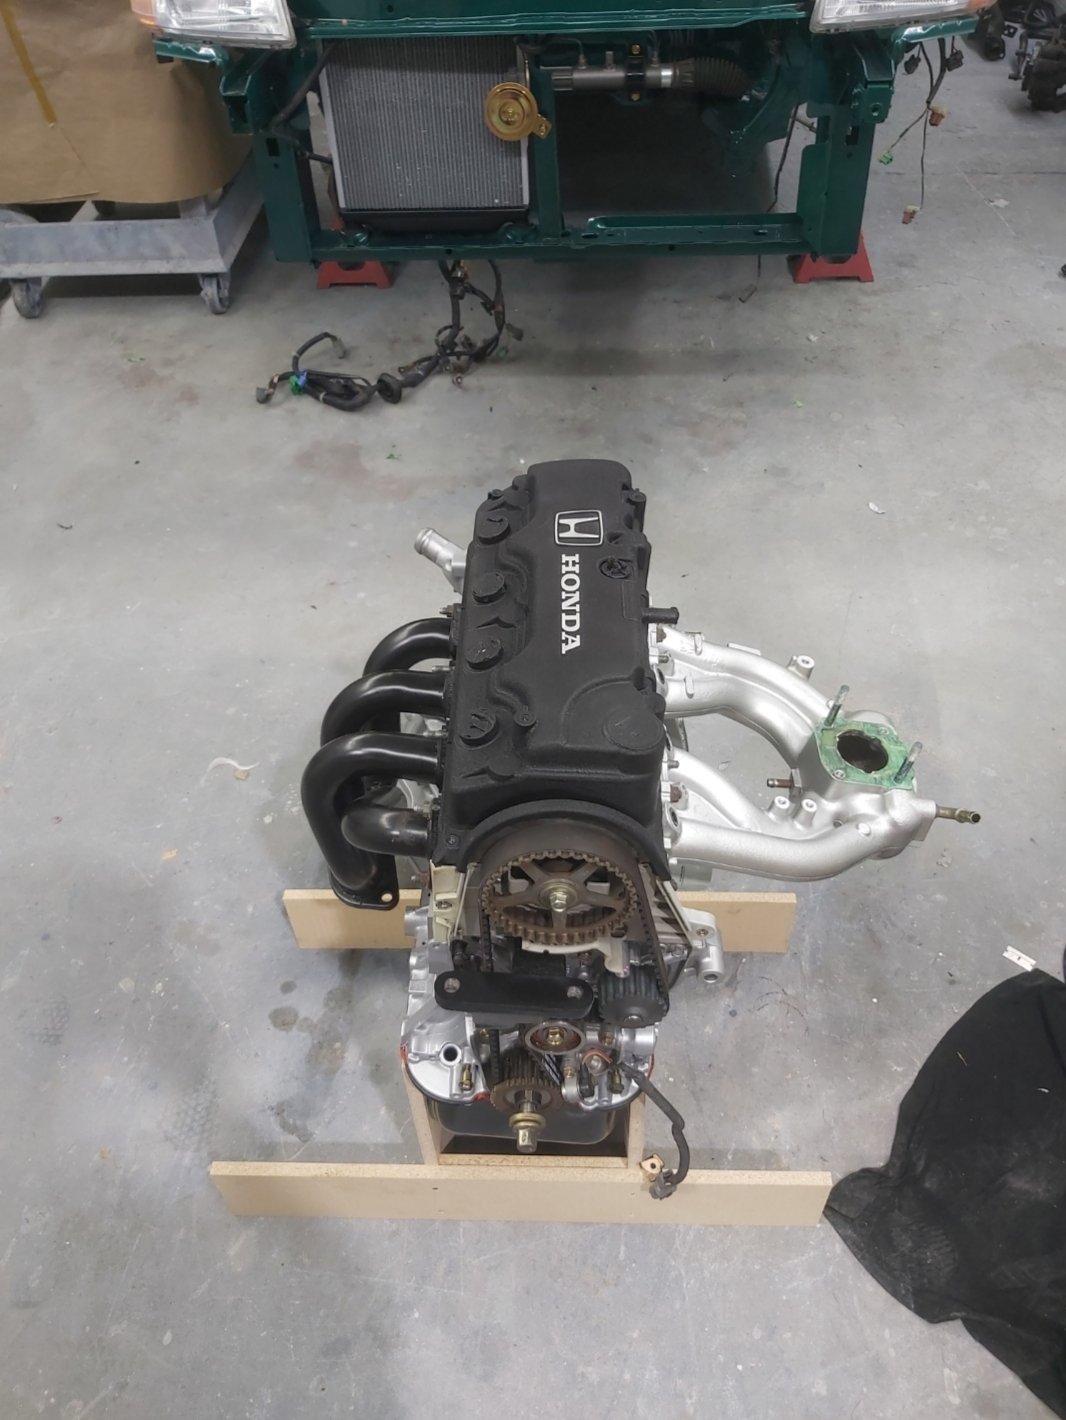
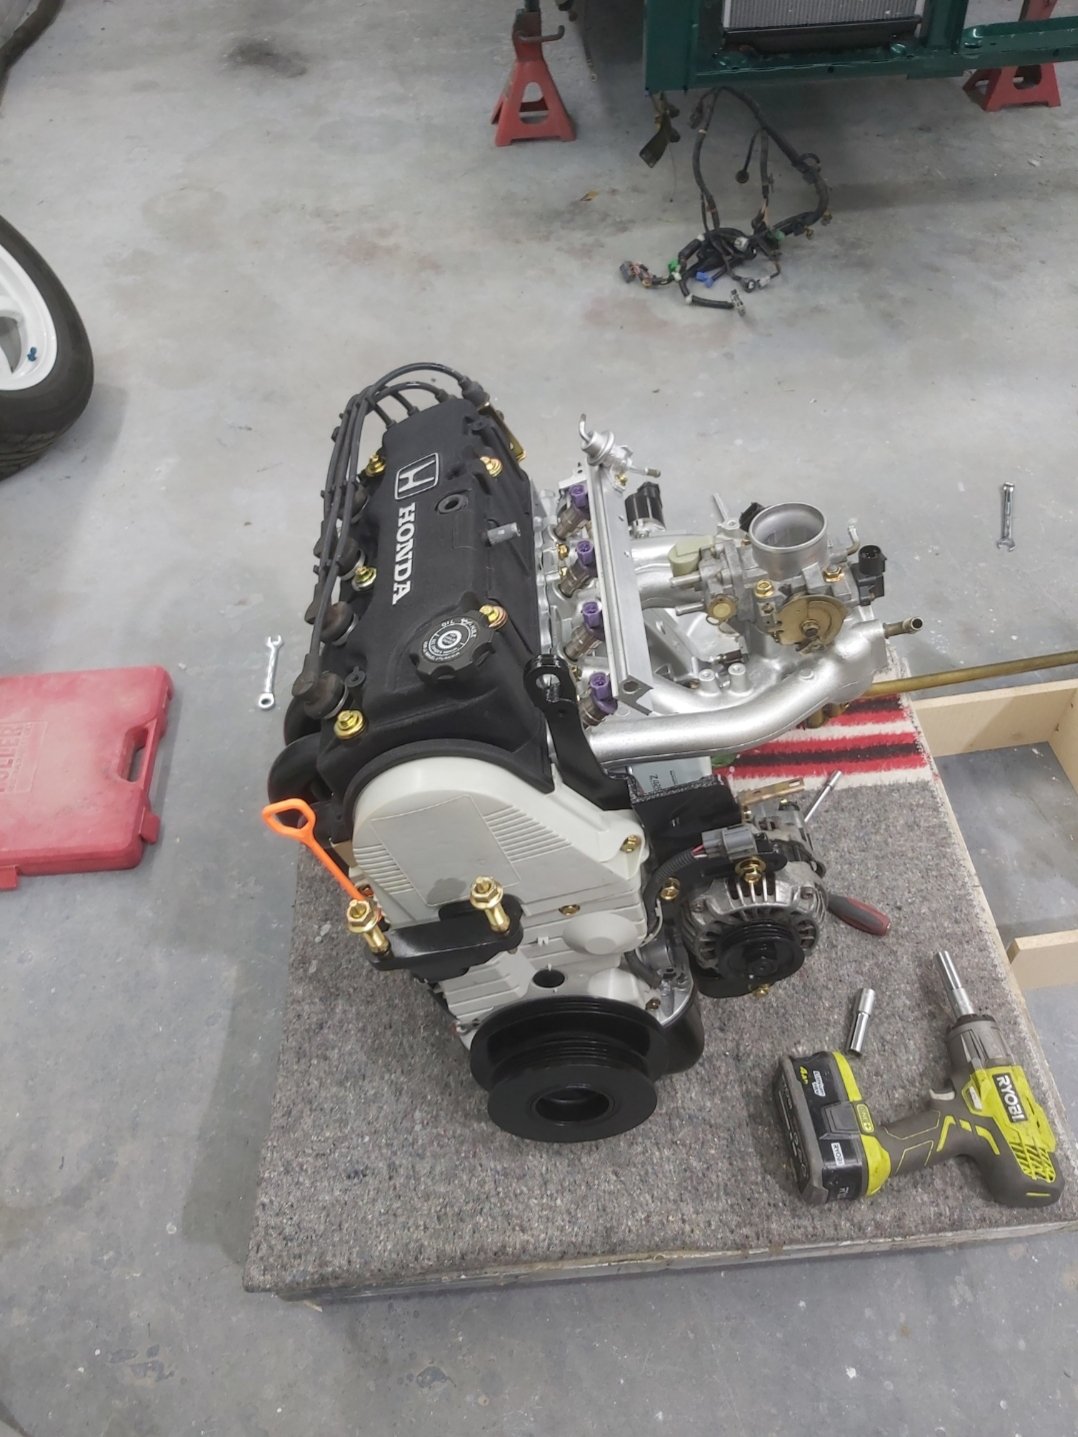
I had been planning on doing a bit of work under the bonnet for the drags but as you will find out that it spiraled out of control Its probably a bit strange but everything I did to the logo over this time was done in a spray booth. We have multiple spray booths and this one is mostly not used. It started with I was having problems with the engine mounts being so floppy the twist of the engine causing the exhaust to hit the sway bar. Plus I wanted to clean up the engine bay and remove the a/c. The solution for the engine mount was to fill the remaining space around the mount with urethane. I went to Bunning's and found a Shellys product that had +-12% movement. To get the urethane in the mounts the easiest way was to remove the whole mount. But that meant the engine wasn't supported. So I decided to drop the whole engine and gearbox. I had the a/c de gased and removed the compressor. Then started unplugging the loom and was taking photos of all the plugs and bolts to try remember where everything went. Got lazy in the end and gave up. Lol. Dropped the whole engine and gearbox down on to a trolley then rolled it out to the left. Only casualty was a snapped dipstick. I quickly realized that my OCD wasn't going to let me put the engine back in without painting the bay. It was starting to get a bit of surface rust in some places so it was the perfect time. Then realized there was no good place to have a masked line apart from just before the rear axle so that meant I had to paint the underside. So I may as well paint under the guards as well. OCD kicks in again anything that needs to be black needs a fresh coat of black. Then the block, head and gearbox look dull. So I took my time selecting the colour for the aluminum as I wanted it to be an almost perfect match. I ended up going with a basecoat with 50% clear coat. Then the bolts looked crap so I sent them to get zinc plated from Terei Brothers. Denis and the boys did a great job would definitely recommend them. Before photo of about half the bolts I got done. The assembly was quite daunting until I remembered that partsouq have a full breakdown of every part and bolt size and length. Everything went relatively smoothly for assembly. Had a small problem with a axle bearing that is still in the car but seems to be ok at the moment. While the engine was out I brought a set of civic headers for d16. Surprisingly they bolt up but just needed a bit of work to get around the engine mount and sway bar. Unfortunately I ran out of time to make the exhaust myself so I sent the car to pit stop New Lynn they did a really good job. Full 2inch with 2 mufflers it looks really good I'm super happy with it. I feel it may have changed the mid range powerband but I'm a looks come first guy. Lol. Did a small brake upgrade while I was at it. Later model logo front discs (vented not soild) with gd3 Honda fit calipers. All bolt on. Got a wof on the Tuesday before the drags did a few small drives around town. Packed the car friday night and ready for the drags. It had been a crazy 5 weeks glad I did it and glad it's over. I have to thank so many people but my wife gets the biggest thank you. She's a bloody legend for dealing with everything while I was working to crazy hours.
 9 points
 -
Here's the finished exhaust and the half finished floor. That's a job for next year. I didnt want the yuck paint burning off the headers smell so I paint stripped them before hand. Will get them pro coated next year. All done ready to go. Crazy 5 weeks. Photo from Roman Dave. Racing with Kieran. He help me so much with finding parts and even getting the engine in the car. Even if he doesn't understand my ways he's always there to help out. Thanks mate.
7 points
-
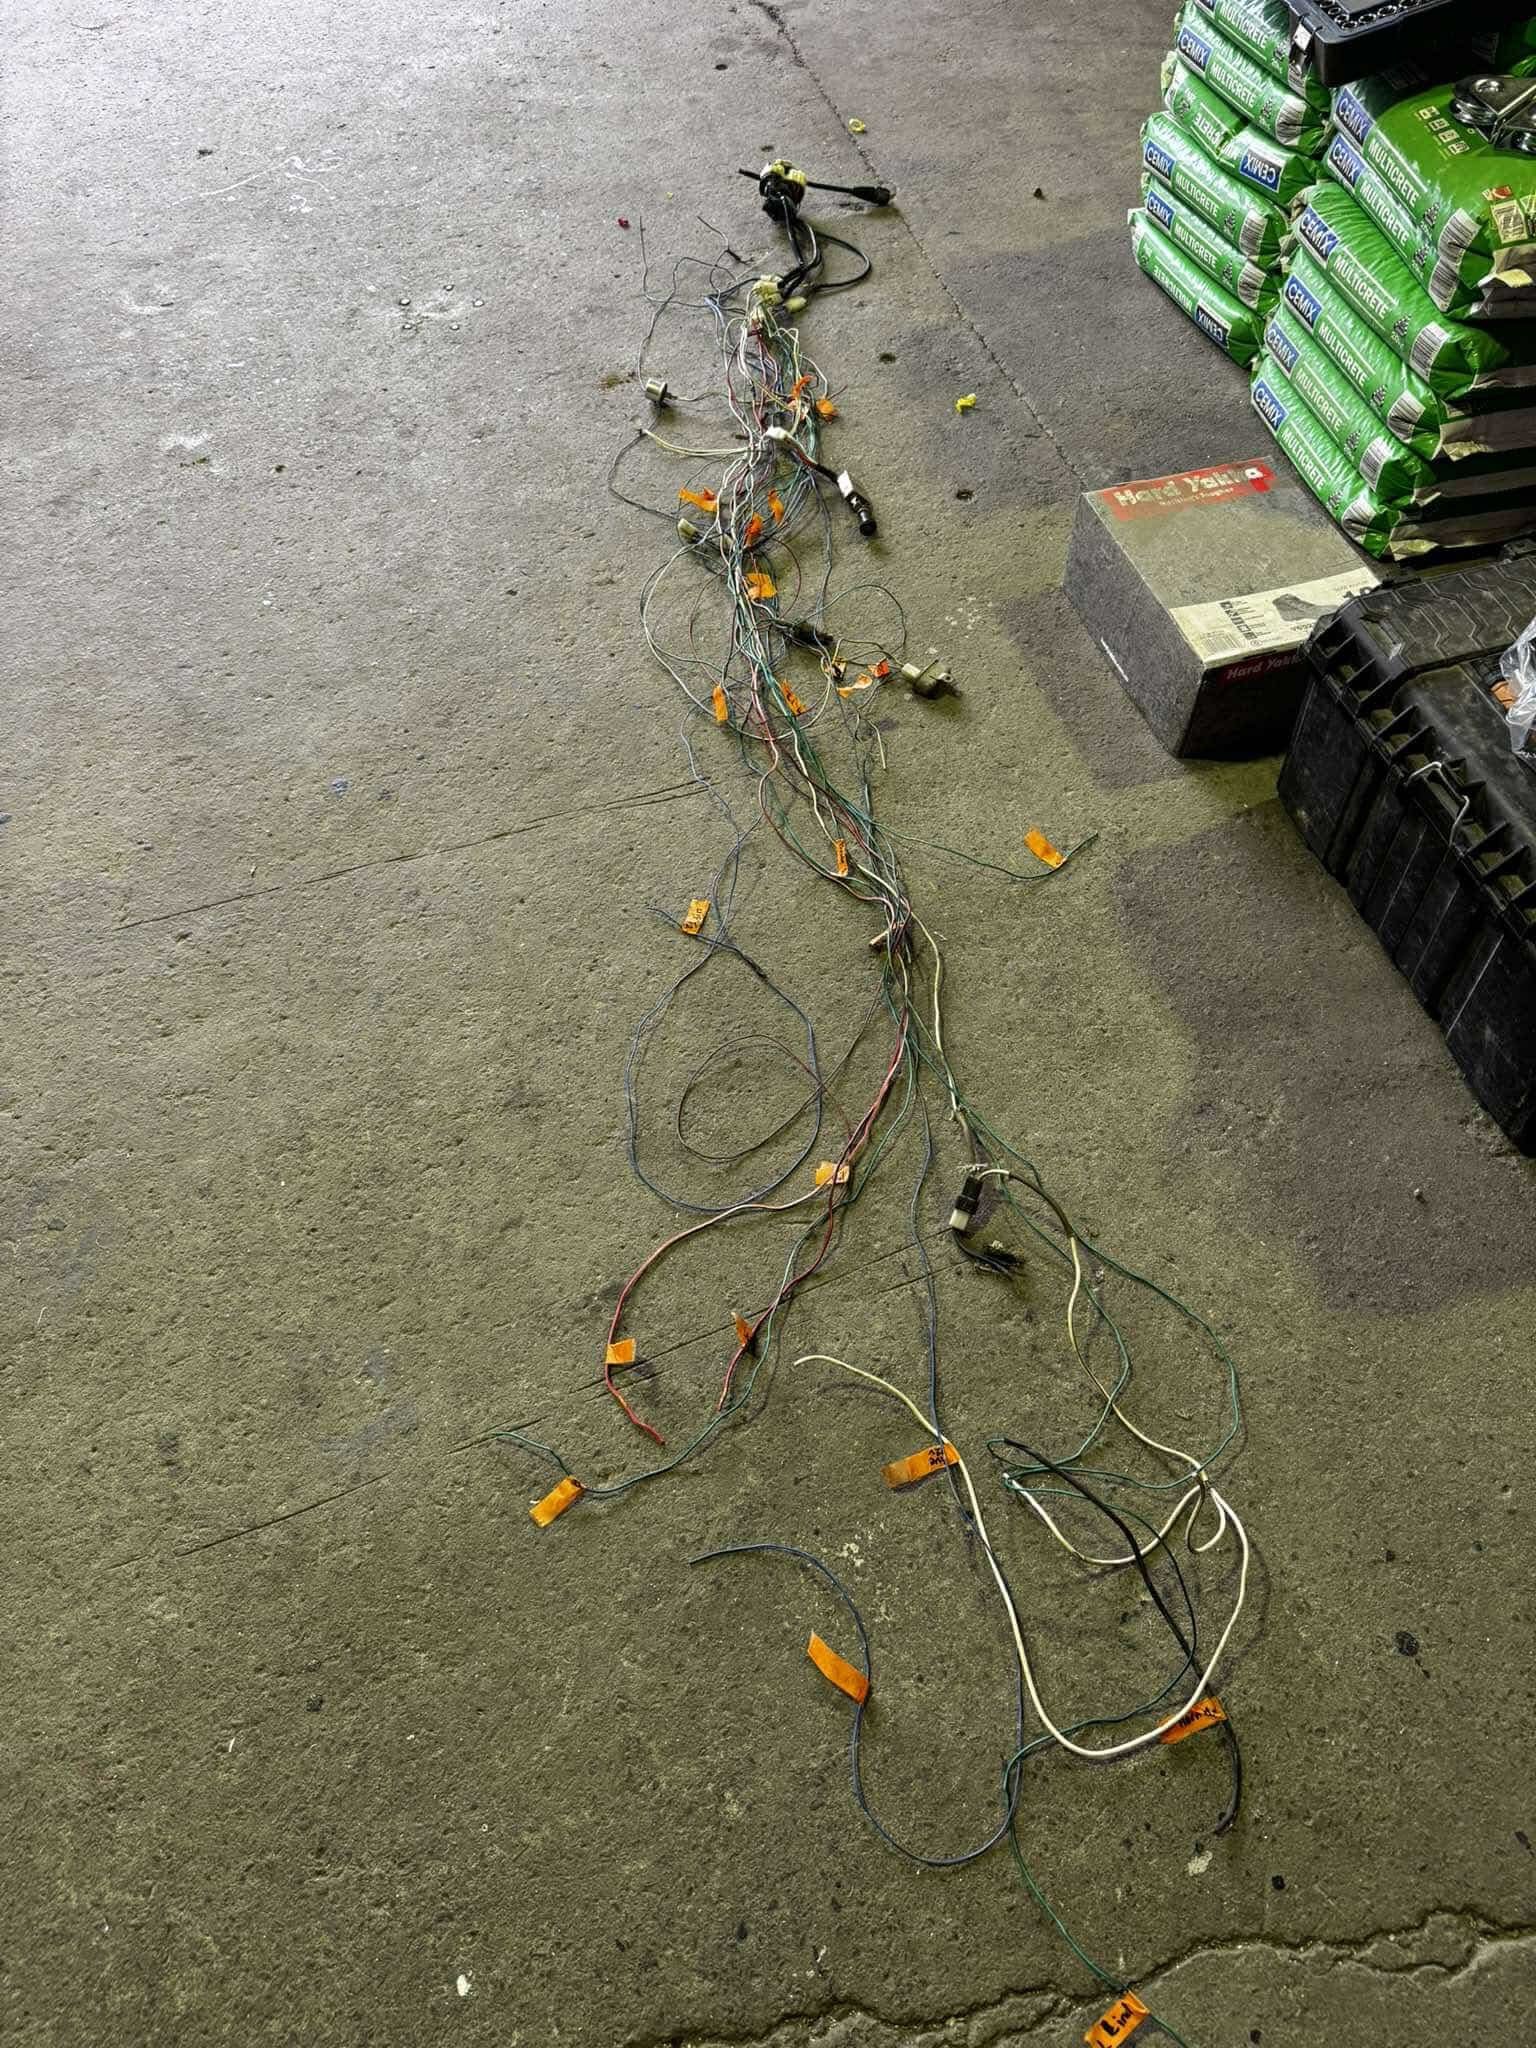
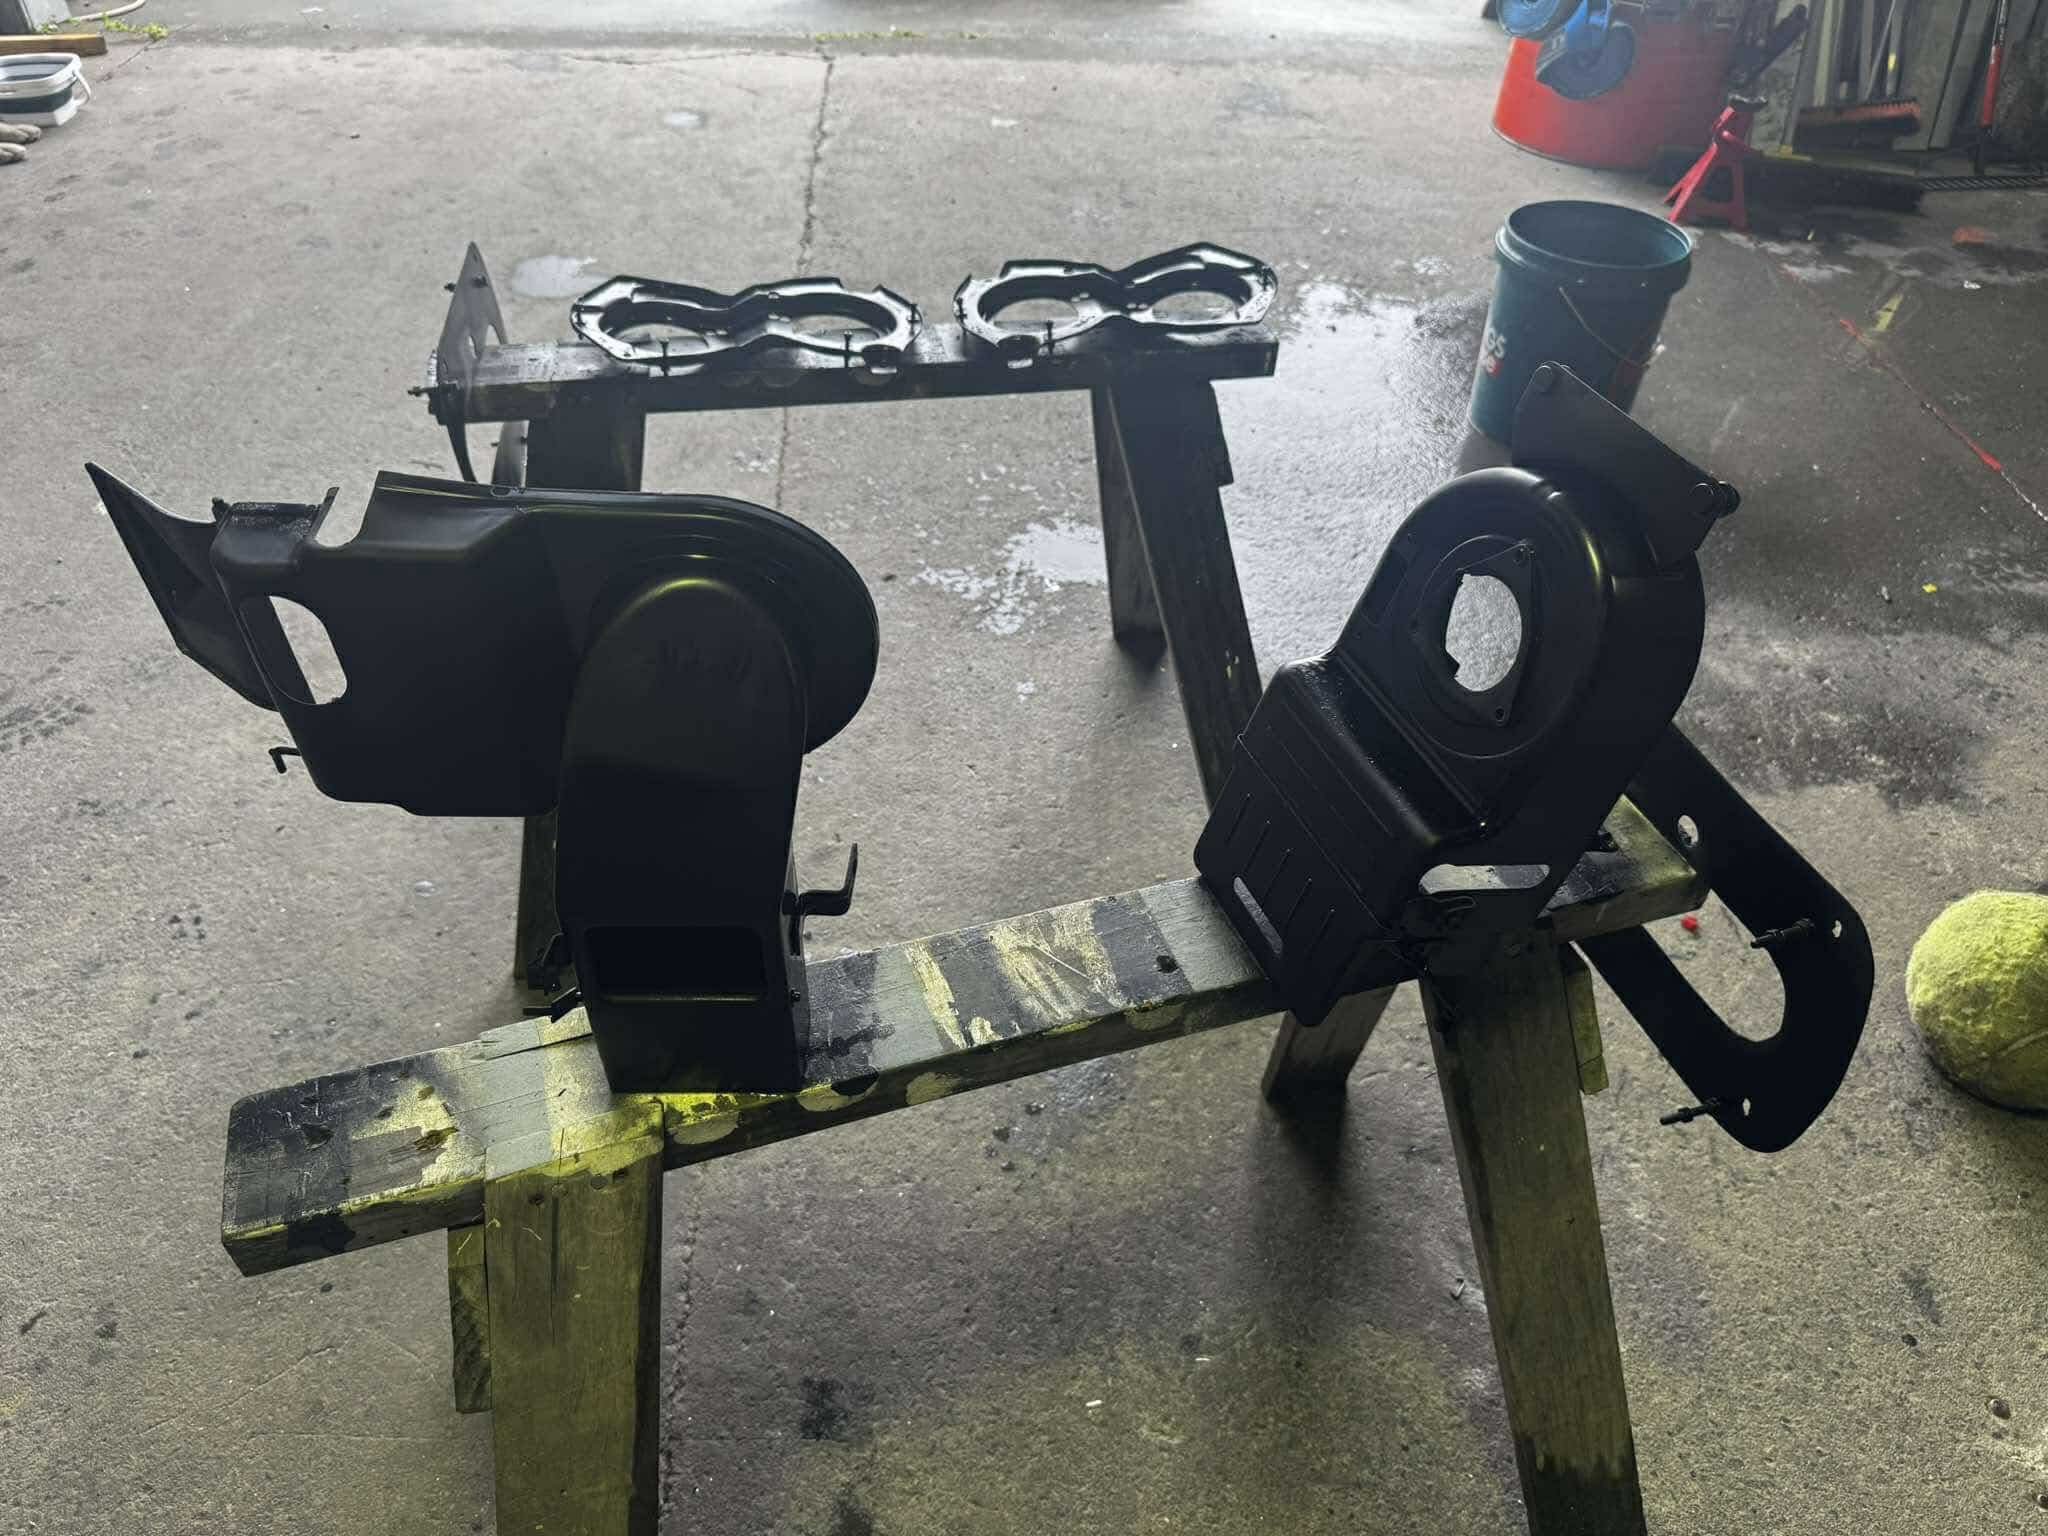
Rainy day stuffs today. stripped back the factory loom to salvage the plugs. Labels everything as it got cut away. seems pretty easy. Just need to figure out the flasher set up cos it was unplugged. then cos it was still pissing down I decided to strip the heater box, remove the heater core, test the fan and scrub and respray the entire housing. came up great. did the same with the headlight buckets and mounts.
6 points
-
Here is some photos. Couldn't fit them all in one post It's a honda so it has to have a wrinkle finish rocker cover. Also while engine was out I did cambelt and water pump. The timing Marks were a bit confusing but looked into it online and found the timing Marks on the back of cam gear line up to the head while rocker cover is off. I guess it's so you can see while engine is still in the car. Did the sump gasket while it was on the engine stand. unfortunately I couldn't get the shifter linkage off the gearbox so I painted it with a zinc coating and clear coated it. Kept the axle ends in to stop overspray getting in the box and them blacked them after. Note: brand new genuine Honda dipstick.
6 points
-
In the same vein, I brought a CNC plasma at the start of the year. In order to get them running really well/cutting clean you need dry air, I went over the top but it has paid dividends in quality (just like painting). I have a really old 3ph compressor hard lined through 2" pipe throughout the factory (id say it's the original compressor that was fitted to the building in 1978 - an old sewing factory). So the whole manifold is like a giant tank, I'm unsure how big but would be at least 300-400l total incl the tank. The compressor runs for a solid 10 minutes or so on startup so generates plenty of heat and moisture. I brought a couple of cheap aliex 230v auto drains, I think they were about $20 each. I put one on the bottom of the compressor tank and another on a low point in the factory pipework, they drain every 15 minutes for a 5 second burst. I never have to think about draining my compressor/system. Ever. I then run a water trap on the inlet side of a $400 refrigerator dryer I picked up off tm (score- a new one is about $2500) I very rarely have to drain the trap on the inlet side to the refrigerated dryer. The tip life on my plasma suggests it's good and dry. The only other thing I could do better to get better air is a dessicant type filter post refrigerator. I painted my digger with enamel and it came up pretty ace. I'm stoked with having nice air, it's a really worthwhile investment I reckon.5 points
-
12 monthly update. Lol. Still got this. Has some friends. Got it running again the other day for the first time in a while. Doesn't seem to like sitting. Thanks to @Geophy for the work bench. Added some castor's and its a dream to work on the bike now, and makes shed tetris much easier.
5 points
-
it’s been noticed… lol
4 points
-
Does the chassis have numbers at all? Or even easily readable? /grind the numbers off and cover in dirt4 points
-
They were cheap with lots of life so that's why I ran them as I've got BRIDGESTONE RE003 on rear for street and didn't want to scuff those up, I'll keep an eye out for some proper drag slicks. I did a 14.6 @98mph on the Road tyres as my first run just see how everything performed I'm 100% blaming the driver he's a bit shit. Was fun to not lose every race though.4 points
-
It worked. Discovered my dusty old practice amp is an Ashton too... It made noise, and the tuner worked, if a little rudimentary... But the action needed sorting, and I wasn't happy with the flimsy screws into plastic holding the unit to the body. There's a bit of extra tension with the bendy surround mod, so I drilled out and used 3mm black machine screws. Much more secure... The new nut was way too high, so pulled it and sanded similarly to the saddle, supposed to have roughly 1/2mm clearance at the first fret. Before/after pics... And all done, re-strung and whole thing looks much better, and seems playable, now just down to the operator...3 points
-
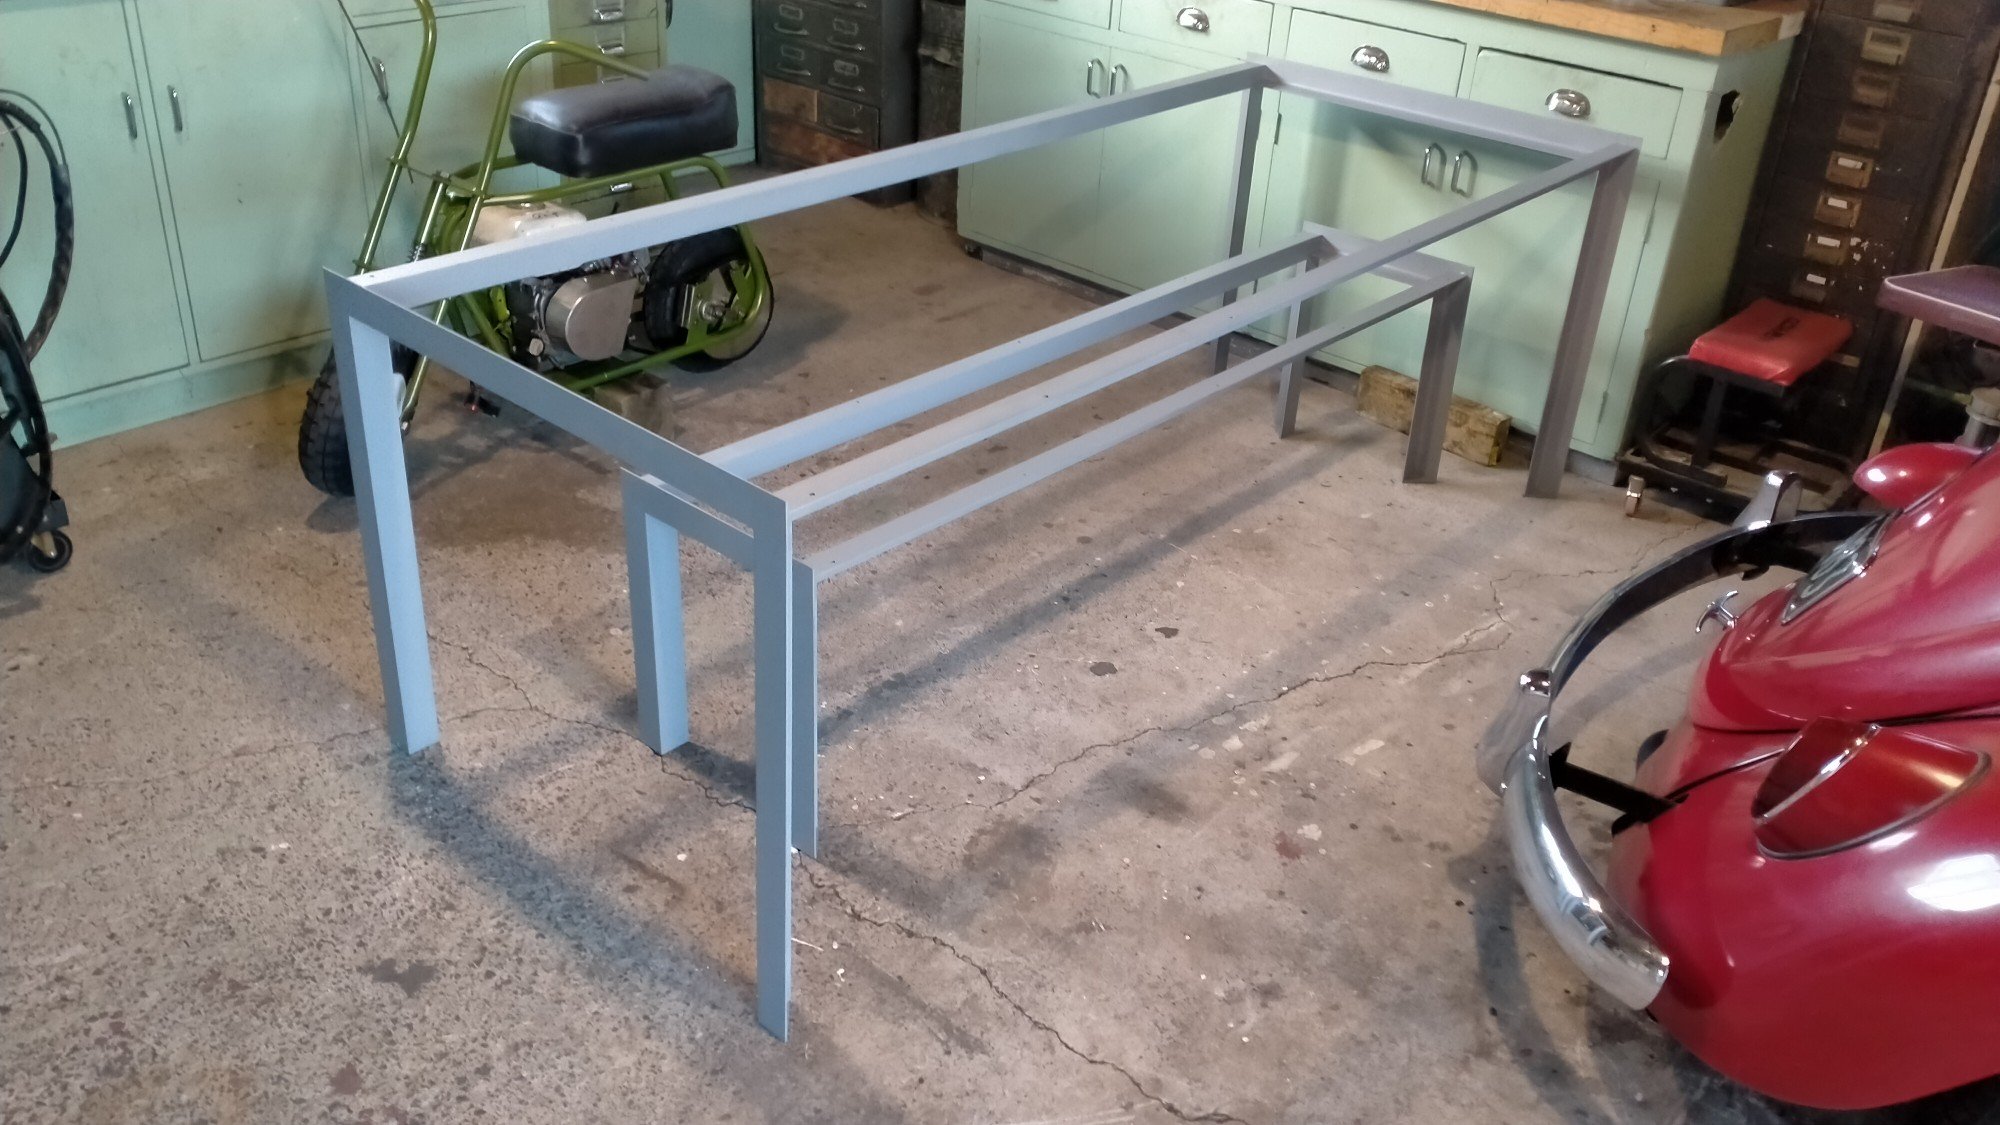
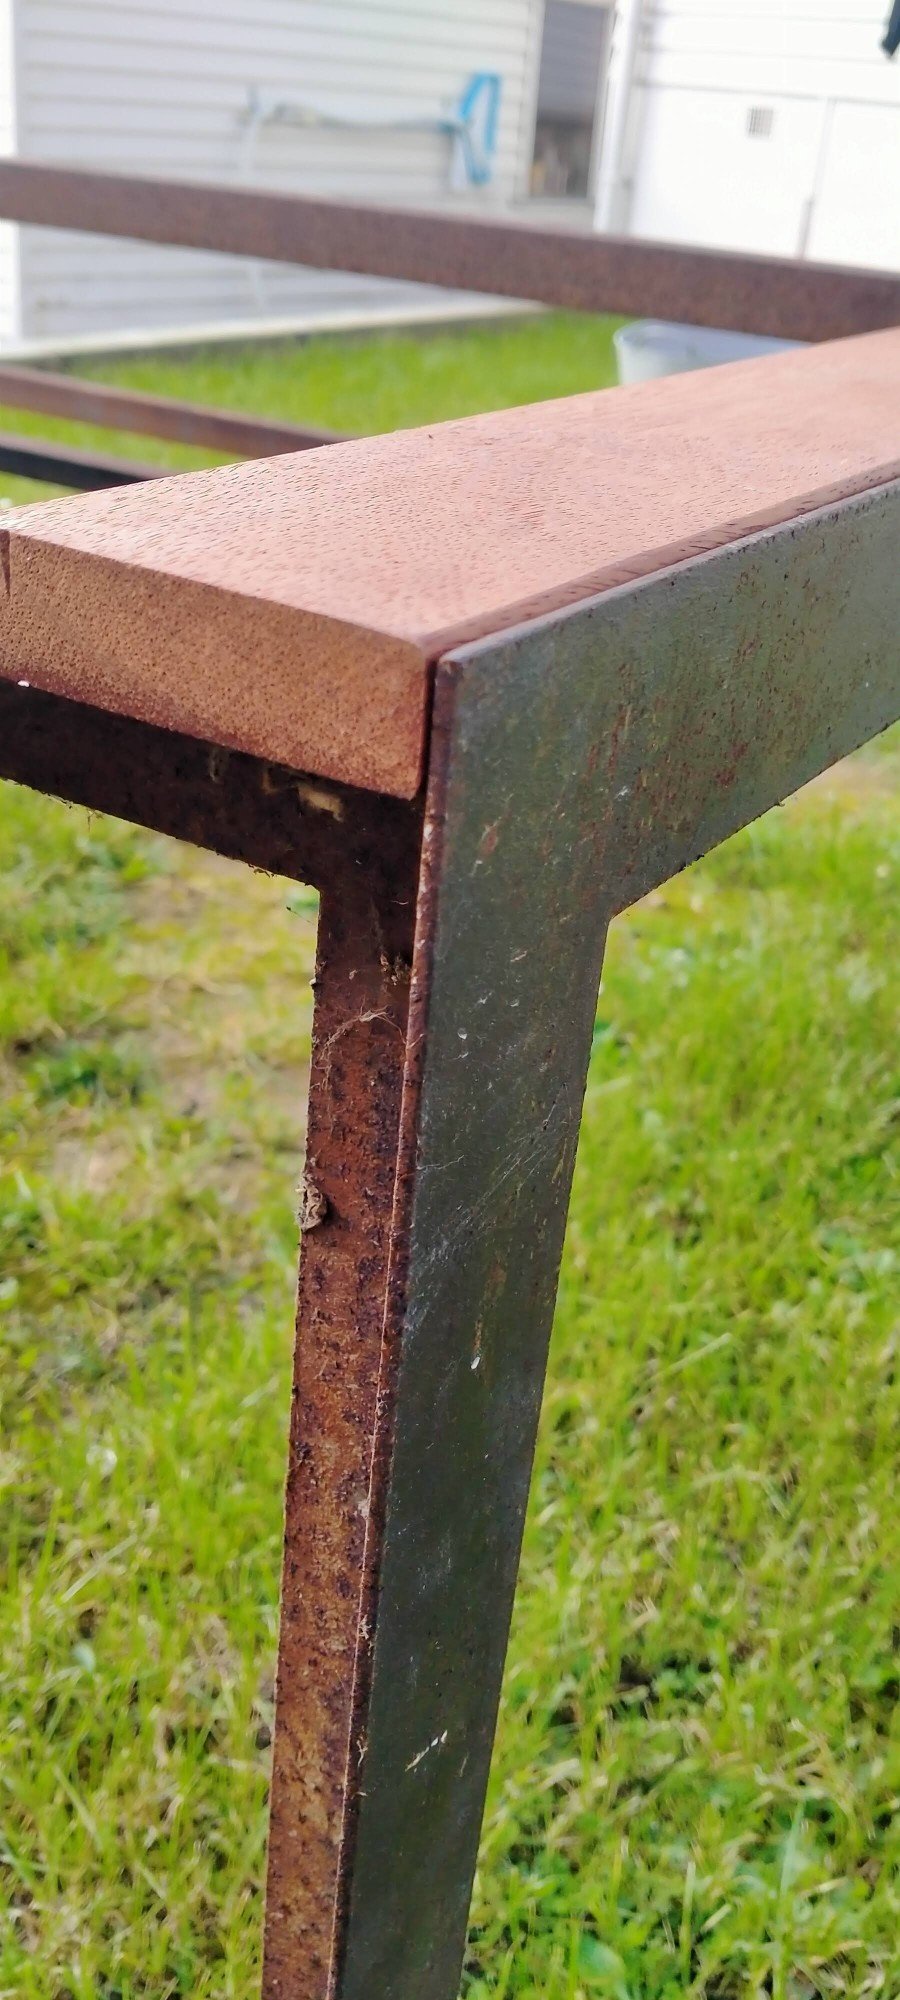
After looking for a new outdoor table and chairs my workmate found this for me. Just a couple rusty frames with no wood. Have been wire wheeling, rust converting, priming and painting as I've had time. Bought some lovely Garapa this week and fitted it up today, so satisfying oiling it up.
3 points
-
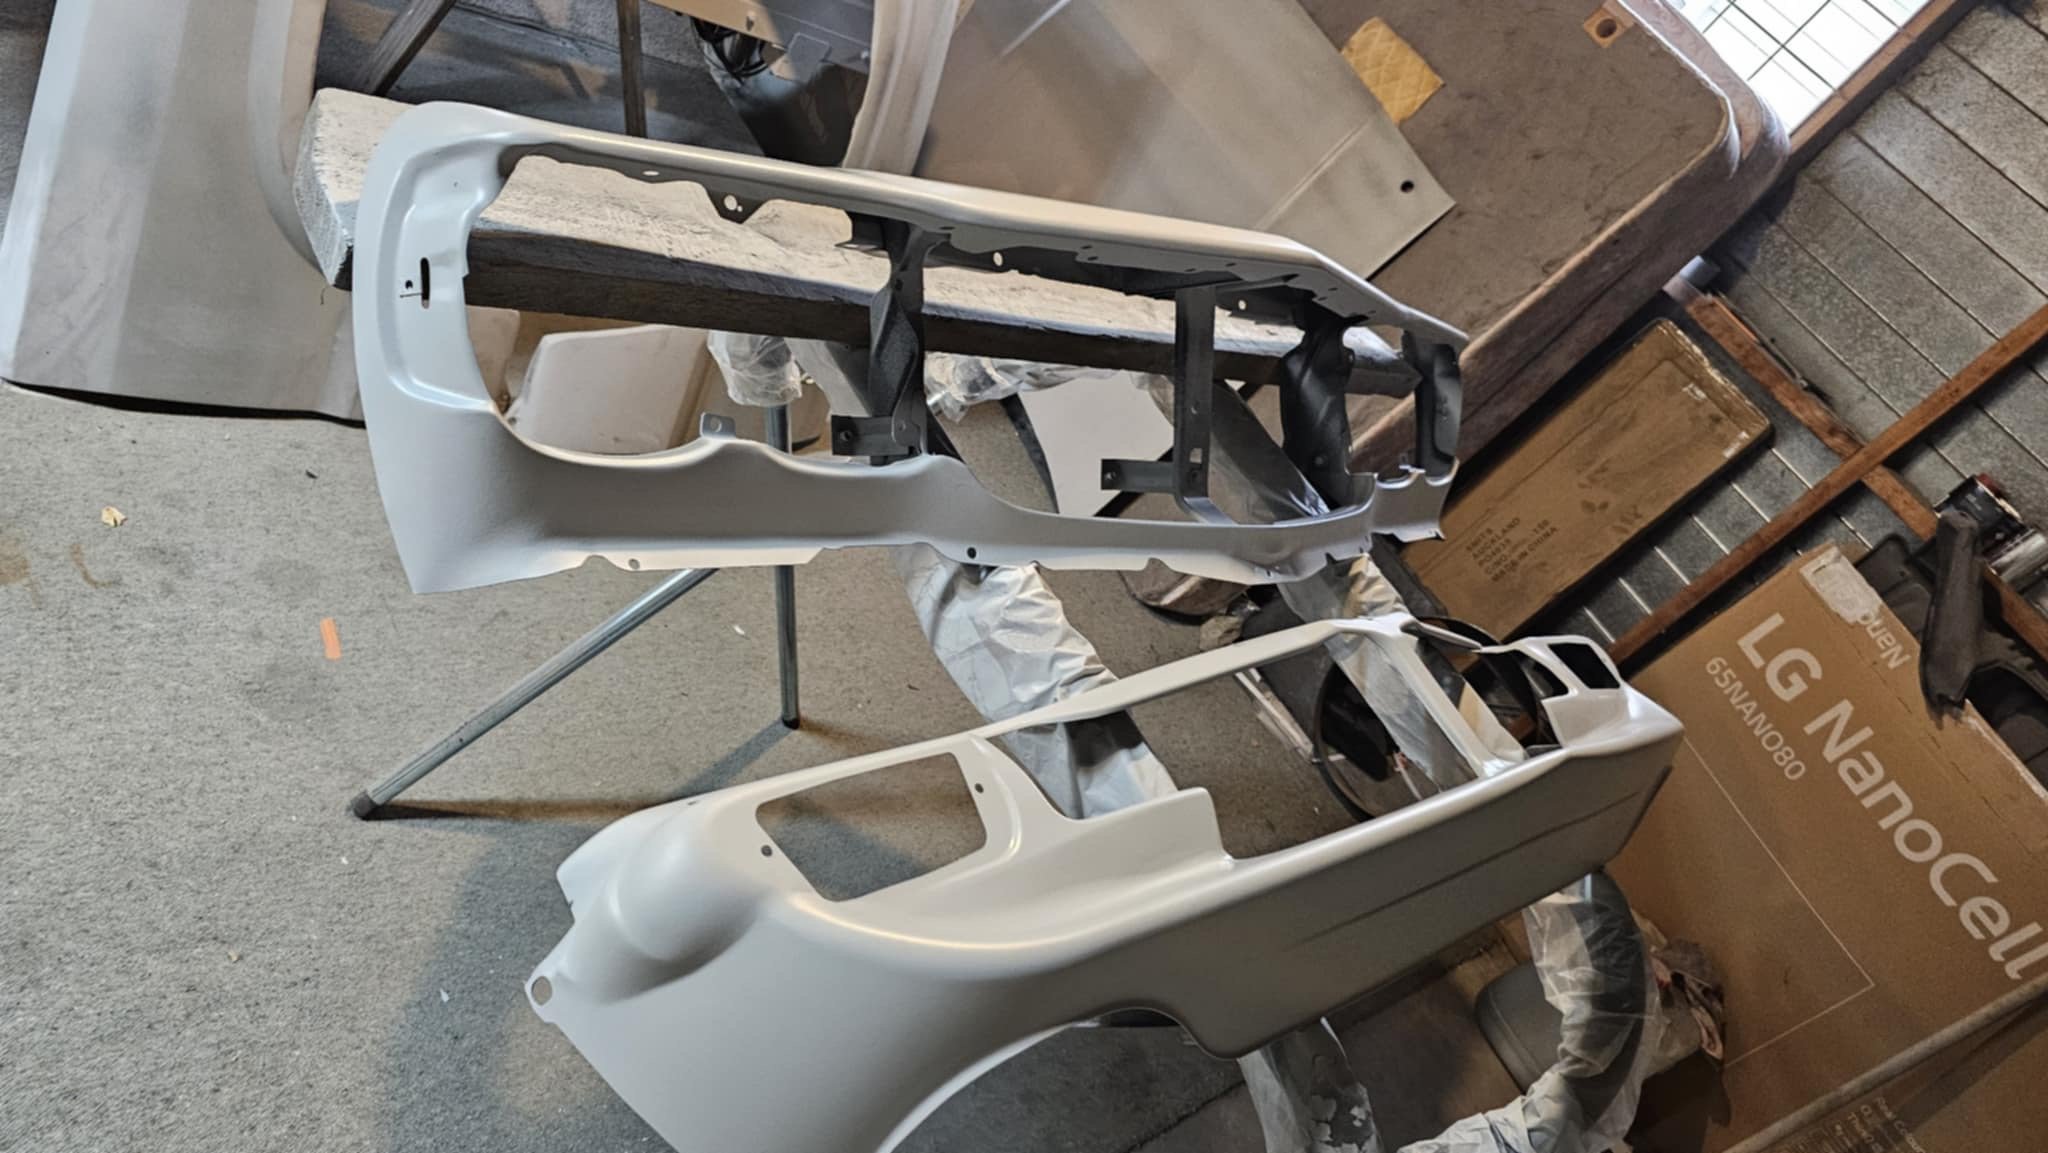
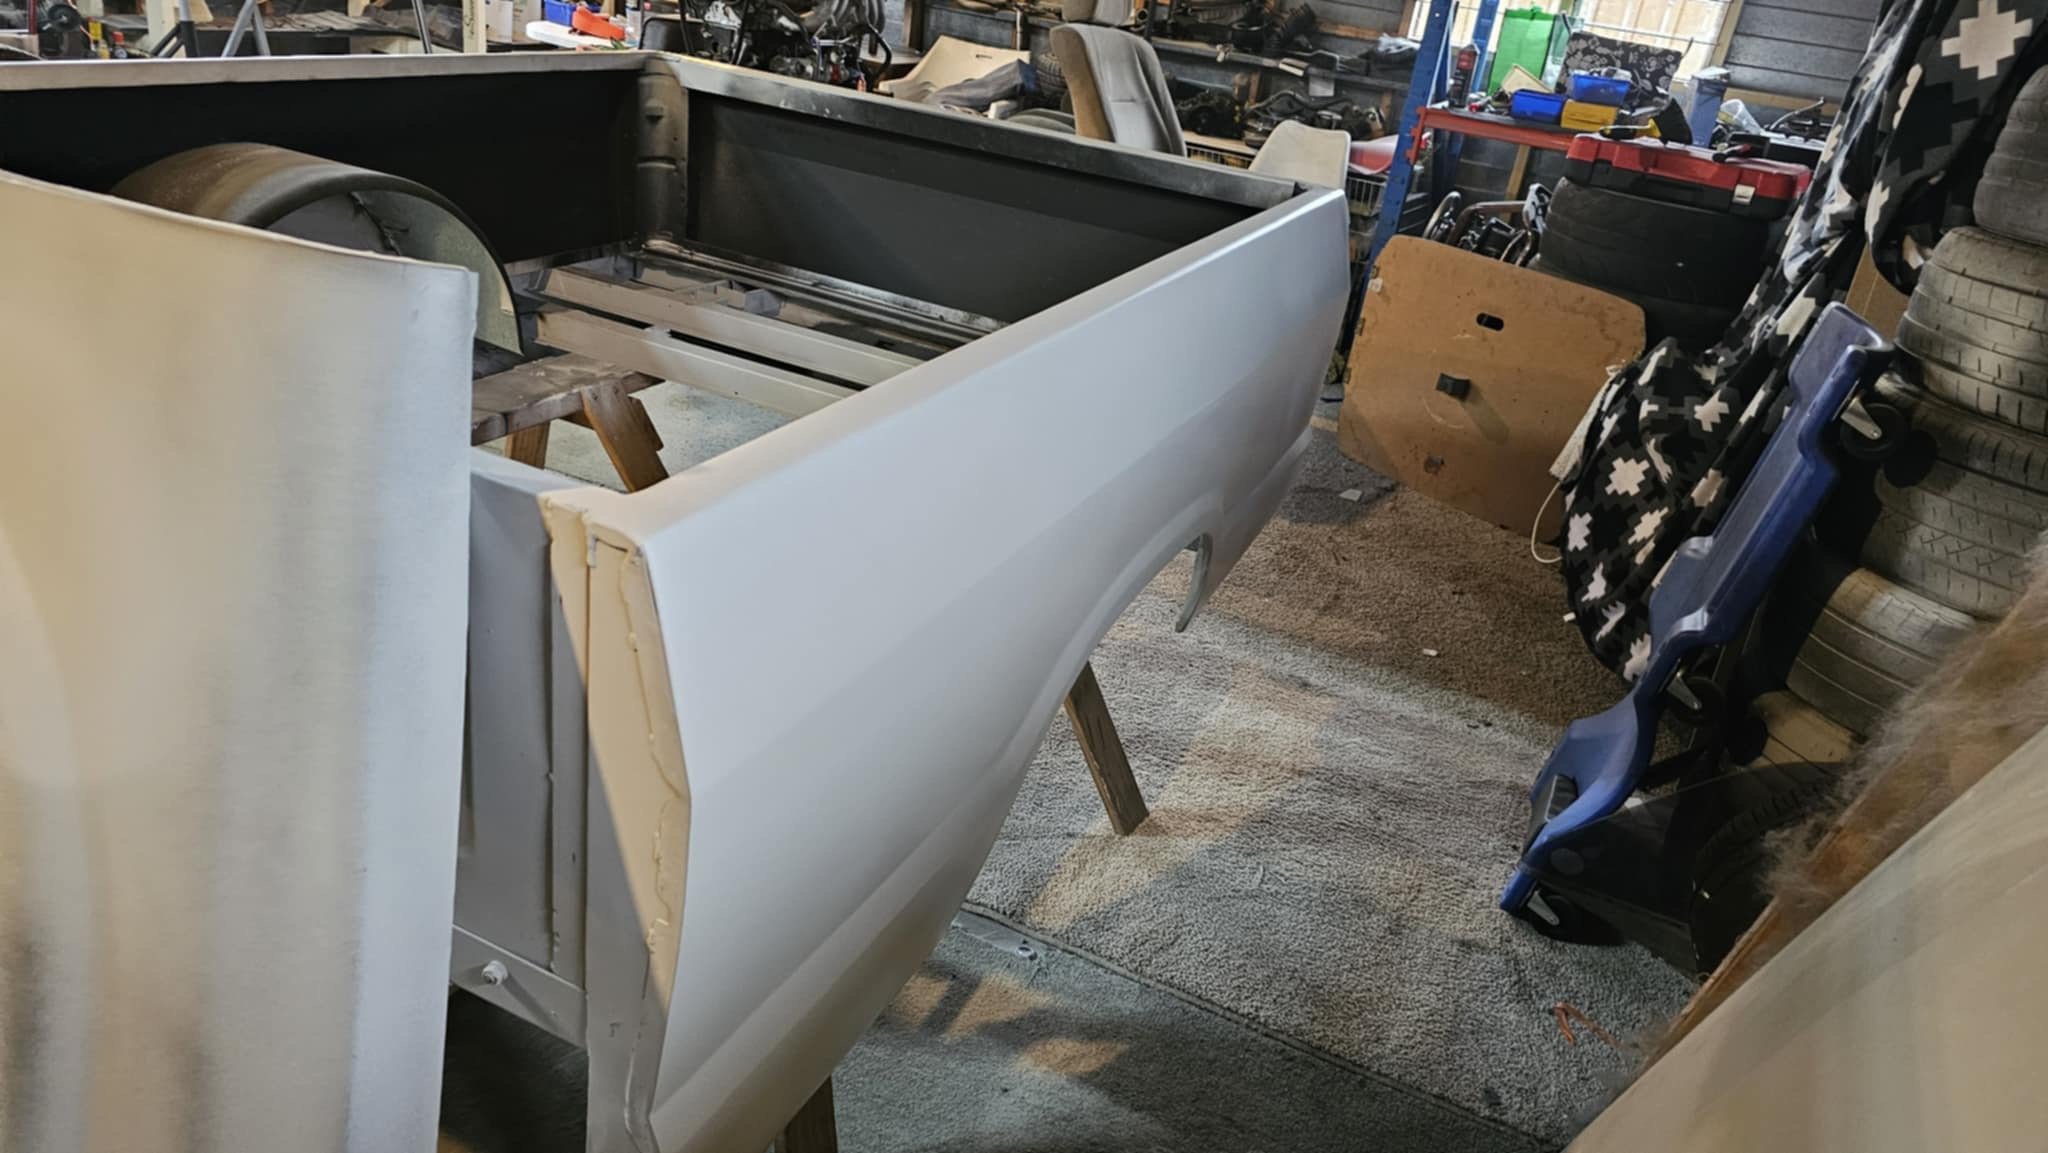
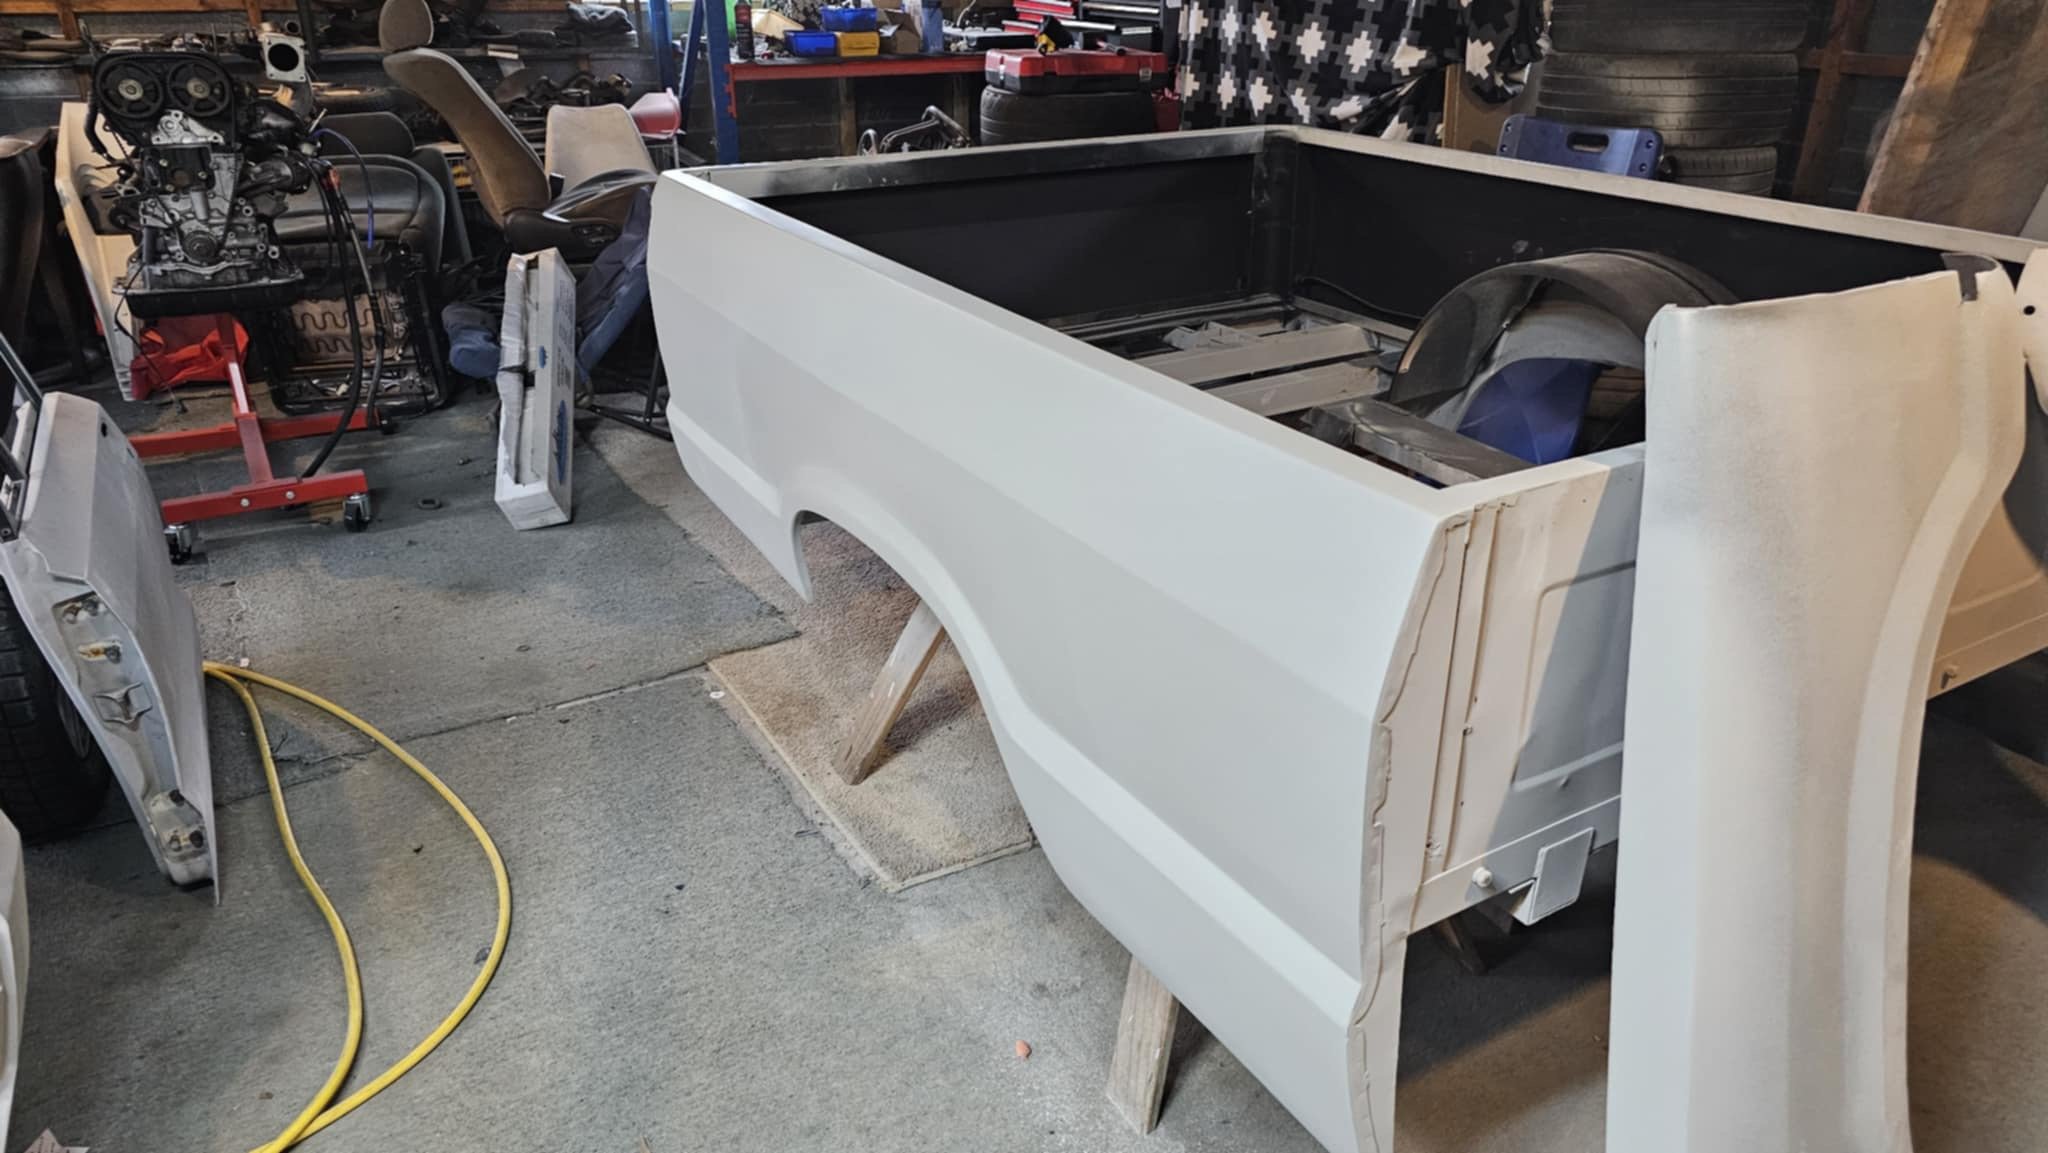
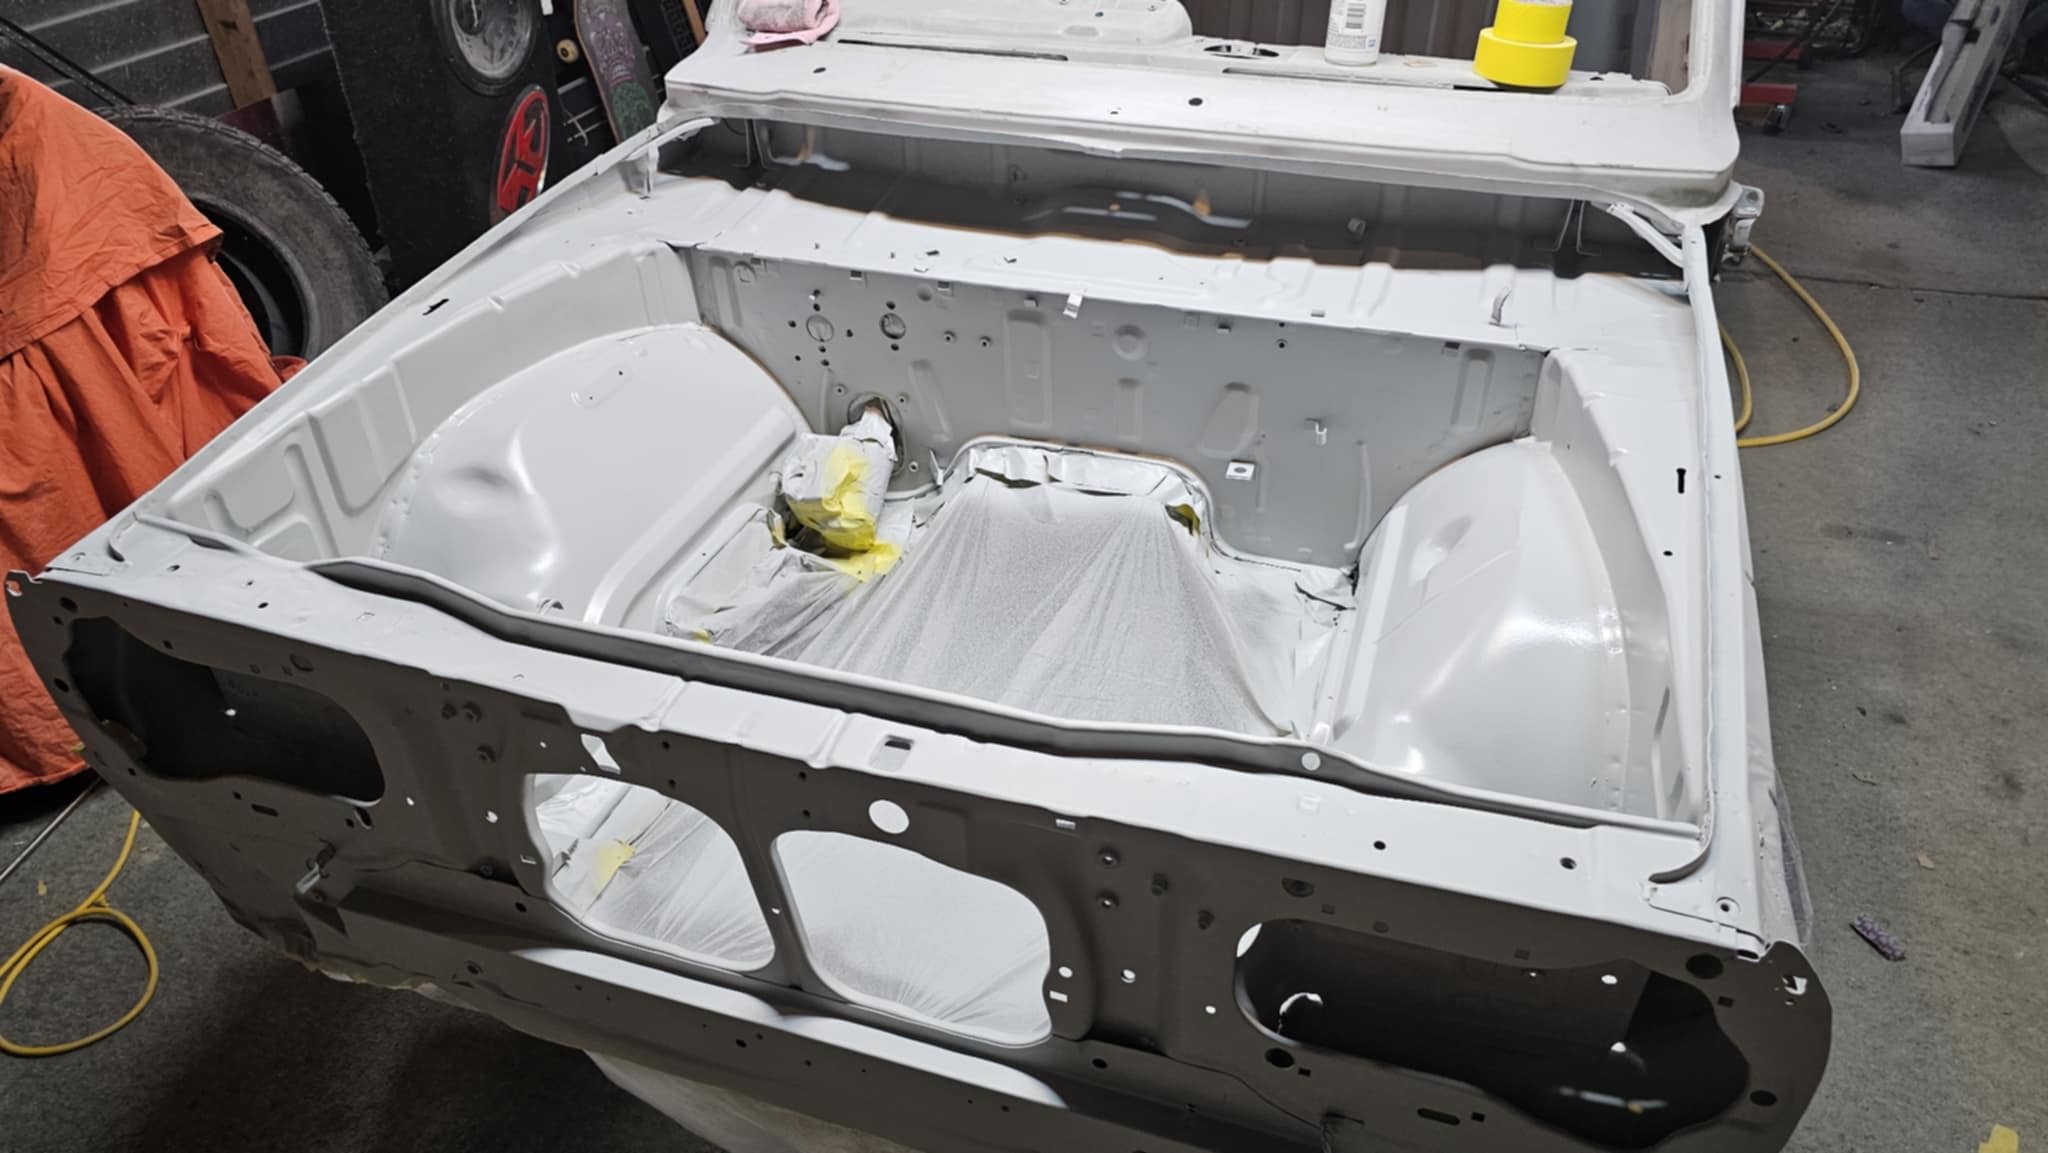
Panel n paint progress… ooosh blocked right back, and into primer.
3 points
-
Congrats! Its pretty good mph for the time - probably a low 14 even maybe a 13 in it.2 points
-
Well, this thread took a search….. Bad news on the fuel system gumming up. Assume the Bosch pump is one of the canned ones with the crimped end? assume it’s still drawing current, just not spinning? You could try taking it off, applying power and tapping on something solid. This seems to work better than just smacking it while on the car, though you could try that too. Don’t leave the power applied for more than a few seconds at a time and if it runs don’t run it dry. If the above fails then you can try emptying out the old fuel and tipping a bit of fuel system cleaner or solvent of your choice in instead. This is a bit of a PITA as there’s a spring loaded NRV at the discharge end, so you have to shake it out of the suction end and tip solvent in the same way. Leave to soak and repeat power/tap process. I’ve saved a couple like this. If you are keen and careful it’s even possible to uncrimp the end, extract the workings, clean, free off and reassemble. I’ve done 2. Both worked after, but one had a weep that was a bit much to use, so bit of a desperate measure. I had more time than money at the time and a pile of stuck pumps. Good luck….2 points
-
I'm hoping for a similar luthierish goodness with this 115 year old banjo I scored the other day. Unfortunately the back is coming off a bit and the fretboard isnt attached in places, so may not be a quick fix.
2 points
-
So this has been living in the side shed for a while so I can do stuff to the Scimitar. I'd been starting it occasionally. A few months back it suddenly wouldn't idle or rev and couldn't keep it runnings. Well shit. Injectors must be gummed up? Several months later, last weekend, I finally got around to taking the injectors out. I put them in a jar of mineral turps cause it seems to be a pretty good solvent. Then I put that jar in the ultrasonic cleaner, for 30 minutes. I did that a few times, they probably had about 2 hours total. Today I put the injectors back in the car and reconnect everything. Fetched the battery and installed it. Turn the ignition on.... wait... where's the fuel pump prime. Turn the ignition off and on again but still no noise from the lift pump or high pressure pump. Have a look at those, the wiring to them feels a bit warm. Maybe the earth has corroded? Go get the jumper cables and connect the pumps directly to the battery. Nothing. Well, fuck. BOTH pumps are gummed up with old gas? The low pressure Carter looks like it might come apart, maybe. But the Bosch, I assume I just have to fork out for a new one?2 points
-
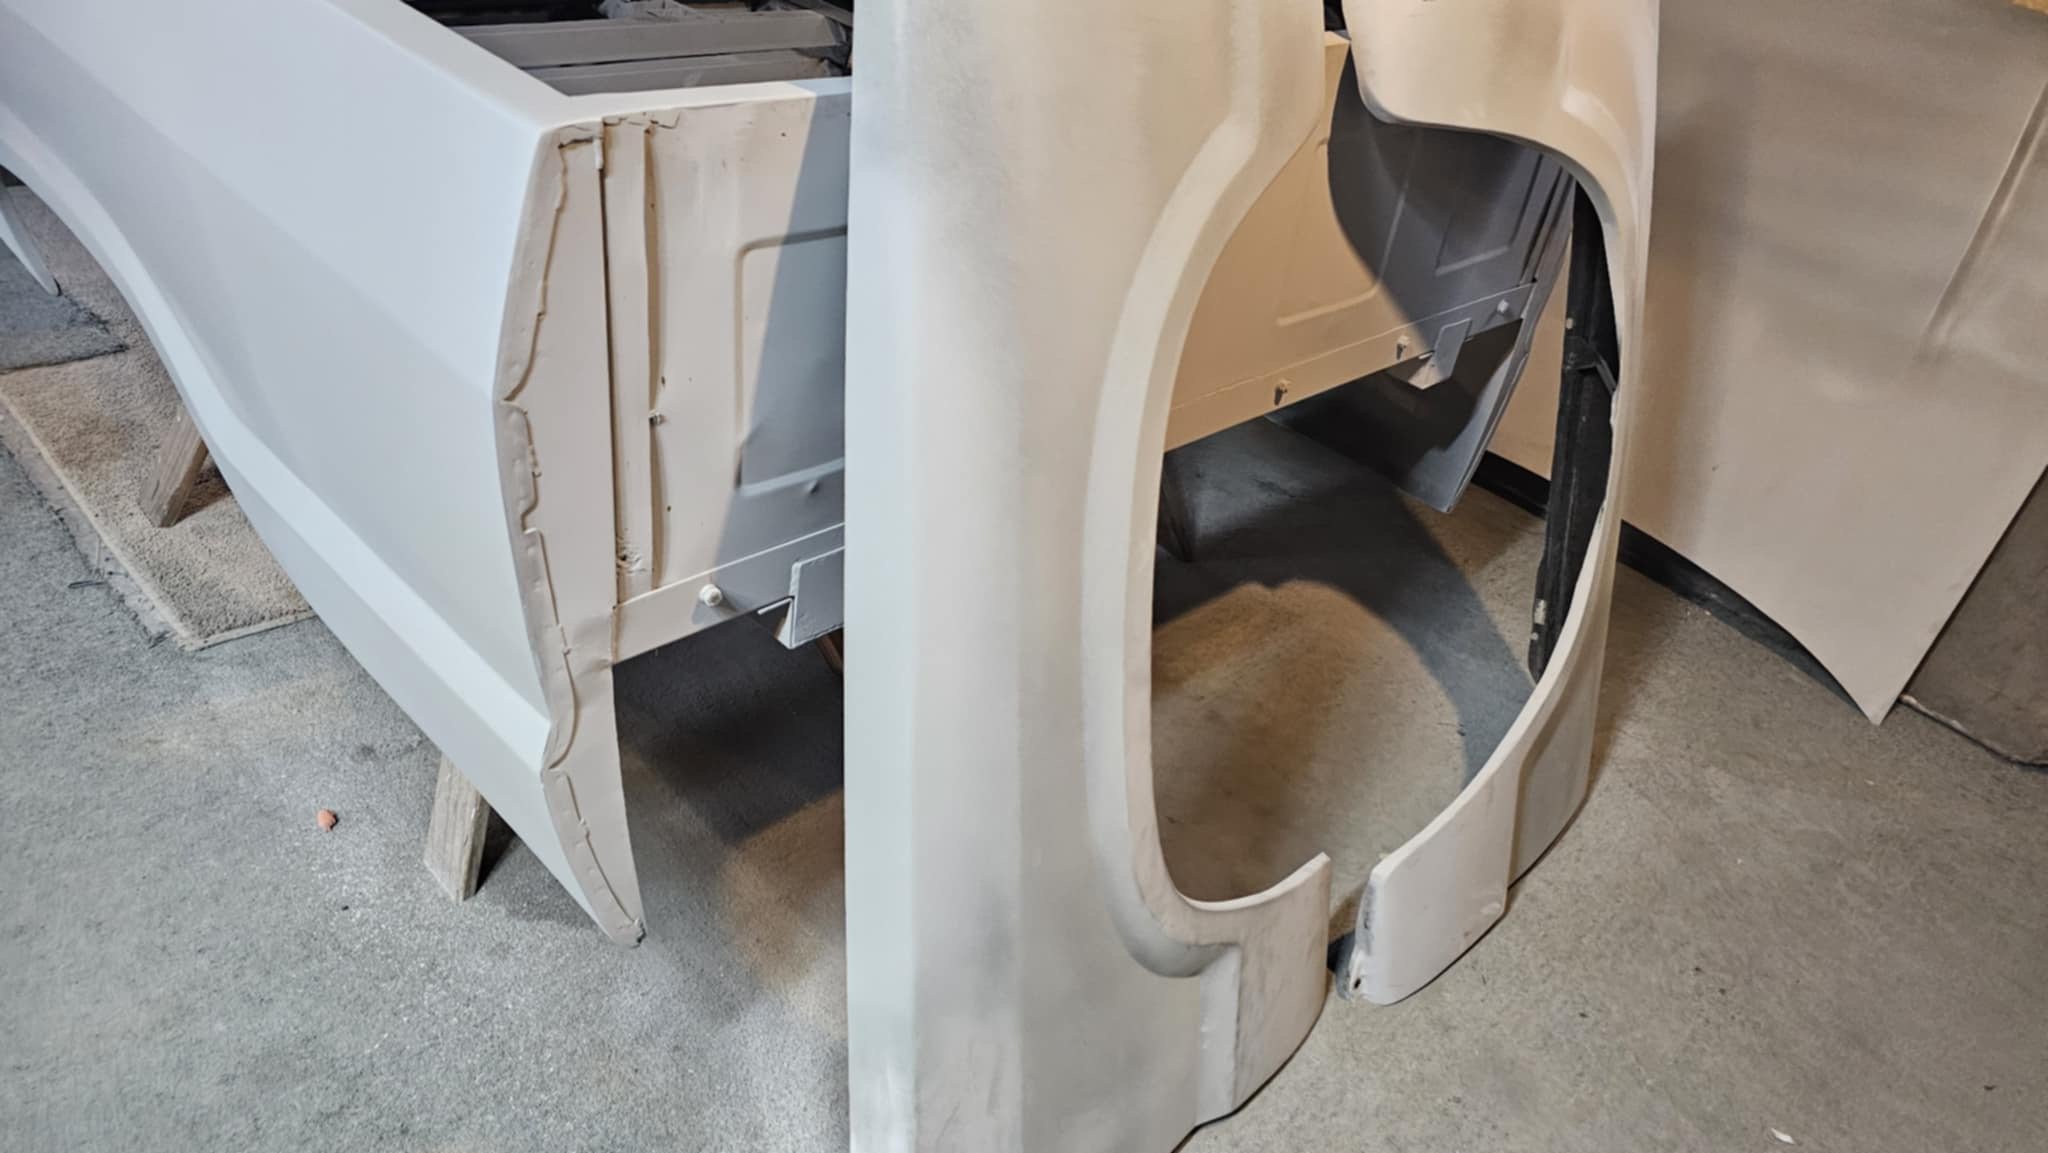
I have made the decision to replace both lower side sills rather than just patch where the rust is as they are looking pretty sad on the inside and I don't want to have rust bubbling through in a couple of years.
2 points
-
Was awesome seeing this run! Love it how it has full interior etc, towing a trailer on way there, does its drag day stuff, then back to regular duties. An awesome all rounder. You've done a great job.2 points
-
2 points
-
Reading all the above the high stall could probably wait but a diff gear change and LSD is probably a less invasive and better value mod. A 13 should be easy if i can get some practice at night speed wars or something. Shit it was so tempting to give the boost controller a few more clicks but the temperature gauge was starting to move if I hotlapped it. At least the Transmission shift points and pressures I set worked mint spinning it to 6400rpm helped too.1 point
-
So 900nm of torque...what is that like with the camper going up hills? Is there even a slight uptick in revs or is it like it's on the flat still?1 point
-
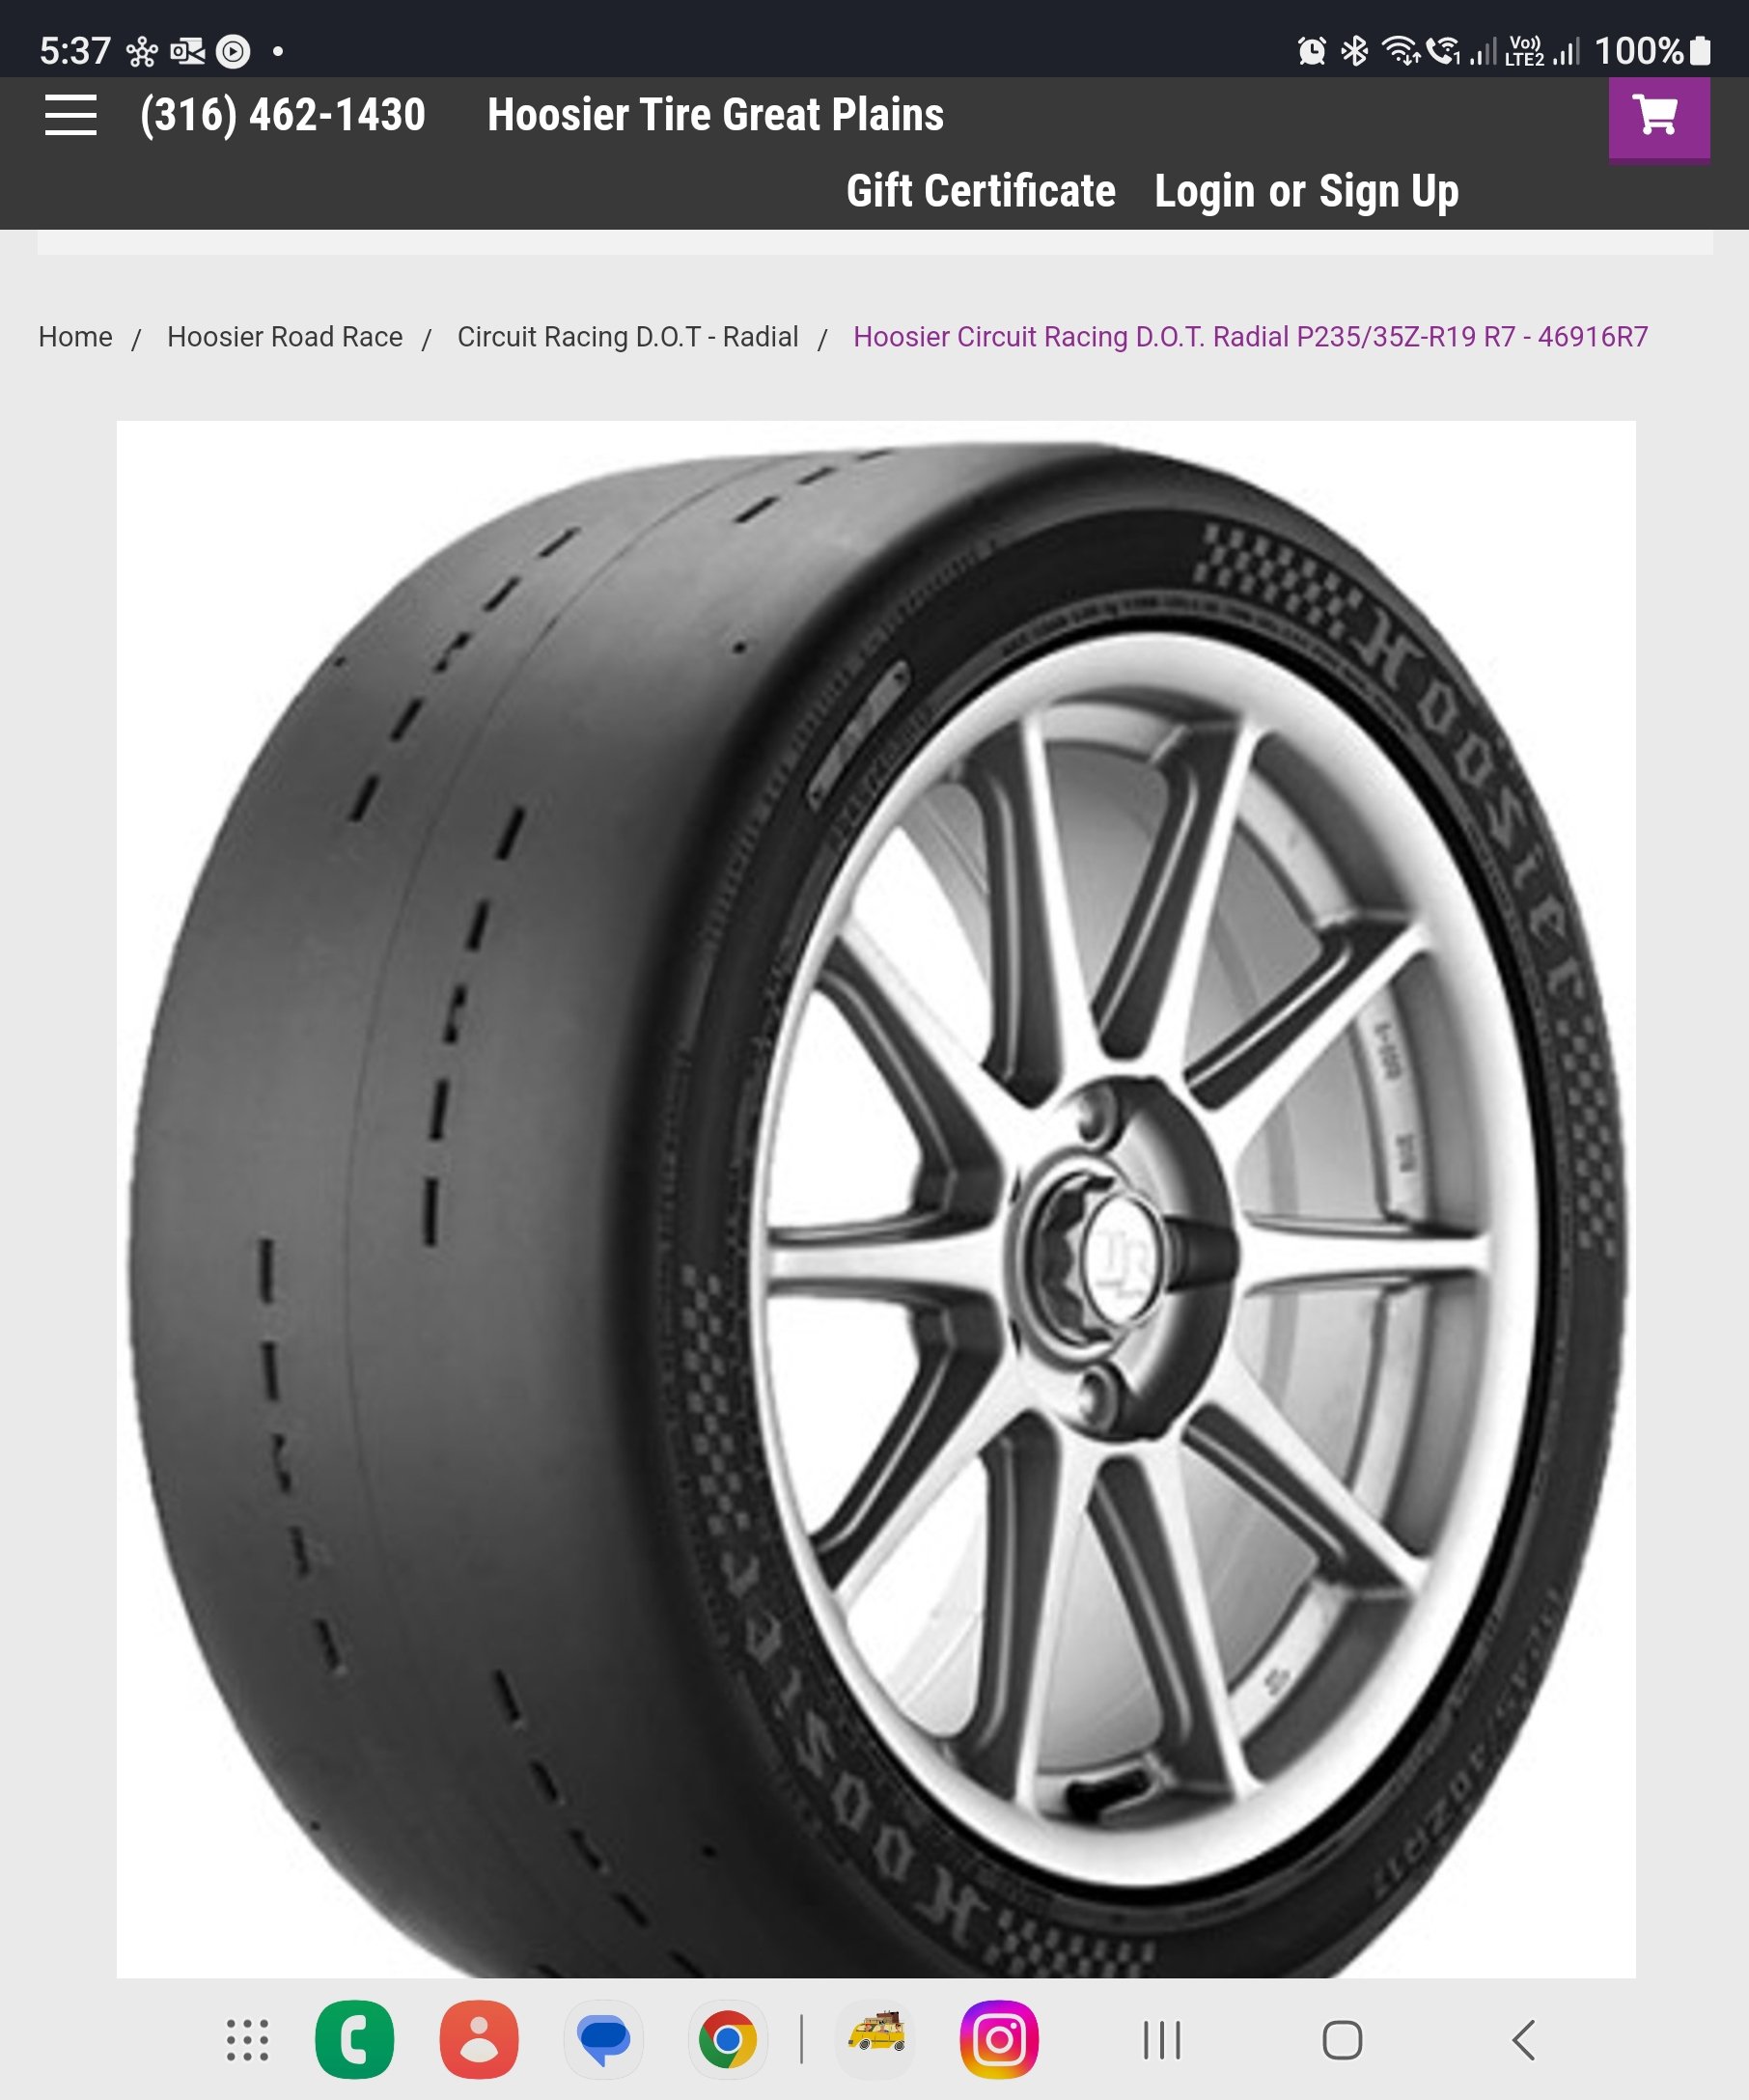
https://hoosiertiregp.com/hoosier-circuit-racing-d-o-t-radial-p235-35z-r19-r7-46916r7/ Not a drag slick but should have been better than road tyres. Think I'll take Cletus advice and find some 15" soft side wall proper drag tyres if im going back. 60 foot times were in the 2.3's the lack of initial power then as soon as it spooled up wheel spin didn't help. 90% shit driver
1 point
-
May have had more luck on my street tyres but been a taller sidewall it would put way more load on everything and i was worried about breaking the Transmission. I'm dead keen to give roll racing a go as it would be in its element as is. From the drive to and from the track towing, What a tow rig! My trailer isn't big but it's bloody heavy and tall engine just cruises along boost is there as you need it without the trans changing down. I did my fastest run of day with 2x 12" subs in the boot and the spare tyre and took a bite out of my toasted sandwich from Pokeno bacon on return road after the run and that's the best part of day for me. Second best part of day is people bloody loved it in the pits, nothing but positive comments from people with cars i thought were way more impressive.1 point
-
Not the guy in Auckland named Louni? That offers some rather cheap 4l60 rebuilds a mate of mine who did my trans had a horror story or two of peoples trans that had a very short life due to rebuilds not really being rebuilds and some very suspect reassembly. He was basically rebuilding them for what a reputable full rebuild kit costs so you have to wonder what you get for the $$.1 point
-
Springs shocks fitted and the cars weight put back on wheels and it is sitting where it should. So all is good and thanks to Cobra springs for the advice and the new springs. Happy Chappy.
1 point
-
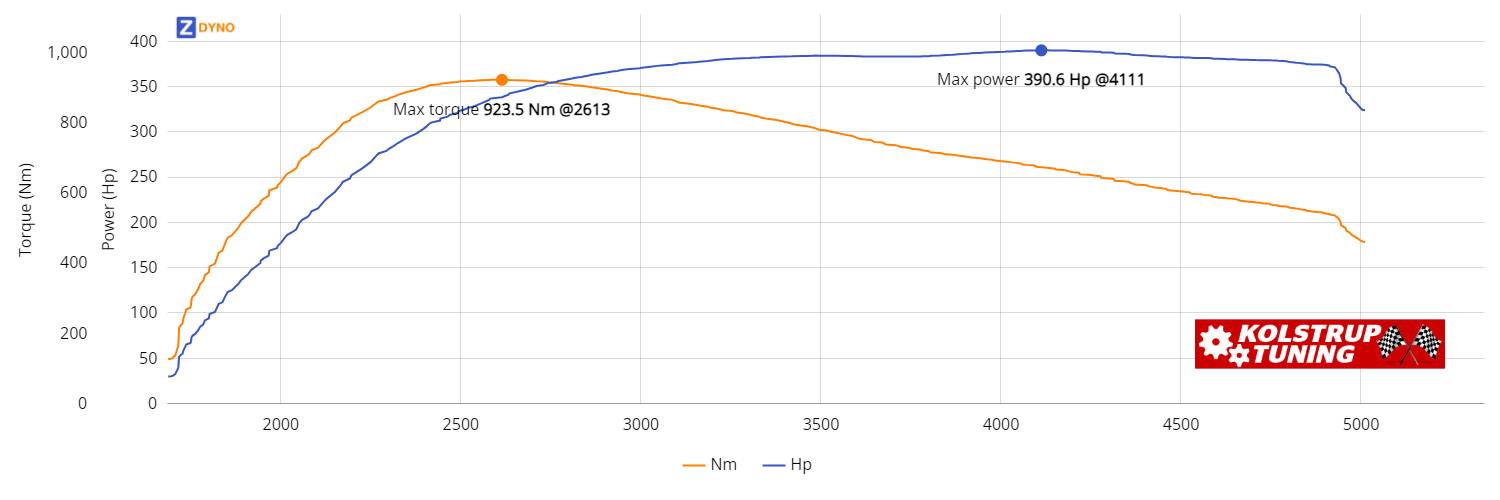
I found the dyno graph online so here you go.
1 point
-
The 2ZR uses the 1ZZ header flange so I might see if I can get some factory MR2 headers. The car needs a WOF first though1 point
-
Guitar renovation. Last century I used to play a bit, completely hopeless now but wanting to try again I attempted to set up my crappy old acoustic properly, got all enthusiastic and shouted it a new bridge, saddle etc but the truss rod thread stripped just as I was getting it right, so I swore a bit - and have been looking out for a decent'ish used one since. Saw this advertised at a charity shop, Ashton D25, scratched, rusty, 2 strings so grabbed it as a cheap project... [Reviews state the D25 is a 'cheap, nice sounding full-sized beginner/muckaround guitar' so perfect for my needs] I re-strung it to check things and apart from needing some new parts it actually played OK, neck was straight, strings at good playing height etc, so I ordered a bunch of bits from Aliexpress, then stripped it right down and gave it a good clean. Can't do much about the giant scratch on the body but might try to hide it later... The Ali machine heads fitted perfectly, sort of wished I'd got the black option now though for full blackout look, but they look far better than the grotty old ones... And the new bone nut and saddle looked to be well made. The plastic ones were worn out, (nut had actually crumbled at the 6th string and I'd filed a temporary notch to test it) also got some fancy bridge pins... Biggest issue was the cheap in-built tuner, that was missing the battery holder clip. I bodged it up and it still worked but the cover/clips are always going missing and are unobtainable, so bought a combined tuner/equalizer/pickup unit to turn it into an electro-acoustic... This is still on the way, so I gambled that the online templates will match what I actually get, and cut the hole while I had it apart... Hopefully this arrives in the next few days and I can see how things go together, bit of wiring/fettling to do when I get it. It won't be fancy, but I should have a useable geetar for around $100 all up...1 point
-
I've now done a few cars on 50l compressors, here in Canterbury its pretty dry and you can get away with it, just. I have a large aluminium bodied line filter that does an amazing job at removing moisture, nothing like a refrigerated dryer, but good enough and religiously check it, once it gets warm, its time to go inside for a cuppa. It takes some planning of how you're going to do each coat, during base coats figure out how much time/cycles the compressor tank takes to heat up and cool down so that when it comes time to do the final coats, you know how much you can get done each session. Most 1ph compressors won't do full duty cycle so that also plays into the mix depending on your level of mechanical sympathy. Sucks balls, takes way longer, but its cheaper than rewiring for three phase!1 point
-
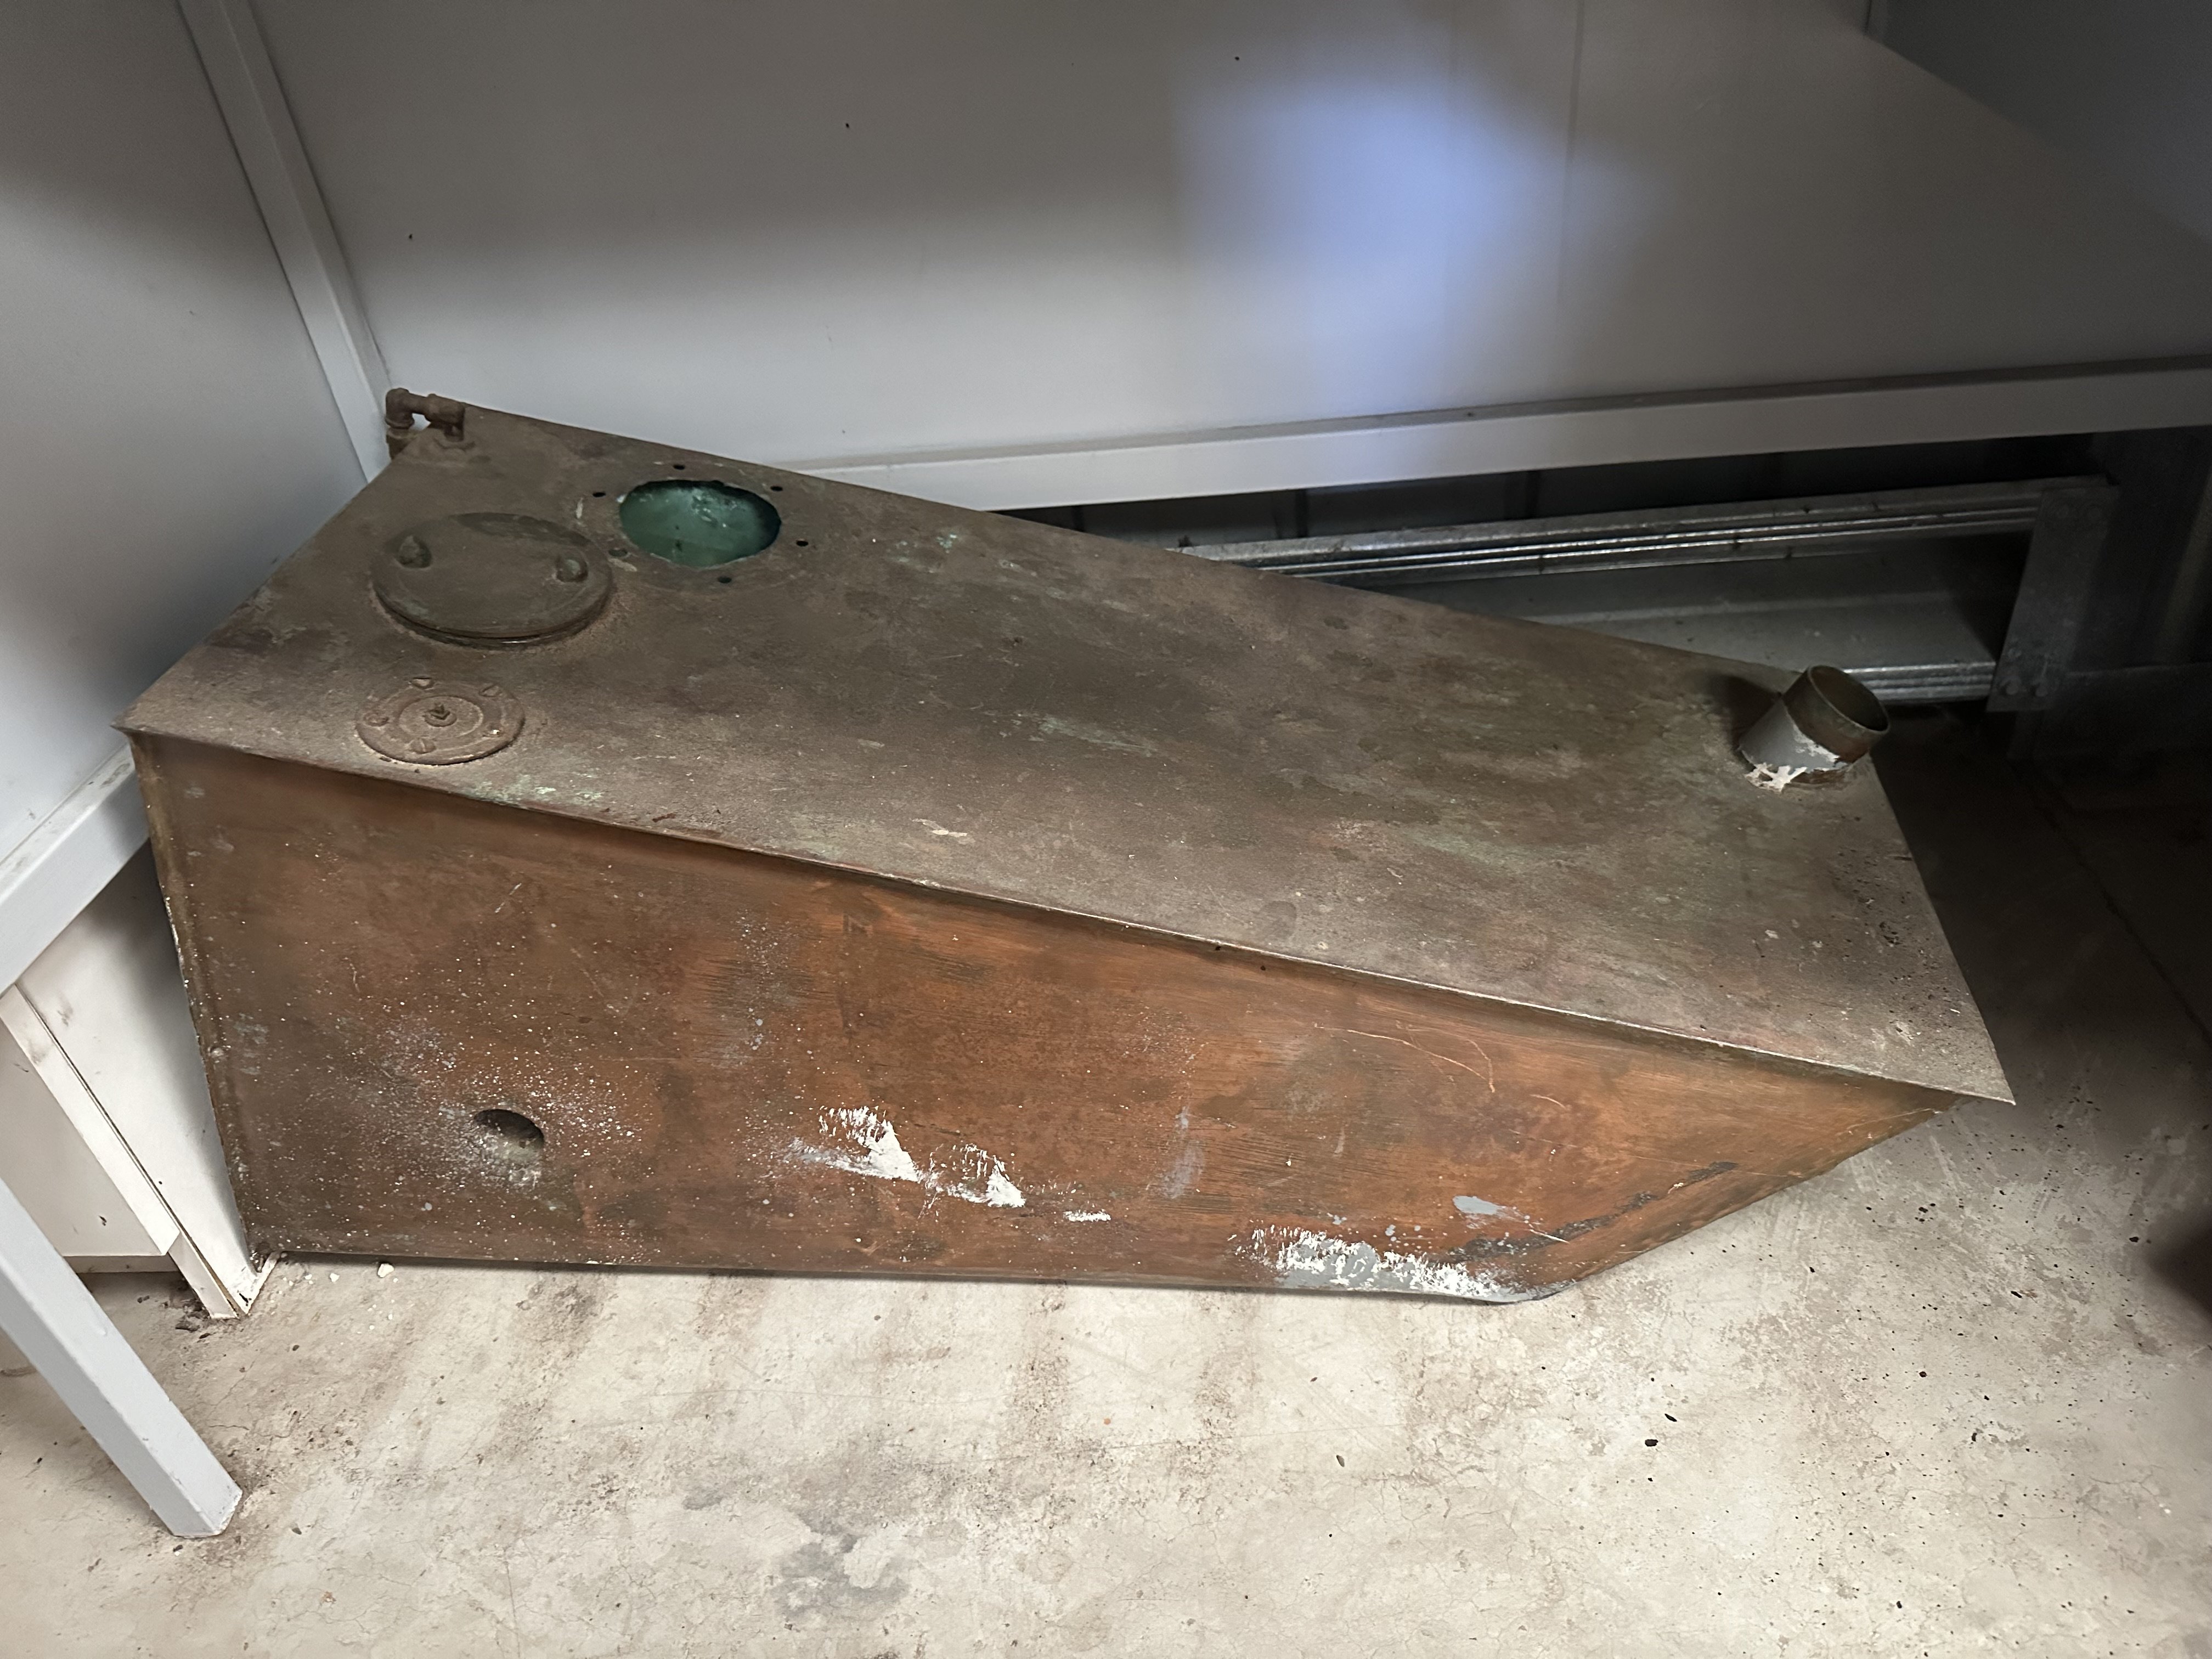
I was contacted yesterday and asked to call in and discuss a few things with the boat. The engine is now on. We have decided to go with tote tanks and put them in the bin seats behind the front seats. Originally it had a copper fuel tank which I have but it will be retired. Tote tanks are easy to use and you can just lift them out and use the fuel for something else if you are not using the boat for a while. Another advantage of a 4 stroke engine I would think. The biggest obstacle to getting it in the water by Christmas will be the trailer. The springs are not healthy and would need replacing I would think to get a Wof. I asked them to find a new trailer as even if I fix the original trailer I would still need to do a lot of maintenance on it every winter.
1 point
-
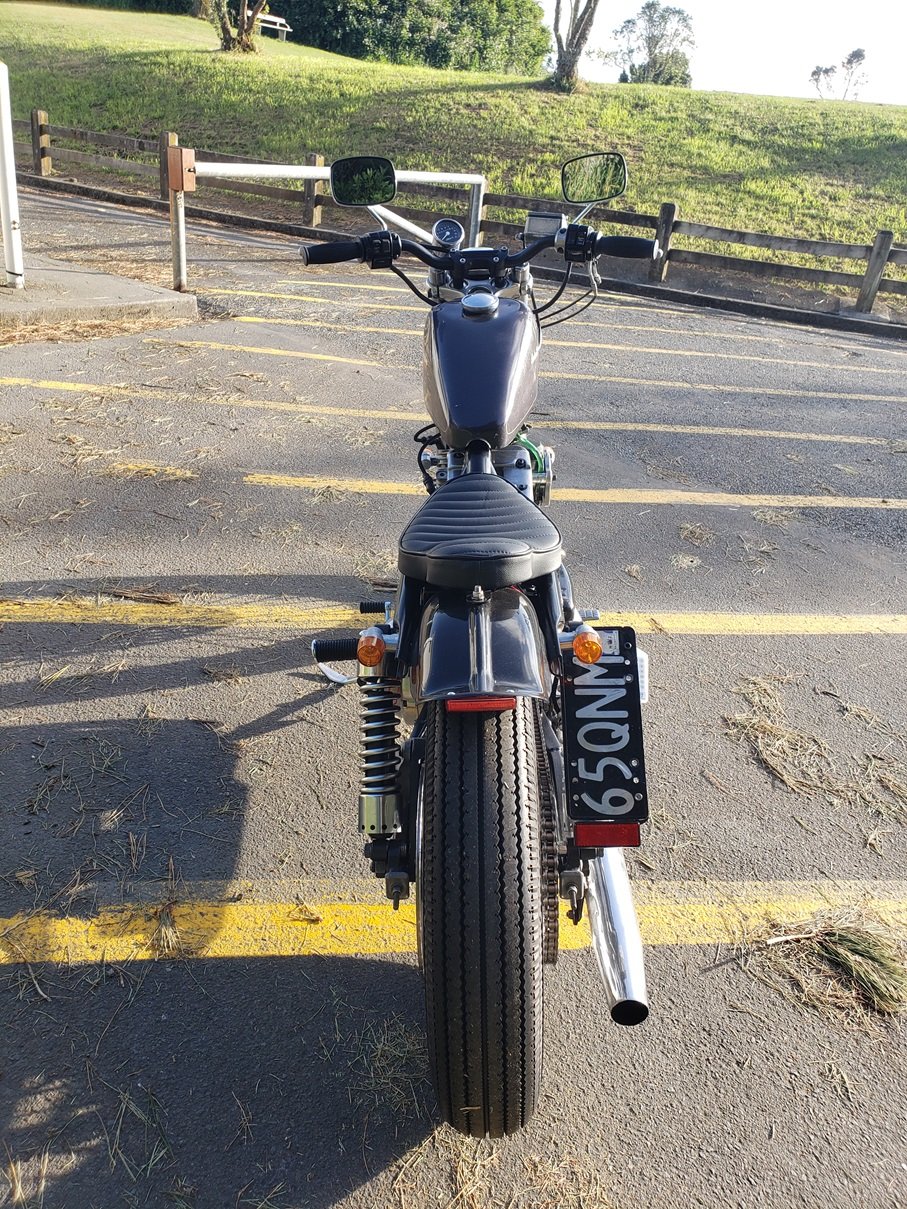
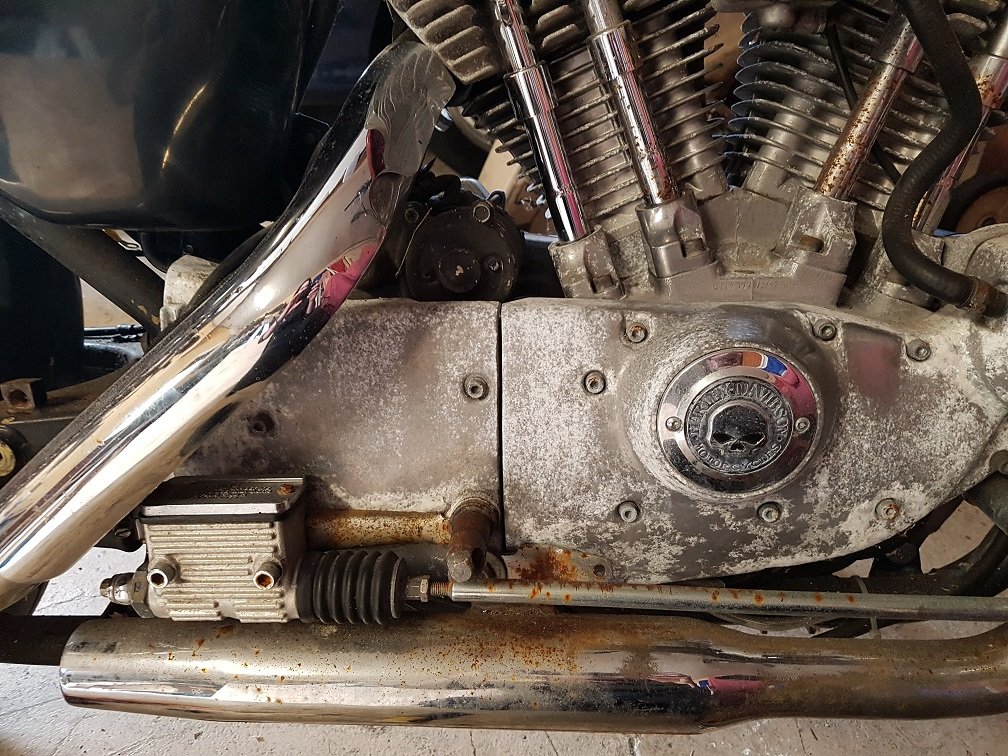
So yeah, pretty into these turds. Saw this come up super cheap on trademe. Reg on hold. Bought it site unseen and had it shipped down to me. Oohwee, what a turd she was: Its an 1988 883 evo sportster. The successor to the Ironhead. It was cheap, and I really like cleaning stuff up. So something to keep me busy between rage quits with the Goldwing, Laverda and my Ironhead.
1 point
-
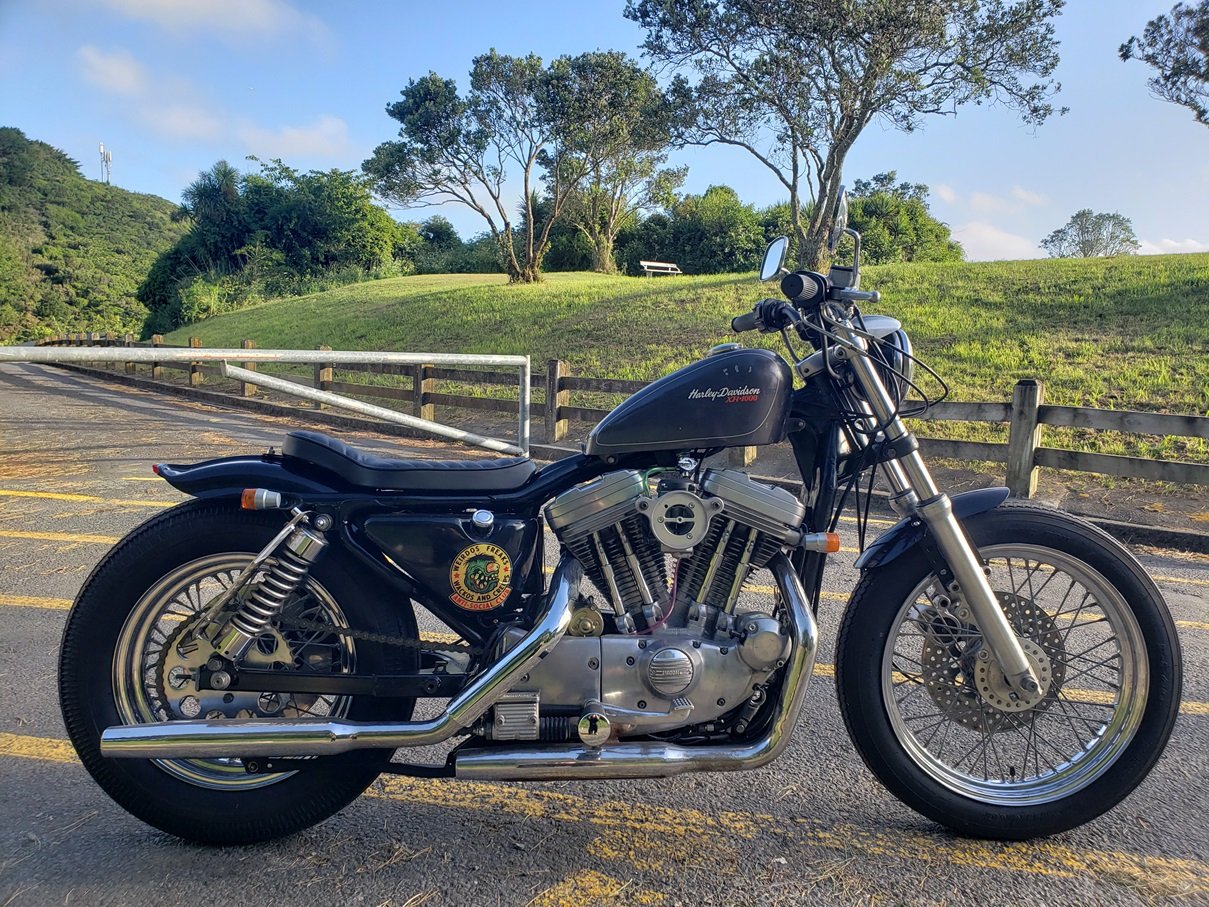
Finally got this finished. All legal. Taken it for a few rips. Super fun. So small and light. Oh so narrow: For sale now. As I enjoy the journey more than the destination. Already neck deep in another build.
1 point
-
Good call.1 point
-
Cricut has its limitations, I tried a few different gasket materials, and that's the first to cut fully through (99.9% so you can just snap thr bits out easily. Ideal outcome) the others were about 95% cut, so could go through with a quick zip round of the scapel blade. Standard oil jointing paper/an old wheetbix box, is more within its limits, but very happy. A proper desk top cnc or laser would be real nice. Cutting exhaust gaskets would be a dream For general tinkering, can't beat it. No more dirty finger smearing the outline, hammer and punch for me1 point
-
We went to the MG club's driver training event again (same one from Feb) at Manfield. Most of the same crew turned up and we nabbed the first four bays. I brought tools this time I had been feeling run down so wasn't super looking forward to it, but I knew I should come and would enjoy myself in the end, so I pushed to. I just told myself that I'd take it easy for both myself and the car's sake. The day of the event I woke up with a solid headache which didn't bode well, however it slowly resolved itself over the day. Girlface went out first and had some fun, just in case I broke the car again. Then I went out, with my Ek9 mate in the passenger seat, who I'm very glad who was there - he's a great track buddy and a good teacher. By the end of the first session I was feeling more confident and much better at hitting lines. He then had a go with me as a passenger which was tons of fun and great to see how hard the car can really be pushed, also great to see that my lines were getting pretty close to his. Girlface also got a run with him and did great. I was terrible at capturing any video or photos so this is pretty much all I have. :\ https://i.imgur.com/XHakpcy.mp4 We definitely took the day easy and I'm glad we did. The weather was great, the car was great, we had awesome runs and a bunch of people from Feb wandered over and congratulated us on getting the car up and running again. It was the most ideal way to validate our work returning the car back to health, and to overwrite our previous track day's experience with nice new happy memories. It turns out we had also won car of the day thanks to the combination of our car and story (though we had left by 4pm and missed the organiser by like 30 minutes). He mailed us some swag. He had no Alto stickers but I forgive him for that. Next time we'll can get some lap timing going and go a little harder. edit: more pix from group1 point
-
5,384km since rebuild. Only a couple of the tiniest sparklies in the oil that I really had to hunt down to see, and the filter was almost entirely clean as well. Thanks @cletus that oil filter method works a charm Kelv was parting with his GReddy intercooler so I scooped that up. It's a true bolt-on replacement to the OEM intercooler; all the pipes, the air scoop and the rubber isolated bolt holes swap over with no problems. It's a much bigger sandwich. While my butt dyno is pretty questionable, I think I feel the car pull a bit harder as the turbo kicks in. But its main value will be in the future when I get my larger turbo setup The car's been running perfectly. We've been on a few road trips now and she gets driven almost daily without any issues. The number of thumbs ups and neck-craning we experience really helps us appreciate her that much more. It's such a stupid cute cool car that is impossible to hate.1 point
-
Over a month has passed since the last update. That went quick! I've been busy on other jobs so the Imp had to get time where I could. The cooling system was what I wanted to sort out. I had emailed Davies Craig about their electric water pump controller. I explained the issue in detail and the friendly tech fella there ended up calling me a few days later. We chatted for 45mins and ran through the system. He'd actually taken the time to read the full build thread which he said he'd really enjoyed. This also meant he was well informed about my setup. From the conversation I learned that I could have a more effective bleed system setup which will help not only filling the system up from dry but also possibly help the warm up. If it didn't warm up effectively enough after changing that then I could add a traditional wax type thermostat in. I had already gone down the path of starting to make a remote thermostat housing before the phone call anyway so I continued with that first. We had popped to the wreckers and got a thermostat and its cover from a Nissan k11 (of course..). I machined up a flange to take that and welded it onto a tube. Then stepped the tube down in size, added extra alloy I could drill and tap to suit the 3 temp sensors. In the end the whole thing was made from about 7 bits of alloy. Its not pretty but it fits in the same location as my original sensor pipe. You can see the added bleed stub sticking out. This bleeds off air to the new expansion tank I was going to make. I have added the same size take off onto my original sensor pipe which I'll be using first - just in case I might not end up needing a thermostat. Originally the sensor pipe had a larger feed pipe taking fluid from the expansion tank - which I was informed was the wrong location because the sensor pipe is on the pressure side of the pump, coming off the engine. Not the suction side that it should be feeding into. Silly me. So I now had to add a feed point somewhere into the system before the pump. Luckily there was just enough room to do so on the pipe just before the pump. I removed the pipe from the car and added this feed here... I also removed the main front to back pipes that run under the floor. I was happy/relieved that they come out ok without having to take out the fuel tank. I wanted to drain the complete system of the old water/dirty coolant mix but these two pipes can't be drained properly and they hold quite a lot of fluid. So I fixed this issue. Machined up some drain points and welded them at the lowest point.. Super easy to drain the lot out now without having to even touch a hose clip. Now onto building a new expansion tank. I have been planning to do this for some time. The old one that came with the race car is steel, heavy, ugly and rusty. It also sits in the wrong spot and upsets my engine bay Feng Shui. It just had to go. This is also where some time got lost.... I started by machining up a filler neck to accept the smaller type of radiator cap. Then some simple cad work... Welded bits.. Cut, bent, folded, welded, machined and out popped this... Wire brushed it... Painted it in epoxy paint (and the thermostat housing too) Bolted it in place... Then chopped it up because I didn't like it... Yep. Bit of time down the drain that. But I just wasn't happy with it. It was still too obvious, too sticky outy and upsetting the generally symmetrical engine bay. It was also going to make my planned bulkhead cover more awkward to make and fit neatly. So back to the drawing board. I cut out the filler neck, machined it clean and started over. No pictures of it being built because I just cracked on and got it done. Finished result though.. You'll see how it fits soon. Next job was to see if I could quieten down the exhaust boom. Those exhaust valves didn't seem to make much difference in sound and it was more than loud enough anyway. So they could get lost. I took the muffler off, such an easy quick job. Took it apart... Removed the exhaust valves and made some extra baffles to hopefully knock a bit of sound off. V shaped 'ceilings' in the first expansion chambers... and extra baffles on the outlet chambers... I also removed the crossover hole between the two halves. Simply not needed on a flat six and I suspect it was stopping the distinctive flat six sound at idle. Bolted it all back together and got stuck into the next fun job. Not an essential job at all. But one I wanted to do. I have never liked the ugly, non symmetrical covered up hole where the Datsun cylinder head used to pop up through the parcel shelf. I've wanted to hide it behind something nice. So I got a sheet of alloy from our rack and cut out a cover. Gave it a curve in the folder... Had to recess it in the very centre right where the Plenum/spaceship resides. Not much luckily. Cut some strips of 4mm alloy... Gave them a 'brushed' look with my poor mans linisher... I had been ringing around all the various upholsterers about my district and no one had any black leather in stock plus the prices they quoted were absurd. I had bought some black vinyl instead but wasn't really happy with the idea of something so flammable being above the engine. Popping into Tasman canvas on our way home from town was just an idea at the very end of the day because I thought maybe a canvas could work. But they had some leather left over from a job and were happy to help out with some offcuts. Leather carefully glued in place... Then the alloy strips were carefully bolted in place. Before fitting the leather Hannah and I had deliberated over the positioning and spacing of these for some time. The idea is that I can remove them at a later date, cut them short so the middle has a gap in which I can fit a badge/logo of some sort. This will then mean there's six strips, 3 each side, much like a flat six. Deciding on what to put in the centre is now the hard part. So some pics of it all in place, along with the new expansion tank tucked away to the side...(the little bolts will be changed to dome heads when I next get some from the city) I'm pretty happy with that. I might well change it out later on but for now its hiding the ugliness behind. The new tank is a huge improvement in looks and its tucked away neatly. The new bleed system is a massive improvement too. I filled the whole system up so quickly (9 litres in total ) and the air bled out really quickly this time. We started the car up today. New exhaust is quieter but still a bit boomy at certain revs. Not a concern right now as its not a daily. Just a fun toy. The cooling system heated up much quicker (A very cold clear 10 degree mid morning at the time of testing today) (EFI tuning talk time. Carb folk look away) I'm now going to spend some time really trying to fine tune the idle. Its idling happily at a touch over 700 rpm but I think that's a little low. The hesitancy just off idle when for example you squeeze the throttle to pull away needs to be tuned out. I think I'll get it sorted on the VE table alone. Its not an acceleration enrichment issue. I want to get this area sorted so anyone can jump in and drive it about town slowly without any stumbling or hunting. Its still on open loop warm up idle control which I want to have dialled perfectly before I look at maybe going to closed loop.1 point
-
Picked up the clutch MC seal kit from town while there for the weekly shop. Got home, removed the fuel tank to gain access to the pedal box, removed the cylinder and stripped it. Like I said , its been 5 years since I last had it apart. I'd like to blame this time span for forgetting what the main seal looks like. Or I could just blame my own stupidity for not looking up Imp seal kits before ordering what I thought was the right kit in because what I'd bought doesn't look much like what I needed. Oh well. The seal doesn't look too bad, nor the bore too worn. The seal could have sharper edges for sure but it would just have to do because I wanted to go out for a good drive the following day. I'll sort out replacements for the future. I reassembled it all and Hannah helped me bleed the system, again. Seems ok so we got all the blankets that used to be in the car and covered the rear parcel shelf in a bid to quieten down the engine thrum. This morning dawned a bit chilly with high cloud. Since it was about 6 degrees I used that as a chance to further tune the cold start. Once warmed up I tried sorting out the hot start. It would always start but then die unless I held the throttle open and let it settle to idle. If I didn't hold the revs up it would stumble into in the low revs/high load area on the main fuel map and I thought that was too rich. So I leaned those bins out. Got sick of mucking about and we went for a drive. By the time we got near our morning coffee destination the sun was out and it was lovely! We had a date to meet up with another oldschooler and there he was, waiting with his small rear engined noisy toy by the beach. I took some pics. Its one of the few cars that makes the imp look large... Dylan went for a hoon in my imp and then I in his x19. The various folk about the carpark with their dogs and kids must have had a giggle. We both must have looked clown like emerging from these tiny low cars. I'm 6'2" and Dylan is even taller. It was great to try out a x19 with a proper amount of power and it sounds great. I'm looking forward to when my Imp is properly sorted so we can do some spirited cross country drives. My throttle tip in from idle was a bit sensitive and inclined to bog down making it tricky to get used to. After a good coffee we parted ways and Hannah and I went home. On the motorway (Tasman 'motorway' that is.. there's like 3 areas with decent passing lanes) I was able to see how it was at higher speeds. It cruises along effortlessly at 100kph pulling around 2900rpm. Luckily the 'its getting boring now' exhaust boom is not around that zone. I'm going to have to do some work to the exhaust and try to tune out some of the drone. I have ideas already on how. Before getting home Hannah took some driveby vids. Once home I threw them together and popped them up on the tube. It sounds great. This is the first time I have heard it properly as such. Please do it justice and listen to the vid on a decent sound system because phones won't do the low notes any favours. Once home I had a play with the off idle area of the tune. I started by adding fuel back to the area I'd removed it this morning and this improved it muchly. I tweaked it, tested it, tweaked it until it was now much easier to open the throttle from idle without going lean and lurching. Then the hot start issue. Turns out I just needed to add more seconds to the 'crank to run taper time' in idle control. 5 seconds wasn't enough. Just kept adding time until its started and settled gently down to idle. Those who have tuned their own efi projects will understand just how satisfying this shit is and also how frustrating it can be until you learn what needs to be done. So I ended the days tuning on a little high and decided to tinker no further so left it at that. I put the imp on the hoist, up in the air and checked for leaks. But for a tiny weep from one bolt area there's nothing. In fact, touch wood, this is now the least leaky of all our vehicles!1 point
-
After settling down from all the excitement I had a little break from the car for a day or two while I got some other stuff done. Plus it was raining cats and frogs outside. We ended up getting 160mm (6.2" for those imperial folk) of rain in two days. I made a rough plan on what I'd do next to iron out some of the issues. The leaks and clutch were the most urgent. We bled the clutch again. It seemed fine in use on the hoist with Hannah in the car working the pedal in and out while I turned the rear wheels. Bite point still roughly in the middle of travel. But I'm still going to look at the master cylinder because from a peek under the dash it doesn't look that flash... It has been playing up (bite point getting low) with the Datsun engine and it's not been touched in the 5 years since first getting this imp on the road. There's a seal kit waiting for me in town and I'll see how good it comes up. The leaks next. I had a suspicion that the little vent hole in the filler tube was letting oil squirt out as the oil splashed up the tube. I wanted to work out where the majority of oil was coming from before taking the next steps. Plus I wanted to drive the car some more before mucking about taking things apart. So I folded up this oil shield with a folded edge that hopefully catches the oil... 'The oil shield 2000' bolted up below the cam belt cover... Now I can go for another hoon. But I need to easily spot my revs (because until tuned I'm not going to blindly go bouncing it off the limiter). My rev counter wasn't working off the signal from the coil pack. I'm not sure what kind of signal that puts out or if indeed its working properly at all. So I swapped the signal wire over to the one from the megasquirt. Still nothing though. The rev counter, being an old cheap thing ($7 from the swap meet) needs a high voltage spike like it gets from the negative terminal of the ignition coil. Enter stage left a spare relay. I took it apart, removed switch plate leaving just a little coil... Made this little harness.. Ignition voltage flows through the relay coil to the ecu tach signal wire. The rev counter tach signal wire is connected to the ecu side of the coil. Each time the current is switched off by the ecu it creates a voltage spike to the old rev counter so emulating an old ignition setup. This was a fun little job made nicer by having 'driven' the imp out into the sunshine. The ground had already dried nicely after the rainy weekend, the sun was hot and it was nice to be working in natural light. Fitted the little 'Ignition spike generator 2000' in place and now I have a working rev counter... I'd also folded up a bit of alloy, stuck some double sided tape on and remounted the water pump controller angled upwards so I could read the bloody thing ^ Note how generally untidy that lot is. I really want to remove the lot, put it in a bin and rebuild my own dash and instruments. That is future Alex's job though. Time for a second drive. Boy its quick! I let it get up to about as hot as it could and did a spot of auto tuning. The tune was improving all the time as I tried to drive in as many areas on the fuel map as I could. I still didn't want to drive for too long because I was aware that the oil leaks were no doubt covering the whole back of the car with a fine mist of muck but I gave the throttle a bit more jandal (actually bare foot) and took it up to 5k. A mix of genuine surprise, shock from going that quick in the imp and mechanical sympathy held me back from going any higher. Its wicked! It really snarls. Very much looking forward to getting better footage including some drive by clips so I can give a you all a better idea. Its much quicker than I was expecting from what should be a stock 100bhp (but could well be less or maybe a little more) and I figure its the 115lbft torque that's making it feel so punchy and fun. Once back home and into the workshop it was up into the air to see where the oil splatter was at its worst. Sure enough most of it was around the filler cap area. That vent hole. Luckily its very easy to undo one screw and remove the filler neck. See the little hole here, above the screw hole... I filled it in with some quiksteel epoxy putty and refitted it with a smear of sealant around the joint and screw head just to be sure. I also made this. Its a cablestay 2000. It stops the O2 cable from going for a sneaky wander across the top of the oil filter pedestal and straying too close to the exhaust headers... One other issue I have been thinking about (too much) is the coolant system not getting hot enough. From extensive sofa residing google searches there's a few Davies Craig pump/controller combo owners in colder climates who can't get their cars up to temp, or at least not very quickly. Interestingly it was often Triumph car owners. Stags and Dolomites etc. The controller chip runs the pump through 3 main settings. At warm up runs the pump for 10secs on, 30 off until it reaches 20 degrees below the user defined target temp. Then it goes to 10 on, 10 off. At 5 degrees before target temp it has a lineal ramp up to pump on full time. Ideally it should be able to pump slower or for less time when its cold outside because on these colder days (circa 10-15 degrees) takes quite a long time to get up to even 80 degrees if the target temp is say 90-95. I was getting a bit too thinky about all this, doing lots of frantic googling and getting ready to type a strongly worded email to Davies Craig. I was also prepping to build a thermostat housing, just as some had on various threads I'd read. I even bought some alloy. I wasn't keen on this happening though. Adding restriction is one of the main reasons for premature pump failure (according to other threads..) plus it was going to be adding more ugly things to go wrong. But common sense prevailed... Goldwing engines seem to sit at around 87-90 degrees when cruising right and while they can happily handle more heat I have no need to chase it. Its pretty cold here. About as cold as I'd normally expect to see when I might be out in the car. Summer is bloody hot. Be happy it stays cool easily. Finally.. up the target temp a few degrees higher so the controller sits in the lowest flow rate possible. Rest easy me. So we went for another drive this evening. A good strop. Up some hills. Did more tuning. Tried to see as much of the fuel map as we could and let the program do its thing. It was getting better all the time although the fuelling will only end up as efficient as what I have set as targets. If I have that wrong then it'll always be wrong. Lots of driving to do so I can tune areas more by the seat of my pants and what feels right. But it was already much better and I was getting more confident and it was fun. Not so much for Hannah who was trying to hold onto the door and the laptop at the same time though. Clutch seems to be holding ok and the bite point seems ok but I'm still replacing that seal. At one point we heard a sound and saw something bouncing on the road in the cars wake. I stopped and checked the engine bay. Nothing amiss. Then I looked at the oil level (that little light under the cap never gets boring..) and the level was down. Hmmm. No signs of oil mess on the rear though. Maybe its just the oil level when the car is idling and hot... We drive up the road again and spot that the thing I must have clipped with my wheels was a bit of roadside marker. Go home now. Play is over. Its getting dark. Onto the hoist... No signs of mess at all on the back like the last two drives. Have a look under the car.. Clean as. The slightest hint of oil on one rear sump bolt. But no drips. Result !!! It must have been that vent hole. The low oil level? I checked it with the car on the ground again hoping it had risen as the oil drained back but no. Then I released the cap and the oil level in the filler tube rose. Ha. It's that well sealed. But really it needs a vent so there's no pressure changes. I'll have to look into it because I don't want oil pissing either. Going to be tricky with such a low cap. Other things I have done is go on more romantic dates with Hannah to the wreckers where we looked for bits. I got these to try out for the basis of my custom instruments. If I can get the speedo head working fine with my Toyota speed sensor then I'll strip it further.1 point
-
Chopping up the Imp shell took longer than expected. I'm pleasantly surprised at how solid they are for what is just a budget small car. It was also even rustier than expected and I'm glad I was not tempted to try and make something of it. I had to get this shot... ...and this shot. All chopped up... I rescued these bits. I have no idea where I'll stash them. Maybe hang the nose cone from high up on the workshop wall, led lights fitted into the headlamps. I've now got a full spare set of suspension arms too. These could come in handy as bench top jigs if I look into mounting disc brakes on the back etc. We took the remains to the scrap man the following day and he gave us $78 in return. I had paid $200 for the complete Imp so it now owes me only $122. Or I prefer to look back at the pies, cakes and coffee we both had in town after seeing Mr scrappy. Back to the Impy project. I now really only had a bit of wiring to do plus some other little jobs. Wiring first. A bit of work in the 'frunk' to clean up the fuel pump wire routing.. Drained the last of the coolant out while I was there.. glad for the handy drain plug I had added when building the radiator in. Work where the car needed to be on the hoist was over with but before I lowered the car onto its wheels I grabbed these shots which I really like.. Onto its wheels and rolled away for the first time since fitting the flat six. Wow. Pretty neat occasion in itself. Happy to see it still sat at the same height. Looking forward to weighing it in the future and seeing how much lard/muscle/festive season insulation its put on. I was now able to climb in and out of the doors easily and sort out the final wiring. Stuff to be done was running the power and ignition wires to the ecu, water pump wires and some sensor wires forward then make it look all serviceable and neat enough. I had to extend the water pump temp sensor wire so the controller could be mounted in a sensible place. Take note of this last bit as I'll be coming back to it... With the wiring now sorted I could move onto finishing of some other loose ends so to speak. But first I had to start the engine up in the car and check it worked. Which it did after I swapped the two fuel lines in the frunk about so the feed did actually feed the correct line etc - only discovered when I was under the car with a container to clear the lines out of any debris and it came out the other pipe. Whoops. So yeah. The engine just started up with no fuss on first turn of the key. Simples. Sounded great. The was no water in the system so I just ran it for 30 seconds, gave it a rev and let out a little giggle. I then painted the parcel shelf cover thing that I'd made in the last update... While that was drying I made a little lever for the exhaust valves. I started with an old pulley that I'd originally made for my V6 Viva.. Ran a long length of bicycle brake cable through from the engine bay into the interior via the routing that one of the original Imp heater hoses took. Connected the dots with a tandem brake cable inner.. Out with the rivnut tool and put a couple into the inner sill. Lever mounted... Sound levels turned up to 11, small kids scarper, nuns faint and dogs howl in the distance* when lever is turned as such. *Hopefully. Next up was filling the cooling system with water. Not coolant. I've learned from that mistake and I'm sure I'll be having to remedy some sort of issue which might involve emptying it out again. Turned the electric pump controller on and noticed it telling me the water was a balmy 54 degrees. It definitely wasn't. Its winter here (apparently) and the water was 15 degrees according to my volt meter temp probe. That bloody sensor wire! When I lengthened it by about 800mm I used 12/0.15mm gauge wire. The original sensor wires were 17/0.15. I didn't think 5 strands @ 0.15mm were going to make enough difference to change the reading but how I was wrong. So this was where I was working early evening yesterday... I rummaged through my extensive supply of cables, picked out a few that might be ideal and started with some beefier speaker cable that had many more strands. I didn't count them as tiny. I just connected it up and tried it out. Bang on! Both meters read exactly the same. I tidied it all up and we started the engine. Ran it up to temp which took ages because by now it was only about 11 degrees. No leaks and the pump seemed to bleed of air easily. Hannah took a vid of me giving it a cheeky rev. Such fun. You'll see that in the next vid. Interestingly and annoying is that the exhaust valves don't seem to do anything to the engine note at idle. Maybe they will make a difference when asking more of the exhaust? It was by then too late to go out for a hoon. I still had to fit the belts, all of the seats, the nice blue parcel shelf engine hole cover and also the actual engine bay lid. So I spent the evening finishing these tasks off. I'd love to have driven it because it was a clear, albeit cool, day. Lots of heavy rain expected the following few days. Oh well. It was great to see the interior back in. Although the recaros don't match the interior colours I just love seeing them. I like this pic. Old and new. 'West German' seats, old imp interior, sneaky megasquirt and usb cable. So this morning it was finally time for the big occasion. There were so many things to go wrong, not work, be noisy etc. We just popped a tool box in the front, plugged the laptop in and went for a drive... Wow. It works! The clutch pickup point was spot on, gear change seems fine in a mechanical way. The gearbox was quiet. No whines. The engine was completely out of tune and we couldn't really tune it properly on this short drive. We did about 12km but a combination of the very cold morning and a very efficient cooling system meant the engine wouldn't get above about 80 when on the move so for much of the drive it was still on warmup enrichment. I now realise that I should have upped the temp setting on the pump controller. I think the default is 85 degrees so it pretty much had the pump running full time. I want this engine to be running at 95 degrees C. But hey - great to know the cooling system works well at cooling. The exhaust is more than loud enough. There's no insulation above the engine cover so that will refine the interior when cruising and how cool it is to pop into a 5th gear!!! Again, due to lack of tune I couldn't really note what the gearing is like. I never really gave it the full welly because my dash rev counter wasn't working (I have a sneaky suspicion I plugged in the wrong signal wire that currently goes no where) I just drove the car and enjoyed the fact that this moment was finally happening. Hell - it was March 4 years ago that this engine first arrived on a pallet. The things that were not so good.. The clutch bite point got lower and lower until it was tricky to get into gear. Either failing slave or master cylinder. I suspect (and hope) its the MC. Its a bit fumy. Granted it was running pretty rich and the rear cover I've made is not sealed properly. The gear lever knob moves back and forth with the engine/transmission movement. Not annoying and only noticeable if you keep your hand on the knob (chuckle) while accelerating. I had figured it would because its a very slop free mechanical connection. Maybe stiffer engine/box mounts might help but then I could expect to have more noise in the cabin. The weather was a bit shit so we went home, had coffee and cake and I looked over the car. It leaks oil. Typical. It was weeping/dripping from the point between the heads and case sides where the oil drains back into the sump then running back with the airstream and spitting onto the muffler. So there's some of the fumes then. Only happens when the engine is running but its enough to be an issue I want to sort out asap. The leaks are here. This side where it leaks straight onto the cooling pipe and runs back... The other side.. Nothing to leak onto but its still getting flicked back by the airstream onto the muffler... Here's a head gasket. You can spot the drain hole. Its only pinched up at the bottom by one 6mm bolt. If I knew then what I know now I'd have added a thin smear of threebond sealant on each side of the loop to be sure. Oh well. The mess it made on the muffler. So that's where I'm at. We checked the clutch. It works fine on the hoist. Bite point still at halfway?. No obvious leaks or traces of fluid from a leaking slave cylinder. Fluid level was fine. I'll check the m/c tomorrow. We bled the system again just to be sure. Only other thing I could suspect would be a dragging spigot bearing but I cant imagine that being the case. Its a new sealed bearing. As for the oil leaks. I'm going to try removing the lower water pipe in situ and get enough room to apply marine sikaflex 291 or similar. Its under no pressure so hopefully should seal ok so long as I get it super clean beforehand. We will test it all again, leaks or no leaks, when the rain stops (rain warning for our district this weekend) but for now I am simply chillin' and relaxin' and celebrating the first drive in a flat six powered imp that sounds pretty glorious.1 point
-
This might be helpful if you do it again, stops any extra debris1 point
-
I will try to keep updates coming along a bit closer now as I tick off many of those little jobs. The useful alloy scooter handle bar thing I'd picked up at the dump ages ago is getting shorter and shorter. It happens to be 32mm OD and ideal for many jobs such as extending the sensor housing so I could add a 16mm tee for my header tank.. Another bunch of little bits to do was the air filter mount and associated points to feed the IACV, the catch can and a place for the air temp sensor. I made an alloy mount which bolts to the firewall in about the only place left that would fit it. It connects to the throttle body by flexible ducting. The Goldwing engine just has a simple breather system. The crankcase is under a constant light vacuum and any blowby fumes are drawn straight into the air box before the carbs. I decided ages ago I would just replicate it. I machined up a Ventura... Oh. Hang on. That's not right. I mean Venturi... with some other bits.. Looks like this inside... I made a little stainless catch can with shelves and stainless scrubbers - for scrubbing out any oil mist. It has a drain plug which is easy to get to. Painted it black so it hides better (not exactly a pretty thing) It, along with the filter and filter mount plus associated tubing all resides at the back of the engine bay, luckily out of sight because its all a bit messy. I tried my best without getting too carried away. Its tight in there!.. The two main plugs plus the wideband plug are tucked up nearby.. Also nicked the oil pressure sensor from the Datsun engine and fitted it in place... Lifted the big folder into place and bent some steel sheet ... ...to cover the hole that normally has a Datsun cylinder head poking through it... Used rivnuts so now it simply bolts down in place. I'll glue foam on top so it'll match the rest of the parcel shelf. I'll eventually cover that with an easily removable carpet mat. Its super handy having this access hatch. As for the underside - that will get painted blue for now and I'll be looking into some sort of cover that simply screws in place, possibly with a covering like vinyl or something. Maybe use pop studs to hold it in place. Just something neat and uniform that will hide the hole.I'm still thinking on this one. While I had the folder out I cut out a bit of 0.7mm stainless sheet, curved the edges and hey presto - a heat shield for the exhaust silencer... That's about where I'm at as of today. I've just started looking into fitting the fuel tank but I need to get some more hose. We also wheeled the green imp into the shed and this evening started making it smaller. Eventually it'll be so small it'll fit into the van and can go to the scrap steel man, less the roof and some tricky shaped sections I'm keeping just in case of whoopsies in the future. It's also handy to have another spare set of suspension arm, hubs and axles etc. This shell really is too rotten to rescue considering the sensible values imps still seem to be at so I didn't cry too much at first cut. Bye bye little green Imp. You served me well and will not be forgotten...1 point
-
So many little jobs that add up to suck time. But its a fun time to be at and there's no point in rushing it. The rear seat base was next up because I needed to work out where I could run the engine loom through. I tried the base in place, got an idea of how its steel rod framework needed to be adjusted and set to it. As you might spot in the above pic I also gave myself a decent cut from something sharp in there. Seat base now fits in neatly although it wont be a luxurious softly sprung seat for a middle passenger when 5 up. Highly unlikely scenario that is an Imp though. Megasquirt and associated fuses/relays etc are tucked away under the seat. I made some mounts for the exhaust box.. Welded the mounts in place and I was then able to tack, then weld the secondaries to their flanges. I painted the crossmember after having added some handbrake cable guides. Then it and the rear suspension was all bolted up in place. The new driveshafts fitted and hubs pulled on, wheels bolted up and it was rolling again. So it got rolled out the back to join green imp so I could use the hoist to do a customers van job. As soon as the van was fixed and out of the shop I put Impy back up on the hoist. I then worked out the final section of pipework for the clutch's concentric slave cylinder (CSC). I wanted the bleed nipple to be easier to access and not have any spillage running down into the bellhousing. I made some pipework and fittings to suit. Bench was covered in brake fitting stuff and I pieced together a system. I made one setup, tested the clutch and while it worked fine I wasn't happy with the pipes sticking up in the way so I changed a it again leading to the final iteration.. The csc itself was a unit I'd scored from a Ford Mundano engine and gearbox I had well over 6 years ago. Intended to fit the duratec into my Viva wagon. Sold the engine and kept the release bearing just because I thought it might be handy. So six years I've had it laying about and before that it was residing in a wreckers yard. It must surely be a bit cruddy inside? They are not designed to be serviceable but they are also stupidly priced here in NZ - like triple what they cost in the UK. So I decided it was going to be serviceable and I took it apart. Sure enough it had some mild corrosion marks on luckily what is a stainless guide tube but otherwise actually pretty good. It cleaned up well in the lathe.. Its a very nicely made thing and quite simple but has to be mounted correctly. This guide tube seals on the mounting plate with a thin square section seal. I made a new bigger mount to support the base because the original machined support I'd made wasn't broad enough. I was then able to add two more bolts to sandwich the lot together so that square seal remains squished evenly at all times, as it would in a OEM situation. We trial fitted it all with the new base plate and pipework. I was not sure whether my stock Imp 5/8" bore master cylinder was going to move enough fluid to get the release bearing travel I needed and I was prepared that I might have had to fit a 3/4" M/C. However it all seems fine with a light pedal and the bite point is about midway. Very smooth motion too! While this lot was being done Hannah finished prepping the rear valance for paint. On a nice warm morning I set up the paint frame outside and sprayed some blue about.. I did my best not to paint the cat blue.. It turned out fine.. Another little fun job was cleaning up the gearstick shaft in the lathe.. ...and discovering that universal steering rack boots make for neat gearstick boots... I'd bought some muffler packing sheet and then played with scissors... I then painted it with stove paint and sat it on the burner to help it harden. It looks much better in black. I've used silicone to seal the lid. Ran some beads, let them set for a couple of hours till at the point where it squishes flat without smearing. Stainless bolts carefully pulled up evenly. Seems all good but only time will tell on how the seal lasts. Like a few things on this build its a bit experimental. Gaskets for the inlets and tailpipes are copper. I have quite a bit of decent thick walled copper pipe from the Imp racecar cooling system. Chopped some bits, flattened out, heated and quenched with the oxycet and now nice and soft. Exhaust all mounted and engine now ready to go in for the final time (he says..) I just had to get a few more pics of this stage because its a point I've been looking forward to Positioning the power plant under the car.jpg Yep. Getting very close now!!!1 point
-
Lol, gotta be.. we're being trolled in a weird way1 point
-
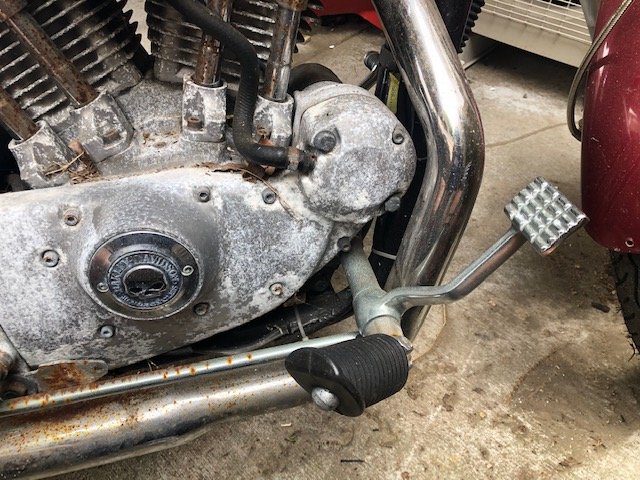
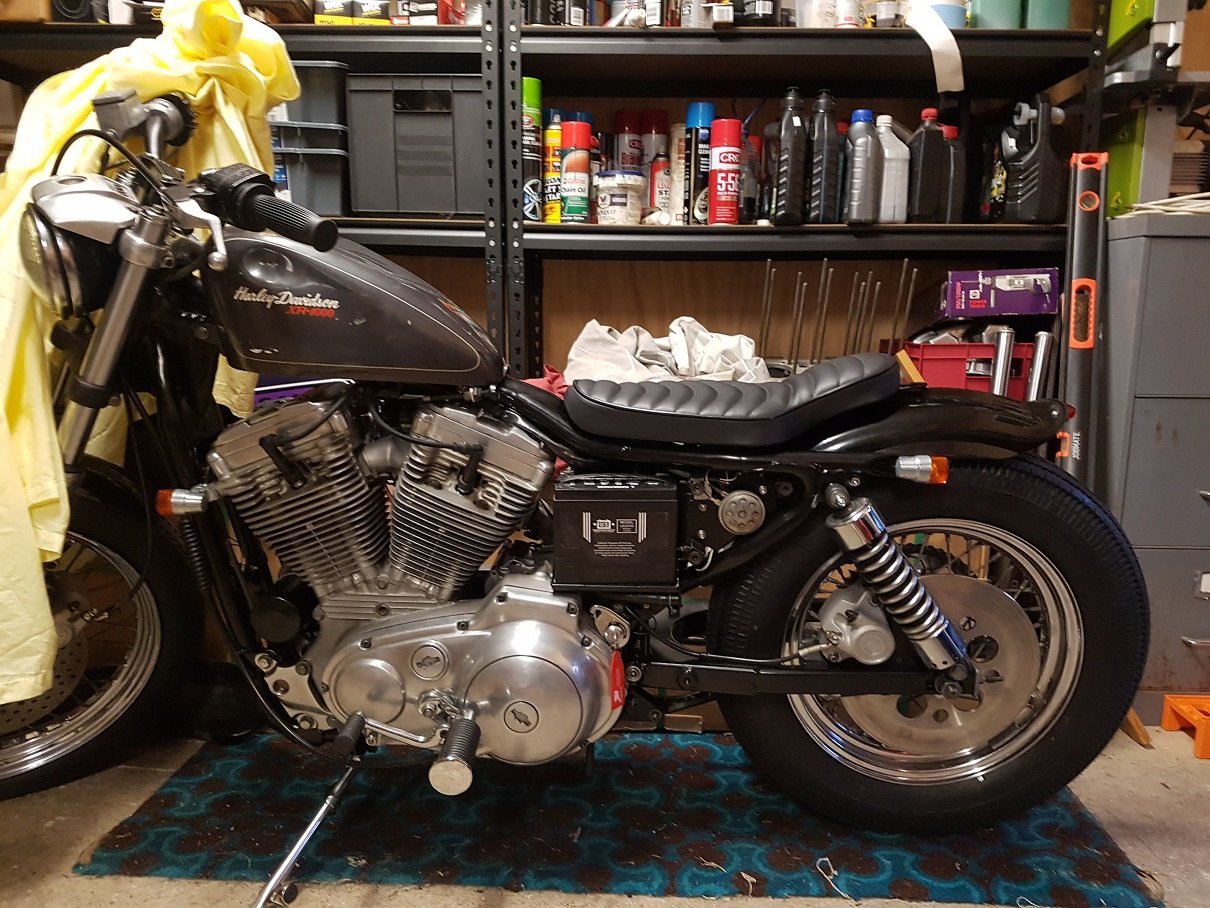
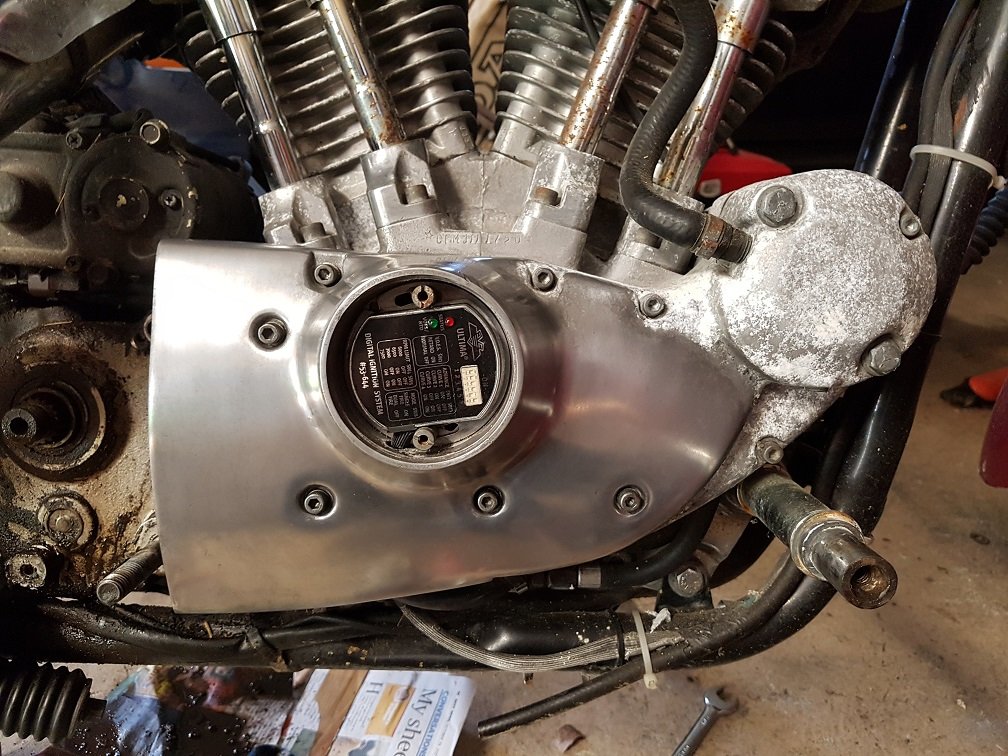
Yeah, primary cover gaskets are the same. I'm sure you could fit the primary cover on a later model ironhead and vice verca. Clutch has alternator behind it (they only did this for the first few years of the evo as it was a bit of a sucky setup). And has a pull release instead of a push. Quite a lot nicer action. And its easy to select neutral when its running! Still havent taken it for a ride yet. But should be a blast. Will do some laps this weekend. Have taken 50mm out of the forks, and dropped the back 50mm too. Feels like a tiny and compact bike. Plus there is nothing to it either. Just an engine and 2 wheels really. I relocated the key to under the battery and cleared all the VOES and other wiring, hid the coil behind the oil tank and setup all the wiring there. To keep it clean under the tank. Will get some propper pics soon. But i actually put in quite a bit of effort doing subtle things to keep it looking as clean as possible, but also looking retaining an OEM look. Want to keep it minimalist too so need to figure out where to tuck the speedo to keep it clean. I've tried to do this build as cheaply as i could. The most expensive thing i have done was getting the frame blasted and powdercoated for $400 and that was worth every cent. The shinko tyres were from a 15% off at motozone, and the seat was spendy at 350nzd landed. The rest of the bike is just elbow grease. This has really been a budget build. Reusing all the fasteners (after wire wheeling them), cutting front springs, 2nd had trademe shocks, and lots of autosol. Pretty happy for how this has turned out. It looks like a very tidy wee bike. Especially considering the condition it started with. Has been a very rewarding journey.1 point
-
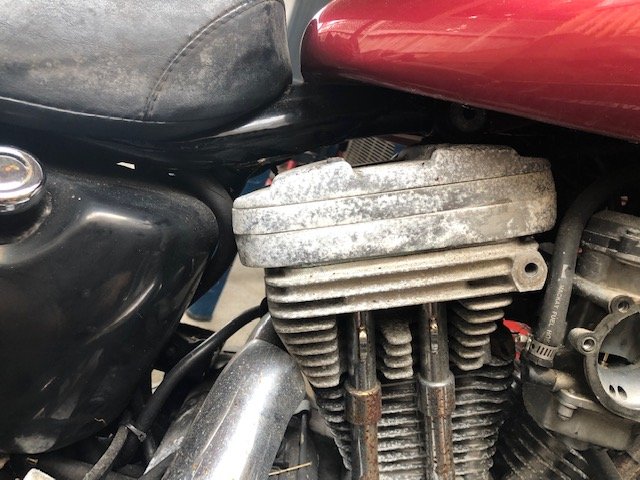
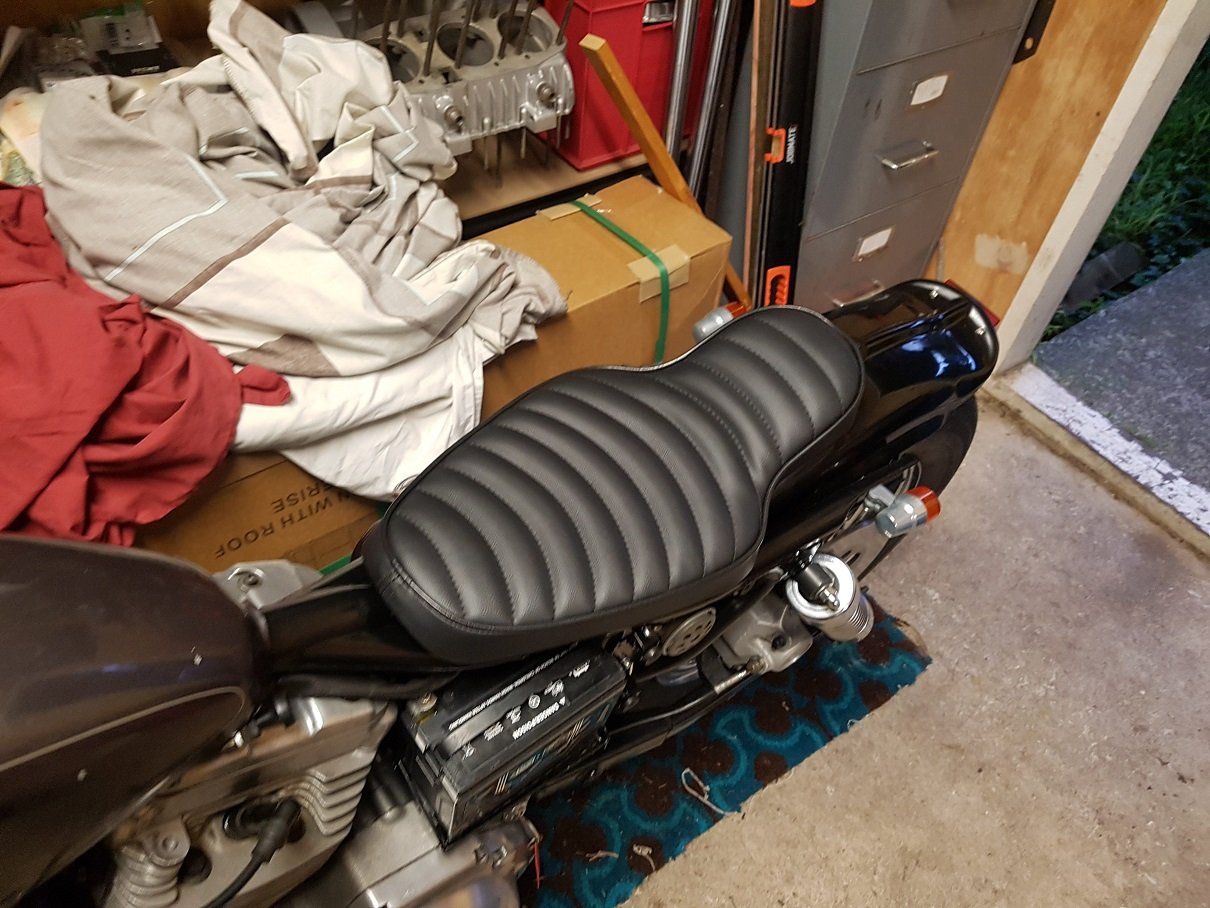
Small update on this. New seat turned up in August. Looks great. Fitted a micro tail light which you can see under the rear ducktail. The bike starts and runs like champ. Starts first pop even after sitting for ages. However the clutch had been stuck. The mechanism works fine, but i assume the plates have stuck/rusted from it sitting for the last 10+ years. I tried freeing it by doing a burnout with the clutch in, but it was proper stuck! So pulled clutch apart. Cleaned, and put back together. Clutch works a charm now! All i need to do now is mount numberplate, and fit a speedo and then its ready for a wof! Just intime for summer. This should be a lot of fun. Its actually a tiny wee bike, should be great for ripping through the wellington hilly streets!
1 point
-
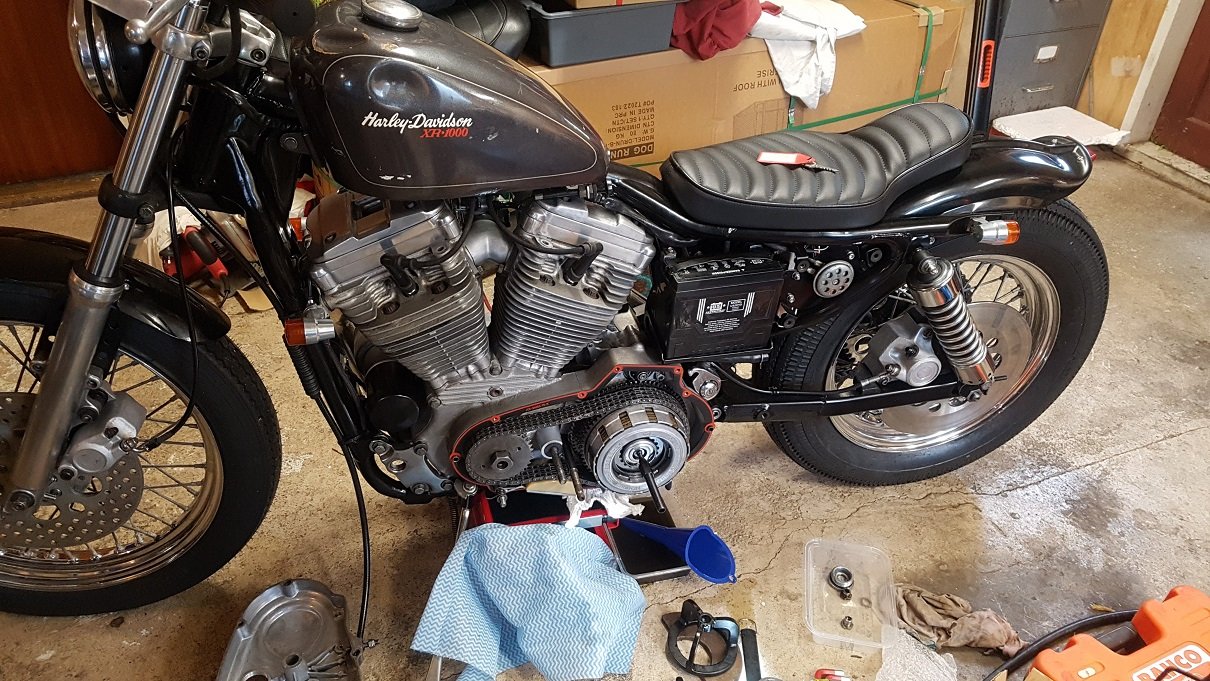
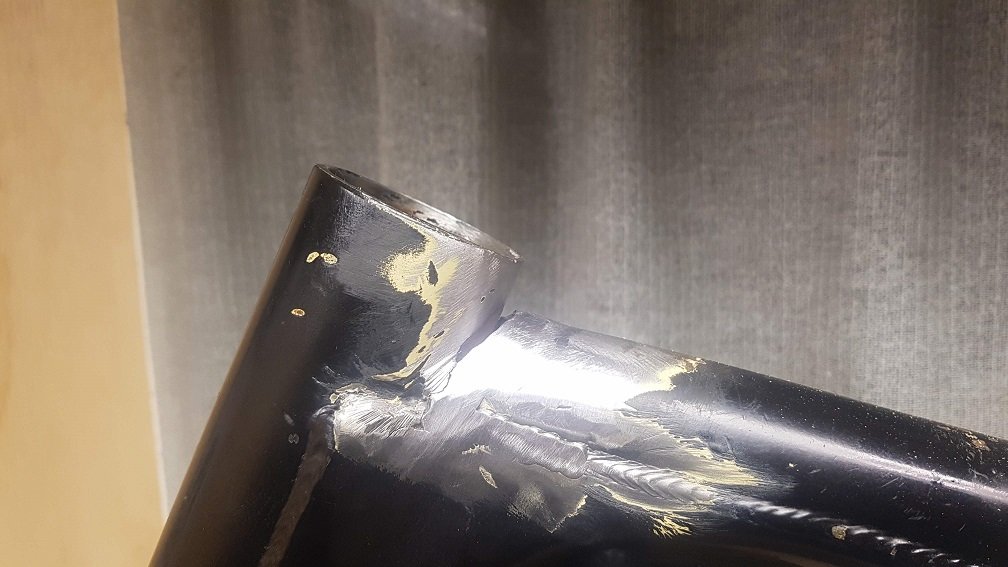
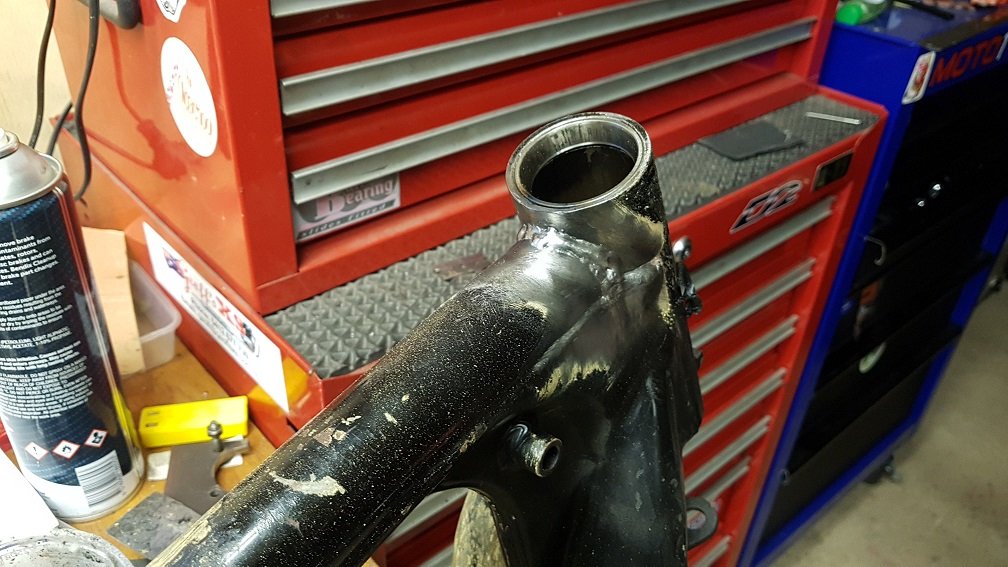
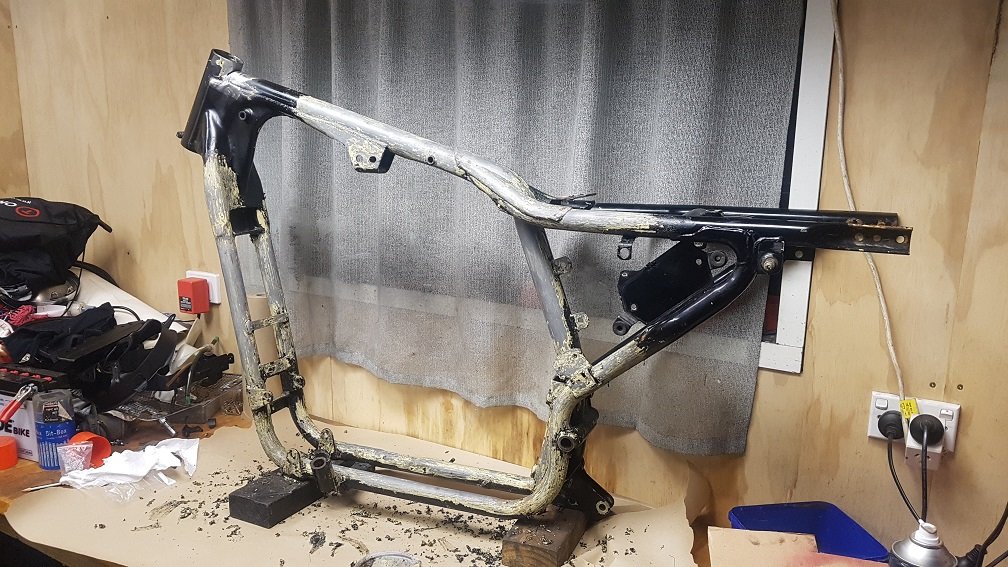
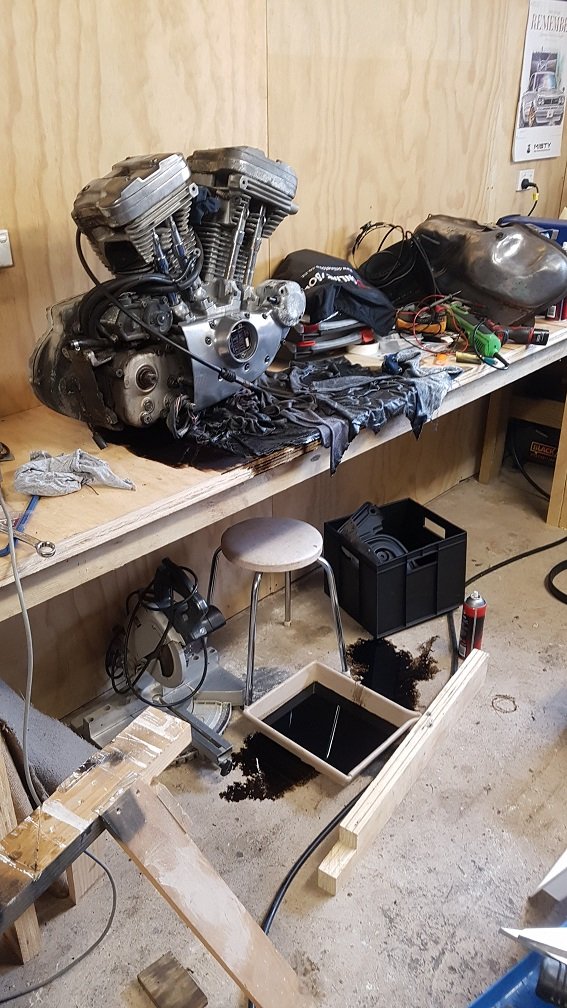
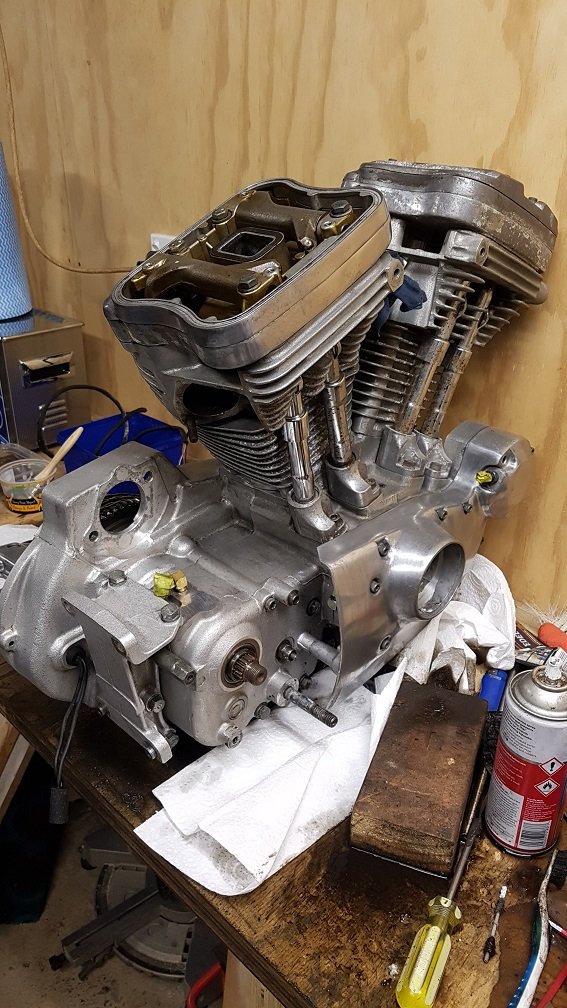
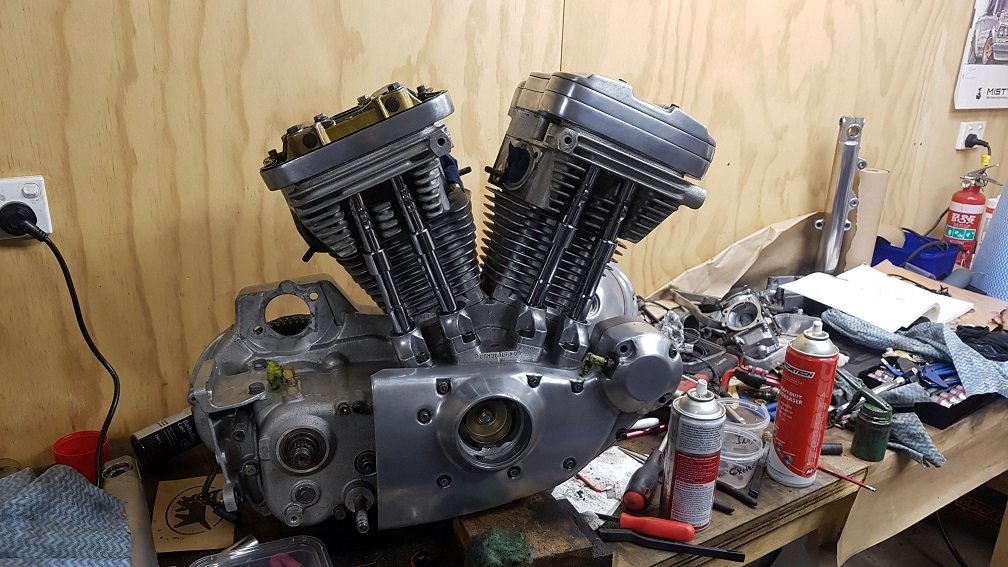
First step was to see what I'd bought and start cleaning it up. It was responding well to some 400 grit and some autosol. Before: After a test patch: It certainly had potential.... Next issue was the frame. It had some goobied up weld on the headstock. So i ground this back and re-welded it. Looked much better: I then proceeded to strip the frame by hand: I got this far then rage quit as it was absolout misery. Dropped it at blasters to be blasted and powdercoated. While that was happening i put the motor on the bench to give a propper cleanup with new gaskets etc. It had wet-sumped and proceeded to go wees on my bench overnight: Was really fun to clean it up and add new seals: Got the frame back from powdercoaters and put the engine in. Looks like brand new! Started to reassemble it whilst trying to not make it look super gross. Got some short rear shocks from a dyna, and some cuttiez in the front g. Also popped some new shinkos onto the cleaned up rims: Love how narrow it is. Ali express rear guard. This is where it currently stands. As soon as my ironhead is off the table i'll get full force back into this. On the home stretch now. Have a whole heap of new bits to go on it. Plan is just to have something cool and reliable as a backup bike or one mates can ride when they're in town. Will hopefully come back with updates in next few weeks. Motivation is high at the moment.
1 point


.thumb.jpeg.e0a4bff61111e0c8c7396950fcc94da1.jpeg)


.thumb.jpg.570970b401ac8d26ce9af7c1bf2bd8cd.jpg)


This leaderboard is set to Auckland/GMT+12:00