
Leaderboard


Popular Content
Showing content with the highest reputation on 13/12/24 in all areas
-
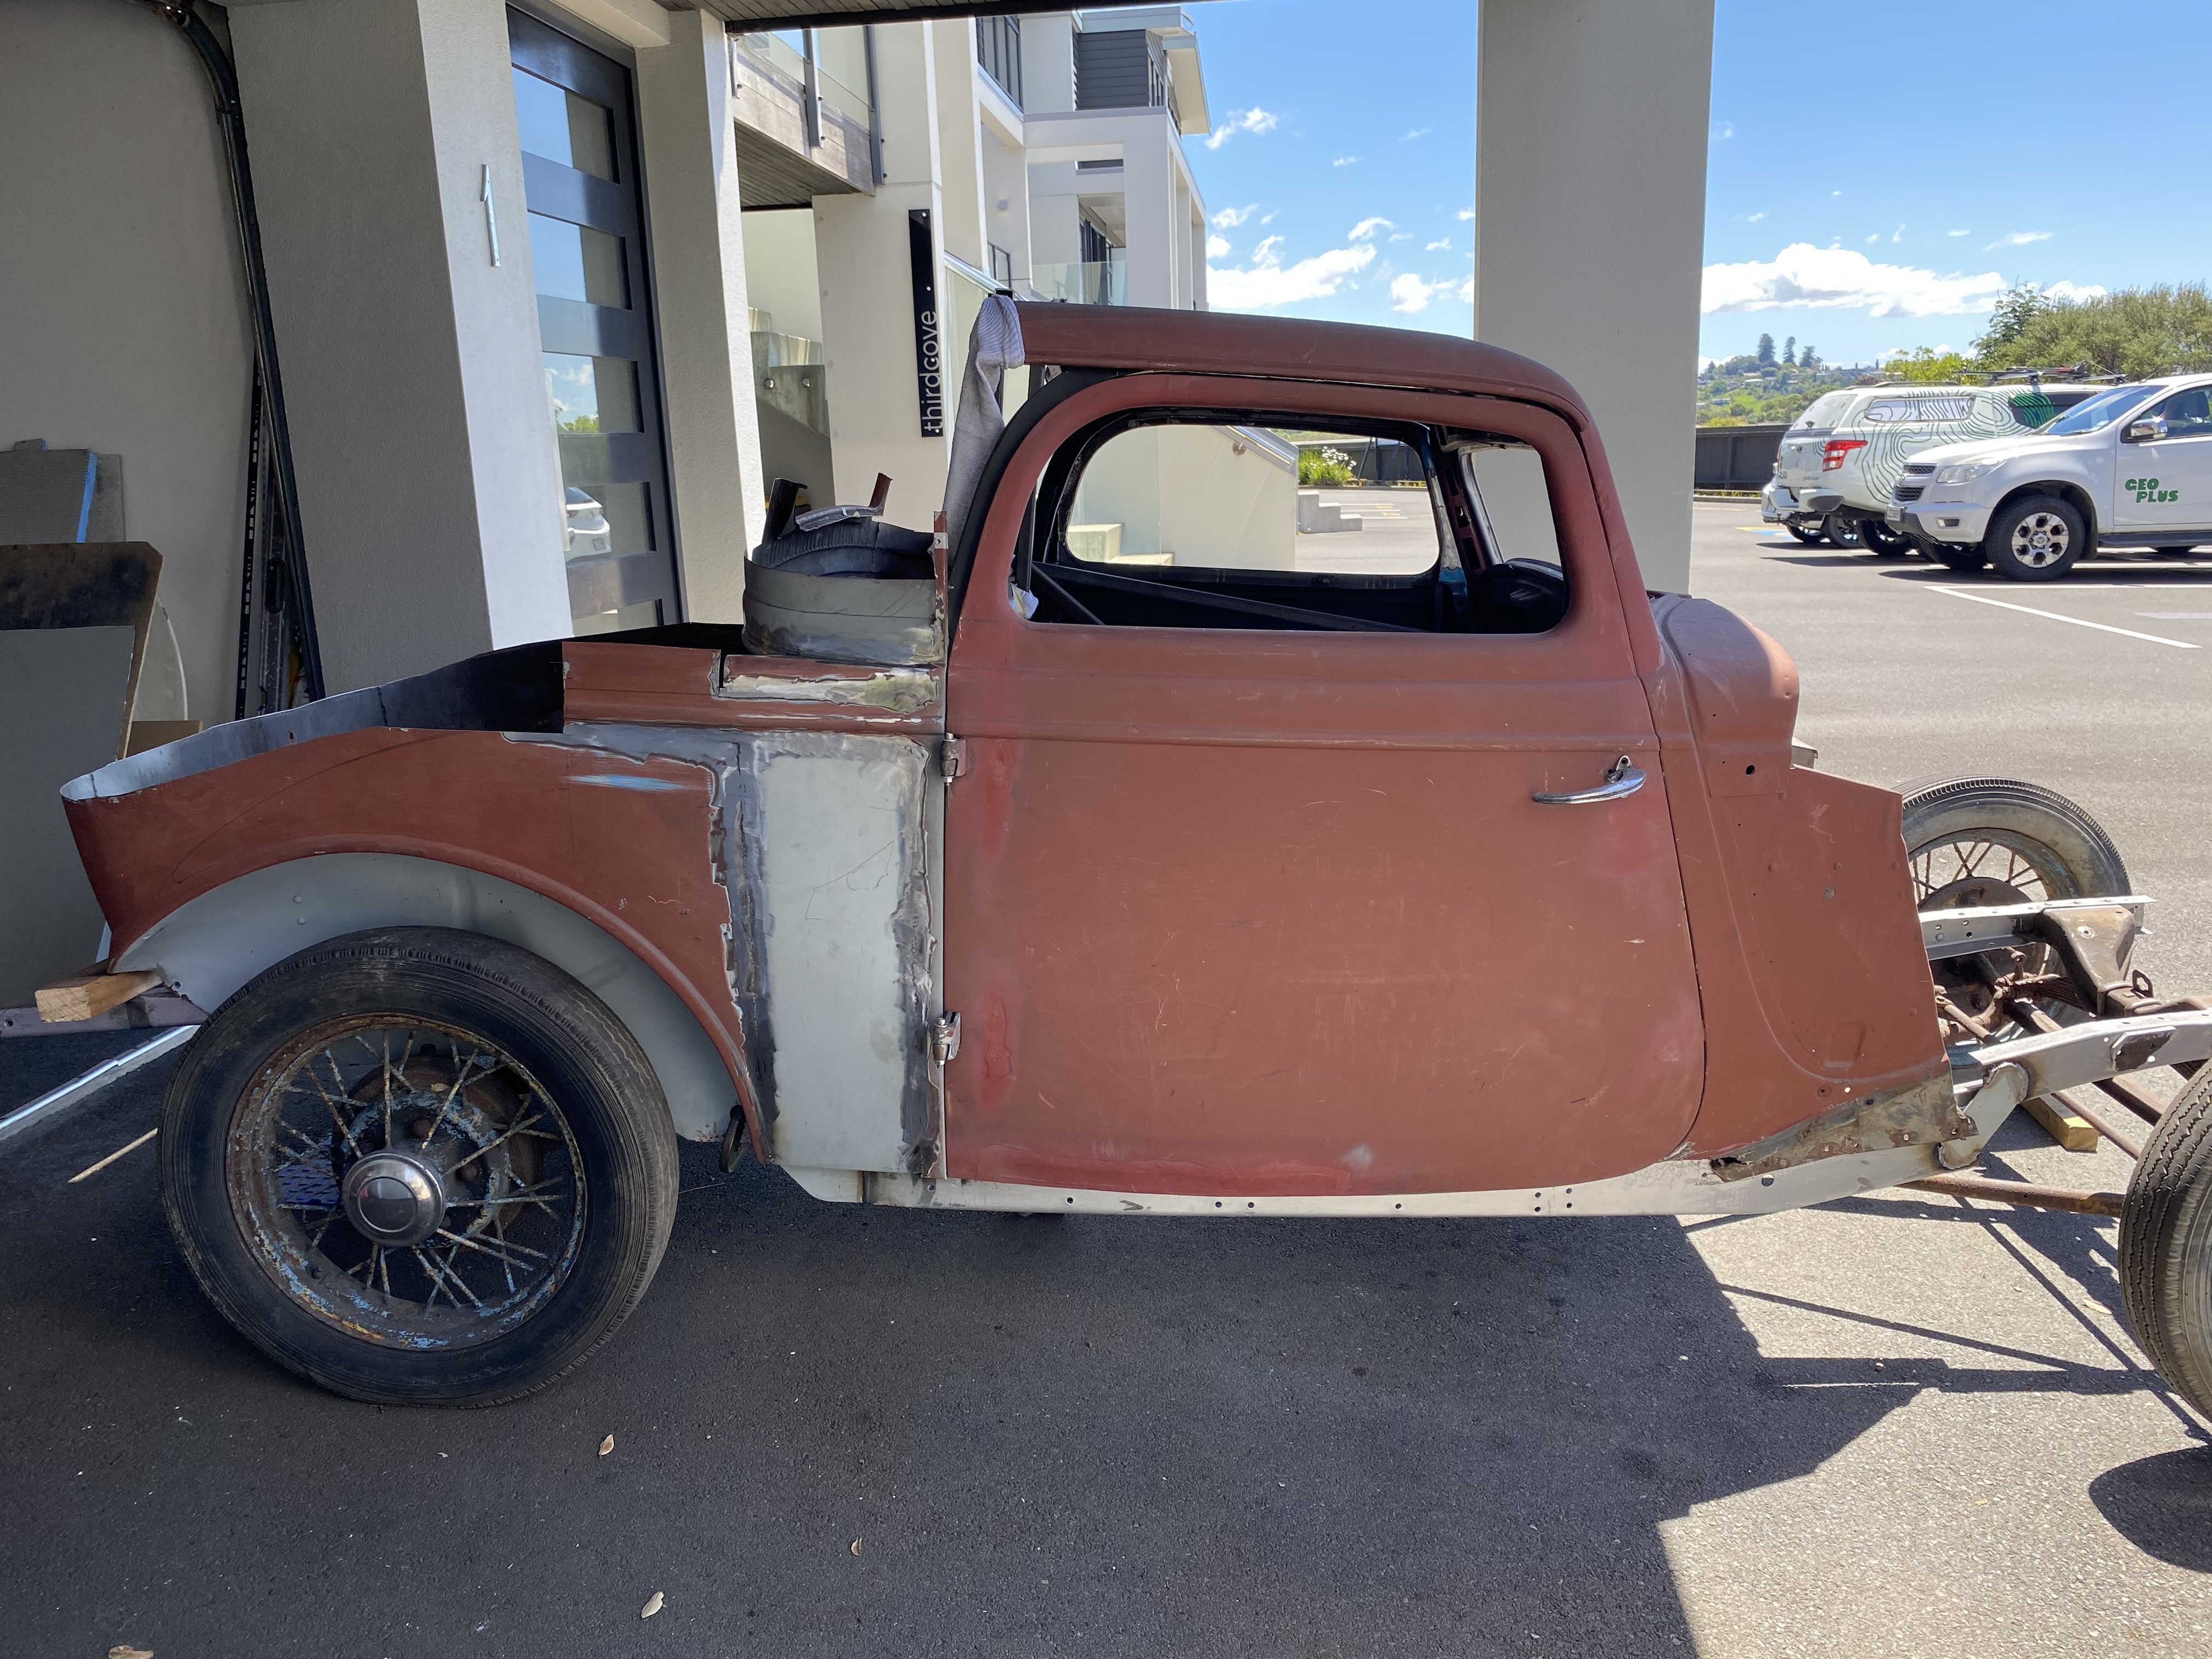
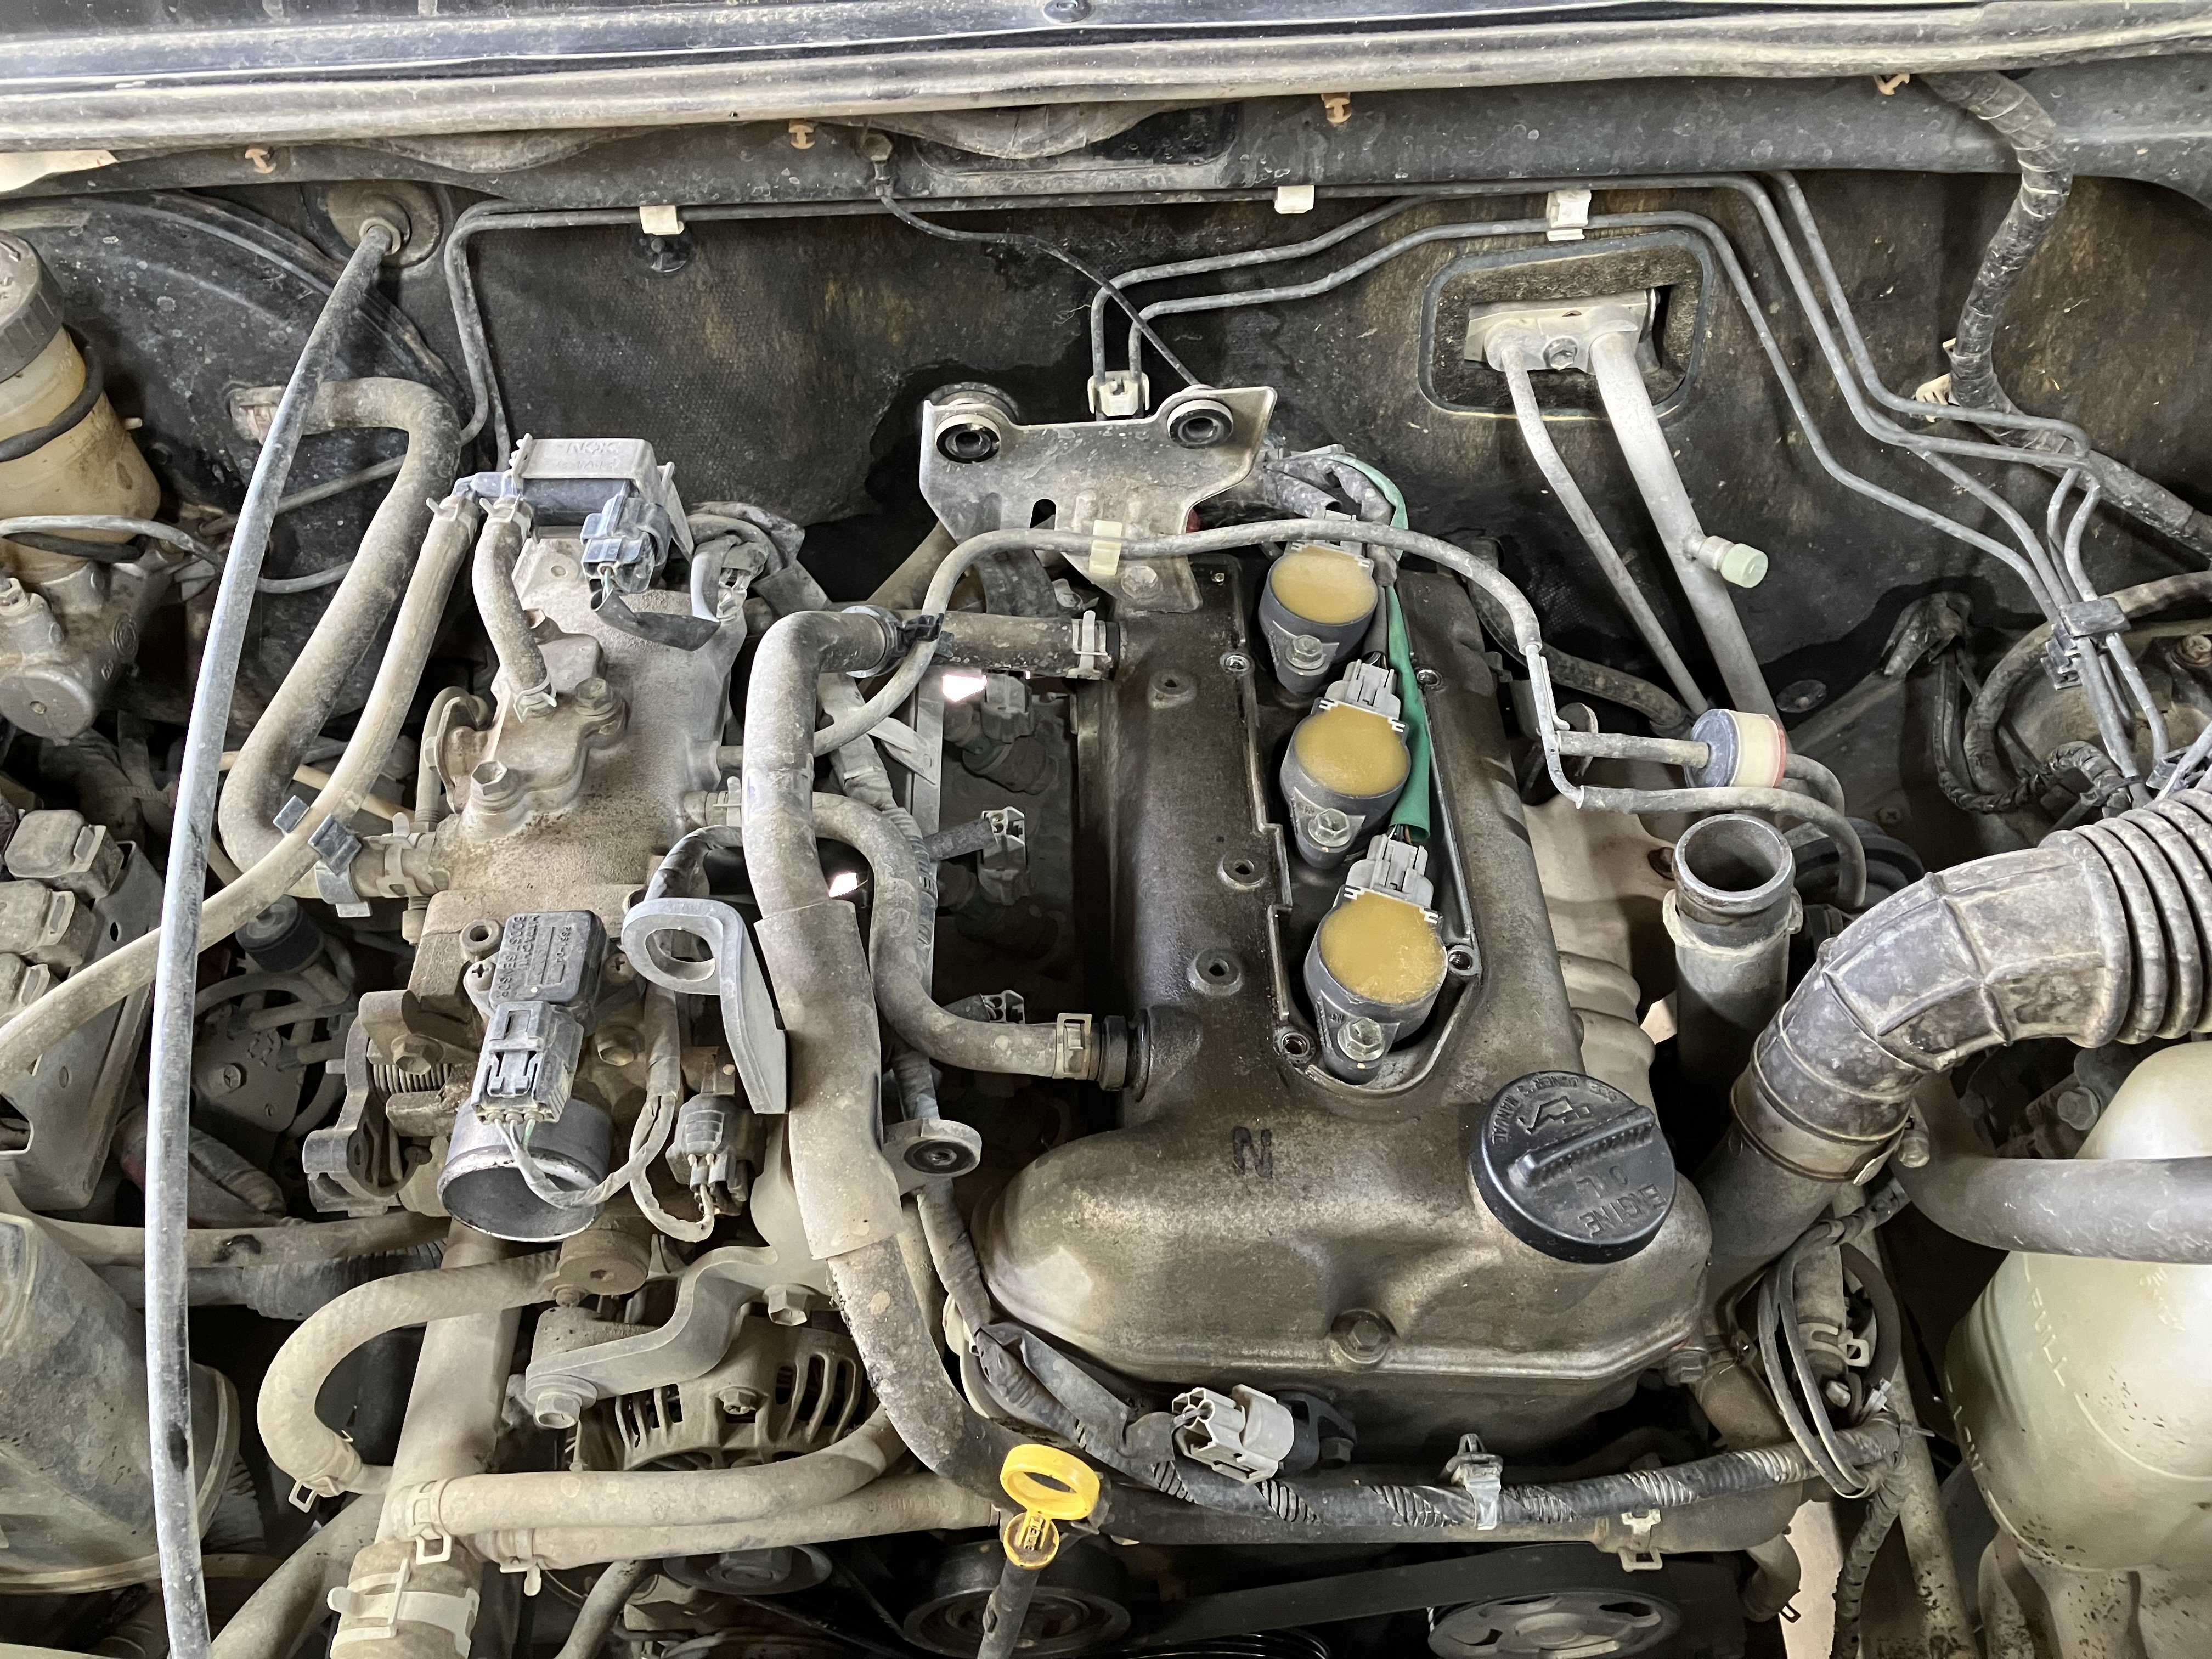
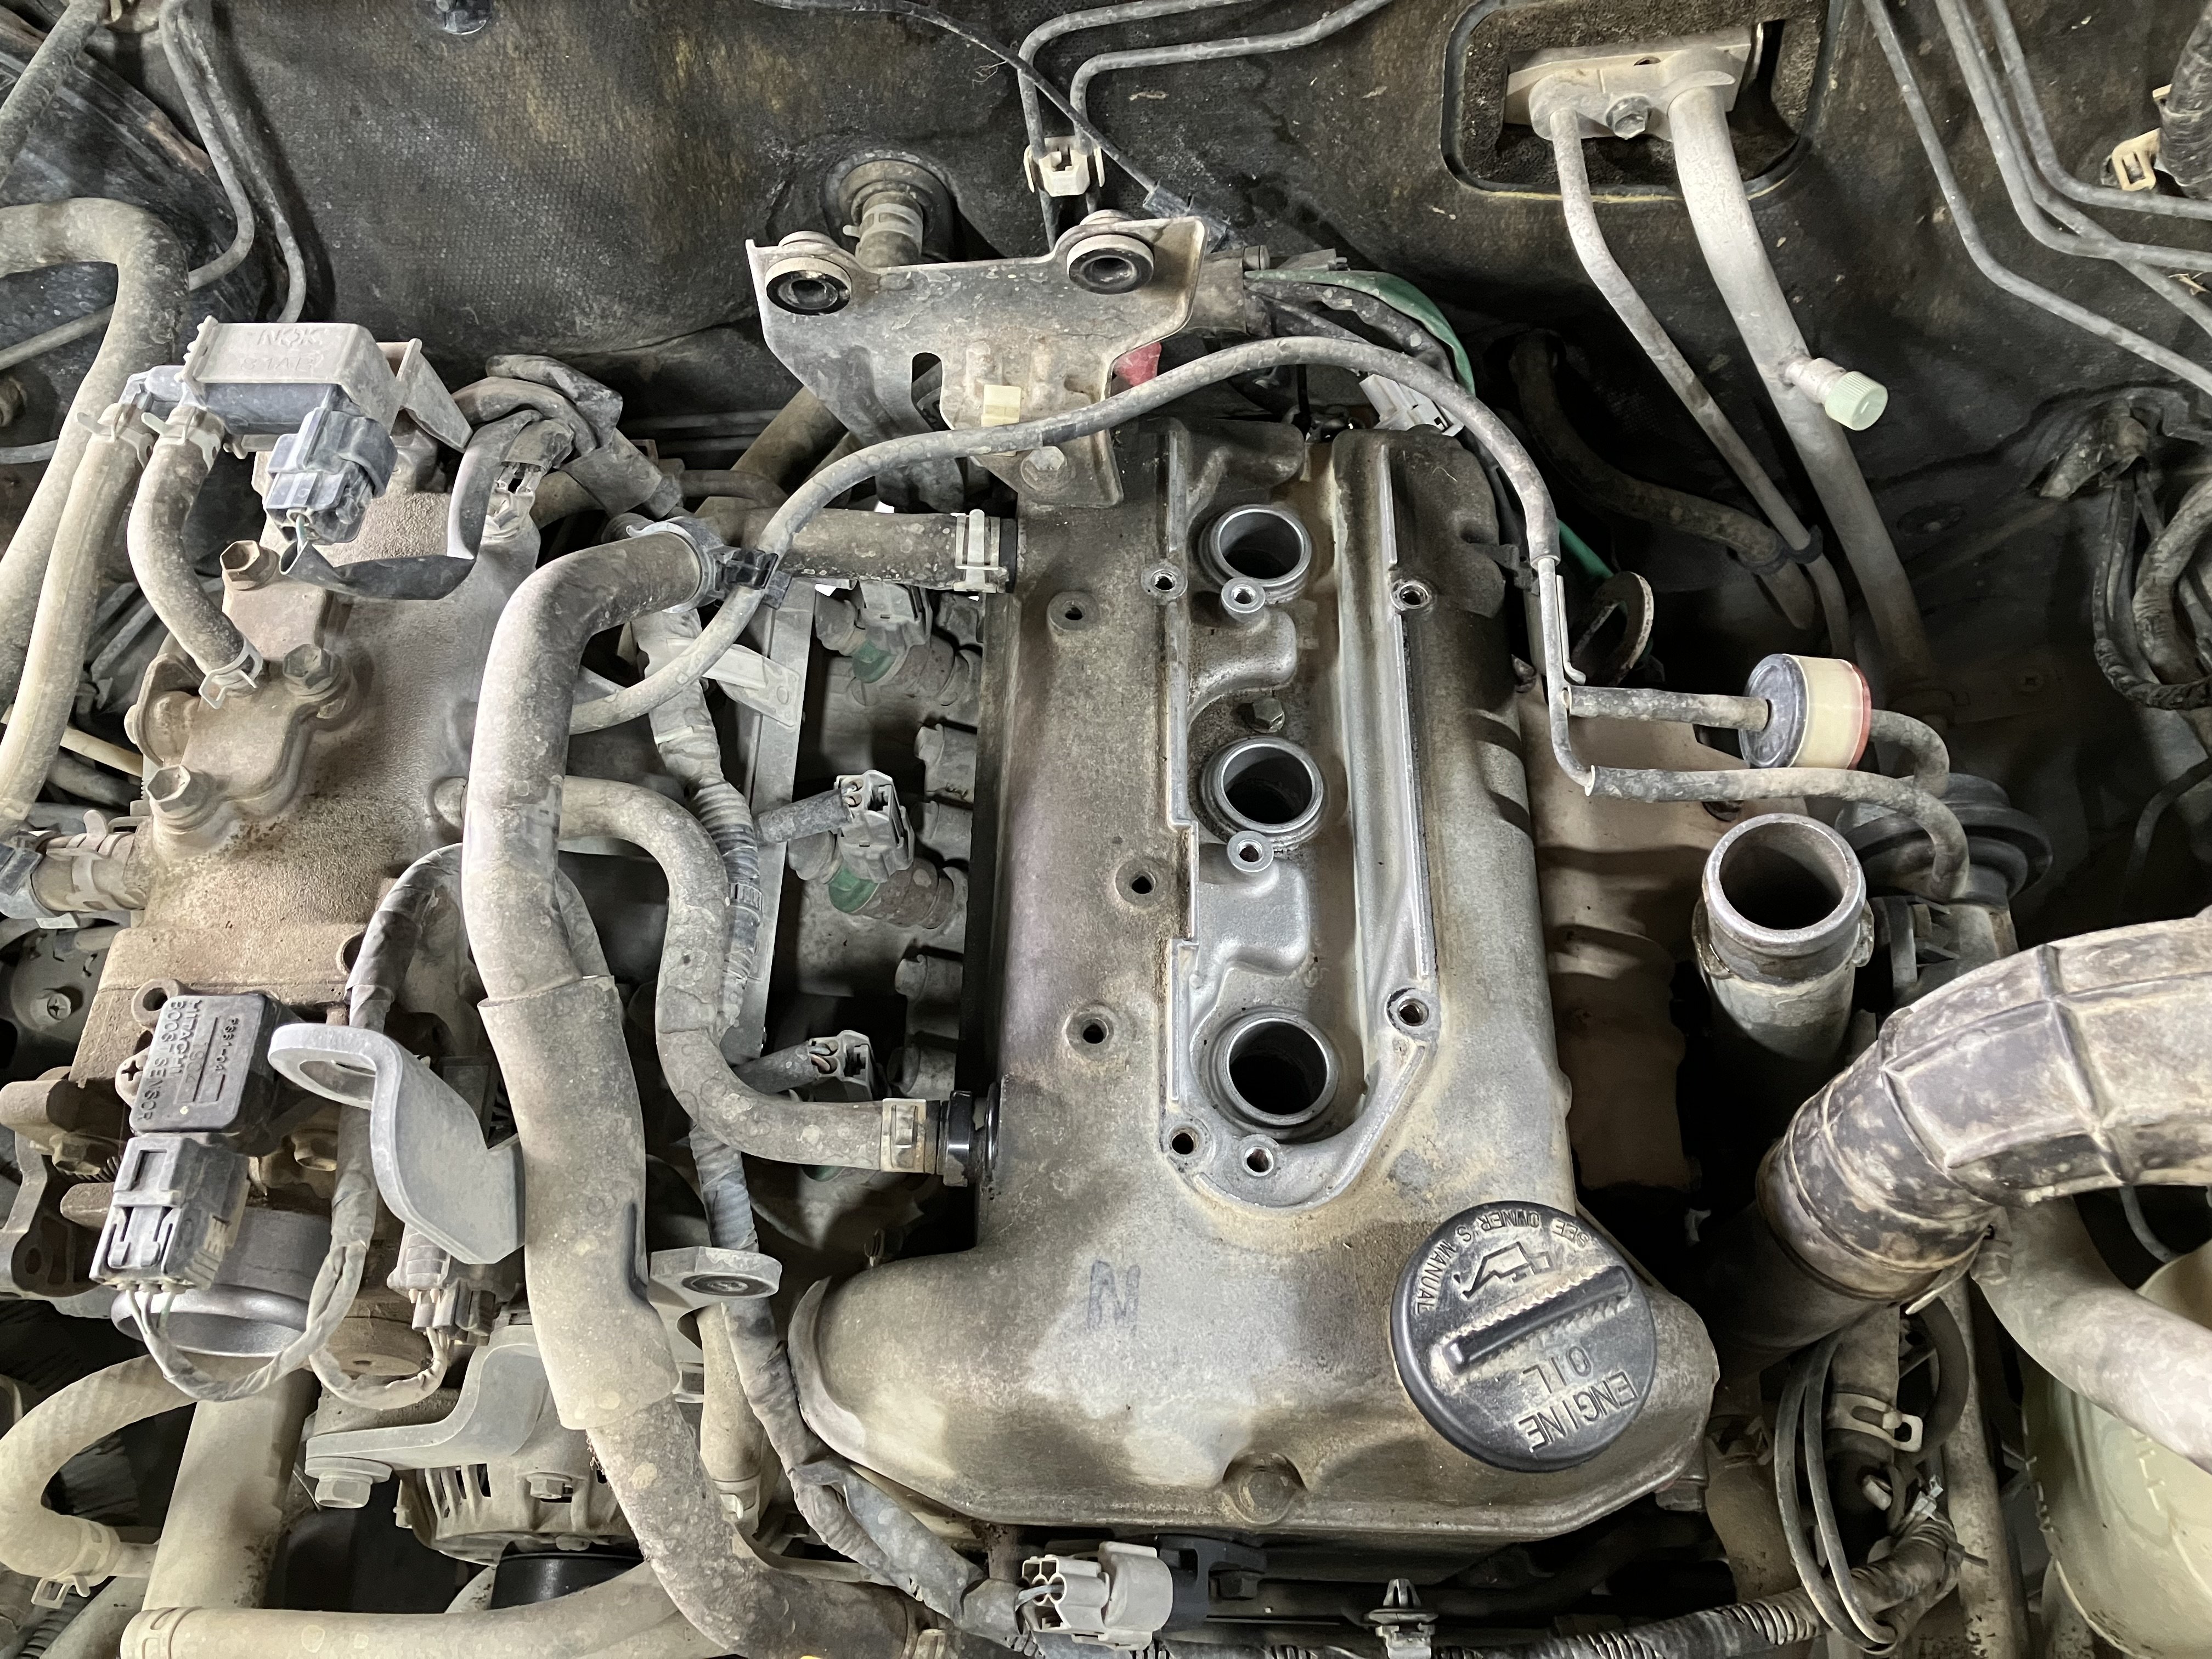
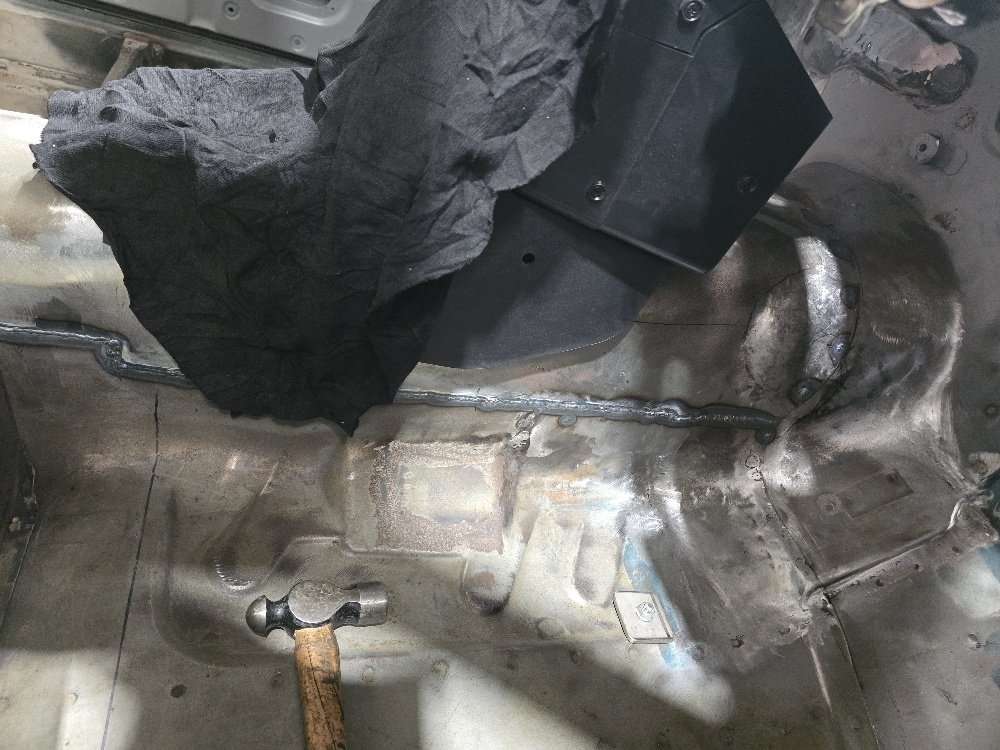
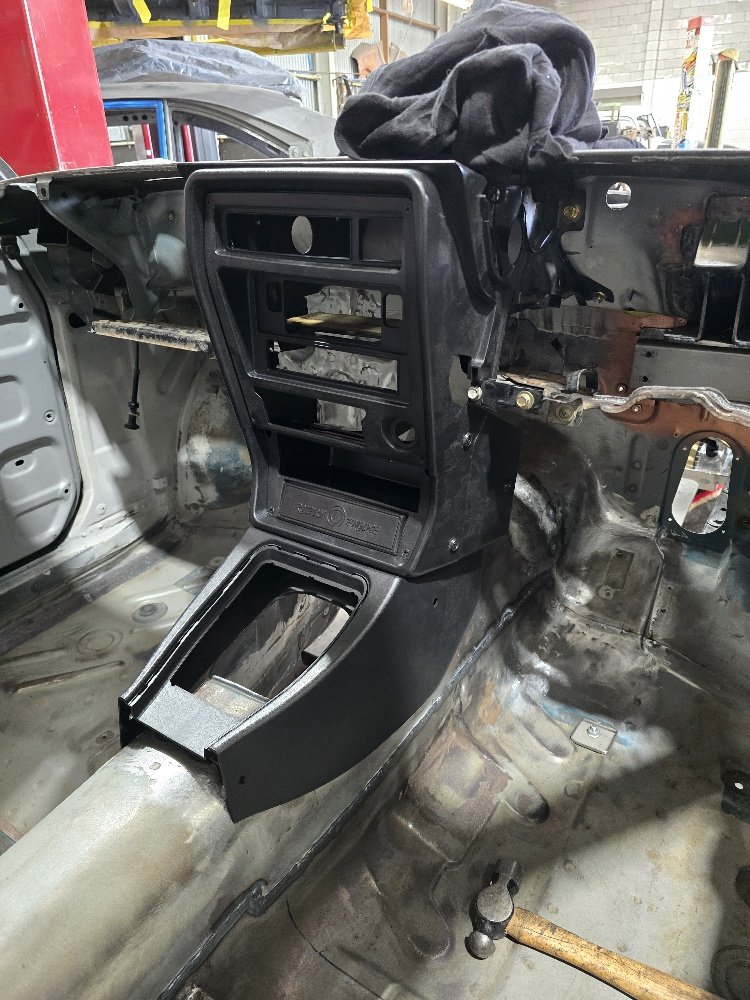
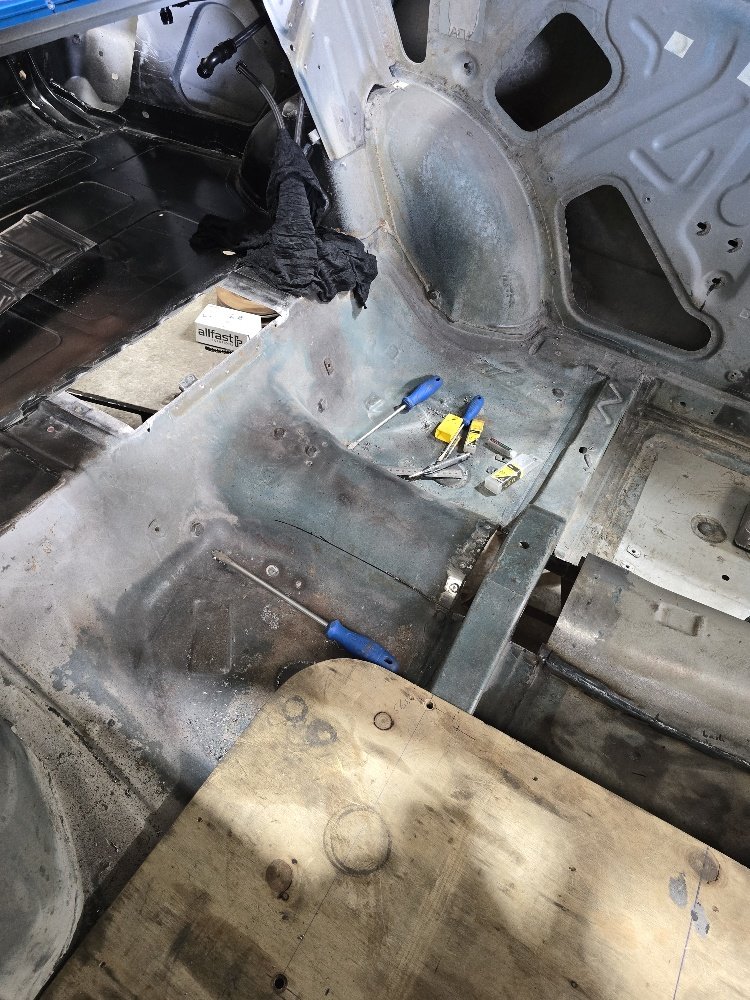
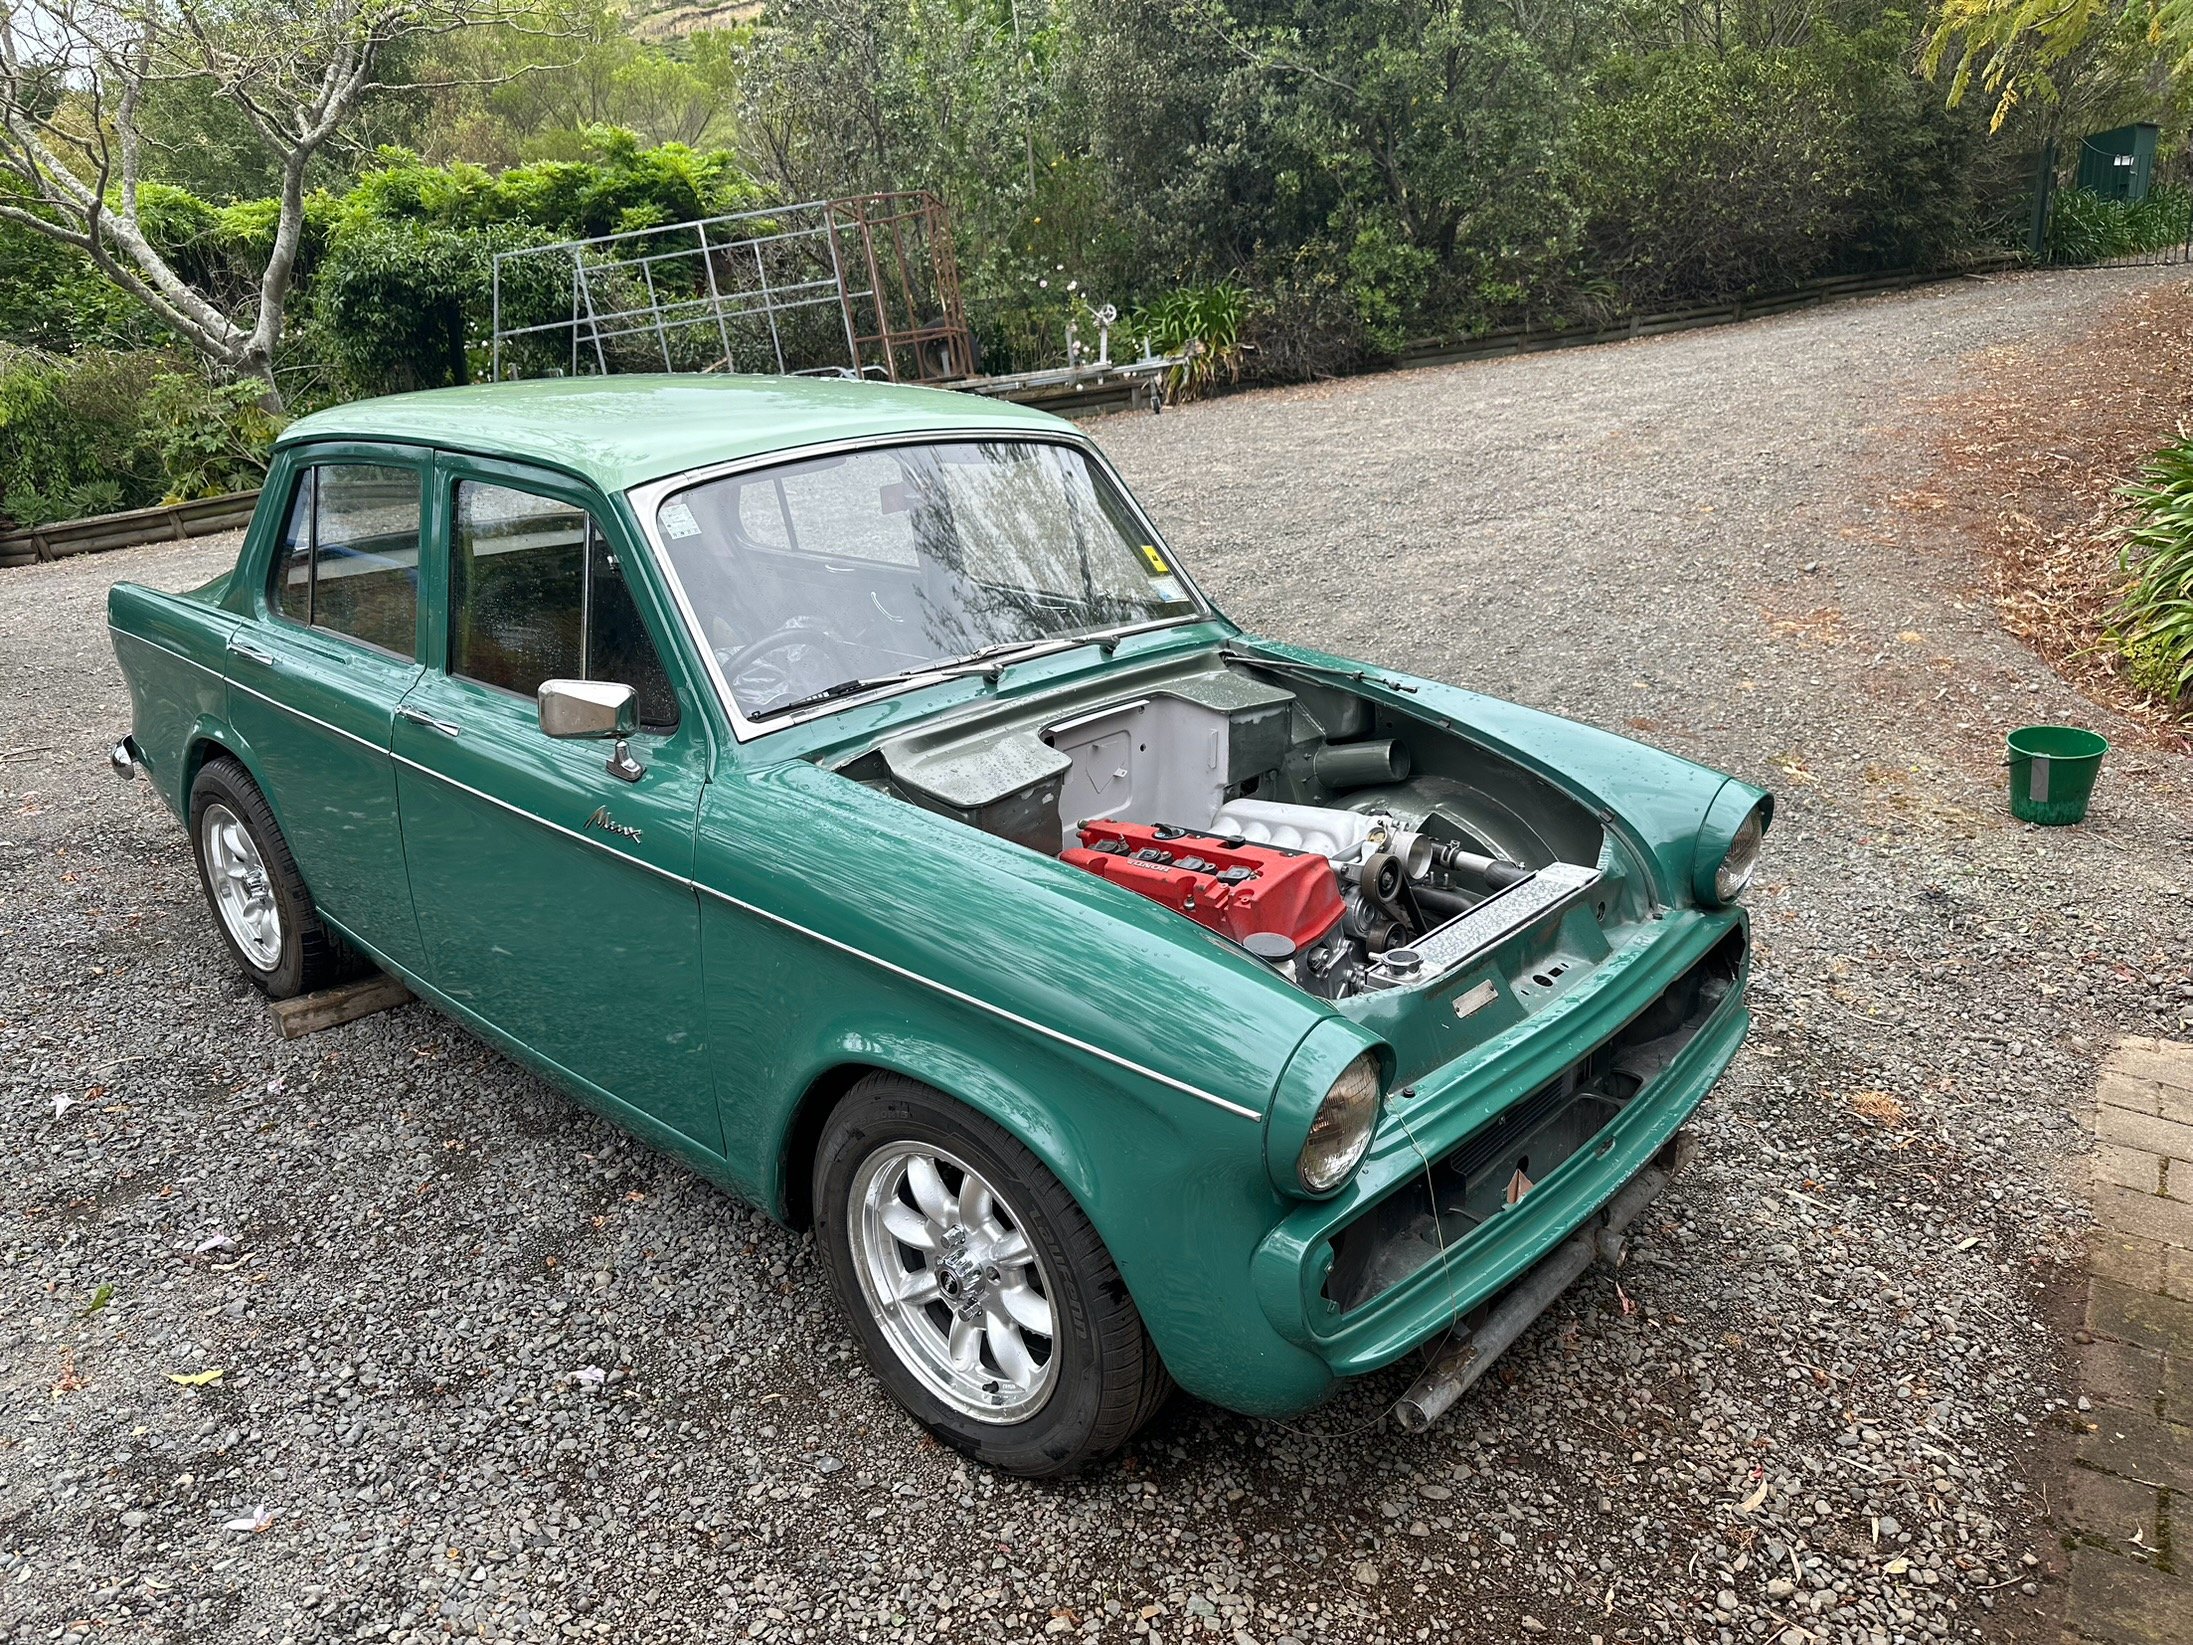
Sorry to everyone that I have blue balled with this project! Over the period of god knows how long it's been so far without any cool stuff happening. I have not yet made good on my promise of doing zillions of rpm with a shitbox wrecker engine. In V6 variant at least. I've been putting in some solid hours to get things finished to try get to the drags. But tonight I've come to see I'm not going to make it. If it was just about getting the car finished enough, might be feasible with some long nights. However it turns out I need an MSNZ license as well as a log book in order to race without wof/reg. I've been going down this road over last few days to try organize it. I paid $70 to join a car club, which is a prerequisite to applying for a license. However it was then was going to be another ~140ish bucks for a license that might not arrive in time. So combined with some extra expenses to get car in a drivable state I'm probably looking at $7-800 I need to pull out of my ass in a hurry. My bank balance got fairly well emptied a week or two ago when the neighbors dog tried to eat our cat. Then the cat crunched my finger when I picked it up. So big vet bill for the cats injuries, and a week on antibiotics and a day or 2 with bandages for me. So as exhausting as it has been pushing hard to get this done. For now I just have a rest. But it's really close to being drivable. Since last post: -Firewall finished -Put crossmember and steering rack back in -fixed gearbox leak (loose bolt) -fixed engine oil leak -finished exhaust manifolds on both sides, down to a finished flange. So they can stay in for good while I make rest of the exhaust. -Got motor and box back in -TA63 booster fitted -Interior started going back in -Started on battery tray -ITBs properly fitted and bolted/sealed up -Exhaust manifolds on properly with gaskets etc, all bolted up properly -Some wiring stuff sorted -2nd wideband wired up -radiator back in -front of car back together -Motor fired up again! My collector flares out to 2.25" or 2.5" (cant remember) but then you can see down where the flange ends up, thats where it flares out to 3". So does this mean it's an F1 car now? haha. The last weld I did on this pipe was the one on the rear of the 3d printed part, and turned out quite nice compared to some earlier efforts. Also, although I'm no welding expert by any means. Holy shit, it feels like cheat mode being able to weld indoors. So much easier when you're not battling a mild breeze on the driveway. haha.
 33 points
 -
Engine sounds like its on track to make good v6 noises which is great news. Cant wait for the Blog about this and instagram posts "He put a hilux engine in his Corona, you should rage post below about how your gay engine is better"9 points
-
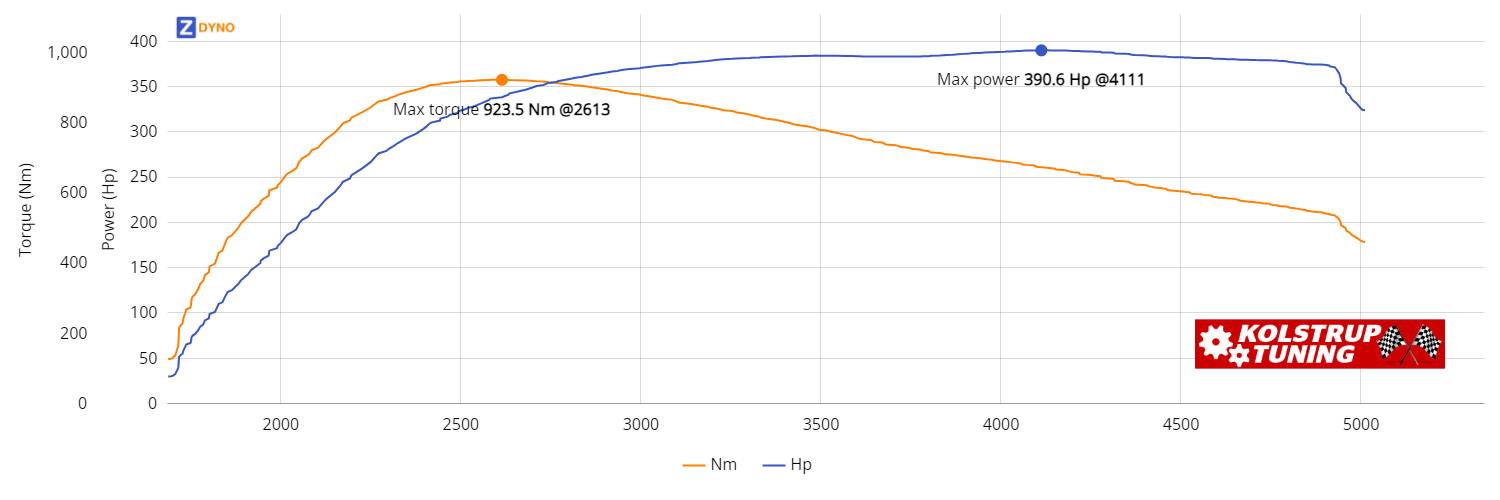
I found the dyno graph online so here you go.
7 points
-
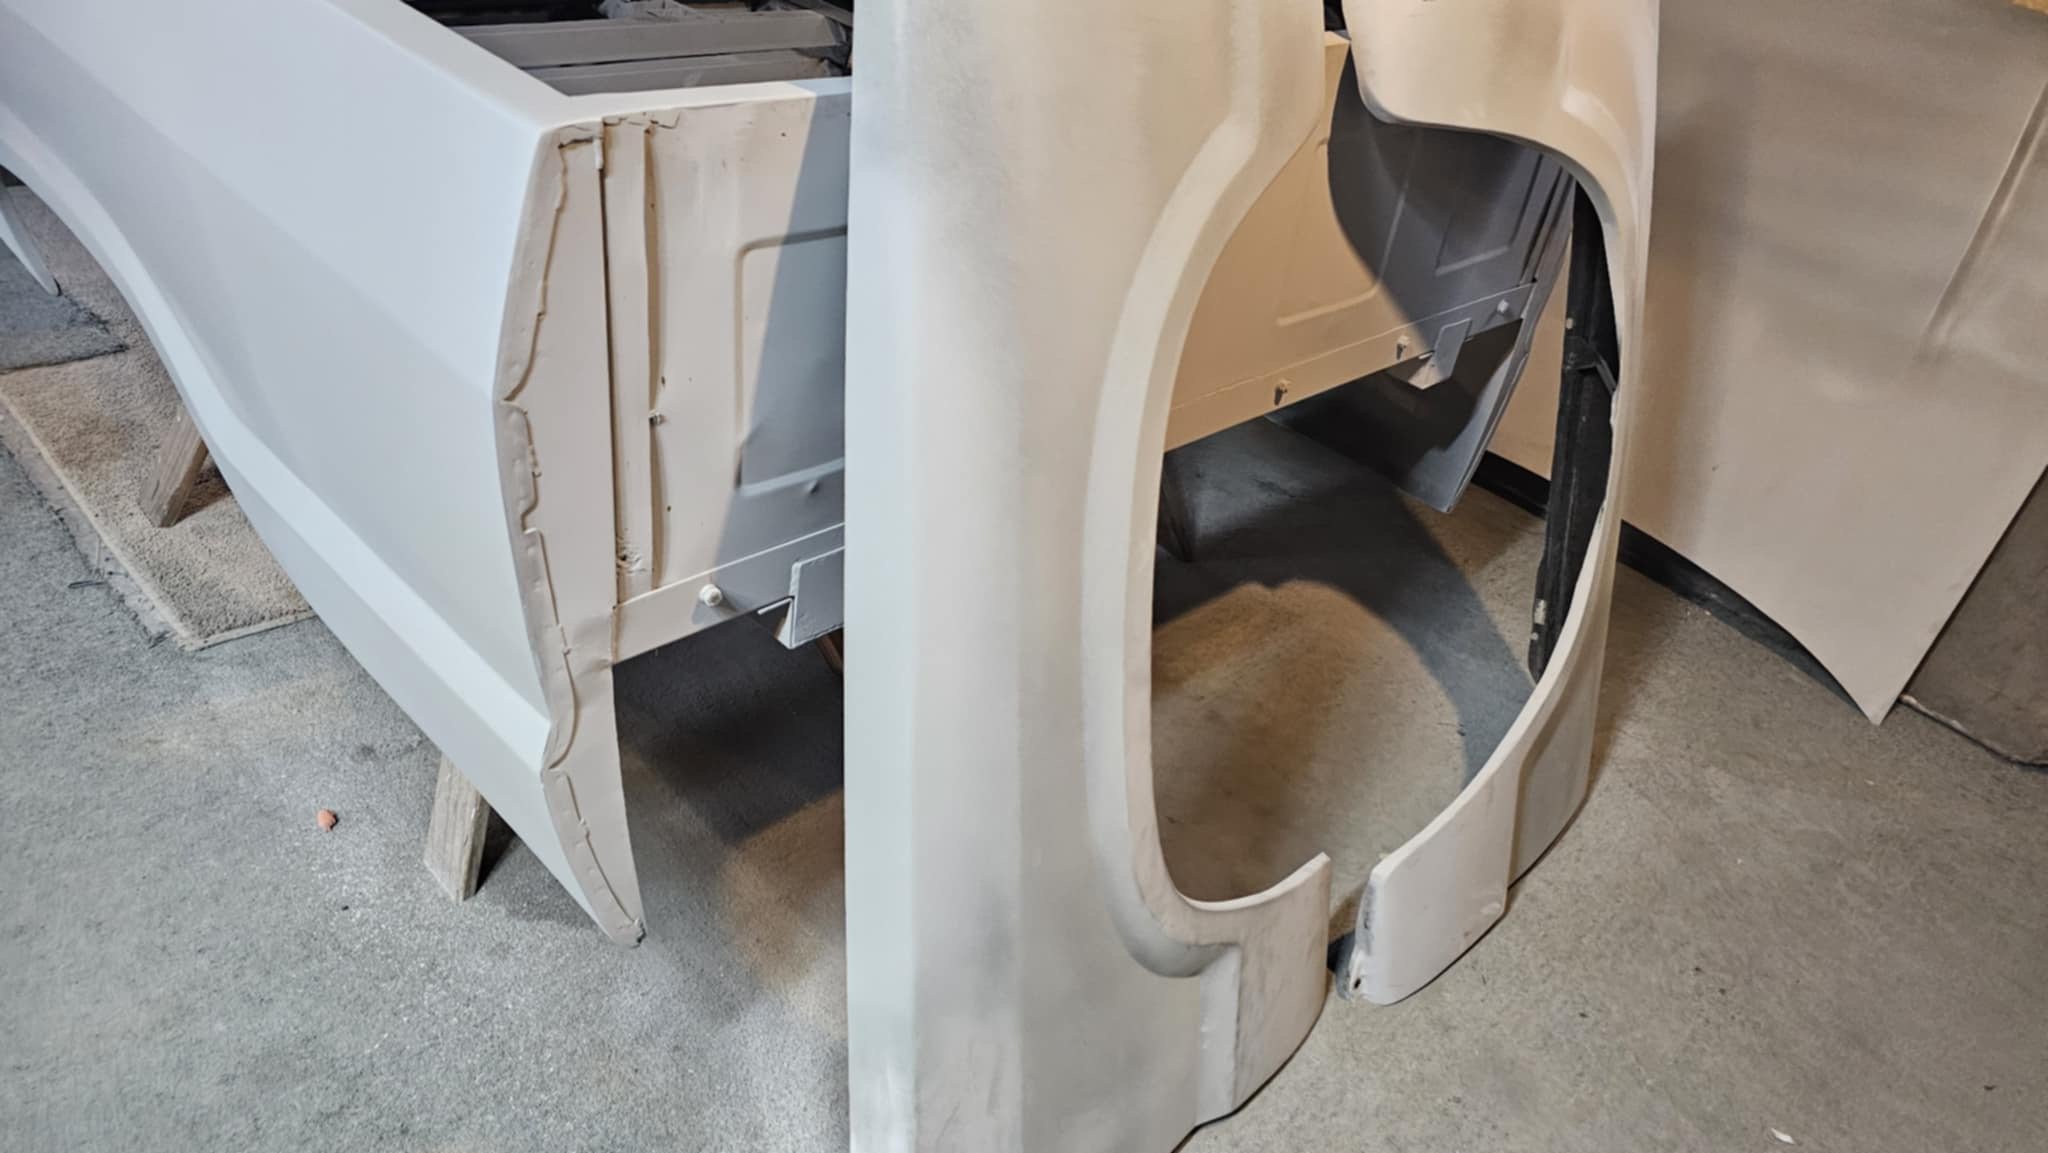
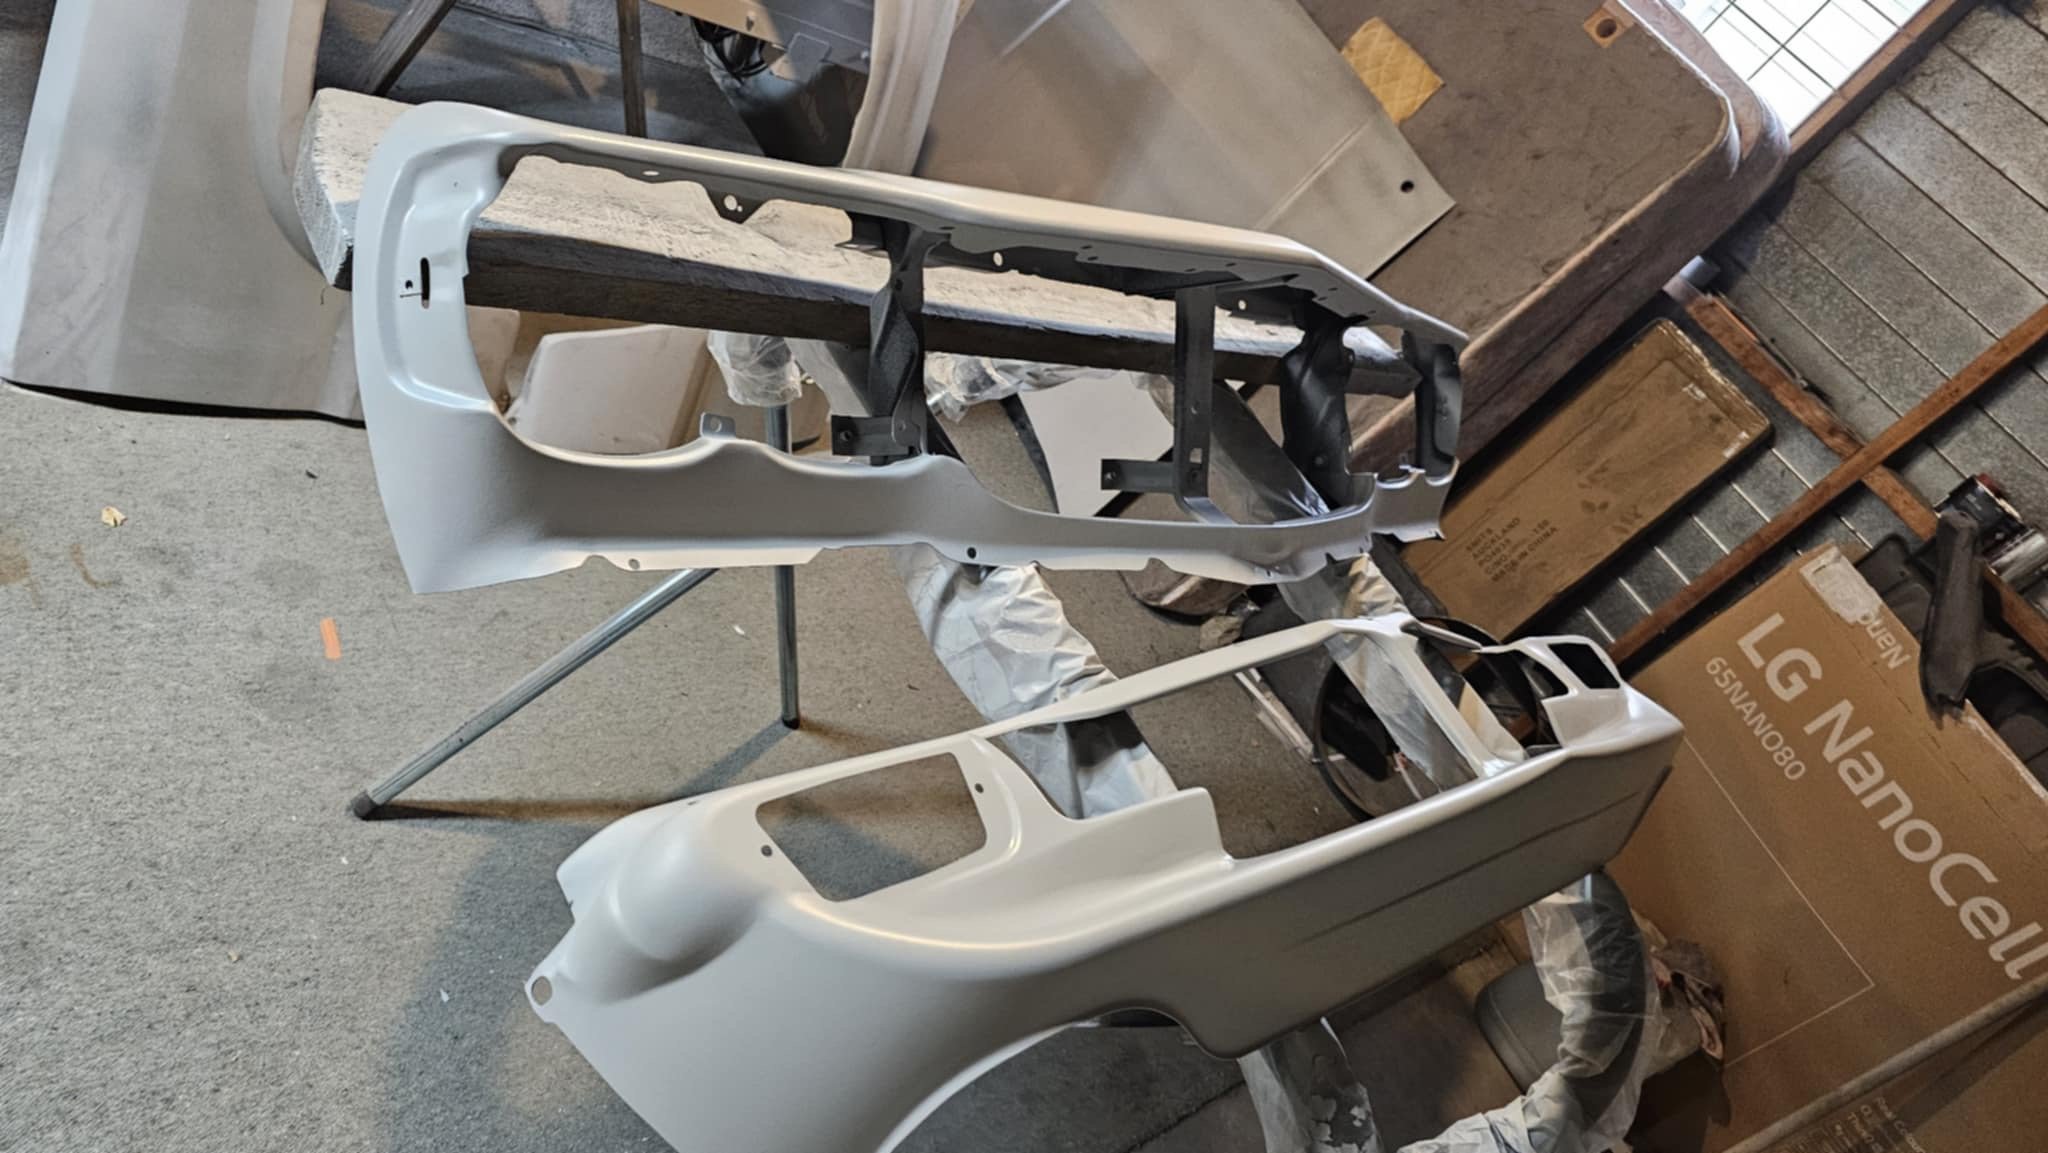
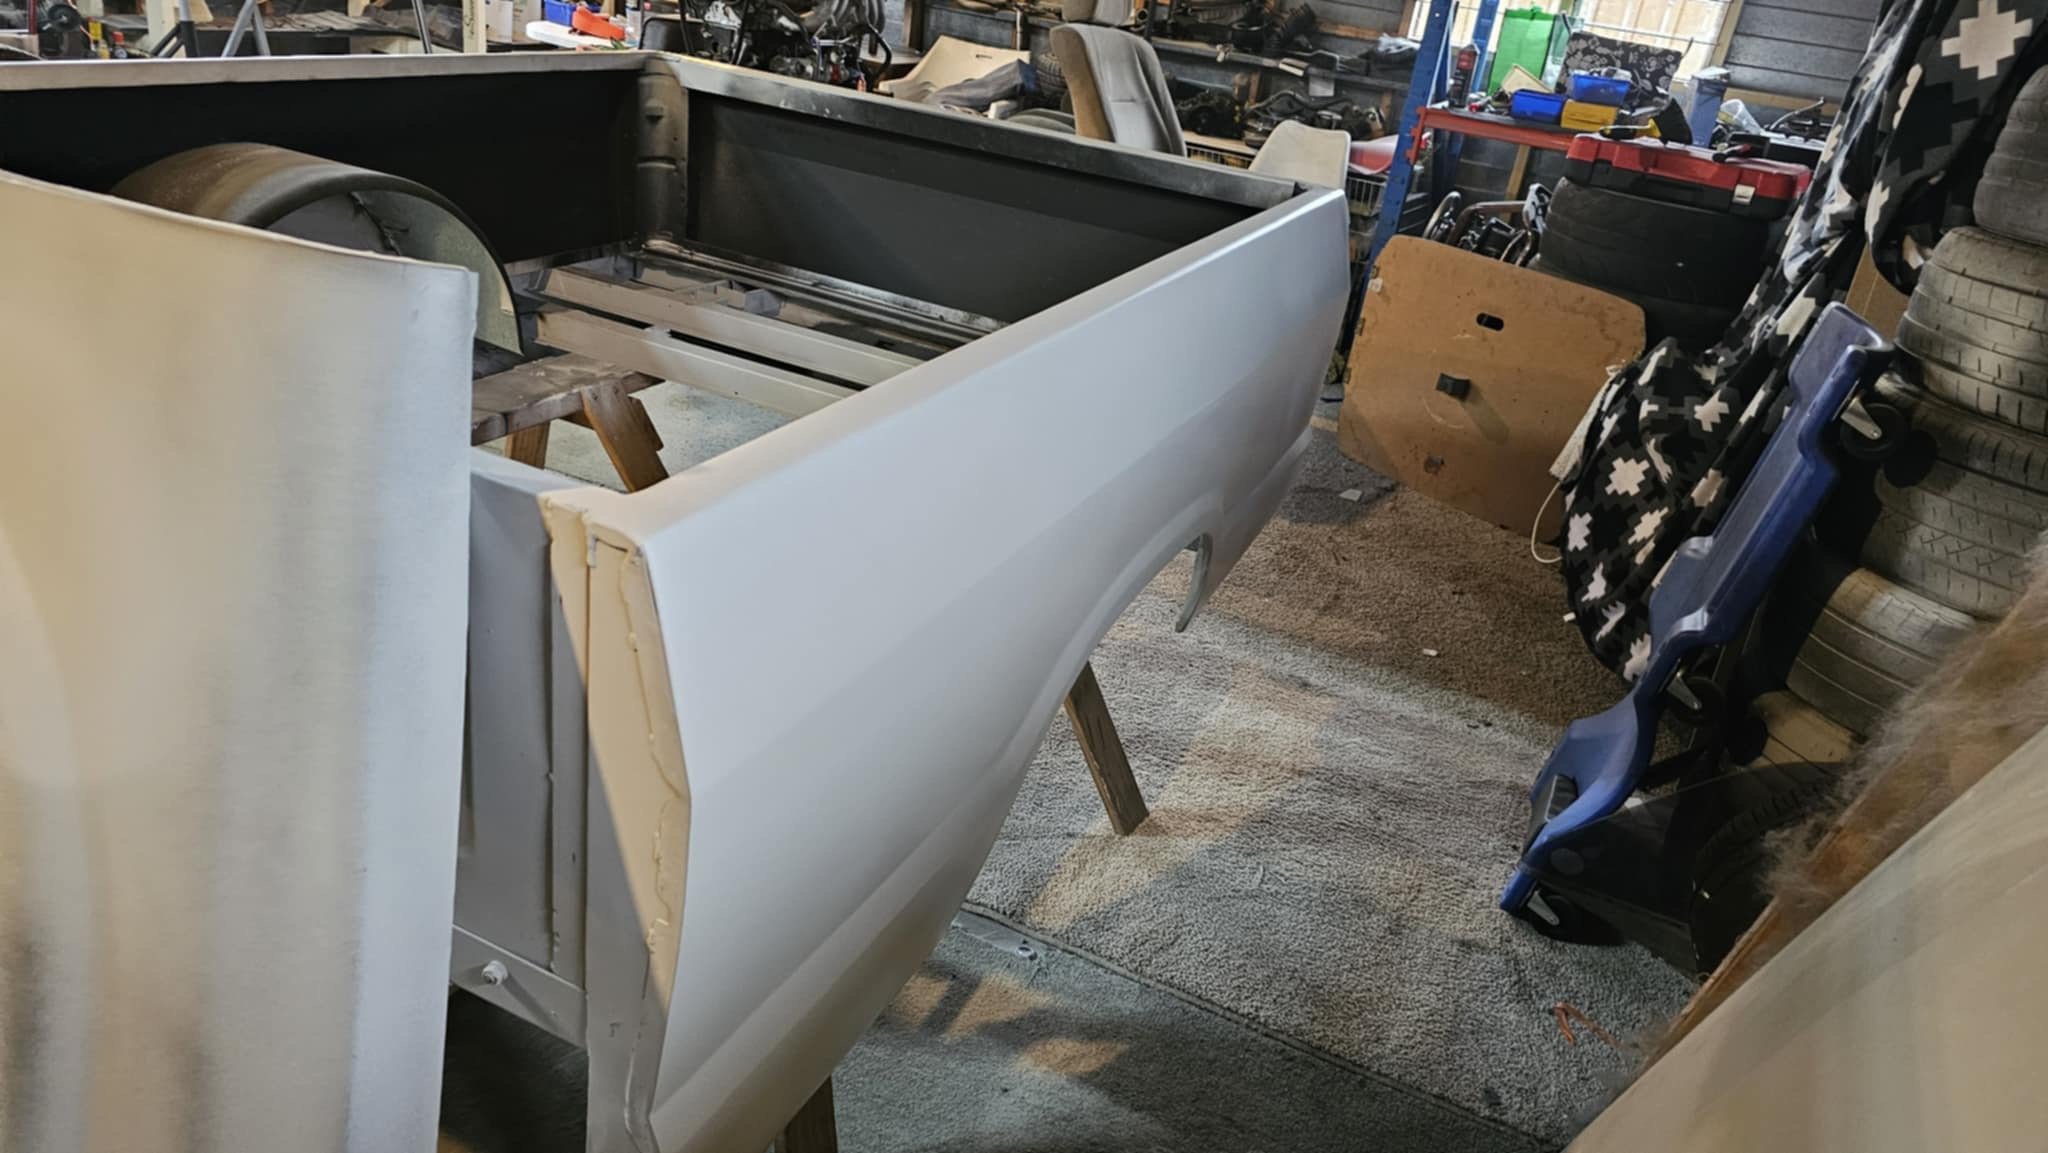
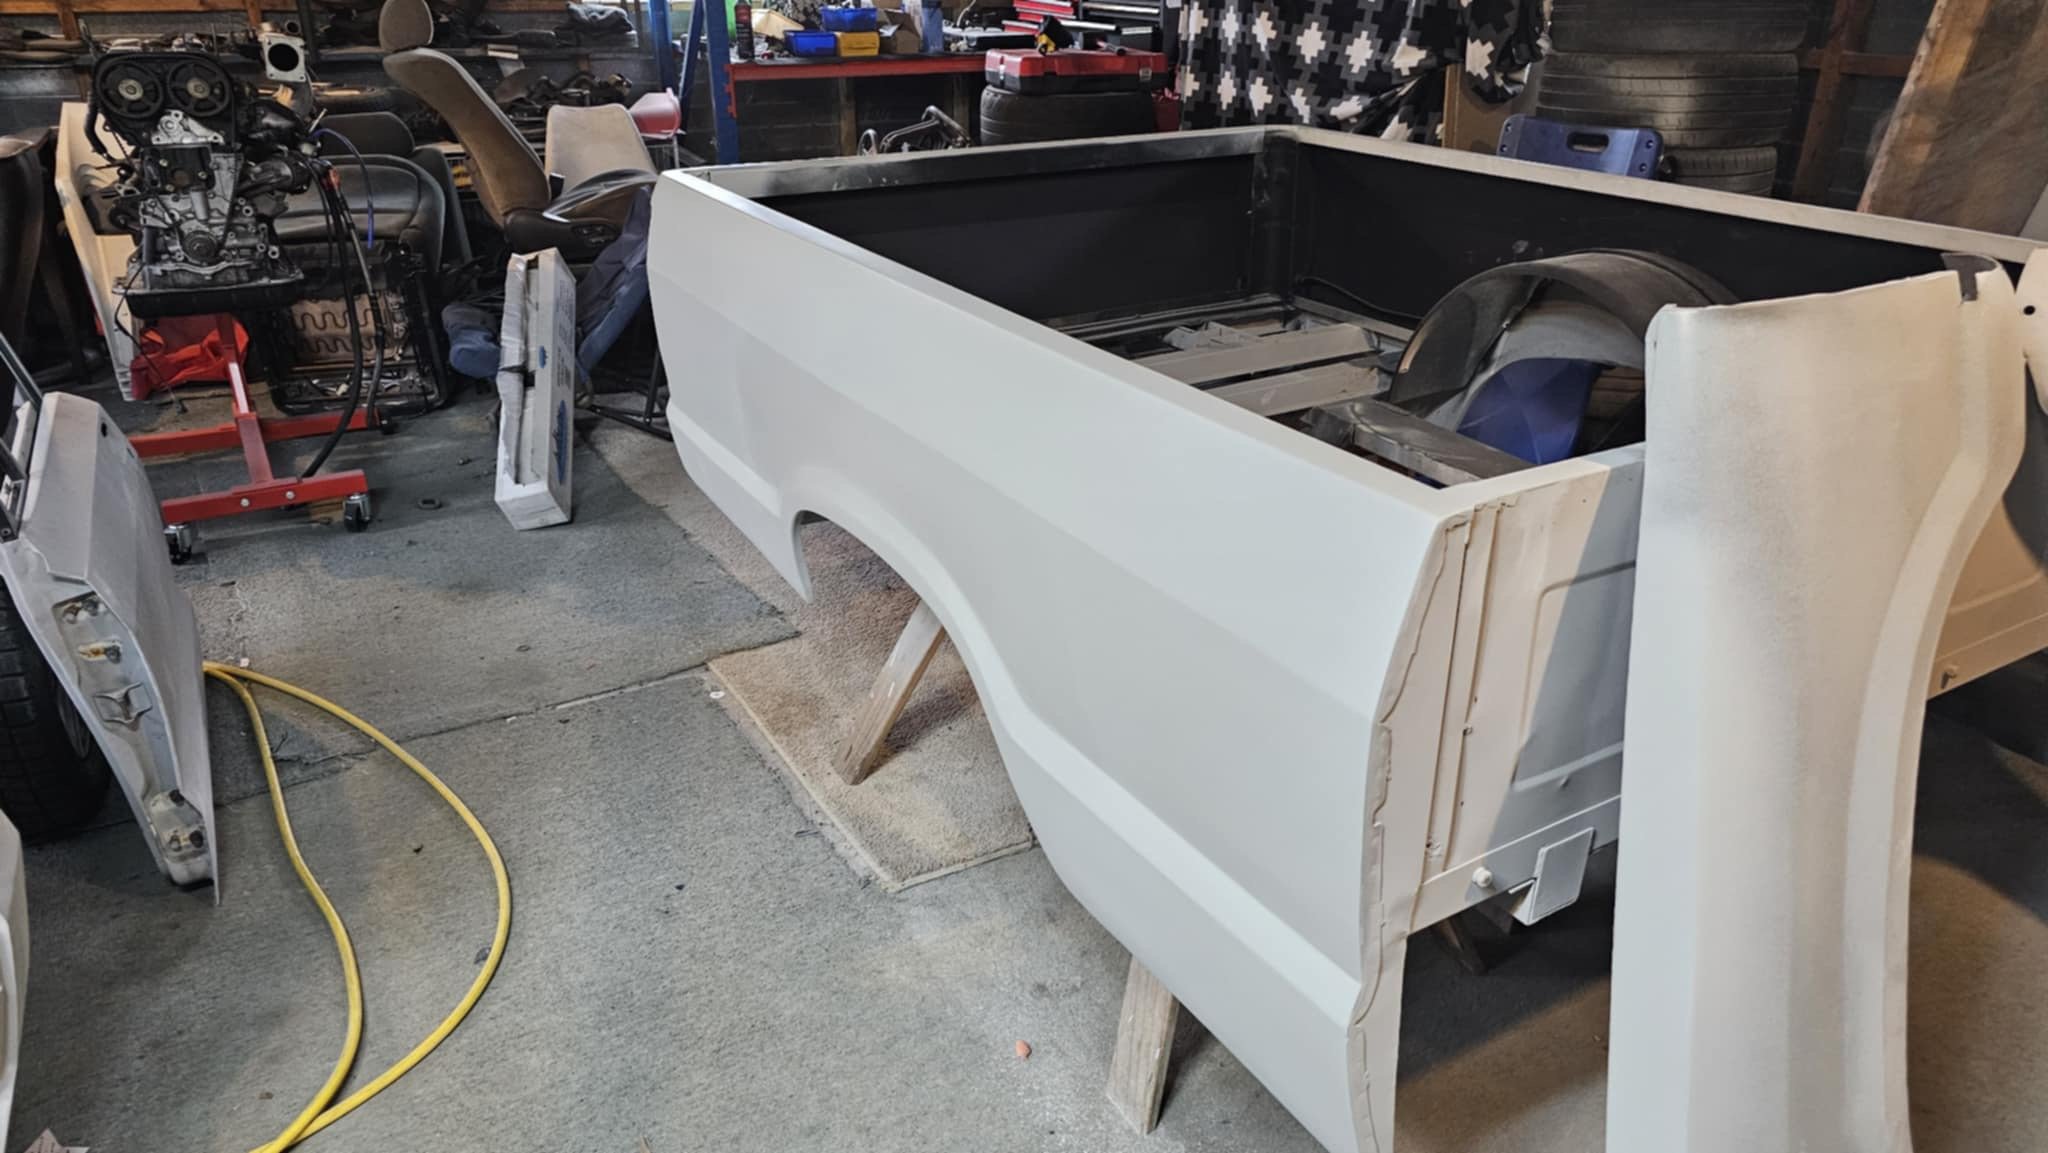
Panel n paint progress… ooosh blocked right back, and into primer.
7 points
-
Just waiting for repco to open so I can grab a few supplies. Waterpump gasket delete partial success have small leak from one bolt that goes into Water so im going to fit a fibre washer and o rings and hope for best @zach_munce suggested just weld it together at this point im starting to consider it as an option. Anyway to distract myself I Fitted the Tein adjustable rear shocks @jakesae101 sent me originals have gone a bit flacid.
5 points
-
See you all tomorrow. It has a tiny weep that evaporates before forming a drip..... it'll do im to scared to touch it, i resorted to double heatshrinking the bolt thread taping it to death and a fibre washer as its an 8mm bolt in a 10mm hole seems very dumb and floppy its another days problem ill still bring water though Just need to get some 100 octane and pack trailer and start to relax. I've got a tune with the rev limit mapped to 6400rpm and a decent amount of timing pulled so I can go maddog and up the boost to 12-15psi if I all the stars aline.4 points
-
Nothing for weeks and 3pm i decided to smash this together have had the 205 60 13's in roof for at least 9 years someone gave them to me from here look pretty sweet on the galvanised modgies haha the tyre shop dude rolled his eyes when I told him white letters out. Anyway if it rains or is sunny this thing can be shelter I'll throw some extra tools etc in it and i can throw stuff out of car in it. Car tows really well I've not towed with it since I Turbo'd it. See you all tomorrow
3 points
-
3 points
-
I hope kitty is doing OK now. Engine sounds mean. Take your time and just enjoy the process. There will be other drag days.3 points
-
Has been a crappy month in terms of getting car stuff done. Had the dog/cat/finger thing. (wow, that might sound bad out of context) Garage has still needed work. Ended up away for work for about a week in South Island (Which was great! Just not good for getting car finished) Then lingering flu bullshit that has been sapping my energy. Not gonna lie it sucks big time to miss OS drags again. But I guess I'm still on track towards the important part of the project (drawing graphs)3 points
-
Have had a good run with sealwell cubes tbh and they dont seem to jizz anything up. Has managed to keep my mini retaining its coolant after a few small issues2 points
-
Great effort getting this far man I'm super impressed at the progress in such a short time. Sucks about the license and logbook situation but there is always another event to go doorting at!2 points
-
I've given up on the gasket its fucked now anyway and special order from basically anywhere that sells such things so scraped the mating surfaces till they are shiny and am resorting to only grey gasket schmoo. It's on sitting properly and has bolts hand tight I'll nip up in morning and pray to the gods this chapter is closed.
2 points
-
So I have been attempting to get the box back together, but it has taken 3 attempts so far; #1 - all the clusters back together, everything inserted and getting to put 5th gear on when I realised I was so intently following the written writup on Xweb that I had forgotten to put the actual gearshifting mech in because it wasnt part of the writup. Sigh, gently pull it apart and scrape off all the blue gasket poo. #2 - everything back together again but realising the there was some burring in one of the the detent ball holes and the now impossible to get out ball bearing was moving neither forwards nor backwards. Sigh, gently pull it apart, extract the ball and then scrape off all the blue gasket poo. #3 - slowly and methodically reassemble it all again, barely even referring to the writup cos there is now an element of familiarity with the process. I am still waiting for some axle seals, but apart from that its all done. Like the old box it has a tapered drain plug in a straight tapped hole, I think I will make a straight plug up so I dont split the case. Anyway there are very few pics of all this as it required much concentration.2 points
-
New shed skids1 point
-
It doesn't bounce at all ! I thought the old shocks were ok but this is night and day difference. I've got to figure out how they work. One was at 3 clicks one was 9 so I've started at 3 and will see how it rides.1 point
-
Somehow I got new (old) tyres on trailer and fixed a massive hole in floor, car tows like a landcruiser with the turbo
1 point
-
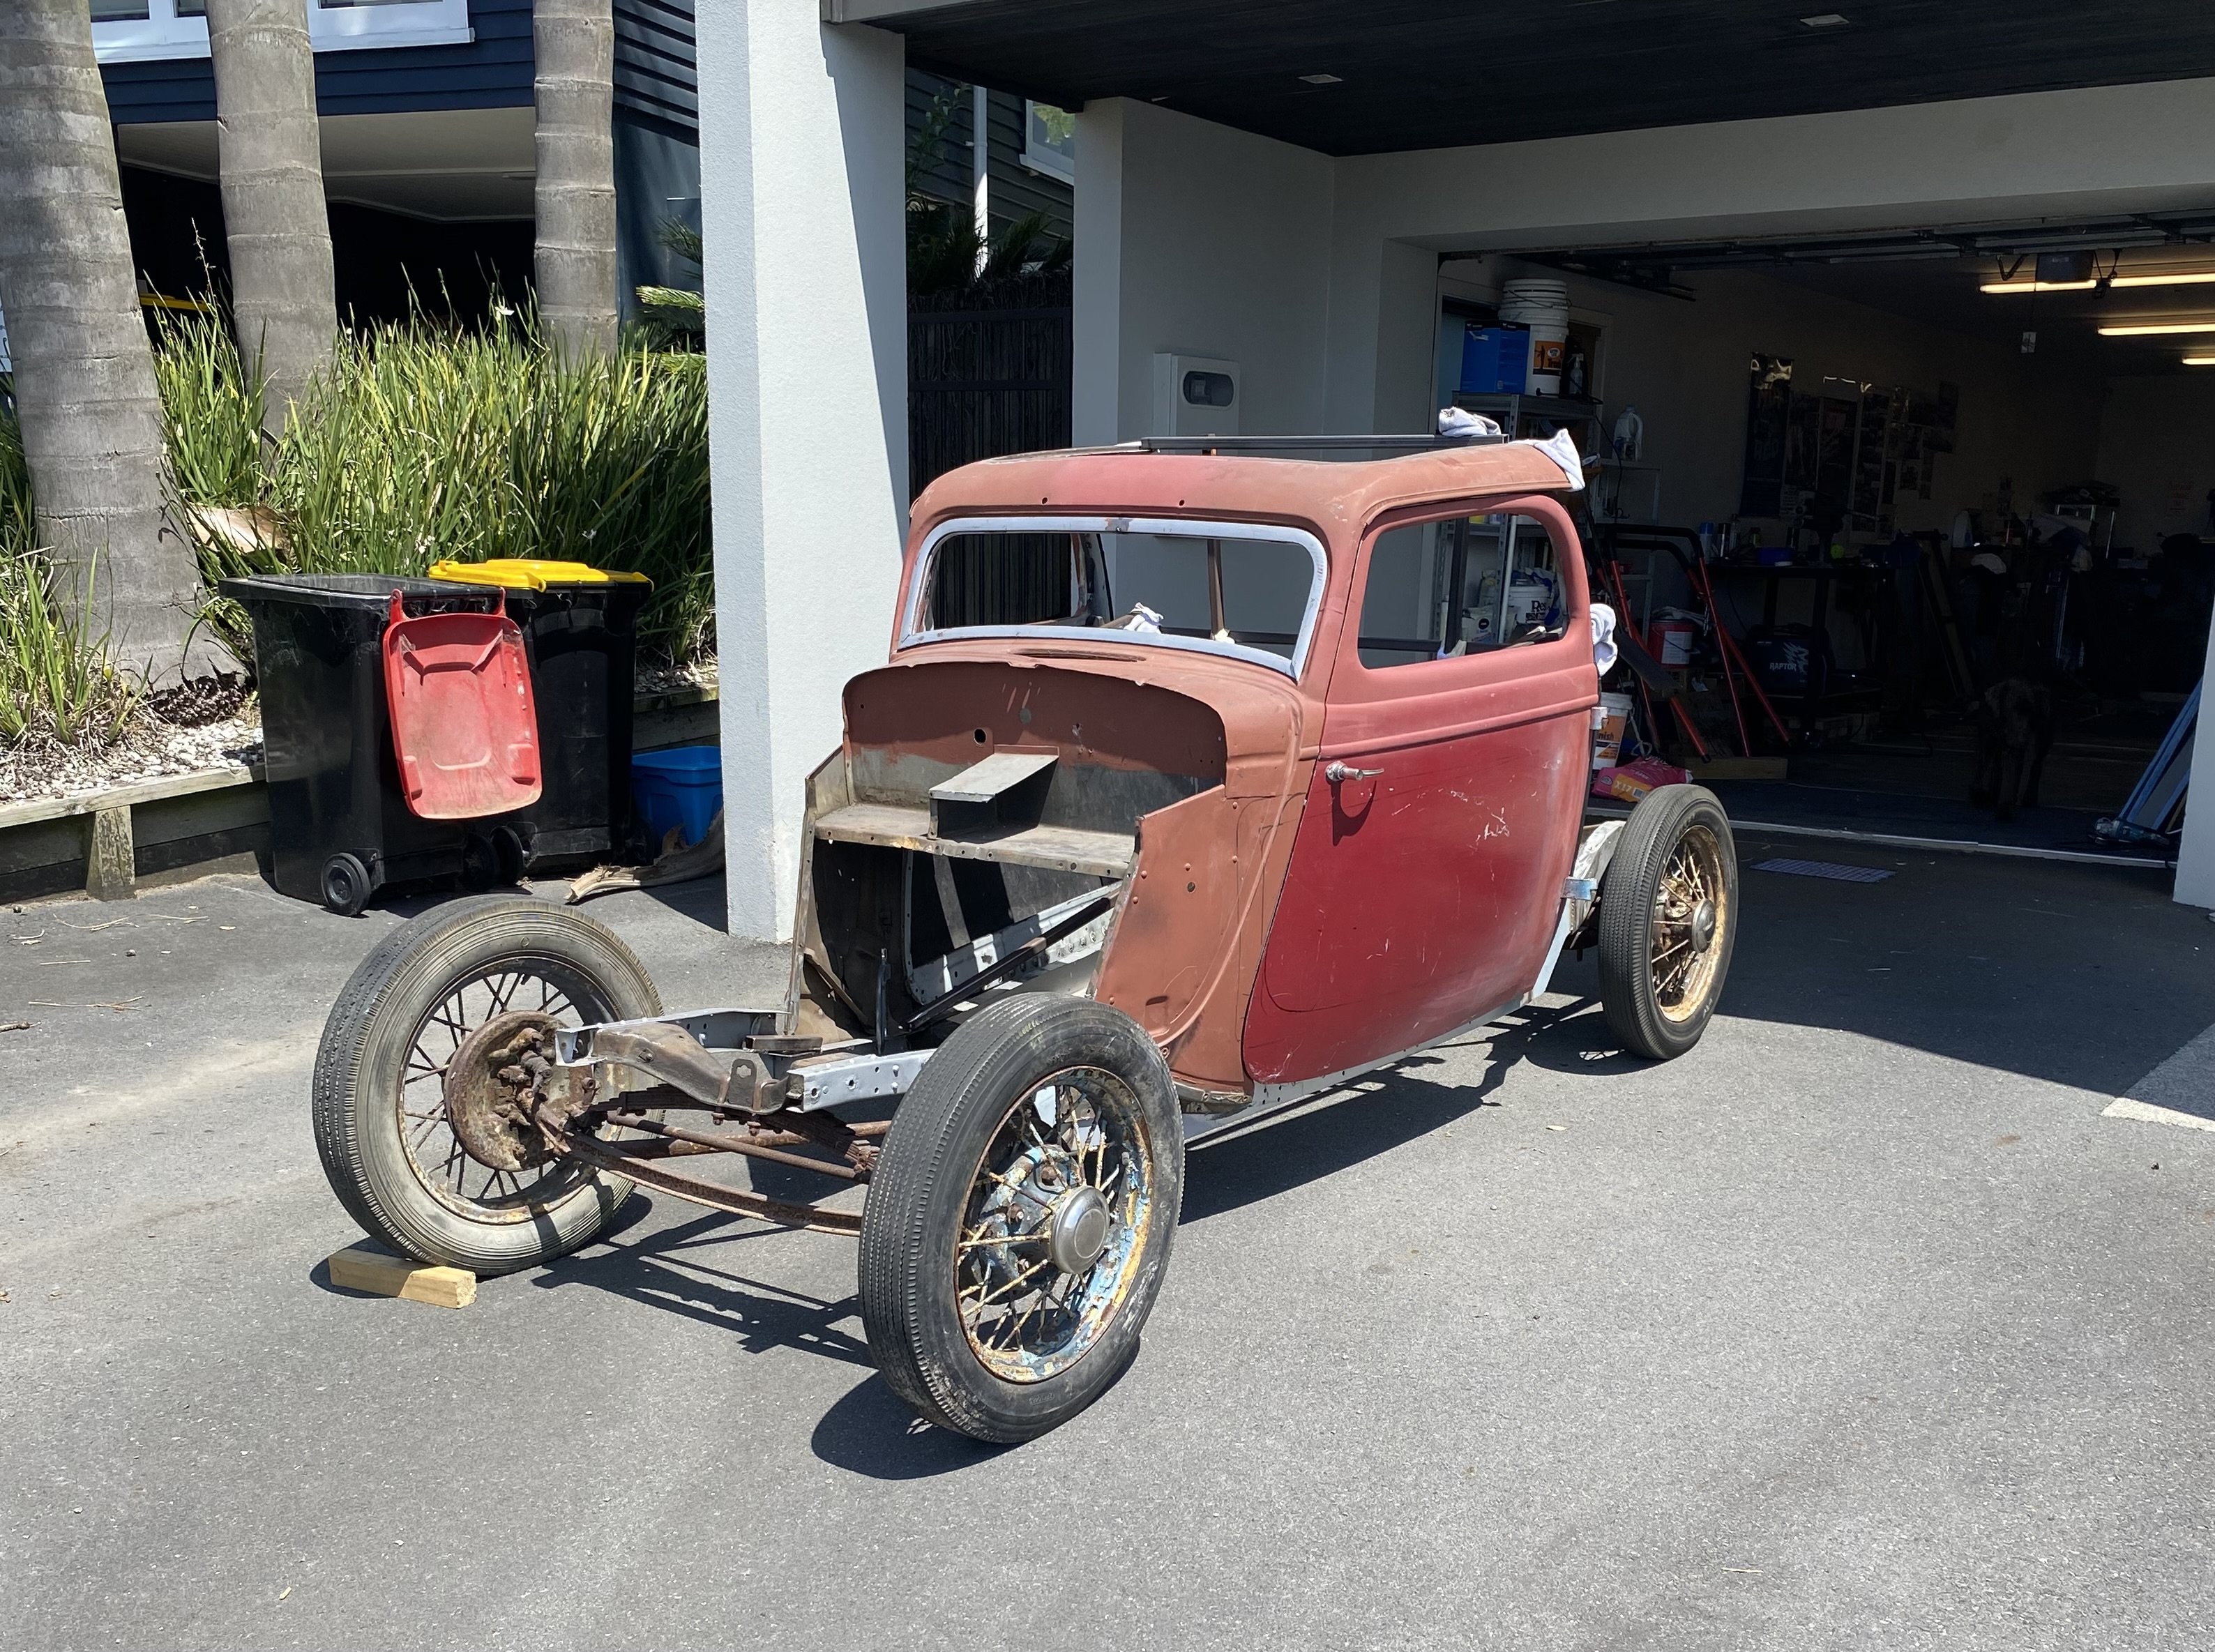
Proportions are starting to take shape. Bit more welding to do on these extension panels but coming together. Looking forward to starting on the roof
1 point
-
I'm excited too its a big development from last year it actually wants to go now, 16.0 felt like reclining an armchair.1 point
-
The Holden requirements are that you drop a "water pump lubrication" tablet in the radiator every time you work on the cooling system It's literally one of these https://www.supercheapauto.co.nz/p/rislone-rislone-radiator-stop-leak-tablets-50g-pack/681095.html?srsltid=AfmBOoqQHPLrnGHoq-xadBA4aP4Pkt4V68eGyMm-mLLcJFToGZmEpNCS But with a Holden part number
1 point
-
Engine sounds hektik man. One thing I learned in the last couple years is to just let yourself off the hook (aka forgive yourself but that sounds pretty lame) and restart the counter on whatever you're focusing on. Takes a weight off your shoulders and lets you spend the time to do things right.1 point
-
Excited to see this run! Good luck mate.1 point
-
Well done on the efforts so far bro. Sometimes you gotta know when you're beat. If you want to feel good about yourself you can follow my progress. God I would love another AA63. One day.1 point
-
Well, that sounds like a saga and a half! Always the way when you're working to a tight deadline, though I must admit I haven't had the whole 'bitten by a cat I was trying to help' thing happen to me specifically... Sounds good though. Sounds real good.1 point
-
So taking the daily down the strip or pushing the carina? I'm sure they'd let you push it down last run of the day I'm glad cars are held to a safer standard but I do miss the days it was possible to get a wof sticker posted1 point
-
Surely a real Barry would have popped down to Woolworths for some weetbix, and made a gasket from the box? I hope it holds for you it's been a bit of a journey.1 point
-
Guitar renovation. Last century I used to play a bit, completely hopeless now but wanting to try again I attempted to set up my crappy old acoustic properly, got all enthusiastic and shouted it a new bridge, saddle etc but the truss rod thread stripped just as I was getting it right, so I swore a bit - and have been looking out for a decent'ish used one since. Saw this advertised at a charity shop, Ashton D25, scratched, rusty, 2 strings so grabbed it as a cheap project... [Reviews state the D25 is a 'cheap, nice sounding full-sized beginner/muckaround guitar' so perfect for my needs] I re-strung it to check things and apart from needing some new parts it actually played OK, neck was straight, strings at good playing height etc, so I ordered a bunch of bits from Aliexpress, then stripped it right down and gave it a good clean. Can't do much about the giant scratch on the body but might try to hide it later... The Ali machine heads fitted perfectly, sort of wished I'd got the black option now though for full blackout look, but they look far better than the grotty old ones... And the new bone nut and saddle looked to be well made. The plastic ones were worn out, (nut had actually crumbled at the 6th string and I'd filed a temporary notch to test it) also got some fancy bridge pins... Biggest issue was the cheap in-built tuner, that was missing the battery holder clip. I bodged it up and it still worked but the cover/clips are always going missing and are unobtainable, so bought a combined tuner/equalizer/pickup unit to turn it into an electro-acoustic... This is still on the way, so I gambled that the online templates will match what I actually get, and cut the hole while I had it apart... Hopefully this arrives in the next few days and I can see how things go together, bit of wiring/fettling to do when I get it. It won't be fancy, but I should have a useable geetar for around $100 all up...1 point
-
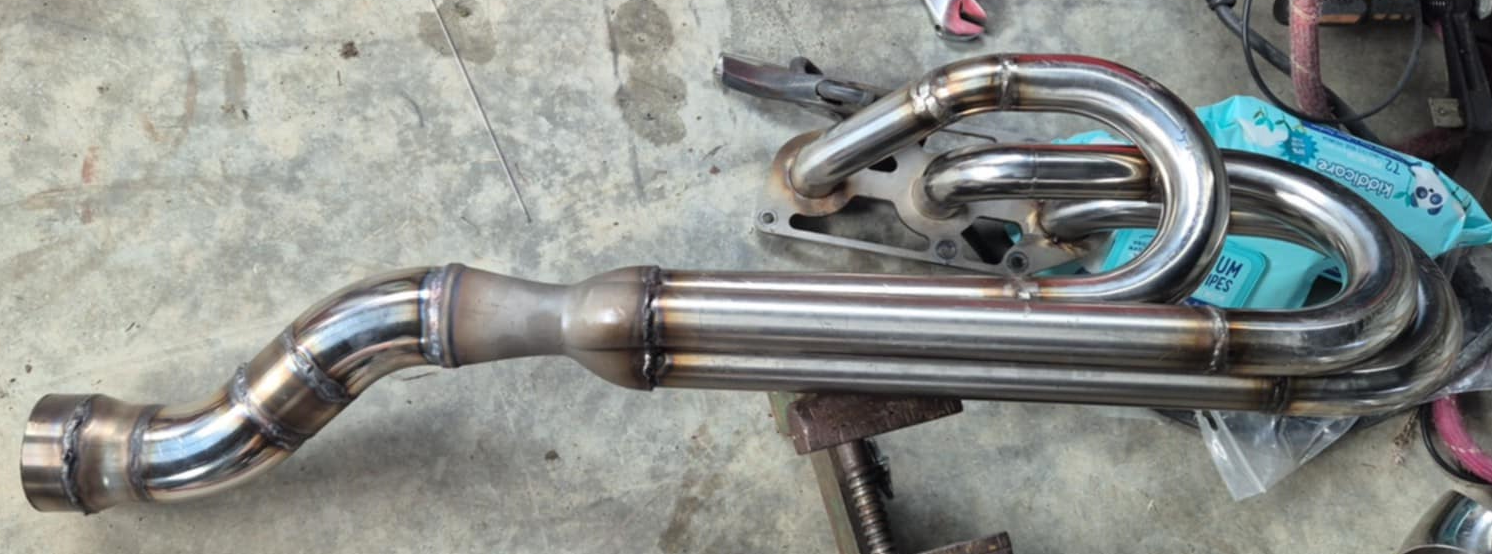
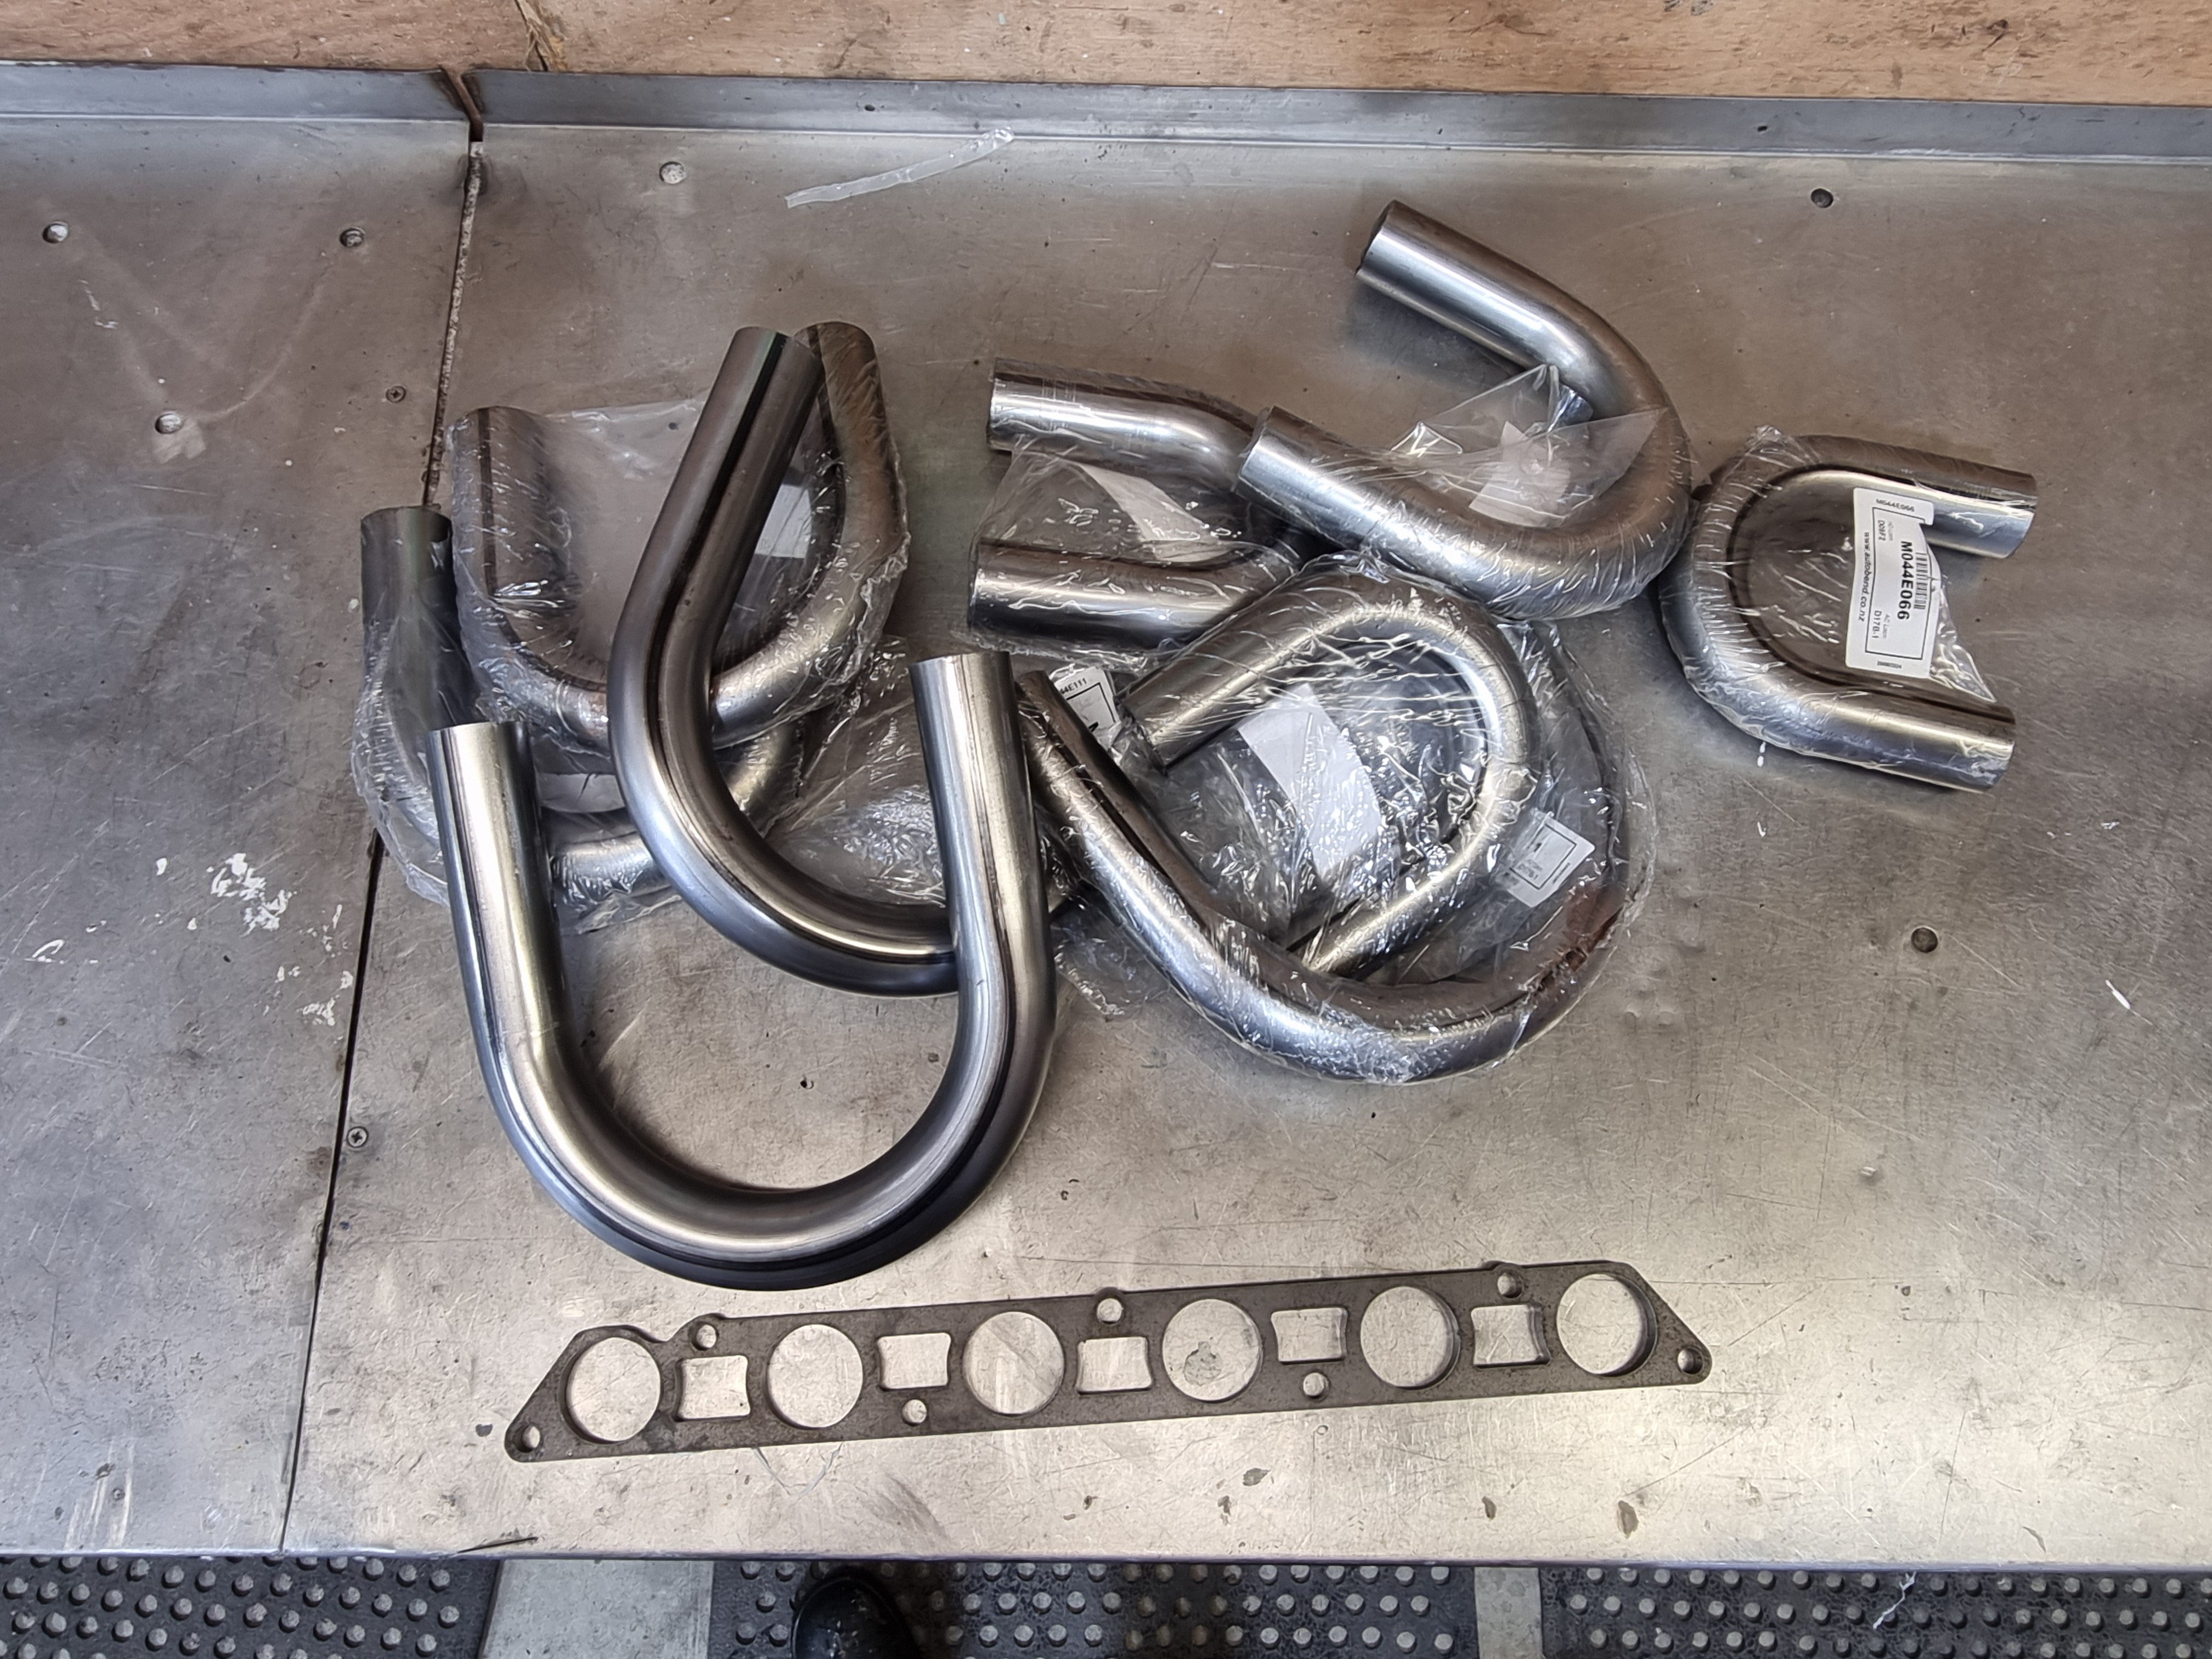
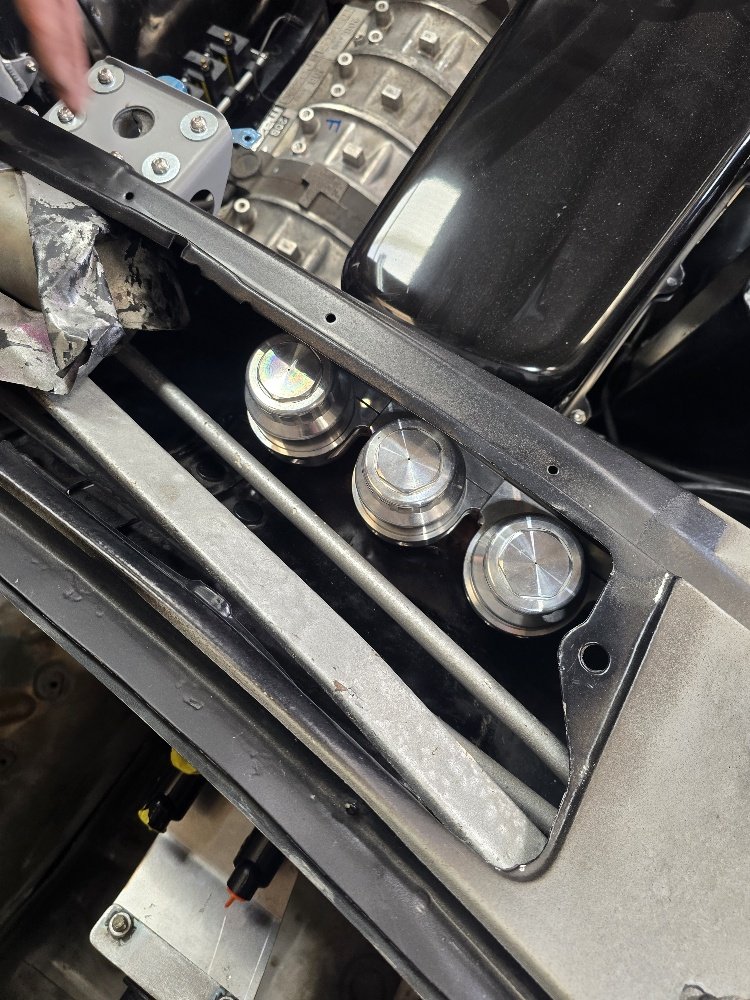
I bought a 5M-GX exhaust header kit. As it the style with this type of kit there is some assembly required.
1 point
-
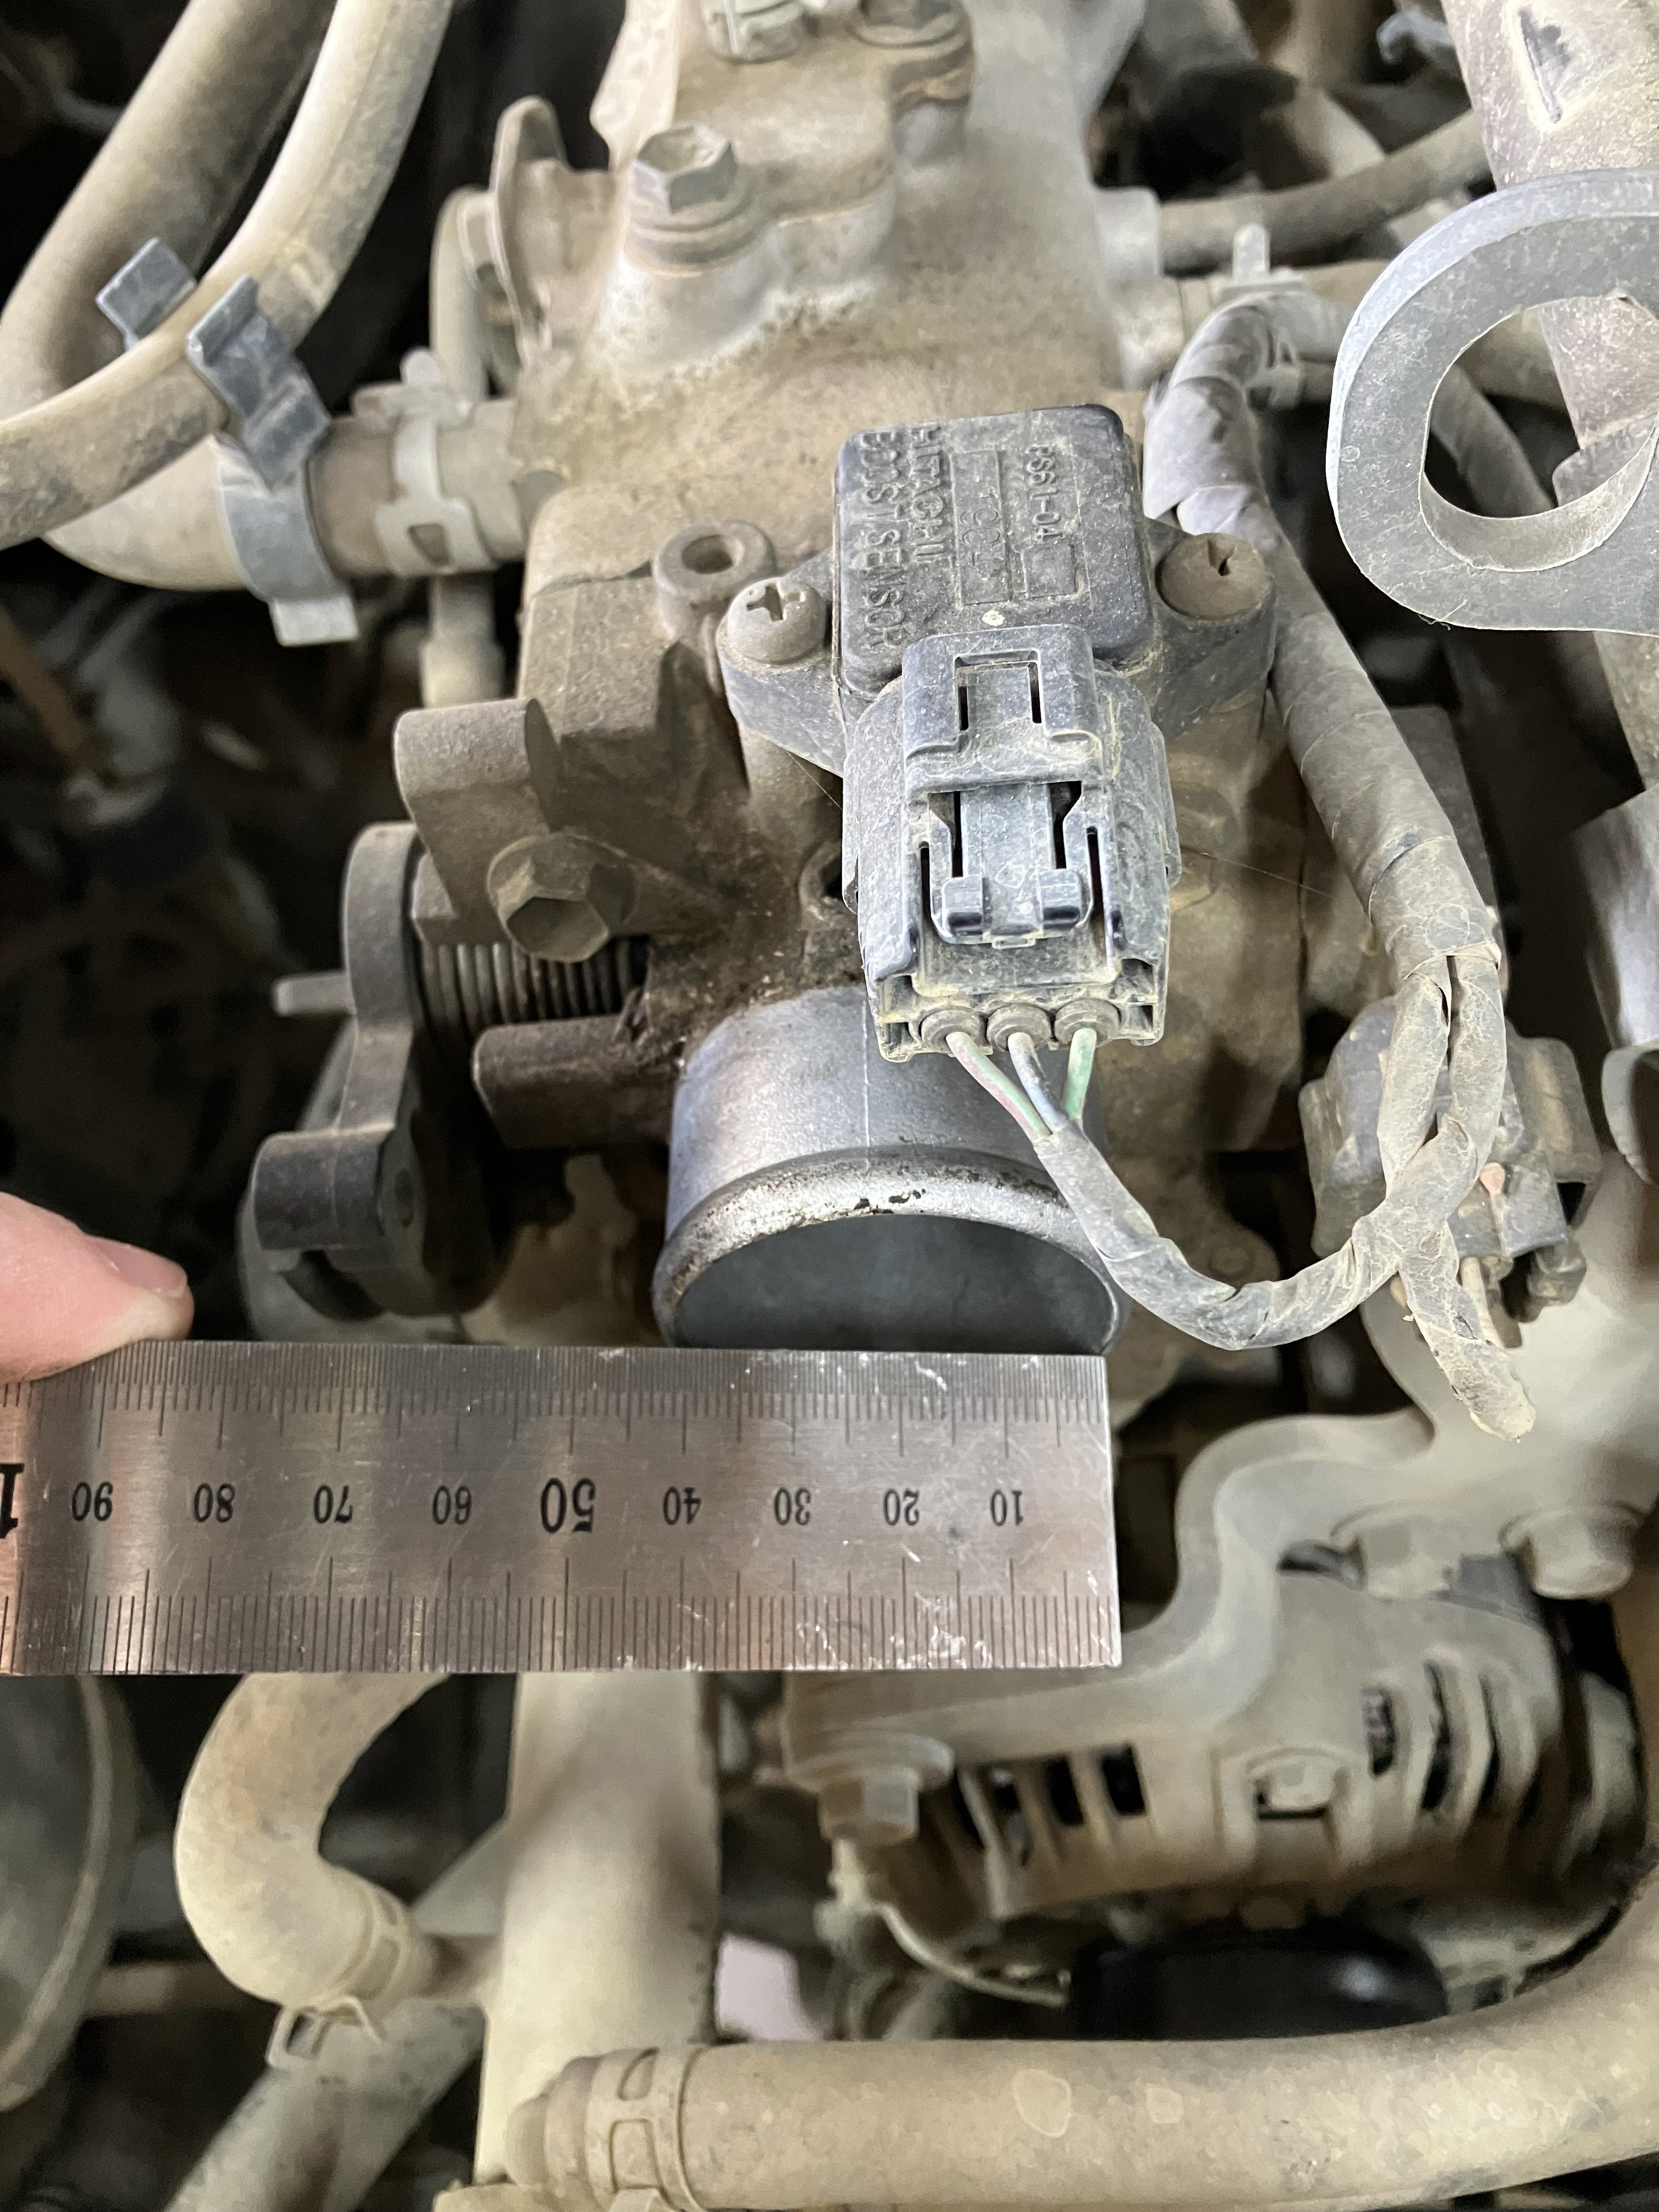
@d.p.n.s 1. Yeah that is the fuel feed Into the pump. 2 that's the return to the tank. 3 fuck knows. Probably something from the original car the motors from. 4 . That's the fuel cut solenoid. Supply 12v to run and remove power to the solenoid to shut the motor off 5 yeah fuel screw. In is more fuel and out is less fuel. Little adjustments at a time . 7. Yeah oil feed for vac pump 8 one is the oil drain to the sump for the vac pump. Treat it like a turbo drain. 9 the other one is the vaccume. It goes to the brake booster or whatever else needs vaccume looks like the one with the hose still on it is the vaccume 10 is your heater hose feed. The heater return is in the back of the block on the driver's side from memory 11. Hard to see what the pic is. 12 no idea. Most of that shit on the pumps is to do with the car it was in original . Could be a fast idle or something like that for cold or ac or anything There is a idle speed stop that you'll need to lower when you add more fuel too1 point
-
That's impressive work you are doing, looks like a well proportioned car so far. How is it for interior room?1 point
-
Bottom end is mint, bearings are perfect still and without the pistons in the crank spins freely. Ill take the head to Mean Machine tomorrow to get it looked over, see what they have to say.1 point
-
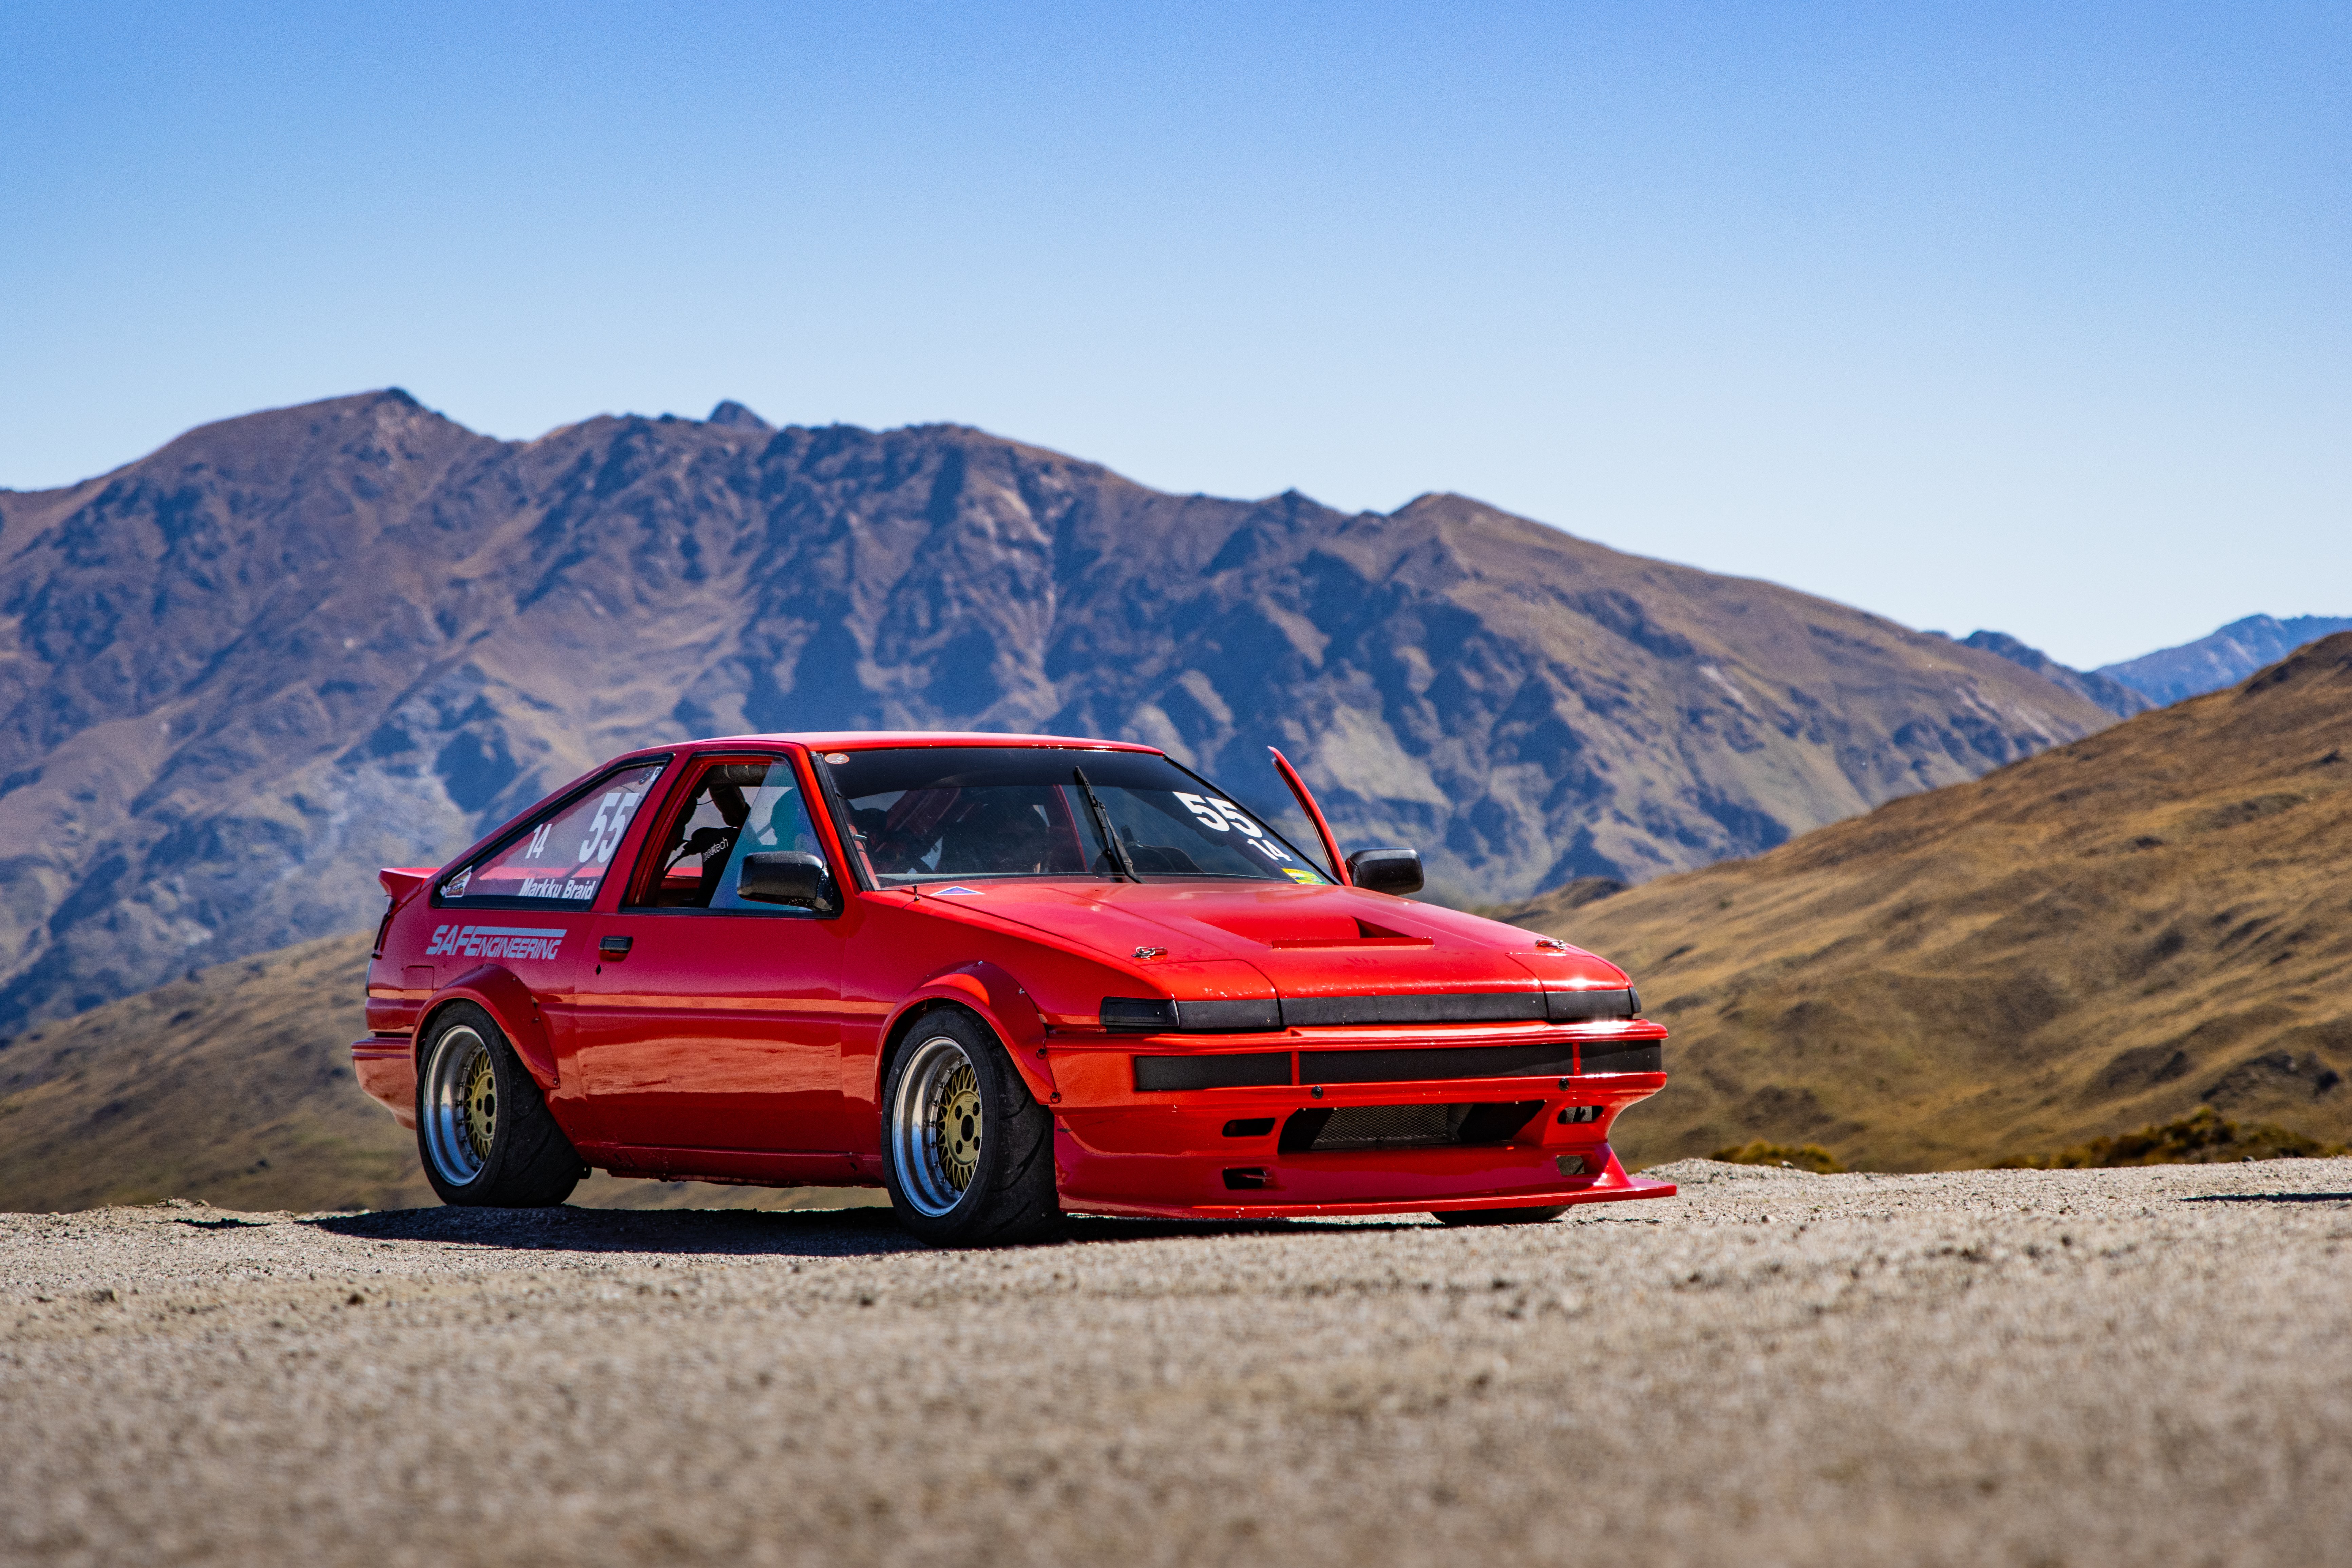
Entered a hillclimb in the weekend. I'll come back to tell the story soon... for now, here's some eye candy.
1 point
-
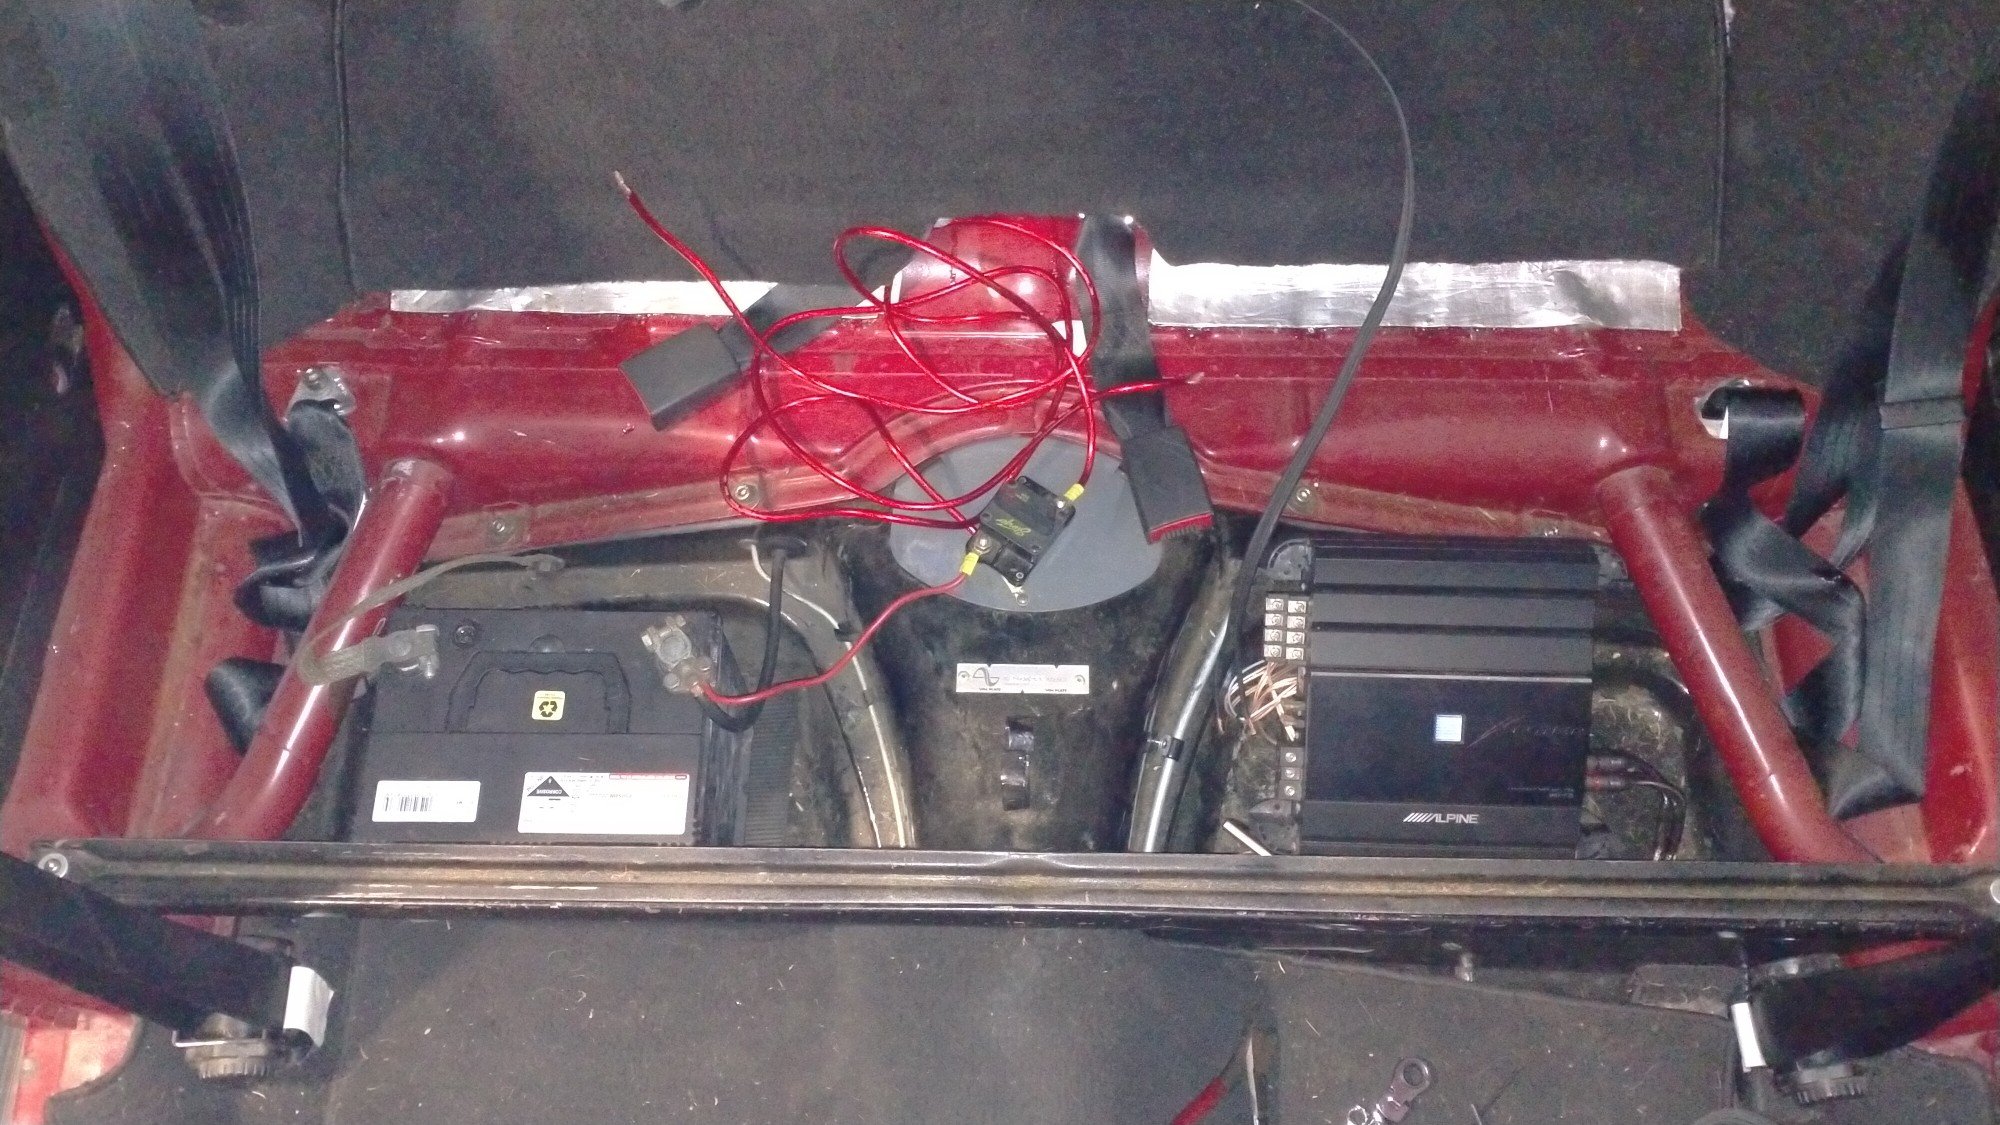
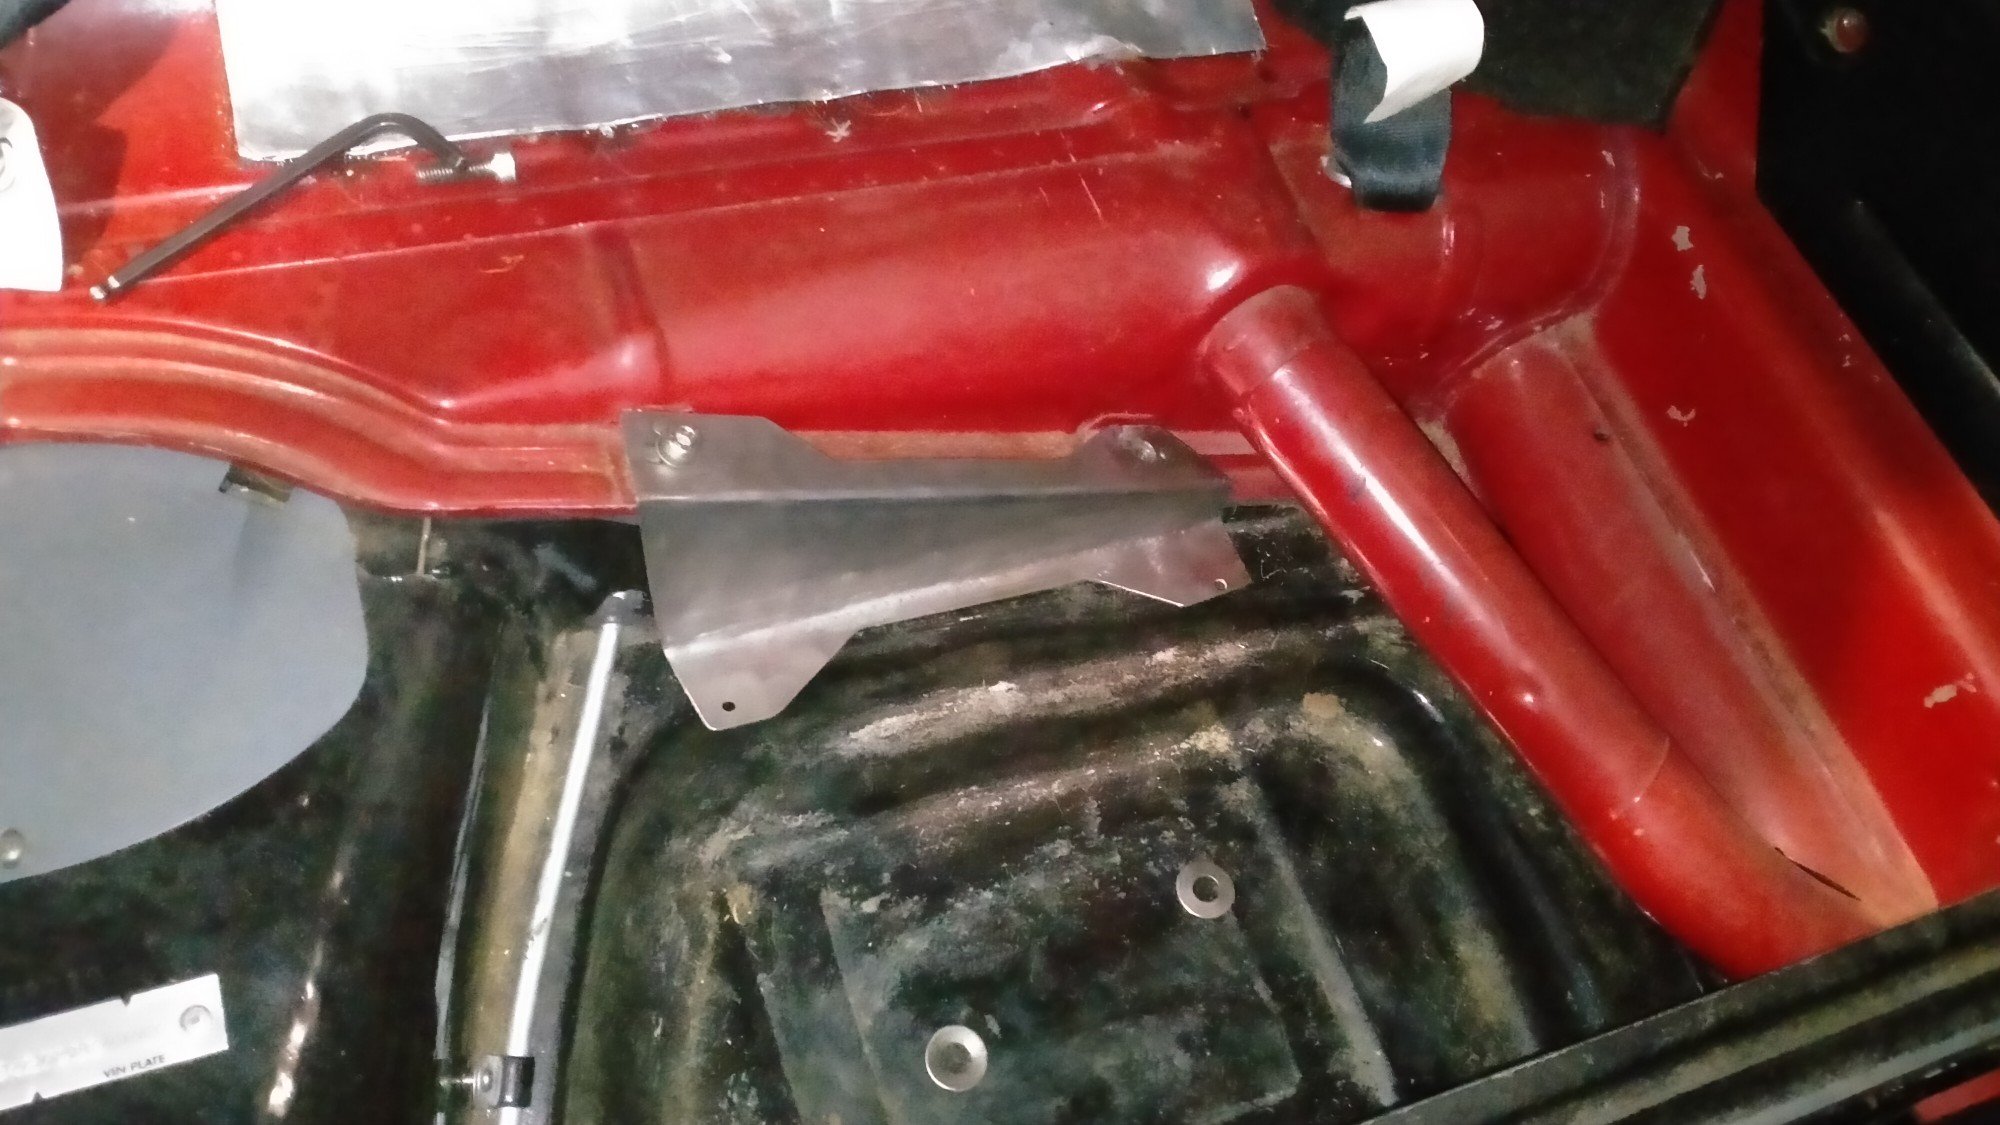
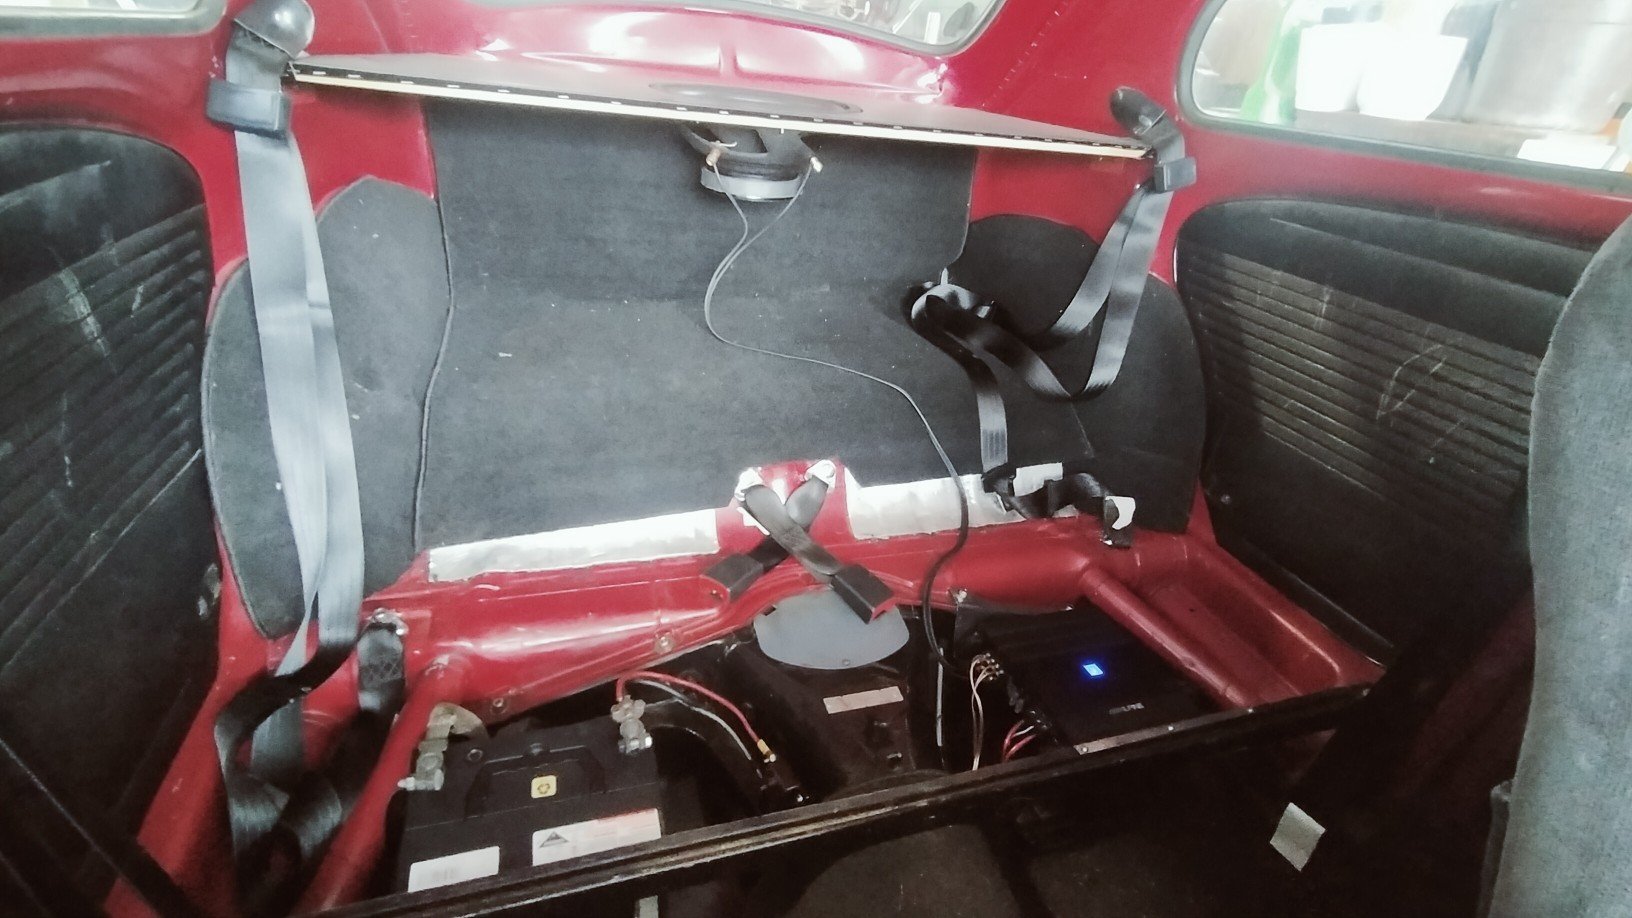
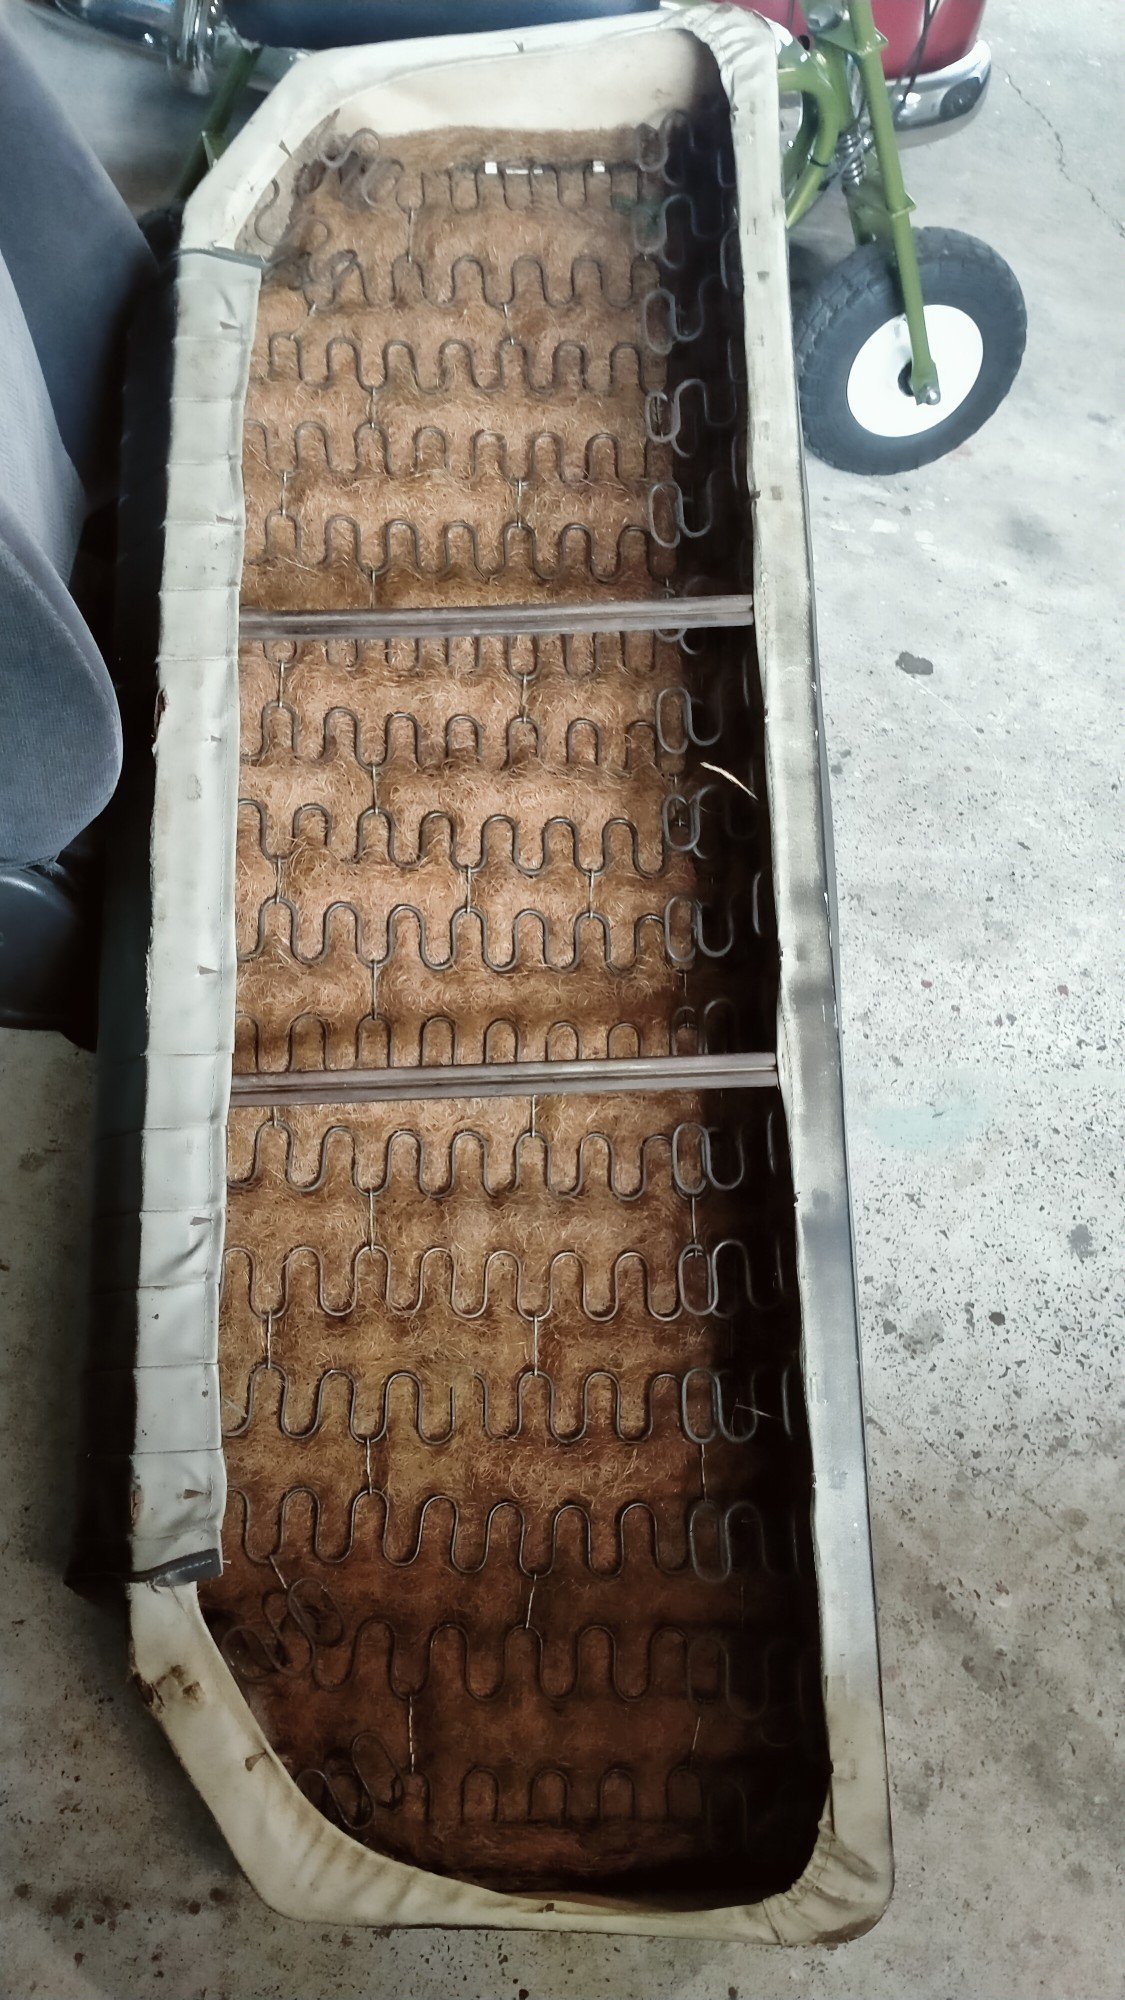
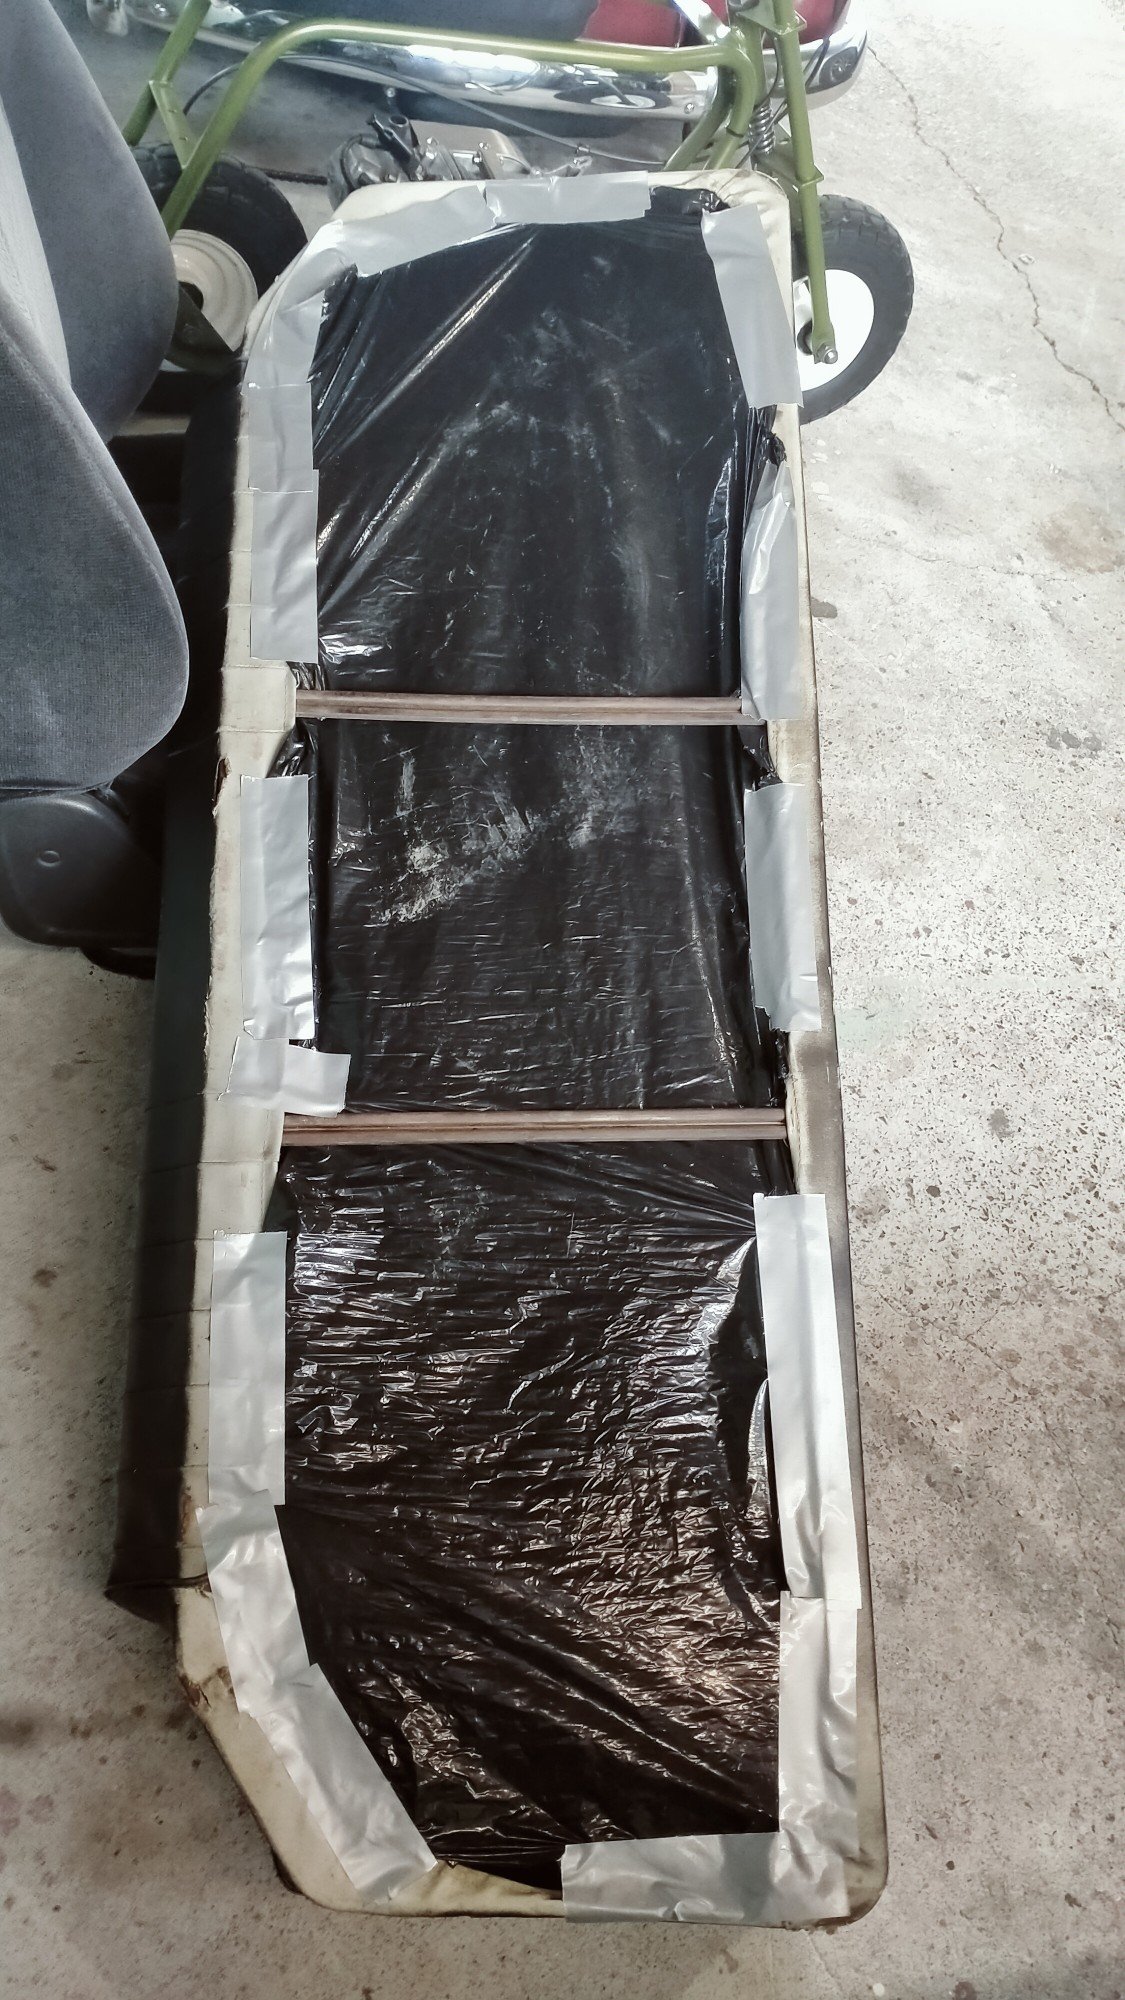
Finally got around to mounting the amp. Great spot for an amp, but there isn't much to actually attach anything to and I was not drilling holes in my floorpan. So I came up with this little arrangement using the body mounts to hang the amp. Spun up some spacers to get over the lip on the body. Was hard work bending 2mm stainless like this. front was a little simpler and just hangs from the seat brace. Also added some rubber feet under the amp to isolate it. Drilled and tapped the tunnel for the earth and mounted the stinger circuit breaker, also hooked up the Bluetooth adapter, seems to work well for $20. Also gave the whole area a good clean, found a couple rust spots in the corners so sorted that. The reason for the dirt is the horse hair stuff under the back seat, shit rains down on everything and seems to have some kind of resin that sticks. Not anymore! So chucked everything back together, all looks exactly the same, had a play with the amp settings, seems okay but Bluetooth is cool, seems to have heaps of range to, was controlling the music from across the street!
1 point
-
Now it was inside I could muck around with it. First job. I noticed the radio didn't work and the pocket in the second DIN slot wasn't mounted so that should be a quick fix. A loose wire was culprit as to why it wouldn't work. I found two screws to mount the storage pocket properly and reassembled. It's a JDM headunit so only receives one local station and doesn't have bluetooth - but plays CDs okay and also has iPod connectivity via USB so can play Spotify off my iPhone. Second job - while pondering and procrastinating I thought I'd quickly clean up the headlights which were very yellow. Here's the job 50% done for comparison. Last job of the day - why doesn't it start? Intercooler off, coils out, plugs out. Everything is so tiny. Turned it over with plugs out and it was like a water pump - a lot more came out of the bores than I had imagined and I forgot how far it goes under pressure. What's that smell? Petrol. That ain't water. Not sure what was going on but it was a mix with a lot of petrol in it, and it evaporated/flashed off pretty quickly. When I've got it apart I'll clean and check the injectors as well to make sure there isn't a sticky one or some other reason why it may have flooded with petrol. After all that I rewarded myself with a cold beer and thought about what next. Engine out over the holiday break (if not before) and see what is needed. Parts will need to come from Japan but they appear to be readily available. It can sit and wait for now.
1 point
-
Why didn't you just use a f20c1 point
-
1 point
-
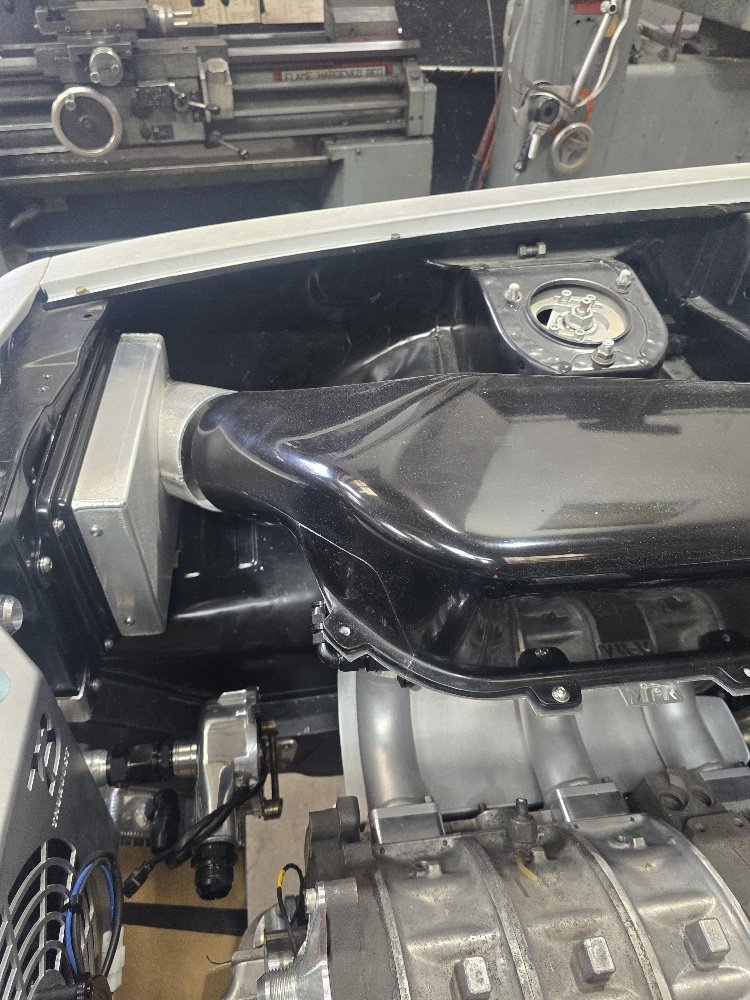
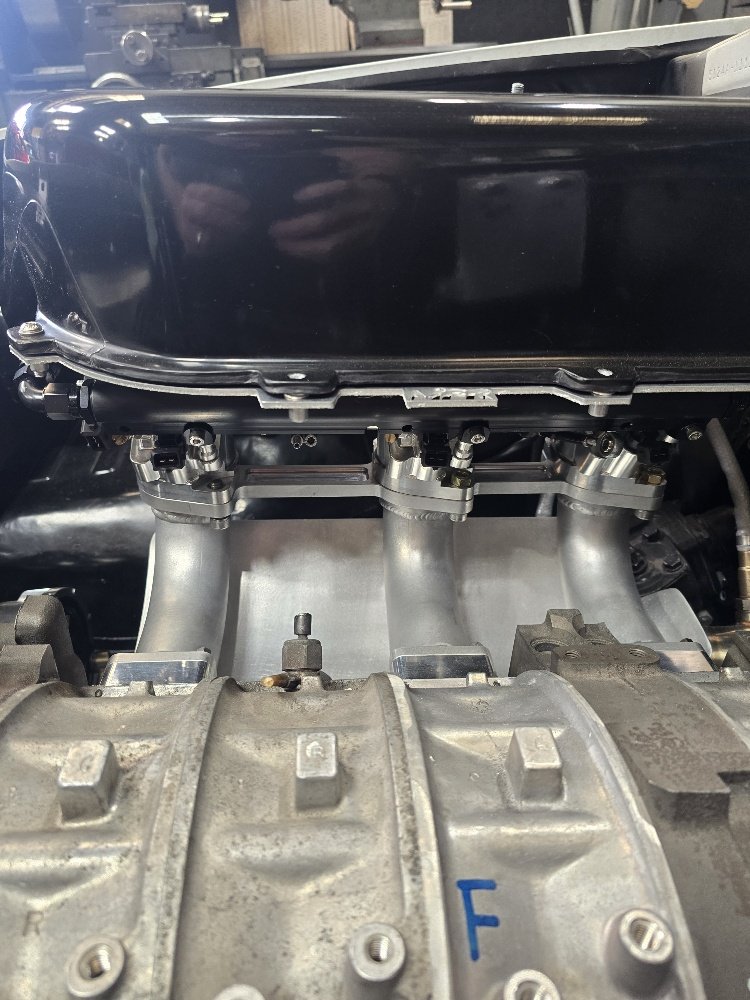
Dan and the team at Rocket down in Hamilton have been busy as! Tunnel raised 30mm and restitched in, did a bit of clearancing around the firewall/merge collector too to give a bit more space. Have plumbed up oil cooler, cooling system, mounted overflow bottle. Modified the MFR intake by cutting the back half off and folding up a new sheetmetal feed so it lines up better with the airbox intake. Modified the exhaust, moved resonater back from under driver to before diff so it can be tucked up into base of tunnel so hangs way higher, also cut exhaust and went under diff instead of over to add clearance. Can still run my centre console which im happy about was a key thing i wanted to keep with the modified tunnel so that worked out well! Few things left - Finish clearancing under rear seat/over diff head, - Brake/hand brake cables/lines - Modify rear tubs and rear rails to allow it to go a bit lower, now we have raised gearbox and d shaft tunnel its the last bit of clearancing thats needed to get a bit of extra slam. [
1 point
-
What possibly could go wrong did go wrong. The MC needs new seals. I thought it might and should have had it done earlier. Anyway I found a reasonable replacement rear rubber spring seat as one of the ones I had was a bit nackerd. I fitted that and now the car sits level. So I lowered it down and dragged it out for a wash and to see how it sits. The ground outside is not level but it’s the best I can do for now.
1 point
-
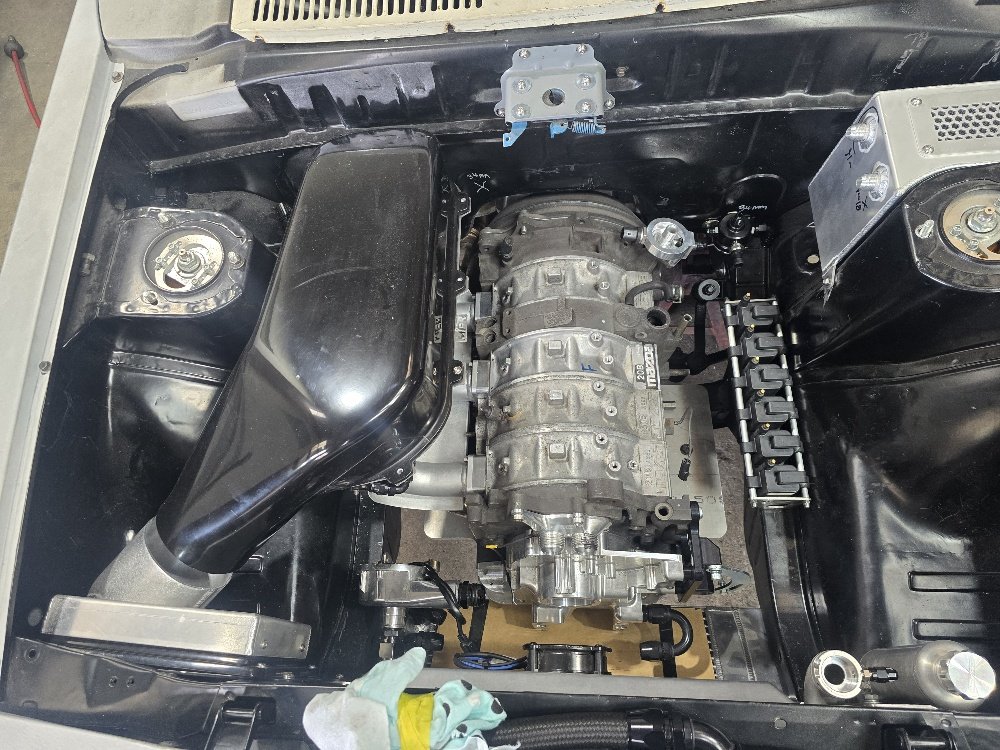
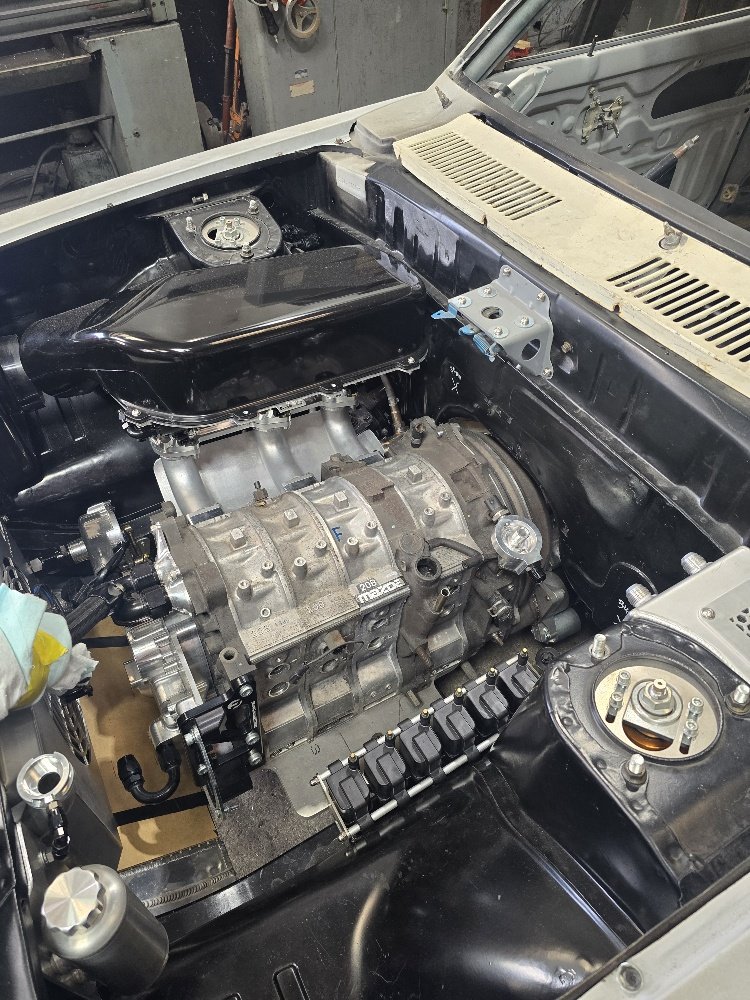
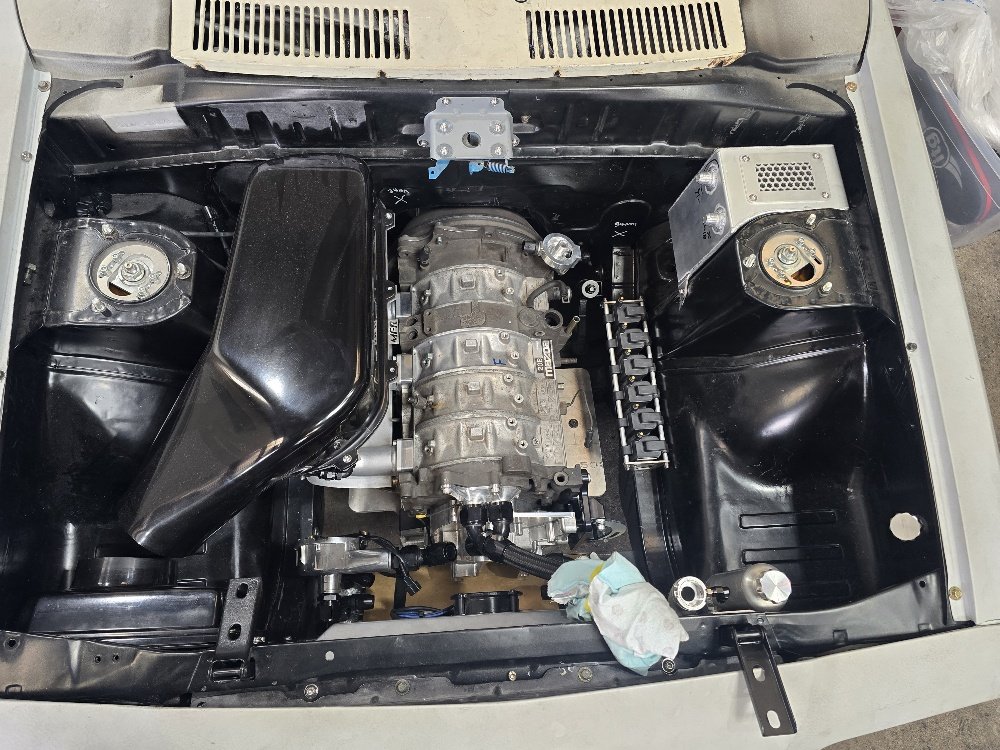
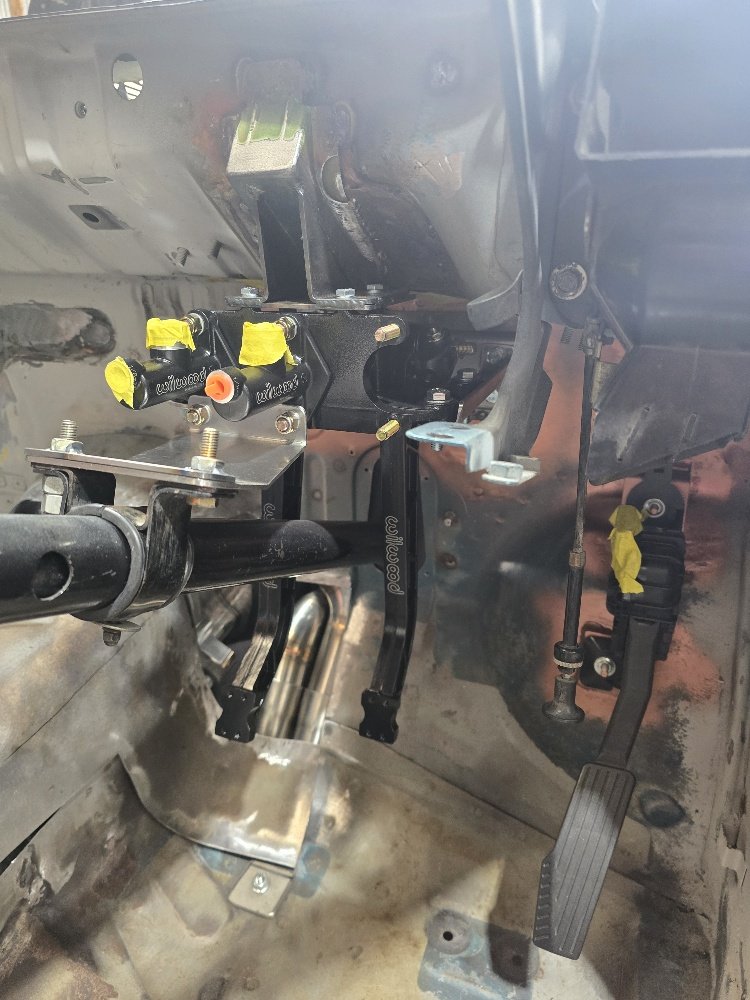
Swung into Rocket this week to check out progressing, Dan and the lads have been hammering it out, bloody stoked on progress. -Have cut the tunnel to allow gearbox to be raised to a better angle (had to come up about 30mm) -Modified gearbox xmember to suit TKX -New driveshaft to suit TKX -Welded up old master cylinder holes in firewall -Fit wideband ports in each header runner -Mounted the pedal box -Mounted wilwood billet reservoirs in the windscreen cowl so nice and hidden away but accessible -Braced EWP as its coming out from the radiator a fair bit -Mounted overflow bottle -Made up the Greens intake manifold kit and welded it up, to get the EFI hardware intake to fit with the MFR airbox overtop and fit under the bonnet -Redid rear diff shock mounts to suit the BC Golds (old shocks had a way narrower eye) -Few other misc holes filled and fab bits done Few things left to do - Clearance floor for diff head an low -Finish sheet metal work for tunnel -Sort brake lines, handbrake cables to suit wilwood rears -Modify MFR intake filter pod to work better with the 20b position /air box angle -Change exhaust to go under diff instead of over (fitted but was really tight and not much clearance) Very happy with how its all coming together and looking!
1 point


.thumb.jpeg.e0a4bff61111e0c8c7396950fcc94da1.jpeg)


.thumb.jpg.570970b401ac8d26ce9af7c1bf2bd8cd.jpg)
This leaderboard is set to Auckland/GMT+12:00