
Leaderboard


Popular Content
Showing content with the highest reputation on 04/26/24 in all areas
-
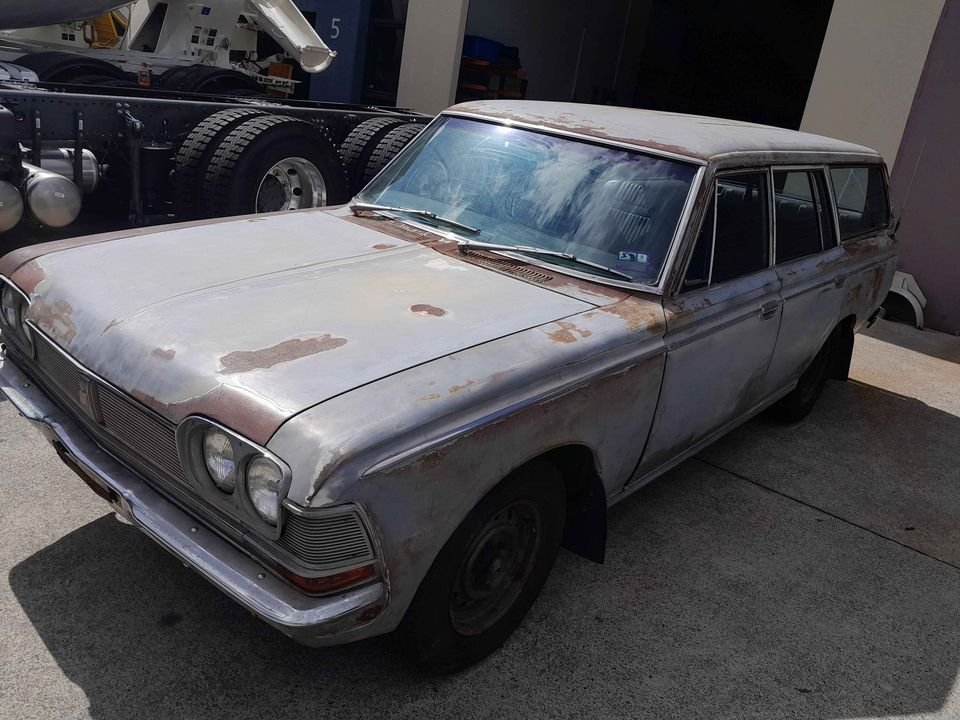
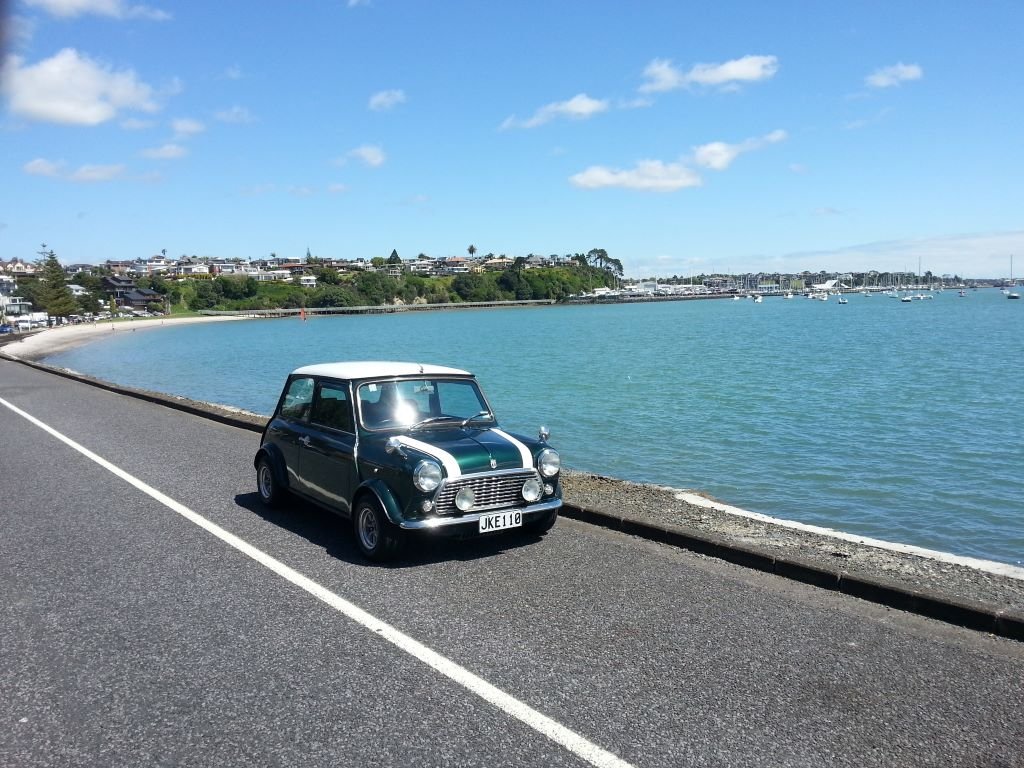
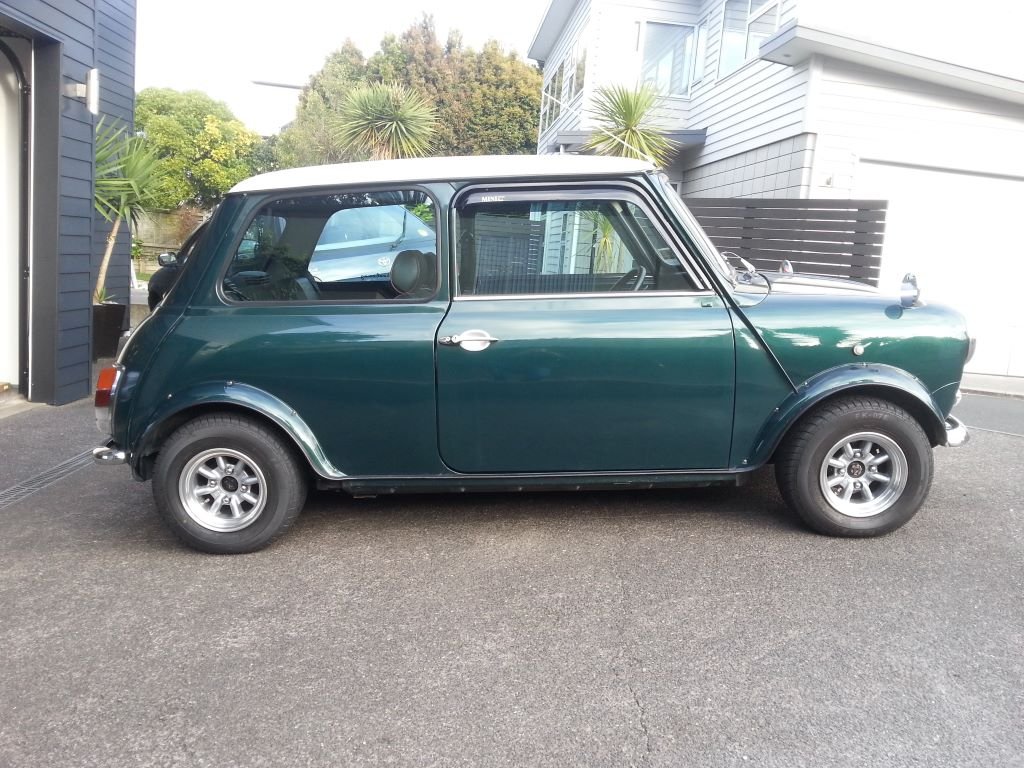
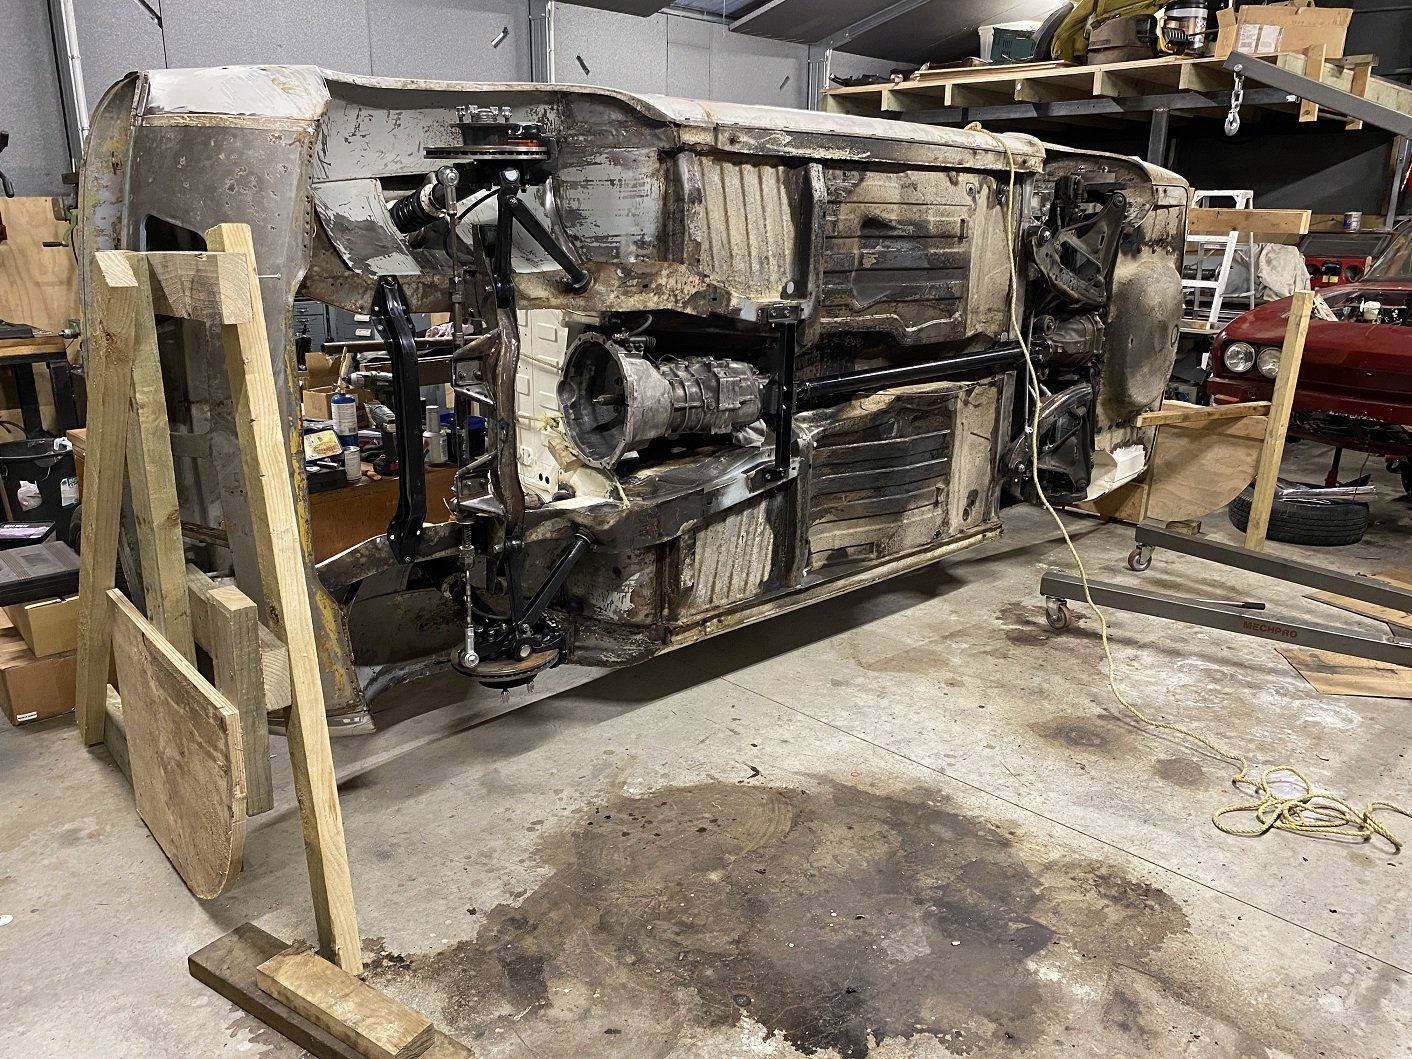
Well its been a while but I am back. Finally got my hands on another old-school car after much going back and forth on several other choices. Car arrives in mid-May. Has a 2M and 5 speed but will be swapping out for modern drivetrain later on.
 16 points
 -
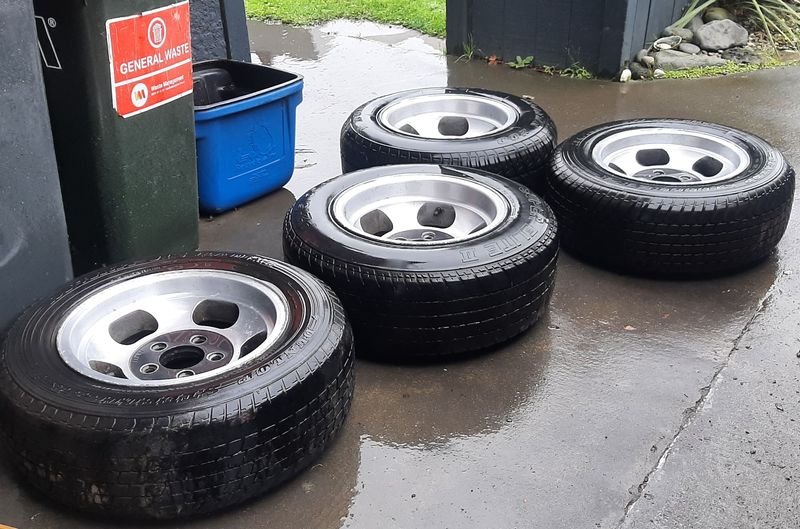
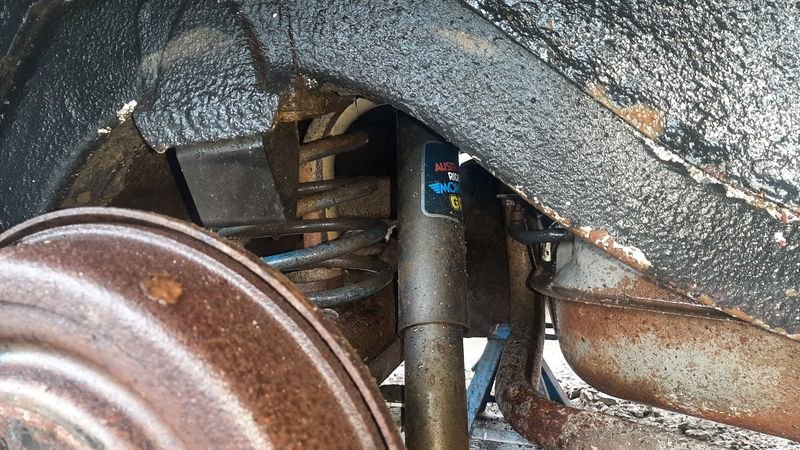
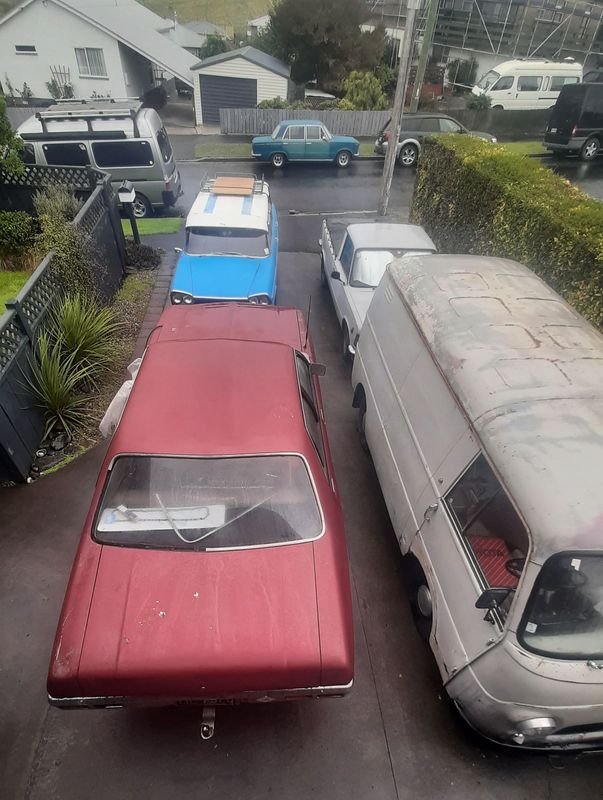
So point of having it stop is to have it driving is so it can be moved around. Driving a project is a good motivator too Point of being able to stop is to drive it outside to give it a good clean underneath, mainly so we can see whats under there and dont get filthy while working on it This car was driven a lot on wet gravel roads. There was a LOT of dirt underneath Quick tidy of the 14x7 and 14x8 Cheviots while they are off with some fine scotchbrite to get the worst of the oxidising off Some blue springs and matching blue AUSTRALIA RIDES MONROE GAS shocks in the rear. Pretty sure both he springs and the shocks are completely shagged from carrying around the LPG tank but interesting to see. This thing is an absolute whale compared to the rest of the fleet Gave it a wipe down with a waxy towel Swept out and tidied up stuff And shuffled everything back to bed
9 points
-
Right then. Booked in for cert inspection in two weeks or so. This is the remaining list which I hope to cross off one item a day.
9 points
-
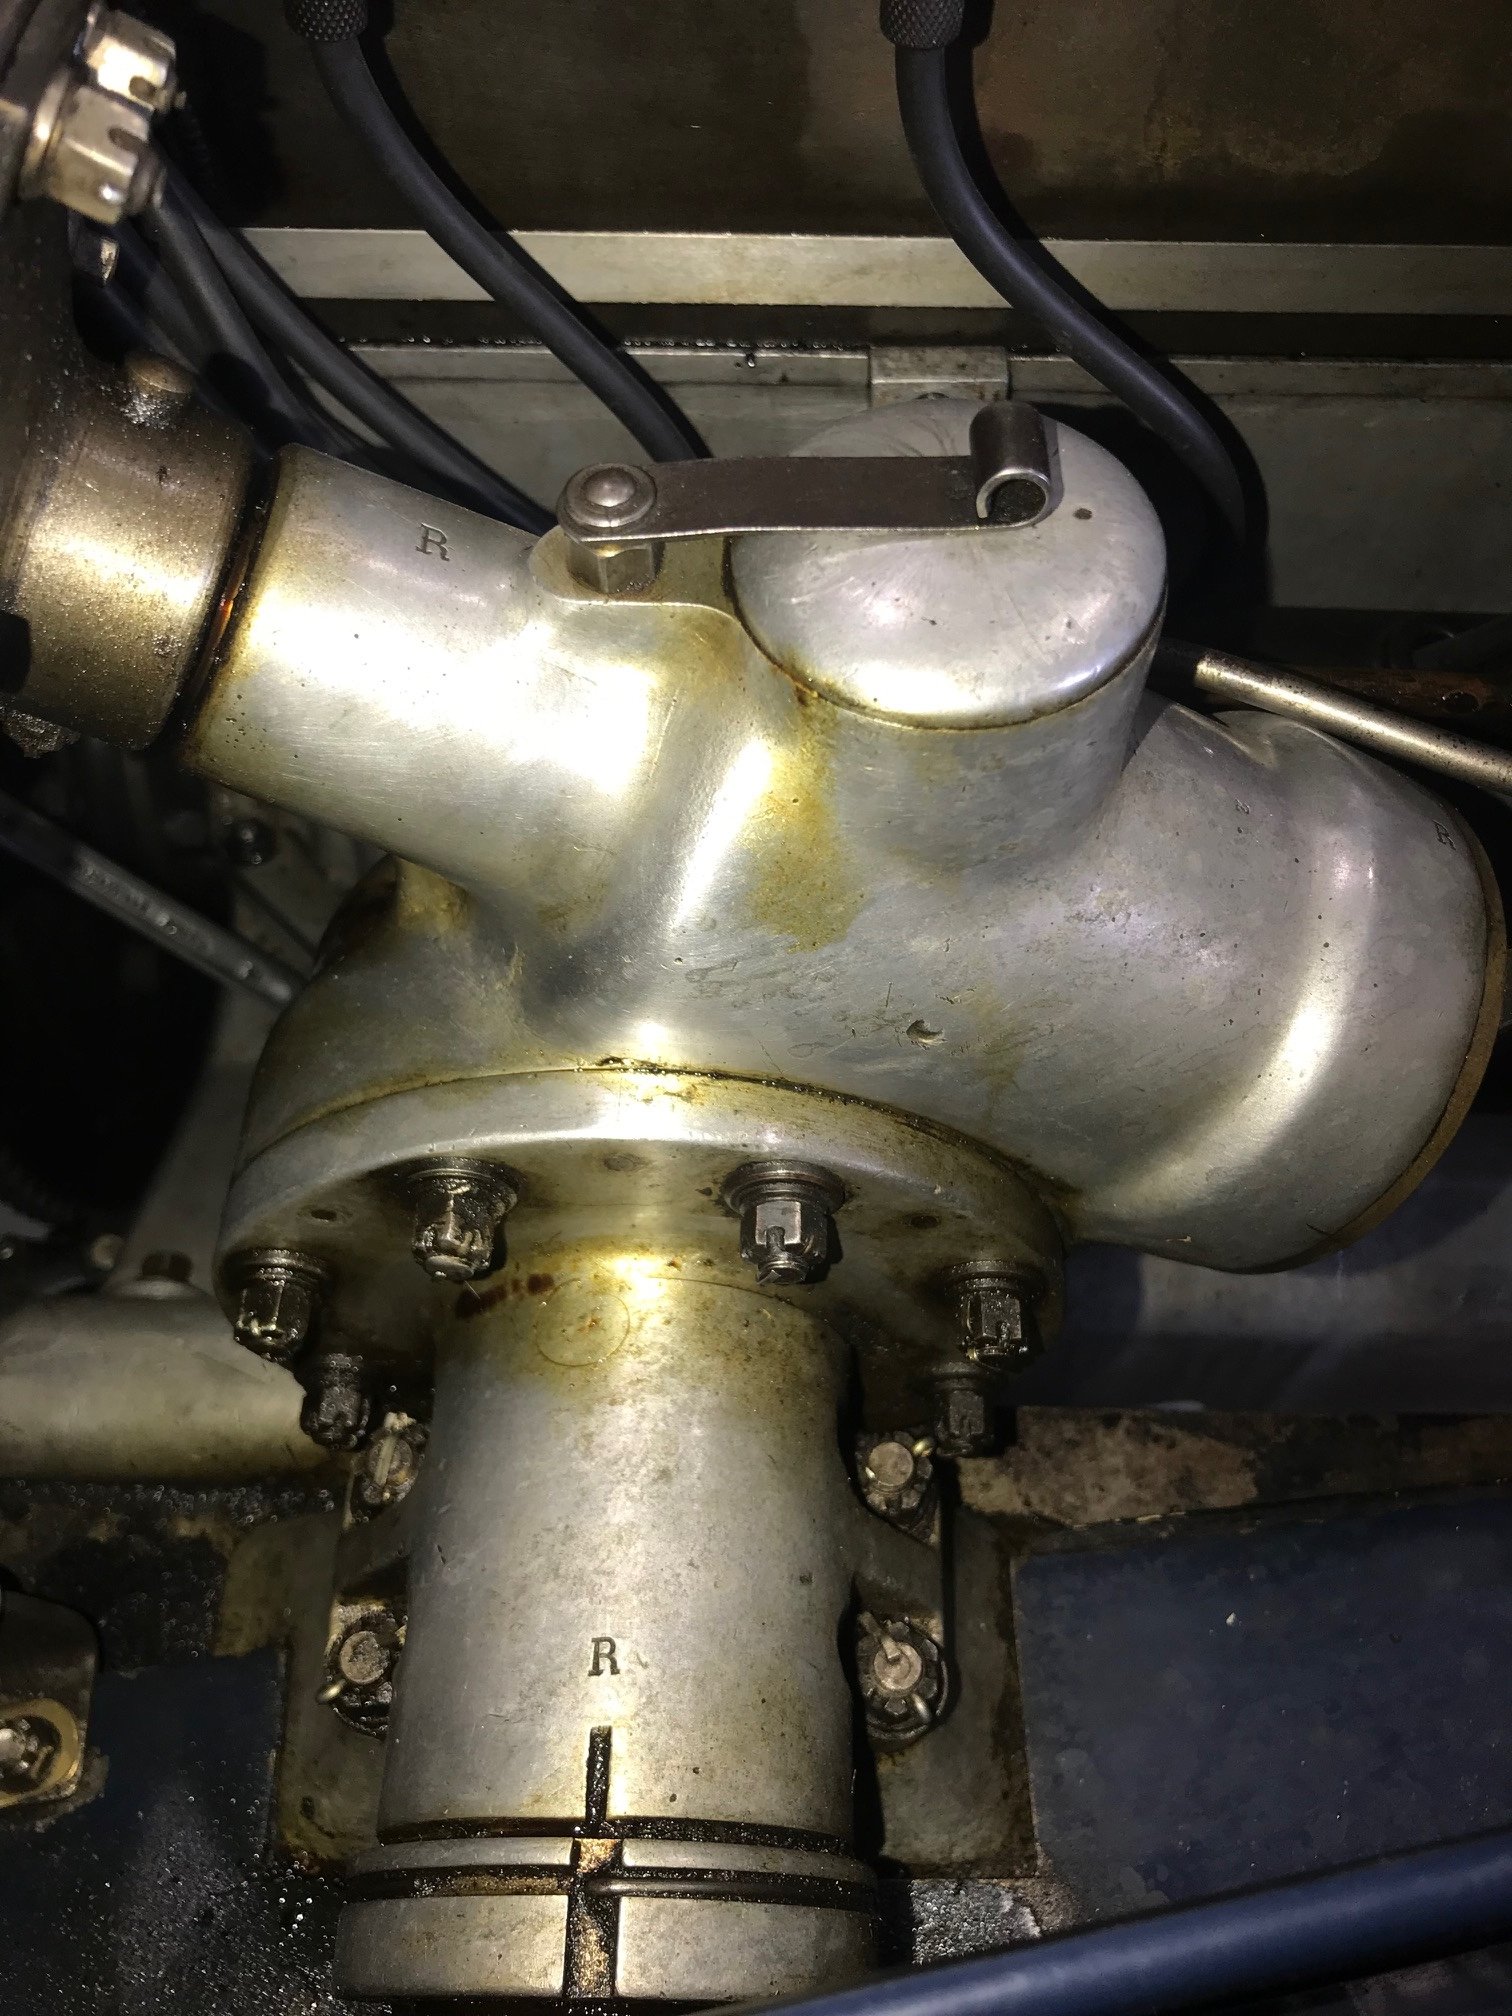
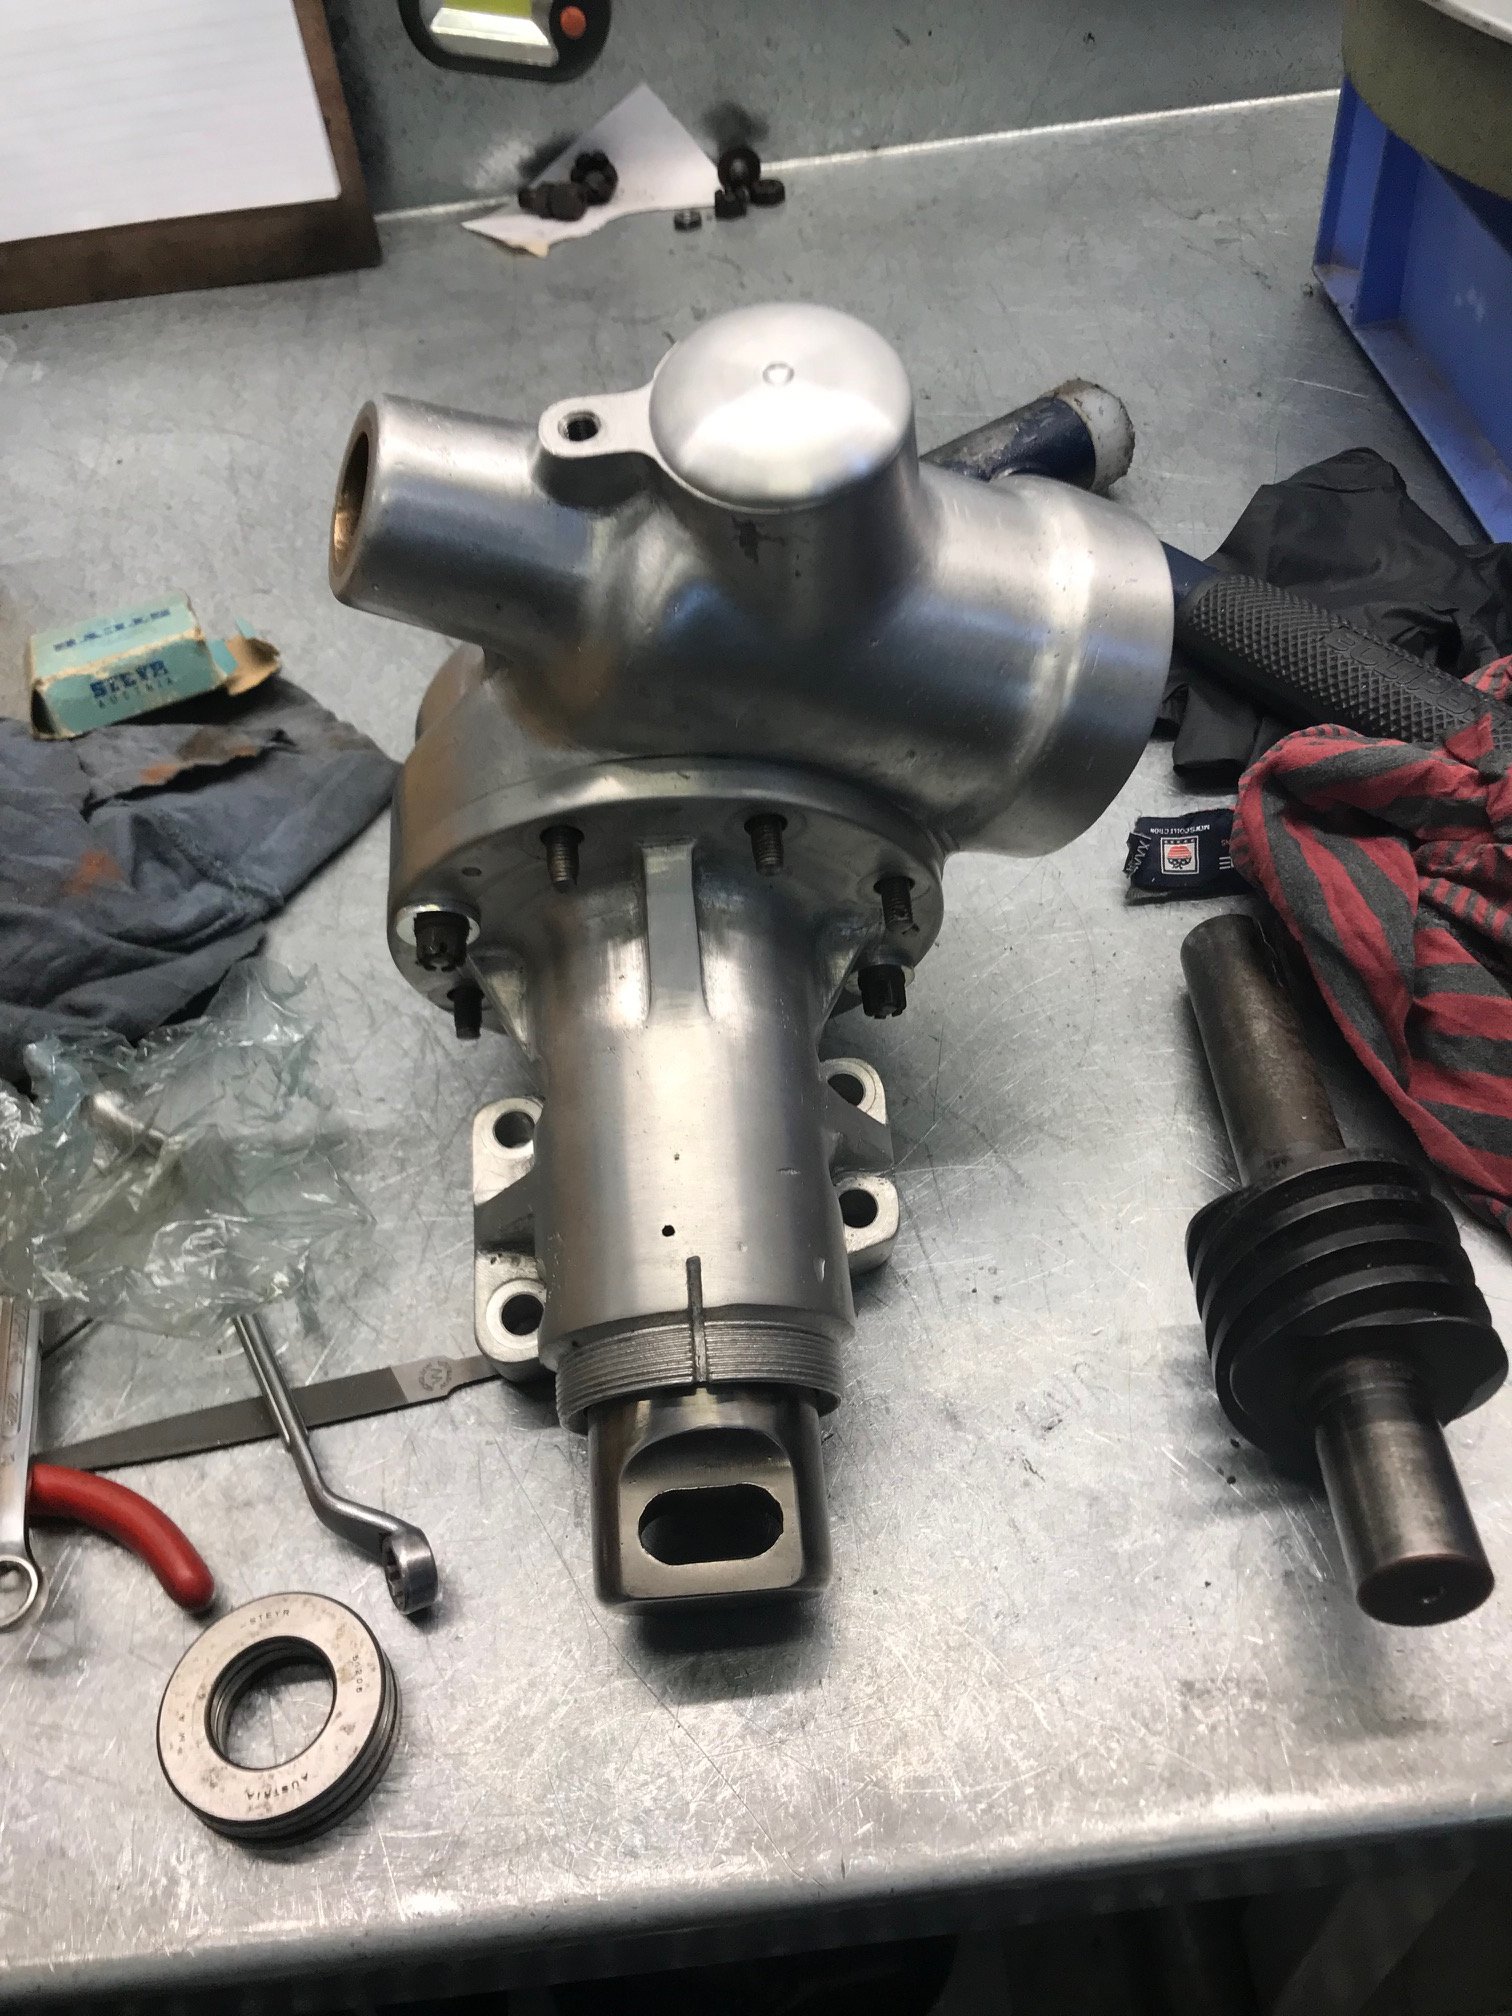
Hi Peter; You mention that you plan to nickel-plate the lovely radiator-shrouding that your Dad has fabricated. My information suggests that Bugatti radiators were customarily finished in an alloy called "German Silver". This may not necessarily apply to the T59, but it may be worth checking out before you get any plating done. The other thing that might be important to understand is that modern nickel-plating is NOT the same as what was used in pre-War Europe (the modern version was invented in the USA, and was only used sparingly there until after WWII). The 'old school' nickel-plating used on Bugattis used a process nowadays known as "electro-less nickel-plating". You should be able to find a workshop in NZ that will still do it. The result is soft and has a satin finish that will buff up quite well, but it is much more durable than the thin, shiny and brittle modern equivalent. You need to specify a minimum coating of 12 microns. The original GP Bugattis didn't have plating on many of their steering and suspension parts, instead leaving the steel in polished form. Die-hard authentic Bugattistes will still opt for this, but you need to devote regular sessions for careful application of moisture resistant coatings to the polished parts, and keep the car in a low-humidity environment. Old school nickel-plating may be a practical option, but - whatever else you may decide - please don't plate your front axle! That would constitute a cardinal sin!!! Your CAD drawing of your proposed steering box appears to differ visually from the T57 steering boxes that I am familiar with - maybe that's the case for T59 steering boxes, but I wouldn't know. The T57 steering box has radial strengthening ribs between the main gear-housing and the attached boss around the drop-arm actuator. I only know this because the steering box in my T49 project is actually off a T57, and it looks quite different to the usual touring Bugatti steering boxes that were fitted to T40, 44, 49 etc., which also look more like your CAD drawing. I'll attach a pic of a T44 and a T57 steering box to show you what I mean. Very excited to see the progress that you're making! Cheers, Michael Anderson
6 points
-
Old guy next door who loaned me that big van, died a couple of years ago, and his daughter isn't really coping with home ownership. She's been away ~3 months looking after an ex who was having heart surgery. So I had a bit of time to think as I wombled around doing this, and concluded doing something for a neighbour was pretty appropriate for Anzac day.
6 points
-
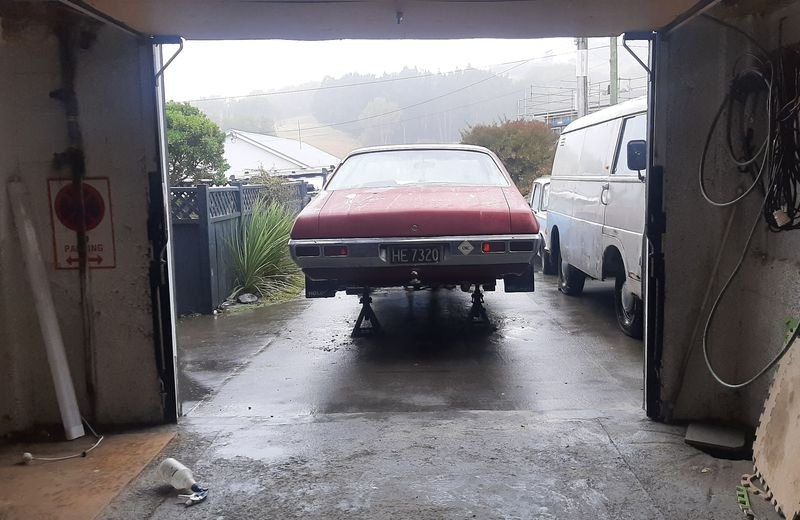
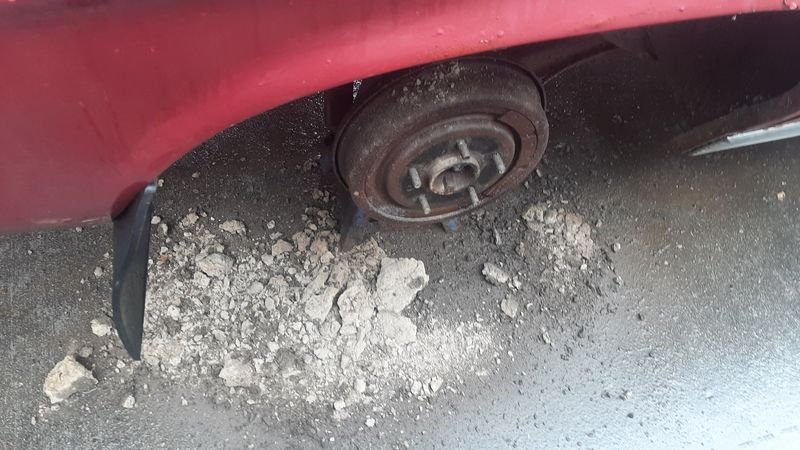
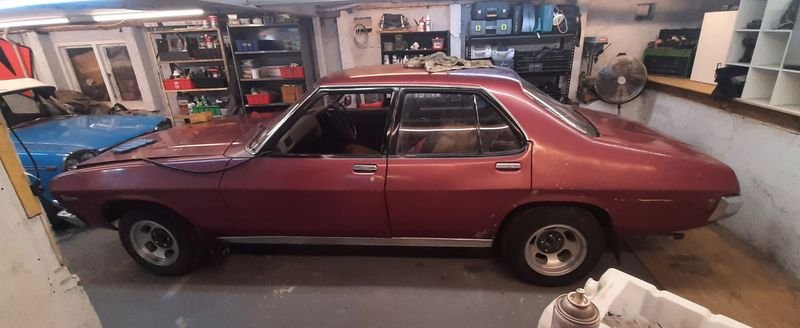
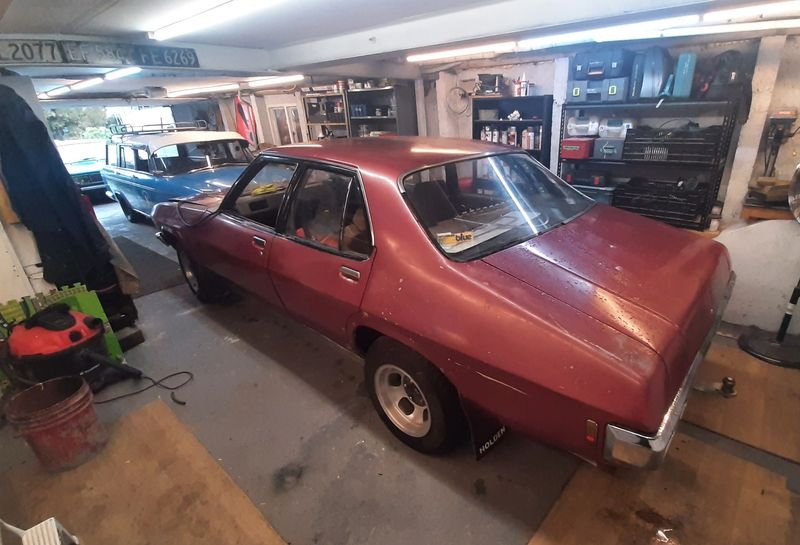
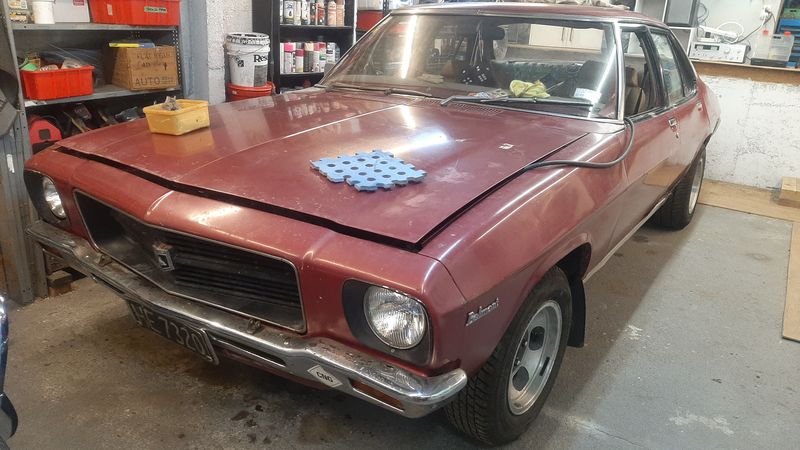
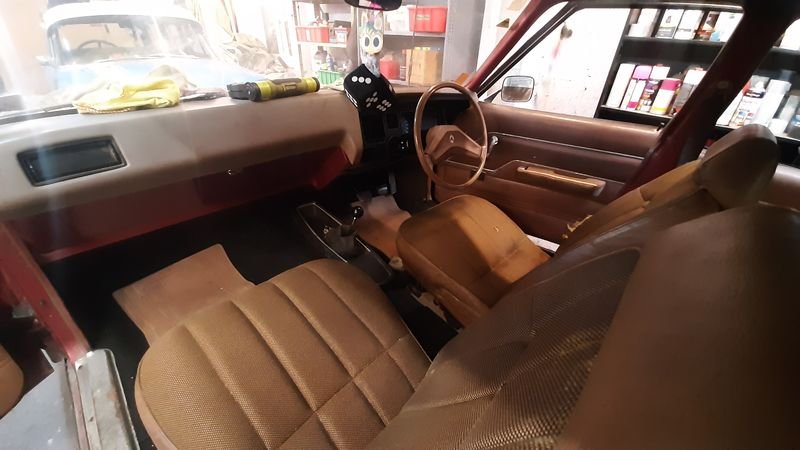
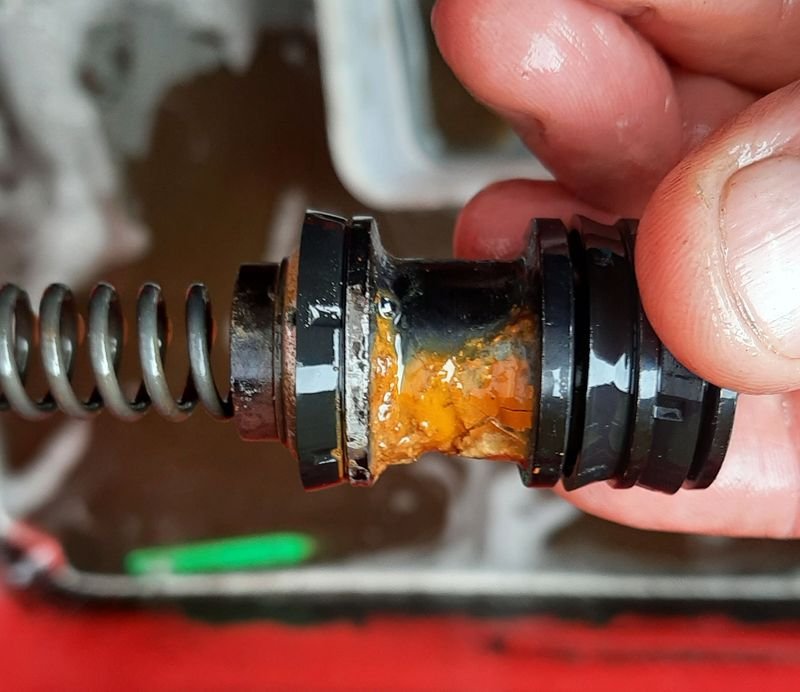
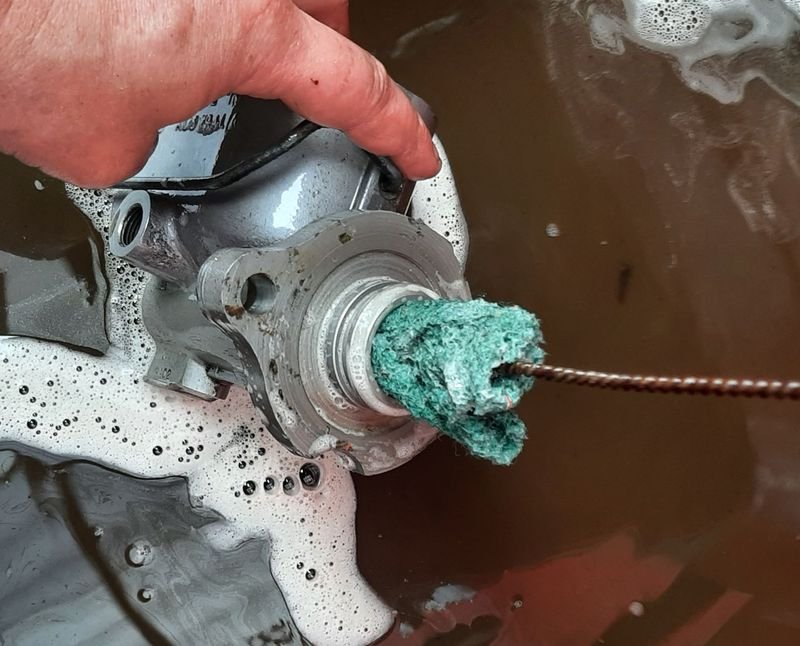
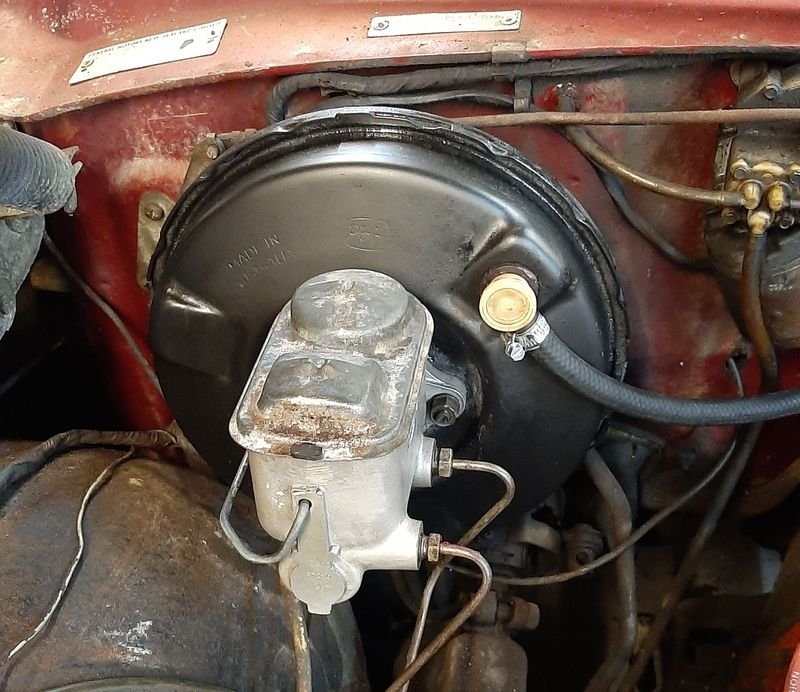
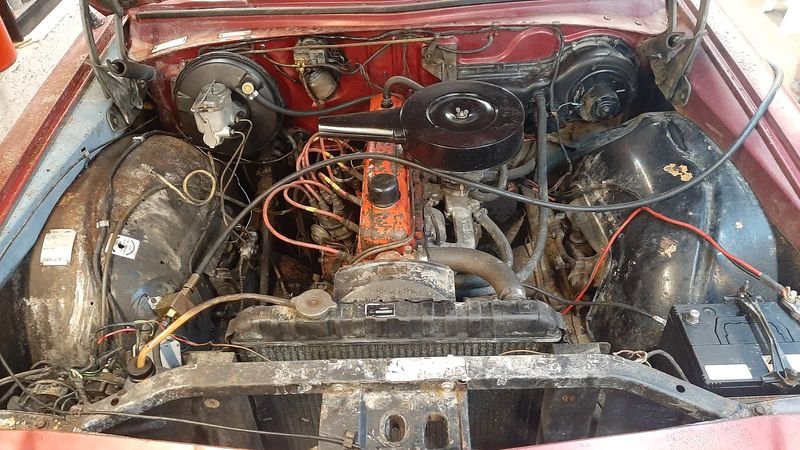
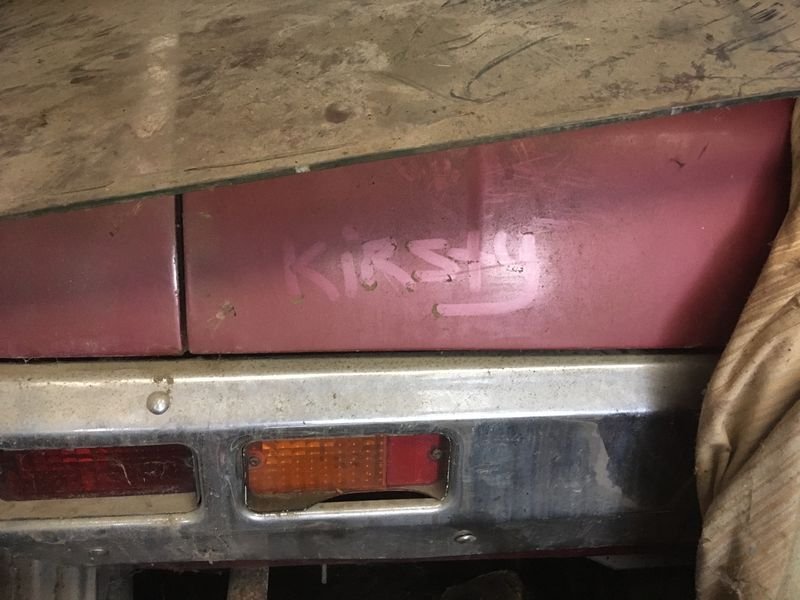
last month or so Kirsty and I have been poking away at this Got the interior back together, the Torana seats look pretty cool in brown, but there is no reclining function, they only bolt to two of the HQ factory holes and there are bits of wood under the two feet, so some factory or better seats are on the list now too. Seatbelts as well. Got it running off a boat tank off the key reliably, and next task is to make it stop so at least it can move it self around relatively safely. I like having projects be drivable, I like that they can do their main function, lots me think they are pretty much done apart from some petty technicalities. Started bleeding from the master as the pedal felt like the piston was stuck. No fluid exiting from the front port (rear brakes), rear port (front brakes) seemed fine. (Notes for later reference: PBR alloy master, cast iron front callipers, drum rear) Yep - was stuck down and full of schmoo. Got it professionally line bored Assembled it with lots of rubber grease and 'rebuilt' the brake booster Tidied up the engine bay a bit more as well Aaaaand now it leaks fluid into the booster when the pedal is pumped.. I may have assembled it wrong but i suspect one of the seals is blown/nicked or the bore is pitted somewhere (looked fine). Will need all new brakes at some point anyway so ill try to find a kit for cheap, or a new master even (seems they are around $300 from the usual places)
5 points
-
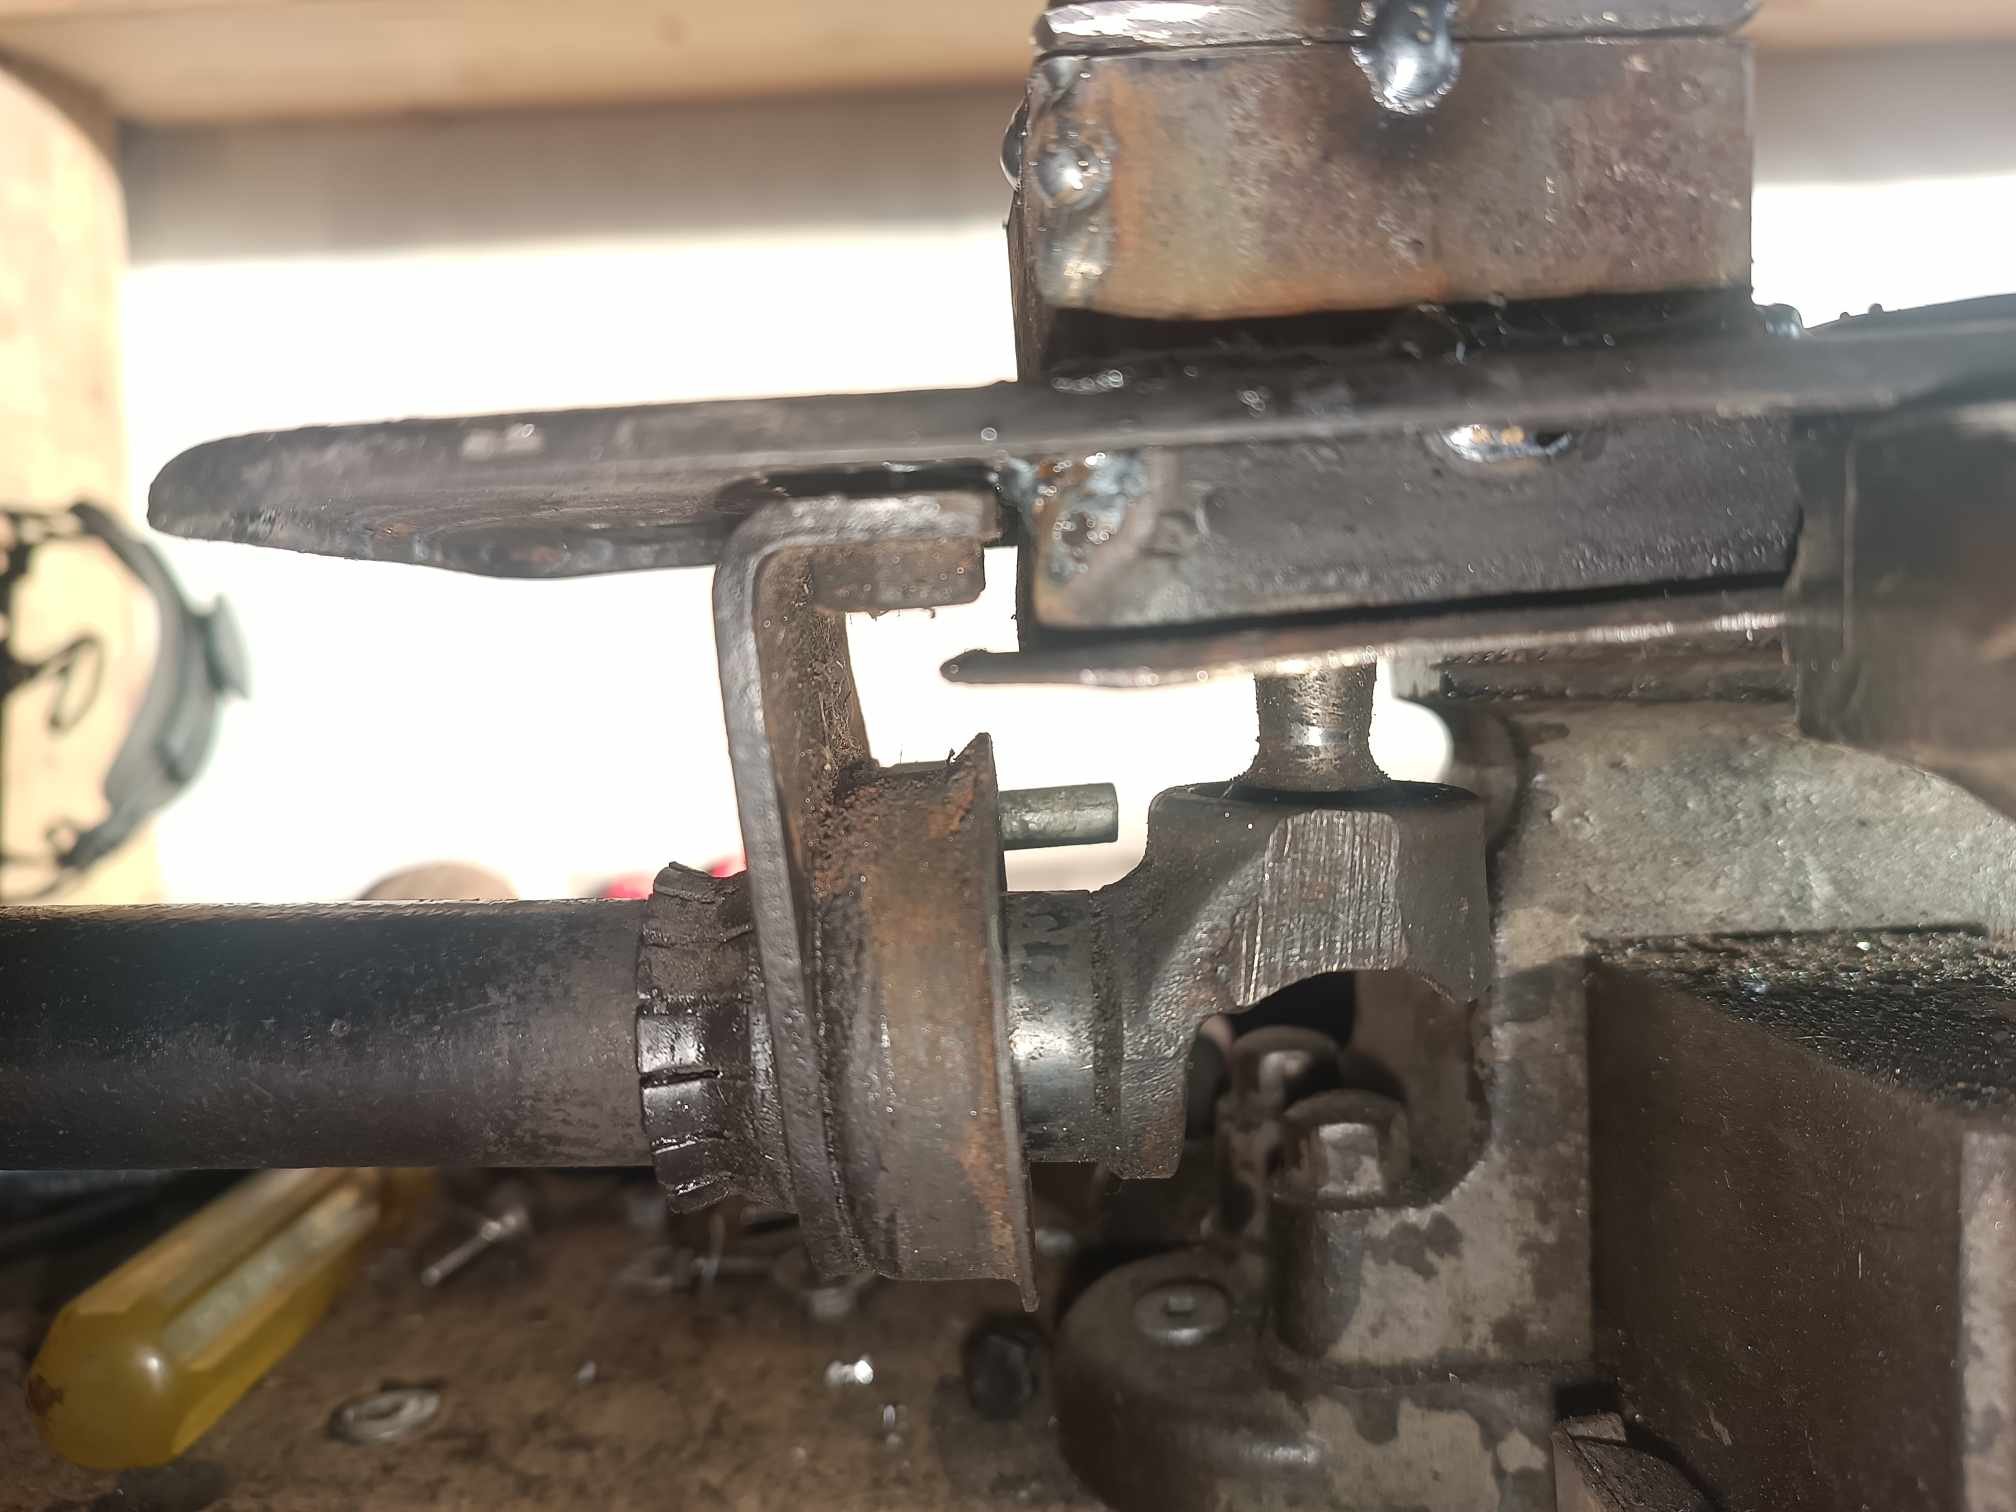
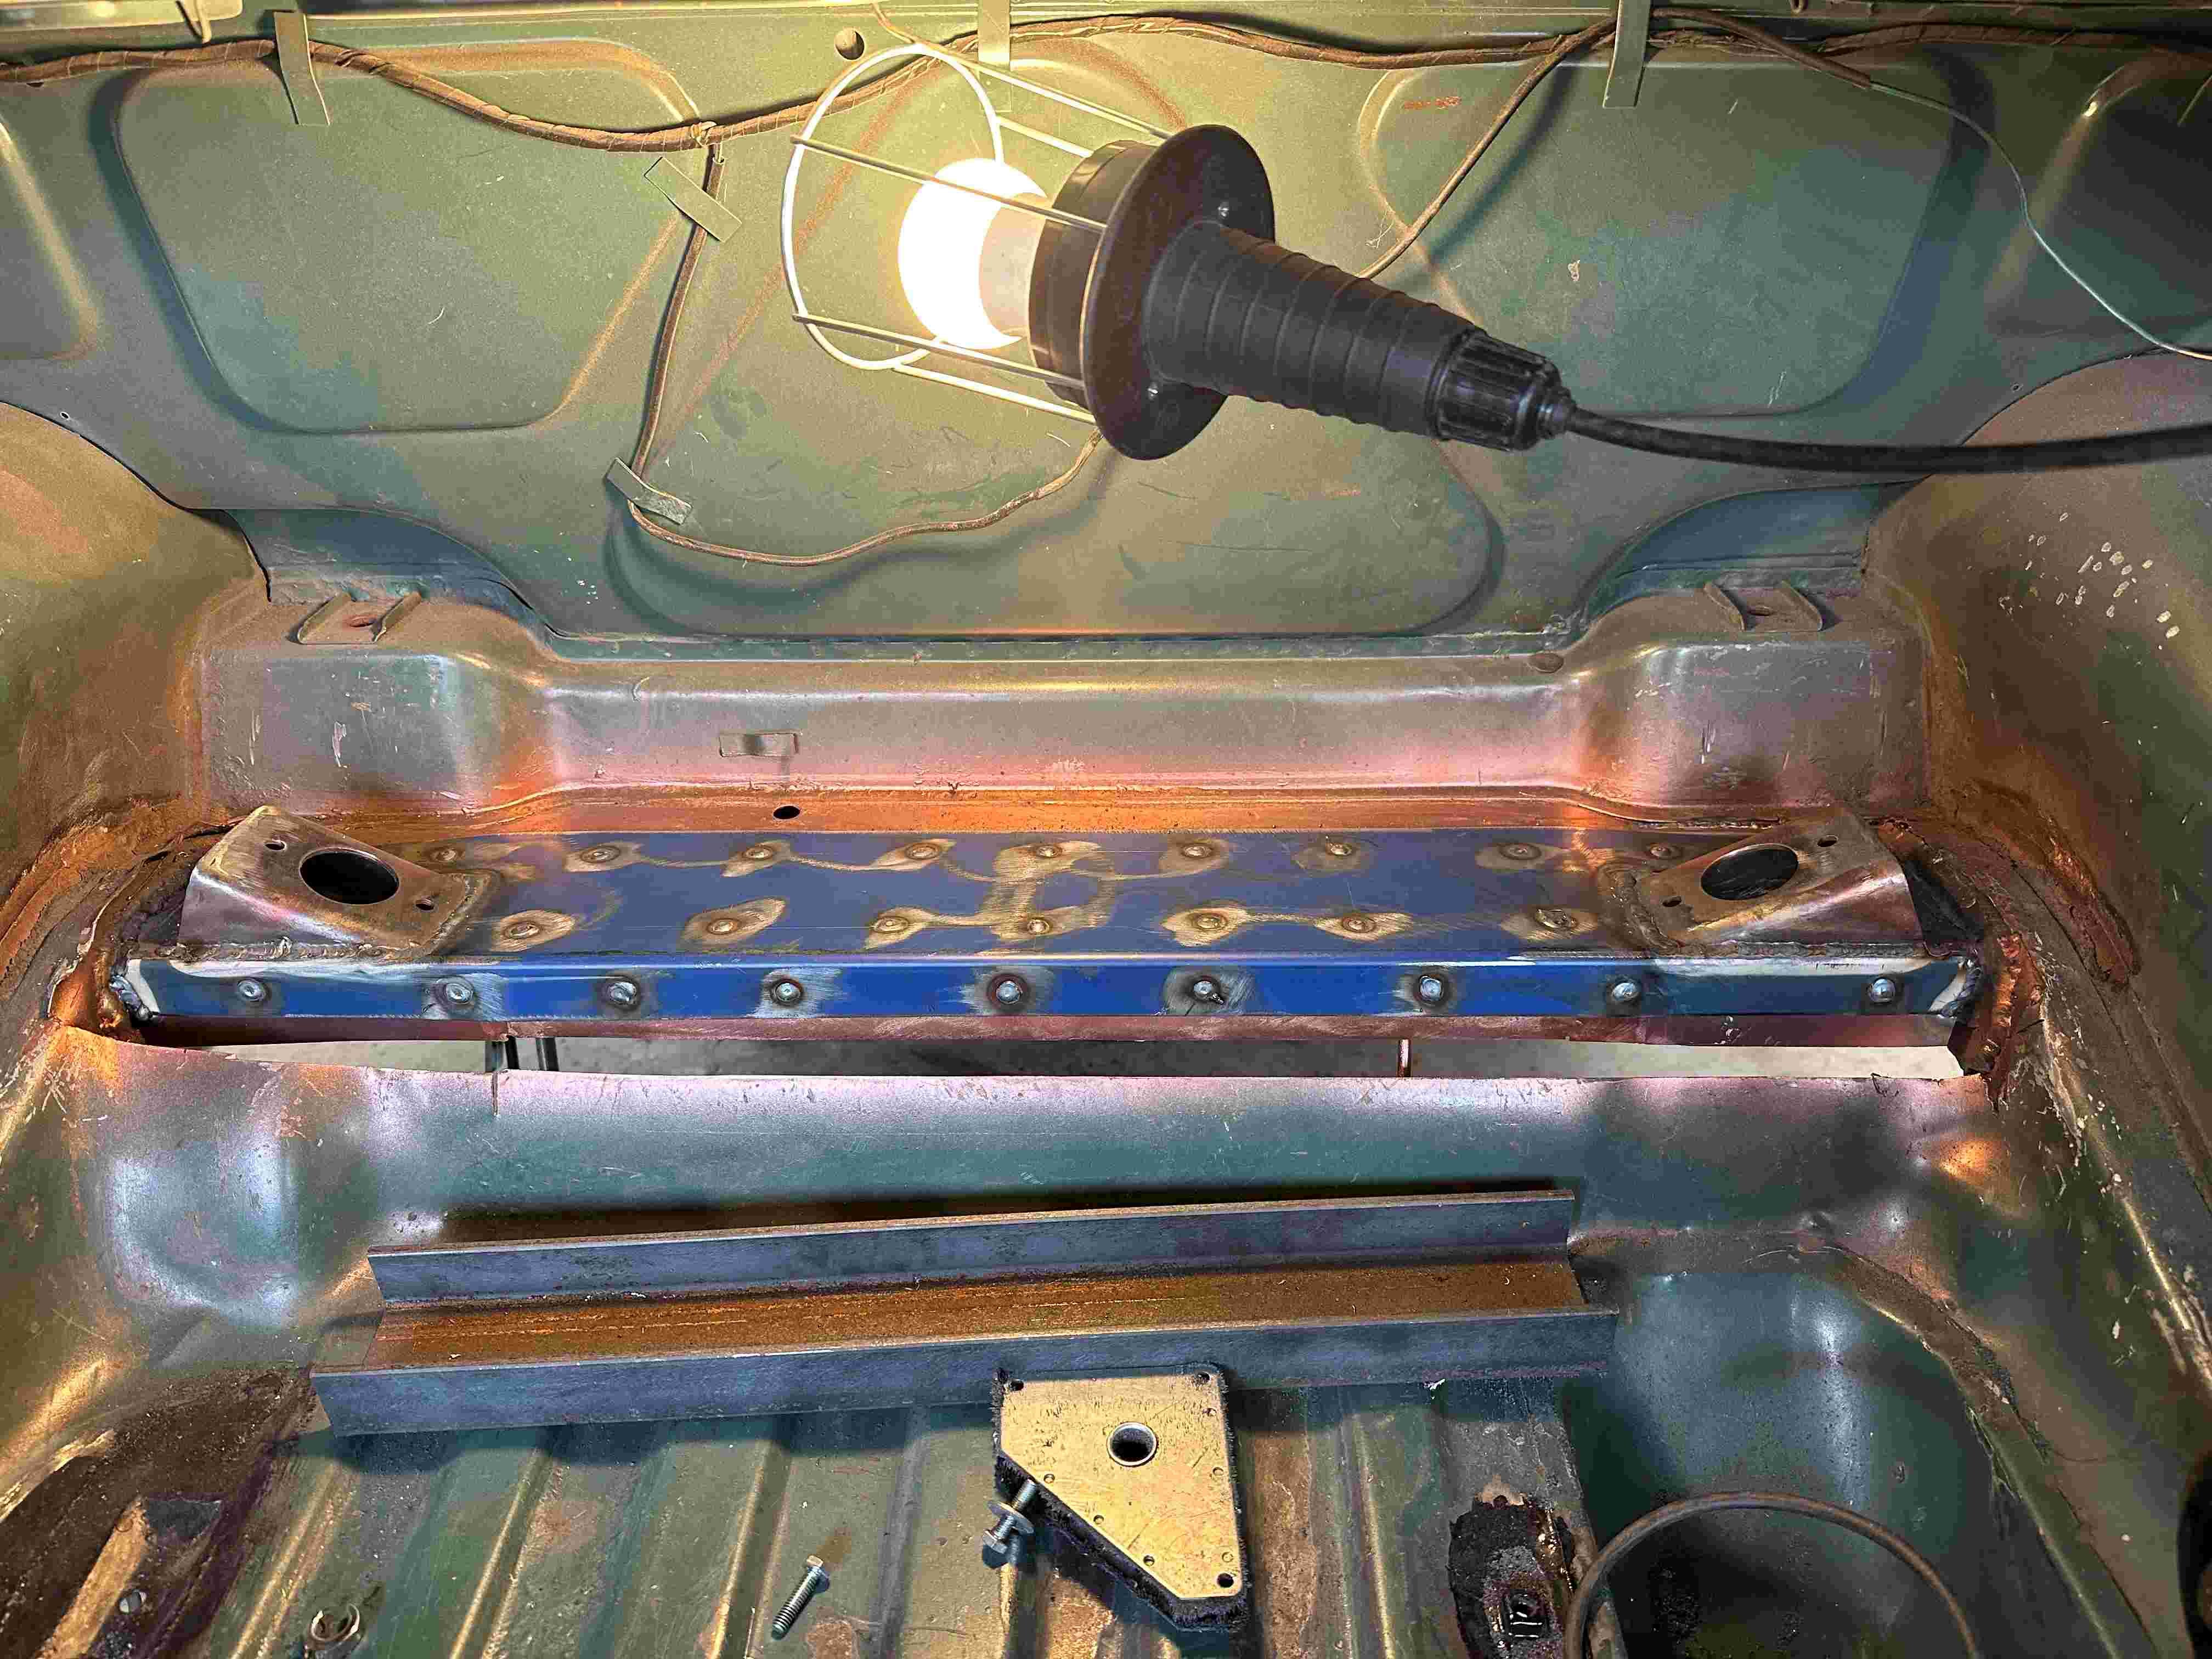
First job ticked off. Welded up a box for the gearbox cover. The only thing it does is provide access to the selector uni grub screw. Even that's pointless if when taking the engine and box out I slide it backwards. If the engineer asks me to weld it in it wont be a big deal. Just a faff around with making sure it doesnt catch fire. I have to put the rear seat back in sans some springs in the middle. No biggy.
5 points
-
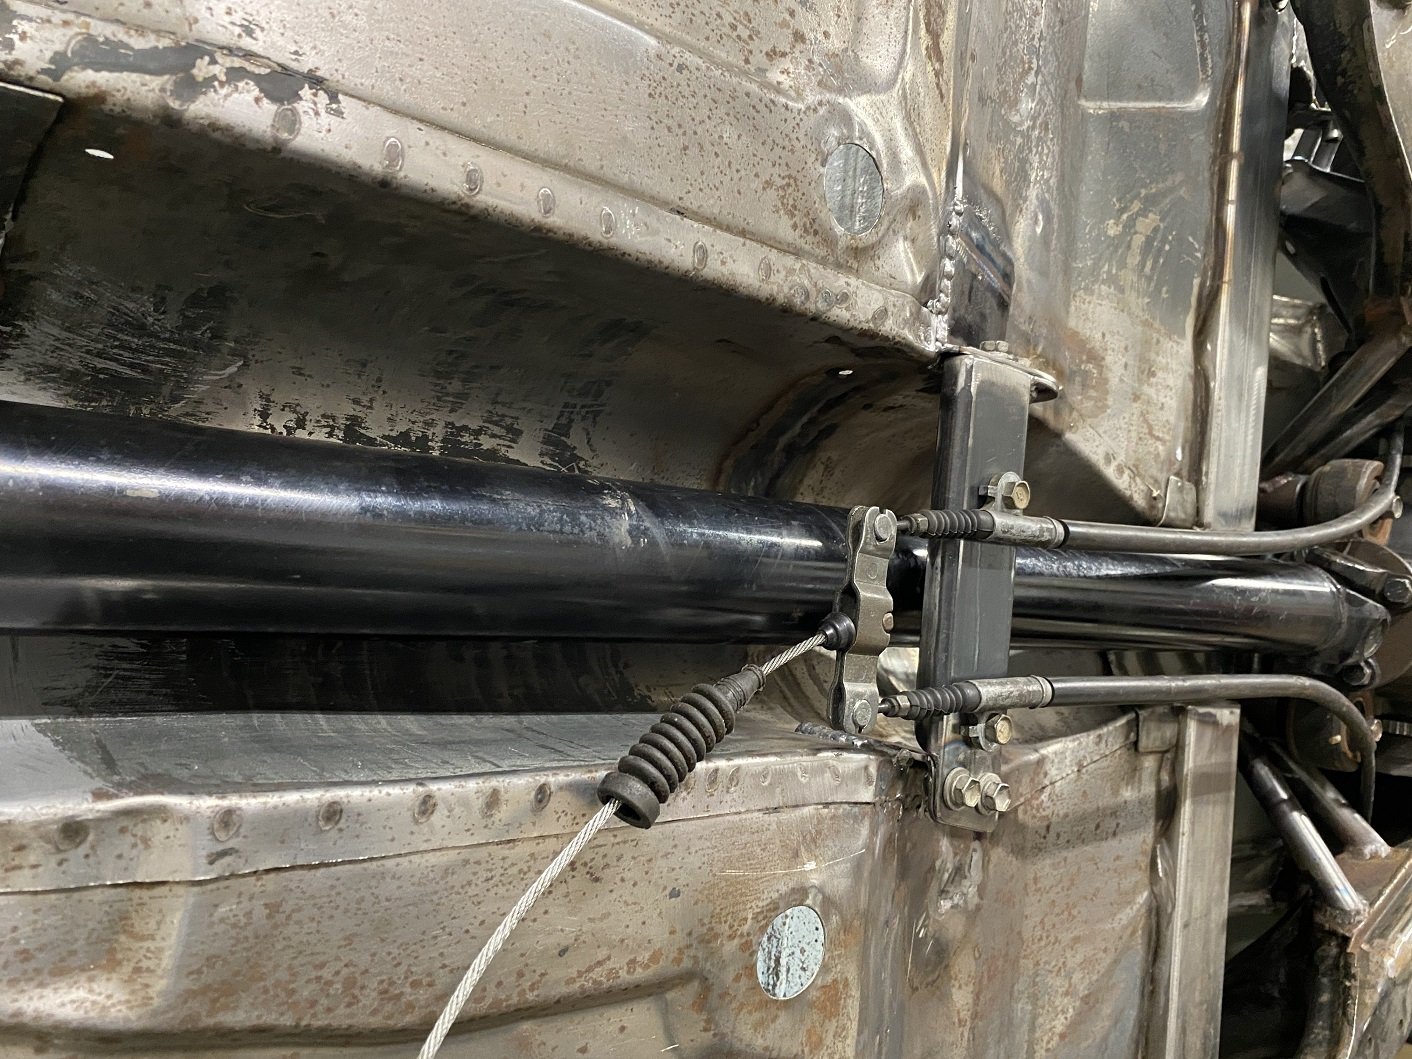
I made the handbrake cable bracket. I can make the cable outer touch the propshaft flange, so I'll make some brackets to hold them away. I'm fairly confident they wouldn't touch by themselves anyway... I must decide how I want to marry the Triumph handbrake lever to the toyota cable so it's still adjustable. The handbrake is offset to the drivers side, so the cable 'just' misses the propshaft.
5 points
-
4 points
-
Went out this morning to pull the front bumper off and check out how things look. Got carried away but at least i know most of the front end is in good shape now.
4 points
-
I picked up the engine wednesday and got bizzy after work. Mmm shiny Outside not so much - I think I prefer this, because it'd fuck with me if I only had some parts that were super shiny on the outside. They skimmed the head, checked for cracks and heat issues, and only found minor pitting on some valve seats which they lapped out. Forgetting that I hadn't done this ahead of time, I went through a soapy water -> water rinse -> brake cleaner -> fresh oil routine to make sure the engine gets as little extra iron in its diet as possible. The valve stem seals go in with a socket and extension + oil... I uh accidentally put a used one in at once (visible at bottom of image above), because for some reason past tom put an old one next to a fresh one... Special tool 09916–14510 Special tool 09916–14522. If I had to change this I'd make it a little longer. The first one went in reasonably easy. I used some shitty aliexpress tweezers (might as well be made of slices of takeaway container plastic) and grease to hold the bingles in place. It made me think that this would be easy... Turns out almost all of them gave me a fight. The bingles HATE going into position and the intake side is even more of a bitch as they need to seat deeper. They'd wiggle free, pop each other out, stick to the tweezers or whatever else I put in there, and just generally be a bit of a bitch. The tool I printed left too short a window on a couple of them to keep a piece of material in there to hold the bingles down. I tried a bunch of tricks, including putting foam in the special tool and in a socket, but ultimately the best technique was to just struggle and eventually get there. The next day we aimed to get the head and the block together. We got the shop to do the rotating assembly and I think it was well worth it. Before we could put the head on there were a couple jobs we wanted to do first. First, the oil seal housing. Some internet sleuthing tells me that Threebond 1217G is equivalent to Permatex Ultra Grey. Special tool 09911–95010 helps get the seal onto the crank. Girlface finishes off cleaning the breather plate and we get that back on too. While we waited for the sealant to cure, we got the engine set up on the hoozitchacallit. Then after an hour we came back and torqued to spec. Wiping down all surfaces with brake cleaner, we busted out the dowels and head gasket... and then the engine got marginally larger! The head bolts are next. We got fresh new ones under the assumption that the old ones underwent enough plastic deformation to be unusable, but I haven't actually checked. 20 Nm, then 40Nm, fine. But then +60 degrees, which introduces unhappy metal sounds and vibrations, which is really disconcerting! And then another +60 degrees which put us completely in anoos puckering territory. Fuck me I'm glad that's over and nothing broke. Today, I set my sights on the camshafts, sprockets, chain and oil cover. I still hadn't disassembled and cleaned the camshaft parts so that was the first job. Gingerly separated the cams from their sprockets in a vice, then cleaned in the parts washer before rinsing thoroughly with brake cleaner and then a further rinse in fresh oil. The exhaust camshaft was a lot simpler to clean The intake camshaft has a bearing at the sprocket end, just the one, I guess because there are some complex oil gallery stuffs going on there. The old bearing felt fine but I grabbed a new one anyway, it's only one size. Then the cams go in! It was ambiguous in the manual whether to use oil on the bolts but I thought yes and the internet backed me up so that's what I did. Kelv later told me his gut said no. So Kelv, if something fucks up here, you were right. It was at this point I tore the garage up trying to find the crankshaft key. It gone . I remember seeing it at some stage so I can't imagine it has gone far but ugghh what a bummer, let me keep assembling god damn it! I kept going anyway and got the chain, guides and tensioner set up per the manual. Before I torqued the tensioner down I tested that everything can be removed with it in place for if I find the key / need to disassemble the head later, so that gets the ol' paint marks on the bolts treatment. The other annoying thing: the machinist said to check the valve clearances due to the lapping. I slightly fucked it up (measured at parallel instead of perpendicular because the above image didn't load first time and I'm a numpty) but I got a 0.2mm in (good) but not a 0.25mm in (bad). I also wanted to get the chain properly set up so I could start rotating the lobes into the correct positions for measuring so that annoyingly threw me off today. I'll find some way to measure those little bastards tomorrow though. I really hope I don't have to wait for new tappets and/or key from Japan... But anyway progress is progress!3 points
-
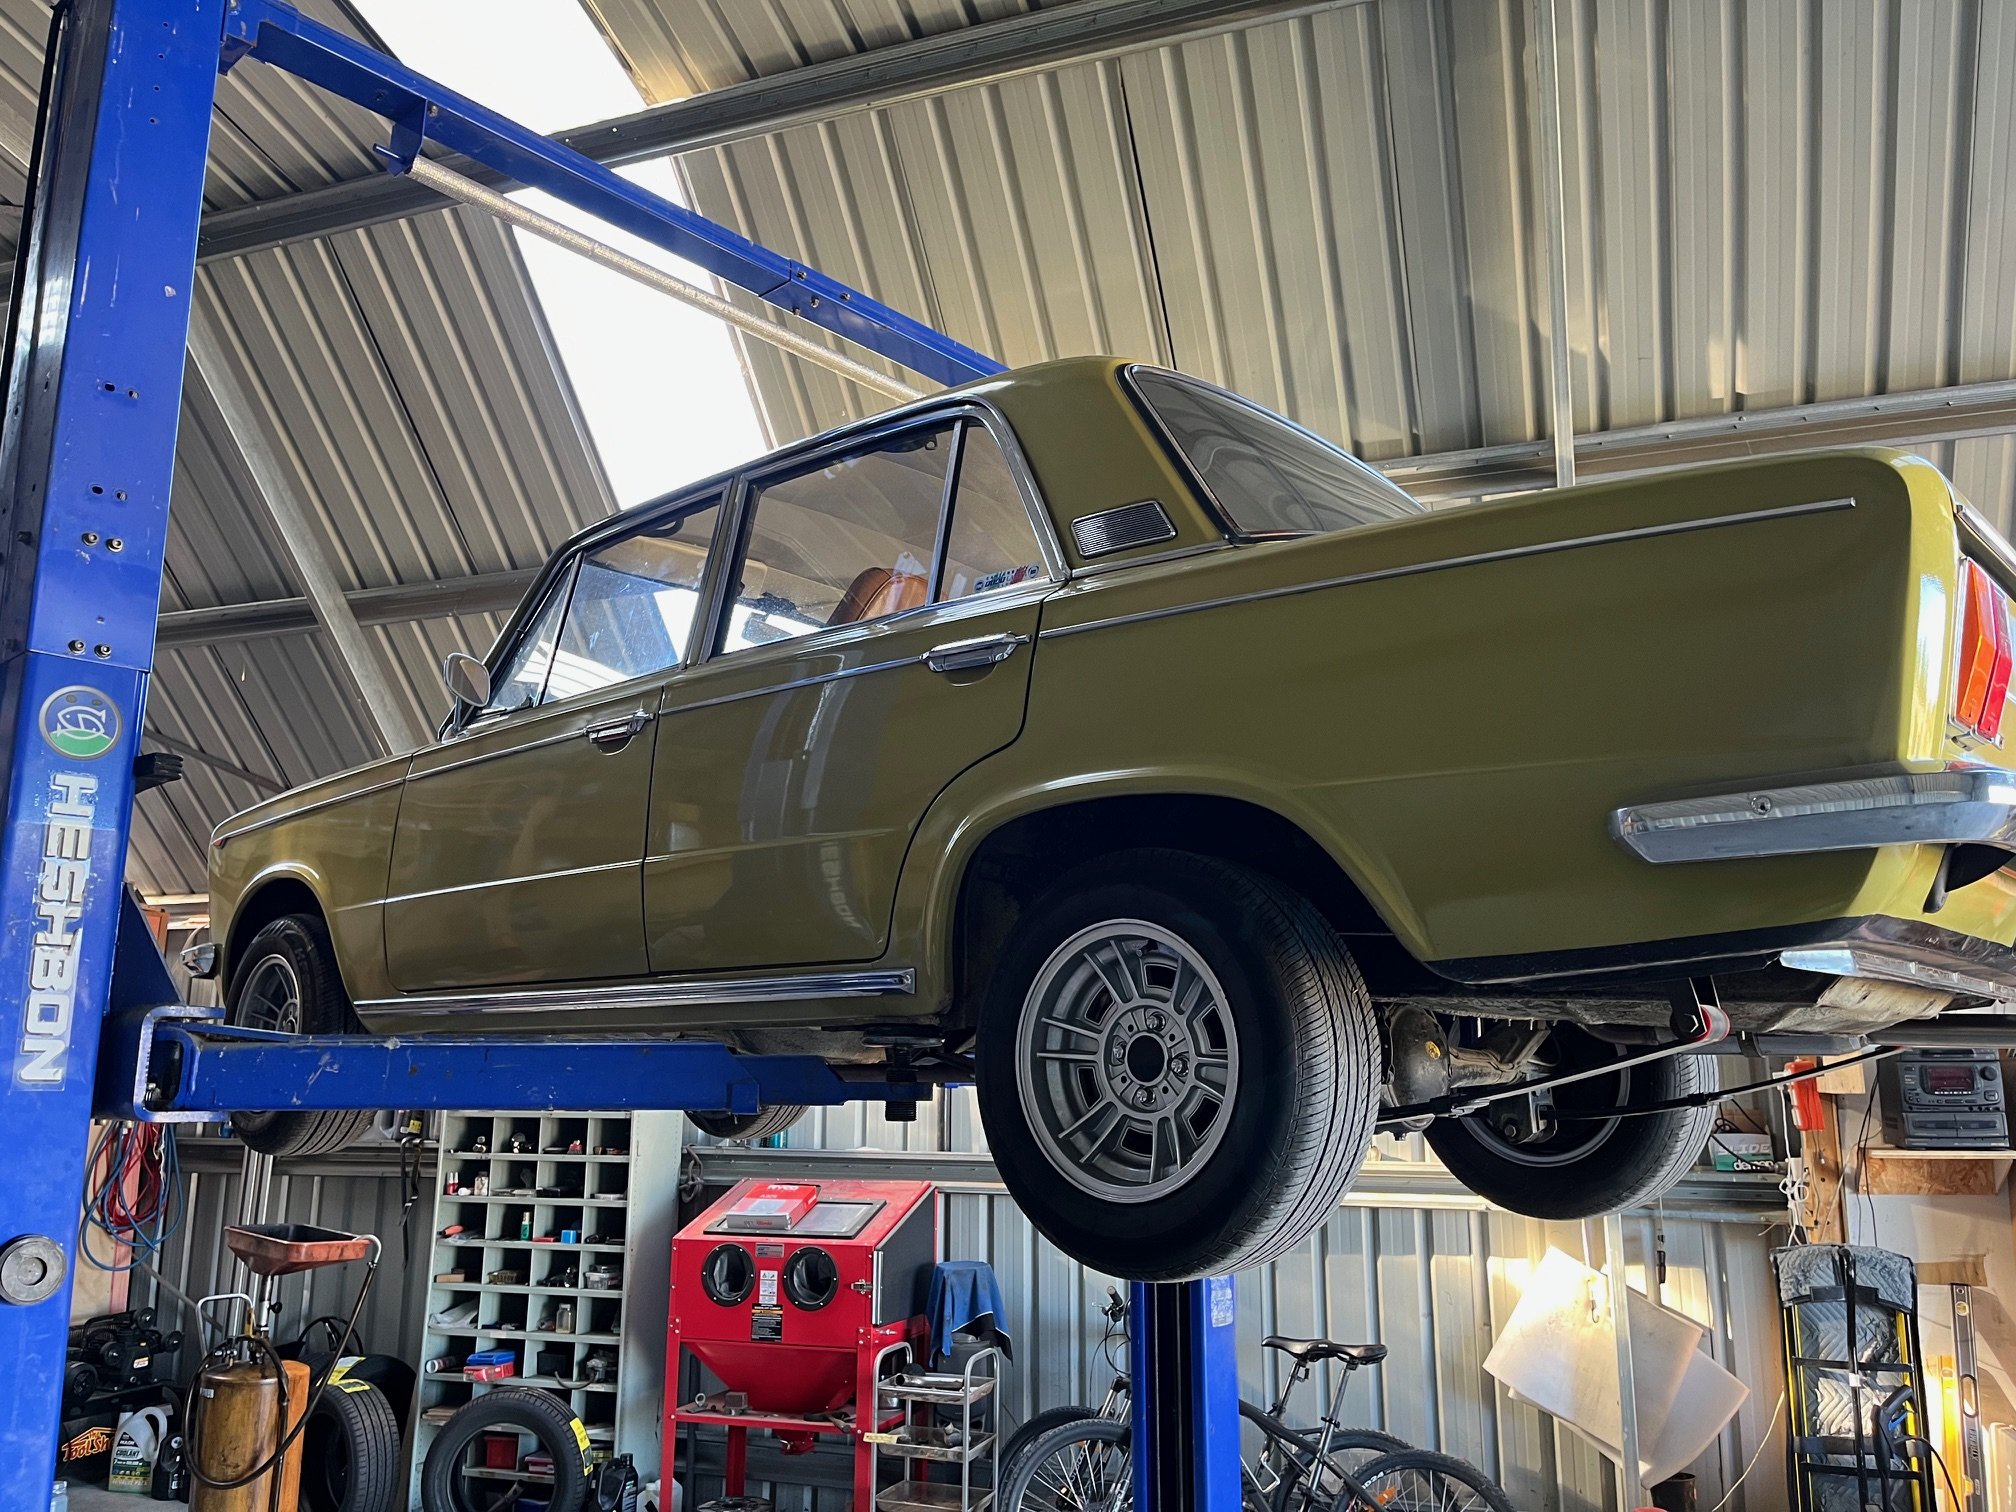
However, during the pre purchase inspection I picked up a few things in the engine bay and suspension wise that placed some doubt on how far the mechanical restoration had been taken. Nothing major, but just little signs that some items still needed attention. On getting it home, the first thing that I did was to fit an electronic unit to the existing distributor in the hopes of resolving an intermittent misfire. We then clocked up about 1000km during which time I was almost constantly fiddling about to try and get the timing right. In desperation I eventually pulled the dizzy out for a closer look and discovered excessive play in the shaft, so I ended up ordering a brand-new distributor from MiniSport in Adelaide. The new distributor came with its own set of electronic internals already fitted so the old unit went into the parts bin. This solved the misfire, and we ended up enjoying another 500km of trouble-free motoring until one day the Moke just suddenly cut out and left us stranded at the side of the road. Luckily, we were close to home, so I walked the rest of the way and returned with our Holden ute and a tow rope. After a bit of troubleshooting, I pinpointed a fuelling issue which turned out to be a faulty float valve. Got a new one sent up from MiniSport and we were back in business. Shortly after that the actual carby started playing up - again excessive wear - and we ended up ordering a reconditioned SU from MiniSport. Since then its literally been an annual oil and filter change and the fitting of a new battery and we are now up to around 2400km of travel that we have undertaken since purchase. And that pretty much brings us up to this point in time. In my next update I'll cover some additional maintenance work that has happened over the past few weeks. And no one likes a pictureless update so here is a group photo of our small fleet:
3 points
-
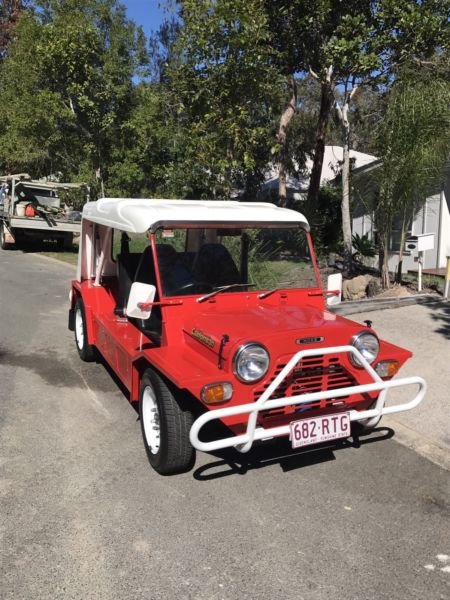
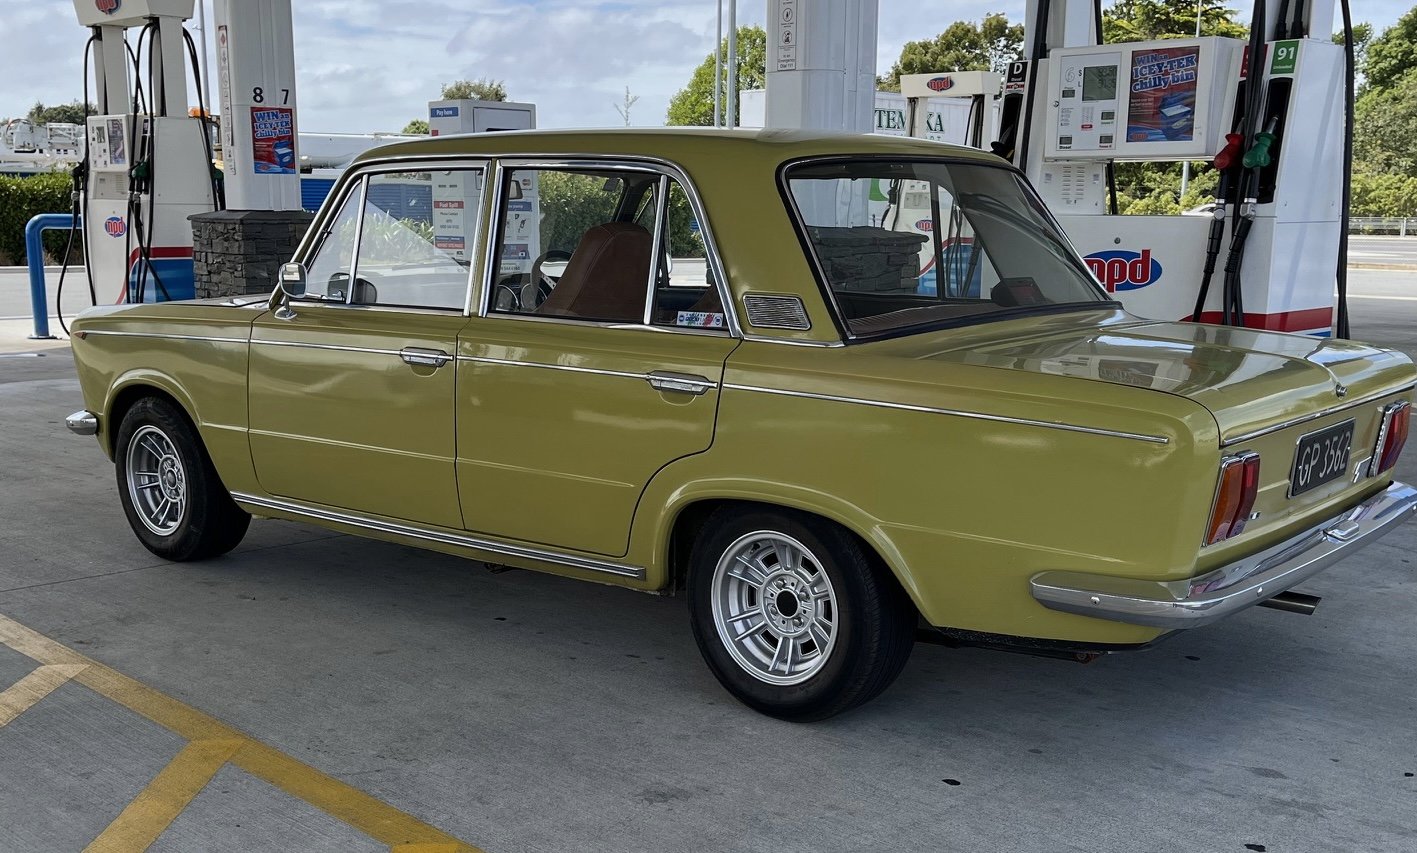
We have owned this little Moke for about 4 years now and since I'm starting to do a bit of work on it, I figured I'd start a thread as it might be of interest to others. So, first up a bit of background. When we lived in NZ, Mrs Flash owned one of those newish 1275cc SPI Rover Minis. It was a Jap import that someone had done quite a bit of back dating on. A lot of the changes were fairly subtle, but the most notable things were the fitting of 10-inch Watanabe rims to replace the original 13-inch units and the removal of the modern dashboard that was replaced with a classic centre mount speedo. The car was a little rocket and super fun to drive. Sadly, we made the decision to sell it before heading off on our Australian adventure and last I heard it was somewhere in Christchurch. So fast forward a few years and we are now permanently OZ based and looking to get back into some classics. We often thought back to the fun that we had with that little Mini and decided that owning another little Leyland would be good. The climate over in tropical Queensland lends itself to something a little more open and so we set our sights on a Moke. After checking out a few we ended up pulling the trigger on a fully restored 1100cc powered 1974 Californian look alike that was going for reasonable money. When I say reasonable I really mean that after doing my own sums I concluded that I couldn't have restored a clunker to this level for the money that was being asked. So, after swapping a few calls with the current owner together with the studying of some detailed photos a "deal in principle" was struck pending final inspection. We grabbed a hire trailer and headed south down to Noosa hoping to be returning with a loaded trailer. Gave it the once over, took it for a quick drive, some cash changed hands, and this happened: In my next update I'll talk about the maintenance undertaken to date and then a little bit about the current work being done. Thanks for looking.
2 points
-
It’s at this point you need to take a deep breath.
2 points
-
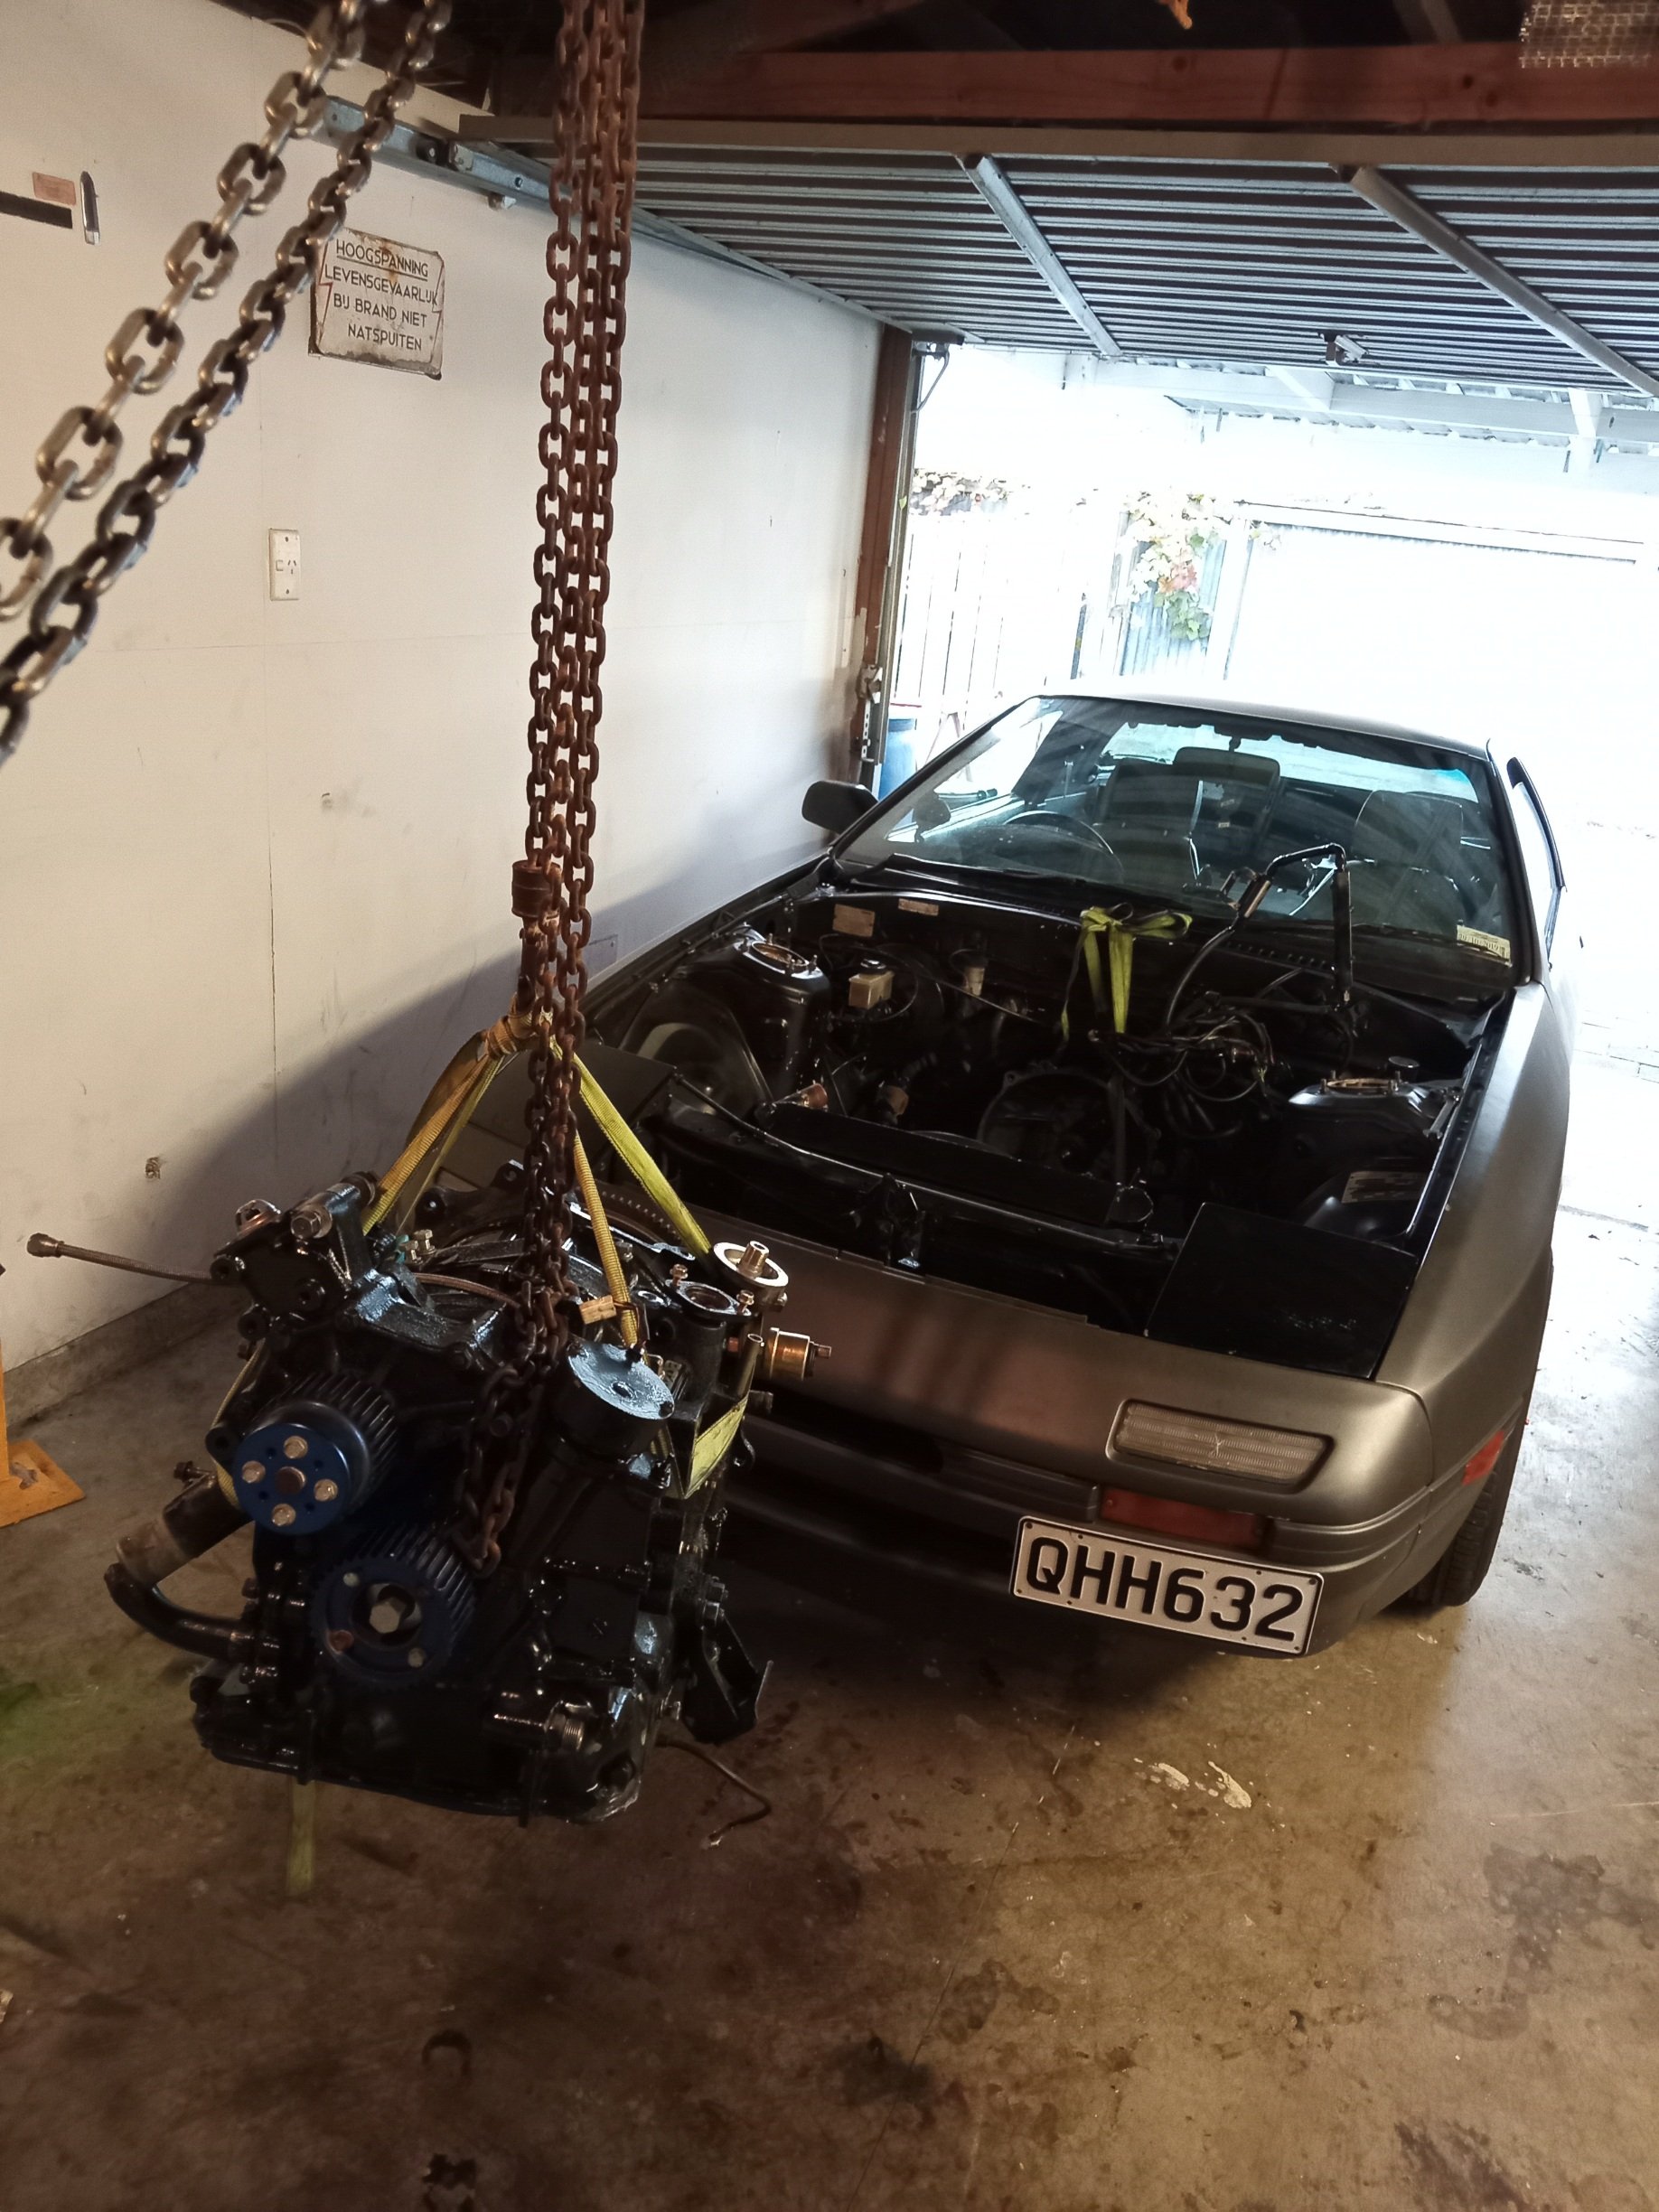
MX5's can fit car engines np! Such a practical car.2 points
-
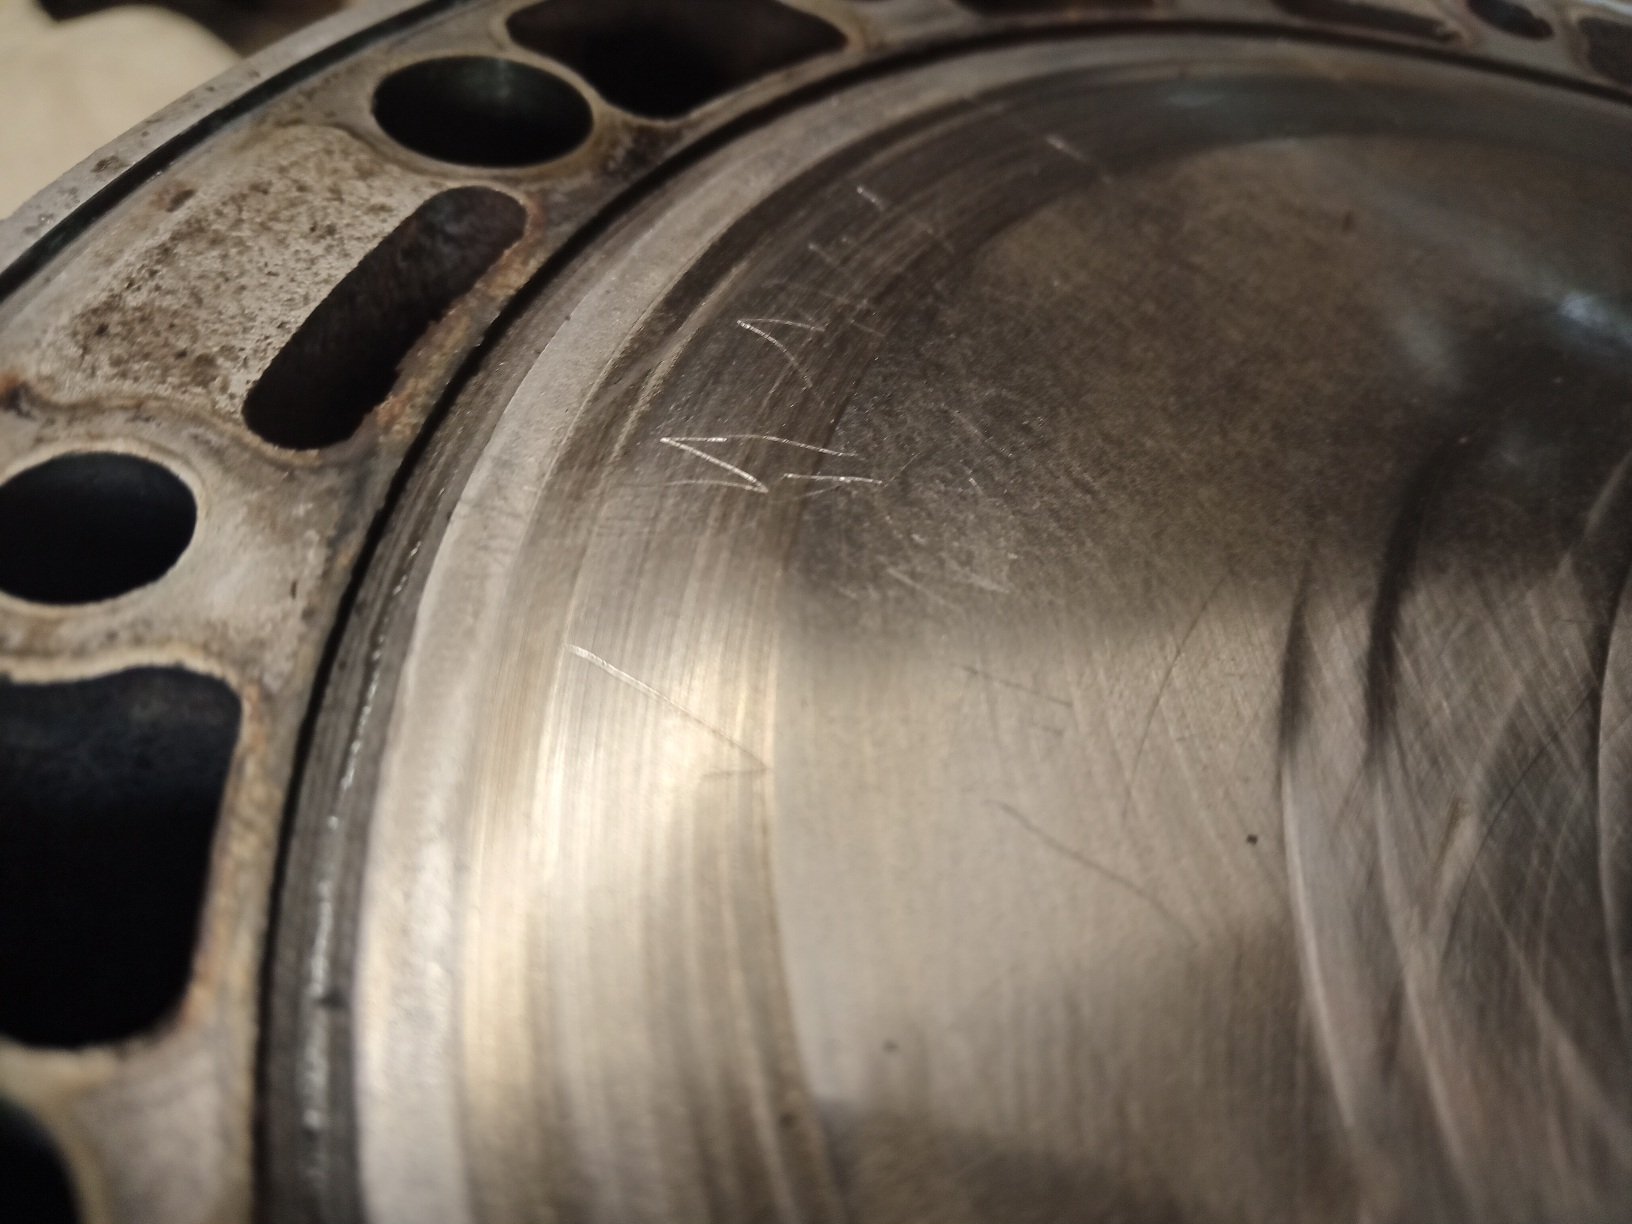
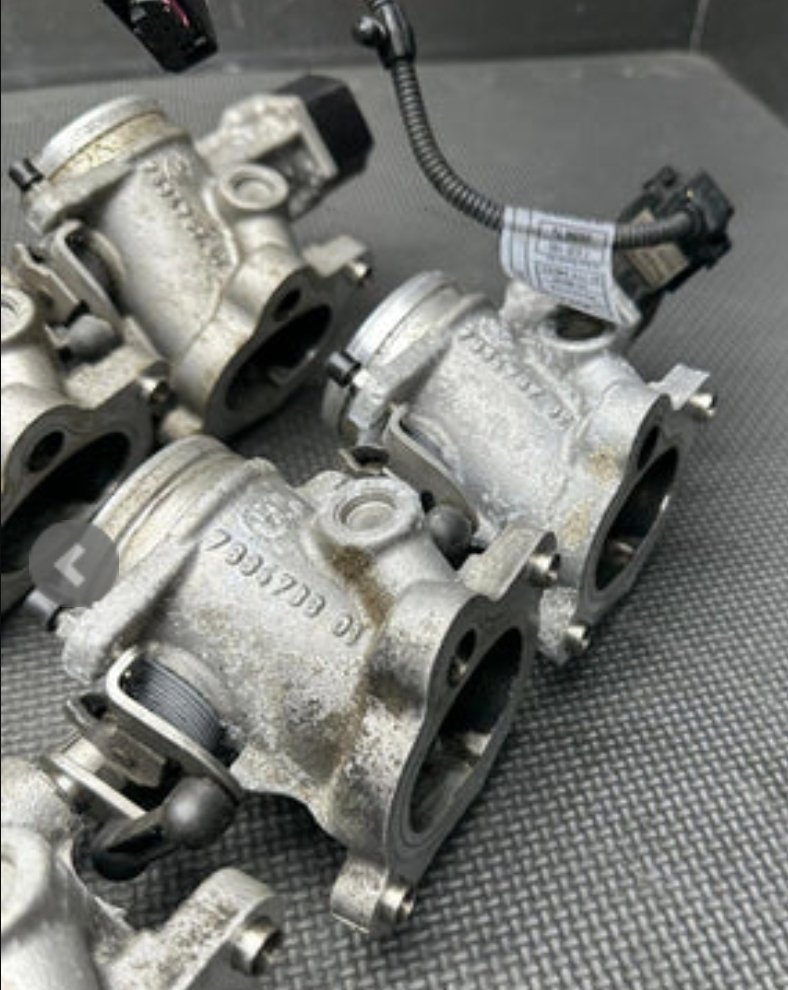
Soo i did some backyard hardness testing with various tools and the housing with the BIG wear marks or step wear whatever you call it is easily scratched with relatively soft metal, slightly harder on the unworn surface on the outside but still scratches, another plate will not scratch at all with the same tool (screwdriver), (not very scientific haha), but the plate that scratches easily and is worn, shows signs of having been sanded or something in the past. This leads me to believe someone may have surfaced one or more plates and ultimately removed some of the surface hardening, i could measure widths as well and other things but it still remains that ill need new plates anyway due to the cracking and exessive wear, potentially i could save one but ill see...
2 points
-
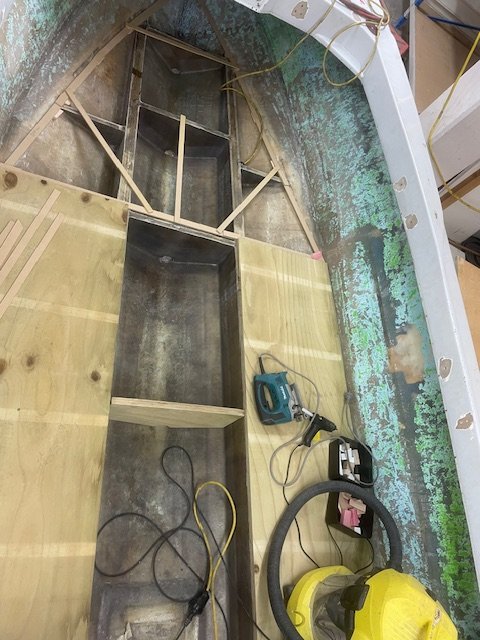
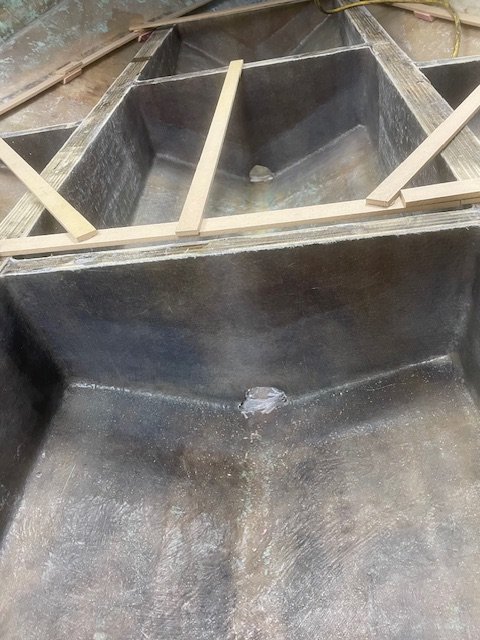
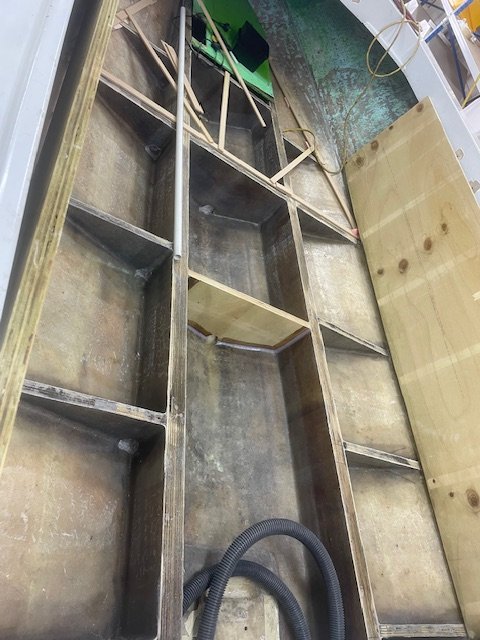
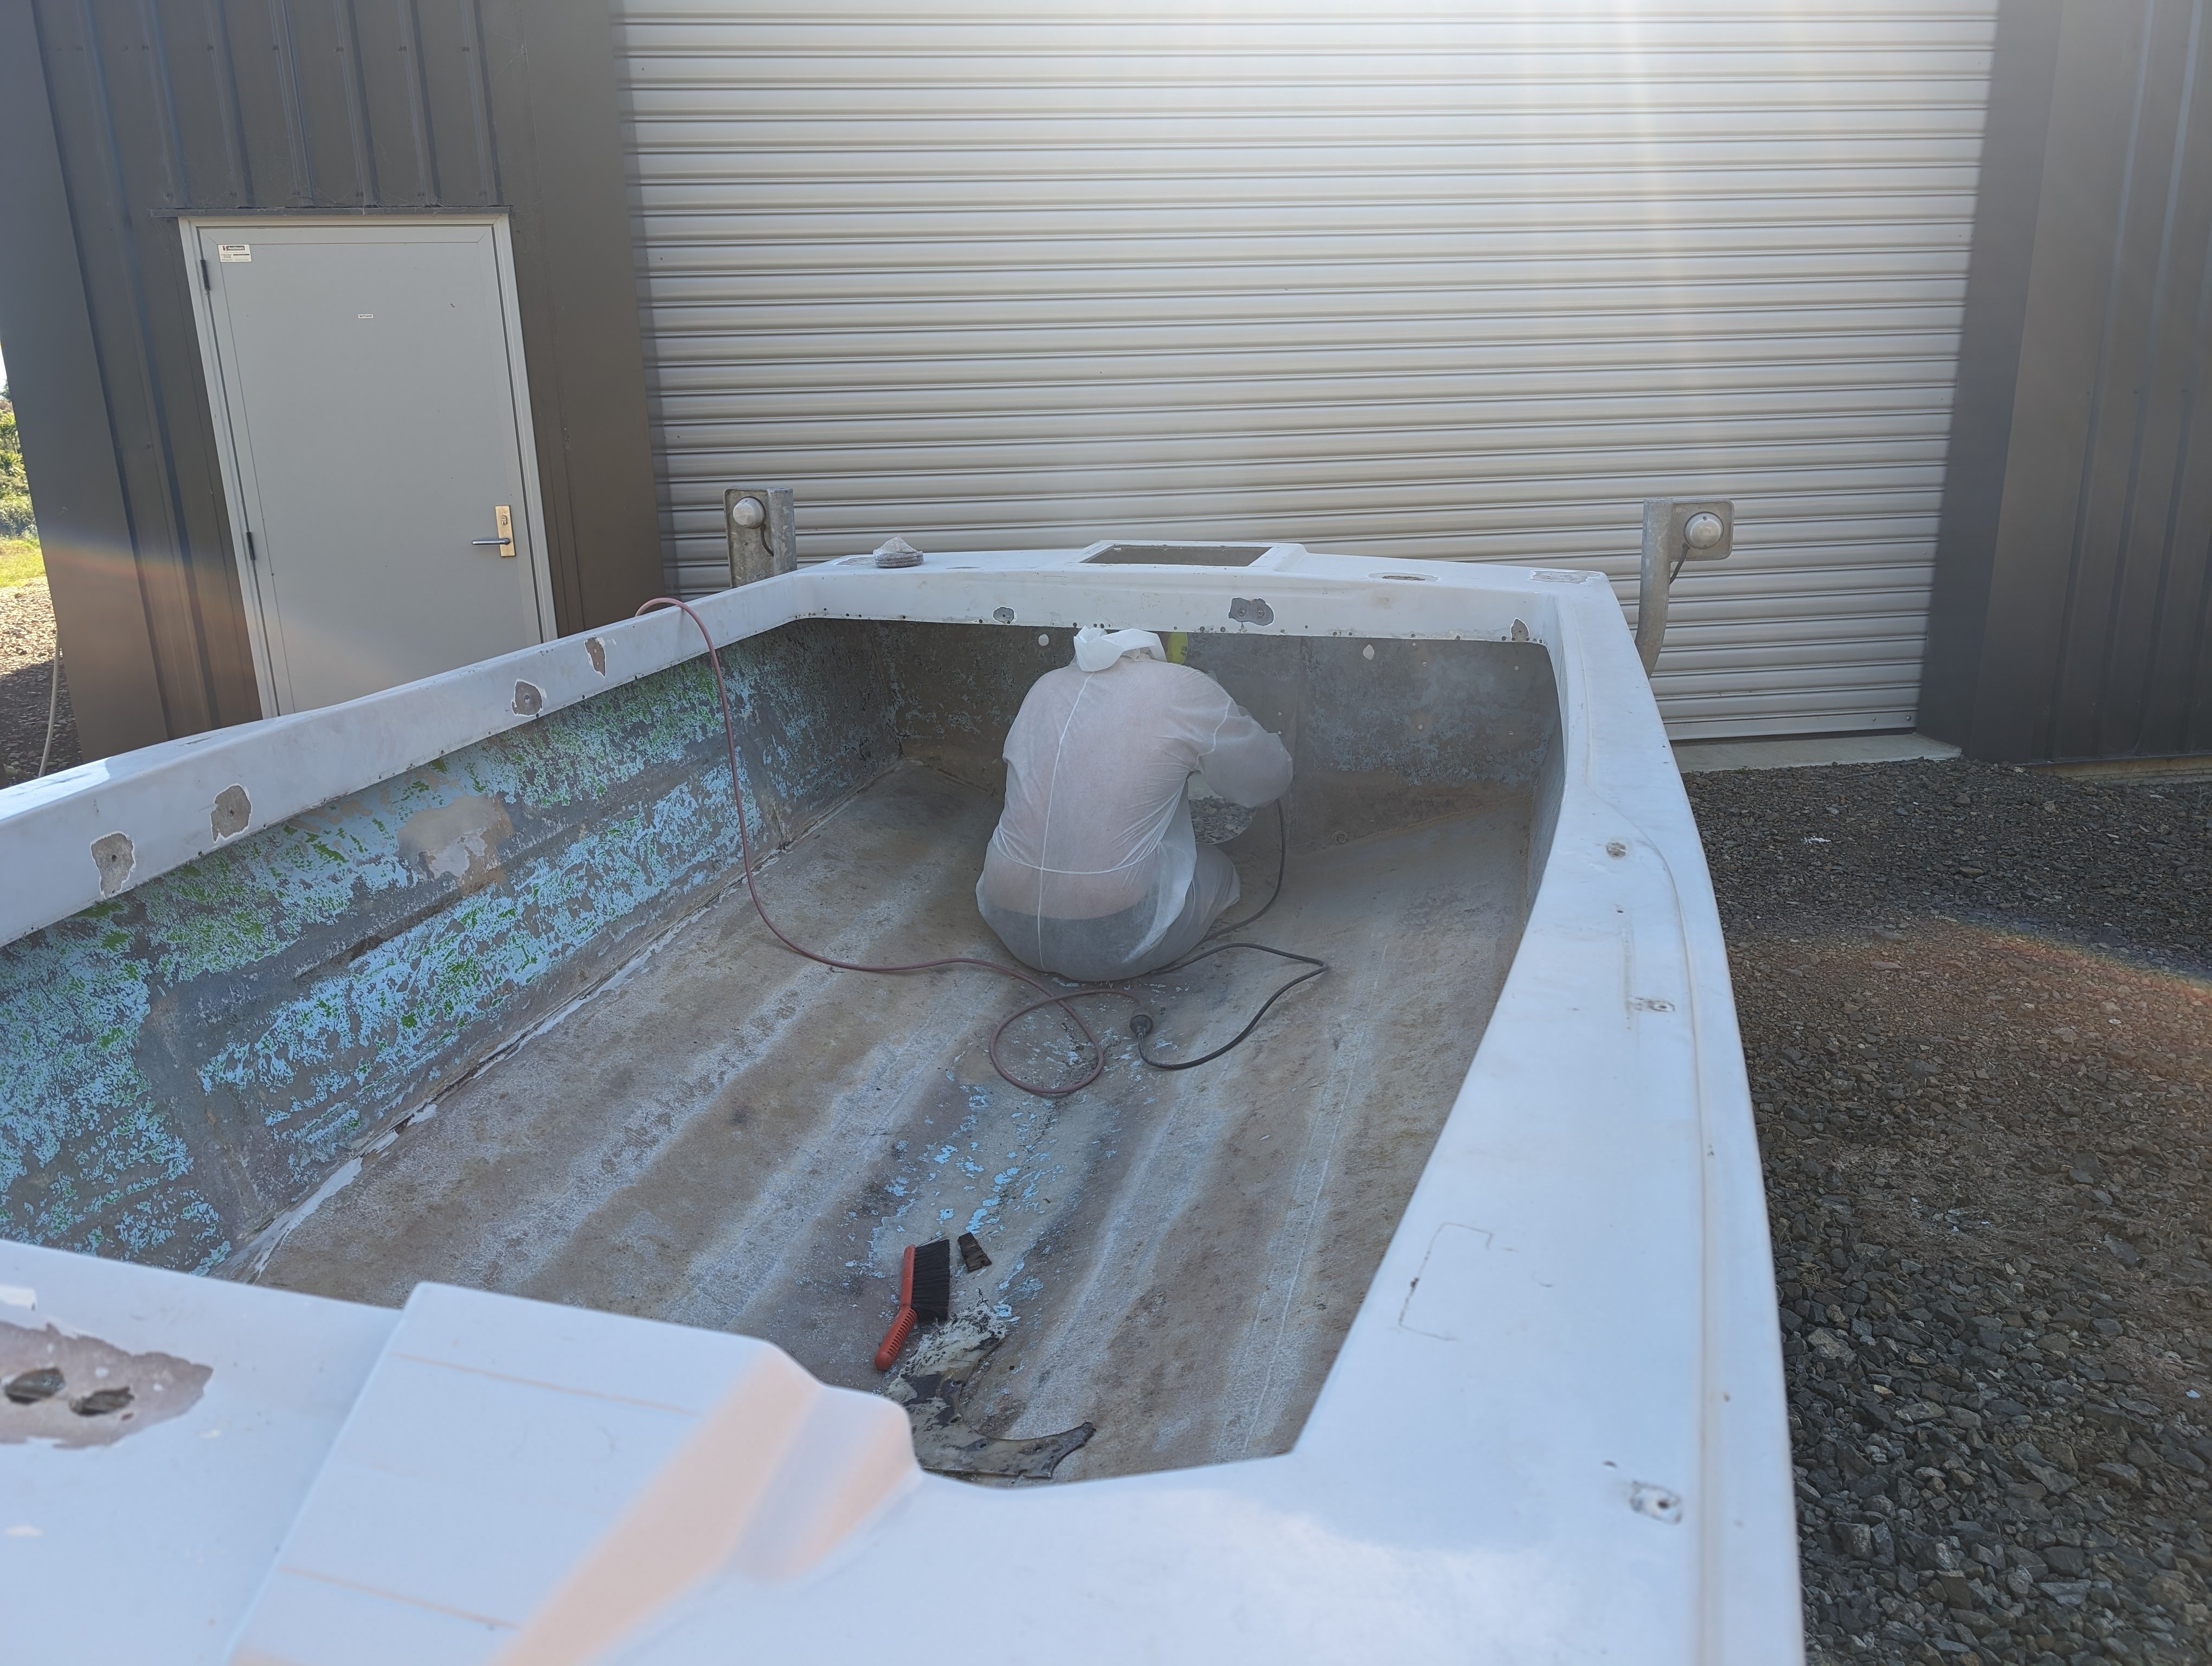
Uncle Neemia has been working away at this, one more bulkhead to go in, then it will be “flowcoated” with gel coat to make it smooth, and then the floor can go down, the flooring plywood will be encapsulated both sides with fiberglass, as much as I dislike wood, I couldn’t justify solid composite (coosaboard) material and I didn’t want soft foam core flooring.
2 points
-
When we purchased the little Moke it had only travelled 1614km since being restored born witness by the odometer reading on the brand new Speedo. The story goes that a father restored the Moke for his disabled son. The son was wheelchair bound and old mate had even fitted 12 volt rams to the rear hinged fibreglass roof so that he could get the youngster in and out of the passenger seat. Problem was that the youngster didn't have much upper body control either and nearly fell out of the Moke on the first outing. The family got such a scare that the Moke got parked up for a while before they sold it on to a young fella from Noosa. I think that the new owner fell in love with the idea of owning an old classic without realising that it isn't like driving a modern hatchback with all the mod cons. He was also not mechanically minded so he ended up farming the maintenance out to a local mechanic and after receiving a few repair bills the novelty of owning the Moke wore off. And its at this point that Mrs Flash and I stepped in to take over the reins. So, both inwardly and outwardly the Moke looked absolutely immaculate as borne out by the below photos that I saved from the original advertisment:
2 points
-
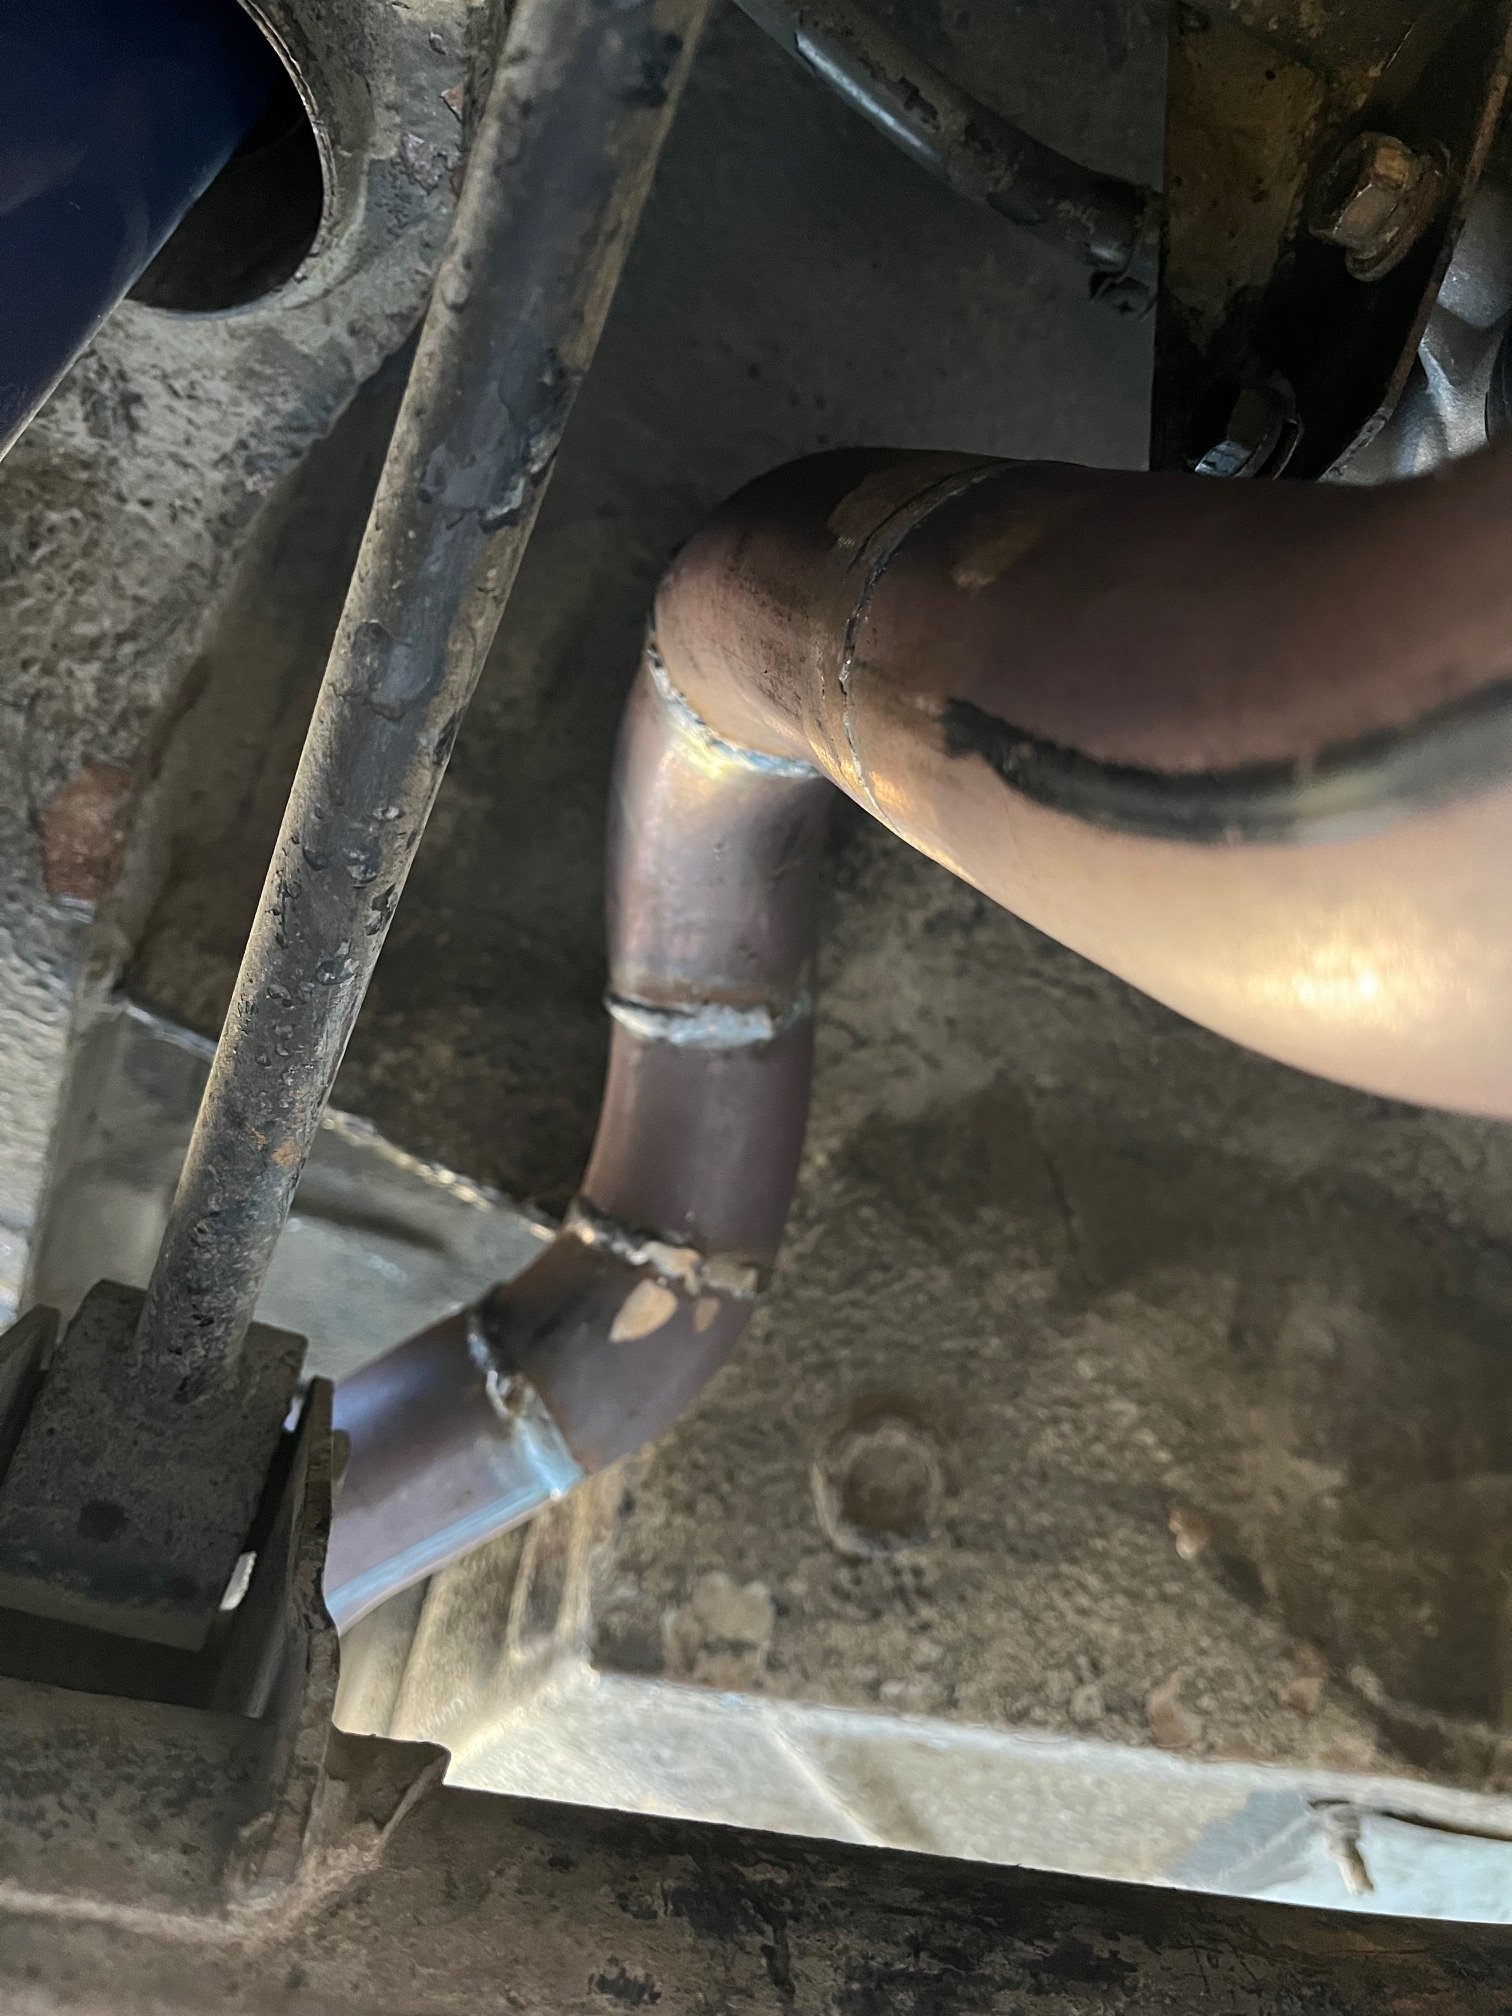
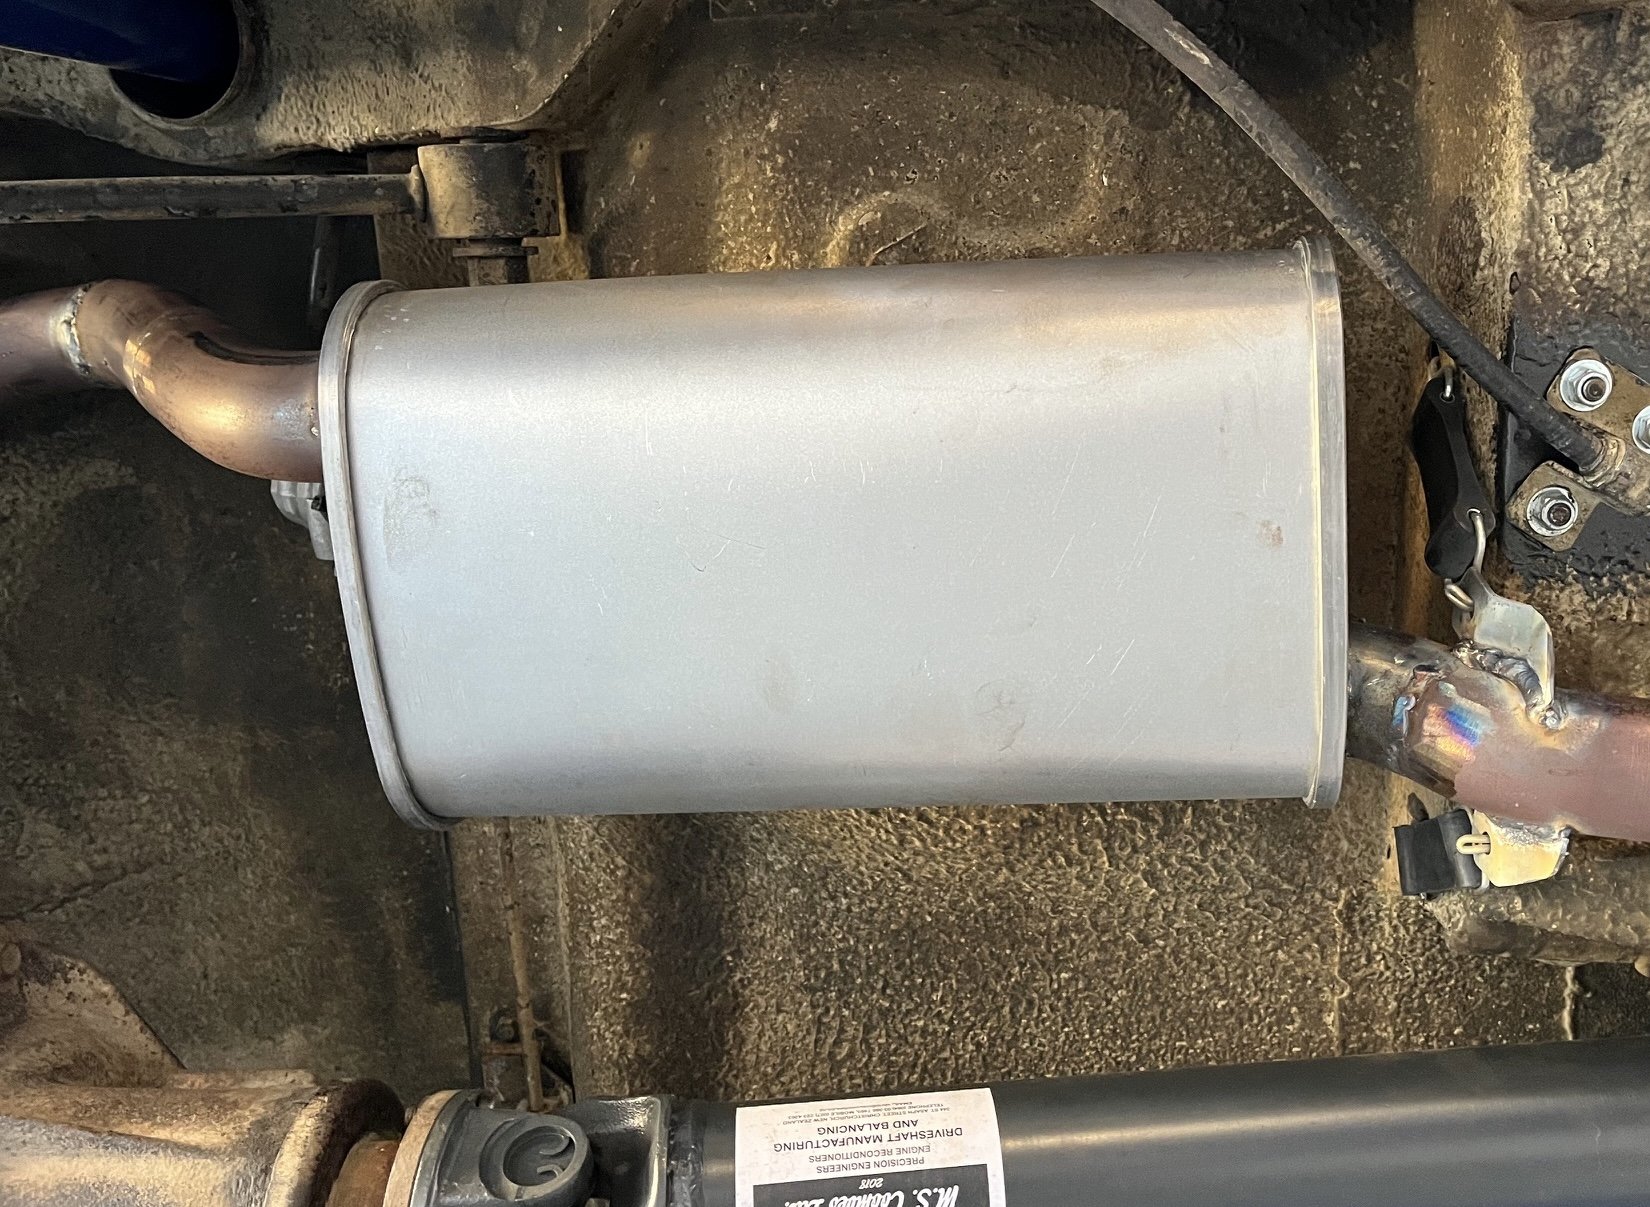
1000km post run in oil change time. Then I took it in for some surgery on the exhaust. I got sick of playing around with it so like a coward I farmed it out to a zorst wizard. There was much choppy chop and a quieter centre muffler was grafted in. Still sounds good but is now bearable to drive. Wizard made multiple angle adjustments to clear the diff and brake bias valve and torque arm. One problem to report: Whiff of antifreeze when the heater is on. GROOOAAAN!! Looks like dash out in my future.
2 points
-
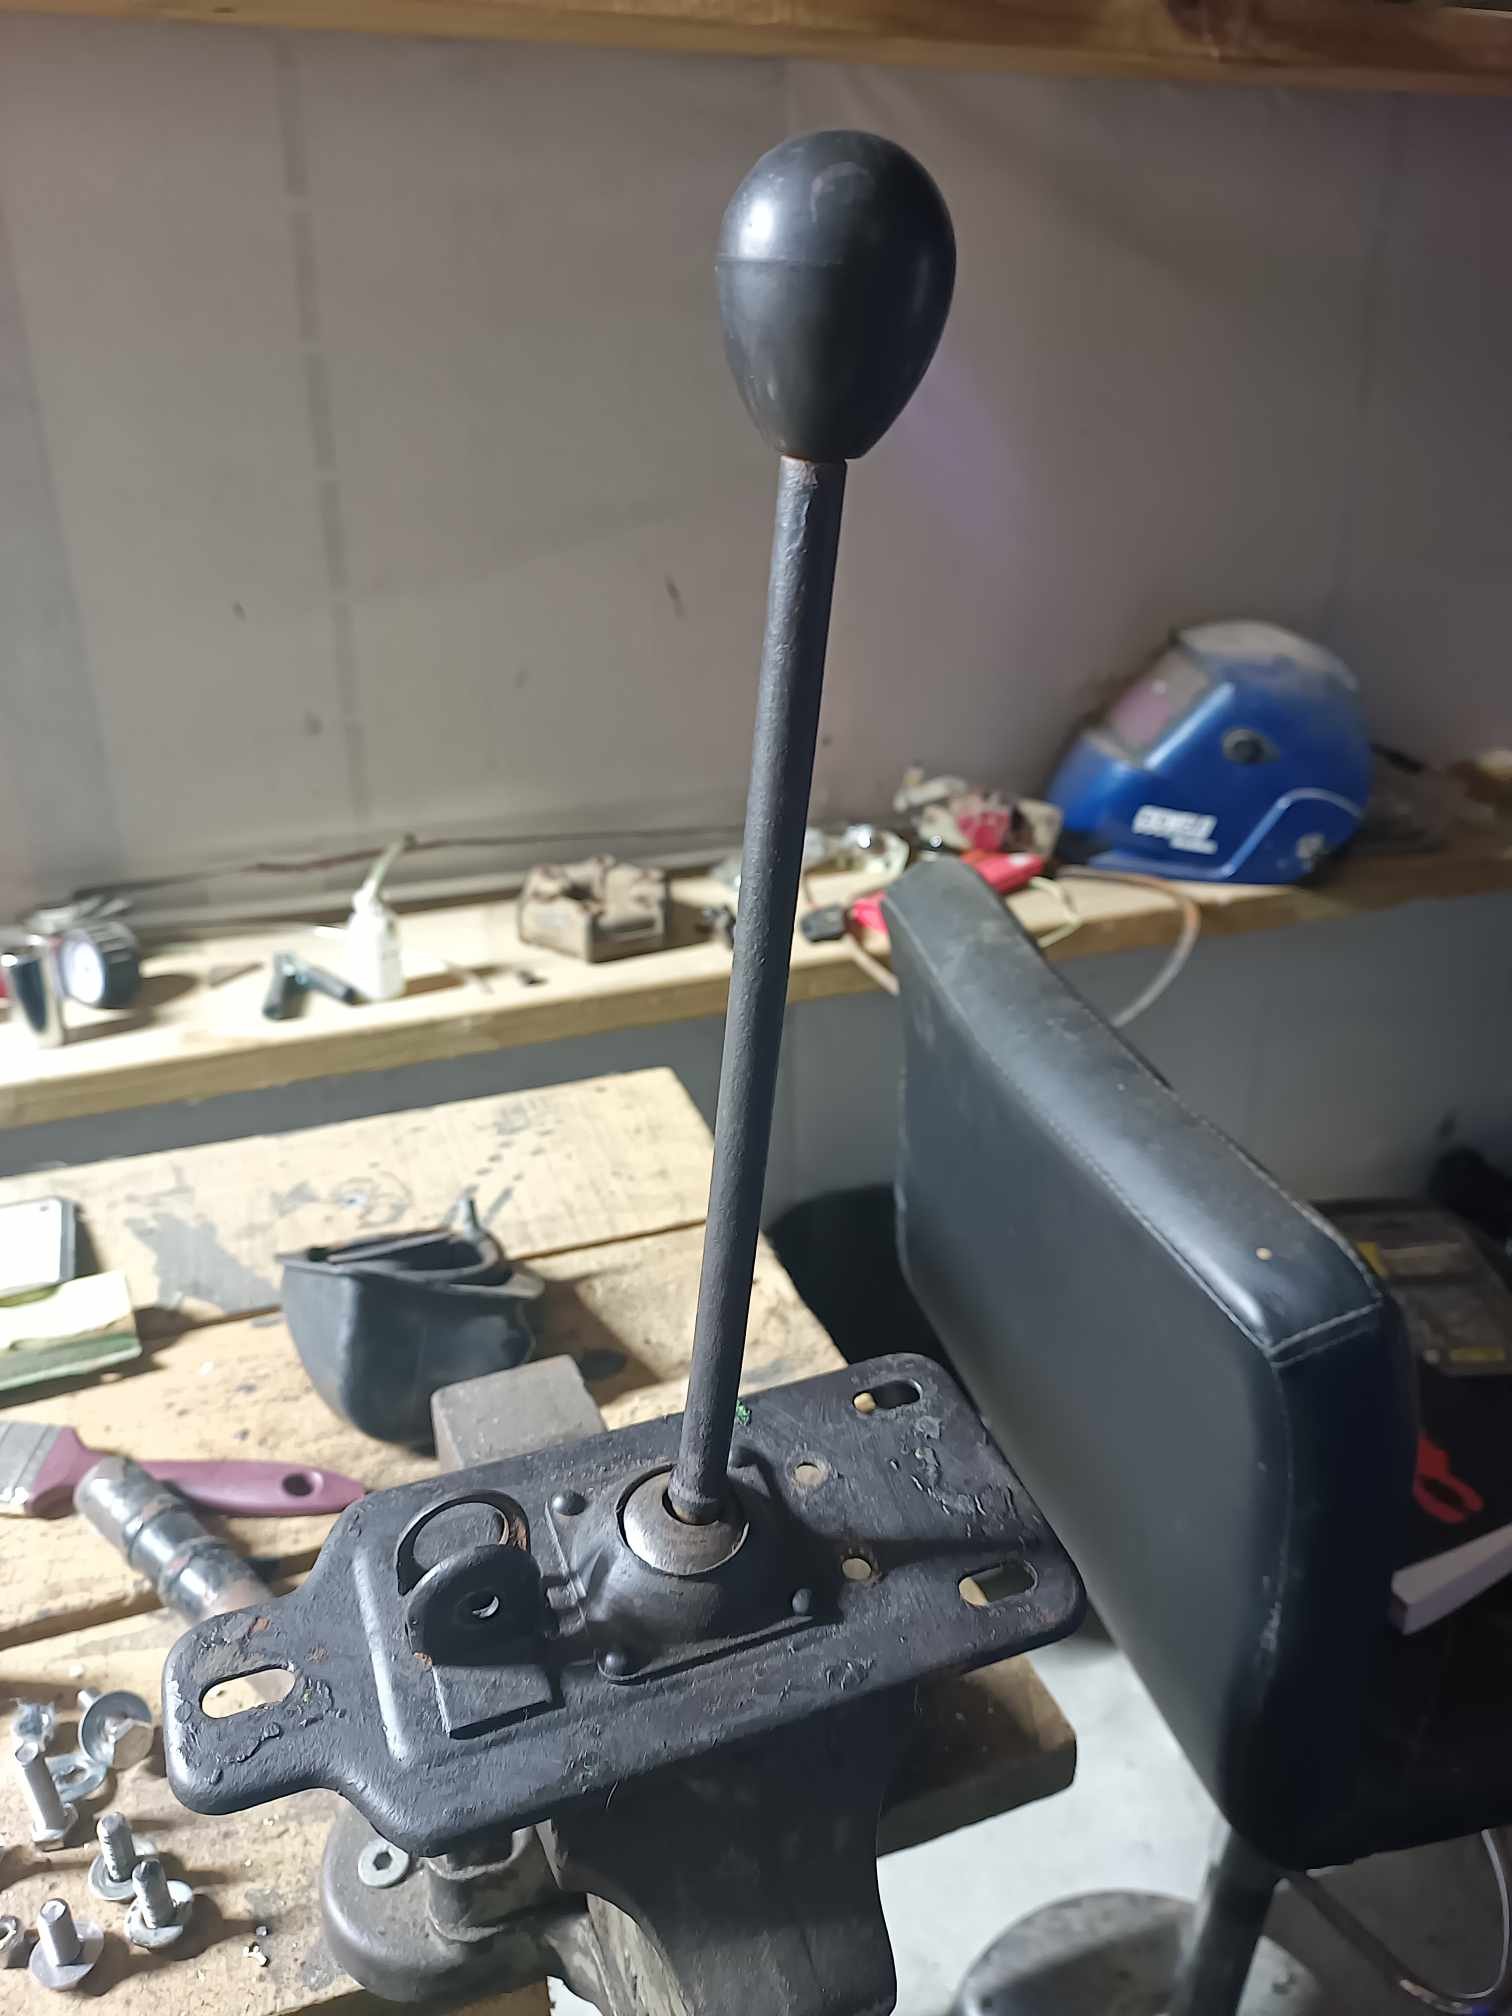
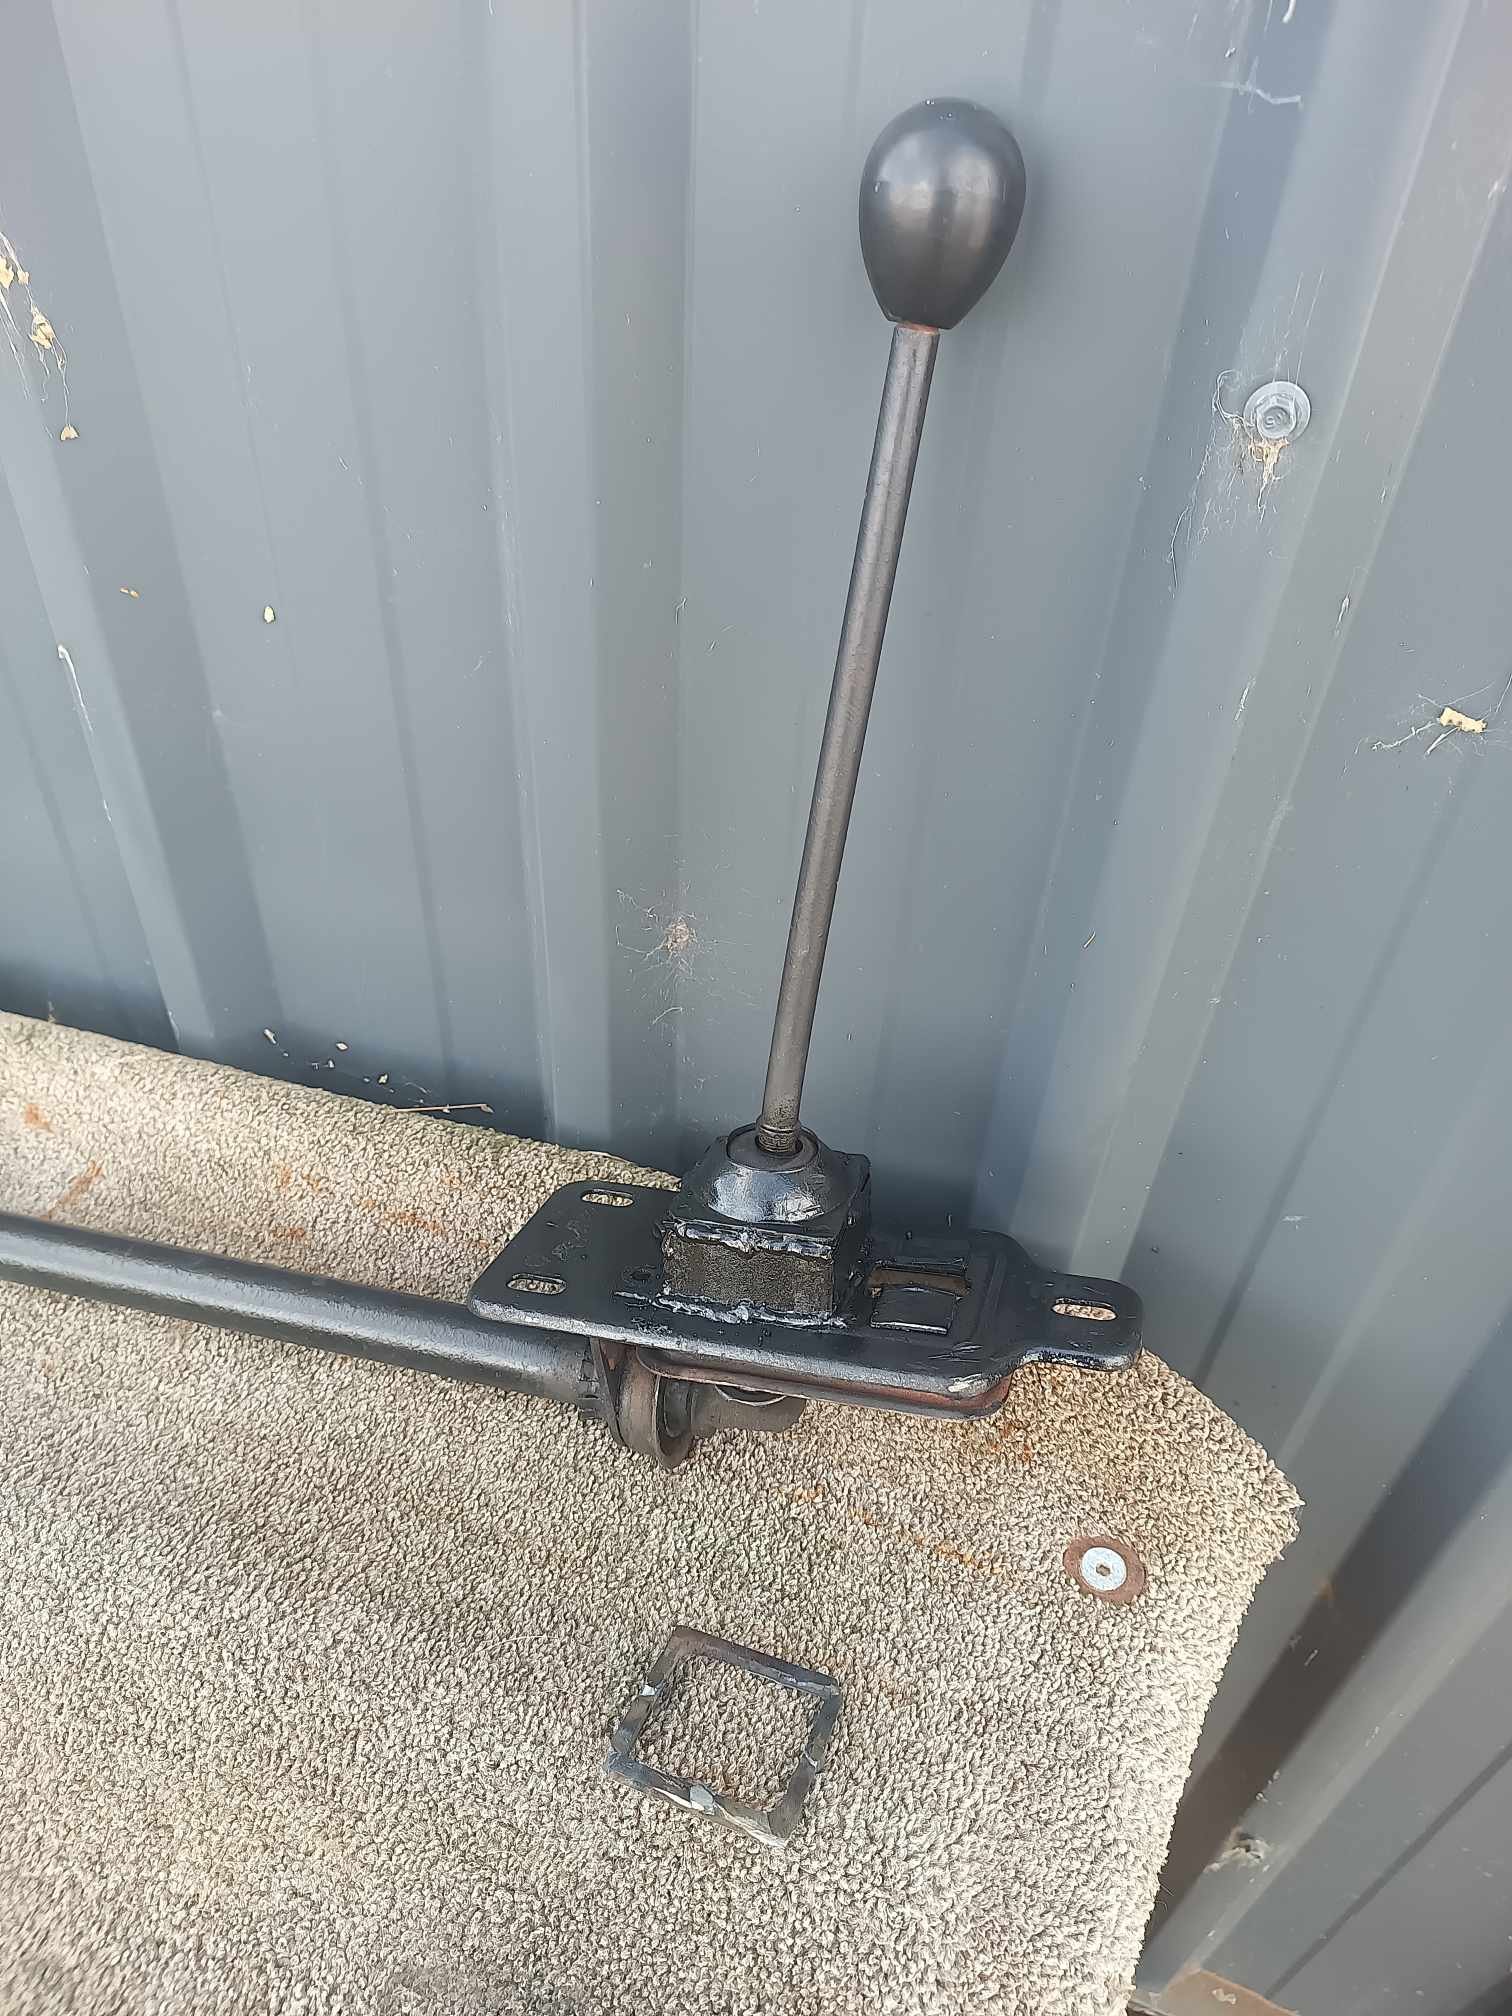
If anybody is going to call @yoeddynz a cunt then I'd appreciate it if you put the word rad in front of it. His embarrassingly lame MS paint drawing dumbing it down to my level worked and I now have a proper shift pattern. Happy days.
2 points
-
New beam’s laminated and machined from @Ned’s 3d scans, amazing outcome for such a big surface and “low cost” scanner Realising I don’t have enough talent for structural fiberglass work, talented uncle Neemia from work took over and is doing an excellent job, a layer of glass is over the inside of the hull and the beams bonded in place to be laminated over the top of.
2 points
-
This is not my car. Im just the low rate mechanic. What i knew about this car was: My Father in Law, Bill, has 'The Holden' in a lean to shed. Kirsty learned to drive in it, and shes always wanted it and Bill said she could have it one day. It has the engine and gearbox (exact details unclear) from the Torana her older brother rolled when he was 16 'dodging a rabbit' on a gravel road. Its been in the shed pretty much since they moved into the 'new house'. He used to bring it out sometimes to wash it but hasnt for a long while. She put her name on it a few years ago and sent me a pic. My first and only view of it till now. Then a couple months ago, he said 'come and get the Holden' So, we did.
1 point
-
Hello, Maybe it's just my age, and to do with the cars that I learned about when I grew up. However I seem to be stuck in thinking of all of the motors from the 90s or early 200s as the "golden era"? Where anything before that was a bit primitive, and anything much after that is too modernized and hard to do anything with. So only things from around this time are good. Legendary little rippers such as the 4AGE, 4G63, 2JZ, 1UZ, 13B, LS1... Gotta love em! Cheap, plentiful, great potential, great aftermarket support, and so on. However a lot of these older motors are getting hard to source, expensive, and a bit less fun when it costs 10x what it used to. However I feel like there are some good modern options which are slept on. So, what are some cool modern engines that should have some potential for swapping into shitty old cars? @shrike noted a few cool options in a recent project thread. I figure it's a worthy topic of it's own, going into some more detail on each type of motor. I will write a few posts below that I've seen some success with, with some different engines and pros/cons. In my mind what made those older engines great, was a combination of few factors -Easy to make power in factory form. -Good modding capability. -Good aftermarket support. -Plentiful engines / not too expensive. Now to be fair I am Toyota biased, not because I think these motors are best, it's just what I know about from top of my head. Feel free to spam other alternatives if you know of something cool! First up Toyota 2ARFXE engine This is a 2.5 litre 4 cylinder engine with a 90mm bore and 99mm stroke. This is normally found in a hybrid car like a Camry. There is a non hybrid version too (2ARFE) Think of it as a slightly less good Toyota version of a K24 I guess. Why consider it? It uses all of the Toyota hybrid engine tricks, for good economy - that are good for power too when modified. High compression ratio, huge ports, big standard cams, somewhat bolts to a 3SGE gearbox (Easier for FWD than RWD though) There's currently one on Trademe for under $900. How does it go? These motors have a really big factory intake cam, and this can fit on the exhaust side too. So you buy a 2nd one and fit it on the exhaust side for a cheap and easy upgrade. Then retime the cams away from atkinson cycle, and you make big stacks of power with some basic bolt on mods. This guy was making 270whp with an NA motor with 2x factory intake cams fitted. Pretty awesome! It somewhat bolts up to a 3SGE bellhousing pattern, which works well for transverse engine swaps. Downsides are that it's a fairly tall engine, some people have had to cut their bonnet to fit in smaller RWD cars. Okay so that's cool for a low budget throw together, but does the aftermarket support scale up? How about a full $$$ turbo build? As this motor was common in america, there's heaps of stuff available. Papadakis racing made a 1000hp variant.1 point
-
k24 pretty easy to get 250hp at wheels. stock engine with cam upgrade and good bolt on's1 point
-
I'm all good with the current safety inspection of older cars, one thing I though.... I think there should be slightly more leniency for the testing of brake imbalance on old historic /classic.. I want the convenience of going to a vtnz, but I don't want the ballsache of having to get a 50 year old braking system to be as accurate and repeatable as a modern day equivalent when the car weighs under 700kg and probably couldn't do a 17 second 1/4 mile..1 point
-
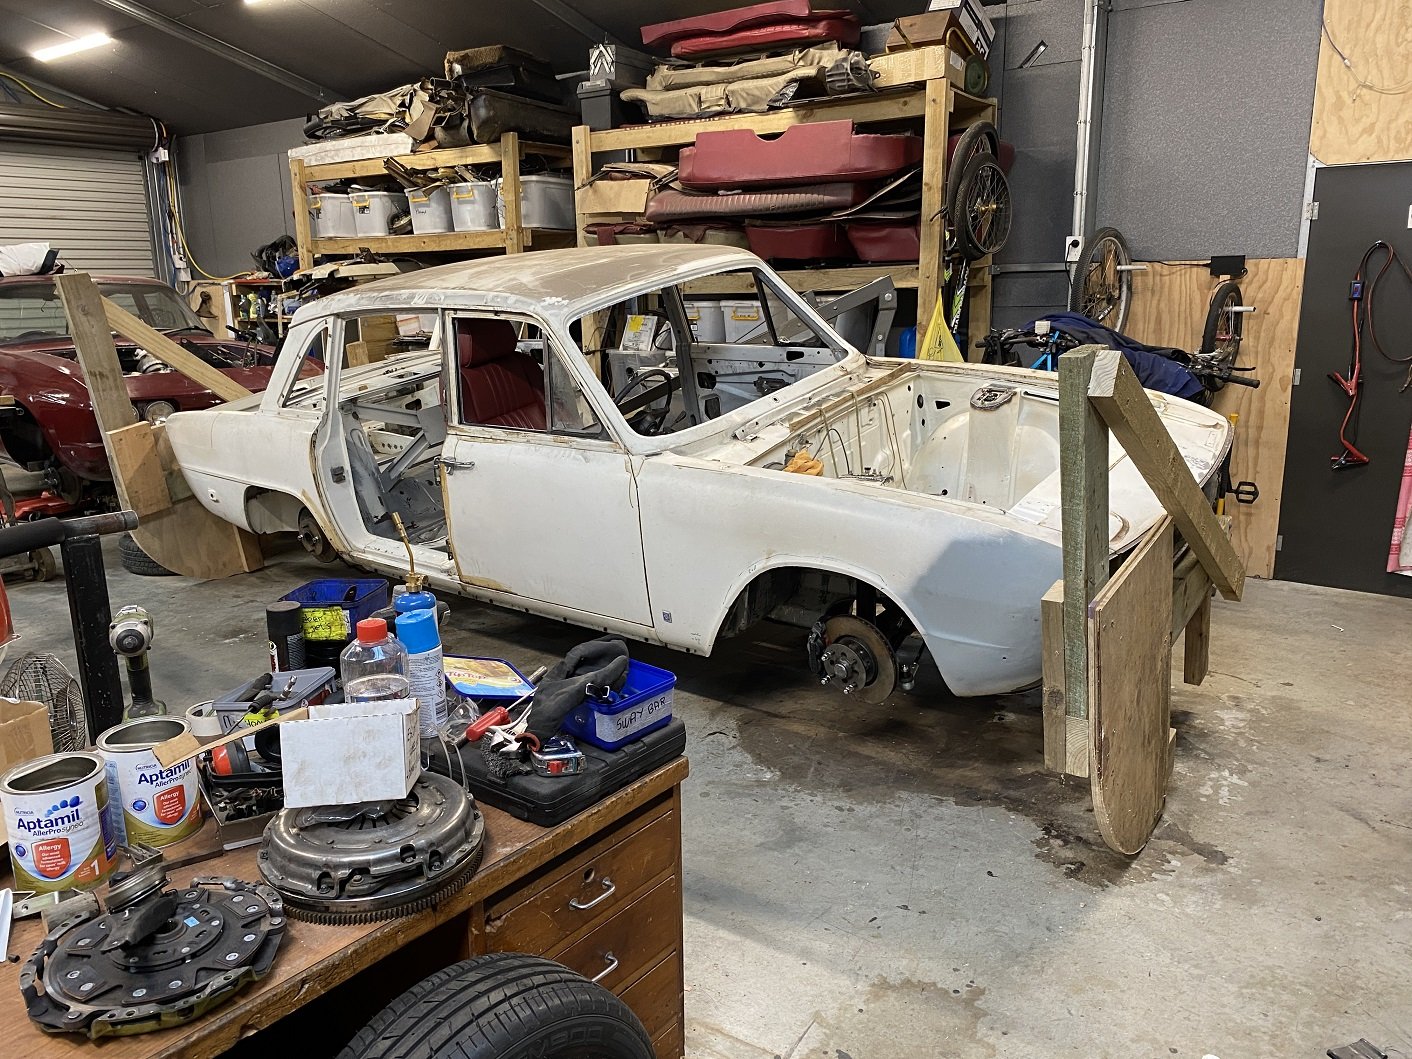
Drivers A pillar is no good. Fixable though. Found a hole under the wiper panel too, will see how bad that really is when i pull the dash out. Not looking forward to it tbh.
1 point
-
Unpopular opinions (and wall of text from a non-expert) incoming. As a workshop that does a lot of newer stuff - the 3 year first WOF works pretty well for 99% of people. The average driver round here does about 10-15,000km per year. By the third year, it's time for tyres... The majority of those cars are inspected annually for servicing anyways so a cut tyre, puncture or crappy wiper blades gets picked up then. Hardly ever do bulbs or anything else within the first 3 years. If someone does really high mileage and kills their tyres quick - an annual WOF check would pass them, then they'd be bald within 6 months because the time between 1.5mm of tread and a bald tyre isn't very long for a high mileage driver. My argument for keeping 6 month WOFs on the older stuff is that things seem to go from OK to broken much quicker. A wheel cylinder starts leaking, brake caliper seizes up or a rubber bush splits or something starts dropping oil onto the exhaust. It's not that the cars are inherently less safe, they're just at that age where things fail from time more than mileage. So I'd put a 20 year sliding scale on 6 monthly inspections. The current most dangerous cars on the road (that we frequently fail) are the 2002-2012 high mileage shitters that get little maintenance and zero fucks given by the owners. They roll in with cords hanging out the tyres, one headlight out, valve covers pouring oil onto the manifold, ball joints knocking, smeary windscreens you can't see out of....and do you know what - they all passed the last WOF a year ago. The WOF requirement is really there to force people to at least get the car checked by a professional. It makes absolutely no implications that your car is safe to drive at any point other than the 45mins the WOF inspector looks at it. It's hopefully checked to a standard that most things would last to the next mandated check. We currently can't expect drivers to be responsible for knowing if their car is safe to drive because people are idiots and there's very little accountability. I'm pretty sure in blighty, if you got pulled over with 4 bald tyres - that's enough points for loss of licence? So whats the solution. It's fucking complicated. I don't know how much a slightly chafed seatbelt webbing, non functioning tail lamp or a stonechipped windscreen actually contributes to the accident rate and I don't trust the government to know or tell us the truth either. Perhaps we can continue fine tuning the inspection process to focus on the items that really make a difference to safety and spend less time failing cars for 34% tints or a slightly crusty rubber bush or a tiny bit of scabby surface rust on a subframe. TLDR: Tyres, brakes and lights should absolutely be checked often. Maybe other things don't need to be?1 point
-
Next lil patch prepped
1 point
-
All of which is getting silly - simple rules for what should be a simple system. Annual wof's for all cars.1 point
-
1 point
-
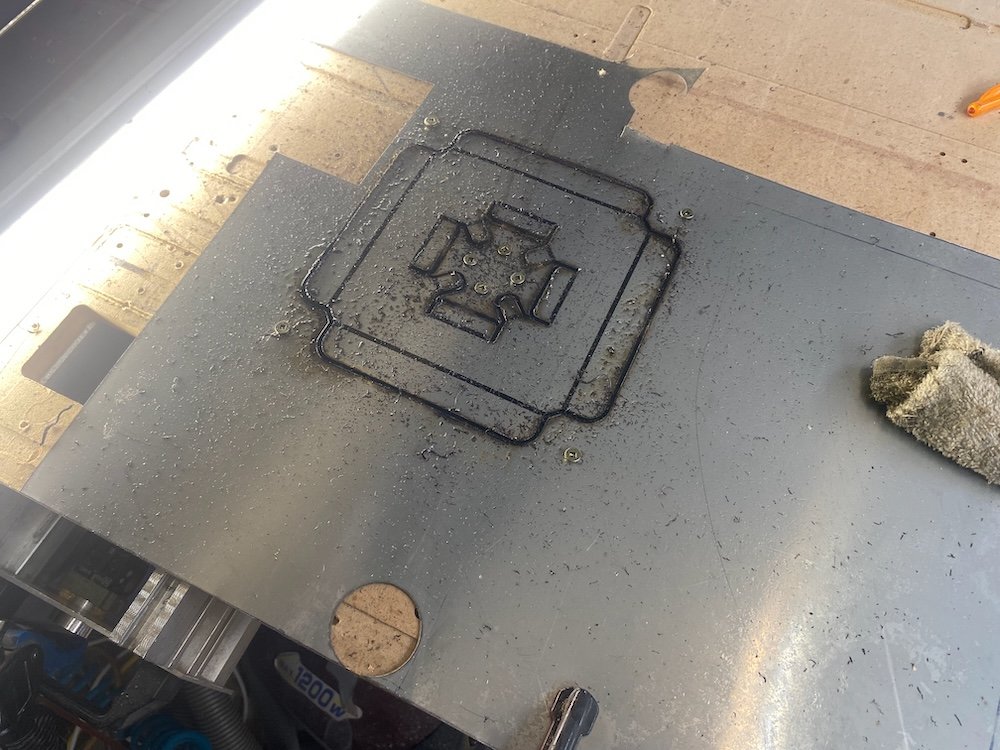
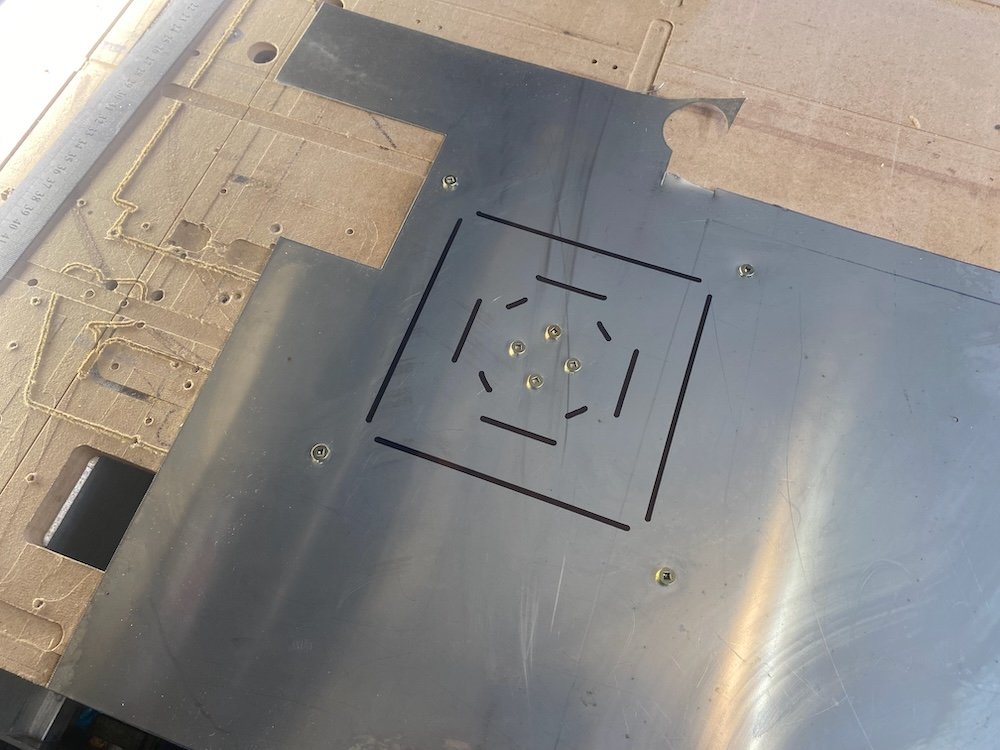
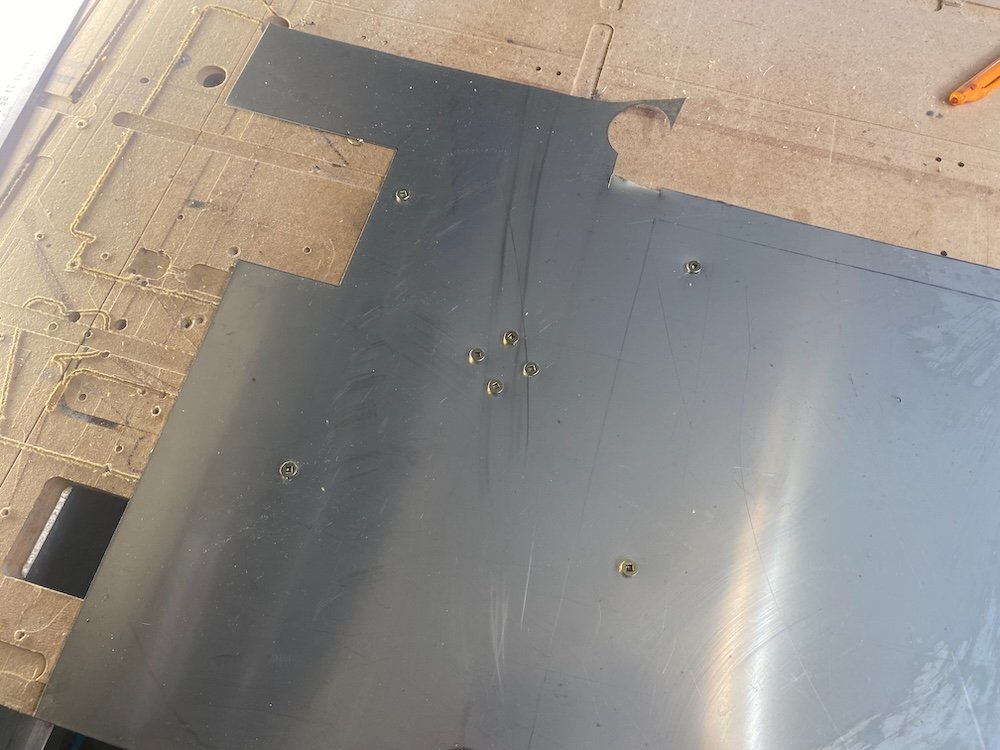
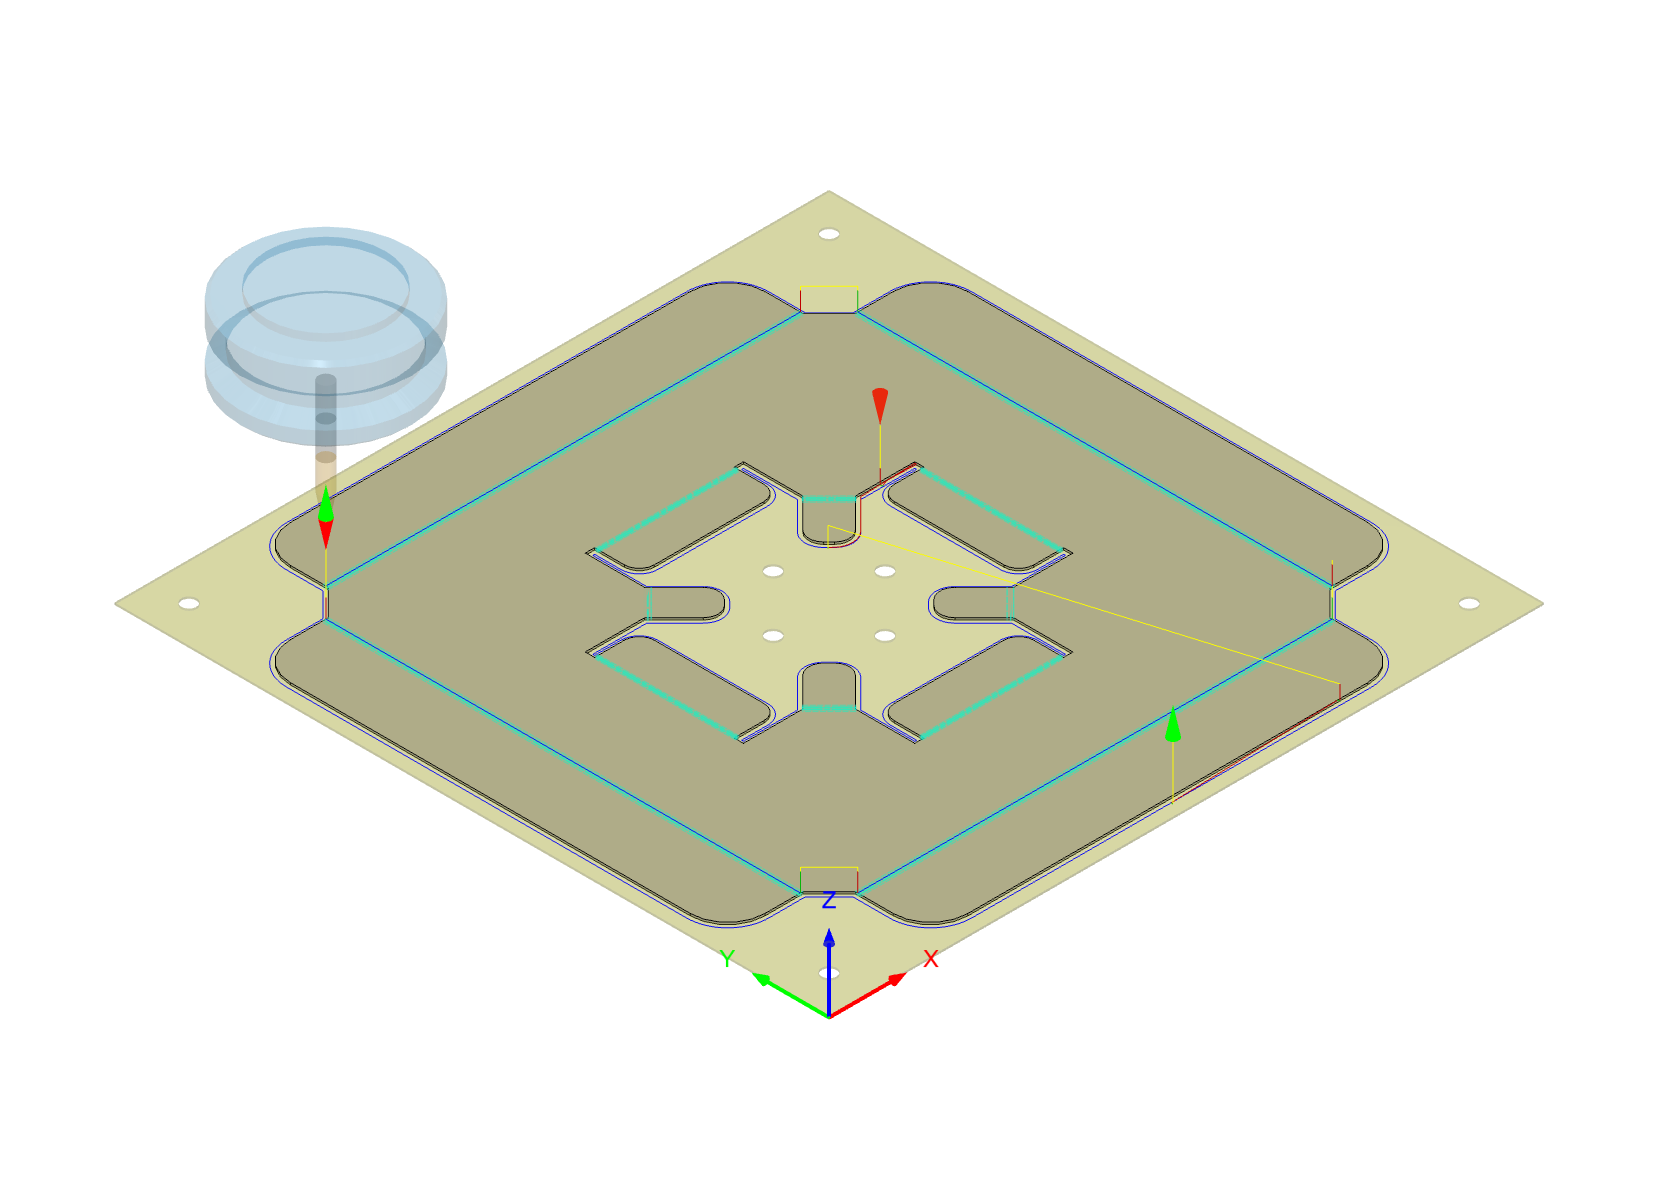
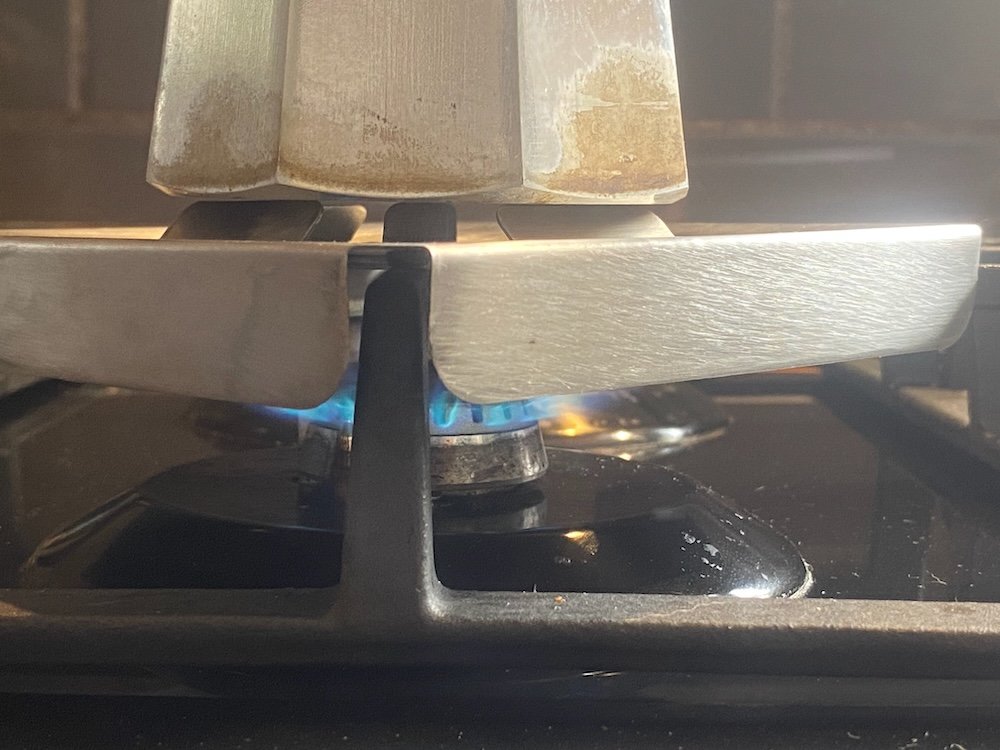
Coffeepot only just fits on the gas cooktop and disasters have struck, a few solutions have been tried but didn't really work, a stainless sheetmetal idea has been floating around in my head that holds the pot up and directs the heat to the pot but with only basic cutting tools I never managed to get far, having just managed to get my cnc router running on sheetmetal, this was a golden time to put a brew on. As @ajg193 asked about my process, I've taken a few photos along the way. First up draw a sheetmetal part and create toolpaths in Fusion, I also make the stock as a seperate body so the machine can place workholding holes in useful places: The idea of this design is the smaller tabs project off the cooktop grill to support the pot while the skirt and larger tabs direct the heat. First machine op, g clamp 0.55mm sheet to the bed and drill 4mm holes: Second op draw fold lines: And finally cut out: This was bit of a disaster, personally I hate working with stainless but I also want coffee, now! Knowing plenty of coolant was compulsory, I got ready with a can of crc, of course this turned into a flame thrower after 50mm of cutting and by the time I hit stop the cutter was toast, I gave it more cutting depth to shift to undamaged flutes and went back to the messy option of heaps of cutting oil, the mdf spoil board was getting pretty smokey by the end of the cut but we got through. Clean off the burnt mdf, add some folds and done: Test run confirms the idea works, but I think improvements are possible. Turns out the tabs didn't quite like the weight once the heat came on and I think a change to the wider tabs could maximise the surface area for heat transfer....... Well, at least the pot won't fall over so easy now
1 point
-
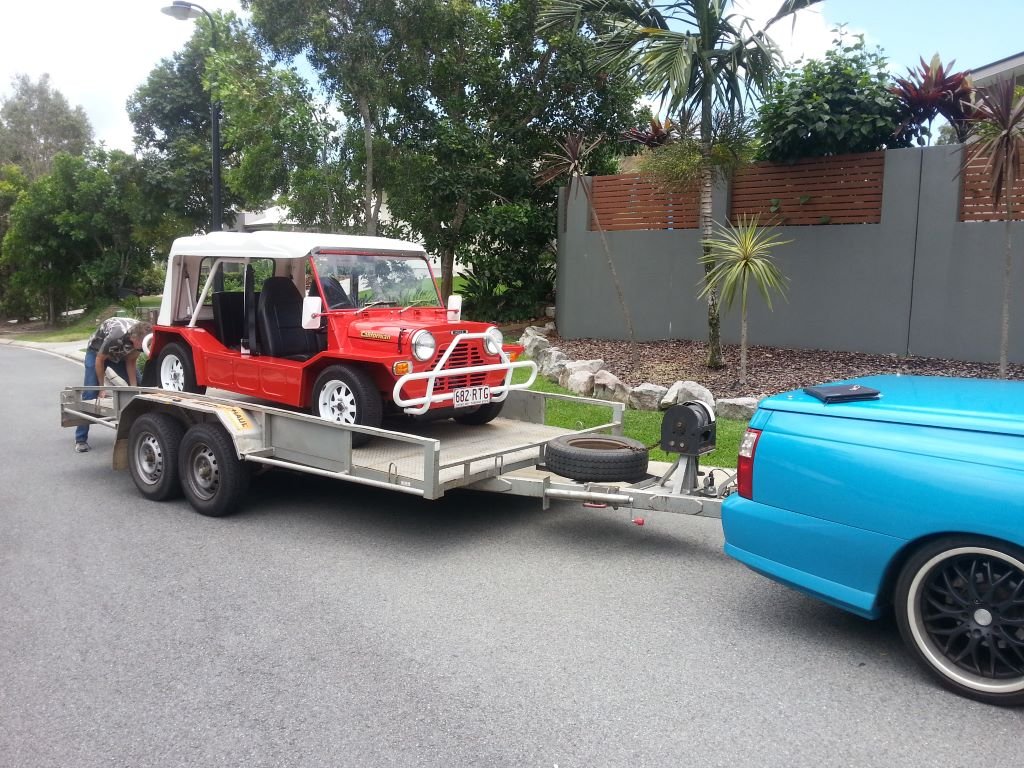
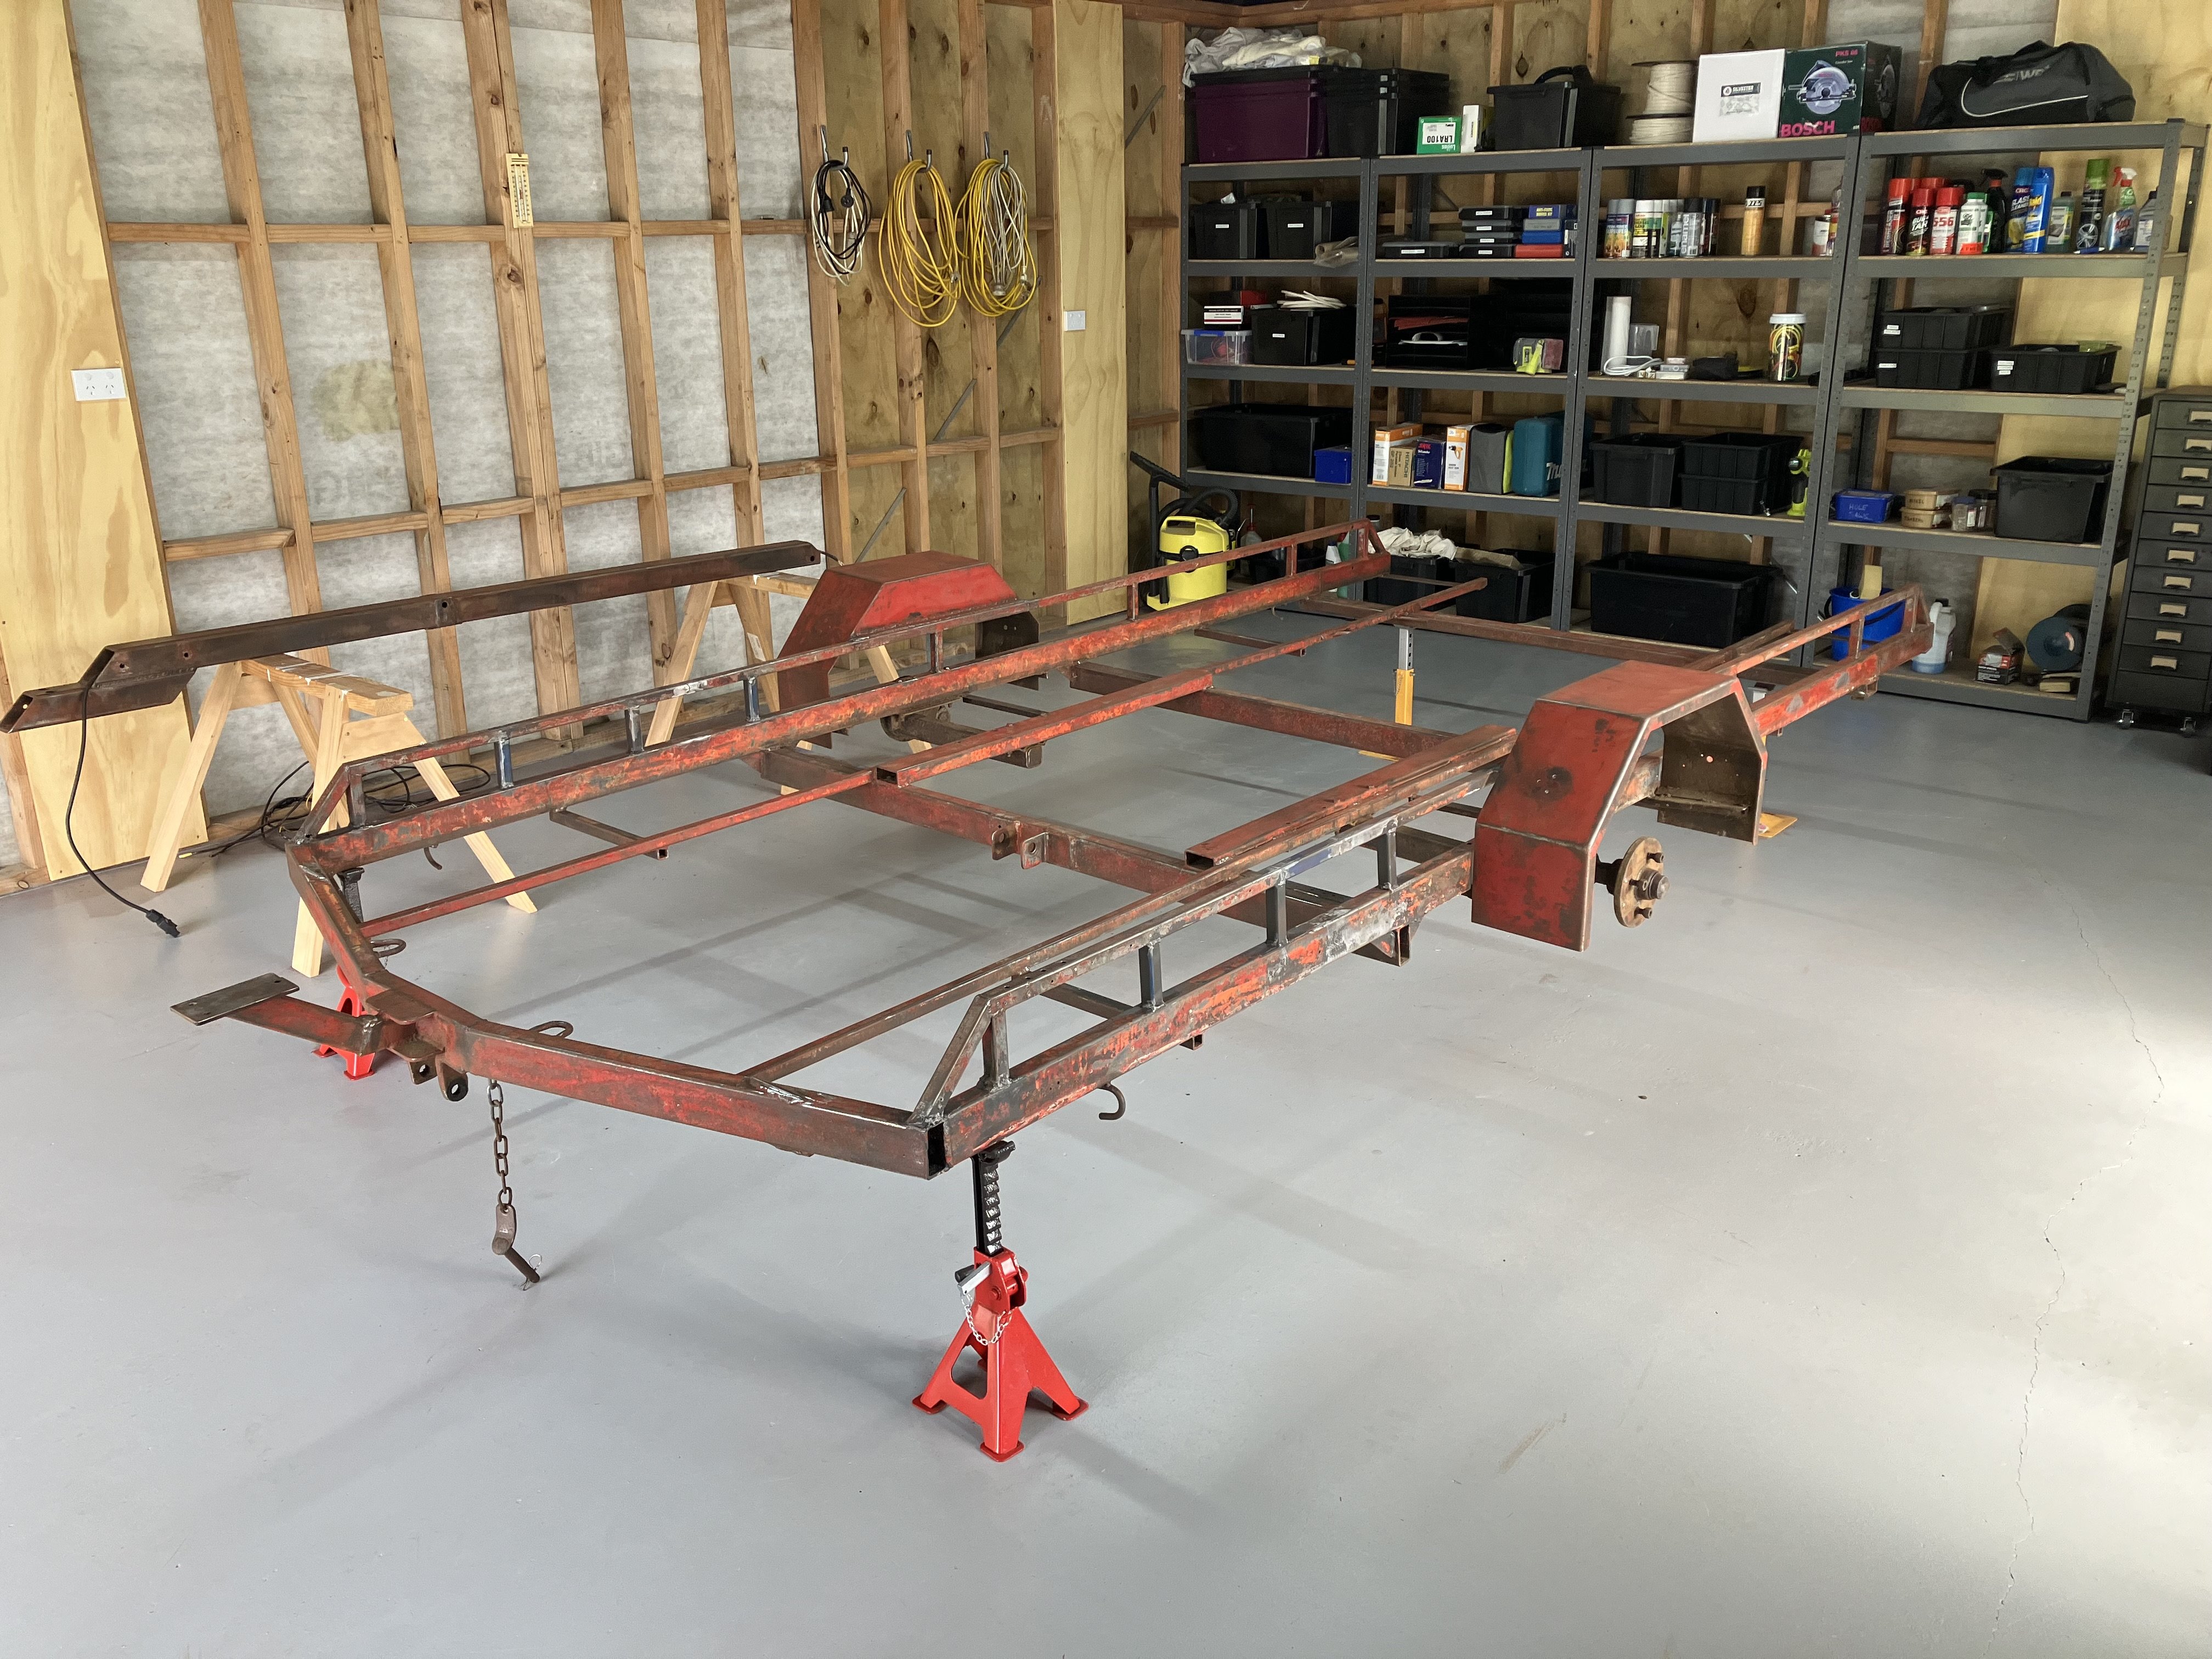
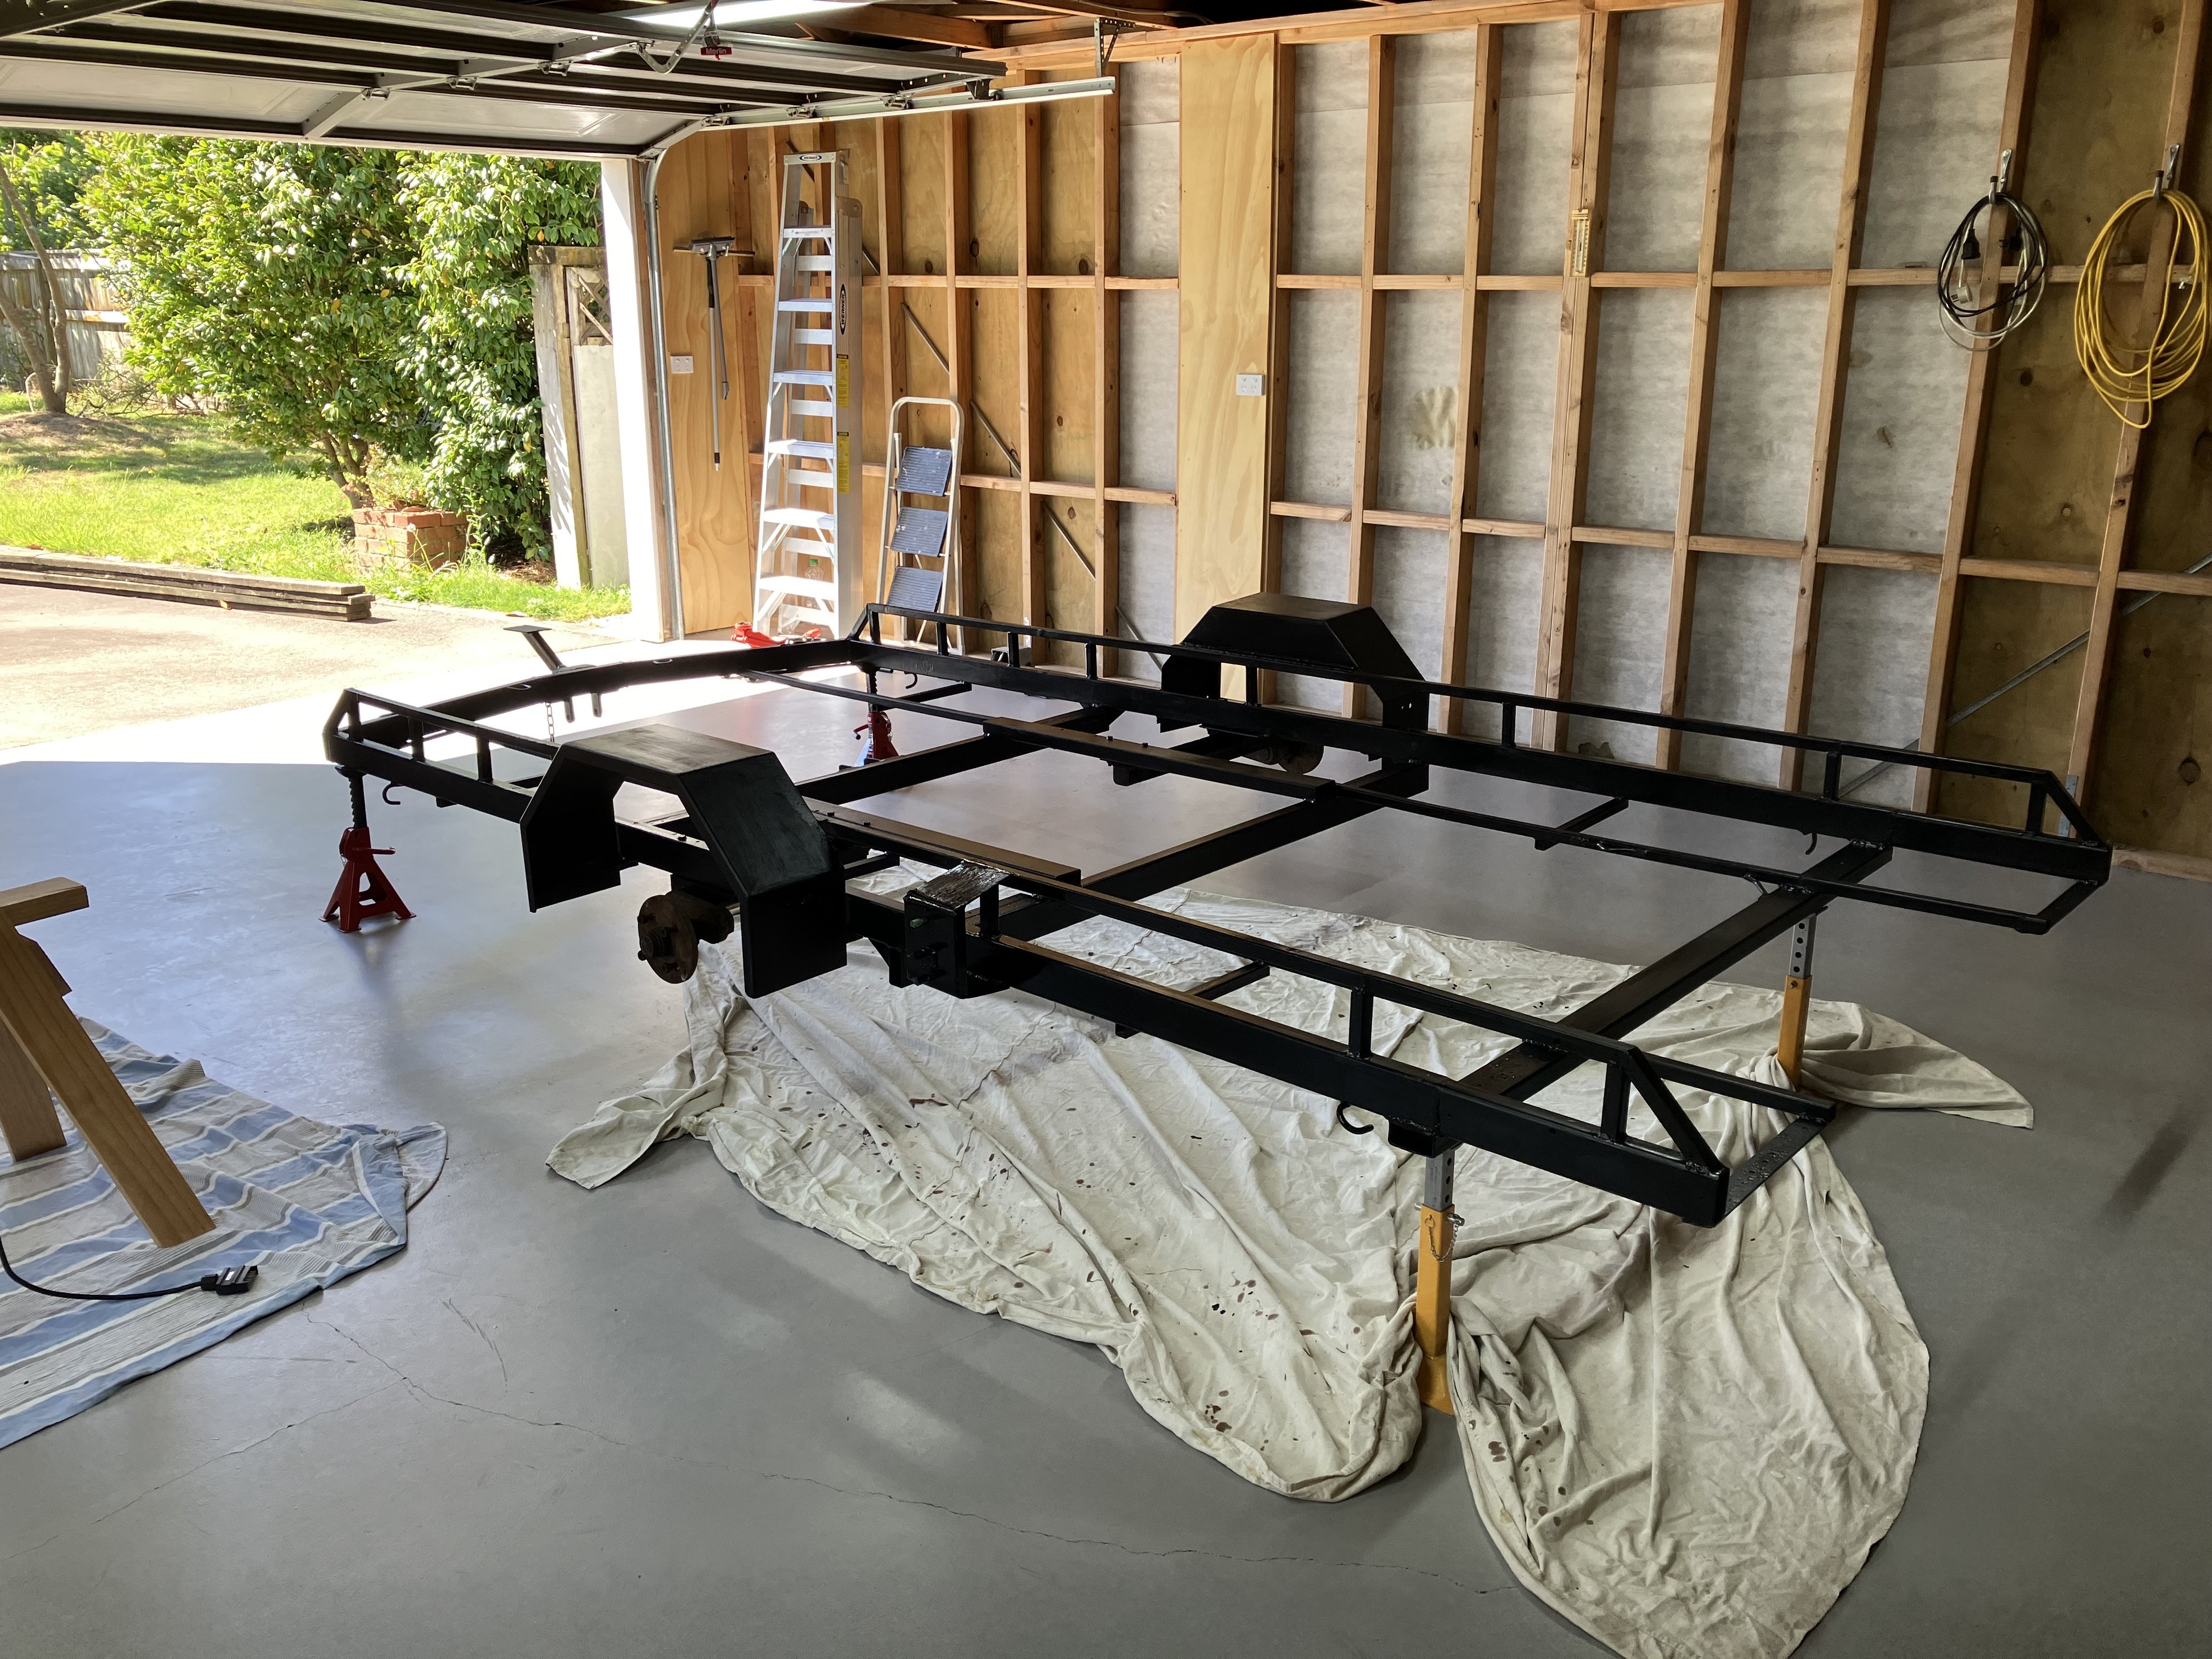
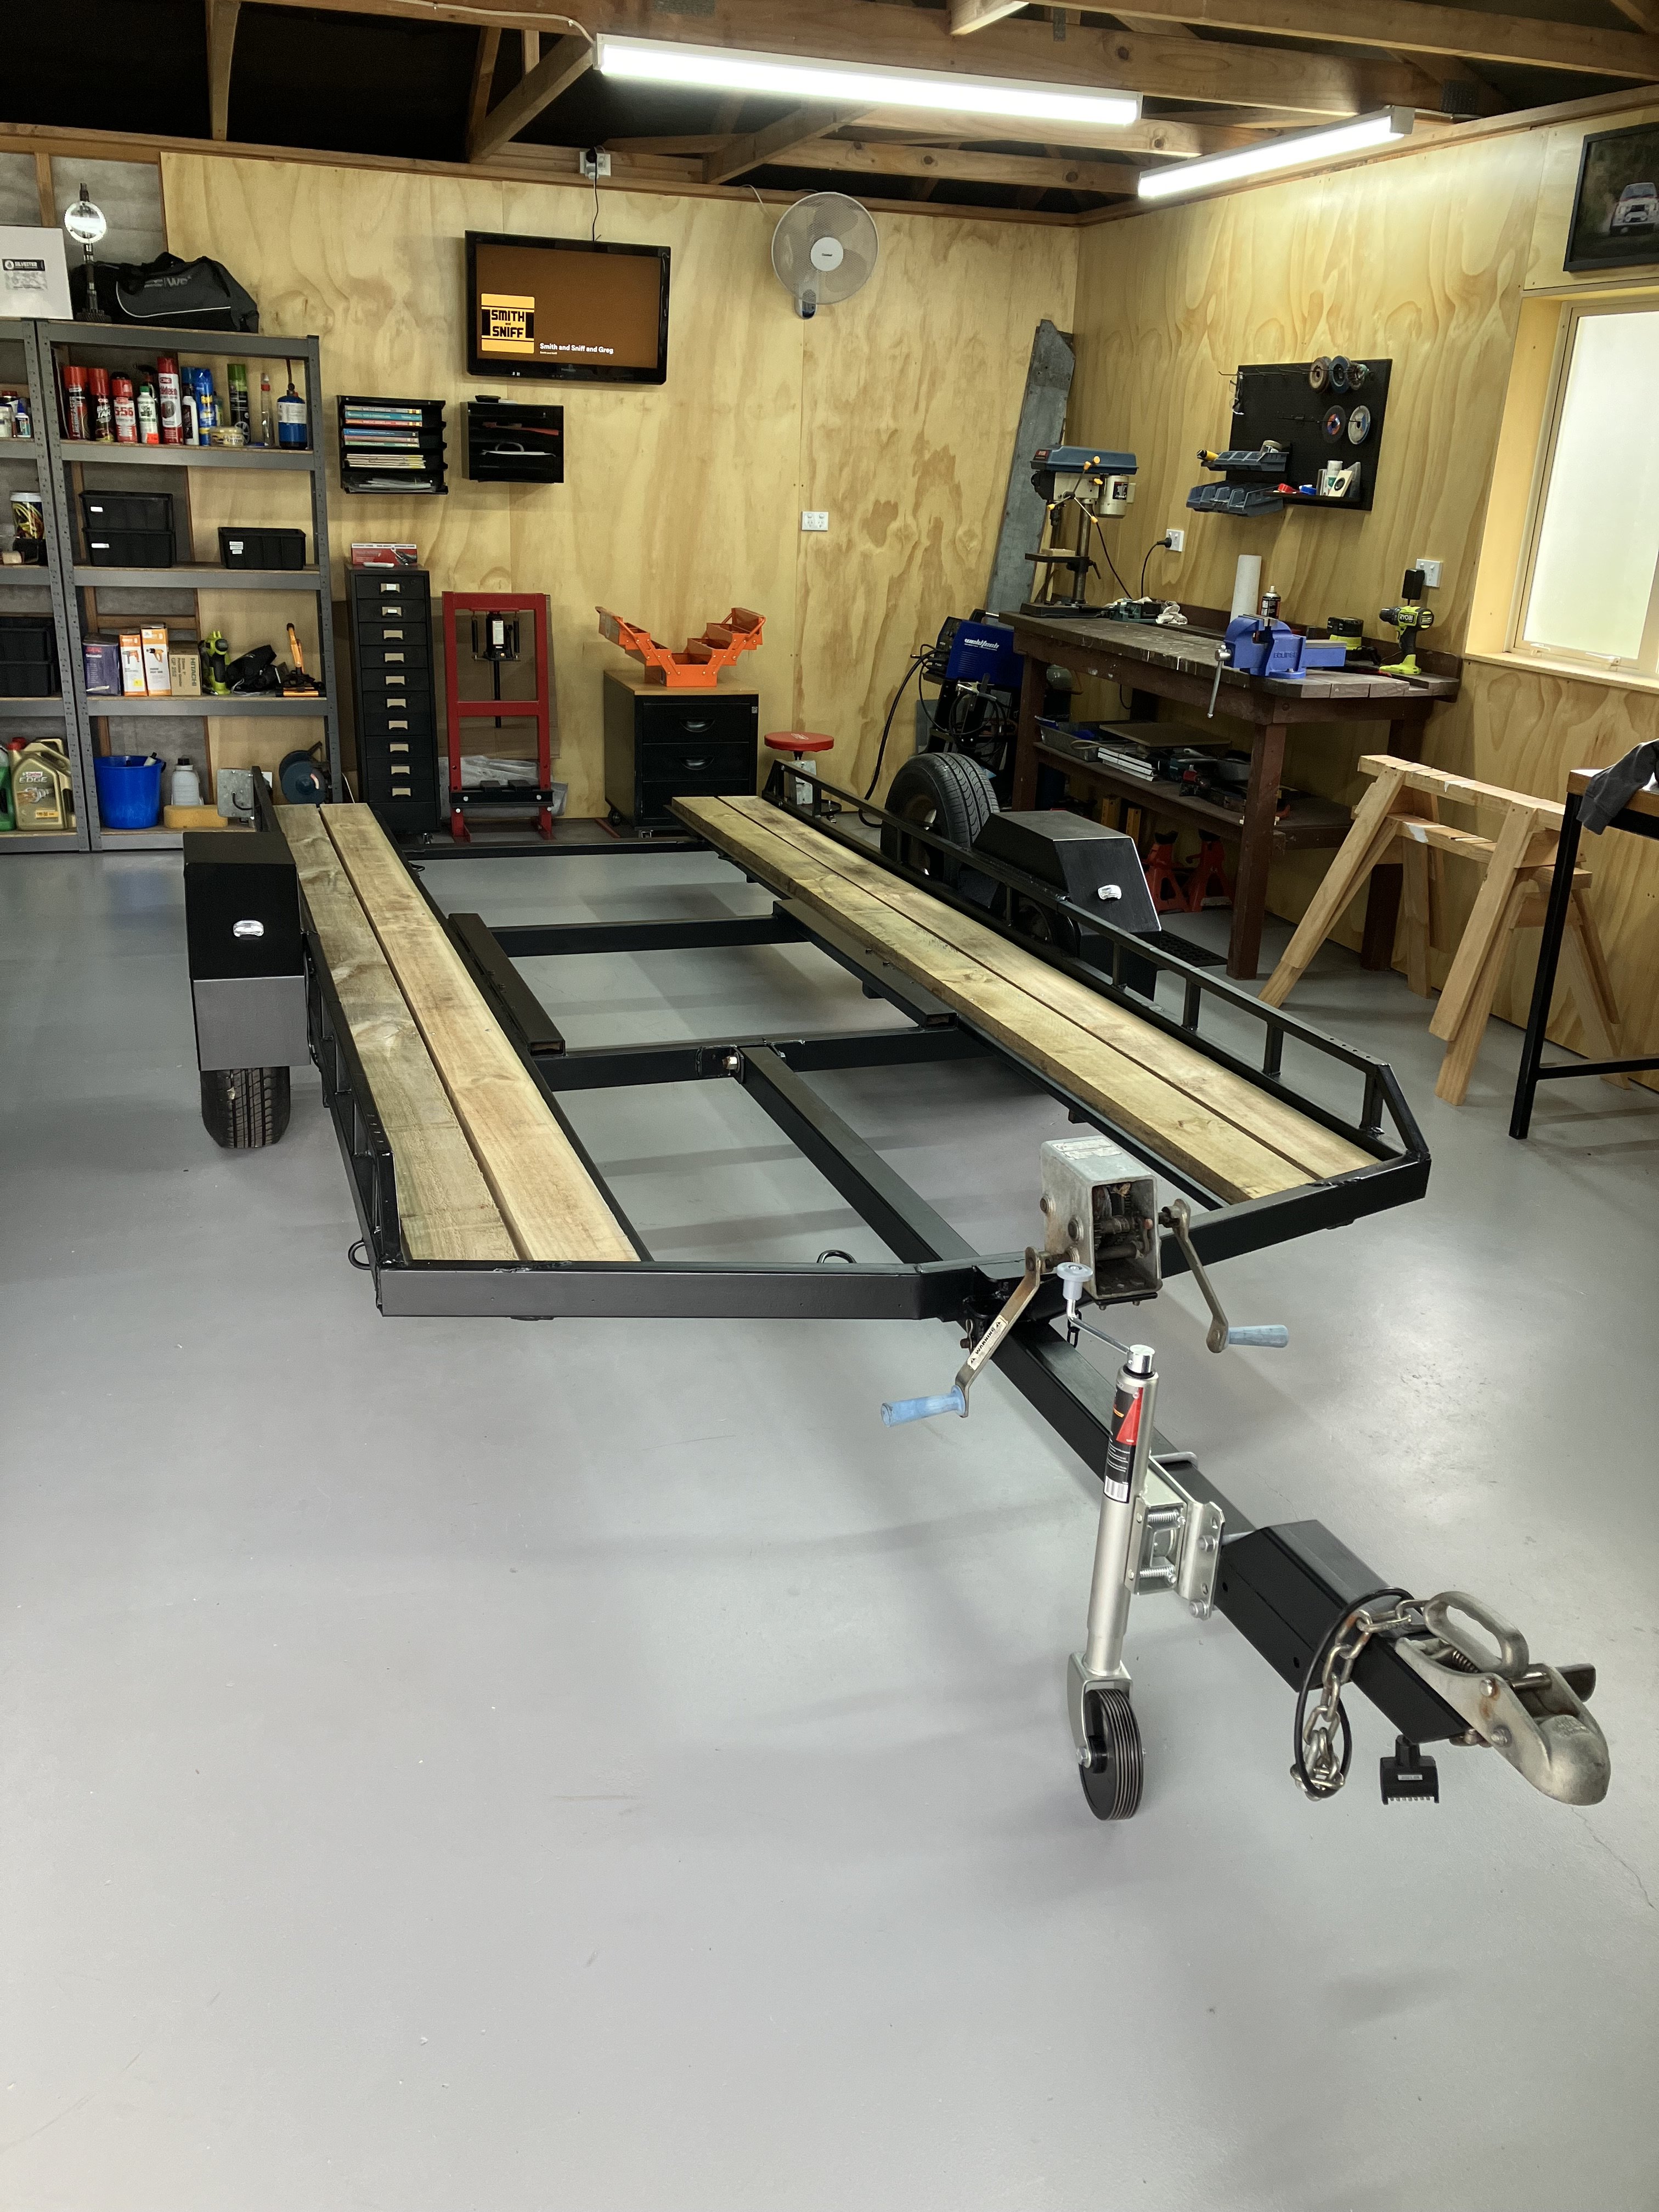
This is kind of random project thread worthy. So I’ve owned this old single axle car transporter for over 20 years (apart from a short period where a mate owned it, then I bought it back). In about 2005 I gave it a rough wire brush and painted it tractor red and put a new timber deck on it (necessitated by a mates Fiat 131R almost falling through the rotten old deck). I’ve been meaning to give it a refurb for ages, but it kept passing wofs and just looked like shit. It progressively got worse until @azzurro borrowed it and it had some structural failures where the spare wheel mounted (coincidentally while also towing a Fiat on it). He kindly patched it up before returning it but it needed attention. After moving back up north I decided it was time to tackle it and strip it right down and give it a birthday. Fix a few bad welds. Paint, new electrics, new deck etc. Anyway. After a few solid weekends of work it’s just like a new one. P.S. if you want to buy it, hit me up. It’s only small (suit Viva, 1200, Escort, Starlet etc).
1 point
-
I ended up pulling the whole loom out to check things on the bench. It took a few hours to figure things out, I had made a few mistakes. Since I have pullup resistors on all of the cam angle sensors, the 5v supply on that loom plug splits 4 ways and joins to the signals. However I'd swapped the 5v supply wire with one of the 5v/DI signals on one half of the plug. So looking with a multimeter it still showed the correct amount of resistance on that DI, but, it was the wrong way around. Then I also found a broken wire at the plug end of one of the other DIs. Then I also found one of the pins in one of the plug halves was pushing back out when you put the plug together. So replaced the plug. I've got all of them responding on/off when holding steel against the sensors. While I was there I also changed the supply to 8v instead, hopefully less chance of trigger errors. Hopefully it'll all work okay now.1 point
-
Stoked to have met the Retropower team this week - the cars are unreal in the flesh.
1 point
-
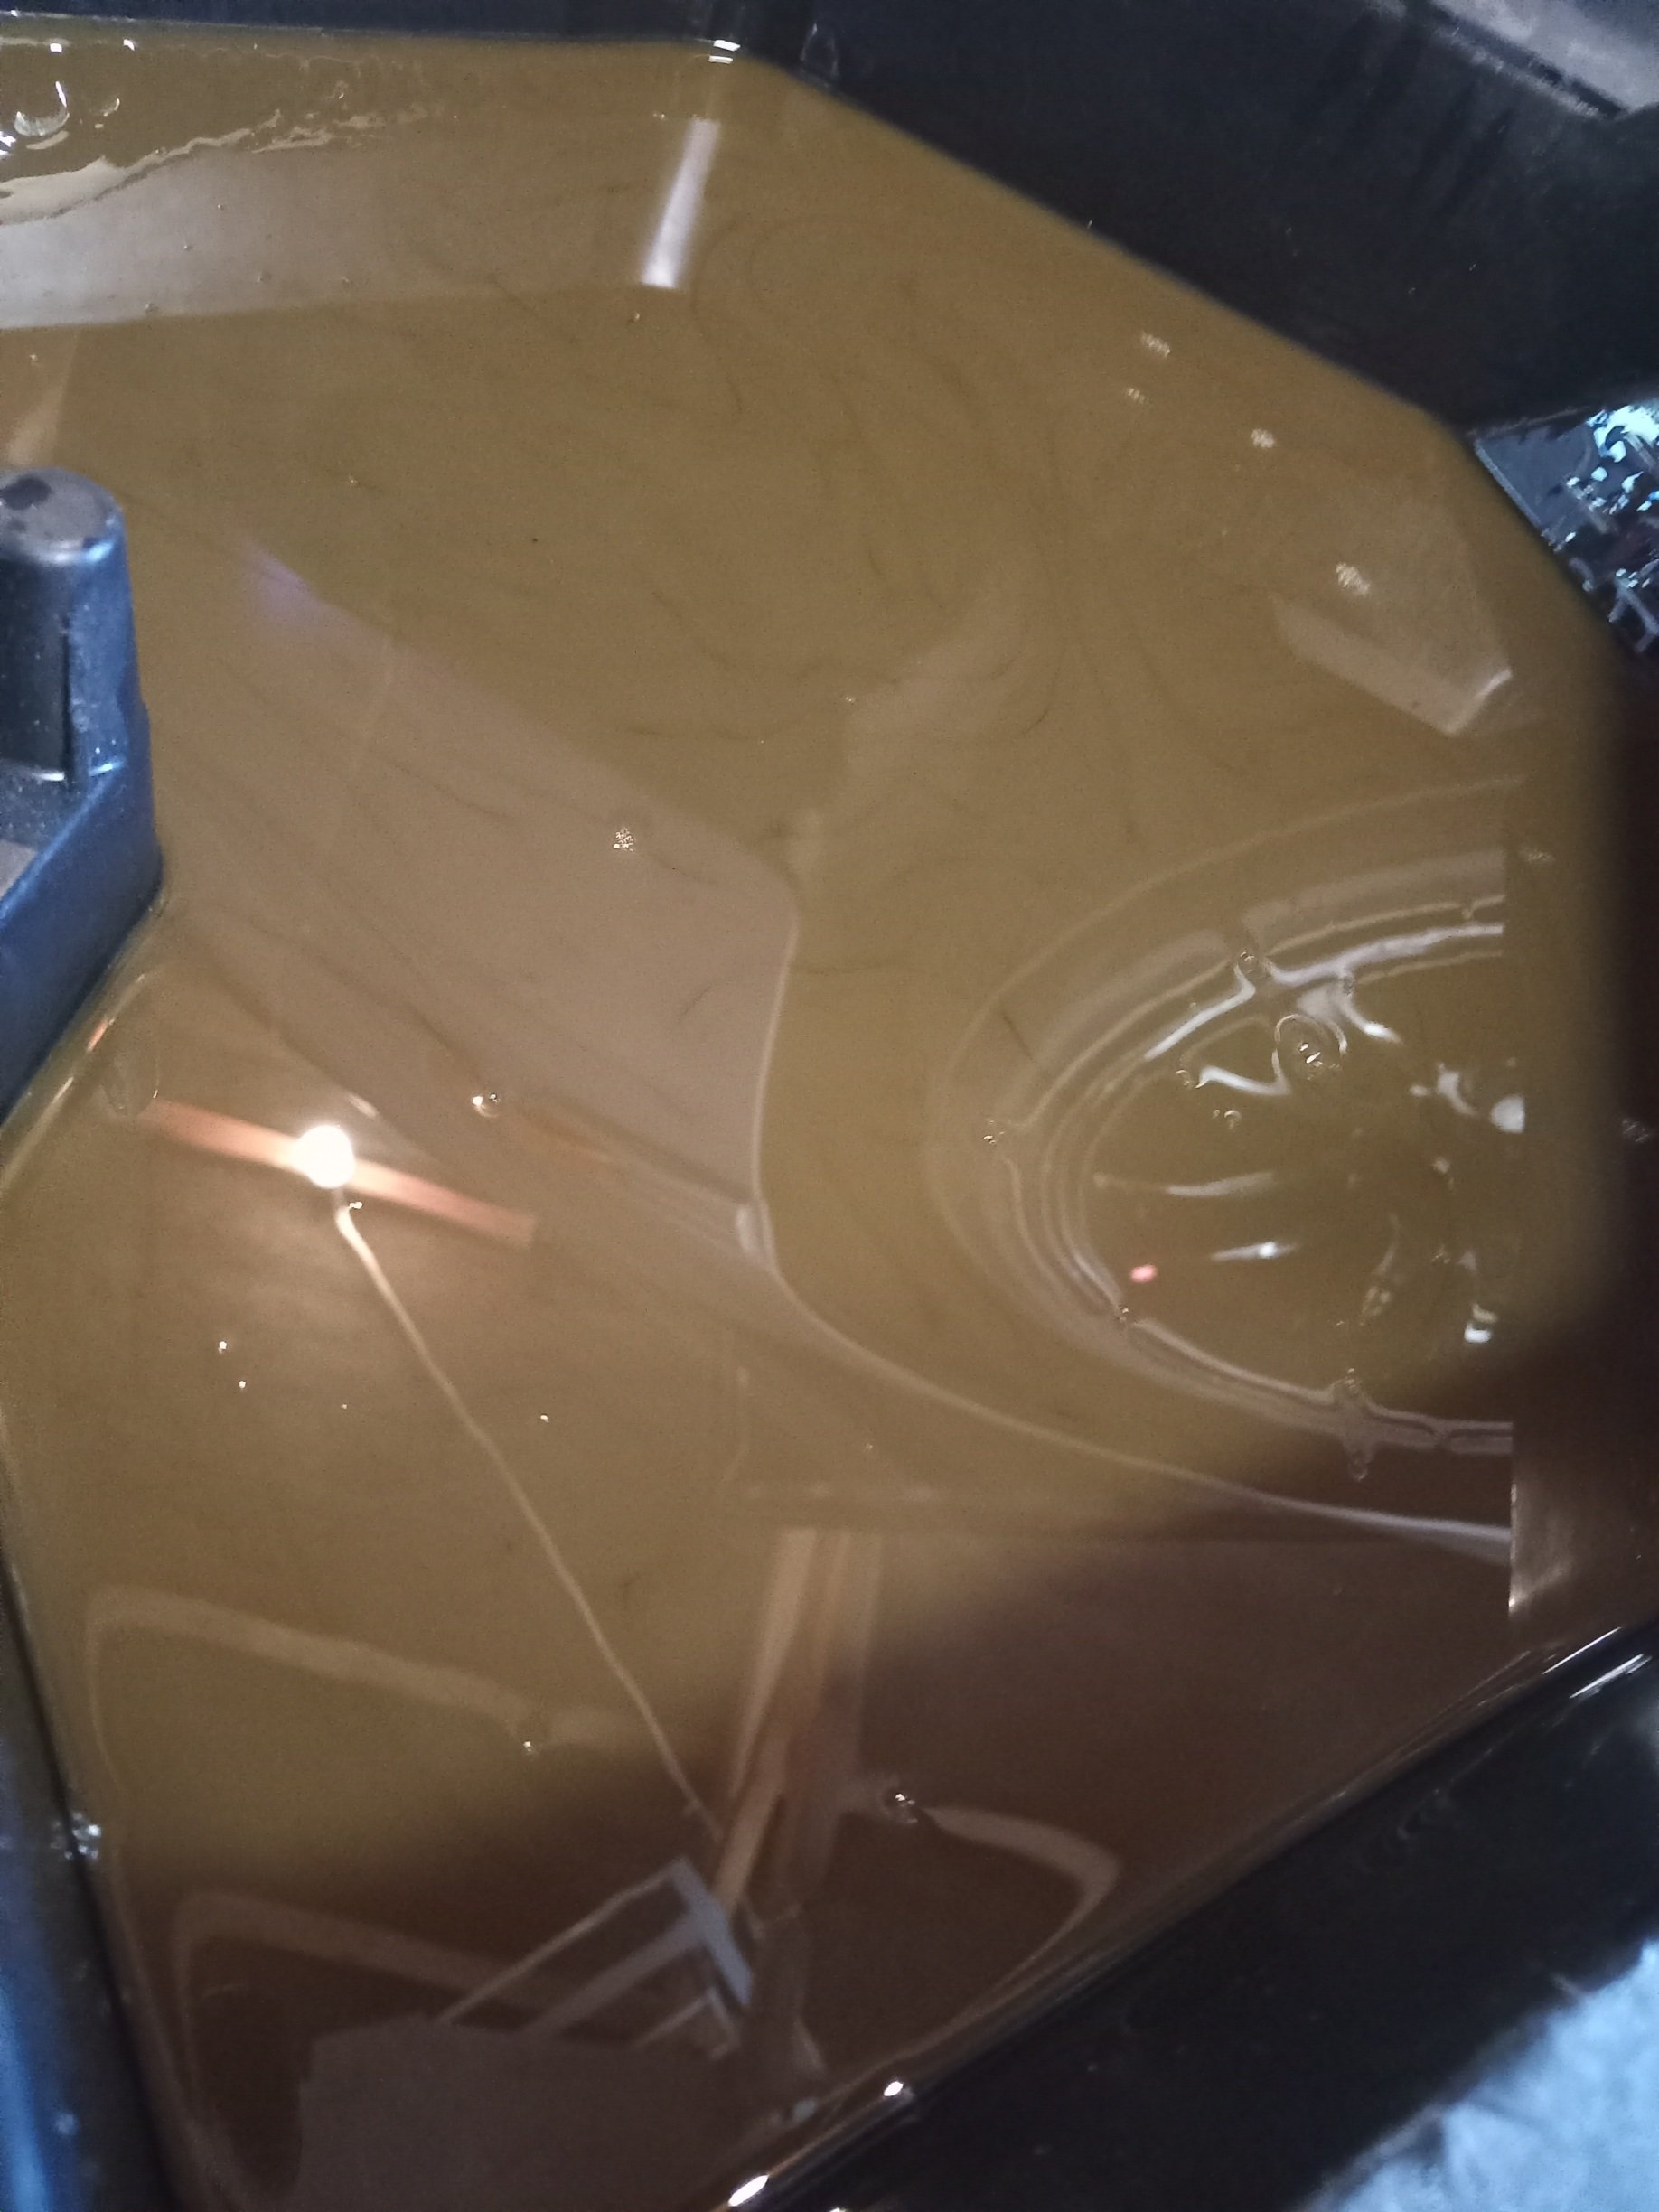
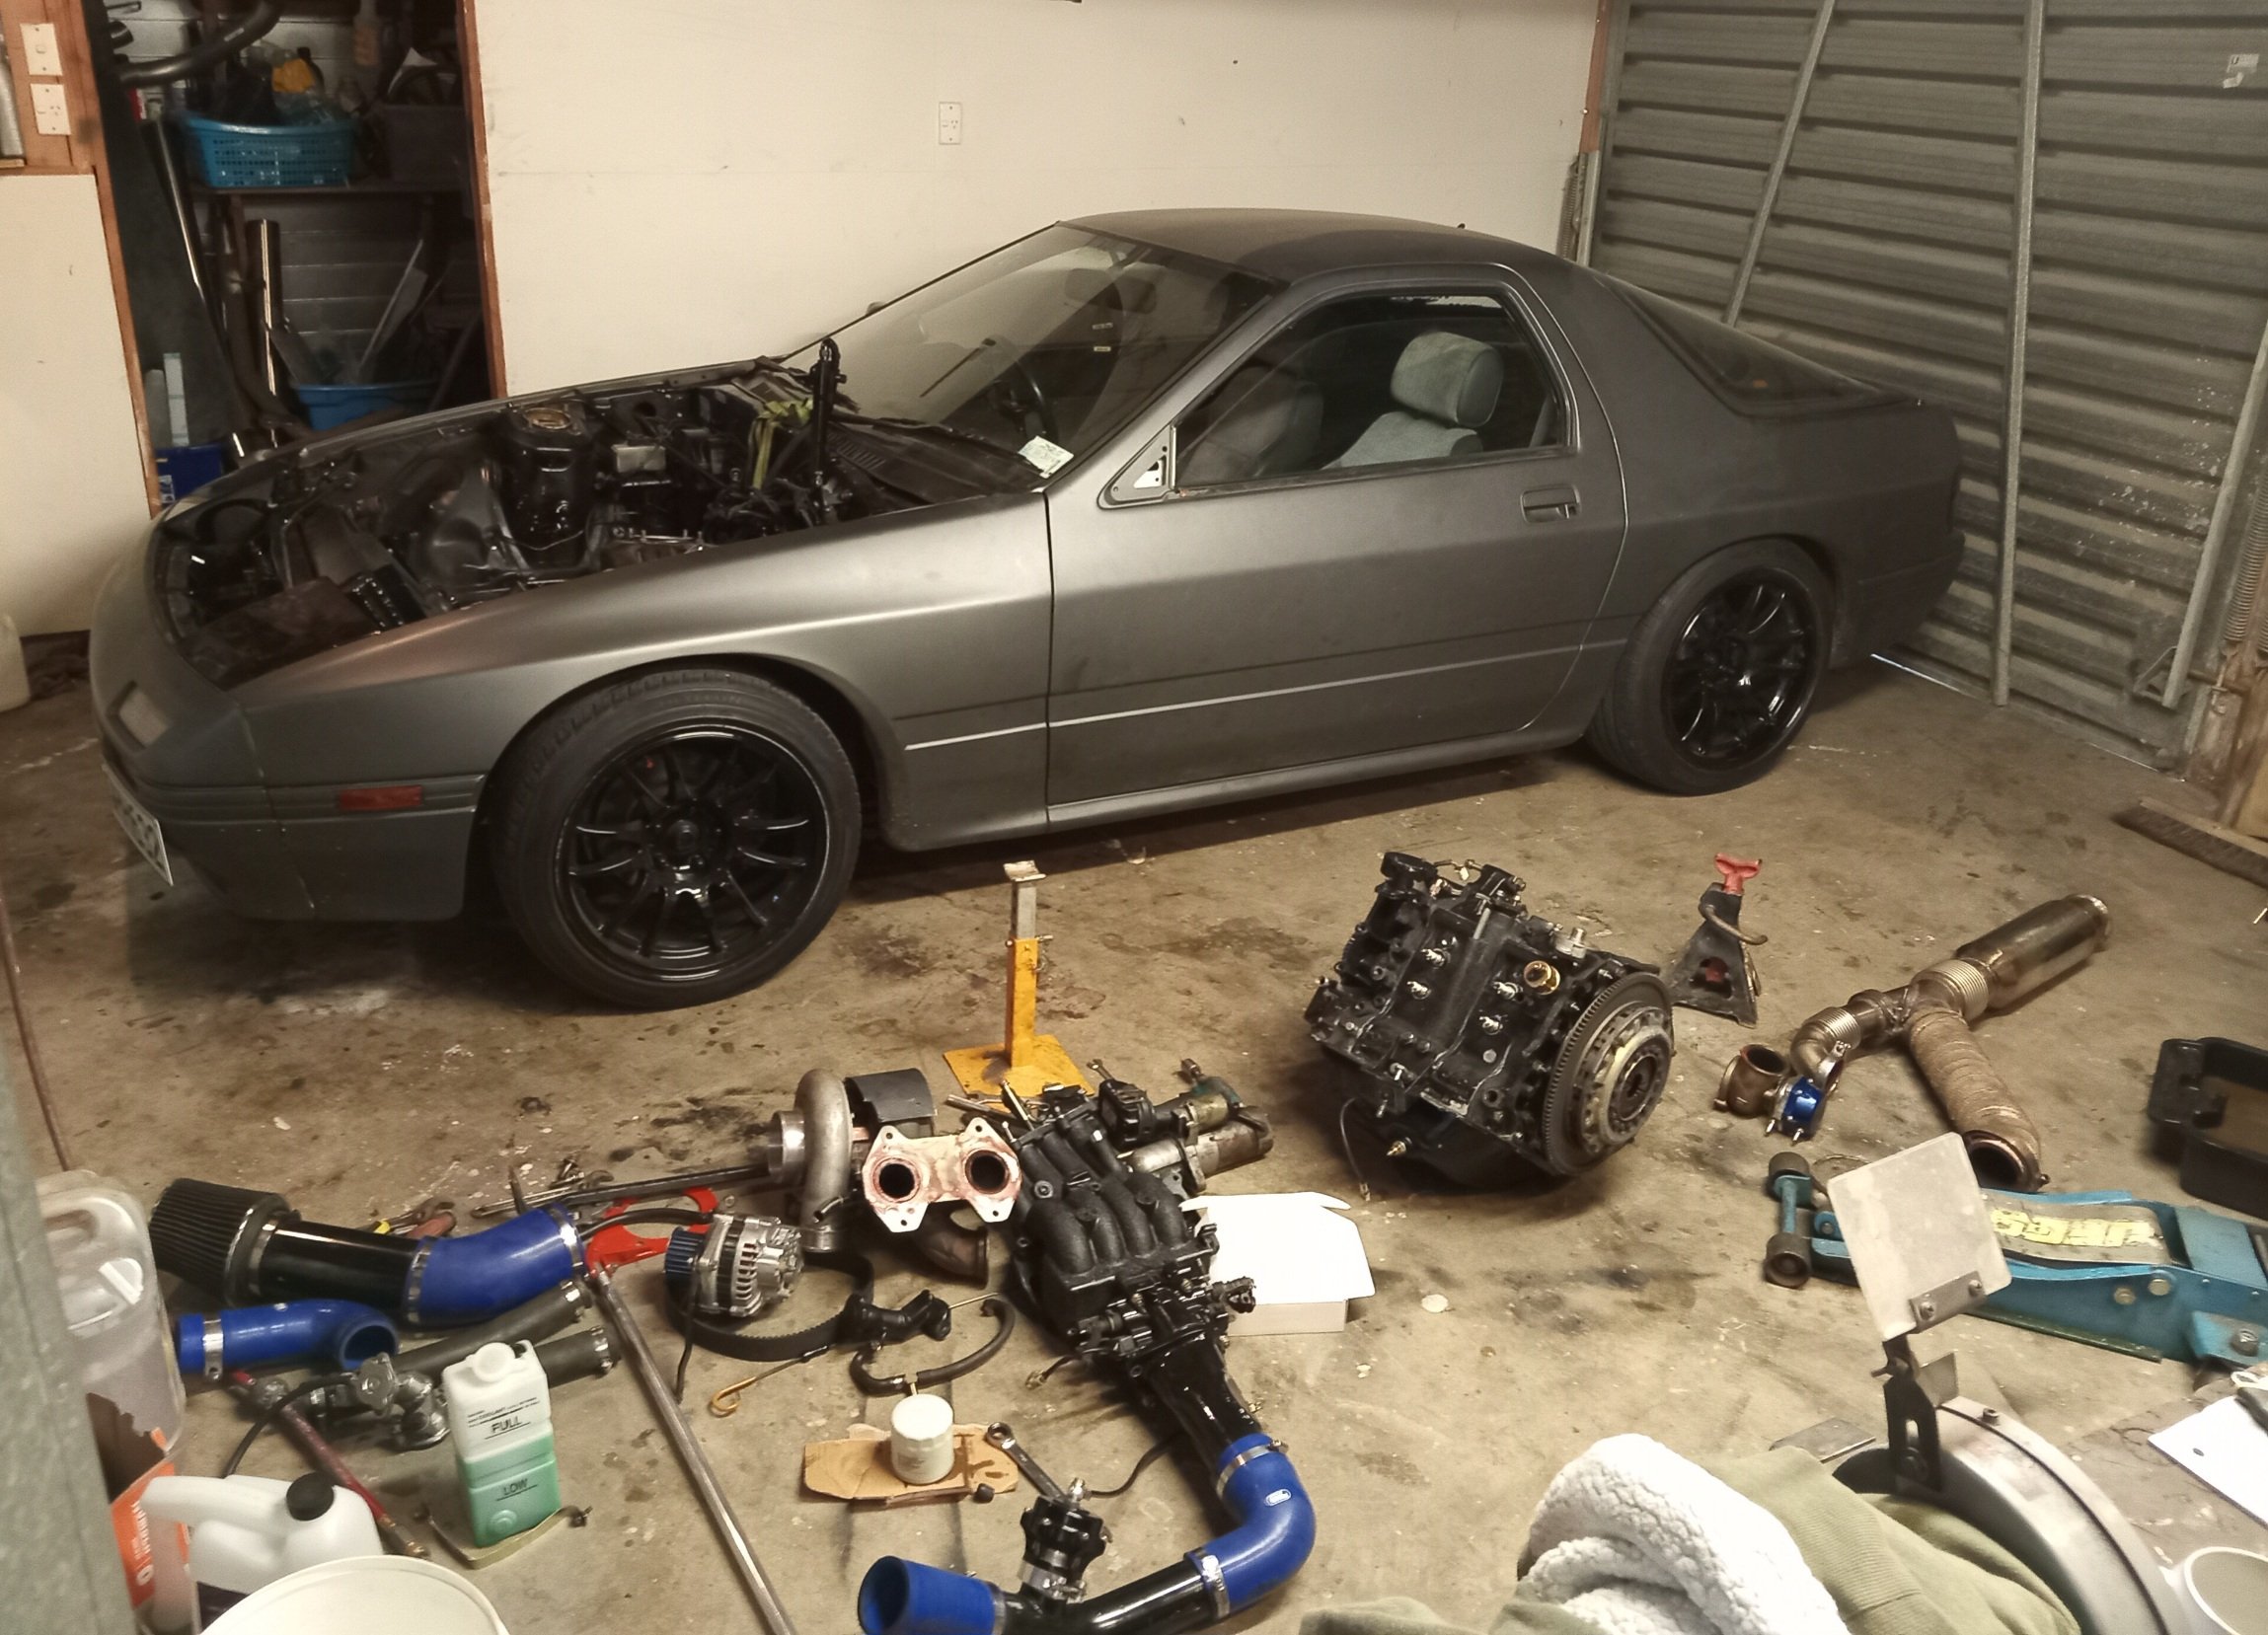
Well this ran with a misfire upon entering boost since i got it, now its really started being undriveable, i checked tps, coils, all the things that could cause that miss and came up with nothing definitive, it always smoked a bit but i thought this was as a result of being rotary and then i noticed the oil looked cloudy on the dipstick, changed it for fresh oil and filter.. The oil looked like this after 10min run time and smells kinda like coolant, time to rebuild, im guessing a water seal let go or something... I should be sad about this or something but im actually looking forward how a rotary engine looks inside, especially a 'worked' one.
1 point
-
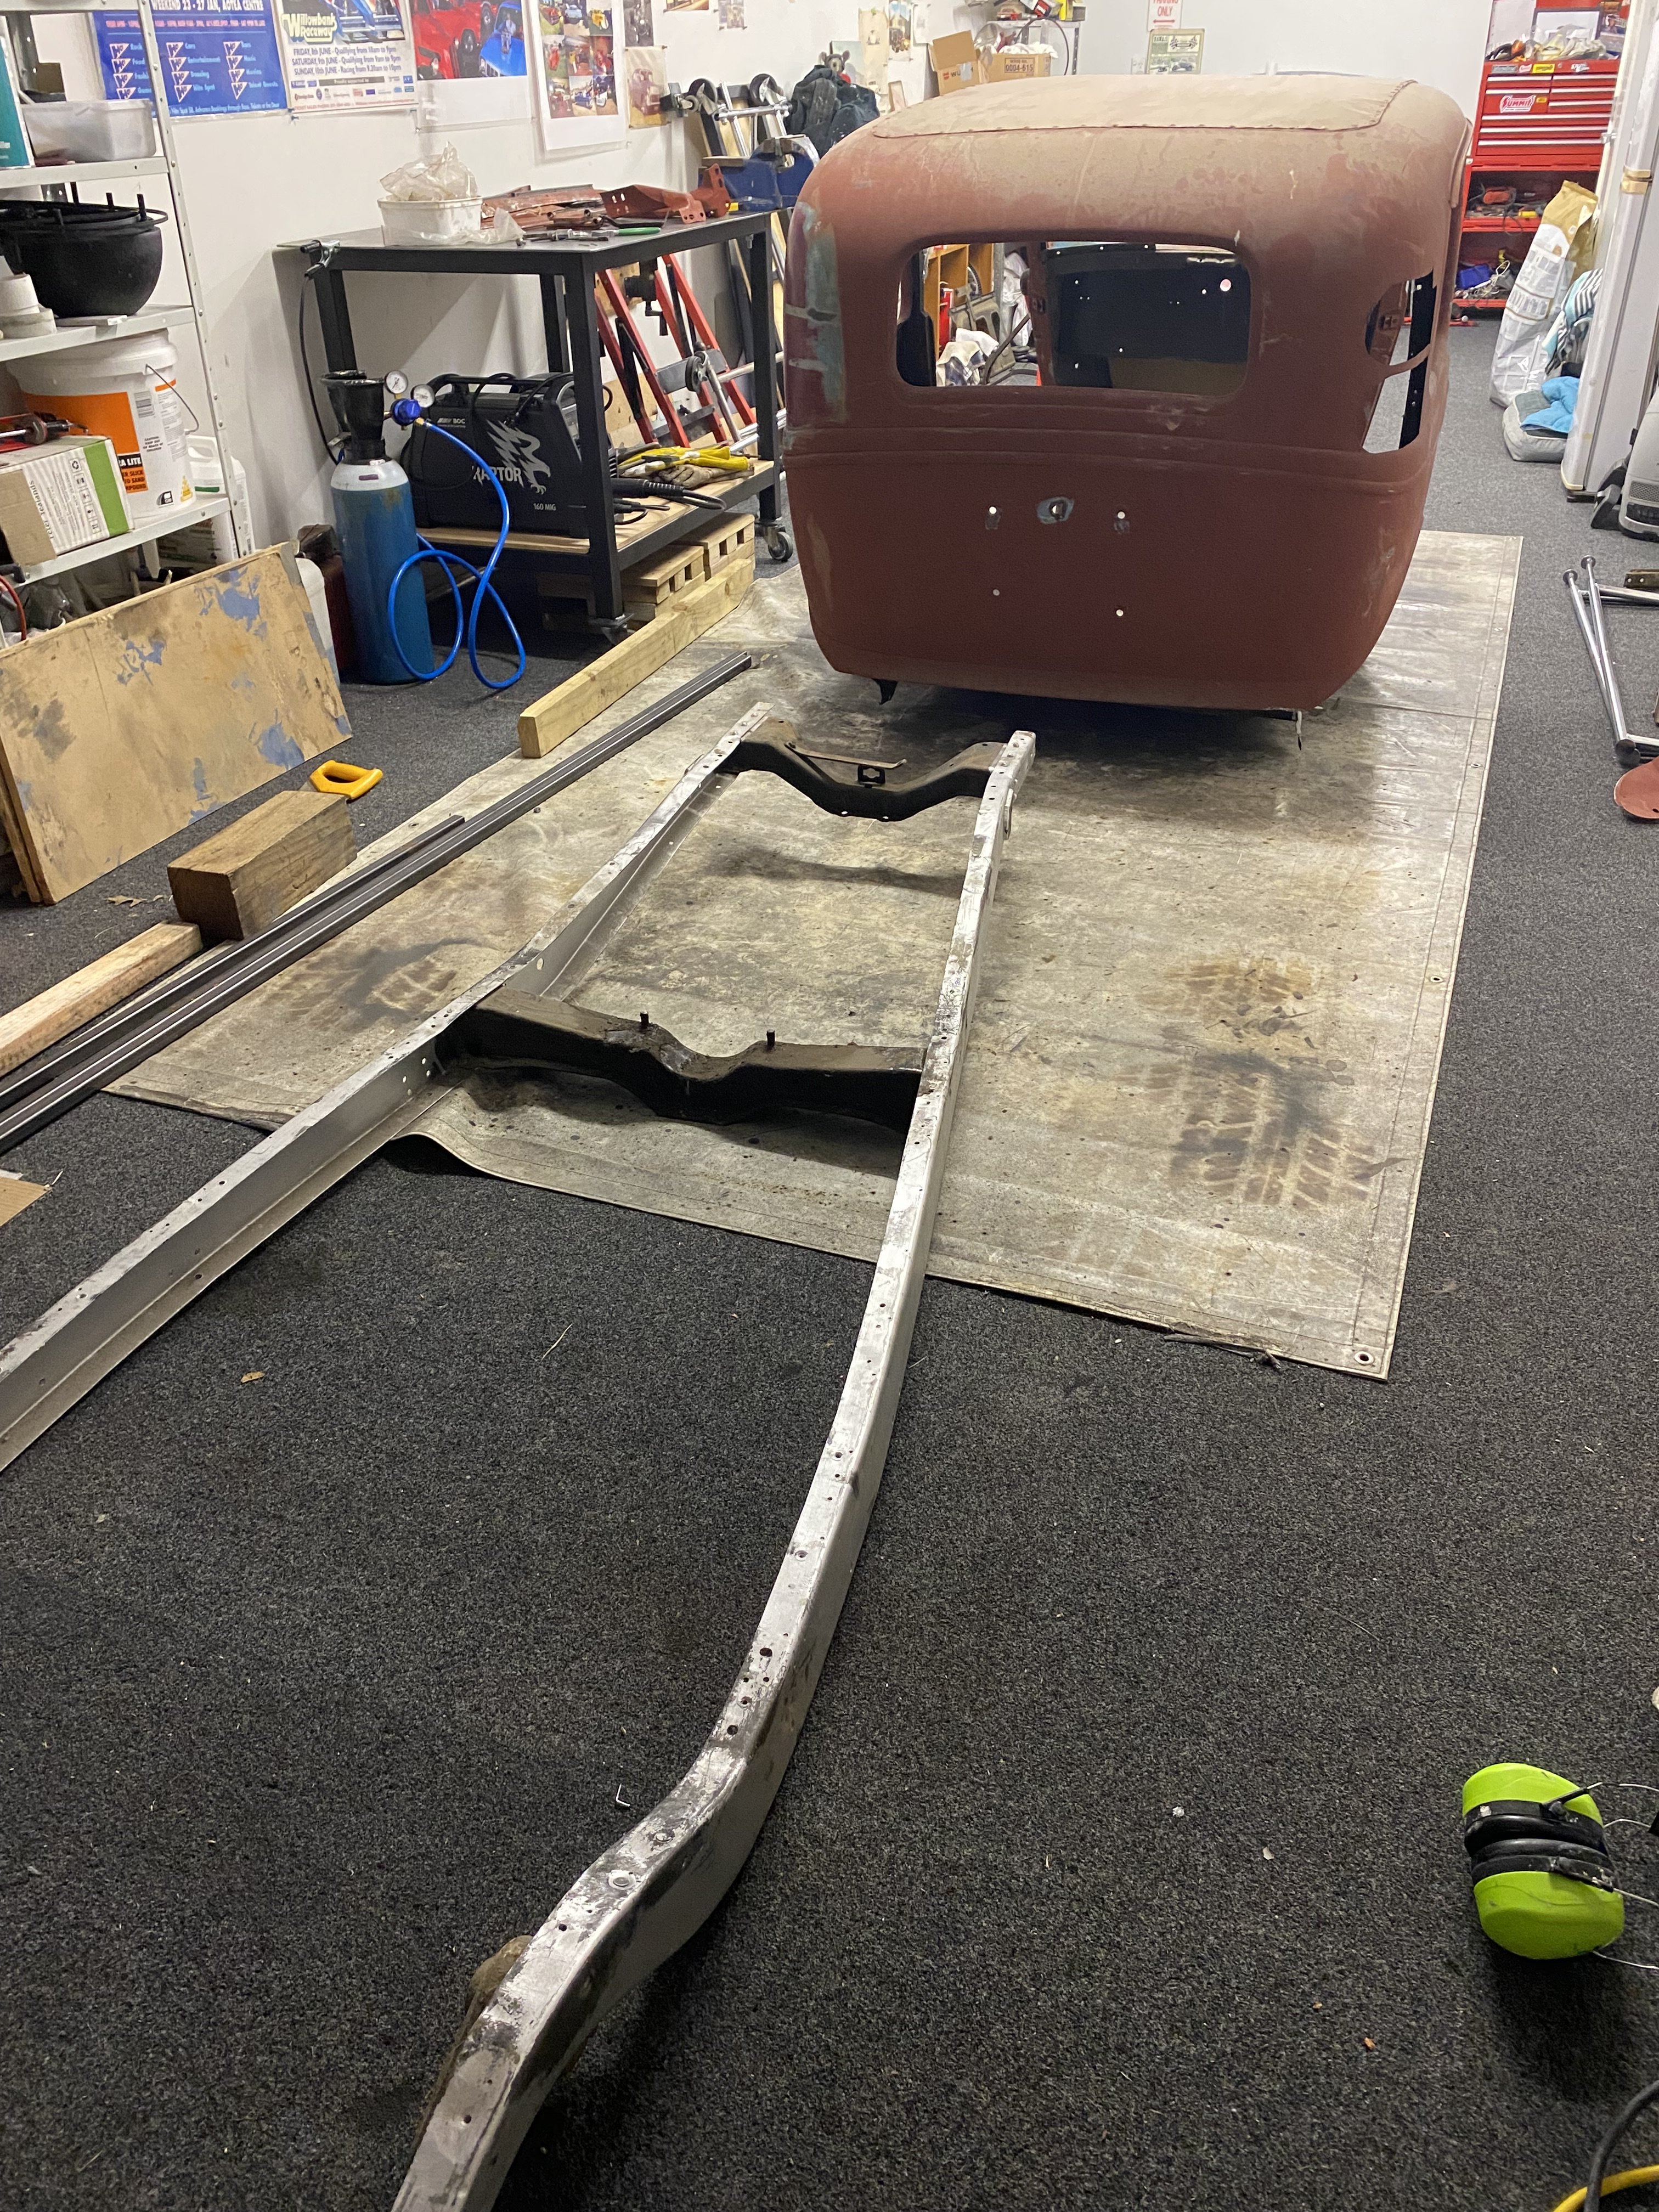
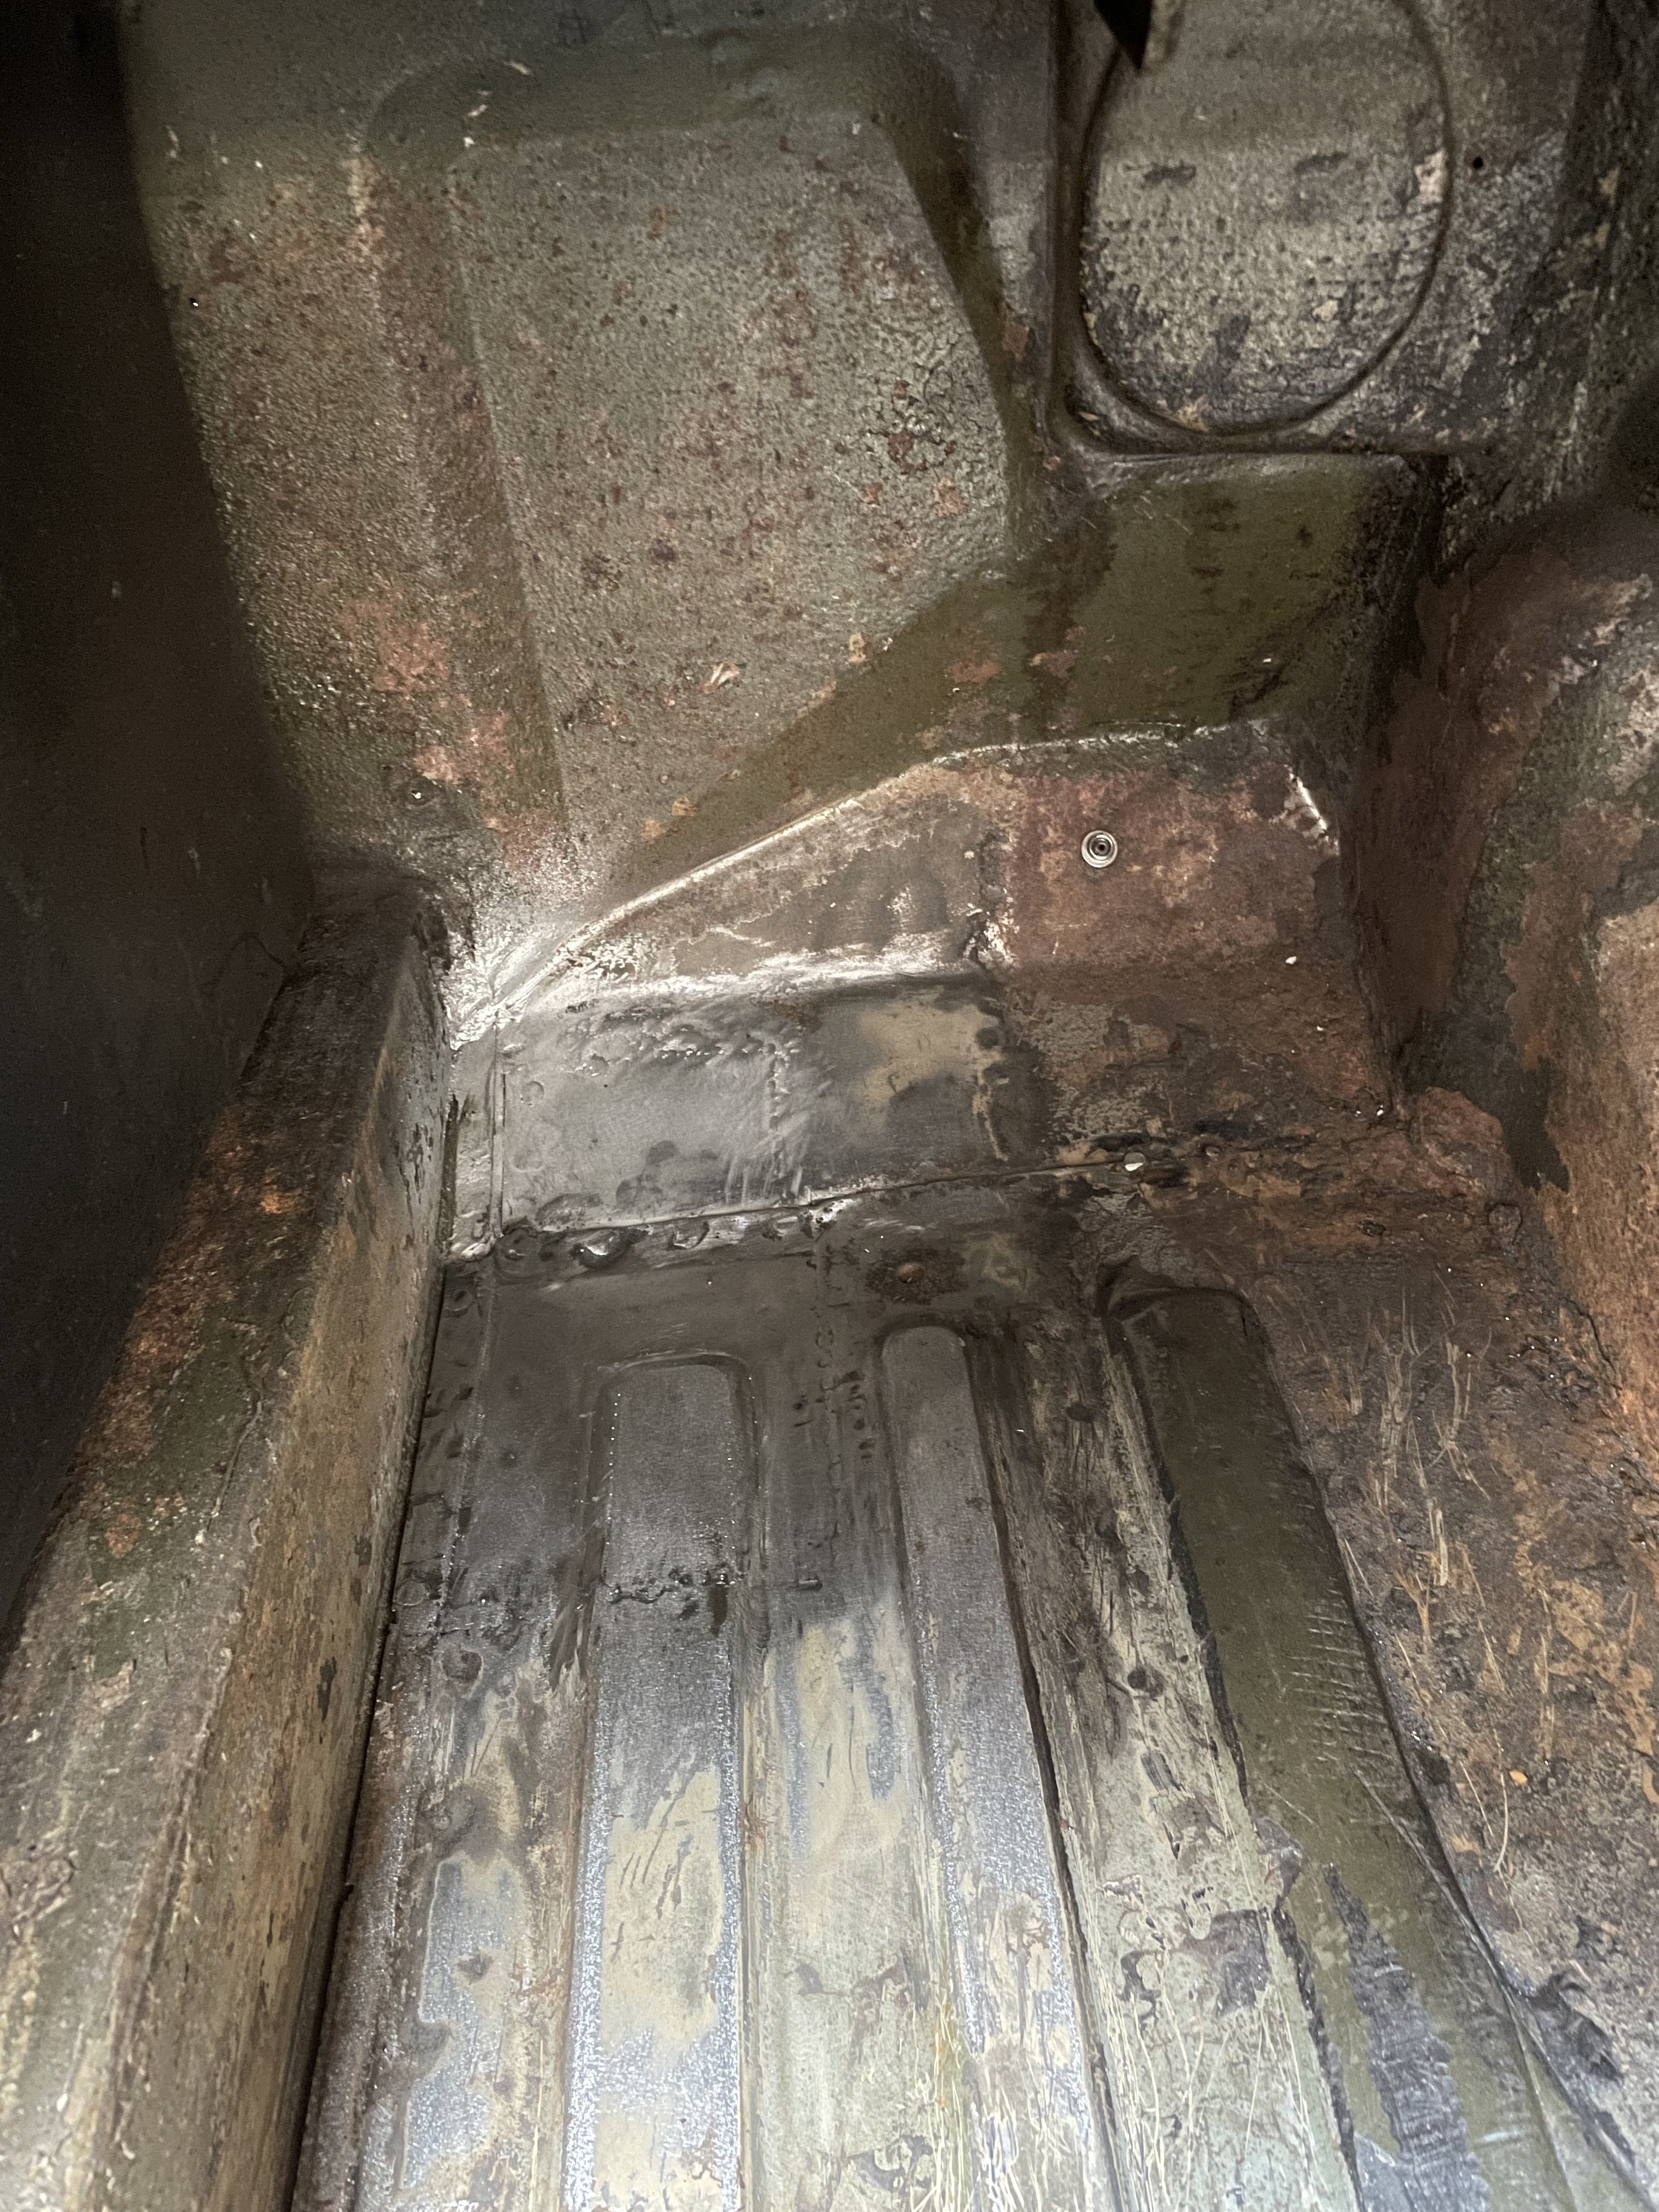
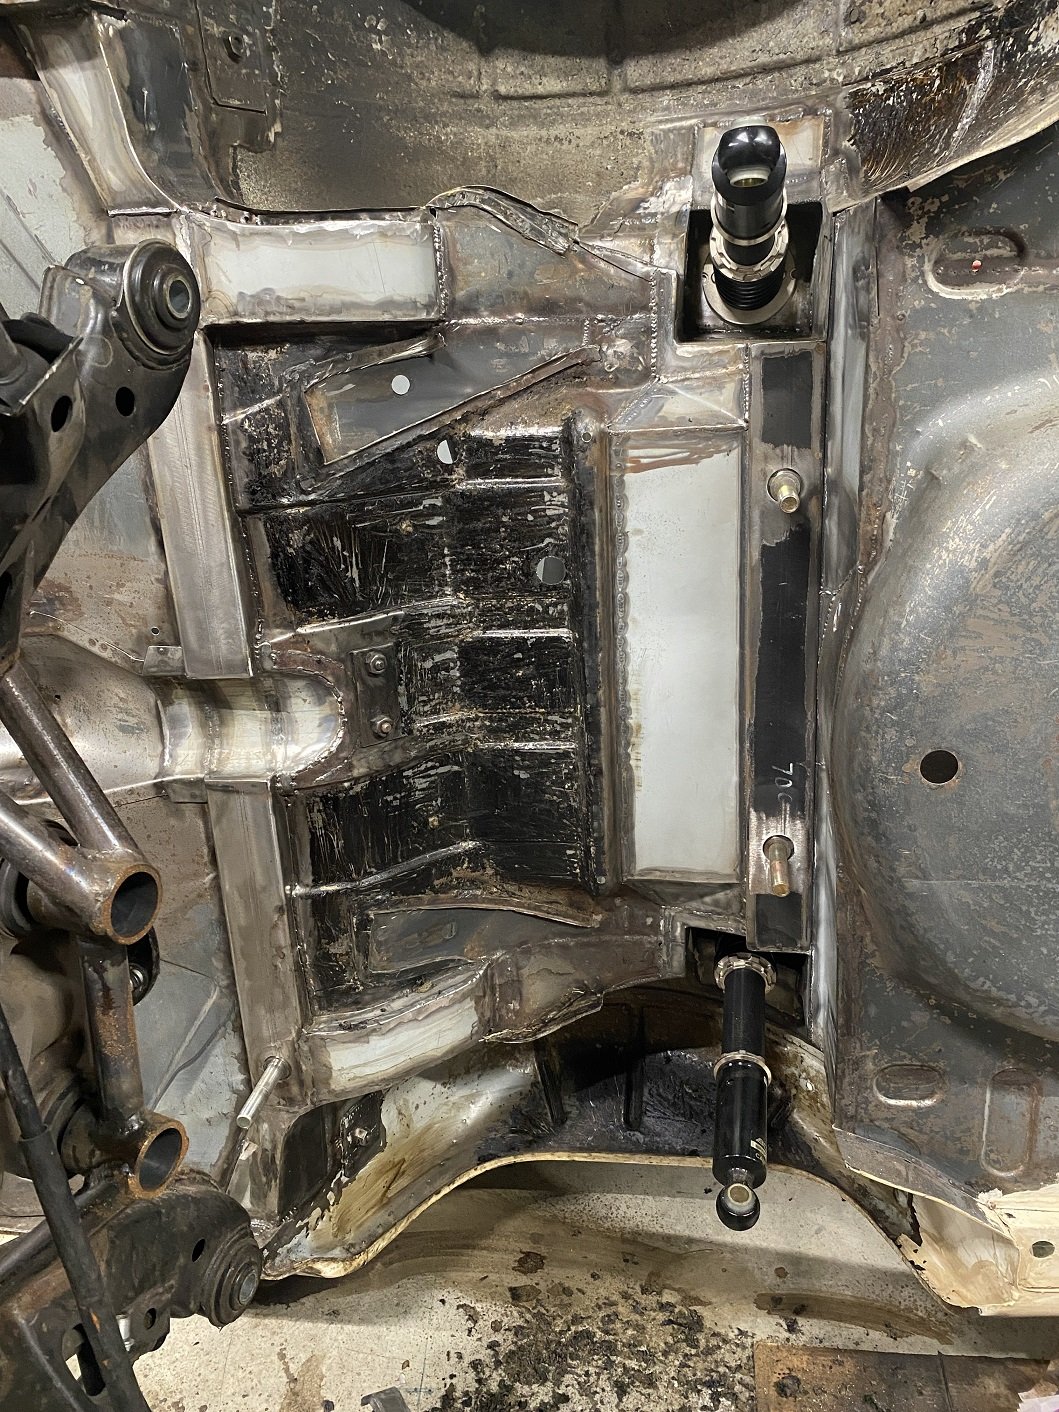
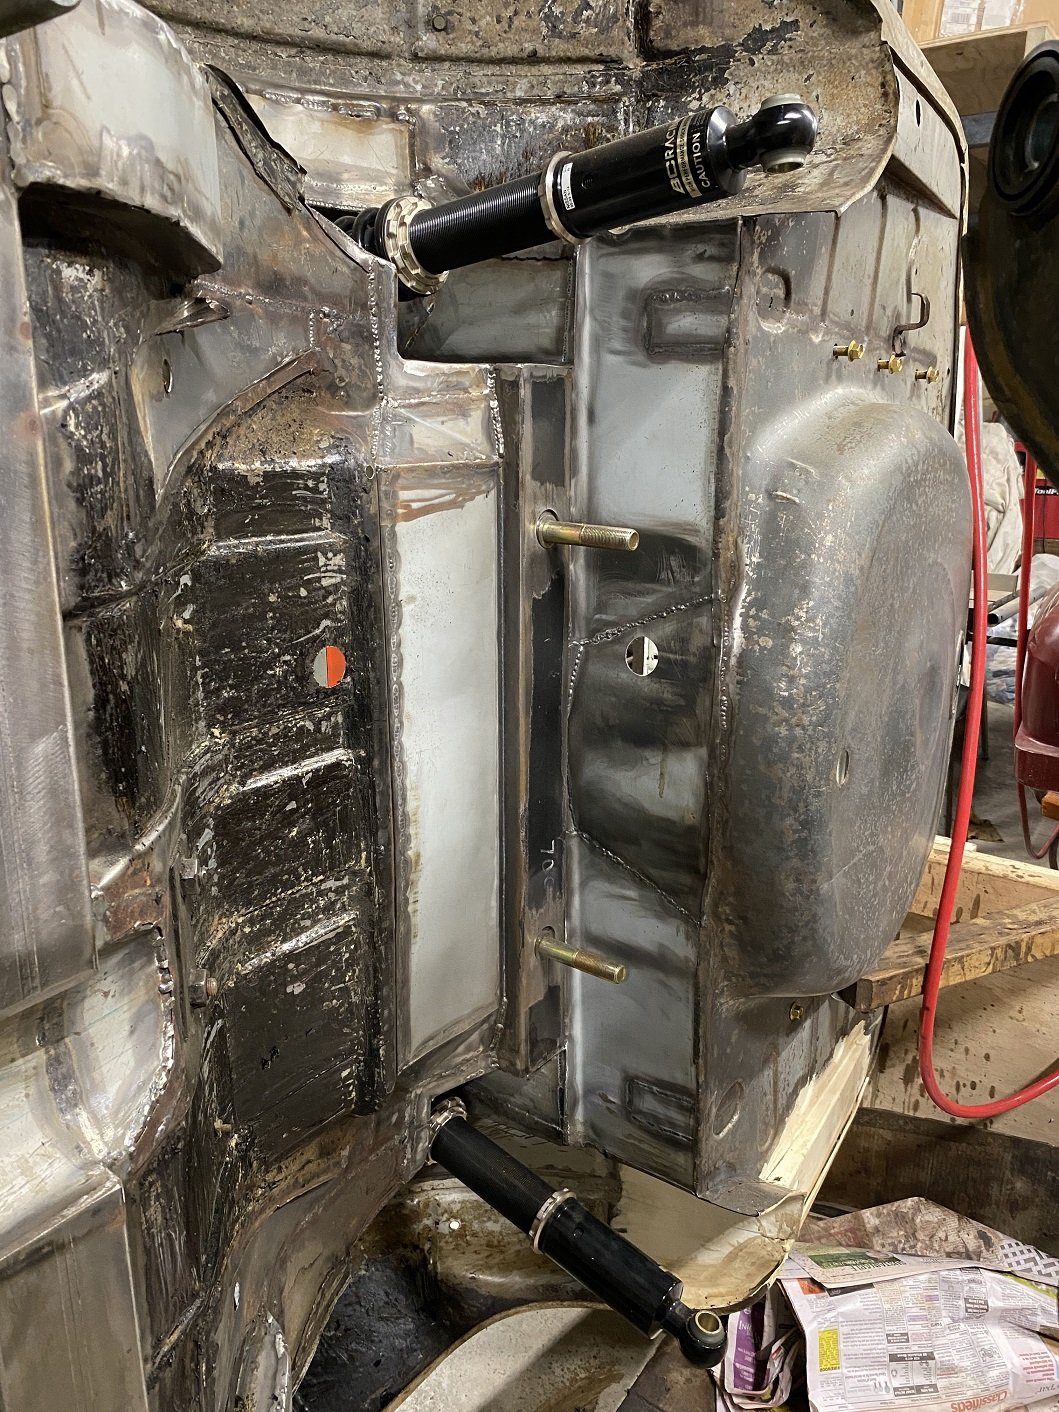
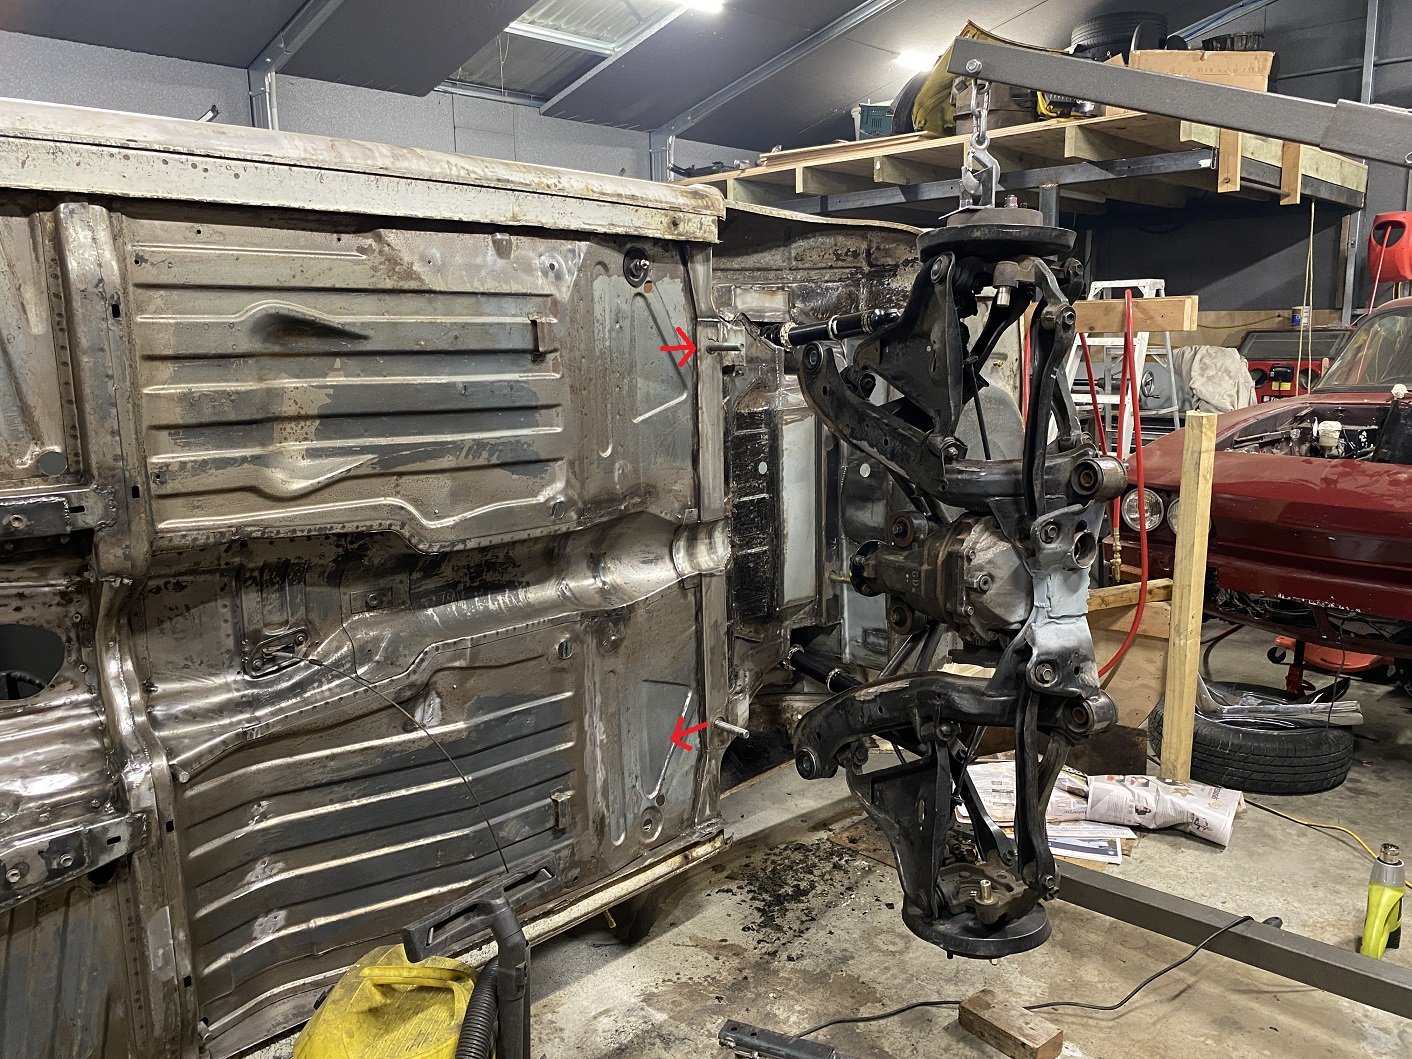
I lifted the rear subframe off. Feels like one of those photos showing off the big fish I caught... With the car like this it made it really easy to measure between the front and rear lower ball joints to find the wheelbase on the drivers side was longer than the passenger side. I suspect it's because I built the alignment jig for the two front mounts on the yellow car, not this one. I had oversized the holes that the studs come through to allow some wiggle room, but I need to take a further 4mm off both sides. Once I can get it on a wheel alignment machine to make sure it's straight the studs will get welded in solid. I've started cleaning off the last of the underseal. I've got to also remove the remains of the original spring seat reinforcement.
1 point
-
Ive been making good progress on getting everything wired into the fusebox and controlled by ECU rather than hardwired. I bought 2x 500mm coby hotdog mufflers which are currently just sitting pushed over the ends of the pipes on each bank. Quieter than just open manifolds but should be better once welded. Have wired up ECT, wideband, fuel pressure sensor. The motor was still idling really high (like 4200rpm...) with fully closed throttles, even after setting everything to fully closed. I couldnt figure out why until I noticed that my 2x lower intake manifolds dont quite cover the edge of the circular holes which must be an idle air bypass. It was only by a smidge, so gooed the gap with some silicone and solved that problem. My current issue is that the cam angle triggers arent being picked up properly. This motor uses hall effect sensors on the cam angle sensors, and the voltage they output is too low for this ECU to register correctly. So pullup resistors are needed, which I have wired in. But stilk not working it seems. Some people have suggested wiring them to the 8v power supply rather than 5v supply, and this boosts the output voltage. But this stuffs up my loom a bit, as the 5v supply on that plug branches to a few other things as well as the triggers. So, another annoying problem, but not insurmountable. Just soaking up more time on little bits and pieces than expected. But thats always the way I guess!
1 point
-
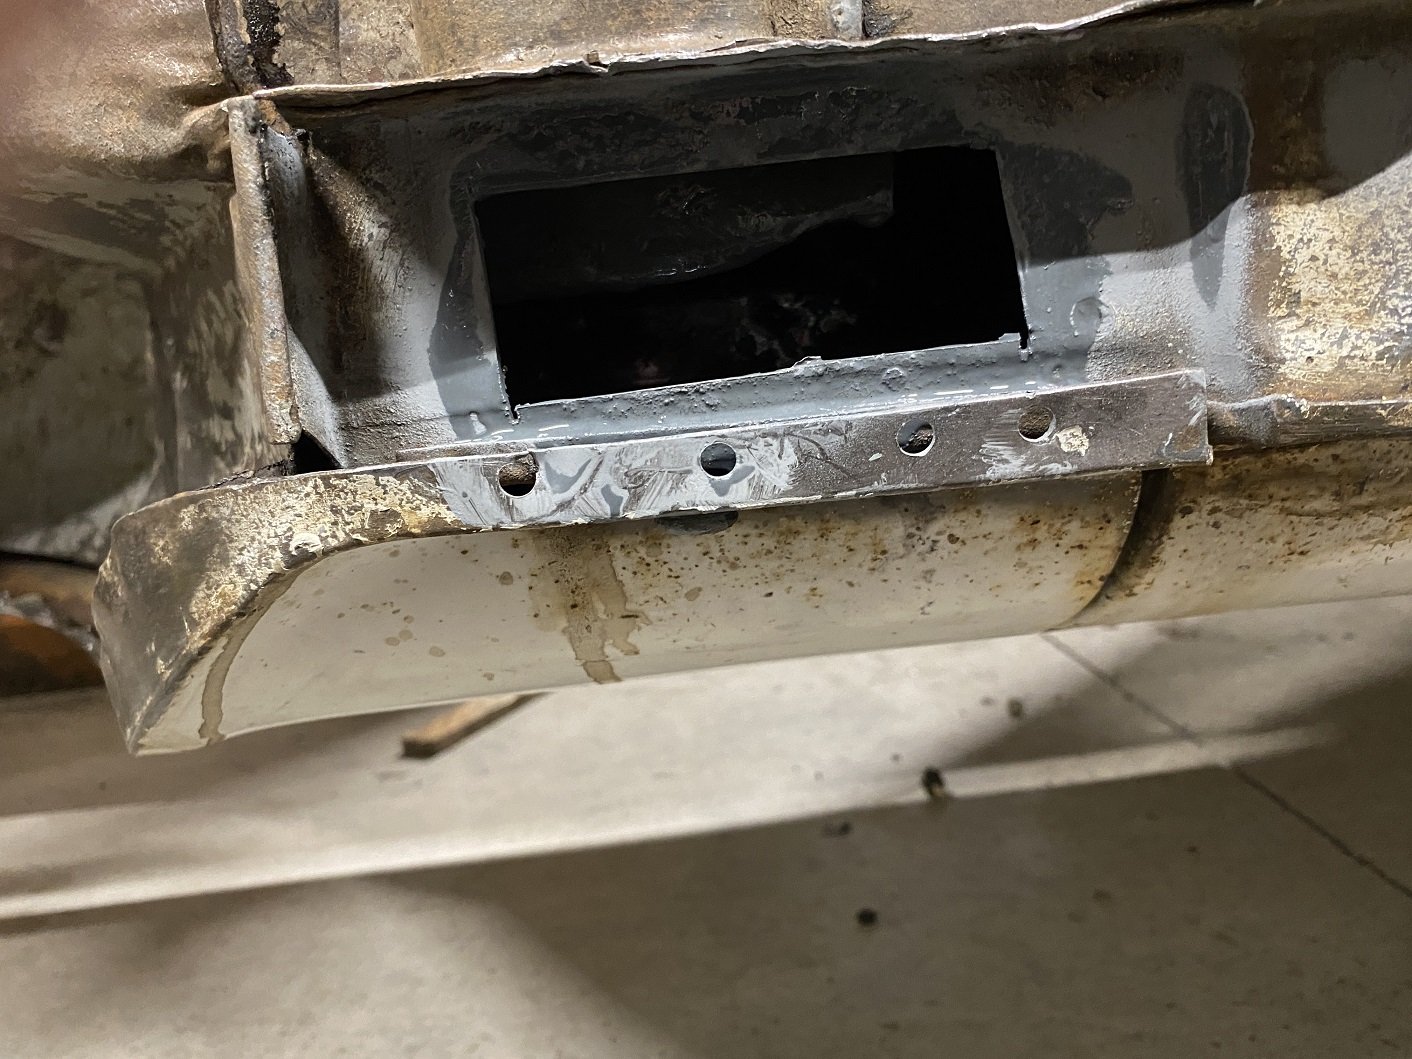
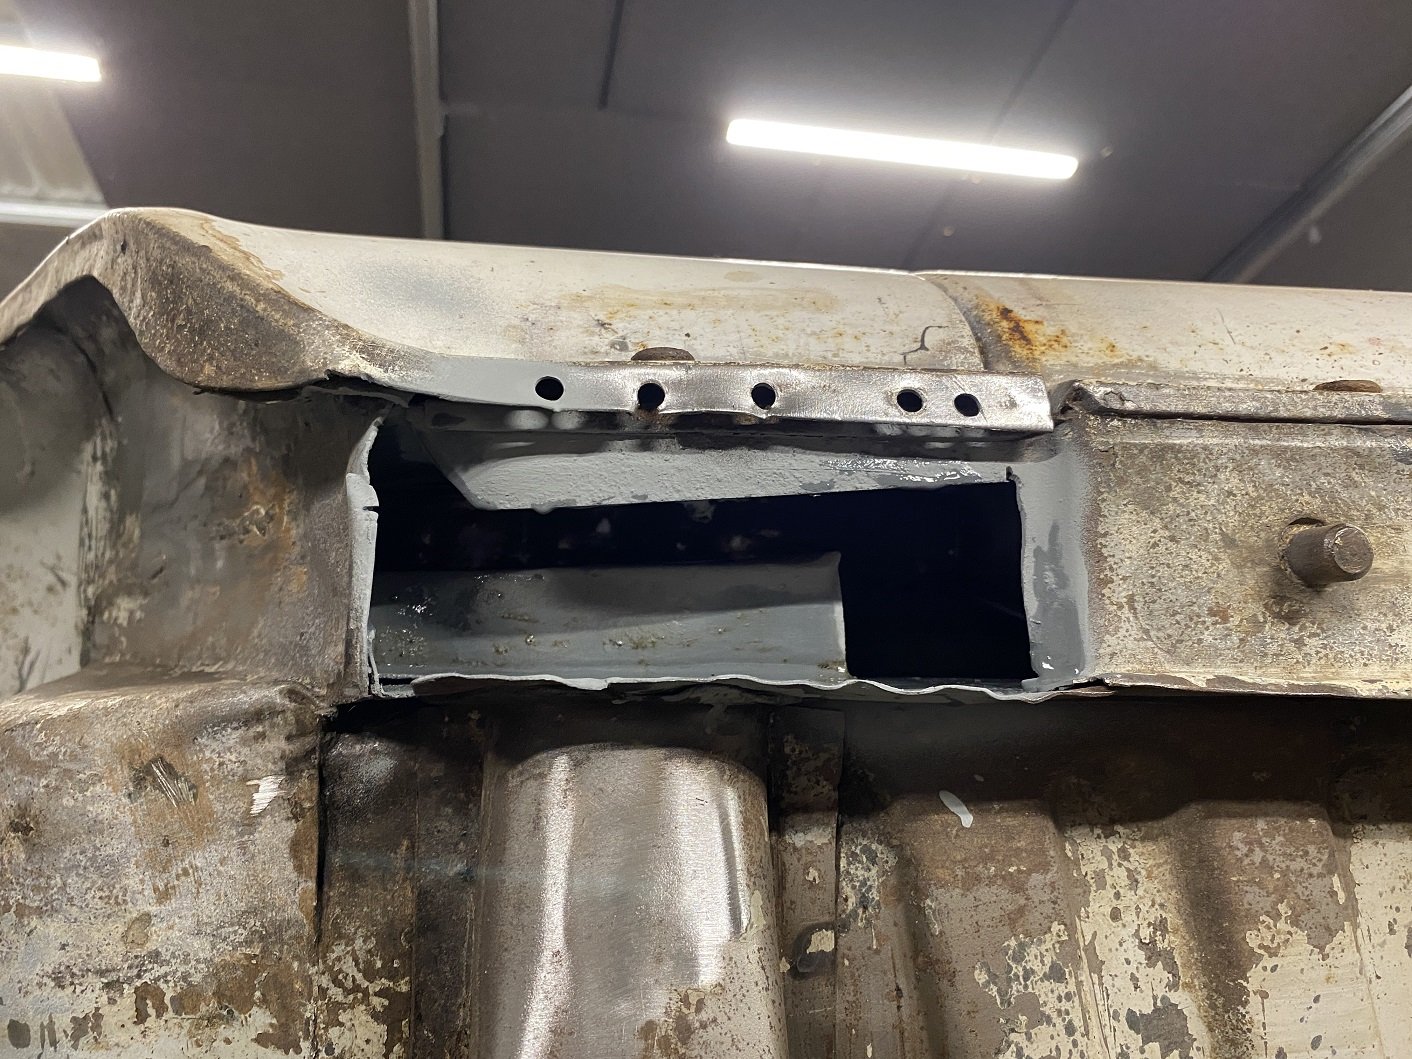
While I've got the underside of the car right in my face, I've been using the hammer to close up any gappy seams and straightening edges. Because I can. The seam at the front end of the sills were a bit squashed from jacking so I knocked and pried them back into shape. While doing that I noticed some pinholes in the flat panel that joins the bottom of the front wing to the seam on the bottom of the sill. I decided to remove that panel. It's basically an 'L' shape so real easy to make a new one.(I've made the new ones using slightly thicker metal) The drivers side sill end was quite pitted under that flat panel because debris gets stuck between them. I cut that out too, it's also flat. It was in AMAZINGLY rust free condition in there. It seemed to be evenly coated with a dark grey primer, this shell must have been dunked in a vat of this primer at the factory for it to be in there. Just for good measure I flooded it with Zinc primer. I did the passenger side too, just to check it was in even better condition. A little pitting, but no pinholes. I tried to take a photo inside but my phone didn't want to use the flash.
1 point
-
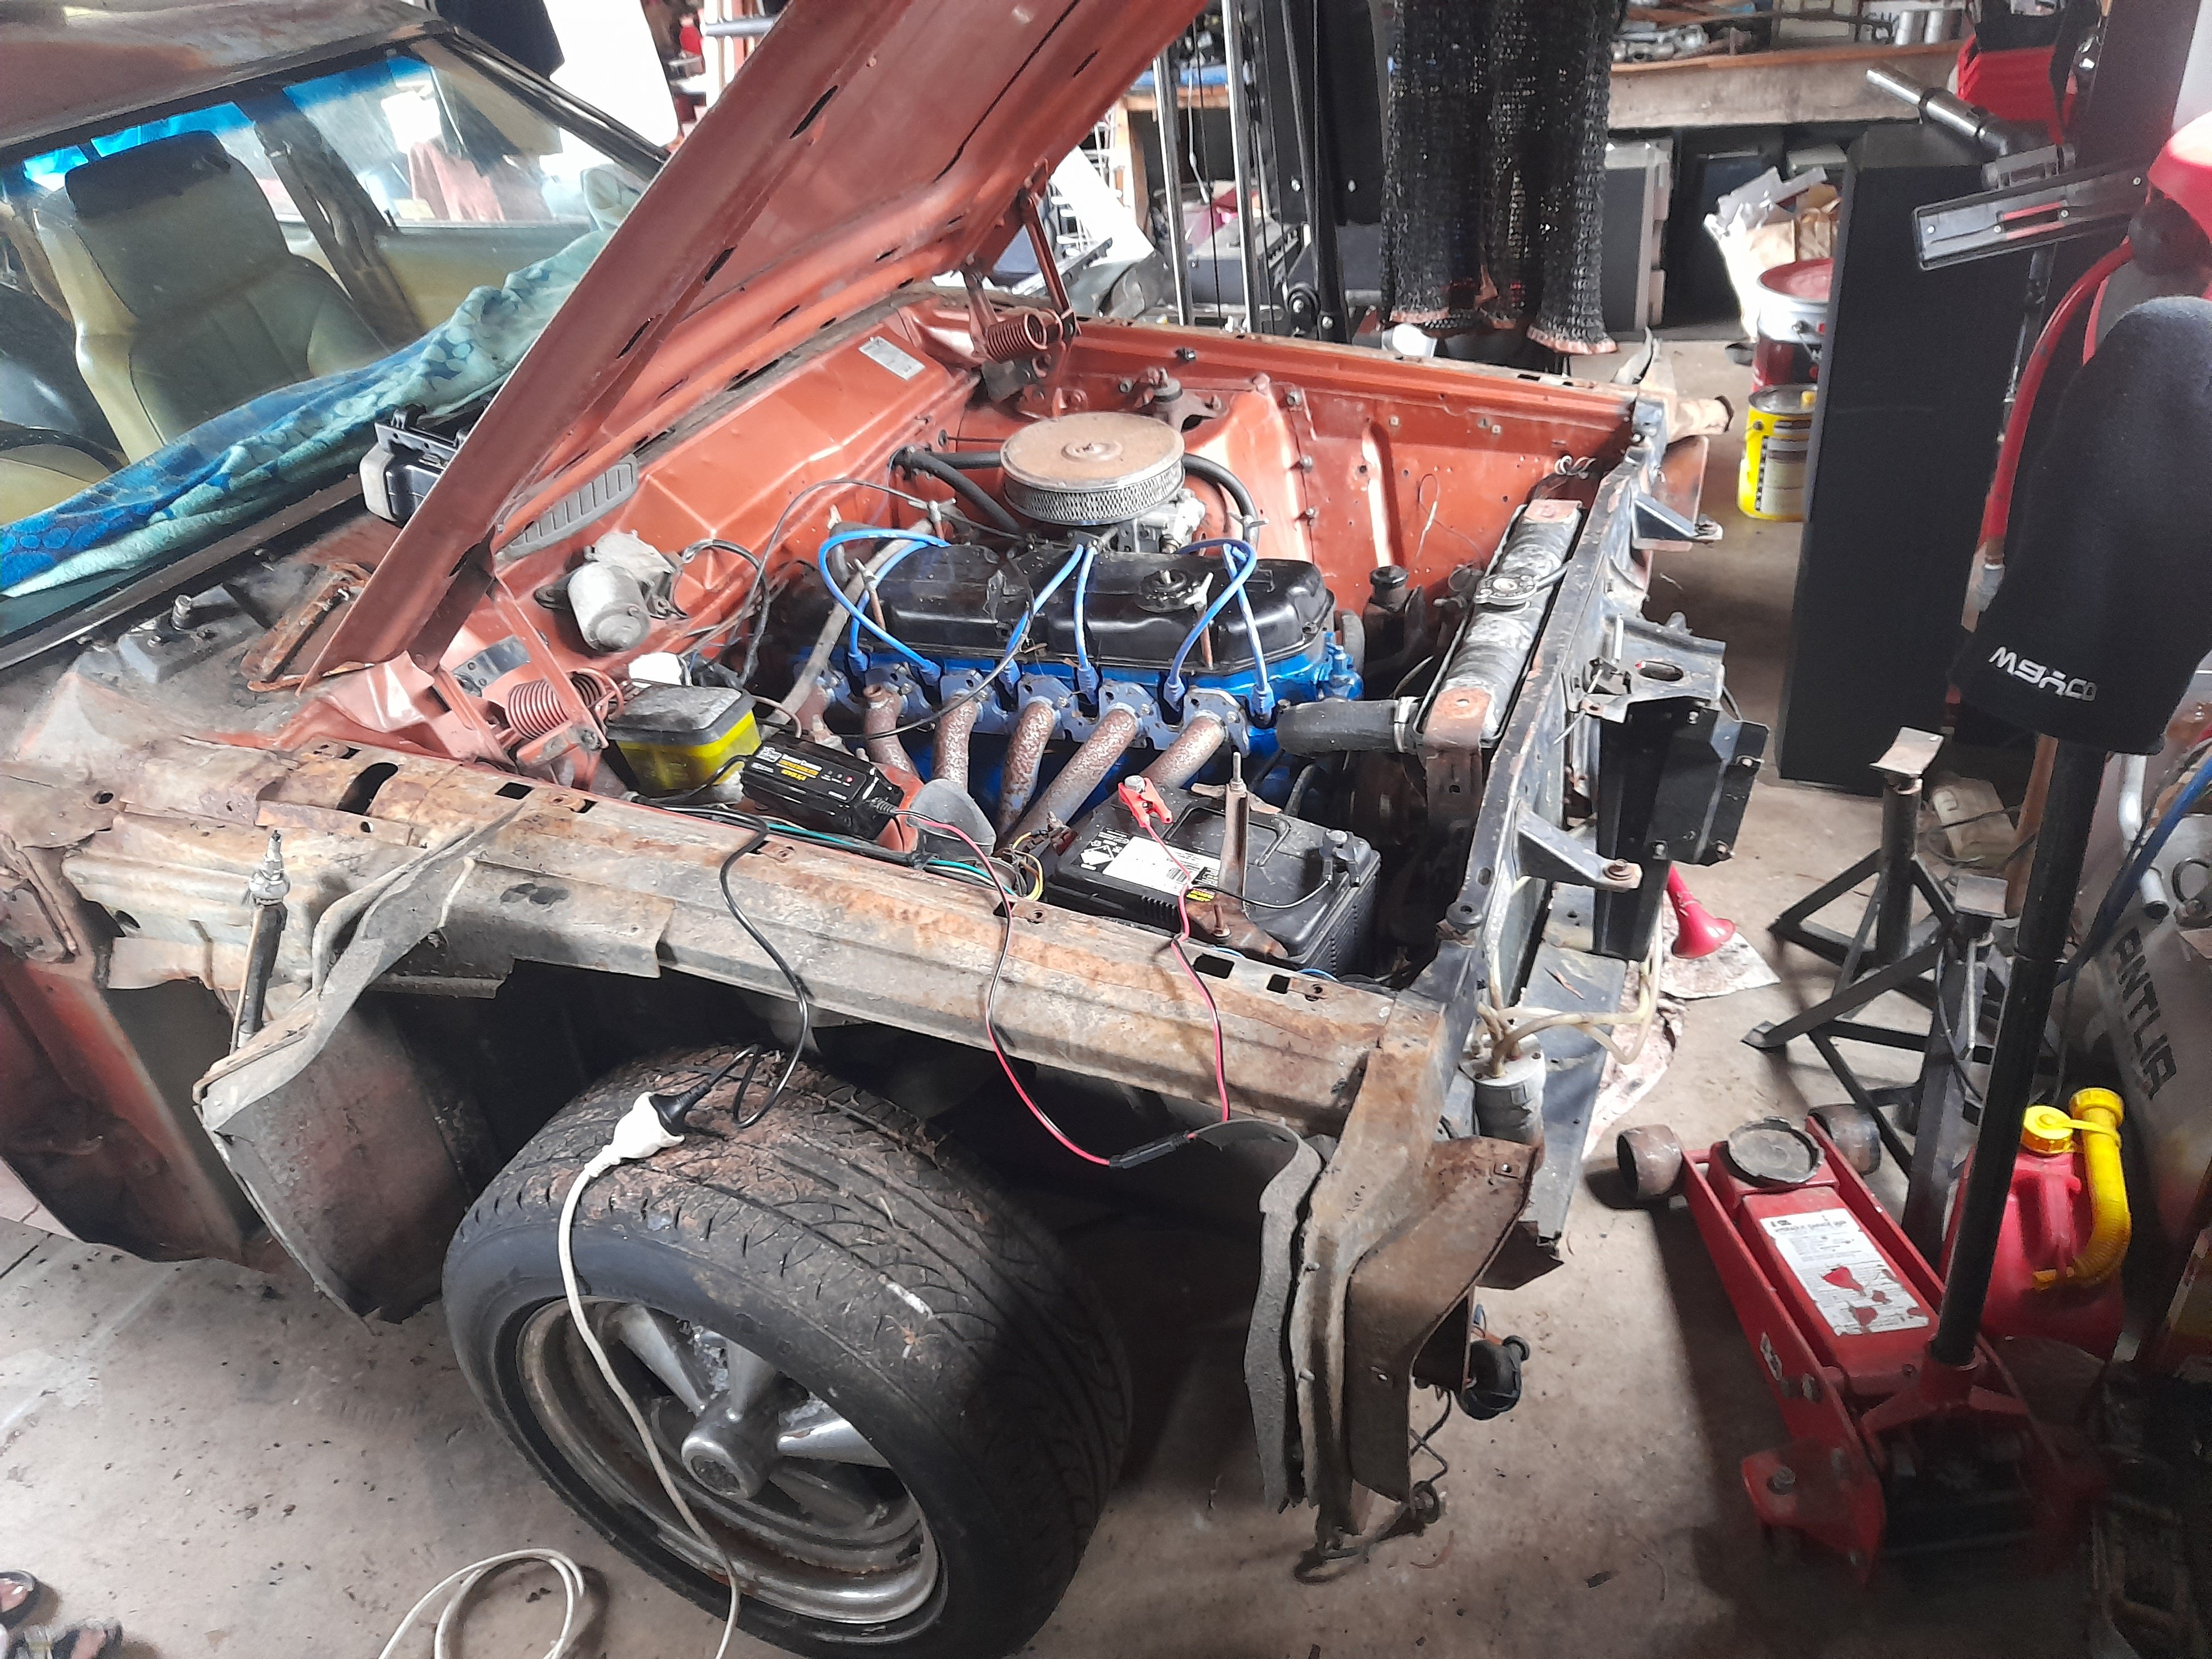
Went to pickapart and replaced the missing air bleed hoses. Fixed a few other coolant leaks. Now it's good. Bought a big syringe pump thing to fill the gearbox with oil, managed to do this notoriously messy job without spilling a single drop of gearbox oil! Miracle! Until I realized that the drain plug wasnt screwed in properly, and itwas on an angle - so I had to undo it and quickly straighten it and tighten it up. So gearbox oil everywhere still. Damnit, haha. Then I think I've still got some fairly massive air leaks, I dont have any gaskets or sealants at the moment so I'll pull it all apart and sort that a bit better. I managed to get it idling at around 1000rpm, but only because I've leaned out the fuel table so much. Again an easy fix, just time consuming. Then another cool milestone, and to be honest something I was dreading a bit - testing the clutch. Everything's good! I drove the car forward about a meter, then reverse about a meter. Which is officially the furthest it's propelled itself in about 6 or 7 years. It's still ear splittingly loud, and dear god it sounds like a straight piped RB or something dreadful currently. Ugh. Will buy some mufflers this week if I can, so I can keep making some progress without making my brain bleed. Then also have enough of an exhaust on there that I'll be getting okay readings on the wideband. Small steps but all in the right direction currently. nother1 point
-
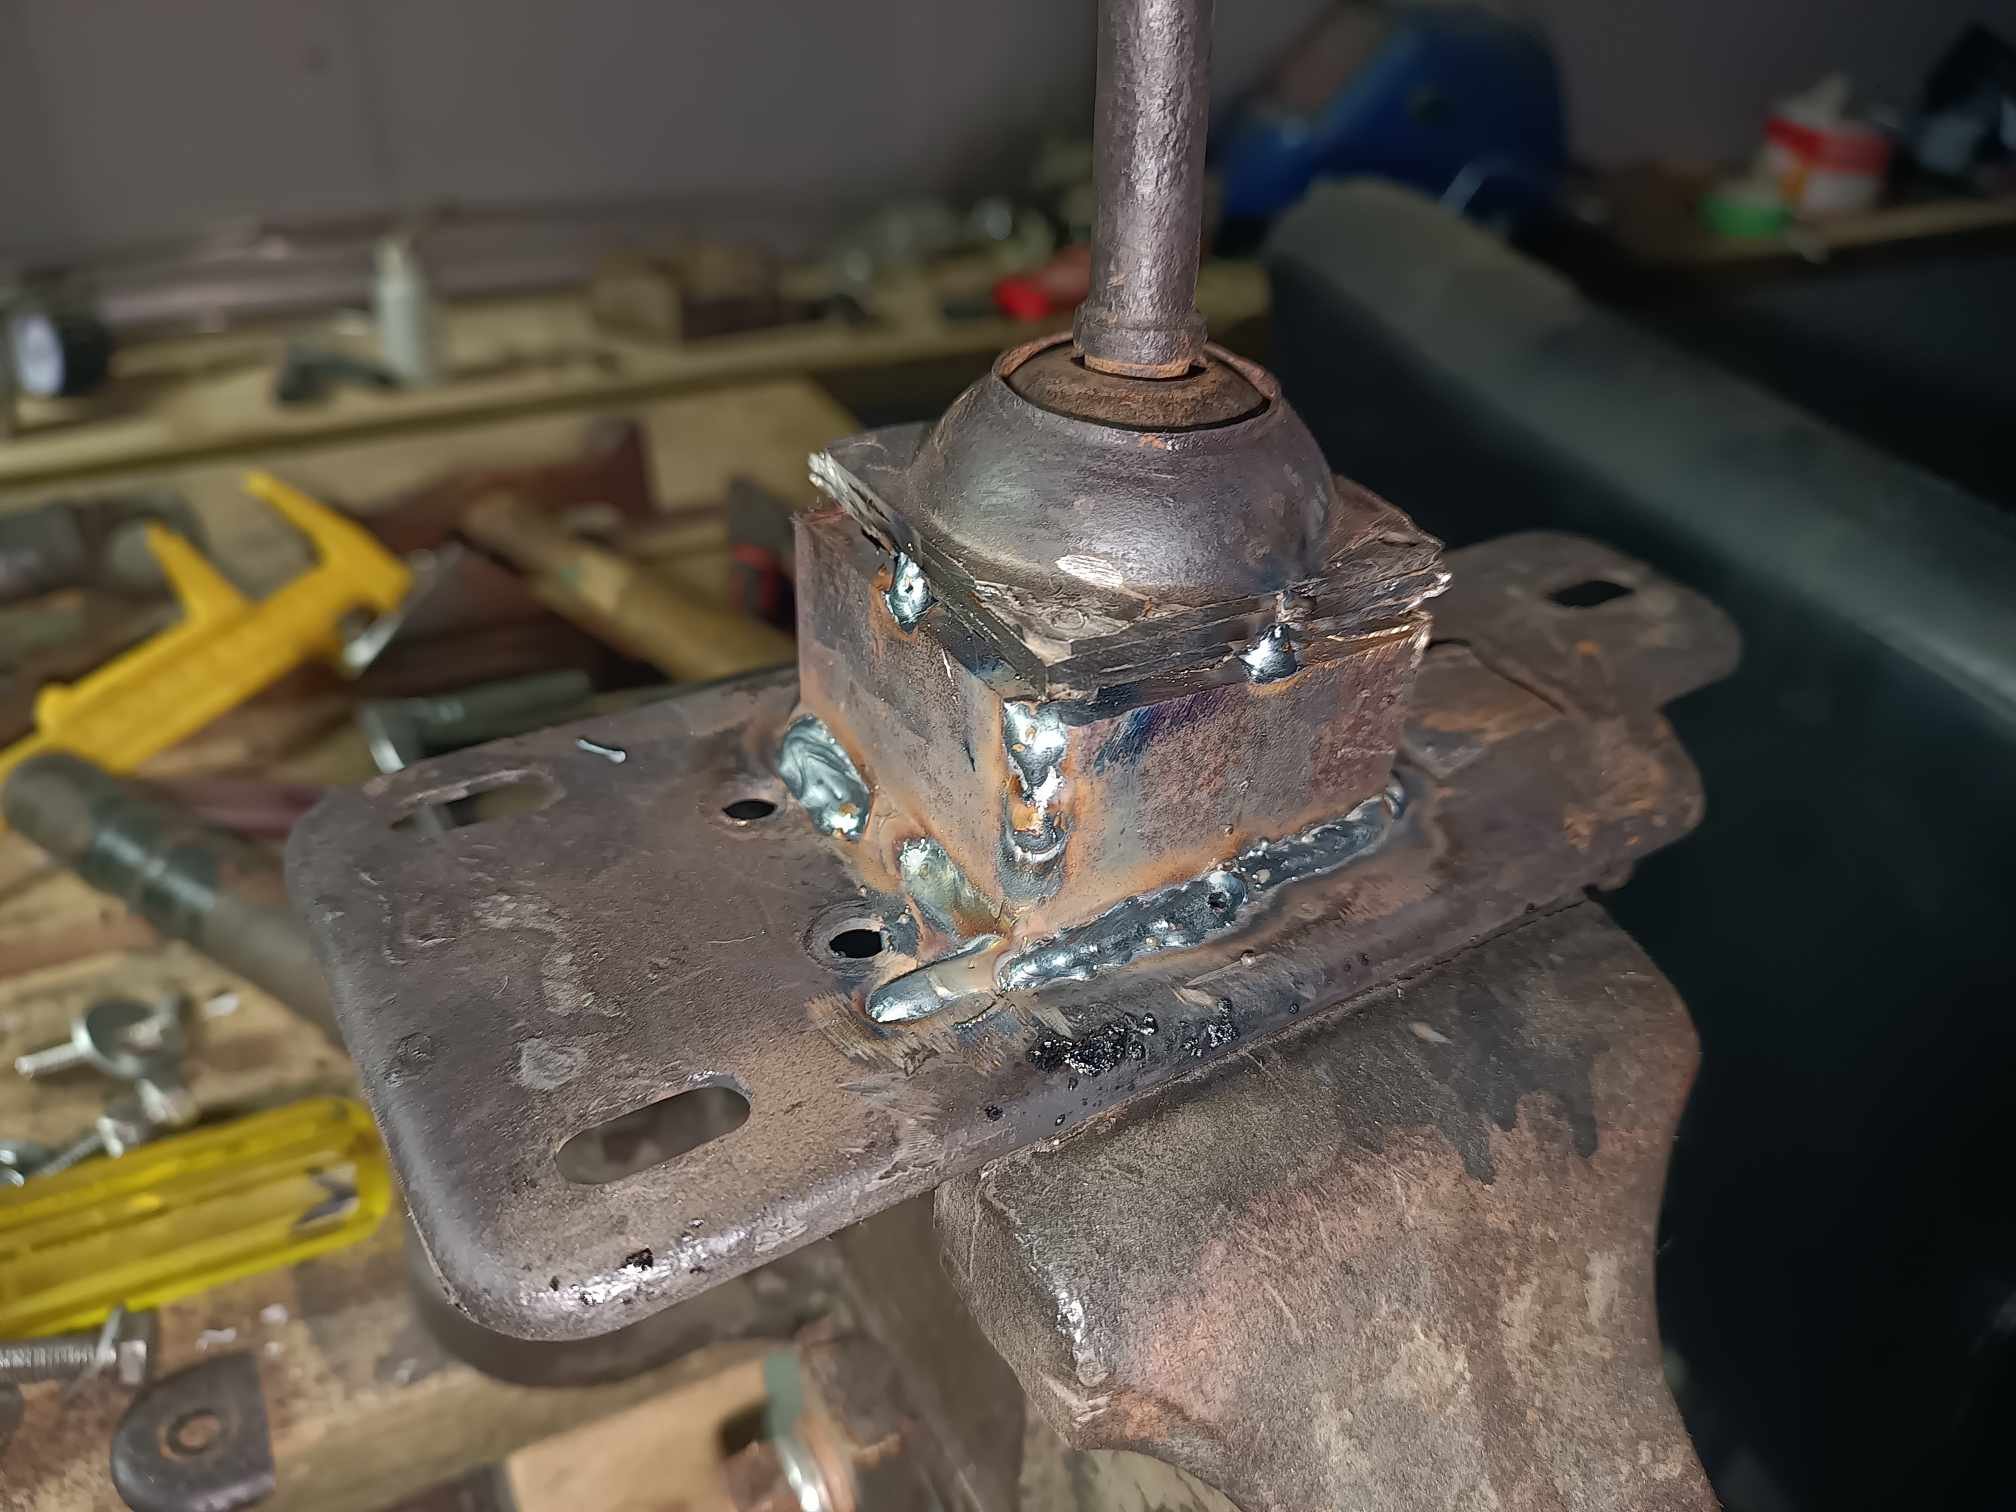
Some more boring old shock mount photo's. It's been a while as I ran out of gas and time but finally found the time and bought some gas so I was back into it. I did make up another top piece, so it didn't have the added middle section. I drilled lots of holes and used bolts mainly and some clamps to sandwich it all together. Welded up the plug holes and then the bolt holes. I will weld around the edge as well both underneath and the top piece but I will only weld it in about 25mm sections 50mm apart should do. I certainly think it is better being one piece going the width of the car. Certainly easier to get both sides the same.
1 point
-
2GRFE / 2GRFXE This is a 3.5 litre V6 that I guess replaces the 2JZGE engine. Has good aftermarket support, aftermarket cams etc but the engines cost a lot. Popular for engine swaps into MR2s and similar, because the east-west variants have a bellhousing pattern very close to a 3SGE. So they bolt up to a factory gearbox. Unfortunately ends up being pretty expensive all up, though. This guy made 405whp with an NA setup, using high comp factory pistons, aftermarket cams and valvesprings. and some bolt on mods. Pretty sweet to be banging past 100hp/litre at the wheels with a fairly big engine.1 point
-
1NZFXE I think we've covered this one well enough - but definitely earns a mention. It's a pity that available aftermarket cams max out at 264 deg / 9.5mm lift. As I think this motor would give a lot of older 1600cc motors a run for it's money if bigger cams were available. Wins the prestigious Goez hard 4 wat it iz award.1 point
-
This make some things easier.... I bolted the don't-fall-on-me props on so they can't accidentally be knocked out. It's a bit bottom heavy with all the suspension still attached so it does want to come back down.
1 point
-
Check the top loop on the pillar, gunk builds up on it under the belt1 point
-
Been driving around some more. 2200-2800 rpm is punishing to cruise at. Transitioning through this band is fine and generally it makes bad-ass old car tunes. The rear muffler is a straight through bullet style and this needs to change, I think. I have a new problem with clearance though. The exhaust isn’t banging the floor anymore but now the rear axle housing is banging on the inverted U section. I think I need to ditch the slip joints and weld flanges in instead. This will give me some more wiggle room to play with angles before welding the flanges on. Also I may investigate adding another leaf or part leaf to the rear springs. They are so soft I can make the diff housing touch the bump stops (and exhaust)by pressing down firmly on the boot! Increasing ride height is not an option. Servo pic: 8.8 l/100km on this one. I was expecting 10-11 so call me pleasantly surprised.
1 point
-
Dave in his 'happy place' in his undies getting itchy
1 point
-
Yeah good. Had a 'break' for a bit and planning on getting back into the CAD over the winter. Updates would be: I bought a continuous sand mixer at a government auction for ~$2k. Cost $90k new! Couldnt believe it! Its missing controller and pumps though so thats a significant cost but I should be able to figure something. Foundry guys had a look and said it looks brand new. Also got several crucibles in deferent sizes because I plan to make a couple of furnaces. The bigger plan is to setup my own small foundry. So ill have a proper industrial sand mixer (since its continuous I can do any mould size) then some furnaces to do my own Aluminium. I would stick with a foundry to do Iron. Ive started the move back to NZ. I packed up the whole shed into 4 large custom crates, have them in storage at a friends in LA. From July I have been traveling the US in my RV with the family. Plan to do that for another year and then move back to NZ end of 2024. So yeah its been on hold for a bit but Im going to go full time on it when im back in NZ. Ill add some cad screenshots to the main one. Sand mixer Started in SoCal and have been all over the Westcoast and top states for the last 4mths. So far done 6k miles. Currently in Michigan1 point
-
Finished! Bit of machining porn for you!1 point
-
Dropped the second half on with no drama. So its all bolted up now and ready to go to the foundry at the end of the week. Nailed it Thats like 1000hrs work right there!1 point


.jpg.c472fa6721301e28f293a24cf337a896.jpg)


.JPG.911996a57340489b89409222facd1532.JPG)
.JPG.32ca8111e8a98af724dd0f2e2c95b891.JPG)
.JPG.893e17939e59eecb0ff27421c7b47d00.JPG)
.JPG.4314fad55b635779c2c647b6d56b1709.JPG)
.JPG.5224b5e07dac0595316b8abde0085eb5.JPG)
.JPG.d527fed8e5a257d86f52d15d2c74e985.JPG)


.jpeg.f1cce9356261f12f1194414c46a391d3.jpeg)
.thumb.jpg.570970b401ac8d26ce9af7c1bf2bd8cd.jpg)


This leaderboard is set to Auckland/GMT+12:00