
Leaderboard


Popular Content
Showing content with the highest reputation on 03/30/24 in all areas
-
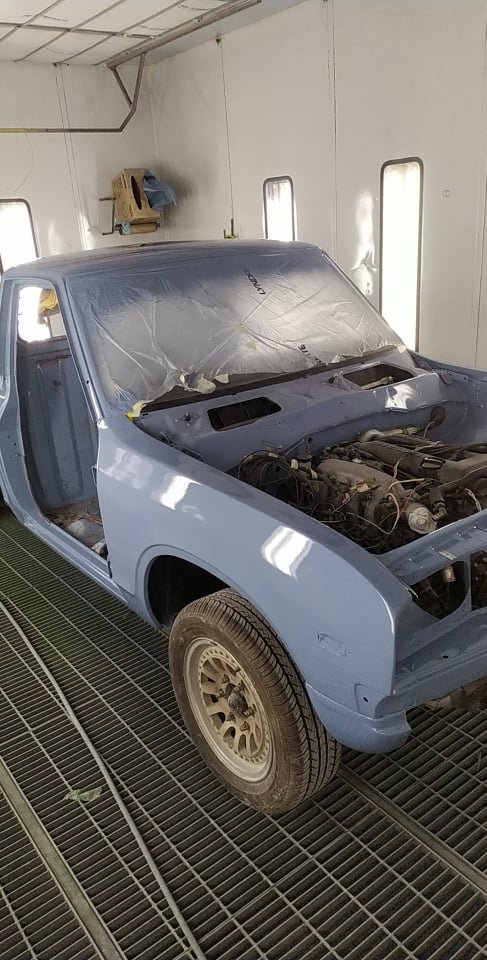
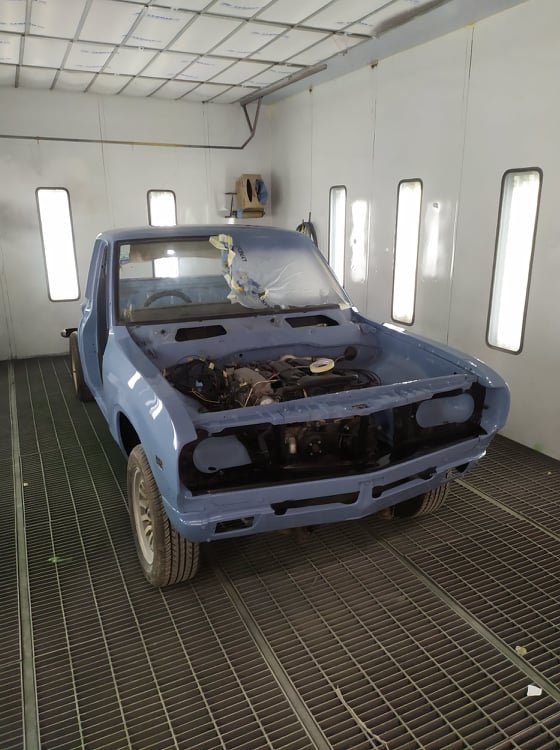
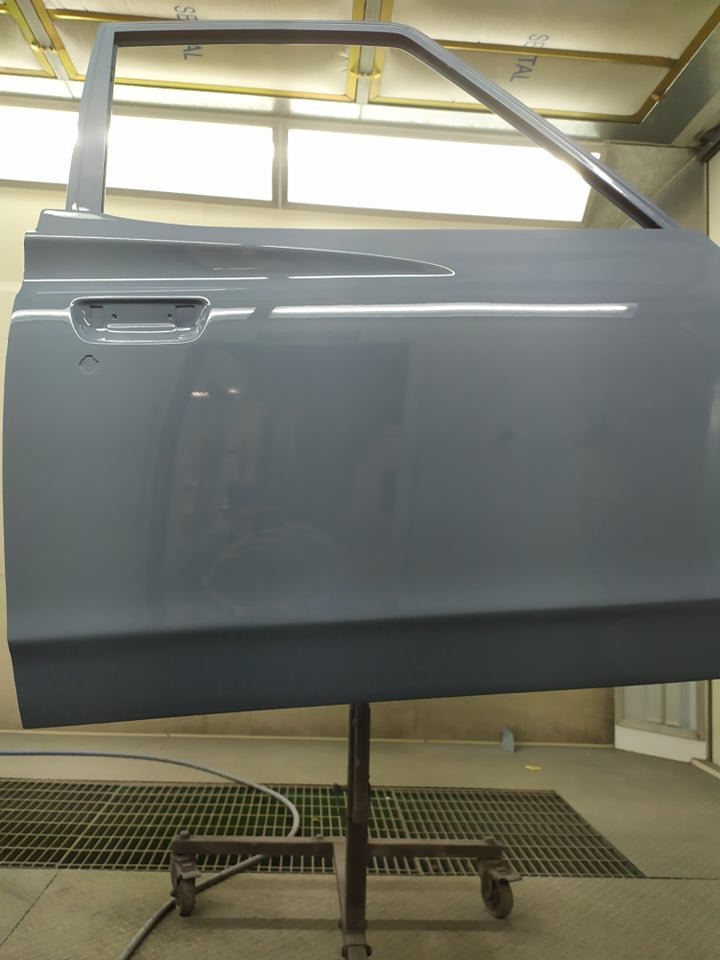
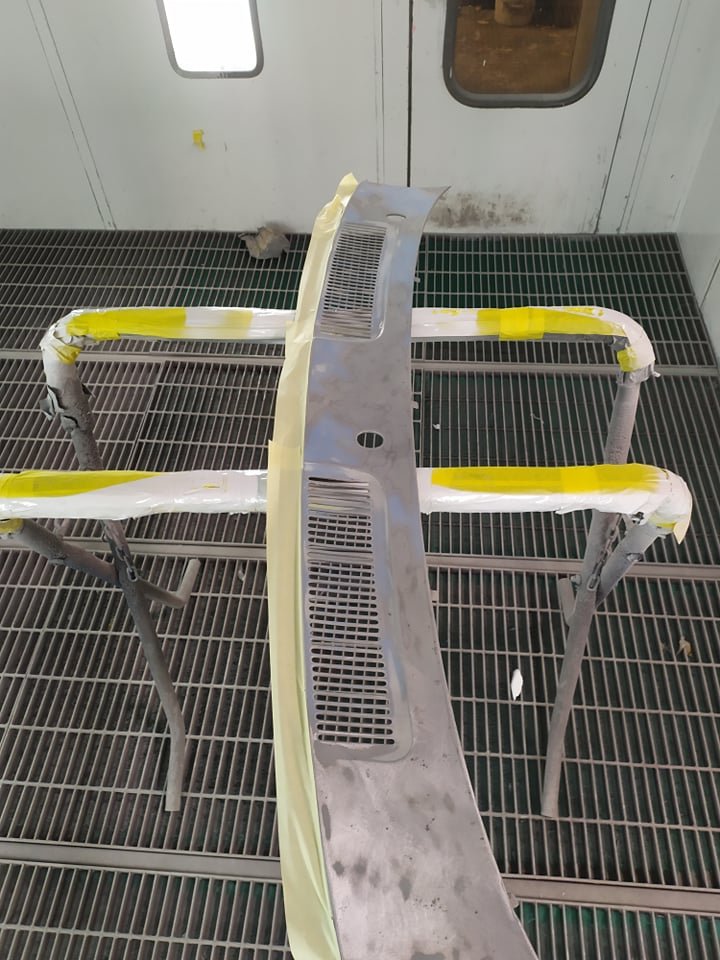
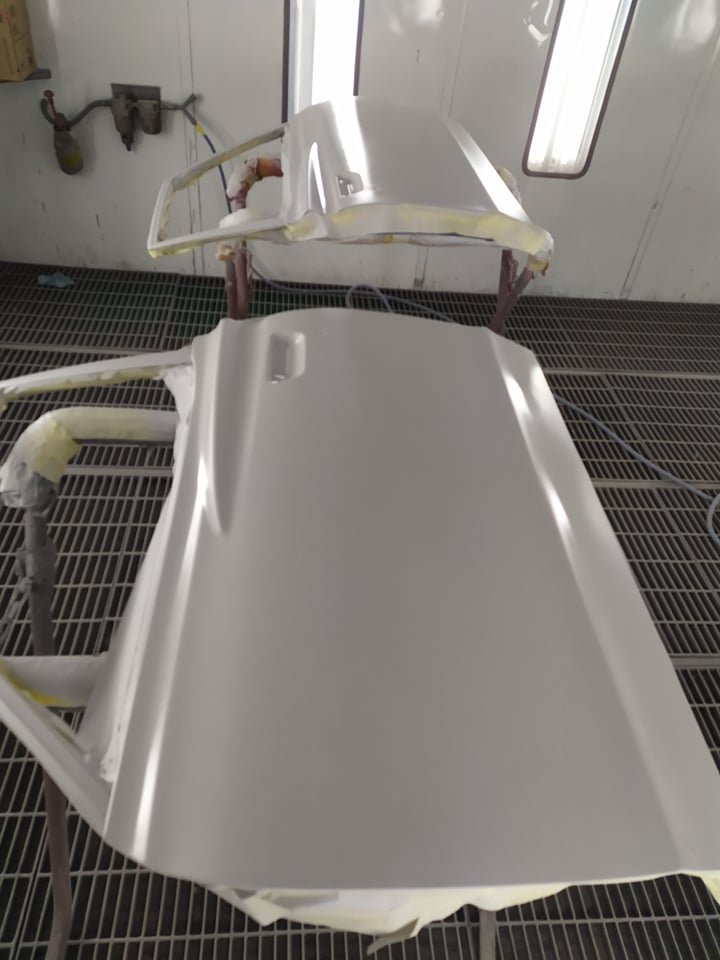
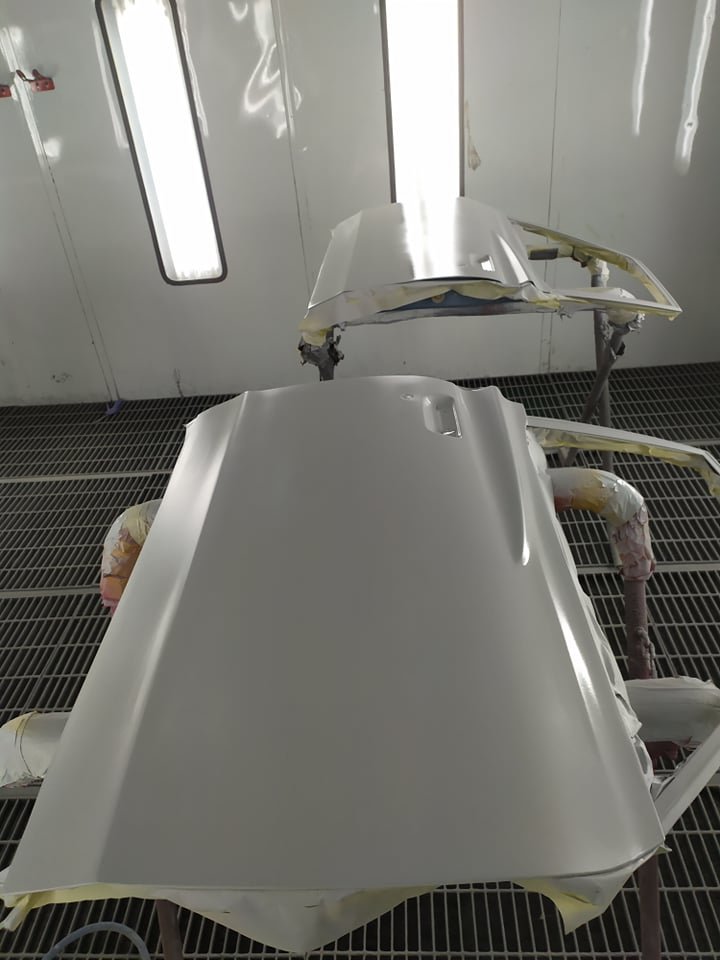
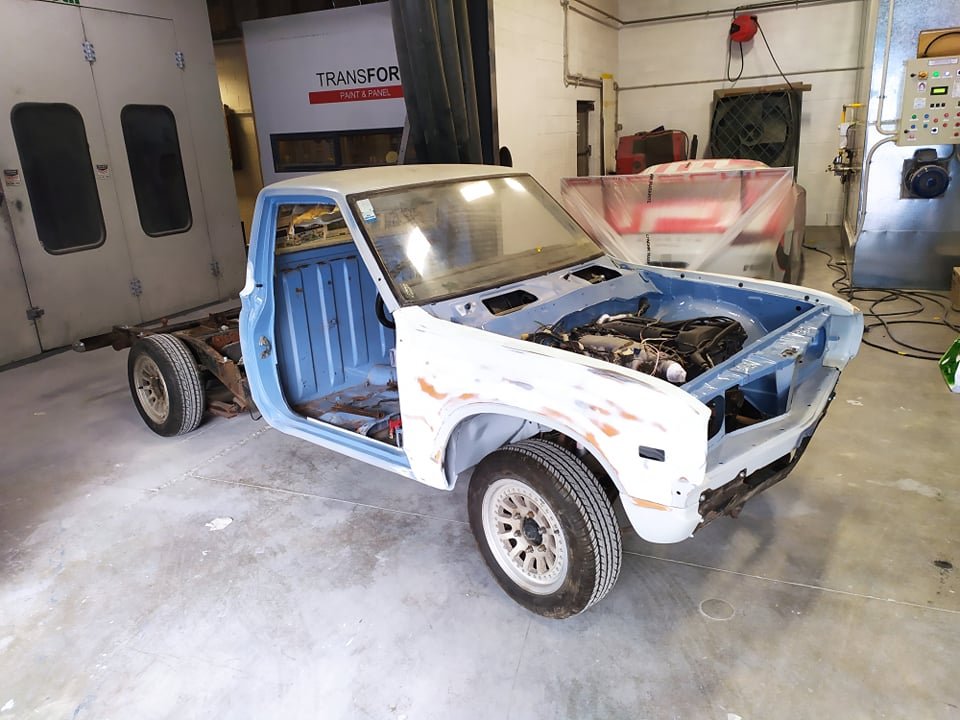
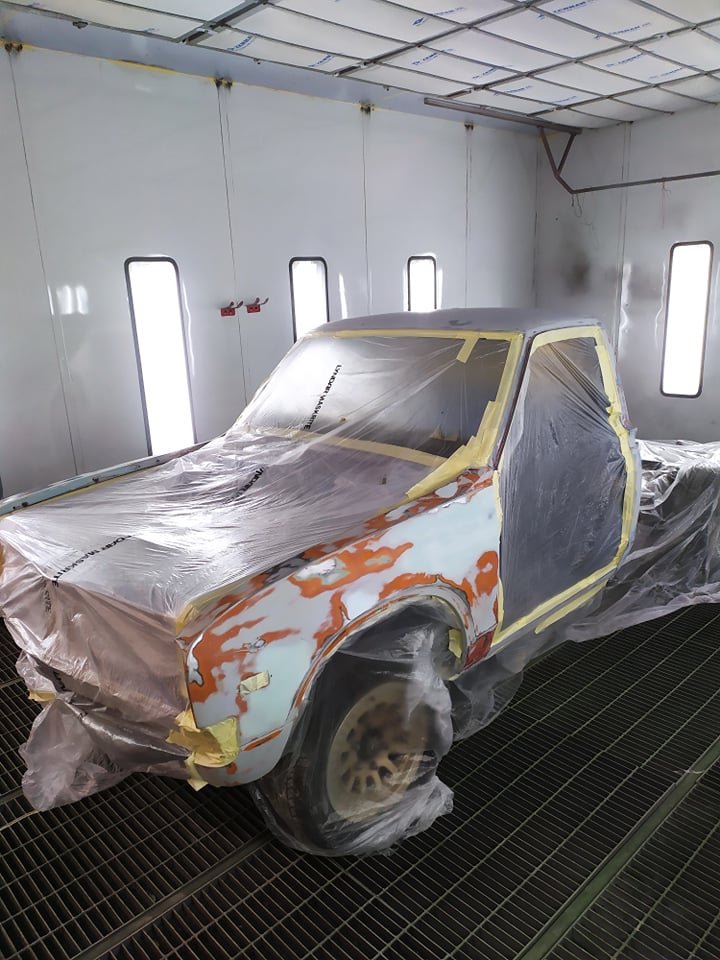
Car has been delivered! Currently organising it to be stripped and off to panel/paint/repair cert so hopefully have some updates in the coming few months.13 points
-
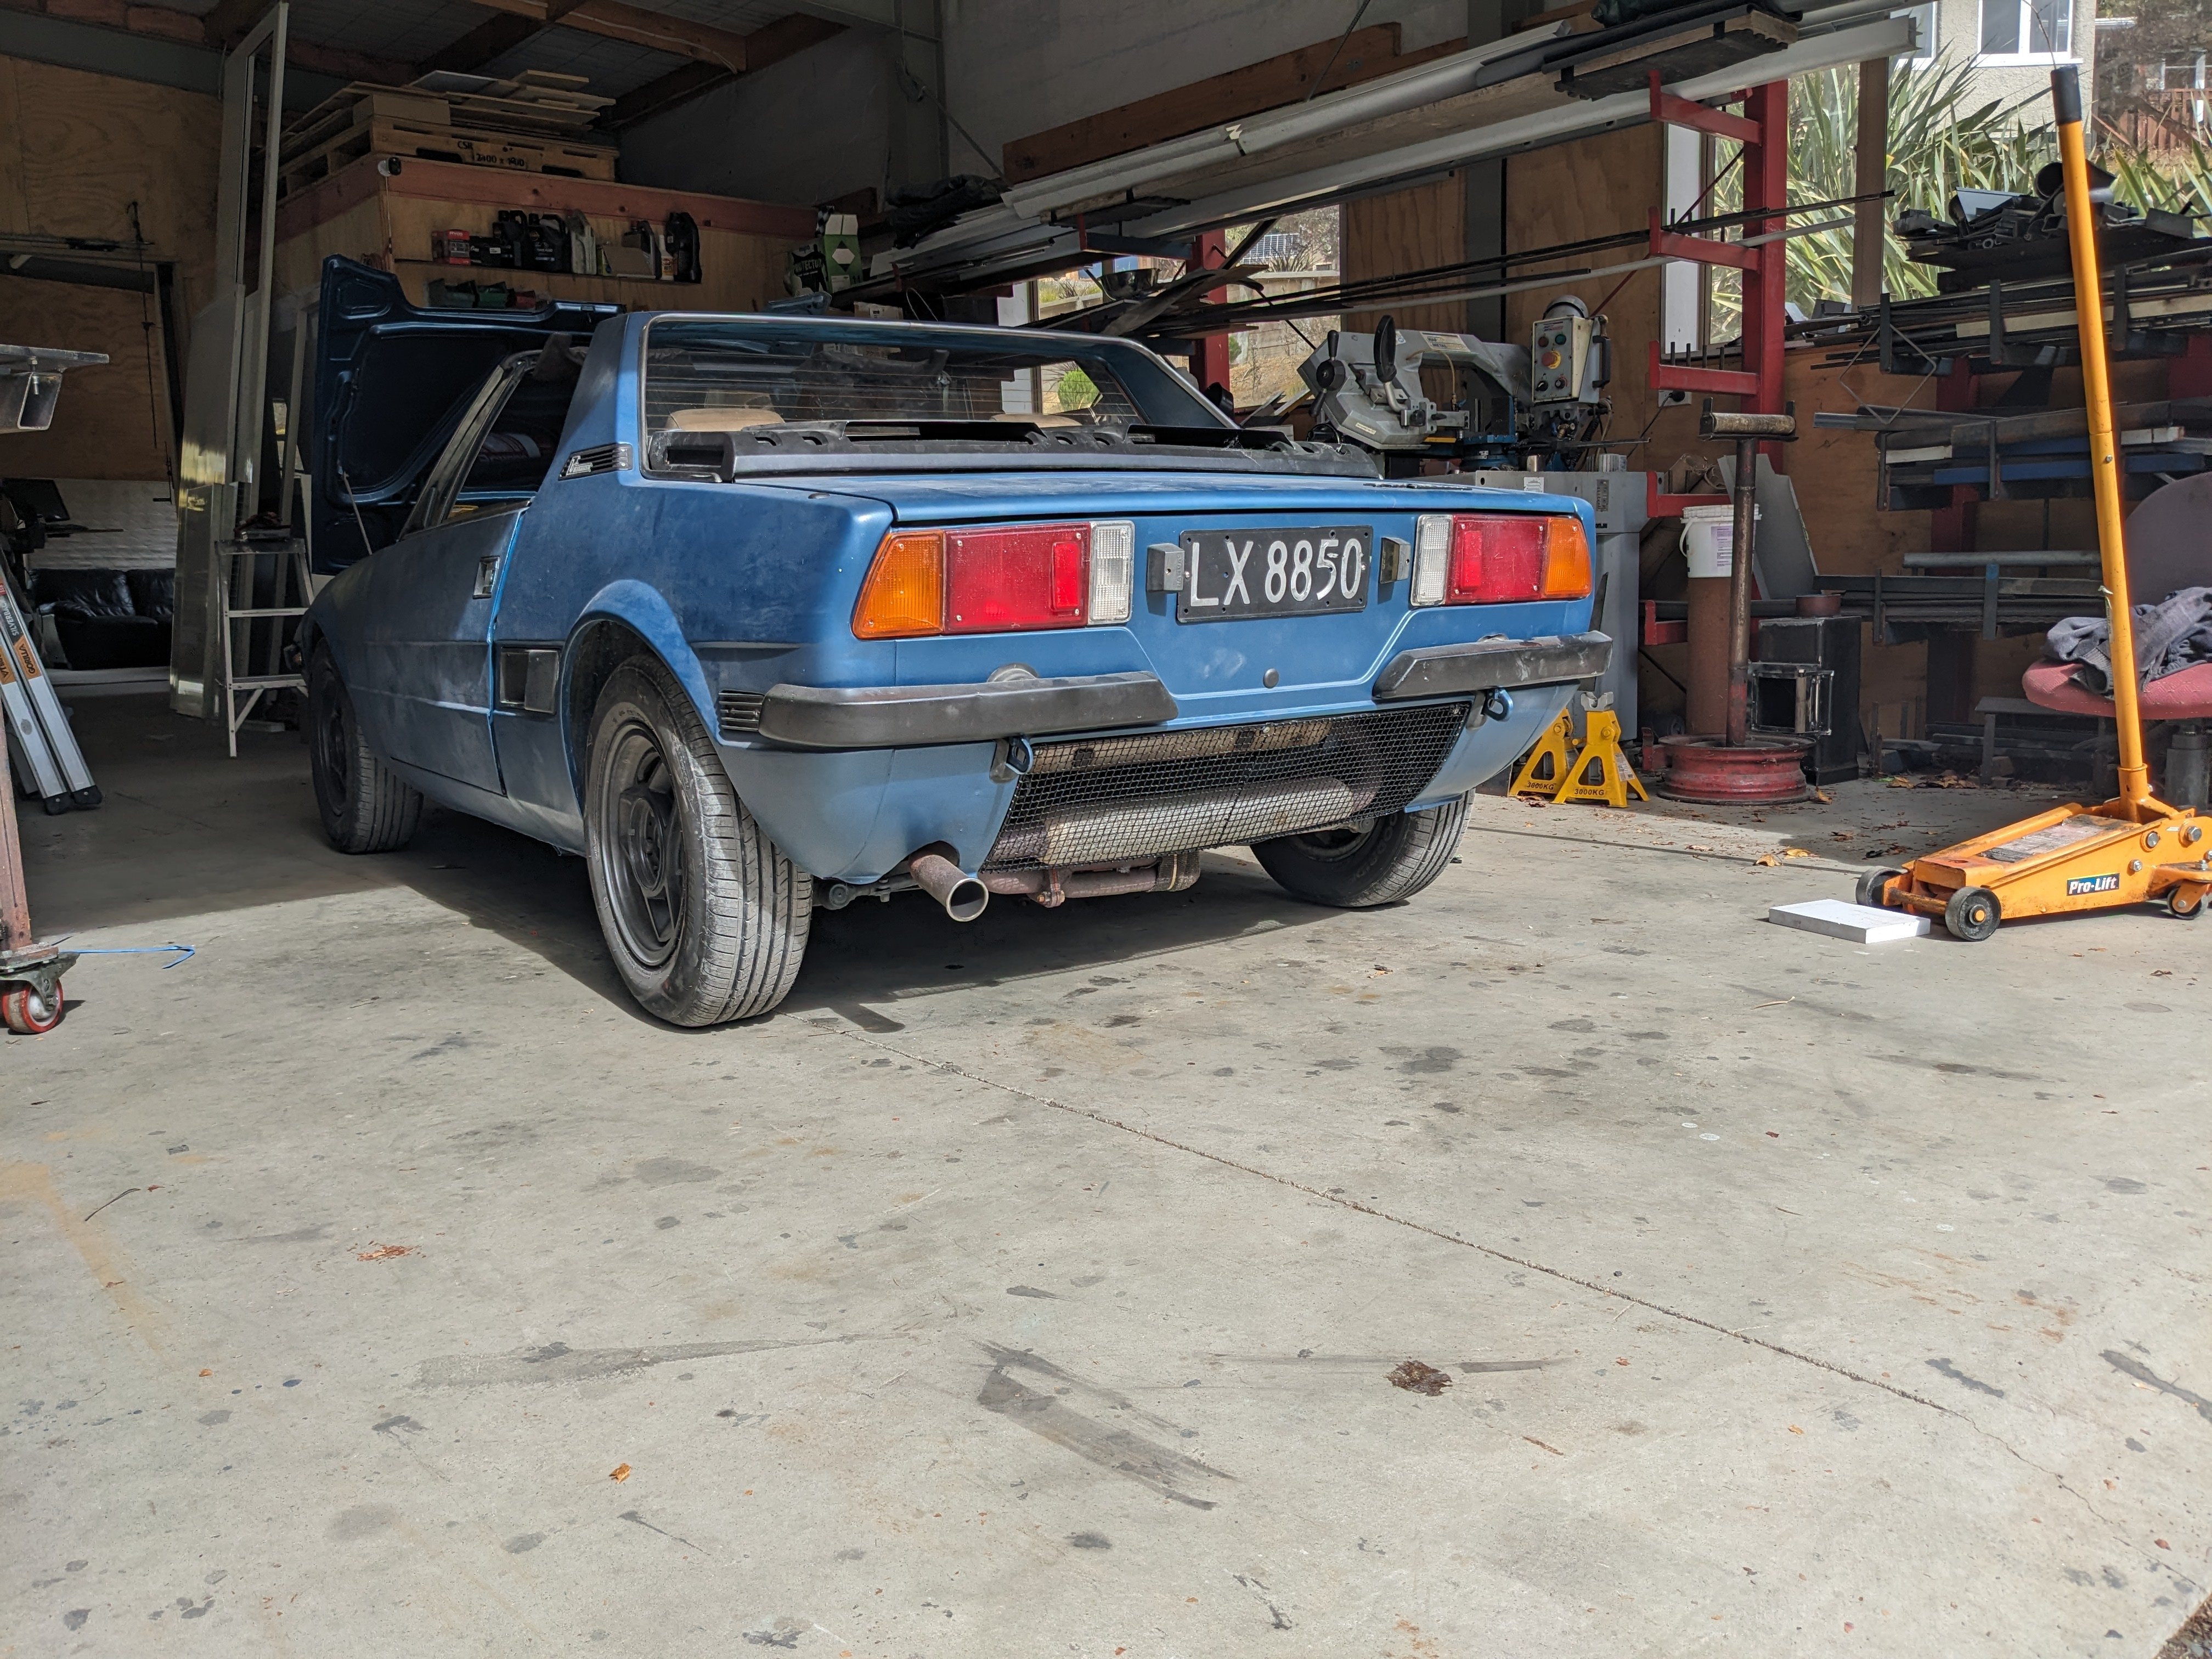
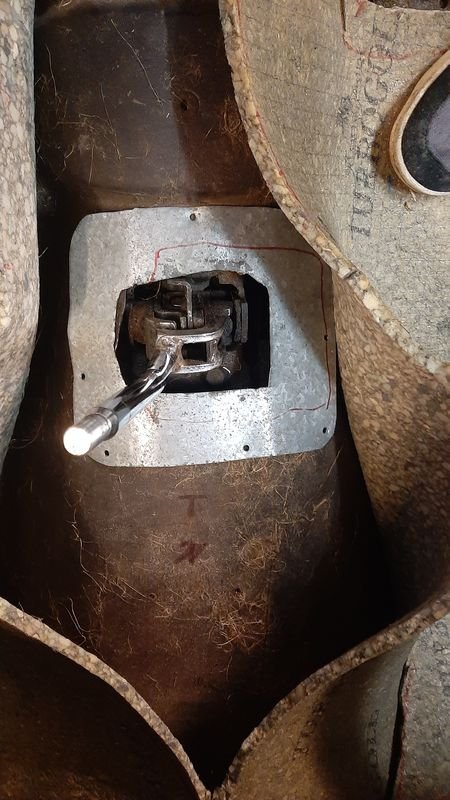
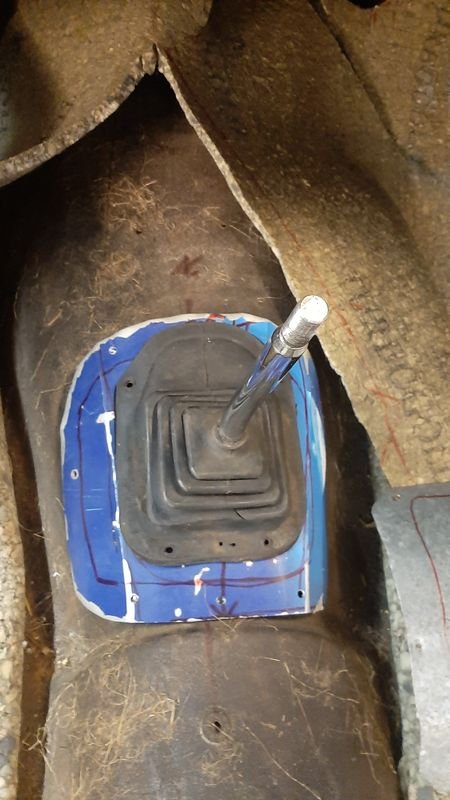
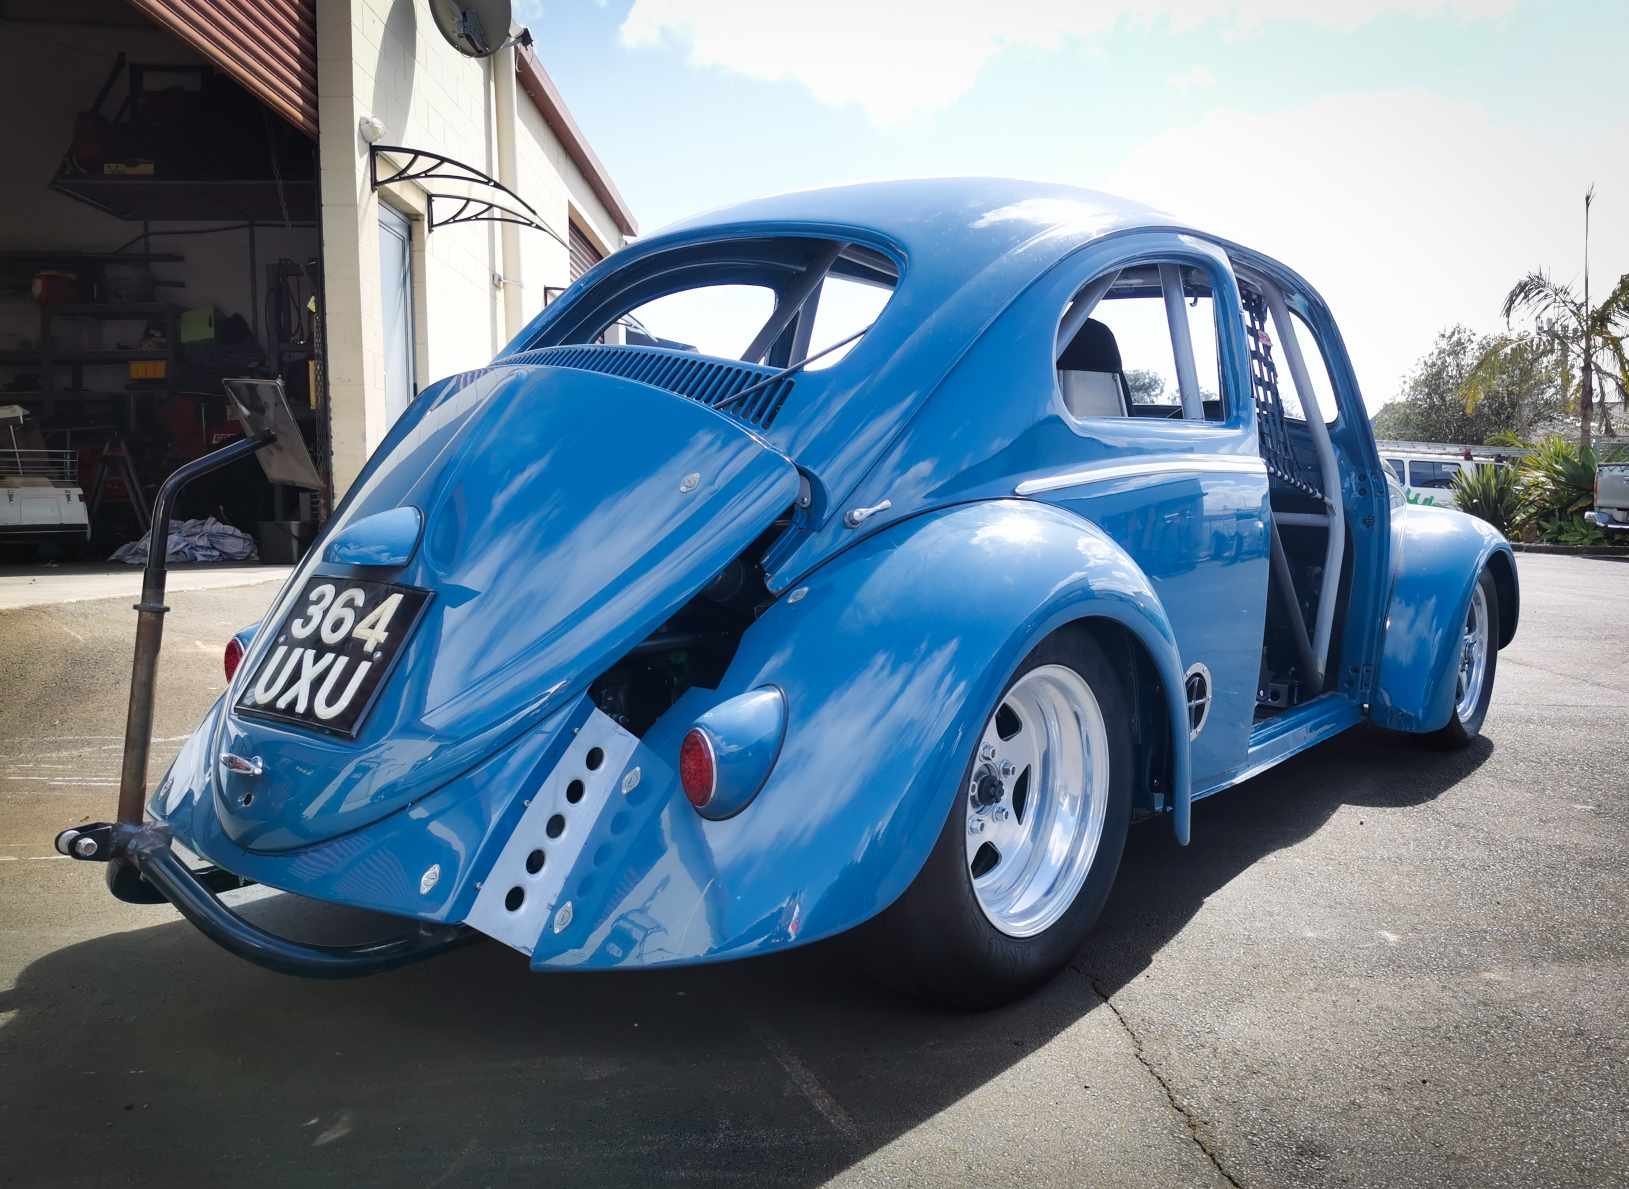
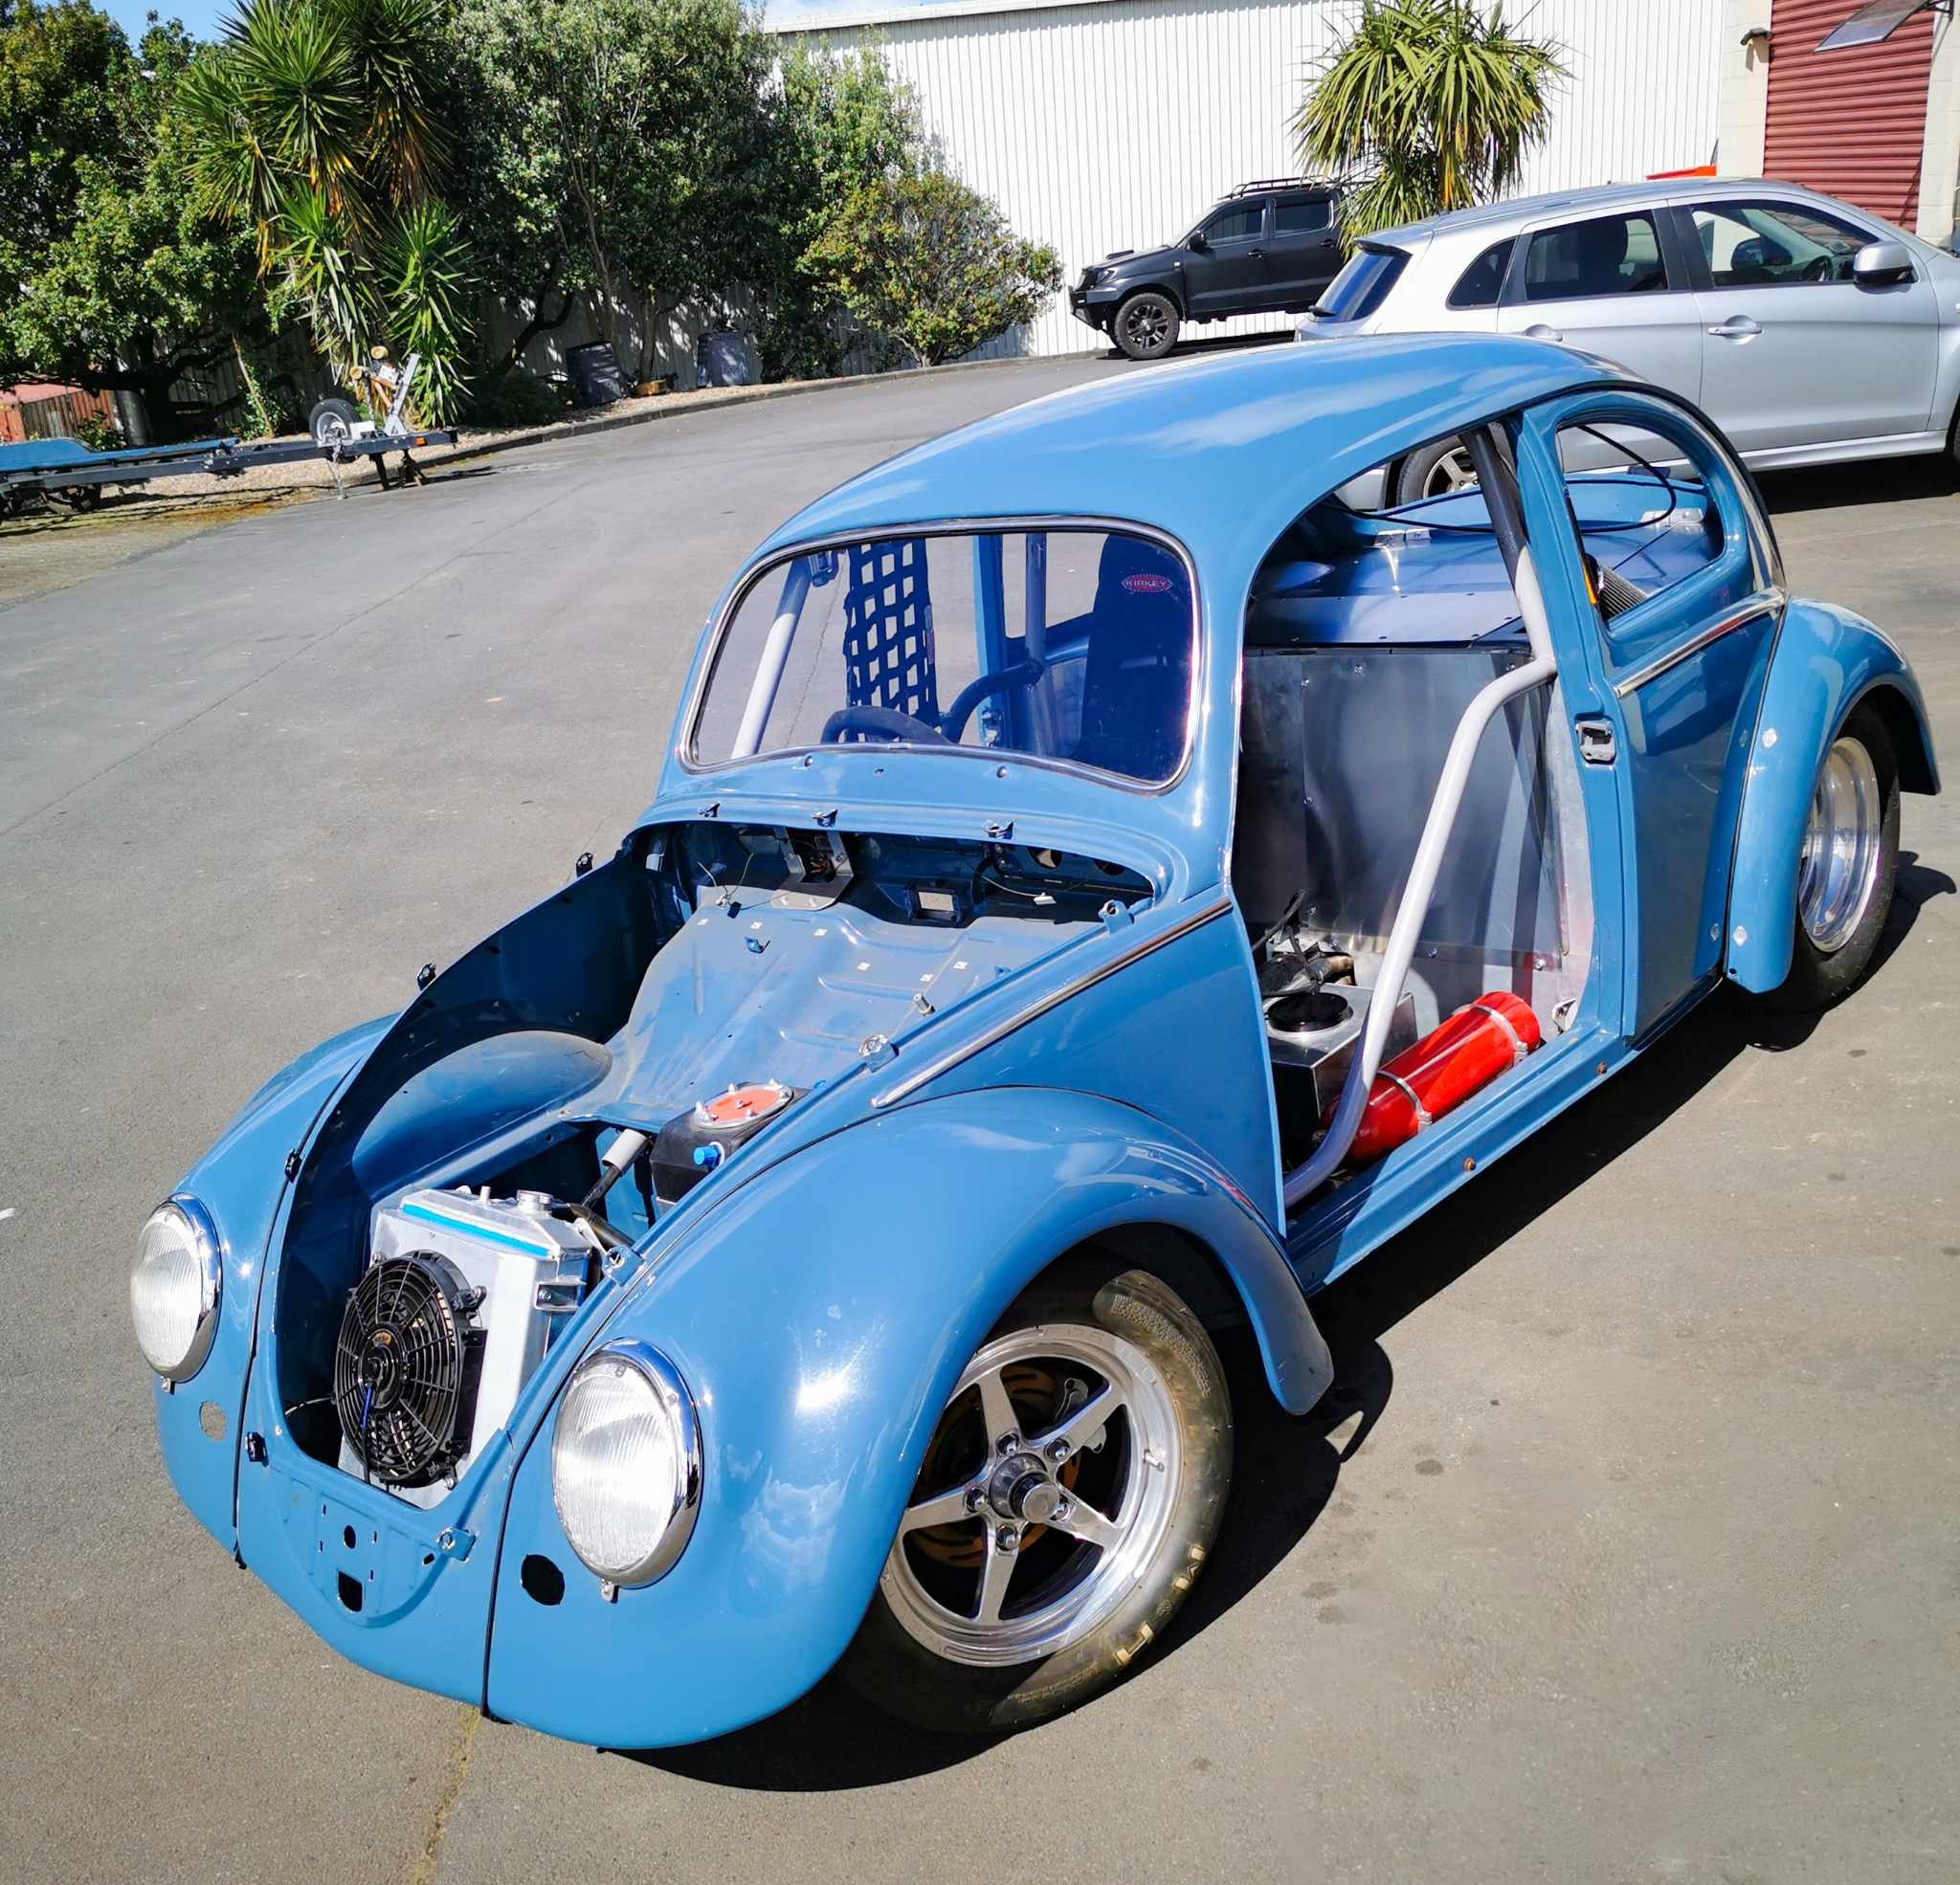
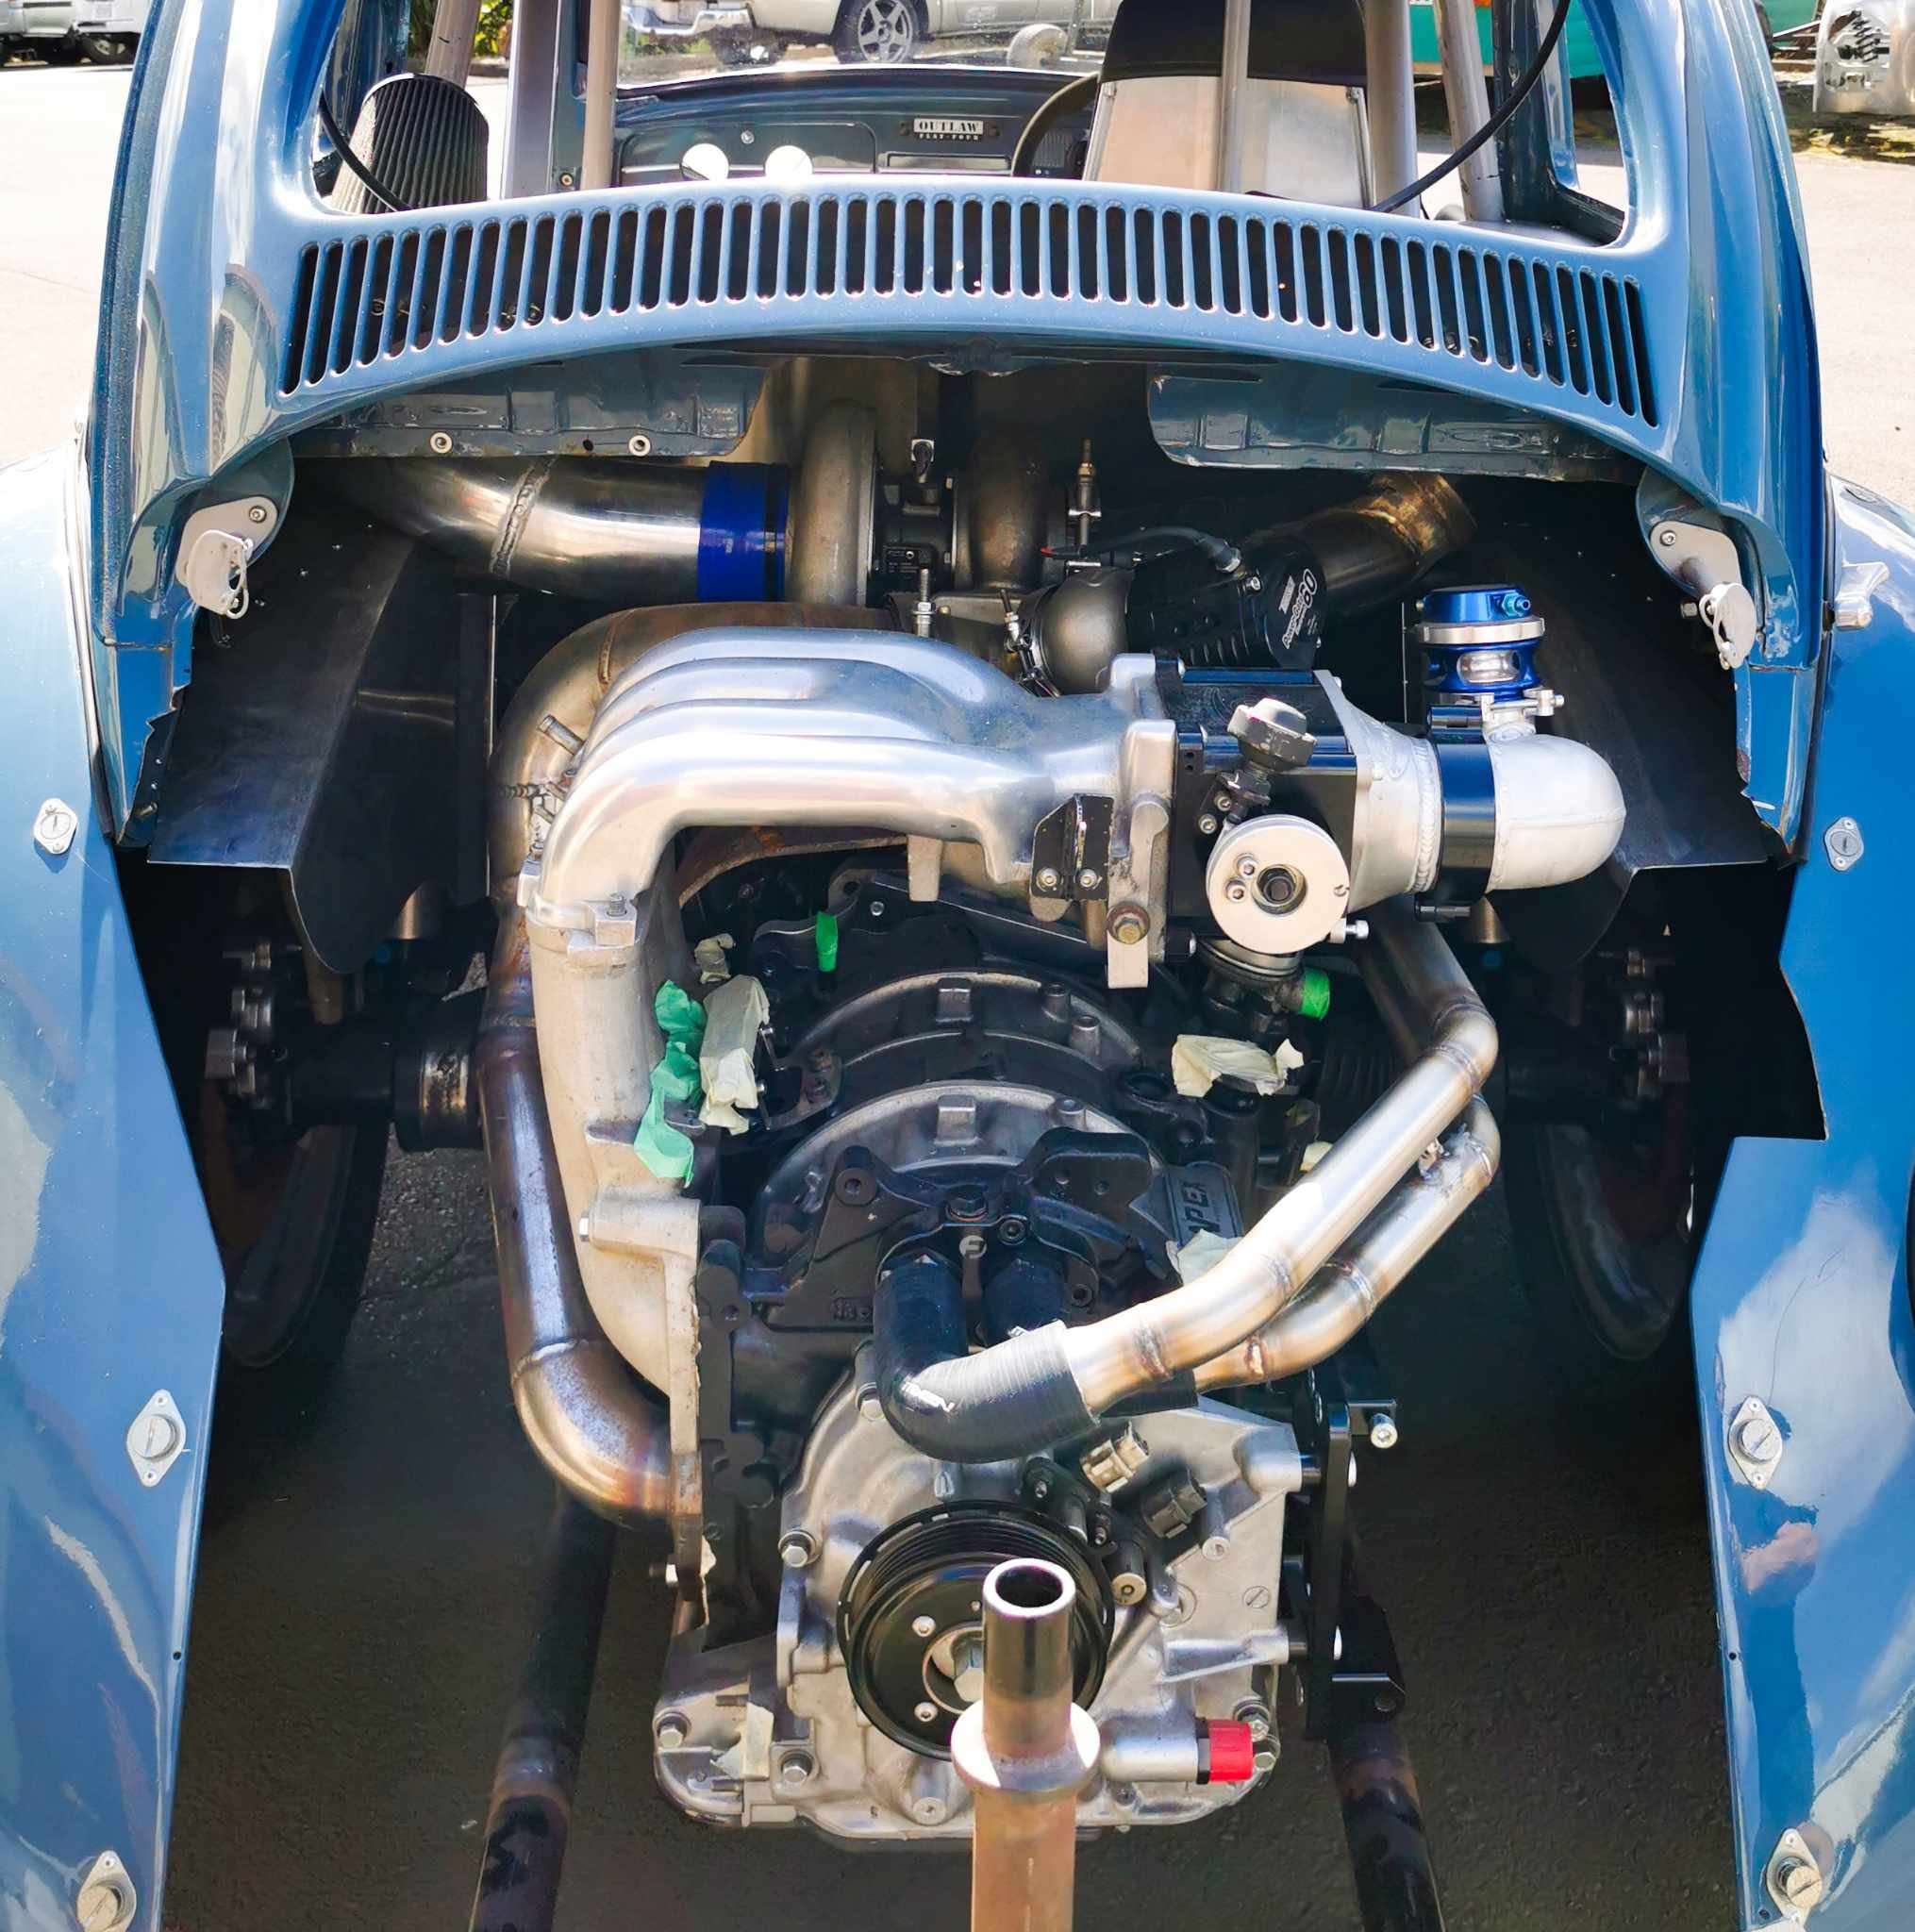
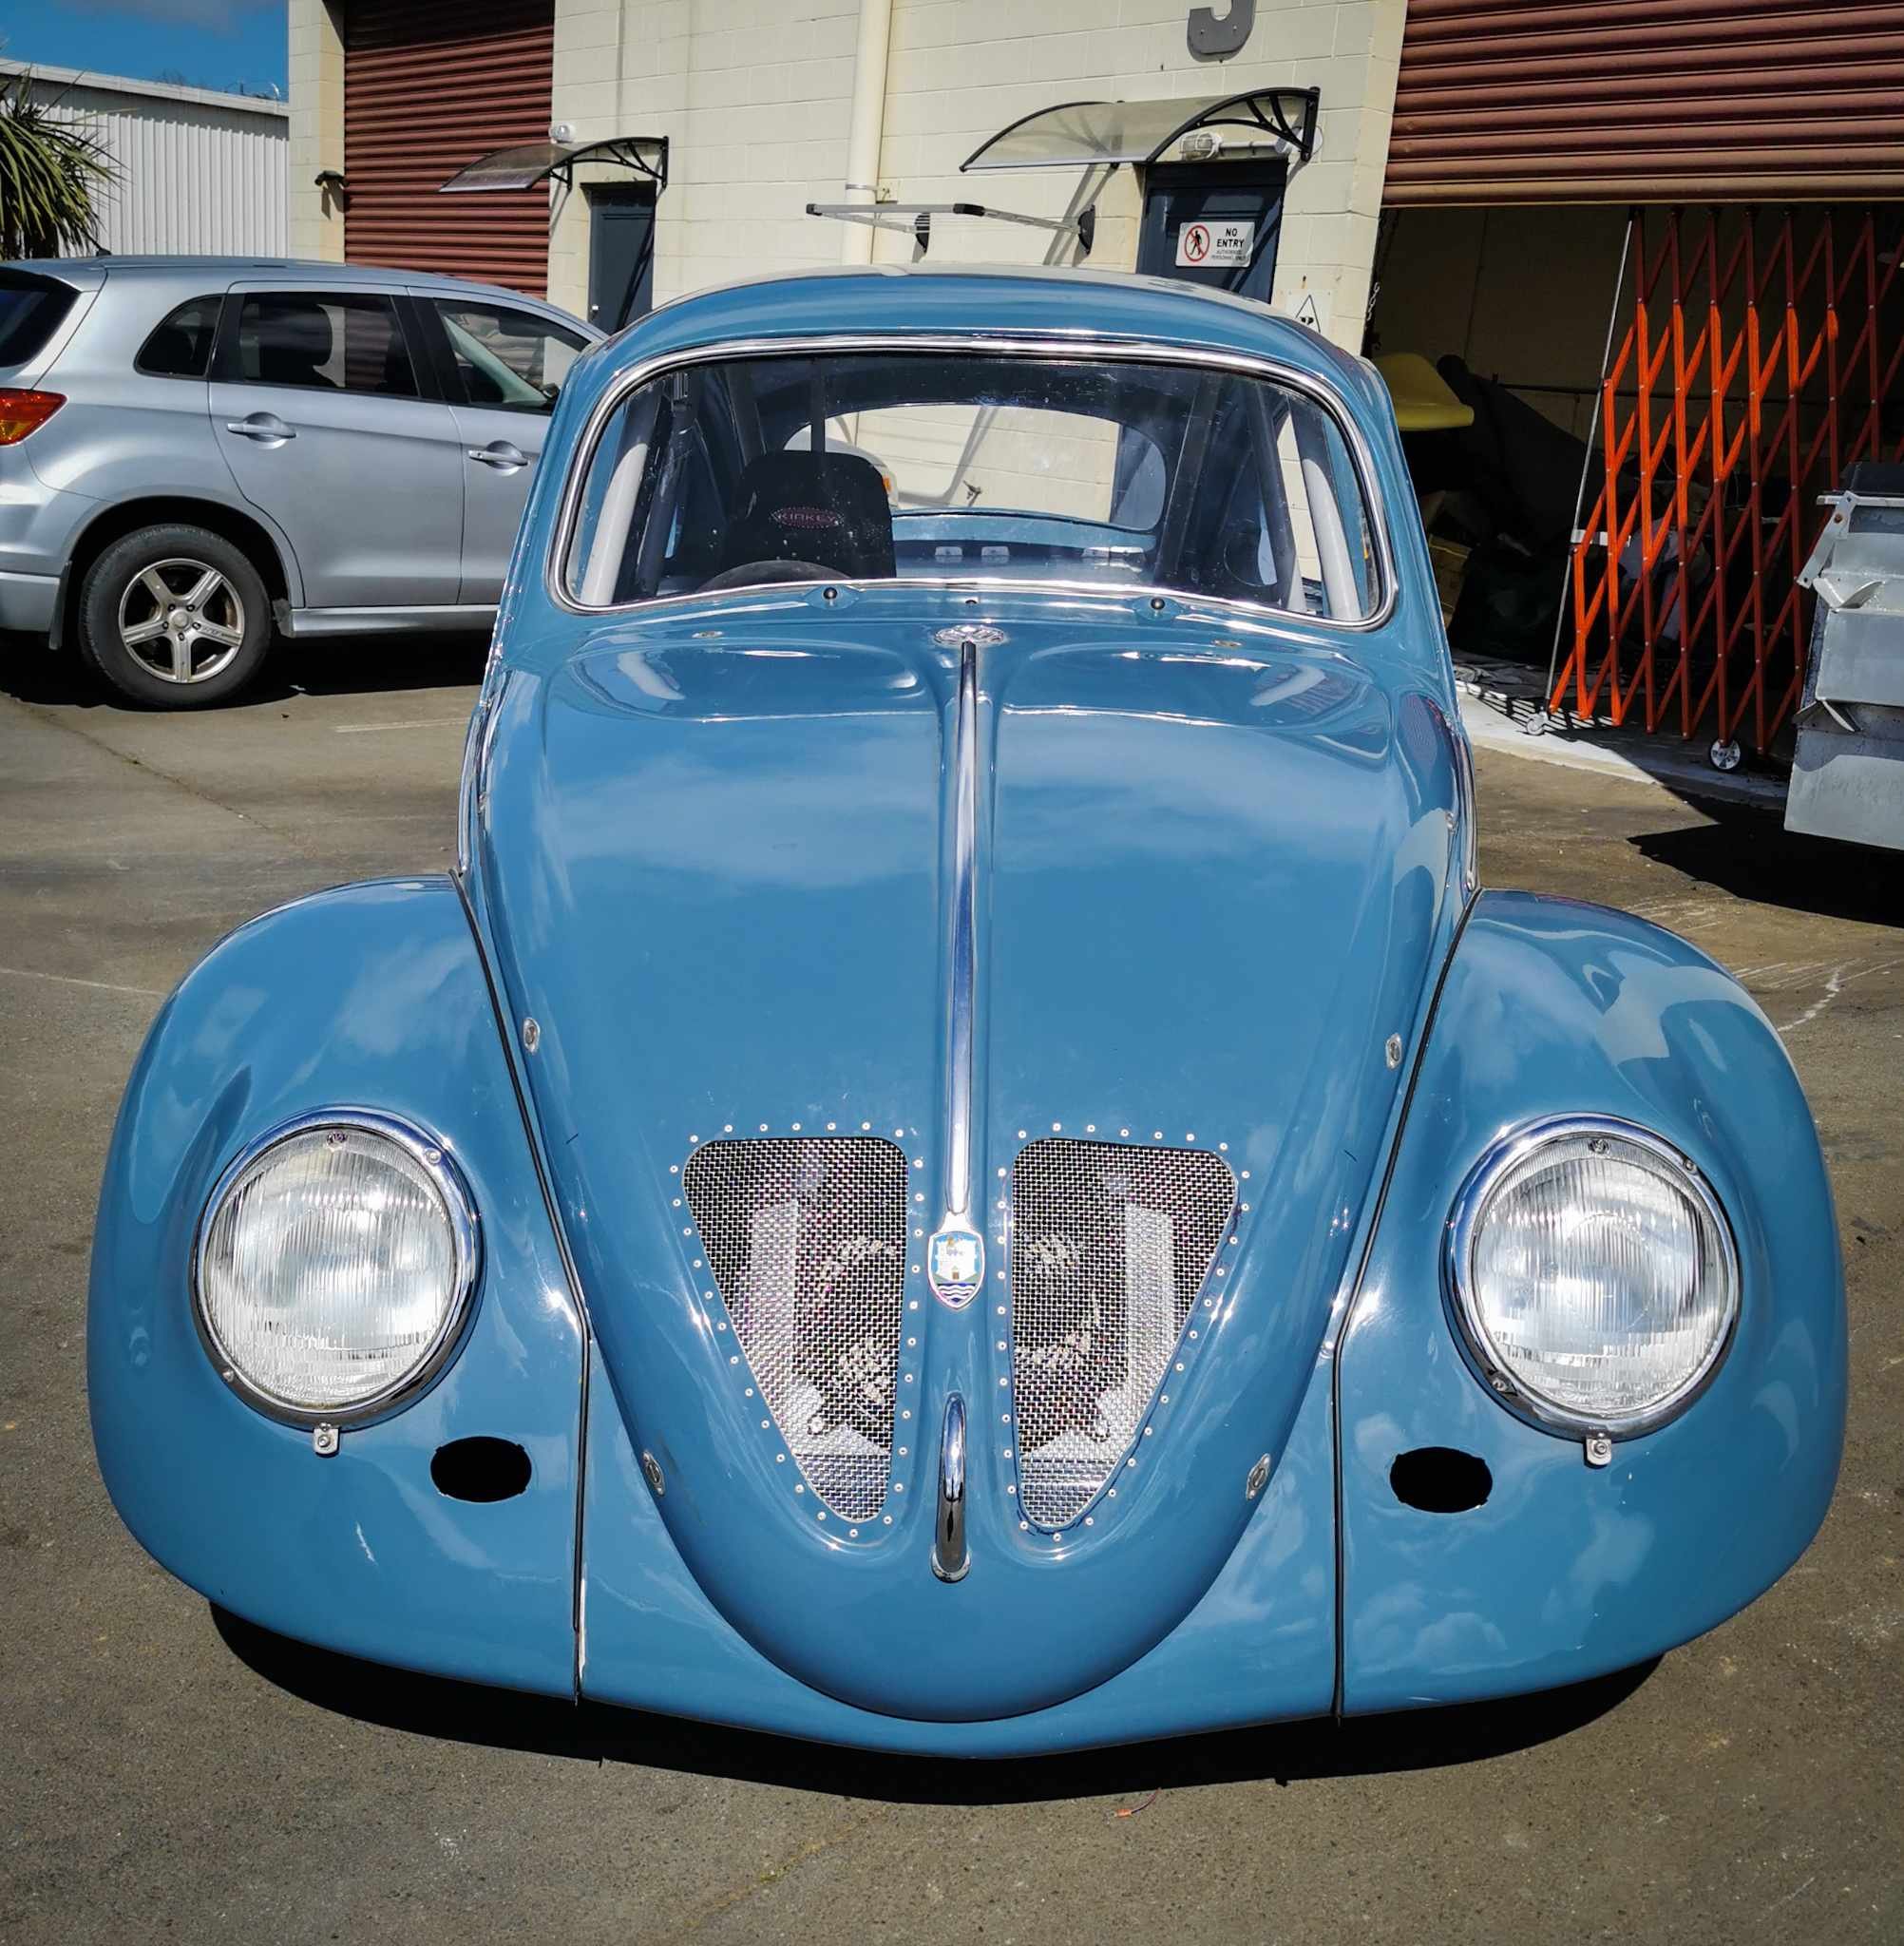
Yea so today I fixed a couple of issues with the windscreen washer, firstly trying to get the aftermarket nozzles to actually fire at the screen, then fixing the washer tank which for some reason is about 8 litres, most of which got dumped into the frunk overnight due to a crack. This I filled up with poo and hoped for the best. Then I addressed the extreme force needed to make the washer run, which meant pulling the stalks off and doing an excellent bodge which you dont need to know about in case my good name as an engineer is ruined, suffice to say they work perfectly now. Then with the few hours still left in the day I made a rear valance thing, although the mesh looks pretty sparse irl so I might smash something slightly denser on there; And I think thats pretty much it, I'll book a wof for next and see how that goes....
 8 points
 -
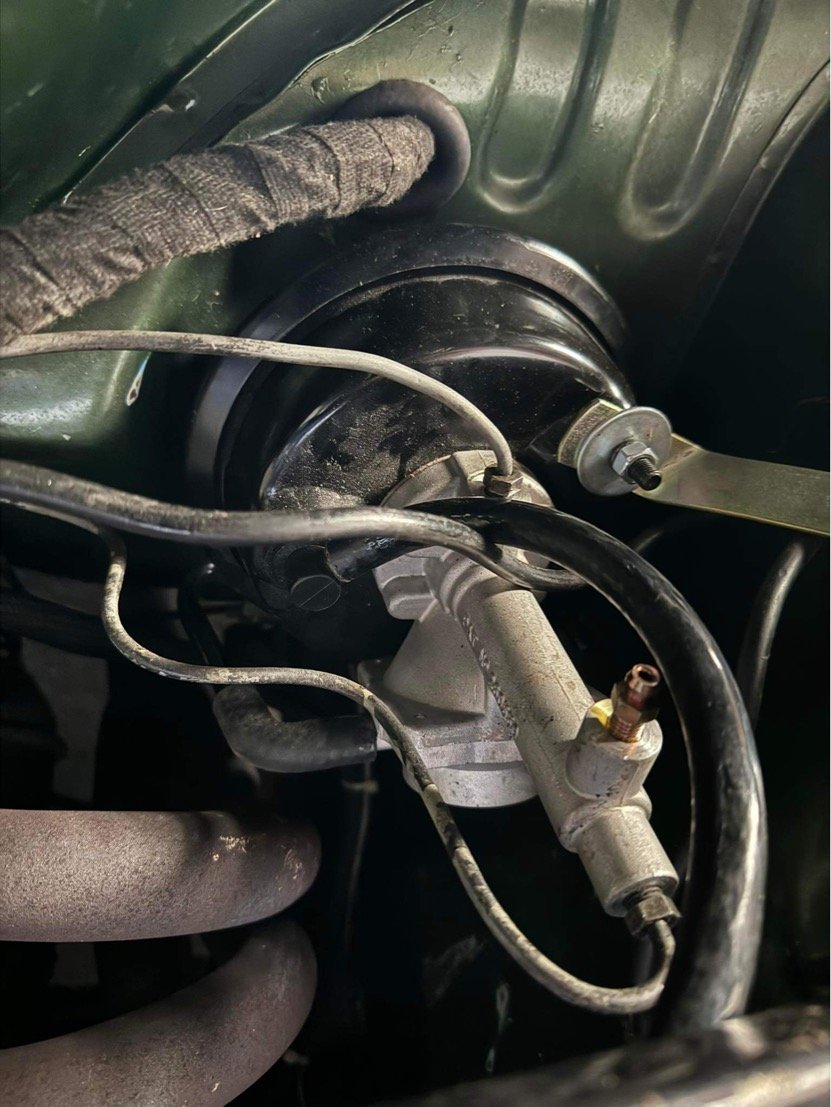
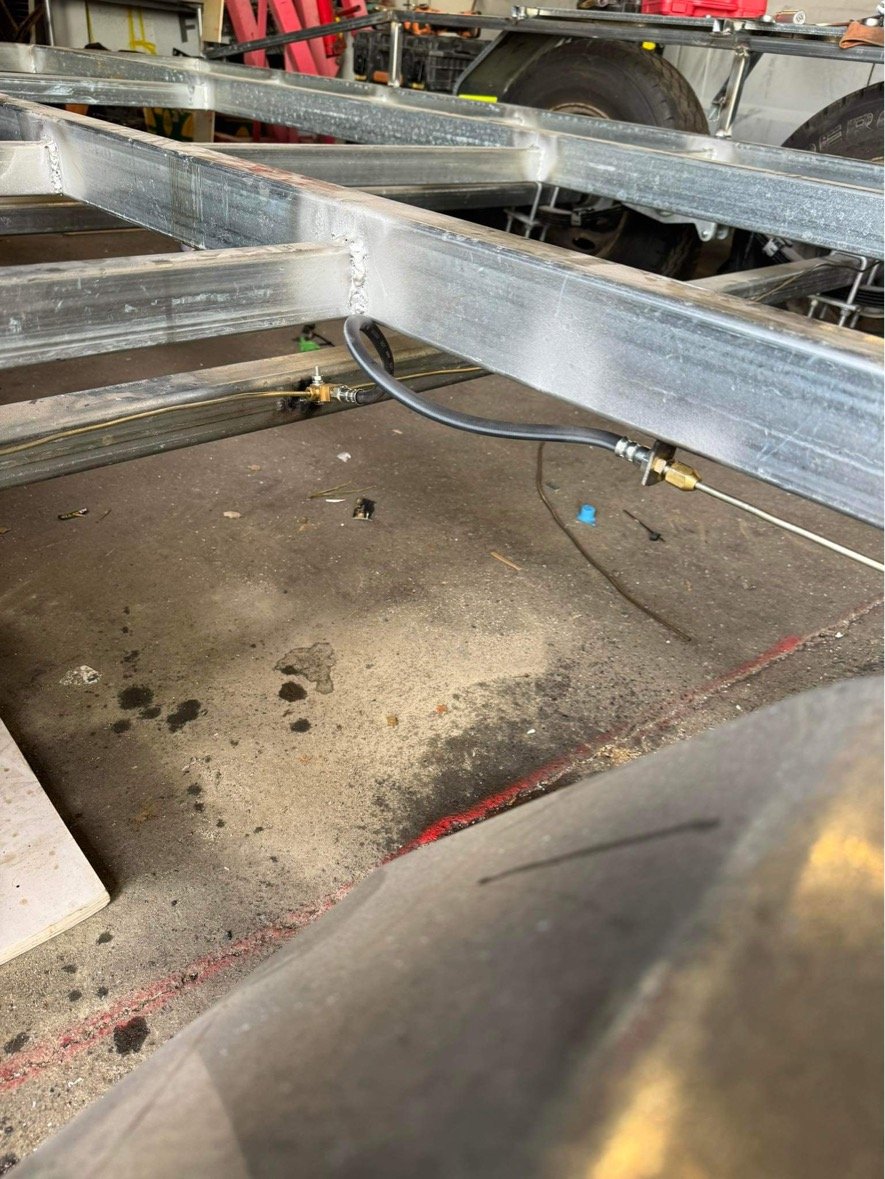
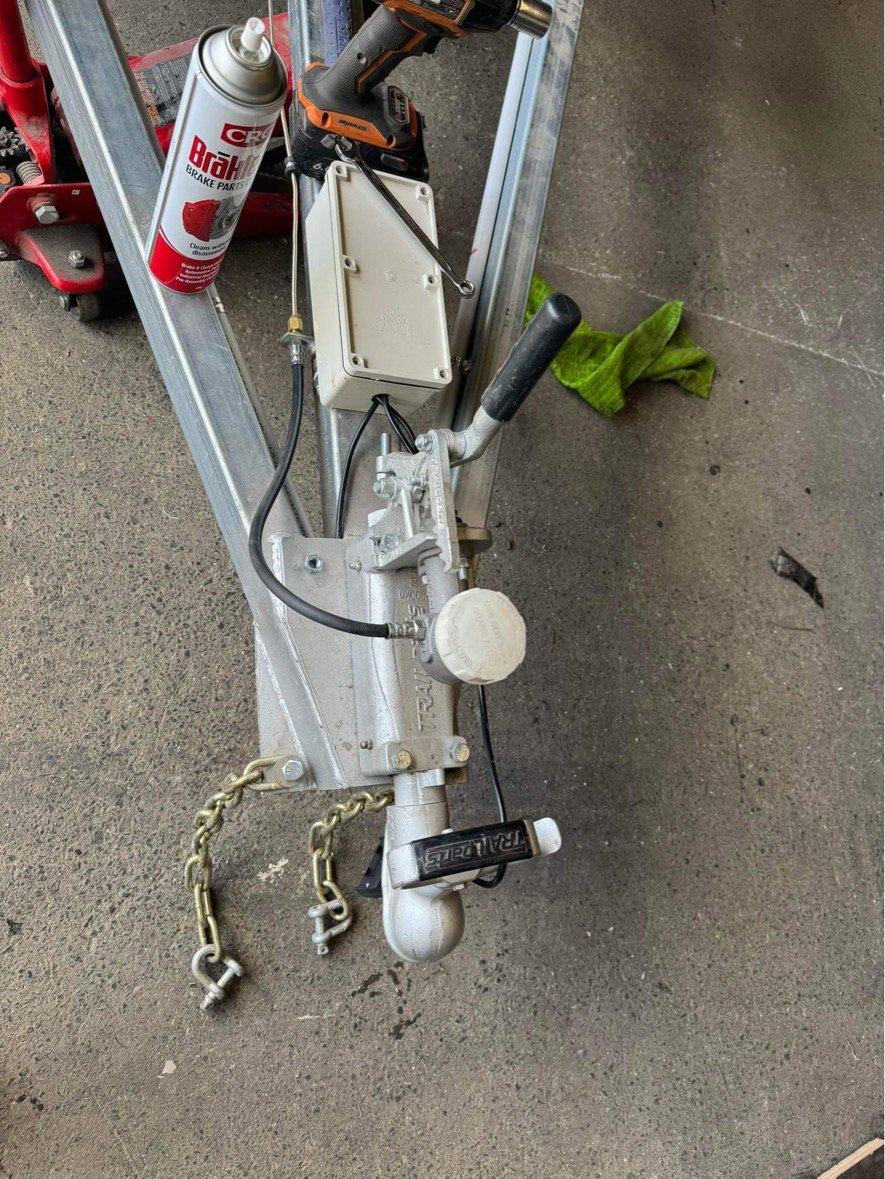
Took the Hunter away for the garlic farm budget Nats .. had brake issues the morning I left, and throughout the weekend, but managed through it cos Slow car.. I knew what it was, the little valley type thing inside the remote booster/slave vh44 deal threw a shit fit and decided to stay put and no longer do brake things. i already had a new unit on the bench, but procrastination took hold and I never did swap it until today. im taking her to Waiau Pa hop next weekend, so keen to have brakes. fairly easy deal to swap it. and it brakes now, and releases.. winning while I had the brake mojo and the flaring tool, I decided to run the brake lines on the trailer. What a Kent, but it’s done and it has brakes and no leaks. ive left the brakes locked on overnight to check for any leakage. Should be good. also clamped the conduit up. so only have the 4 mudguard stays to weld on, then screw the boards on before getting it registered.
8 points
-
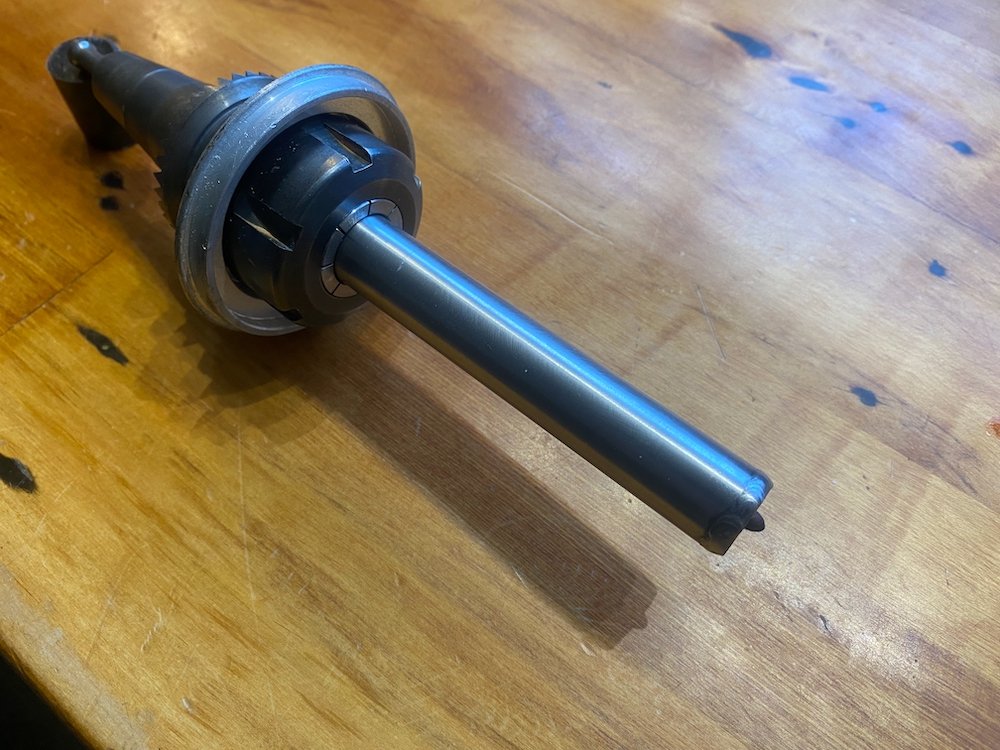
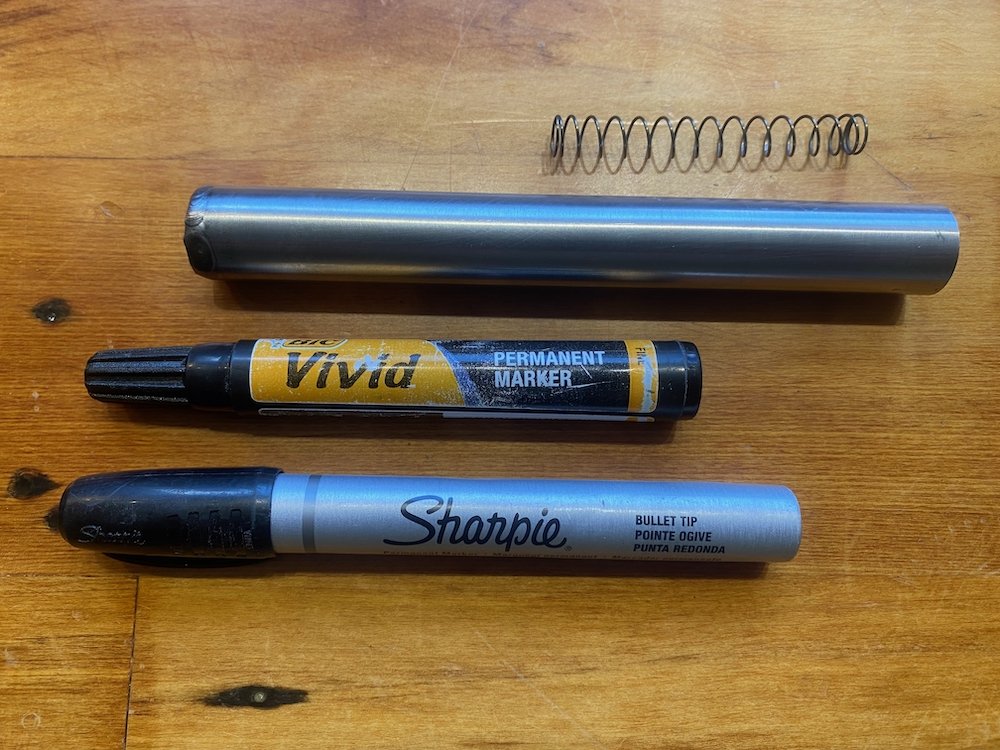
Had access to a large plotter table at my last job which was super handy for reverse engineering or taking prototypes from the computer to the real world, could print notes and datums to cardboard before cutting out for test fits or confirming bolt holes before longer/expensive processes. Today step one of bringing that capability home began, a vivid/sharpy holder for my cnc router. 3/4" mm seamless tube offcut has the same id as the markers, weld 1 stainless washer to the end completes the holder body, complex eh! All I needed was a suitable compression spring to ensure the marker holds a constant pressure without needing a perfect level bed. Awesomely, big green and big orange hold stocks of these things, sadly they are both closed today, buzzkill. Wanting to test NOW a full workshop search was initiated with a suitable donor found in an old BB gun, the slide spring happed to be 110% perfect for the job. Length is set to hold the two types of marker I usually have littering every corner.... Fitted up into a tool holder and good to go
7 points
-
Nick the sparky gave me a hand and we got the right plugs for the air bag and figured out the steering wheel controls for the stereo. I've got to get the right connector to connect the radio to the steering wheel output but that shouldn't be too much of a drama. Once that's done I can program the radio and heypresto! Steering wheel controls that work.
6 points
-
Pics from the port in Kobe! All looks good, appears that the owner that flipped the car put new tyres on it which is a bonus. Due to leave Japan this week Two gremlins to note: - Car looks to be started up in the images as rev gauge shows 1500 rpm however the charge light is on.. - From photos I've just noticed that the chassis plate is also not in the engine bay. I hope this isn't an issue come VIN time, hopefully the TE27-XXXXX stamp on the firewall is ok on its own?6 points
-
The last few months I've been looking through the USS Auctions in Japan, bid on a few TE27's. Funnily enough, I bid on one particular TE27 in October. Lost it to someone. The buyer must have been doing a buy and sell flip for some quick money as it came back up for auction the following weeks but with the reserve higher so I wasn't successful. Come the new year, they dropped down their reserve and I was able to nab it for a reasonable cost! The plan is to swap all of the good stuff out of the KE25 I have to it, and flick the KE25 off. If you're looking to purchase the KE25 project below get in touch. https://oldschool.co.nz/index.php?/topic/52400-pbaines-1971-toyota-corolla-ke25/ Photos from inspection. - Interior is average which is perfect because I have a great interior in my KE25 to get goods from - Underside has some rust, especially in the sills. But for a car this age, can you really be surprised? No stress to be honest. the rest of the car looks like a great base for a resto. More to come at a later date. 20231116_121909_copy_2000x1126 by phillipbaines, on Flickr 20231116_122016_copy_2000x1126 by phillipbaines, on Flickr 20231116_122315_copy_2000x1126 by phillipbaines, on Flickr 20231116_122314_copy_2000x1126 by phillipbaines, on Flickr 20231116_122304_copy_2000x1126 by phillipbaines, on Flickr 20231116_122300_copy_2000x1126 by phillipbaines, on Flickr 20231116_121947_copy_2000x1126 by phillipbaines, on Flickr 20231116_121940_copy_2000x1126 by phillipbaines, on Flickr 20231116_121939_copy_2000x1126 by phillipbaines, on Flickr 20231116_121912_copy_2000x1126 by phillipbaines, on Flickr 20231116_121910_copy_2000x1126 by phillipbaines, on Flickr 20231116_122104_copy_2000x1126 by phillipbaines, on Flickr 20231116_122103_copy_2000x1126 by phillipbaines, on Flickr 20231116_122100_copy_2000x1126 by phillipbaines, on Flickr 20231116_122057_copy_2000x1126 by phillipbaines, on Flickr 20231116_122046_copy_2000x1126 by phillipbaines, on Flickr 20231116_122029(0)_copy_2000x1126 by phillipbaines, on Flickr 20231116_122028_copy_2000x1126 by phillipbaines, on Flickr 20231116_122025_copy_2000x1126 by phillipbaines, on Flickr 20231116_122007_copy_2000x1126 by phillipbaines, on Flickr 20231116_122256_copy_2000x1126 by phillipbaines, on Flickr 20231116_122254_copy_2000x1126 by phillipbaines, on Flickr 20231116_122143_copy_2000x1126 by phillipbaines, on Flickr 20231116_122139_copy_2000x1126 by phillipbaines, on Flickr 20231116_122129_copy_2000x1126 by phillipbaines, on Flickr 20231116_122126_copy_2000x1126 by phillipbaines, on Flickr 20231116_122123_copy_2000x1126 by phillipbaines, on Flickr 20231116_122122_copy_2000x1126 by phillipbaines, on Flickr 20231116_122121_copy_2000x1126 by phillipbaines, on Flickr 20231116_122106_copy_2000x1126 by phillipbaines, on Flickr 20231116_122105_copy_2000x1126 by phillipbaines, on Flickr 20231116_122326_copy_2000x1126 by phillipbaines, on Flickr 20231116_122321_copy_2000x1126 by phillipbaines, on Flickr Discussion thread:4 points
-
Yeah .. I could have held for way more money ..but I got the car back cheap and sold things for what people offered..... I made my money back and enough to get my mk3 all legal.... so happy as with that3 points
-
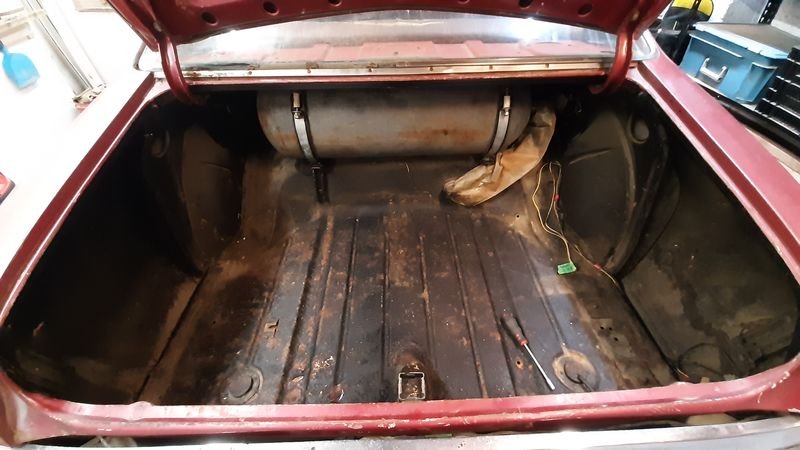
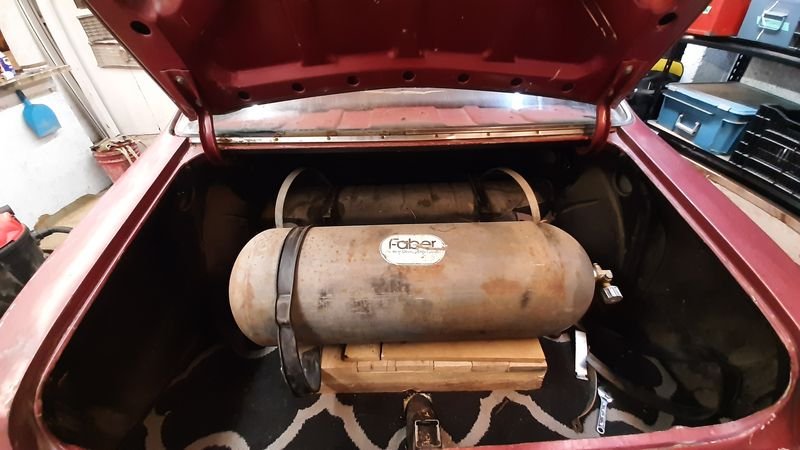
Fixed the rust hole, no pics cos boring. Made a heatshield for the alternator, first drilling and tapping some brass hex to stand it off, then some CAD, then some shiny so it reflects heat; Then I grabbed the pretty non functional catch can that I made for the truck, modified it so the wire wool was less in quantity and right before the outlet rather than at the inlet, which is why I suspected it didnt work well, then gave it some chode so it would fit in the engine bay; Went and filled it with some 95 as it was pretty low and it definitely needs some time spent on tuning, the low throttle popping and banging sounds good but the afr tells me its not right. Man it feels good to drive tho, the combo of the gogo and the noise is pretty great. If anything it sounds better now the air filter is on, a really purposeful growl.3 points
-
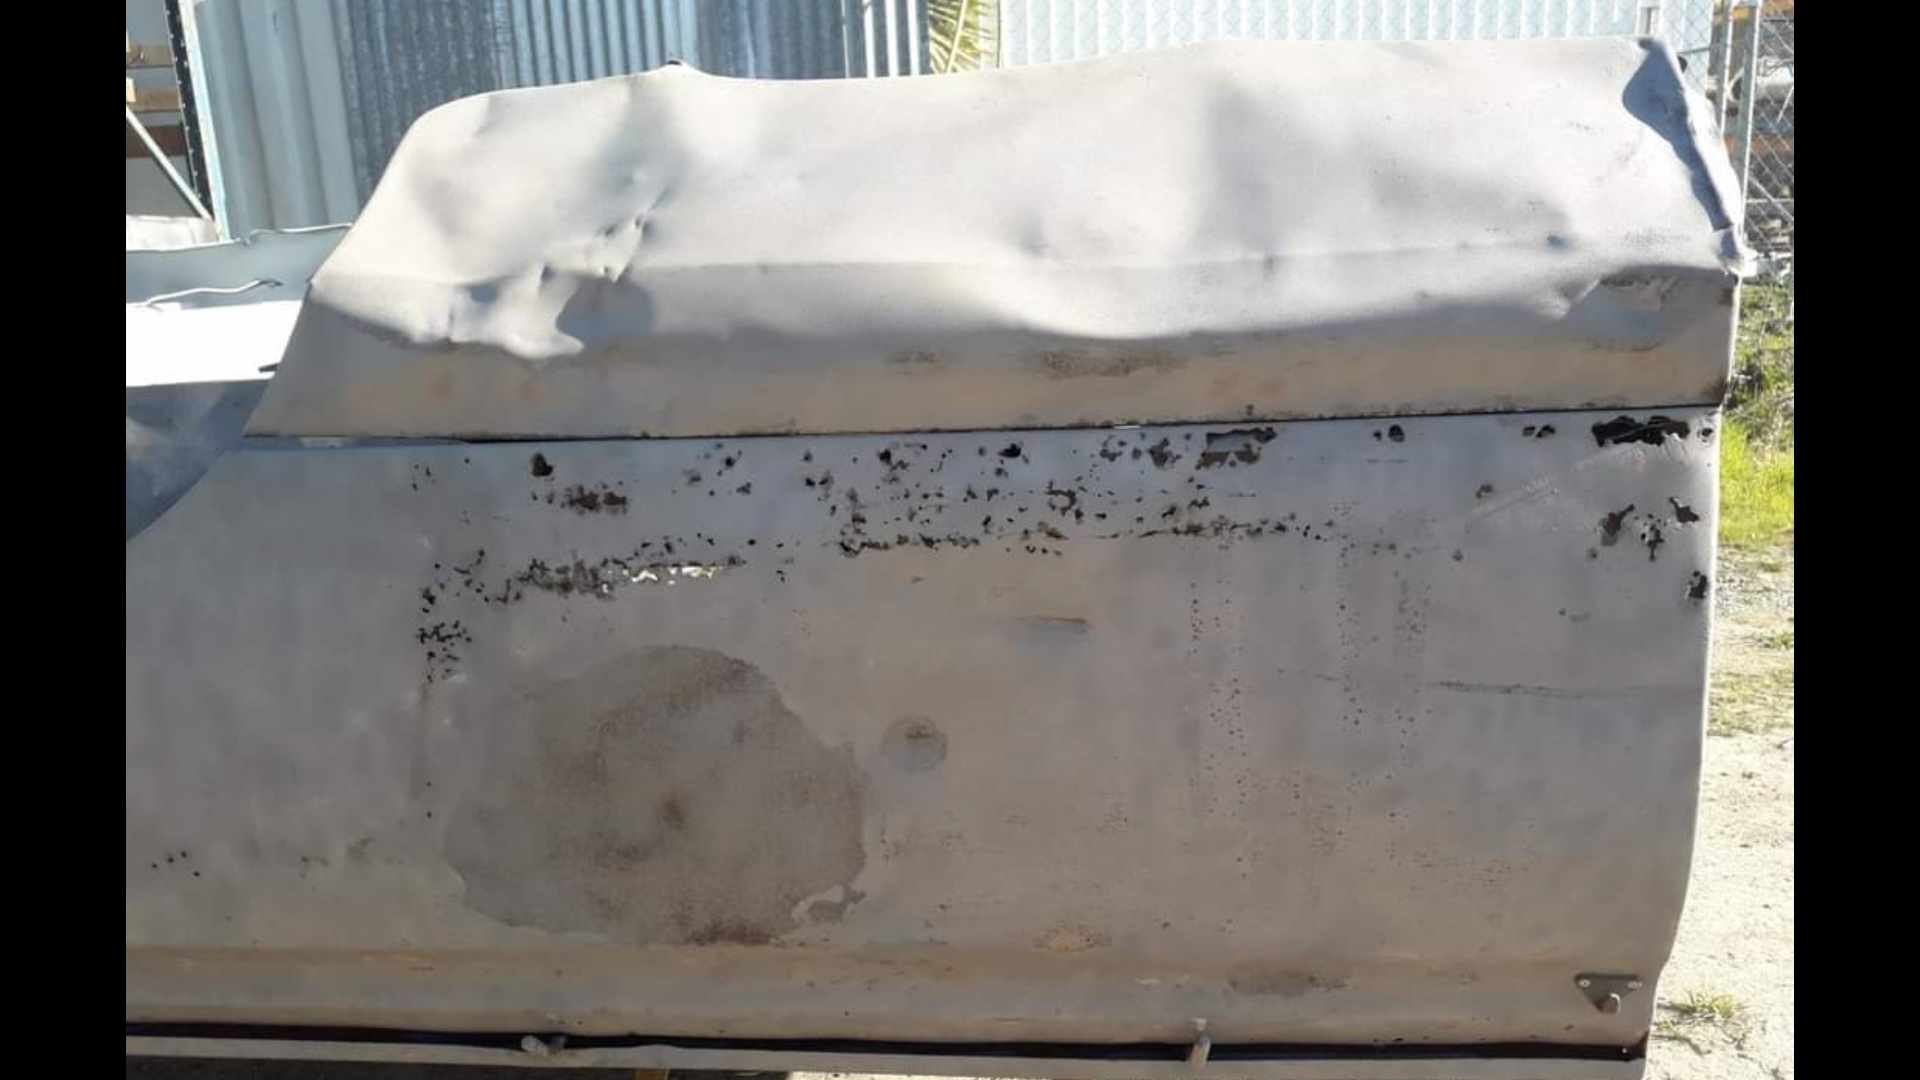
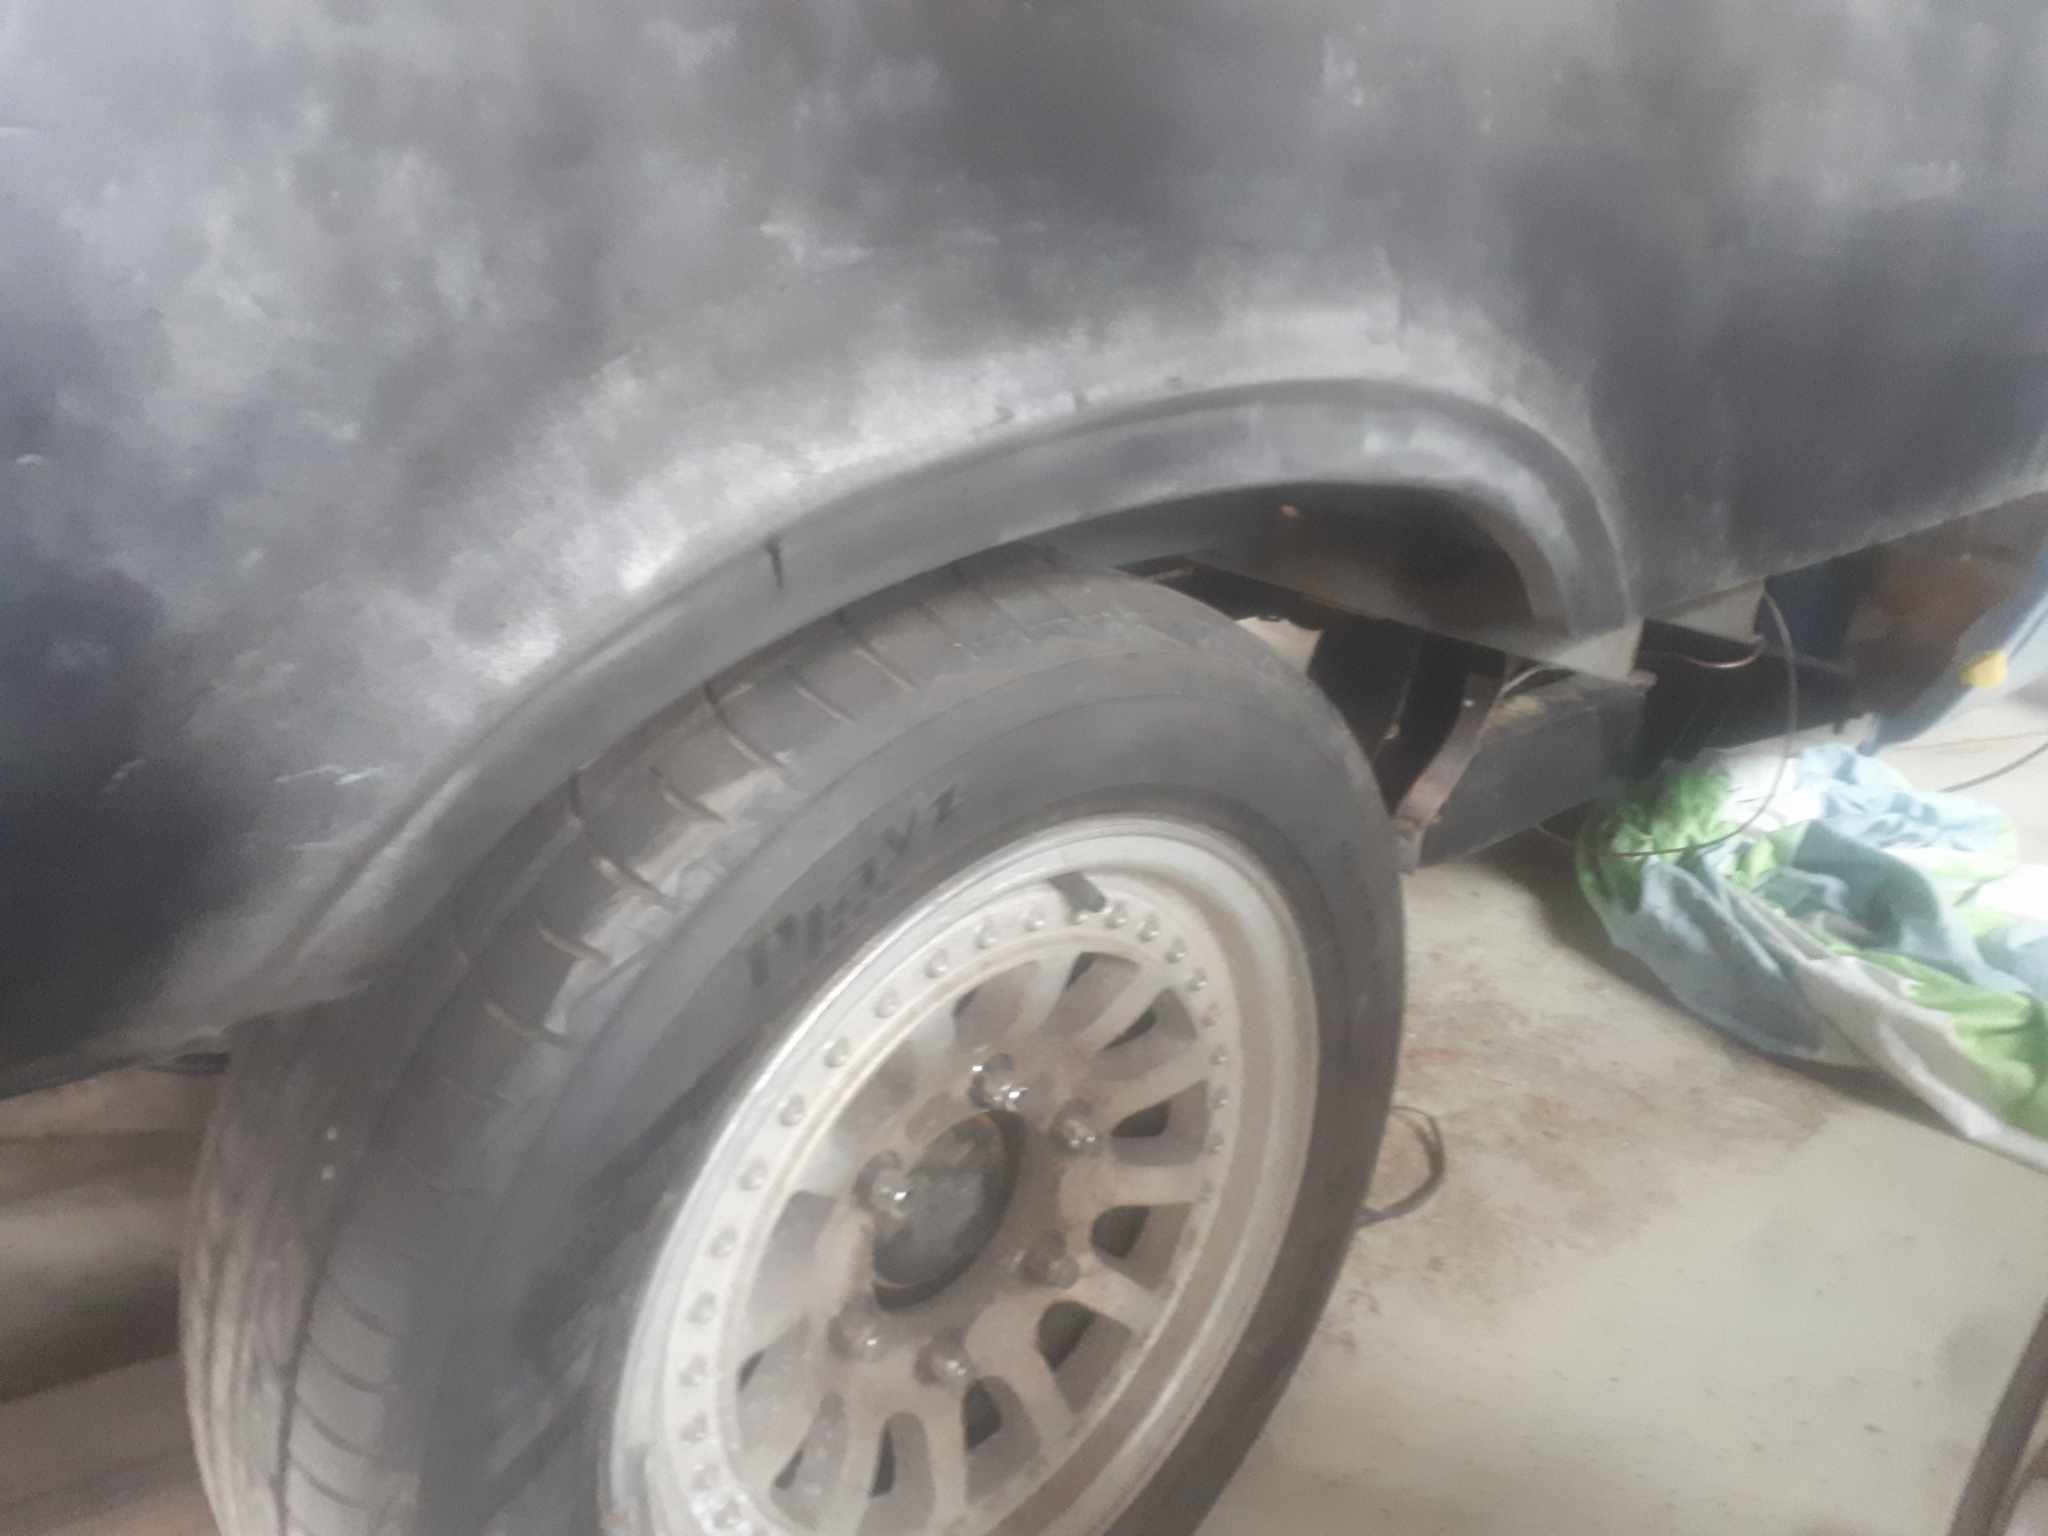
A few people have asked why theres no thread for this vehicle. (Because the owner is so useless tbh) i showed some pictures on my phone to some people at Garlic nats. And one of them convinced me i should post them up. (Thanks @Sungai Sungai) The story begins quite some years ago when i bought a datsun 620 ute of @Mr.Mk1. He'd rescued it from scrap. He also found a pretty fucked wellside tray for it. (Which is also rockinghorse shit 8n terms of rarity) it would seem i only have one picture of that truck. It needed plenty of work, but the rego was on hold, and it was (mostly) complete. When josh and i did the mission down to Alexandra to collect it, he showed me another 620 ute. It belonged to the landlord from whom his brother rented his business premesis from. Daily driven, and a real sweet honey. Because Alexandra is as dry as fuck with no foreplay, it was completely rust free too. (For what its worth, 620 are without a doubt the most rust prone vehicles on planet earth) Some time later, i learned that the elderly gentleman who owned that truck stacked it. And some time later it popped up as wrecking in Christchurch. Hoping to get some parts, i shot around there. Where i met @Agent75. The truck was still pretty rust feee. But unfortunately Shane had cut the radiator support panel off to make removing the engine easier. The inner gaurds were a little bit puckered, but it could have been straightened out. A deal was struck, and i dragged it home. Another mate had another 620 he wanted ro move on. ( @I'm new here) it had been completely dismantled. And had some prettt cunty rust. So i bought that, and had a coachbuilder mate graft the inner gaurds and rad support panel off that cab onto this one. Unfortunately i have no pictures of this. I also picked up a pair of front guards off another mate. As i didnt get the nasty, underpowered, leaky, J15 with the truck, i opted for an S14 SR20 that i bought off @mint16. With the gearbox attached, i had to make the centre of the rad support panel removeable. After id painted the engine bay, @fletch have me a hand to do the final engine installation. Because id slung the engine so low, and so far back, the sump had to be notched to clear the drag link. Seeing as this chassis is the later model/last iteration of the 620, it was fitted with ball joints, rather than king pins. This is a wicked bonus, because i learned that if the top ball joint is swapped over, that D21 navara hubs and stubs are a bolt in affair. No more gawdaful drum brakes. Best of all, a mate gave me a set for free. (Less calipers, which i then sourced of marketplace) because im not a total broken arse any more, i threw on a pair of new rotors too. Discussion,
2 points
-
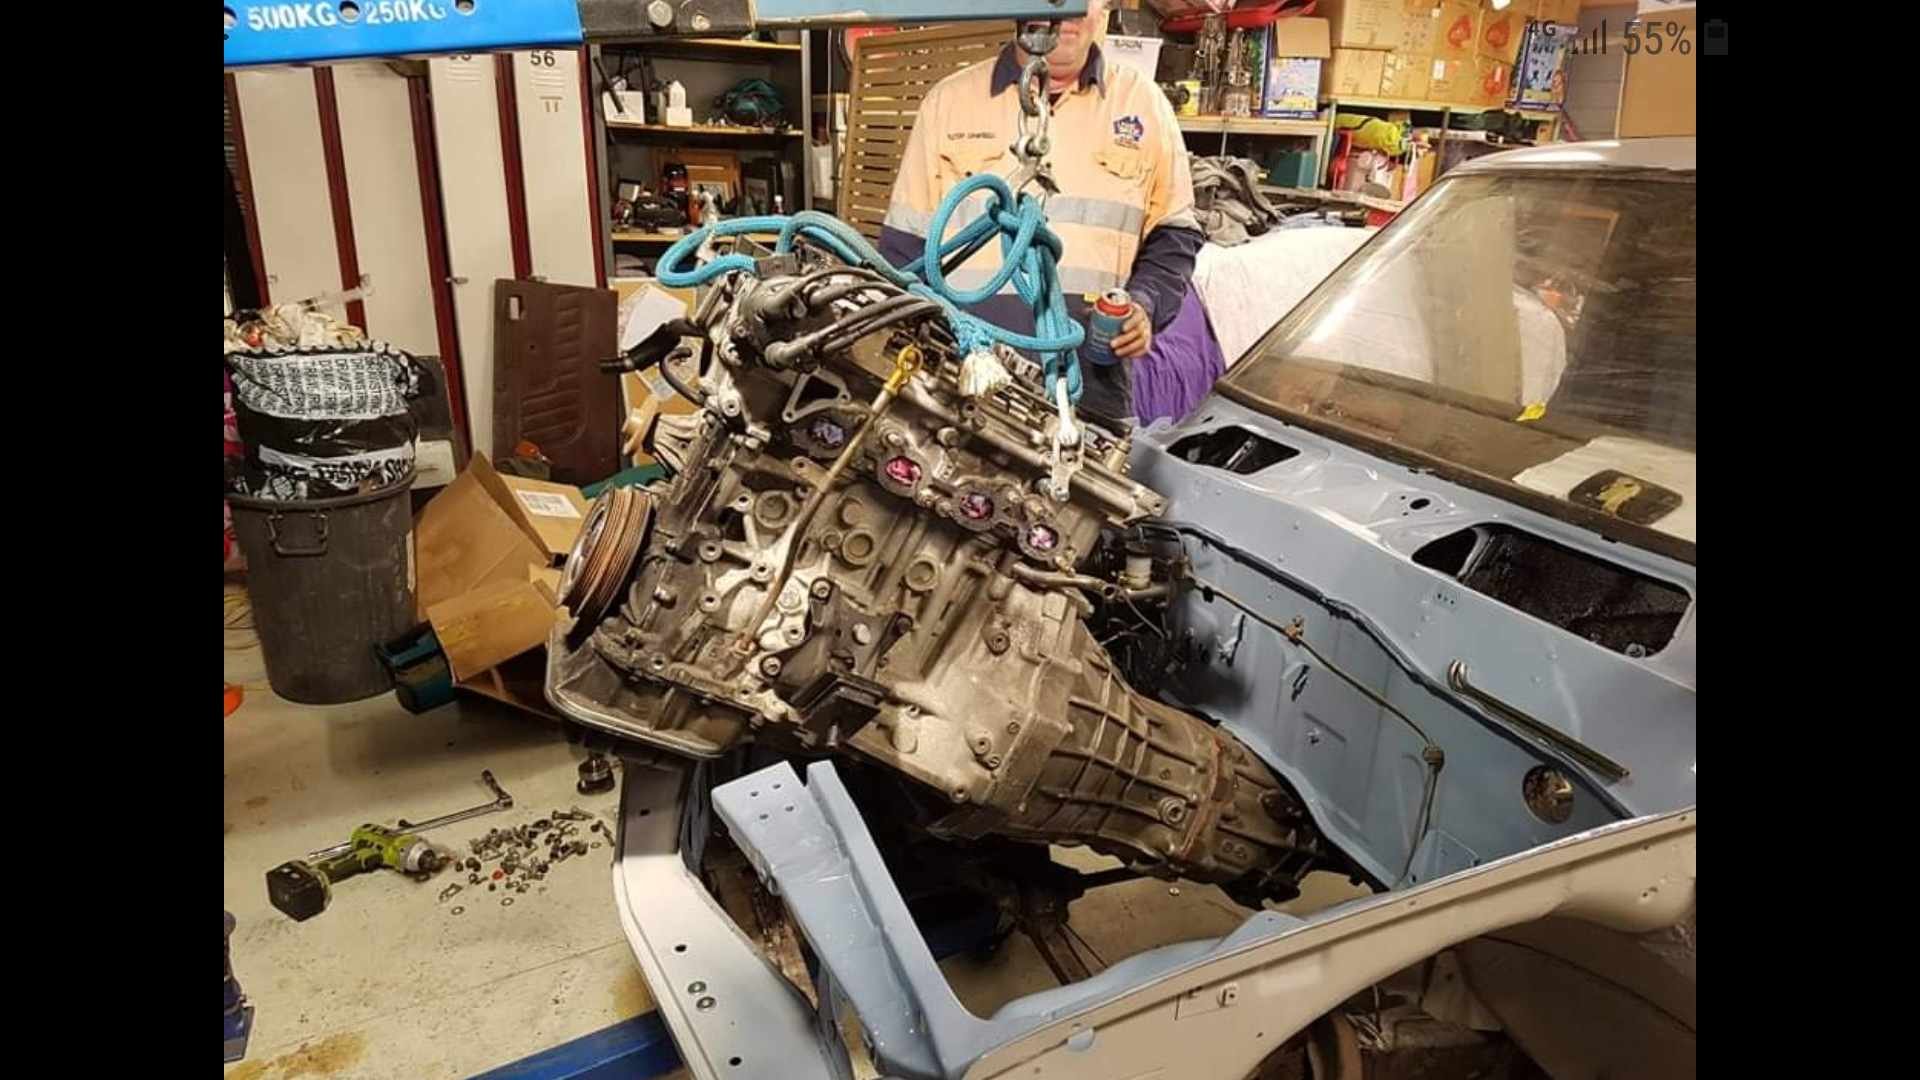
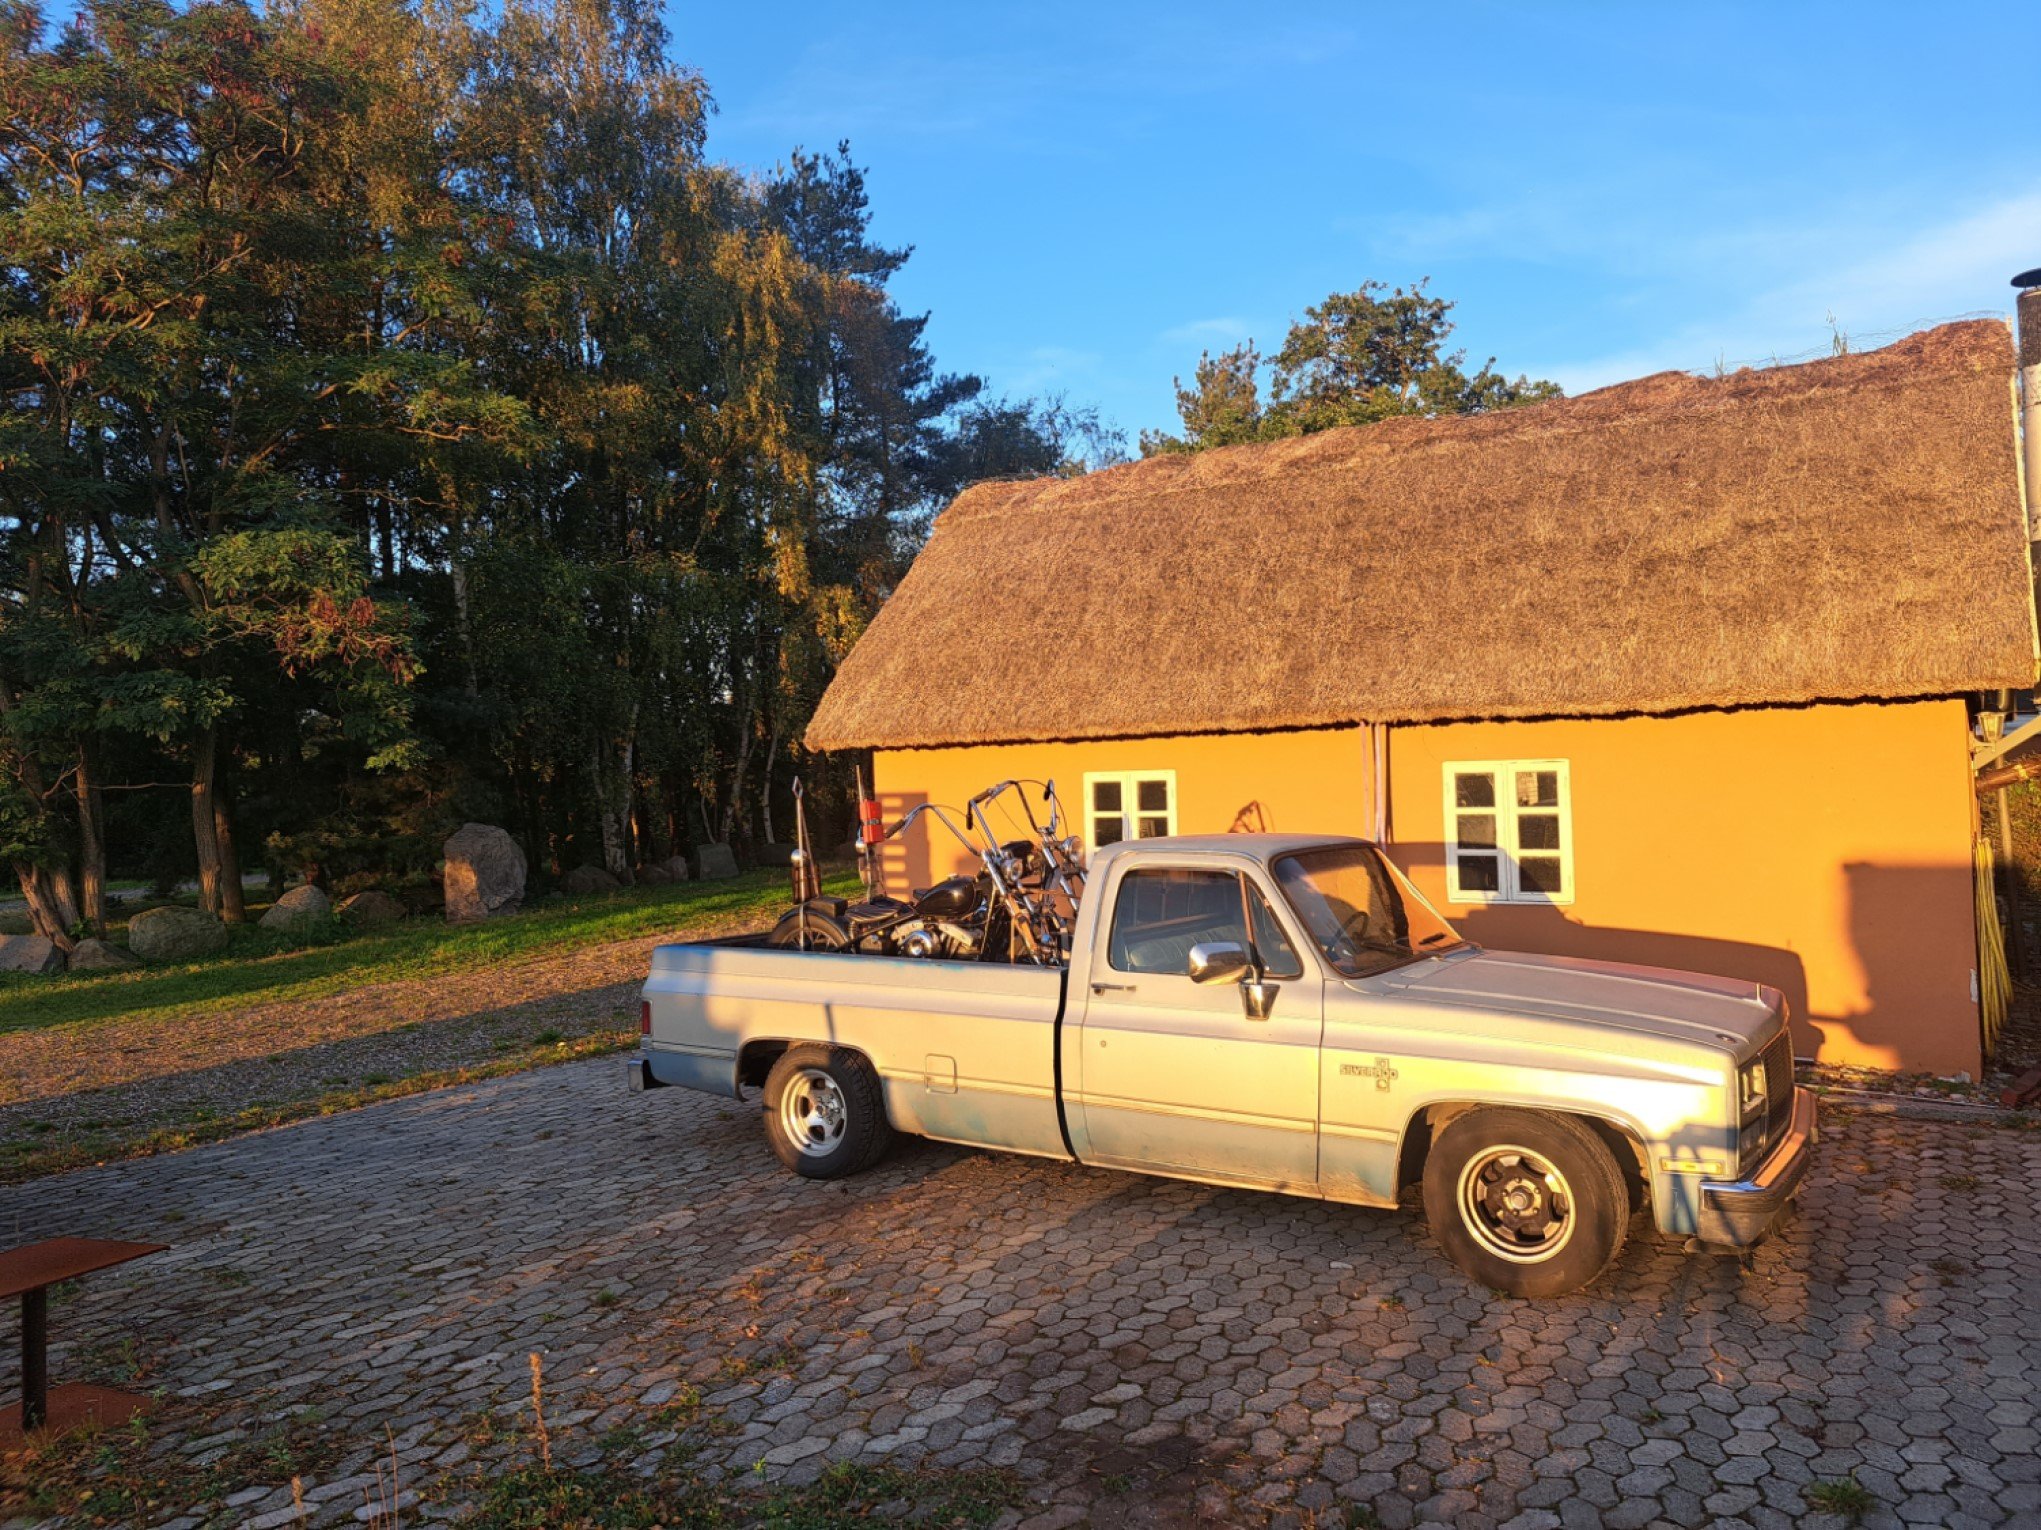
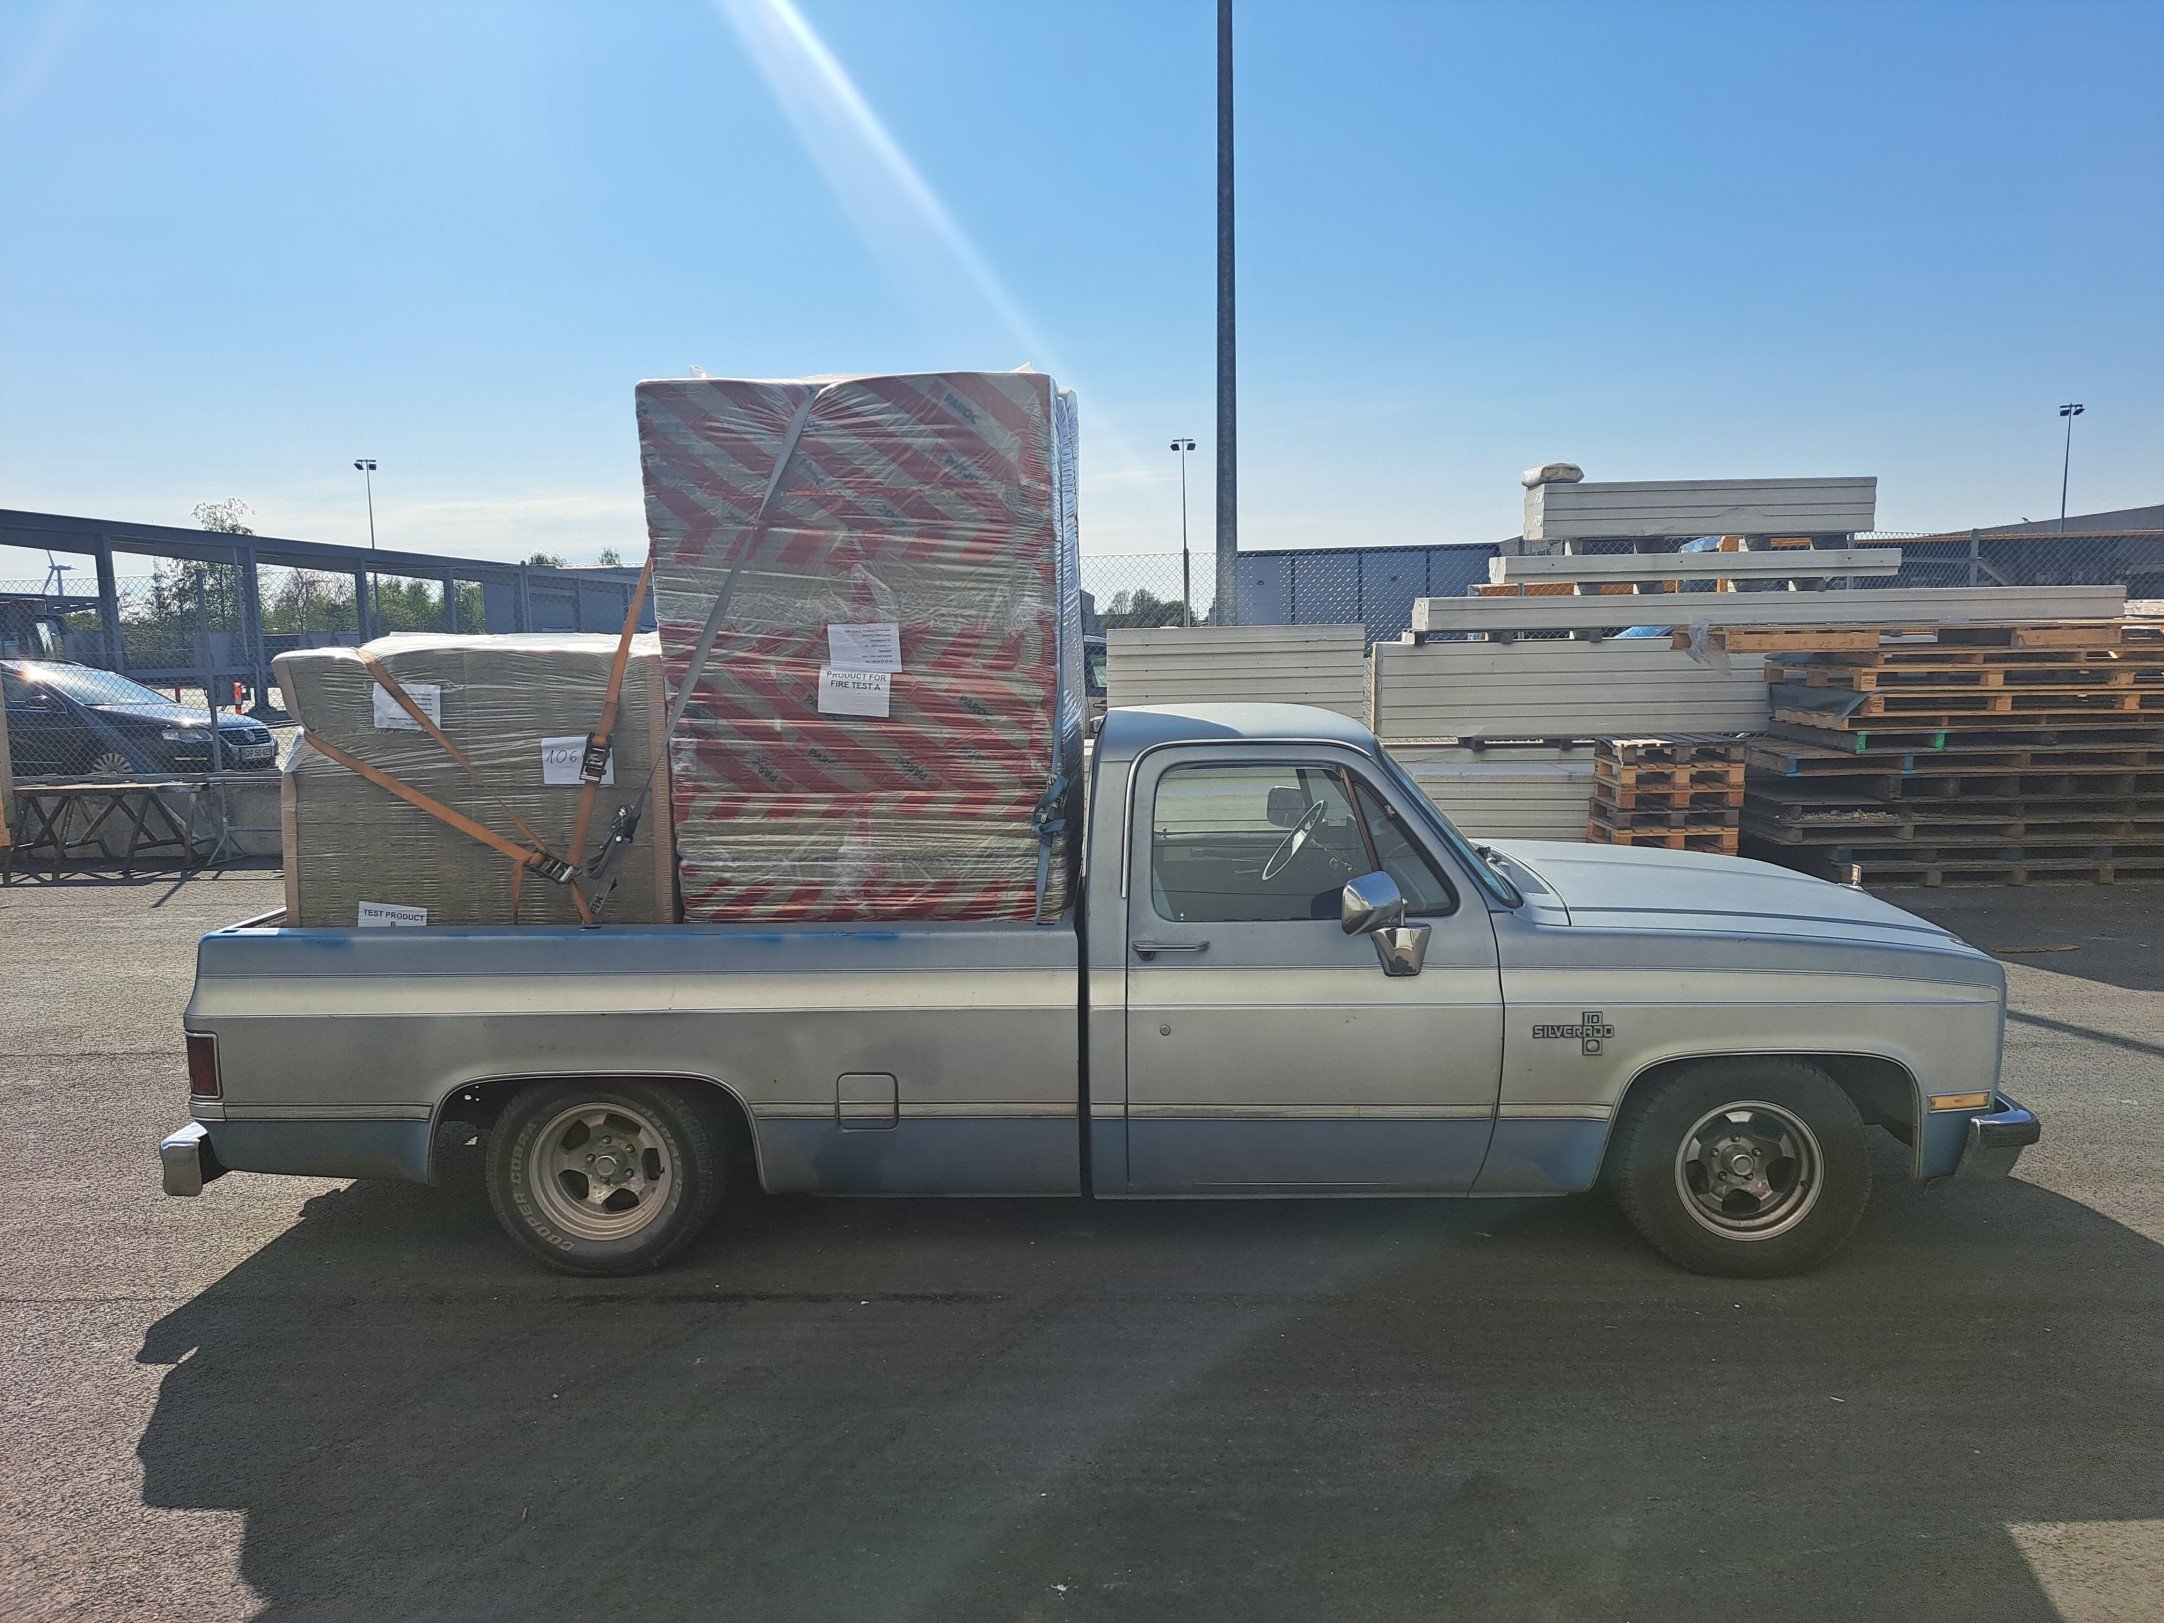
Yo, Long time no see, I figured that because im about to embark on phase 2 of this heap that I should probably make one of these. Anyway, I needed a new daily so I went shopping and found this sweet 82 long bed, I was after a long bed specifically as I needed/wanted it for my shop truck to haul choppers round with. The 350 had a sweet cam and gear drive so it sounded cool and had the requisite chop chop but the 4km/l fuel consumption meant that the daily part of the new car purchase didnt work quite so well. Luckily I had done my due diligence before the purchase and also bought a 2005 Mercedes Benz E320 cdi. Anyway @98cc hit me up and said he wanted to come visit so I put him to work and we pulled the 350 out and swung the OM648 in. Then at some point a @peteretep came and visited so we did some more work, anyway, I had a deadline, I made it, the truck got its maiden voyage with its new motor around Norway chasing a bunch of bikers, good times. Basically the rundown of the swap were: OM648 3.2l inline 6 diesel, the same one the Blacksmoke Racing dudes use. Baldurs Control Systems DID1 stand alone ECU 722.6 Mercedes 5 speed Auto with lockup OF Gear TCU 3 inch intercooler Built 10 Bolt with 30 spline axles, 9 inch housing ends and bearings, Eaton Trutrac and 3.08 gears. At this point it turned into my summertime daily and did truck things Then doing the usual facebook marketplace thing late at night I found a truck camper for sale, so of course I had to have that... At this point I found the limit of the 1/2 ton suspension so with the camper and the 6/8 drop that it has, so I had to do something, I made a bag over leaf setup in the back to help with load carrying capabillity. So about here is up to date, the engine swap is legit, it now gets 14 km/l and will happily cruise at 120 on the highway, because of the 8 foot bed it hauls all manner of things without asking, and does a skid. Discussion
2 points
-
Also the coldest part of the year so great for max enjoyment of hotpools!2 points
-
First weekend in July would be good as I already have the time booked off for SI adventure2 points
-
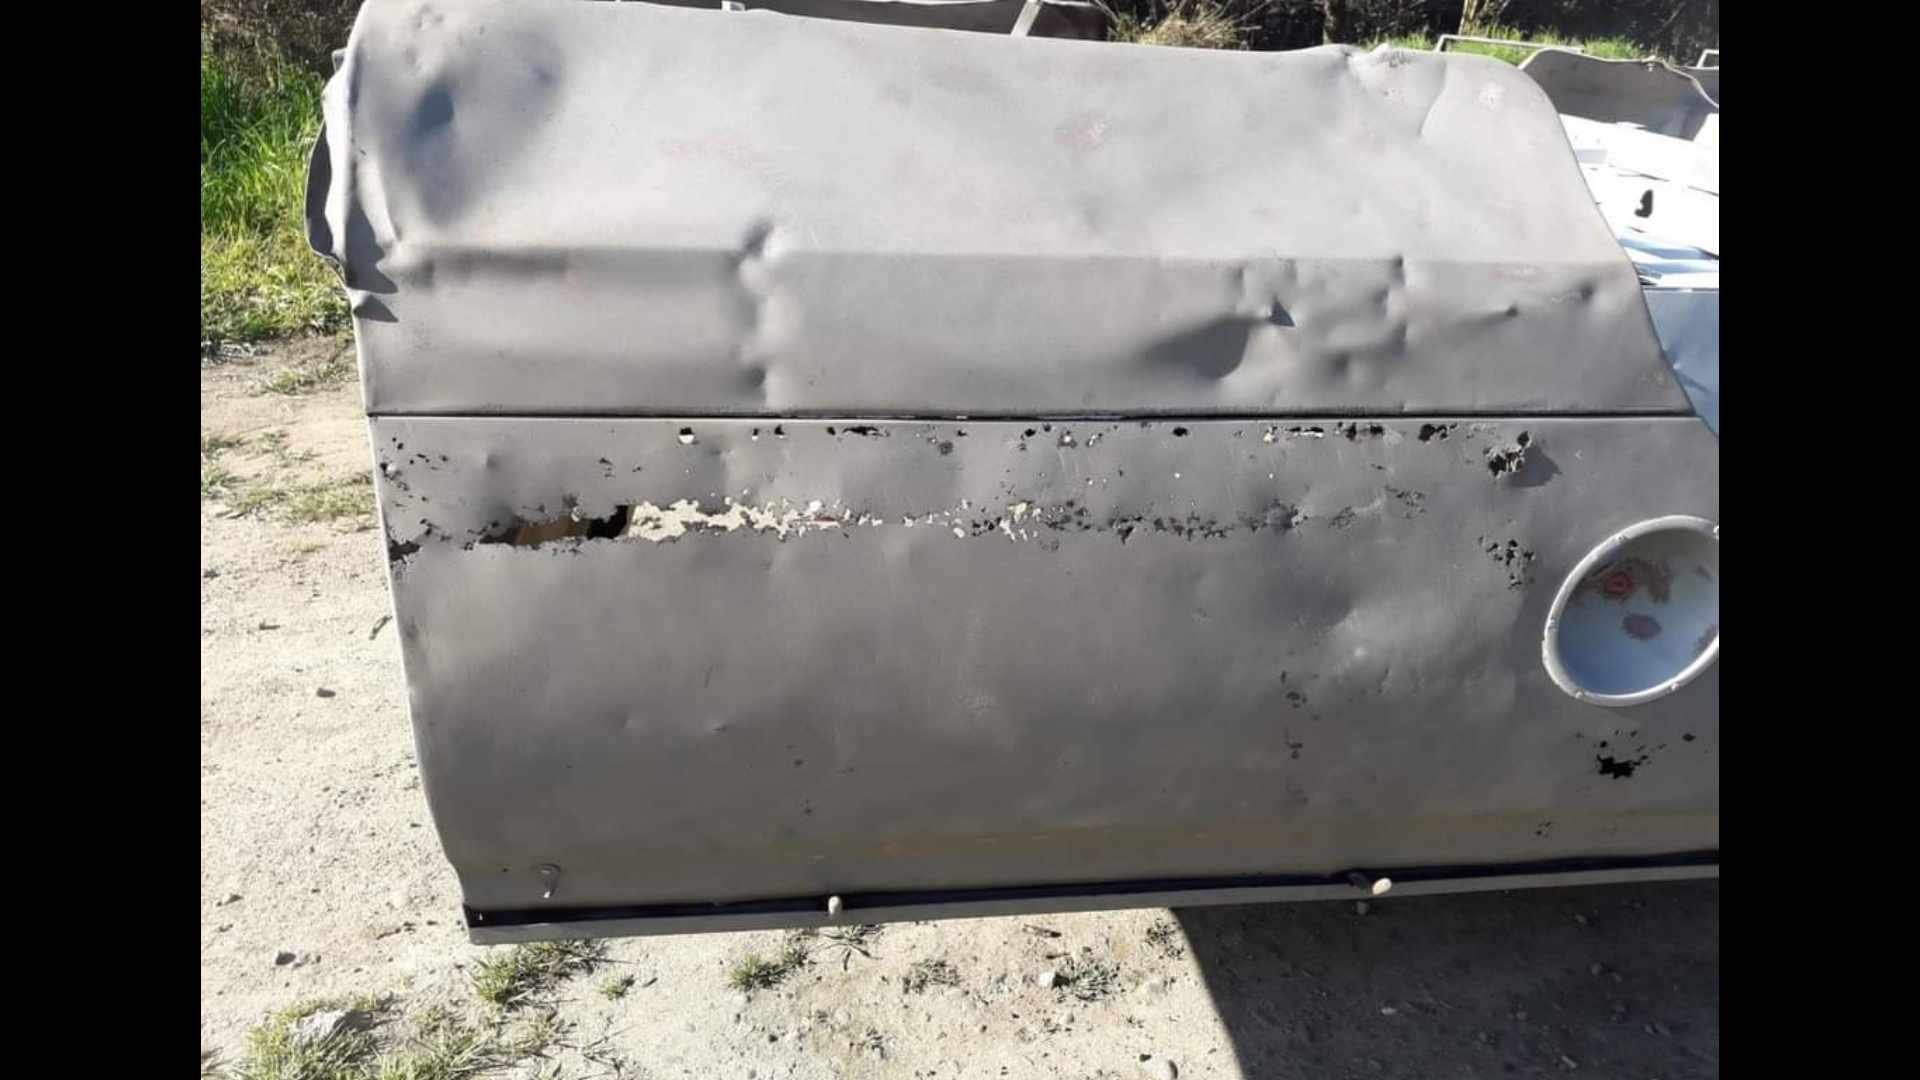
How about that wellside tray i hear you ask? Well, thats an ongoing saga. To start with, i had is sandblasted. Yep, she was a "bit" rusty. it must have been left sitting full of geass or the like i think. Anyway, i was somewhat worse for wear. Dropped it off to a mates shop, and he sid this with it. fast forward to lockdown, and i removed the floor. (It was fuuuuucked) I disovered this was a new Zealand made tray. (Possibly made in Timaru) they had a different profile on the floor, different wheel tubs, no swage around the whel arches to match the front. I replaced the floor with like for like. And a sheet metal mate halped me make new wheel tubs too. ( @JustHarry grafted these in) the same mate helped me reproduce the top edges which were also different. (Harry grafted those on too) Harry also grafted in wheel arches out of some fucked front guards to mimic what a proper datsun tray would have had. The tail gate is actually off a proper datsun tray, and its needed quite a bit of fettling to fit. (The NZ tray is a bit deeper) The tray is still a work in progress. Harry has opted to make new lower sections from scratch, rather than attempting to strighten the mangled mess that was there before.
2 points
-
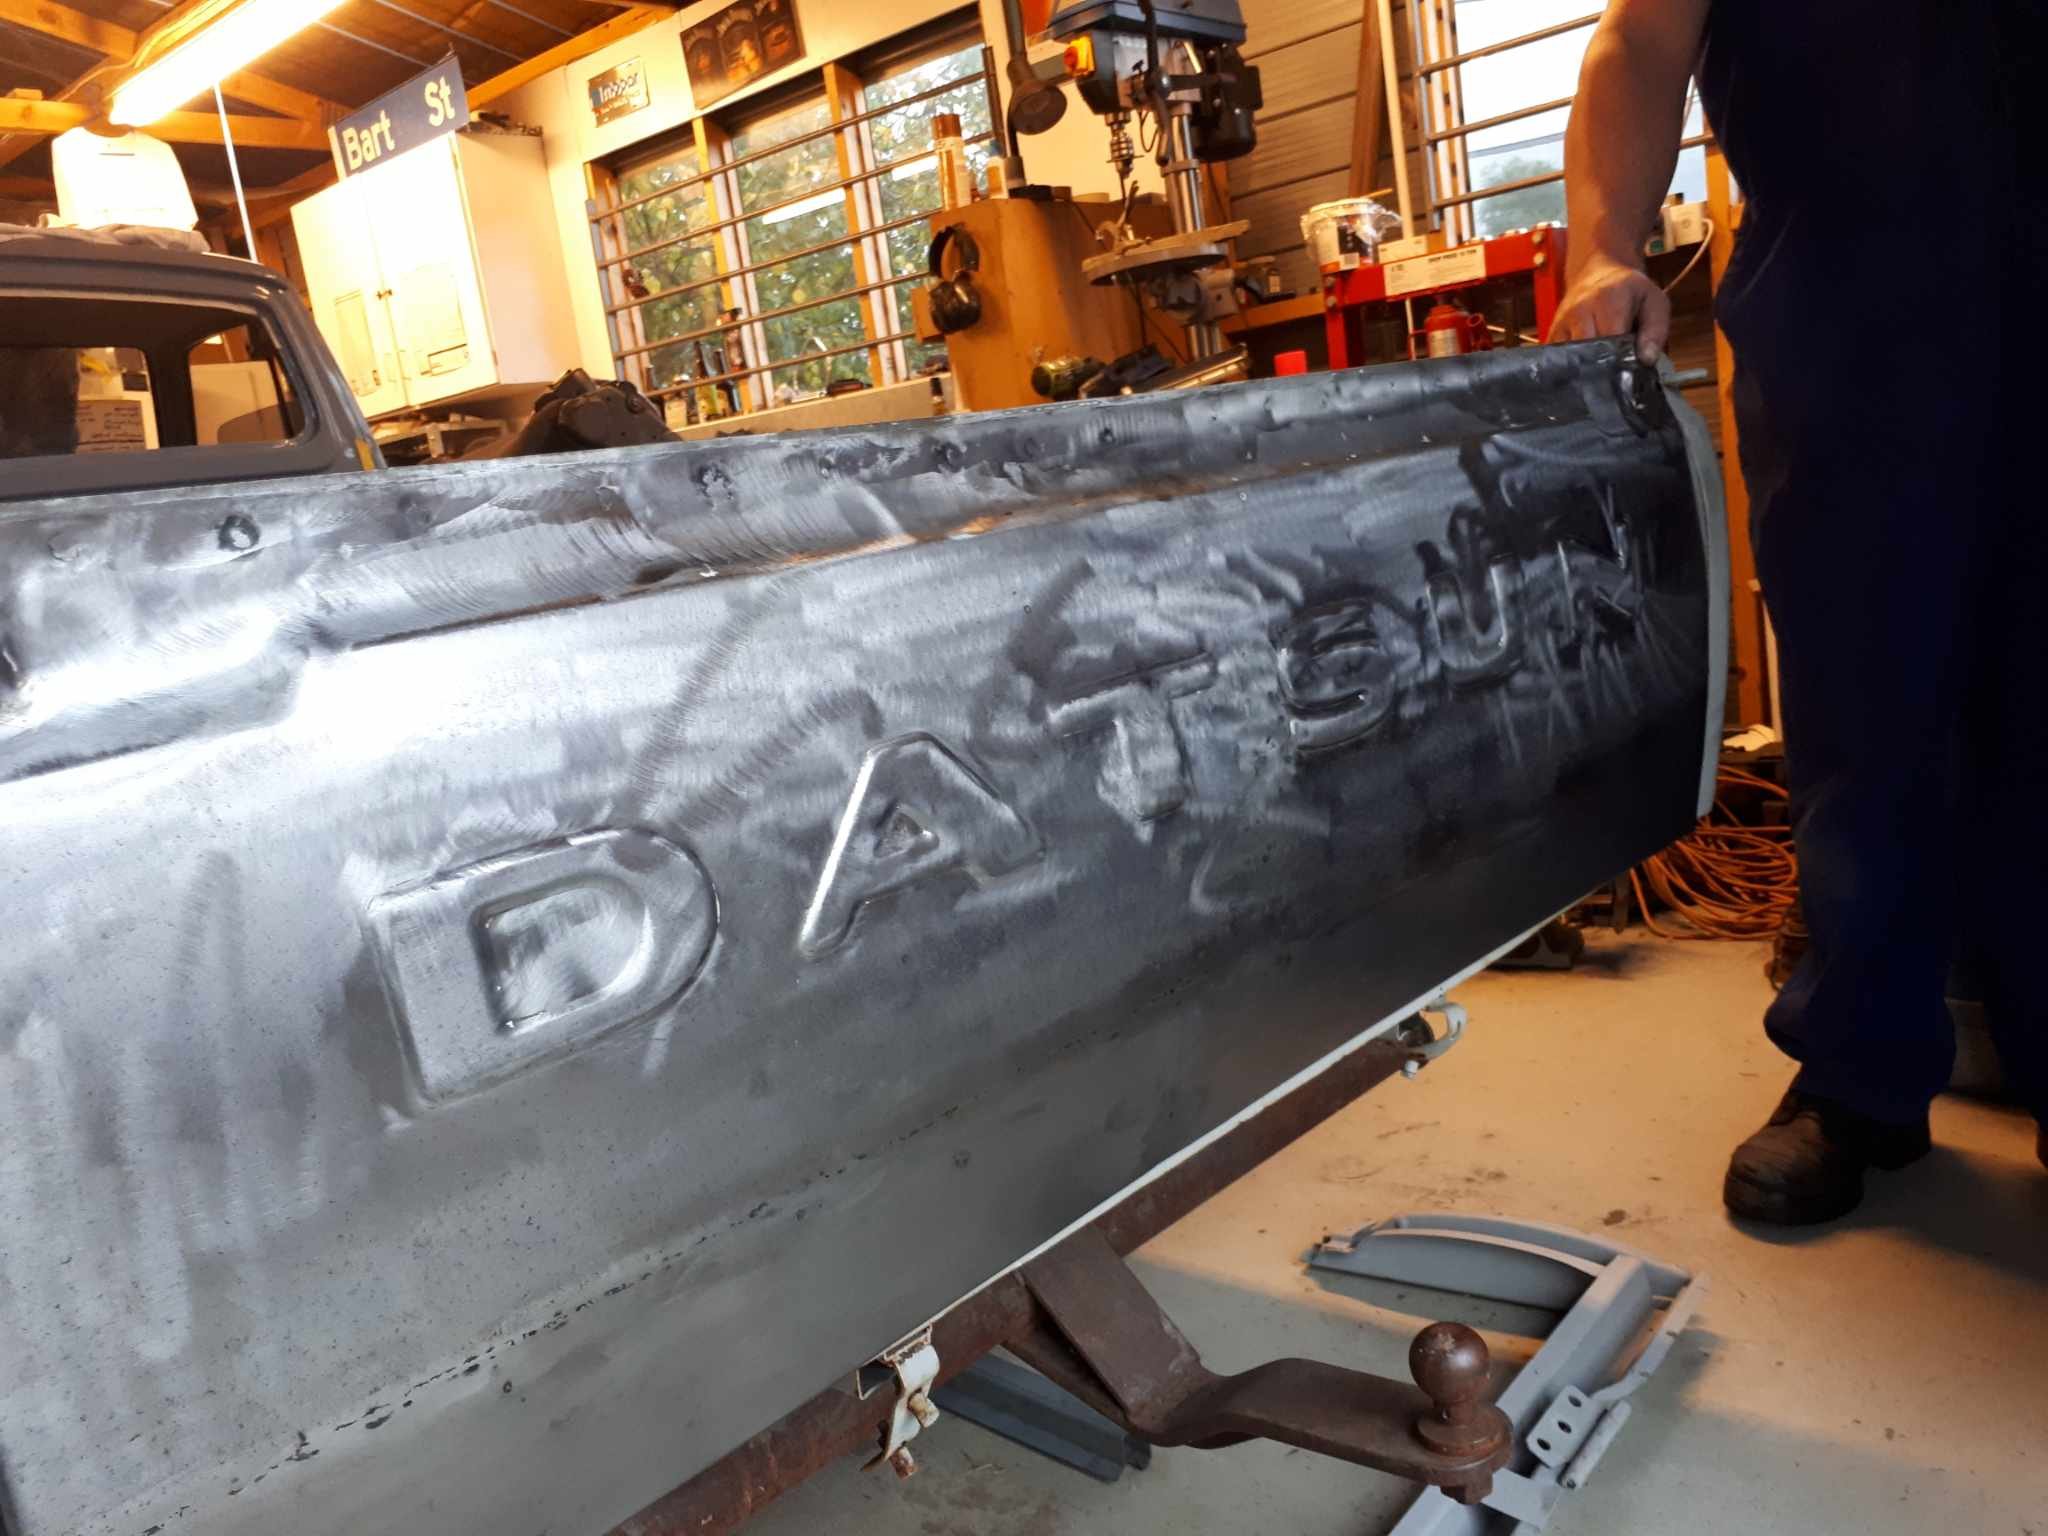
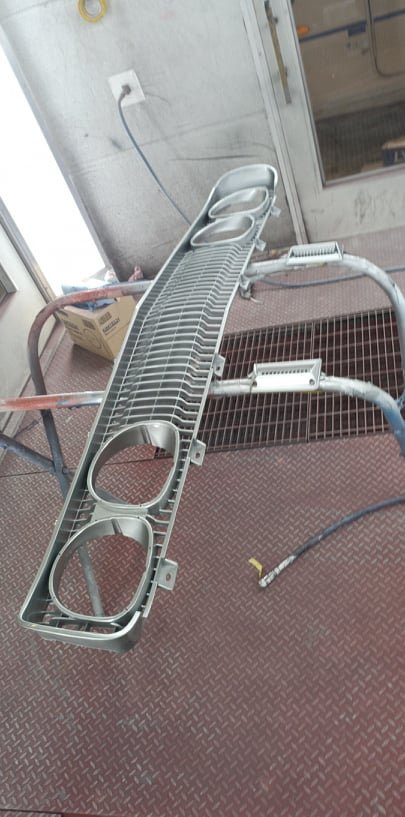
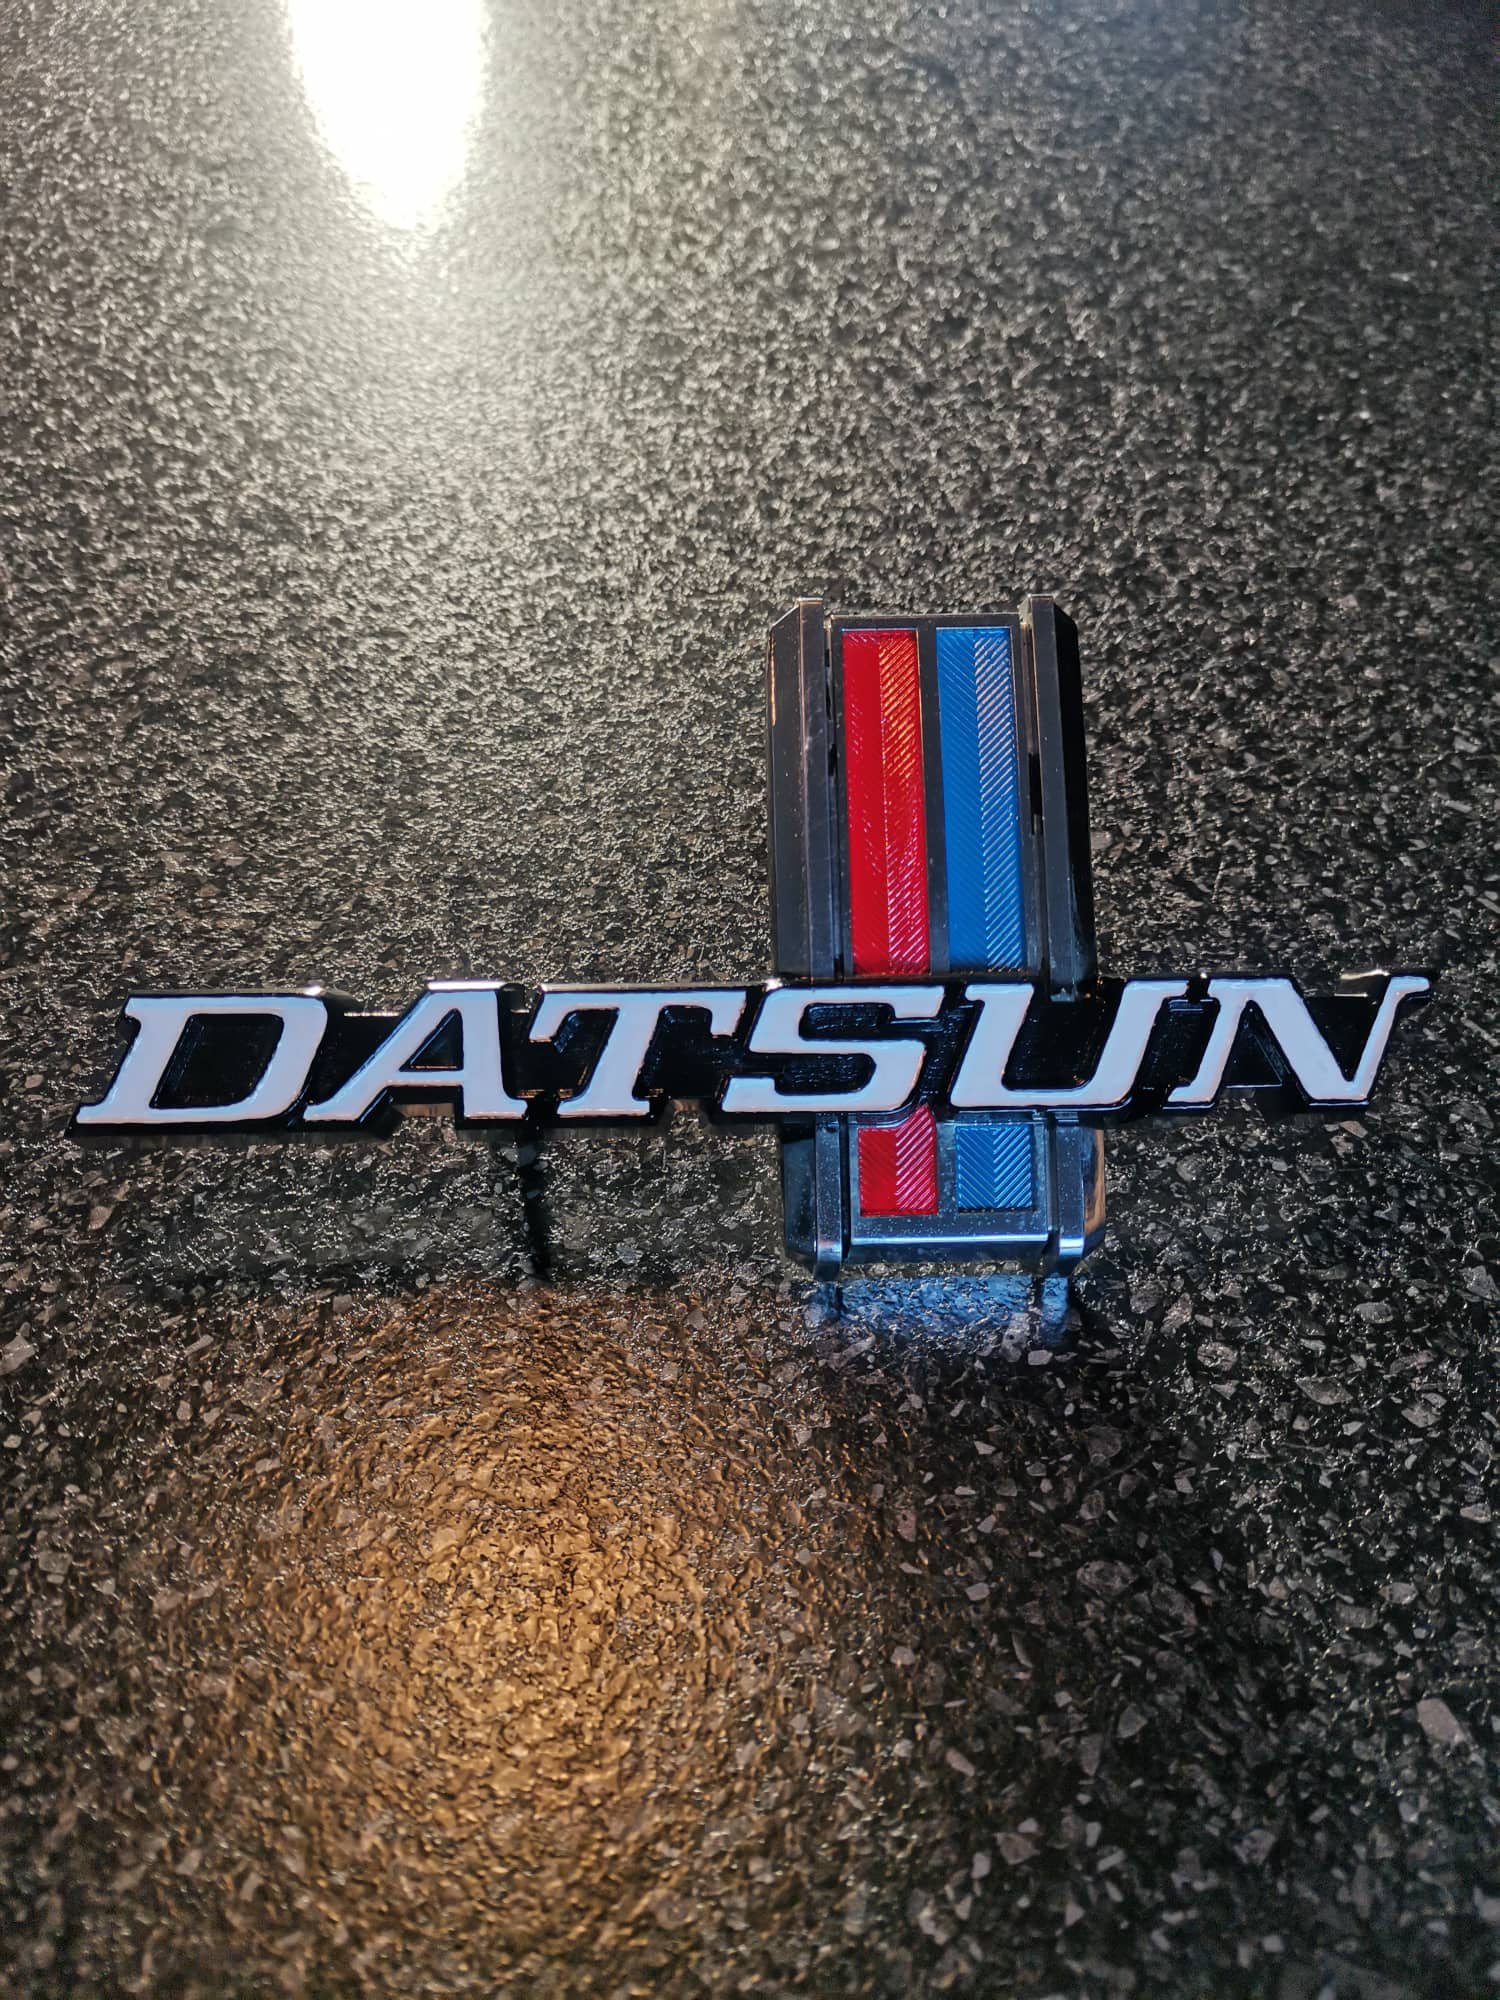
You can see the grill just didnt look nice enough with the rest of the truck painted. So once again i called on Hamish to give it a birthday for me. And the grill badge likewise looked pretty used. I enlisted the help of @filthy one mrs (Gemma from twisted sister customs) to give it a birthday for me.
2 points
-
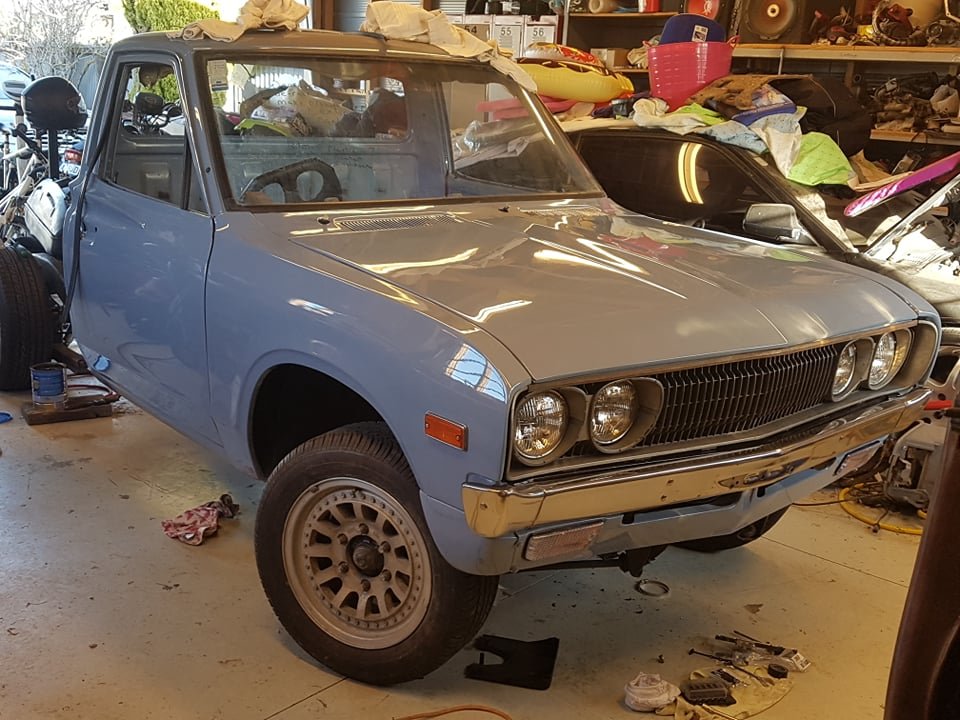
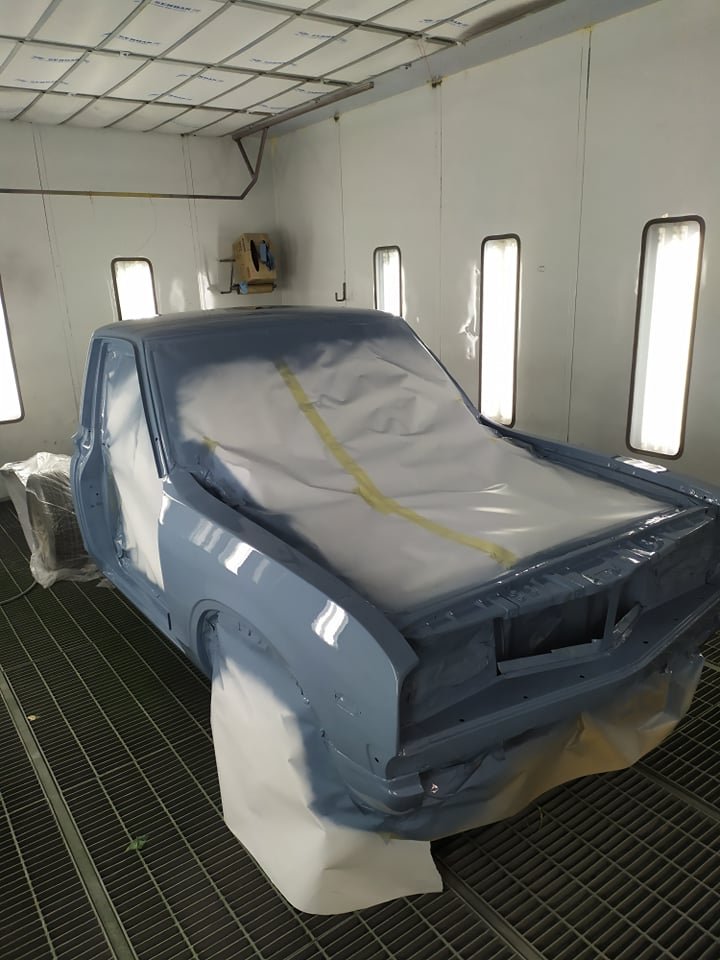
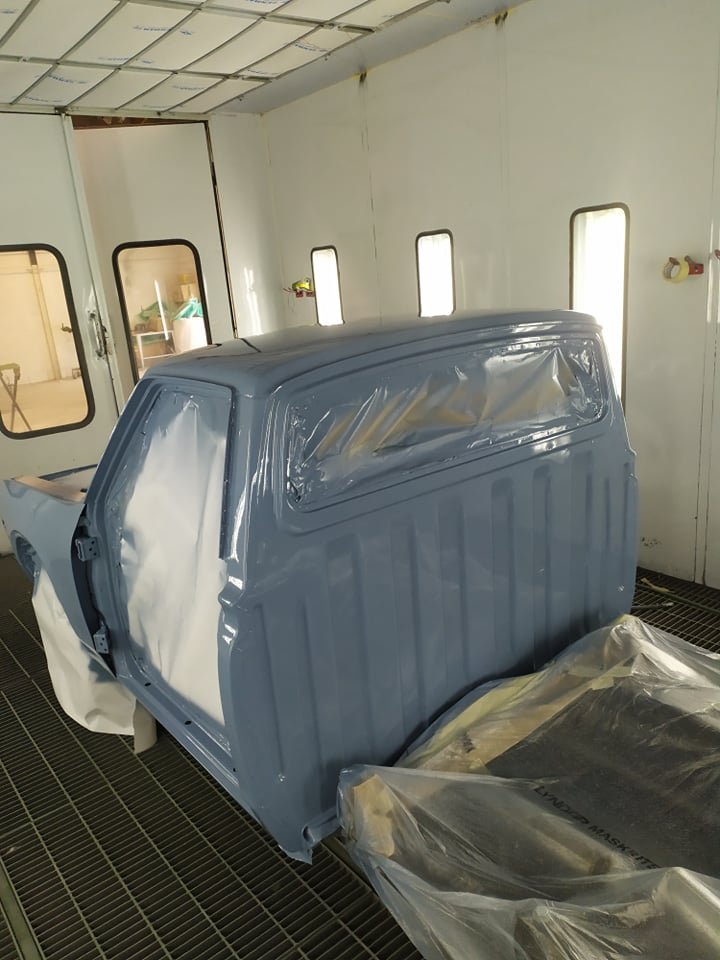
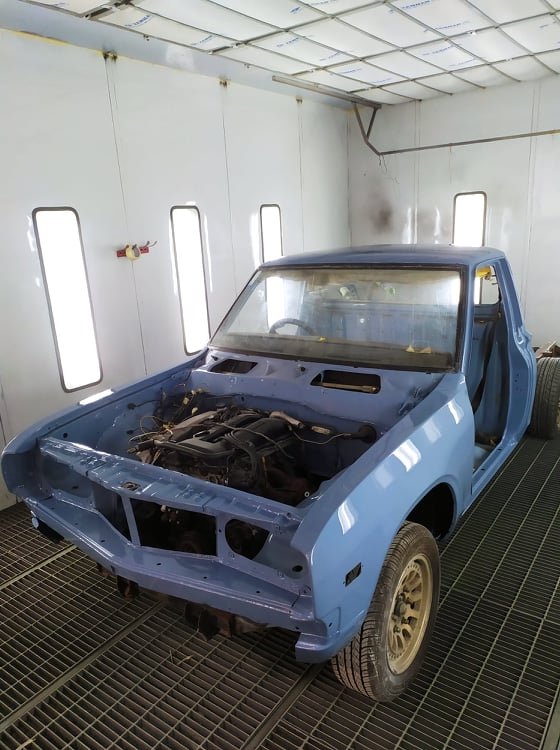
Bit of colour went on too.
2 points
-
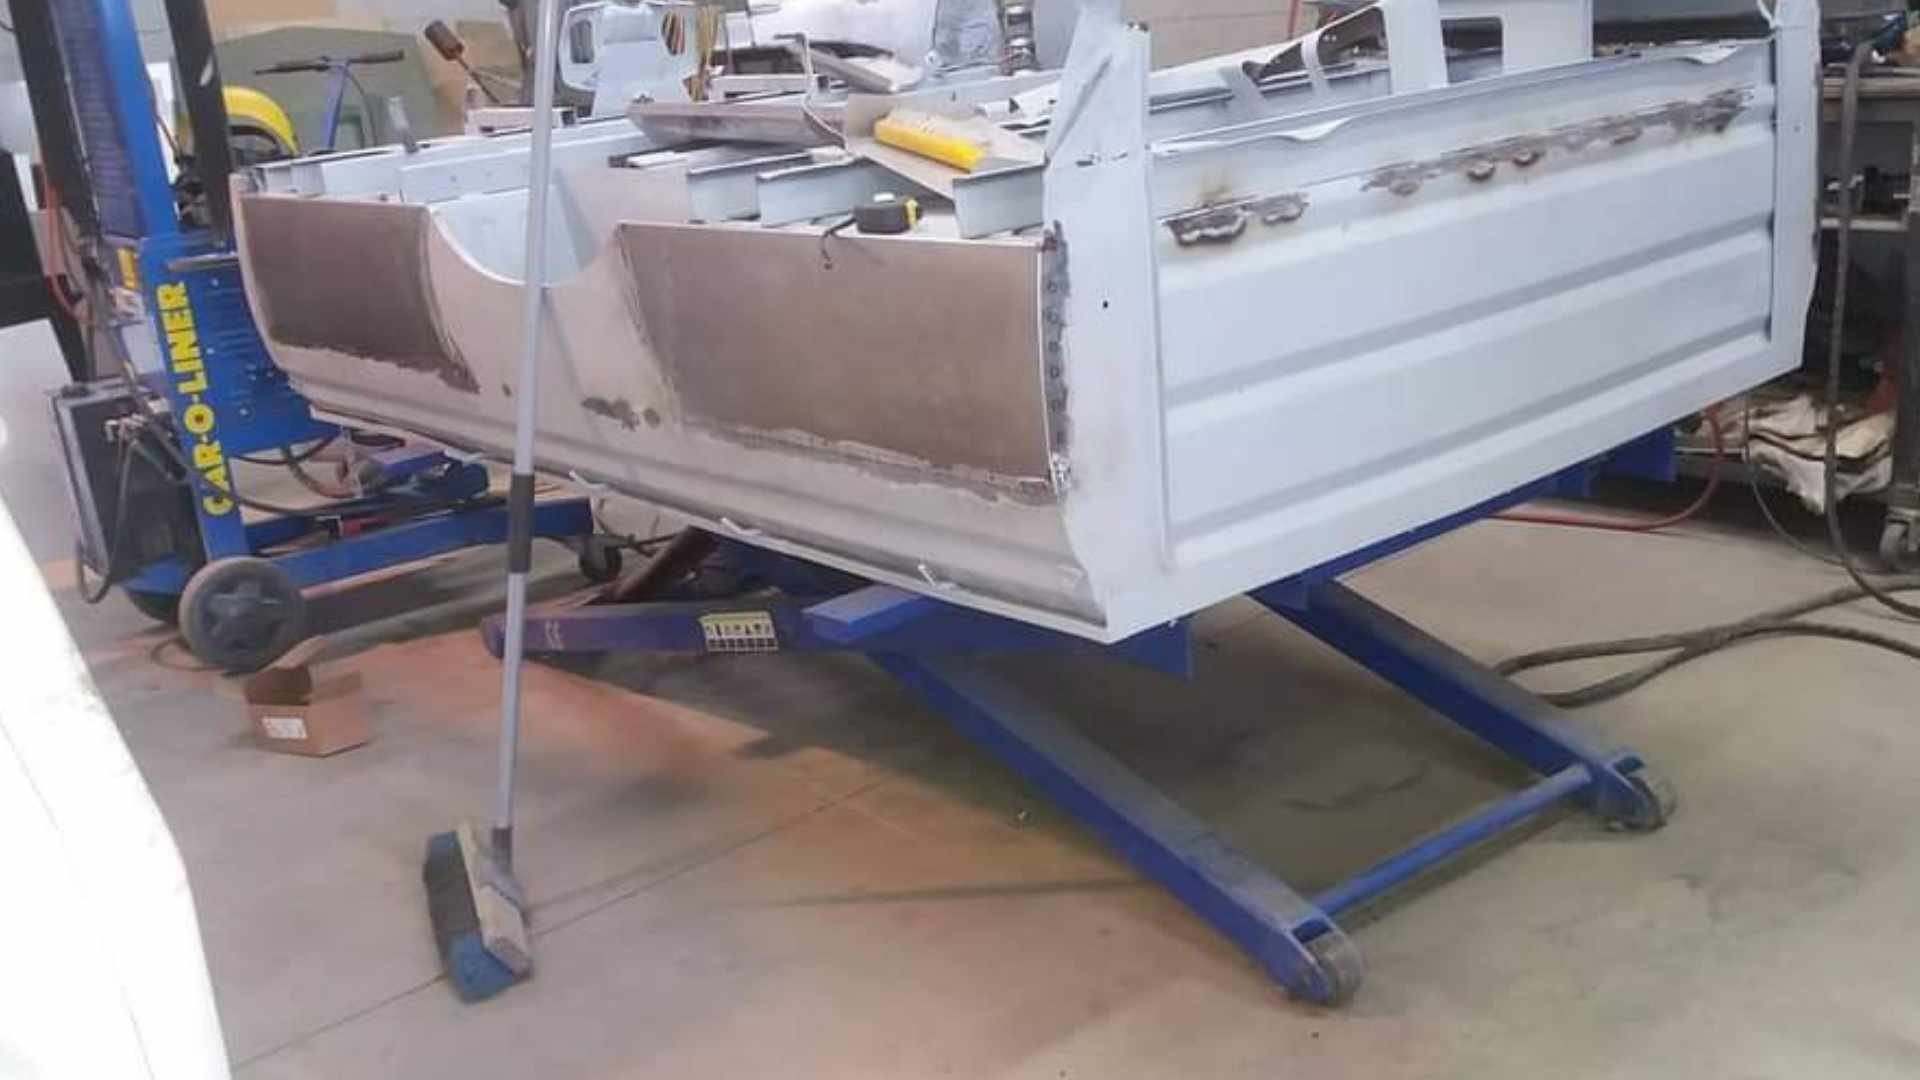
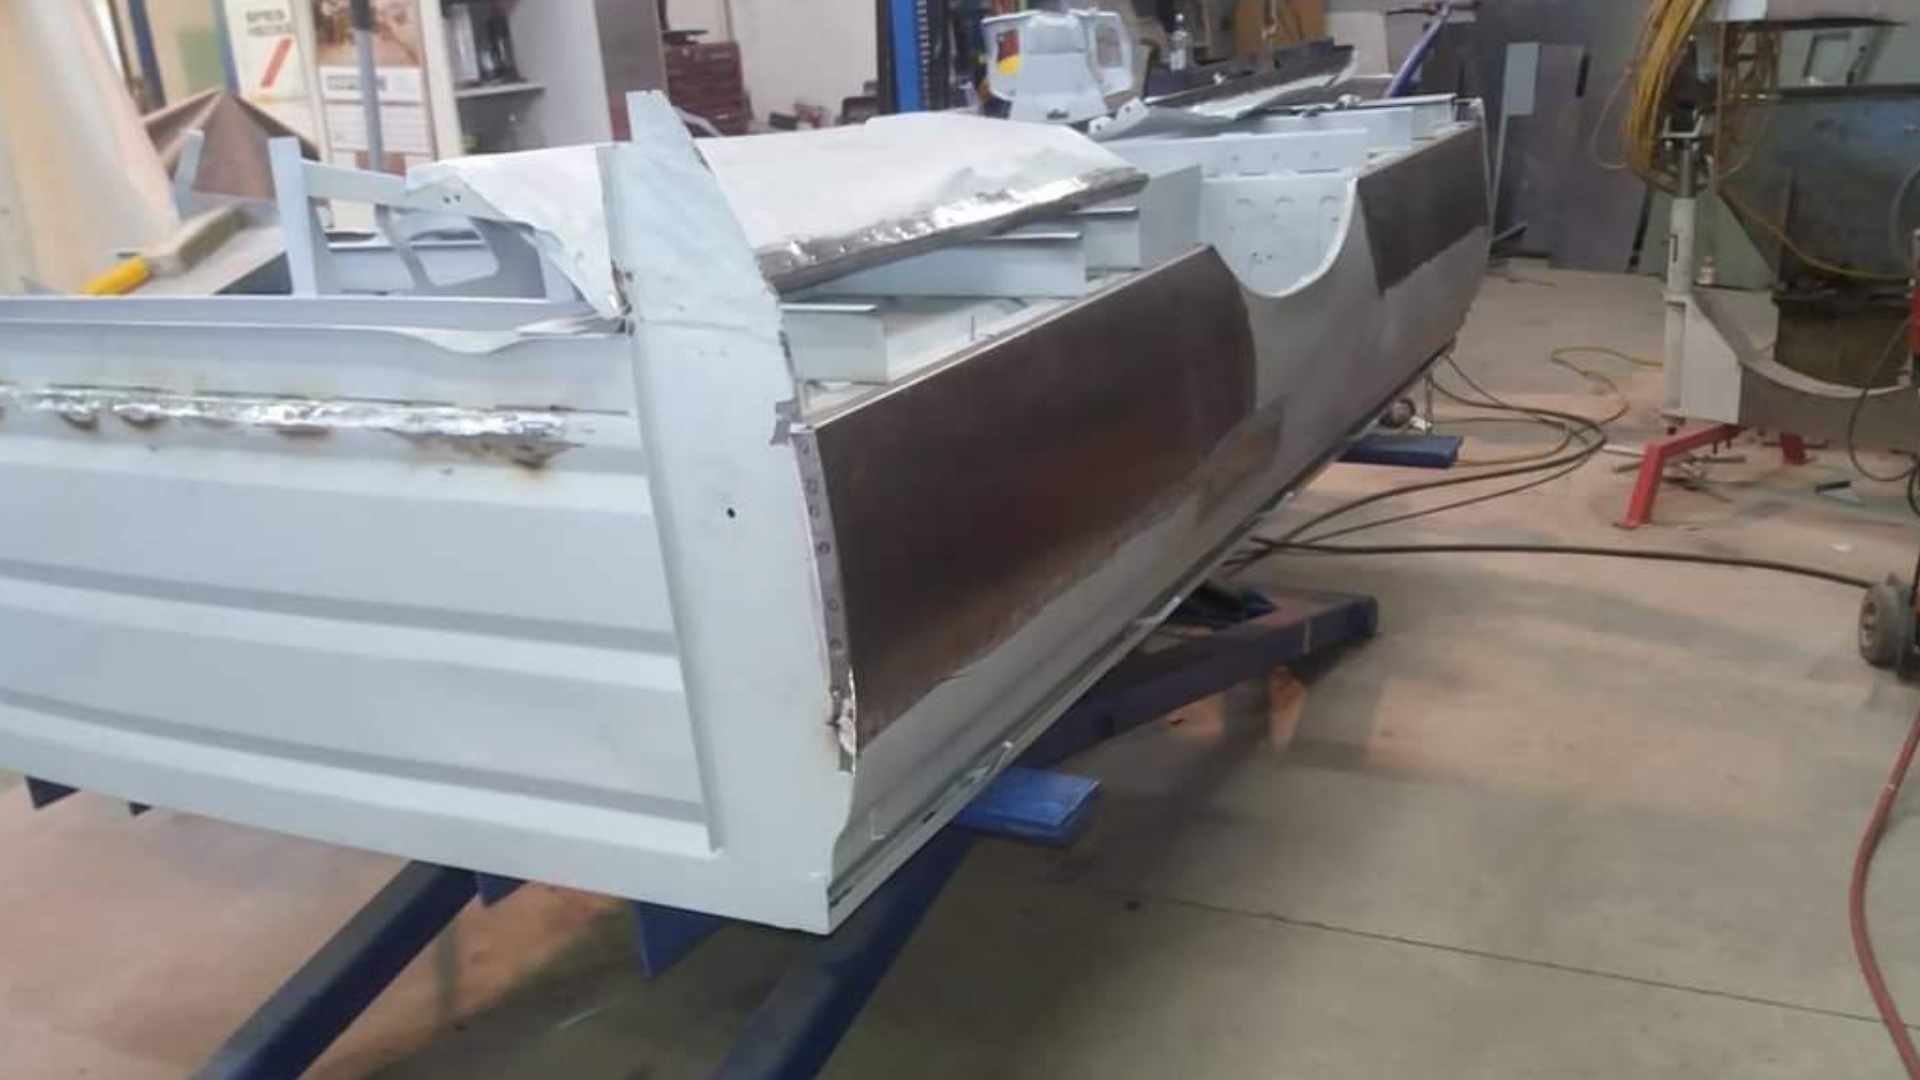
Then theres the body work, So it began pretty rust free. But sitting around outside in Christchurch, a bit of cancer began to show. My coarch builder mate fabricated me a new drivers side sill, and @governorsam grafted it in for me. (As well a couple of other small bits) i dont have any pictures of this either. And one of the gaurds needed a patch too. Again no pics, but i got a panel smasher to come weave his magic. Id fitted the front guards, and they did not match the shape of the doors at all. Also i found that old repairs etc meant that the drivers door was beyond economic repair. And needed to be replaced too. So mister panel smasher had the guards fiting beautifully afternonly a couple of hours. I removed rhe back window, and dropped the headlining down so he could pop some dents out of the roof. (It had been a working truck in its former life) he did a bloody good job all told too. I told him, im not some file finish fuckwit. Its a datsun, and its a ute. You can use as much filler as you need to. Because i knew he wont use more than is necessary. I also said, u donr expect a show car result. If its good enough fo you, its good enough for me too. But as a tradesman, i also knew he would do a good job. The last car he did for me came out really really nice. After the panel smashing was done, a mate brought over one of those paint spectro camera thingos. We took a picture of the paint on the underside of the roof skin. This gave me the colour the trauck was when new. Most of the rest of it had suffeeed 40+ years of central otago UV degradation. Some paint was procured, and it was sent into @I'm new here work on a long weekend. Hamish really pushed the boat out with stopping all the repairs, before paint
2 points
-
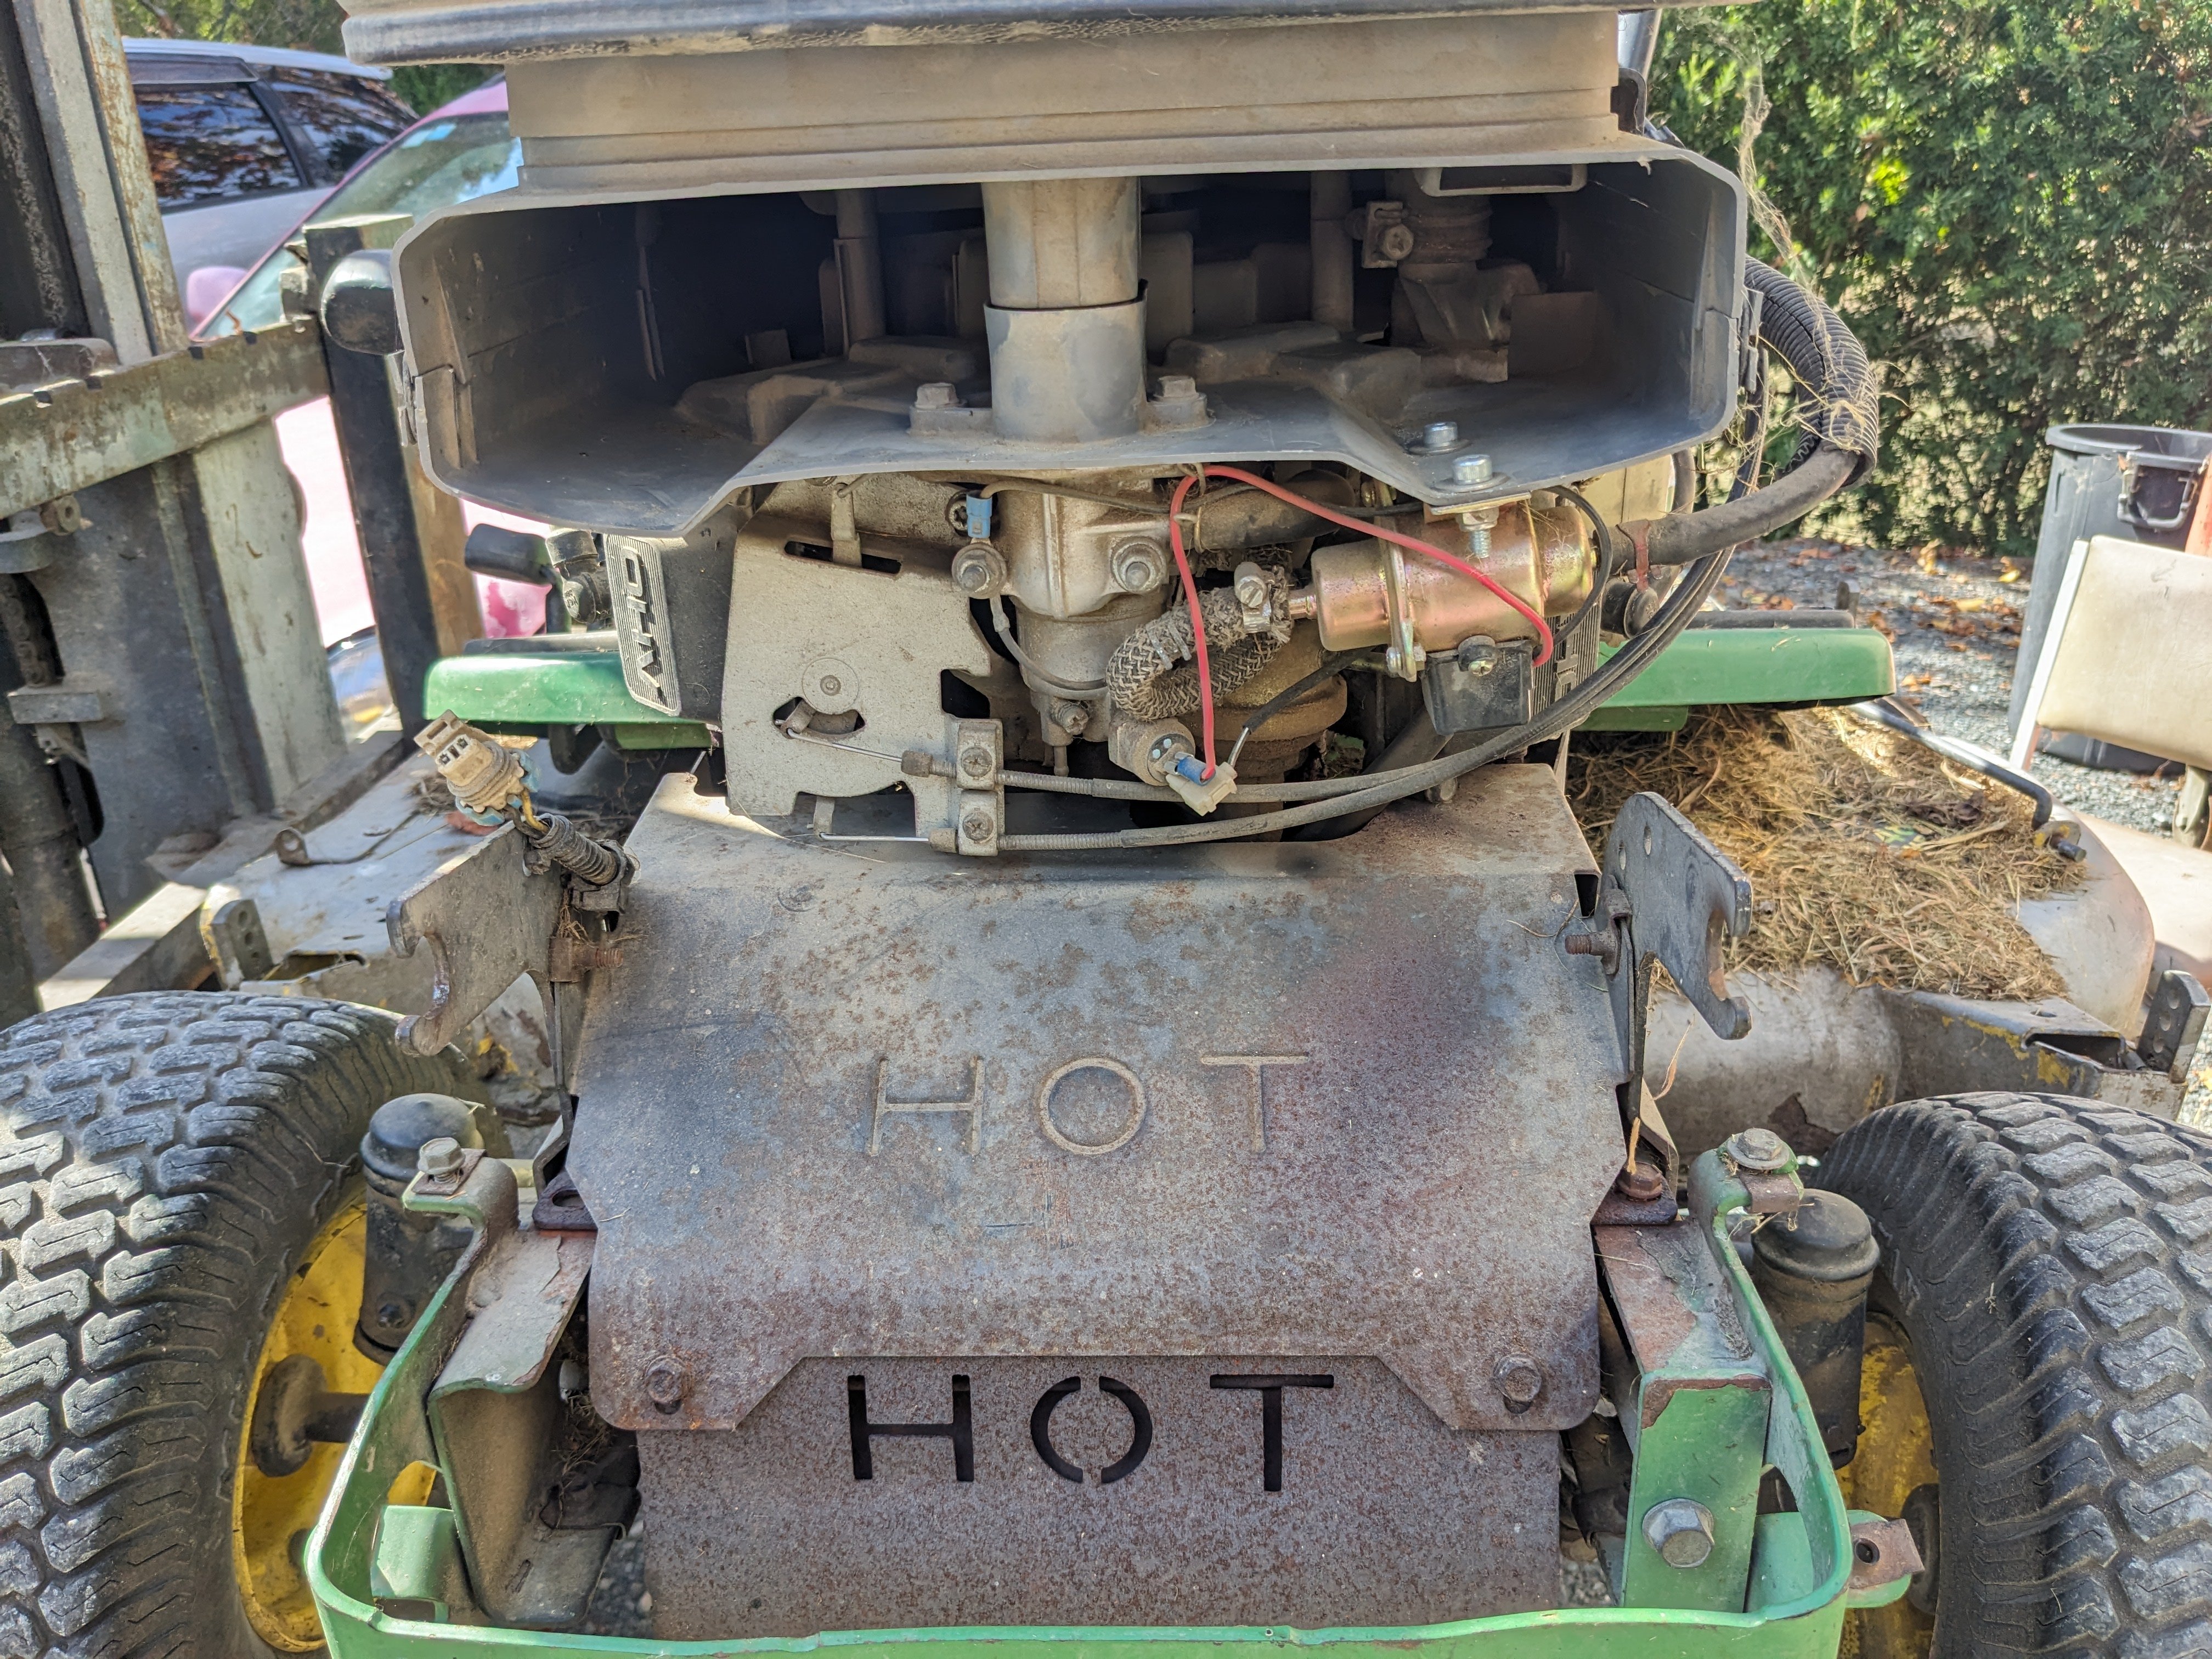
Then I remembered the shitty fuel pump that I hacked into my ride-on a couple of years ago cos it was way too much money to buy OEM; Then naturally this; Dunno what the crackly business is, nevertheless it sounds glorious.
2 points
-
I was given a John Broadwood a long time ago that was badly broken. My wife went to the UK for a month so I sat the action on the dining room table and slowly worked my way along it replacing springs and tape etc. Getting the parts was hilarious as the man at the piano shop had a full on rant at me cos i asked if he also had a tuning key I could buy or borrow, he lost his shit and told me loudly and in the thickest Scottish accent that he had been fixing pianos for 40 years and what made me think I could do it in any way shape or form. I suggested that playing guitar for 20 years might have developed my ear for these things somewhat and he lost it so bad that he had to walk out. His boy was cracking up in the background and sold me all the parts I wanted once the old boy was gone. I didnt get a tuning key so jimmied one out of some square sockets in my socket set. It was never spectacular but played and sounded pretty nice. Unfortunately I had to store it in a shitty shed for a few years and it got ruined again. So when my daughter had her 16th we had a piano smashing party and they laid into it with sledgehammers and axes while drunk. She has one friend who is an unusual girl but holy shit she could wield a sledgehammer.2 points
-
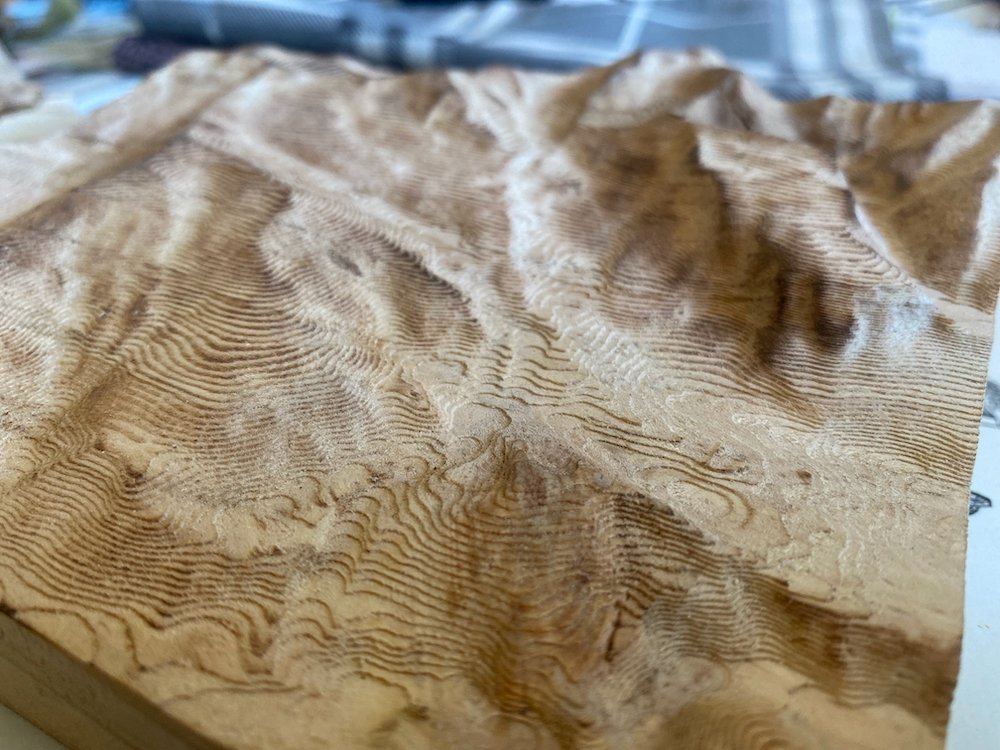
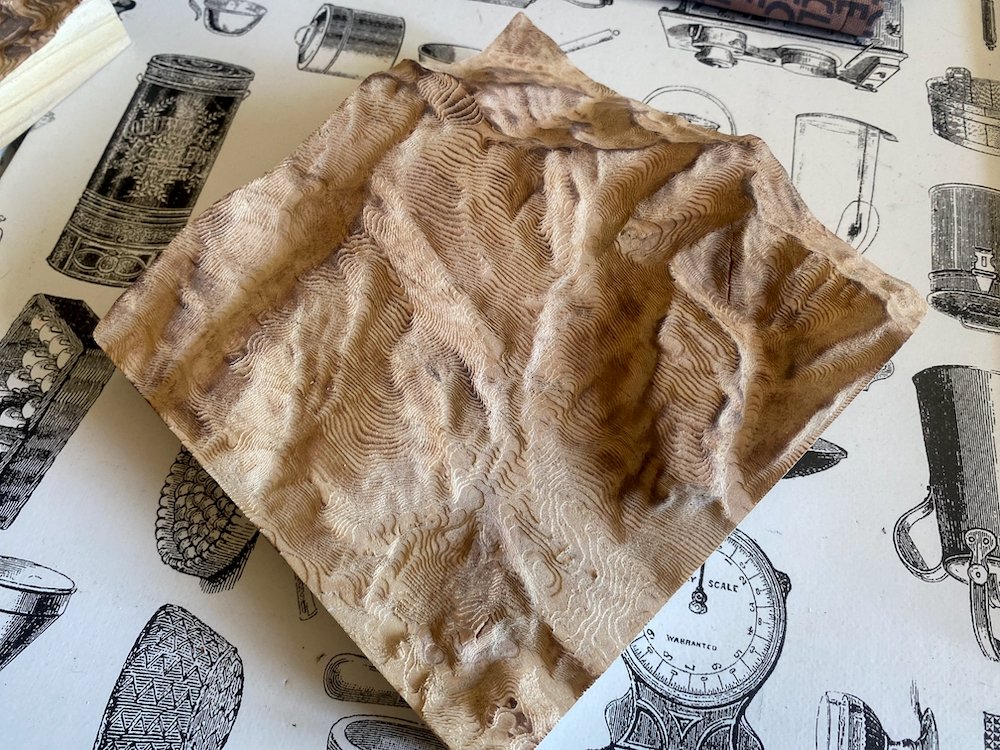
Making some thank you gifts for friends that looked after us on our recent trip overseas, reliefs of the mountains they call home. Carved out with the cnc to replicate contour lines on a map then run over with the gas torch to highlight the ridges.
2 points
-
I want to do that but with an Er11 chuck. Maybe the inside of a gel pen??1 point
-
Good excuse to put some form of heat exchanger in the system? A car AC condensor will be rated to ~250psi which would be an easy addition. Guess would be original was 1-1/4" tube? A std polymer hose won't be up to the temps unless it has some form of reinforcement, depending on the application, service temp can really drop the rating too. Almost any metallic tubing at that size range will be good for 100Bar and not care about temp. Metallic connection will also give at least some effort of dumping heat before the receiver, comes down to access to suitable bending gear and compression fittings can get spendy over 1" If you go for steel, make sure the bends are in such a way so that thermal expansion doesn't try to pull them apart, a big elbow usually does the trick.1 point
-
You should get up to 14 extra days:
1 point
-
Solid cruiser, should be driving in no time.1 point
-
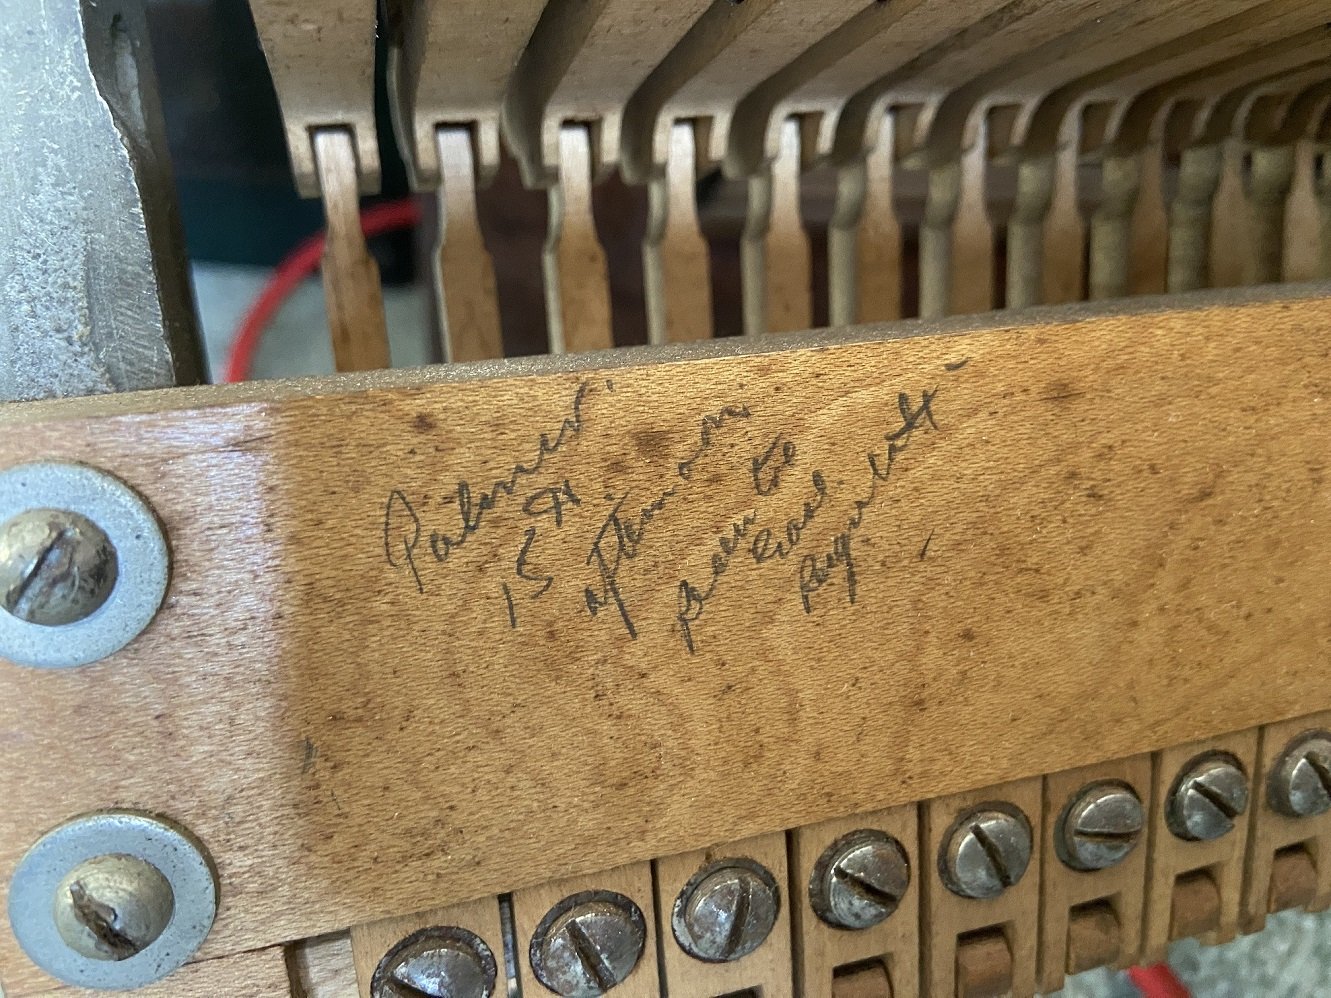
Interesting. A guy from my industry randomly decided to retrain as a primary school teacher, but he didn't last long in the field. I used to flat with a primary teacher years ago, and I remember her making strong vodka jellies to take to school and share around the staffroom at lunchtime - presumably those helped the teachers get through the day. I had David Jenkin assess my piano years ago. I found it interesting and I was sorely tempted to throw money away on a rebuild, but instead I bought a new piano for some reason. Now I have two pianos, because of course I can't get rid of the old one. More than a decade ago I was already finding it difficult to book piano tuners - they were busy, which meant they would tell me their one and only available time slot a month or two in the future, and I'd have to make that work. Then they'd decide to specialise in tuning expensive Steinway grands and stop accepting jobs for old British uprights. The piano tuner I use now is someone I was forcibly transferred to when my previous tuner basically said he was too busy. She's not the norm for the industry as she's about a decade younger than me. She was able to bring forward her return visit to finish the hammer bushing replacement to earlier this week. So that work is mostly done now, but it has an annoying short-term downside - as Tim Finn would say, what I need is a positive action, but there's a fraction too much friction. Ooo, and I noticed this written on the back of the action: I think it says "Palmer. 15th afternoon Recentre Ease Regulate". Palmer was my great grandfather's last name, and ironically he must have been getting the same work done to the action as I've just had done.
1 point
-
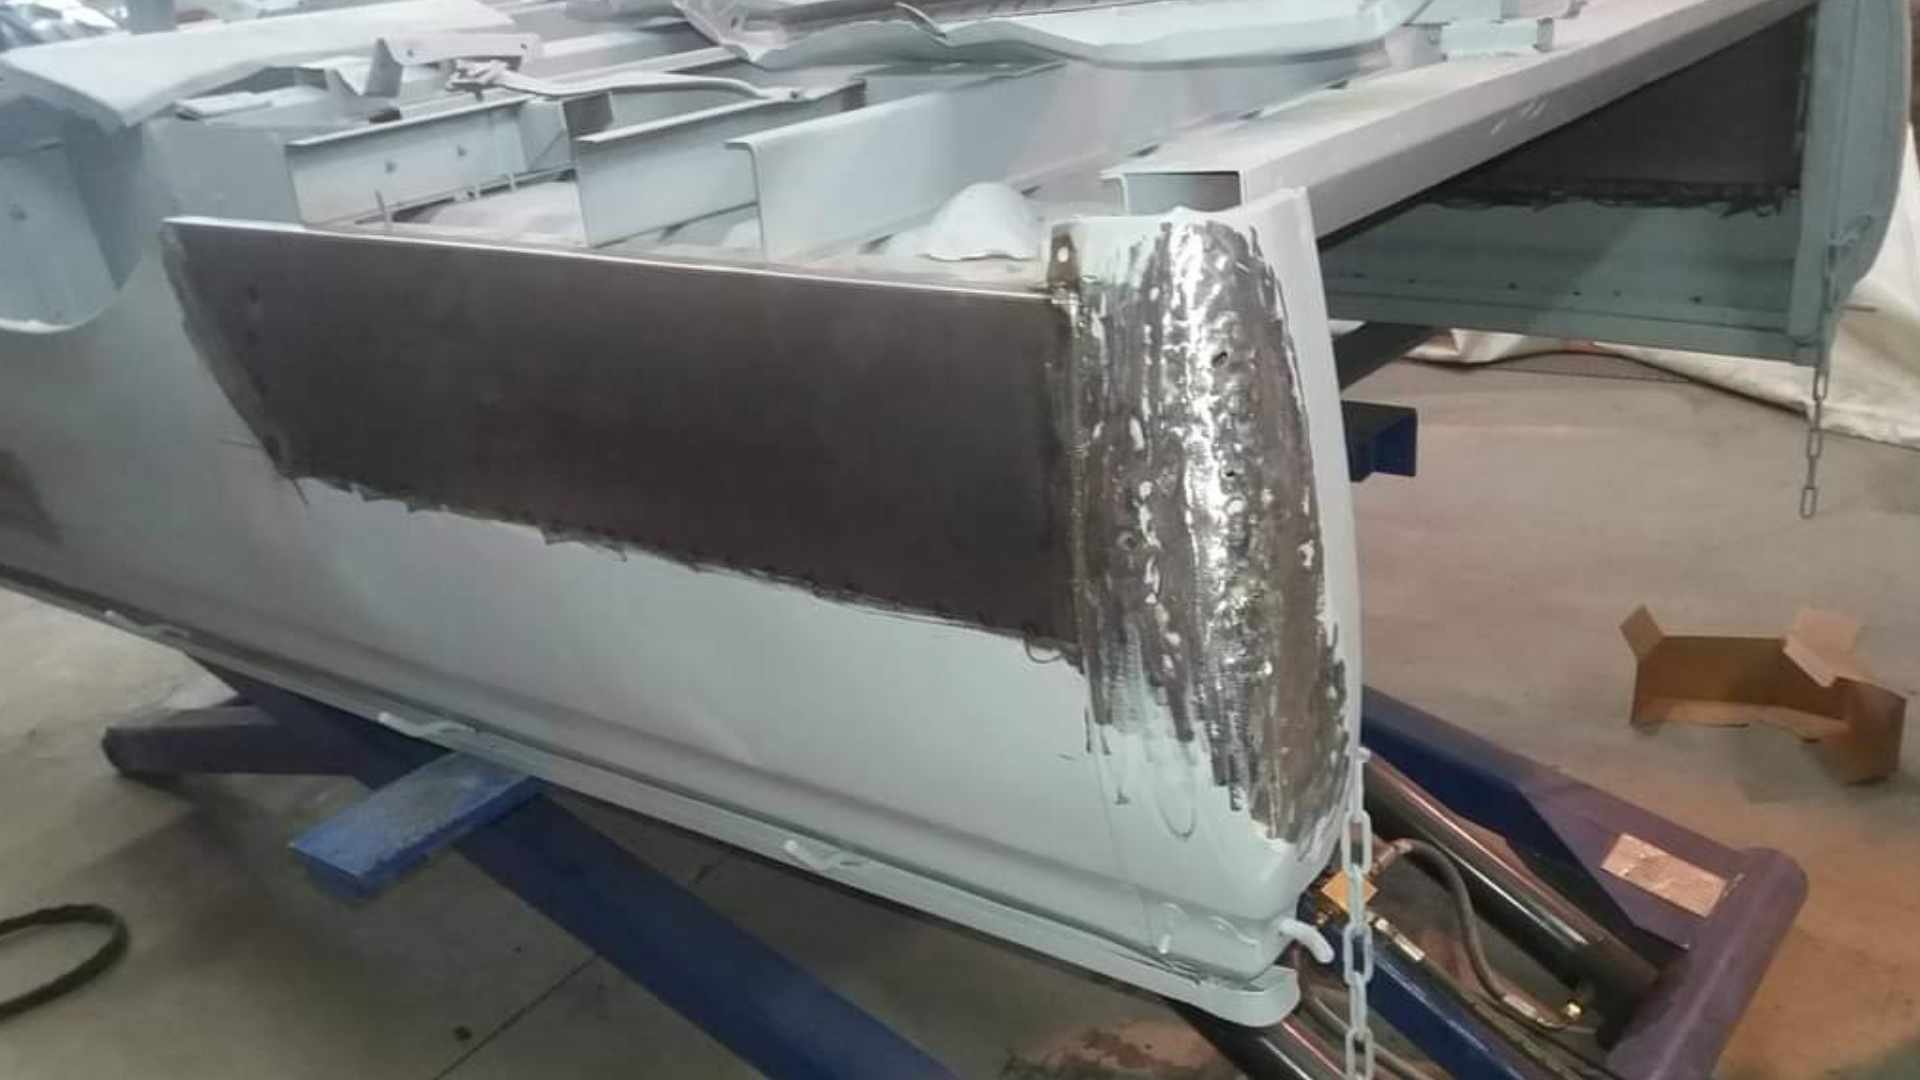
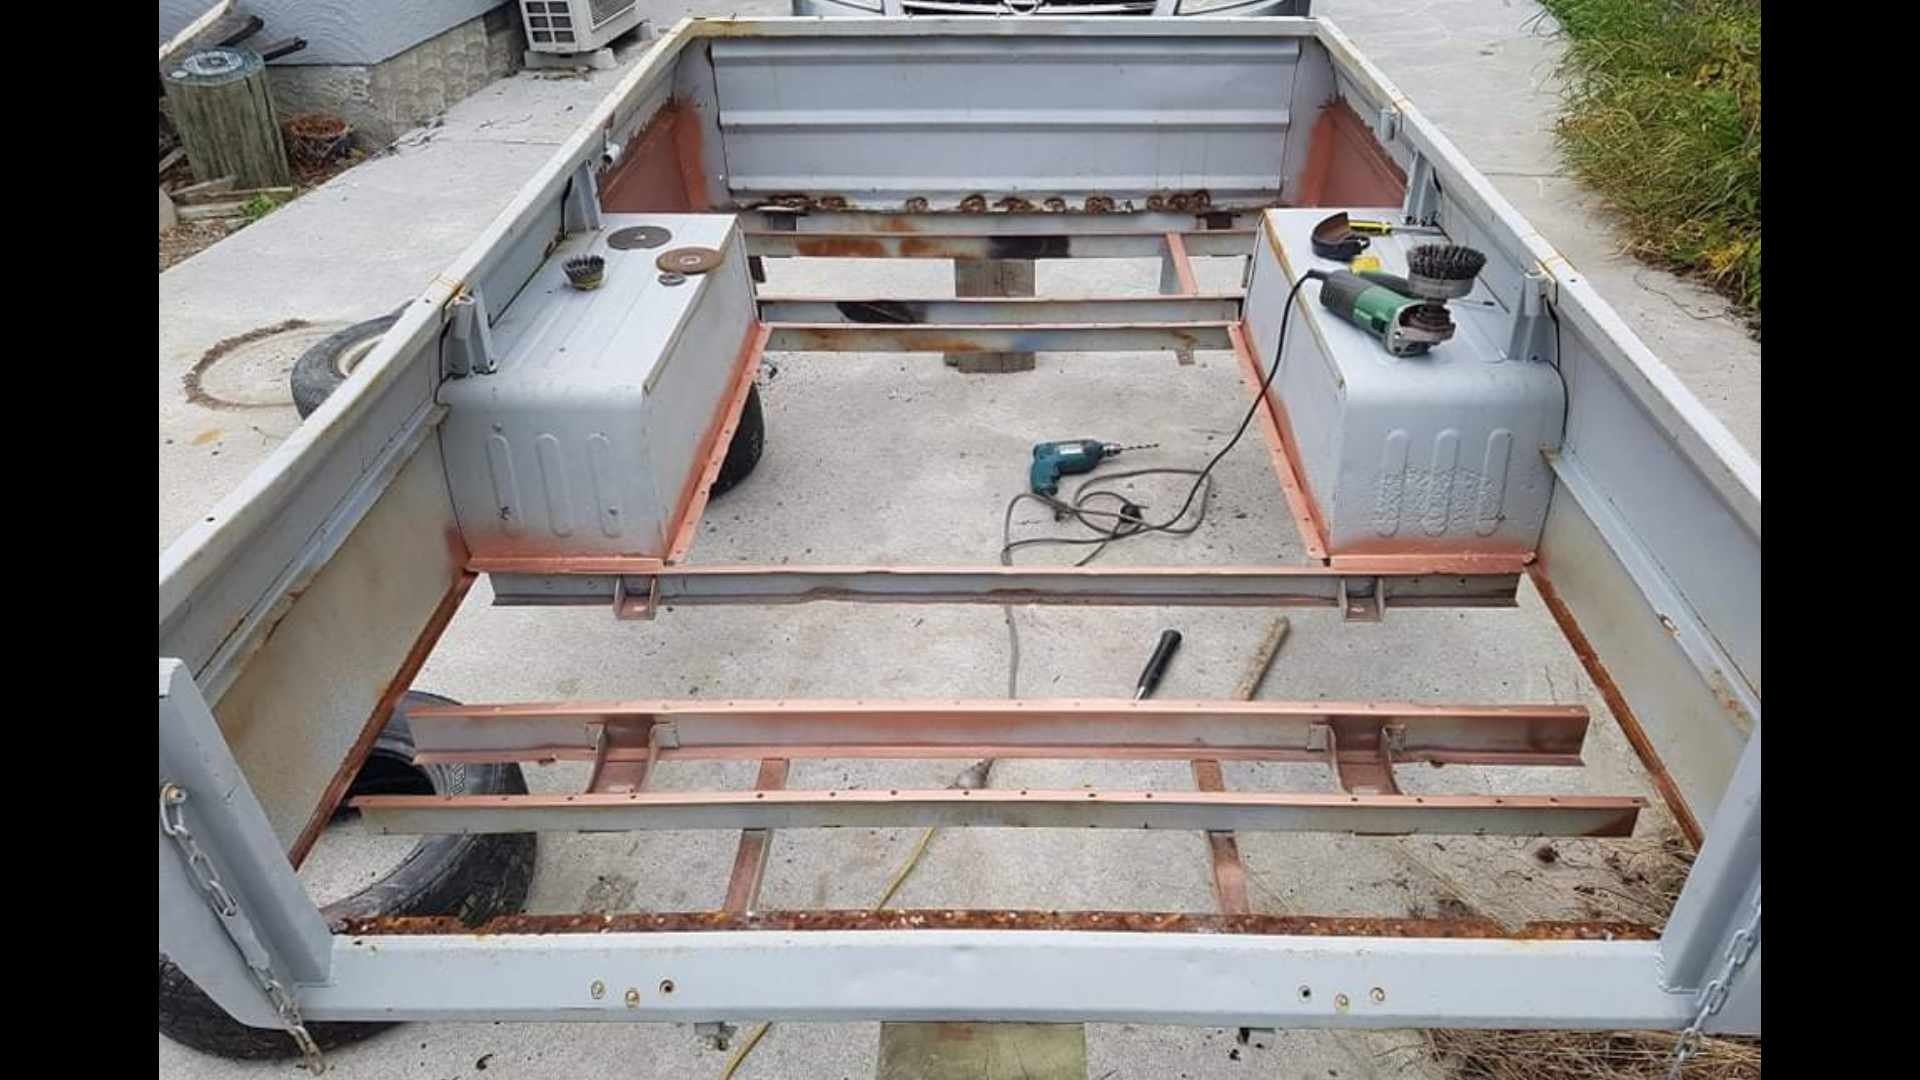
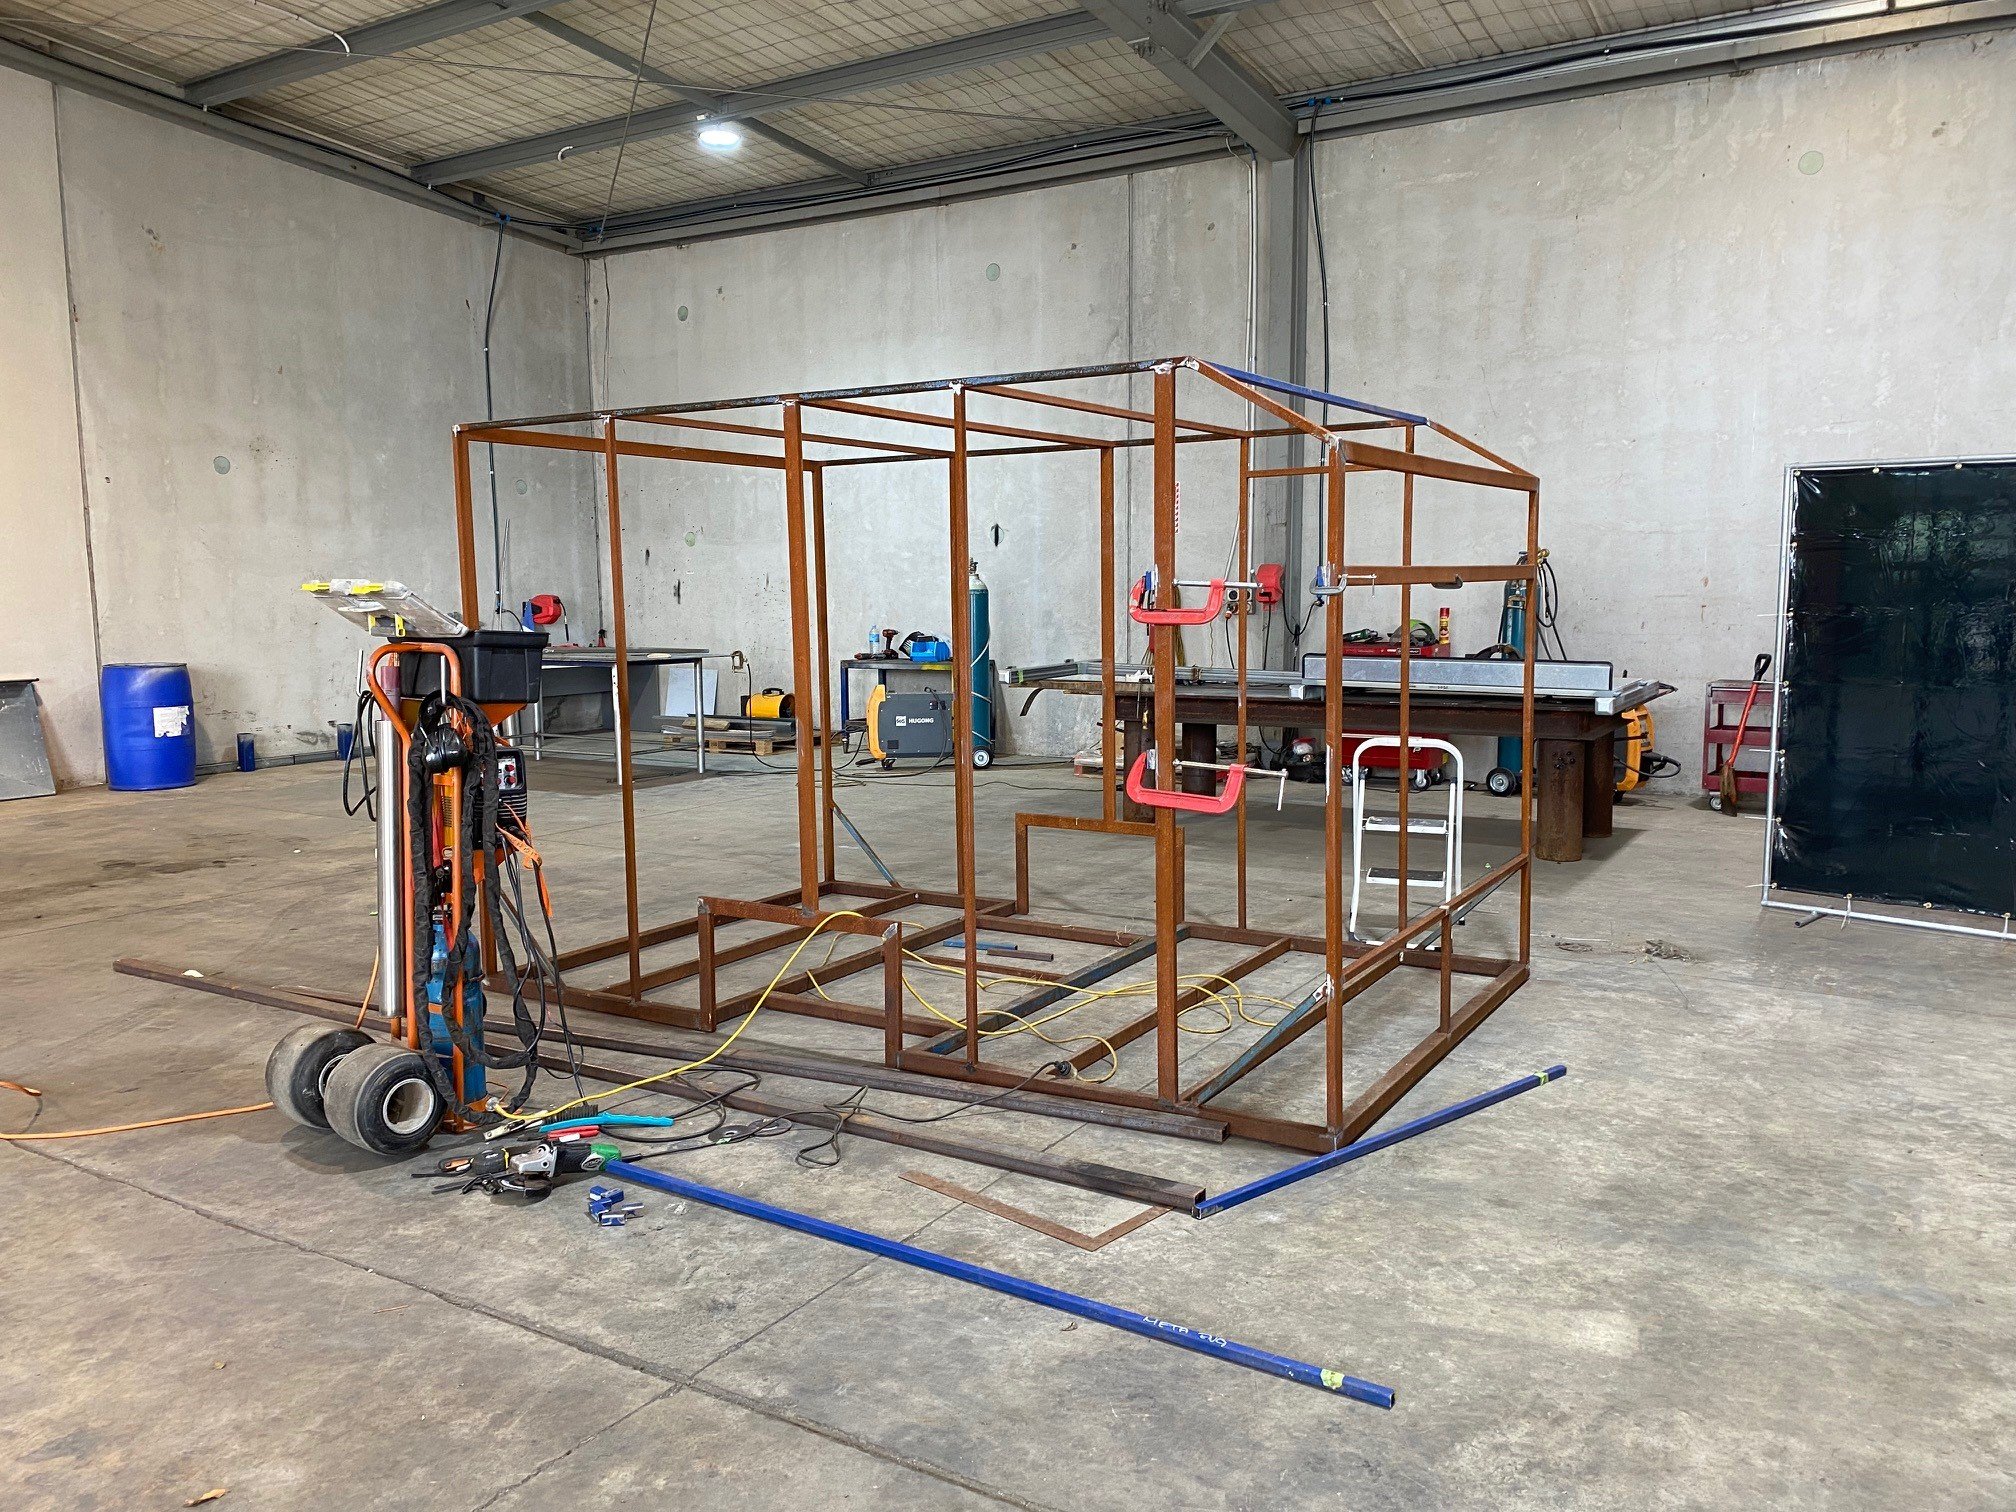
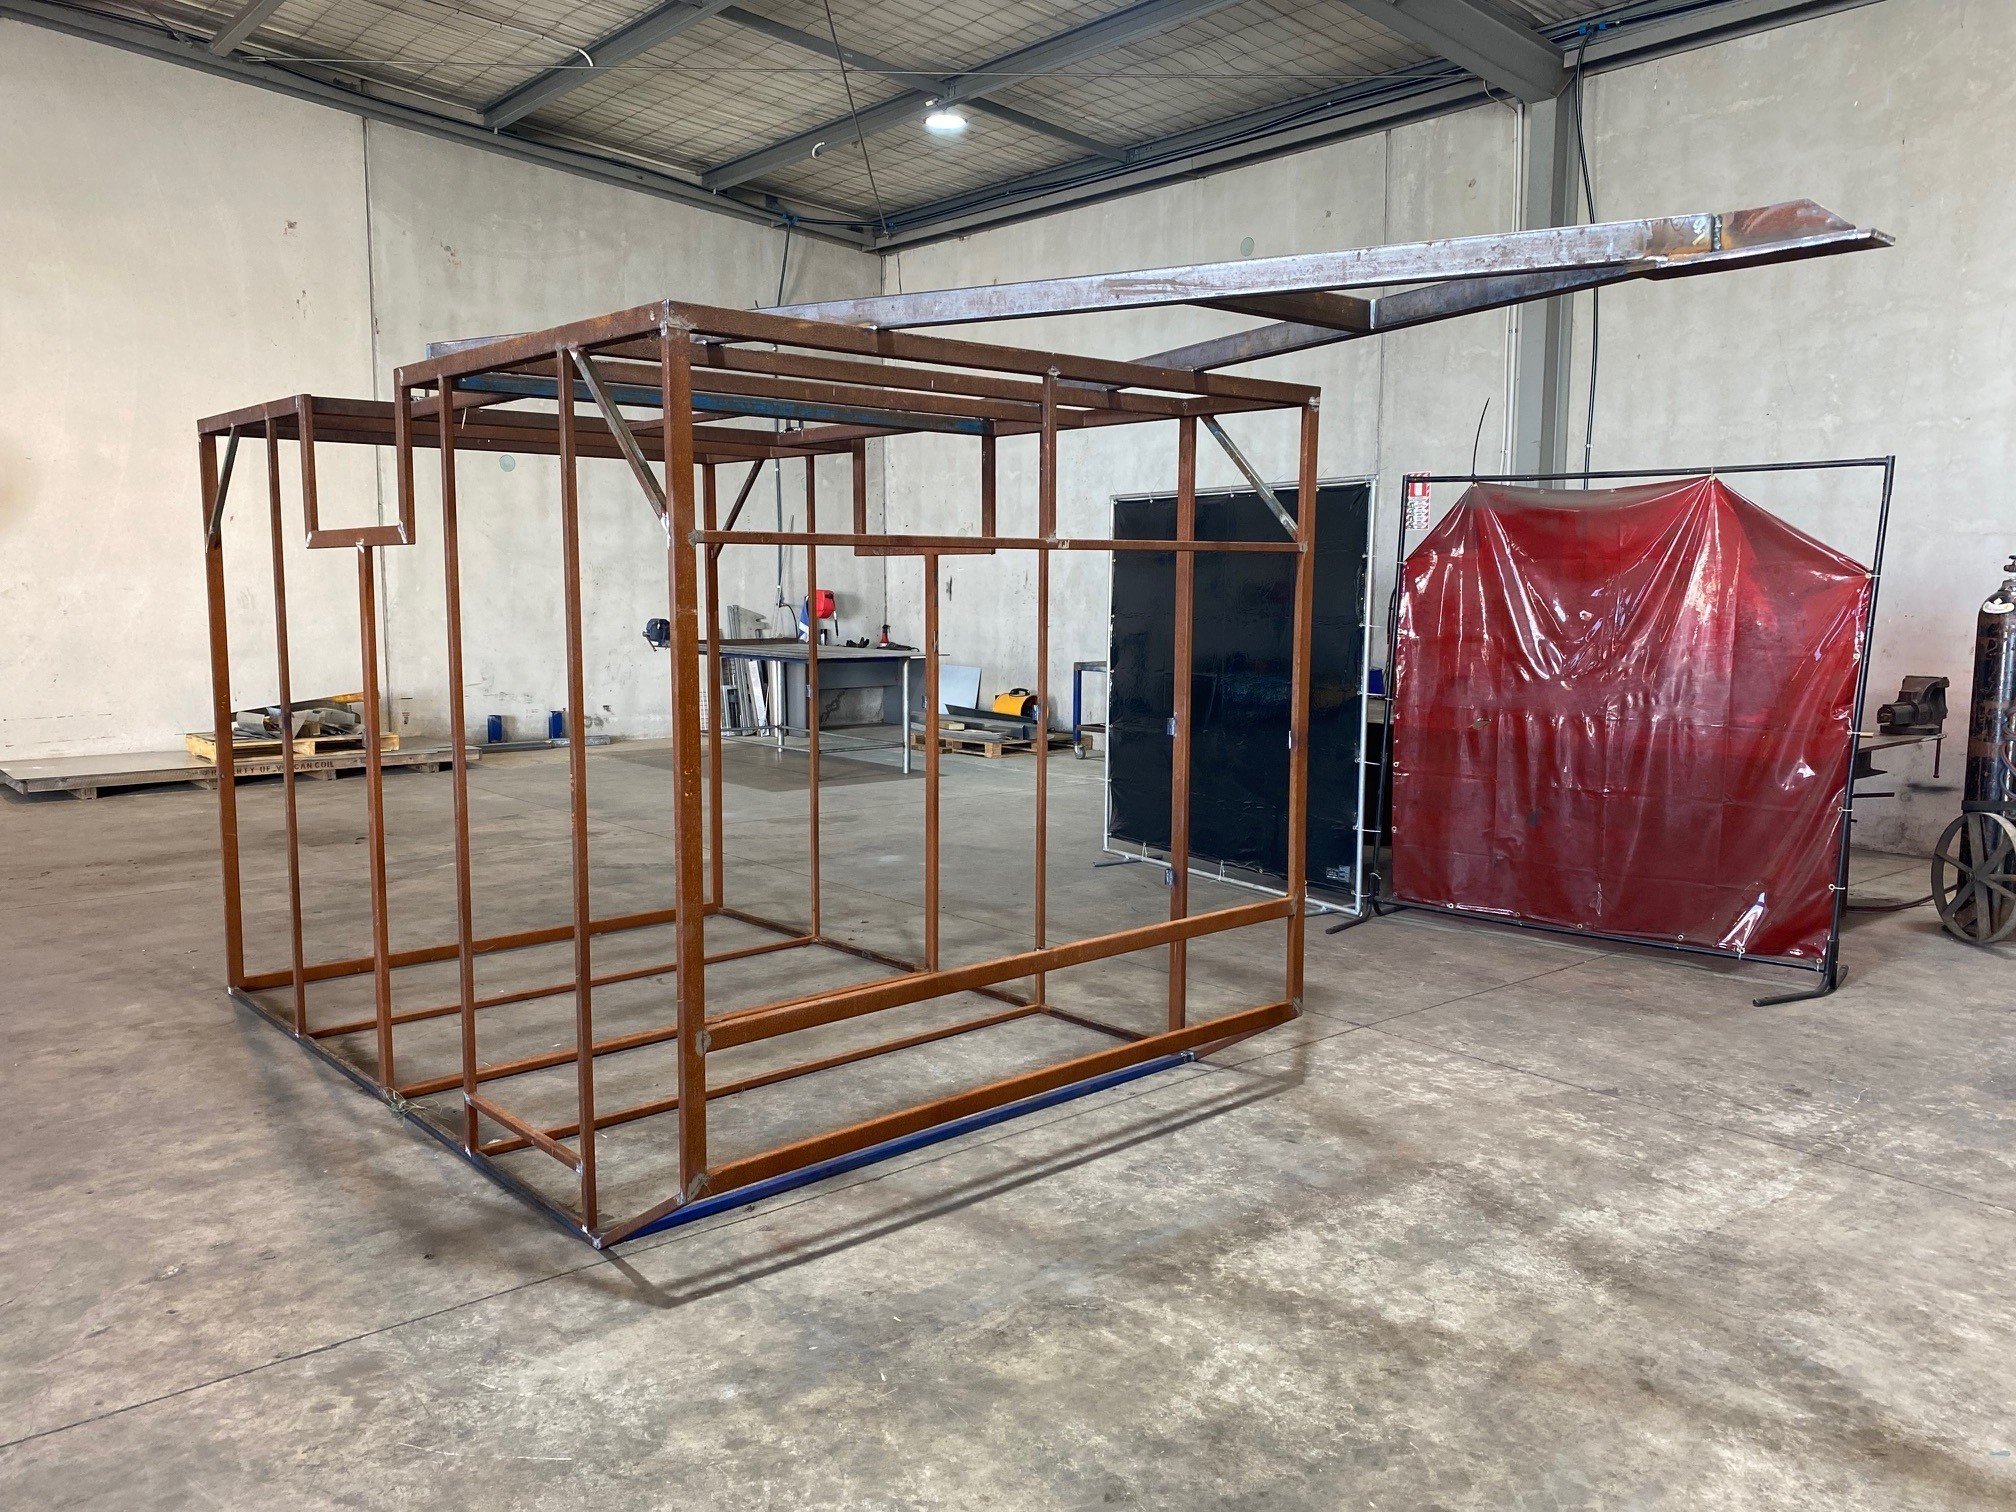
Jesus! 2022 was my last progress on it! Well, after that update, we decided to sell our house. So I was frantically working on the house for about 6 months and then we moved, and the trailer doesn't fit in the new garage. So its been outside, in the grass since last June/July and its developed a bit of scale. Anyway @Duke Blackwood decided that he wanted it off his lawn, so he came up with a clever scheme that got it moved and forced me into working on it at his workshop. Yesterday I took a day off work, welded on some mounting points for a future removable tire rack and work bench, fabbed up a draw bar, and welded on the spring mounts. It was a pretty massive day in the workshop for myself, usually an office fairy... so today I'm pretty shot, to the point where my boss commented this morning on how tired I look Anyway, its finally going to be heading off to blast and paint, and then I will make it towable so I can at least move it around while I sell something to pay for the cladding.
1 point
-
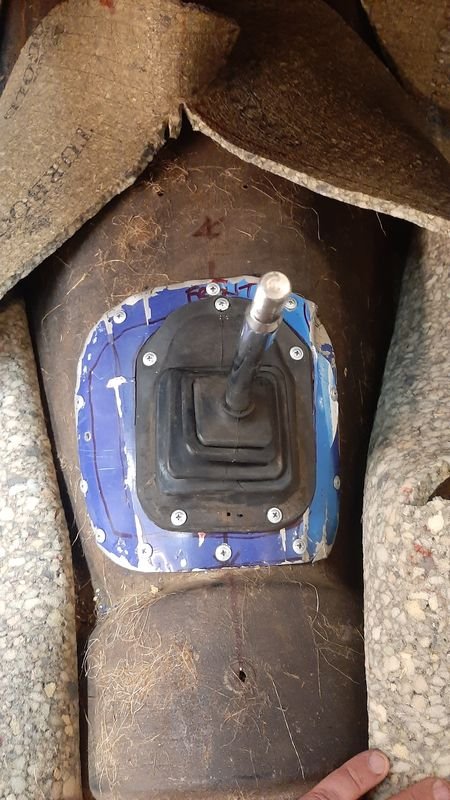
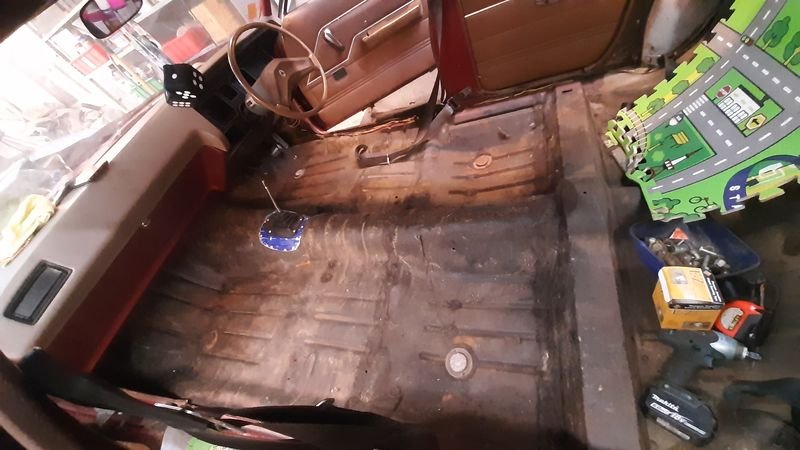
Now we know it runs, next step is to make it worth driving The interior was pretty good condition but there was a lot of evidence of rats eating and storing snail shells in the engine bay and mice droppings in the interior, but no evidence they lived there long, and the shed it was in wasnt water tight so it was all a bit smelly and musty Anyway, all needed to come out for a clean & deodorised the seats, throw away the original horsehair underlay and to make it easier to do a few other jobs, like... Improve the shifter opening, replaced the galv flashing and countersinks that dind really cover the hole with some alloy sheet (from the Sign of the Year! - now in 5 of 5 of our classic cars!) and a rubber boot - adding my first FIAT part Removed everything else and give it a good cleanup. Floor condition is excellent, no rust at all! 'New' Underlay (free second hand stuff) to replace the original horsehair stuff that was a bit smelly and flat. I think the front carpet might be ex-torana too, it doesn't quite meet up with what im pretty sure is the original HQ rear carpet. Both carpets are in nice nick, and we will cover the gap (which under the seats) with some cheap nylon outdoor carpet from m10 that we will also use for the parcel tray that is also unmolested by axe holes for 6x9s etc. Rear came up nice as well, car has a tan interior with dark brown headlining - class! Removed the steering wheel spayed the steering column black (was grey and still has the column change mech in it) and tidied the (omg its so janky!) dash up a touch, and the wiring behind it mainly by removing anything that has added in And then remove the dead weight out of the boot to make room for bodies and crates of DB Its easily 80kgs, empty Things will likley slow down a bit now, as from here its time to start spending money on parts, most likley starting with brakes which i have not even had a wheel off yet to even check what they are apart from being discs up front and drums out back) I suspect the weird too easy/dead stop half way pedal/no brake function issue is the piston is jammed halfway down the master cylinder, as there is no leaks from any soft lines, and lots of fluid in the MC.
1 point
-
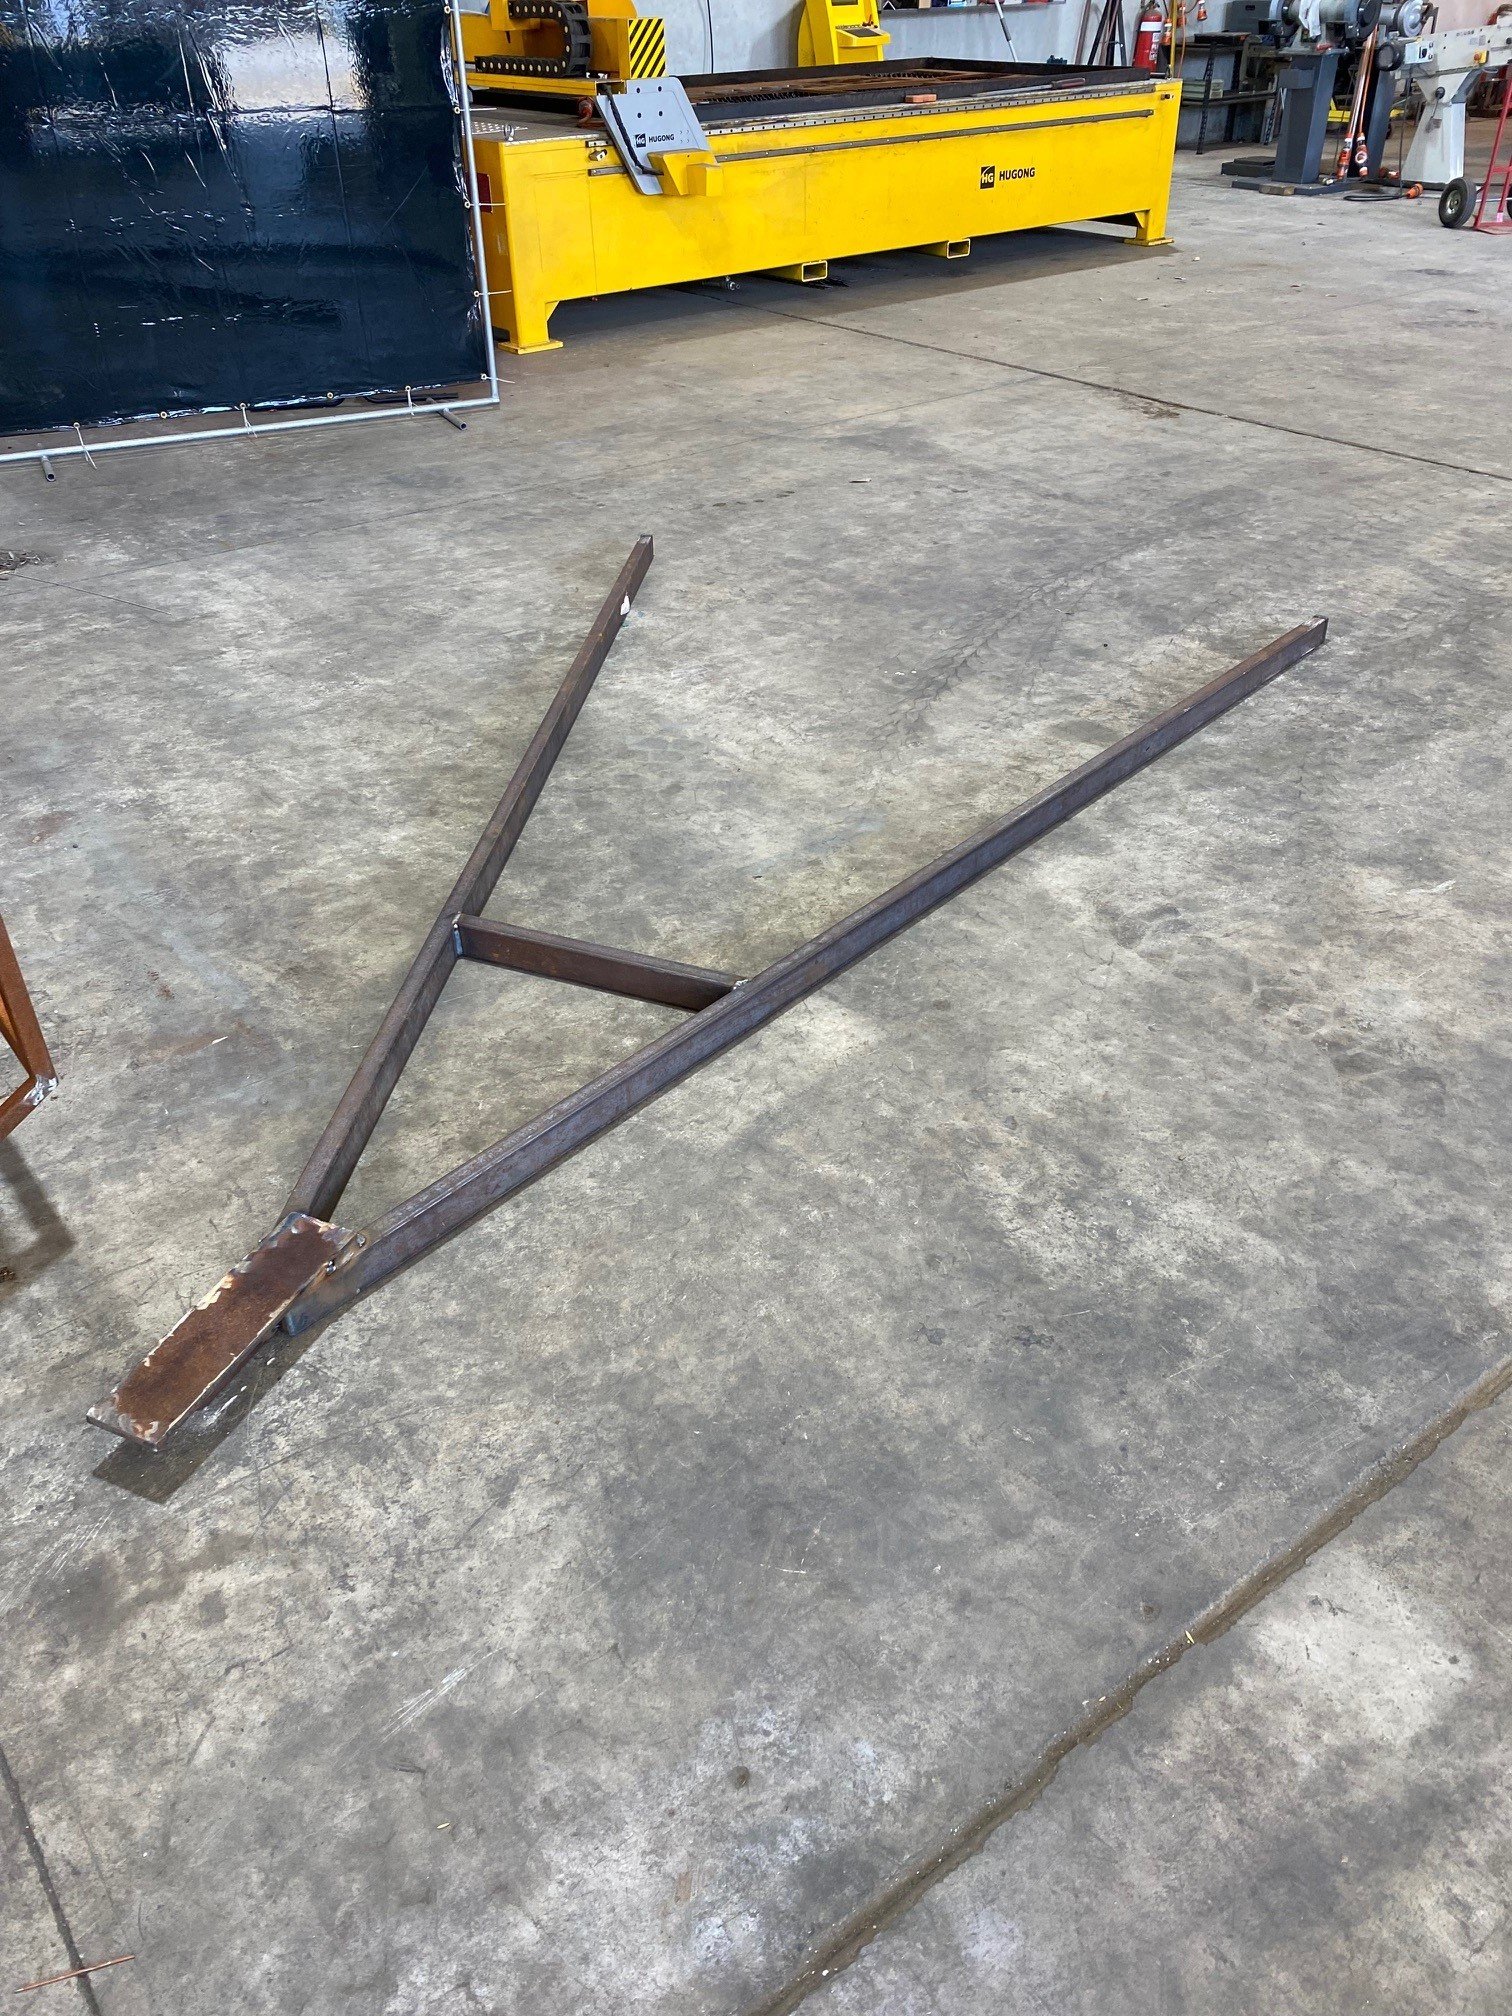
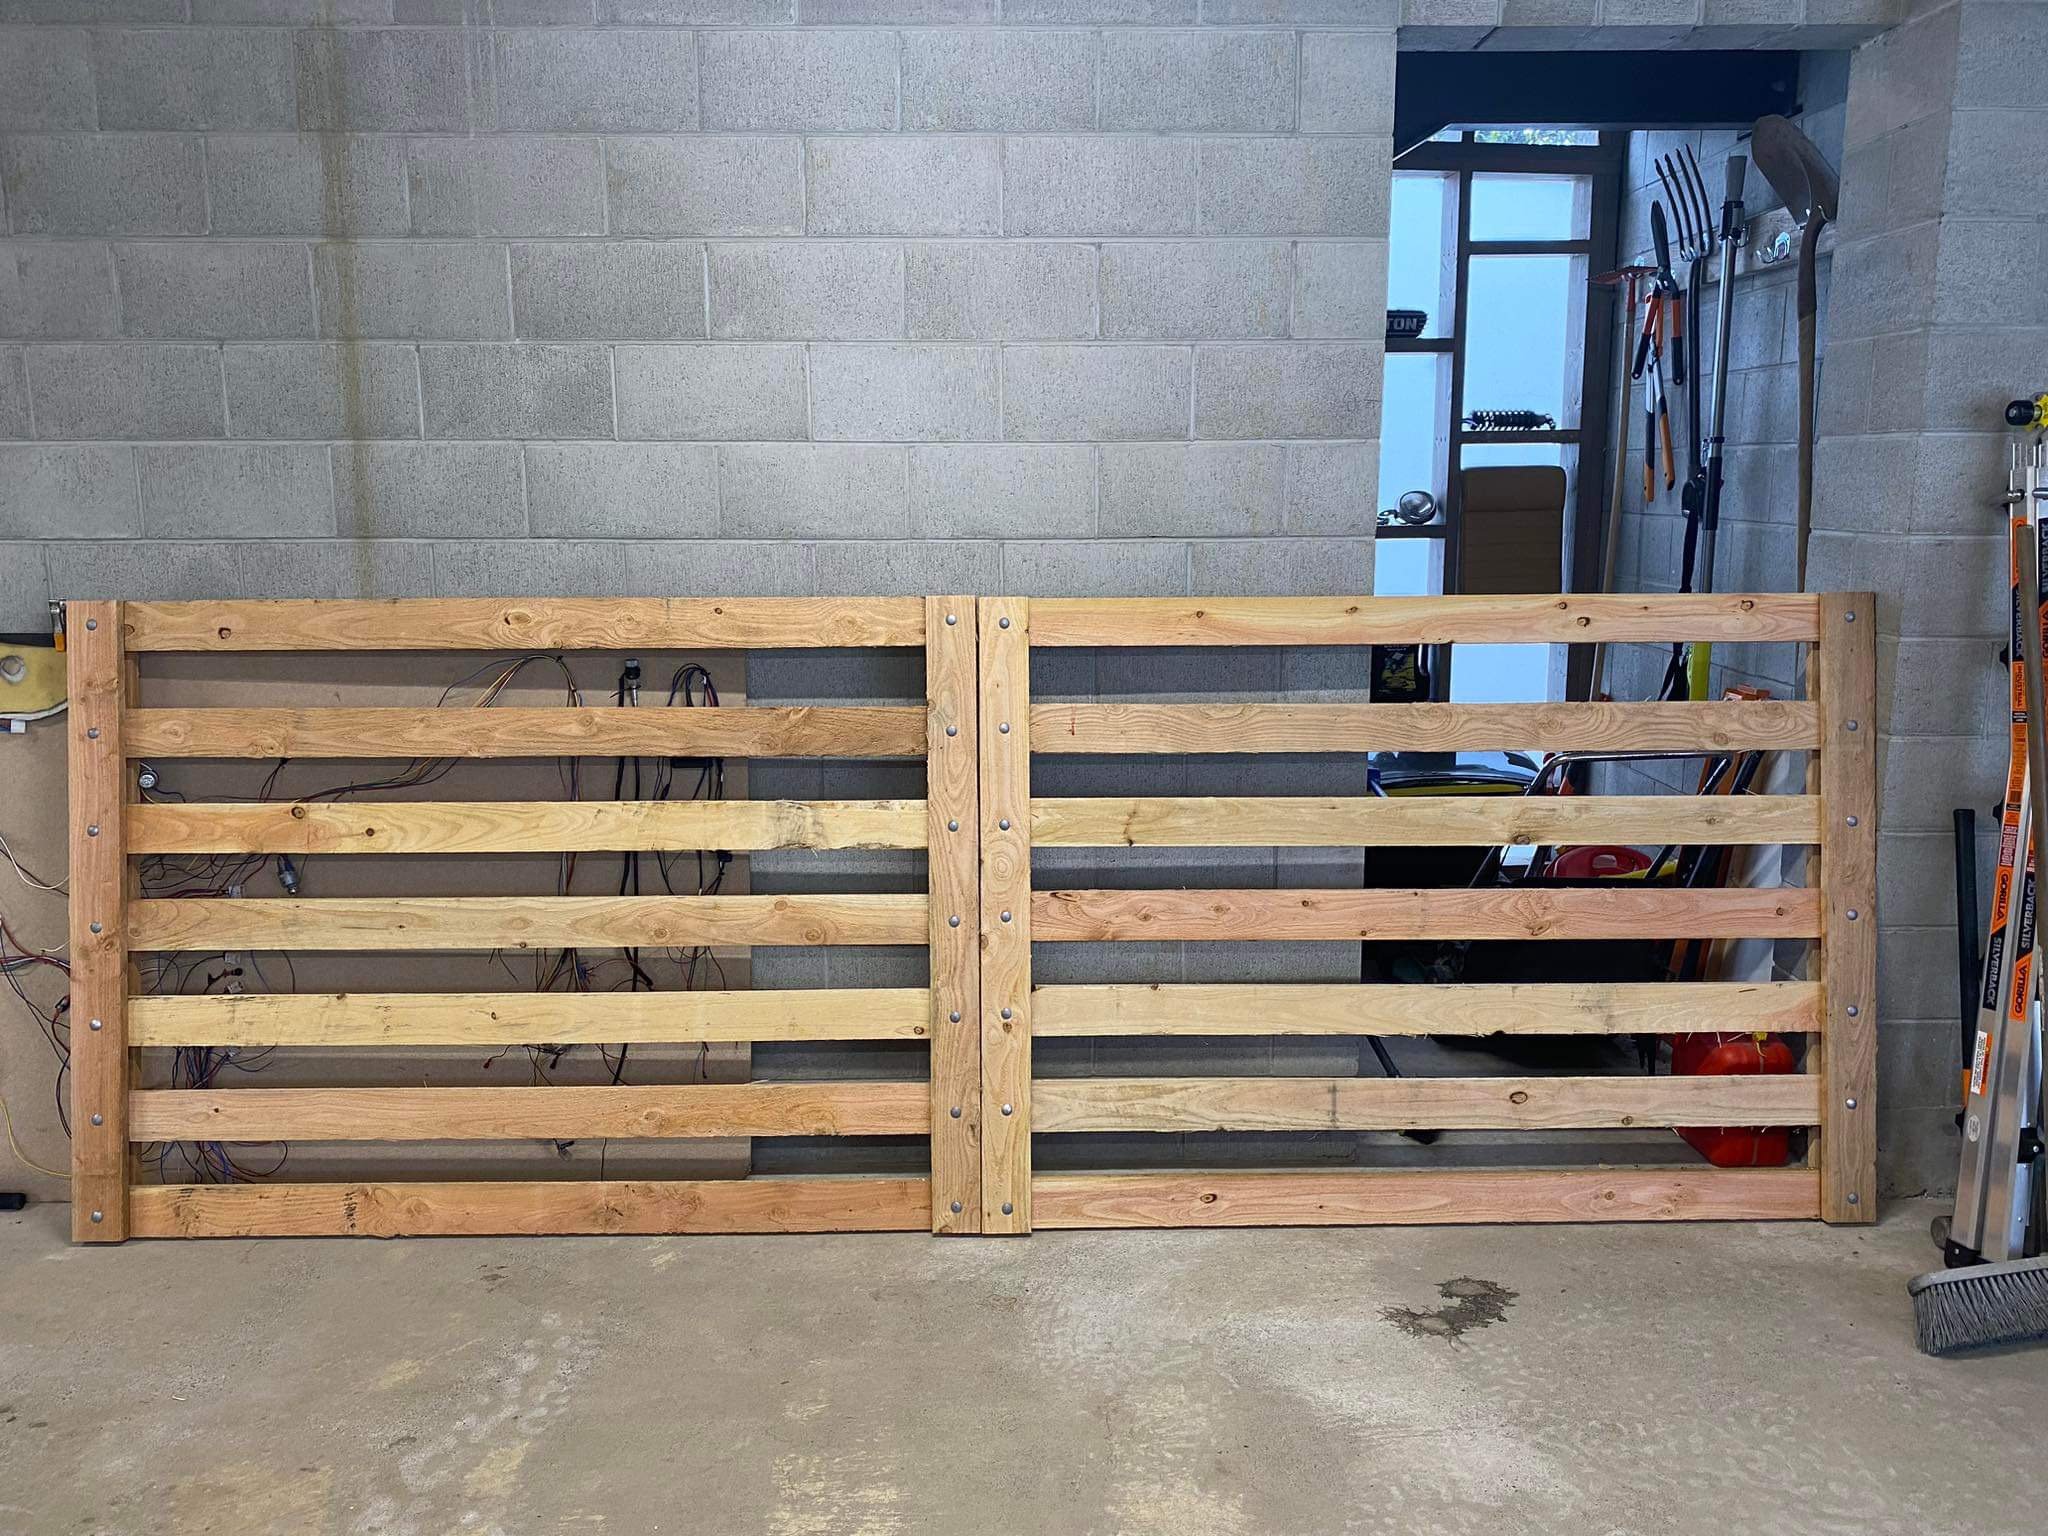
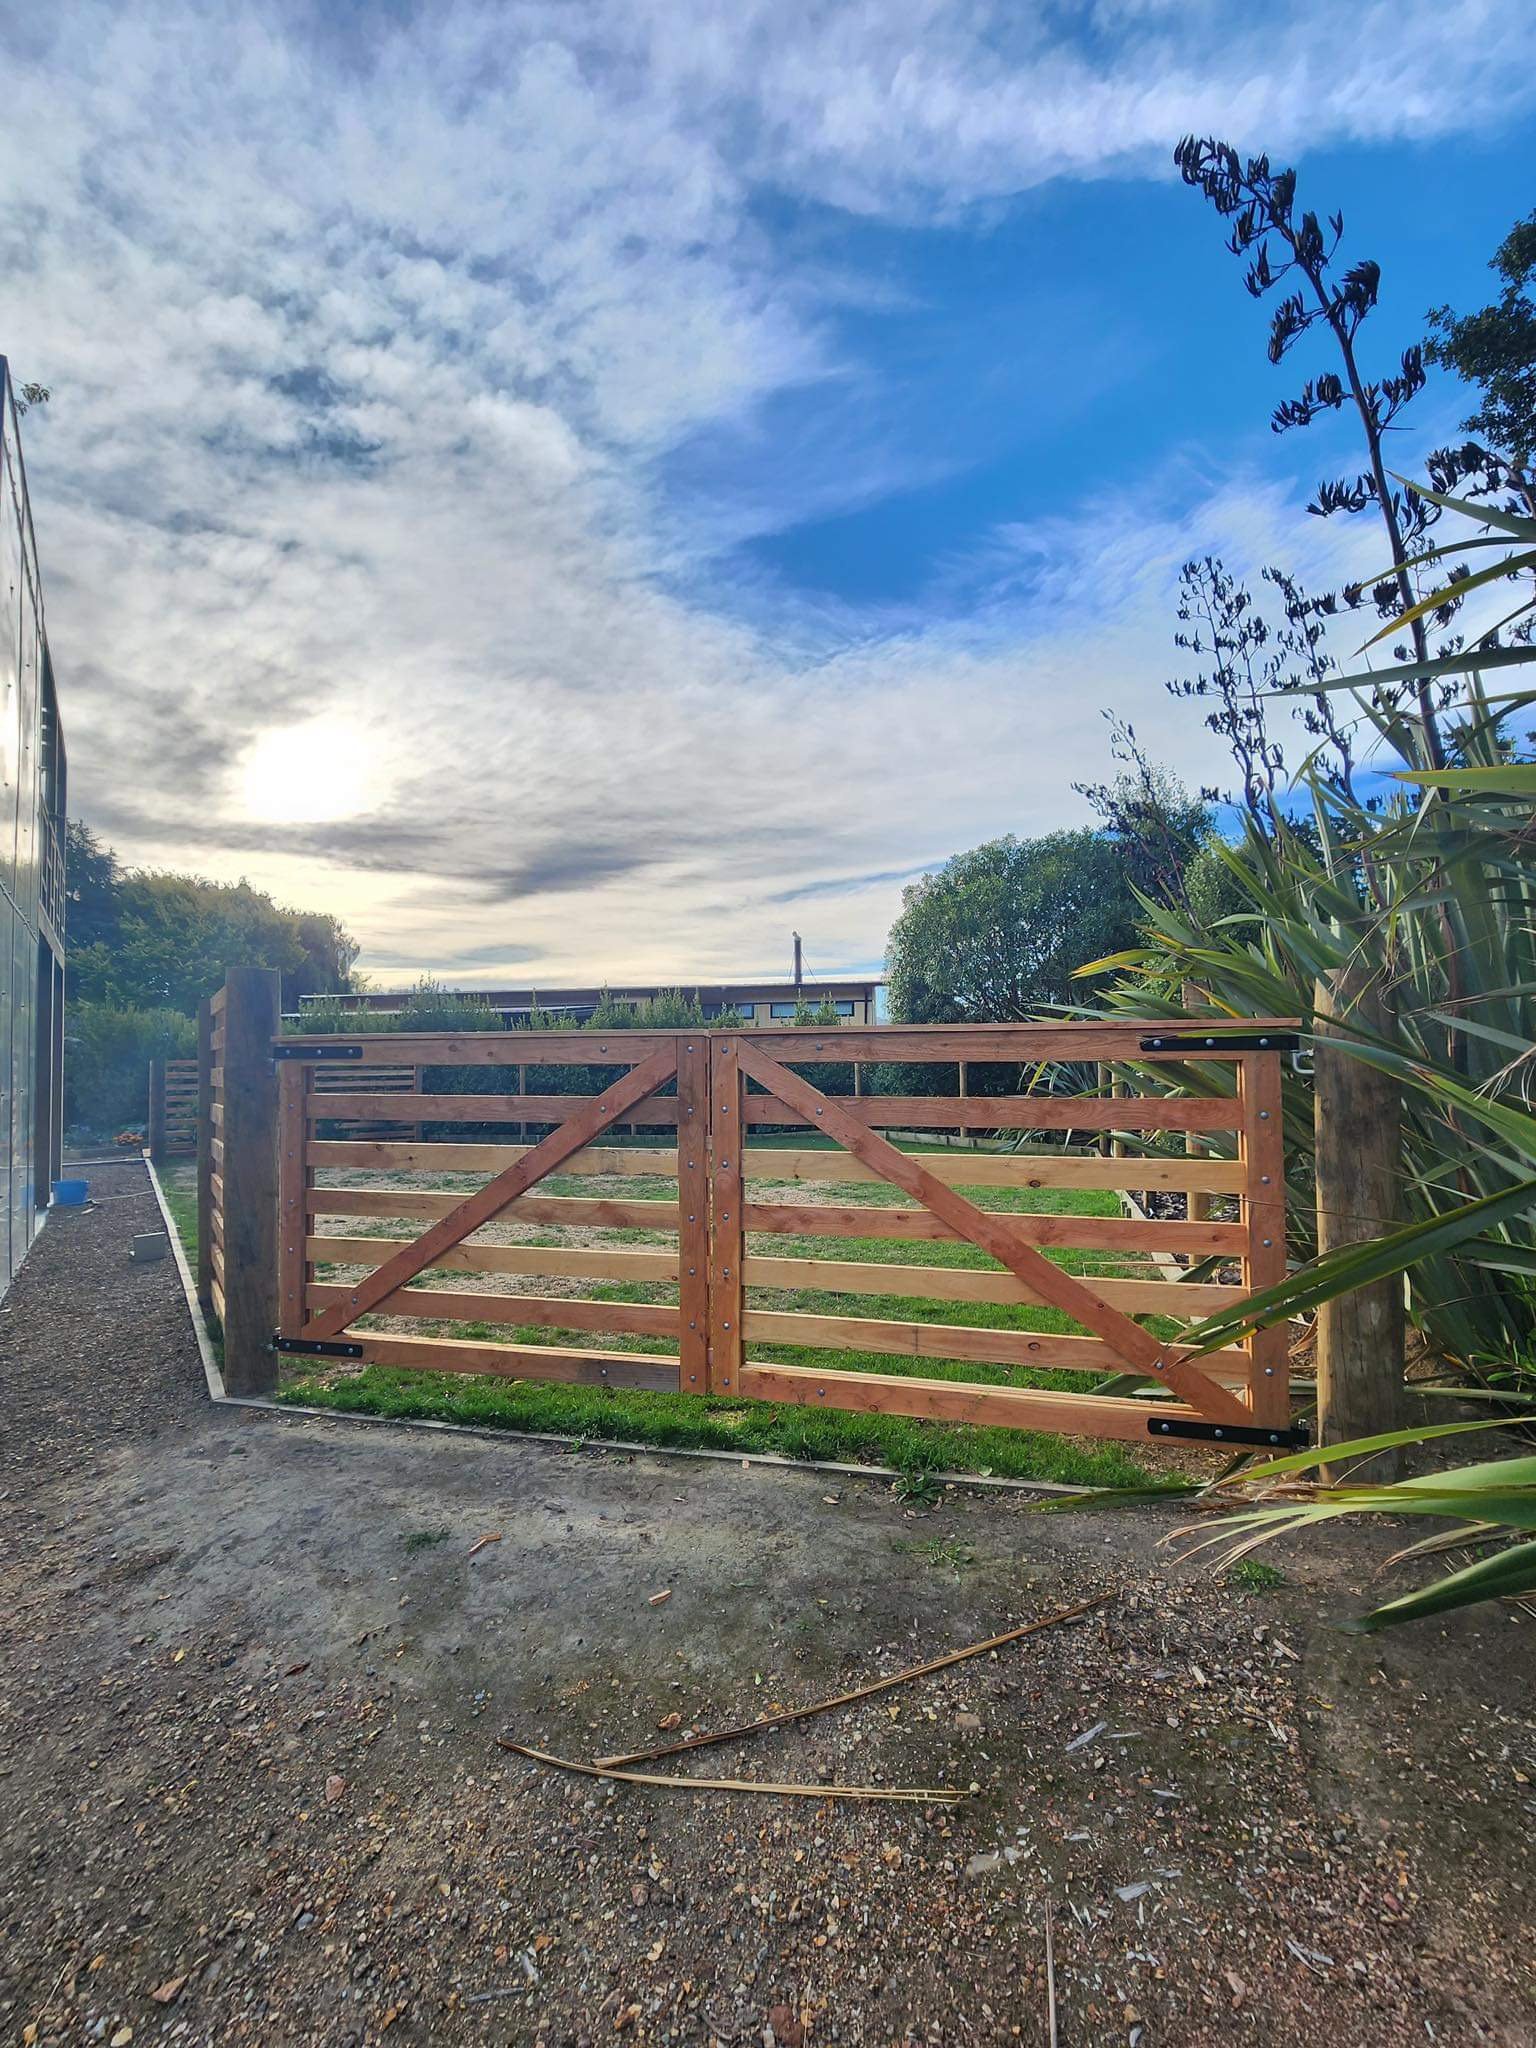
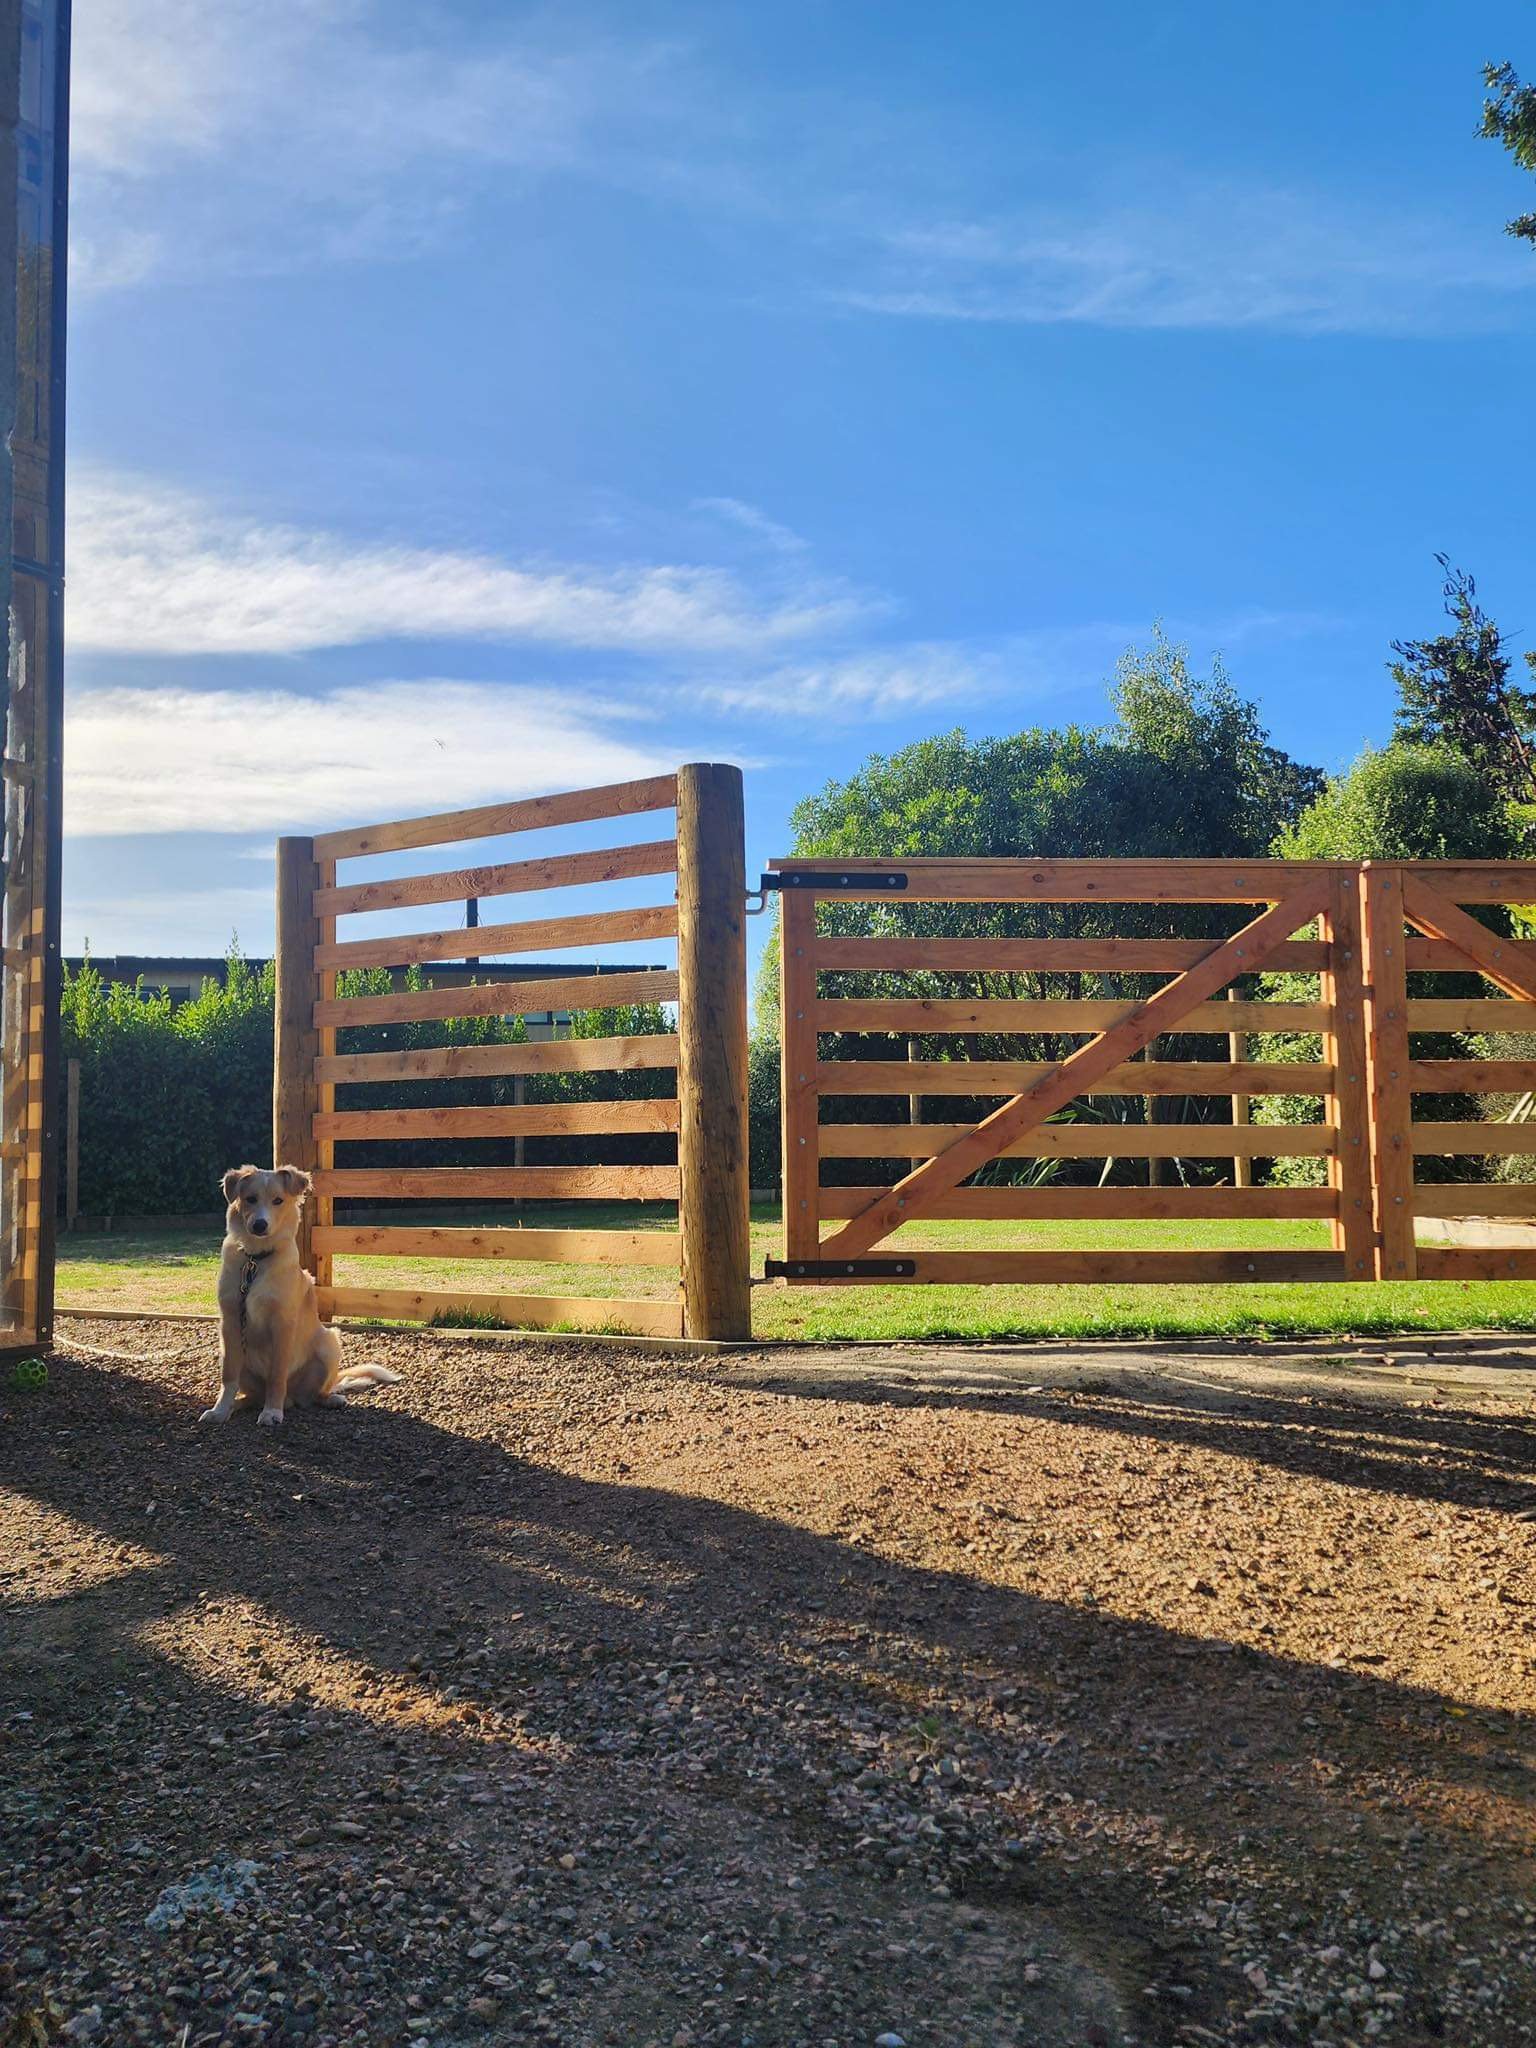
Made some gates so Finn has a nice place to hang out off the lead. Gates are 100x25 Oregon and 200mm round strainers for each gate post buried a meter per side, pretty sturdy: He was keen to show that he could still escape if he wanted to… Alcatraz it is not… yet…
1 point
-
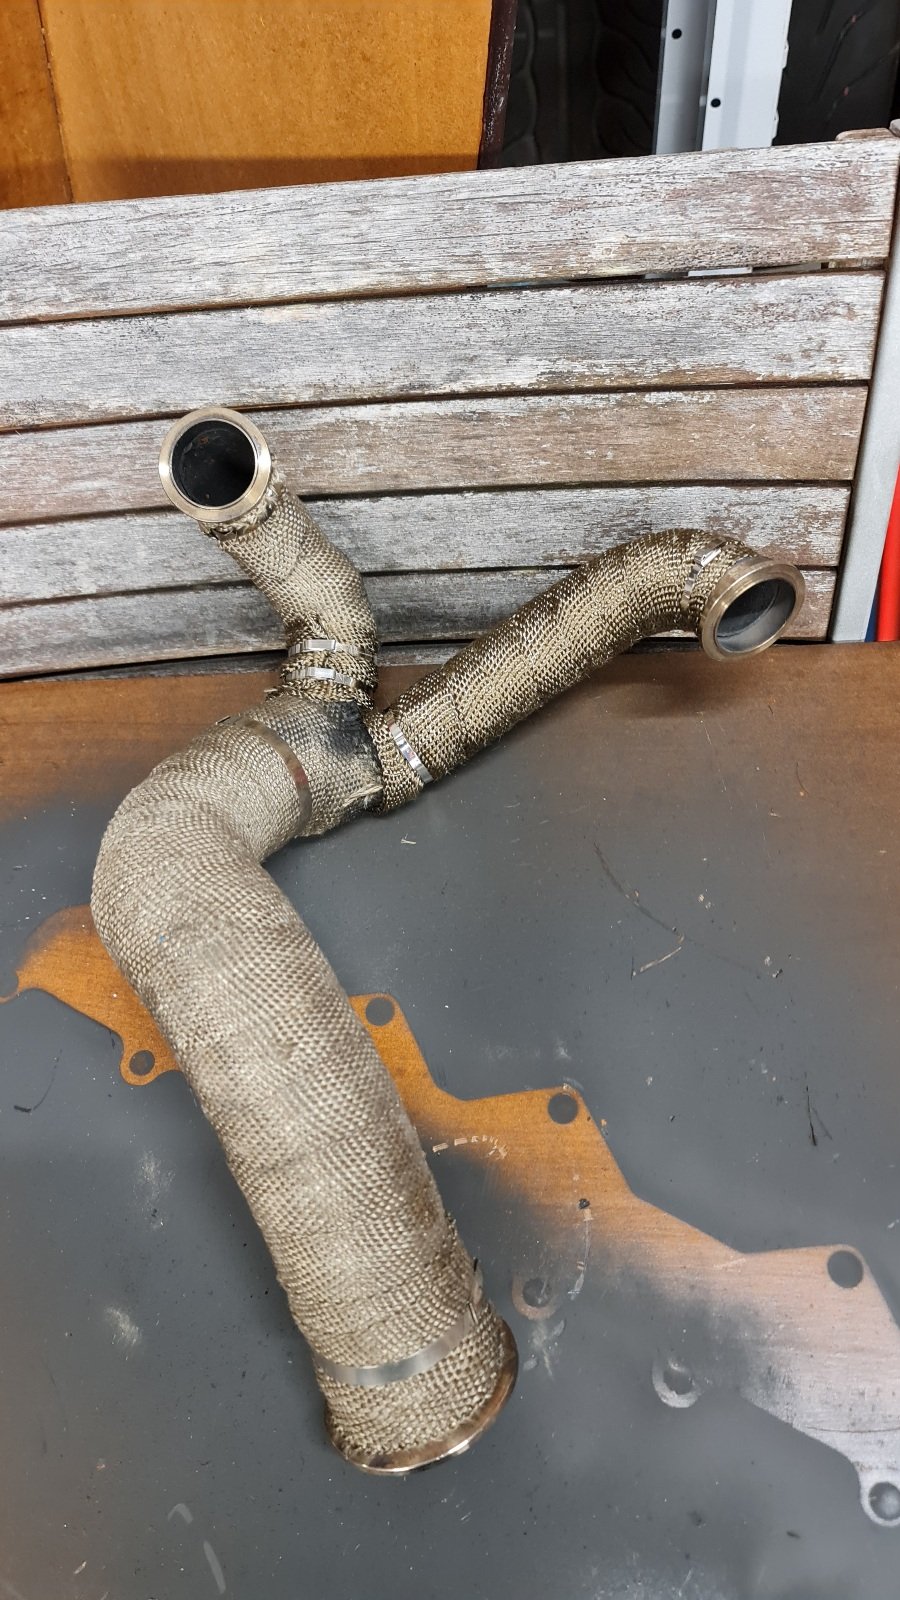
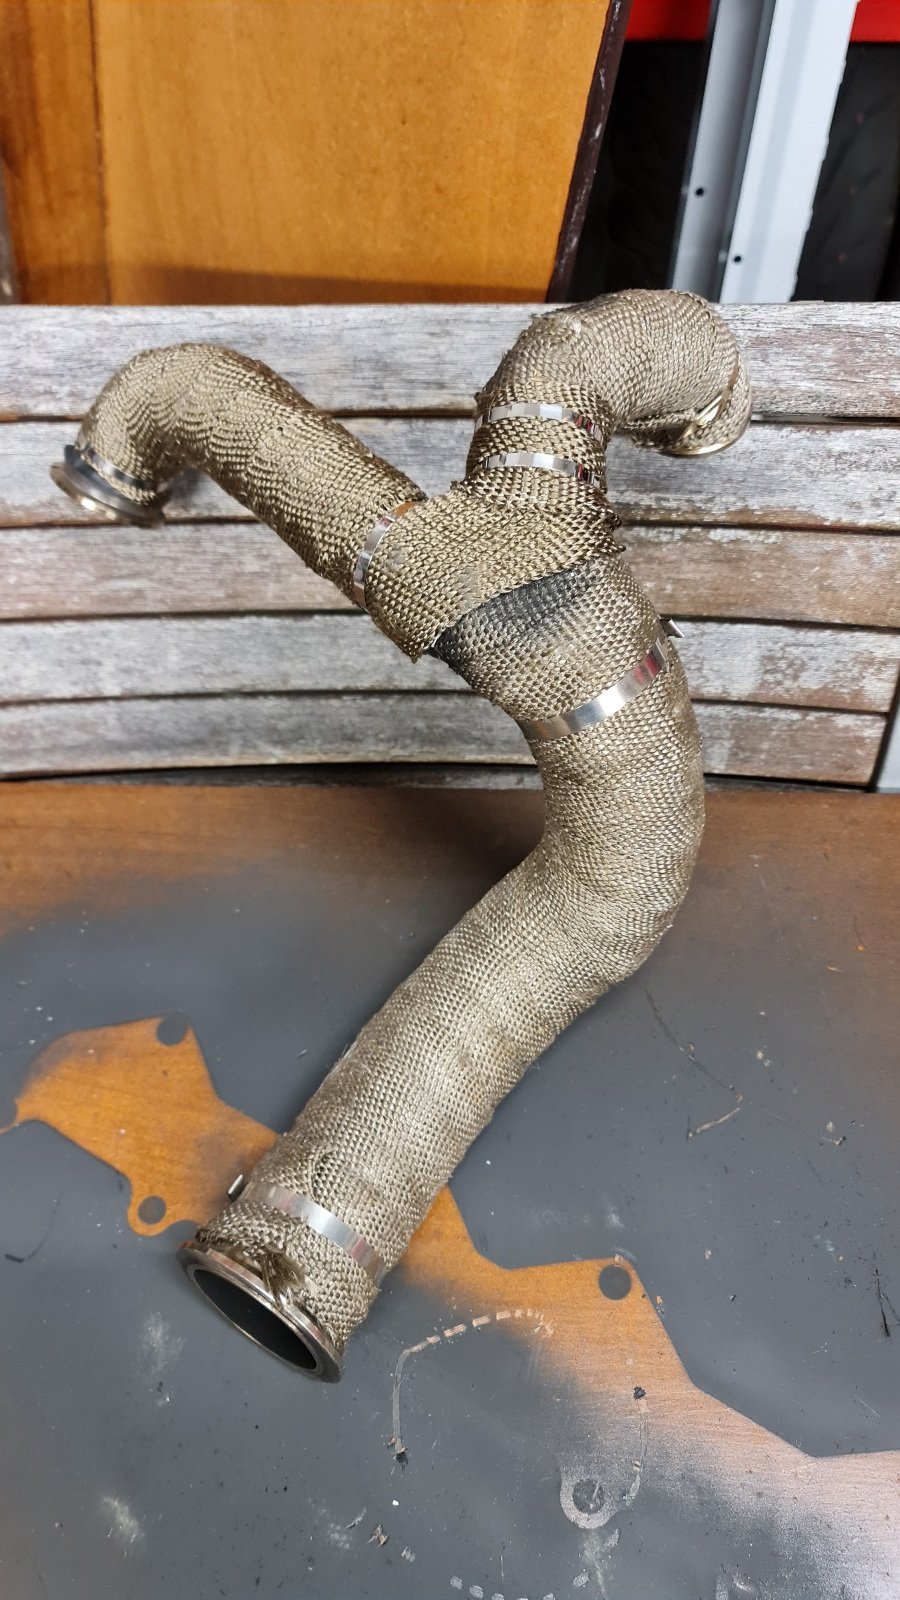
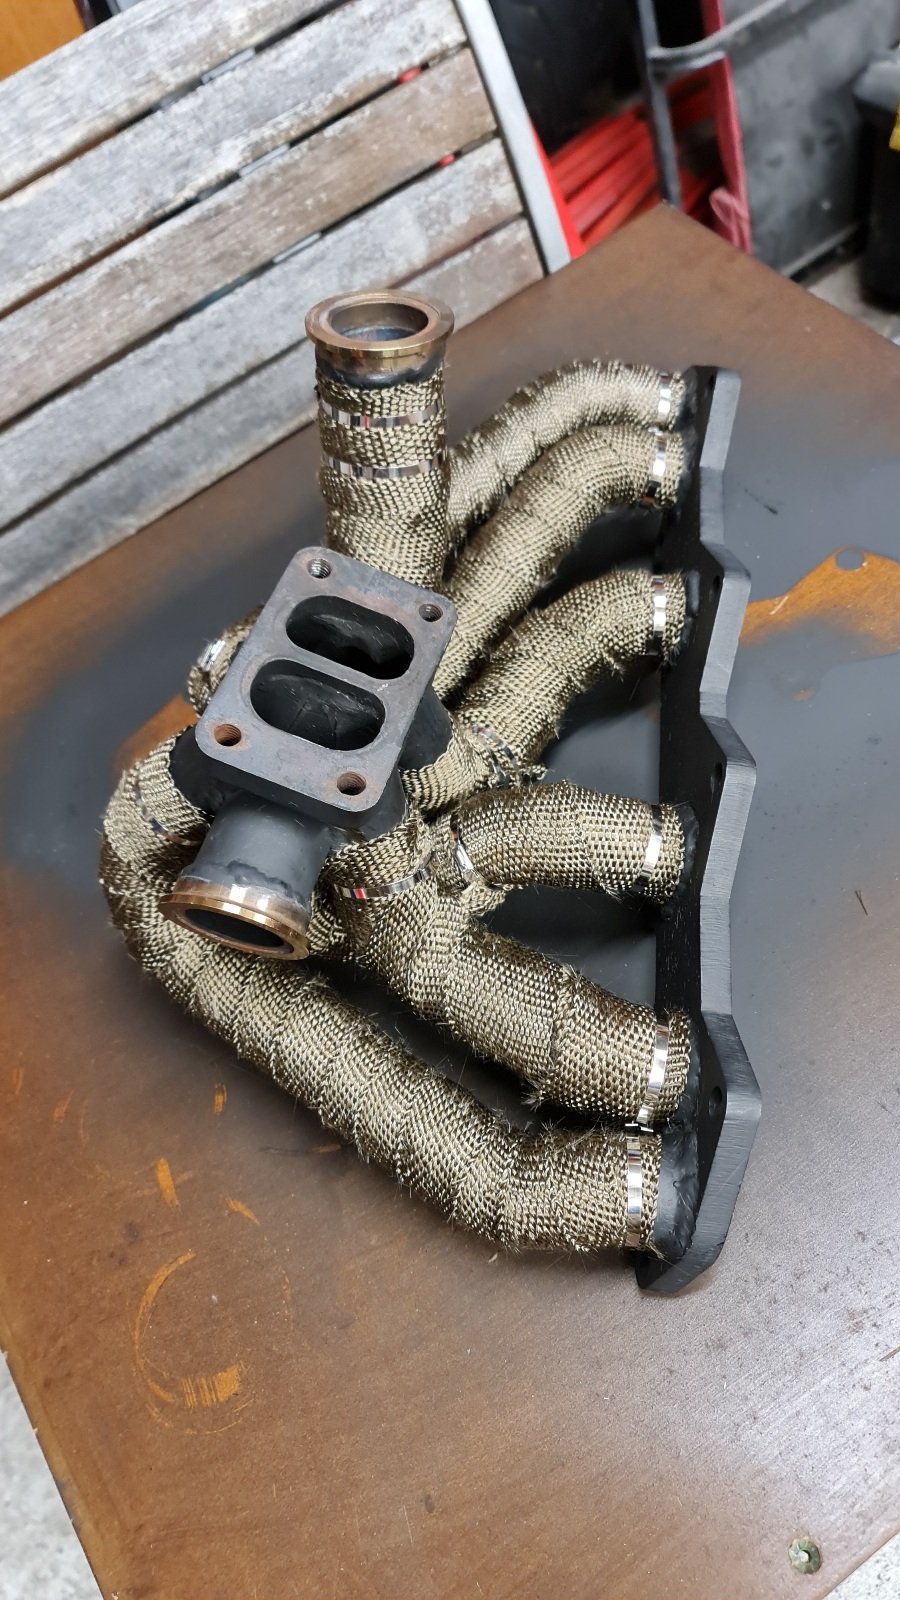
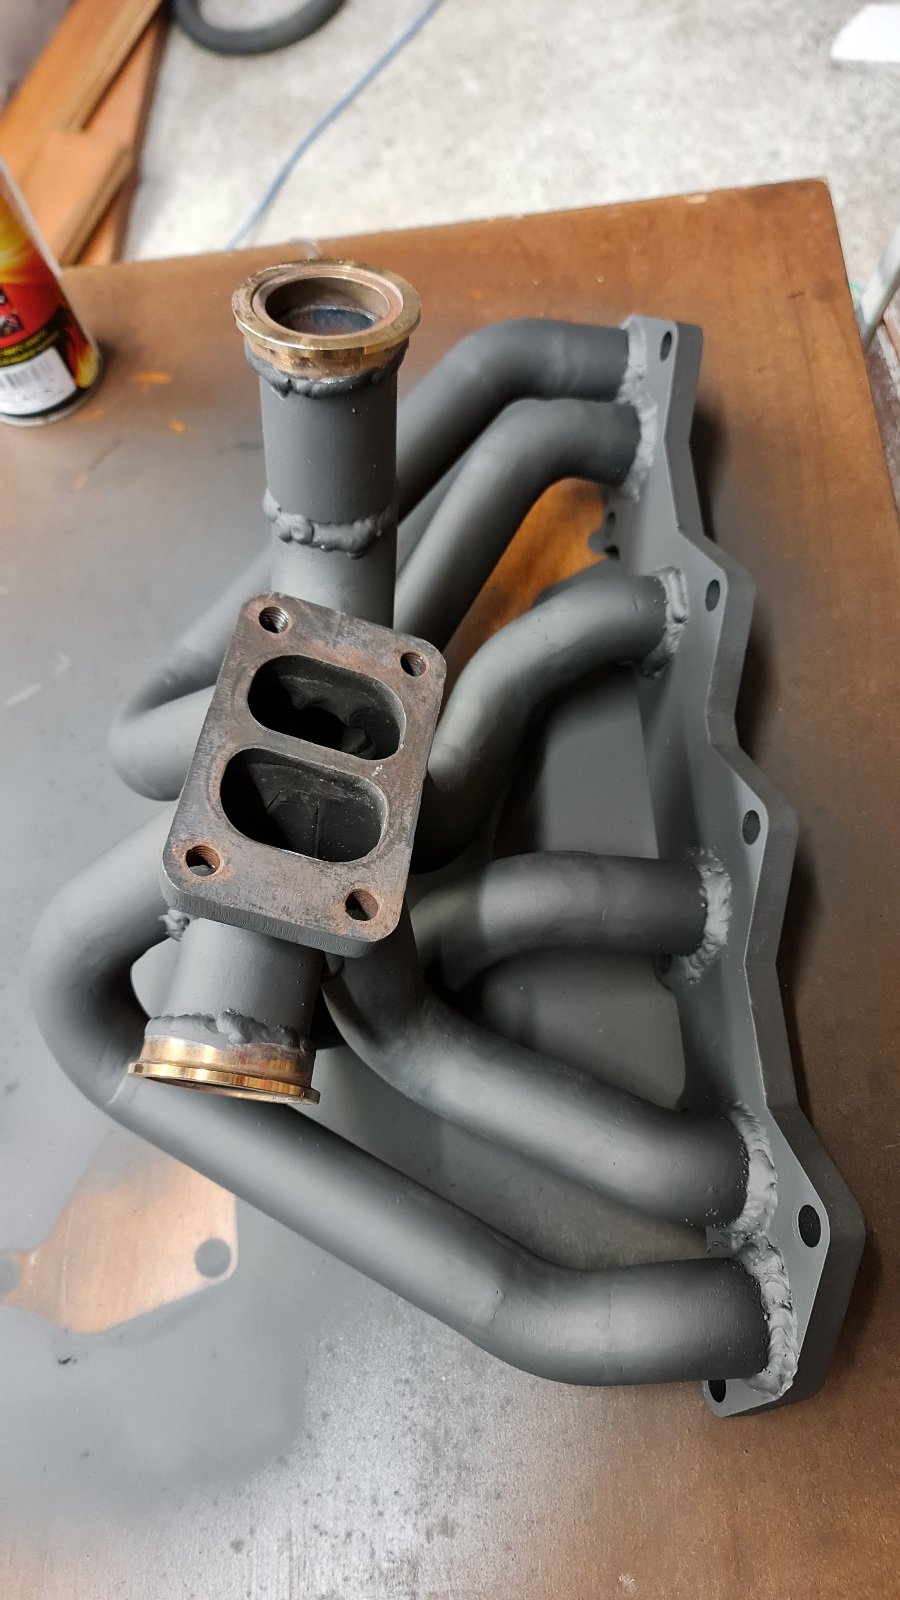
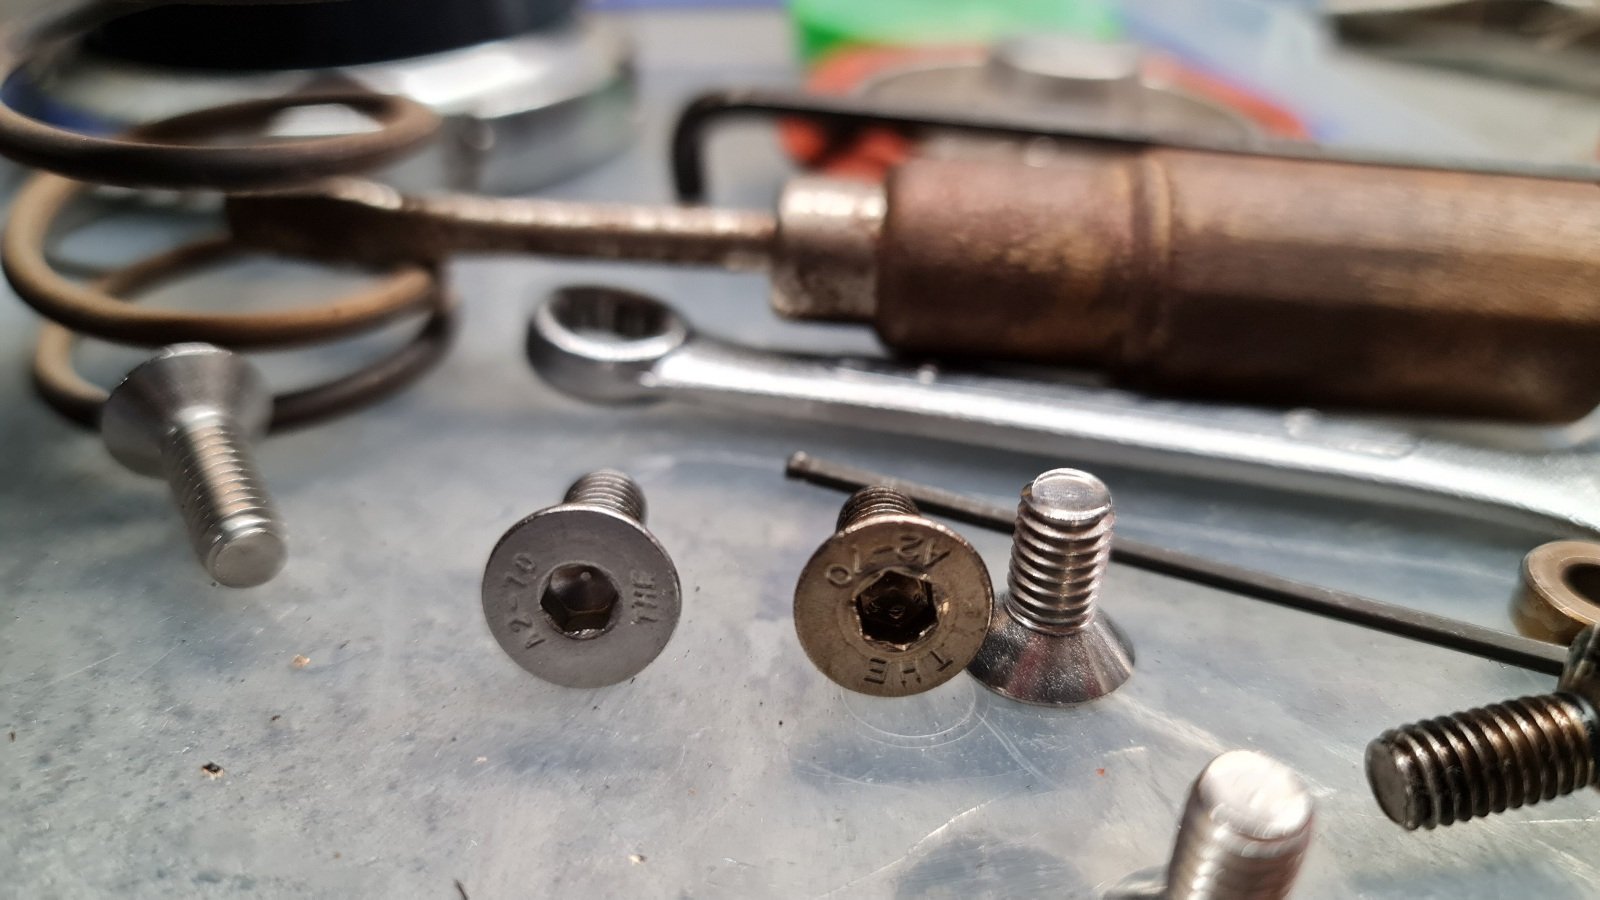
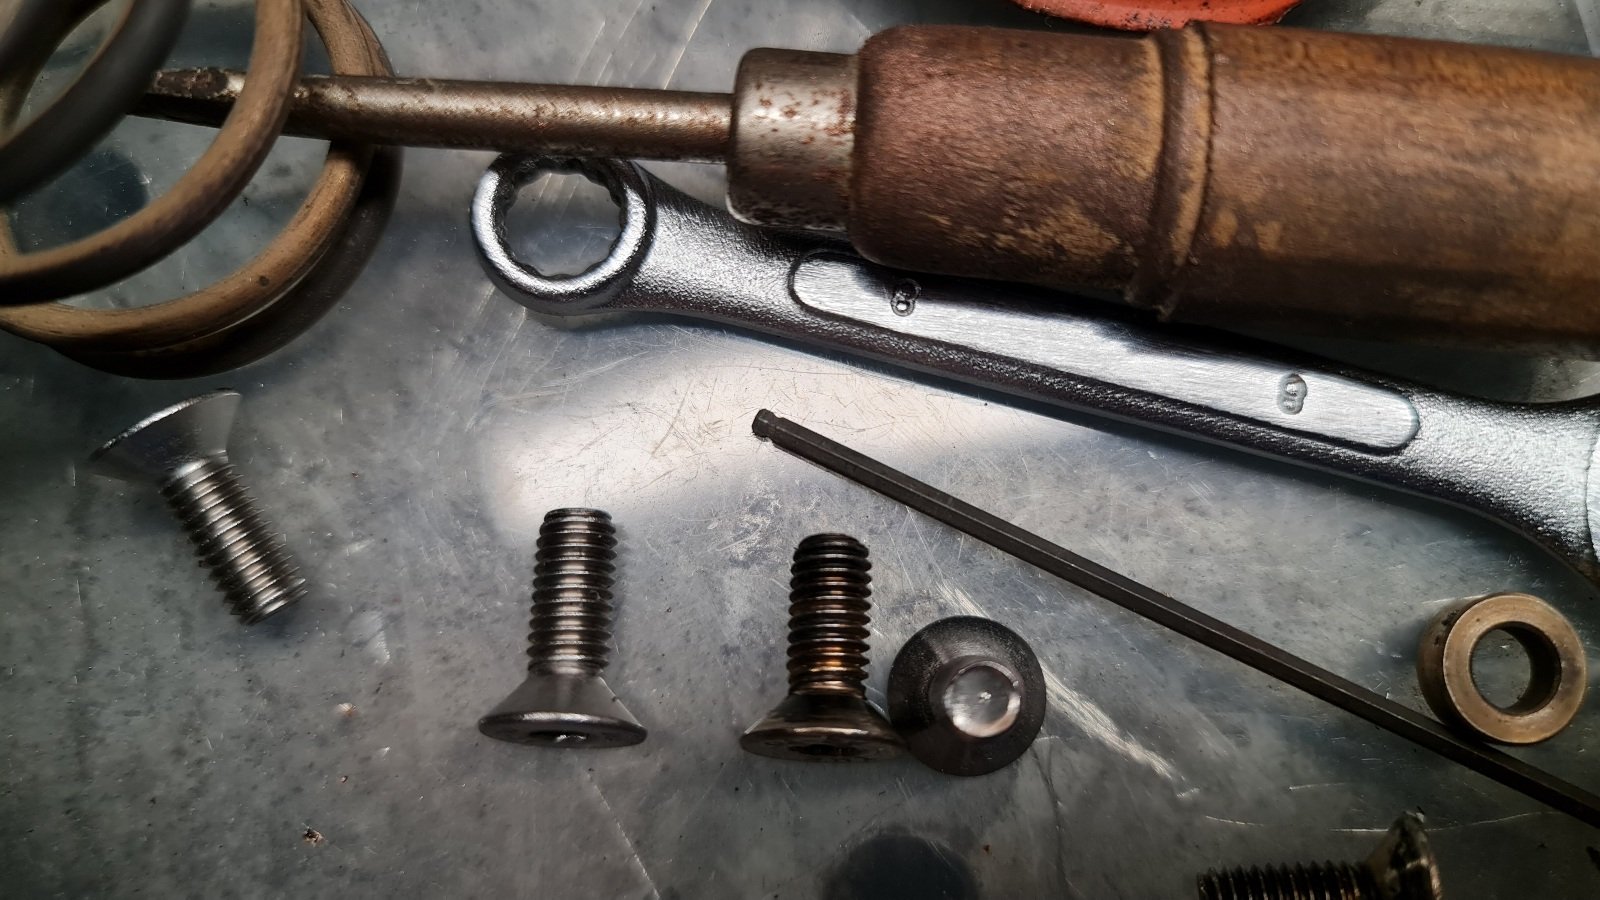
Found the right screws at Anzor, same head taper, allen size, 'THE' manufacturer and same 304 stainless. 16mm long, so maybe 1.5mm longer than the originals but they don't bottom out so work fine: Repainted the manifold: Decided to heat wrap the manifold, not too worried about rust since its thick wall stuff: Back on the engine: Also painted and wrapped the wastegate outlet to dump y piece:
1 point
-
Check the top loop on the pillar, gunk builds up on it under the belt1 point
-
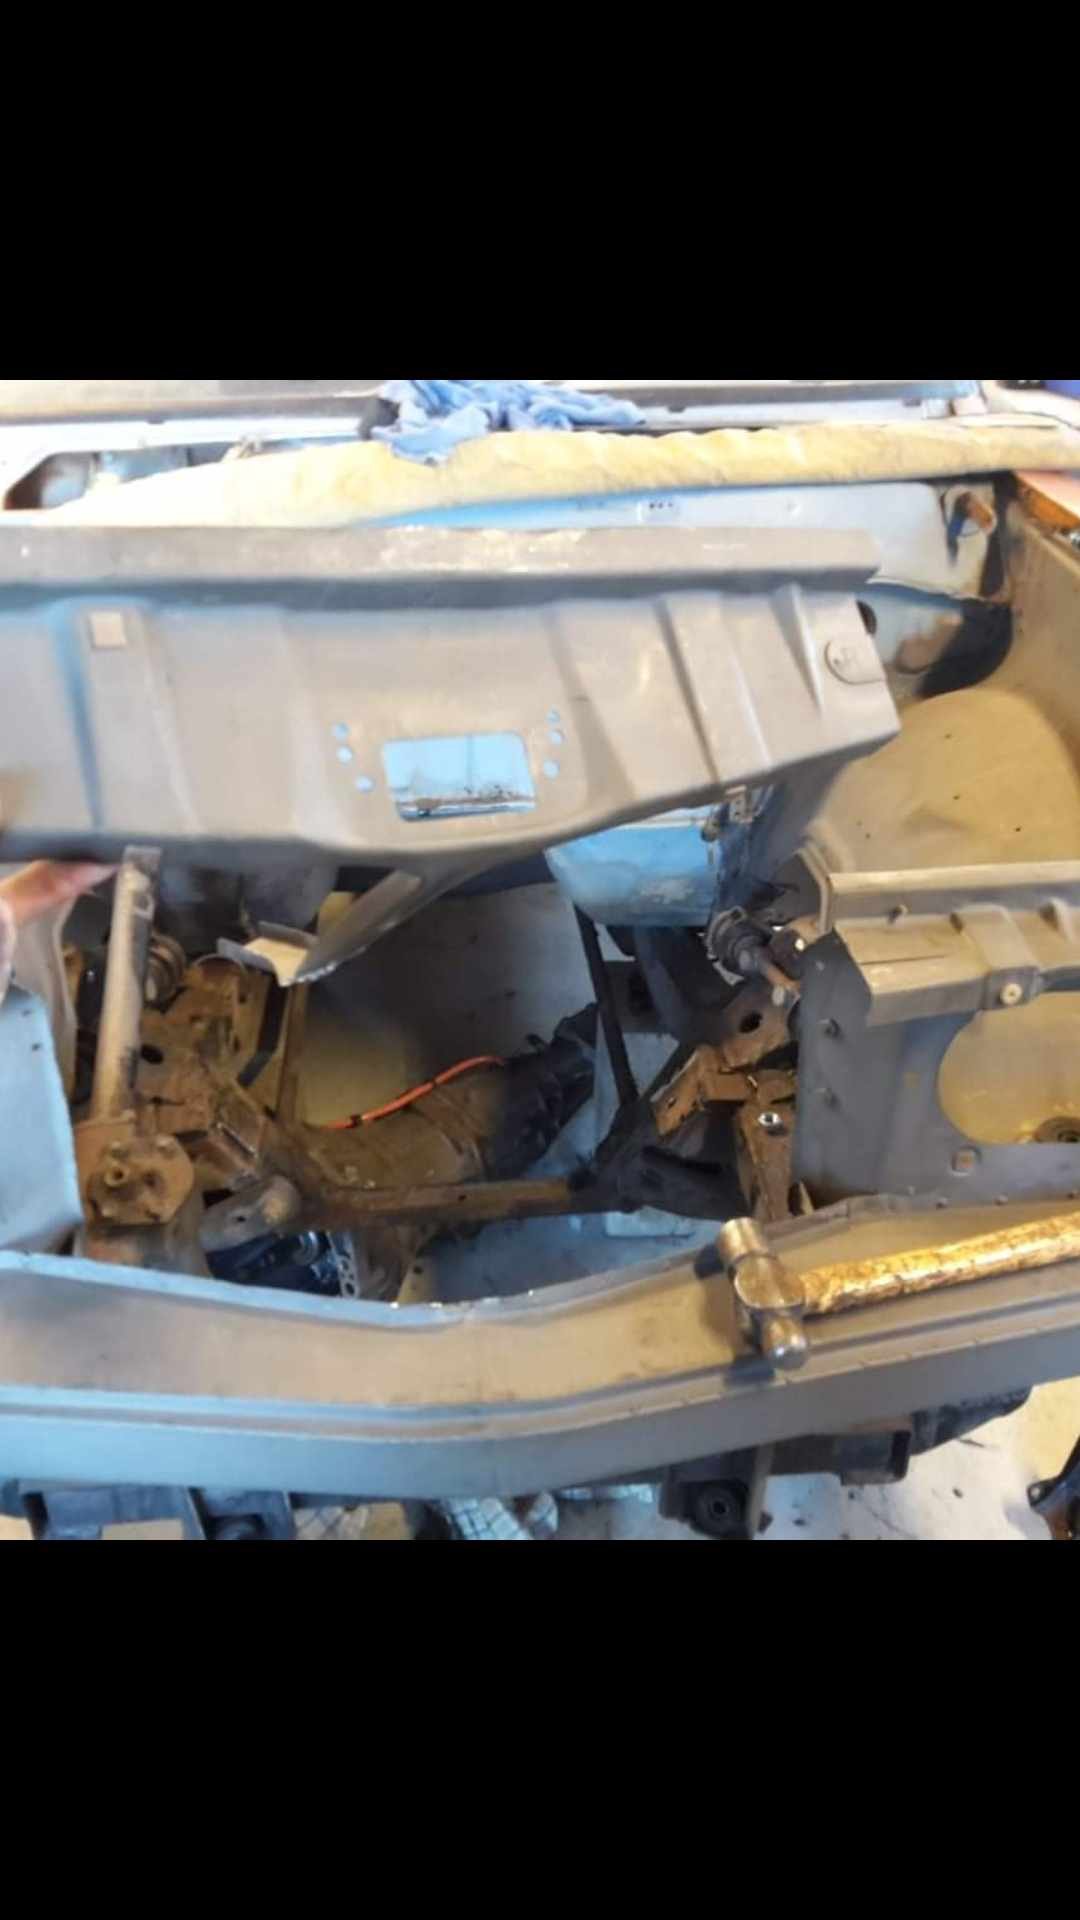
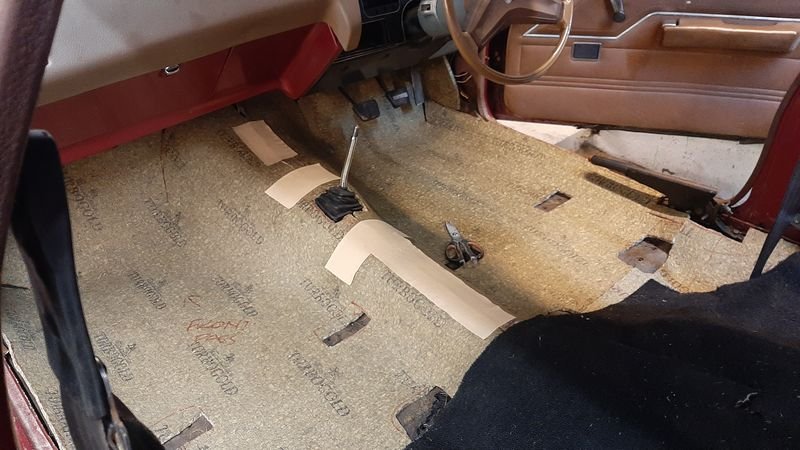
Got some use out of my stupidly big and chunky ramps, its not a bad working height. Fixed this little bit of ugly in the frunk. Apart from the windscreen area thats all the hard stuff done.1 point
-
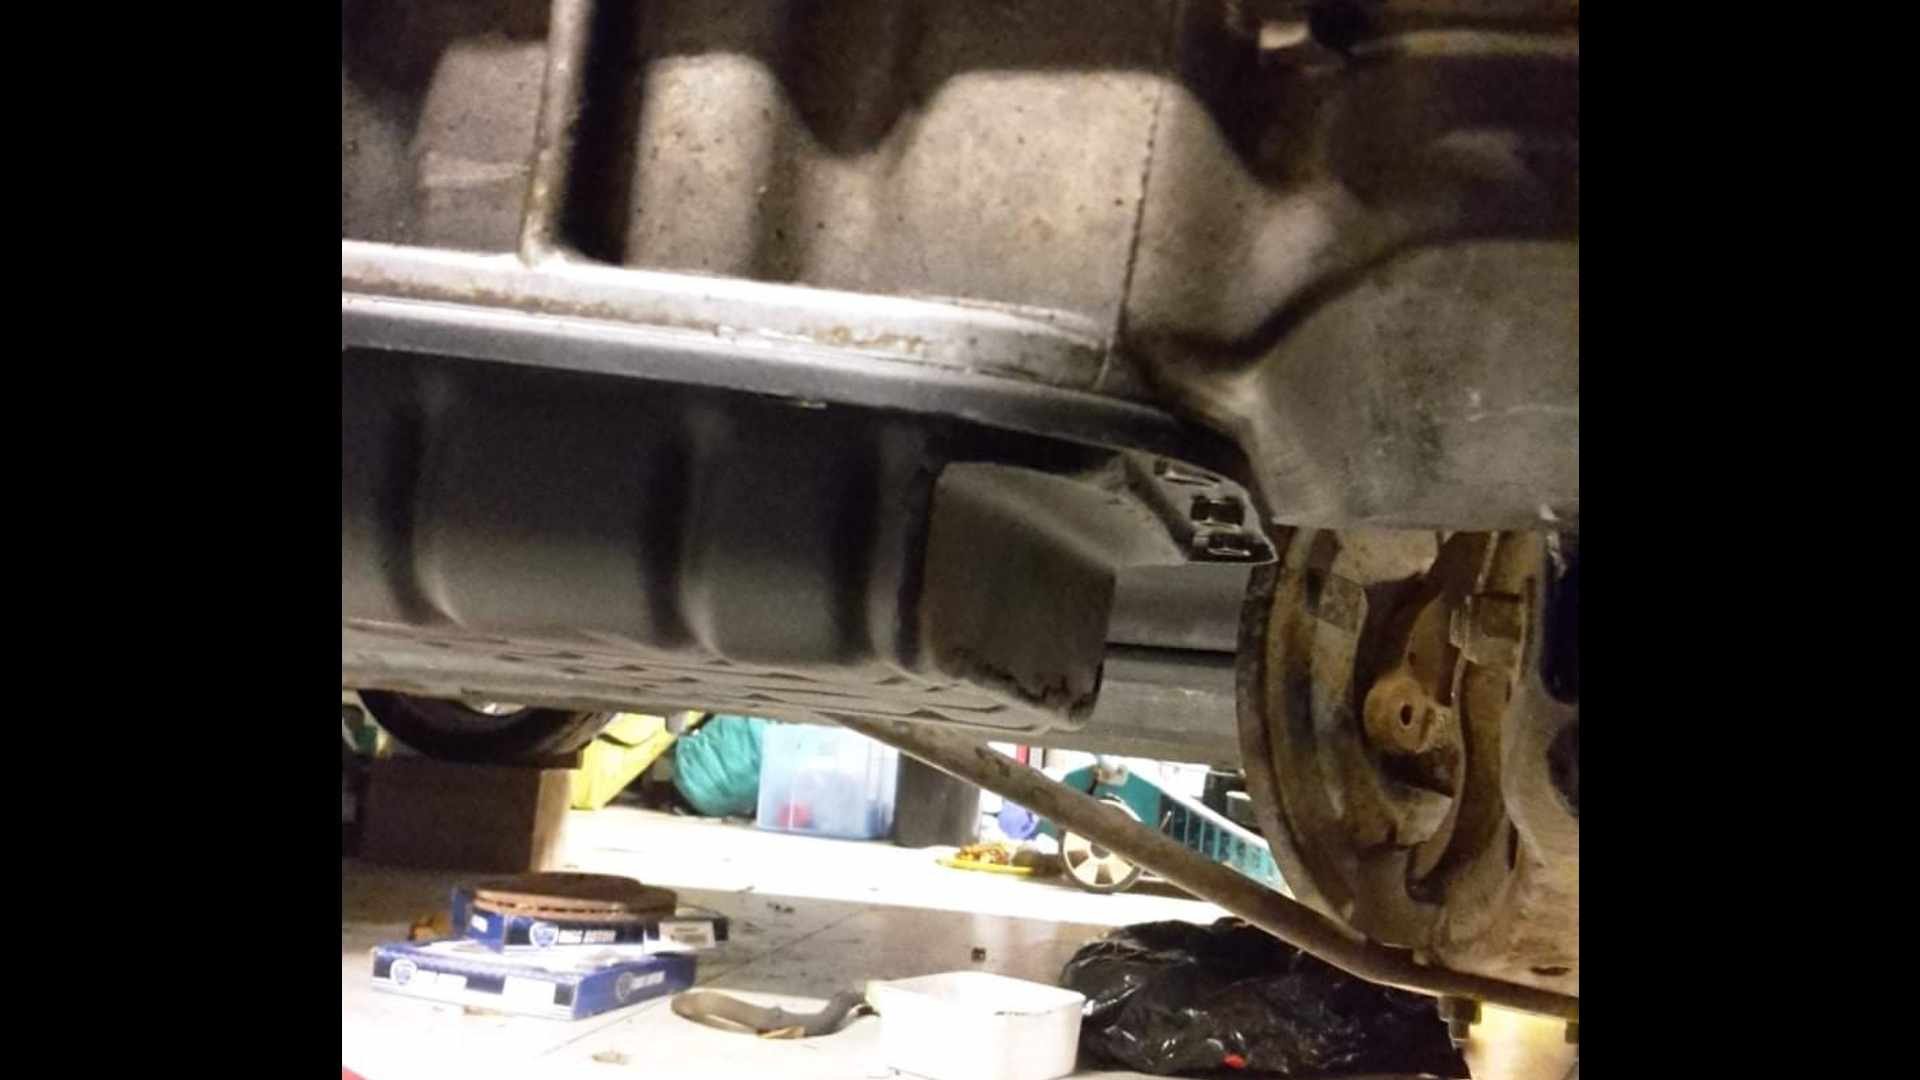
The front drop spindles and disk brakes finally arrived after about 9 months of waiting. So chucked them on, the calipers didn't clear the 14" wheels, but we had a 14" HQ Holden rim sitting around to test fit and they just had clearance. So got a pair of them to run on the front. Went to America for a couple weeks a month ago and brought back a bunch of goodies in my suitcase. Twin antennas, body mounts, tail lights lenses, steering column rebuild bits, driveshaft centre bearing, accelerator pedal, fender ornaments etc. New port wiper motor aswell, since the original one never worked and I couldn't get it working. and a CPP power steering box. Had the power steering pump and reservoir on the LS so thought it'd be nice to have it. The CPP drop spindles pushed the steering arms out 19mm each side, so that made the Ackerman angle pretty much zero. I asked them if they made any steering arms to rectify it, but nope. I guess Americans can just heat them up and bend them to suit. Drew some new ones up and had my brother 3d print the prototype. All looked good, so had them laser cut out of 20mm mild steel. Also shortened them up for quicker steering too. On to the front airbag mounts now. The lower arms aren't quite flat, so welded another piece of 3mm on top once the had shaped the main piece of 5mm to suit. Made a compressed size dummy bag for the RE7 air bags. That way I could get the upper and lower mounts the correct height and in line. Used some wooden discs to build up the height on top of the dummy bag and then packed the rest with some resin. This allowed me to push the lower arm right up and get the resin to form the shape of the top spring pocket. Once set overnight I cut it to the diameter of the steel pipe the upper cup will be made out of. That then gave me the cut pattern after wrapping some paper around it to make the template. Steel cup all made the perfect shape to fit inside the spring cup at the top. All fitted with 3/8" threaded rod holding the top mount in place. Still need to countersink the lower plate holes and figure out a bump stop for it. Also new shock mounts made up, basically a copy of the Ridetech ones as that was easy to do. Test drove a truck with the single pot GM brake calipers on it, which are what came with my disc brake kit, and didn't like how they barely stopped it. Dad said he had the same issue with the ones on his too. So decided to make some adapters for some WIlwood Dynapro 4 pot calipers. Made a wooden mock up first, then drew them up in Solidworks and then 3d printed to make sure they were all good. Got them laser cut as well, out of some 16mm and 10mm mild steel. Still got to machine them up to fit.1 point
-
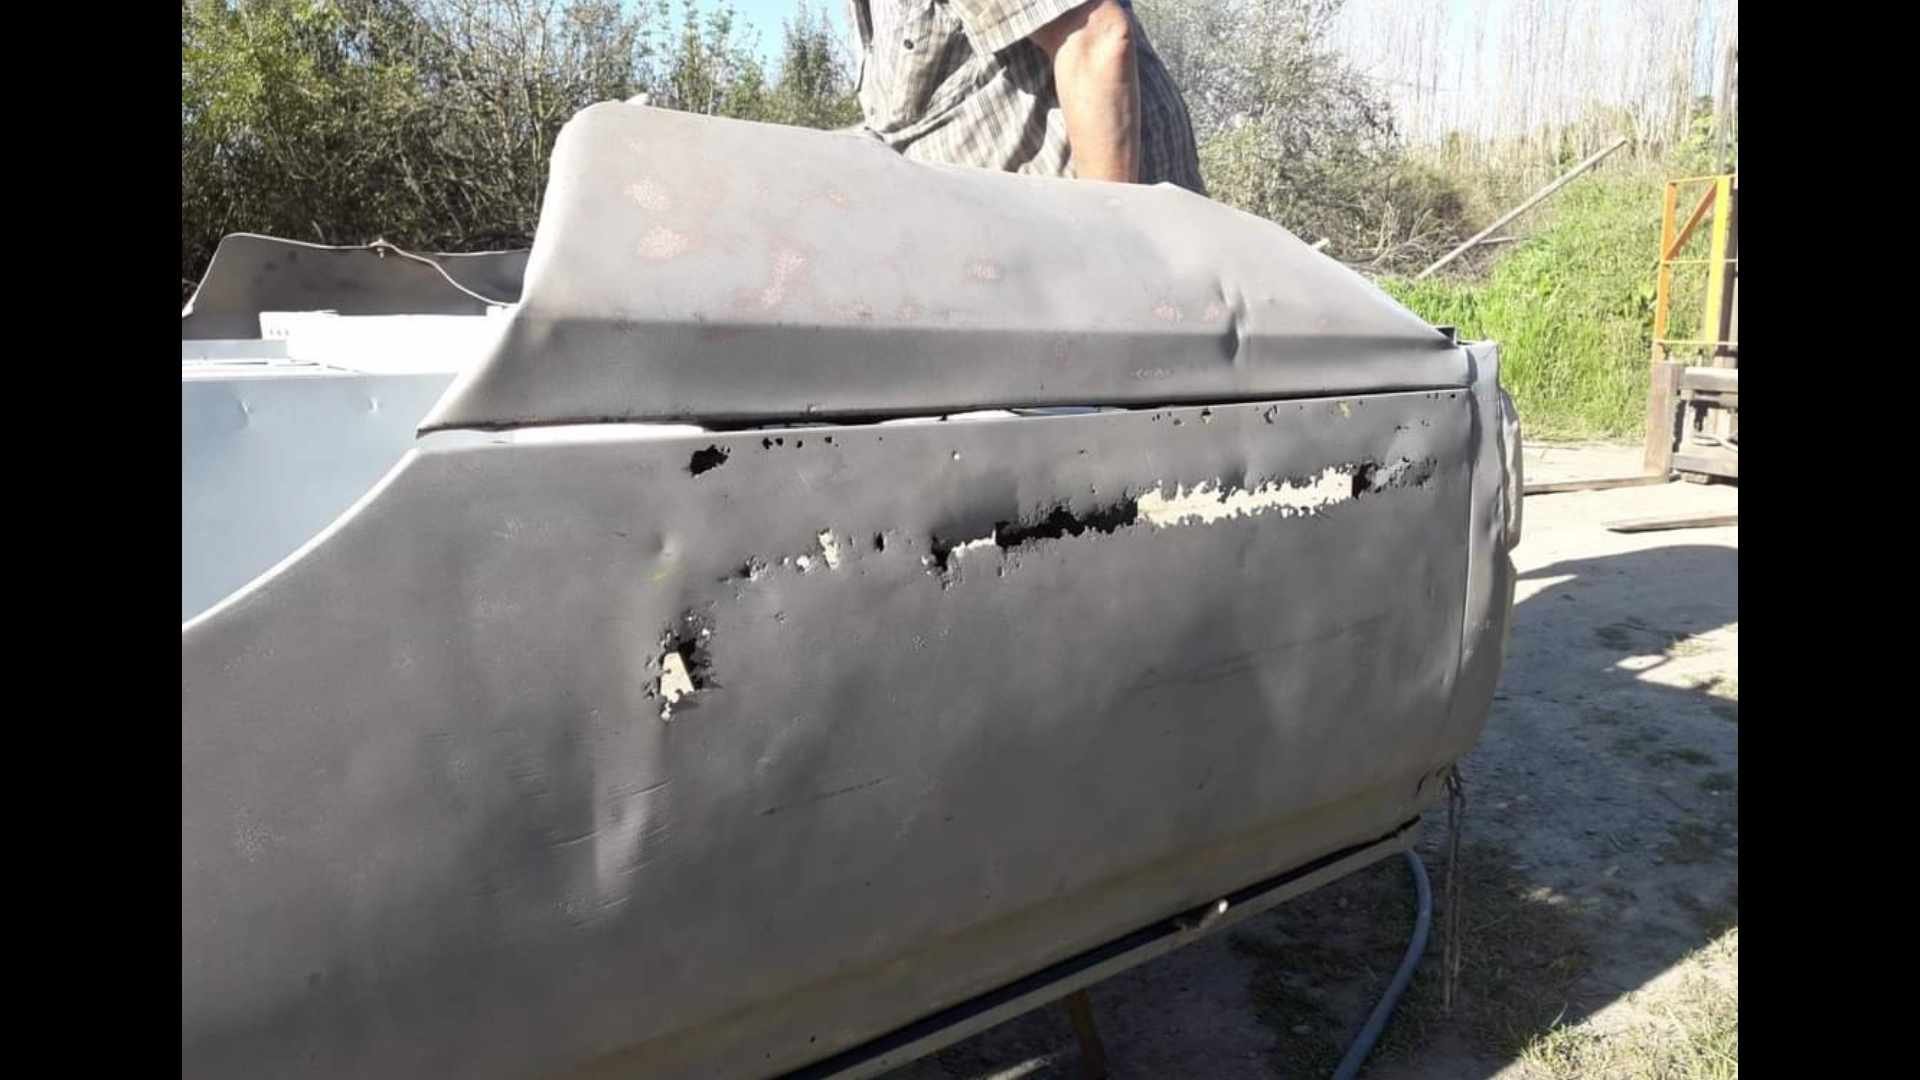
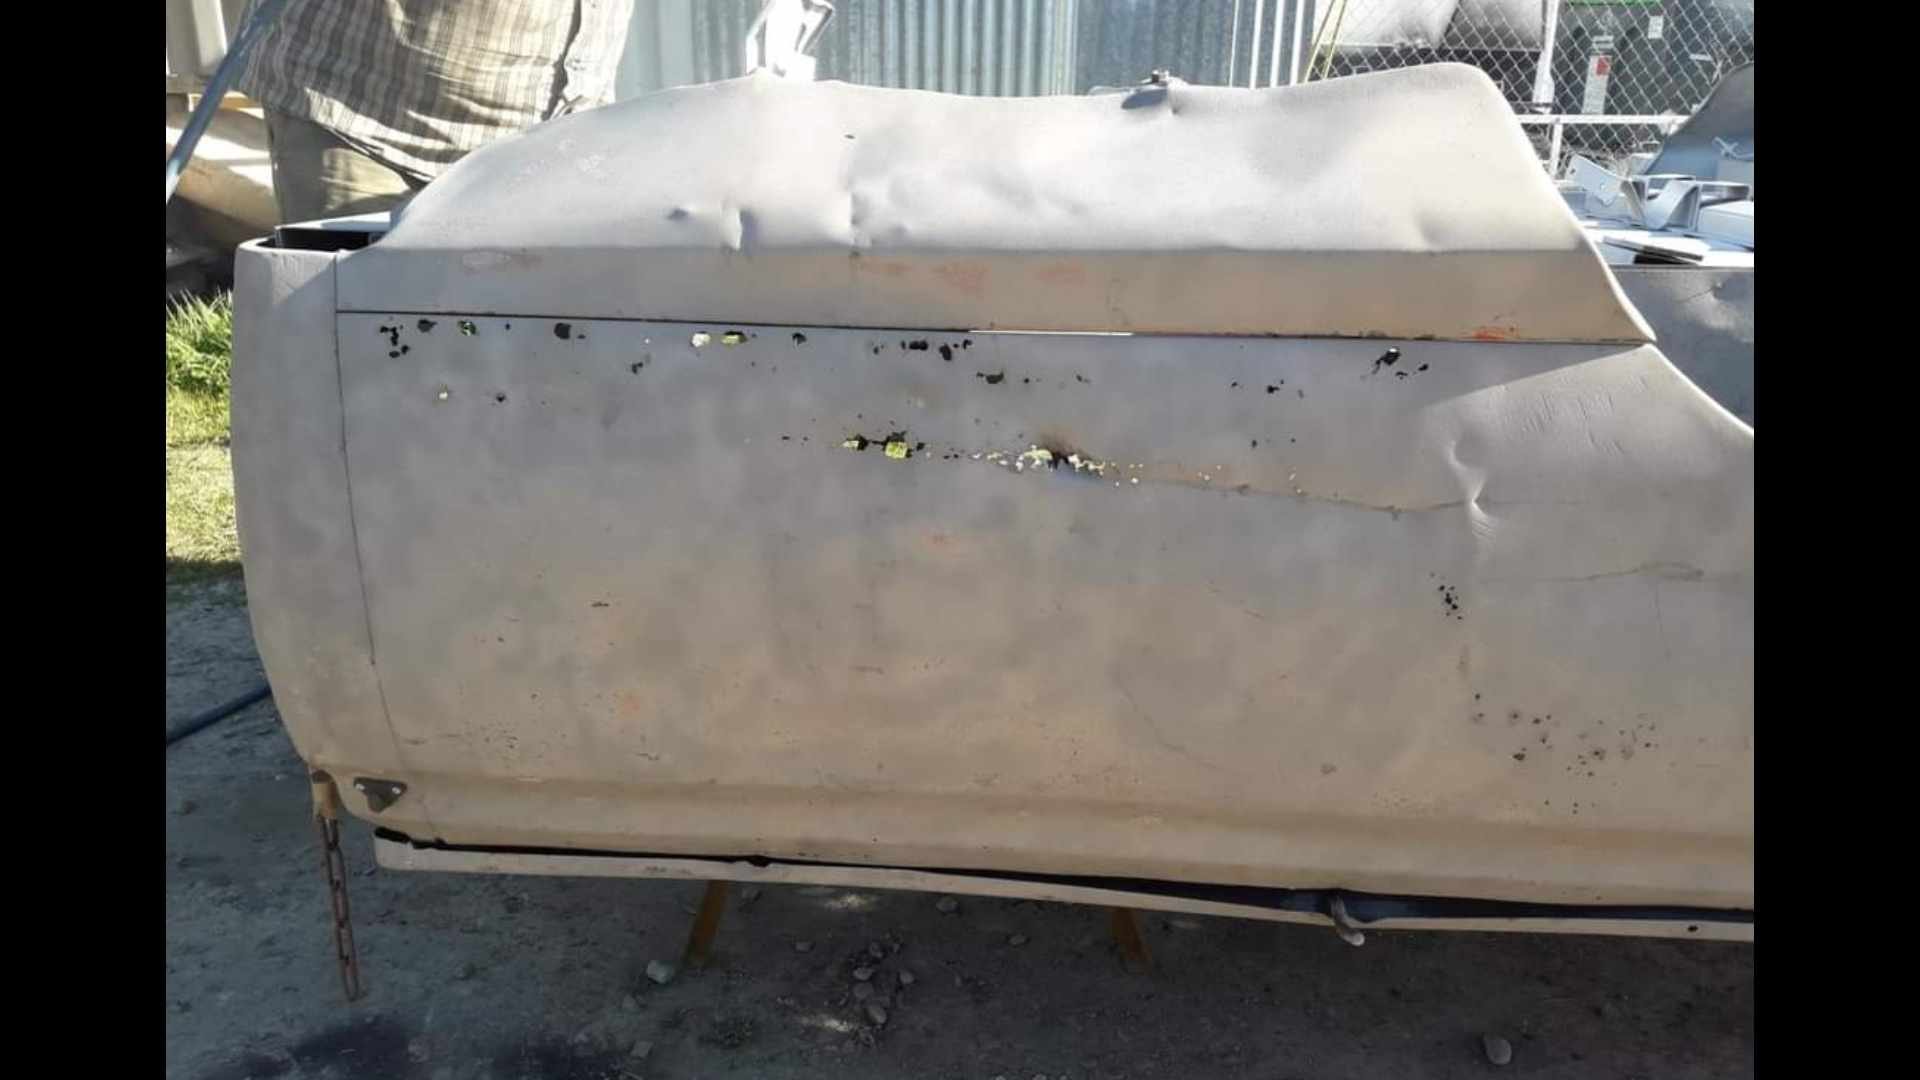
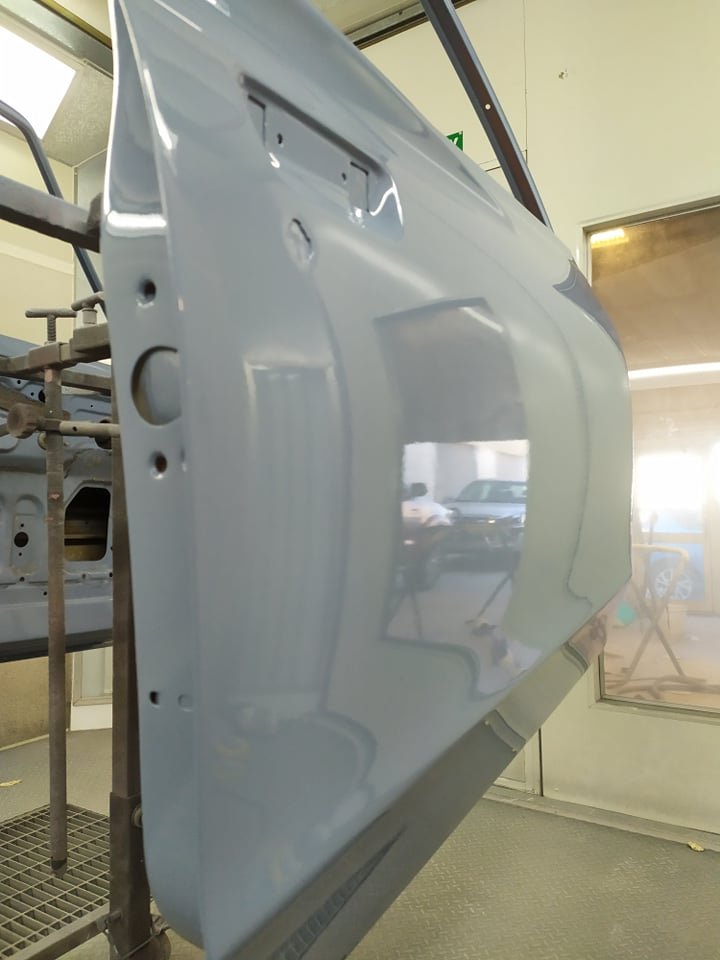
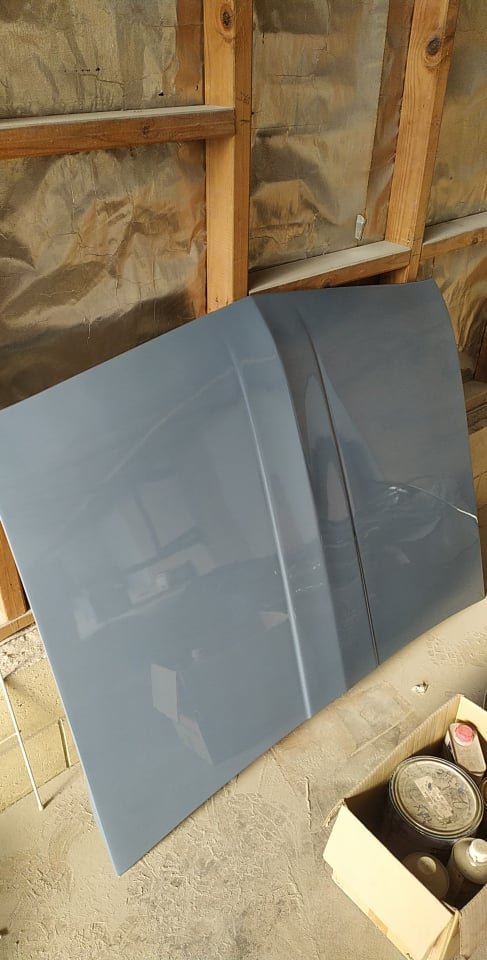
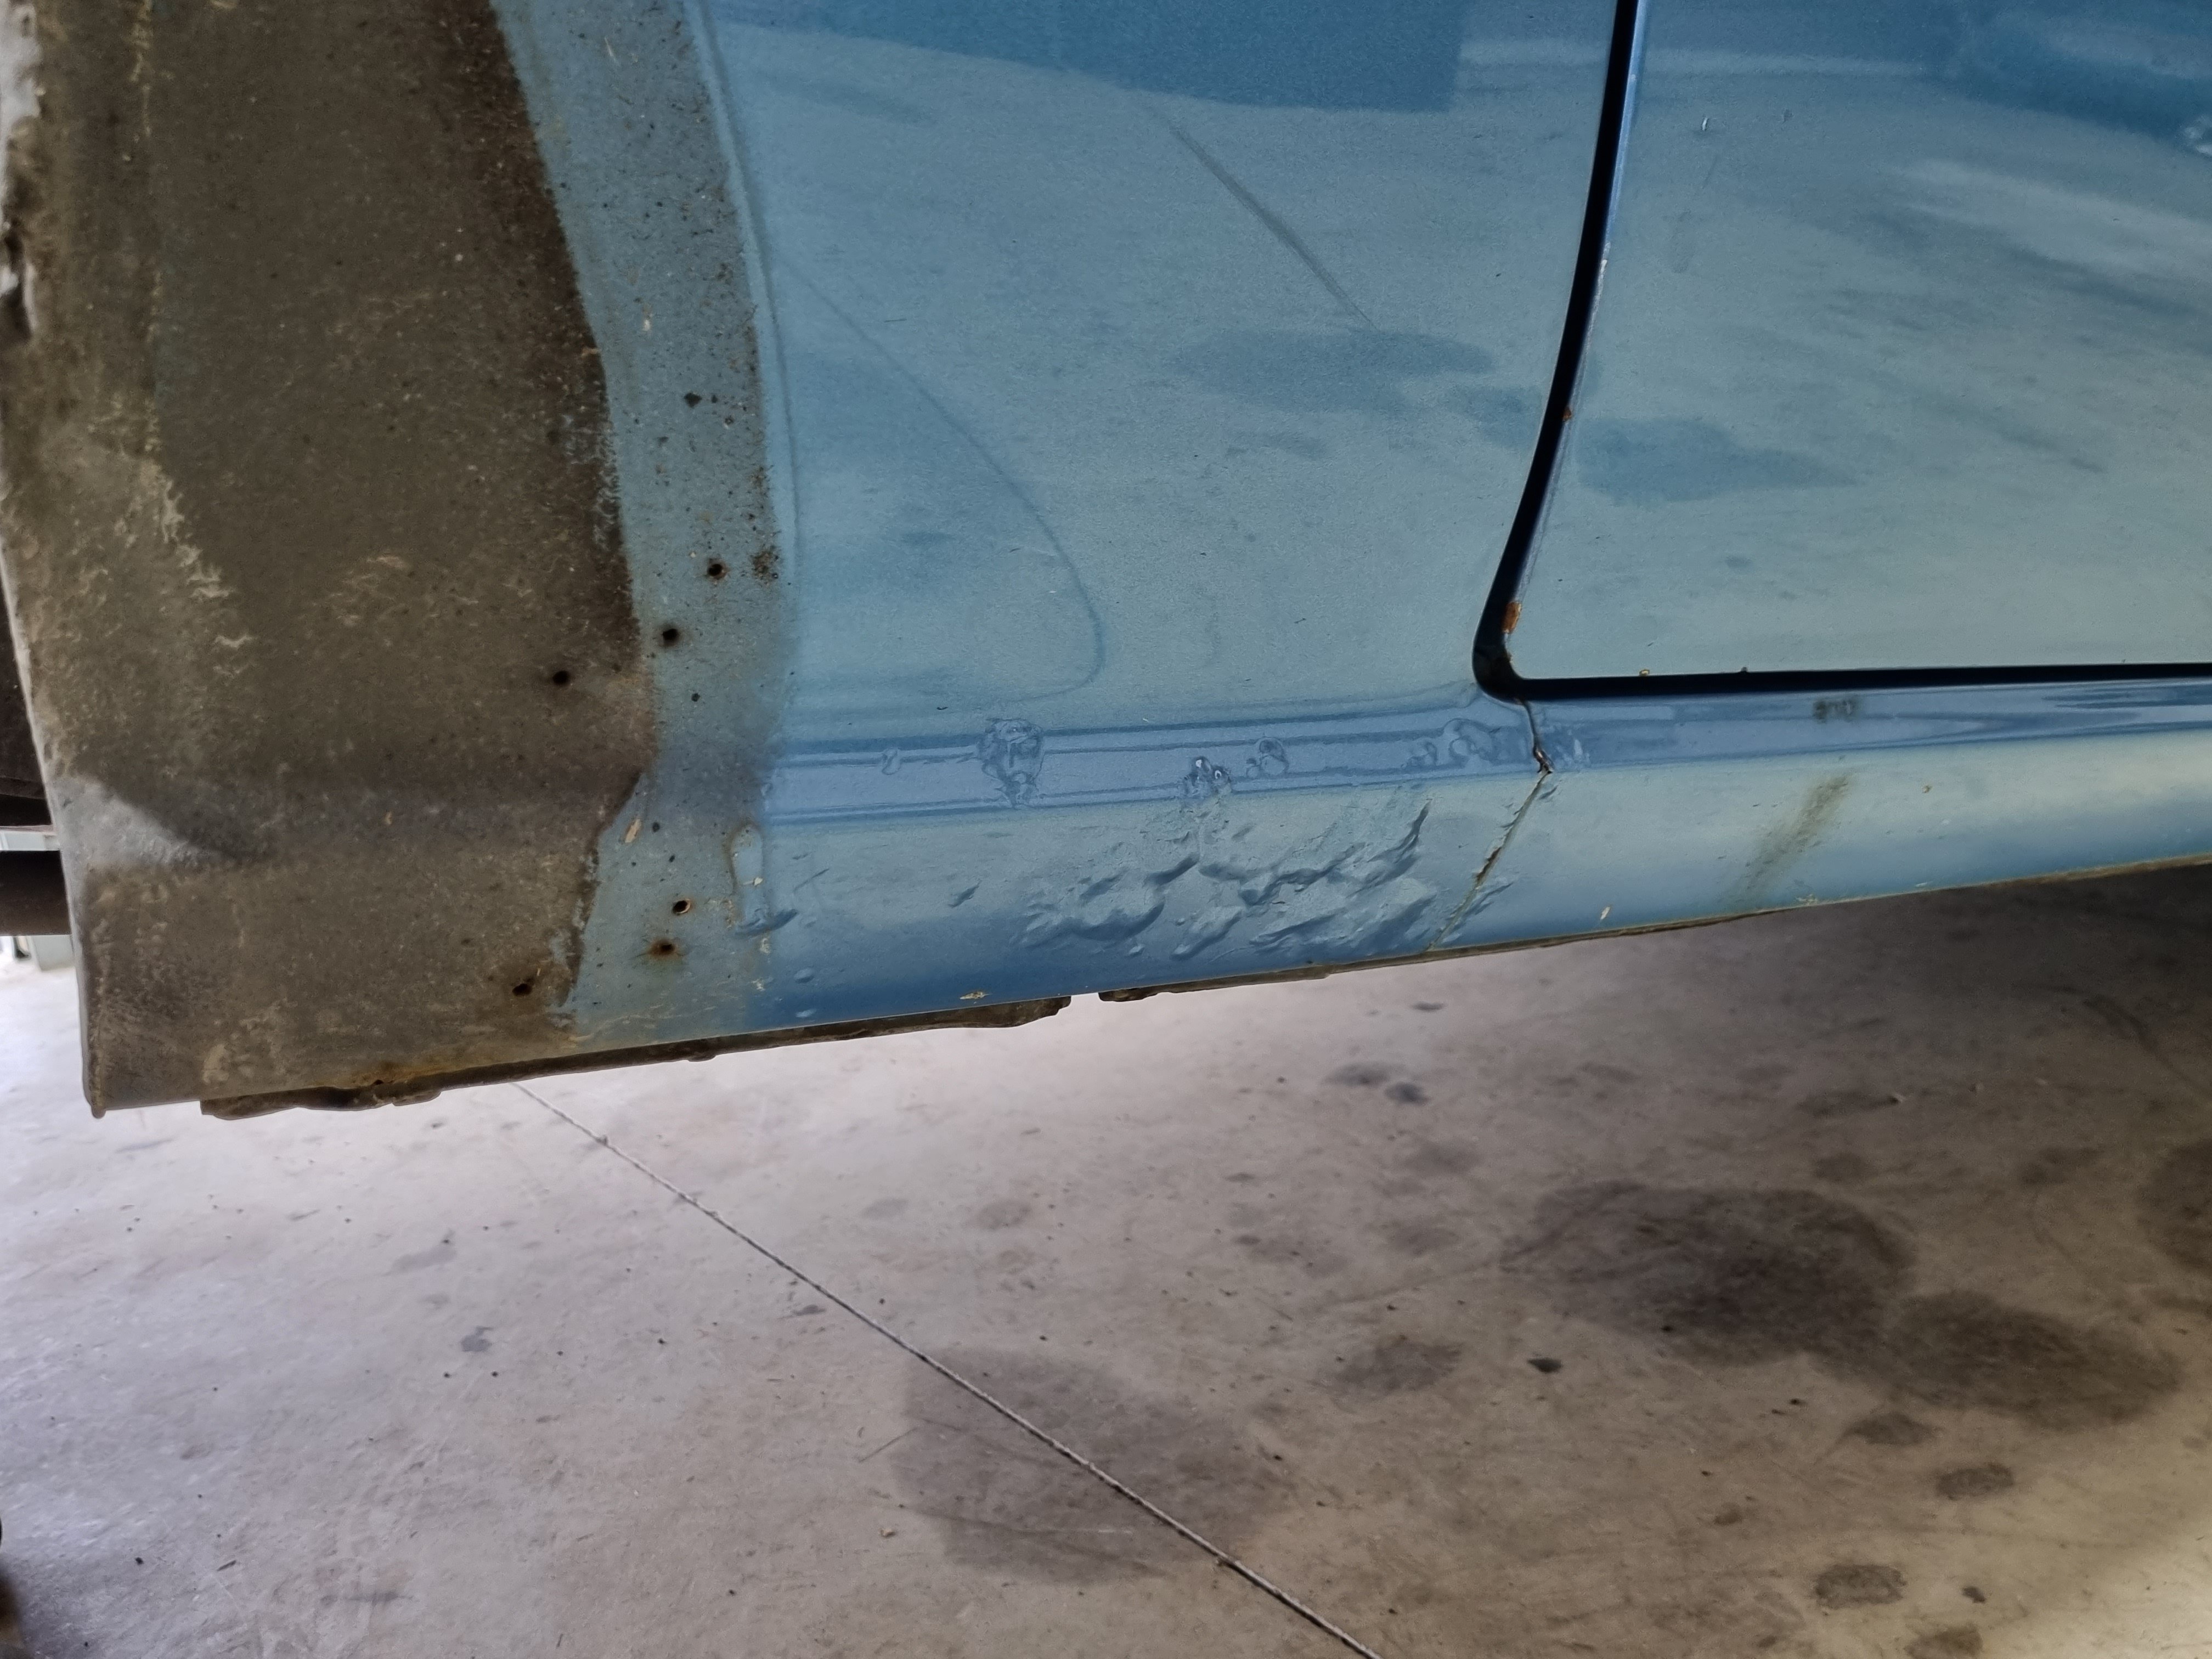
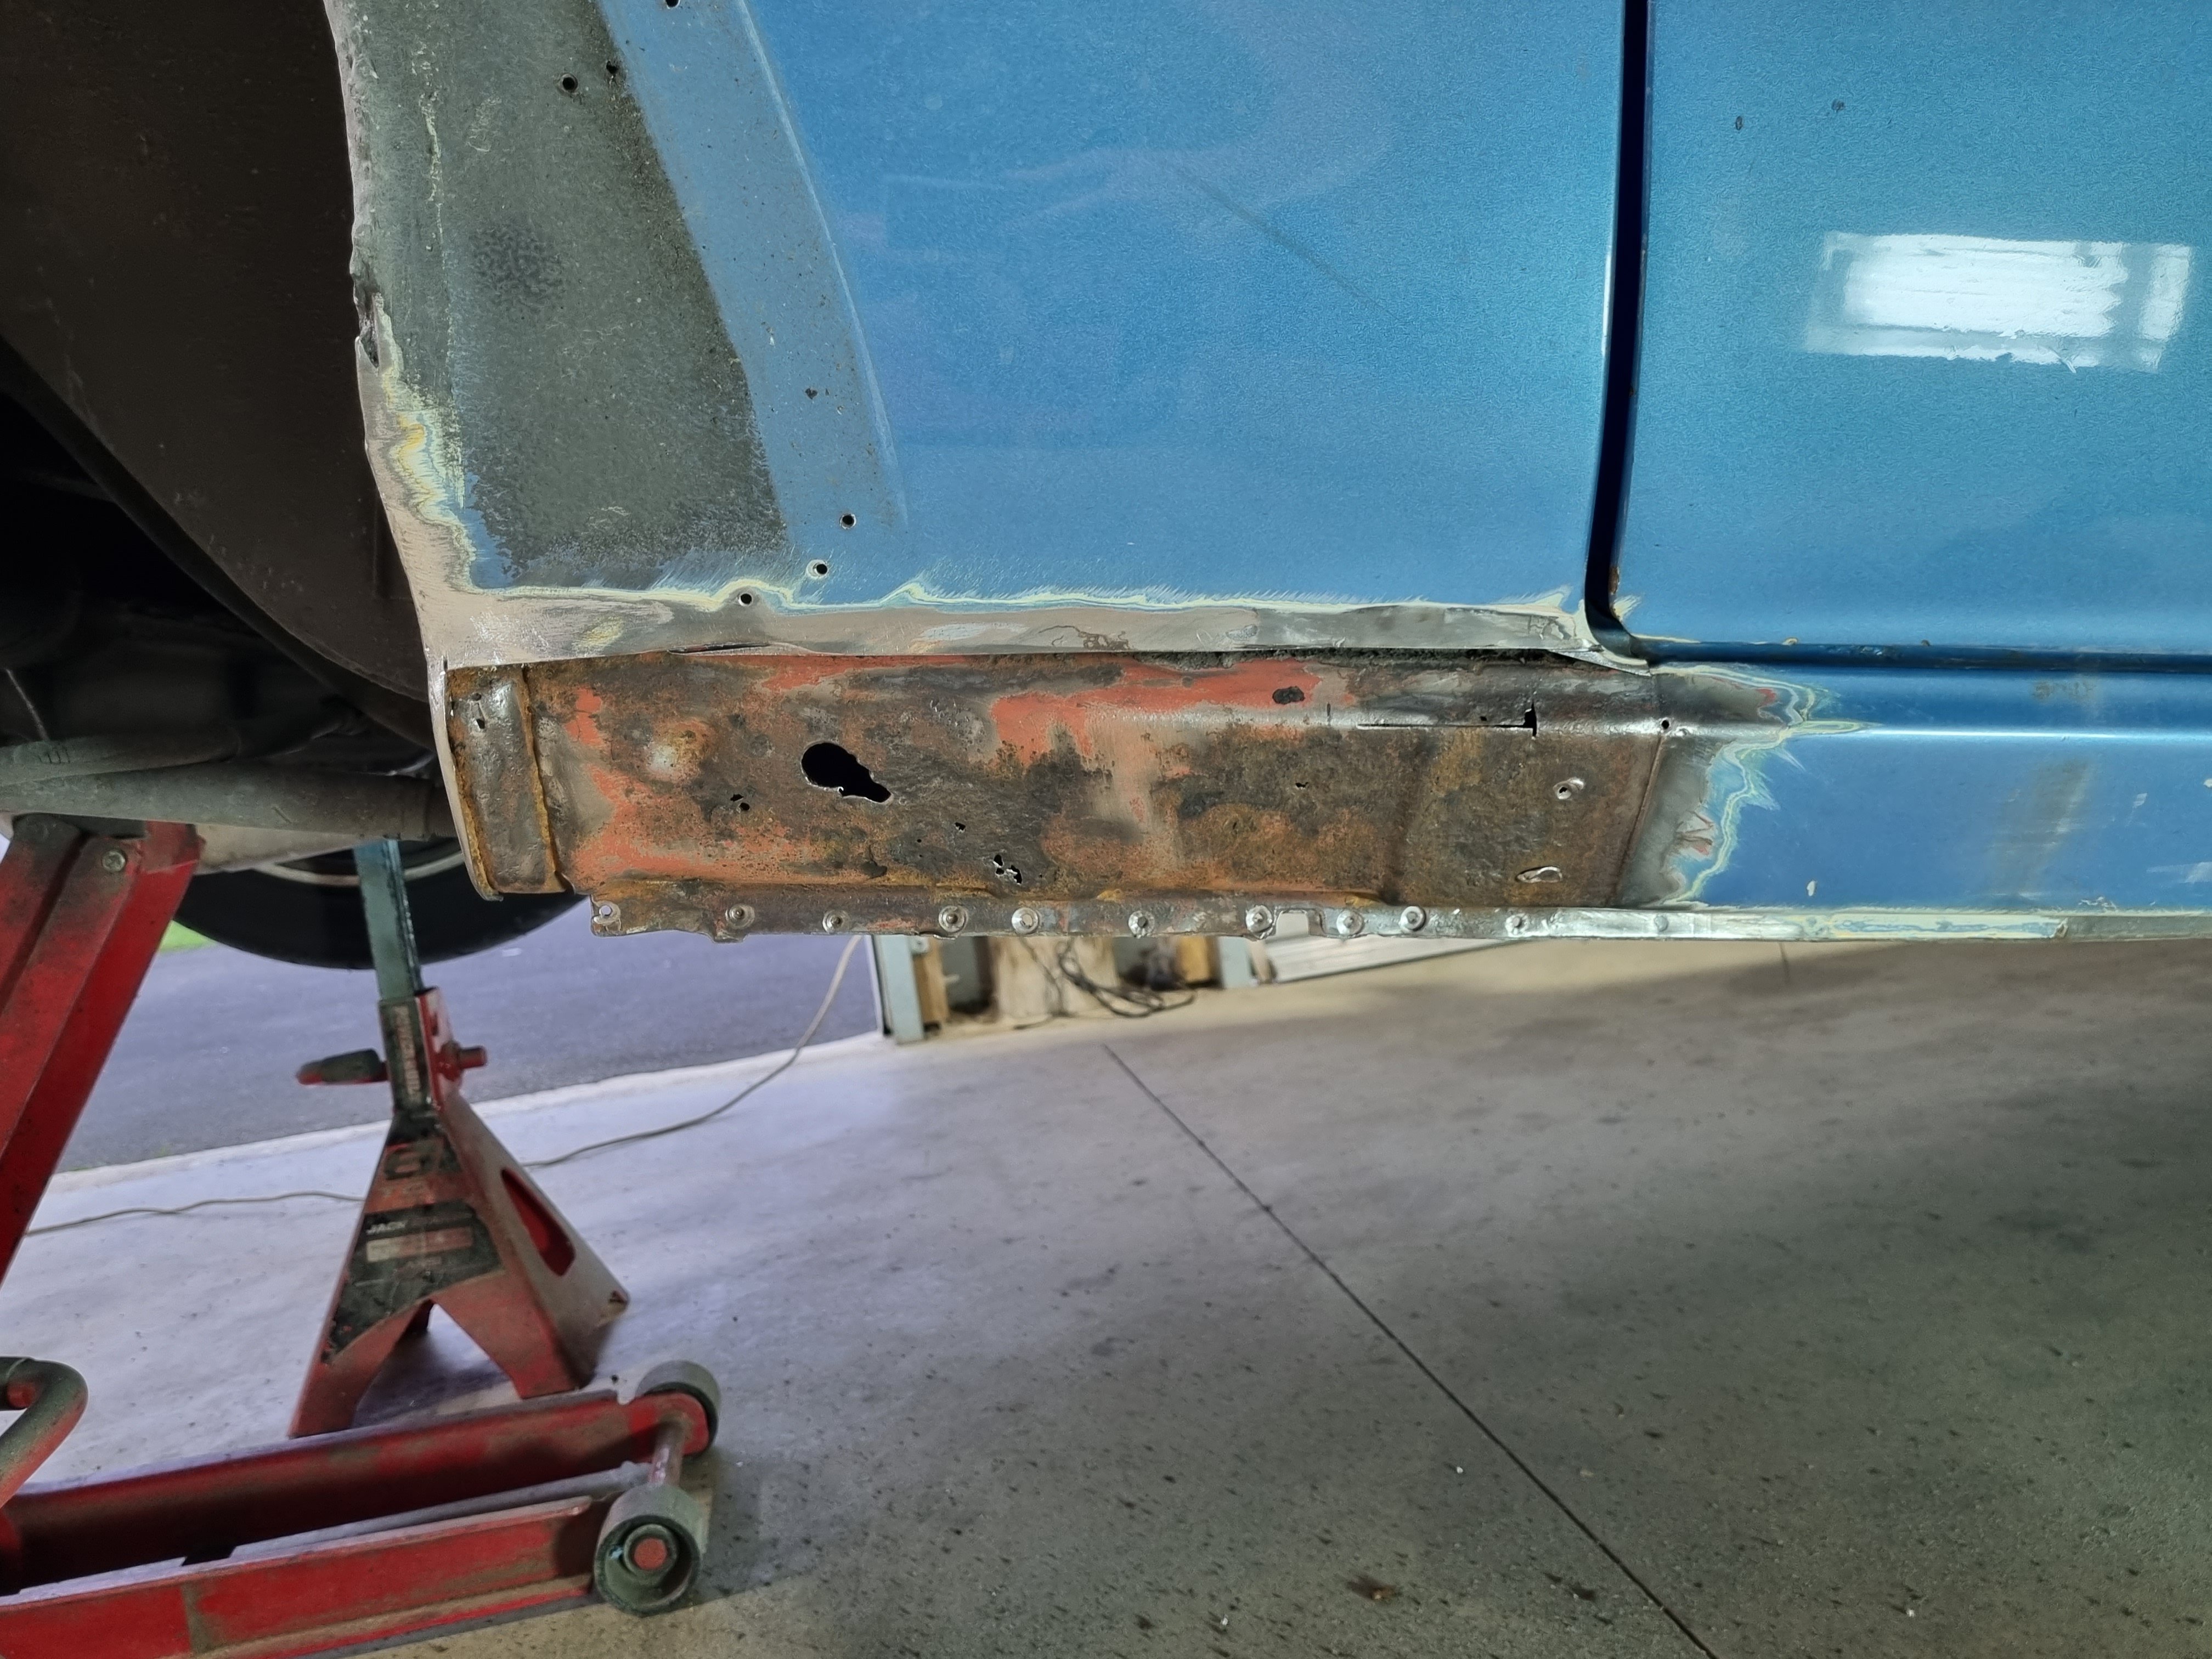
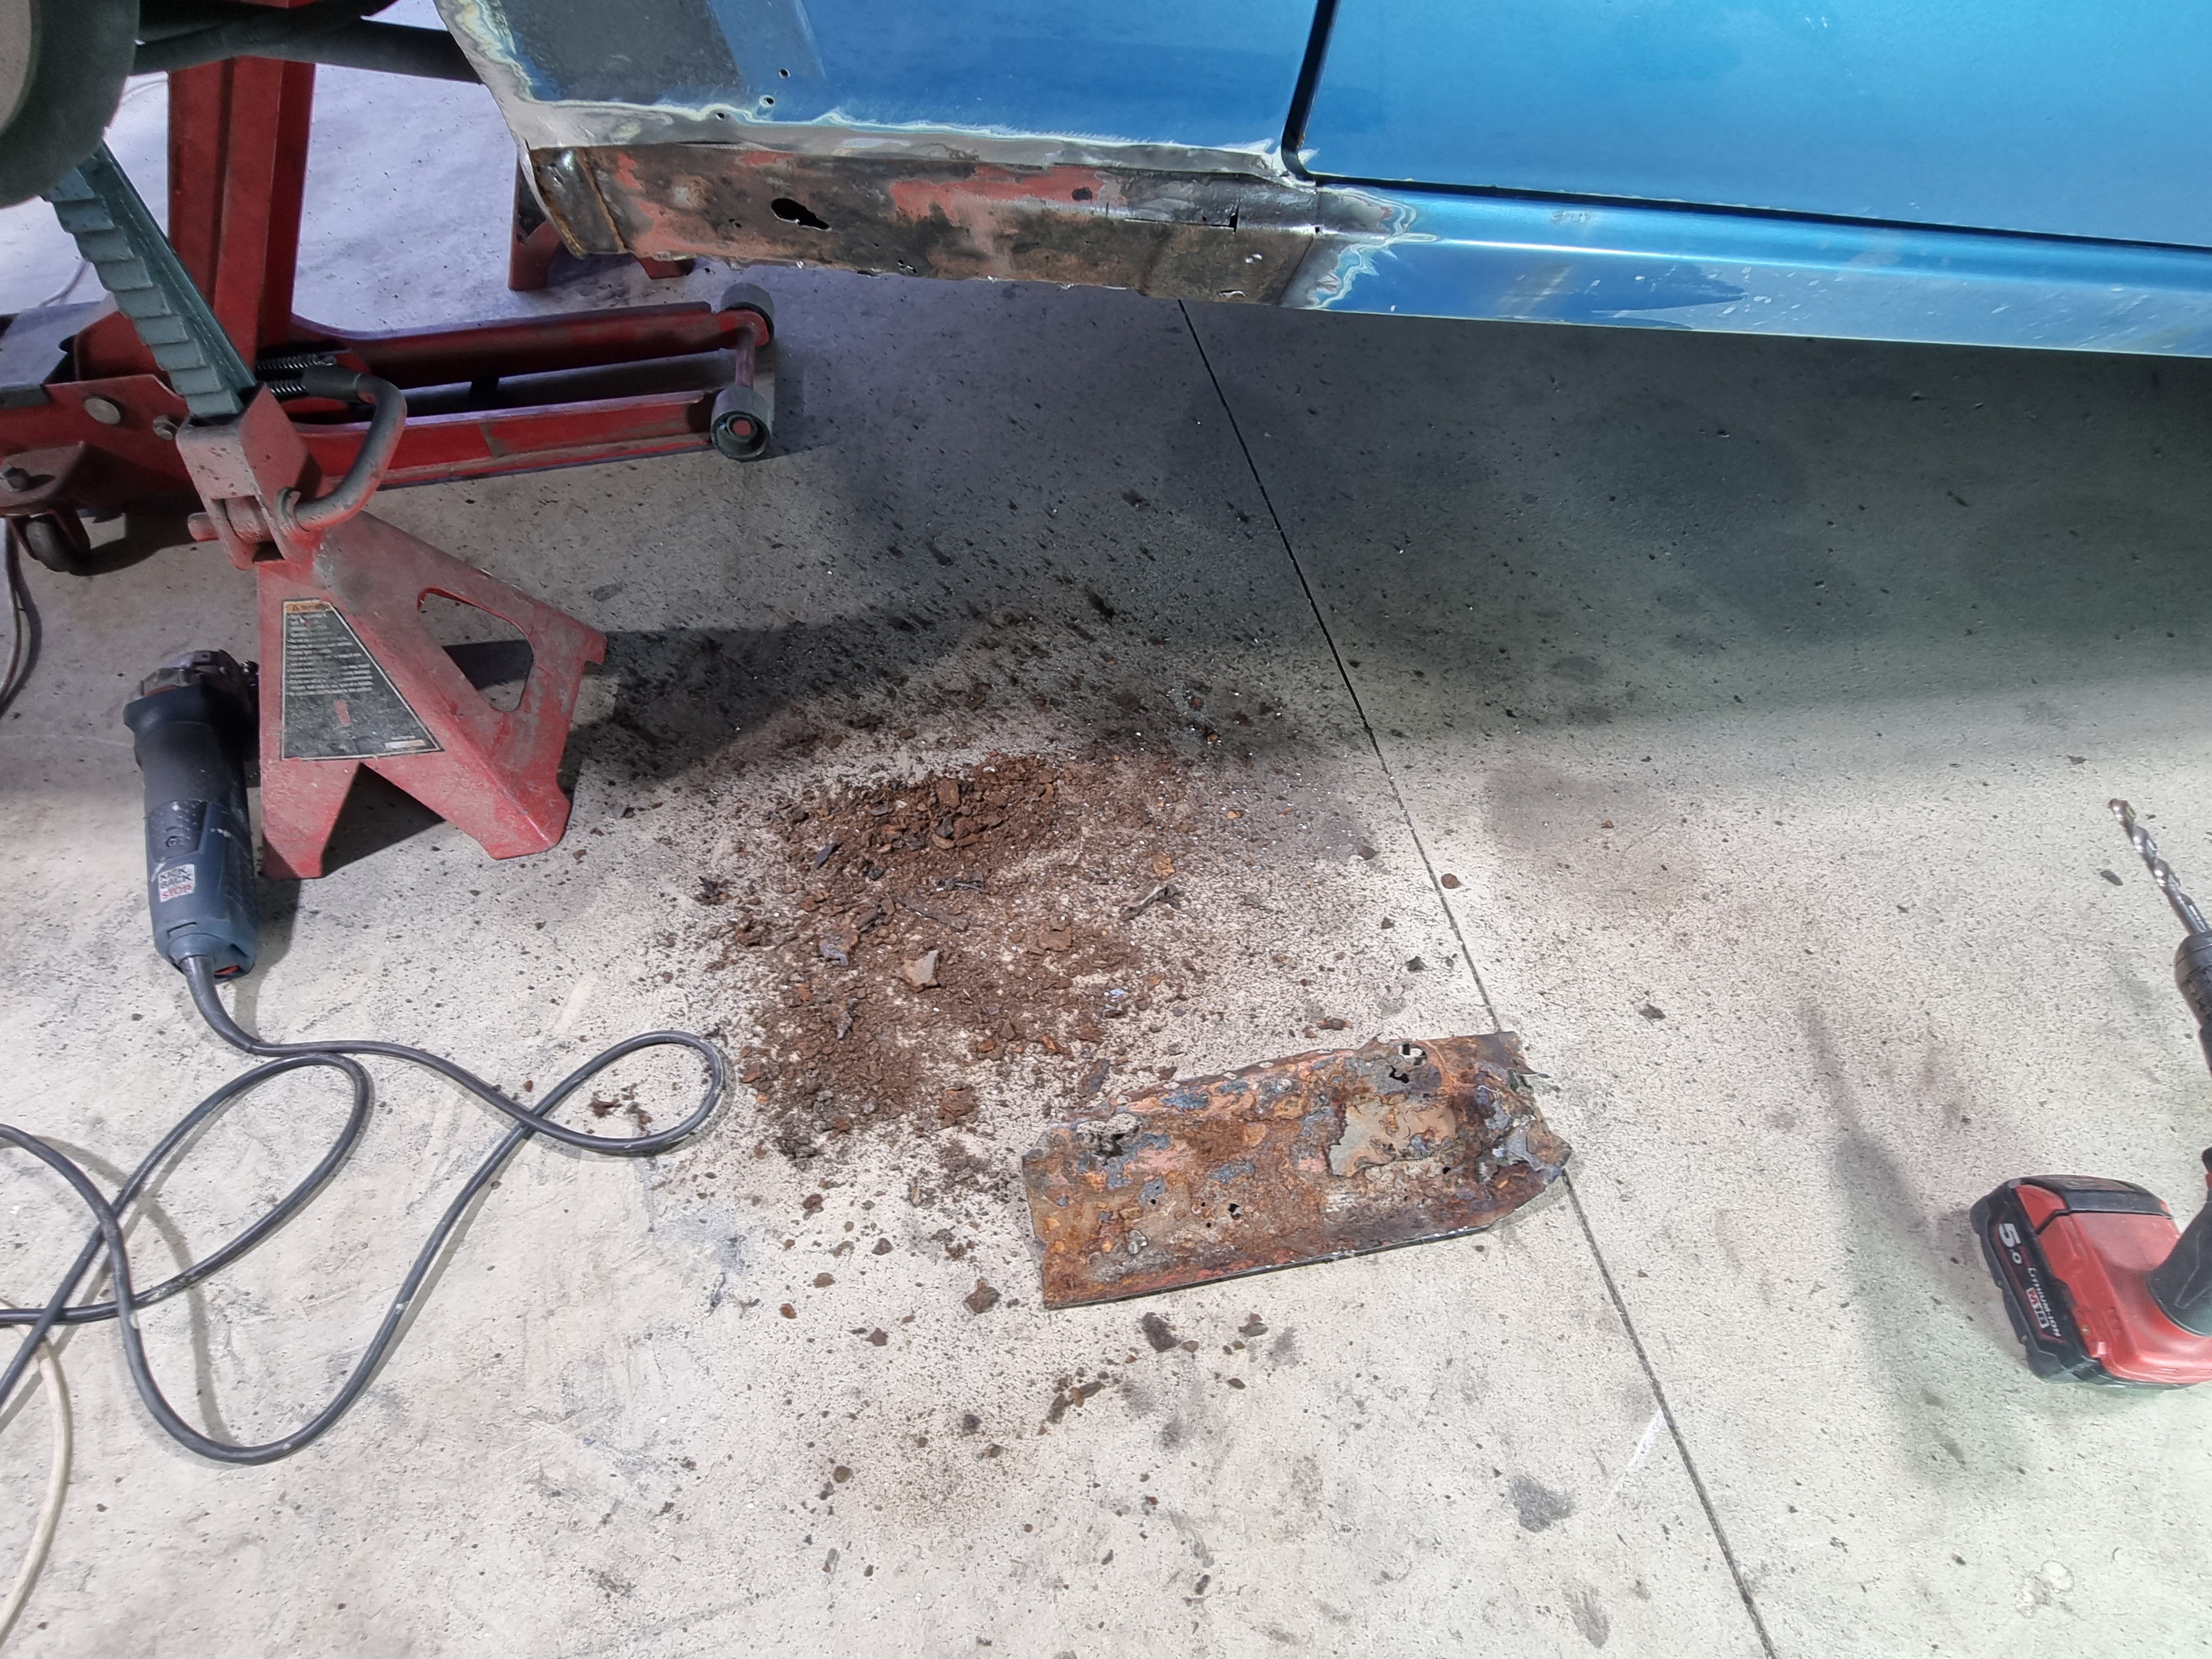
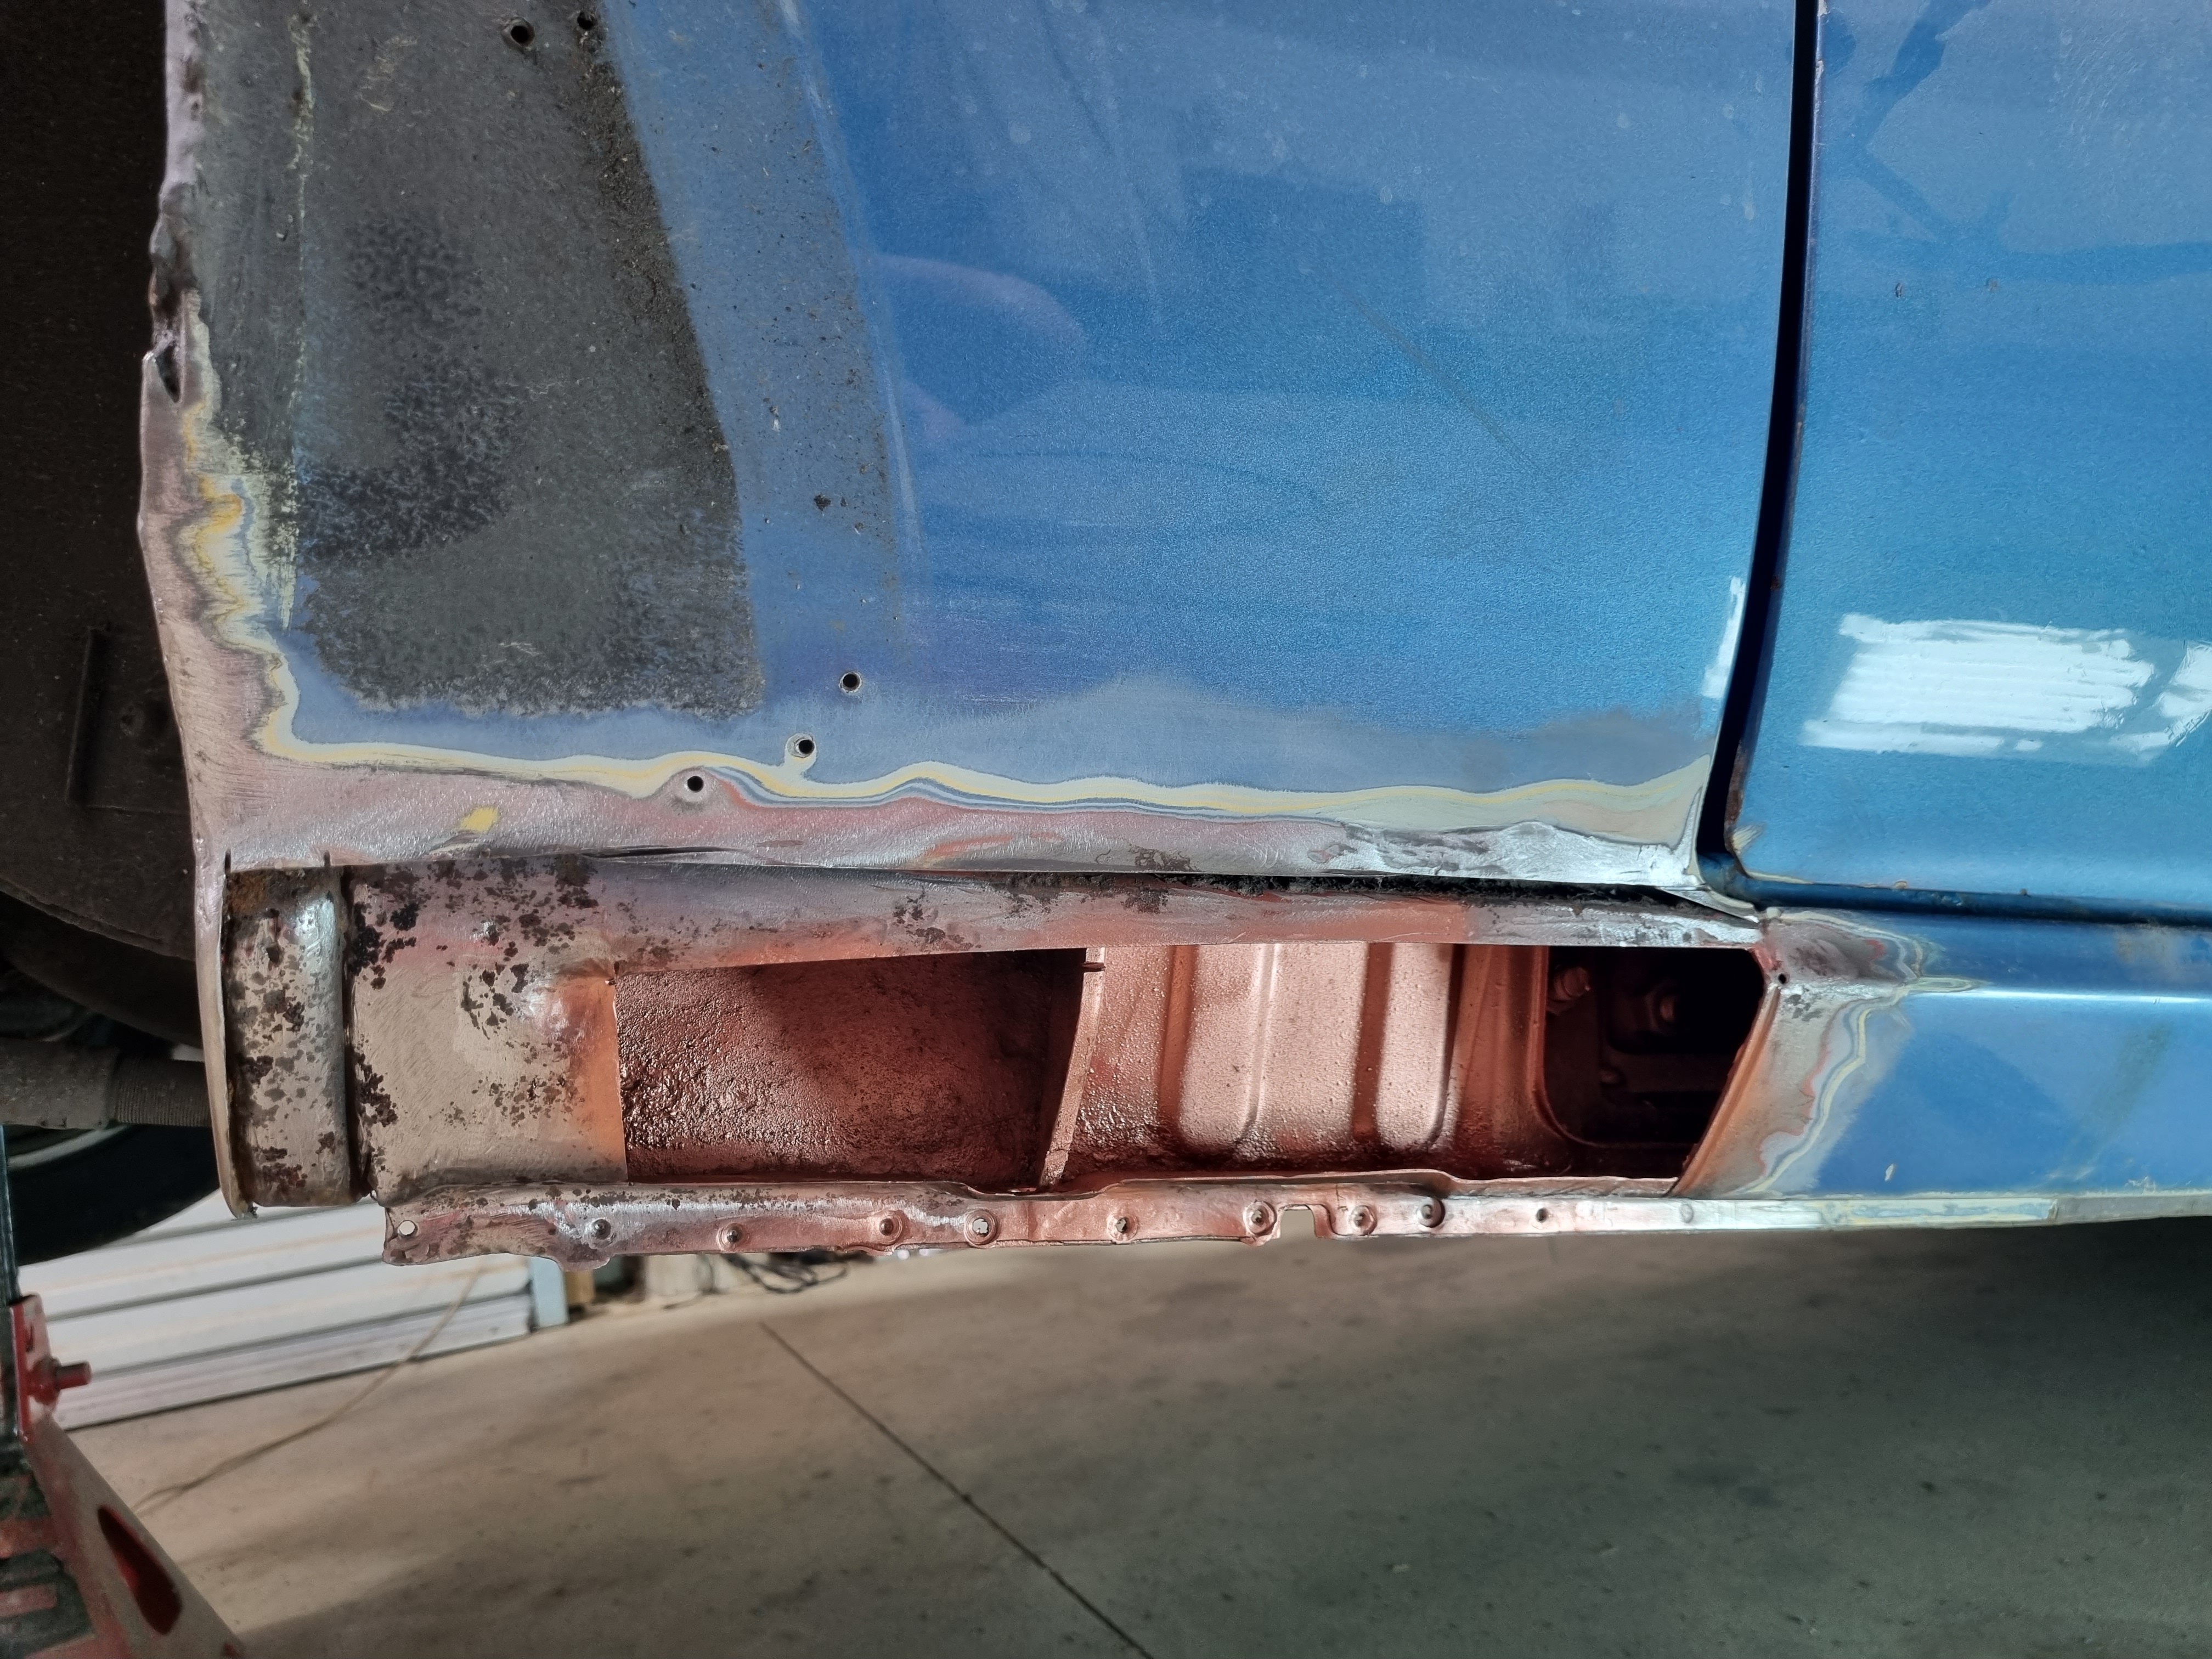
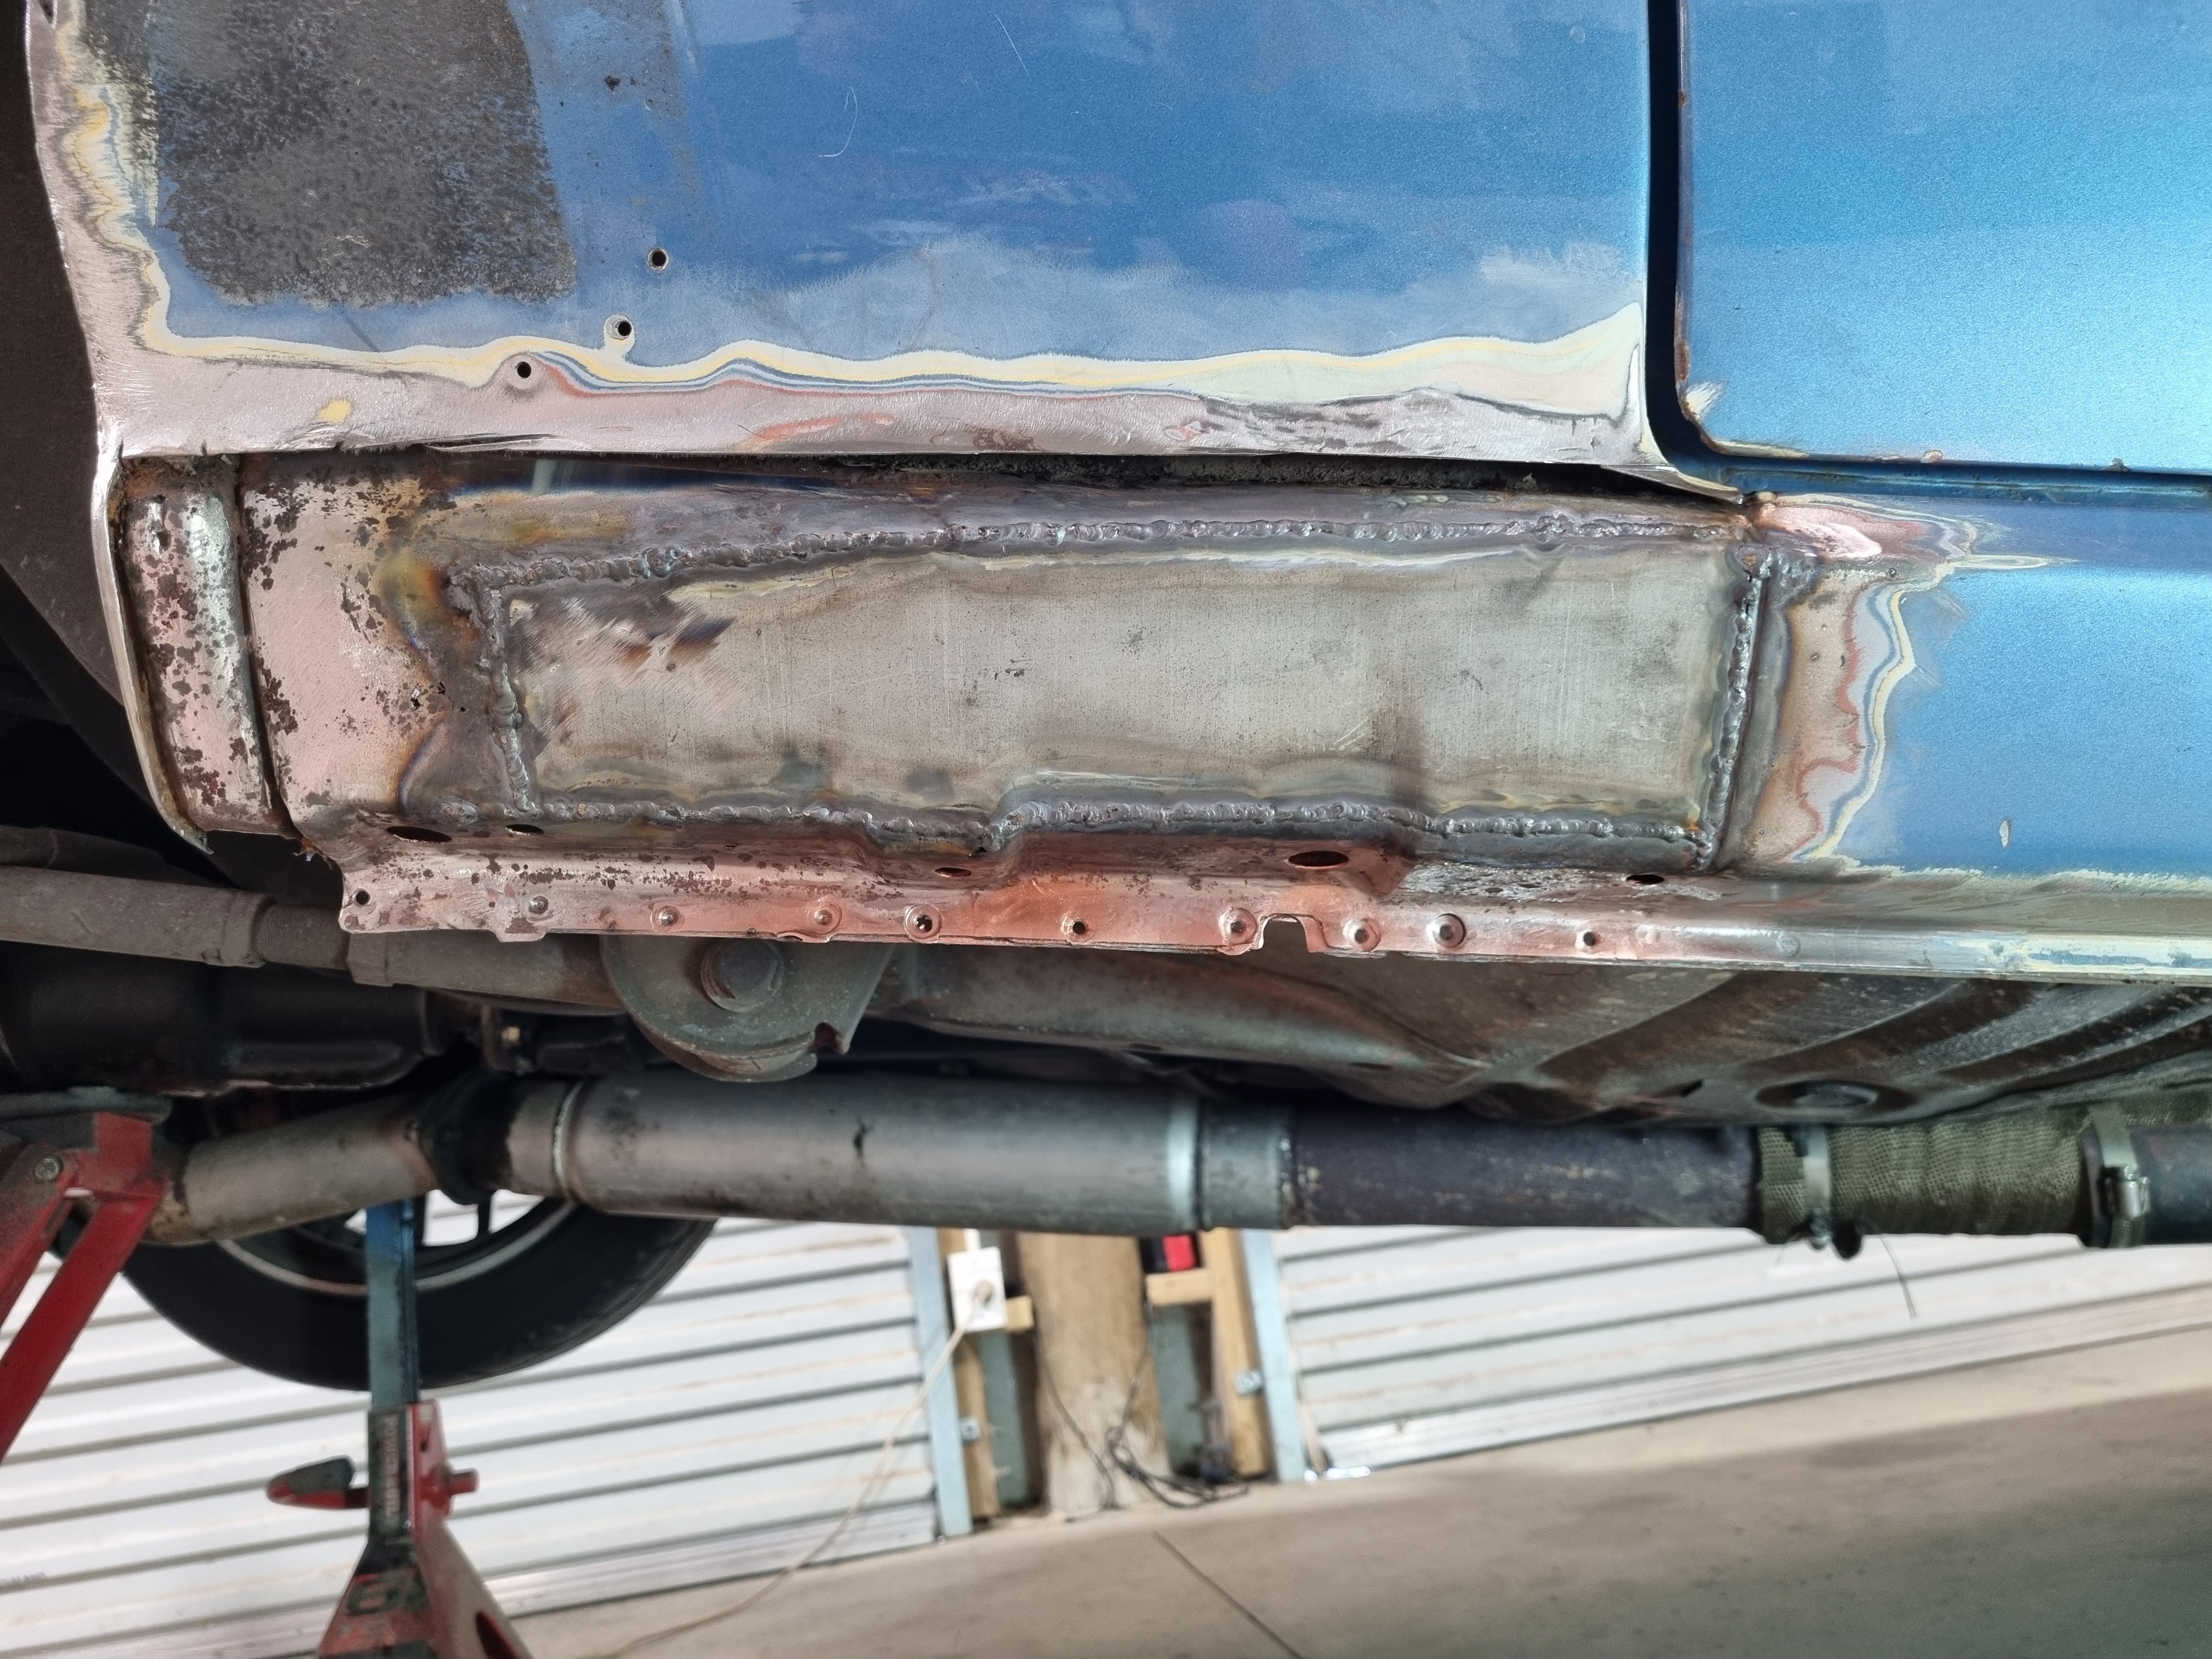
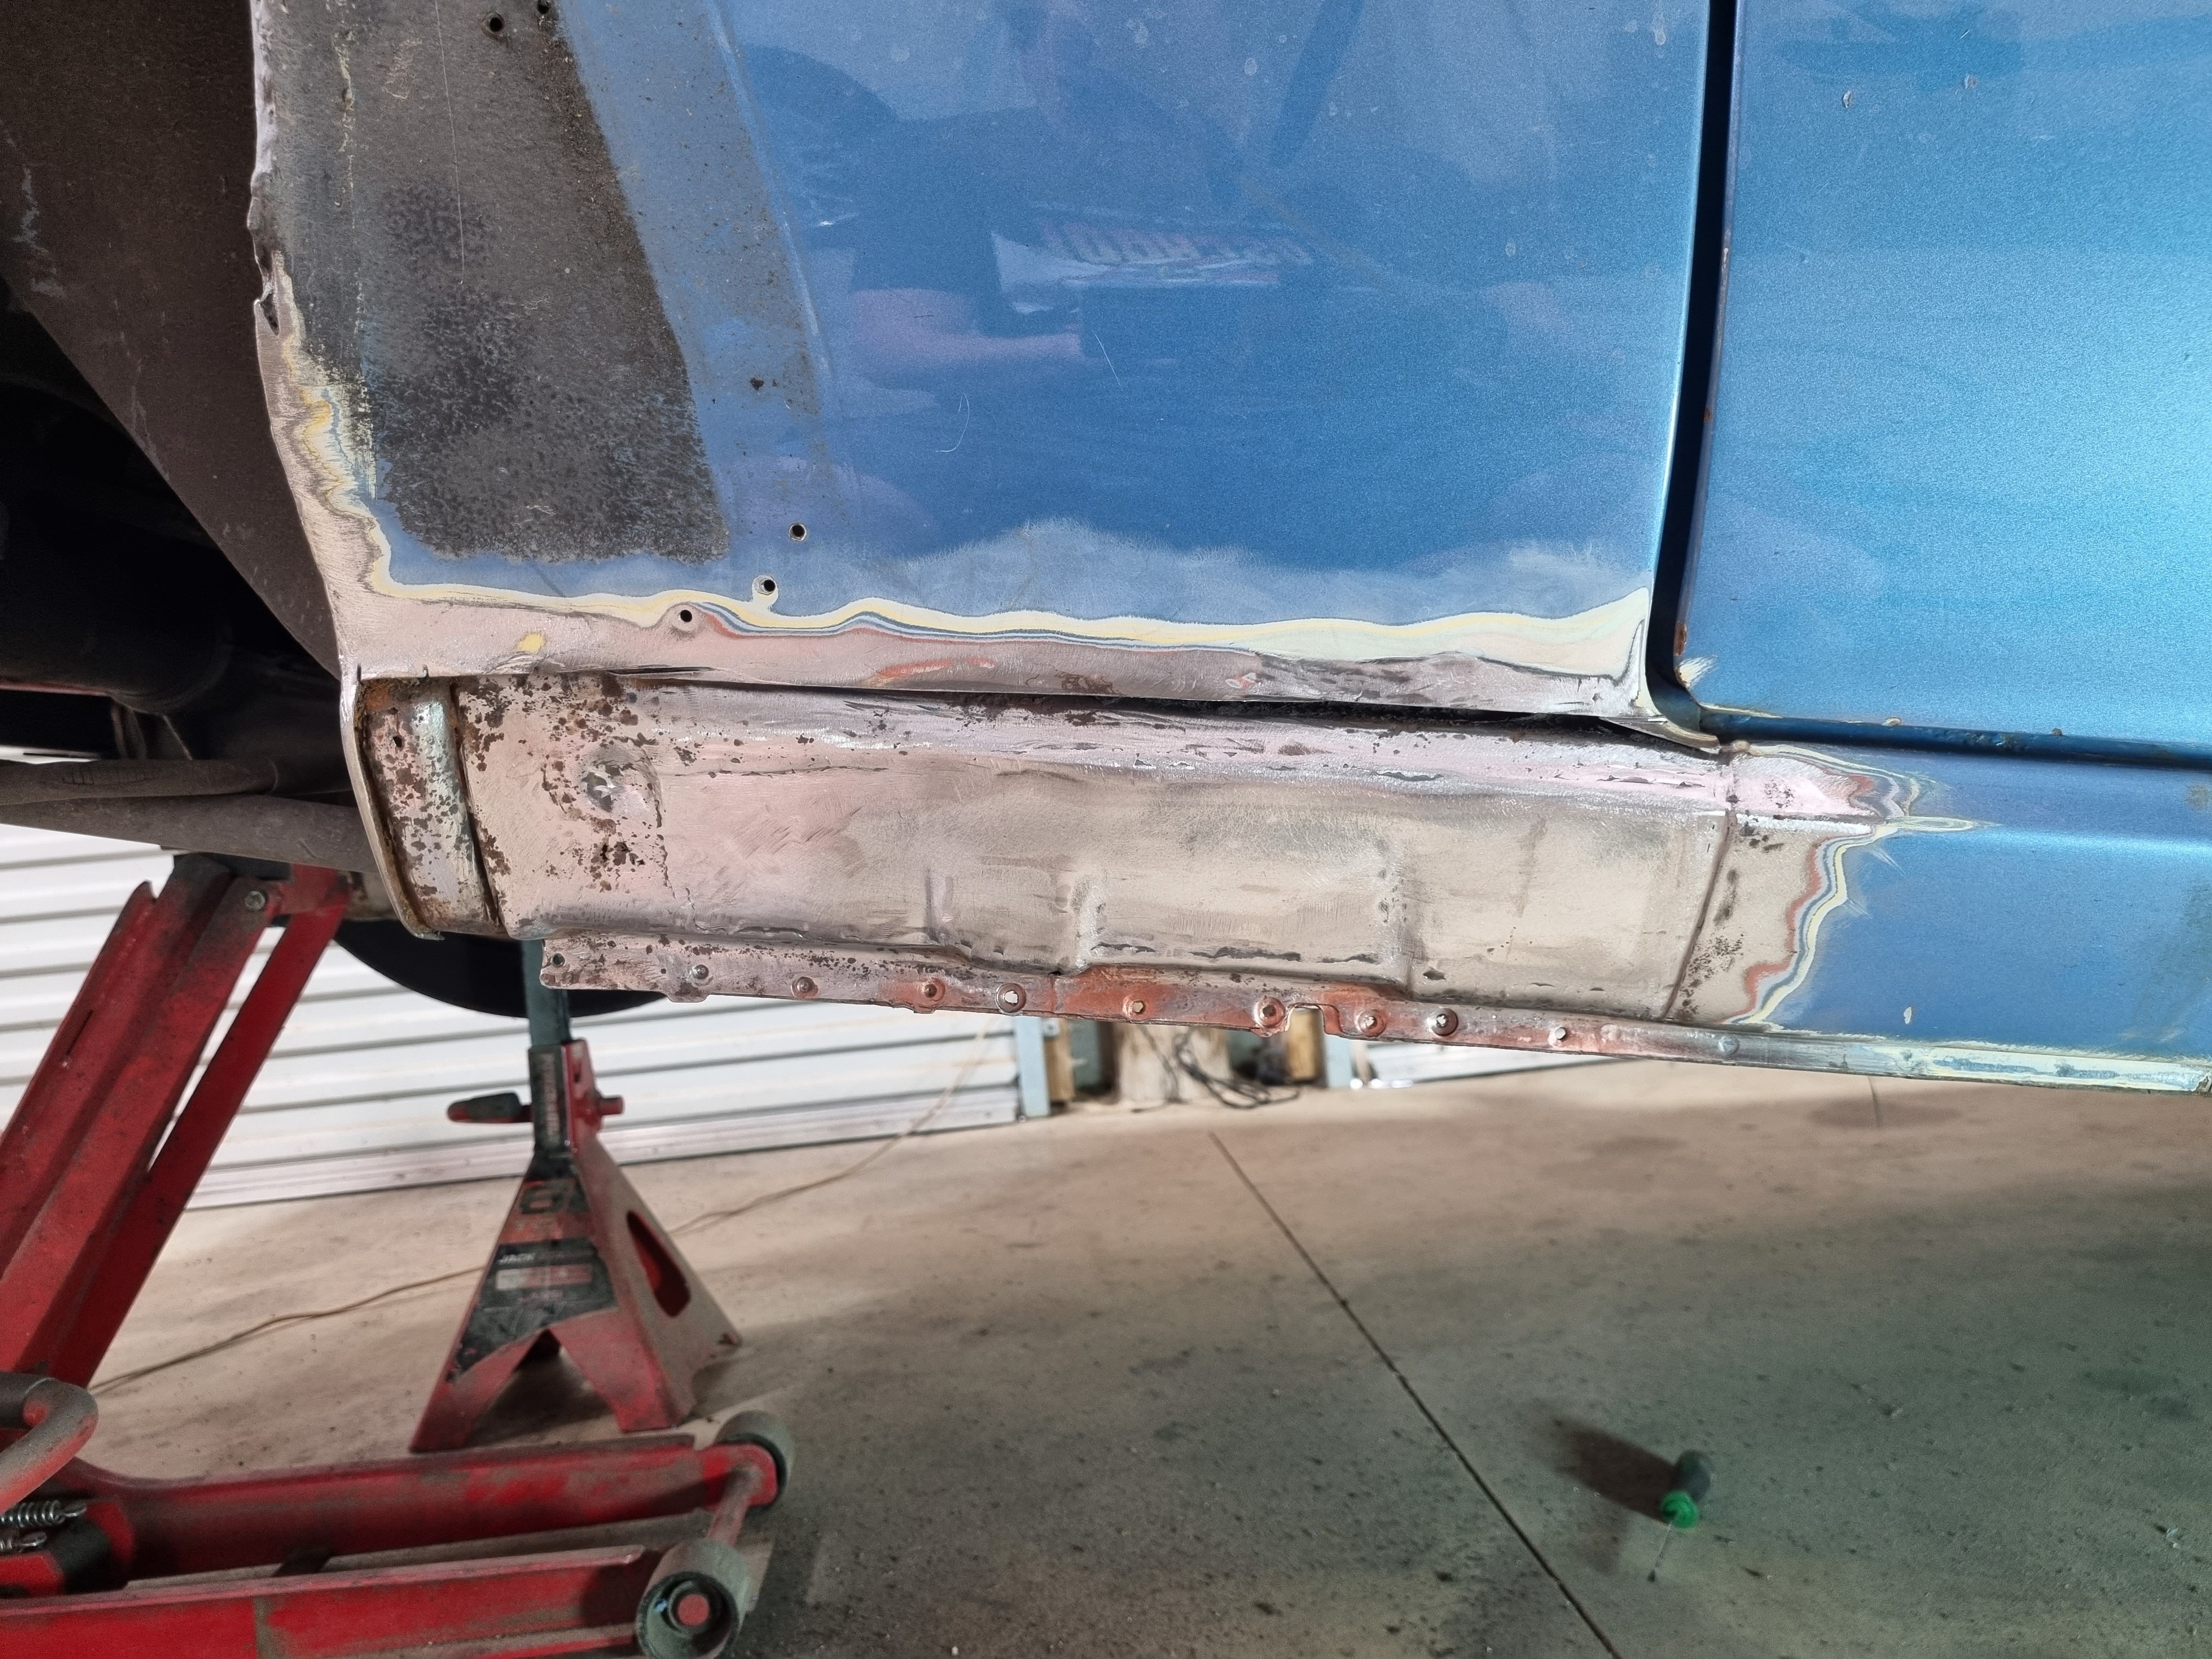
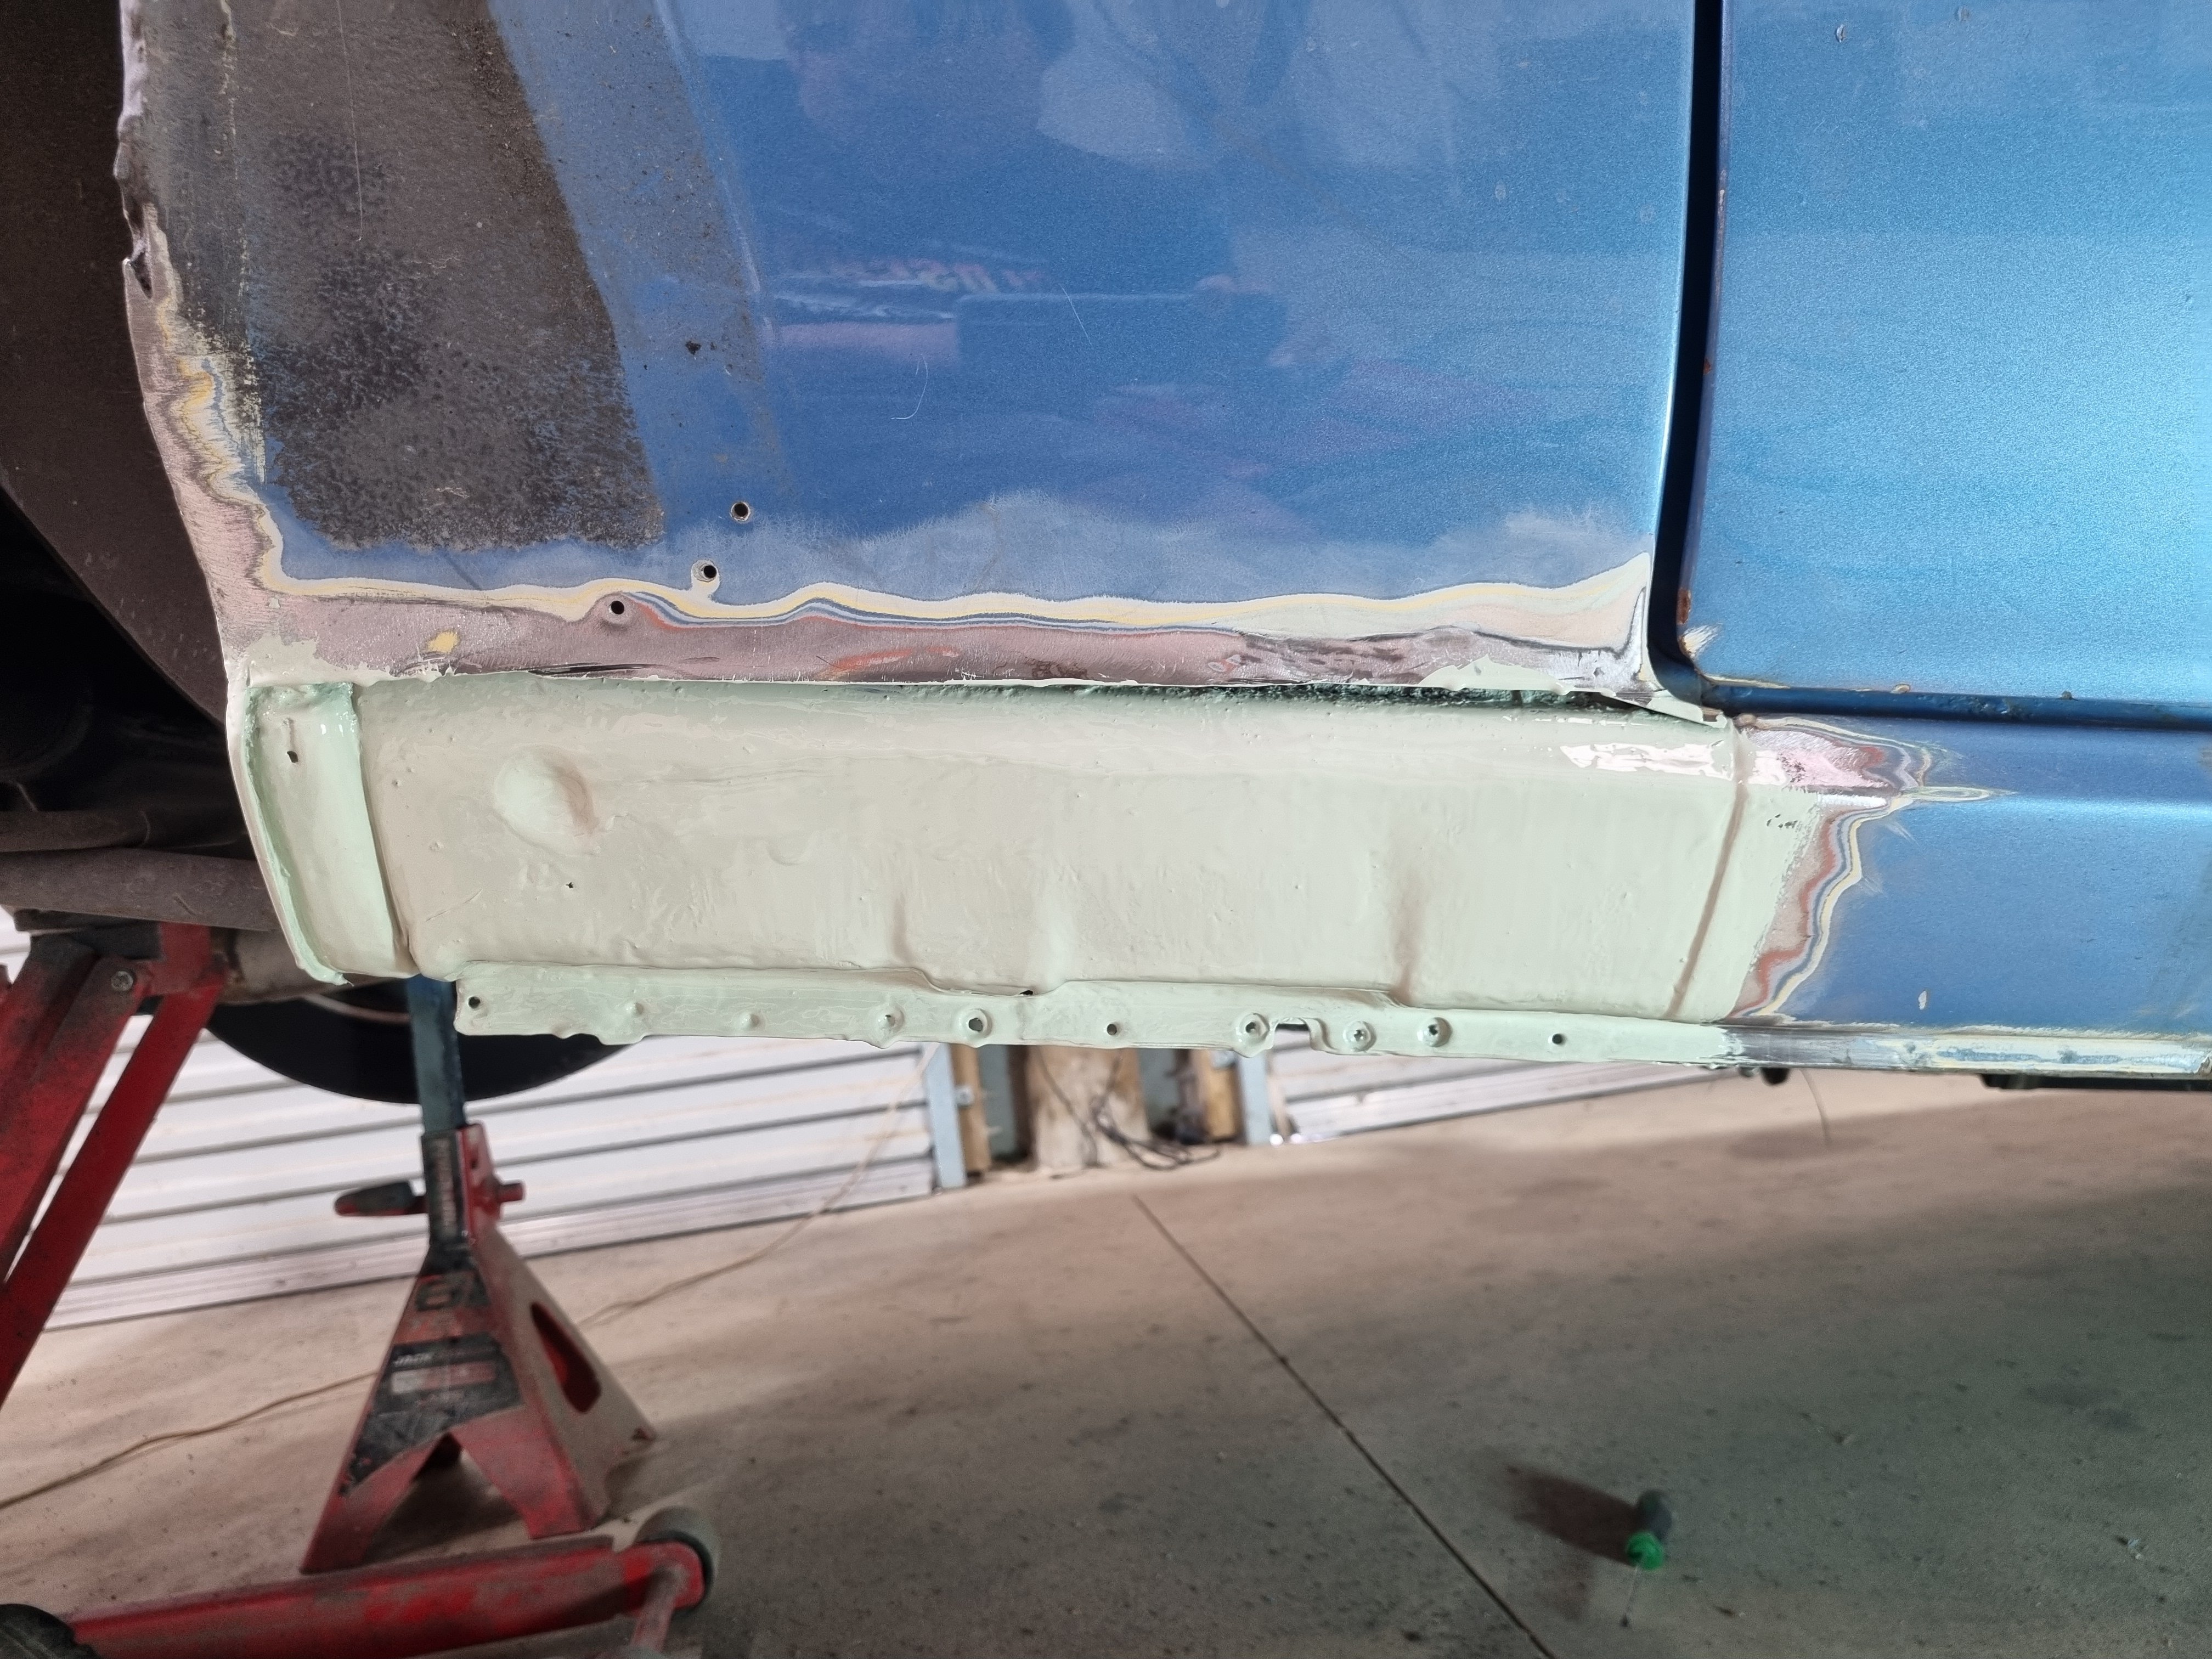
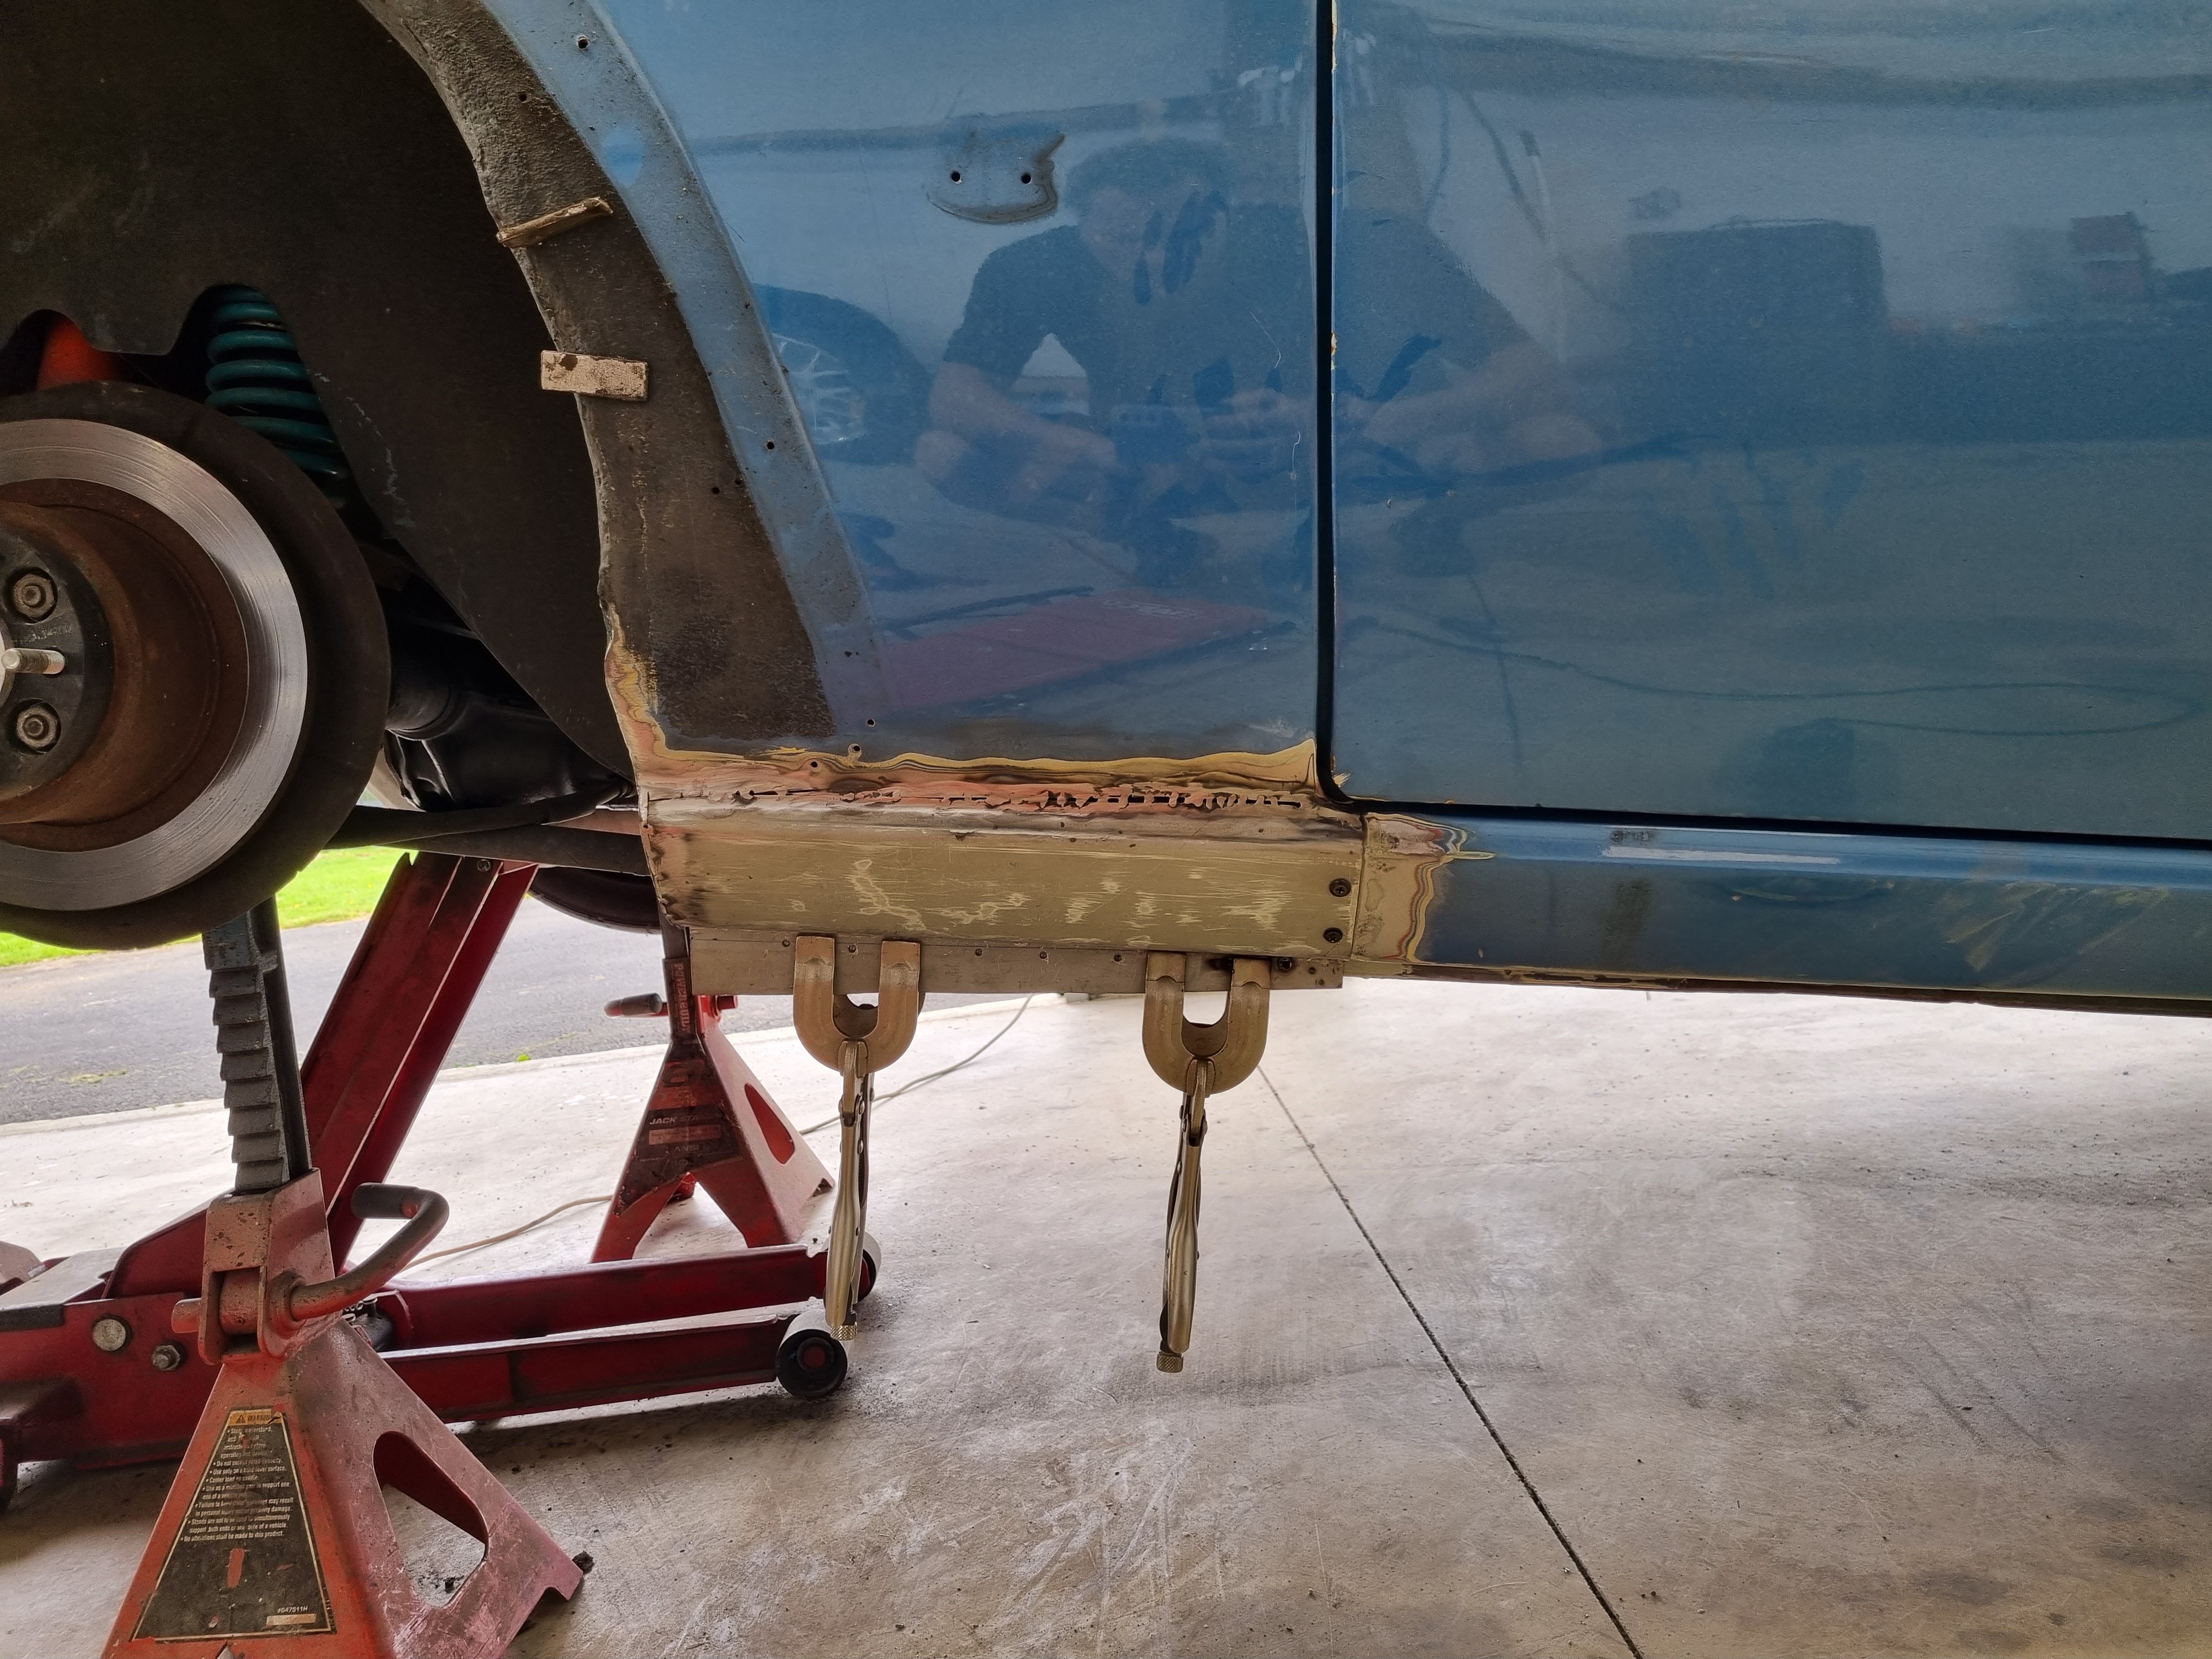
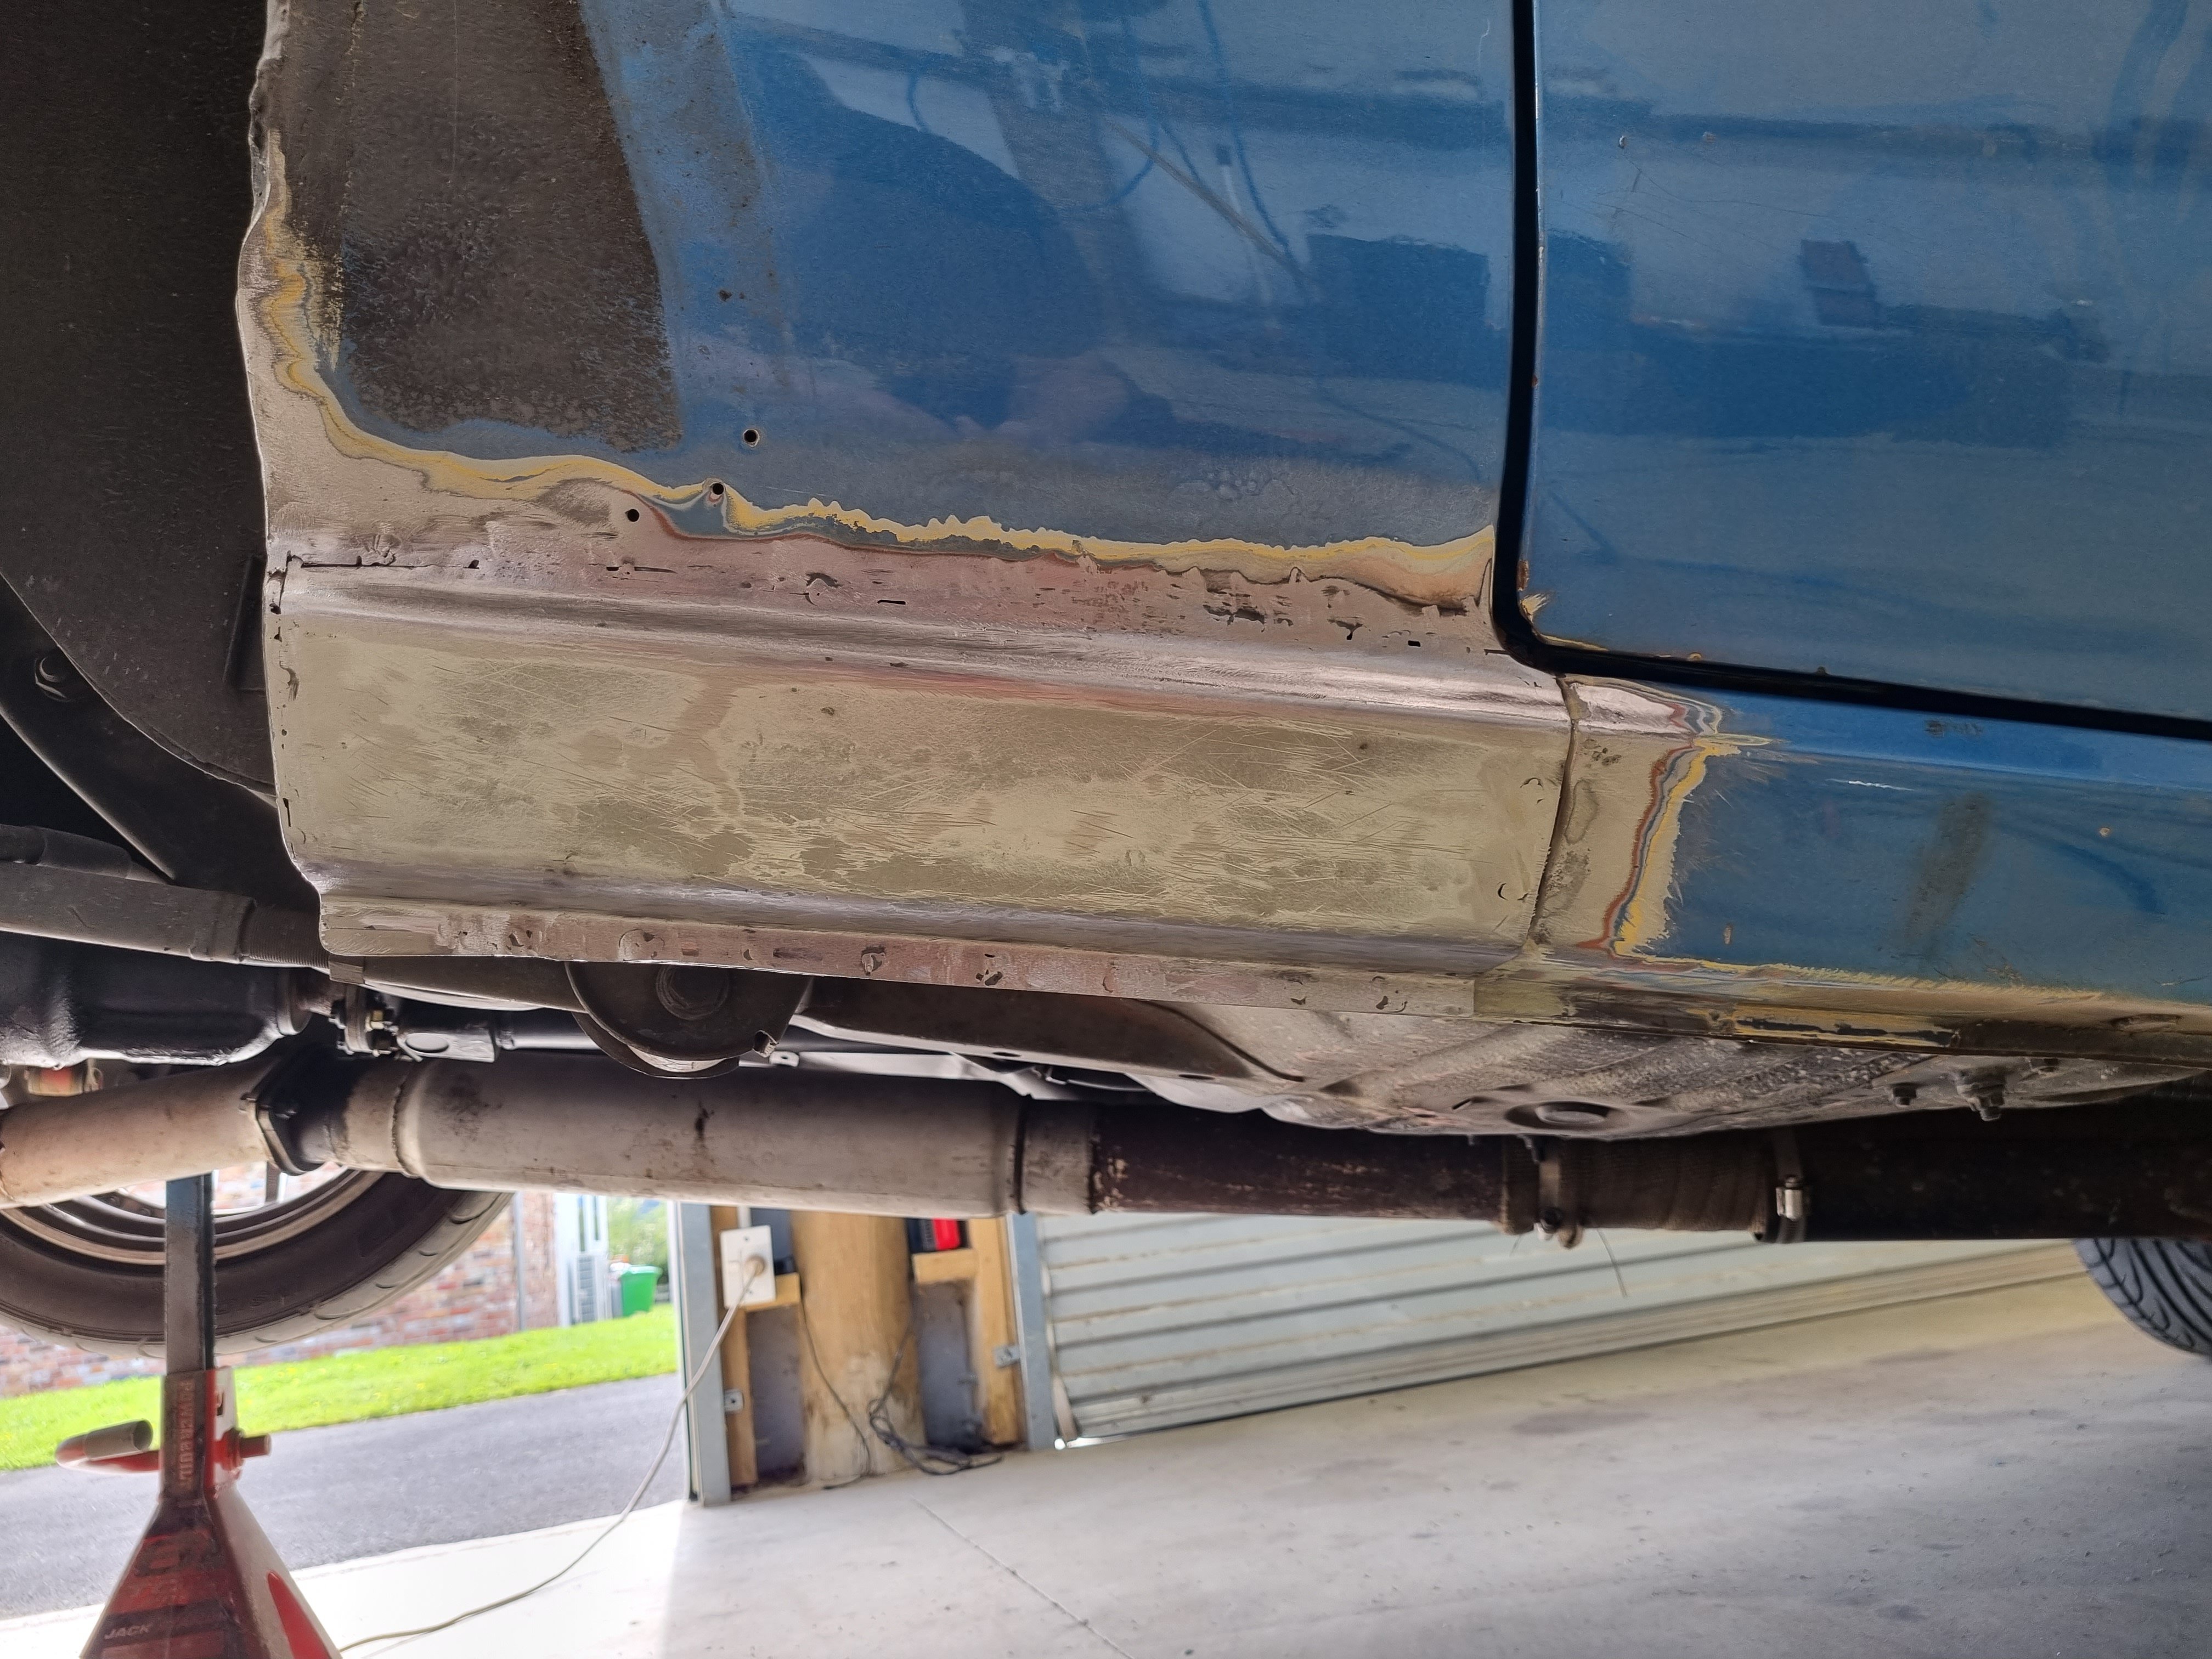
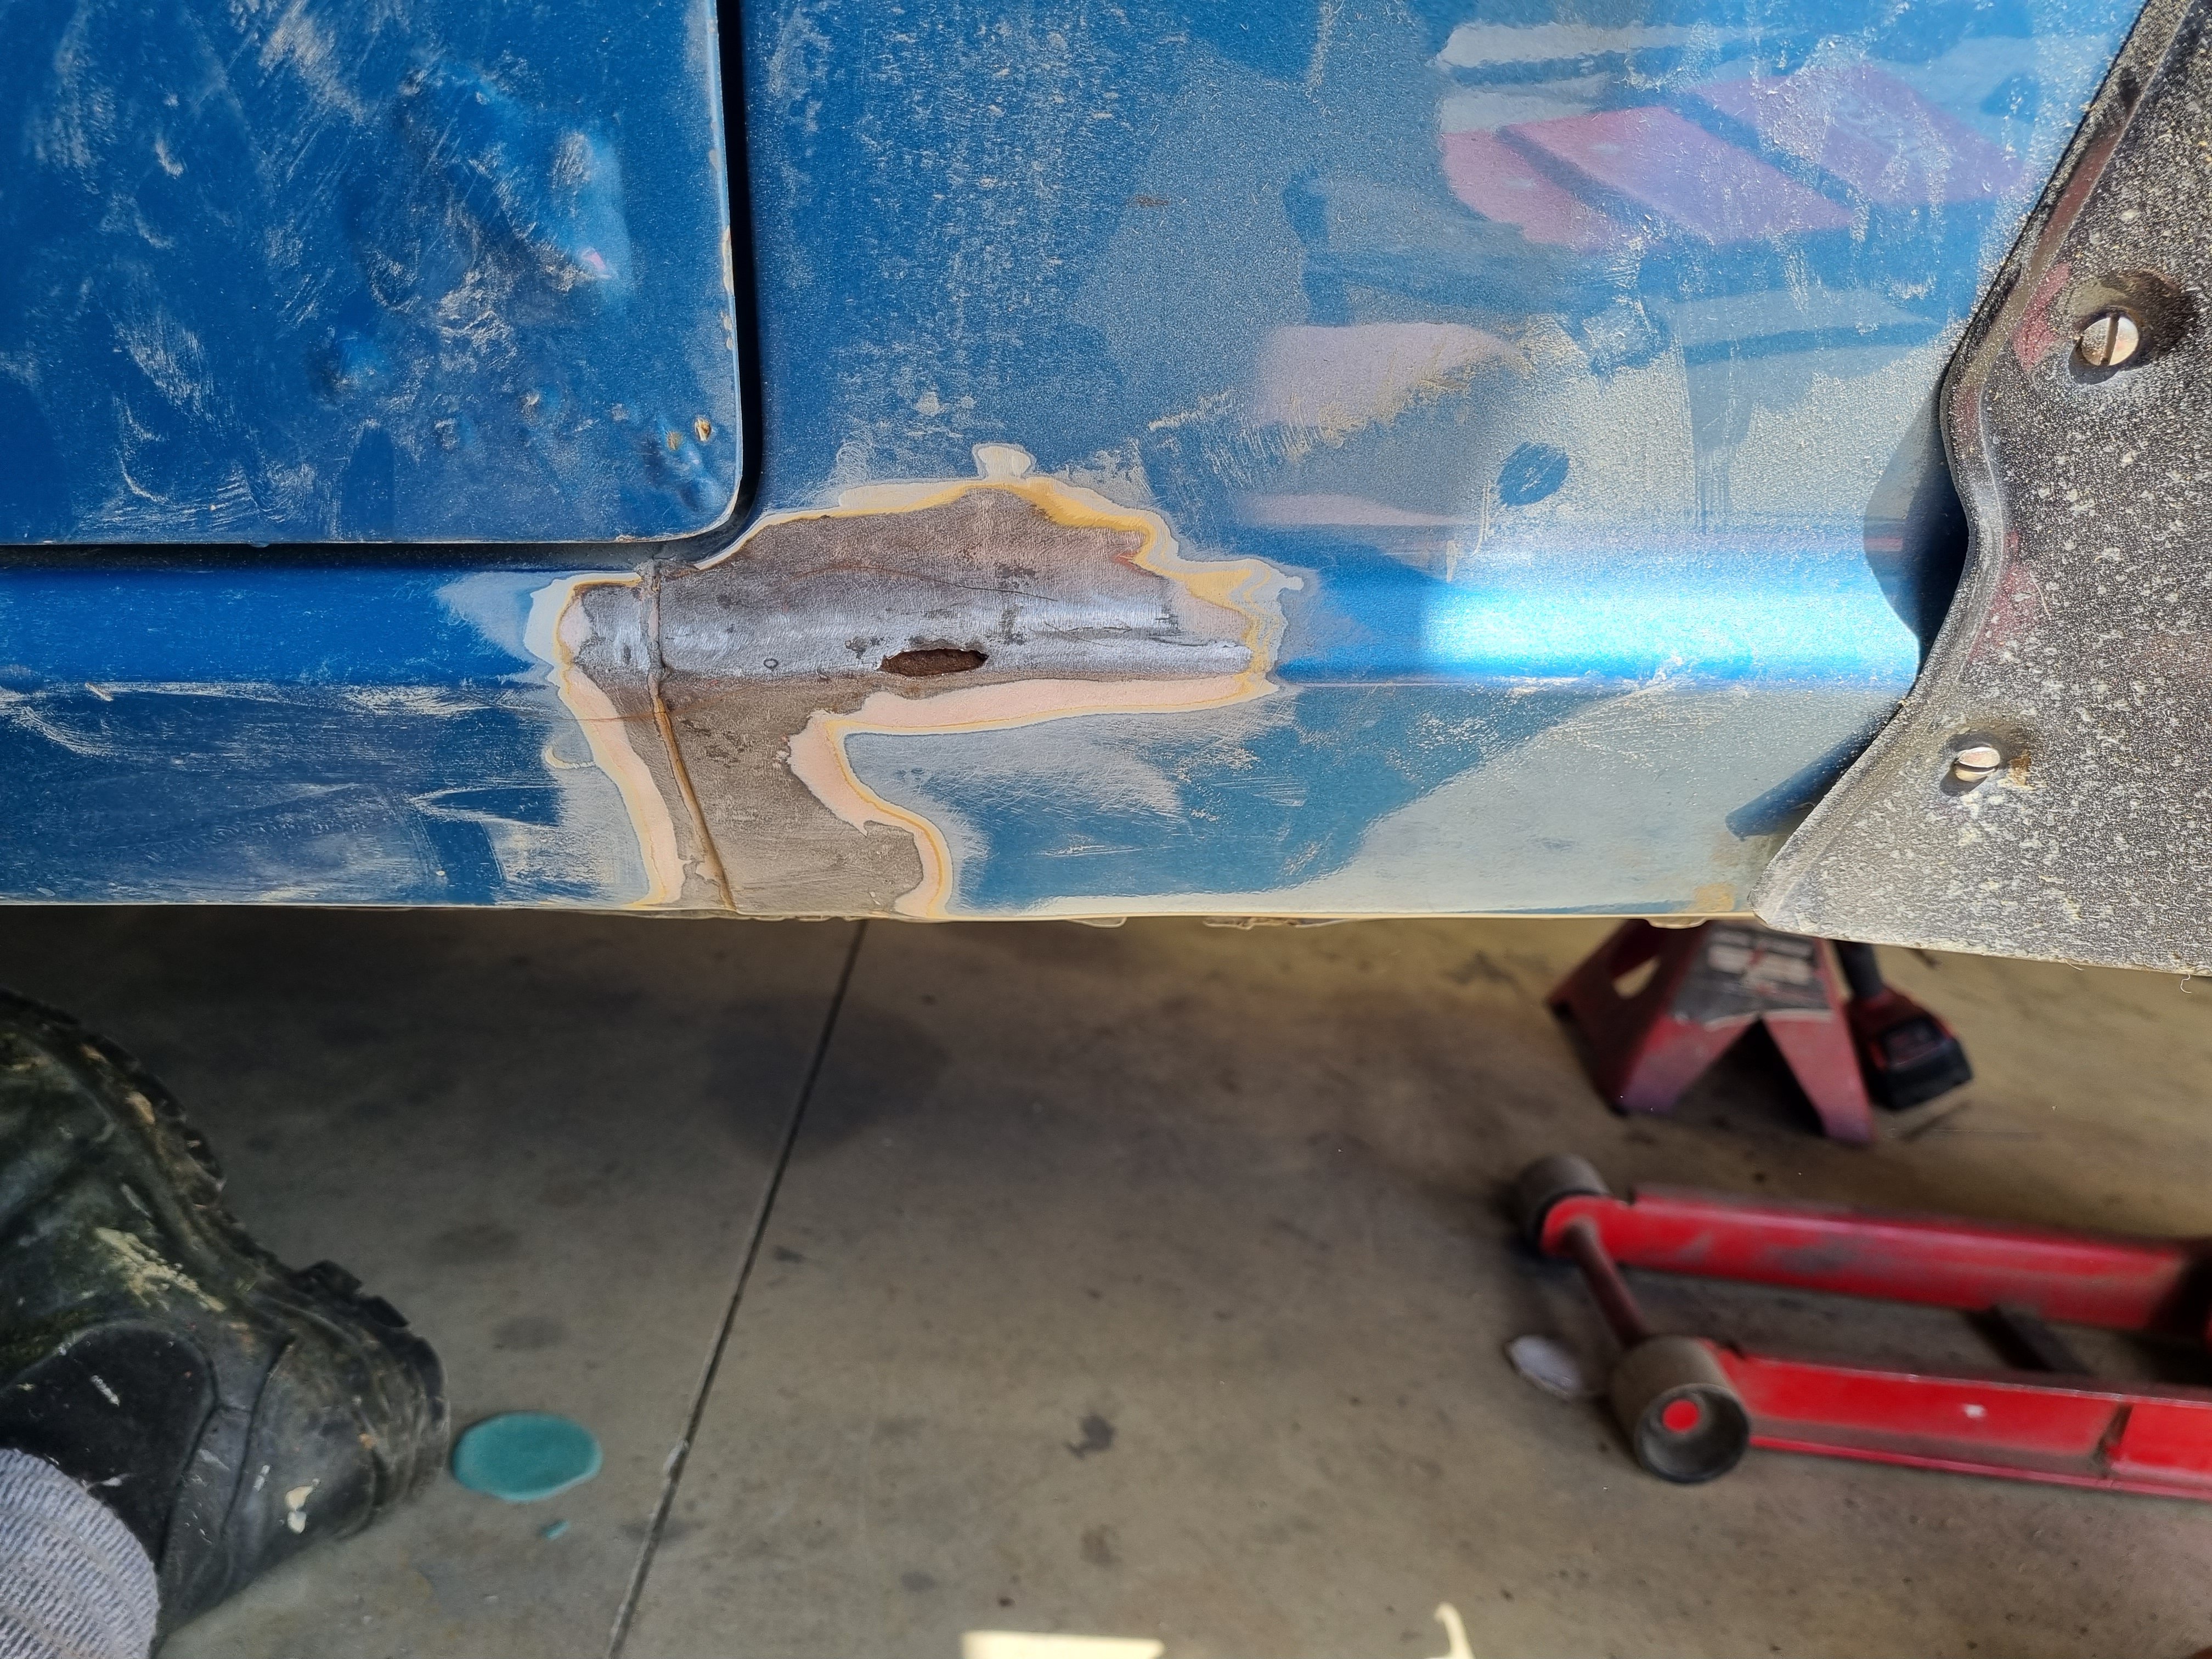
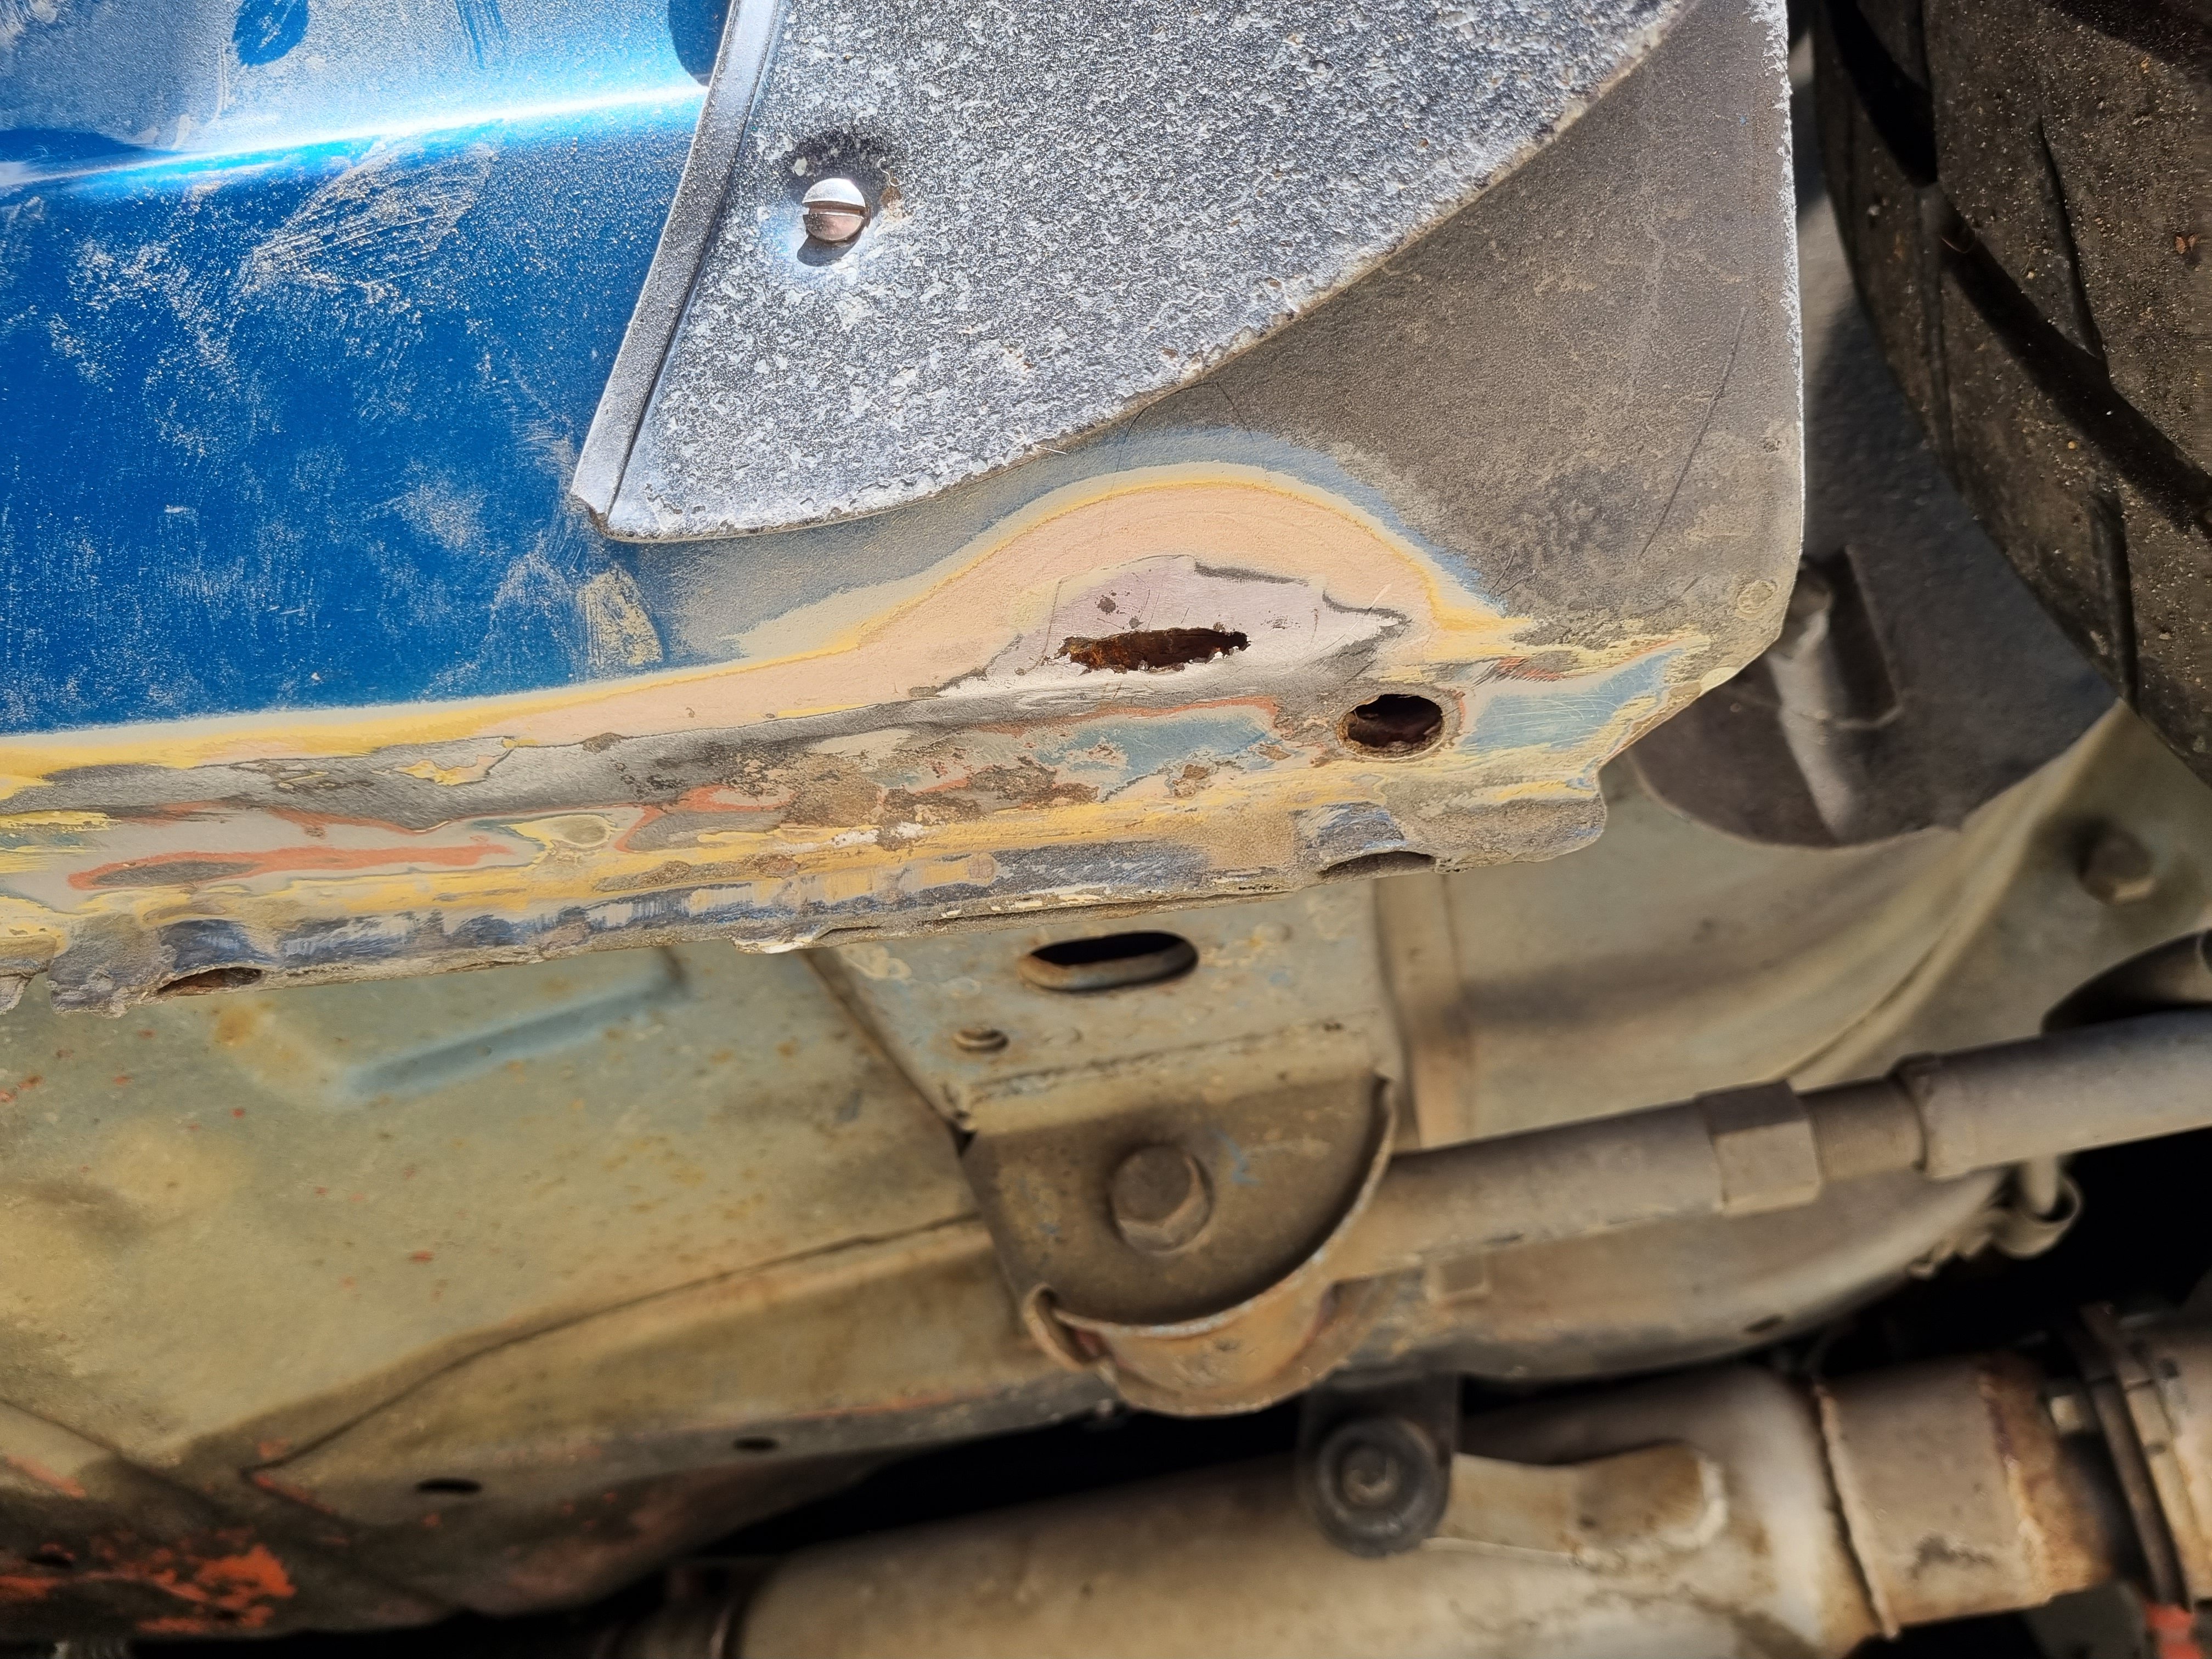
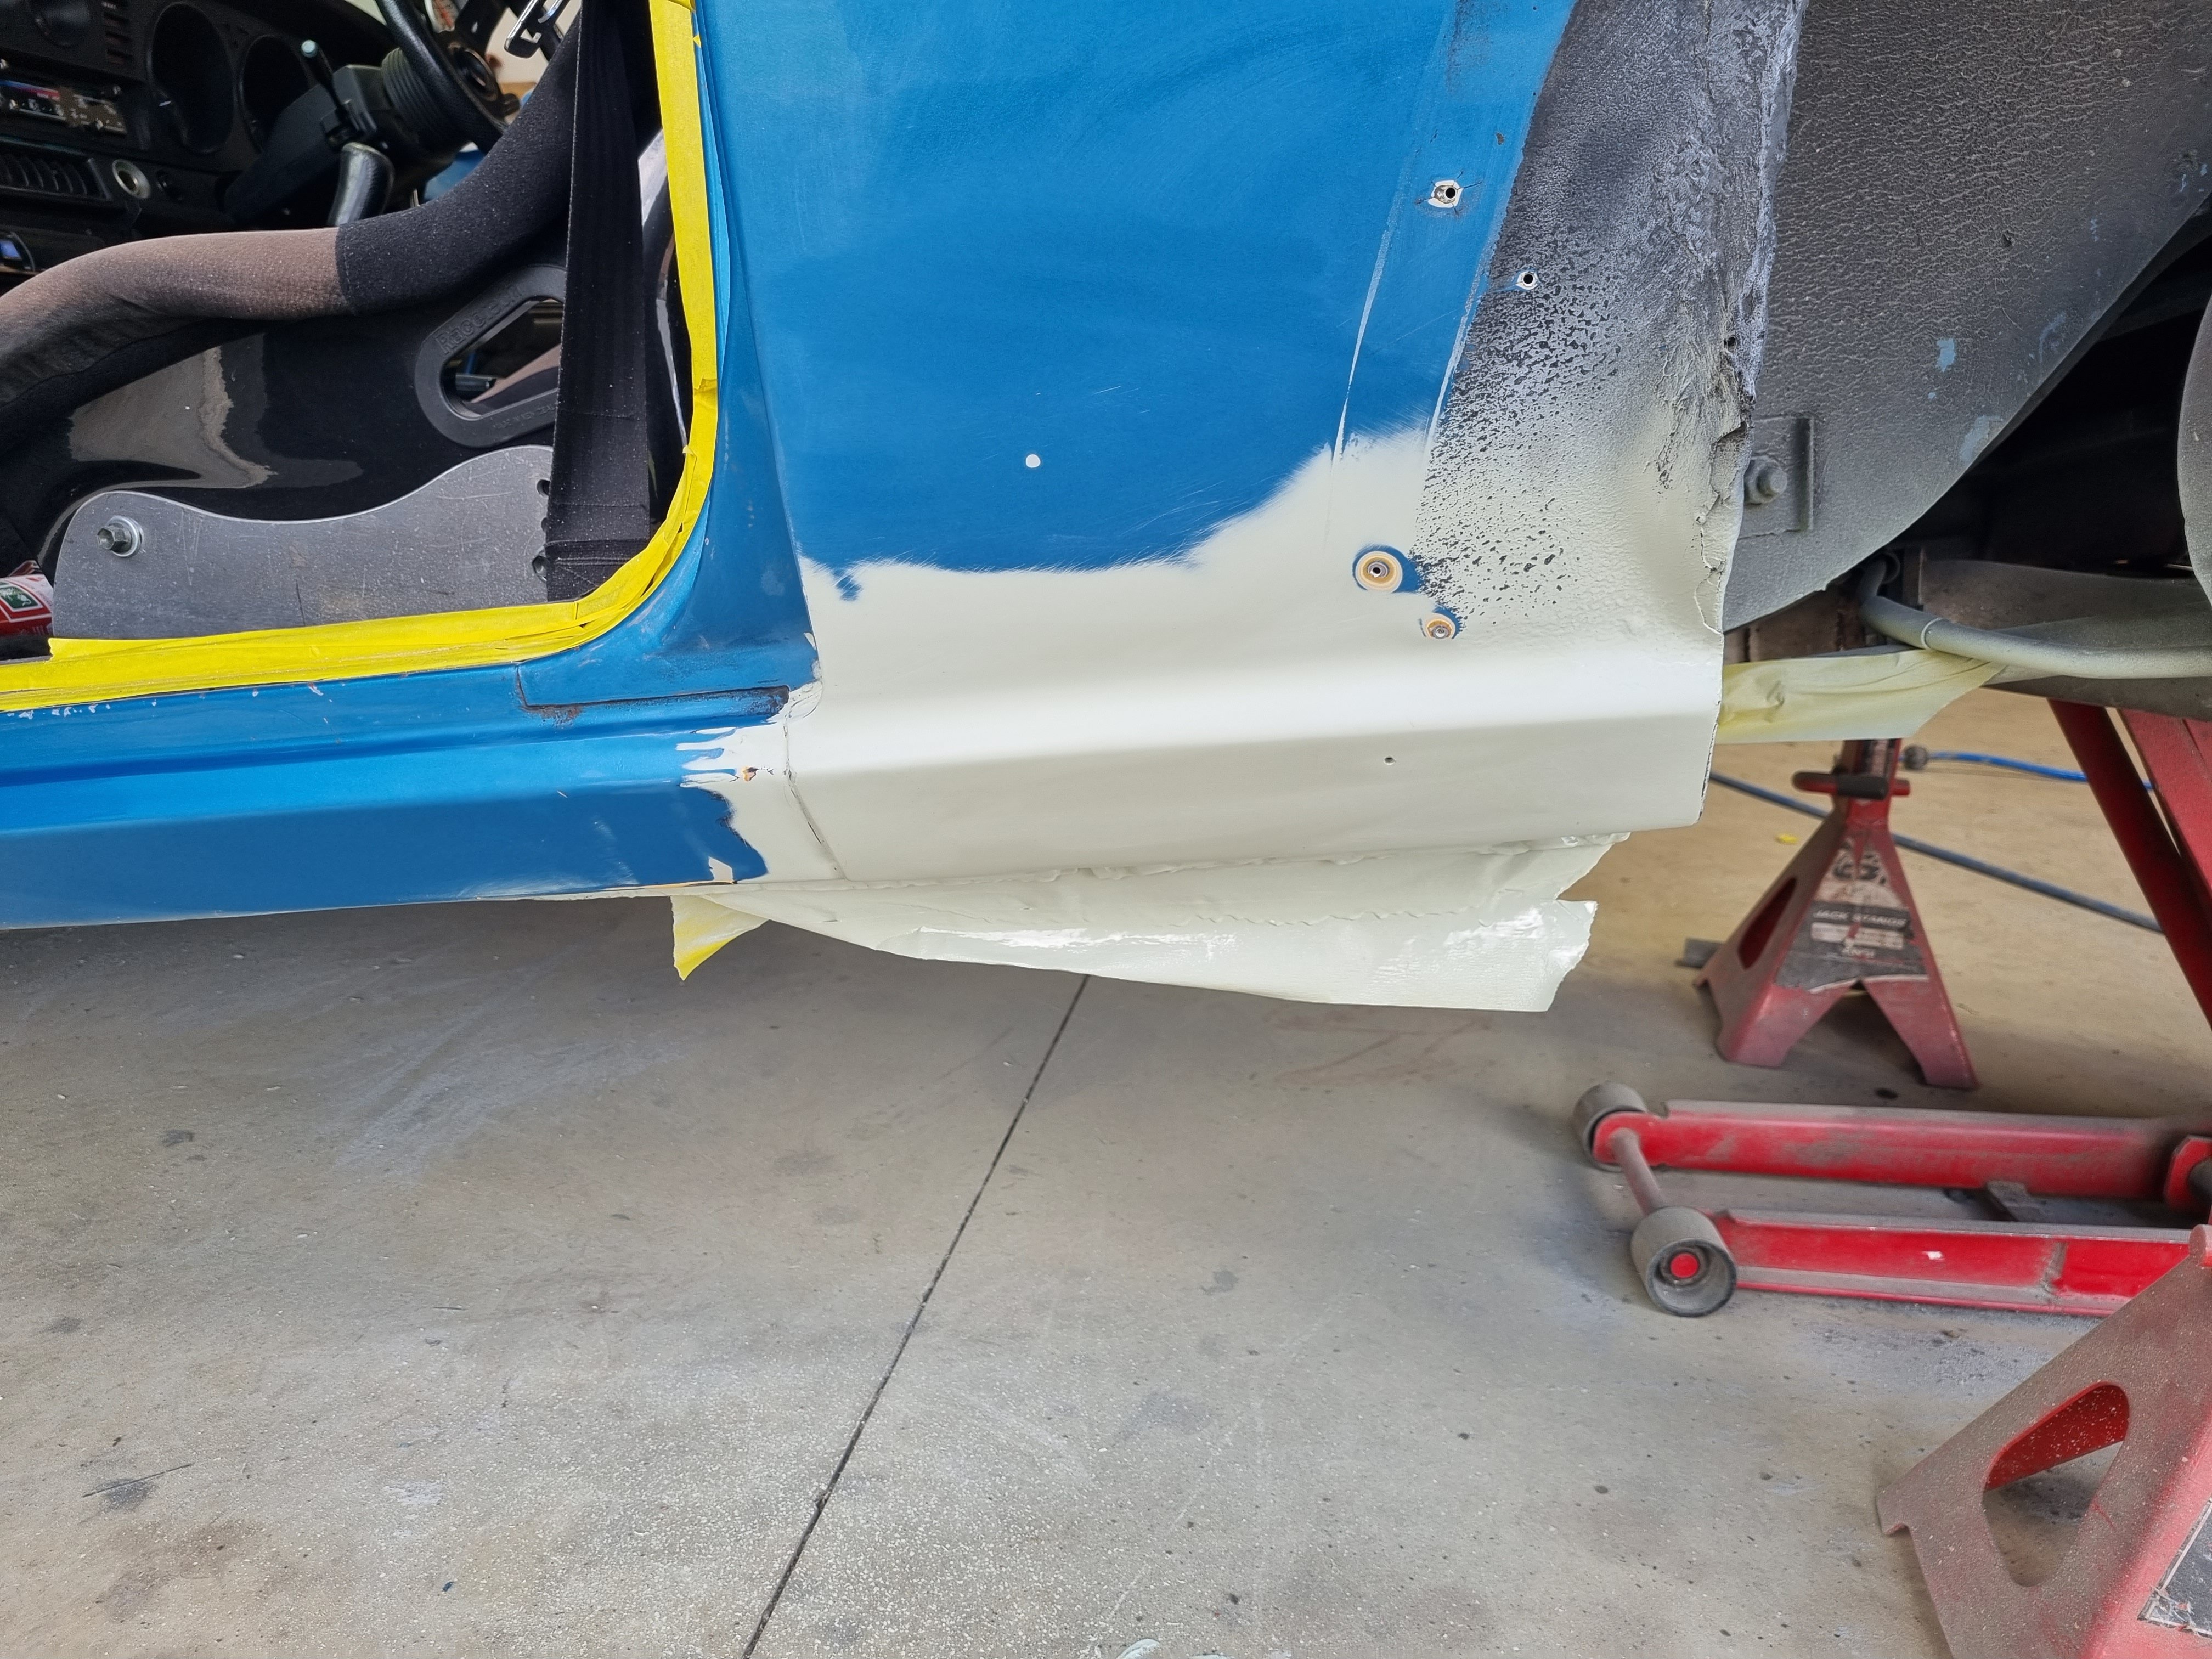
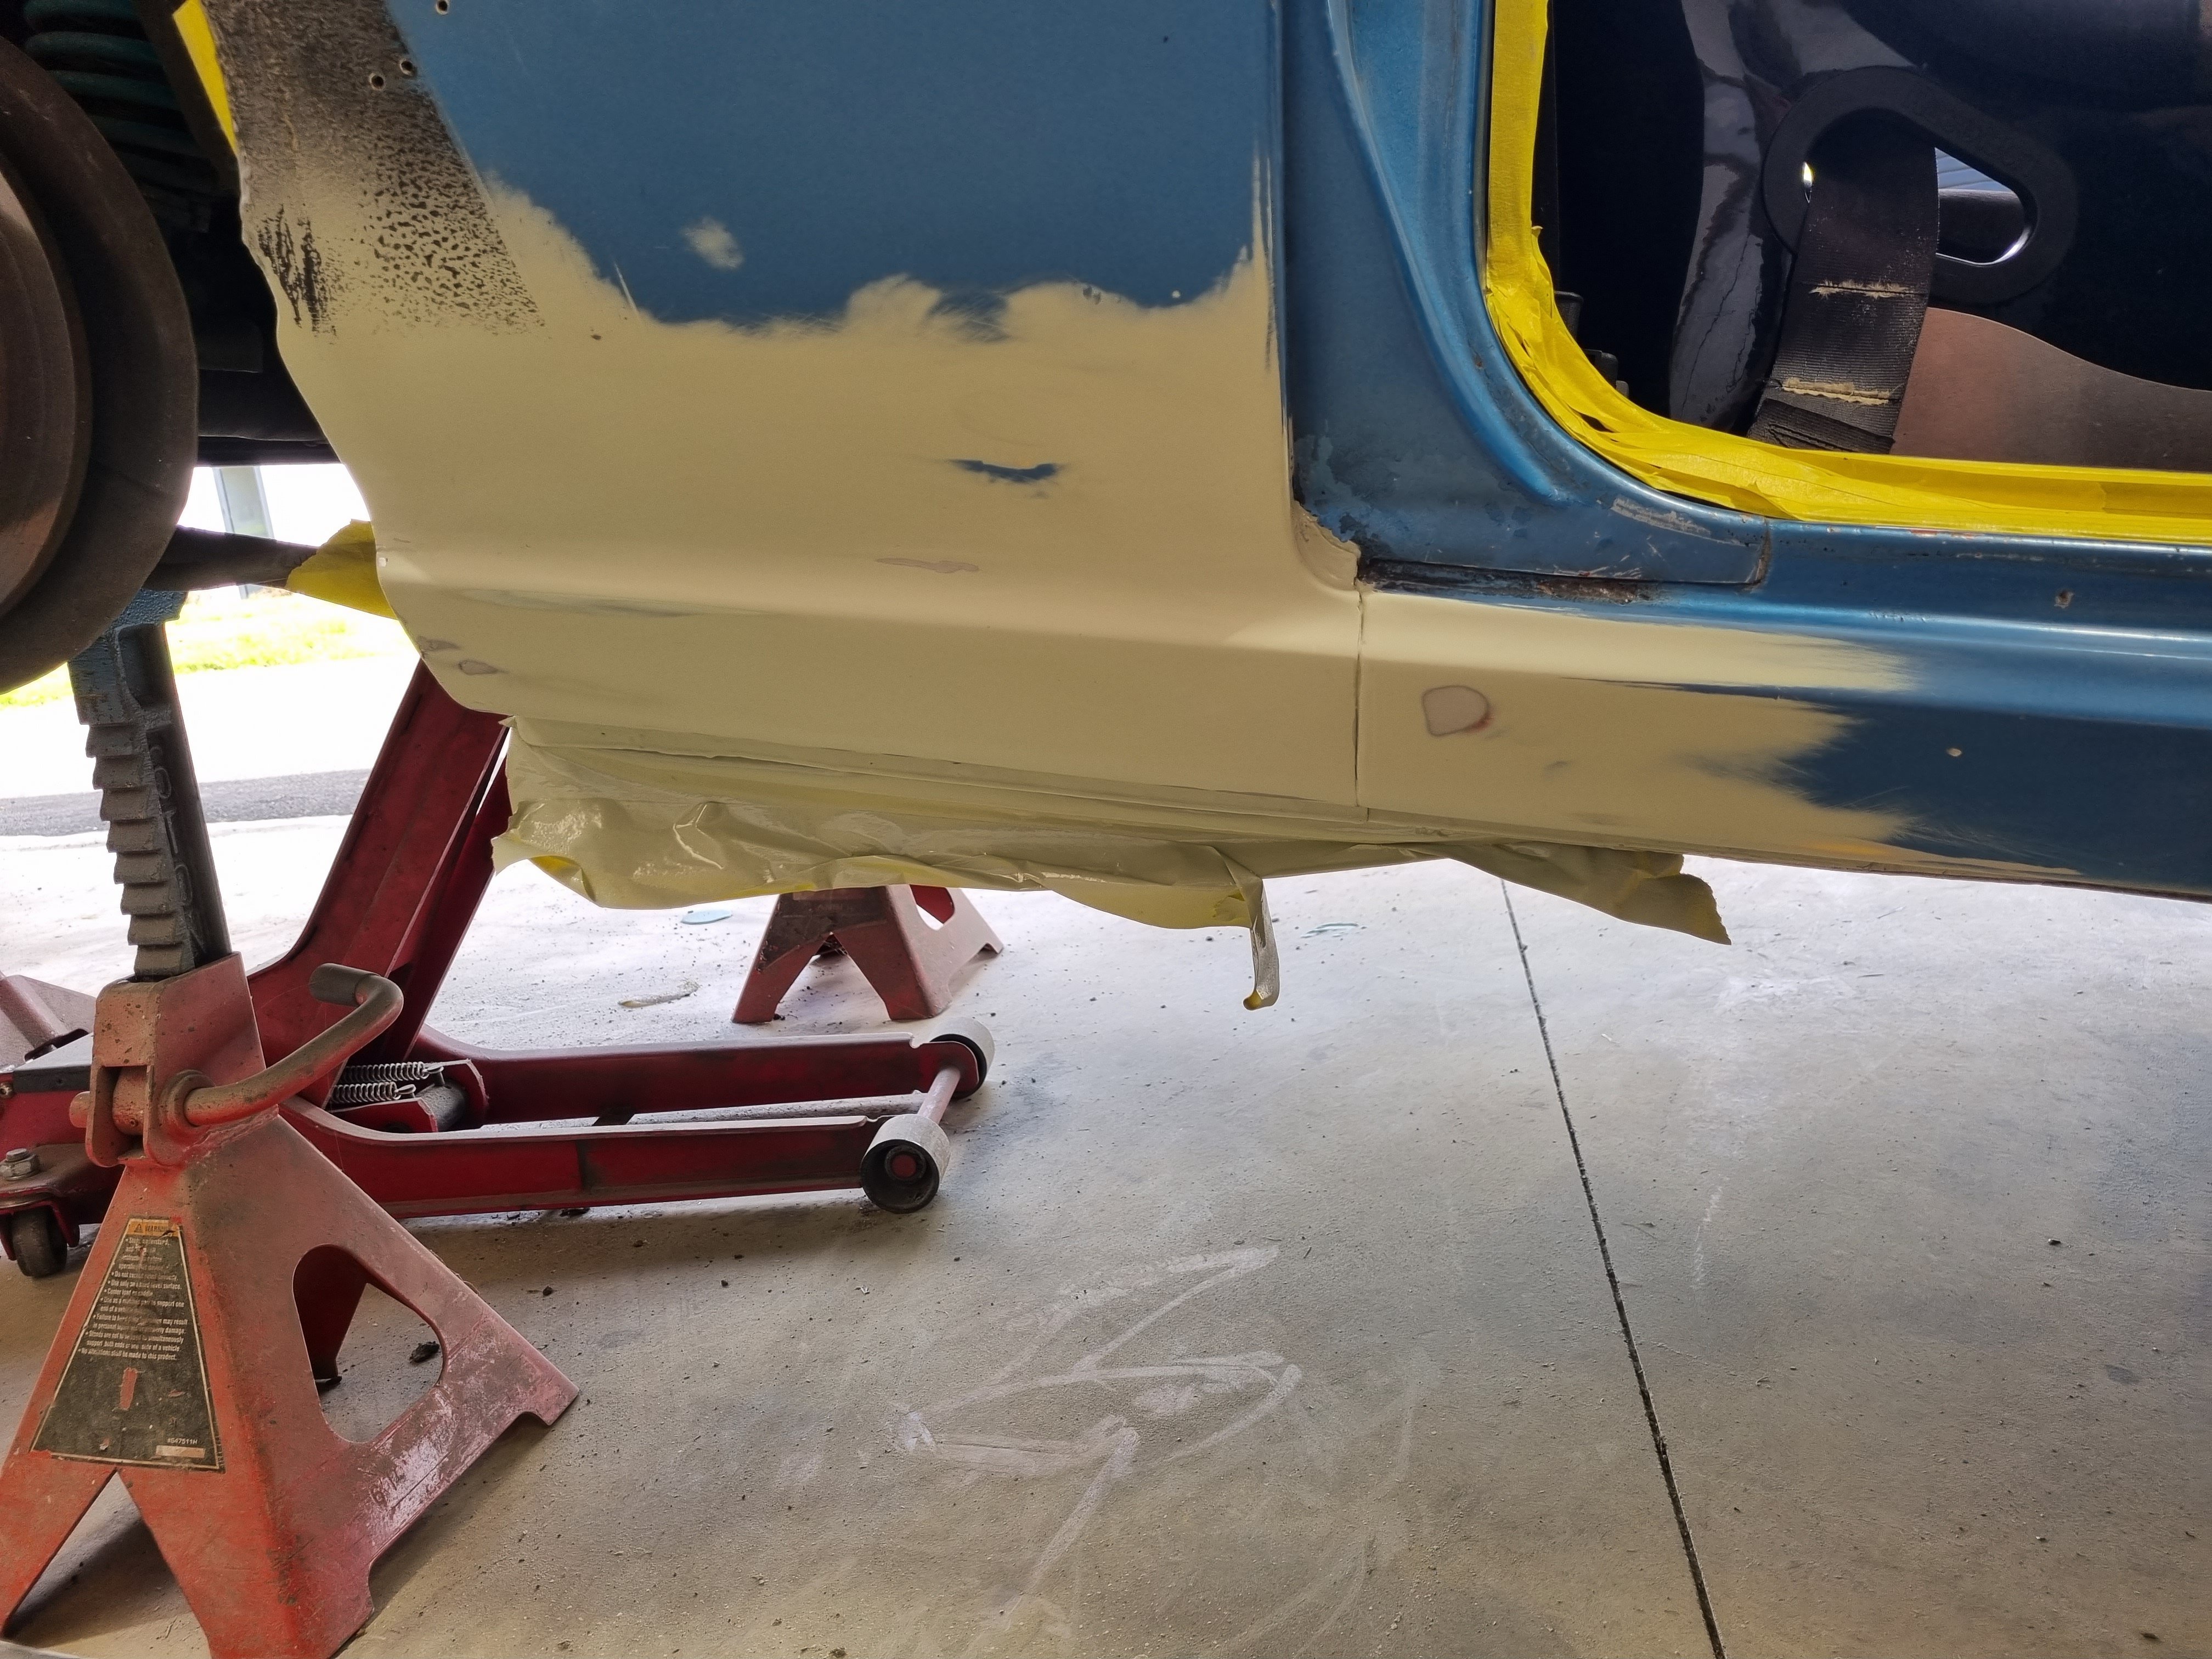
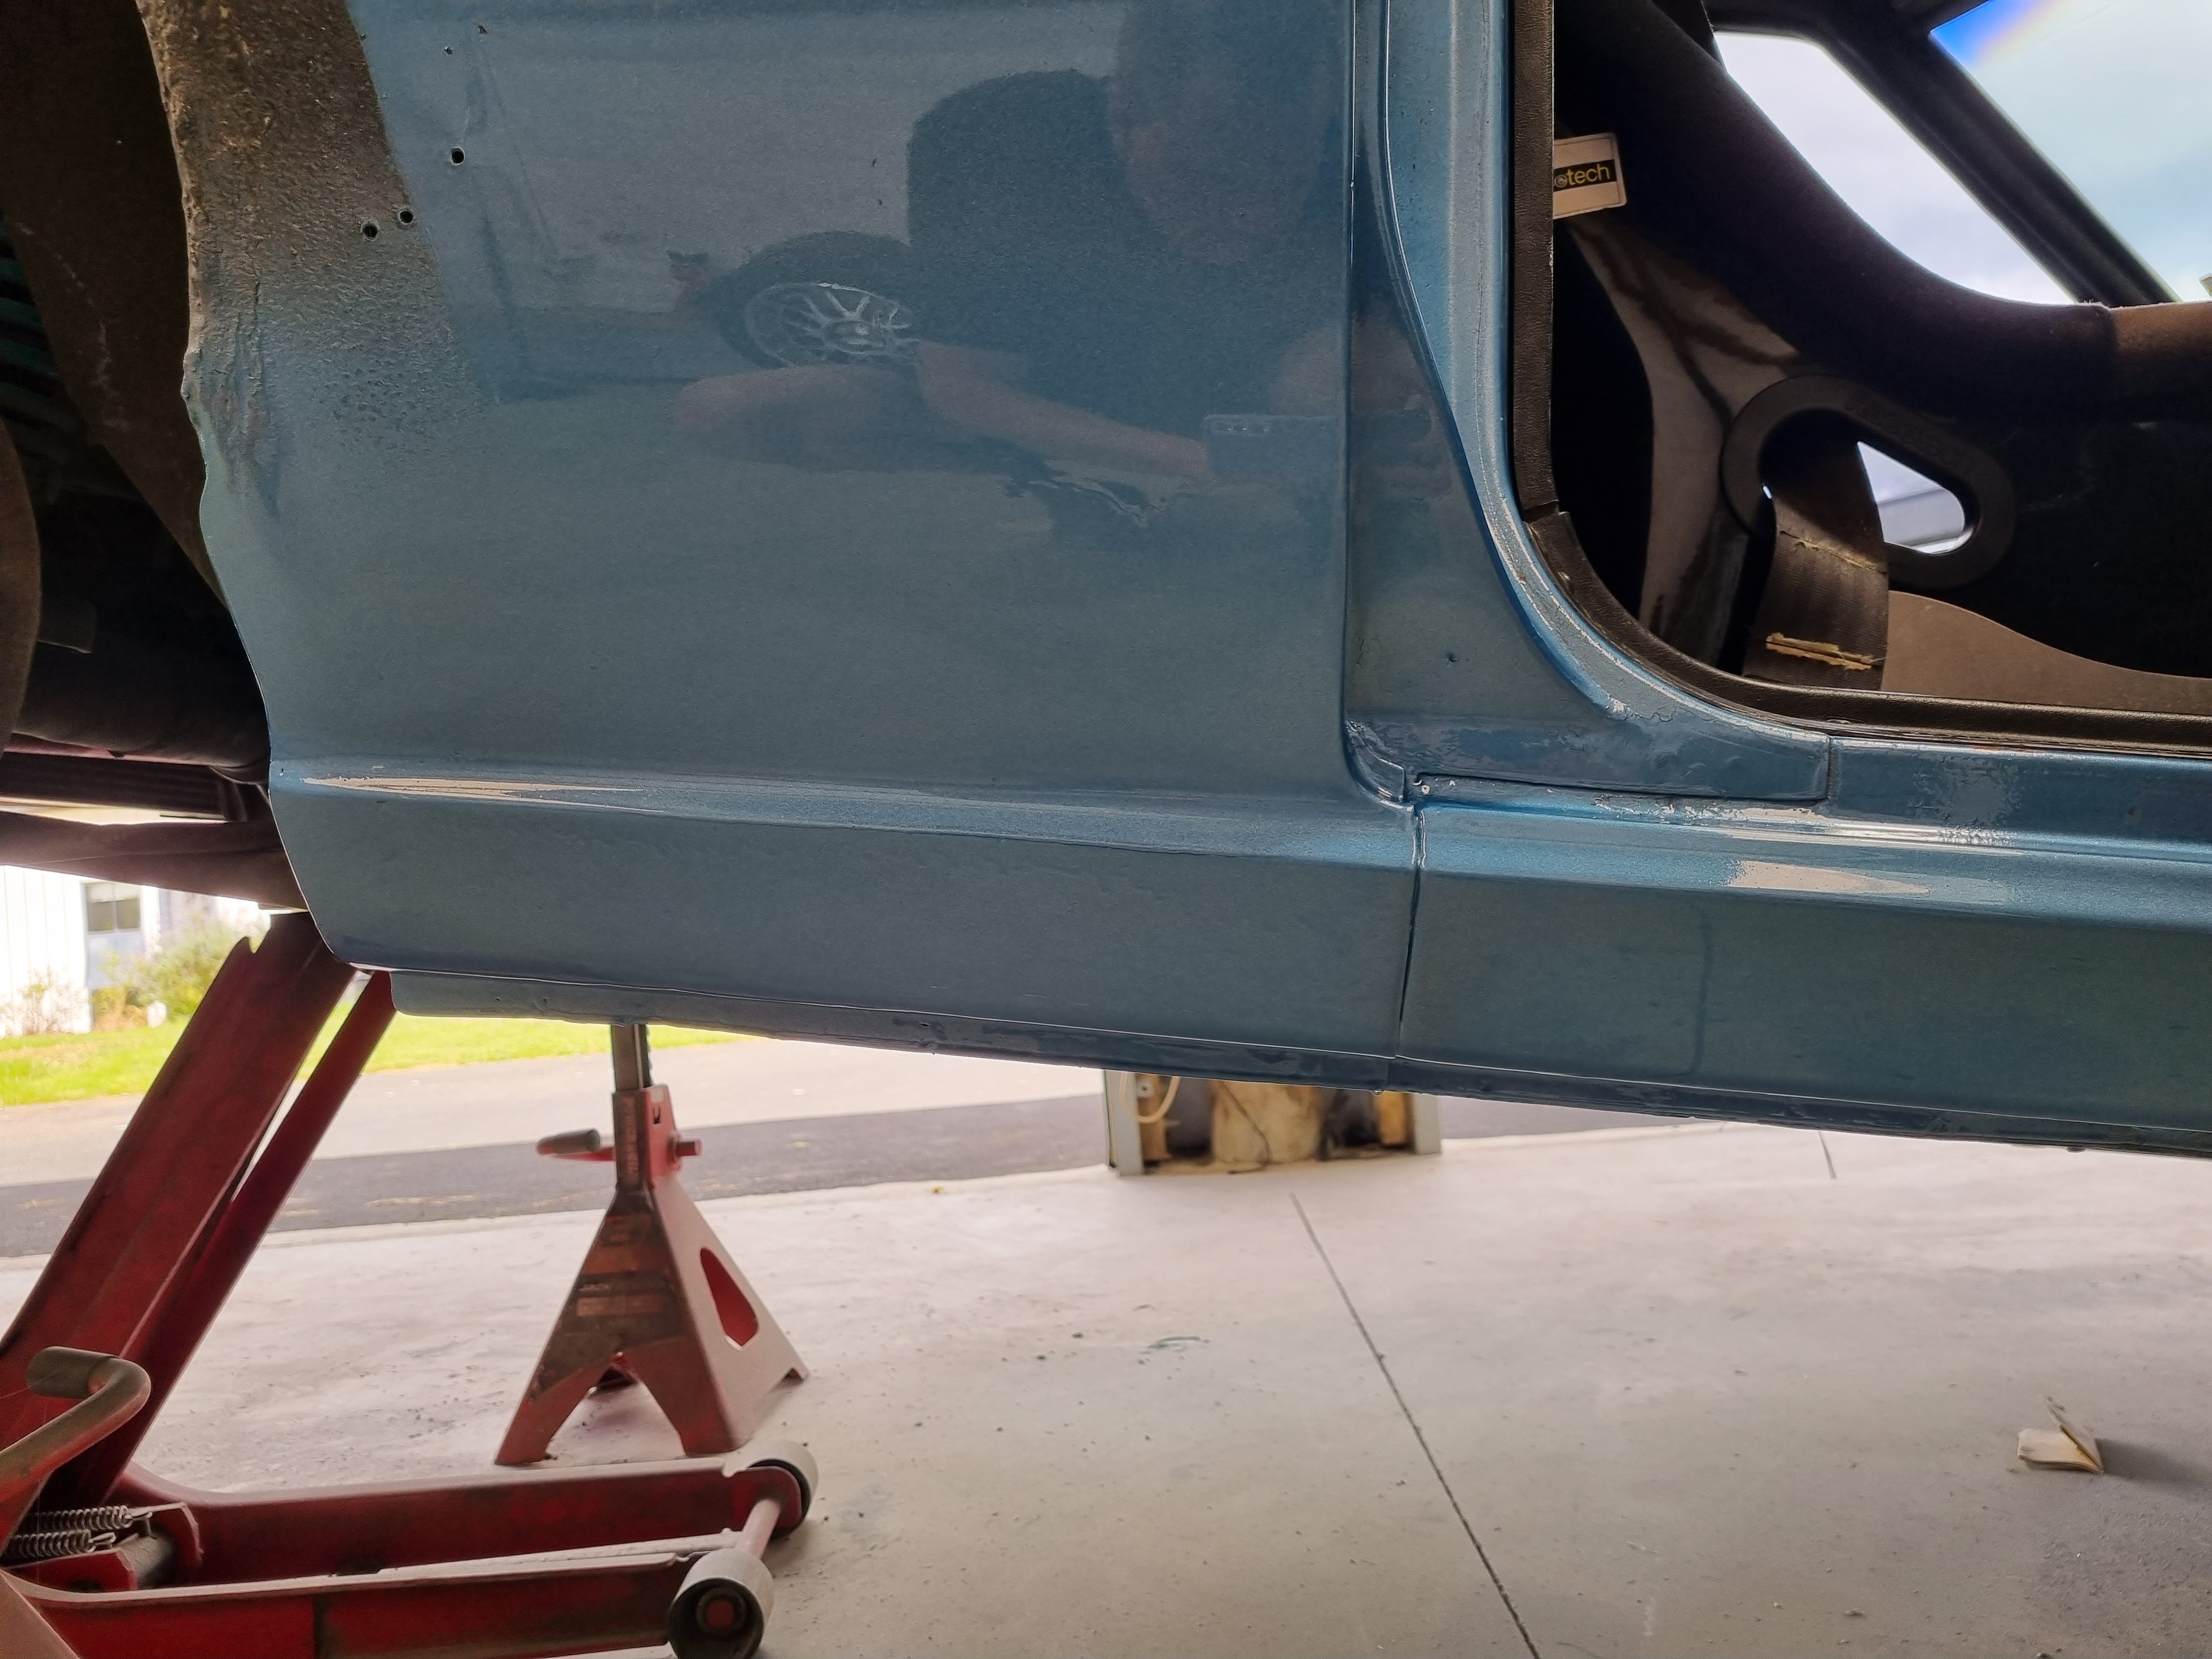
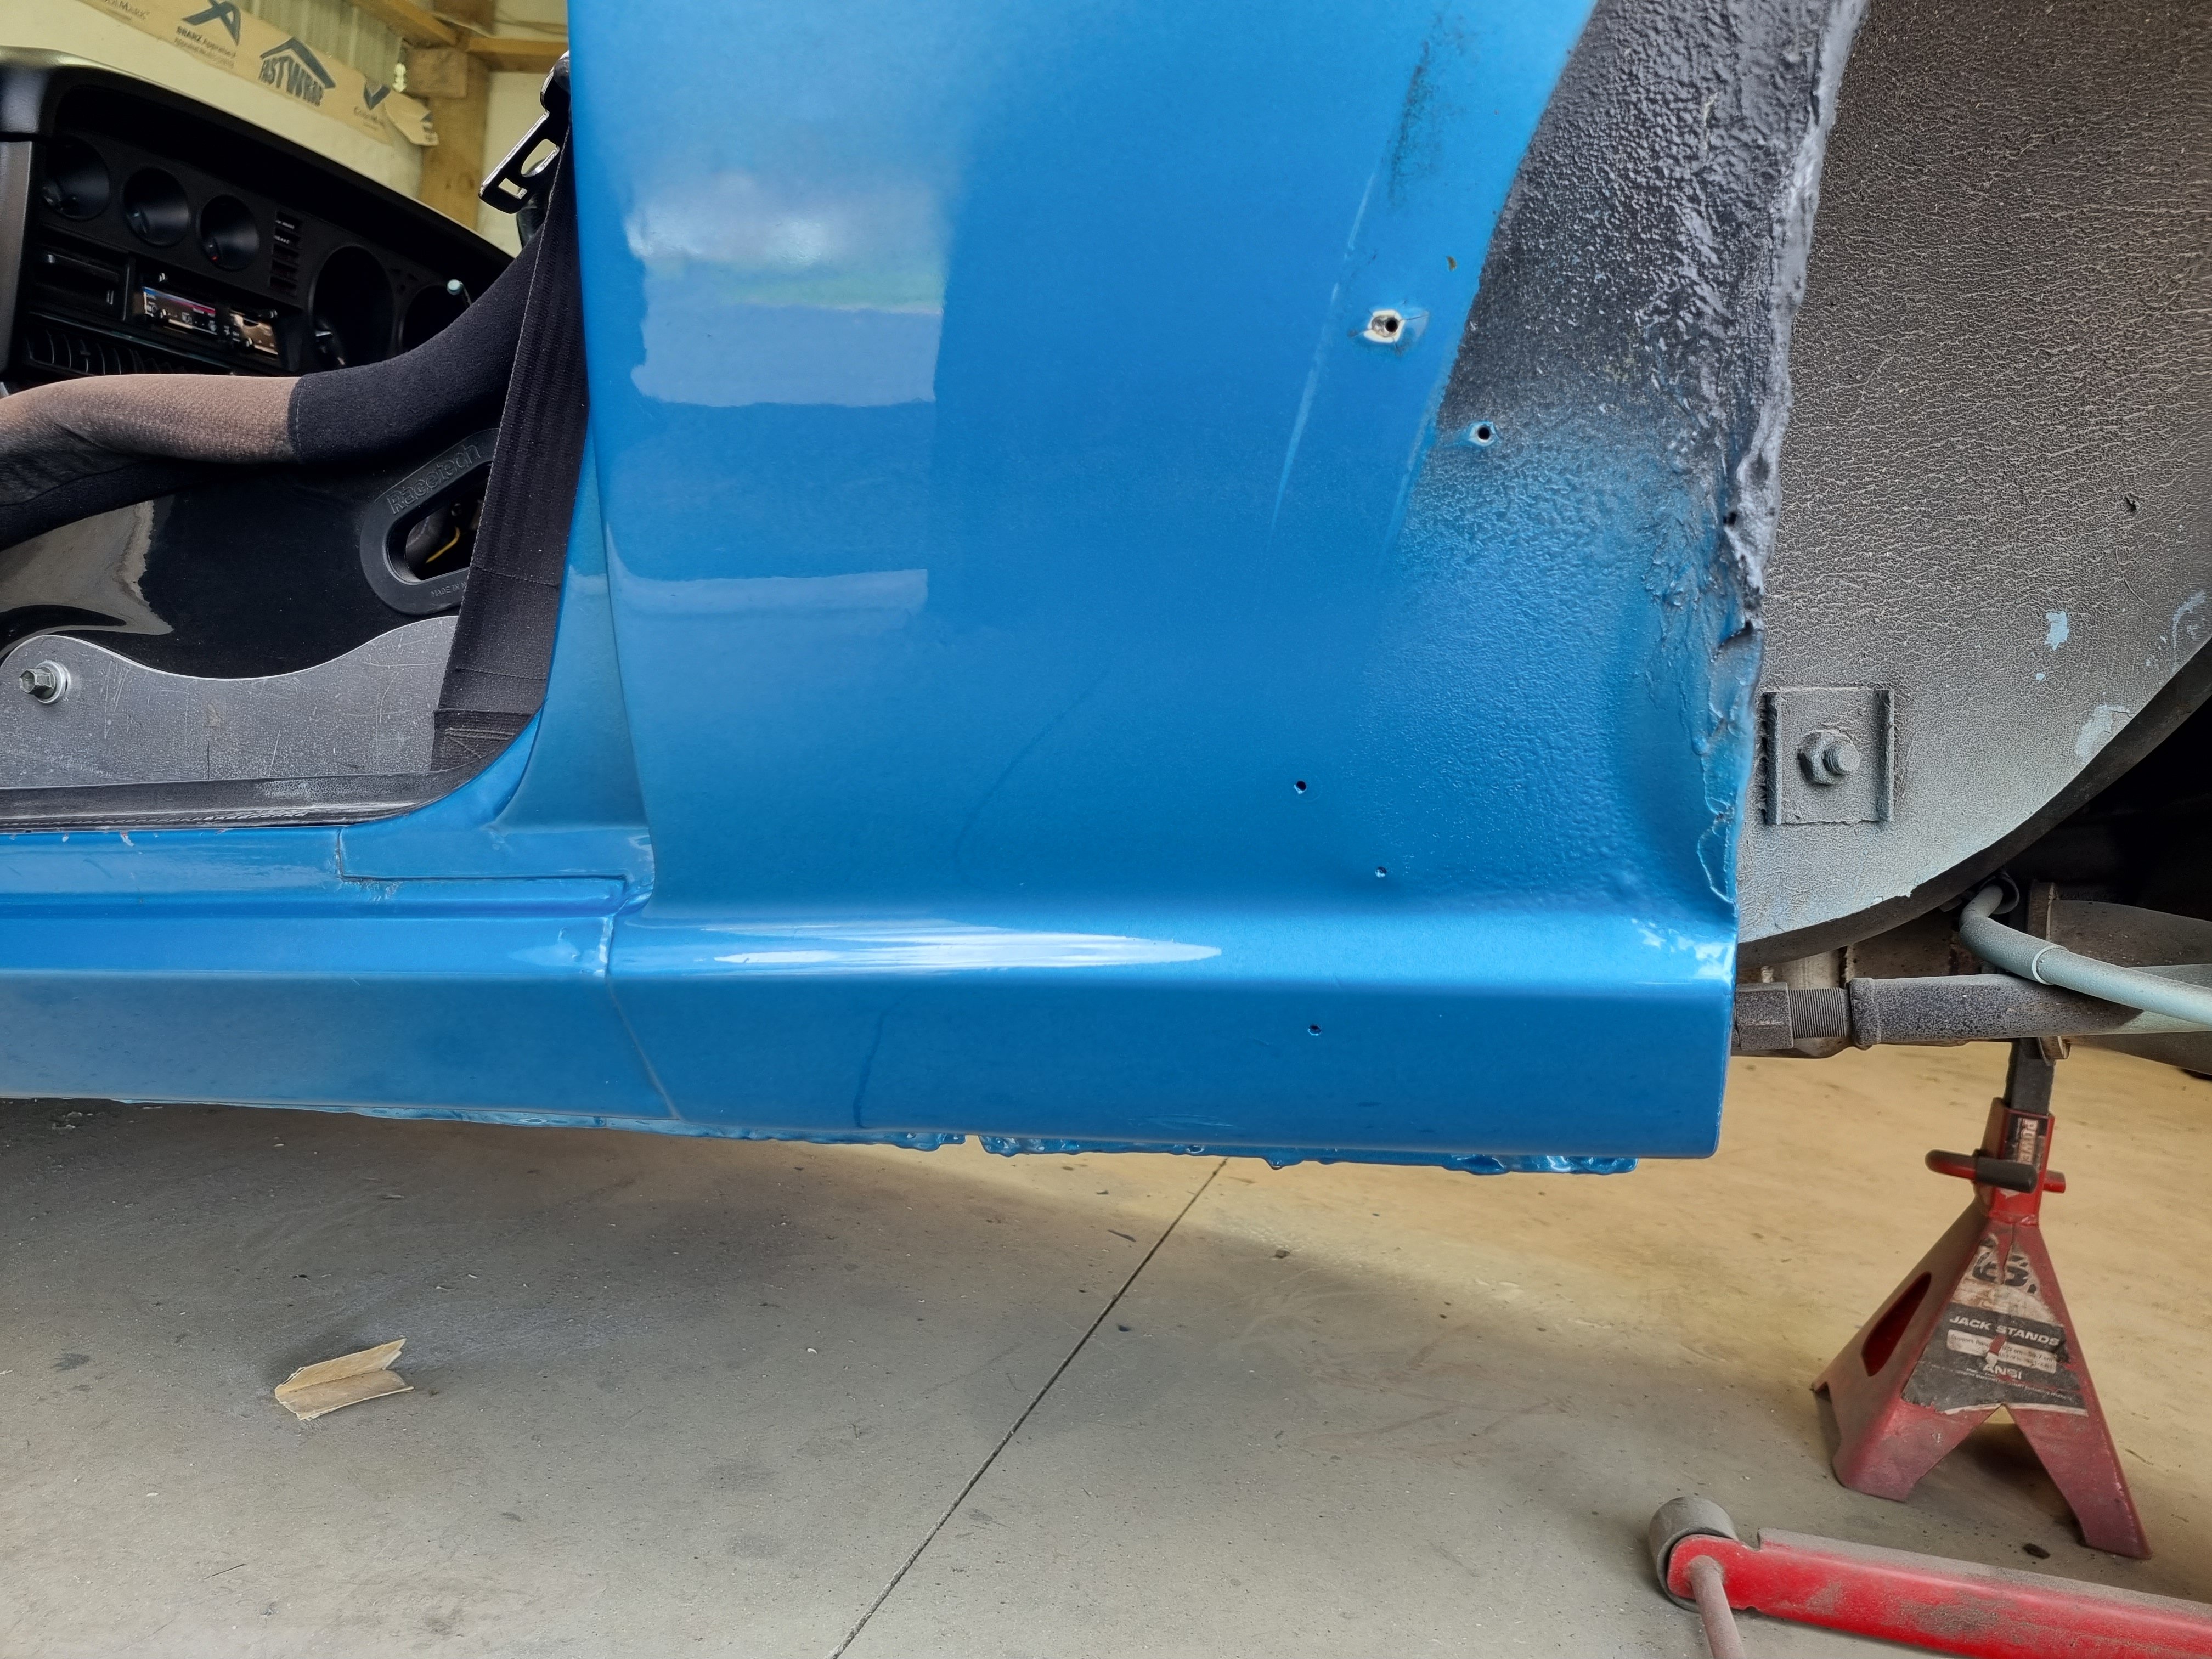
Had to do some rust repairs for wof. Didn't realise how bad it had got, both sills behind the doors needed work. Is a common rust area for celicas, side window dumps shit down the quarter and it's sort of double skinned at the bottom. Anywho, drivers side needed a whole new inner and outer sill made and passenger just had two small holes so I welded them up. Side note, I thought I had already been in to the sill in the past but it turns out it was all original. So it had lasted 47 years which isn't to bad. I fucked up the clear on the drivers side and got some runs in it but you can't really see it. Also I did a pretty good job of flicking in the new colour over the top of the old. She's pretty hard to fade metallics but this time I did alright.
1 point
-
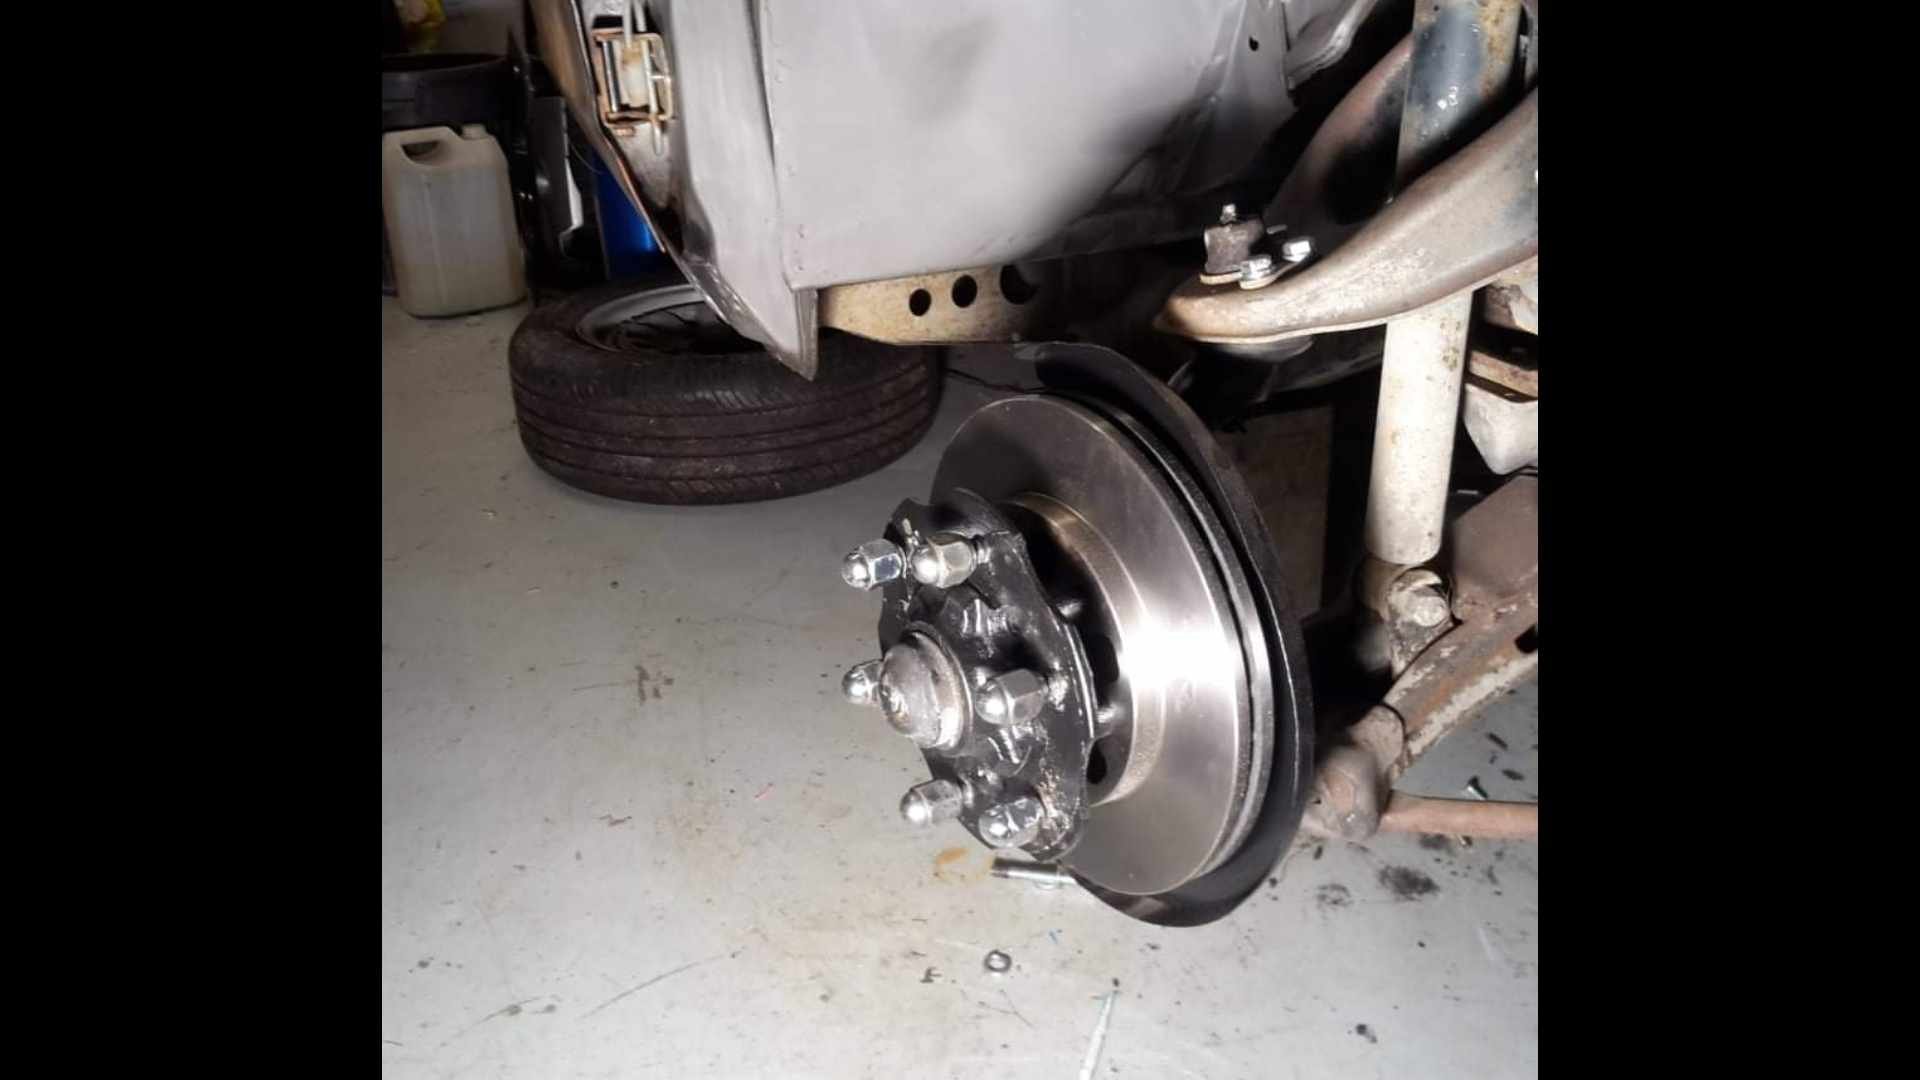
Noticed when it was back on the ground that the steering lock was almost non existent, since I installed the drop spindles about 8 years ago it has been up on axle stands or just pushed forward or backwards into the shed so never noticed it til now. Had a quick look underneath to see what was going on and the top bolt on the brake caliper was hitting the top arm preventing full lock so was slightly confused for a bit considering the spindles were supposed to be a bolt on jobbie but found the details of the shop I purchased them from and flicked off a message asking what was up. Turns out you need to fit 90s hilux brake calipers as they dont have the long ugly bolt bit that fouls the top arm. Ripoff wreckers on trademe wanted $450 for a pair of calipers! but luckily theres a crashed lux at PaP at the moment so went and grabbed those ones for $80 with brand new pads in them. Factory calipers with fouling lump as modeled by another 80s hilux at Pap 90s Sr5 calipers with less fouly design1 point
-
Bit ambitious but got down the motorway at 80ph to VTNZ for a wof on both. Also GV weight what>?? Ive given up on the Arduino idea, tried a few things but its either beyond me or not feasible. I did have a high temp programable switch with a EGT sensor pre turbo, with the relay triggering a normal boost solenoid y on the line to the pump, at 630deg it will turn on the solenoid, and bleed off boost, therefore reducing fuel delivery and lowering egt, but its a bit aggressive and also the triggering temp is a bit random. Im surprised no one makes a EGT gauge with this function built in, preferably with a way to say start at 10% duty at 550 deg, and 100% at 630deg or so (Programmable). Maybe there is a way to do with arduino.
1 point
-
Spent a few days up in Auckland getting this thing sorted for a WoF. Cut out and replaced a bit of the boot seal lip on the body as it had developed some rust holes. Ended up being a bit of a hassle as VTNZ brake rollers were not happy with rear imbalance. After loads of fiddling and adjustments the car stops dead straight now. Took it to Murray Kemp in the end, they checked twice as much stuff as VTNZ and gave it a clean sheet.
1 point
-
And 7 months later.... needs wiring, plumbing and skills but getting closer.
1 point
-
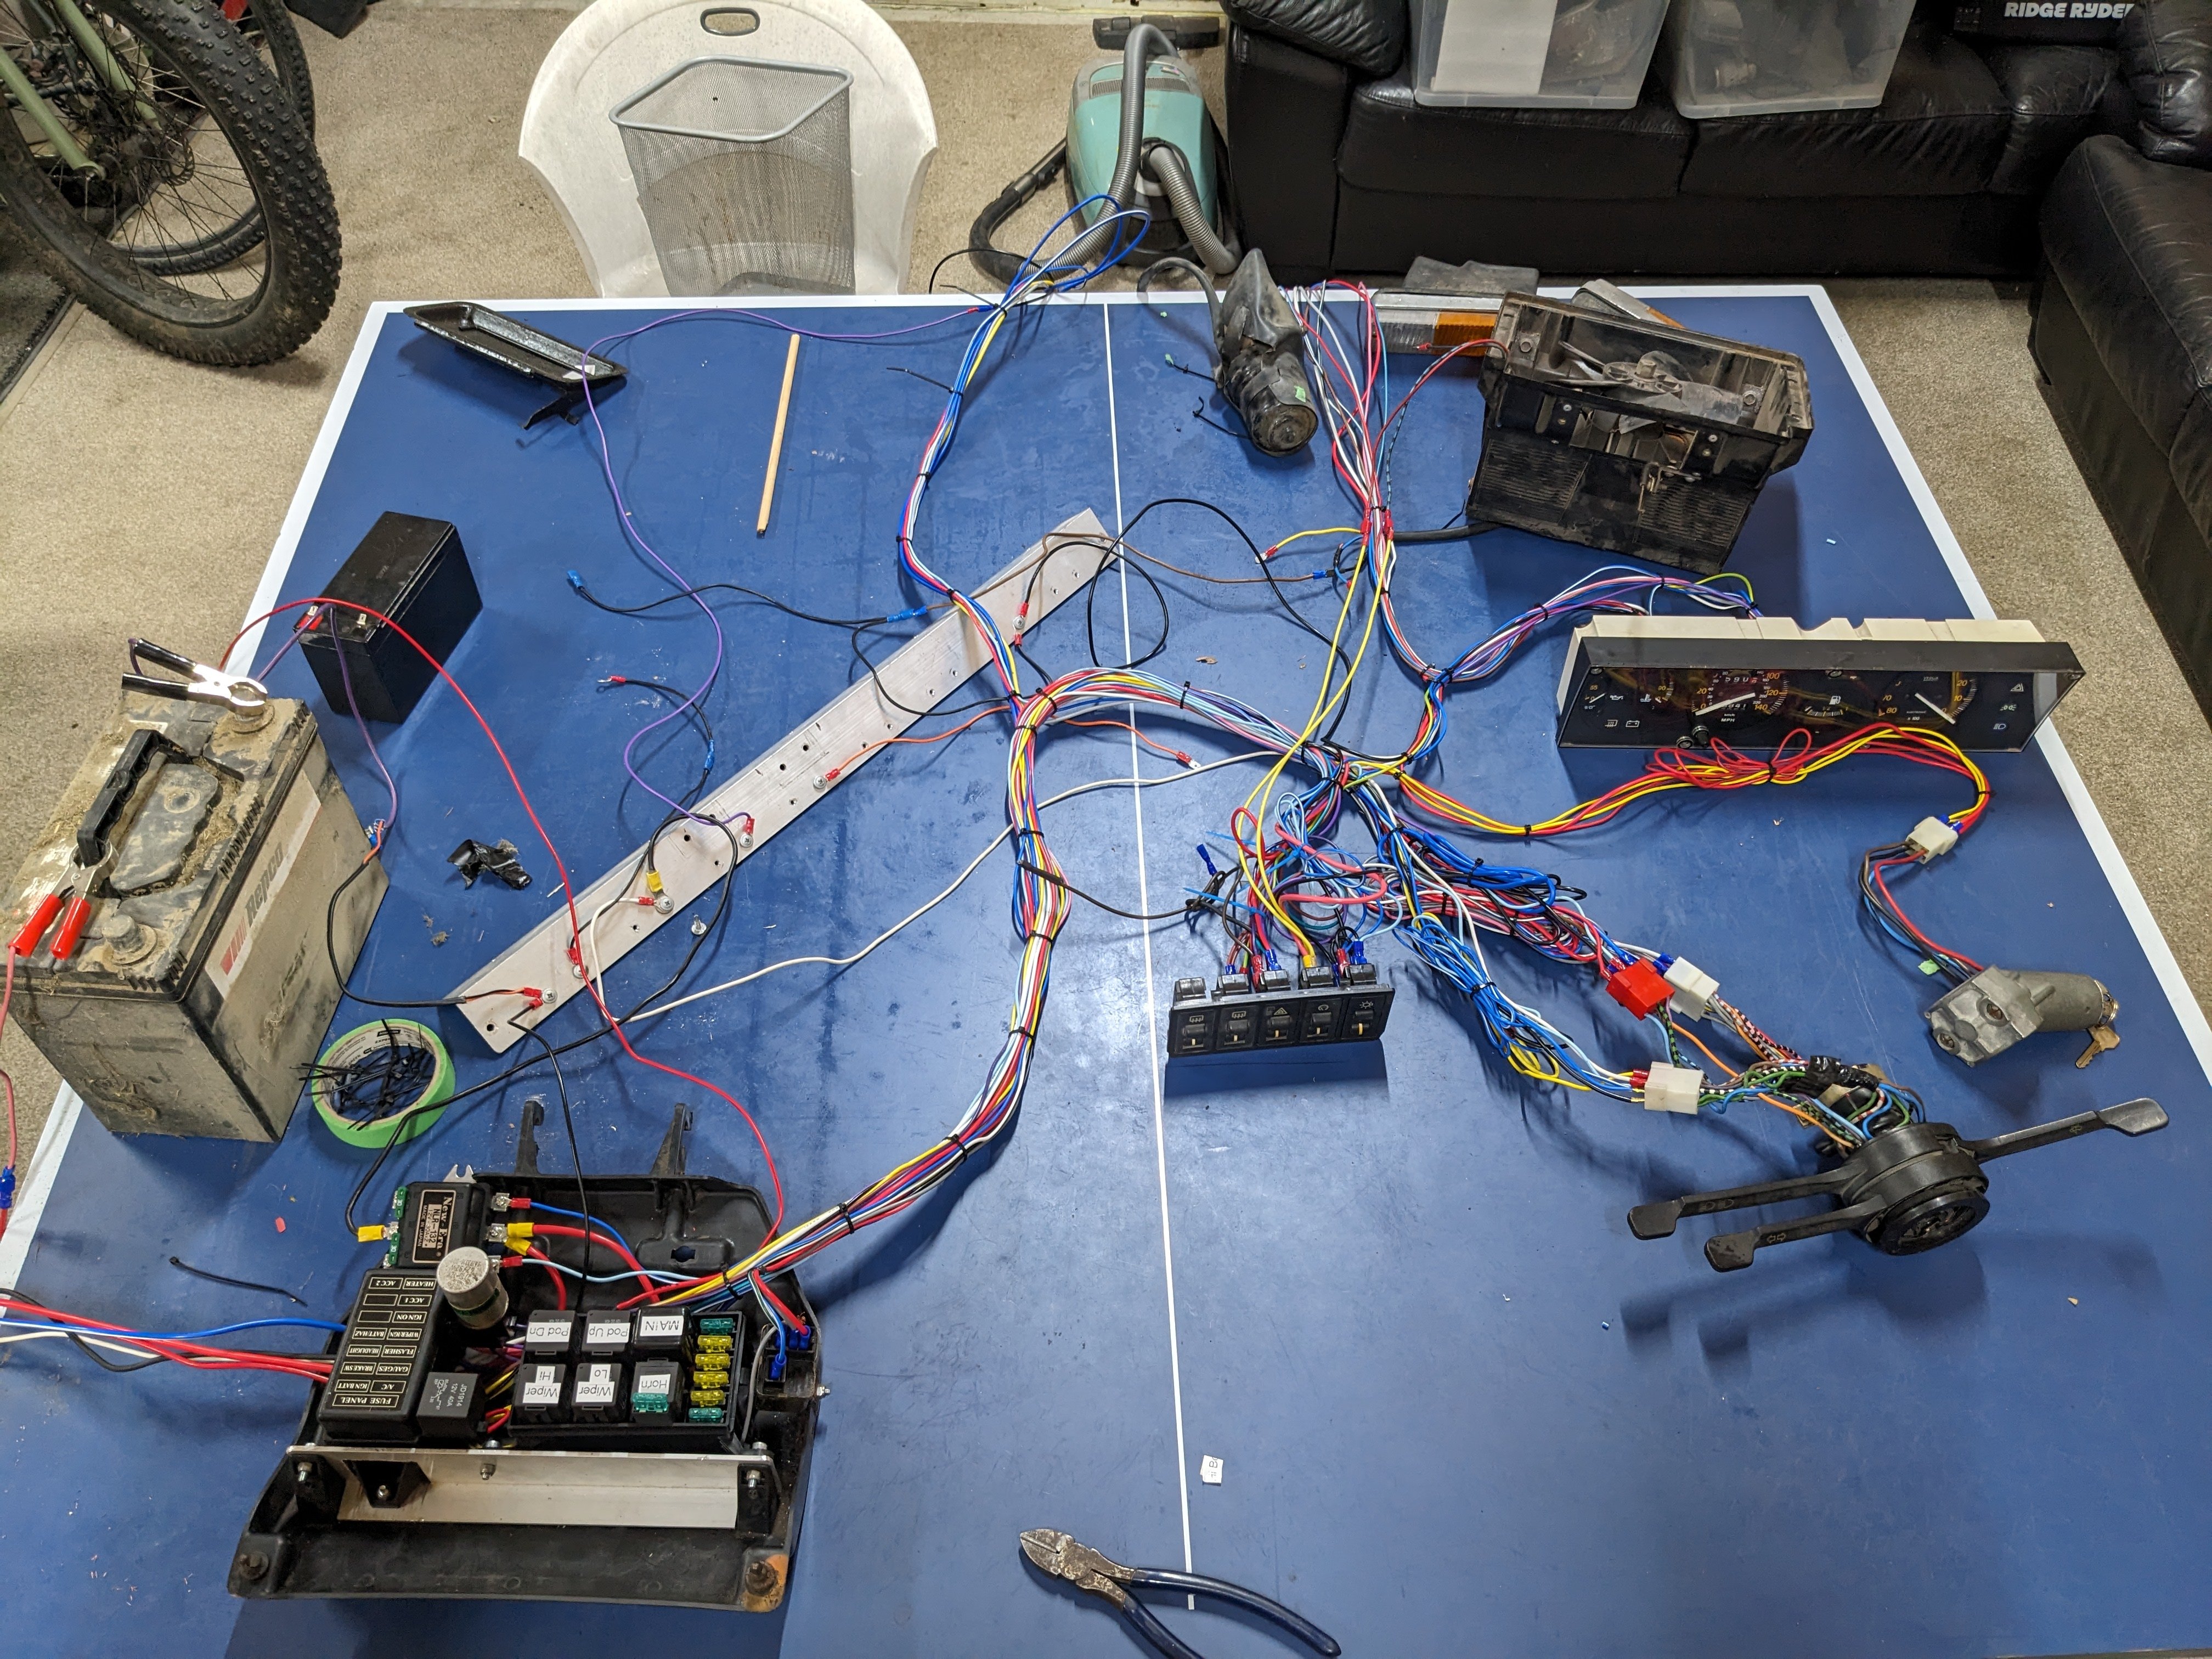
Pretty much done, the Fiat fusebox is mounted on a handy drop down tray, I managed to mount everything on without too much bother. 'Finished' that is apart from the things like the headlamp and pod motor wires that I will run once I have it in the car so I dont waste wire. And the brake circuit. And indicator wires. And the running lights. And all the shit in the engine bay; starter/fuel pump/coil pack/sensors/etc. So probably not all done in the slightest.
1 point
-
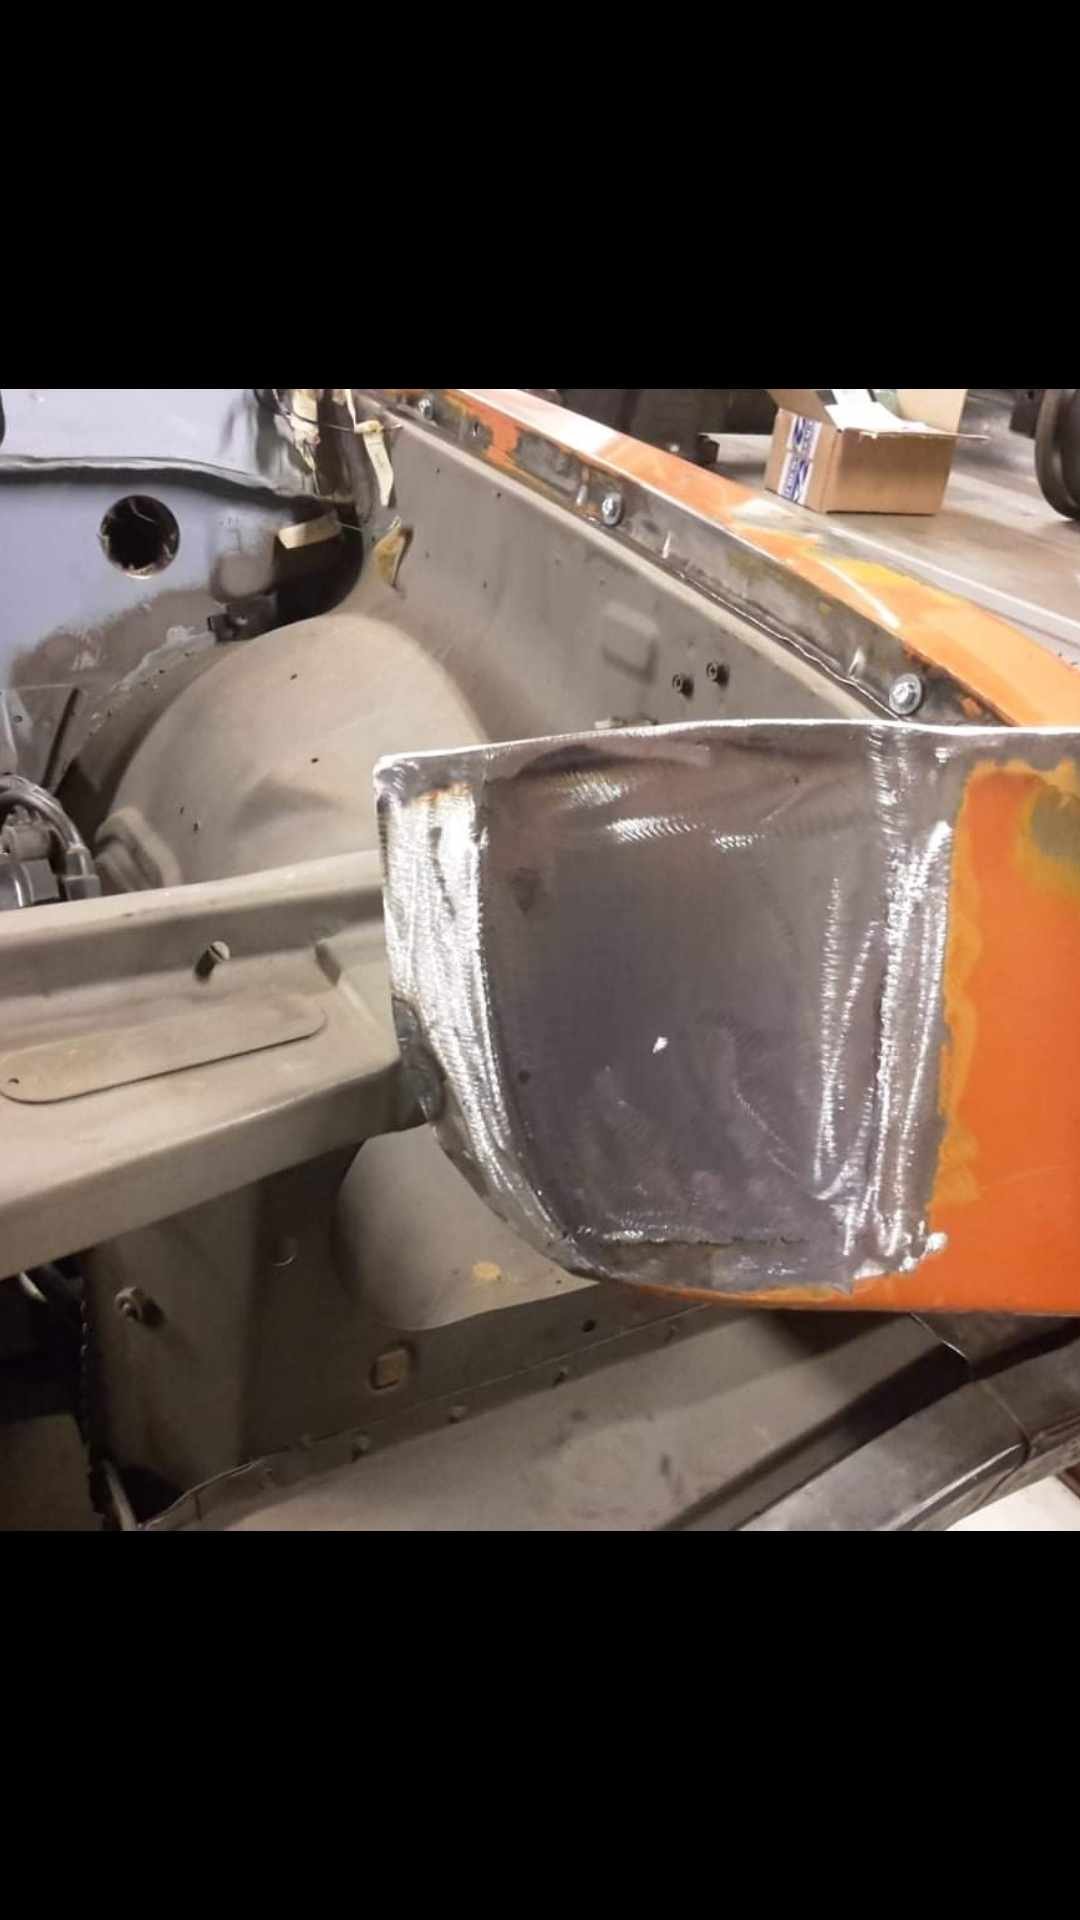
Drivers footwell had another lovely American patch, think this one was held in with liquid cement or something, as it was very hard. Patch panel trimmed to fit. All welded and cleaned up. The passengers side wasn't as bad, was just covered up with thick paint, looked like Hammerite to me. It was quite pitted and had a few small holes all over so thought I may as well cut it right out and use most of the patch panel I had anyway. Didn't look like there was rust under the rear seat, until I looked closely and started poking at it. Another lot of thick paint had been used to cover up the few small holes. This patch was wrecking my brain on how to go about making it, was simple once I had a plan to go about it. The other side is a bit worse, just will be a bit more time making some extra shapes. This will hopefully be the last bit of rust on the floor to do!1 point
-
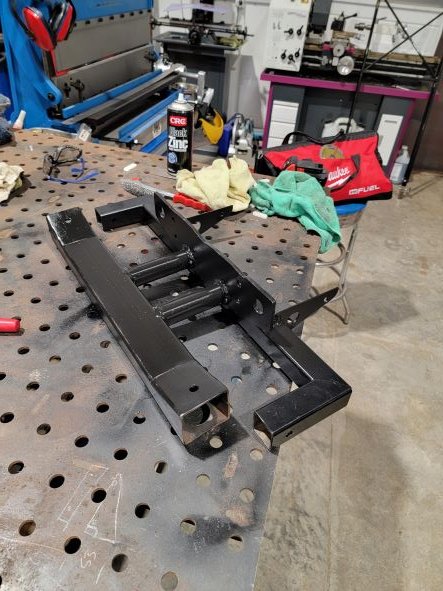
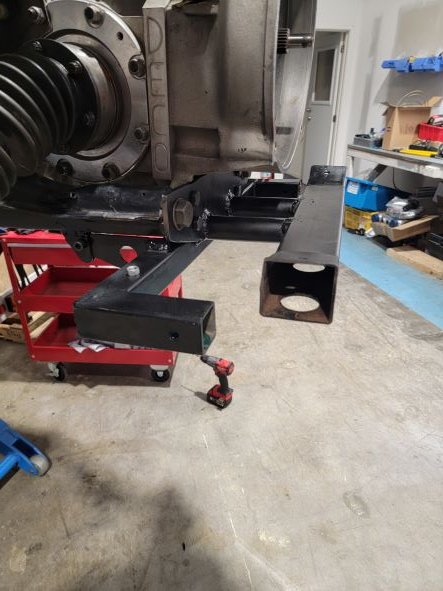
Have finally finished the engine/box/wheelie bar mount. Came out OK. Some time later I thought scatter shield, which it needs so will attempt to get that done this week. Then it is onto radiator. Thinking of running rectangular aluminium section under the pan, then transition to round at the hosey connections.
1 point
-
9 years, 2 weeks and 2 days of ownership now. Just passed my 100,000th km in this thing today. Happened to be on the same piece of road that I test drove it too. Trade in value must have just plummeted to near zero.1 point
-
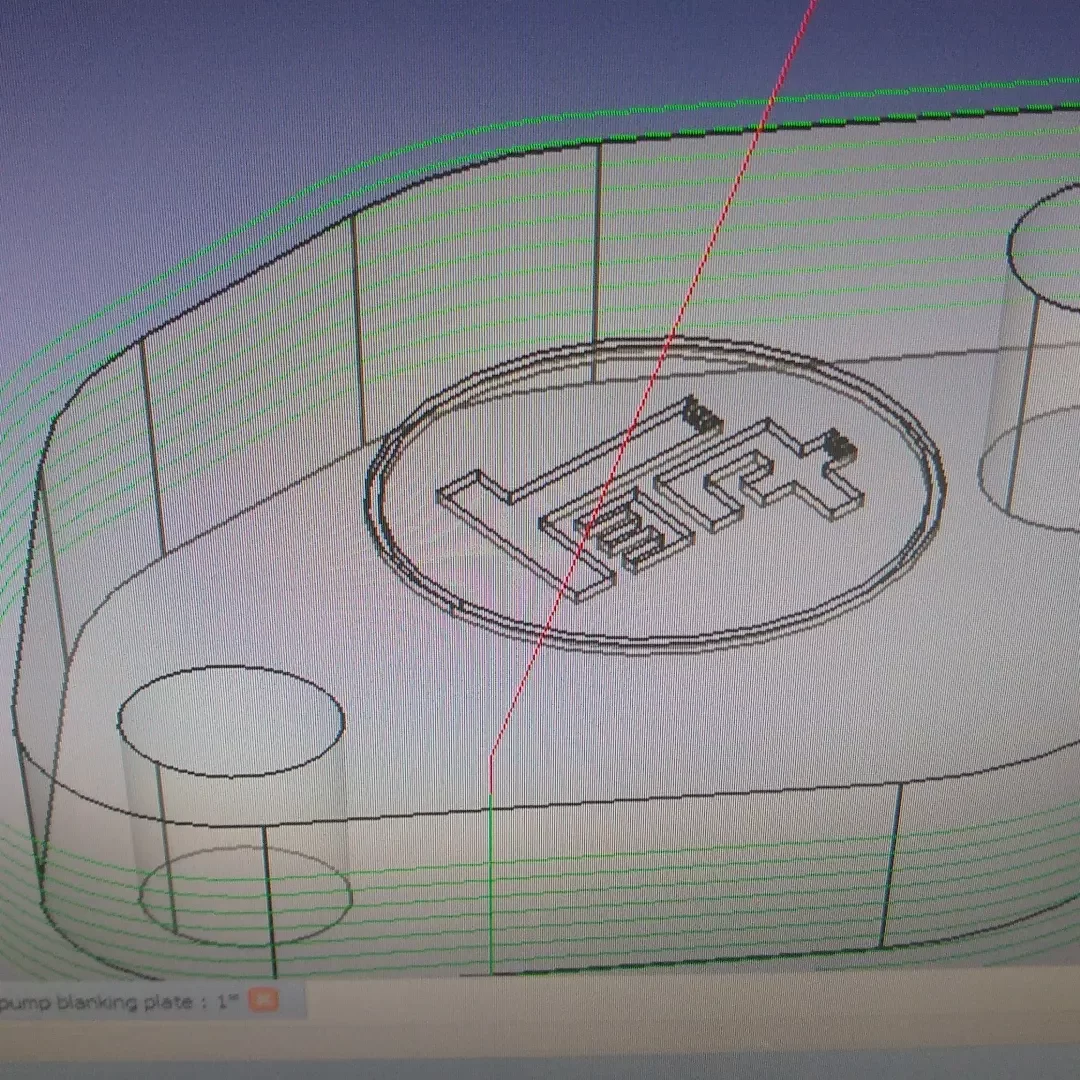
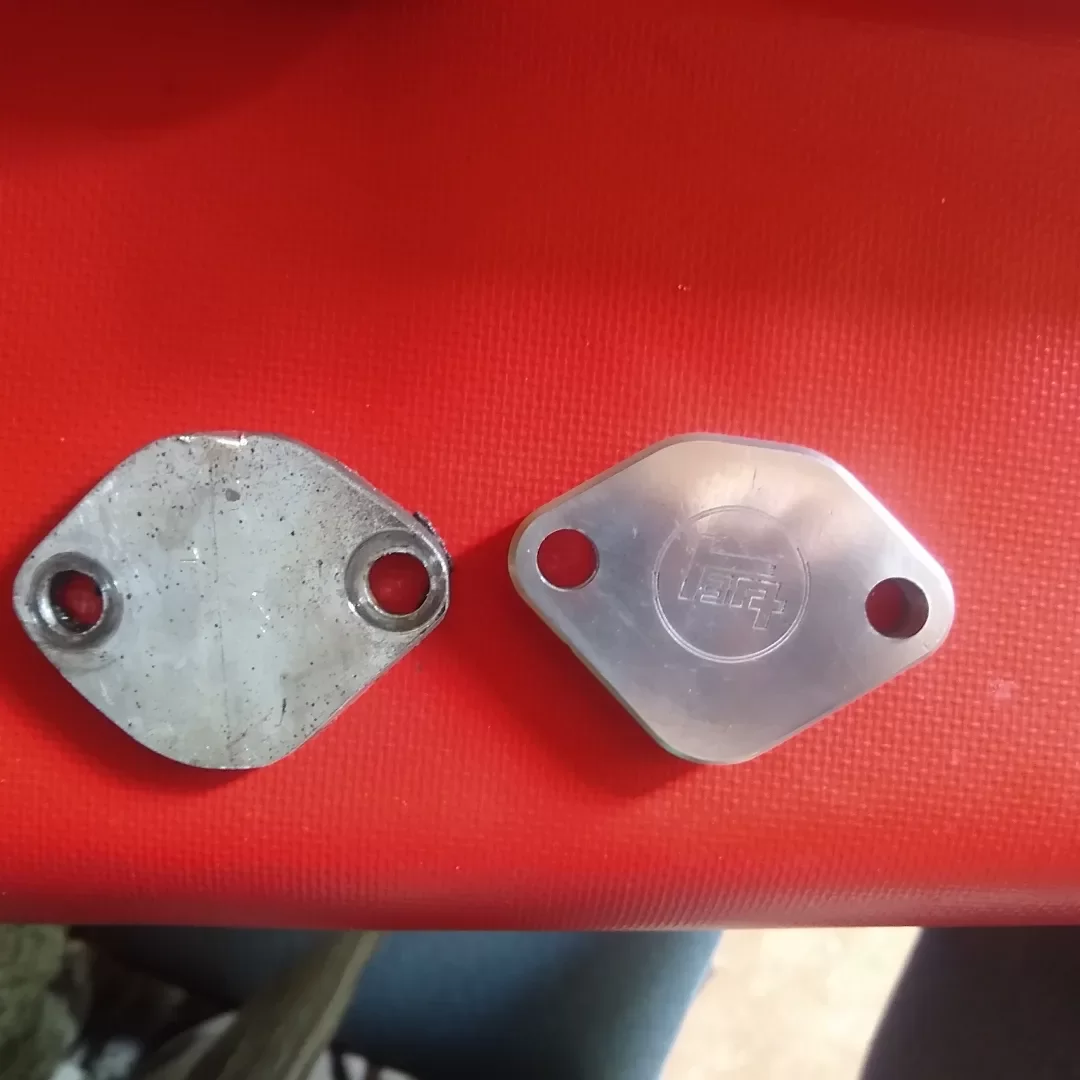
Not a particularly interesting update I had a bit of time to kill today so I figured I'd get around to making a nicer fuel pump blanking plate for the engine. I took measurements of the spacer from the original pump and made a model in FreeCAD and set the milling machine to work I'm not entirely sold on the logo, maybe I'll sand it off and put a smaller one on it in the future. Either way the plate is an improvement. I also cleaned the seatbelt yesterday as it was starting to get a bit gummy and wouldn't retract properly. I couldn't really believe the amount of gunk that came out of it.
1 point
-
back on the dyno today and all was well. the car took yet another beating and was fine. no fuel issues, no anything issues which was a relief tbh. made 460 KW again on slightly less boost but call it the same. fuck, like it matters at this point, its undrivable at that level anyway so what difference does it make. oil stayed cool and the oil cooler fans seem to work good too which is great. i do need to replace the heat shielding on the exhaust that goes under the floor. that last lot got oil all over it so i removed it and man can you feel the heat coming up through the floor now.... 2021-11-30_10-20-12 by sheepers, on Flickr1 point
-
forgot to post these. first is R32 GTR intercooler core design. second is plazmaman core. 2021-09-28_06-56-17 by sheepers, on Flickr 2021-09-28_06-56-26 by sheepers, on Flickr1 point
-
Here's the Newspaper ad from the clipboard:
1 point
-
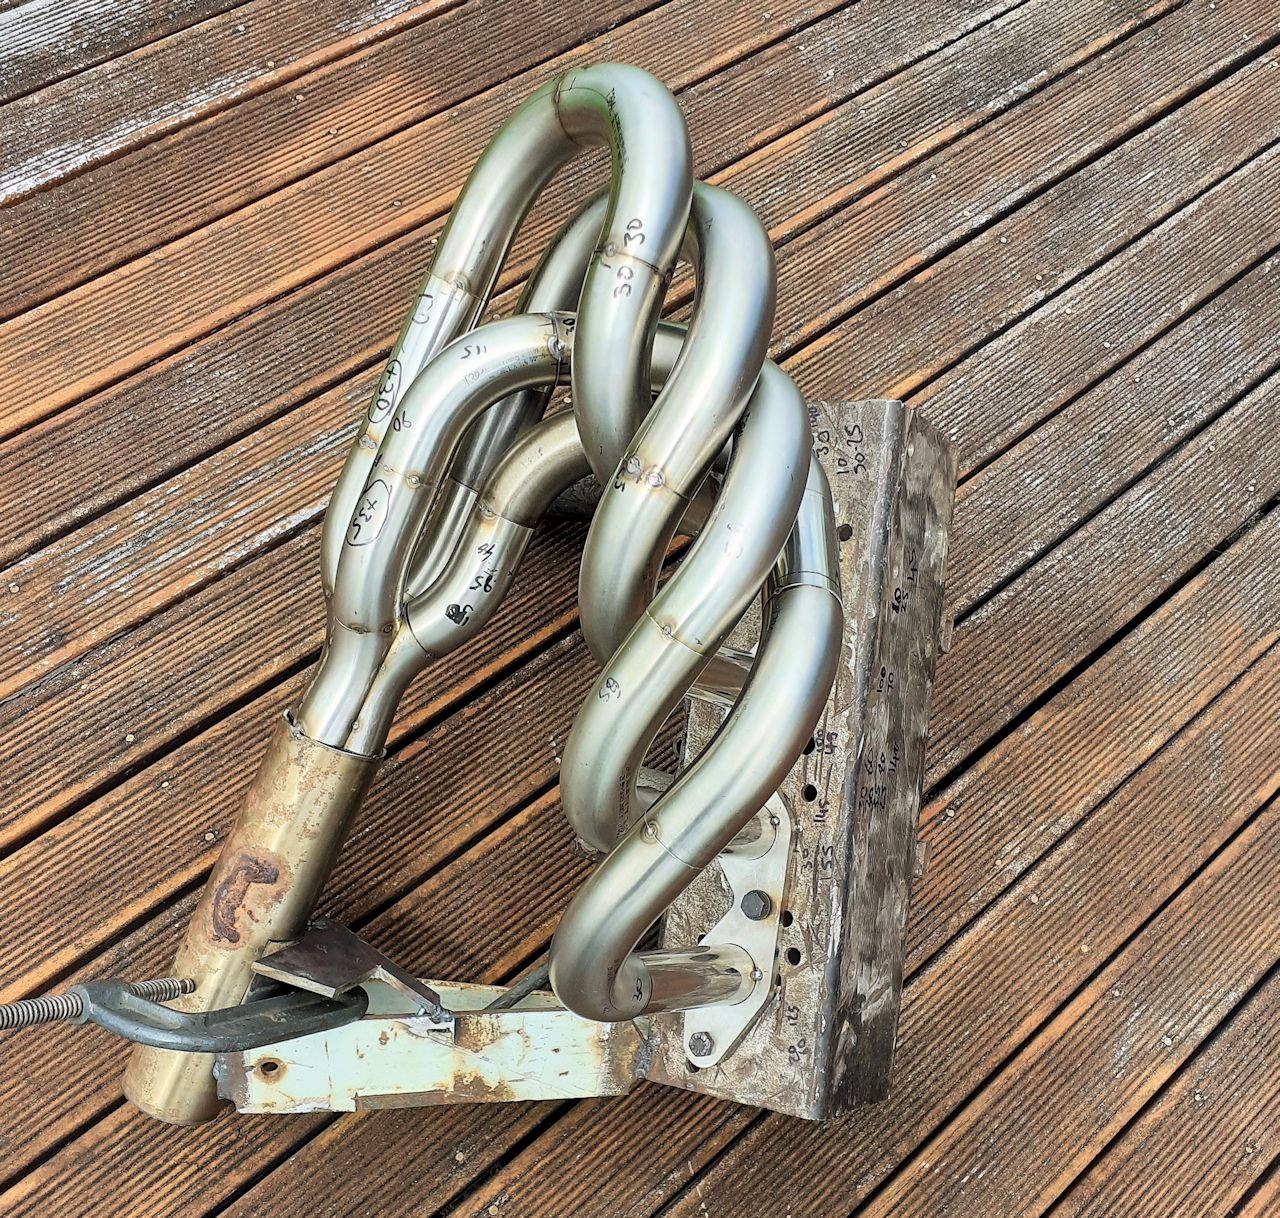
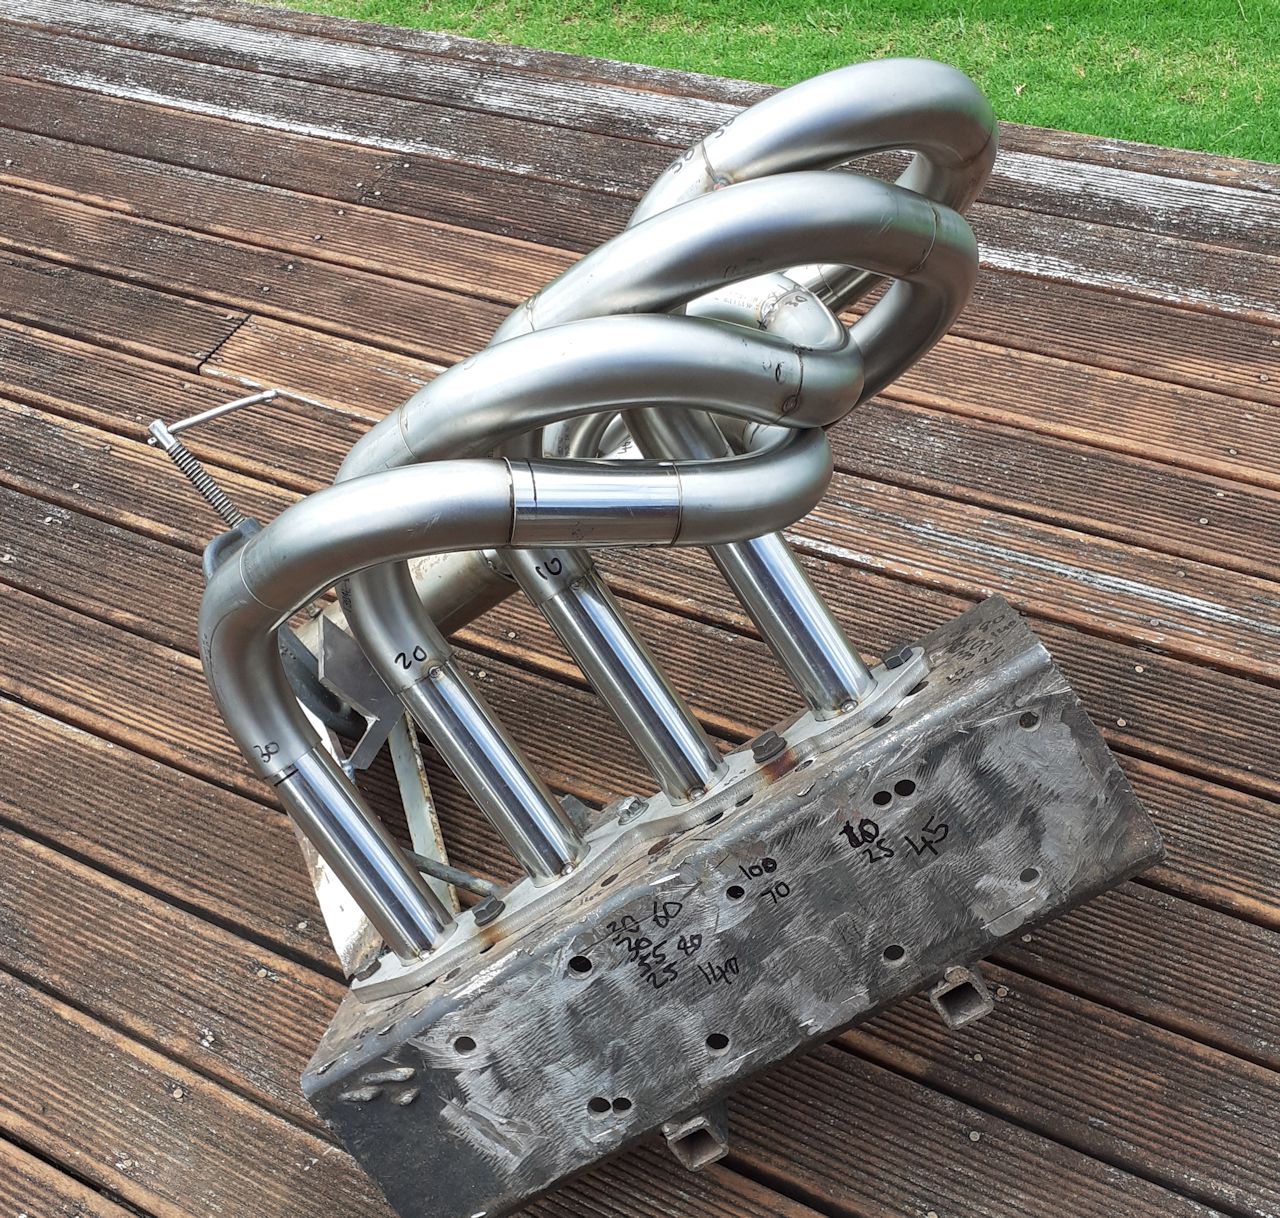
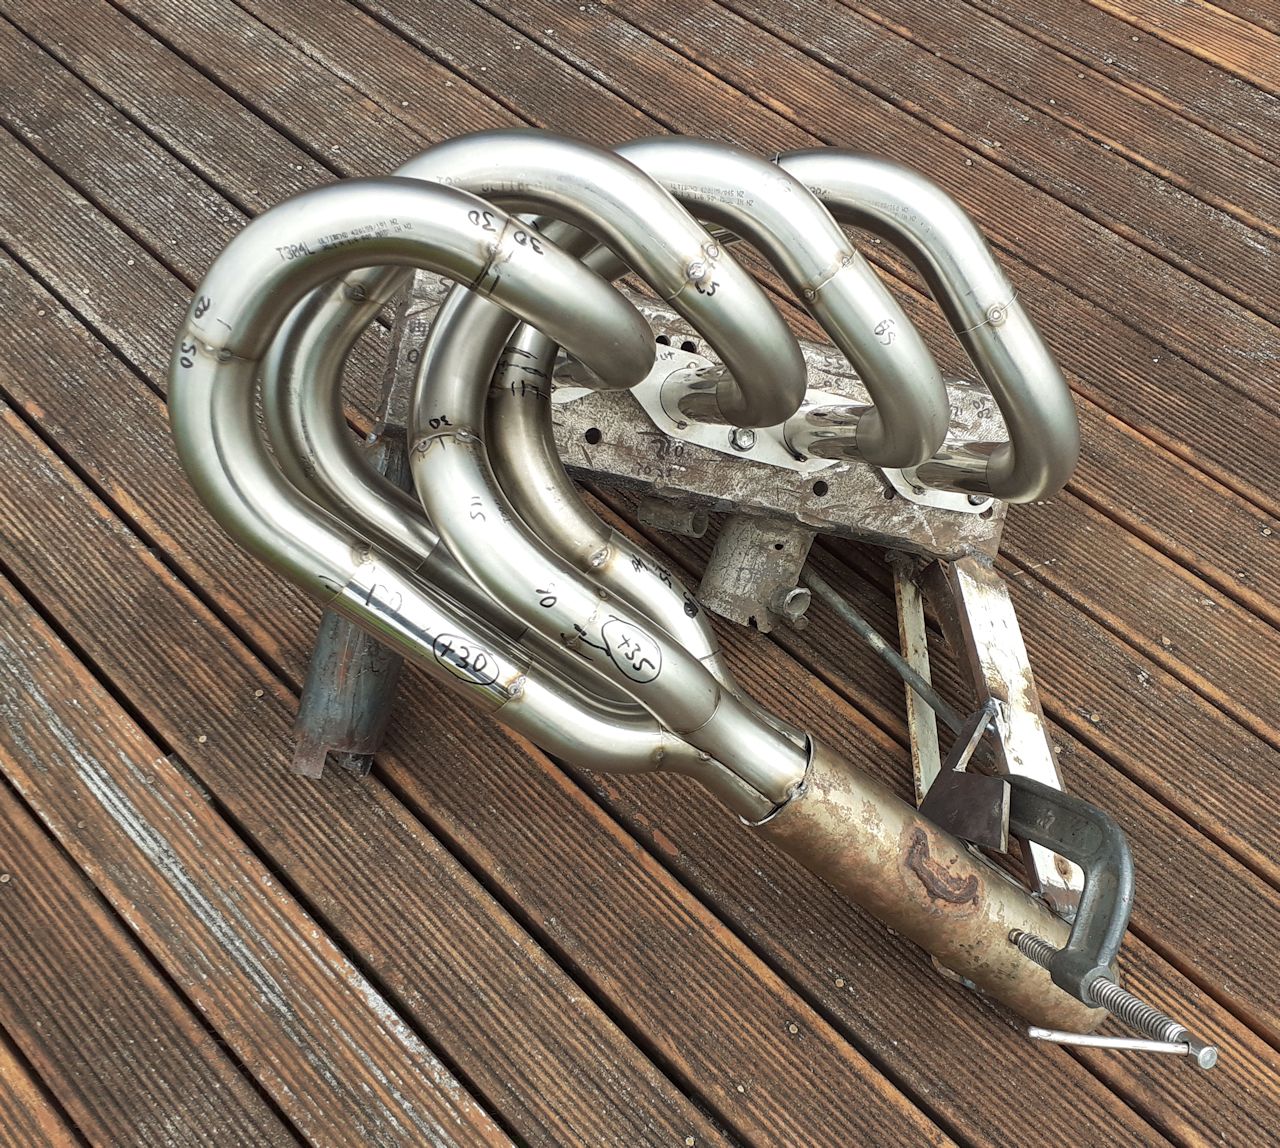
I screwed up one of the pipe lengths. so after many alterations, I'm happy with the lengths and how they look. I think for initial setup i will make a pipe that tapers up slowly from the end of collector as it sits (in place of the ugly pipe tacked on the end) Probably wait till good engine is back in before playing with that section more.
1 point
-
Engine is all back together and running now. Broke it in for about 100 km and did a quick power run, running a bit lean at the top end (I manually adjusted the VE table after, will have to let auto tune hit that region one day) so started misfiring. It gained more than 10 hp though and didn't even hit peak by red line. Once it is fully run in I might consider lifting the rev limit to 6500. On the other end, it lost a fair bit below 3000 rpm, down 17% at 2000 rpm compared to before. Fuel consumption when cruising on open road looks to be about the same as before: 60 cc/min at 80 km/h (4.5 L/100 km) 90 cc/min at 100 km/h (5.5 L/100 km) The idle is a little bit screwy with the new cam, but could be worse. I kind of feel like I have ruined the car's soul by doing the cam though... I also had a little issue with the idle oil pressure getting low enough to make the light flicker when the engine is fully hot, threw a gauge on it and confirmed it makes /some/ pressure, pressure rises quickly above idle. Peter at Kennelly cams reckons that it's pretty common on 4Ks, he suggested going to a thicker oil. Now running 20W-60 and no more lights on, does seem stupidly thick though... I don't really have any new pictures, so here's the one I posted in the spam thread
1 point
-
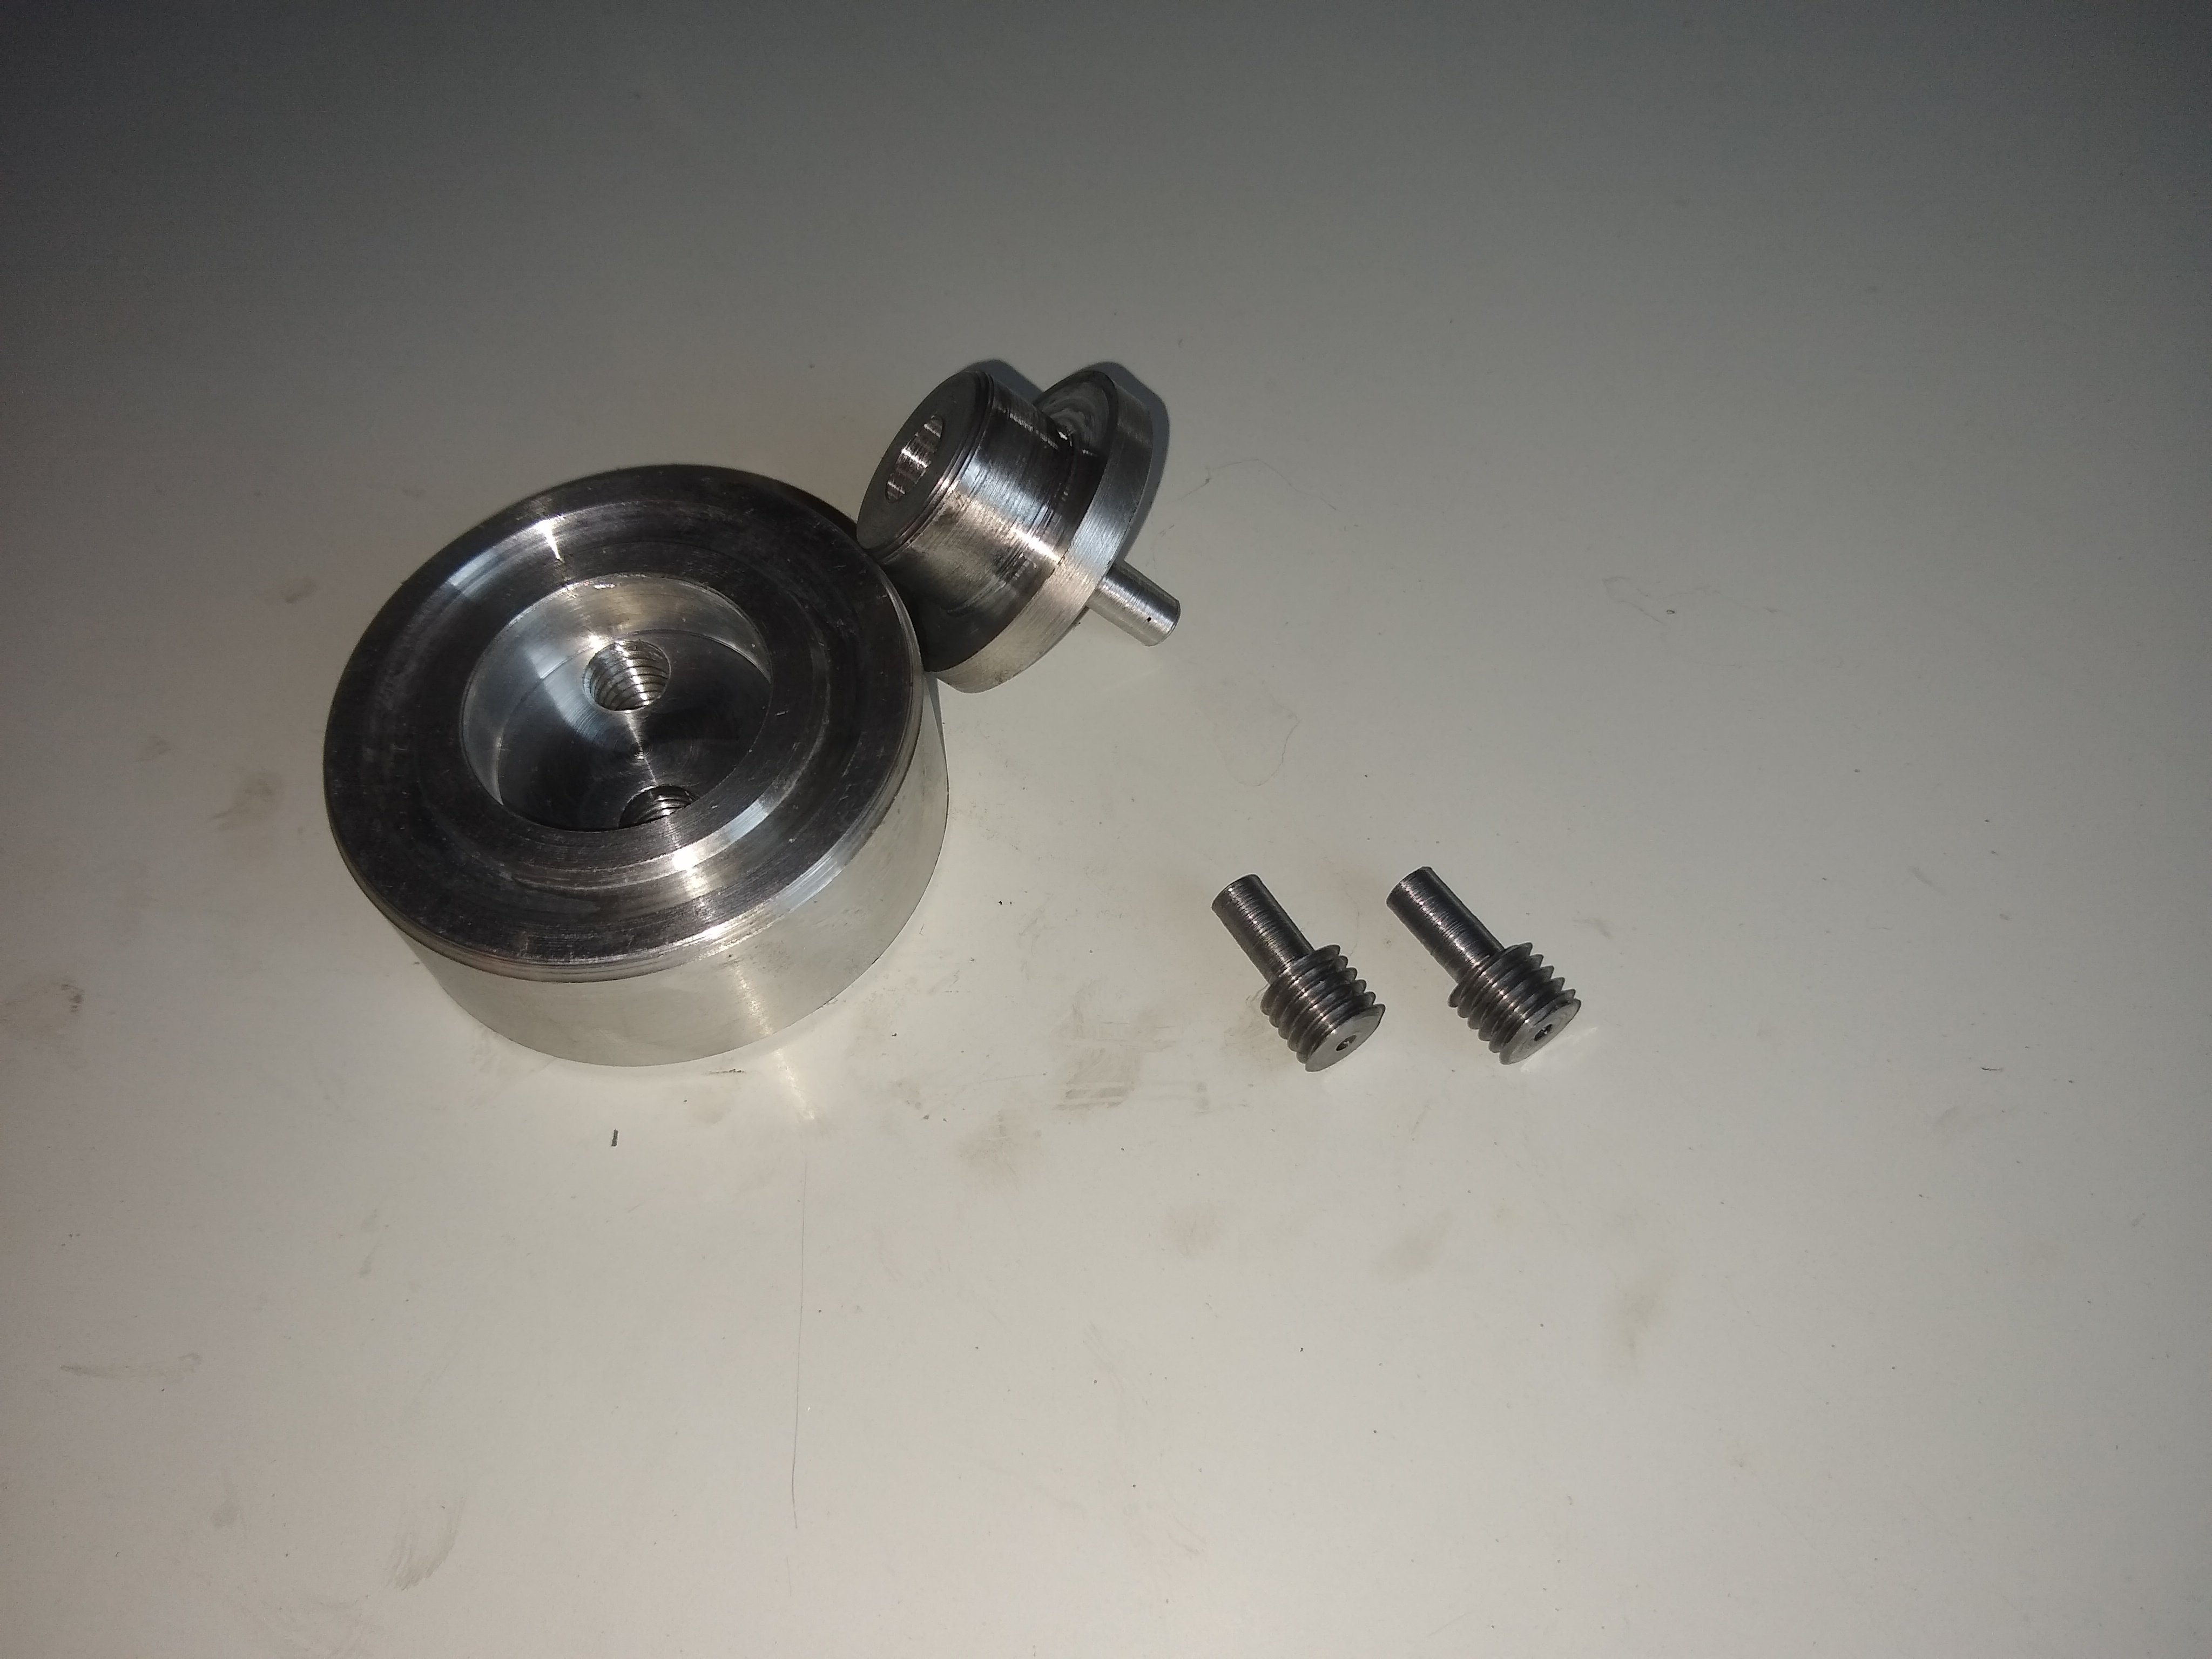
Cylinder block tested up fine, so is just getting hone and rings. I bought some second hand pistons from Kennelly cams - inspecting and crack testing each one from his pile to find the four best. I made a valve leak testing tool yesterday and used it this morning on the head The threaded nubs go into the big block, allowing for it to be connected to a vacuum gauge or sensor and to a vacuum pump (smaller block just goes into the vacuum pump's port). An o-ring is glued into that groove on the big block. All valves sealed perfectly with springs on, one wasn't sealing with the spring removed though - there was a bit of finger nail stuck between the valve and the seat. Removed that and now they all seem to seal perfectly.
1 point
-
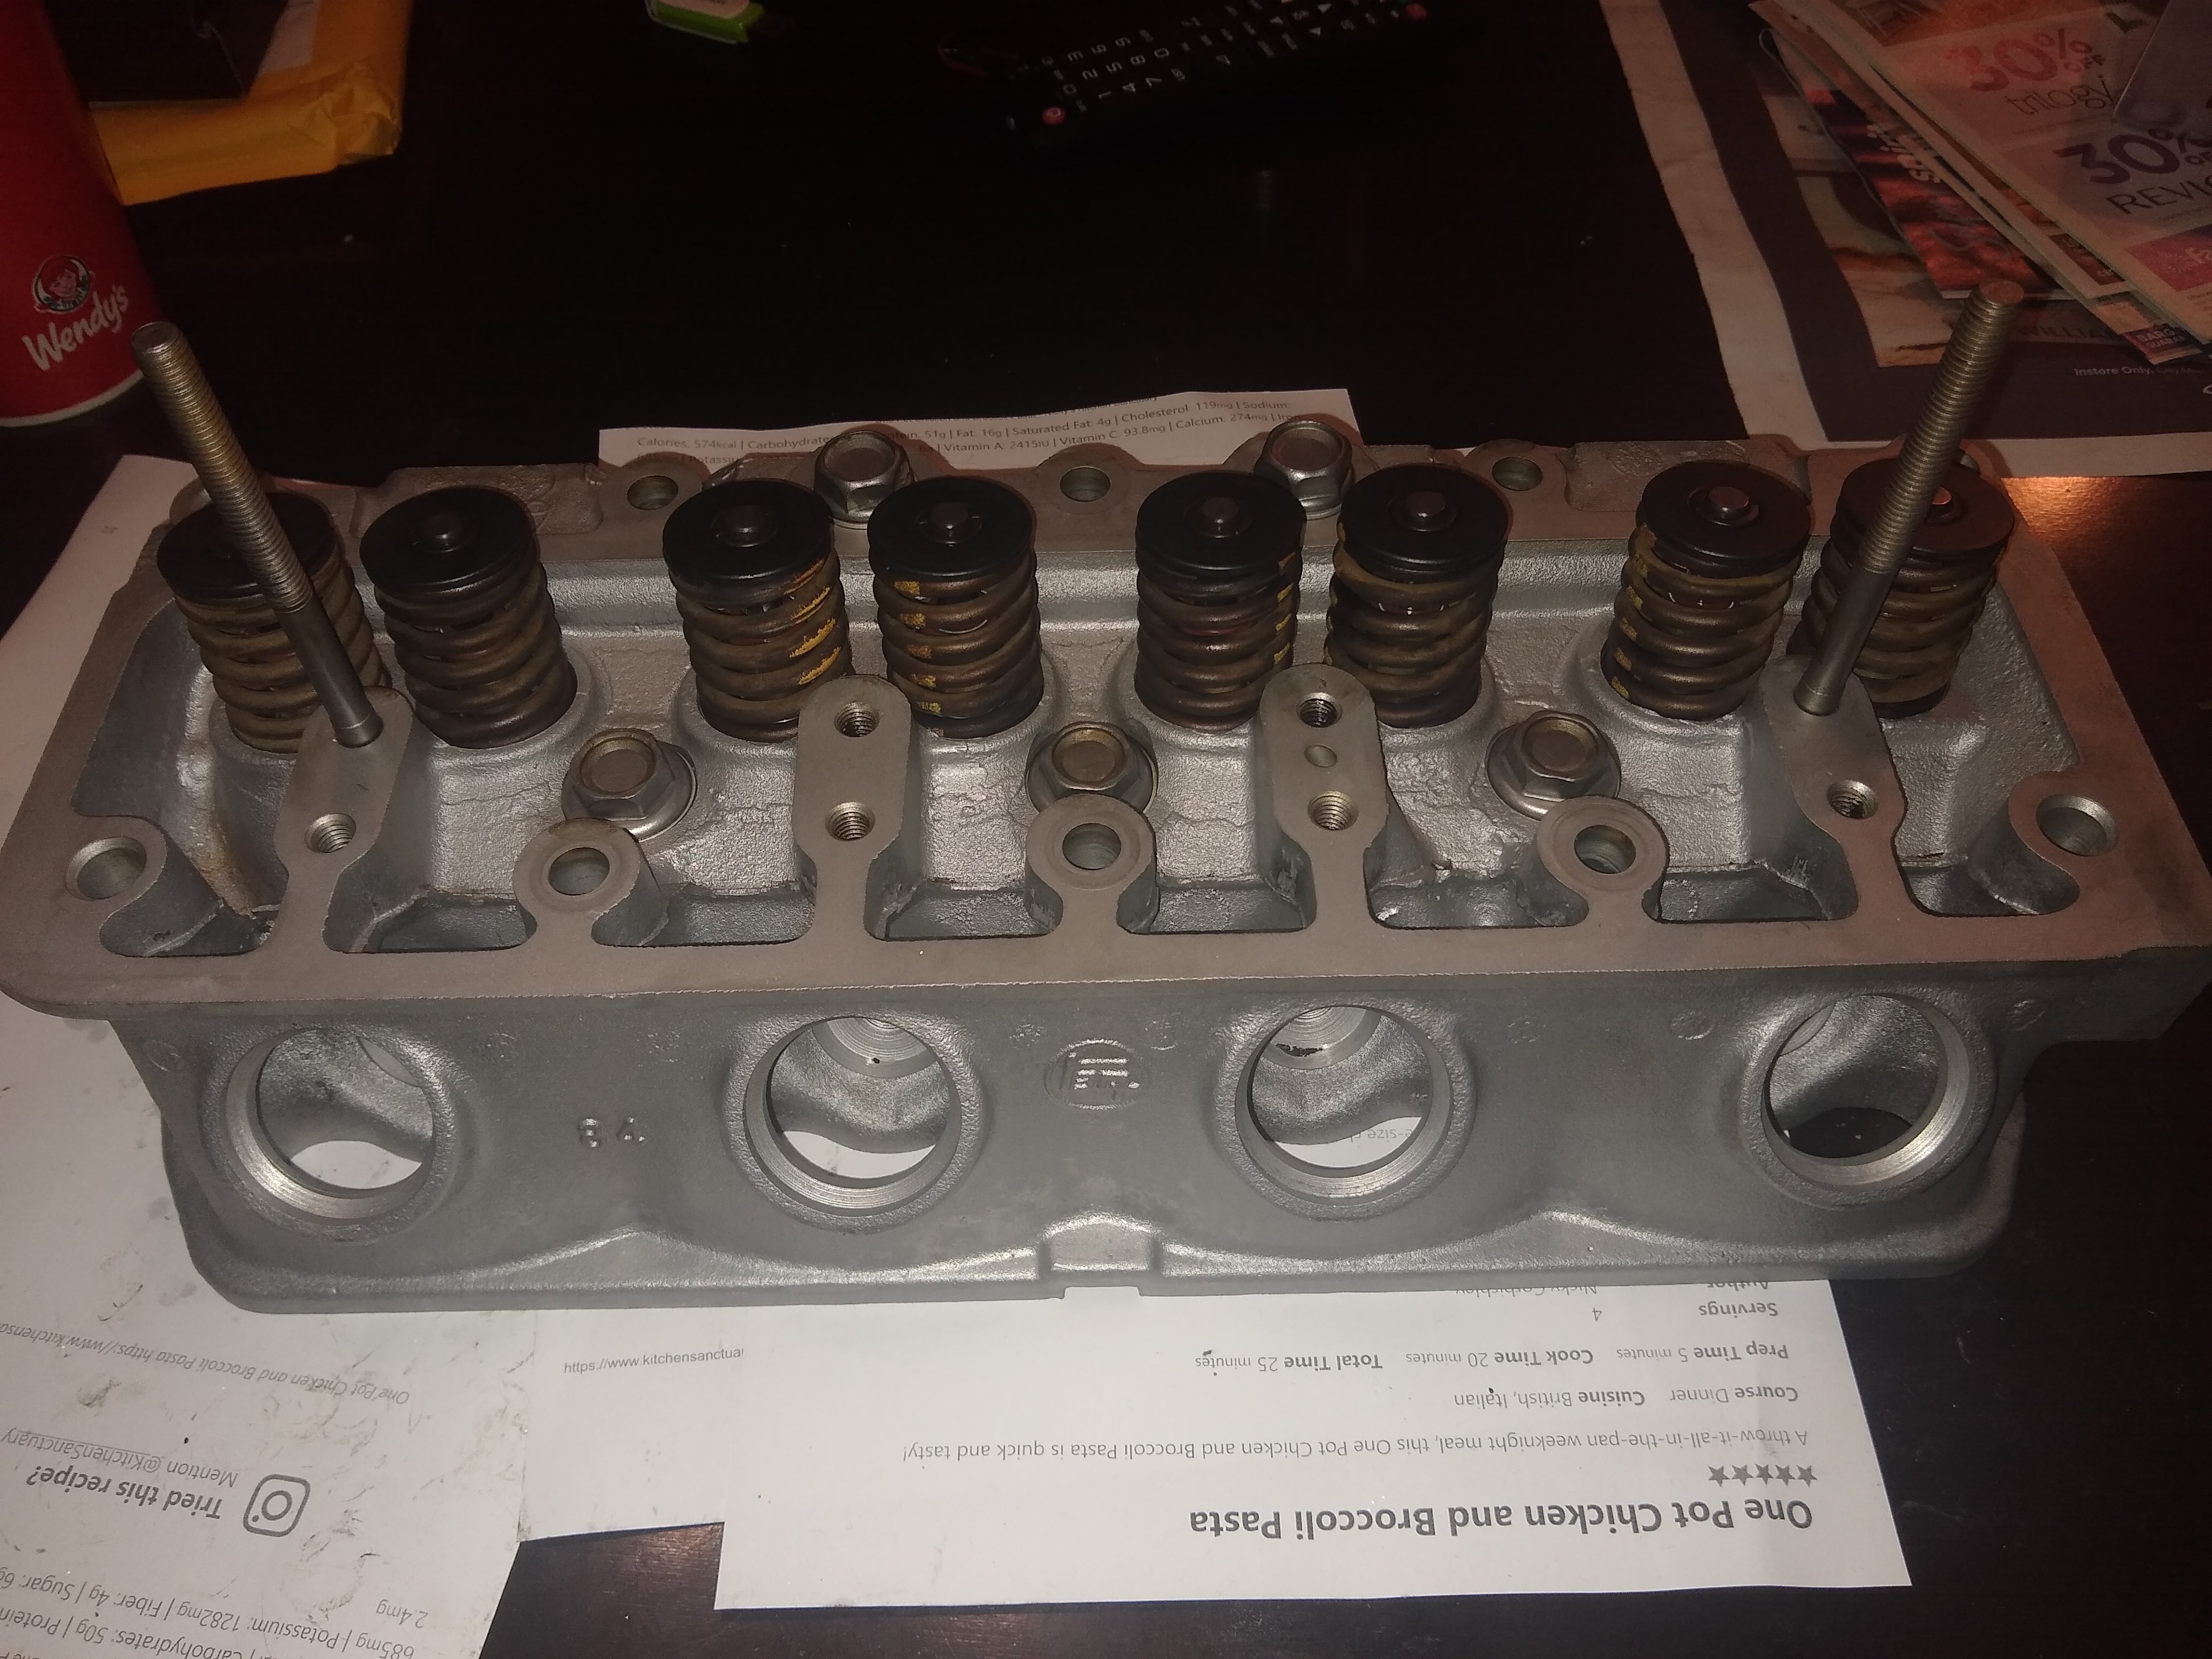
Cylinder head rebuilt, intakes port matched to manifold. Exhaust ports tidied up near valve seats to remove steps. All ports somewhat cleaned up for casting irregularities. Another 0.12 mm skimmed from head to clean it up. Next task will be to make a vacuum testing tool to ensure the valves still seal after I lapped them. Also collected the cam and lifters from Kennelly cams, m6-7 grind - whatever that means. Dyno tests have shown it to take a bone stock 4k from 64 to 76 HP or something with no other modifications. I believe the correct technical classification is "3/16th BSP*" *Barry spec performance
1 point


.thumb.png.b2aee08688778d18bdc7b3e3c1852d9c.png)


This leaderboard is set to Auckland/GMT+12:00