
Leaderboard


Popular Content
Showing content with the highest reputation on 03/24/24 in all areas
-
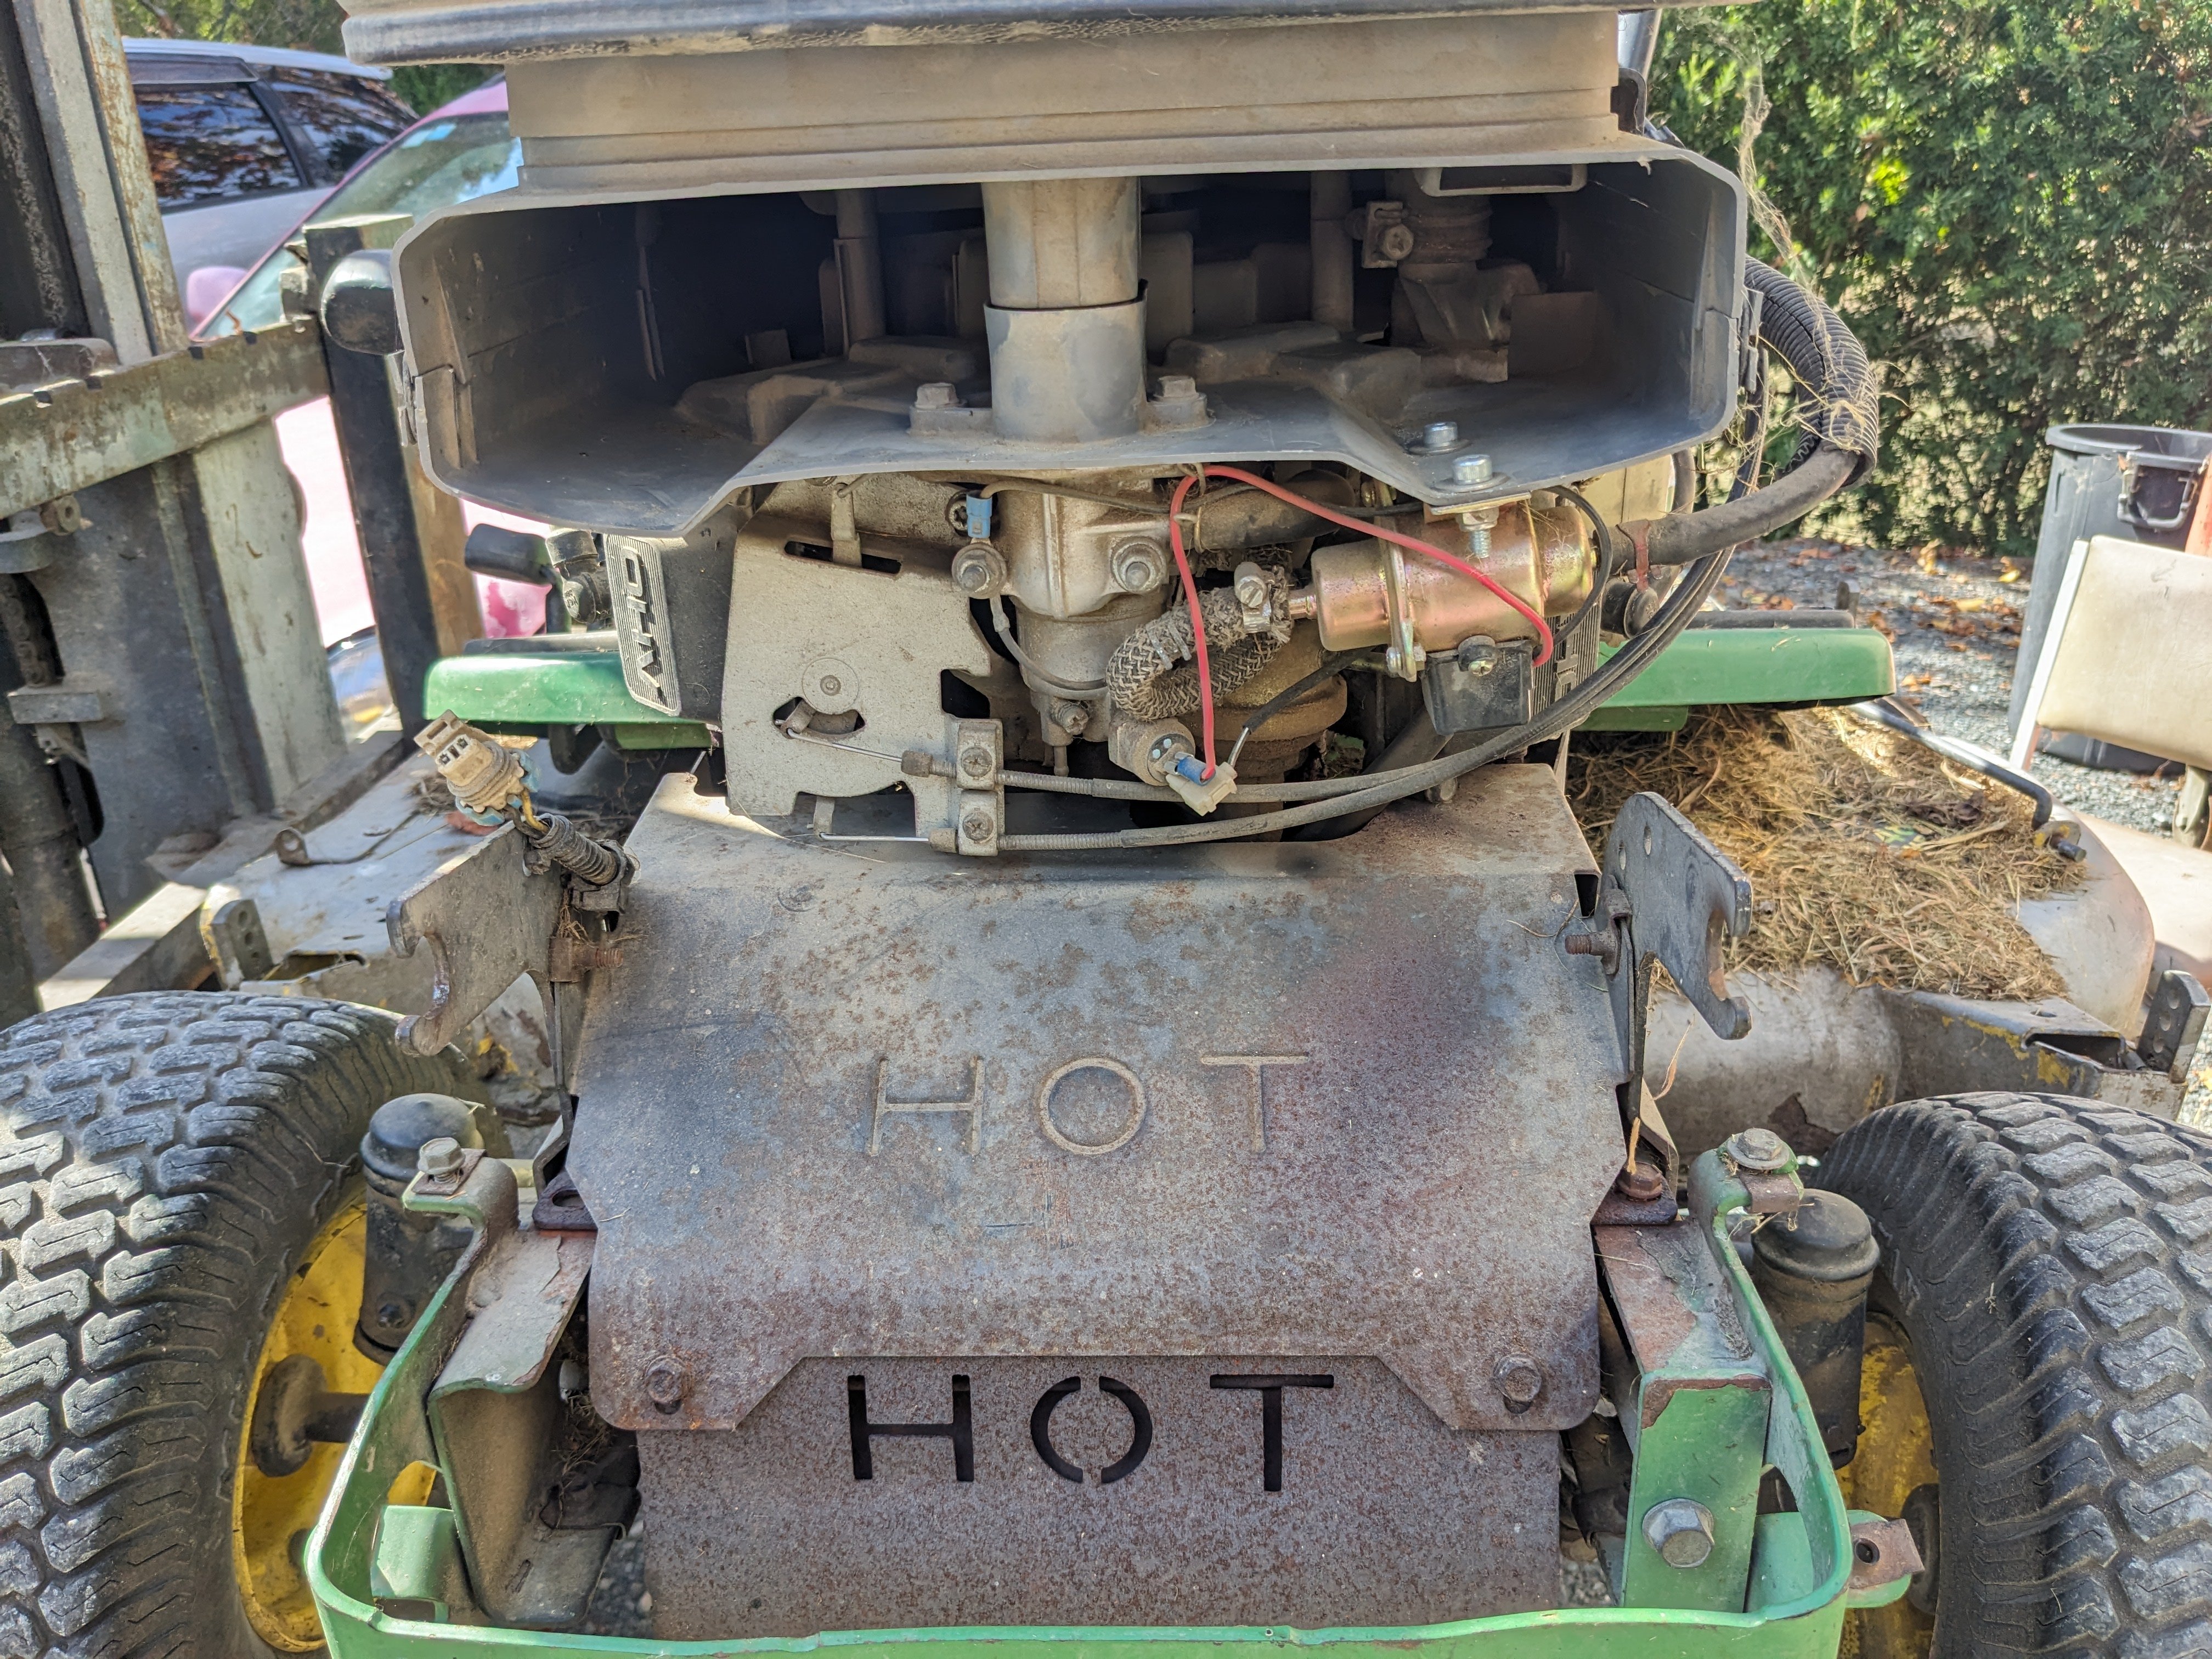
Then I remembered the shitty fuel pump that I hacked into my ride-on a couple of years ago cos it was way too much money to buy OEM; Then naturally this; Dunno what the crackly business is, nevertheless it sounds glorious.
 15 points
 -
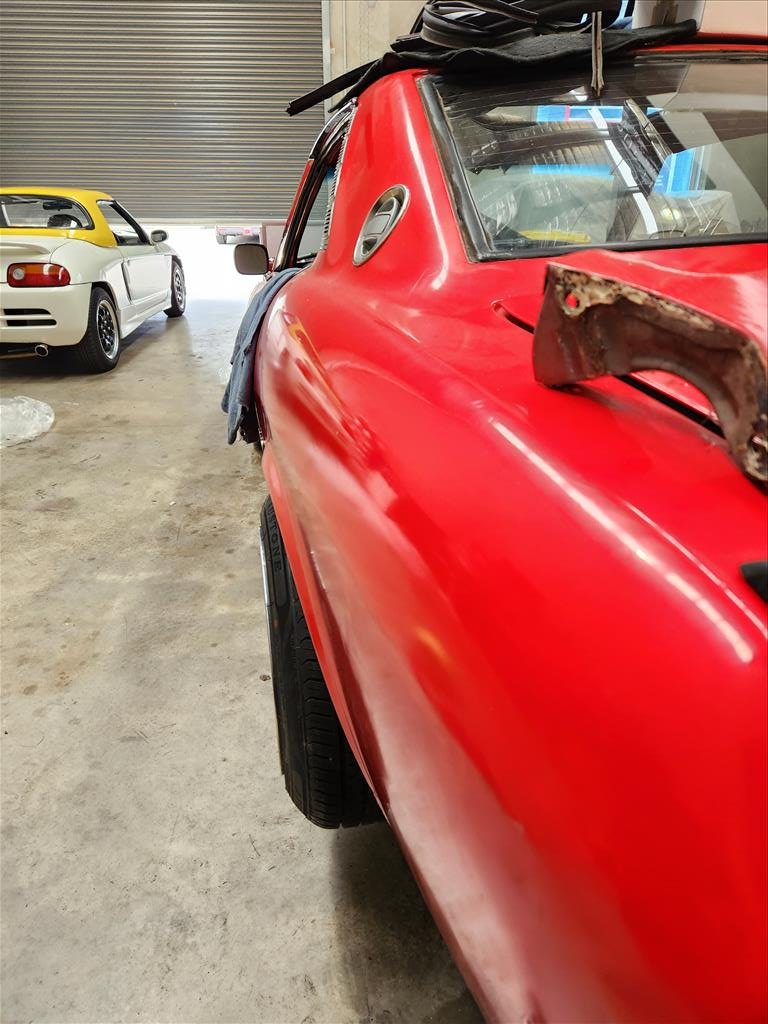
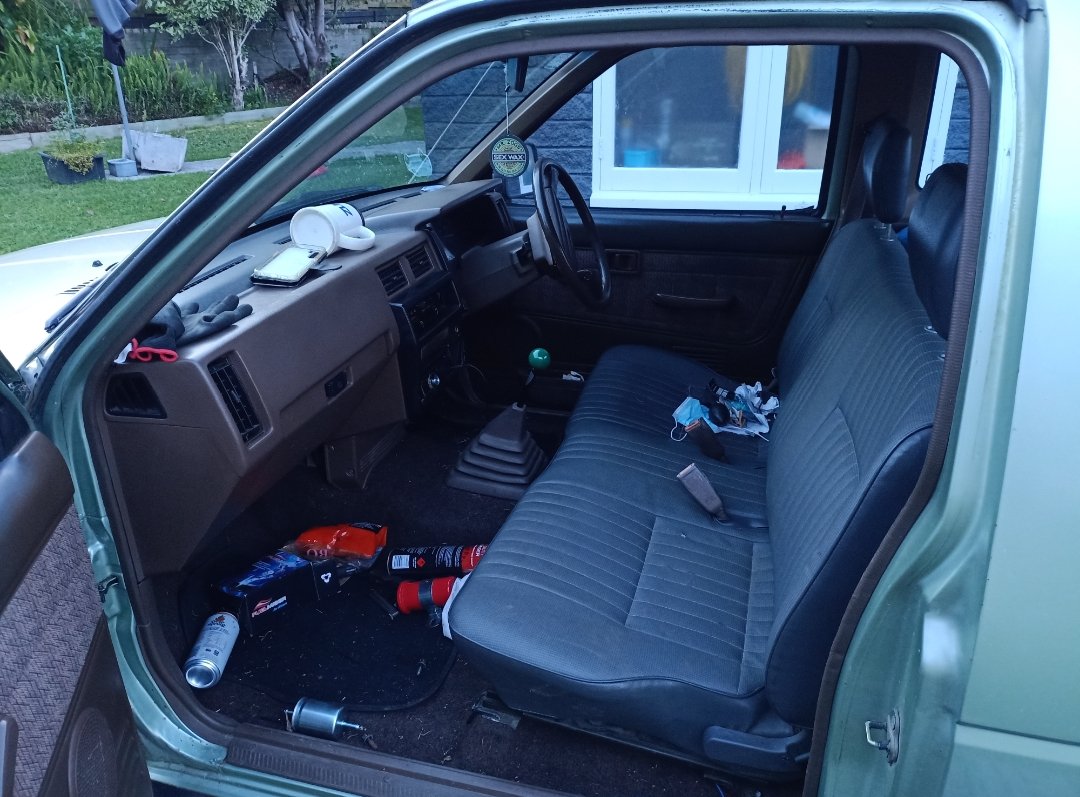
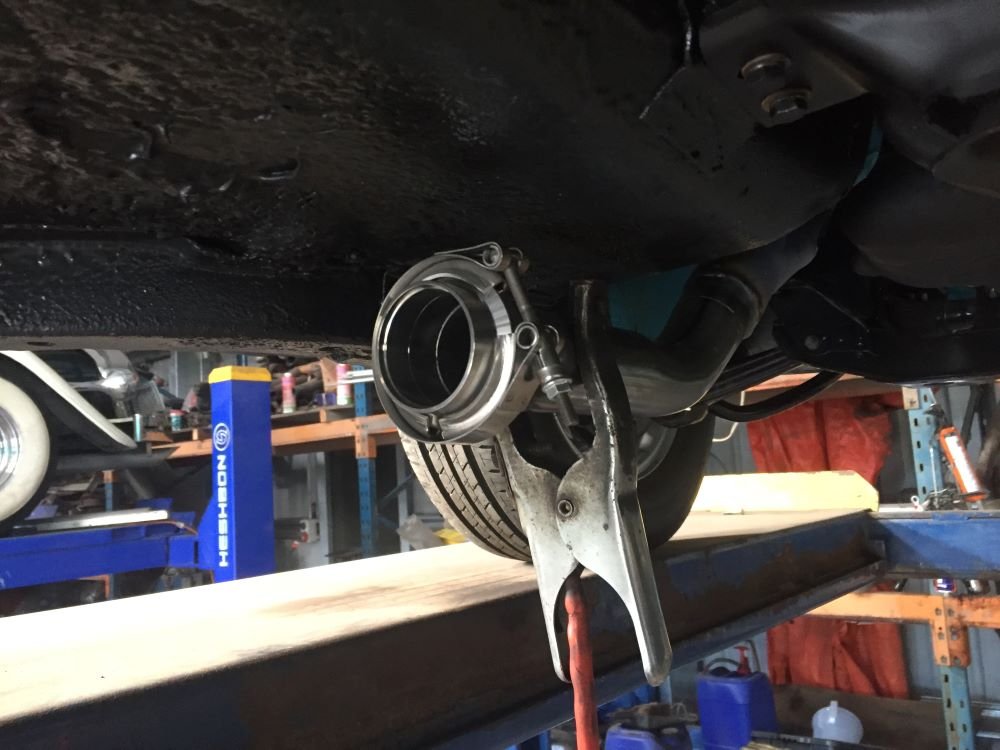
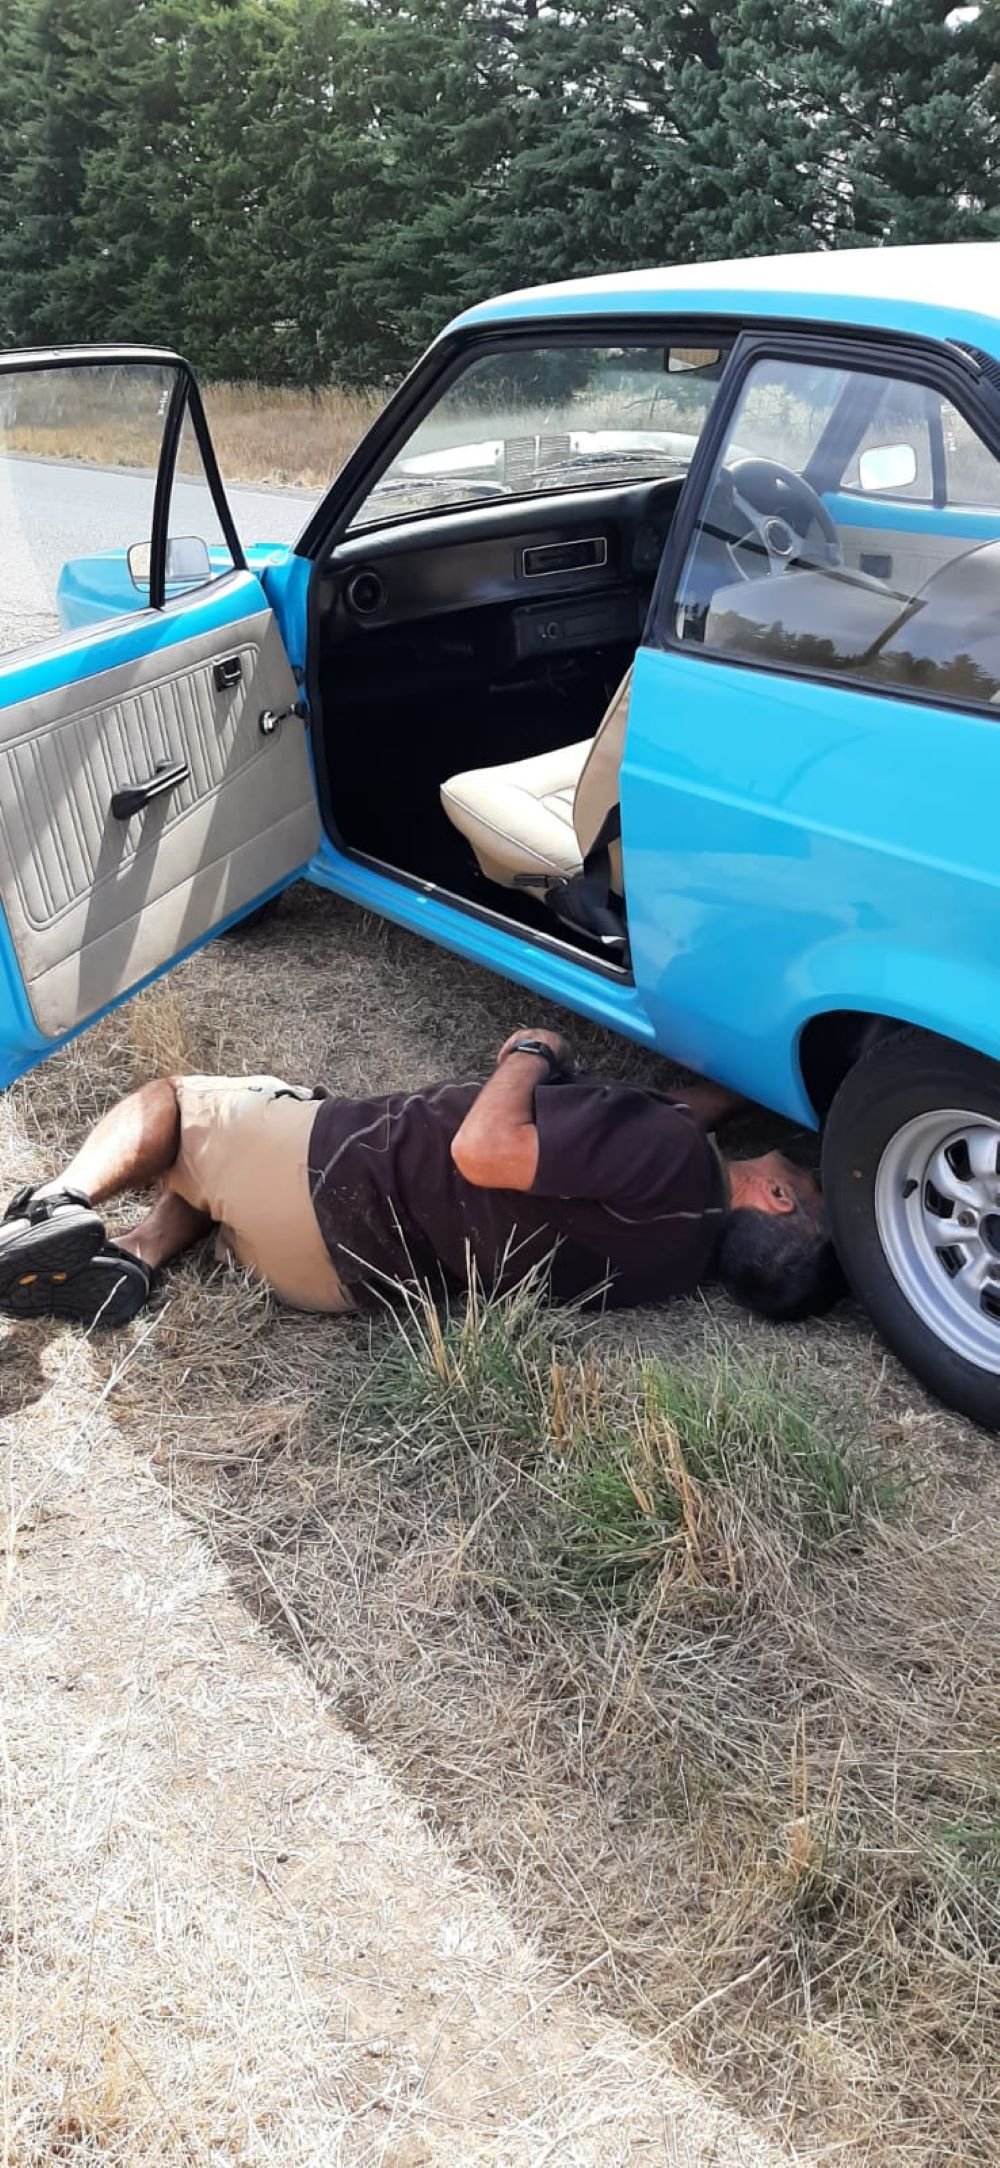
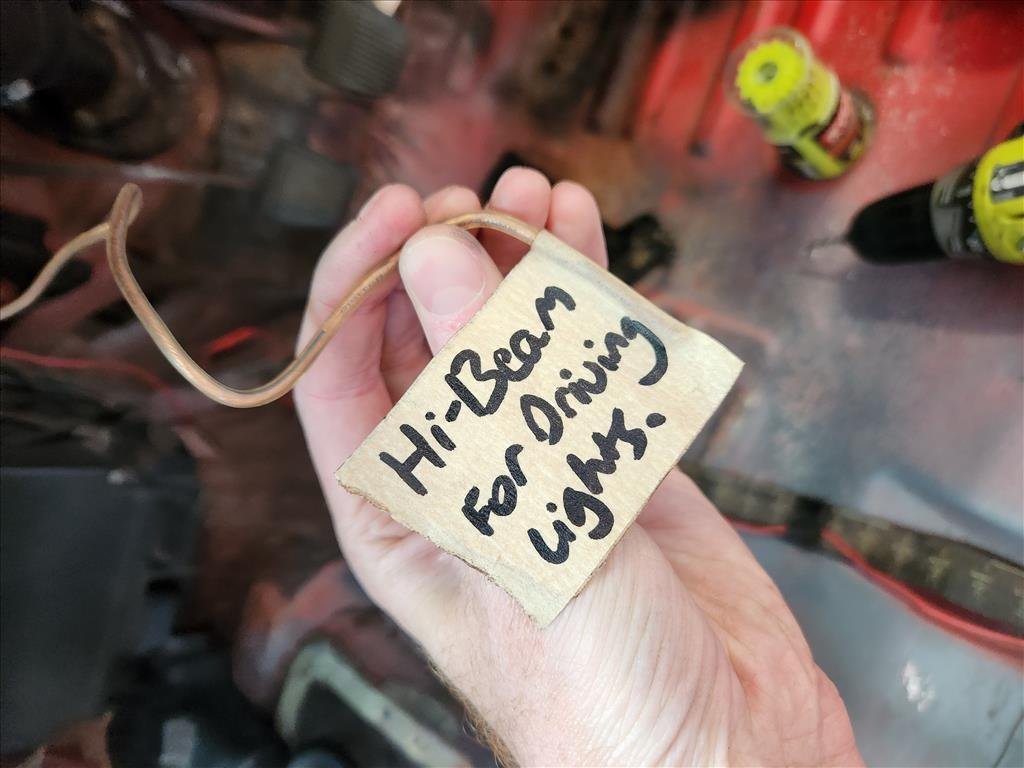
Driveshafts in Oil in Coolant in Popping and banging when I try to start it Realising the plug leads are 180deg out Boom Then realising the fuel pump is leaking like a sieve and it is a $14 AliX special so not unexpected. Then finding the original Facet pump and checking it works, it does Then realising you have no fittings to make it work so no driving12 points
-
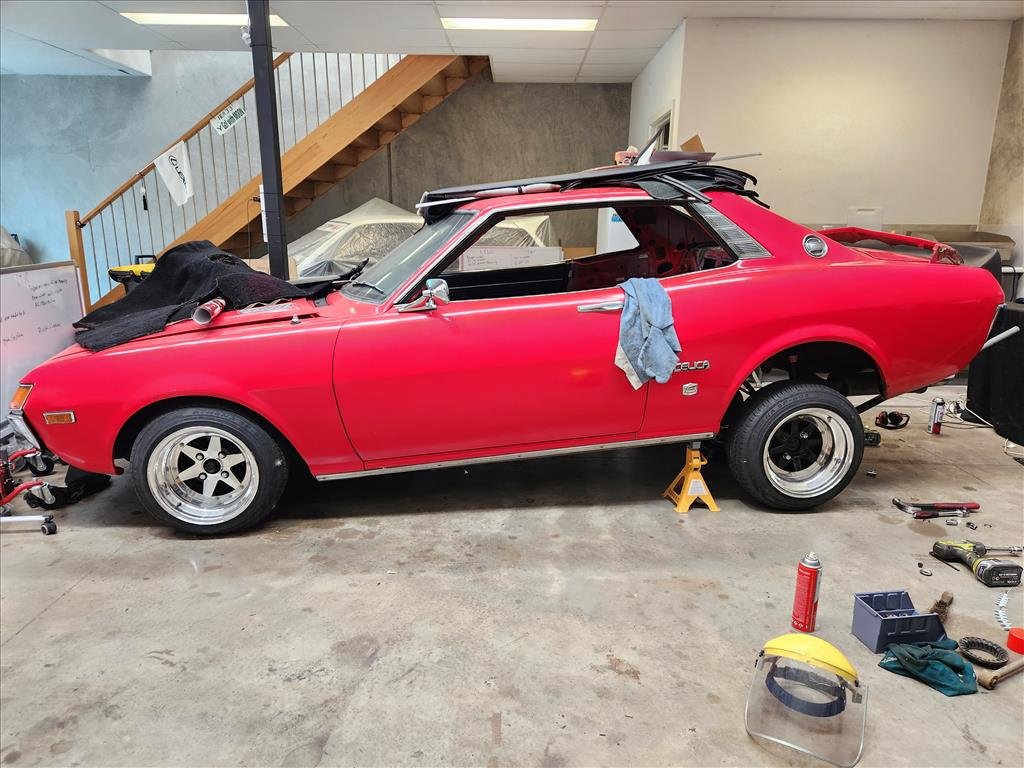
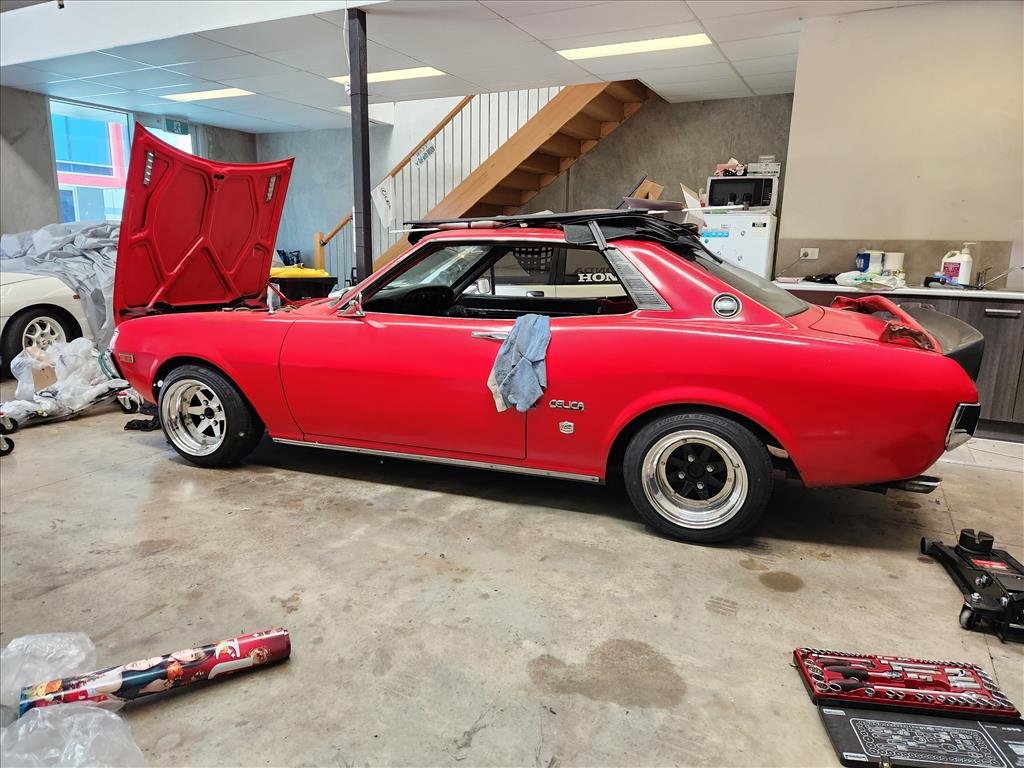
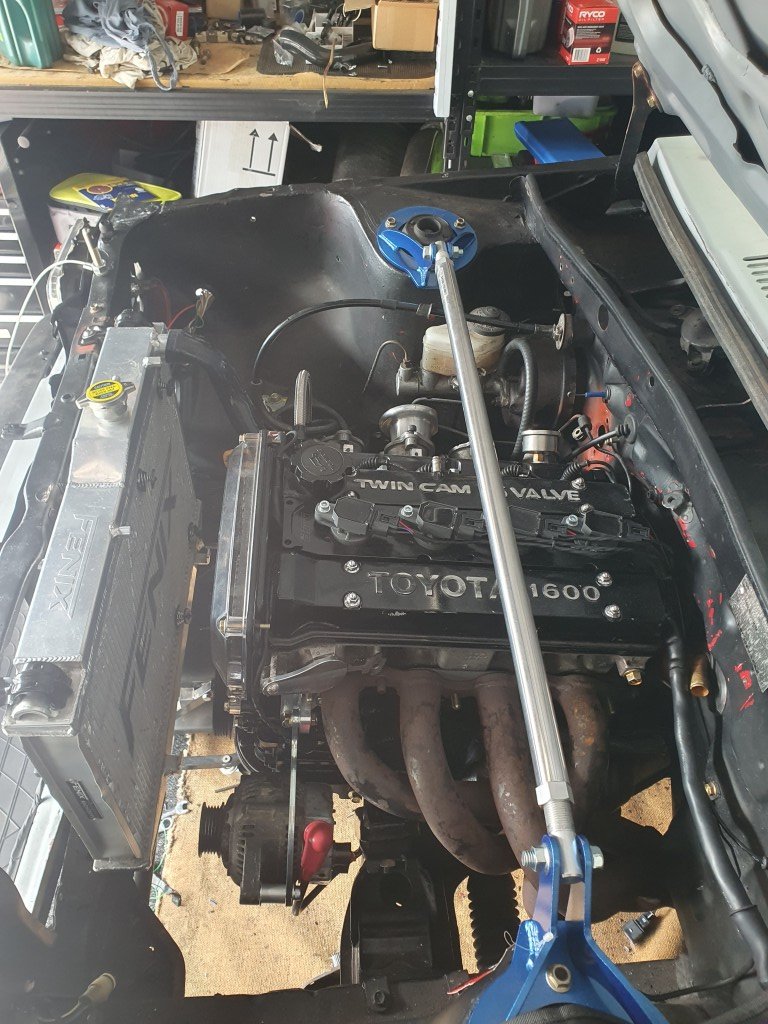
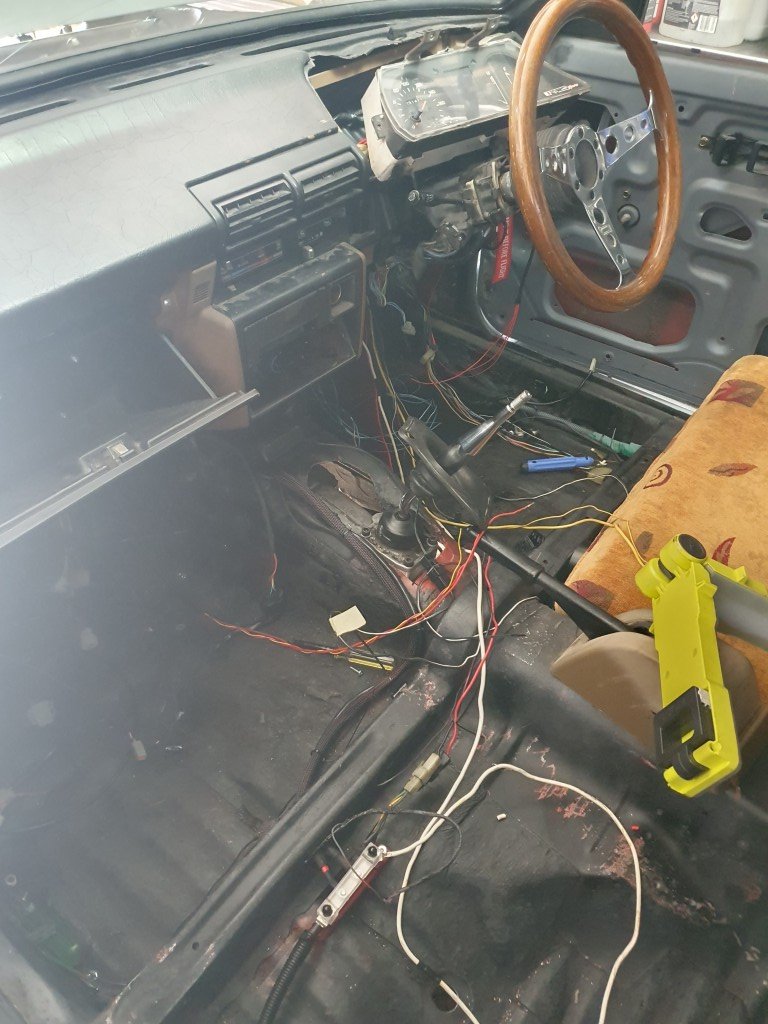
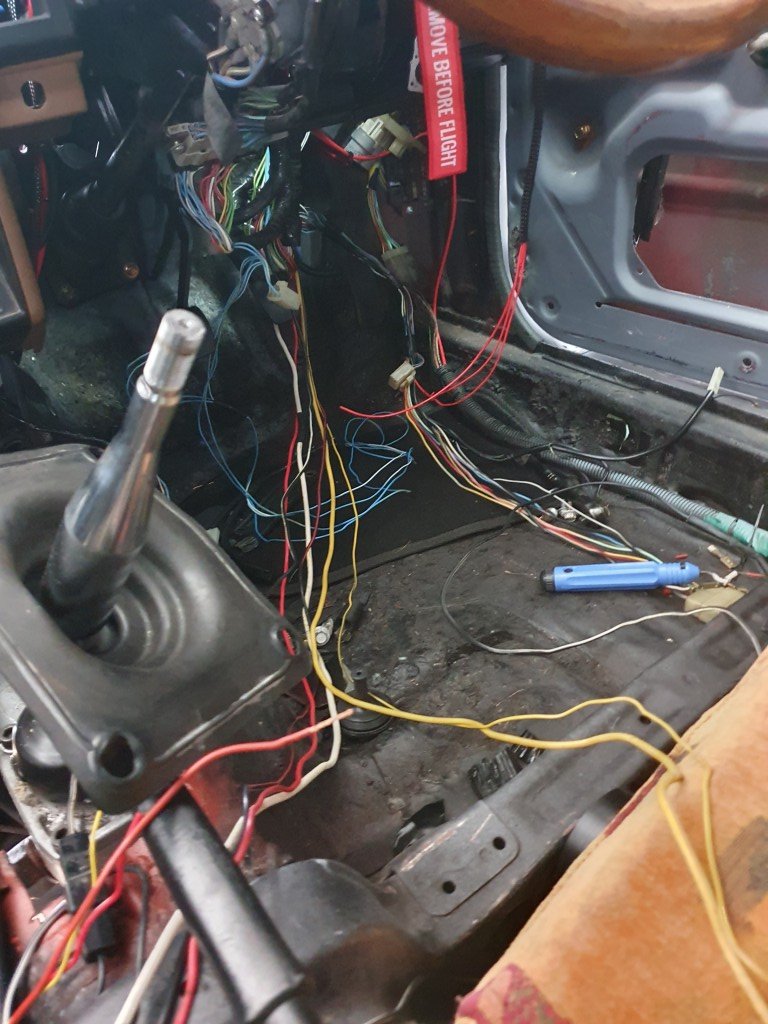
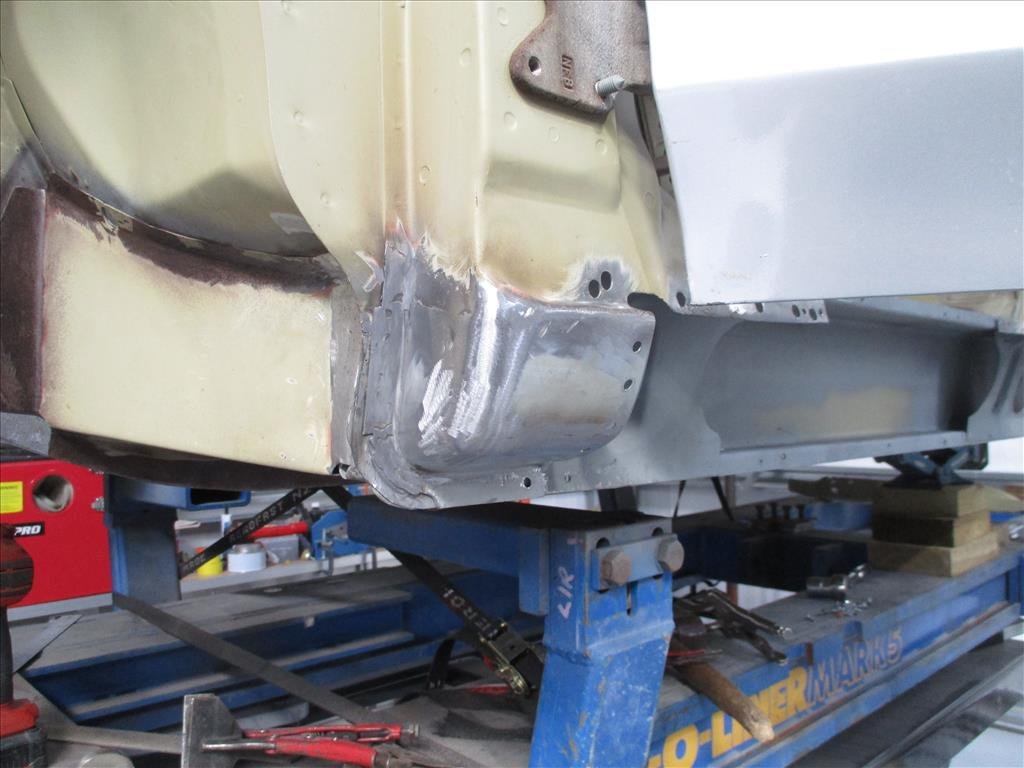
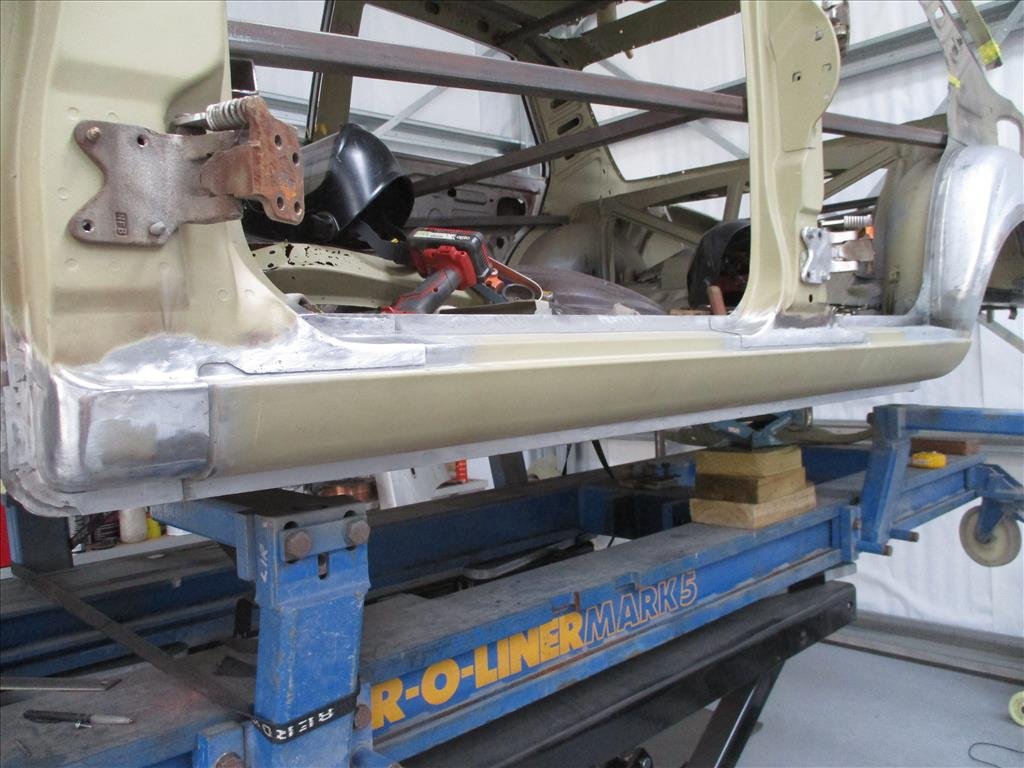
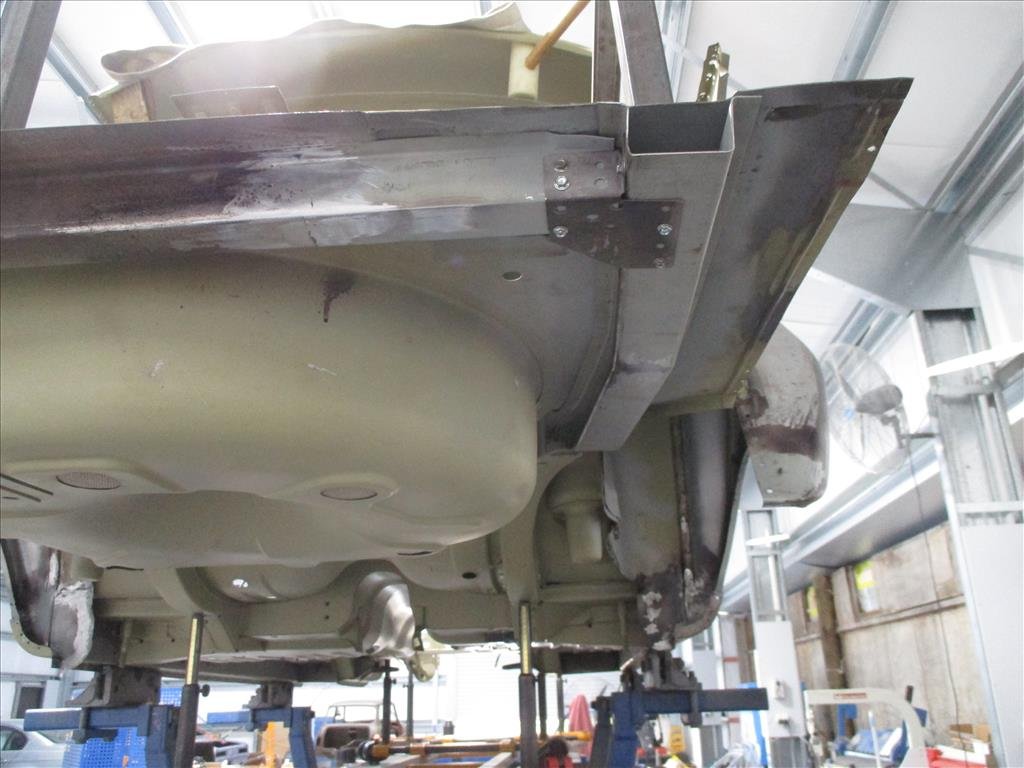
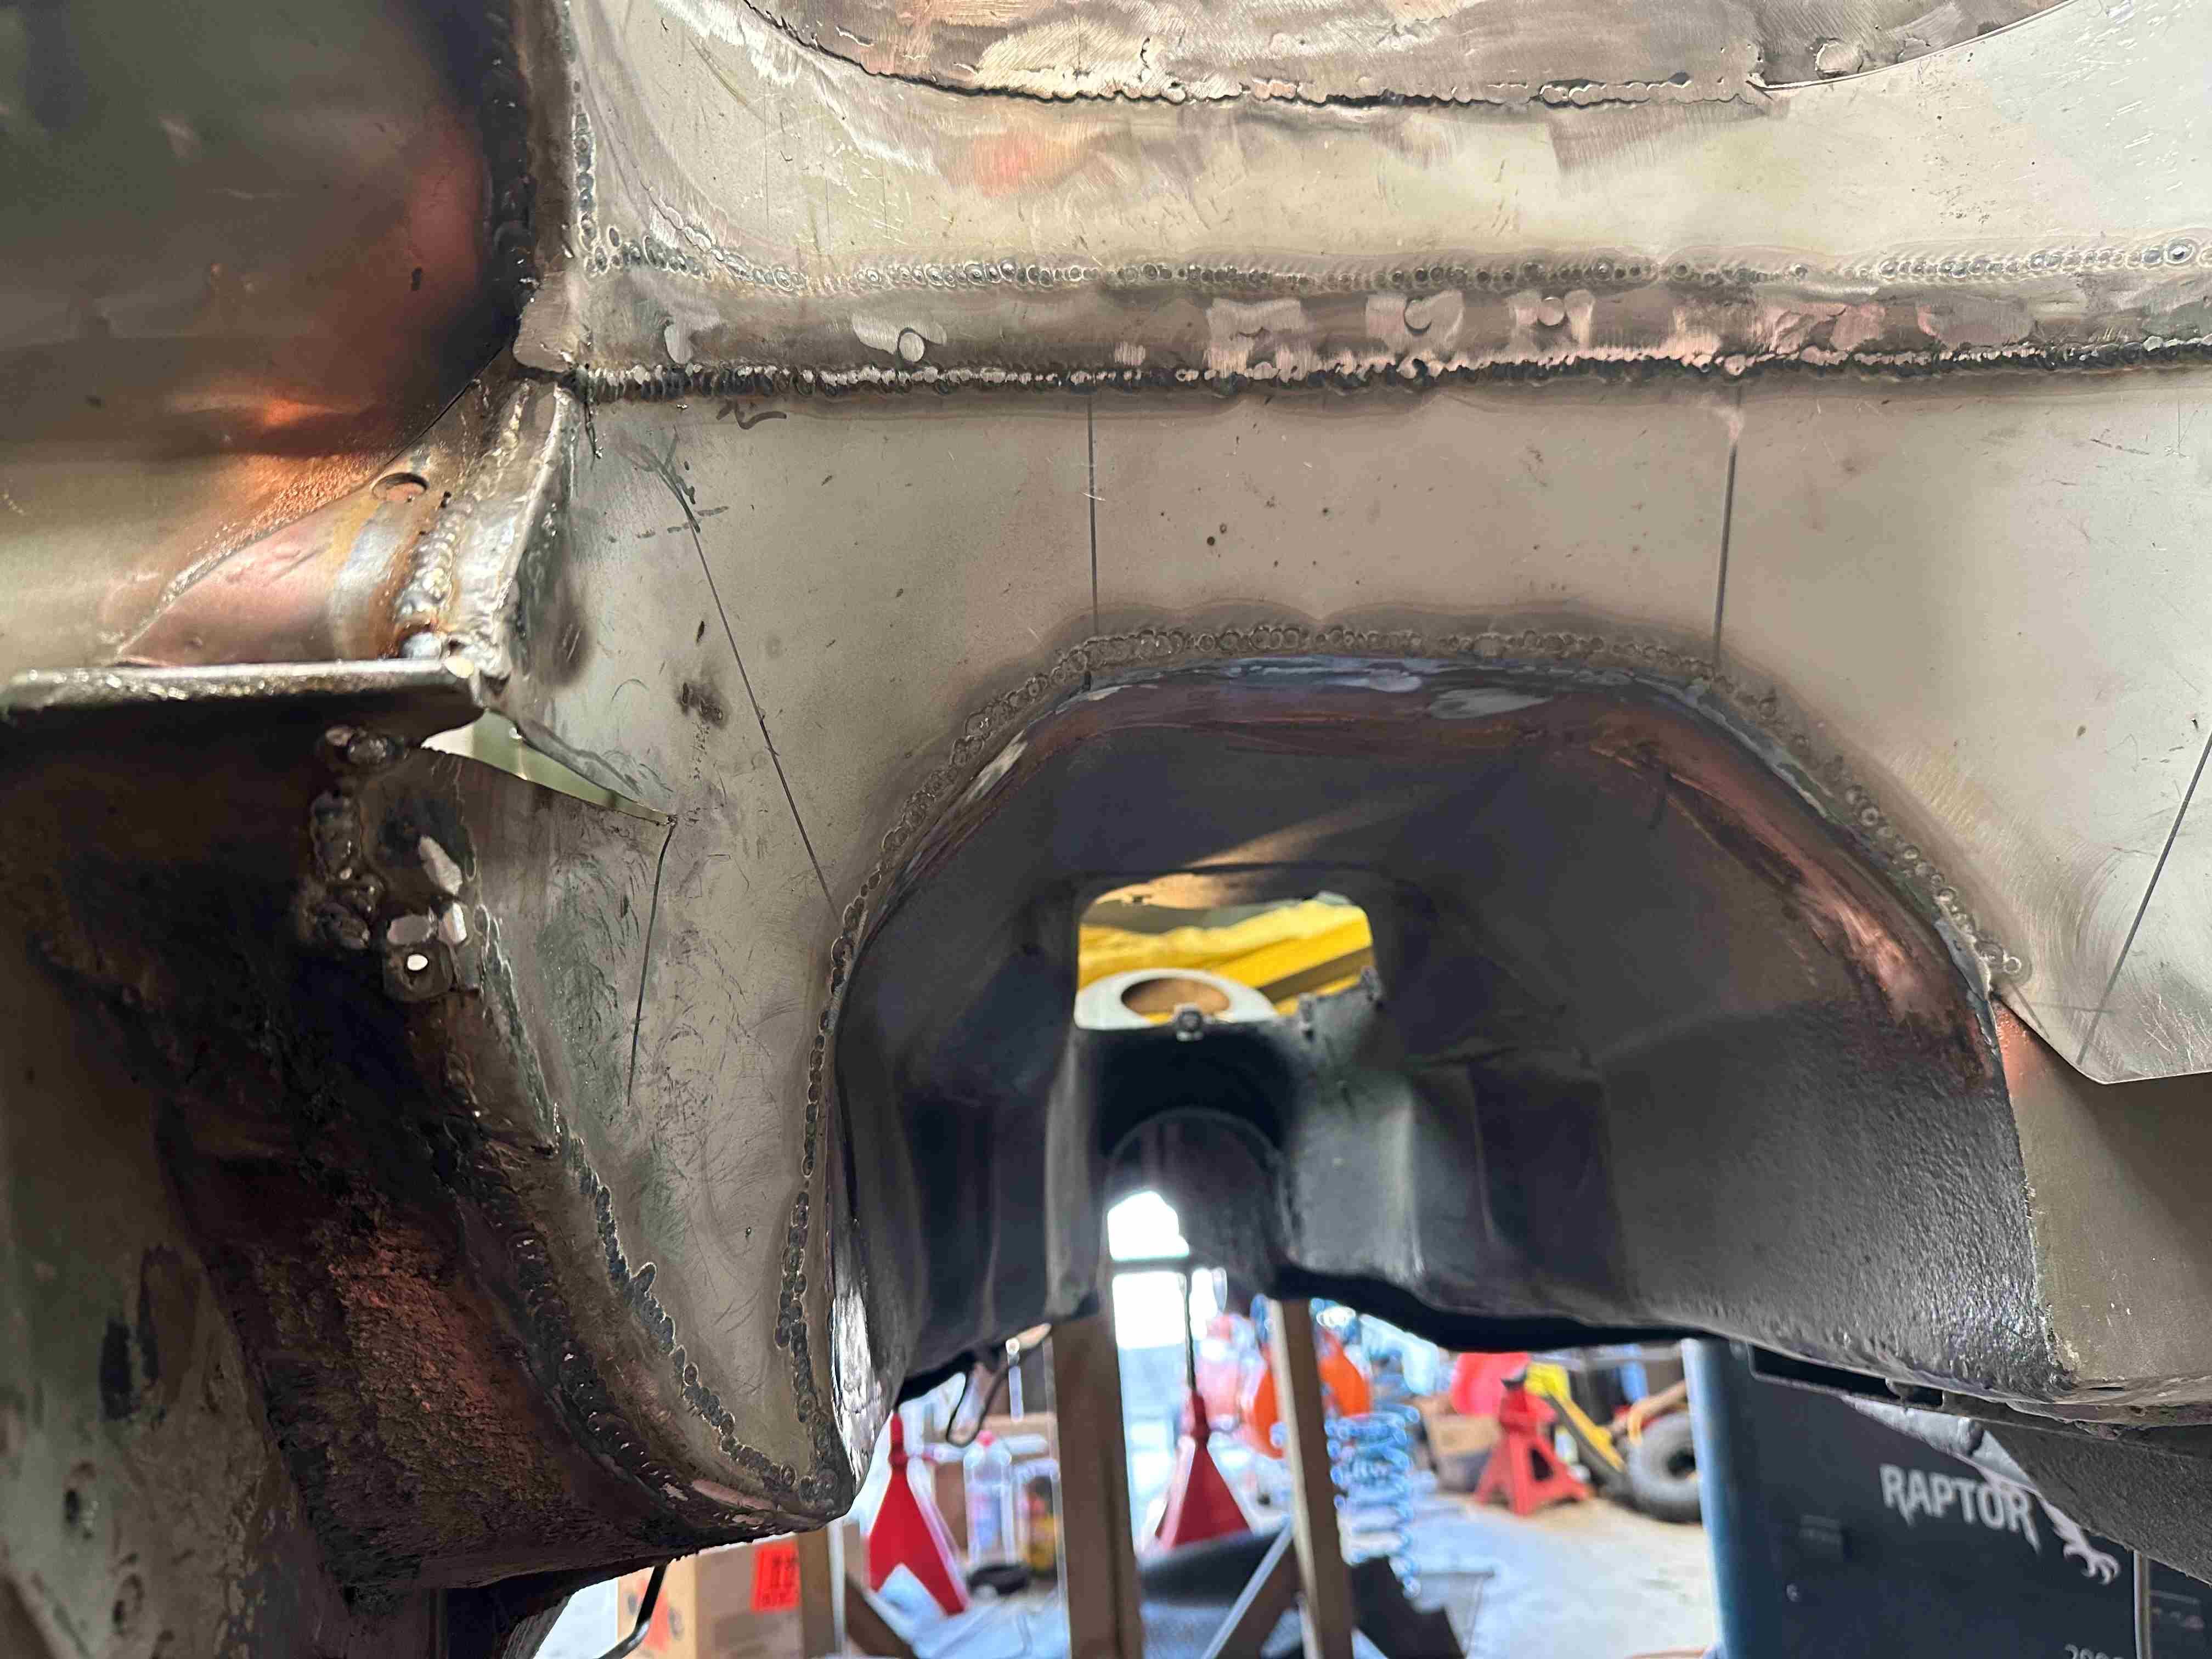
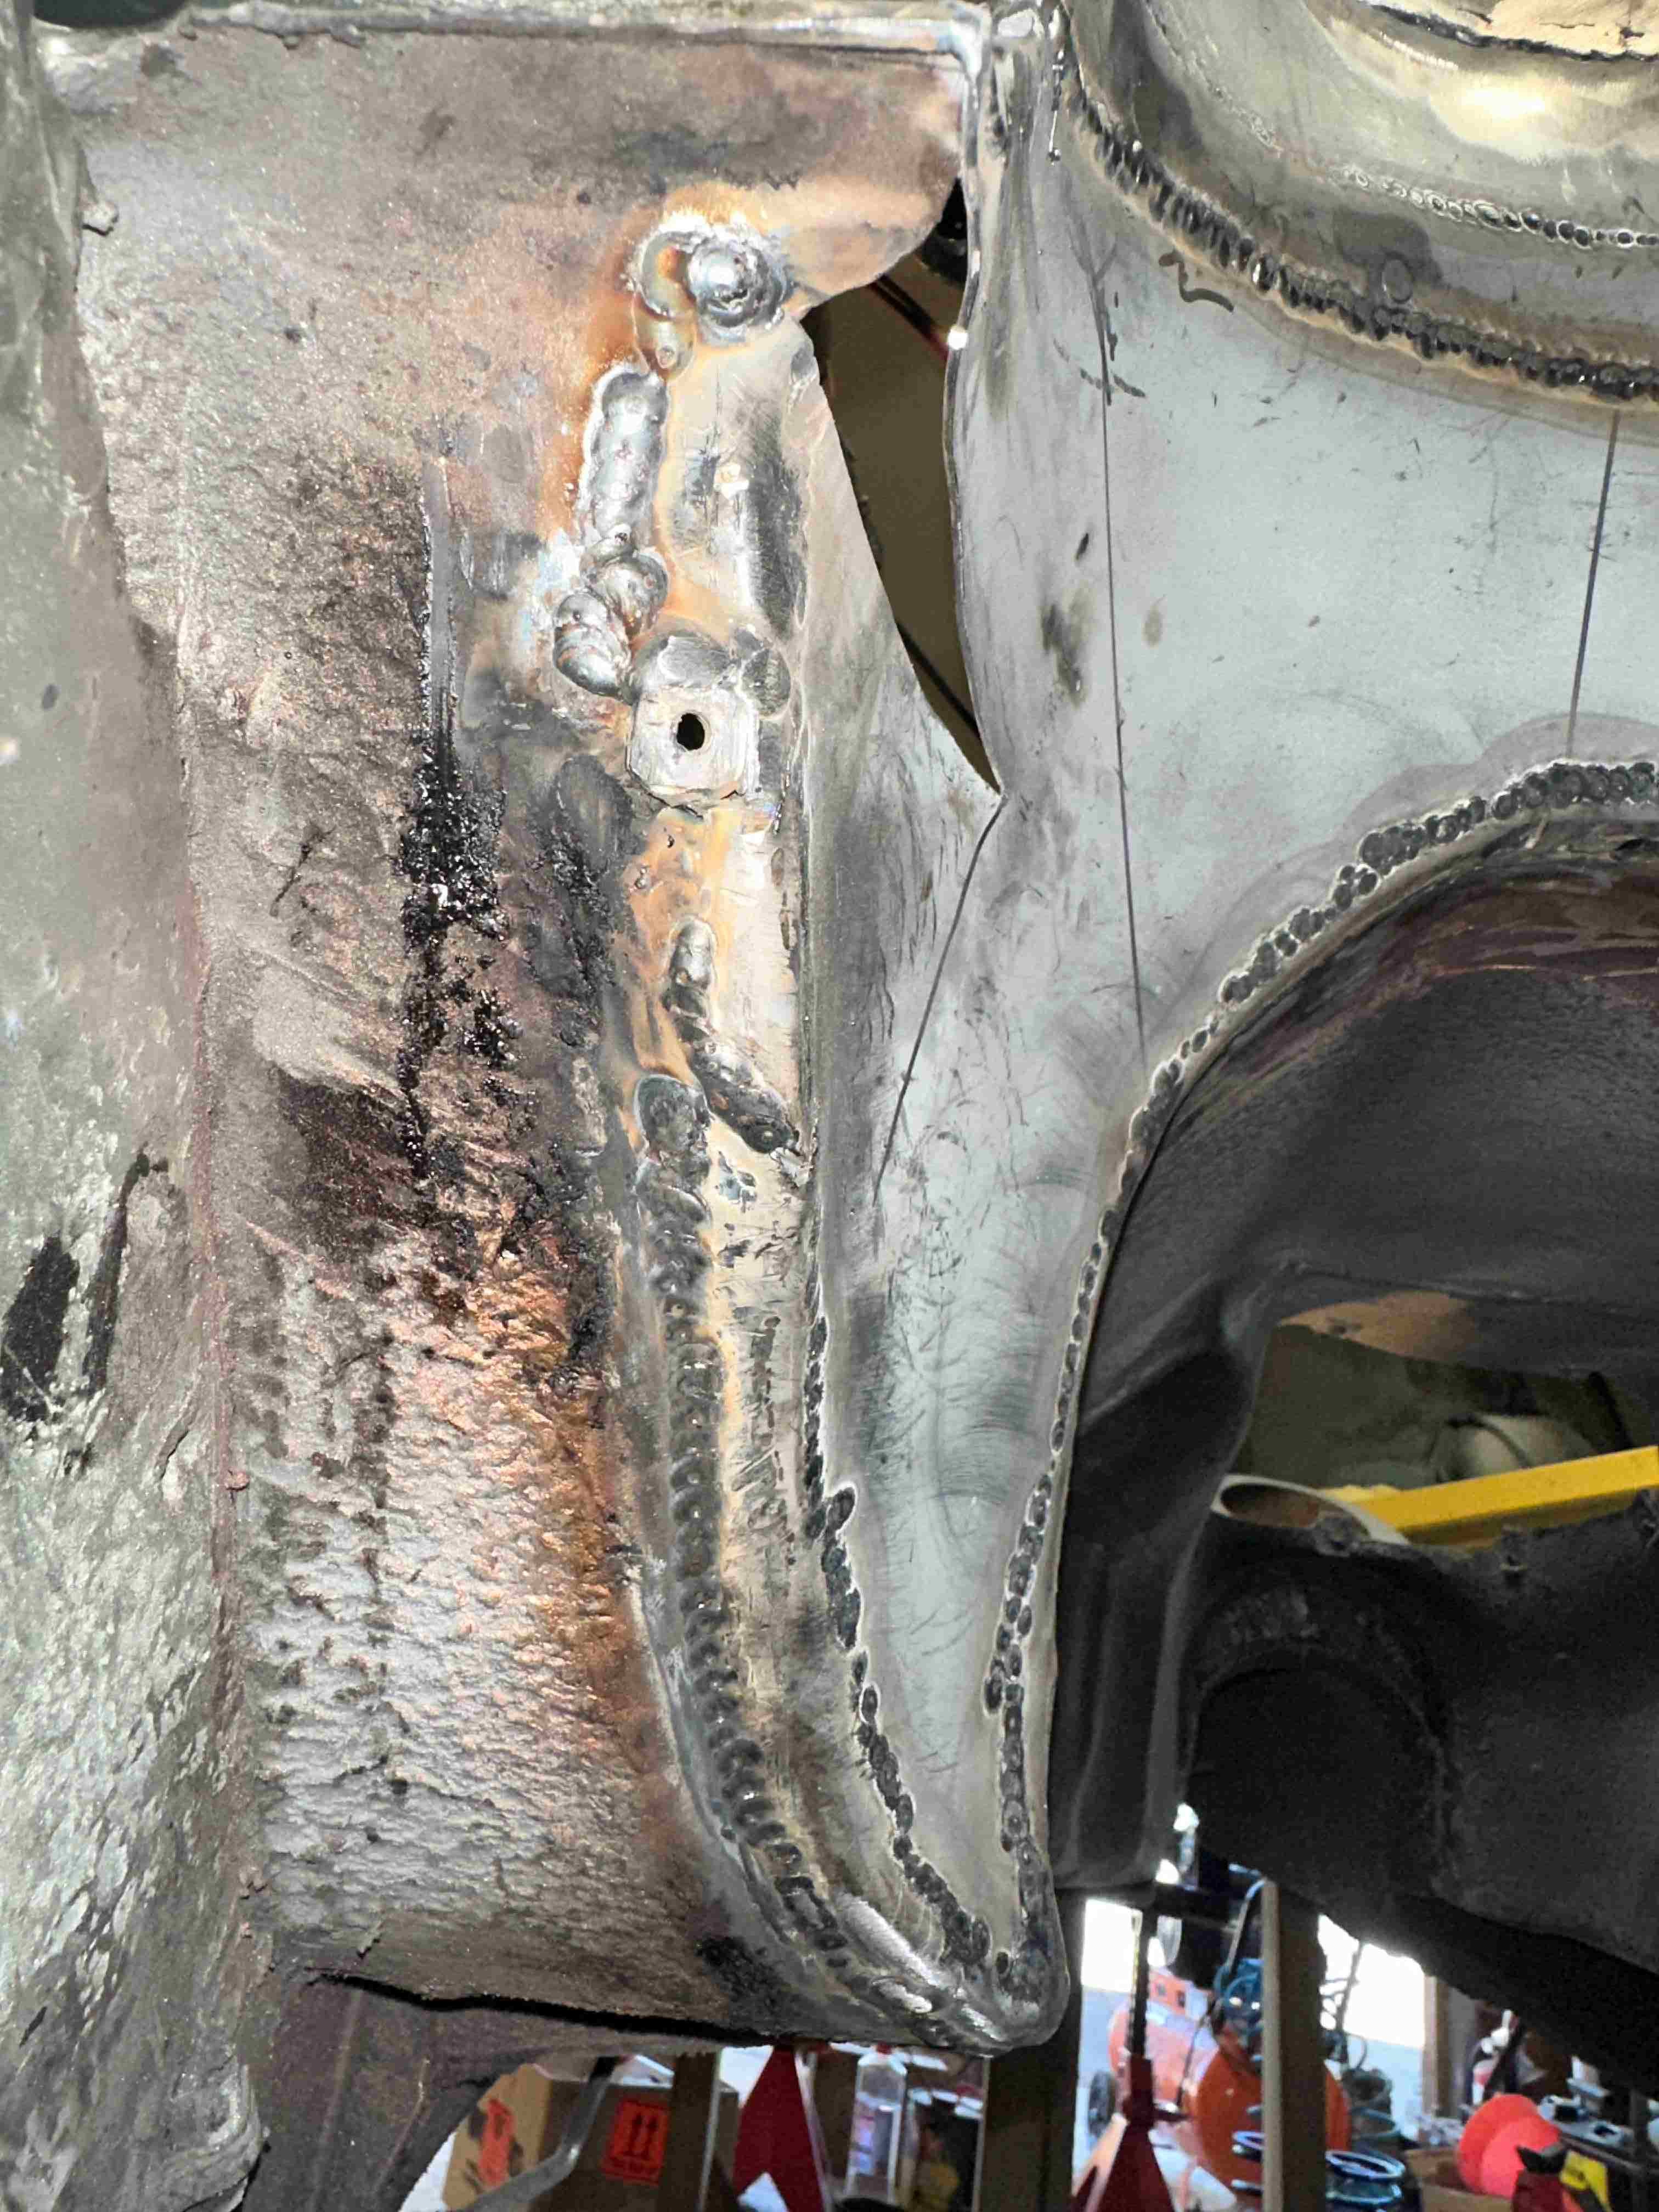
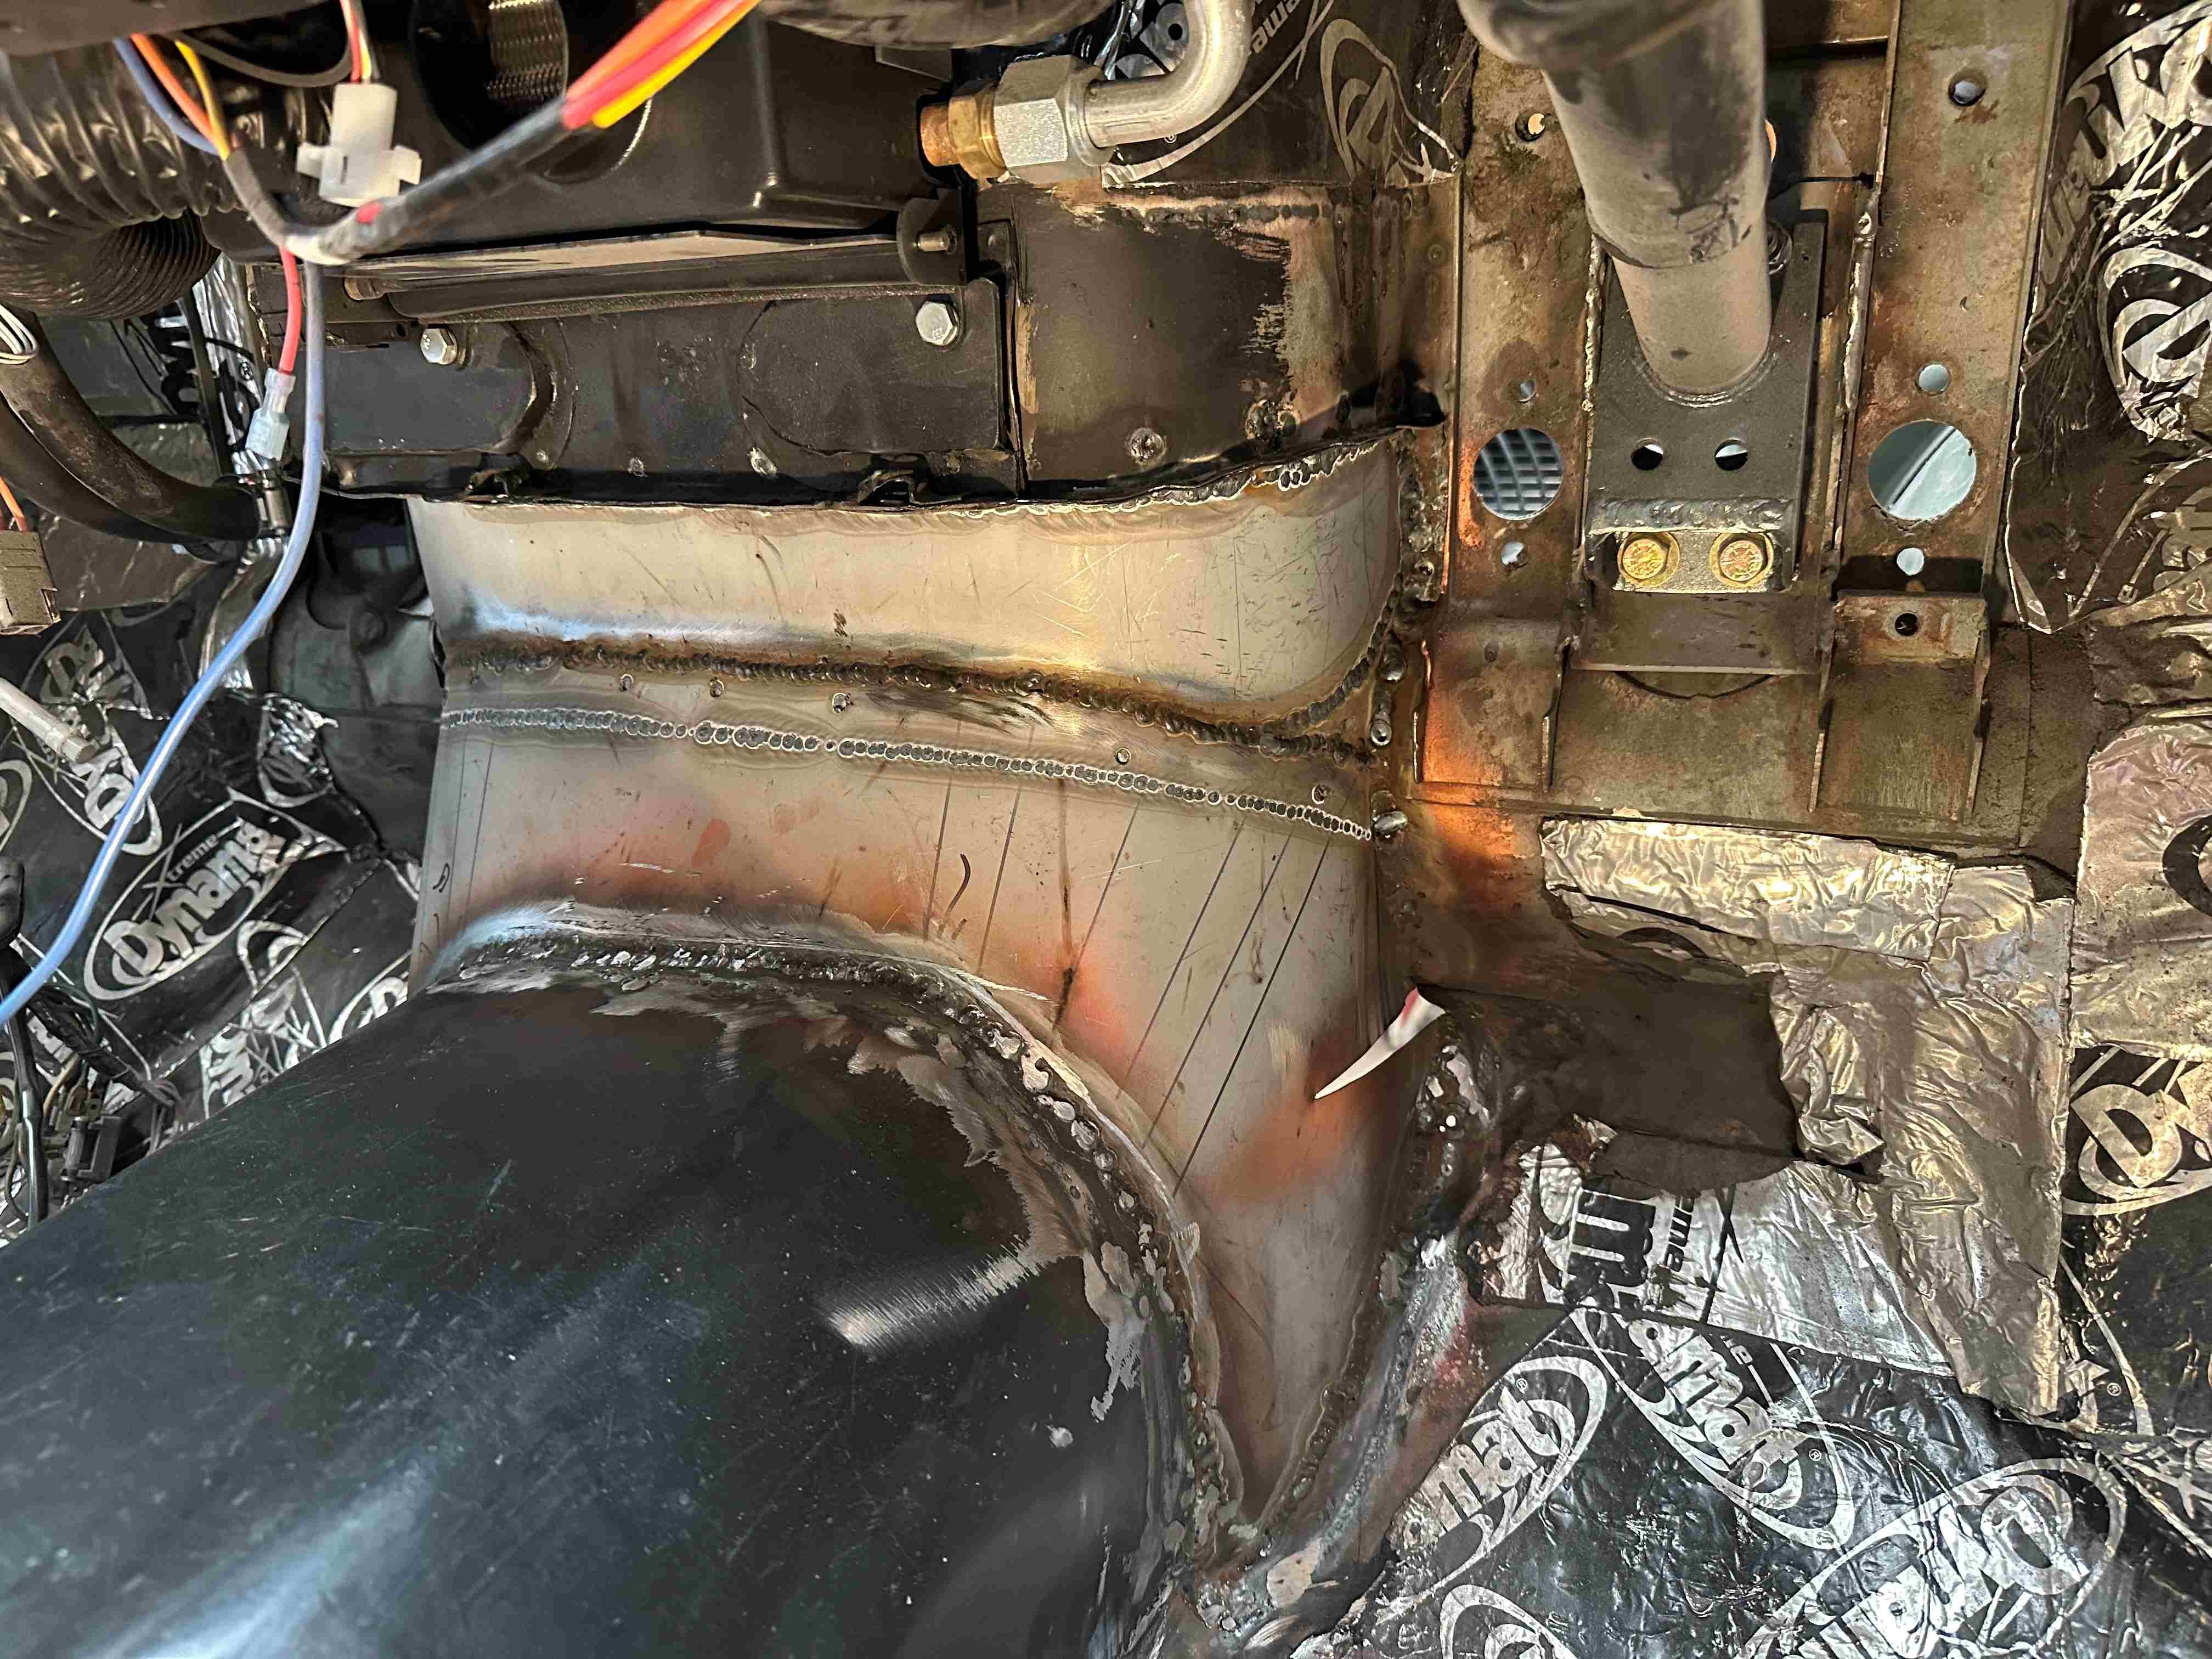
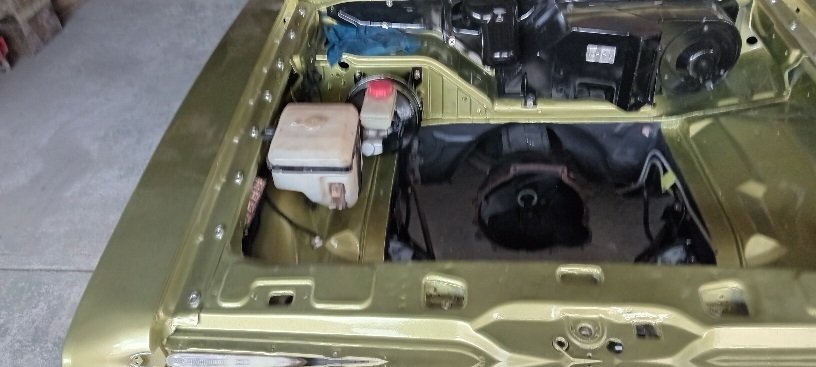
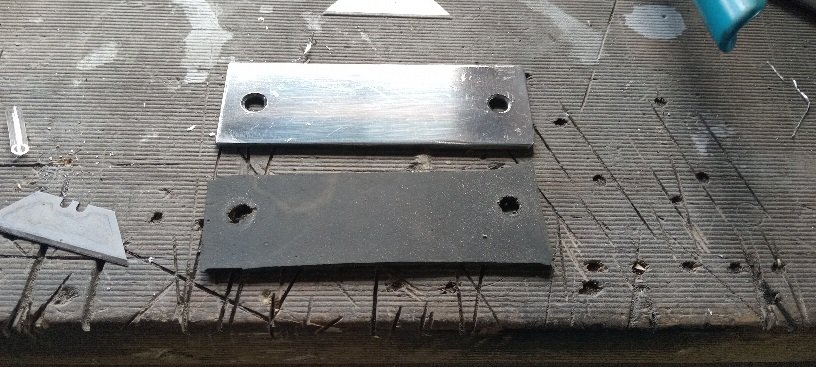
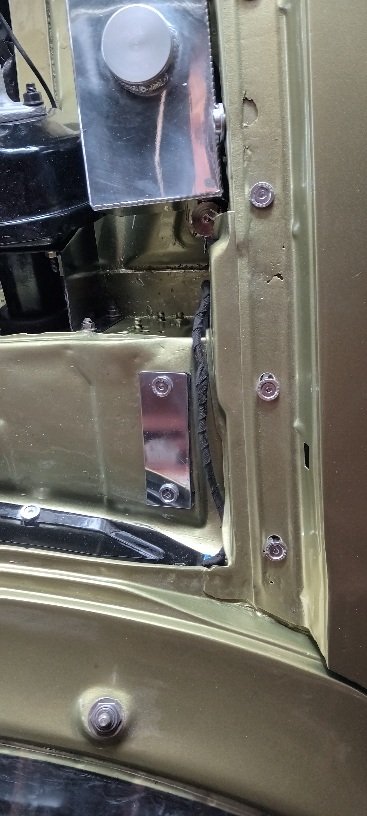
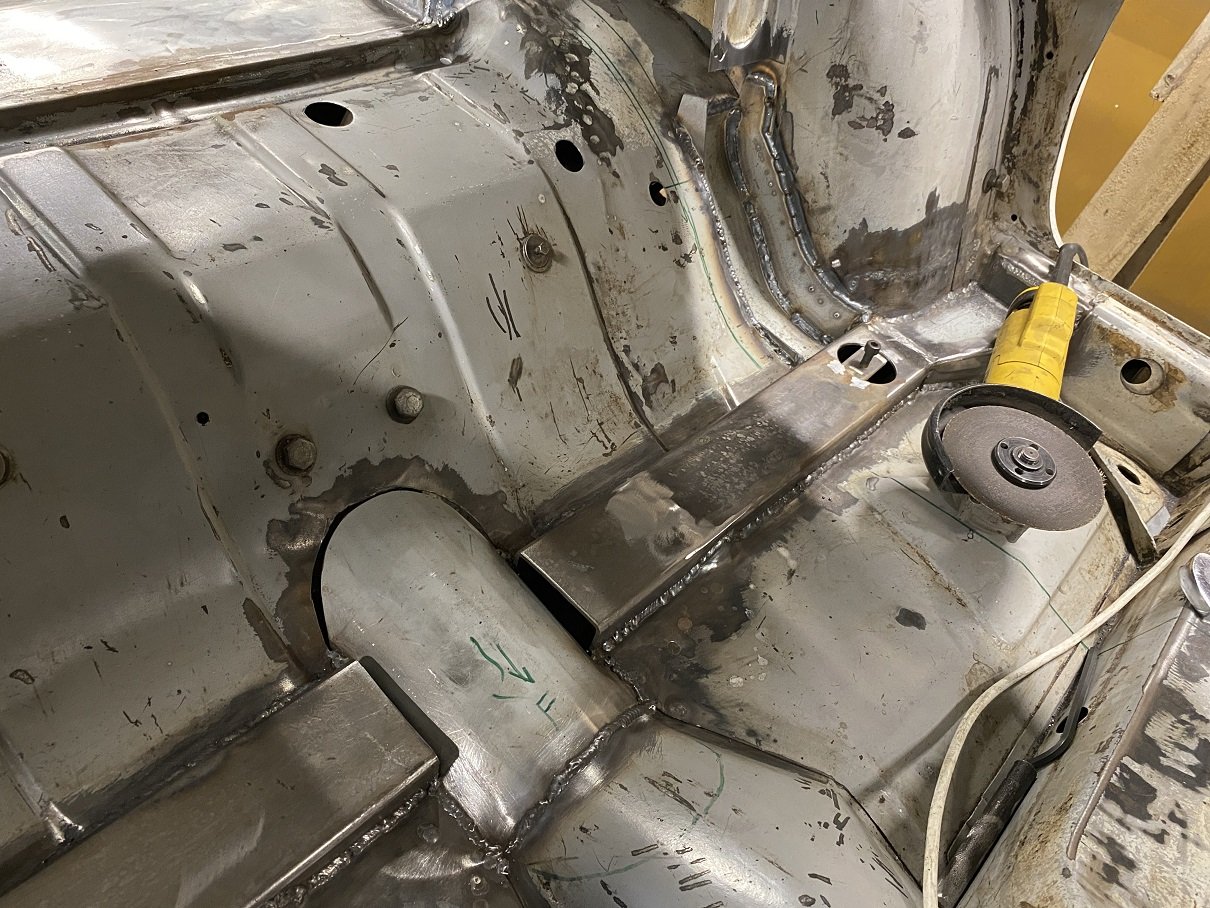
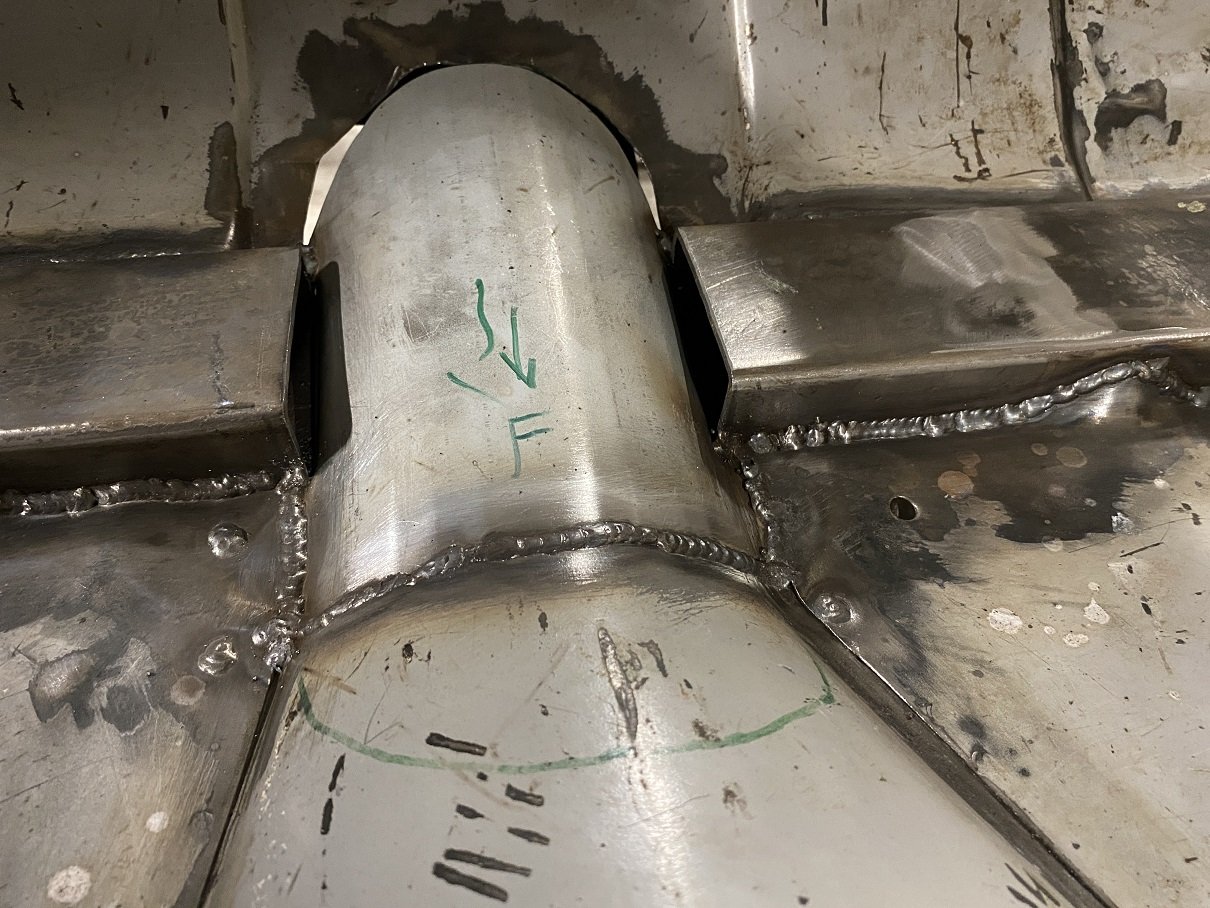
Lots of spreadsheets and mulling led to the decision to rebuild it ourselves. The engine the mechanics sourced had no information other than "64kkm"; engines before 2019 models have thrust bearing issues I'd like to avoid. They'd charge a lot of money for something that I'm meant to be learning how to do. The cost of getting an appropriate year replacement engine from Japan is approx $5000 delivered with gst, depending on who I go with. Engine reconditioney man said if it was his block, he'd re-use it. Obviously he's not going to put "it's fine" on paper but it's better than him saying a perfectly reusable block should be tossed to avoid liability. Anyway, The good news The crank and conrod could be saved! The block should be fine! The bad news For the life of us, we couldn't find any undersized bearings for the crank in the "standard 0.25mm" increments. The engine is used in so many cars, I find it hard to believe there's nothing out there, but we just couldn't find the right people. Apparently part numbers are king in Japan and they are super cagey about anything else for liability reasons. After a while of inquiries and searches, I gave up and bought a new crank and conrod. The good news 2: electric boogaloo I'd been plugging part numbers into Amayama and bugging them to update their database because no altos past 2015 are in there. But while inquiring with Jesse Streeter, he mentioned off hand that he could get them for cheaper. I gave it a shot and.... yeah he's right! Amayama: $1.9k Streeter corp: $1.45k Delivered faster, too... That said, I'd already bought a batch from Amayama; still, the bulk of the parts went through streeter so I'm very happy with that turn of events. When Jesse's first batch arrived at his office, I asked him to send a pic of the crank stamps. This let me use the block and conrod stamps to figure out the most likely bearings to use and order them in advance. I forgot to get him to check the new conrod but fortunately it worked out While girlface cleaned the schmoo and old (possibly metallic) oil from the block, I cleaned up the old crowns. I struggled a lot with some old kitchen scourers and toothbrush with acetone before I spot-tested a brass brush and absolutely blasted through the rest of it. I also replaced the new flywheel bearing (don't worry it's clean now), 10mm for scale Cleaned and schmoo'd the transmission clutch housing, ... and the floor, went slightly overkill getting rid of those fuel fumes that we really should have dealt to weeks ago, And sorted out those drive shafts. When we removed the engine, we cut the boots open. I was super dubious about this move, having (somewhat) recently dealt with the Starion's shafts and watched people on youtube reinstall their modern FWD shafts, but since when is DIY engine overhauling smooth? I popped the shaft ends out of the transmission easily with gentle pressure from a crow bar and some light rubber malleting. Then dealt with the other ends which were still in the car. Fortunately I didn't have to remove any suspension bits because there was no engine blocking them, I just had to remove the wheels and hub nut. That's a rusty rotor. It's okay bb soon hush Then I recruited girlface to slam them out in an afternoon. Ew Ugh gross This is the closest I'll ever get to baby poop We struggled for like an hour to get the big end "properly" seated. It just looked like there was a notch waiting for it. We used shims, screwdrivers, pliers, the vice, brute force... I finally had the idea to go confer with Kelvin on how they look assembled on his car, and also hunt for high-res second hand drive shaft shots on the internet, and discovered that nope we'd been all the way on the whole time .... :') So fine, moving on to clips. The suzuki boot clips we got were this design I'd never seen; you bend a piece of metal over and it has the precise correct clamping force for the boot. Cool. Well it was cool until we had to do the two large clips. You see with the small ones, we could just use adjustable pliers to perform a reach around and grip both sides of the shaft. This let us press down easily and evenly. There's a lot of force required to get the metal to bend over, and it needs to be consistent along its length because it'll happily deform. We tried a few things, and just when we thought we had a good thing going with a hammer, we broke it :\ We didn't think the other one would go any better - or inspire confidence if we did get it on - so we decided fuck it, we'll go generic. One clamp installer and generic set later... ... the drive shafts are back at square one. I sure hope the outer boots don't die any time soon because you have to take the inner ones off to service them ... ... We need a final shipment (bearings) to arrive which will take up to a couple weeks probably, but we've got all of the other parts and there's plenty of work to do in the mean time. I've been assembling a (work-in-progress) dependency/workflow diagram to try rein my brain in and have been printing out sections of the manual for stuff that's trickier to do in front of a laptop with greasy hands. And we're caught up. Oh I bought a head stand and it's probably overkill... So um, here some more pics for scale.11 points
-
So I decided to make it one piece which I should have done the first time. It makes it much easier to get both sides the same. Pretty much the same design apart from that, with the boots sheet metal sandwiched between the two pieces. All just being tacked together for now until I am sure it is right. Shouldn't need an additional brace between the two sides now.
8 points
-
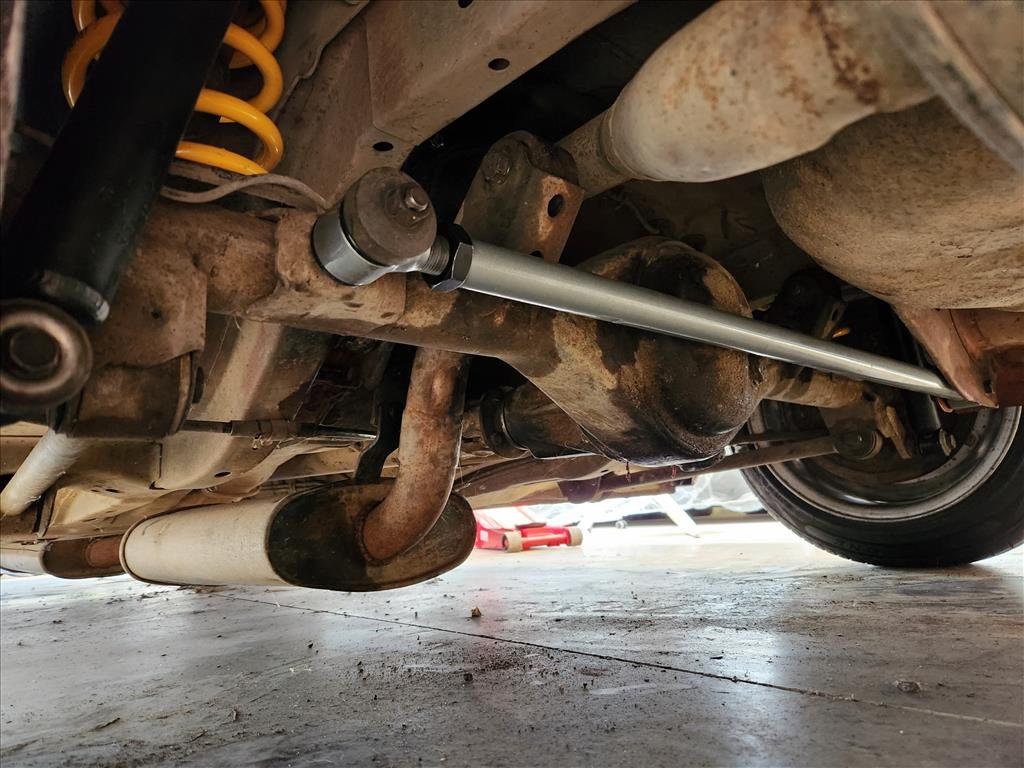
Trust me to turn a one hour job into two days. Ever since I had the SSR MK3s built there was some fender scraping on one side in the rear (which is why I decided to switch it up briefly and have one side swapped around front to back). This is partially because the rear arches are probably uneven and filled with bog and partially because I had the wheels built without measuring anything. Seeing as I was doing a Whiteline stock order I added one of their adjustable panhard rods and try to square up the rear diff. First issue was one of the nuts stripped threads so I had to cut that off and made a hash of it, then I was trying to do this job without unbolting the 4 control arms which meant the diff was super hard to move around so I gave up and went home to sleep off my hangover. Day 2 I straight away unbolted the four control arms and life was considerably easier. I need to get another castle nut to replace the one I cut off but otherwise it's on now. Also a little bonus is the control arm bushes appear to have been replaced so they're still nice. Seems like I was also adjusting it the wrong way so rectified that and I think it's about even on both sides now. Keeping in mind the guards are filled with bog so also not really even. I was thinking about doing a slight one way height adjust on the rear but might leave it for now until car is back to driving and see how the clearance is. Long term plan is not to use those wheels anyway.
7 points
-
Made a thing
7 points
-
Bright and early this morning, firstly time to pour some liquid money into the box once the engine is kindof level. 3.2 liters of Redline MTL which all the cool kids say is the only shit to use in an X1/9 box. At $200 for 4x bottles it fucking better be. Then on to the main event; Then after half an hour of wiggling and jiggling, angling and dangling etc Then the rest of the day bolting shit back on; Just the driveshafts and some oil and it might be time for a skid. But thats tomorrow's effort.7 points
-
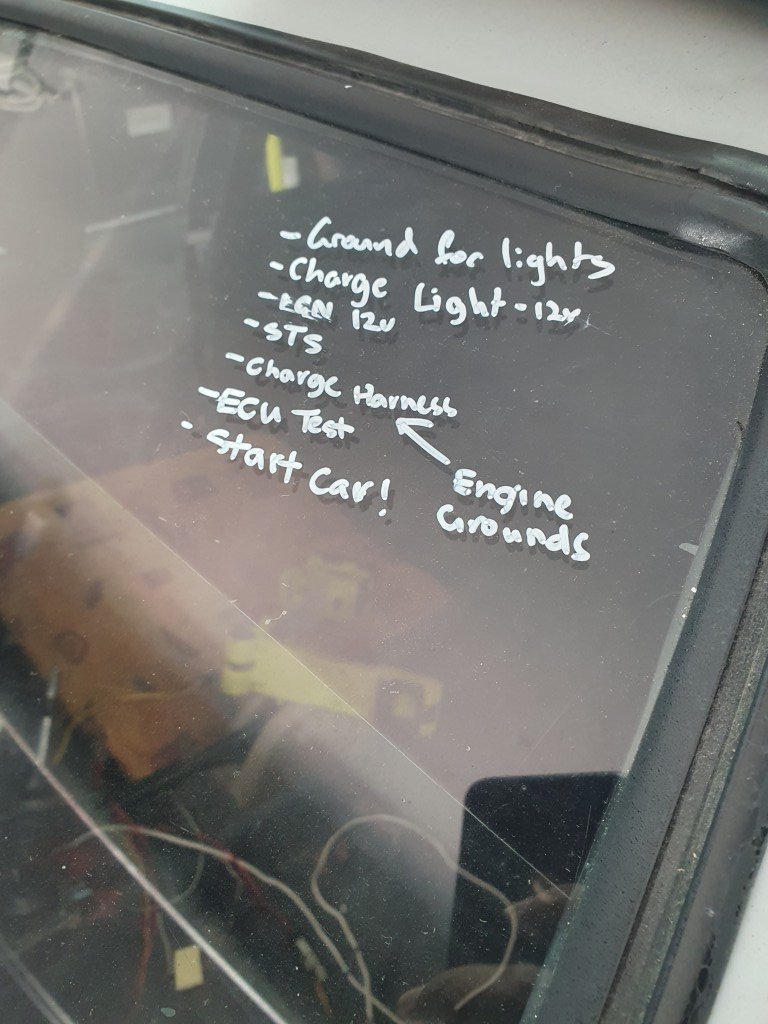
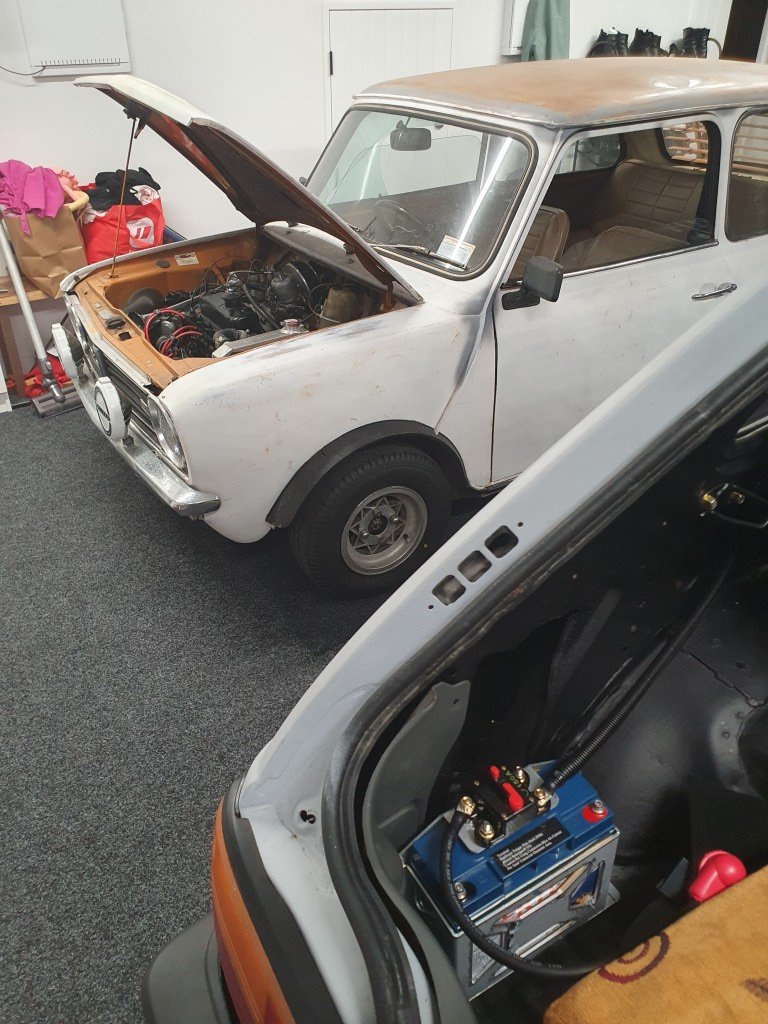
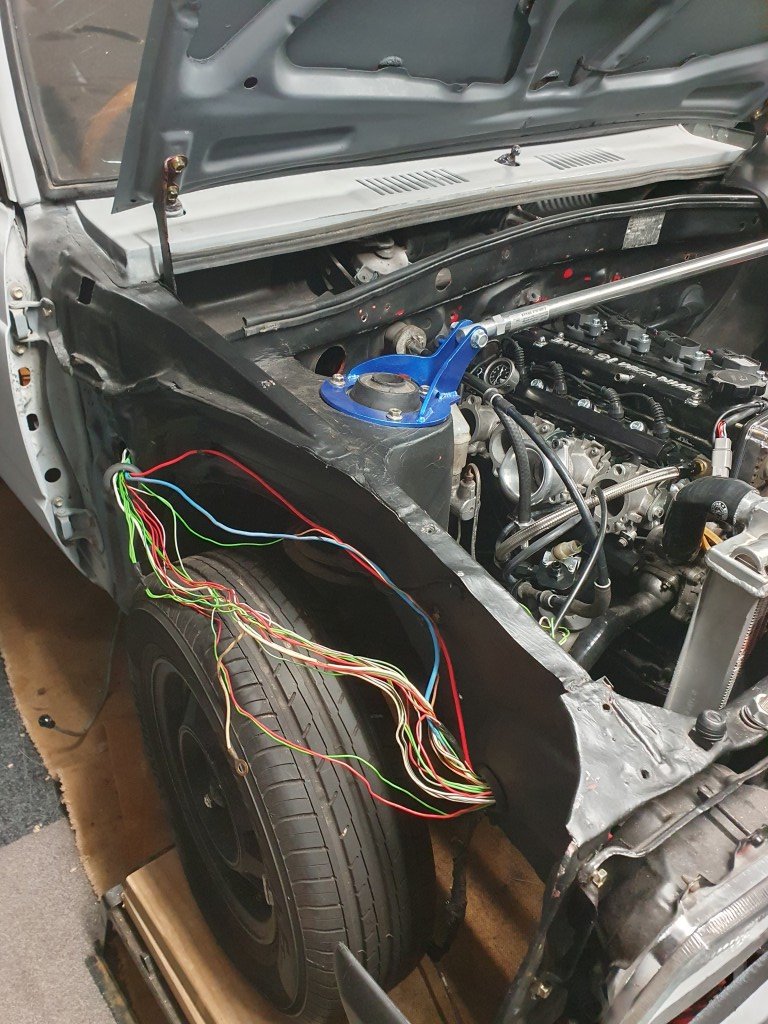
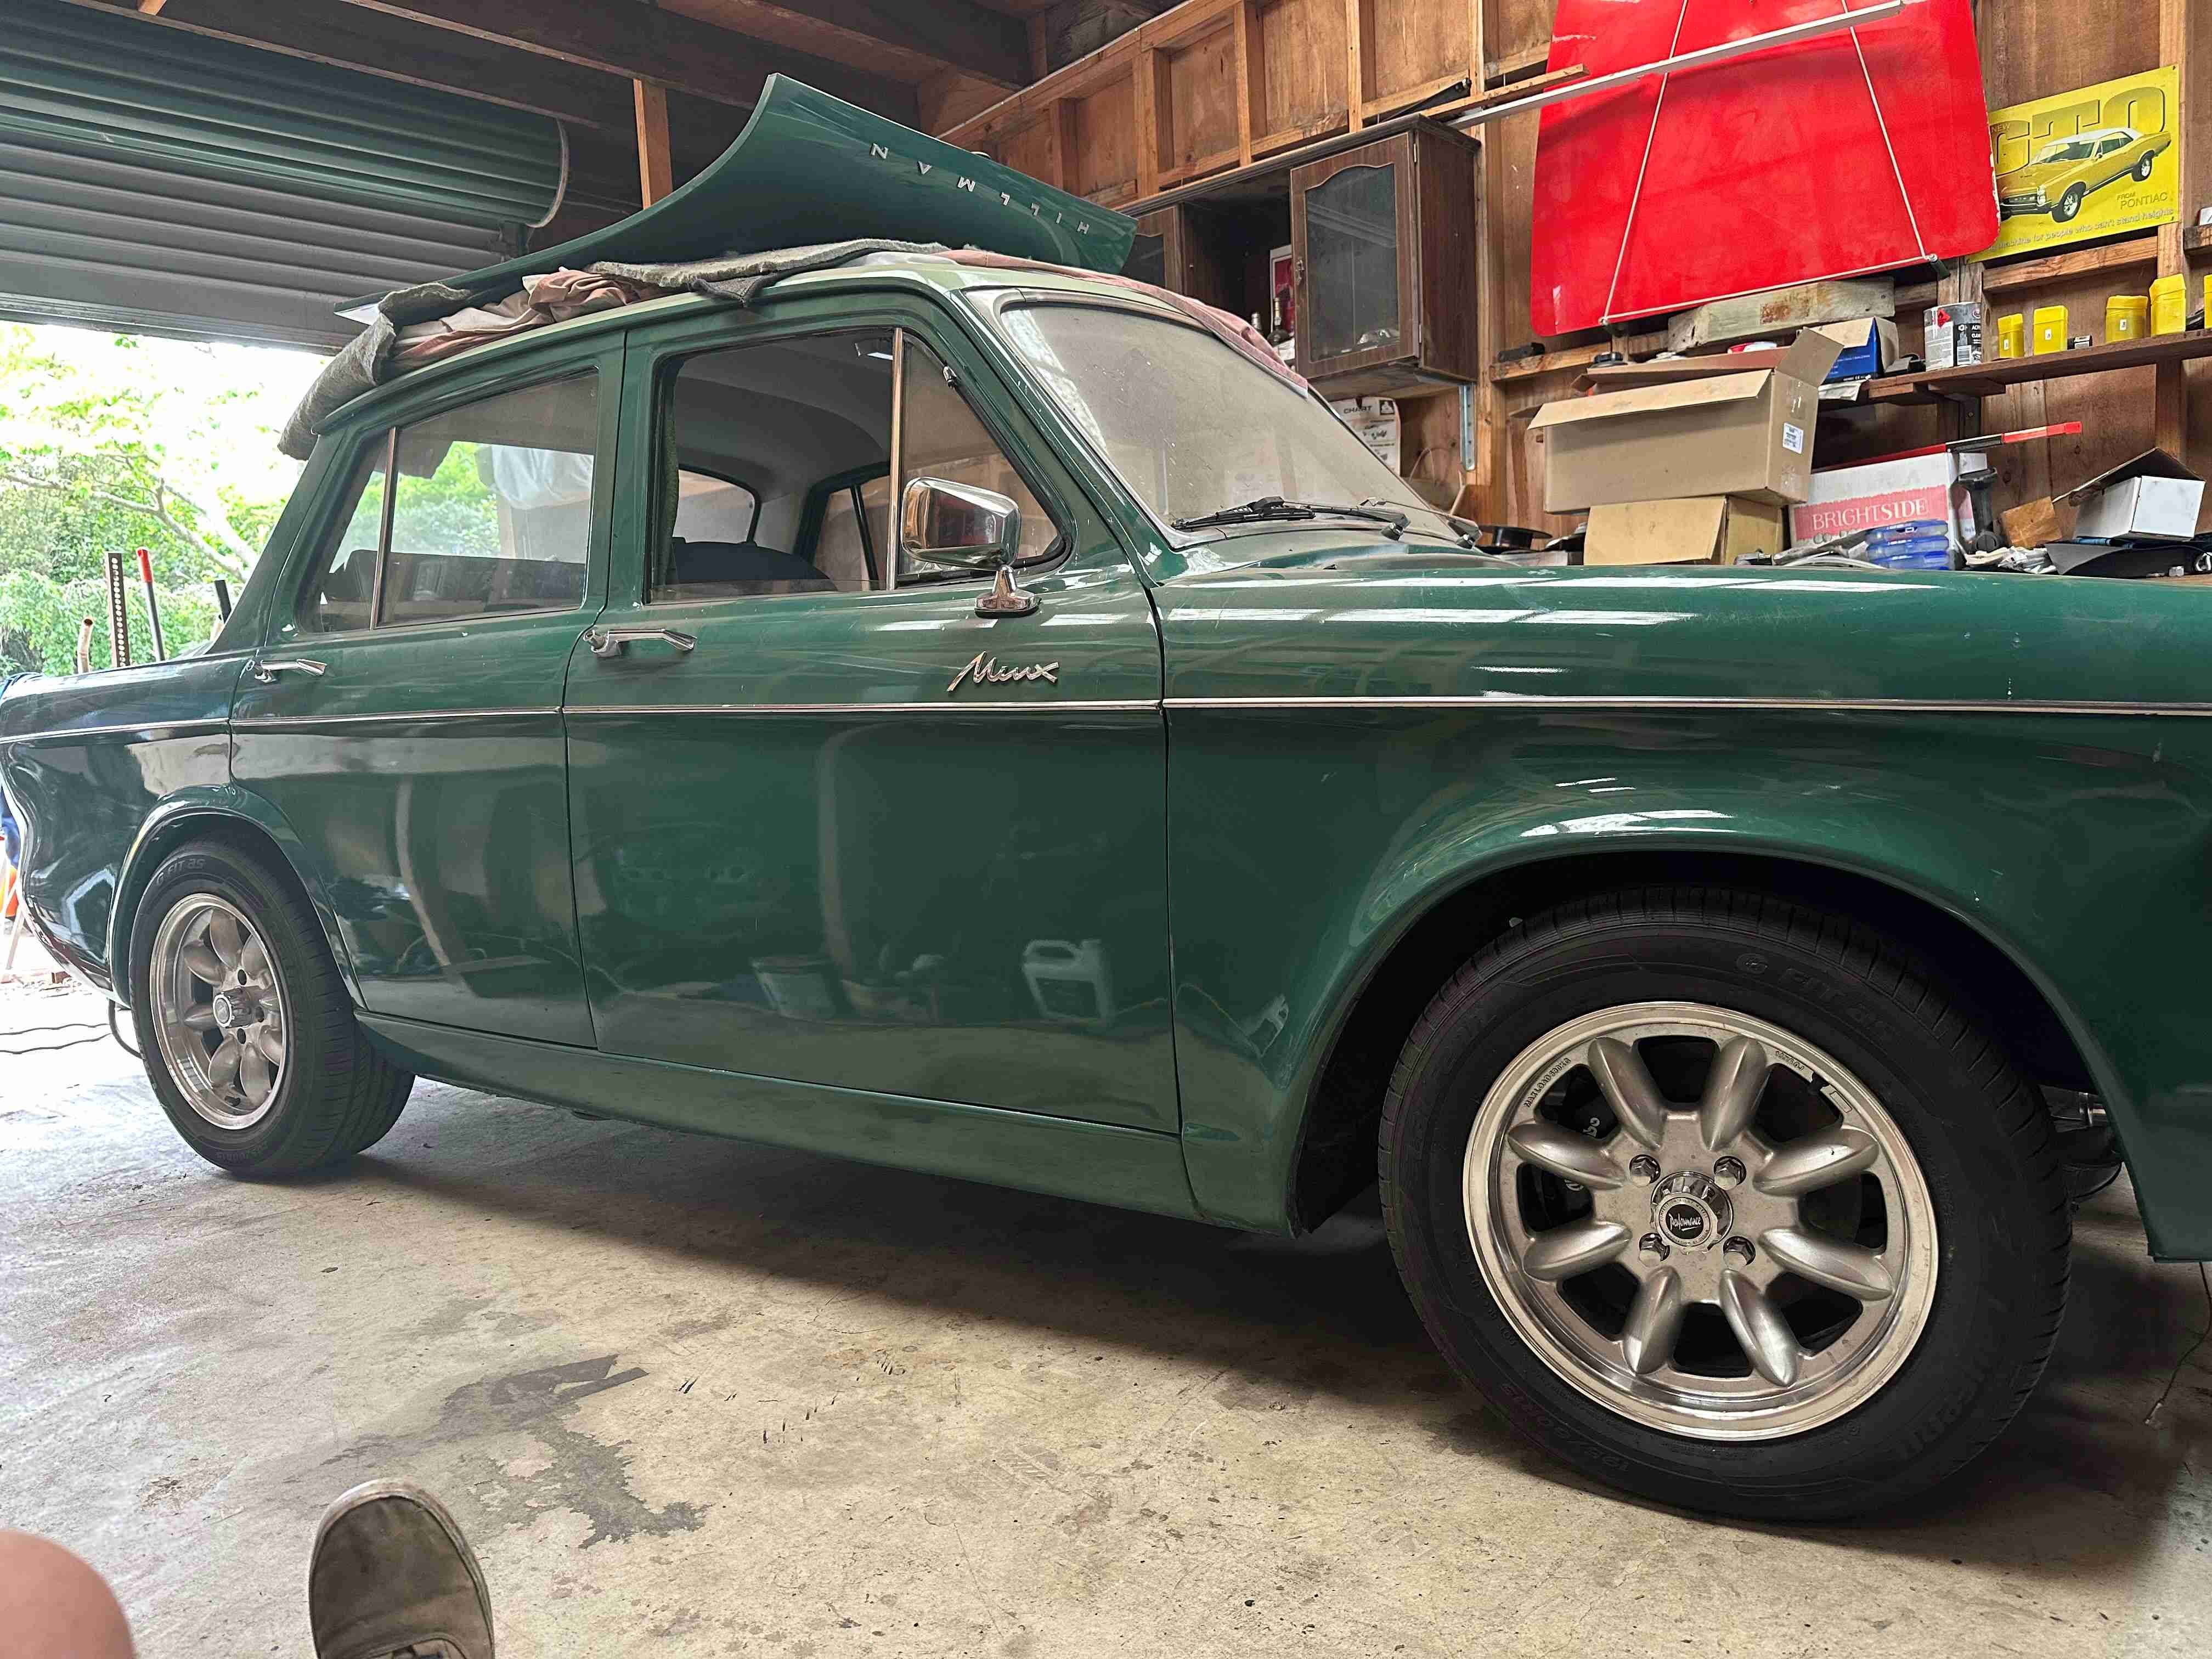
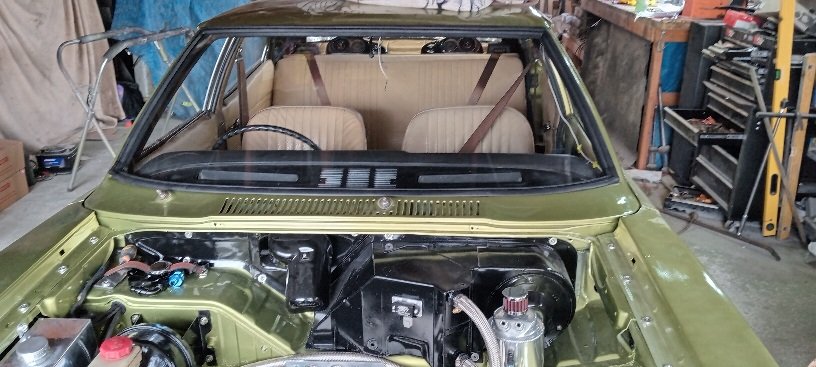
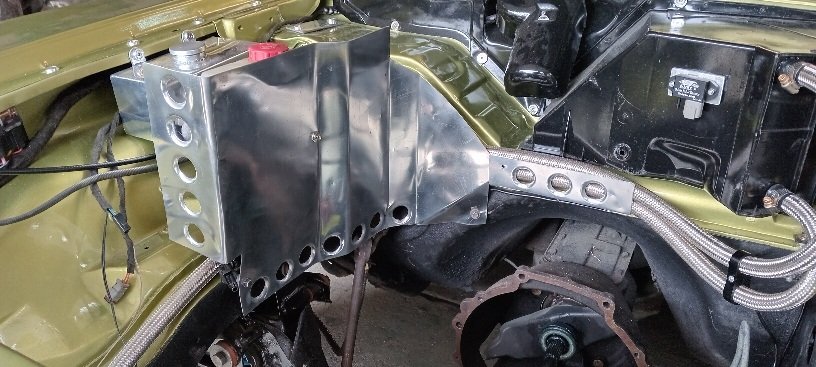
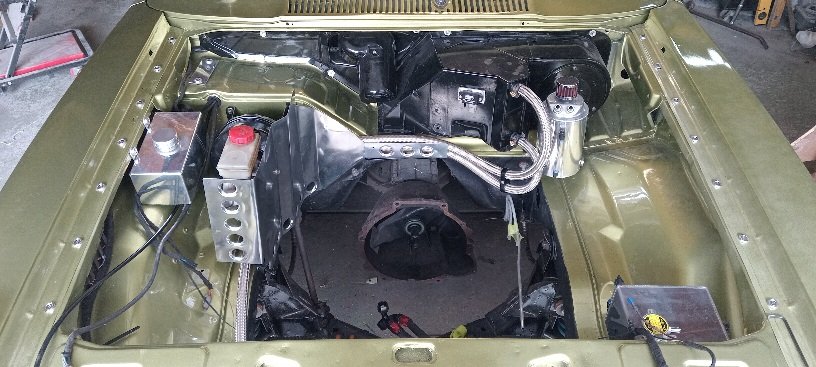
Decent update: ECU basically all wired in, just the wideband to go and a few bits to go. We've turned the car over which is huge! Will go for a start shortly. Semi wire tuck has gone well, just a few bits to tidy up. I've learned a thing or two for next time. Theres not many good wiring diagrams out there for KPs. I thought being around as long as they have been with numerous 4AGE swaps that there would be more accessible information out there. Before and after: Just some small amount of body loom that will be showing in the engine bay. Itll be hidden by the coolant tank anyways. The Mini is back in the garage, after a once over and some new tyres she runs mint! @mk2marty and I had a good night hoon. Really need to get onto paint prep, but time is scarce.
6 points
-
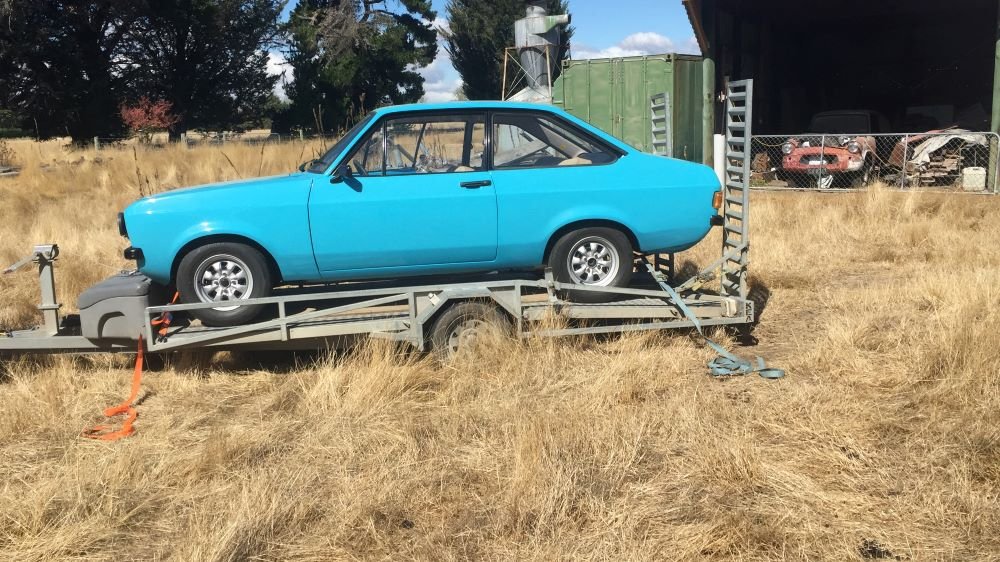
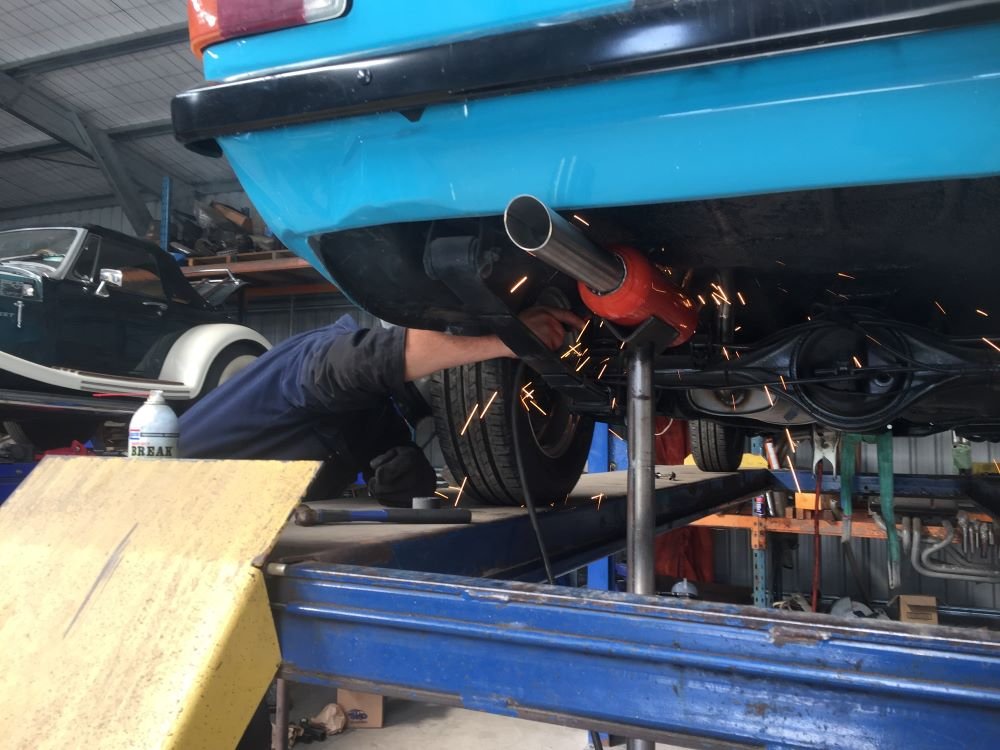
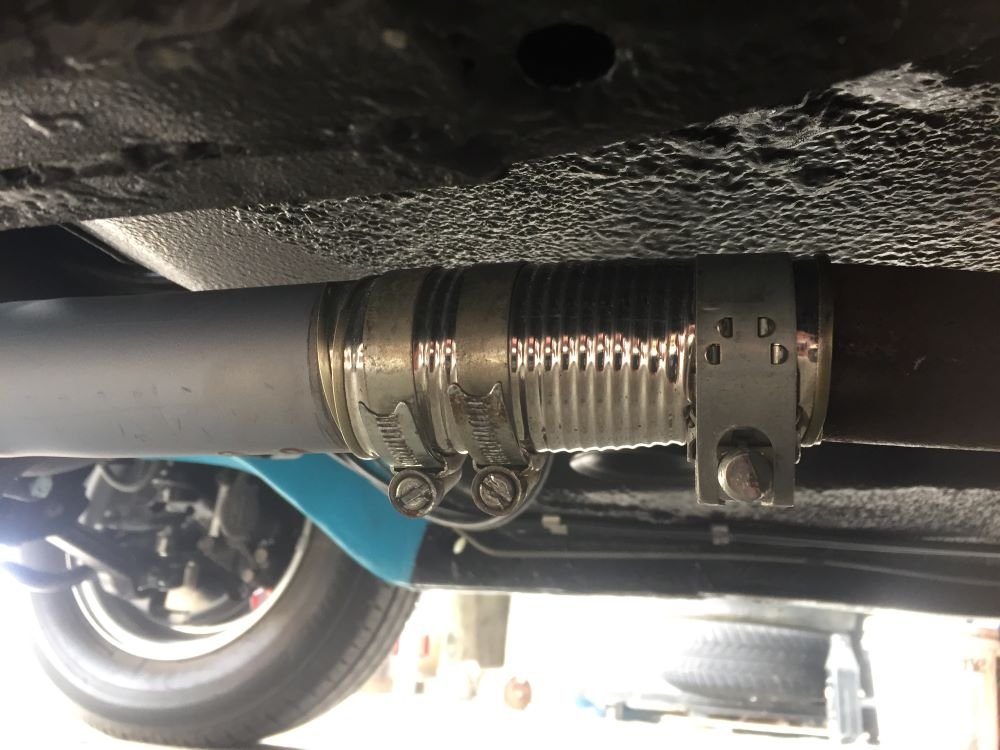
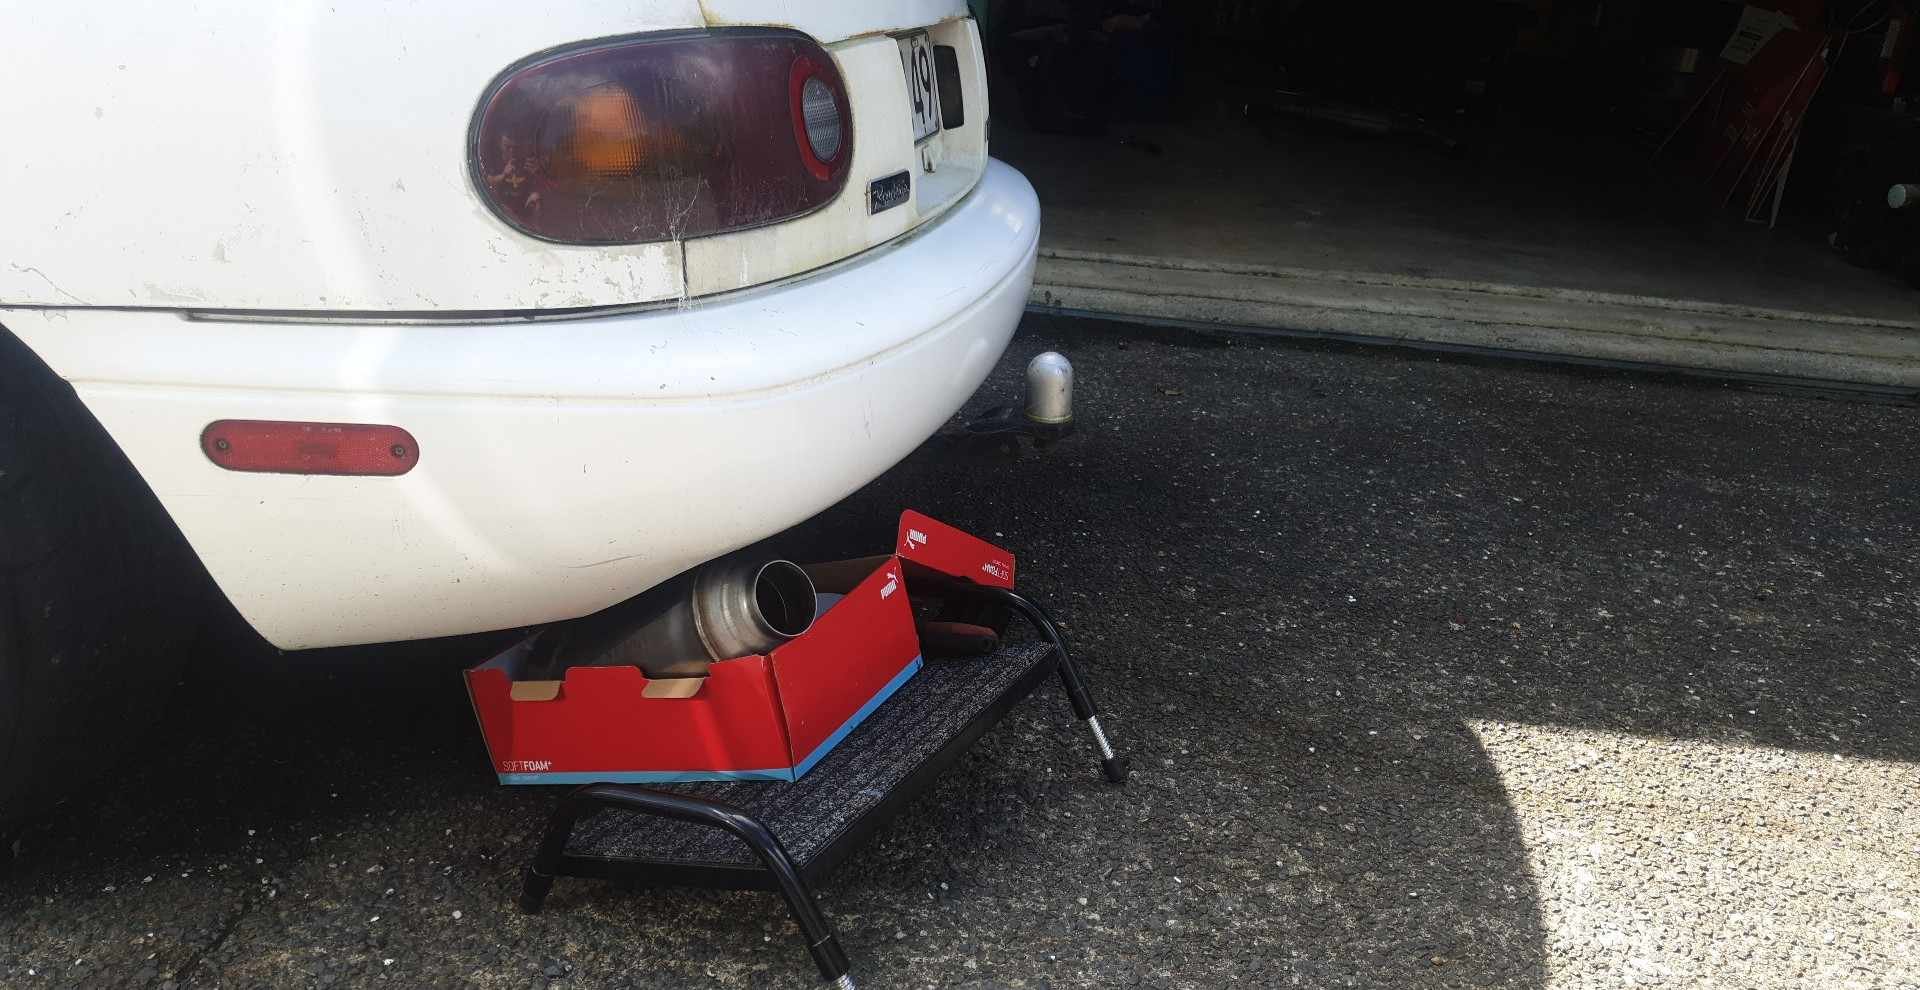
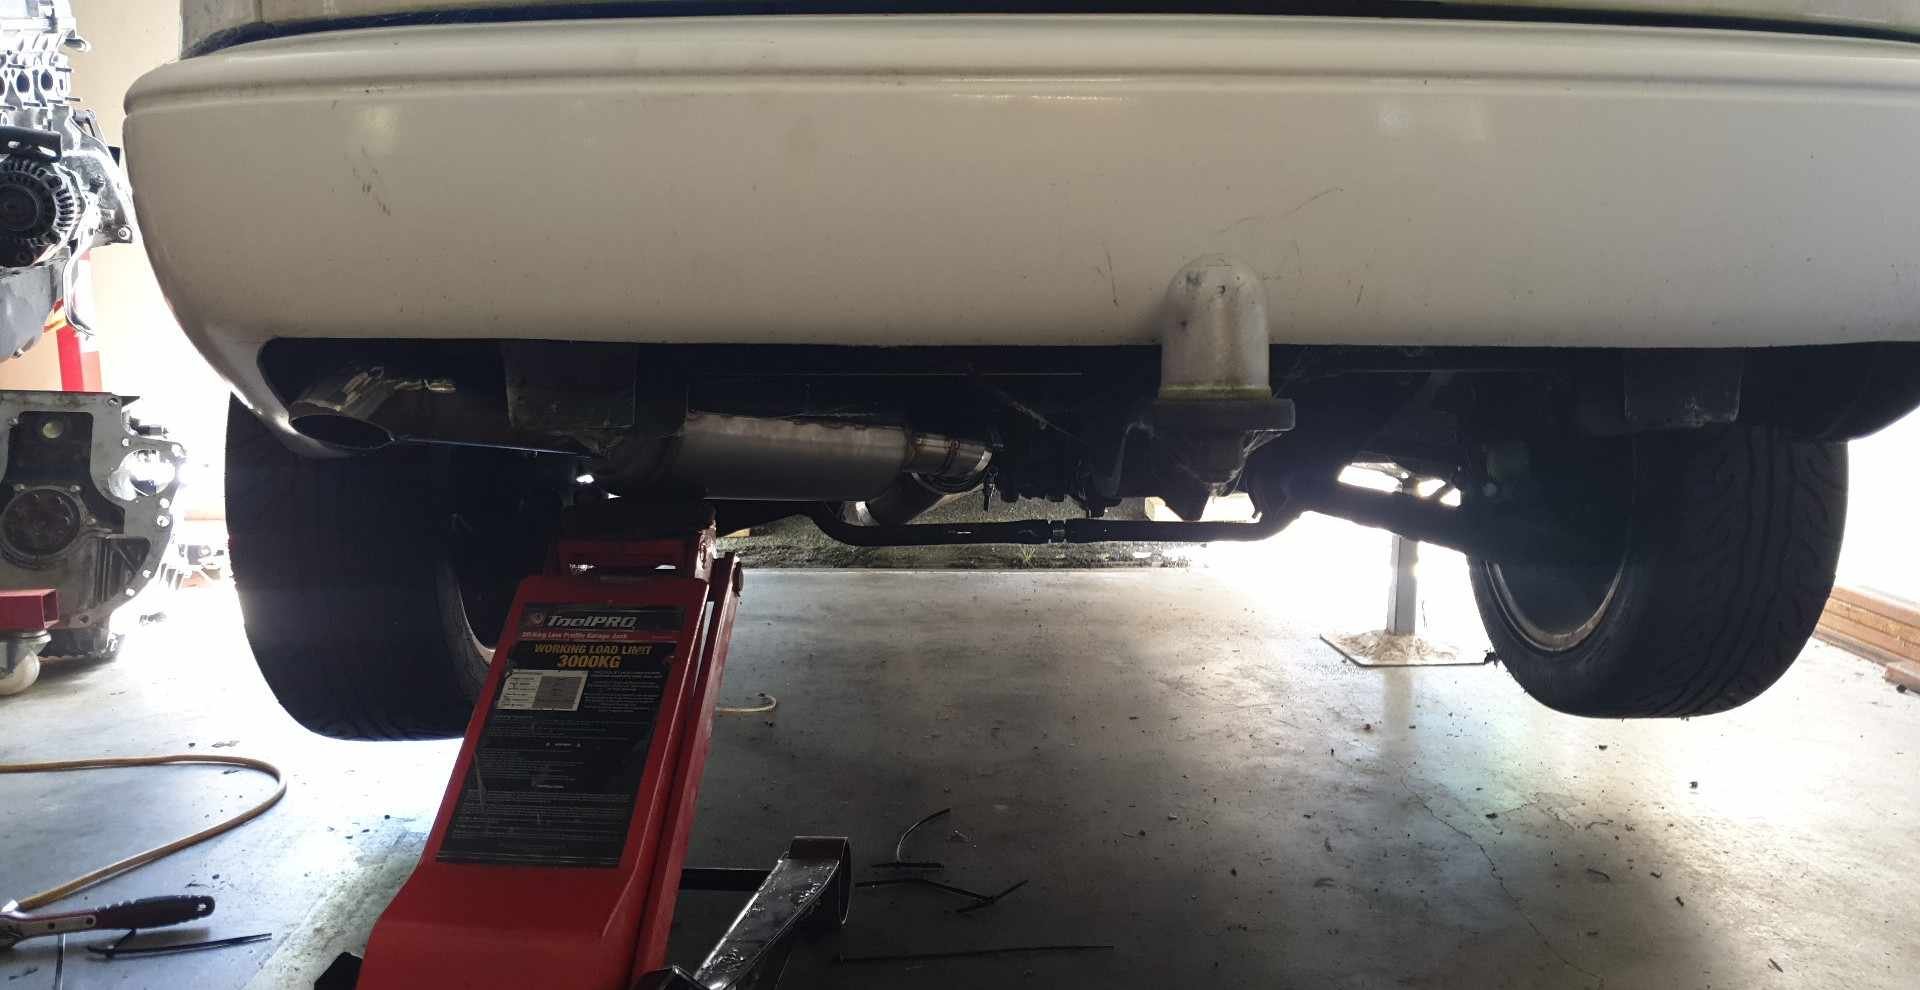
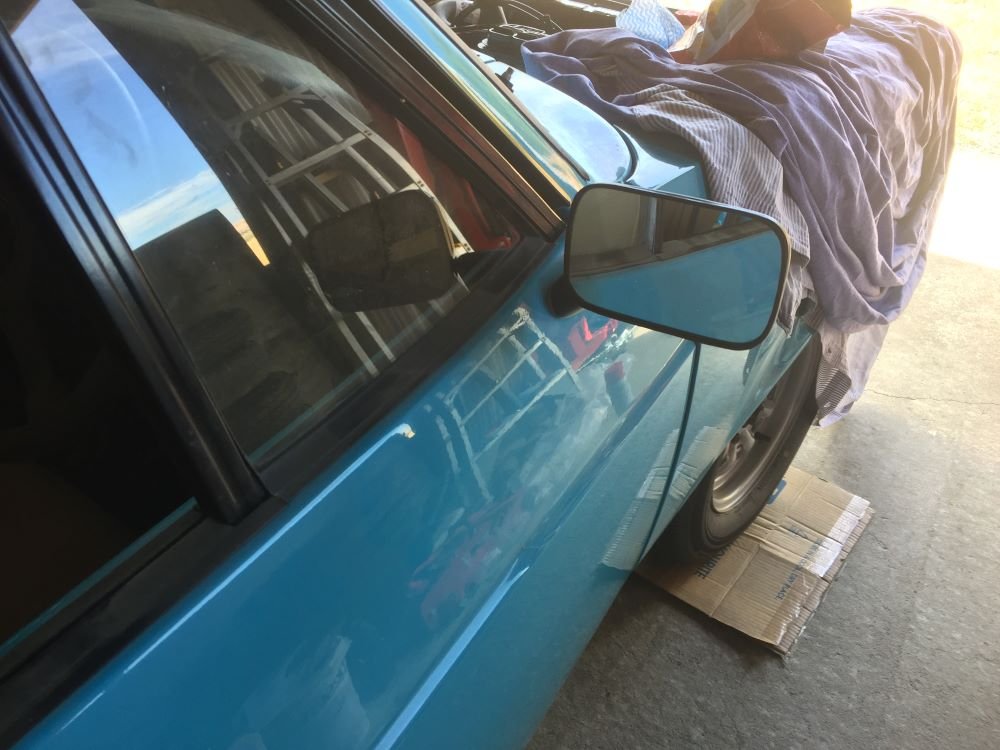
Car back on the trailer and off to Christchurch to have exhaust fitted. Corey from Elite Exhausts has got the job and after discussing what I wanted he sets to work. We are going with a 2" system with standard oval muffler before diff and a Coby after. I really like watching someone working who knows what he is doing. He has it all mapped out in his head. No tape measure, just a piece of wire to help form curves.. He cut off end of headers to start 2"pipe and fitted V-clamp, welding in place. Next placed muffler in place and bent up pipe for first section. Welded in place and fitted mounting bracket. Next put Coby in place and bent up section over axle and welded to first muffler. At this point Corey said we should see how it sounds. While he held Coby in place, I started car. Perfect, has a nice throaty note but not to loud. Welded Coby on place and mounting bracket. Finally put on tip and all done. Just a few more things to do. Wof, Wheel alignment and tune. Shouldn't take to long ??? Project Discussion https://oldschool.co.nz/index.php?/topic/84912-petes-mk2-escort-1600-sports/page/3/#comment-2625686
6 points
-
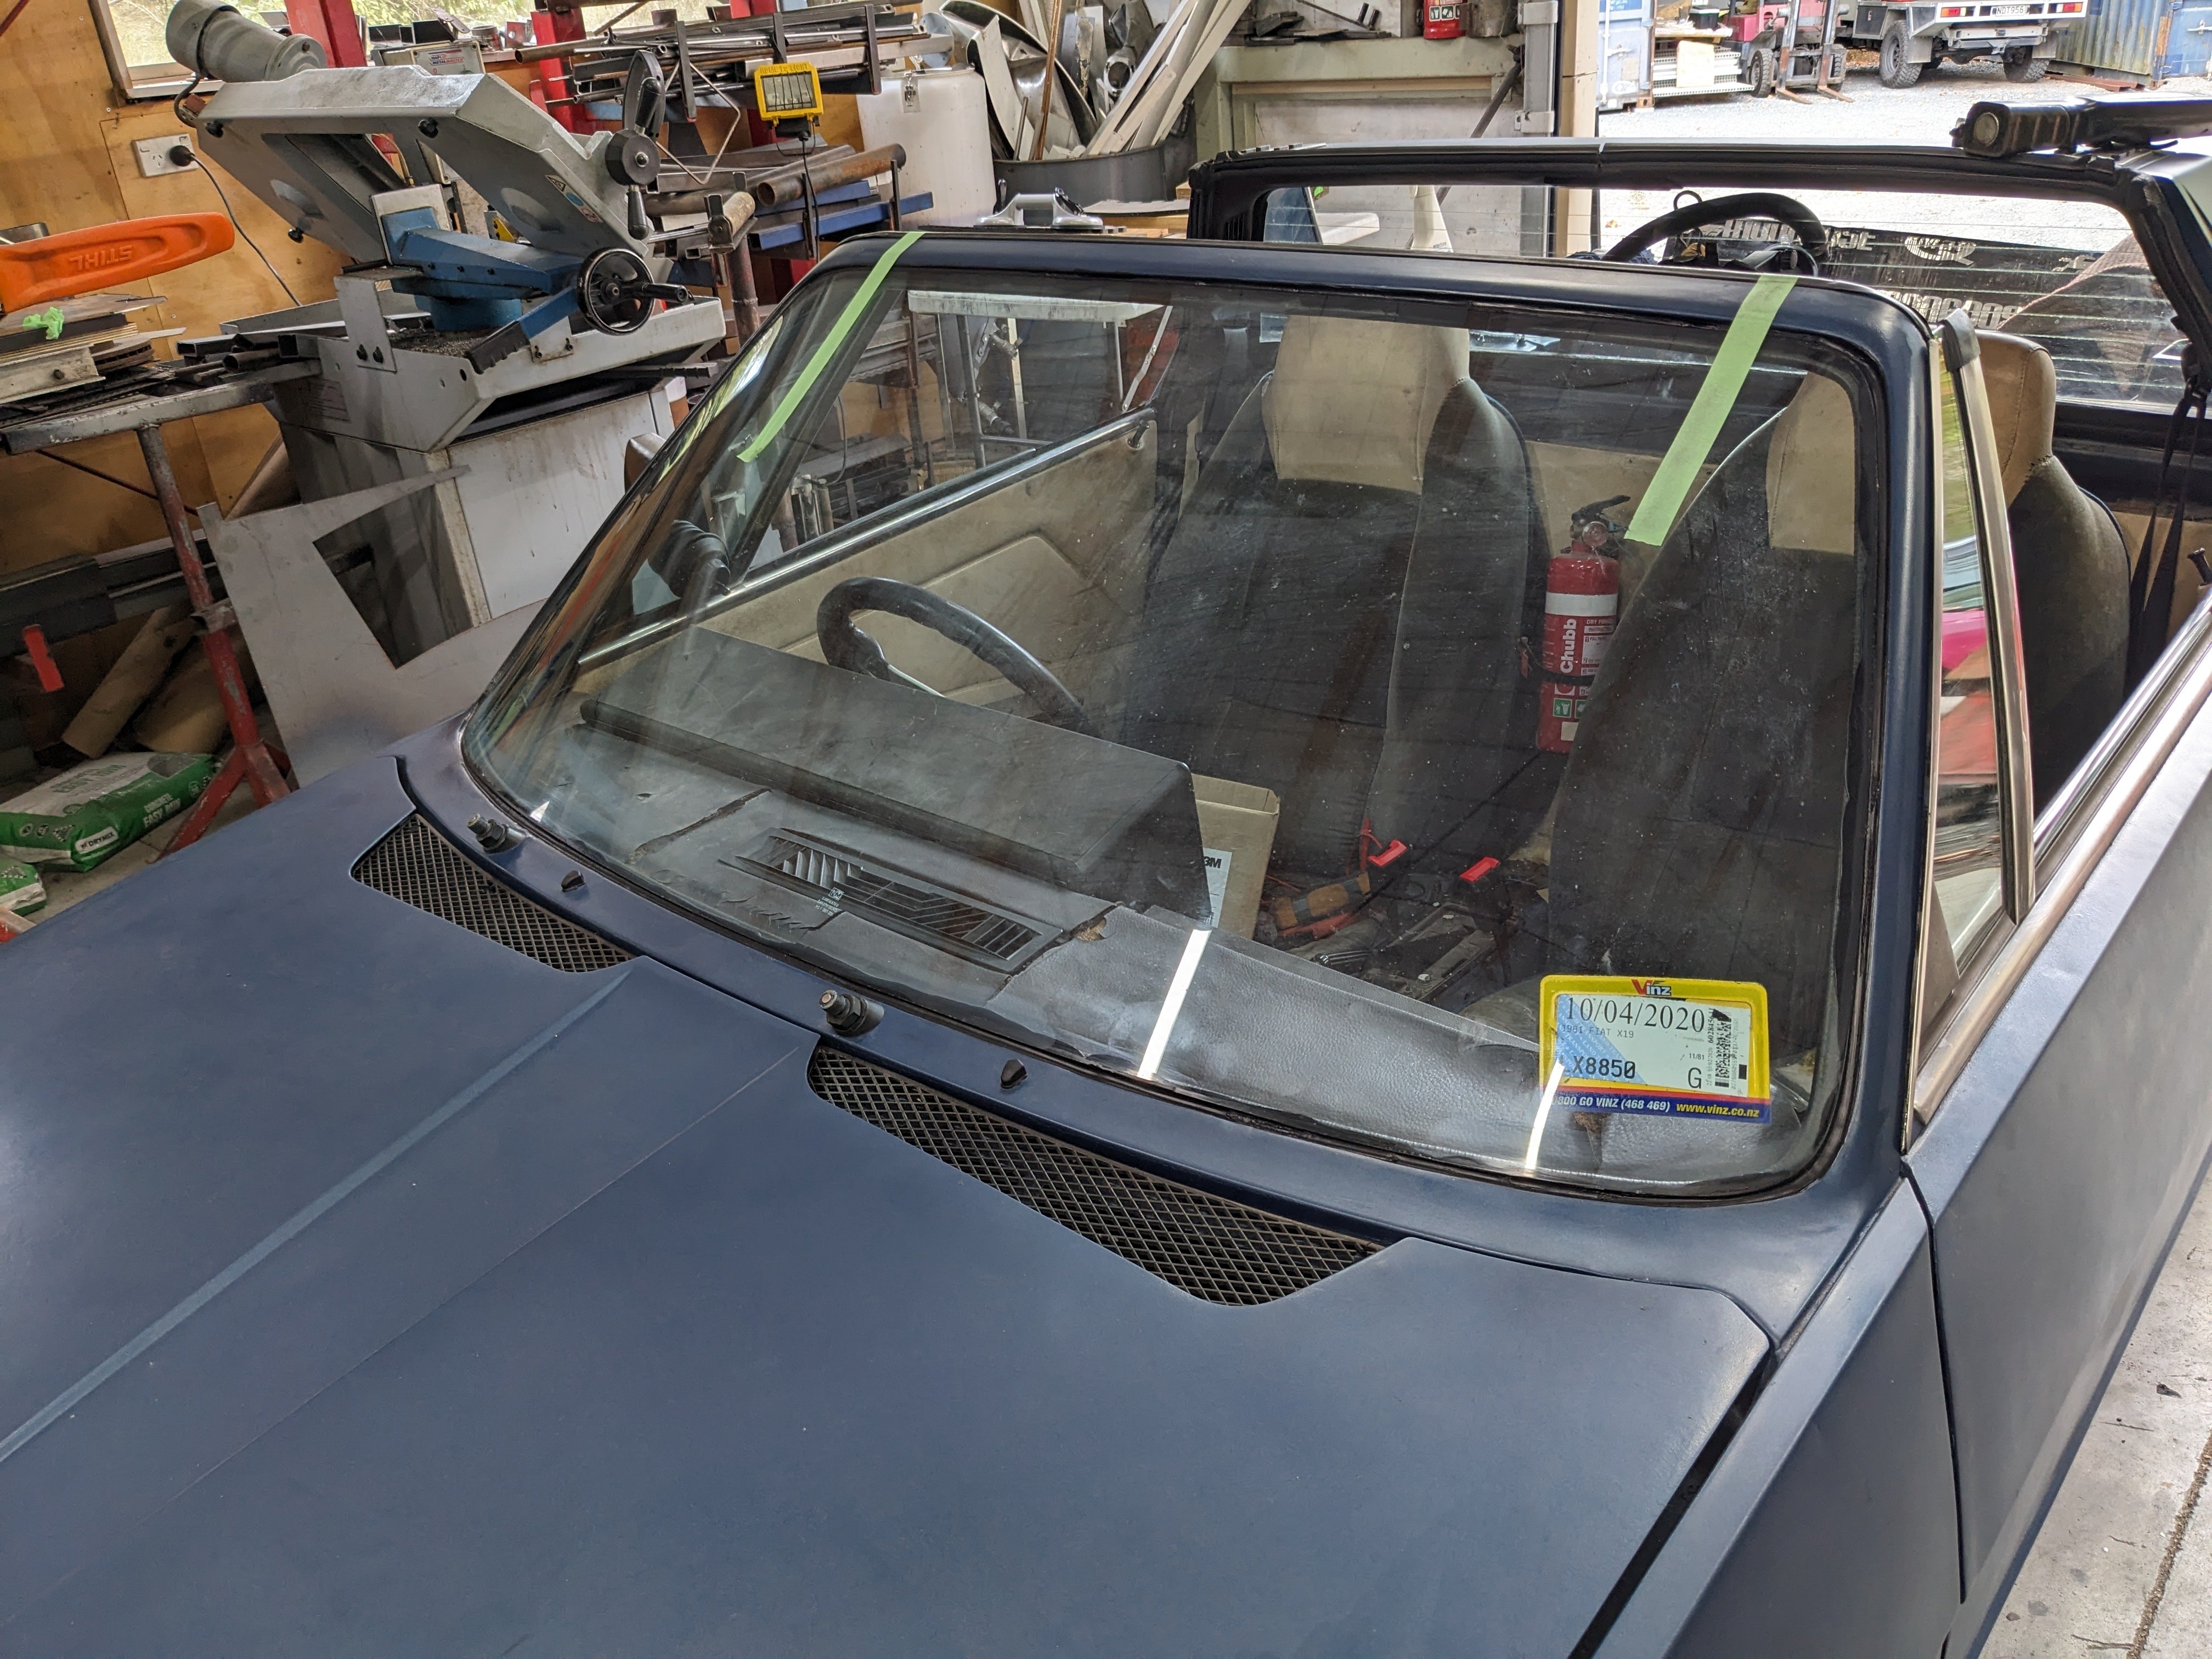
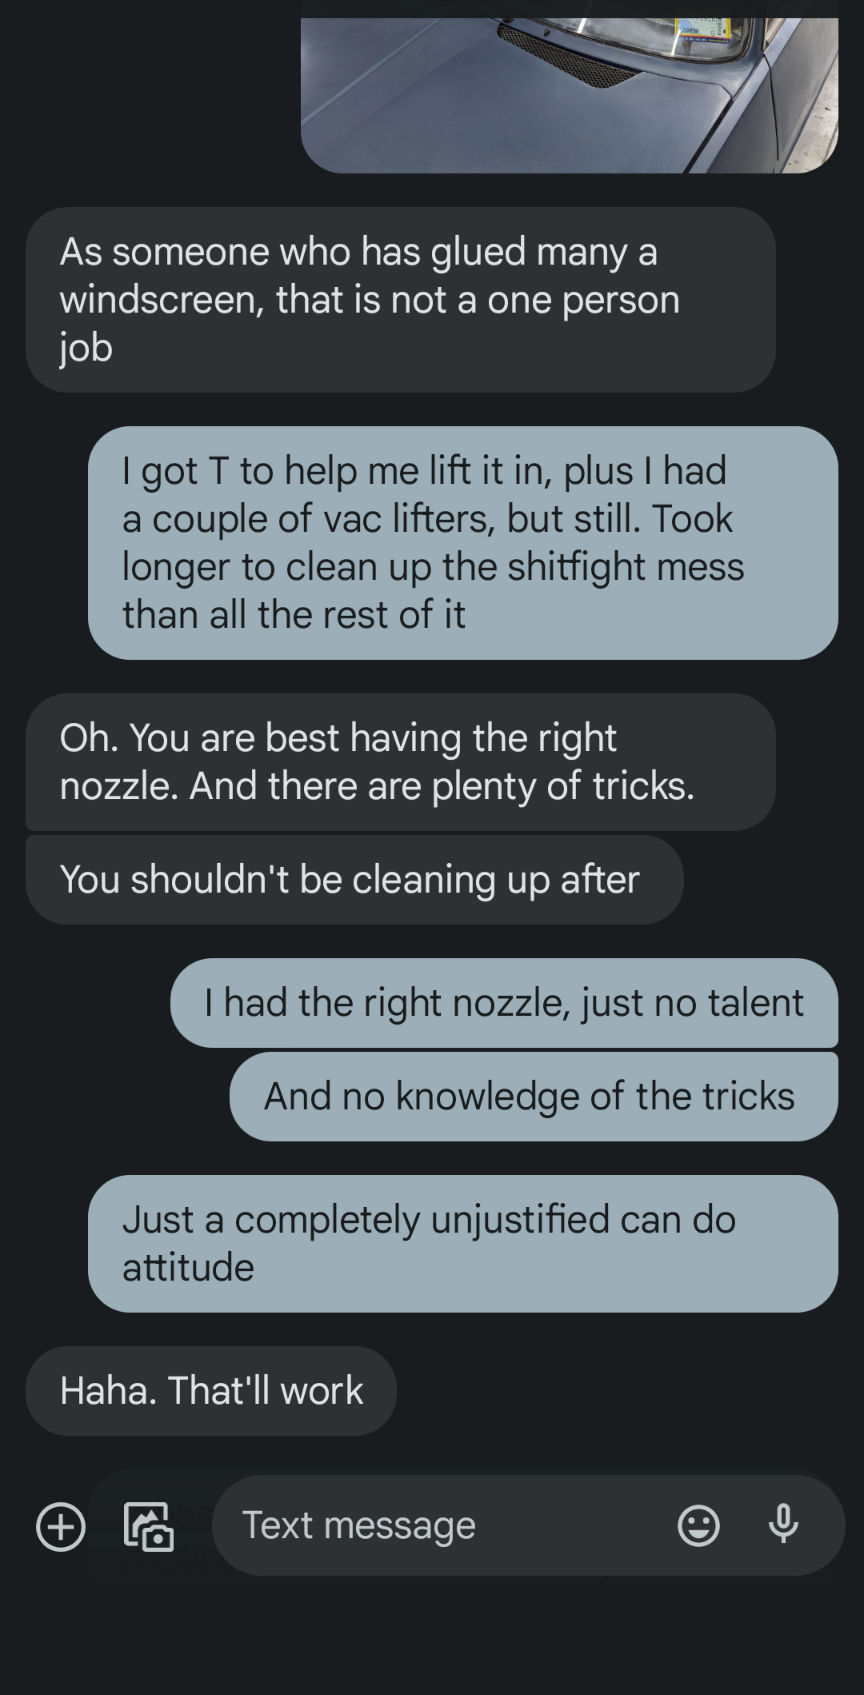
Just glued the windscreen in cos I am too cheap to pay someone to do it. I should have done so. The experience is best described by this convo with @HumberSS
5 points
-
Here is a wee update. The fist job was to sort out a couple of issues on the hydraulic clutch setup. I realized that the slave cylinder I had that came with the bellhousing fowls on the headers. After a bit of head scratching and hunting I found another slave cylinder that just fits. I heated the headers then tweaked them out about 15mm to give a bit more clearance, it is still very tight. I still only have about 10mm of clearance. I'll make a heat shield I think. That is the new one, only problem is that the bolt holes don't line up with the holes on the bellhousing. So I milled slots in it. I was going to TIG the bellhousing holes and tap them but I decided not to just incase this new slave cylinder doesn't end up working out. For the master cylinder I welded a backing plate to the fire wall and mounted it in the engine bay between the booster and the header. Tight fit but it works. That picture makes it look much closer to the header than it is. I couldn't have it directly behind the clutch pedal unfortunately, so it's off set from the pedal. I used some steel rod linking them all together and threaded the ends. It's nice and smooth, I'm hopeful it will work well. Engine in for hopefully the final time. I couldn't mount the gearbox as when I went to fit the fly wheel I realized I don't have any flywheel bolts. Doh. ARP ones are on the way. Next I'll start wiring her up and put the dash back together. Cheers guys. P.S. Pro tip... Don't spray a car in jandals. That was taken after 2 showers.5 points
-
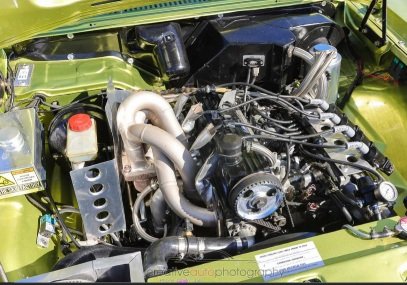
Been a while and I have been pretty shit about up loading on here. . But the car is running and driving it is still on a factory motor (apart from ARP head studs) she is running 10psi at the moment and is happy with it.. We are still road tuning and she not legal at the moment ...but I have taken her to a bunch of meets and to work a few time... (its a fun car Lol).
4 points
-
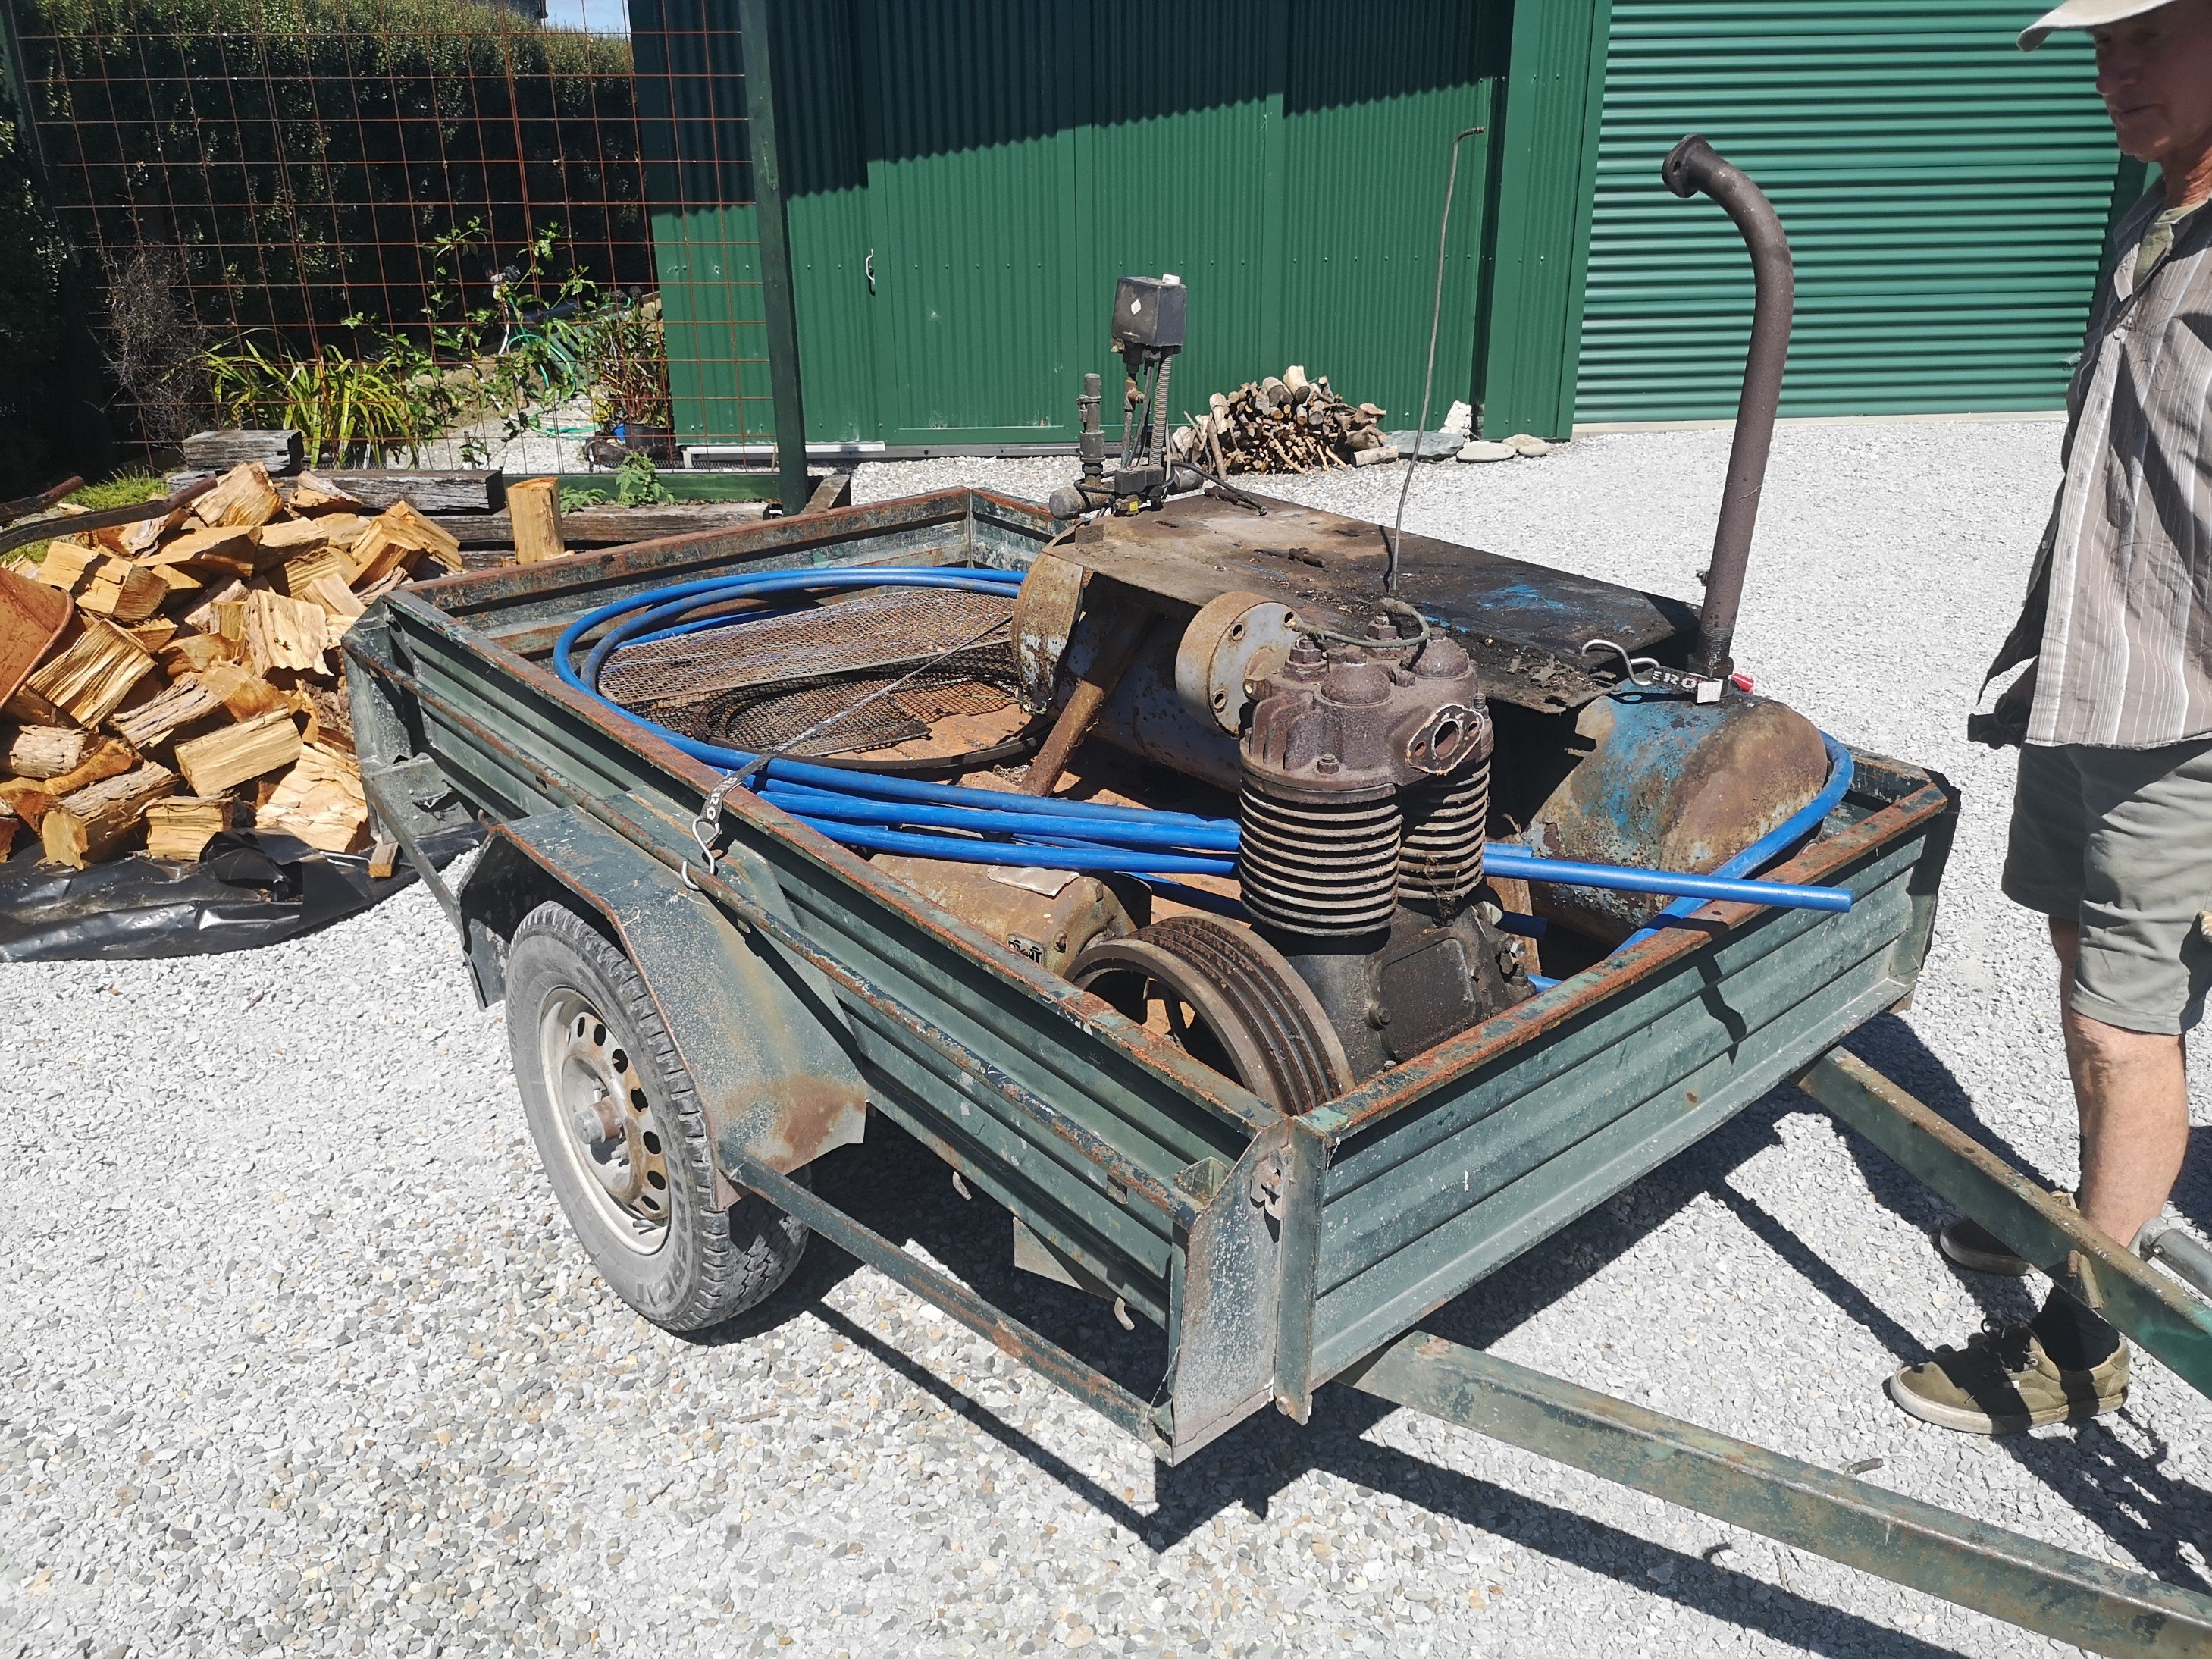
Nice... looks like a red dwarf.. At "some point in the future" I have this 10hp Broomwade to reco.. Think it was out of a mine
3 points
-
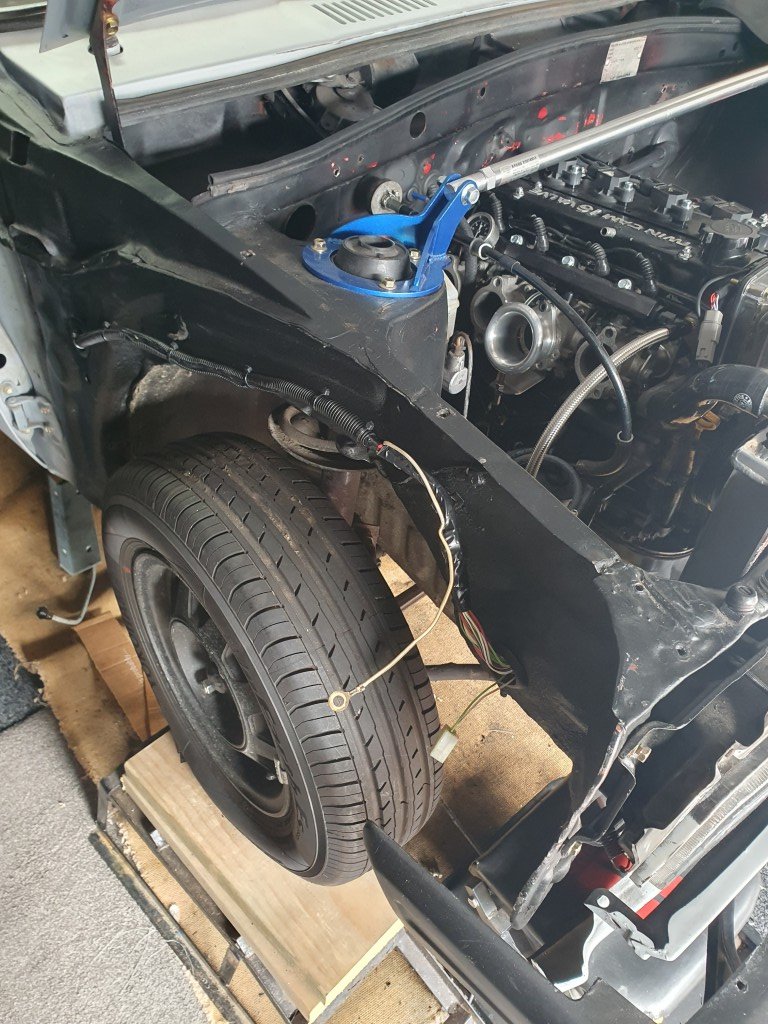
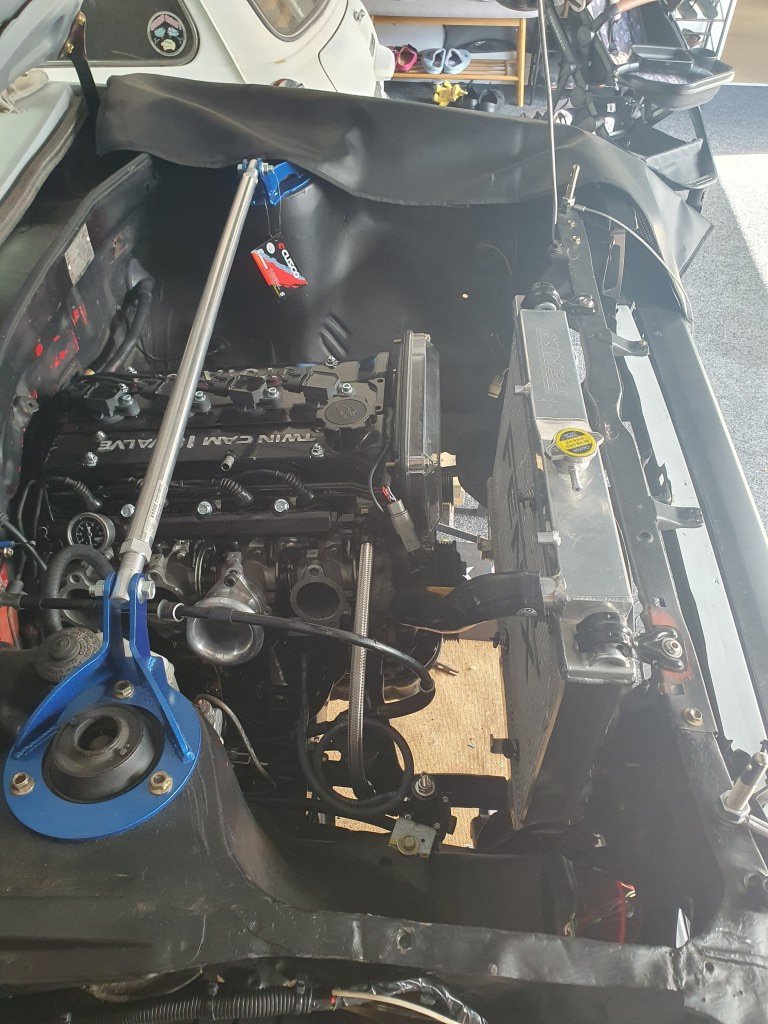
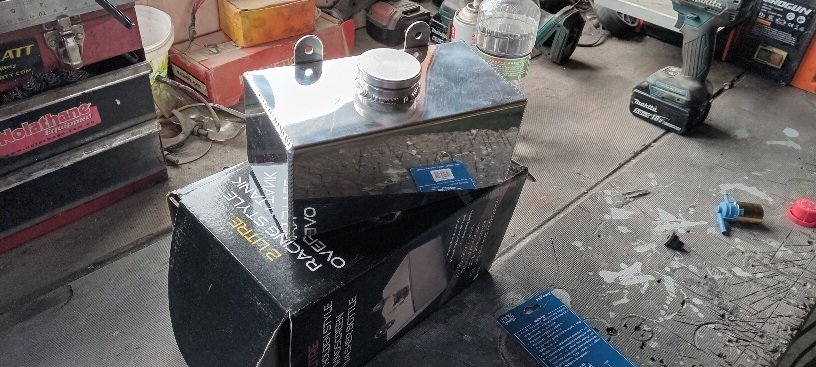
The SW20 radiator turned up, and thankfully it was indeed 755mm wide, not 770. So just needed a small snip up one side to fit. There isnt actually too much in the way of the fins being shrouded by the front panel, because those side parts are mostly the end tanks. So ended up better than expected, it will mount up to the front panel nicely. This is the amount of room to the crossmember level: My next problem was that the radiator outlets are 32mm, but on the motor they are 38mm. Wellllll, turns out that you can buy flexi hoses with 32mm at one end, 38 at the other. At what looks like good lengths (400 for one side, 300 for the other). So ordered some. Too easy! I'm glad to not need a join in the hoses this time. I printed some lower radiator brackets which bolt onto the crossmember similar to the ones I had for the Altezza radiator. I remember we made the altezza ones out of aluminium, and it seems like it took forever and was a really hard job. Now with a printer it's just incredibly easier to test print and test fit a few iterations within hardly any time at all. I've also got all the fuel lines connected, throttles are now mounted on carbon nylon manifolds, throttles are balanced and connected. My to-do list for getting the motor fired up is rapidly shrinking!
3 points
-
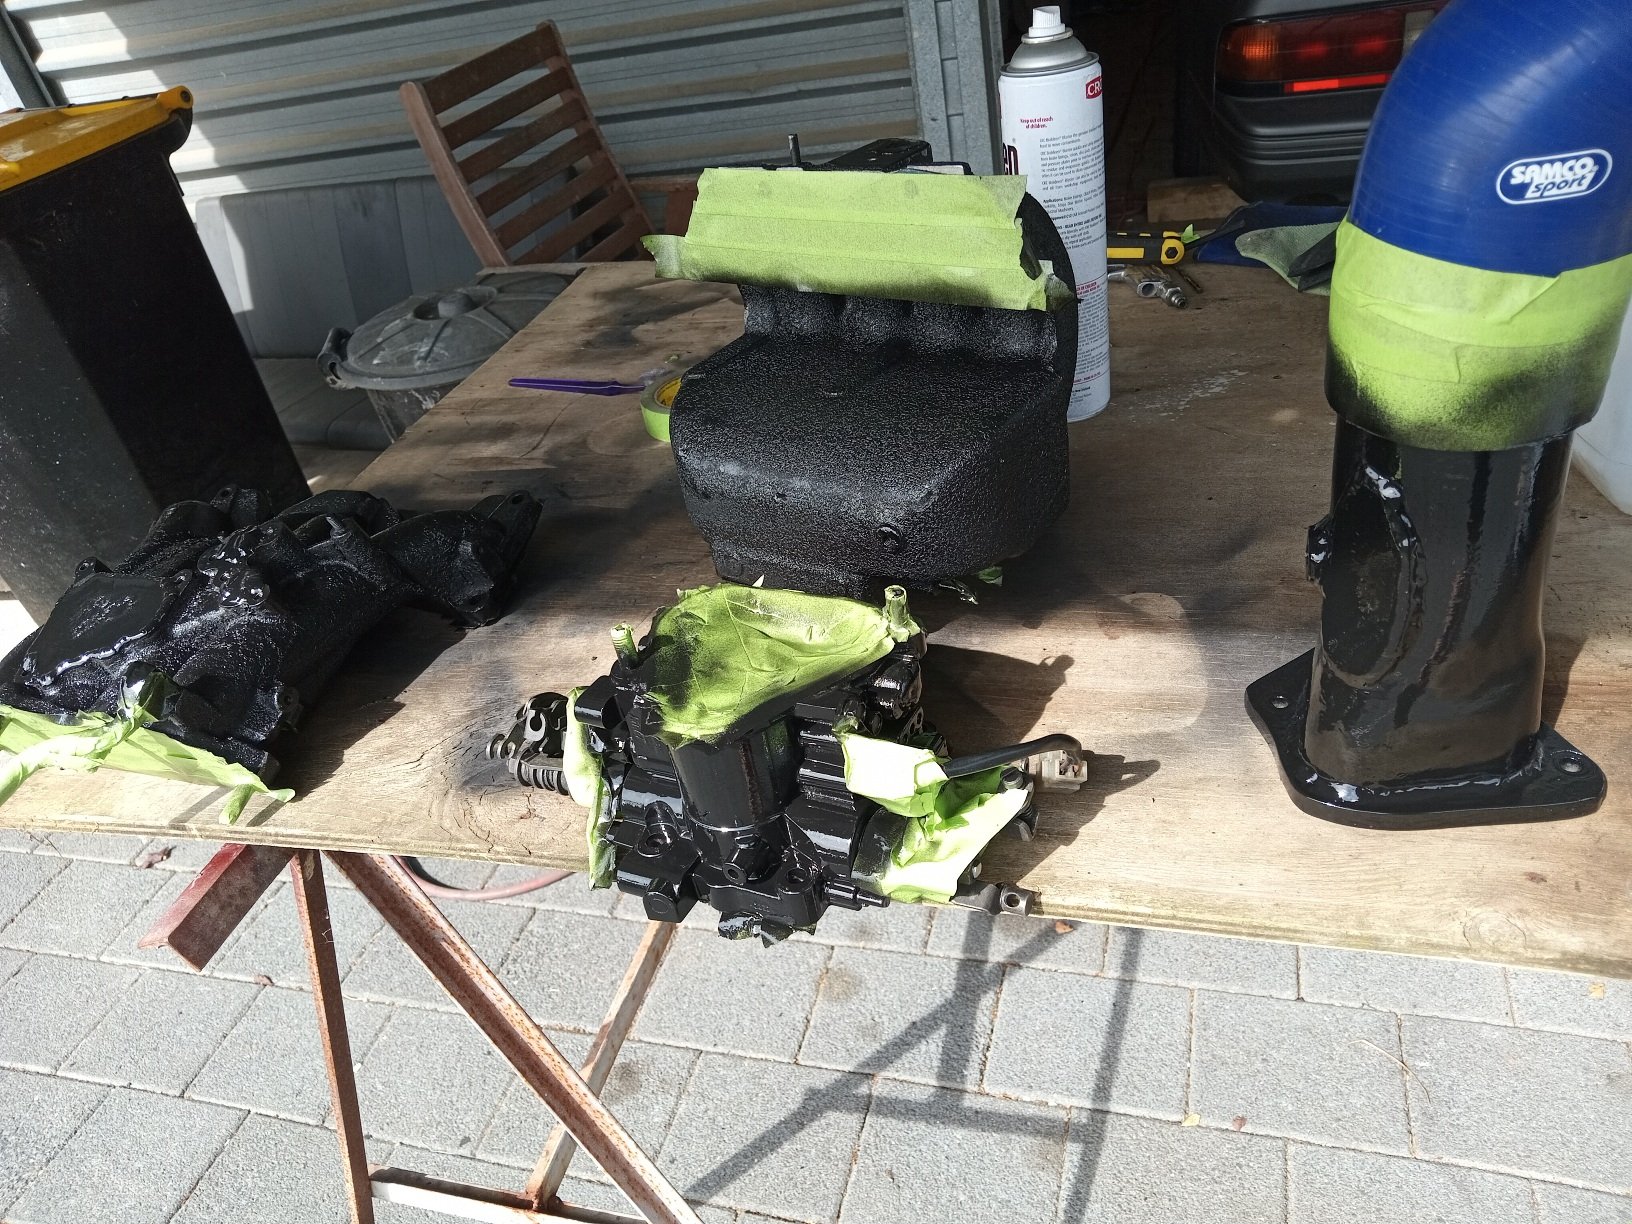
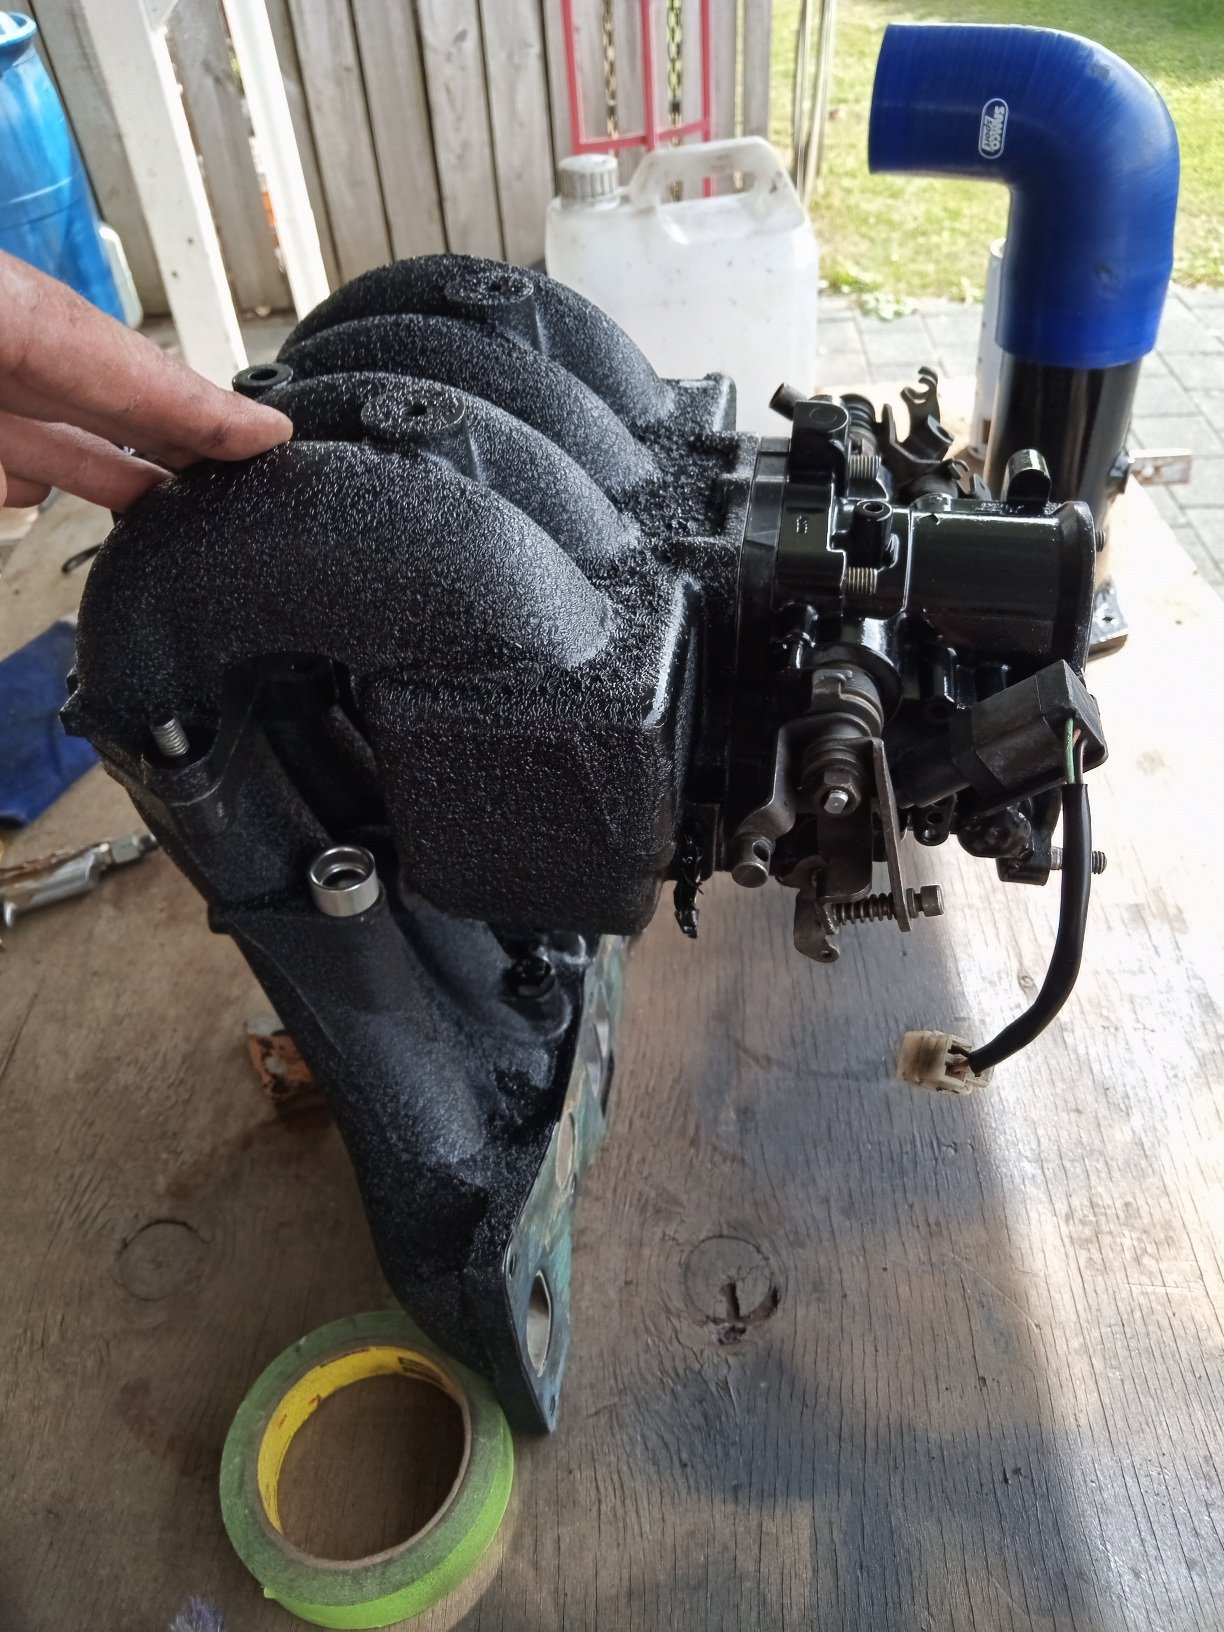
Welded up all the emissions and unused ports, this got rid of about 5 plates and gaskets as well as 3 or 4 hoses with bolts in them, sprayed in high temp black, should tidy things up a bit
3 points
-
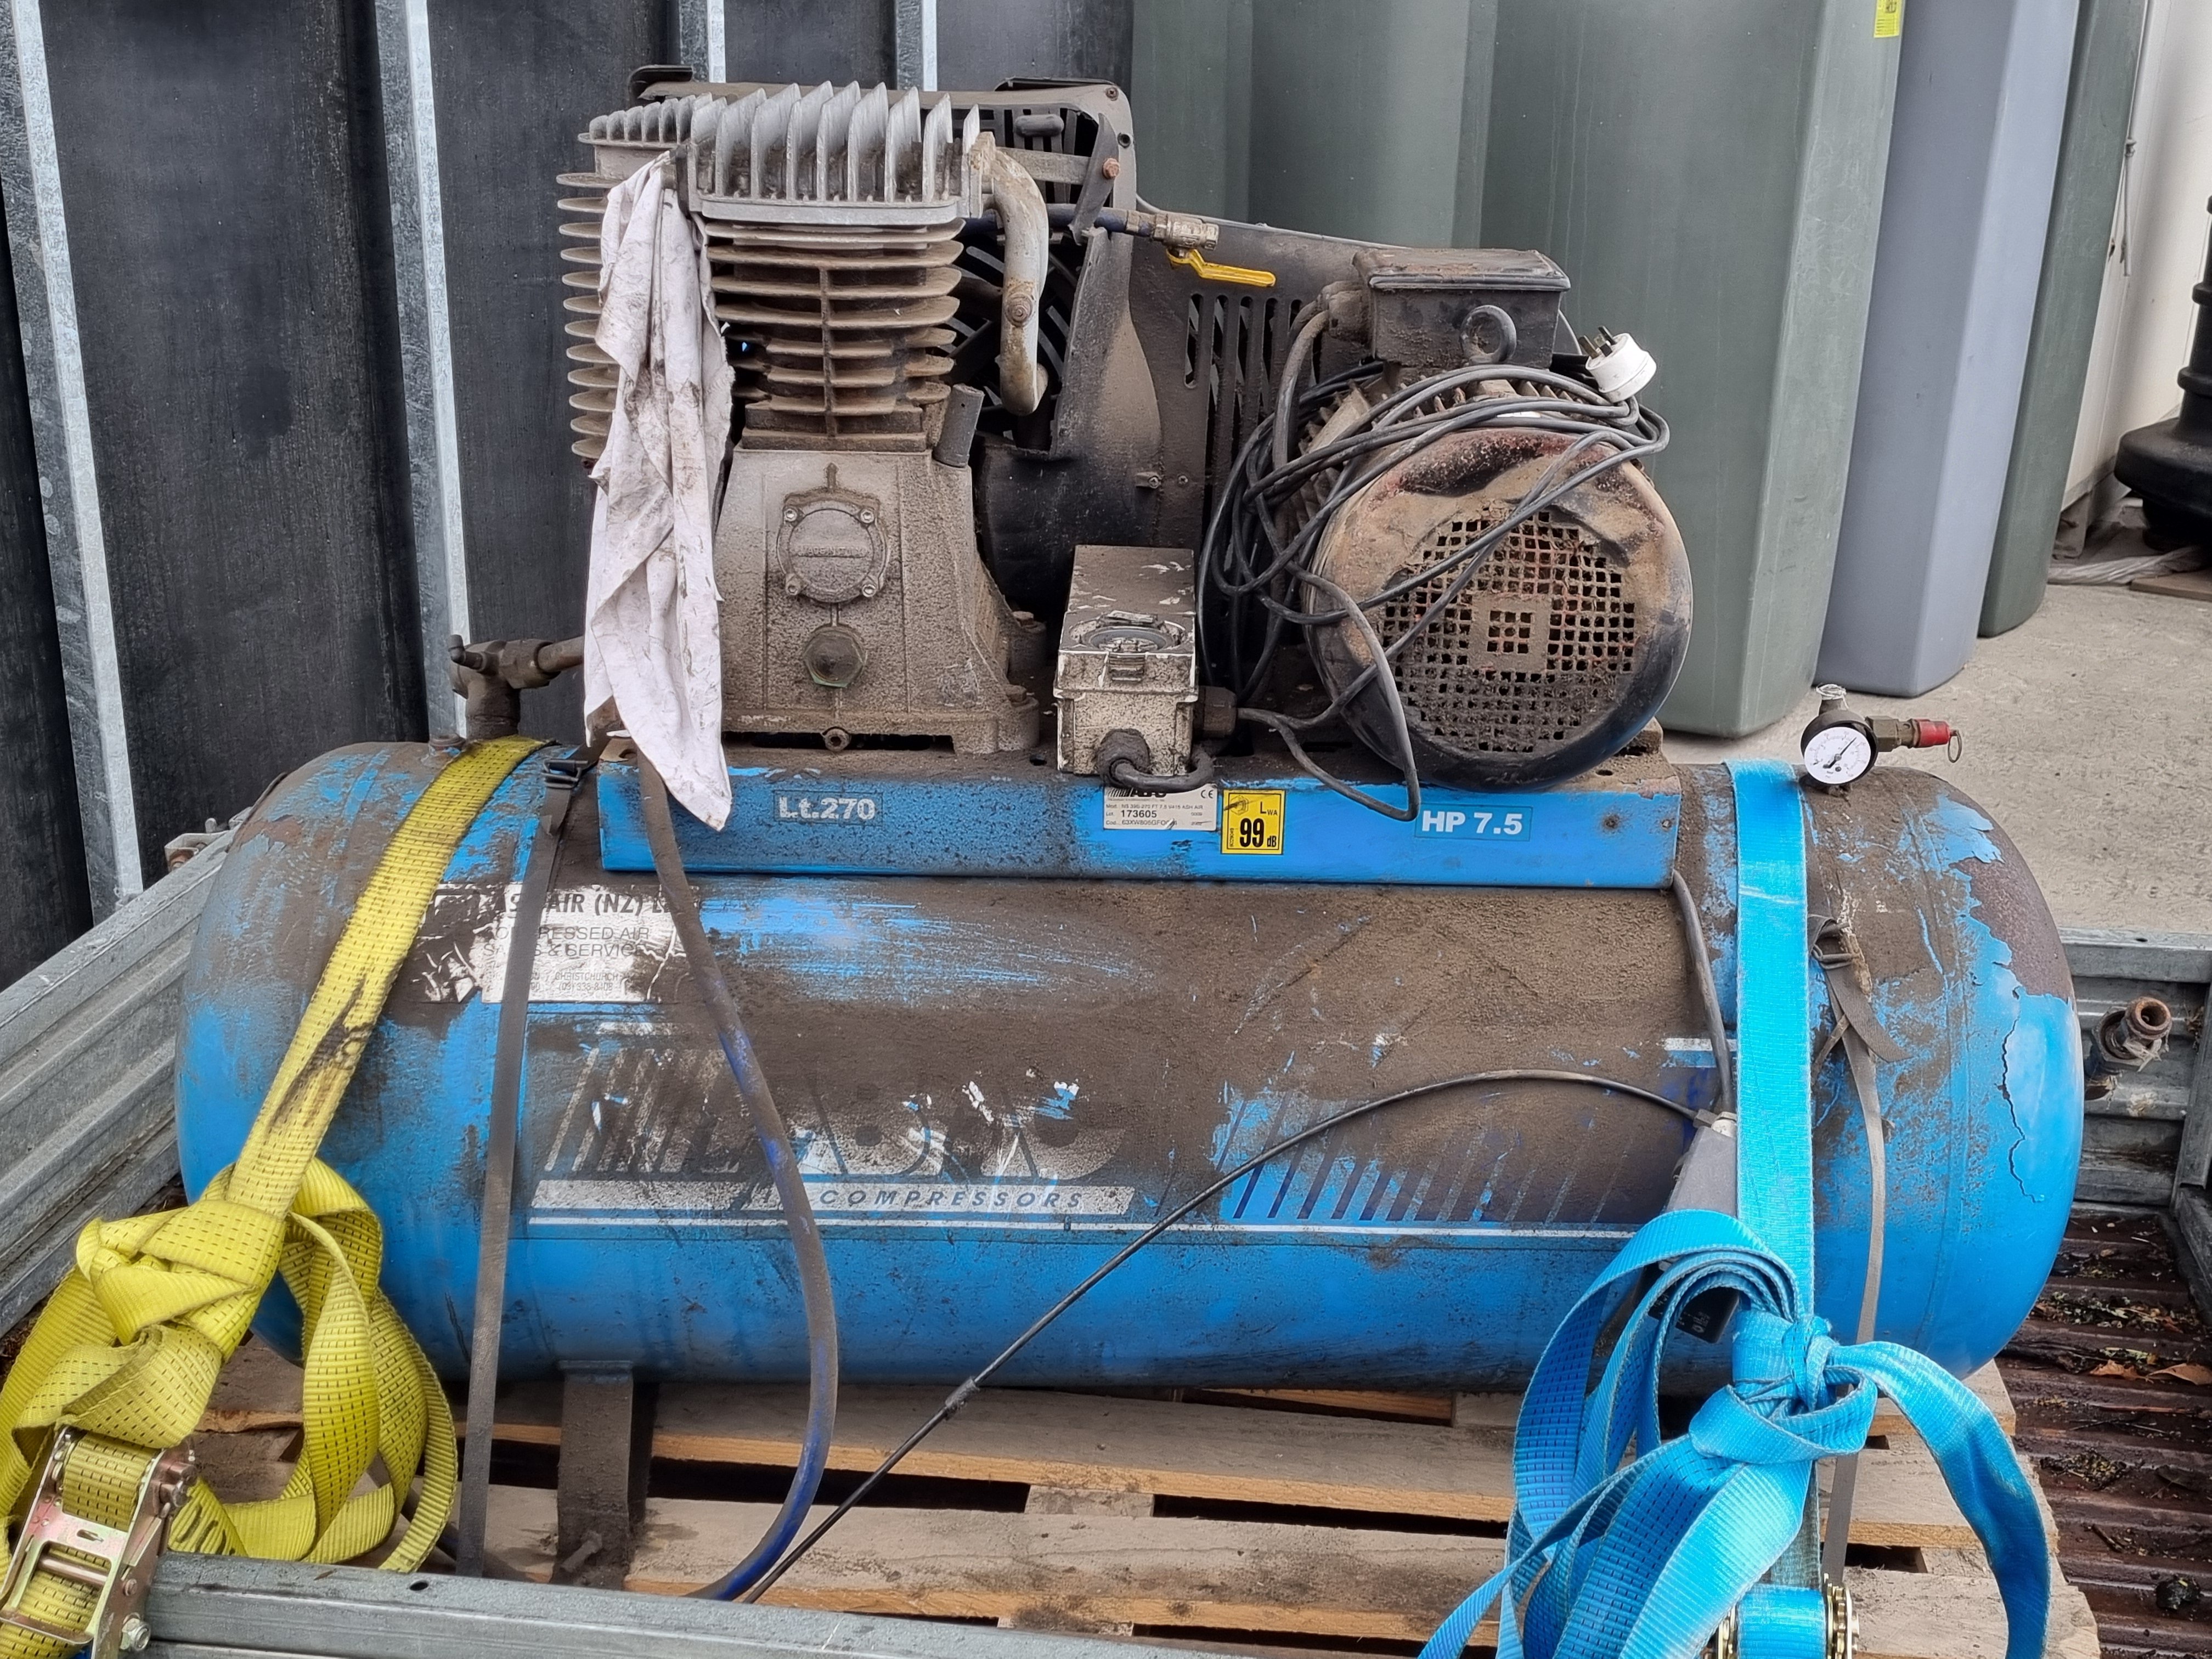
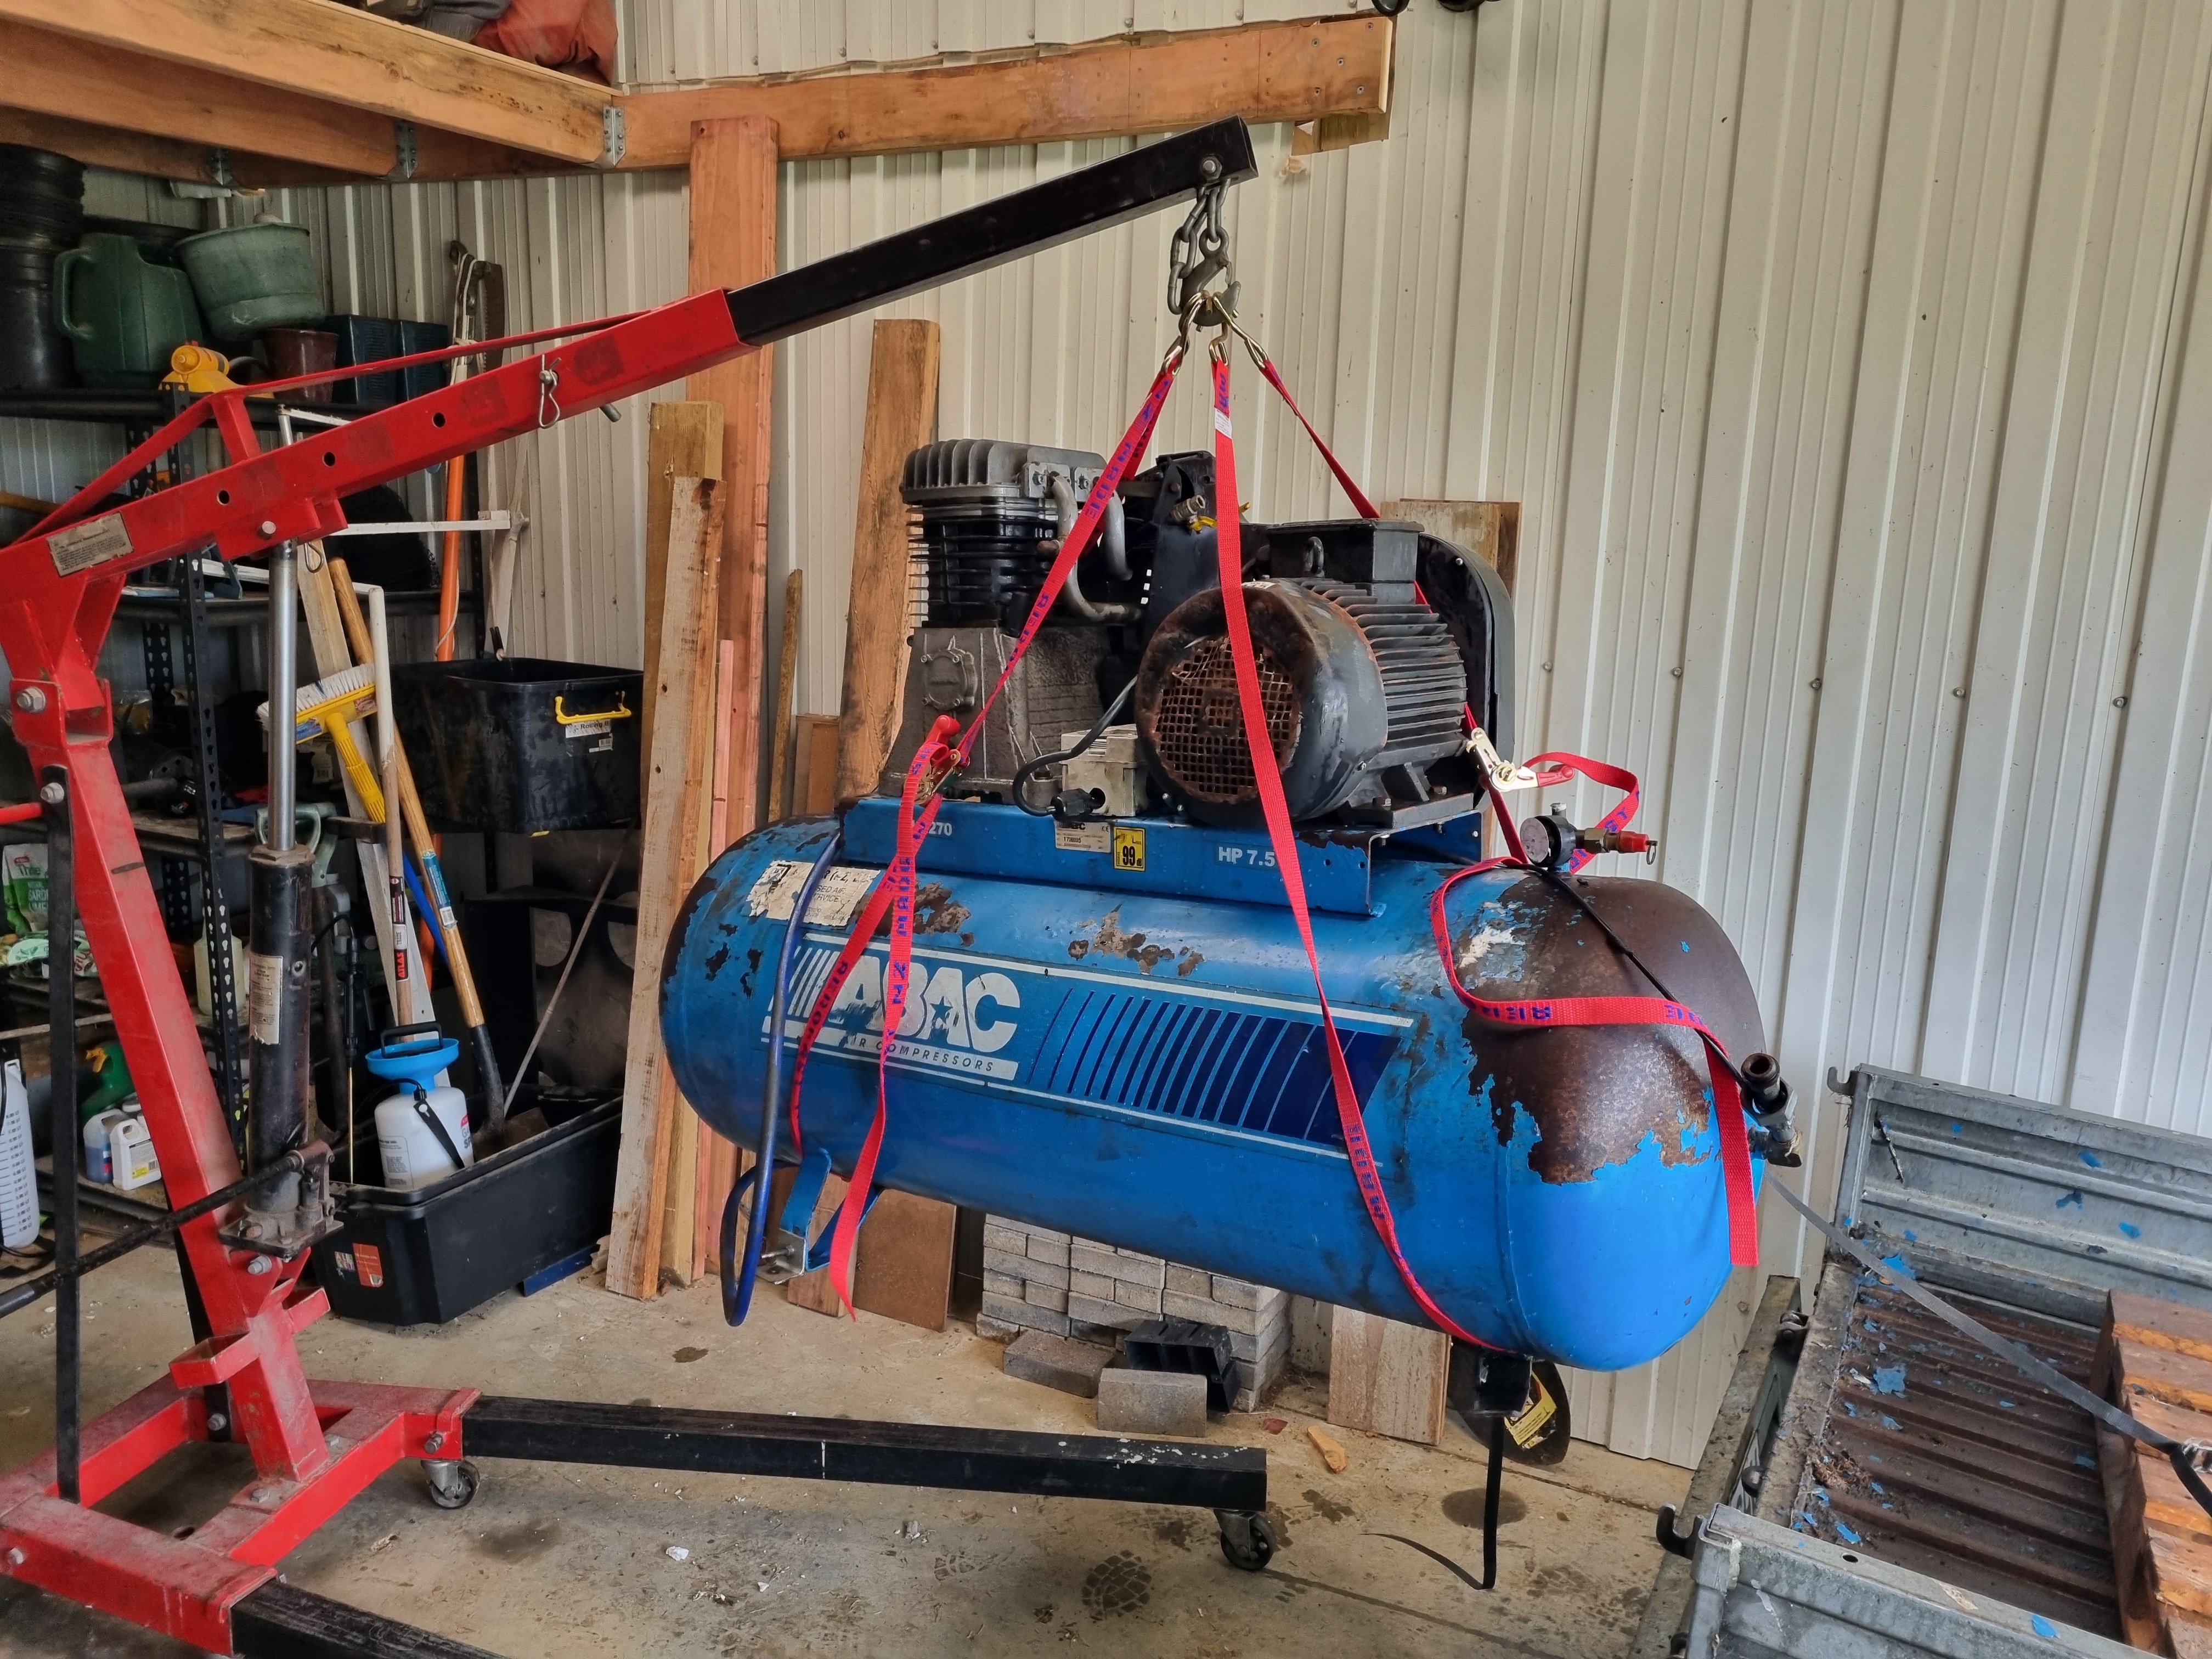
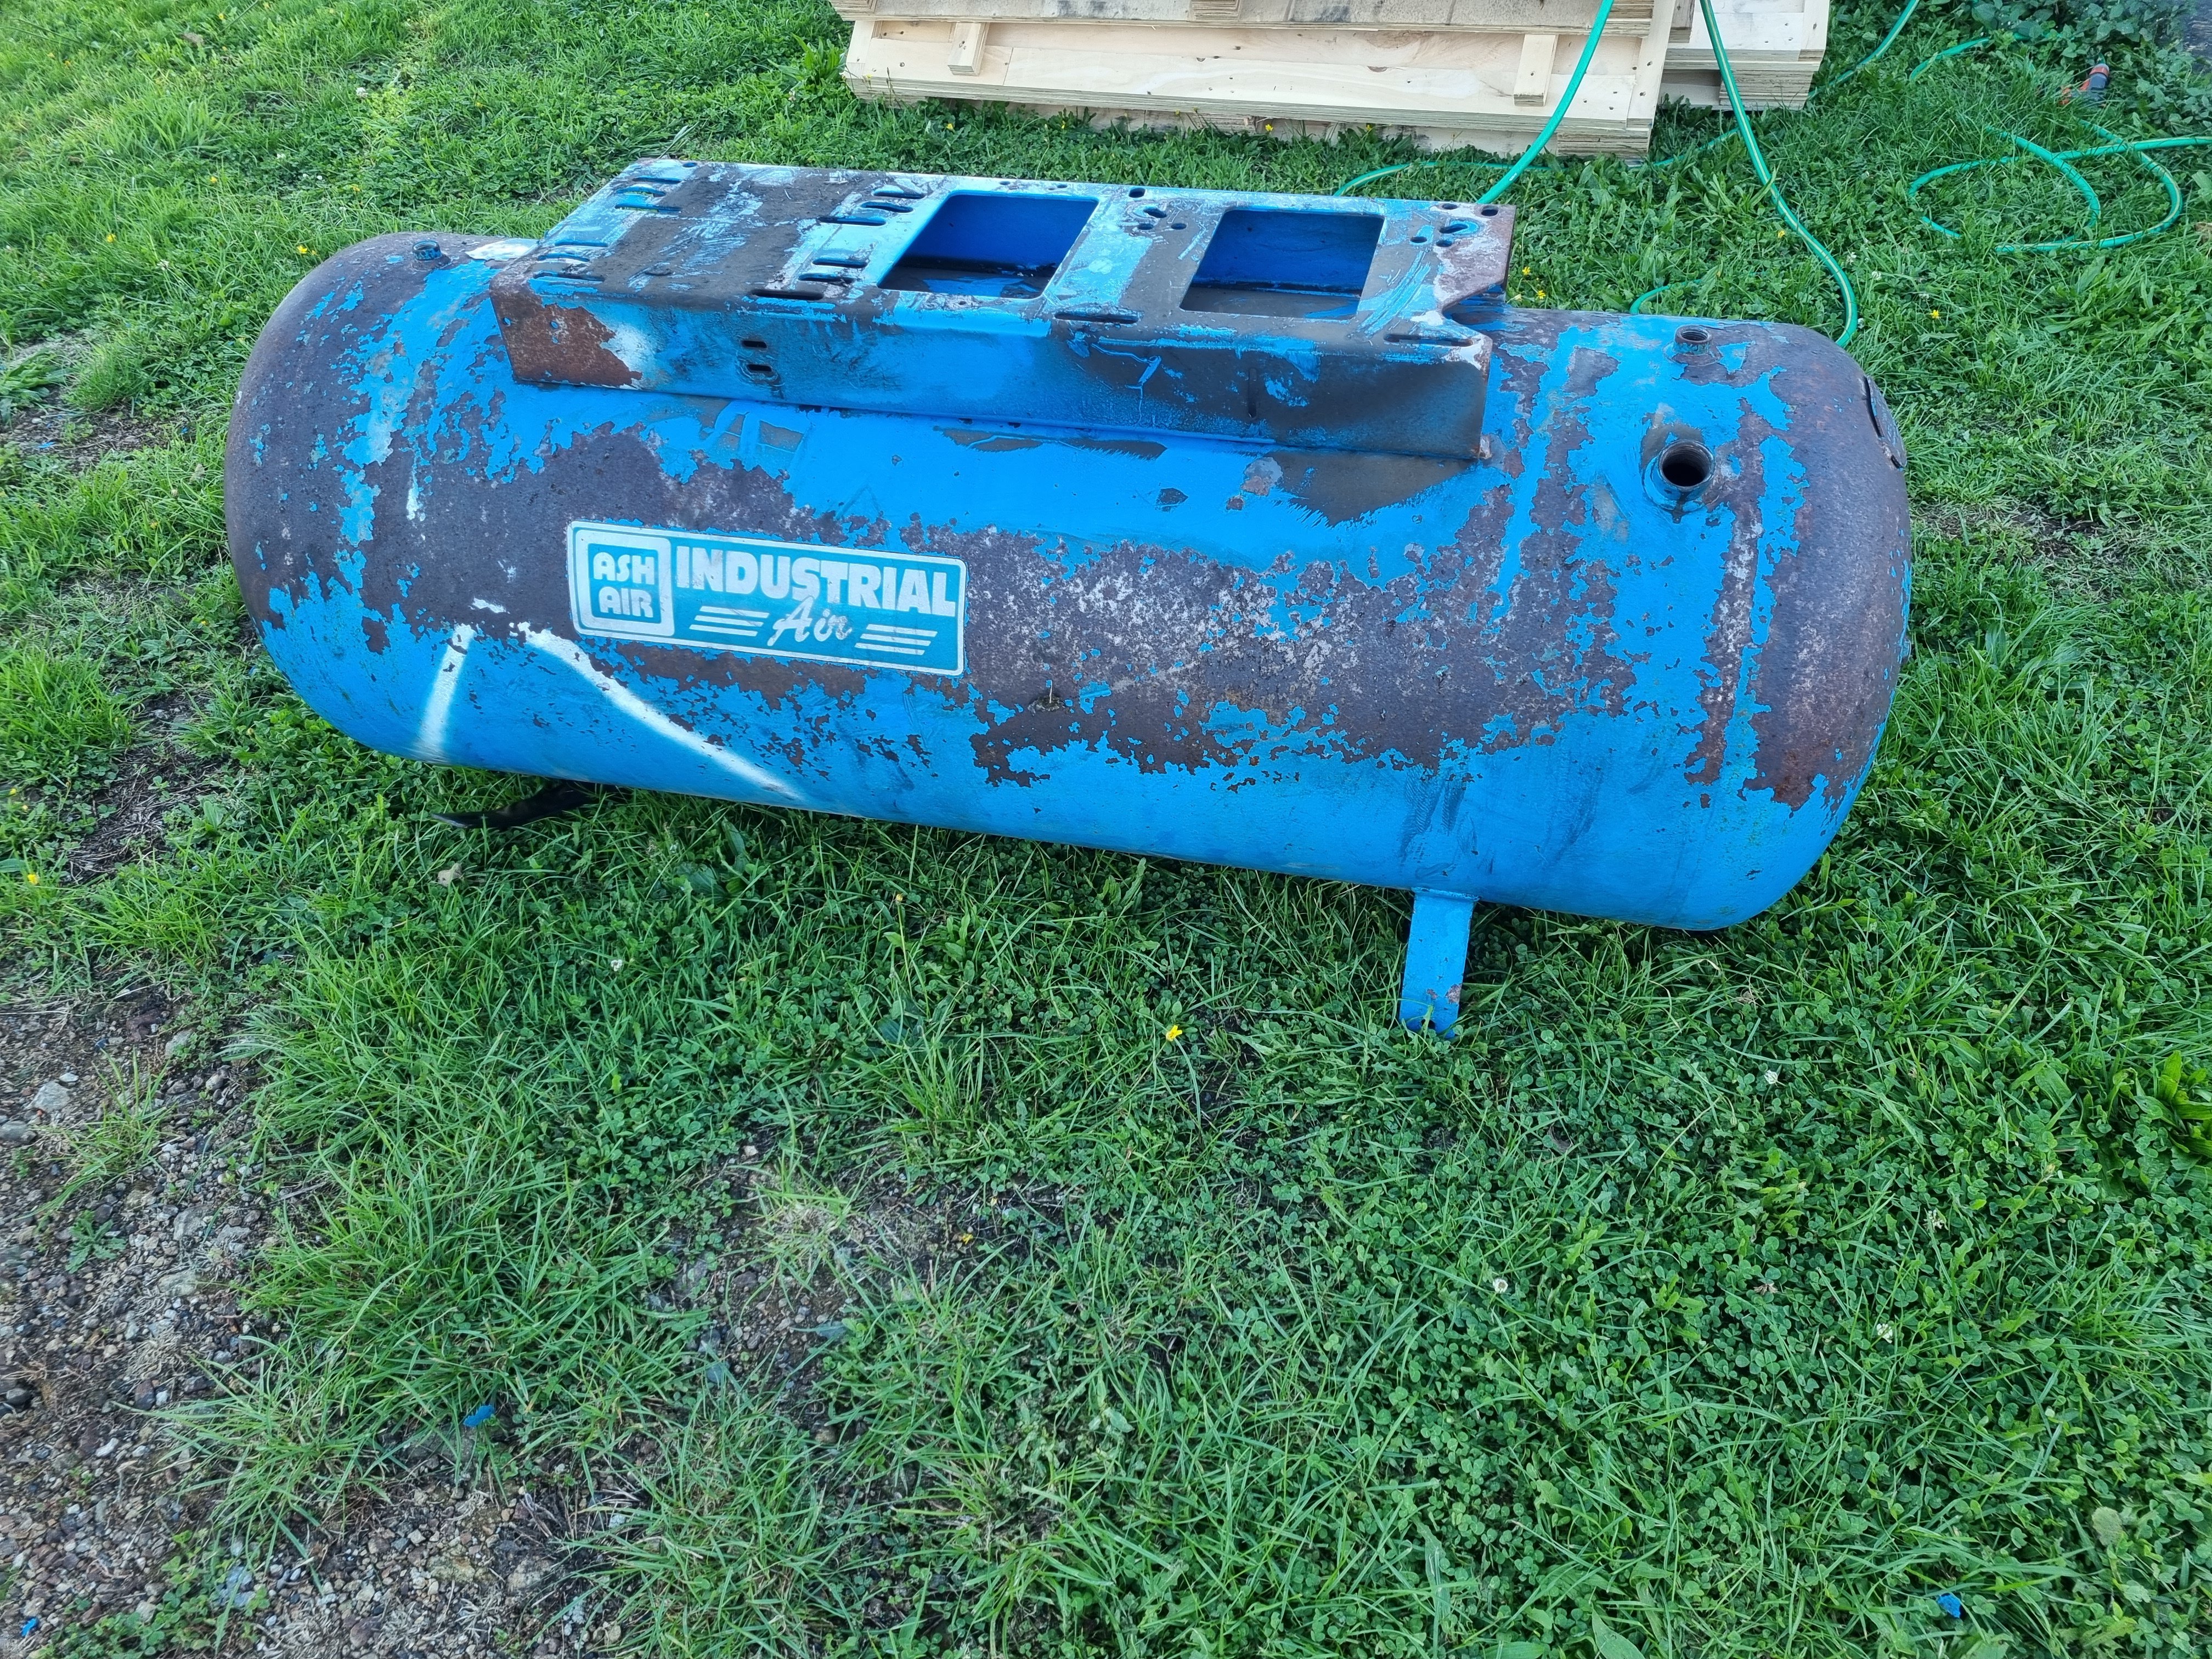
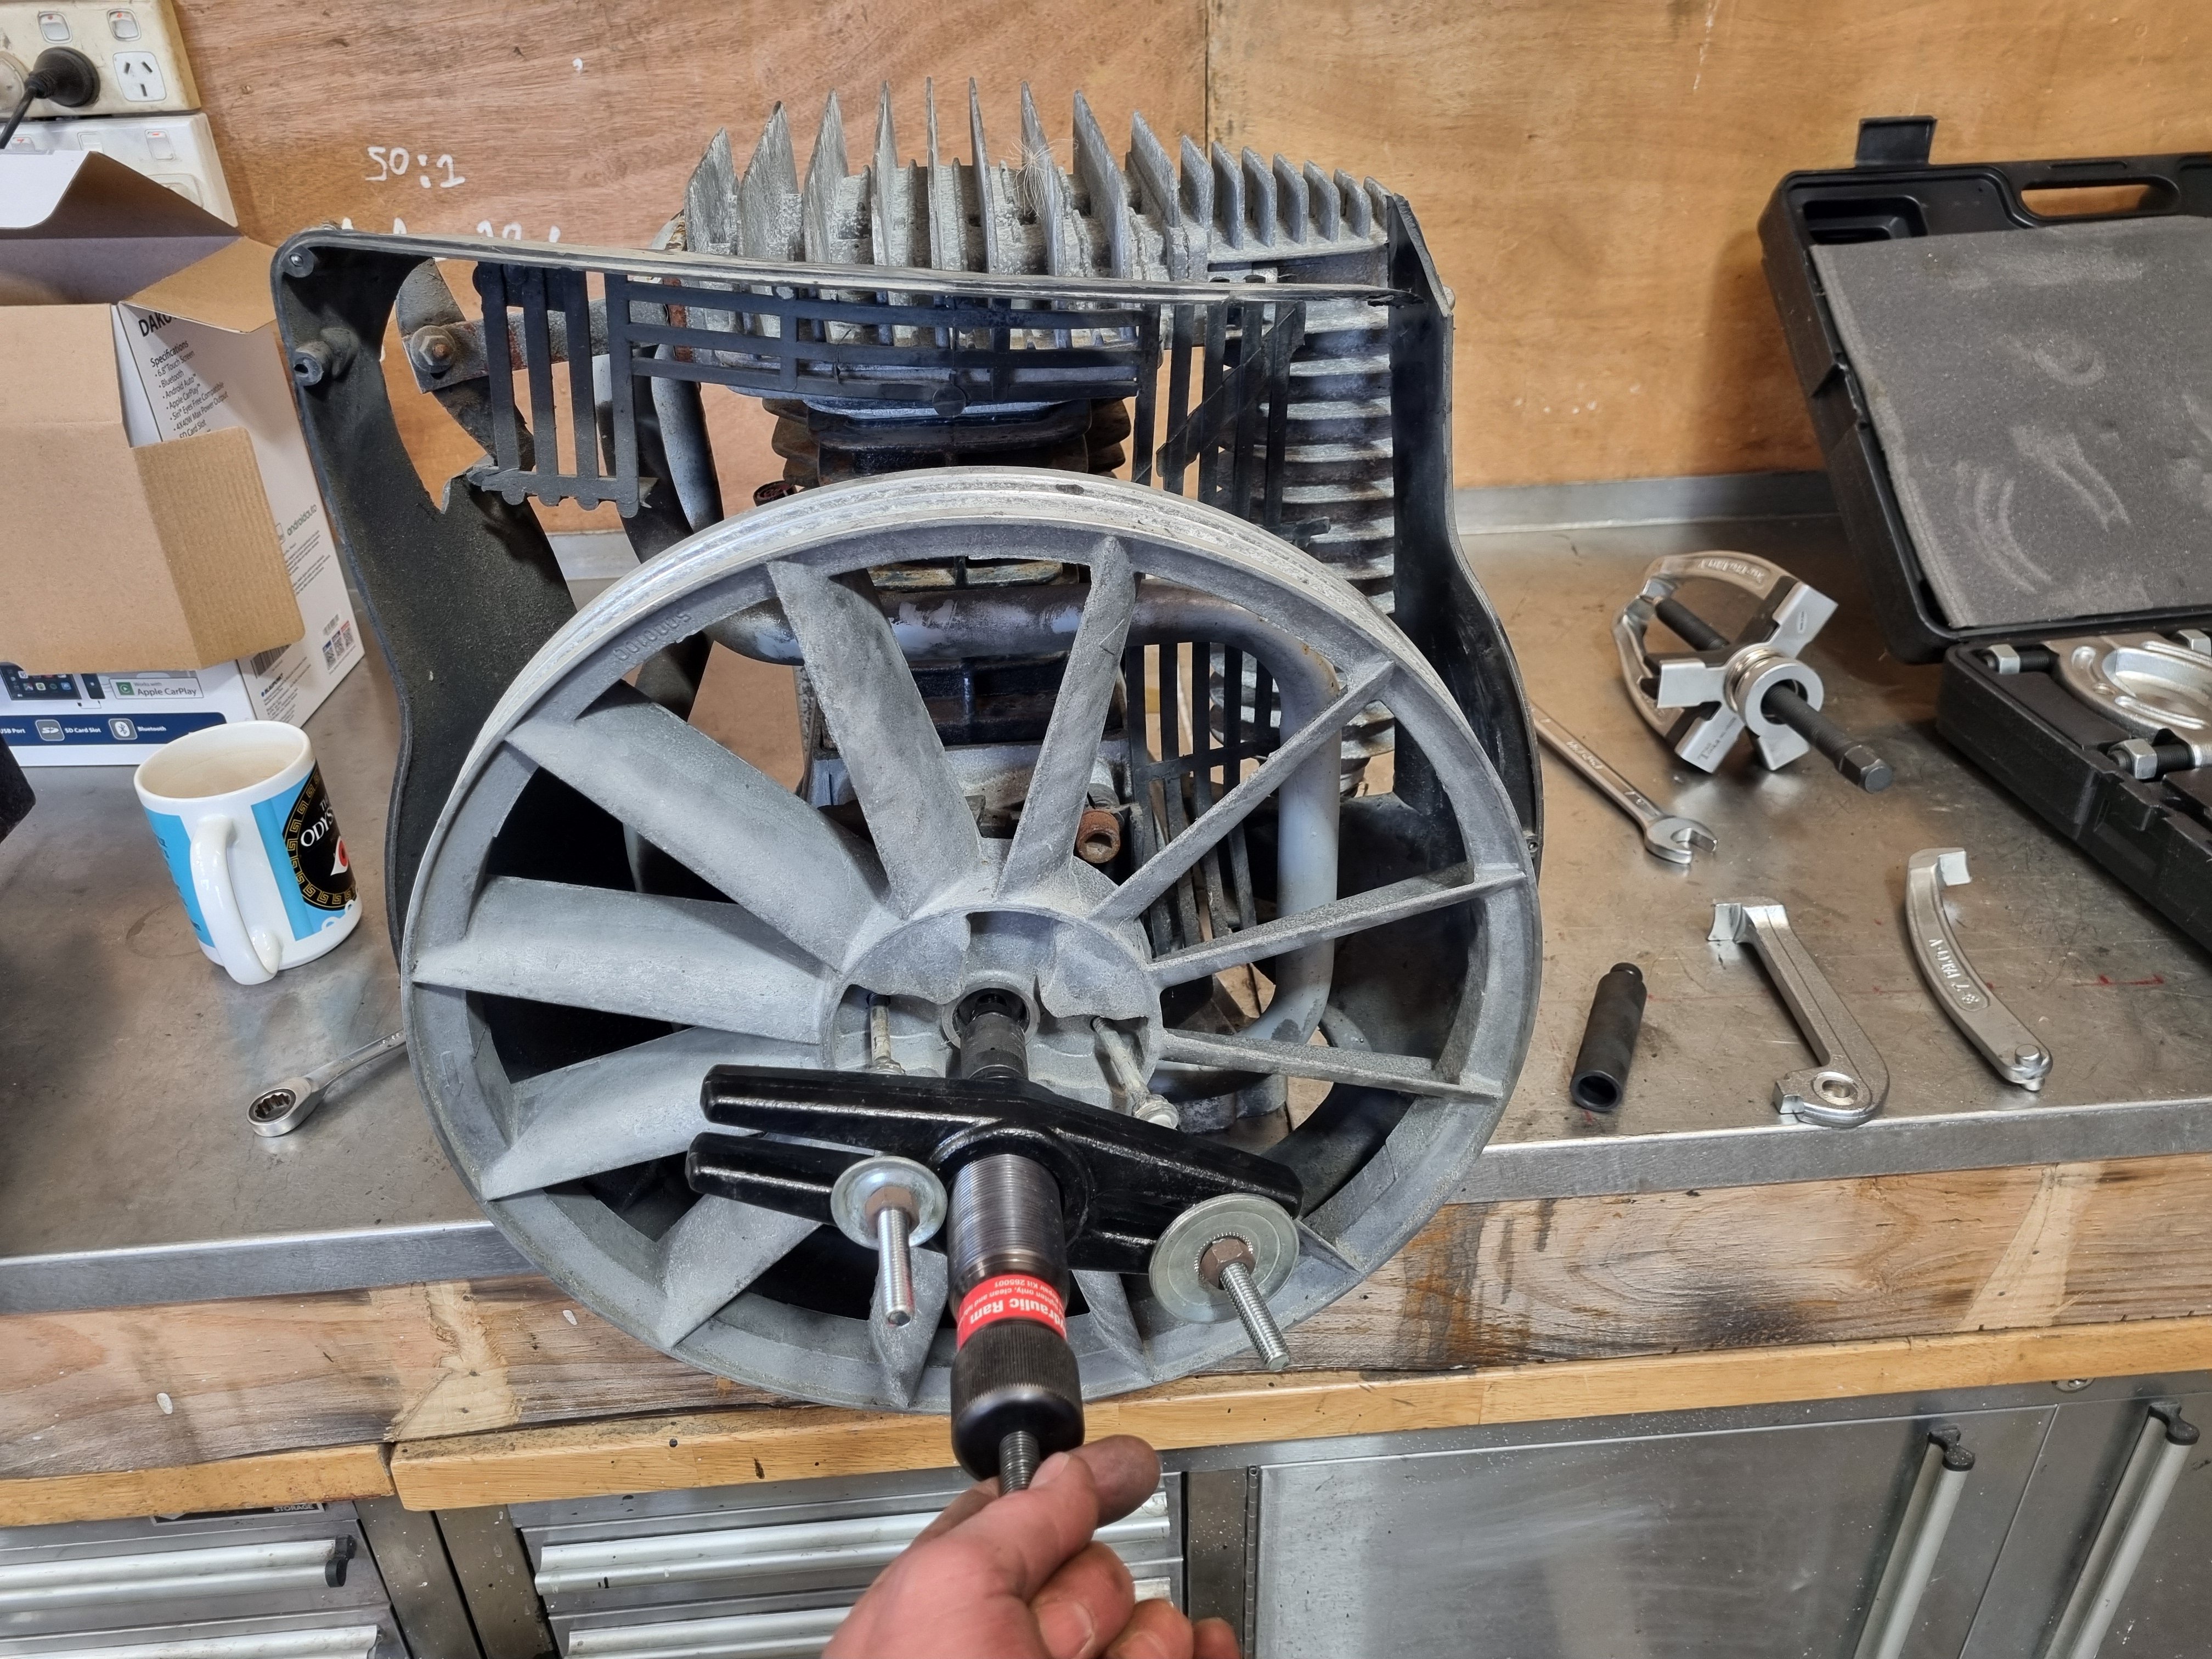
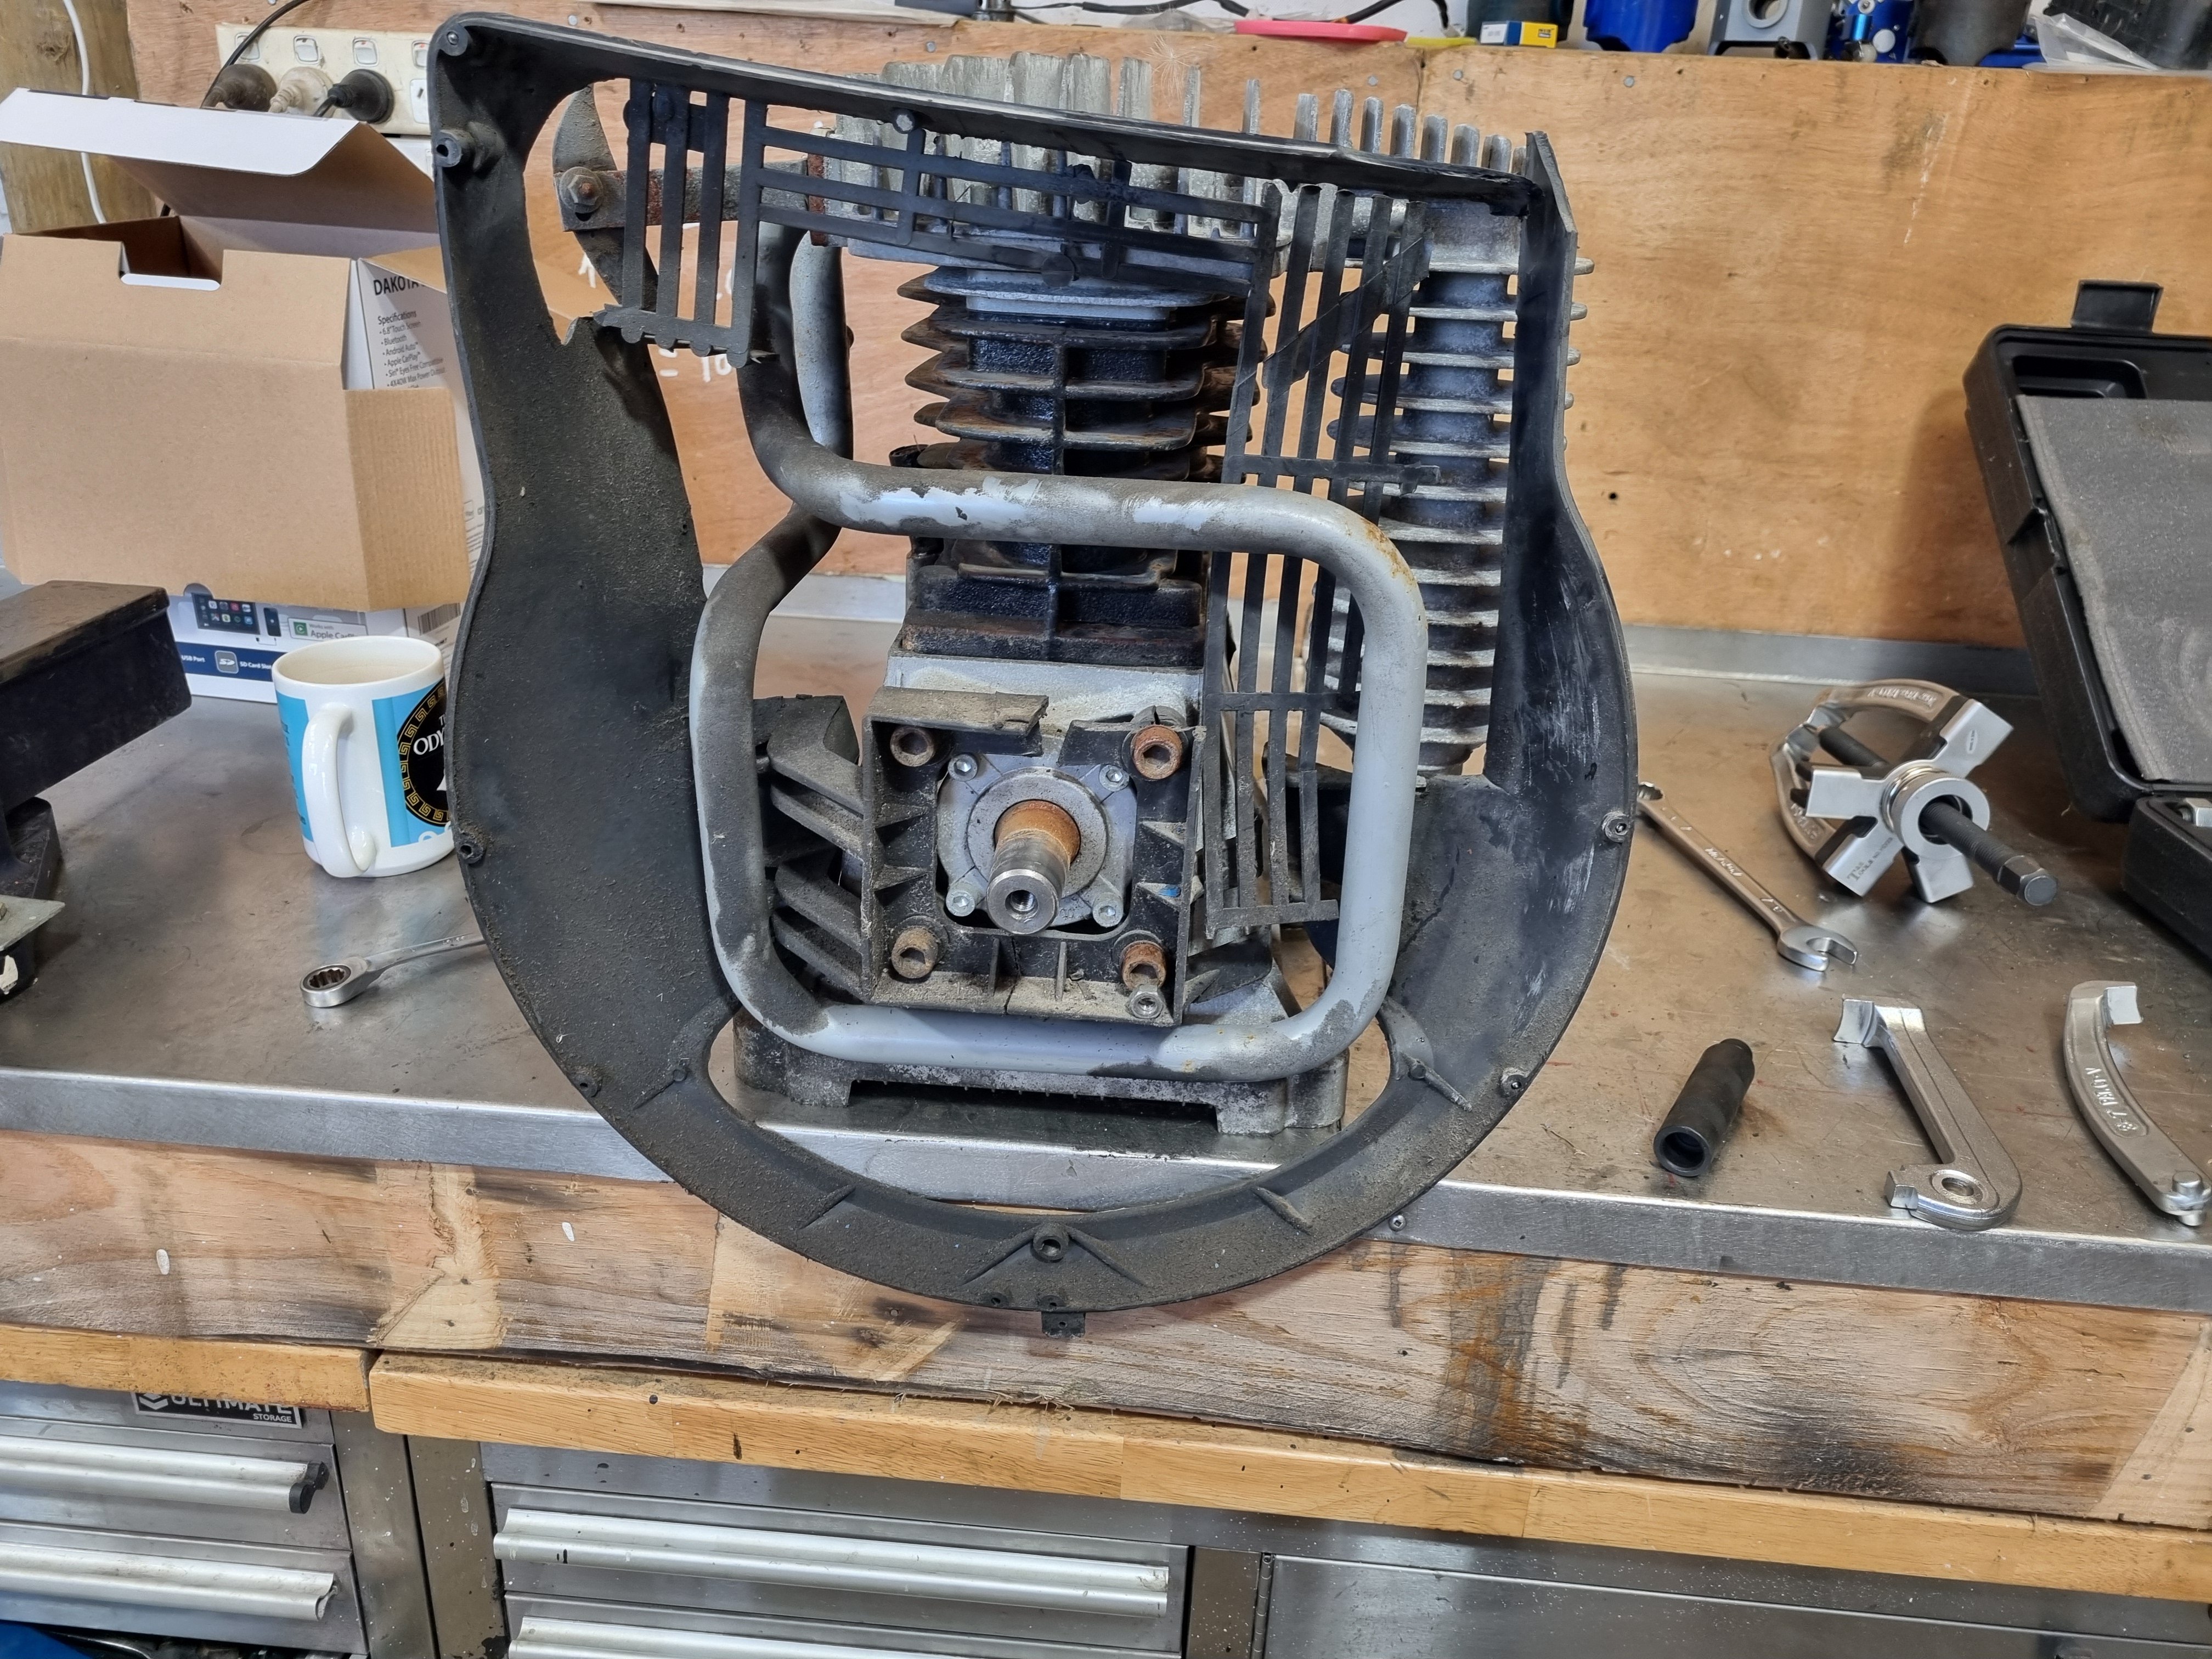
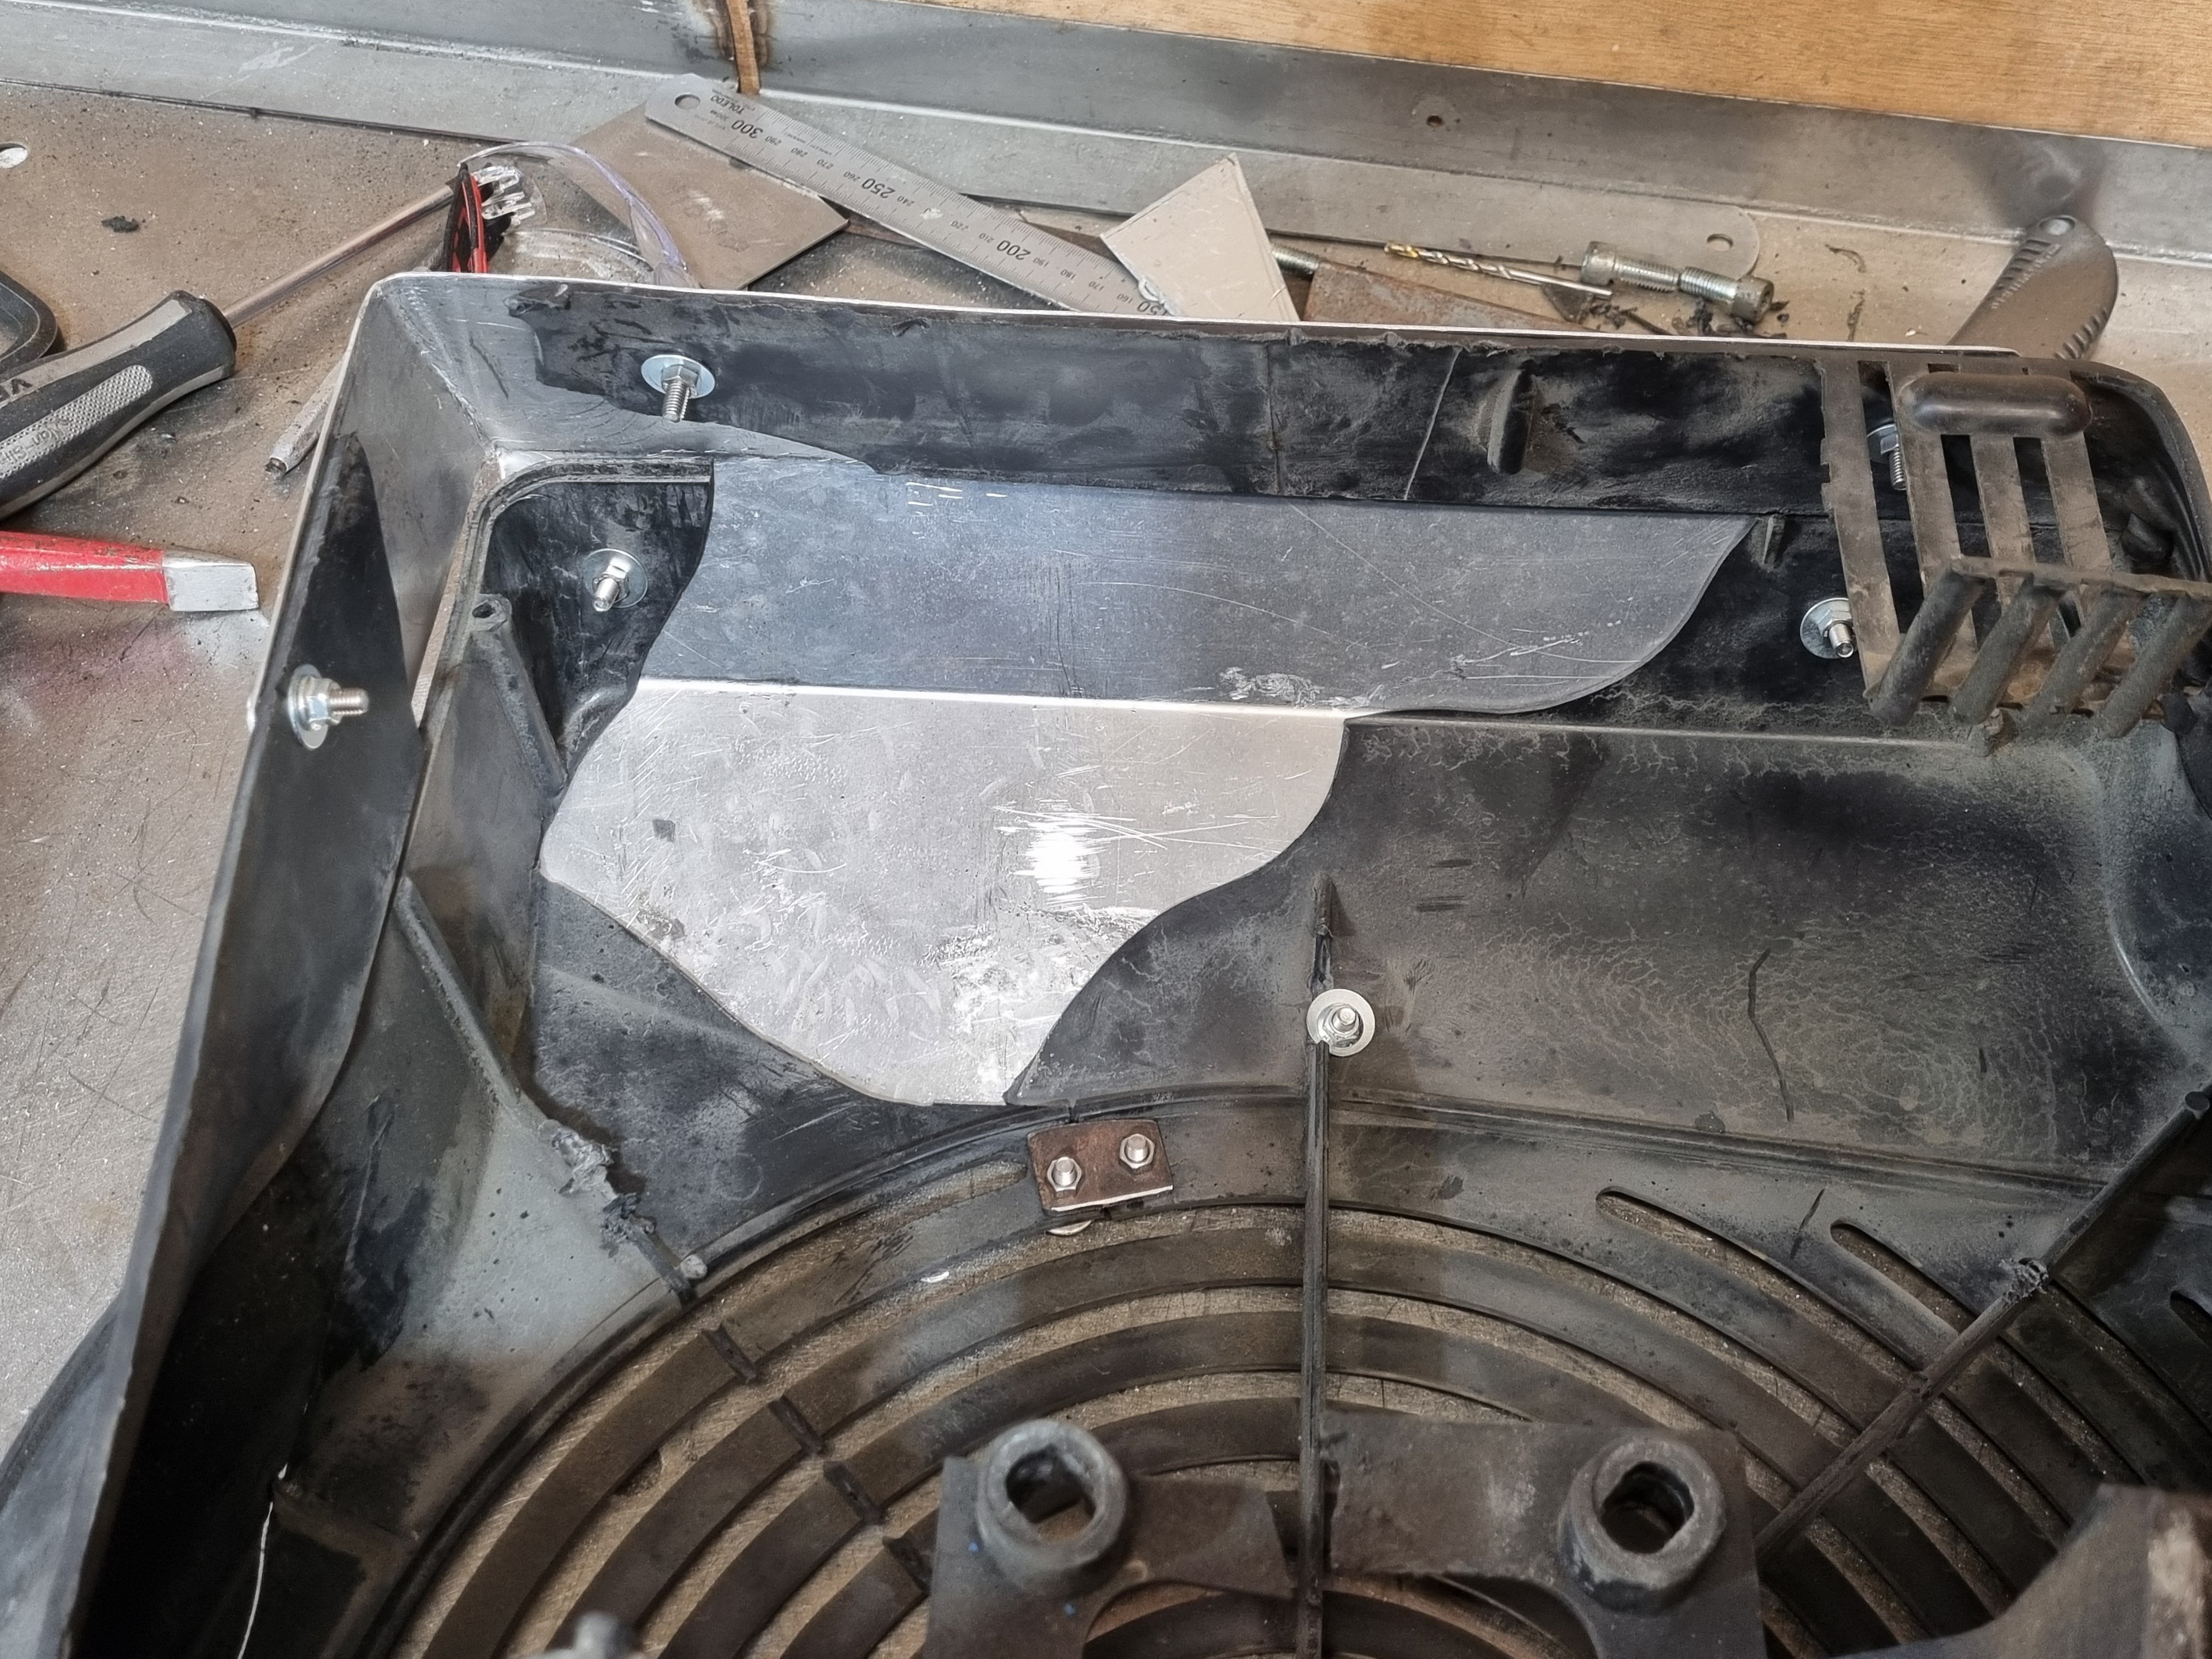
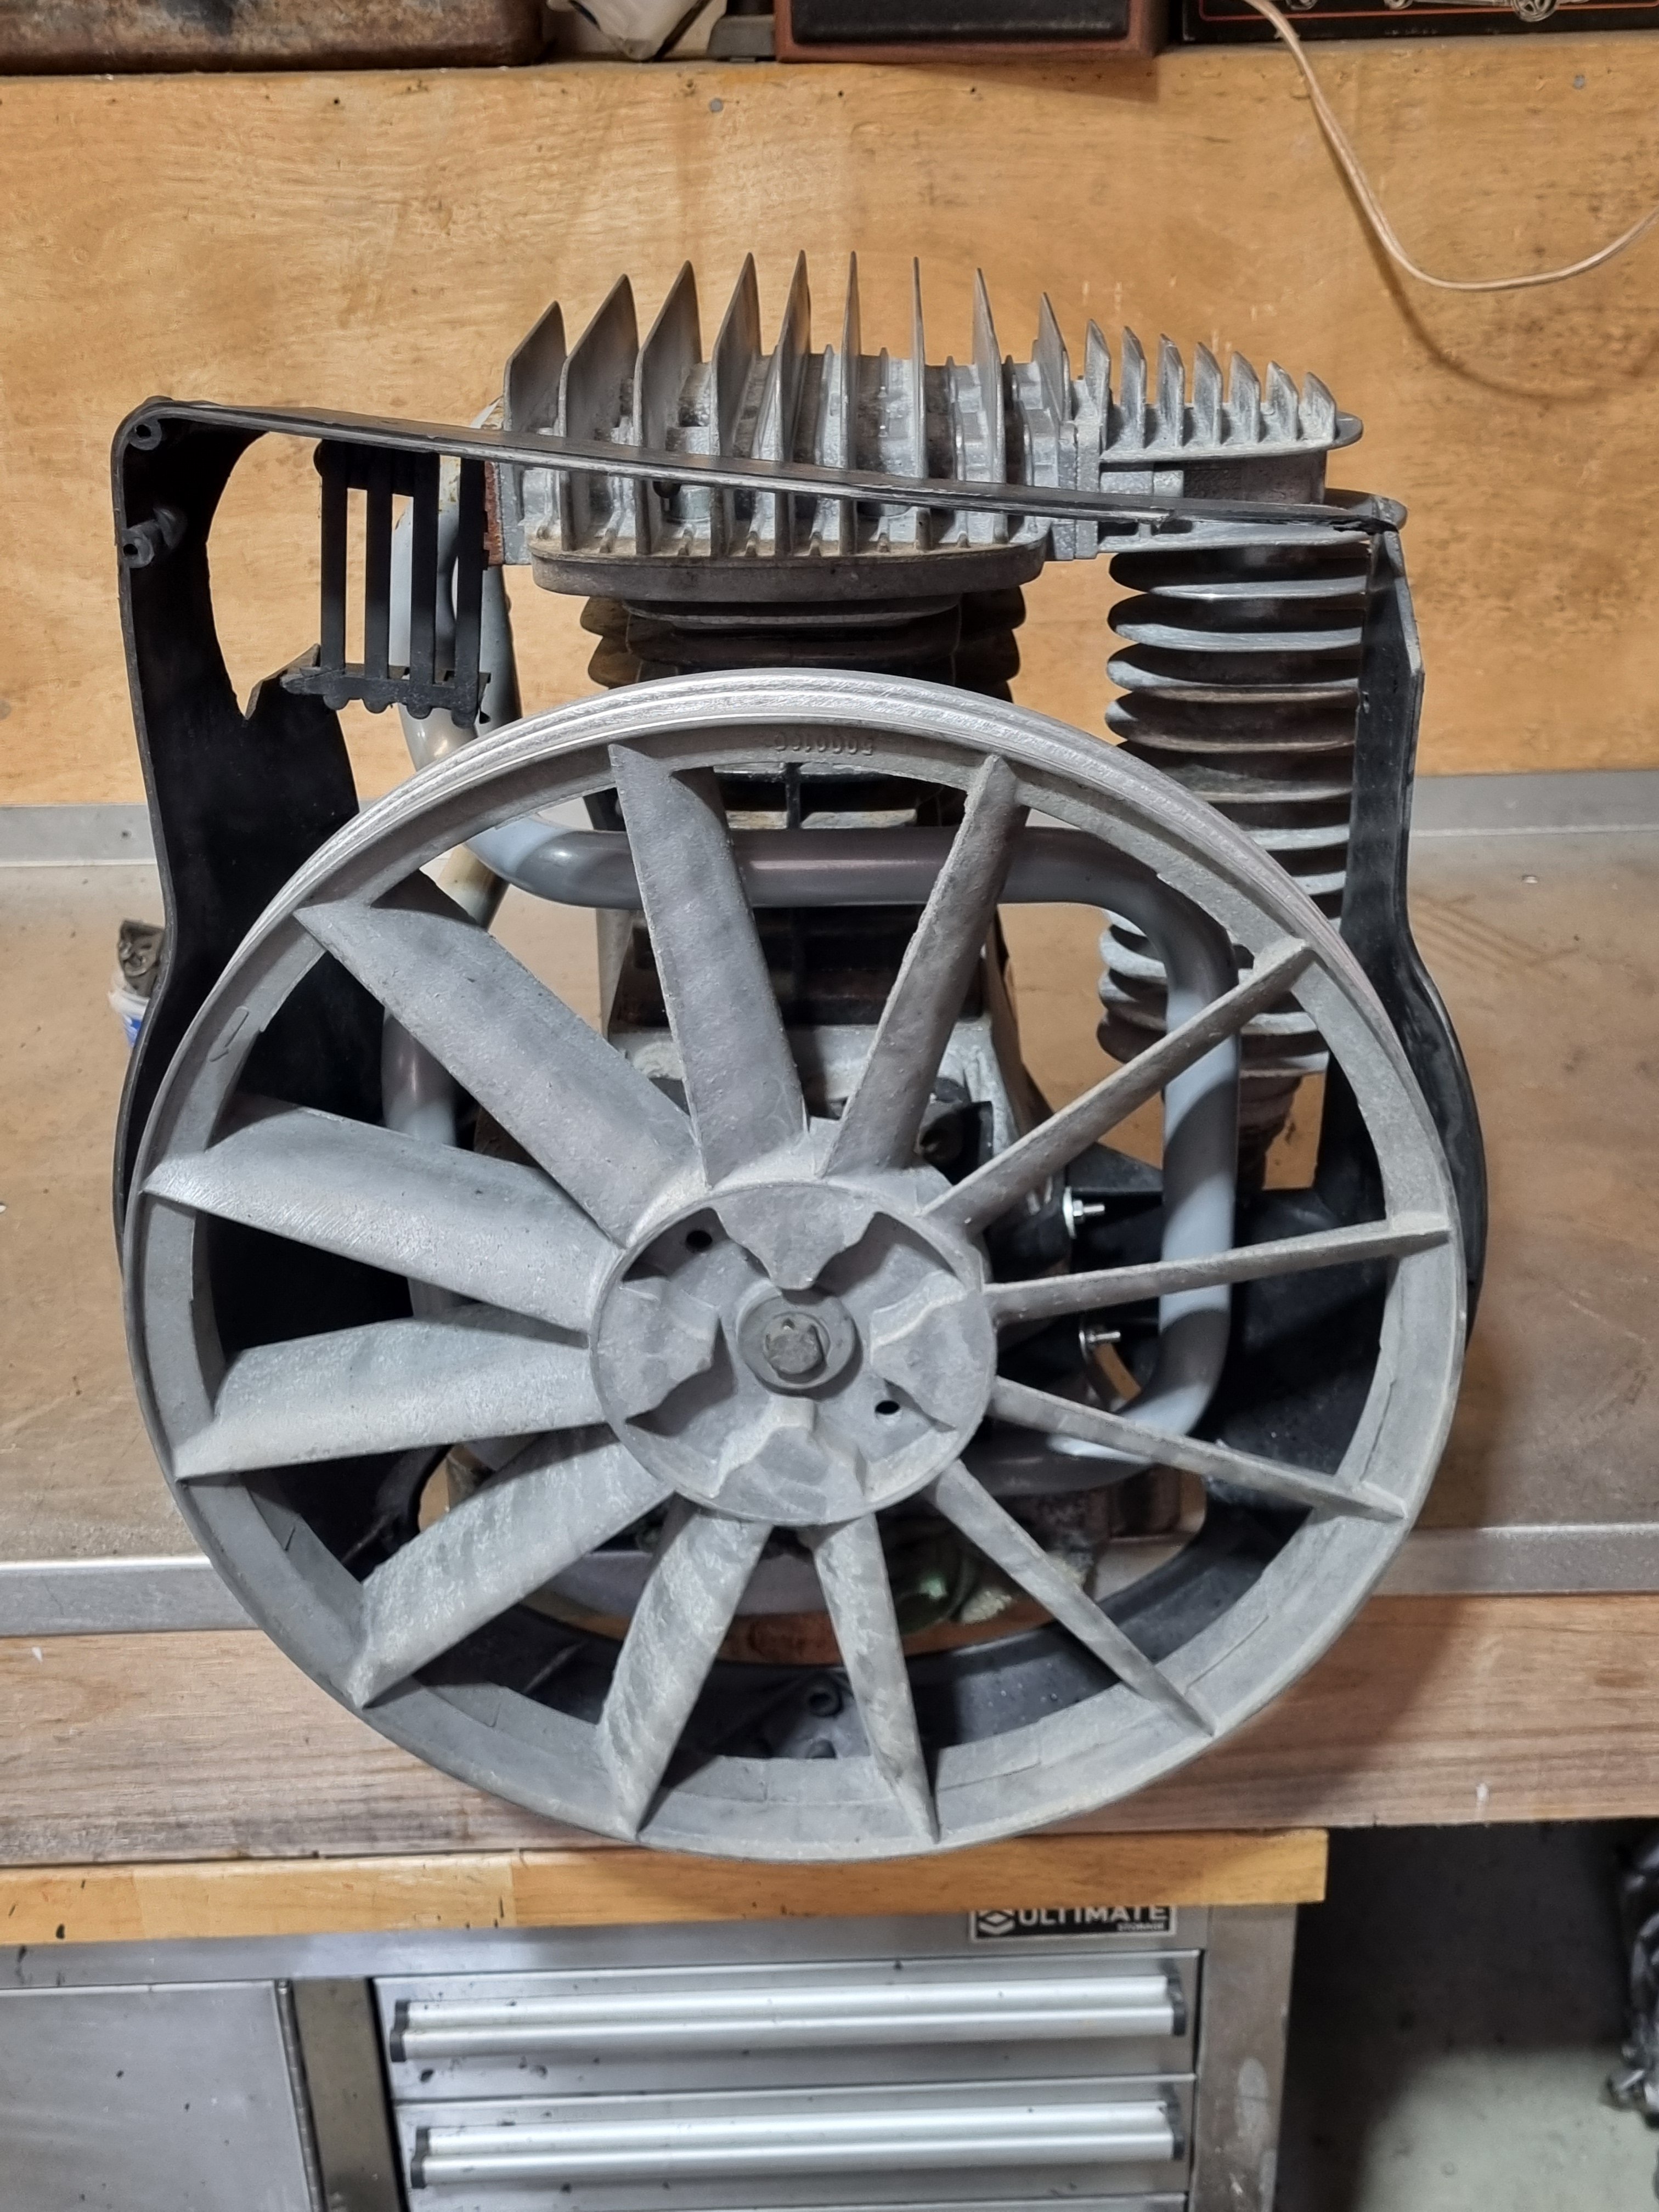
this is the old compressor from work. its been on a pallet kicked around from place to place for the last 10 years or so. its Italian, 44CFM 7HP 3 phase with a 270L tank. and because of that its fucked in many ways. the pressure switch is smashed off, the inlet filter is completely gone, the shroud around the belts is badly broken, the wiring for this thing is all up the shit also the electric motor shroud is all smashed in. it hasn't run in many years and when i picked it up from work it wouldn't even turn. i took it home, waterblasted it and pulled it to bits.
2 points
-
Oh yep. Yeah k33n.2 points
-
Love your work! Also, outstanding use of Banana for scale...2 points
-
2 points
-
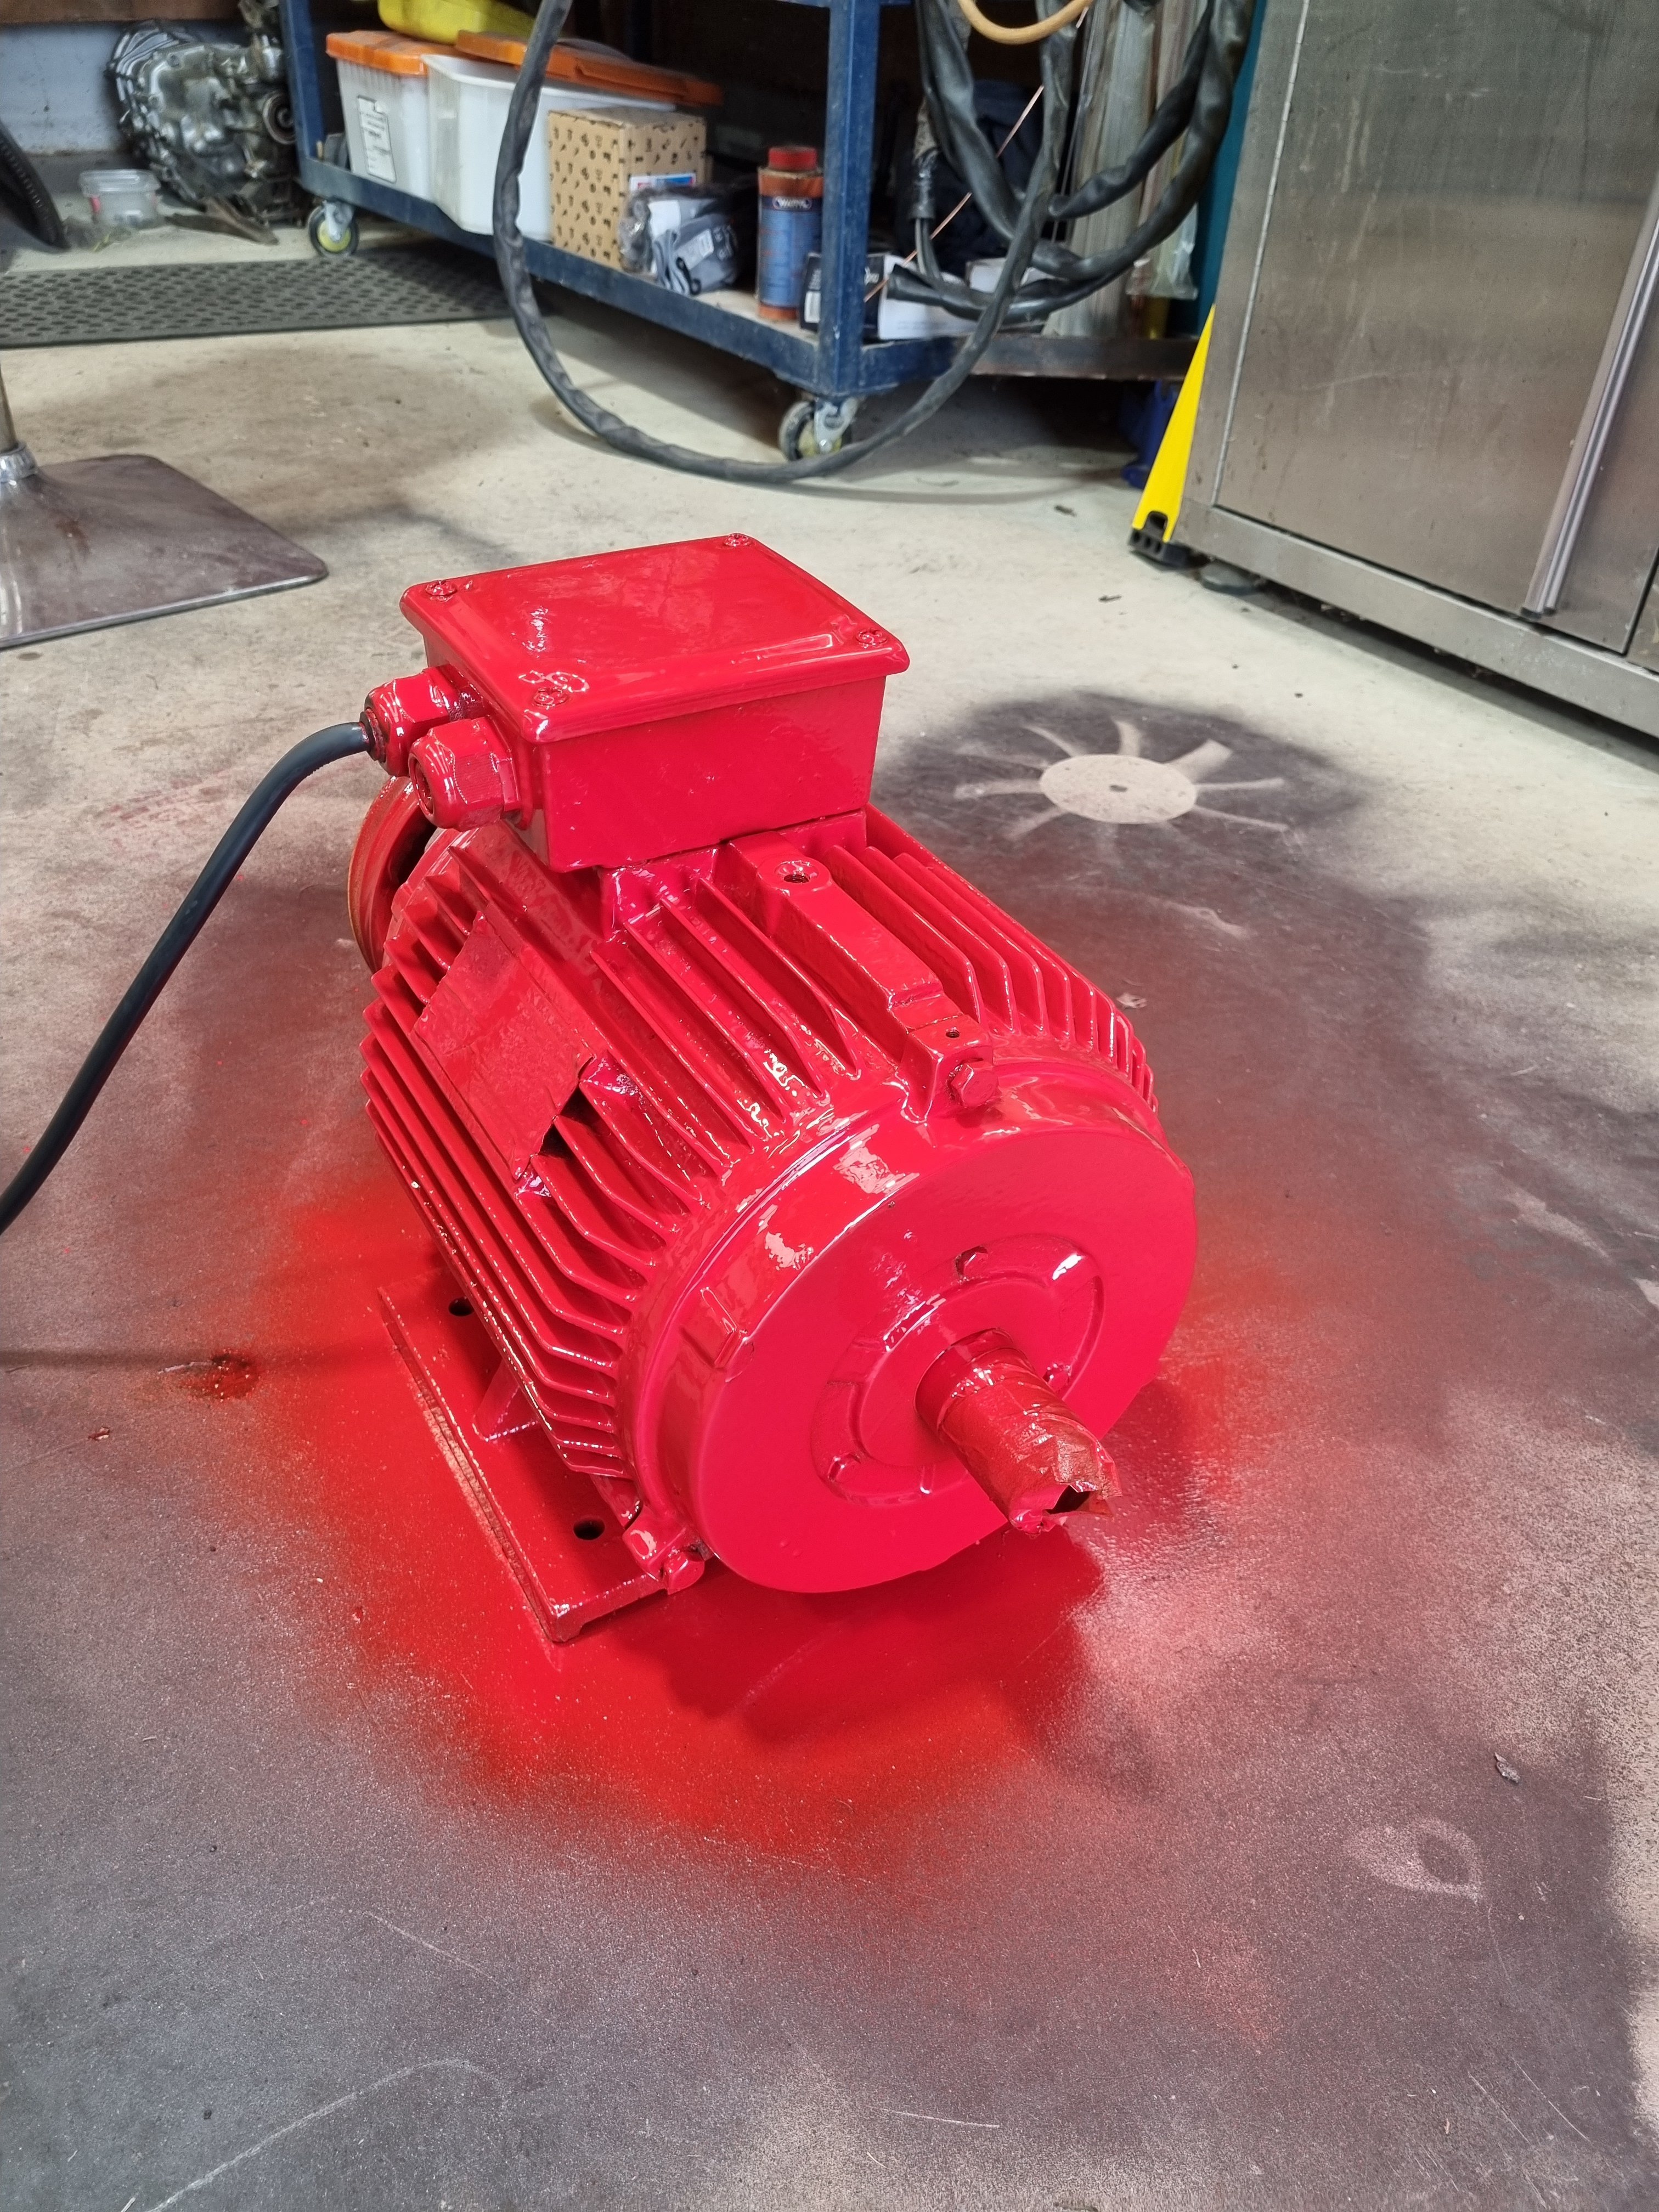
then, to make it go faster, i painted the electric motor red.
2 points
-
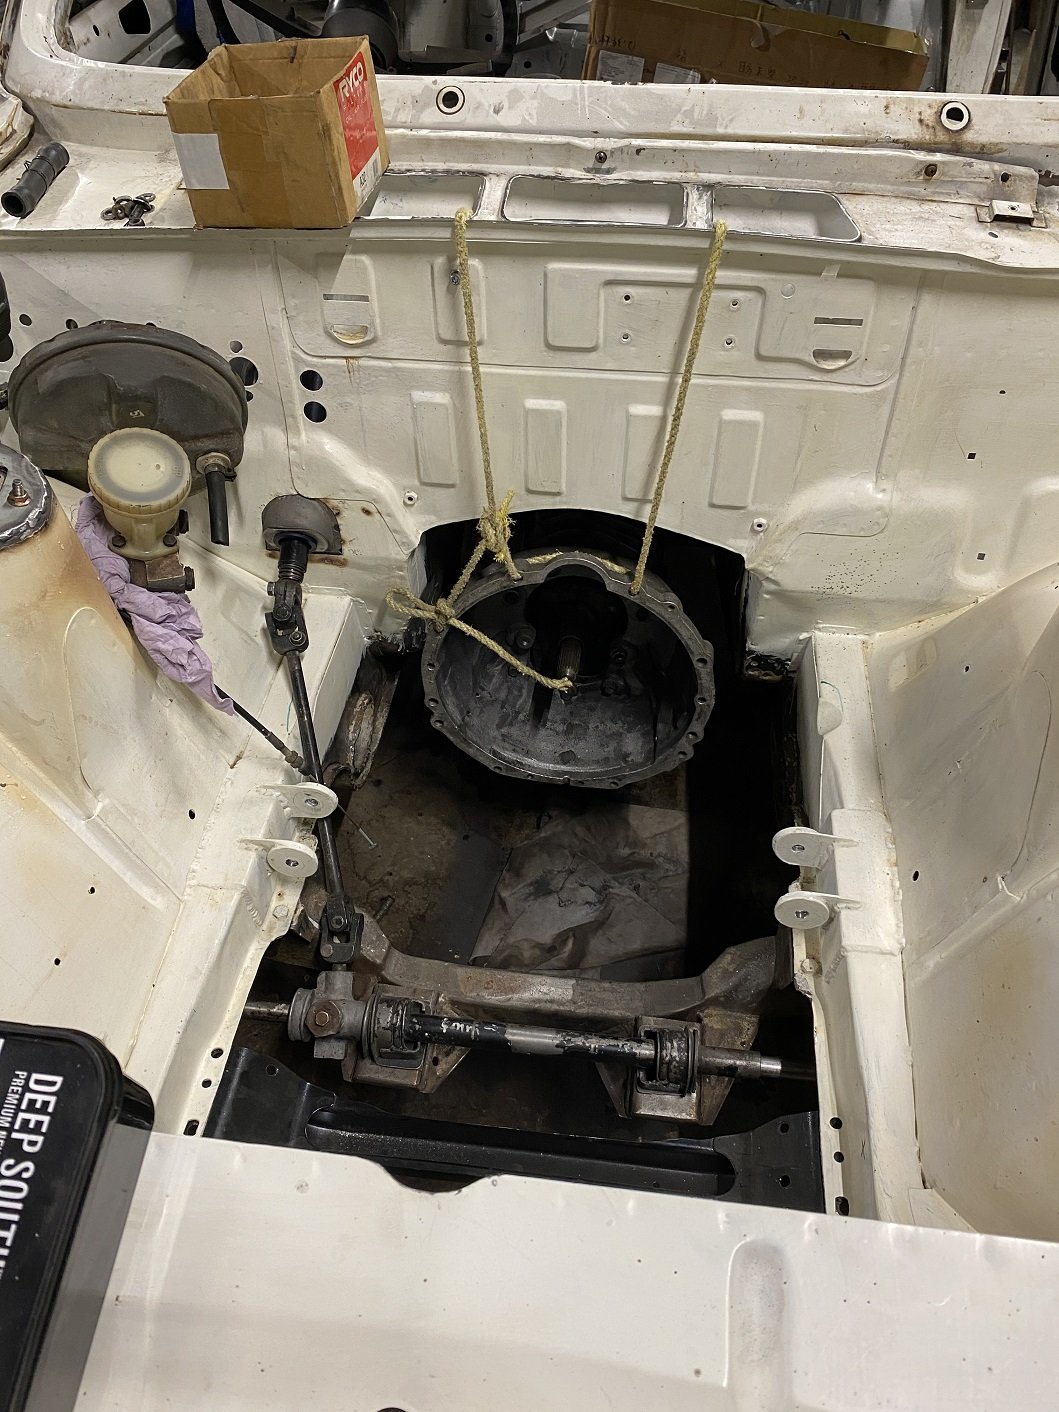
Scooped the engine back out the hole. Then put the gearbox back in so I can do the clutch and brake lines. I'll also be redoing the engine mounts as cert man wanted them thicker. And I can weld in the relocated steering column lower mount. I'll also be clearancing the chassis rails a bit more for the passenger side exhaust cause I put it in the wrong place the first time. And some clearance for the steering intermediate shaft. Epotec goes a bit toasted marshmallow if you use a MAP gas torch to soften underseal for scraping it off...
2 points
-
So what you're saying is, a modern car would be better? That's it! Close the forums, we're done. Let's not forget a 2J is 5 miles long and weighs the same as a bus.2 points
-
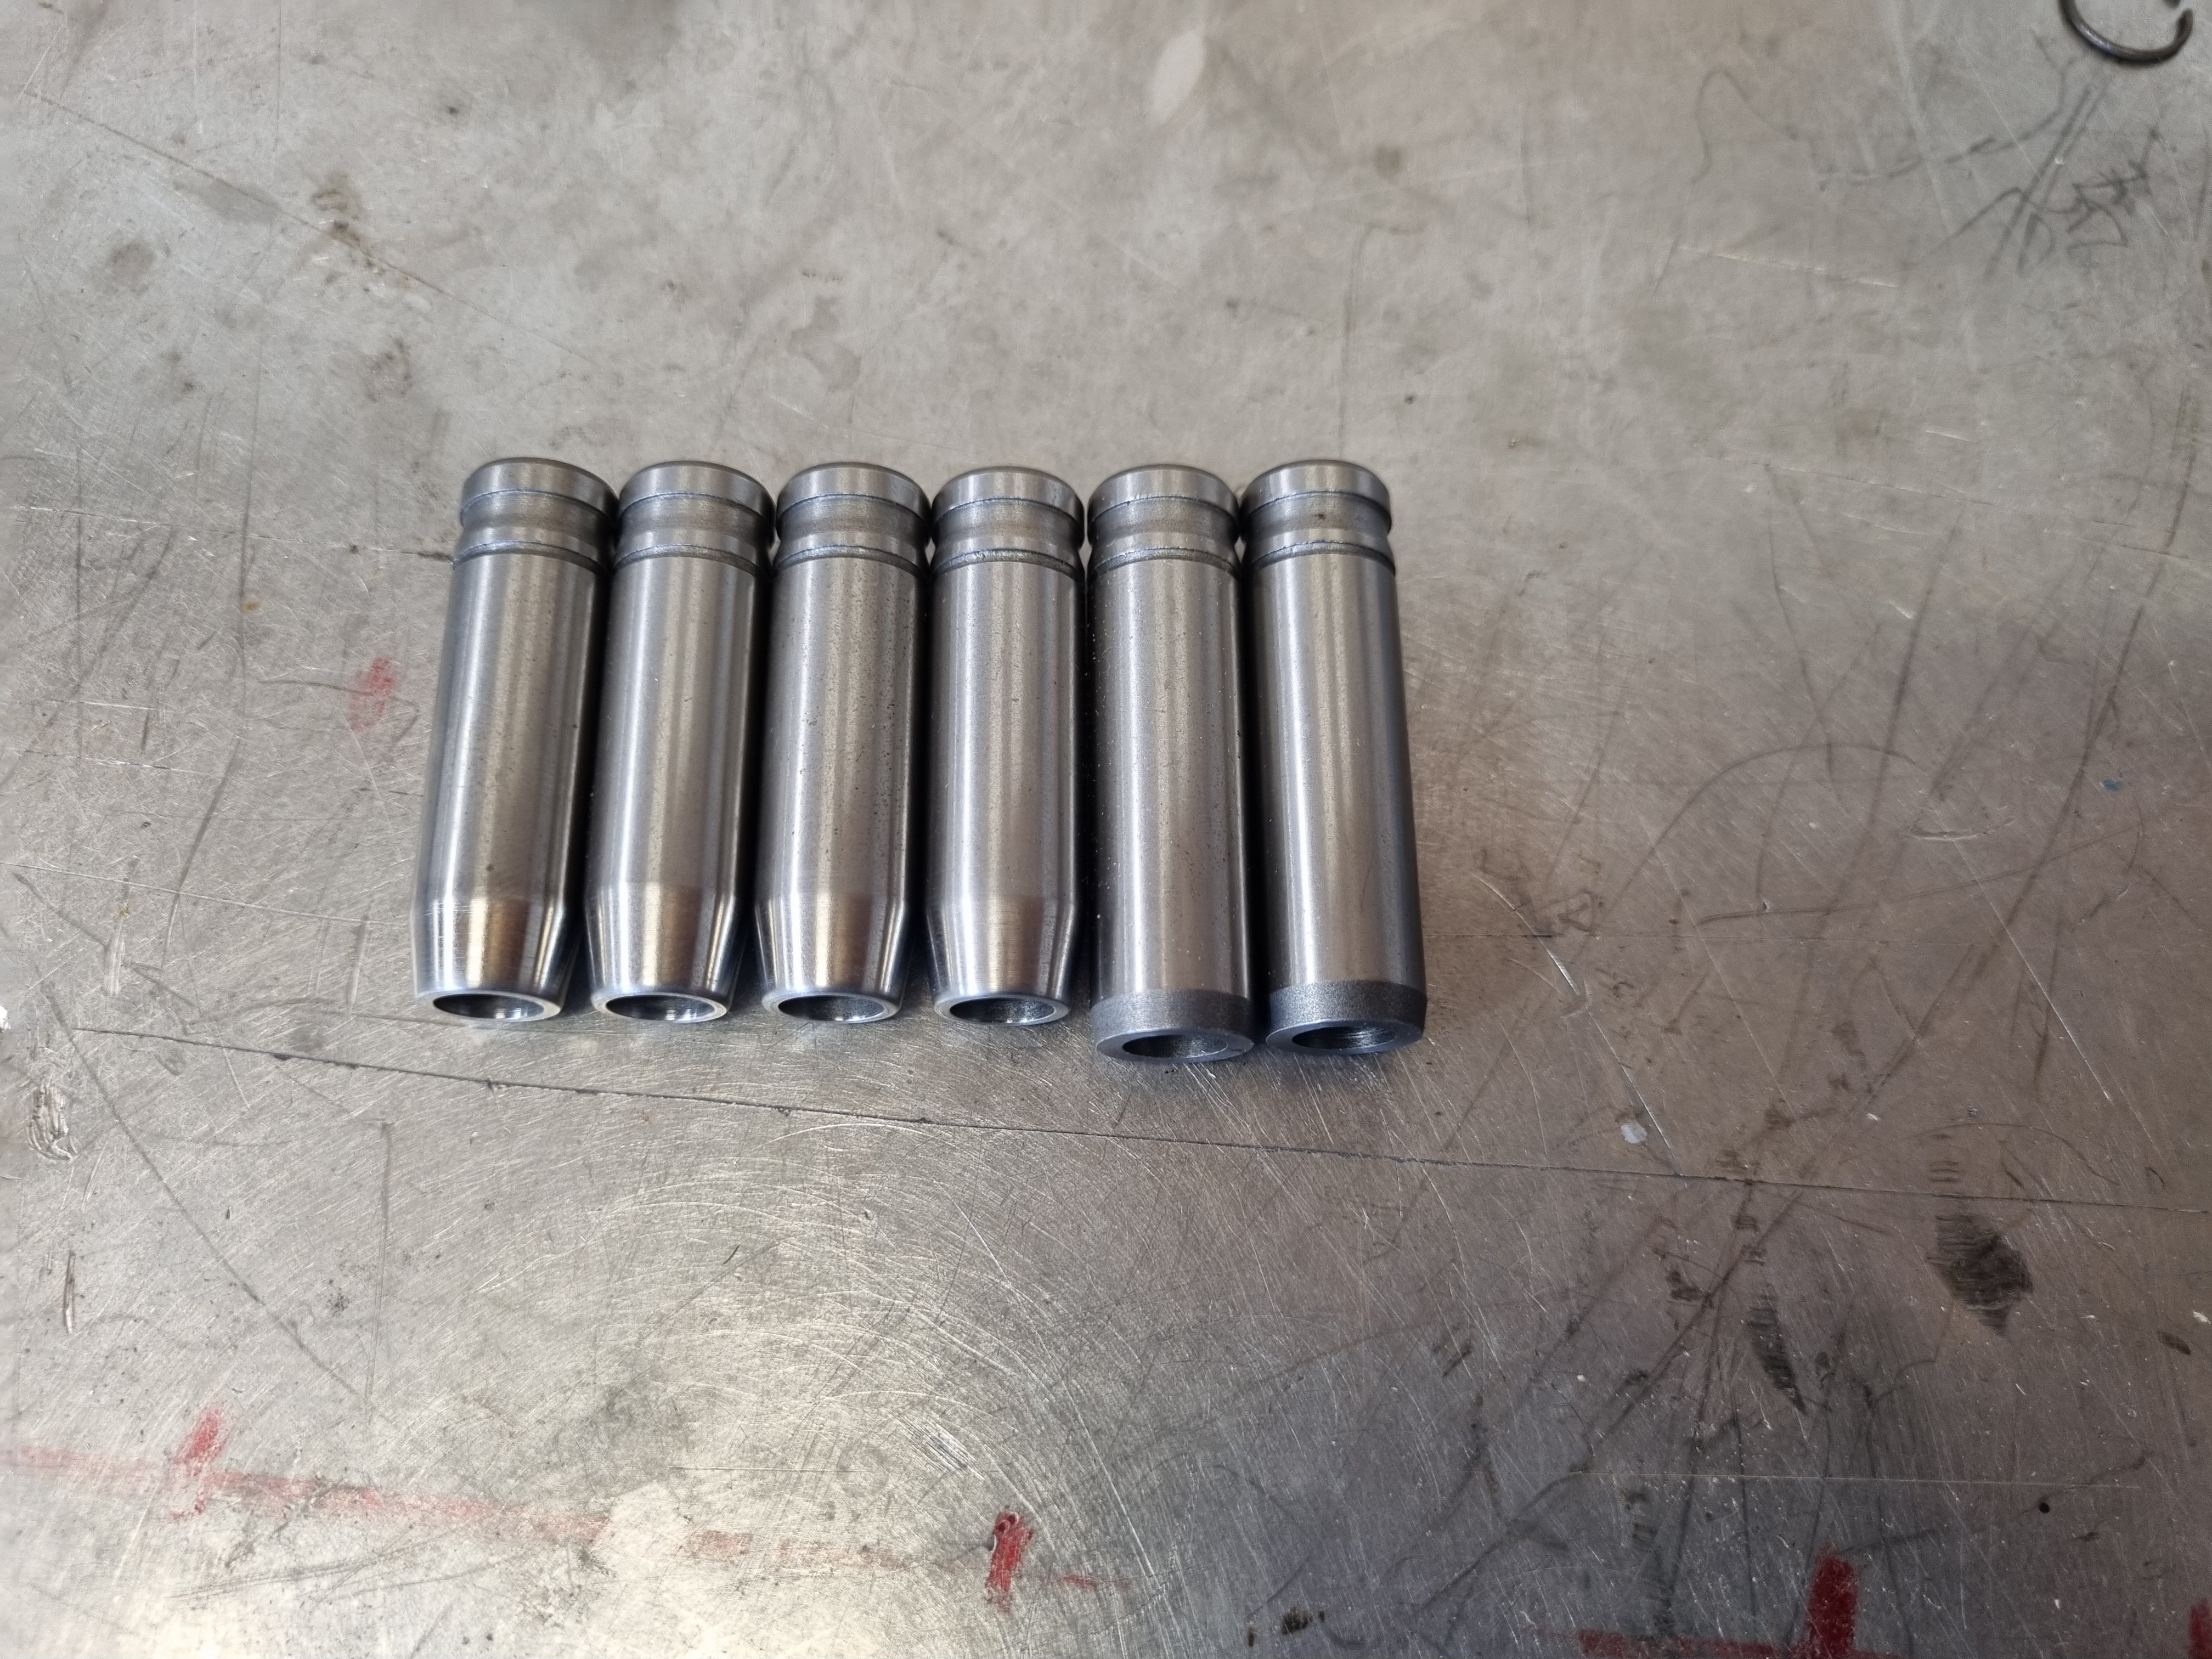
So when I left off the motor was back to completely disassembled. I got the cap machined and now it's back together with the correct crank end float. The other thing is that I got the head flow tested with the porting and bigger valves. It shows about an 11 percent increase over stock. I was kind of hoping for a bit more but using the "no science just hog it out" method is probably why 11% was the result. Anywho, now it's time to get the head all sorted and I can bolt it on. Need new valve springs, new spring washers and retainers - all of which will need to be custom or at least sourced from some other engine. In preparation for this I shortened the valve guides to suit the machining that the head needs to clear the higher lift. 3mm off the exhaust and 6mm off the inlets
2 points
-
Aaaaaaannnnddd car is still in the weather outside. But i just found and paid for something i have been looking for since 2005ish..... AN INTERMITTENT WIPER SWITCH!! This may not seem like a big deal but only having a 2 speed wiper switch in rainy reporoa is a problem. And yes while i could have wired in an aftermarket timer that wouldn't have felt right. So long as david from gumtree doesn't let me down.....2 points
-
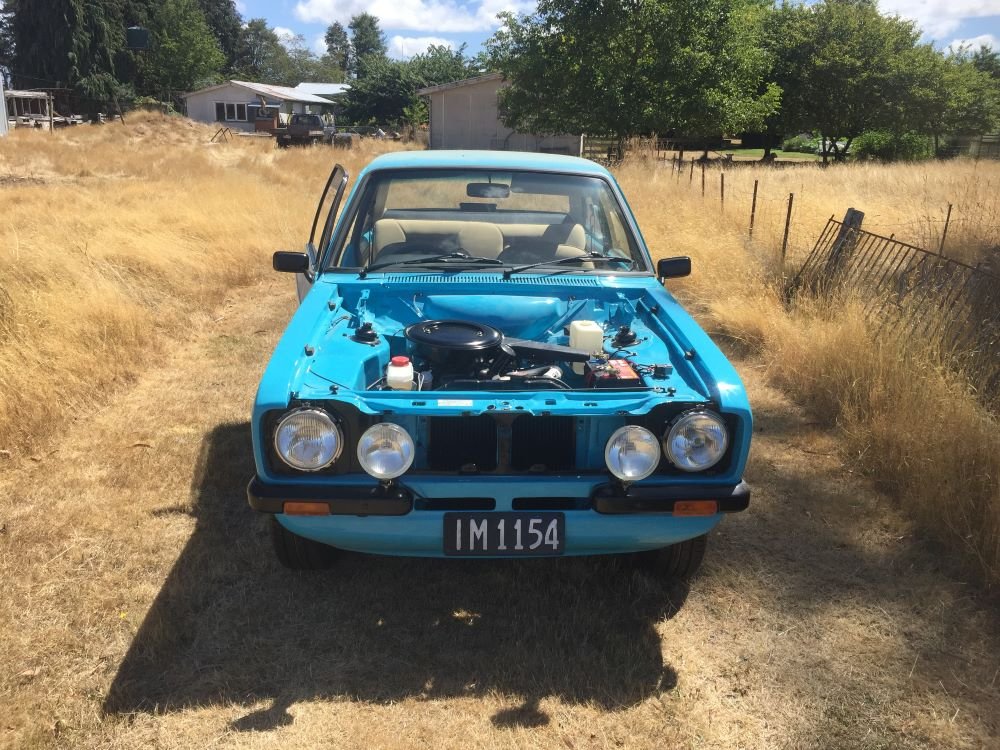
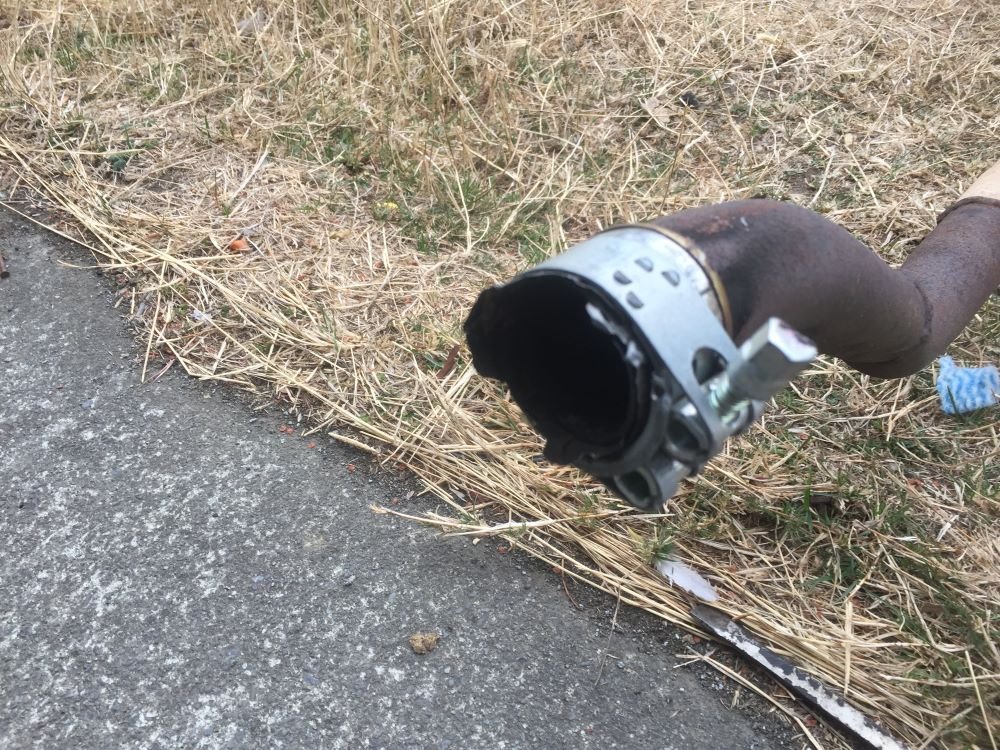
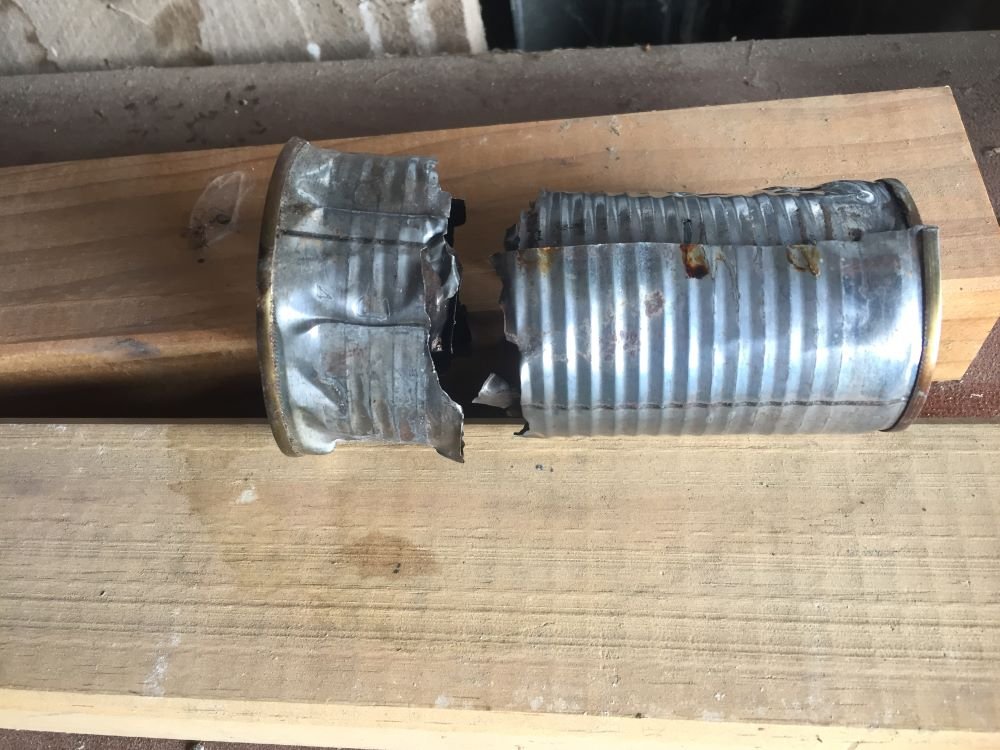
Nearly ready for first startup. Just a couple of jobs to do, one being to attach old exhaust to new headers until i'm able to get a proper system made. Don't laugh but I cut both ends out of a baked bean can, slit it down the side and with the help of some hose clamps, made a sleeve and clamped over both pipes. Should be ok for a while. Checked all fluid levels and filled radiator with hot water as mechanic suggested as been sitting for a while since build. Removed plugs and cranked motor until oil pressure light went out. Replaced plugs and turned key. Motor started straight up and sounded really good. Ran it up to temp and checked for leaks of which there were none. Time for a trip around town. Goes well but needs a tune. Brakes are good and everything else works except fuel gauge. If anyone has a suggestion of where I could get my 32/32 weber carb tuned around Christchurch could they leave a message on Project Discussion page. Cheers Project Discussion https://oldschool.co.nz/index.php?/topic/84912-petes-mk2-escort-1600-sports/page/3/#comment-2618039
2 points
-
Anyway. Slight F*#%$ up. I should have just tacked it in place and wrestled the diff back up in place and CHECKED the F*&%$#g thing. When I went to fit the shock in place it was in the wrong place. The diff must have moved on me when I was originally setting it up so what I thought was the correct place to weld it in was to far out to leave. It wasn't as bad to remove as I thought it would be.
1 point
-
Designed in failure to make the consumer buy more new cars.1 point
-
normally I might be tempted. (ESPECIALLY if I found a mk1 wagon)... but its my daily driver so I need another one... So if I can buy it back cheap enough I will and part it out. Buy a cheap reliable daily and now I have 1 daughter about to learn driving and 1 not so far away from it it can also be something for that ...and use the rest of the money to get my mk3 legal1 point
-
check with your insurance company if they can get a post incident valuation. ive had that in the past when i had an accidentally under insured car. i didnt even have to pay for it, though i also wasn't at fault.1 point
-
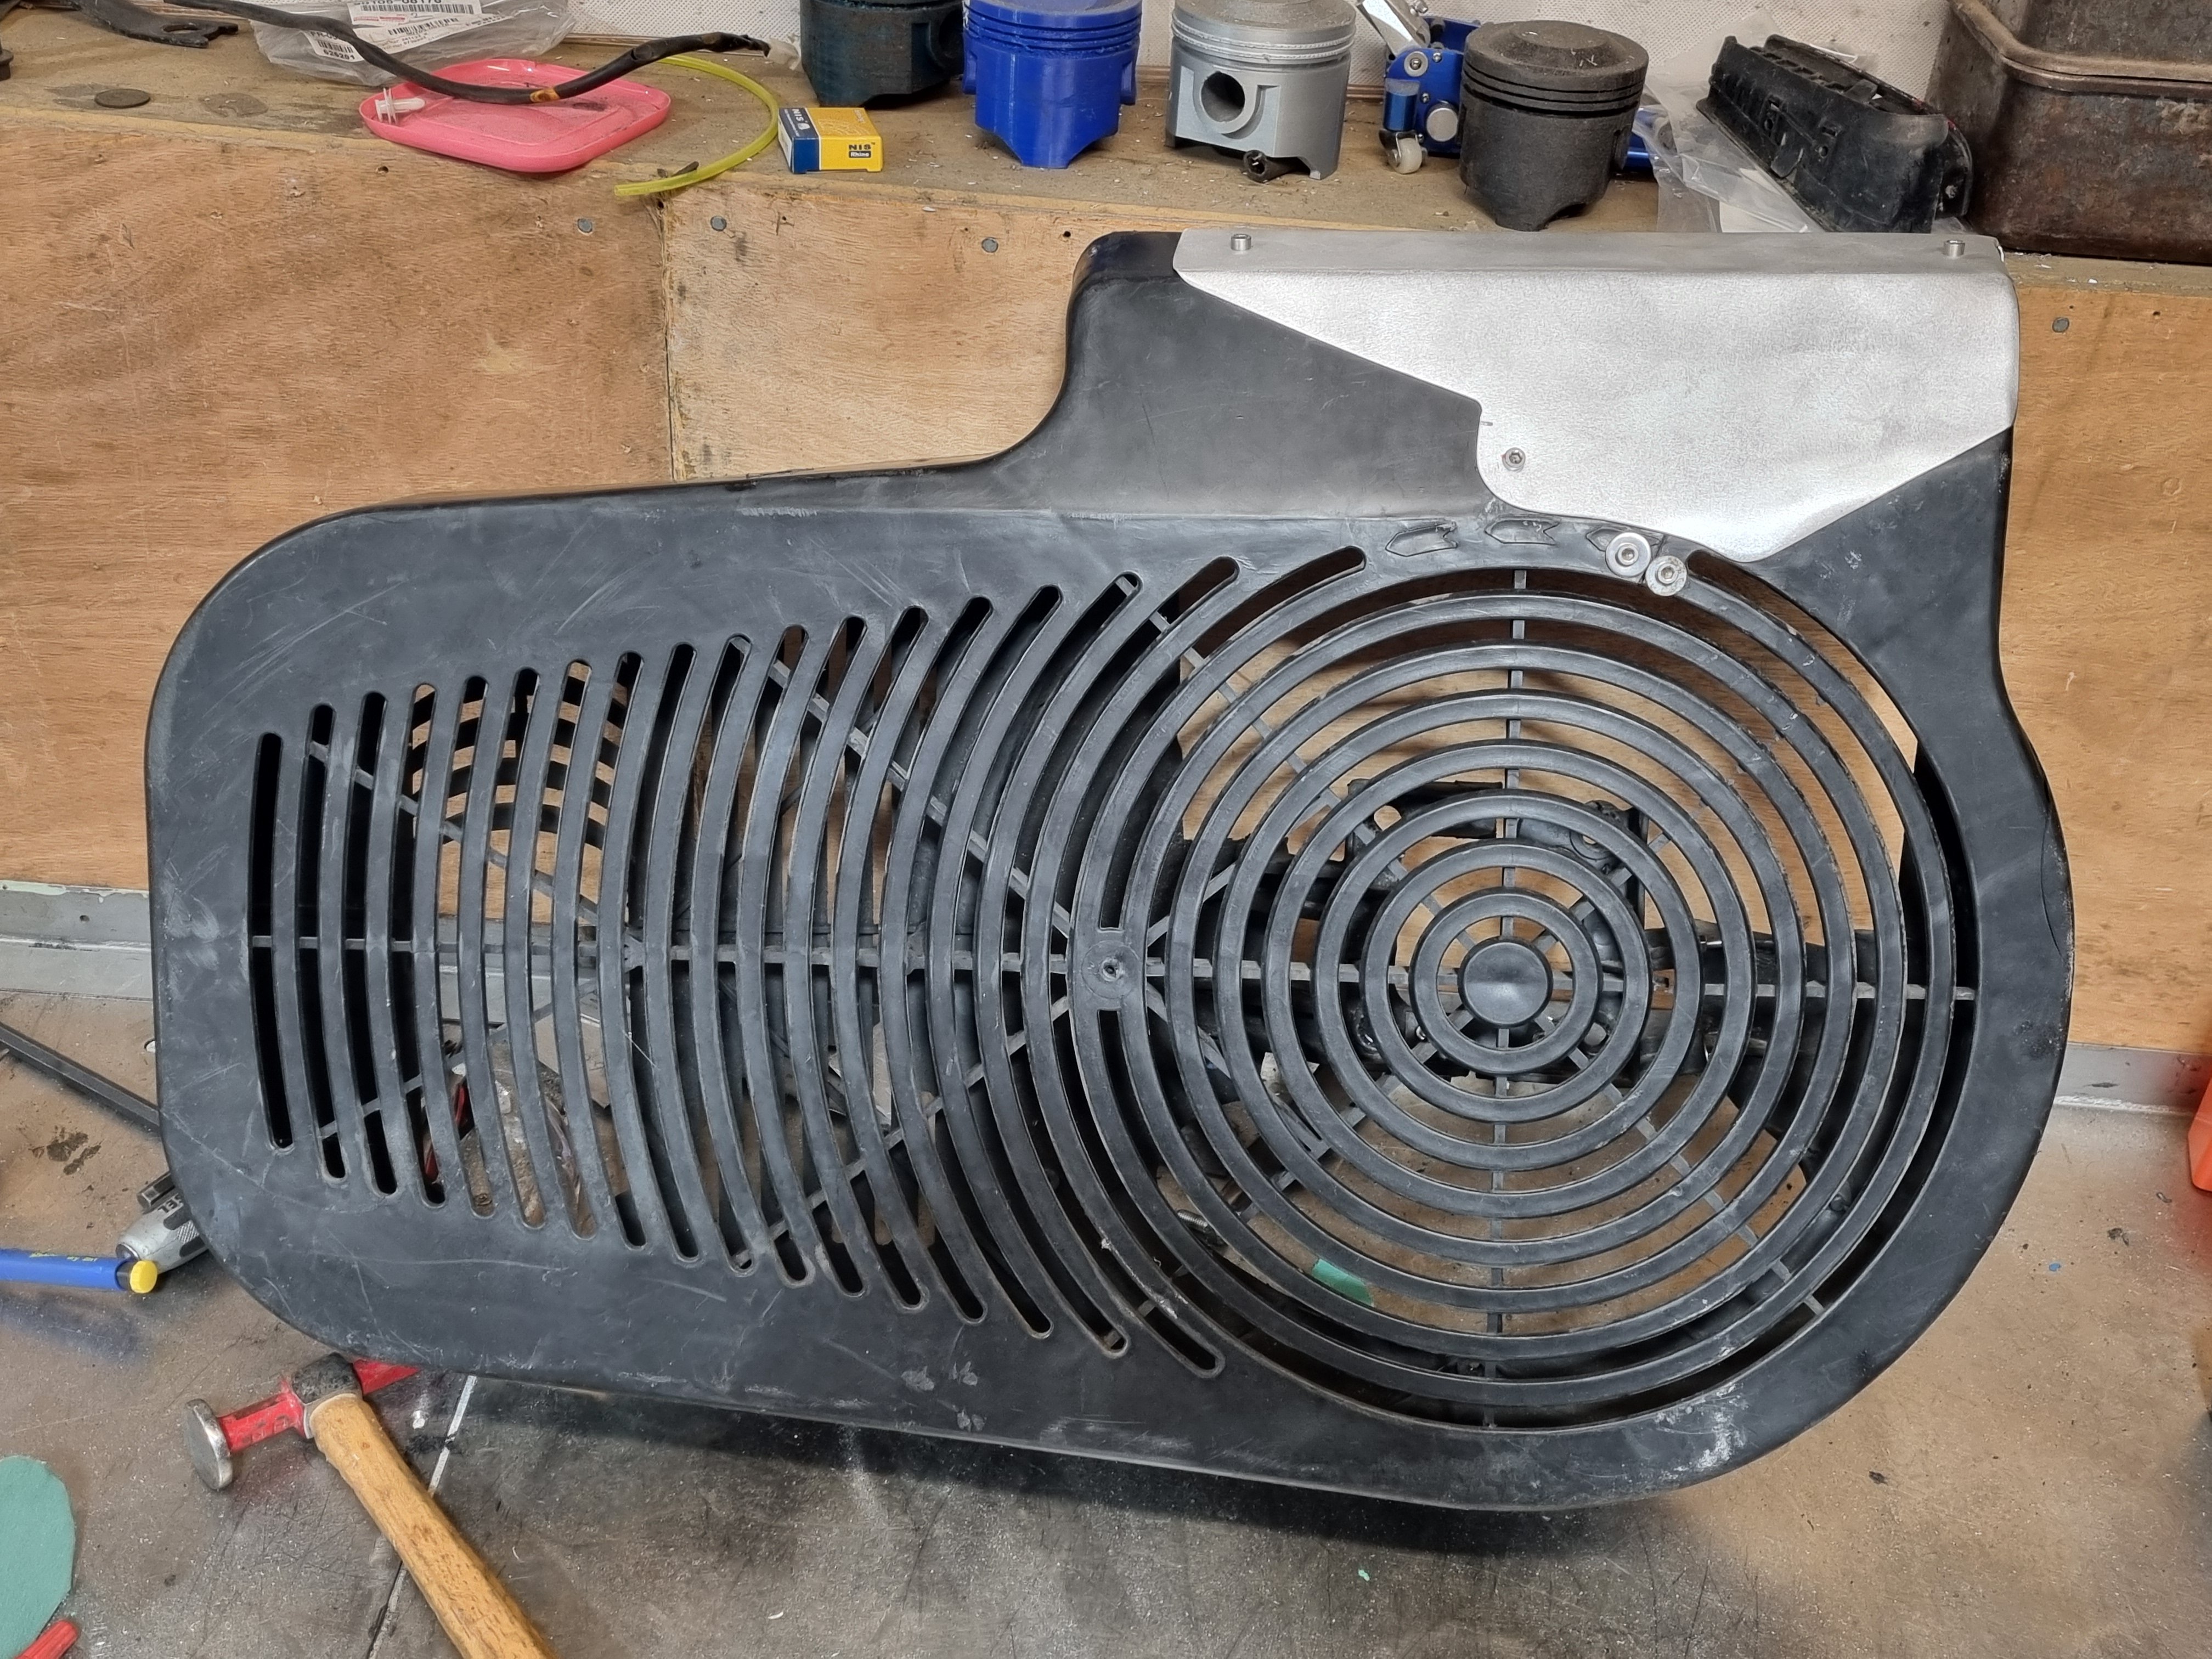
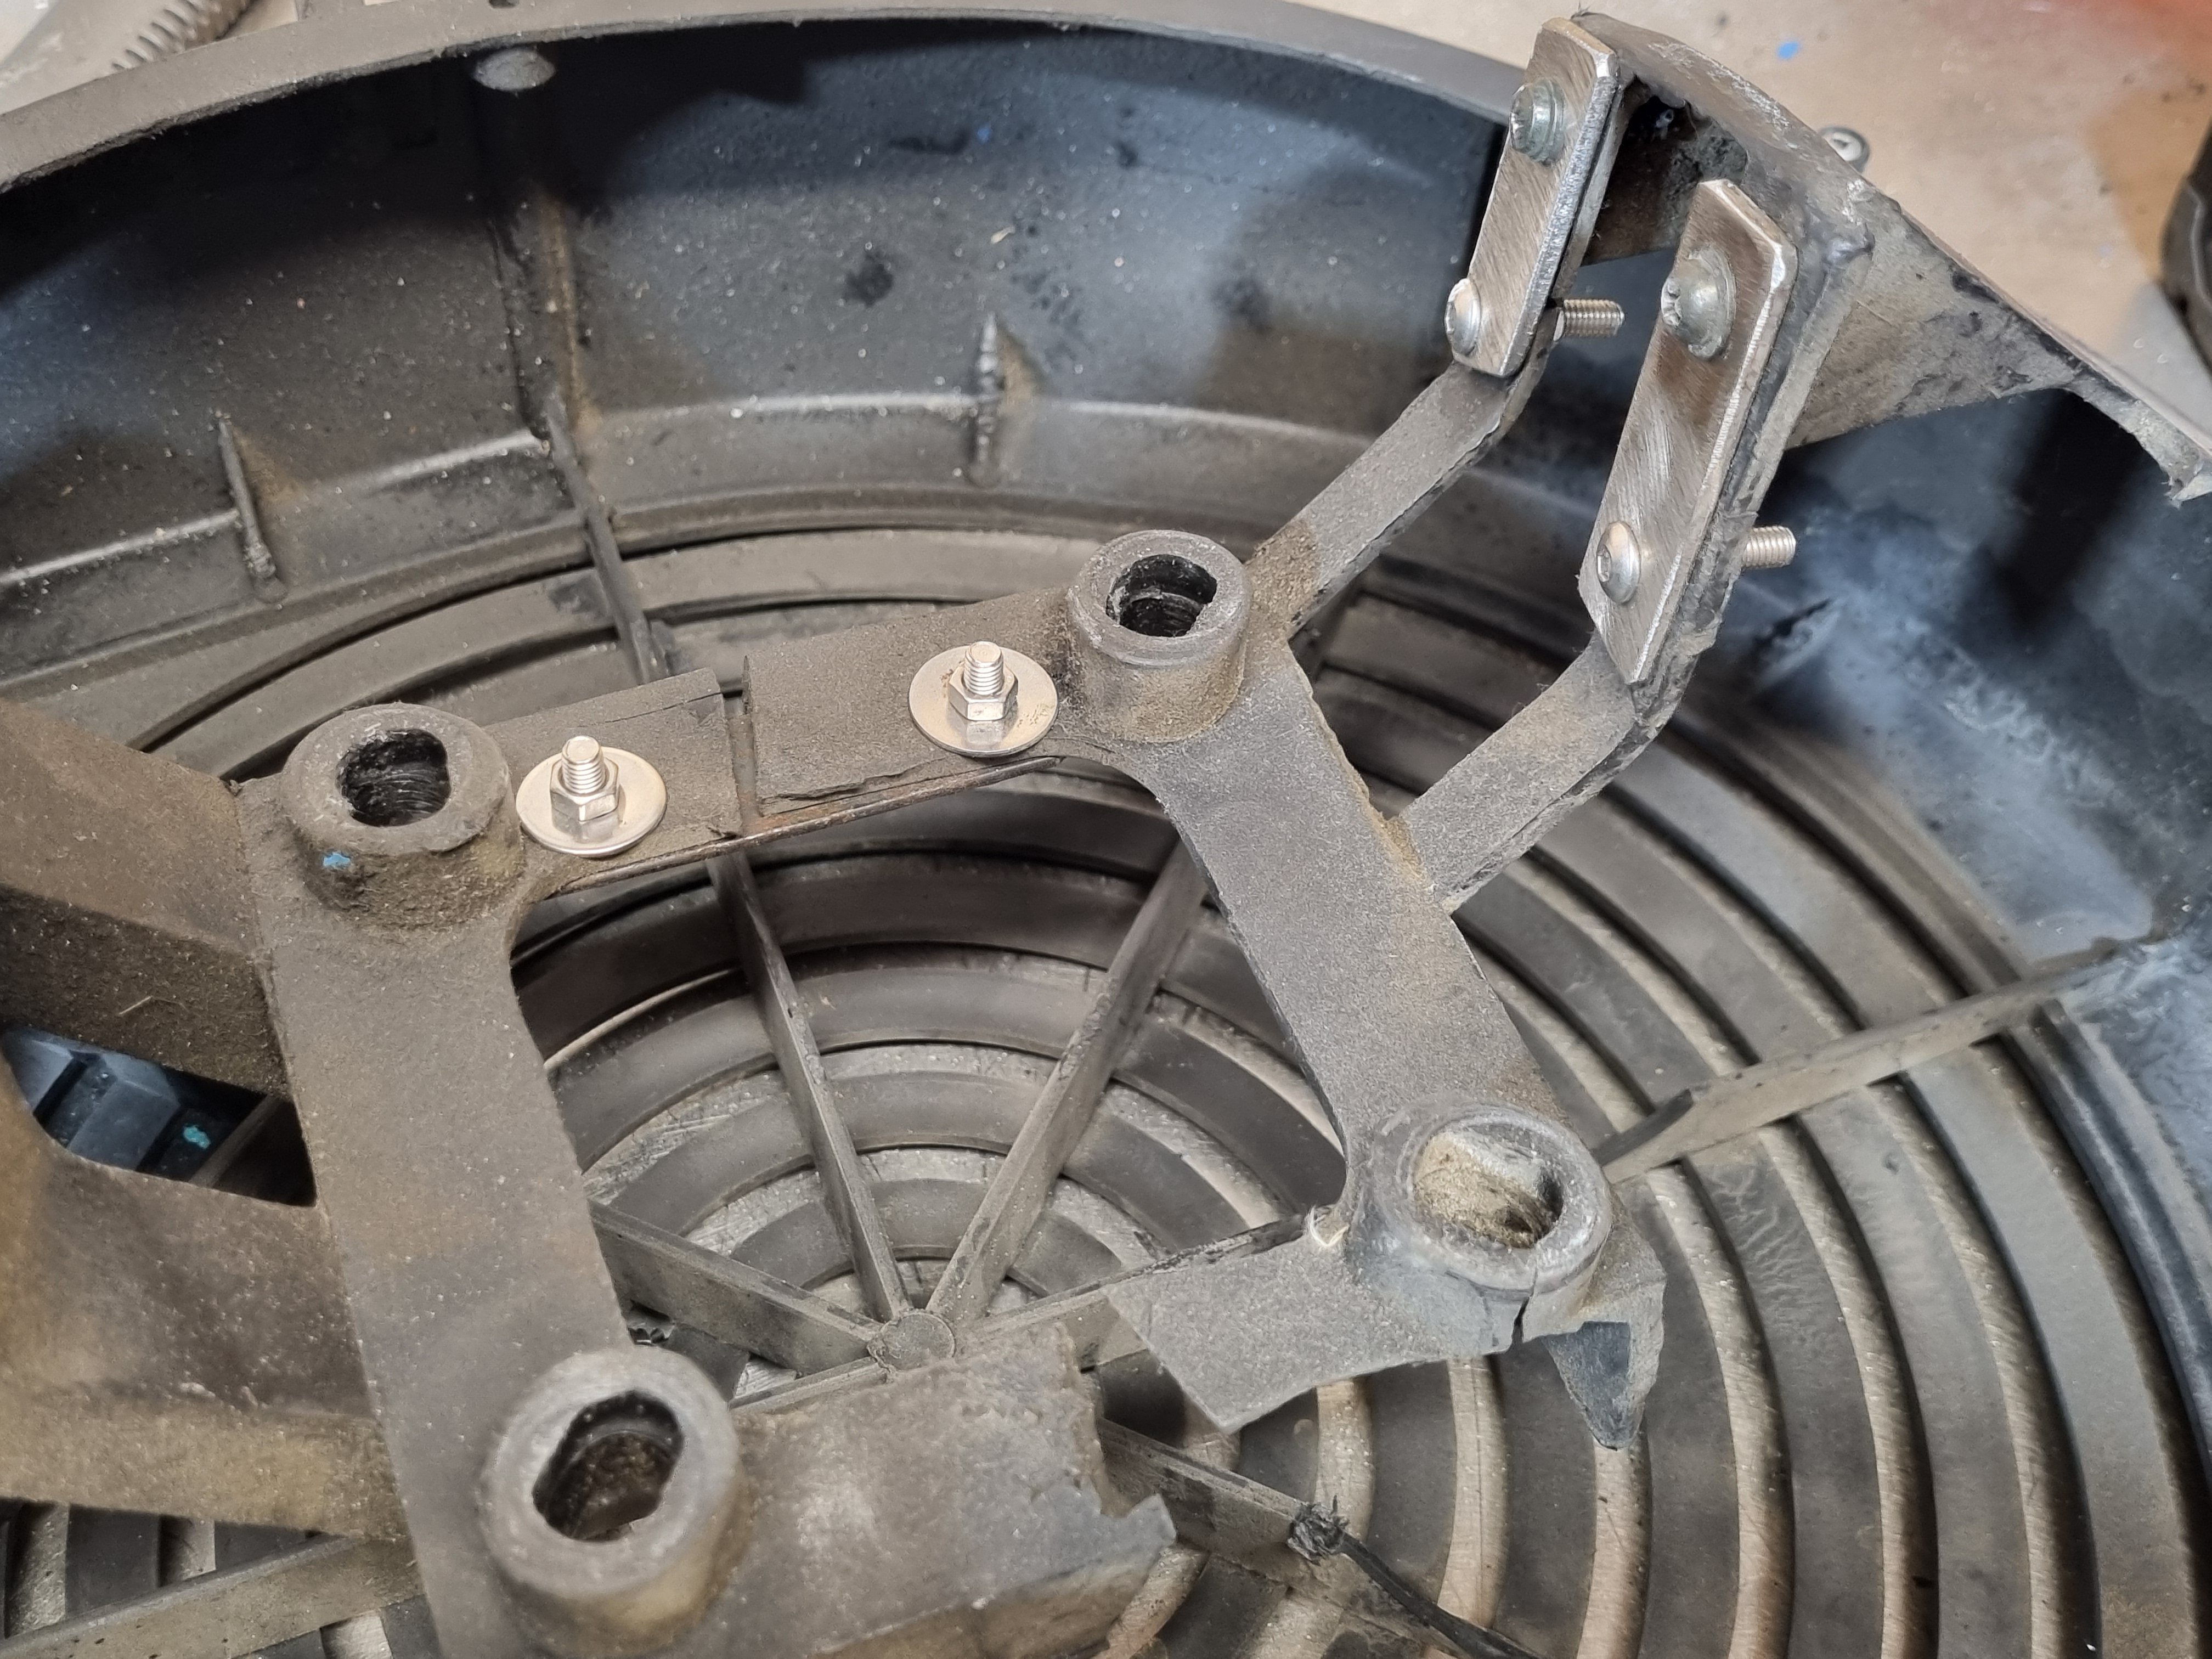
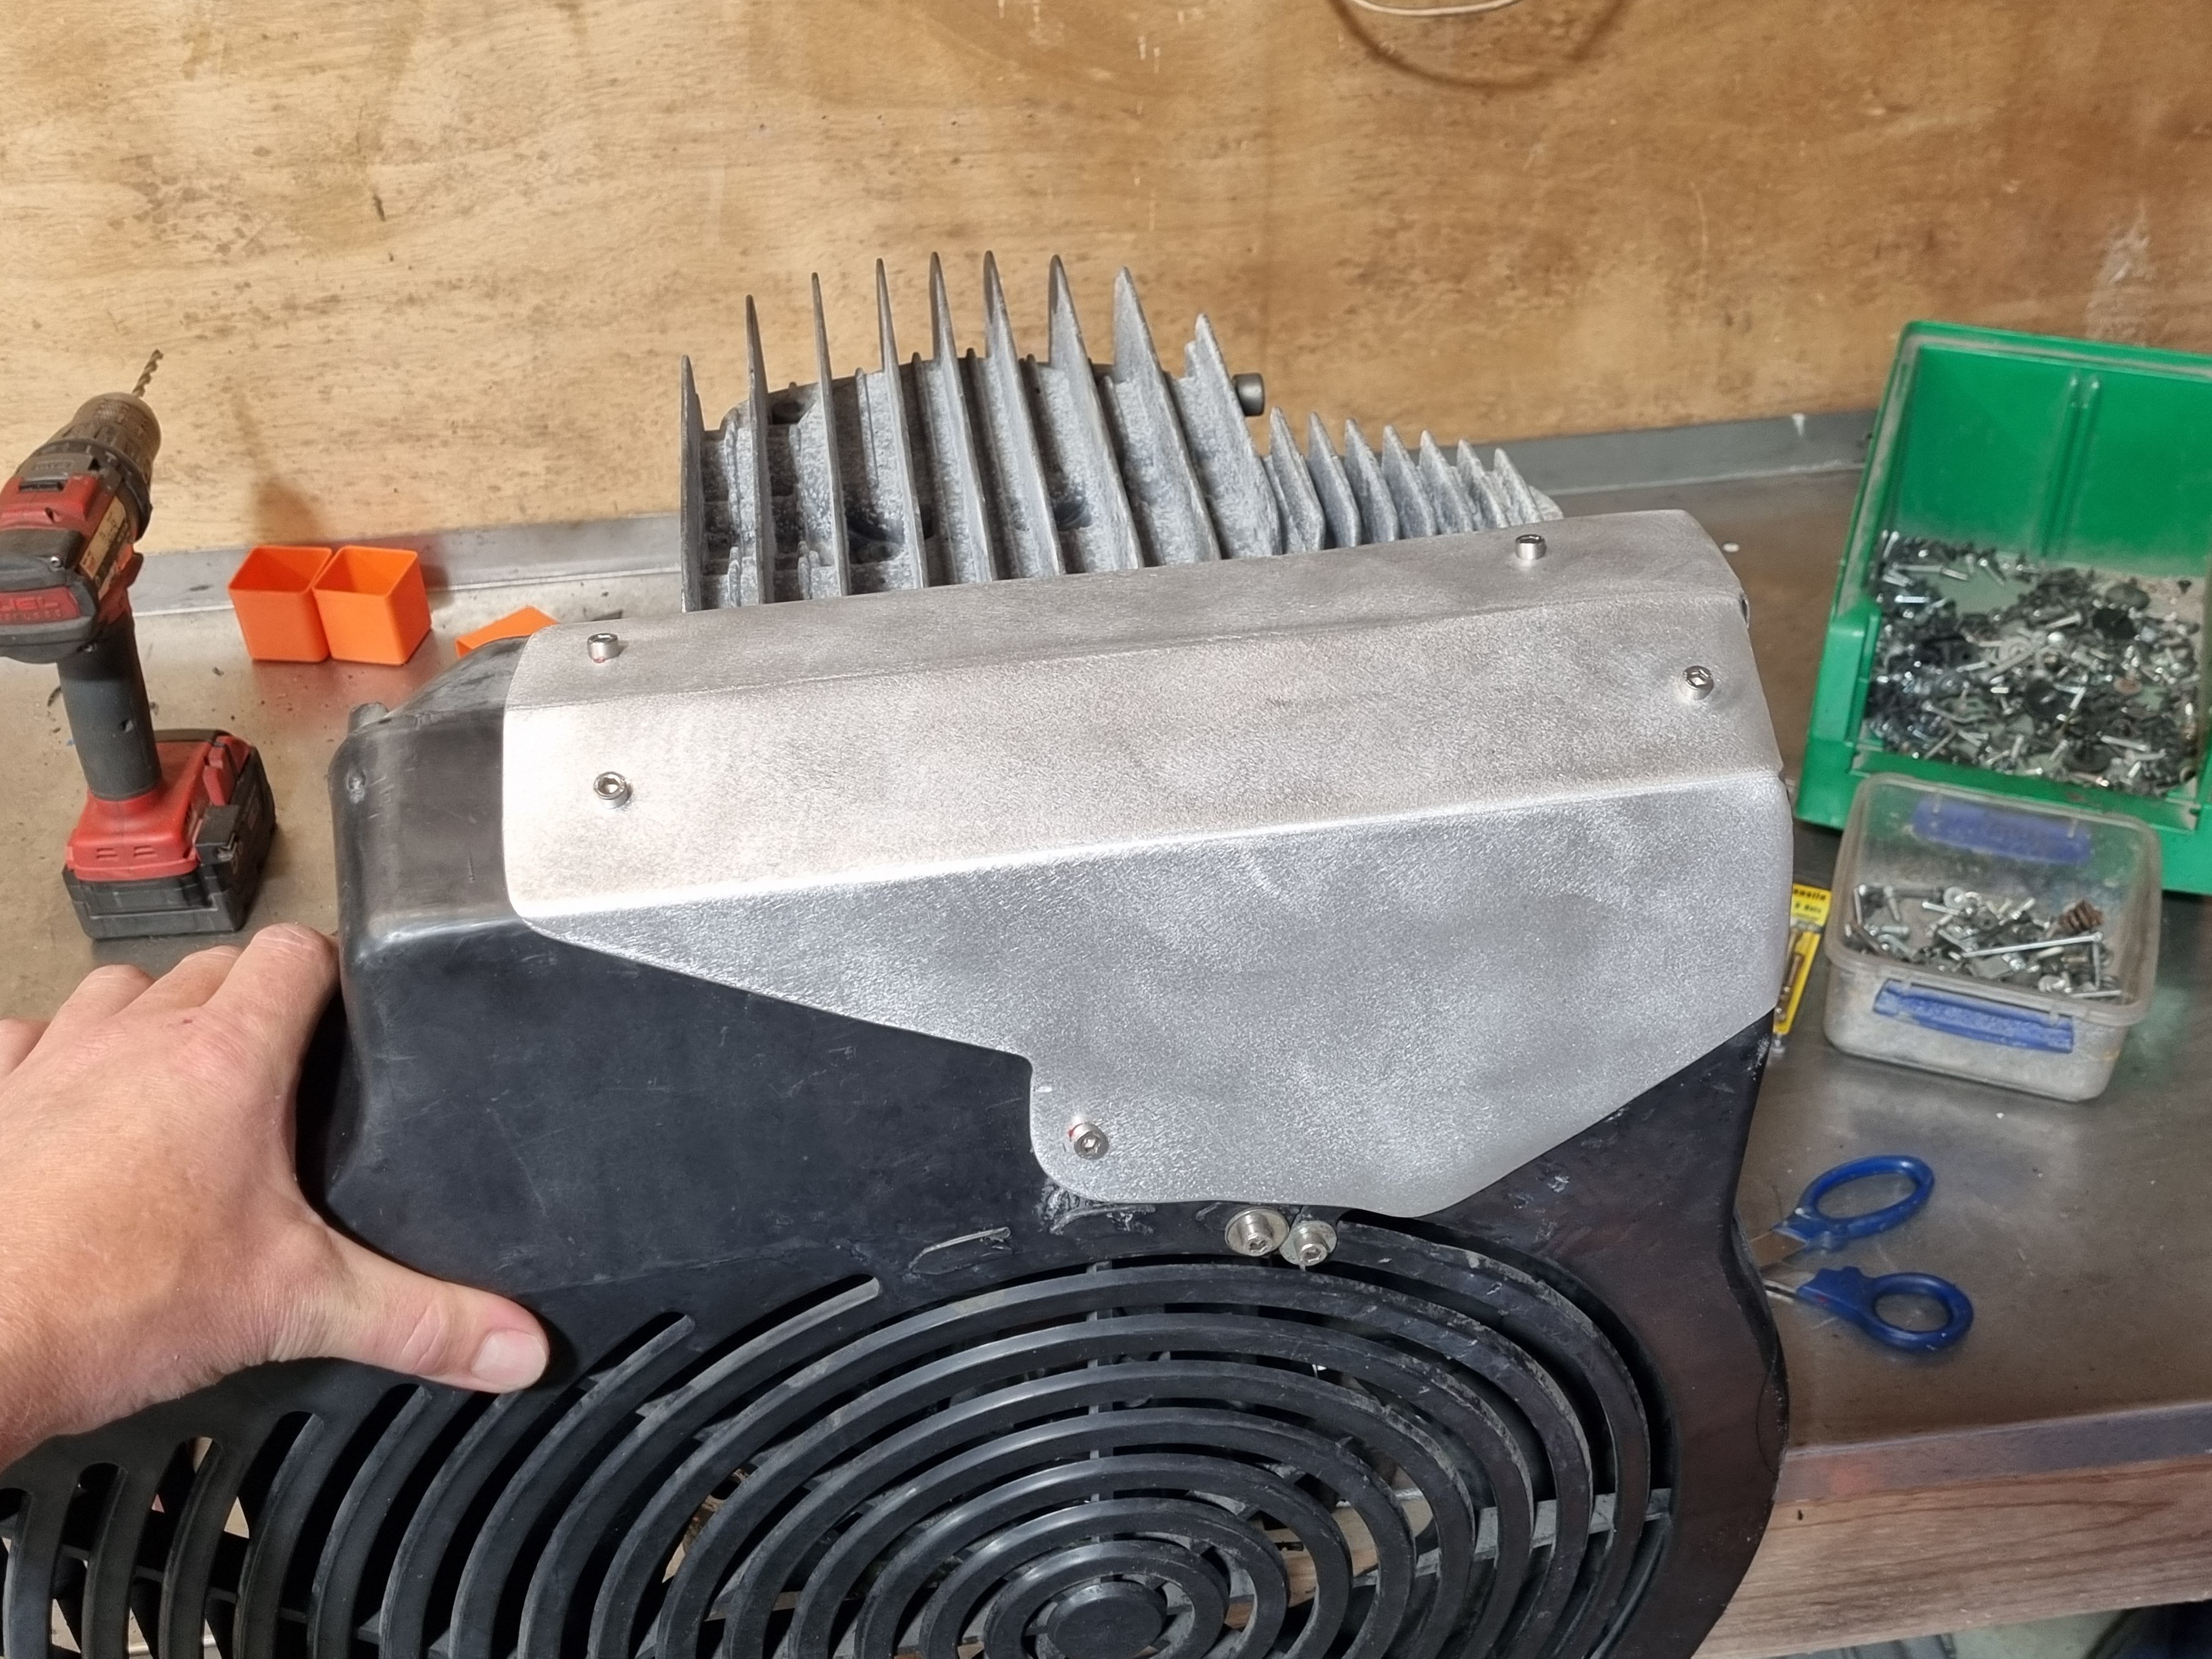
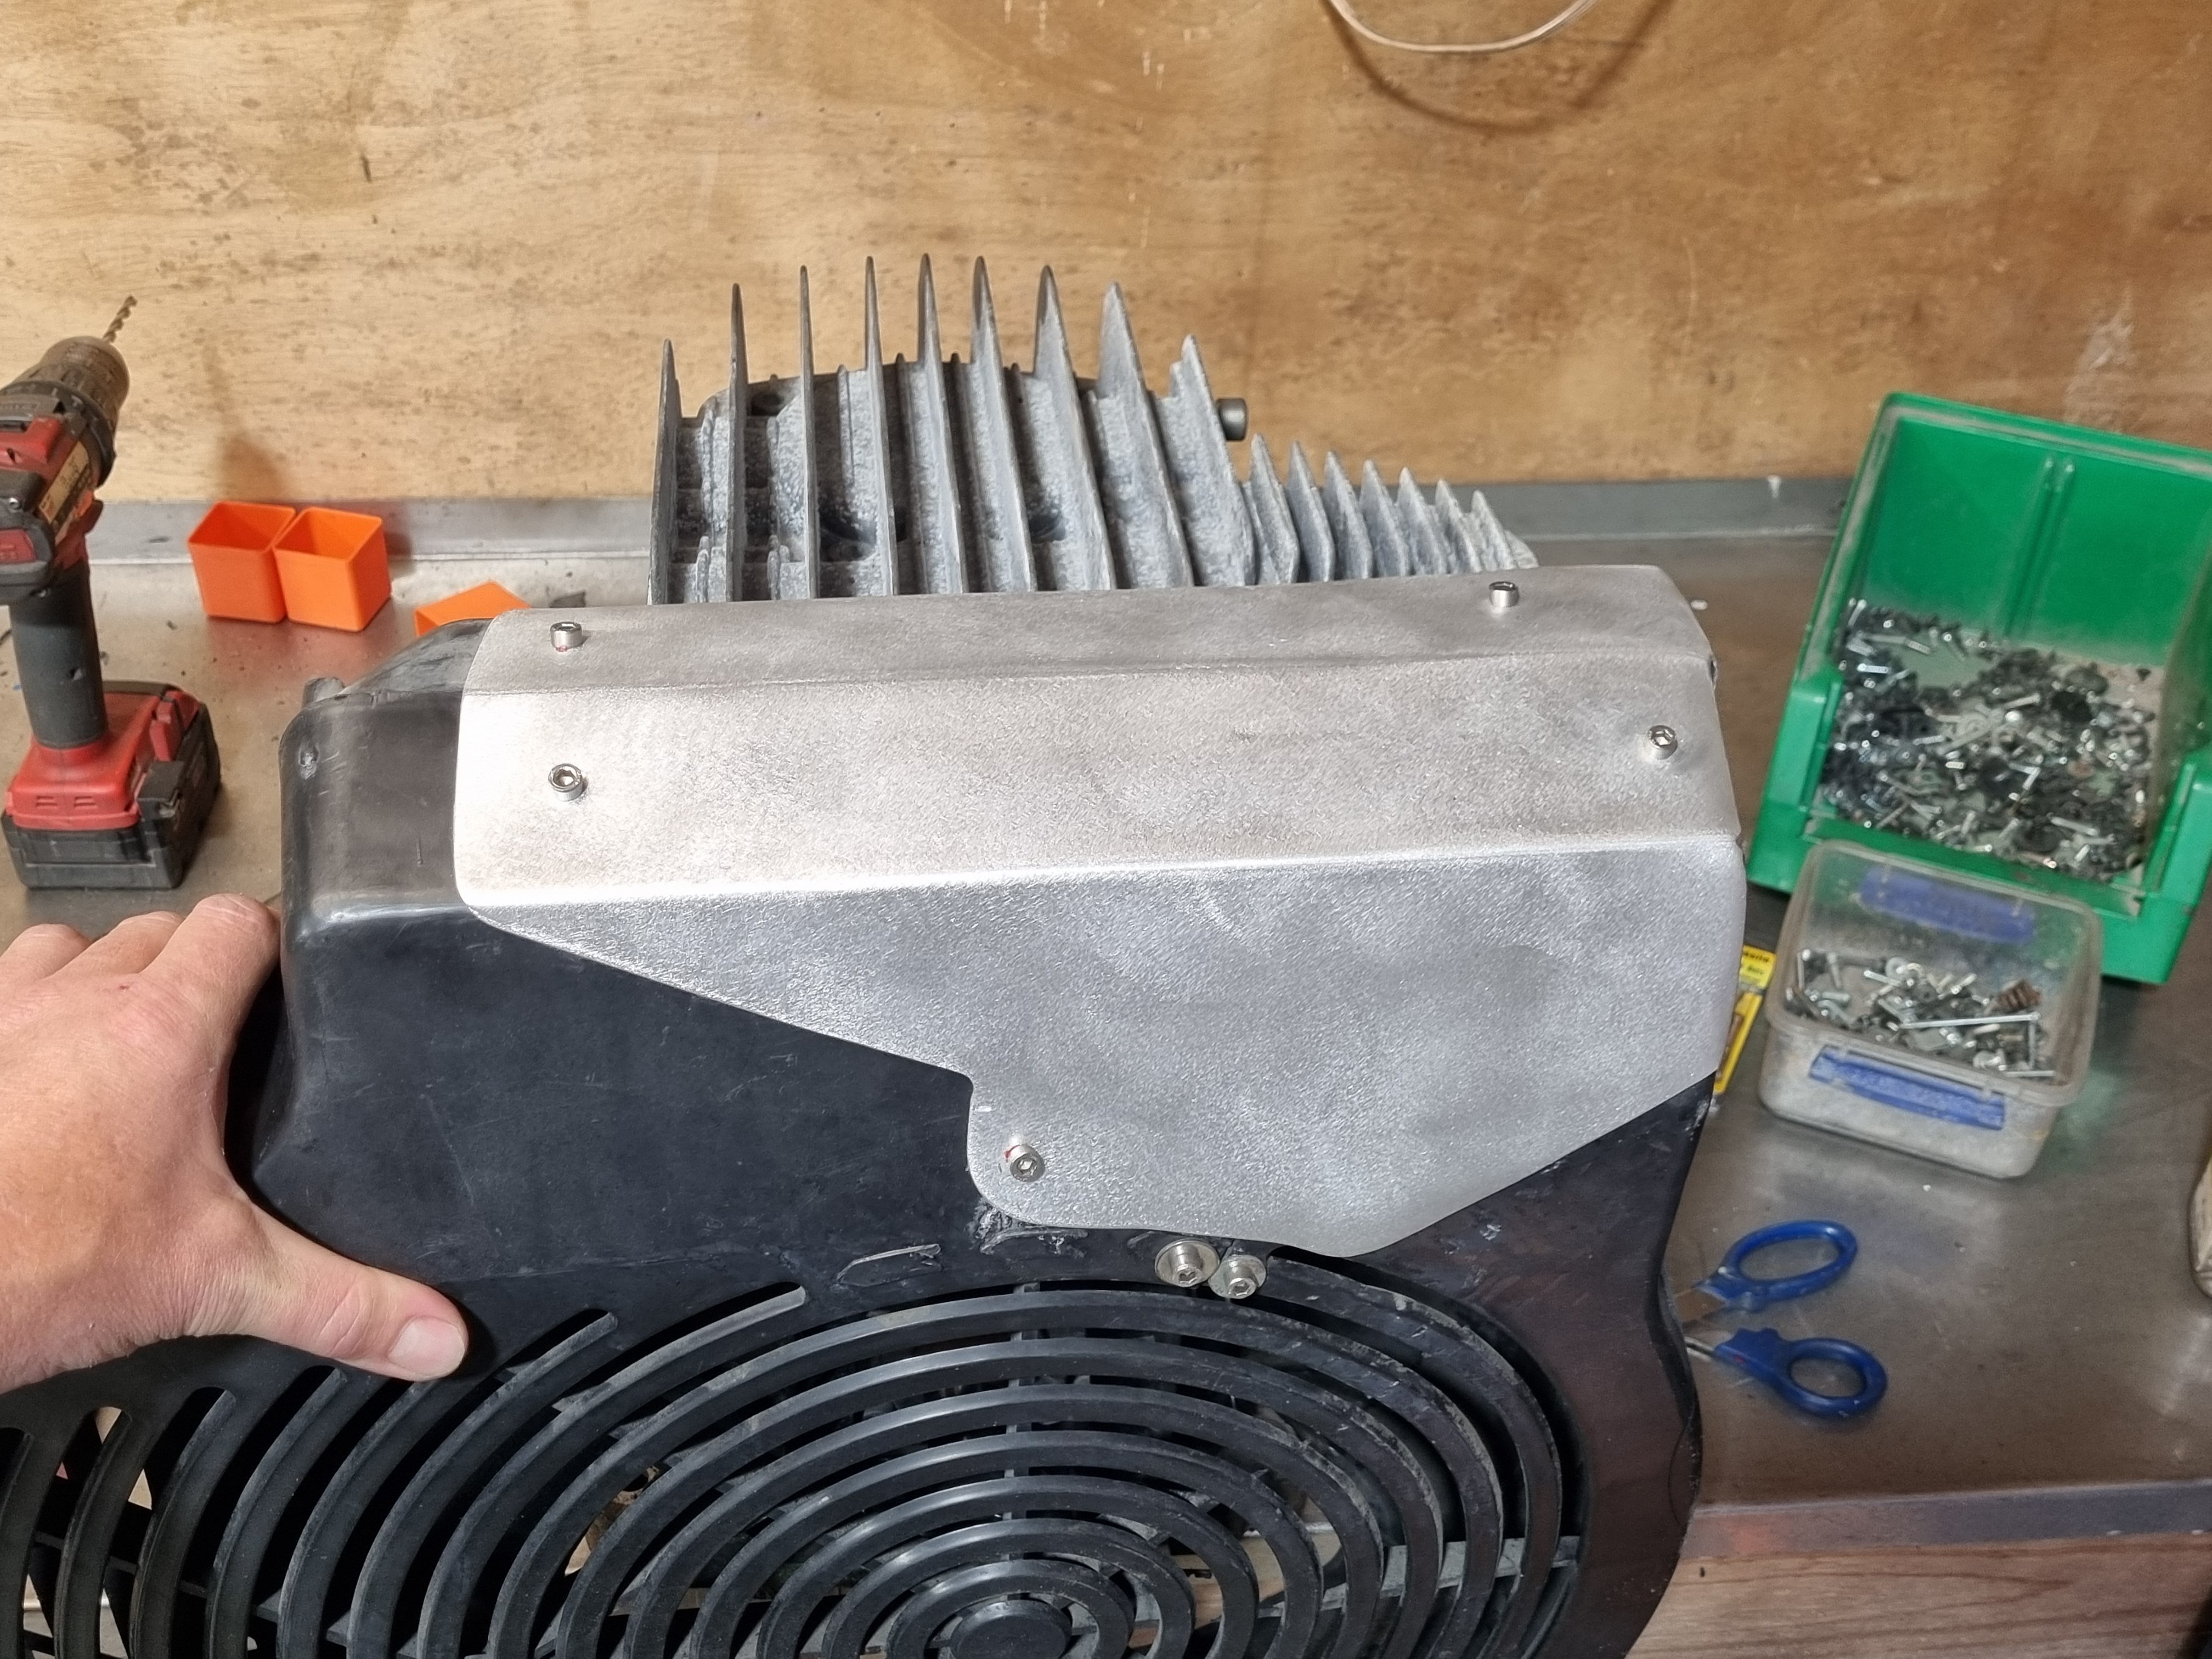
once id gotten the thing apart i had a look inside the tank and it wasn't great, it also wasn't terrible but yea. im sure there are many, many tanks being filled with compressed air every day that look way worse but still i wasn't keen on having it explode in my face. so i took the tank to get pressure tested. the joker said it was too rusty for him to certify but that's cool with me, i don't need any documentation, i just need to know its safe. so its at the testing place now. once its tested i will get the tank blasted and then ill paint it some colour, probably whatever colour i have enough of to do the job. then i had a go at fixing the belt shroud. i had to make a bunch of metal brackets to bridge all the breaks i could and bolt it all back together. I also had to make a big aluminium bit to fill in a huge piece that was missing completely. when its a whole unit its pretty strong, ill make a bracket to support the far end of it (the whole thing hangs off the 4 bolts around the crank spigot and thats it) once i put the thing back together on the tank.
1 point
-
If you're looking at getting that wagon, probably want to do a rack and pinion conversion as the steering box stuff takes up heaps of space where you'd want to run the exhaust. Also most likely has leaf spring in rear of that wagon which is a bit gross compared to 4 link. Also, at the best of times with some $$$ spent these cars handle... not amazing compared to modern stuff. But with standard suspension etc they just wallow all over the road haha. Costs a fair bit of $$$ to get them handling and braking a bit better. With lots of weight in front and not much power would be kind of like wielding a marshmallow sledgehammer.1 point
-
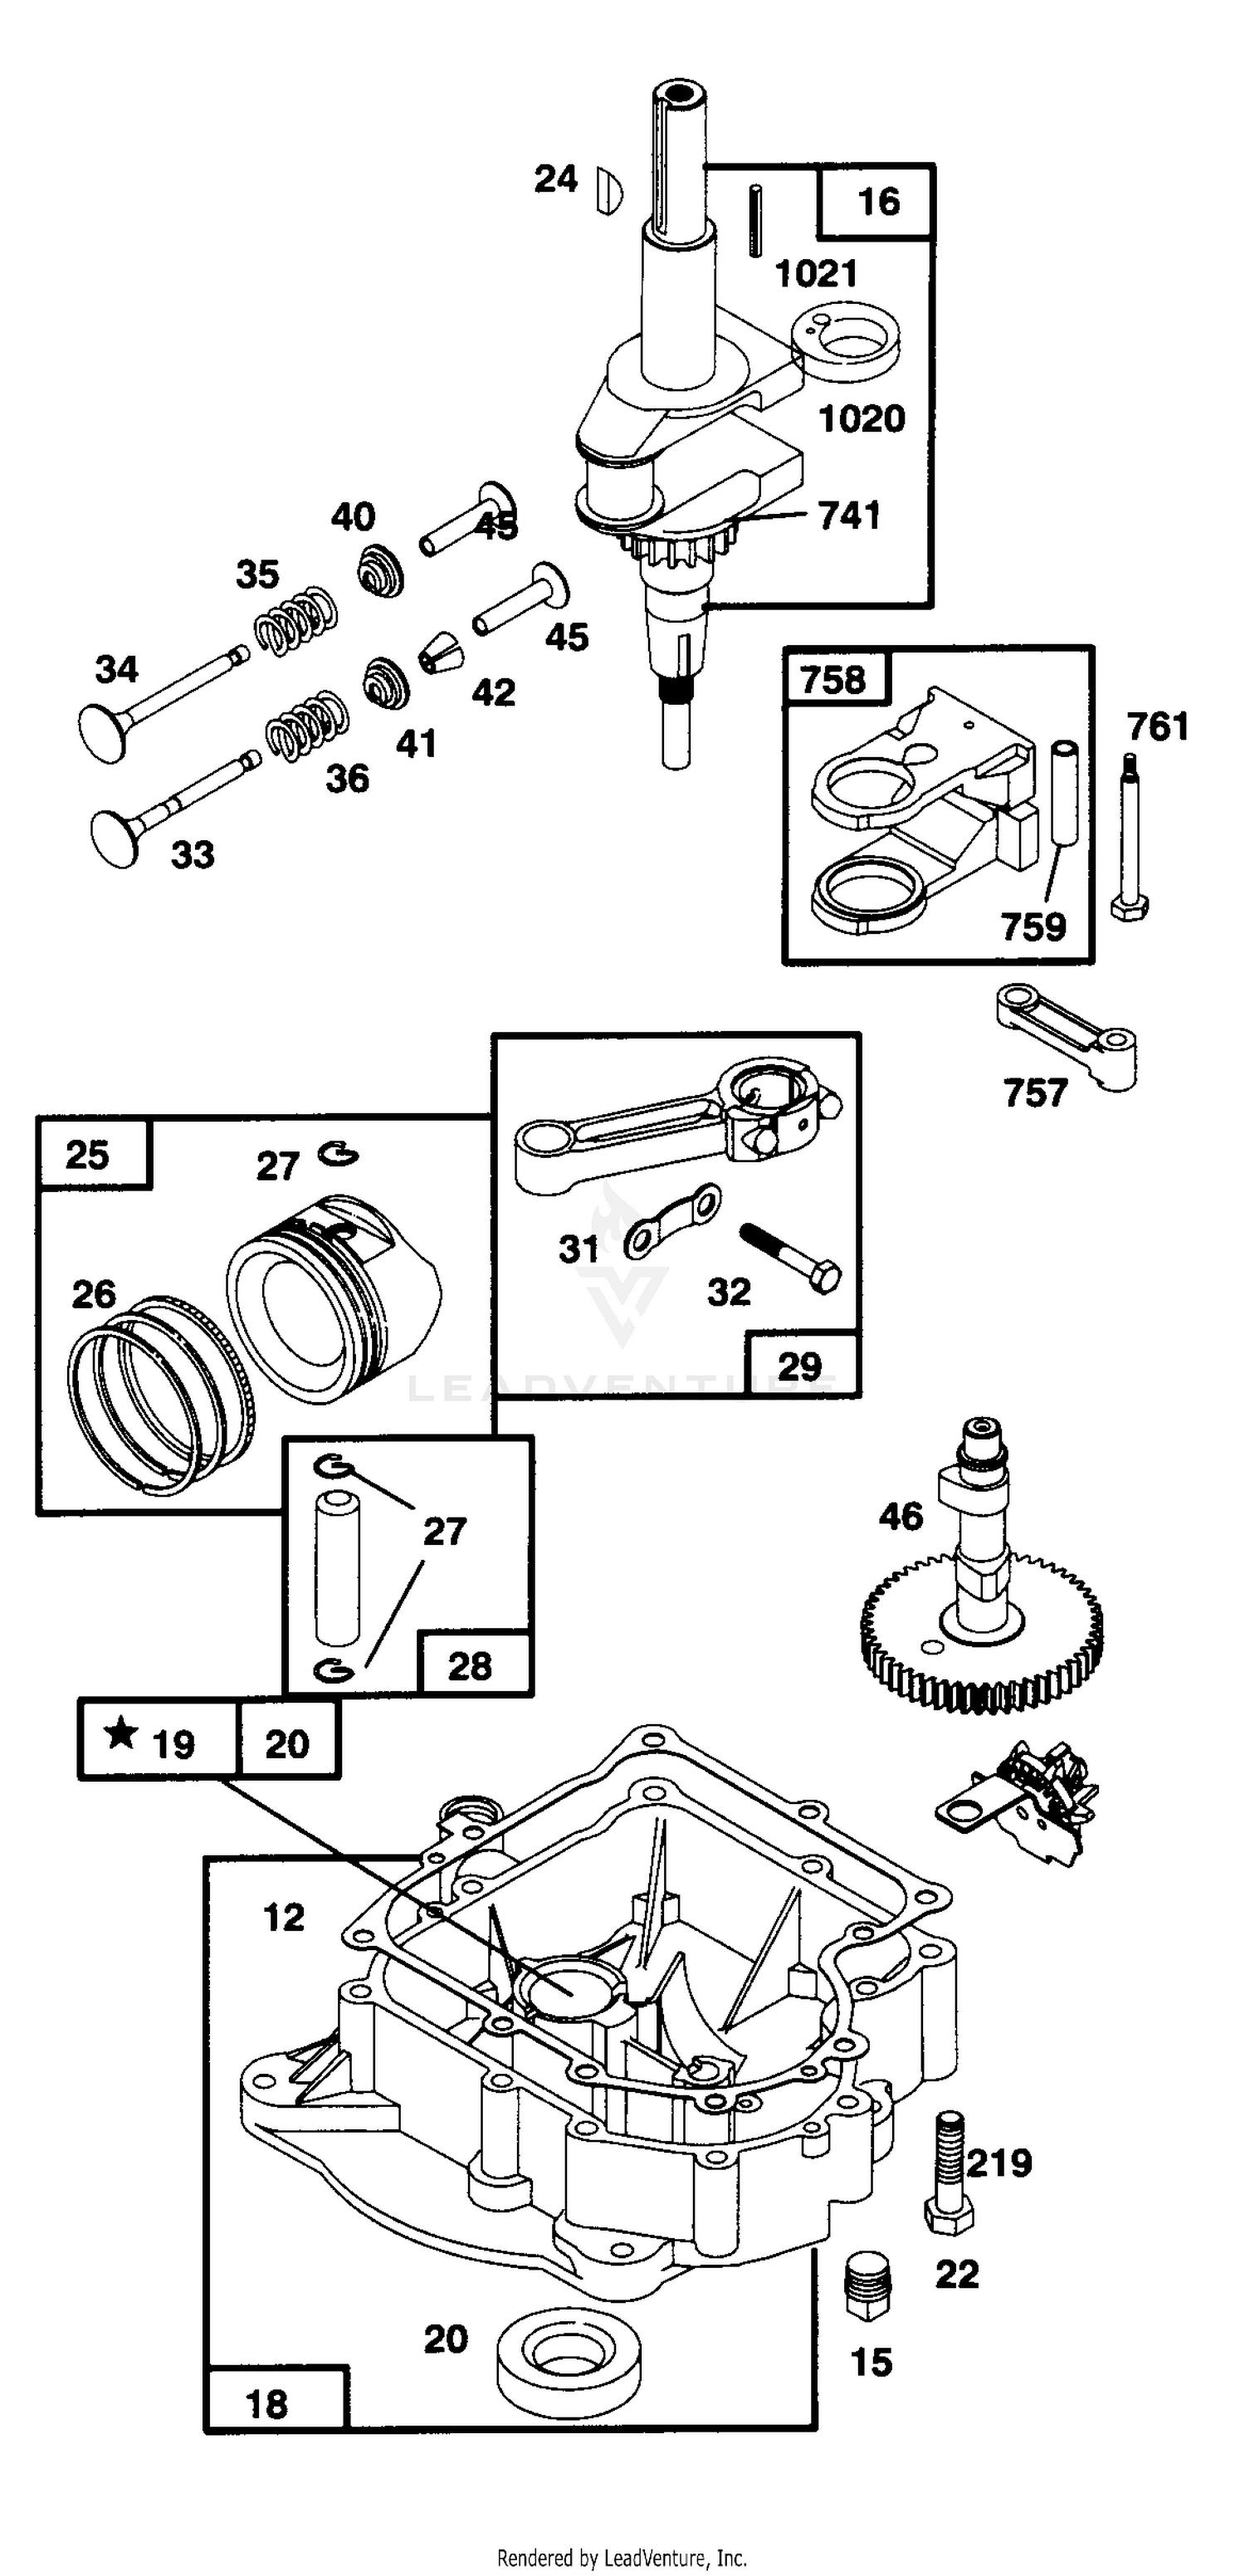
I remember pulling apart the motor that was in the ride on mower I bought off @Nominal a number of years ago and thought the plastic components were surprising and you can’t help but think that can’t be good, but in saying that the reason that motor had given itself an upper cut was due to a metal (cheese) part giving way. I think if any of the plastic gave up it wouldn’t run but unlikely it would have ventilated the case either. Was the little pivot arm 757 in this diagram that let go.
1 point
-
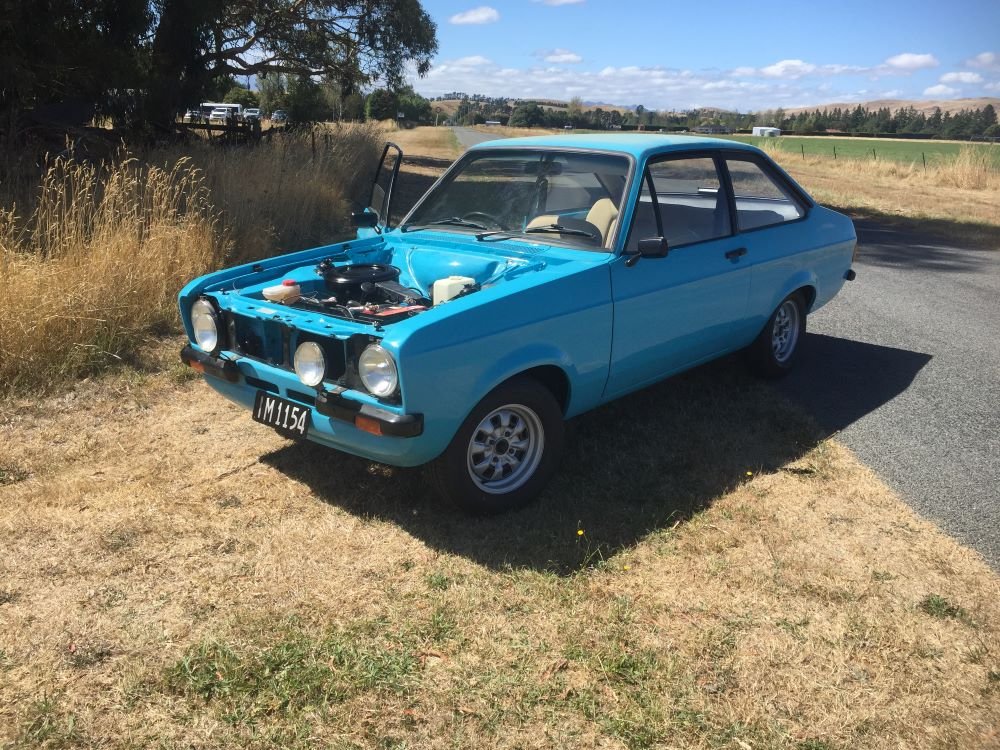
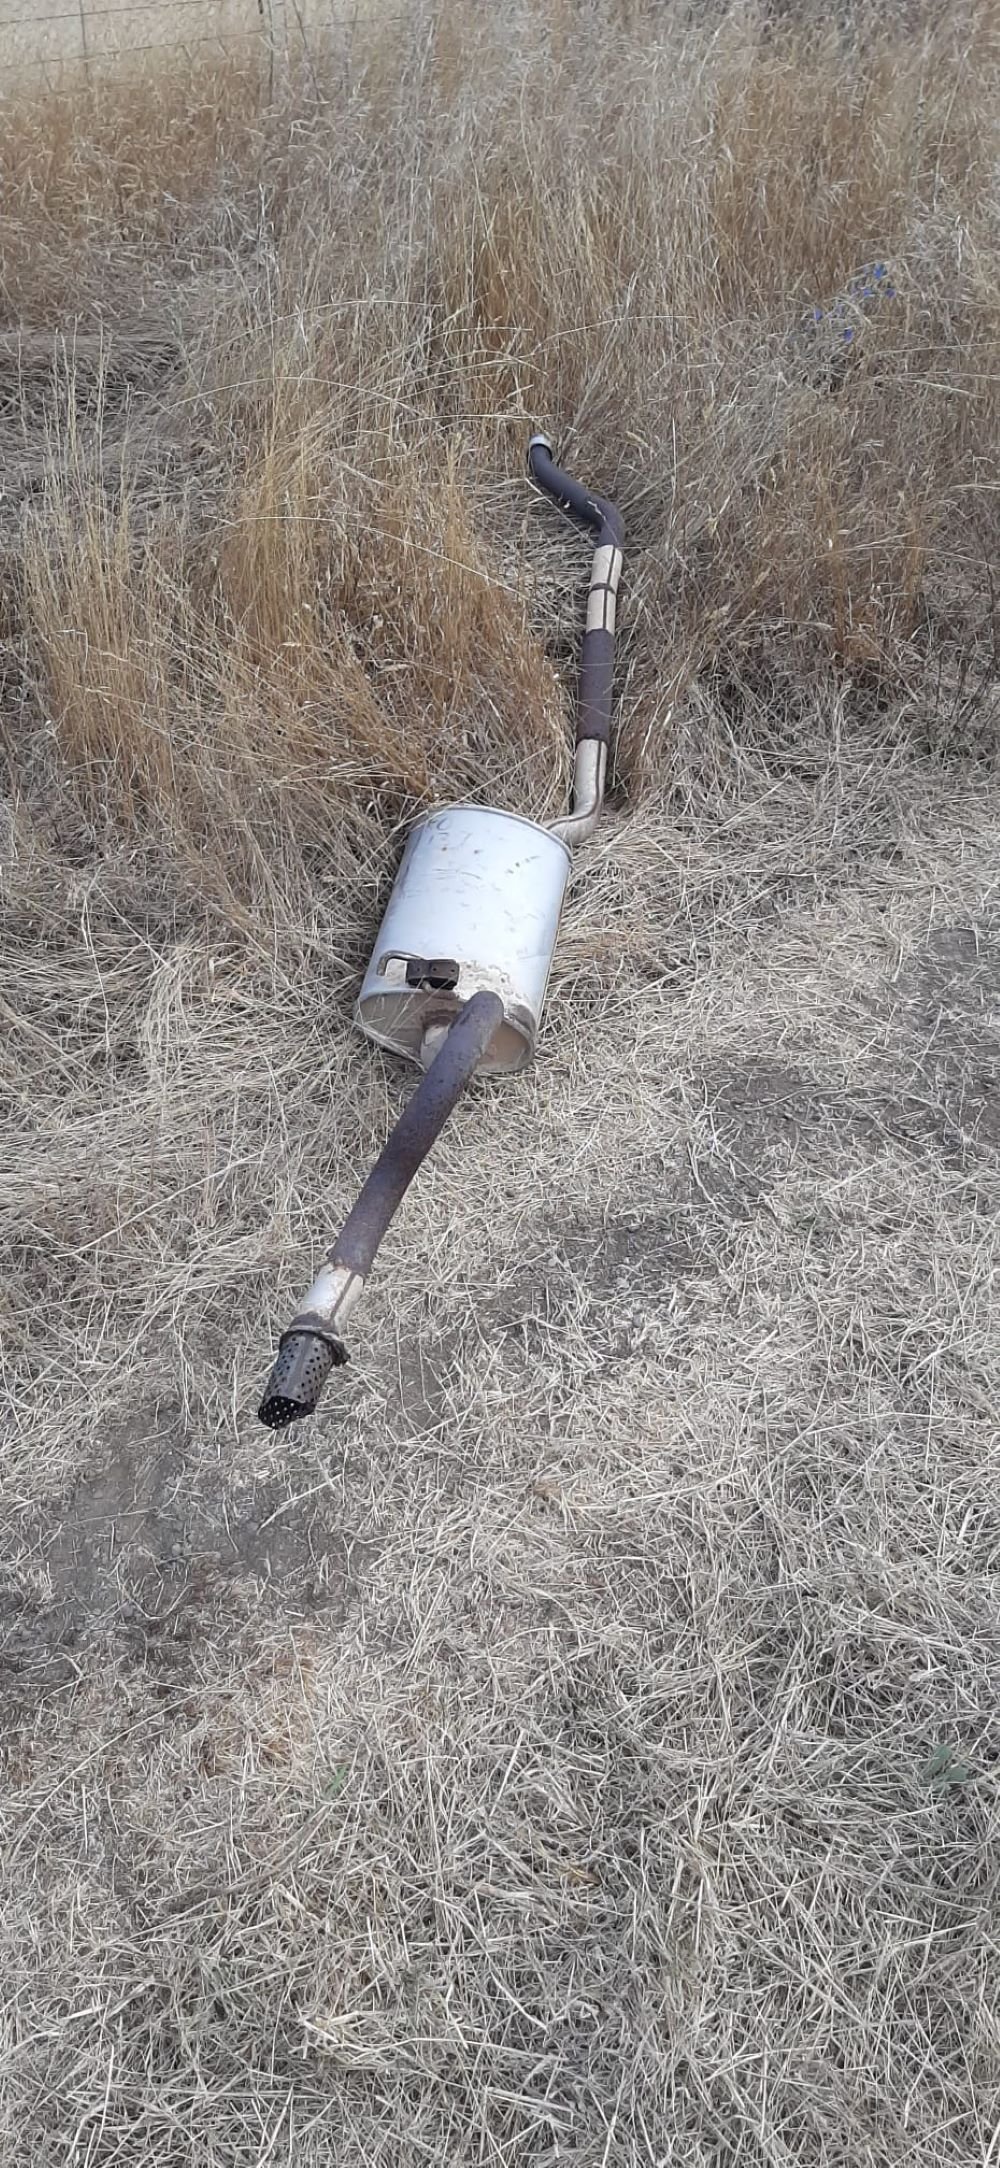
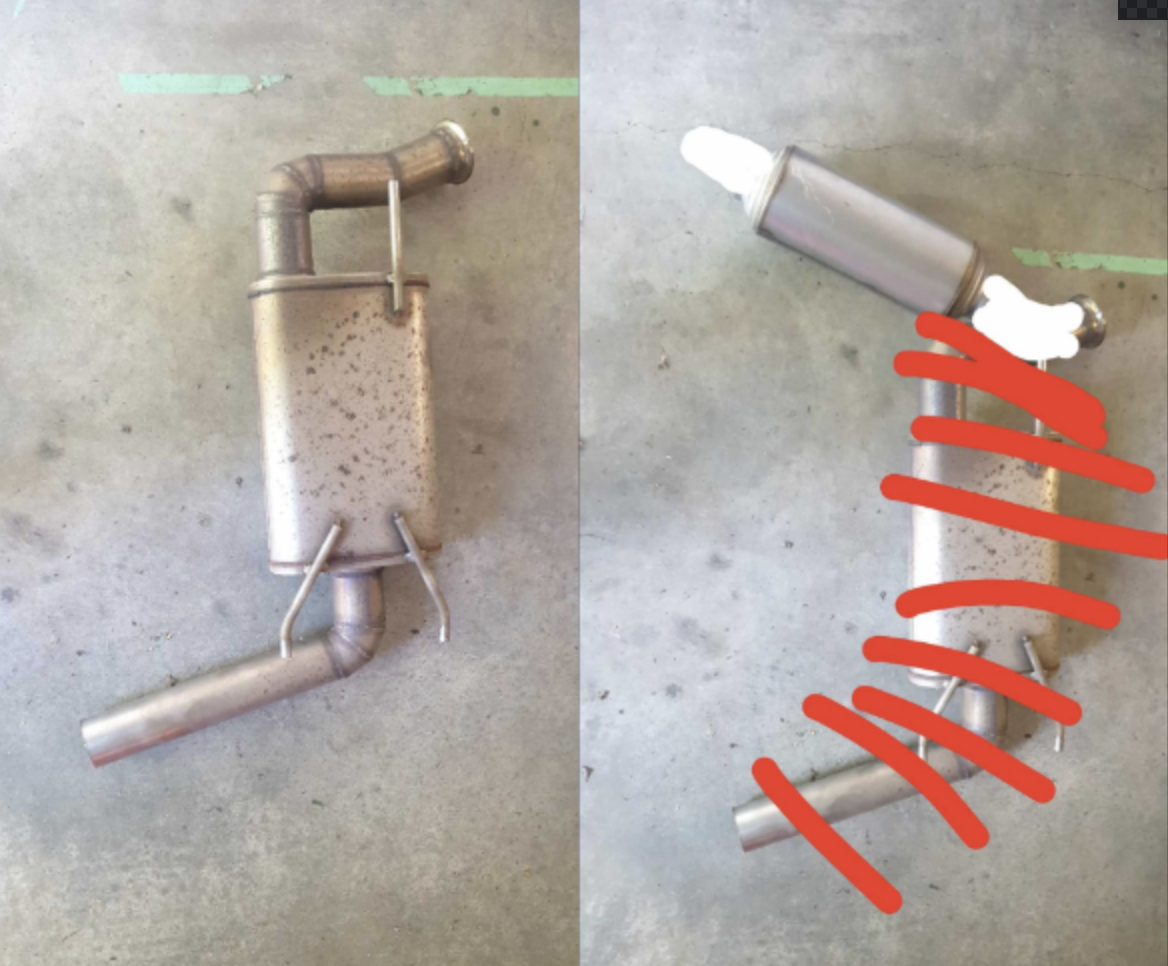
We had great weather in the weekend so decided it was time to take Jenny, my long suffering wife out for a drive in the escort. Things wrer going really well until I noticed a change in the exhuast sound followed by metal scraping on road. Quick stop and inspection shows that they don't make baked bean cans like they use to. Managed to remove exhuast from under car while jen was busy taking photo's and letting family and friends know how her first outing in the escort went. Needless to say it was a very noisy 8km trip home. Lucky we live in the country so left exhuast on the side of the road to be picked up later and booked in to get new exhuast fitted. Project Discussion https://oldschool.co.nz/index.php?/topic/84912-petes-mk2-escort-1600-sports/page/3/#comment-2625686
1 point
-
Pulled the tappet cover and sump, all looks well; Printed a new faceplate for the heater mech with the knobs set back a few mm as the cables were pulling it a bit, plus I printed a white insert for the indication to make it tidier, this just got coloured in with permanent marker for the red and blue bits; Clutch arrived; Also my younger self had bodged something for the top engine mount as the original one didnt work with the new engine, this was an unconvincing effort. So I spent some time with the lathe and the welder and made something much nicer with replaceable standard bushings;1 point
-
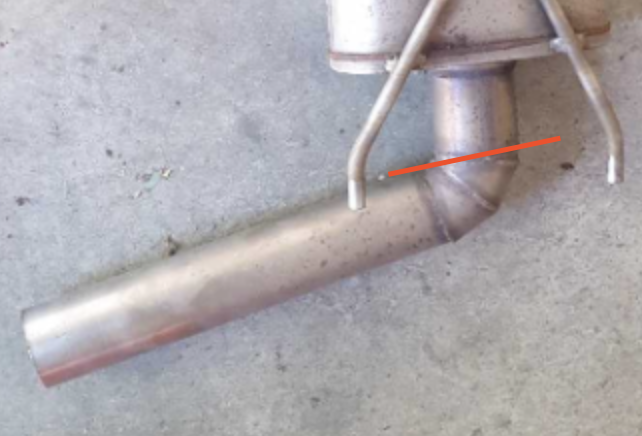
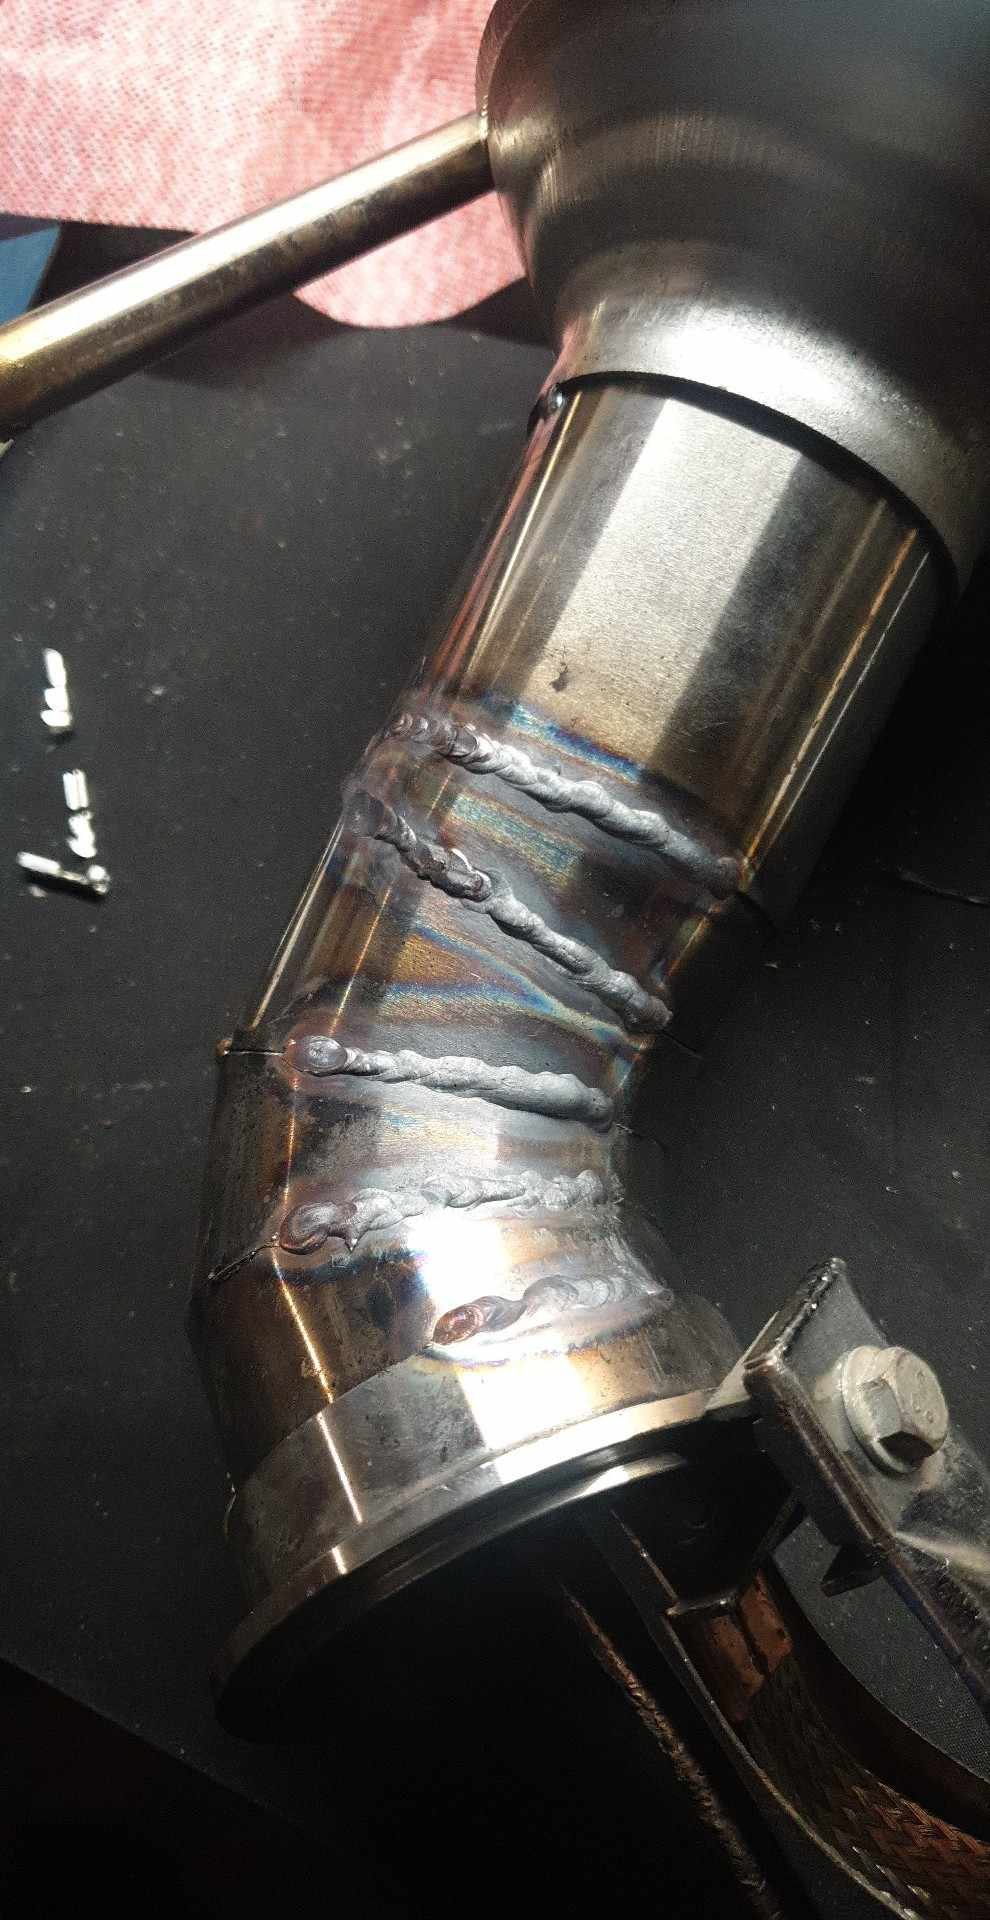
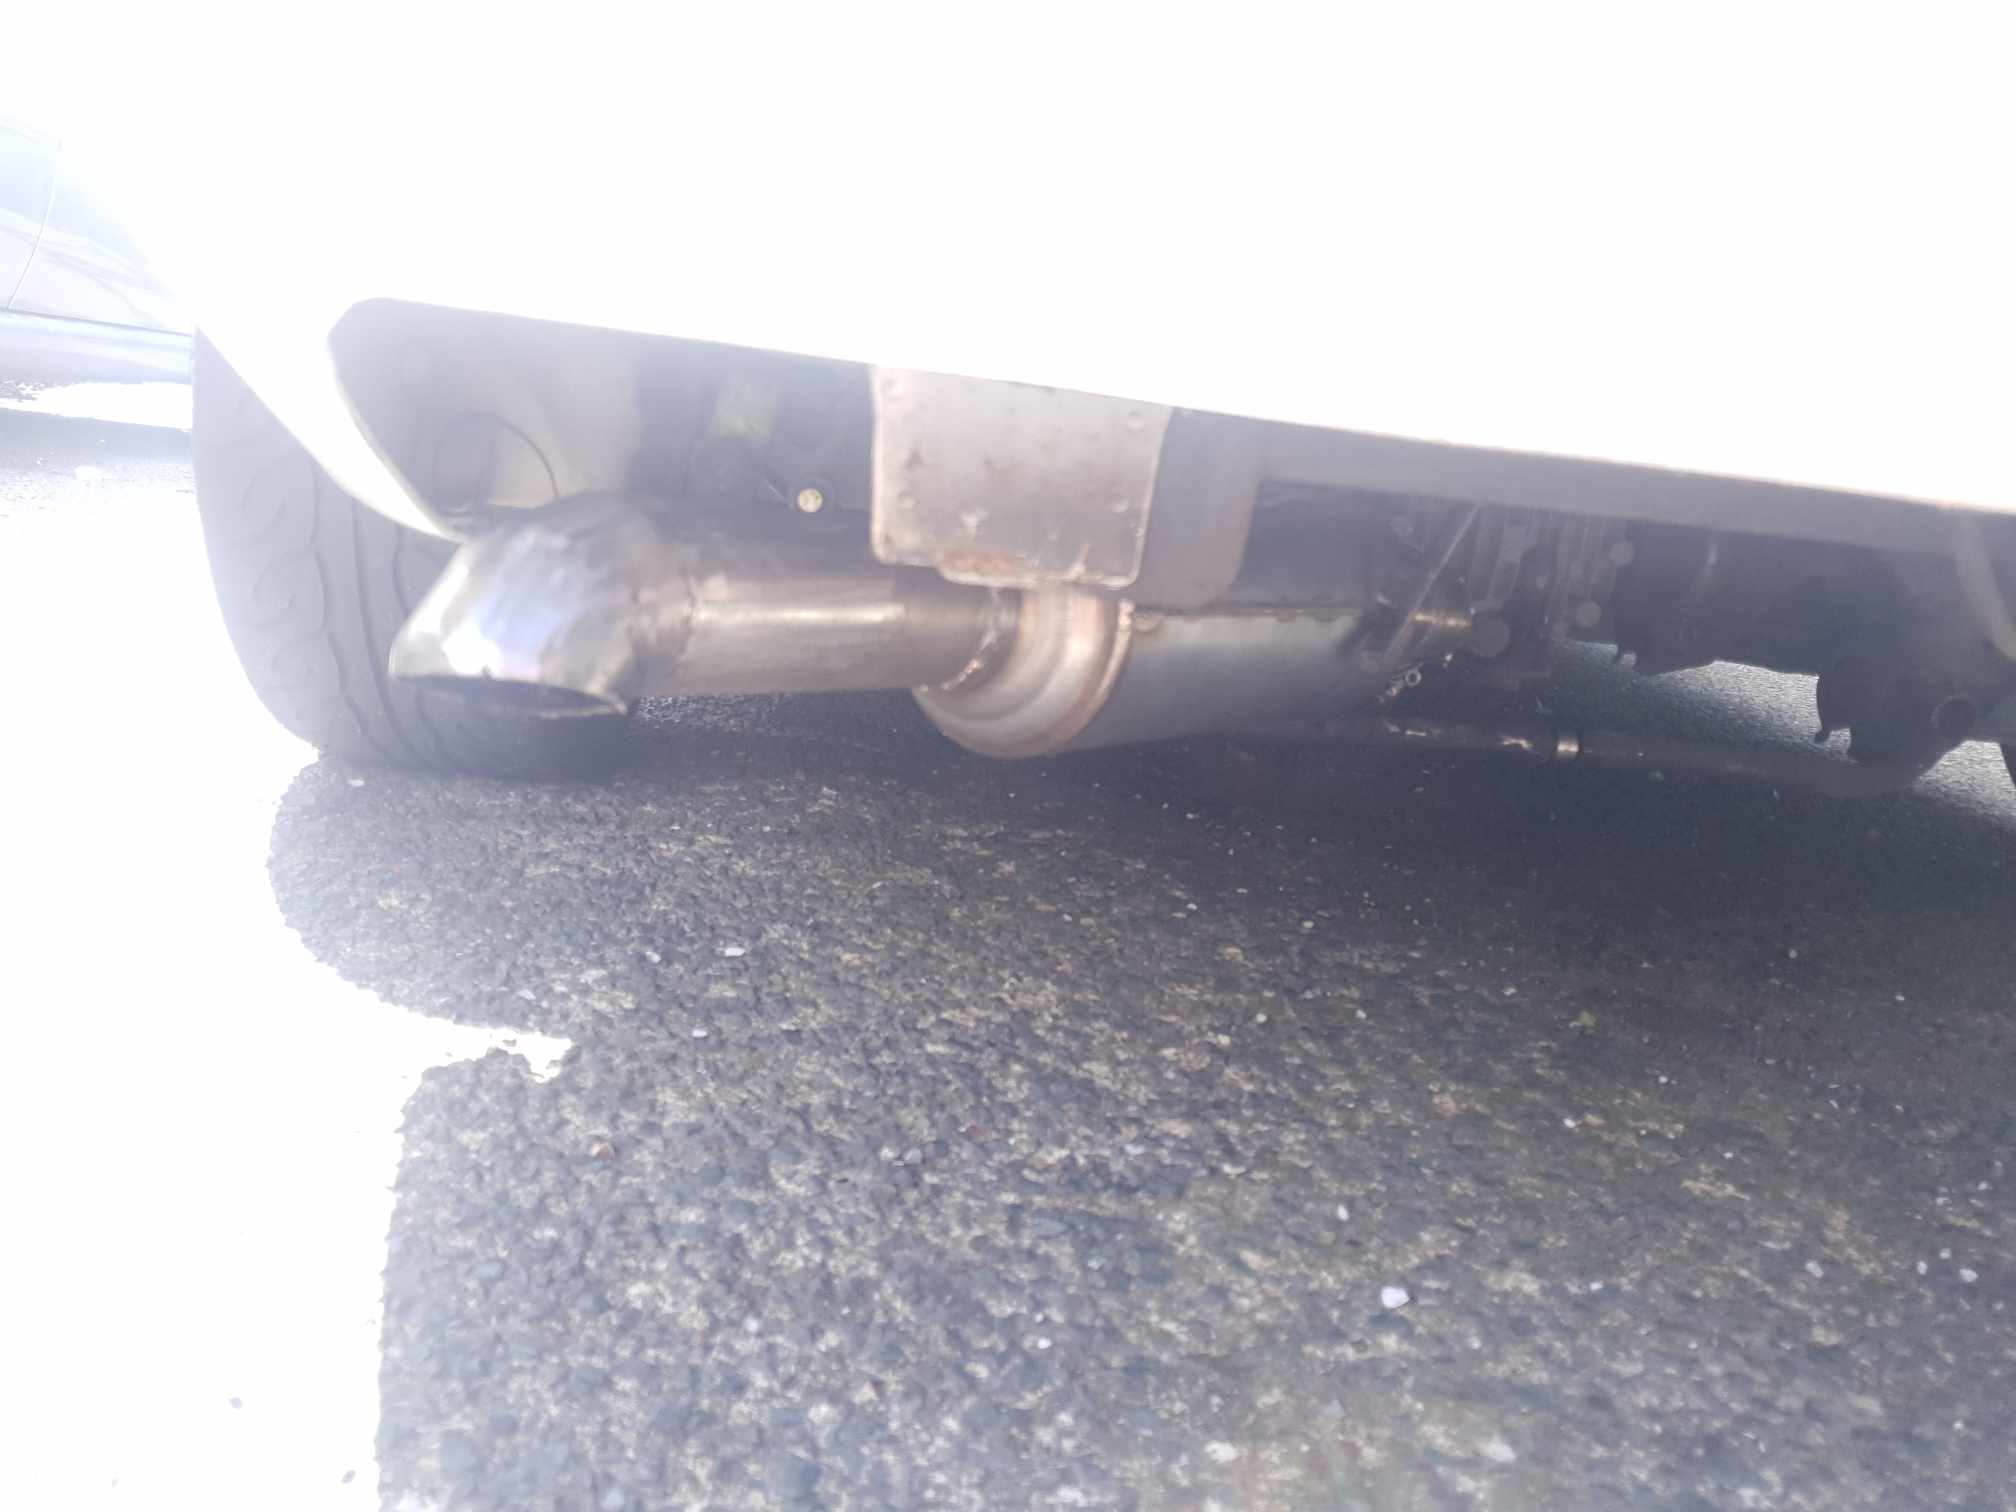
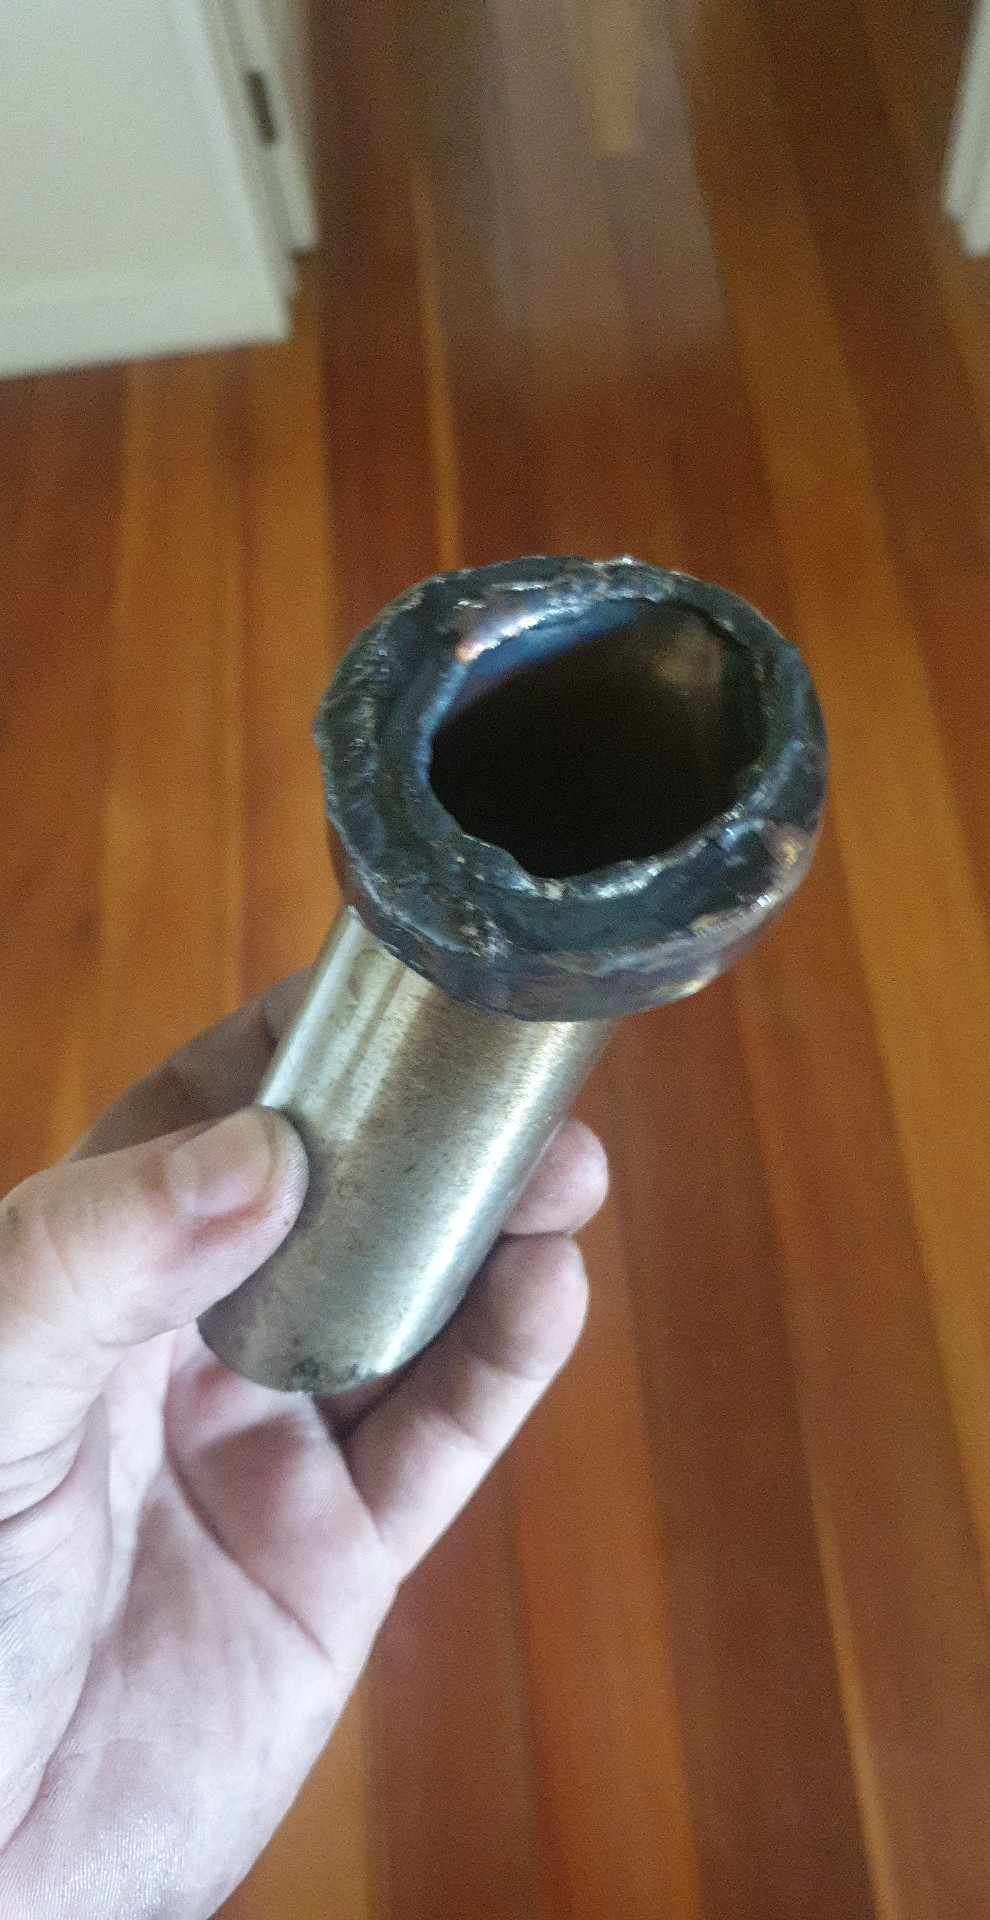
Another few months of nothing and then I decide to sign up for another sccnz motorkhana. At this point it is 10am saturday, and the motorkhana is 10am sunday. Last time I checked, my TPS is falling off, throttle #4 has a vacuum leak from being yanked about when the tps was knocked, and there is maybe a slight misfire. Instead of even opening the engine bay, I decide the exhaust needs more work and I have a muffler just lying about SOOO a plan is formulated... I'm also critically out of stainless filler and argon, but that won't stop me Contemplating new muffler position, was tempted to have it riight out the bumper but I don't hate myself that much. Instead, we tuck the muffler right up underneath the car and do a downturned exhaust tip. At this point I was chopping up the old muffler to save argon. Here is where the downturn tip came from: After procrastinating a fair amount, I get the muffler all tacked and have completely exhausted my argon bottle. Nice, its about 3pm and I'm making dinner for some friends before a comedy show. Make a lasagne then quick trip to bunnings at 5.30 for an argon swap, comedy show and start "welding" again at about 11.30pm. Do I need more gas coverage? Sure. Are my "welds" shit and rushed? You know it. Do they work? To be decided. Midnight:30, job done. Car lost some rasp, gained a LOT of bass. Right at 90Hz at motorway speed, heaps of it. So much bass I was getting a headache, and that was not fun. I figured its about time to actually make the car quiet, so I make a (suss) slip in silencer after the motorkhana. It had to be short and on an angle to be able to get up the downturn exhaust tip, but it does the job. Bass is gone, rasp is gone, car sounds pretty reasonable for once!
1 point
-
Peak Engineering textbook and probably one of the best books ever written Shrink fit the axles is a brilliant idea, love it!1 point
-
Exhaust box....An empty tube - say 4inOD 1.6mm wall. Across the back of the car. Your two sides discharging into it straight in 90deg to CL. Discharge pipes from each end. 1 1/2in OD. Length inside box to be perf tube same 1 1/2in OD. Close/blank off the inner ends of this and make them overlap with a figure 8 support in the center of the box. 90 deg bends outside the main tube for the discharge pipes to point them out the back. This will work - and not be too noisy.1 point
-
Loving the fuel tank shenanigans proper design and thought out... not that you do anything less than awesome1 point
-
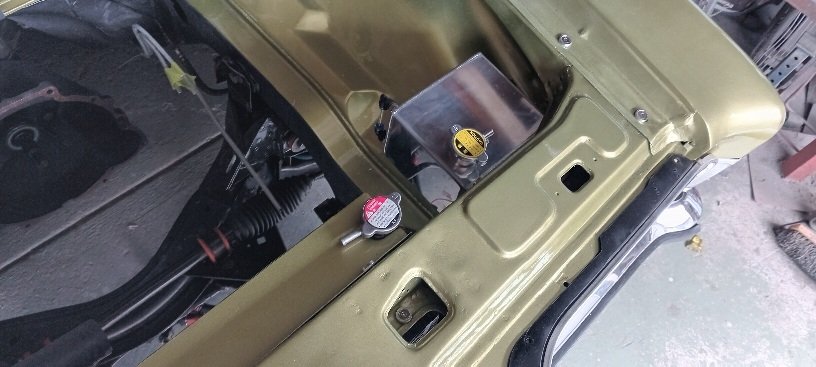
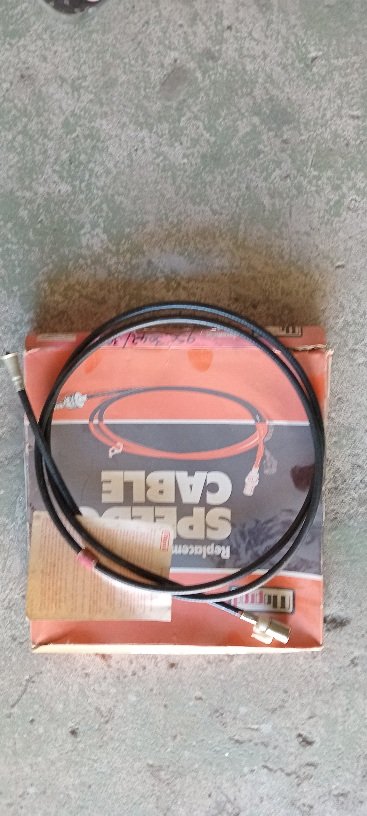
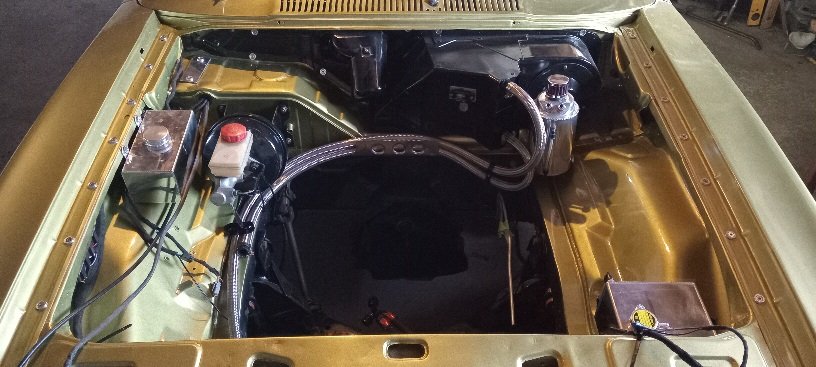
It's been an interesting few weeks. I had a scare in the Alto, and more parts arrived. The weirdness started when I was taking the Alto to work the other week. I jumped in, started it up, and all was normal. I'm cruising along, jamming to some tunes, and hit the usual start stop traffic. I'm just crawling along... And BAM, ALL the dash warning lights suddenly light up and start flashing. They flash a few times and then the majority turn off, leaving only the Check Engine and Stability Control warning lights lit. I'm worried, will the car suddenly die stuck in traffic? Is the car about to asplode? I've never seen all the dash lights flash like that. I quickly jump off the highway at the next exit and crawl the car home. It was running fine, no misfire, no smoke, no leaks, nothing. Just the lights. I made it home fine, swapped cars and left it to think about what it had done. After work, I plugged in the tablet and fired up SZ Viewer to scan the codes. Ah yes, I think I have a couple of codes. None were current, but nearly all modules at at least one code. Reading into the codes, they all centered around one thing, the loss of CAN communication with the ABS unit. I checked all the modules and they were all the related codes, so I saved screenshots of the codes for later and cleared all the codes in the modules. Nothing came back. I've driven a few hundred KM since, and haven't had any issues, so hopefully it was a once-off and not an intermittent CANBUS issue. I did have a quick look at the ABS module and it looked normal, so I gave the plug a wiggle and left it While in the engine bay, I forgot that I hadn't shown my awesome duct tape duct. For whatever reason, either the intake rubber intake or the fibreglass duct are too short and they don't really meet up, leaving a large gap between and around the two. I made the duct tape duct before trackday to try and encourage more air into the airbox rather than slip out around the smaller rubber intake. Its fully enclosed and seals the two parts together. It withstood the trackday heat and is still there. I might look for a proper solution one day, or maybe not. The other day I finally had some bits arrive that I have been trying to get for months. Before Christmas, when I first got the car, I tried to order these bits through the local dealer. They asked Suzuki NZ, who asked Japan, and were advised they could be ordered, so we placed the order. Japan then proceeded to ignore the order and not process it. After a couple of months of chasing it, I cancelled the order. I enquired with Amayama, who I have been getting the majority of my genuine Suzuki parts through, and sure enough, they could supply and at a lower cost. Finally, those parts arrived. What are they? Well, the main one was the massive polystyrene insert that sits in the boot and gives me a proper boot floor. Without it, the floor of the boot is much deeper but tapers and makes it kinda useless for carrying anything in. The insert just slips into place All the shaped spaces in it are meant for things like the jack, tyre iron and flat tyre goo kit. I have none of these, so all it is used for is my tow hook I would like to find a water bottle for the intercooler spray that fits into one of the spaces too... Having the block in place means I could reinstall the coreflute "floor" and carpet. These are retained with two special clips with little pull tabs on them, so you can access the tools under the floor It's a kinda dumb thing to be excited about, but I can finally use my boot. The other thing to arrive was the LH and RH front A-pillar trims. The LH side had a big crack in it, and the RH side had a bunch of holes from when the Japanese owner had a gauge pod fitted there. To remove these trims, all you do is pull down the door seal And pull the trim free, starting at the top. It's hooked into the dash at the bottom, but easy to pull free. Refitting is the reverse, hook it in at the bottom and then push the clips into place. Refit the seal, and you're done. I've got a couple of other small things on the way and then that should be most things sorted. It's crazy how well priced genuine parts are for these wee things. I'm paying the sort of prices I would normally pay for secondhand junk on Facebook, for brand new parts from Japan. Future thoughts are an oil cooler for the engine, an SWK intercooler and water sprayer, and maybe some half-down lowering springs. All in good time, and depending on cost.1 point
-
I've been chipping away a fair bit lately. I managed to find some radiator suport panels. This was my first time doing any sort of panel work, after a fair bit of tweeking I managed to get them good enough to where I was happy. I also filled in the 2 big holes in the engine bay. Years ago I hacked off the washer bottle mount to make room, luckily I kept the remains of it. I made new ends for it to replace the bits I hacked away. Replaced the battery tray. I did a test fit of the engine to sort a few things out. The main things were the gearbox cross member and where to fit a clutch master cylinder and sorting the exhaust. Not a hell of a lot of room, but it worked out OK. The wee fella helped modify a toyota gearbox cross member. I've just finished painting the engine bay today. It's not going to win any awards, but I'm happy enough with it. I'll start the final reassembly now. I sorted out the flywheel/clutch issue too. The guys who did the engine work (Kennally Cams) did some magic to the fly wheel and machined it to accept shouldered bolts to locate the pressure plate as it's being torqued down. Hopefully this week I'll get the engine in for the last time.1 point
-
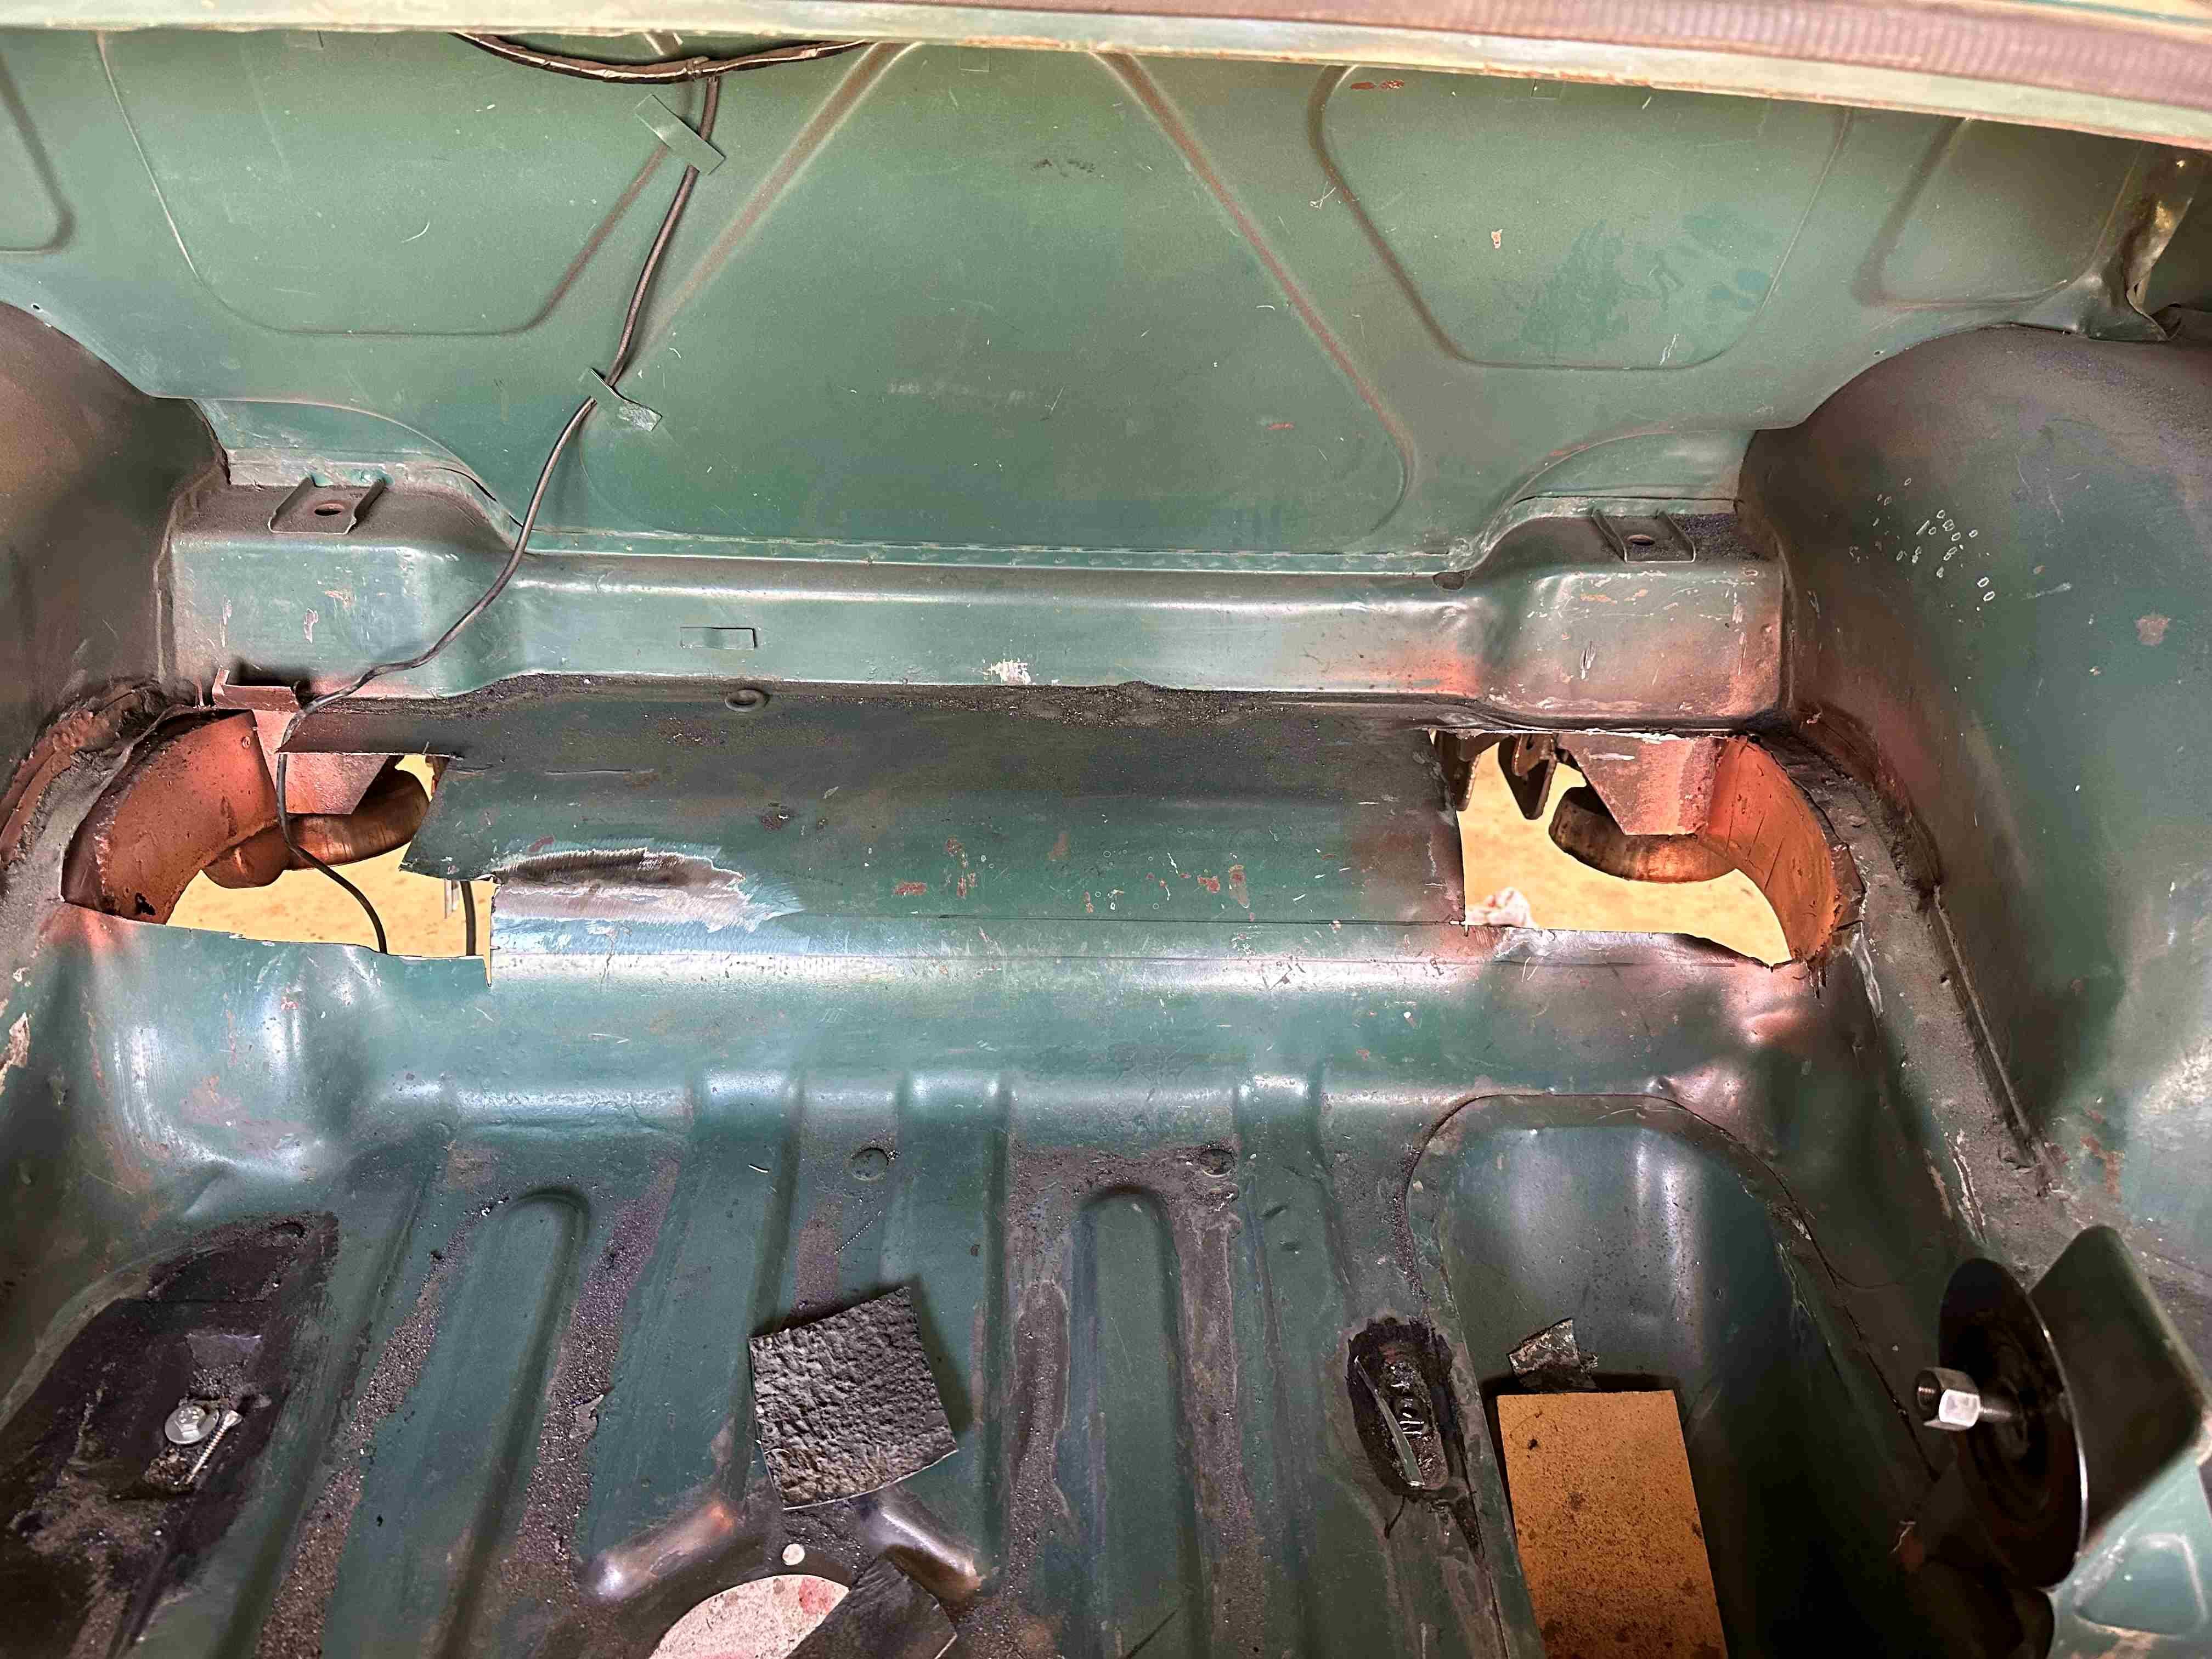
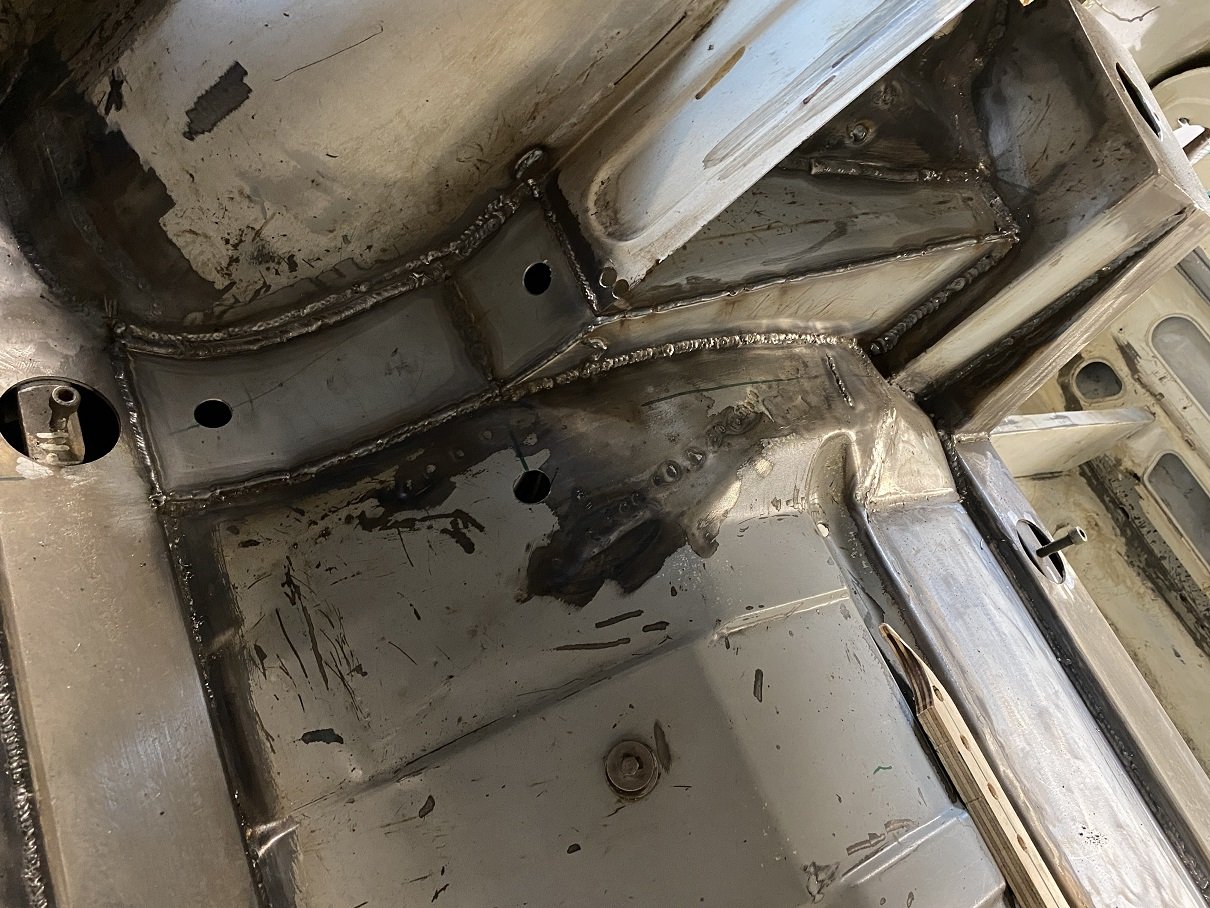
Another email from panel Barry come through recently. He's been spending time cleaning up the sills and preparing for the final weld in as well as getting all the welds in the rear floor/boot area ready to support the rear end going back together.
1 point
-
Two tasks planned for today, both failed. First task was to remove the dashboard. Reason for that is so I could check out some wiring behind it and also make sure I could eventually get as much undercoat sprayed up in as many areas as possible. Additionally I didn't want to damage it when trying to grind away the mounting blocks that were put in for the roll cage. After drilling out one broken screw and breaking the surround for the steering column unfortunately I did not get to take the dash out. I was thwarted by the choke cable knob that seemed like it was fused on by the nuclear power. I also didn't want to undo the choke cable from the engine bay and drag it all the way through as by this time my interest in that portion of the project had been depleted so I put it back together as best as I could and had lunch. I did find this gem under there which answers one puzzle about the headlights. After lunch I thought I'd see how I went with grinding away the roll cage boxes at the front. Unfortunately I could only access so much with the grinder and when I got to about here is where I gave up. Talking to some panel beaters the suggested method from a DIY point of view is reciprocating saw to get in as many cuts and angles as possible really and smash/grind out the rest. Just a shit job all around. Oh well, an excuse to get some more tools.
1 point
-
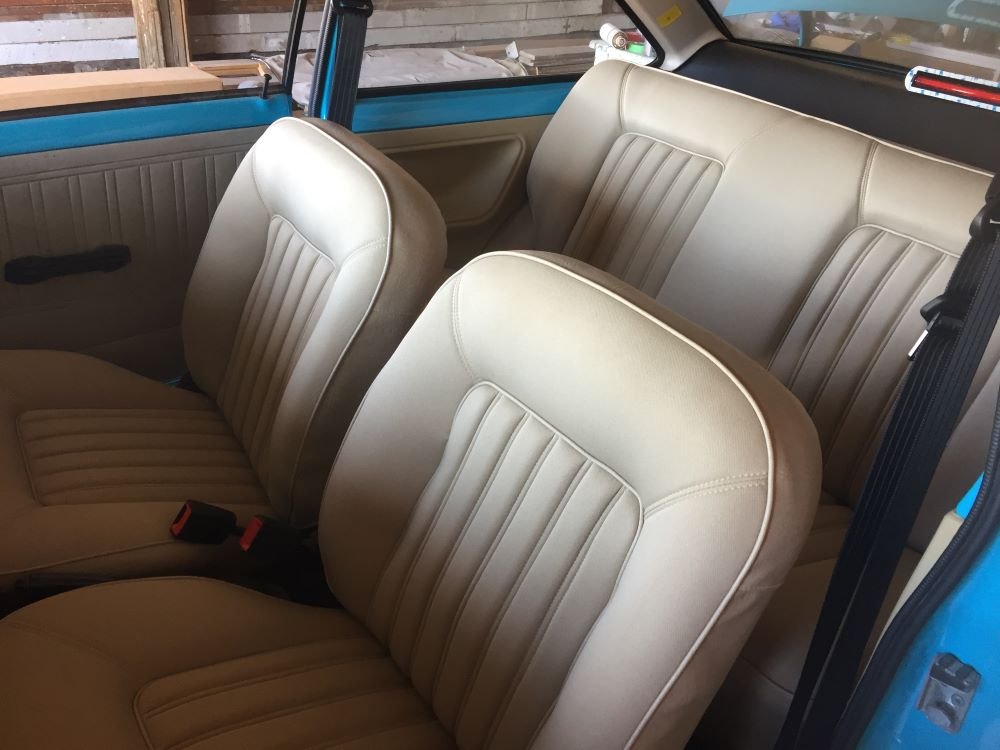
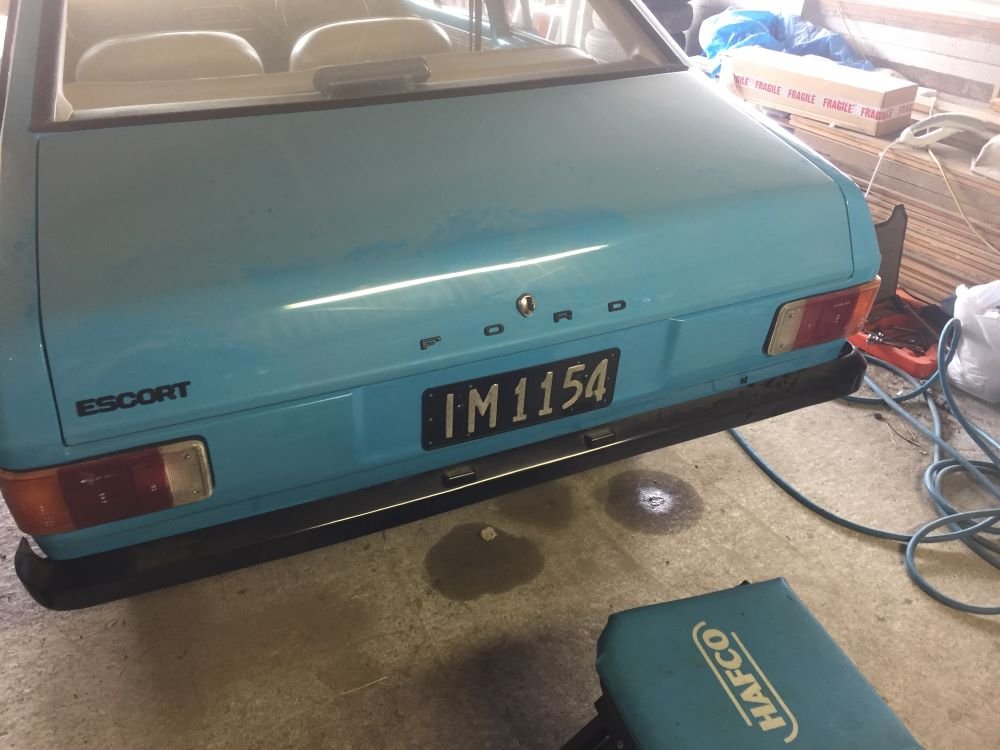
Just slowly picking off jobs as time allows. Fitted the carpet and cut all holes for seats, seeatbelts, gear stick, brake handle. Installed gearstick and rubber gaiter. Next put in seatbelts and also fitted door cards. All looking pretty good. Next in was the seats which took a while as quite hard to line up holes I had cut in carpet. Starting to look like a new car. Next put badges and number plate on rear also mirrors on doors. Time to put some petrol in the tank in anticipation of startup but it all ended up on the ground. Didn't see that coming and had to take tank out to find hole. Rust never sleeps. Luckly had another tank which I checked more carefully. Cleaned, painted and installed. No leaks Result Project Discussion https://oldschool.co.nz/index.php?/topic/84912-petes-mk2-escort-1600-sports/page/3/#comment-2618039
1 point
-
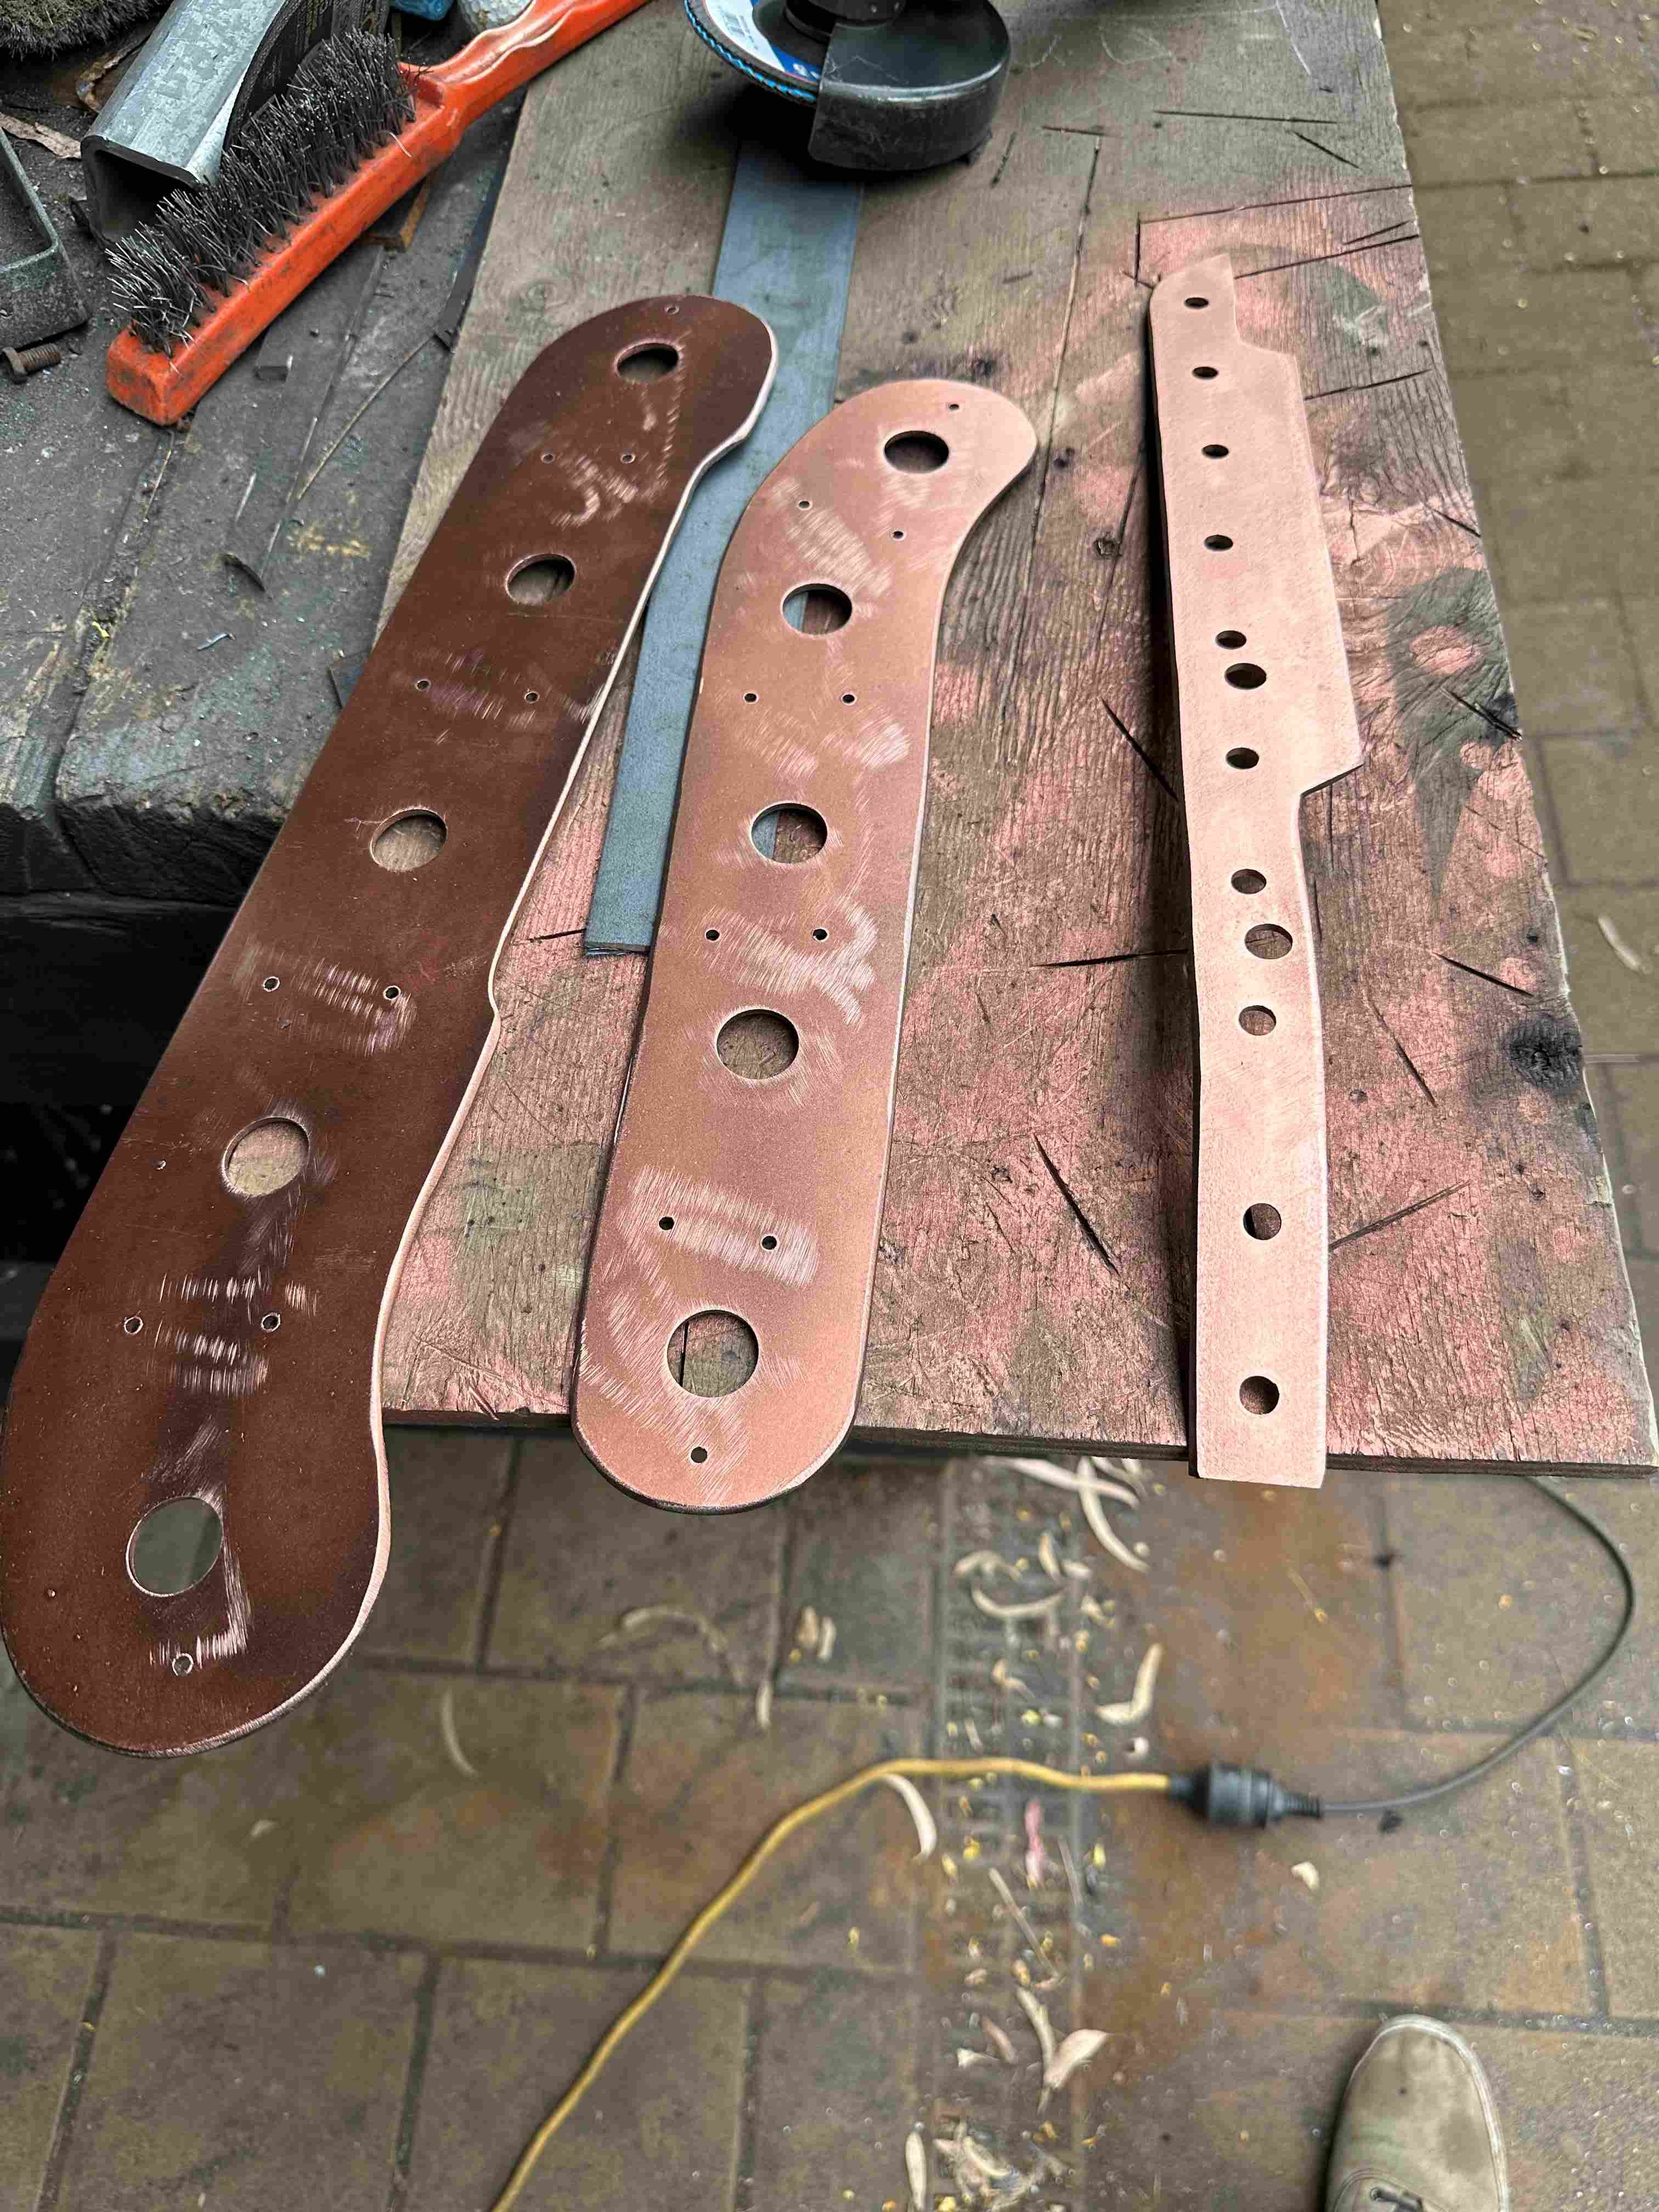
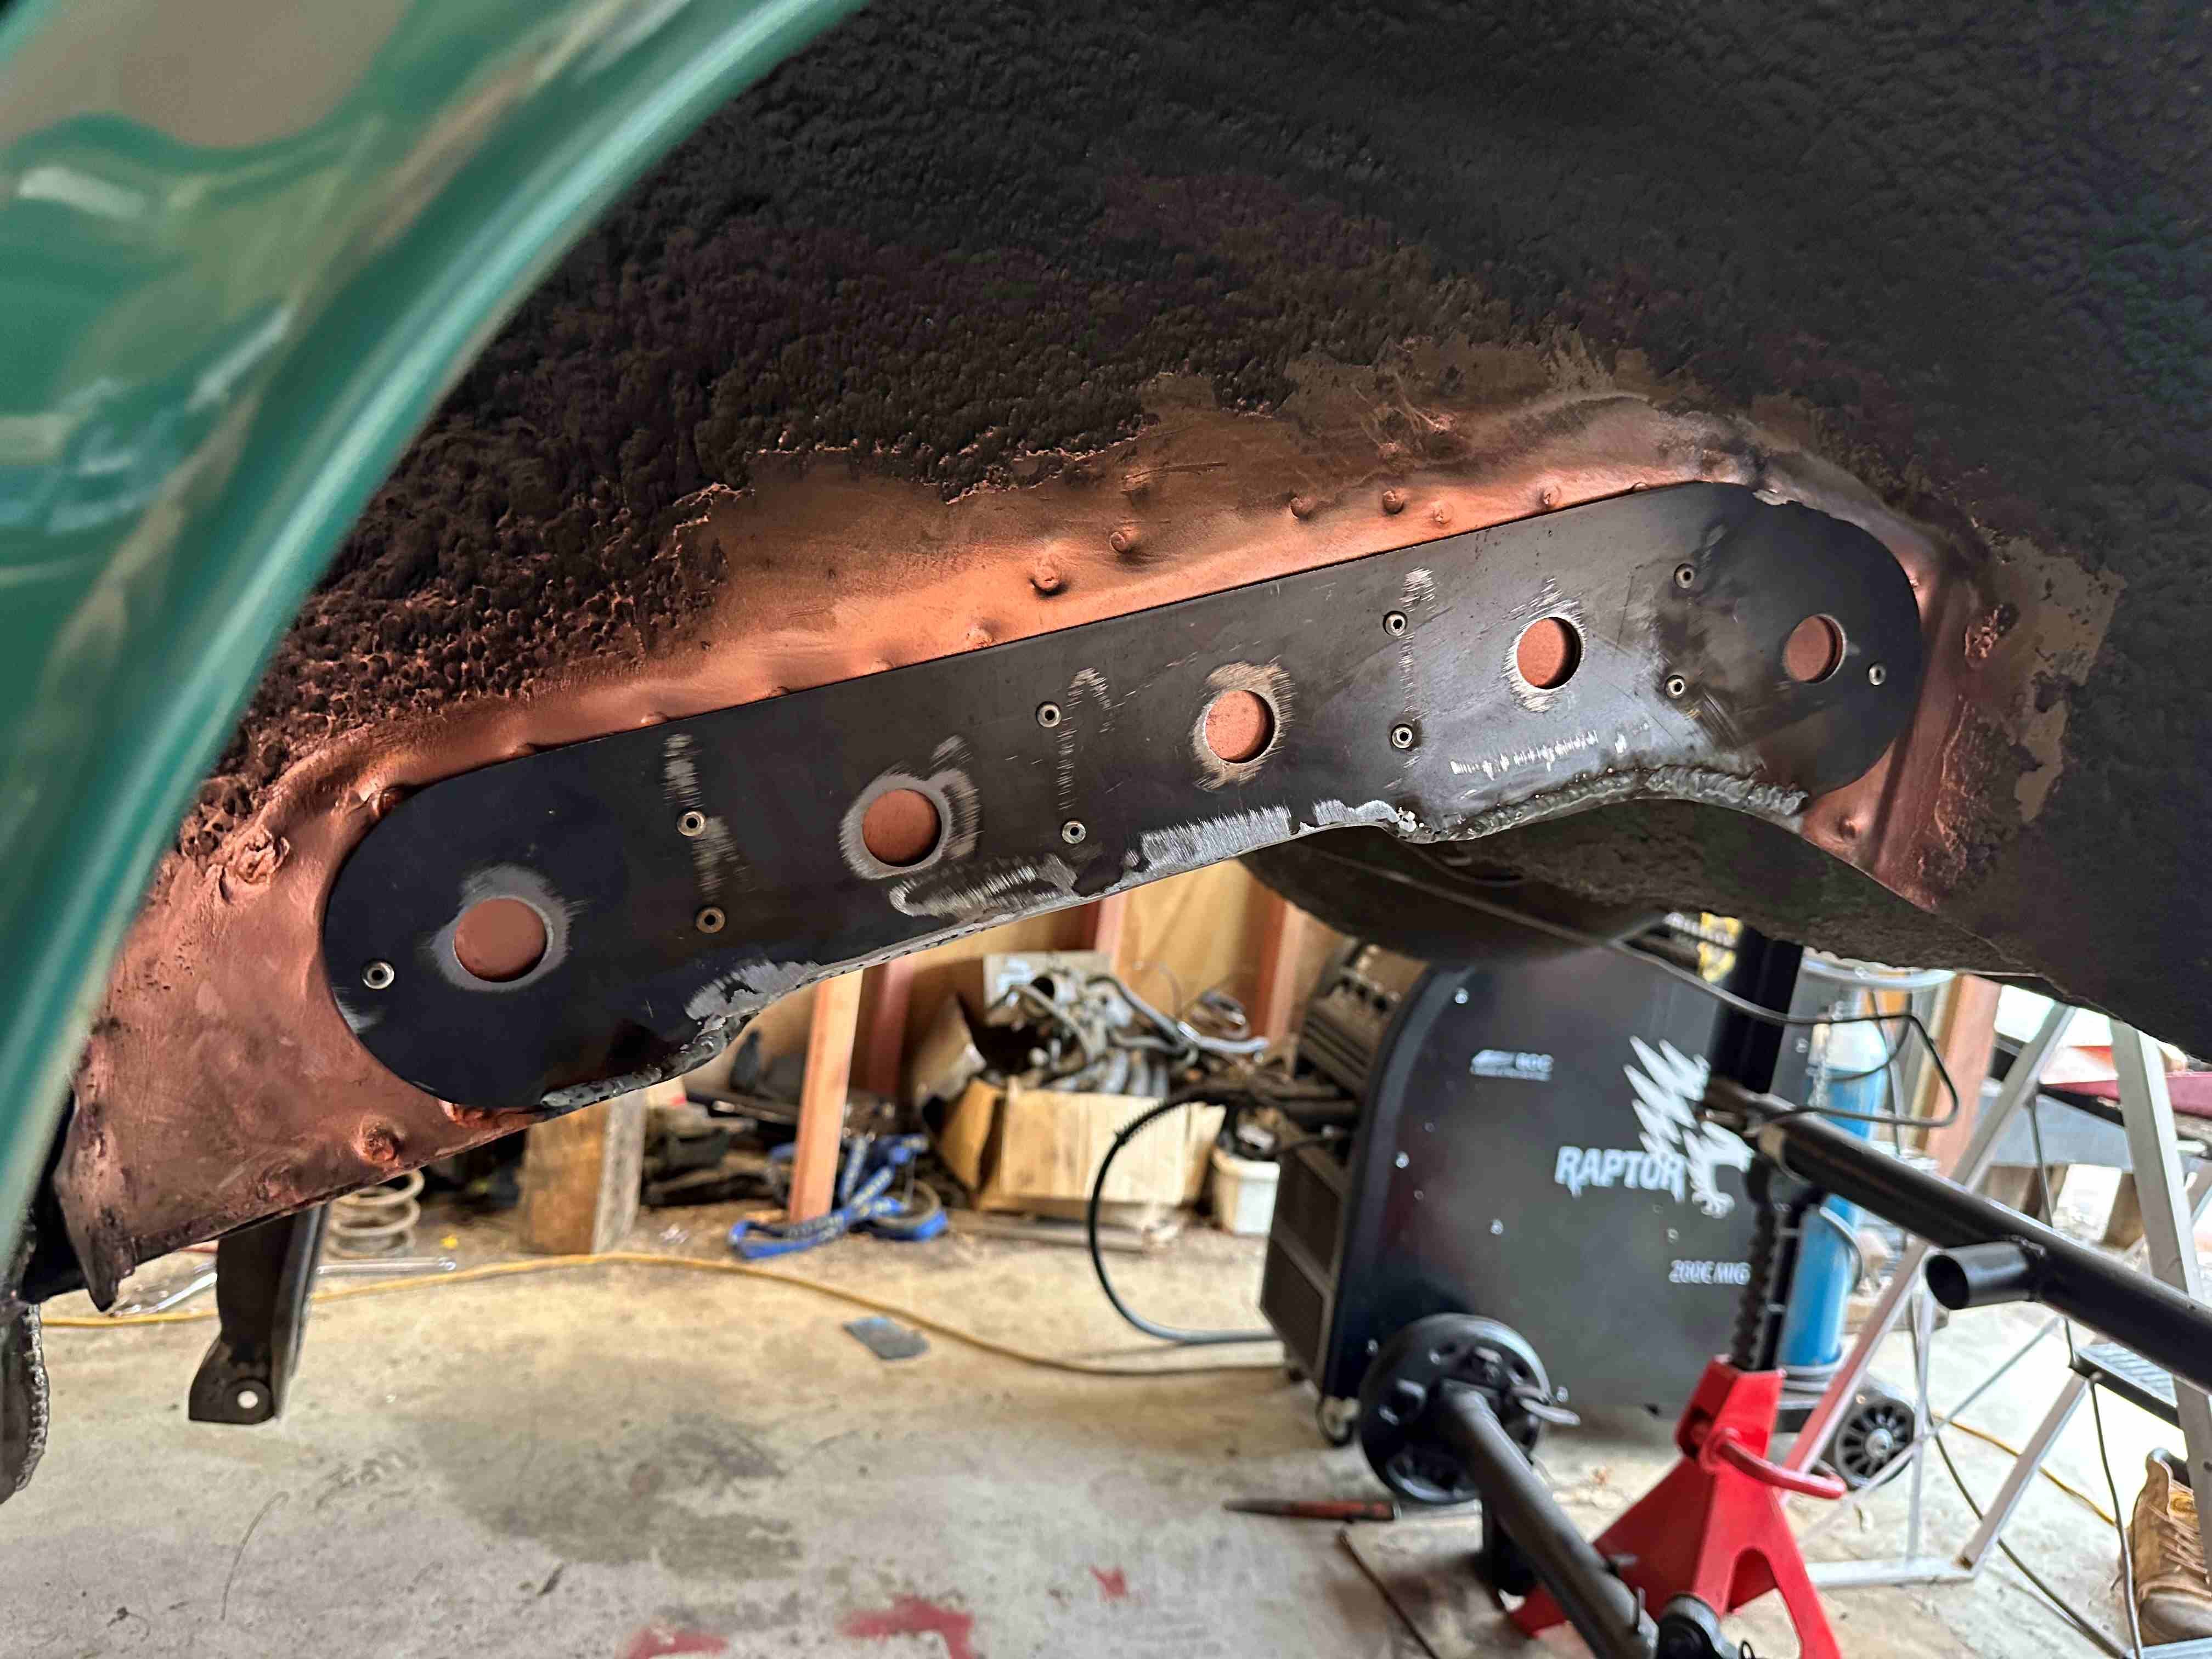
Mainly done. I need to weld in a small piece to fill the hole you can see in the pic's. It's that shape to give a bit more clearance for the odd square corner of the Honda engine. Also, another piece to fill the tight corner up on the right. It will make a little shelf but will be ok. I am pretty happy with the welding. I seem to have good penetration and not too much build in the main. I have taken a few high starting lumps off but it won't need much more. Some filler will be needed to smooth of top join (I suppose I am allowed to being sheet metal), but I still need to weld that from the inside as well. I think it is coming along well. Far better than my first attempt which was not so good but still gave me a stepping stone to doing a much better job the second time.
1 point
-
A comparison pic. Not the same angle but you can see the difference.
1 point
-
I made up the plates for the passenger side today and took some pic's. I made a start on welding in one of the plates. I will leave it there for today. It will be interesting to see how it sits with the Avenger springs in. The minx is about 100kg heavier. I think I will need to get some shorter springs made to get it sitting where I want it.
1 point
-
Car is still outside. Having a shed refit and cleanout currently so hopefully that will change soon. Haven't completely been neglecting the car though, found these urethane engine mounts on clearance so bought the last 3. Can't hurt to have a spare.
1 point
-
I've been doing a few bits... the problem I have is everything is so clean now it means everything this g else needs to be clean or remade.... factory washer bottle.......... NO. so I bought a alloy one for a torana... blocked the bottom hole off and drilled a new on on the side. a couple of rivnuts into the fresh paint and ....much better.....also mounted the catch can back on. the old fuse box hole ...i was going to weld it up.. but for some strange rrason if you wanted to go back to the old fuse box.... you can.. so I cut some alloy (polished it) and a rubber gasket. and that taken care of. then the header tank.... ( yup more wanky wanky polished alloy)...180sx header tank....perfect. I ran all the wiring on the driver side and a new old stick speedo cable. I got my dad to come and give me a hand to get the windows in...(new rubbers suck ....1st time I've ever used new ones).... I did order some chrome center locking strip for the winthis from the uk ....via youshop... fuckers!!!!! what turned up Is a 2nd hand ladies long sleeve black shirt ... not impressed....didnt even fit ...so they arr looking into that... but front and rear windows in for the 1st time since 2006. I didn't want to use the quick shitty heat sheld I made ... so I took the time to use card and make a new one....even made it line up to the center plate that sits behind the motor for the header hoses...... and yes I polished it...(just that side....painted the other side in high temp engine gloss black........niiiiiicccccçce). other shit ..... only put the reg on hold for 3 months this time... , head is off being skimmed ( will be using the standard cam for now....actually pretty good on a rurbo motor)... ,some more bits arrived for the motor ..so once together I'll slap it in my nephew's mk5 with standard carb ,exhaust and dizzy to run the motor in.. (it's legal and I'll just run it to work for a couple of weeks)... cheers
1 point
-
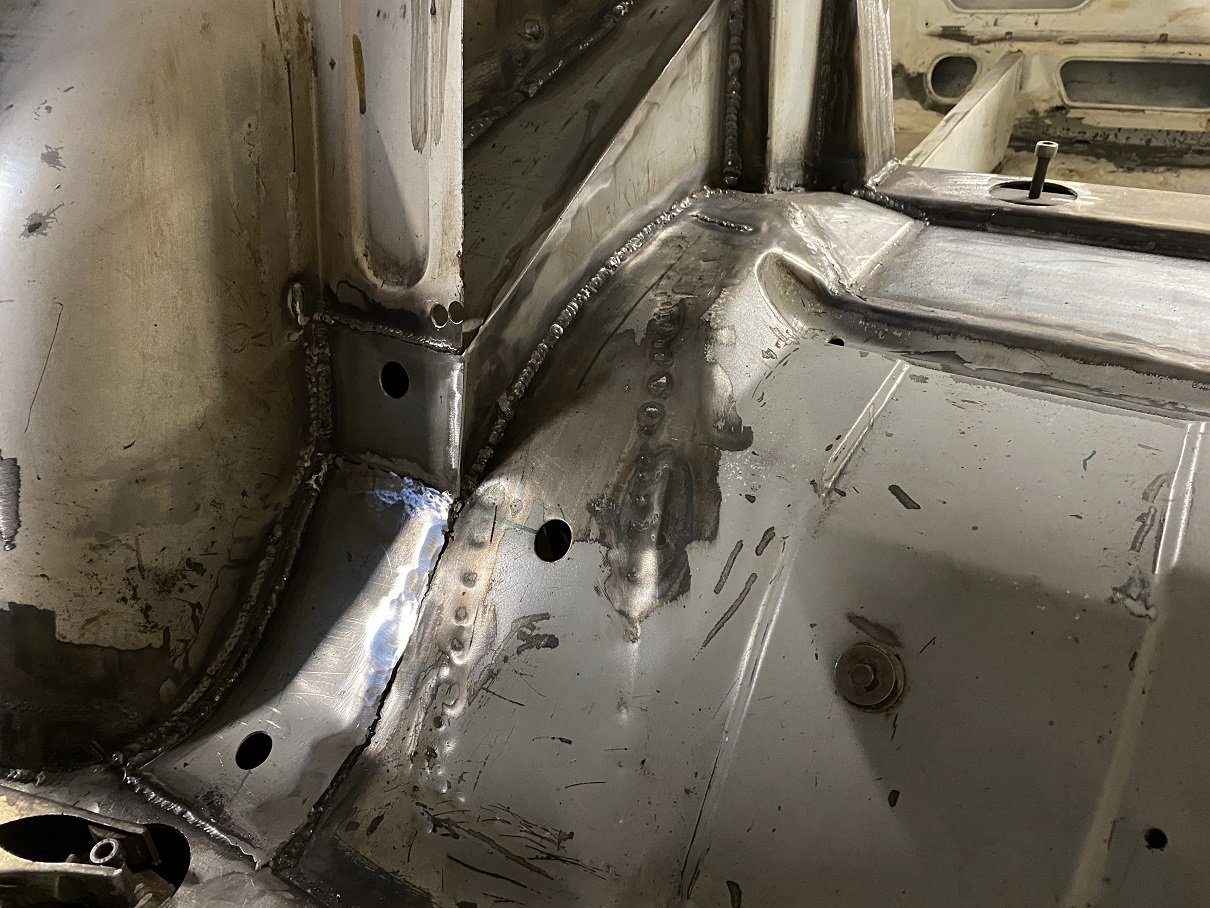
Linished... The holes are so I can spray some oily waxy antirust stuff in later. Then I started on the other side. Then I got distracted because I got some new blades for the reciprocating saw and chopped the gap for the tunnel. Then fit the tunnel. I decided it would be too hard to bend a flange on the end so I will cut the flange as a separate piece and weld it on.
1 point
-
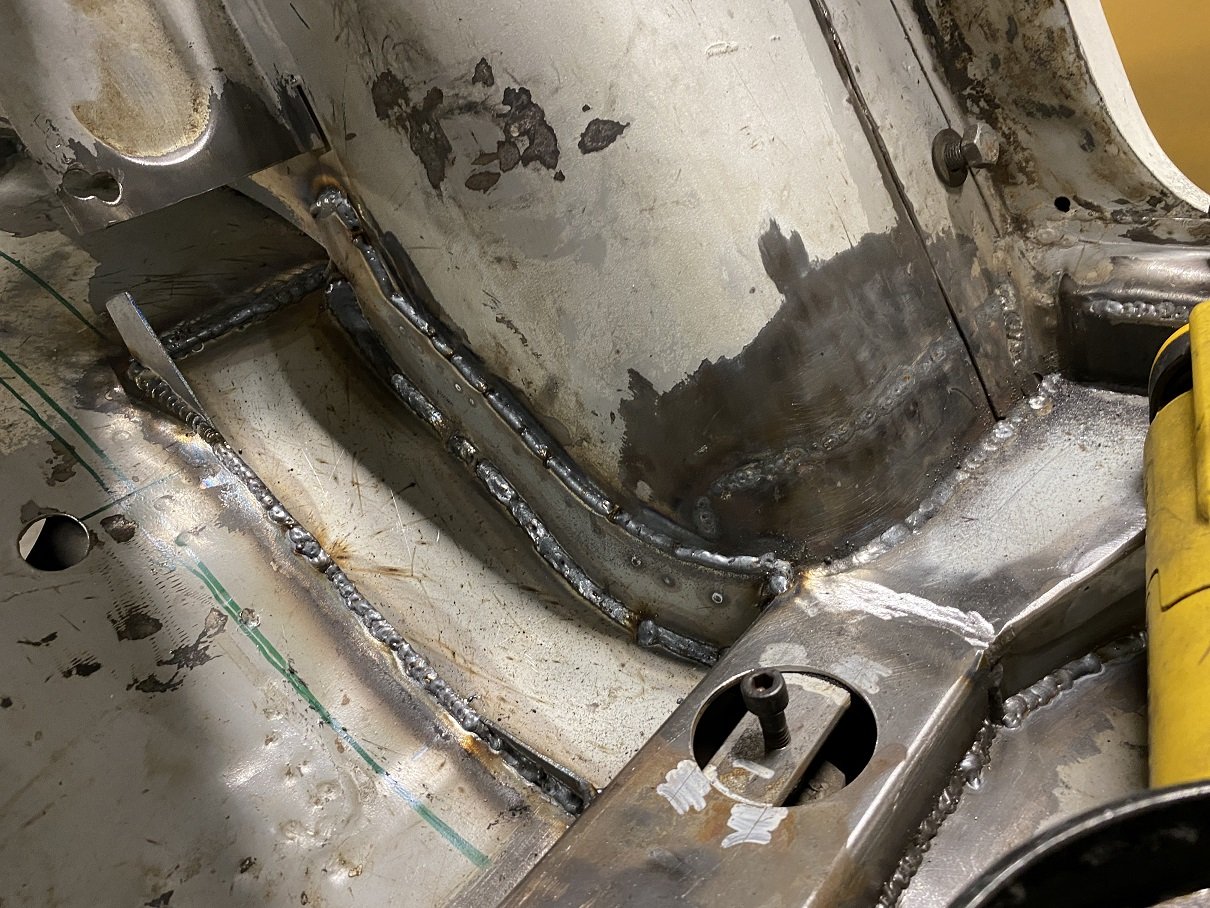
This side chassis rail... box section... whatever, is all welded. I'll linish back some of the welds.
1 point

.thumb.jpg.570970b401ac8d26ce9af7c1bf2bd8cd.jpg)


This leaderboard is set to Auckland/GMT+12:00