
Leaderboard


Popular Content
Showing content with the highest reputation on 10/26/21 in Posts
-
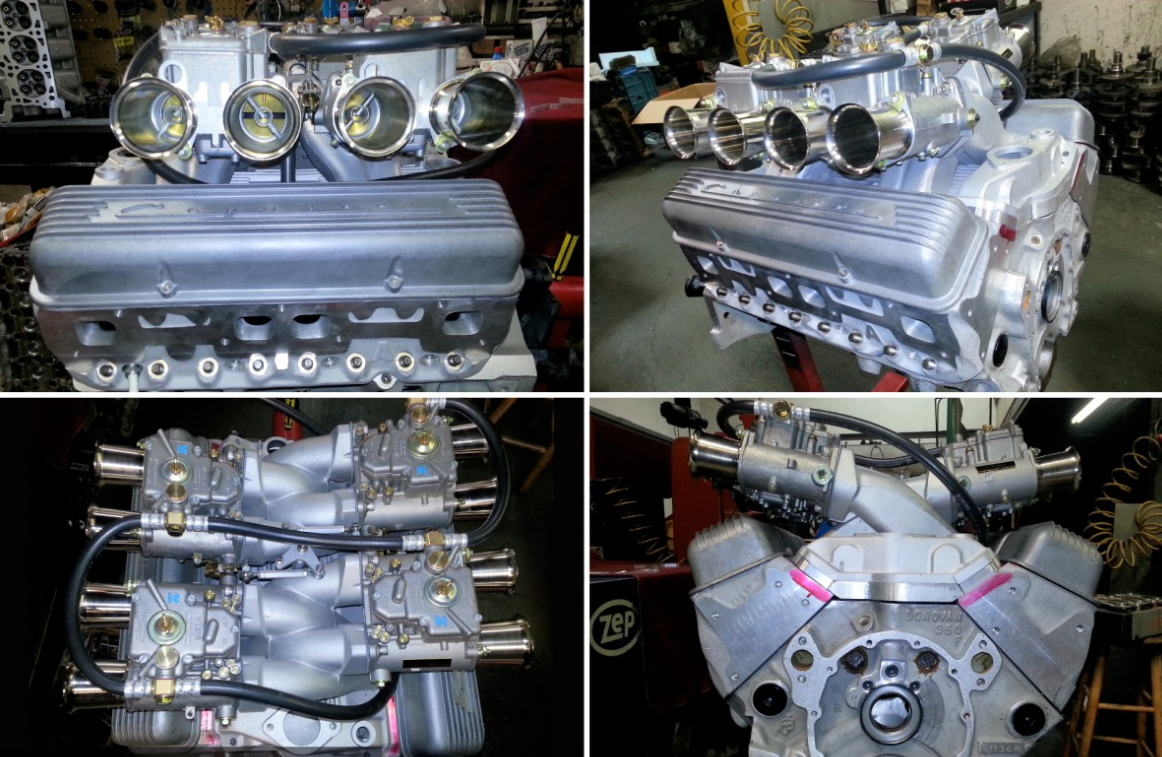
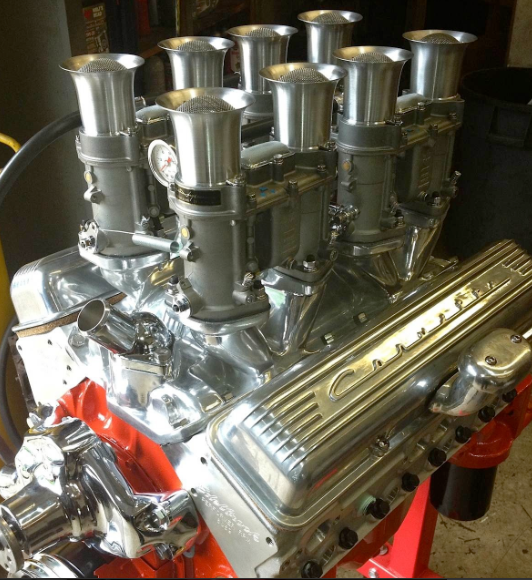
Im thinking of doing the whole engine (including heads) this Grey. Then just clean up the covers but leave them a 'patinaed' kind of raw look. Same with the Webers.11 points
-
Ok side drafts it is then! I dont think the down drafts would fit under the bonnet anyway! Got the engine out this weekend. Pretty easy. Got a bit of cleaning up and harnessing to do. Got some nice original Cal Custom finned rocker covers.8 points
-
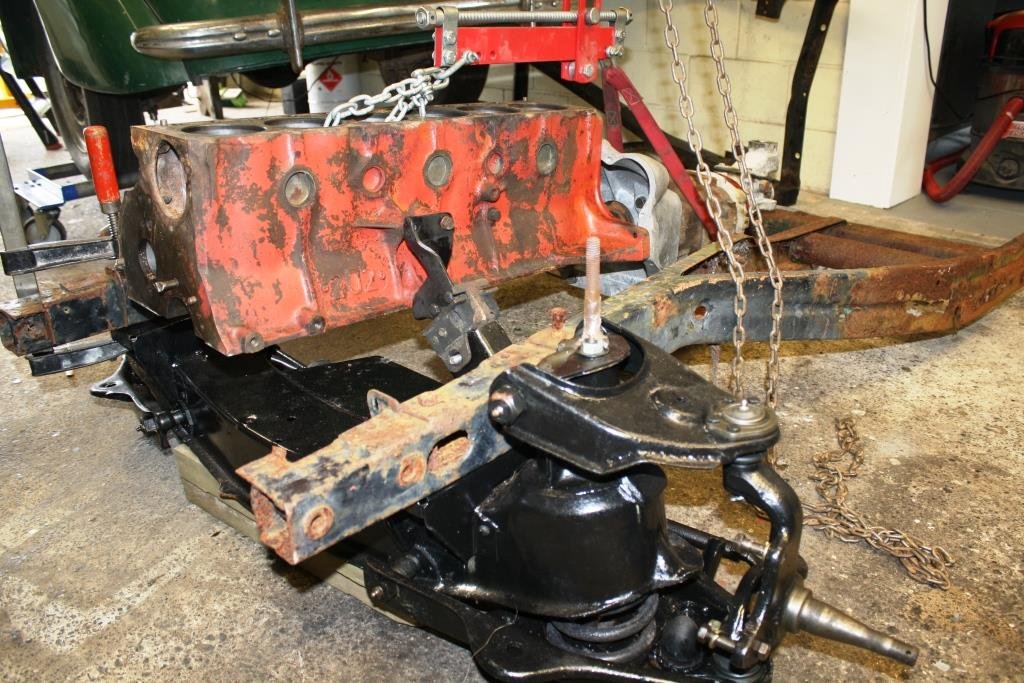
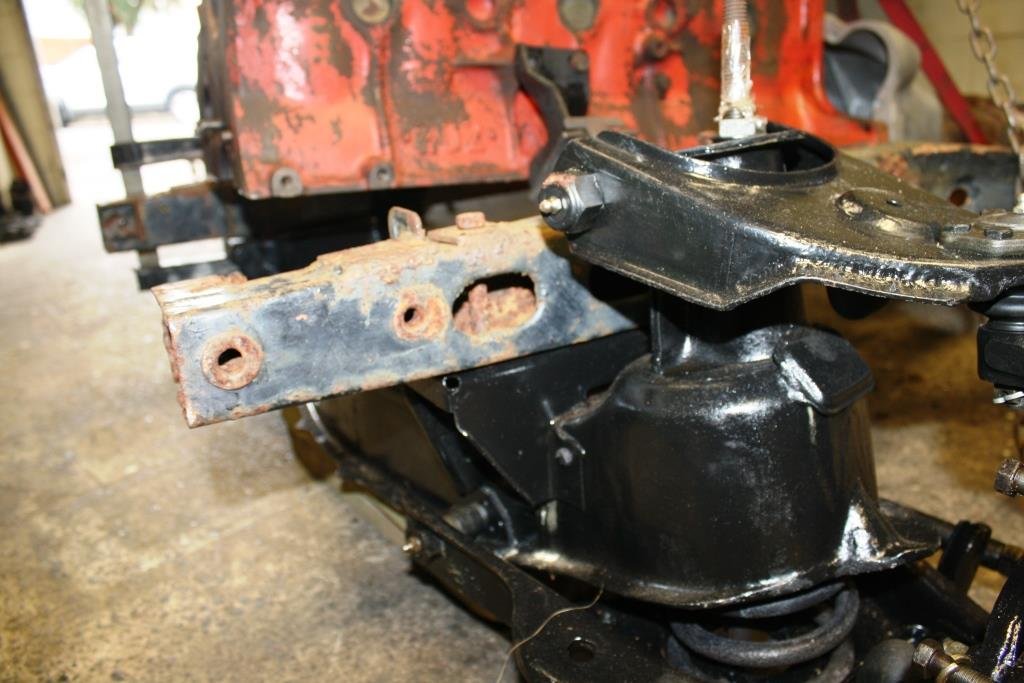
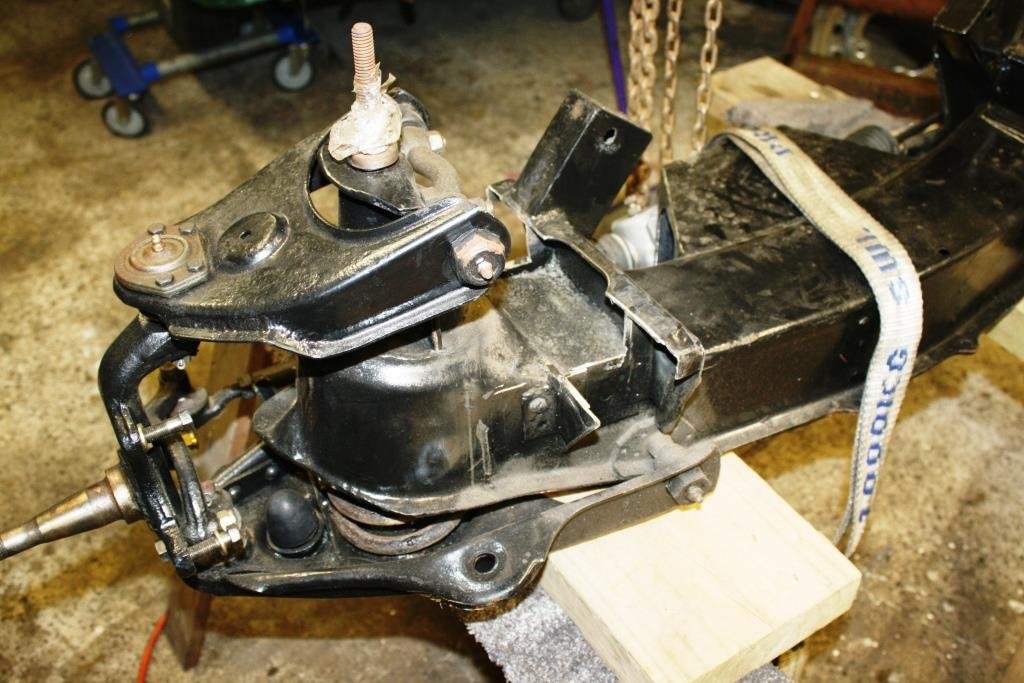
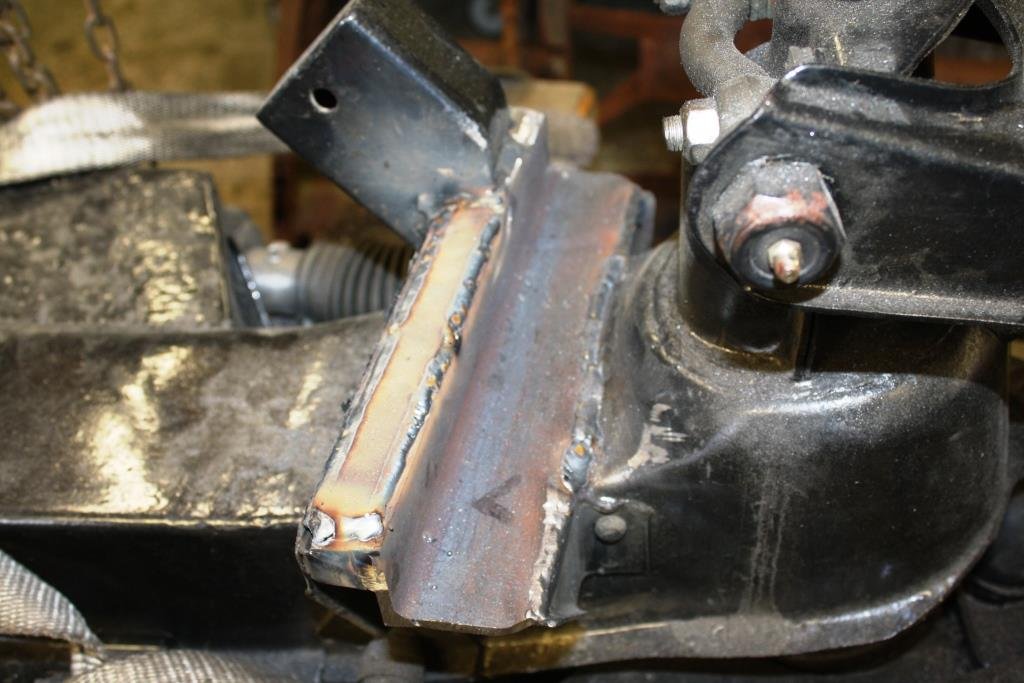
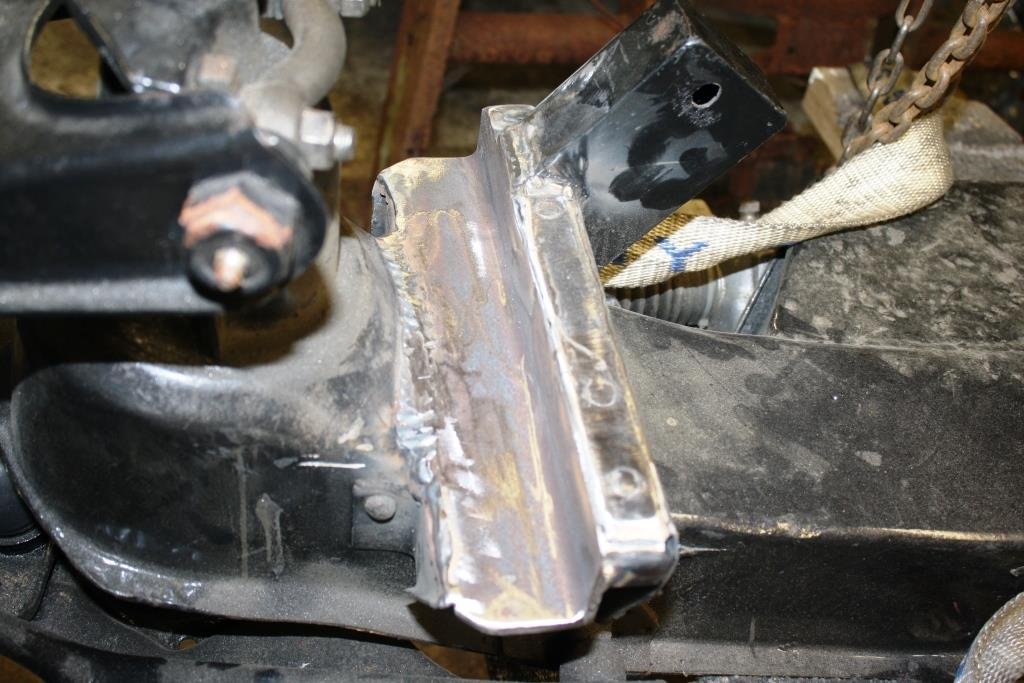
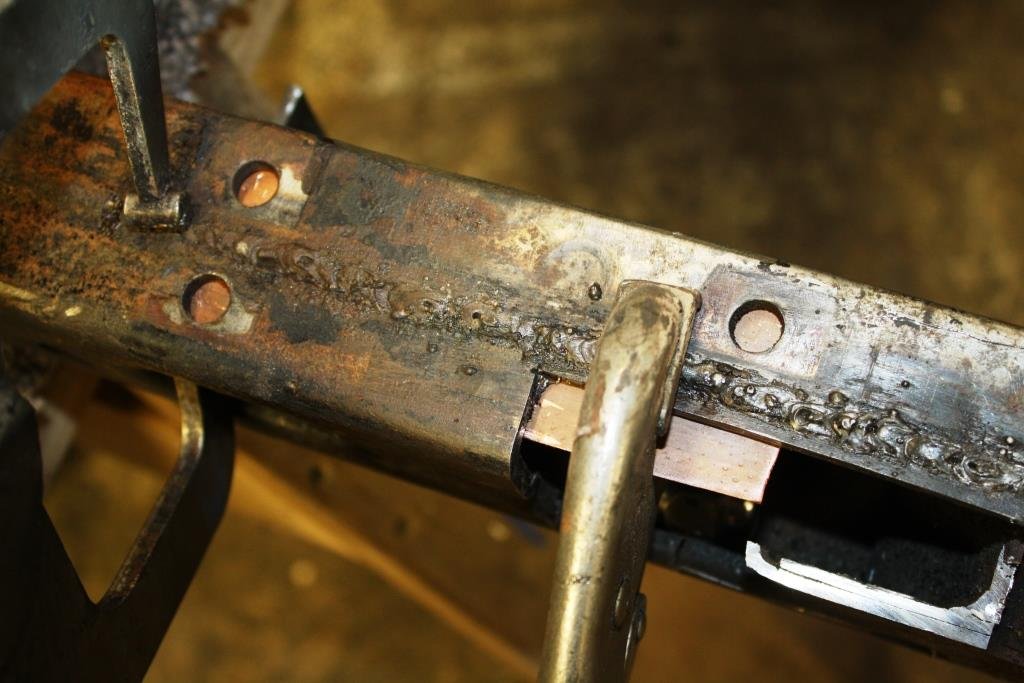
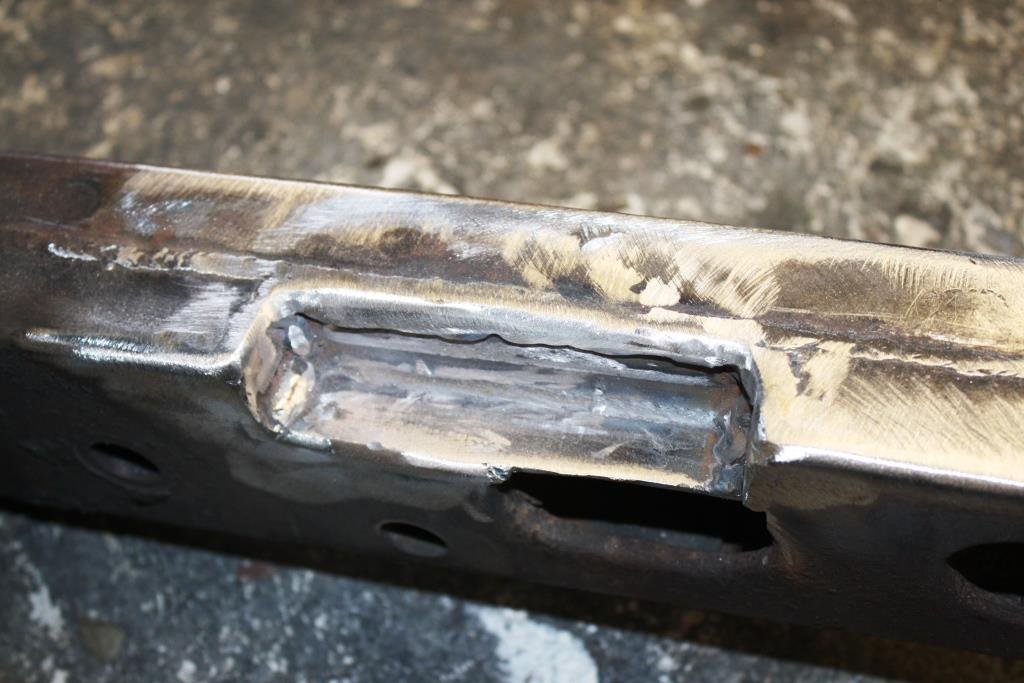
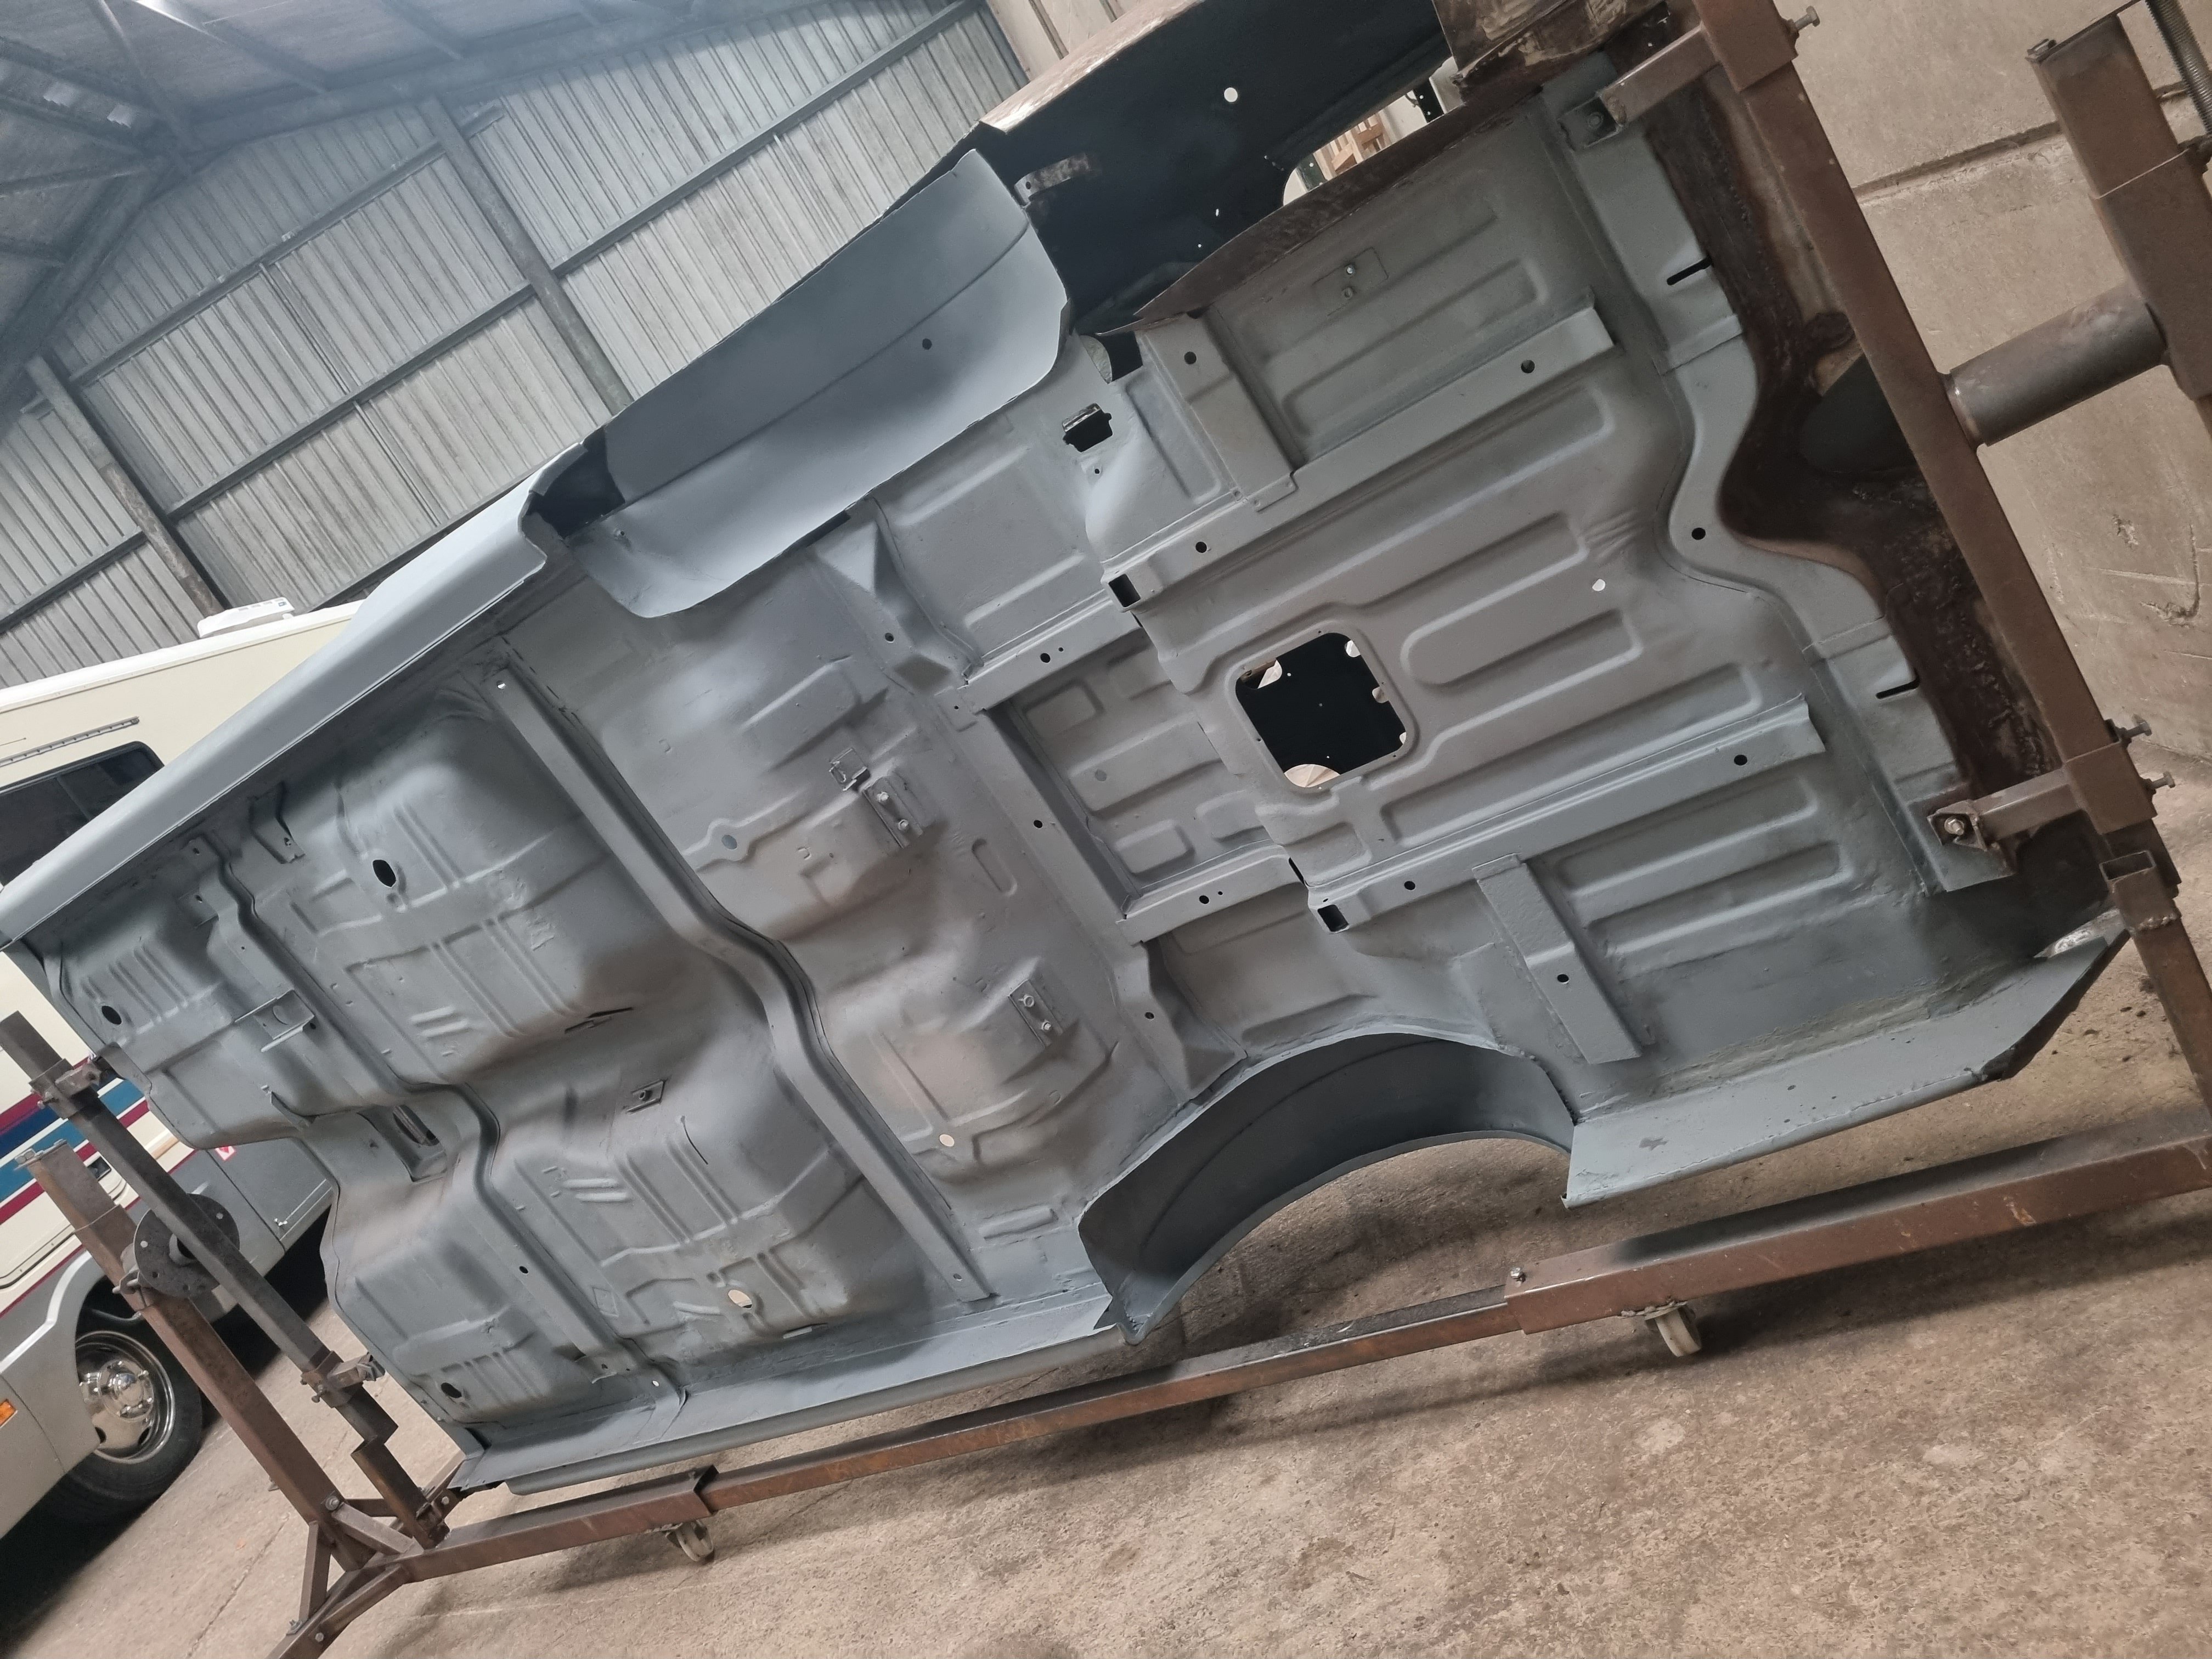
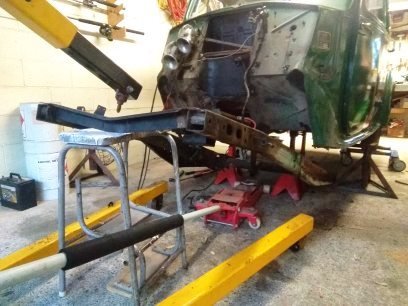
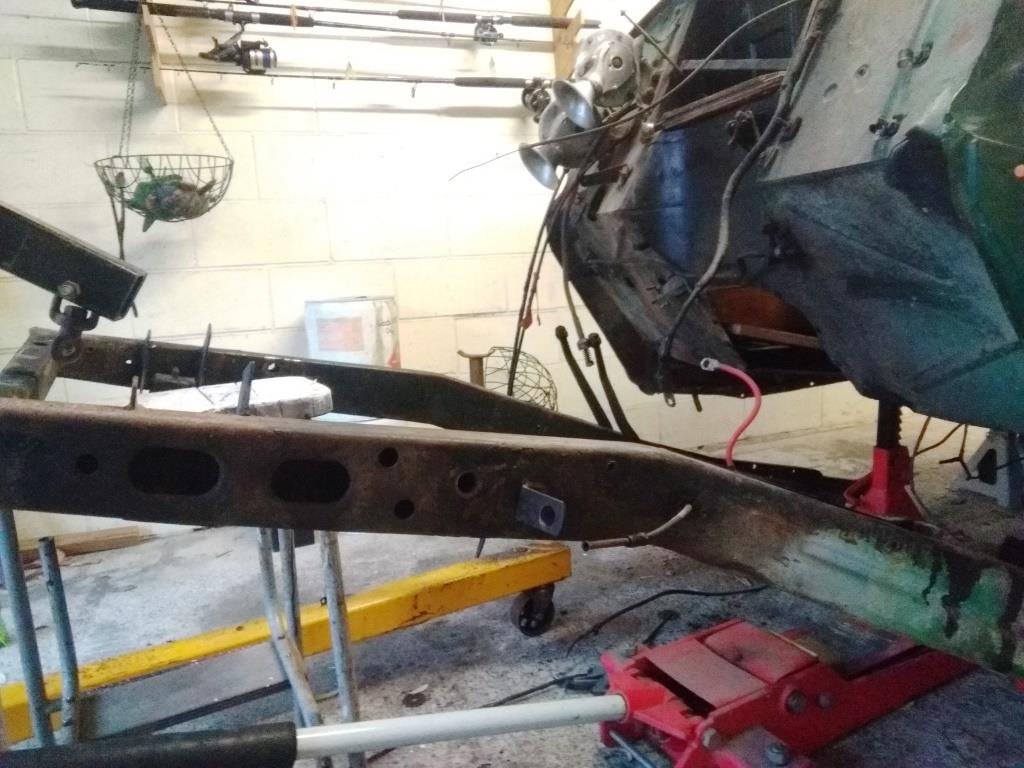
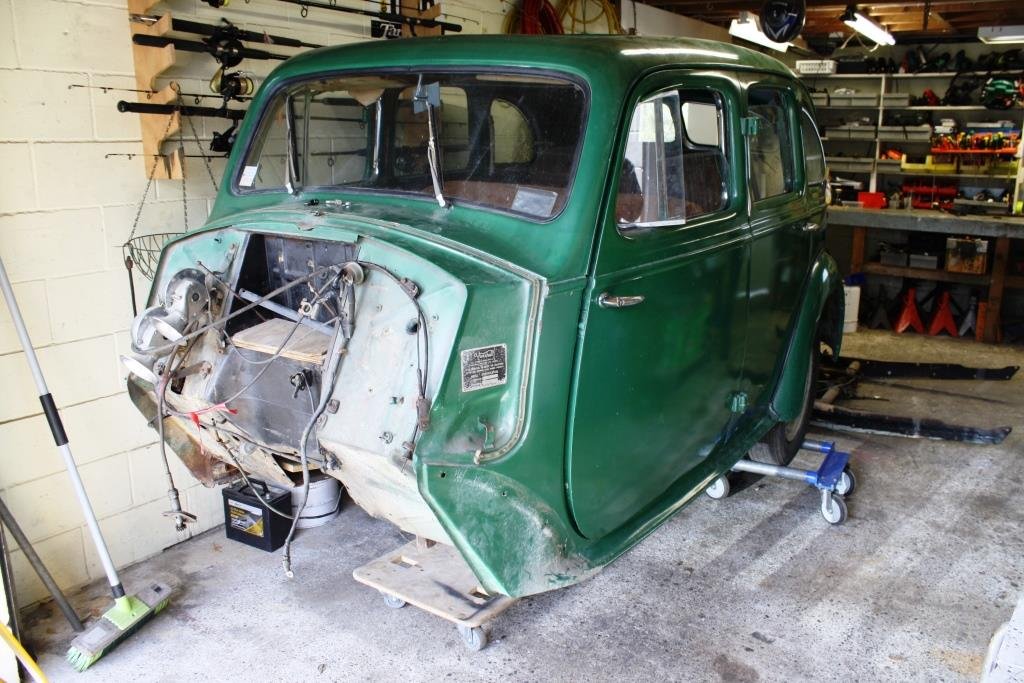
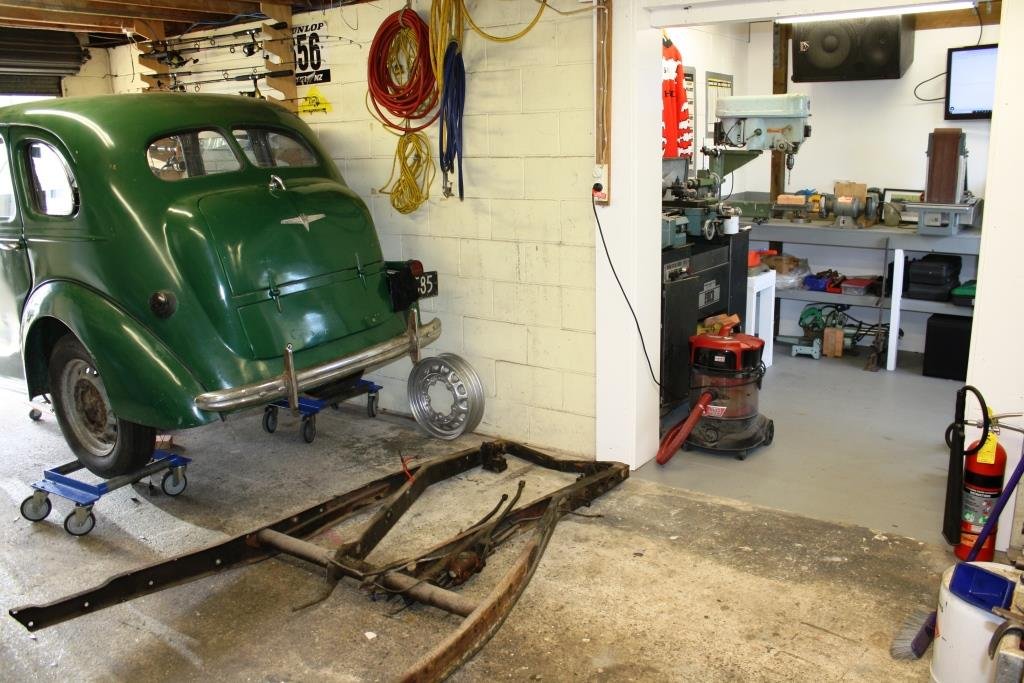
Putting the new frame aside I mocked up the original old, rusty frame with the rebuilt front end and a dummy motor & box and started taking measurements. Came to the conclusion that the old girl would look better a little lower in the front, and if I was going to do it now was the time. Options were to either kick the front rails up or lower the mounting pads on the HR cross member. As much as it cutting up something I’d already rebuilt goes against the grain Rigamortice and I decided on the latter. Time to start cutting. Wound up the amps and welded in a piece of 3mm angle to build a lower pad. Boxed it all in with gussets and then cleaned it up. Not the prettiest welding I’ve done but it was all about penetration and strength. Filled some holes (note the copper sheet) and notched the frame rails to clear the cross member, I’ll fill the holes in the side of the rails later.
 8 points
 -
Used my labour day wisely just doing some small things. started with sandblasting another (2/3) of my 14" SSR Formula Mesh faces with my 100L supercheap auto sandblasting cabinet. Definitely not a fun thing to blast. Untitled by Emmett Westwood, on Flickr Untitled by Emmett Westwood, on Flickr Then I used my 3L ultrasonic cleaner (using Evapo-rust as a solution) for about 27mins to clean the hardware. Not perfect but the replacement bolts I tried were slightly too wide at the head for the face and I didn't want to drill them all out so decided to reuse the original hardware. even if they're a bit stink. Untitled by Emmett Westwood, on Flickr Untitled by Emmett Westwood, on Flickr Then finally I blasted all the hinges. Not to perfection as I'm not that fussy for this part. Then I put it in epoxy primer using my new Iwata spraygun with a 1.8tip. My first time trying out this set up and I'm happy with how it turned out. Untitled by Emmett Westwood, on Flickr Untitled by Emmett Westwood, on Flickr Untitled by Emmett Westwood, on Flickr Still waiting to find time/effort to get the doors sandblasted (from the actual sandblasters)7 points
-
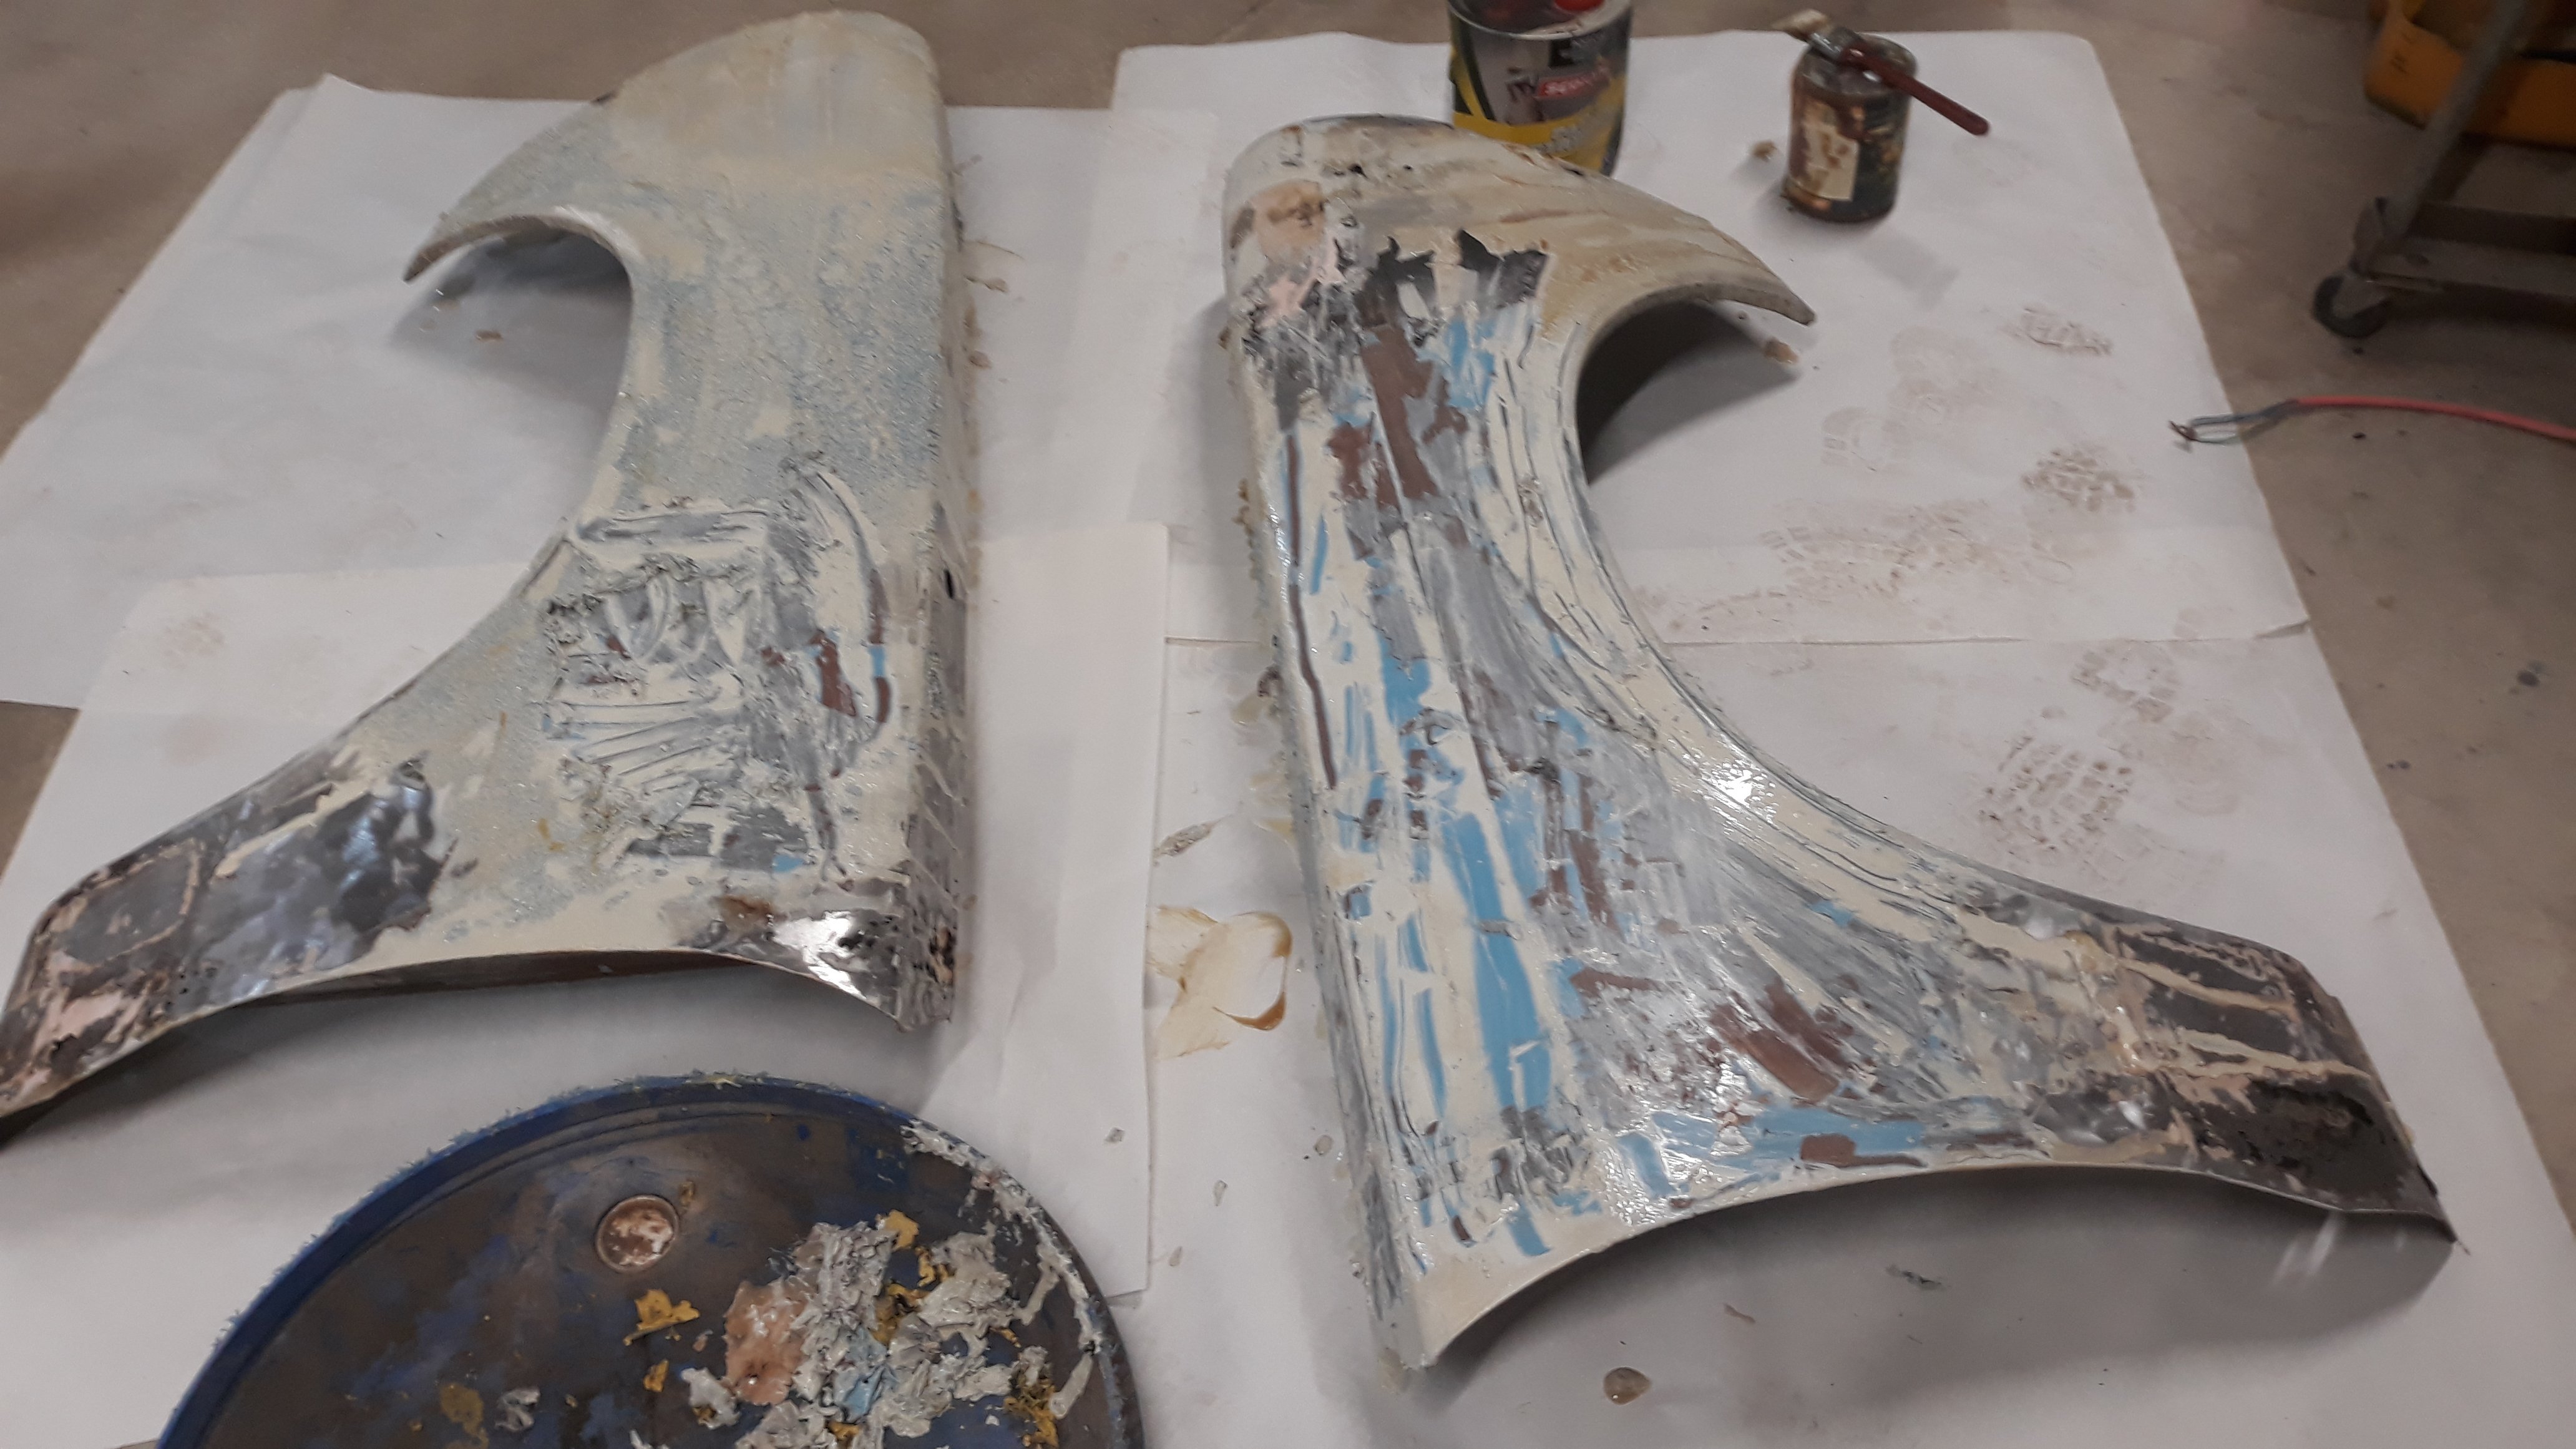
There were a few pallet cover sheets going spare at work so I claimed them, brought a jigsaw and got into making some new cards. Unfortunately the fronts are still on the car..down south so I could only do rears (which were way more haggard than front anyway). Wouldn’t mind pre-fitting them before I glue them so have come to a halt. also made a new partition for between the boot and rear seat. I made some more wee splash gaskets for inner guards. This grille is a proper cunt of a design. I couldn’t successfully mask it right, ended up making a card insert to cover the black and leave the silver exposed for painting..it somehow failed and I got overspray. Don’t particularly like the silver and the plastic is kinda pitted in places which I should have primed and sanded but wasn’t so obvious before. I still want to silver the seam around the inner edge but might have to use a paint pen which won’t be the same shade.. brush will look arse. I tried touching it up and the paint fried up so that’s me giving up for a few years. tried to start into making some new brake lines and the flaring kit fucked out so I went inside.6 points
-
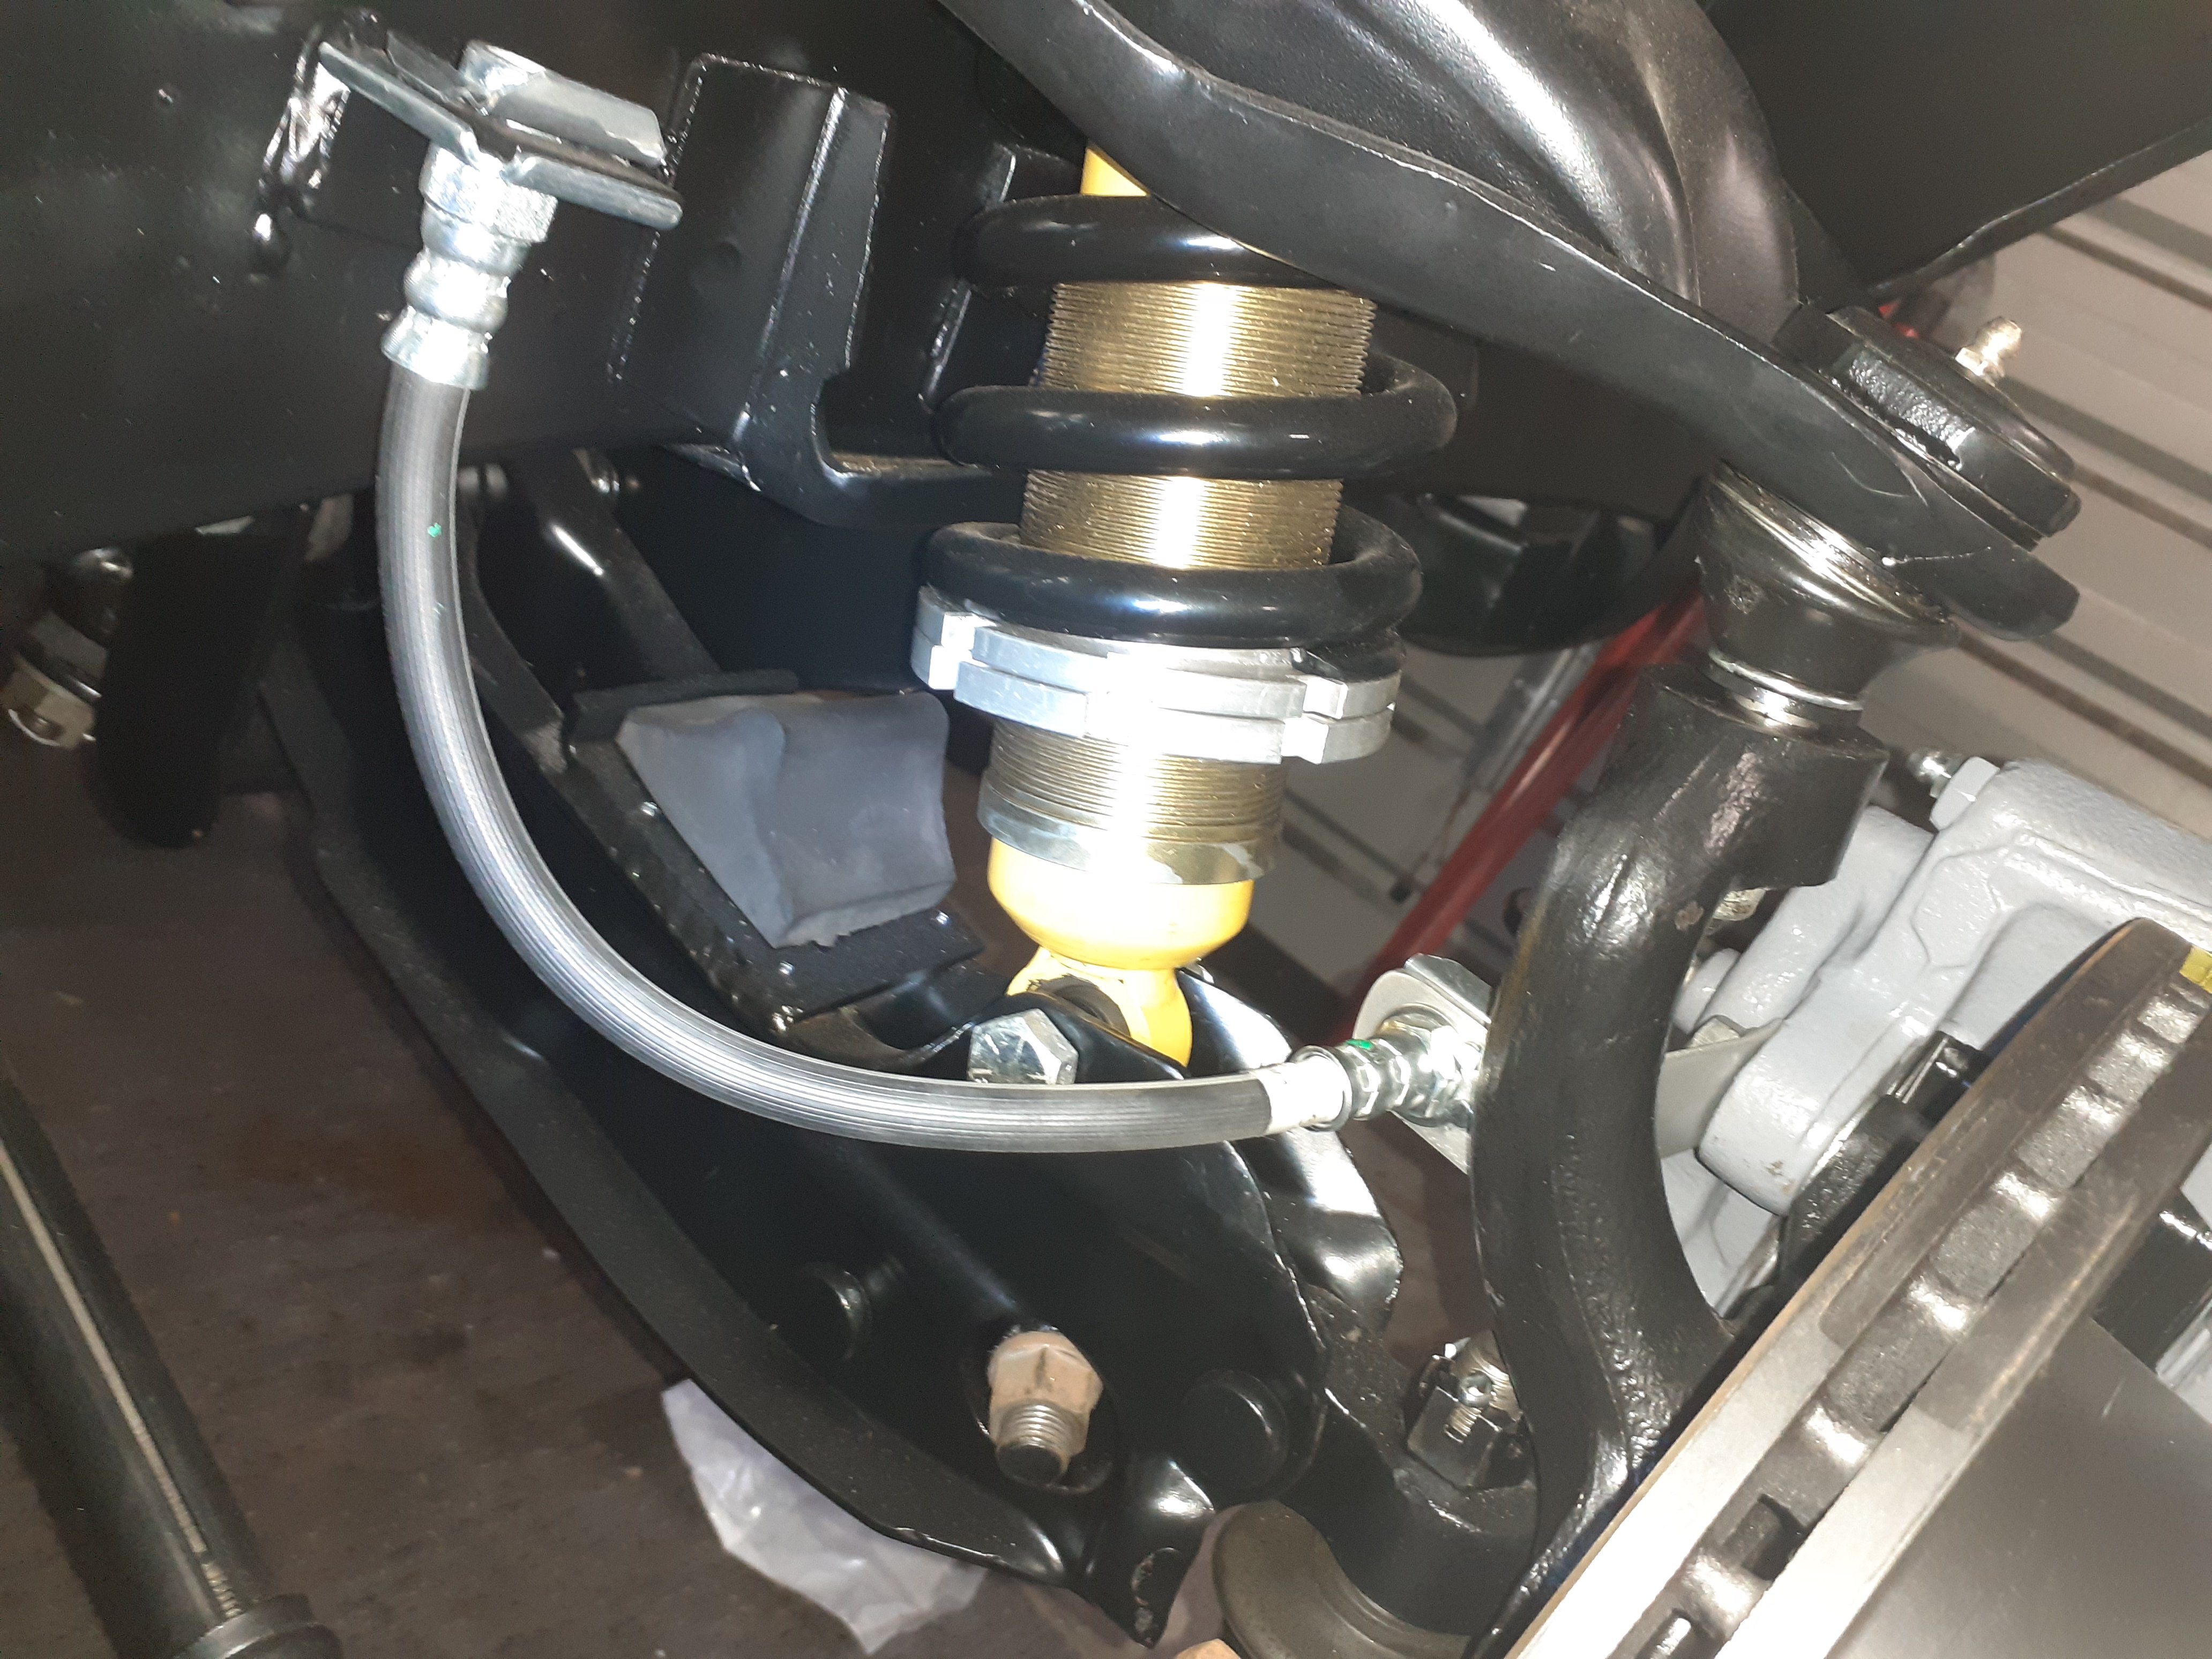
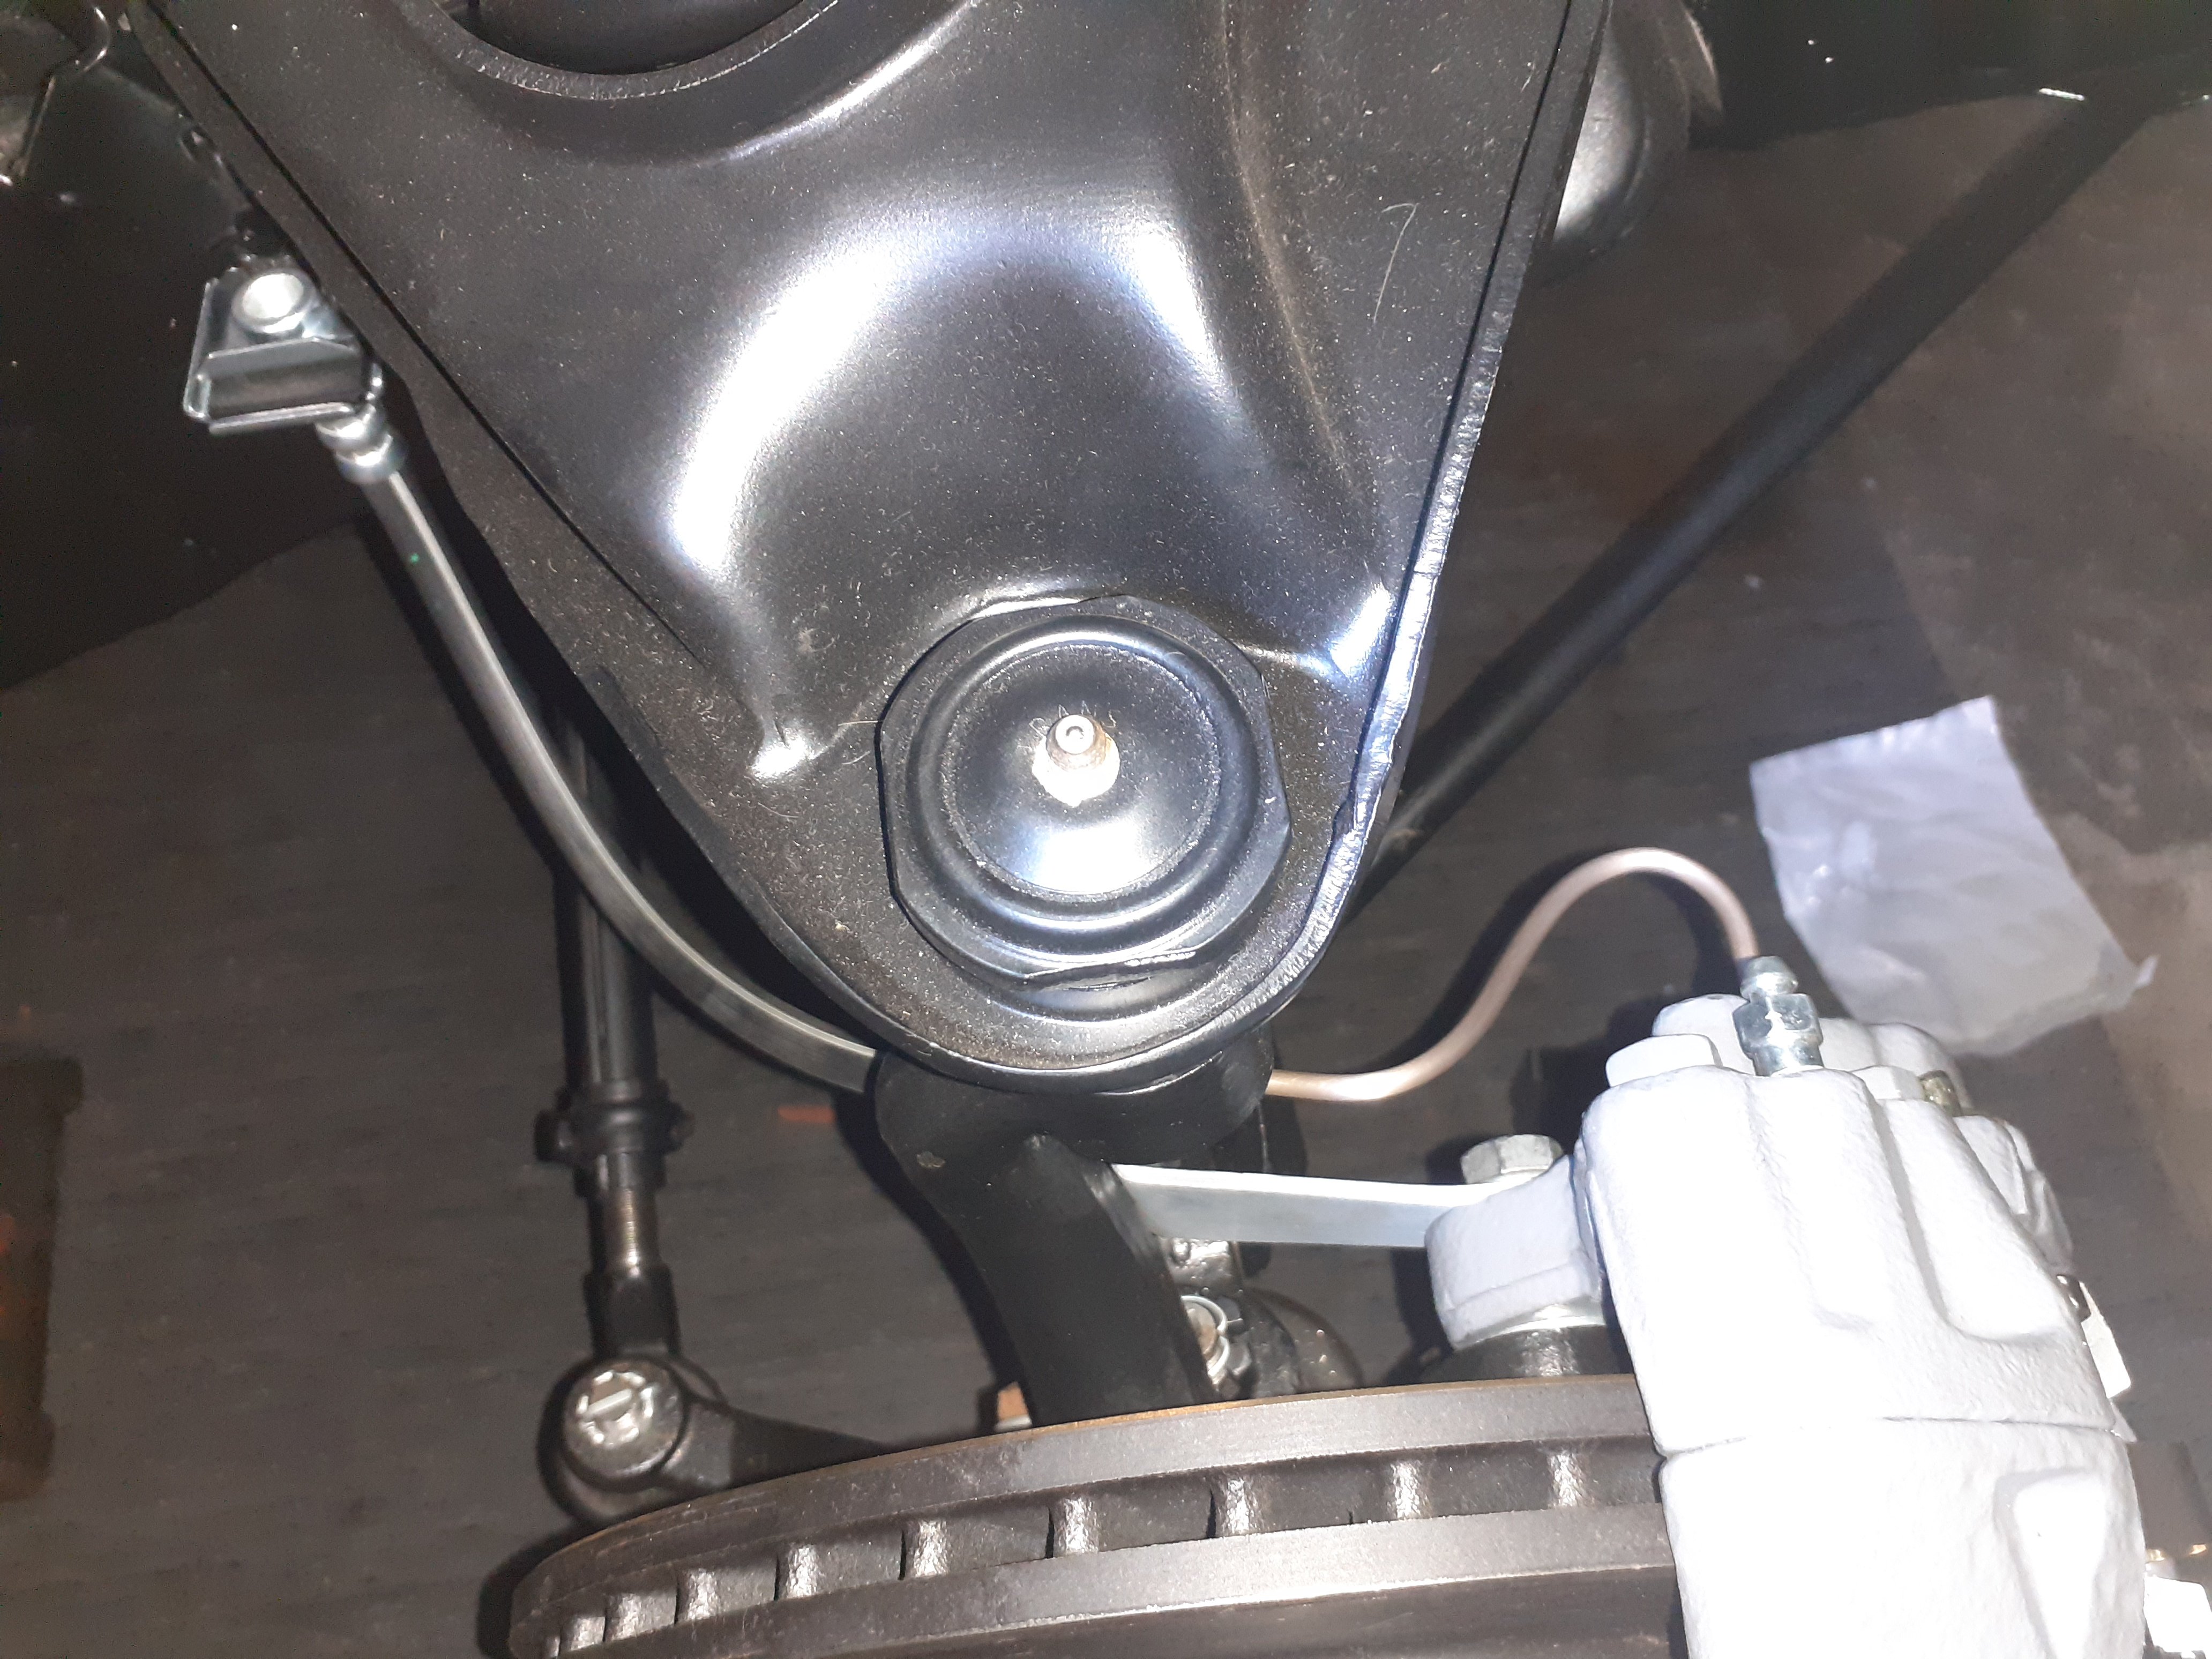
Got new brake hoses, tube nuts, brake pipe clips, some copper nickel pipe, made some hose brackets and joined toyota parts to plymouth ones
6 points
-
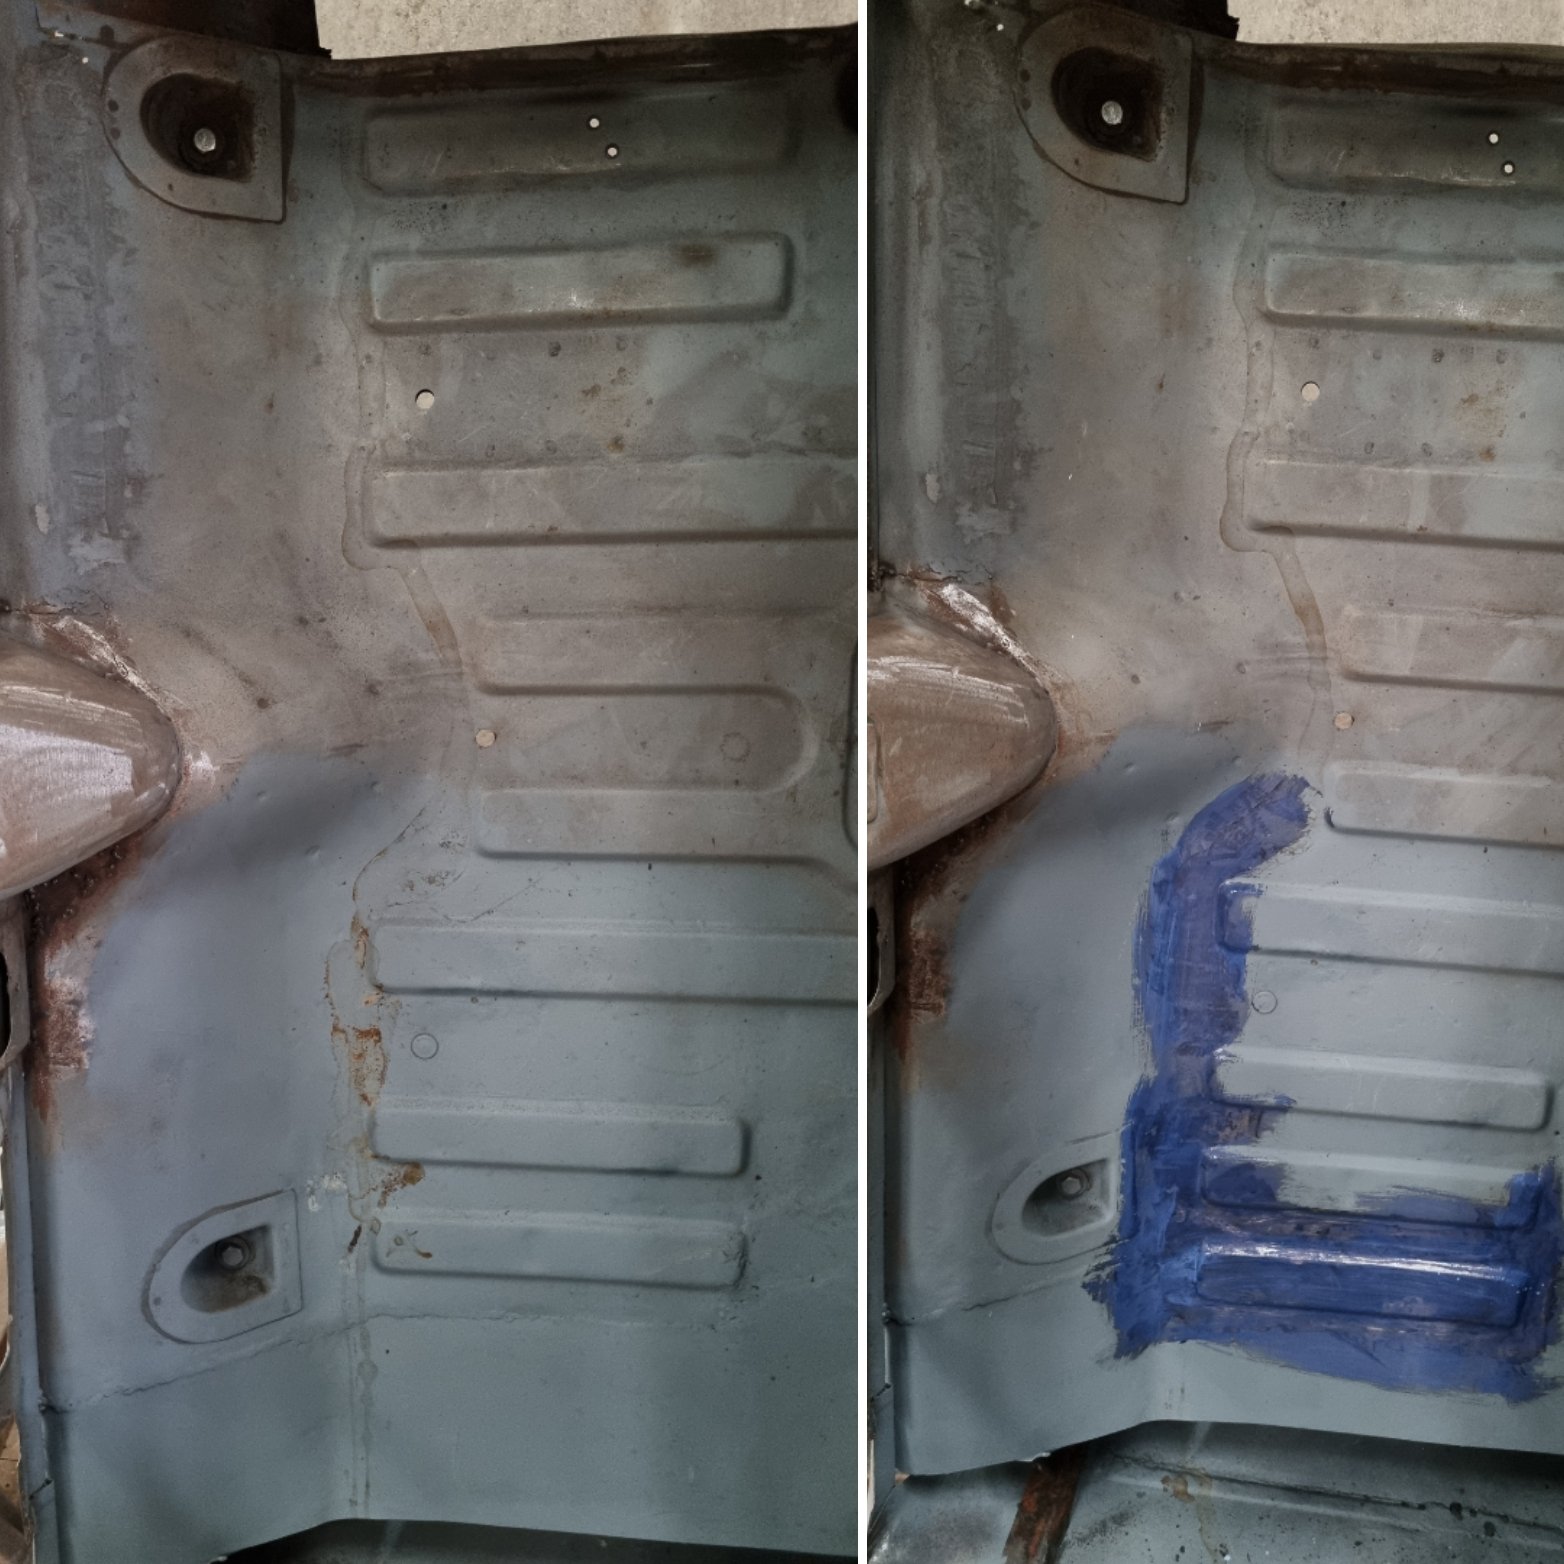
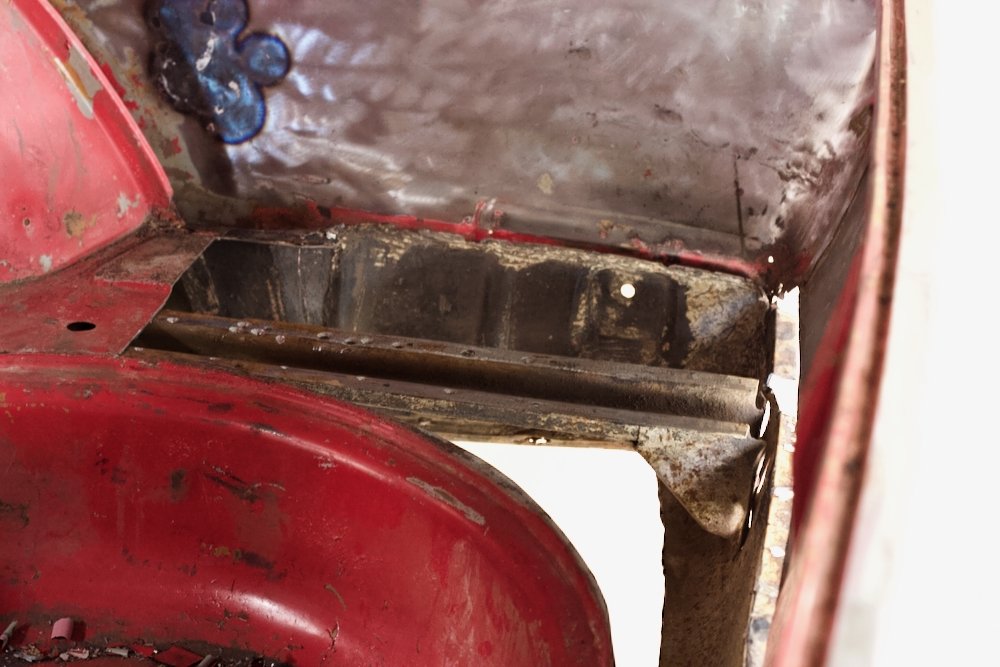
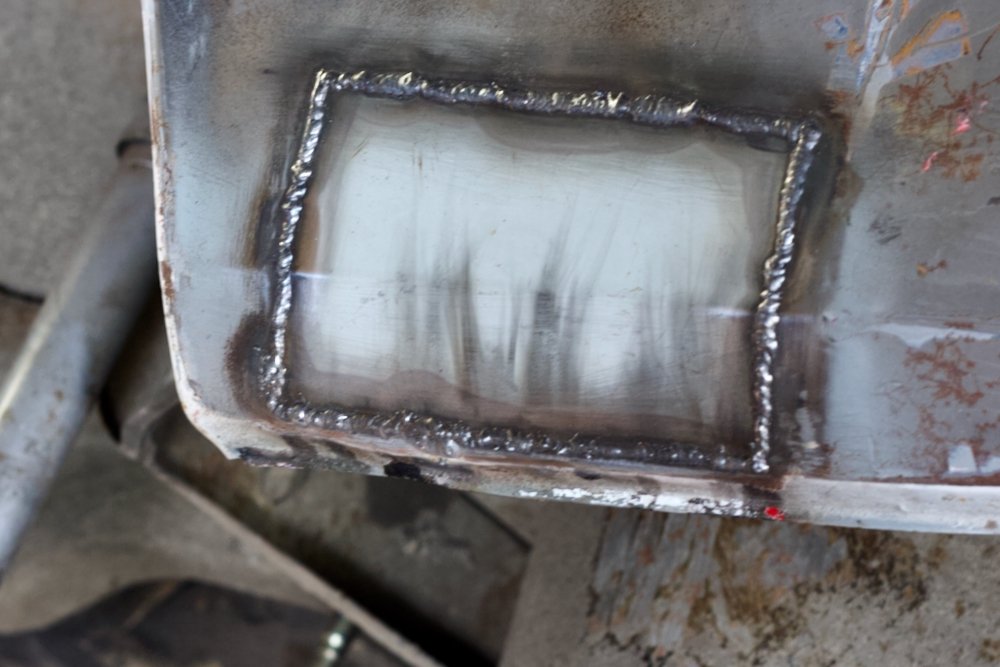
Boot floor indent also added to the replaced section
4 points
-
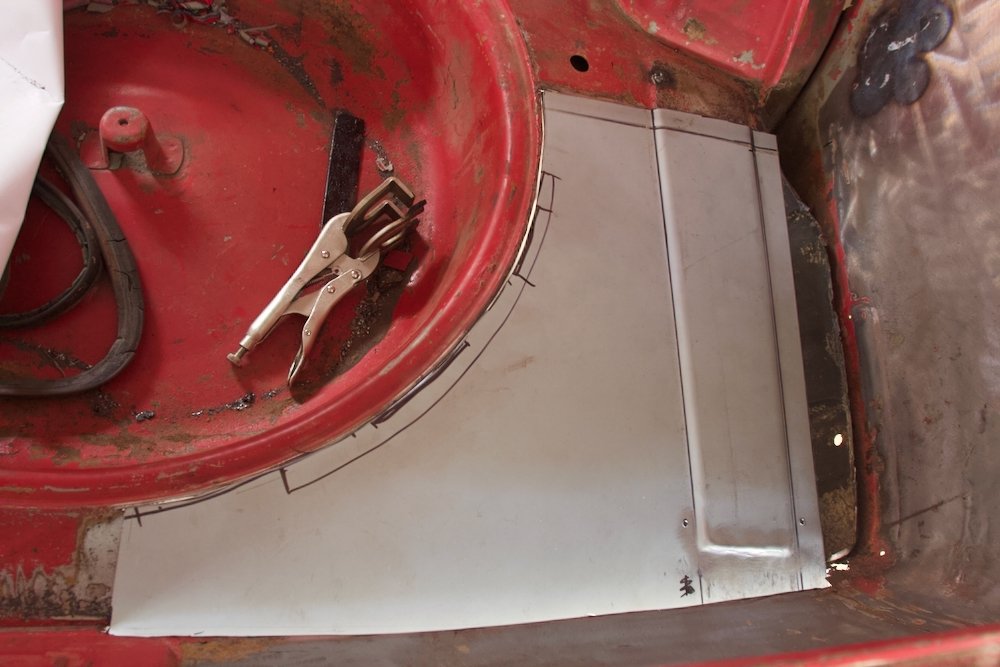
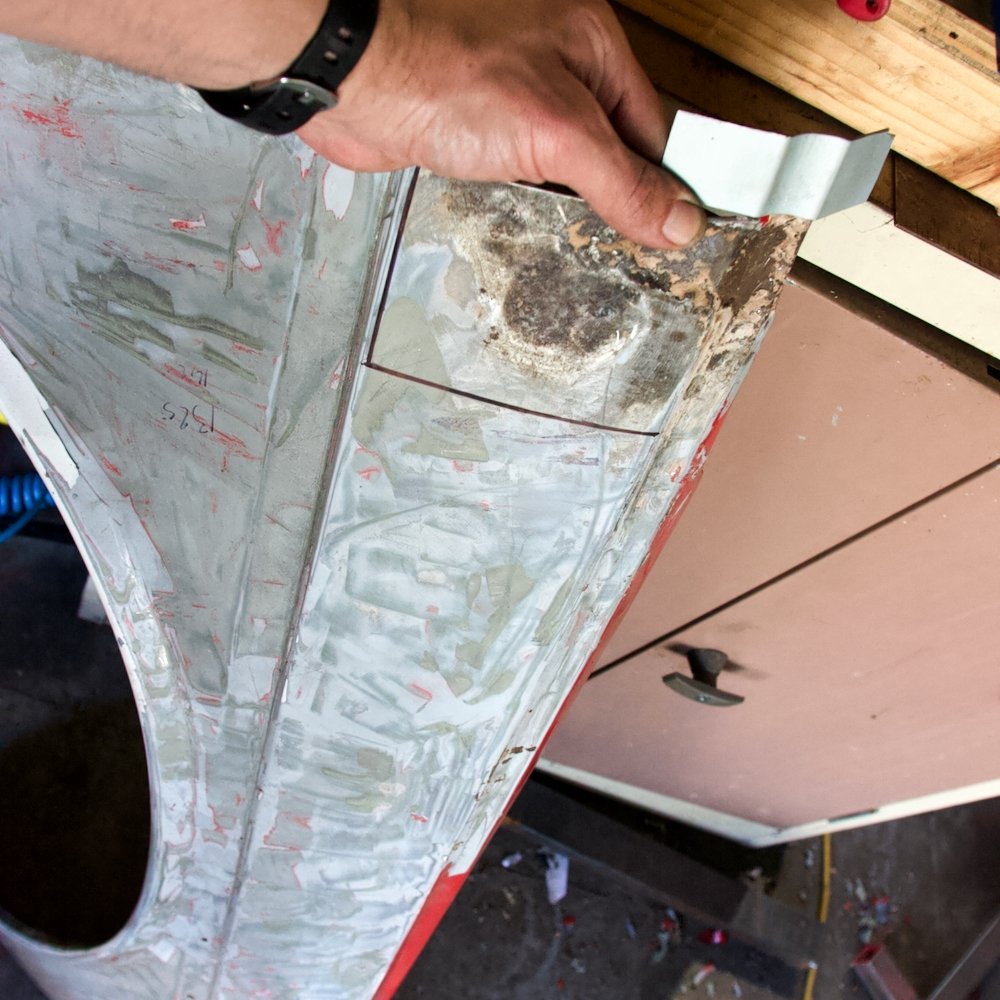
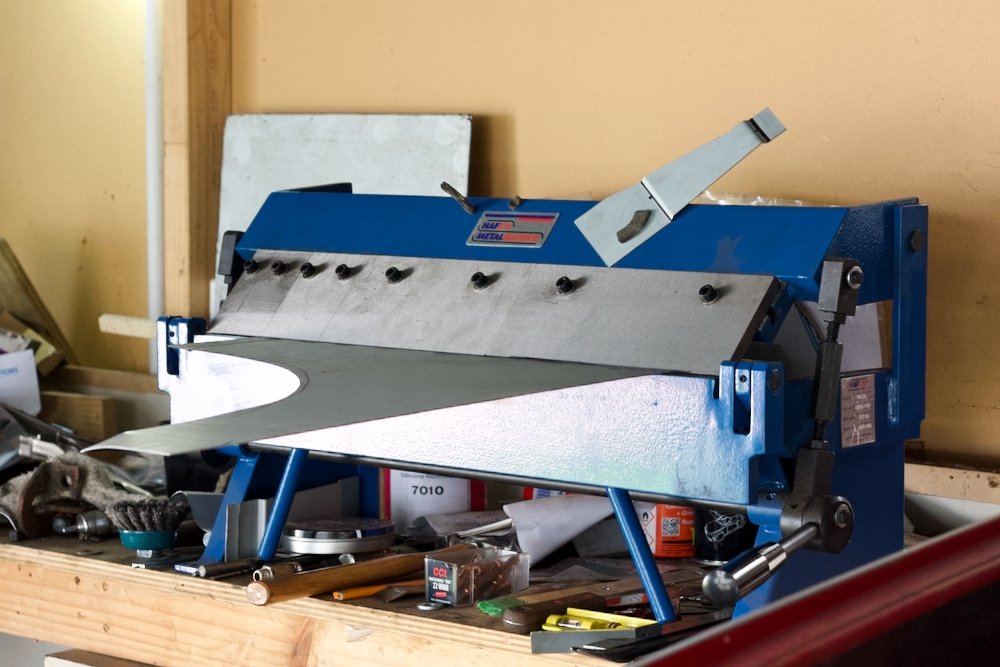
Where were we? Ah yes, Rust.... Folded up a patch allowing me to warm up on the relatively simple rear guard. And so onto the main event, the boot floor. I have been thinking many hours how to do this panel, if not for the cobwebs in my wallet I would have just dropped a stack of coin on bead rollers and such and moved forth, instead I gave an idea a go and managed to fold up a test piece with the pan bender which impressed me enough to push forward with making the repair. Hold the breath and... Almost there, used some rivets to hold across the bends and tapped the end around a suitable shaped offcut of 4mm Not the tidiest up close, but it is rust free! Next step would be to launch into welding up but my gas bottle is near empty from other projects and there seems to be somewhat of an Argon shortage going on, hedging bets on making some calls Tuesday. Until then i've got some grot in the front guards that needs attention, folded up some more test pieces to confirm the process and dimensions
4 points
-
The water jacket is in very nice condition. No pitting, and just a light dusting of surface rust. I have cleaned up the outside of the fuel tank too. No pics because it’s boring. I just hit any spots with signs of rust spidering under the paint with a strip disc, then spot painted with brunox. Then I hit the whole thing with 400 grit and painted it with a brush and some White Knight rust killer paint I had leftover from another project. Inside the tank looks like this though: that’s the back of the drain bung you can see on the right of the picture. Check out the tide mark. Thoughts on how to treat?
3 points
-
I've neglected this thread, but not the car.. mainly been a case of more of the same, but we now have sills both sides etc
3 points
-
Don't stress. You could hide that fuck up with some of these...
3 points
-
That tank looks fine to me, but im broken. Id just run it as is with a new inline filter or 2.2 points
-
.....and before you know it you'll be the boss. HORN PLEASE!
2 points
-
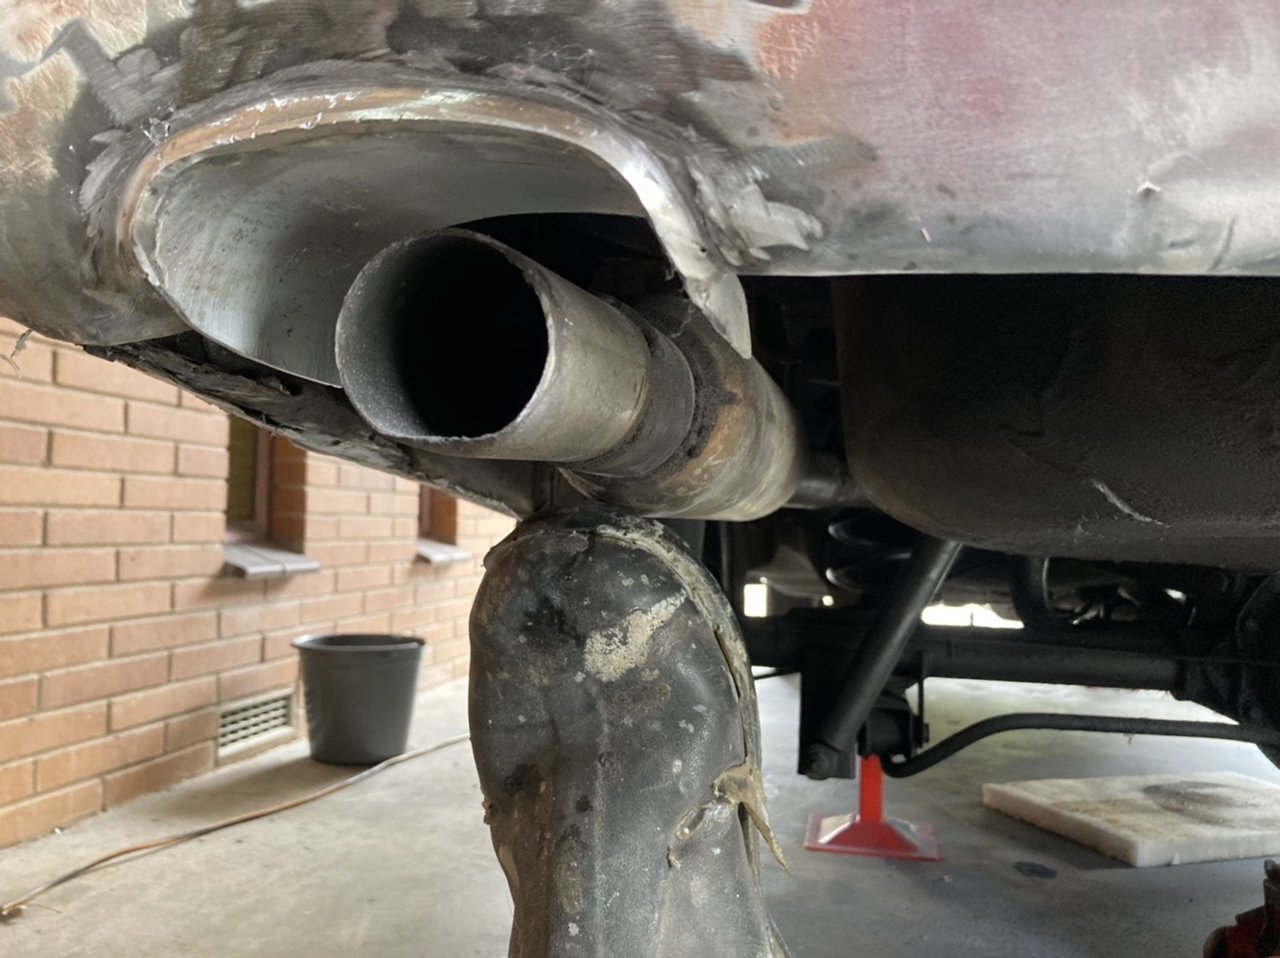
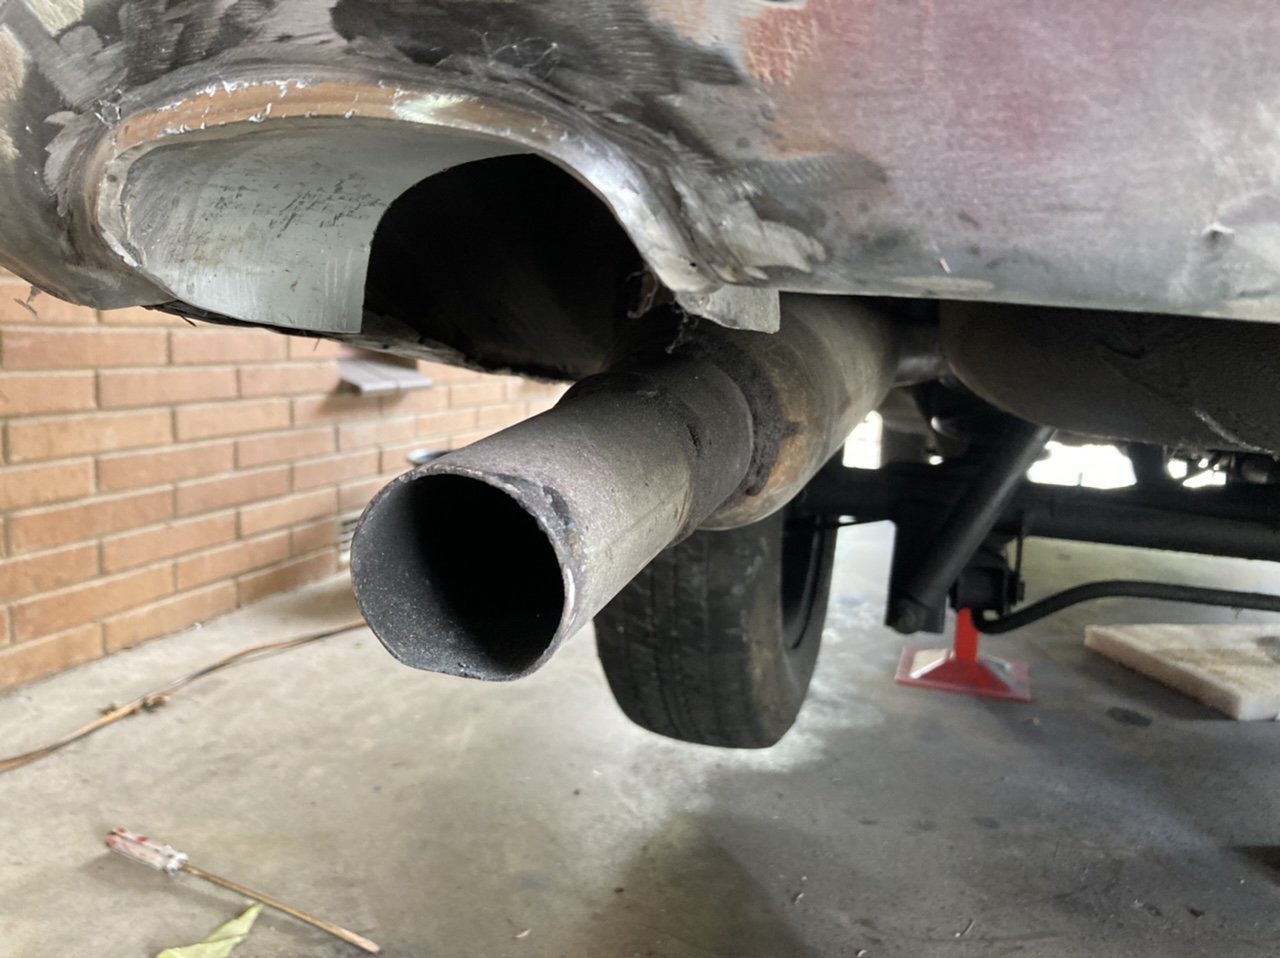
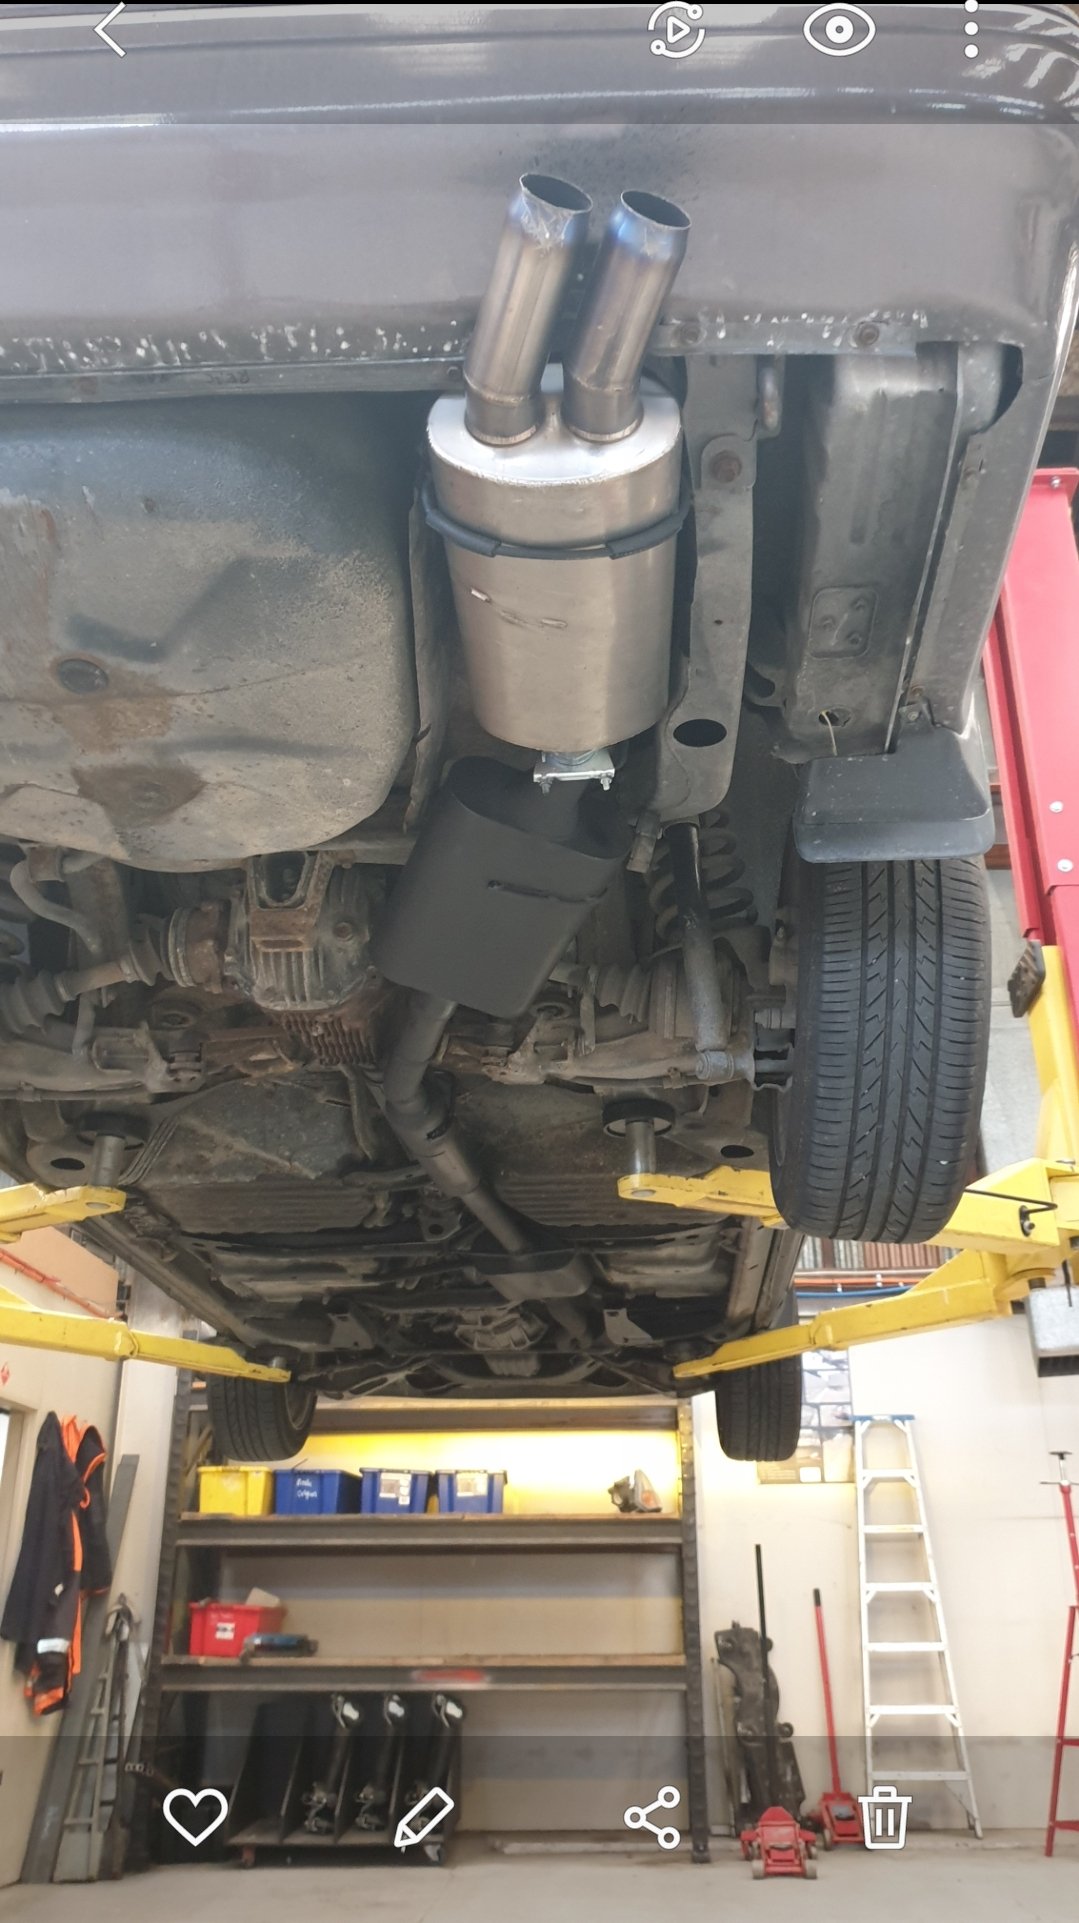
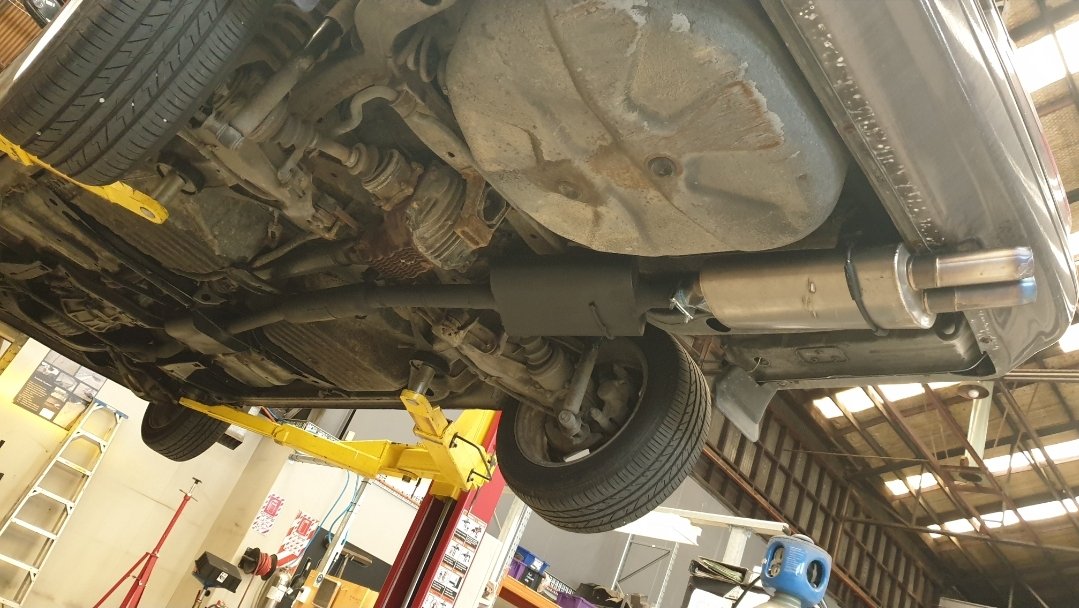
Exhaust positioned.
2 points
-
righto so i wasn't happy with the left side of the spoiler so i cut it off and made a new one. i was really happy with the fit and the shape so i went about finessing the thing to get it how i wanted it. i radiused the bottom corners and went about making it stronger, i welded a couple of bits of 1.6mm thick sheet all the way along the bottom edge to stop it flopping around then i set about making a good mounting for it. i ended up welding a bit of 3mm plate to it that bolts to the bottom of the intercooler bracket so its pretty strong. then i put another bit of 1.6mm sheet right across the lowest most forward point in the hope that when i inevitably crash it into something its got a bit of strength to it. then i put a coat of primer on it. and today i sanded it, put some bog on it and put some more primer on it. tomorrow ill wet sand it and put some colour on it and its finished. also this is the english wheel i bought. i wouldn't know a good english wheel from a fucking sandwich but this one worked for the thing i did and i was really happy with how well i was able to make the steel do what i wanted, so yea. 2021-10-20_07-24-20 by sheepers, on Flickr 2021-10-24_03-00-29 by sheepers, on Flickr 2021-10-24_03-00-39 by sheepers, on Flickr 2021-10-24_03-01-06 by sheepers, on Flickr 2021-10-24_03-00-55 by sheepers, on Flickr2 points
-
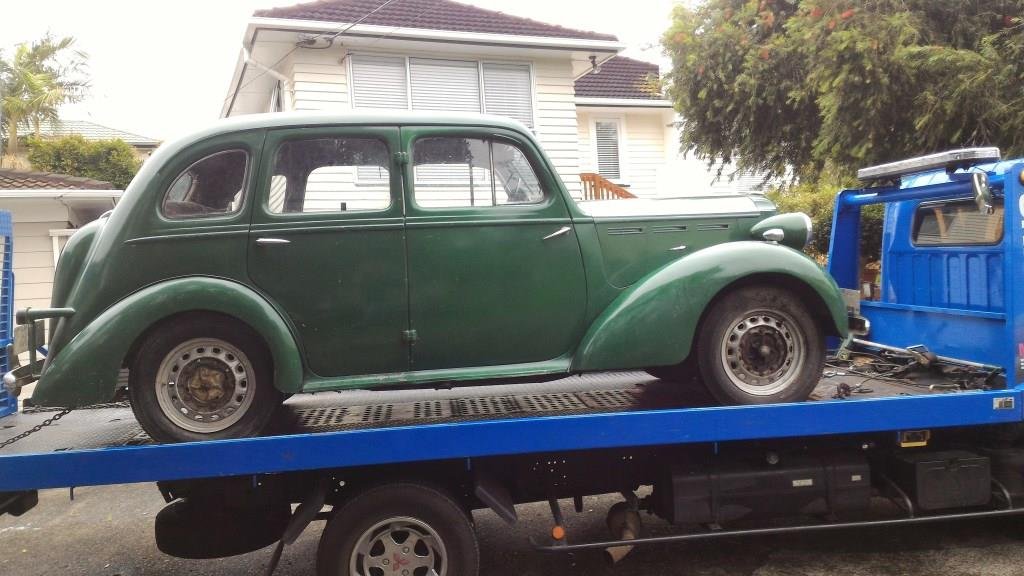
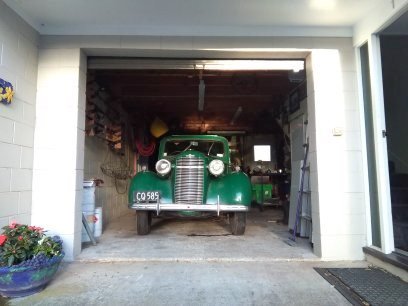
A few weeks later on old friend arrived on a transporter… …and settled into her new/old home…let the games begin!
2 points
-
This happened a while ago. Ran over a piece of steel on the road and sliced the sump open. Was an absolute mission to get the sump off and new one on. If I knew how hard it would be I would have just welded it up! Turns out I should have just committed to pulling the engine completely. Not a single drop of oil coming from this engine now! But it drinks oil, has low compression and gutless as anything! So whats the solution? A 446hp Blueprint 383 stroker!2 points
-
time to make a front air dam for this thing. its only been needing one for 16 odd years so I've really not hung around on this. i bought an english wheel and a bead roller, neither of which i have any idea of how to use but you gotta start somewhere. so i made up a wire frame using 3.2 dia welding rods then put some cardboard on it. i used the cardboard as a template to cut out some steel then i went about wheeling a tiny bit of shape into it just to give the pieces some rigidity. with some folding, some beating with a mallet and a bit more rolling i ended up with what you see below. for a first time doing this im fucking amazed at how good it is, im really happy i was able to get the shapes i did without fucking it up too much. having said that im going to start again with the sheetmetal and make another one. i learned heaps just making this first one and i know i can make the second one better so i will give it a go. 2021-10-20_08-03-54 by sheepers, on Flickr 2021-10-20_08-03-48 by sheepers, on Flickr 2021-10-20_08-03-40 by sheepers, on Flickr 2021-10-20_08-03-31 by sheepers, on Flickr2 points
-
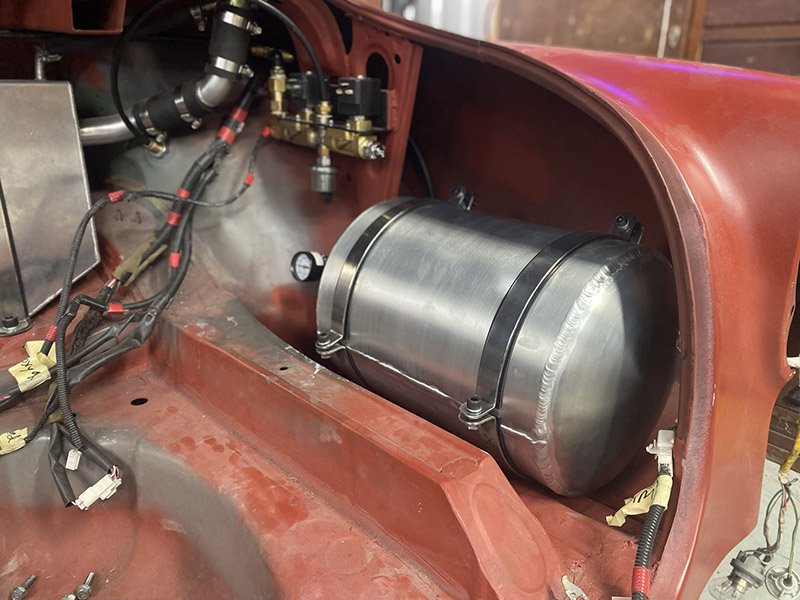
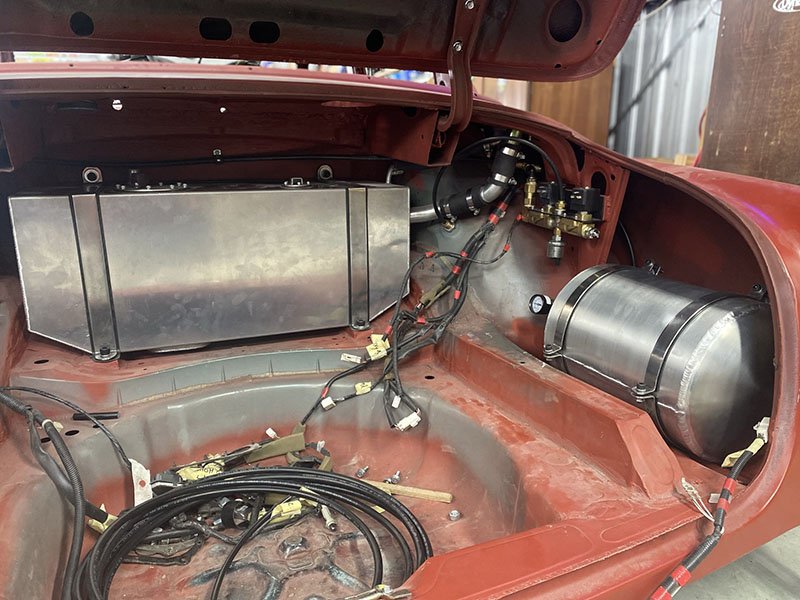
Air tank is in, with fittings connected and sealed. Wiring loom is pulled back through too.
2 points
-
Started goin over the engine. Compression testing @ about 155-165 but cylinder 4 is at 145psi. So I gotta keep checking that and see if it is actually bad. Ignition was way off too. I had 35deg mechanical advance (excluding vac). So even with low static timing I was in the mid 40s which cant be good. So I got a new electronic dizzy and high power coil. Now running 16deg static and 38deg mechanical with 14deg vac. Works way better. It wasnt without its issues though. I didnt know the harness ran an internal ballast. So the coil was only getting 4volts and breaking up at higher revs. Then after I fixed that out the ignition key couldnt handle the higher current coil and started playing up after a while. Put a relay in and fixed that.2 points
-
Need a ute to carry moulds for the engine project. So I got a 67 El Camino. Picked it up in Tucson and drove it back to CA without too much stress. Has the original 327 with camel hump heads and a modern (/80s) 700r4 trans. Ton of things to sort to make it a daily. Like it doesnt run very well! Timing feels off or vac advance isnt working. Carb seems way too big. It looks good from a distance but dont let the fool you!1 point
-
Any garage, hold is taken off when you buy rego. VTNZ for pink/green sticker removal.1 point
-
loving this guys videos, doesn't waste your time with 20mins of sharn.1 point
-
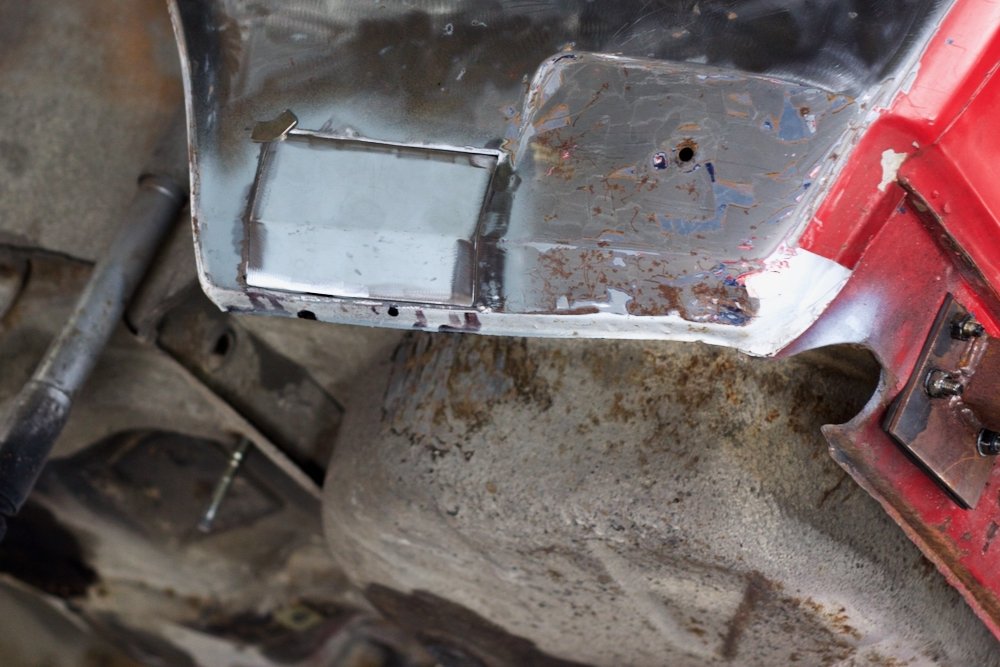
I know we all love original, but I thought I’d throw in a little customisation. I welded in an exhaust Channel in the rear valance I had to make up.
1 point
-
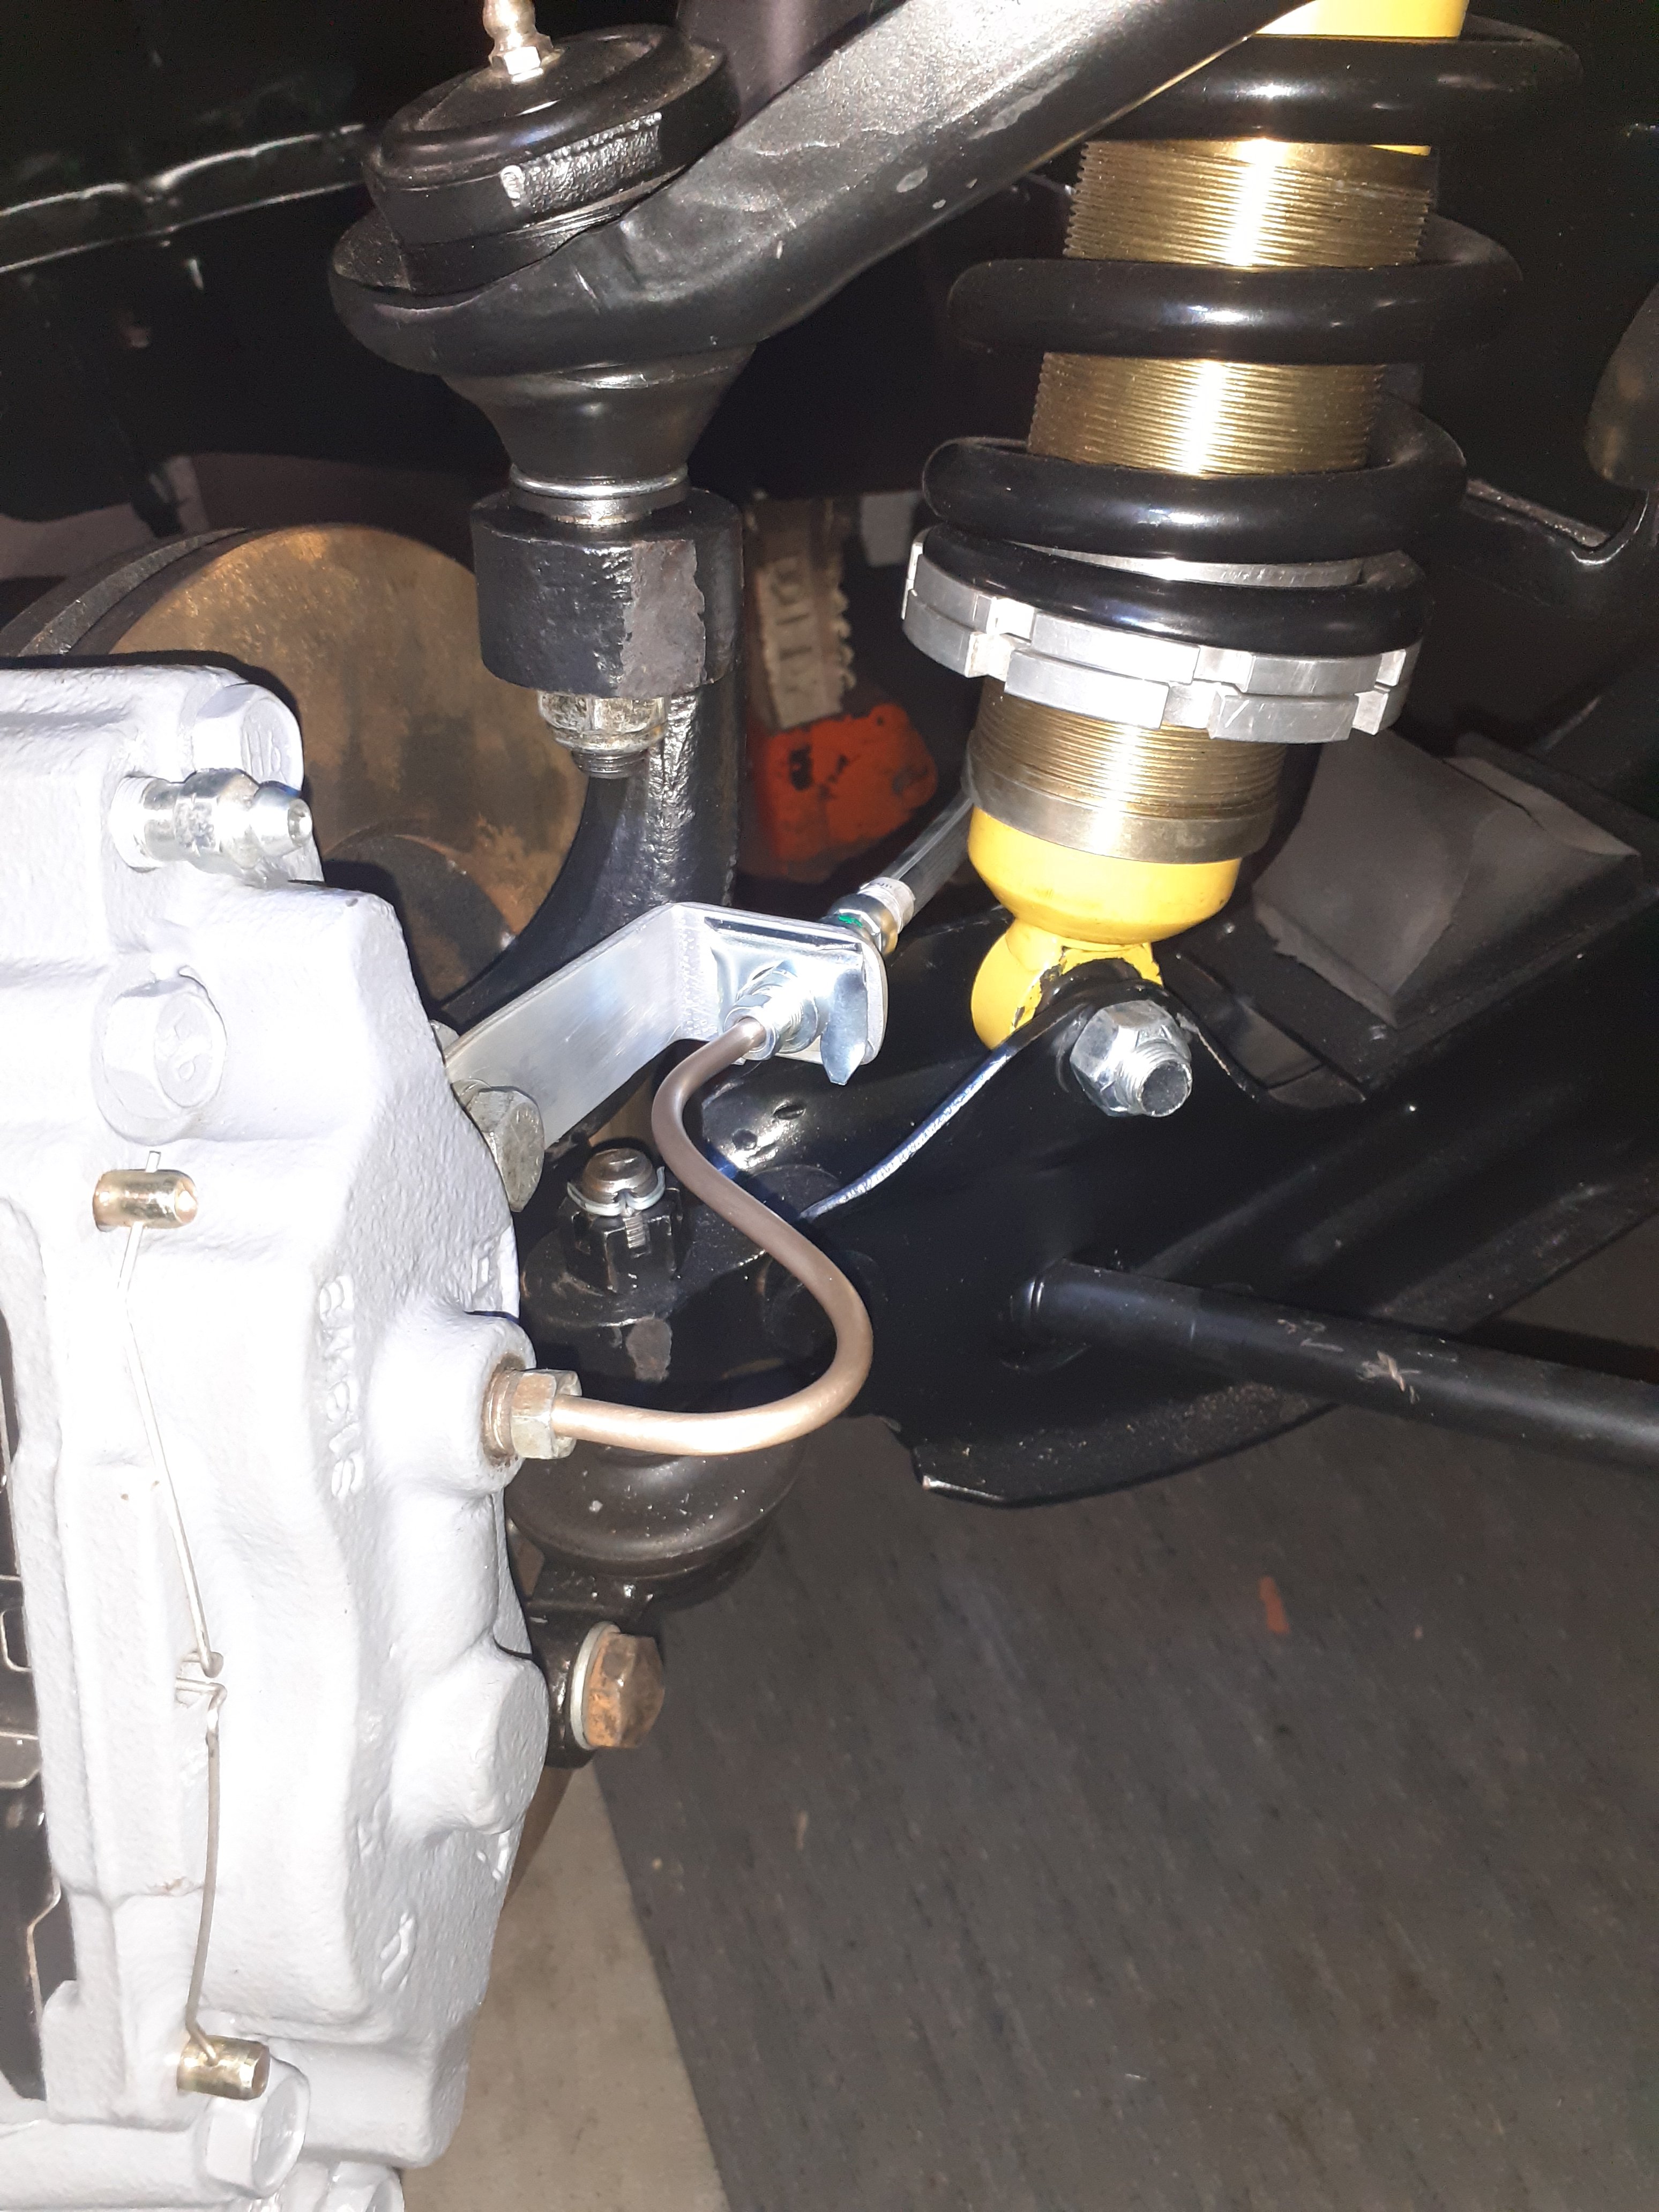
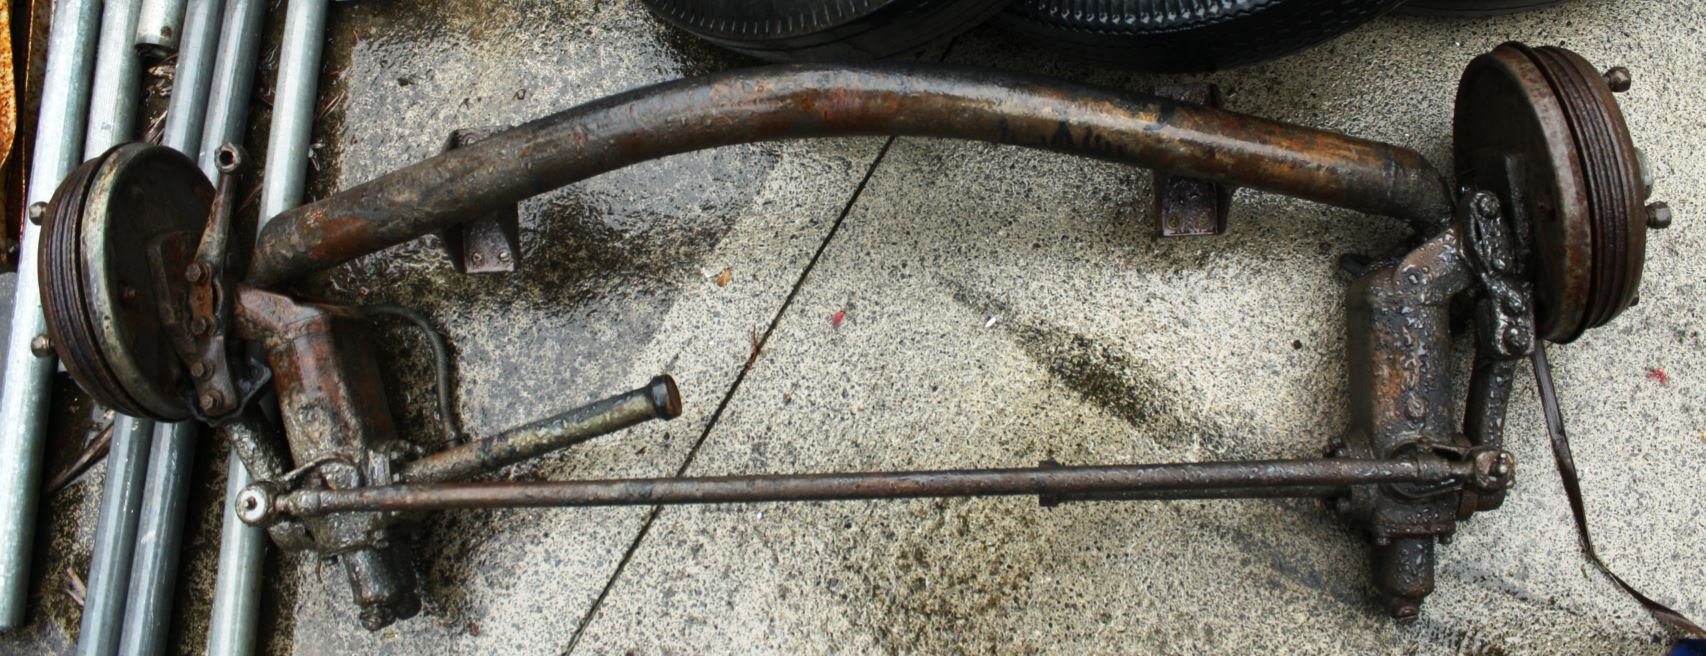
Back to the task in hand: Next step was to remove the steering column/box assembly and then drop the original front suspension. Considered to be state of the art in its time the famous Vauxhall torsion bar “knee action” suspension sort of worked when new but when aging, rapidly descended into a dreadful, wobbly collection of bits that had the car lurching all over the place even when traveling in a straight line. Bloody terrifying and a little too ahead of its time me thinks. After some 6 hours of lying on a creeper I managed to remove all the bolts securing the body to the chassis without any mishaps. Resisting the temptation to grab the impact wrench and shear the heads off the frozen little bastards the job was achieved with patience, an old set of Whitworth spanners, CRC, a little heat and lashings of old age and treachery. Designed in the mid 1930’s Rigamortice sports an innovative semi-monocoque construction where the chassis ends just past the B pillar, it makes the body/chassis fixing a little more complicated as it’s all designed to flex. The end result of my labours was something like this….
1 point
-
Great work. The intercooler hanging out the front has always been my least favorite thing about this car, and now you have fixed that with something that matches the look of the flares and rear spoiler. I shall give you a crisp high five as a reward1 point
-
I was planning to weld a little "ear" onto the gear stick to hold the "gear" cable, but then realised that I'm going to need to keep the "ear" removable if I'm wanting to be able to strip the mechanism down for maintenance purposes in the future. So I ended up carving a little "ear" that bolts up to two existing mounting points on the Tarago gear stick. Bolted it together once again for a test. Success ! With the mechanism now largely completed, I cut a piece of ply and attached it to the top of my mock up tunnel to represent the actual Thames floor. I've kept the opening oversize for now. Tomorrow I'll make a little filler panel based on the final gear stick movement and I can then determine the size of the rubber gaiter that I will need to cover things up. Thanks for looking.
1 point
-
Spent another fruitful few hours on my floor shift conversion again today. Managed to fabricate the last two mounting brackets, then bolted the mechanism into my mock up tunnel. I've still got a few spacers to fabricate but its fine as is for testing purposes. Chucked the other end of the morse cables onto the HiAce gearbox for a further check. Put the shifter through its paces and I'm very happy with how its turning out. It's becoming a busy little space inside the tunnel.
1 point
-
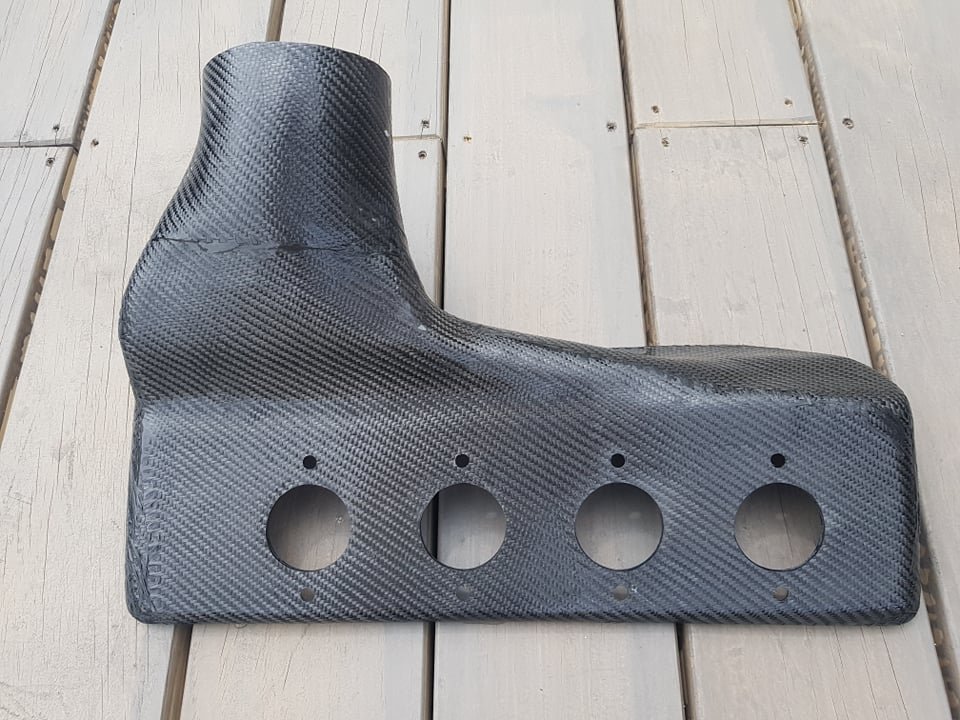
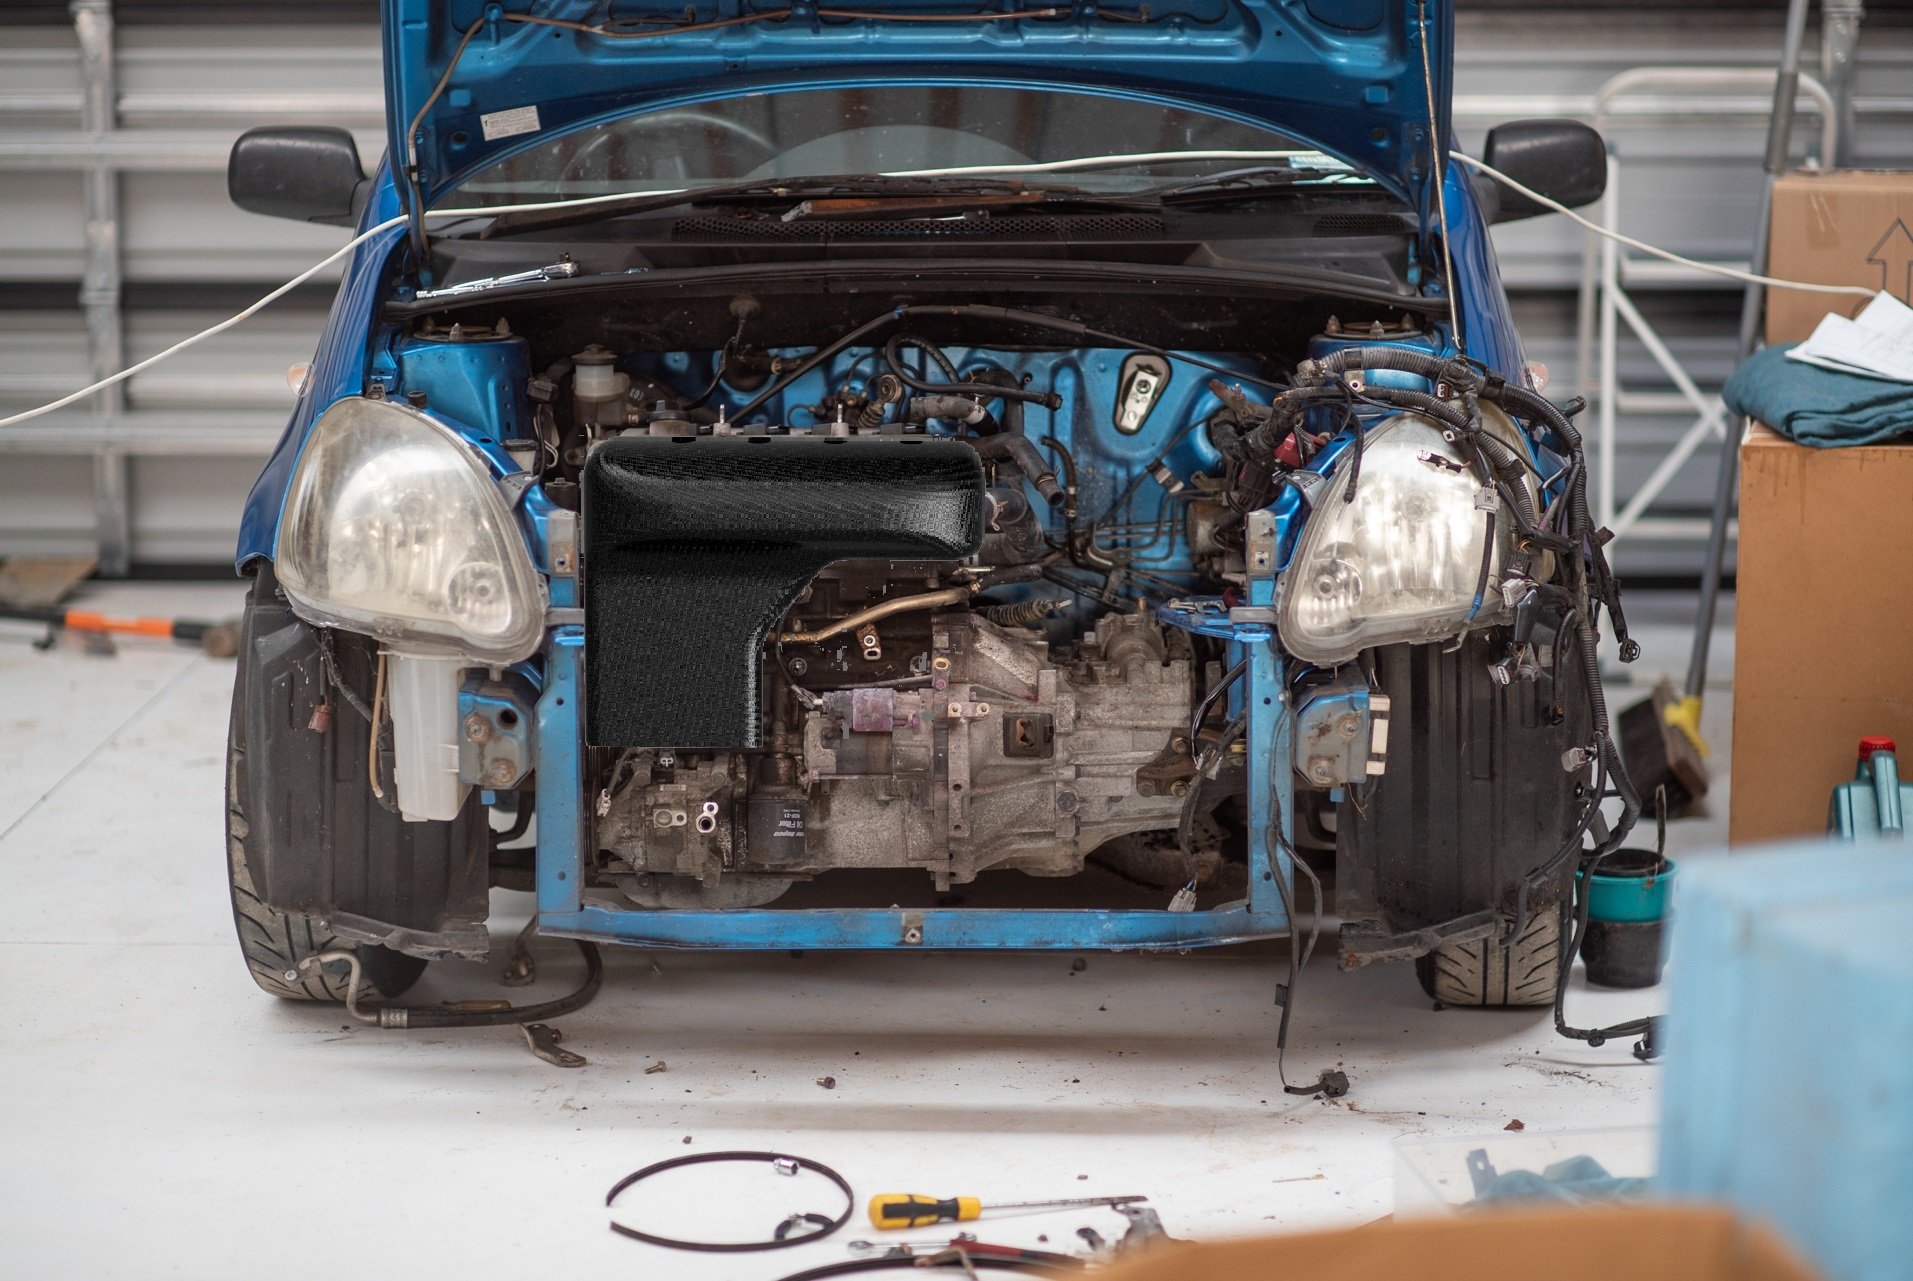
Nearly finished this bit, and the lid part is currently printing. Having a 3d printed core is 100% cheat mode for carbon stuff haha. It makes drilling/filing the holes super easy, because I can just work from the other side and shows me exactly how far I need to go (a few of the holes as pictured need a little more work with the dremel) Most of the work is sanding down sharp edges, I dont think I've experienced any splinters more ruthless than from CF. Definitely 100% do not want to get that shit in your eyes/lungs/whatever. Although I've got a setup that can do vacuum bagging and /or resin infusion, or making 2 piece moulds to make a 100% carbon part. Wet layup and retaining a thin printed core provides excellent results that is about 1000 times less effort. It's also nice because you can retain 3d features like upstands for clips or bolts or whatever, rather than being left with a super thin material that you then have to add stuff to. Which is another time consuming step where you could get things put in the wrong place. A++ would cheat again
1 point
-
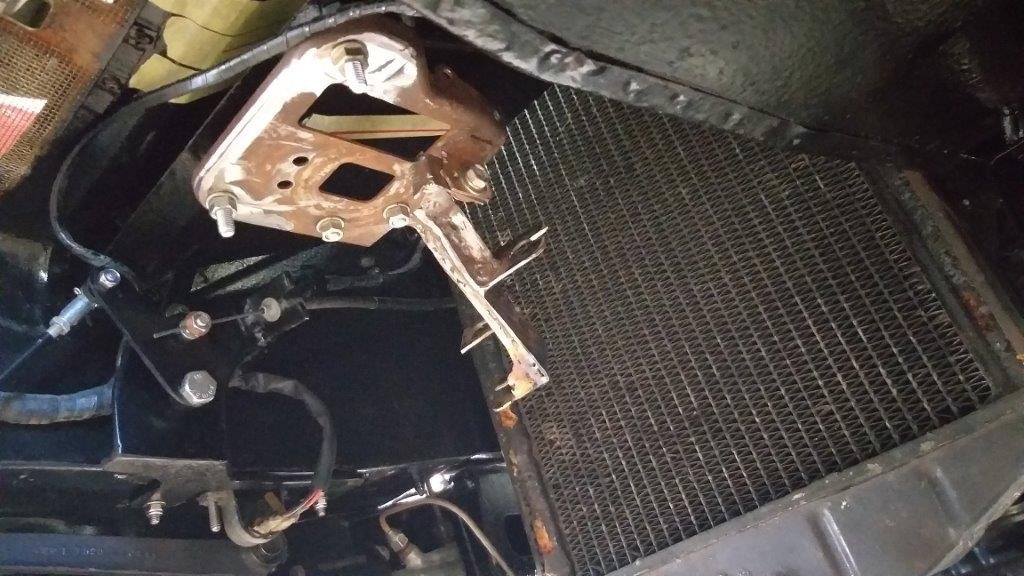
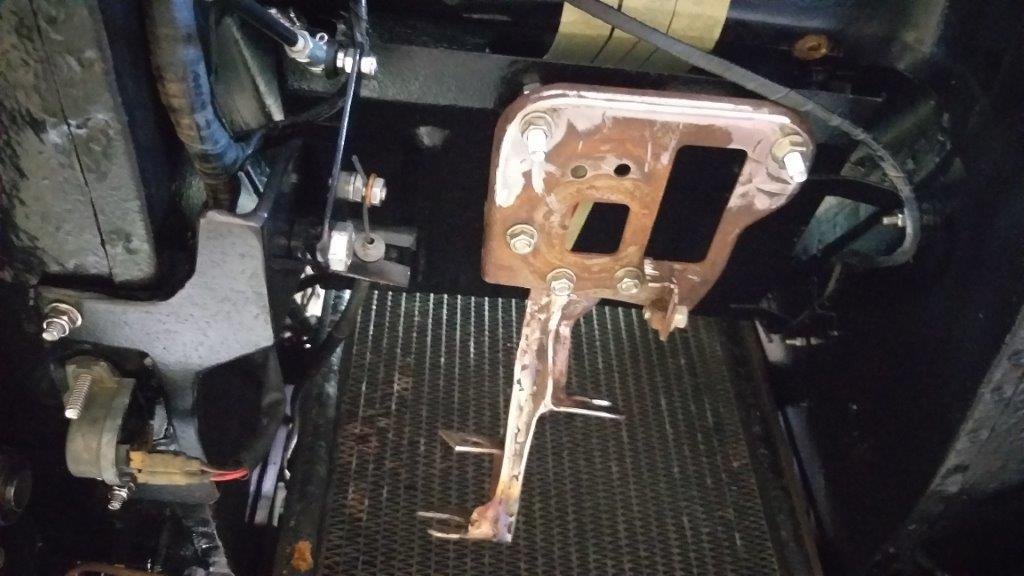
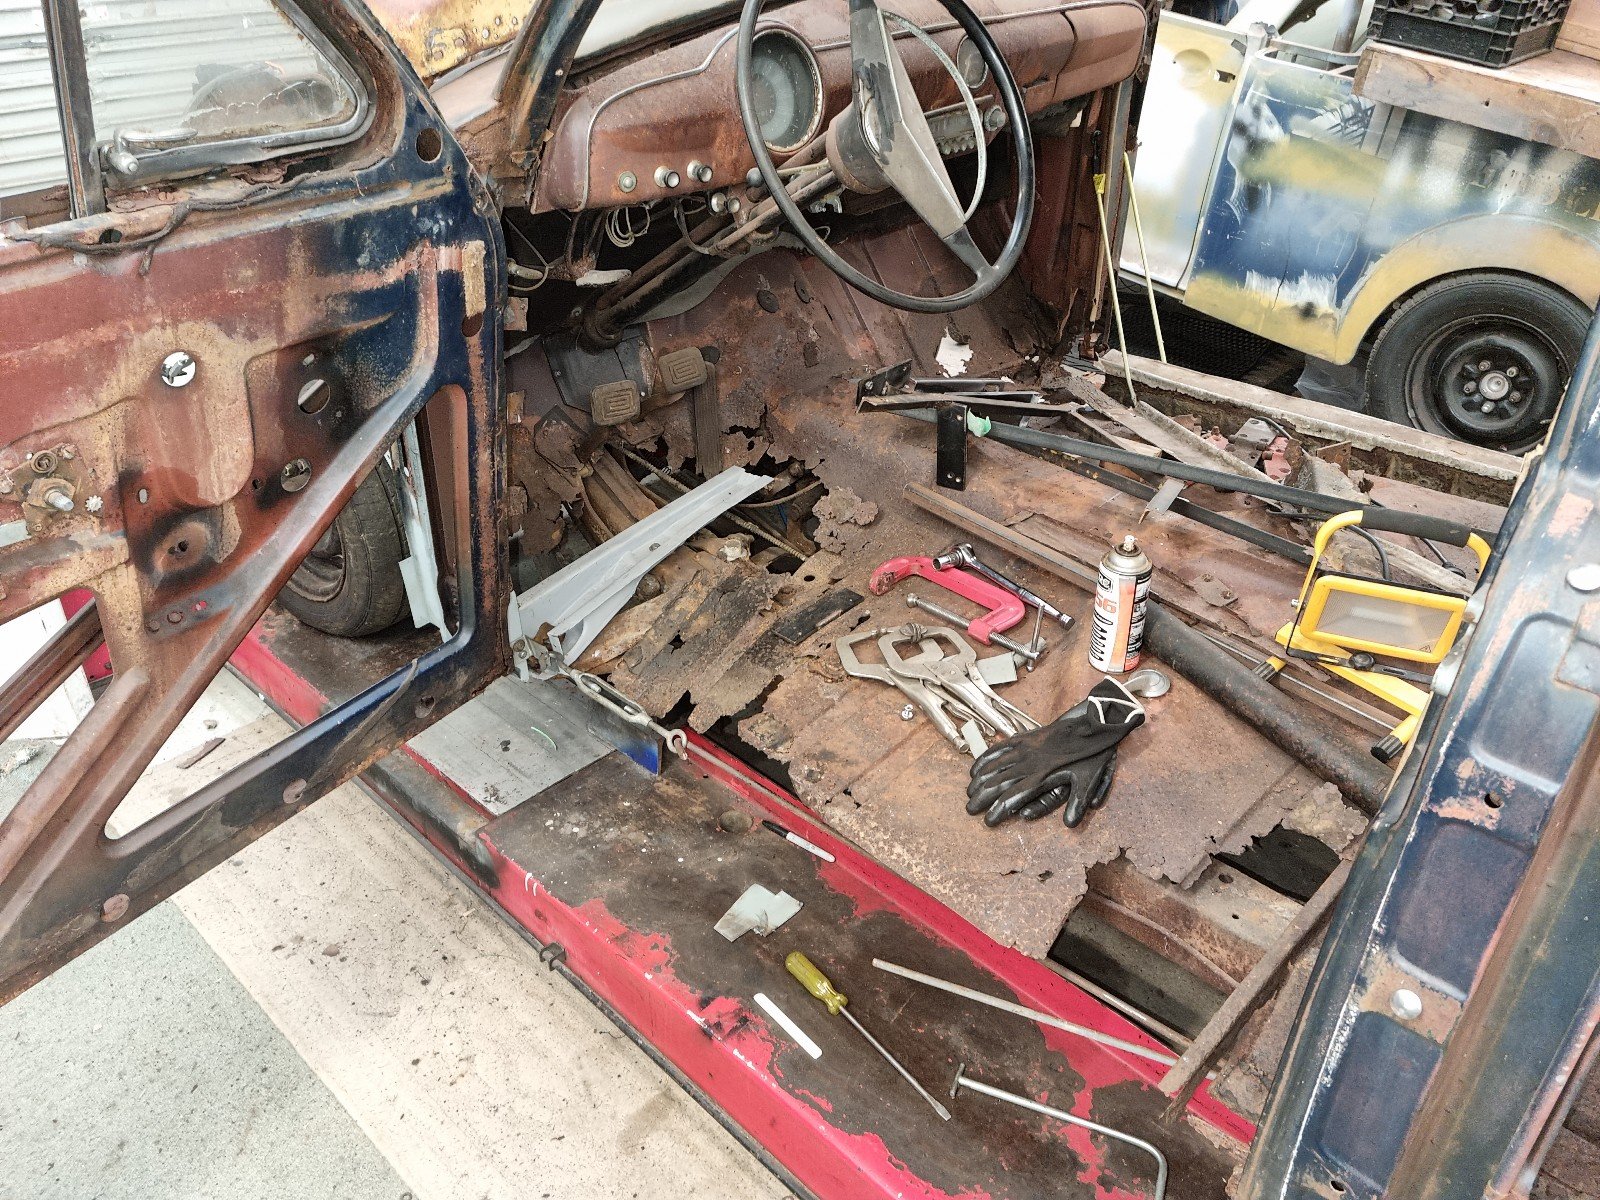
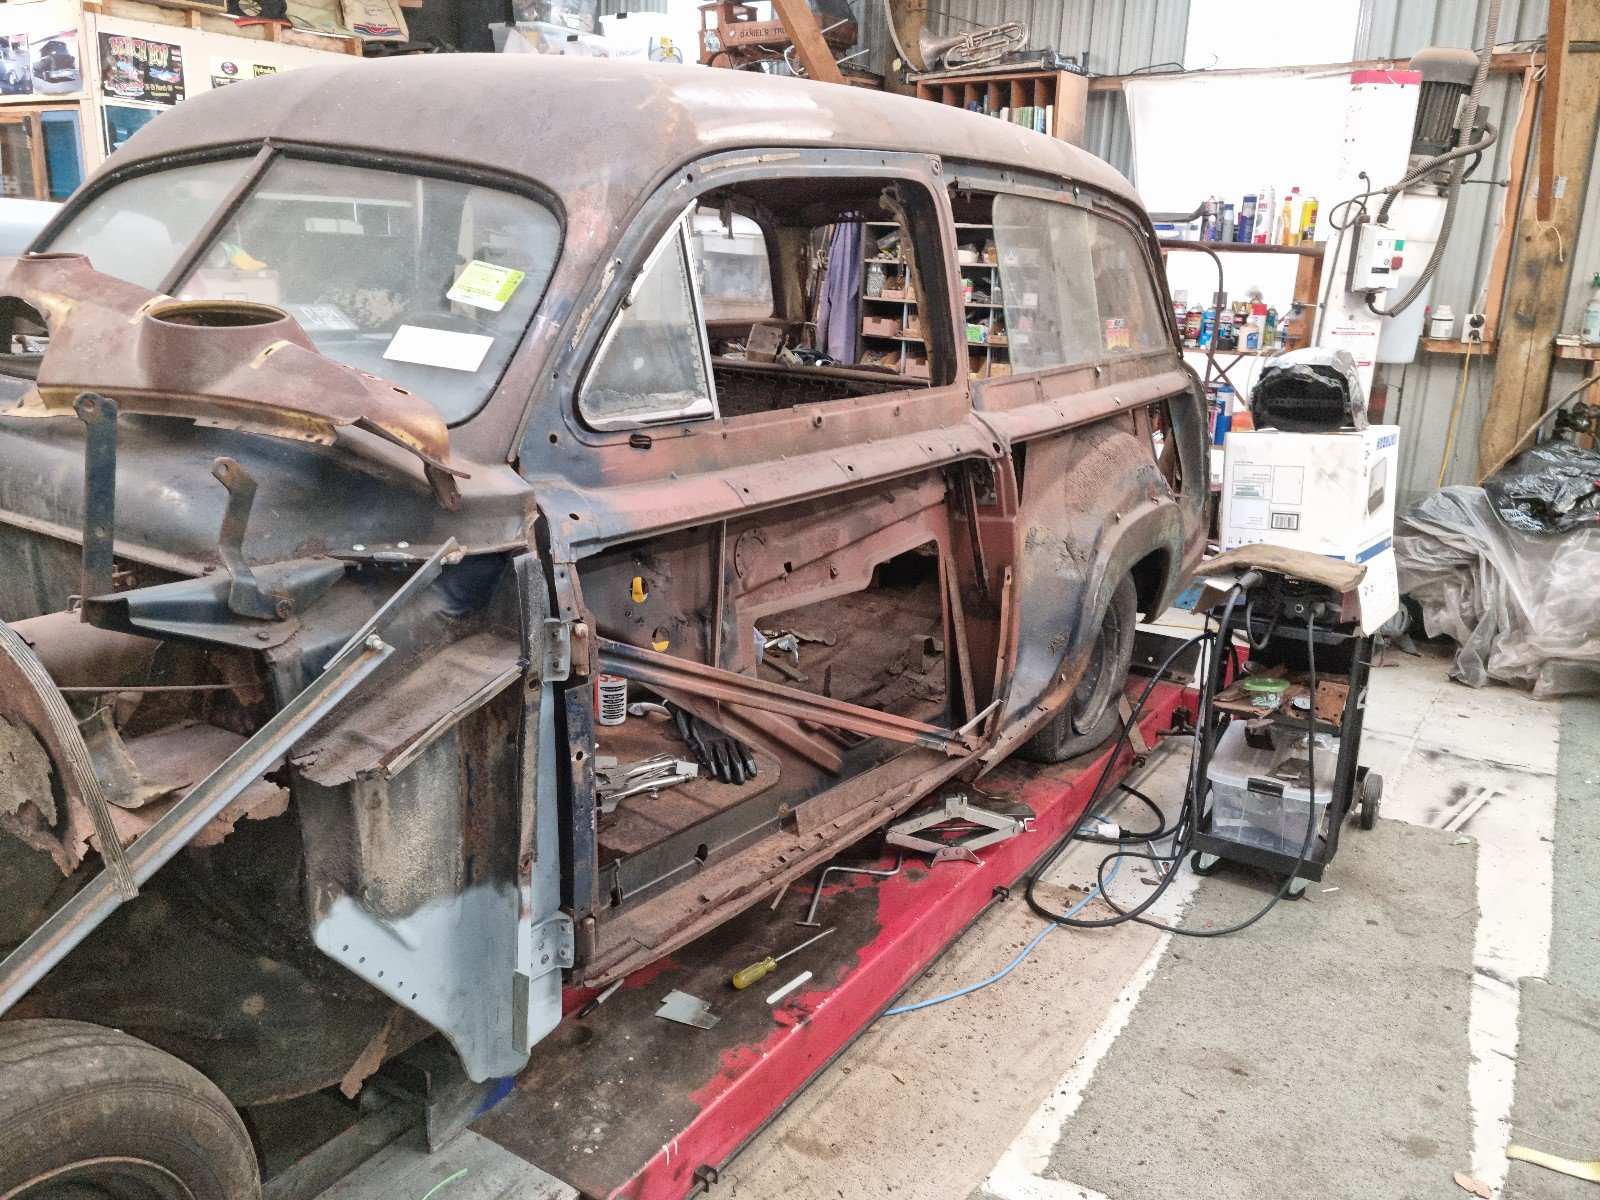
Did the car need blasting? Maybe. I doubt someone experienced would have done it - they would have started taking bits off and decided "actually it seems pretty straight". They'd have tackled problem areas as they arose with wire brushes and some welding + paint. But I went into this project with the idea of transforming something old and tired into something that's ready for another 40 years, and that combined with my bushy-tailed newbiness and slow pace always meant getting someone to blast and paint the bulk of the work in one go. There were some clear problem areas we knew about Fun amounts of bog in places The radiator mount has a rust hole in it There's some cheeky rust above the dash Some rust damage at the boot latches A tiny hole in the floor pan so why not just Get It Done. Strip it all away, know what we're dealing with and let the phoenix be born again from the ashes. Was it worth it? Idunno, prolly. I think it was. The above issues were all of course still there. Less words more pictures you say? Well you may regret saying that, straw-reader. But I made sure to downsize all of the photos on this page so it should be less brutal on your modem this time. The misc bog wasn't actually that bad........ .... (foreshadowing?): The radiator support had no surprises for us. The hole in the floor. There was also a tiny hole on the other side. The rear latches had a bit more to say, with some issues at the keyhole and pinholes below the rear as well. What we thought was just surface rust on the back seat actually punched through a bit, but not by much. We thought we were one of the only starions on the planet without rust under the windscreen but we didn't quite escape that event horizon. I had no idea it was this bad! We learned about some new problem areas. The left rear fender has some issues. And the swiss left door sill.... But the worst blindsided us: the entire front has been stitched on. Someone threw a new front-end onto the car, then bogged and painted the welds in the frame to hide them. Overall, the work doesn't seem to massive - but the front end gives me pause. The car has previously been registered in NZ so I feel it's probably okay as long as the work is cleaned up a bit? Would love some advice there. The other thing is it'd be great to get the suspension back on (once cleaned up). But it seems like we should get the underside sealed/painted first?1 point
-
A few years ago I got sick of wearing glasses and got laser surgery. My eyes suck so they couldn't just do the in-and-out, drive-yourself-back-to-work one. They laid me under the laser, put alcohol into my eye, scraped to the lens with a tiny spatula, lasered the lens into behaving (after warning me that the smell would be the air ionising not me burning) then tweezered a bandage contact into place. I was told I'd have to basically stick to a dark room at home for at least a week. I'd been told what the process was. I was okay I guess, I wanted it and was steeled for it. Then the doc said "cool that's one eye done, onto the other one" and it suddenly hit real. There's no backing out now. I've got one eye done, I can't exactly nope out at that point. While the mystery of the first eye was easy to experience as it came, I knew exactly what was coming now. I suddenly felt very anxious. I'm feeling a lot like that again. One eye done. There's no backing out now.1 point
-
blue guards????? Bonnet could be hiding blue too? I do know previous owners wife put car through back of garage once years ago
1 point
-
Took this temporarily off the road to chase down an oil leak that was getting real bad. I presumed it was the front main seal, but after having the whole front of the motor off and then the sump, which had fuck all of the wrong sealant on it, concluded that this was likley the issue. Did all the usual servicing with the front taken apart. While I was in there I discovered the cambelt crank pulley was fucked, it was worn on keyway and the key itself was worn, as it turned out approximately 18 degrees of timing innacuracy. I tried to buy a new pully only for it to come back nla, and nothing second hand turned up in the short amount of time I wanted to wait, so I took to repairing what I had. Machined off the rear belt guide flipped the pully so it drove on the fresh side and made a new belt guide. Also ground up a new key that drives on the full width of the pulley. Also discovered the *slightly* harder to swap rear two plugs just hadn't been swapped. 6 new iridium plugs went in to replace this garbage. I also got sick of the cobbled together exhuast that sounded shit so ordered up some new parts, coupled with a hand made in Japan titanium rear muffler from Fabril Laboratory (little alfa romeo and general Ti manufacturing shop) sounds great now and quiet at cruise. Tucked up nice and high and havnt heard a scrape yet. Got some stickers And today, wofd, regd, cleaned and polished ready for daily duties once again
1 point
-
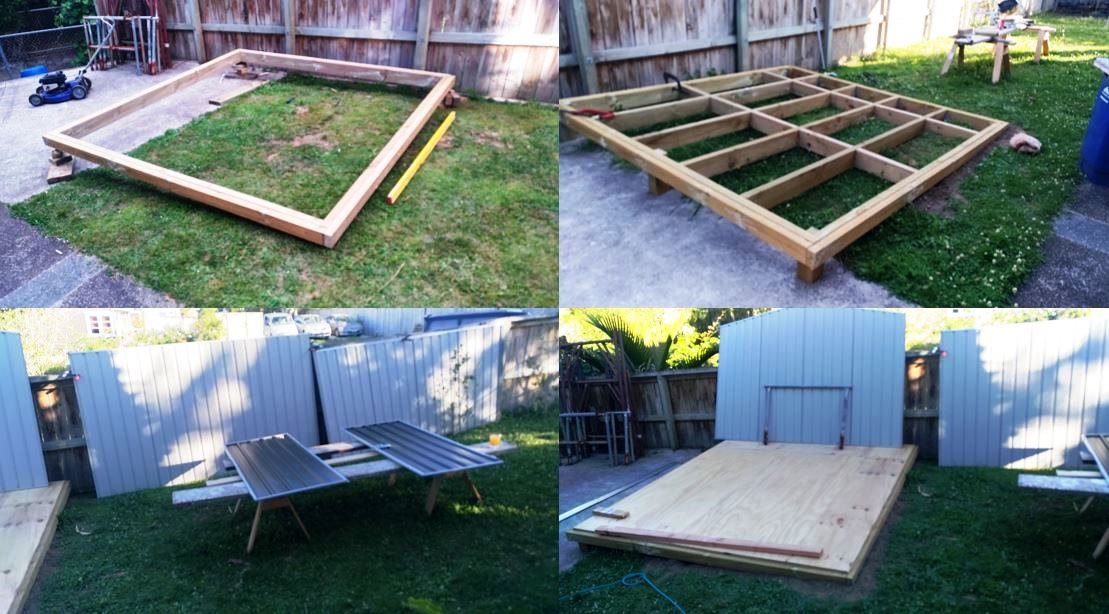
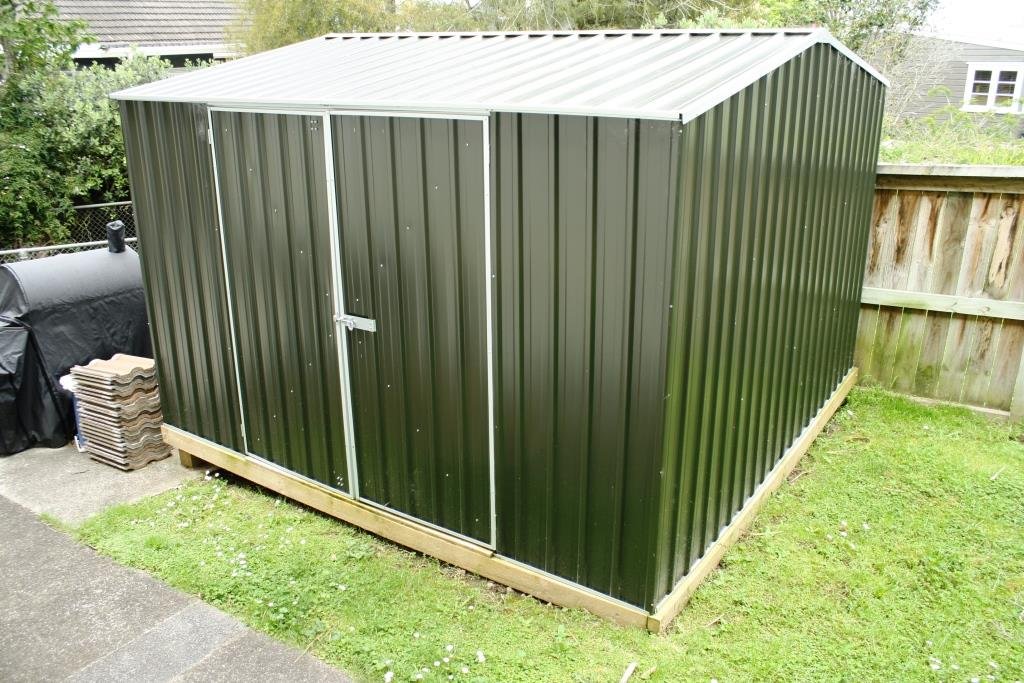
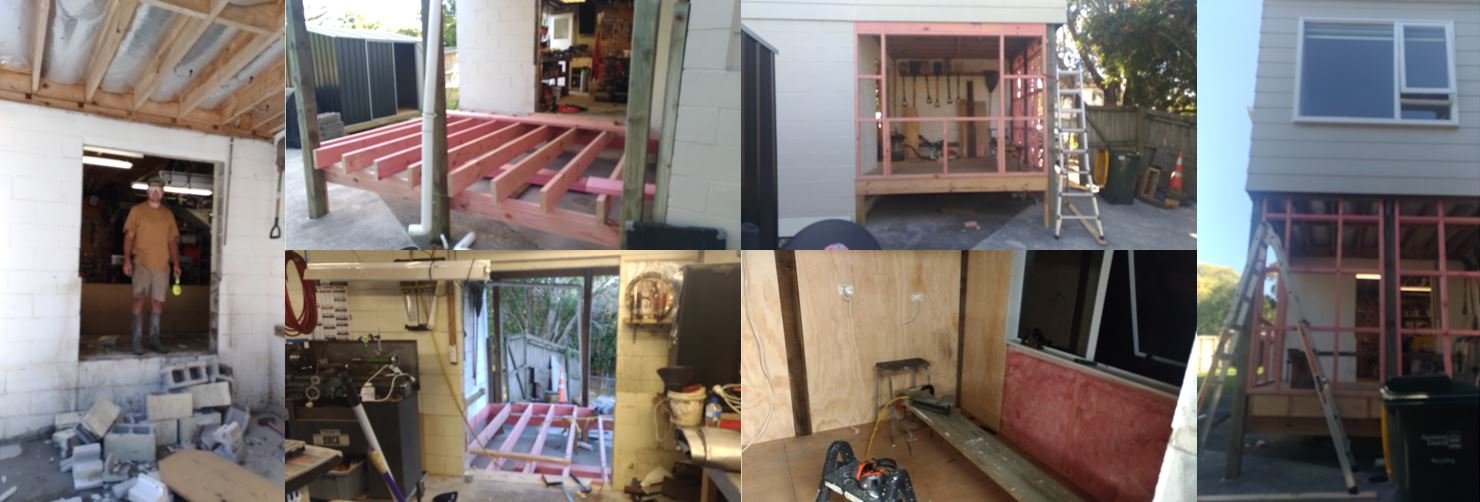
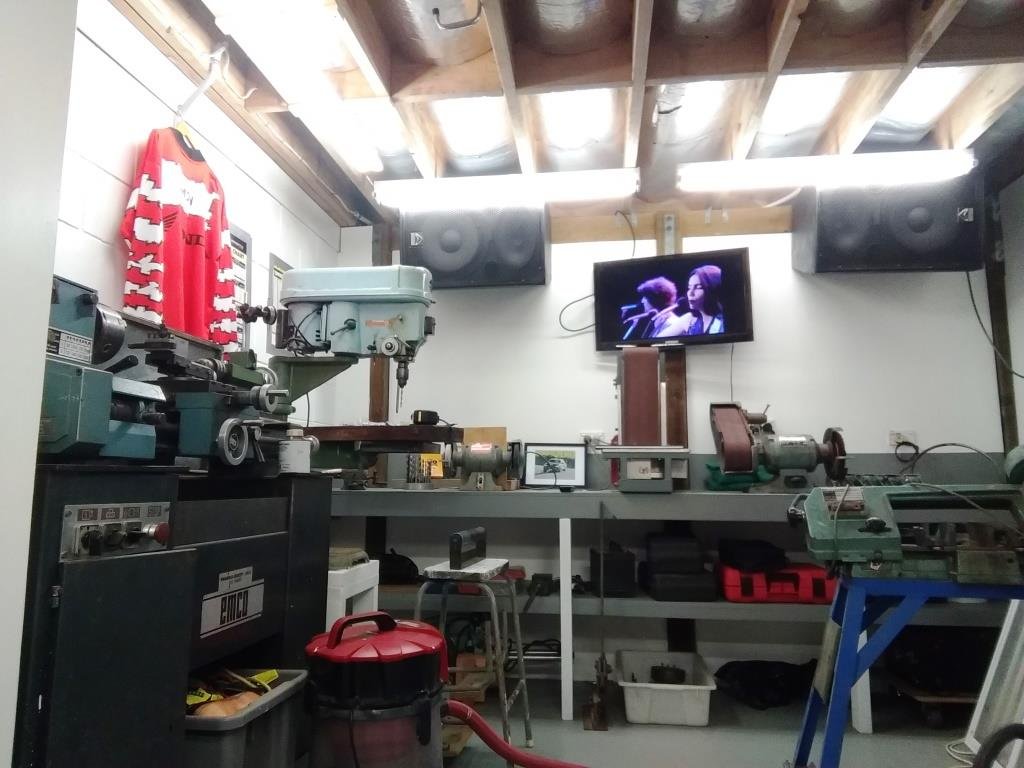
Decided it was about time I focused a little more on the Rigamortice project. It was obvious I needed more space than my meagre suburban garage could provide so storage shed and a small machine shop became a priority. Solved the shed problem with a Bunnings el-cheapo but couldn’t resist building a sturdy base on which I could build something more substantial on in the future. Yes it’s a flimsy piece of junk but hey you get what you pay for! Next step was to cut a hole in the side of my garage block wall (with the help of my son) and build the machine shop I’d been hankering after for a while. Still needs a little finishing (and a sub for the sound system) but I’m happy.
1 point
-
And since im such a sucker for punishment im going to do either DCOE side draft Webers or 8 Stack downdraft Webers. What should I do? Im leaning towards side drafts. How about a vote? Side Draft = Confused Down Draft = Sad
1 point
-
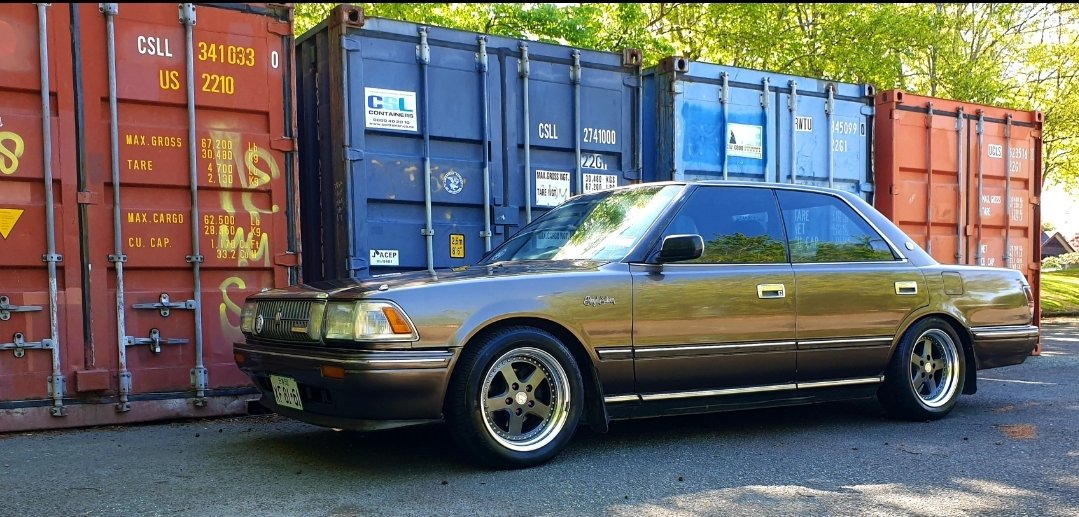
This is pretty much the finished car. I took it to Clint for a cert. It didn't fail on too much, just some additional fuel line clips needed, a smidge of camber to be wound in, heat sleeving on a brake line on the diff, some nyloc nuts for the seat bolts, and a couple of other very minor things. Anyway here's finally, some proper camera photos of it. 1981 Toyota Starlet KP61 4AGE (369)-Edit by Richard Opie, on Flickr 1981 Toyota Starlet KP61 4AGE (383)-Edit by Richard Opie, on Flickr 1981 Toyota Starlet KP61 4AGE (327)-Edit by Richard Opie, on Flickr 1981 Toyota Starlet KP61 4AGE (350) by Richard Opie, on Flickr 1981 Toyota Starlet KP61 4AGE (356)-Edit by Richard Opie, on Flickr 1981 Toyota Starlet KP61 4AGE (311)-Edit by Richard Opie, on Flickr 1981 Toyota Starlet KP61 4AGE (294)-Edit by Richard Opie, on Flickr 1981 Toyota Starlet KP61 4AGE (403)-Edit by Richard Opie, on Flickr 1981 Toyota Starlet KP61 4AGE (58)-Edit by Richard Opie, on Flickr 1981 Toyota Starlet KP61 4AGE (66)-Edit by Richard Opie, on Flickr 1981 Toyota Starlet KP61 4AGE (83)-Edit by Richard Opie, on Flickr 1981 Toyota Starlet KP61 4AGE (48)-Edit by Richard Opie, on Flickr 1981 Toyota Starlet KP61 4AGE (160)-Edit by Richard Opie, on Flickr 1981 Toyota Starlet KP61 4AGE (175)-Edit by Richard Opie, on Flickr 1981 Toyota Starlet KP61 4AGE (238)-Edit by Richard Opie, on Flickr 1981 Toyota Starlet KP61 4AGE (263)-Edit by Richard Opie, on Flickr 1981 Toyota Starlet KP61 4AGE (440)-Edit by Richard Opie, on Flickr 1981 Toyota Starlet KP61 4AGE (408)-Edit by Richard Opie, on Flickr 1981 Toyota Starlet KP61 4AGE (306)-Edit by Richard Opie, on Flickr 1981 Toyota Starlet KP61 4AGE (494)-Edit by Richard Opie, on Flickr Thanks for looking, for the past 15 years or so.1 point
-
Spent this morning working on the MK2 version of my gear shift mock up and I'm much happier with the proposed position of the gear stick. I then disassembled the shifter one more time, drilled the first of the mounting holes in the intermediate tunnel panel and bolted the panel in for a quick test fit. The good news is that it clears my accelerator mechanism and the gear change cables look like they will clear the radiator. So now I need to take a courage pill and start cutting up my intermediate tunnel panel.
1 point
-
So I had it all booked to go off for its rollcage to be done. Nope not even close. Last minute job of pulling out sound deadening found some weight reduction holes in the floors. Only the fronts. So I promptly ordered a bead roller, as you do. And will find some zintec to make up some floor plates. Cage was able to be swapped with another car.. So better pull finger.
1 point
-
1 point
-
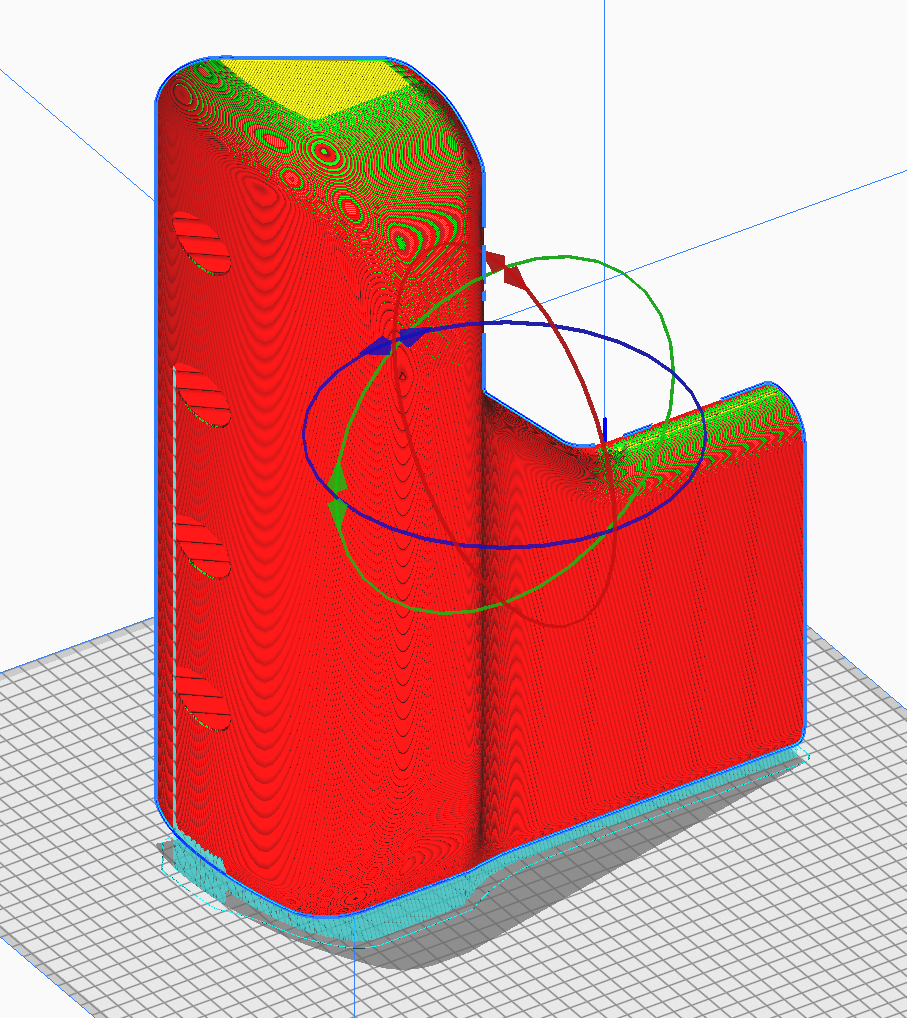
Time for an airbox to try stop the motor from inhaling 50,000 mozzies per hour. So started with a basic 2D profile. Found it hit where the bonnet rounds off a bit. Bought some play dough and smooshed it around the place to check clearance. Generally better than expected, have got 20-25mm to the closest brace part. So measured up the places I had to cut, then modelled V2.0 which is currently printing Once this is done, if it clears everything and there are no other issues. Then I need to decide how to divide it up into sections so I can still get inside to do up the bolts for the throttles. And then figure out what sort of air filter it's going to have, whether try jam a panel filter on it (probably makes sense given available space by radiator) or just transition to a round to jam a pod filter on there. Still a few iterations left to go until it will be a usable thing, but getting there. EDIT: Will be something like this
1 point
-
Poking with the torch revealed some crust in the pillar seam hidden by the roof framing so out came the welder again and brother put paid to it in a tidy fashion1 point
-
Took ages to sand the hood back, about 14 120 discs to get it uniform, lol. Only had to apply filler around the nose where I repaired, 2 wee dints and 2 repair patches and the crease that appeared when the wind caught it the other weekend in the gales and threw it onto the stand right after I welded the frame back in! shot it in leftover Isolack 2k, it’s bizarre shit..like bed liner to mix but comes out normally. The Second coat ejected some snot and fucked it up but at least it’s sealed in the meantime.. now I’ll just re-spray when I do the stripes down the track. The back of the scoop will be gloss black but I had a little spare so painted them as well as battery tray. Also scrubbed up the grills, have decided on the style I’ll paint them too.
1 point
-
Protip Ensure that your vehicle is up to wof standards before taking it in for a wof1 point
-
Ohh yeah it worked!!!! One minor defect where one of the thin standoffs didnt vent. But thats a simple weld job. Other than that it went awesome! She was a pretty big job!1 point
-
Loaded up. Suitably sketchy process, no injuries though. Air bags doing the job for now.1 point
-
Dismantled all the taillights and put some zinc primer on the worst ones. The better parts have been sent to the molasses barrel for a soak. Should be enough parts to get two good omplete units. Also have the structural part of the drivers door pillar done and it closes and latches ok. Next part is probably the sill and where it attaches behind the door. Stay tuned.
1 point
-
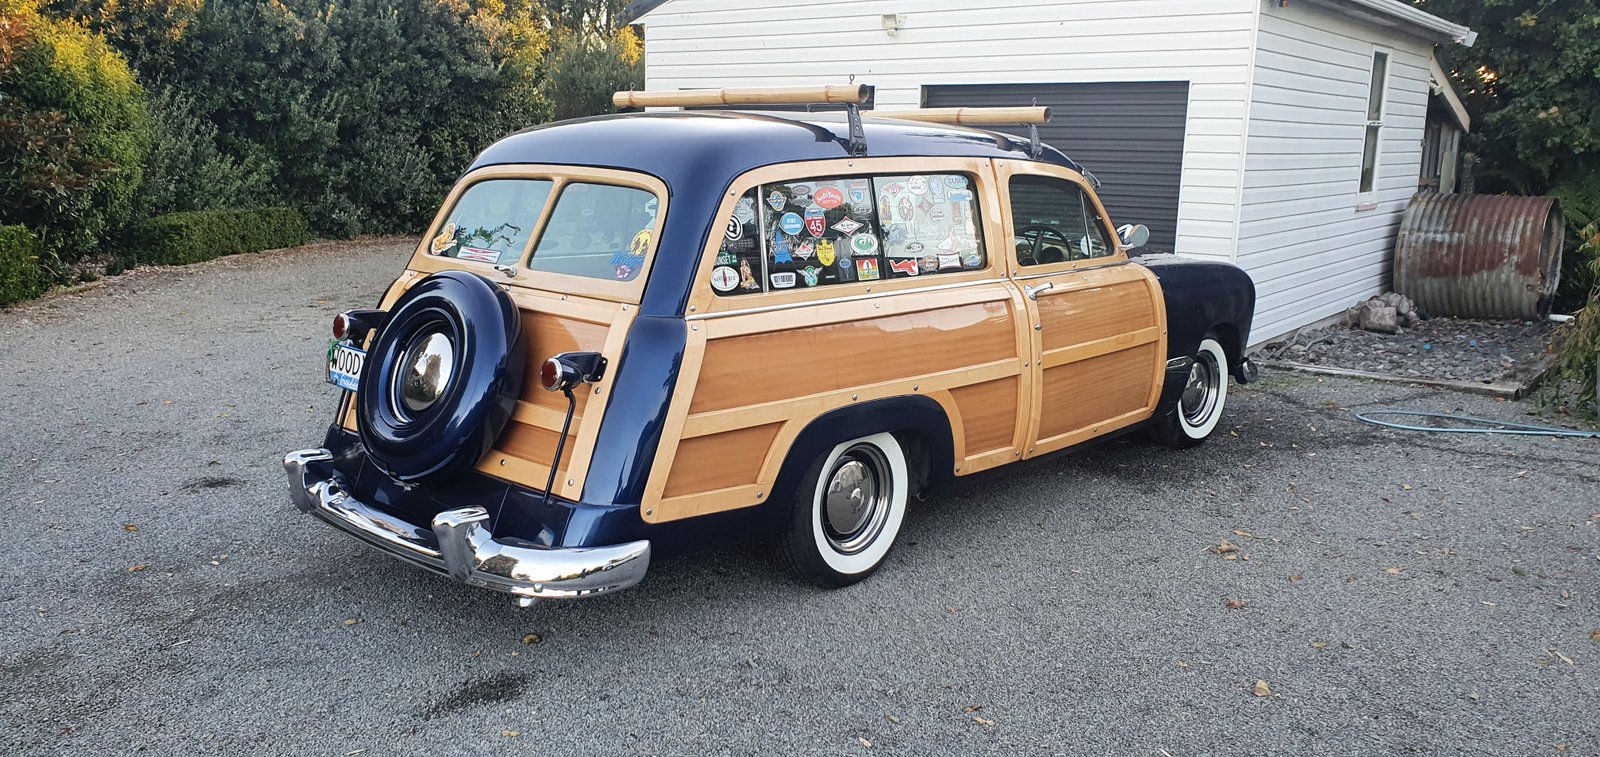
So, the new one has a little bit of history in NZ, built in Nelson back in the early 2000's https://themotorhood.com/themotorhood/2008/1/3/articles-surfin-usa-1949-ford-country-squire-202 It's was sold to the previous owner up in Whangamata several years ago. Sill much the same running gear I think, except for an aftermarket Scott front suspension setup. All I've done so far is remove bamboo roof rack and most of the stickers. The roof needs a touch up where the roof rack was mounted. The wood will have to come off and be refinished 'soon'
1 point
-
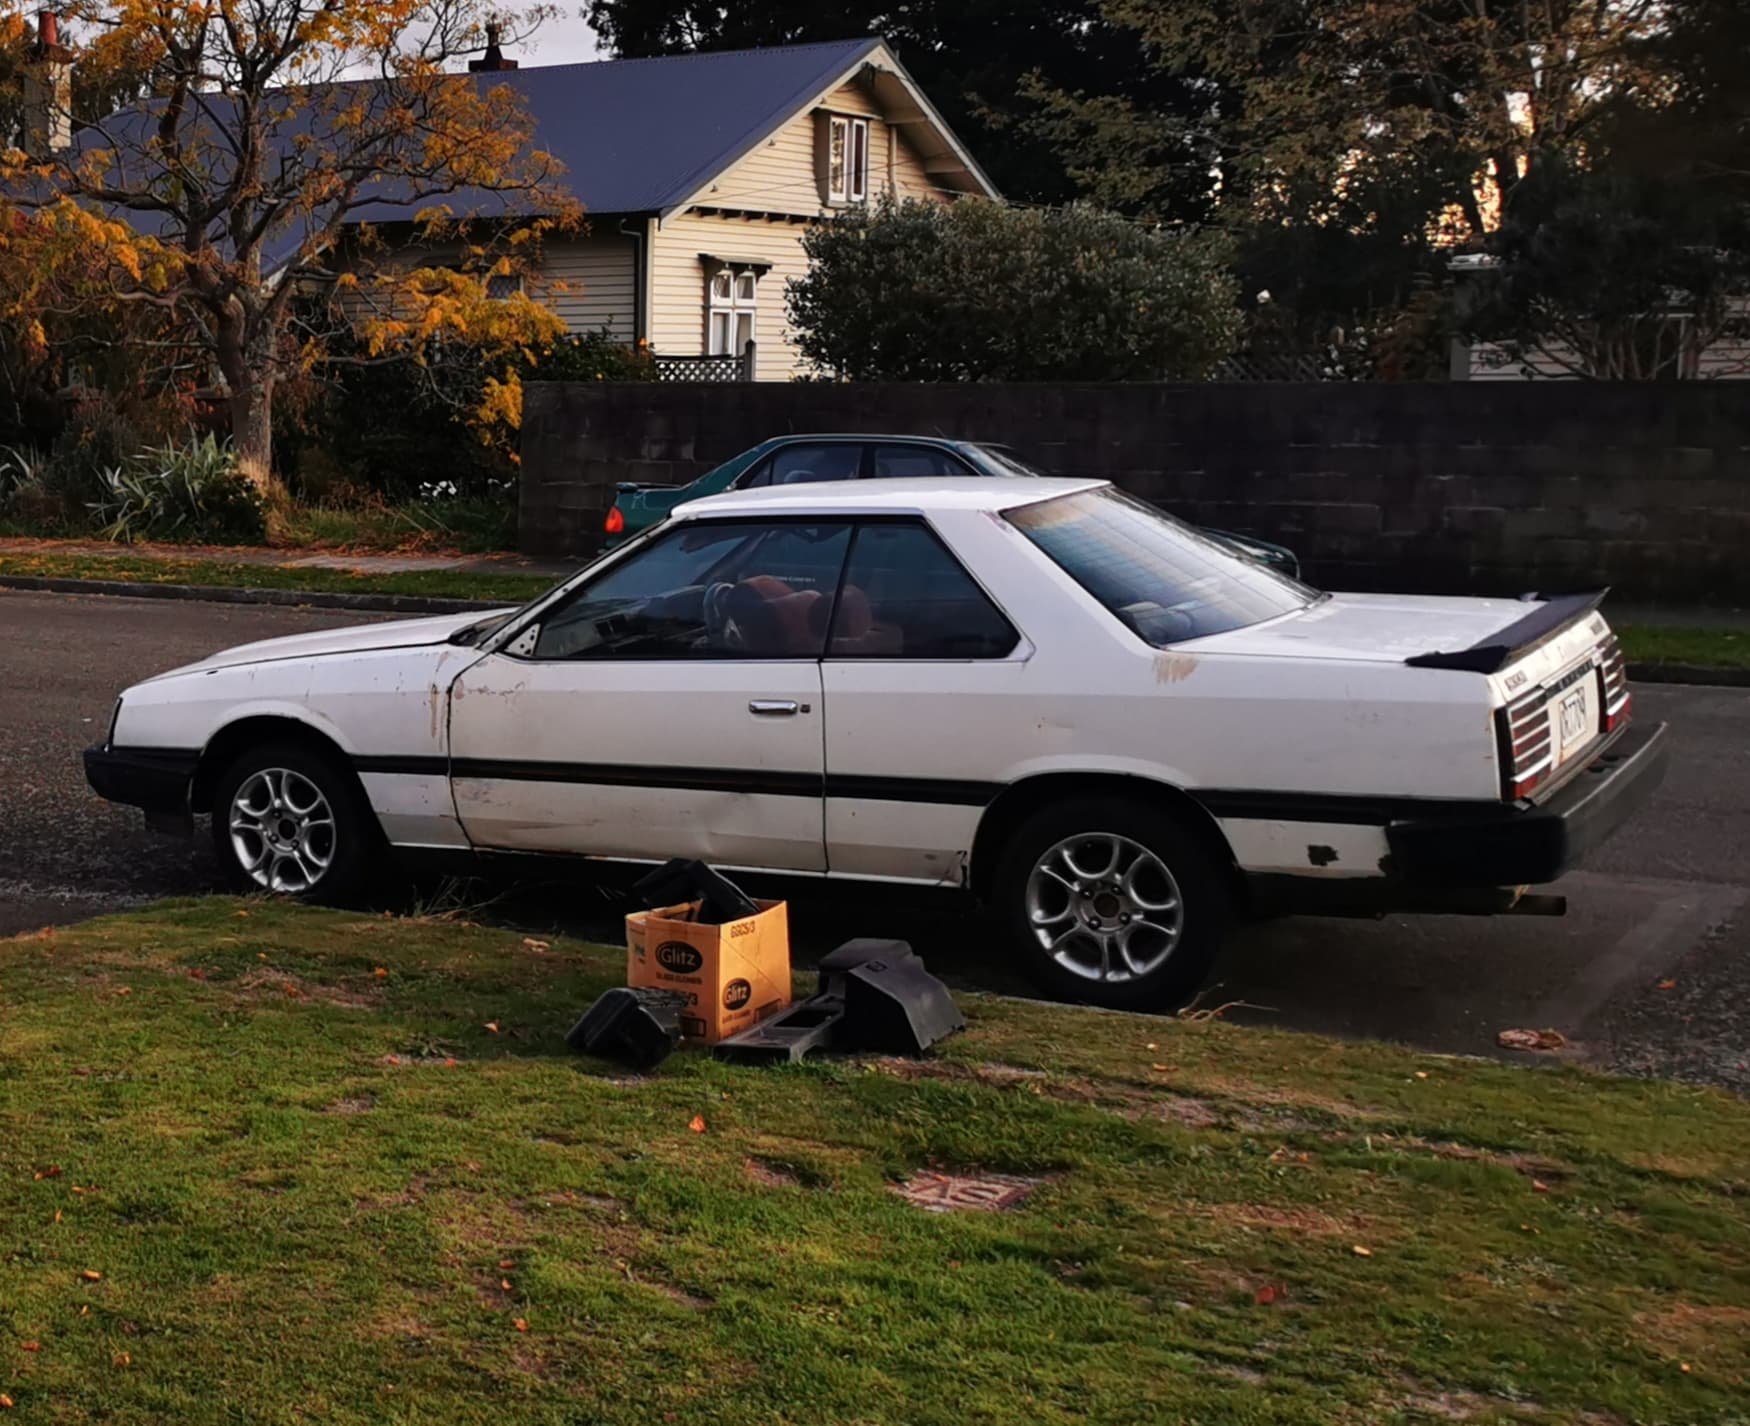
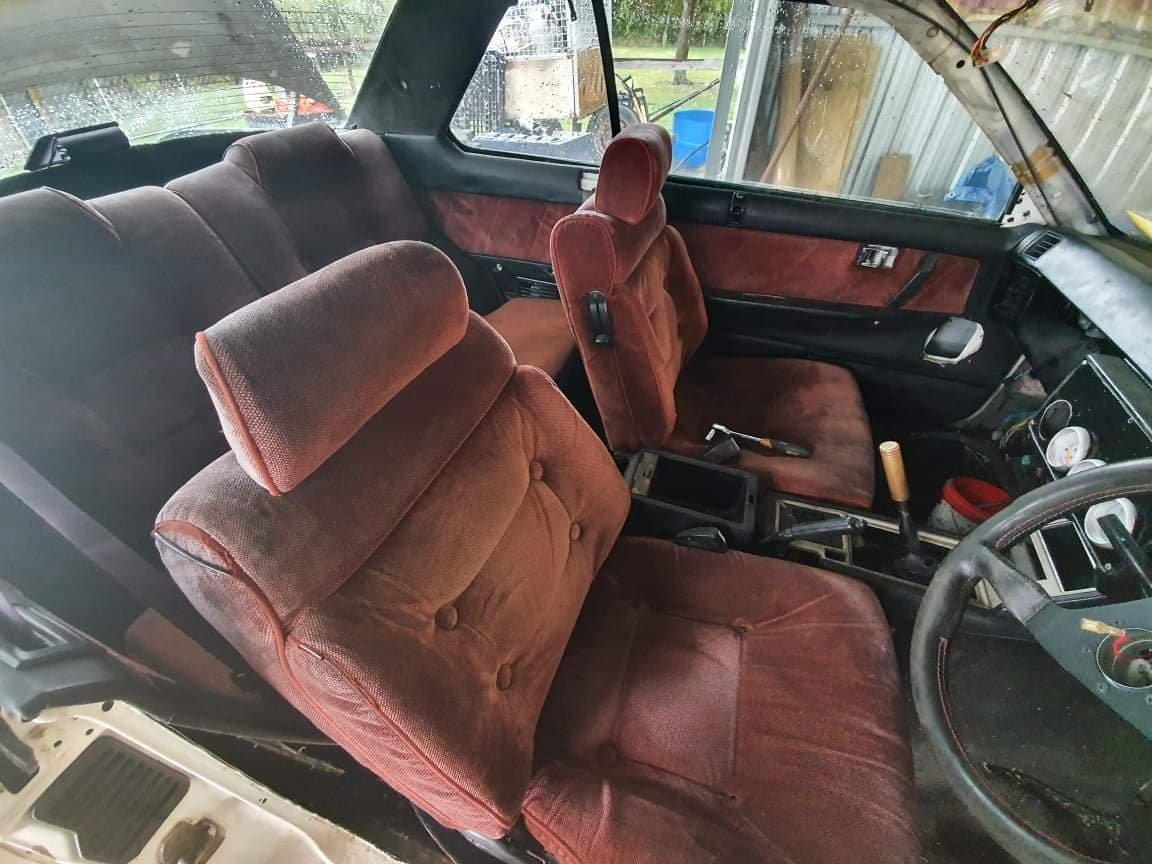
Discussion: https://oldschool.co.nz/index.php?/topic/77978-pediigrus-83-nissan-skyline-coupe-khr30/ Hey all, I'm pretty new around here but I've been in the old skyline scene for awhile. Most people know me for my 1986 Nissan Skyline Passage GT but I have a small habit for collecting hardtops cars as well. Earlier in the year I finally managed to pick up a KHR30 L20ET Coupe which has GT-ES Badges but I believe is actually a GT-EX. As you can see it's had a bit of a hard life so far. Overall it's in average condition. The interior when i got it was half put in with the roof liner ripped and closer than the ground than on the actual roof. When i first picked it up she didn't drive. Would just turn over and never start so I had to trailer it down from Napier to Wellington. The interior wasn't actually in to bad shape although it'll definitely need a proper cleanup in the future. None of he windows worked and the alternator was also cooked. The engine bay was an absolute rats nest of vac lines, loom and coil leads and just overall mess. Who knows what sort of rust is hiding underneath as well. Whilst the intercooler was a nice addition it doesn't help much when the L20et doesn't actually run. The car is an 83 pre-facelift with facelift bumpers on it which don't fit properly so I'll have to find the rest of the facelift parts or fork out the small fortune for an iron mask front end. The plan for the o girl is give her a good old tidy up and fix some of the classic RFB additions that have been made. Just looking at these pictures alone i can see there's going to be a fair wack of rust work that I've got to do, some panel and paint work, and then the engine. I'm planning to keep the L20et in it and rebuild it up for roughly 200hp. Not sure if I'll get there or not yet though. Next steps are stripping it down and find out what sort of rust is hiding under the car and panels and interior. I'll repaint it the factory white and most likely wrap the bottom half of the car silver to make it a bit unique. Hope at least someone finds watching my pain and suffering enjoyable as I strip this thing apart. Discussion: https://oldschool.co.nz/index.php?/topic/77978-pediigrus-83-nissan-skyline-coupe-khr30/
1 point
-
Put discs on as it had scary braking. Same old story, get in to install the discs etc and find the ball joints are gone. I get new ball joints and when I get to the 2nd side I find the upright is flogged out (scary). So I do all ball joints and uprights. Then when installing the new booster find that the proportioning valve is in a completely different place with different sized fittings. So replace all the brake lines!1 point
-
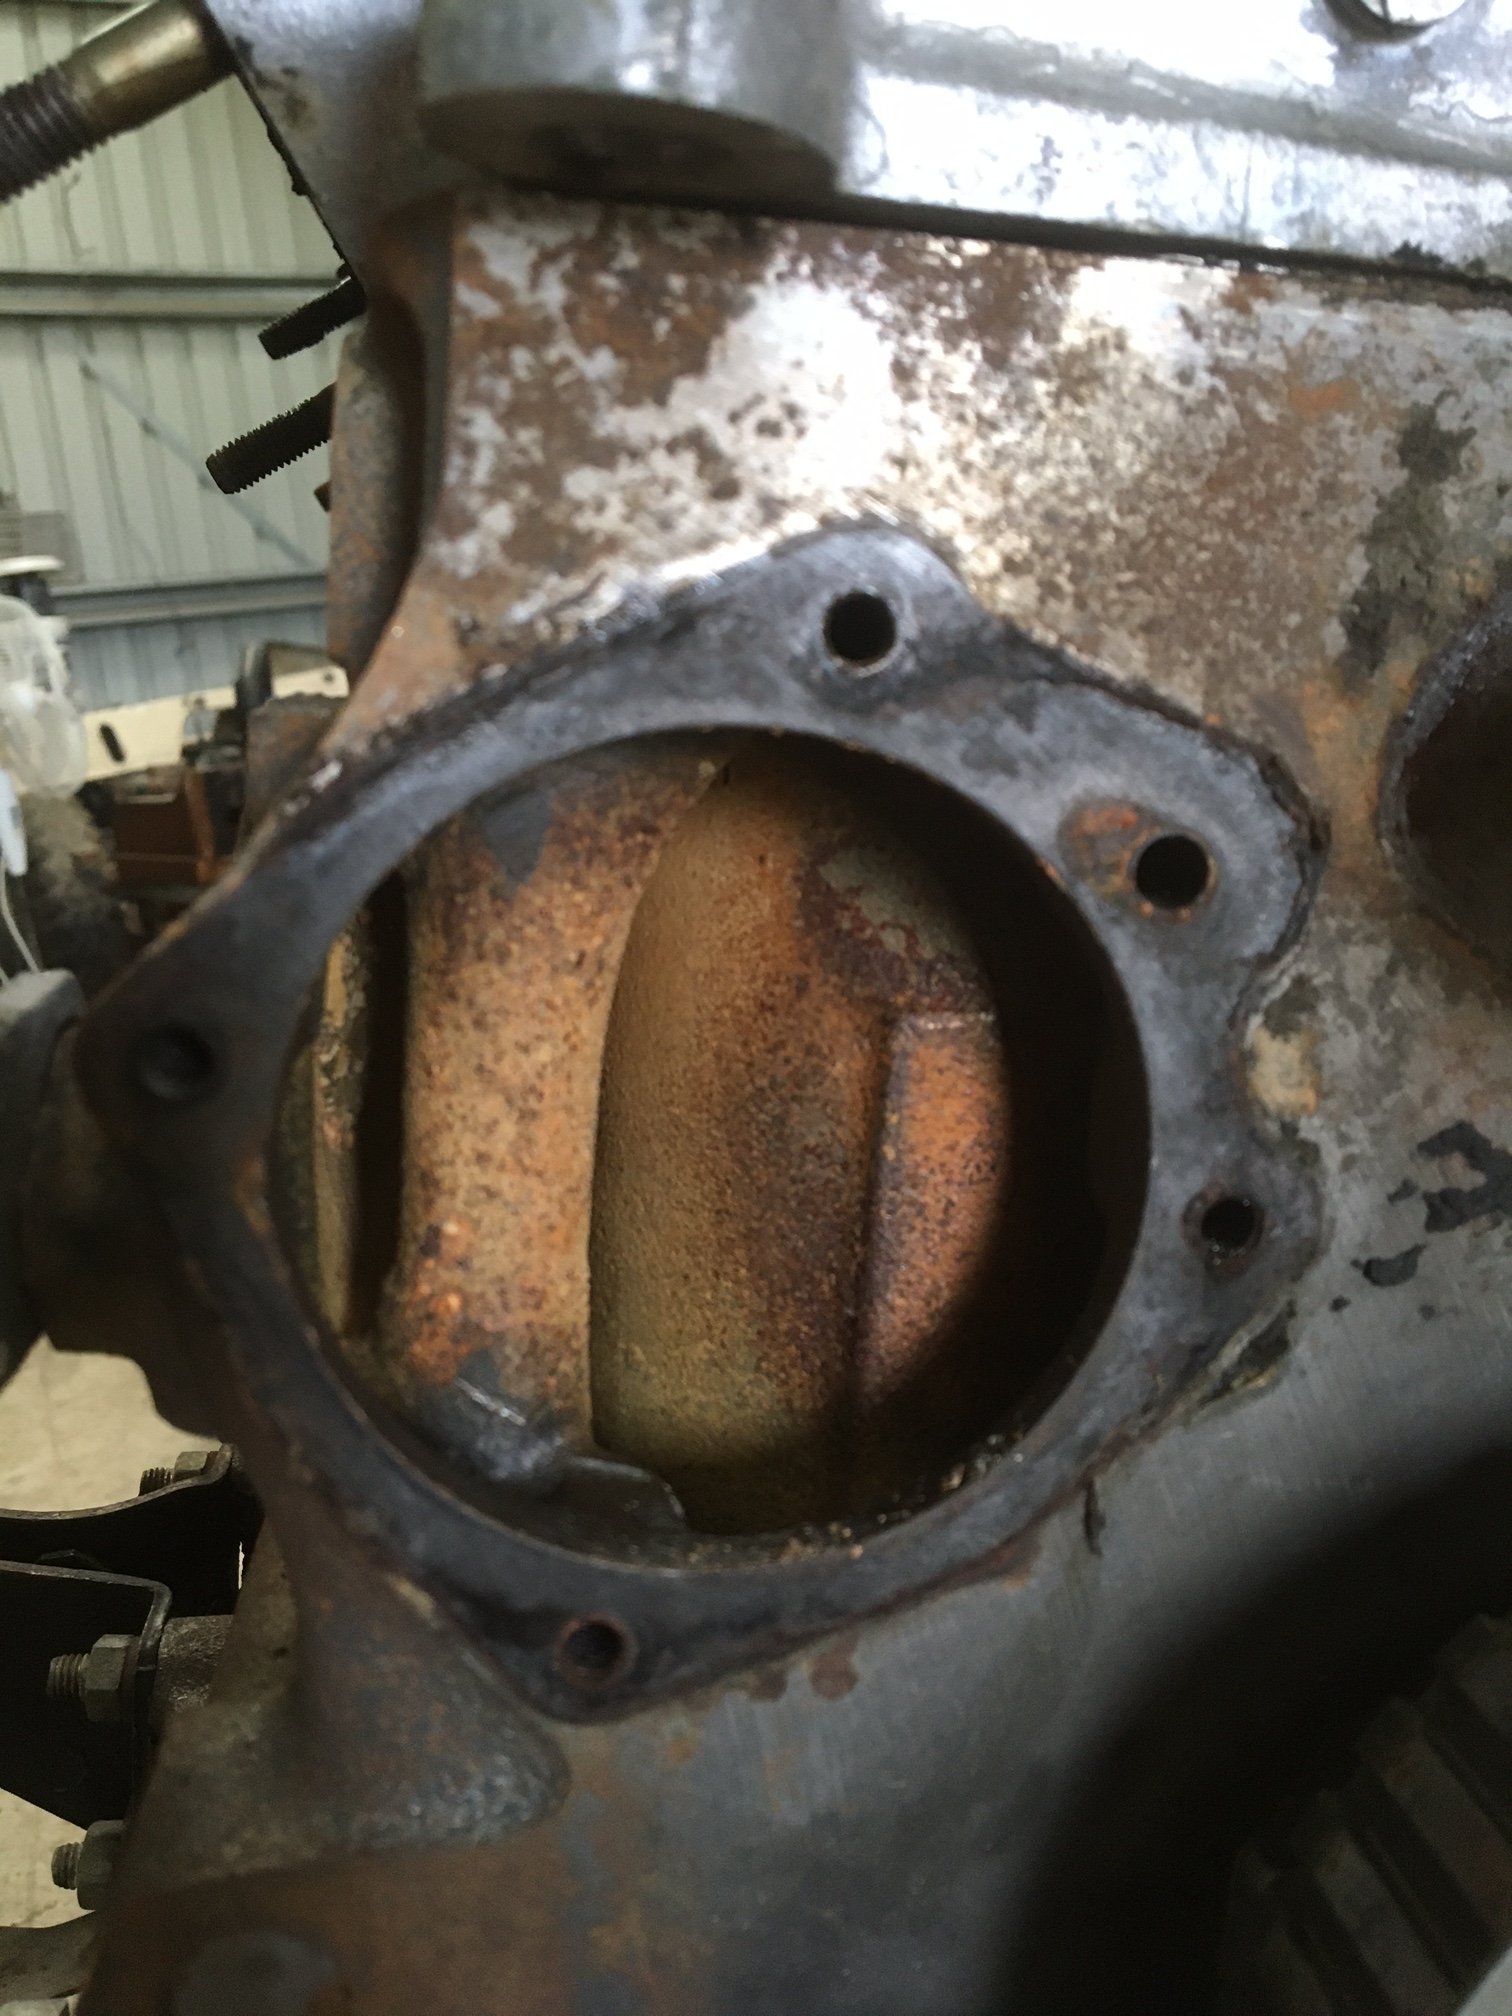
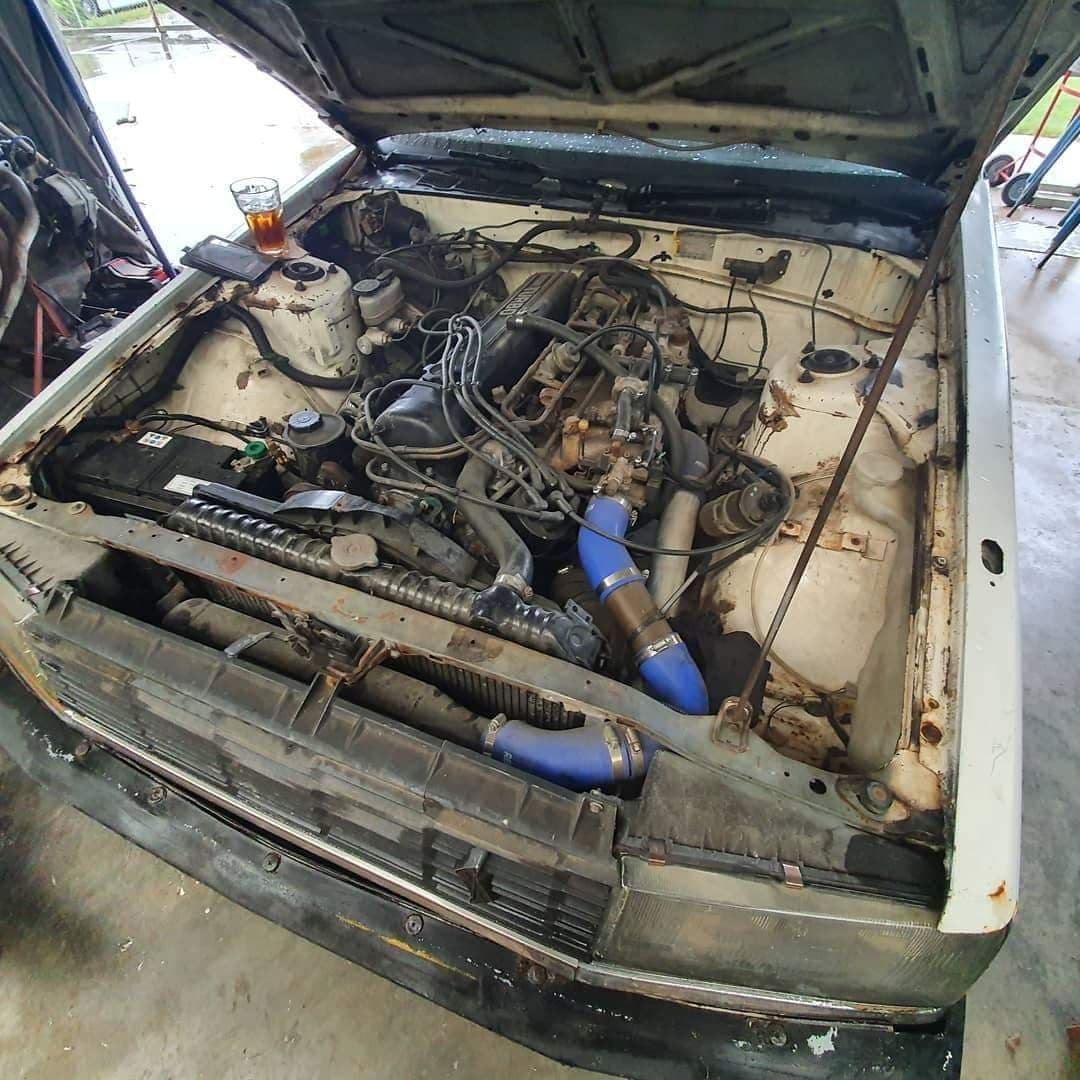
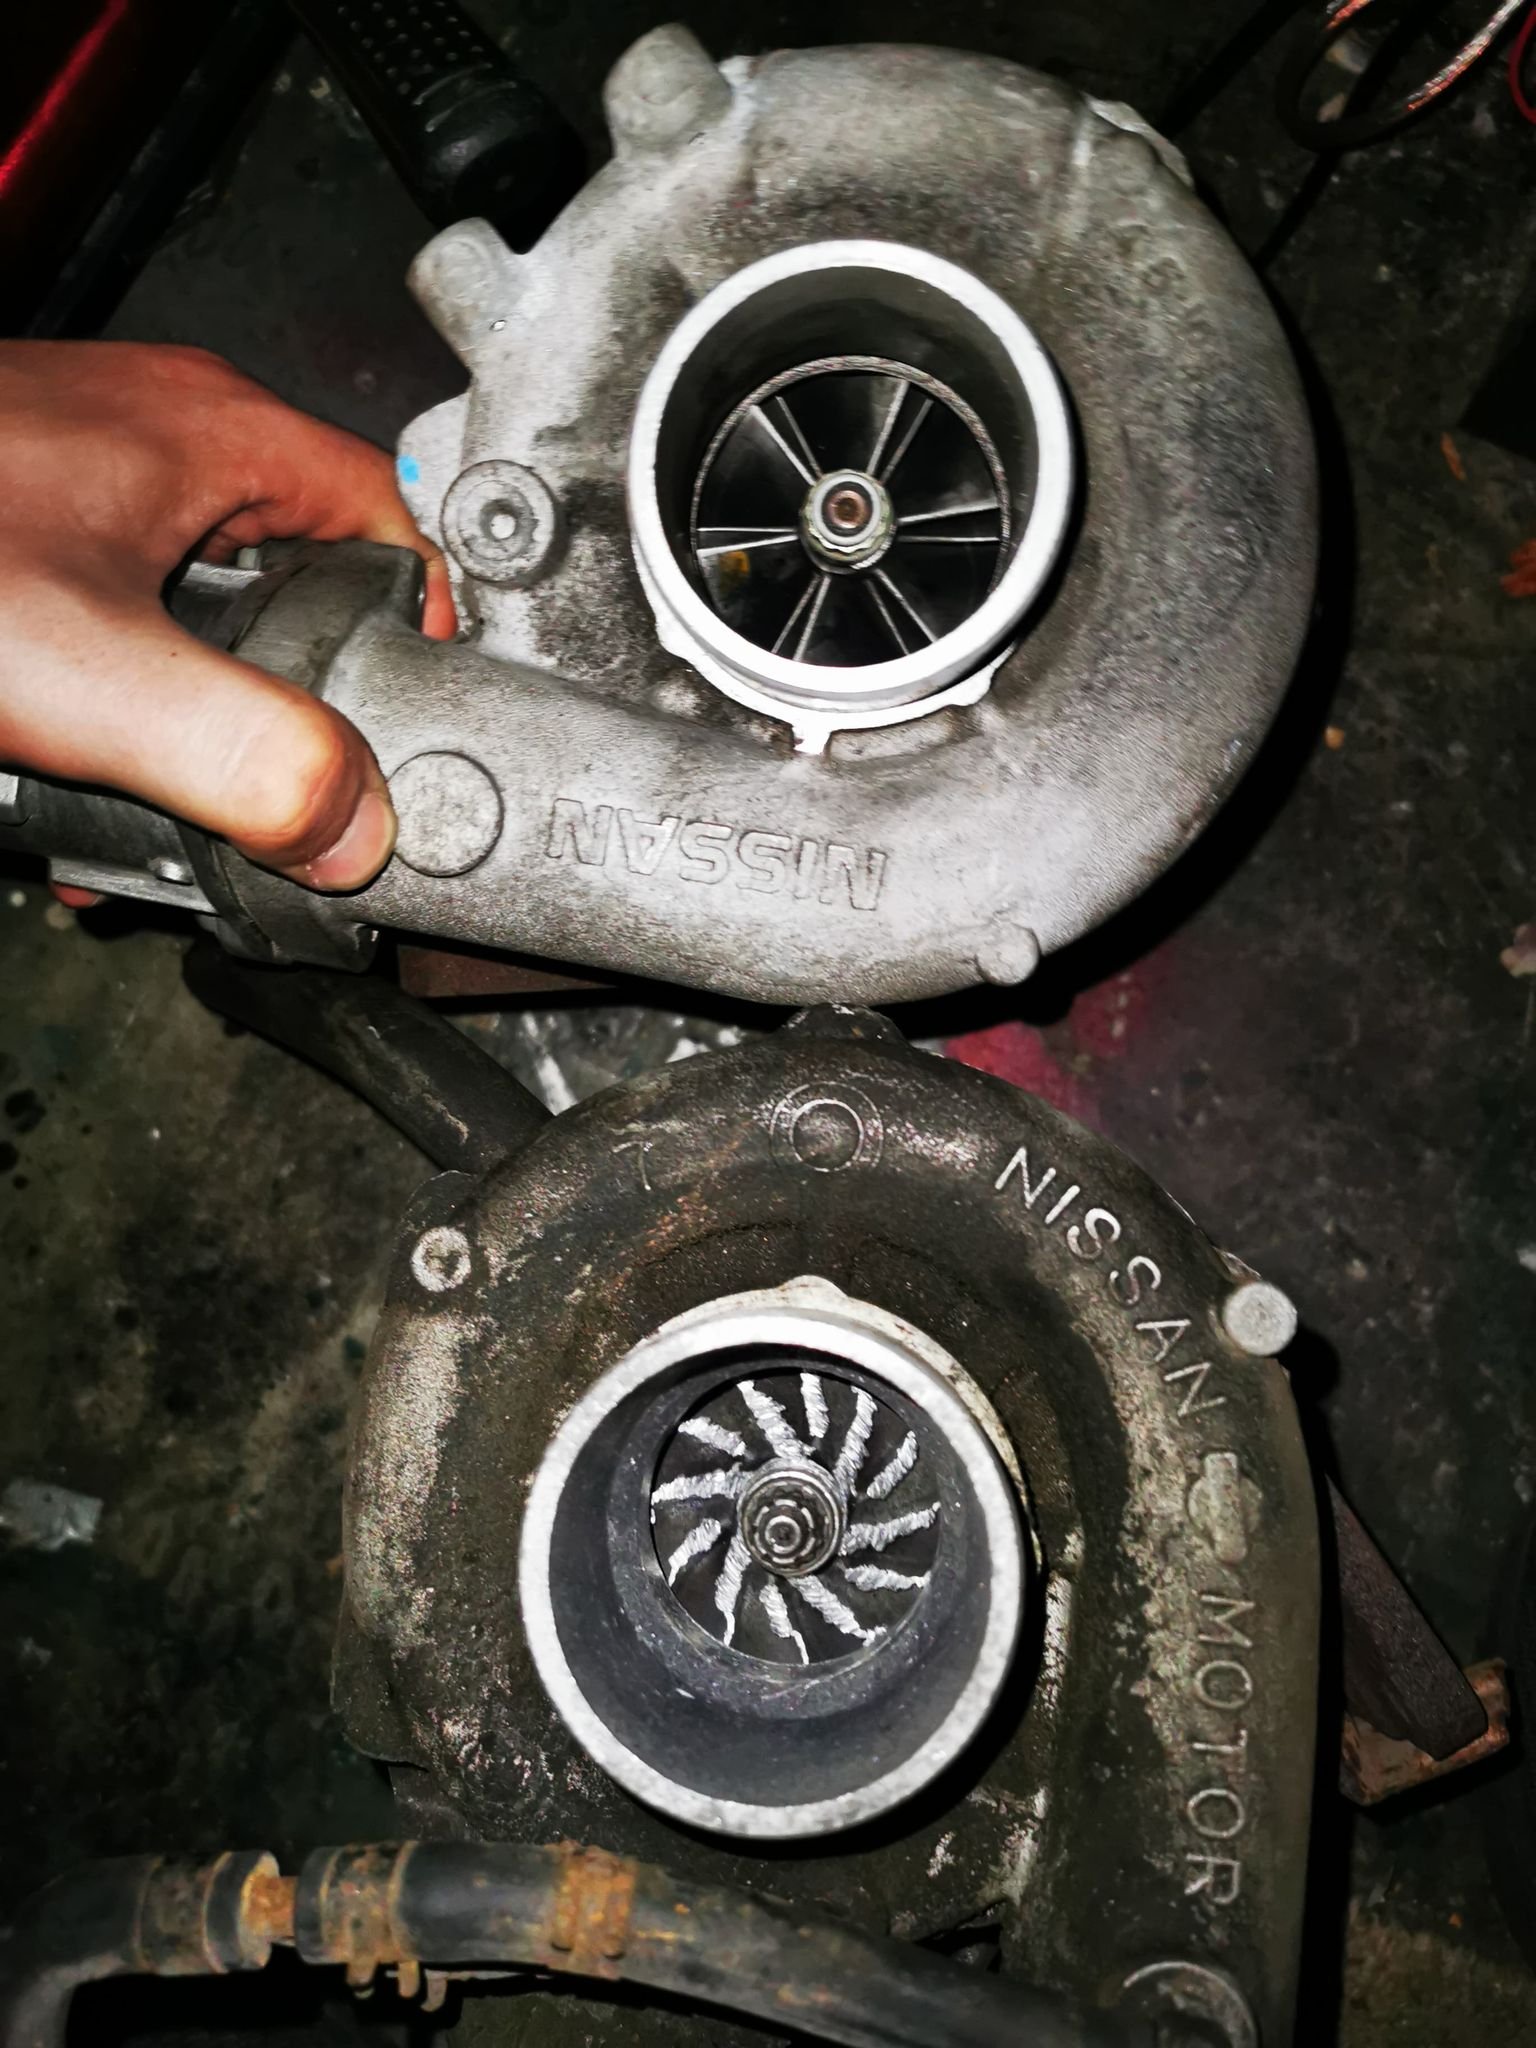
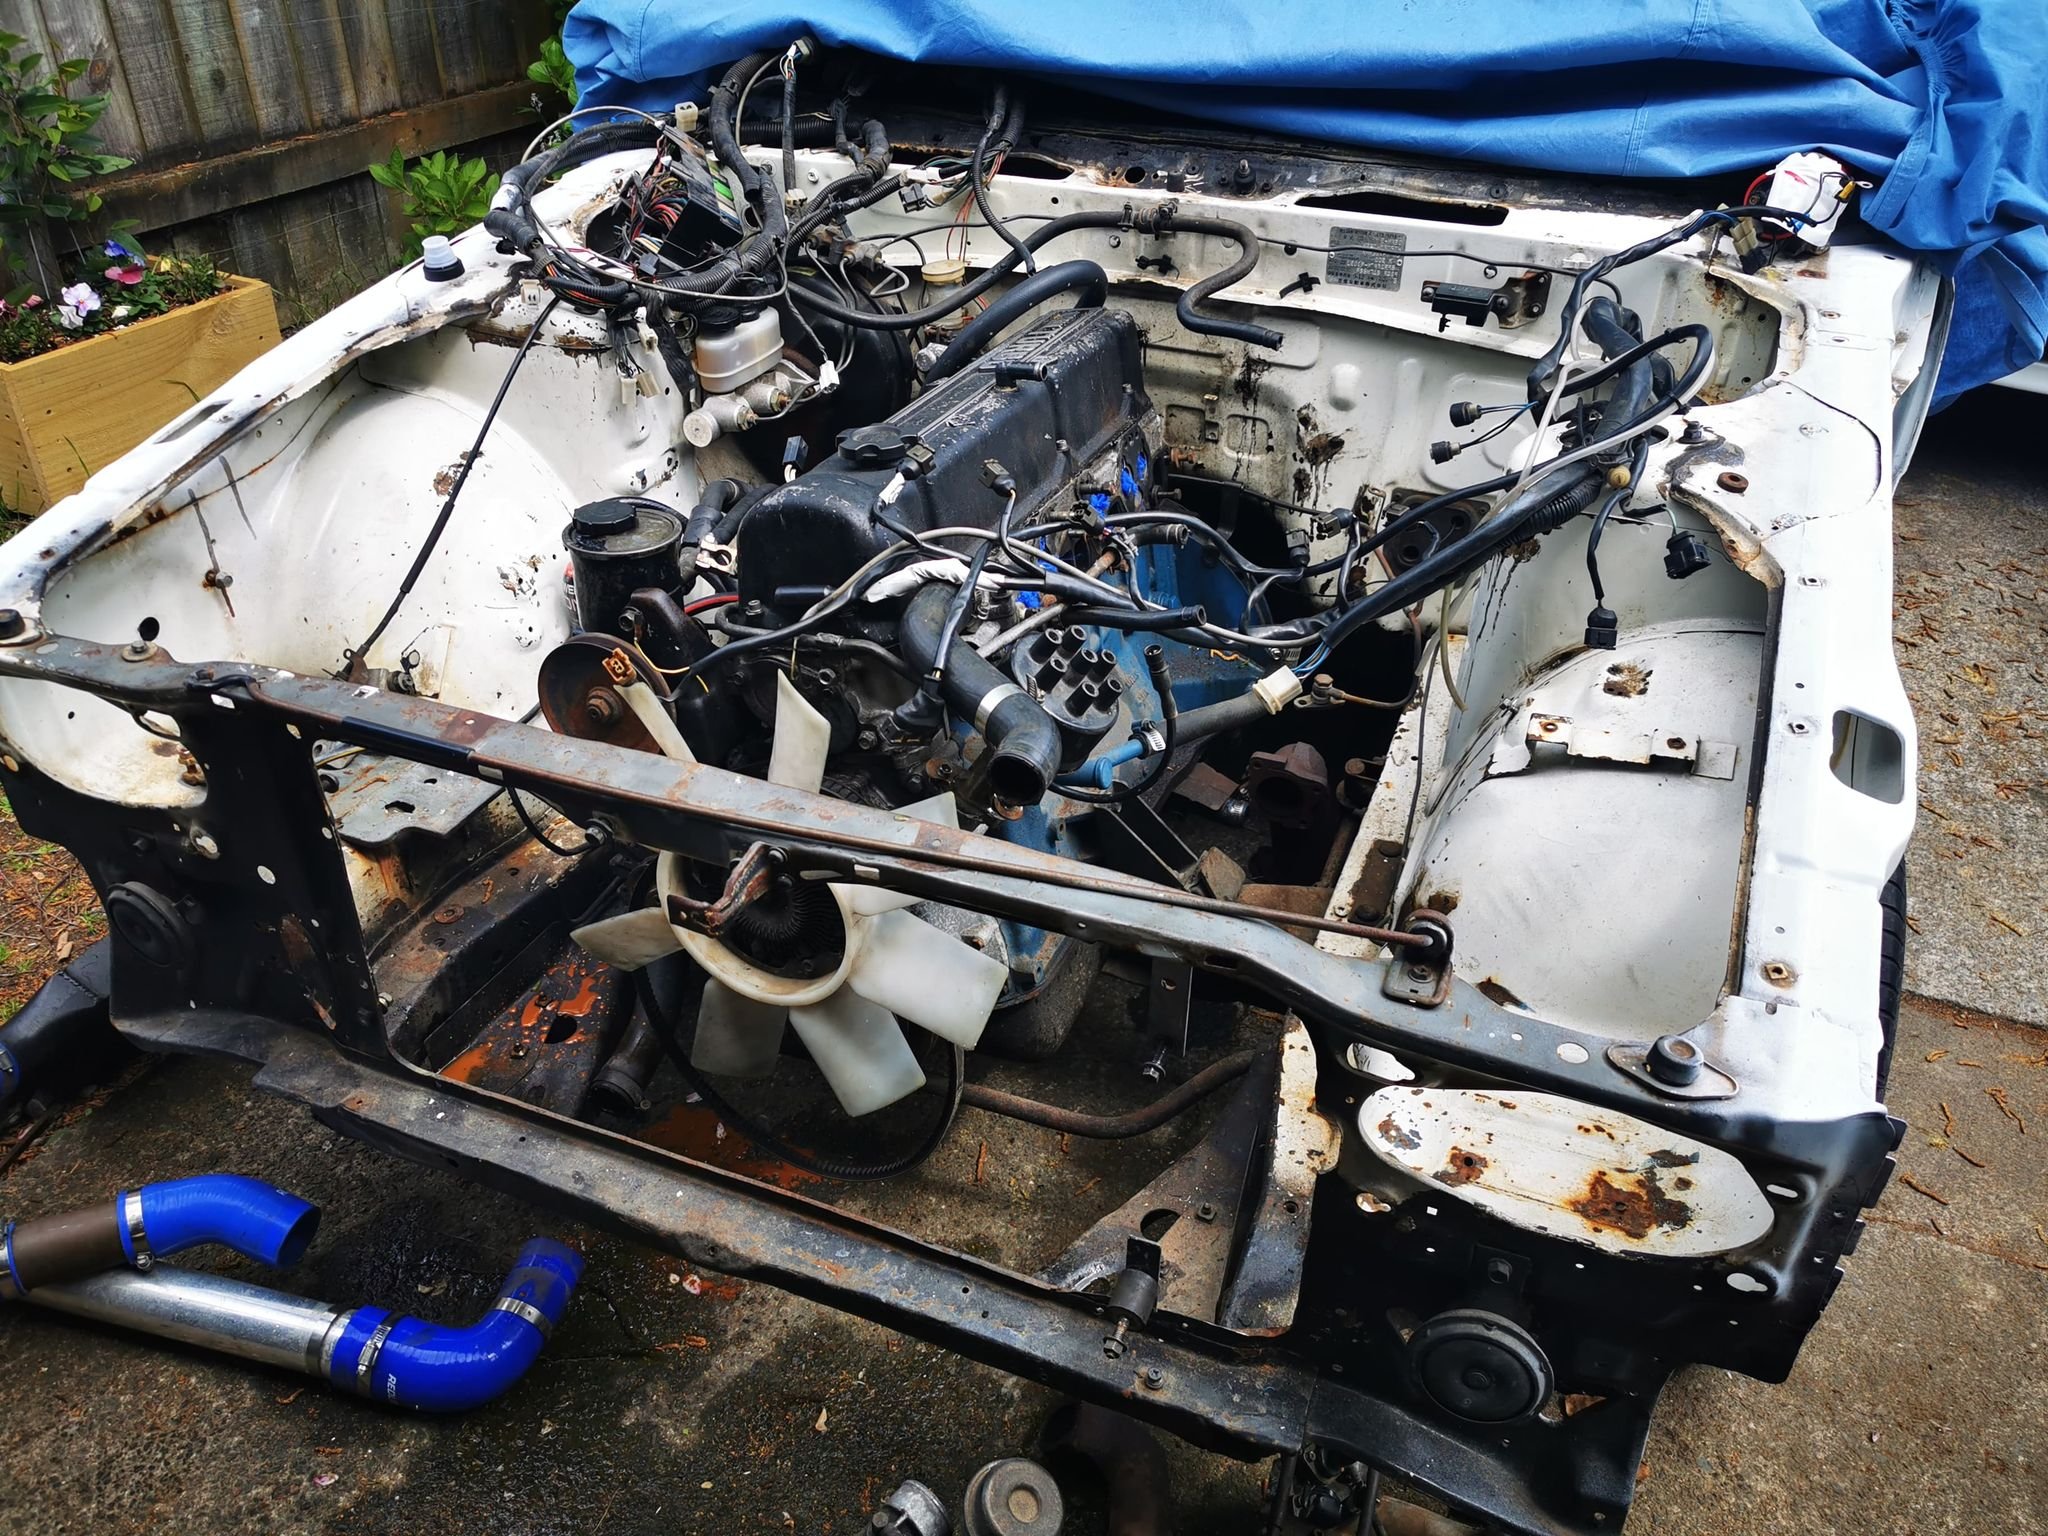
So here we are today. I've pulled mostly everything off the engine. I have the exhaust out and driveshaft out. And I'm planning to remove the gearbox today or tomorrow and then last the engine. I'll repaint the whole bay whilst i have everything out and just give the whole thing a general tidy up. The intercooler piping was horrible and I'm going to be putting in a new front mount intercooler and radiator and tossing up the idea of putting an oil cooler in as well whilst everything is apart. Unfortunately I still don't have access to a garage so keeping track of everything is a bit of a mission. I also worked out why it sounded like a hair drier and I'm surprised it was even making boost. there was a stud missing on the intake manifold and the turbo had pieces of metal all through it and in the intercooler intake piping. Here's a pic of the old l20 turbo versus the new 25det one that is going in. I'm also going to be putting in a new fuel pump at the same time as well as relocating AFM, tightening the AFM spring and putting new injectors in. I'll also be cleaning up the intake manifold and removing the rest of the EGR system that's left. Hopefully the next update will be the engine and transmission out and the bay being prepped for paint and the engine work being done.
1 point


.jpg.4f56a8a5b9341900e8cd0bd7d2b57768.jpg)
.jpg.9a6330c546893d5e2069a1038765c028.jpg)
.png.9d411fc5ab2937b3a1ee2c475091b645.png)


This leaderboard is set to Auckland/GMT+12:00