
Leaderboard


Popular Content
Showing content with the highest reputation on 04/28/21 in Posts
-
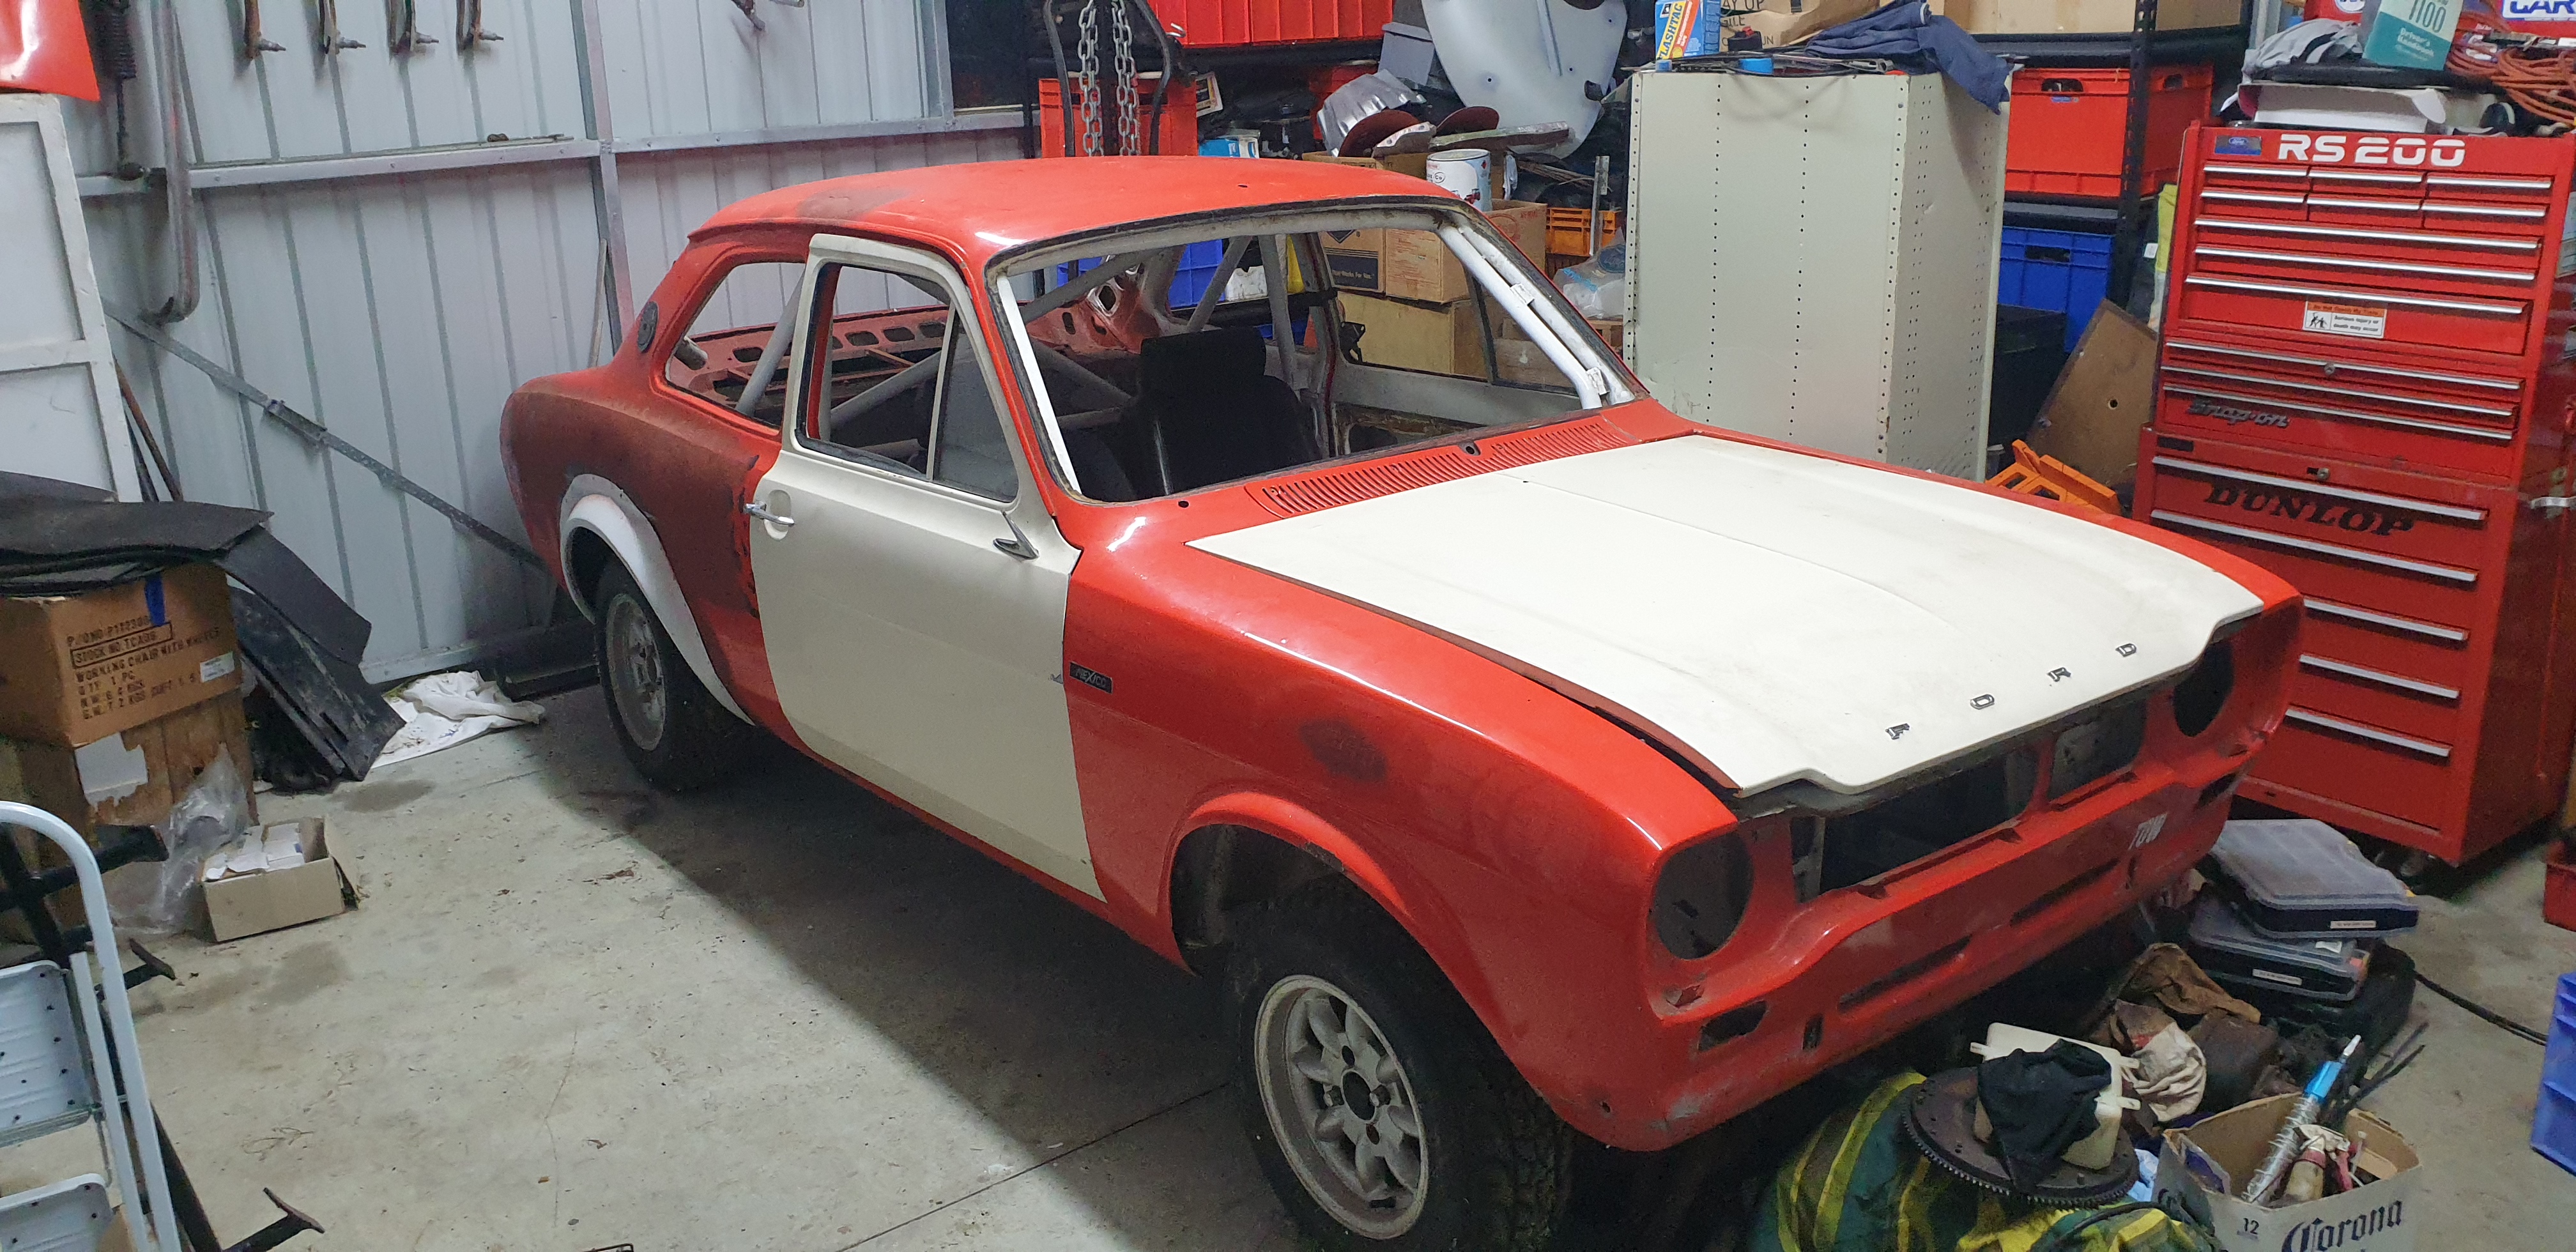
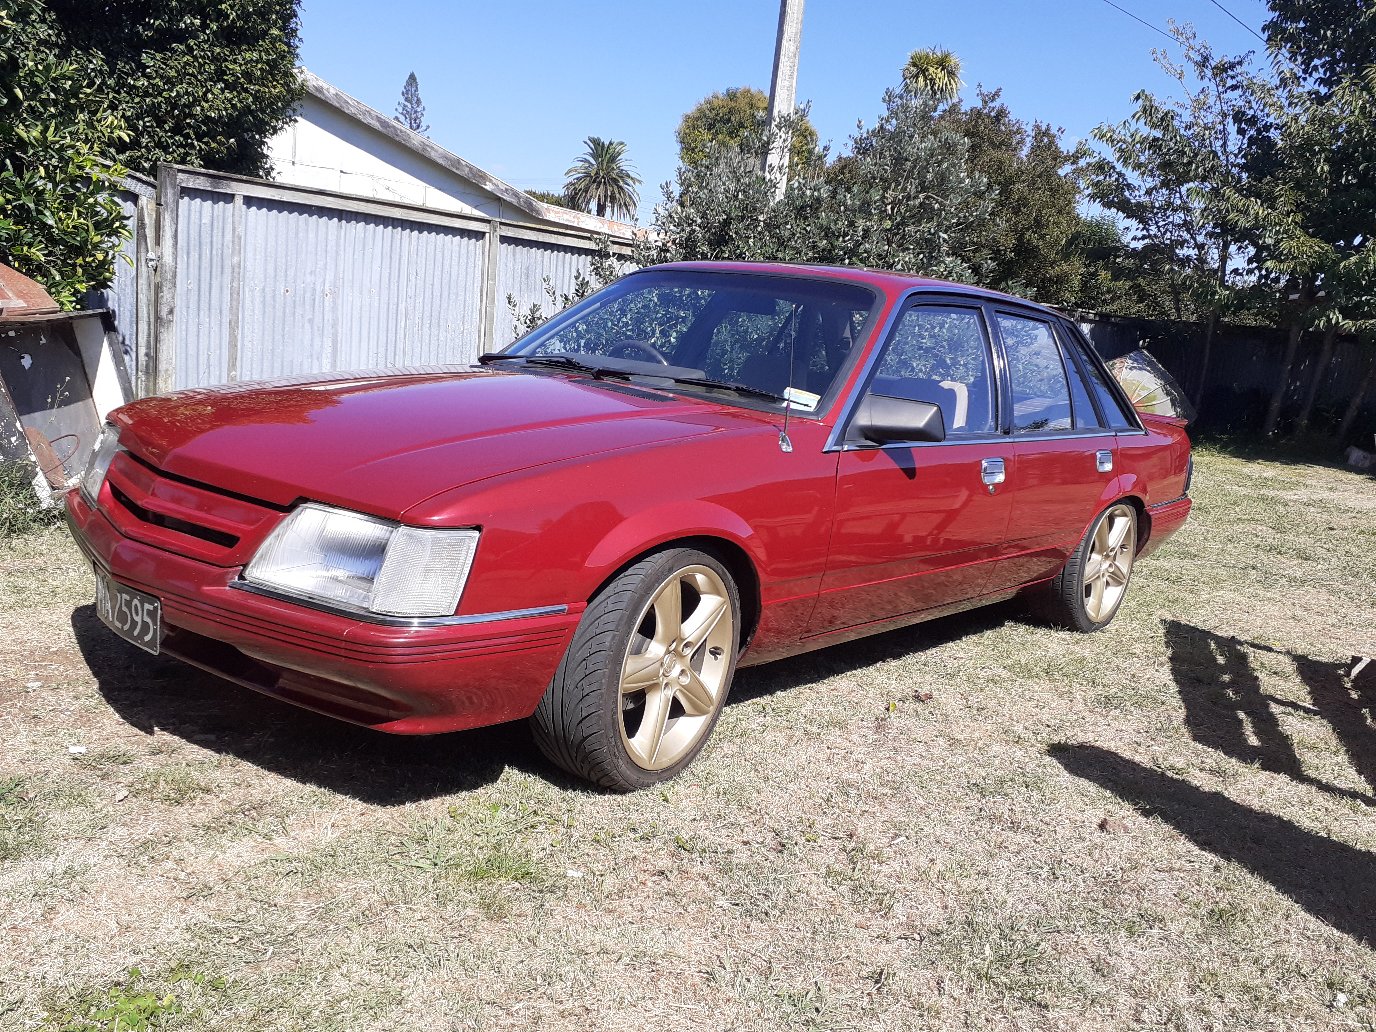
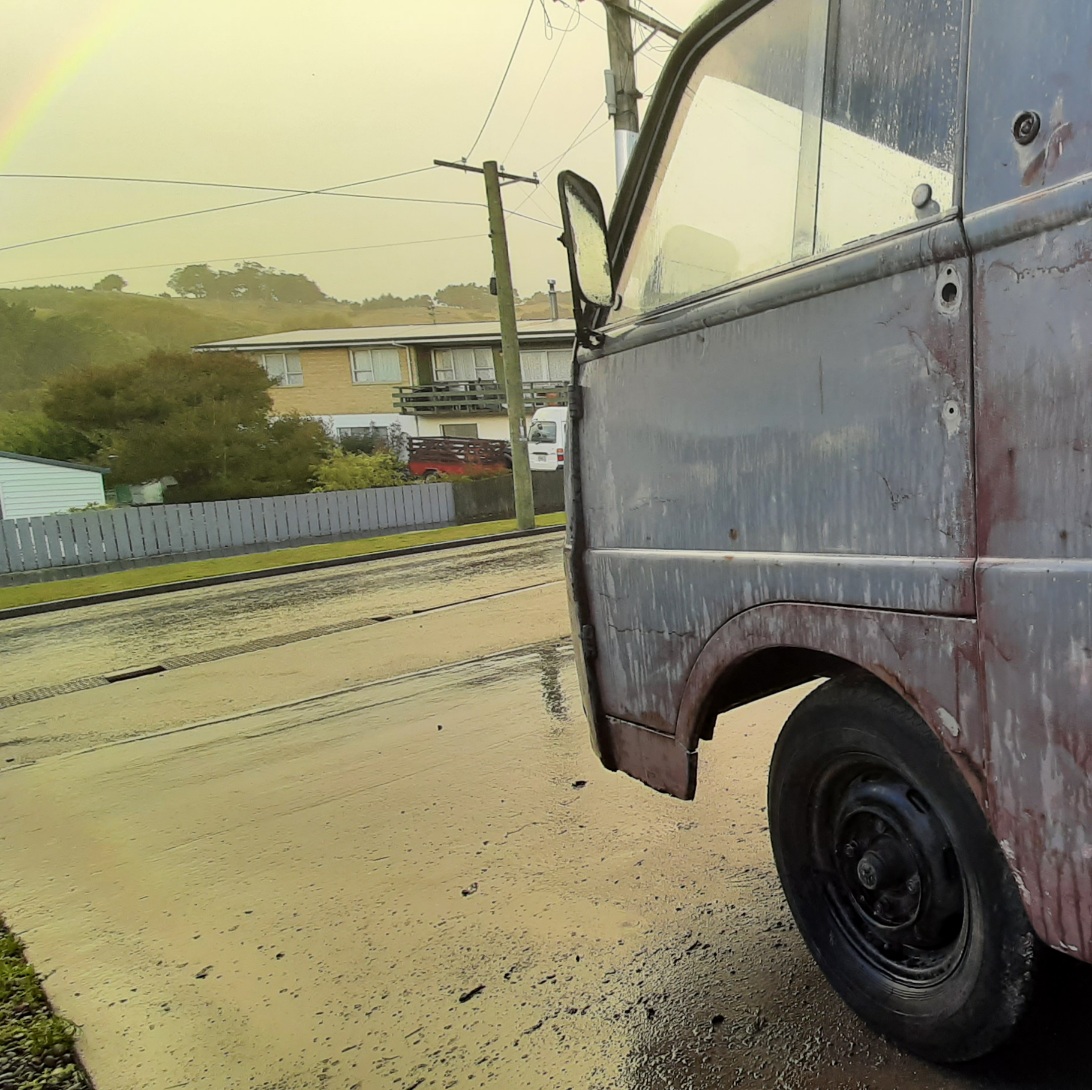
Here is a pic of one of it's last events before i parked it up .
 15 points
 -
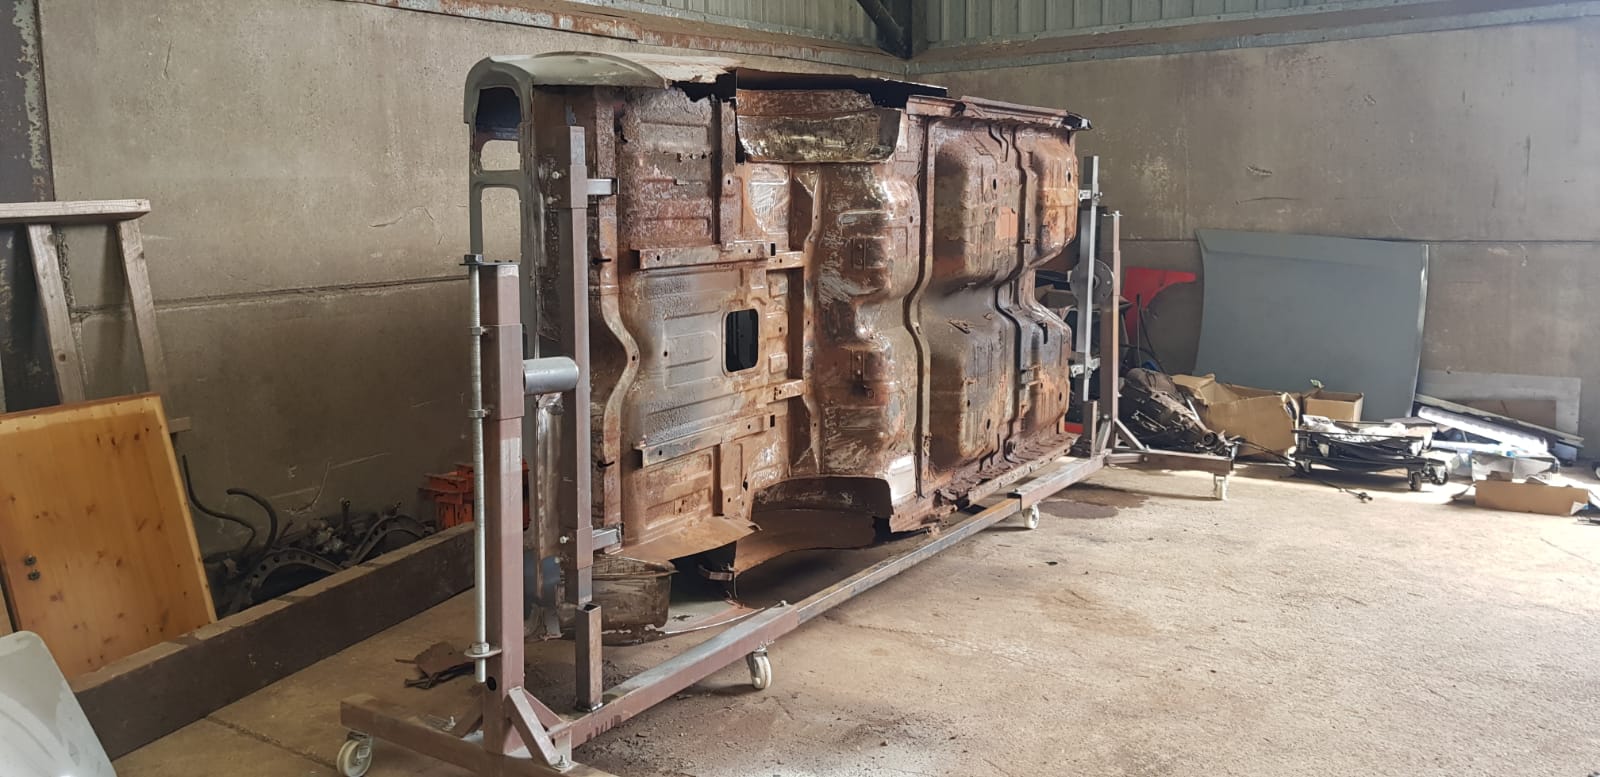
Car stripped and mounted on spit to start the paint stripping and mods.
9 points
-
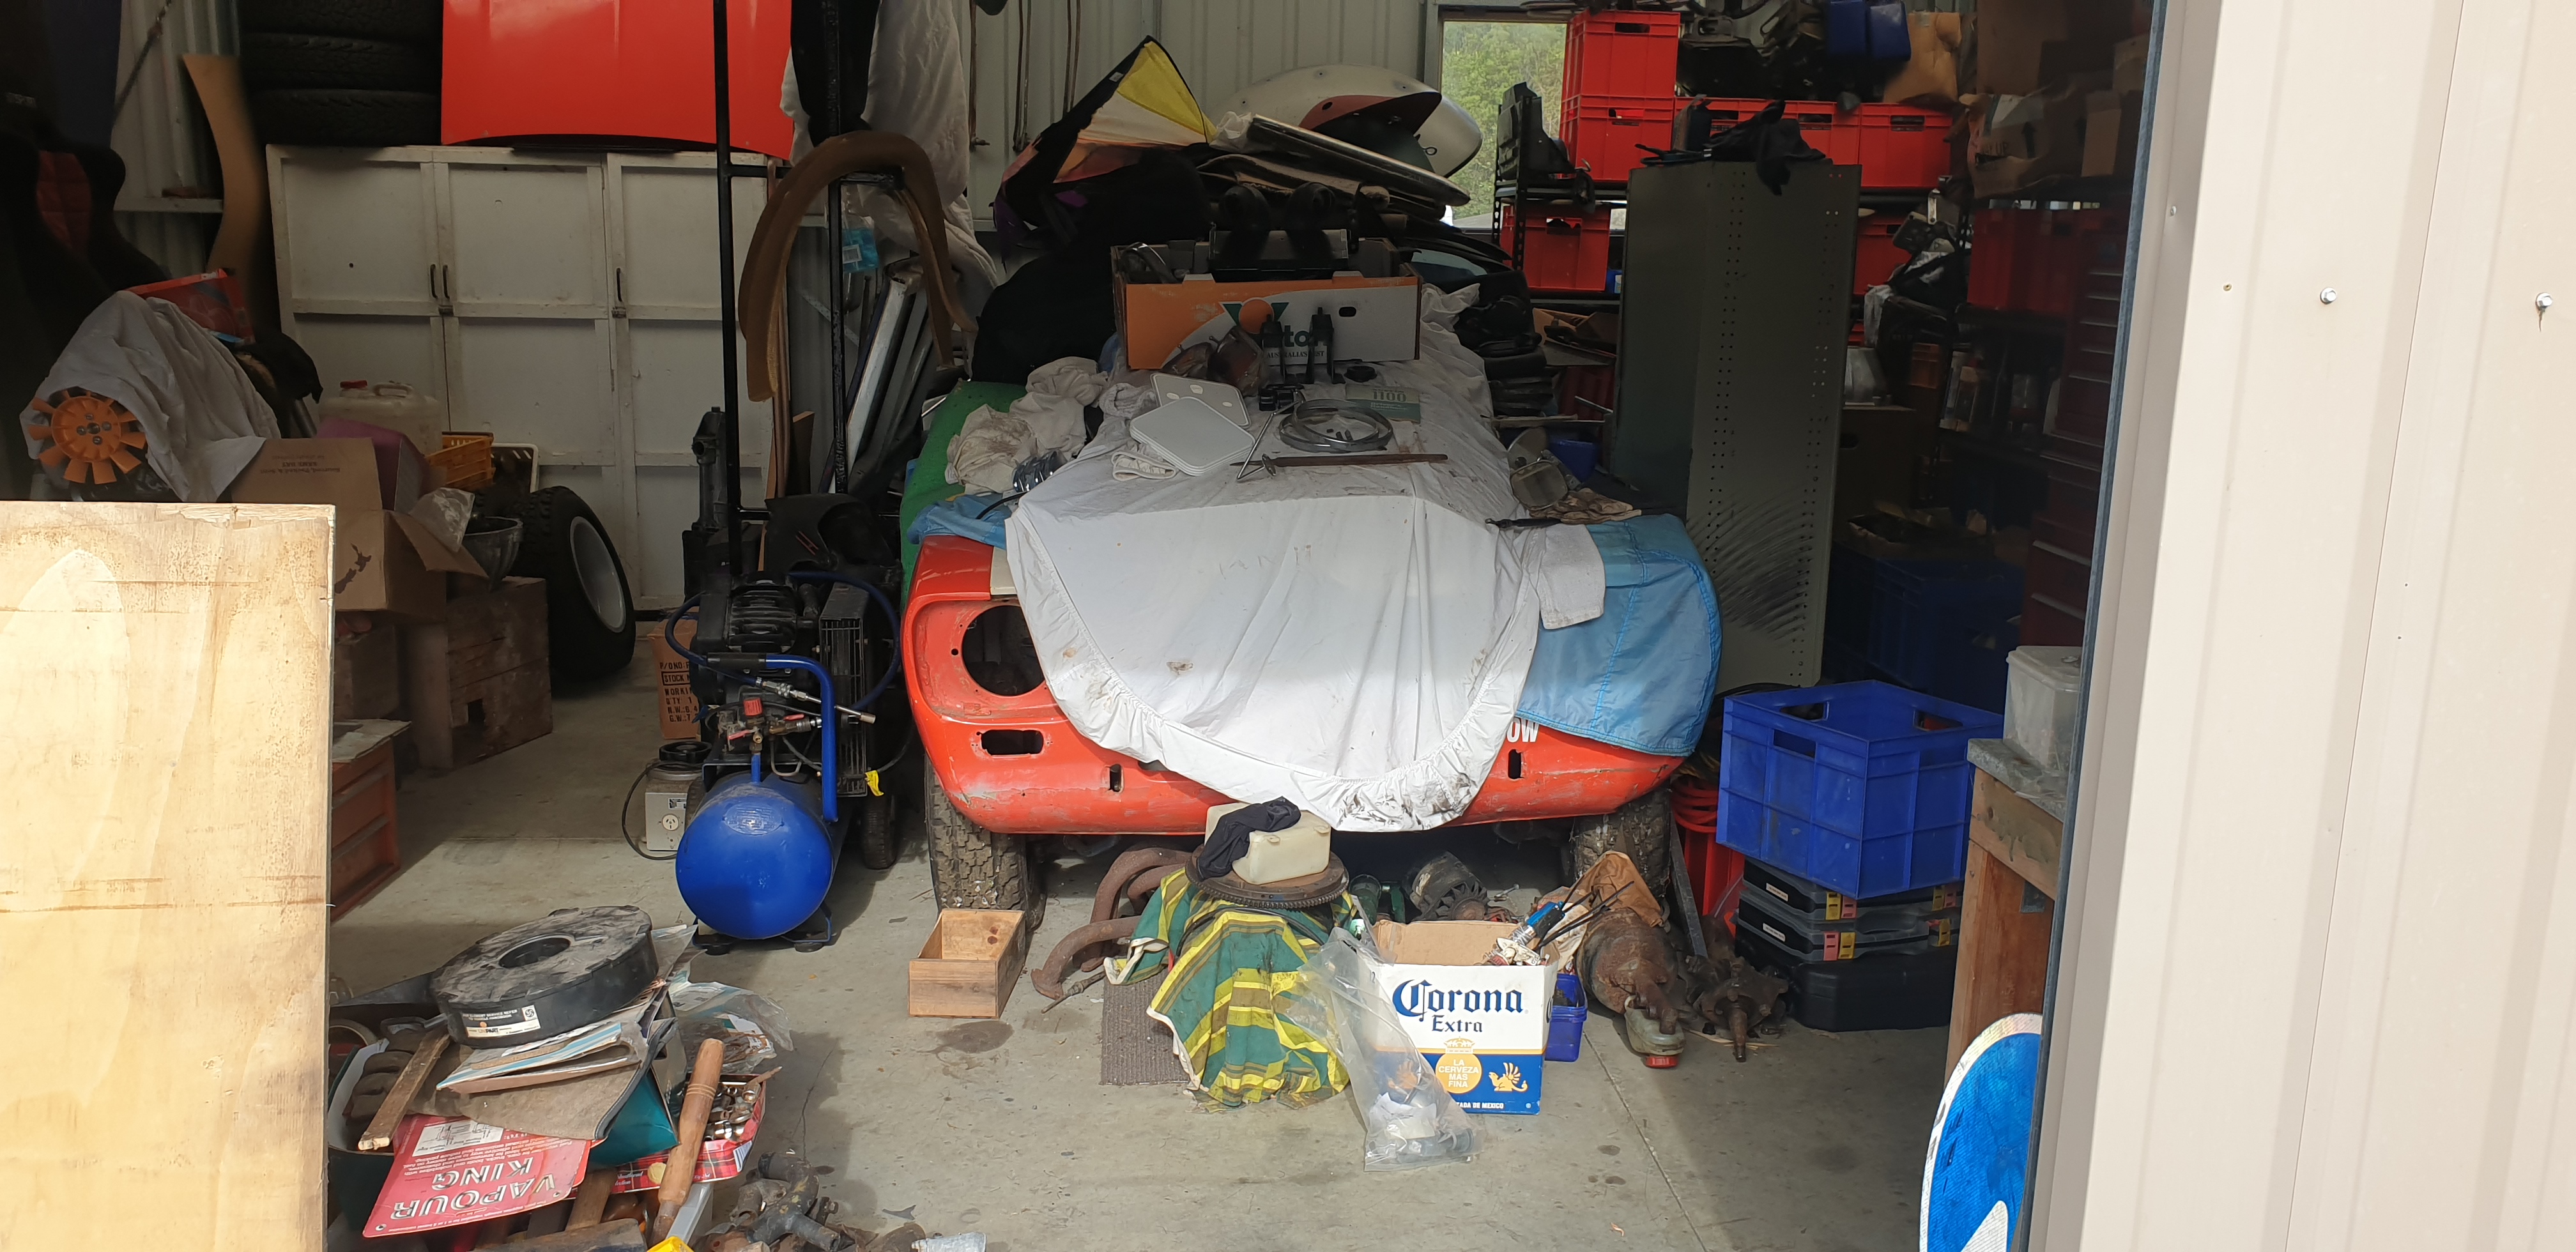
Car uncovered and looking a bit sorry for itself.
7 points
-
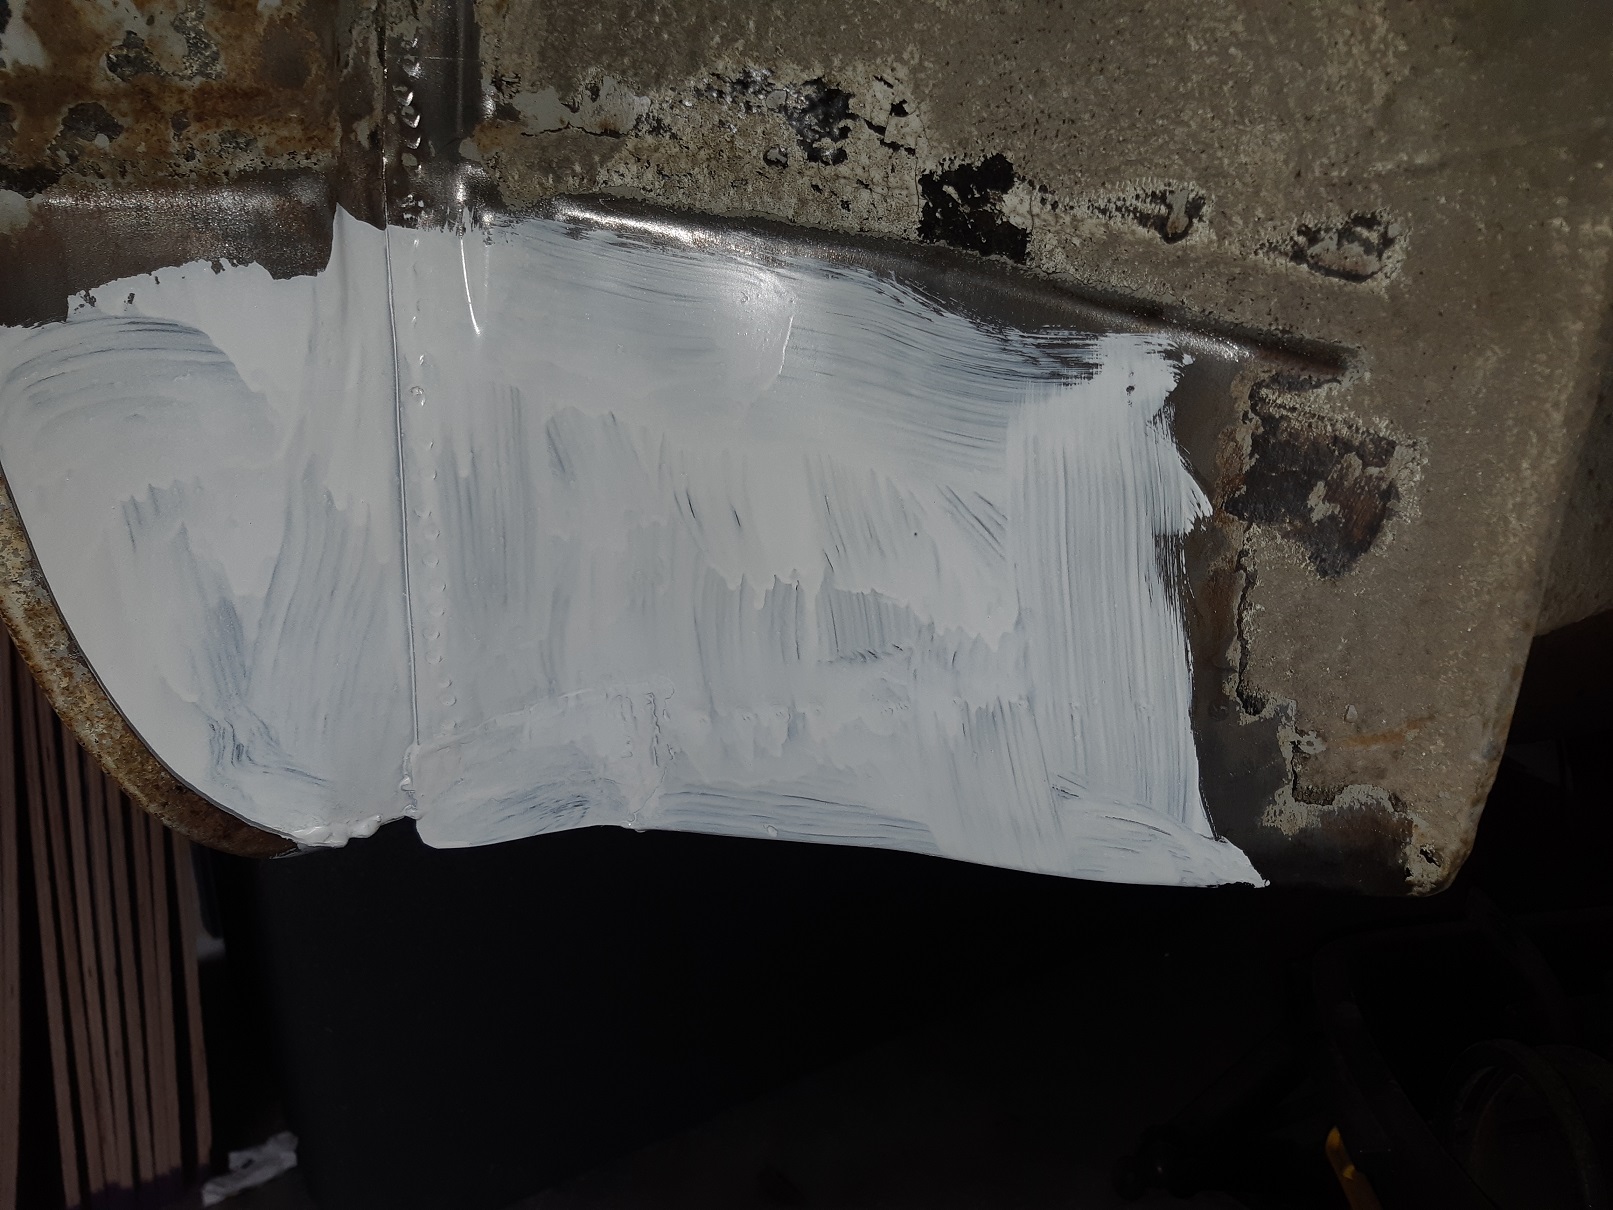
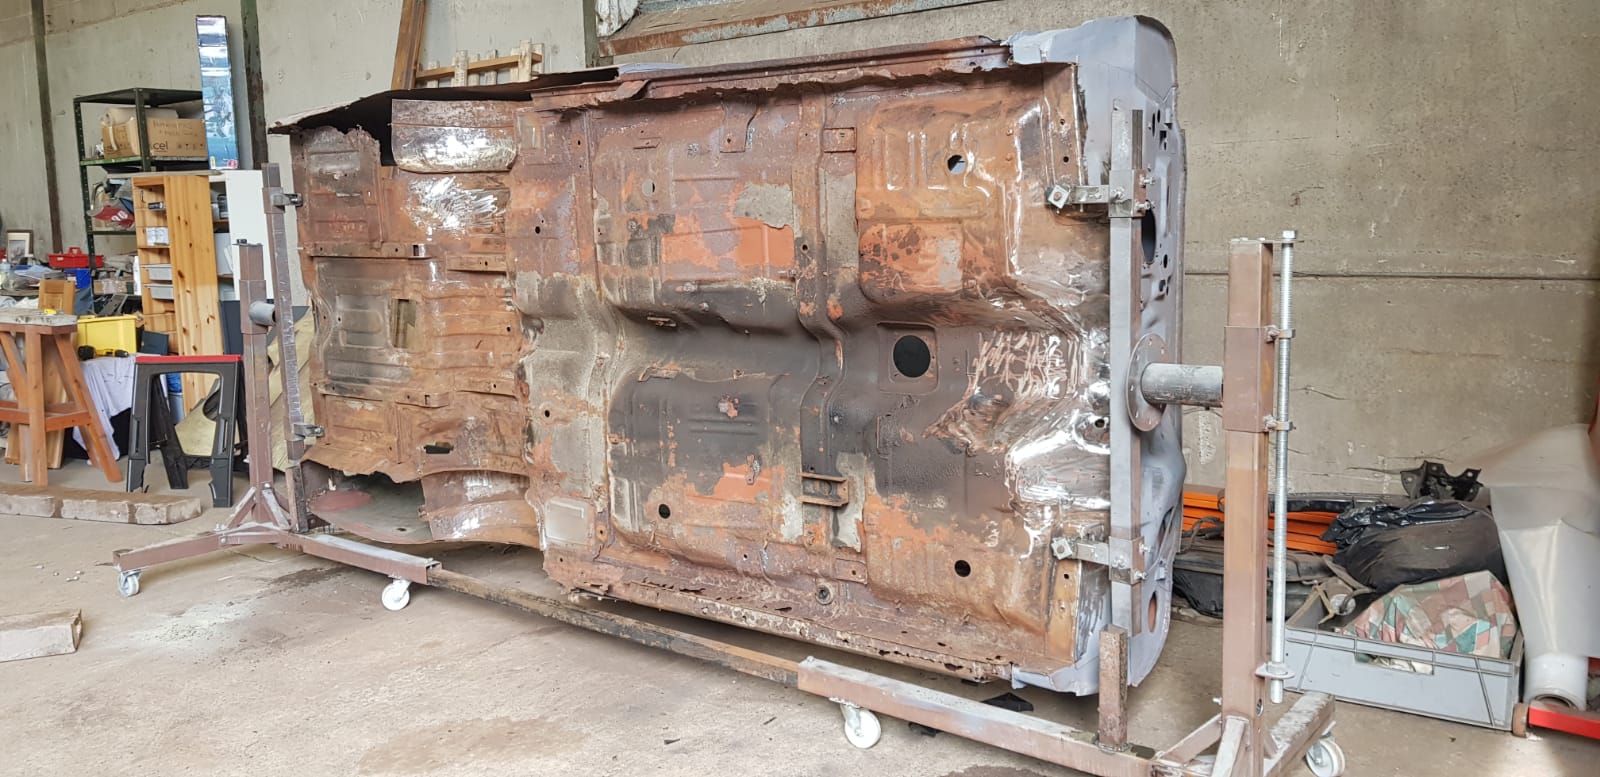
Finally rust treated and etch primed.
6 points
-
Several hours and tins of paint stripper later !
6 points
-
Hi all . Back in 1992 i built myself a Mk1 Escort rally car, i used this car for a couple of years before barrel rolling it in Woodhill forest at a rallysprint. After sourcing another shell i reshelled the car and did events in it till '99 when i parked it in container while i went on my OE. Fast forward 20 or so years... So after a gentle nudge from my partner that went along the lines of " You should do another rally before you're 50.." So i started to unearth my Escort ( it has been out of the container for about 10 years ). I will try to up load some progress shots as we go. Cheers for following!
5 points
-
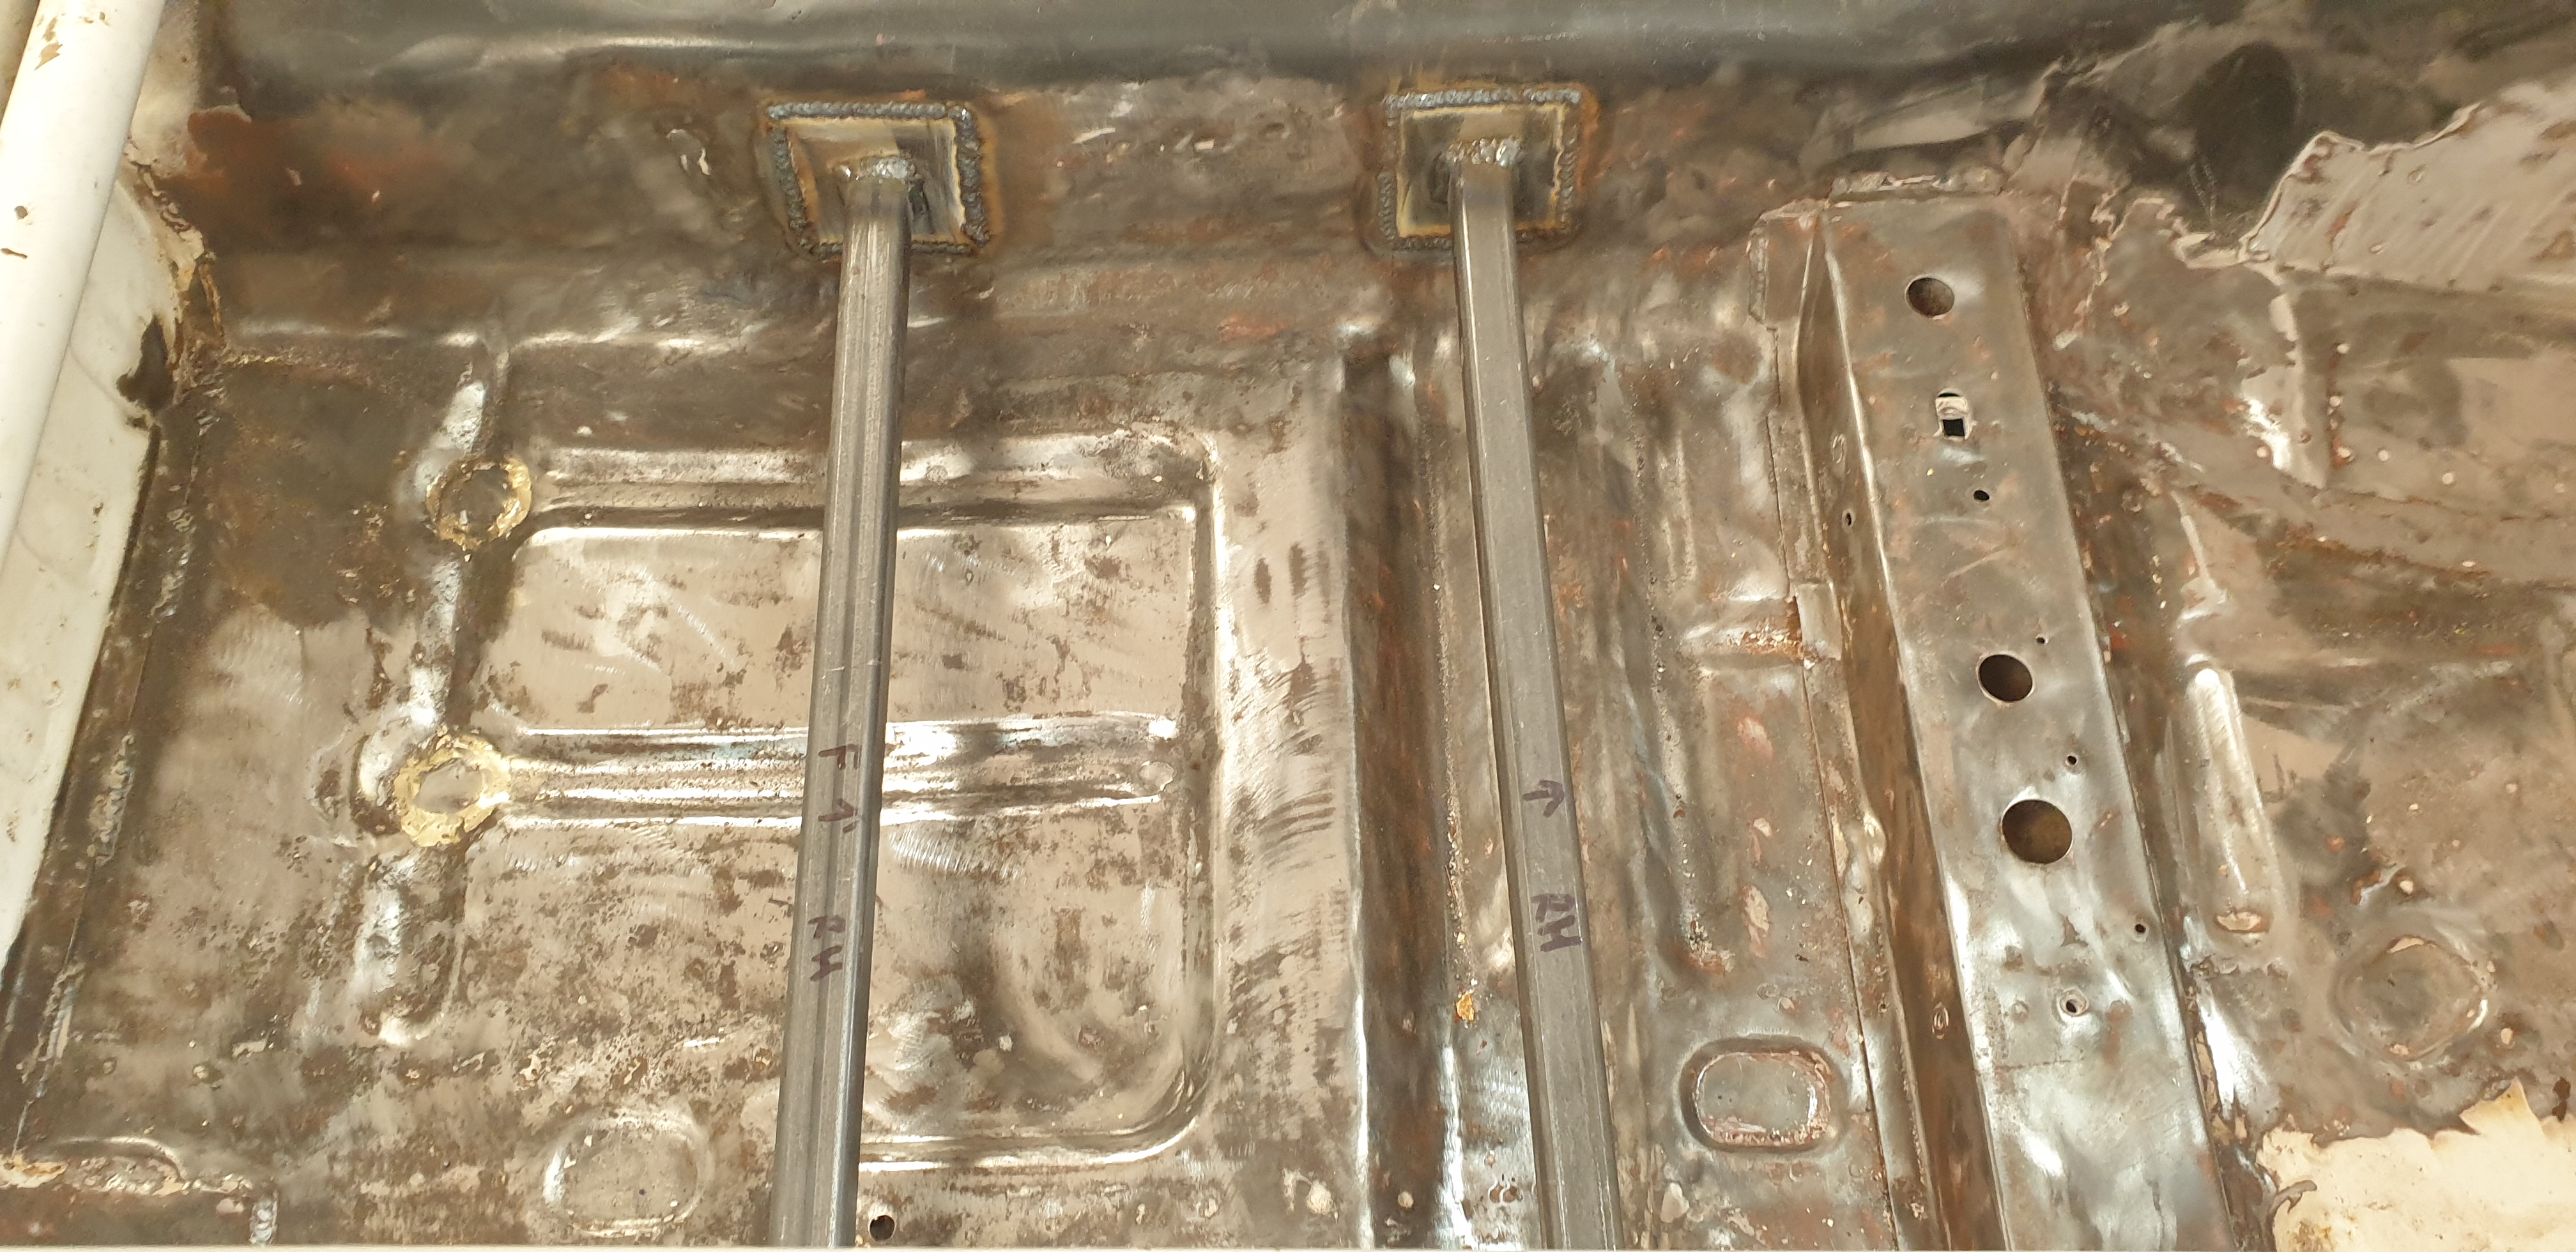
More progress of floor bare metaled and seat rails welded in.
4 points
-
can they be trusted to find it when the time comes?4 points
-
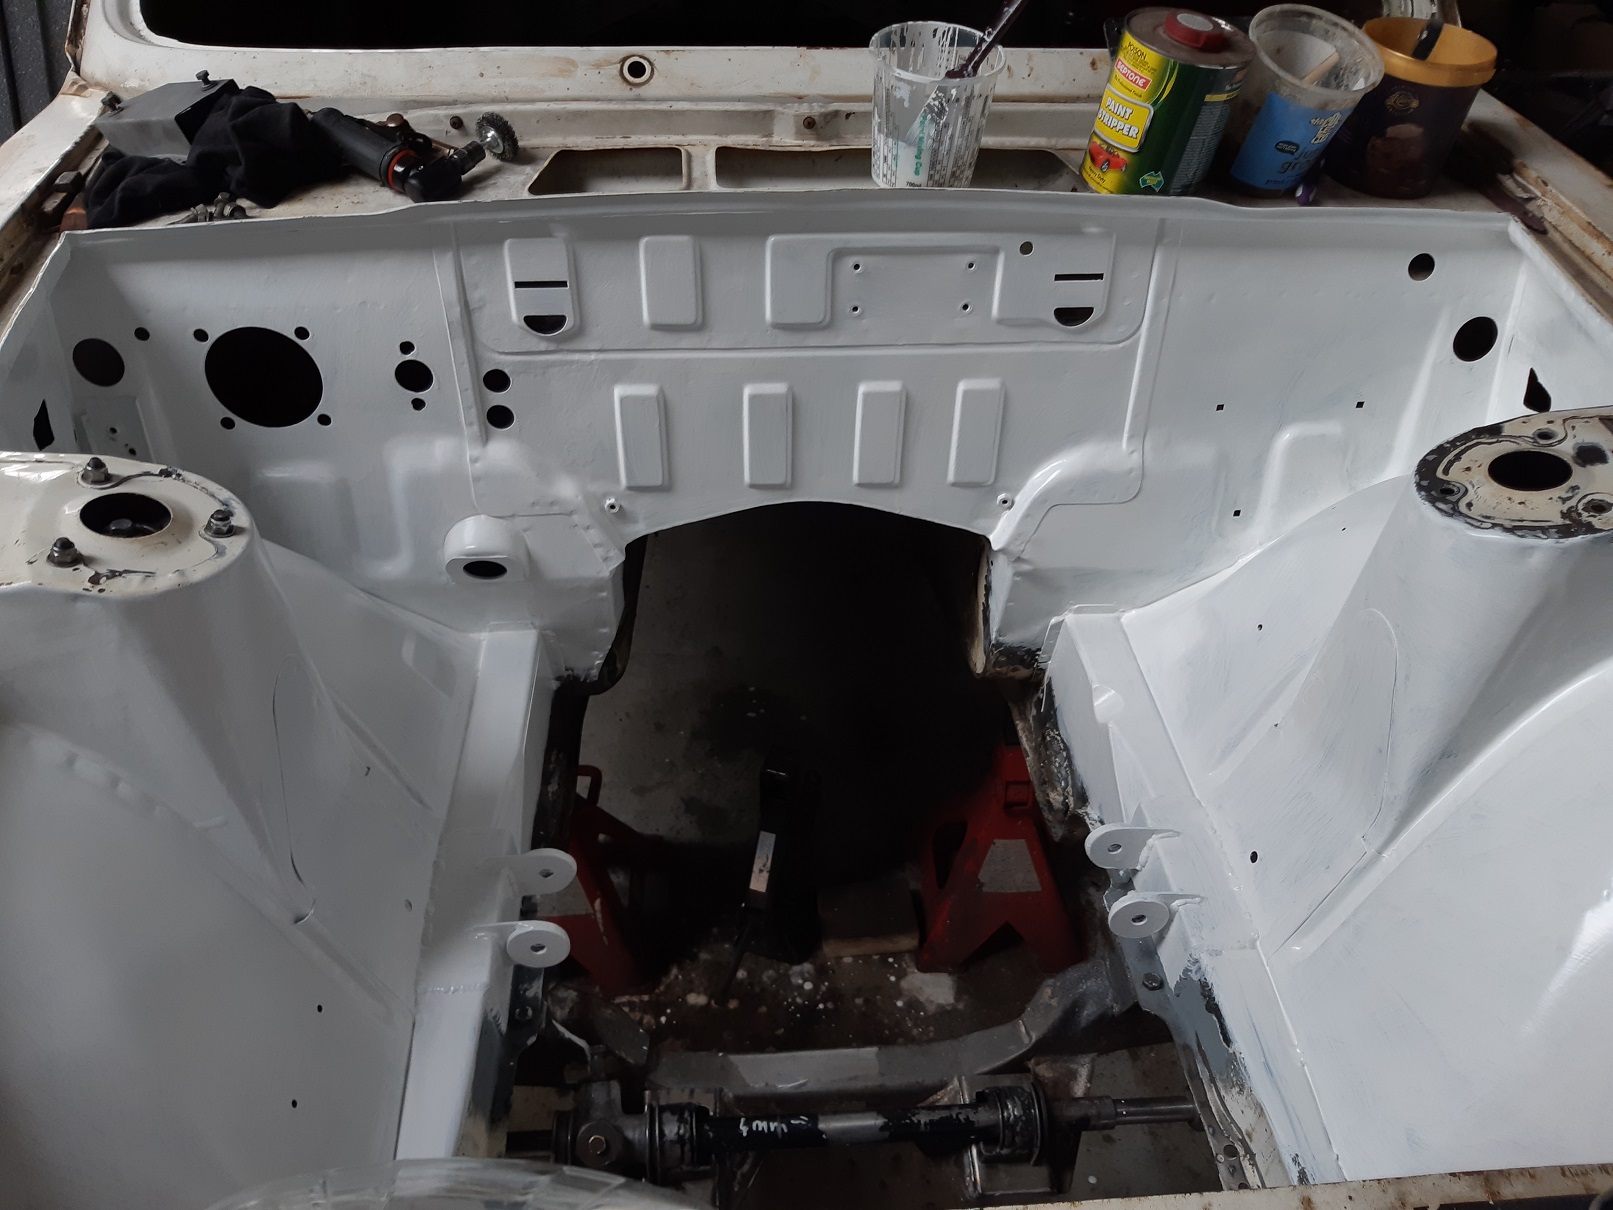
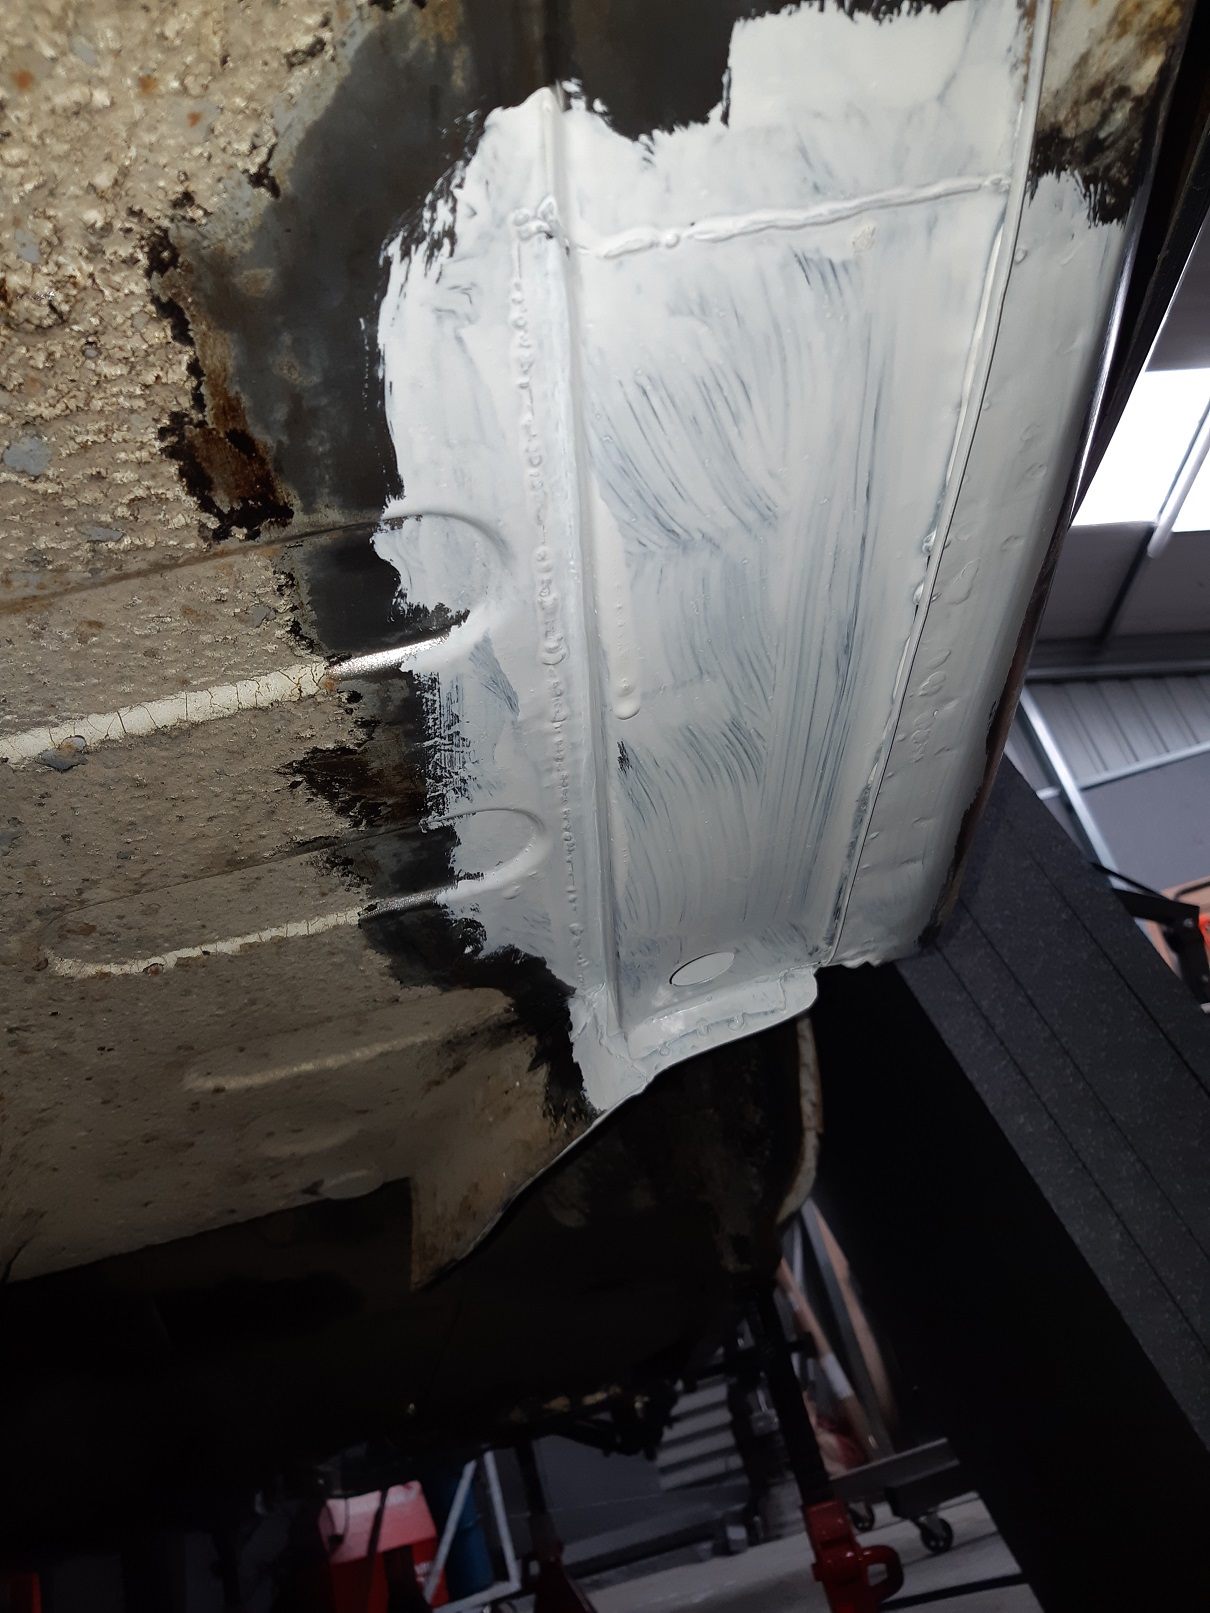
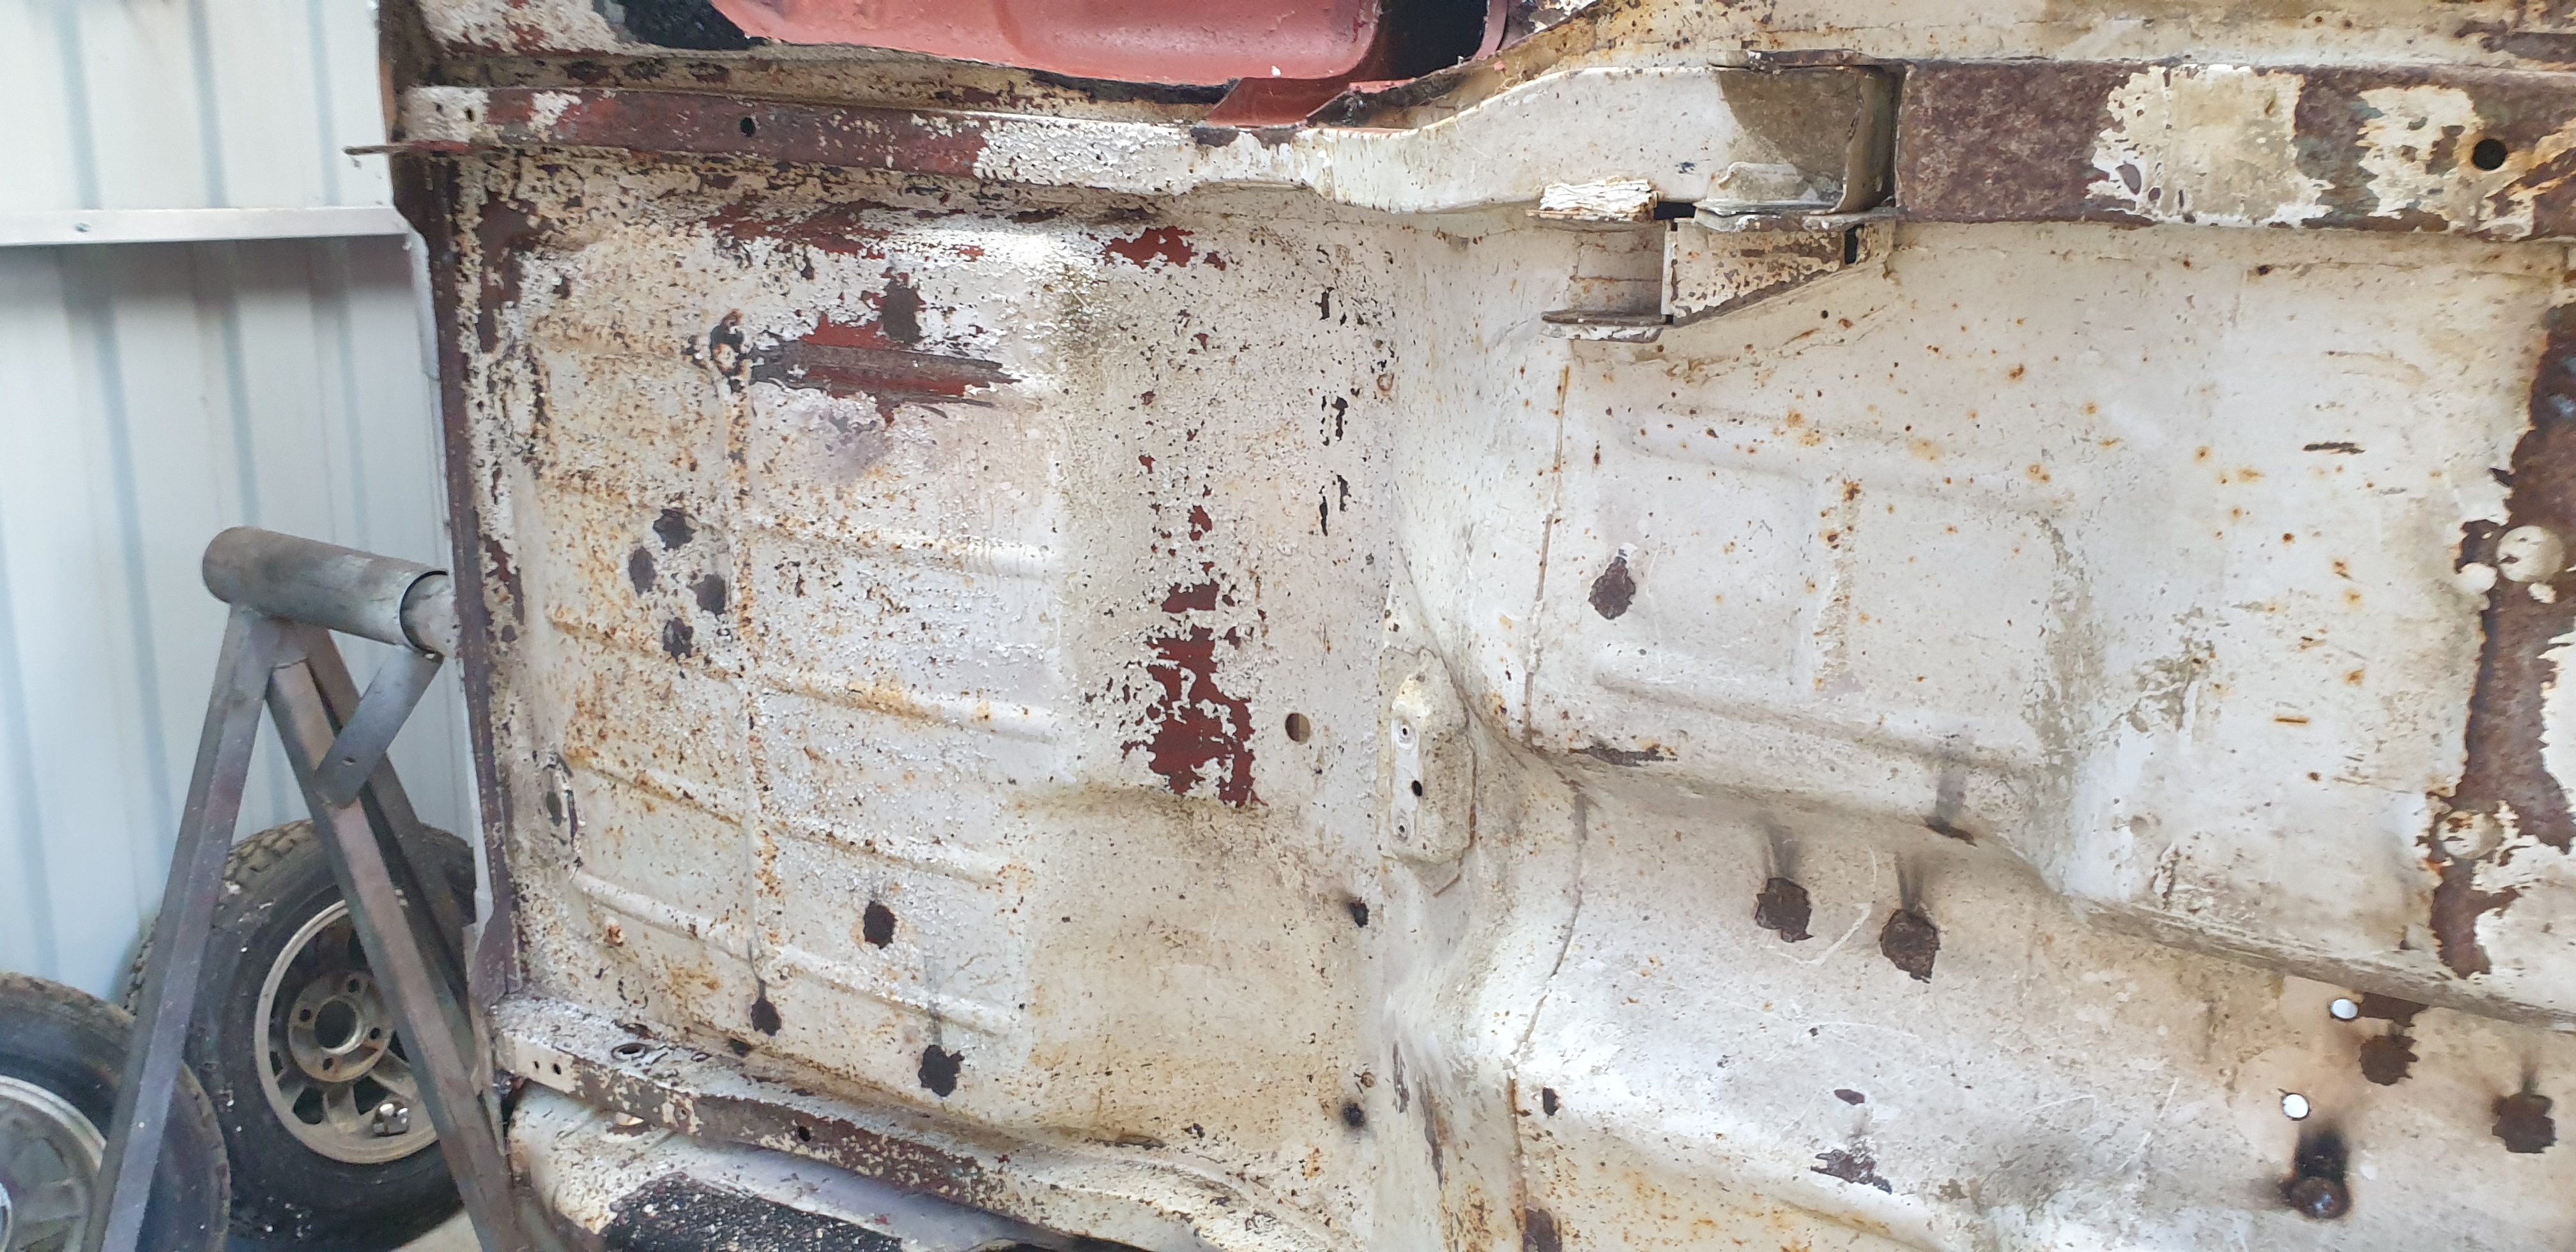
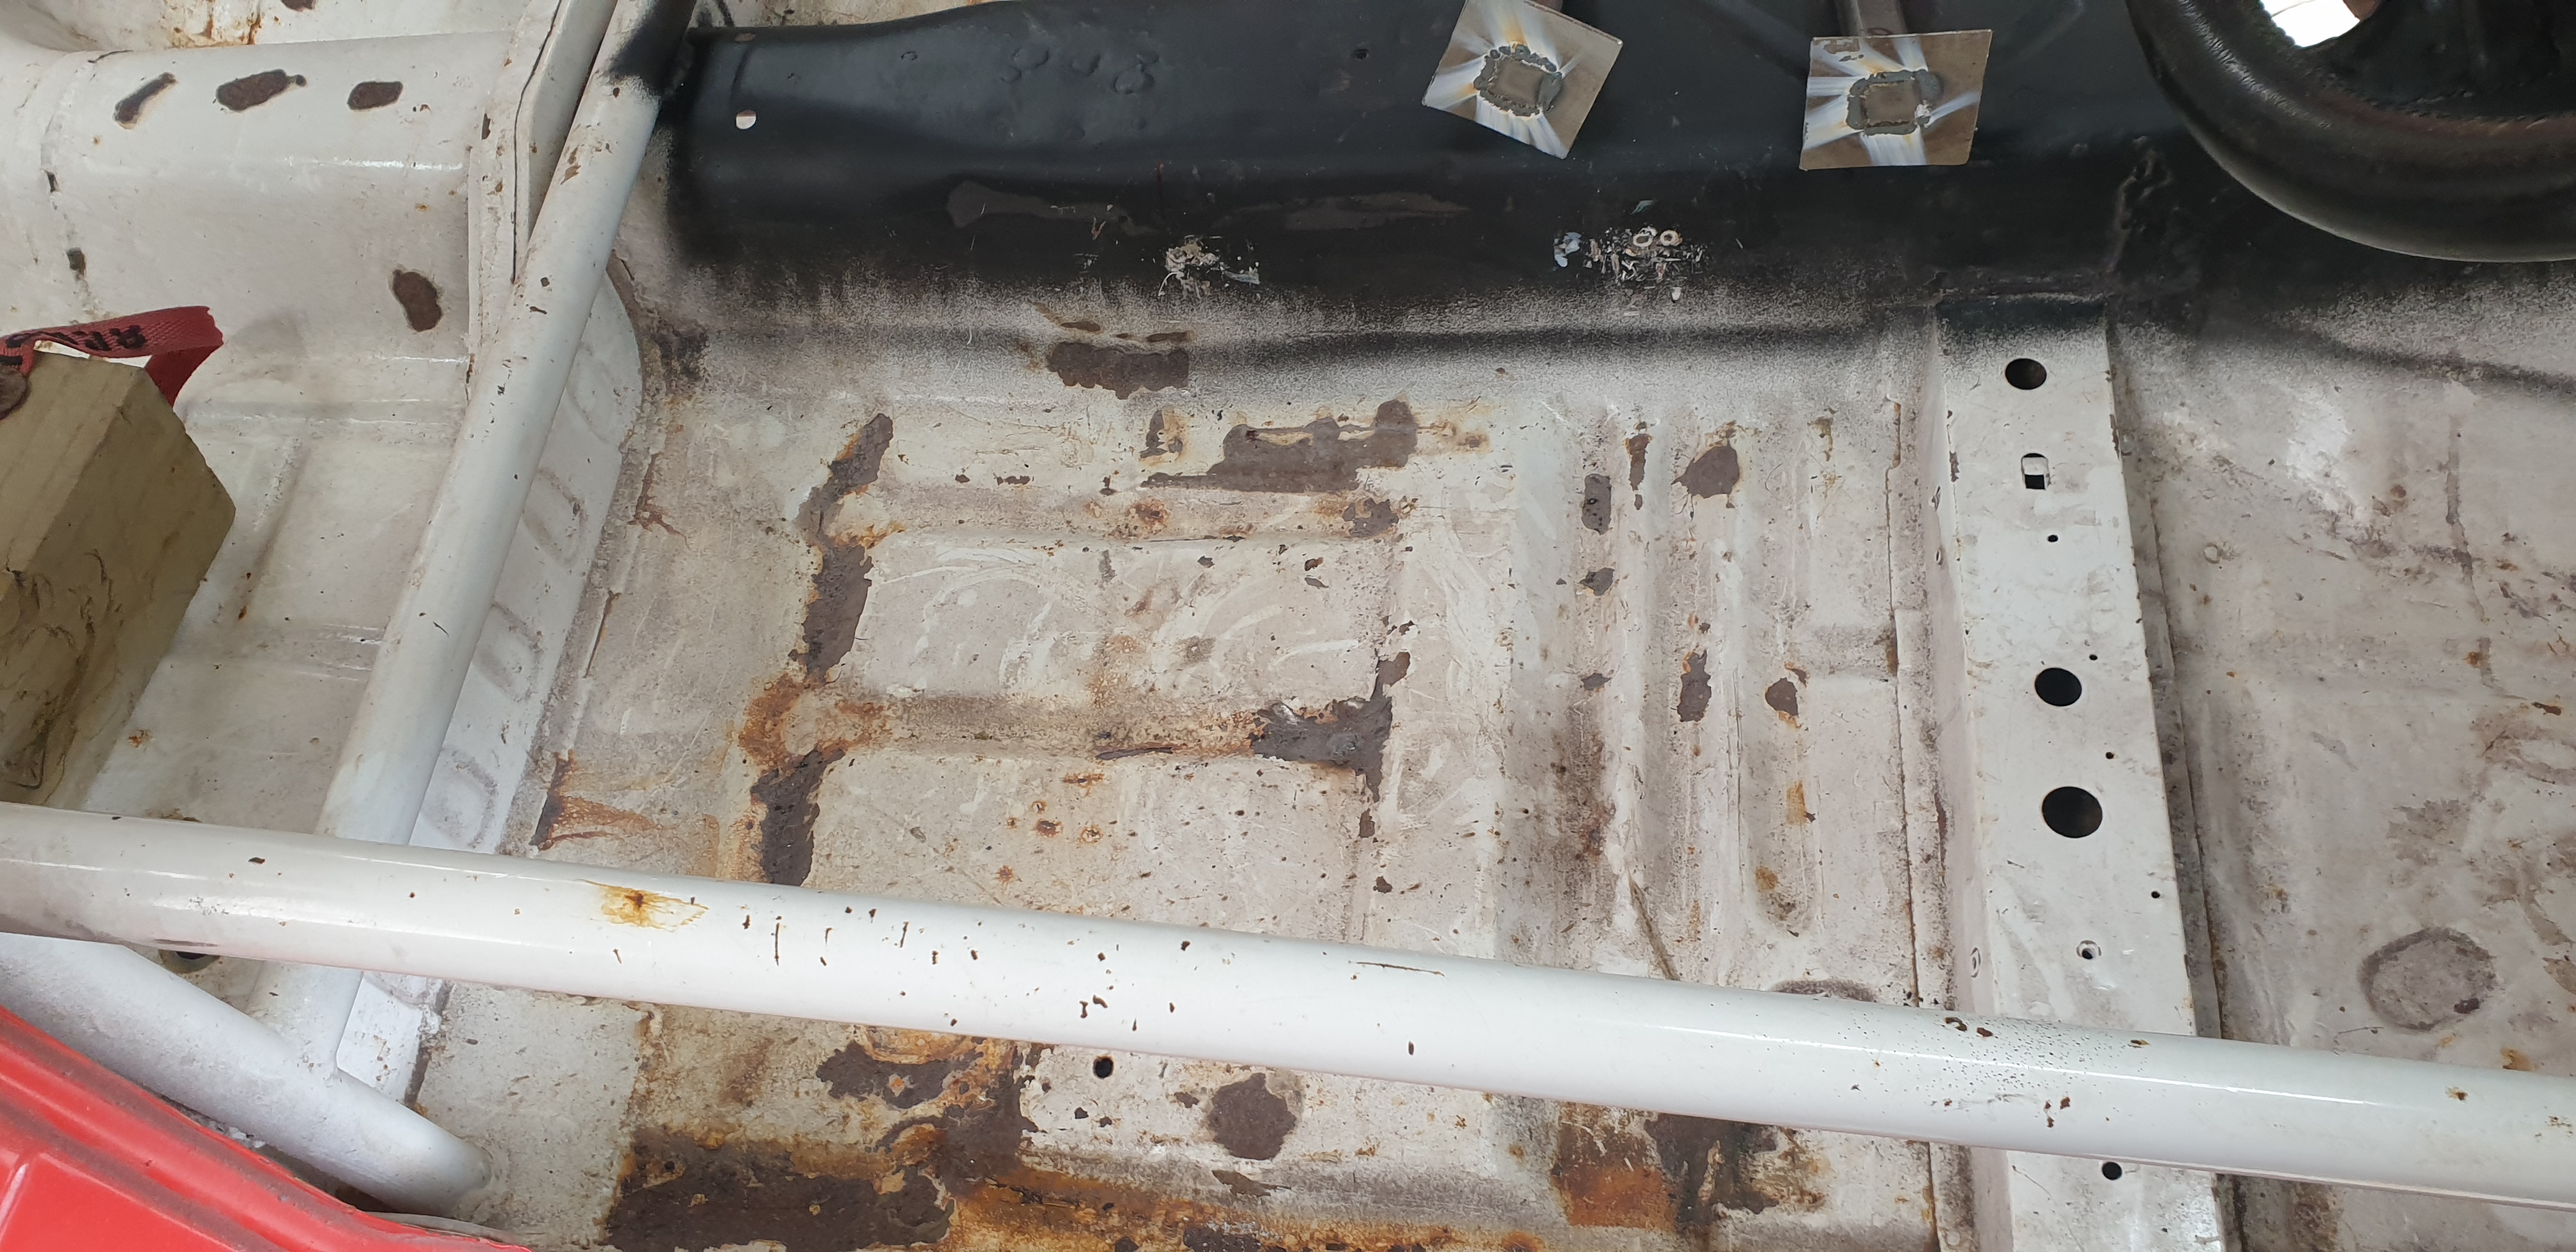
I had some areas of bare metal where I had made repairs or modifications. They kept getting minor surface rust, so I thought I should really get around to painting them with epoxy. The prep around the firewall was awful. All the seam sealer was bituminous tar stuff. So there was many hours of heat gun and scraping and rags soaked in kerosene and manual wire brushes to remove it. Then I needed to remove the paint because there were areas with surface rust and others where rust was creeping under the paint. So that was more many hours of knotted wire brush on the grinder. And the 3M abrasive pad thing on the grinder. And chemical paint stripper on the larger flattish areas and more scraping. Then there are lots of narrow spaces and gaps and corners I can't get into with the grinder. I found some reasonably priced little wire brushes at mytools.co.nz that were rated to use in a die grinder at 20000rpm without exploding. I also used small abrasive pads in the die grinder. Then I dusted it off with the air gun and wiped it all down with a cloth soaked in prepsol. And dried it off with the heat gun. And brush painted it with protec 408 epoxy primer. The engine bay has had two coats, the repair in the boot has only had one. I have some modern seam sealer to use. Hopefully it hasn't all gone hard... I think I might have bought it a couple of years ago.
4 points
-
May as well go non grease all the way through. Almost everything runs non greasy, and it's not like you're stressing them. Coz, Marina... Up to you. I've done 400,000km and 35 years on non greasy joints and only one is fucked.3 points
-
You realise no one is ever going to plate and tag a Wolseley right? Yeah that's why they didn't look too hard. They only do it to desirable cars.3 points
-
Builders weren't going to wait on the roofer so got the sheet delivered and started on it themselves. My spare shed is brimming with building materials so with the roof on they can plow on with the rest now that the weather has turned here is the south. 3 waters contractor was round to put in the new water connections, cant recall what the cost was for this (was in the total contract) but shouldnt be too much with such a short run. New power connections due in a few weeks also. Had a brief chat with my lawyer this morning, just to sign an easement to the council over their sewer main, and a private one for the sewer connections into the new lots. Title should be easy (and apparently not too much of a wait at the moment). We are also having thoughts on just selling up the whole lot and just buying or building somewhere else, I have the pricing to do the relocate (60k+) but the hassle/financing factor plus the residual value of the bare sections, added to the fact availability of lifestyle blocks is getting harder means we are weighing up our options. Watch this space, happy to receive questions also, I've had a few PMs along the way.
3 points
-
Brief spec on the car before the rebuild was 1600cc Xflow, Kent 244 cam, big valve head with double springs and steel rocker posts and solid spacers. Datsun pistons and twin 45mm Webers. 4 speed Straight cut , close ratio Tran-x gear kit. English axle with a steel plate type LSD 4.9:1 Ratio. Two link rear end. 4 wheel vented discs and bilstein shocks all round. Quick rack and a world cup cross member. All pretty normal for a rally car of that era. Plans for the rebuild are making it look more like a period works escort of the 70's, ie. Satin black interior with correct works twin cowl dash and centre console, correct smiths gauges etc etc. Improving the rear suspension travel by adding mini tubs and a diff tunnel. Adding a panhard rod, proper seat rails and sill mounted jacking points. I will still use the Tran-x 4 speed and same rear axle, i may have to change to a 5:1 diff ratio tho with the new engine.3 points
-
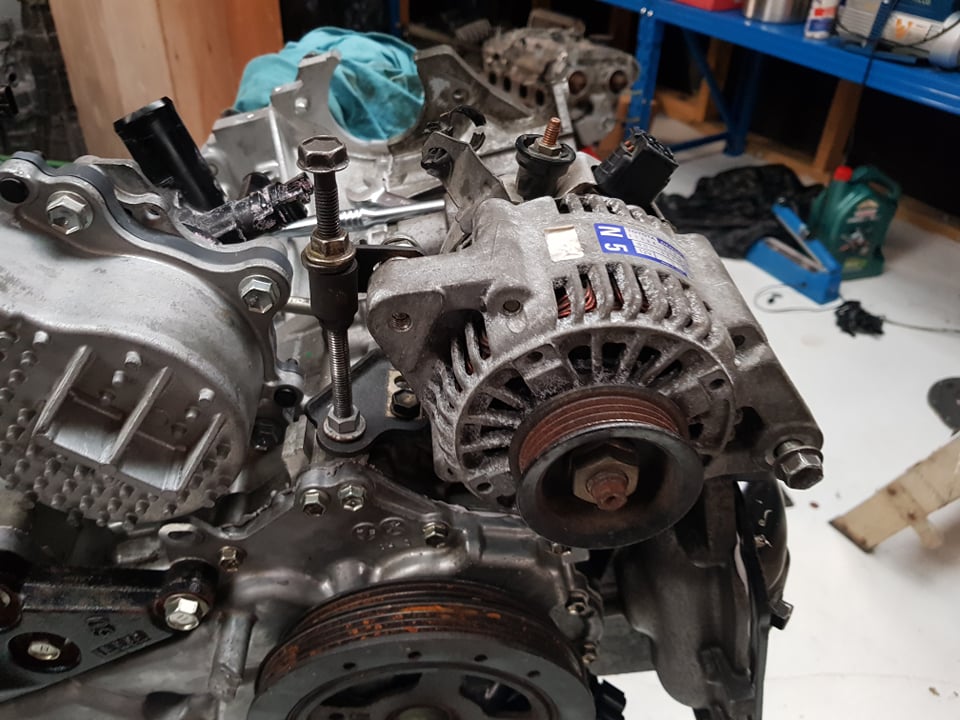
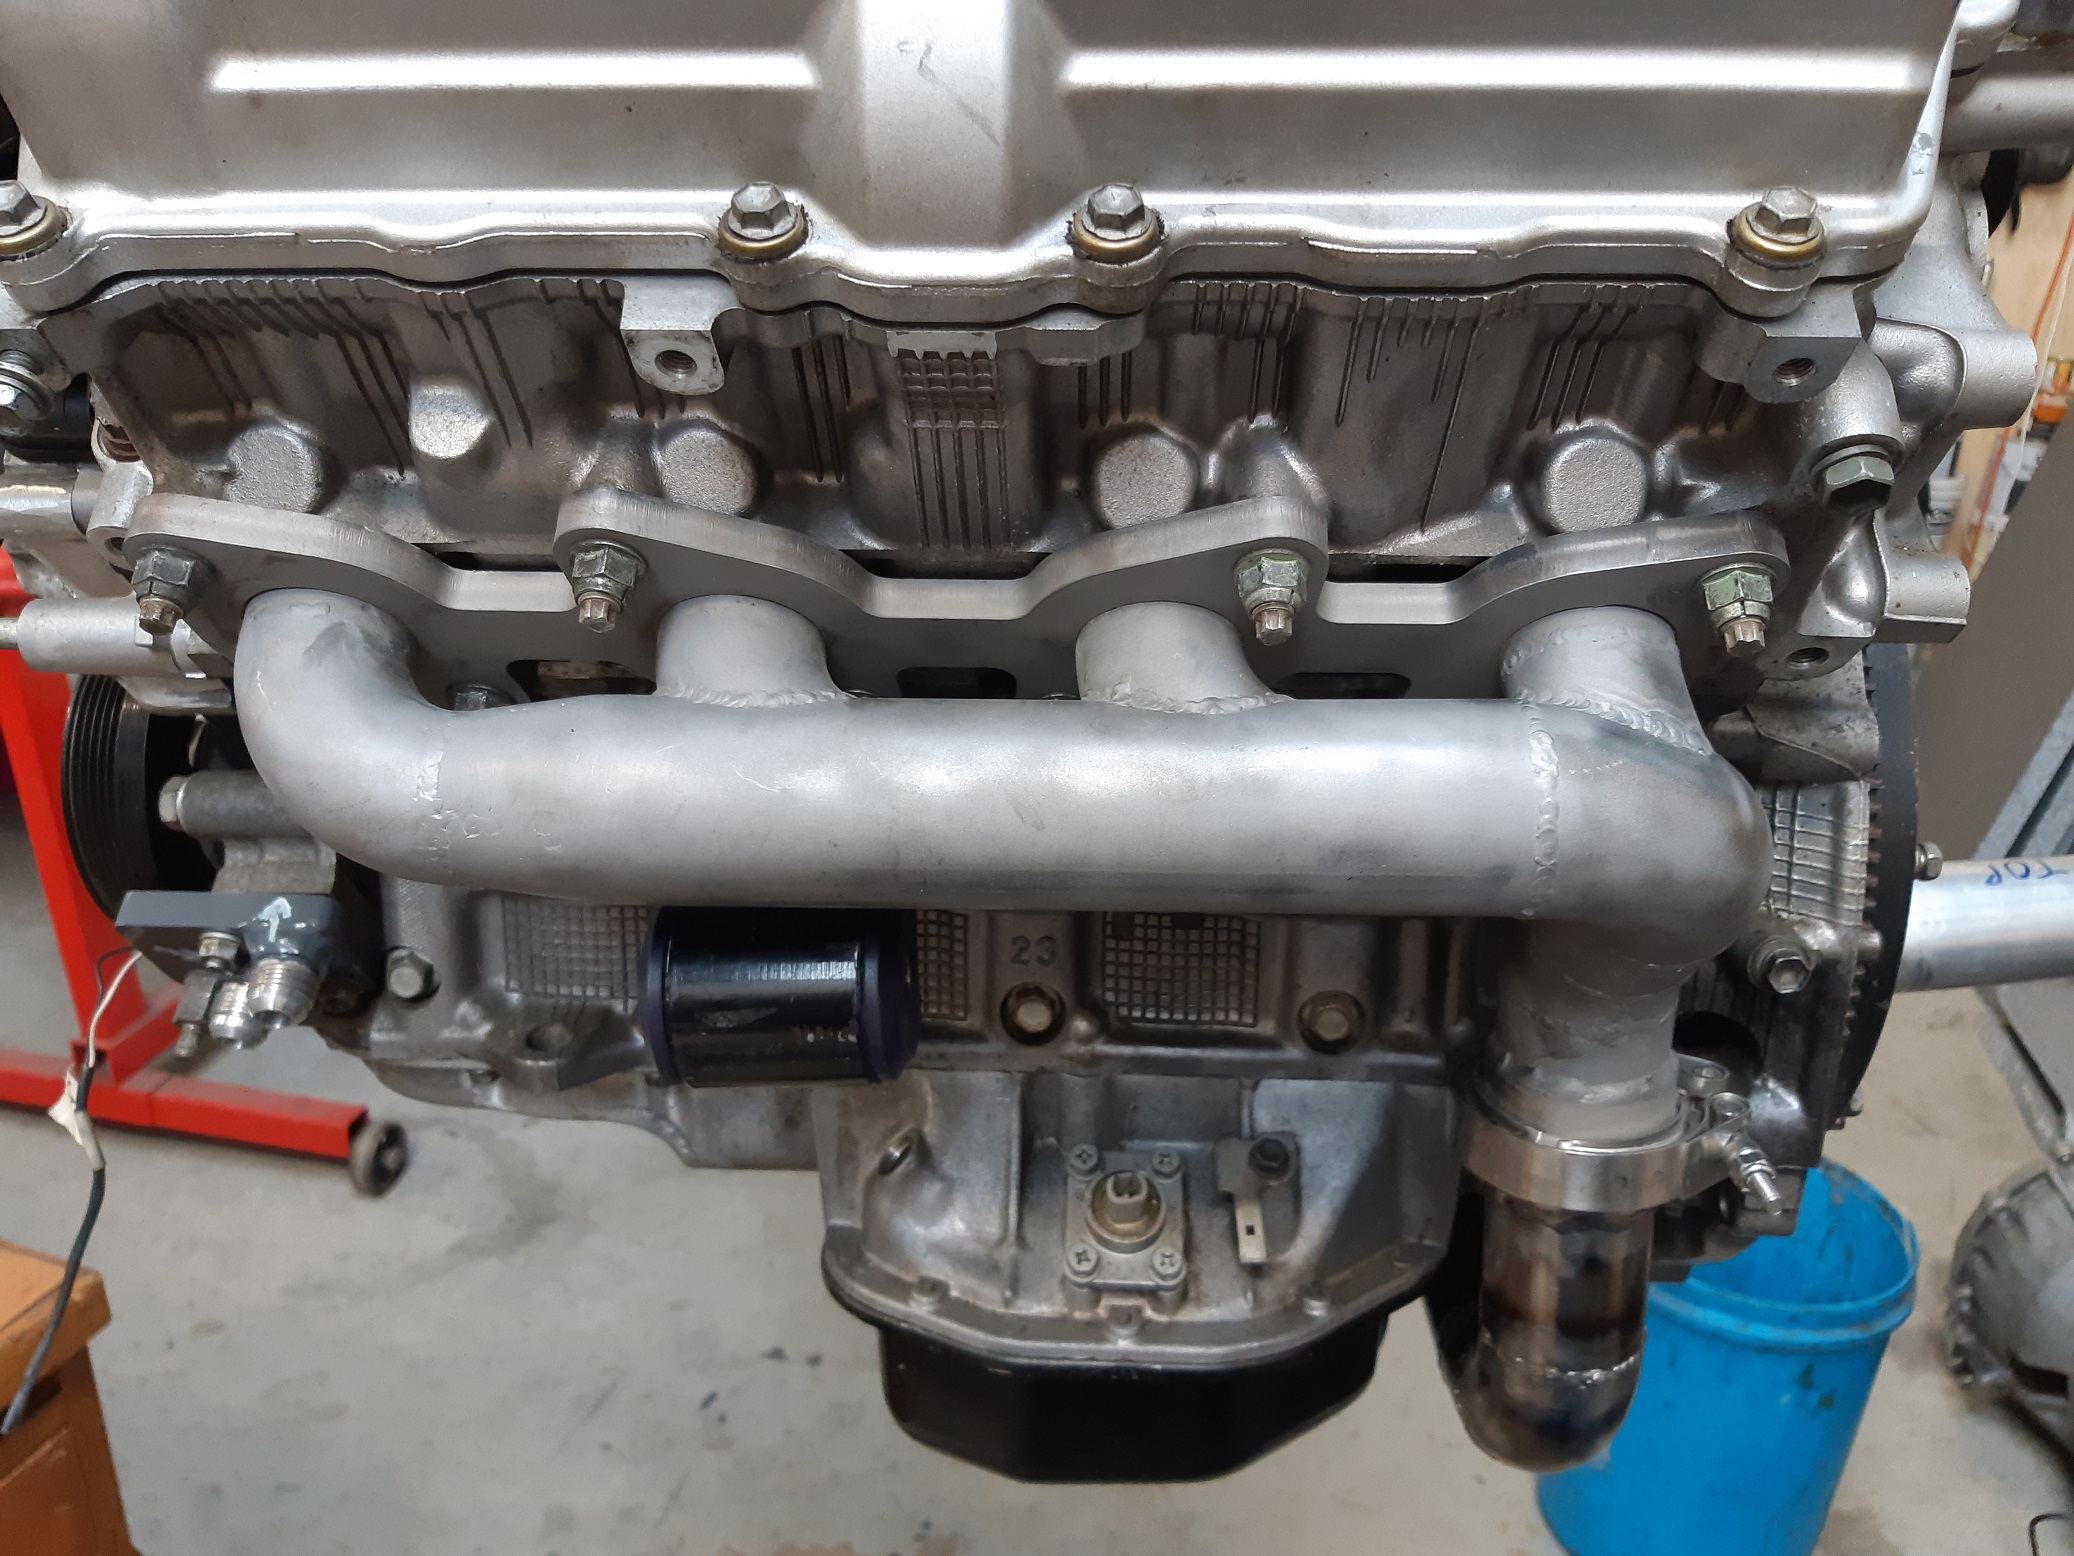
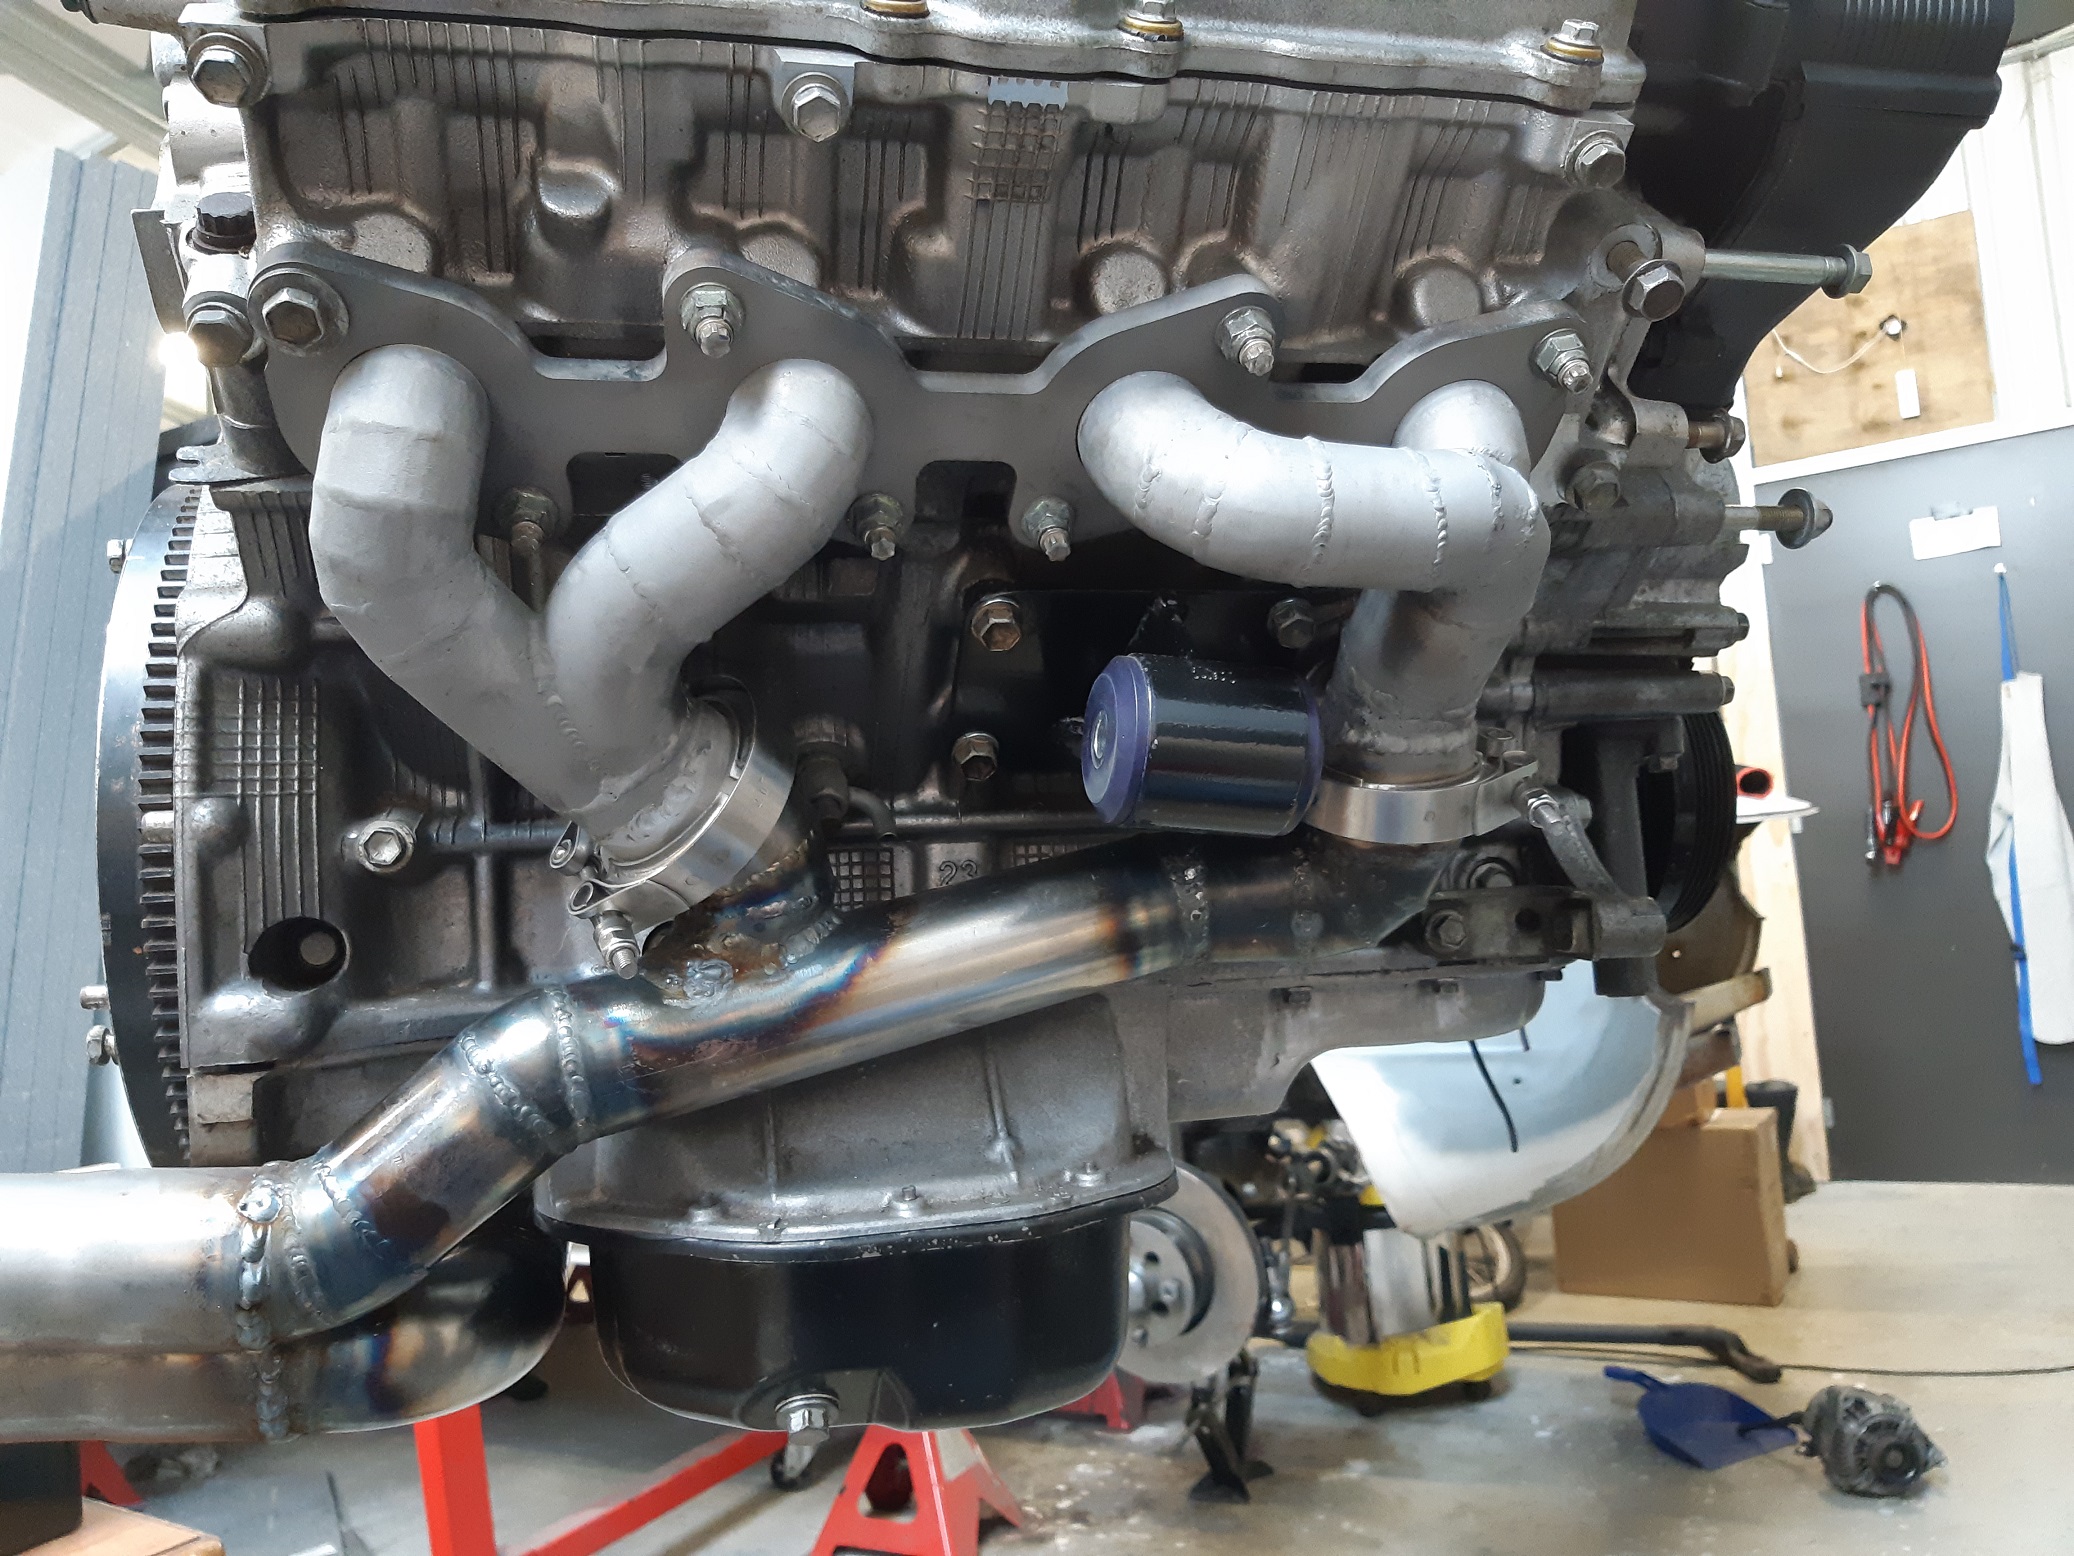
I've pulled the throttles off the car to mock up on here. Then reverted Echo to standard manifold which is a bit more WOF friendly, even if it's technically legal with throttles on currently. Also thanks to the excellent dude Matt Gill I've got some 2ZZ injectors on the way. So that's most of the puzzle pieces solved! The main task left to figure out has been the alternator bracket, which has resulted in some head scratching and a few different attempts at finding somewhere for it to sit. Settled on this, which is very low down bolting onto bottom of the sump. Ideally I didnt want to have the mounting points that far down the engine, but I think it'll be alright. Then the worlds shittiest assortment of accessories as a tensioner. I might improve on this, but if it works probably not haha. I dont have the skills or materials or tools to make a proper version of the bracket from aluminium, so I was hoping in someone in Waikato might be able to help? Here's some more specific details if anyone can.
3 points
-
Got a jig set up & the car mounted, ready to bare metal underneath & make a start on the sills etc.
3 points
-
car went to the paint shop to get the runs out of it and get the final cut and polish. i went and picked it up last night and it looks amazing. anywho, today i wanted to fix the exhaust where the flex joint had worn through because its the lowest point and its had a fucking over judder bars and whatnot and subsequently has a hole it in. step 1 - jack up your car. this is where things went wrong. 2021-04-25_02-55-42 by sheepers, on Flickr car slid off the jack on the way up. given what could have happened i got off extremely lightly. it bent the radiator support up and bent the bottom of the radiator real bad. it also bent the bottom of the front bumper. however, the radiator isn't leaking and the crank pulley is unscathed which is a fucking miracle given what happened. i was able to bash the rad support back down and i got most of the bend out of the bumper so it looks fairly normal again. fuck it could have been WAY worse.................. so yea, after dealing with that i moved on to fixing the zorst. cut out the fucked bit, made a new bit, tacked it in place, remove zorst from car and fully weld, add 4mm thick bash plate and put zorst back in car. 2021-04-25_02-55-49 by sheepers, on Flickr 2021-04-25_02-55-55 by sheepers, on Flickr 2021-04-25_02-56-02 by sheepers, on Flickr 2021-04-25_02-56-09 by sheepers, on Flickr 2021-04-25_02-56-21 by sheepers, on Flickr then it was time to wax the newly polished paint. that went well. it looks pretty ace tbh and yea, i cant take a photo that justifies how good it looks. but it looks good. take my word for it. 2021-04-25_05-34-27 by sheepers, on Flickr 2021-04-25_06-18-48 by sheepers, on Flickr 2021-04-25_06-19-23 by sheepers, on Flickr 2021-04-25_06-32-09 by sheepers, on Flickr3 points
-
yeah but wombling in the shed factor comes into it2 points
-
Relevant VIRM page for anyone interested https://vehicleinspection.nzta.govt.nz/virms/in-service-wof-and-cof/general/vehicle-identification/vin-and-chassis-number2 points
-
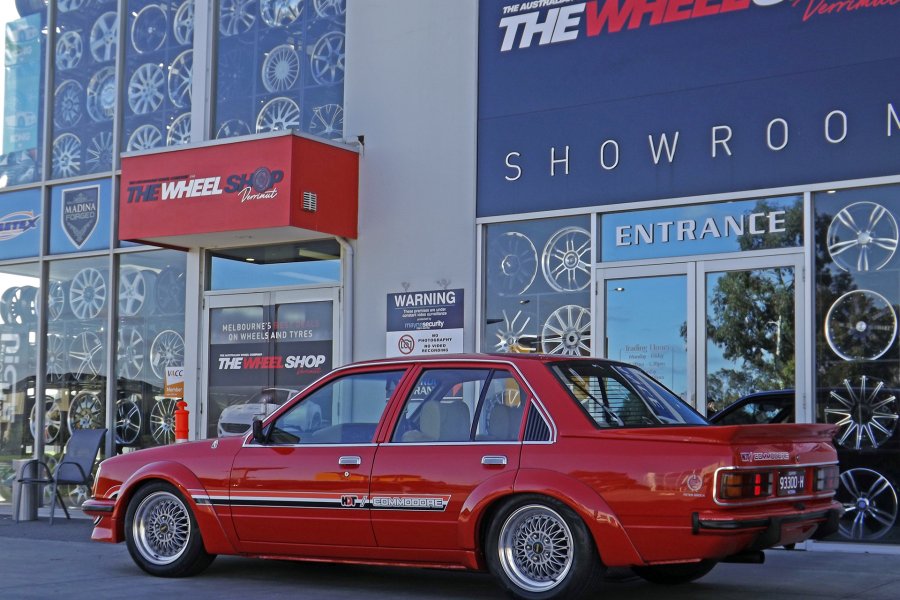
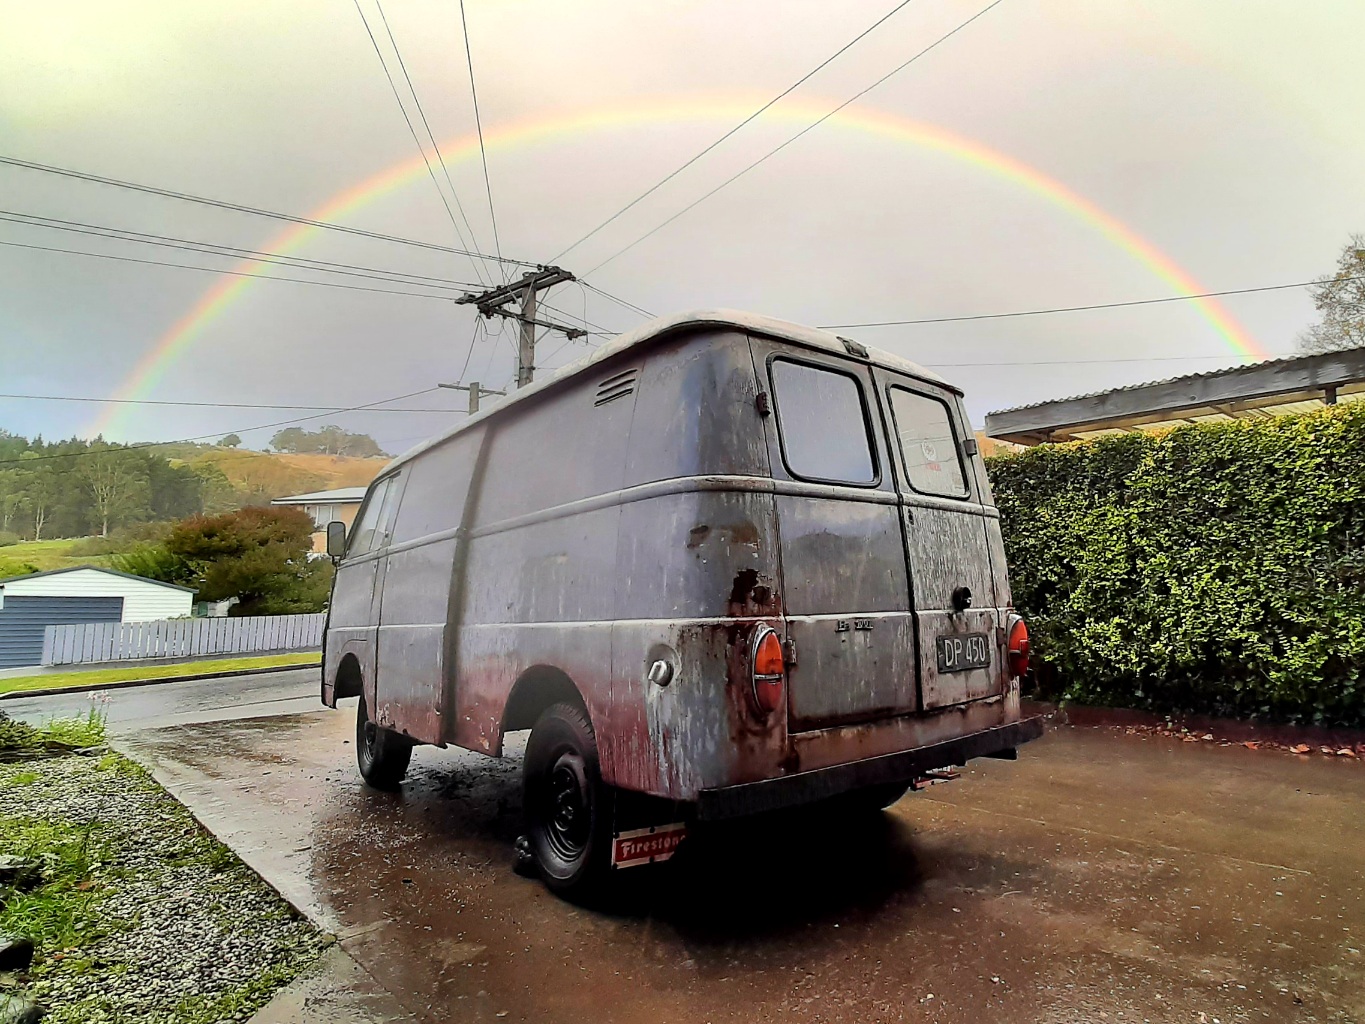
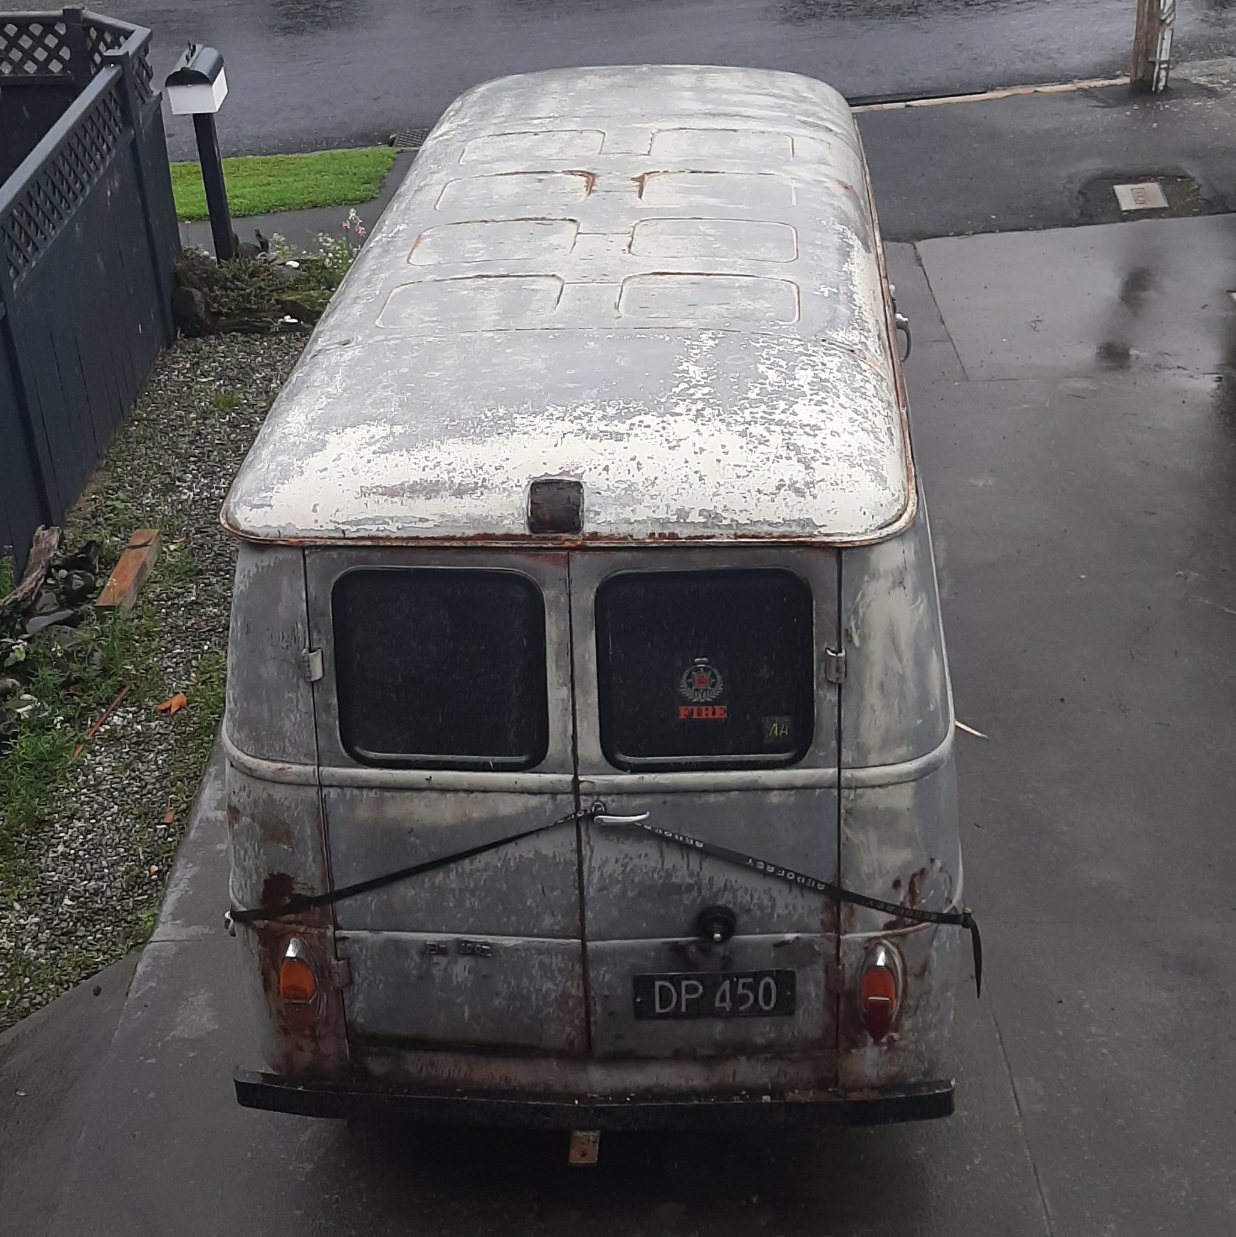
27 years of paint coming off... slowly but surely
2 points
-
Good tips, I wonder if silicon spray in the oil will help reduce frictional losses at high rpm2 points
-
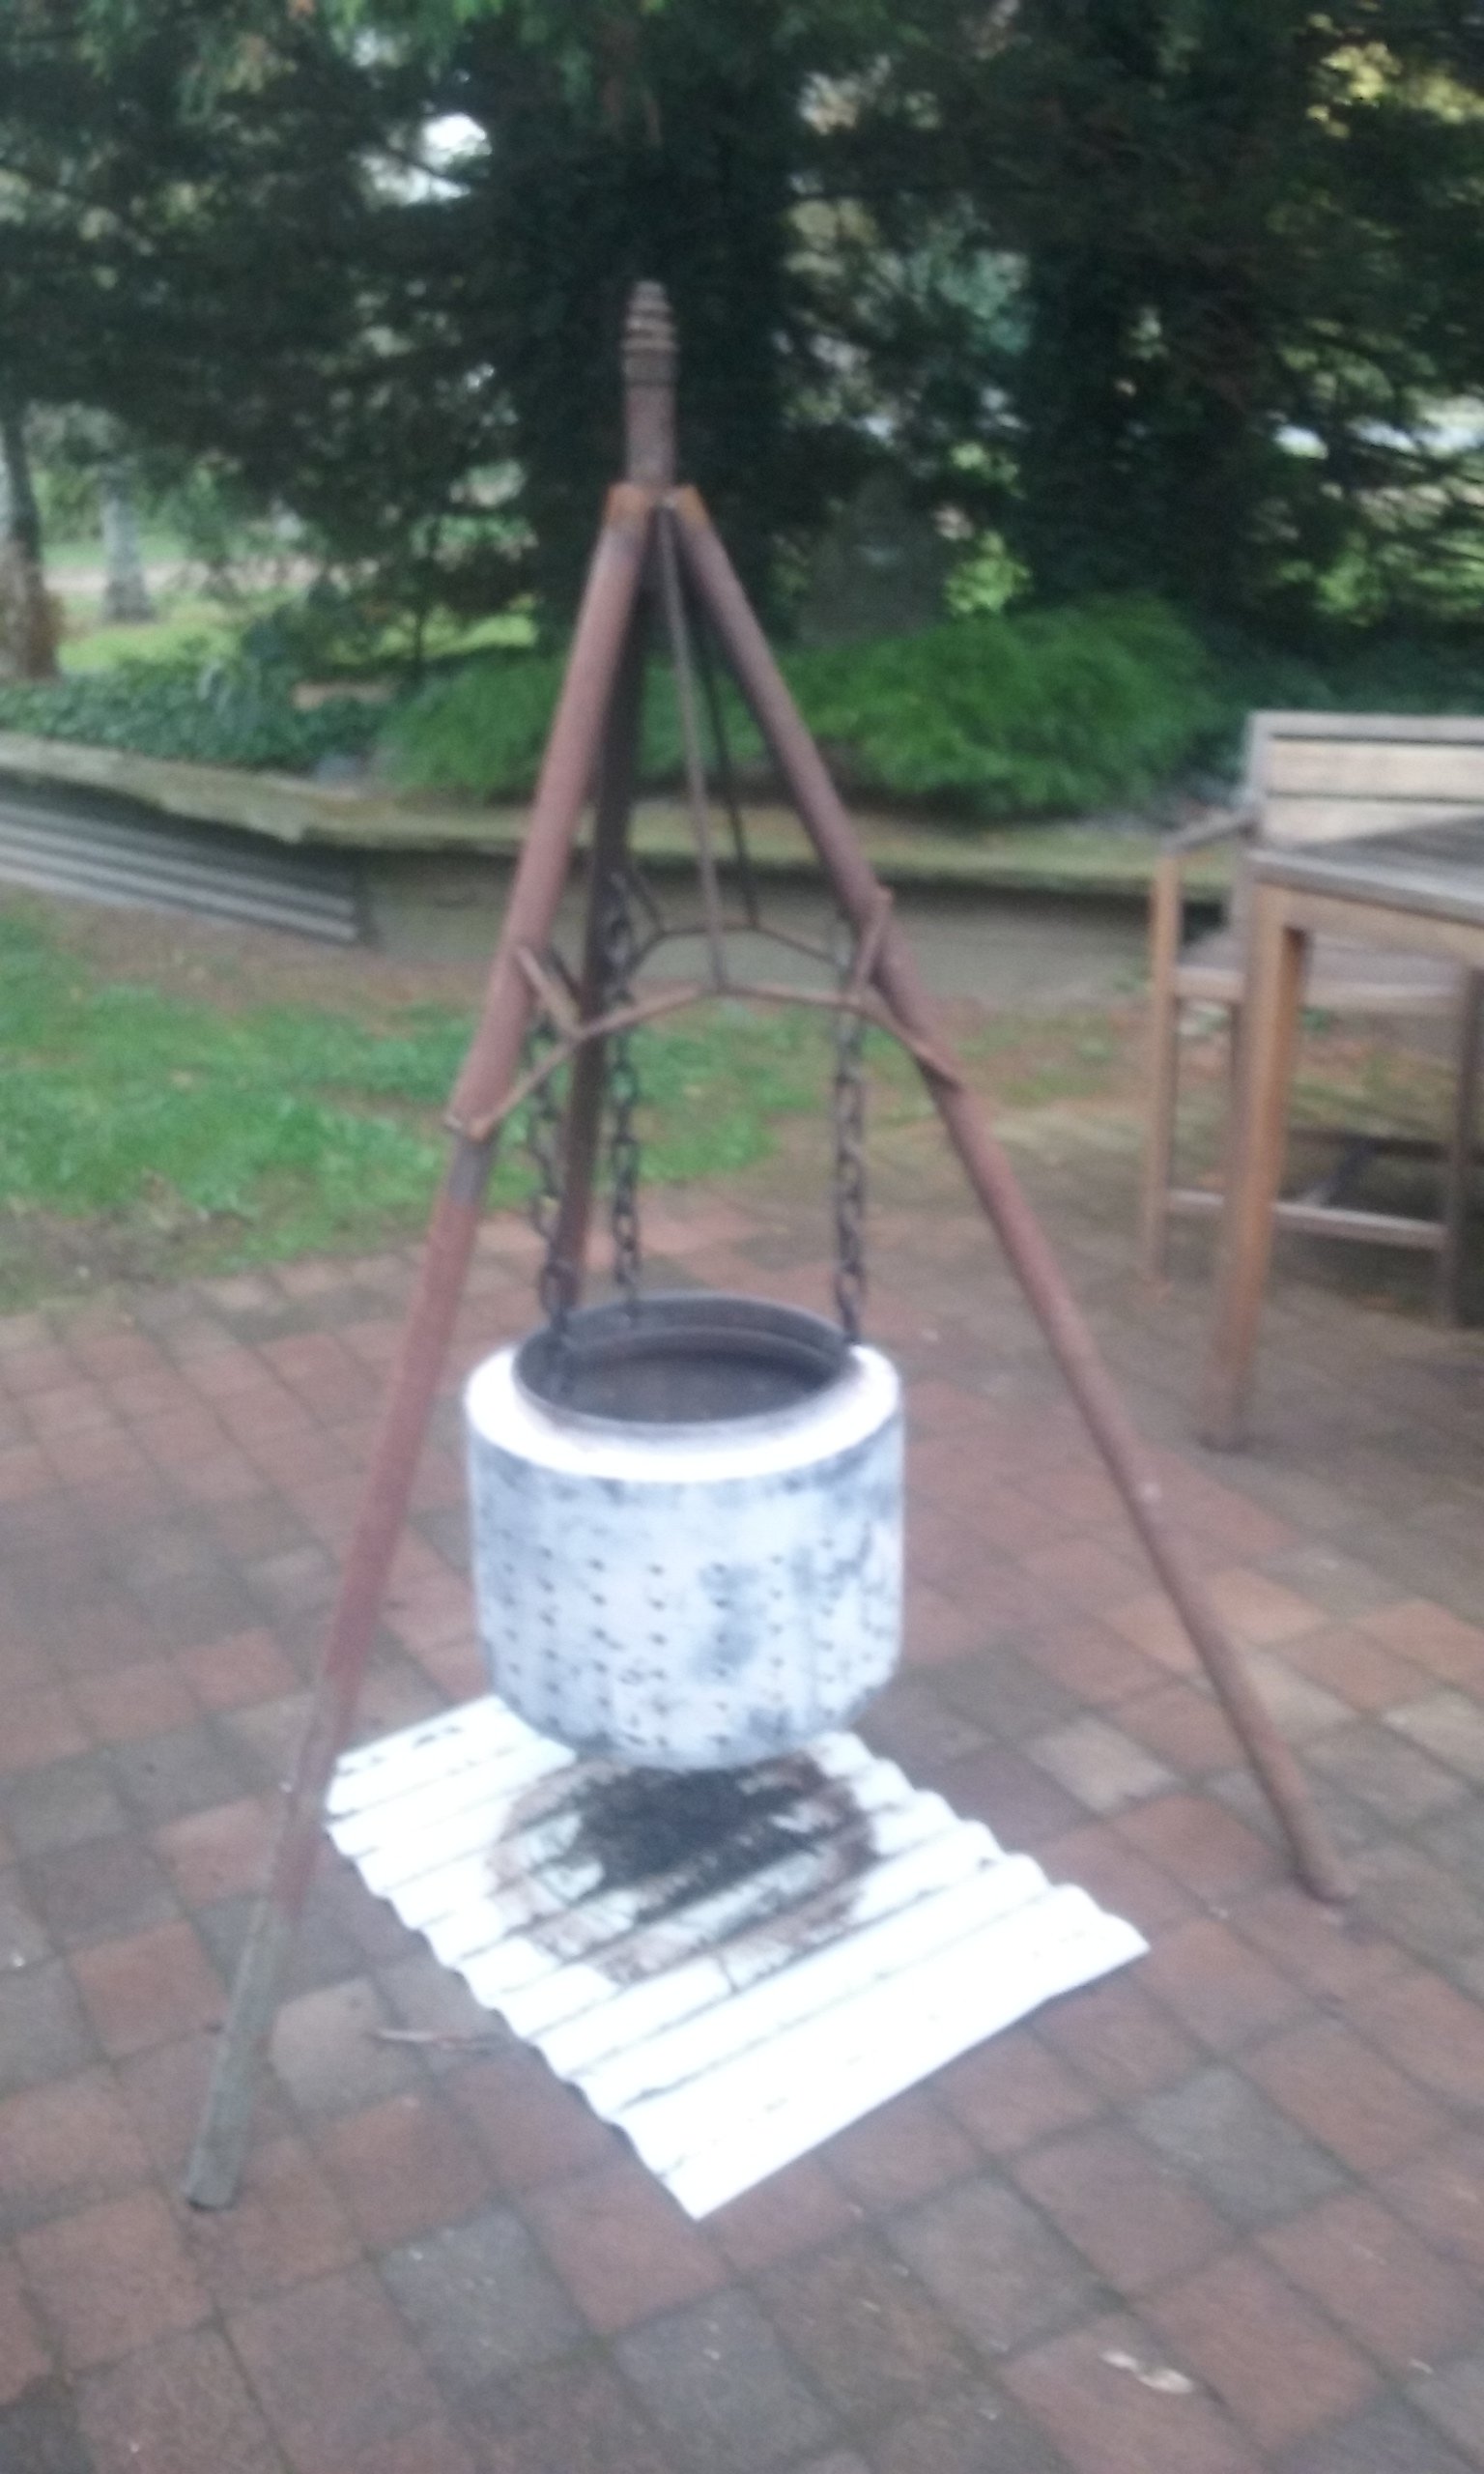
Was a bit hung over on Anzac day appreciation day, So I made a fire thingy out of some junk I had lying around
2 points
-
I've had a tiny amount of play in my rear wheel bearings so decided to rebuild my whole rear-end New CVs, bearings, aftermarket stub axles & companion flanges to take a 108mm CV. Old vs new stub axles. They have a larger splined diameter and are beefier at the wheel flange. This now shifts the weakest point in the driveline to my r180 diff, but it should be good enough for my engine. I also replaced all diff seals & o-rings so hopefully it stops leaving little puddles on the floor now. I couldn't get a micrometer inside the hubs to confirm, but I've assumed the play was from the bearing spacers getting overtightened and mushrooming slightly. So I cut some 0.05mm shims and torqued the hubs up and things feel right now. The left hub required two shims. Everything seems to measure up correctly and there's no play anymore. Rad! However. At this point I realised I have a problem. Since my new companion flange accepts a 108mm CV directly, I no longer need to run the CV adapter plate I used to use. This means my axles are now 25mm too short. FML. Cars aye!2 points
-
Some updates. Waikumete upholsteres made a carpet for me. 2 pieces, like original, and we found a loop pile in maroon! Which was brilliant, as I really wanted a loop pile for that more premium appearance. 20210321_161234 by Richard Opie, on Flickr 20210321_165710 by Richard Opie, on Flickr I think it turned out pretty well! Did the boot also, but I haven't got a pic of that for some reason. 20210408_210246 by Richard Opie, on Flickr Engine and gearbox came out again. This is minutes before it all lifted out. Very easy. 20210417_114901 by Richard Opie, on Flickr Pulled apart the gearbox with great guidance from Earle McFarlane. 20210417_121227 by Richard Opie, on Flickr Measured all the clearances, then pulled it apart. Selector hubs are a bit pwnt, there is excessive wear in the shift forks, bearings seem all right but they're all being replaced anyway with all those parts in the post above. So now the mainshaft has been assembled (in my absence) and we are just waiting on the forks to come in from Japanland so we can reassemble. 20210330_125040 by Richard Opie, on Flickr Since the motor was coming out anyway I thought it'd be a good time to get the top end sorted, as it's only ever been a stock head and cams, despite the bottom end being built/hi comp. This is a spare smallport head that I spent a while scrubbing in the shed to get clean. 20210330_125016 by Richard Opie, on Flickr I then thought I'd try cold jet/dry ice blasting as a bit of a test case on the cam boxes to remove the baked on sludge and scum. This is the result. Pretty awesome! I'm going to be using this process to clean some of the undercarriage parts in situ on the Honda. 20210331_084622 by Richard Opie, on Flickr I stripped the head myself, once I learned how to remove the collets from the retainers it was all pretty simple. Here's the head, with all the bits catalogued and in containers, with the Kelford 193B cams and Supertech retainers/springs I bought ages ago for it. It's in with Alan Harris at Harris Performance Engineering (previous Lynn Rogers) for porting, some tickles on the combustion chamber and a port match of the ITB manifold. I then got to thinking about what audio this car is going to have, even if you can't hear anything inside it really. Initially, I was going to run a modern Bluetooth head unit in the glovebox, and got as far as buying this pretty rad Sony unit that has 50wrms per channel - from a head deck!!! Enough to power anything, speaker wise. But then Ed sent me a link to a Yahoo auction that changed things. 20210422_172330-01 by Richard Opie, on Flickr 20210422_172308-01 by Richard Opie, on Flickr This is an AD-189T fitting kit/adapter produced by Pioneer in the early 80s. It fits a 'B' type head unit, which is conveniently what the 'component' systems of the early/mid 1980s are. Before the standard DIN size we all know and love today. It replaces an entire middle panel on the dash, replicating the OEM fit where normally there would be a spindle mount head unit (as is the case on my factory dash). I had never, ever seen even a picture of one of these kits before, let alone a NOS one on Yahoo. So I bid on it, because who doesn't love period accessories. And I won it. So then I thought I'd probably better find a head unit to fit. 20210422_172407-01 by Richard Opie, on Flickr I ended up with this Pioneer KP-717G tape deck. Note - it's a tape deck only, there is no AM/FM radio or anything with this, as was the style of the component systems of the time. This one was listed with a clean bill of health, and some remedial work done to ensure it was operational. The auction was backed up with a video to prove it. It's one of the higher end units in this range, with Dolby NR, adjustable tone controls, all the fruit. It doesn't have an amp on board - luckily Ed has one of the Pioneer GM-4 amps for this to plug into, that will find it's way into my car. 20210422_172454-01 by Richard Opie, on Flickr This is how it should look when installed in the car, using the AD-189T kit. Fuckin. Awesome. I reckon. 20210422_172612-01 by Richard Opie, on Flickr 20210422_172638-01 by Richard Opie, on Flickr And this is essentially what the initial system I run will be. Later on I may add some fronts - I have some NOS Pioneer TS167 coaxials, and also dual cones whose code escapes me right now. These TS-X9 are incredible though - I had them wired up to my amp in the house and they produce enough bass you can actually feel it through the floor. How they achieve it, I do not know. Sure it's not sub levels, but it's a beautifully balanced sound that I hope will be loud enough to listen to while pootling along at slow speeds or stuck in traffic. Thank you for coming to my TED talk. Hopefully, next updates will include a rowdy cylinder head, a slick shifting T50 and some Phil Collins tapes in the KP-717G.2 points
-
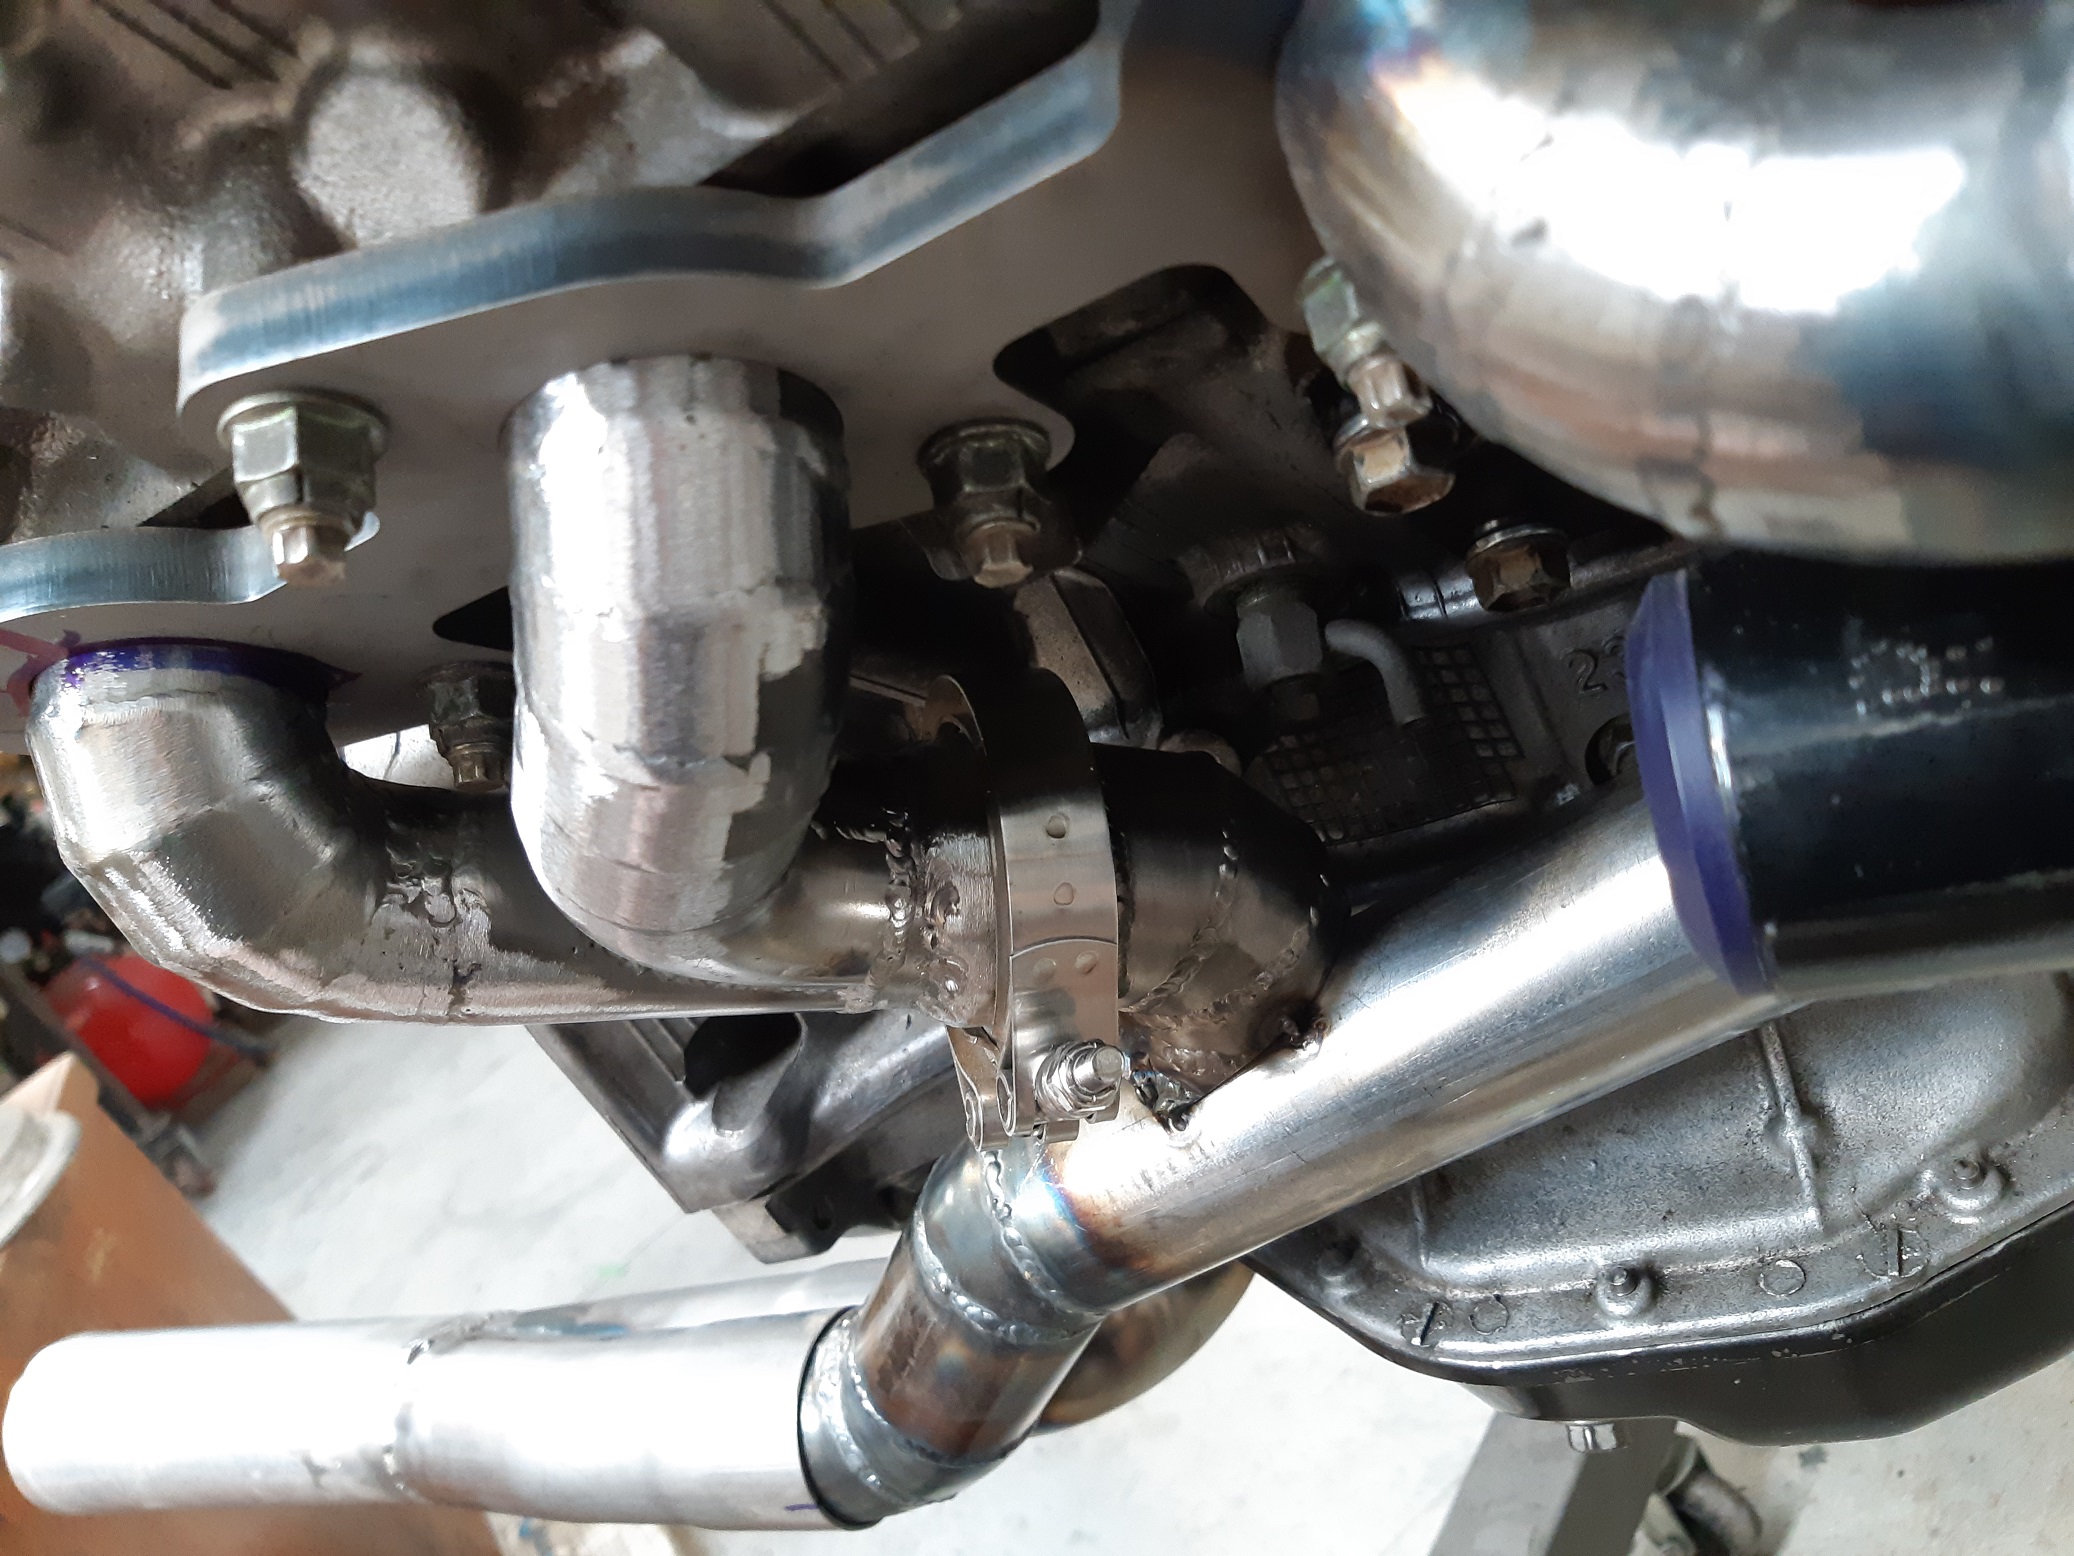
Leak test identified that the rear v-band on the drivers side was not sealing. I tried cutting and realigning with no luck. I changed the design to use only one v-band. Hopefully it's all good now.
2 points
-
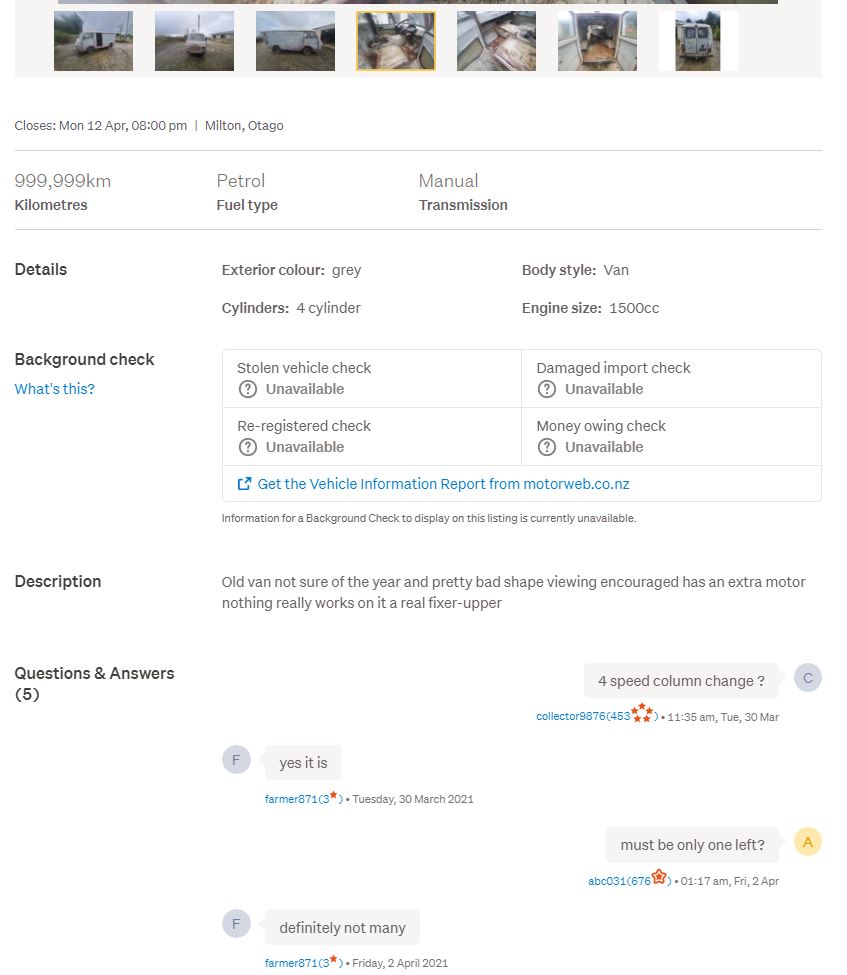
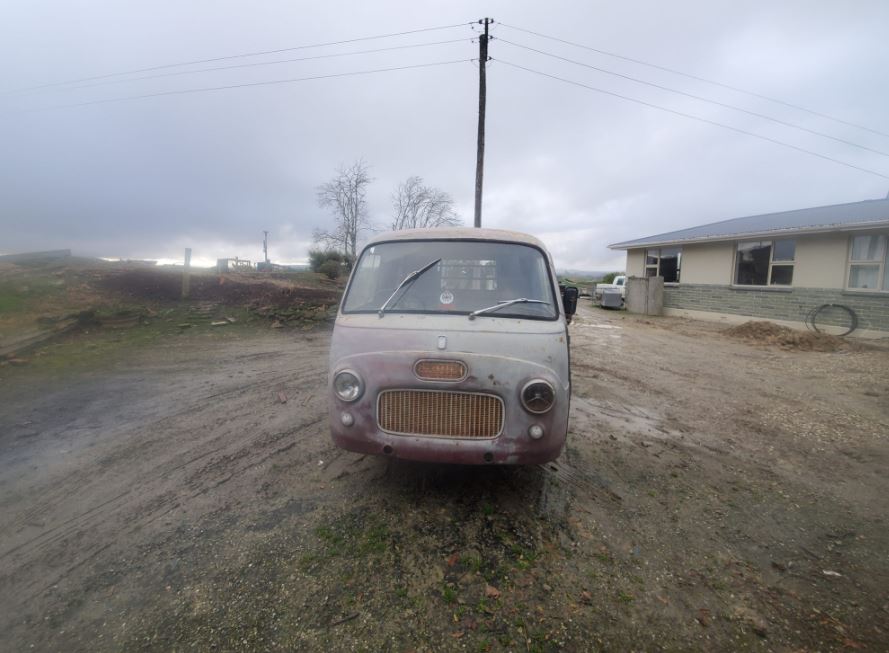
Just won a trademe auction for this. Not collected yet, so not fully mine or in my possession, but i'm quietly fizzing. Its been sold and resold on trademe and on Facebook about 4 times in the last 5 years, I was the second highest bidder a couple of times, moving pretty steadily south, starting off in Ashburton, then Christchurch (a fellow Fiat botherer went and had a look and sent me lots of detailed pics and declared it was savable), then i think Timaru , and now, back of Milton. At least 5 people messaged me directly to share the link, and the key difference is this time Im only 40 minutes up the road, and this time i got it for about half of what i have bid on a couple of the previous auctions I like to think the sellers (honest!) description, and utterly depressing photos put a lot of punters off but i could also be assuming its the world that is mad, not me.. Anyway, looking forwards to collecting and then playing around with this. What i know: - A 1960-64 model based on the sliding windows and engine - they made the same shape from the mid-1950s but started off with the 1100cc from the Fiat 1100 its based on. I suspect many bits will be easy (but not necessarily cheap) to find once i figure out what other Fiats it shares parts with - the 1100 obviously (eventually evolving into the Premier Padmini Taxi from india) , but also the Fiat 600 particularly the Multipla shared some lights and switchgear and maybe column change/front control parts and other bits which itself formed the base of the 850/133 and many other variants made up until the 1980s in places like Spain, Serbia and Argentina under licence. - dead rego, no papers no nothin, but im hoping the black plates are an in and maybe some faint rego stickers. Suggestions and hints on getting the paperwork sorted so its at least in the system again welcomed! - has the 'big block' 1500cc pushrod engine (the engine that should be in my 125p ute, and is the 2300 in my wagon, less 2 cylinders (so have some bits and pieces already). There was also a 1300cc model and orginally they came out with an 1100 same as the car. There is one engine in the hole thats seized and one in the back that i assume is also seized. - Seats and Engine cover, front bumper are int eh back - it doesnt really have any interior from the factory, no rear bumper either, this one has a tow bar (lol) - 4 speed column change, 5.x something rear diff, 95kph top speed new but apparently very quick off the line and able to lug a surprising amount of stuff, just not quickly! - everything is 'there' except a sliding door handle, but almost everything looks like shit or is slightly busted - it appears to be relatively low milage and remarkably unrusty otherwise - the terrible paint (flaky grey and rusty brown primer over the original poorly sanded white?) makes it look much worse than it is, but definitely needs new front floors, and the bottom of all the doors is frilly, otherwise surprisingly good underneath and on top
1 point
-
Cost/Availability is the thing, its cheaper and easier to get ones with grease fittings from the States, but they dont list sealed ones.1 point
-
If the nipple wont interfere with the movement of the shaft, i had could only get joints with fittings for my commer and one of them would have jammed up the works. so if they dont bind and you have access go for it1 point
-
The tag on my Wolseley is held on with screws. It was never a problem at wof time. Guess they didn't look very hard.1 point
-
Have had a few really dodgy ones over the years, a "mitsubishi lancer 1500cc" that had "been converted to a makkinen evo replica" And a "V6 commodore with a LS swap" that had really low kms and lots of weird rust almost like it had been hidden in a damp shed for 10 years and you could see where the SS stickers on the doors were and the engine number had been attacked with a chisel and the date tag on the belts didnt match the year on the rego and the vin tag under the glass had heaps of weird scratches on it Or the VE commodore that had a different vin on the bit under the carpet on the floor to under the glass and in the engine bay because whoever the crackhead that stole it didnt realise there was a chassis number in the floor1 point
-
A certifier has to send it to a TSDA to sort out any discrepancies in the ID of the vehicle. With old stuff it can be tricky because a lot dont have a stamped in number so swapping tags is very hard to pick up unless there is a difference in the body, ie if someone put VK commodore plates on a VH you'd notice because the body is different. Ive had quite a few cars that have never come back after being asked to sort out ID issues but most of them have been cars where it's been obvious, ie the stamped in number in the firewall had been cut out and another one welded in The last old car I had with chassis number problems, was one that the owner had lost the tag when it got painted, i failed it, next time i saw it hed "found the number under some bog" but had obviously got a punch set and diy'd the number into the front panel, he painted the front so it looked semi legit but forgot about the back side and the primer and paint had cracked where hed punched the numbers in It went to a TSDA to get a new vin, a bit of paperwork and a month or so of waiting and it got a new vin number on a proper tag1 point
-
Eh, I just came in to ask the same thing. I'm also in the market for a decent spool gun, for ali via mig. Halp. Def go for a spool gun Mr Sentra, the ali liners for a std mig lead/hand piece always suck ass.1 point
-
Managed to source a spring and get it fitted with help from a friend was a job and a half1 point
-
Easy for whatever. Pretty much any night works aside from Tues for the next 3 weeks as we got puppy preschool/socialization classes. Further north the better now we live in goon as well haha.1 point
-
1 point
-
And give them a good coating of oil to prevent any future rust1 point
-
so, I'm thinking we should get back into monthly meets, its been a while, Unfortunately I'm no longer able to do Wednesday evenings. what other evening would potentially suit?1 point
-
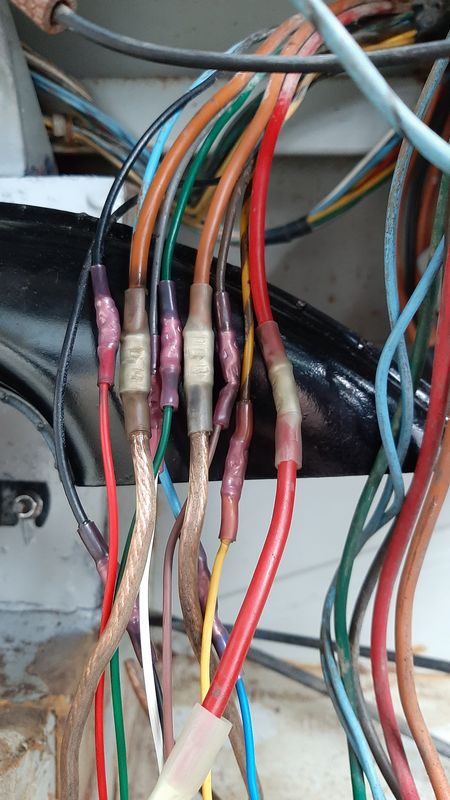
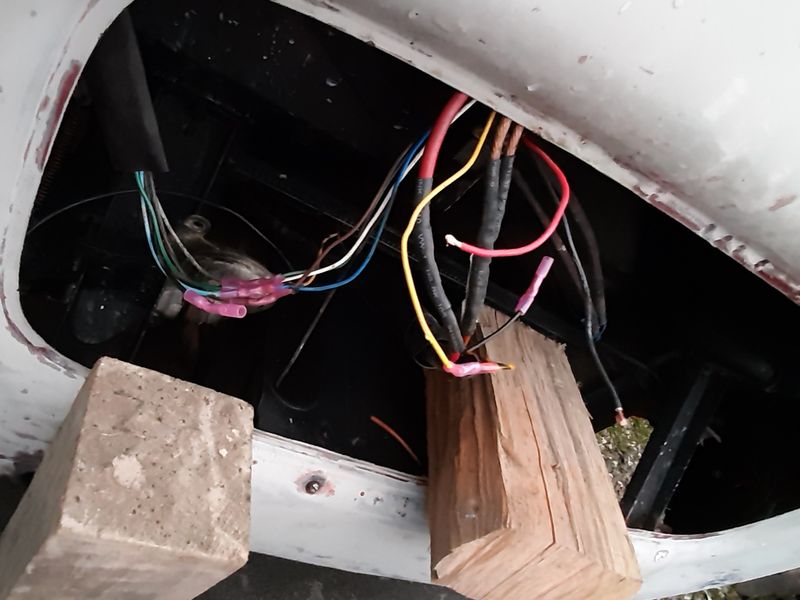
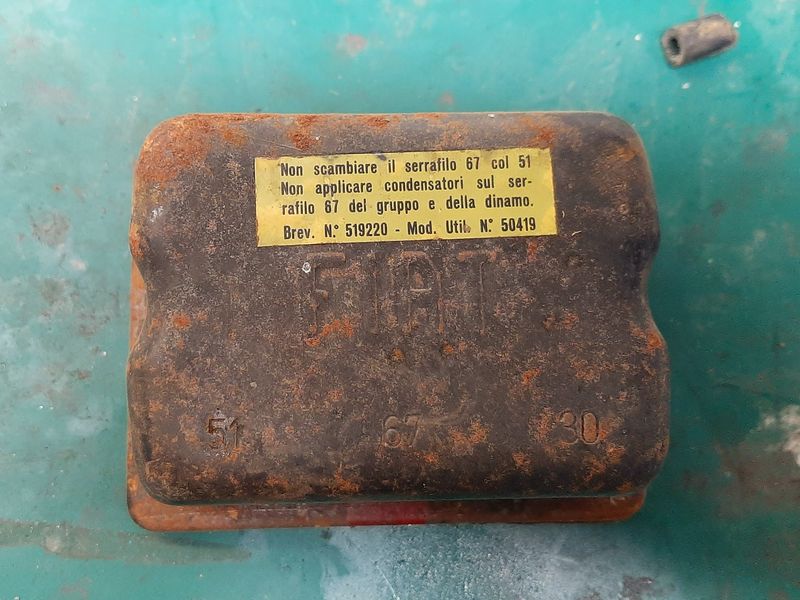
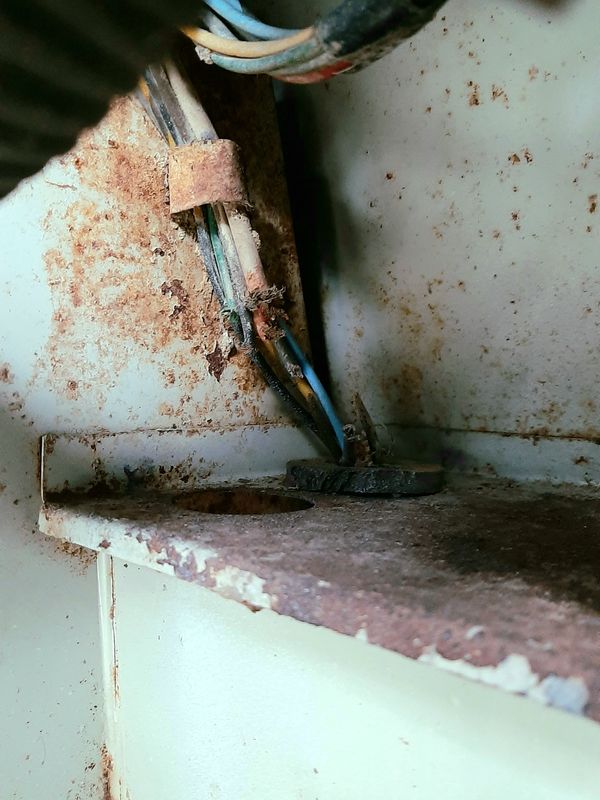
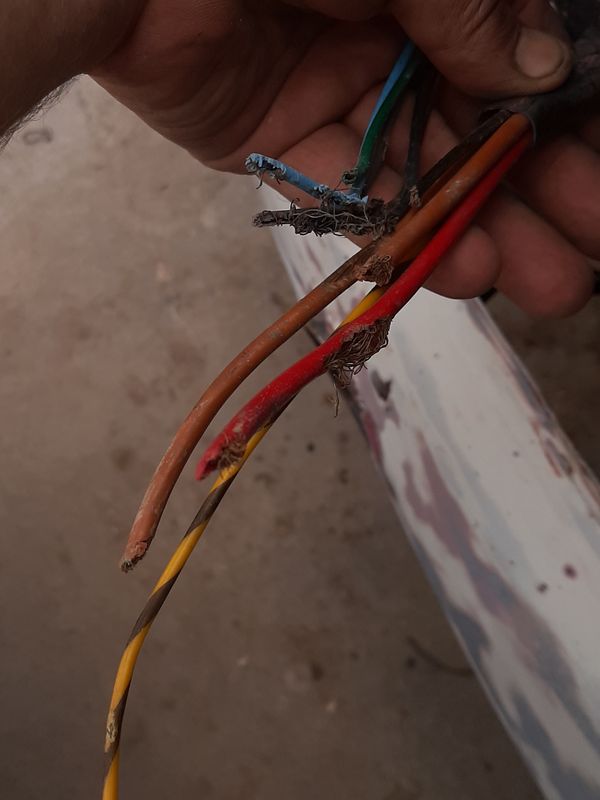
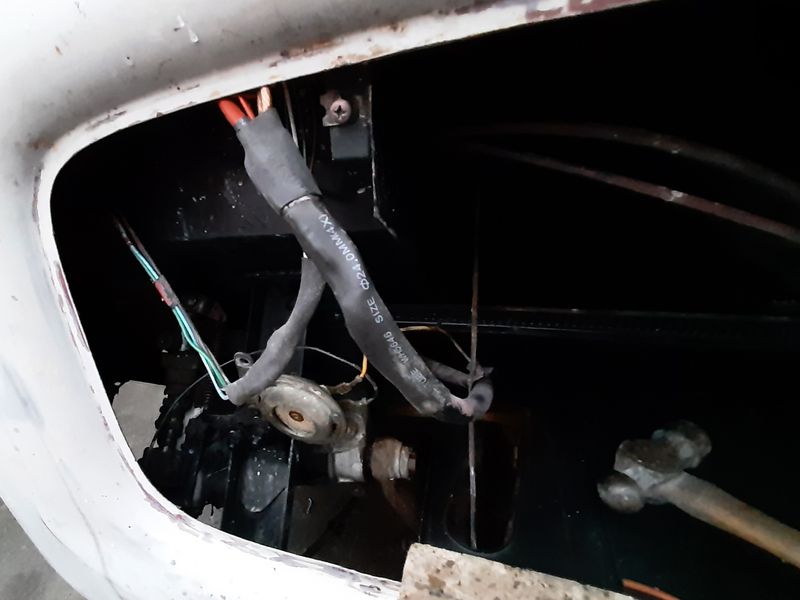
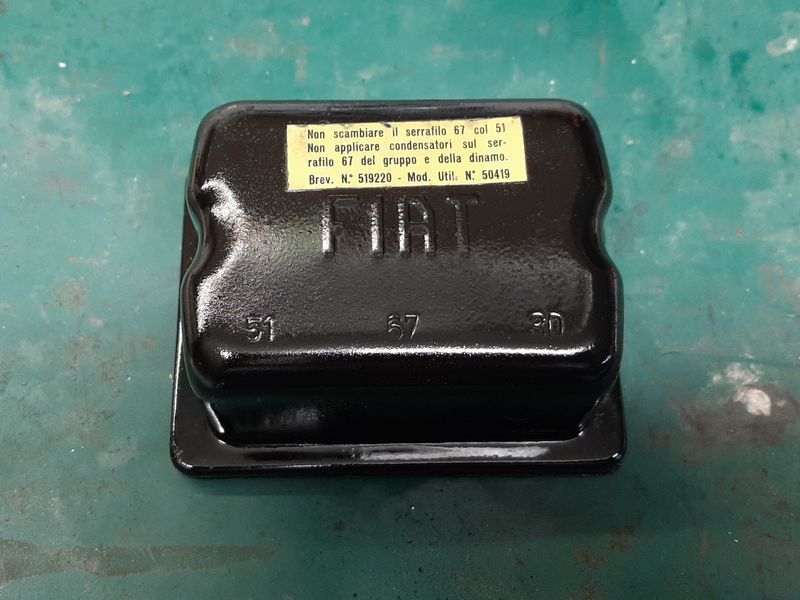
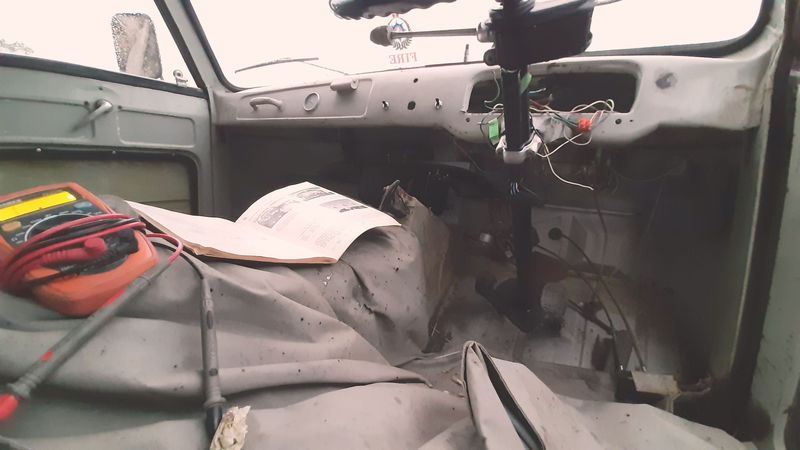
Before i put any electrical things back in i gotta take care of some shit. Fucking rats man. This is the main engine loom (alternator and starter control plus main power feed) as well as the drivers front lights loom. Only wire not chewed to the point of separation was the horn power supply. Interesting horn wiring sidesharn, the other horn wire (from the button, that earths out the circuit) actually travels the length of the hollow! steering column and exits the bottom of the steering box!?! Because of where the break was,right in a really tight shitty spot, under the dash, I extended the loom from the dash side first. Love these shrinky connectors and my box of wires came up with almost a match for most of the wires. For future reference the black to red wire is the alternator signal for the voltage controller. Then poked that though the hole after a quick derust on the shelf while it was all ot the way. Then finish off underneath with lots of heat shrink. The wooden block for really getting those small crimps crimped up good with a blunt cold chisel, my crimpers dont quite go small enough on the small ones And some cable ties then more heats for good measure. If you cant fix it with a hammer you got yourself a software problem... Voltage regulator lives under the dash too. "Do not mistake the clamp 67 with the 51 Do not apply capacitors on the wire clamp 67 of the unit and of the dynamo" Cleaned out the cobwebs and gave the 'points' a quick file while the paint dried after a quick sandblast. Important electrical safety messages maintained. I forsee a bit of this before i finally wire everything back in. My back got pretty sore from even thinking about doing that, so I did some more sanding, shes coming around. Got a good light for finally seeing the chassis number properly. I also wanted to be able to get a good photo of it before cleaning up the area. FIAT 217D * 107627 * Tipo 217D = Type 217, revision D, that makes it a 'late' 1962 to 1968 model, and this was the 107627th, Tipo 217
1 point
-
When funds permit I'll get some v5 simmons or similar
1 point
-
Also did some building, turned this... into this... Has different levels to help with sparging, siphoning etc. Bit of a gamble design-wise before I've actually done anything, but should work out ok. Cleared out a corner of the garage to put it in... And put down a brew last week. Simple all-grain APA, with NZ hops... And malt pipe lifted for sparging... Into the fermenting bucket. Hygiene is everything so fastidious cleaning and sterilisation as you go... Original gravity came out around 1.058, pretty good sugar levels... And into the brew fridge. No airlock fitted here yet, was just lifted into place after pitching yeast once it had cooled to 21 deg C, almost exactly 20 litres of wort... And ticking away doing its thing. My lovely little yeast cells are making things bubble away... So will hold at 20 degs for 10-14 days. Will take gravity readings later on then siphon into bottling bucket, add conditioning sugar and bottle. Then another couple of weeks... Took about 6hrs as it was my first time and I had initial equipment cleaning to do etc, I'll get better as I have learned how the temps go now and I'll be able to multitask once things are under way. Been interesting...1 point
-
iT b0lTs oN sO iTs gOOd It A kIT I bRoUgT fRoM aMuurica
1 point
-
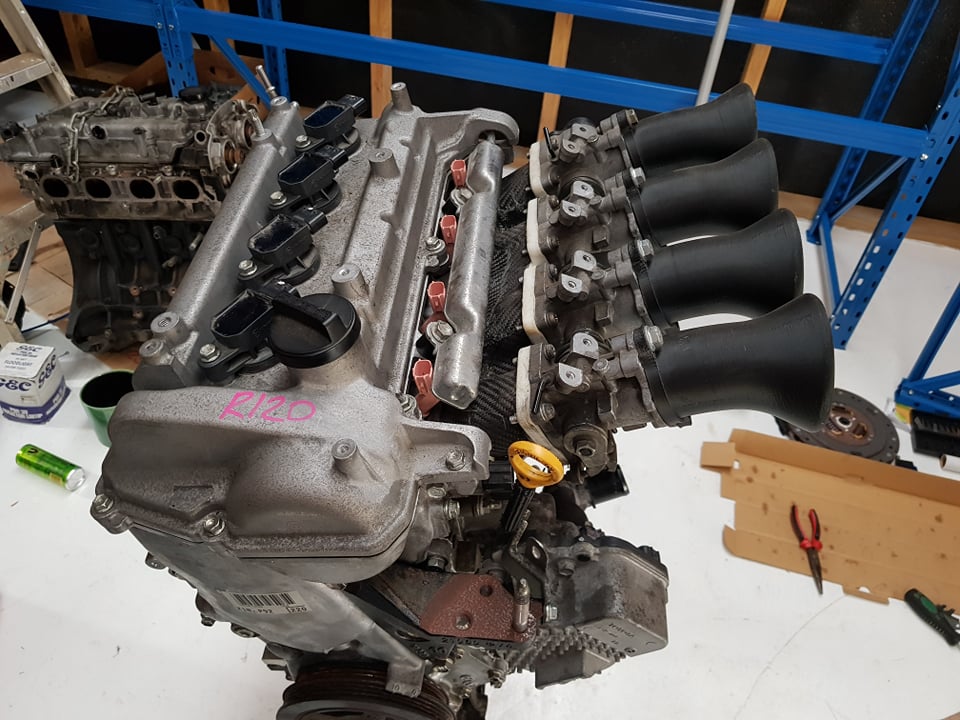
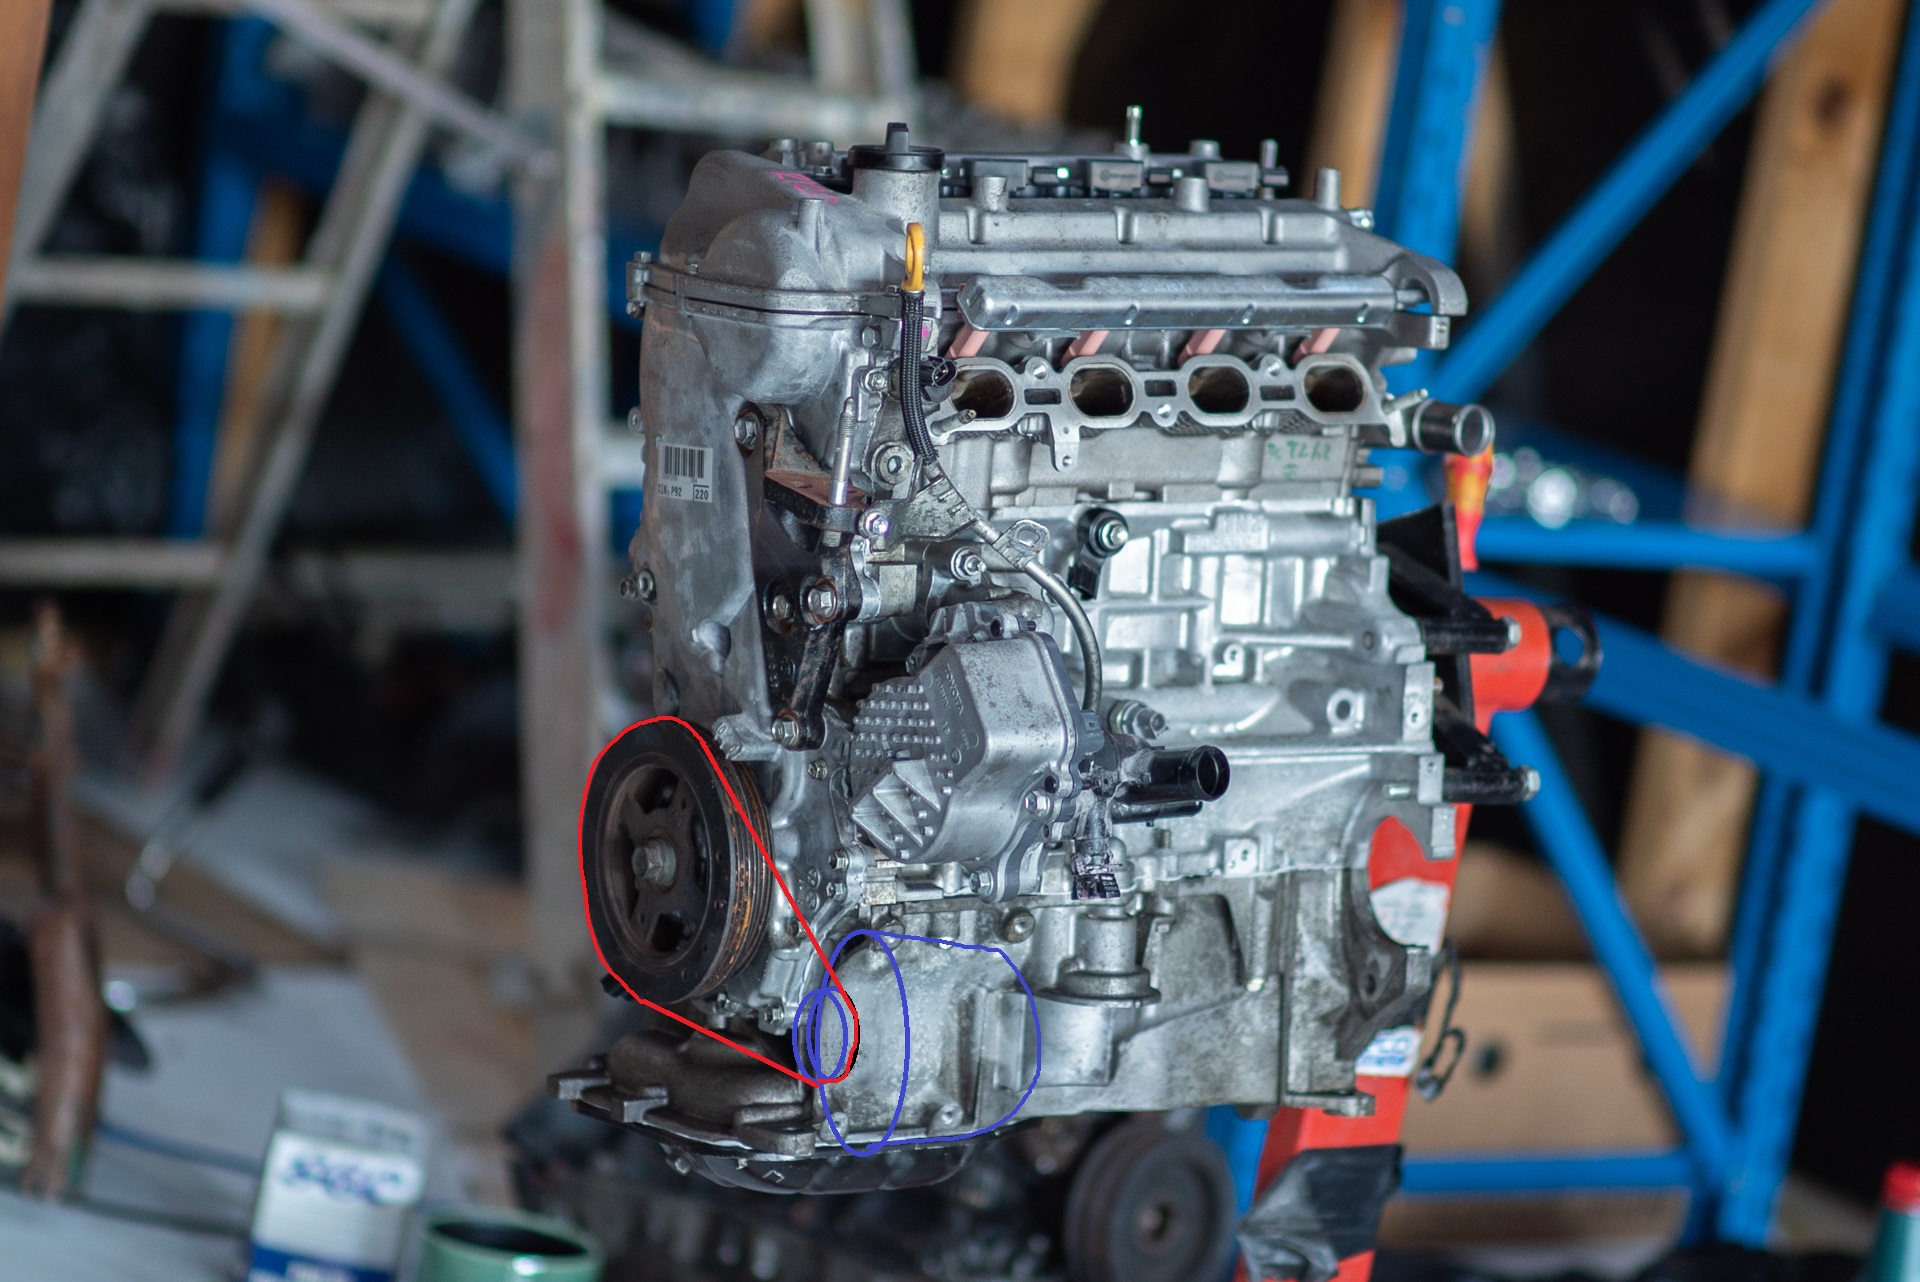
Progress. The head is back on properly, cam clearances all within spec after 2-3 goes of juggling the existing shims around. I pick-a-parted a front pulley, so now I can start on an alternator bracket. Funnily enough the light weight alternator kit for my 3S motor, that saves 4KG. Uses a 1NZ alternator. So there's some irony in stealing the brackets from that, in order to mount a 1NZ alternator to a 1NZ. I'll just need an intermediate plate to bolt to the side of the block and stick these on, hopefully. Not the most light weight solution but I'm more about just getting this going for now. Looks like underneath the waterpump will be the place for it, and no AC anymore. Keep the top side looking tidy - Afterall, this is a show car. One of the now superfluous water outlets was a hose barb that sat with a tapered thread into the back side of the block. Which I replaced with a drain block off bolt I pinched from a dead 3S motor. Easy fix. Also note how the dipstick on this motor nicely bends out of the way, rather than being between number 1 and 2 throttles. Excellent. The power steering pump is apparently difficult to mount on the rear side of the engine, but I'm thinking something looks doable. The amount of gasket goo required to put on both layers of the sump as well as the timing cover is insane. If this doesnt leak, I'll be suprised!
1 point
-
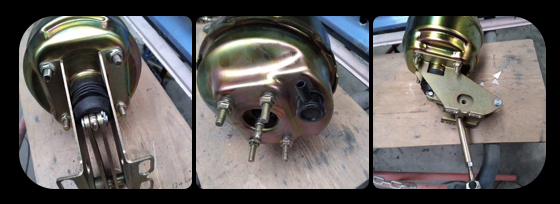
Minty! Didn’t like how the generic Tridon ones went so rock auto came through again, for less coin! I sent the old booster to a shop to assess its state and they came back at $700 in parts alone x USA in a month. It is a bit of an oddball, but no thanks. I figured it was fucked cause it had been full of brake fluid but a customer I didn’t know had the tech came in and saw it, said he can clean it up and reassemble it and that if the diaphragms we’re going to react badly to fluid contamination then it would happen pretty quickly, that mine was salvageable. I mean it’s junk totally disassembled in a box so may as well sling it back together! He’ll sleeve the master too. Just prior to this, I brought new booster off a chap on Facebook for cheap, he didn’t end up using it. It’s not ideal but was going to make it work.. it’s a couple inches smaller than my original unit but I figured all it does is assist. I could deal with a slightly heavier pedal. me preference is original..
1 point
-
Well it didnt 100% work. But it could definitely be fixed with a welder! It didnt fill fast enough and there wasnt enough pressure. So they had to frantically fill from one of the riser holes to try save it. In doing that there is a big section of cold lap and a big hole! So the changes would be to have 2 filling sprues in the middle of the casting. Then increase the head pressure a little bit. The bowl I had in the sprue was way too big and reduced the head pressure. For the most part it looks pretty good. All the finer details are there. No cores collapsed or shifted, no shrinking of any areas so I dont need to worry about chill blocks. El Camino for scale. Going to have to figure out an easier way to do this in the shed. Was way too much work!1 point
-
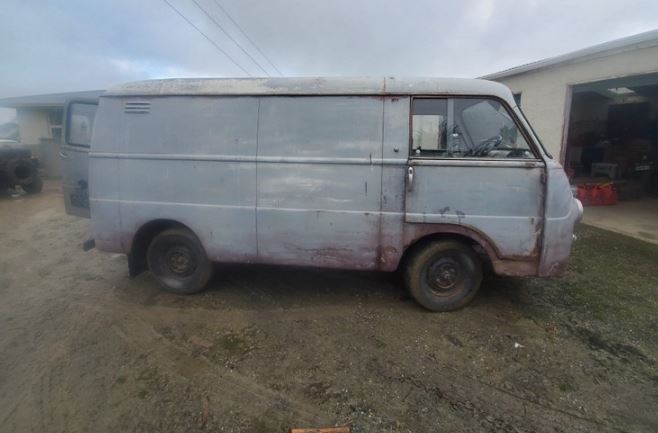
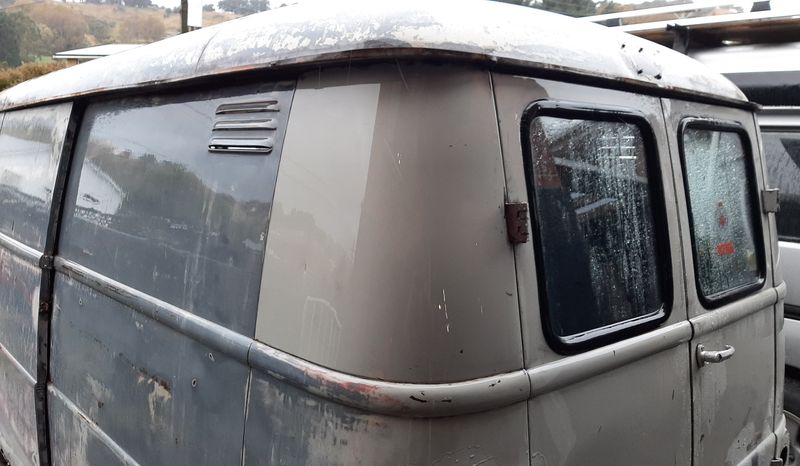
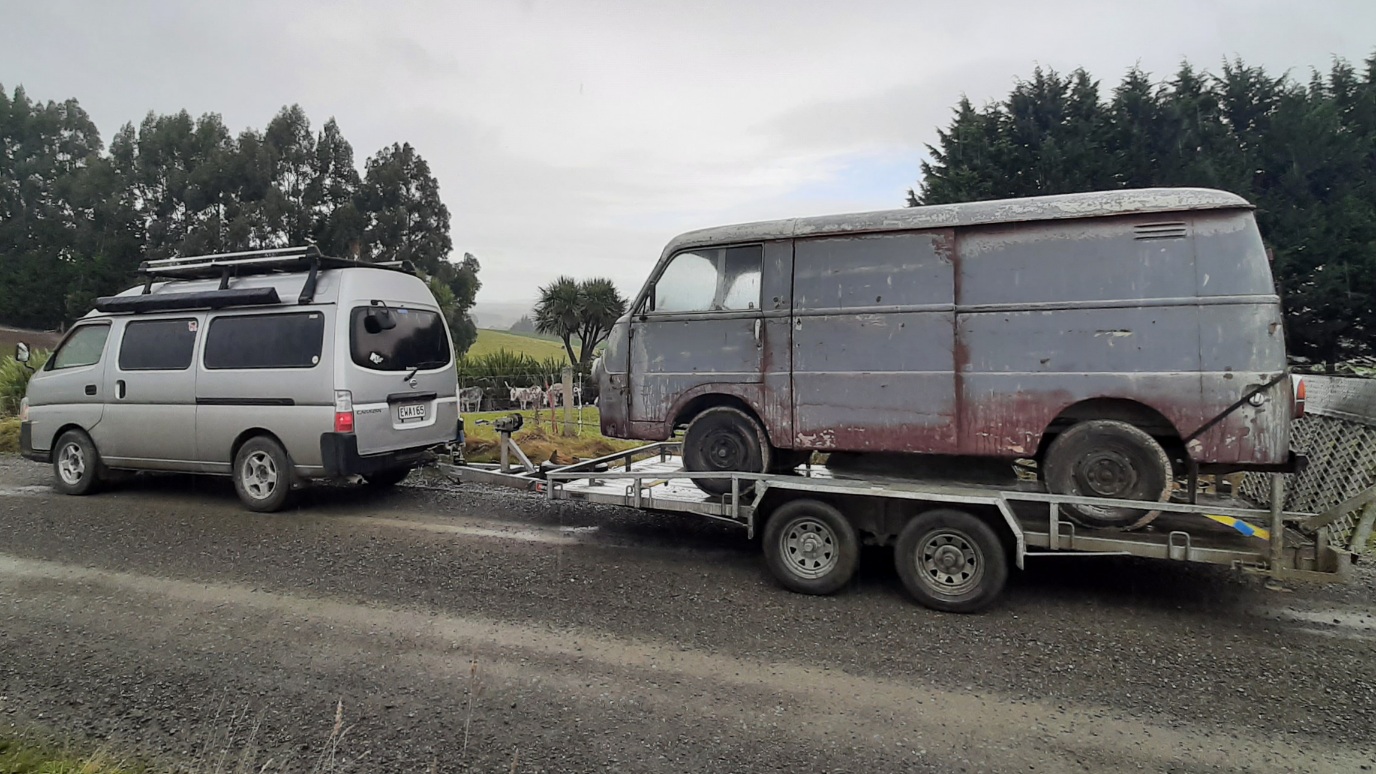
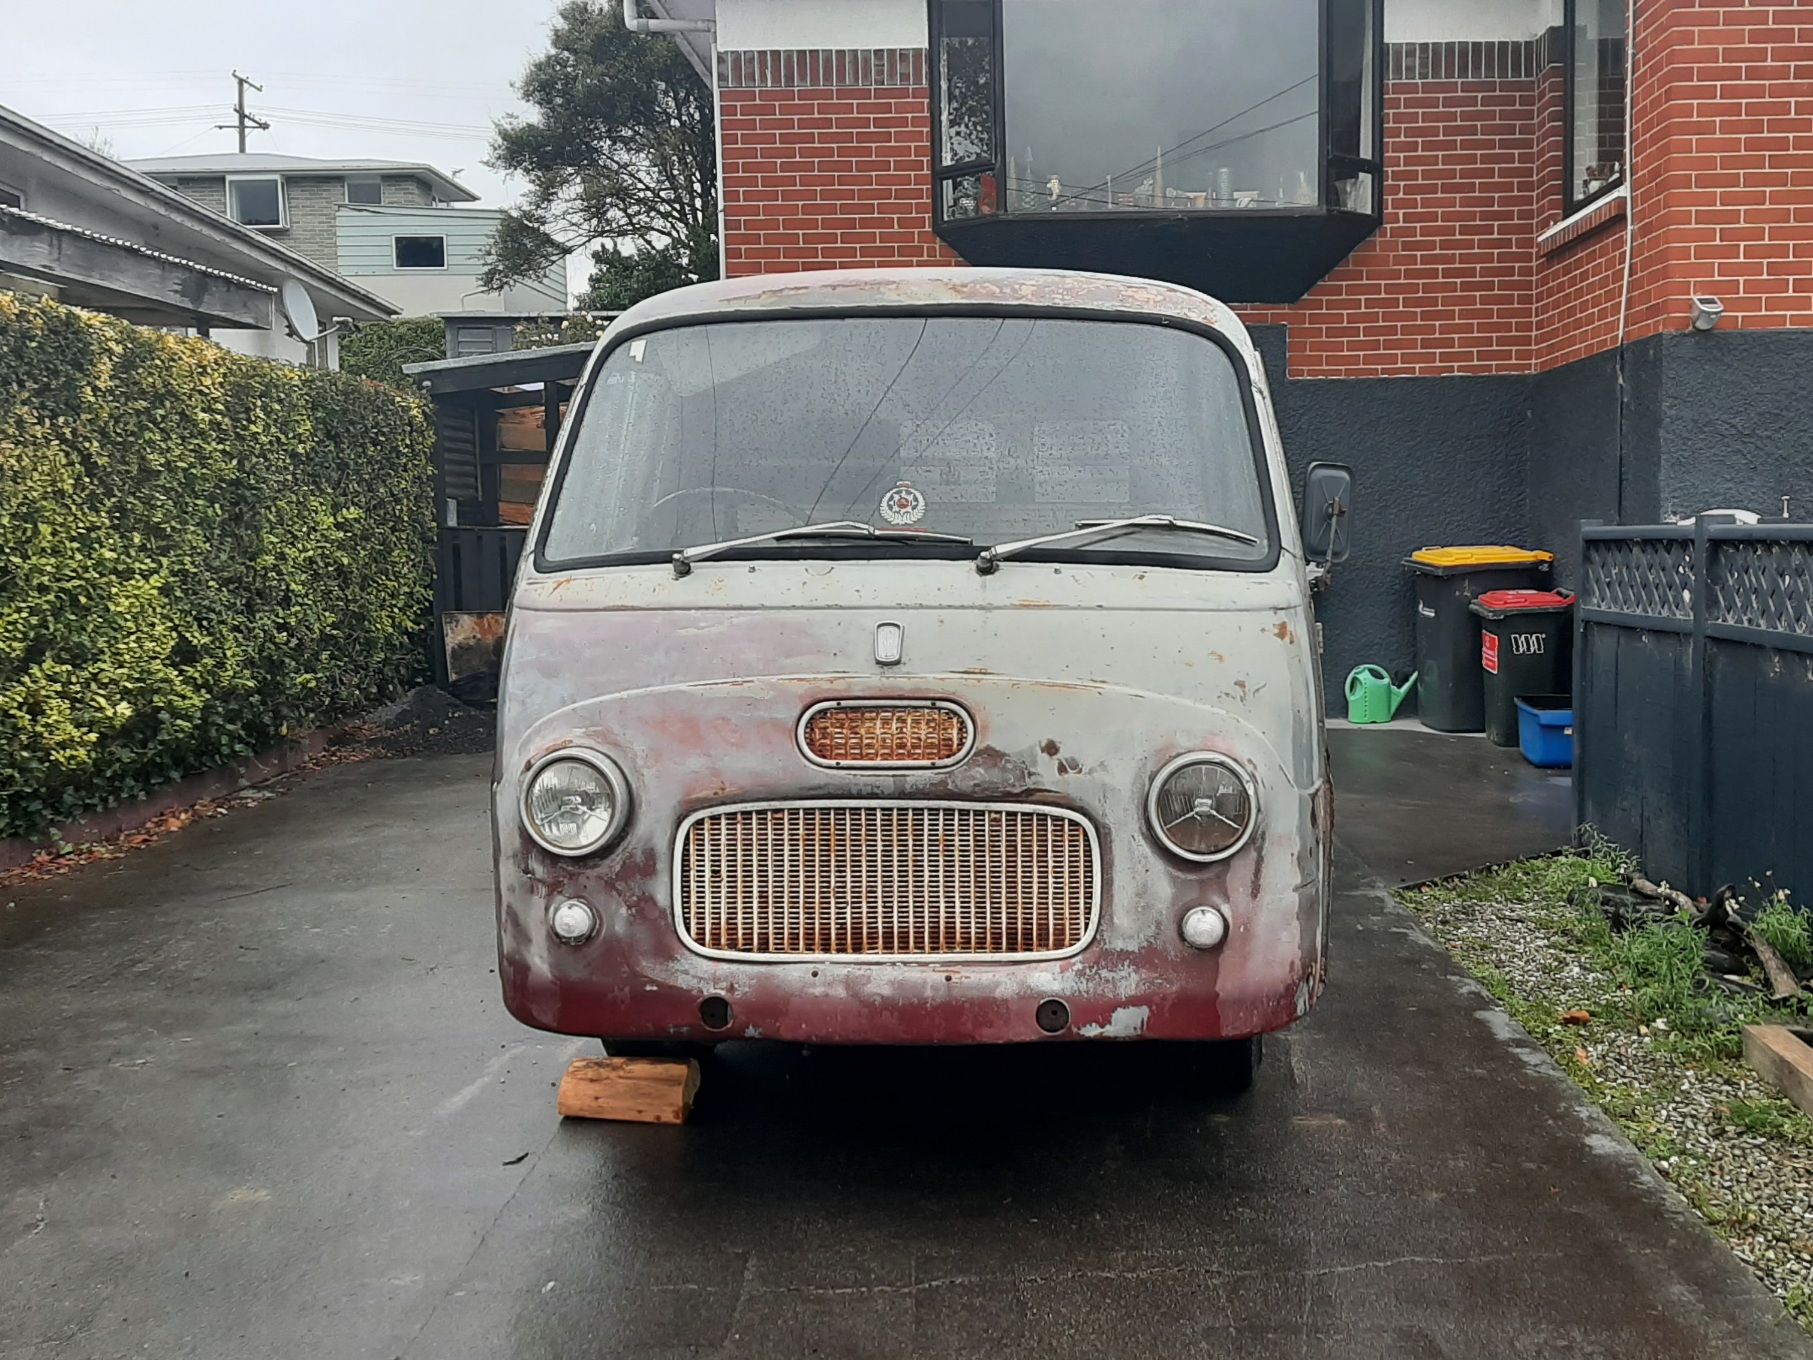
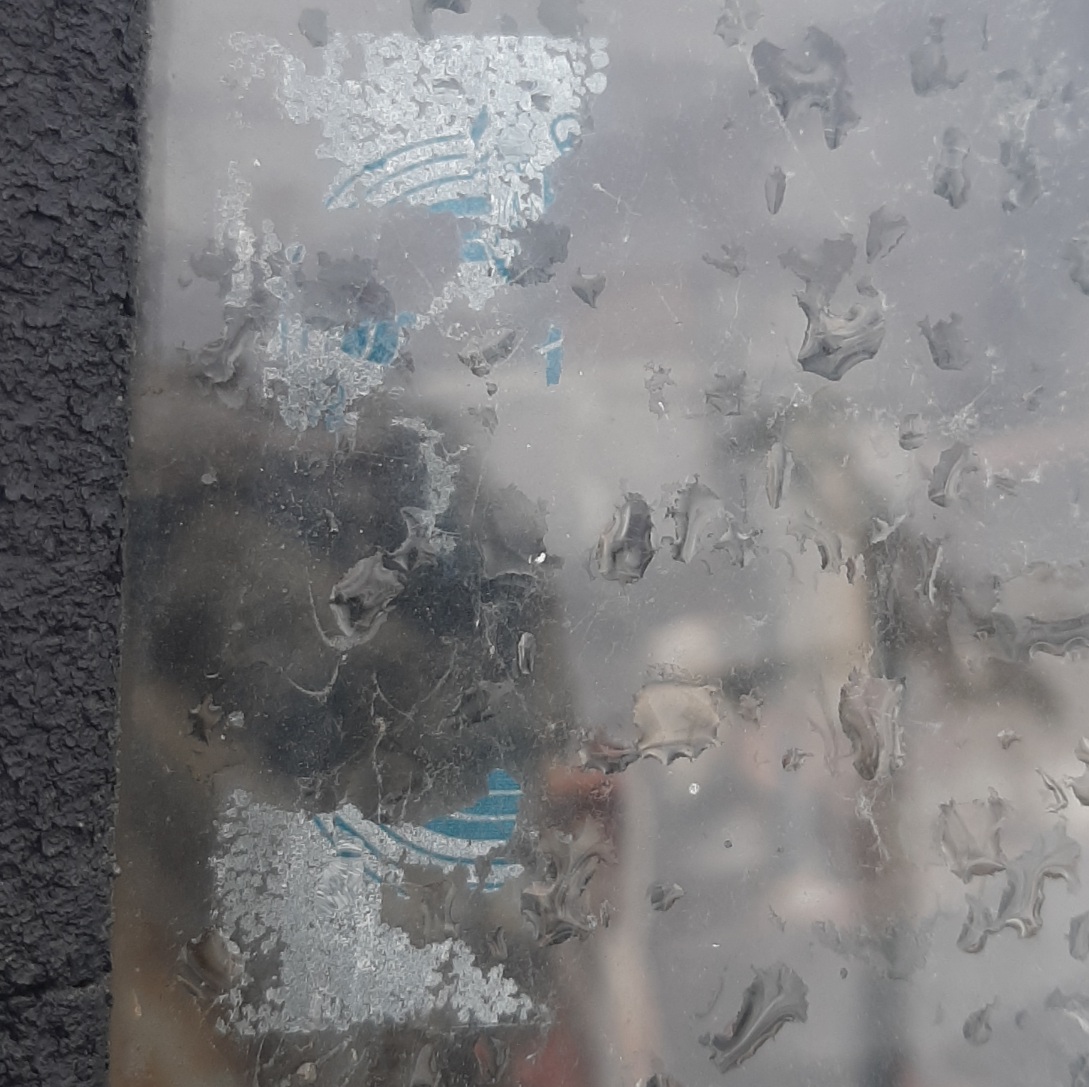
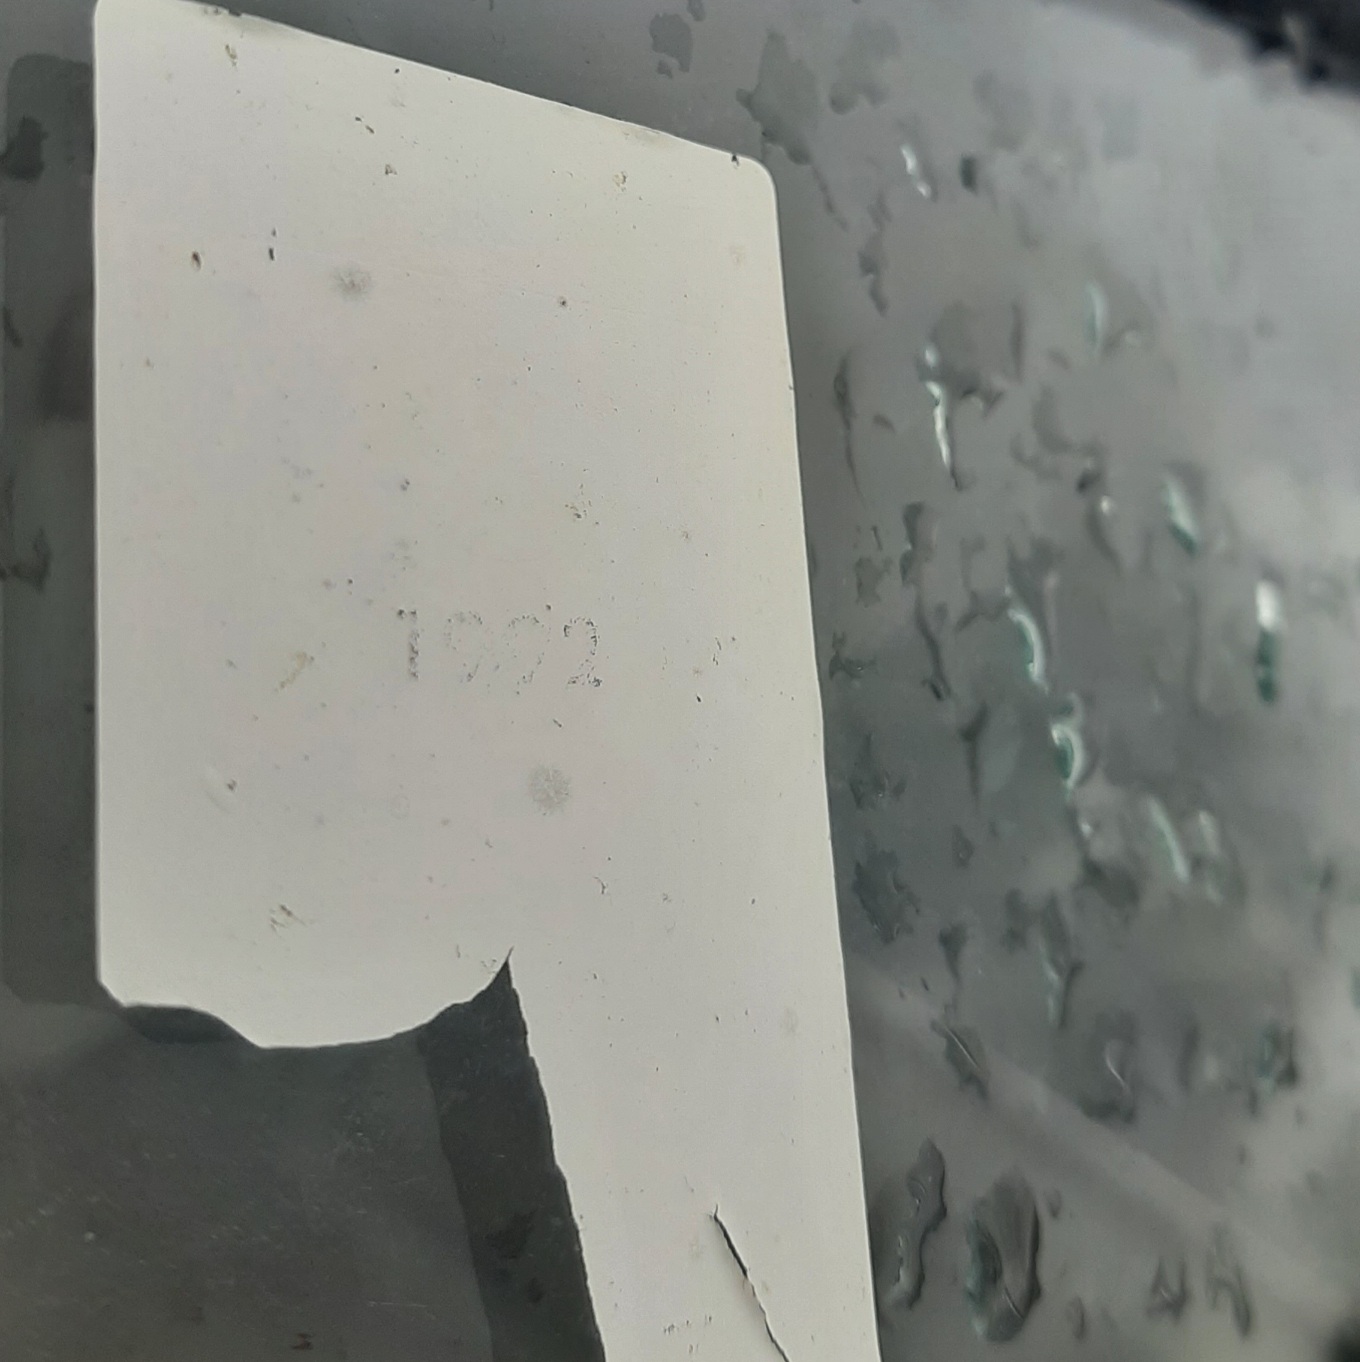
Took the day off work today to pick this up. Donkeys! Then home. Gave it a rinse inside and out with the waterblaster, and started digging in to see what I got/whats missing. It is mostly complete, box of spares has old brake bits, which might be ominous. It has a 4x148 or so stud pattern, which ive never seen before. The body is pretty good, just the bottom of all the doors and front floors are crispy. All the switches are bung. Windows are stuck. Found the chassis number, data plate and an faint image of an old wof sticker and an old style reg sticker with 1992 faintly on it. Pretty sure it was repainted maroon over grey primer and roof left cream, and the maroon has fallen mostly off. I think the grey primer might wet sand off. I also think it was a painters van for a while based on the range of colours and depth of house paint splatters in the back. None of the doors close or work properly so i started by adjusting the catches then taking the door handles off to clean and lube them up. Fixing the rust will help the door stiffness too.
1 point
-
Had a design in mind for the wall up to the lounge from very early on. Was gonna take a bit of time but I thought it would be well worth it. Cut and planed lots of batons from Rimu off cuts Its not a techy thing. They went up along the wall and are spaced just so that as you enter from what will be a hallway it sort of looks like a solid wood wall. Then as you walk in and past you can see the orange paint through the gaps... Neato. Much neater. I like the effect. But I also had this planned... and all the colours in between Today we went to the big smoke (Nelson..) and met up with @CPR Sierra who gifted us loads more leftover timber plus loads of insulation from a house build. Top fella- thanks so much Morris! This is just what we need to now continue on with the kitchen smoko room and bedroom sickbay build.1 point
-
Painted the door window frames in 2k matte black and then assembled them back together. Hatch assembled and back on. Finally found some factory fender mirror, in pretty good condition too! Sanded the tail lights and sprayed them with some clearcoat. Got it off the rotisserie in the weekend, after being on it for 16 months!1 point
-
Done. I suppose I should do some kind of leak test since there are eleventy billion welds on this thing. I also learnt that if you use the cordless drill on the nut for the v-band clamps, and there is no lube, and they are stainless, the thread eventually galls and welds itself on. Fortunately, my original design was going to use more clamps, so I had a spare. But still, they aren't cheap. I put a drop of oil on the threads now.
1 point
-
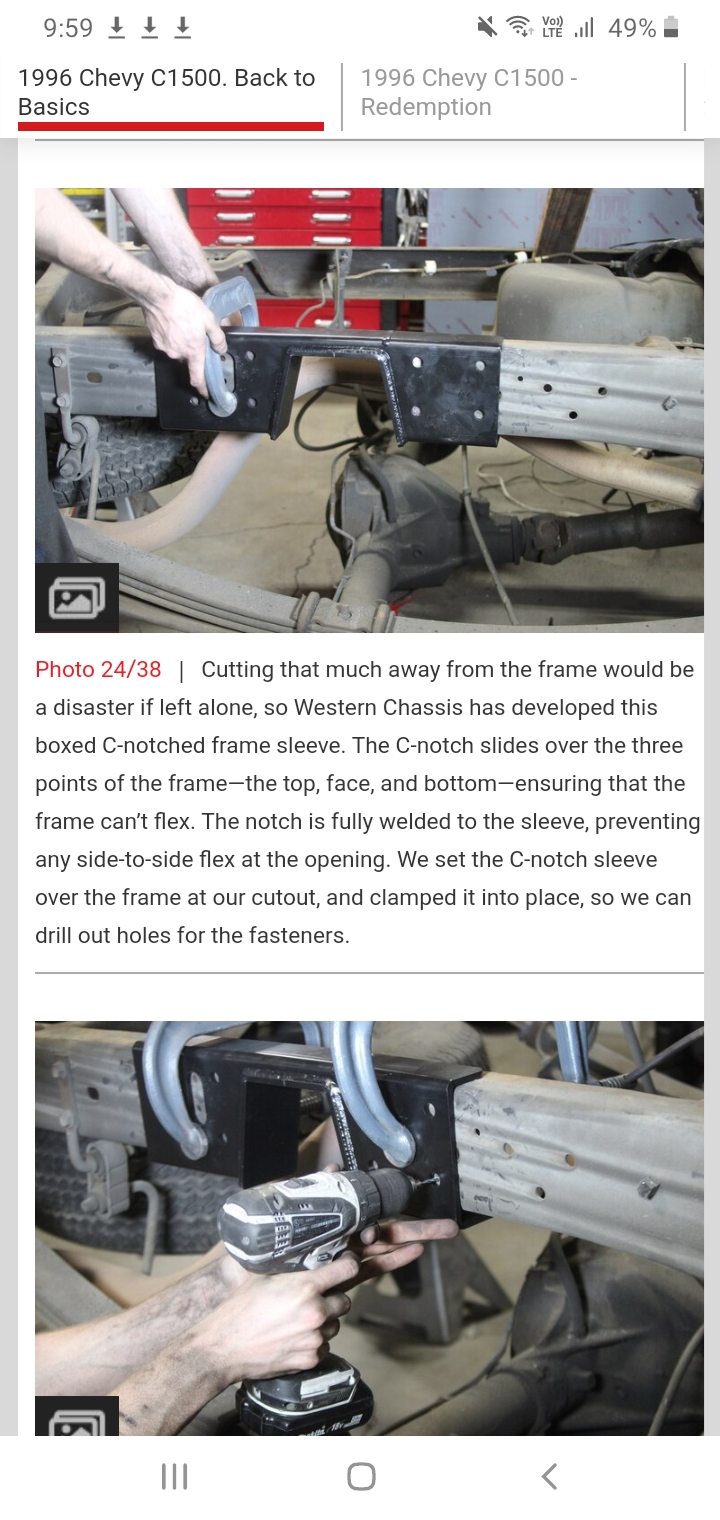
Managed to fit it all in. I had to put the v-band flanges in the lathe to make it shorter. Need to scribe around it, then cut those spot welds and whittle out a hole
1 point
-
Need to see the label on the back of the machine, but the time period for the duty cycle rating will be super short. Most welder duty cycles are based on 10 minute blocks. This machine will be something like "100% @ 232A" based off 1 minute blocks. I also highly doubt that a 13.2kg single phase baby machine like that is capable of outputting 300 amps.1 point


.jpg.1e328f149fdc01e2337acb0ff4b7c054.jpg)


.thumb.jpeg.384ff72c8d2b0ee0d34a7bdedb55bdcf.jpeg)


This leaderboard is set to Auckland/GMT+12:00