
Leaderboard


Popular Content
Showing content with the highest reputation on 04/21/19 in all areas
-
Its been a while since the last update but i have been chipping away at this project. I finished the weldathon on that bus and it was picked up the next day. The owner is really happy with my work and it turns out he has quite a collection of classics. He now wants to bring me some of the cars, including a mk1 mini cooper, for some rust work. Cool! While the bus was taking up space I had been sneaking in some work on the wee Imp. I fitted the engine up to the transaxle, weighing the engine first. 87kg with the flywheel in place. Not too bad at all. Not super light like the standard Imp all alloy unit however I have moved so much stuff to the front that it should still be well balanced. I do love the idea of an all alloy Nissan cg13 twink from a K11 Micra- however that would require a full re-certification. I prefer the idea of a Goldwing engine engine more! I digress. So anyway- I had slung the engine in place using a lump of timber and a ratchet strap. Worked fine. Then started making new engine mounts and cross member. I was not happy with the state or look of the old one and knew it could be far better. Not really a lot to say about making fabricating it all- the usual story of lining the engine up exactly central and building things to connect. I wanted to make sure that the exhaust manifold and starter could be easily removed without touching the cradle. I probably over built it with extra bracing (I even ended up adding extra gussets just before painting it, because ocd paranoia) but all up it still only weighed in at around 7-8kg. In photos. I didn't take many as work progressed on this bit really quickly.. Clearance under the car was still really good, considering how low the sump looks from the back. I think an optical illusion due to the rear panel not being in place. Then painted in black epoxy.. Next up was the exhaust. The manifold that came fitted was running really close to the drive shaft! Enough that it would contact when the car was lifted off the ground. There was quite a bit of damage, dents, poor welds and other bits that needed attention so I chopped it all back and carefully shortened the bottom pipes then systematically pieced it back together. I required quite a bit of forward thinking because the access to weld to pipes all the way round was really tight. No photos of work though as I was so immersed in the process I forgot to take some. Really happy with the result though. Fits perfectly, cleaner runs and still equal length (as if a Datsun A12 with a carb the size of a small cup would care. But hey, every little helps ) Later on I painted it and then wrapped the upper pipes to ward off heat from the inlet and coolant pipe. I know some dont like heat wrap but I think its great! Its worked well on my last several car builds. Luckily I live in a dry enough area to get away with it and not worry about potential corrosion. With that sorted I moved onto the rest of the system. I have always had a picture in my mind of what I wanted it to look like and I wanted it to be rear slung with a side exit to avoid the car filling with exhaust fumes. Apparantly these early Imps with the roof vents can suffer from fumes being pulled into the car by the vacuum. I also had a rough idea on how I would build my own silencer and there wasnt anything available that fitted my ideas with a price I liked. I had built one for the Mazda Rx3 and it worked well. Money is tight (I'm too tight..), time is plenty and I love making things so I started building. Using the pipe from the original straight through muffler.. Then fabricating my silencer using some ideas I nicked from Google along with extensive coffee fueled airflow thinking in my mind. I have no idea on what it will sound like but it was a fun process and looks neat. The stainless pads worked well in my last muffler along with some glass matting I got from the neighbour. I'll report back In photos... I had a pipe bent to 90 degrees and added mount points to the muffler so it slings up under the rear valance. I made a stainless heat shield to deflect heat away from paint and bottom pulley. You'll see that later. I have yet to decide on the length of the exhaust tip, cut it and then weld it on to finish. Then the inlet. Because the Datsun engine sits flat in this Imp, unlike the rear sloping angle in its usual Datsun 1200 home, the carb is not level. I chopped off the mounting face and milled the manifold at angle to suit. Then I welded it back in place. Carb is now level. I filled in an unused vac hole, cut off the extra unused lugs and gave the whole thing a clean up till it was nice and smooth. While I was playing with alloy I made a new alternator bracket... and had to rebuild a very corroded thermostat outlet. it was knackered... I was given a better spare by a nice fella with a Datsun 1200 ute but it pointed upwards. My outlet, most likely from a van, points down and suits the pipework routing I wanted to do. So I had to fix it. I found a suitable piece of alloy pipe on an old scooter handle I had rescued from the local scrap metal pile at the dump... Much better! Then onto the pipe work in the back... Just a case of sussing out a neat route to suit my tastes, remain easy to work on and remove and allowing for a potential Davies Craig electric water pump just in case the Datsun pump is not up to the task (and also because I do rather fancy the geekiness of the little display unit not to mention how much better it could work) With the pipes sorted I replaced the transaxle output seals because well, for $20 it made sense to do them now. I machined up a stepped tool to make sure they went in straight and to the correct depth. New seals.. Then mounted the brand new BMW couplings I bought from Rockauto. I had to make some spacers to suit as they are narrower then the stock Rotoflex couplings. With the car on the ground the driveshafts sit almost bang on parallel to the ground which is good for their longevity. I didn't fancy reusing the red Nolathane couplings that came with the race car because whilst strong in shear and rotation they didn't have much flex in and out which would impose quite large stress on the transaxle casing as the rear suspension went through its motion I felt. I then did some fun little jobs (but its all fun really..) like cleaning and painting the starter and alternator... I dug out my old art oil paints and mixed up a suitable orange to paint the inside of a very faded rear indicator lens. It'll do for now but I do look forward to locating and buying some better ones when I go to Blighty in July! Then began the wiring! Like all my other previous car projects, I enjoy this part immensely. I love the challenge of hiding as much of the wires away, re-configuring the circuits to suit add ons or just to make them better. In the case of the Imp, which has no fuses fitted at all (until the later mk3 Imps came along) this was an essential item to address. It also has a terrible dash wiring layout whereby you have to unplug everything to remove the instruments. Almost everything seems to run off just one piddly feed wire coming from the key. I'll sort that lot out with some plugs. Add in some relays for the lights, fan. Wires for a potential electric pump, sound system, high stop lamp (I have a neat idea floating about in my head for that) and making sure its future proof because later on I would like to inject this engine. I have also added in a tail to attach a trailer plug to. Because that will be a thing So I had two extra looms going spare which I pulled apart. I now had a large amount of extra wires for my project. Wiring isn't the most exciting thing to take photos of. I have now finished the engine bay wiring and I'm pretty happy with it. Now I've refitted the rear valance panel and exhaust and can lower the car down and start on the interior wiring. I'll be making a removable fuse box/relay unit and fit it under the dash if all goes well. Some photos of where I'm at now...log burner in use as the nights get colder. Sofa wheeled over to middle of workshop for max stereo imaging whilst I drink beer and play with wires... Wires hanging from engine bay.. Engine bay completed (missing hose clip noted..) but for an over flow tank from header tank to fit. I will build a better two part tank in the future I think. Exhaust tip length yet to be decided and cut. Note stainless heat shield. Bumper also to go back on, with bottom mounted rego plate.29 points
-
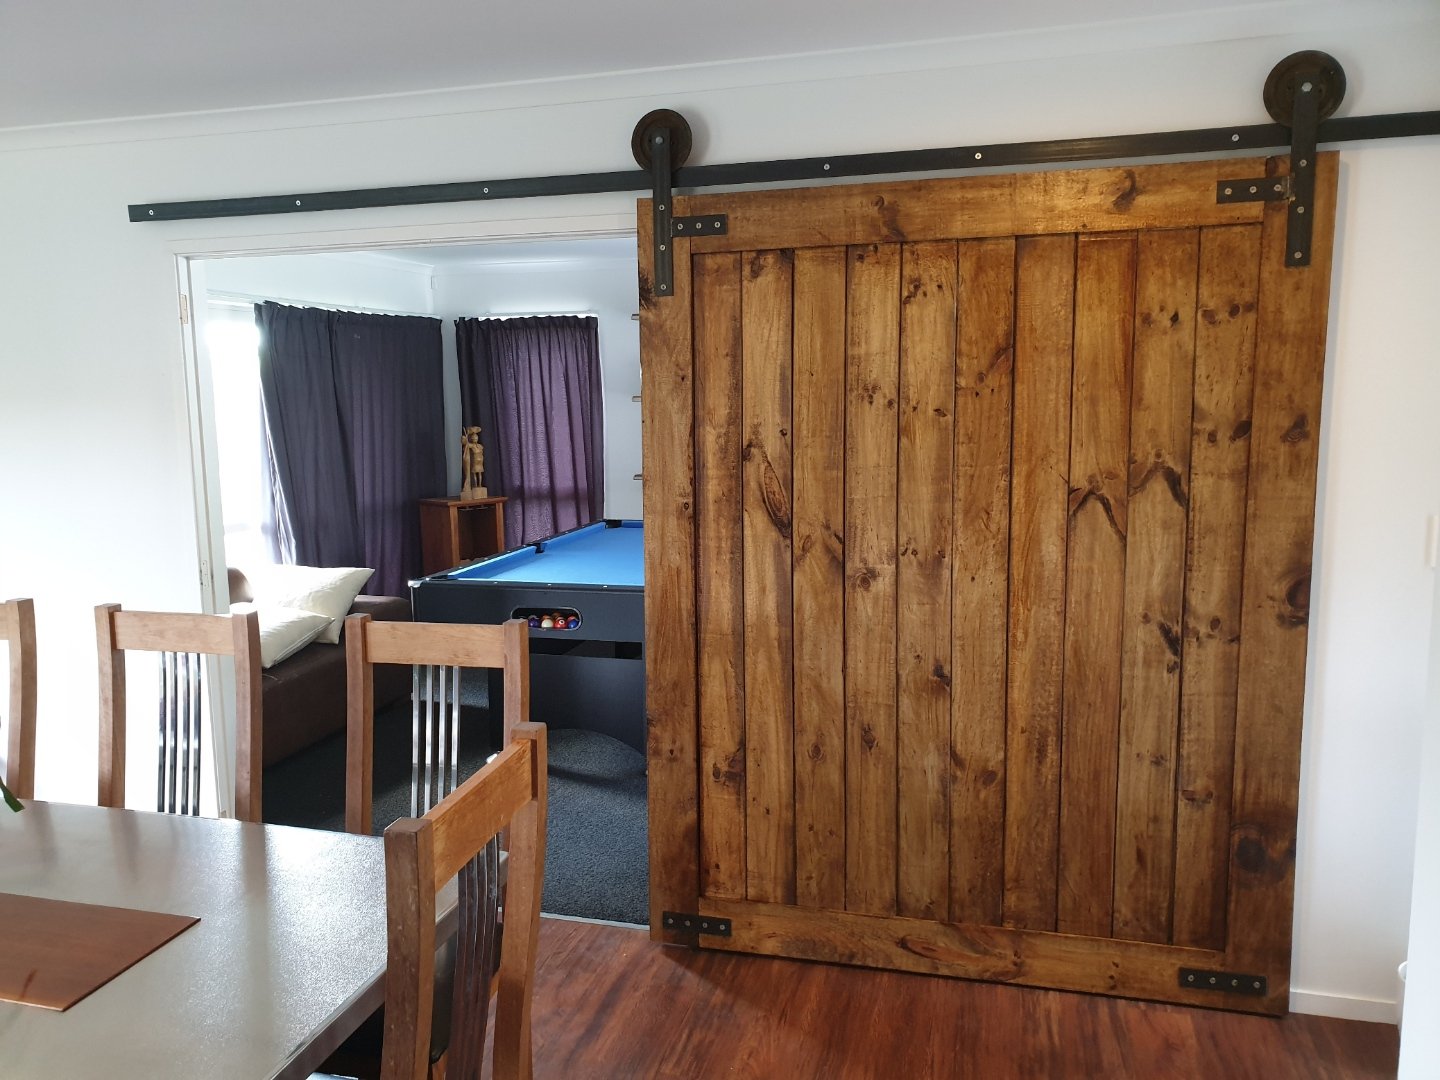
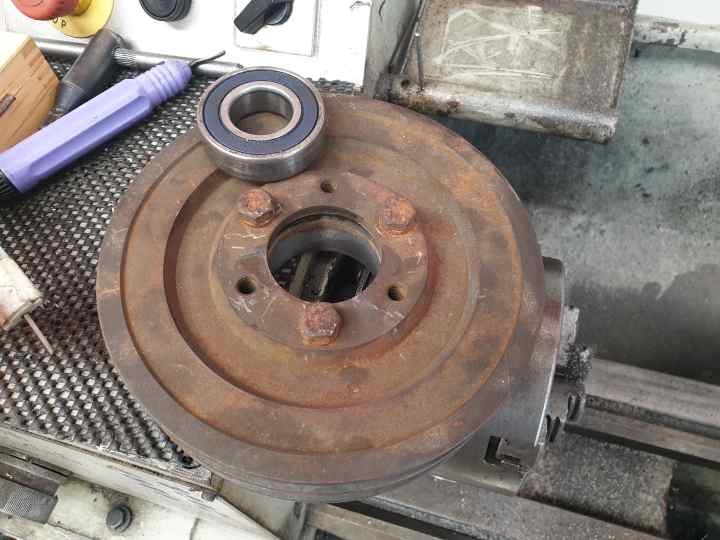
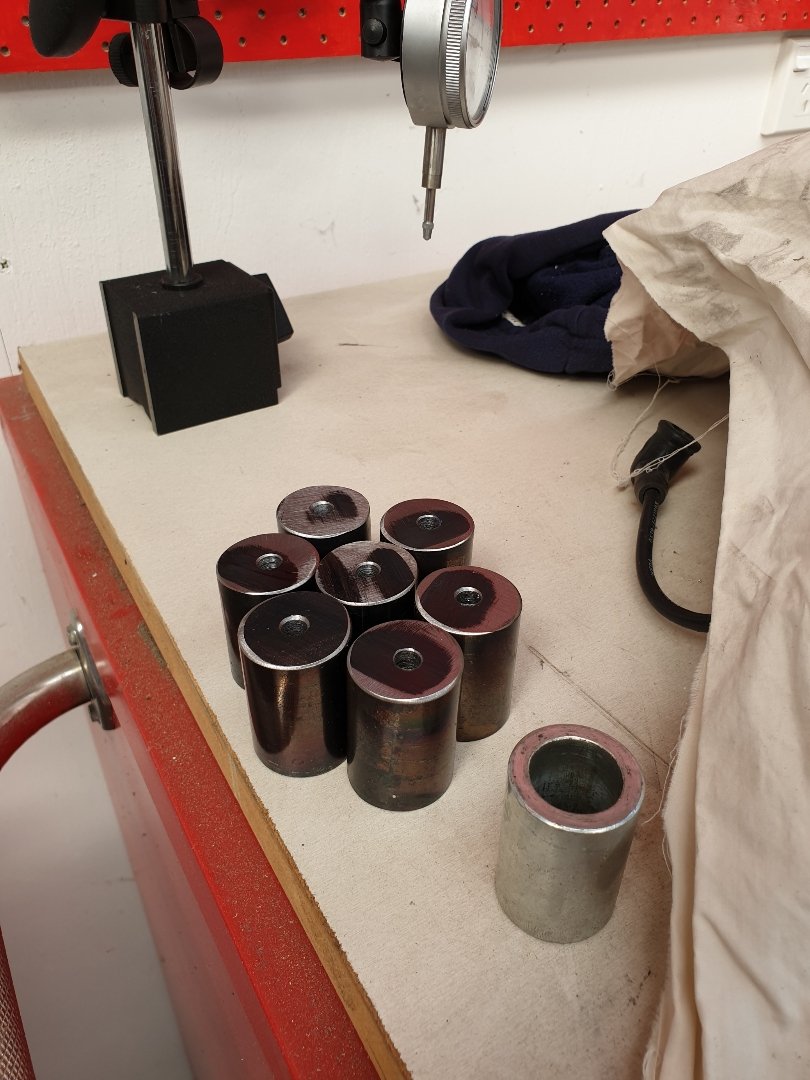
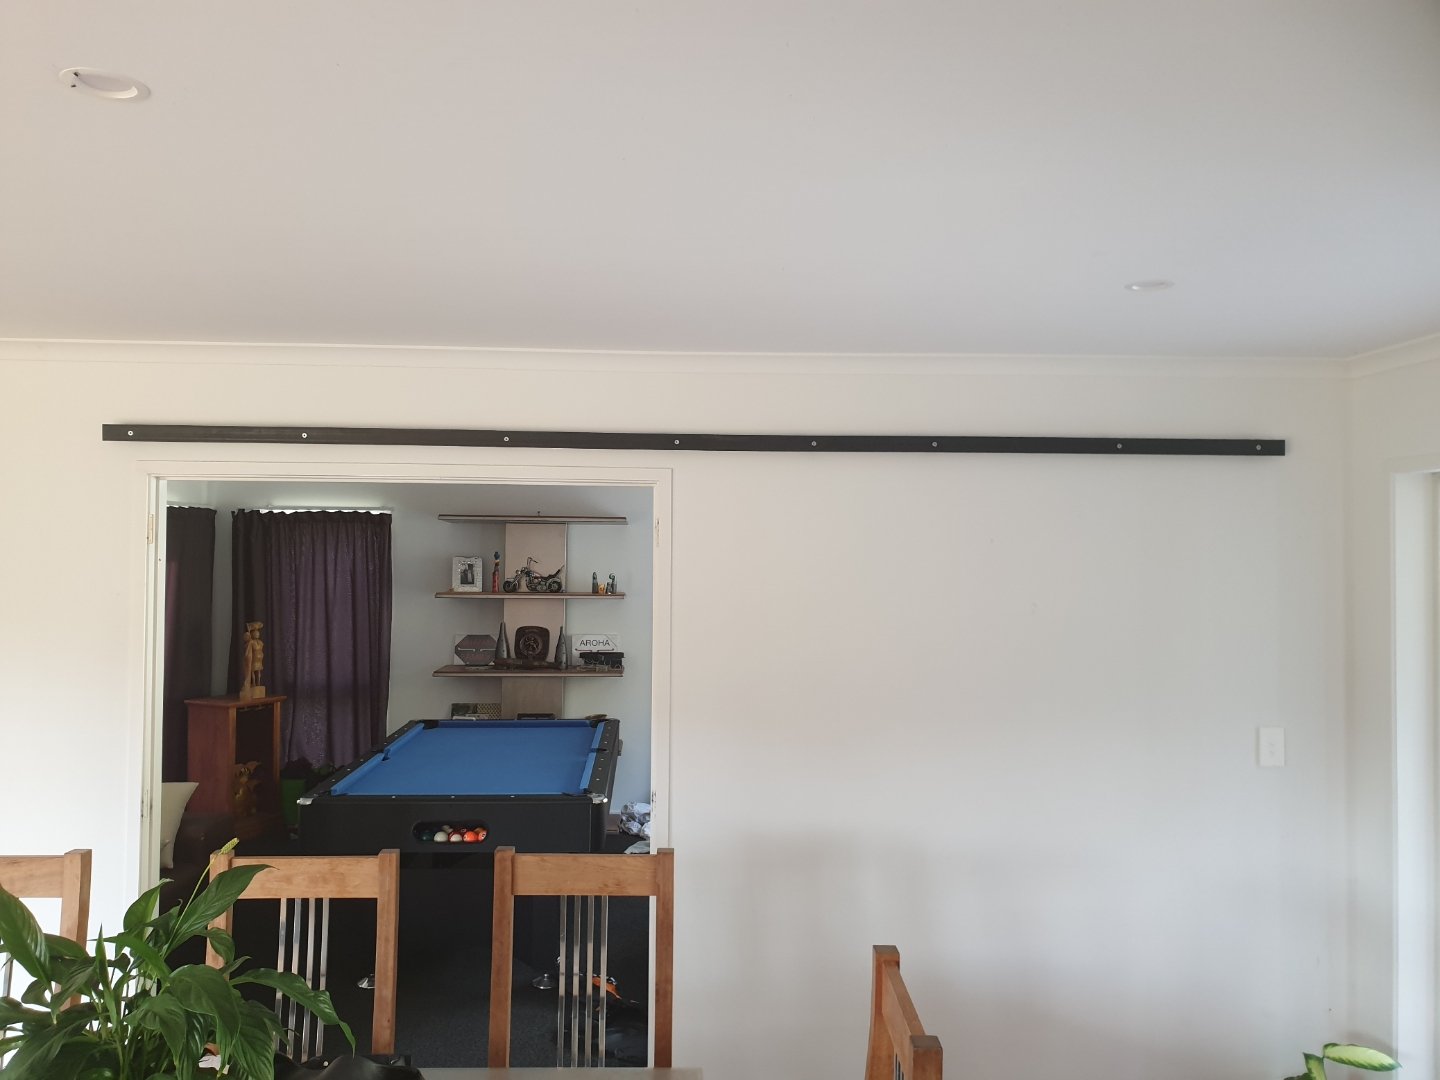
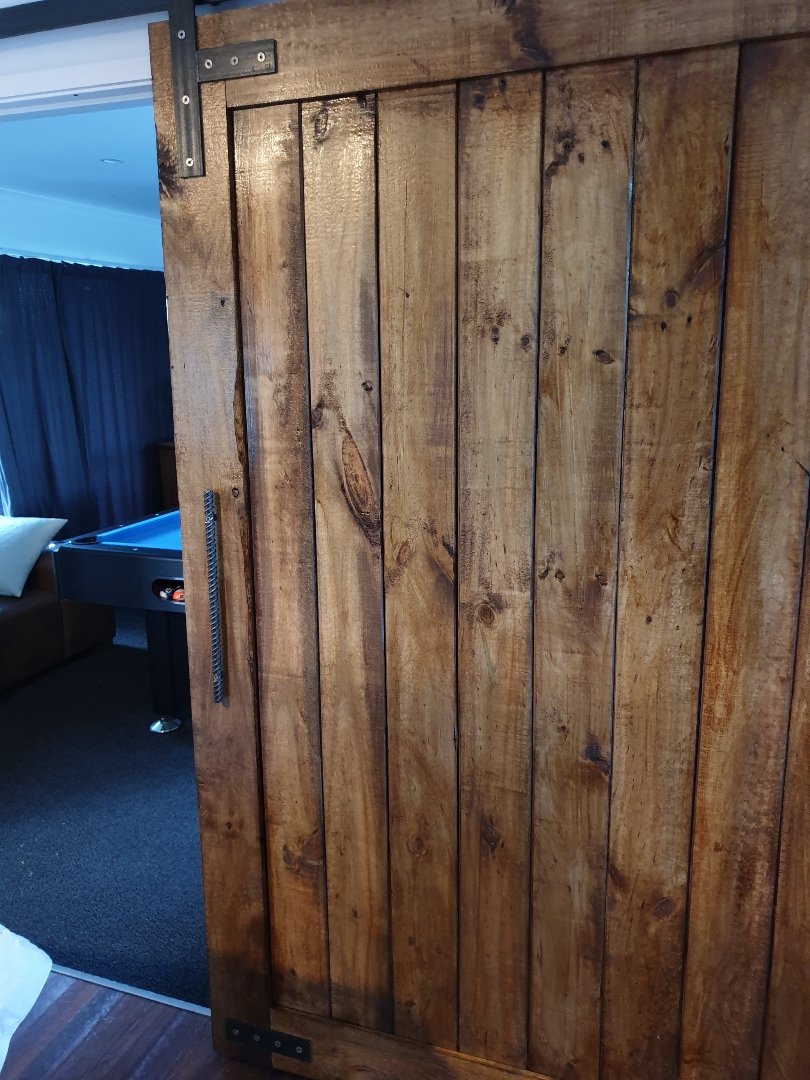
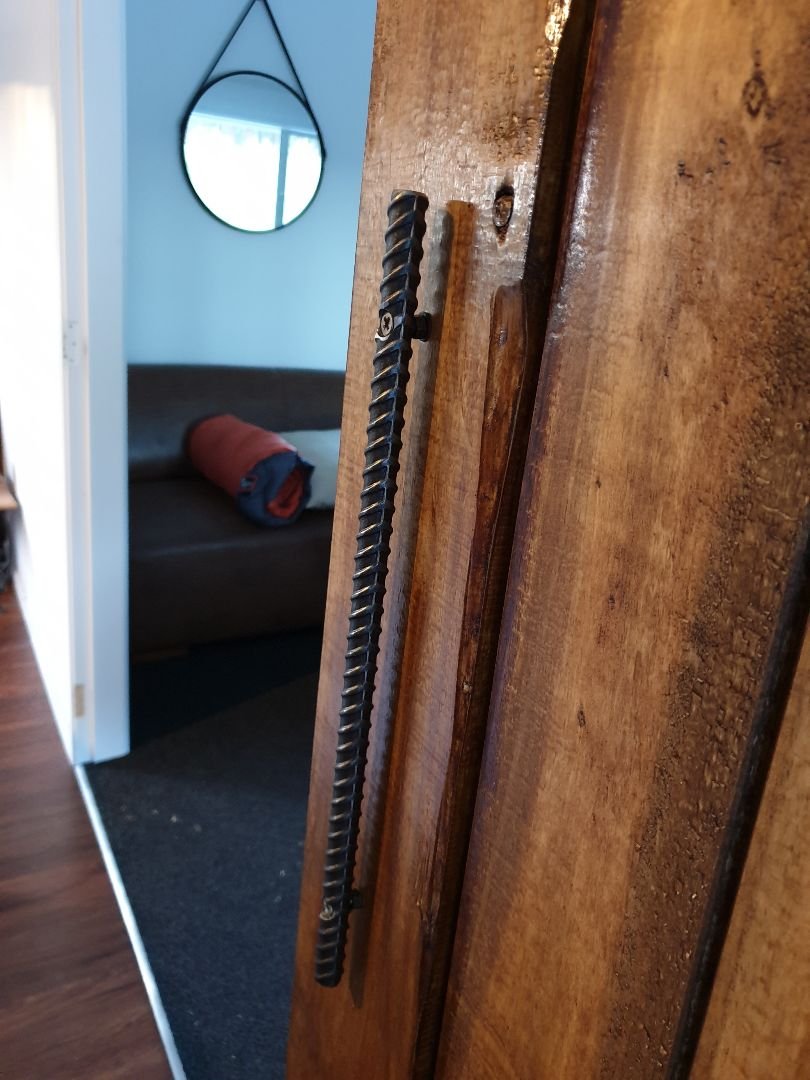
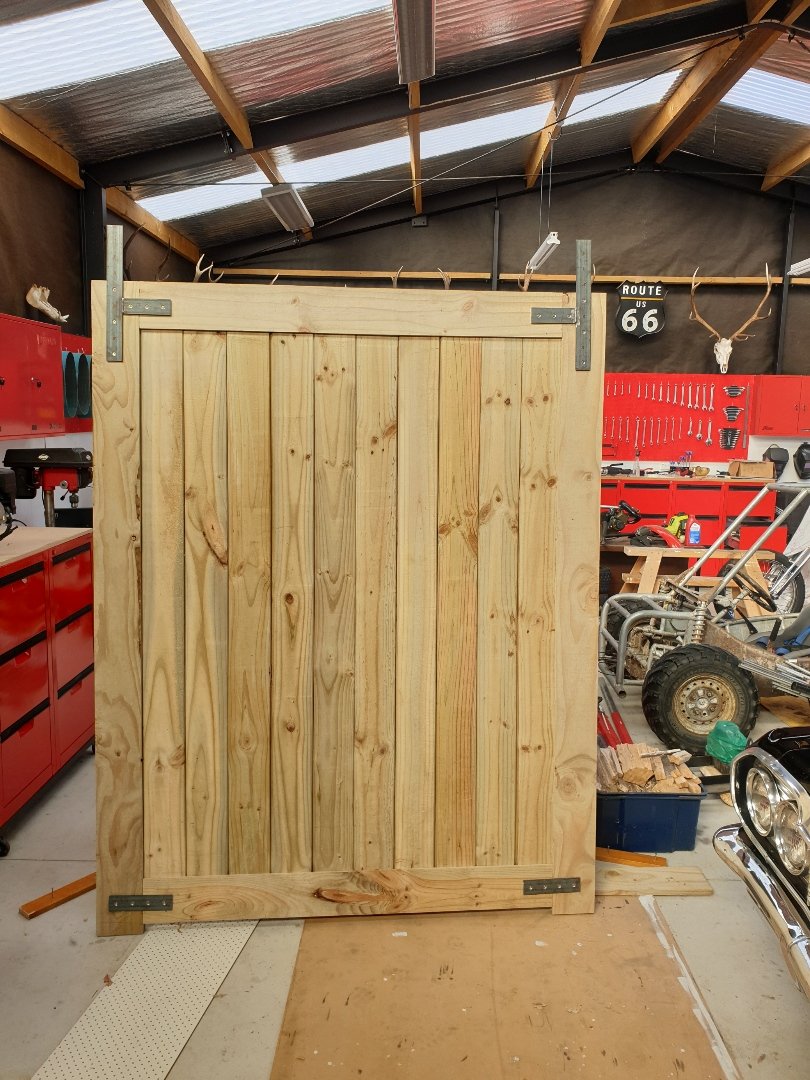
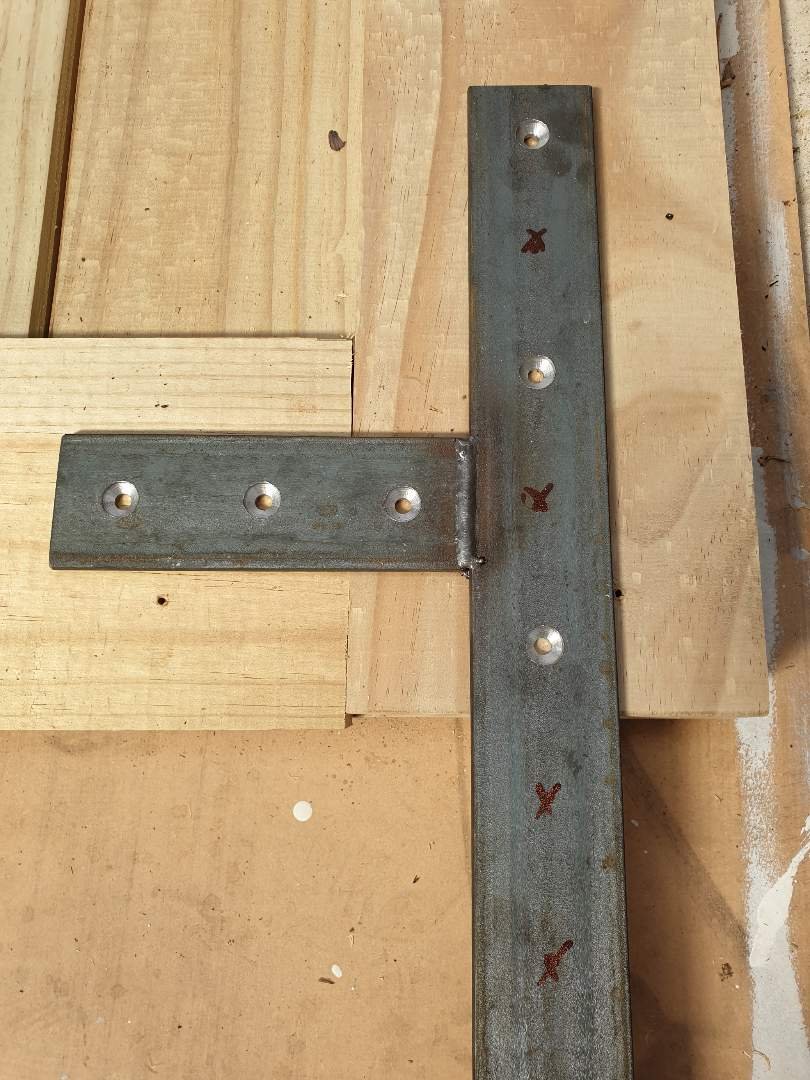
Love the e-kettle above...wicked! Finished the barn door today. Been a public holiday I totally forgot that shops aren't open. However this just made me have to come up with creative solutions, rather than buying ready made. So: Standoffs made. Then using the above standoffs I attached the rail to the wall. It's just 50x6mm flat bar. The same stuff I made the hangers out of. Then I used some left over parts from Pete's velobike. And machined in some recessed pockets to hold some leftover harley bearings. Then I had to make mini stub axles for the bearing to attach to the door hangers. And tadah!!!! It works!!! Added a big handle made of rebar. As they say "big door - big handle"... I've also added some stops, "so it doesn't go off the rails" and a floor guide for it to track on. Pretty happy with it.
 22 points
 -
I've done and did it again. Sight unseen, I didn't expect no one else to bid. You know the story..... Its a 62, fully retrimmed interior, and a half decent paint job. Big pile of receipts, it's had a lot of money spent on it. Unfortunately it's got dead Rego, fell off the system 10 or so years ago and has been passed around a few owners since then, mainly sitting in their sheds till they give up. Not with me though! Main issue is that the chassis rails are shot. Usual Morris minor rust. Someone has attempted to make new ones in short sections and made an effort to weld. I wouldn't pass it, so neither will the inspector. So I have just spent roughly the purchase price in new quality UK panels. Rhs needs the full length done as they have tried to do the whole thing (£££ in postage )LHS there's enough of the original left in good order that I can get away with a half panel. Some wobblyness and rust in the RHS engine bay tie plate, so got another of those as they are cheap enough. Possibly it's had a prang on that side at some point too. Have a stack of paperwork stating various rust repairs done about 20 years ago in Nelson, so il have to check those out too. Plus a couple of half pie attempts at small patches from the last owner as well. Nothing major, she's not a mitsi. Other main issue is there's no engine, box, or driveshaft. I have a 1100 with the head off and a smooth case box (possibly the one in the paperwork that's had about 2k spent on an extensive rebuild only a couple thousand km ago) and a 1275 marina engine and ribbed box, which I'm told runs. Car however should have a 950. I'm leaning towards another 950 and see how bad the gearbox I have is. If I needed to cert it id want to modify a bunch of stuff to make it worth it. Have a supercharger here, or maybe just out the body on a Suzuki 4x4. Maybe next one. Otherwise just the usual Morris problems. Brakes are all in bits, tyres although very low km are now dry rotted. For some reason there's indicators on the front but has never been any on the rear. Looks like the suspension bushes are missing (it's also on lowering blocks and sitting on its bump stops). Hoping for an over winter refresh.....15 points
-
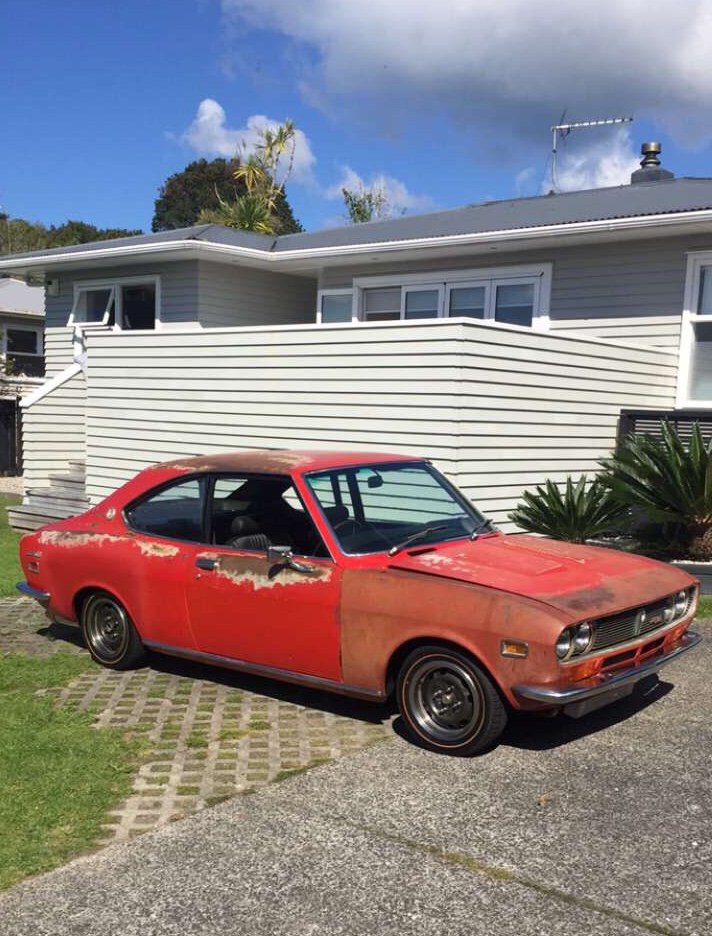
did a bit more. i gave the patches i put in a bit of a tidy up and made the whole car red. i got some rattle cans matched and just used them. i fucked up a bit on the passengers side around the wheel arch and didn't cover the primer enough so now its showing after i gave it a polish. ill blaze some more paint on that bit and call it good. i started trying to polish the paint to see if it would come up ok. it didn't. its better i suppose but the paint is pretty fucked. anywho, ive only done one side. ill paint the whole car at some point but i was kind of hoping it would come up a bit better. 2019-04-21_12-54-05 by sheepers, on Flickr 2019-04-21_12-54-20 by sheepers, on Flickr15 points
-
Update - all items on the list are done apart from adjusting the hand brake and moving the rear hard brake line up a tad on the diff. I fired the coupe up today and idled it for 20min the drove it up and down the road to get some heat into it. I wanted to monitor the temp and ensure the fan is doing its job and that the rad isn’t spitting any fluid. Pretty sure some neighbours applauded when I turned it off. That just made me turn it right back on. Cert recheck 14th May and toad test. Here are are some pics from today
15 points
-
Looks good man, rustic AF Another homebrew project in the works atm, brew buddy's missus wanted us to brew her some cider - things got outa control from there, naturally Scored some apples from block down the road, noticed a bunch of laden trees in his front paddock and cold called the dude and turns out he has no interest in them - so 200kg of free apples for me Next came processing machine, stainless innards 3/4hp insinkerator + $25 warewhare stool: And press is still a work in progress. Was tossing up a cheap bearing press but then decided to build something with more majesty for the shed - because medieval...13 points
-
Chatham Island's Nissan population just increased by one.
13 points
-
Tentative list of work Replace RH chassis leg Replace LH chassis leg front half Replace RH tie plate Rust RH Sill Rust battery tray Poor patching boot floor rust Crack in engine mount tower New hard brake lines front Replace suspension bushes Fit brake light Install rear indicators Buy driveshaft Assemble front brakes Engine and gearbox Install heater and under bonnet stuff accessories9 points
-
Just failed on principal8 points
-
Took the aliexpress rip-off Renthal bar pad off and can now see the dash alot easier. Fixed the broken tacho wire so thats working again Rear brake was shithouse but having no fluid in it wasn’t helping, a flush and a bleed now its locking up nicely if you stomp on it. Just been for my 1st proper ride for about 50ks and man its good fun. Need proper gear and a decent helmet asap plus some ear plugs cause its pretty loud at any speed5 points
-
So Easter Friday the Middy went out an left me at home with the kids (who are on no screen time for Easter) so while they played outside I played in the garage, found another great use for the hoist separated the trans and motor then used the hoist to lift the engine off the k frame an trolley I built so I could get it on the engine stand. Dropped the sump to have a quick Nosey inside, which further confirmed my lack of service history there’s a reasonable amount of sludge, there was also a random small washer pulled a big end cap off crank and bearings look good all in all pretty happy with the condition. Should make for a good build to finish the day I returned to stripping underseal pretty happy with the lack of rust I’ve found4 points
-
Depends how well press works, gonna add some steel reinforcing so can buy a jack on the bigger side (10 ton prolly), so hoping for btw 60-70% yield by weight (so >100L hopefully)...3 points
-
Technically yes, but you'd have to be the most pedantic prick to pull it up on it3 points
-
Cheery Jonny - glad someone thinks it’s cool apart from me haha. Ive tried to keep it honest as I can but a bit of a NA sleeper too. Hotwire regret...perhaps Im just loving the steelies at the moment. I ventured past another speed bump in my street today and no scrapage. I’m looking forward to the slightly higher profile tyres soon to allow me another cm of clearance. Might be taking it to hamptons next weekend if the weather is fine as it’s the caffeine and classics track day. Get some seat time in it and maybe, just maybe get it in 5th for the first time
3 points
-
Is there a healthy dibs system on Chatham? Like when someone brings something over, others start forming a queue for when the owner wants to sell.3 points
-
This thread is so great, nice to see the love of project running strong out there Surprised to see lack of piss-related craftery tho... E-kettle from the archive, 6kw element on 32A single phase supply. Runs on microcontroller and SSR: 60L of IBA3 points
-
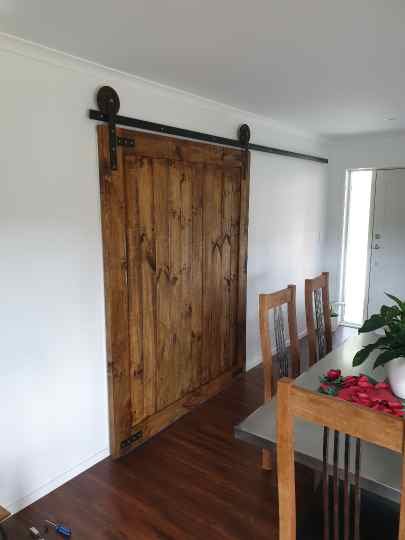
Barn door update. I've been away so much lately that this took a backseat. Anyway, a few more hours spent on getting it done this afternoon Ready to stain and hang on the wall.
3 points
-
Budget shelter nearly finished. We had to add 4 more ribs today to get the iron to sit better. Aesthetically its quite poor. Practicality, and budget wise it's very good.3 points
-
A bit more progress. I bought some Vitara seats from the wreckers, these are the same frame as the ones I put into my bus so I know they can sit pretty low once you start cutting and shutting. They are a bit more supportive than the Dyna seat, and they have the added benefit of being a pair, not a single. Banana for scale; I removed the bar that runs along the back of the seats, this allows the seats to recline into a far more comfortable position. It will go back in when the seats are installed and I know how much clearance it will need. I will need to split that engine cover lengthways and add another hinge and latch. This means I can still get into the rad space without removing the passenger seat. This shouldn't be a drama. I also checked the bump steer situation last weekend, first with the factory setup, then with the new arrangement. The new setup turned out pretty shit as my positioning of the new steering box did not put the tierod exactly in line with the factory setup. This was due to some geometry that I had to guess at a few weeks ago, but when I moved the box up 25mm this made a huge difference, it is now slightly better than the factory setup which is a big relief. The brakes look pretty new with minimal disc wear so that is good. About there is where things have stalled as my back went out pretty badly and I spent a couple of nights in hospital. I'm home now and itching to do stuff but I should probably take it easy for a while. I am going to have to get serious about losing my belly as I am sure that would make a huge difference to the situation. Fat old fuck that I am.3 points
-
Regarding the revin, how hard would a plate and tag swap be? Surely something this old would be a cakewalk? /don't do that though, it's illegal!2 points
-
Oh awesome! I never realised you had come back on here and started a thread about this after having told me about the dickhead mod at xmas time. Fuck this is looking good! Top work going on. loving your new shed too- damn I bet its a relief not to be shafted with absurd rent anymore. Looks a lot warmer and lighter too! We are still planning our similar project with a Bedford K series cab and have found a supply of Safaris. The planning continues- now even more excited after seeing your project.2 points
-
2 points
-
If I can afford it I'll stash a few dozen Panhead beers in the cab, but apart from that it'll be loaded with tools. Unfortunately I don't have the amounts of money I used to have, so I can't leverage on the freight as much as I'd like to. I haven't been this broke since my early 20s, but I haven't been this happy since then either.2 points
-
Not been on here much at all for a few months, mostly cos an unnamed mod changed one of my posts to make me look like even more of a cunt than I actually am without indicating that they had done so, this gave me a complete sense of humour failure so I lost quite a lot of interest. I guess I am over it now but we will see how things go.... Anyway I have been up to a bit of stuff in the absent months, I will let the pics mostly do the talking. Cost 3x boxes of beer White dust is from fingerprinting, was stolen and recovered.. Fitted pretty nice with minimal sheetmetal cutting Engine is seized, need to find another, but will use this to set up the mounts. Made a removable subframe for the rear and mid body mounts Later model safari steering box, this might be a sticking point but i have a plan that has been agreed with the cert man in principle. The box is rotated forward from the original position, the tie rod position is exactly the same though Front body mounts and steering box mount are all tied in. I have a design for this in CAD which looks pretty good. Fitted the Safari clutch booster in there with relative ease Engine is just propped there, I have moved it back 570mm to help with weight distribution/radiator clearance/etc. It also means I can use a SWB rear driveshaft. Gear linkage might be fun, although apparently the gearbox in a Condor/Atlas with the FD42 has the same box housing, the top plate and gearshift mech should respectively bolt on/be able to be modded to fit. Took it to a weighbridge to check axle loadings, 1755kg all up, 1130kg on the front. Axle ratings are 1500kg front and 1800 rear so should be good to go. The weighbridge was reading 65kg heavier by the time we were done so this is probably worst case. GVM of the Safari was 2505kg, so will be racecar. There is a lot to do yet, as I said the engine is seized so need to find another + turbo to put on it. Build the front cab mount and steering mount, engine and gearbox mounts Need to think how to build the front driveshaft, probably a shorty shaft to a frame mounted carrier, then use the standard front axle. Need to find FD42 gearbox linkage Probably needs new tyres and at least one more rim for a spare Need adjustable panhards and adjustable rear lower trailing arms to get the axles in a better position. It had a 2" lift that translates to about a 3.5" lift with the current weight, so axles are a bit off to one side and the rear will need rotating so the driveshaft flanges are parallel. Need to airbag the rear for load leveling. Need to convert the AC pump to continuous air for the airbags and whatever else Will need to build a deck with big ass drawers underneath for my tools. Will probably will have a budget hoist of some variety, maybe just an arm with a chain block. Electrical will be a nightmare as the cab is 12v and the chassis is 24v, need to talk to an auto sparky to discuss my ideas. Still need to 100% make sure that my cert guy will be able to take it on, there is no one in Nelson with 1D unfortunately. Piece of piss really.1 point
-
North Shore Rotary Club present a 1995 Workshop Coupe (as it has only 2 doors). Back in December old mate rot808 and I bought a workshop on the North Shore for a bit of classic rotary storage, which is great because families get excited to free up their garage space but realistically it means we can now buy more Mazdas. It's a tilt slab studio spec thing with only 2 doors for less whores (maybe why the brothel unit shut down opposite us but thats another story). Based in a group of 13 or so units which keeps the bodycorp and maintenance down heaps, the neighbours are great because from the ones we have met they have classic cars, two units are mechanics, and one races Targa. Built in '95 most the other units were converted to mezzanine all the way through, but ours in one of a couple left standard with a smaller mezzanine, and more room for cars. Even 3 phase for eventual hoist storage options. The upstairs is a fair size for office/lounge area and for collection of naked lady supercar pics. The funny story about the pics is that we won the Ferrari one and was one road away from collecting it as a man brought out the Lambo one to side of road. We immediately stopped and did a u-turn to ensure it was free. It was "after 10 years in the garage my wife told me to choose between topless lady Lambo or bottomless lady Porsche", so after admiring the other choices we chucked in the Lambo and went off to pick up the Ferrari. Functionally it can host 2 Mazda's, and tightly 3. Cleared out for overseas adventures it can host 4 (thanks to our specific bathroom measurements to not exceed two Mazda's door to door) and the 5th Mazda can of course be hosted with eventual hoist but we don't own 5 (... yet) Rocked up to meet the ex-owner of the workshop in my car, to find out he owned RX7's and the guy over the road has an FC outside his too. Bonus features not listed in sale agreement are weekend rotary burnouts - did not realise this, quite happy with the outcome. So we grabbed some workshop toolboxes and shelves to act as a kitchen for an industrial theme. Even added the slam bike for a feature, and $3 plants which I eventually forgot to water and they RIP'd. So it's come a fair way in 3 months considering it's a blank canvas to try design. The bathroom was extended out with help from Mr Ryan Fels, and I left him and rot808 alone too long and they made a ridiculous small door under the stairs with handle at bottom (it's all functional now though so great job guys). Then I taught myself how to gib-stop & subsequently developed stronger language skills. My mate Leonard (the fridge) was $10 on Trademe, won before we even had the workshop, but didn't check location… so down to Tauranga and back for one of the best purchases… second only to the fabulous Rothmans cigarettes dairy sign which required pick up and storage by the lovely Danger Dane until we could fly it home. So now that it was all painted and ready to go, we had the idea to invite a concrete grinder in to take off the paint I had just applied. Forward thinking does help these situations but anyway. These 2 guys came over from a company called Auckland Concrete Grinding and worked for 3 days perfecting the floor, grinding it back around 3mm and coating it with a couple layers of penetrating sealer and coater that smells like Tolene, to become water and stain resistant. Thankfully we don't own British cars so didn't need another 3 protective coats. The results are far more impressive than we thought, we assumed a light grind would just be a lighter grey finish with none of the speckles visible but they did an amazing job. Even got the back wall coated to act as a splashback. Before, During & Afters: So that's the basics of the downstairs for now, and after sorting out the plumbing and wiring downstairs we will then start to tackle the layout. First point of confusion how to lay things out... Will be updating some of the projects as I get time, feel free to follow along and give recommendations etc.1 point
-
Love seeing/hearing this thing running, patina just sets it off. Especially with no jilliez!1 point
-
@Horse25 Look above, something you might like.1 point
-
Needs more Hotwires, oh wait... Looks sooo awesome with the patina and primer. And with the window surrounds/top part of the doors painted black. With Mazda’s being garage and trailer Queens it’s so good to see one that looks exactly like the ones we used to own 20 years ago. Probably my favourite rotary in NZ.1 point
-
Discuss how I should just big block it here1 point
-
Hi folks I have one gutless Nissan LD28 in my lovable Series 2A, SWB. I am interested in hearing from folks that have turbo'ed an LD28 back in tha day.. I am huntin a manifold to suit but keen to confirm what Z car or what ever turbo'ed Nissan manifold is a direct fit with minimal work to an LD28? Many thanks in advance, Bugly...1 point
-
Flush the block, fit the biggest radiator you can, wack in a 78 or 82C thermostat, run a 1/3 mix of HD antifreeze and a bottle of redline water wetter and you should easily keep the temps in check. They'll take a bar of boost all day as long as the turbo and intercooler are up to the task. Engine life won't be affected if it's in good health and you keep up with maintenance.1 point
-
Nah man, L series love boost. I've been shoving 25psi into mine and it takes it like your mother1 point
-
1 point
-
I have heaps of customers looking in the Hutt valley1 point
-
yea sorry this build has gone faster than my spare time to write out the next post. so for the mean time i would like to show you what you can achieve in 11 days after work doing a few hours here and a few hours there. A huge thanks to Paul. now dont worry i will go into detail on what we have done and how i went about it all, but i feel the need to show you guys and gals this. Cheers team, we might just be driving George the kombi over the Easter & Anzac break.1 point
-
Update for those interested Repair Cert PASS Compliance and WOF all PASSED apart from the below 2 points - tighten hand brake cable - fix slight leak in return line to gas tank brass fitting Cert Clint did the cert on Friday and I’ve attached the list. I just need to work through that list and take it back for the brake road test. I also need the old old owner from USA to email that he sold me the car - I keep in touch so that won’t be an issue. Now to work through the list and get this sled legal. Am I happy? Yes, the answer is YES!
1 point
-
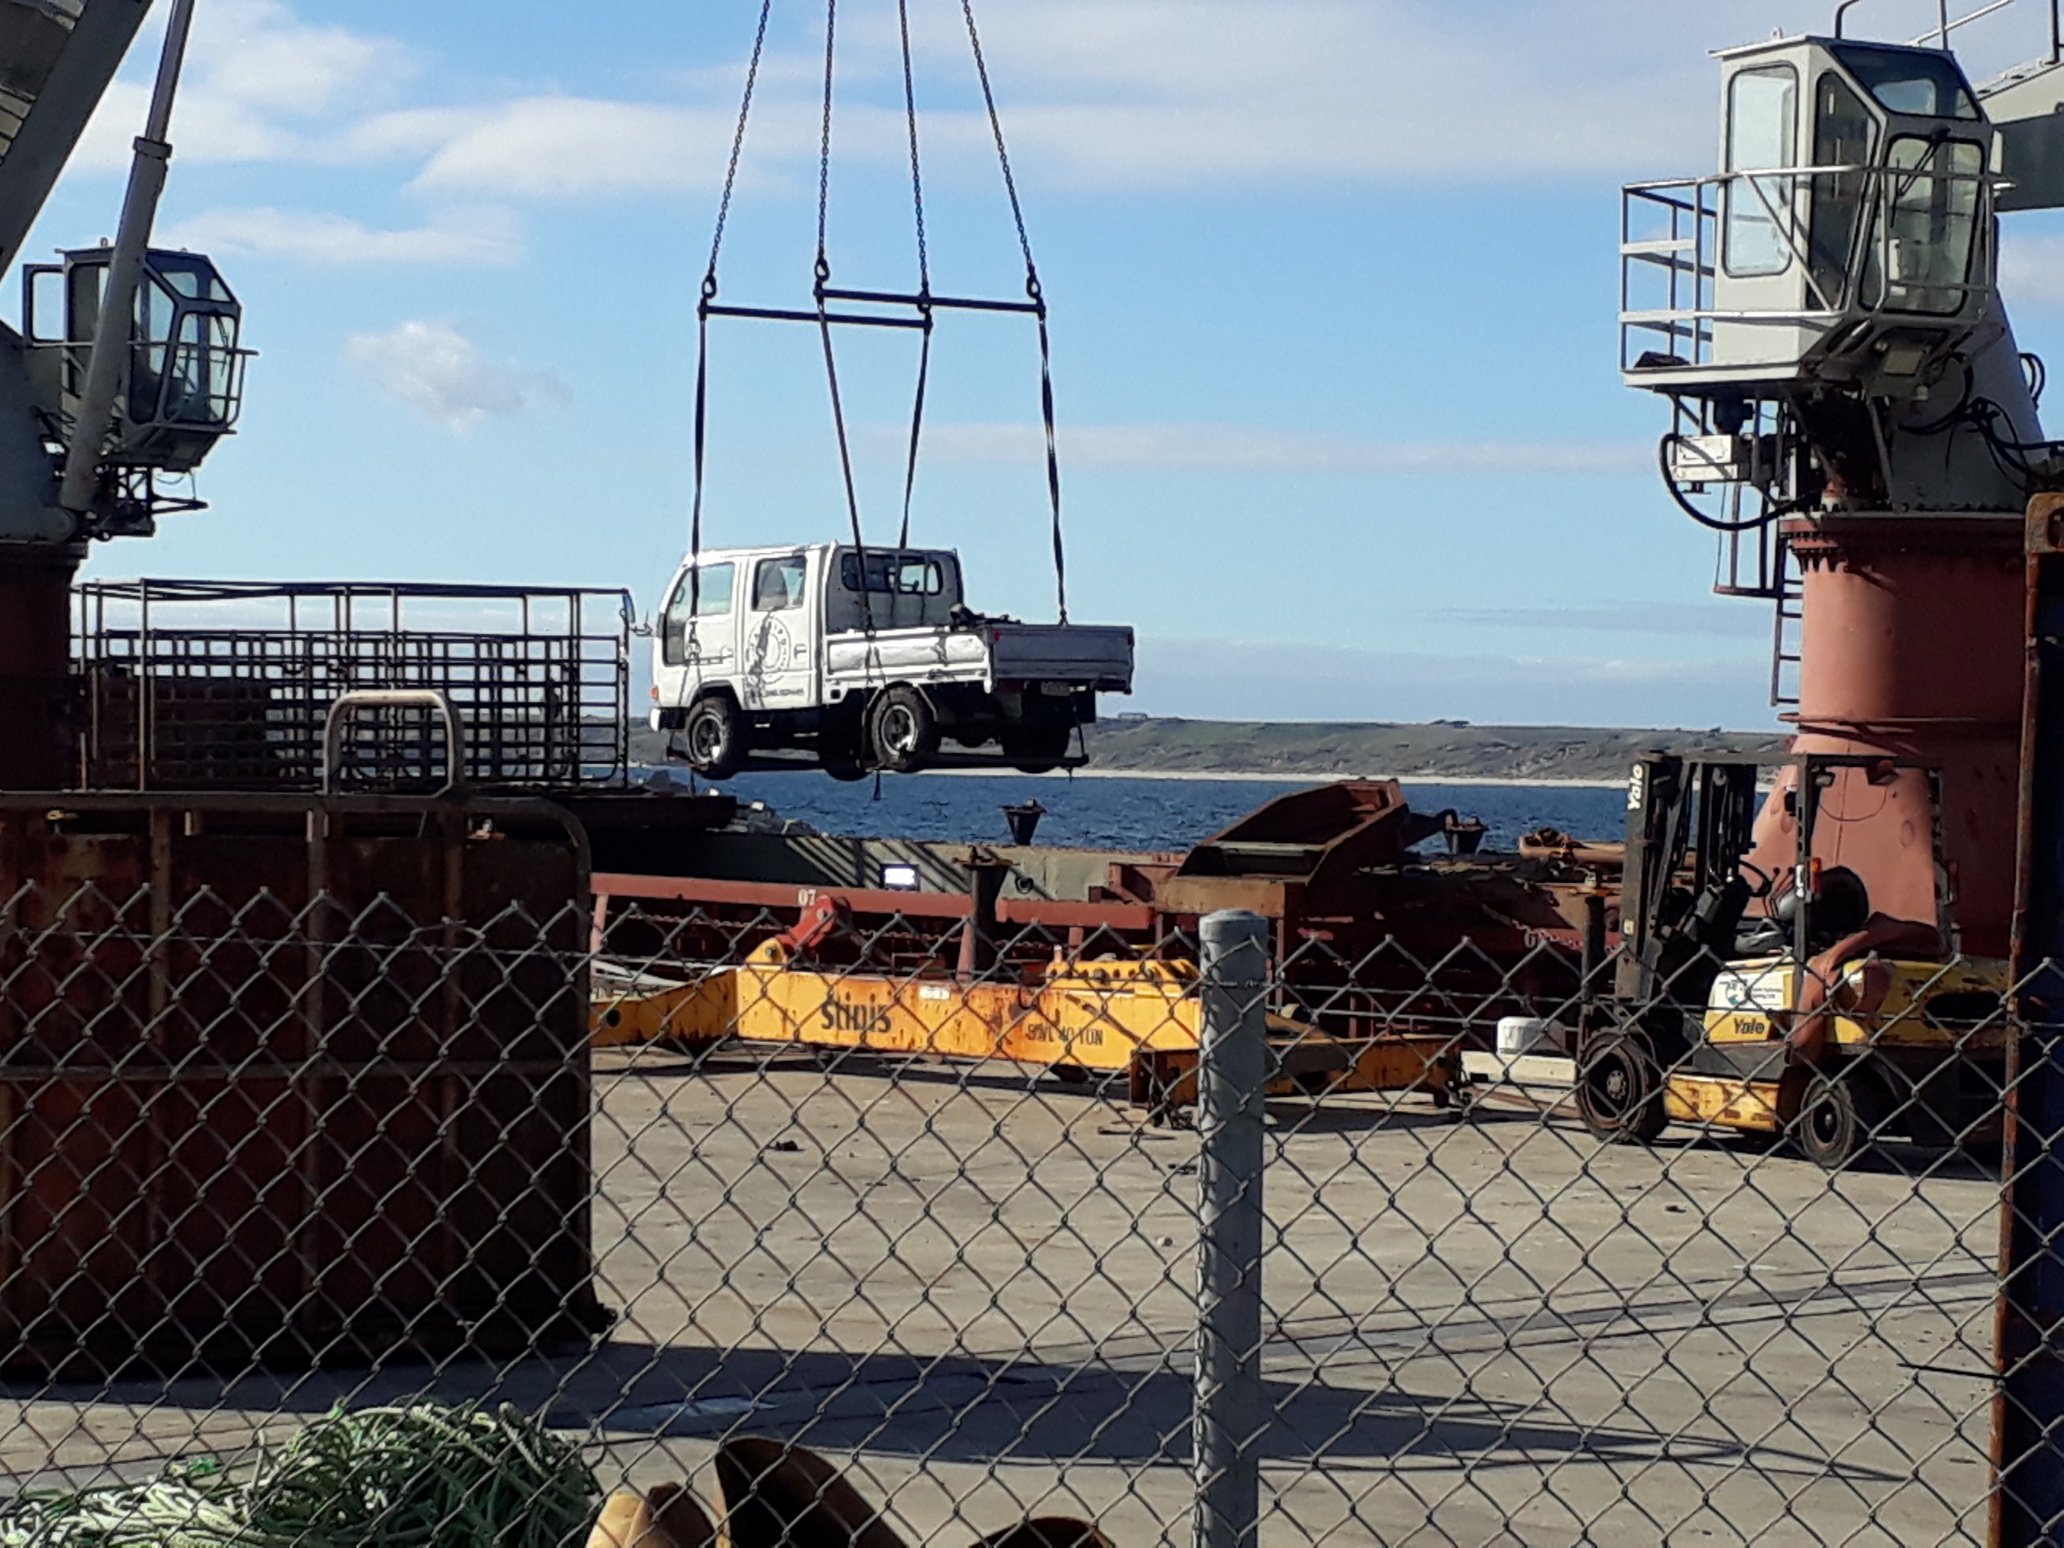
Most of them drink either Speights or Tui... but the pub had pretty much run out of beer when I left last week. I heard the ship arrived this morning so there's going to be 300 4x4 utes lined up at the port to collect pallets of grog. Lol. Oh, in other news:
1 point
-
There are gears now, after a fair few evenings involving head scratching. It was pretty straightforward really, I just reinstalled the Dyna shift mech, remounted some pivot stuff, extended some linkages, bent some others, and made some missing bits. There is a lot of adjustment there so i can mess with the lever throws, it feels pretty good already. Also the low range lever linkage is 75% there, the last pic shows its position on the floor beside the drivers leg. I need to cut a bit more floor and move the mount over about 25mm so its in the right spot. Once finalised I can connect it to the rest of the lever mech. O and there is a handbrake now as well. Also the interior stuff at the front all fits with no mods at all, this is good. It has a pretty skanky bench seat + drivers seat at the front, I will probably end up with a two singles although I will need to find seats that have a very skinny back and small hinge mech.1 point
-
So yea, knocking it out like a schoolboy. I have a cert man now, very excited. Bent some laser cut profiles and glued them together Tacked the xmember on for positioning purposes Sealed up where I cut the old xmember out so water didn't sit in there and rust it Looks strong enough, it 5mm plate. Tacked in place, I will weld it with the chassis turned so I get a nice weld all around. Then time to replace the temporary front mounts Cut off the old mounts for reuse. Glued some shit together. Might yet plate either side for extra strengths, it is probably strong enough though. The old mount is welded to 65 x 5mm box section, so all of the weight is going through the weld. There is a fat bead but still. Mounted the clutch line. Does anyone know the logic behind the secondary bleed that comes out of this block? I would have thought it was unnecessary. I will fit something but I am guessing it needs to be higher than the clutch master...? I pilfered all the brake and clutch stuff off the dyna chassis, and have had success straightening out the lines with a vice, then rebending where needed. I am using rivnuts into the chassis or existing mount points if convenient. Had to drop the power steering pump 50mm to clear some vital cab related stuff, just made an adapter plate. I might brace it up a bit. Modded the adjuster plate to match the 50mm drop. Modded the throttle cable mount as this is literally all it needed to hook up the Dyna cable setup. My solution for the steering is pretty much sorted and been ok'd, I just need to set up the original box and check the bump steer limits, then set up the new system and check again. I want to fix the castor first though as this will have a slight effect on things. I measured the lift accurately with the cab on and it is a fraction over 2". This means that drop boxes are pretty much overkill and will mean more castor than factory, so i have ordered some castor correction bushes which should bring it back to factory spec. The pitman arm is currently getting modified to suit my new tierod end, the boys were disconcertingly vague about the possible cost of this. Next I will sort the brake and fuel lines, this should be piss easy. The fuel lines need to be 570mm shorter, but i may just route them with a bit more flexi. Handbrake will be making up a pivot bracket to connect the two cables and correct the pull ratios, this should also be trivial. Hopefully have sorted an engine, I just need to find a couple of hundy more $$ from somewhere. No doubt I can just sell dick pics to desperate fembots, again trivial. Also I bought a hilux rear driveshaft. PCD of the mounts is very close to the Safari front shaft ones. It has a hangar bearing so I will make a chassis mount and get it shortened so it can mount the front shaft. That will do for now.1 point
-
We move shit around and install it. The stuff is mostly big and unwieldy and I have a big box of tools I need to take. There is a long convoluted justification involving being unable to find a decent replacement for my current work vehicle, but this is tedious and mostly unbelievable so I won't bother. The real reason is that I think it will be cool and I am only happy in myself when I have a nice big chunk of interesting stuff to do that isn't work.1 point
-
Yea I have some pics of that. I did wonder about a 1uz, but as this is intended to work after the zombie apocalypse/mass coronal ejection I preferred a donk with no real electrical requirements. Edit; reply was to the one above. I have been fantasizing about a big Cummins, but I figured the td42 was plentiful and relatively cheap.1 point
-
I just couldn't help myself but take this photo... Having fun stripping remaining bits from the other two Imps, cleaning and painting bits and generally playing about with what is a big model car. Proper update soon.1 point
-
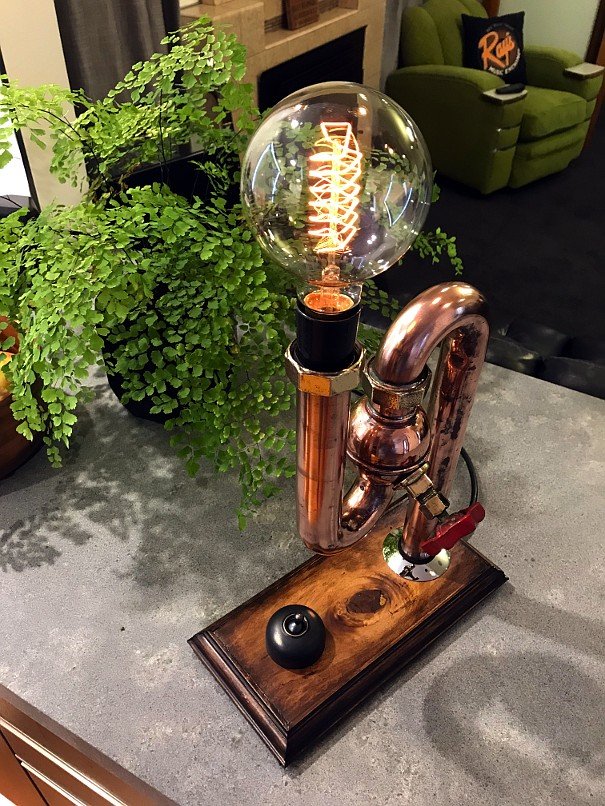
I made an object with no real purpose: It uses old plumbing from my house renovation, a leftover sink plug, a bit of decking timber, leftover varnish that Barry really should have thrown out etc. I somehow managed to fit the mechanism from a dimmer inside that bowl part and connect it to the red valve knob, but the connection is flimsy due to my first attempt failing. The first kid to use it will break it. I'm giving this creation to my brother as a gift, to take up space in his house and make his wife complain. I have learnt a bit from making it, which will allow me to do a better job when I make myself something similar. =)
1 point
-
These 100kg caster wheels just don't cope with my gate Nothing really available that I could find that would be an improvement. So this freaking unit was cobbled together from a trailer jockey wheel and some rectangular box section Fully height adjustable and I can make the gate lay frame to remove the wheel for easy servicing. Plus I like to be able to "raise the drawbridge" if I don't want anyone getting in. Haha1 point
-
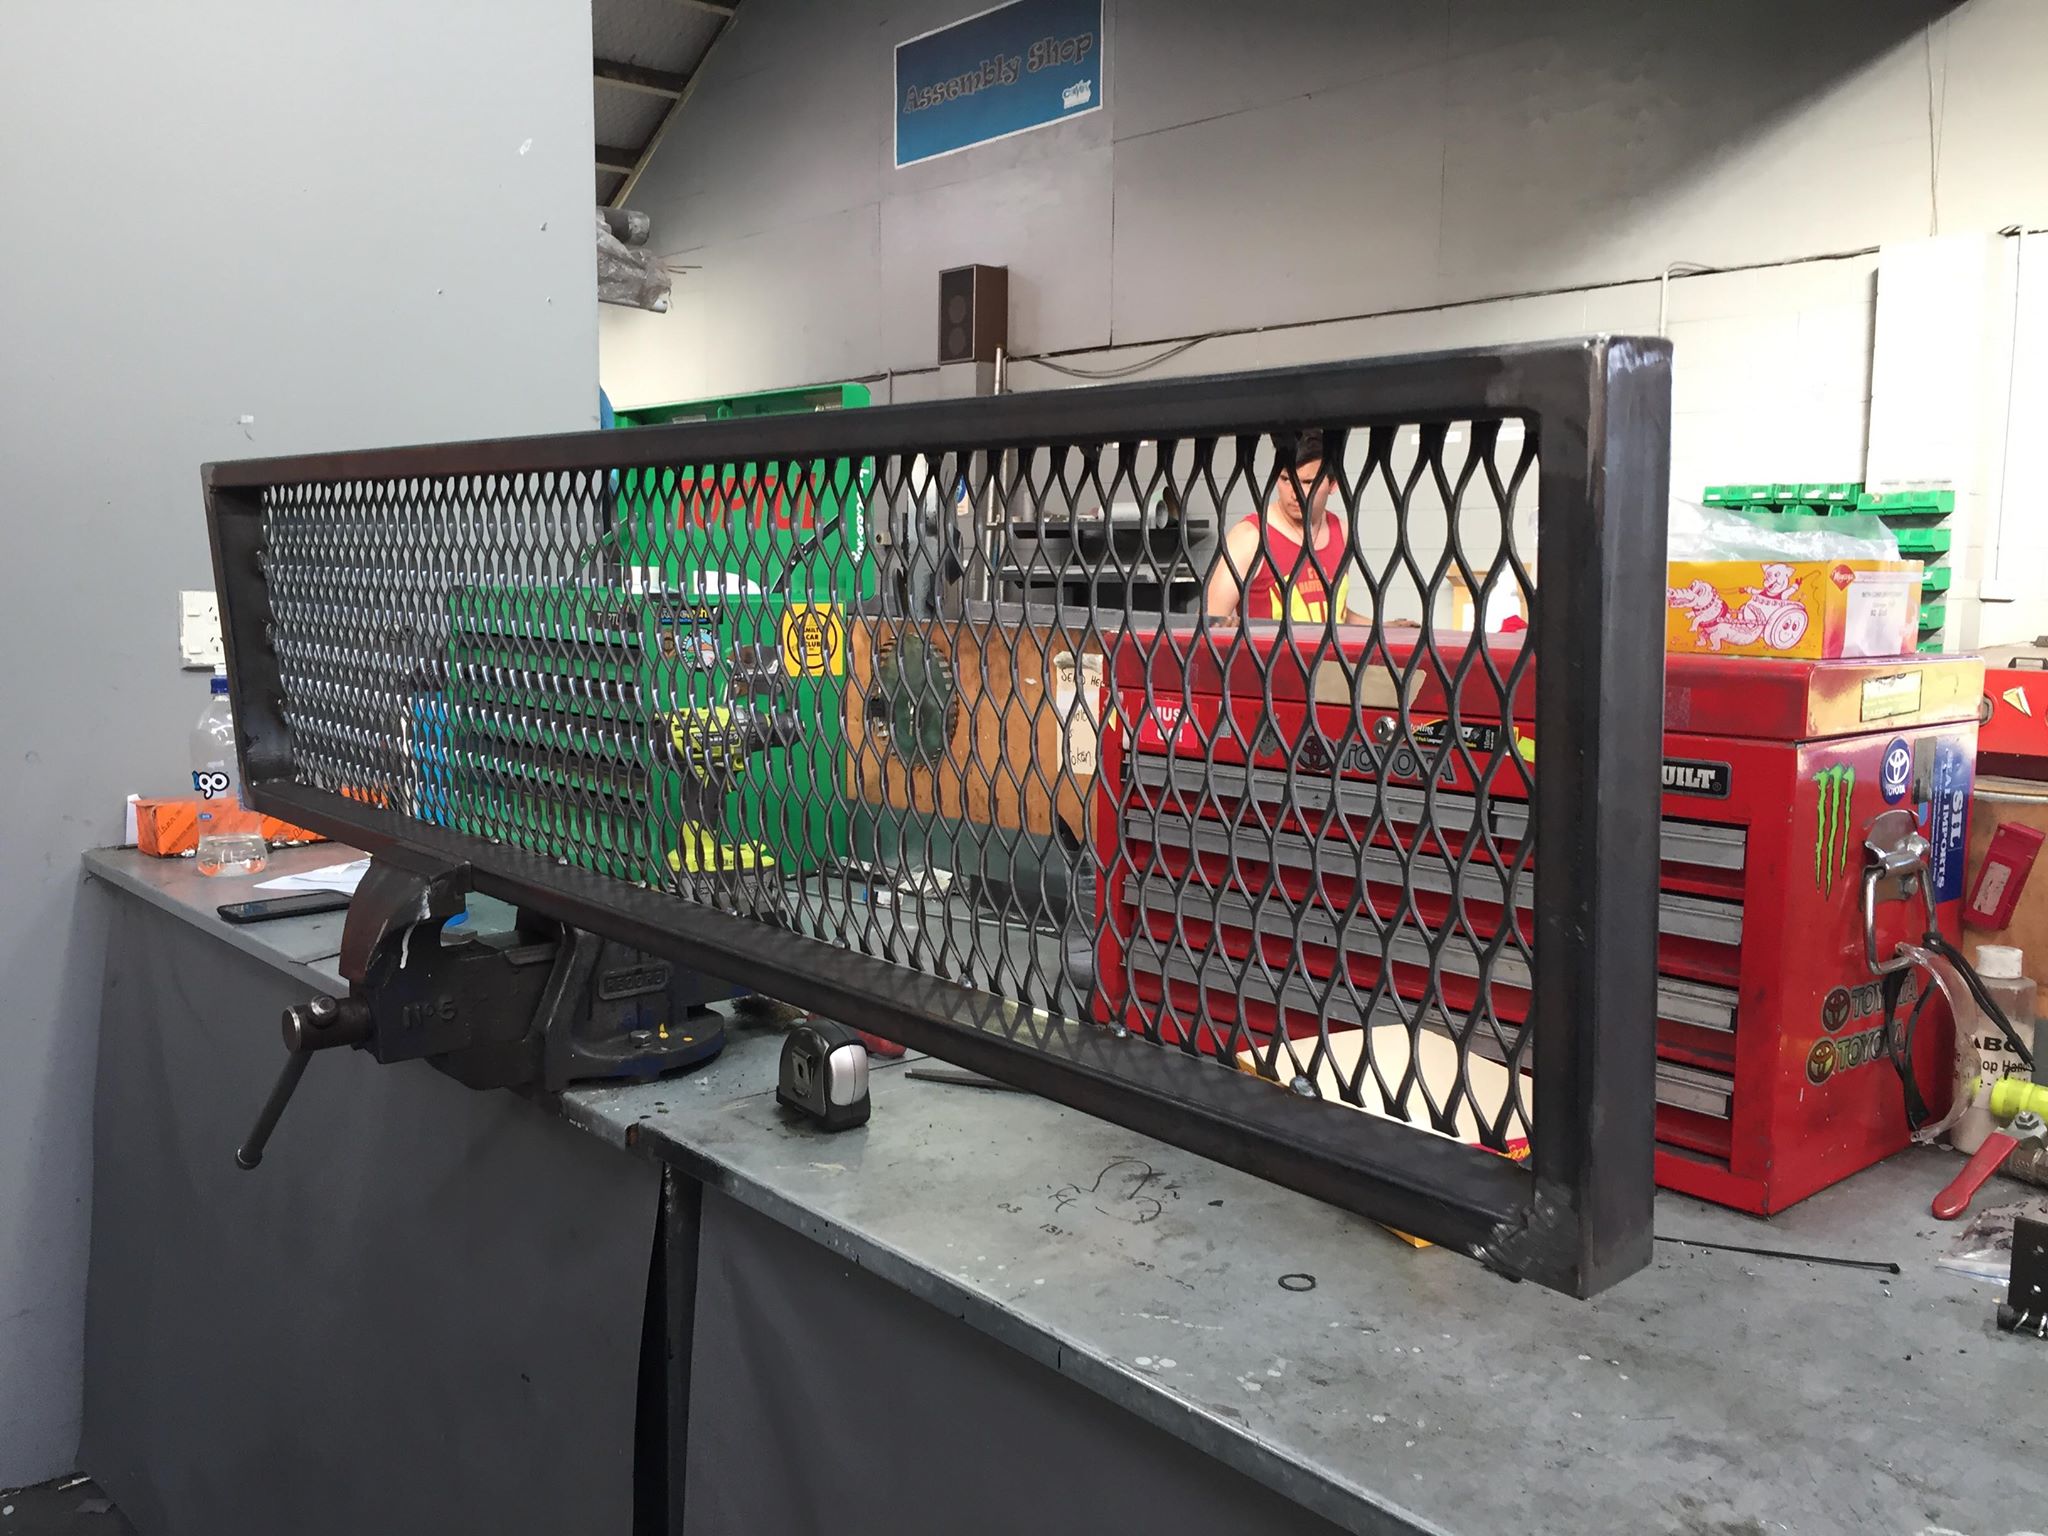
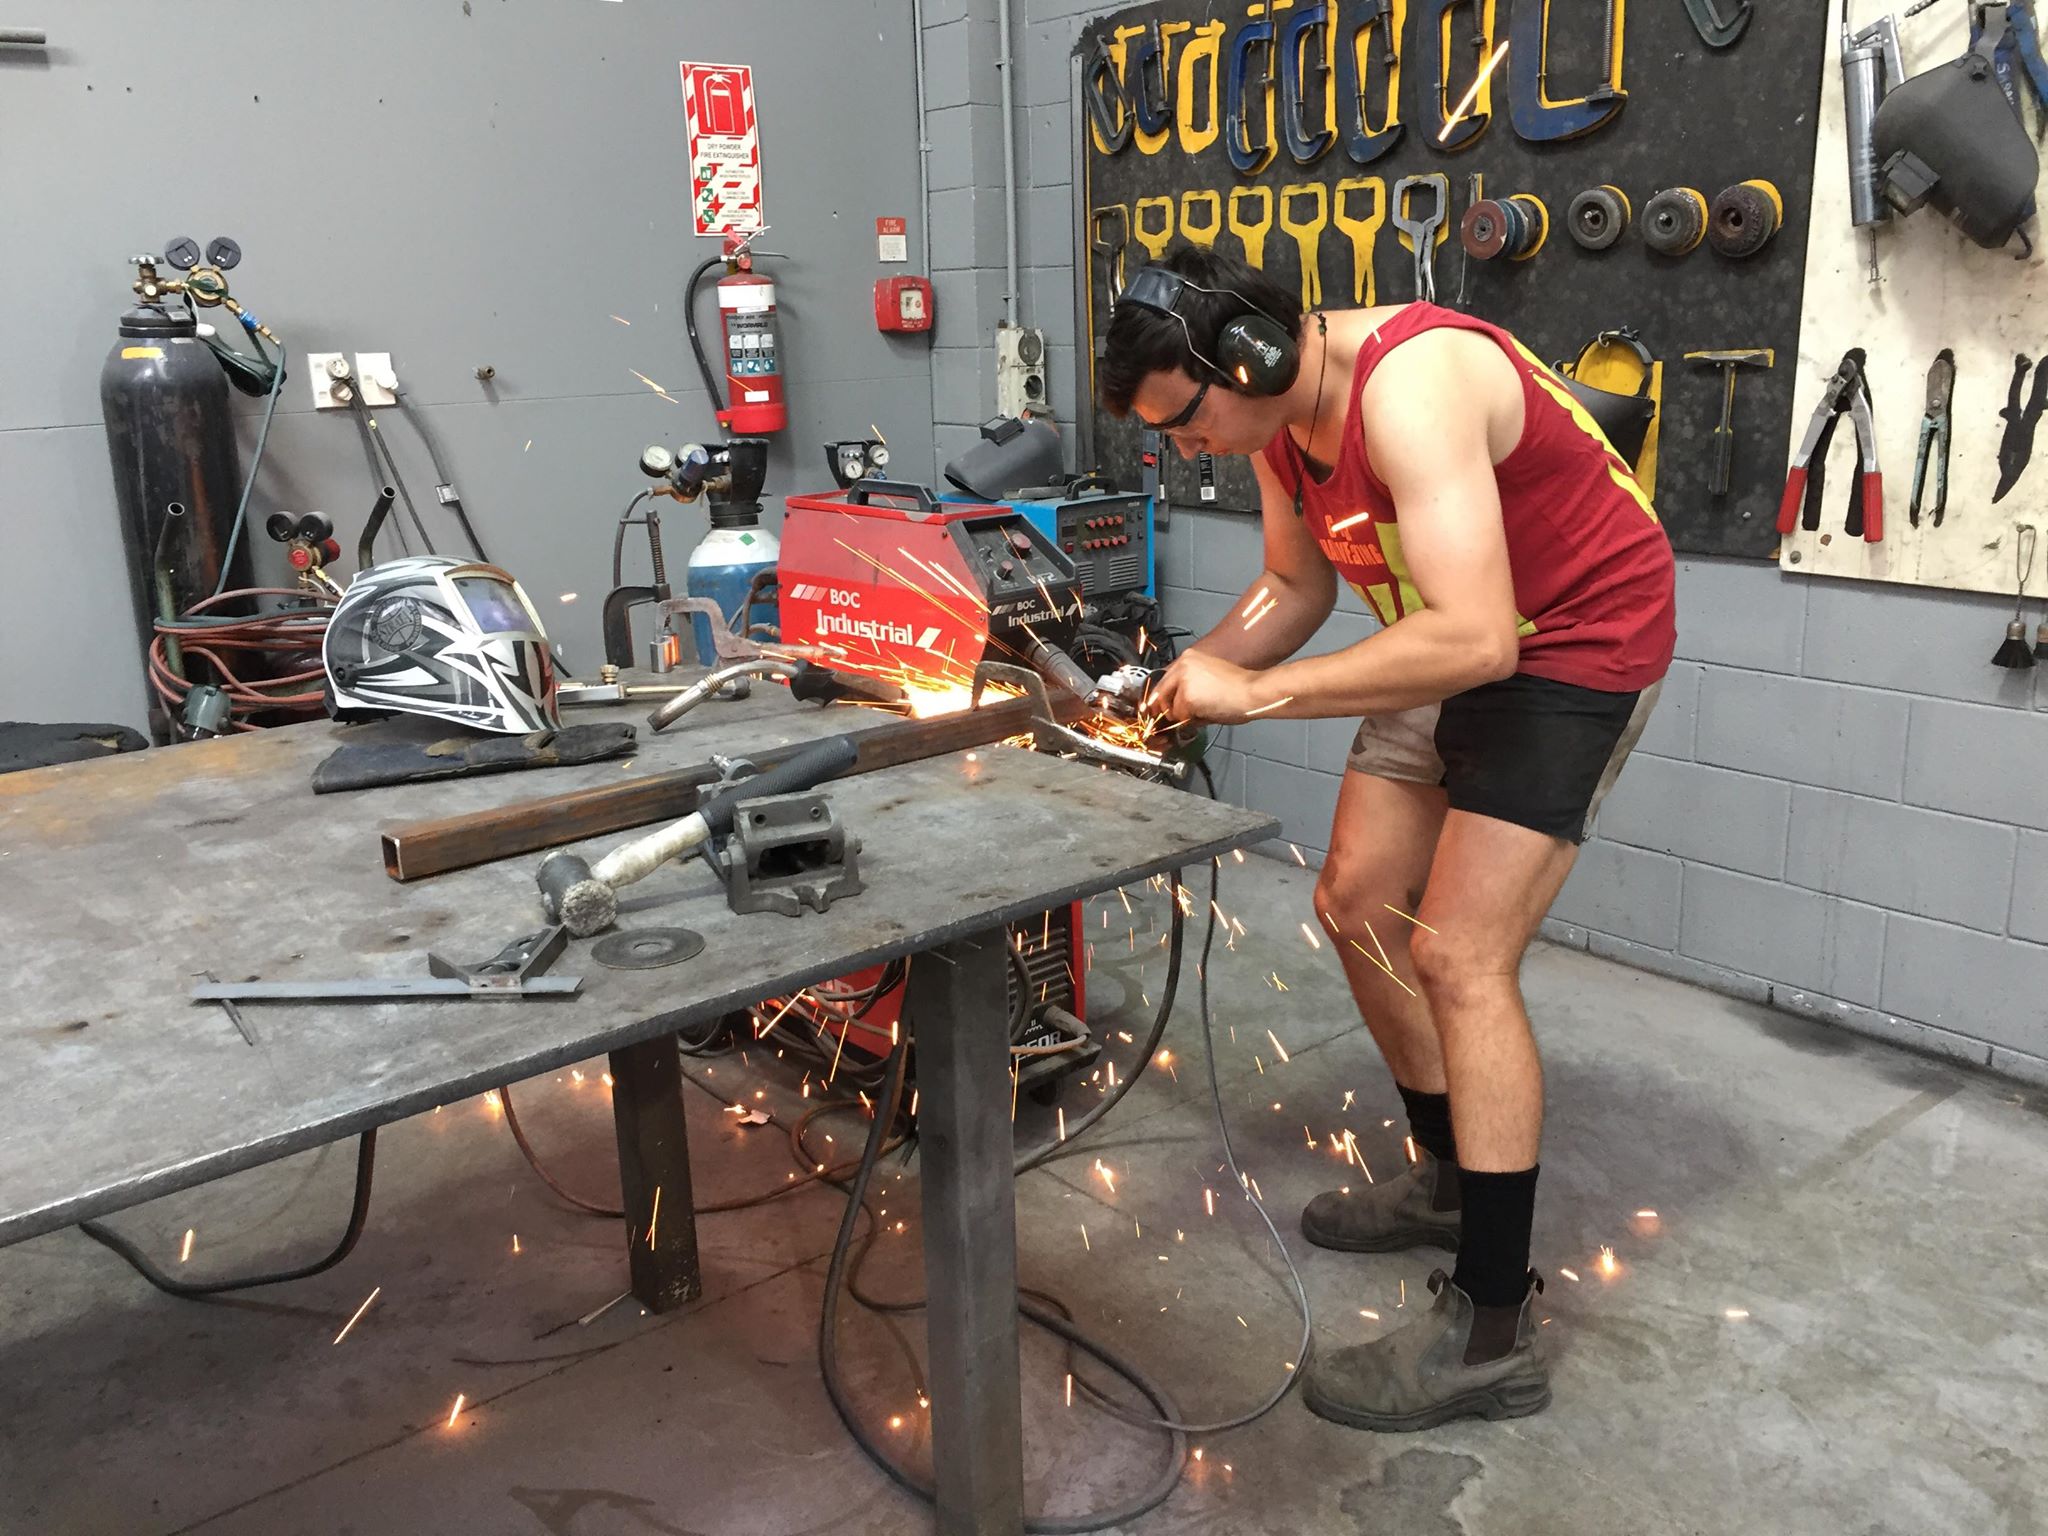
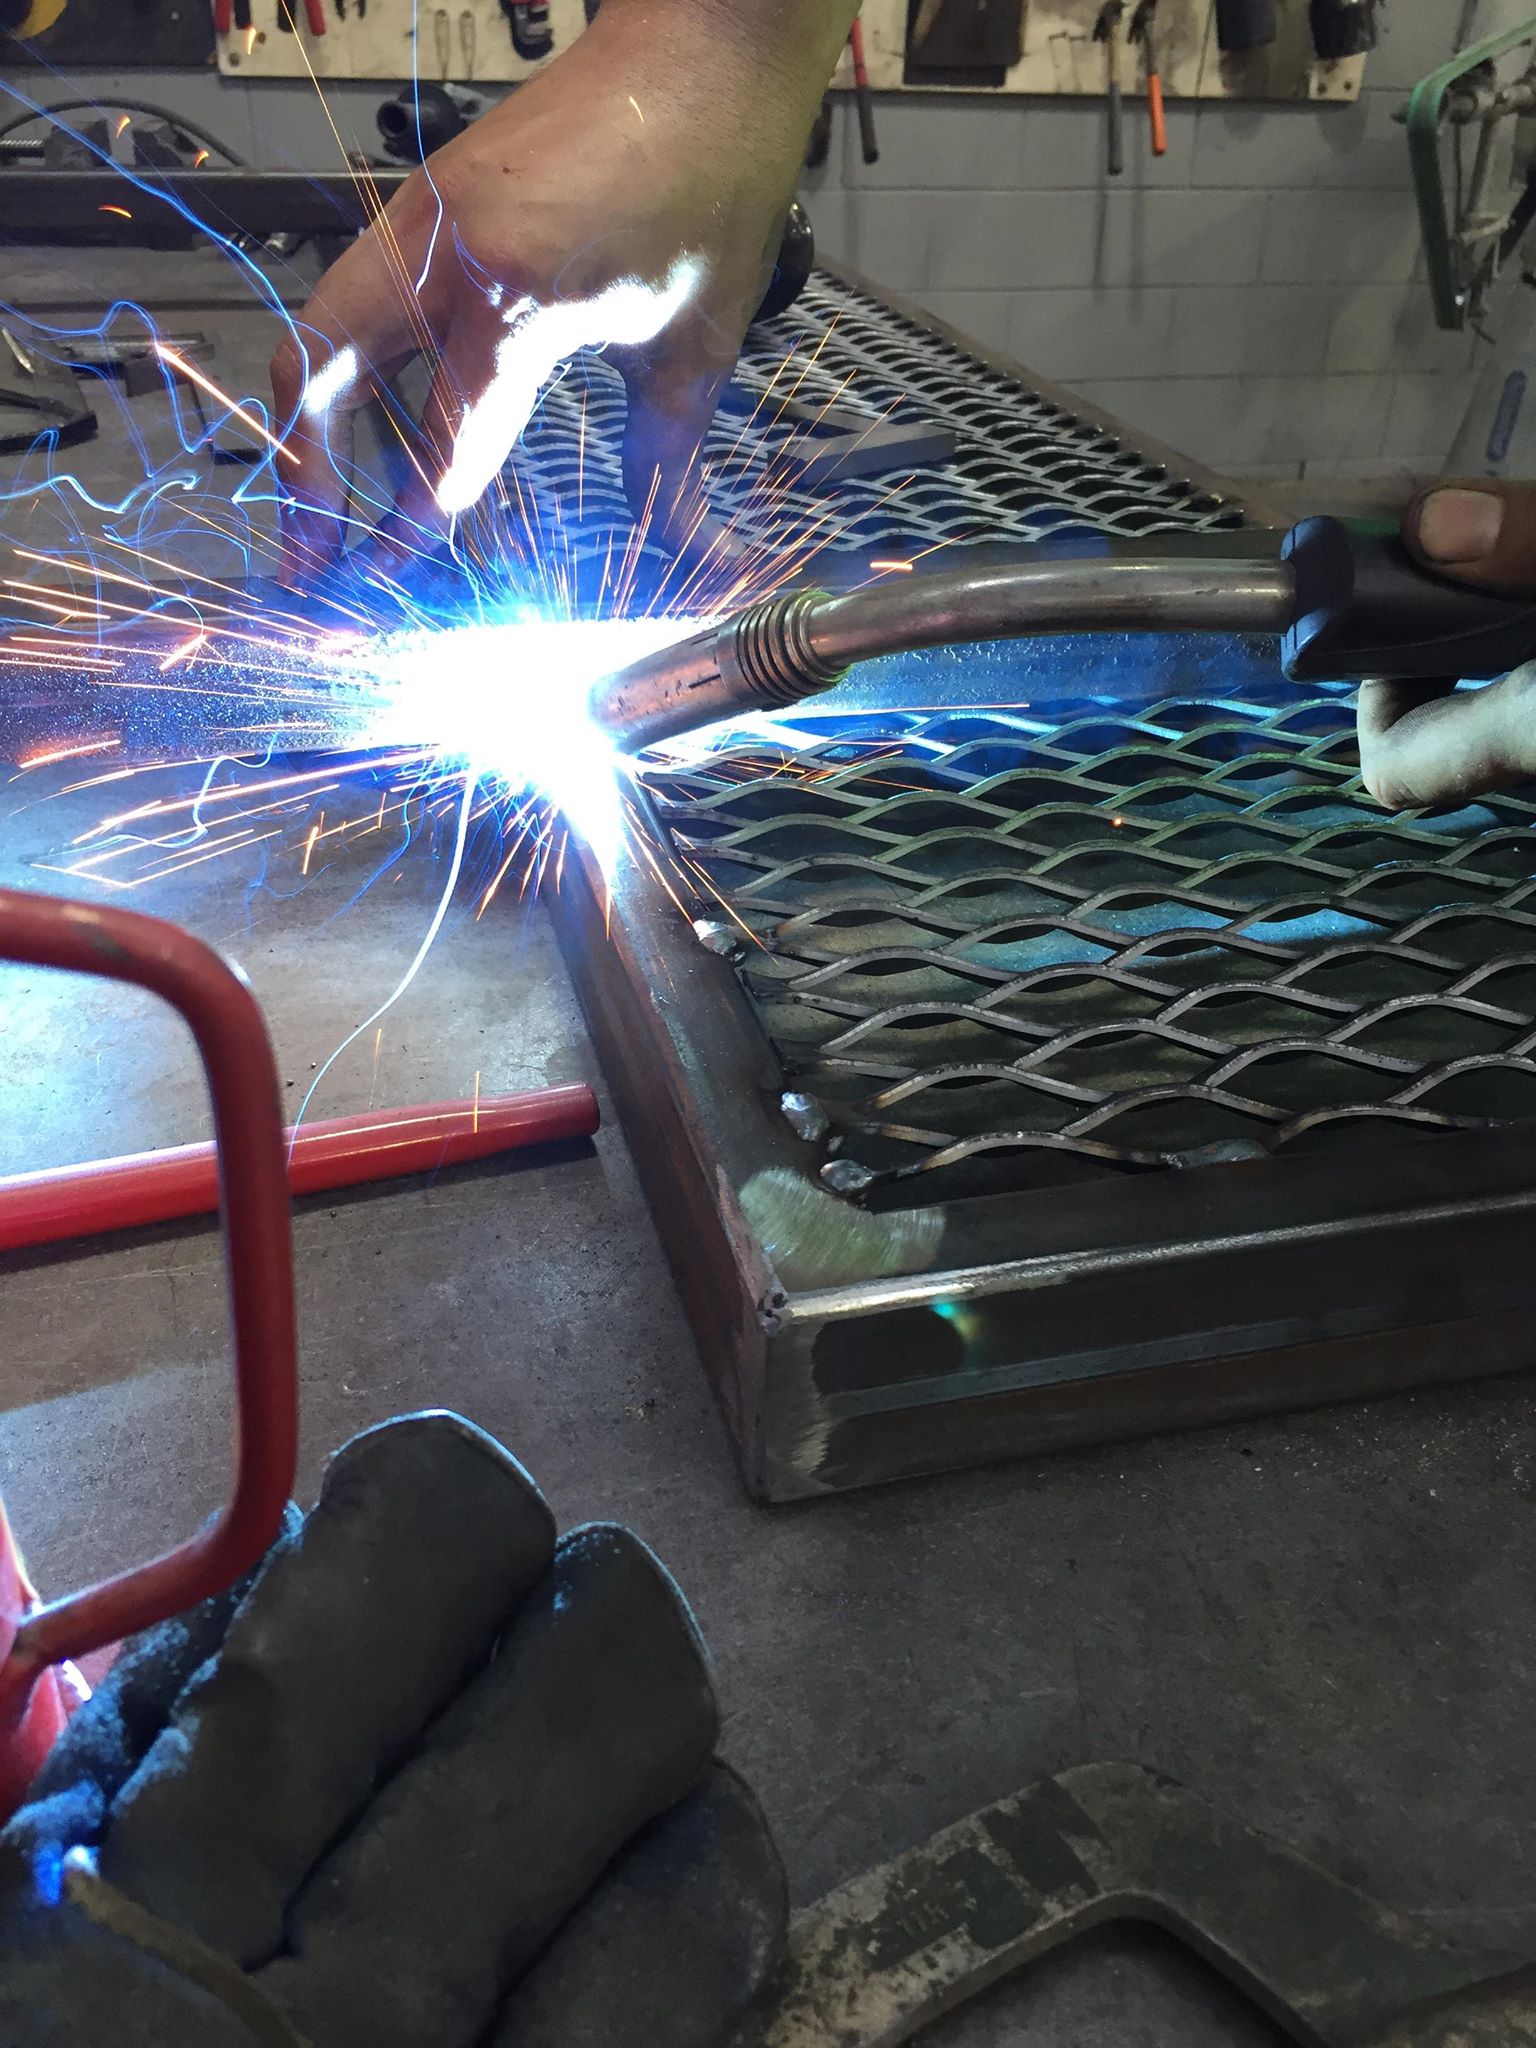
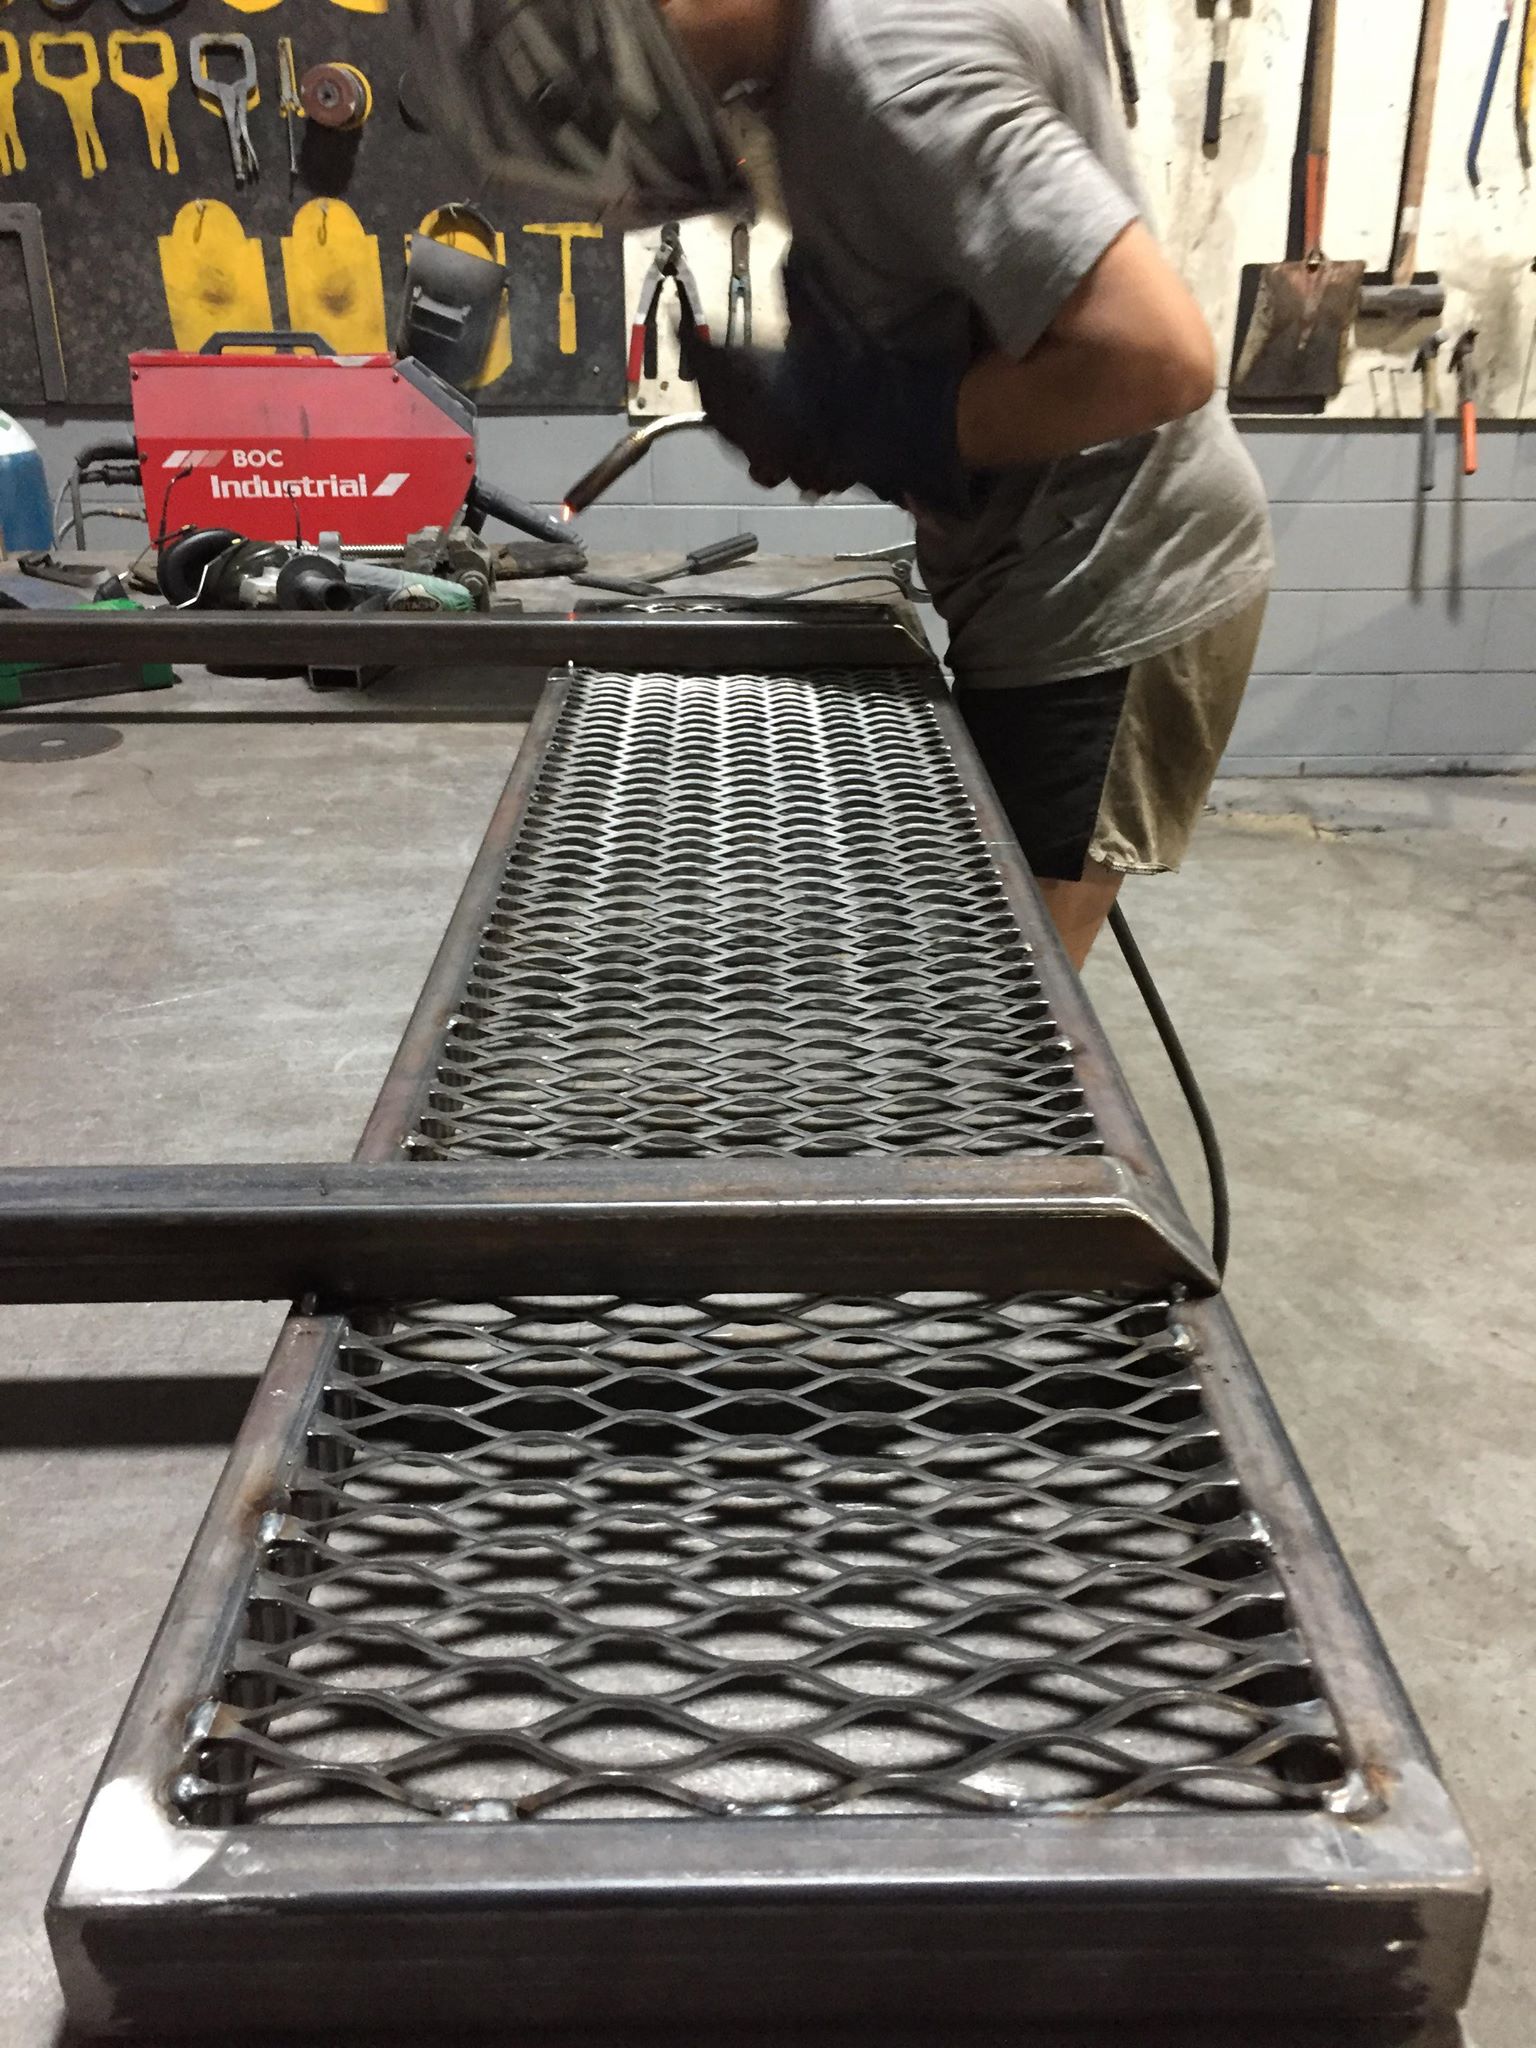
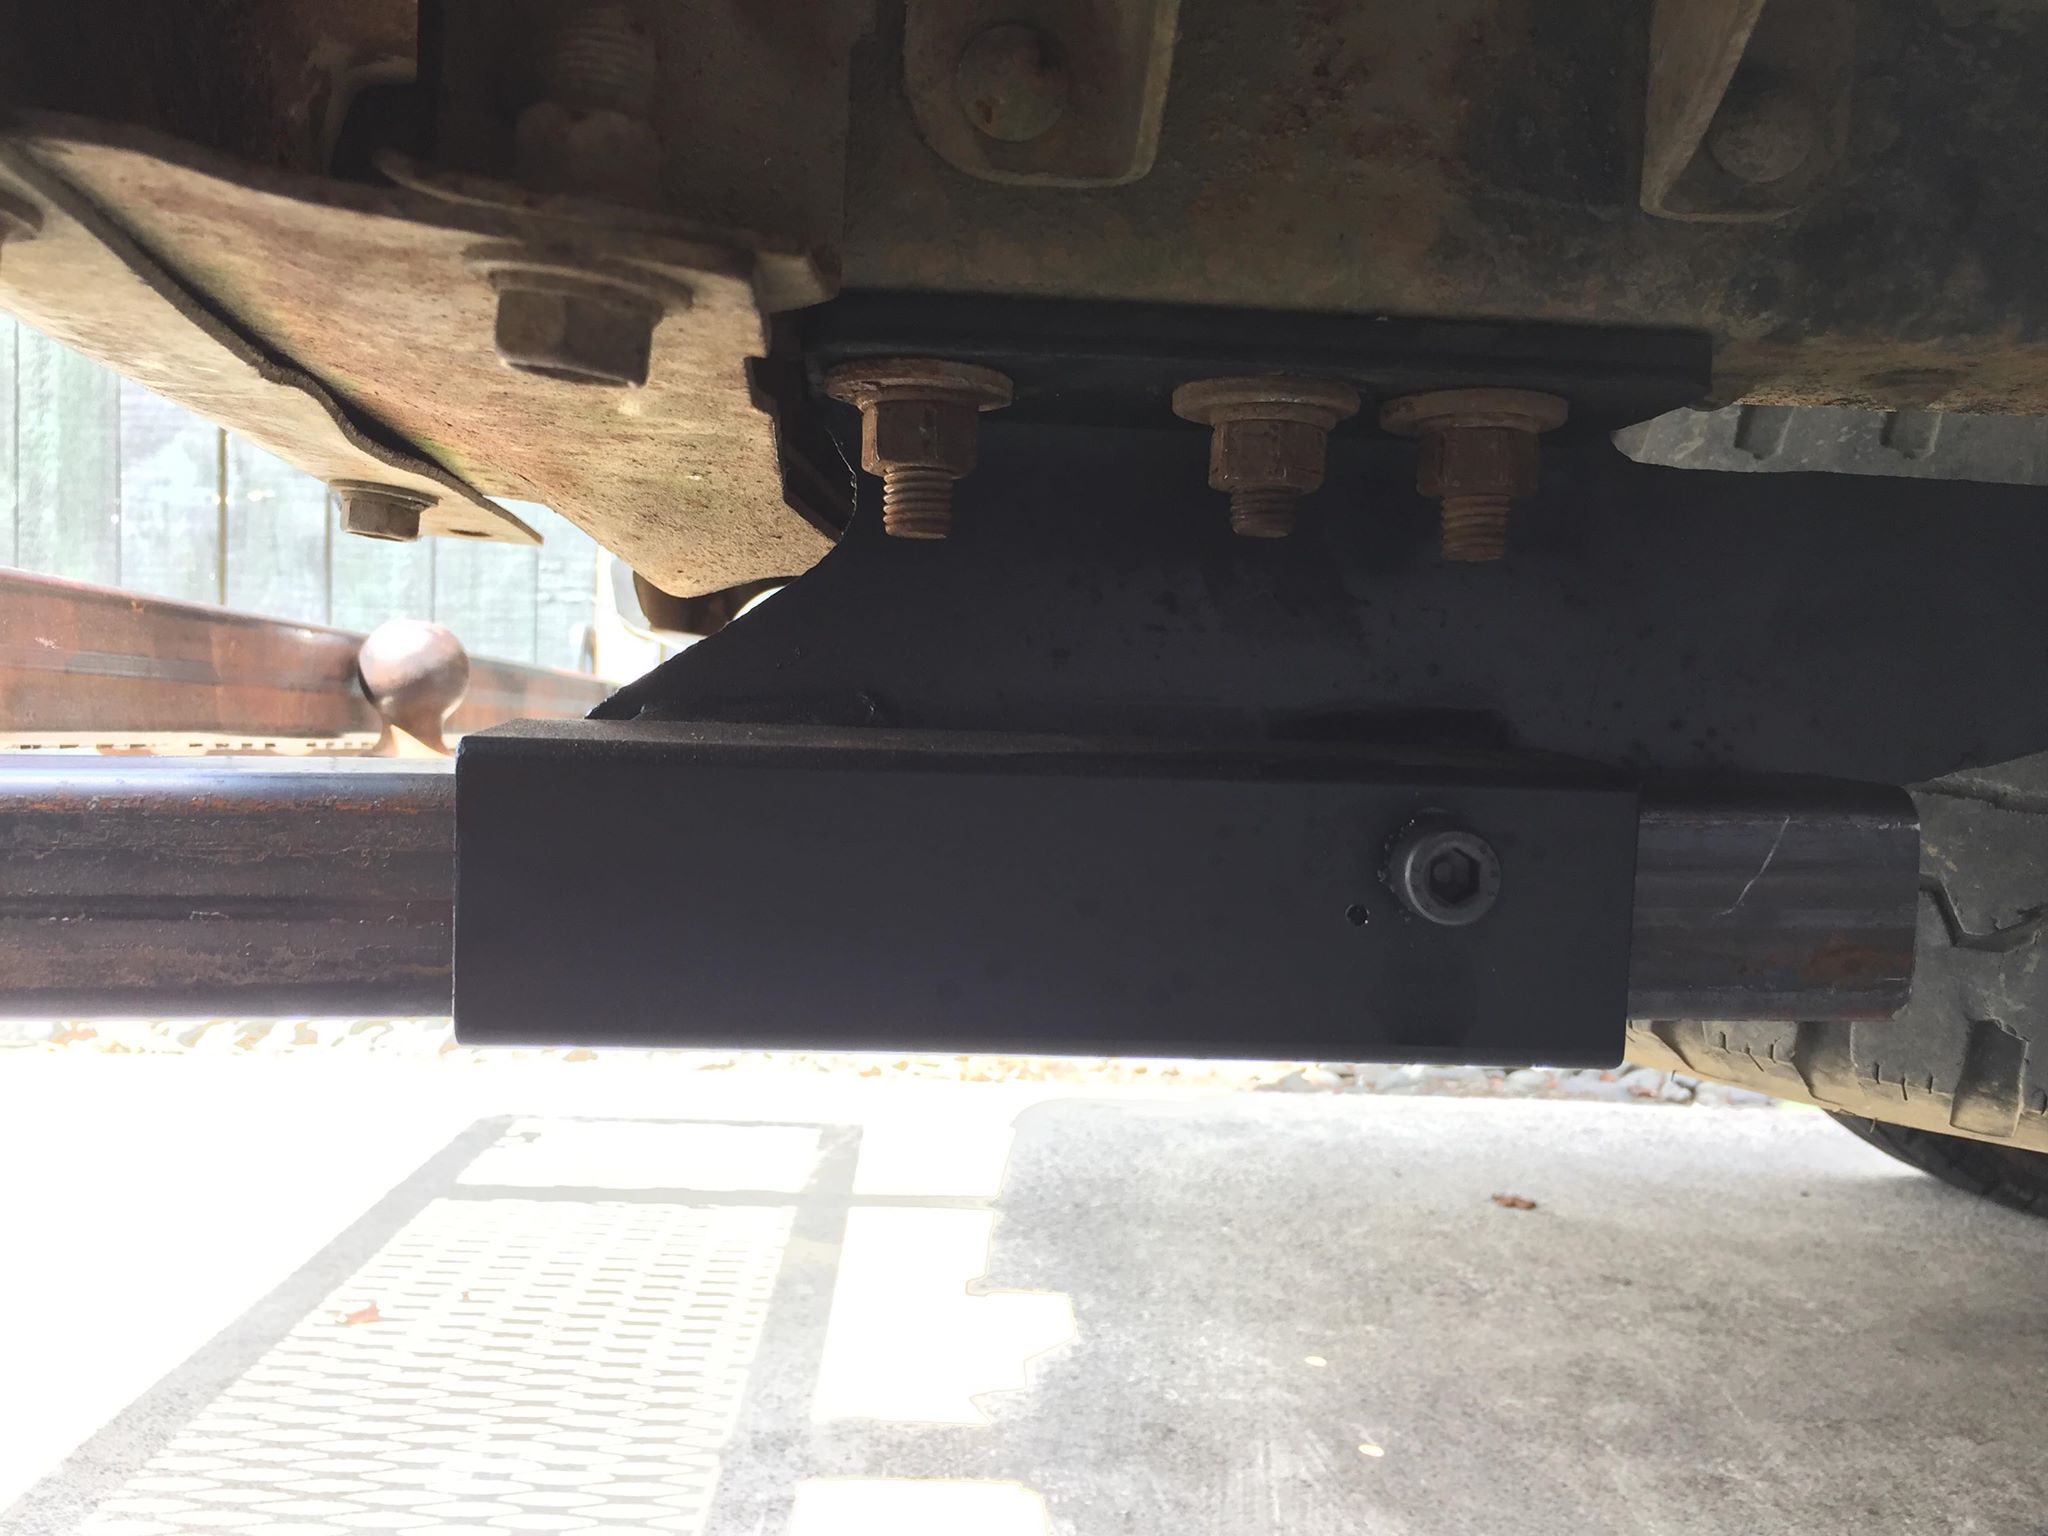
Here's a thing that @Geophy made for me. I've seen a few of these tyres of carriers around but none of them looked that skookum, either sitting on the tow ball or hitch mount. So much weight flopping all over the place. Sent Geophy some sketches then trucked down to Hamilton after work on Friday and he already had the majority of it welded up. Gave him a hand to finish it off and get it lined up with the truck. Used the most appropriate tool, forklift. We welded some box section to the outer of the towbar assembly and have it secured with bolts through there. It's strong! Had both of us jumping up and down on it (we aren't small dudes) and it didn't move.
1 point
-
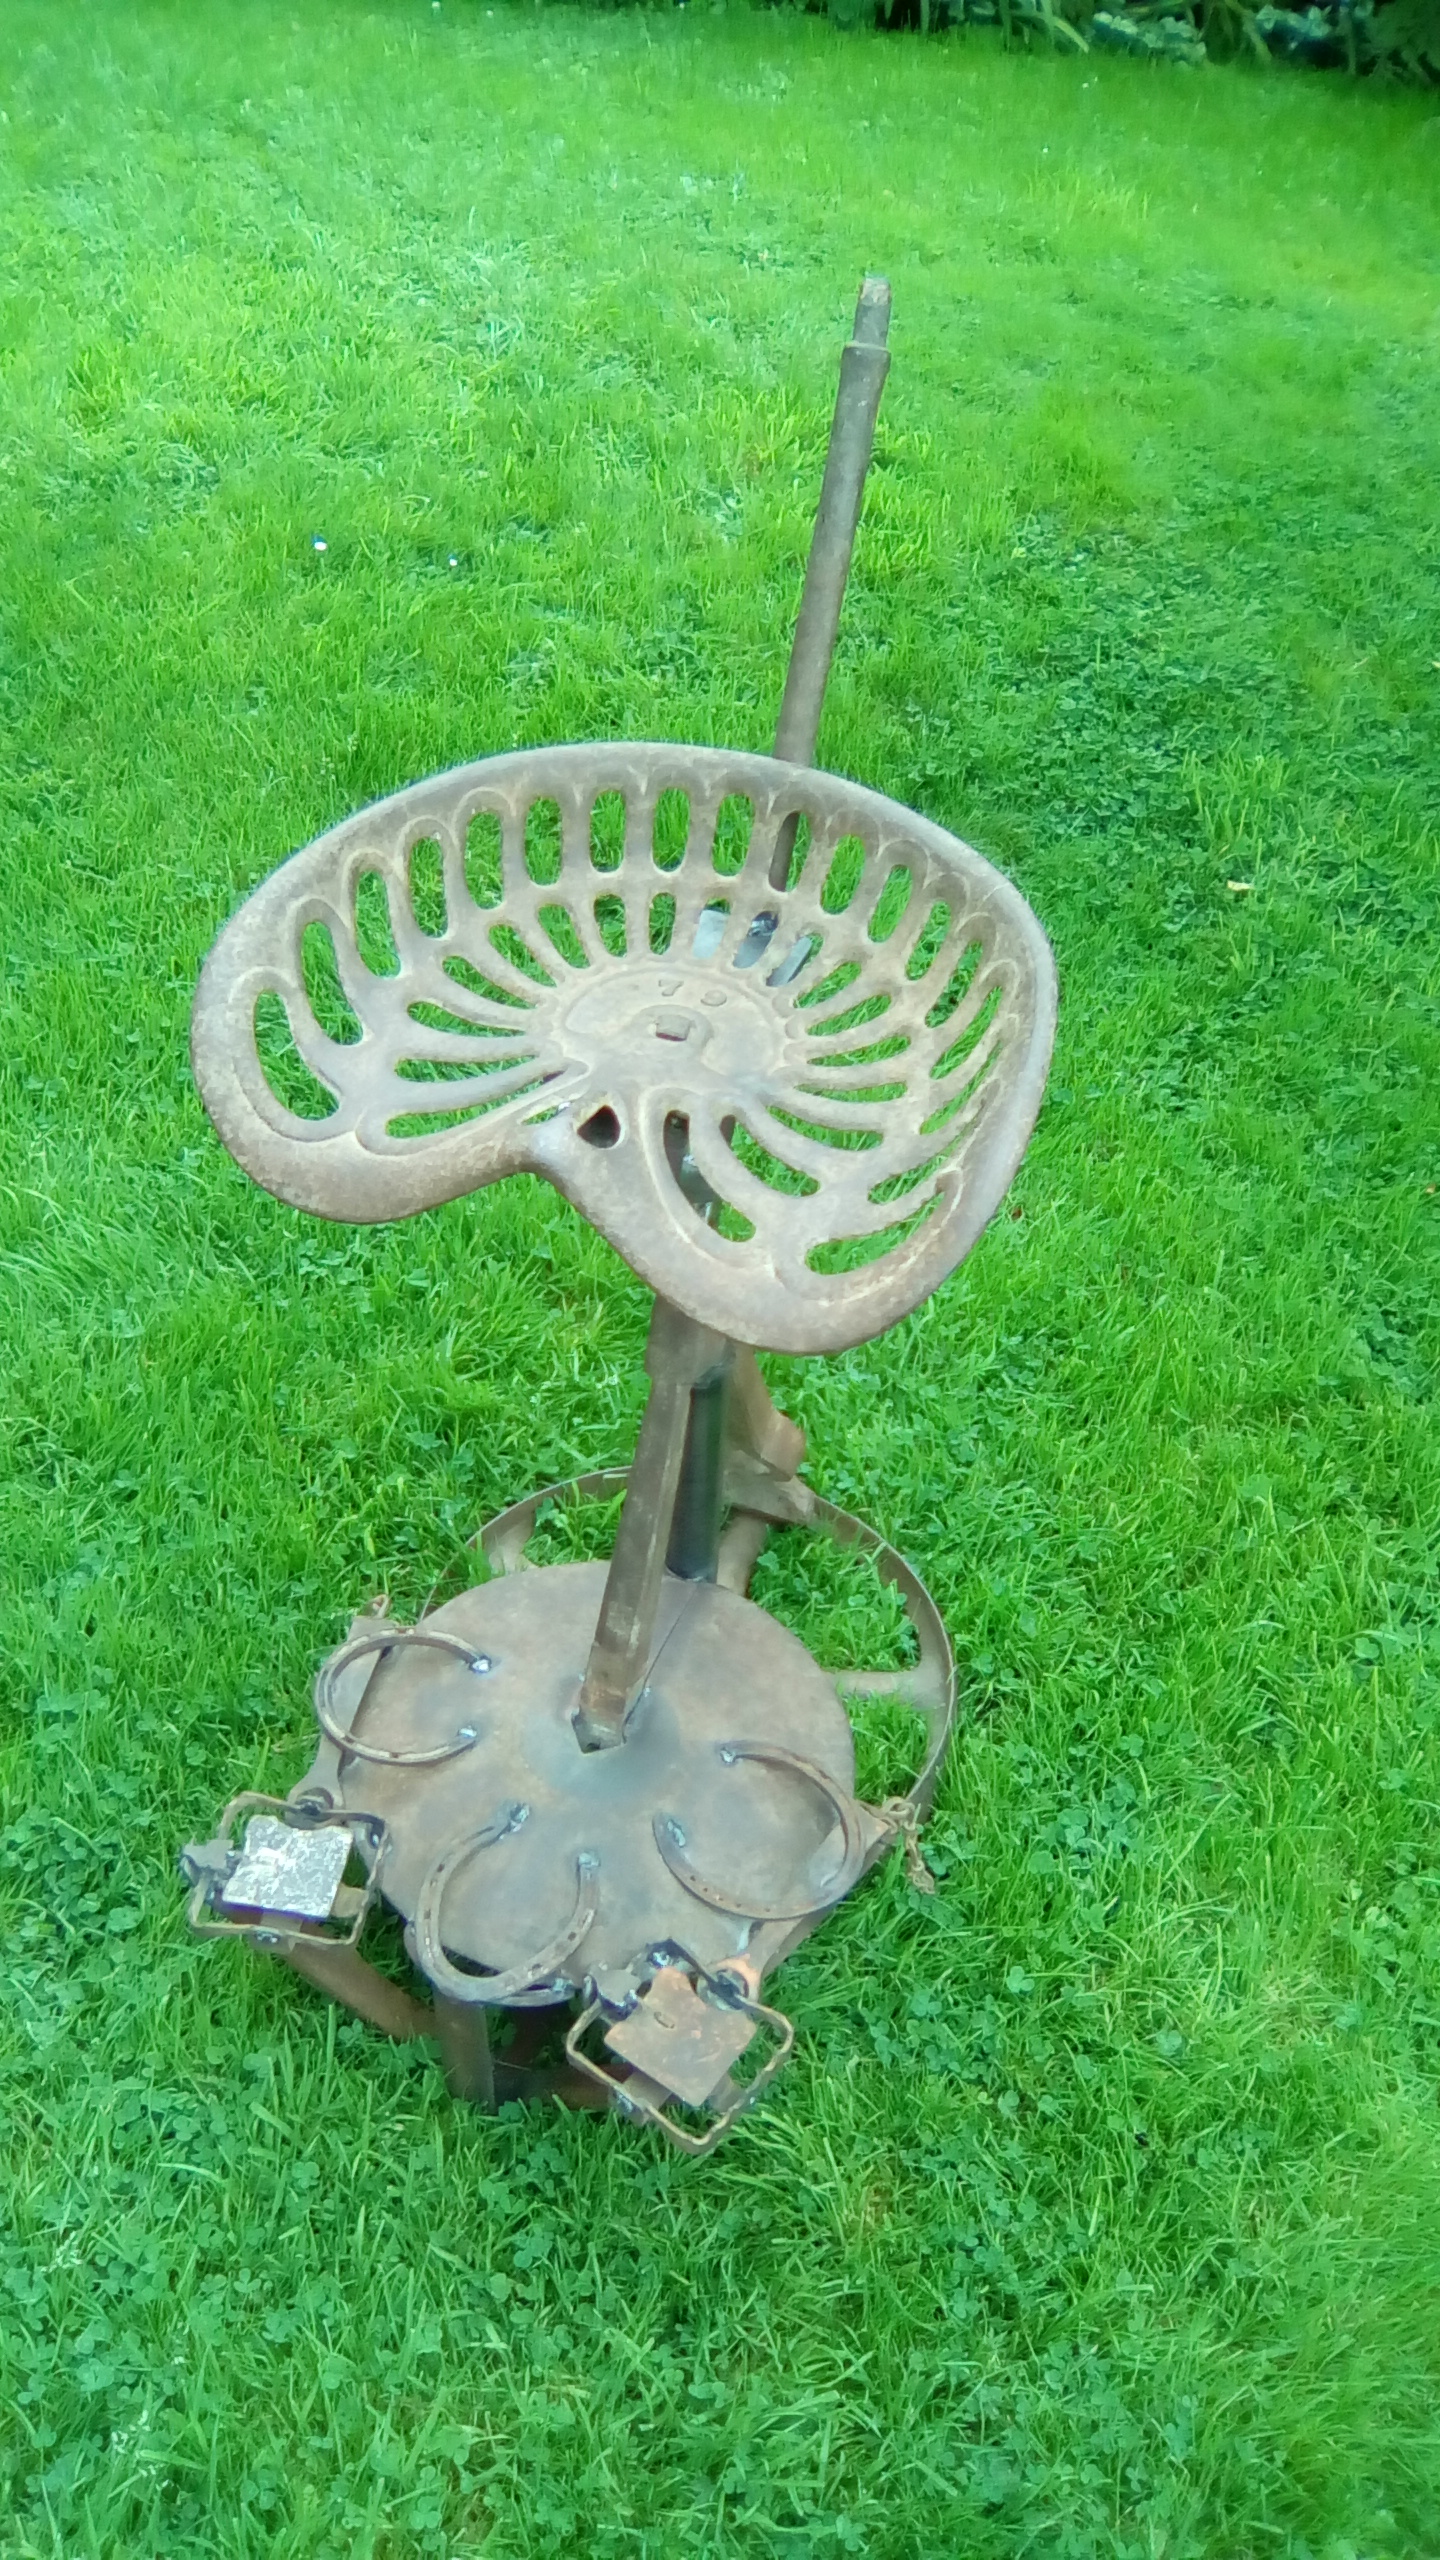
Given random pieces of steel so made a seat.
1 point
-
Thought I'd chuck up a post for these roof racks we just cleaned up for a mates mini (mainly because it's a really cool old mini). We wanted to be able to get 2 full size mountain bikes on the roof but keep it looking old school. We set out to find something to use as a starting point and thankfully @Steelies has just the thing. Racks when I picked them up Just needed a good tickle up with the wire-wheel, a couple coats of satin black rust kill paint, and all new allen head bolt for max style points. Then found online these alloy transport/storage mounts that act as a fake hub so you can just whip the front wheel off the bike, and bolt the fork straight to it using the bike axle. Plus some nice titanium bolts to hold them on And she's all ready to roll Not the most complicated project, but means the old beast can keep doing it's daily duties! Cheers Matt1 point
-
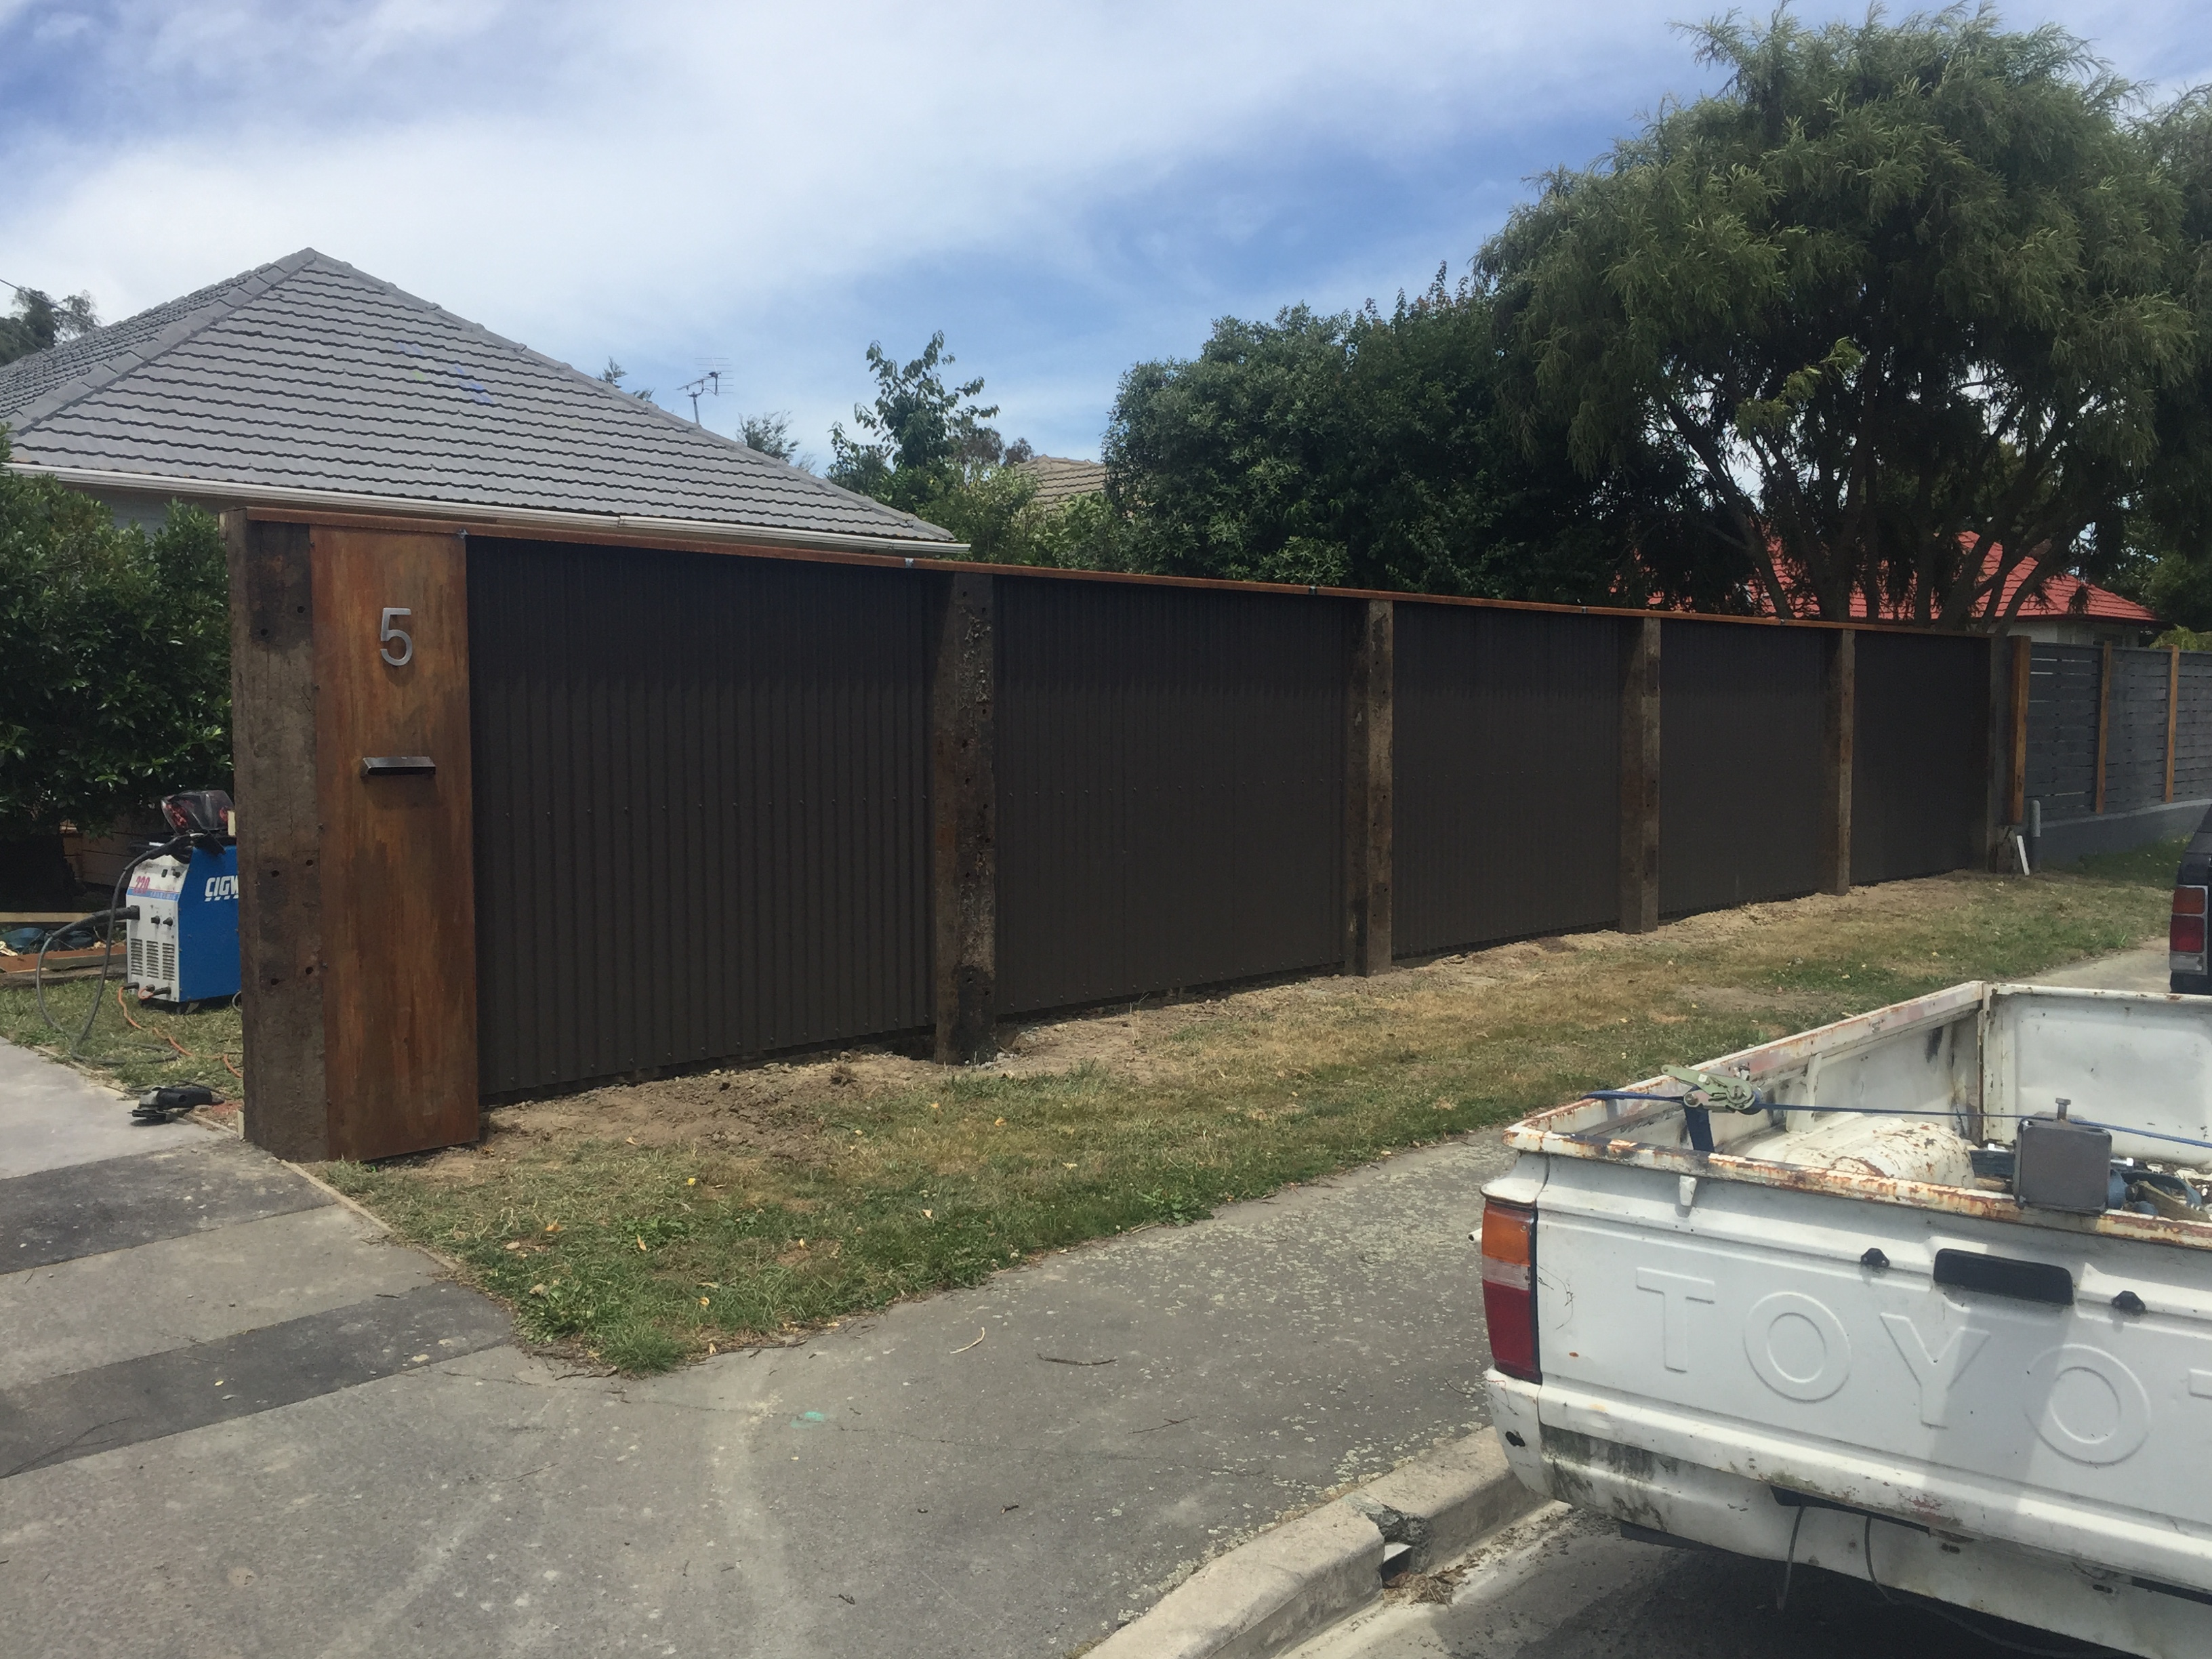
Also built a fence for privacy and keep the kid in.i used extra long railway sleepers 2.7m-3.3m for the posts, colour steel for the panels and corten steel for the capping/letterbox.just need to fit the auto gate which i made from stainless box with ceder inlay.
1 point
-
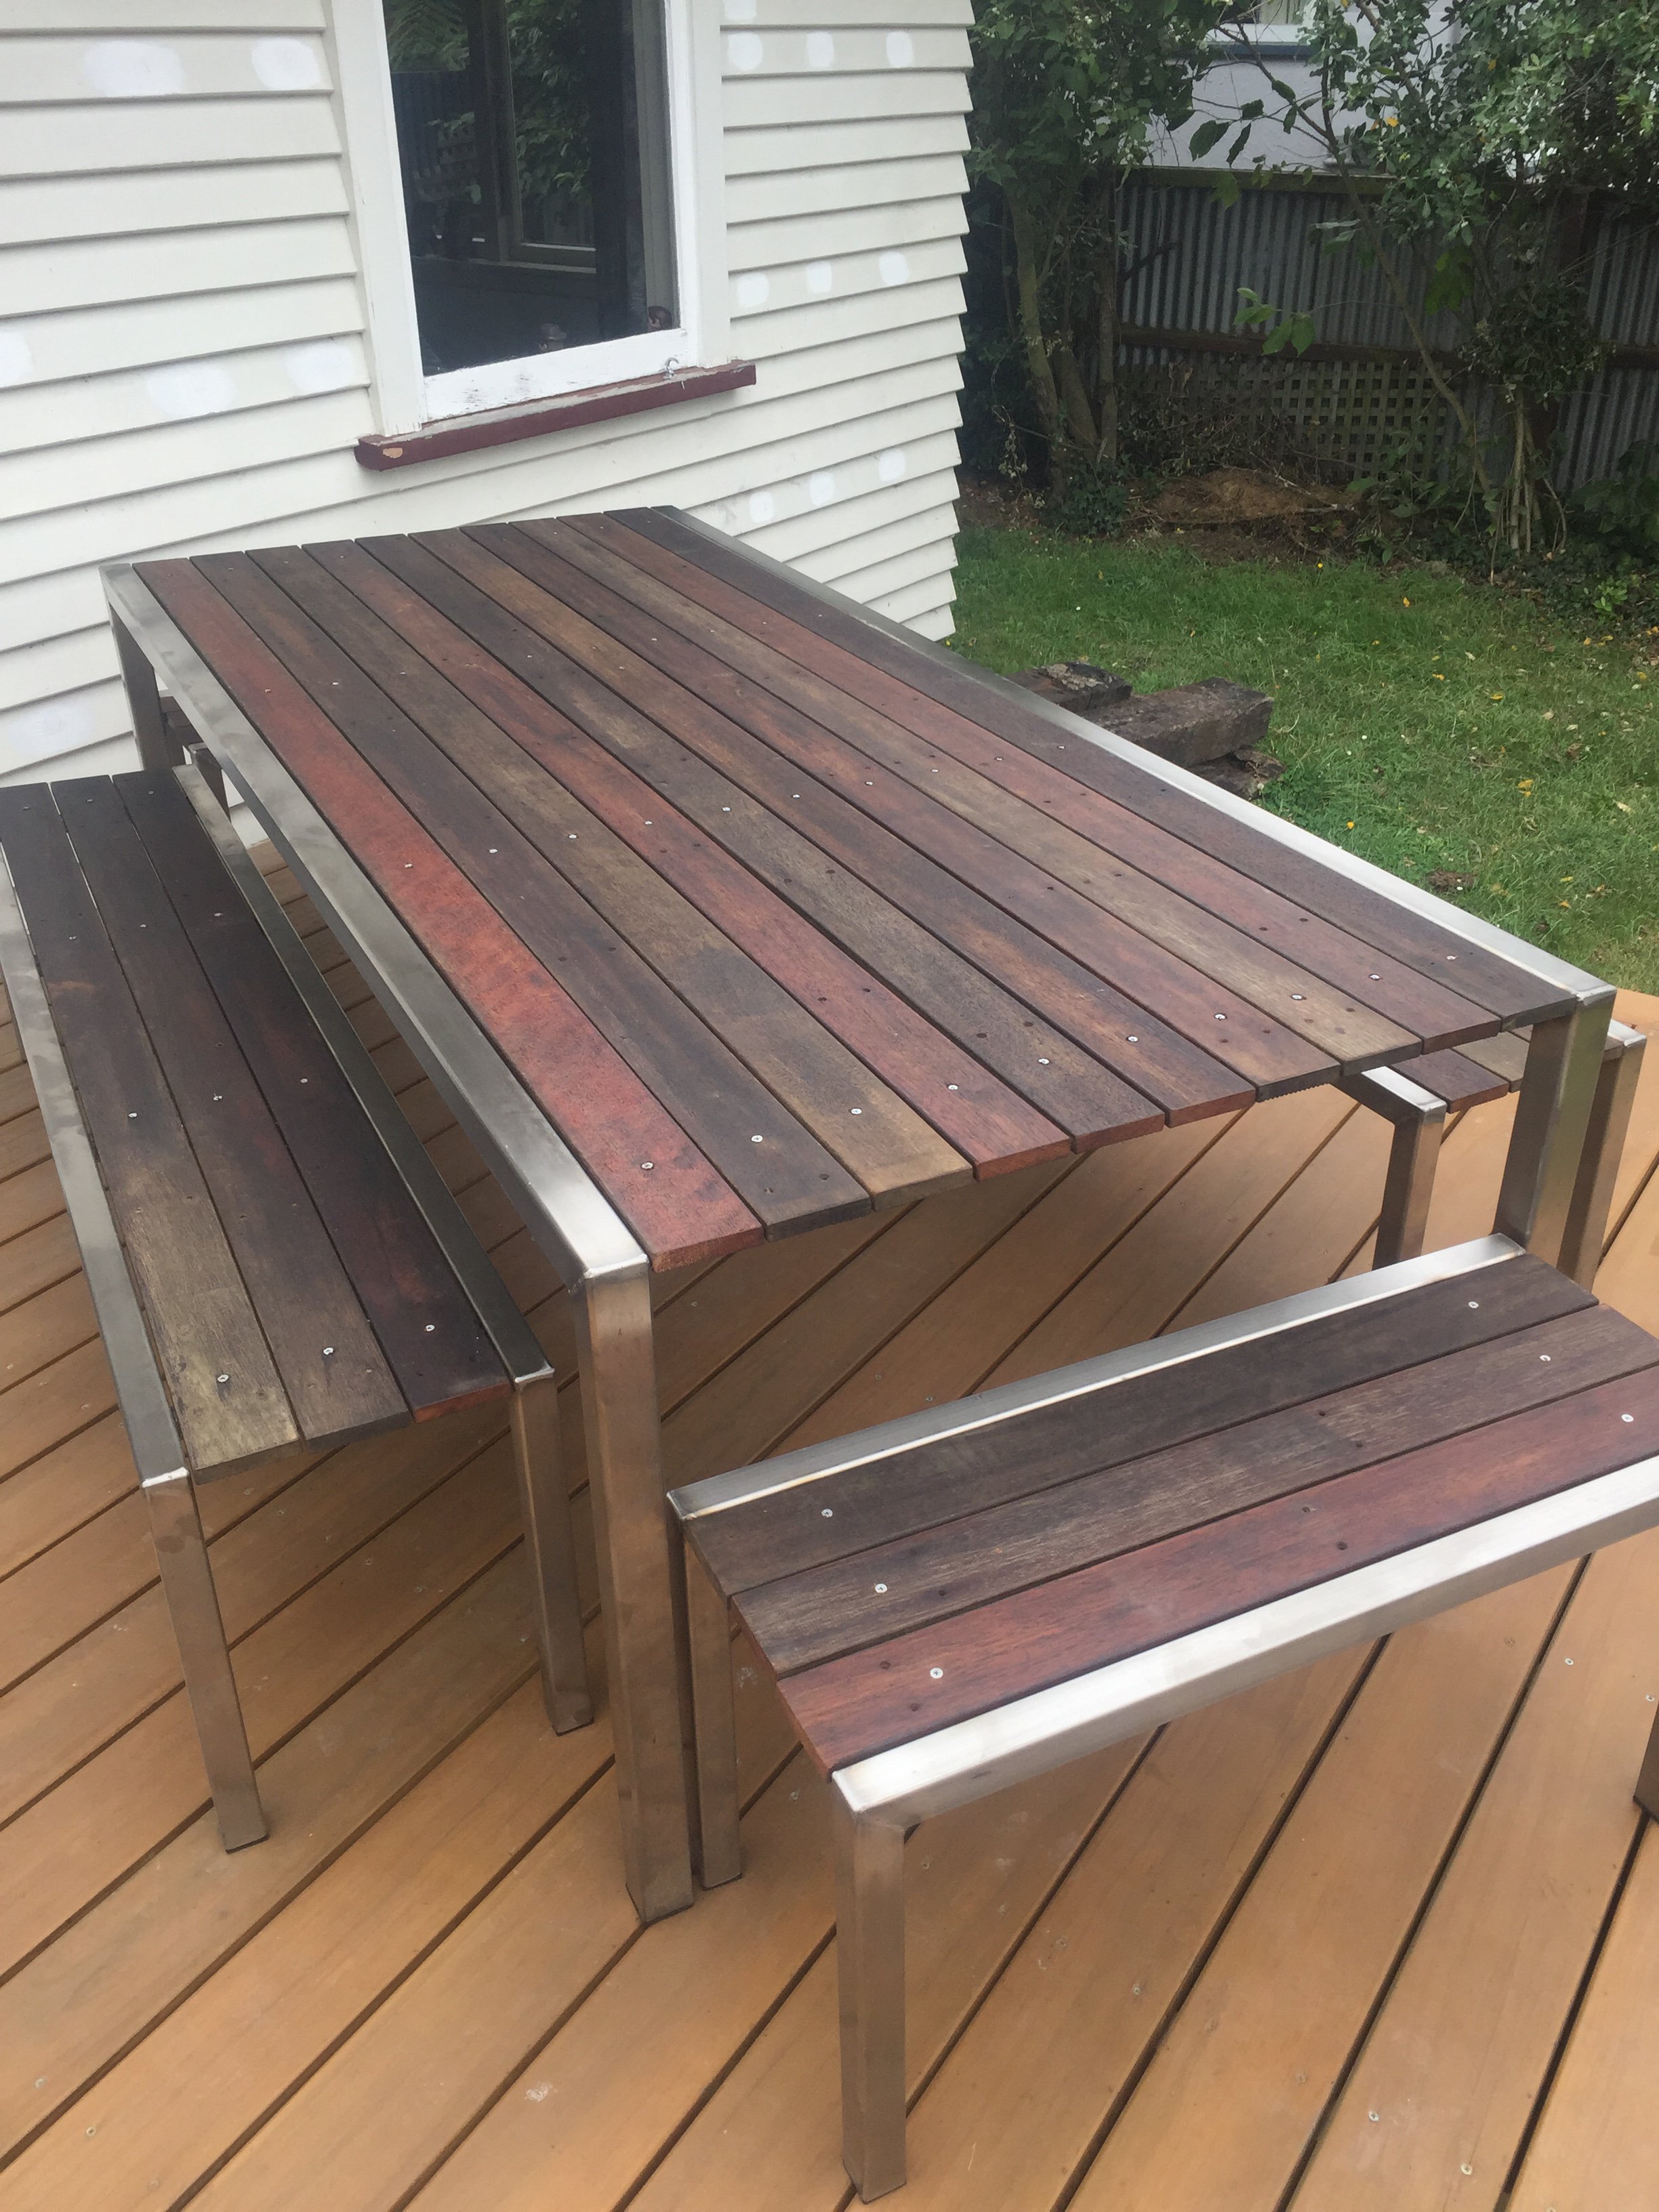
I made an outdoor table/chairs over the break.stainless frame with reused kiwla decking re oiled
1 point
-
The evolution of my no electricity espresso machine for the bus; V1 - I had to use a camping stove to heat this one due to the height of the mini keg I used as a pressure vessel. This was fine apart from it sounded like a rocket for the duration of the heating; V2 is a lot sexier, I used the top of the mini keg cos it had all the fittings ready to go. This is a standard 115mm to 76mm SS pipe adaptor and some 76mm pipe. I still need to sort the sealing on the steam wand a wee bit but it works pretty well on a gas stove top...1 point


.jpeg.9a37bc131bbda1b309ba67c93d0194c0.jpeg)


This leaderboard is set to Auckland/GMT+12:00