
Leaderboard


Popular Content
Showing content with the highest reputation on 04/01/19 in all areas
-
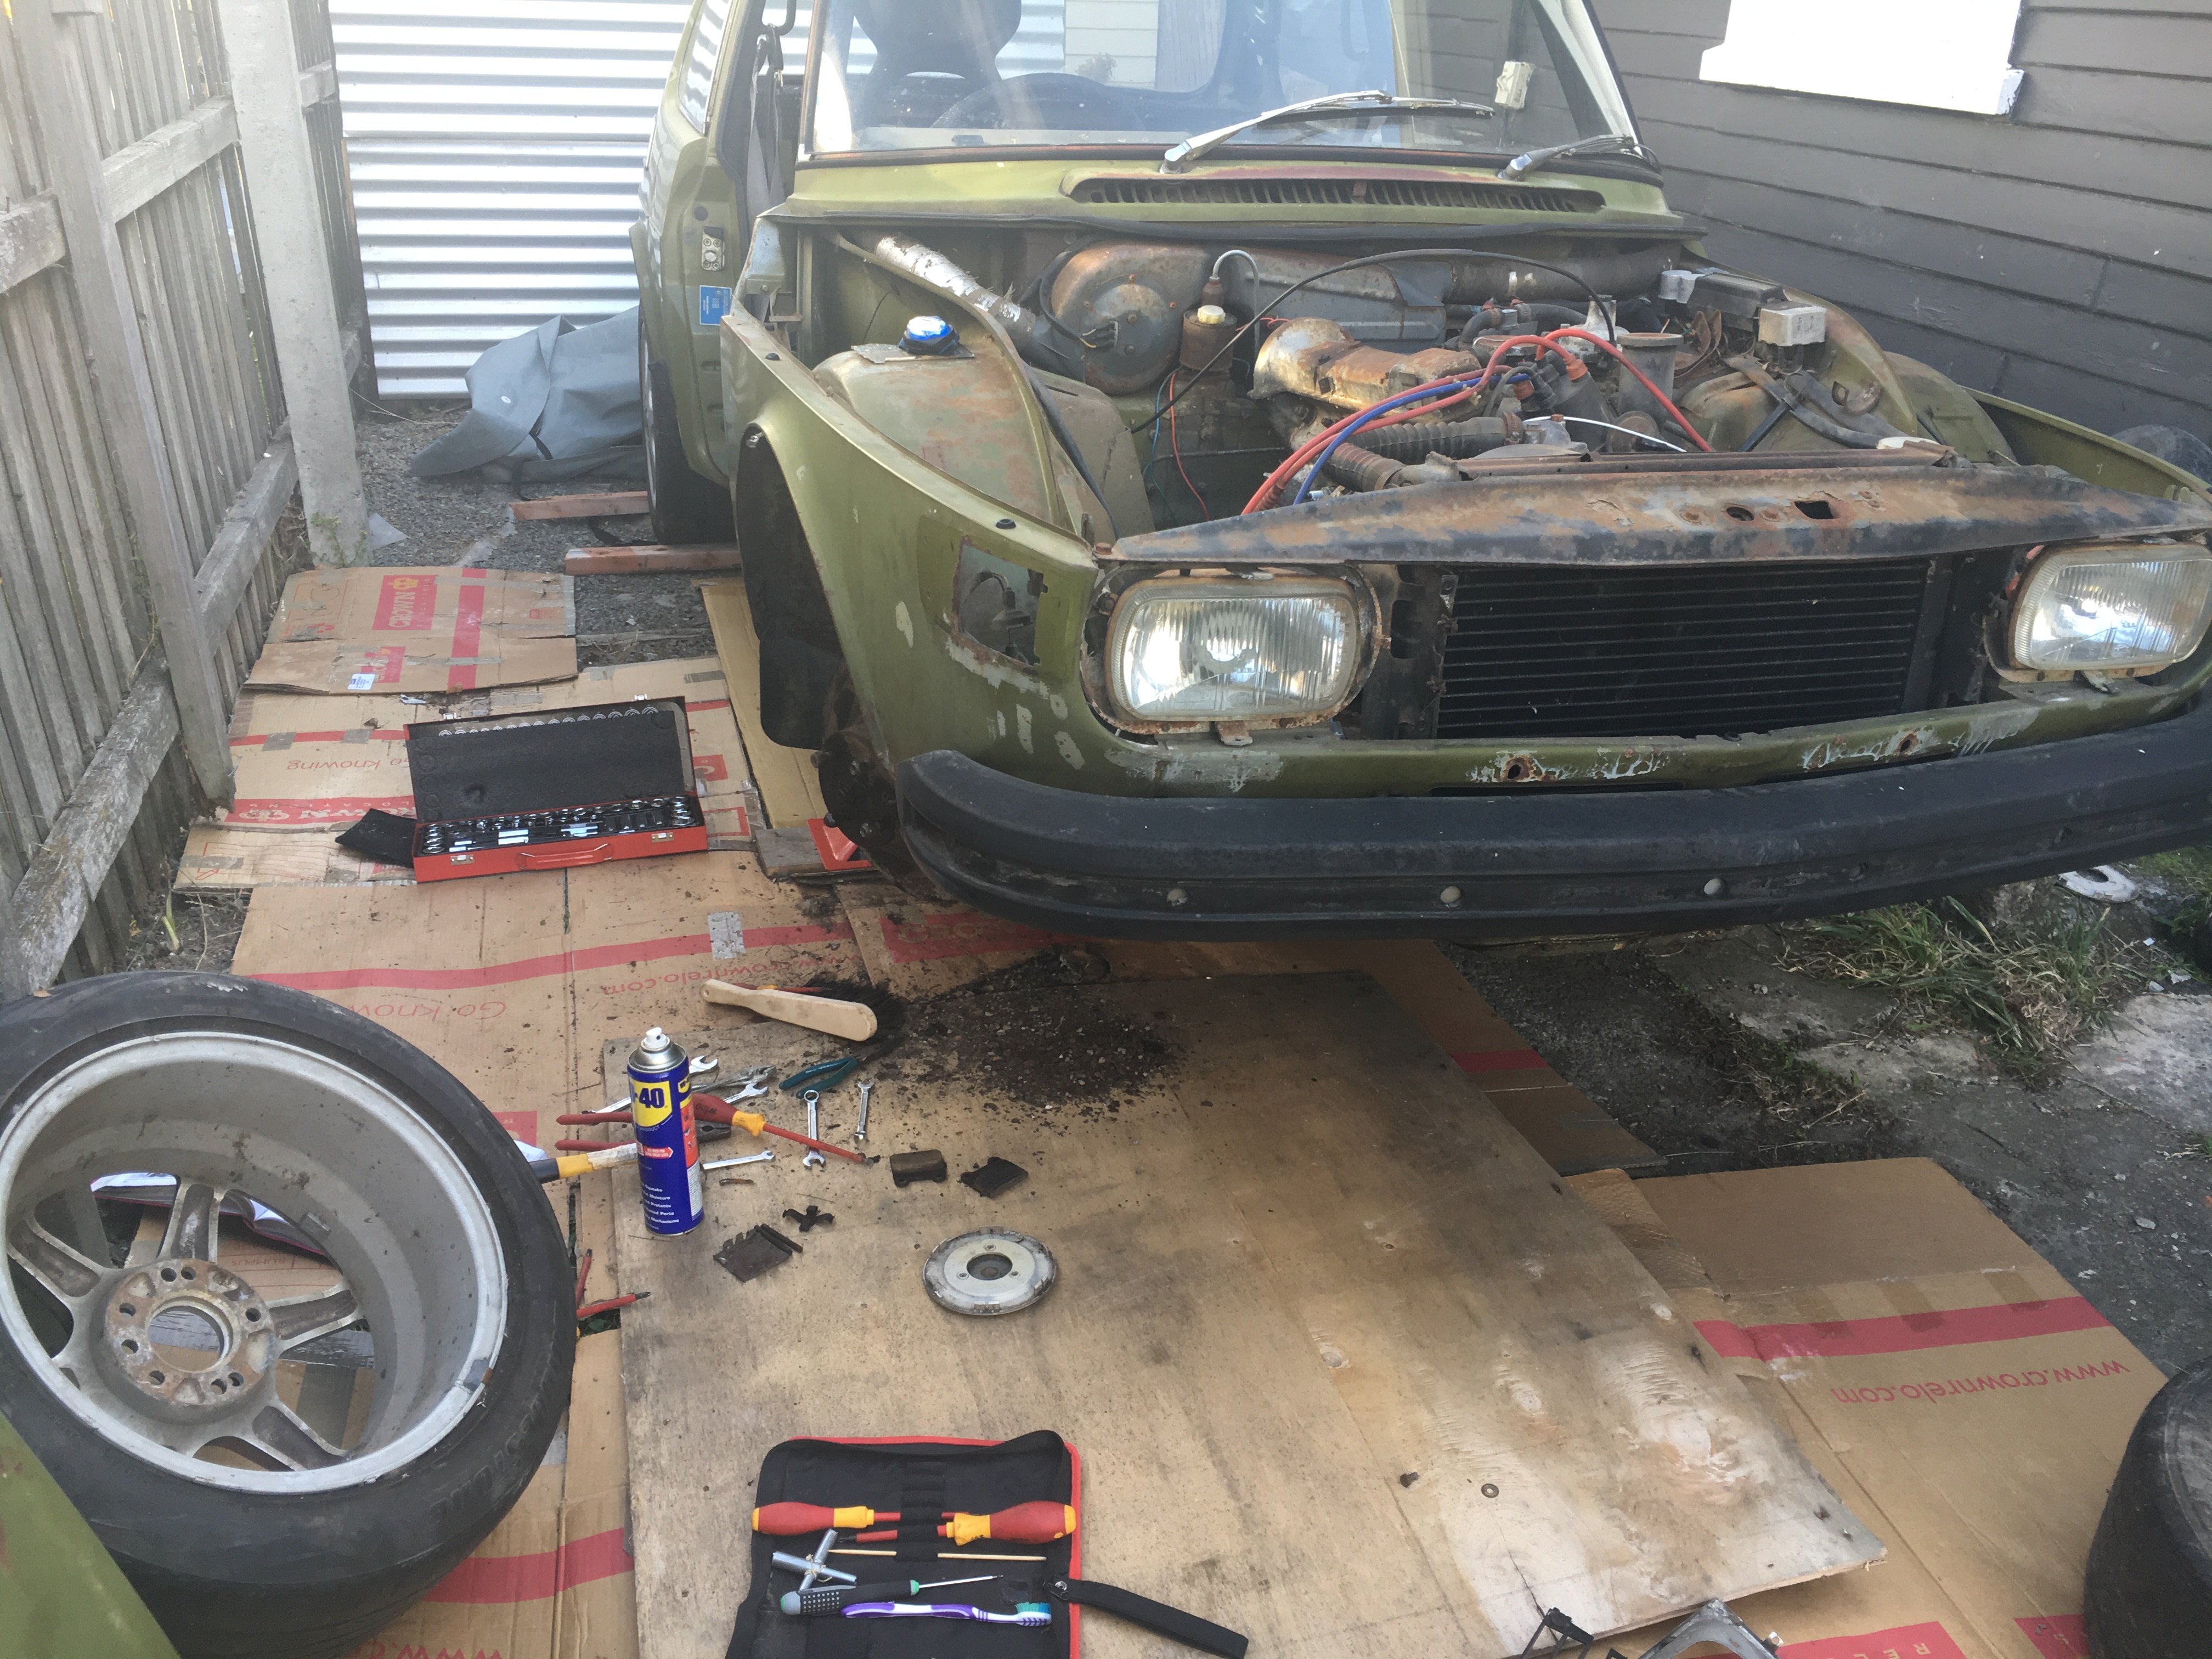
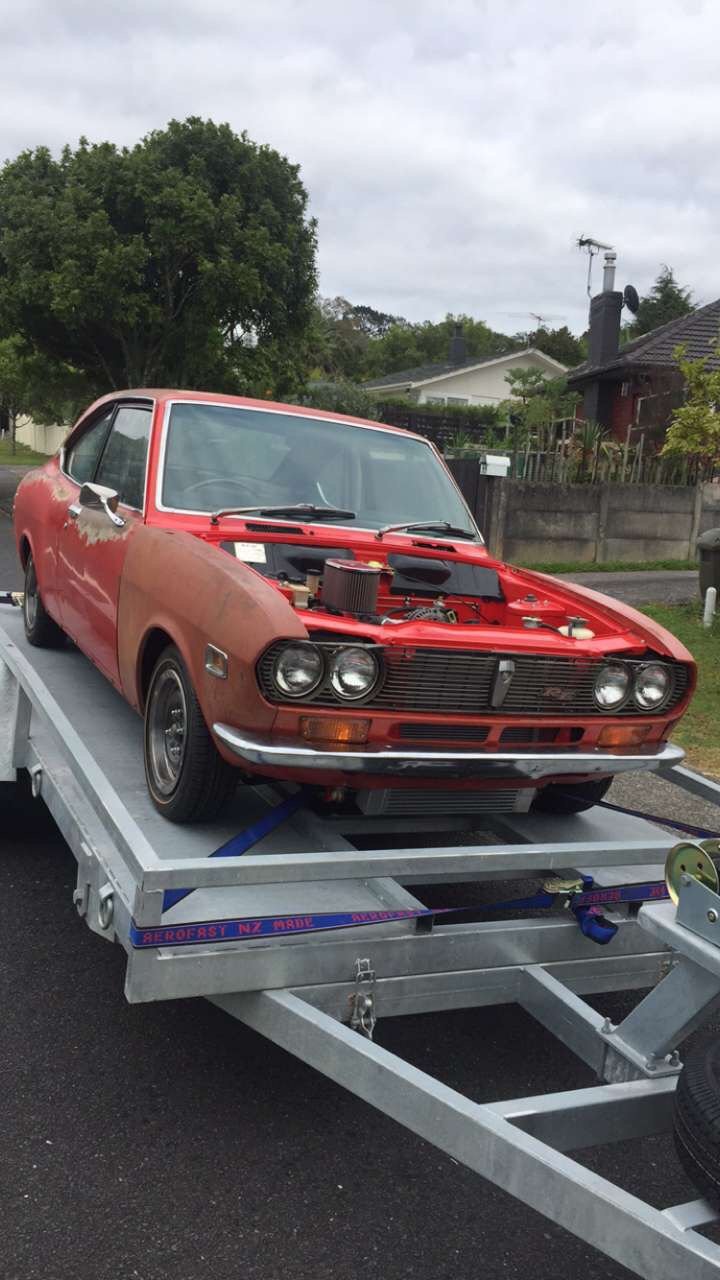
I would absolutely love to keep those big tyres, but two of them are stuffed, there's no stock in NZ, and to keep them I'll have to cut off the front steps. Believe or not the steps are useful for getting in and out - so I'm going to a smaller tyre. You all have the most excellent taste though, but it's no fun being an adult for me Today's progress: Paint acquired, a new spraygun acquired (half way through the job I might add), the tray painted in POR15 silver top coat, and the chassis painted in POR15 chassis coat. I also seem to have overspray on my camera. Ha! Tomorrow's plans - try to get a few more mm of height out of the front right, hopefully underseal the cab, get the new tyres on, fit replacement grille, glovebox, cubby box. Four days to go. I got this
 7 points
 -
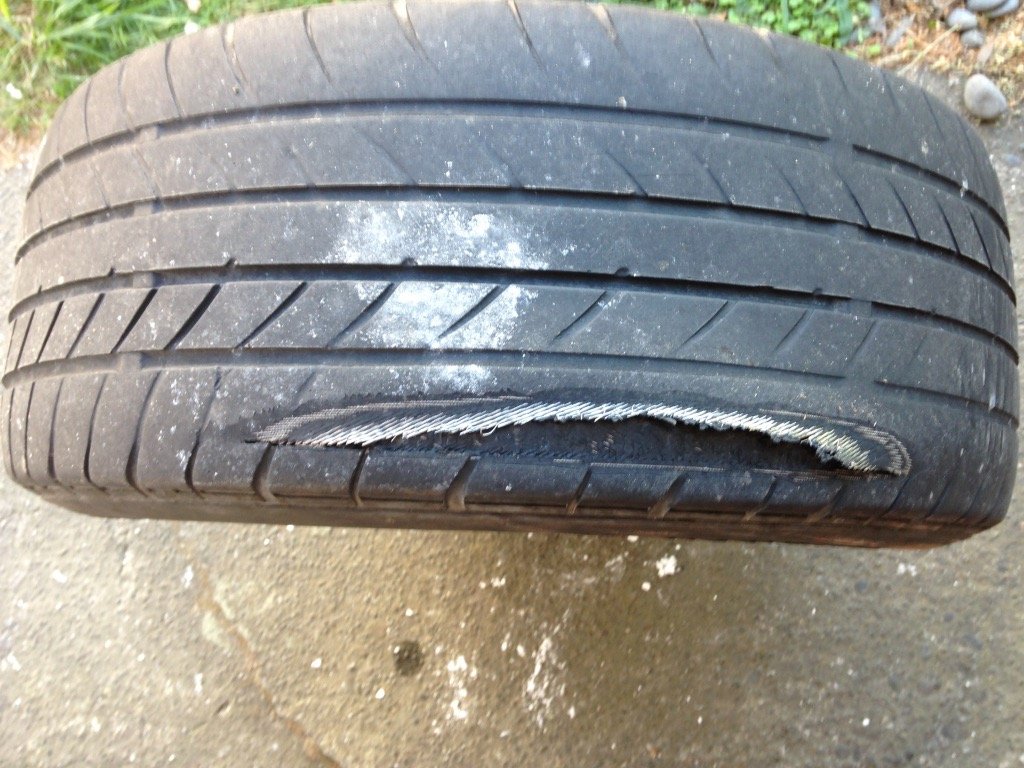
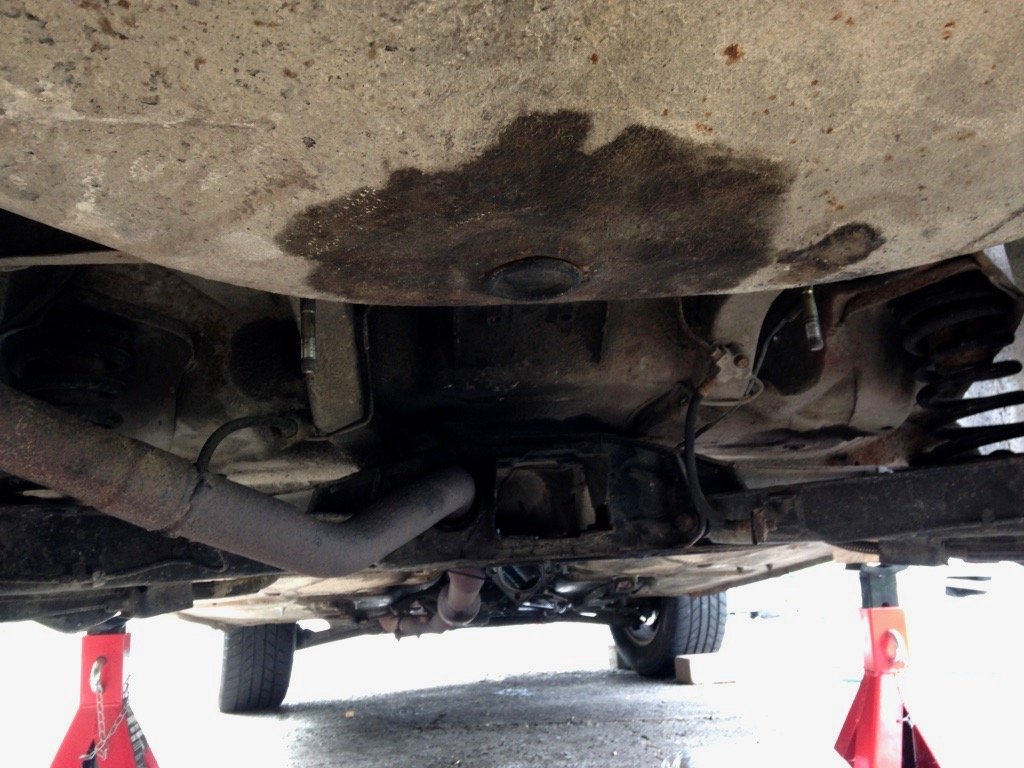
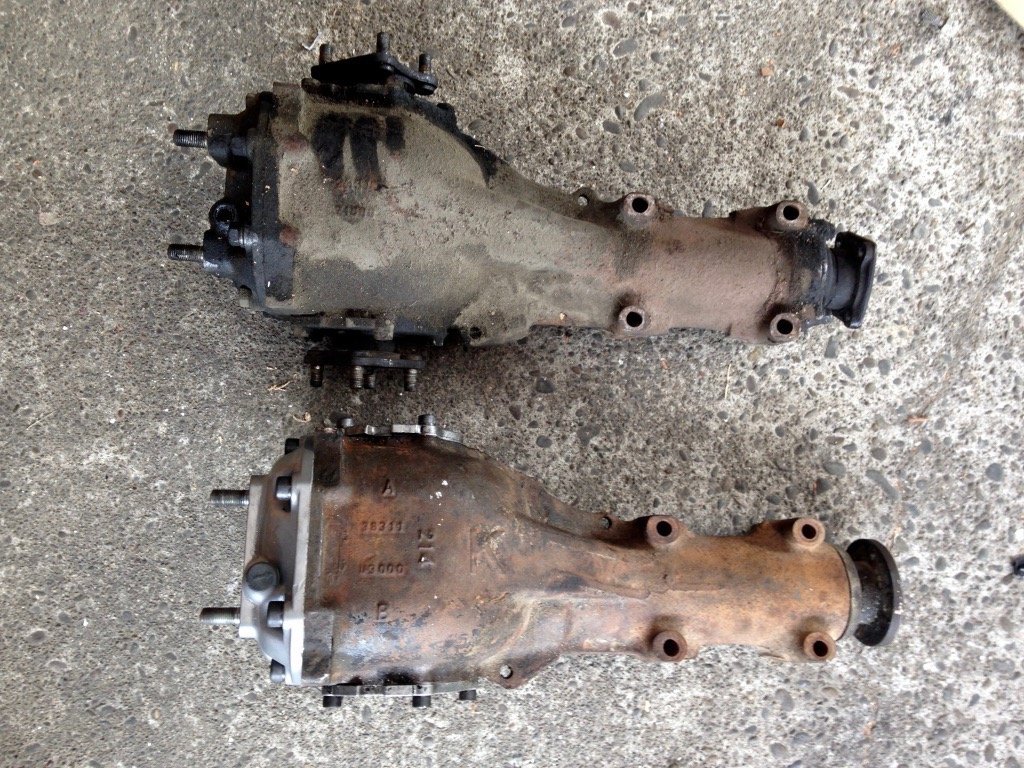
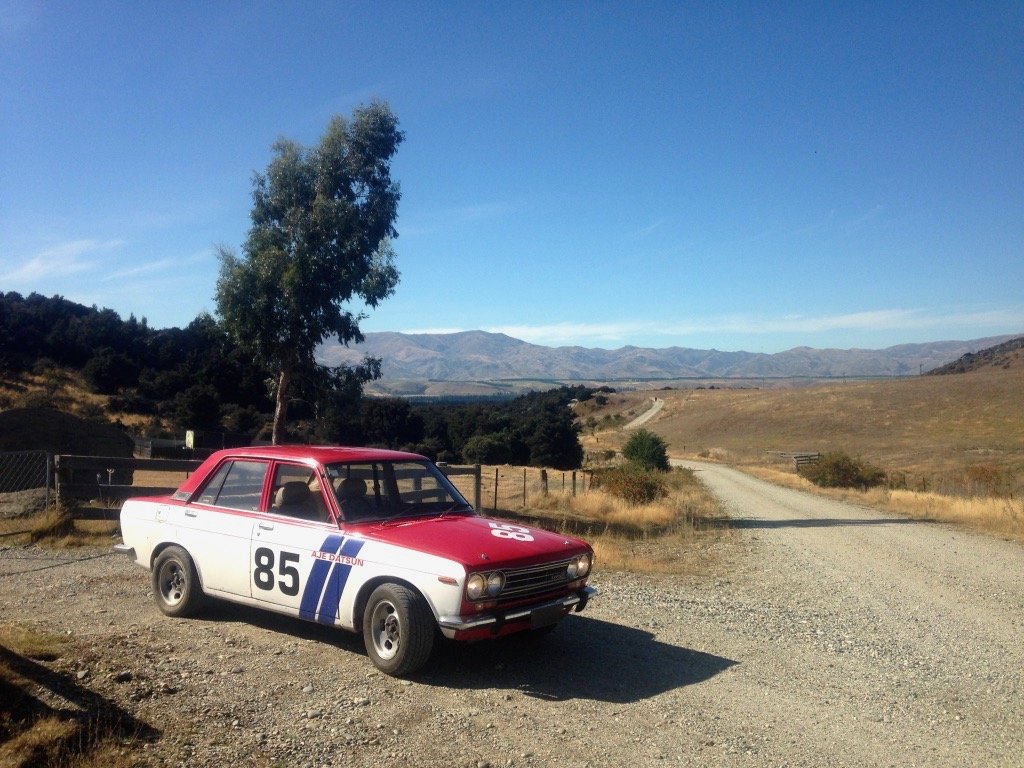
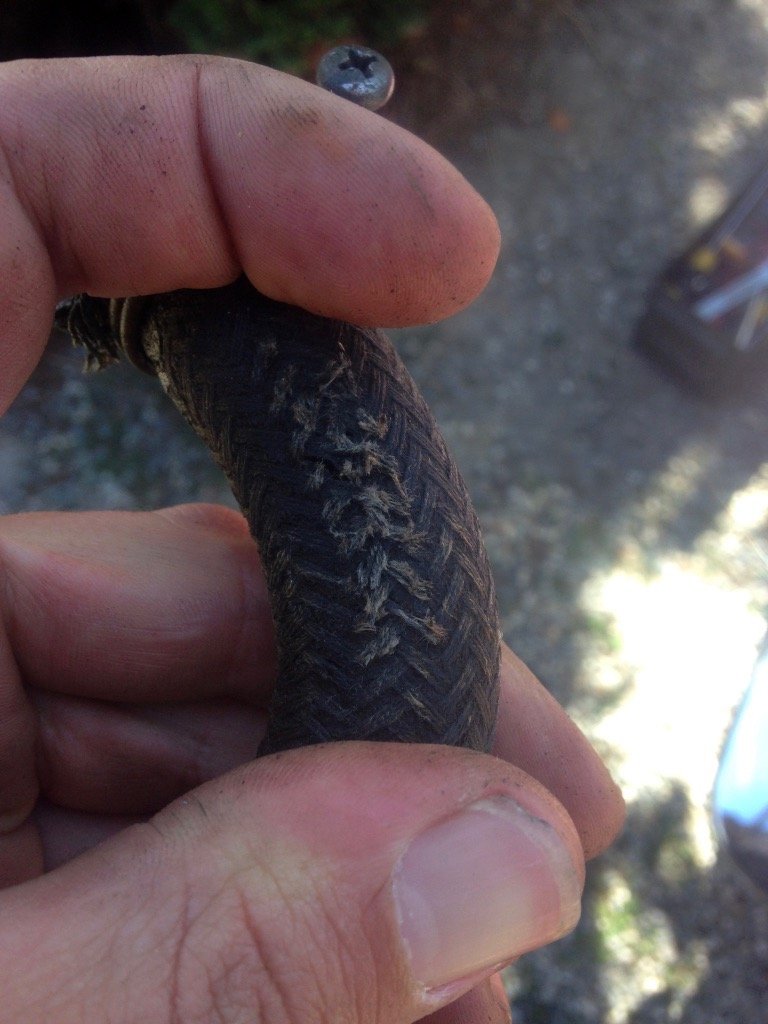
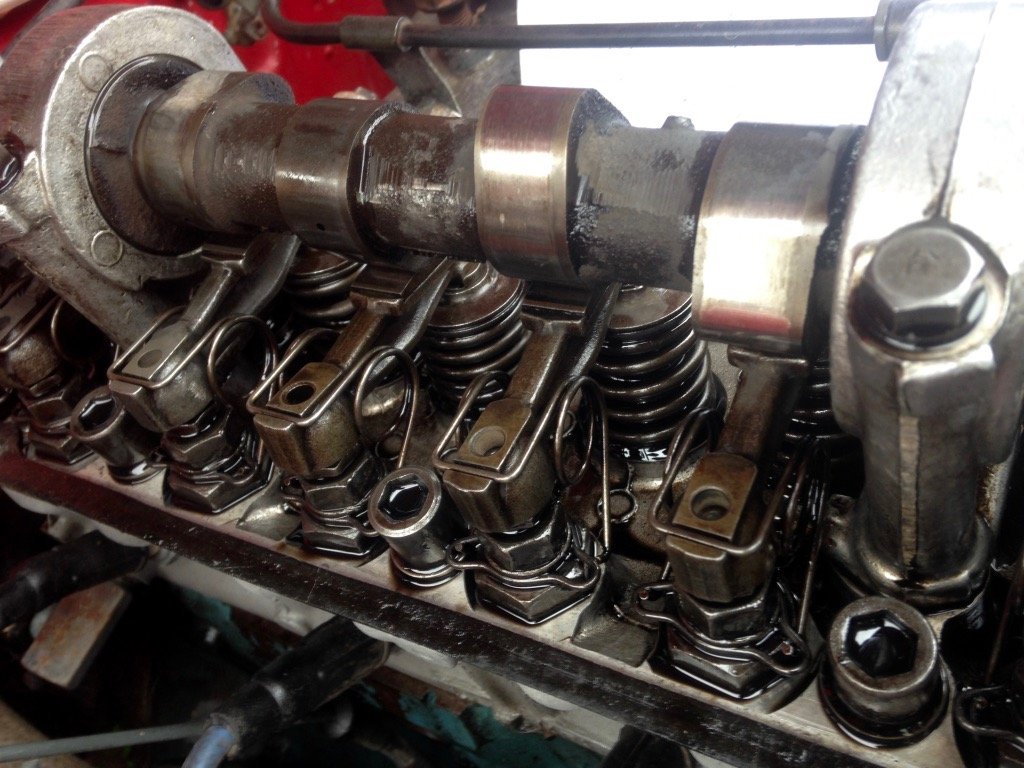
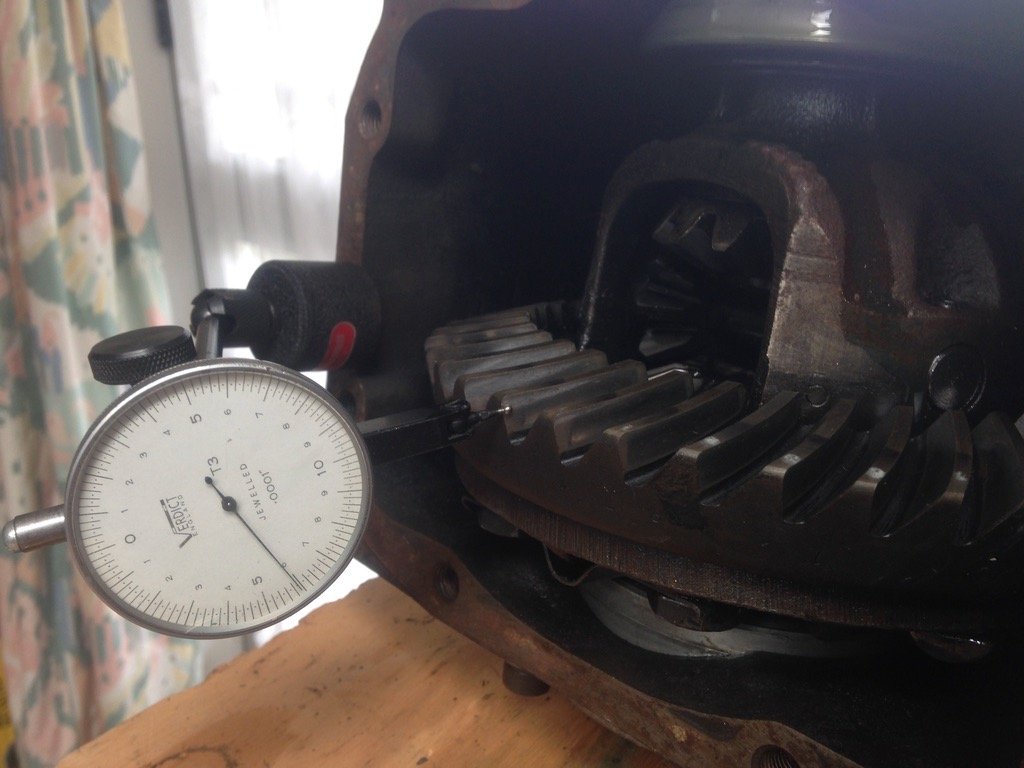
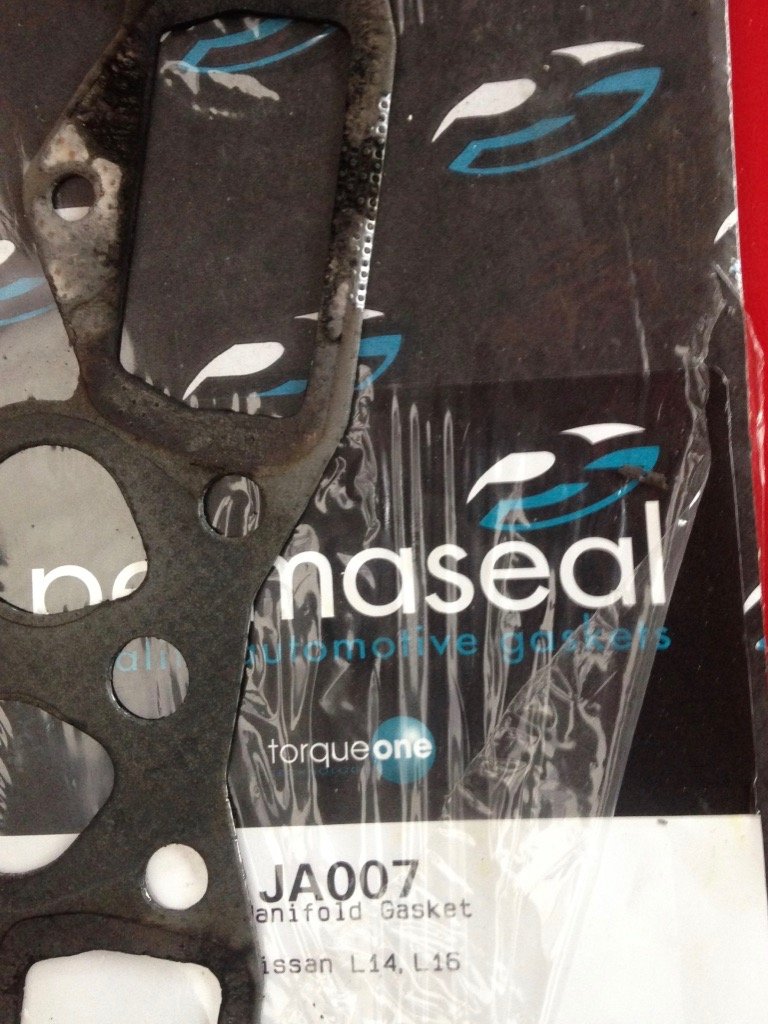
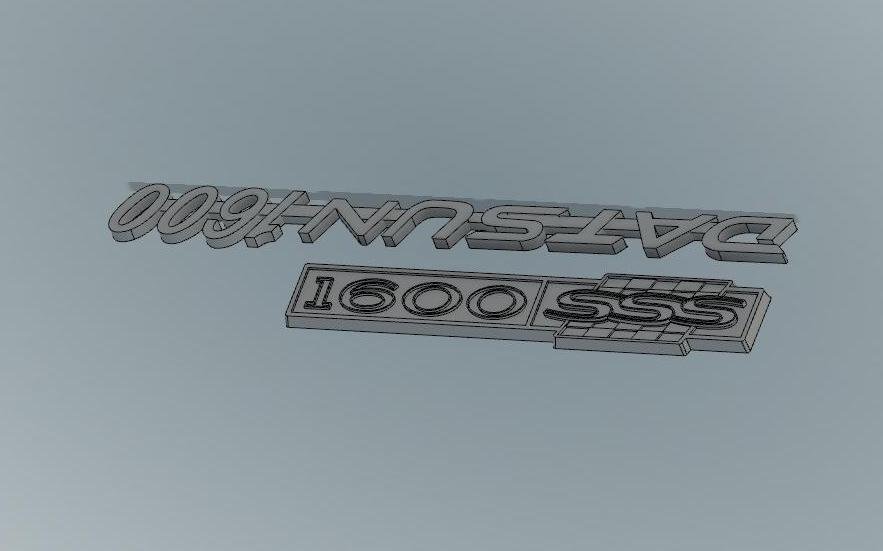
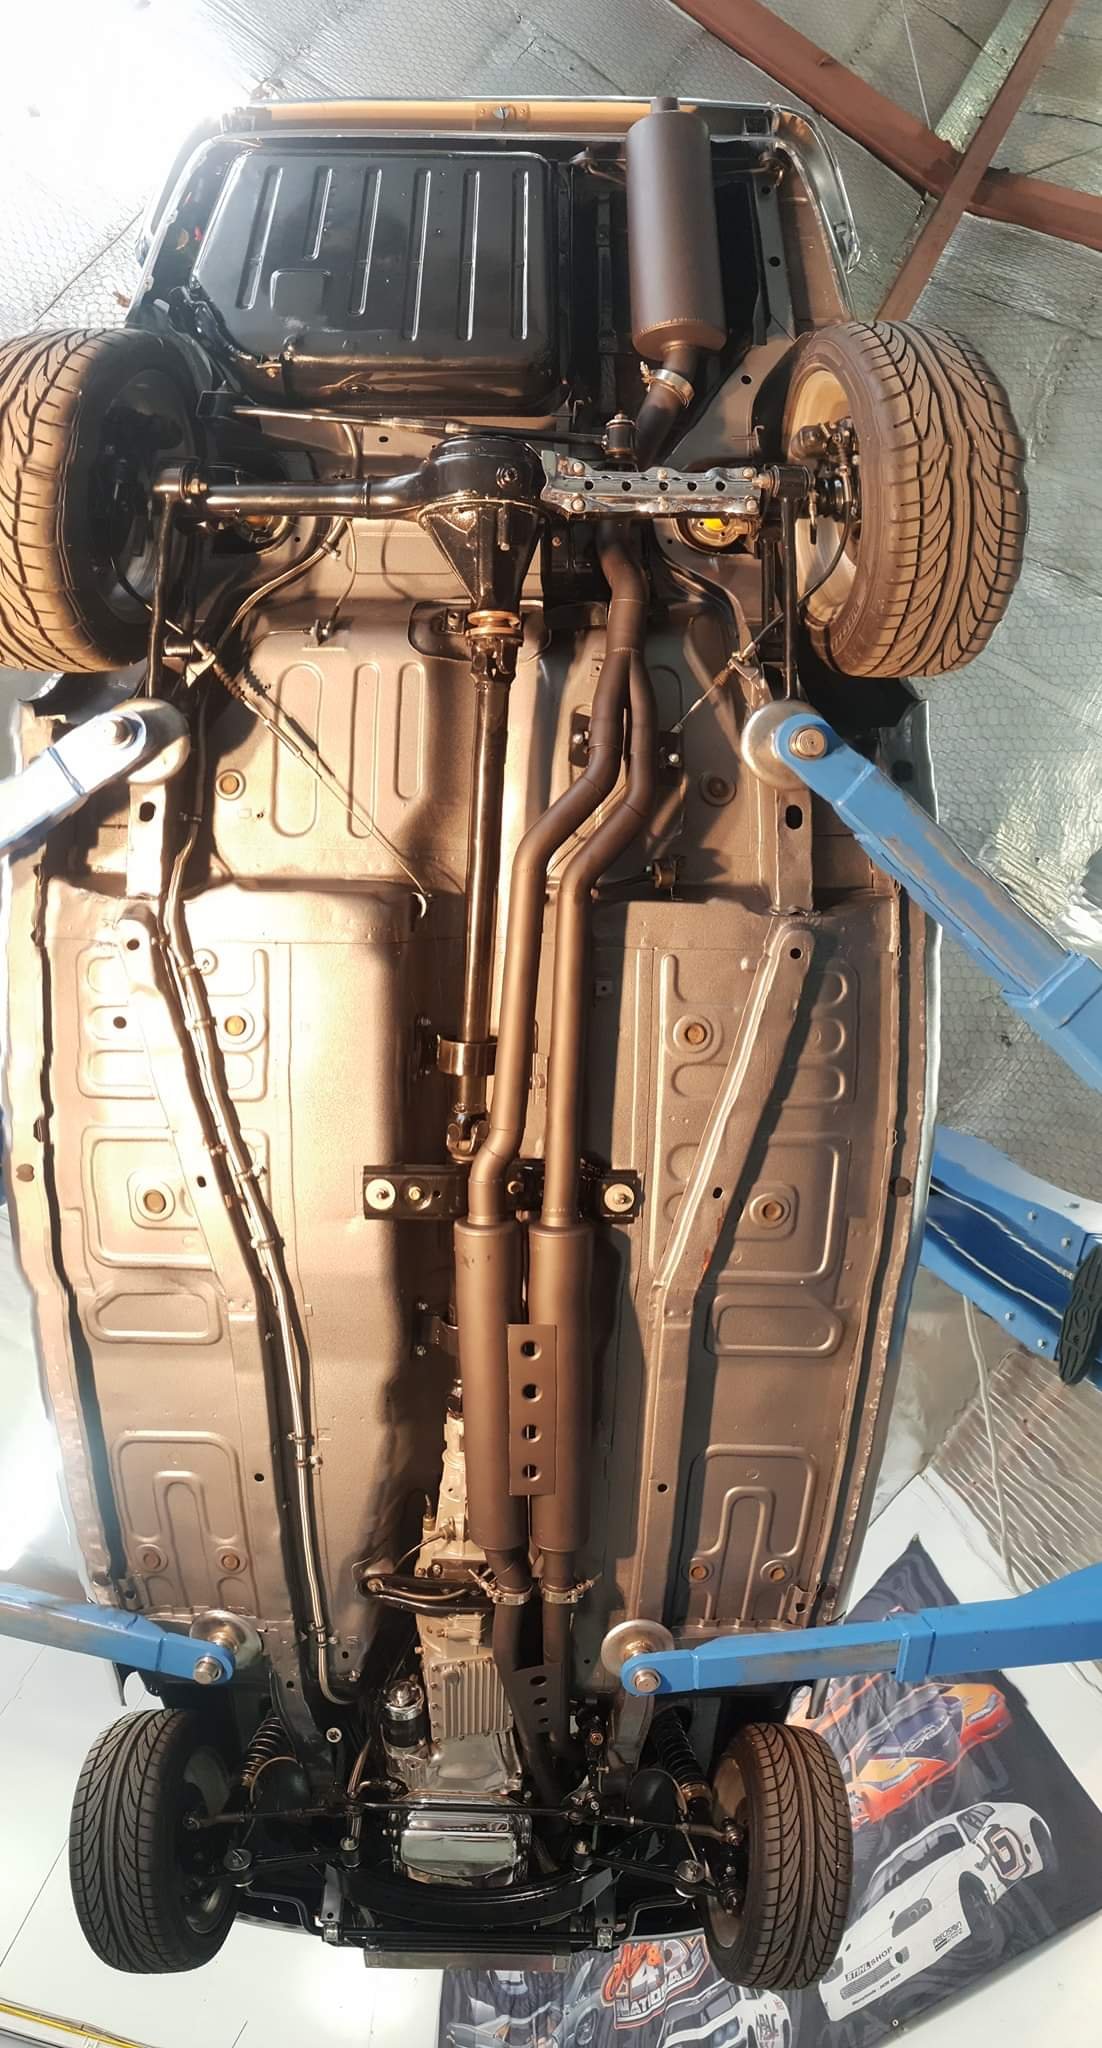
Electrical issue turned out to be worn brushes in the distributor, after a solid tour of Chch looking for a replacement brush housing I ended up finding a young fella at Repco who took one look and said, you need bush set xxx, see, they can be soldered in right there. Not often you find someone at a parts store that has the right knowledge, he set me off to another branch with stock and the repair was made in 5 minutes for less than $10 Valvetrain tick investigating time...... Once again, couldn't find much, but one lashpad and rocker had a burr which I took off, unsure if it really changed much. After some more driving and a worsening sound I rechecked the gasket, turns out the new gaskets don't have reinforcement around the exhaust ports, didn't last long! Put the old one back in with a helping of sealant, so far so good. Whats really odd is the tick is most noticeable in the cabin, with the bonnet up it is there, but is drowned out by general engine noise and you'd struggle to pick it up. I'm starting to lean further towards i'm just being paranoid. The only thing I am yet to do (and probably should have done first) is check clearances when hot, that might offer a different view. Went for a hoon down Central Otago way Was a bloody good drive, midweek and late afternoon meant little to no traffic through all the fun bits, until overheating at lake Pukaki on sunset, I topped up with water and limped into Wanaka, unsure to the exact cause as it drank quite a bit of water, wasn't down on power or using fuel and the oil was all good. Turns out I had blown a heater hose and thankfully the old L series is a tough beast, a quick visit to tractor services for some tube to bypass the split hose and she was all go again. However I no longer had a heater. Calling around the usual suppliers and Nissan didn't provide any replacements, the hoses are all listed NLA so to the parts shelf I went Generic Gates hose 01-0005 covers the heater feed behind the block and a Holden commodore hose Gates 02-0912 was just enough for the return line. While in the mood, next on the list was to get the 3.5 R180 diff into place. Standard R160 top, R180 bottom. Quick check up, close enough. Out with the old In with the new. Needed a pair of sump plugs which were happily provided by pick a part and their solid collection of R180 equiped Subaru wagons. This should bring the 100k rev limit down around 3200rpm, it may be at the cost of of the line go, but the car is more of a cruiser than racer now, its worth a go. During the process I cut my hand on the wheel, not sure if its from being old or due to damage, but a new set of tyres is now on the list. Bloody happy to have found it here and not on the Lindis! Have also sorted CAD files for the badges, currently waiting on some tiny carbide end mills to feed the machine, this is so I can keep the actual badges on the shelf and not be paranoid of them falling off. Numb nuts put them in the scanner opposite which is why one is upside down!
7 points
-
Thought I would try a new look 17x8 d windows looks good to me just need white lettering on the tires
6 points
-
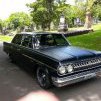
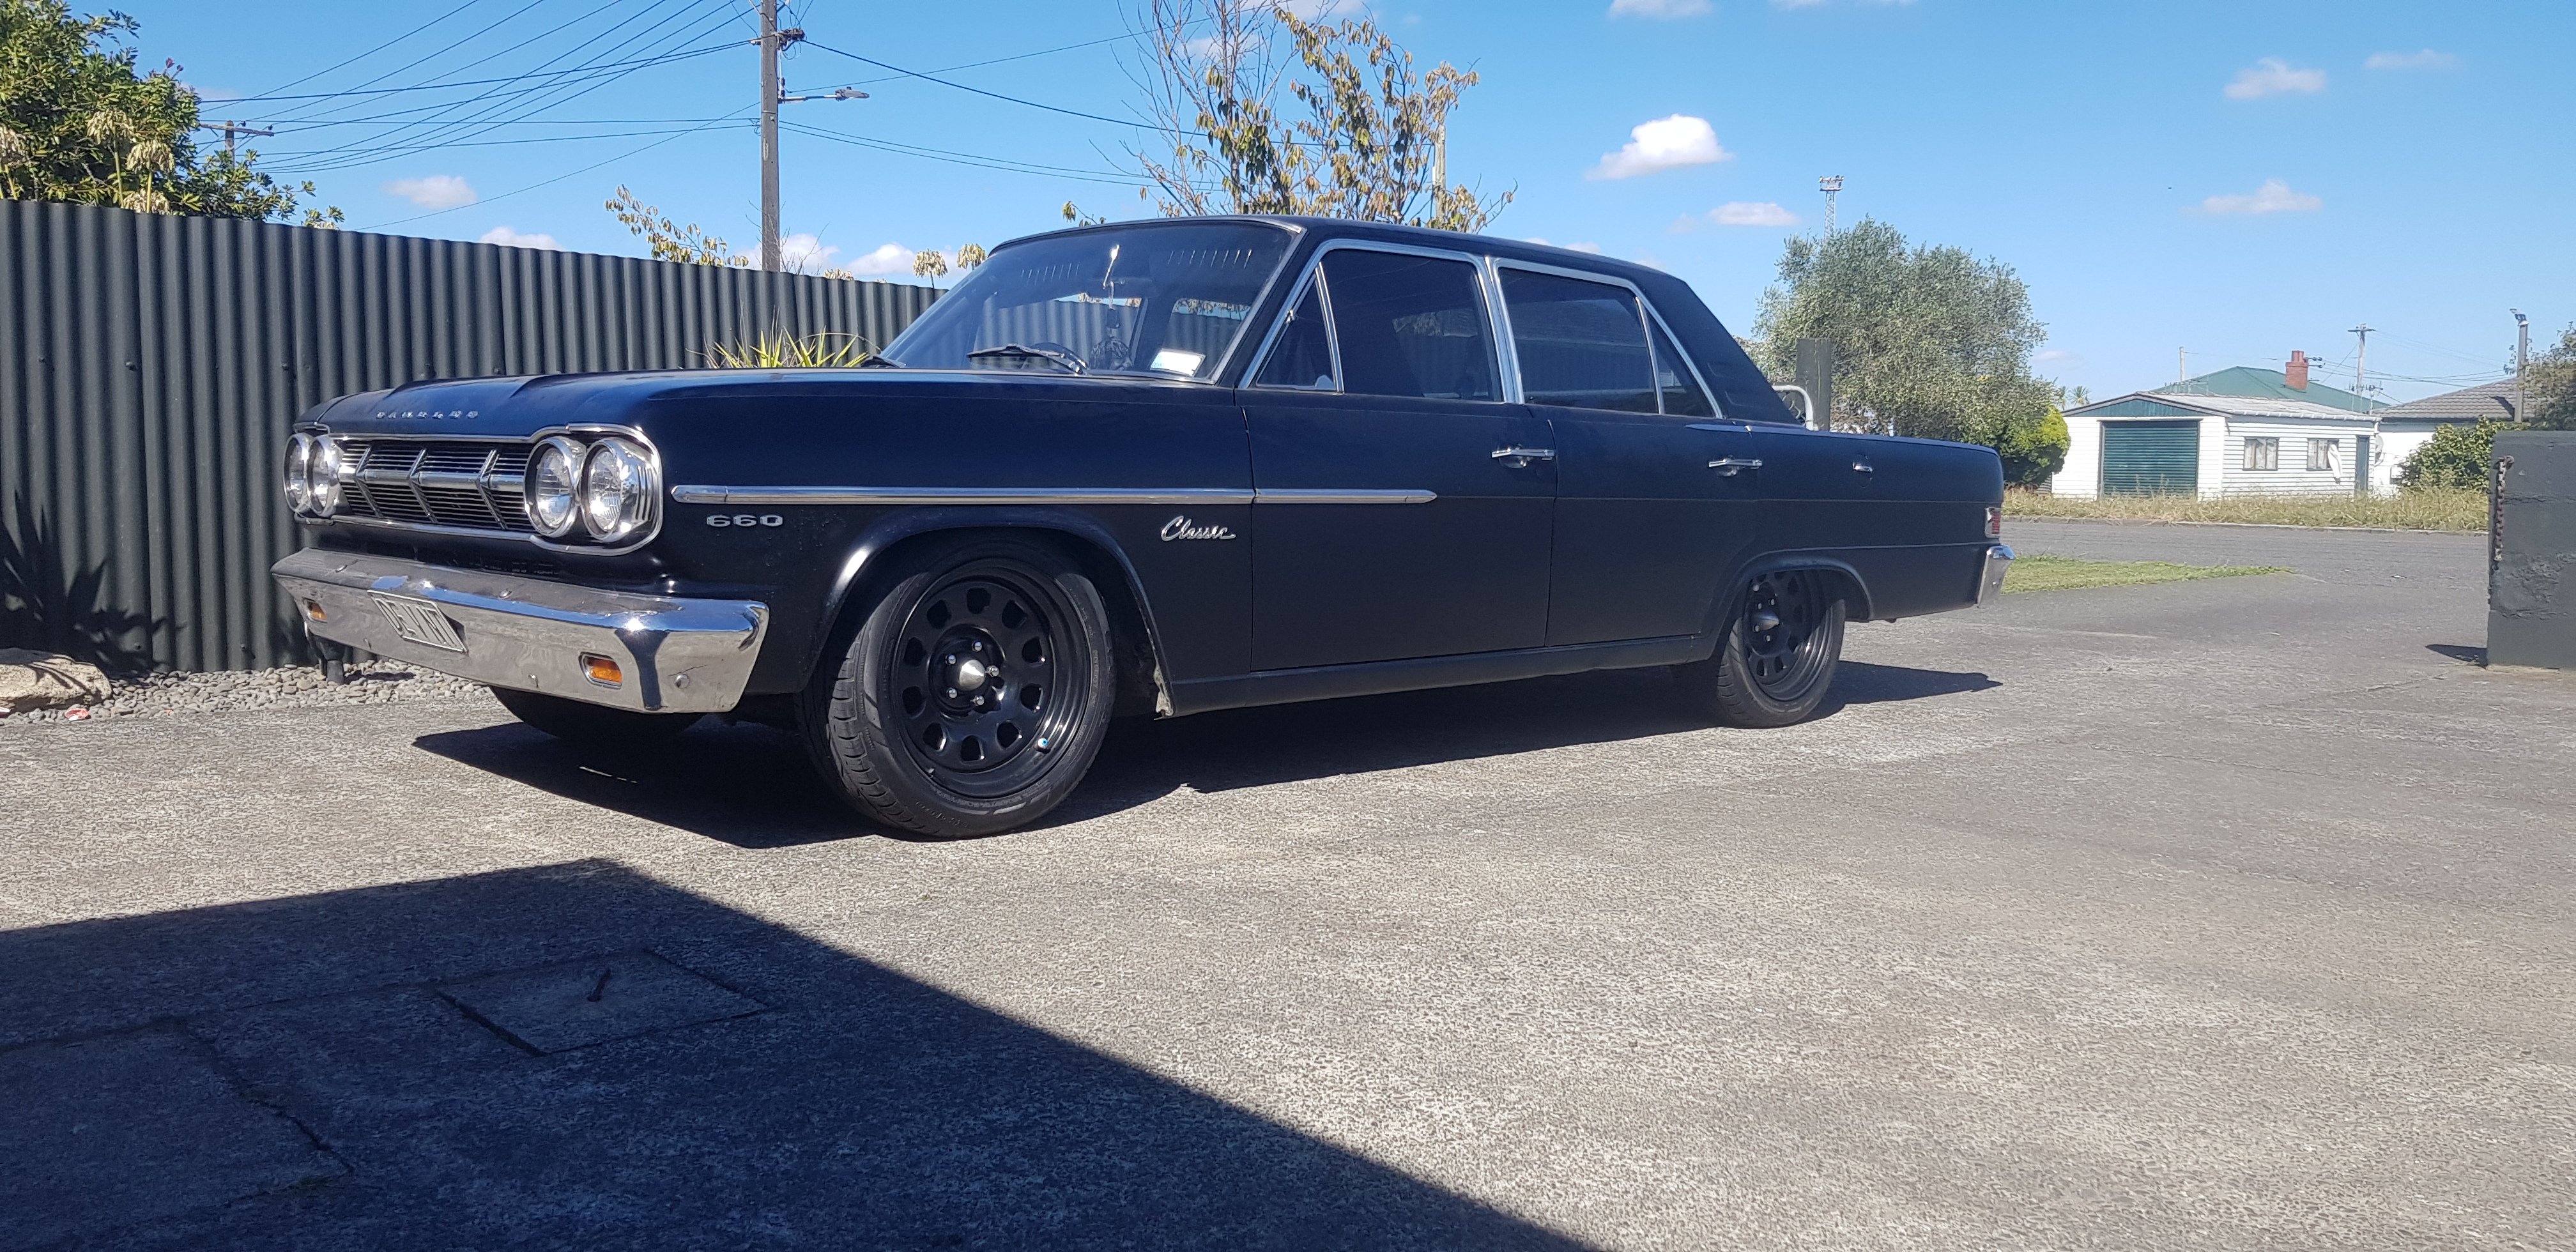
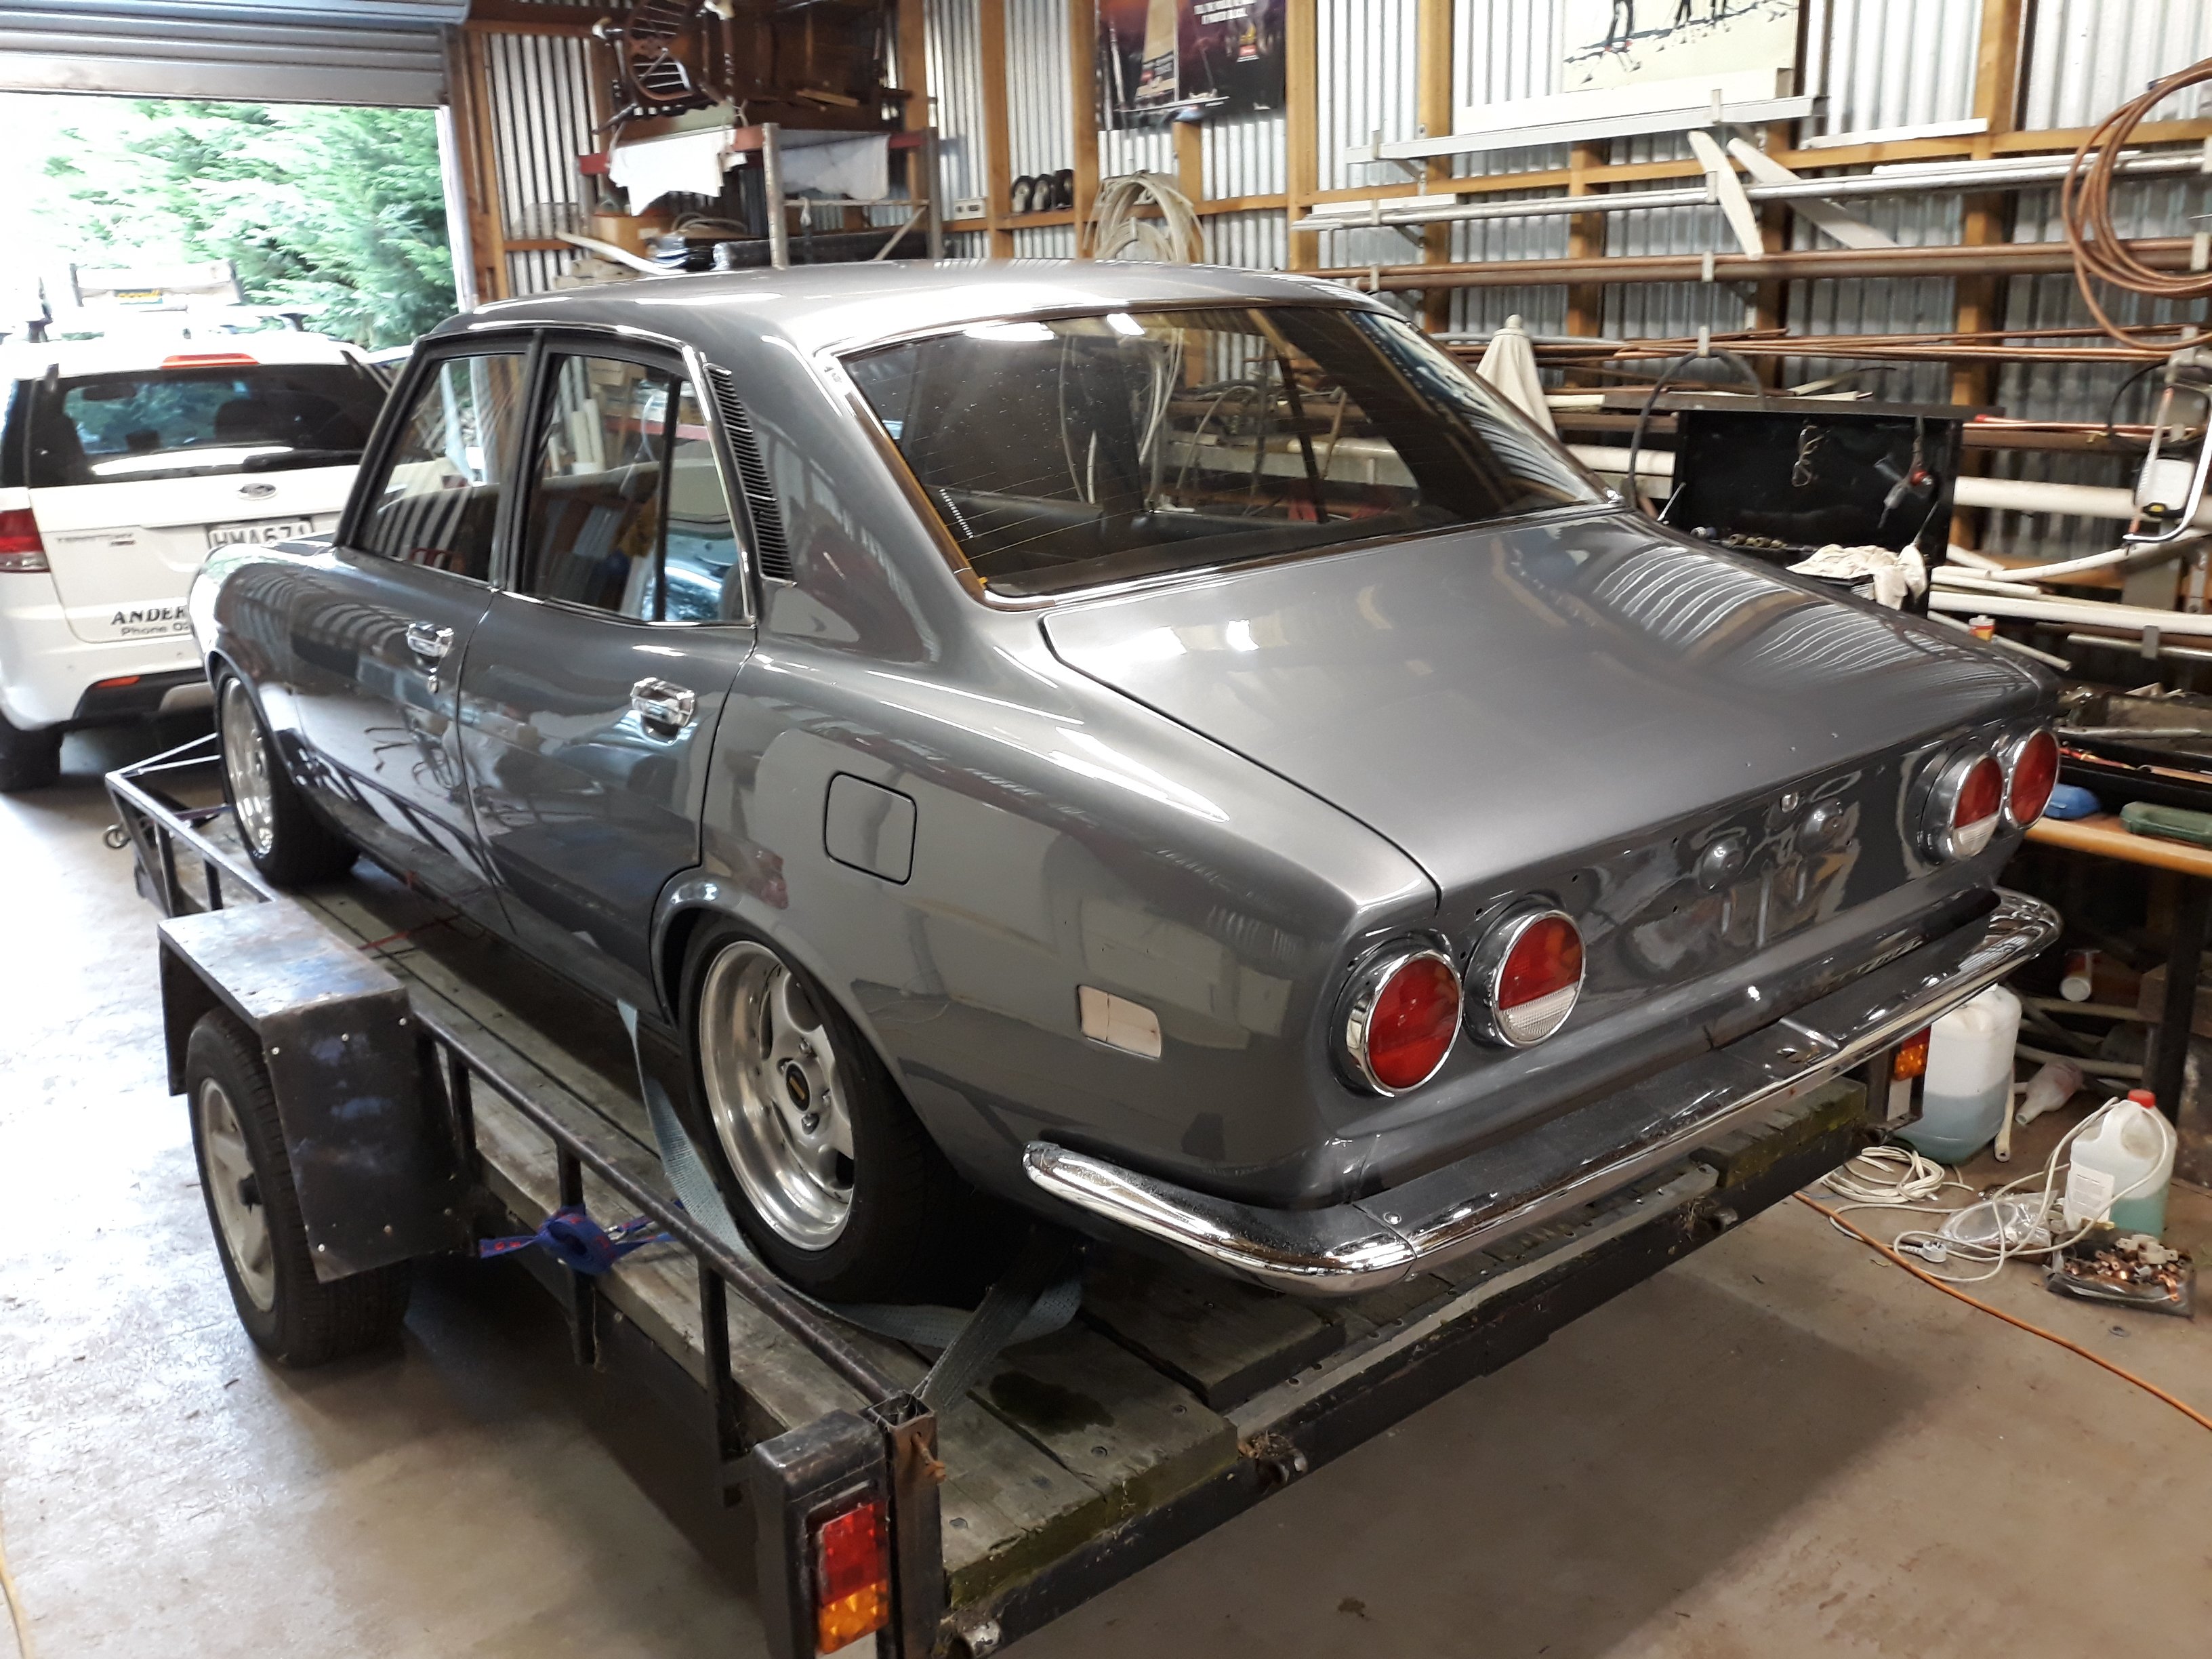
dragged it out of storage got a wof and some rego, and a well needed clean
5 points
-
Bay...Bee.....Saab do-do-di-do-di-do.... Not much of an update, but thanks to the dynamic duo (aka @Carsnz123 and @JustHarry) Agnetha is now back safely tucked up at home. She is now up on stands at the front end and, with Haynes in hand, I have started disassembling the front suspension. Or at least I was until I ran out of tools and talent (will be on the scrounge for a breaker bar this week...and possibly some spanners). Oh, and the bonnet and front grill are now elsewhere to facilitate access to the donkey. If any one is interested, I have for sale some of the bits I no longer have a need for: Theres a suspicious amount of road gravel in this car....
5 points
-
5 points
-
It can do. A wof check= $30-40 1hr of my time=$150 I often tell people it can save them money, especially if the vehicle is rough4 points
-
I still vote chop and hammer whatever to make them fit, love me some diff clearance.4 points
-
The shuttle was surging and running like shit. I suspected the fuel pump was on its way out so I whipped it out. All gunked up with dried fuel sadness. Luckily the tank doesn't seem to be rusty enough to need lots of work to clean it out. I thought I'd finally attack the new to me headers for the crx as they had some surface rust and peeling paint. Quick once over with the flap disc and a squirt of paint and they are presentable The crx rad support was pretty bent and buckled which pushed the rad into the manifold so that needed fixing. I had kept a nose cut off one of the shuttles I've wrecked so drilled out all the spot welds. A quick check to see how close the shuttle stuff is to the crx. Carefully cut the fucked mount out Some carefully trained seagulls later and its in. Bonus now the bottom of the t bracket actually lines up with the bolt hole. The gearbox should be ready this week so I'll chuck it in soon. Might give the rest of the exhaust a quick squirt of paint too as it's mild steel. I also chucked some non fucked headlights on too as the other ones were all yellow and the brackets were butchered on or broken4 points
-
If I can afford it I'll stash a few dozen Panhead beers in the cab, but apart from that it'll be loaded with tools. Unfortunately I don't have the amounts of money I used to have, so I can't leverage on the freight as much as I'd like to. I haven't been this broke since my early 20s, but I haven't been this happy since then either.3 points
-
Wof check sheet dated within 14 days of cert inspection = certifier doesn't have to check wof items when doing a cert.3 points
-
3 points
-
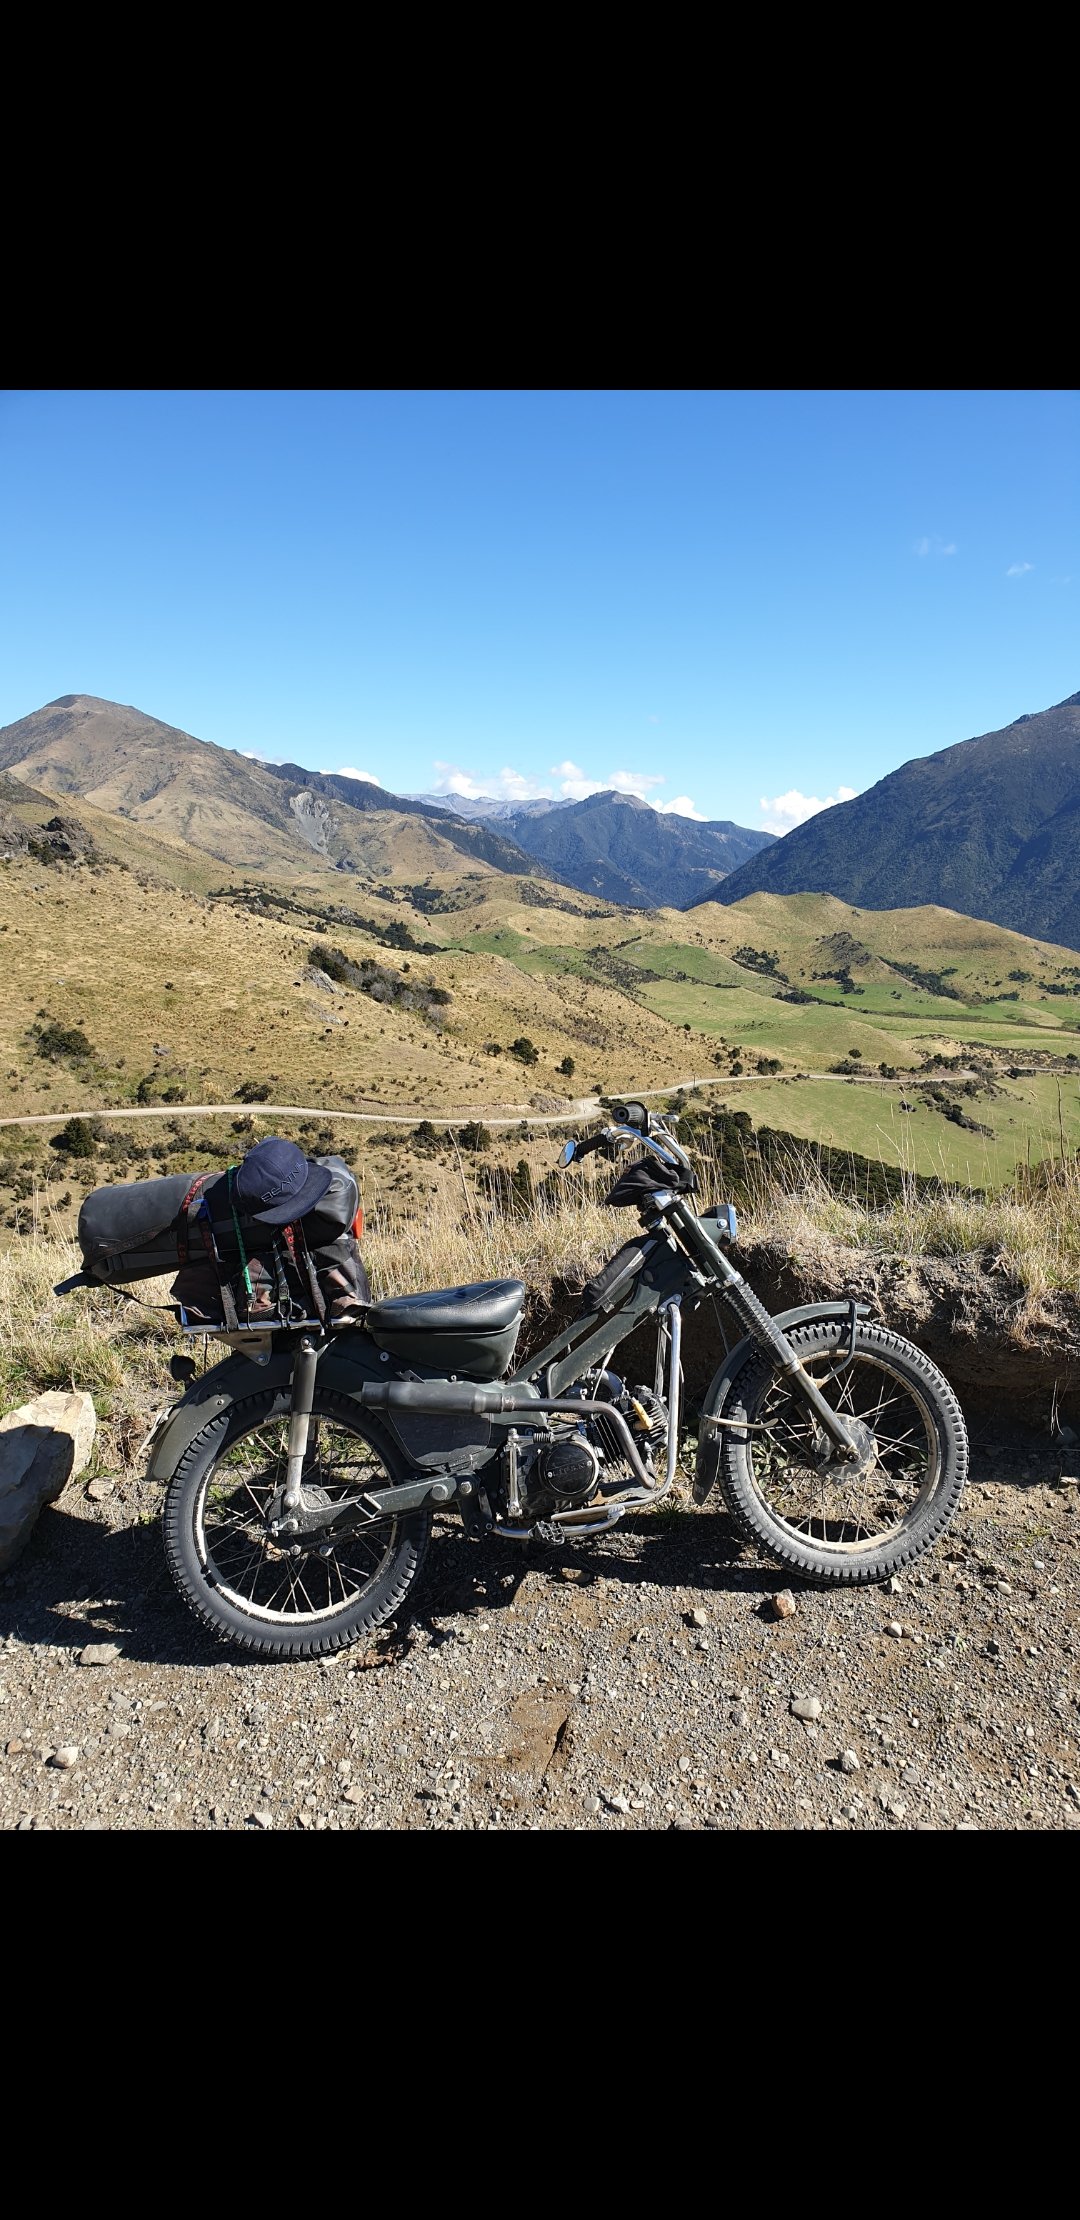
Snuck out yesterday morning all loaded up and rode some gravel roads up Waipara Valley then up to Lake Taylor in North Canterbury. Such lush gravel roads and the lake was a stunner. On the way in it felt like I was on the west coast. Bike ran like a dream as usual and my bud on the GB400 clocked me at 105km on the flat in front of him. My weight on the back was a bit too much with a 18pk of lobros but was lighter on way home. Once we got to Lake Taylor we rode back out to Hurunui and to a bike rally at Balmoral Reserve for a evening of bogan activities. Won best tattoo again and scored a bottle of Jim Beam which ill prob give away to a mate sometime. Great foggy ride home this morning and home by 1030. Not a bad 26 hours away and $30 gas for 250 odd km3 points
-
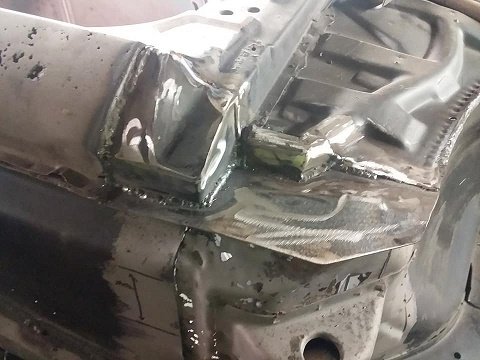
So things are getting a little out of hand3 points
-
The last few days I have had elcrrical issues. Lost wipers/washers , lights and horn. Fml Matt my auto sparky came over from Redline and fixed all my issues tonight. I couldn’t be happier. He even fitted the brake light switch to the pedal box so we are all go. Compliance and WOF Thursday - along with hopefully the repair cert sign off. As I understand it, the WOF automatically fails due to the need of a Cert. Friday is cert check so I guess I have the to do list after that and have 21 days or something like that to rectify. Busy time and hope everything still works as it should for the checks - I’ve literally driven it 50metres up the road so Thursday will be it’s longest voyage in the new engine. Once this is all sorted, I will dyno it (perhaps earlier if required). Cheers2 points
-
got a message from @Mrs 64valiant saying we need to get a buddy seat for our bus. (center seat for a walk through) found a diagram on the net add that to the list of things to make2 points
-
I thought it was mandatory, all vans be converted to rotary, in Hamilton.2 points
-
Hey Chris Go thru the gate at Taylor camp, thru the next gate, about 150m further turn right onto the spit and camp there. Such lush. Don't take a rod unless you got a licence, or are prepared to lose $1000. Ask me how I know...2 points
-
On Friday I managed to lift the front as much as I could (which meant ripping off the upper bump-stops and removing the front shocks (too short) and stressing the shit out of the torsion bars), then I took the wheels and tyres from another ute I have parked up in the bush (a mission in itself). But yeah, but NAH! The wheels fit but the tyres are just too big. I could cut off the front footsteps and flip the rear shackles to get a bit more clearance, but time is short so it's going to have to be smaller diameter tyres. I just love balloon tyres so I am sad, but needs must. Smaller tyres it shall be. Hopefully they'll be here by Tuesday 2nd April I'm on the hunt for some longer shocks. There's some good info on TradeMe from an Australian supplier so that's probably who I'll buy from. They can send the shocks to me on Chatham whilst the Atlas is on the ship. Probably.
2 points
-
2 points
-
2 points
-
Will it read this? /spam //totp
2 points
-
What's the car and are they body adjustable? The correct way to get more droop is to add keeper/helper springs to your setup. It's easy to do, and if your coilovers are body adjustable there should be plenty of adjustment (body adjustment changes the total length of the shock). Here's the process I would follow: Remove springs and run suspension through its whole sweep with the wheel and tyre on. Take note of how much clearance you have at full compression (if any). You should aim to have the tyre as close to the wheel arch as possible at full compression for optimal handling. Make sure there's enough clearance for the bump stop to compress a little for big bumps (10mm minimum gap between tyre and inner guard). Use the shock body adjustment to set this height. Jack the car up and see how far it droops. Measure the distance between the centre of the hub and the wheel arch at both ends of the sweep to give yourself an idea of total available droop travel. Install your main spring (no keeper) and drop the car on the ground. Set your desired ride height for cert using the spring perches. The spring will probably be un-captive after this. Once ride height is set, jack up the car again and see how far the spring is from being captive. This will give you an idea of how long your keepers need to be. Install your keepers with spring locaters between the keeper and main spring You will need to drop the spring perch to account for the compressed length of the keeper plus the thickness of the locater to get the same ride height ??? Profit If you don't have enough perch adjustment, you might need a shorter main spring. Hope that helps.2 points
-
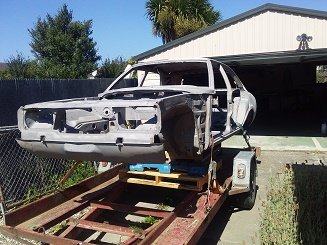
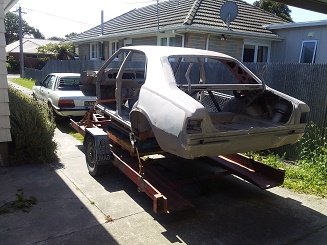
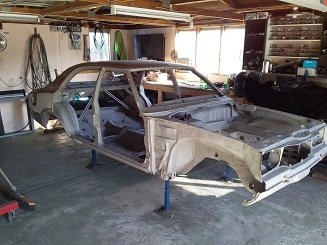
Soooooo. About 3 weeks ago. This happened.
2 points
-
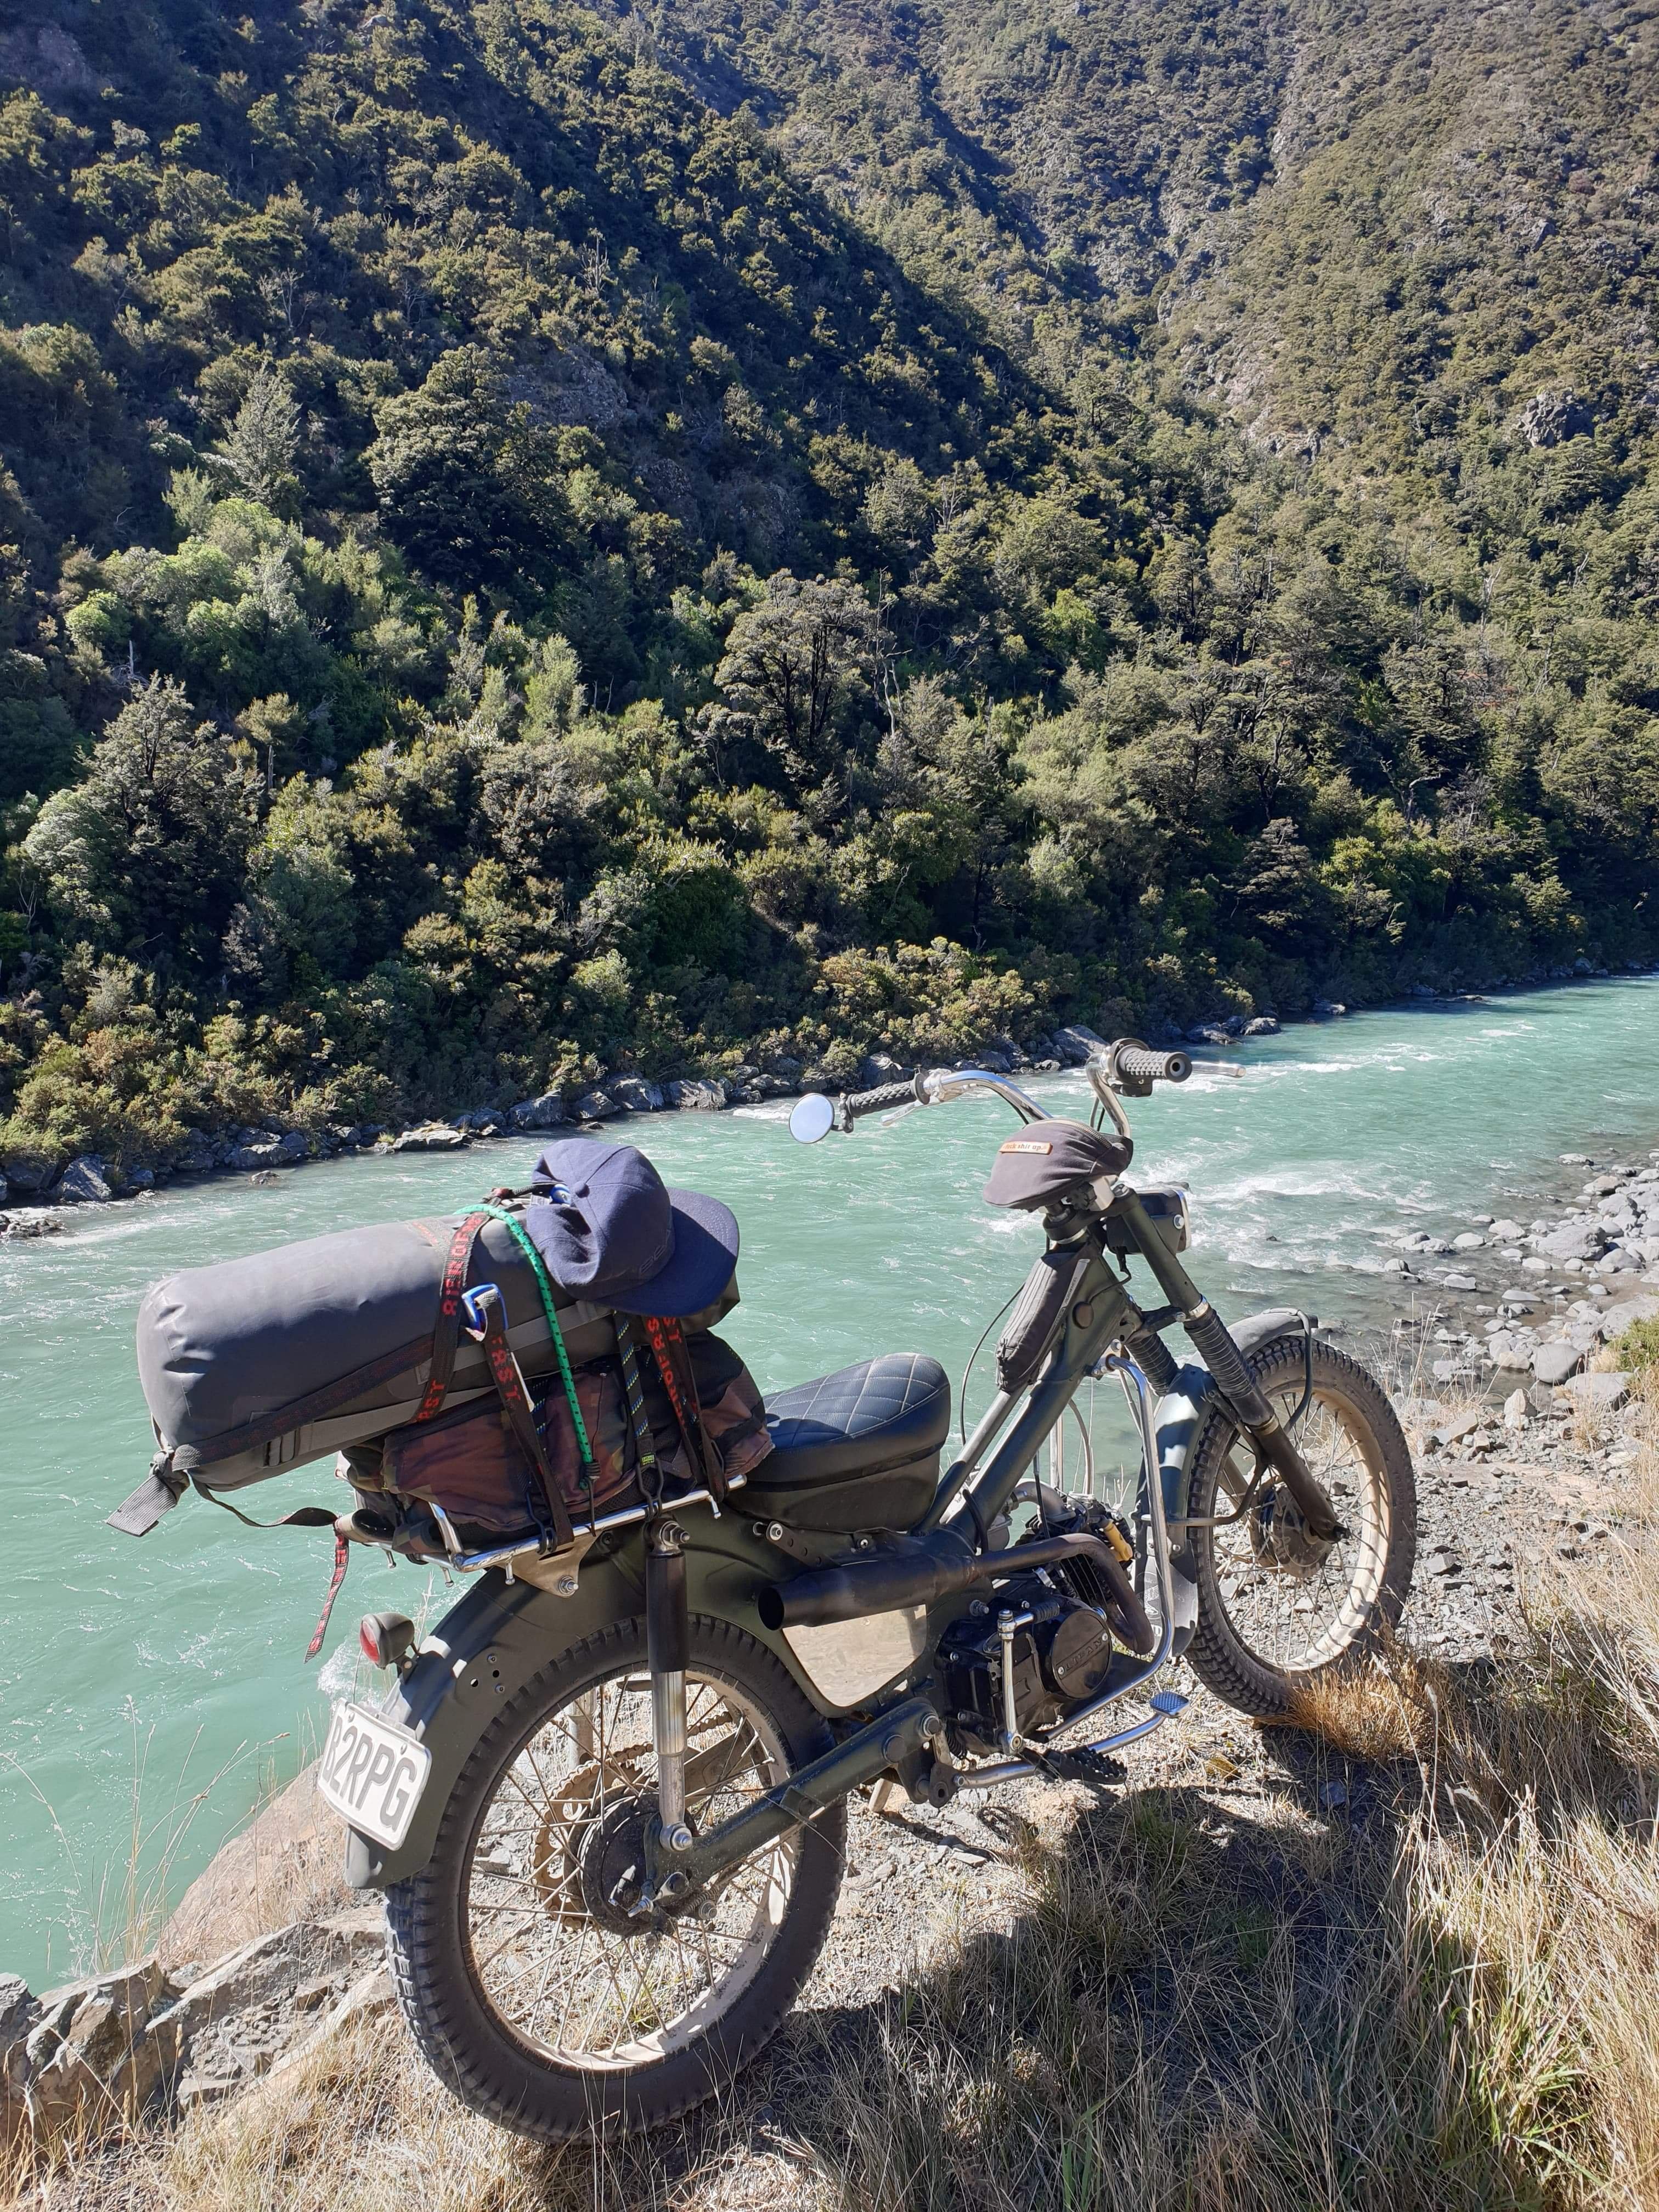
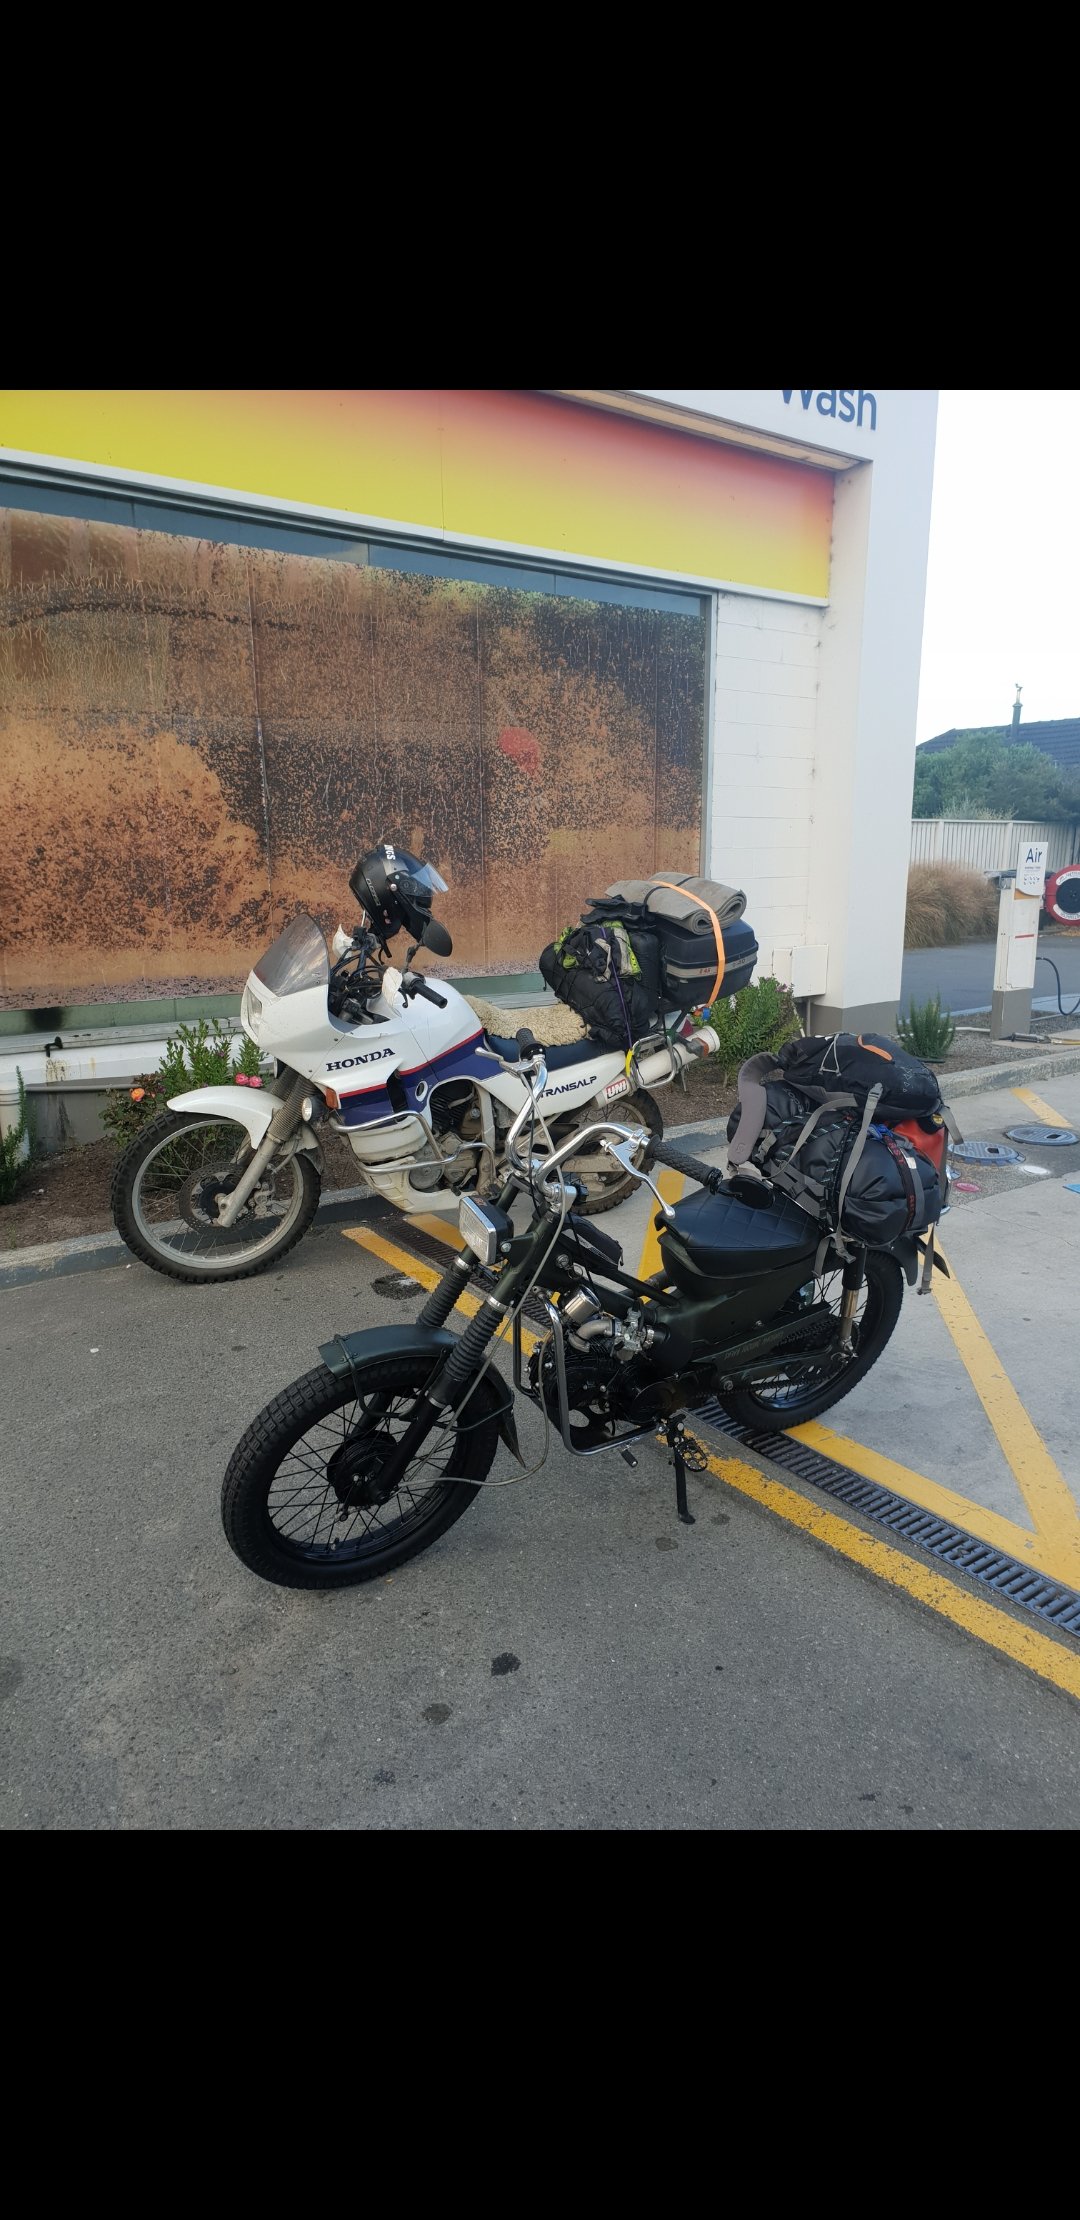
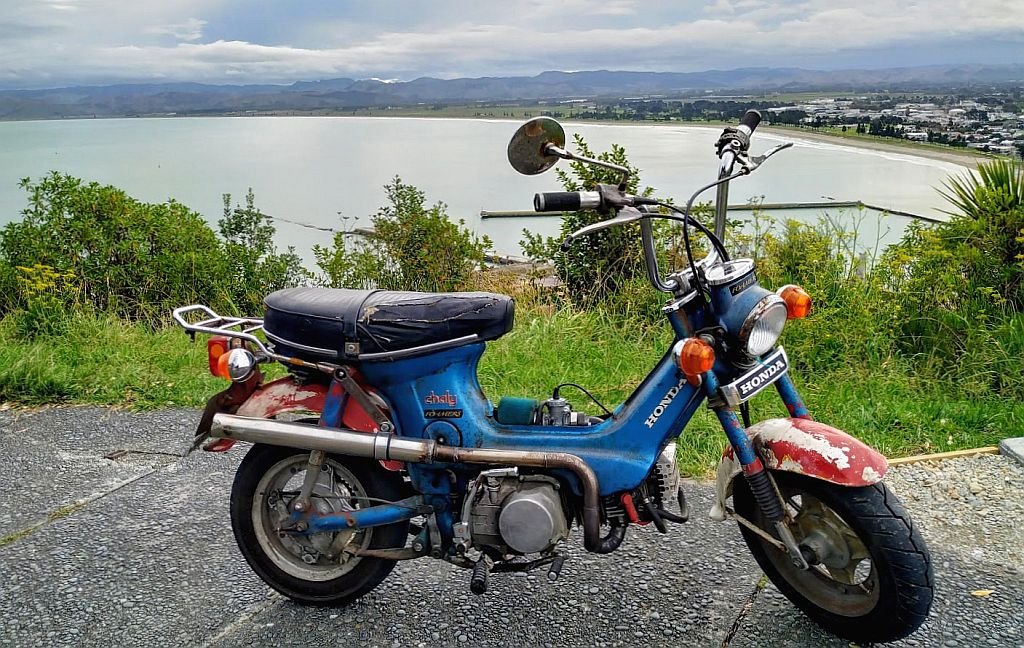
So over the last few months I probably put another 1000km of daily duties and exploring . Then I had a big upcoming ride for Heyholes Stag party which was gonna be the Molesworth Rainbow loop but due to fire risk that was closed and Blizzo came up with a new route. Before the ride I changed the oil and spark plug and chucked on a new rear tyre and gave the bike a good check over. Packed up my spares and tools into my new 20L drybag and a 5L fuel can and headed off last friday morning with my mate Brent on his old Transalp. We rode to Culverden then headed up the Inland Kaikoura rd and had a much deserved beer and feed before he headed back to Hanmer Springs. I carried on up the coast and stayed at my folks place in Renwick. Brent showed me a few gravel back roads on the Inland Kaikoura rd and I clocked up 380Km that day. The next day I left my folks at 8am and headed up the Wairau Valley knowing the Wellington lads on bigger bikes would catch me leaving from picton a little earlier and we met half way up the Valley and cruised up into some twistys. My bike died suddenly but was a quick fix as the coil wire plug had just popped off. Carry on to St Arnaud and gas up before heading off the sealed road onto the Porika track which was steep and rocky but a fun challenge for my bike being so small . We then headed down into Lake Rotoroa after a couple beer stops and then headed onto Braeburn track and out of another valley into Murchison for late lunch and beers. From there we headed up the valley and over the Maruia Saddle then into Springs Junction then straight lined it to Hanmer Springs for a big night. Up first thing in the morning for a soaking wet and cold ride back home to chch while the others headed north up the Inland Kaikoura rd. My bike performed so well and kept up with the 200s and 250s well enought and held a good 90kmhr on its own . Prob smashed close to 950km over 3 days and only had sore ears due to straight pipe. My next mission might be Danseys Pass and pop into Cardrona Valley to see a mate. Best thing was all the old boys fizzing over the posties at the gas stations and being blown away how far away from home I was. Great fun on small bikes always !
2 points
-
So I've made progress of sorts on both the crx and the the shuttle. My friend jason came around and helped remade the crx exhaust for me. Its tucked up nicely and the muffler is actually level and nothing rattles which is a win. I pulled the gearbag out and that is currently at the gearbox shop getting a new synchro and the mfactory diff fitted. The shuttle went for a wof and failed on a leaking master (that explains where the fluid went) and a rear seatbelt. I found the seatbelt while looking for other stuff in my hoard which was great. I had taken the door card off when I parked it ages ago for some reason and when shutting the door I managed to smash the speaker. Que replacements for both the shuittle and crx. I also got a new head unit and put the shuttle one into the crx. I started putting sound deadening mat on the doors but ran out when I got to the drivers door so I'll have to get some more. I've also ordered new engine side plugs so I can make a new engine loom for the shuttle as i'm not too happy with the current one2 points
-
Hacksaw blade with the sides ground down was what I have been told works. Get in there and scrape it out. Then flatten with a bit of hard wood and hammer/ press. No heat. Any hammer marks will result in a fail at inspection time. Used to work at a truck place, this is what I was recommended by cof inspectors .1 point
-
1 point
-
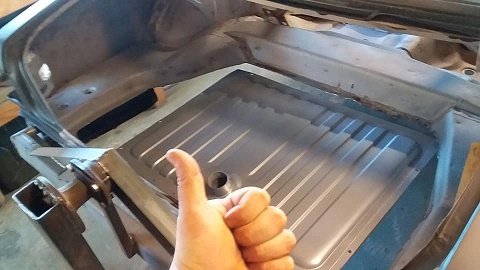
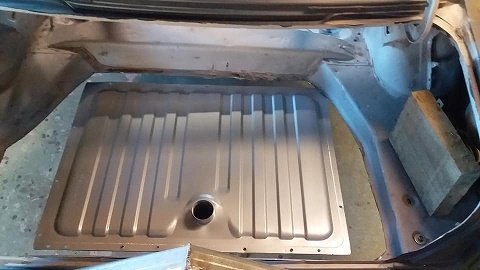
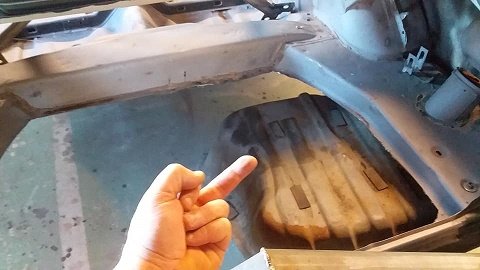
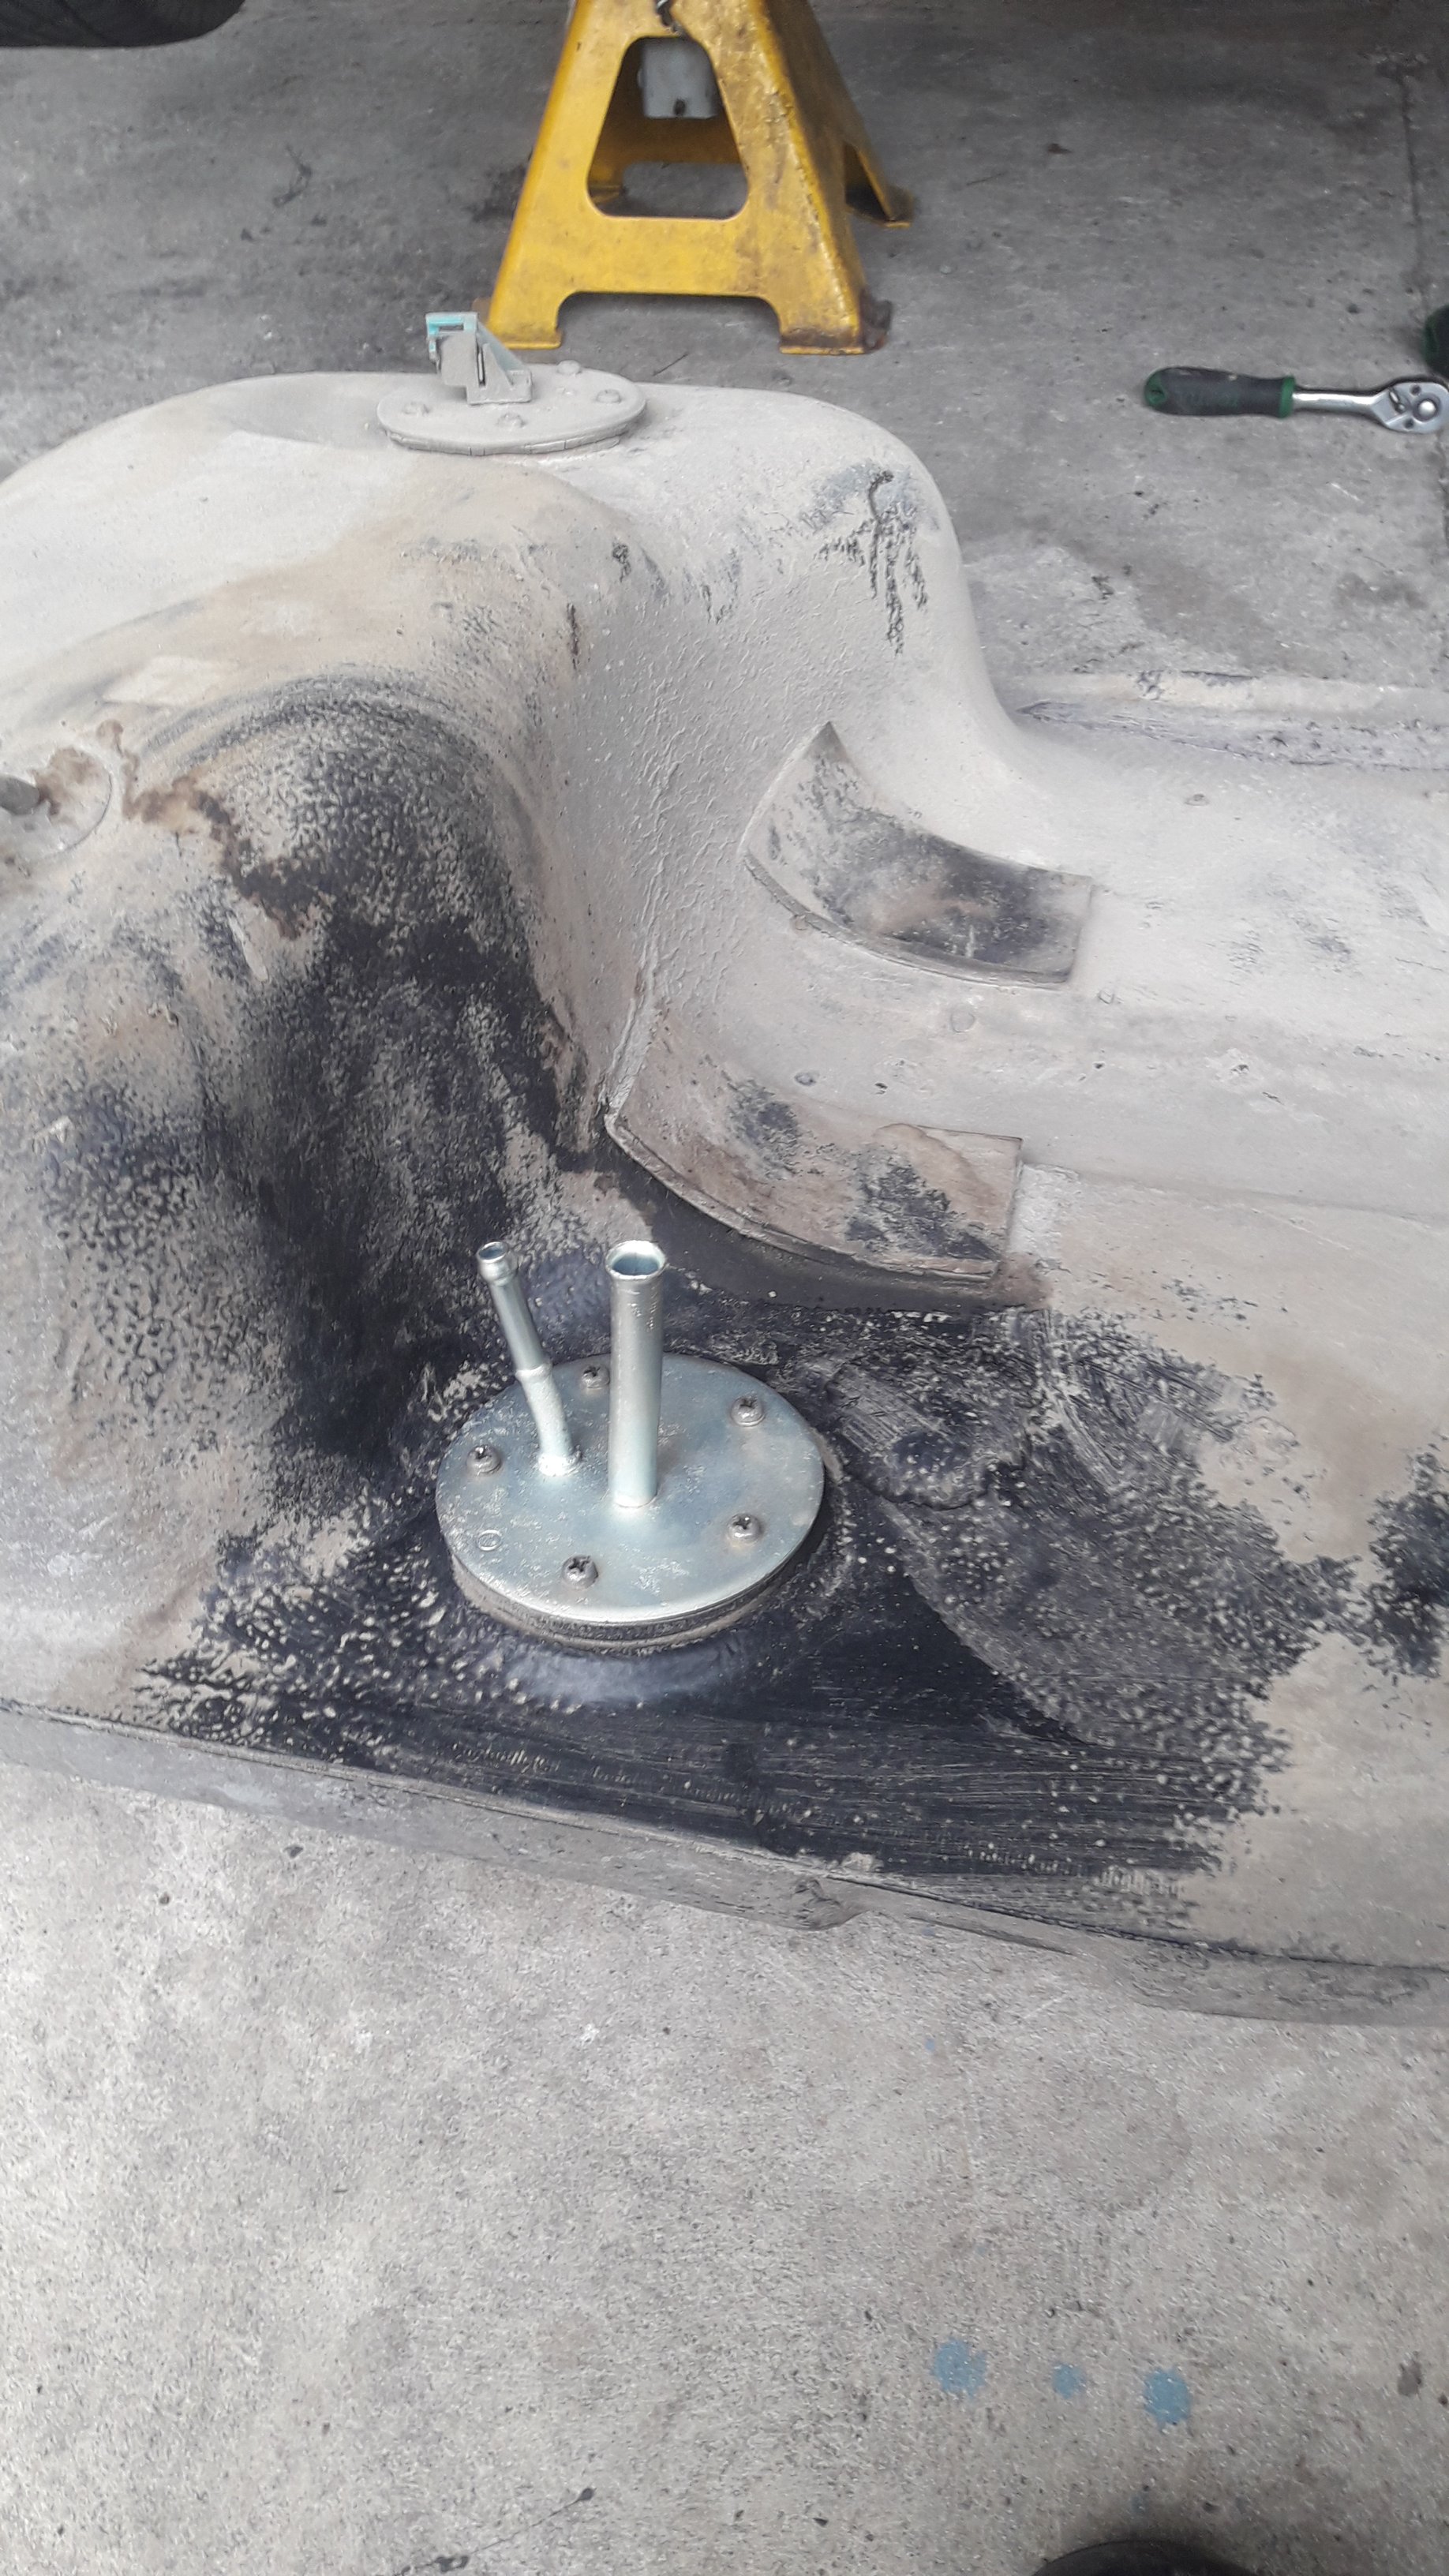
old fuel tank. new hotness tank
1 point
-
Heat it & beat it. If it stands up to that then sandblast & treat it. May have a few holes to patch. But then i've patch up land rovers worse than that & they're horrible rust magnets.1 point
-
The judge lady at court told me so1 point
-
Fuck you’re a wild man. In awe of the distances you ride on that thing. So good1 point
-
Agree, they look choice - make em fit!1 point
-
Remade the muffler, it isn't quiet but it's much less offensive than it was. The extra restriction cost enough power that I had to rejet to get it back lol. HUGE thanks to @GuyWithAviators who kindly brought a few goodies back from Thailand for Chandler! Not that the needle will ever see speeds beyond 50kmp/h... So stoked with that front badge!
1 point
-
1 point
-
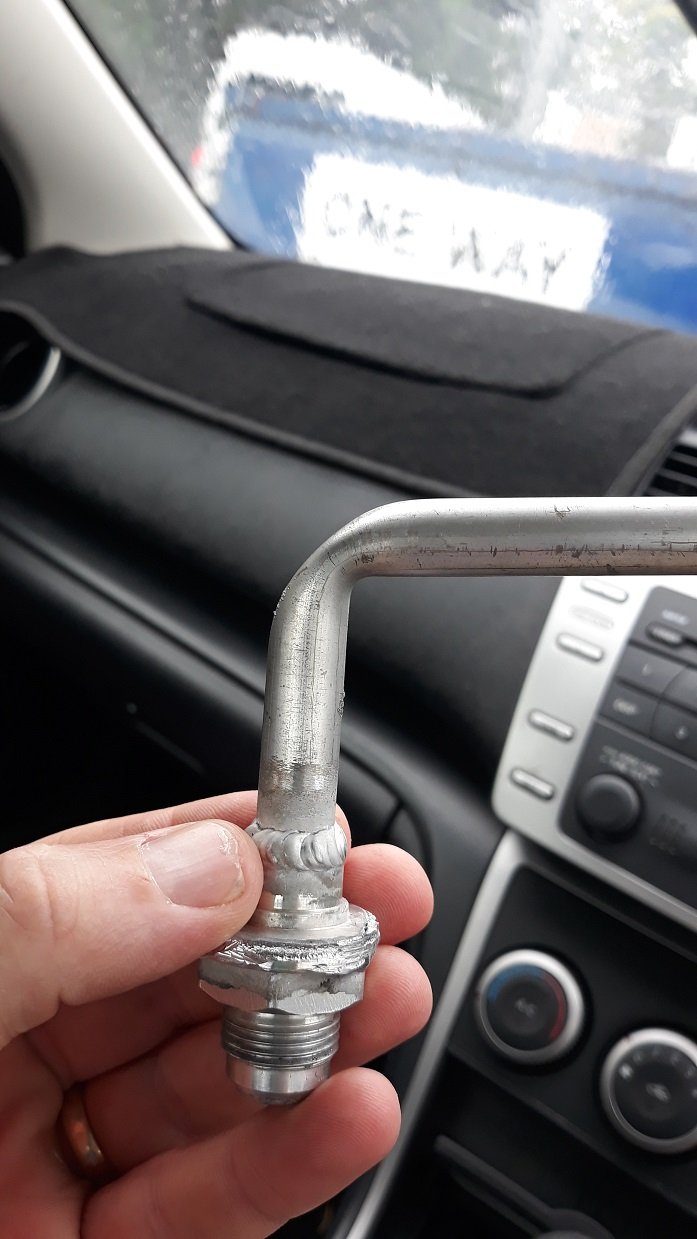
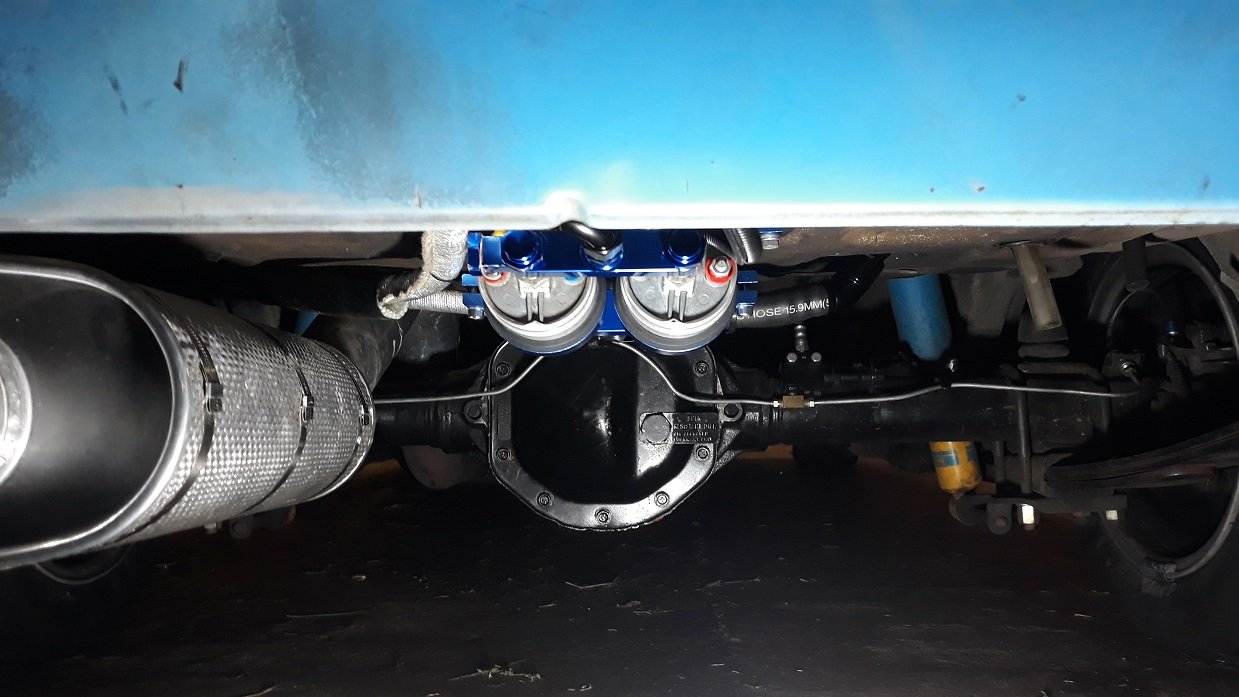
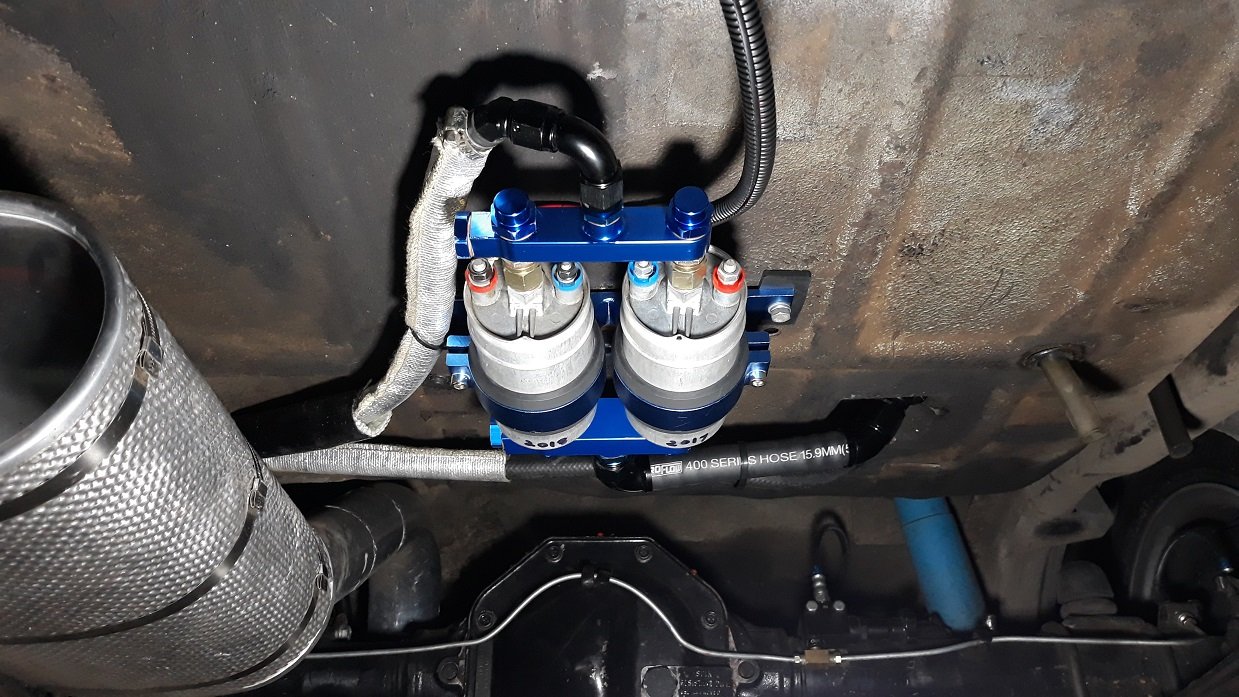
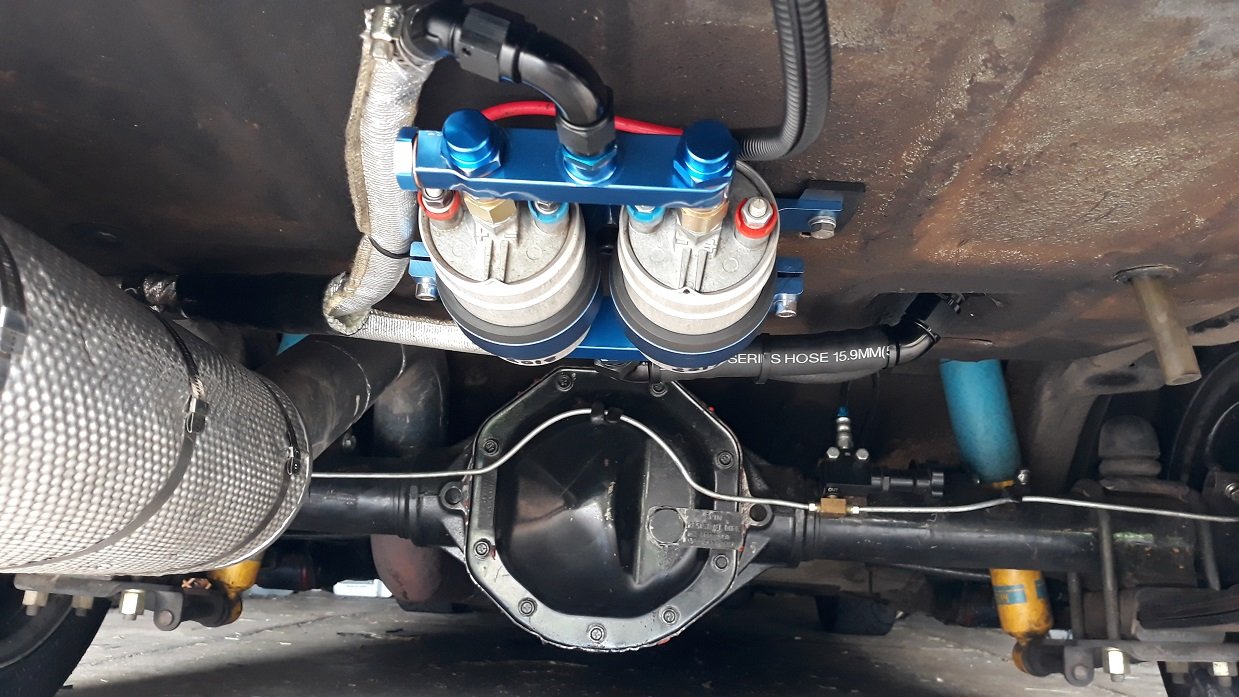
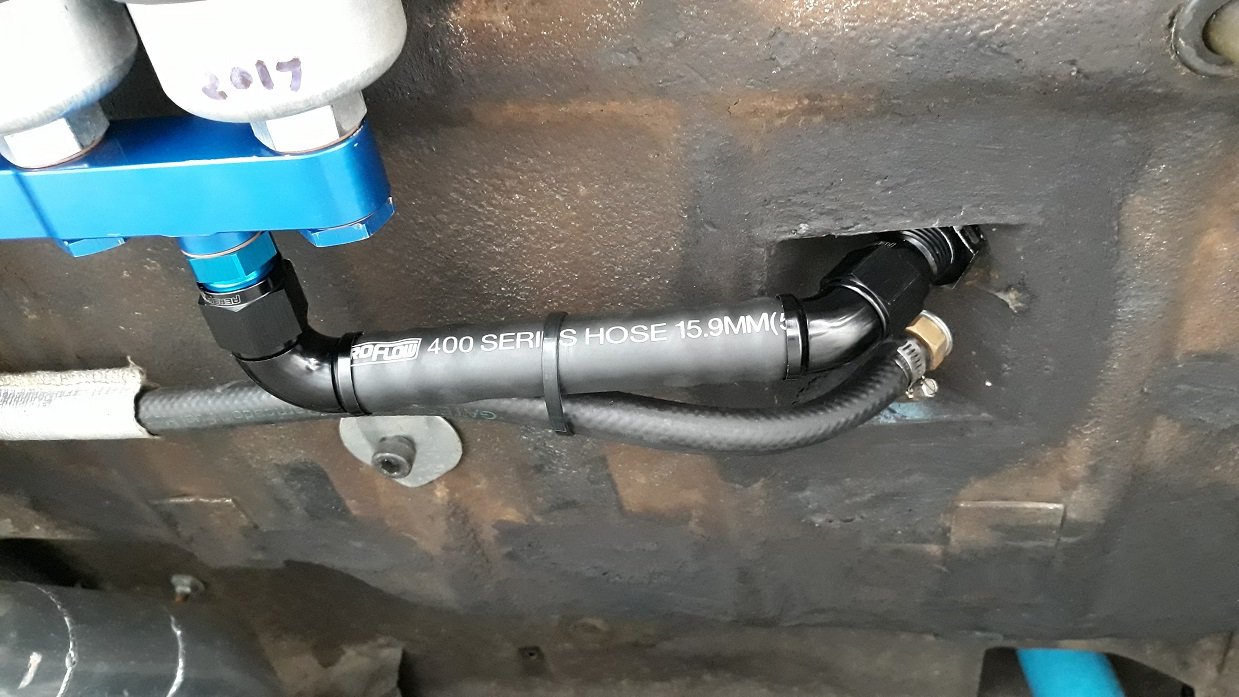
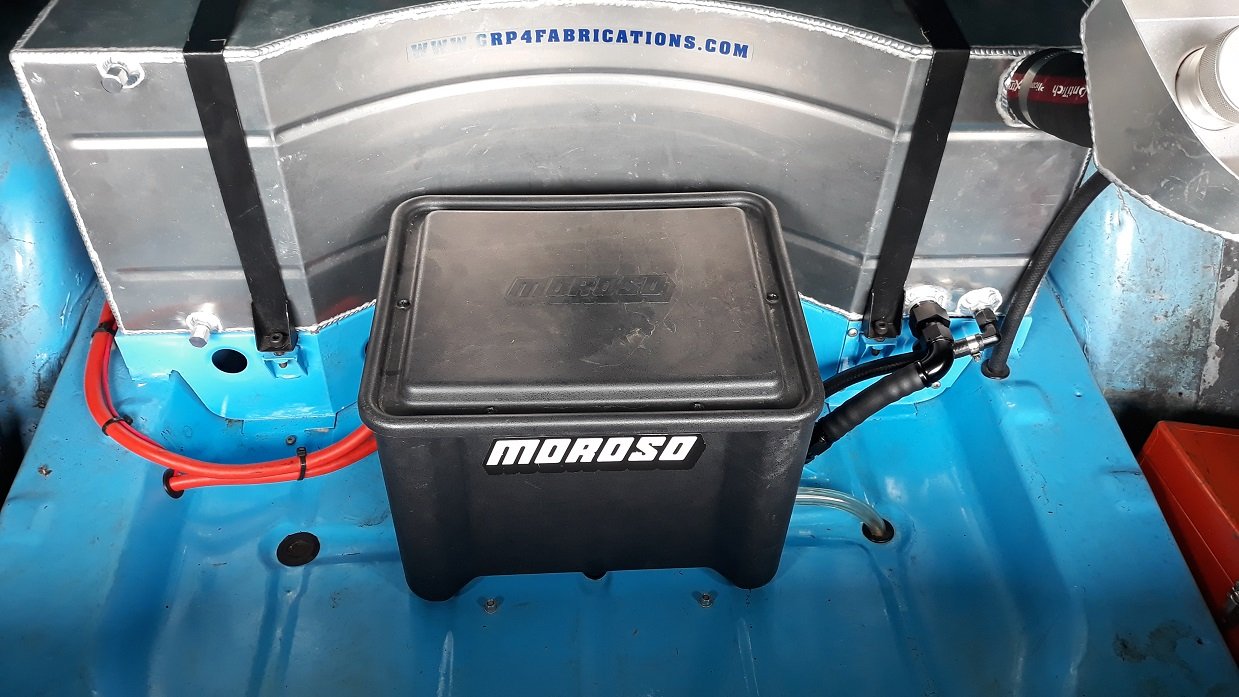
The car is also running the full return fuel pickup now too Zinc plating was only $5
1 point
-
MUCH more success today! shortened up the brake pushrod and made some changes to how its retained. to further shorten up its length inside the master cylinder. bled all four wheels and it just seemed to go right today. pedal felt great. just how id hoped it would with the particular valving id choosen. the car doesn't have a booster due to space issues. but i didn't want a rock hard pedal like a race car. the valving i chose gave more mechanical advantage over the slave cylinders at the "cost" of longer and a bit spongier pedal throw. which is also exactly what i wanted. the car brakes just as good if not better than the original boosted brakes with incredible control over the brake pressure. you can lock the rear brakes up with moderate pressure, which isnt actually a good thing, however the fuel tank is dead empty and i limped back to the garage ending up on 19psi of fuel pressure, so itll probably stop doing that with a bit of weight, otherwise a simple 2 port bias valve will sort it right out! it feels like the fronts would lock up if you really stood on it harder than you probably ever would which is about right. very very happy as this has been one extremely long headache and im over the moon to have it finally working how i wanted it.1 point
-
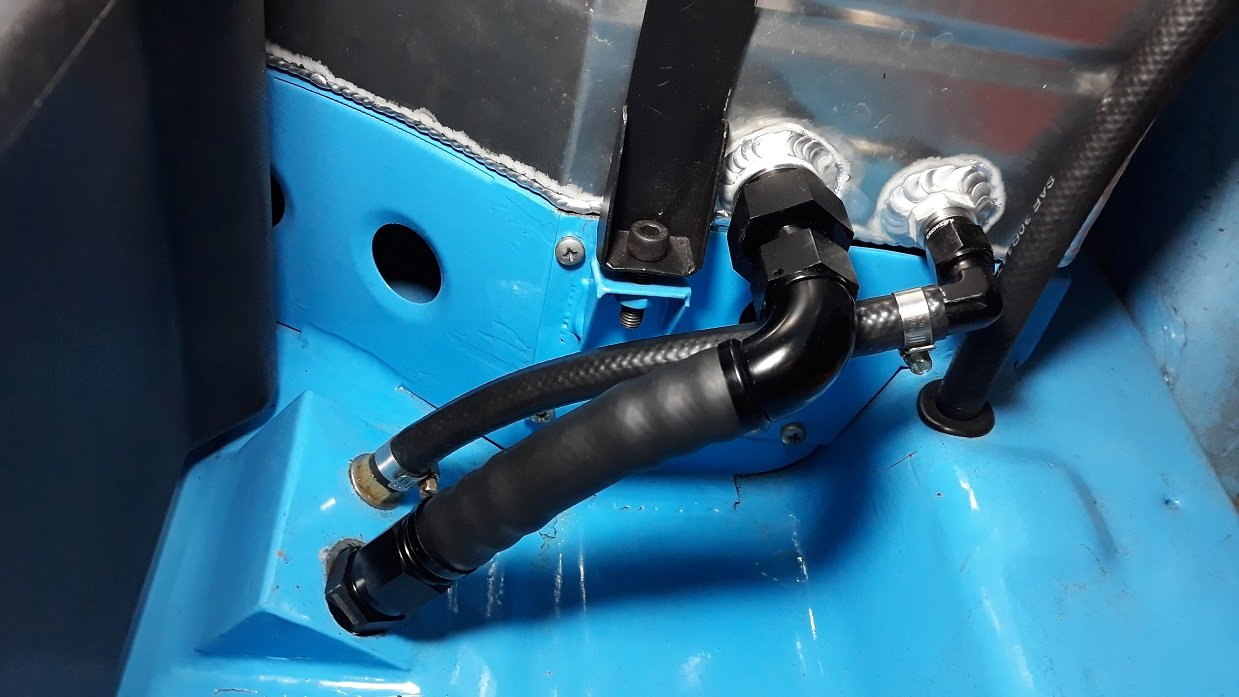
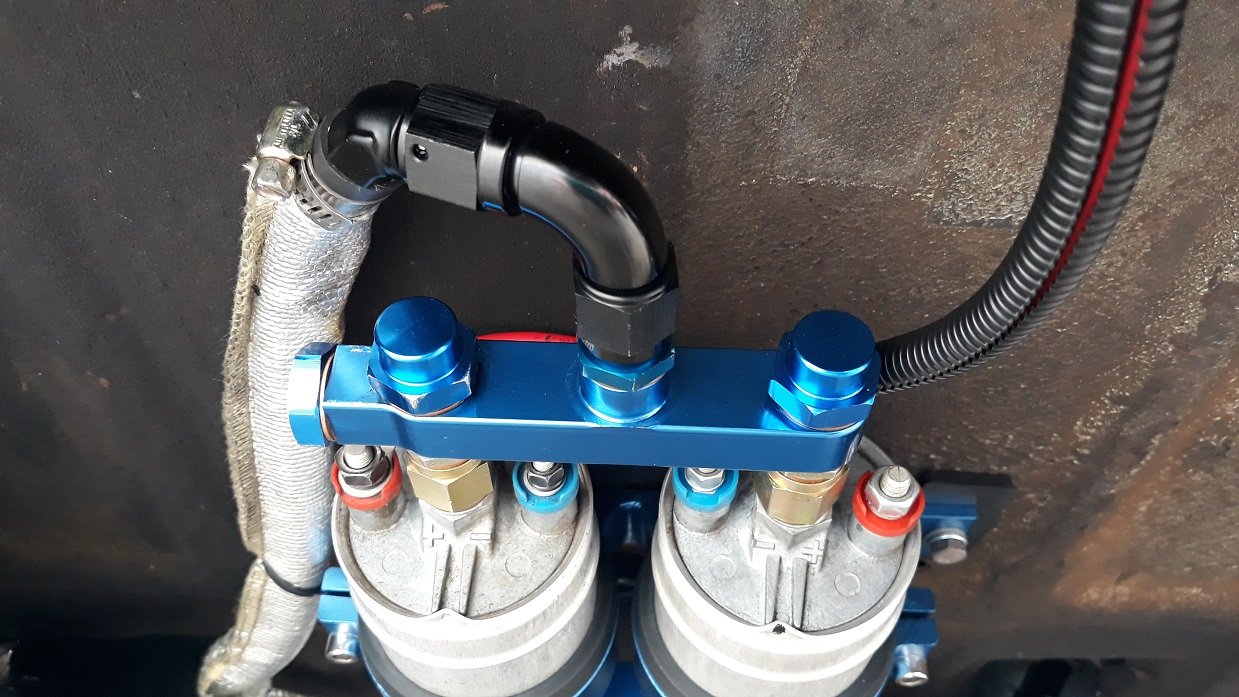
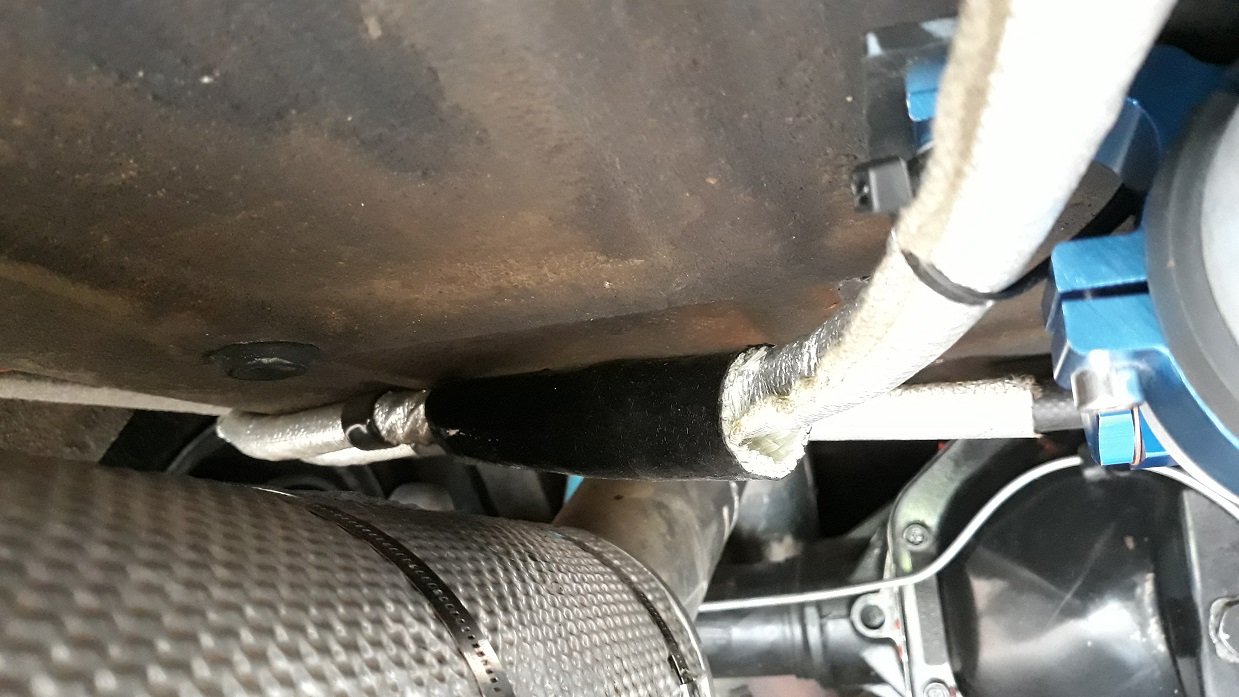
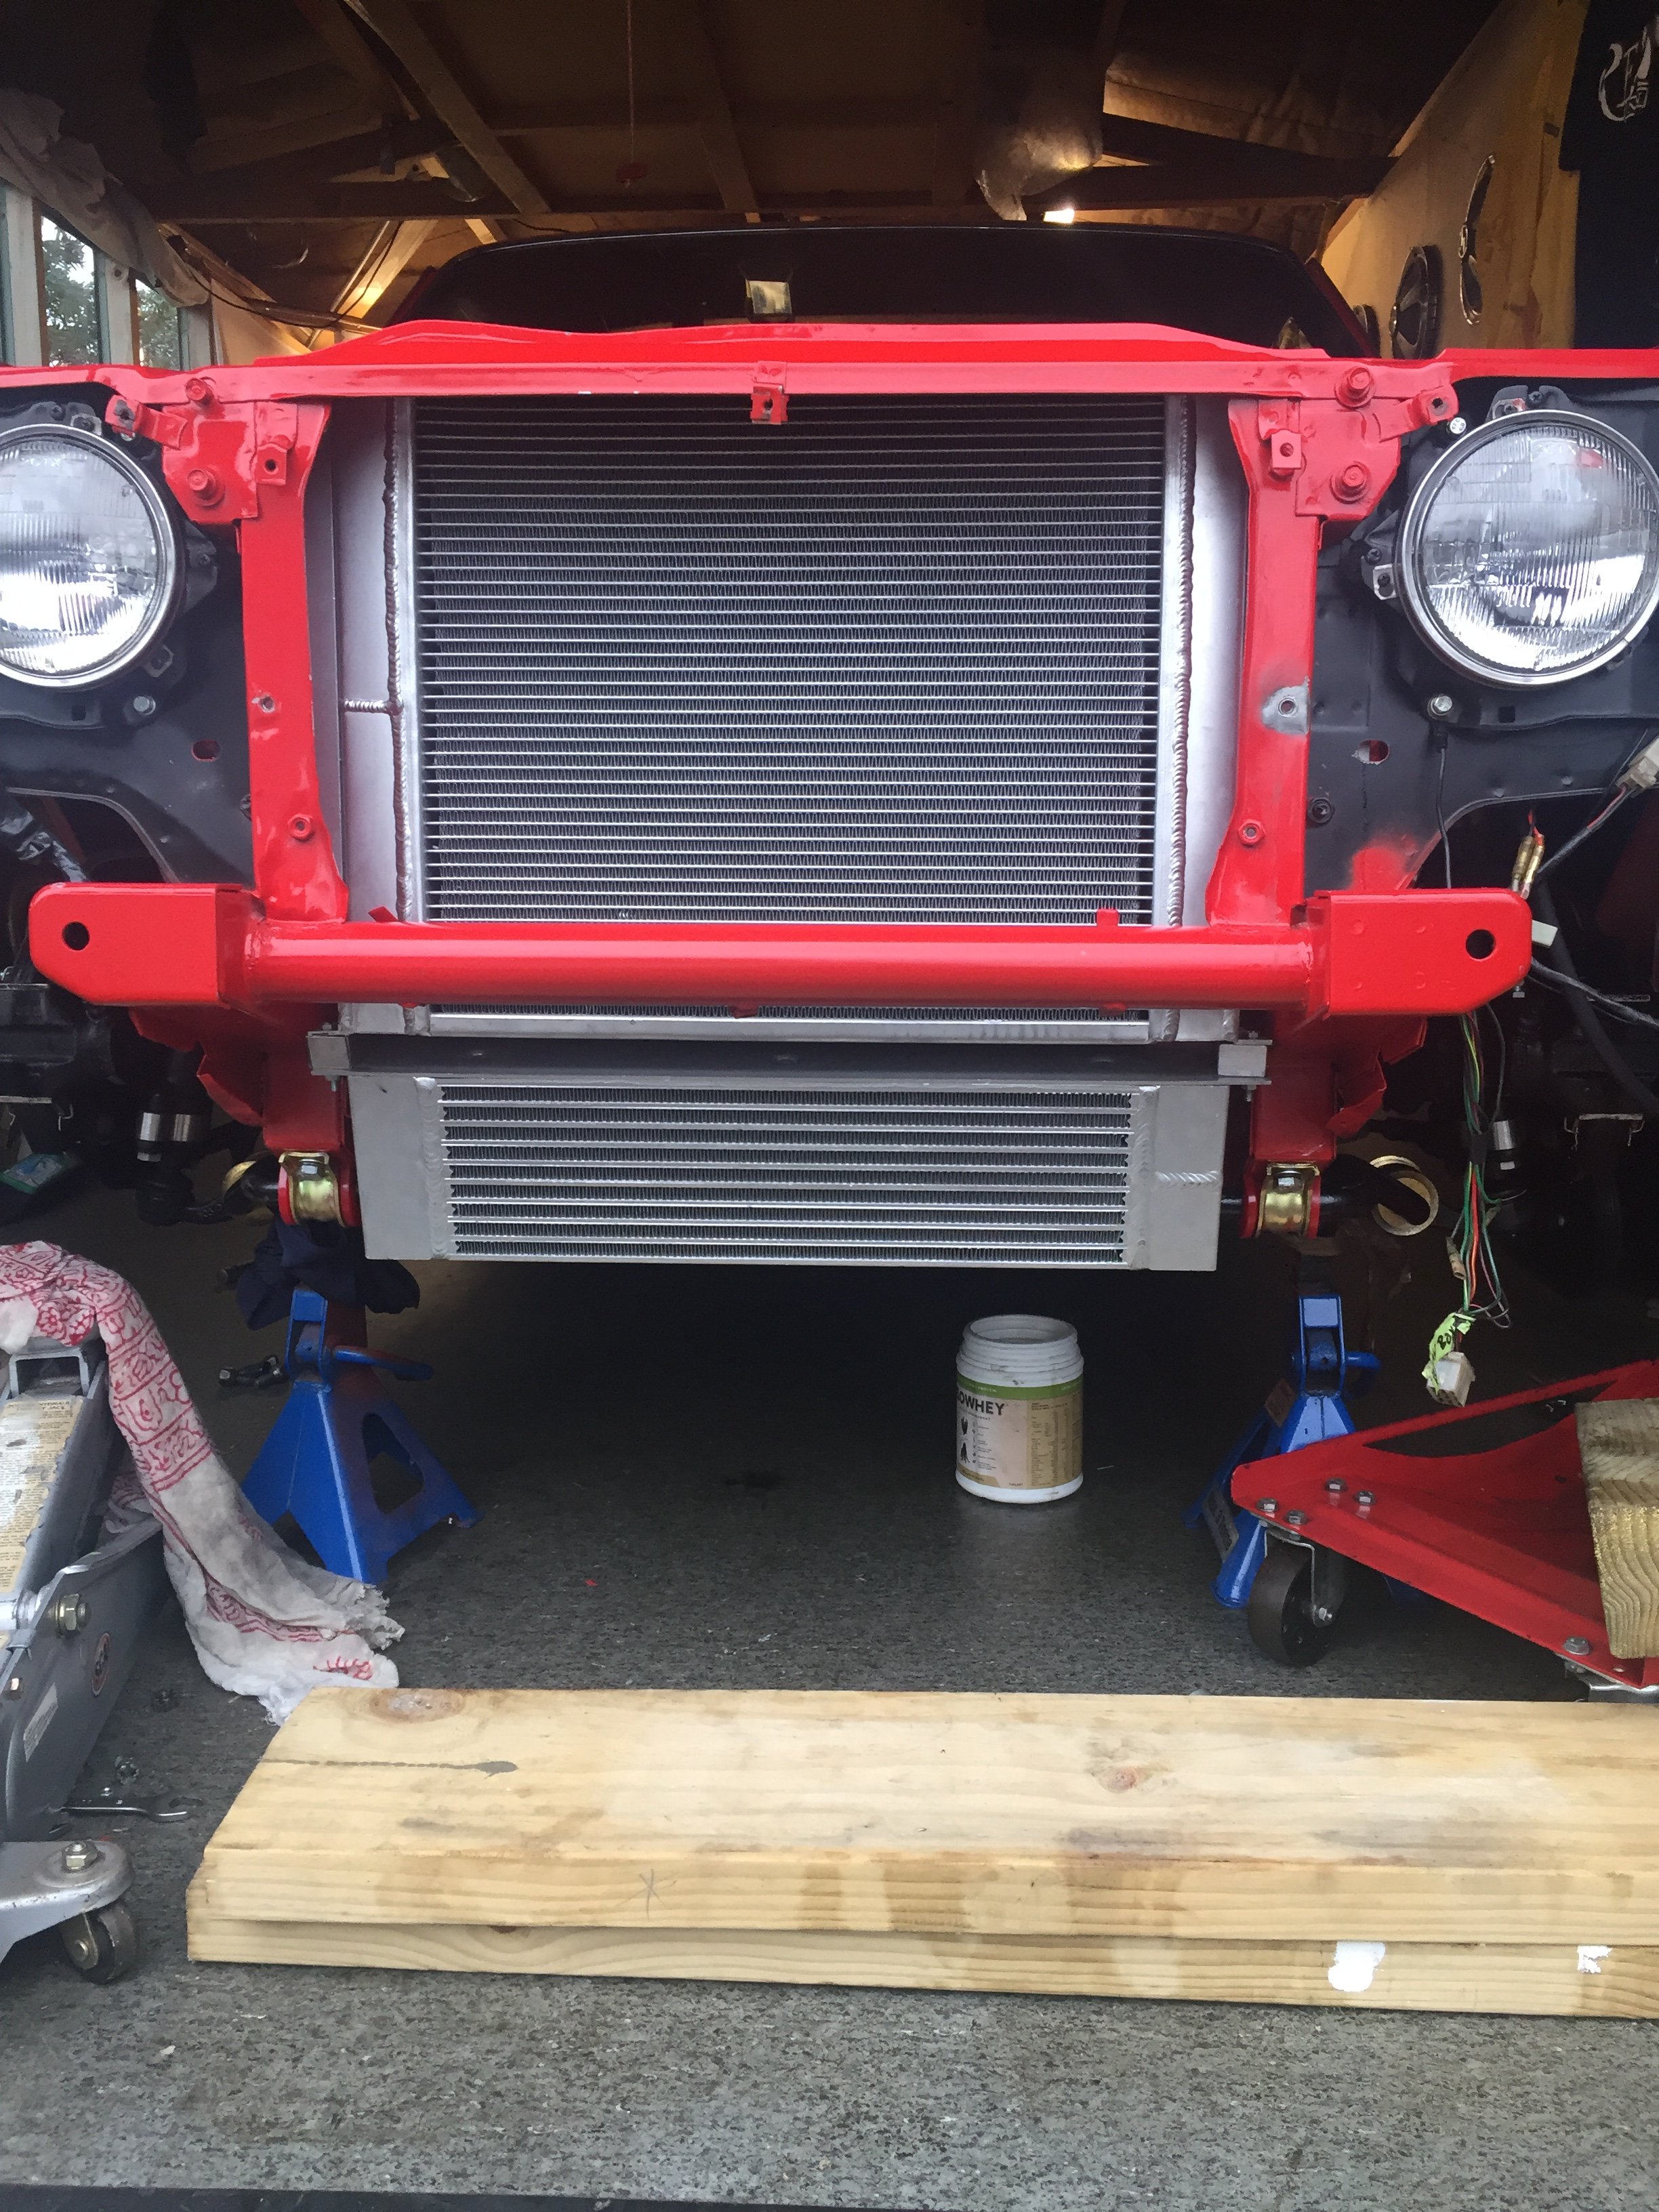
From the very beginning my Bosch 044 pump suffered from cavitation. Sounds like glass beads getting smashed up inside the pump. Well when the fuel pressure fell over on the dyno and it was time to go twin pumps, I emailed GRP4, the tank manufacturer and asked them if the -8AN outlet would flow enough to support two pumps. He was good enough to be honest with me and explain the the pick up pipe inside the tank has a kink in it and would reduce flow. I had no idea it would be this bad! Needless to say this was causing massive flow issues and is a testament to the durability of the mighty Bosch 044 pump. After careful planning and acquiring all the parts to complete the job, I took the tank to Drew at ARE Cooling in Brendale where he cut side of tank open, welded on a -12AN outlet and 1" pick up pipe. -4AN fittings where the fuel sight gauge used to be and tidied up the welds where my fuel sender goes in. The car is back running and the pump is actually QUIET! I will get the second one wired up soon, the ECU will switch it based on manifold pressure, as a guess it will come on around 18psi.
1 point
-
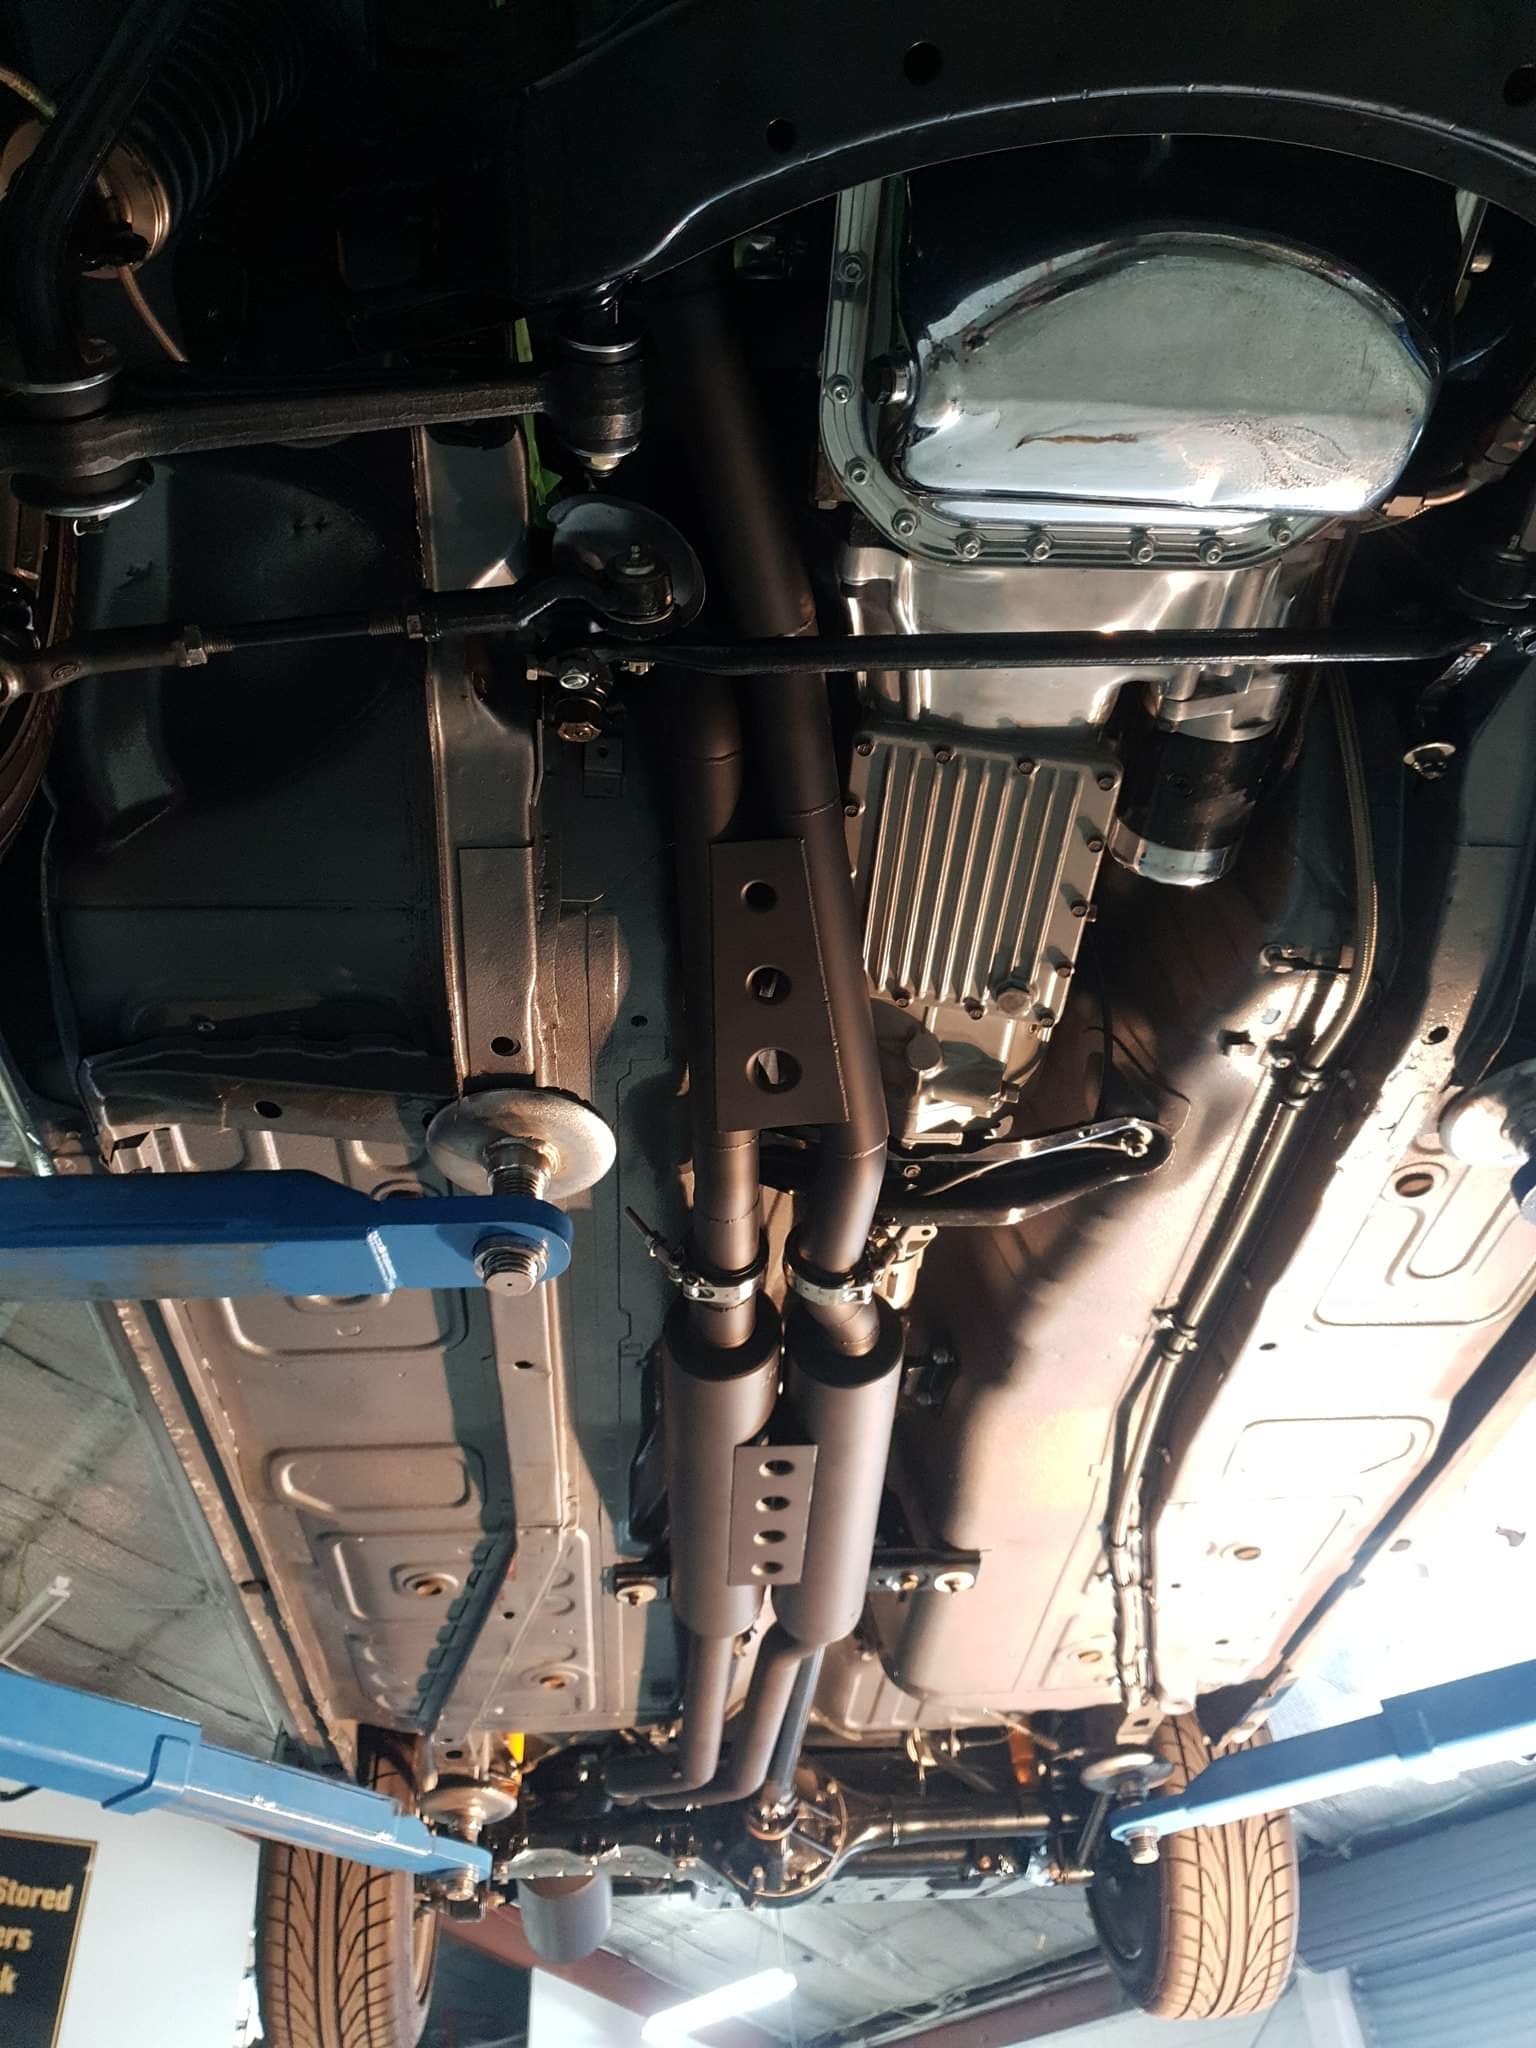
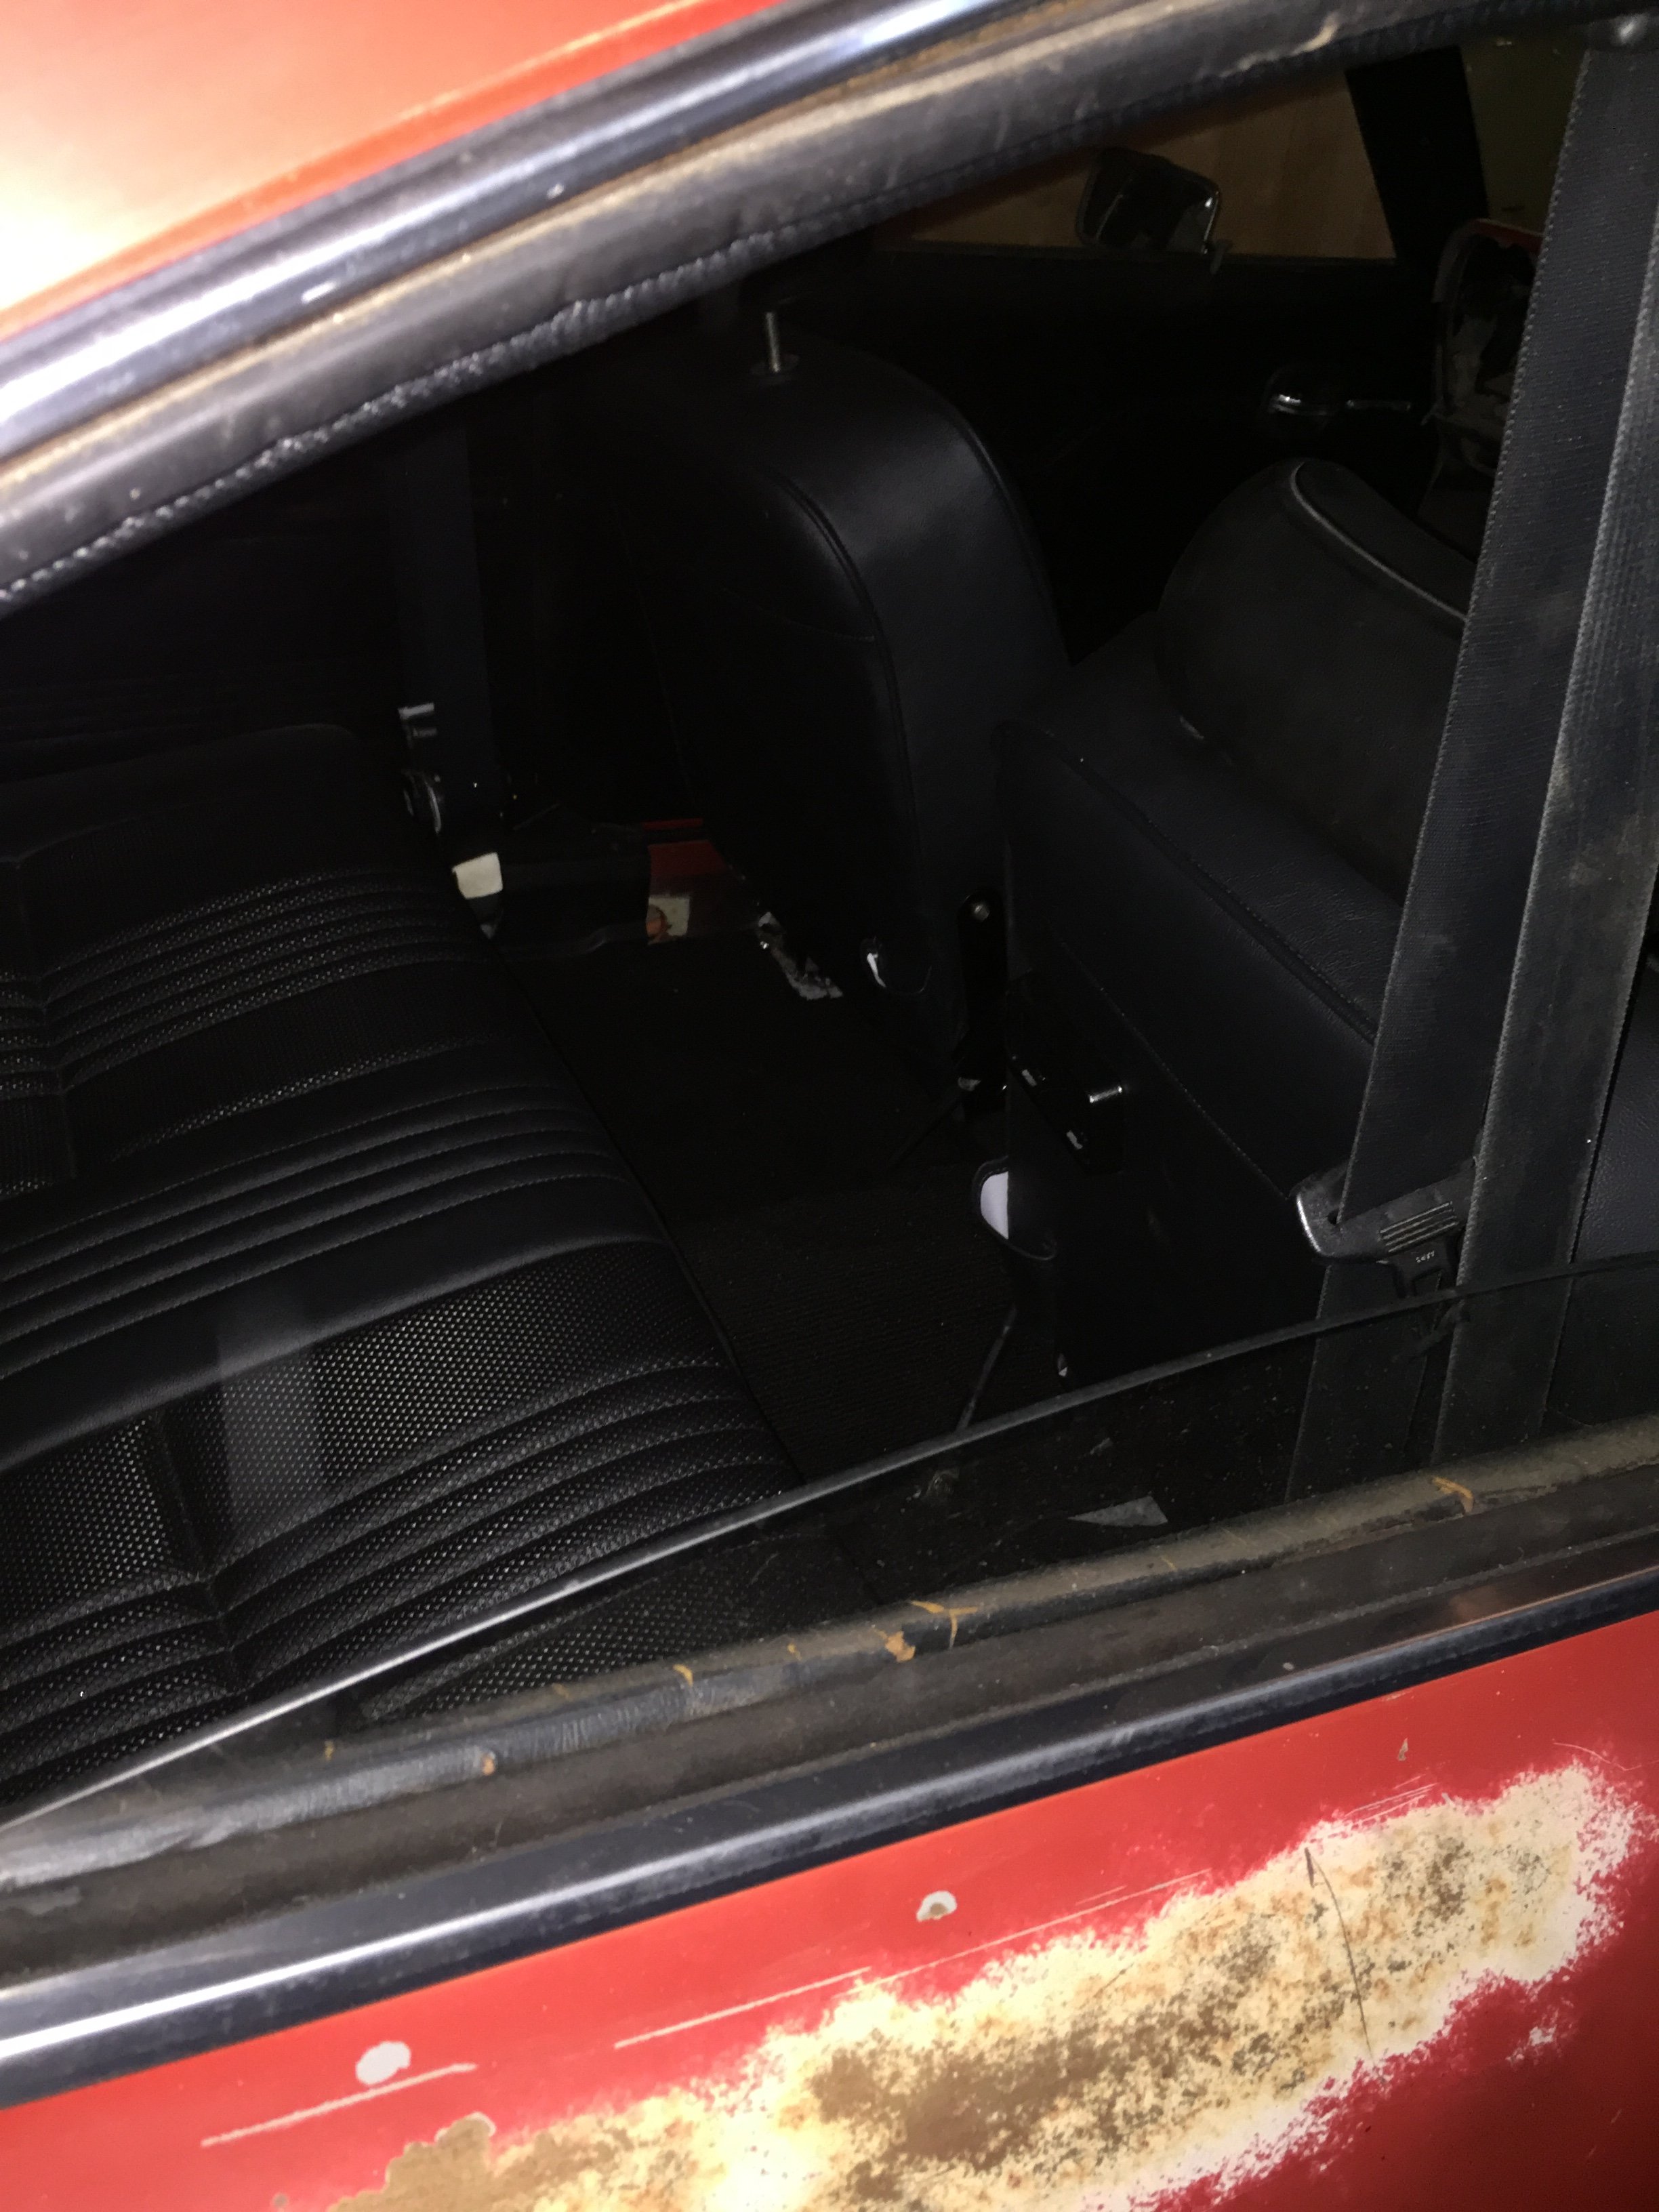
Just tidying up all the loose ends. Added aditional brackets to the new rear soft brake hoses so that they don’t touch the diff. Venting the gas tank. Wrapping wiring. Bonnet on My rear brake diff hard line might need another flaring as I have a slight leak at one junction.
1 point
-
And now thanks to the awesome boys at Vinny Fab. I now have an exhaust. Better pictures to come
1 point
-
Hell yeah. as much as i was not happy about the smashed window im so happy. the clean window is so good. such a better look with out the tint strip on it. very un happy but happy with the result. so brilliant. kass wanted to stay late and work on the buss and get it going as he has been working on his BSA during work hours, not that fazed but give some get some right. so we chucked the new second hand breaks on the front. new hoses and then moved to the rear. the first job was to fix the oil leak. we are running an adapter to suit the kombi engine mount off the oil pump and casing. we stripped the thread on the bottom to bolts and i said to kass fuck we should do that, his response was like nah it cant be that bad dw about it, lols. kinda a pain in the ass. had to take the exhaust off and a bunch of other things. so yeah broke the other exhaust getting it off and well hey lets just fit this one instead. while we done that i also got into the rear breaks. Fuck me thats right, hub nuts........ 1.7 meter bar with a 46mm socket welded to the end piss easy mayte. oh hello we have a few missing peaces here. lucky i brought stuff from the vdub shoppe and it'll go straight in right. oh nice the pistons and shoes i brought are the wrong ones, so off we go back to the vdub shop and get the correct ones. its also missing a few peaces so ill scavenging through the scraps and wrecks to find the missing stuff. thats enough for today. hopefully we can get it sorted and drive it next week.1 point
-
So I've been driving this around as normal. Failed the latest wof on an exhaust leak and a driveshaft uj. I ended up replacing most of the exhaust with extractors and a copy resonator. Pulled the gearbox, replaced the rear seal, changed the clutch plate and release bearing. Replaced the driveshaft with a spare . With that done I took it up to Napier over New year's. Got a bit warm on the way up,l. On the way home it developed a vacuum leak which I couldn't find. Wouldn't idle and would only run at high revs. Made for some frustrating driving. After a few hours of this it miraculously fixed itself. Still not sure what that was about. With it running so well I decided to do this.. ... Cbr600 carbs. I made up a manifold last year and this weekend thought I'd man up and actually have a go at installing it. Got all my vacuum, water and fuel lines sorted. Drilled mains to 1.3mm and blocked off the air correctors. Took vaccum lines off all four runners that run to a common line and go to the dizzy and brake booster. Running a mechanical fuel pump and currently have the pcv valve venting to the atmosphere, will fix this later. Got it installed this evening, crossed my fingers and turned the key. Once the fuel came through, it started and idled. Immediately fuel starting pissing out of a few places of the carbs, so I turned it off before I could give it some revs. I'm thinking a seal kit through the carbs. My other thought are the float bowls aren't sitting quite horizontal so I'll need to look at adjusting the float, or the other obvious fault could be non regulated fuel pressure. Will take the carbs of this week and see what's what before trying again.
1 point
-
1 point
-
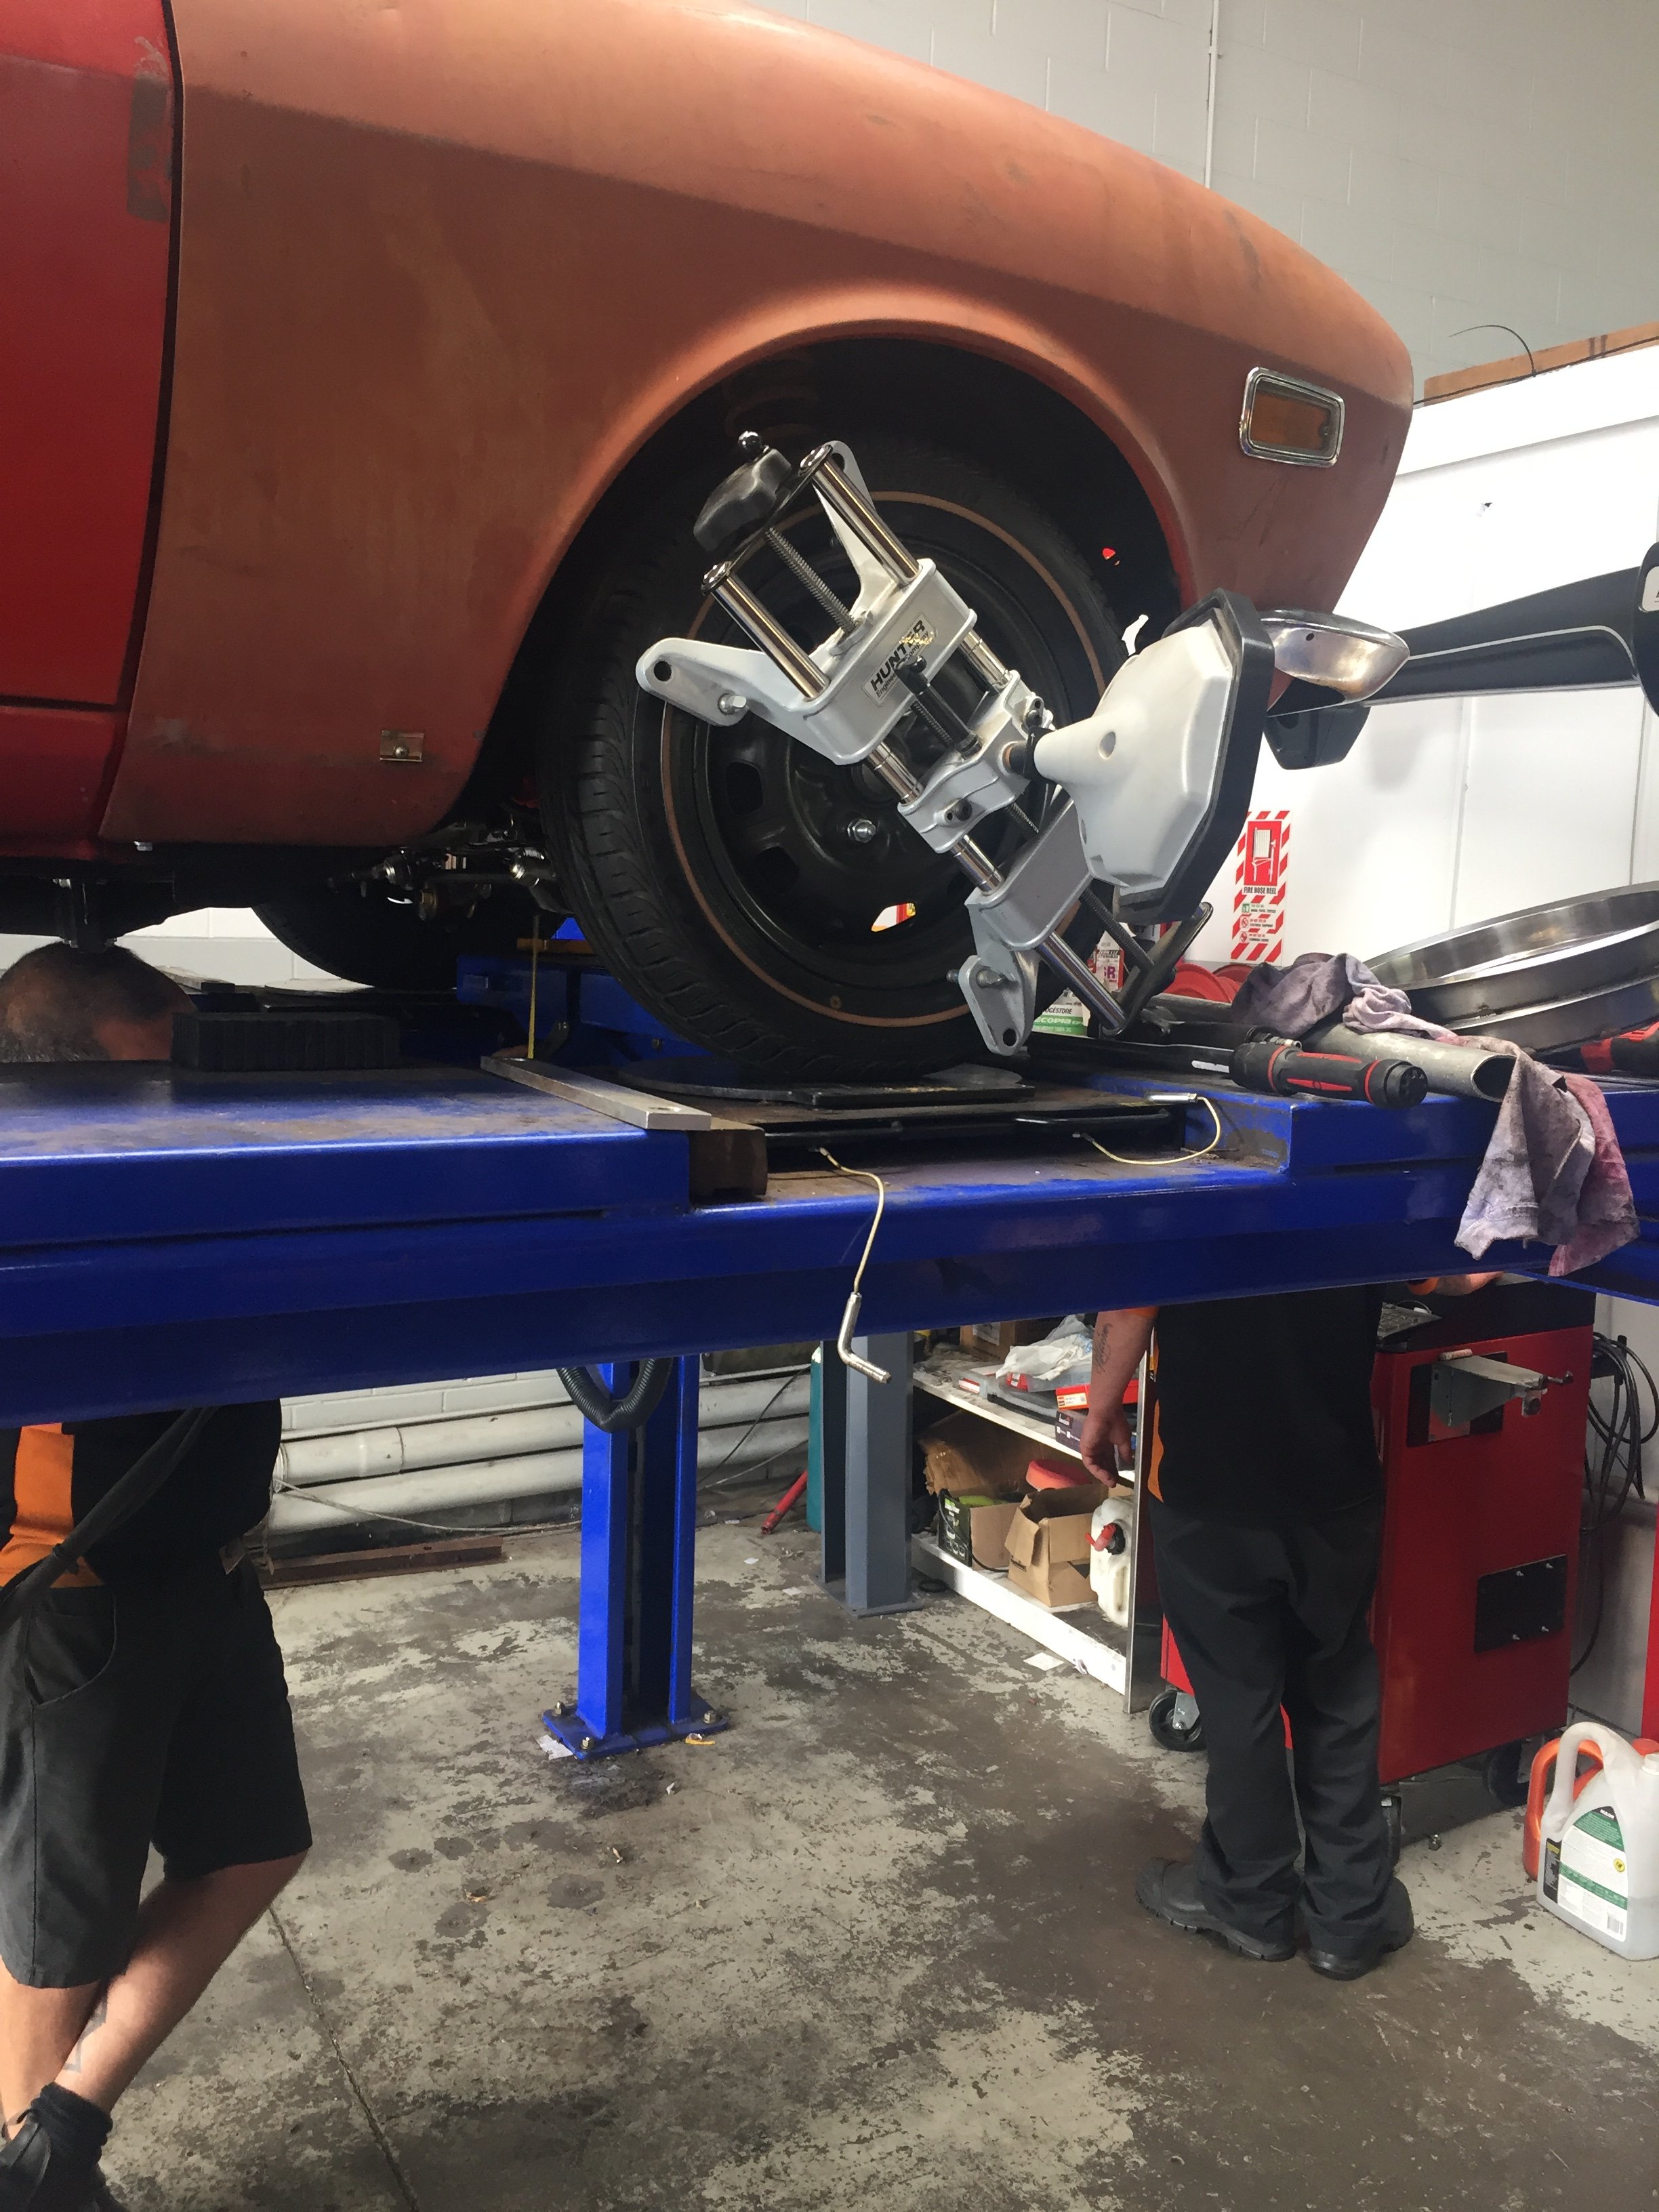
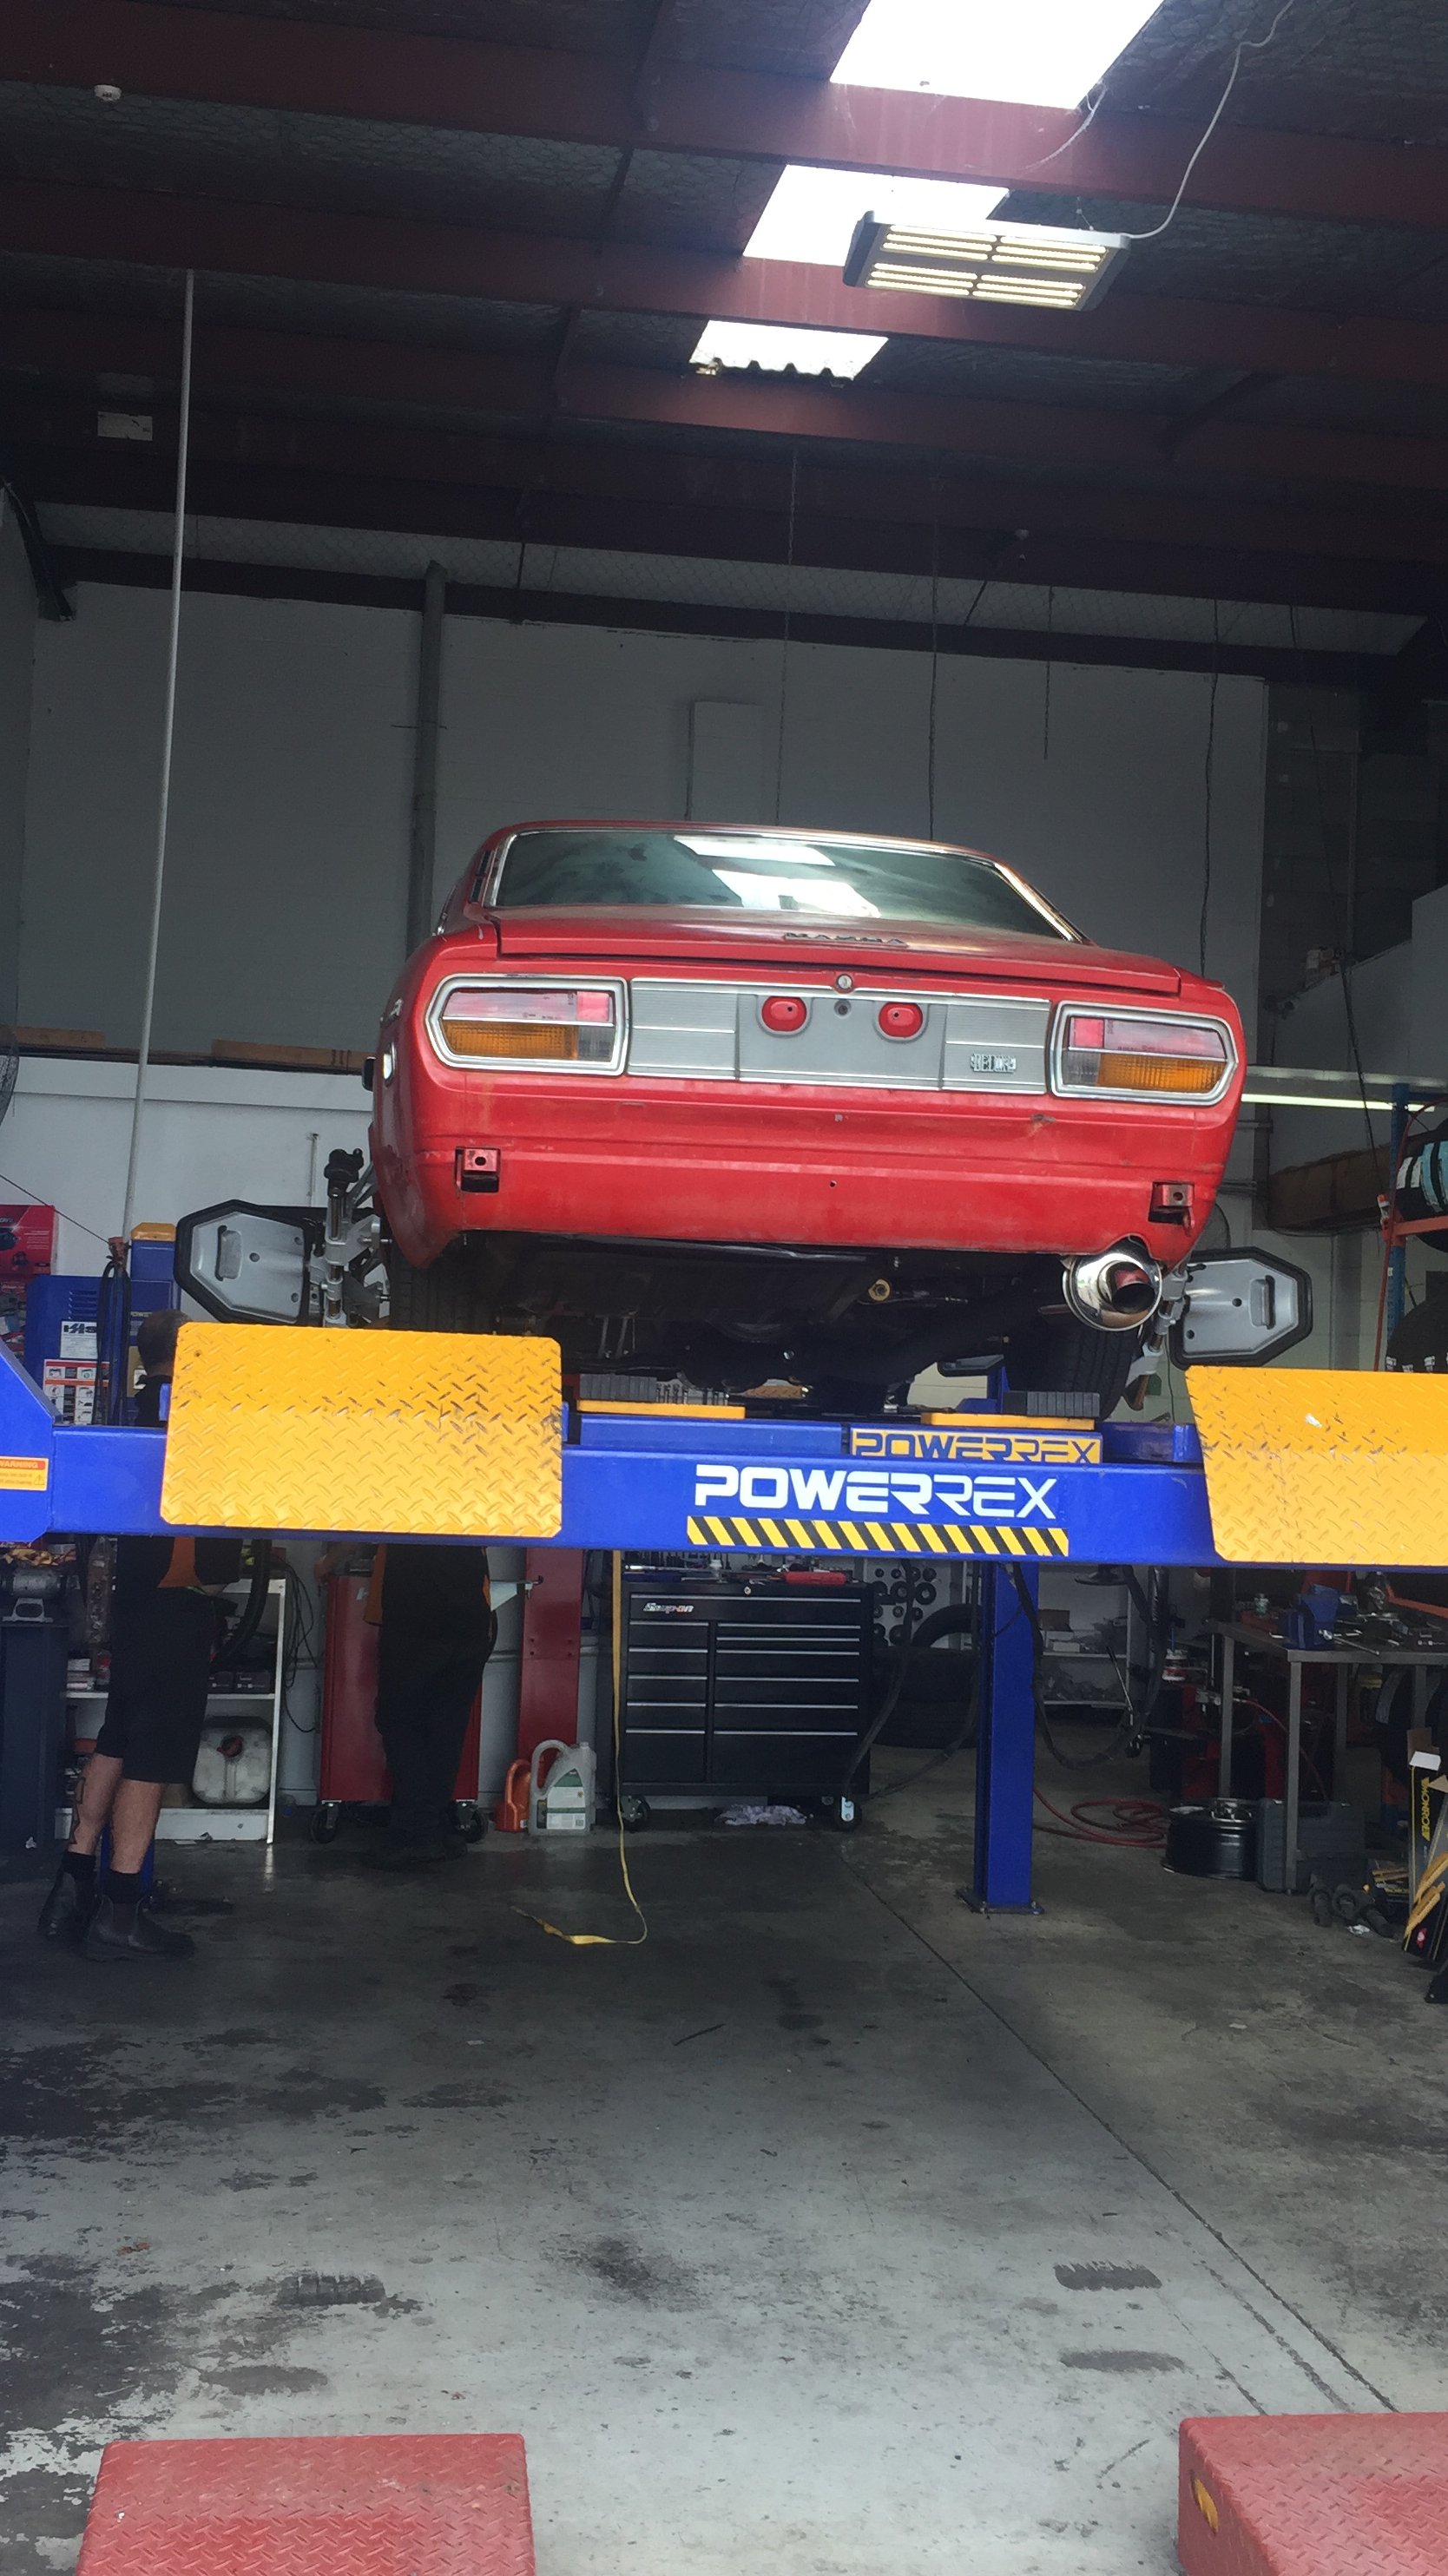
Another step closer... I took the sled to Lincoln Tyre Centre on Saturday for a wheel alignment and genera spanner check. The top blokes there went over the cars bolts and set up my suspension all nice and even They performed an alignment too, along with the print out - this will be going to the repair certifier to prove that the car is all square and set up. Next steps - last bit of wiring. Compliance/VIN 3 or 4th of April and then cert on the 5th. Until then I’m buttoning it up and trying to iron out as many kinks as I can. Exciting times.
1 point
-
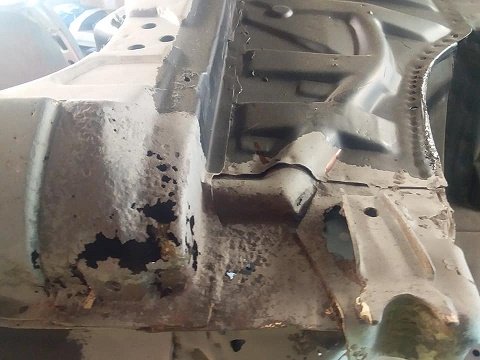
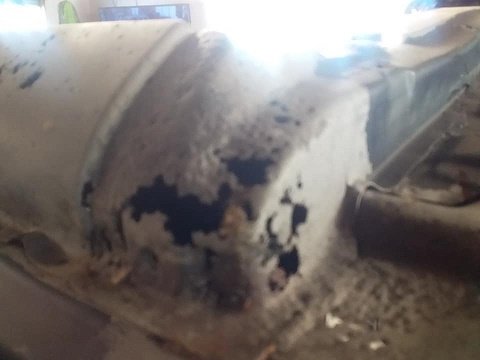
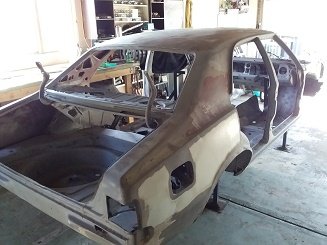
started doing what i believe to be the worst/most difficult rust are ...2 hours so far and about half way done.
1 point
-
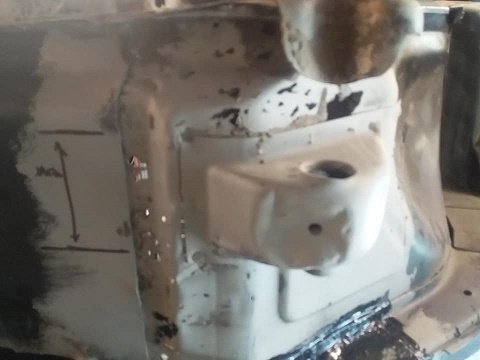
well its back from blasting ....and good news .....its not a pile of dust
1 point
-
1 point
-
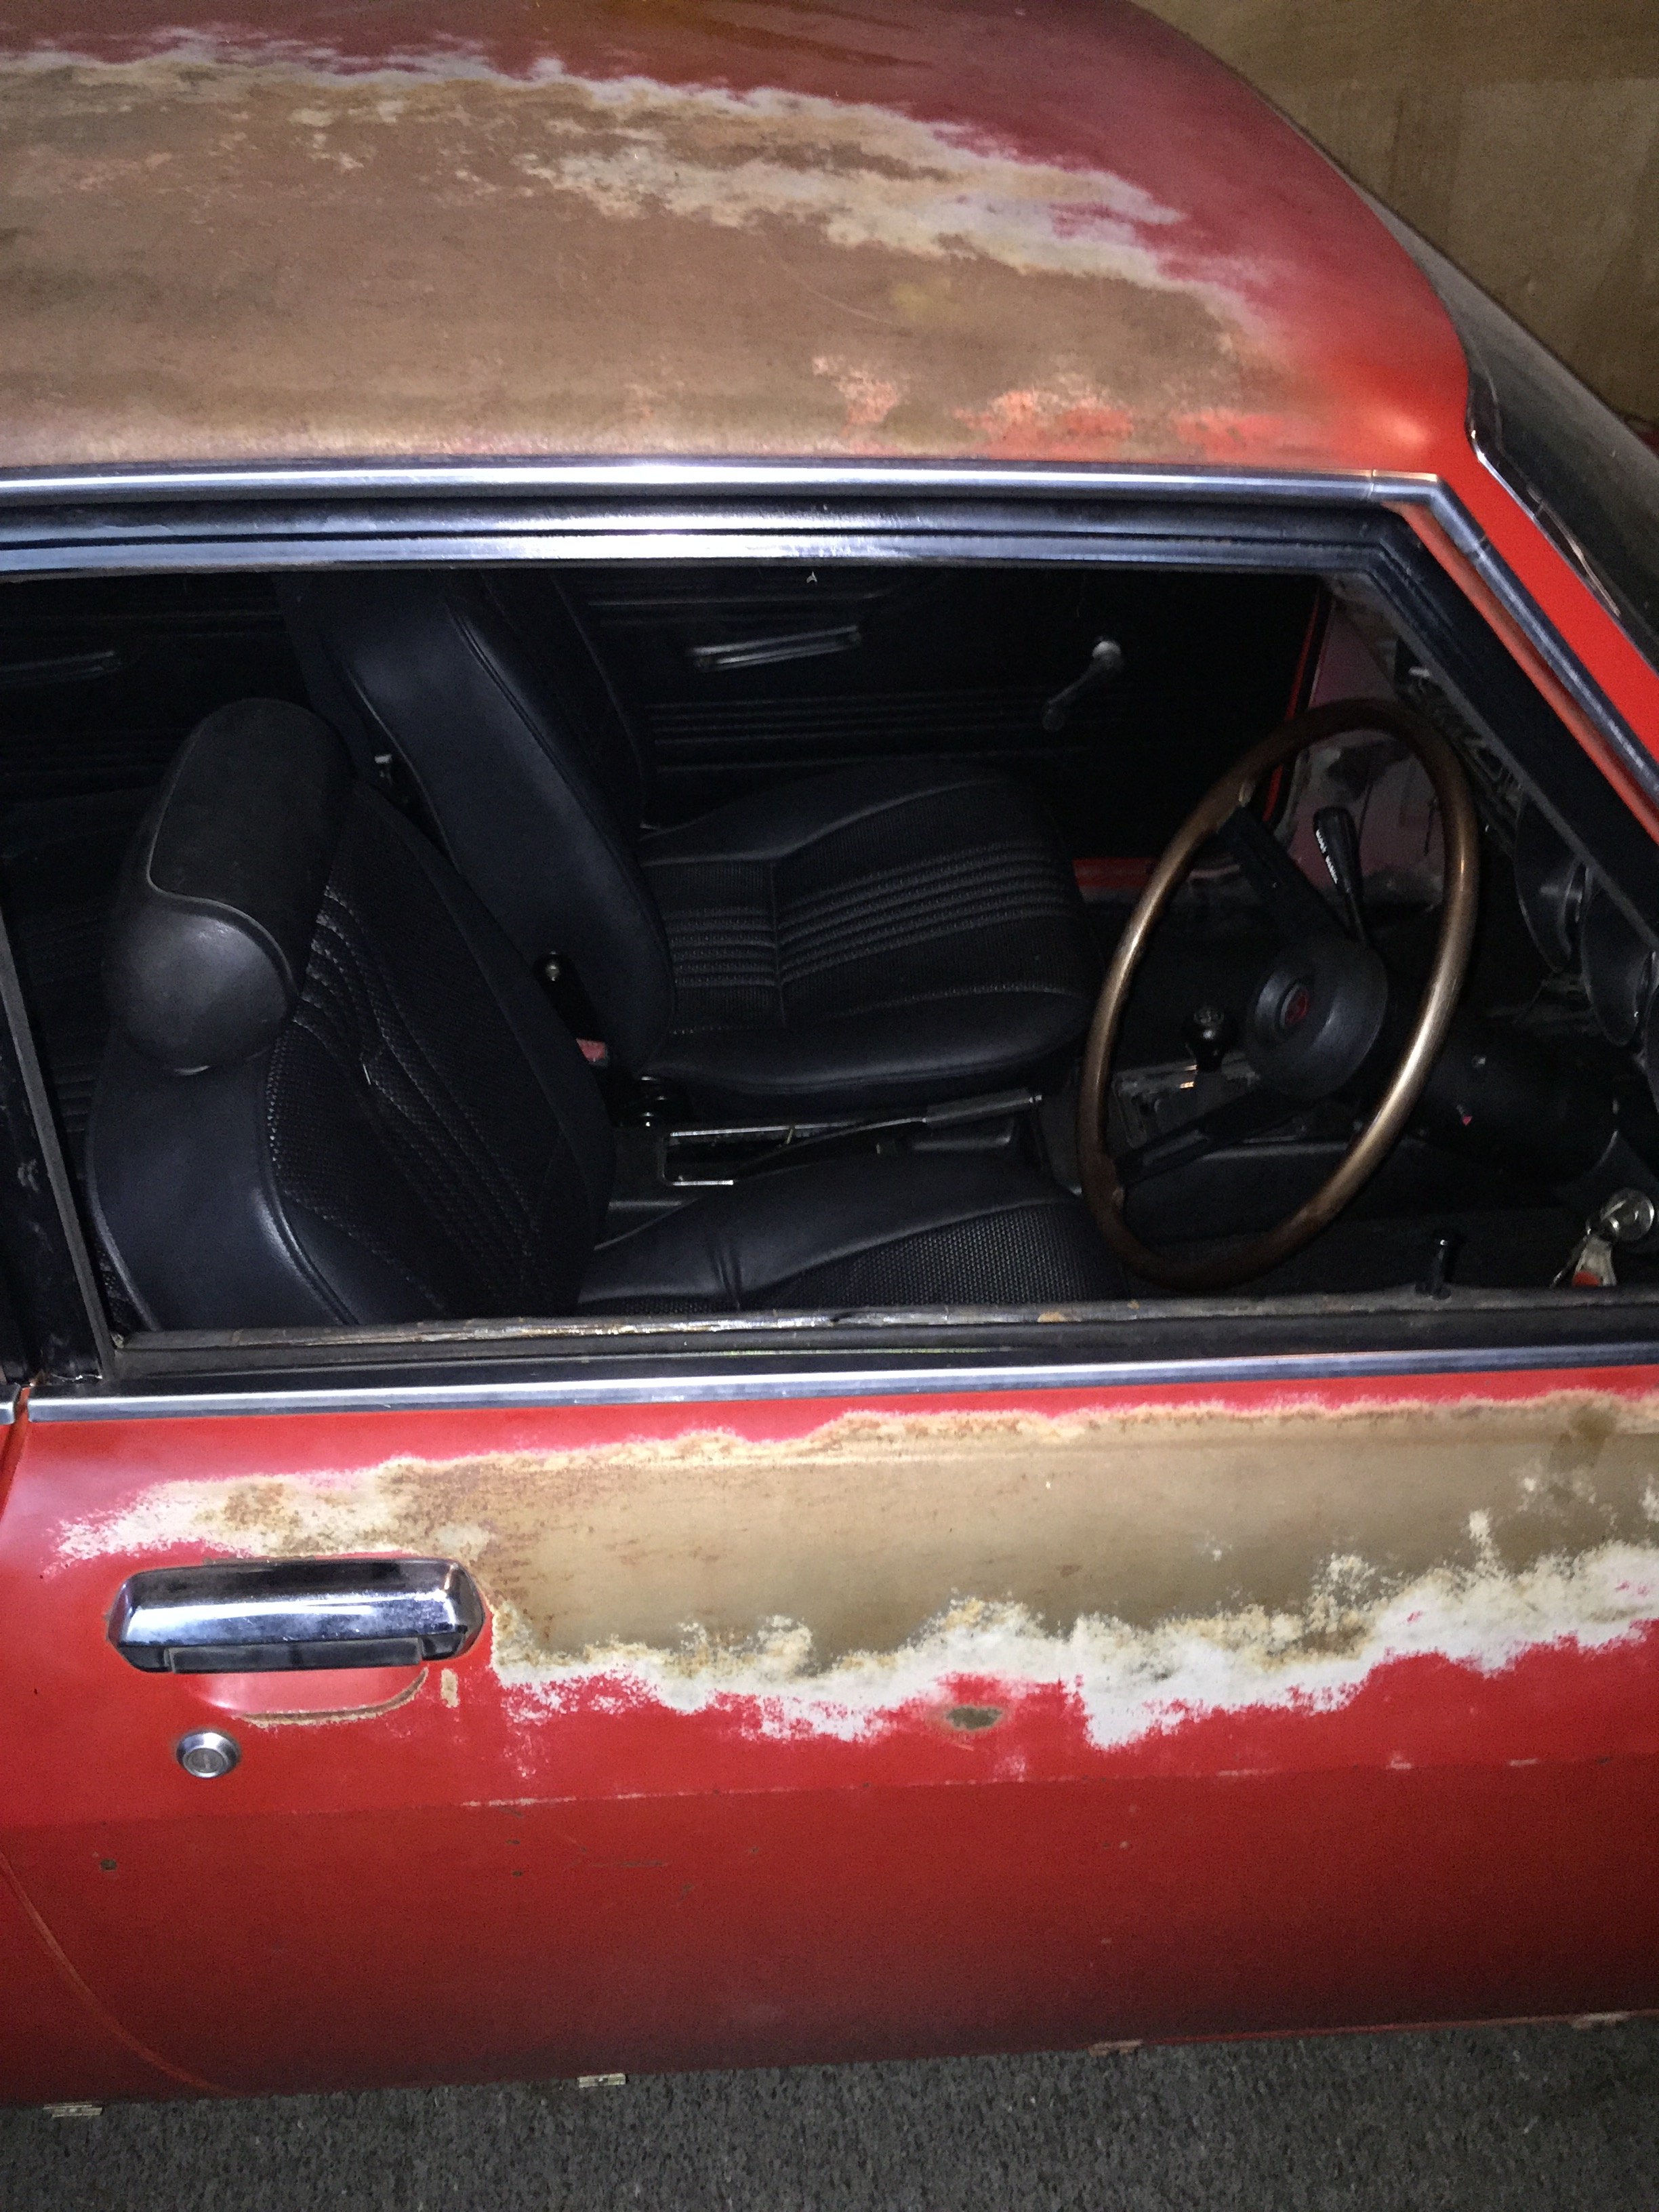
Cert is booked in for early March. I will need the following before that: 1) wheel alignment 2) wiring 100% done 3) custom handbrake cables made live put the carpet in and let me tell you, I think I could do a better job than Autodec. Anyone looking to do new carpet in their car - make a template and get some upholstery outfit to overlock the edges. It will be loads cheaper and should fit well too. Front seats are in as are the seatbelts - unfortunately the VIN people need to see and sign all seatbelt mounts. Unfortunate because 2 of mine are under the hood lining hahaha. The rest are easily accessible and clearly you can see the mounting points. It’s still low AF so I will wind all 4 adjusties up another 1” and see where we end up. I repainted the RX2 Coupe steering wheel and that’s now in the car. I need to fit the rear oh Jesus handles and one sun visor and that’s the end of the tedious small stuff. Cheers
1 point
-
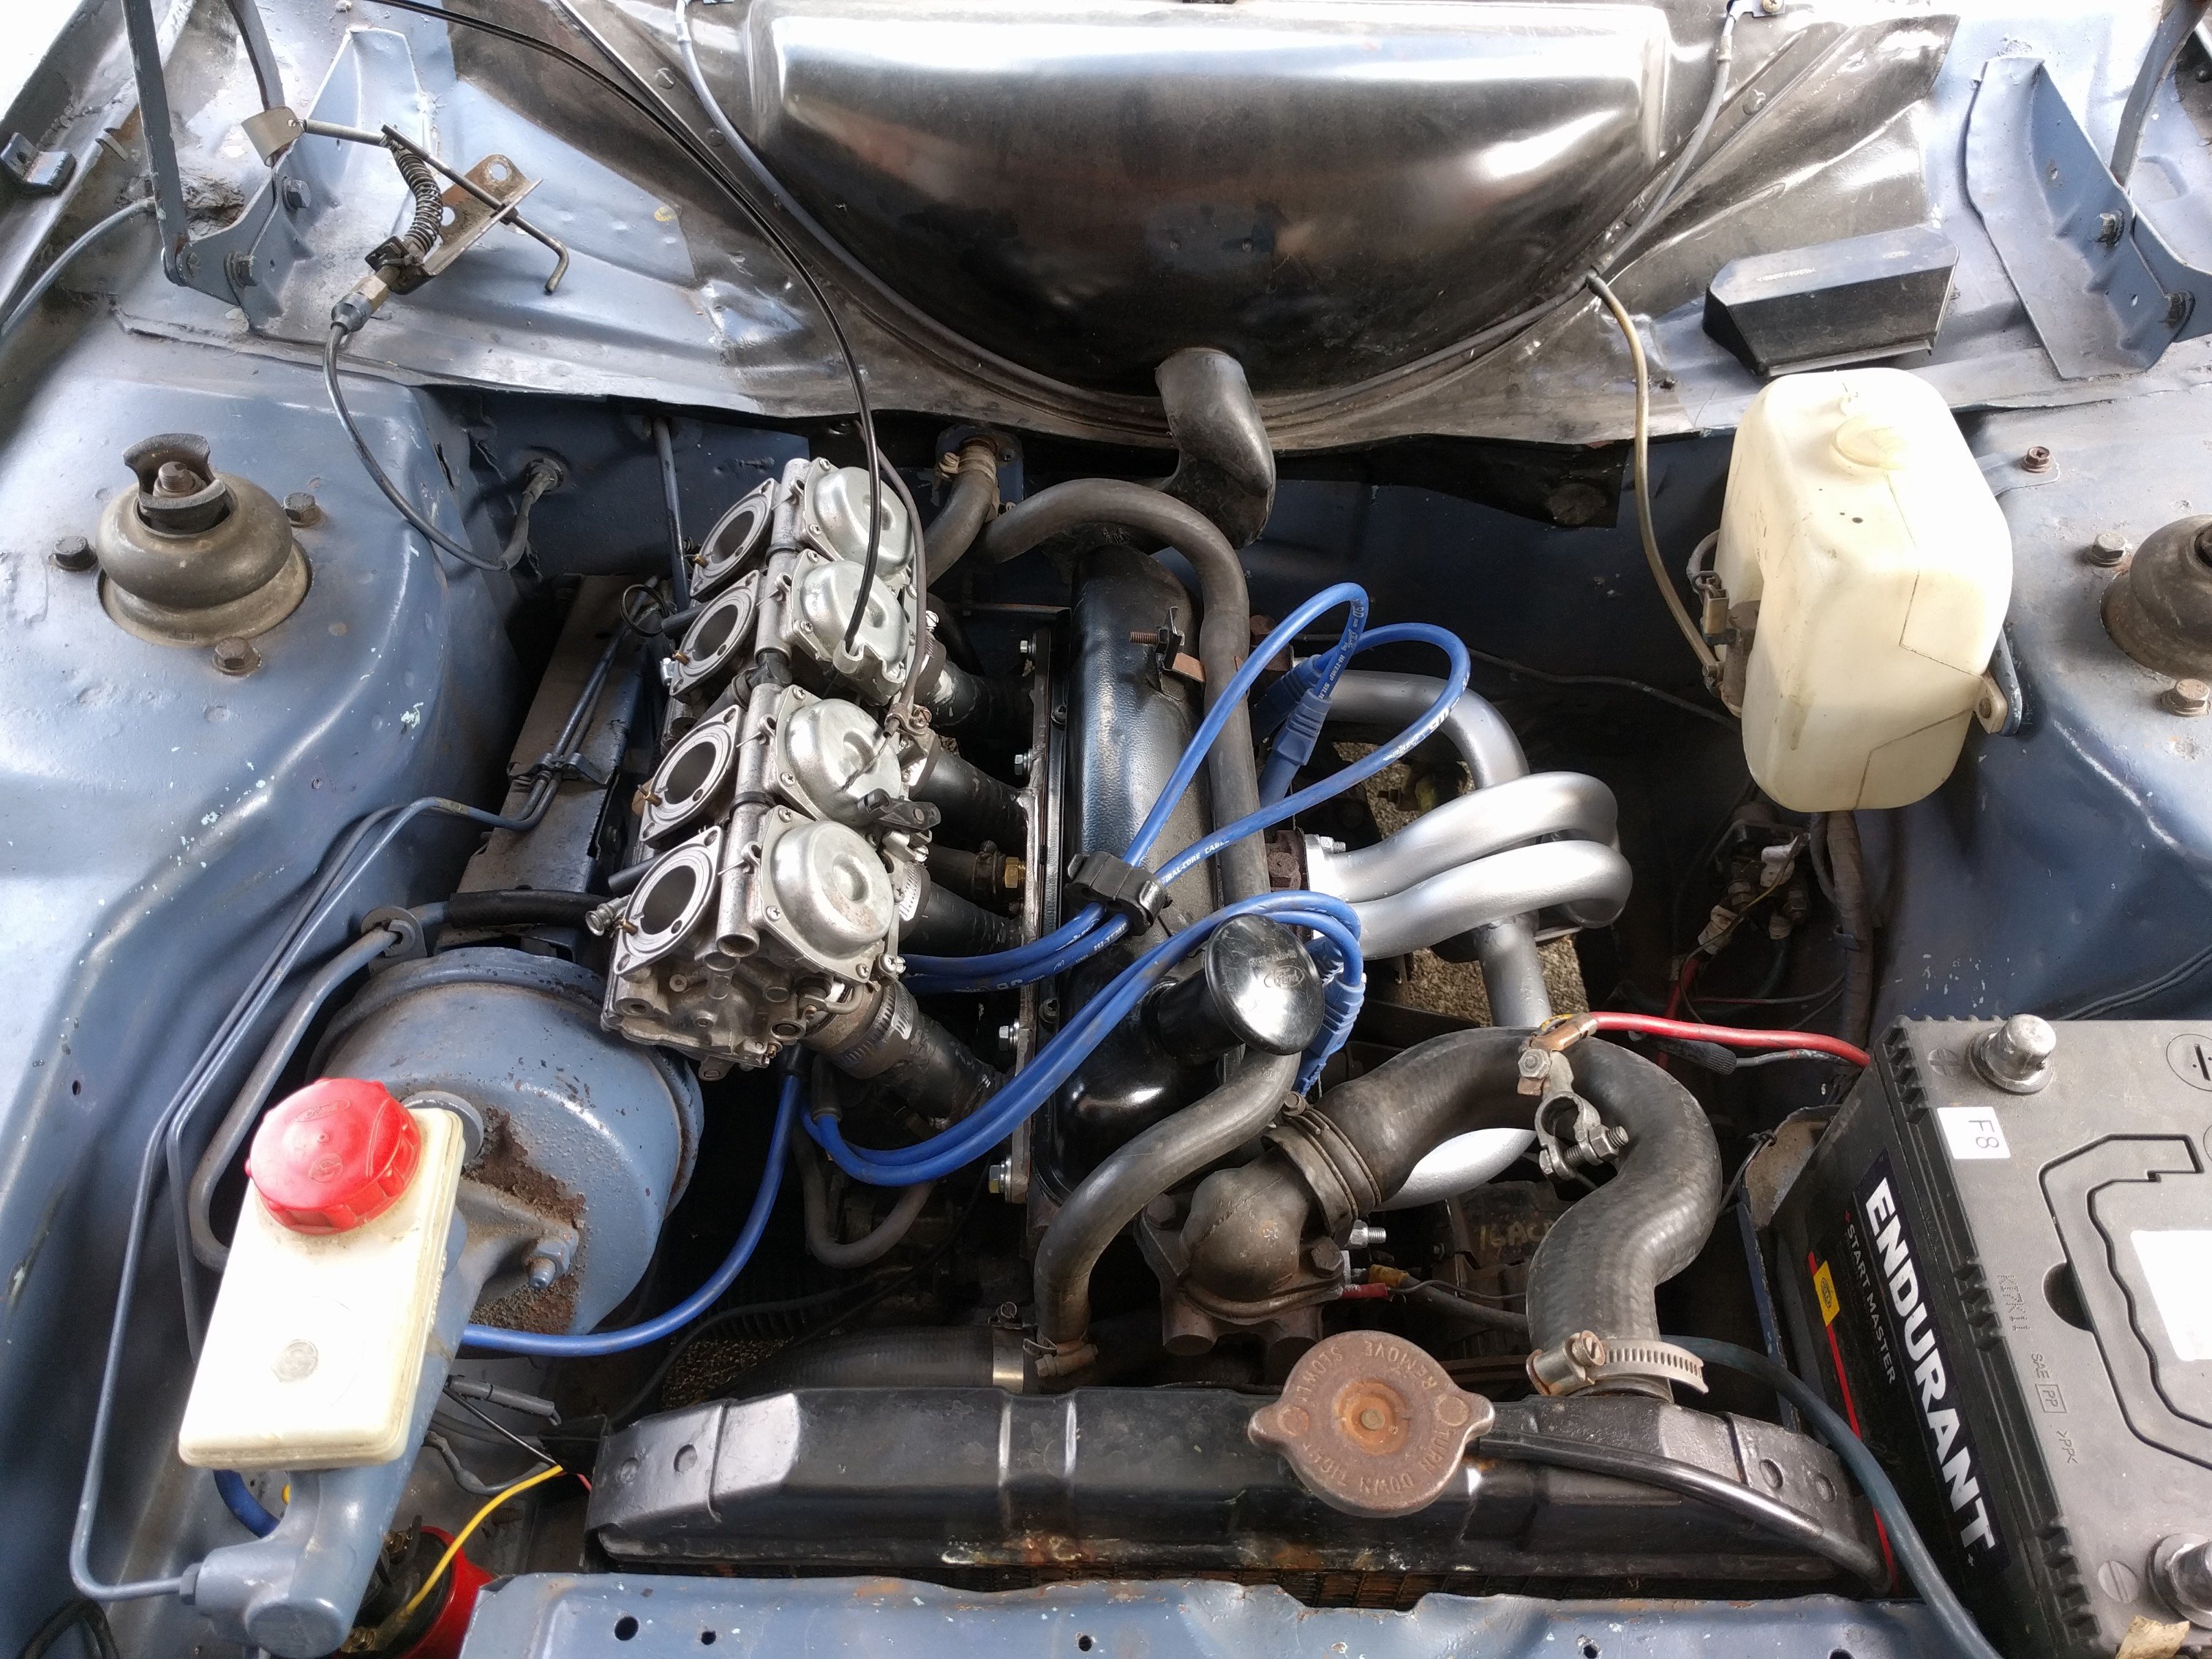
The Racing Beat 51 IDA are just the 48 IDA that’s been bored out to 51. The ventries get cut down too and grub screwed to the body. The velocity stacks are siliconed in which makes it a pain in the ballbag to fit the standard K&N filter base.
1 point
-
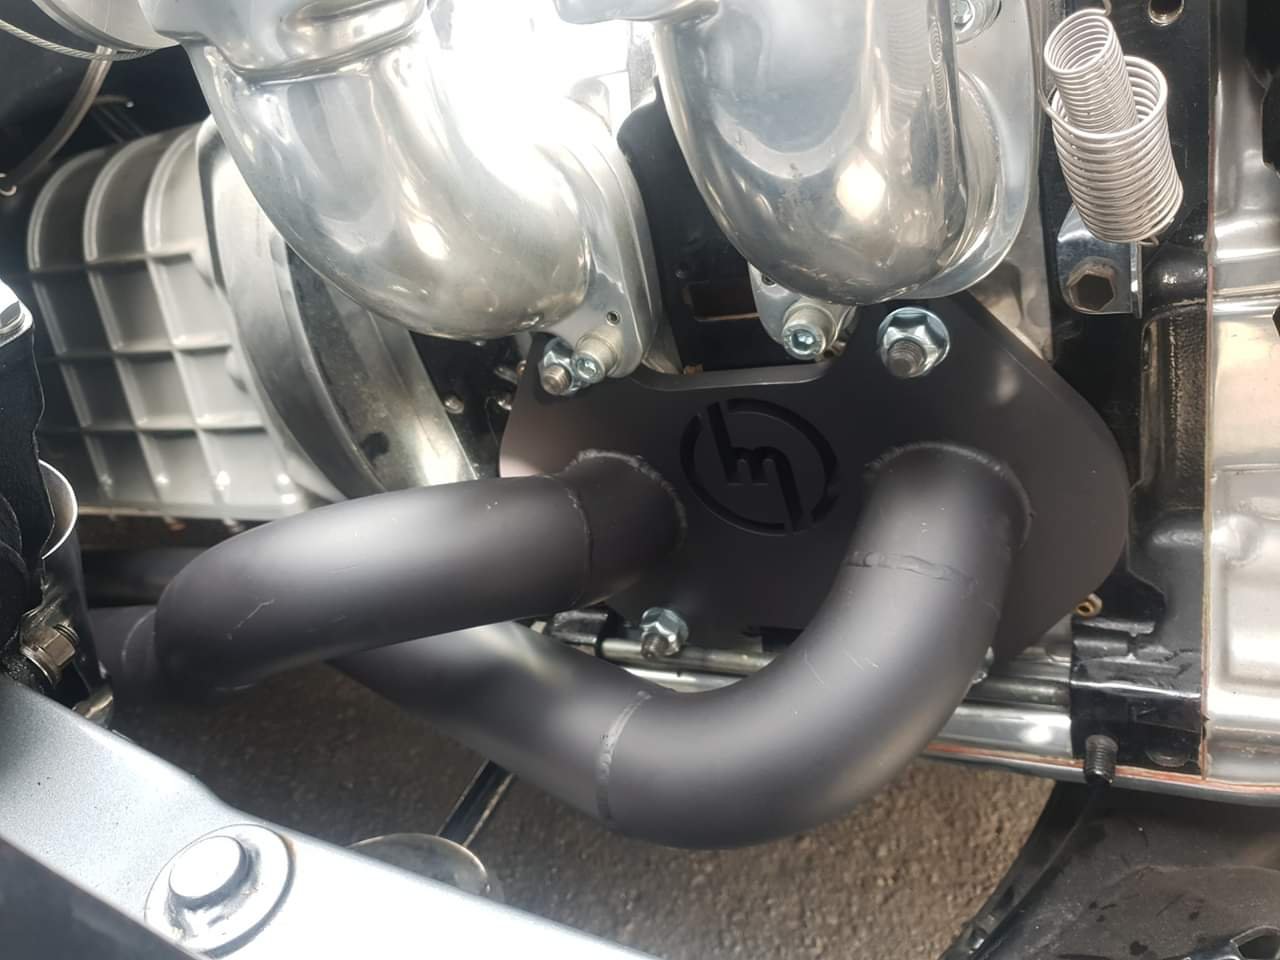
Had a mate pop over Saturday and take a look at the 48 IDA settings as the motor is clearly getting PLENTY of fuel.... turns out that this carb was off a race 12app and basically everything that could be drilled out was. The main issue was with the accelerator pumps. These should have size 50 jets however my ones were drilled out to 120.... hence the smoke etc. to cut a long story in half, I did a deal with a racing beat 51m IDA that is set up for a bridgie. We plonked it on and it fired up easy as so that’s that. I’m sure there will be more fiddling with it to come however it’s night and day different from my last one. Also re mounted the oil cooler (again) using aluminium wedges I cut the other day. This brings the cooler tighter to the radiator and more importantly further away from the road. Ive binned the AN and braided oil cooler lines in favour of new custom make Pirtek ones that should be getting fitted tomorrow.
1 point

.jpg.57f49b72100bc0223de95bf610ecb0ef.jpg)


.jpg.8e74f4acbba23495f1293aad3c7b3859.jpg)
.jpeg.b76f14f53c84c5ce6e30ea2fa5b5a048.jpeg)


This leaderboard is set to Auckland/GMT+12:00