
Leaderboard


Popular Content
Showing content with the highest reputation on 06/08/16 in all areas
-
so the car has just come back from Greg's where it has had a full cut and polish. its pretty much done now. there are two things left to do, adjust the door glass so it seats in the rubber s better and paint the rear badge. thats it. its done. hard to believe really but it is. the new owner has joined OS and will be involved in OS events for the future so imi sure you'll see the car around. for what could be the last post by me in this thread here are some bad photos of trying to show how fucking amazing it looks after polishing. 2016-06-08_06-43-53 by sheepers, on Flickr 2016-06-08_06-44-17 by sheepers, on Flickr 2016-06-08_06-44-30 by sheepers, on Flickr 2016-06-08_06-44-51 by sheepers, on Flickr 2016-06-08_06-45-03 by sheepers, on Flickr21 points
-
Mmmkay, so the GSR has never had a working key for the boot or passengers door. Drivers door could be opened with basically anything. Ignition has had a key broken off in it since the car was last used actively. Won't mention the fuel door lock, as they all appear to be just a latch that any key will fit into. Was hoping to use all the locks out of green car as they all appeared to match at first glance, and had an original key which I get major boners for. Did some tinkering. Found the door locks were pretty beat up, I don't really know what I'm doing but these weren't right. Ended up pulling a bunch of locks apart that were left over from crashed red Brumby, and the Green wreck. Final result is 2 working door locks, a working boot lock, a working ignition barrel and steering lock. Key will pull out of ignition barrel though, I think thats cause the key is a bit(lot) worn out. And thats my story about keys. Going up a hill Tell me to hurry up here. //oldschool.co.nz/index.php?/topic/22150-waimaks-gsr/page-1912 points
-
6 points
-
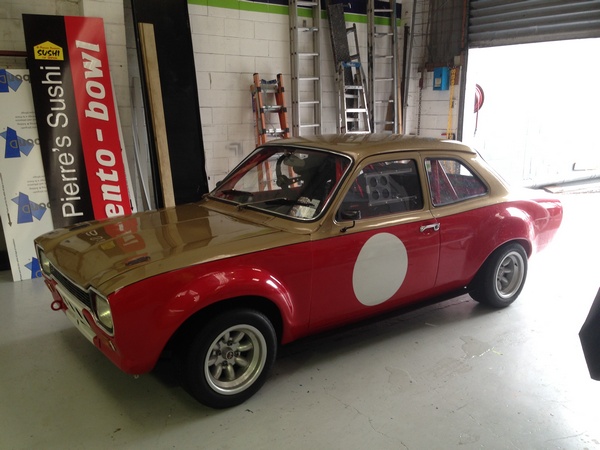
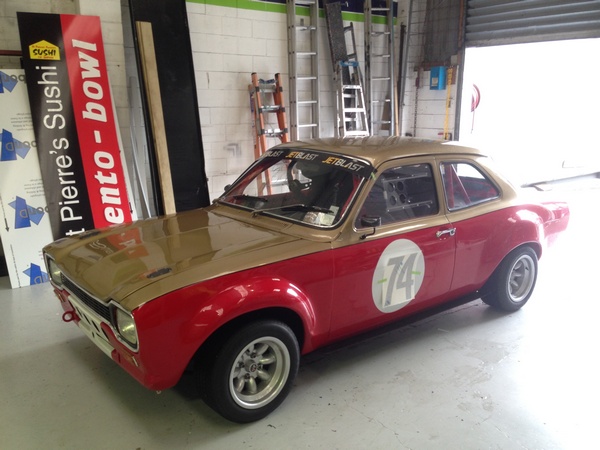
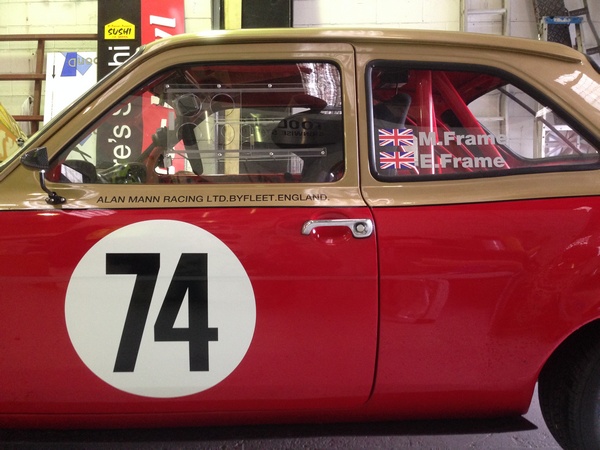
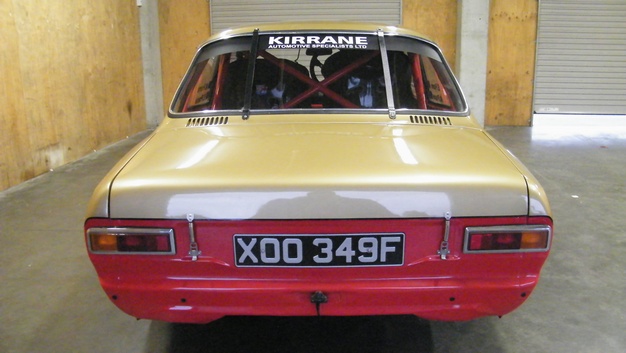
Tarmac Rally Prep Part 3 Sticker Time Numbers , Names and Alan Mann Racing Decal And Big Thanks to my sponsor Jetblast - Air blast technology for sorting out all my stickers and making my car look so good
 6 points
 -
So daily has been sold to Boxed who will hopefully have heaps of fun and learn lots in it. For me its good to close another chapter in my ae101 life. Also finished moving into new garage finally getting rid of some furniture to make room for racecar. Time for some progress. All my wheels went with the daily so time to buy some new wheels and tyres. These will be my road tyres. Went for a dunlop DZII which was unfortunately only available in a 195 but the tread pattern is pretty cool which looks like the footprint on the road will be more like a bigger tyre with a conventional tread pattern. Will see how they go. Wheels are a Lenso PDJ 15x8 +20. Relatively lightweight. Bit too much bling but brake dust should solve that.. pretty happy so far. Ride height sorted: Pretty happy with finding a modern wheel in a 15x8 that looks pretty good on the car. Next up is organising rollcage re-homologation and mods and ordering a set of these: Can't wait!!!5 points
-
I got a bit of time to mess around doing some landscaping in the weekend. I also managed to get the basement closed in. UJ are happy TBH And there was even time to waterblast all the mud off the floor. Please forgive the poor photo. It was taken tonight under the FUCKING AWESOME lights... but the generator is now playing up so I've hauled it down to the workshop. I'll take a look at it Thursday4 points
-
Just sing out if you need a hand with driveshaft loops for when you tang it.3 points
-
Unsure if you're familiar with the song 'Little Blu House,' by Unknown Mortal Orchestra but it could well have been written about this. Refers to, well, a little blue house which is 'sitting high on the mountainside.' It then recites the line 'maybe all the wolves could lose my scent, and I could stay here for a while.' Anyway everytime that song comes on shuffle, I think about this thread. #coolstorybro (PS paint it blue)3 points
-
Did some patches on this last night.. started by trying to pull the dent out of the rear pass guard.. since it was a crease and I can't get to the back of it I welded some threaded rod into the crease and other areas, when I discovered, *sigh, thanks to gasmith again that it had very thin steel around here hence blowouts.. should've just cut the whole lot out.. My mini slide hammer, This bit was particularly thin thanks to the seam sealer, so I cut it out. Pretty ugg, but I'll skim it with love Did the puncture as well.. I'll do some more tonight..3 points
-
Remove bootlid, apply tape and yellowpages I have no idea what I'm doing. STAY AWAY RUST.3 points
-
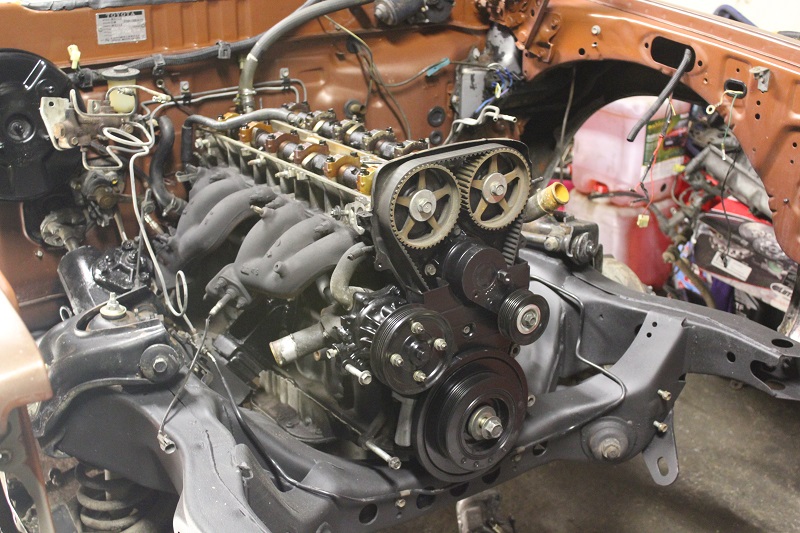
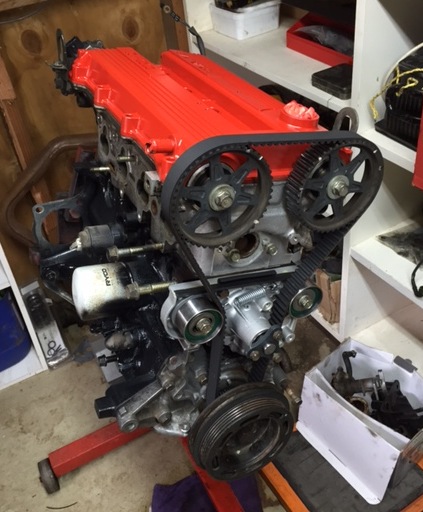
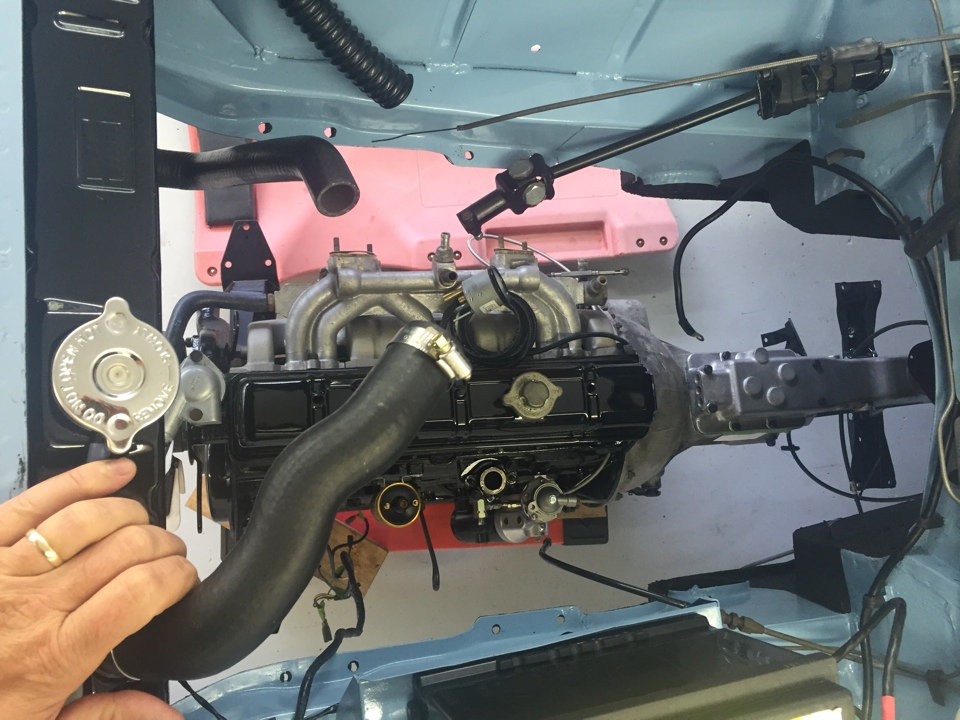
motors starting to look the part, new water pump and timing belt kit, ditched the belt covers. need to finish cleaning and painting the rest of the brackets/pulleys/inlet and alternator ect, also need to work out how to mount the coils on new rocker cover. hopefully pull out the old motor this weekend
2 points
-
Now chuck in rear window add dodgy wof from Tane and drive to fielding for swapmate2 points
-
Literally just been reading through your build thread, the race car looks absolutely epic man, good to see my money is going to be well spent! Haha. Counting down the days to the first track day in your old/my new 101, I'll have to start a thread once I've done some stuff worth sharing.2 points
-
I took my sectioned tail unit to be plastic welded back up, big props to All Bumper Repairs in Kilbirnie, had it ready the next day and did a fantastic job. I have my sidecovers, lower fork legs and top clamp ready for blasting, need to strip my wheels so I can add the hubs to the pile.2 points
-
that's what mine was doing (precision air) loading up to 125 psi then venting back down to 90, just randomly started doing it. Pulled the pressure switch to pieces, it was pretty clean in there, but I coated everything with silicon spray and now it works fine.. well it did when I last used, I'll go out there tonight and try it and the fucker will do it again I bet..2 points
-
wrong gear..? wouldn't worry a 4age.. Re hilux diff. the lsd will swap over fine. some useless information: 4.88 carrier is specific to that ratio. none of other ratio crown wheel and pinions will go in the 4.88 carrier.2 points
-
Went and bought a timing light and learnt how to use it. Fuck what a difference! It's no rocket, but I did manage a little skid coming out of a roundabout and I'm not sure what made me grin the most between that and lack of twitching from the rear end! The 180B half shafts mod is a success Also had the exhaust fixed up today, it was all a bit of a mess but all good now so pretty much ready to go for a WOF2 points
-
This is me and Wifeys wedding anniversary so it's gonna be a hella romantic burger date2 points
-
Did you forget to install two of the strokes in the engine?2 points
-
2 points
-
Ripped into the trans too, unfortunately it's been so long I couldn't recall what bits went where (I really wanted to avoid that situation). Thank fuck for phone pics. Thought I'd lost some pan bolts till I found these brackets etc in a box, what went where was a head scratcher till I scrolled back through some images... I've never looked into an auto trans before, first thought here was shit look at all that crap... But after a wipe up I realised these bits had fallen out of the filter when I rolled it over, and it was actually pretty clean inside... And a new filter made it look pretty flash... I cleaned out the pan and gave the holes a tickle with a hammer to straighten out the dimples... And all together, also chucked some heat shrink over the tatty wiring, couldn't get it as tight as I'd like as had to slide it over the plug, but I'll tape up the join and should be all good... I also checked I had torqued the flywheel bolts and was contemplating mating the engine to the trans when a mate came round with beer, so that's pretty much where things stopped...2 points
-
Spent some time liberating the rear screen from the green turd yesterday. I suspect the green one was a low spec model compared to the orange GSR as it doesn't have rear demister. Spent a bit of time with some window cleaner and a razor blade to remove the lichen and funk. Perfect. And so the green one was parked in an open yard next to SH3 since the year 2000 it would seem. Subsequently anything easily removed like lights, trim and badges has been. Funnily enough, this pair of badges don't appear to be worth stealing. May order some window rubber I think matches from Basis' selection this week if credit card says yes. Tell me stuff about window demister kits and tetanus here. //oldschool.co.nz/index.php?/topic/22150-waimaks-gsr/page-192 points
-
So, back in October 2015 a nice OS member from Wellington sent me this Snapchat of this glorious car, with all glass attached. In the mighty Taranaki/Midhurst. Got pretty excited, hoping I could get me a rear window, quarter window latch and well anything really. Did some streetview sleuthing® and google stalking™ and managed to track down the fella who possessed it. He reckoned he'd sold it some time ago, and the bloke was yet to pick it up. Fella reckoned he'd get in touch with the bloke to see if he still intended to take it, as he had already paid for it. Followed up every few weeks until recently with unsuccessful phone calls. Till a few weeks back he said that no, the bloke didn't want it anymore, and if I were to reimburse his purchase price I could take it. This is how I spent the most I ever have buying one of these, $200, robbery I tells ya. So yesterday I set off from the lovely sunny coastal eastern Bay of Plenty, and drove the width of the country to the also sunny coastal western Taranaki district. Was greeted by this mess, half a dozen cars deep and with a few more bits missing but it has the crucial window I need and hopefully some more is salvageable. Aired the tyres, managed to jack it up somehow and un-seize/disassemble the rear brakes and fit two OK rear wheels. Dragged it kicking and screaming onto the dolly and then drove back across the country. Made it home fairly uneventfully, although there will be a decent amount of debris trailing I think. Tell me about the sickness here. //oldschool.co.nz/index.php?/topic/22150-waimaks-gsr/page-182 points
-
So fetched this turd burglar out of its hidey hole, got it next to the other newer thing. Man it lookslike/is a rough piece. First eyeballing tells me the rear windows may be the same. Still got to assess which one is less of a dog. Barn find? Is it worth money yet? I bought a dolly, seems to work, needs finishing up/winch. Tell me how I should have bought a trailer. Gross Discuss these unloved misfits. //oldschool.co.nz/index.php?/topic/22150-waimaks-gsr/page-162 points
-
proper job buddy. You deserve a pie. Not just any dried up old meat sack from the servo warmer mind you, a pudding pie. With ice cream.1 point
-
Rally Prep Part 4 Kirrane Automotive Has stickered me up too
1 point
-
Going to give it a red rocks test run and see how upset-tingly slow it is offroad. Then might get the cheqebook out after all this . . . more power is safer after all?1 point
-
id rather not go and cut it like that just encase i go down the track of wanting an original bug with standard wheels on it one day or if i sell it and some one else does that to it. still researching heaps about bag set ups and i may have scored another pan to build a bag set up on and go from there1 point
-
Some people may have seen some chatter in parts wanted. But what eventuated was me being convinced to just make what I wanted on CAD. For ages I've wanted a nice raised txt rocker cover. Next to no aftermarket options for the 18r bar some super rare items. I've gone for a TRD 3k-r style cover as my engine is loosely similar to that engine. The letters will be raised 4mm. Just need to learn how to make cnc router tool paths and I can hopefully cut it out at work.1 point
-
I've checked in with my tyre guy, and he says he has to split them because of a tall rim on the wheel. He's given me a recommendation for Royce Clive Engineering, who he says will get a rim and make up a wheel to suit. I'll report back later.1 point
-
Woops... Better not do this again or I'll have some rods coming through the block to say Hi1 point
-
Should work. I was going to do this until I found a drift spec (lol) LSD head with the correct ratio.1 point
-
Cool idea, thanks for sharing! There is quite a bit of room in there, a friend has sent me a couple of photos of a local Sachs bike with a rotary with a cvt gearbox conversion so i may try get into the Scootling store to have a look at that for ideas as well1 point
-
if its just a single skin, and you are not weakening it, i cant see a problem with that1 point
-
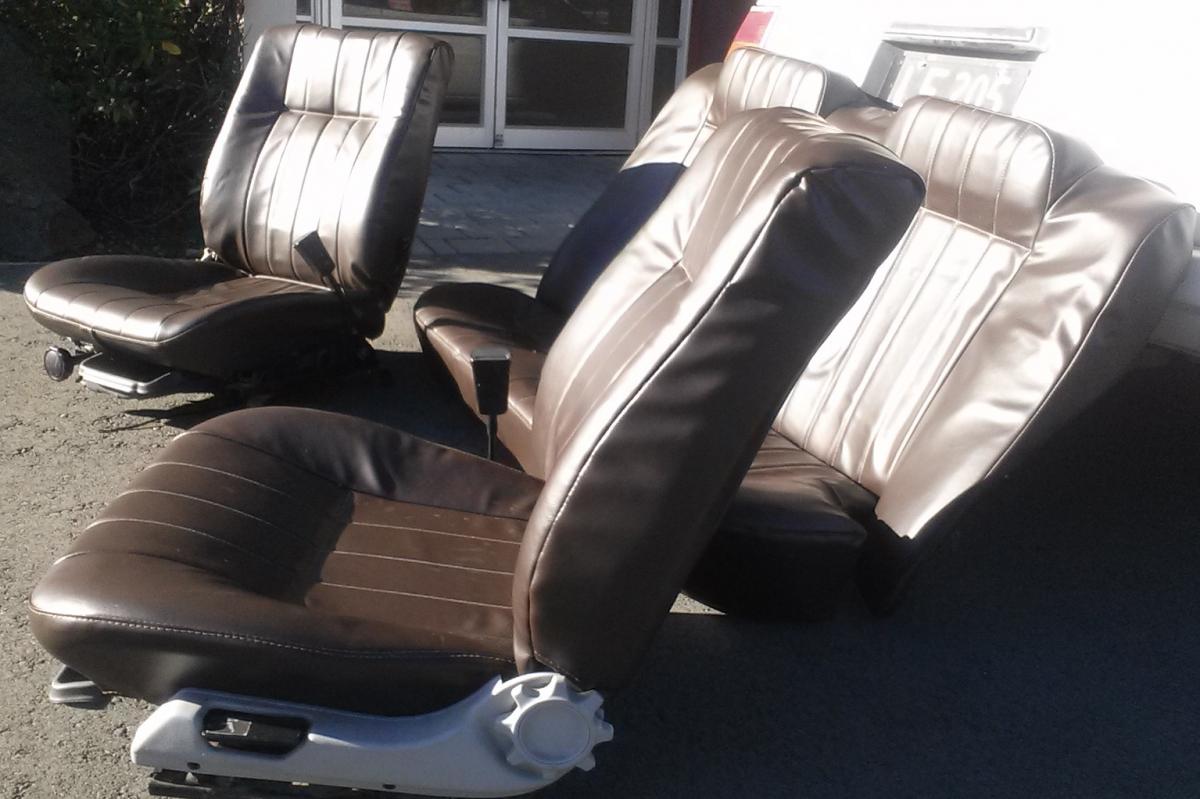
The seats are back from being reupholstered, Should fit great in chocolate brown. Need to get carpet sorted now then re-assembly shall begin!
1 point
-
The extent of the problem;1 point
-
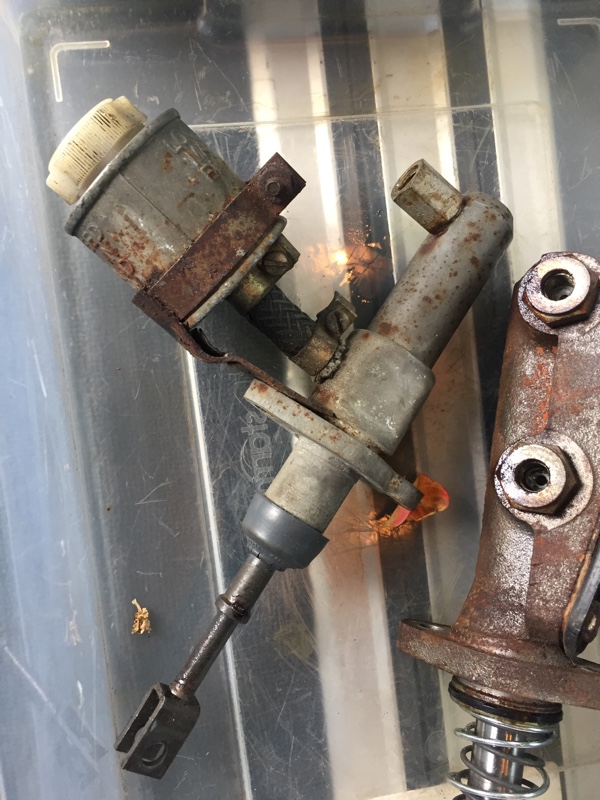
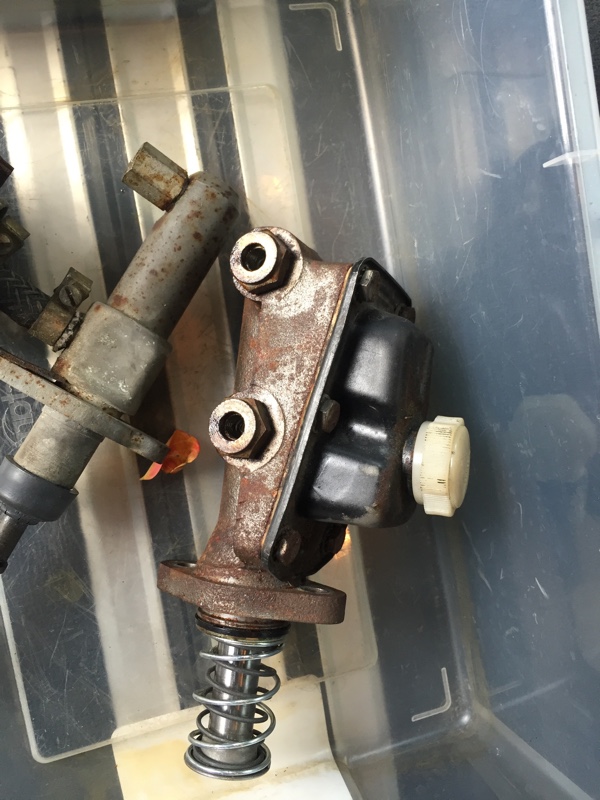
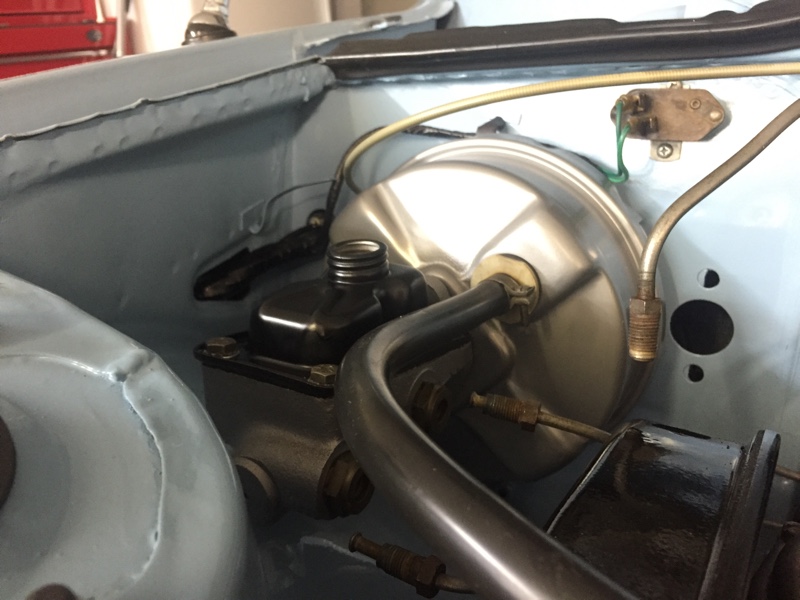
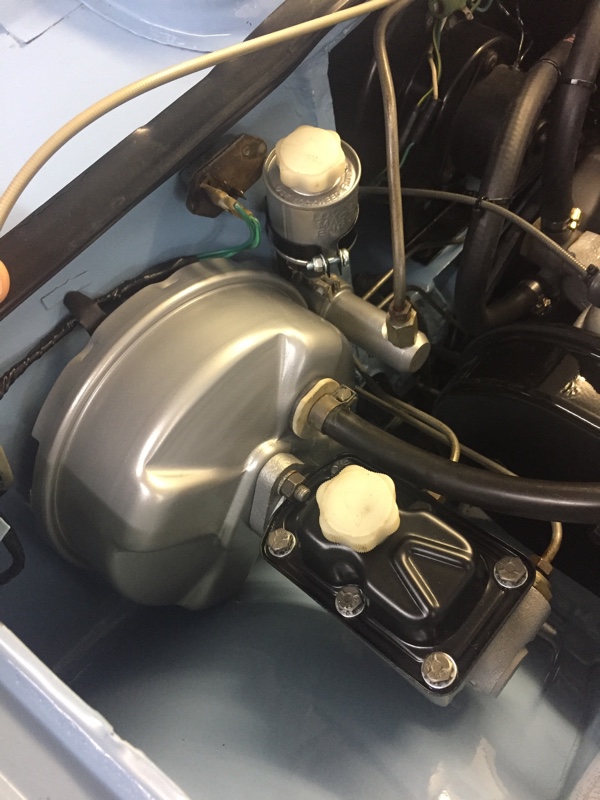
Finally got round to stripping the servo and master cylinders, repainting them and throwing in new overhaul kits. I'd been putting these off for a while but they turned out pretty easy to do and now I know that they'll give good service for at least a few years...
1 point
-
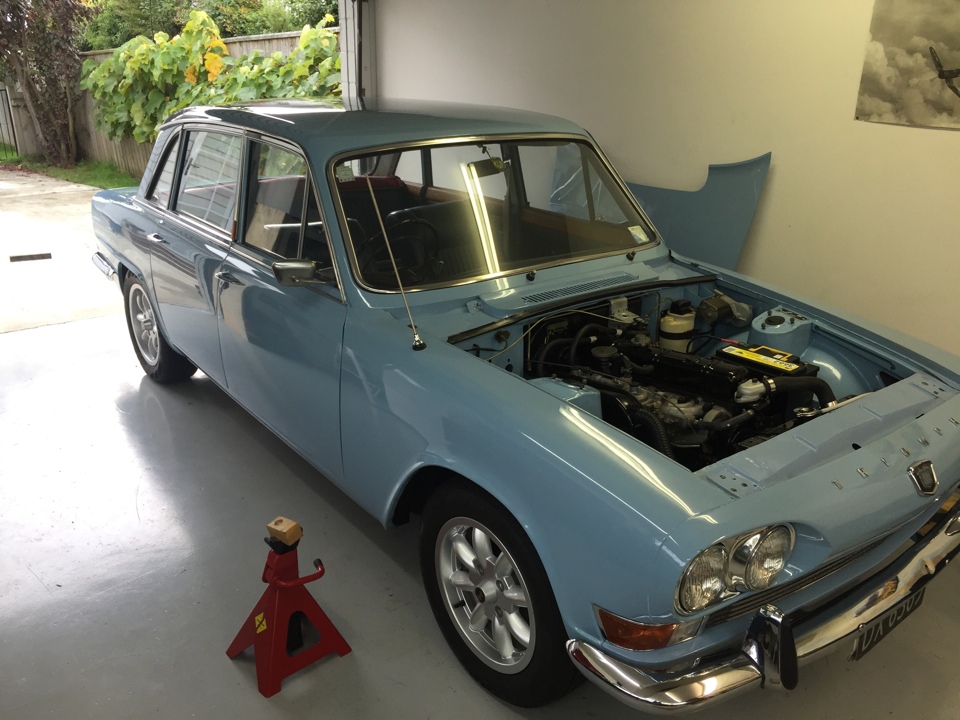
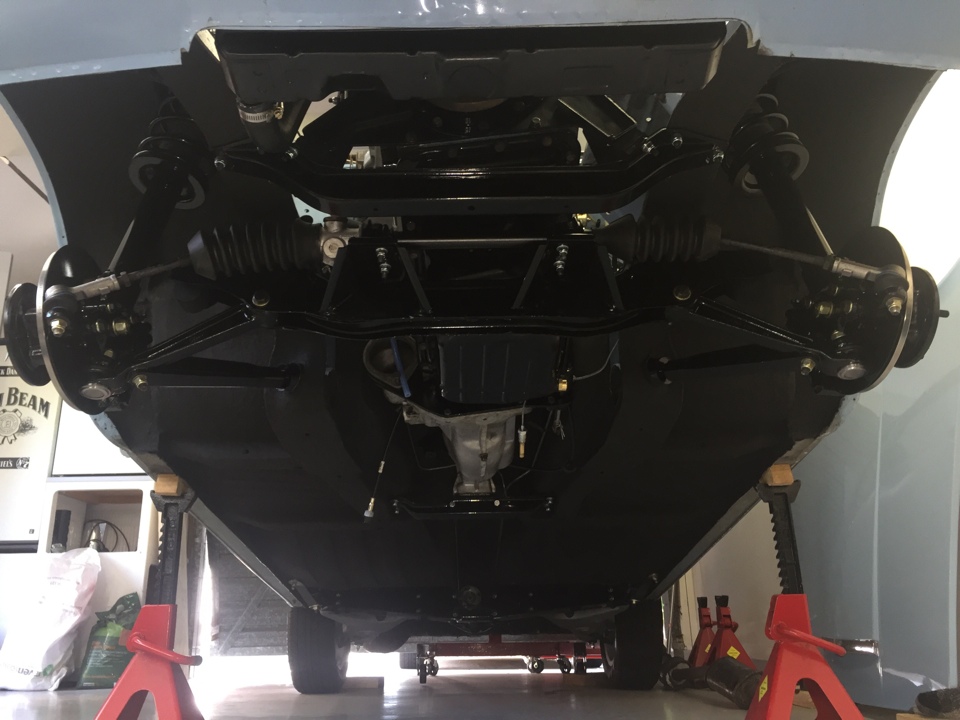
Still need to rebuild the dizzy, do something with the exhaust, and sort the brake servo and master cylinder for the brake and clutch. Plus a whole lot of other small shit. At least it's on 4 wheels for the first time in a year...
1 point
-
1 point
-
1 point
-
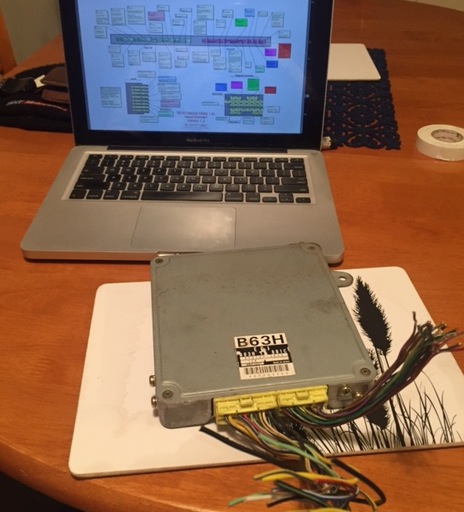
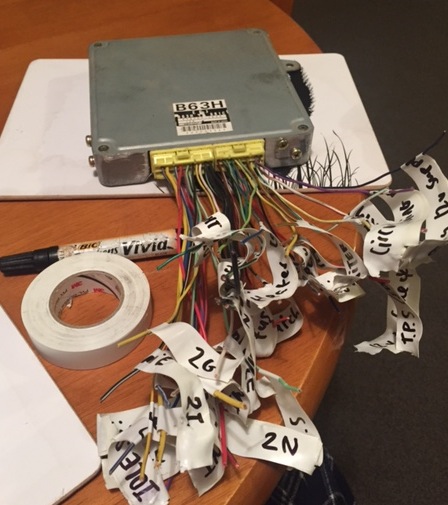
found a sweet pin out diagram for the mx5 ecu so thought it might make life easier if i label all the wires. going to make a mounting bracket to fit the ecu up in the passenger kick panel and maybe put a fuse box and some relays next to it. this is Teddy degreased the motor today, ready to strip it down for cam belt ect
1 point
-
Paint stripper is no match for the 40 year old paint the panels are coated in. Gona have to stripdisk it all off. Welp1 point
-
So the first piece from the Green turd made its way onto the Orange turd this afternoon. One functional window latch, has been broken for nearly as long as I've had the car.1 point
-
So yeah, I'll throw this piece in this thread incase it isn't worthy of its own project thread. Will give each car their own posts though incase it does become a project? (mods does this logic work?) Went to Ohaupo auction last weekend after learning of this thing, thought I'd go check it out. Was unsure about the rear window being the same as the GSR, and it is pretty rough/has the rot. So I bid on it anyway and won for a suitable price I thought. Reg on hold, last WOF in 2009. I found a photo and TM listings from '09 and '05 out of curiosity. http://www.trademe.co.nz/Browse/Listing.aspx?archive=1&id=38143743 http://www.trademe.co.nz/Browse/Listing.aspx?archive=1&id=248753609 '09 TM listing photo Headed back over next day and retrieved. Will endeavor to get GSR and GFT side by side and figure out which is best and which bits the same. Has orig engine which is 1400cc EA63 with twincarbs. Seems like it might run OK with some attention, has some melted charging circuits and no brakes. Different side windows and grill/taillights to GSR, and dope blue interior. But essentially the same. Pillarless wow, blue wow. Leone thing. Blue squiggles. Ruined and blue What is this logo/symbol? Question my condition here. //oldschool.co.nz/index.php?/topic/22150-waimaks-gsr/page-161 point
-
BOOM ! After an extremely painful experience the car has been painted . unfortunately not quite end of paint saga tho . they didn't mask up door jams propley so over spray was all in my door jams and on some of the side doors were they meet .... And on inside of bonnet.. Oh and boot fuck sake. So off it all came to respray it all for a 2nd time Used up every last drop of paint and finished up at 4am today with just enough time to drive home n mate to shower n back to Aussie he goes . he is the fuckn man may I say the least. Anyhow I'm shattered like fuck will get a bit of paint Monday so they can fix their overspray cut n polish then cars off to get an exhaust made then WOF. I'll let the pictures do the talking . they don't call him "glass master Adam" for nothing1 point
-
Another update getting closer n closer now !! Car has been bogged up all panels aligned had 1k primer bit more blocking bogging etc . But now she's just had 3 coats of 2k primer ready for Final blocking and to fix any little imperfections we find . She's bloody straight n looking schweeeeeeet Pic dump Will be blocked back again 2m evening and fixing little bitz then another panelbeater who is really good with 40 years experience (he was too busy to take on my car unfortunatly) will come check over car make sure all ok which I'm sure it will be . Painter coming over 21st of august to paint it. Will keep you posted thanks for looking1 point
-
Couple weeks ago I decided to get my wheels tidied up .. got em back yesterday really happy with how they are now to seal em up n chuck em on car .. Tires being used r 185/55/r14 .. thinking of increasing rears to 205/55 or something of similiar for something decent.. 9" rim Here's some wheel porn here's what they orginally looked like Got wheels taken off bead.. Tires r a good fit lol centre's were tigged to the rear lips had em chemically dipped n acid dipped to clean em all up Even took radiator surround and bonnet hinges to be dipped. Centre's went off to powdercoaters . Used Brian n Whyte in kingsland nice guys and really well priced . 40 bucks per rim to go metallic gun metal grey and then clearcoated. Front bands I took to progressive electroplaters n polishers in new lynn travis is the guy to see he's awesome. Here's finished product . What a difference the bands are they are like mirrors now. Thanks for looking1 point
-
Alright, So the cars now handled a pretty good run since ^ then. Palmy- Nats- Gymkhana(roughly 5th place!??)- Welly- Back to Palmy- Auckland- Hamilton- Rotorua- and finally home. ~2200km in 7 days sitting at 4k-rpm. I'm pretty pleased with how its gone. Exhaust + rear inner guards have taken a hammering, might weld a flexi into exhaust to try and cope with the occasional scrape that occurs. Brakes are still a little poo poos, after a mild fang through the Rotomas, there was a bit of brake fade evident, along with the pedal feel I'm still not happy with. So that might get some attention. Getting supplies in Turangi with Vintage Grumble Mid cruise Would trade again A++1 point
-
Got Wheel alignment on friday, shit was way out. Will be attempting to remedy wheel bearings early next week, then its REGO, insurance, and NATS Exhaust clearance @ WOF height I spent some time attempting to strip paint off some of the other 14' SSR's I have. What a cunt of a job, I hate paint stripper and I hate meshies now too. This is the best I've been able to do so far, might just slam some tyres on there and say get fucked. How it looks for WOF Photoshopped matching wheels And a few other random shots. Also, found LH lower balljoint was fucked last weekend, and looked very similar to the same item on Brumby. So pilfered one off my crashed Brumby on Monday night. Forgot about it untill Friday when during my lunch break I concluded it would be a good idea to attempt to fit it for W/A. Turns out it was the right balljoint, except I had overlooked that the GSR's one was riveted to the lower arm with 10mm rivets, and the Brumby item with M14 nuts and bolts. Enter angle grinder, chisels, drills, and me getting very very furious. Lunch break was extended by 1hr, but got it done with minutes to spare. So yeah, progress is on track.1 point
-
Todays update is bought to you by Nokia cellphone camera, fuck! Short video of the exhaust, poos I know. http://s8.photobucket.com/albums/a28/waimaks/GSR%20coupe/?action=view¤t=Video000.mp4 As it currently sits, no longer as beached on hoist as it was, still gets beached, but not so much. Currently ~80mm at front with adjusters wound 100% down. The inside of my boot with the cutdown and painted billboards removed, note braces and safety fuel tank location. The view from in the cabin with the rear seat squab removed, note safety fuel tank location pt2. Also please never crash into me, I like living. Fuel tank etc removed, view straight through. Rear end droop. Add some more of these into rear trailing arm inner mount = more camber, Techically I should probably have not put them back in to combat the camber I've gained by lowering, but my argument is that they would get lost, so back in they go! Pile of things sitting about. Have a great day!1 point


This leaderboard is set to Auckland/GMT+12:00