
Leaderboard


Popular Content
Showing content with the highest reputation on 04/28/16 in all areas
-
time for low. 2016-04-28_05-13-11 by sheepers, on Flickr 2016-04-28_08-13-30 by sheepers, on Flickr oh and also this is sold. a guy i work with is super keen on it and we've agreed a price that we're both happy with so its sold. i will still be finishing it to the level that i was going to (not much to do now, just carpets and cert really) and then its gone.8 points
-
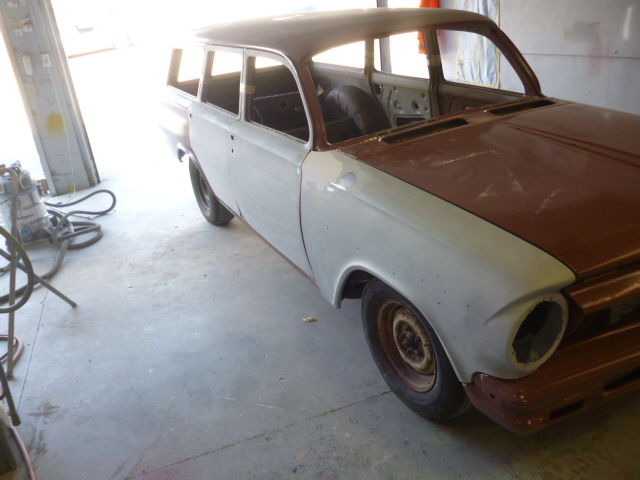
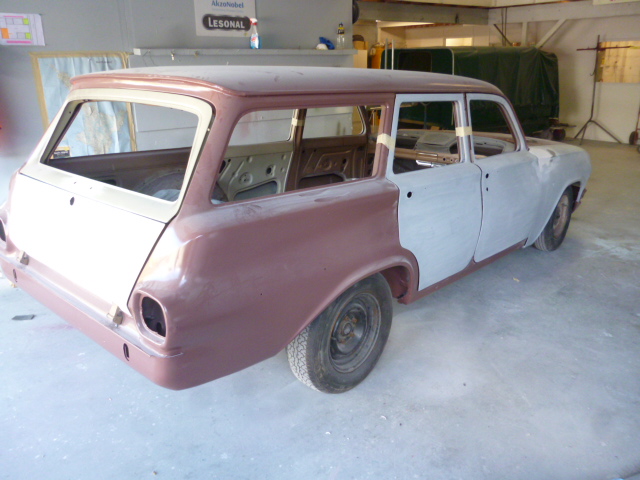
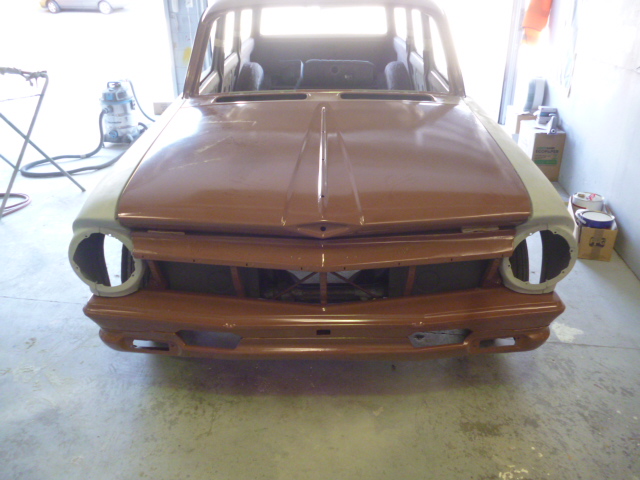
Got some photos from the panel beater yesterday. All panels on and gapped. It is almost a car for 5 minutes. everything will be ripped off for priming and I get to take the body away for the next stage. It's booked to go to A1 exhausts where chassis connectors, engine mounts, steering column and a heap of other stuff will be done.
 5 points
 -
2016- 2016-04-26_05-47-04 by sheepers, on Flickr5 points
-
i extend an invite around to anyone who wants to conduct direct a/b finger testing4 points
-
it looks nice but for its insulation qualities its an expensive joke wrap works 999999999x better i was super dubious but had it done after reading multiple people on the internet saying that it is as good as wrap it is not those people are liars4 points
-
And tried for 300 degrees by plugging all unused ports and heating at full blast from both ends, then had an oops... Who knew that cotton rags would burn at 300 degrees...? And with new rag plugs, got up over 300 surprisingly, didn't hold it for 30 minutes however due to fire risk and my good gun starting to melt, so we'll see how it goes... While things were cooling I sprayed the drippy air cleaner again, typically got bugs on the bit I'd just done so it'll probably look worse than if I'd left it... And even after that the headers were still hot as I hung them in the shed. No idea if this'll work or not, the temp control was a bit random, but the paint is definitely stuck on better than when I started, also got a few marks where the pipes were laying on the cardboard edges. Worse case I'll just spray some more on once the engine is sorted, and cook them according to instructions in place, an interesting exercise anyway...3 points
-
People talk a big game, up to the point where they get asked to finger Daves exhaust port.3 points
-
In the defense of ceramic stuff. My understanding is that ceramic coating only works as a reflective barrier. So if its between the hot exhaust gas and the metal, it does something useful. But once your exhaust pipe is hot, ceramic doesnt stop it from radiating any heat that's already in the metal, to the outside world. Example - Porsche 944 turbo had ceramic coated exhaust ports but it would be useless coating the outside of the exhaust manifold in the same stuff. It doesnt do the same job as heat wrap. For conductive heat (like engine block heat soaking the intake manifold via conduction) then placing a high R value material between the two items works really well (8mm thick phenolic intake manifold spacer works awesomely, 20 micron ceramic would be useless) But for radiative heat, it's a different story and ceramics can earn their keep. Example... Gold foil in the engine bay of a McLaren F1 keeps engine heat away from carbon fibre panels by reflecting it back. Some things like loose fitting aluminium foil or space blankets work rediculously well, because they're reflective, create an air gap, and have very few points of conduction for the surface area they cover. Some examples of heat management in my car, either factory or by me: Radiant: -Alternator has reflective foil on the rear of it to protect from radiant heat of extractors. -Extractors have heat wrap to limit radiant heat into engine bay. -Fuel rail has thick coating of ceramic paint to prevent radiative heat from the hot engine absorbing into the rail. -Intake manifold has thick coating of ceramic paint to reduce absorbtion of radiant heat from engine bay. -The factory extractors have a 3 layer reflective heat shield made from stainless and ceramics Conductive: -Intake manifold has a rubber spacer to prevent conductive heat soak from engine. -Fuel rail has plastic washers under the bolts, and plastic upstands to prevent conductive heat into the fuel rail from the engine. -Alternator has plastic washers to the bracket to limit conductive heat from the engine.3 points
-
Yuh I've heard of the cracking myth too, I think for the most part that only applies to cast manifolds (which crack on their own frequently enough anyway) but then aftermarket manifolds could be completely hit and miss on that since there's so many other variables involved that could cause them to crack. Wrap made a massive difference to my turbo deez wag, mostly in that it no longer cooked my left foot on the trans tunnel.2 points
-
I just googled jzs130g body mounts and that was the first link.2 points
-
It'll generally be near the thermostat area. It should be 22630 on this diagram so look in that basic area of yours;2 points
-
People might be like "It's R value is better than heat wrap" But R value is based on insulative properties of both materials both being an inch thick for sake of comparison. if the wrap has 1/10th the R value but is 1000x thicker then it's a winner! As mentioned the lava rock heat wrap from Ali is magical stuff. Which makes it easy for you FlyingBrick as you've already own a roll of it thats sitting in a cupboard in my garage haha. I might be down in hamilton some time in next few weeks.2 points
-
Won this auction the other day. Have a soft spot for Crowns but wagons especially.A few people on here would have been watching this auction, Will be delivered up to New Plymouth later this week sometime, Failed on a few things, so will need to sort out; the list is: *HP lights to be replaced * Diff Cross brace rubber to be replaced *Left hand side Idler Arm * Front + Rear top shock rubbers to be replaced *Indicators to work *Steering drop arm ball joint to be replaced *Machine rear drums *glove box to shut *cracked rubber Body to chassis mounts to be replaced to start with I just want to get it rego'ed, which will mean having to track down above parts, made harder by the fact I live overseas mostly, however a lot of internet searches and phone calls should have it sorted. Once it's legal then will look into 1JZ-GTE, the biggest issue (maybe) will be the fact that these still run a steering box, and not sure if it will be a straightforward drop in or involve some mods. Wheels - alot of options, that look good on these|: I'm also madly searching Yahoo.co.jp for a set of these lights, found on the base model vans, and deluxes; if anyone has or knows where I could find a set in NZ give me a yell The headlight conversion makes the car look 1000x better to my eyes, so I need them.. Also if anyone has a set of MS137 / UZS131 88-91 alloys for sale let me know, the old man wants them for his Hiace, same as the set below: If anyone can help with any of the parts i'm after will be eternally grateful.1 point
-
Also keen to head back out to that golf joint at Muriwai for beers and wedges. That was a good day of yarns!1 point
-
Exactly! And a know a RWD box that bolts straight up I'll give you guys a hint.. Uses parts from a two different makes Friend has a 2GR in his aw11, 310hp on standard ECU with just headers. It's nuts! Just needs the RPM limit cut And yeah, price is partly why I'm in no hurry1 point
-
Factory Altezza exhausts are heat wrapped. They're bukakk'd with chopped strand sort of stuff and then clamped between two stainless steel shells that surround the 2-1 section. Like top set in this pic1 point
-
i can confirm that my pipes are corroding under the wrap (real asbestos i believe)1 point
-
I always thought the thermal fatigue applied mostly to stainless manifolds that were wrapped.1 point
-
It's not turbo but it's super inefficient so the exhaust is hot, it looks brand new. I did sand blast and paint straight away (you want to spray it) so perfect prep. I didn't wrap mine and I wish I did, so much hot in that engine bay.1 point
-
see it as really expensive rust protection. I used some expensive paint ($50 for a tiny pot, cheap by comparison, POR15 I think) on my headers and they look perfect after 5 years, do that and then wrap, gotta prep shit real good like.1 point
-
http://www.jp-carparts.com/toyota/partlist.php?maker=toyota&type=331170&cartype=34&fig=51031 point
-
Yep I know the clip you're talking about. The problem with the way they conducted the test though, as mentioned in the youtube comments. Is that they used an IR heat gun rather than a surface temp probe. Unless you enter compensation values, an infrared heat gun will measure something shiny and something dull at different temperatures. (Emissivity changes) So it massively biased towards showing that the painted pipes performed exceptionally.1 point
-
It likely looks something like this; So basically just something that has a two pin plug on it that's positioned in the flow of the coolant1 point
-
Isn't there a vid in the exhaust tech thread about ceramic coating? Maybe it was a vid I watched that came up after one of them, but according to the vid it made a massive difference to heat output. No increase in power I don't think, despite them claiming it does, but this was on an engine dyno.1 point
-
Man the R value logic is great- I hadn't actually considered this!1 point
-
2GR would be friggen awesome in a Carina! Finally Toyota made a decent V6. Rather than the junk 3VZ etc that people swap into MR2s. They're still pretty spendy though at last check, especially since you need to factor in an ECU that can run 4x VVTI.1 point
-
man all your pics have dropped out1 point
-
I was going to convert my one but with how tidy she is Id rather keep her factory. I only need one part if you come across it. Its the plastic trim piece from the bottom of the rear door. They are cool wee cars. Very suprised at how well it goes for the 1400. Im going to try get some better photos in the weekend. Have you come across any nice old style accessories like chrome monsoons or Louvers?1 point
-
Yeah the guy I bought it off said they didn't want it to turn into a drift hack and were pretty picky on who they sold it to Bloke I bought I off was going to drop a lot of coin into the car but things changed as they do You can tell him it won't be a hack. And that I've already replaced some broken interna bits and am super stoked with it. And it will be mint once I finish my other project late this year or early next year and see a good over hall with no "JDM" or tasteless mods, stickers or hacking1 point
-
Gah, its easy to forget how much a conversion can cost when your are trying to sort out the whole lot at the same time haha Just purchased EFI pump, fuel lines (need to replace all rubber lines for EFI hose), pipe fittings and hose clamps. Along with a fuel pump bracket. Total of 253.60. Not to bad I guess Actually think that is the most of the spending sorted now, Just need to do rear exhaust section, and some rear tyres. Damn......... Oh and buy a 32mm hole saw to do my clutch master cylinder mounting. WHO DOES UP CARS! Slash might need some recovery time before I start on the next one.......1 point
-
Im pretty sure if you played "join the dots to create a drawing" with your mileage graph - there's a model arching her back in there somewhere...1 point
-
Sweet as bro, another project thread for the ol mirage. I'm crazy for these and own two of them. One I brought back in September for $800 with an automatic trans. Which had the same troubles you described. Couldent be effed with flushing it and so forth. As much as I would have liked to try, and keep the auto trans I didn't and converted it to a manual from one at the Zebra Wreckers yard here in Auckland. They haven't been too hard, to get parts for, which I'm surprised at, didn't need to scrap my green mirage for the manual trans thank god. Keep up the good work, if you need help you only needs ask mate. Cheers1 point
-
Bit of a saga with the headers, Any coating (incl ceramic) requires curing, and doing it on the vehicle doesn't work in with the running conditions to bed in a new cam. I debated leaving them as-is and doing a proper job later (priced ceramic coating with Elite in Ch'ch) but I can't really be arsed pulling them off again and didn't want to stick rusty old pipes on my shiny engine, so decided just to rattle can VHT on them to see how it goes... So a couple of weeks ago I dropped into the largest sandblasting place in Invers (a place I put a bit of work through incidentally) to ask about blasting them clean. 2 weeks later, despite me going in there twice plus leaving my details, hadn't heard a bloody thing. This disappoints me as I treat every job as a trial for bigger ones, and not being contacted pissed me off more than a little, this will be remembered when larger contracts come about... Anyways, did a google search for sandblasting Invergumboot, and Sievwright blasting/panel/paint popped up. Never knew anything about them but called past on the off chance to see what they could do. The GC there said sure, no probs, they boys had a window and as they were in the car I could get them done right then, and pick them up in an hr. Done... Crap pic but shit this saved some work, I'm over sanding stuff down and would happily pay for this service again. The bloke asked me how I found them as they don't advertise, and laughed when I said I had the arse with the normal outfit (Southern Industrial Coatings) and went looking... And I knocked off early and degreased, warmed and chucked a few coats of VHT black on 'em... These look pretty good now but I'm under no illusions it'll last, so I looked into curing them prior to bolting them up. I need to bake at: 120 degs for 30 mins cool 30 mins 204 degs for 30 mins cool 30 mins 315 degs for 30mins After my last shed cleanup I discovered I had 3 hot air guns (no idea how) so toying with the idea of using these plus an IR thermometer to give it a go. I know I can get the pipes to over 100 degs with one gun, so will be interesting to see what I can do, can always plumb in an lpg torch for bit of extra oomph. Worst case is I'll waste a bit of time trying it out, best case is it works and I have fun trying...1 point
-
Twinning Outer brackets are different so I had to drill 5 spot welds on each side to put the twin outer months on Just put bolts through the spot welds for the time being until I get some time to lines it all up properly. Gonna need to space the inside head light mounts as they sit in like its cross eyed. Probably use some TV wall mount bracket spacers. And of course wire it up. Thinking I might get some multi pin plugs so I can wiring them up so its one plug and wire the single ones onto a plug as well so if I decide to change back I can simple just unplug it at one point and plug the single plugs back on
1 point
-
Bit more low and the cleaner guards put on1 point
-
Picked up wheels from sand blaster today, so many runs to sand out of primer they put on...and a nice metalic something over spary all over all of them... but happy nonetheless here we have 6" hq rims x2 8" hq rims x 4 and 7" val rims1 point
-
"Your search for the term "temporary" returned 286 results"1 point
-
Yokohama AD08R Still a road tire, but pretty aggressive tread pattern and compound. Not noisy at all like R888s and dont pick up marbles off the track. They felt faster than the very old R888s I had last time, but would be a fair bit slower than brand new semis. Which gives me the shits as it felt super fast in corners as is, miles ahead of previous! Full slicks on a hot day must be epic.1 point
-
Totally reckon it need to be modified to match the height of a normal mower. With 50-60mm, honey I shrunk the kids would have been a non-event and they'd just stand there meh'ing.1 point
-
So she is packed and ready to go We Headed west and stopped to admire the view of the Alps: Then we entered the beautiful weather: It was about 20 min later I was trying to climb a steep muddy track in an outlander that i learnt the joys of sliding backwards with wheels spinning and the choice of jacknife or roll. Needless to say nothing was damaged except my pride. Some kids A bird How's the serenity? Little Hunter Cooking stew Too much cream.. fuckit , it will simmer down..(and did) Some goose breasts.. I am getting a collection of cast iron now Whats in his Pikau?1 point
-
I did donuts inside the oriental markets building in my r32 once Actually my Mrs did a film assignment on 'town' life one night, followed some girls going to the loaded hog, and us cruising round town. I should see if it is any good1 point
-
anyone keen for getting messed up and doing town laps sometime soon?1 point
-
So after my bust on the 180sx wiper motor I did a bit more research and found that majority of Datsuns of similar vintage shared (or 95%) the same wiper motor. There are some Honda ones you can use and various other things but mint16 on NZ Datsun had some 510 motors for sale so I contacted him and picked up two of those. You can see they're almost identical except the centre linkage shaft is longer on the Hakosuka one. I took apart/cut the plugs off and ran some quick bench testing. With old cars it's always better to have more spares than less and it's a good thing too as one of the motors was not as good as the other. One was better than my current one though so I used the not so good one as a sacrifice so I could take it apart without concern and learn about how it all works. What I learnt initially was how much of a huge pain in the ass these bushes can be, and how much of an idiot they make you feel like.. that is until you work out/research how to get them to stay in their sprung houses. Then you feel like an even bigger idiot, albeit an enlightened one. This motor (which was the best of the lot) looked like it had some moisture inside it sometime in the past. Nonetheless it worked OK so after giving it a little clean up I re-used that part. My main quandry was how to get the linkage shaft out and move it from the hako motor to the 510 one. I tried for ages to remove a washer on the outside to pull it out but then thought I'd see if it were possible to remove it from the inside, jackpot! Once this cover is removed you're faced with this. Pretty straight forward system. Simply remove that nut, couple of washers and the park position thing and a circlip then you can see this. Just lightly knock out the centre shaft and it pops out the other side. Easily enough to reverse the procedure with the hako shaft. Better look at the size difference. Bigger is better huehuehuehue Taking the advice of many, I also tried to lube up this linkage area. I couldn't for the life of me get the washer clip thing off the top but it was quite stiff to move around. I did clean it up and gunked it as best as possible and it definitely made it move more freely. So after putting it all back together it's not a major improvement but definitely an improvement. Also for some reason the park no longer works despite wiring being the same, the motor just seems to run continually so perhaps something isn't quite exactly the same. Anyway, don't need that so I've not plugged that in for now. I think definitely for a proper decent upgrade the Honda motor could be the way to go, but I learnt a bunch from this so I consider it a win win. I also learnt that I need a new battery and a trickle charger.1 point
-
All the way though this project I've been conscious of being overwhelmed with the size of the task at hand, attacking one mini project at a time, ticking them off, moving on to the next one. Looking though my photobucket the other day I noticed how few of the photos actually look anything like a car, just red,brown, grey metal shapes, every now and then it's great for the motivation to mock up a few panels, sit back with a beer and bong, and picture the day it's all back together and rolling the streets again. photoshop is also great for this. hell yeah.1 point
-
And assembly. As these things are so robust, it was really just a case of taking the best bits and putting them together with new bearings and grease, a couple of repairs, the odd replacement part and a bit of a polish up... And it was successfully used in the surf to city by my 4 yr old a couple of weeks ago (this was in the park afterwards, she did wear the lid during the event)... I've since found a period tool bag that straps on behind the seat, and some Winkie decals to attach. All the neighbourhood kids love riding 'speedy' the chain bike, and I've found if you lean it over you can do burnouts as the driving wheel skids it up. Win...1 point
-
Haters gonna hate haha ?? Me spending my money or you on yours?1 point
-
Finished installing the lowering blocks. Finally sitting at a ride height that I'm happy with. Rear suspension is pretty soft so gets pretty slammed with people in the back. At some stage I'll get a new leaf added and springs reset, but happy with blocks for now.1 point


This leaderboard is set to Auckland/GMT+12:00