
Leaderboard


Popular Content
Showing content with the highest reputation on 02/09/16 in all areas
-
Because im lazy.. and havnt made any updates in 8 months or so.. its close but still got a bit left to do. ill fill in the blanks when i get time.. image by matt postle, on Flickr image[1] by matt postle, on Flickr image[2] by matt postle, on Flickr image[4] by matt postle, on Flickr image[3] by matt postle, on Flickr image[5] by matt postle, on Flickr15 points
-
Weekend just gone took it out again. no drama's with tyres leaking or falling off. was a good day. mate took a few pictures. mate brought his suzuki beater along (previous owner rolled it) and tried to use it as a submarine the hiway maker7 points
-
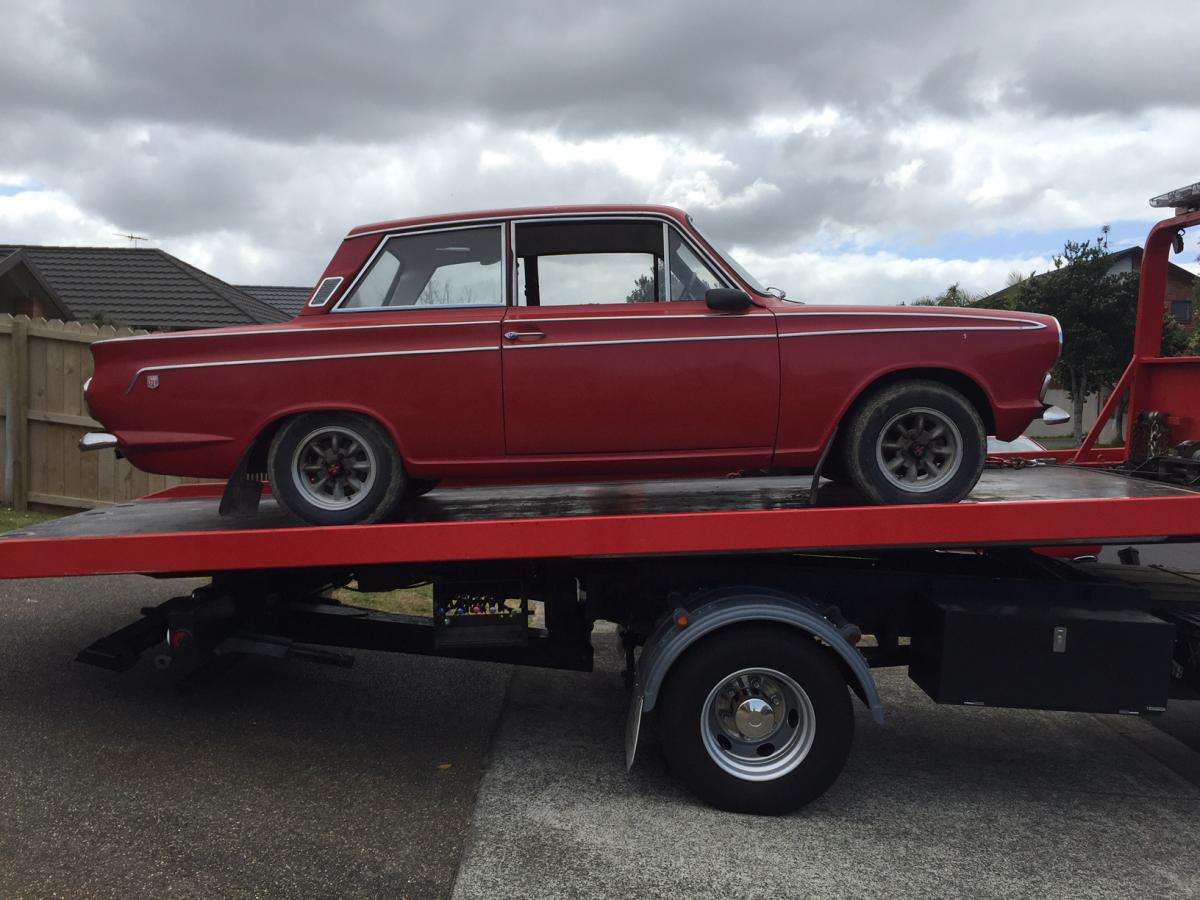
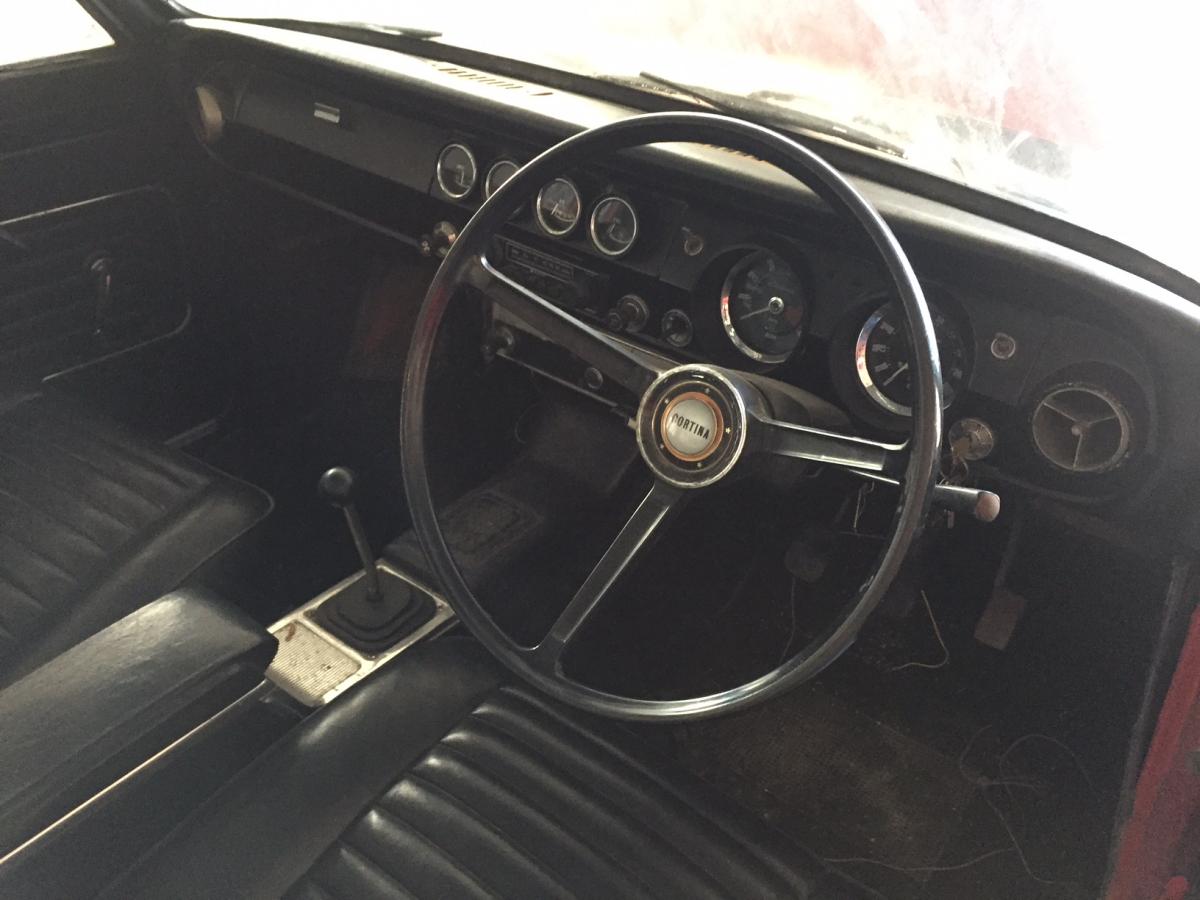
Hi all. I have just started a full restoration of my MK 1 GT 2 Door Cortina. Currently it is fully stripped and with Greg at Custom Metal Shapers. All the exterior paint has been stripped and it is very rust free for one of these. Unfortunately it was restored in the early 80's after I suspect it had a frontal and as a result the front rails and inner guards are a bit ugly. It would really annoy me every time I opened the bonnet knowing what was there so the front rails and inner guards are going to be replaced. The exterior will be finished as per the original Dragoon Red and all completely standard. Ditto the black interior apart from a Les Leston woodrim wheel. Running gear will be all standard precrossflow with period modifications. Engine is a Throbnozzle Racing pre crossflow running the standard 28/36 Webber with jetting to suit. Gearbox is fitted with a 2000E gear set and Ali bell housing, tailshaft and remote housing. Diff is 3.7 in an Ali Nose. Shocks all round are adjustable Spax. Wheels are going to be BRM 4 spokes from the 60/70's. Aiming to have it on the road October 2016
 4 points
 -
Have taken this out a few times. Got the front bead lockers on for the first day. the 2nd pair hadn't arrived. plus they wont fit over the rear brakes. Tyres seem to seat on the inner bead real easy. Turns out they also fell off real easy. only about 10mins in one went flat. put more air in this time. then later in the day the one on other side fell off the bead. Inner beads were too loose and burping air, then tyres just go flat of fall off. after some googling. it seemed to be a problem with some tyres rather than the rims. but my tyres in particular didnt get mentioned. after measuring the china steels. vs the beadlocks the china spec rims were at least a few mm bigger than the bead locks. so thinking the china wheels may have stretched the tyres if thats possible.. anyway, found all sorts of dodgy fixes. but ended up giving duct tape a jam. let them down to 4psi and tried to smash them off the rims in some ruts. seemed to hold fine?! parked up on side of rut, tyre folded up past rim lip, no leaks. seemed legit, so ready to take out again Grump. Also somewhere along the way cut the bottom off the gearbox x-member for more clearance doesn't hang down too bad now4 points
-
A long overdue update. After many promises of the Holden will be next to be finished at the panel shop there has been big progress over the last couple of weeks. Trevor the owner of the shop has been doing most of the work and now 90% of the cutting and welding has been completed. Here is a couple of photos that really don't look that different from while ago. I guess the great thing is that when its finished I know that all the rust is gone and it will be fill with fish oil so it wont be coming back any time soon.
4 points
-
So I refitted the frost/drain plugs and filled the block with a radiator flush treatment to see if that made any difference. Left it in half an hr then drained it thru the sieve again, then popped plugs and hit it with the water blaster... Blasted every passage in as many directions as possible, and got quite a bit of gunk out. The white bits were stuff that accumulated in the old alloy intake manifold after it sat for years... Looked much better after that... I know they're not perfect and it should be properly cleaned, but I'm trying to just do the top end, and I have see far worse than these, so we'll see how it goes. Dried out passages with air and the crappy prelim stuff is done - should be ready to pull the heads off next... Just needed to order the wife and No 1 daughter to push the old girl away for the night... I did help by mowing the bit of shaggy lawn they had to push it over...4 points
-
I've probably painted my nails more than you have yours, farm girl.4 points
-
Wheels rebuilt, cheers NZmoped for the new rims!3 points
-
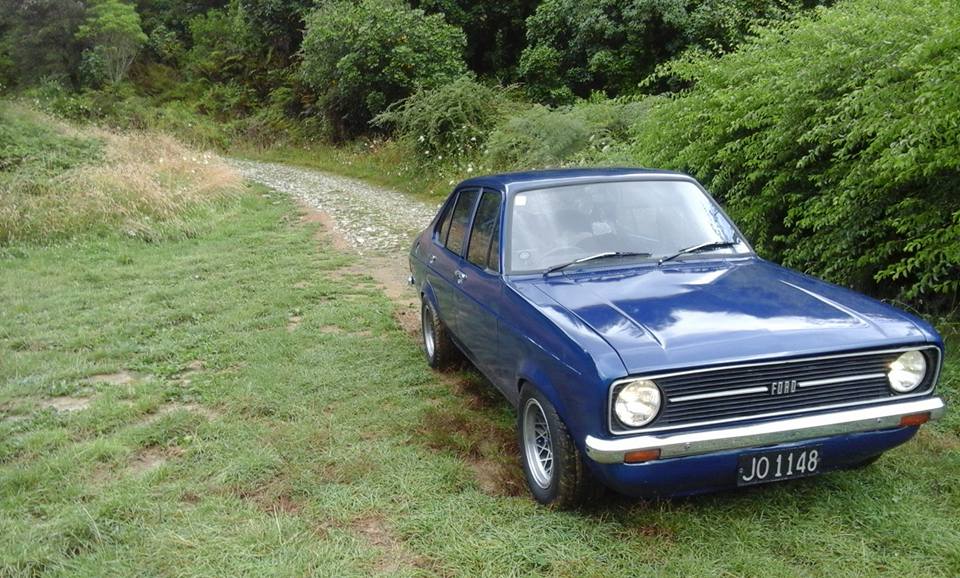
So short story : Test driving after fresh wof Week before Leadfoot CHOICE Drove Palmy Tues night fine.... Back to Dvk she lets go all water via split in the Radiator I had been monitoring (below temp sensor so I assume nothing to measure = very little warning) STINK Take the Day off work Wednesday head over to see Graham Ekins (Avenger/Humber club spares Guru $25 for new Head & Intake/Exhaust Gaskets Drop Rad off at A & D Radiators on Cook Street as per recommendations quote for $300 Head off Wed Night Head back on Thurs night / new oil filter Radiator ready Fri morning Install 11am Leave for Leadfoot 1pm DVK via Vinegar Hill (not testing fresh setup over Napier : Taupo's its 3hrs to Taupo either way we go from here) 808 miles @ 3500 rpms / 1300km Back to Dvk 10pm Monday Night mostly trouble free motoring SO STOKED car literally turns heads, and gets comments wherever we stop they are like Belly Buttons, everyone has had one or knows someone with one! only issue was a sticking caliper, was grinding metal / changed pads in the carpark at Leadfoot, made the last half hour into Whitianga interesting Fri Night will do a massive post with a dump of pics from the weekends adventures & a list of people to thank & congratulate, now to count costs & see if there's any money left for my Nat's entry3 points
-
So, time for an update. Canterbury Champs has been and gone, managed a respectable 8th equal from 29 cars. Reliability was the key there, although I wasn't without my own dramas. Have chewed through a clutch, broken a input shaft flange off the gearbox - snapped the dowel holding the throwout bearing, then the braided line and made one hell of a mess. Missed one meeting due to parts availability but managed some extra racing last weekend. Good to get some laps in - however I was battling a miss-fire all night which meant the car speed was down. - To be fair the car still had the same spark plugs, leads and coil pack from when I pulled it from the road car 3 years ago! I've also been struggling with the linkages on the shifter. Finally managed to track down a used Ford Prefect 100e shifter already modified to suit (this involves turning the gearbox on its side - which the Walford bellhousing has the capacity for this anyway. Instantly worked better, but I have had some problems with the throwout bearing from the prior disaster.. (O rings were destroyed, fittings were damaged) Missed one meeting due to parts availability but managed some extra racing last weekend. Good to get some laps in - however I was battling a miss-fire all night which meant the car speed was down. - To be fair the car still had the same spark plugs, leads and coil pack from when I pulled it from the road car 3 years ago! Anyway ; I had bought quite some time ago a MSD lead kit from Craig @ Pro Parts - so set to making them up - took me maybe 1.5 hours to do, however they're certainly a much nicer finish and fit! - As seen, I've modified the position of the lever so it sits forward and well to the left of the steering wheel. V-d out the join where I welded it, then also sleeved it. I've since drilled the base so it picks up more points on the gearbox, and welded some gaps that were causing gear oil leaks.. Thanks to Tim, Blaine, Matt & Troy helping on the car when they can - all hands make it easier getting the car on the track each race and far less stressful!3 points
-
Been awhile... last year. Oops. Had thought I had knackered the drive line before Christmas while transporting a baby grand piano... went in for WOF when I came back for holiday and it's only universal joints. Winning right there. Still have the V8 and that plan is potentially still on the cards. Issue is these things are actually starting to get rare... I dare say probably worth more in original spec than being hacked up all for a bit more power... and grin factor... very much on the fence at this stage. Currently running in totally awesome surf mode. That's all for now...
3 points
-
Found our old BMX in my sister's garage this weekend. I have a wee niece now and have been looking for a new bike project so here goes. These wheels are so pooozed. Some sweet stickers I'd like to get re-done. Definitely going to re-do the two frame pads, maybe have one which has my niece's name on it. Undecided if I want to keep the same style/graphic or think of something else. Gave some of the bits a wee scrub - comes up okayish but will probably just get them re-done. I'll never forget the guys face when I got my first bike sandblasted and I gave him a whole bike's worth of nuts, washers and my chrome bits on a big wire to get dipped. Or the guys at EDL when I took in a bag of mixed nuts to get new ones... I have the majority of it now dismantled, except the pedals - that can be tomorrow's job. Will try have a go at sandblasting it this weekend all things going well.2 points
-
Makara You say..... Cool! what car to take. IE not the VW2 points
-
so i finished sanding the roof last night so i will drop it off this arvo. ive left a little bit on the pillar so he can match it up. dropping my old clutch off to get rebuilt today at waikato clutch and brake.2 points
-
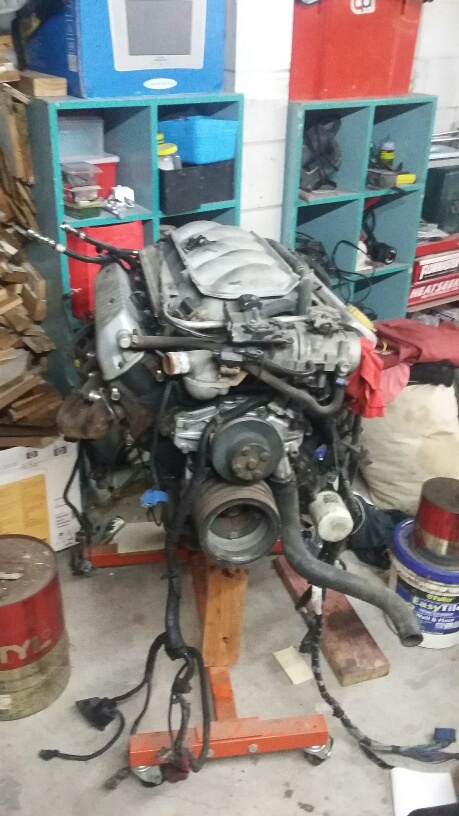
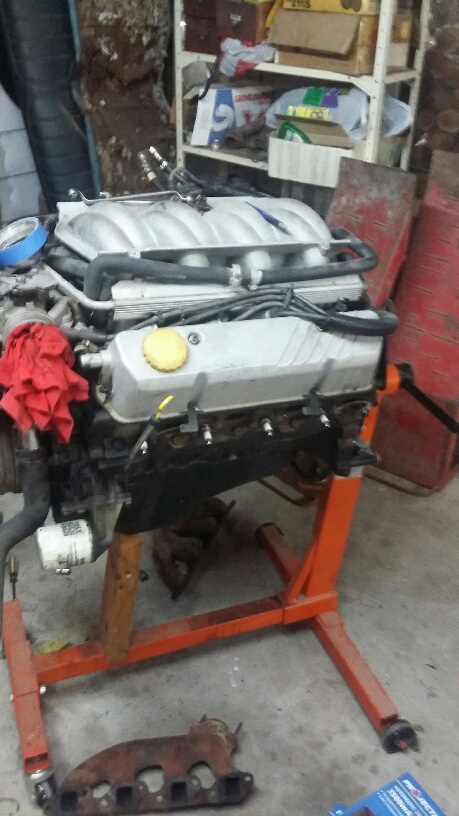
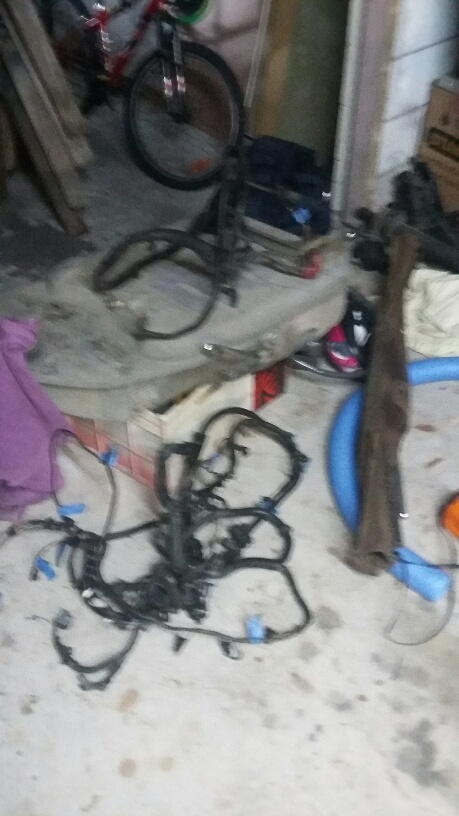
So in preparation for the changes to come, I removed the Inlet, CIS etc.. What surprised me however was the amount of Vacuum lines the car had, and then the amount that were broken, T'd off or rooted, certainly wouldn't have been helping when I was trying to get it running.. Rob has drawn a manifold up, and when time allows we'll do the first trial fit.. Amazing how much roomier it looks now! Discuss; http://oldschool.co....ith-added-moss/2 points
-
So, I hacked the guards up as I wasn't happy with the fit.. Used my original TF left front guard and that is fitting really quite nicely indeed now. Chevette guard on the drivers side, also the side that bore the brunt of the impact took me awhile longer however.. Properly bolted on this time, rather than just sitting on like last time. Bolted the halfs in place then welded slowly.. Discussion: viewtopic.php?f=18&t=154342 points
-
These are sweet! you need a jet engine2 points
-
Looks great from 5m2 points
-
It's only been 3 months of no progress, whoops. Oh well, back into it now. Decided against trying to make it out of round tubing so just used some 30x30x2mm RHS as it's much easier. More updates over the next couple of days hopefully.2 points
-
Time for a bit of a update; Welded the head plate, fish plates for chassis rails. Got green sheeted, had to tweak & alter a few things, lengthened the driveshaft. Took it out to a local black track for a run in, stopped, turned and seemed to go well, so rather than pull in and check I just went for it, went really rather well indeed. Made a few alterations after the test day.. Changed the diff head, radiator hose setup & fuel hoses. Near complete chassis Carby, Breather Setup Roof plate welded, hot work welding 10mm plate! Went to Woodford Glen for my first meeting in the car, had a fantastic bunch of people helping with the car which made for a stress free night, didnt have to worry about a thing. Proud to display RO Jones on the car, fantastic Job Scott & the team did painting the body, bonnet & dash! Stands out supremely well!! 33 cars fronted for the the night, I started all of them off the rear of the grid as I wanted to stay out of the way, whilst I get to grips with the car without pin balling around. First race went well in the fact I finished the race, 21st (22 finished), but the gearing was all wrong. Race 2 we put the RR onto the LR and the largest tyre I had onto the RR (225/75r15), instantly shaving 1.5 second off my best lap time from the race prior. Finishing 13th Race 3 we made no changes however the track was very slick and lots of people were spinning up. No faster this race, but managed 10th from the rear. Have a few changes to make again, and will try something with the rear end, but overall it handled well. Driver just needs to get up to scratch a little - more consistent. Big thank you to all involved who have helped along the way, advice, parts, time or materials. Thanks to the crew that came and gave a helping hand; Tim, Caitlyn, Crystal & Matt. - All made for a stress free first night. A few tweaks to be done, but overall very happy with the car finishing 3 from 3 races. Started them all off the back and went forward so that's a bonus! Especially big thanks to the Read & Blyth family's for their generous support throughout building the car. RO Jones for the painting of the Body, bonnet, Dash. Fast Blast - sandblasting wheels, components, advice, help in time & materials also Mag & Turbo of course for being on board right from the start, wheels, tyres2 points
-
feel free to talk shit here about my latest money pit ect / source of financial instability have a feeling its been a rally car for a while autosport seats , a terratrip 2 and that momo to just tie it all together apparently it was built in the waikato so if anyone knows any history im all ears its been in gisborne for some time keen to see if its had bf brakes put on it to be rid of the tiny solids if anyone has any pro tips for me im all ears having never had a mazda before1 point
-
The Auckland Monthly Meet! Wednesday 17 February 7:30pm onward A chance to catch up with fellow club members, talk some shit and eat some lush foodstuffs. Burgerfuel and Mexicali Fresh cnr of Robert St and Hurst St, Ellerslie See map. [/url] The DEAL$: FREE Drink with Burger and Chips Purchase (From the COKE range , excluding mini burgers) FIRST MEET??If you are new to these meets here are a few points that may help,Most people usually show up between 730 and 8 ish,We roll down to get burgers sometime around 8 / 8:15 ish. Or whenever you feel like really.We sit around either at burgerfuel or back up top and continue the yarns.Remember its always a casual affair , a place to yarn to mates and make new ones.An oldschool car is not required at all, of course if youve got one on the road then bring it and show it off!! Doesnt need to be flash or special.SOME OF THESE ARE NEW, MOST OF THESE ARE COMMON SENSE. WE WILL PROVIDE A FEW GENTLE REMINDERS WITH THE NEW RULES BUT REPEAT OFFENDERS MAY BE ASKED TO LEAVE. RULES AND THE BORING STUFF!! Basically these are in place so we have a fun and friendly meet and leave the carpark clean and tidy like we were never there. Take your rubbish away with you or put it in a bin, (Use the public bins downstairs not the private ones belonging to the business up top Smokers please don't dispose of your butts on the ground! Please limit the ALCOHOL consumption. Its a public place and the Police/security regularly stop in and we don't want want anyone getting in trouble, We also don't want people leaving empties around. You are welcome to invite a few mates, but please note you are 100% responsible for their behaviour If you belong to other clubs and feel they might be keen to come check out our meet then that's cool but please see BDA780, Threeonthetree or 73crownwagon for permission before inviting them. NO Skids or Reckless/Dangerous driving Please leave a space near the fenced off area clear for the cleaners and don't block them in if they are there. Park in a proper carpark! If its full then just use a bit of common sense and try not to park to many people in. Newschool cars please park to one side and be prepared to move if we get short on space. If its raining and we have to park downstairs then new cars park upstairs or out of the way. The covered carpark is very small and needs to be OS only, If you have any suggestions or input for the meets then PM BDA780 , Threeonthetree or 73crownwagon Thanks!!1 point
-
So long time fuck all happening. Life/other car took all my money so not a lot has been happening to this. Buuuttttt It now moves. Haven't moved it far as it has no brakes but it does. Got my driveshaft lengthened and chucked it all in. There is a hell of a noise coming from the engine which i am praying is only lifters, I think the noise was amplified a bit by being inside the garage so will pull it out tomorrow and whip the cam covers off to have a look. Umm what else. Oh got another dash as my one wasn't coming up with the speedo, revs, fuel or temp as it is digital. I know the dash i got is good cause i saw it working but its still doing the same thing, so need to check some simple shit to see if its a fuse or earth, if not its off to a auto sparky. Painted the rear strips, only thing is they are really warped so they stick out but isn't a lot i can do about that, and all the other ones ive seen are rusted away so they will do for now. Am selling my Celica so will be using the BCs out of that in this, and have test fitted a 9j with tire on to see how much work i need to do to fit them, quite pleased to say not a lot. Am supposed to be taking this to Nats so am pushing it a bit haha Talk shit about my shit : //oldschool.co.nz/index.php?/topic/50314-beachlanders-mz12-discussion/1 point
-
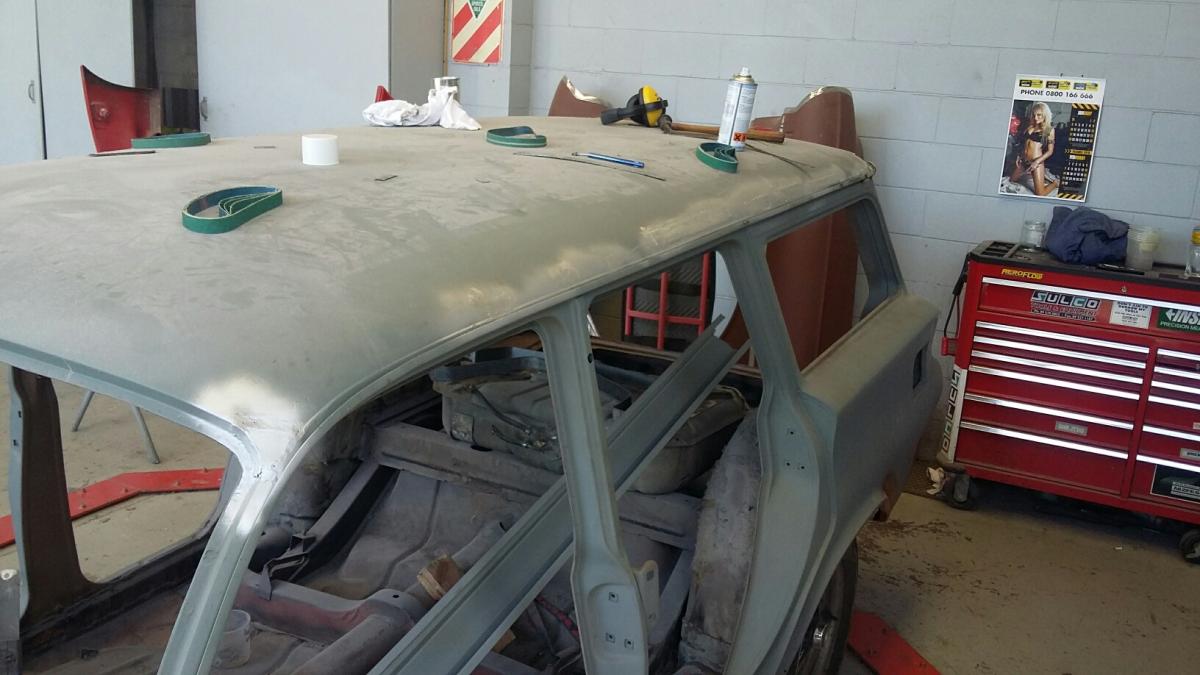
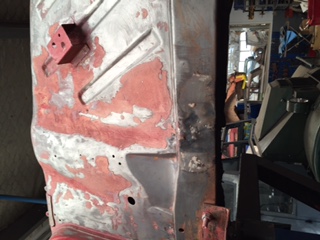
Here is some pics of what was underneath when the paint was stripped. There's a few old repairs which looks like they have been brazed in and the sorry state of the inner front guards and chassi rails can be seen. There is a couple of NOS inner guards on Fleabay at the moment so if they don't go for moon beams I'll score them. Have ordered the replacement panels for inside the boot and headlight rings from the MK 1 Cortina Owners Club so hopefully they will be here later next week. Greg reckons he can make everything else so all good!
1 point
-
Yay for the beach! As last month wasn't windy enough for us hardbums, lets go to Makara Beach! I won't bother with a map as there is only one road in so you can't get lost. Drive as far as you can (i.e. onto the beach) thenlook left, then look right, and spot the flock of homeless bums. Kickoff about 730pm to give people time to get feeds and get there etc etc. Bring some feedz (plenty of places in Jville for example) and eat them on the rocky shore. Discussion //oldschool.co.nz/index.php?/topic/33331-welly-monthly-meet-3rd-thursday-of-the-month-discussion/page-1071 point
-
Do you want to build a snowman race car? Also a while back I also had an exhaust leak where the manifold met the exhaust, leaky seal. It was a bitch to get off and even more off a bitch to get back on, with me using a seal that doesn't actually belong on the car.1 point
-
TRS is this weekend : get the "front slicks" set of 4 used to be $100 if you talked to the right guy1 point
-
this is next sunday. come along/can I get a show of hands? Sunday the 14th Feb at the same grubby gravel pit located at 44 Cambridge Ave, Ashhurst Plan to meet at around 9ish so we can head off at 9.30am, hoping to be at Pongaroa Pub around 12ish for lunch https://www.google.co.nz/maps/place/44+Cambridge+Ave,+Ashhurst+4810/@-40.2946584,175.7515998,17z/data=!4m2!3m1!1s0x6d41b74255e5e4f1:0xdb1ecc05871d86d9 bring ya o/s car. bring ya daily. bring ya work ute. whatever. everyone welcome. Bring a passanger as well as we are doing a quizz type thing and ya camera! Allow for 5 hrs, should be back at Ashhurst around 2ish Around 10km of loose metal, have checked it out already its pretty smooth, no huge pot holes Fill up with petrol before coming as not to many petrol stations on the jont around the roads1 point
-
in comes the pics1 point
-
nice work..good to actually have it out turning some laps.1 point
-
have been keeping an eye on this. Awesome work man! Can't wait to see it in paint1 point
-
Big 3 day weekend. Netting, drip edge flashings, paper and corrugated iron all done. Pretty stoked with that.1 point
-
Yay progress! Still at least 12 bars to cut up and weld in.1 point
-
brought this to push people who annoy me1 point
-
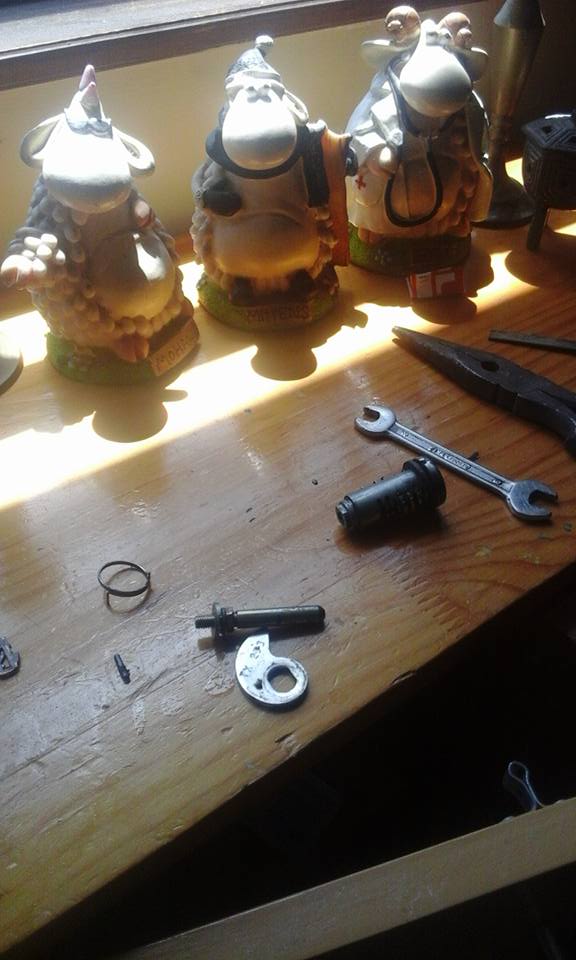
So thanks to a lovely chap at the swap meet this weekend I got a free Cortina bootlock which is the same as an escort WINNNNN The lock had no key which was no problem for me as I want to use my escort key How to make your key fit other locks FIrst I pulled the tumbler out and then inserted my key, holding one side of the tumbler you should see prongs protruding, all you basically do is grind those flat so no prongs are protruding, the old key can still open the lock aswell as your key good to know =P. Simply put back together test with key until perfect sorted, this can be done with any barrel tumbler lock. If you want diagrams or more indepthh I can do so
1 point
-
so did she pass, you bet she passed after the wof dude gave her box a true smashing like I mean I was cringing she was legal once again after four years of hard work, Have a few photos I will share, it even made the journey of 1200km to nelson and tiki touring without any to major hickups, not bad for a engine that was sitting for four years, So yes I defied all the odds people where saying "you cant build a car in under a month" well guess what your wrong because I did plus some Here are some pictures from along the way from getting stuck in a reserve to scenic views
1 point
-
Great success. The Valiant wiper motor I picked up for $30 was a Lucas Australia job too, and the magnets were in tip top condition. Just slid them out of their retaining clips and into the casing of my unit. The Mopar job was similar to what I am doing, no pesky pump mechanism, just a pressed steel cover over the plastic driving gear... I wasn't sure how the magnets were aligned (north south) so just colour coded a small magnet and aligned them the same way round to the cracked remnants in my case... And a good cleanup and lick of aluminium engine paint tidied it up. Won't know it works till I get the battery back in but looks ok... You can get repo factory style washer bottles with pumps too so should have a better than new system...1 point
-
giz deets on mt vic plz1 point
-
Did someone say princess?1 point
-
Since it was such a crap day outside I thought a bit of garage time was in order. One of the jobs I had been putting off was stripping the wiring loom of the motor. This is what I started with. After slowly taking things off and managing not to break anything major I found something that looks more like a 308. And here is a couple of miles of spaghetti, one loom on the tank and the other on the floor. Once I got into it the wiring loom doesn't look so bad. There is some stuff that will get removed and a few bits that can be simplified. Next stop finding a decent copy of the VT wiring loom that I can get printed off in A3 size.
1 point
-
Il sign that pic of me if you want Horsey.1 point
-
Not very much has happened recently, but now hopefully back into it. Most of that time was spent trying to figure out how to clamp the chassis down so it is all straight before welding on the boxing plates. Decided to make some trestle like things that are bolted to the floor, then put some spacers in between them and the chassis to get it all level. Chassis is then welded to the trestles to hold it in place. Managed to get most of it within 0.1 of a degree. So I'm hoping it comes out quite good. (Probably better than it was from factory anyway) Will bring the boxing right up to the front crossmember, just need to do some cutting to get the plates fitting. Thinking we might need to close-tack it all together, then fully weld the top and at least tack the new crossmembers in, so it can then be flipped to weld underneath of the boxing. That should then hold it all together without twisting too much, I hope.1 point
-
Setting it to 4 didn't help, have ordered the white faced one I posted above. Talked to the seller and was assured it will work fine of a single cyl 2 stroke, fingers crossed! No tank as yet, but have made some little bits of progress. We drilled the stock master cylinder out from 19mm to 7/8" on the mill art work, is tons of meat to do it, but it was very tight to get the drill between the mount bolts! Made a little bracket and mounted the hall effect sensor for the speedo, new one takes the same sensor so figured I might as well get it mounted now. Discovered the steerer tube on the fork is hollow, so the hall effect wiring can be routed through the fork. Also brought a pair of clamp on mirror mounts, going to use them to mount the speedo and possibly brackets to hold the indicators, prototype (read quick hack) bracket makes me think it'll work nicely! Also been drawing up my idea for my loom in the ultimate design program that is MSPaint Using a bridge rectifier and a capacitor to convert the normally AC headlight power to DC for the light I've got coming.1 point
-
Pulled off all the extra mounts and brackets that I no longer needed and welded up the bottom of the c-notch. Took it to A1 sandblasting who sandblasted and primered it. Looks so much better! I think the next step is to box it, make some new crossmembers and sort out the rear arms.1 point
-
I understand it depends on the year of the vehicle? Mine's a '72 and it's cool with nothing*. *yet to be tested come compliance day but this is what I read from the WOF requirements.1 point
-
Got the lower airbag mounts all done. Chucked the airbags in. They sit good, just a little too close to the lower rear arm so might grind a little off. Cool video:1 point
-
So the cars been coming along good, all the interior is back in and it passed a wof for the first time in a year and a half. I got all the lights fixed and working before it went in so it only failed for a front wheel bearing and the horn wasn't working. Just had to plug the horn in and grease up the wheel bearing. Easiest wof it's had and it's awesome being able to drive it fully legit. This was the light that caused the most problems I painted all the interior parts with this texture paint before after Carpet going in All the seats, original condition All of the windows are in now as well. They needed quite a bit of adjusting since its pillar less. There really good now as they close up nice and there's hardly no wind noise. Really happy with how it came up. Big thanks to our good mate Ben from Reel Flooring for installing the carpet and my dad for all the work he has put into it. Now that its back on the road i'll have to take some good pictures for the next update.1 point
-
More progress! Got the top fully welded on now, chassis cut out and the bottom partially tacked. We are thinking of putting the airbags on the outside of the chassis, since they would be pretty close together if they're on the inside. Like the pic below, except the top bag mount will be about an inch or so lower.1 point
-
Ive been lazy with updates and pretty slack at taking photos so will try get upto speed with this build thread.. pulled the diff back out and gave it a clean, new gaskets etc thena paint and reassemble. IMG_2186 by postlematt, on Flickr Welded in cross bars for the drop tank. IMG_2115 by postlematt, on Flickr stared mocking up the rear filler between the tail lights. IMG_2122 by postlematt, on Flickr IMG_2118 by postlematt, on Flickr IMG_2117 by postlematt, on Flickr bent up some steel IMG_2159 by postlematt, on Flickr Fitted end caps IMG_2164 by postlematt, on Flickr in the process of making up a filler neck that bolts inplace of the filler cap on the tank, also go to install the toll over valve and get some an fittings for the tank IMG_2167 by postlematt, on Flickr bend up some brackets and test fitted the hinged cover. IMG_2279 by postlematt, on Flickr1 point
-
Salutations fellow noble celica owner, Might I enquire as to where thou didst purchase thine replacement sills? Mine are in a most putrescent state!1 point


This leaderboard is set to Auckland/GMT+12:00