
Leaderboard


Popular Content
Showing content with the highest reputation on 02/05/16 in all areas
-
Everythings out
 8 points
 -
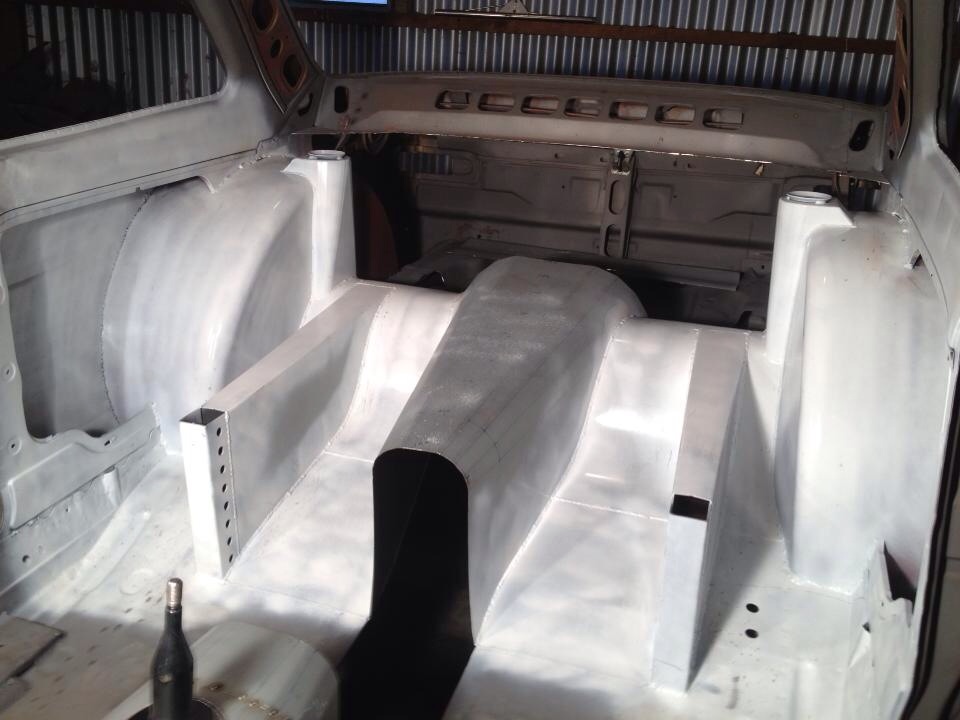
So. It seems I really only update this thread like once every year... Holy shit I am slack... Anyway, this update sucks. For the last year, the car has sat in the garage in Auckland. I was really hoping that due to the proximity (it's in the same fucking house as me!) that I would be able to crack into the bitch and get it all ready for assembly this summer. Well, summer has come and it's far from ready. I've finished off welding on the sills (need to trim off excess), and finished all the firewall fabrication - It just needs some sort of underseal or something to make it look less shit-house: I have tried and failed multiple methods of actually mounting the engine now, and just can't seem to get it right. It's a combination of having an utterly shit welder, BEING utterly shit at welding and not being strong enough to wrangle the engine into position for measuring and fabbing. The sad reason for this is that over the last few months I have had monumental health fuck ups. Initially some sort of infection, then essentially flu symptoms (all-over aching and weakness etc) that have lasted for weeks on end. At one point, also was hospitalised by the pain, which turned out to be kidney swelling and tissue damage from this mystery illness. The latest, is that I have something wrong with my head. Now we all already knew that based on my choice of engine and car, but jokes aside, I've been having some rather interesting experiences, including Hallucinations, Synesthesia, paralysing headaches and constant nausea/ dizziness, in addition to a whole bunch of odd mood swings and anxiety. This has all obviously meant that working on the car has been VERY difficult. I managed to get mounts welded up and the engine in the hole, but then for some reason, after a bout of tears and weird paranoia, I cut it all off!! (seriously, I kind of came to my senses, hacking up the hours of welding I'd just done and muttering to myself all sorts of weird shit.) Pic here: The latest development is that after multiple visits to the doctors, (one of them seriously just googled my symptoms!) I have been referred for a CAT scan, but my work-perk health insurance just changed due to me getting a promotion at work (yay) unfortunately meaning that the policy restarts from the 12th and I am unable to make claims etc until then. I will have to wait it out until then to find out if I am growing a second brain, or have that psychokinesis tumor thing that John Travolta got in that 90s movie. My suspicion and hope is that it has to do with some sort of fucked-up sinus shape in my skull. My little sister had similar but much more mild (and less fun, if you enjoy seeing people that aren't there!) symptoms and ended up needing surgery to shave some of the bone away in her sinus cavity as it was putting pressure on her brain. Anyway, it all sort of sucks, so I have contacted a few fabricators around the city to get quotes for mounting the engine and trans up and therefore not having to worry about this bullshit. Failing that, or if my head stuff turns out to be worse than I hope, then I will look at selling the car. It does still have a rego on hold and I imagine with a shit-ton of work, someone could reverse all the blasphemic butchery that I have done to the car (or be awesome and actually carry on with this engine conversion!) I will let you all know if it has to be sold - and of course you motherfuckers will have first option! Anyway, wish me luck!6 points
-
Decided to do a bit straight after work as it was warm and windy, so good chance to wheel things outside and get the water blaster out... Amazing how easy it is to knock the grease off with a decent blaster... Surprised how good things were under there, pleased I made the effort while the guts were out of the way...6 points
-
Then while I had space in the shed, I thought I'd mount the engine on a stand and tackle the stuck drain plugs... First one was textbook, welded on a large nut, and the heat and something to grip let me twist it out no bother. Fuck I'm good (I thought)... The other one however was a right crunt. Welded nut after nut onto it, and the metal of the plug kept fracturing as I tried to take it out... Tried upping the current for more penetration but it seemed the plug metal was pretty brittle... When there was fuck-all to weld to I ended up grinding it flat and punching it to try to drill it out... Drilled it through (fuckin hard stuff, whatever it was) and upped the drill size till I could try an ezy-out. I've had mixed results with these, so hit it with more heat to try to avoid snapping the hardened tool... But still no go. Ended up drilling it right out and tapping it inwards with a centre punch to crack the thread... and finally got the fucker... So here's me at the puter now having a well deserved dram... and yes, that bottle's empty so just cracked an Ardmore single malt...5 points
-
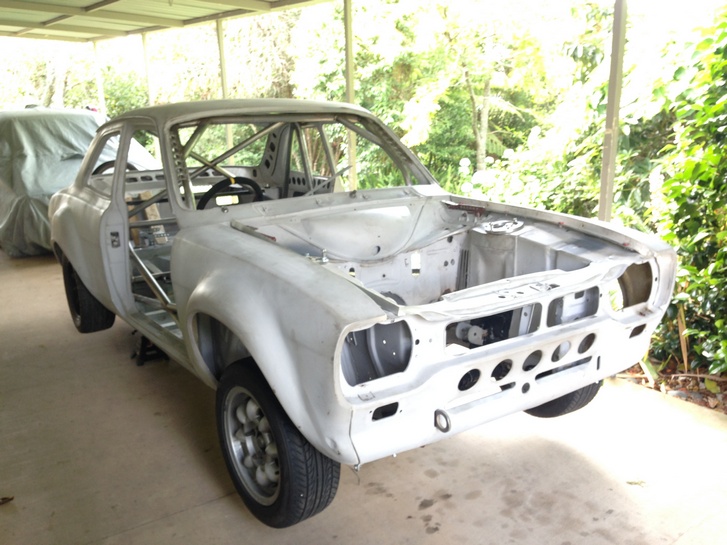
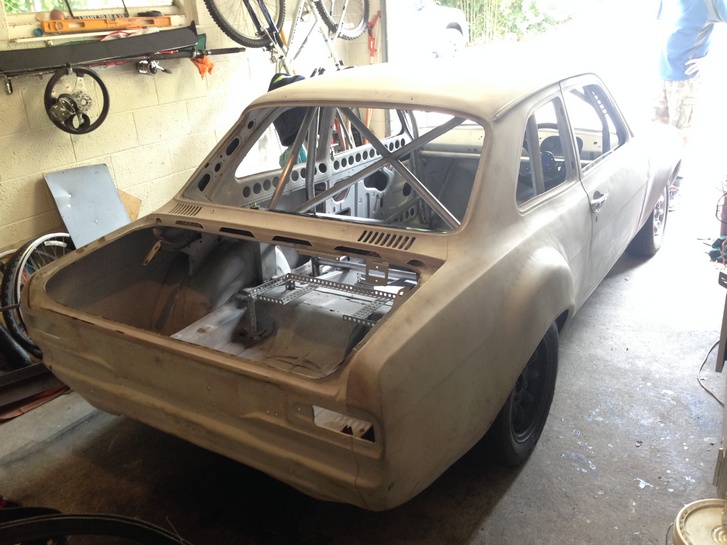
Had a successful follow up Cert inspection and have been given the thumbs up to go ahead with panel and paint The big strip down to a bare shell commences Next stop , the media blasters
5 points
-
hahaha so i chucked the windows back in for a mate of 10/5 and just pulled them back out again tonight. the gearbox is now really bad and clutch has a rather bad shutter as well. so il send an old clutch away tomorrow to be rebuilt all new again. pulled the top off the gear boxes to see what the look like on the inside came across this. WTF they are different what the actual!!! so a post on a ap5/5/vc face book page later turns out they will both fit in. one has a reverse under the last gear (left hand side gearbox) and the right hand one also has synchros. cheers crazy ozzy guys that problem sorted i hit the roof with a grinder until noise control set in (my mum telling me to shut up) started out side like this and ended up like this will continue to strip the roof tomorrow and drop it off at the painters late tomorrow. hes going to do his majic over the weekend so i get it back like wednesday so i can chuck headlining, windows and a gearbox as well as a clutch in and then clean it ready for a wedding on friday haha nothing like dead line.4 points
-
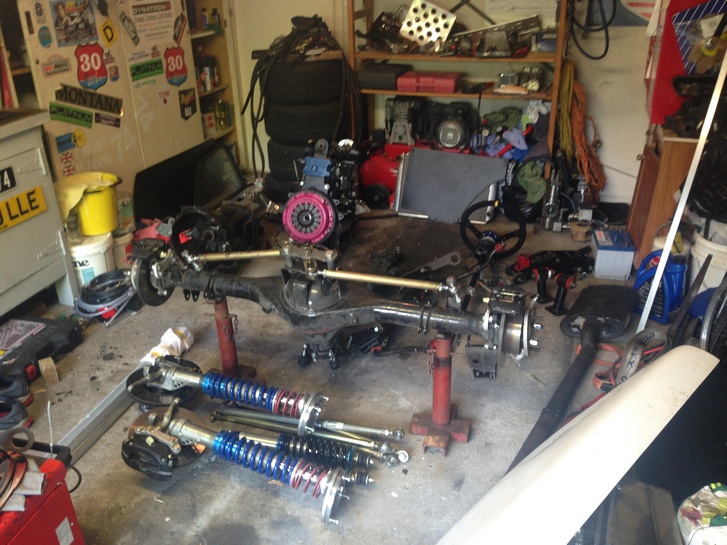
So i've been incredibly slack at updating this, but have been busy with the car. The meet last year told me stuff that i already knew. Suspension was far too hard and I needed seat time. I made the decision to do things properly with the rear shocks first time so I spent my money on a set of QA1 double adjustable coilovers with spherical bearings top and bottom, and also some 12" 110lb springs to go with them. Putting them in wasnt super hard, had to drill out the bottom mount to 1/2" and had to ditch the tophat and weld on some brackets for the bearing as below. I had to add some 5mm spacers as the tires were very close to the spring platform. Next was the front. The brakes had a bit of a wobble when i had it at the strip last year and i decided that they were still far too big for drag racing so I bought another set of front struts and the stock brake setup and started over with the front suspension. I decided to go 110lb in the front as well as in a drag car its really just holding the front up and the more weight transfer to the rear the better, so i ended up with the same as the rear, 12" 110lb springs. I bought a coilover sleeve kit and put together a pretty simple setup with a bit of pipe sleeved over the strut and plug welded in place for the threaded sleeve to sit on. I reconditioned the stock calipers and put it all back together. I forgot how crazy tiny the stock brakes are but I only have to stop once, plus I saved quite a bit of weight. A few driveway launches confirmed that it had made a huge difference to the setup, the front was lifting up as I had hoped and it had heaps more grip on the drive way as it had previously. Off to the first meet of the season I went, first run was a pretty soft run but felt pretty good except it was till pulling to the right a bit as it had at the last meet, brakes worked fine. Gave it a bit more on the next run off the line and it went straight down to a 12.2. Still pulling to the right so went and asked a couple of the on to it guys what they thought and they suggested preloading the right rear spring more to counteract the body twisting up on the launch. I wound the platform up 10mm and went out for another run which was much straighter and ran a 12.04@119mph. i wound another 5mm into the platform and next run was 12.03 and the car felt like it went pretty much dead straight. Played with the damper settings on the shocks for the next run and went 11.88@119. Needless to say I was stoked to be in the 11's so quickly! Discussion - http://oldschool.co....983-5efte-kp60/4 points
-
Slow progress is better than no progress, right? Purlins complete, all brackets and brace straps done. Ready for roof. Dug out about 1-200mm of grass and soil ready for base course later this week. Thanks to Mark and his little digger. I missed cruising in something made in the 1970s so bought this RN40 Hilux lol4 points
-
3 points
-
Finally!! I'll just put this here as it's not really Project Thread worthy... Took 2 weeks to get here, & at $300NZ landed I can't complain.. Such a pity the xmas holidays are now over & I'm back to having what feels like zero free time3 points
-
Great location for making lots of noise right there!!! Parties, angle grinders, hammering panels, pet lions etc3 points
-
Fark it's hot, mid 30's in Invers, not quite used to that... Anyway, got home and thought I'd better do a bit rather than sit under the aircon drinking beer, so wheeled the old tranny out for a cleanup. interested to see what it looks like under 40-odd years of grime... Plugged all holes with either rags/tape or fittings blocked with RTV... And wheeled it round behind the shed to my chemical hazard area (where no plants will ever grow again) and scrubbed it with petrol, a scrubbing brush, rags and a toothbrush, and it came out looking purrty... I know it makes no difference to how something operates but I like a clean piece of machinery. Love cleaning up some old piece of grot and bolting it back looking good...3 points
-
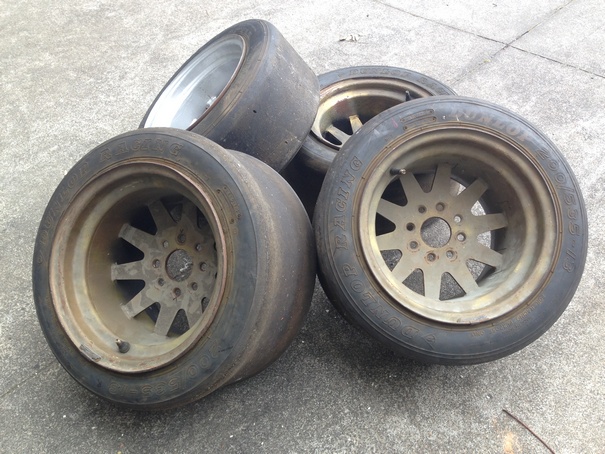
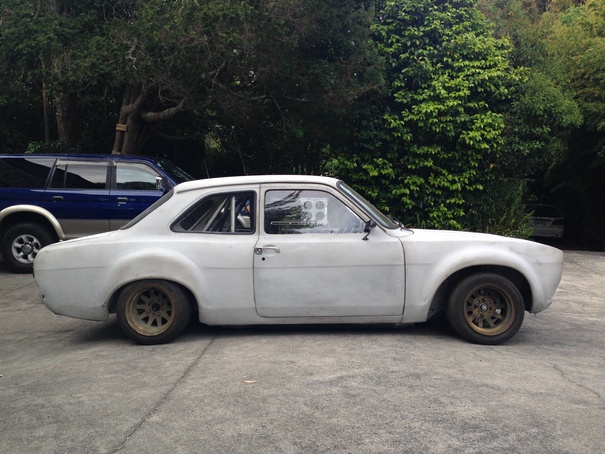
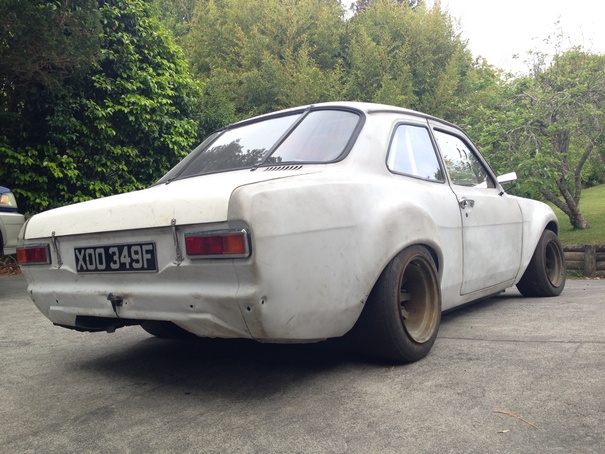
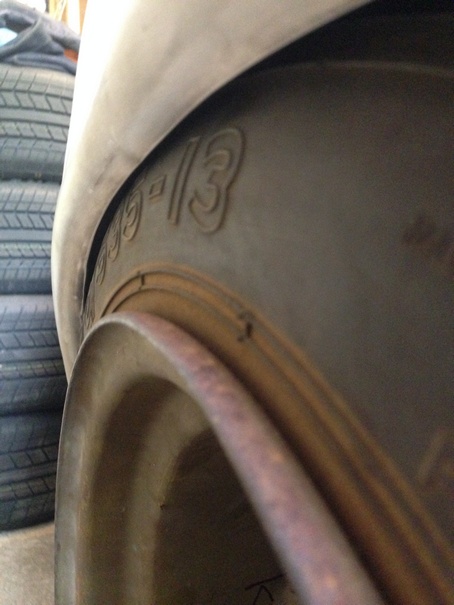
Trademe speacial Jolly wheels - fronts 13x8's rears 13x10's with dunlop slicks
3 points
-
2 points
-
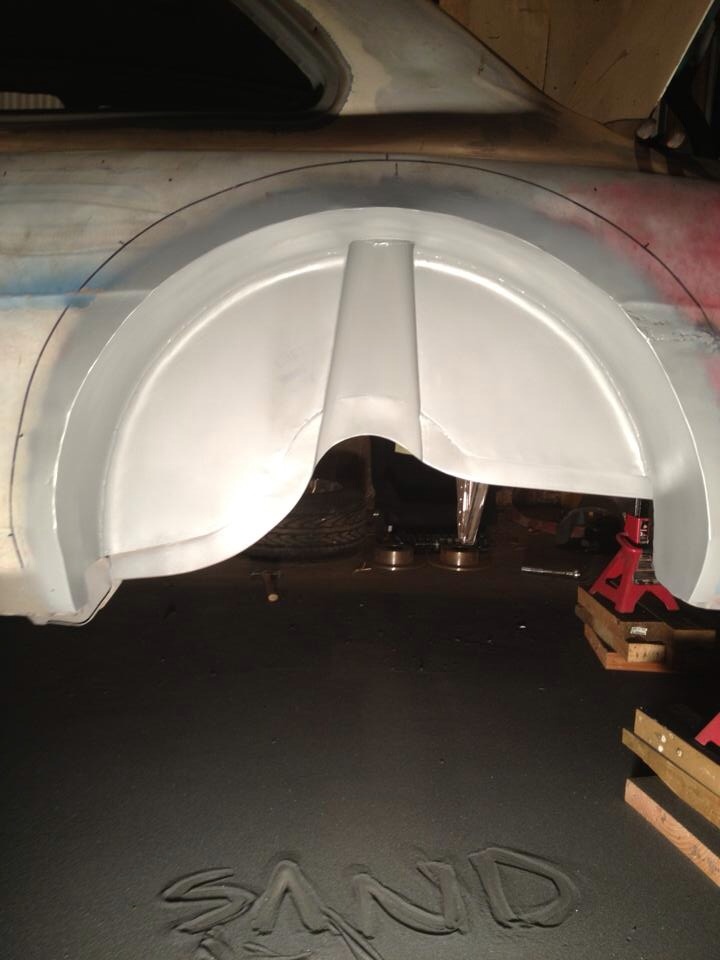
Not sure i'd be spreading too much underseal on things until it's certed as they may want to make you remove it so they can inspect welds, but then again i may be wrong. i like this car.2 points
-
Thanks guys, yeah I'm stoked with it, really stoked. I haven't had any job offers as yet but I'm sure I will in time. Yeah it pushes strongly, it has much more push than traction which is ideal. I haven't been brave enough yet to put both gearboxes in top for a speed run.2 points
-
Won't have time to do much this weekend, wife's B/day plus taking the kids out to the crib to learn how to play in the surf, but had a look last night at why I couldn't undo the drain plugs - I've seen some rounded off heads in my time, but this is especially circular. Looks like a weld-a-nut-on job...2 points
-
Found this diagram in my 1000 page pdf parts manual that may help with the Alt. And I dropped into the local auto sparky at lunchtime to see what they had. Showed him a brush and he immediately knew it was from an old Email (kudos), then said I'd be lucky to find any parts for it (crap). 20 odd years ago they had umpteen bits for them but they're pretty much a museum piece now. The good news is they did have the old metal can diodes on the shelf, plus suitable bearings, so I grabbed them while he looked for any brushes that may fit - but nothing was even close. These could be a problem, they measure around 9 x 5mm and he couldn't find anything suitable in their database either. Bit of a bugger I broke one getting things apart really... Rather than buy some parts and potentially get stuck without brushes he suggested a new Bosch 70A replacement, but at $300+ I said no thanks. I'd rather persevere with the original as I'm bloody-minded (I've started so I'll finish) - not to mention cheap. So I'll give it a go, I repaired this umpteen years ago and it is sound, and should go again all right, it's not like the old tape deck will draw enough current to stretch it. I bought the bits he had, then had a scout around on th' web. Eureka, 20 of these things ex Hong Kong delivered for around $10... So should have enough to get the old girl making volts again. Debateable whether I'd be better off just buying a new one, but it's not about that, eh...2 points
-
Goodbye rev limiter!2 points
-
Shadow Gangrage2 points
-
This baby needs some lovin. My Uncle has just finished his BMW K100 Cafe (which is awesome) and he started well after me. A mate has recently finished my rear fender to accommodate the tail light and made the bracket for my speedo. Finish list getting smaller; Check rear fender fitment. Strip apart to bare frame. Frame: Make cut outs for coils (different for B frame to C frame) Weld on rear disc brake bracket (different for B frame to C frame) Weld on mounting tags for rear indicators Weld mount for ignition Make mount for speedo Weld up holes in modified triple tree Blast / paint frame, fenders, triple tree Modify /source alternative front fender (redrill mount holes as sections welded in to accommodate clearance for larger tyres) Parts: Front disc brake bolts x 4 New air filters (some of the old ones rubbers have separated from filter) Rear shocks? Shorter clutch cable / throttle cables smaller battery To get running: Wiring - new speedo (removal of super huge cluster), moving of ignition, LED indicators/tail light, check suitability of wiring for H4 headlight WOF2 points
-
Stinking hot in the shed and I couldn't be bothered doing anything too hard, so I looked at the Alternator (Factory Email job). it worked fine but there was a slight knock and I just wanted to tidy it up a bit. First step was to mark the cases with a punch so it went back together the same way... I had visions of opening it up, replacing bearings, cleaning the slip rings and putting it back together all painted/shiny and good for another decade, but these things don't come apart very easy... The pulley nut was pretty well stuck, and without a rattle gun I just persevered with tapping a spanner with the fins wedged against a block of wood till it came loose (will have to straighten a couple of fins). A bigger problem was the rear bearing wouldn't let go, so I had to remove the diode plates with the rotor in place, bent things to buggery and dislodged a couple of diodes in the process... And once that was out I could remove the stator... So finally in bits and a few repair jobs required rather than maintenance - but nothing terminal, and at least I can clean up the component parts now...2 points
-
Day 1! 21st November 2014 Picked up this little beautie for $3200 NZD. The local mini club owner who was selling it gave me a $400 discount purely for my squeeling on arrival, I'd never seen so many mini's in my life! First thing i brought - new gear knob! Cheers Aliexpress! Got central locking for a Christmas gift with the key remotes installed! Accidentally locked the keys and remote in the car.... Took 5 people to break into my tiny car! Central locking sadly didn't get re connected after painting of the car... but hasn't been anymore lock outs since! She turned out to be suuuuuper rusty! Time for some repairs.. and a broken windscreen. "No don't take it out yourself you'll break it!" "No I promise I won't!" ...20 minutes later see my ex boyfriend post on the NZ mini facebook group that he's looking for a replacement windscreen. Damn it. Thank god for insurance! Hello kitty hanging in there during my repairs. 1 floor pan and new windscreen later... it was time to get ready for a new colour! Colour! I literally took in my nail polish and a picture to the paint shop for inspiration and walked away with this! We have some paaaaint! Need to get some better pictures in the light.. or not use my phone camera! She's feeling a little blue Picked her up some new bits in exchange for a box of bourbons hahaha. Goodbye ugly rice steering wheel that someone has friggin welded in place! More new editions? HAHA Interior battles Thought i'd get all fancy and refurbish my door cards with some vinyl and fabric. The door cards that came with my mini were horrible to say the least!! Refurbishing them didn't turn out much better. Manged to make some back ones but have given up on front and dash and thinking of getting some laser cut and then powder coated the same color as little blue! Sitting a bit crooked but will sort it out! I've fallen in love with another mini... I hope this guy doesn't mind me sharing his pics but I found this little beauty on Instagram! https://www.instagram.com/jacktubbsey/ Really want black flares now!! What I really love is the headlights! Found some tint off ebay here super cheap and now just waiting for it to arrive! Totally illegal here in New Zealand but i'm sure i'll be okay with all the cars with blacked out ones I see driving around Some treats for little blue! The sound system in her wasn't that bad when I got her but the speakers were literally put into plastic containers from the warehouse ($6.99 price tag still attached omfg) that you take your lunch in HAHA. Then covered in vinyl!! Kiwi ingenuity. Thinking of doing some colour changing led rings around the speakers like this: Will update once I've finished it! Also wanting to replace the switches inside with illuminated push button type switches. Here's some examples: First pic is a pre made one that is sold by Marcos Controls if anyones after some! Second some switches on Aliexpress I like. Just put in my new brake hose, got my new headunit & sub going. 2016: Finally got a WOF and current rego! But also feeling lazy, need to CAD up my dash and door cards to get laser cut already! Discussion Thread: //oldschool.co.nz/index.php?/topic/51794-samanthamannells-1978-mini/1 point
-
The Auckland Monthly Meet! Wednesday 17 February 7:30pm onward A chance to catch up with fellow club members, talk some shit and eat some lush foodstuffs. Burgerfuel and Mexicali Fresh cnr of Robert St and Hurst St, Ellerslie See map. [/url] The DEAL$: FREE Drink with Burger and Chips Purchase (From the COKE range , excluding mini burgers) FIRST MEET??If you are new to these meets here are a few points that may help,Most people usually show up between 730 and 8 ish,We roll down to get burgers sometime around 8 / 8:15 ish. Or whenever you feel like really.We sit around either at burgerfuel or back up top and continue the yarns.Remember its always a casual affair , a place to yarn to mates and make new ones.An oldschool car is not required at all, of course if youve got one on the road then bring it and show it off!! Doesnt need to be flash or special.SOME OF THESE ARE NEW, MOST OF THESE ARE COMMON SENSE. WE WILL PROVIDE A FEW GENTLE REMINDERS WITH THE NEW RULES BUT REPEAT OFFENDERS MAY BE ASKED TO LEAVE. RULES AND THE BORING STUFF!! Basically these are in place so we have a fun and friendly meet and leave the carpark clean and tidy like we were never there. Take your rubbish away with you or put it in a bin, (Use the public bins downstairs not the private ones belonging to the business up top Smokers please don't dispose of your butts on the ground! Please limit the ALCOHOL consumption. Its a public place and the Police/security regularly stop in and we don't want want anyone getting in trouble, We also don't want people leaving empties around. You are welcome to invite a few mates, but please note you are 100% responsible for their behaviour If you belong to other clubs and feel they might be keen to come check out our meet then that's cool but please see BDA780, Threeonthetree or 73crownwagon for permission before inviting them. NO Skids or Reckless/Dangerous driving Please leave a space near the fenced off area clear for the cleaners and don't block them in if they are there. Park in a proper carpark! If its full then just use a bit of common sense and try not to park to many people in. Newschool cars please park to one side and be prepared to move if we get short on space. If its raining and we have to park downstairs then new cars park upstairs or out of the way. The covered carpark is very small and needs to be OS only, If you have any suggestions or input for the meets then PM BDA780 , Threeonthetree or 73crownwagon Thanks!!1 point
-
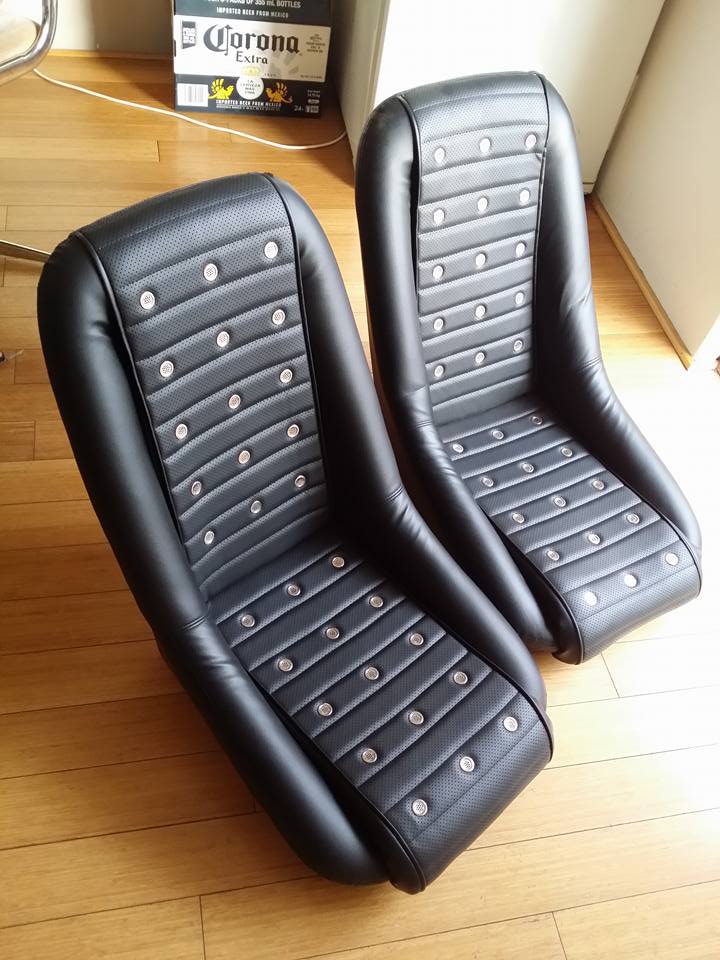
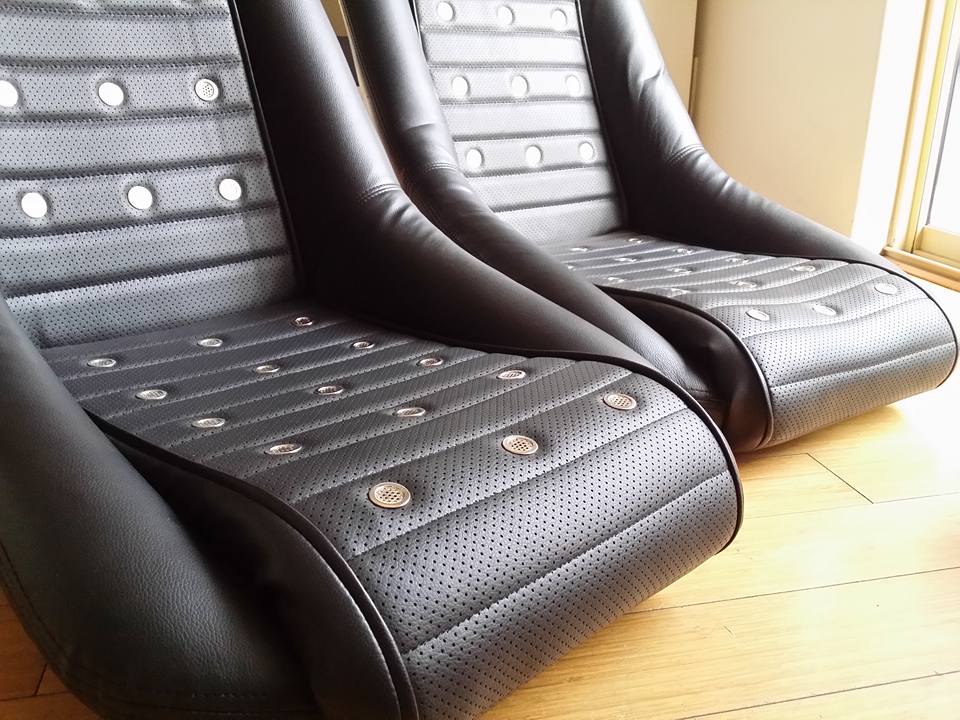
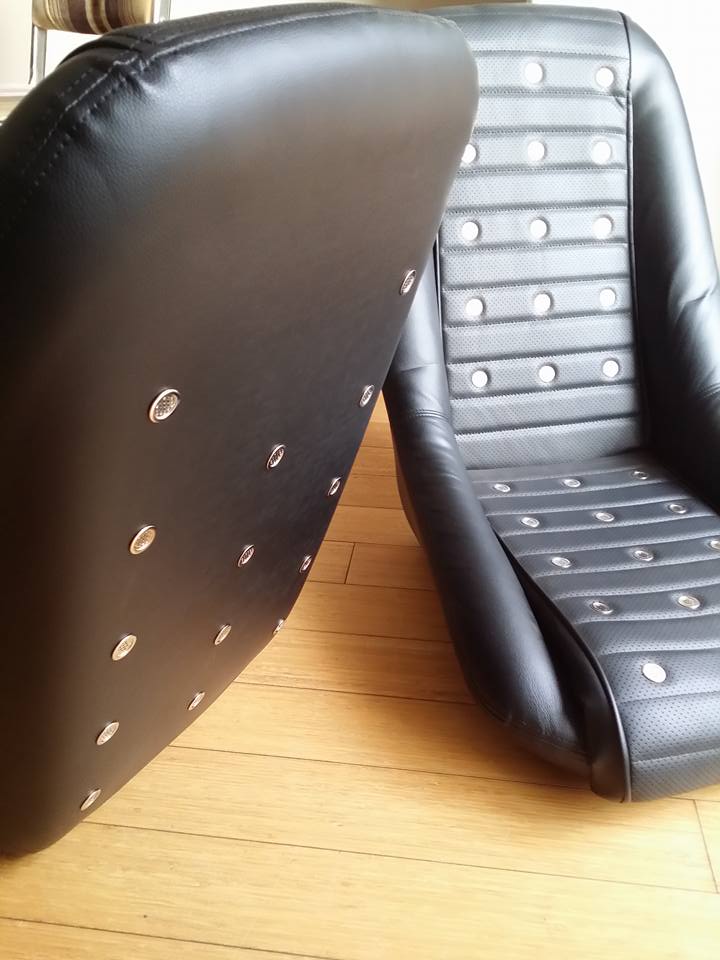
I've also picked up these sweet retro racing seats. Luckily they happened to pop up on Gumtree (Aussie Trademe) just 10mins away from where I live. Paid an arm and a leg for them but still much cheaper than getting something similar out of Japan or America. They're a similar style to the optioned Hakosuka Skyline/Datsun 240z seats. They are a very small frame so once again I only just squeeze into them - means I cant get fat and fat cunts wont be able to ride shot gun so no biggy. They also came with one headrest so will need to get another made up as I doubt i'd be able to hunt one down online. Have also hunted down a replacement rear seat as my original was stolen. They will be getting retrimmed at some stage to match the fronts .
1 point
-
Shit thats brilliant. Can we see your interpretation on the road in the wet?1 point
-
Need driveway graded - will take pics - gravel already bout 200m long lol. Can bring car transporter for moving it - would it be over 3T Awesome work though - need running vids1 point
-
Nothing to sell but I should be there 8ish for a nosey.1 point
-
Yeah Karl can't make it now so will need someone to bring a bbq if possible. I'll be parked up in similar spot. You won't miss the big blue American van1 point
-
Cheers bro, yeah I figured that could be a problem, though if there is seal and carpet.... how would they know there were patches? Nah I do wanna do this all legit, so that's a good point, cheers!1 point
-
I NEED ONE... Well done1 point
-
Congratulations Pete! You must be chuffed1 point
-
Jeepers this thing was scary at 60 something, must've been screaming to hit 93k1 point
-
Join a gang, sell drugs?1 point
-
Tractor jousting?1 point
-
I won't be able to make it. Valentine's day and the missus is terrified of my car hahahaha. Honestly, I don't blame her!1 point
-
Been searching for a while and have finally found a reasonably priced Nardi wheel! Picked this up off TM and also grabbed a BMC adapter boss for fitting. Suits Maggie's look pretty well and the restored wood really pops (guy we bought it from been sanding it for 10 hours ).1 point
-
Looks pretty chur, good job so far. ^thirded the white roof statement. Minis look sweet with the classic white roof. I had a similar era Mini which was yellow. I painted the roof white and it looked much better.1 point
-
Cars getting wired up at the moment at AVR Performance. Using a Life Racing Ecu, Motec c125 dash and they're doing a mil spec loom. Engine looms sitting on top of the dash.1 point
-
Dig a hole, stare at it whilst leaning on spades.1 point
-
Good day in the shed. Laid out my toys after removing driveshaft and all but the last couple of bolts... Then jacked the back up to make removal easier. My patented engine stands are laid out on the lawn. As I was removing engine and trans together I planned to drop the sump into the larger tyre and rest the tranny on the littl'un so I could separate them... Now, I was going to get a mate round to help, but I was keen to try the leveller out, so just had a wee go, and next thing you know the guts were out of her... Leveller and a good hoist made it really easy, just wriggled if forward then angled up, lifted to clear things and changed angle to slide the thing out the front. I had checked the hoist lift height and chain length etc beforehand - Be a bugger to hit the roof with the thing only half out... I had no intention of doing it myself but it worked out ok. I just snapped on a couple of used gloves to stop fluid leaking out the back end. The bits are separated now, my weiner engine stand is not big enough to mount the engine but will hold the trans ok. Waiting on a mate to get back from holiday so I can use his stand to begin engine work...1 point
-
Yea those wheels gave me wood when I saw them too ay. Rubbers not cheap for them but I had to have them.1 point
-
Treated myself to a new oil tank. Welded in some mounts and a wee bracket in the floor to keep the fittings somewhat protected above the floor line leaving only about a foot of hose exposed running from the floor to the oil pump that will be easily replaceable. Got an oil cooler mounted in front of the radiator but going to have to redo a few things in that corner to make the catch can/breather fit and increase amount of air available to the radiator not that the oil cooler is taking some. Don't want to put anything on the other side of the bay as I want a nice clean area for a cool air feed to the throttles.1 point
-
Arse end needs to be raised a bit and going to have to modify the tension strut kit in the front some more to pull the wheels forward in the arch then trim the arch to clear the wheels. Otherwise fronts will have to go back to 9s. \ \ \1 point
-
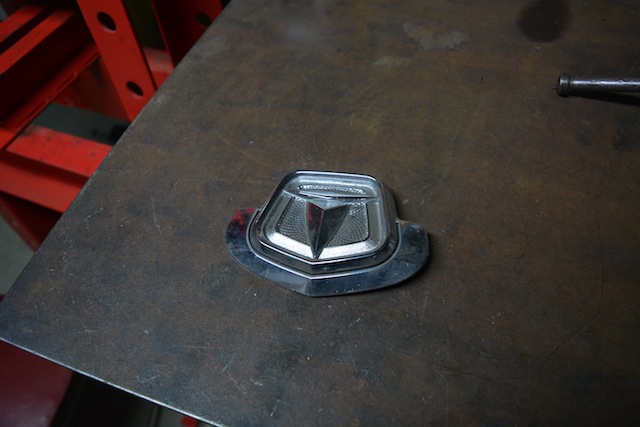
So i've decided on bit of a plan in the way I should attack this thing. Get the motor, brakes and suspension up to scratch road test rust repairs rear fit out- seats, bed, kitchen etc re-vin I probably should re-vin at an earlier stage but we will probably use it for a few sneaky runs down the valley to camp at the river and i'm willing to risk it. Have had a reasonable look over the van and its all in really good shape save for the rust which i gather has only appeared since being parked up under the tree. Got it up on axel stands, removed the wheels and drums to inspect brakes, all in really good condition, good shoes, no leaks and un worn drums. Repaired the dodgy work on some of the fuel lines and replaced the broken filter. charged the battery and got it going with the help of ether. Cleaned the points, set the idle mixture and speed, set the timing (way advanced! no wonder it struggled to turn over) now it fires up and idles fine just need to get oil, filters, plugs and coolant. Next step is to get some tyres (looking at whitewalls from STA parts) and put the van back together to road test! Realised i've had a few goodies stashed that fit the project perfect! Front centre badge i've had for ages and i'm sure its from a Hiace (and the camper is missing it) A set of 14" hubcaps that fit perfect, pretty sure they came off a Toyota Crown so a good enough match for me
1 point
-
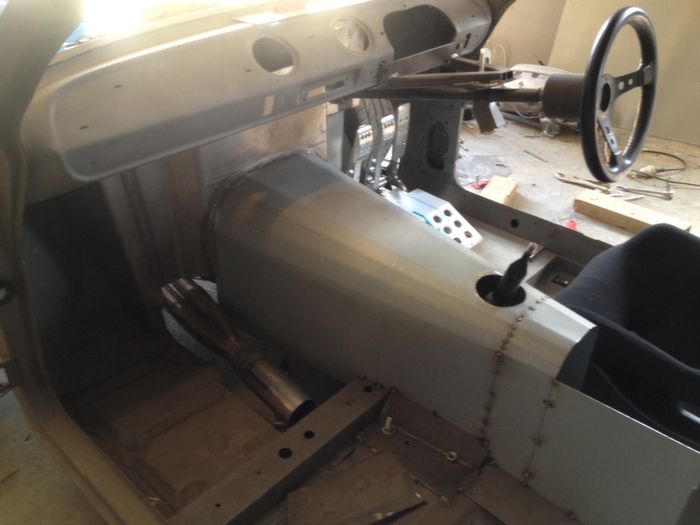
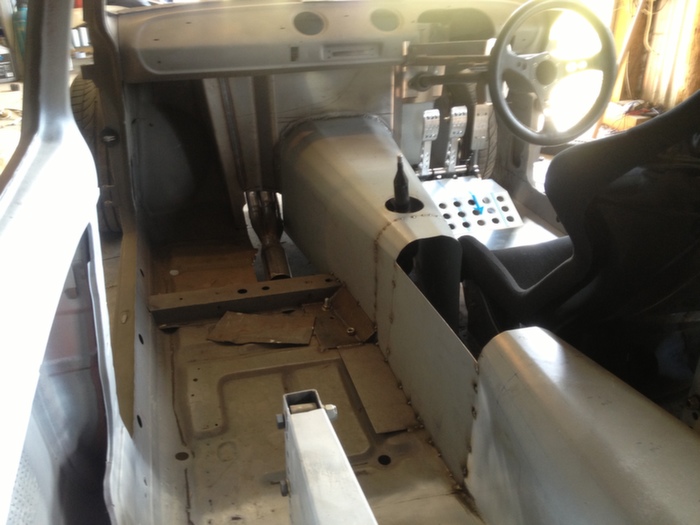
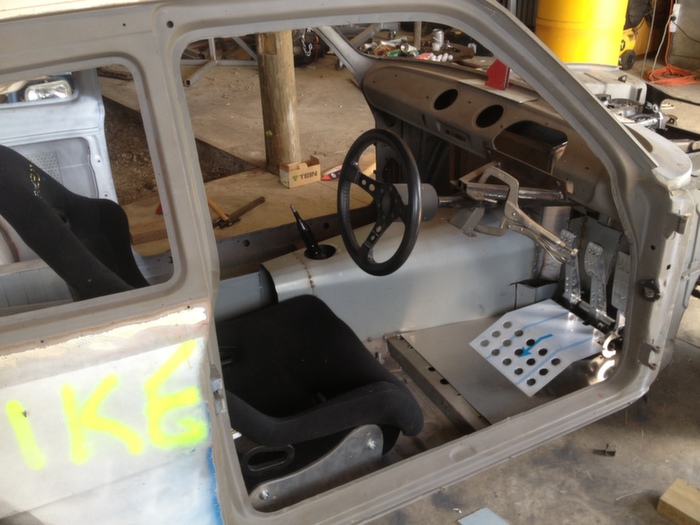
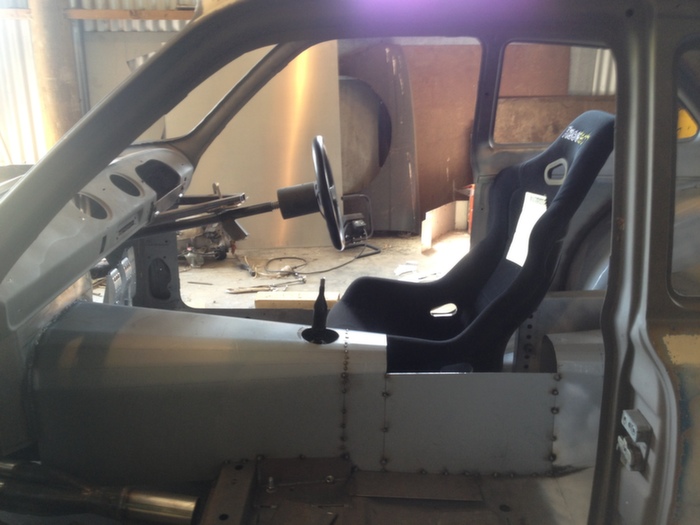
How its looking at the moment.. Still finishing tunnel.. also been sorting out pedal box position
1 point
-
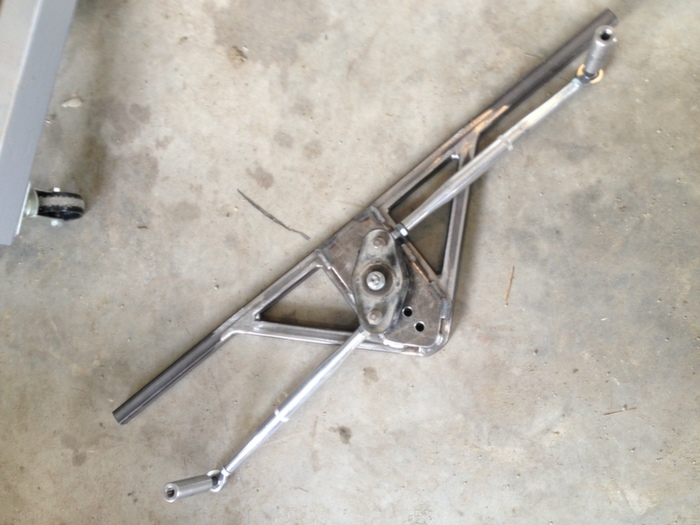
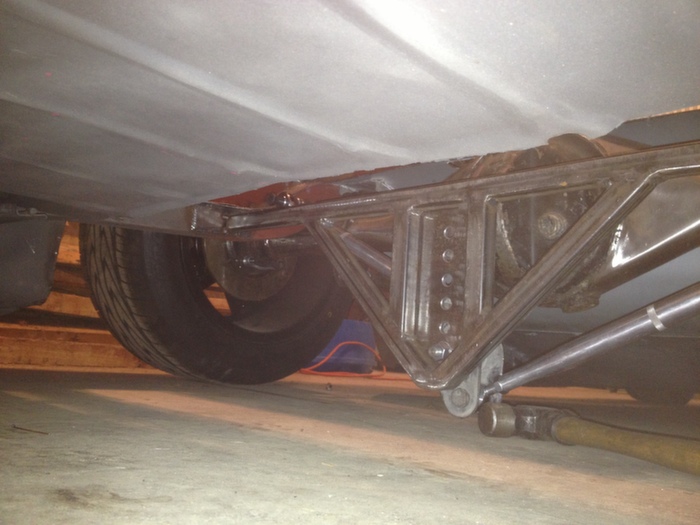
Made watts link using falcon centre on custom spigot. Not a huge amount of clearance on bumpstops. might have to raise it up a bit..
1 point
-
Having a sort out of my photos so I can get more up. It was supposed to be a quick rebuild after I rear ended someone and the insurance company wrote it off in 2008 but it's escalated out of control.
1 point
-
I spoke to him about it before I bought it (I know him through our other strange obsession with old Transit vans which we share!) He purchased it from a guy in Hawkes Bay 5 or 6(?) years ago. It was painted all gold, with an airbrushed dragon on the bonnet. It ran on 17"s at the time, I remember it being for sale on Trademe, I didn't like it! . Jackson bought it, swapped the bonnet (he kept the dragon one) and painted the bonnet gold. The paint on the side of van was bubbling, through a preparation problem, so he decided to respray the sides in red, for the Alan Mann look.Swapped the 17's for a set of Minilite replicas, sorted the suspension and some other bits, then used it as a work vehicle for his plumbing business. Sold it to buy his Transit, to another friend of mine. I literally "tripped over" it a couple of weeks ago when I went to get a WOF on my Mk2 Cortina, and when told it was for sale bought it straight away. Conrad1 point


This leaderboard is set to Auckland/GMT+12:00