
Leaderboard


Popular Content
Showing content with the highest reputation on 01/25/16 in all areas
-
today i sanded, then painted the bumpers. they came out pretty good. also it was hot in the shed today. 2016-01-24_02-38-41 by sheepers, on Flickr 2016-01-24_03-43-38 by sheepers, on Flickr 2016-01-24_03-43-46 by sheepers, on Flickr 2016-01-24_03-43-56 by sheepers, on Flickr 2016-01-24_05-16-28 by sheepers, on Flickr6 points
-
another cool day in the shed. 2016-01-25_06-11-53 by sheepers, on Flickr i fitted up the front bumper and its sitting fairly well. just need to figure out what colour to paint the grill and i can put that in too. 2016-01-25_06-12-04 by sheepers, on Flickr 2016-01-25_06-12-16 by sheepers, on Flickr 2016-01-25_06-12-24 by sheepers, on Flickr oh, and i also painted the scuttle panel bit that goes between the wipers. 2016-01-25_06-13-04 by sheepers, on Flickr5 points
-
Cert recheck occurred the other day and while I had originally been waiting to have the plate and attempted Warrant sheet etc to make this update. I am conveniently sitting in front of the tele with a cool drink and the cricket on. I have been doing a thing lately where if I come onto old school and Sheepers has made a post about progress on any of his cars, I force myself to go and do something in my garage. While this has helped me to achieve physical progress, it is detrimental to my forum presence and particularly my ability to post updates. I fitted the above parts without huge drama, I had a mare of a time bleeding the brakes up, mostly because the pedal seemed to not be improving. I had left the bias valve wide open to remove any restriction in the bleeding process and when I wound that in, the brakes were great. I basically knew that if i could lock the wheels up, It could pass the test. (it couldn't even do that before, now it can. Happy days) I think it could still do with some tweaking because it's still gets a little tail happy under heavy breaking. Also of interesting note, this is a comparison of the rear Suspension cones, new and old and how much they sag I made some heat shields, the first one was a simple affair with a couple of holes, a couple of folds and took me about 15 minutes. This is easy I thought... many swearwords and about 5 hours later the second was completed. In true fashion I left most of the rest of the stuff to the last few days, Panic ensued with the steering rack and I eventually managed to figure out a plan of attack as the suppliers were absolutely useless in bringing any help to the table. My plan involved purchasing an identical rack and taking it with me so it could be inspected and I wouldn't need to a) pull the current rack out and forfeit my standing re-check booking. I took the car to get a wheel alignment. Left it with the crowd after specifically asking whether they could accommodate the small 12" wheels. By the end of the day they rang me to then confirm that they couldn't. Day wasted. Drove across town the next day to somewhere less useless. Thanks Grey Lynn Tyreworks. Clutch was less than perfect at this stage. On the night before re-check I pulled the carb apart to clean the Jets, that went well but by the time I got it all together it was too late to start it up. Also bled the clutch up in the hope of a temporary fix to get me through Morning-of came around and the idle was high as because I didn't put it back together right. Got it there and Clint assisted in adjusting it down. Good news was that it was running smoother on the primary needles. Happy days. The test drive went well, excluding the fact the clutch slave cylinder had more or less shat itself by this stage. Remainder of re-check also went well. I have since replaced the Slave cylinder in expectation of cert plate, That way I can attempt a WOF and if necessary place an online parts order following that for any remaining parts. So to summarise, THMINI will hopefully be road legal in the foreseeable future. Who would have thought I'd ever actually finish this. it doesn't actually feel any where near finished, after driving it a little over the cert process, theres a growing list of small niggly expensive things to fix. Pic churrrrrs to come4 points
-
Waiting on brake bits ive got the drivers scuttle up to here All solid now - I made the scuttle from about 4 bits due to the compound curves and lack of stretcher, also remade a couple of the screen trim holders. There are a few sections in the A-Pillar too, but i didnt have a camera on hand while sorting them out. *-*-*-* Then Pistons for the rear brakes turned up For future reference package listed Triumph Dolomite, Morris Oxford/Farina (fronts) as well as the seller listeing them for FIAT 1500S/2300 etc. All new parts excepting the handbrake pads which ill sort out later (400 euros!!!), reassembled them with the rubbers kit i go before, new flexi line, bled up and fitted (* hard line joining the two halves is installed incorrectly in these pics - it crosses over with the port the bleeder is in so it doesnt rub on the rim ) And then stole the battery from the 125, fired up off a can of gas in the dash, and fairly uneventfully, drove it down the driveway, up to the end of the cul-de-sac and back into the shed like it aint no thing. No vids or anything unfortunately, but some neighbours up the road just about got themselves run over to come ask if it was a Super Minx Ill fix the roof rust first then I need to start thinking about chopping bits off the parts car to finsh this side which is the bad one.4 points
-
Hoist arrived, and on my wedding anniversary, could call it a present... Looks great, and it arrived assembled on a pallet. Given it was free delivery I assumed it would have to be put together. Would love to spend the evening hoisting things - but I'm picking there are other plans tonight...3 points
-
They might even be the correct scale to make the car look right3 points
-
3 points
-
I'd check loose wires first. Otherwise can try hitting starter with a hammer next time it happens. If it gets better when you hit it then probably starter related. Hitting it only usually lasts a few goes before the magic of the hammer runs away2 points
-
That's nearly exactly my list aswell!2 points
-
You could at least buy me dinner first2 points
-
Posted 20 January 2016 - 08:04 PM update for those interested= took this week off work as we have nothing on, so have been hitting the body work HARD, is coming along not too bad. have been using "EVERCOAT FEATHER FILL" and its the best!! really gets the panels nice and straight. still not sure if i will paint it myself, have asked a couple of shops if they would topcoat her and was very surprised that they were not interested. would have to buy a gun if i do it.2 points
-
Chassis is coming together nicely: A bit to go, but the main framework should be finished next week. I got the Jag IRS this week And stripped out anything I didn't want, which left the good bits: I just need to narrow it around 450mm. The engine I'll be using is a Falcon XR8 5.4 litre DOHC like this one: Deal done this week! Very happy, I'll be converting it to carb/distributor which should do away with all of the wiring and the need for an ECU.2 points
-
bits painted. 2016-01-19_08-00-47 by sheepers, on Flickr 2016-01-19_08-00-19 by sheepers, on Flickr2 points
-
Sunday after Drag Day I set the tappets, installed the clutch and swung the engine back in the hole Hellloooww Strill have to get teh gear box in - Do you even lift Bro? Friends? -+-+-+- Just hefted the gear box in, went pretty well with a jack and two small furniture trolleys, and all my socket extensions, just the fiddly bits like linkages and stuff to hook up now. So thats the front 2/3rds of the running gear sorted, and half the rust. Just brakes, diff, and the rest of the rust to go, but that means chopping up the parts wagon, which means having a running van to store and move the bits which means rust repairs on the van, which ill do over the christmas break ahhhg bloody cars.2 points
-
Hi everyone, I recently acquired the car of my dreams and Greg (64Valiant) has told me to share it with you. I'm pretty new to forums but here we go: She's a 1972 Datsun 240z in off-white/cream. The previous owner had her since 1976. The Z was driving around 20 or so years ago, but has been parked up in a garage with a cover since around 1995. He passed away four years ago and the family decided to sell it through the Z Club to find an enthusiast to bring her back to glory. Luckily, I was the first serious buyer and the rest is history. NZ new car 85000 original miles I'm the third owner Interior is near mint (no cracks in the dash and factory radio still installed) Minimal rust (no such thing as a no-rust 240 haha) She runs but clutch won't engage, so is probably fused to the flywheel which should be interesting. The rego has lapsed and I'm trying to keep the black plates naturally, so anyone familiar with this process please shout out! Currently assessing what needs doing for Re-vin and looking at options after that. I will keep her mostly stock, only changing the suspension to something a bit stiffer and throwing on some 15 or 16" Minilites or Watanabes a bit later on in the piece. She's a real darling so I'm not going to deflower her with flares or an Airdam. I've probably forgotten something else important but I'm sure you'll all point it out. Looking forward to chatting and meeting everyone. Thanks for reading, -Reubin First fresh air for 20 odd years! Discussion Thread1 point
-
In a rare moment of lucidity, I realised the poor old girl lanquishing in the shed under a pile of parts and gathering dust had just celebrated her 45th birthday. She has been parked after overheating a couple of years ago and being put in the 'too hard' basket and forgotten about - apart from my girls who love playing in the 'big car' in Dad's shed. Despite having umpteen other projects on the go (plus wife/kids/work/sports) I decided I needed something else to spend time/money and to skin my knuckles on. Shit pic but it reflects the loss of dignity of the old girl being parked up and used as a bench... It is a factory 302 Fairmont, C4 with column change and fold down seat between the buckets. Had her since I was 18, and despite the mistakes of youth, I still have original 2 barrel carb, manifolds etc tucked away. Now, I could just sort the overheating issue and drive her, OR I could take the chance to pull the engine, tidy up 40+ yrs of use, and add some fun bits while I'm at it - so she can gather her skirts and keep up with the brash young tarts of today. Seeing a 2T engine hoist on sale at The Toolshed with free delivery made my mind up, so I ripped into it last night...1 point
-
Its got a replacement gear reduction on it at the moment. The lack of heatshield and oil leaks will not be helping it at all1 point
-
When out to this today - a small selection of OS cars - some familiar faces as well! 427carguys fine Italian steed IMG_6199 IMG_6210 IMG_62081 point
-
Reverse lights??? there are none on one of these.1 point
-
They would come out too accurately to fit your devilish fantastic piece of rubbish great 80's Russian engineering.1 point
-
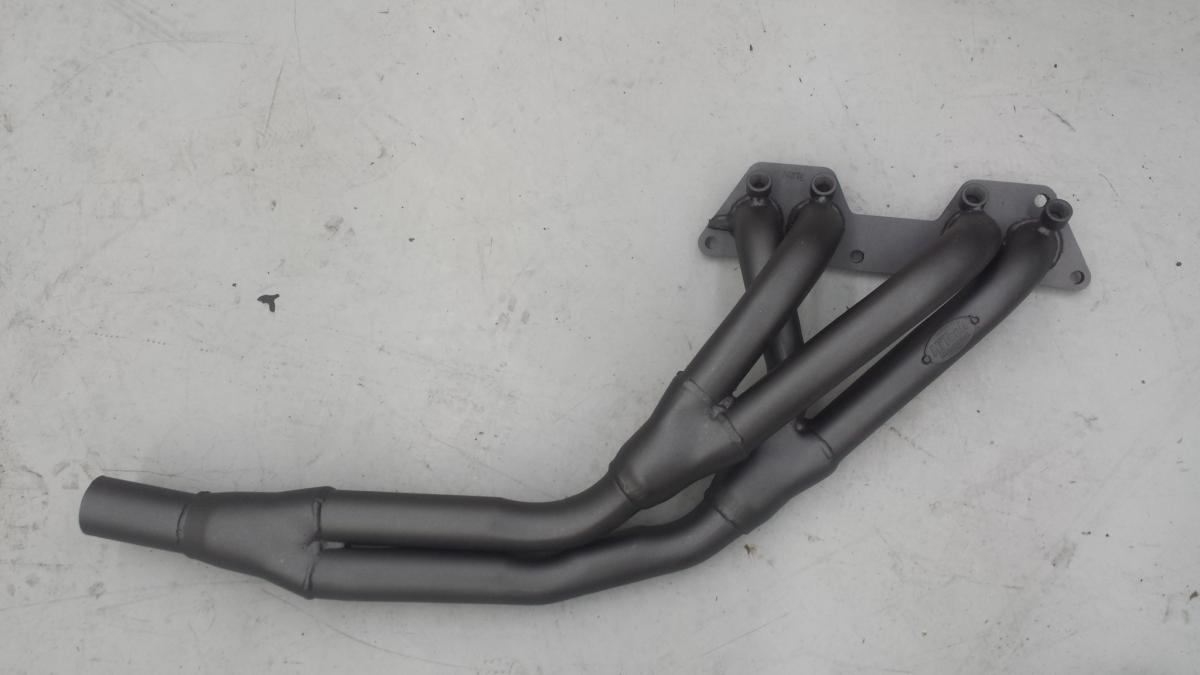
New Hi-Tech Headers extractors arrived today. Hope to still make my own at some point but these should do the job in the meantime.
 1 point
 -
Good idea with removing the washer pump i had the same brainwave a couple of weeks ago for the Impala and am doing the same thing!1 point
-
Good work man, keep it up, I love seeing your updates!1 point
-
talking thread - //oldschool.co.nz/index.php?/topic/51653-mitchs-kp60-starlet-build-thingy/ so got this thing started up yesterday, got it running for about 2 minutes and it will then die, every other time it starts its for about 30 seconds then dies. Any suggestions? i was thinknig or slapping a new wiring loom in it as this one is a bit iffy. EDIT: Problems solved thanks to pbaines for lending me a bunch of parts, i slapped an ae86 (EDIT: ae82) ecu in and it fired right up and ran perfect! starts first pop every time. now to fix everything else1 point
-
Scotty and I have decided that we are having the meet at the groynes some time seen, you will see why when we have it1 point
-
Discussion Thread Posted 26 August 2012 - 05:37 PM this is my new xw project, have had it for about three months, have just started stripping for a quick rebuild, not going to go too hard out on this one. will update this page with whats going on if anyone is interested???1 point
-
Posted 10 July 2015 - 06:26 AM will get some pictures of the asked for "460 porn" over the weekend, in the mean time here is some of the suspension, brakes and steering components that are going in, needed to fit the rack to see if it would clear the trans. which it will. may need to lift engine back out and fit a sump just be sure that it will also clear, still not to sure what to do with the headers, the xr-y pacemaker 4-1 will be the easiest to fit, but just don't really look right, sort of too close to the block not really taking advantage of the big notch i cut. so could be some custom 2" ones being made. Posted 12 July 2015 - 08:07 PM done a bit on the old wagon over the weekend, got the front suspension bolted in. the new towers seemed to weight, very stiff. not too sure if the shocks on these struts are adjustable. are most likely one of the first sets that RRS released. got them second hand. anyway still not sure what to do with the exhaust headers, dont really want to chop up my 1 7/8 pacemaker headers. being thinking about trying to find some BB chev ones and chop them up or even make my own. so being doing a lot of thinking/drinking and maybe this build needs to go a bit more extreme. so am off to the main workshop to get some bits. any guess's what i will come back with?? Posted 21 July 2015 - 10:48 PM have started getting the 460 ready for assembly, all cleaned, this engine was in my xw sedan and would say it had only 30 hours running max since being rebuild, so the bores are mint, is just getting new bearings. stronger con rods and flat top pistons, turbo was just a dream, now that looks good Posted 19 September 2015 - 03:52 AM Right done very little on this project for a while now, work has been full on, after dicking around trying to fit the cleveland headers past the steering rack i have decided to bite the bullet and make my own stainless headers. is going to work out about the same to make as carbon ones and have them HPC coated. so bought $250 worth of 304 bends after work on Friday. which i would say is about 1/2 of what i will need. going to have to get some new flanges cut as the ones i have are carbon and don't fit very good. will do a drawing and send over the road for laser cutting. still dragging my feet on the body work, just don't enjoy it so just do little bits then get side tracked. At least i got the starter motor problem fixed, had to get a new 2 kw adjustable position unit as ever starter i had would not clear that fucken steering rack. am hoping my sump will also clear as that is not fitted to the block yet. still not started putting the engine back together yet, but not going tunnel ram anymore just too high and harder to get a cert, plus if it gets a cert with it fitted i need it fitted ever time i go for a WOF. which is a bullshit rule here in New Zealand. got the same problem with my xf ute cert plates states 14" rims and i run 18" on it 99% of the time. so ever 6 months i convert it back to what it says on the plate then go home and change it all back again. not a big deal but just a pain. anyway wagon is getting there just very slowly. Posted 01 October 2015 - 05:32 AM been doing a bit on this project this week, fitted guards and made new mounting points at bottom near sill, fitted grill to make sure it would fit etc, got some more exhaust flanges, ordered some new mufflers, trial fitting center console and shiftier. will start on headers this weekend Posted 15 January 2016 - 06:39 PM bit of a update on this thing- back on the body work again, epoxy primed the body again then have sprayed the worst areas with evercoat feather fill, block sanding that back and is not looking too bad, looking like the roof and rear quarters will need a few more coats. plan is to try find a painter that will put the top coat on for me, if not will have a go myself. also did not have much on at work this week so played around with some fab work on my headers, flanges come up not bad, will make the collector and most likely all the exhaust right to the back, have all that fixed in place then bridge from flange down to collector, but that could change,1 point
-
Posted 18 July 2014 - 09:43 AM well what project, being too many years. today it many go into primer. got to get err done. whole drive train is changing. out with to six and in with some cubes. Posted 16 February 2015 - 10:24 PM looked so good in the first photos, wish I had just done one bit at a time. the thing has been a major project. Four years and still not even in paint!! But have changed my mind on the whole driveline, suspension everthing is coming out. bit of a shame as i have poured a bit into that six. will post a vid of that running before i try to sell it. Posted 16 February 2015 - 11:07 PM have gone too far with this now to turn back, sold the diff off about 9 months ago. which is a shame cos i need it for another car. just got to put the hours in on the body to get it finished. is mostly in primer. just blocking it back as we speak. have the paint which is like the green in the pics of the xy sedan. going to paint it myself. but before that will rip out that crossflow and box for something alot bigger. be happy to get my money back for the intake,cam, roller rockers etc. not to sure if it will be manual or auto yet, the manual i have with the engine i have in mind would need a remote clutch master cylinder, which is a hassle. Posted 04 April 2015 - 09:39 PM all righty then back into this piece of shit, have 10 weeks to finish it ready for the winter drag series at fram autolite dragway in meremere auckland, can i do it? hell no err yes. not much to do- paint it, build a engine, notch the front towers, put it back together, get a cert have sold the cross flow engine, will keep the T5 as a spare for the xf ute, diff is long gone. let the work begin, UFE, on 05 Apr 2015 - 12:09 AM, said: oh this is real mate, no tv bullshit here, just me and the cat. well have been working about 4 hours a night since the last update and looks like i have gone backwards. really is the body were most of the work is still left to do, emailed a young car painter down the road from were i work to see if he was interested in painting the wagon, outlined what was wanting from him and what products were being used on the car, have not got a reply yet, could have put him off i think. he is going to paint it just does not know it yet. also emailed the company that i get my pacemaker headers from and was told 8 weeks and $1230 for a set of 2" cleveland headers. cant wait that long so looks like will be making my own. ,weather is turning to shit here for the rest of the week so may not be able to do much priming, still got to pull the crossflow out for the new owner. got a bit of cutting and welding do in the engine bay, about time for a new vid i think?? Members 170 posts 0 warning points Locationnew zealand Posted 27 April 2015 - 01:41 PM heres some pics of were the car is at the moment Posted 27 April 2015 - 02:26 PM HOLE [url=http://s1056.photobucket.com/user/guidohatzis1/media/020_zpsl3rtqro9.jpg.html][/url gone to get gas torcth. Posted 27 April 2015 - 07:49 PM bigger hole plate 90% fitted, template was no were near the correct shape, Posted 28 April 2015 - 07:25 PM just some final grinding and this side should be done for fitting, ended up cutting no were near the template, not sure if they updated their template with something better. pretty much used the whole plate, bit short in a couple of places . Posted 30 June 2015 - 09:08 PM heres a few pics of the towers welded in, plus a few of the dummy engine in place for mockup of parts etc. at the moment the engine has no sump bolted on, next step is to fit one to see if that clears the rack. my plan was to chop up a new set of pacemaker headers but they look like they may hit the rack when fitted. so if that is the case then will make my own 2" headers to suit. lots of fun not. not to sure if the ram will stay?? think it is abit much?? diff is also in, ended up going with a 3.7 tru trac.1 point
-
Bought some of these trumpets. Don't worry they aren't staying this colour. Hoping to pic up my throttle body flanges and the engine side tomorrow. Arrange my friend to tig them together with short radius bends. Then start on the linkages.1 point
-
i got the extractors HPC coated so they would look alright. and now they do look alright. 2016-01-23_11-27-36 by sheepers, on Flickr 2016-01-23_12-16-20 by sheepers, on Flickr1 point
-
It will be burning it thanks to worn rings, fairly common with Subaru. I'm going to guess it's a 2.5L?1 point
-
I got the iwata w-71 kit as its genuine iwata and the only one I could find retail was 250 no tips, no cup which in my mind puts it middle of the road.. mates a prof sprayer and reckons it was a great deal so I'm haps..1 point
-
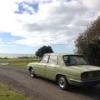
Have been visiting my folks in Nelson, and camping in the Sounds in January. Left in the rain onto the Interislander, hauling the camping gear and kayaks. Our camping setup at Momorangi, on Queen Charlotte Dr between Havelock and Picton At Anakiwa, across the sound from Momorangi. Anyone else been to Outward Bound? I went in the early 90s. Dazzling the tourists at Pelorus on the way back. If you look close you can see bathcollector's wheels on the trailer. Car went mostly OK. I locked my only set of keys in the trunk which was a hassle. A bit of hotwiring got us mobile for a day until the locksmith from Blenheim picked the lock while it was pissing down with rain (thanks AA and Gary Ching Locksmiths). I got some more keys cut after that. Also had some fuel starvation issues which seemed to get worse over the 3 weeks. By the end I was running the electric pump full time otherwise it would lean out and stumble up hills or cruising above 80kmh. Not sure what is going on - perhaps the mechanical pump doesn't like sucking through the Carter pump? I really need to address the fuel leak before using the Carter pump all the time. On fuel leaks, after we filled up at Havelock I notice a lot of gas leaking under the drivers door. There is an old fuel return line that I had cut and 'crimped' under there that is still connected at the tank end. Apparently with a full tank (and maybe the hot weather) there was enough pressure to leak quite a bit. I crimped it up more tightly with some vice grips to stop it leaking, but will fix that better now I'm home. Was quite nice as a camping wagon, but mileage means it's only feasible on trips near home, we will likely go back to the Holden next January.1 point
-
Give me $20 a week and it can eat my lawn!1 point
-
I had made a list of jobs that I needed to carry out on the Blue SD1, but I hadn't driven the car let alone worked on it for at least a month. I fired it up, fixed a fuel leak and drove it to the Oldschool Meet on Wednesday. I then spent a bit of time working on it yesterday and managed to complete a few jobs: - Cleaned the car properly (and then messed it up again by cutting wires, throwing tool around and eating my lunch and dinner in it) - Replaced the broken wiper stalk - Replaced the broken buttons on the instrument cluster - Sorted out the flickering oil pressure light (Pressure is fine, the sender was at fault) - Sorted out the red temperature light (used to illuminate at random, again a sender fault) - Fixed the buttons on the trip computer. They're pretty good now, I just push them at random for the hell of it because I'm an 80s Executive etc. Just need a car phone now. I'm putting some rear tyres on it today and possibly sorting out the horn. I removed the Air horn setup and am going back to twin electric shell horns for that low tone. Here's a shot from South Auckland Bristol with another English car: 603 by Neal OnTheTree IMG_3948 by Neal OnTheTree No more airhorns. They weighed an absolute tonne. It's a good thing I removed them though, as the car is such a lightweight performance vehicle where every kilogram helps... IMG_3951 by Neal OnTheTree Disconnected the alarm and associated wiring. I kicked the siren away in triumph but it speared off the side of my shoe and landed back in the car (sunroof was open). IMG_3953 by Neal OnTheTree IMG_3955 by Neal OnTheTree IMG_3956 by Neal OnTheTree All fixed: IMG_3958 by Neal OnTheTree1 point
-
Figured out how I can crank the engine and see the timing marks at the same time.1 point
-
New Year-Time to go on a diet. I had always planned on keeping full interior but have come to the realization its pointless and just punishing myself when i could send certain pieces off to people who actually require them and in the process give myself a bit more power since i dont plan on adding a turbo. In the past week ive removed and weighed a few things for curiosity more than anything front seats 18.6kg each rear seat 21kg spare wheel 13.7kg sound deadening removed so far 14.2kg carpet unknown lets say 5kg =91.1kg To remove the sound deadening i used science - dry ice mixed with isopropynol This worked a treat and i highly recommend it, all you do is smash the dry ice with a hammer in a plastic bucket untill its a fine powder(carefull not to break bucket), then you poor in the isopropynol and give it a good mix, i just used a concreting trowel. It makes a kind of gel which you poor into the area with the sound deadening and let the magic happen. This video was pretty helpful Ive also acquired a pair of out of date sabelt 6 point harnesses today which will be going in with the new race seat this weekend in time for the ZCD summer matsuri amatuer day next friday in taupo!1 point
-
I kno where one of these is that's all complete glass and everything. Motors had some head work but I don't think it been ticked over in a while. Body was pulled apart for rust work and respray that never got done. Would be a heck of a lot of work and the owner said its to far gone so might split as a parts car1 point
-
In today's episode of office boy plays with old shit and fails I replace some bits and nothing happens. I managed to swap the HT Leads, Condenser, Rotor and Points. None of that helped me though. Still won't start. So I did what Blizzo reckoned and which the top off the carbs, I was greeted with this That blury yellow stuff is fuel, running a bit rich haha.1 point
-
Wow. Crikey. Its been a while aint it. July was the last post. A few things have been done since then so I better get typing. First off. Come February we will have owned the land for two years and it will be 14 months since we moved out to it. Its settled in nicely and we are getting a good feel for the seasons and all the little things that happen out here when they change. Starting to get to know the locals quite well and have had lots of work coming into the workshop from just word of mouth which is awesome. Hannah is working a summer season job down at the beach front and when thats over we will be doing a flyer drop around the valley and surrounding areas to put out to people that they can get many sorts of engineering/repairs/bike repairs/advice on cats/great coffee from us* *my coffee aint that great.. In the start of spring I spent a morning going about the land taking photos. I tried to compose them as close as I could to the original photos we took as we cleared the land. Some are ever so slightly off. This was because things have changed so much that even I struggled to work out where the original photos were taken! I'm pretty happy with the resulting before and after collection so I'll put them right here. I have tried to list them from the drive way entrance and then heading down the drive to the north end of the property. The driveway entrance.. heading up the drive.. The highest point of the driveway.. I like this one.. looking down the driveway. Such a difference. Next up- one of the 5 old caravans that got taken away. This one was surrounded by lots of junk/scrap steel etc. Now just trees and some sweet old gates we saved. The mountain bike track I started heads in just around there. These next ones are looking out from about where the cabin veranda is.. Looking back towards where the cabin is now. Thats my brother duncan trying to locate where the Gravely mowers might be. We found them a few months later. and now.. Hannah wondering WTF... This next one is from the first night we stayed over to check the land out. We had pushed the driveway gorse down by throwing the van into 4wd and just driving over the top. Here down at the north end I was just laying back in the grass chilling and imagining what the area could be like. There is now a bit more parking area.. The following morning of the first night Hannah chilling in the morning sun with a coffee. We didnt really know what this area was going to be like in two years time.. This is it. you can see we kept the little Kanuka to the left. Its thriving now! The main yard was not much of a yard back then.. This is better !... Our first morning.. two years later.. I'm really glad I took so many photos before we cleared it all. Its great to look back at. Moving on to recent times. Not long before xmas this happened.. https://youtu.be/uaAHS96LGP4 We had been wanting rid of that 70 plus year old bugger for ages and its so good to see it gone. Shane (sideways sickness) and Greg (64Valiant) came round and got to see some of it heading to earth. Then we had a nice BBQ. Big thanks goes out to Shep for chopping it down. No way would I be doing that job. For starters I dont have chainsaw with a metre long bar! Nor the skill or experience. It was great fun just helping out and watching. We have many more big pine trees to come down over the next couple of years but this one was the one I wanted gone now. The view afterwards is heaps better!!!. Plus we now have a sweet as 8 metre high trunk to build a cool viewing platform on one day Before.. After.. Then for the end of the year we thought we had better crack on and finish the bathroom before my brother came over to stay. We needed the shower going for him so we got stuck in and finished it just before xmas eve. It still has some little finshing touches like light switches, extra lights, better prettier shower head, hand rail up the steps etc but its pretty much done. It works really well however I reckon we'll get a new califont for winter as the old Palomar is a bit small on heating capacity. We'll see. The compost toilet is working really well and still doesn't smell. Ive not yet even wired in the fan. Happy with that. Its taking about 3-4 months to fill a bin. Will put in a third bin soon and then start a secondary outside composting area away up under the eucalyptes just to be safe. The bathroom lights and shower pump are running off the cabin solar panel setup too and we have run wires to add a couple of outside lights to light up the pathway from the cabin to the bathroom. I just have to make some lights yet. Anyway.. some photos of the new bathroom ... We moved all the various piles of gorse and Kanuka into one place to chop too. Here you can get an idea of the amount of Gorse we cleared.. We have also started a vege garden and although a bit late its going well. Its certainly not a massive affair like our neighbours but we'll learn and it'll get bigger/better. The strawberries all going mental and its great to have 4 or 5 fresh strawberries on the cereal in the morning. Our fruit orchard trees are growing well and seem pretty happy. We'll plant heaps more this winter. The olive tree seems happy as so we'll plant more of them along the driveway. Finally Hannah spotted an old picnic table offered for free down at someones holiday home so we grabbed that. I told the owner we had been after one for ages so he was stoked it was going to be used. It looks the part and is an ideal little spot to chill. Thats it for now. I hope you enjoyed it. Im pretty damn happy with it all and now the rush is sort of over (for a bit) we have both finally been enjoying more of a summer recently of just swimming and cycling. Next big plan is the mezzanine floor in the workshop but that will be a winter thing. Then more cabins! Oh and bike tracks. Oh and spa pool. Damn...1 point
-
i put it outside and washed all the crap out of it. 2016-01-16_01-57-15 by sheepers, on Flickr 2016-01-16_01-57-24 by sheepers, on Flickr 2016-01-16_01-57-33 by sheepers, on Flickr 2016-01-16_01-57-45 by sheepers, on Flickr1 point
-
So the other night Gal and I built this. We both found it to be hilarious. But I needed one of my own... Luckily this cropped up on TM with giant 32" wheels. So I brought it, and made this! What a blast! @scooters1 point
-
I've been doing a few things to get the car running again. the wiring loom is hilarious in its fuckedness. Nick came over the other night and went through it and fixed a whole bunch of shit. there is still a bit to do to get the wiring sorted but its getting there, and its become apparent why it was difficult to get the starter to engage among other things. I'm going to hide most of the loom except for a small bit that goes under the radiator so its needs work anyway. so it now has brakes and a clutch again. I've attached a few bits and I've been cleaning and prepping other bits to go back on. oh, and Greg came over earlier tonight and fixed a couple of runs and polished them out. 2016-01-14_08-38-00 by sheepers, on Flickr1 point
-
and now its at the paint booth. Greg is going to paint it tomorrow arvo/night and ill bring it back thursday morning. thats the plan anyway. so, the next time you see it it will be red. 2016-01-05_03-19-59 by sheepers, on Flickr1 point
-
1 point
-
I have put a dti down the spark plug holes and turned the engine back and forth and there was zero play between each direction so I feel all bearings are sweet. I have also run engine with tappet cover off and could not find the noise up top anywhere using stethoscope. It may be that the headers being thin stainless transfer noise better but they are certainly where the noise can be heard best with stethoscope. Too bad it's all 4 that make pretty much the same sound1 point
-
Went and picked up this today Big thanks to Chris for ditching work to collect rusty cars using his own trailer and tow vehicle (also thanks Tara for takinmg the Grande Latte Barina to work today) It looks alright from afar but is far from good. Its missing quite a lot of the more valuable bits like: - engine - gearbox - brakes - steering box - diff head (and i need to return the axles) but it also contains many parts of value to me - i also have to take the axles back and pick up more stuff in a month or so to the PO who owns a 2300S Coupe that this was a parts car for - a set of good bumpers + not so good ones on the car - red interior in good condition + a extra set of carpets in red - spare wheel well cover in good condition + 2 in not so good condition - seat belts - a clutch adjusting nut - spare rear springs (for adjustment purposes) - good windscreen - ok doors - brake booster - spare lower tail gate + rusty one on the car - spare rear side windows - some useful rust cuts for the drivers side including (most) of the drivers floor - various other bits and bobs Including, and best of all - spare good upper tail gate + good one on car + a spare tail gate glass (!) - i pretty much bought this for the tail gate alone and to find it has spare glass (which i could have happily used) and an extra one as well is just crazy. Thats a veritable embarresment of riches! Based on the number of tail gates or parts thereof i now have, that suggests i possess the mortal remains of 4 of the 9 or 10 2300 Wagons imported into NZ. How did that escalate so quickly?1 point
-
I got the Cromodora CD9's cleaned up - i only had black etch primer, and i liked the look so i went with a matty b top coat as well. wound the torsion bars down as far as the adjusters would allow, need a 44mm socket to get the retainer nut off the front of them to take them out and rotate them a spline - surprsing amount of adjustment with just the nut tho. right rear caught on the handbrake thingee, enven tho the left has about 5mm clearance, so unsure what to do about that, will worry about it later as its on the 'against the wall side' for now. pretty happy with how it panned out:1 point
-
So the cars been coming along good, all the interior is back in and it passed a wof for the first time in a year and a half. I got all the lights fixed and working before it went in so it only failed for a front wheel bearing and the horn wasn't working. Just had to plug the horn in and grease up the wheel bearing. Easiest wof it's had and it's awesome being able to drive it fully legit. This was the light that caused the most problems I painted all the interior parts with this texture paint before after Carpet going in All the seats, original condition All of the windows are in now as well. They needed quite a bit of adjusting since its pillar less. There really good now as they close up nice and there's hardly no wind noise. Really happy with how it came up. Big thanks to our good mate Ben from Reel Flooring for installing the carpet and my dad for all the work he has put into it. Now that its back on the road i'll have to take some good pictures for the next update.1 point


This leaderboard is set to Auckland/GMT+12:00