
Leaderboard


Popular Content
Showing content with the highest reputation on 12/13/15 in all areas
-
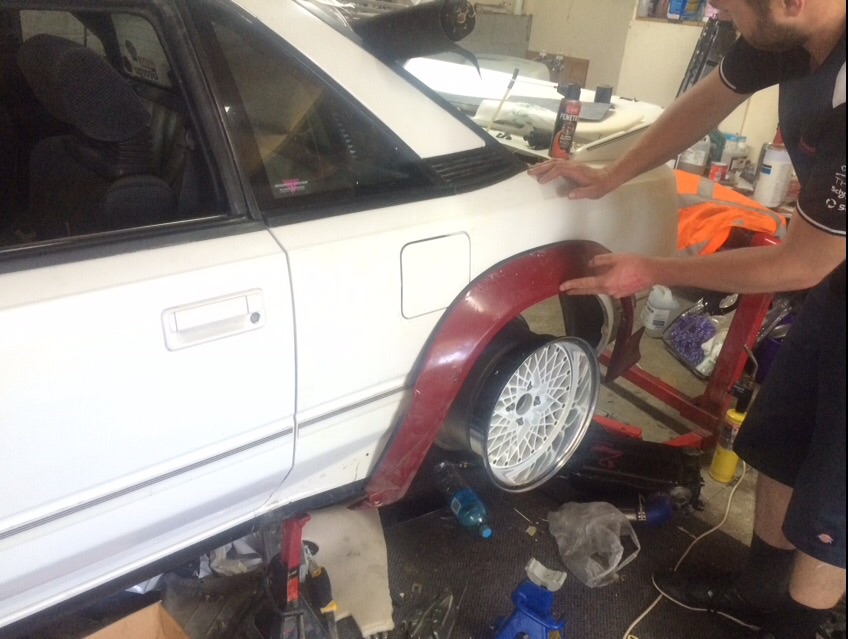
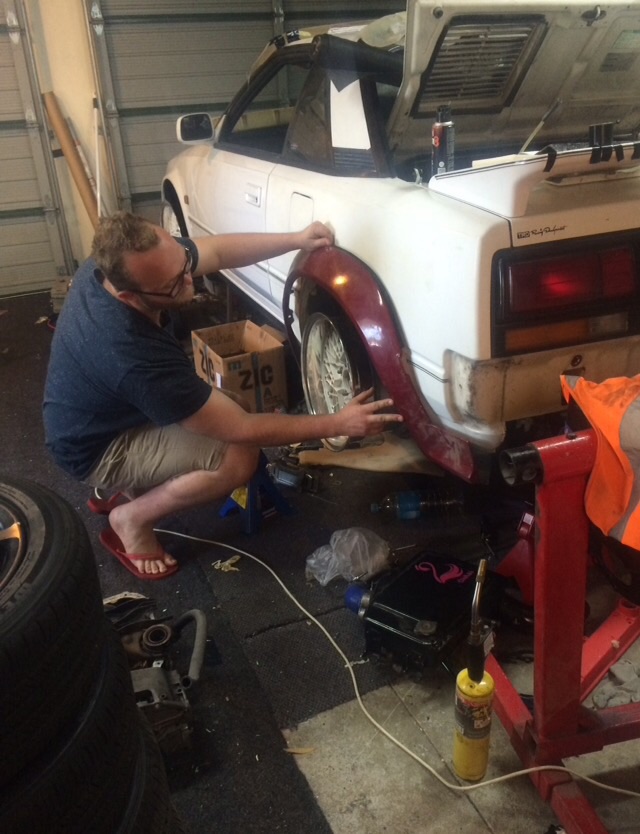
well picked up my new project yesterday needs a bit of work but nowhere as much as my old ponty drained the fuel tank out today cleaned the carb and started it up then snap the dizy bearing seized snapped the bottom off my dizy in the oil pump lol never mind more things to fix if anyone has some 318 v8 parts let me know thanks ill up load more pics later8 points
-
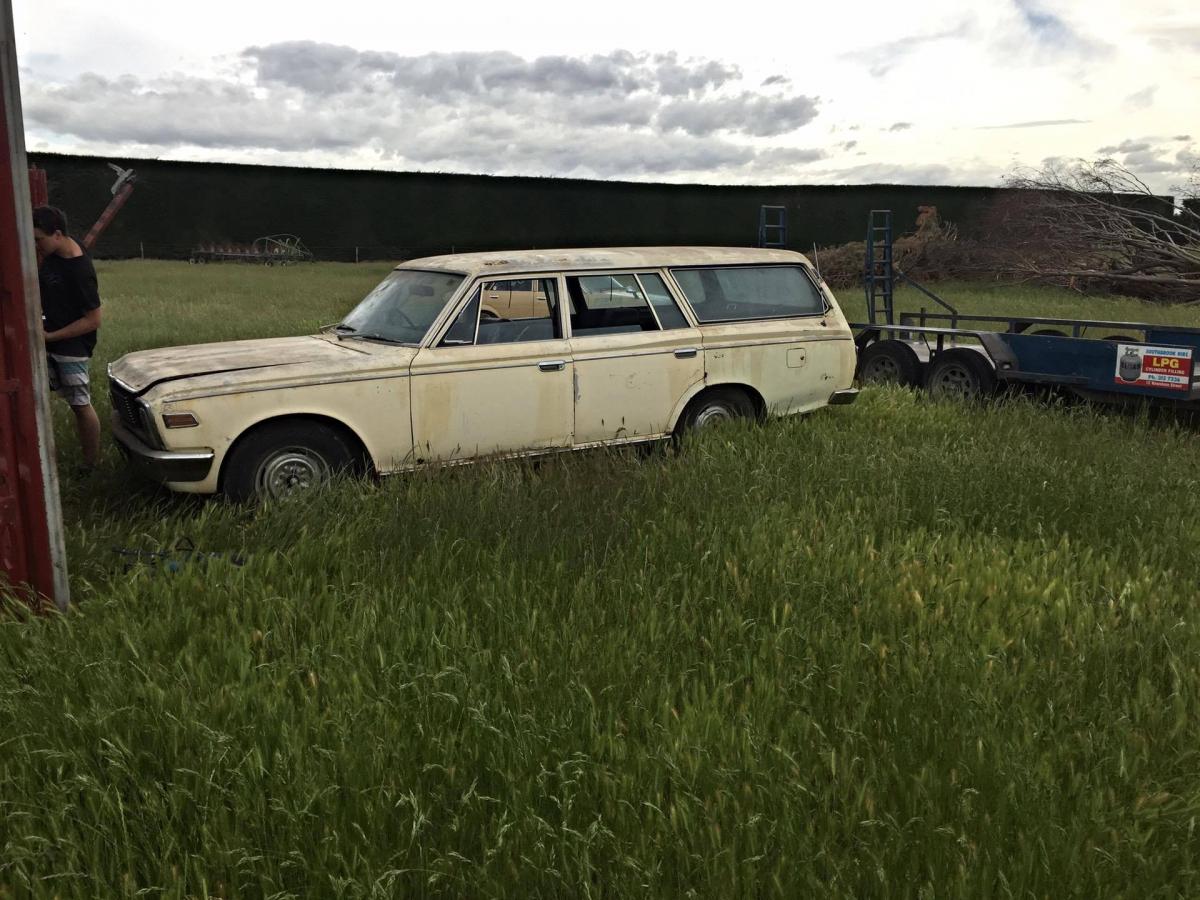
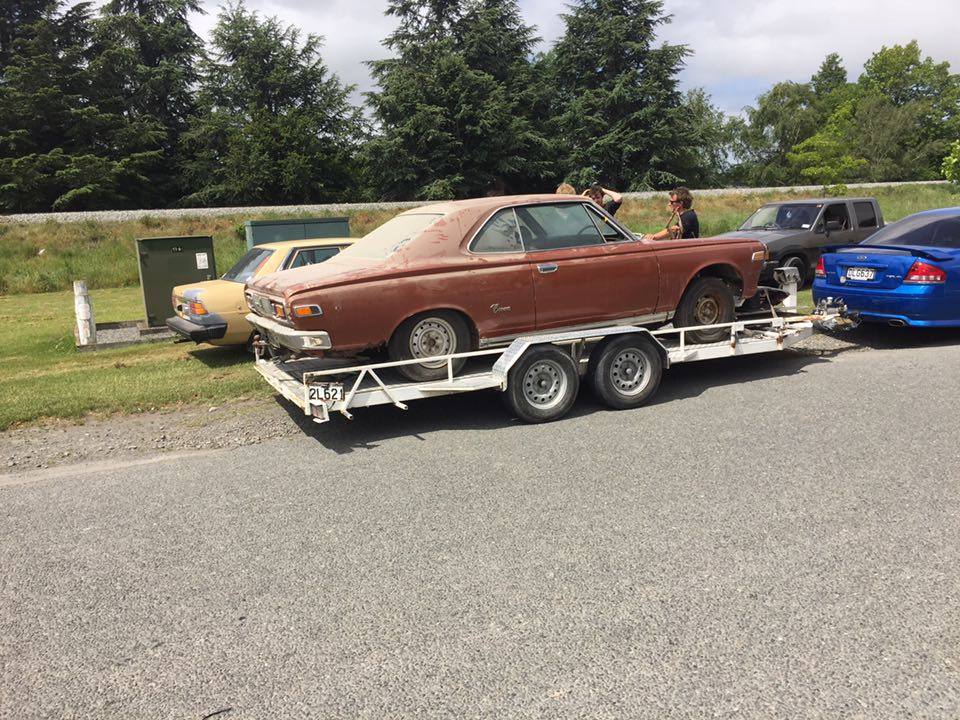
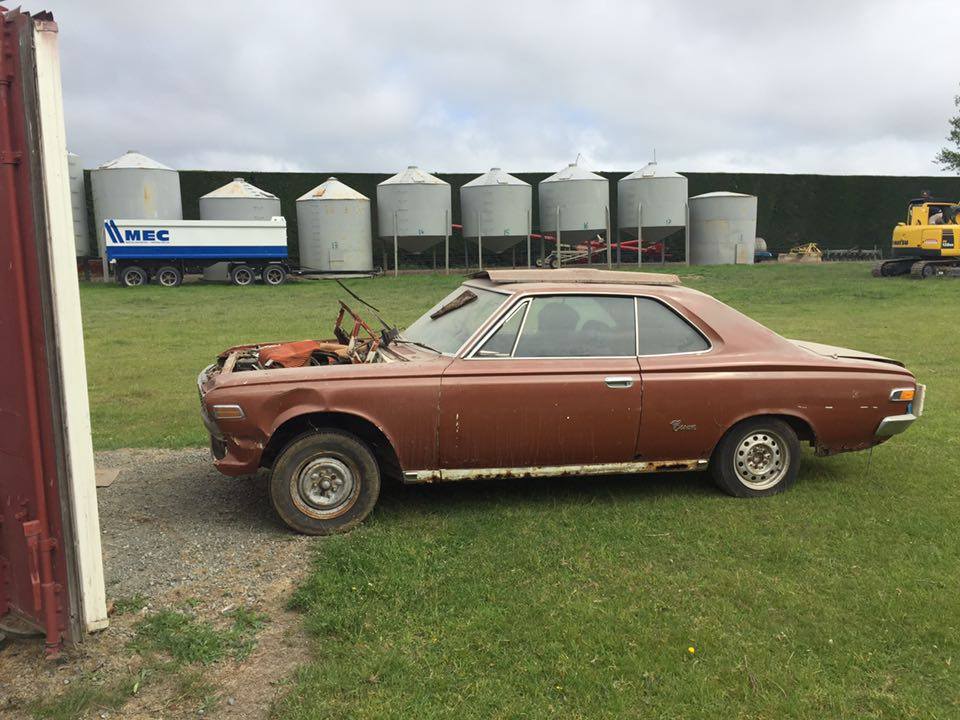
So now another crown has found its way into the shed. A 1969 Toyota Crown MS53 wags.last registered in 1996 and possibly the last time it ran.This came from the same place as HORNDOG's MS51 coupe.It has been sitting in a shed for quite awhile which has kept it in not to bad condition but the bottom of everything has rusted away, ie doors,sills,guards and tailgate.Tailgate has the worst of the rust but nothing that carnt be fixed.The car is 98% complete all chrome is there and is in relatively good nick .Just missing both front headlight bezels,'custom' badges and rear crown badges.Interior is all there ,factory black ,front seats are buckets with the usual wear and tear.Dash pad has a large bubble in it and the rear dickie seat works.So i trailered the old girl back home behind the 60series cruiser only for it to have a melt down on the way home. The alternator ratted loose and it spat some coolant out of somewere but no split hoses.After a helping hand from a local she was fixed and made it back with out any extra issues. Specs: reg on hold!!! factory 2M replaced with a 4M-U factory 4spd manual on the floor disc brake up front 5 seater with a 2 seater dickie seat in the rear electric tailgate window that still goes,and would go better than most 90s cars windows boot full of crown parts for ms60s 1973-1974 Got her home,chucked in a battery,checked the electric window to see if it still goes and score it works!!!!! Cleaned all the ignition system changed the seized carb over for another and put some gas in her and she fired up purring nicely,just some timing and tappets to adjust.Clutch needs bleeding to see if i can get it rolling under its own power,brakes also need some attention. So no real plans for this as of yet,just get it to drive and stop.Wouldnt mind taking it to the Rangiora car show at the start of the year.The ms65 will be finished first before the wags gets some love This is the parts container that is full of mostly crown 60series crown parts (theres a little left but i took most of it) a few rt80 corona bits,rx30 cressida parts,datsun 260c towbar,taillights and gasket set.these are all for sale and need to go Discuss here-----> //oldschool.co.nz/index.php?/topic/51148-toymotas-1969-ms53-crown-wags-discussion/7 points
-
So yeah, the Oldschool drag day today was dope! I didn't do great times; worse than last year. But the LSD was sweet and I did 2nd gear skidz up the strip which was awesome. I was having so much fun I monged out and snapped an axle during my staging skid trying to grab 2nd gear. But as luck would have it I had some similar Datsun axles in my shed and managed to cobble together a complete axle, so I'm back up and running, JEAH! The one in the middle is the one I made out of the broken one and one similar to the bottom one.7 points
-
the red looks really good in the sun. i don't think its too black, in fact i think its just right so thats that sorted. Rosso red it is. 2015-12-13_12-41-44 by sheepers, on Flickr 2015-12-13_12-41-53 by sheepers, on Flickr 2015-12-13_12-41-30 by sheepers, on Flickr6 points
-
i had a go at drag racing. never done it before but it was heaps of fun. did lots of skids, lots. even when i didn't want to do a skid. anywho the car is pretty fast and it behaved itself impeccably all day. 2015-12-13_10-55-45 by sheepers, on Flickr6 points
-
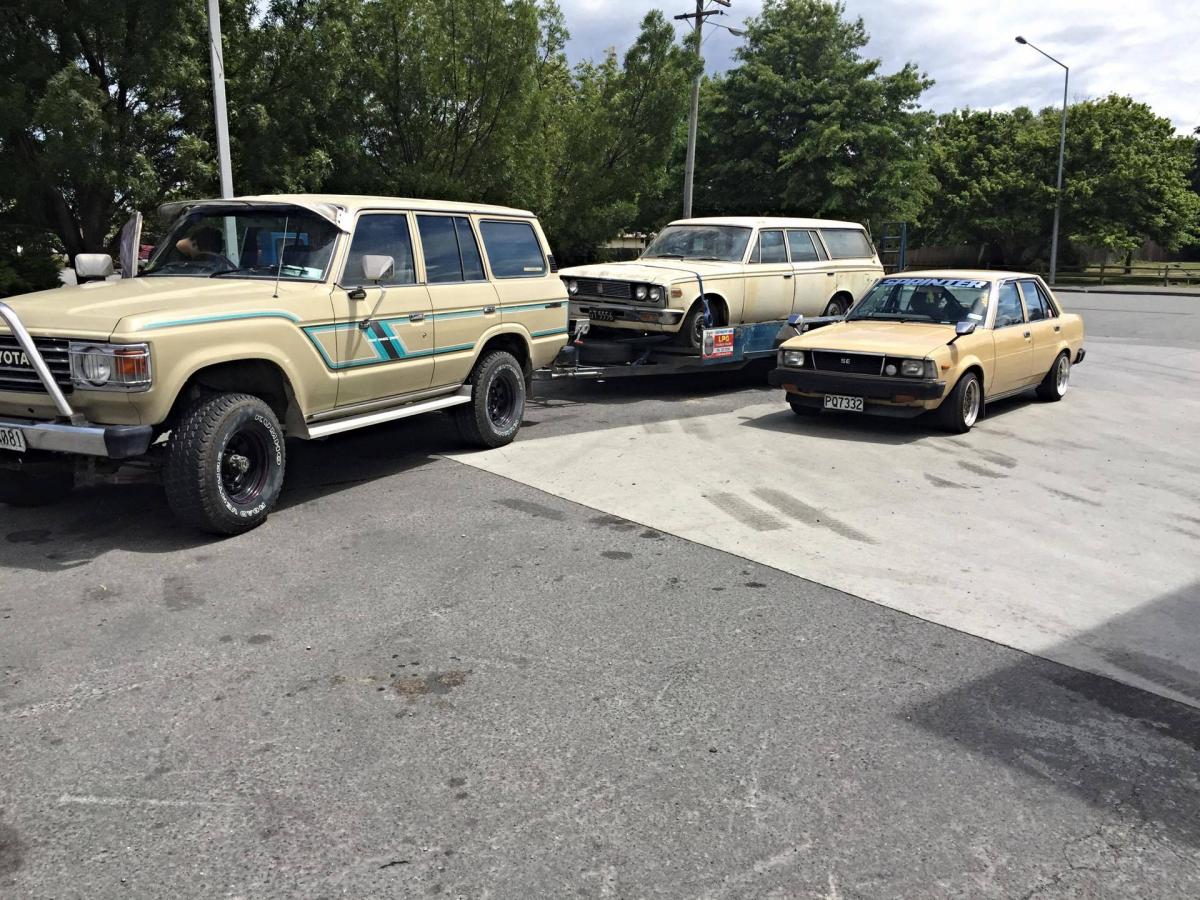
last pic with the tan team, matts 60 series cruiser with his new ms53 crown wagon behide and my 1980 ae70 sprinter sedan next to it
 4 points
 -
Story time! We all nearly died. In fact we did all die. But people asked for prayers on facebook and it bought us back to life because that shit totally works. Praise Bald Jebus. But fuck that huge big slip.4 points
-
^ I was a bit of a girl with the b-outs sorry. Did the near on 600km round trip to the drags and back sweet as, with a couple of bikes on the back even, hit the bumps less often then I thought it would, so that was nice. Did 10 runs at the drags, my first run was my best at 14.03 at 97 mph, even thought I sneaked the boost up through the day to 17psi, which was a bit naughty, but wanted to get into the 13's bad, lols. Air temperature and heat soak effect this a lot more then the corolla, that's fo sho. Also getting a turbo off the line properly is quite hard, it was either bog down or skid up, puhuhuhu. Had a shit ton of fun though. Here's a shitty vid of a few runs.4 points
-
In 2000 I decided I wanted to repower this car, I wanted to go the turbo rotary route. Bought a 13B from a cosmo. And started on the mods to make it go. Ended up chopping the tunnel for the RX7 gear box and getting some nice customised celica struts for bigger brakes.... Anyway not much happened from there...other priorities. Last year I began where I left off, but changed my mind to go with a 20v Blacktop 4AGE engine, rather than the turbo rotor. My daily is a blacktop 4age powered Carib, and its a really nice engine. I'm just learning as i go, so made sense to have a working version to compare it to lol. Here is the engine bay, chopped and all. Not beyond repair though. I had done a fair bit of research, and new i was going to need to change the ignition to coil on plug. The modification is not particularly hard for this, but wanted to try it on a working engine, before i started fitting it to my car. So i bought this 1999 Levin BZ-R for a donor. De-reg'd but still running and driving. Perfect for testing before pulling the engine out. Coil on plug setup tested and working. Yay! Video of startup. Very exciting. https://youtu.be/UUzKnKyeOGM
4 points
-
i had a go at drag racing this just for a laugh. it actually did a skid but i don't have any photographic evidence of it….. it is slow but i was happy to break the difficult 20 second barrier. 2015-12-13_10-54-19 by sheepers, on Flickr4 points
-
Heres Pics of the new one: and home at last It does have the 4th minilite style wheel in the boot =)3 points
-
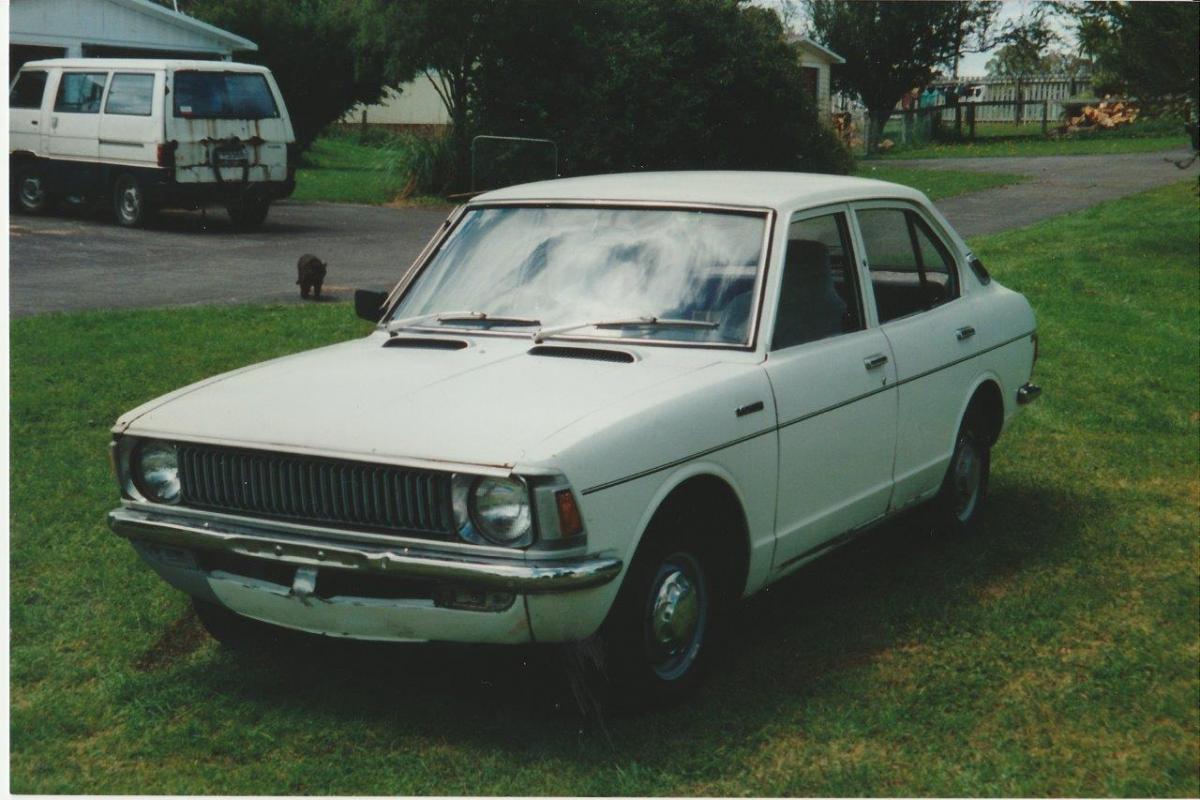
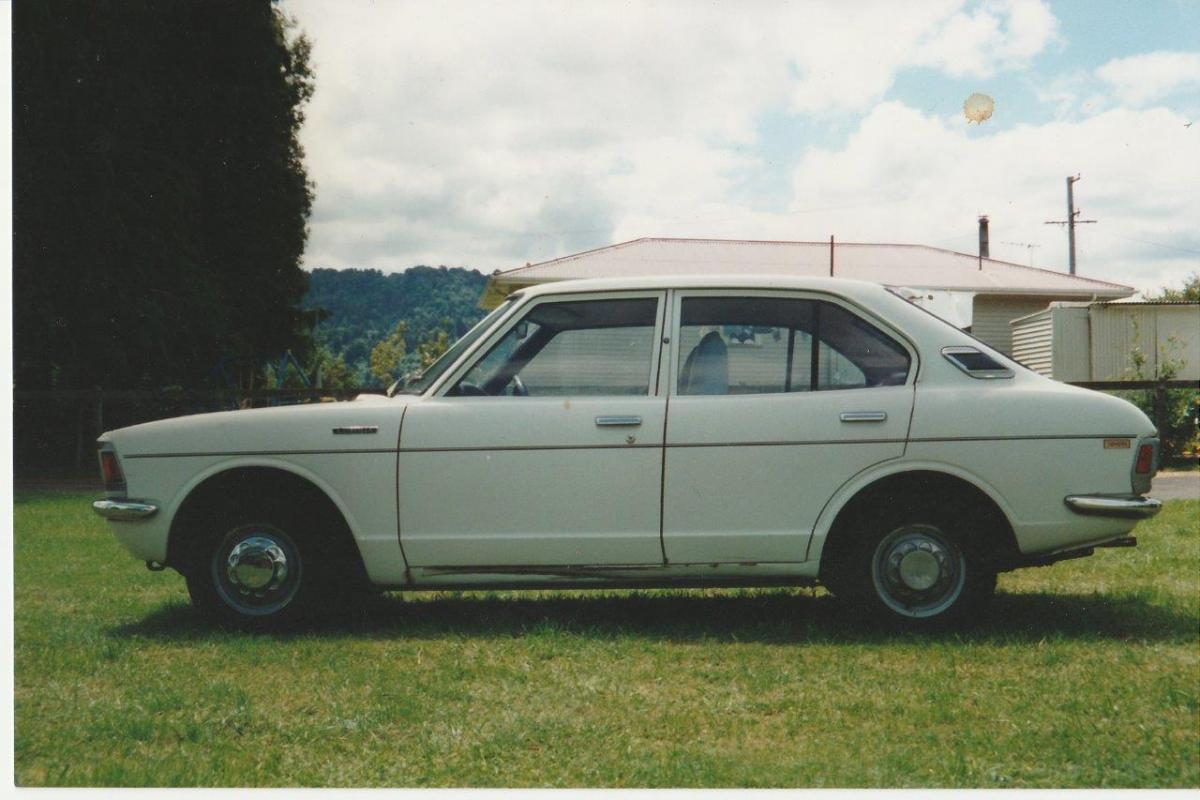
Discussion thread here: //oldschool.co.nz/index.php?/topic/51144-gtuthills-1971-ke20-corolla/ So I've had this ke20 corolla since 1995. A little over a year ago i started on repowering and getting this car going again. Wasn't quite sure about where to start the build thread, so at the beginning it is ! My first car, given to me by a friend of the family, who had become to old to drive. Had a 4k, replacement for the original 3k. Here's how it looked in '95:
3 points
-
Few more pics, Had to redesign the remote after the first run, Originally it was designed to be in the off position at 6oclock ,standby at 9, throttle from 9 to 4, but I kept accidentally shutting the engine off when throttling down. So I added a 2nd switch, the top switch is power and bottom one is standby/ run so the throttle is now adjustable on for the entire range of the rotary knob, all I need to to to shut down normally is turn the throttle to minimum and throw the4 bottom switch to standby which lets it stay powered for the cooling cycle. Here's a couple of pics of the unit on it's own, it's designed to be added to any healing cruiser and just uses the seat bolt to attach. and the final touch, the tank stickers ,thanks to Bangbug for printing these off last minute.3 points
-
OH WOULD YOU JUST STOP IT!! Stokedness is on MAXIMUM.3 points
-
I shall never pack 'just enough' when I go camping ever again. Just in case.2 points
-
Well well well, have we got a Storey for you.2 points
-
Picked up this Nardi woodgrain wheel for a price I couldn't resist as was looking for something larger than the Momo that was on there in order to see the gauges properly (couldn't see water temp, somewhat important). With a bit of fettling it's on, and looks perfect. Feels really nice to hold, I've never had a woodgrain wheel before. Also took this opportunity to straighten the boss as the previous owner for whatever reason had the wheel on a slight angle which bugged me to no end. Now I need to get some repair parts for the centre console to get it back to it's former glory. When I took that photo from the driver's seat it reminded me of this one I took a little over 3 years ago at Rocky Auto: It was never a matter of IF I would own one.. but a matter of when! Discussion: //oldschool.co.nz/index.php?/topic/49704-mlracings-hakosuka/page-6#entry16278412 points
-
So yesterday was a glorious day as I finally got the engine in the car!! Step one was bolting up the Niteparts adapter plate, the starter, flywheel and clutch etc. I hope the starter doesnt fail as I would now have to remove the gearbox to replace it. (I did test it worked before fitting). Totally forgot to take a photo with the Exeedy clutch in place. Gearbox meet motor. Car assuming the position. After a lot of screwing about we had to drop the crossmember to get it to clear with the J160 attached. Managed to snap off the hose that comes out of the heater core so I will now need to strip the dash out again to repair replace that but im not bothered because the engine is in! My 90mm trumpets clear the smaller booster with ease, I can definitely go to 100mm ones if I decide to splash out and get some billet ones at some stage. I had to cut a bit more out to get the shifter in the correct position, its quite far back compared to the factory position - however I am pretty happy with where it sits as it lines up nicely with my wheel now that it has a hub spacer. I have to sit pretty far back to actually fit in the car (Im 6ft 4) so wheel and gearknob are in the perfect position for me. Ill have to mod the interior as it doesnt fit with the shifter in its new position, hopefully I can re-work it so it still looks factory-ish. So just waiting for my end of year bonus to come through so I can purchase up all that is required to assemble the diff, Ill also need to make a gearbox crossmember. Hopefully all of the wiring can be completed over the Christmas break so that come January I can get a driveshaft made up and get it started up!2 points
-
Clearance might be sorted curtesy of _david_
2 points
-
I did some maths once many moons ago to figure out how long it would last, i cant remember exactly what the out come was but it was something like slammed to full up 18 times before the tank needed a refill. but in reality you dont do that, i would lay it out when parked but only go up 50mm to drive it. going to the dive shop was a weekly occurance at least though. $ 5 a fill and wait for 10 mins while they did it. that was why i went to a york pump, i found i used it less so i didnt have to fill it, which seemed dumb. the last straw was a trip back from coromandel with no air left, every time i went round a corner the air bypassed the valve and got a sag on, had to bump it back up again ( without check valves, the air pressure in the tank must be more than in the bag or when the air pressure in the bag increases ie when going over a bump, the air bypasses the valve and goes back into the tank)2 points
-
Pretty much done, went for a blast around the carpark at work, it's a weird sensation... nothing ... nothing... moving ... woah hang on!2 points
-
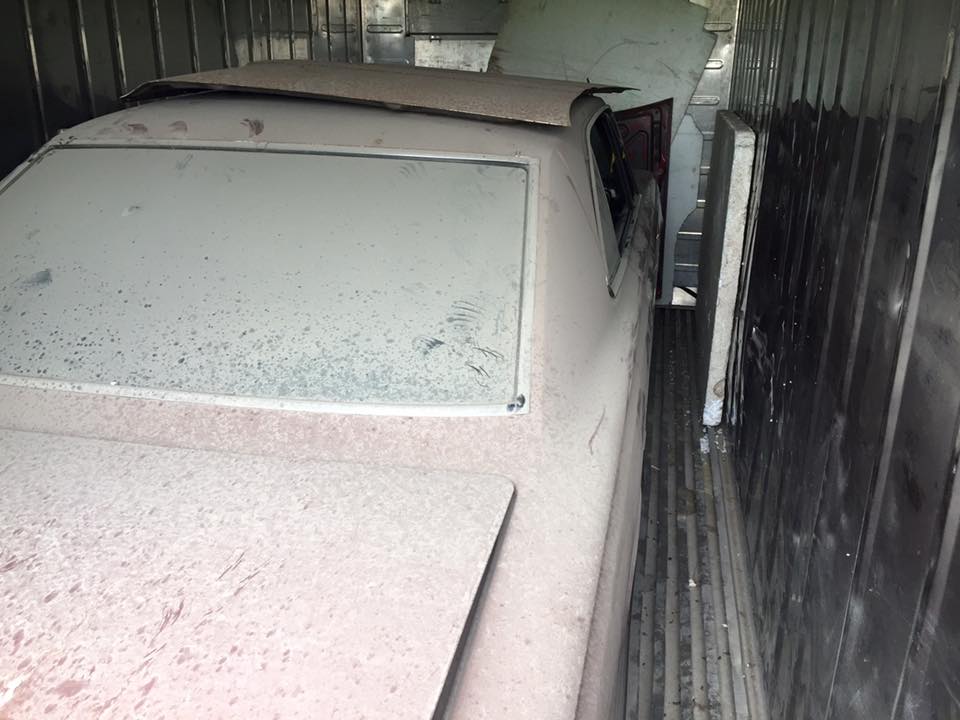
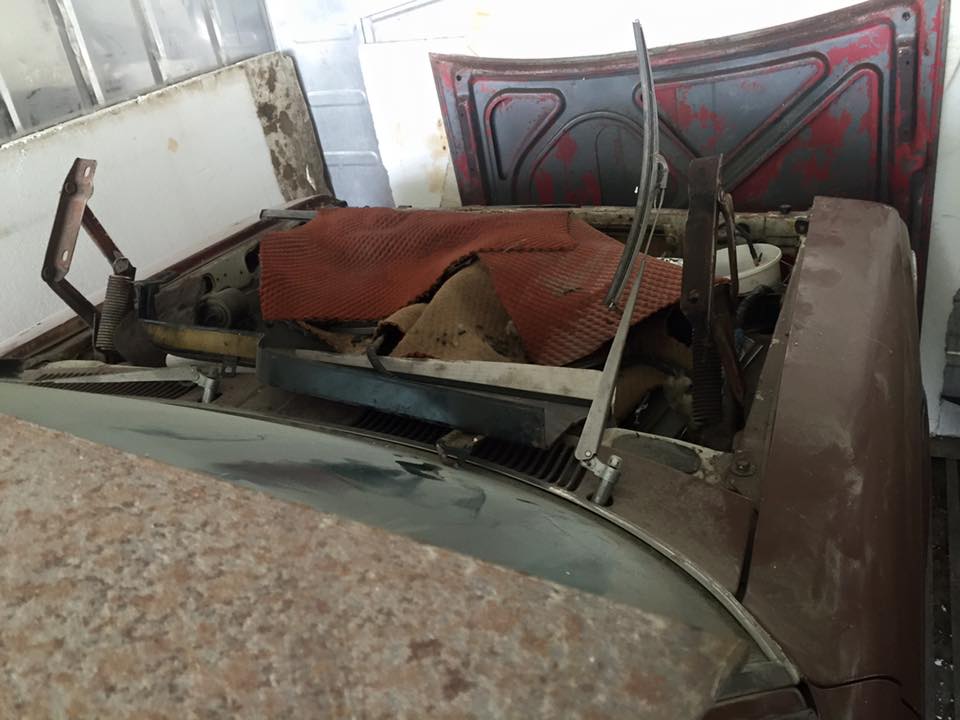
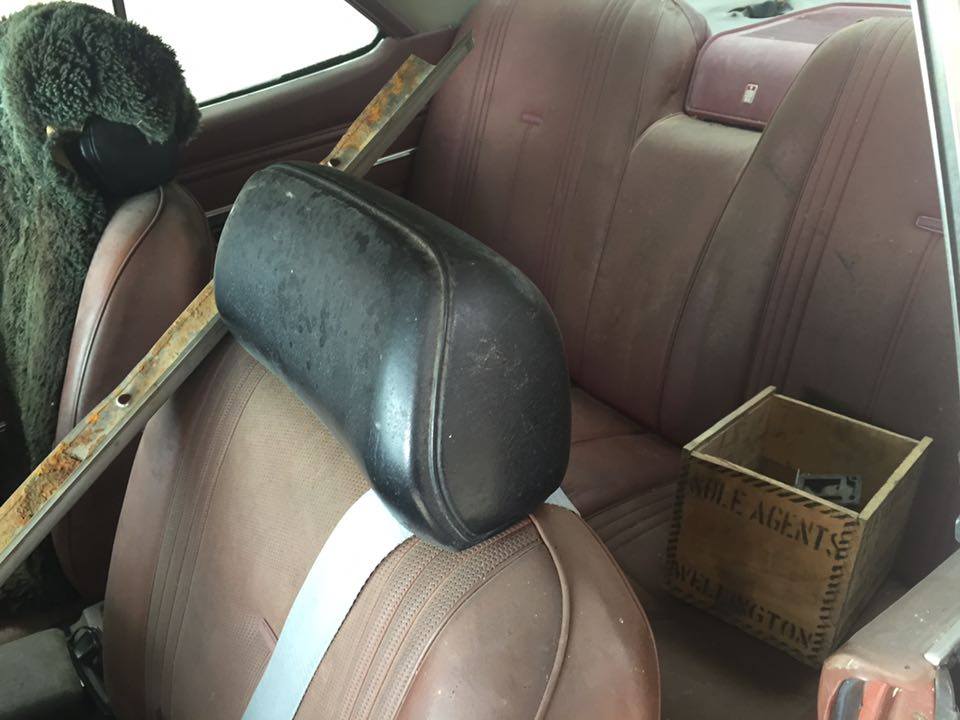
Discussion Thread hey guy just starting my build thread of my 1969 ms51 crown coupe. wont be starting the build for some time. I have been after this crown coupe bran find for over 3 years the guy finally let me buy it, it needs a fair bit of work as its just a rolling body at this stage. dereg and rusty eg sills and rear guards seams to be mostly there apart from motor and box. has been off the road since 89
1 point
-
Discuss: //oldschool.co.nz/index.php?/topic/51171-guypies-wifes-1986-corolla-gt-discussion/ When I met my wife some years ago now she was driving around in her first car, a maroon 1987 ee80 corolla hatchback with 320,000km on the clock and a leaky valve stem seal that would foul the #3 spark plug every 100km or so. The original corolla: She had a love/hate relationship with this car, it was quite simple and went like this: Is the car going at the moment? Yes: LOVE! no: HATE! Eventually a few years later we had to get rid of it as it was only worth about $300 and it needed rust repairs (I had no welder at the time) and seatbelts plus a few other things for a wof and was just not viable to fix for broke students. So off it went and every time since then... and I mean EVERY SINGLE time we saw one on the road she has pined over it and wanted her old one back. This came to a point when Heather saw Gnarlydude/Matt's lovely yellow EE80 (might be different number for sedan?) Corolla sedan, and after Dromageddon this year she decided she needed one back in her life. And who am I to stand in the way of getting a sweet new/old car?! So after trawling trademe and facebook we found a AE82 liftback that didnt exceed our budget, and was registered. We went over to Tauranga, inspected it and found it to be in reasonable shape in terms of bodyshell. It is currently not running. The story is that he fired it up after sitting for about 7 years and it spluttered out and wouldnt start again. My guess would be old fuel/clogged fuel filter/dead fuel pump, however I have not put any time into it yet so it could be anything. Will post up pics in a moment on the next post.1 point
-
Hey, thought I would post up some pics of my project/tale of woe... It started a few years back when I foolishly thought that a rotary would go good in an Anglia, plus the motors are quite small so how hard could it be. So I bought this for the princely sum of $400 Then bought this intending to ditch the turbo and run it N/A Over the next couple of years I slowly chipped away at it until it got to this stage So it was about ready for panel and paint, however as I had been working on it I had found a bit of damage at the front end and it was only as I dug deeper that I realized how bad it was basically the front of the car had taken a massive hit and it had pushed both strut towers over towards the passenger side, as near as I could tell the drivers side had gone 30mm in and the passenger side about 20mm out. Combine this with the front panel being stuffed and the drivers guard also stuffed and the whole thing kind of ground to a halt. You can almost make out the difference in strut tower positions in this photo So I started trying to fix it but soon realized that it was a bit beyond my abilities, plus there was some other damage on the car that I was also going to have to fix, end result I started looking for another shell. Now somewhere along the lines people lost their minds and started asking ridiculous money for Anglias but after a fairly long search I picked this one up for $350 has a bit of rust but is straight and while I hate fixing rust at least I can deal with it. So this is how it sits today So in theory it is just a case now of swapping over all the good bits from the other car. So the specs are: front suspension is mk2 Cortina, converted to coilovers, Escort front brakes, modified bottom arms and a double sway bar. Rear suspension is reset and retensioned leaves with disc brakes (escort discs and Silvia calipers). 15 x 6.5 rims (trade me specials) with 195 45 tyres Engine is a 13b bridgeport, carbon seals, weber carb, gilmer belt drive, blah blah blah, s4 turbo gearbox custom 3" driveshaft all running through the standard diff I have some more pics I just need to get them off my work computer....... Discuss here //oldschool.co.nz/index.php?/topic/33014-matts-rotary-anglia/1 point
-
Once upon a misty evening....1 point
-
This, pretty much. We did stock takes when we found out.1 point
-
Considering the foul weather that was about today, in which Hannah and I got caught out in whilst out bke riding, the day turned out great and the meet was another goody! Cheers to those that came along. Great spot for it and some more new cars along including a very rare in NZ Mk1 Granada coupe. V6, in brown, with brown vinyl roof and brown interior. SWOON The storm clouds looming on way home over mt Cambell. Luckily while it looked like Nelson it self was getting hit hard we had nothing but hot sun1 point
-
I reckon I'll just leave it as is until I eventually maybe get around to refurbing the whole grille area. Actually when I was showing someone the car earlier today it looks fine from about a foot away and chances of looking super close are slim.. there are much more important things to get onto first haha1 point
-
New neck tube lathed up out of some hollow bar. Jig almost done, ran out of CO2 to do the steering neck part. Seems square enough...1 point
-
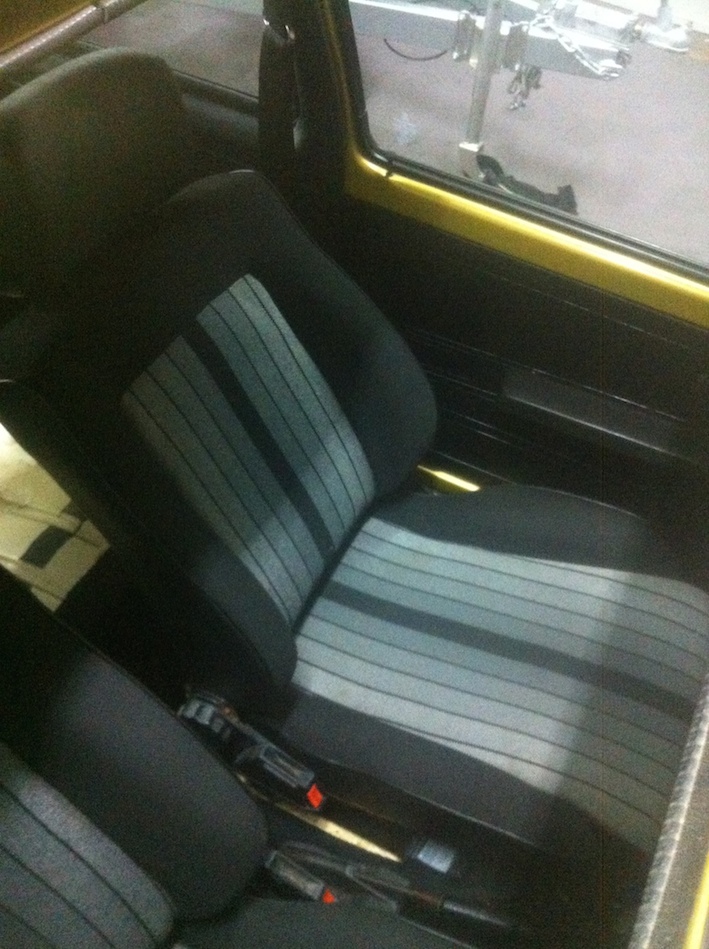
Re dons seats
1 point
-
Time for a bit of a update; Welded the head plate, fish plates for chassis rails. Got green sheeted, had to tweak & alter a few things, lengthened the driveshaft. Took it out to a local black track for a run in, stopped, turned and seemed to go well, so rather than pull in and check I just went for it, went really rather well indeed. Made a few alterations after the test day.. Changed the diff head, radiator hose setup & fuel hoses. Near complete chassis Carby, Breather Setup Roof plate welded, hot work welding 10mm plate! Went to Woodford Glen for my first meeting in the car, had a fantastic bunch of people helping with the car which made for a stress free night, didnt have to worry about a thing. Proud to display RO Jones on the car, fantastic Job Scott & the team did painting the body, bonnet & dash! Stands out supremely well!! 33 cars fronted for the the night, I started all of them off the rear of the grid as I wanted to stay out of the way, whilst I get to grips with the car without pin balling around. First race went well in the fact I finished the race, 21st (22 finished), but the gearing was all wrong. Race 2 we put the RR onto the LR and the largest tyre I had onto the RR (225/75r15), instantly shaving 1.5 second off my best lap time from the race prior. Finishing 13th Race 3 we made no changes however the track was very slick and lots of people were spinning up. No faster this race, but managed 10th from the rear. Have a few changes to make again, and will try something with the rear end, but overall it handled well. Driver just needs to get up to scratch a little - more consistent. Big thank you to all involved who have helped along the way, advice, parts, time or materials. Thanks to the crew that came and gave a helping hand; Tim, Caitlyn, Crystal & Matt. - All made for a stress free first night. A few tweaks to be done, but overall very happy with the car finishing 3 from 3 races. Started them all off the back and went forward so that's a bonus! Especially big thanks to the Read & Blyth family's for their generous support throughout building the car. RO Jones for the painting of the Body, bonnet, Dash. Fast Blast - sandblasting wheels, components, advice, help in time & materials also Mag & Turbo of course for being on board right from the start, wheels, tyres1 point
-
except I've only got one pump.1 point
-
Nah bro, this is a bomb!1 point
-
I've been putting aside some surprise gifts in anticipation for this. Hope everybody else has too. Get them wrapped, in whatever you have laying around and bring them down next Wednesday. Wrap it up like fush and chups puhuhuhu1 point
-
Seen this on the tardme...? http://www.trademe.co.nz/sports/cycling/other-bikes/auction-995386562.htm Rudge with 3 spd derailleur.1 point
-
THIS IS THE BEST THING I HAVE EVER SEEN1 point
-
Couple more pics, need to tighten the seat up a bit Also, credit due to Polecat for a very last minute "can you build this stainless thingy" with crap drawings on paper and little notice, cheers!1 point
-
I'm double booked again. Will try to make it, but who knows. If I do then I'll be in newschool daily and a suit, won't stand out at all...1 point
-
heh, weirdly enough it was pretty much only a trot for the 205, with a few spots of minerals here and there too. It's not fast on a track by any means but give it a bit of road like that and it's amazingly casual to drive quickly. I've been thinking of flicking that thing but when you drive it on a road like that it reminds me why I have it in the shed. I think I used about $15 of gas for the whole day too. such economy. Love that loop road. There's an extension you can do (instead of turning left at the Tee to come into apiti, turn right) which links through to Rangiwahia. Can go through to Mangaweka or back down to Kimbolton. Another great set of roads. We did that loop with the french forum a few years ago mid winter. I didn't have a french mobile so took my old man's 1000cc mini and was working seriously hard to keep the pack at a fun pace (I was leading). We were driving amongst snow lined roads and all. So awesome! Glad all you jokers enjoyed. I'm not good at organising stuff, and I don't always catch up with everyone that comes along but I really love showing people around the backroads of my home region. There's some damn good roads, beautiful scenery and great 'left to rot' sights to be seen on plenty of backroads. I'll start planning the next one now1 point
-
went for a cruse on Sunday with the wonderful Uterus keeping me company for the trip. we discovered that something is hitting something else under hard acceleration and there was a fuel surge type issue that ive been chasing for a little while not sure what it was. when we got back Simon went on his merry way and i had a quick peek under the car and found the cause of the issue. 2015-11-30_08-58-55 by sheepers, on Flickr the day before i had replaced all the trailing link bushes and it seems that having the diff not flap about caused it to be closer to the floor than it was. i also remembered that ages ago i was chasing a drive shaft vibration (that turned out to be the centre bearing) and we tipped the nose of the diff up to change the pinion angle. that didn't fix the vibration but i never put it back down again. so ive adjusted the trailing links to tip the nose of the diff back down by about 10mm which should do it, and ive taken the drive shaft out and given it to Aden at Drive Inn services to check it out for me. as for the fuel setup, i had plumbed the rail return into the tank, don't want all that hot fuel dumping into the surge tank and making the fuel progressively hotter and hotter. but since ive installed the fuel cooler the temps of the return are pretty low so ive plumbed the rail return through the cooler and into the surge tank. that should take care of the fuel supply issue. i suppose ill find out at the drag day.1 point
-
Not very much has happened since the last update. The rear springs got a bit of a "trim" so it sits a bit nicer now. Still want it lower so I'll try sort some shorter shocks at some point. The clutch has decided to give out all of a sudden, so I went and bought a new one (thanks Mark!). Will try and get it in this weekend. The 4K that is at the engine builders is now getting bored out as big as it can go, since he found new pistons for very cheap. Hopefully they start on it soon! I have made a start on making my own extractors, I drew up a flange and got it laser cut at work. Now to figure out how to do the rest of them.1 point
-
Ahhhh OK, that makes sense. Also, this piece of shit just passed its fucking cert, zeeeeeeeeeeeeoooooooooowwwwwwwwwwwwww!!!!!!!!!!!!!!!!!!!!!!!! Towed it alllllllllll the way to Tauranga, drove it into his shed, he looked at it for around 1.47 minutes, and said it was good to go. He was more worried about arguing the origins of the wild bunch with some old dude, than having a good look at my work. Didn't even give me a high five for my sweet engine check light. Glad its all done thought, neat. All was not without incident though. When I went to load the ute onto the trailer last night, the fucking thing unhitched somehow (brother in law attached it, so I blame him, lols) and made a mess of the boot of his car, so that's going to be at least $500 to fix, bugger. Next on the list is to fit the alarm, and banging high fatality sound system, then get the cert plate stuck on, and DO SUM SKUDS. Regards, V "fuli hektik" G.1 point
-
LOL when I was training we would drain like 50ml and then it would get hiffed into the grass. If we drained 500ml from a tomahawks tabk we'd have had to go refill again lol1 point
-
catch can finished. Untitled by sheepers-ra28, on Flickr Untitled by sheepers-ra28, on Flickr Untitled by sheepers-ra28, on Flickr1 point
-
earlier today i didn't have an oil catch can. now i do. its not finished in that it needs fittings and something to bolt it to the car with but its getting there. i think ill paint it black. Untitled by sheepers-ra28, on Flickr Untitled by sheepers-ra28, on Flickr1 point
-
zorst is painted. fuel rail is installed and plumbed. and rear driveshaft loop is done. Untitled by sheepers-ra28, on Flickr Untitled by sheepers-ra28, on Flickr Untitled by sheepers-ra28, on Flickr Untitled by sheepers-ra28, on Flickr Untitled by sheepers-ra28, on Flickr1 point
-
new page time. been driving it and its still fucking awesome to cruse in. thats about it really, acquired a few bits for it that i was missing so ill make them fit and do a few more things i want to do as well. its hard work having 3 cars. I've been working flat out on the blue car which is fucking choice now but I've not done anything on this in a while. good problem to have i suppose. anywho, here are the boys together. Untitled by sheepers-ra28, on Flickr Untitled by sheepers-ra28, on Flickr1 point
-
So, I took this for a drive on the weekend. Still need to put a bunch of interior trim in, and go for a cert. It's dropped a cylinder somewhere in the last 5 months, hopefully that wont be a hard fix.1 point
-
all wof'd and rego'd now , so of course time to lower it. Ended up with cut springs in the front but not for long have ordered proper springs ,and I want to go a little lower in the front, as for the rear found some random cobra springs under the house, know idea what car they are from, they looked like they'd fit and they do mint! it's settled a bit since these pics and is pretty slammed in the back now. so next is sort white walls, and decide on wheels, I've started getting bits in pieces for the hidden stereo install too . I really need to get some better pics of this .something other than my driveway haha1 point
-
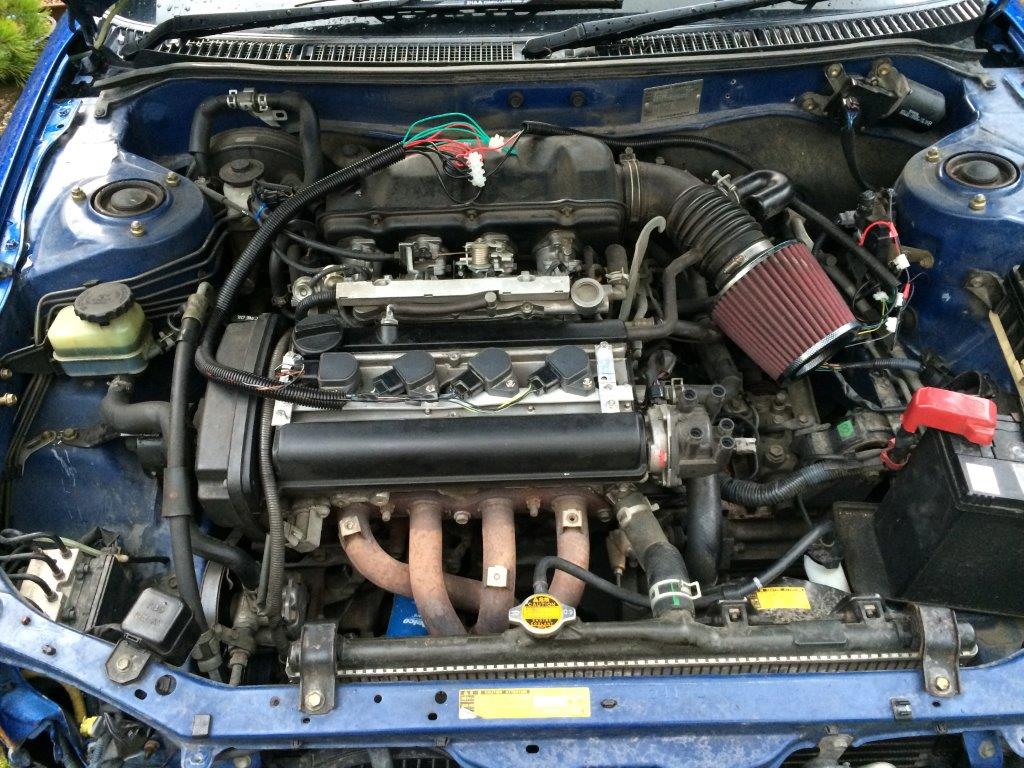
here's some more pics , excuse the crappy cell phone pics Yea no rev counter ! got a spare one sheepers? haha engine bay really needs some TLC , don't think its ever seen degreaser !1 point


.thumb.jpeg.384ff72c8d2b0ee0d34a7bdedb55bdcf.jpeg)


This leaderboard is set to Auckland/GMT+12:00