
Leaderboard


Popular Content
Showing content with the highest reputation on 06/08/15 in all areas
-
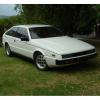
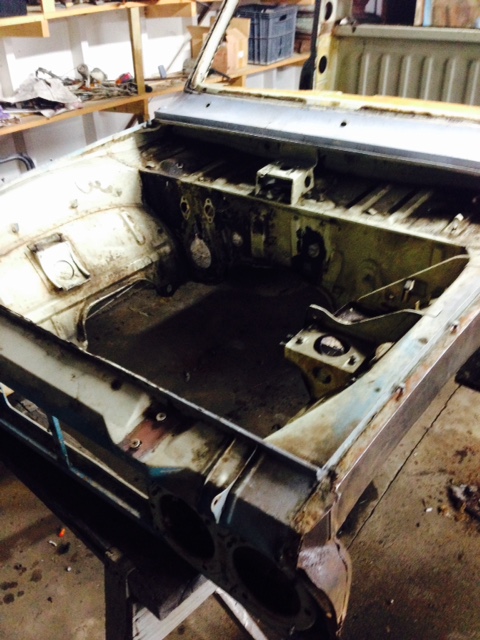
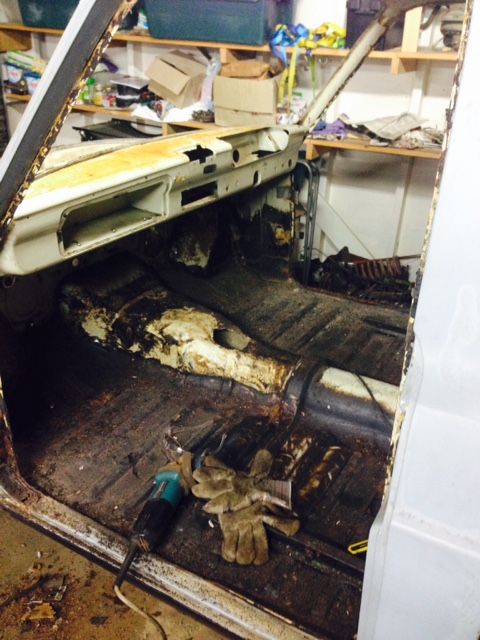
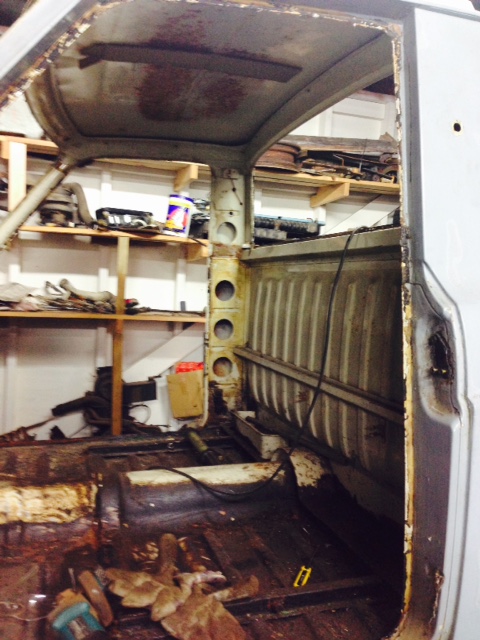
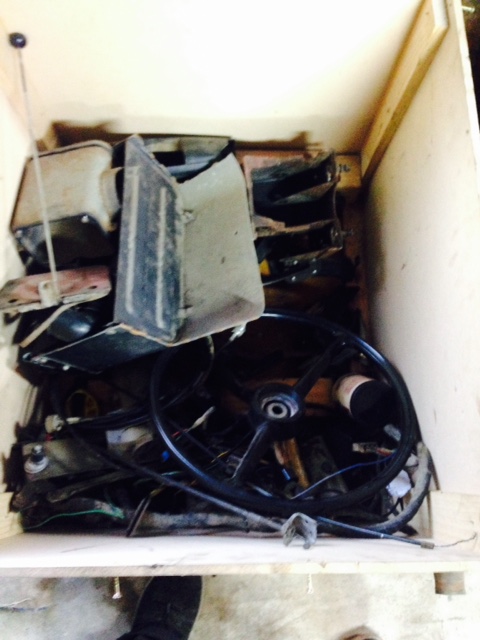
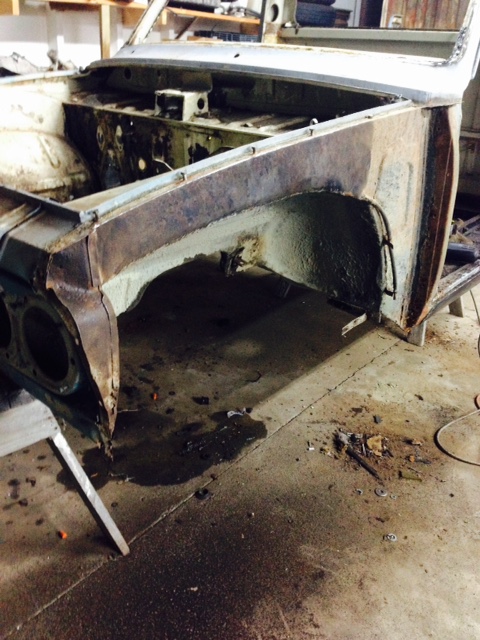
So after 6 years of not owning an oldschool car I thought it was time I did something about that. I decided at the end of last year I'd try to buy a GT6. However, I wanted a Mk2 as I preferred the more 60s styling, the problem being these are stupidly rare. But luckily I managed to be the first to offer money for the one that briefly appeared on Trademe last weekend. I picked it up from Whakatane/Rotorua/Tauranga (its a long story) yesterday. Drive back went well other than the speedo doesn't work and the headlights are dangerously bad for the last two hours in the dark, Its a 1970 and has had quite a lot of money spent on mechanicals recently. It needs the interior redone and theres a small amount of rust in both rear guards and the drivers door. Given I bought it site unseen I was pleasantly surprised. Its reasonably standard though has a few upgrades like brand new Mikuni flatsides, electronic ignition, hotter cam, GAZ adjustable shocks etc. Goes well though it is rather loud at 100ks despite having overdrive. [/url] ] If you look closely in this photo you'll see a piece of wood holding the tailgate up. Its supposed to be held up by a torsion bar by the hinges but like most this isnt working anymore and they're no longer available. So it has gas struts except these are just as broken. It has the factory option rear seat. These are like hens teeth apparently and having now experienced it I can see why noone chose them. Single worst rear seat ever, theres no leg room, no shoulder room let alone head room and you have to climb over the back of the front seats as they dont go forward enough to go around them. Here is the rust in the rear guards. As you can see drivers side is the worst of the two though the passengers is worse than this photo makes it look. Plans are to do not much to it in the short term as my mortgage is looking a bit sick but medium term plans are to continue tidying it up.8 points
-
Diff case almost done. just need to sort out a bump stop setup and make some caliper brackets. Then i cut a hole in it Welded up hole.. Have gained just over 20mm ground clearance. Doesn't sound alot. but its pretty much the same difference as going from 33" tyres to 35's. should have done the same to front when i had it apart.but didnt want to cut that sweet chrome. . Also, Someone in another thread awhile back, was saying how triangulated 4 links bind up with rose joints. Yeh nar nar nar.. only thing its binding up on is the ground.8 points
-
i done made a thing 90% done, will add some bracing and something to lock it in position once i know how much room i have around the body. it bolts on to where the bumpers bolt to the chassis. also got some box section to brace the body while im working on it7 points
-
Over the weekend I got the gearbox mounts done, welded some nuts to the folded plates that sit inside the chassis rails then welded them in and finished off with some patches in the floor Then it was on to the handbrake mount, I took the brace thing out before I cut the old tunnel out and moved it back 150mm, problem was the tunnel is a completely different shape at this point, so I cut sections out of the back of it and welded it back together then widened the front by adding some steel back in. Some hammering and grinding later and I had this. Then welded it back in place It looks pretty much factory which was kind of the point so I am happy. Got a few other little jobs done but they were mainly filling in all the speed holes that the car has collected during it's life. It's weird but I have pretty much run out of things to weld, might be time to get another shell and start again....... So now I can start putting it back together, maybe with one last distraction, A few years back someone was selling a roll cage for an Anglia on Trade-me, I got it for like $20 or something, it was only a main hoop which doesn't meet the new MSNZ regs (it's only dia 38 tubing)and some braces but I figured it might be useful to have as a template or to throw in for a laugh but now I am thinking maybe I should put it in to attach the harnesses to as it does meet the rules for cert. Anyway I am undecided as to whether or not it will actually make it in yet but I have set it up in there and I will see if it grows on me or not. As I said I can now start putting it back together so the updates from here might be more interesting5 points
-
Oh, I forgot to show y'all something else: I wanted to replace the super hard original water squirty tubes that run from the washer bottle to the jets to clean the windscreen, so looked around and found an old IV line my dad brought home from work. It actually fit perfectly haha I also had a nosey in the back and found the original jack and toolkit (may not be original tools but look old enough) in their super secret drug smuggling hatches behind the seats:4 points
-
Fished the air box today.made to fit an evo k&n panel filter
 3 points
 -
those arms are choice ^ I built this jig to prove no bind with rose joints. now to put the leafs back in my hilux3 points
-
Next little task is to fix up a set of Hayashi Street ST 13x7 +8 and -6 I have had kicking around for a while, ever since I got the car I've wanted to run it on Streets (and even tried and failed once with a set of 14's that Beaver now owns I think...) and these are the ideal size for stock guards. So I got some time with a sandblasting cabinet courtesy of a good friend and fellow OS member and stripped the centers and inner barrels with a fine garnet in prep for a polish/paint in the next few weeks. IMG_2904 by Richard Opie, on Flickr IMG_2913 by Richard Opie, on Flickr IMG_2918 by Richard Opie, on Flickr Will update with progress ASAP! Old mate Sheeper popped around this morning to provide an extra pair of hands to lift the diff into place, without scratching it. Results below. IMG_2947 by Richard Opie, on Flickr IMG_2950 by Richard Opie, on Flickr IMG_2968 by Richard Opie, on Flickr IMG_2972 by Richard Opie, on Flickr Rolled it out into the 'sun' to check height, everything is good. Usable, plenty of travel... I'm rapt. IMG_2925 by Richard Opie, on Flickr Just before I packed it away, I snapped a quick shot of the office - yearning to get back in here! IMG_2998 by Richard Opie, on Flickr As always, thankyou for looking3 points
-
Untitled by sheepers, on Flickr3 points
-
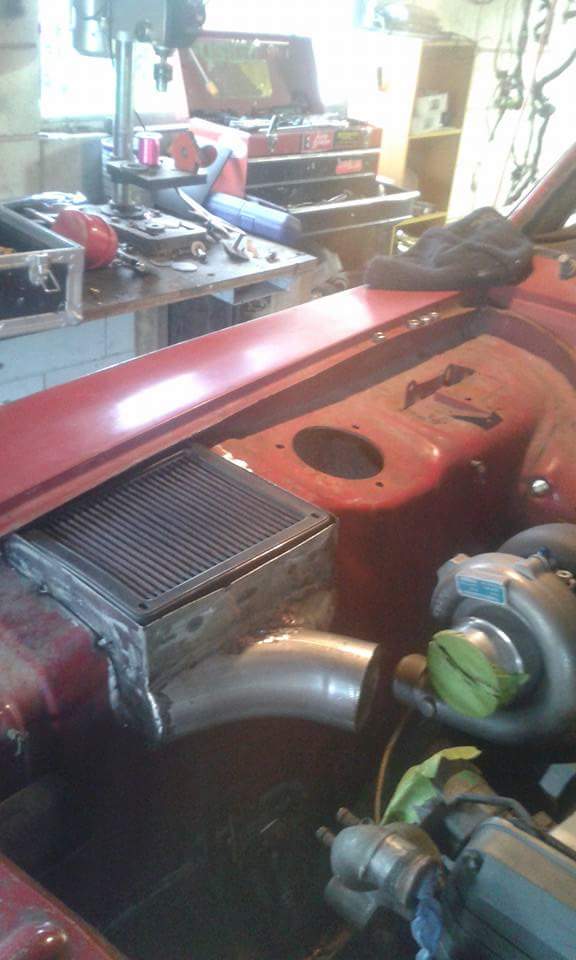
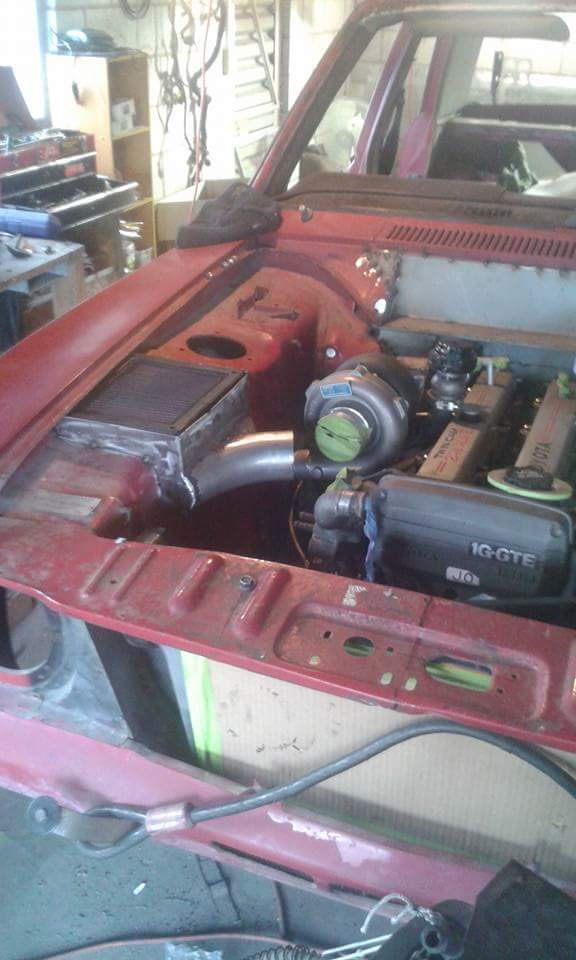
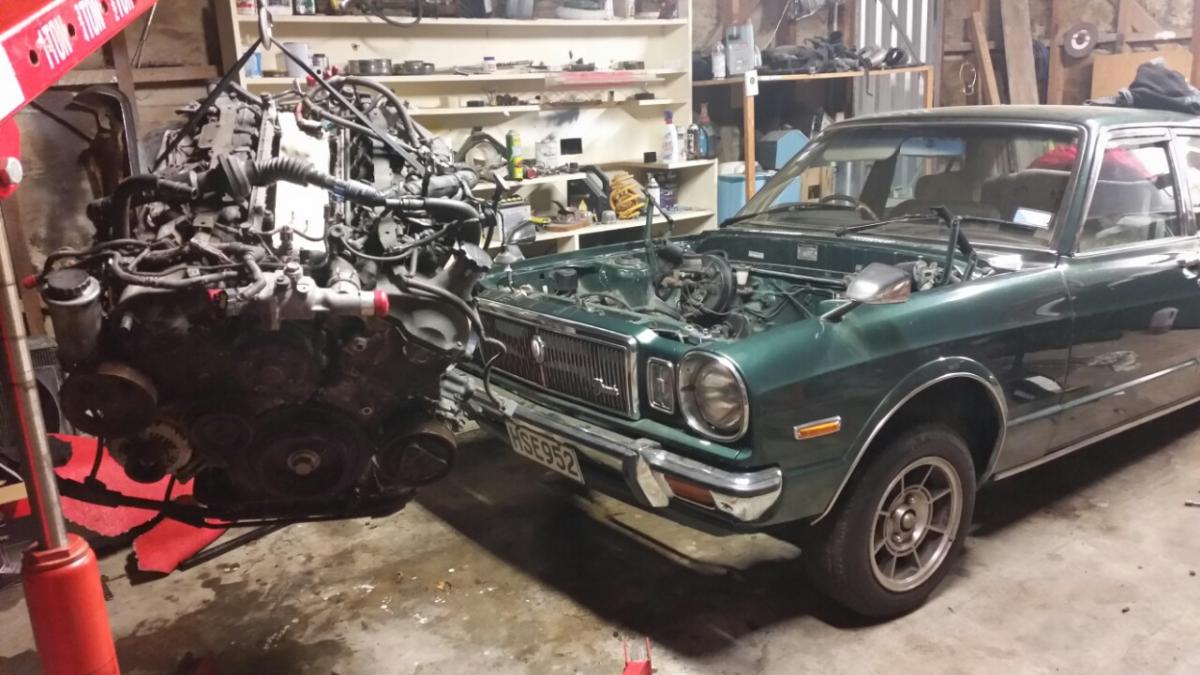
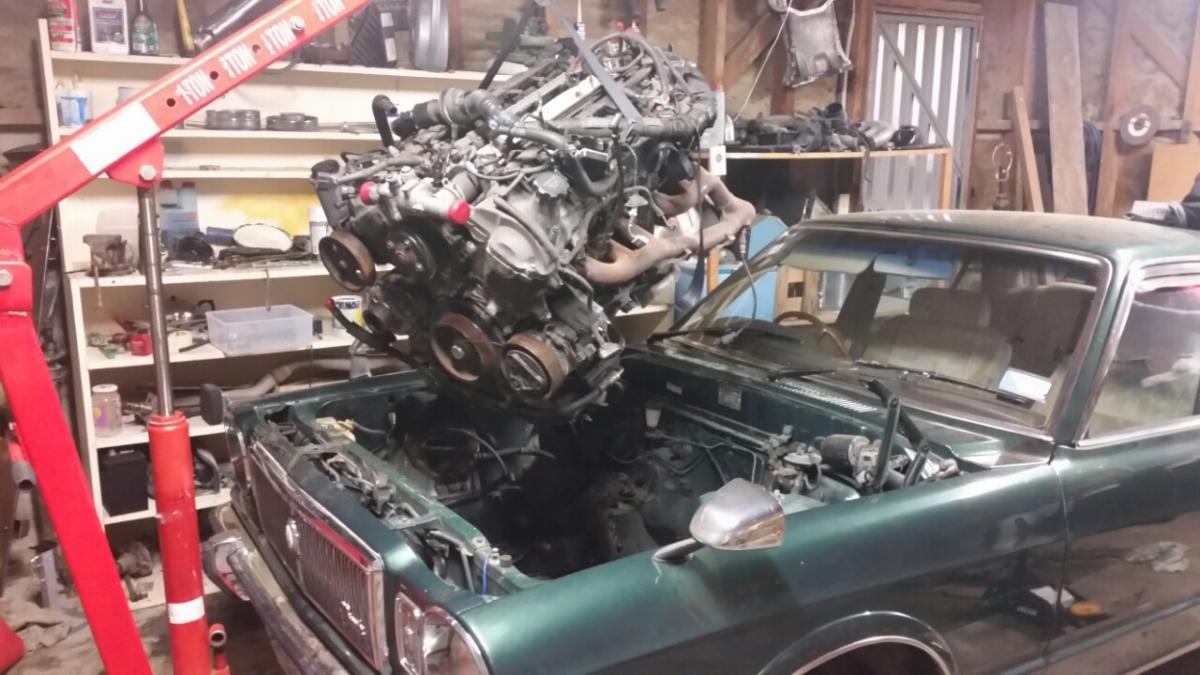
This deserves its own update The engine was off the stand for a reason. In she went... Exhausts need a tweek to clear steering box and rail but have heaps of room to move them in towards the block. Sump fits perfect and the engine mounts are pretty much on top of the subframe mounts. Still heaps of room for radiator. Was meant to be.
3 points
-
Discuss here - //oldschool.co.nz/index.php?/topic/48697-blizzos-83-kp-starlet-rally-car/ Right boes, a dream of mine over the last few years of lurking in the corner of my father in laws rally career has finally come true. Yesterday I took ownership of am 83 Kp rally car. I have been wanting to get on the gravel for a while, and have had a go co driving for my father in law in his escort. Now its time to get into the hot seat myself. He gave me a bit of cash towards this starlet under the priviso that he sits in the co pilot seat and teaches me with the occasional drive, pretty good deal IMO. So dont get excited, this thing isnt that flash, hasn't been used in about 6 years and needs a fair bit of TLC, but thats all good fun anyway. good bits - - "worked" 4k, still unsure how worked, has 45mm sidedraught and quite a high duration cam, still waiting to hear from the bloke who built it for more info. - rego on hold - MSNZ hologated cage, i just need to finish getting my R2 license and get authority card in my name. - different struts with good stiff rate springs bad bits - -a fair bit of bog hidden rust - a bit gutless ATM, gunna investigate a few things (buggered mech fuel pump) and poss pull head off - a ghey colour scheme and average paint - VERY FUCKED DOORS (bottoms are very rusty) photos! bad bits - what it used to look like - what it could look like-2 points
-
That would require me to buy a welder, learn how to use it and spend money on making fuck ups and remaking etc etc. It's much cheaper to buy them I imagine2 points
-
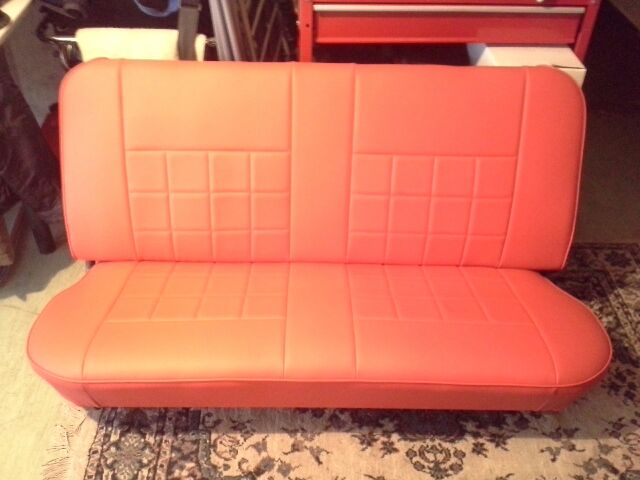
Long story short. Bought some $10 indicators of tardme. And a 2 dollar taillight from the dump. A few cans of matt black, whipped up some new exhausts too and some baffles, Next minnit. LOL almost forgot. Made the sweetest custom seat. But I can't take all the credit.The final shape was done by Greg at Midnight Upholstery, and the final stretching of the vinyl. So basically most of it. I take credit for all the stuff ups and slight off centre pattern hahah. Got some close ups of the indicators and brake light after all. Not of the side mount much though. And now its for sale. . Sadly it needs to go so I can pay some debts off. My next build will be a but slower but more manoeuvrable .2 points
-
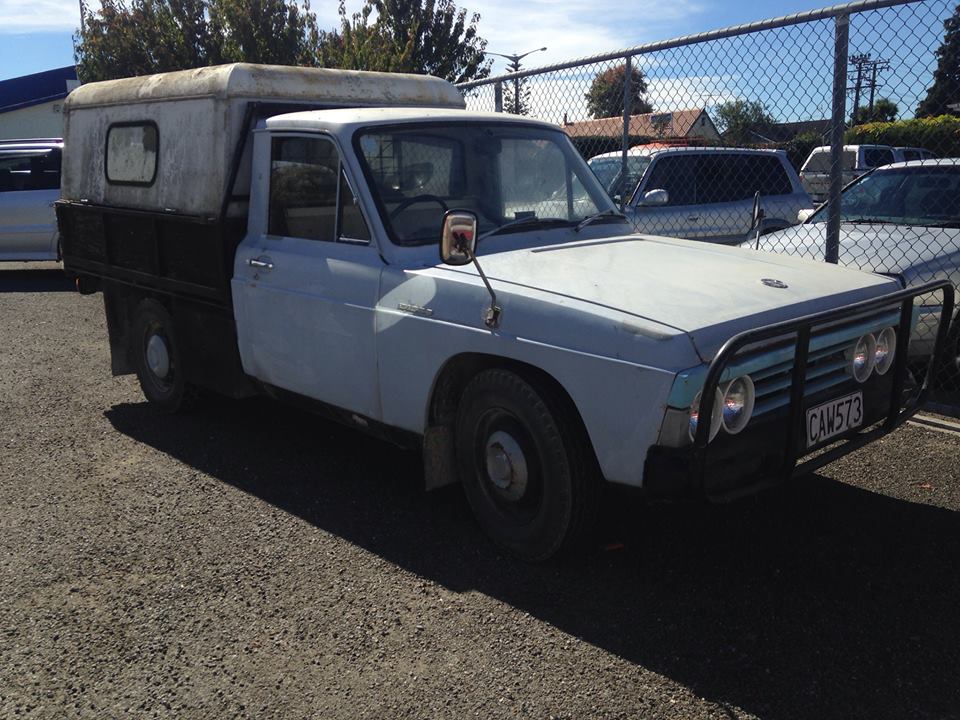
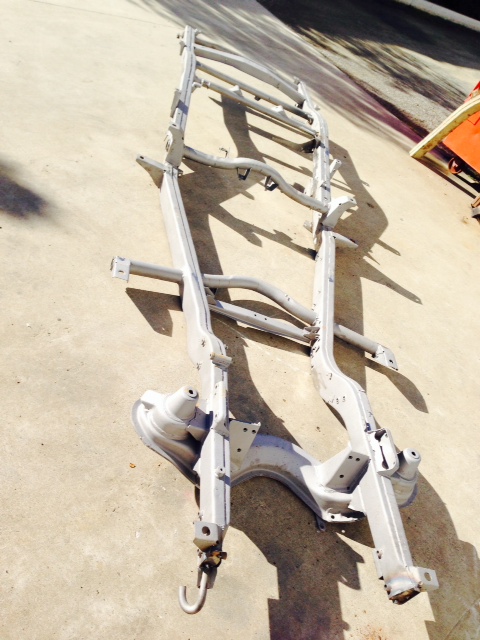
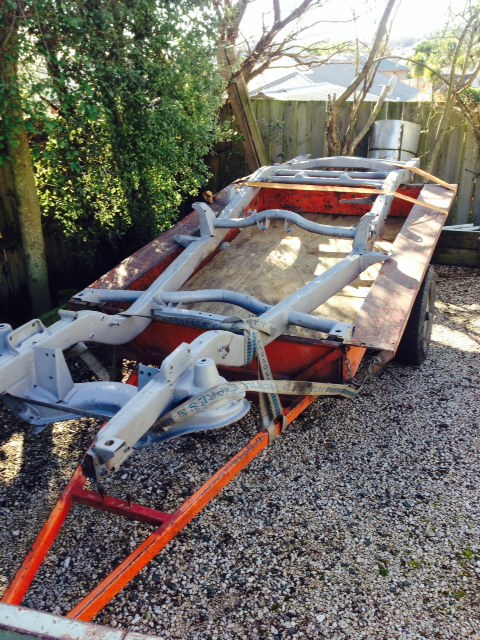
Starting of fresh with the b1500 as I've ditched the rotary idea and b1600 for the older b1500. Plan is to pretty much just restore it and lower it with a couple of subtle mods. keeping the factory motor and use it as a daily driver. Here it is how i picked it up from a car yard over in motueka I've stripped it all down and removed cab from chassis Sent chassis off to be blasted repaired a couple of thin sections where the blaster went through and now its ready to go back to be powder coated looking forward to getting it back painted and start piecing it back together with all new gear, also going to oil the chassis to try and prevent any rust in the future anyone had experience with that Discussion thread //oldschool.co.nz/index.php?/topic/44409-maxteds-1969-mazda-b1500/
1 point
-
Hey guys im moderating the thread for my dad. Here we have a 1964 Ford XP falcon that my dad has had for 20+ years. He has had a fully reconditioned heads and motor blocks and he has had a single carb supercharger. About a year ago we started peicing it together and this is how it went: Disscusion: //oldschool.co.nz/index.php?/topic/48719-1964-ford-xp-falcon-noel-supercharged-disscusion/ My Anglia: //oldschool.co.nz/index.php?/topic/48706-1963-ford-anglia-first-car-shannon/ Anglia Disscusion: //oldschool.co.nz/index.php?/topic/48716-1963-ford-anglia-first-car-shannon-disscusion/ Brothers Anglia: //oldschool.co.nz/index.php?/topic/42275-jordens-1967-ford-anglia-105e/?hl=jordens Dads Anglia: //oldschool.co.nz/index.php?/topic/45036-noels-1963-ford-anglia/?hl=anglia So this is how it started out as Yellow and just sitting in weeds with flat tires: This is the super charger: And the motor on the stand: First step was to take the old shot motor out: Which looks like this: Next was to put the motor together first to give it the signature Ford Blue paint: And then we put it fully together and it looked like this: Next we started the long process of putting the motor in: And that ended up looking like this: Side veiw, but we wernt happy with how high it was sitting so a future project is to make a spacer to make it as high as the top window line: But we diddnt have time to make one before the formal so we just went with it. After checking everything and fitting a dummy fuel can to feed it fuel we started her up for the first time: https://youtu.be/brKckiFJRjQ Next we had to cut the hole in the bonnet, although we did not want to as they are hard to come by: And finally came the paint: And this is how it turned out, pretty well i think for no body work except a small bit of sanding: But now this is how it sits waiting for us to get her going as she blew a head gasket. The plan is to pull her out this weekend and start getting it ready properly rust and all for the Kaikoura Hop. Here it has the recently purchased shotgun scoop which gives it a mean feel. Will update soon!1 point
-
The 11th of July is now locked in, Eddie Once you have voted, could you please post below if you are either: A: Attending the shed tour B: Attending the tour and would like your shed to be included C: Not attending the tour but would like your shed to be included. I think it would be great if this became a regular event, not as frequent as monthly meets etc but something that we can do a couple of times a year. It's all about upholding the great OS traditions of having great yarns, perving in sheds, pining over old stuff and having a BBQ in the boot of a Morris Minor. Feel free to add suggestions etc too as I've never organised a meet so would have undoubtedly missed out a few things. Maybe even more than a few. Some rules: - OS members only. Please respect this as we all have things that are very important to us in our sheds. We trust OSers. - When visiting a person's shed, follow their instructions. It's their stuff so they have every right to tell you to tone it back a bit when you're jizzing all over their sweet triple sidedraught carb setup - We'll be driving from shed to shed. Drive (relatively) sensibly. The sheds are the focal point, not your hectic D1s. Probably doesn't apply to anybody attending but I am running out of rules to write here so threw that one in. - Have fun and don't be shy. Meet people, socialise and enjoy yourself. We'll arrange the BBQ meat, drinks etc closer to the eventual date.1 point
-
once again i have acquired another car that is not an austin... (regret that username) BUT never the less this is my new project was a freebee off my mate who is moving to the uk and for some odd reason he though i would like it.... and i think he thinks im the only person who will put work into it. so first things first is WOF and i need >window wipers >lift side steering arm boot ( im think its that rubber thing) >reverse lights (and according to VTNZ its too low but who said i had to go there for wof...) hopefully can get around to it all this weekend, the only thing i dont want to do it the reverse lights because i am terrible with trouble shooting electrical problems so if anyone has any tips for that it would be much appreciated. Plans for this beast includes fixing the front bumper, paint both bumpers gun metal grey, then primer the body because surprisingly its pretty straight and virtually rust free. not planning on spending heaps of money on this so thats why its only getting primer. and also sounds, needs sounds. there are some slight mechanical issues that need sorting too, there is a wicked tap in the engine (well i think its the engine, dad thinks its something else) and it leaks autotrans fluid and diff fluid so ill have to take a look at that too.. anyway thanks guys, update probably after the weekend if i get wof!! >discussion<1 point
-
Picked this sweet thang up for a chill $2000. Well my girly bought it for me for my birthday by surprise. What a G B. Deregistered but in pretty good nick. Got to work getting it revinned Needed a few minor things like the indicators flashed too fast, headlight only had high, tyre was almost through to the wire. Few messy wires that I had to tidy up but otherwise she was all good. $1400 later, (I know right!) It was back on the road ready to bobber.1 point
-
Took the old girl out to the hills this evening for a quick photo shoot with NickJ and his Lada. Gave the car a service the other day, new oil,new filter, valve clearances set, manifold bolts tightened, new gearbox oil (Castrol VMX 80W) - this stuff is like the finger of god! Car runs beautifully at the moment, I wonder how long that will last Also finally have some wall art1 point
-
Those Toyota ones would fit in your pocket.1 point
-
When i was doing up my 300zx i used a electronic shiftkit destined for a nissan safari rumour has it the guts are the same in auto trans. Would be worth seeing if a 5 speed box from a turbo z32 could have the td42 belhousing bolted on. Failing that a 350z box may also work both pop up occasionally and are well priced compared to Toyota options.1 point
-
Discussion thread //oldschool.co.nz/index.php?/topic/48710-bullitts-1970-triumph-gt6/ I also have a set of Dunlop LP923 5.5" steels I bought a few months ago that wil give me an alternate wheel choice once I do them up:1 point
-
Cool Car. Mate of mine has had several of these over the years. The one he had that was the twin of yours came home, wife took one look at it and said that is mine. One of the great things is that all the body panels are available from the US, but I'm sure you know this already1 point
-
Cheers ky but I would struggle to convince myself to walk across Feilding for another set let alone inter Island1 point
-
Hummmm wonder if I can buy the bushed ends separate if rose joints prove dumb1 point
-
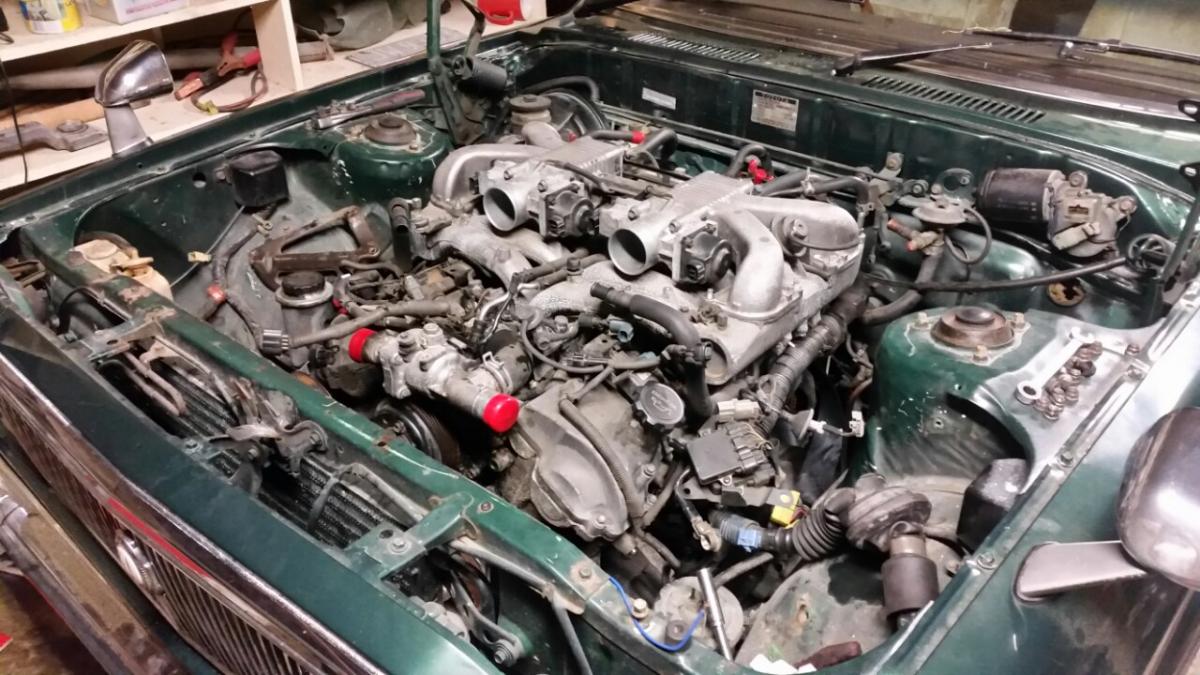
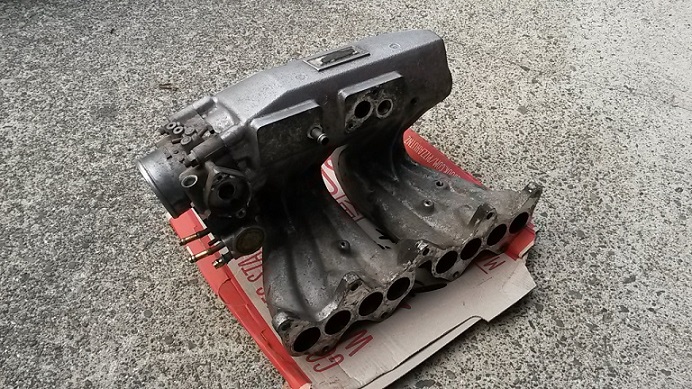
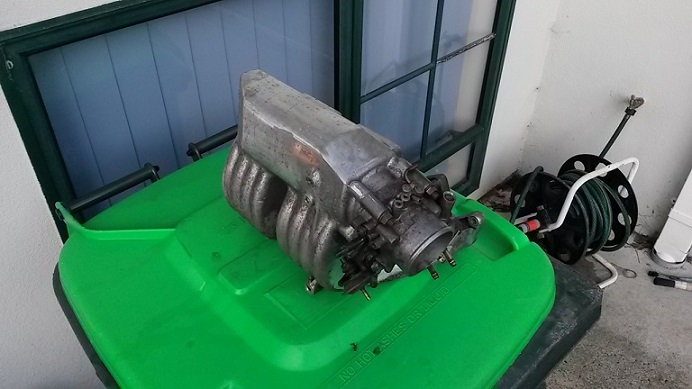
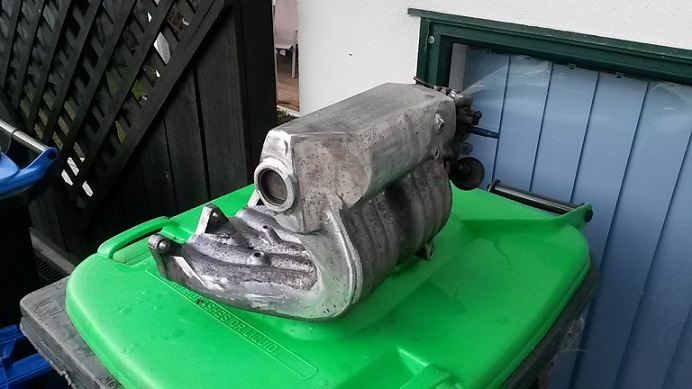
I thought while the intake manifold was off I might as well give that a bit of a clean up aswell, have taken off the majority of the casting rough edges and smoothed off the top area where the T-VIS badge was, plan to take it work tomorrow and give it a blast with some glass beads to bring it up looking fresh and clean
1 point
-
Bit of off-seal action this weekend. This is the normal ride height.1 point
-
No thanks sparkle that paint can idea sounds about as good as your stretched rally tyres on 7" rims idea. It serves a purpose, peeling paint and exposed bog will suffice until rust repair / coat of jam is complete1 point
-
super sweet, fix minimum needed and go racing or youl end up like me (2 events in 5 years)1 point
-
Greets Amigos, Since last update, The gearbox is back in with new clutch assembly, frost plug and crank seal. After that, we looked into the brakes which were bled for maybe 45 mins before all the air was out (hopefully). The rusty old pressure plate Shiny new clutch plate Also installed this weekend are four new heater hoses and a pertronix electronic ignition system which was suspiciously easy to install... one of the hoses ripped to bits as I took it off so probably worth the time it took to replace them. Heater hoses are my new pet hate! Awkward little suckers to get to but worth replacing since they are the 40yr old originals. Also installed were a new inner and outer shifter boot I got from the states. Now she's going to Speedwells in Hamilton to sort out the carbs and get her running properly. Currently only one carb is working so 3 cylinders are firing. Really need the compression to build up so we can see if the brake booster brings the spongy brake pedal up to a good spot. After that's done, it's just shocks and a windscreen rubber to put in and we can go for a vin check. Cheers, Reubin1 point
-
So exhaust done, I had to finish of the changes on the hot side of the I/C piping. I machined up another one of these adaptors This rotates the intercooler elbow that bolts to the compressor housing 60 degrees, so that it points to the front of the car, instead into the manifold or strut tower. Welded a boss on to said elbow, added a 90 deg hose barb for a pressure signal to the wastegate. Bolted it up to the adaptor I machined earlier and fitted it on the turbo, which meant I could finish installing all the hose joiners and clamps. Ditched all the blue joiners and went for black stuff, also went to an 3" intake pipe instead of the 2.5" I was using previously. With that done it means its pretty much all sorted, except I decided to relocate the boost control solenoid to reduce the length of the lines. Oh and because race car, I made a racing light weight race pipe for racing because race car loud race pipe tip... yeah. Basically just a 3" tip, I put a V-band on it so I can swap back to the muffler if noise became an issue (which it was) With everything back together and ready to go on the dyno again, in typical fashion, I decided to pull some more shit off it so it wasnt going haha. The AE85 fuel tank has always been a pain, from mounting the fuel pump, to the lack of baffling and the surge you get below half a tank of gas... Made the decision to finally sort this out by putting a proper surge tank setup in it. Bought a Bosch 044 and a 10 micron Aeromotive filter from NZ Performance. Always a pleasure dealing with them! So after talking with NZEFI about whether I'd be able to use the Bosch 044 on the same electrical circuit as the DW300 pump (which shares with the ignition), we came to the conclusion that I would be pushing the current draw to high, and also the fact the DW300 pump wouldnt be suitable as a lift pump I purchased a low pressure lift pump to replace the DW300. The good thing about this lift pump is that it only draws 1amp, so it drops the current draw to much more suitable level. NZEFI have been really helpful with any questions and queries Ive had since purchasing the Link G4+ Atom from them. Pulled the tank out to drop the new lift pump in, and I could see a fair amount of sediment in there, aswell as really small fragments of what looked like rust in the DW300 filter sock... Not something I want going through my new pumps or injectors! 15mins researching of how to clean a fuel tank and I found that hydrochloric acid was recommended, which was good as I had 15-20L of this. So stripped the old paint off the outside of the tank, filled the tank up with hydrochloric acid diluted with water. For anyone doing this at home, make sure you're wearing suitable protective gear, dont want to get any of this stuff on your skin or breathe in the fumes! Let the acid do its thing for a few hours, added some baking soda and let it sit for a bit then drained it, then filled it back up with water and a few cups of baking soda to further neutralise the acid. After draining that, the tank basically looked like new inside, stoked! I filled it back up again with water and some "Super Ripper" cleaner, let that soak to remove anything left behind and went through a lengthy drying process which involved pumping hot air through it with a heat gun. With inside clean I masked off the holes and removed any rust on the outside, painted it with a rust kill etch primer and then finished it in satin black. I just needed to get the lift pump in there now, but I was sick of staring at this old fuel pump cradle... Soooooo I made a new one. Machined up a few pieces and welded the lot together, added some Fragola -6 adaptors so I can run braided line from the tank to surge and vice versa. Ill leave it here for now1 point
-
OH MY GOD SO SMOOTH GEAR CHANGE WHEN COLD NOW1 point
-
not much progress on the ute week gone been busy getting rid of all the bits i didn't need, have made some progress in getting bits i need. -have some brake hoses on the way -also cleaned up a spare set of axles and got rid of left hand thread and changed to sealed bearings ready for lsd courier/bounty nugget with a lower ratio to go in (that combined with 5 speed should be nice cruising at 100) -also this is ready to go in after sorting out sound deadening and carpet (thinking of going autodec? anyone else used them?) -then need some door cards done to match
1 point
-
A few photos from race day. Lap 13 Took over an hour to find the wheel. My mate was recording some of the race and happened to get part of Lap 13. His reaction still cracks me up and at the end he forgets to turn the camera off, so lots of shoes and ground,but the half hour of comments is hilarious. (Is he allowed to race with 3 wheels? etc). Video1 point
-
I have been researching a bit more on the brake front, at the moment audi rs3/ttrs 370mm rotors look like an option to fill the 19 inch wheels properly, but no solid progress on the fitment of the monster 6 pots yet.. also found some dash inserts on ebay Australia for a sharp price in the colour i was after. Pretty sure they are from a G6E.. my mate brought them back with him to save on postage dramas.. before: 10 minutes later.. sadly thats the best my phone camera was going to do in those light conditions..1 point
-
Hahah I just fit 3 years of time, effort and a lot of swear words in one page. Ill get some photos of the car in its current state when the sun comes out1 point
-
I know someone who has a spare Piazza body needing an engine though1 point
-
Another weekend of fine weather so got some painting done and the trial fit the spoiler, arrived this morning1 point
-
Managed to score a cluster with a tacho. Extremely useful for the big RPMs this car can hit! So, out with the old.... ...and in with the old. Also found a front bumper thats a bit straighter Ive got my eyes on an injected 4G15. Im just waiting for the guy to drop his pants on the price and ill grab it. This was meant to be my daily, its now turning into another project. Story of our lives!1 point
-
More progress, I have repaired the rusted out corner, I ended up taking out a bit more steel to find something solid and there were 3 different sections that meet in that corner and all 3 were pretty much done so it took a bit longer to fix but it is all sorted now. Then it was on to sorting the gearbox mounts, I think I may have mentioned previously that I am using the Anglia gearbox mount which almost bolted straight up to the rx7 gearbox, the hole centers were only a few mm out so I slotted the holes in the mount and it bolted straight on, then when I was setting up the position of the motor and gearbox I found that I could use 2 of the 4 mount holes so to do the other 2 I Cut a section out of the floor so I could get down into the chassis rails and then made up some mounts that were the same as the existing Anglia ones I just need to weld some nuts to them and then I can put them inside the chassis rails and weld the floor section back in. I also started modifying the handbrake mount to allow it to sit 150mm further back, I have to trim it to fit the tunnel as the area it sits now is a bit narrower then where it was sitting. The good news is that I am almost done with the little bits and pieces now so I will soon be able to start putting it all back together.1 point
-
not much to get excited about, but- dash out hooray no surprise rust restorers dream i tell ya found this interesting. these were between the dash and body to stop rattles i assume. bits of vinyl trim, this has never been apart so this was factory, ha and check out how rough some of the work is on these things1 point
-
Long time no updates, Been trying to drive this as much as possible. Slowly collecting parts that shall be fitted soon, such as rear TRD sway bar, TRD lightweight flywheel, OEM period correct fog lamps and some ke30 Lower control arms, which are longer so should provide a little more camber. The list of other things i need, like seats, lsd/locker and clutch, keeps growing, but sadly funds cant provide.1 point
-
So, as the title states I plan on trying to build a rotary powered velo bike. Mainly for my own LOL's and also to stick on the back of the B1600 for car shows etc. The main issue I currently have is how I want it to look and how I am going to make it work. I guess I would also like it to confirm to any Velo Drome bike rules so that one day if I wanted I could come along and do some droming I could. I have never built anything like this and don't know what I'm doing so all advice/input will be greatly appreciated. I would also consider purchasing a pre built frame if someone has one for sale.1 point
-
More progress, I took last Wednesday off work and also had a half day in the garage today so got a bit more done, the tunnel is now all welded in, it came up pretty good I reckon, I was thinking that I might need a bit of bog to smooth it where the tunnel meets the firewall but it is pretty good as is. Anyway here are some pics, and these are the last ones of the tunnel I promise Then it was on to the rust, the bottom corner that I found the other day is pretty far gone, I kind of expected this as Anglias are prone to rusting out here so I wasn't surprised to find that it was a bit worse than it looked, anyway it's all fixable, just going to take a bit longer. And it doesn't help that over the course of the last week I first blew up my drill, then my die grinder crapped out and finally today my powerfile (which is my favourite tool) started making massive popping noises and smelling like burnt plastic so I am thinking it is done. I had been saving some money to buy something cool for the car but now it looks like it will have to be spent replacing tools.1 point
-
Cert plate acquired. Beach Hop attended. I do need to make some changes to the rear shocks or something as it is rather bouncy in the rear when driving. I've been advised that '4WD' shocks would be better. Will do some research after the school holidays.1 point
-
Beautiful Mazda RX7 yesterday1 point
-
Exited the shed last night, first time since May 2014 (I need to work faster!) First test drive went 'ok' ish, until the compressor clutch locked up and the air line blew out with a big bang Cue slow drive back home on bump stops. So, need to sort that and fit a one-way valve to the compressor line. Had a beer after that episode, and left the car outside. Washed it today, need to clean up garage then get it back in to pick up the issues. Looks cool dumped though. Before wash And after.1 point
-
Finished stripping the cab of everything tonight, everything is phillips head and rusty/underseal(tar like) so there was a bit of drilling going on and winding the left overs out with vice grips, managed to get the loom out leaving everything still attached so hopefully not too much guess work when putting it back in, theres a few modified sections thats going to need re-doing, passenger door cab hinge bolt/phillips head counter sunk screws were absolute bitches to get out 10 came out with the impact driver but ended up drilling out two and managed to get out the remains of one but going to have work out some plan to get out the other theres just not quite enough meat there to get a grip on it, started hitting under the passenger guard of the cab with wire brush, and had a wee go at the floor but the underseal is almost like tar and kind of comes of but sort of just gets pushed around, any sweet tricks out there to remove this?? I've hit a couple of sections to get the worst off then going to see if prepsol will get the left over layer off. theres a few hours/days of quality time with the grinder/wire brush ahead!
1 point
-
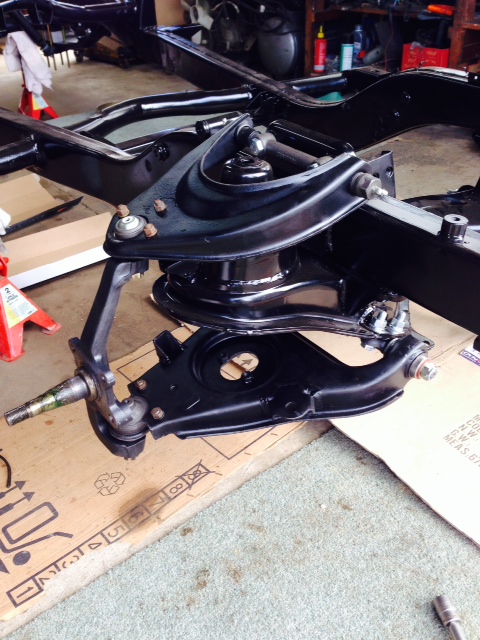
pressed in the lower control arm bushes and assembled top arms, dummied up the ball joints, bump stop and spindle to work out how much of the the spring i need to stay captive. have trimmed up a pair of springs to suit (have a couple of spare pairs if its too much off). next on the list is some new bolts for ball joints and clean up the bump stops, strip and paint the backing plates/drums and get the wheel bearings sorted then may be able to get it back on some wheels next weekend, have got some wheel dollies to put it on and then will cover it up and push it to one side things are going to get messy stripping back this cab and well side! Few boxes of all the new bits, starting to add up but it will be worth it
1 point
-
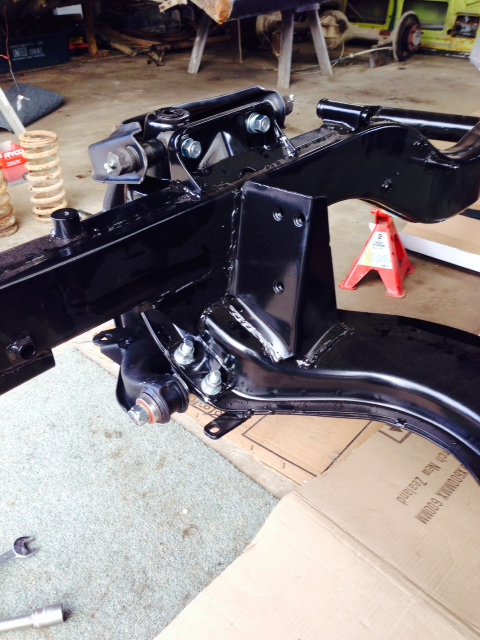
Got the chassis back today pretty happy with how its turned out, been busy stripping down arms ready to be painted then new bushes and ball joints ect need to get this back rolling1 point


.thumb.png.46e518f714cdc319554c389f990e75a4.png)


This leaderboard is set to Auckland/GMT+12:00