
Leaderboard


Popular Content
Showing content with the highest reputation on 06/04/15 in all areas
-
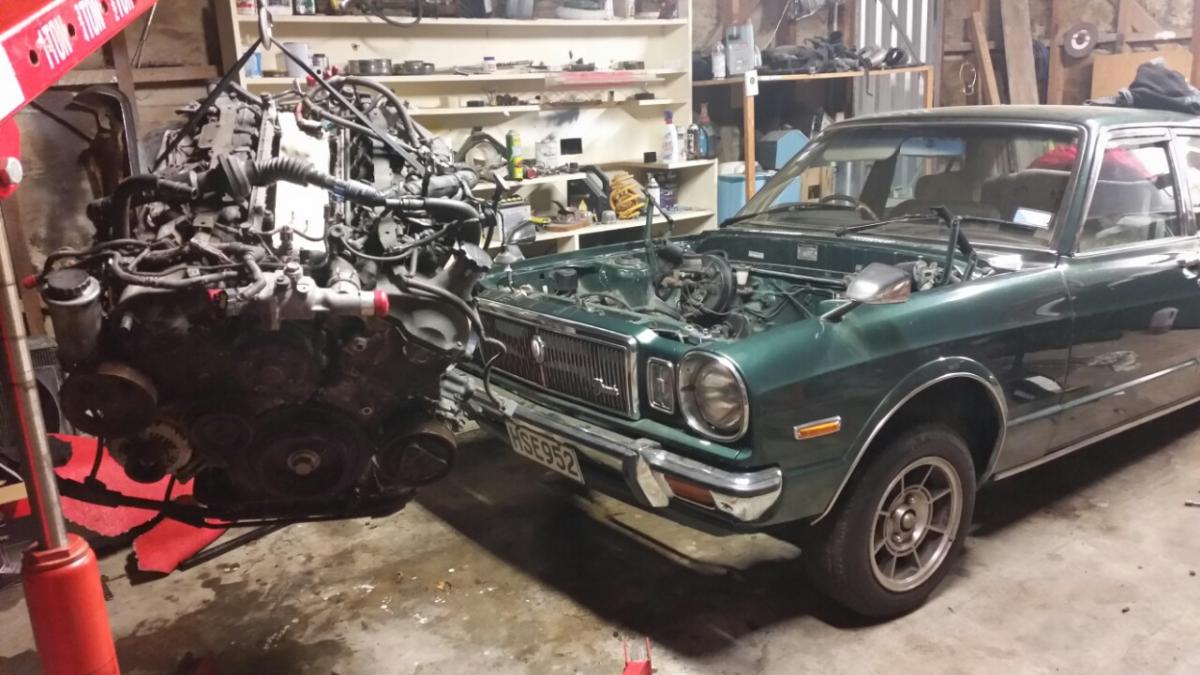
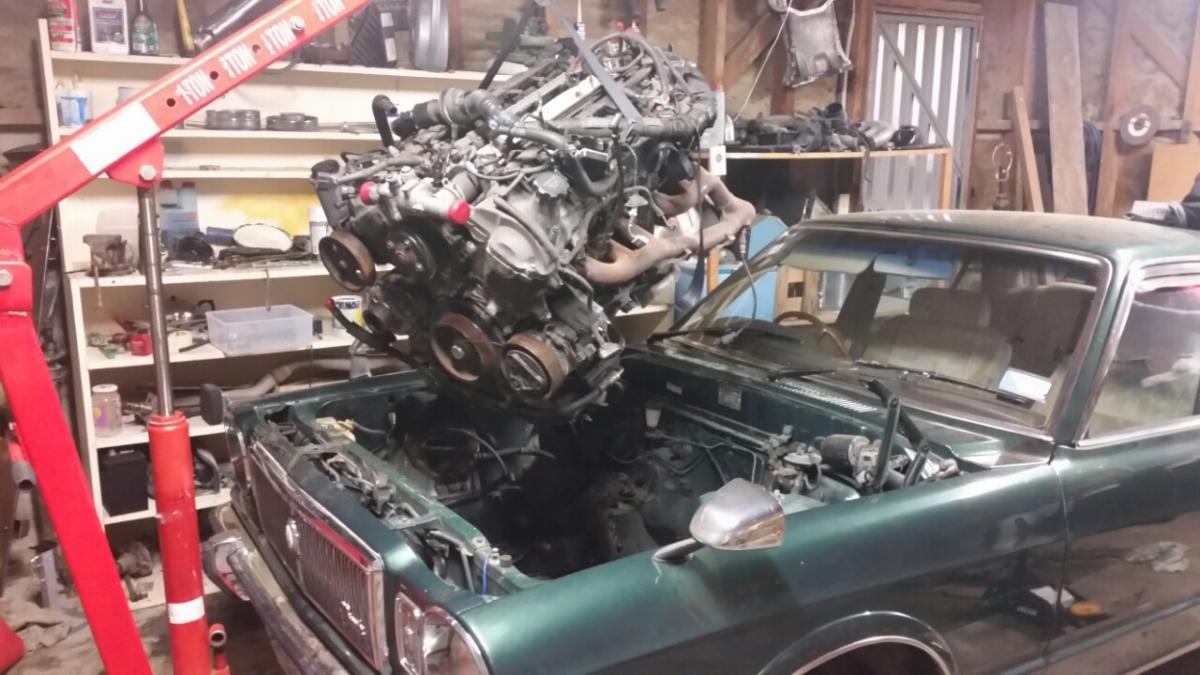
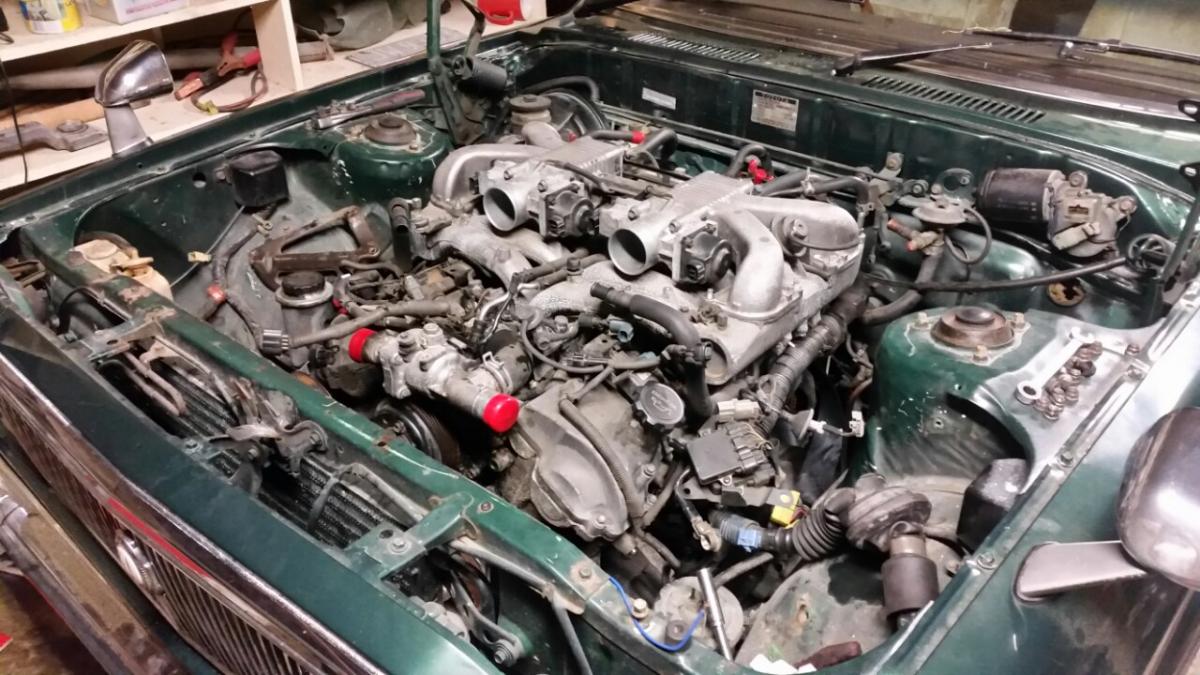
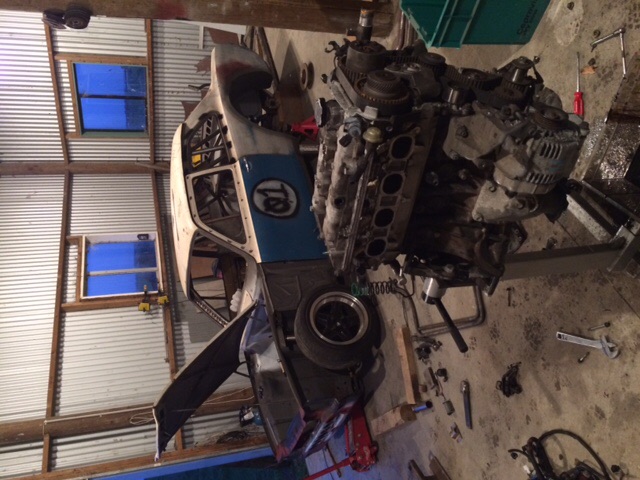
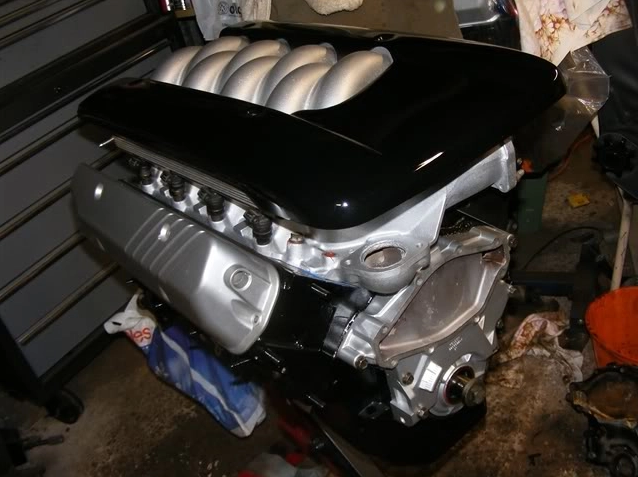
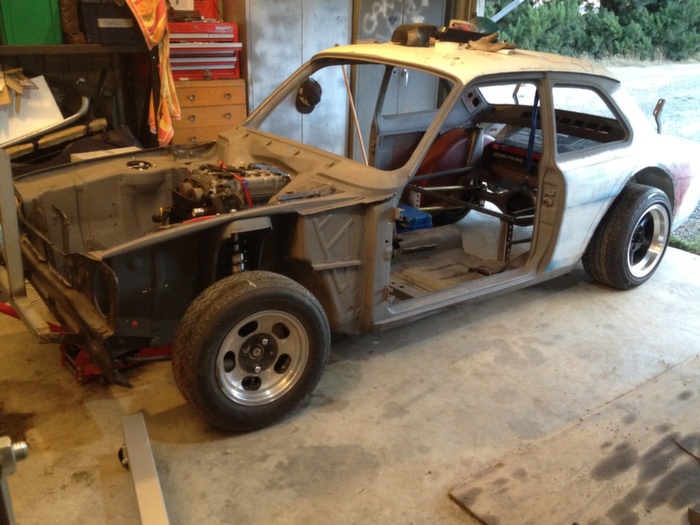
This deserves its own update The engine was off the stand for a reason. In she went... Exhausts need a tweek to clear steering box and rail but have heaps of room to move them in towards the block. Sump fits perfect and the engine mounts are pretty much on top of the subframe mounts. Still heaps of room for radiator. Was meant to be.
 24 points
 -
It is assembled, new brake hardlines made up. All that's left are brake pads and the clips to hold the flexible lines in place. IMG_1855 by Richard Opie, on Flickr IMG_1878 by Richard Opie, on Flickr IMG_1863 by Richard Opie, on Flickr That, my friends is the exercise in doing things the hard way. But pretty stoked it's sussed. IMG_1900 by Richard Opie, on Flickr IMG_1910 by Richard Opie, on Flickr Had some of the fasteners and suchlike for the ITB's plated in the last batch I had done, so I thought it would be rude not to pop all the bits on the motor for a little bit of motivation. It's not going to take too much effort to get this thing clean enough to eat off, that's a couple of jobs down the list at this stage though! Thanks for looking20 points
-
So here are some photos of the restored.jp frp panels as requested by Kyteler who was also a real good sort for putting me onto Ewan at stacked. Pretty happy with the build quality only a couple of minor imperfections and a small amount of damage on the the front drivers side corner of the bonnet which is to be expected when shipping something of this size from japan to nelson. Anyway photos!! (taken the night i got the panels so will get some better photos in the day light). IMG_2542 by matt postle, on Flickr IMG_2545 by matt postle, on Flickr IMG_2553 by matt postle, on Flickr IMG_2560 by matt postle, on Flickr5 points
-
Grant from GT Refinishers asked if I would have my car in his stand for the 4nR nationals, engine was back in and going through the running in process so I figured why not. Turns out the judges deemed it worthy enough to award me the Best Toyota trophy. Here's few photos from the 4 and Rotary Show and Shine With the car back home, and the running in process almost done after a couple open days at Pukekohe, I decided there was a few things I was gonna change before it went for its final tune. Picked up a new steering wheel (obviously doesnt effect the tune but trying to keep a constant timeline happening) to replace the bent 330mm wheel. 330mm always felt a little too small so went with a 350mm dia 90mm offset wheel from Velo so its all matchy matchy with the harnesses. Bought a new G4+ Atom ECU and NZEFI wiring kit/bracket. While there was nothing wrong with the G1 ECU, figured it was time for some new technology and now was the time to do it seeing as I will need to retune the engine since the rebuild. Got a 2.5bar MAP sensor, Bosch IAT sensor and a boost control solenoid also. The NZEFI mounting bracket is a neat bit of kit, Id say its worth paying the extra few dollars to have all the relays and fuses already wired, sensor wires twisted and labeled, makes the installation that much neater and easier. I really wanted to go for a full Mil-Spec loom with all the fancy Autosport connectors and Raychem DR-25 heat shrink, but after pricing up a few of the items, it was going to cost me what I spent on the ECU alone... So went for Mil-Spec "inspired" loom instead, seeing as none of the automotive plugs Id be using for injectors, coils etc arent up to MIL spec anyway. Put an order through Jaycar for a few metres of each size of their heatshrink (seems to be the better stuff without breaking the bank), along with some switches and crimping pliers. Coolant temp sensors, Injectors, TPS, IAT sensor all done, with just the CAS and coil wiring that need to be finished off to complete the engine bay side of things. Also picked up some 1NZFE coils to replace the dated distributor setup. Purchased a bunch of Deutsch connectors for various things, mostly so I didnt have to cut and solder old plugs back on etc, and to make the engine and chassis loom independent of each other, something that always bugged me was not being able to remove a section of wiring without having to remove everything. DT 4 way connector terminated to the CAS and trigger wiring. Also in the picture are the sensor grounds and oil pressure sender which makes the engine side of things complete minus the coil wiring which I was still waiting for connectors to finish. Moving to the interior, it has been looking like a bit of a mess lately with wires going everywhere. Here are a few more of the Deutsch connectors on the chassis side of the engine loom. You can see one of the mating connectors in the background. These have the fuel pump/fan wiring, dash sensors, boost switch, ECU supply etc going through them. Got this neat little switch from Jaycar, illuminates red when switched on. This will be used for activating the boost control solenoid to switch between high and low boost. There was already a switch mounted there so I used that hole rather drill another, I think it was originally for the fuel pump when I first brought the car. Also when I bought the car a few years back now, it had an Isolation switch mounted in the dash like this pretty much. I removed it when I re-routed the power wiring because it wasnt installed properly, so alot of the electrics still worked with it off... Ended up putting it back in, as I can have my main battery wire attached to one side, with the starter, alternator and chassis power wires on the other terminal so it should work as it suppose to, and eliminates the use for a distribution block to feed power where it needs to go. Tidied up the battery wiring a little with some heat shrink instead of the split corrugated tubing. The coil pack plate and distributor blanking cap arrived, spent a few minutes and got those installed. Got all the wiring done for the ECU, but I left it disconnected and started to check through all the chassis wiring making sure all my lights and wipers etc still worked. I did have an issue where the head lights have been intermittent and I have had no dash lights aswell. Started at the headlights working my way back checking all the components, and after several hours of fault finding I had found nothing out of the ordinary and I was only left with the switch on the dash to check. Grabbed the light switch out of my brothers Notchback and plugged it in mine... Sure enough everything worked as it should. So pulled my light switch apart to find some broken solder joints, easy fix with the soldering iron, was pretty stoked to have all that working again! Started running the G4+ Atom through the configuration. The ECU has a feature to test all your circuits to make sure they work before the first start up, so went through that and seems my wiring was spot on as the fuel pump, fan, injectors, coil packs, boost solenoid etc all works perfectly. So with the new ECU all wired up and working, but still yet to start the engine, there was a couple more things I decided I could do before the tune... My brother had decided he would turbo his Notchback Levin, I figured he could have my old turbo manifold and Ill fabricate a new one for myself. As usual, started to take some pictures at the beginning, got involved and forgot to take any more. Here is the start of the merge collector after the first cut on each tube. After that, I tacked a pair of the tubes together as above, and made another cut, then tacked the pairs together to form the merge collector. This one has a nice shallow angle for a smooth merge into the turbo. Several hours later I had 3 runners tacked up, all equal length, with just cylinder 1 to finish. Looking back at this now, I should have had the runners enter the collector in firing order, but it was going to be a little more difficult having to overlap runners and still clear everything, and I really liked the almost symetrical look. Anybody done any back to back testing with merge collectors to see if entering the collector in firing order matters or not? Anyway, I've positioned the turbo in a better place with this manifold. I originally made the first manifold for the T25 turbo, but with the T28 being a little bit bigger it ended up sitting up higher and closer to the strut tower than I wanted, so I have dropped it down about 45mm, moved it forwards and away from the strut tower 20mm. Finished off tacking up the last runner, machined up a new flange as that one on the manifold I basically just use for setting up so I can tack and cut as I need to without worrying about cutting into the flange with the grinder etc. Same deal as the last one with the 30 to 35mm port taper and a 1mm recess which makes locating the runners concentric with the ports a lot easier. Added a 2 braces between the runners and collector, aswell as the wastegate port and flange and then finished in the same high temp flat black Dulux paint. Seems to be the best paint out of all the VHT and other "high temp" paints I have used. Got the turbo bolted on with new studs and lock nuts, but something I had been fearing for a while had finally become a reality... There are 3 bolts and 2 studs which seal the exhaust manifold to the head, and since Ive owned the car, 2 of the holes/threads in the head have been a little iffy and Ive always taken extra care to do them up. When bolting this new manifold up, they've finally given up and wiped the thread out completely, which was gut wrenching. Purchased a Helicoil kit from Trade Tools, they're not cheap as I found out, but everything worked out perfectly in the end. Was pretty stoked! With the manifold and turbo now bolted up for good, I made the wastegate pipe. Ended up being pretty funky! Fabbed up a new down pipe, pretty much the same as the old one which my brother is going to be using, just a few different bojangles as I cut and rewelded a section of the down pipe to make room for the wastegate pipe. Machined up an o2 bung, welded it onto the bottom of the down pipe, and said cut and welded section. That basically wraps up the exhaust side of things, just need to make a few changes to the intercooler piping on the turbo side.5 points
-
4 points
-
Started taking all the unneeded bit off the new engine.
4 points
-
I ran Redline lite-shock in my Mk1 Cortina race car diff and gearbox. That shit is awesome. It was still clinging to gears two years after storing a gearbox on the shelf. AllTourque knows what's up. I'd recommend it too3 points
-
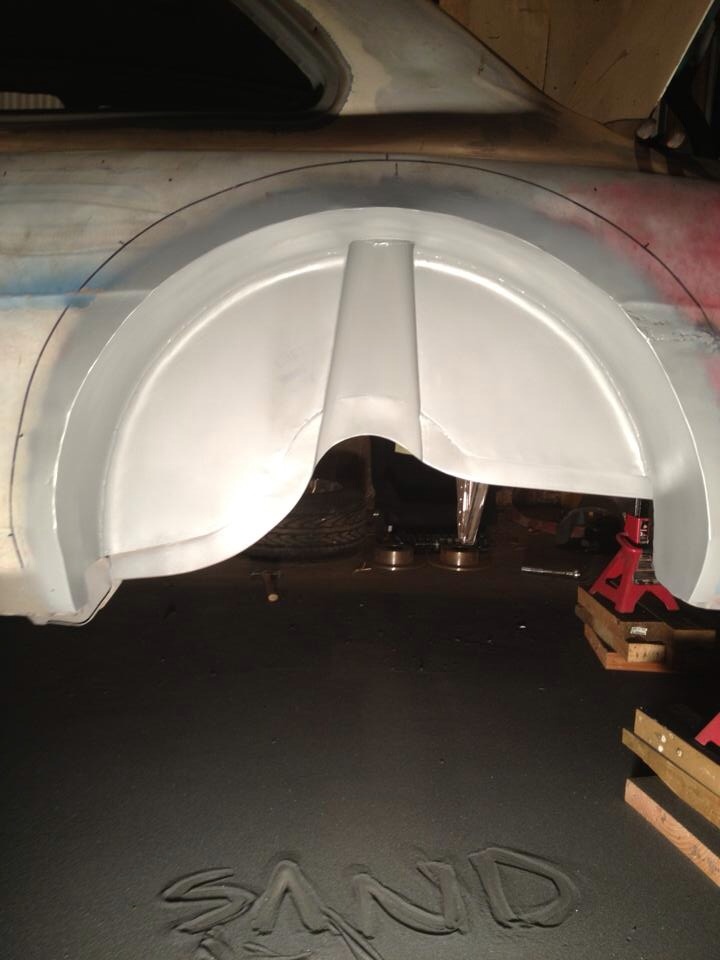
Got the rest of the bottom plate off the heater channel. some funking looking whiteish decay in there. small batch on the rear of the sill, was all pin holed. Larger patch up front. I think I've got making those little dents down now. And next on the list. this fucking mess!3 points
-
I think this car was a single seater and was converted to a double as it is very snug. There were two bars on either side of roll cage that you would bang you head on. Had them moved out about 100mm at one end,made a big difference. Also found some adjustable shocks at the recycle centre one day ($5 for both) , front now has hard and soft with the flick of a switch. Spent a lot of weekends with friends and the kids testing it out. Made an old high chair with foam around it so my girls could go in it. This is the only car of mine I let my sister drive. Then I joint the offroader club and started going on there practice drives in the forest. AWESOME FUN !!!!3 points
-
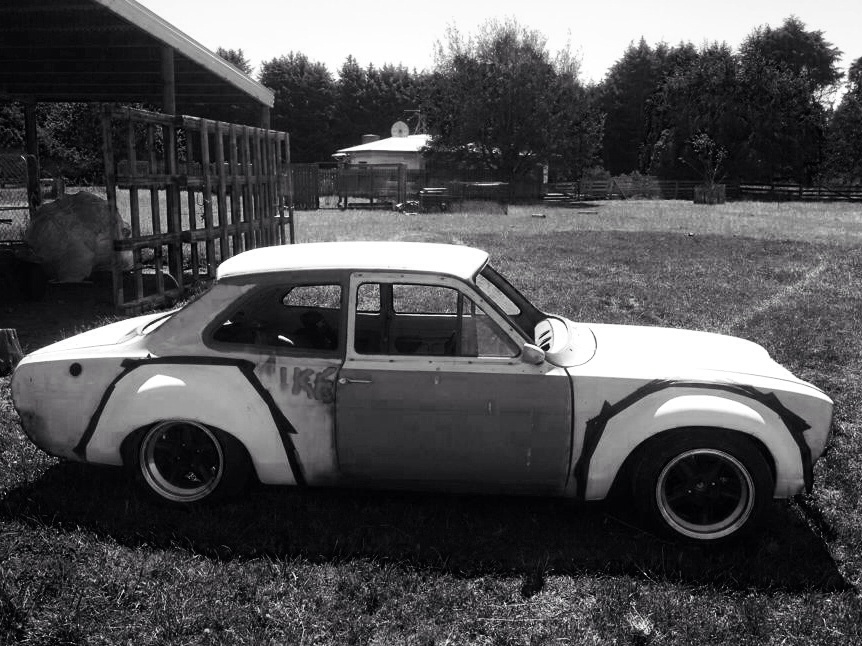
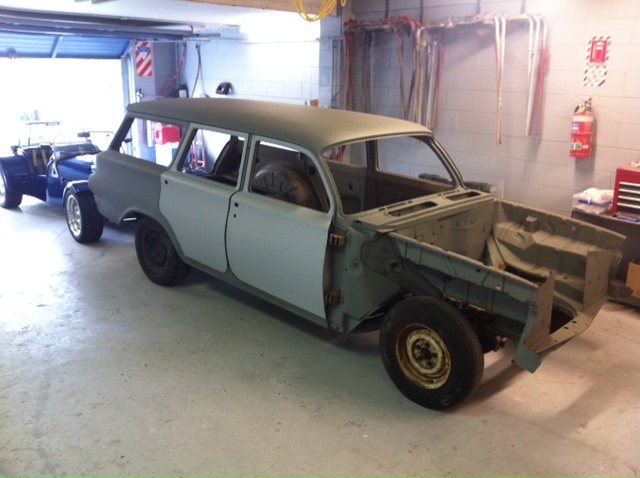
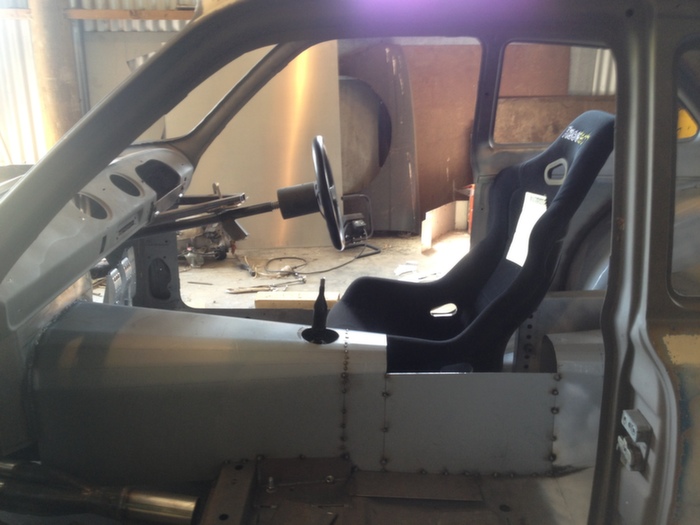
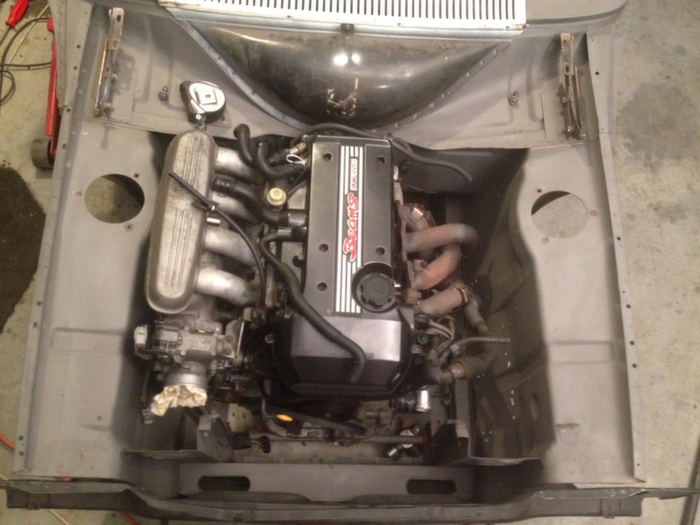
Hey, Been lurking in the shadows for a few years. Thought I'd get my project up for you all to have a look. Specs: Mk1 Escort with lots of chopping and welding. 15x9 all round Tubs Turrets Custom tall 4 link for low ride height Low roll centre watts link Gaz gold adjustable coil overs all round Modified front cross member to fix front roll centre Firewall moved back about 300mm Beams 3sge with custom headers, dry sump and quads with 2 stage injection coming from Glen (celicara45). Just about everything that can be has had to be modified.
2 points
-
So about 9 years ago I decided to buy this offroader. Me and my mate would spend hours driving it around a paddock track, seeing who could scare each other the most. It has a 1800 boxer motor on a combi 4 speed gearbox. Here are some photos of when I brought it.2 points
-
Datalog all the things please2 points
-
Definitely looks like it would fit nicely in that hardtop.. ..Coupe Life.2 points
-
If you're sticking with points and condensor, fit two condensors in parallel. Modern condensors are cheap-as-shit Chinese made rubbish which fails easily, fit two and the failure problem goes away...... We used this mod on the FIA Historic race cars that had to run 'original' ignition systems, and never had another problem.2 points
-
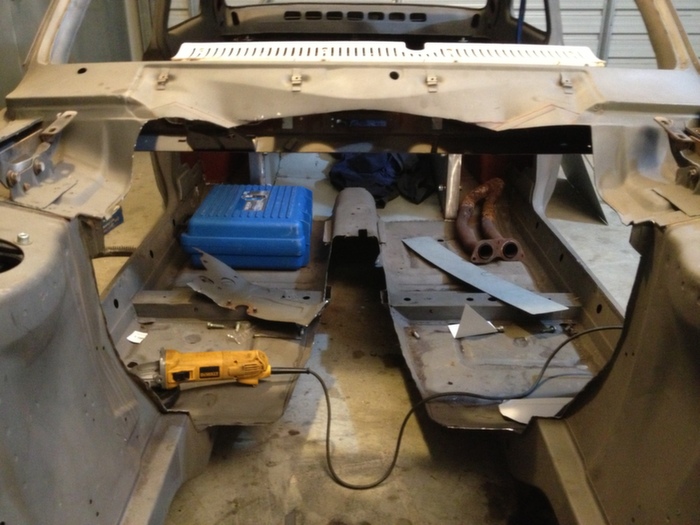
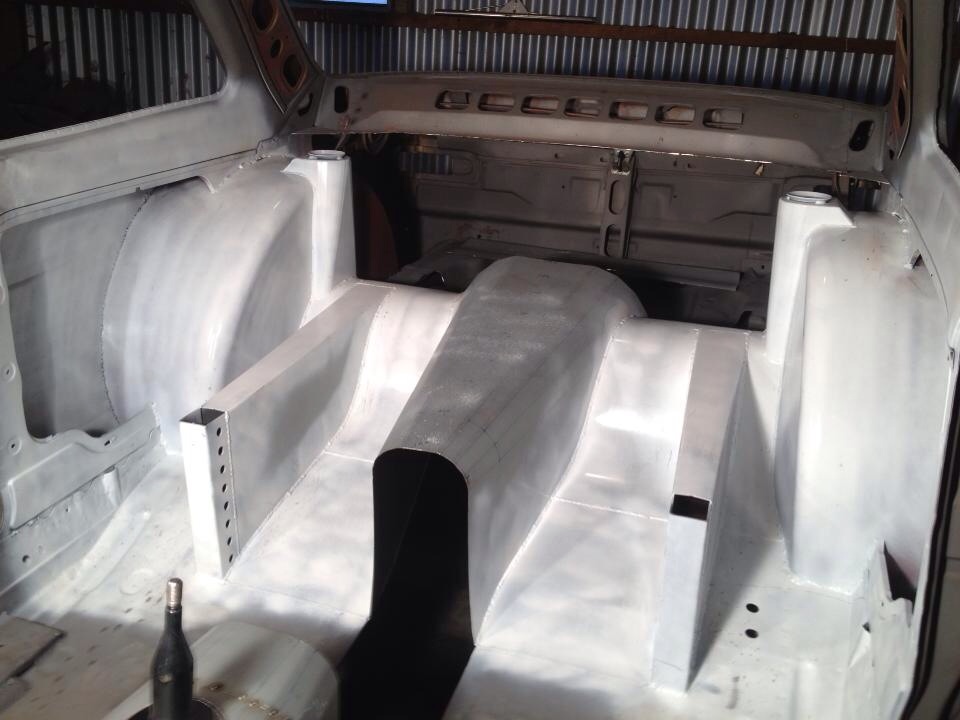
More progress. Finished cleaning up all the seams and seam welding the chassis. Once I got into the swing of it it wasn't too bad and Simons welder was ace for it. Sneak shot of engine bay: Decided to cut the spare tyre well out and make a diffuser from some Sheetmetal. Quite happy with how it turned out. Will add fins and underbody panels once all the bumper (what will be left of it) etc goes back on Currently working on trying to figure out how to get the exhaust to exit above the diffuser.. best option so far is to weld up the rear section of the staonless exhaust then weld it into a 3" mild steel pipe and weld it into the car.. just means the rear section will never come out. Undecided at this stage - open to ideas! Also making a box for the 60l fuel cell to sit in the rear seat. I decided on 60l because the long term goal with this car is to do targa. The standard 45l tank would of never been enough and also gives me the option of endurance racing. The old man's ae82 uses approx 1l per km and this will be making about the same power so when being thrashed it's sure guna drink the gas.. Just trying to source a jaaz fuel cell with all the fuel senders etc for a decent price. I know this doesn't look like much but for me this has been a huge step forward welding in this cut outs in the tunnel and finishing off the floor repairs. There were so many holes I'd drilled in the past for seat/battery mounting! I filled at least 15 on just one side of the car. Next step is to mount the seat rails and mock up the dash.. then it will be off to the sandblasters again for the shell and the dash will be sent off to be flocked. Speaking of the dash quite happy with myself here.. Had planned on spending big money molding a carbon dash for coolness factor/lightweight. Turns out abs plastic has a density much less than carbon fibre! So I stripped the vinyl and foam off a ae111 dash (about 5 kg lighter than the Ae101 dash). Total weight is between 2-3kg I'm stoked! Still trying to decide on colour.. options are either white or something along these lines http://lh6.googleusercontent.com/proxy/A2INBHCZhvLKzpoWlW1meodeWGwBvkiG50ZLxglHQmgLcL6uXCcHypQRpEZ0U2u_JzJeLOarO1BIYrmKNGWm0crX3VwCu_hhWOsU0Msc6BzBIffDrg=w443-h332-nc2 points
-
spotted I'm hugely proud of this. The same issue as the immaculate ZERO3 as well, A++2 points
-
2 points
-
Don't worry, Steeb. I got your back.1 point
-
Managed to score a cluster with a tacho. Extremely useful for the big RPMs this car can hit! So, out with the old.... ...and in with the old. Also found a front bumper thats a bit straighter Ive got my eyes on an injected 4G15. Im just waiting for the guy to drop his pants on the price and ill grab it. This was meant to be my daily, its now turning into another project. Story of our lives!1 point
-
will be exhaust. i bet it had a dip in power at that spot before revision son1 point
-
aliens1 point
-
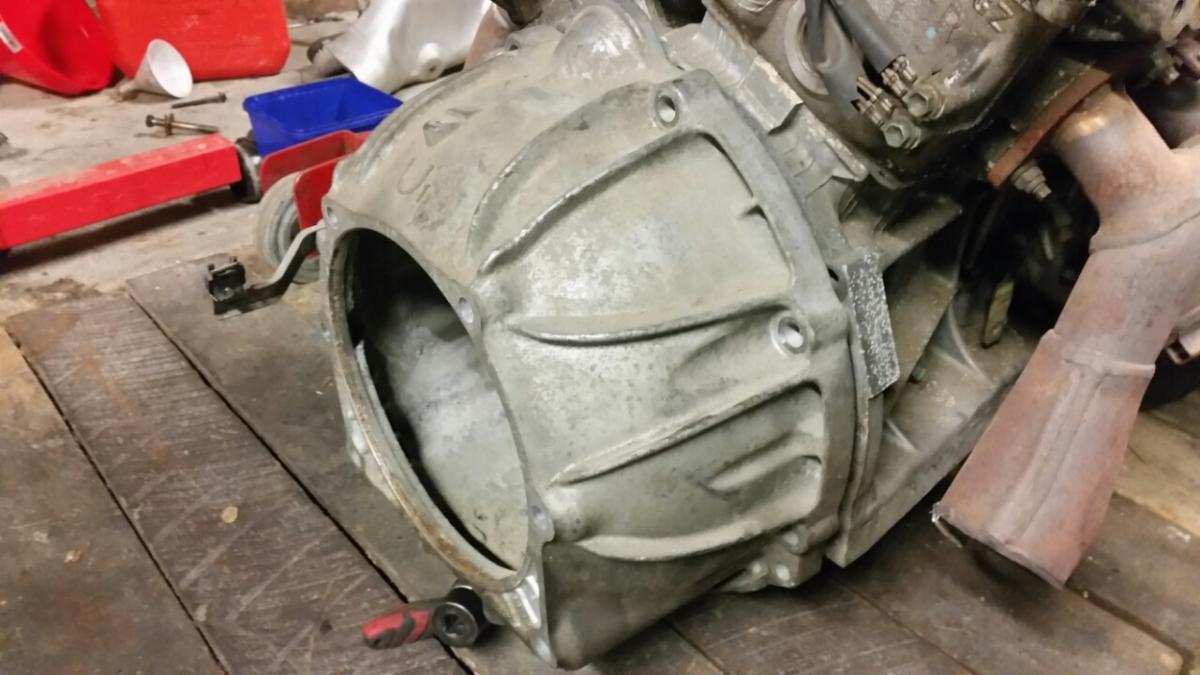
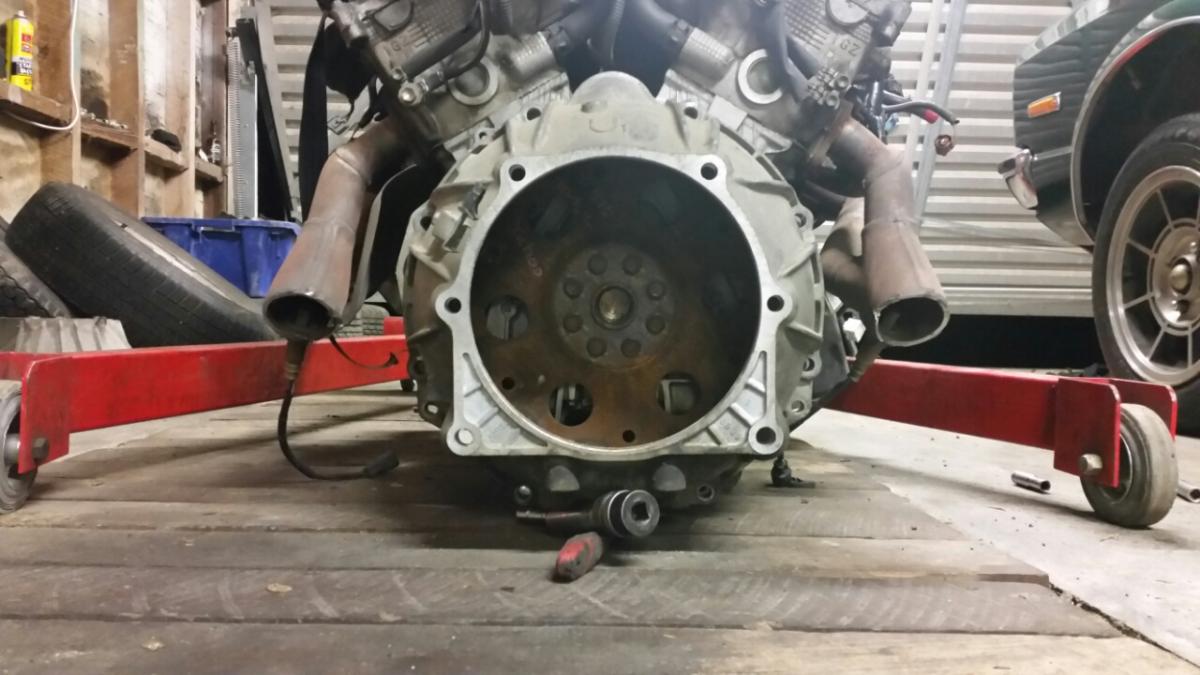
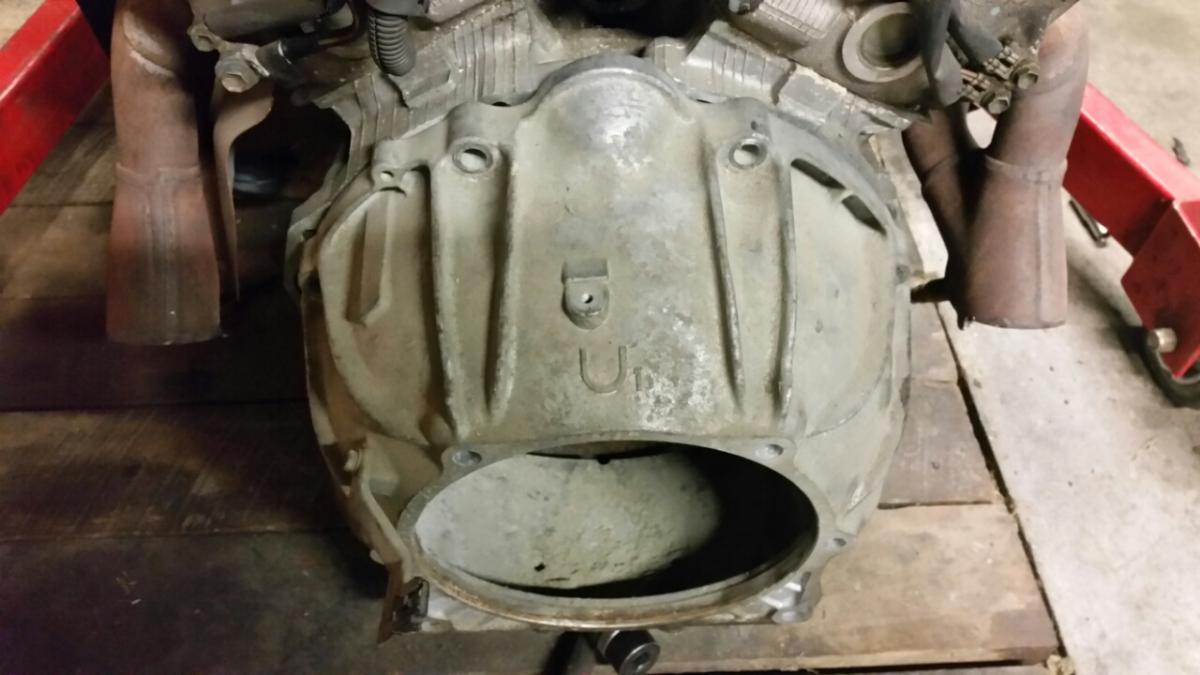
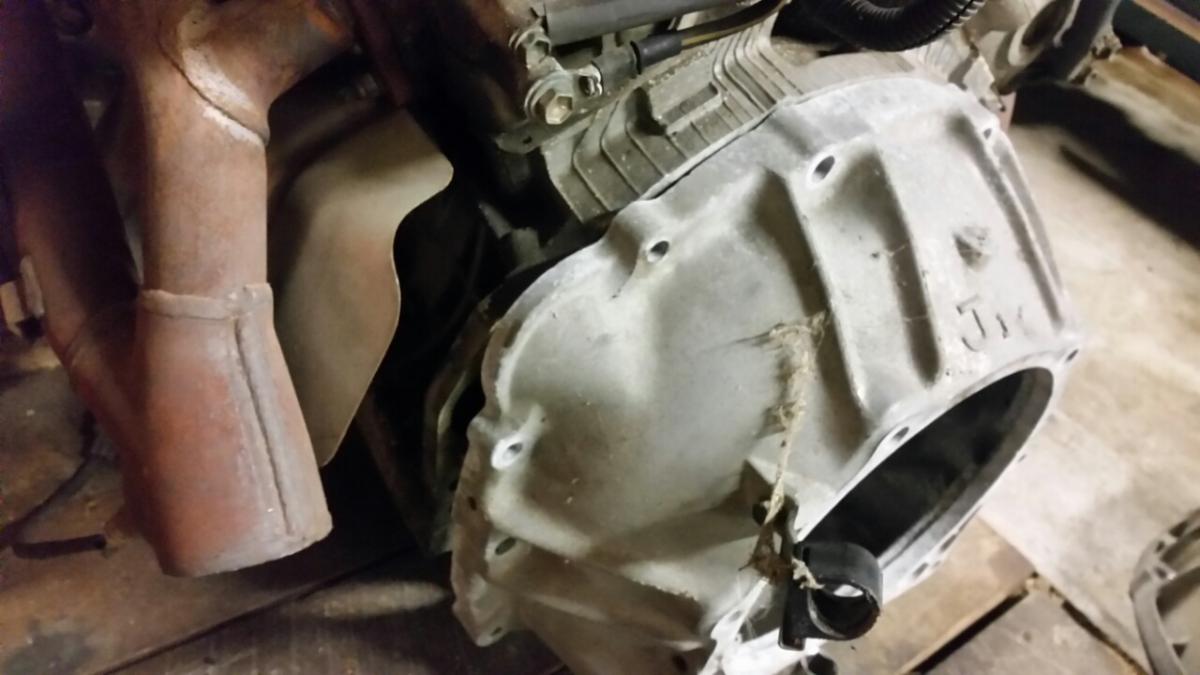
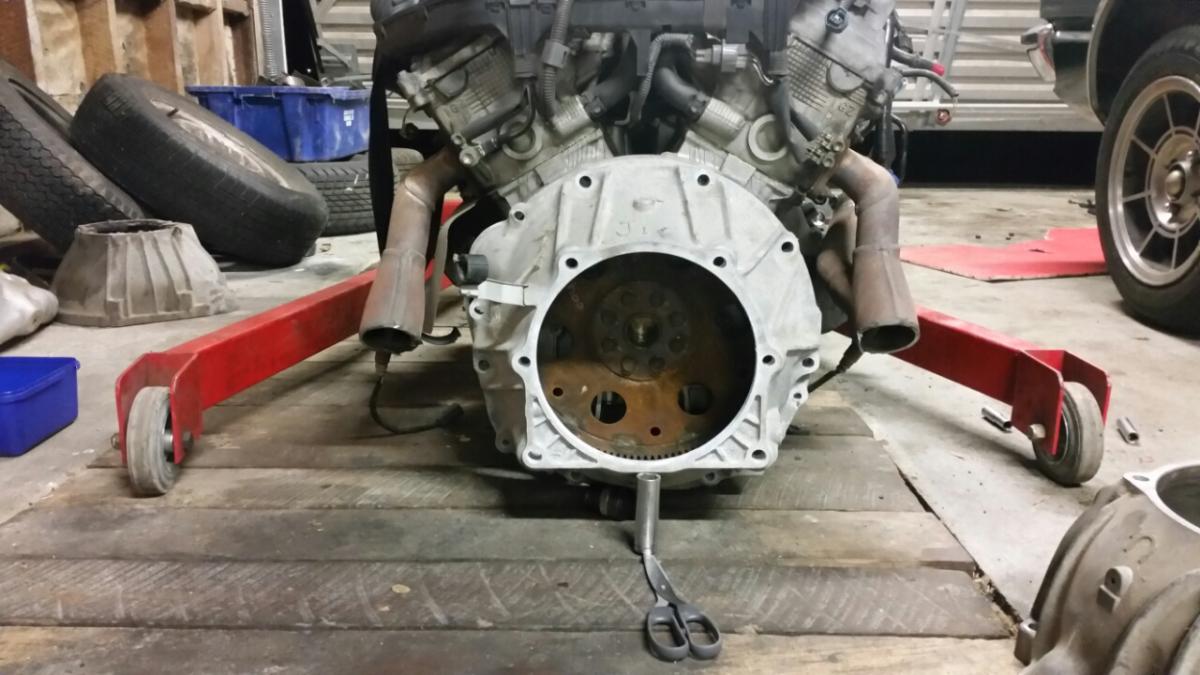
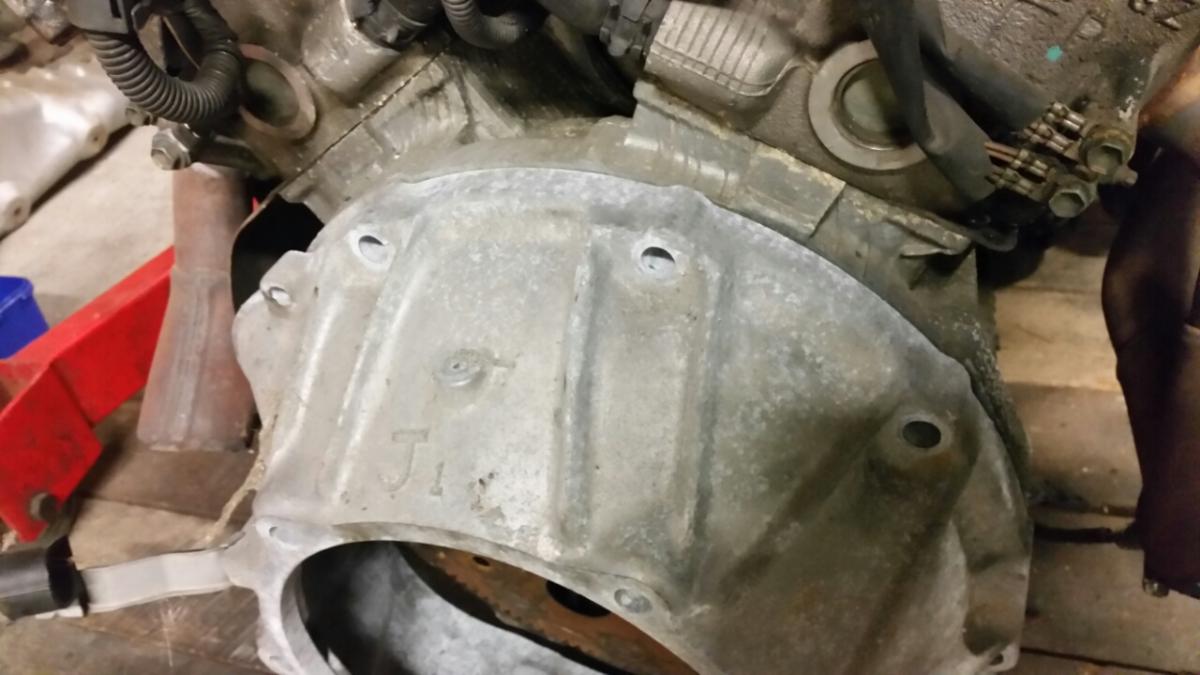
Had a bit of a progress night last night. Took the engine off the engine stand and sat the JZ and UZ bellhousings up to the engine. 1UZ is very close in shape and a few holes line up. This could be adapted in my opinion with a few slotted holes and redrilled holes. also cutting out the starter part if this was an issue. JZ bell housing has less holes that line up but it's closer again to the shape. So woth the same mods I can see this working as well. High chance this is the direction I will go still.
1 point
-
Yeah the biggest thing I have learnt now is unless its a general consensus its best to try it lol. So I did. The 1UZ is almost a comparable fit to the JZ one. Obviously the starter hole is in the wrong place but more bolt holes line up. The JZ is a slightly better match to the actual bellhousing shape. Ive added pictures to the build thread.1 point
-
Yeah that'll be for the clubmans... I'll be at all 4 rounds all going well, might even do a clubmans day if I manage to sort my shit out...1 point
-
1 point
-
nice! so subaru leone/early legacy watercooled engine? cute sister1 point
-
What kind of car? Get some of this from BNT. Not cheap, but is awesome for old syncros1 point
-
So after a day of diagnosing, we've worked out it has weak as piss spark and is in need of a little bit of tlc so I'll do all the electrical bits and pieces involved with the ignition and see where we go from there, I'm extremely lucky my brother in law is an auto sparky I'd hate to have to actually pay someone for their time with this, thanks for the input lads I'll keep you posted as to how I get on1 point
-
Did a bit of work on the V50 today in preparation for the annual QCR "Dirtmasters" day. Stretching, springer front and Mad Max inspriations... Cutting it down and spacing it out. Square to round dongle cut off a spare FR50 frame1 point
-
Should be a bit of fun, lots of noise and a bit of straight line speed once it gets going, will definitely still need the pedals for hills and starts. I'd like to make it "bolt on and go" and leave the bike as original as I can apart from new tyres , bearings and some brakes. And a new seat, its a bit lumpy. Initial thoughts are tubing sub frame, same colour as the bike while trying to keep it looking minimalist. Kero (jet a1) fuel tank parallel to the seat stalk, perhaps 4"alloy tube with a false bottom to hide the fuel pump. It drinks a lot for a tiny engine (350mls/min) so I wont be going for long distance records. Another oval or round tube to hide the ECU and battery and possibly the mini propane bottle (for starting) and run all wiring and tubing inside the engine sub frame, I hate seeing wires and crap everywhere. A quick release clamp around the seat and steering stalk to hold it all on, if that's what you call it. Will need to put controls somewhere. Open to suggestions on all of it, will do a couple of shoddy sketches and post them up.1 point
-
Bought a lowish mileage one of these today. Going to buy a carby manifold and stick with good old analogue fuel and spark, The motor in particular that I have bought is a VT Commodore 304 that's the last of the aussie built V8's. I got it now cos it's a hard to find motor as only the first series 1 VT's had the 304, after that they went to the 350 LS1. The VT is different from every other 304/308 because it is factory roller cam, 4 bolt mains and is already clearanced for 355 stroker crank. It's closest relative is the 304 Walkinshaw motor from the VL - but they are as rare as hens teeth and apparently 10K for a complete one. I've been told that the heads apparently flow 400hp from the factory. So if I really want to get carried away I could snap up a 355 stroker kit and chuck that in. But the line needs to be drawn somewhere. Who knows though I may end up putting this motor to the back of the shed while I save up for a stroker kit and monster Rawb cam - jam that in and then proceed to blow multiple gearboxes. Hahah.
1 point
-
I swung by the Panel Shop to get a couple of photos to prove that the car has moved. Time to get the bonnet and front panels stripped of the should be shiny bits and off to be blasted. I keep forgetting how small these cars really are, especially now there is some space around it. Lastly I have bought a modified chip for the VT 5litre I have to go in from a Guy named Tony off trademe. The big thing is the chip has the VATS disabled. The tune should take the motor close to HSV specs. This should be fun, 190 Kw in a car that weighs 1200 kg with 215 tyres on the back..
1 point
-
So, I had been thinking about making a new exhaust manifold, proper merge collector, equal length etc. I had never made one before so thought it would be a good challenge. Did a bit of research and got some advice from some people (thanks Kris!) and thought Id start with making a merge collector. I made a jig so I could cut the angles I needed in my saw at home, I went with a 15deg cut just to see how it would come together and I am a little limited for room. Skip a few steps Finished welding the collector, shortened it up too Machined an exhaust flange Picked up some bends. These are 1 1/4" SCH40 short radius bends. Got the first 2 runners tacked up and equal length Finished welding up all the runners. The last two I thought were going to be the easiest, but trying to get them equal length and still clear everything was a little tricky. Managed to get them pretty much all equal length (within 5mm from the longest to shortest), thats why the runners look a little funky. Decided to machine a new flange. The DXF file I got off a forum for the other one wasnt overly good interms of fitment and decided I wanted the ports to taper from 30mm to 35mm to match the pipe and exhaust ports. New down pipe, a lot simpler in design now that I am using an external waste gate and probably a lot better flowing than my original one. Instead of welding it to the rest of the existing down pipe, I did a slip joint that this slips into which makes it alot easier getting the turbo on and off not having to go under the car and bolt the whole lot. After adding a waste gate port for the Tial gate and some heat proof paint and bolted it up The T25 turbo had some weird issue where it constantly sept oil pass the oil seal, after adding an oil restrictor, bigger oil drain and even replacing the seal (turbo was rebuilt already) it kept leaking. Decided to upgrade to a T28 Garrett turbo from a Nissan S15. Got it tuned with the new manifold setup and T28 turbo. Ended up going with 470cc Siemens Deka Injectors and upgraded the fuel pump to a DW300 unit. I was pretty suprised with the results to say the least! Found some complete pics of the manifold too. Anyway, less talk moar pictures. I wasnt expecting to make 180kw at the wheels, I was hoping for atleast 150kw. It went bloody good though!1 point
-
$383 shipped. Nzd from Autodec, not bad I thought.1 point
-
shame i didnt put too much in the build about the hydraulic setup but will add photos as it all comes out haha. got the car up last night, just in the nick of time too - panhard rod's gone cack, rubbed on the diff housing, caught the rear brake hardline and rubbed/crimped it flat, in a very 'design disaster thread' style. i'll post pics when i dont feel like such an idiot about it. sent shivvers up my spine when i saw it. other than that, lookin ok under there! lots of dents and scrapes.1 point
-
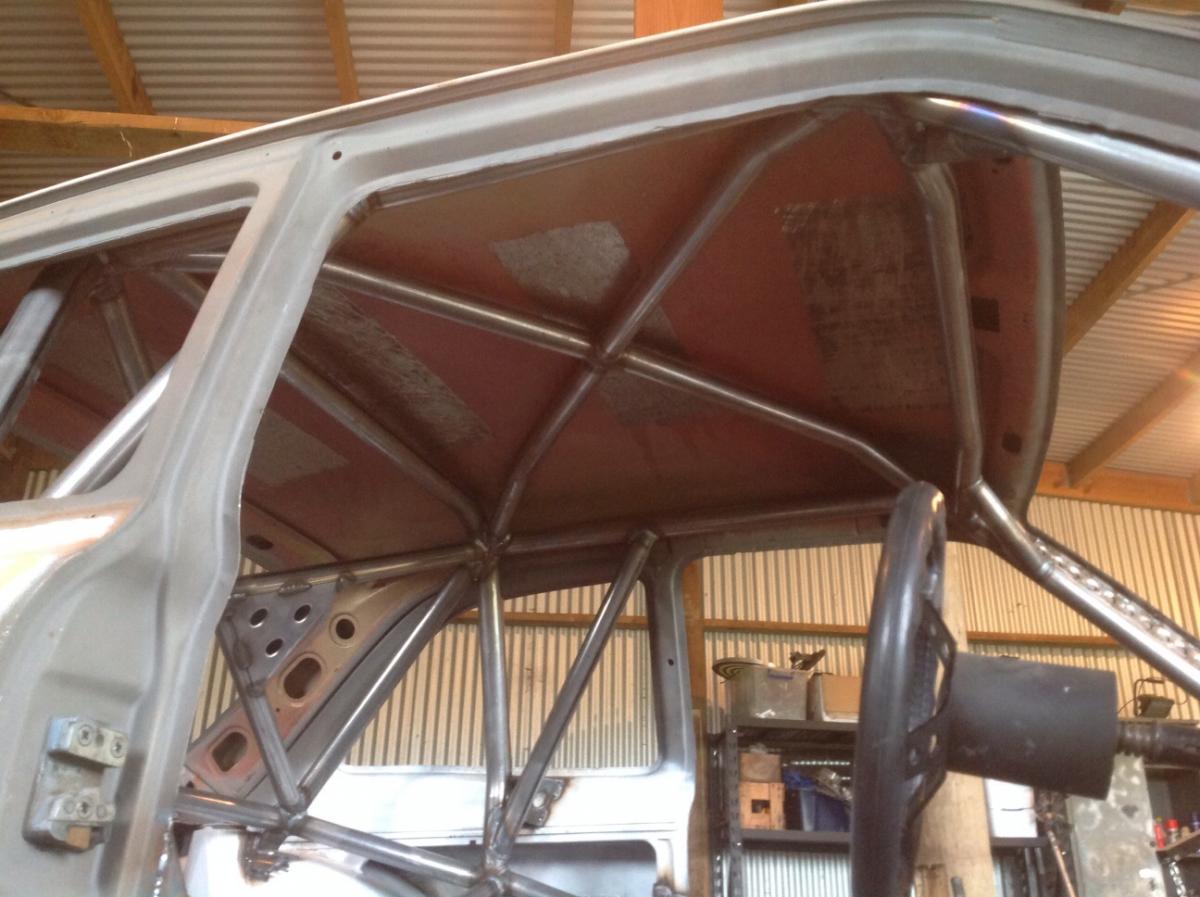
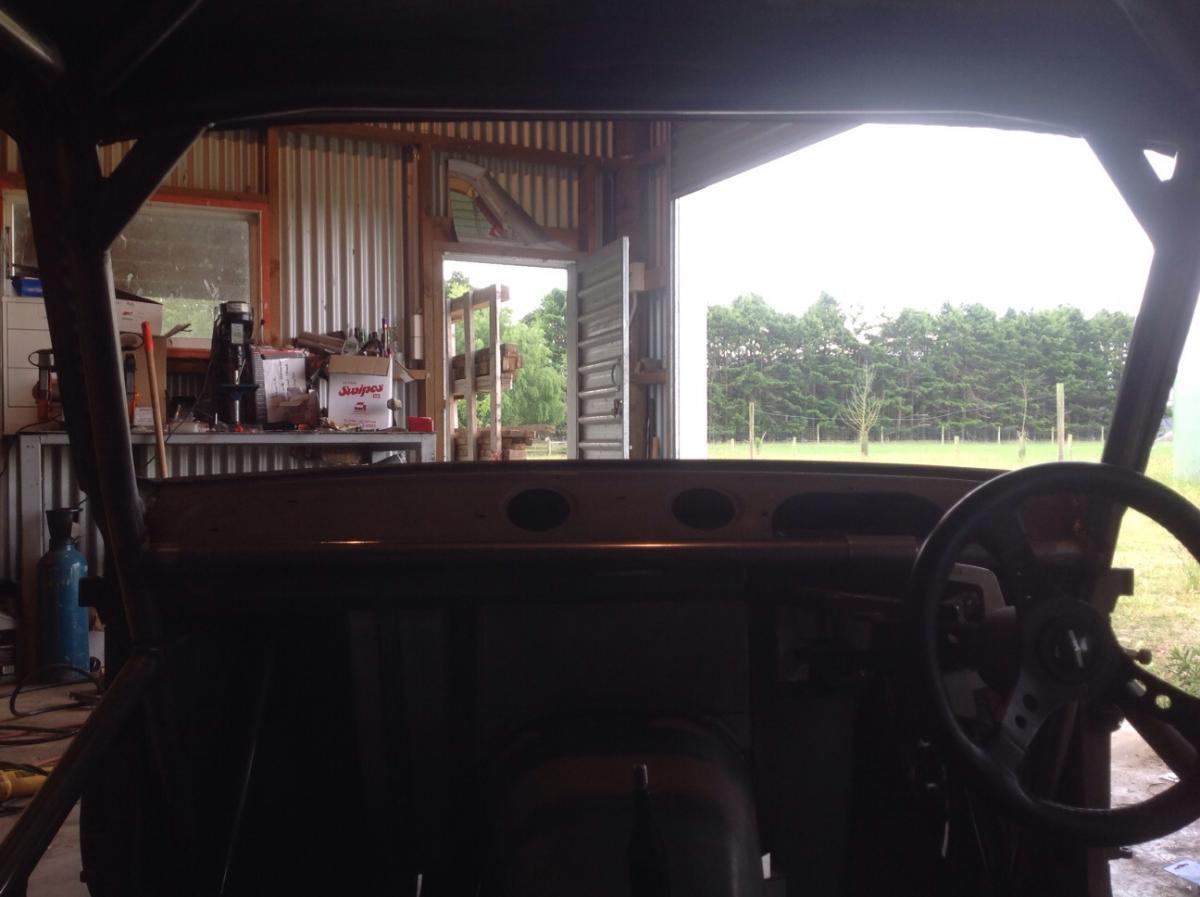
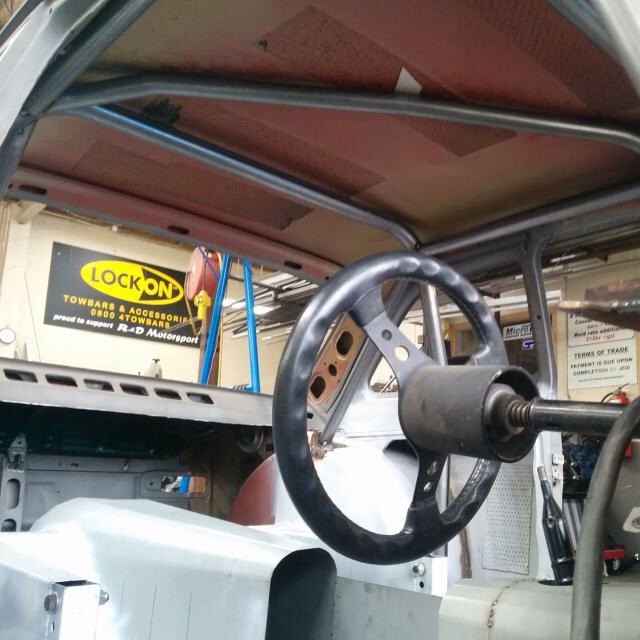
An assortment of other angles.. Through to front strut towers.. Snug fit to the roof.. Nice and tight to the A pillars hardly looks like they're any wider than normal.
1 point
-
This began today. I have very big smile.
1 point
-
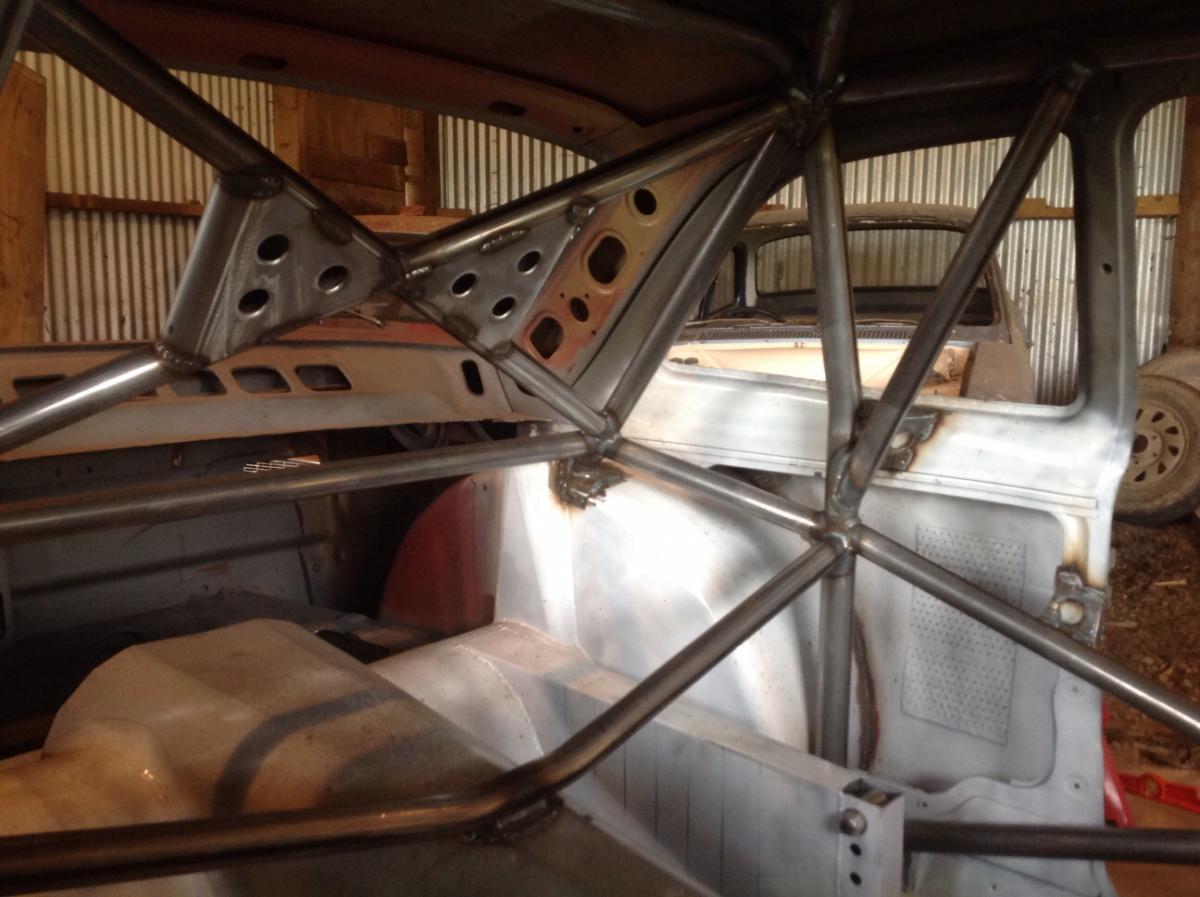
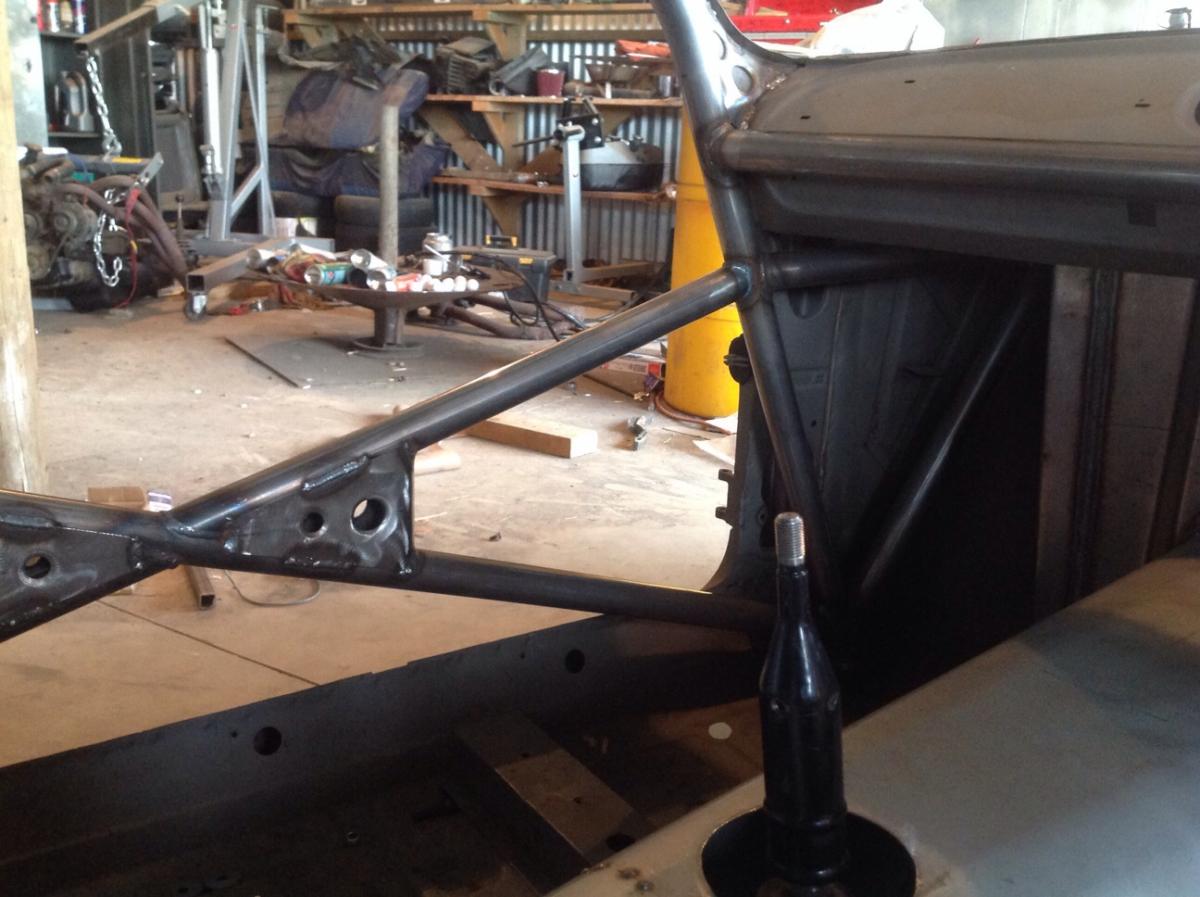
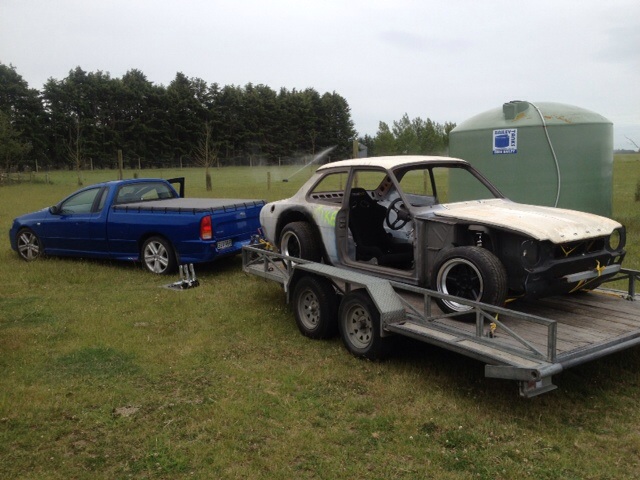
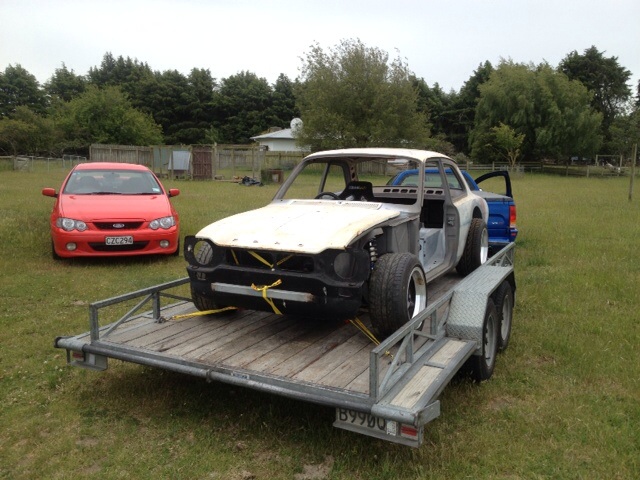
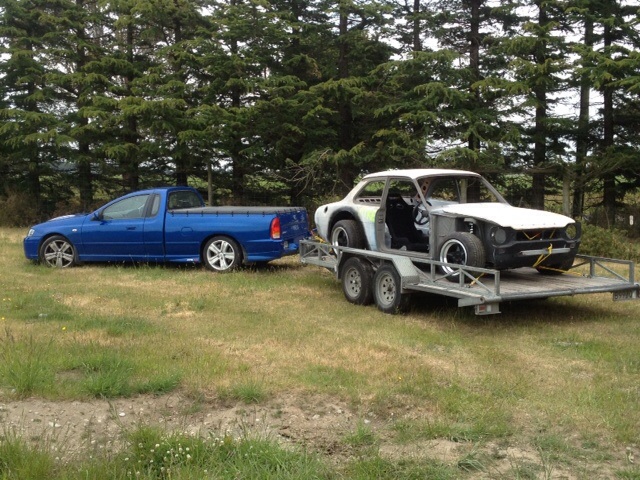
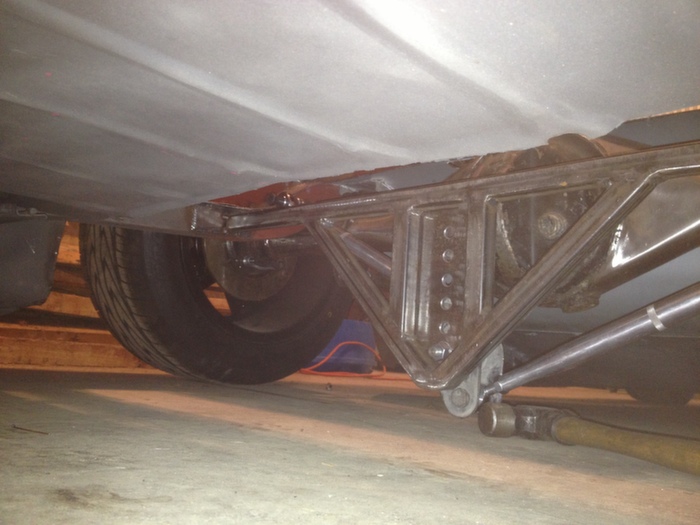
Cleared a few hours this arvo and went hard on the escort. Got watts link all tacked in and braced so it's a bit stronger for moving around untill I have time to finish it properly. Then i spannered up all the nuts and bolts through out for cartage so I didn't lose anything as most things were only finger tight. Then loaded up and off to get some work done while I go on holiday for a week. Things that will be done. -Epic as roll cage. I'll find a drawing of what it's getting. -New steering column made up and mounted to roll cage dash bar -Drive shaft. It's too short for 2 piece so has to be a solid as 1 piece to handle revs. -New sway bar made up to clear the steering drop links. Happy days We are a ford family all the way. That's my boss 'work' ute for the boss, and dad's xr6 sedan.
1 point
-
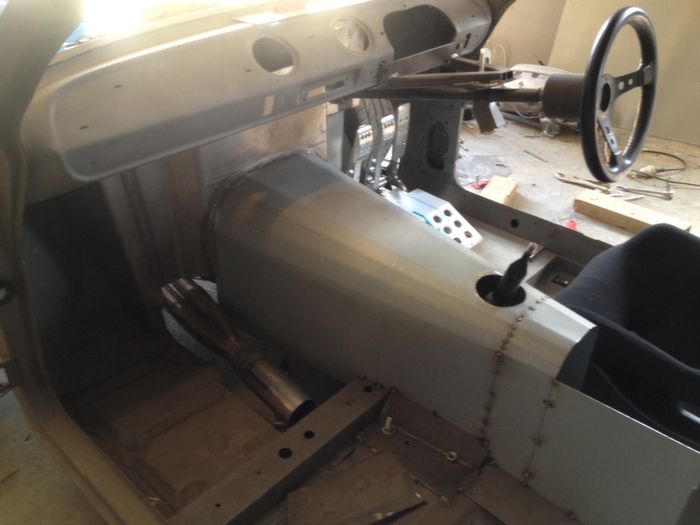
How its looking at the moment.. Still finishing tunnel.. also been sorting out pedal box position
1 point
-
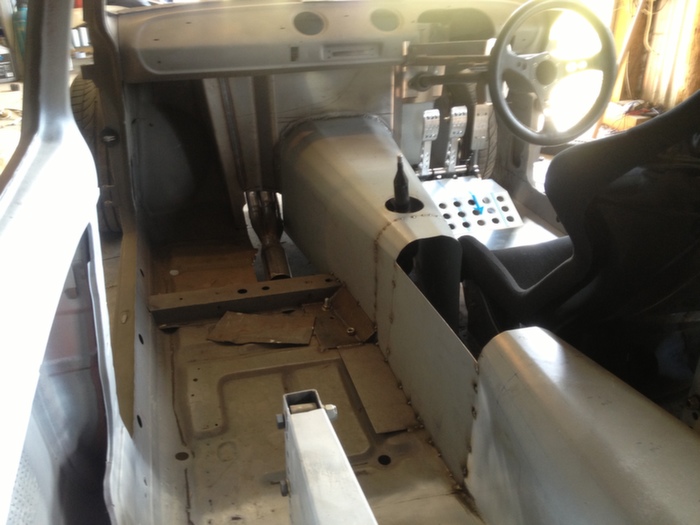
Inside View
1 point
-
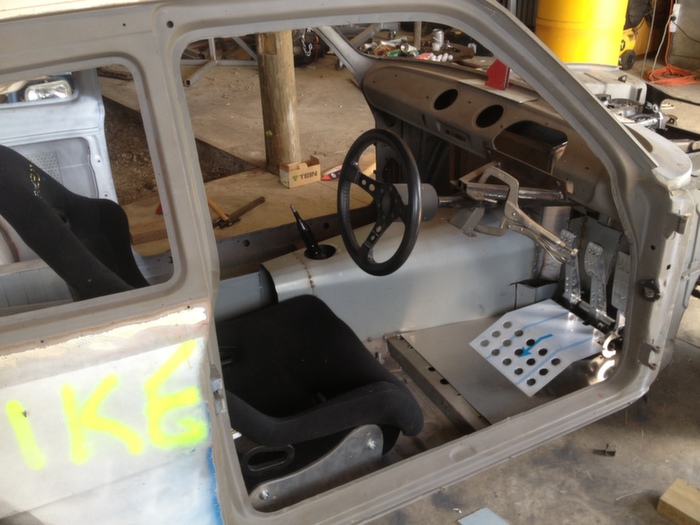
When deciding on an engine i saw the beams and like any misguided young fool thought oh sweet theres an easy 200hp thatll do. Unfortunately i hadnt read one of romans sweet why you shouldnt go beams rants. I discovered one the other day on another thread and i identified with the whole lot and was pissing myself laughing.. Its been over 2 years and will cost well over 10k by the time it runs.. Got the engine and was stoked.. Test fit.. tight as teeth but could make it work. Then i had a mate tell me it was too far forward for a race car.. I immediately felt like i had no nuts... So.. Out came the angle grinder. Much better
1 point
-
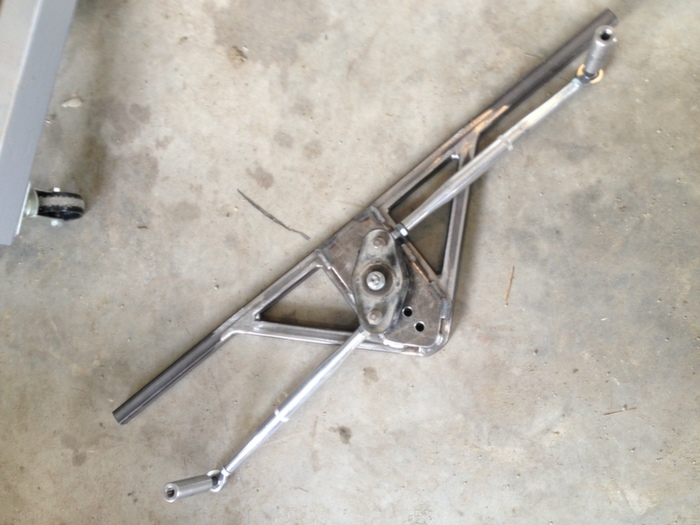
Made watts link using falcon centre on custom spigot. Not a huge amount of clearance on bumpstops. might have to raise it up a bit..
1 point
-
Having a sort out of my photos so I can get more up. It was supposed to be a quick rebuild after I rear ended someone and the insurance company wrote it off in 2008 but it's escalated out of control.
1 point
-
1 point
-
Oh man I definitely didn't put two and two together, was browsing your thread last night thinking 'fuck he's picked up some good bits!'. All makes sense now hahaha!1 point
-
1 point
-
1 point


.thumb.jpeg.384ff72c8d2b0ee0d34a7bdedb55bdcf.jpeg)


This leaderboard is set to Auckland/GMT+12:00