
Leaderboard


.thumb.jpeg.384ff72c8d2b0ee0d34a7bdedb55bdcf.jpeg)
Popular Content
Showing content with the highest reputation on 08/13/14 in all areas
-
10 points
-
Re-vin booked for next Tuesday..9 points
-
mm, so my sd card shat out yesterday awesome. Sitting staggered at the moment, until my MK3's turn up later this week hopefully; 14x.6.5 +10 & 14x8.5 -20 - excuse the shitty quality. & fixed my jdm chrome front grille need to fix that wonky bumper as well.9 points
-
I never thought I'd be posting this update, but we got the car back in one piece! Spamming social media really does help sometimes. The awesome Niki/Mourning Cupcake spotted it parked in town, called me up and now we've got the car back. I've just got home from recovering the car and a trip to the police station. There doesn't appear to be any major damage and there's still plenty of fuel in it. Woo woo! It's been an exciting couple of hours and Grandad is suitably stoked. Thanks to everyone who shared the news around so lots of people could keep their eyes open for it. Thanks to Niki especially!9 points
-
Its a trick question. Bring them all and mix them up in a big flaggon. Then add an once of weed and some mushrooms. Everyone will be your friend and running around a field naked with nothing but a polo mallet will feel so normal.5 points
-
Did some work on the daily. New matching tires, clutch cable, headlight grille, Defender taillight, Matching side covers, Black front guard, black handlebars, Led headlight & taillight, chain and pads, fixed kick stand and welded zorst, tidied up electrics and carb. might need to re-spoke the rims next. Both bikes have now been POR15 tank sealed. Still muddy from mancamp. LED headlight, tried to hide the bracket Blanked speedo drive hole. Managed to misplace the rotating nub that the brake cable fixes to dow! Got the motor running, Accidentally threw out the battery cage also dow! Will have to make one or get back on ebay Made exhaust from bike forks Found some 280mm shocks. Still waiting on postman pat for a few bits. Continental tyres New Fairling Spokes Cushion drive rear sproket side covers bars (with clamps) leavers SLURP4 points
-
Discussion Thread Yeah I brought another rusty Toyota. Farmer spec. Actually is surprising how solid it is, panel work is super rough. but have had a good dig around and its the least rusty toyota yet. only surface rust in a few places, no holes! Plan was to take it out in the mud then make a few changes. But found a few things needing some attention first. Wheel spacers Something not right here. hub gears don't exist inside. guessing they removed the guts after breaking it, then kept driving. DICK's3 points
-
Bit of an update. After having a weekend off from gorse clearing due to Viva engine swaps etc we spent last weekend out there and got heaps done. But before I talk about that I will first mention what we had been up to in previous weekends. One major thing happened- this appeared... Its 25,000 litres and its bloody big- about 4m diameter by 3m high. Luckily our friendly neighbour who has been doing all the digger work for us made a nice big pad for it to sit on and then move it for us. Otherwise it would have stressed my wheelbarrow to within its meagre limits. While he was about he dug a trench for the future shed storm water pipe. It would have taken me ages. I like these digger things! Plus he skimmed all the muck off the stone based driveway. Hopefully soon we will get fresh stone down on the whole driveway making it supercar friendly. Next thing we got hooked into was removing this bloody ugly pine tree. It blocks the early summer sun and just looks horrid. I only wanted to chop below the height of the hedge but keep it alive. I love climbing trees, like seriously if I can get to a bottom branch I'm up there. But chainsawing up high I was a bit sketchy on. But funtimes anyway. We borrowed my tree felling friends signage and cones and pretended to be all official and all that. We even stopped some traffic (not that we have much traffic...) So tree got chopped... ...and then the lesser branches got turned into smoke (which brother Duncan enjoyed because he's a pyro) .... On the Sat night we sat on the ridge with Kevin and some beer (but not for Kevin because cats cant be trusted when drunk) and watched the sunset. In the evenings we fitted lights like this... ($5 for several actual Italian made lights- thanks recycling centre. Although being Italian means they will most likely fail) Or watched the evening sky... and I fitted an inverter so we now have 240 volts. Note my amazing wiring. I tried to shape some mouse ears... We also went bush bashing and did some exploring. My brother found an old benched track from about 40 years ago down at the south end of the block. Great mtb track potential! It heads up from the gully floor to another ridge then disappears. Duncan will continue clearing it back in the future. While walking about we made it to the base of one of the large pines on another ridge. Bloody huge things. I aint cutting these buggers down in a hurry.. Whats that there???... Oh its the other side of this gully! Wow- that will be where a main track to the ridge will climb up through them tree ferns then. So back to the weekend just gone. Lots of clearing of gorse and blackberry (there is a theme going on here...) and creating of more space while freeing natives. As always so very satisfying. I think part of the reason is because while it is very hard, back breaking work its also not at all taxing on the mind. Just drink coffee, whiskey, beer or whatever, turn up the ipod and hack away. All good harmless fun and at the end of the day we get to sit around a big fire and drink more beer. This weekend had an awesomely massive moon too which just added to the occasion. Next morning we get to see a whole new play area of grass. Over the next two or three years we will just poison these areas each spring with Tordon which wont affect the grass. This will stop the cycle of gorse coming back. I can mow some of these areas for lawn bowls. So before... Then after (Monday mornings effort here)... Next weekend we want to finish off this area and then its some big trees due to come down. I will be trading skills.. I will build my friend a inlet manifold for his 1940 dodge army truck and he will chop down trees. We are hoping to be applying for consent on a 15x7.65 double story shed soon. Will be interesting to see what bollocks the council come up with...3 points
-
Got a cage.2 points
-
yay more porsches. everybody should get 911s2 points
-
oooooooooooooo big call2 points
-
Wow! I hope 911s are the next OS bellybutton car.2 points
-
me and mini man will both have old school cars this month. be good to see others out2 points
-
so cool! wouldn't change anything. /replace stanceworks stickers with oldschool stickers.2 points
-
A pretty boring update really.. Got the tops welded onto the new rear strut tubes, still got to chuck them into the lathe and spin them down to the correct height (80mm from the floor + 20mm on the underside of the floor) IMG_1342 by postlematt, on Flickr Earlier in the build thread i posted a GT front grill i bought from japan, listed as a ta22 grill but was actually and ra23/28 grill (too wide) ta22 GT grills a RARE and go for about $400-700 usd. Solution... cut down the gt ra23/28 grill to fit the ta22! Measured up the ta22 ST grill and marked out the difference IMG_1098 by postlematt, on Flickr Then cut the honey comb and cut and shut the grill. IMG_1101 by postlematt, on Flickr IMG_1103 by postlematt, on Flickr Cut and shut GT grill sitting next to the factory ST ta22 grill IMG_1105 by postlematt, on Flickr Luckily the GT grill is steel so tigged back together, Photo for reference. Top: ST ta22 plastic grill. Middle: cut and Shut ra23/28 GT grill. Bottom: Ra23 LT plastic grill IMG_1350 by postlematt, on Flickr Also Bought a 40L drop tank. IMG_1351 by postlematt, on Flickr //oldschool.co.nz/index.php?/topic/38745-matt-spitfires-ta22-daily-driver-buildresto/page-3 Cheers Matt2 points
-
Few photos of the passenger side repairs inside the heater duct and lower windscreen areas. Like the drivers side a section was removed to carry out the repair then refitted when complete. Kayne has checked that the windscreen fits evenly as the previous repairs had distorted the steel so some more work was required to get it all looking good. As usual Im very happy and now starting to think about colours. Some discussion //oldschool.co.nz/index.php?/topic/30893-crustys-jzx31/ And the finished product. Super happy.2 points
-
Hope to get the wheels finished over the weekend, get them on the lathe and re spray...
 2 points
 -
hogan knows whats up. If you're a bitch then you're a bitch. The truth will come out. Hanmer knows no bounds.2 points
-
I got it sitting pretty up front, but it wouldn't turn and the arms were touching the inner guard. Real lame. Missed out on a few events over the weekend. Got some v8 hq super lows and we're back in business but it's 30mm too low. I plan to run some steelies so that will lift it a bit and will look into those urethane coil spacers that go where a factory rubber would go in a more modern car if it's still a bit boned. Polished up the interior handles, mirror bracket, painted mirror because it was aced, door cars pulled off in preparation for my 6x9 turning up 2moro. The doors have a big chrome trim that will get in the way of the speakers so will have to trim the surrounds. If it looks like a failure I'll mount in the back doors or kick panels.2 points
-
I love it. Barely explored it yet so hoping to find something hidden in gully..like a plane, a bunker..or a space saucer. Found evidence that a long time back someone must have been growing tomatoes in the most awkward of areas..2 points
-
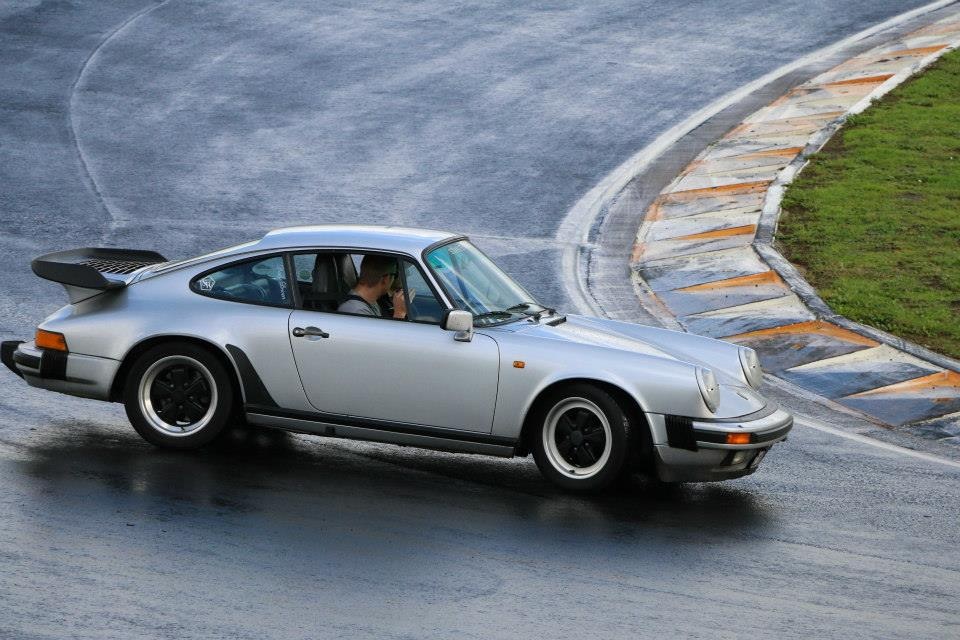
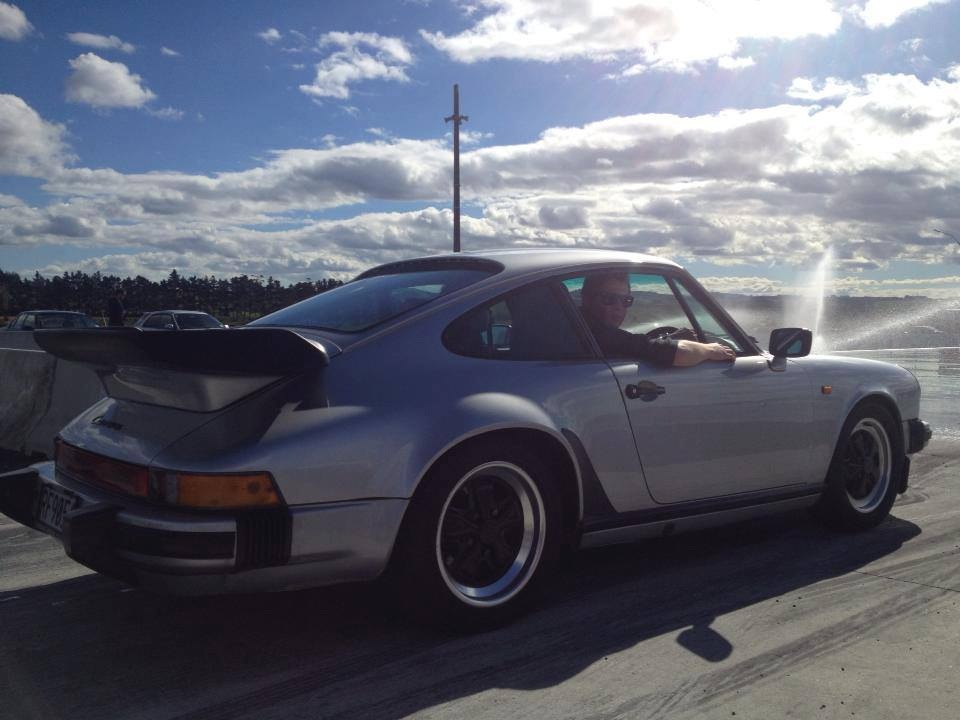
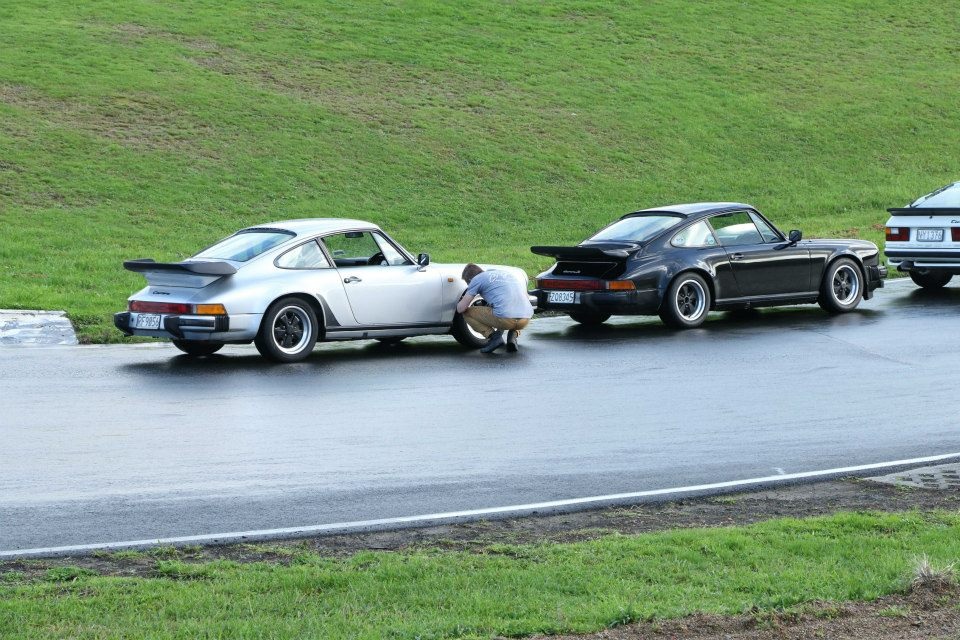
Discussion Thread //oldschool.co.nz/index.php?/topic/44710-kiwi-911s-86-carrera-32/#entry1371775
1 point
-
https://www.facebook.com/events/548481695263378/ August 23rd, Saturday It's time we had a proper old Toyota Meet in Christchurch. All old Toyotas welcome, bring yours! Doesn't matter if it is rough, as long as it has a WoF. Start at Northlands Mall and heat out to New Brighton/Port Hills summit road and then to Riccarton for Burgerfuel.1 point
-
cheers alex. are you coming to hanmer? I can meet you there for a screw...1 point
-
I have a random box of black screws I can send you if you want. FREE I bought a box of black ones while hungover and didn't realize till I got home. So I used like 4 out of the pack of 30 odd1 point
-
I heard from a mate who fixed lots of rusty cars that for revin and to get a repair cert, the repairs need to be carried out by a repairer who has passed muster as a repairer. My mate is qualified to do such repairs.1 point
-
Wanna borrow some chevette rostyles? They have tyres, but I have no idea how old the rubber is1 point
-
Visit to the Pirsche museum for my 26th Birthday. This is a place every car nut should visit!
1 point
-
so so lush, loving the mounting plate for the sidewall lamp and switch - awesome detail. gas bottle next to switches made me nervous though?1 point
-
Awesome work as per usual mate. Love reading your updates. Would be so keen to buy a bit of land and do something similar... one day!1 point
-
He's actually a myth. On a side note I'm really looking fucking hanging out for this !1 point
-
add tee pieces to spark plugs with decompression valves and your off / spam1 point
-
I would look at other options if the car had a suitable start tune - (tow start) but seeing as i will be needing to tinker with major fuelling changes and crank enrichment to get it fired up i need to be able to crank the engine for 10-15 seconds at a time.1 point
-
Proof that the back is actually okay and not mexican without spacers.1 point
-
so yeah havnt touched the sedan in probaly 3 months now..... thought id better have a look the my brake problem and see why i was losing my brake peddle. as i drove it out of the garage while moving the other valiant around went to put my brake peddle down and yeah..... pretty much straight to the floor. so bummed around and thought ohhh wonder if it has any fluid and how that looks turns out it looks a bit like this not the site i wanted to see. il put it up on the hoist tomorrow or Thursday at my shop and see what i can find/see. just about to pull the front brake hoses off to go get some new ones made. shull wait and see....1 point
-
1 point
-
I think I'll get a litre of russian gold standard or whatnot, cheap stuff. Like 32 drinks for $371 point
-
Not much has been happening with this unfortunately Still sitting on the fence on weather to run 14s or 15s and have been putting cash aside for a panel beater Smashed the chin spoiler to pieces on our chch roads dont think ill bother with another one till i get a proper one from japan So here it sits...will get some more attention once i sell the SA221 point
-
Got new tyres on this Running 185/60/13s now, they sit alot nicer and inside the guards which im happy about! Pic1 point
-
Skim of filler will sort it1 point
-
Also buy some jumper leads lol1 point
-
So I have been plugging away at this. Tank is all mounted and finished. No wonder they want ~$800 for these things as they take fucken ages to make. Also some how I managed to measure correctly and everything fits?!?! I must be getting better at this hahaha.1 point
-
rokie pls1 point
-
I spent this entire weekend between panelbeaters on Van, car parts shops, and the garage on this thing. Today was ment to be spent going on a facebook cruise meet in my mates MX-5 with him, but that was cancelled due to lack of people. I was sort of keen to start prep for paint on this as a learning curve for my Van. So went to bunnings and bought a cheap orbital sander, some sanding paper, and some flap discs for the grinder. Smoothed out and finished most of the welds from the rust repairs. gave most of the cab a rub down with the sander. tried to mask of windscreen. got fed up with it. pulled it out in one piece (victory). Lifted cab off chassis and pushed that out side Man the chassis filthy right now. Its so thick with dust and sanded off paint. Cab was flipped onto its back, and the underside was prepped to get it ready to prime it - I had cleaned it off back in march to paint it then but never got around to it. Primed the underside, under guards and most of the engine bay. Then left that to dry and came back later and gave it a couple of coats of the black paint I had left over from the chassis. all the grey you see is this seam sealer. I purchased this off the Wurth rep that comes through work because he said it was good stuff and cut me a mean deal on it.I resealed where all the factory sealer was that I removed and over the welds/patches. It is really good stuff, and has good coverage. but it is brush on and is horrible to spread and smooth out so unfortunately doesnt really look the tidyest. So next time I think im going to get the stuff that goes in a caulking gun as from previous experiences, it comes up a lot nicer. Once that was dry, I gave it another couple of coats of black which made it look alot better. And this. I sprayed this all over it too, Its rubberized stone guard. Hopefully should help protect underneath and minimise chances of stonechips ect. Unfortunetly I ran out of stuff halfway through so off on Monday to buy more. Close up of the stone guard and sealer on the underside. Looks really good. Once I get more of that ill finish underneath/wheelwells/enginebay then spray it all black again. All this work for something thats going to get covered in mud and dirt Ive decided on a colour for the exterior so need to get to a paint shop to price that up. Im pretty sure the underside will stay black, But should I do a black or body colour engine bay? Also, I think I need a new spray gun. The old one my Grandfather gave me is a great gun and mint for spraying primer, but seems to spray other paints a bit patchy and uneven so I think its a bit worn out. Any recommendations from you panel guys out there? Gravity fed or nah? I dont want to spend heaps, but dont want something Id get a crappy finish out of either. help me here ://oldschool.co.nz/index.php?/topic/40381-shakotoms-1985-toyota-hilux/ Thanks Disclamer *Im only slightly awkward, and I do have a social life. Im not a complete hermit/freak. :)1 point
-
haha russel's all yours1 point
-
So tyres fitted today, forgot to take any photos of them before i chucked them on the car, was too chuck them on the ta.. ill get some of the stretch etc next time theyre off. Anyway, photos.. hope you enjoy seeing it finally sitting on the rims half as much as i do haha. IMG_1279 by postlematt, on Flickr IMG_1266 by postlematt, on Flickr IMG_1265 by postlematt, on Flickr IMG_1281 by postlematt, on Flickr IMG_1273 by postlematt, on Flickr IMG_1276 by postlematt, on Flickr IMG_1270 by postlematt, on Flickr Currently running no discs on the back at the moment so that will push the rears out atleast another 10mm, front are spaced 10mm, will probly space them another 5mm for cert thn maybe got 20-25mm. Discussion here: //oldschool.co.nz/index.php?/topic/38745-matt-spitfires-ta22-daily-driver-buildresto/page-3 Cheers Matt1 point
-
Took it for a celebratory dort up the hills1 point
-
Busy weekend... Gave the engine fresh fluids, burnt the shit out of my hand on the exhaust, fixed the window wipers and fixed all the rust i could find..(sorry no pictures ) Decided i wanted to flush the old brake fluid for some new stuff but ran out of time, will do one night this week and re-book for WOF anyway here is a picture of the engine bay as someone said they would be interest.... Have tidied it up quite a bit since photo... but you get the general idea The lads at Pine engineering have some 13x7 0 offset SSR MK3s i'm looking at, but i am unsure on how they will look on the car.....couldn't find any pictures of a Series 1s with Mk3s or similar fitted...any body have pictures?
1 point
-
Progress has been slow lately, and my computers mucked up so Ive lost alot of photos. (teaches me for not having backups) With the forces of winter approaching lately it was decided to make some room in the garage and stop this heap from taking up two bays. Underneath the body has been stripped back and primed so It was lifted back onto the chassis for temporary while I start prepping the rest of the body for paint. The motor had been sitting on a stand in the corner and the gearbox was too. The motors been stripped of all bolt on bits and given a quick paint (Shiny = Rebuilt right?) and the gear box has been too. I bought a Exedy 'sport tuff' clutch kit and had the fly wheel machined. man that photo is crap. That about sums up how well this went down. Picked up cluch on friday (ordered on thursday overnight) to do it on saturday. Eyeballed parts on pickup was like yup thats sweet. fast forward to saturday morning.fought with old spigot bearing while replacing it because puller was too big. Loctited and torqued flyweel down. went to put pressure plate on and it turns out its too small. Clutch and release bearing were correct. Gave up for the weekend. On monday went back to shop. was a packaging error from exedy. Got correct pressure plate. Went home Monday after work and put clutch on! Whos got keen eyes that can spot the issue here? After mating the gearbox to the motor and starting to put bellhousing bolts in 'hmmm I can see abit much of the flywheel. whys that?' I forgot to clean and fit this sheild. Gave it a quick clean and painted it at work the next day. Tuesday night: removed clutch and flywheel. fitted cover. refitted flywheel and clutch. Gearbox to motor. motor and box back in. I forgot how little this motor was. I hope itll be sweet to turn my 33x12.5 mud tyres. Needs turbo deez!! What a drawn out procedure for what should've been a simple job. But at least now I have alot more space in the garage1 point
-
Update time since its raining outside and cosy inside. Hmmmmm woodburners. Two weekends ago we finished building a shower cubicle because as nice as it was to shower under the stars its getting cold now and last time the wind kept blowing the pilot light out in the califont. The new cubicle is basic and was cheap. Treated decking for the floor, stainless shower tray bought local on trademe for $2.50 The walls are free pine packing stuff. Yes- over time they will rot but it might take bloody ages so for now they will do. The iron roof was left over from the cabin. I made a little decking pathway that goes from the veranda around to the shower and then fitted a $5 ceder frame window so we can look out at the Kanukas while showering. The whole thing can be liftted easily by two people with the iron roof removed. Wow- what a revelation having a cosy sheltered shower room. We made a little bench in there too and it has plenty of room to easily change in. Is this the first shower photographed for OS?... A few weekends sgo we went and chatted to our neighbour about some land works. He not only owns two diggers but also has his own quarry on his land. Very very handy. So when we turned up last weekend he had already set to work and scrapped away all the squishy mud on our second little driveway and the park area. He then filled it in with large rocks. This he has started to cover with smaller stone. He then terraced away the bank where we want to park the truck. The clay he took out has built up the area opposite and created a move smoother larger area while making the corner wider. This will get hardstanding too. Next on the list is to sort out the two steeper bits on the main driveway and the main entrance. It was so awesomely epic for us to turn up on the friday night not having known that he had started the earthworks already and discover hardstanding. With the amount of rain recently the driveway has been too slippy for anything 2wd and was just going to get ruined. Luckily the main drive has had hardstanding down already so will mainly receive more cover without scrapeing needed. That same weekend after sorting the shower we finally moved the kitchen bench into the cabin. This stainless bench had been recovered from the bush where it was overgrown with blackberry. Its now much handier to our needs. We celebrated its fitting by placing a 4 burner LPG hob next to it- kindly given to us by VivaGT from this forum. Cheers Andre!!! Much better than using our little camp stove! I also added some Rimu rails to the bed edge has Hannah was not sleeping well constantly thinking she might fall out of the bed onto the woodburner. Sleep easy Hannah. This weekend we mainly spent scrub cutting more gorse. Sooooo very satifying seeing the gorse and blackberry go and finding natives growing up. The grass below is good and healthy so come spring we will buy some Tordon and selectively spray anything that pops up again. As I cut Hannah burned. Heaps of it. It was a big fire that kept us warm as we worked into the darkness on both Sat and Sunday night with headtorches. Then the full moon would apear and it was so lush out there. Bonfires and beer = great! We have cleared almost all the way south along the high track which runs paralell to the main drive to where the cabin will eventually reside. It's a sweet spot surrounded by bush. The previous owner had that track graded in and levelled off a great site so we quite thrilled about this. Meanwhile Kevin just chilled whenever and wherever possible... So this morning we left and headed back to Nelson. Raining. We had prefect weather out there.1 point
-
Oh cool. Yeah would be happy to do that. Would have to paint meter board box camo style as its bloody ugly. Going to paint the power pole sometime in future too. Just paint up high enough to help it blend in. Or sticker bomb it... hks, k&n, trust, hello kitty. All the usual shopping list stylee stuff the kids put on their hondarus these days. Max power.1 point


This leaderboard is set to Auckland/GMT+12:00